Jupiter Quick Start: Gradebook Management

Welcome message from author
This document is posted to help you gain knowledge. Please leave a comment to let me know what you think about it! Share it to your friends and learn new things together.
Transcript
Jupiter Quick Start:Gradebook Management
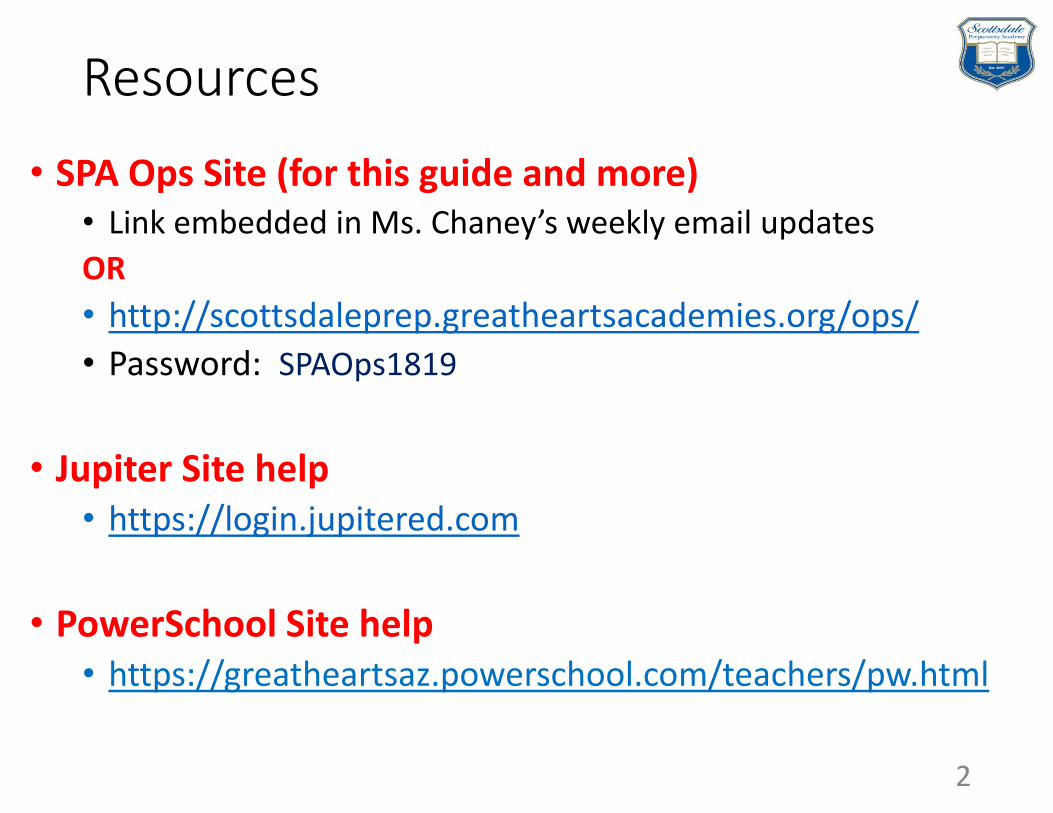
Resources
• SPA Ops Site (for this guide and more)• Link embedded in Ms. Chaney’s weekly email updates
OR
• http://scottsdaleprep.greatheartsacademies.org/ops/
• Password: SPAOps1819
• Jupiter Site help• https://login.jupitered.com
• PowerSchool Site help• https://greatheartsaz.powerschool.com/teachers/pw.html
2

CONTEXT&
YOUR ROLE3
IMPORTANT: ACTUAL SCREEN VIEWS MAY DIFFER SLIGHTLY FROM WHAT IS IN THIS TRAINING PACKET DUE TO THE RECENT UPGRADE OF JUPITER!
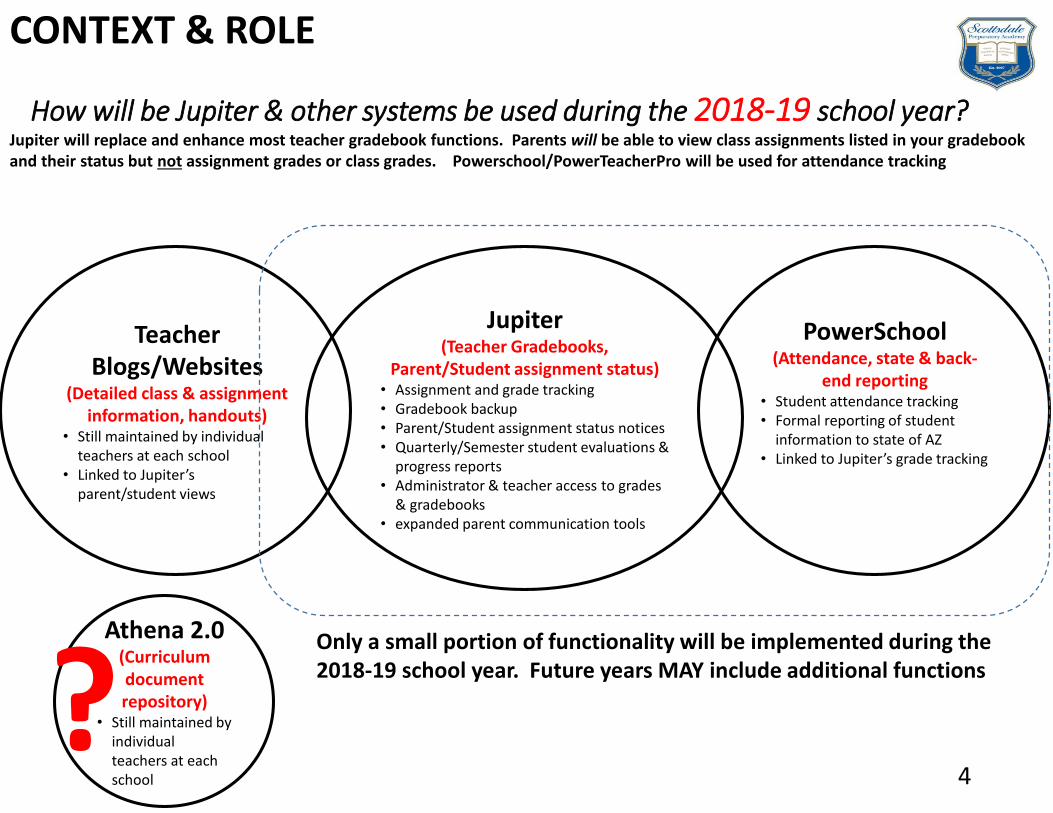
How will be Jupiter & other systems be used during the 2018-19 school year?
4
Jupiter(Teacher Gradebooks,
Parent/Student assignment status)• Assignment and grade tracking• Gradebook backup• Parent/Student assignment status notices• Quarterly/Semester student evaluations &
progress reports• Administrator & teacher access to grades
& gradebooks• expanded parent communication tools
PowerSchool(Attendance, state & back-
end reporting• Student attendance tracking• Formal reporting of student
information to state of AZ• Linked to Jupiter’s grade tracking
Teacher Blogs/Websites
(Detailed class & assignment information, handouts)
• Still maintained by individual teachers at each school
• Linked to Jupiter’s parent/student views
Jupiter will replace and enhance most teacher gradebook functions. Parents will be able to view class assignments listed in your gradebook and their status but not assignment grades or class grades. Powerschool/PowerTeacherPro will be used for attendance tracking
Athena 2.0(Curriculum document repository)
• Still maintained by individual teachers at each school
Only a small portion of functionality will be implemented during the 2018-19 school year. Future years MAY include additional functions
CONTEXT & ROLE
?

Teacher Responsibilities
1. Review this “quick start” training packet
2. Review Jupiter’s on line training tutorials (see last page of the packet)
3. Become familiar with those Jupiter and Powerschool functions you will need during the school year
4. Set up your gradebook, assignment categories, assignment weightings and your first week of assignments according to the directions in this packet or as otherwise directed
5. Maintain your Athena and Class blog files as in previous years
6. Recognize and accept that there will be changes to pre-existing grading and reporting processes along with occasional “growing pains” as we expand system functionality
7. Know who to contact:
• Teacher functionality questions: Jupiter tutorials, Jupiter customer service, peer teachers/master teacher, Mr. Villaca, Ms. Michaels, Mr. Labadie, Mr. Moncada, Ms. Stone
• Administrator settings: Mr. Gale, Mr. Villaca; Ms. Chaney, Ms. Lopuszanski,
• Student information changes: Ms. Lopuszanski, Mr. Gale
• Class/Section changes: Ms. Loupanski, Mr. Gale
5
CONTEXT & ROLE
POWERSCHOOL:HOME SCREEN, ATTENDANCE & STUDENT INFO
6
7
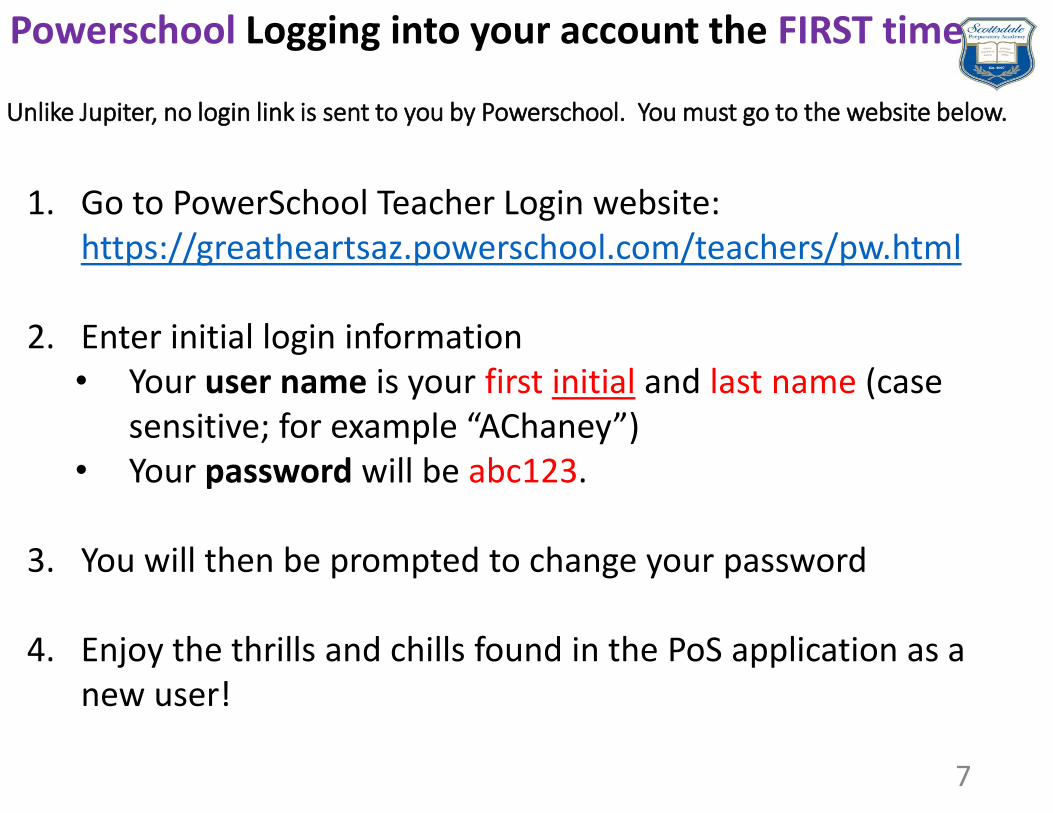
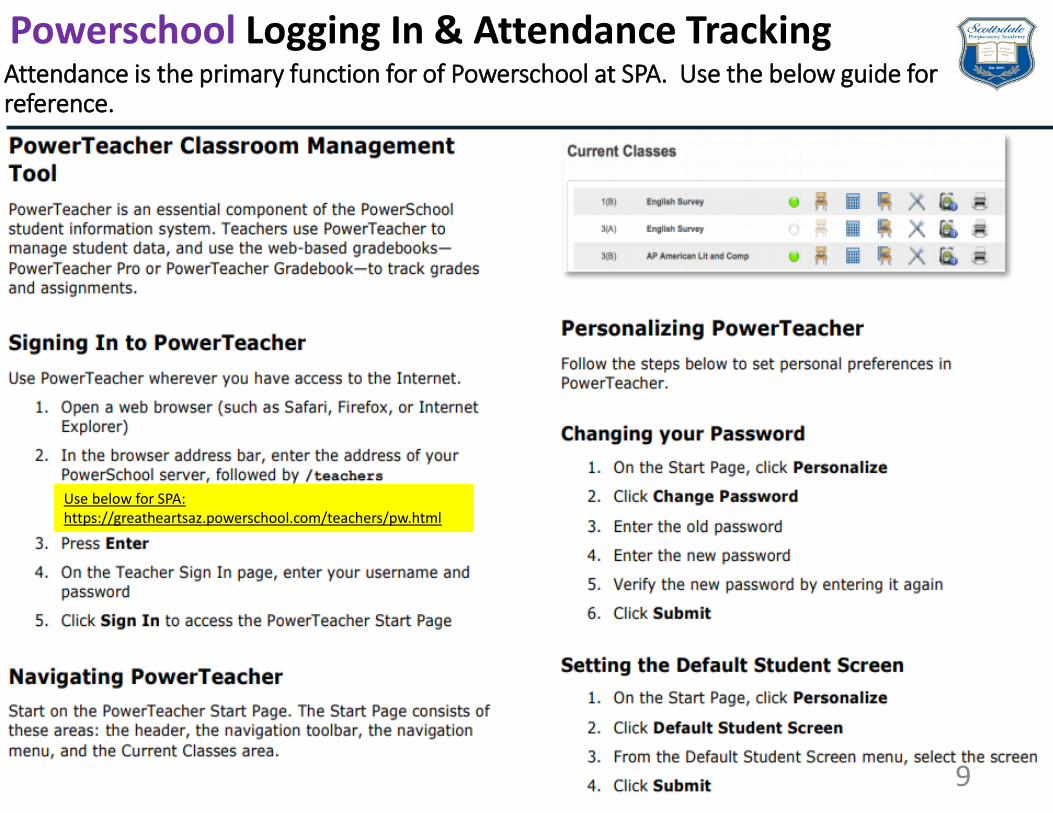
Unlike Jupiter, no login link is sent to you by Powerschool. You must go to the website below.
Powerschool Logging into your account the FIRST time
1. Go to PowerSchool Teacher Login website: https://greatheartsaz.powerschool.com/teachers/pw.html
2. Enter initial login information• Your user name is your first initial and last name (case
sensitive; for example “AChaney”)• Your password will be abc123.
3. You will then be prompted to change your password
4. Enjoy the thrills and chills found in the PoS application as a new user!
8
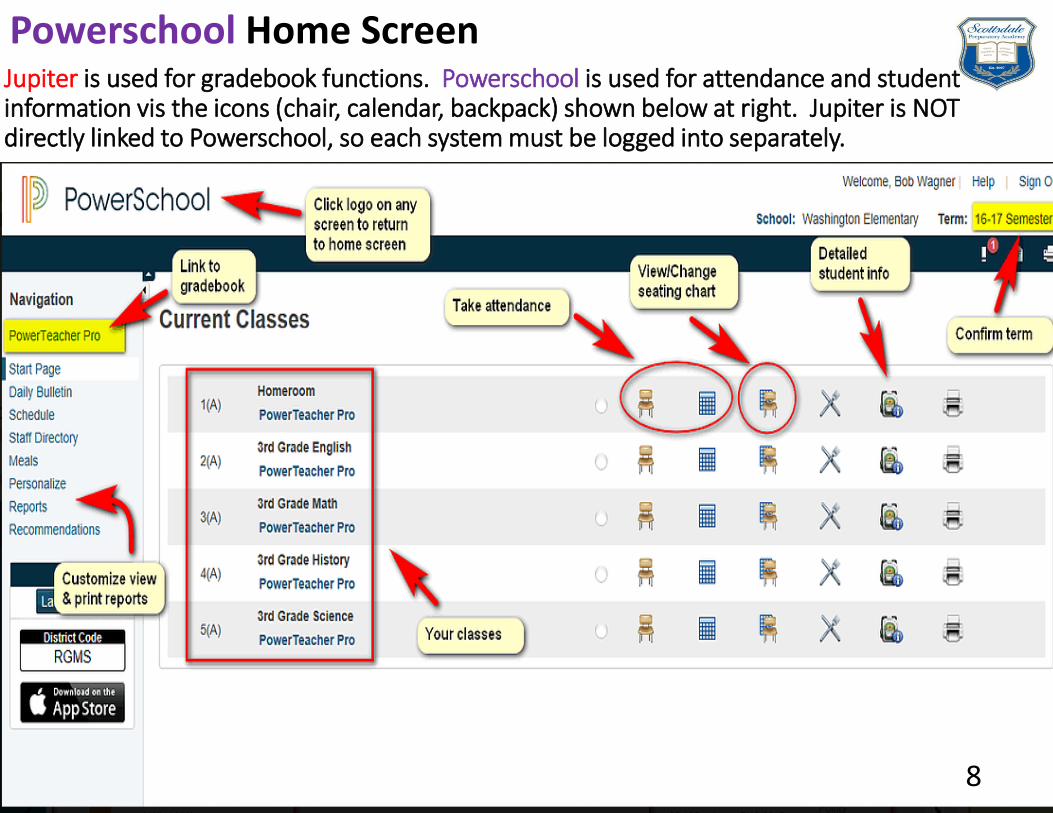
Jupiter is used for gradebook functions. Powerschool is used for attendance and student information vis the icons (chair, calendar, backpack) shown below at right. Jupiter is NOT directly linked to Powerschool, so each system must be logged into separately.
Powerschool Home Screen
9
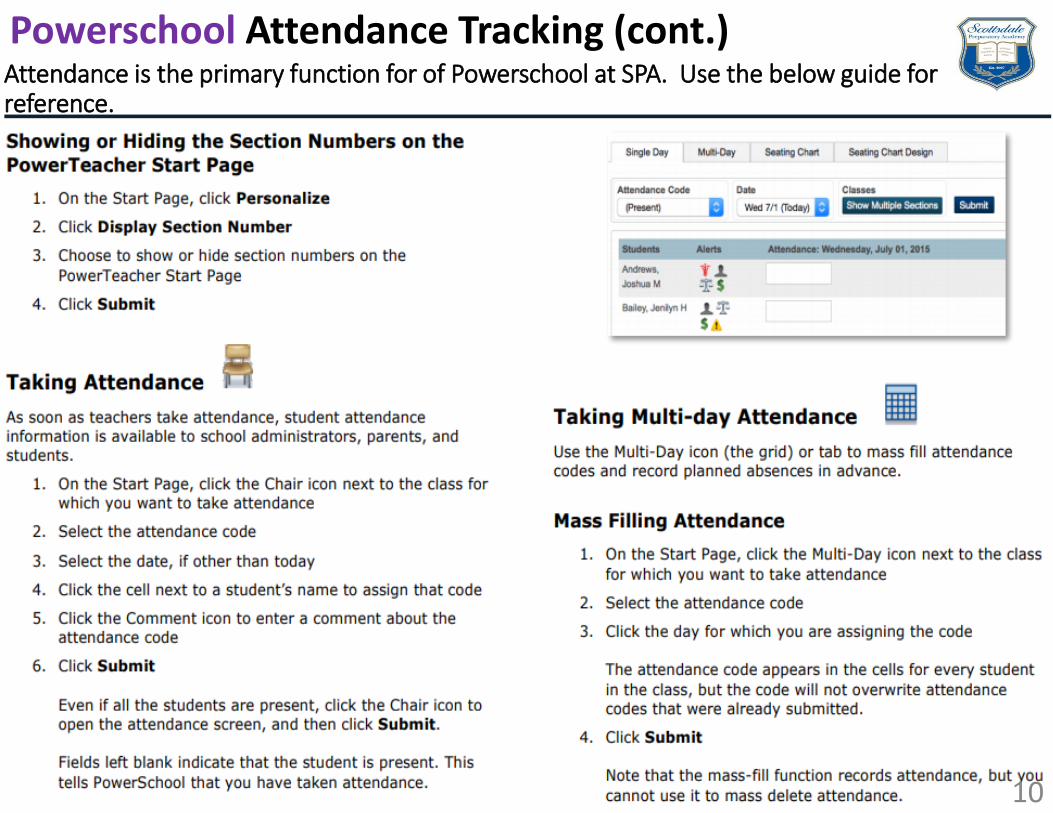
Attendance is the primary function for of Powerschool at SPA. Use the below guide for reference.
Powerschool Logging In & Attendance Tracking
https://greatheartsaz.powerschool.com/teachers/
Use below for SPA:https://greatheartsaz.powerschool.com/teachers/pw.html
10
Attendance is the primary function for of Powerschool at SPA. Use the below guide for reference.
Powerschool Attendance Tracking (cont.)
11
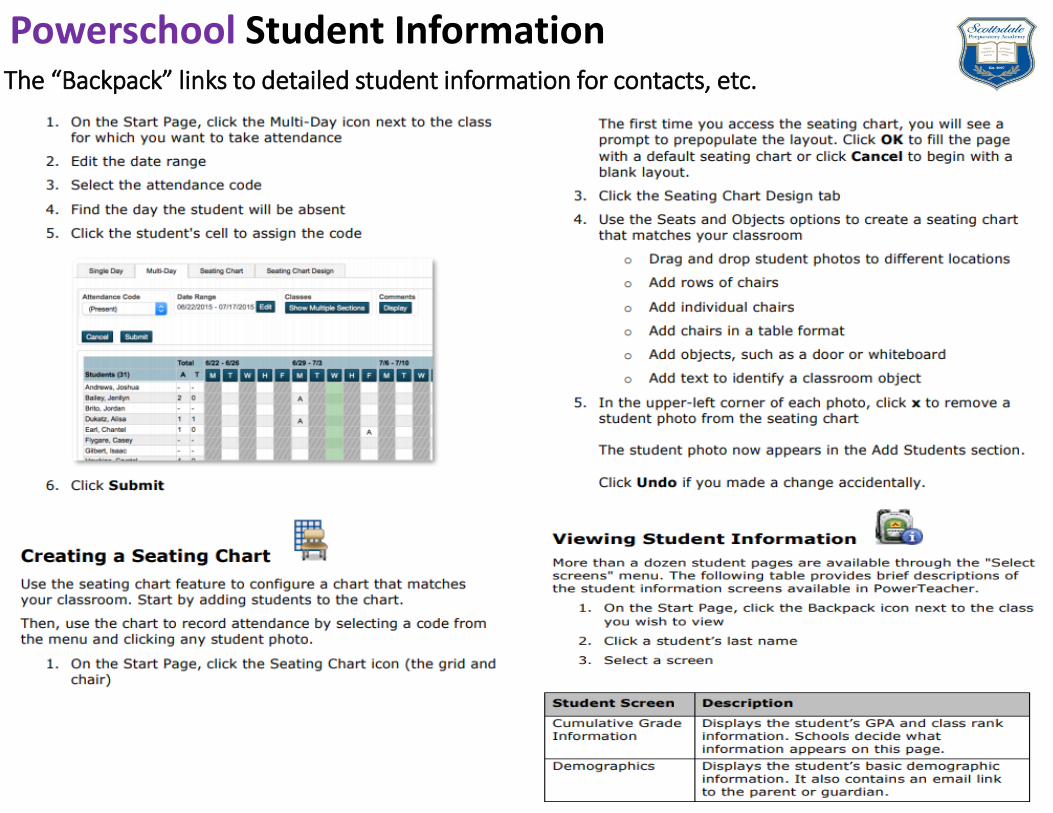
The “Backpack” links to detailed student information for contacts, etc.
Powerschool Student Information
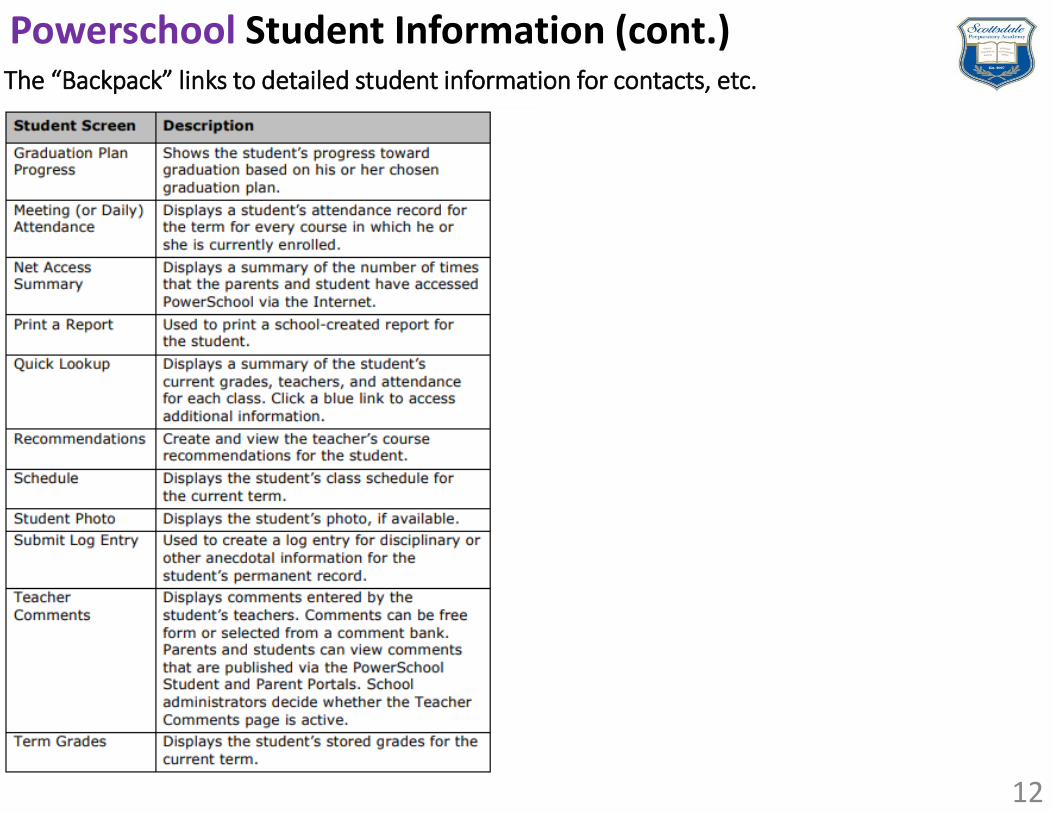
The “Backpack” links to detailed student information for contacts, etc.
Powerschool Student Information (cont.)
12
JUPITER:SIGNING UP
& LOGGING IN
13
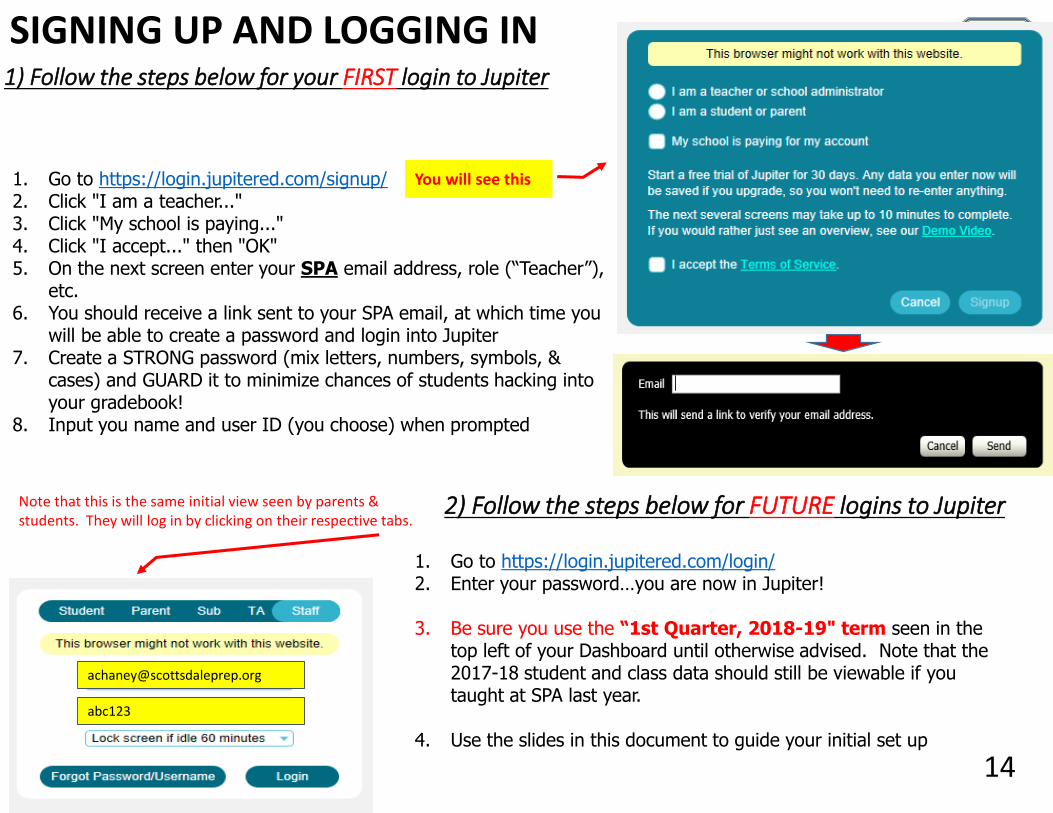
1) Follow the steps below for your FIRST login to Jupiter
14
Note that this is the same initial view seen by parents & students. They will log in by clicking on their respective tabs.
You will see this
SIGNING UP AND LOGGING IN
1. Go to https://login.jupitered.com/signup/2. Click "I am a teacher..." 3. Click "My school is paying..." 4. Click "I accept..." then "OK" 5. On the next screen enter your SPA email address, role (“Teacher”),
etc.6. You should receive a link sent to your SPA email, at which time you
will be able to create a password and login into Jupiter7. Create a STRONG password (mix letters, numbers, symbols, &
cases) and GUARD it to minimize chances of students hacking into your gradebook!
8. Input you name and user ID (you choose) when prompted
2) Follow the steps below for FUTURE logins to Jupiter
1. Go to https://login.jupitered.com/login/2. Enter your password…you are now in Jupiter!
3. Be sure you use the “1st Quarter, 2018-19" term seen in the top left of your Dashboard until otherwise advised. Note that the 2017-18 student and class data should still be viewable if you taught at SPA last year.
4. Use the slides in this document to guide your initial set up
abc123
CREATING YOUR
GRADEBOOK15
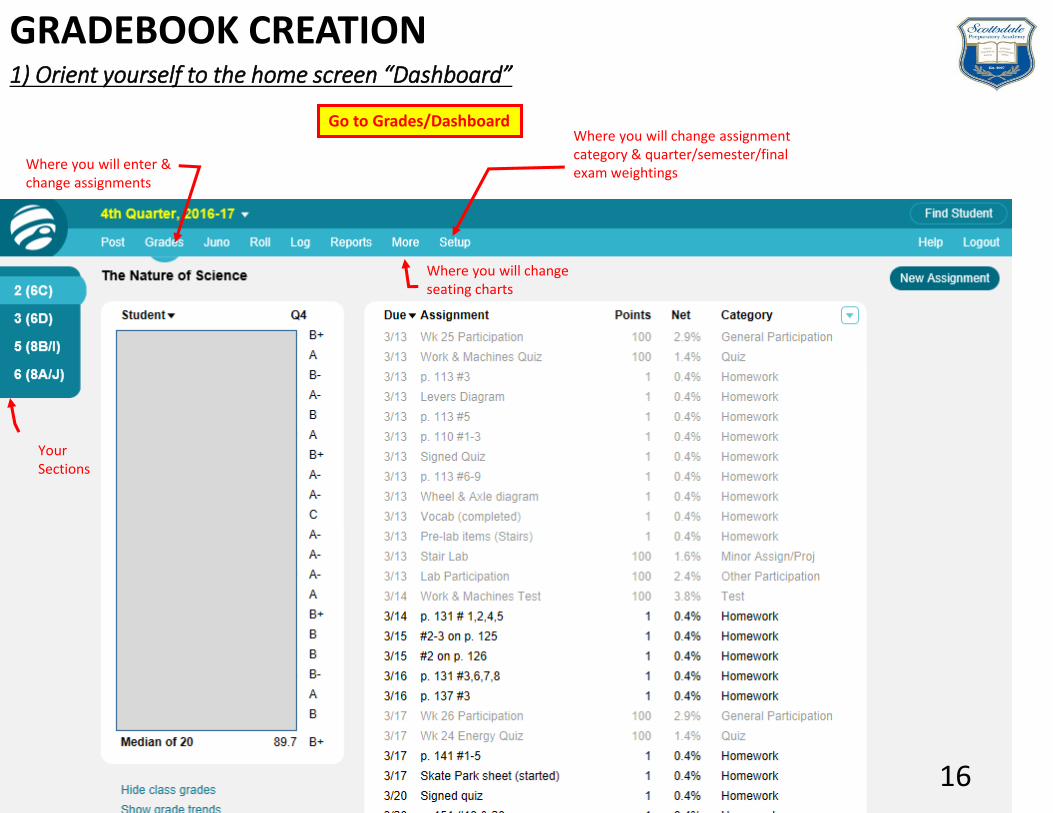
1) Orient yourself to the home screen “Dashboard”
16
Your Sections
Where you will change assignment category & quarter/semester/final exam weightings
Where you will enter & change assignments
Where you will change seating charts
GRADEBOOK CREATION
Go to Grades/Dashboard
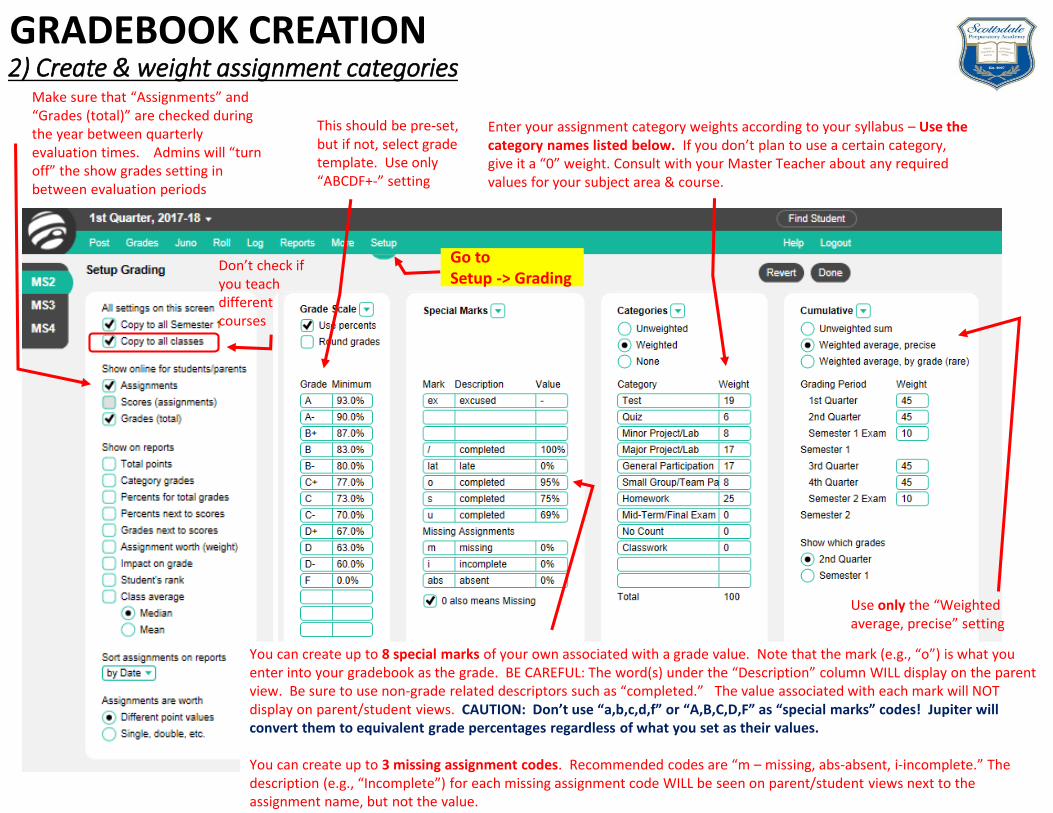
2) Create & weight assignment categories
17
This should be pre-set, but if not, select grade template. Use only “ABCDF+-” setting
Enter your assignment category weights according to your syllabus – Use the category names listed below. If you don’t plan to use a certain category, give it a “0” weight. Consult with your Master Teacher about any required values for your subject area & course.
Make sure that “Assignments” and “Grades (total)” are checked during the year between quarterly evaluation times. Admins will “turn off” the show grades setting in between evaluation periods
Go to Setup -> Grading
You can create up to 8 special marks of your own associated with a grade value. Note that the mark (e.g., “o”) is what you enter into your gradebook as the grade. BE CAREFUL: The word(s) under the “Description” column WILL display on the parent view. Be sure to use non-grade related descriptors such as “completed.” The value associated with each mark will NOT display on parent/student views. CAUTION: Don’t use “a,b,c,d,f” or “A,B,C,D,F” as “special marks” codes! Jupiter will convert them to equivalent grade percentages regardless of what you set as their values.
You can create up to 3 missing assignment codes. Recommended codes are “m – missing, abs-absent, i-incomplete.” The description (e.g., “Incomplete”) for each missing assignment code WILL be seen on parent/student views next to the assignment name, but not the value.
GRADEBOOK CREATION
Use only the “Weighted average, precise” setting
Don’t check if you teach different courses
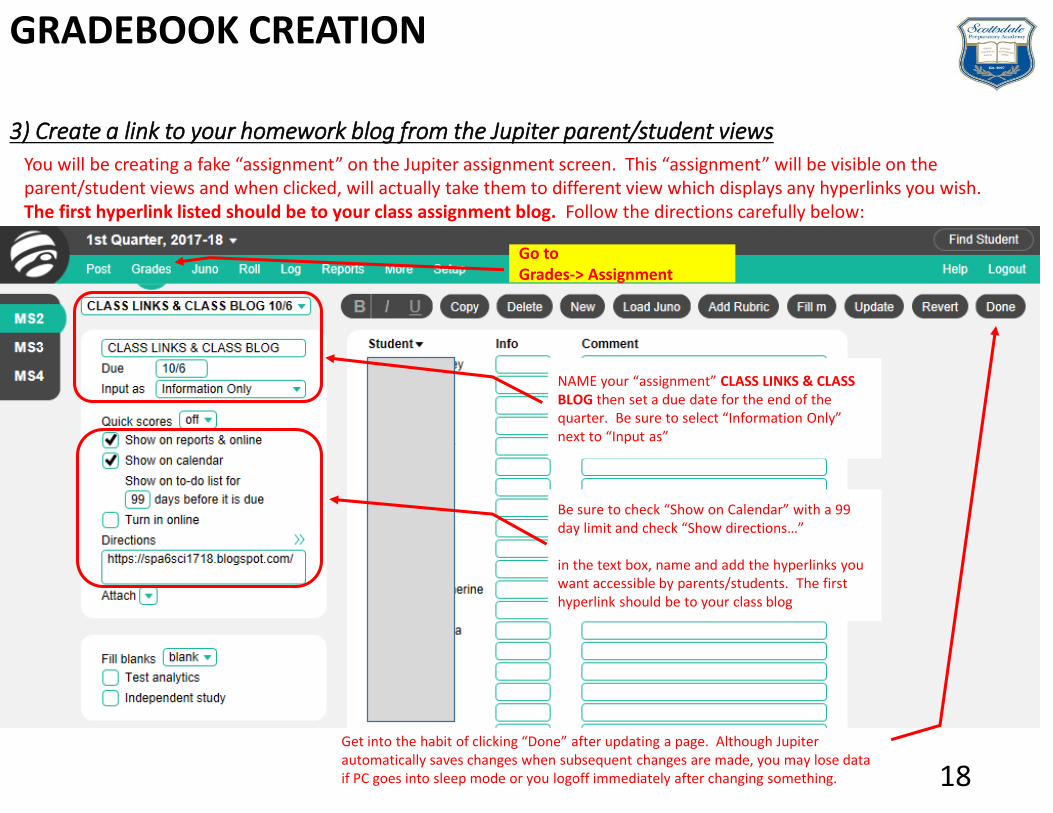
3) Create a link to your homework blog from the Jupiter parent/student views
18
NAME your “assignment” CLASS LINKS & CLASS BLOG then set a due date for the end of the quarter. Be sure to select “Information Only” next to “Input as”
Go to Grades-> Assignment
You will be creating a fake “assignment” on the Jupiter assignment screen. This “assignment” will be visible on the parent/student views and when clicked, will actually take them to different view which displays any hyperlinks you wish. The first hyperlink listed should be to your class assignment blog. Follow the directions carefully below:
Be sure to check “Show on Calendar” with a 99 day limit and check “Show directions…”
in the text box, name and add the hyperlinks you want accessible by parents/students. The first hyperlink should be to your class blog
Get into the habit of clicking “Done” after updating a page. Although Jupiter automatically saves changes when subsequent changes are made, you may lose data if PC goes into sleep mode or you logoff immediately after changing something.
GRADEBOOK CREATION
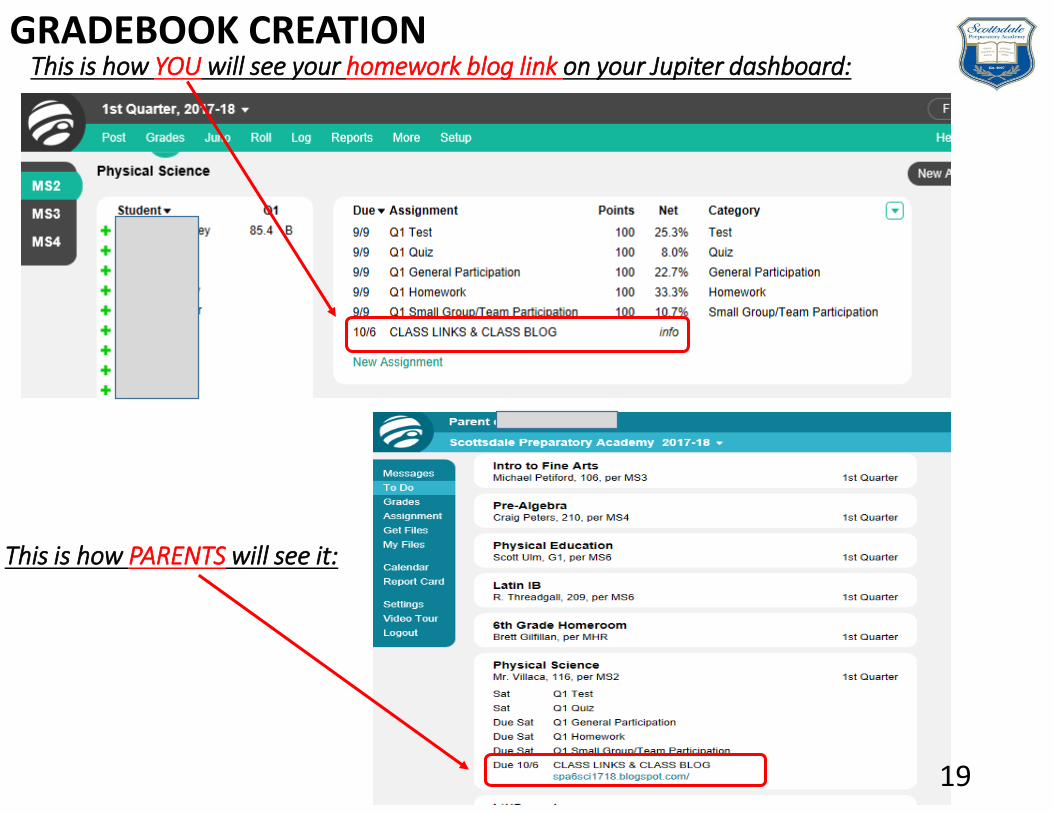
This is how YOU will see your homework blog link on your Jupiter dashboard:
19
This is how PARENTS will see it:
GRADEBOOK CREATION
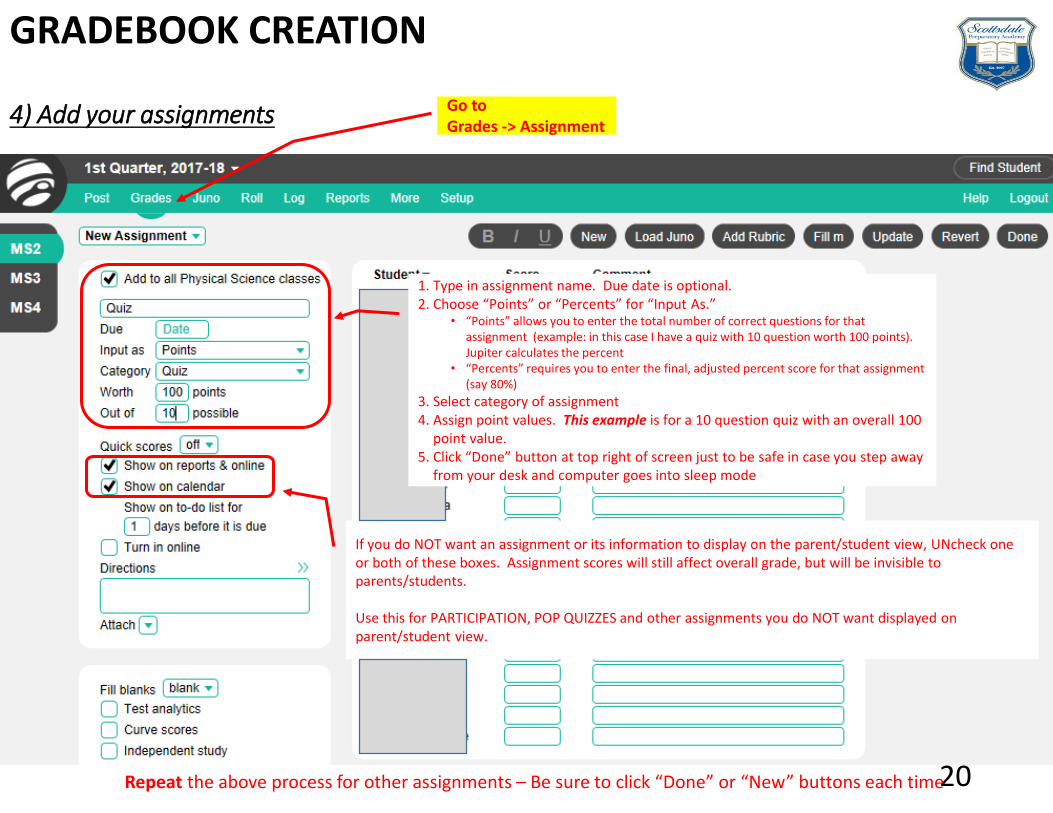
4) Add your assignments
20
Go to Grades -> Assignment
Repeat the above process for other assignments – Be sure to click “Done” or “New” buttons each time
If you do NOT want an assignment or its information to display on the parent/student view, UNcheck one or both of these boxes. Assignment scores will still affect overall grade, but will be invisible to parents/students.
Use this for PARTICIPATION, POP QUIZZES and other assignments you do NOT want displayed on parent/student view.
GRADEBOOK CREATION
1. Type in assignment name. Due date is optional.2. Choose “Points” or “Percents” for “Input As.”
• “Points” allows you to enter the total number of correct questions for that assignment (example: in this case I have a quiz with 10 question worth 100 points). Jupiter calculates the percent
• “Percents” requires you to enter the final, adjusted percent score for that assignment (say 80%)
3. Select category of assignment4. Assign point values. This example is for a 10 question quiz with an overall 100
point value.5. Click “Done” button at top right of screen just to be safe in case you step away
from your desk and computer goes into sleep mode
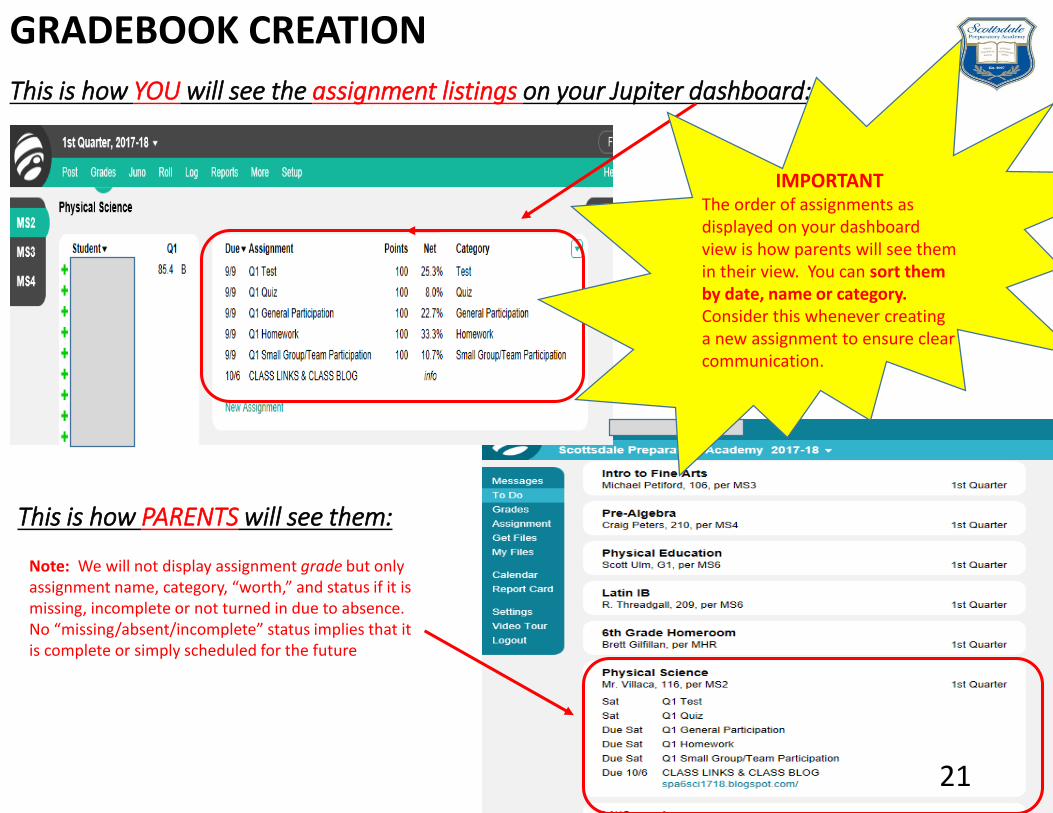
This is how YOU will see the assignment listings on your Jupiter dashboard:
21
This is how PARENTS will see them:
Note: We will not display assignment grade but only assignment name, category, “worth,” and status if it is missing, incomplete or not turned in due to absence. No “missing/absent/incomplete” status implies that it is complete or simply scheduled for the future
GRADEBOOK CREATION
IMPORTANTThe order of assignments as displayed on your dashboard view is how parents will see them in their view. You can sort them by date, name or category. Consider this whenever creating a new assignment to ensure clear communication.
com
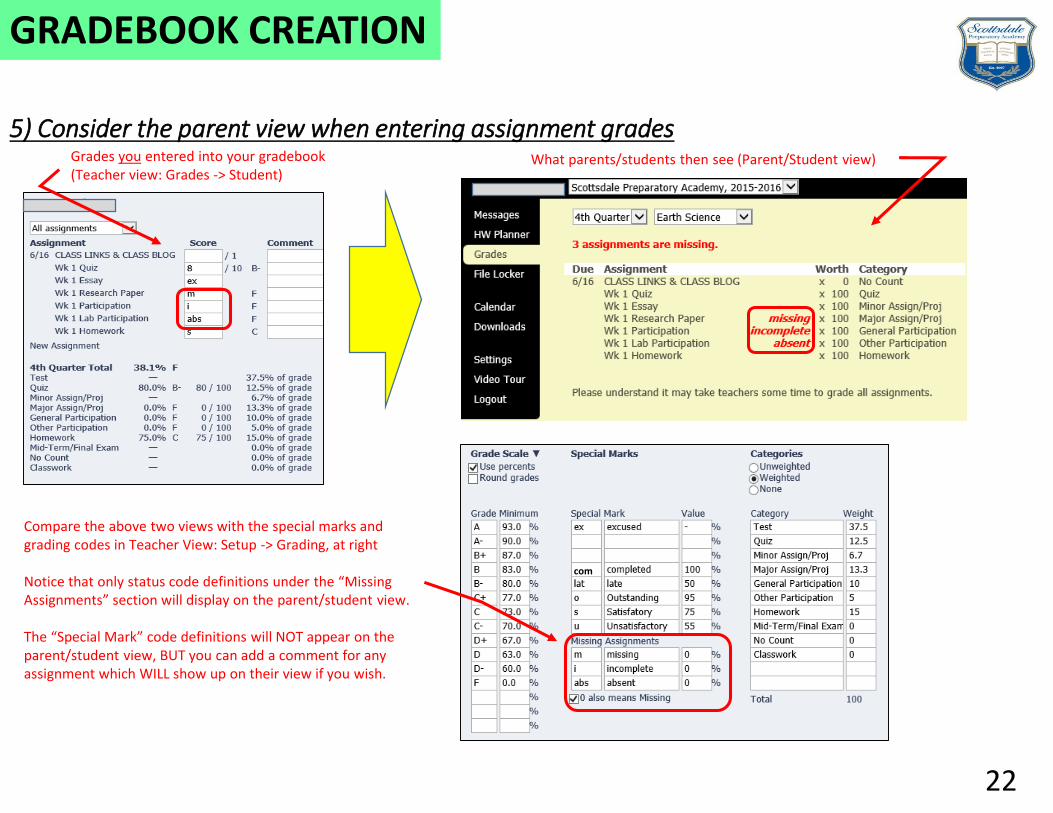
5) Consider the parent view when entering assignment gradesWhat parents/students then see (Parent/Student view)
Compare the above two views with the special marks and grading codes in Teacher View: Setup -> Grading, at right
Notice that only status code definitions under the “Missing Assignments” section will display on the parent/student view.
The “Special Mark” code definitions will NOT appear on the parent/student view, BUT you can add a comment for any assignment which WILL show up on their view if you wish.
22
GRADEBOOK CREATION
Grades you entered into your gradebook (Teacher view: Grades -> Student)
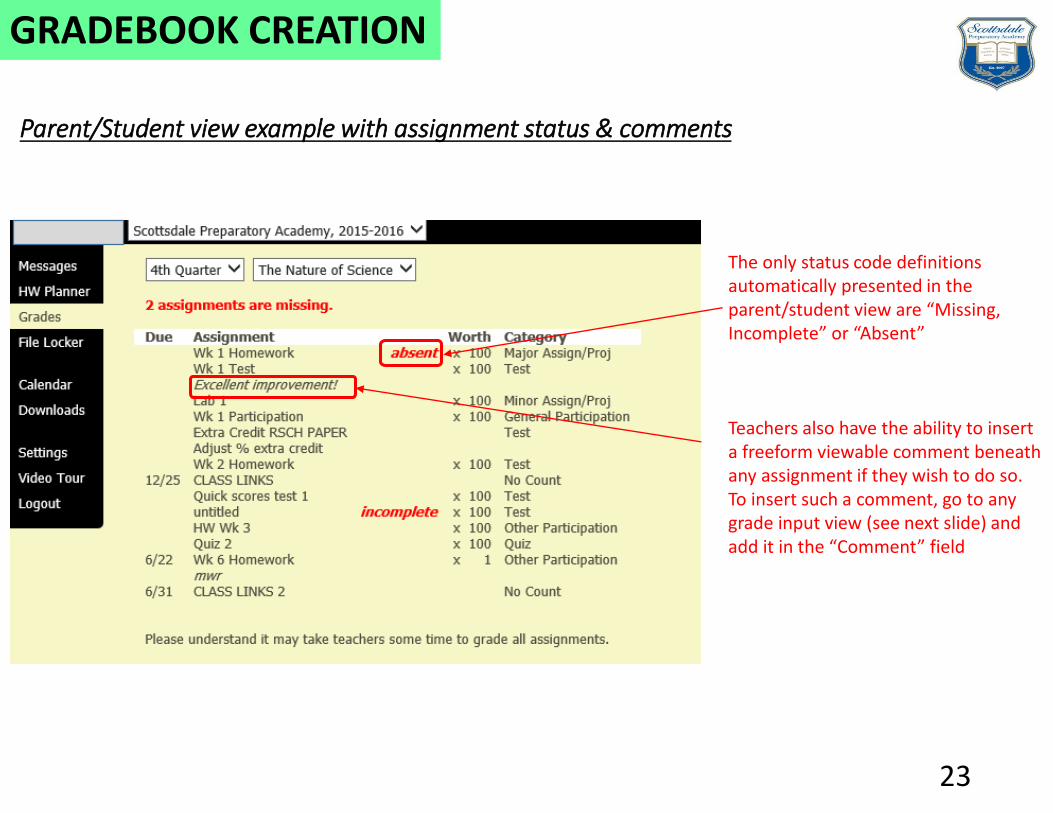
The only status code definitions automatically presented in the parent/student view are “Missing, Incomplete” or “Absent”
Teachers also have the ability to insert a freeform viewable comment beneath any assignment if they wish to do so. To insert such a comment, go to any grade input view (see next slide) and add it in the “Comment” field
Parent/Student view example with assignment status & comments
23
GRADEBOOK CREATION
ENTERINGGRADES &
MANAGING ASSIGNMENTS
24
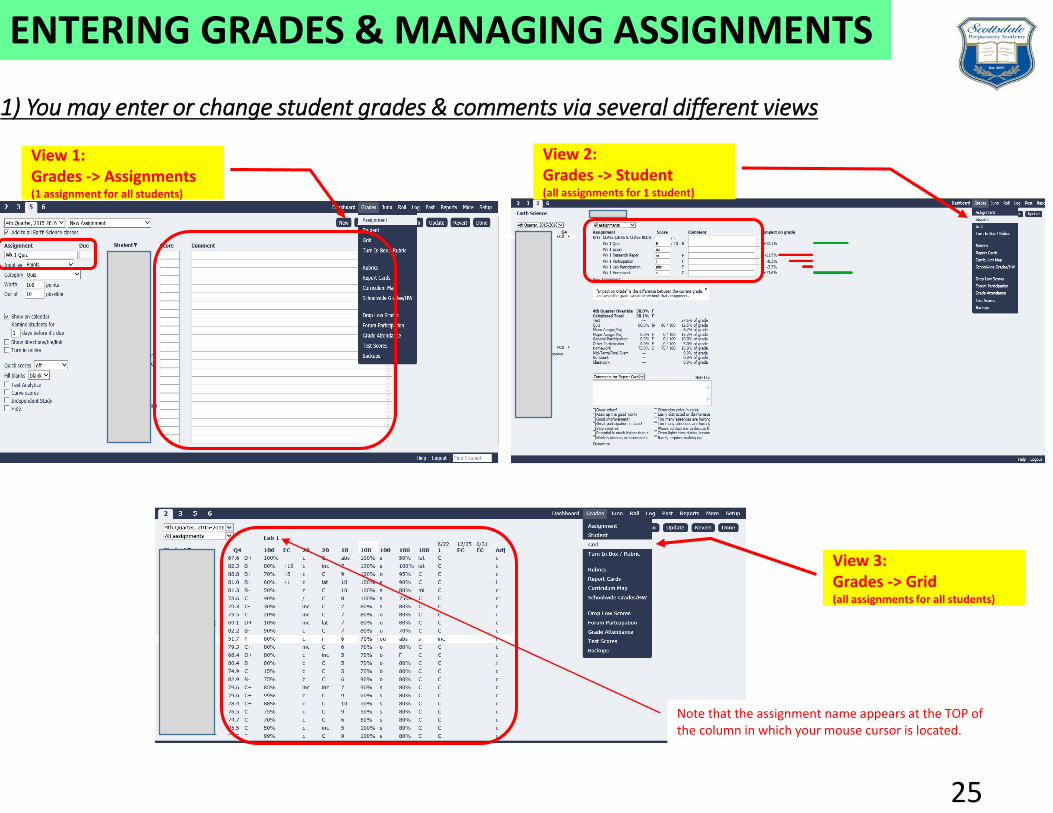
1) You may enter or change student grades & comments via several different views
25
View 1: Grades -> Assignments(1 assignment for all students)
View 2: Grades -> Student(all assignments for 1 student)
View 3: Grades -> Grid(all assignments for all students)
ENTERING GRADES & MANAGING ASSIGNMENTS
Note that the assignment name appears at the TOP of the column in which your mouse cursor is located.
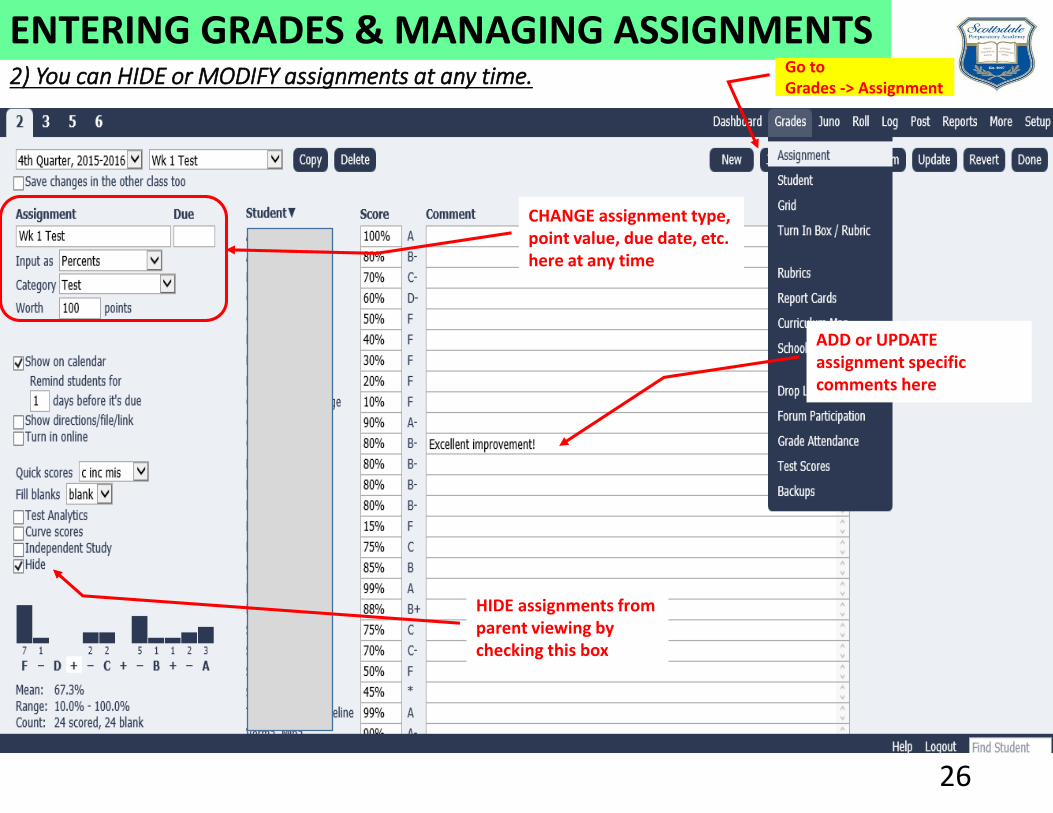
2) You can HIDE or MODIFY assignments at any time.
26
ENTERING GRADES & MANAGING ASSIGNMENTS
ADD or UPDATE assignment specific comments here
Go to Grades -> Assignment
HIDE assignments from parent viewing by checking this box
CHANGE assignment type, point value, due date, etc. here at any time
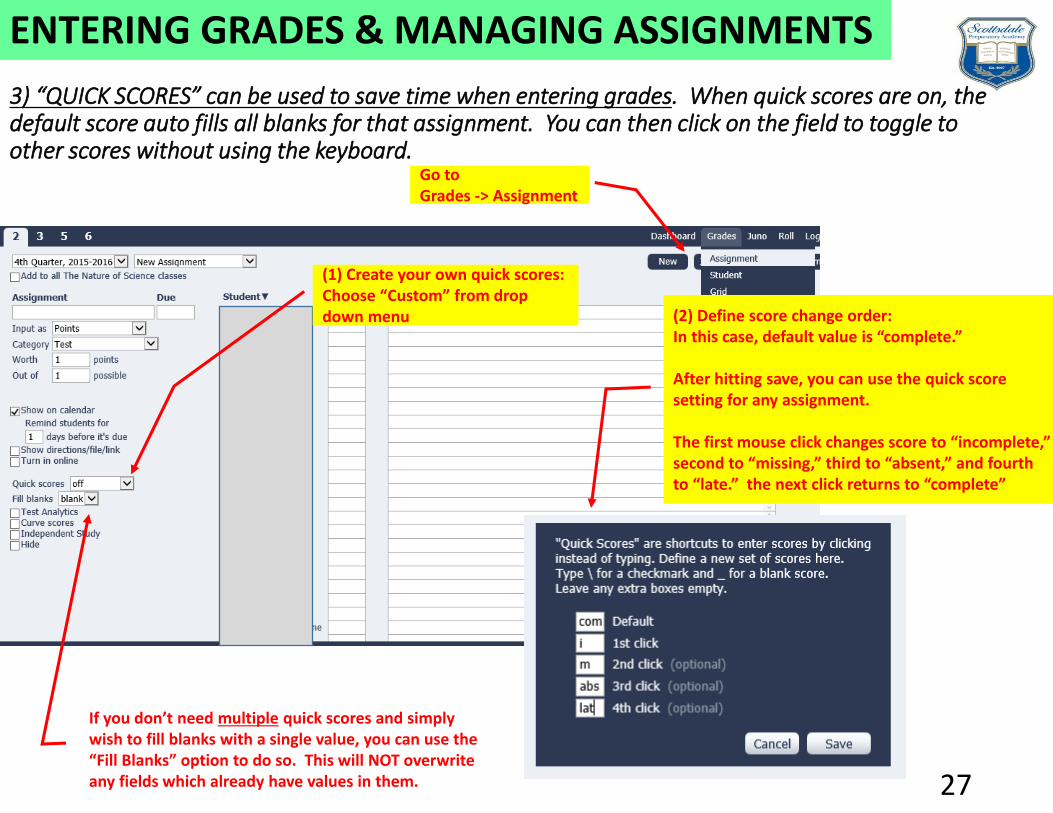
3) “QUICK SCORES” can be used to save time when entering grades. When quick scores are on, the default score auto fills all blanks for that assignment. You can then click on the field to toggle to other scores without using the keyboard.
27
ENTERING GRADES & MANAGING ASSIGNMENTS
(2) Define score change order: In this case, default value is “complete.”
After hitting save, you can use the quick score setting for any assignment.
The first mouse click changes score to “incomplete,” second to “missing,” third to “absent,” and fourth to “late.” the next click returns to “complete”
If you don’t need multiple quick scores and simply wish to fill blanks with a single value, you can use the “Fill Blanks” option to do so. This will NOT overwrite any fields which already have values in them.
Go to Grades -> Assignment
(1) Create your own quick scores: Choose “Custom” from drop down menu

MESSAGING PARENTS
28
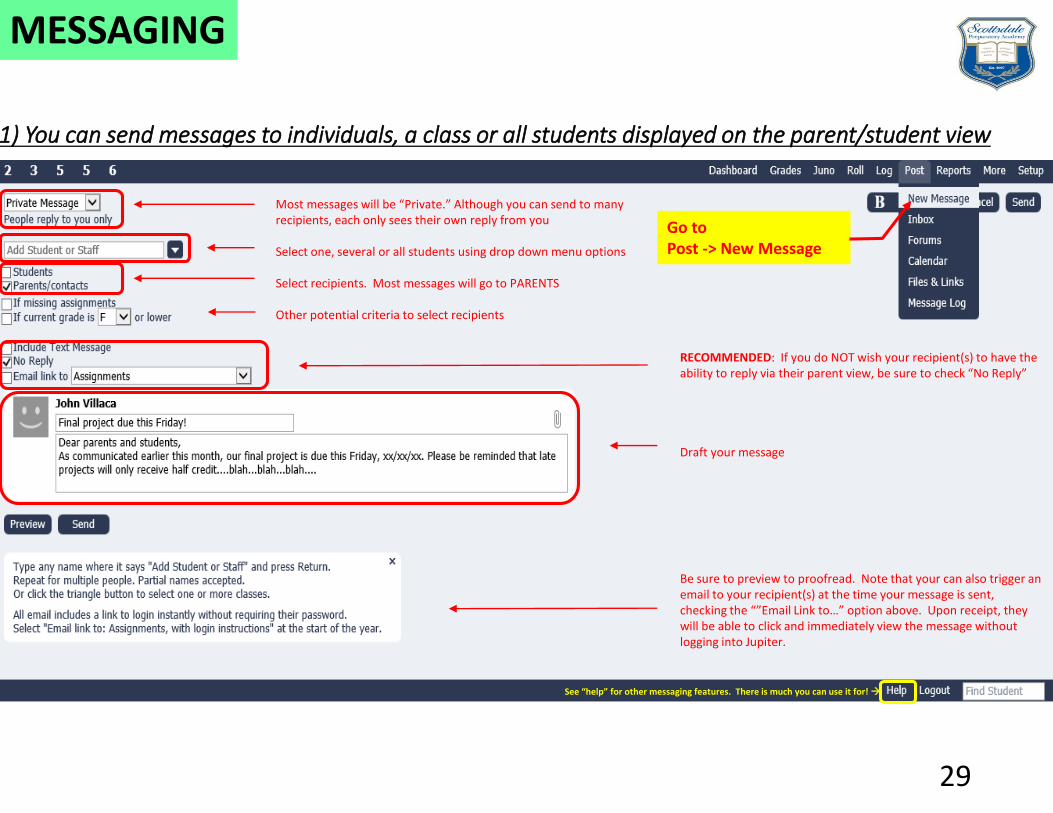
1) You can send messages to individuals, a class or all students displayed on the parent/student view
29
Go to Post -> New Message
Most messages will be “Private.” Although you can send to many recipients, each only sees their own reply from you
Select one, several or all students using drop down menu options
Select recipients. Most messages will go to PARENTS
Other potential criteria to select recipients
RECOMMENDED: If you do NOT wish your recipient(s) to have the ability to reply via their parent view, be sure to check “No Reply”
Draft your message
Be sure to preview to proofread. Note that your can also trigger an email to your recipient(s) at the time your message is sent, checking the “”Email Link to…” option above. Upon receipt, they will be able to click and immediately view the message without logging into Jupiter.
See “help” for other messaging features. There is much you can use it for! →
MESSAGING
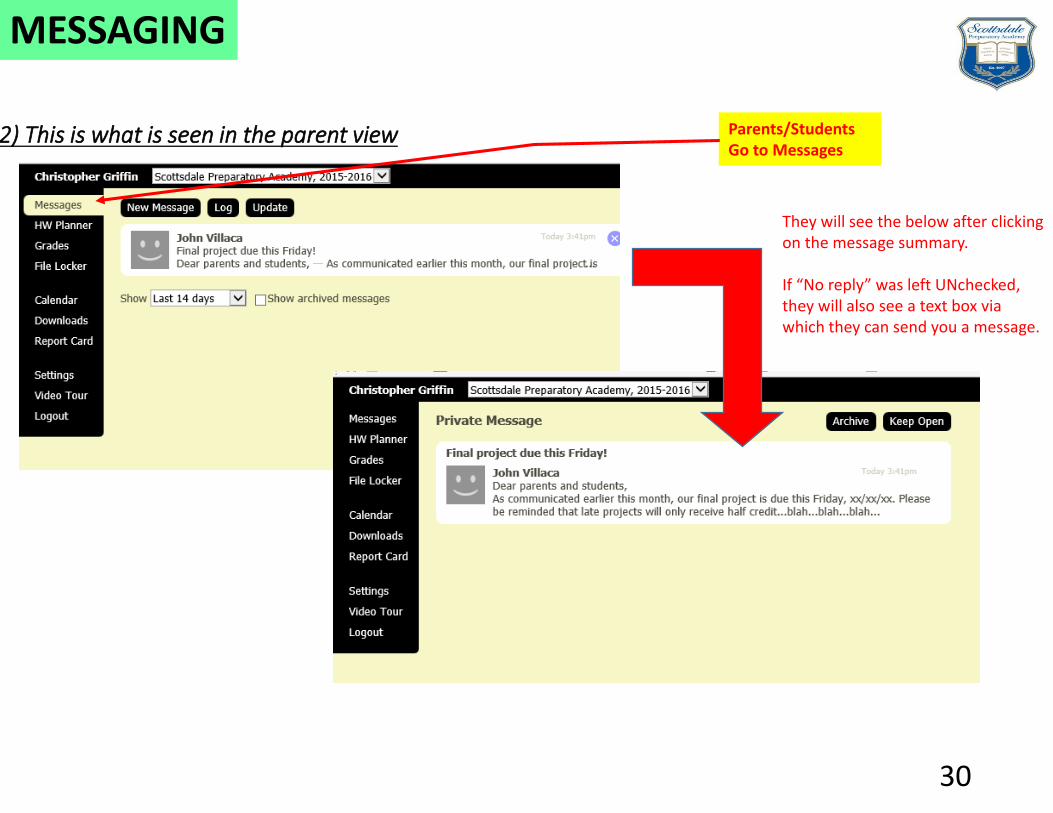
2) This is what is seen in the parent view Parents/Students Go to Messages
They will see the below after clicking on the message summary.
If “No reply” was left UNchecked, they will also see a text box via which they can send you a message.
MESSAGING
30

SENDING DEFICIENCIES &
PROGRESS REPORTS
31
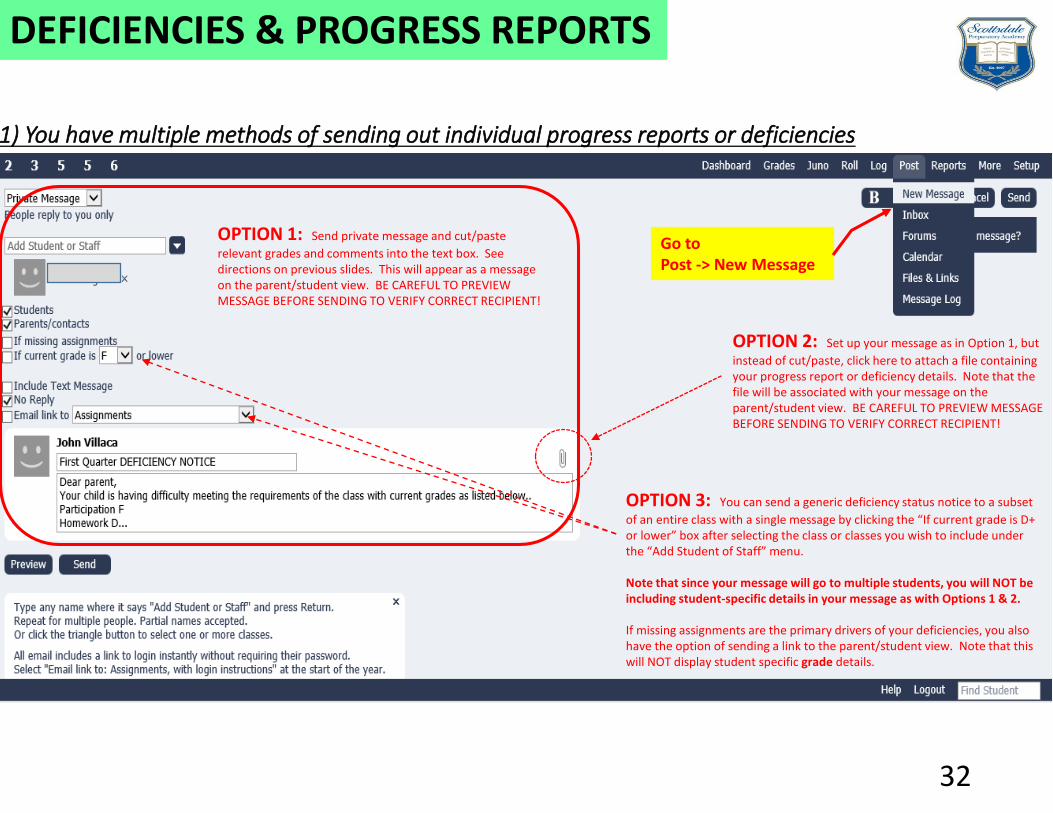
1) You have multiple methods of sending out individual progress reports or deficiencies
Go to Post -> New Message
OPTION 1: Send private message and cut/paste
relevant grades and comments into the text box. See directions on previous slides. This will appear as a message on the parent/student view. BE CAREFUL TO PREVIEW MESSAGE BEFORE SENDING TO VERIFY CORRECT RECIPIENT!
OPTION 2: Set up your message as in Option 1, but
instead of cut/paste, click here to attach a file containing your progress report or deficiency details. Note that the file will be associated with your message on the parent/student view. BE CAREFUL TO PREVIEW MESSAGE BEFORE SENDING TO VERIFY CORRECT RECIPIENT!
OPTION 3: You can send a generic deficiency status notice to a subset
of an entire class with a single message by clicking the “If current grade is D+ or lower” box after selecting the class or classes you wish to include under the “Add Student of Staff” menu.
Note that since your message will go to multiple students, you will NOT be including student-specific details in your message as with Options 1 & 2.
If missing assignments are the primary drivers of your deficiencies, you also have the option of sending a link to the parent/student view. Note that this will NOT display student specific grade details.
DEFICIENCIES & PROGRESS REPORTS
32
ADDING MIDTERM & FINAL EXAM
SCORES33
com
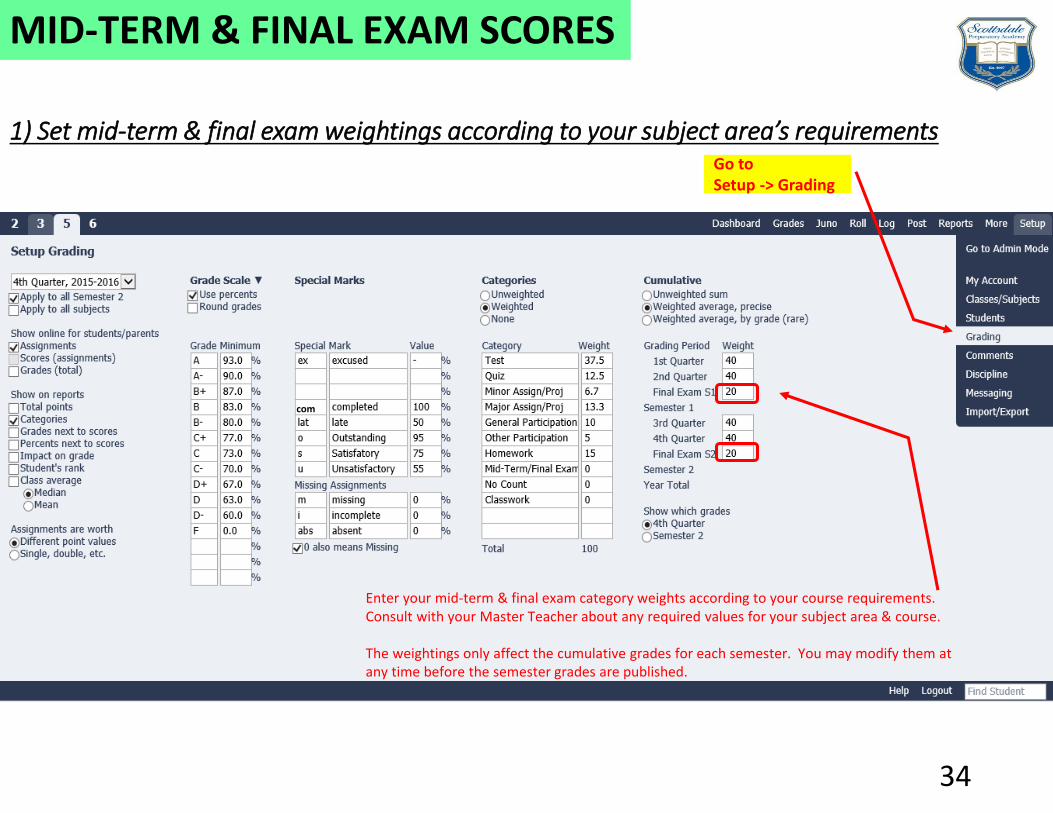
1) Set mid-term & final exam weightings according to your subject area’s requirements
34
Go to Setup -> Grading
Enter your mid-term & final exam category weights according to your course requirements. Consult with your Master Teacher about any required values for your subject area & course.
The weightings only affect the cumulative grades for each semester. You may modify them at any time before the semester grades are published.
MID-TERM & FINAL EXAM SCORES
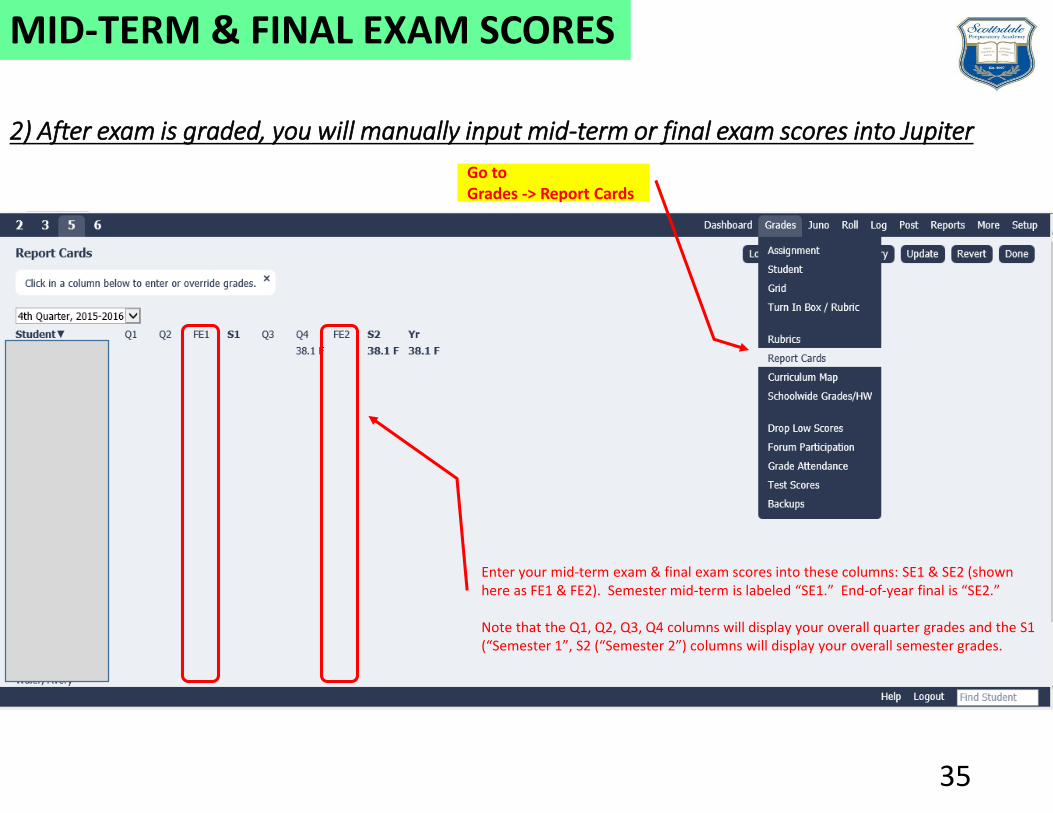
2) After exam is graded, you will manually input mid-term or final exam scores into Jupiter
35
Go to Grades -> Report Cards
Enter your mid-term exam & final exam scores into these columns: SE1 & SE2 (shown here as FE1 & FE2). Semester mid-term is labeled “SE1.” End-of-year final is “SE2.”
Note that the Q1, Q2, Q3, Q4 columns will display your overall quarter grades and the S1 (“Semester 1”, S2 (“Semester 2”) columns will display your overall semester grades.
MID-TERM & FINAL EXAM SCORES
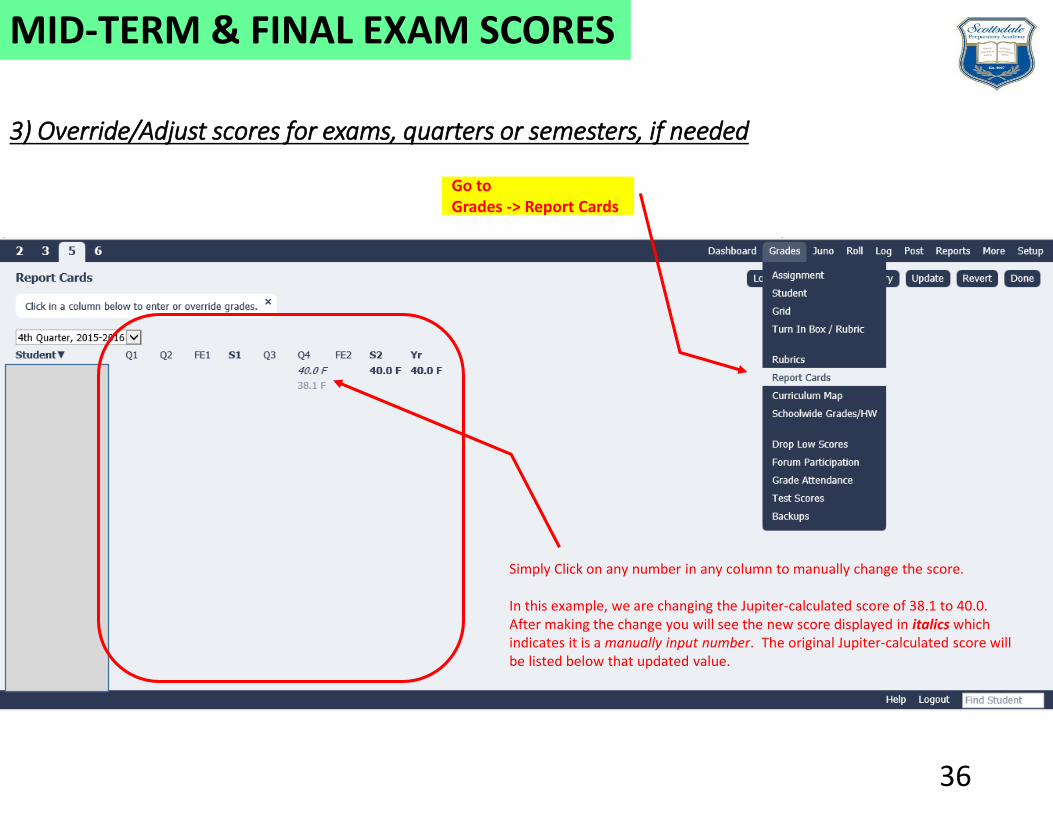
3) Override/Adjust scores for exams, quarters or semesters, if needed
36
Go to Grades -> Report Cards
Simply Click on any number in any column to manually change the score.
In this example, we are changing the Jupiter-calculated score of 38.1 to 40.0. After making the change you will see the new score displayed in italics which indicates it is a manually input number. The original Jupiter-calculated score will be listed below that updated value.
MID-TERM & FINAL EXAM SCORES

PREPARING FOR
EVALUATIONS37
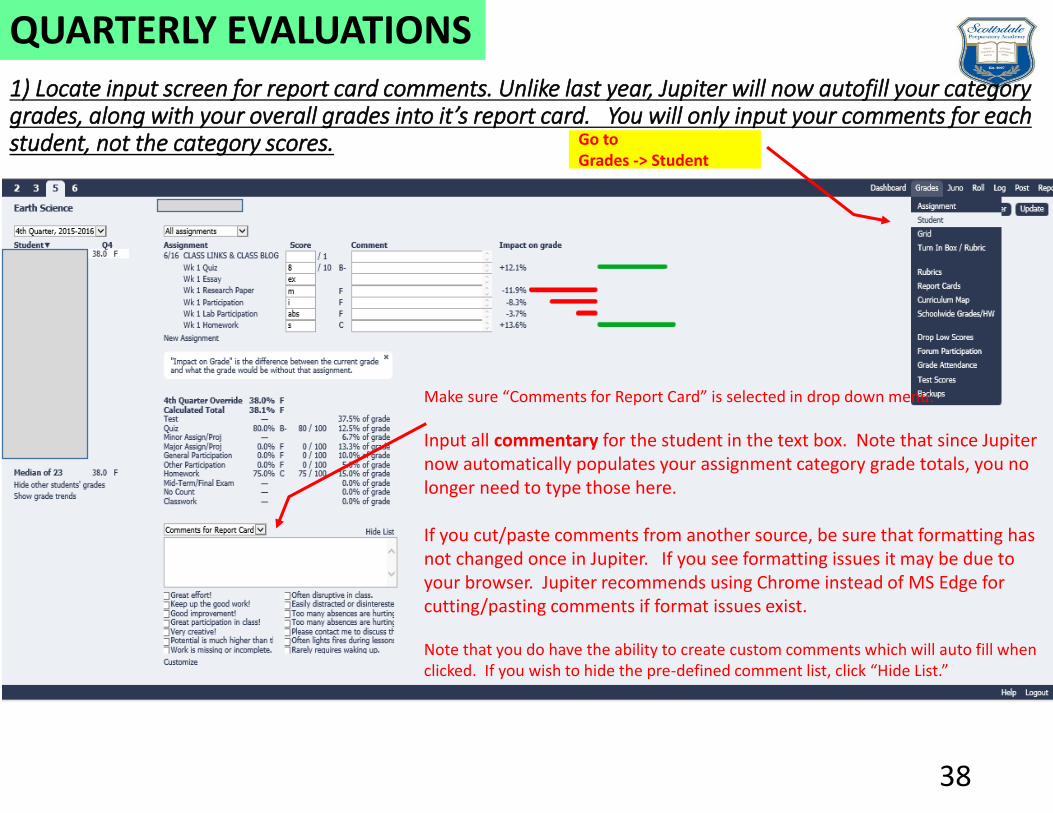
1) Locate input screen for report card comments. Unlike last year, Jupiter will now autofill your category grades, along with your overall grades into it’s report card. You will only input your comments for each student, not the category scores.
38
Go to Grades -> Student
Make sure “Comments for Report Card” is selected in drop down menu.
Input all commentary for the student in the text box. Note that since Jupiter now automatically populates your assignment category grade totals, you no longer need to type those here.
If you cut/paste comments from another source, be sure that formatting has not changed once in Jupiter. If you see formatting issues it may be due to your browser. Jupiter recommends using Chrome instead of MS Edge for cutting/pasting comments if format issues exist.
Note that you do have the ability to create custom comments which will auto fill when clicked. If you wish to hide the pre-defined comment list, click “Hide List.”
QUARTERLY EVALUATIONS
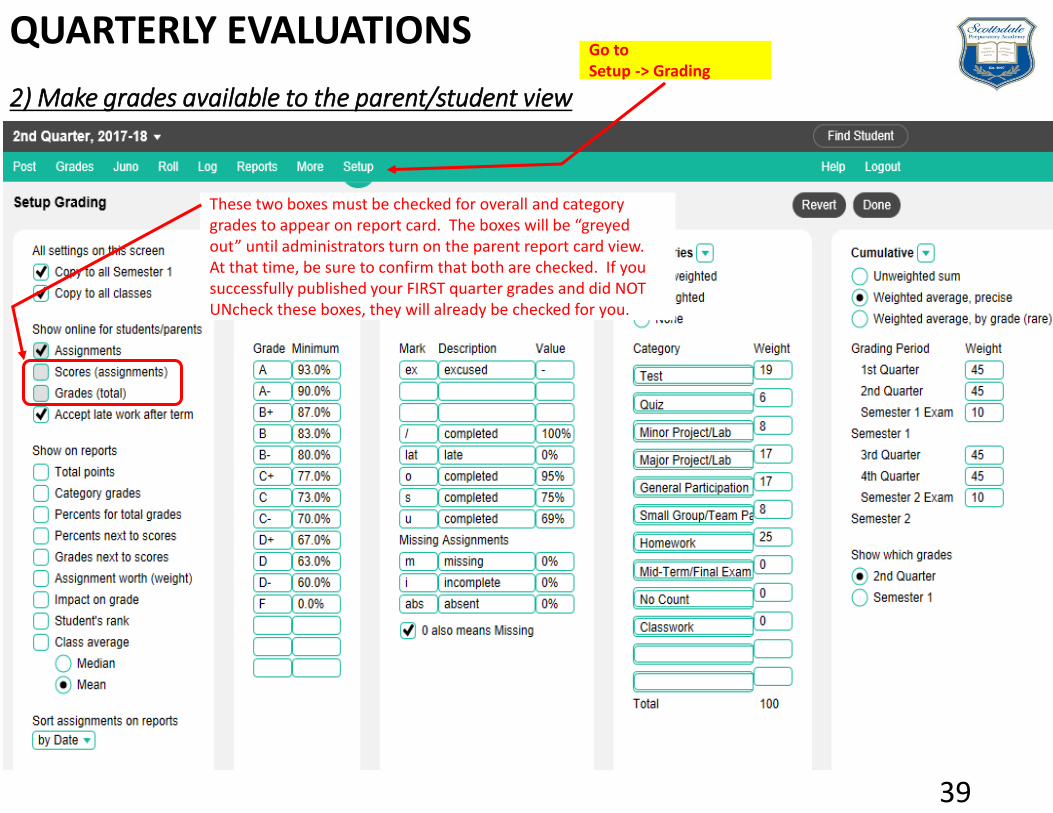
2) Make grades available to the parent/student view
39
Go to Setup -> Grading
These two boxes must be checked for overall and category grades to appear on report card. The boxes will be “greyed out” until administrators turn on the parent report card view. At that time, be sure to confirm that both are checked. If you successfully published your FIRST quarter grades and did NOT UNcheck these boxes, they will already be checked for you.
QUARTERLY EVALUATIONS
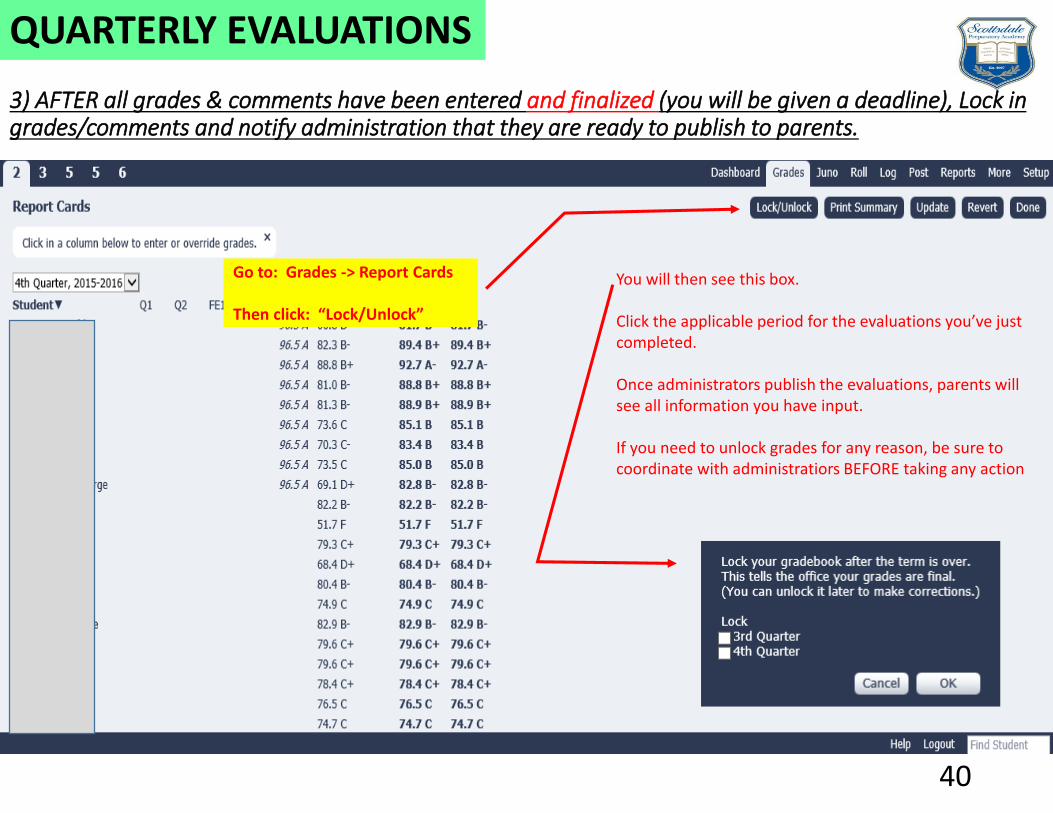
3) AFTER all grades & comments have been entered and finalized (you will be given a deadline), Lock in grades/comments and notify administration that they are ready to publish to parents.
40
Go to: Grades -> Report Cards
Then click: “Lock/Unlock”
You will then see this box.
Click the applicable period for the evaluations you’ve just completed.
Once administrators publish the evaluations, parents will see all information you have input.
If you need to unlock grades for any reason, be sure to coordinate with administratiors BEFORE taking any action
QUARTERLY EVALUATIONS
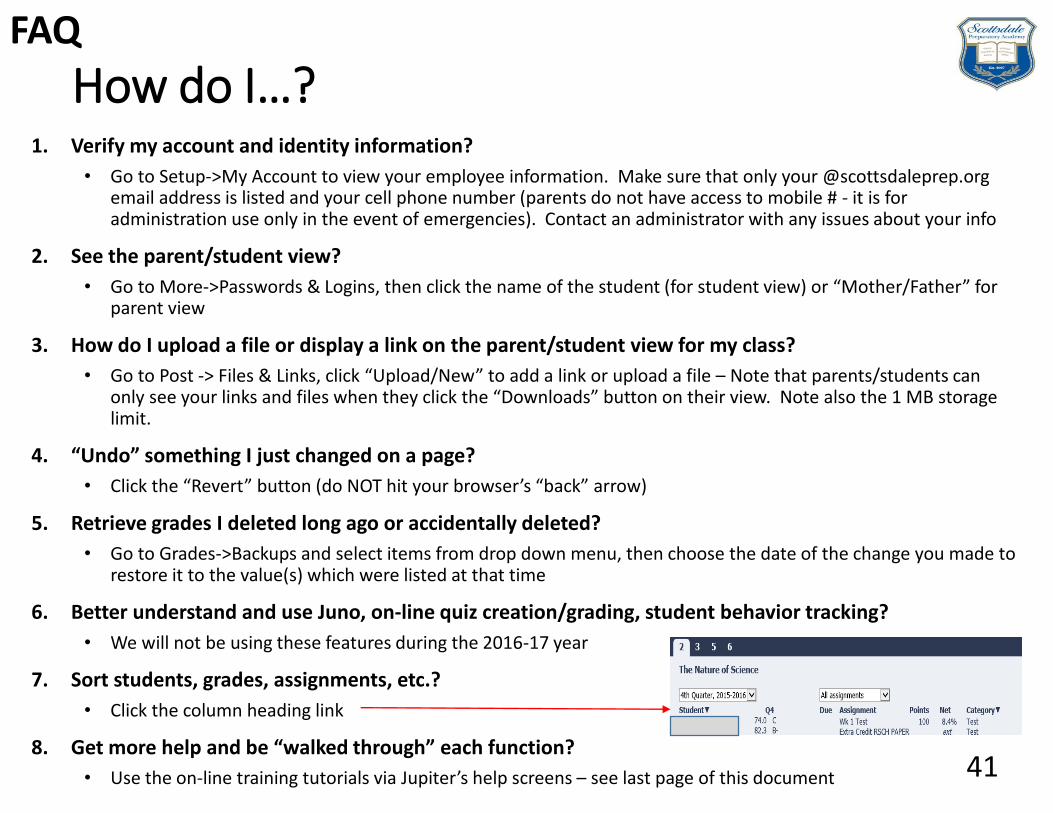
How do I…?1. Verify my account and identity information?
• Go to Setup->My Account to view your employee information. Make sure that only your @scottsdaleprep.org email address is listed and your cell phone number (parents do not have access to mobile # - it is for administration use only in the event of emergencies). Contact an administrator with any issues about your info
2. See the parent/student view?
• Go to More->Passwords & Logins, then click the name of the student (for student view) or “Mother/Father” for parent view
3. How do I upload a file or display a link on the parent/student view for my class?
• Go to Post -> Files & Links, click “Upload/New” to add a link or upload a file – Note that parents/students can only see your links and files when they click the “Downloads” button on their view. Note also the 1 MB storage limit.
4. “Undo” something I just changed on a page?
• Click the “Revert” button (do NOT hit your browser’s “back” arrow)
5. Retrieve grades I deleted long ago or accidentally deleted?
• Go to Grades->Backups and select items from drop down menu, then choose the date of the change you made to restore it to the value(s) which were listed at that time
6. Better understand and use Juno, on-line quiz creation/grading, student behavior tracking?
• We will not be using these features during the 2016-17 year
7. Sort students, grades, assignments, etc.?
• Click the column heading link
8. Get more help and be “walked through” each function?
• Use the on-line training tutorials via Jupiter’s help screens – see last page of this document 41
FAQ
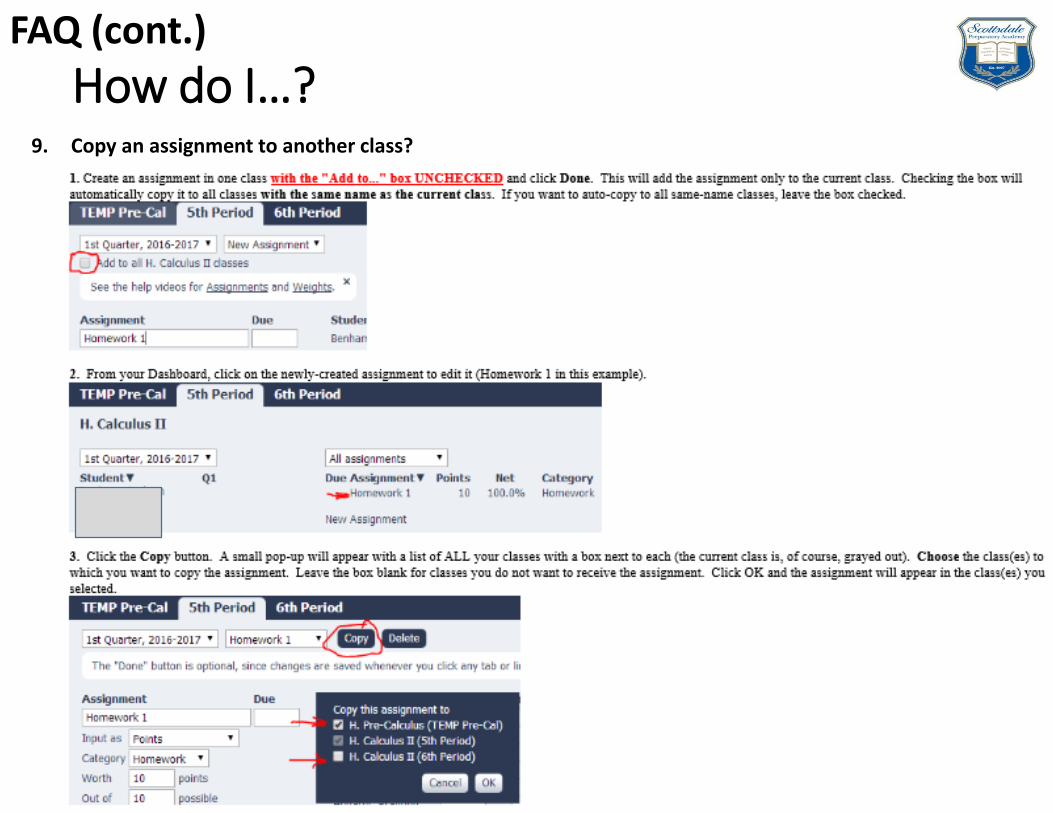
How do I…?9. Copy an assignment to another class?
FAQ (cont.)
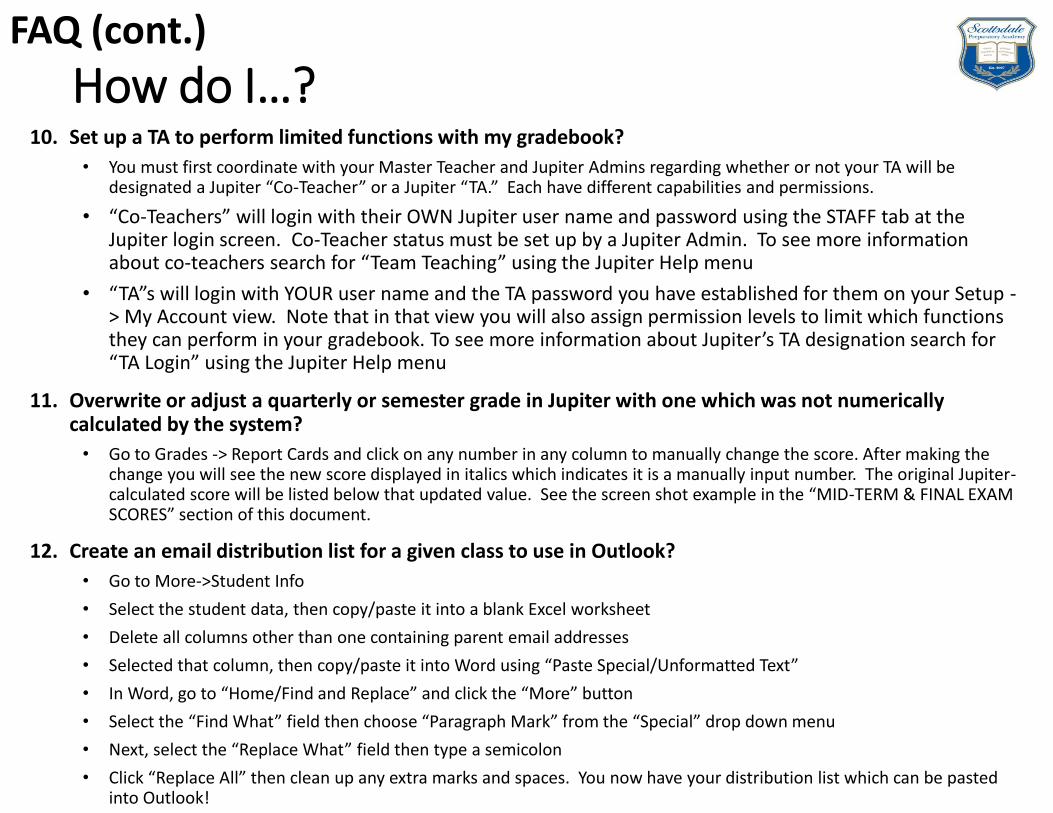
How do I…?10. Set up a TA to perform limited functions with my gradebook?
• You must first coordinate with your Master Teacher and Jupiter Admins regarding whether or not your TA will be designated a Jupiter “Co-Teacher” or a Jupiter “TA.” Each have different capabilities and permissions.
• “Co-Teachers” will login with their OWN Jupiter user name and password using the STAFF tab at the Jupiter login screen. Co-Teacher status must be set up by a Jupiter Admin. To see more information about co-teachers search for “Team Teaching” using the Jupiter Help menu
• “TA”s will login with YOUR user name and the TA password you have established for them on your Setup -> My Account view. Note that in that view you will also assign permission levels to limit which functions they can perform in your gradebook. To see more information about Jupiter’s TA designation search for “TA Login” using the Jupiter Help menu
11. Overwrite or adjust a quarterly or semester grade in Jupiter with one which was not numerically calculated by the system?
• Go to Grades -> Report Cards and click on any number in any column to manually change the score. After making the change you will see the new score displayed in italics which indicates it is a manually input number. The original Jupiter-calculated score will be listed below that updated value. See the screen shot example in the “MID-TERM & FINAL EXAM SCORES” section of this document.
12. Create an email distribution list for a given class to use in Outlook?
• Go to More->Student Info
• Select the student data, then copy/paste it into a blank Excel worksheet
• Delete all columns other than one containing parent email addresses
• Selected that column, then copy/paste it into Word using “Paste Special/Unformatted Text”
• In Word, go to “Home/Find and Replace” and click the “More” button
• Select the “Find What” field then choose “Paragraph Mark” from the “Special” drop down menu
• Next, select the “Replace What” field then type a semicolon
• Click “Replace All” then clean up any extra marks and spaces. You now have your distribution list which can be pasted into Outlook!
FAQ (cont.)
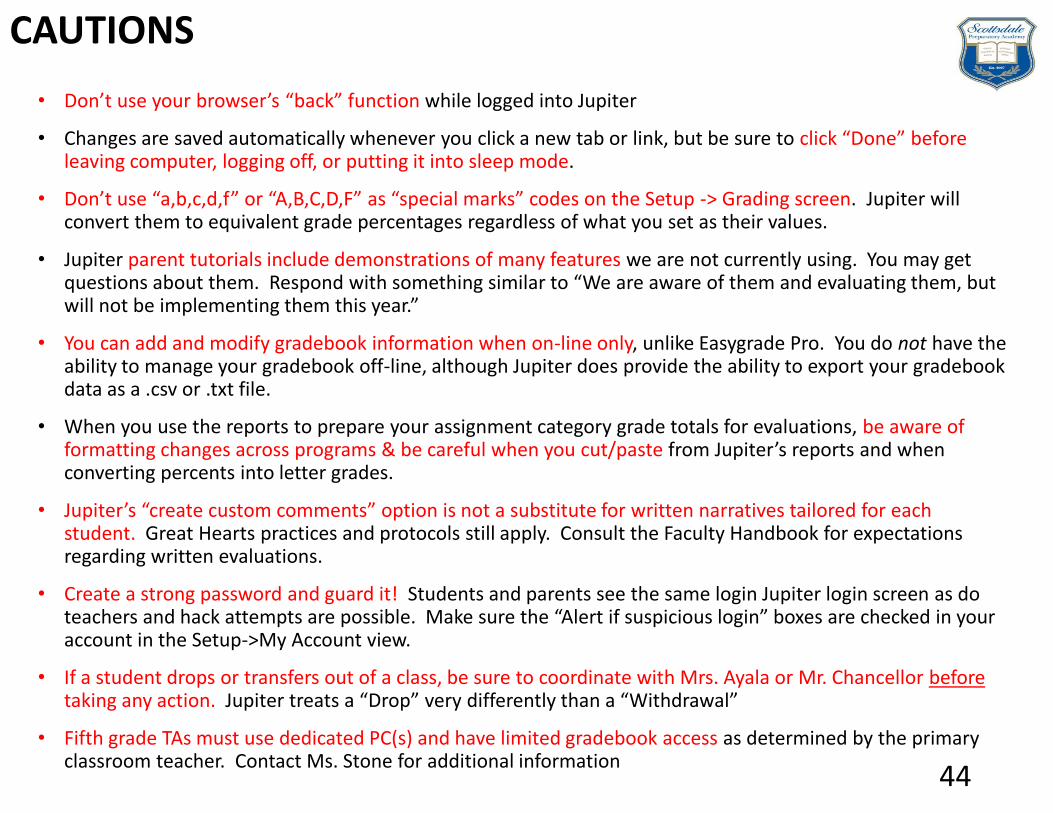
• Don’t use your browser’s “back” function while logged into Jupiter
• Changes are saved automatically whenever you click a new tab or link, but be sure to click “Done” before leaving computer, logging off, or putting it into sleep mode.
• Don’t use “a,b,c,d,f” or “A,B,C,D,F” as “special marks” codes on the Setup -> Grading screen. Jupiter will convert them to equivalent grade percentages regardless of what you set as their values.
• Jupiter parent tutorials include demonstrations of many features we are not currently using. You may get questions about them. Respond with something similar to “We are aware of them and evaluating them, but will not be implementing them this year.”
• You can add and modify gradebook information when on-line only, unlike Easygrade Pro. You do not have the ability to manage your gradebook off-line, although Jupiter does provide the ability to export your gradebook data as a .csv or .txt file.
• When you use the reports to prepare your assignment category grade totals for evaluations, be aware of formatting changes across programs & be careful when you cut/paste from Jupiter’s reports and when converting percents into letter grades.
• Jupiter’s “create custom comments” option is not a substitute for written narratives tailored for each student. Great Hearts practices and protocols still apply. Consult the Faculty Handbook for expectations regarding written evaluations.
• Create a strong password and guard it! Students and parents see the same login Jupiter login screen as do teachers and hack attempts are possible. Make sure the “Alert if suspicious login” boxes are checked in your account in the Setup->My Account view.
• If a student drops or transfers out of a class, be sure to coordinate with Mrs. Ayala or Mr. Chancellor beforetaking any action. Jupiter treats a “Drop” very differently than a “Withdrawal”
• Fifth grade TAs must use dedicated PC(s) and have limited gradebook access as determined by the primary classroom teacher. Contact Ms. Stone for additional information
44
CAUTIONS

TRAINING TUTORIALS
45
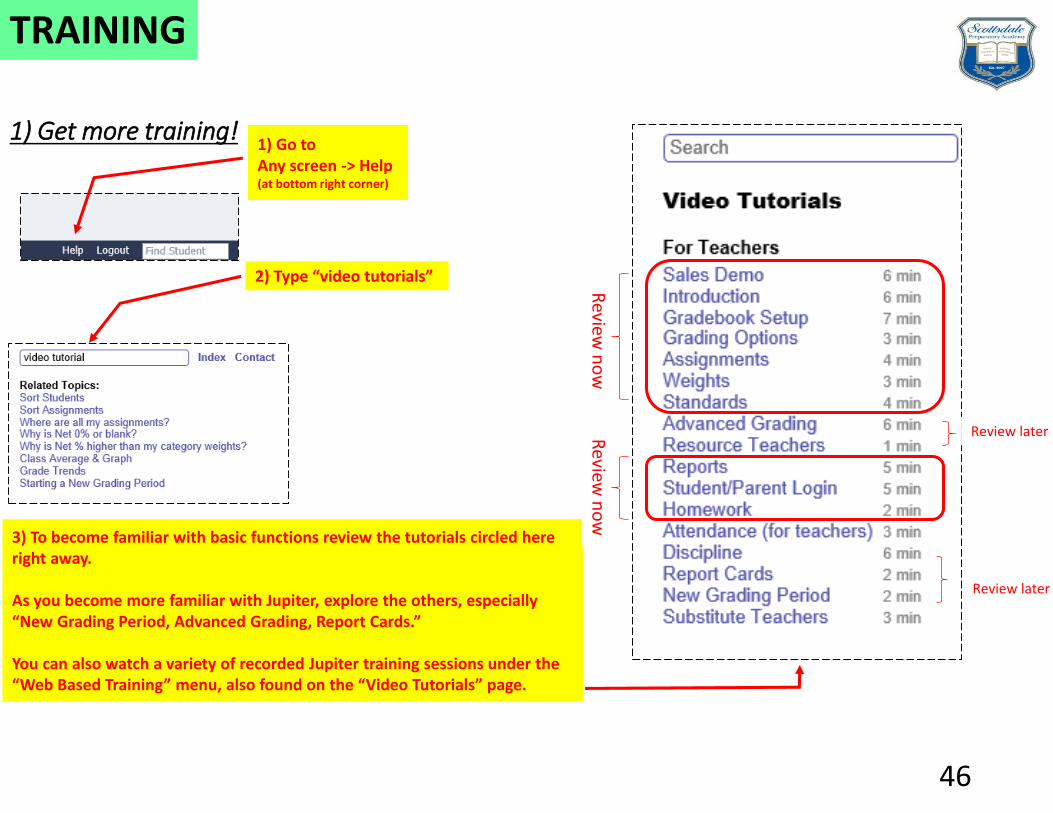
1) Get more training!
46
1) Go to Any screen -> Help (at bottom right corner)
2) Type “video tutorials”
3) To become familiar with basic functions review the tutorials circled here right away.
As you become more familiar with Jupiter, explore the others, especially “New Grading Period, Advanced Grading, Report Cards.”
You can also watch a variety of recorded Jupiter training sessions under the “Web Based Training” menu, also found on the “Video Tutorials” page.
Review
no
wReview later
Review later
Review
no
w
TRAINING
Related Documents