Juniper Secure Analytics Configuring DSMs Guide Release 2014.8 Modified: 2018-01-16 Copyright © 2018, Juniper Networks, Inc.

Welcome message from author
This document is posted to help you gain knowledge. Please leave a comment to let me know what you think about it! Share it to your friends and learn new things together.
Transcript
Juniper Secure Analytics Configuring DSMs Guide
Release
2014.8
Modified: 2018-01-16
Copyright © 2018, Juniper Networks, Inc.
Juniper Networks, Inc.1133 InnovationWaySunnyvale, California 94089USA408-745-2000www.juniper.net
Juniper Networks, the Juniper Networks logo, Juniper, and Junos are registered trademarks of Juniper Networks, Inc. and/or its affiliates inthe United States and other countries. All other trademarks may be property of their respective owners.
Juniper Networks assumes no responsibility for any inaccuracies in this document. Juniper Networks reserves the right to change, modify,transfer, or otherwise revise this publication without notice.
Juniper Secure Analytics Configuring DSMs Guide2014.8Copyright © 2018 Juniper Networks, Inc. All rights reserved.
The information in this document is current as of the date on the title page.
YEAR 2000 NOTICE
Juniper Networks hardware and software products are Year 2000 compliant. Junos OS has no known time-related limitations through theyear 2038. However, the NTP application is known to have some difficulty in the year 2036.
ENDUSER LICENSE AGREEMENT
The Juniper Networks product that is the subject of this technical documentation consists of (or is intended for use with) Juniper Networkssoftware. Use of such software is subject to the terms and conditions of the End User License Agreement (“EULA”) posted athttp://www.juniper.net/support/eula/. By downloading, installing or using such software, you agree to the terms and conditions of thatEULA.
Copyright © 2018, Juniper Networks, Inc.ii
Table of Contents
About the Documentation . . . . . . . . . . . . . . . . . . . . . . . . . . . . . . . . . . . . . . . . . . . xliii
Documentation and Release Notes . . . . . . . . . . . . . . . . . . . . . . . . . . . . . . . . xliii
Documentation Conventions . . . . . . . . . . . . . . . . . . . . . . . . . . . . . . . . . . . . . . xliii
Documentation Feedback . . . . . . . . . . . . . . . . . . . . . . . . . . . . . . . . . . . . . . . . xlv
Requesting Technical Support . . . . . . . . . . . . . . . . . . . . . . . . . . . . . . . . . . . . xlvi
Self-Help Online Tools and Resources . . . . . . . . . . . . . . . . . . . . . . . . . . xlvi
Opening a Case with JTAC . . . . . . . . . . . . . . . . . . . . . . . . . . . . . . . . . . . . xlvi
Chapter 1 Event Collection from Third-party Devices . . . . . . . . . . . . . . . . . . . . . . . . . . . 49
Event Collection from Third-party Devices . . . . . . . . . . . . . . . . . . . . . . . . . . . . . . . 49
Log Sources . . . . . . . . . . . . . . . . . . . . . . . . . . . . . . . . . . . . . . . . . . . . . . . . . . . 49
DSMs . . . . . . . . . . . . . . . . . . . . . . . . . . . . . . . . . . . . . . . . . . . . . . . . . . . . . . . . . 49
Automatic Updates . . . . . . . . . . . . . . . . . . . . . . . . . . . . . . . . . . . . . . . . . . . . . 49
Third-party Device Installation Process . . . . . . . . . . . . . . . . . . . . . . . . . . . . . . 49
Universal DSMs for Unsupported Third-party Log Sources . . . . . . . . . . . . . . 50
Adding a DSM . . . . . . . . . . . . . . . . . . . . . . . . . . . . . . . . . . . . . . . . . . . . . . . . . . . . . . 51
Chapter 2 Introduction to Log Source Management . . . . . . . . . . . . . . . . . . . . . . . . . . . . . 53
Introduction to Log Source Management . . . . . . . . . . . . . . . . . . . . . . . . . . . . . . . . 53
Adding a Log Source . . . . . . . . . . . . . . . . . . . . . . . . . . . . . . . . . . . . . . . . . . . . . . . . 54
Adding Bulk Log Sources . . . . . . . . . . . . . . . . . . . . . . . . . . . . . . . . . . . . . . . . . . . . . 55
Adding a Log Source Parsing Order . . . . . . . . . . . . . . . . . . . . . . . . . . . . . . . . . . . . . 55
Chapter 3 Log Source Extensions . . . . . . . . . . . . . . . . . . . . . . . . . . . . . . . . . . . . . . . . . . . . . 57
Log Source Extensions . . . . . . . . . . . . . . . . . . . . . . . . . . . . . . . . . . . . . . . . . . . . . . . 57
Patterns in Log Source Extension Documents . . . . . . . . . . . . . . . . . . . . . . . . . . . . 58
Match Groups . . . . . . . . . . . . . . . . . . . . . . . . . . . . . . . . . . . . . . . . . . . . . . . . . . . . . . 58
Matcher (matcher) . . . . . . . . . . . . . . . . . . . . . . . . . . . . . . . . . . . . . . . . . . . . . . 59
Multi-event Modifier (event-match-multiple) . . . . . . . . . . . . . . . . . . . . . . . . . 62
Single-event Modifier (event-match-single) . . . . . . . . . . . . . . . . . . . . . . . . . . 63
Extension Document Template . . . . . . . . . . . . . . . . . . . . . . . . . . . . . . . . . . . . . . . . 64
Extension Document Example for Parsing One Event Type . . . . . . . . . . . . . . 65
Parsing Basics . . . . . . . . . . . . . . . . . . . . . . . . . . . . . . . . . . . . . . . . . . . . . . . . . . 66
Event Name and Device Event Category . . . . . . . . . . . . . . . . . . . . . . . . . . . . . 67
IP Address and Port Patterns . . . . . . . . . . . . . . . . . . . . . . . . . . . . . . . . . . . . . . 67
Creating a Log Source Extensions Document . . . . . . . . . . . . . . . . . . . . . . . . . . . . . 68
Building a Universal DSM . . . . . . . . . . . . . . . . . . . . . . . . . . . . . . . . . . . . . . . . . 69
Exporting the Logs . . . . . . . . . . . . . . . . . . . . . . . . . . . . . . . . . . . . . . . . . . . . . . 69
Common Regular Expressions . . . . . . . . . . . . . . . . . . . . . . . . . . . . . . . . . . . . . . 71
Building Regular Expression Patterns . . . . . . . . . . . . . . . . . . . . . . . . . . . . . . . . 72
Uploading Extension Documents to JSA . . . . . . . . . . . . . . . . . . . . . . . . . . . . . 75
Mapping Unknown Events . . . . . . . . . . . . . . . . . . . . . . . . . . . . . . . . . . . . . . . . 76
iiiCopyright © 2018, Juniper Networks, Inc.
Parsing Issues and Examples . . . . . . . . . . . . . . . . . . . . . . . . . . . . . . . . . . . . . . . . . . 77
Converting a Protocol . . . . . . . . . . . . . . . . . . . . . . . . . . . . . . . . . . . . . . . . . . . . 78
Making a Single Substitution . . . . . . . . . . . . . . . . . . . . . . . . . . . . . . . . . . . . . . 78
Generating a Colon-separated MAC Address . . . . . . . . . . . . . . . . . . . . . . . . . 78
Combining IP Address and Port . . . . . . . . . . . . . . . . . . . . . . . . . . . . . . . . . . . . 78
Modifying an Event Category . . . . . . . . . . . . . . . . . . . . . . . . . . . . . . . . . . . . . . 79
Suppressing Identity Change Events . . . . . . . . . . . . . . . . . . . . . . . . . . . . . . . . 79
Encoding Logs . . . . . . . . . . . . . . . . . . . . . . . . . . . . . . . . . . . . . . . . . . . . . . . . . . 79
Formatting Event Dates and Time Stamps . . . . . . . . . . . . . . . . . . . . . . . . . . . 80
Multiple Log Formats in a Single Log Source . . . . . . . . . . . . . . . . . . . . . . . . . . 80
Parsing a CSV Log Format . . . . . . . . . . . . . . . . . . . . . . . . . . . . . . . . . . . . . . . . . 81
Log Source Type IDs . . . . . . . . . . . . . . . . . . . . . . . . . . . . . . . . . . . . . . . . . . . . . . . . . 82
Chapter 4 Log Source Extension Management . . . . . . . . . . . . . . . . . . . . . . . . . . . . . . . . . 95
Log Source Extension Management . . . . . . . . . . . . . . . . . . . . . . . . . . . . . . . . . . . . 95
Adding a Log Source Extension . . . . . . . . . . . . . . . . . . . . . . . . . . . . . . . . . . . . . . . . 96
Chapter 5 3Com Switch 8800 . . . . . . . . . . . . . . . . . . . . . . . . . . . . . . . . . . . . . . . . . . . . . . . 99
3Com Switch 8800 . . . . . . . . . . . . . . . . . . . . . . . . . . . . . . . . . . . . . . . . . . . . . . . . . 99
Configuring Your 3COM Switch 8800 . . . . . . . . . . . . . . . . . . . . . . . . . . . . . . . . . . 100
Chapter 6 AhnLab Policy Center . . . . . . . . . . . . . . . . . . . . . . . . . . . . . . . . . . . . . . . . . . . . . 101
AhnLab Policy Center . . . . . . . . . . . . . . . . . . . . . . . . . . . . . . . . . . . . . . . . . . . . . . . 101
Chapter 7 Akamai Kona . . . . . . . . . . . . . . . . . . . . . . . . . . . . . . . . . . . . . . . . . . . . . . . . . . . . 103
Akamai Kona . . . . . . . . . . . . . . . . . . . . . . . . . . . . . . . . . . . . . . . . . . . . . . . . . . . . . . 103
Chapter 8 Amazon AWS CloudTrail . . . . . . . . . . . . . . . . . . . . . . . . . . . . . . . . . . . . . . . . . . 105
Amazon AWS CloudTrail . . . . . . . . . . . . . . . . . . . . . . . . . . . . . . . . . . . . . . . . . . . . 105
Troubleshooting Amazon AWS CloudTrail Integration with JSA . . . . . . . . . . 108
Enabling Communication Between JSA and AWS CloudTrail . . . . . . . . . . . . . . . 108
Verifying That Amazon AWS CloudTrail Events Are Received . . . . . . . . . . . . . . . 109
Troubleshooting Amazon AWS Log Source Integrations . . . . . . . . . . . . . . . . . . . 109
Configuring Amazon AWS CloudTrail to Communicate with JSA . . . . . . . . . . . . . 110
Chapter 9 Ambiron TrustWave IpAngel . . . . . . . . . . . . . . . . . . . . . . . . . . . . . . . . . . . . . . . . 113
Ambiron TrustWave IpAngel . . . . . . . . . . . . . . . . . . . . . . . . . . . . . . . . . . . . . . . . . . 113
Chapter 10 APC UPS . . . . . . . . . . . . . . . . . . . . . . . . . . . . . . . . . . . . . . . . . . . . . . . . . . . . . . . . 115
APC UPS . . . . . . . . . . . . . . . . . . . . . . . . . . . . . . . . . . . . . . . . . . . . . . . . . . . . . . . . . 115
Configuring Your APC UPS to Forward Syslog Events . . . . . . . . . . . . . . . . . . . . . . 116
Chapter 11 Apache HTTP Server . . . . . . . . . . . . . . . . . . . . . . . . . . . . . . . . . . . . . . . . . . . . . . 119
Apache HTTP Server . . . . . . . . . . . . . . . . . . . . . . . . . . . . . . . . . . . . . . . . . . . . . . . . 119
Configuring Apache HTTP Server with Syslog . . . . . . . . . . . . . . . . . . . . . . . . . . . . 119
Configuring a Log Source . . . . . . . . . . . . . . . . . . . . . . . . . . . . . . . . . . . . . . . . . . . . . 121
Configuring Apache HTTP Server with Syslog-ng . . . . . . . . . . . . . . . . . . . . . . . . . 121
Configuring a Log Source . . . . . . . . . . . . . . . . . . . . . . . . . . . . . . . . . . . . . . . . . . . . 123
Copyright © 2018, Juniper Networks, Inc.iv
Juniper Secure Analytics Configuring DSMs Guide
Chapter 12 Apple Mac OS X . . . . . . . . . . . . . . . . . . . . . . . . . . . . . . . . . . . . . . . . . . . . . . . . . . 125
Apple Mac OS X . . . . . . . . . . . . . . . . . . . . . . . . . . . . . . . . . . . . . . . . . . . . . . . . . . . 125
Configuring a Mac OS X Log Source . . . . . . . . . . . . . . . . . . . . . . . . . . . . . . . . . . . . 125
Configuring Syslog on Your Apple Mac OS X . . . . . . . . . . . . . . . . . . . . . . . . . . . . . 126
Chapter 13 Application Security DbProtect . . . . . . . . . . . . . . . . . . . . . . . . . . . . . . . . . . . . . 127
Application Security DbProtect . . . . . . . . . . . . . . . . . . . . . . . . . . . . . . . . . . . . . . . 127
Installing the DbProtect LEEF Relay Module . . . . . . . . . . . . . . . . . . . . . . . . . . . . . 128
Configuring the DbProtect LEEF Relay . . . . . . . . . . . . . . . . . . . . . . . . . . . . . . . . . . 129
Configuring DbProtect Alerts . . . . . . . . . . . . . . . . . . . . . . . . . . . . . . . . . . . . . . . . . 130
Chapter 14 Arbor Networks . . . . . . . . . . . . . . . . . . . . . . . . . . . . . . . . . . . . . . . . . . . . . . . . . . 133
Arbor Networks . . . . . . . . . . . . . . . . . . . . . . . . . . . . . . . . . . . . . . . . . . . . . . . . . . . . 133
Arbor Networks Peakflow SP . . . . . . . . . . . . . . . . . . . . . . . . . . . . . . . . . . . . . . . . . 133
Supported Event Types for Arbor Networks Peakflow SP . . . . . . . . . . . . . . . 134
Configuring a Remote Syslog in Arbor Networks Peakflow SP . . . . . . . . . . . 134
Configuring Global Notifications Settings for Alerts in Arbor Networks
Peakflow SP . . . . . . . . . . . . . . . . . . . . . . . . . . . . . . . . . . . . . . . . . . . . . . . 135
Configuring Alert Notification Rules in Arbor Networks Peakflow SP . . . . . . 135
Configuring an Arbor Networks Peakflow SP Log Source . . . . . . . . . . . . . . . 136
Arbor Networks Pravail . . . . . . . . . . . . . . . . . . . . . . . . . . . . . . . . . . . . . . . . . . . . . . 138
Configuring Your Arbor Networks Pravail System to Send Events to JSA . . . 139
Chapter 15 Arpeggio SIFT-IT . . . . . . . . . . . . . . . . . . . . . . . . . . . . . . . . . . . . . . . . . . . . . . . . . 141
Arpeggio SIFT-IT . . . . . . . . . . . . . . . . . . . . . . . . . . . . . . . . . . . . . . . . . . . . . . . . . . . 141
Configuring a SIFT-IT Agent . . . . . . . . . . . . . . . . . . . . . . . . . . . . . . . . . . . . . . . . . . 141
Configuring a Arpeggio SIFT-IT Log Source . . . . . . . . . . . . . . . . . . . . . . . . . . . . . . 143
Additional Information . . . . . . . . . . . . . . . . . . . . . . . . . . . . . . . . . . . . . . . . . . . . . . 144
Chapter 16 Array Networks SSL VPN . . . . . . . . . . . . . . . . . . . . . . . . . . . . . . . . . . . . . . . . . . 145
Array Networks SSL VPN . . . . . . . . . . . . . . . . . . . . . . . . . . . . . . . . . . . . . . . . . . . . 145
Configuring a Log Source . . . . . . . . . . . . . . . . . . . . . . . . . . . . . . . . . . . . . . . . . . . . 145
Chapter 17 Aruba Networks . . . . . . . . . . . . . . . . . . . . . . . . . . . . . . . . . . . . . . . . . . . . . . . . . . 147
Aruba Networks . . . . . . . . . . . . . . . . . . . . . . . . . . . . . . . . . . . . . . . . . . . . . . . . . . . 147
Aruba ClearPass Policy Manager . . . . . . . . . . . . . . . . . . . . . . . . . . . . . . . . . . . . . . 147
Configuring Aruba ClearPass Policy Manager to Communicate with JSA . . . 148
Aruba Mobility Controllers . . . . . . . . . . . . . . . . . . . . . . . . . . . . . . . . . . . . . . . . . . . 149
Configuring Your Aruba Mobility Controller . . . . . . . . . . . . . . . . . . . . . . . . . . 149
Configuring a Log Source . . . . . . . . . . . . . . . . . . . . . . . . . . . . . . . . . . . . . . . . 150
Chapter 18 Avaya VPN Gateway . . . . . . . . . . . . . . . . . . . . . . . . . . . . . . . . . . . . . . . . . . . . . . 151
Avaya VPN Gateway . . . . . . . . . . . . . . . . . . . . . . . . . . . . . . . . . . . . . . . . . . . . . . . . 151
Avaya VPN Gateway DSM Integration Process . . . . . . . . . . . . . . . . . . . . . . . . . . . 152
Configuring Your Avaya VPN Gateway System for Communication with JSA . . . 152
Configuring an Avaya VPN Gateway Log Source in JSA . . . . . . . . . . . . . . . . . . . . . 152
vCopyright © 2018, Juniper Networks, Inc.
Table of Contents
Chapter 19 BalaBit IT Security . . . . . . . . . . . . . . . . . . . . . . . . . . . . . . . . . . . . . . . . . . . . . . . . 155
BalaBit IT Security . . . . . . . . . . . . . . . . . . . . . . . . . . . . . . . . . . . . . . . . . . . . . . . . . 155
BalaBIt IT Security for Microsoft Windows Events . . . . . . . . . . . . . . . . . . . . . . . . 155
Configuring the Syslog-ng Agent event source . . . . . . . . . . . . . . . . . . . . . . . 156
Configuring a syslog destination . . . . . . . . . . . . . . . . . . . . . . . . . . . . . . . . . . . 157
Restarting the Syslog-ng Agent service . . . . . . . . . . . . . . . . . . . . . . . . . . . . . 158
Configuring a log source . . . . . . . . . . . . . . . . . . . . . . . . . . . . . . . . . . . . . . . . . 158
BalaBit IT Security for Microsoft ISA or TMG Events . . . . . . . . . . . . . . . . . . . . . . . 159
Before You Begin . . . . . . . . . . . . . . . . . . . . . . . . . . . . . . . . . . . . . . . . . . . . . . . 160
Configure the BalaBit Syslog-ng Agent . . . . . . . . . . . . . . . . . . . . . . . . . . . . . 160
Configuring the BalaBit Syslog-ng Agent File Source . . . . . . . . . . . . . . . . . . 160
Configuring a BalaBit Syslog-ng Agent Syslog Destination . . . . . . . . . . . . . . 161
Filtering the Log File for Comment Lines . . . . . . . . . . . . . . . . . . . . . . . . . . . . 162
Configuring a BalaBit Syslog-ng PE Relay . . . . . . . . . . . . . . . . . . . . . . . . . . . 163
Configuring a Log Source . . . . . . . . . . . . . . . . . . . . . . . . . . . . . . . . . . . . . . . . 164
Chapter 20 Barracuda . . . . . . . . . . . . . . . . . . . . . . . . . . . . . . . . . . . . . . . . . . . . . . . . . . . . . . . 167
Barracuda . . . . . . . . . . . . . . . . . . . . . . . . . . . . . . . . . . . . . . . . . . . . . . . . . . . . . . . . 167
Barracuda Spam & Virus Firewall . . . . . . . . . . . . . . . . . . . . . . . . . . . . . . . . . . . . . . 167
Before You Begin . . . . . . . . . . . . . . . . . . . . . . . . . . . . . . . . . . . . . . . . . . . . . . . 167
Configuring Syslog Event Forwarding . . . . . . . . . . . . . . . . . . . . . . . . . . . . . . . 168
Configuring a Log Source . . . . . . . . . . . . . . . . . . . . . . . . . . . . . . . . . . . . . . . . 168
Barracuda Web Application Firewall . . . . . . . . . . . . . . . . . . . . . . . . . . . . . . . . . . . 169
Configuring BarracudaWeb Application Firewall to Send Syslog Events to
JSA . . . . . . . . . . . . . . . . . . . . . . . . . . . . . . . . . . . . . . . . . . . . . . . . . . . . . . 170
Configuring BarracudaWeb Application Firewall to Send Syslog Events to
JSA for Devices That do Not Support LEEF . . . . . . . . . . . . . . . . . . . . . . . 171
BarracudaWeb Filter . . . . . . . . . . . . . . . . . . . . . . . . . . . . . . . . . . . . . . . . . . . . . . . . 172
Before You Begin . . . . . . . . . . . . . . . . . . . . . . . . . . . . . . . . . . . . . . . . . . . . . . . 173
Configuring Syslog Event Forwarding . . . . . . . . . . . . . . . . . . . . . . . . . . . . . . . 173
Configuring a Log Source . . . . . . . . . . . . . . . . . . . . . . . . . . . . . . . . . . . . . . . . . 173
Chapter 21 Bit9 . . . . . . . . . . . . . . . . . . . . . . . . . . . . . . . . . . . . . . . . . . . . . . . . . . . . . . . . . . . . . 175
Bit9 . . . . . . . . . . . . . . . . . . . . . . . . . . . . . . . . . . . . . . . . . . . . . . . . . . . . . . . . . . . . . 175
Bit9 Parity . . . . . . . . . . . . . . . . . . . . . . . . . . . . . . . . . . . . . . . . . . . . . . . . . . . . . . . . 175
Configure a Log Source . . . . . . . . . . . . . . . . . . . . . . . . . . . . . . . . . . . . . . . . . . 176
Bit9 Security Platform . . . . . . . . . . . . . . . . . . . . . . . . . . . . . . . . . . . . . . . . . . . . . . . 177
Configuring Bit9 Security Platform to Communicate with JSA . . . . . . . . . . . 178
Carbon Black . . . . . . . . . . . . . . . . . . . . . . . . . . . . . . . . . . . . . . . . . . . . . . . . . . . . . . 178
Configuring Carbon Black to Communicate with JSA . . . . . . . . . . . . . . . . . . 179
Chapter 22 BlueCat Networks Adonis . . . . . . . . . . . . . . . . . . . . . . . . . . . . . . . . . . . . . . . . . . 181
BlueCat Networks Adonis . . . . . . . . . . . . . . . . . . . . . . . . . . . . . . . . . . . . . . . . . . . . 181
Supported Event Types . . . . . . . . . . . . . . . . . . . . . . . . . . . . . . . . . . . . . . . . . . . . . . 181
Event Type Format . . . . . . . . . . . . . . . . . . . . . . . . . . . . . . . . . . . . . . . . . . . . . . . . . 182
Before You Begin . . . . . . . . . . . . . . . . . . . . . . . . . . . . . . . . . . . . . . . . . . . . . . . 182
Configuring BlueCat Adonis . . . . . . . . . . . . . . . . . . . . . . . . . . . . . . . . . . . . . . . . . . 182
Configuring a Log Source in JSA . . . . . . . . . . . . . . . . . . . . . . . . . . . . . . . . . . . . . . . 183
Copyright © 2018, Juniper Networks, Inc.vi
Juniper Secure Analytics Configuring DSMs Guide
Chapter 23 Blue Coat SG . . . . . . . . . . . . . . . . . . . . . . . . . . . . . . . . . . . . . . . . . . . . . . . . . . . . 185
Blue Coat SG . . . . . . . . . . . . . . . . . . . . . . . . . . . . . . . . . . . . . . . . . . . . . . . . . . . . . . 185
Creating a Custom Event Format . . . . . . . . . . . . . . . . . . . . . . . . . . . . . . . . . . . . . . 187
Creating a Log Facility . . . . . . . . . . . . . . . . . . . . . . . . . . . . . . . . . . . . . . . . . . . . . . 188
Enabling Access Logging . . . . . . . . . . . . . . . . . . . . . . . . . . . . . . . . . . . . . . . . . . . . 188
Configuring Blue Coat SG for FTP Uploads . . . . . . . . . . . . . . . . . . . . . . . . . . . . . . 189
Configuring a Blue Coat SG Log Source . . . . . . . . . . . . . . . . . . . . . . . . . . . . . . . . . 190
Configuring Blue Coat SG for Syslog . . . . . . . . . . . . . . . . . . . . . . . . . . . . . . . . . . . 193
Creating Extra Custom Format Key-value Pairs . . . . . . . . . . . . . . . . . . . . . . . . . . 193
Chapter 24 Blue Coat Web Security Service . . . . . . . . . . . . . . . . . . . . . . . . . . . . . . . . . . . . 195
Blue Coat Web Security Service . . . . . . . . . . . . . . . . . . . . . . . . . . . . . . . . . . . . . . . 195
Configuring Blue Coat Web Security Service to Communicate with JSA . . . . . . . 196
Chapter 25 Bridgewater . . . . . . . . . . . . . . . . . . . . . . . . . . . . . . . . . . . . . . . . . . . . . . . . . . . . . 199
Bridgewater . . . . . . . . . . . . . . . . . . . . . . . . . . . . . . . . . . . . . . . . . . . . . . . . . . . . . . . 199
Configuring Syslog for Your Bridgewater Systems Device . . . . . . . . . . . . . . . . . . 199
Configuring a Log Source . . . . . . . . . . . . . . . . . . . . . . . . . . . . . . . . . . . . . . . . . . . 200
Chapter 26 Brocade Fabric OS . . . . . . . . . . . . . . . . . . . . . . . . . . . . . . . . . . . . . . . . . . . . . . . 203
Brocade Fabric OS . . . . . . . . . . . . . . . . . . . . . . . . . . . . . . . . . . . . . . . . . . . . . . . . . 203
Configuring Syslog for Brocade Fabric OS Appliances . . . . . . . . . . . . . . . . . . . . . 203
Chapter 27 CA Technologies . . . . . . . . . . . . . . . . . . . . . . . . . . . . . . . . . . . . . . . . . . . . . . . . . 205
CA Technologies . . . . . . . . . . . . . . . . . . . . . . . . . . . . . . . . . . . . . . . . . . . . . . . . . . 205
CA ACF2 . . . . . . . . . . . . . . . . . . . . . . . . . . . . . . . . . . . . . . . . . . . . . . . . . . . . . . . . . 205
Integration Of CA ACF2 with JSA by Using Juniper Networks Security
ZSecure . . . . . . . . . . . . . . . . . . . . . . . . . . . . . . . . . . . . . . . . . . . . . . . . . . 205
Before You Begin . . . . . . . . . . . . . . . . . . . . . . . . . . . . . . . . . . . . . . . . . . . 206
Creating a Log Source for ACF2 in JSA . . . . . . . . . . . . . . . . . . . . . . . . . . . . . . 206
Integrate CA ACF2 with JSA by Using Audit Scripts . . . . . . . . . . . . . . . . . . . . 210
Configuring CA ACF2 to Integrate with JSA . . . . . . . . . . . . . . . . . . . . . . . . . . . 211
Creating a Log Source . . . . . . . . . . . . . . . . . . . . . . . . . . . . . . . . . . . . . . . . . . . 215
CA SiteMinder . . . . . . . . . . . . . . . . . . . . . . . . . . . . . . . . . . . . . . . . . . . . . . . . . . . . . 219
Configuring a Log Source . . . . . . . . . . . . . . . . . . . . . . . . . . . . . . . . . . . . . . . . . 219
Configuring Syslog-ng for CA SiteMinder . . . . . . . . . . . . . . . . . . . . . . . . . . . . 221
CA Top Secret . . . . . . . . . . . . . . . . . . . . . . . . . . . . . . . . . . . . . . . . . . . . . . . . . . . . . 221
Integrate CA Top Secret with JSA by Using IBM Security ZSecure . . . . . . . . 222
Before You Begin . . . . . . . . . . . . . . . . . . . . . . . . . . . . . . . . . . . . . . . . . . . 222
Configuring a CA Top Secret Log Source . . . . . . . . . . . . . . . . . . . . . . . . . . . . 223
Integrate CA Top Secret with JSA by Using Audit Scripts . . . . . . . . . . . . . . . 227
Configuring CA Top Secret to Integrate with JSA . . . . . . . . . . . . . . . . . . . . . . 227
Creating a Log Source . . . . . . . . . . . . . . . . . . . . . . . . . . . . . . . . . . . . . . . . . . . 231
Chapter 28 Check Point . . . . . . . . . . . . . . . . . . . . . . . . . . . . . . . . . . . . . . . . . . . . . . . . . . . . . 235
Check Point . . . . . . . . . . . . . . . . . . . . . . . . . . . . . . . . . . . . . . . . . . . . . . . . . . . . . . 235
Check Point . . . . . . . . . . . . . . . . . . . . . . . . . . . . . . . . . . . . . . . . . . . . . . . . . . . . . . 236
Integration Of Check Point by Using OPSEC . . . . . . . . . . . . . . . . . . . . . . . . . 236
Check Point Configuration Overview . . . . . . . . . . . . . . . . . . . . . . . . . . . 236
Adding a Check Point Host . . . . . . . . . . . . . . . . . . . . . . . . . . . . . . . . . . . . . . . 237
Creating an OPSEC Application Object . . . . . . . . . . . . . . . . . . . . . . . . . . . . . 237
viiCopyright © 2018, Juniper Networks, Inc.
Table of Contents
Locating the Log Source SIC . . . . . . . . . . . . . . . . . . . . . . . . . . . . . . . . . . . . . 238
Configuring an OPSEC/LEA Log Source in JSA . . . . . . . . . . . . . . . . . . . . . . . 239
Edit Your OPSEC Communications Configuration . . . . . . . . . . . . . . . . . . . . . 241
Change Your Check Point Custom Log Manager (CLM) IP Address . . . . 241
Updating Your Check Point OPSEC Log Source . . . . . . . . . . . . . . . . . . . . . . . 241
Changing the Default Port for OPSEC LEA Communication . . . . . . . . . . . . . 242
Configuring OPSEC LEA for Unencrypted Communications . . . . . . . . . . . . . 243
Configuring JSA to Receive Events from a Check Point Device . . . . . . . 243
Integrate Check Point by Using Syslog . . . . . . . . . . . . . . . . . . . . . . . . . . 245
Configuring a Log Source . . . . . . . . . . . . . . . . . . . . . . . . . . . . . . . . . . . . 246
Integration Of Check Point Firewall Events from External Syslog
Forwarders . . . . . . . . . . . . . . . . . . . . . . . . . . . . . . . . . . . . . . . . . . . . . . . . 247
Configuring a Log Source for Check Point Forwarded Events . . . . . . . . 247
Check Point Multi-Domain Management (Provider-1) . . . . . . . . . . . . . . . . . . . . . 249
Integrating Syslog for Check Point Multi-Domain Management
(Provider-1) . . . . . . . . . . . . . . . . . . . . . . . . . . . . . . . . . . . . . . . . . . . . . . . 250
Configuring a Log Source . . . . . . . . . . . . . . . . . . . . . . . . . . . . . . . . . . . . . . . . 250
Configuring OPSEC for Check Point Multi-Domain Management
(Provider-1) . . . . . . . . . . . . . . . . . . . . . . . . . . . . . . . . . . . . . . . . . . . . . . . . 251
Configuring an OPSEC Log Source . . . . . . . . . . . . . . . . . . . . . . . . . . . . . . . . . 252
Chapter 29 Cilasoft QJRN/400 . . . . . . . . . . . . . . . . . . . . . . . . . . . . . . . . . . . . . . . . . . . . . . . 255
Cilasoft QJRN/400 . . . . . . . . . . . . . . . . . . . . . . . . . . . . . . . . . . . . . . . . . . . . . . . . . 255
Configuring Cilasoft QJRN/400 . . . . . . . . . . . . . . . . . . . . . . . . . . . . . . . . . . . . . . . 255
Configuring a Cilasoft QJRN/400 Log Source . . . . . . . . . . . . . . . . . . . . . . . . . . . . 257
Chapter 30 Cisco . . . . . . . . . . . . . . . . . . . . . . . . . . . . . . . . . . . . . . . . . . . . . . . . . . . . . . . . . . . 259
Cisco . . . . . . . . . . . . . . . . . . . . . . . . . . . . . . . . . . . . . . . . . . . . . . . . . . . . . . . . . . . . 259
Cisco ACE Firewall . . . . . . . . . . . . . . . . . . . . . . . . . . . . . . . . . . . . . . . . . . . . . . . . . 259
Configuring Cisco ACE Firewall . . . . . . . . . . . . . . . . . . . . . . . . . . . . . . . . . . . 260
Configuring a Log Source . . . . . . . . . . . . . . . . . . . . . . . . . . . . . . . . . . . . . . . . 260
Cisco Aironet . . . . . . . . . . . . . . . . . . . . . . . . . . . . . . . . . . . . . . . . . . . . . . . . . . . . . . 261
Configuring a Log Source . . . . . . . . . . . . . . . . . . . . . . . . . . . . . . . . . . . . . . . . 263
Cisco ACS . . . . . . . . . . . . . . . . . . . . . . . . . . . . . . . . . . . . . . . . . . . . . . . . . . . . . . . . 264
Configuring Syslog for Cisco ACS V5.x . . . . . . . . . . . . . . . . . . . . . . . . . . . . . . 264
Creating a Remote Log Target . . . . . . . . . . . . . . . . . . . . . . . . . . . . . . . . . . . . 265
Configuring Global Logging Categories . . . . . . . . . . . . . . . . . . . . . . . . . . . . . 265
Configuring a Log Source . . . . . . . . . . . . . . . . . . . . . . . . . . . . . . . . . . . . . . . . 266
Configuring Syslog for Cisco ACS V4.x . . . . . . . . . . . . . . . . . . . . . . . . . . . . . . 267
Configuring Syslog Forwarding for Cisco ACS V4.x . . . . . . . . . . . . . . . . . . . . 267
Configuring a Log Source for Cisco ACS V4.x . . . . . . . . . . . . . . . . . . . . . . . . 268
Configuration Of the Cisco ACS for the Adaptive Log Exporter . . . . . . . . . . 269
Configuring Cisco ACS to Log Events . . . . . . . . . . . . . . . . . . . . . . . . . . . . . . . 269
Cisco ASA . . . . . . . . . . . . . . . . . . . . . . . . . . . . . . . . . . . . . . . . . . . . . . . . . . . . . . . . 270
Integrate Cisco ASA Using Syslog . . . . . . . . . . . . . . . . . . . . . . . . . . . . . . . . . . 271
Configuring Syslog Forwarding . . . . . . . . . . . . . . . . . . . . . . . . . . . . . . . . . . . . 271
Configuring a Log Source . . . . . . . . . . . . . . . . . . . . . . . . . . . . . . . . . . . . . . . . 272
Integrate Cisco ASA for NetFlow by Using NSEL . . . . . . . . . . . . . . . . . . . . . . 273
Configuring NetFlow Using NSEL . . . . . . . . . . . . . . . . . . . . . . . . . . . . . . . . . . 273
Configuring a Log Source . . . . . . . . . . . . . . . . . . . . . . . . . . . . . . . . . . . . . . . . 275
Copyright © 2018, Juniper Networks, Inc.viii
Juniper Secure Analytics Configuring DSMs Guide
Cisco CallManager . . . . . . . . . . . . . . . . . . . . . . . . . . . . . . . . . . . . . . . . . . . . . . . . . 276
Configuring Syslog Forwarding . . . . . . . . . . . . . . . . . . . . . . . . . . . . . . . . . . . . 277
Configuring a Log Source . . . . . . . . . . . . . . . . . . . . . . . . . . . . . . . . . . . . . . . . 277
Cisco CatOS for Catalyst Switches . . . . . . . . . . . . . . . . . . . . . . . . . . . . . . . . . . . . 278
Configuring Syslog . . . . . . . . . . . . . . . . . . . . . . . . . . . . . . . . . . . . . . . . . . . . . 278
Configuring a Log Source . . . . . . . . . . . . . . . . . . . . . . . . . . . . . . . . . . . . . . . . 279
Cisco CSA . . . . . . . . . . . . . . . . . . . . . . . . . . . . . . . . . . . . . . . . . . . . . . . . . . . . . . . . 280
Configuring Syslog for Cisco CSA . . . . . . . . . . . . . . . . . . . . . . . . . . . . . . . . . . 280
Configuring a Log Source . . . . . . . . . . . . . . . . . . . . . . . . . . . . . . . . . . . . . . . . 281
Cisco FireSIGHT Management Center . . . . . . . . . . . . . . . . . . . . . . . . . . . . . . . . . 282
Configuration Overview . . . . . . . . . . . . . . . . . . . . . . . . . . . . . . . . . . . . . . . . . 282
Supported Event Types . . . . . . . . . . . . . . . . . . . . . . . . . . . . . . . . . . . . . . . . . 283
Creating FireSIGHT Management Center 4.x Certificates . . . . . . . . . . . . . . . 284
Creating Cisco FireSIGHT Management Center 5.x and 6.x Certificates . . . 285
Importing a Cisco FireSIGHT Management Center Certificate to JSA . . . . . 286
Configuring a Log Source for Cisco FireSIGHTManagement Center
Events . . . . . . . . . . . . . . . . . . . . . . . . . . . . . . . . . . . . . . . . . . . . . . . . . . . . 287
Cisco FWSM . . . . . . . . . . . . . . . . . . . . . . . . . . . . . . . . . . . . . . . . . . . . . . . . . . . . . . 288
Configuring Cisco FWSM to Forward Syslog Events . . . . . . . . . . . . . . . . . . . 288
Configuring a Log Source . . . . . . . . . . . . . . . . . . . . . . . . . . . . . . . . . . . . . . . . 289
Cisco IDS/IPS . . . . . . . . . . . . . . . . . . . . . . . . . . . . . . . . . . . . . . . . . . . . . . . . . . . . . 290
Cisco IronPort . . . . . . . . . . . . . . . . . . . . . . . . . . . . . . . . . . . . . . . . . . . . . . . . . . . . . 293
Configuring IronPort Mail Log . . . . . . . . . . . . . . . . . . . . . . . . . . . . . . . . . . . . . 293
Configuring a Log Source . . . . . . . . . . . . . . . . . . . . . . . . . . . . . . . . . . . . . . . . 294
IronPort Web Content Filter . . . . . . . . . . . . . . . . . . . . . . . . . . . . . . . . . . . . . . 295
Cisco IOS . . . . . . . . . . . . . . . . . . . . . . . . . . . . . . . . . . . . . . . . . . . . . . . . . . . . . . . . 295
Configuring Cisco IOS to Forward Events . . . . . . . . . . . . . . . . . . . . . . . . . . . 296
Configuring a Log Source . . . . . . . . . . . . . . . . . . . . . . . . . . . . . . . . . . . . . . . . 297
Cisco Identity Services Engine . . . . . . . . . . . . . . . . . . . . . . . . . . . . . . . . . . . . . . . . 298
Supported Event Logging Categories . . . . . . . . . . . . . . . . . . . . . . . . . . . . . . 298
Configuring a Cisco ISE Log Source in JSA . . . . . . . . . . . . . . . . . . . . . . . . . . . 299
Creating a Remote Logging Target in Cisco ISE . . . . . . . . . . . . . . . . . . . . . . . 301
Configuring Cisco ISE Logging Categories . . . . . . . . . . . . . . . . . . . . . . . . . . . 301
Cisco NAC . . . . . . . . . . . . . . . . . . . . . . . . . . . . . . . . . . . . . . . . . . . . . . . . . . . . . . . . 302
Configuring Cisco NAC to Forward Events . . . . . . . . . . . . . . . . . . . . . . . . . . . 302
Configuring a Log Source . . . . . . . . . . . . . . . . . . . . . . . . . . . . . . . . . . . . . . . . 303
Cisco Nexus . . . . . . . . . . . . . . . . . . . . . . . . . . . . . . . . . . . . . . . . . . . . . . . . . . . . . . 304
Configuring Cisco Nexus to Forward Events . . . . . . . . . . . . . . . . . . . . . . . . . 304
Configuring a Log Source . . . . . . . . . . . . . . . . . . . . . . . . . . . . . . . . . . . . . . . . 304
Cisco Pix . . . . . . . . . . . . . . . . . . . . . . . . . . . . . . . . . . . . . . . . . . . . . . . . . . . . . . . . . 305
Configuring Cisco Pix to Forward Events . . . . . . . . . . . . . . . . . . . . . . . . . . . . 306
Configuring a Log Source . . . . . . . . . . . . . . . . . . . . . . . . . . . . . . . . . . . . . . . . 306
Cisco VPN 3000 Concentrator . . . . . . . . . . . . . . . . . . . . . . . . . . . . . . . . . . . . . . . 307
Configuring a Log Source . . . . . . . . . . . . . . . . . . . . . . . . . . . . . . . . . . . . . . . . 308
Cisco Wireless Services Module . . . . . . . . . . . . . . . . . . . . . . . . . . . . . . . . . . . . . . 309
Configuring Cisco WiSM to Forward Events . . . . . . . . . . . . . . . . . . . . . . . . . 309
Configuring a Log Source . . . . . . . . . . . . . . . . . . . . . . . . . . . . . . . . . . . . . . . . . 312
ixCopyright © 2018, Juniper Networks, Inc.
Table of Contents

Cisco Wireless LAN Controllers . . . . . . . . . . . . . . . . . . . . . . . . . . . . . . . . . . . . . . . 313
Before You Begin . . . . . . . . . . . . . . . . . . . . . . . . . . . . . . . . . . . . . . . . . . . . . . . 313
Configuring Syslog for Cisco Wireless LAN Controller . . . . . . . . . . . . . . . . . . 313
Configuring a Syslog Log Source in JSA . . . . . . . . . . . . . . . . . . . . . . . . . . . . . 314
Configuring SNMPv2 for Cisco Wireless LAN Controller . . . . . . . . . . . . . . . . 315
Configuring a Trap Receiver for Cisco Wireless LAN Controller . . . . . . . . . . . 316
Configuring a Log Source for the CiscoWireless LAN Controller That Uses
SNMPv2 . . . . . . . . . . . . . . . . . . . . . . . . . . . . . . . . . . . . . . . . . . . . . . . . . . . 317
Chapter 31 Citrix . . . . . . . . . . . . . . . . . . . . . . . . . . . . . . . . . . . . . . . . . . . . . . . . . . . . . . . . . . . . 319
Citrix . . . . . . . . . . . . . . . . . . . . . . . . . . . . . . . . . . . . . . . . . . . . . . . . . . . . . . . . . . . . 319
Citrix NetScaler . . . . . . . . . . . . . . . . . . . . . . . . . . . . . . . . . . . . . . . . . . . . . . . . . . . . 319
Configuring a Citrix NetScaler Log Source . . . . . . . . . . . . . . . . . . . . . . . . . . . 320
Citrix Access Gateway . . . . . . . . . . . . . . . . . . . . . . . . . . . . . . . . . . . . . . . . . . . . . . . 321
Configuring a Citrix Access Gateway Log Source . . . . . . . . . . . . . . . . . . . . . . 322
Chapter 32 Cloudera Navigator . . . . . . . . . . . . . . . . . . . . . . . . . . . . . . . . . . . . . . . . . . . . . . . 323
Cloudera Navigator . . . . . . . . . . . . . . . . . . . . . . . . . . . . . . . . . . . . . . . . . . . . . . . . 323
Configuring Cloudera Navigator to Communicate with JSA . . . . . . . . . . . . . . . . . 324
Chapter 33 CloudPassage Halo . . . . . . . . . . . . . . . . . . . . . . . . . . . . . . . . . . . . . . . . . . . . . . 325
CloudPassage Halo . . . . . . . . . . . . . . . . . . . . . . . . . . . . . . . . . . . . . . . . . . . . . . . . 325
Configuring CloudPassage Halo for Communication with JSA . . . . . . . . . . . . . . 326
Configuring a CloudPassage Halo Log Source in JSA . . . . . . . . . . . . . . . . . . . . . . 328
Chapter 34 CloudLock Cloud Security Fabric . . . . . . . . . . . . . . . . . . . . . . . . . . . . . . . . . . . 329
CloudLock Cloud Security Fabric . . . . . . . . . . . . . . . . . . . . . . . . . . . . . . . . . . . . . . 329
Configuring CloudLock Cloud Security Fabric to Communicate with JSA . . . . . . 330
Chapter 35 Correlog Agent for IBM Z/OS . . . . . . . . . . . . . . . . . . . . . . . . . . . . . . . . . . . . . . 333
Correlog Agent for IBM Z/OS . . . . . . . . . . . . . . . . . . . . . . . . . . . . . . . . . . . . . . . . . 333
Configuring Your CorreLog Agent System for Communication with JSA . . . . . . . 334
Chapter 36 CRYPTOCard CRYPTO-Shield . . . . . . . . . . . . . . . . . . . . . . . . . . . . . . . . . . . . . 335
CRYPTOCard CRYPTO-Shield . . . . . . . . . . . . . . . . . . . . . . . . . . . . . . . . . . . . . . . 335
Configuring a Log Source . . . . . . . . . . . . . . . . . . . . . . . . . . . . . . . . . . . . . . . . . . . . 335
Configuring Syslog for CRYPTOCard CRYPTO-Shield . . . . . . . . . . . . . . . . . . . . . 336
Chapter 37 CyberArk . . . . . . . . . . . . . . . . . . . . . . . . . . . . . . . . . . . . . . . . . . . . . . . . . . . . . . . . 337
CyberArk . . . . . . . . . . . . . . . . . . . . . . . . . . . . . . . . . . . . . . . . . . . . . . . . . . . . . . . . . 337
CyberArk Privileged Threat Analytics . . . . . . . . . . . . . . . . . . . . . . . . . . . . . . . . . . . 337
Configuring CyberArk Privileged Threat Analytics to Communicate with
JSA . . . . . . . . . . . . . . . . . . . . . . . . . . . . . . . . . . . . . . . . . . . . . . . . . . . . . . 338
CyberArk Vault . . . . . . . . . . . . . . . . . . . . . . . . . . . . . . . . . . . . . . . . . . . . . . . . . . . . 339
Event Type Format . . . . . . . . . . . . . . . . . . . . . . . . . . . . . . . . . . . . . . . . . . . . . 339
Configuring Syslog for CyberArk Vault . . . . . . . . . . . . . . . . . . . . . . . . . . . . . . 339
Configuring a Log Source for CyberArk Vault . . . . . . . . . . . . . . . . . . . . . . . . . 340
Chapter 38 CyberGuard Firewall/VPN Appliance . . . . . . . . . . . . . . . . . . . . . . . . . . . . . . . 343
CyberGuard Firewall/VPN Appliance . . . . . . . . . . . . . . . . . . . . . . . . . . . . . . . . . . 343
Configuring Syslog Events . . . . . . . . . . . . . . . . . . . . . . . . . . . . . . . . . . . . . . . . . . . 343
Configuring a Log Source . . . . . . . . . . . . . . . . . . . . . . . . . . . . . . . . . . . . . . . . . . . . 343
Copyright © 2018, Juniper Networks, Inc.x
Juniper Secure Analytics Configuring DSMs Guide
Chapter 39 Damballa Failsafe . . . . . . . . . . . . . . . . . . . . . . . . . . . . . . . . . . . . . . . . . . . . . . . 345
Damballa Failsafe . . . . . . . . . . . . . . . . . . . . . . . . . . . . . . . . . . . . . . . . . . . . . . . . . 345
Configuring Syslog for Damballa Failsafe . . . . . . . . . . . . . . . . . . . . . . . . . . . . . . . 345
Configuring a Log Source . . . . . . . . . . . . . . . . . . . . . . . . . . . . . . . . . . . . . . . . . . . . 346
Chapter 40 DG Technology MEAS . . . . . . . . . . . . . . . . . . . . . . . . . . . . . . . . . . . . . . . . . . . . 349
DG Technology MEAS . . . . . . . . . . . . . . . . . . . . . . . . . . . . . . . . . . . . . . . . . . . . . . 349
Configuring Your DG Technology MEAS System for Communication with JSA . . 350
Chapter 41 Digital China Networks (DCN) . . . . . . . . . . . . . . . . . . . . . . . . . . . . . . . . . . . . . 351
Digital China Networks (DCN) . . . . . . . . . . . . . . . . . . . . . . . . . . . . . . . . . . . . . . . . 351
Supported Appliances . . . . . . . . . . . . . . . . . . . . . . . . . . . . . . . . . . . . . . . . . . . 351
Configuring a Log Source . . . . . . . . . . . . . . . . . . . . . . . . . . . . . . . . . . . . . . . . . . . . 351
Configuring a DCN DCS/DCRS Series Switch . . . . . . . . . . . . . . . . . . . . . . . . . . . . 352
Chapter 42 Enterprise-IT-Security.com SF-Sherlock . . . . . . . . . . . . . . . . . . . . . . . . . . . . 355
Enterprise-IT-Security.com SF-Sherlock . . . . . . . . . . . . . . . . . . . . . . . . . . . . . . . 355
Configuring Enterprise-IT-Security.com SF-Sherlock to Communicate with
JSA . . . . . . . . . . . . . . . . . . . . . . . . . . . . . . . . . . . . . . . . . . . . . . . . . . . . . . . . . . 356
Chapter 43 Epic SIEM . . . . . . . . . . . . . . . . . . . . . . . . . . . . . . . . . . . . . . . . . . . . . . . . . . . . . . . 359
Epic SIEM . . . . . . . . . . . . . . . . . . . . . . . . . . . . . . . . . . . . . . . . . . . . . . . . . . . . . . . . 359
Configuring Epic SIEM to Communicate with JSA . . . . . . . . . . . . . . . . . . . . . . . . 360
Chapter 44 Exabeam . . . . . . . . . . . . . . . . . . . . . . . . . . . . . . . . . . . . . . . . . . . . . . . . . . . . . . . 363
Exabeam . . . . . . . . . . . . . . . . . . . . . . . . . . . . . . . . . . . . . . . . . . . . . . . . . . . . . . . . 363
Configuring Exabeam to Communicate with JSA . . . . . . . . . . . . . . . . . . . . . . . . . 364
Chapter 45 Extreme . . . . . . . . . . . . . . . . . . . . . . . . . . . . . . . . . . . . . . . . . . . . . . . . . . . . . . . . 365
Extreme . . . . . . . . . . . . . . . . . . . . . . . . . . . . . . . . . . . . . . . . . . . . . . . . . . . . . . . . . 365
Extreme 800-Series Switch . . . . . . . . . . . . . . . . . . . . . . . . . . . . . . . . . . . . . . . . . 365
Configuring Your Extreme 800-Series Switch . . . . . . . . . . . . . . . . . . . . . . . . 366
Configuring a Log Source . . . . . . . . . . . . . . . . . . . . . . . . . . . . . . . . . . . . . . . . 366
Extreme Dragon . . . . . . . . . . . . . . . . . . . . . . . . . . . . . . . . . . . . . . . . . . . . . . . . . . . 367
Creating an Alarm Tool Policy for SNMPv3 . . . . . . . . . . . . . . . . . . . . . . . . . . 368
Creating a Policy for Syslog . . . . . . . . . . . . . . . . . . . . . . . . . . . . . . . . . . . . . . 370
Configuring a Log Source . . . . . . . . . . . . . . . . . . . . . . . . . . . . . . . . . . . . . . . . 373
Configure the EMS to Forward Syslog Messages . . . . . . . . . . . . . . . . . . . . . . 374
Configuring Syslog-ng Using Extreme Dragon EMS V7.4.0 and Later . . . . . . 374
Configuring Syslogd Using Extreme Dragon EMS V7.4.0 and Below . . . . . . . 375
Extreme HiGuardWireless IPS . . . . . . . . . . . . . . . . . . . . . . . . . . . . . . . . . . . . . . . . 376
Configuring Enterasys HiGuard . . . . . . . . . . . . . . . . . . . . . . . . . . . . . . . . . . . . 376
Configuring a Log Source . . . . . . . . . . . . . . . . . . . . . . . . . . . . . . . . . . . . . . . . 377
Extreme HiPath Wireless Controller . . . . . . . . . . . . . . . . . . . . . . . . . . . . . . . . . . . 378
Configuring Your HiPath Wireless Controller . . . . . . . . . . . . . . . . . . . . . . . . . 378
Configuring a Log Source . . . . . . . . . . . . . . . . . . . . . . . . . . . . . . . . . . . . . . . . 379
Extreme Matrix Router . . . . . . . . . . . . . . . . . . . . . . . . . . . . . . . . . . . . . . . . . . . . . . 380
Extreme Matrix K/N/S Series Switch . . . . . . . . . . . . . . . . . . . . . . . . . . . . . . . . . . . 381
Extreme NetSight Automatic Security Manager . . . . . . . . . . . . . . . . . . . . . . . . . . 382
Extreme NAC . . . . . . . . . . . . . . . . . . . . . . . . . . . . . . . . . . . . . . . . . . . . . . . . . . . . . 383
Configuring a Log Source . . . . . . . . . . . . . . . . . . . . . . . . . . . . . . . . . . . . . . . . 384
xiCopyright © 2018, Juniper Networks, Inc.
Table of Contents
Extreme Stackable and Stand-alone Switches . . . . . . . . . . . . . . . . . . . . . . . . . . 385
Extreme Networks ExtremeWare . . . . . . . . . . . . . . . . . . . . . . . . . . . . . . . . . . . . . 386
Configuring a Log Source . . . . . . . . . . . . . . . . . . . . . . . . . . . . . . . . . . . . . . . . 387
Extreme XSR Security Router . . . . . . . . . . . . . . . . . . . . . . . . . . . . . . . . . . . . . . . . 388
Chapter 46 F5 Networks . . . . . . . . . . . . . . . . . . . . . . . . . . . . . . . . . . . . . . . . . . . . . . . . . . . . 389
F5 Networks . . . . . . . . . . . . . . . . . . . . . . . . . . . . . . . . . . . . . . . . . . . . . . . . . . . . . . 389
F5 Networks BIG-IP AFM . . . . . . . . . . . . . . . . . . . . . . . . . . . . . . . . . . . . . . . . . . . . 389
Configuring a Logging Pool . . . . . . . . . . . . . . . . . . . . . . . . . . . . . . . . . . . . . . 390
Creating a High-speed Log Destination . . . . . . . . . . . . . . . . . . . . . . . . . . . . . 391
Creating a Formatted Log Destination . . . . . . . . . . . . . . . . . . . . . . . . . . . . . . 391
Creating a Log Publisher . . . . . . . . . . . . . . . . . . . . . . . . . . . . . . . . . . . . . . . . . 392
Creating a Logging Profile . . . . . . . . . . . . . . . . . . . . . . . . . . . . . . . . . . . . . . . . 392
Associating the Profile to a Virtual Server . . . . . . . . . . . . . . . . . . . . . . . . . . . 393
Configuring a Log Source . . . . . . . . . . . . . . . . . . . . . . . . . . . . . . . . . . . . . . . . 394
F5 Networks BIG-IP APM . . . . . . . . . . . . . . . . . . . . . . . . . . . . . . . . . . . . . . . . . . . . 395
Configuring Remote Syslog for F5 BIG-IP APM 11.x . . . . . . . . . . . . . . . . . . . . 395
Configuring a Remote Syslog for F5 BIG-IP APM 10.x . . . . . . . . . . . . . . . . . . 395
Configuring a Log Source . . . . . . . . . . . . . . . . . . . . . . . . . . . . . . . . . . . . . . . . 396
Configuring F5 Networks BIG-IP ASM . . . . . . . . . . . . . . . . . . . . . . . . . . . . . . . . . . 397
Configuring a Log Source . . . . . . . . . . . . . . . . . . . . . . . . . . . . . . . . . . . . . . . . 398
F5 Networks BIG-IP LTM . . . . . . . . . . . . . . . . . . . . . . . . . . . . . . . . . . . . . . . . . . . . 399
Configuring a Log Source . . . . . . . . . . . . . . . . . . . . . . . . . . . . . . . . . . . . . . . . 399
Configuring Syslog Forwarding in BIG-IP LTM . . . . . . . . . . . . . . . . . . . . . . . . 400
Configuring Remote Syslog for F5 BIG-IP LTM 11.x . . . . . . . . . . . . . . . . . . . . 400
Configuring Remote Syslog for F5 BIG-IP LTM 10.x . . . . . . . . . . . . . . . . . . . . 401
Configuring Remote Syslog for F5 BIG-IP LTM 9.4.2 to 9.4.8 . . . . . . . . . . . . 402
F5 Networks FirePass . . . . . . . . . . . . . . . . . . . . . . . . . . . . . . . . . . . . . . . . . . . . . . 402
Configuring Syslog Forwarding for F5 FirePass . . . . . . . . . . . . . . . . . . . . . . . 402
Configuring a Log Source . . . . . . . . . . . . . . . . . . . . . . . . . . . . . . . . . . . . . . . . 403
Chapter 47 Fair Warning . . . . . . . . . . . . . . . . . . . . . . . . . . . . . . . . . . . . . . . . . . . . . . . . . . . . 405
Fair Warning . . . . . . . . . . . . . . . . . . . . . . . . . . . . . . . . . . . . . . . . . . . . . . . . . . . . . . 405
Configuring a Log Source . . . . . . . . . . . . . . . . . . . . . . . . . . . . . . . . . . . . . . . . . . . 405
Chapter 48 Fidelis XPS . . . . . . . . . . . . . . . . . . . . . . . . . . . . . . . . . . . . . . . . . . . . . . . . . . . . . . 407
Fidelis XPS . . . . . . . . . . . . . . . . . . . . . . . . . . . . . . . . . . . . . . . . . . . . . . . . . . . . . . . 407
Event Type Format . . . . . . . . . . . . . . . . . . . . . . . . . . . . . . . . . . . . . . . . . . . . . 407
Configuring Fidelis XPS . . . . . . . . . . . . . . . . . . . . . . . . . . . . . . . . . . . . . . . . . . . . . 407
Configuring a Log Source . . . . . . . . . . . . . . . . . . . . . . . . . . . . . . . . . . . . . . . . . . . 408
Chapter 49 FireEye . . . . . . . . . . . . . . . . . . . . . . . . . . . . . . . . . . . . . . . . . . . . . . . . . . . . . . . . . . 411
FireEye . . . . . . . . . . . . . . . . . . . . . . . . . . . . . . . . . . . . . . . . . . . . . . . . . . . . . . . . . . . 411
Configuring Your FireEye System for Communication with JSA . . . . . . . . . . . . . . 412
Configuring Your FireEye HX System for Communication with JSA . . . . . . . . . . . 413
Configuring a FireEye Log Source in JSA . . . . . . . . . . . . . . . . . . . . . . . . . . . . . . . . 413
Copyright © 2018, Juniper Networks, Inc.xii
Juniper Secure Analytics Configuring DSMs Guide
Chapter 50 Forcepoint . . . . . . . . . . . . . . . . . . . . . . . . . . . . . . . . . . . . . . . . . . . . . . . . . . . . . . . 415
Forcepoint . . . . . . . . . . . . . . . . . . . . . . . . . . . . . . . . . . . . . . . . . . . . . . . . . . . . . . . . 415
Forcepoint TRITON . . . . . . . . . . . . . . . . . . . . . . . . . . . . . . . . . . . . . . . . . . . . . . . . . 415
Configuring Syslog for Forcepoint TRITON . . . . . . . . . . . . . . . . . . . . . . . . . . . 416
Configuring a Log Source for Forcepoint TRITON . . . . . . . . . . . . . . . . . . . . . . 417
Forcepoint V-Series Data Security Suite . . . . . . . . . . . . . . . . . . . . . . . . . . . . . . . . 418
Configuring Syslog for Forcepoint V-Series Data Security Suite . . . . . . . . . . 418
Configuring a Log Source for Forcepoint V-Series Data Security Suite . . . . . 419
Forcepoint V-Series Content Gateway . . . . . . . . . . . . . . . . . . . . . . . . . . . . . . . . . 420
Configure Syslog for Forcepoint V-Series Content Gateway . . . . . . . . . . . . 420
Configuring the Management Console for Forcepoint V-Series Content
Gateway . . . . . . . . . . . . . . . . . . . . . . . . . . . . . . . . . . . . . . . . . . . . . . . . . . 420
Enabling Event Logging for Forcepoint V-Series Content Gateway . . . . . . . 421
Configuring a Log Source for Forcepoint V-Series Content Gateway . . . . . . 422
Log File Protocol for Forcepoint V-Series Content Gateway . . . . . . . . . . . . . 423
Configuring the ContentManagement Console for Forcepoint V-Series
Content Gateway . . . . . . . . . . . . . . . . . . . . . . . . . . . . . . . . . . . . . . . 423
Configuring a Log File Protocol Log Source for Forcepoint V-Series
Content Gateway . . . . . . . . . . . . . . . . . . . . . . . . . . . . . . . . . . . . . . . 424
Chapter 51 ForeScout CounterACT . . . . . . . . . . . . . . . . . . . . . . . . . . . . . . . . . . . . . . . . . . . 427
ForeScout CounterACT . . . . . . . . . . . . . . . . . . . . . . . . . . . . . . . . . . . . . . . . . . . . . 427
Configuring a Log Source . . . . . . . . . . . . . . . . . . . . . . . . . . . . . . . . . . . . . . . . . . . . 427
Configuring the ForeScout CounterACT Plug-in . . . . . . . . . . . . . . . . . . . . . . . . . . 428
Configuring ForeScout CounterACT Policies . . . . . . . . . . . . . . . . . . . . . . . . . . . . 429
Chapter 52 Fortinet FortiGate . . . . . . . . . . . . . . . . . . . . . . . . . . . . . . . . . . . . . . . . . . . . . . . . 431
Fortinet FortiGate . . . . . . . . . . . . . . . . . . . . . . . . . . . . . . . . . . . . . . . . . . . . . . . . . . 431
Configuring a Syslog Destination on Your Fortinet FortiGate Device . . . . . . . . . . 432
Configuring a Syslog Destination on Your Fortinet FortiAnalyzer Device . . . . . . . 433
Chapter 53 Foundry FastIron . . . . . . . . . . . . . . . . . . . . . . . . . . . . . . . . . . . . . . . . . . . . . . . . . 435
Foundry FastIron . . . . . . . . . . . . . . . . . . . . . . . . . . . . . . . . . . . . . . . . . . . . . . . . . . 435
Configuring Syslog for Foundry FastIron . . . . . . . . . . . . . . . . . . . . . . . . . . . . . . . . 435
Configuring a Log Source . . . . . . . . . . . . . . . . . . . . . . . . . . . . . . . . . . . . . . . . . . . . 436
Chapter 54 FreeRADIUS . . . . . . . . . . . . . . . . . . . . . . . . . . . . . . . . . . . . . . . . . . . . . . . . . . . . . 437
FreeRADIUS . . . . . . . . . . . . . . . . . . . . . . . . . . . . . . . . . . . . . . . . . . . . . . . . . . . . . . 437
Configuring Your FreeRADIUS Device to Communicate with JSA . . . . . . . . . . . . 438
Chapter 55 Generic . . . . . . . . . . . . . . . . . . . . . . . . . . . . . . . . . . . . . . . . . . . . . . . . . . . . . . . . . 441
Generic . . . . . . . . . . . . . . . . . . . . . . . . . . . . . . . . . . . . . . . . . . . . . . . . . . . . . . . . . . 441
Generic Authorization Server . . . . . . . . . . . . . . . . . . . . . . . . . . . . . . . . . . . . . . . . . 441
Configuring Event Properties . . . . . . . . . . . . . . . . . . . . . . . . . . . . . . . . . . . . . 441
Configuring a Log Source . . . . . . . . . . . . . . . . . . . . . . . . . . . . . . . . . . . . . . . . 444
Generic Firewall . . . . . . . . . . . . . . . . . . . . . . . . . . . . . . . . . . . . . . . . . . . . . . . . . . . 445
Configuring Event Properties . . . . . . . . . . . . . . . . . . . . . . . . . . . . . . . . . . . . . 445
Configuring a Log Source . . . . . . . . . . . . . . . . . . . . . . . . . . . . . . . . . . . . . . . . 447
xiiiCopyright © 2018, Juniper Networks, Inc.
Table of Contents
Chapter 56 Genua Genugate . . . . . . . . . . . . . . . . . . . . . . . . . . . . . . . . . . . . . . . . . . . . . . . . . 449
Genua Genugate . . . . . . . . . . . . . . . . . . . . . . . . . . . . . . . . . . . . . . . . . . . . . . . . . . 449
Configuring Genua Genugate to Send Events to JSA . . . . . . . . . . . . . . . . . . . . . . 451
Chapter 57 Great Bay Beacon . . . . . . . . . . . . . . . . . . . . . . . . . . . . . . . . . . . . . . . . . . . . . . . . 453
Great Bay Beacon . . . . . . . . . . . . . . . . . . . . . . . . . . . . . . . . . . . . . . . . . . . . . . . . . 453
Configuring Syslog for Great Bay Beacon . . . . . . . . . . . . . . . . . . . . . . . . . . . . . . . 453
Configuring a Log Source . . . . . . . . . . . . . . . . . . . . . . . . . . . . . . . . . . . . . . . . . . . . 454
Chapter 58 HBGary Active Defense . . . . . . . . . . . . . . . . . . . . . . . . . . . . . . . . . . . . . . . . . . . 455
HBGary Active Defense . . . . . . . . . . . . . . . . . . . . . . . . . . . . . . . . . . . . . . . . . . . . . 455
Configuring HBGary Active Defense . . . . . . . . . . . . . . . . . . . . . . . . . . . . . . . . . . . 455
Configuring a Log Source . . . . . . . . . . . . . . . . . . . . . . . . . . . . . . . . . . . . . . . . . . . . 456
Chapter 59 H3C Technologies . . . . . . . . . . . . . . . . . . . . . . . . . . . . . . . . . . . . . . . . . . . . . . . 459
H3C Technologies . . . . . . . . . . . . . . . . . . . . . . . . . . . . . . . . . . . . . . . . . . . . . . . . . 459
H3C Comware Platform . . . . . . . . . . . . . . . . . . . . . . . . . . . . . . . . . . . . . . . . . . . . 459
Configuring H3C Comware Platform to Communicate with JSA . . . . . . . . . 460
Chapter 60 Honeycomb Lexicon File Integrity Monitor (FIM) . . . . . . . . . . . . . . . . . . . . . 463
Honeycomb Lexicon File Integrity Monitor (FIM) . . . . . . . . . . . . . . . . . . . . . . . . . 463
Supported Honeycomb FIM Event Types Logged by JSA . . . . . . . . . . . . . . . . . . . 463
Configuring the Lexicon Mesh Service . . . . . . . . . . . . . . . . . . . . . . . . . . . . . . . . . 464
Configuring a Honeycomb Lexicon FIM Log Source in JSA . . . . . . . . . . . . . . . . . . 465
Chapter 61 Hewlett Packard (HP) . . . . . . . . . . . . . . . . . . . . . . . . . . . . . . . . . . . . . . . . . . . . 467
Hewlett Packard (HP) . . . . . . . . . . . . . . . . . . . . . . . . . . . . . . . . . . . . . . . . . . . . . . 467
HP Network Automation . . . . . . . . . . . . . . . . . . . . . . . . . . . . . . . . . . . . . . . . . . . . 467
Configuring HP Network Automation Software to Communicate with JSA . . . . 469
HP ProCurve . . . . . . . . . . . . . . . . . . . . . . . . . . . . . . . . . . . . . . . . . . . . . . . . . . . . . . 470
Configuring a Log Source . . . . . . . . . . . . . . . . . . . . . . . . . . . . . . . . . . . . . . . . . 471
HP Tandem . . . . . . . . . . . . . . . . . . . . . . . . . . . . . . . . . . . . . . . . . . . . . . . . . . . . . . . 472
Hewlett Packard UNIX (HP-UX) . . . . . . . . . . . . . . . . . . . . . . . . . . . . . . . . . . . . . . 472
Configure a Log Source . . . . . . . . . . . . . . . . . . . . . . . . . . . . . . . . . . . . . . . . . . 473
Chapter 62 Huawei . . . . . . . . . . . . . . . . . . . . . . . . . . . . . . . . . . . . . . . . . . . . . . . . . . . . . . . . . 475
Huawei . . . . . . . . . . . . . . . . . . . . . . . . . . . . . . . . . . . . . . . . . . . . . . . . . . . . . . . . . . 475
Huawei AR Series Router . . . . . . . . . . . . . . . . . . . . . . . . . . . . . . . . . . . . . . . . . . . . 475
Supported Routers . . . . . . . . . . . . . . . . . . . . . . . . . . . . . . . . . . . . . . . . . . . . . 475
Configuring a Log Source . . . . . . . . . . . . . . . . . . . . . . . . . . . . . . . . . . . . . . . . 475
Configuring Your Huawei AR Series Router . . . . . . . . . . . . . . . . . . . . . . . . . . 476
Huawei S Series Switch . . . . . . . . . . . . . . . . . . . . . . . . . . . . . . . . . . . . . . . . . . . . . 477
Supported Switches . . . . . . . . . . . . . . . . . . . . . . . . . . . . . . . . . . . . . . . . . . . . 478
Configuring a Log Source . . . . . . . . . . . . . . . . . . . . . . . . . . . . . . . . . . . . . . . . 478
Configuring Your Huawei S Series Switch . . . . . . . . . . . . . . . . . . . . . . . . . . . 479
Chapter 63 HyTrust CloudControl . . . . . . . . . . . . . . . . . . . . . . . . . . . . . . . . . . . . . . . . . . . . . 481
HyTrust CloudControl . . . . . . . . . . . . . . . . . . . . . . . . . . . . . . . . . . . . . . . . . . . . . . . 481
Configuring HyTrust CloudControl to Communicate with JSA . . . . . . . . . . . . . . . 482
Copyright © 2018, Juniper Networks, Inc.xiv
Juniper Secure Analytics Configuring DSMs Guide
Chapter 64 IBM . . . . . . . . . . . . . . . . . . . . . . . . . . . . . . . . . . . . . . . . . . . . . . . . . . . . . . . . . . . . 483
IBM . . . . . . . . . . . . . . . . . . . . . . . . . . . . . . . . . . . . . . . . . . . . . . . . . . . . . . . . . . . . . 484
IBM AIX DSMs . . . . . . . . . . . . . . . . . . . . . . . . . . . . . . . . . . . . . . . . . . . . . . . . . . . . 484
IBM AIX Server DSM Overview . . . . . . . . . . . . . . . . . . . . . . . . . . . . . . . . . . . . 484
Configuring Your IBM AIX Server Device to Send Syslog Events to
JSA . . . . . . . . . . . . . . . . . . . . . . . . . . . . . . . . . . . . . . . . . . . . . . . . . . 485
IBM AIX Audit DSM Overview . . . . . . . . . . . . . . . . . . . . . . . . . . . . . . . . . . . . . 485
Configuring IBM AIX Audit DSM to Send Syslog Events to JSA . . . . . . . 487
Configuring IBM AIX Audit DSM to Send Log File Protocol Events to
JSA . . . . . . . . . . . . . . . . . . . . . . . . . . . . . . . . . . . . . . . . . . . . . . . . . . 489
IBM AS/400 ISeries DSM . . . . . . . . . . . . . . . . . . . . . . . . . . . . . . . . . . . . . . . . . . . . 491
Configuring IBM I to Integrate with JSA . . . . . . . . . . . . . . . . . . . . . . . . . . . . . 492
Pulling Data Using Log File Protocol . . . . . . . . . . . . . . . . . . . . . . . . . . . . . . . 494
Configuring Townsend Security Alliance LogAgent to Integrate with JSA . . 495
IBM Bluemix Platform . . . . . . . . . . . . . . . . . . . . . . . . . . . . . . . . . . . . . . . . . . . . . . 496
Configuring Bluemix Platform to Communicate with JSA . . . . . . . . . . . . . . . 497
Integrating Bluemix Platform with JSA . . . . . . . . . . . . . . . . . . . . . . . . . . 498
Configuring a Bluemix Log Source to Use Syslog . . . . . . . . . . . . . . . . . . 498
Configuring a Bluemix Log Source with TLS Syslog . . . . . . . . . . . . . . . . 498
IBM CICS . . . . . . . . . . . . . . . . . . . . . . . . . . . . . . . . . . . . . . . . . . . . . . . . . . . . . . . . 499
Before You Begin . . . . . . . . . . . . . . . . . . . . . . . . . . . . . . . . . . . . . . . . . . . . . . 500
Creating a Log Source . . . . . . . . . . . . . . . . . . . . . . . . . . . . . . . . . . . . . . . . . . 500
IBM DB2 . . . . . . . . . . . . . . . . . . . . . . . . . . . . . . . . . . . . . . . . . . . . . . . . . . . . . . . . . 504
Integration Of IBM DB2 with LEEF Events . . . . . . . . . . . . . . . . . . . . . . . . . . . 504
Before You Begin . . . . . . . . . . . . . . . . . . . . . . . . . . . . . . . . . . . . . . . . . . . 505
Creating a Log Source for IBM DB2 . . . . . . . . . . . . . . . . . . . . . . . . . . . . . . . . 505
Integrating IBM DB2 Audit Events . . . . . . . . . . . . . . . . . . . . . . . . . . . . . . . . . 508
Extracting Audit Data: DB2 V9.5 and Later . . . . . . . . . . . . . . . . . . . . . . . . . . 509
Extract Audit Data: DB2 V8.x to V9.4 . . . . . . . . . . . . . . . . . . . . . . . . . . . . . . . 510
Creating a Log Source for IBM DB2 . . . . . . . . . . . . . . . . . . . . . . . . . . . . . . . . . 511
IBM DataPower . . . . . . . . . . . . . . . . . . . . . . . . . . . . . . . . . . . . . . . . . . . . . . . . . . . . 514
Configuring IBM DataPower to Communicate with JSA . . . . . . . . . . . . . . . . . 515
IBM Federated Directory Server . . . . . . . . . . . . . . . . . . . . . . . . . . . . . . . . . . . . . . . 516
Configuring IBM Federated Directory Server to Monitor Security Events . . . 518
IBM Guardium . . . . . . . . . . . . . . . . . . . . . . . . . . . . . . . . . . . . . . . . . . . . . . . . . . . . . 519
Configuration Overview . . . . . . . . . . . . . . . . . . . . . . . . . . . . . . . . . . . . . . . . . . 519
Creating a Syslog Destination for Events . . . . . . . . . . . . . . . . . . . . . . . . . . . . 519
Configuring Policies to Generate Syslog Events . . . . . . . . . . . . . . . . . . . . . . . 521
Installing an IBM Guardium Policy . . . . . . . . . . . . . . . . . . . . . . . . . . . . . . . . . 522
Configuring a Log Source . . . . . . . . . . . . . . . . . . . . . . . . . . . . . . . . . . . . . . . . 522
Creating an Event Map for IBM Guardium Events . . . . . . . . . . . . . . . . . . . . . 523
Modifying the Event Map . . . . . . . . . . . . . . . . . . . . . . . . . . . . . . . . . . . . . . . . 524
IBM IMS . . . . . . . . . . . . . . . . . . . . . . . . . . . . . . . . . . . . . . . . . . . . . . . . . . . . . . . . . . 525
Configuring IBM IMS . . . . . . . . . . . . . . . . . . . . . . . . . . . . . . . . . . . . . . . . . . . . 525
Configuring a Log Source . . . . . . . . . . . . . . . . . . . . . . . . . . . . . . . . . . . . . . . . 528
IBM Informix Audit . . . . . . . . . . . . . . . . . . . . . . . . . . . . . . . . . . . . . . . . . . . . . . . . . 531
IBM Lotus Domino . . . . . . . . . . . . . . . . . . . . . . . . . . . . . . . . . . . . . . . . . . . . . . . . . . 531
Setting Up SNMP Services . . . . . . . . . . . . . . . . . . . . . . . . . . . . . . . . . . . . . . . 532
Starting the Domino Server Add-in Tasks . . . . . . . . . . . . . . . . . . . . . . . . . . . 532
xvCopyright © 2018, Juniper Networks, Inc.
Table of Contents
Configuring SNMP Services . . . . . . . . . . . . . . . . . . . . . . . . . . . . . . . . . . . . . . 533
Configuring Your IBM Lotus Domino Device to Communicate with JSA . . . . 534
IBM Privileged Session Recorder . . . . . . . . . . . . . . . . . . . . . . . . . . . . . . . . . . . . . . 535
Configuring IBM Privileged Session Recorder to Communicate with JSA . . . 536
Configuring a Log Source for IBM Privileged Session Recorder . . . . . . . . . . . 537
IBM Proventia . . . . . . . . . . . . . . . . . . . . . . . . . . . . . . . . . . . . . . . . . . . . . . . . . . . . . 538
IBM Proventia Management SiteProtector . . . . . . . . . . . . . . . . . . . . . . . . . . 538
Configuring a Log Source . . . . . . . . . . . . . . . . . . . . . . . . . . . . . . . . . . . . 539
IBM ISS Proventia . . . . . . . . . . . . . . . . . . . . . . . . . . . . . . . . . . . . . . . . . . . . . . 542
IBM RACF . . . . . . . . . . . . . . . . . . . . . . . . . . . . . . . . . . . . . . . . . . . . . . . . . . . . . . . . 543
Integrate IBM RACF with JSA Using IBM Security ZSecure . . . . . . . . . . . . . . 543
Before You Begin . . . . . . . . . . . . . . . . . . . . . . . . . . . . . . . . . . . . . . . . . . . 544
Creating an IBM RACF Log Source in JSA . . . . . . . . . . . . . . . . . . . . . . . . . . . . 544
Integrate IBM RACF with JSA by Using Audit Scripts . . . . . . . . . . . . . . . . . . . 547
Configuring IBM RACF to Integrate with JSA . . . . . . . . . . . . . . . . . . . . . . . . . 548
Create an IBM RACF Log Source . . . . . . . . . . . . . . . . . . . . . . . . . . . . . . . . . . 550
IBM Security Directory Server . . . . . . . . . . . . . . . . . . . . . . . . . . . . . . . . . . . . . . . . 555
IBM Security Directory Server Integration Process . . . . . . . . . . . . . . . . . . . . 555
Configuring an IBM Security Directory Server Log Source in JSA . . . . . . 556
IBM Security Identity Governance . . . . . . . . . . . . . . . . . . . . . . . . . . . . . . . . . . . . . 556
Configuring JSAtoCommunicatewithYour IBMSecurity IdentityGovernance
Database . . . . . . . . . . . . . . . . . . . . . . . . . . . . . . . . . . . . . . . . . . . . . . . . . 558
IBM Security Network Protection (XGS) . . . . . . . . . . . . . . . . . . . . . . . . . . . . . . . . 559
Configuring IBM Security Network Protection (XGS) Alerts . . . . . . . . . . . . . 560
Configuring a Log Source in JSA . . . . . . . . . . . . . . . . . . . . . . . . . . . . . . . . . . . 561
IBM Security Trusteer Apex Advanced Malware Protection . . . . . . . . . . . . . . . . . 562
Configuring IBM Security Trusteer Apex Advanced Malware Protection to
Send Syslog Events to JSA . . . . . . . . . . . . . . . . . . . . . . . . . . . . . . . . . . . 565
Configuring a Flat File Feed Service . . . . . . . . . . . . . . . . . . . . . . . . . . . . . . . . 566
IBM Security Trusteer Apex Local Event Aggregator . . . . . . . . . . . . . . . . . . . . . . . 567
Configuring Syslog for Trusteer Apex Local Event Aggregator . . . . . . . . . . . 567
IBM Sense . . . . . . . . . . . . . . . . . . . . . . . . . . . . . . . . . . . . . . . . . . . . . . . . . . . . . . . 568
Configuring IBM Sense to Communicate with JSA . . . . . . . . . . . . . . . . . . . . 569
IBM Tivoli Access Manager for E-business . . . . . . . . . . . . . . . . . . . . . . . . . . . . . . 570
Configure Tivoli Access Manager for E-business . . . . . . . . . . . . . . . . . . . . . . 570
Configuring a Log Source . . . . . . . . . . . . . . . . . . . . . . . . . . . . . . . . . . . . . . . . . 571
IBM Tivoli Endpoint Manager . . . . . . . . . . . . . . . . . . . . . . . . . . . . . . . . . . . . . . . . . 572
IBM WebSphere Application Server . . . . . . . . . . . . . . . . . . . . . . . . . . . . . . . . . . . 574
Configuring IBMWebSphere . . . . . . . . . . . . . . . . . . . . . . . . . . . . . . . . . . . . . . 574
Customizing the Logging Option . . . . . . . . . . . . . . . . . . . . . . . . . . . . . . . . . . 575
Creating a Log Source . . . . . . . . . . . . . . . . . . . . . . . . . . . . . . . . . . . . . . . . . . . 576
IBM WebSphere DataPower . . . . . . . . . . . . . . . . . . . . . . . . . . . . . . . . . . . . . . . . . 579
IBM Z/OS . . . . . . . . . . . . . . . . . . . . . . . . . . . . . . . . . . . . . . . . . . . . . . . . . . . . . . . . 579
IBM Z/Secure® Audit . . . . . . . . . . . . . . . . . . . . . . . . . . . . . . . . . . . . . . . . . . . . . . . 583
Before You Begin . . . . . . . . . . . . . . . . . . . . . . . . . . . . . . . . . . . . . . . . . . . . . . . 583
IBM ZSecure Alert . . . . . . . . . . . . . . . . . . . . . . . . . . . . . . . . . . . . . . . . . . . . . . . . . 584
Copyright © 2018, Juniper Networks, Inc.xvi
Juniper Secure Analytics Configuring DSMs Guide
Chapter 65 ISC Bind . . . . . . . . . . . . . . . . . . . . . . . . . . . . . . . . . . . . . . . . . . . . . . . . . . . . . . . . 587
ISC Bind . . . . . . . . . . . . . . . . . . . . . . . . . . . . . . . . . . . . . . . . . . . . . . . . . . . . . . . . . 587
Configuring a Log Source . . . . . . . . . . . . . . . . . . . . . . . . . . . . . . . . . . . . . . . . . . . 589
Chapter 66 Imperva SecureSphere . . . . . . . . . . . . . . . . . . . . . . . . . . . . . . . . . . . . . . . . . . . . 591
Imperva SecureSphere . . . . . . . . . . . . . . . . . . . . . . . . . . . . . . . . . . . . . . . . . . . . . . 591
Configuring an Alert Action for Imperva SecureSphere . . . . . . . . . . . . . . . . . . . . 592
Configuring a System Event Action for Imperva SecureSphere . . . . . . . . . . . . . . 594
Chapter 67 Infoblox NIOS . . . . . . . . . . . . . . . . . . . . . . . . . . . . . . . . . . . . . . . . . . . . . . . . . . . 597
Infoblox NIOS . . . . . . . . . . . . . . . . . . . . . . . . . . . . . . . . . . . . . . . . . . . . . . . . . . . . . 597
Configuring a Log Source . . . . . . . . . . . . . . . . . . . . . . . . . . . . . . . . . . . . . . . . . . . 598
Chapter 68 IT-CUBE AgileSI . . . . . . . . . . . . . . . . . . . . . . . . . . . . . . . . . . . . . . . . . . . . . . . . . 599
IT-CUBE AgileSI . . . . . . . . . . . . . . . . . . . . . . . . . . . . . . . . . . . . . . . . . . . . . . . . . . . 599
Configuring AgileSI to Forward Events . . . . . . . . . . . . . . . . . . . . . . . . . . . . . . . . . 599
Configuring an AgileSI Log Source . . . . . . . . . . . . . . . . . . . . . . . . . . . . . . . . . . . . 600
Chapter 69 Itron Smart Meter . . . . . . . . . . . . . . . . . . . . . . . . . . . . . . . . . . . . . . . . . . . . . . . . 603
Itron Smart Meter . . . . . . . . . . . . . . . . . . . . . . . . . . . . . . . . . . . . . . . . . . . . . . . . . 603
Chapter 70 Juniper Networks . . . . . . . . . . . . . . . . . . . . . . . . . . . . . . . . . . . . . . . . . . . . . . . . 605
Juniper Networks . . . . . . . . . . . . . . . . . . . . . . . . . . . . . . . . . . . . . . . . . . . . . . . . . . 605
Juniper Networks AVT . . . . . . . . . . . . . . . . . . . . . . . . . . . . . . . . . . . . . . . . . . . . . . 605
Configuring JSA to Receive Events from a Juniper Networks AVT Device . . 606
Juniper Networks DDoS Secure . . . . . . . . . . . . . . . . . . . . . . . . . . . . . . . . . . . . . . . 607
Juniper Networks DX Application Acceleration Platform . . . . . . . . . . . . . . . . . . . 608
Configuring JSAtoReceiveEvents fromaJuniperDXApplicationAcceleration
Platform . . . . . . . . . . . . . . . . . . . . . . . . . . . . . . . . . . . . . . . . . . . . . . . . . 608
Juniper Networks EX Series Ethernet Switch . . . . . . . . . . . . . . . . . . . . . . . . . . . . 609
Configuring JSA to Receive Events from a Juniper EX Series Ethernet
Switch . . . . . . . . . . . . . . . . . . . . . . . . . . . . . . . . . . . . . . . . . . . . . . . . . . . . 610
Juniper Networks IDP . . . . . . . . . . . . . . . . . . . . . . . . . . . . . . . . . . . . . . . . . . . . . . . 610
Configure a Log Source . . . . . . . . . . . . . . . . . . . . . . . . . . . . . . . . . . . . . . . . . . 611
Juniper Networks Infranet Controller . . . . . . . . . . . . . . . . . . . . . . . . . . . . . . . . . . . 612
Juniper Networks Firewall and VPN . . . . . . . . . . . . . . . . . . . . . . . . . . . . . . . . . . . . 612
Configuring JSA to Receive Events . . . . . . . . . . . . . . . . . . . . . . . . . . . . . . . . . 613
Juniper Networks Junos OS . . . . . . . . . . . . . . . . . . . . . . . . . . . . . . . . . . . . . . . . . . 613
Juniper Networks Network and Security Manager . . . . . . . . . . . . . . . . . . . . . 615
Configuring Juniper Networks NSM to Export Logs to Syslog . . . . . . . . . 615
Configuring a Log Source for Juniper Networks NSM . . . . . . . . . . . . . . . 616
Configuring JSA to Receive Events from a Juniper Junos OS Platform
Device . . . . . . . . . . . . . . . . . . . . . . . . . . . . . . . . . . . . . . . . . . . . . . . . . . . . 617
Configure the PCAP Protocol . . . . . . . . . . . . . . . . . . . . . . . . . . . . . . . . . . . . . 617
Configuring a New Juniper Networks SRX Log Source with PCAP . . . . . . . . 618
Juniper Networks Secure Access . . . . . . . . . . . . . . . . . . . . . . . . . . . . . . . . . . . . . . 619
Using the WELF:WELF Format . . . . . . . . . . . . . . . . . . . . . . . . . . . . . . . . . . . . 619
Configuring JSA toReceiveEvents fromthe JuniperNetworksSecureAccess
Device . . . . . . . . . . . . . . . . . . . . . . . . . . . . . . . . . . . . . . . . . . . . . . . . . . . . 621
Using the Syslog Format . . . . . . . . . . . . . . . . . . . . . . . . . . . . . . . . . . . . . . . . . 622
xviiCopyright © 2018, Juniper Networks, Inc.
Table of Contents
Juniper Networks Security Binary Log Collector . . . . . . . . . . . . . . . . . . . . . . . . . . 623
Configuring the Juniper Networks Binary Log Format . . . . . . . . . . . . . . . . . . 623
Configuring a Log Source . . . . . . . . . . . . . . . . . . . . . . . . . . . . . . . . . . . . . . . . 624
Juniper Networks Steel-Belted Radius . . . . . . . . . . . . . . . . . . . . . . . . . . . . . . . . . 626
Configuring Juniper Steel-Belted Radius for the Adaptive Log Exporter . . . 626
Configuring Juniper Steel-Belted Radius for Syslog . . . . . . . . . . . . . . . . . . . . 627
Juniper Networks VGW Virtual Gateway . . . . . . . . . . . . . . . . . . . . . . . . . . . . . . . . 628
Juniper Networks Junos WebApp Secure . . . . . . . . . . . . . . . . . . . . . . . . . . . . . . . 630
Configuring Syslog Forwarding . . . . . . . . . . . . . . . . . . . . . . . . . . . . . . . . . . . 630
Configuring Event Logging . . . . . . . . . . . . . . . . . . . . . . . . . . . . . . . . . . . . . . . . 631
Configuring a Log Source . . . . . . . . . . . . . . . . . . . . . . . . . . . . . . . . . . . . . . . . 632
Juniper Networks WLC Series Wireless LAN Controller . . . . . . . . . . . . . . . . . . . . 633
Configuring a Syslog Server from the Juniper WLC User Interface . . . . . . . . 633
Configuring a Syslog Server with the Command-line Interface for Juniper
WLC . . . . . . . . . . . . . . . . . . . . . . . . . . . . . . . . . . . . . . . . . . . . . . . . . . . . . 634
Chapter 71 Kaspersky Security Center . . . . . . . . . . . . . . . . . . . . . . . . . . . . . . . . . . . . . . . . 635
Kaspersky Security Center . . . . . . . . . . . . . . . . . . . . . . . . . . . . . . . . . . . . . . . . . . . 635
Creating a Database View for Kaspersky Security Center . . . . . . . . . . . . . . . . . . 637
Configuring the Log Source in JSA . . . . . . . . . . . . . . . . . . . . . . . . . . . . . . . . . . . . . 638
Exporting Syslog to JSA from Kaspersky Security Center . . . . . . . . . . . . . . . . . . . 641
Chapter 72 Kisco Information Systems SafeNet/i . . . . . . . . . . . . . . . . . . . . . . . . . . . . . . 643
Kisco Information Systems SafeNet/i . . . . . . . . . . . . . . . . . . . . . . . . . . . . . . . . . . 643
Configuring Kisco Information Systems SafeNet/i to Communicate with JSA . . 644
Chapter 73 Lastline Enterprise . . . . . . . . . . . . . . . . . . . . . . . . . . . . . . . . . . . . . . . . . . . . . . . 647
Lastline Enterprise . . . . . . . . . . . . . . . . . . . . . . . . . . . . . . . . . . . . . . . . . . . . . . . . . 647
Configuring Lastline Enterprise to Communicate with JSA . . . . . . . . . . . . . . . . . 648
Chapter 74 Lieberman Random Password Manager . . . . . . . . . . . . . . . . . . . . . . . . . . . . 649
Lieberman Random Password Manager . . . . . . . . . . . . . . . . . . . . . . . . . . . . . . . 649
Chapter 75 Linux . . . . . . . . . . . . . . . . . . . . . . . . . . . . . . . . . . . . . . . . . . . . . . . . . . . . . . . . . . . 651
Linux . . . . . . . . . . . . . . . . . . . . . . . . . . . . . . . . . . . . . . . . . . . . . . . . . . . . . . . . . . . . 651
Linux DHCP . . . . . . . . . . . . . . . . . . . . . . . . . . . . . . . . . . . . . . . . . . . . . . . . . . . . . . . 651
Configuring a Log Source . . . . . . . . . . . . . . . . . . . . . . . . . . . . . . . . . . . . . . . . 651
Linux IPtables . . . . . . . . . . . . . . . . . . . . . . . . . . . . . . . . . . . . . . . . . . . . . . . . . . . . . 652
Configuring IPtables . . . . . . . . . . . . . . . . . . . . . . . . . . . . . . . . . . . . . . . . . . . . 652
Configuring a Log Source . . . . . . . . . . . . . . . . . . . . . . . . . . . . . . . . . . . . . . . . 654
Linux OS . . . . . . . . . . . . . . . . . . . . . . . . . . . . . . . . . . . . . . . . . . . . . . . . . . . . . . . . . 655
Supported Event Types . . . . . . . . . . . . . . . . . . . . . . . . . . . . . . . . . . . . . . . . . 655
Configuring Syslog on Linux OS . . . . . . . . . . . . . . . . . . . . . . . . . . . . . . . . . . . 656
Configuring Syslog-ng on Linux OS . . . . . . . . . . . . . . . . . . . . . . . . . . . . . . . . 656
Configuring Linux OS to Send Audit Logs . . . . . . . . . . . . . . . . . . . . . . . . . . . 657
Chapter 76 LOGbinder . . . . . . . . . . . . . . . . . . . . . . . . . . . . . . . . . . . . . . . . . . . . . . . . . . . . . . 659
LOGbinder . . . . . . . . . . . . . . . . . . . . . . . . . . . . . . . . . . . . . . . . . . . . . . . . . . . . . . . 659
LOGbinder EX Event Collection from Microsoft Exchange Server . . . . . . . . . . . . 659
Configuring Your LOGbinder EX System to Send Microsoft Exchange Event
Logs to JSA . . . . . . . . . . . . . . . . . . . . . . . . . . . . . . . . . . . . . . . . . . . . . . . 660
Copyright © 2018, Juniper Networks, Inc.xviii
Juniper Secure Analytics Configuring DSMs Guide
LOGbinder SP Event Collection fromMicrosoft SharePoint . . . . . . . . . . . . . . . . . 661
ConfiguringYour LOGbinderSPSystemtoSendMicrosoftSharePointEvent
Logs to JSA . . . . . . . . . . . . . . . . . . . . . . . . . . . . . . . . . . . . . . . . . . . . . . . 662
LOGbinder SQL Event Collection from Microsoft SQL Server . . . . . . . . . . . . . . . 663
Configuring Your LOGbinder SQL System to Send Microsoft SQL Server
Event Logs to JSA . . . . . . . . . . . . . . . . . . . . . . . . . . . . . . . . . . . . . . . . . . 664
Chapter 77 McAfee . . . . . . . . . . . . . . . . . . . . . . . . . . . . . . . . . . . . . . . . . . . . . . . . . . . . . . . . . 667
McAfee . . . . . . . . . . . . . . . . . . . . . . . . . . . . . . . . . . . . . . . . . . . . . . . . . . . . . . . . . . 667
McAfee Application / Change Control . . . . . . . . . . . . . . . . . . . . . . . . . . . . . . . . . . 667
McAfee EPolicy Orchestrator . . . . . . . . . . . . . . . . . . . . . . . . . . . . . . . . . . . . . . . . . 670
Configuring a McAfee EPO Log Source by Using the JDBC Protocol . . . . . . . 671
Configuring EPO to Forward SNMP Events . . . . . . . . . . . . . . . . . . . . . . . . . . 673
Adding a Registered Server to McAfee EPO . . . . . . . . . . . . . . . . . . . . . . 673
Configuring SNMP Notifications on McAfee EPO . . . . . . . . . . . . . . . . . . 674
Configuring EPO to Forward SNMP Events . . . . . . . . . . . . . . . . . . . . . . 676
Configuring a McAfee EPO Log Source by Using the SNMP Protocol . . 676
Installing the Java Cryptography Extension on McAfee EPO . . . . . . . . . 678
Installing the Java Cryptography Extension on JSA . . . . . . . . . . . . . . . . 678
McAfee Firewall Enterprise . . . . . . . . . . . . . . . . . . . . . . . . . . . . . . . . . . . . . . . . . . 679
Configuring McAfee Firewall Enterprise to Communicate with JSA . . . . . . . 680
McAfee Intrushield . . . . . . . . . . . . . . . . . . . . . . . . . . . . . . . . . . . . . . . . . . . . . . . . 680
Configuring Alert Events for McAfee Intrushield V2.x - V5.x . . . . . . . . . . . . . 681
Configuring Alert Events for McAfee Intrushield V6.x and V7.x . . . . . . . . . . . 682
Configuring Fault Notification Events for McAfee Intrushield V6.x and
V7.x . . . . . . . . . . . . . . . . . . . . . . . . . . . . . . . . . . . . . . . . . . . . . . . . . . . . . 684
McAfee Web Gateway . . . . . . . . . . . . . . . . . . . . . . . . . . . . . . . . . . . . . . . . . . . . . . 685
McAfee Web Gateway DSM Integration Process . . . . . . . . . . . . . . . . . . . . . 686
Related Tasks . . . . . . . . . . . . . . . . . . . . . . . . . . . . . . . . . . . . . . . . . . . . . . 687
Configuring McAfeeWeb Gateway to Communicate with JSA (syslog) . . . . 687
Importing the Syslog Log Handler . . . . . . . . . . . . . . . . . . . . . . . . . . . . . . . . . 688
Configuring McAfeeWeb Gateway to Communicate with JSA (log File
Protocol) . . . . . . . . . . . . . . . . . . . . . . . . . . . . . . . . . . . . . . . . . . . . . . . . . 689
Pulling Data by Using the Log File Protocol . . . . . . . . . . . . . . . . . . . . . . . . . 690
Creation Of an Event Map for McAfee Web Gateway Events . . . . . . . . . . . . 691
Discovering Unknown Events . . . . . . . . . . . . . . . . . . . . . . . . . . . . . . . . . . . . . 691
Modifying the Event Map . . . . . . . . . . . . . . . . . . . . . . . . . . . . . . . . . . . . . . . . 692
Chapter 78 MetaInfo MetaIP . . . . . . . . . . . . . . . . . . . . . . . . . . . . . . . . . . . . . . . . . . . . . . . . . 695
MetaInfo MetaIP . . . . . . . . . . . . . . . . . . . . . . . . . . . . . . . . . . . . . . . . . . . . . . . . . . 695
Chapter 79 Microsoft . . . . . . . . . . . . . . . . . . . . . . . . . . . . . . . . . . . . . . . . . . . . . . . . . . . . . . . 697
Microsoft . . . . . . . . . . . . . . . . . . . . . . . . . . . . . . . . . . . . . . . . . . . . . . . . . . . . . . . . 697
Microsoft DHCP Server . . . . . . . . . . . . . . . . . . . . . . . . . . . . . . . . . . . . . . . . . . . . . 697
Microsoft Endpoint Protection . . . . . . . . . . . . . . . . . . . . . . . . . . . . . . . . . . . . . . . 698
Configuration Overview . . . . . . . . . . . . . . . . . . . . . . . . . . . . . . . . . . . . . . . . . 699
Creating a Database View . . . . . . . . . . . . . . . . . . . . . . . . . . . . . . . . . . . . . . . 699
Configuring a Log Source . . . . . . . . . . . . . . . . . . . . . . . . . . . . . . . . . . . . . . . . 700
xixCopyright © 2018, Juniper Networks, Inc.
Table of Contents
Microsoft SQL Server . . . . . . . . . . . . . . . . . . . . . . . . . . . . . . . . . . . . . . . . . . . . . . . 703
Microsoft SQL Server Preparation for Communication with JSA . . . . . . . . . 704
Creating a Microsoft SQL Server Auditing Object . . . . . . . . . . . . . . . . . 704
Creating a Microsoft SQL Server Audit Specification . . . . . . . . . . . . . . . 704
Creating a Microsoft SQL Server Database View . . . . . . . . . . . . . . . . . . 705
Configuring a Microsoft SQL Server Log Source . . . . . . . . . . . . . . . . . . . . . . 706
Microsoft Exchange Server . . . . . . . . . . . . . . . . . . . . . . . . . . . . . . . . . . . . . . . . . . 708
Configuring Microsoft Exchange Server to Communicate with JSA . . . . . . . 709
Configuring OWA Logs on Your Microsoft Exchange Server . . . . . . . . . . 710
Enabling SMTP Logs on Your Microsoft Exchange Server 2003, 2007,
and 2010 . . . . . . . . . . . . . . . . . . . . . . . . . . . . . . . . . . . . . . . . . . . . . . . 711
Enabling SMTP Logs on Your Microsoft Exchange Server 2013, and
2016 . . . . . . . . . . . . . . . . . . . . . . . . . . . . . . . . . . . . . . . . . . . . . . . . . . 712
Configuring MSGTRK Logs for Microsoft Exchange 2003, 2007, and
2010 . . . . . . . . . . . . . . . . . . . . . . . . . . . . . . . . . . . . . . . . . . . . . . . . . . 712
Configuring MSGTRK Logs for Exchange 2013 and 2016 . . . . . . . . . . . . 713
Configuring a Log Source for Microsoft Exchange . . . . . . . . . . . . . . . . . . . . . 713
Microsoft Hyper-V . . . . . . . . . . . . . . . . . . . . . . . . . . . . . . . . . . . . . . . . . . . . . . . . . . 715
Microsoft Hyper-V DSM Integration Process . . . . . . . . . . . . . . . . . . . . . . . . . 715
Related Tasks . . . . . . . . . . . . . . . . . . . . . . . . . . . . . . . . . . . . . . . . . . . . . . 716
Configuring a Microsoft Hyper-V Log Source in JSA . . . . . . . . . . . . . . . . . . . . 716
Microsoft IAS Server . . . . . . . . . . . . . . . . . . . . . . . . . . . . . . . . . . . . . . . . . . . . . . . . 716
Microsoft IIS Server . . . . . . . . . . . . . . . . . . . . . . . . . . . . . . . . . . . . . . . . . . . . . . . . . 717
Configuring Microsoft IIS by Using the IIS Protocol . . . . . . . . . . . . . . . . . . . . . 717
Configuring the Microsoft IIS Protocol in JSA . . . . . . . . . . . . . . . . . . . . . . . . . 719
Configuring Microsoft IIS Using a Snare Agent . . . . . . . . . . . . . . . . . . . . . . . 720
Configuring Your Microsoft IIS Server for Snare . . . . . . . . . . . . . . . . . . . . . . . 721
Configure the Snare Agent . . . . . . . . . . . . . . . . . . . . . . . . . . . . . . . . . . . . . . . 722
Configuring a Microsoft IIS Log Source . . . . . . . . . . . . . . . . . . . . . . . . . . . . . . 723
Configuring Microsoft IIS by Using Adaptive Log Exporter . . . . . . . . . . . . . . 724
Microsoft ISA . . . . . . . . . . . . . . . . . . . . . . . . . . . . . . . . . . . . . . . . . . . . . . . . . . . . . 724
Microsoft Office 365 . . . . . . . . . . . . . . . . . . . . . . . . . . . . . . . . . . . . . . . . . . . . . . . . 725
Configuring Microsoft Office 365 to Communicate with JSA . . . . . . . . . . . . 728
Microsoft Operations Manager . . . . . . . . . . . . . . . . . . . . . . . . . . . . . . . . . . . . . . . 730
Microsoft SharePoint . . . . . . . . . . . . . . . . . . . . . . . . . . . . . . . . . . . . . . . . . . . . . . . 733
Configuring a Database View to Collect Audit Events . . . . . . . . . . . . . . . . . . 733
Configuring Microsoft SharePoint Audit Events . . . . . . . . . . . . . . . . . . . . . . . 734
Creating a Database View for Microsoft SharePoint . . . . . . . . . . . . . . . . . . . 734
Configuring a SharePoint Log Source for a Database View . . . . . . . . . . . . . . 735
Configuring a SharePoint Log Source for Predefined Database Queries . . . 738
Microsoft System Center Operations Manager . . . . . . . . . . . . . . . . . . . . . . . . . . . 741
Microsoft Windows Security Event Log . . . . . . . . . . . . . . . . . . . . . . . . . . . . . . . . . 744
Enabling MSRPC on Windows Hosts . . . . . . . . . . . . . . . . . . . . . . . . . . . . . . . 744
Enabling a Snare Agent on Windows Hosts . . . . . . . . . . . . . . . . . . . . . . . . . 748
Enabling WMI on Windows Hosts . . . . . . . . . . . . . . . . . . . . . . . . . . . . . . . . . 750
Copyright © 2018, Juniper Networks, Inc.xx
Juniper Secure Analytics Configuring DSMs Guide
Chapter 80 Motorola Symbol APMotorola Symbol AP . . . . . . . . . . . . . . . . . . . . . . . . . . . 755
Motorola Symbol APMotorola Symbol AP . . . . . . . . . . . . . . . . . . . . . . . . . . . . . . 755
Configuring a Log Source . . . . . . . . . . . . . . . . . . . . . . . . . . . . . . . . . . . . . . . . . . . . 755
Configure Syslog Events for Motorola Symbol AP . . . . . . . . . . . . . . . . . . . . . . . . 756
Chapter 81 Name Value Pair . . . . . . . . . . . . . . . . . . . . . . . . . . . . . . . . . . . . . . . . . . . . . . . . . 759
Name Value Pair . . . . . . . . . . . . . . . . . . . . . . . . . . . . . . . . . . . . . . . . . . . . . . . . . . . 759
Example 1 . . . . . . . . . . . . . . . . . . . . . . . . . . . . . . . . . . . . . . . . . . . . . . . . . . . . . 761
Example 2 . . . . . . . . . . . . . . . . . . . . . . . . . . . . . . . . . . . . . . . . . . . . . . . . . . . . . 761
Example 3 . . . . . . . . . . . . . . . . . . . . . . . . . . . . . . . . . . . . . . . . . . . . . . . . . . . . 761
Example 4 . . . . . . . . . . . . . . . . . . . . . . . . . . . . . . . . . . . . . . . . . . . . . . . . . . . . 762
Chapter 82 NetApp Data ONTAP . . . . . . . . . . . . . . . . . . . . . . . . . . . . . . . . . . . . . . . . . . . . . 763
NetApp Data ONTAP . . . . . . . . . . . . . . . . . . . . . . . . . . . . . . . . . . . . . . . . . . . . . . . 763
Chapter 83 Netskope Active . . . . . . . . . . . . . . . . . . . . . . . . . . . . . . . . . . . . . . . . . . . . . . . . . 765
Netskope Active . . . . . . . . . . . . . . . . . . . . . . . . . . . . . . . . . . . . . . . . . . . . . . . . . . . 765
Configuring JSA to Collect Events from Your Netskope Active System . . . . . . . . 766
Chapter 84 Niksun . . . . . . . . . . . . . . . . . . . . . . . . . . . . . . . . . . . . . . . . . . . . . . . . . . . . . . . . . . 769
Niksun . . . . . . . . . . . . . . . . . . . . . . . . . . . . . . . . . . . . . . . . . . . . . . . . . . . . . . . . . . . 769
Configuring a Log Source . . . . . . . . . . . . . . . . . . . . . . . . . . . . . . . . . . . . . . . . . . . . 769
Chapter 85 Nokia Firewall . . . . . . . . . . . . . . . . . . . . . . . . . . . . . . . . . . . . . . . . . . . . . . . . . . . . 771
Nokia Firewall . . . . . . . . . . . . . . . . . . . . . . . . . . . . . . . . . . . . . . . . . . . . . . . . . . . . . 771
Integration with a Nokia Firewall by Using Syslog . . . . . . . . . . . . . . . . . . . . . . . . . 771
Configuring IPtables . . . . . . . . . . . . . . . . . . . . . . . . . . . . . . . . . . . . . . . . . . . . . 771
Configuring Syslog . . . . . . . . . . . . . . . . . . . . . . . . . . . . . . . . . . . . . . . . . . . . . . 772
Configuring the Logged Events Custom Script . . . . . . . . . . . . . . . . . . . . . . . . 773
Configuring a Log Source . . . . . . . . . . . . . . . . . . . . . . . . . . . . . . . . . . . . . . . . 773
Integration with a Nokia Firewall by Using OPSEC . . . . . . . . . . . . . . . . . . . . . . . . 774
Configuring a Nokia Firewall for OPSEC . . . . . . . . . . . . . . . . . . . . . . . . . . . . . 775
Configuring an OPSEC Log Source . . . . . . . . . . . . . . . . . . . . . . . . . . . . . . . . . 775
Chapter 86 Nominum Vantio . . . . . . . . . . . . . . . . . . . . . . . . . . . . . . . . . . . . . . . . . . . . . . . . . 779
Nominum Vantio . . . . . . . . . . . . . . . . . . . . . . . . . . . . . . . . . . . . . . . . . . . . . . . . . . 779
Configure the Vantio LEEF Adapter . . . . . . . . . . . . . . . . . . . . . . . . . . . . . . . . . . . . 779
Configuring a Log Source . . . . . . . . . . . . . . . . . . . . . . . . . . . . . . . . . . . . . . . . . . . . 780
Chapter 87 Nortel Networks . . . . . . . . . . . . . . . . . . . . . . . . . . . . . . . . . . . . . . . . . . . . . . . . . 783
Nortel Networks . . . . . . . . . . . . . . . . . . . . . . . . . . . . . . . . . . . . . . . . . . . . . . . . . . . 783
Nortel Multiprotocol Router . . . . . . . . . . . . . . . . . . . . . . . . . . . . . . . . . . . . . . . . . . 783
Nortel Application Switch . . . . . . . . . . . . . . . . . . . . . . . . . . . . . . . . . . . . . . . . . . . 786
Nortel Contivity . . . . . . . . . . . . . . . . . . . . . . . . . . . . . . . . . . . . . . . . . . . . . . . . . . . . 787
Nortel Ethernet Routing Switch 2500/4500/5500 . . . . . . . . . . . . . . . . . . . . . . . 788
Nortel Ethernet Routing Switch 8300/8600 . . . . . . . . . . . . . . . . . . . . . . . . . . . . 789
Nortel Secure Router . . . . . . . . . . . . . . . . . . . . . . . . . . . . . . . . . . . . . . . . . . . . . . . 790
Nortel Secure Network Access Switch . . . . . . . . . . . . . . . . . . . . . . . . . . . . . . . . . 792
Nortel Switched Firewall 5100 . . . . . . . . . . . . . . . . . . . . . . . . . . . . . . . . . . . . . . . . 792
Integrating Nortel Switched Firewall by Using Syslog . . . . . . . . . . . . . . . . . . 793
Integrate Nortel Switched Firewall by Using OPSEC . . . . . . . . . . . . . . . . . . . 794
xxiCopyright © 2018, Juniper Networks, Inc.
Table of Contents
Configuring a Log Source . . . . . . . . . . . . . . . . . . . . . . . . . . . . . . . . . . . . . . . . 794
Nortel Switched Firewall 6000 . . . . . . . . . . . . . . . . . . . . . . . . . . . . . . . . . . . . . . . 794
Configuring Syslog for Nortel Switched Firewalls . . . . . . . . . . . . . . . . . . . . . 794
Configuring OPSEC for Nortel Switched Firewalls . . . . . . . . . . . . . . . . . . . . . 795
Reconfiguring the Check Point SmartCenter Server . . . . . . . . . . . . . . . . . . . 796
Nortel Threat Protection System (TPS) . . . . . . . . . . . . . . . . . . . . . . . . . . . . . . . . 796
Nortel VPN Gateway . . . . . . . . . . . . . . . . . . . . . . . . . . . . . . . . . . . . . . . . . . . . . . . 797
Chapter 88 Novell EDirectory . . . . . . . . . . . . . . . . . . . . . . . . . . . . . . . . . . . . . . . . . . . . . . . . 799
Novell EDirectory . . . . . . . . . . . . . . . . . . . . . . . . . . . . . . . . . . . . . . . . . . . . . . . . . . 799
Configure XDASv2 to Forward Events . . . . . . . . . . . . . . . . . . . . . . . . . . . . . . . . . 800
Load the XDASv2 Module . . . . . . . . . . . . . . . . . . . . . . . . . . . . . . . . . . . . . . . . . . . 801
Loading the XDASv2 on a Linux Operating System . . . . . . . . . . . . . . . . . . . . . . . 801
Loading the XDASv2 on aWindows Operating System . . . . . . . . . . . . . . . . . . . . 802
Configure Event Auditing Using Novell IManager . . . . . . . . . . . . . . . . . . . . . . . . . 802
Configure a Log Source . . . . . . . . . . . . . . . . . . . . . . . . . . . . . . . . . . . . . . . . . . . . . 804
Chapter 89 Observe IT JDBC . . . . . . . . . . . . . . . . . . . . . . . . . . . . . . . . . . . . . . . . . . . . . . . . . 805
Observe IT JDBC . . . . . . . . . . . . . . . . . . . . . . . . . . . . . . . . . . . . . . . . . . . . . . . . . . 805
Chapter 90 Okta . . . . . . . . . . . . . . . . . . . . . . . . . . . . . . . . . . . . . . . . . . . . . . . . . . . . . . . . . . . 809
Okta . . . . . . . . . . . . . . . . . . . . . . . . . . . . . . . . . . . . . . . . . . . . . . . . . . . . . . . . . . . . 809
Chapter 91 Onapsis Security Platform . . . . . . . . . . . . . . . . . . . . . . . . . . . . . . . . . . . . . . . . . 813
Onapsis Security Platform . . . . . . . . . . . . . . . . . . . . . . . . . . . . . . . . . . . . . . . . . . . 813
Configuring Onapsis Security Platform to Communicate with JSA . . . . . . . . . . . 814
Chapter 92 OpenBSD . . . . . . . . . . . . . . . . . . . . . . . . . . . . . . . . . . . . . . . . . . . . . . . . . . . . . . . . 817
OpenBSD . . . . . . . . . . . . . . . . . . . . . . . . . . . . . . . . . . . . . . . . . . . . . . . . . . . . . . . . . 817
Configuring a Log Source . . . . . . . . . . . . . . . . . . . . . . . . . . . . . . . . . . . . . . . . . . . . 817
Configuring Syslog for OpenBSD . . . . . . . . . . . . . . . . . . . . . . . . . . . . . . . . . . . . . . 818
Chapter 93 Open LDAP . . . . . . . . . . . . . . . . . . . . . . . . . . . . . . . . . . . . . . . . . . . . . . . . . . . . . . 821
Open LDAP . . . . . . . . . . . . . . . . . . . . . . . . . . . . . . . . . . . . . . . . . . . . . . . . . . . . . . . 821
Configuring a Log Source . . . . . . . . . . . . . . . . . . . . . . . . . . . . . . . . . . . . . . . . . . . . 821
Configuring IPtables for Multiline UDP Syslog Events . . . . . . . . . . . . . . . . . . . . . 823
Configuring Event Forwarding for Open LDAP . . . . . . . . . . . . . . . . . . . . . . . . . . . 825
Chapter 94 Open Source SNORT . . . . . . . . . . . . . . . . . . . . . . . . . . . . . . . . . . . . . . . . . . . . . 827
Open Source SNORT . . . . . . . . . . . . . . . . . . . . . . . . . . . . . . . . . . . . . . . . . . . . . . . 827
Configuring Open Source SNORT . . . . . . . . . . . . . . . . . . . . . . . . . . . . . . . . . . . . . 827
Configuring a Log Source . . . . . . . . . . . . . . . . . . . . . . . . . . . . . . . . . . . . . . . . . . . . 828
Chapter 95 OpenStack . . . . . . . . . . . . . . . . . . . . . . . . . . . . . . . . . . . . . . . . . . . . . . . . . . . . . . 831
OpenStack . . . . . . . . . . . . . . . . . . . . . . . . . . . . . . . . . . . . . . . . . . . . . . . . . . . . . . . 831
Configuring OpenStack to Communicate with JSA . . . . . . . . . . . . . . . . . . . . . . . 833
Chapter 96 Oracle . . . . . . . . . . . . . . . . . . . . . . . . . . . . . . . . . . . . . . . . . . . . . . . . . . . . . . . . . . 837
Oracle . . . . . . . . . . . . . . . . . . . . . . . . . . . . . . . . . . . . . . . . . . . . . . . . . . . . . . . . . . . 837
Oracle Acme Packet Session Border Controller . . . . . . . . . . . . . . . . . . . . . . . . . . 837
Supported Oracle Acme Packet Event Types That Are Logged by JSA . . . . 838
Configuring an Oracle Acme Packet SBC Log Source . . . . . . . . . . . . . . . . . . 838
Copyright © 2018, Juniper Networks, Inc.xxii
Juniper Secure Analytics Configuring DSMs Guide
Configuring SNMP to Syslog Conversion on Oracle Acme Packet SBC . . . . 839
Enabling Syslog Settings on the Media Manager Object . . . . . . . . . . . . . . . 840
Oracle Audit Records . . . . . . . . . . . . . . . . . . . . . . . . . . . . . . . . . . . . . . . . . . . . . . . 841
Before You Begin . . . . . . . . . . . . . . . . . . . . . . . . . . . . . . . . . . . . . . . . . . . . . . . 841
Configuring Oracle Audit Logs . . . . . . . . . . . . . . . . . . . . . . . . . . . . . . . . . . . . 842
Improving Performance with Large Audit Tables . . . . . . . . . . . . . . . . . . . . . 844
Oracle Audit Vault . . . . . . . . . . . . . . . . . . . . . . . . . . . . . . . . . . . . . . . . . . . . . . . . . 845
Configuring a Log Source . . . . . . . . . . . . . . . . . . . . . . . . . . . . . . . . . . . . . . . . 845
Oracle BEA WebLogic . . . . . . . . . . . . . . . . . . . . . . . . . . . . . . . . . . . . . . . . . . . . . . 847
Enabling Event Logs . . . . . . . . . . . . . . . . . . . . . . . . . . . . . . . . . . . . . . . . . . . . 847
Configuring Domain Logging . . . . . . . . . . . . . . . . . . . . . . . . . . . . . . . . . . . . . 847
Configuring Application Logging . . . . . . . . . . . . . . . . . . . . . . . . . . . . . . . . . . 848
Configuring an Audit Provider . . . . . . . . . . . . . . . . . . . . . . . . . . . . . . . . . . . . 848
Configuring a Log Source . . . . . . . . . . . . . . . . . . . . . . . . . . . . . . . . . . . . . . . . 849
Oracle DB Listener . . . . . . . . . . . . . . . . . . . . . . . . . . . . . . . . . . . . . . . . . . . . . . . . . 851
Collecting Events by Using the Oracle Database Listener Protocol . . . . . . . 851
Collecting Oracle Database Events by Using Perl . . . . . . . . . . . . . . . . . . . . . 853
Configuring the Oracle Database Listener Within JSA . . . . . . . . . . . . . . . . . 855
Oracle Enterprise Manager . . . . . . . . . . . . . . . . . . . . . . . . . . . . . . . . . . . . . . . . . . 856
Oracle Fine Grained Auditing . . . . . . . . . . . . . . . . . . . . . . . . . . . . . . . . . . . . . . . . . 858
Configuring a Log Source . . . . . . . . . . . . . . . . . . . . . . . . . . . . . . . . . . . . . . . . 858
Oracle OS Audit . . . . . . . . . . . . . . . . . . . . . . . . . . . . . . . . . . . . . . . . . . . . . . . . . . . 861
Configuring the Log Sources Within JSA for Oracle OS Audit . . . . . . . . . . . . 863
Chapter 97 OSSEC . . . . . . . . . . . . . . . . . . . . . . . . . . . . . . . . . . . . . . . . . . . . . . . . . . . . . . . . . 865
OSSEC . . . . . . . . . . . . . . . . . . . . . . . . . . . . . . . . . . . . . . . . . . . . . . . . . . . . . . . . . . 865
Configuring OSSEC . . . . . . . . . . . . . . . . . . . . . . . . . . . . . . . . . . . . . . . . . . . . . . . . 865
Configuring a Log Source . . . . . . . . . . . . . . . . . . . . . . . . . . . . . . . . . . . . . . . . . . . 866
Chapter 98 Palo Alto Networks . . . . . . . . . . . . . . . . . . . . . . . . . . . . . . . . . . . . . . . . . . . . . . 869
Palo Alto Networks . . . . . . . . . . . . . . . . . . . . . . . . . . . . . . . . . . . . . . . . . . . . . . . . 869
Creating a Syslog Destination on Your Palo Alto Device . . . . . . . . . . . . . . . . . . . . 870
Creating a Forwarding Policy on Your Palo Alto Device . . . . . . . . . . . . . . . . . . . . 874
Creating ArcSight CEF Formatted Syslog Events on Your Palo Alto Networks
Firewall Device . . . . . . . . . . . . . . . . . . . . . . . . . . . . . . . . . . . . . . . . . . . . . . . . 874
Chapter 99 Pirean Access: One . . . . . . . . . . . . . . . . . . . . . . . . . . . . . . . . . . . . . . . . . . . . . . . 879
Pirean Access: One . . . . . . . . . . . . . . . . . . . . . . . . . . . . . . . . . . . . . . . . . . . . . . . . 879
Before You Begin . . . . . . . . . . . . . . . . . . . . . . . . . . . . . . . . . . . . . . . . . . . . . . . 879
Configuring a Log Source . . . . . . . . . . . . . . . . . . . . . . . . . . . . . . . . . . . . . . . . . . . . 879
Chapter 100 PostFix Mail Transfer Agent . . . . . . . . . . . . . . . . . . . . . . . . . . . . . . . . . . . . . . . 883
PostFix Mail Transfer Agent . . . . . . . . . . . . . . . . . . . . . . . . . . . . . . . . . . . . . . . . . . 883
Configuring Syslog for PostFix Mail Transfer Agent . . . . . . . . . . . . . . . . . . . . . . . 883
Configuring a PostFix MTA Log Source . . . . . . . . . . . . . . . . . . . . . . . . . . . . . . . . . 884
Configuring IPtables for Multiline UDP Syslog Events . . . . . . . . . . . . . . . . . . . . . 886
Chapter 101 ProFTPd . . . . . . . . . . . . . . . . . . . . . . . . . . . . . . . . . . . . . . . . . . . . . . . . . . . . . . . . 889
ProFTPd . . . . . . . . . . . . . . . . . . . . . . . . . . . . . . . . . . . . . . . . . . . . . . . . . . . . . . . . . 889
Configuring ProFTPd . . . . . . . . . . . . . . . . . . . . . . . . . . . . . . . . . . . . . . . . . . . . . . . 889
Configuring a Log Source . . . . . . . . . . . . . . . . . . . . . . . . . . . . . . . . . . . . . . . . . . . 890
xxiiiCopyright © 2018, Juniper Networks, Inc.
Table of Contents
Chapter 102 Proofpoint Enterprise Protection and Enterprise Privacy . . . . . . . . . . . . . . 893
Proofpoint Enterprise Protection and Enterprise Privacy . . . . . . . . . . . . . . . . . . . 893
Configuring Proofpoint Enterprise Protection and Enterprise Privacy DSM to
Communicate with JSA . . . . . . . . . . . . . . . . . . . . . . . . . . . . . . . . . . . . . . . . . 894
Configuring a Proofpoint Enterprise Protection and Enterprise Privacy Log
Source . . . . . . . . . . . . . . . . . . . . . . . . . . . . . . . . . . . . . . . . . . . . . . . . . . . . . . . 895
Chapter 103 Radware . . . . . . . . . . . . . . . . . . . . . . . . . . . . . . . . . . . . . . . . . . . . . . . . . . . . . . . . 899
Radware . . . . . . . . . . . . . . . . . . . . . . . . . . . . . . . . . . . . . . . . . . . . . . . . . . . . . . . . . 899
Radware AppWall . . . . . . . . . . . . . . . . . . . . . . . . . . . . . . . . . . . . . . . . . . . . . . . . . 899
Configuring Radware AppWall to Communicate with JSA . . . . . . . . . . . . . . 900
Increasing the Maximum TCP Syslog Payload Length for Radware
AppWall . . . . . . . . . . . . . . . . . . . . . . . . . . . . . . . . . . . . . . . . . . . . . . . . . . 901
Radware DefensePro . . . . . . . . . . . . . . . . . . . . . . . . . . . . . . . . . . . . . . . . . . . . . . . 902
Configuring a Log Source . . . . . . . . . . . . . . . . . . . . . . . . . . . . . . . . . . . . . . . . 903
Chapter 104 Raz-Lee ISecurity . . . . . . . . . . . . . . . . . . . . . . . . . . . . . . . . . . . . . . . . . . . . . . . . 905
Raz-Lee ISecurity . . . . . . . . . . . . . . . . . . . . . . . . . . . . . . . . . . . . . . . . . . . . . . . . . . 905
Configuring Raz-Lee ISecurity to Communicate with JSA . . . . . . . . . . . . . . . . . . 906
Configuring a Log Source for Raz-Lee ISecurity . . . . . . . . . . . . . . . . . . . . . . . . . . 907
Chapter 105 Redback ASE . . . . . . . . . . . . . . . . . . . . . . . . . . . . . . . . . . . . . . . . . . . . . . . . . . . 909
Redback ASE . . . . . . . . . . . . . . . . . . . . . . . . . . . . . . . . . . . . . . . . . . . . . . . . . . . . . 909
Configuring Redback ASE . . . . . . . . . . . . . . . . . . . . . . . . . . . . . . . . . . . . . . . . . . . 909
Configuring a Log Source . . . . . . . . . . . . . . . . . . . . . . . . . . . . . . . . . . . . . . . . . . . . 910
Chapter 106 Resolution1 CyberSecurity . . . . . . . . . . . . . . . . . . . . . . . . . . . . . . . . . . . . . . . . . 913
Resolution1 CyberSecurity . . . . . . . . . . . . . . . . . . . . . . . . . . . . . . . . . . . . . . . . . . . 913
Configuring Your Resolution1 CyberSecurity Device to Communicate with
JSA . . . . . . . . . . . . . . . . . . . . . . . . . . . . . . . . . . . . . . . . . . . . . . . . . . . . . . . . . . 914
Resolution1 CyberSecurity Log Source on Your JSA Console . . . . . . . . . . . . . . . . 915
Chapter 107 Riverbed . . . . . . . . . . . . . . . . . . . . . . . . . . . . . . . . . . . . . . . . . . . . . . . . . . . . . . . . 917
Riverbed . . . . . . . . . . . . . . . . . . . . . . . . . . . . . . . . . . . . . . . . . . . . . . . . . . . . . . . . . 917
Riverbed SteelCentral NetProfiler (Cascade Profiler) Audit . . . . . . . . . . . . . . . . . 917
Creating a Riverbed SteelCentral NetProfiler Report Template and
Generating an Audit File . . . . . . . . . . . . . . . . . . . . . . . . . . . . . . . . . . . . . . 918
Riverbed SteelCentral NetProfiler (Cascade Profiler) Alert . . . . . . . . . . . . . . . . . 919
Configuring Your Riverbed SteelCentral NetProfiler System to Enable
Communication with JSA . . . . . . . . . . . . . . . . . . . . . . . . . . . . . . . . . . . . . 921
Chapter 108 RSA Authentication Manager . . . . . . . . . . . . . . . . . . . . . . . . . . . . . . . . . . . . . . 923
RSA Authentication Manager . . . . . . . . . . . . . . . . . . . . . . . . . . . . . . . . . . . . . . . . 923
Configuration Of Syslog for RSA Authentication Manager 6.x, 7.x and 8.x . . . . . 923
Configuring Linux . . . . . . . . . . . . . . . . . . . . . . . . . . . . . . . . . . . . . . . . . . . . . . . . . . 924
Configuring Windows . . . . . . . . . . . . . . . . . . . . . . . . . . . . . . . . . . . . . . . . . . . . . . . 925
Configuring the Log File Protocol for RSA Authentication Manager 6.x and 7.x . . 925
Configuring RSA Authentication Manager 6.x . . . . . . . . . . . . . . . . . . . . . . . . . . . 926
Configuring RSA Authentication Manager 7.x . . . . . . . . . . . . . . . . . . . . . . . . . . . . 927
Copyright © 2018, Juniper Networks, Inc.xxiv
Juniper Secure Analytics Configuring DSMs Guide
Chapter 109 Salesforce . . . . . . . . . . . . . . . . . . . . . . . . . . . . . . . . . . . . . . . . . . . . . . . . . . . . . . 929
Salesforce . . . . . . . . . . . . . . . . . . . . . . . . . . . . . . . . . . . . . . . . . . . . . . . . . . . . . . . 929
Salesforce Security Auditing . . . . . . . . . . . . . . . . . . . . . . . . . . . . . . . . . . . . . . . . . 929
Salesforce Security Auditing DSM Integration Process . . . . . . . . . . . . . . . . . 930
Downloading the Salesforce Audit Trail File . . . . . . . . . . . . . . . . . . . . . . . . . 930
Configuring a Salesforce Security Auditing Log Source in JSA . . . . . . . . . . . . 931
Salesforce Security Monitoring . . . . . . . . . . . . . . . . . . . . . . . . . . . . . . . . . . . . . . . 932
Salesforce Security Monitoring DSM Integration Process . . . . . . . . . . . . . . . 932
Configuring theSalesforceSecurityMonitoringServer toCommunicatewith
JSA . . . . . . . . . . . . . . . . . . . . . . . . . . . . . . . . . . . . . . . . . . . . . . . . . . . . . . 933
Configuring a Salesforce Security Monitoring Log Source in JSA . . . . . . . . . 934
Chapter 110 Samhain Labs . . . . . . . . . . . . . . . . . . . . . . . . . . . . . . . . . . . . . . . . . . . . . . . . . . . 937
Samhain Labs . . . . . . . . . . . . . . . . . . . . . . . . . . . . . . . . . . . . . . . . . . . . . . . . . . . . 937
Configuring Syslog to Collect Samhain Events . . . . . . . . . . . . . . . . . . . . . . . . . . . 937
Configuring JDBC to Collect Samhain Events . . . . . . . . . . . . . . . . . . . . . . . . . . . . 938
Chapter 111 Seculert . . . . . . . . . . . . . . . . . . . . . . . . . . . . . . . . . . . . . . . . . . . . . . . . . . . . . . . . . 941
Seculert . . . . . . . . . . . . . . . . . . . . . . . . . . . . . . . . . . . . . . . . . . . . . . . . . . . . . . . . . . 941
Obtaining an API Key . . . . . . . . . . . . . . . . . . . . . . . . . . . . . . . . . . . . . . . . . . . . . . . 942
Chapter 112 Sentrigo Hedgehog . . . . . . . . . . . . . . . . . . . . . . . . . . . . . . . . . . . . . . . . . . . . . . 943
Sentrigo Hedgehog . . . . . . . . . . . . . . . . . . . . . . . . . . . . . . . . . . . . . . . . . . . . . . . . 943
Chapter 113 Skyhigh Networks Cloud Security Platform . . . . . . . . . . . . . . . . . . . . . . . . . 945
Skyhigh Networks Cloud Security Platform . . . . . . . . . . . . . . . . . . . . . . . . . . . . . 945
Configuring Skyhigh Networks Cloud Security Platform to Communicate with
JSA . . . . . . . . . . . . . . . . . . . . . . . . . . . . . . . . . . . . . . . . . . . . . . . . . . . . . . . . . 946
Chapter 114 SolarWinds Orion . . . . . . . . . . . . . . . . . . . . . . . . . . . . . . . . . . . . . . . . . . . . . . . . 947
SolarWinds Orion . . . . . . . . . . . . . . . . . . . . . . . . . . . . . . . . . . . . . . . . . . . . . . . . . . 947
Chapter 115 SonicWALL . . . . . . . . . . . . . . . . . . . . . . . . . . . . . . . . . . . . . . . . . . . . . . . . . . . . . 949
SonicWALL . . . . . . . . . . . . . . . . . . . . . . . . . . . . . . . . . . . . . . . . . . . . . . . . . . . . . . . 949
Configuring SonicWALL to Forward Syslog Events . . . . . . . . . . . . . . . . . . . . . . . 949
Configuring a Log Source . . . . . . . . . . . . . . . . . . . . . . . . . . . . . . . . . . . . . . . . . . . 950
Chapter 116 Sophos . . . . . . . . . . . . . . . . . . . . . . . . . . . . . . . . . . . . . . . . . . . . . . . . . . . . . . . . . 951
Sophos . . . . . . . . . . . . . . . . . . . . . . . . . . . . . . . . . . . . . . . . . . . . . . . . . . . . . . . . . . 951
Sophos Enterprise Console . . . . . . . . . . . . . . . . . . . . . . . . . . . . . . . . . . . . . . . . . . 951
Configuring JSA Using the Sophos Enterprise Console Protocol . . . . . . . . . 952
Configure JSA by Using the JDBC Protocol . . . . . . . . . . . . . . . . . . . . . . . . . . 955
Configuring the Database View . . . . . . . . . . . . . . . . . . . . . . . . . . . . . . . . . . . 955
Configuring a JDBC Log Source in JSA . . . . . . . . . . . . . . . . . . . . . . . . . . . . . . 955
Sophos PureMessage . . . . . . . . . . . . . . . . . . . . . . . . . . . . . . . . . . . . . . . . . . . . . . 958
Integrating JSA with Sophos PureMessage for Microsoft Exchange . . . . . . 959
Configure a JDBC Log Source for Sophos PureMessage . . . . . . . . . . . . . . . . 959
Integrating JSA with Sophos PureMessage for Linux . . . . . . . . . . . . . . . . . . 962
xxvCopyright © 2018, Juniper Networks, Inc.
Table of Contents
Configuring a Log Source for Sophos PureMessage for Microsoft
Exchange . . . . . . . . . . . . . . . . . . . . . . . . . . . . . . . . . . . . . . . . . . . . . . . . . 962
Sophos Astaro Security Gateway . . . . . . . . . . . . . . . . . . . . . . . . . . . . . . . . . . . . . 965
Sophos Web Security Appliance . . . . . . . . . . . . . . . . . . . . . . . . . . . . . . . . . . . . . 966
Chapter 117 Splunk . . . . . . . . . . . . . . . . . . . . . . . . . . . . . . . . . . . . . . . . . . . . . . . . . . . . . . . . . 969
Splunk . . . . . . . . . . . . . . . . . . . . . . . . . . . . . . . . . . . . . . . . . . . . . . . . . . . . . . . . . . 969
Collect Windows Events That Are Forwarded from Splunk Appliances . . . . . . . 969
Configuring a Log Source for Splunk Forwarded Events . . . . . . . . . . . . . . . . . . . 970
Chapter 118 Squid Web Proxy . . . . . . . . . . . . . . . . . . . . . . . . . . . . . . . . . . . . . . . . . . . . . . . . . 973
Squid Web Proxy . . . . . . . . . . . . . . . . . . . . . . . . . . . . . . . . . . . . . . . . . . . . . . . . . . 973
Configuring Syslog Forwarding . . . . . . . . . . . . . . . . . . . . . . . . . . . . . . . . . . . . . . . 973
Create a Log Source . . . . . . . . . . . . . . . . . . . . . . . . . . . . . . . . . . . . . . . . . . . . . . . . 974
Chapter 119 SSH CryptoAuditor . . . . . . . . . . . . . . . . . . . . . . . . . . . . . . . . . . . . . . . . . . . . . . . 977
SSH CryptoAuditor . . . . . . . . . . . . . . . . . . . . . . . . . . . . . . . . . . . . . . . . . . . . . . . . . 977
Configuring an SSH CryptoAuditor Appliance to Communicate with JSA . . . . . . 978
Chapter 120 Starent Networks . . . . . . . . . . . . . . . . . . . . . . . . . . . . . . . . . . . . . . . . . . . . . . . . 981
Starent Networks . . . . . . . . . . . . . . . . . . . . . . . . . . . . . . . . . . . . . . . . . . . . . . . . . . 981
Chapter 121 STEALTHbits . . . . . . . . . . . . . . . . . . . . . . . . . . . . . . . . . . . . . . . . . . . . . . . . . . . . 985
STEALTHbits . . . . . . . . . . . . . . . . . . . . . . . . . . . . . . . . . . . . . . . . . . . . . . . . . . . . . 985
STEALTHbits StealthINTERCEPT . . . . . . . . . . . . . . . . . . . . . . . . . . . . . . . . . . . . . 985
Configuring a STEALTHbits StealthINTERCEPT Log Source in JSA . . . . . . . 986
Configuring Your STEALTHbits StealthINTERCEPT to Communicate with
JSA . . . . . . . . . . . . . . . . . . . . . . . . . . . . . . . . . . . . . . . . . . . . . . . . . . . . . . 986
Configuring Your STEALTHbits File Activity Monitor to Communicate with
JSA . . . . . . . . . . . . . . . . . . . . . . . . . . . . . . . . . . . . . . . . . . . . . . . . . . . . . . 987
Configuring a Log Source for STEALTHbits File Activity Monitor in JSA . . . . 988
STEALTHbits StealthINTERCEPT Alerts . . . . . . . . . . . . . . . . . . . . . . . . . . . . . . . 990
Collecting Alerts Logs from STEALTHbits StealthINTERCEPT . . . . . . . . . . . 991
STEALTHbits StealthINTERCEPT Analytics . . . . . . . . . . . . . . . . . . . . . . . . . . . . . 992
Collecting Analytics Logs from STEALTHbits StealthINTERCEPT . . . . . . . . 993
Chapter 122 Stonesoft Management Center . . . . . . . . . . . . . . . . . . . . . . . . . . . . . . . . . . . . 995
Stonesoft Management Center . . . . . . . . . . . . . . . . . . . . . . . . . . . . . . . . . . . . . . 995
Configuring Stonesoft Management Center . . . . . . . . . . . . . . . . . . . . . . . . . . . . 995
Configuring a Syslog Traffic Rule . . . . . . . . . . . . . . . . . . . . . . . . . . . . . . . . . . . . . . 997
Configuring a Log Source . . . . . . . . . . . . . . . . . . . . . . . . . . . . . . . . . . . . . . . . . . . . 997
Chapter 123 Sun . . . . . . . . . . . . . . . . . . . . . . . . . . . . . . . . . . . . . . . . . . . . . . . . . . . . . . . . . . . . 999
Sun . . . . . . . . . . . . . . . . . . . . . . . . . . . . . . . . . . . . . . . . . . . . . . . . . . . . . . . . . . . . . 999
Sun ONE LDAP . . . . . . . . . . . . . . . . . . . . . . . . . . . . . . . . . . . . . . . . . . . . . . . . . . . 999
Enabling the Event Log for Sun ONE Directory Server . . . . . . . . . . . . . . . . 1000
Configuring a Log Source for Sun ONE LDAP . . . . . . . . . . . . . . . . . . . . . . . 1000
Sun Solaris DHCP . . . . . . . . . . . . . . . . . . . . . . . . . . . . . . . . . . . . . . . . . . . . . . . . . 1004
Configuring Sun Solaris DHCP . . . . . . . . . . . . . . . . . . . . . . . . . . . . . . . . . . . 1005
Configuring Sun Solaris . . . . . . . . . . . . . . . . . . . . . . . . . . . . . . . . . . . . . . . . 1005
Sun Solaris Sendmail . . . . . . . . . . . . . . . . . . . . . . . . . . . . . . . . . . . . . . . . . . . . . . 1006
Configuring a Sun Solaris Sendmail Log Source . . . . . . . . . . . . . . . . . . . . . 1007
Copyright © 2018, Juniper Networks, Inc.xxvi
Juniper Secure Analytics Configuring DSMs Guide
Sun Solaris Basic Security Mode (BSM) . . . . . . . . . . . . . . . . . . . . . . . . . . . . . . . 1008
Enabling Basic Security Mode . . . . . . . . . . . . . . . . . . . . . . . . . . . . . . . . . . . 1008
Converting Sun Solaris BSM Audit Logs . . . . . . . . . . . . . . . . . . . . . . . . . . . 1009
Creating a Cron Job . . . . . . . . . . . . . . . . . . . . . . . . . . . . . . . . . . . . . . . . . . . . 1010
Configuring a Log Source for Sun Solaris BSM . . . . . . . . . . . . . . . . . . . . . . . 1011
Chapter 124 Sybase ASE . . . . . . . . . . . . . . . . . . . . . . . . . . . . . . . . . . . . . . . . . . . . . . . . . . . . . 1015
Sybase ASE . . . . . . . . . . . . . . . . . . . . . . . . . . . . . . . . . . . . . . . . . . . . . . . . . . . . . . 1015
Configuring JSA to Receive Events from a Sybase ASE Device . . . . . . . . . . . . . . 1016
Chapter 125 Symantec . . . . . . . . . . . . . . . . . . . . . . . . . . . . . . . . . . . . . . . . . . . . . . . . . . . . . . 1019
Symantec . . . . . . . . . . . . . . . . . . . . . . . . . . . . . . . . . . . . . . . . . . . . . . . . . . . . . . . 1019
Symantec Critical System Protection . . . . . . . . . . . . . . . . . . . . . . . . . . . . . . . . . . 1019
Symantec Data Loss Prevention (DLP) . . . . . . . . . . . . . . . . . . . . . . . . . . . . . . . . 1021
Creating an SMTP Response Rule . . . . . . . . . . . . . . . . . . . . . . . . . . . . . . . . . 1021
Creating a None Of SMTP Response Rule . . . . . . . . . . . . . . . . . . . . . . . . . . 1022
Configuring a Log Source . . . . . . . . . . . . . . . . . . . . . . . . . . . . . . . . . . . . . . . 1024
Event Map Creation for Symantec DLP Events . . . . . . . . . . . . . . . . . . . . . . 1024
Discovering Unknown Events . . . . . . . . . . . . . . . . . . . . . . . . . . . . . . . . . . . . 1024
Modifying the Event Map . . . . . . . . . . . . . . . . . . . . . . . . . . . . . . . . . . . . . . . 1025
Symantec Endpoint Protection . . . . . . . . . . . . . . . . . . . . . . . . . . . . . . . . . . . . . . 1026
Symantec PGP Universal Server . . . . . . . . . . . . . . . . . . . . . . . . . . . . . . . . . . . . . 1027
Configuring Syslog for PGP Universal Server . . . . . . . . . . . . . . . . . . . . . . . . 1028
Configuring a Log Source . . . . . . . . . . . . . . . . . . . . . . . . . . . . . . . . . . . . . . . 1028
Symantec SGS . . . . . . . . . . . . . . . . . . . . . . . . . . . . . . . . . . . . . . . . . . . . . . . . . . . 1029
Symantec System Center . . . . . . . . . . . . . . . . . . . . . . . . . . . . . . . . . . . . . . . . . . 1029
Configuring a Database View for Symantec System Center . . . . . . . . . . . . 1030
Configuring a Log Source . . . . . . . . . . . . . . . . . . . . . . . . . . . . . . . . . . . . . . . 1030
Chapter 126 Symark . . . . . . . . . . . . . . . . . . . . . . . . . . . . . . . . . . . . . . . . . . . . . . . . . . . . . . . . 1035
Symark . . . . . . . . . . . . . . . . . . . . . . . . . . . . . . . . . . . . . . . . . . . . . . . . . . . . . . . . . 1035
Configuring a Log Source . . . . . . . . . . . . . . . . . . . . . . . . . . . . . . . . . . . . . . . . . . . 1035
Configuring Symark PowerBroker . . . . . . . . . . . . . . . . . . . . . . . . . . . . . . . . . . . . 1036
Chapter 127 Sourcefire Intrusion Sensor . . . . . . . . . . . . . . . . . . . . . . . . . . . . . . . . . . . . . . 1039
Sourcefire Intrusion Sensor . . . . . . . . . . . . . . . . . . . . . . . . . . . . . . . . . . . . . . . . . 1039
Configuring Sourcefire Intrusion Sensor . . . . . . . . . . . . . . . . . . . . . . . . . . . . . . . 1039
Cisco FireSIGHT Management Center . . . . . . . . . . . . . . . . . . . . . . . . . . . . . . . . 1040
Configuration Overview . . . . . . . . . . . . . . . . . . . . . . . . . . . . . . . . . . . . . . . . 1040
Supported Event Types . . . . . . . . . . . . . . . . . . . . . . . . . . . . . . . . . . . . . . . . . 1041
Creating FireSIGHT Management Center 4.x Certificates . . . . . . . . . . . . . . 1042
Creating Cisco FireSIGHTManagement Center 5.x and 6.x Certificates . . . 1043
Importing a Cisco FireSIGHT Management Center Certificate to JSA . . . . 1044
Configuring a Log Source for Cisco FireSIGHTManagement Center
Events . . . . . . . . . . . . . . . . . . . . . . . . . . . . . . . . . . . . . . . . . . . . . . . . . . . 1045
Chapter 128 ThreatGRID Malware Threat Intelligence Platform . . . . . . . . . . . . . . . . . . 1047
ThreatGRID Malware Threat Intelligence Platform . . . . . . . . . . . . . . . . . . . . . . . 1047
Supported Event Collection Protocols for ThreatGRID Malware Threat
Intelligence . . . . . . . . . . . . . . . . . . . . . . . . . . . . . . . . . . . . . . . . . . . . . . . . . . 1047
xxviiCopyright © 2018, Juniper Networks, Inc.
Table of Contents
ThreatGRID Malware Threat Intelligence Configuration Overview . . . . . . . . . . 1048
Configuring a ThreatGRID Syslog Log Source . . . . . . . . . . . . . . . . . . . . . . . 1048
Configuring a ThreatGRID Log File Protocol Log Source . . . . . . . . . . . . . . . 1049
Chapter 129 TippingPoint . . . . . . . . . . . . . . . . . . . . . . . . . . . . . . . . . . . . . . . . . . . . . . . . . . . 1053
TippingPoint . . . . . . . . . . . . . . . . . . . . . . . . . . . . . . . . . . . . . . . . . . . . . . . . . . . . . 1053
Tipping Point Intrusion Prevention System . . . . . . . . . . . . . . . . . . . . . . . . . . . . . 1053
Configure Remote Syslog for SMS . . . . . . . . . . . . . . . . . . . . . . . . . . . . . . . . 1053
Configuring Notification Contacts for LSM . . . . . . . . . . . . . . . . . . . . . . . . . 1054
Configuring an Action Set for LSM . . . . . . . . . . . . . . . . . . . . . . . . . . . . . . . . 1055
Tipping Point X505/X506 Device . . . . . . . . . . . . . . . . . . . . . . . . . . . . . . . . . . . . 1056
Configuring Syslog . . . . . . . . . . . . . . . . . . . . . . . . . . . . . . . . . . . . . . . . . . . . 1056
Chapter 130 Top Layer IPS . . . . . . . . . . . . . . . . . . . . . . . . . . . . . . . . . . . . . . . . . . . . . . . . . . . 1059
Top Layer IPS . . . . . . . . . . . . . . . . . . . . . . . . . . . . . . . . . . . . . . . . . . . . . . . . . . . . 1059
Chapter 131 Townsend Security LogAgent . . . . . . . . . . . . . . . . . . . . . . . . . . . . . . . . . . . . . 1061
Townsend Security LogAgent . . . . . . . . . . . . . . . . . . . . . . . . . . . . . . . . . . . . . . . . 1061
Supported Event Types . . . . . . . . . . . . . . . . . . . . . . . . . . . . . . . . . . . . . . . . . 1061
Configuring Raz-Lee ISecurity . . . . . . . . . . . . . . . . . . . . . . . . . . . . . . . . . . . . . . . . 1061
Configuring a Log Source . . . . . . . . . . . . . . . . . . . . . . . . . . . . . . . . . . . . . . . . . . . 1062
Chapter 132 Trend Micro . . . . . . . . . . . . . . . . . . . . . . . . . . . . . . . . . . . . . . . . . . . . . . . . . . . . 1065
Trend Micro . . . . . . . . . . . . . . . . . . . . . . . . . . . . . . . . . . . . . . . . . . . . . . . . . . . . . . 1065
Trend Micro Control Manager . . . . . . . . . . . . . . . . . . . . . . . . . . . . . . . . . . . . . . . 1065
Configuring a Log Source . . . . . . . . . . . . . . . . . . . . . . . . . . . . . . . . . . . . . . . 1065
Configuring SNMP Traps . . . . . . . . . . . . . . . . . . . . . . . . . . . . . . . . . . . . . . . 1066
Trend Micro Deep Discovery Analyzer . . . . . . . . . . . . . . . . . . . . . . . . . . . . . . . . . 1067
Configuring Your Trend Micro Deep Discovery Analyzer Instance for
Communication with JSA . . . . . . . . . . . . . . . . . . . . . . . . . . . . . . . . . . . 1069
Trend Micro Deep Discovery Email Inspector . . . . . . . . . . . . . . . . . . . . . . . . . . . 1069
Configuring Trend Micro Deep Discovery Email Inspector to Communicate
with JSA . . . . . . . . . . . . . . . . . . . . . . . . . . . . . . . . . . . . . . . . . . . . . . . . . 1070
Trend Micro Deep Security . . . . . . . . . . . . . . . . . . . . . . . . . . . . . . . . . . . . . . . . . . 1071
Configuring Trend Micro Deep Security to Communicate with JSA . . . . . . . 1072
Trend Micro InterScan VirusWall . . . . . . . . . . . . . . . . . . . . . . . . . . . . . . . . . . . . . 1073
Trend Micro Office Scan . . . . . . . . . . . . . . . . . . . . . . . . . . . . . . . . . . . . . . . . . . . . 1073
Integrating with Trend Micro Office Scan 8.x . . . . . . . . . . . . . . . . . . . . . . . . 1074
Integrating with Trend Micro Office Scan 10.x . . . . . . . . . . . . . . . . . . . . . . . 1075
Configuring General Settings . . . . . . . . . . . . . . . . . . . . . . . . . . . . . . . . . . . . 1075
Configure Standard Notifications . . . . . . . . . . . . . . . . . . . . . . . . . . . . . . . . . 1076
Configuring Outbreak Criteria and Alert Notifications . . . . . . . . . . . . . . . . . 1076
Chapter 133 Tripwire . . . . . . . . . . . . . . . . . . . . . . . . . . . . . . . . . . . . . . . . . . . . . . . . . . . . . . . . 1079
Tripwire . . . . . . . . . . . . . . . . . . . . . . . . . . . . . . . . . . . . . . . . . . . . . . . . . . . . . . . . . 1079
Chapter 134 Tropos Control . . . . . . . . . . . . . . . . . . . . . . . . . . . . . . . . . . . . . . . . . . . . . . . . . . 1081
Tropos Control . . . . . . . . . . . . . . . . . . . . . . . . . . . . . . . . . . . . . . . . . . . . . . . . . . . . 1081
Copyright © 2018, Juniper Networks, Inc.xxviii
Juniper Secure Analytics Configuring DSMs Guide
Chapter 135 Universal . . . . . . . . . . . . . . . . . . . . . . . . . . . . . . . . . . . . . . . . . . . . . . . . . . . . . . 1083
Universal . . . . . . . . . . . . . . . . . . . . . . . . . . . . . . . . . . . . . . . . . . . . . . . . . . . . . . . . 1083
Universal CEF . . . . . . . . . . . . . . . . . . . . . . . . . . . . . . . . . . . . . . . . . . . . . . . . . . . . 1083
Configuring Event Mapping for Universal CEF Events . . . . . . . . . . . . . . . . . 1084
Universal LEEF . . . . . . . . . . . . . . . . . . . . . . . . . . . . . . . . . . . . . . . . . . . . . . . . . . . 1086
Configuring a Universal LEEF Log Source . . . . . . . . . . . . . . . . . . . . . . . . . . 1086
Configuring the Log File Protocol to Collect Universal LEEF Events . . . 1087
Forwarding Events to JSA . . . . . . . . . . . . . . . . . . . . . . . . . . . . . . . . . . . . . . . 1090
Universal LEEF Event Map Creation . . . . . . . . . . . . . . . . . . . . . . . . . . . . . . . 1090
Discovering Unknown Events . . . . . . . . . . . . . . . . . . . . . . . . . . . . . . . . . 1091
Modifying an Event Map . . . . . . . . . . . . . . . . . . . . . . . . . . . . . . . . . . . . . 1091
Chapter 136 Vectra Networks Vectra . . . . . . . . . . . . . . . . . . . . . . . . . . . . . . . . . . . . . . . . . . 1095
Vectra Networks Vectra . . . . . . . . . . . . . . . . . . . . . . . . . . . . . . . . . . . . . . . . . . . . 1095
Configuring Vectra Networks Vectra to Communicate with JSA . . . . . . . . . . . . 1096
Chapter 137 Venustech Venusense . . . . . . . . . . . . . . . . . . . . . . . . . . . . . . . . . . . . . . . . . . . 1099
Venustech Venusense . . . . . . . . . . . . . . . . . . . . . . . . . . . . . . . . . . . . . . . . . . . . . 1099
Venusense Configuration Overview . . . . . . . . . . . . . . . . . . . . . . . . . . . . . . . . . . 1099
Configuring a Venusense Syslog Server . . . . . . . . . . . . . . . . . . . . . . . . . . . . . . . . 1100
Configuring Venusense Event Filtering . . . . . . . . . . . . . . . . . . . . . . . . . . . . . . . . . 1100
Configuring a Venusense Log Source . . . . . . . . . . . . . . . . . . . . . . . . . . . . . . . . . . 1100
Chapter 138 Verdasys Digital Guardian . . . . . . . . . . . . . . . . . . . . . . . . . . . . . . . . . . . . . . . . 1103
Verdasys Digital Guardian . . . . . . . . . . . . . . . . . . . . . . . . . . . . . . . . . . . . . . . . . . . 1103
Configuring IPtables . . . . . . . . . . . . . . . . . . . . . . . . . . . . . . . . . . . . . . . . . . . . . . . 1104
Configuring a Data Export . . . . . . . . . . . . . . . . . . . . . . . . . . . . . . . . . . . . . . . . . . . 1105
Configuring a Log Source . . . . . . . . . . . . . . . . . . . . . . . . . . . . . . . . . . . . . . . . . . . 1107
Chapter 139 Vericept Content 360 DSM . . . . . . . . . . . . . . . . . . . . . . . . . . . . . . . . . . . . . . . 1109
Vericept Content 360 DSM . . . . . . . . . . . . . . . . . . . . . . . . . . . . . . . . . . . . . . . . . . 1109
Chapter 140 VMWare . . . . . . . . . . . . . . . . . . . . . . . . . . . . . . . . . . . . . . . . . . . . . . . . . . . . . . . . . 1111
VMWare . . . . . . . . . . . . . . . . . . . . . . . . . . . . . . . . . . . . . . . . . . . . . . . . . . . . . . . . . . 1111
VMware ESX and ESXi . . . . . . . . . . . . . . . . . . . . . . . . . . . . . . . . . . . . . . . . . . . . . . 1111
Configuring Syslog on VMWare ESX and ESXi Servers . . . . . . . . . . . . . . . . . . 1111
Enabling Syslog Firewall Settings on VSphere Clients . . . . . . . . . . . . . . . . . . 1113
Configuring a Syslog Log Source for VMware ESX or ESXi . . . . . . . . . . . . . . 1113
Configuring the VMWare Protocol for ESX or ESXi Servers . . . . . . . . . . . . . . 1114
Creating an Account for JSA in ESX . . . . . . . . . . . . . . . . . . . . . . . . . . . . . . . . 1115
Configuring Read-only Account Permissions . . . . . . . . . . . . . . . . . . . . . . . . . 1116
Configuring a Log Source for the VMWare Protocol . . . . . . . . . . . . . . . . . . . 1116
VMware VCenter . . . . . . . . . . . . . . . . . . . . . . . . . . . . . . . . . . . . . . . . . . . . . . . . . . . 1117
Configuring a Log Source for the VMWare VCenter . . . . . . . . . . . . . . . . . . . . 1117
Supported VCloud Event Types Logged by JSA . . . . . . . . . . . . . . . . . . . . . . . 1118
VMware VCloud Director . . . . . . . . . . . . . . . . . . . . . . . . . . . . . . . . . . . . . . . . . . . . 1119
Configuring the VCloud REST API Public Address . . . . . . . . . . . . . . . . . . . . . 1119
Configuring a VCloud Log Source in JSA . . . . . . . . . . . . . . . . . . . . . . . . . . . . 1120
xxixCopyright © 2018, Juniper Networks, Inc.
Table of Contents
VMware VShield . . . . . . . . . . . . . . . . . . . . . . . . . . . . . . . . . . . . . . . . . . . . . . . . . . . 1121
VMware VShield DSM Integration Process . . . . . . . . . . . . . . . . . . . . . . . . . . 1122
Related Tasks . . . . . . . . . . . . . . . . . . . . . . . . . . . . . . . . . . . . . . . . . . . . . . 1122
Configuring Your VMware VShield System for Communication with JSA . . 1122
Configuring a VMware VShield Log Source in JSA . . . . . . . . . . . . . . . . . . . . . 1123
Chapter 141 Vormetric Data Security . . . . . . . . . . . . . . . . . . . . . . . . . . . . . . . . . . . . . . . . . . 1125
Vormetric Data Security . . . . . . . . . . . . . . . . . . . . . . . . . . . . . . . . . . . . . . . . . . . . 1125
Vormetric Data Security DSM Integration Process . . . . . . . . . . . . . . . . . . . . . . . . 1126
Related Tasks . . . . . . . . . . . . . . . . . . . . . . . . . . . . . . . . . . . . . . . . . . . . . . . . . 1126
Configuring Your Vormetric Data Security Systems for Communication with
JSA . . . . . . . . . . . . . . . . . . . . . . . . . . . . . . . . . . . . . . . . . . . . . . . . . . . . . . . . . 1126
ConfiguringVormetricDataFirewall FSAgents toBypassVormetricDataSecurity
Manager . . . . . . . . . . . . . . . . . . . . . . . . . . . . . . . . . . . . . . . . . . . . . . . . . . . . . 1127
Configuring a Vormetric Data Security Log Source in JSA . . . . . . . . . . . . . . . . . . 1128
Chapter 142 WatchGuard Fireware OS . . . . . . . . . . . . . . . . . . . . . . . . . . . . . . . . . . . . . . . . . 1129
WatchGuard Fireware OS . . . . . . . . . . . . . . . . . . . . . . . . . . . . . . . . . . . . . . . . . . . 1129
Configuring YourWatchGuard Fireware OS Appliance in Policy Manager for
Communication with JSA . . . . . . . . . . . . . . . . . . . . . . . . . . . . . . . . . . . . . . . . 1130
Configuring YourWatchGuard Fireware OS Appliance in Fireware XTM for
Communication with JSA . . . . . . . . . . . . . . . . . . . . . . . . . . . . . . . . . . . . . . . . 1131
Configuring a WatchGuard Fireware OS Log Source in JSA . . . . . . . . . . . . . . . . . 1132
Chapter 143 Websense . . . . . . . . . . . . . . . . . . . . . . . . . . . . . . . . . . . . . . . . . . . . . . . . . . . . . . 1135
Websense . . . . . . . . . . . . . . . . . . . . . . . . . . . . . . . . . . . . . . . . . . . . . . . . . . . . . . . 1135
Chapter 144 Zscaler Nanolog Streaming Service . . . . . . . . . . . . . . . . . . . . . . . . . . . . . . . . 1137
Zscaler Nanolog Streaming Service . . . . . . . . . . . . . . . . . . . . . . . . . . . . . . . . . . . 1137
Supported Event Types for Zscaler NSS . . . . . . . . . . . . . . . . . . . . . . . . . . . . 1137
Configuring a Syslog Feed in Zscaler NSS . . . . . . . . . . . . . . . . . . . . . . . . . . . . . . . 1137
Configuring a Zscaler NSS Log Source . . . . . . . . . . . . . . . . . . . . . . . . . . . . . . . . . 1139
Chapter 145 JSA Supported DSMs . . . . . . . . . . . . . . . . . . . . . . . . . . . . . . . . . . . . . . . . . . . . . 1141
JSA Supported DSMs . . . . . . . . . . . . . . . . . . . . . . . . . . . . . . . . . . . . . . . . . . . . . . . 1141
Copyright © 2018, Juniper Networks, Inc.xxx
Juniper Secure Analytics Configuring DSMs Guide
List of Tables
About the Documentation . . . . . . . . . . . . . . . . . . . . . . . . . . . . . . . . . . . . . . . . . xliii
Table 1: Notice Icons . . . . . . . . . . . . . . . . . . . . . . . . . . . . . . . . . . . . . . . . . . . . . . . . xliv
Table 2: Text and Syntax Conventions . . . . . . . . . . . . . . . . . . . . . . . . . . . . . . . . . . xliv
Chapter 2 Introduction to Log Source Management . . . . . . . . . . . . . . . . . . . . . . . . . . . . . 53
Table 3: Log Source Parameters . . . . . . . . . . . . . . . . . . . . . . . . . . . . . . . . . . . . . . . 54
Chapter 3 Log Source Extensions . . . . . . . . . . . . . . . . . . . . . . . . . . . . . . . . . . . . . . . . . . . . . 57
Table 4: Description Of Pattern Parameters . . . . . . . . . . . . . . . . . . . . . . . . . . . . . . 58
Table 5: Description Of Match Group Parameters . . . . . . . . . . . . . . . . . . . . . . . . . 59
Table 6: Description Of Matcher Parameters . . . . . . . . . . . . . . . . . . . . . . . . . . . . . 59
Table 7: List Of Valid Matcher Field Names . . . . . . . . . . . . . . . . . . . . . . . . . . . . . . . 61
Table 8: Description Of Single-event Parameters . . . . . . . . . . . . . . . . . . . . . . . . . 63
Table 9: Common Regex Expressions . . . . . . . . . . . . . . . . . . . . . . . . . . . . . . . . . . . 72
Table 10: Translating Pseudo-code to Regular Expressions . . . . . . . . . . . . . . . . . . 73
Table 11: Mapping Regular Expressions to Capture Groups for Event Fields . . . . . 74
Table 12: Log Source Type ID . . . . . . . . . . . . . . . . . . . . . . . . . . . . . . . . . . . . . . . . . . 82
Chapter 6 AhnLab Policy Center . . . . . . . . . . . . . . . . . . . . . . . . . . . . . . . . . . . . . . . . . . . . . 101
Table 13: AhnLab Policy Center DSM Specifications . . . . . . . . . . . . . . . . . . . . . . . 101
Chapter 7 Akamai Kona . . . . . . . . . . . . . . . . . . . . . . . . . . . . . . . . . . . . . . . . . . . . . . . . . . . . 103
Table 14: Akamai KONA DSM Specifications . . . . . . . . . . . . . . . . . . . . . . . . . . . . . 103
Table 15: Akamai KONA Log Source Parameters . . . . . . . . . . . . . . . . . . . . . . . . . 104
Chapter 8 Amazon AWS CloudTrail . . . . . . . . . . . . . . . . . . . . . . . . . . . . . . . . . . . . . . . . . . 105
Table 16: Amazon AWS CloudTrail DSM Specifications . . . . . . . . . . . . . . . . . . . . 105
Table 17: Amazon AWS CloudTrail Log Source Parameters . . . . . . . . . . . . . . . . . 106
Table 18: Amazon AWS CloudTrail Sample Message Supported by Amazon
AWS CloudTrail. . . . . . . . . . . . . . . . . . . . . . . . . . . . . . . . . . . . . . . . . . . . . . . . . 108
Chapter 9 Ambiron TrustWave IpAngel . . . . . . . . . . . . . . . . . . . . . . . . . . . . . . . . . . . . . . . . 113
Table 19: Ambiron TrustWave IpAngel DSM Specifications . . . . . . . . . . . . . . . . . . 113
Table 20: Ambiron TrustWave IpAngel Log Source Parameters . . . . . . . . . . . . . . 114
Chapter 10 APC UPS . . . . . . . . . . . . . . . . . . . . . . . . . . . . . . . . . . . . . . . . . . . . . . . . . . . . . . . . 115
Table 21: APC UPS DSM Specifications . . . . . . . . . . . . . . . . . . . . . . . . . . . . . . . . . 115
Table 22: APC UPS Log Source Parameters . . . . . . . . . . . . . . . . . . . . . . . . . . . . . . 116
Chapter 11 Apache HTTP Server . . . . . . . . . . . . . . . . . . . . . . . . . . . . . . . . . . . . . . . . . . . . . . 119
Table 23: Syslog Parameters . . . . . . . . . . . . . . . . . . . . . . . . . . . . . . . . . . . . . . . . . . 121
Table 24: Syslog Parameters . . . . . . . . . . . . . . . . . . . . . . . . . . . . . . . . . . . . . . . . . 123
Chapter 13 Application Security DbProtect . . . . . . . . . . . . . . . . . . . . . . . . . . . . . . . . . . . . . 127
xxxiCopyright © 2018, Juniper Networks, Inc.
Table 25: Application Security DbProtect DSM Specifications . . . . . . . . . . . . . . . 127
Table 26: Application Security DbProtect Log Source Parameters . . . . . . . . . . . . 128
Chapter 14 Arbor Networks . . . . . . . . . . . . . . . . . . . . . . . . . . . . . . . . . . . . . . . . . . . . . . . . . . 133
Table 27: Arbor Networks Peakflow SP Notification Rule Parameters . . . . . . . . . 136
Table 28: System Parameters . . . . . . . . . . . . . . . . . . . . . . . . . . . . . . . . . . . . . . . . . 137
Table 29: Arbor Networks Pravail DSM Specifications . . . . . . . . . . . . . . . . . . . . . 138
Table 30: Arbor Pravail Parameters . . . . . . . . . . . . . . . . . . . . . . . . . . . . . . . . . . . . 138
Table 31: Syslog Parameters . . . . . . . . . . . . . . . . . . . . . . . . . . . . . . . . . . . . . . . . . . 139
Chapter 17 Aruba Networks . . . . . . . . . . . . . . . . . . . . . . . . . . . . . . . . . . . . . . . . . . . . . . . . . . 147
Table 32: Aruba ClearPass Policy Manager DSM Specifications . . . . . . . . . . . . . . 147
Table 33: Aruba ClearPass Policy Manager Log Source Parameters . . . . . . . . . . 148
Chapter 18 Avaya VPN Gateway . . . . . . . . . . . . . . . . . . . . . . . . . . . . . . . . . . . . . . . . . . . . . . 151
Table 34: Avaya VPN Gateway DSM Specifications . . . . . . . . . . . . . . . . . . . . . . . . 151
Chapter 19 BalaBit IT Security . . . . . . . . . . . . . . . . . . . . . . . . . . . . . . . . . . . . . . . . . . . . . . . . 155
Table 35: Syslog Parameters . . . . . . . . . . . . . . . . . . . . . . . . . . . . . . . . . . . . . . . . . 159
Table 36: Syslog Parameters . . . . . . . . . . . . . . . . . . . . . . . . . . . . . . . . . . . . . . . . . 165
Chapter 20 Barracuda . . . . . . . . . . . . . . . . . . . . . . . . . . . . . . . . . . . . . . . . . . . . . . . . . . . . . . . 167
Table 37: BarracudaWeb Application Firewall DSM Specifications . . . . . . . . . . . 169
Table 38: Barracuda Web Application Firewall Log Source Parameters . . . . . . . 170
Table 39: Syslog Parameters . . . . . . . . . . . . . . . . . . . . . . . . . . . . . . . . . . . . . . . . . 174
Chapter 21 Bit9 . . . . . . . . . . . . . . . . . . . . . . . . . . . . . . . . . . . . . . . . . . . . . . . . . . . . . . . . . . . . . 175
Table 40: Syslog Parameters . . . . . . . . . . . . . . . . . . . . . . . . . . . . . . . . . . . . . . . . . 176
Table 41: DSM Specifications for Bit9 Security Platform . . . . . . . . . . . . . . . . . . . . 177
Table 42: Carbon Black DSM Specifications . . . . . . . . . . . . . . . . . . . . . . . . . . . . . 178
Table 43: Carbon Black Log Source Parameters . . . . . . . . . . . . . . . . . . . . . . . . . . 179
Chapter 22 BlueCat Networks Adonis . . . . . . . . . . . . . . . . . . . . . . . . . . . . . . . . . . . . . . . . . . 181
Table 44: Syslog Parameters . . . . . . . . . . . . . . . . . . . . . . . . . . . . . . . . . . . . . . . . . 183
Chapter 23 Blue Coat SG . . . . . . . . . . . . . . . . . . . . . . . . . . . . . . . . . . . . . . . . . . . . . . . . . . . . 185
Table 45: Blue Coat SG DSM Specifications . . . . . . . . . . . . . . . . . . . . . . . . . . . . . 185
Table 46: Blue Coat SG Log Source Parameters . . . . . . . . . . . . . . . . . . . . . . . . . . 186
Table 47: Blue Coat SG Log File Protocol Parameters . . . . . . . . . . . . . . . . . . . . . 190
Table 48: Custom Format Examples . . . . . . . . . . . . . . . . . . . . . . . . . . . . . . . . . . . 194
Chapter 24 Blue Coat Web Security Service . . . . . . . . . . . . . . . . . . . . . . . . . . . . . . . . . . . . 195
Table 49: Blue Coat Web Security Service DSM Specifications . . . . . . . . . . . . . . 195
Table 50: Blue Coat Web Security Service Log Source Parameters . . . . . . . . . . . 196
Chapter 25 Bridgewater . . . . . . . . . . . . . . . . . . . . . . . . . . . . . . . . . . . . . . . . . . . . . . . . . . . . . 199
Table 51: Syslog Parameters . . . . . . . . . . . . . . . . . . . . . . . . . . . . . . . . . . . . . . . . . . 201
Chapter 27 CA Technologies . . . . . . . . . . . . . . . . . . . . . . . . . . . . . . . . . . . . . . . . . . . . . . . . . 205
Table 52: CA ACF2 Log File Parameters . . . . . . . . . . . . . . . . . . . . . . . . . . . . . . . . 207
Table 53: CA ACF2 Log File Parameters . . . . . . . . . . . . . . . . . . . . . . . . . . . . . . . . . 216
Table 54: Adding a Syslog Log Source . . . . . . . . . . . . . . . . . . . . . . . . . . . . . . . . . 220
Table 55: CA Top Secret Log File Parameters . . . . . . . . . . . . . . . . . . . . . . . . . . . . 224
Copyright © 2018, Juniper Networks, Inc.xxxii
Juniper Secure Analytics Configuring DSMs Guide
Table 56: CA Top Secret Log File Parameters . . . . . . . . . . . . . . . . . . . . . . . . . . . . 231
Chapter 28 Check Point . . . . . . . . . . . . . . . . . . . . . . . . . . . . . . . . . . . . . . . . . . . . . . . . . . . . . 235
Table 57: OPSEC/LEA Protocol Parameters . . . . . . . . . . . . . . . . . . . . . . . . . . . . . 240
Table 58: OPSEC/LEA Protocol Parameters . . . . . . . . . . . . . . . . . . . . . . . . . . . . 244
Table 59: Syslog Parameters . . . . . . . . . . . . . . . . . . . . . . . . . . . . . . . . . . . . . . . . . 247
Table 60: Syslog Redirect Protocol Parameters . . . . . . . . . . . . . . . . . . . . . . . . . . 248
Table 61: Syslog Parameters . . . . . . . . . . . . . . . . . . . . . . . . . . . . . . . . . . . . . . . . . . 251
Chapter 29 Cilasoft QJRN/400 . . . . . . . . . . . . . . . . . . . . . . . . . . . . . . . . . . . . . . . . . . . . . . . 255
Table 62: Cilasoft QJRN/400 Output Parameters . . . . . . . . . . . . . . . . . . . . . . . . 256
Chapter 30 Cisco . . . . . . . . . . . . . . . . . . . . . . . . . . . . . . . . . . . . . . . . . . . . . . . . . . . . . . . . . . . 259
Table 63: Syslog Parameters . . . . . . . . . . . . . . . . . . . . . . . . . . . . . . . . . . . . . . . . . 261
Table 64: Syslog Parameters . . . . . . . . . . . . . . . . . . . . . . . . . . . . . . . . . . . . . . . . . 263
Table 65: Remote Target Parameters . . . . . . . . . . . . . . . . . . . . . . . . . . . . . . . . . . 265
Table 66: Syslog Parameters . . . . . . . . . . . . . . . . . . . . . . . . . . . . . . . . . . . . . . . . . 266
Table 67: Syslog Parameters . . . . . . . . . . . . . . . . . . . . . . . . . . . . . . . . . . . . . . . . . 268
Table 68: Syslog Parameters . . . . . . . . . . . . . . . . . . . . . . . . . . . . . . . . . . . . . . . . . 269
Table 69: Syslog Parameters . . . . . . . . . . . . . . . . . . . . . . . . . . . . . . . . . . . . . . . . . 273
Table 70: Syslog Parameters . . . . . . . . . . . . . . . . . . . . . . . . . . . . . . . . . . . . . . . . . 276
Table 71: Syslog Parameters . . . . . . . . . . . . . . . . . . . . . . . . . . . . . . . . . . . . . . . . . . 278
Table 72: Syslog Parameters . . . . . . . . . . . . . . . . . . . . . . . . . . . . . . . . . . . . . . . . . 280
Table 73: Syslog Parameters . . . . . . . . . . . . . . . . . . . . . . . . . . . . . . . . . . . . . . . . . 282
Table 74: Cisco FireSIGHTManagement Center Sample Message Supported by
the Cisco FireSIGHT Management Center Device. . . . . . . . . . . . . . . . . . . . . 283
Table 75: Syslog Parameters . . . . . . . . . . . . . . . . . . . . . . . . . . . . . . . . . . . . . . . . . 290
Table 76: SDEE Parameters . . . . . . . . . . . . . . . . . . . . . . . . . . . . . . . . . . . . . . . . . . 291
Table 77: Syslog Parameters . . . . . . . . . . . . . . . . . . . . . . . . . . . . . . . . . . . . . . . . . 294
Table 78: Syslog Parameters . . . . . . . . . . . . . . . . . . . . . . . . . . . . . . . . . . . . . . . . . 297
Table 79: Cisco ISE Event Logging Categories . . . . . . . . . . . . . . . . . . . . . . . . . . . 298
Table 80: Cisco ISE Log Source Parameters . . . . . . . . . . . . . . . . . . . . . . . . . . . . 300
Table 81: Syslog Protocol Parameters . . . . . . . . . . . . . . . . . . . . . . . . . . . . . . . . . . 303
Table 82: Syslog Parameters . . . . . . . . . . . . . . . . . . . . . . . . . . . . . . . . . . . . . . . . . 305
Table 83: Syslog Parameters . . . . . . . . . . . . . . . . . . . . . . . . . . . . . . . . . . . . . . . . . 307
Table 84: Syslog Parameters . . . . . . . . . . . . . . . . . . . . . . . . . . . . . . . . . . . . . . . . 309
Table 85: Syslog Protocol Parameters . . . . . . . . . . . . . . . . . . . . . . . . . . . . . . . . . . 312
Table 86: Syslog Protocol Parameters . . . . . . . . . . . . . . . . . . . . . . . . . . . . . . . . . . 314
Table 87: SNMPv2 Protocol Parameters . . . . . . . . . . . . . . . . . . . . . . . . . . . . . . . . 317
Chapter 31 Citrix . . . . . . . . . . . . . . . . . . . . . . . . . . . . . . . . . . . . . . . . . . . . . . . . . . . . . . . . . . . . 319
Table 88: Syslog Protocol Parameters . . . . . . . . . . . . . . . . . . . . . . . . . . . . . . . . . . 321
Table 89: Syslog Parameters . . . . . . . . . . . . . . . . . . . . . . . . . . . . . . . . . . . . . . . . . 322
Chapter 32 Cloudera Navigator . . . . . . . . . . . . . . . . . . . . . . . . . . . . . . . . . . . . . . . . . . . . . . . 323
Table 90: Cloudera Navigator DSM Specifications . . . . . . . . . . . . . . . . . . . . . . . . 323
Table 91: Cloudera Navigator Log Source Parameters . . . . . . . . . . . . . . . . . . . . . 324
Chapter 33 CloudPassage Halo . . . . . . . . . . . . . . . . . . . . . . . . . . . . . . . . . . . . . . . . . . . . . . 325
Table 92: CloudPassage Halo DSM Specifications . . . . . . . . . . . . . . . . . . . . . . . . 325
Chapter 34 CloudLock Cloud Security Fabric . . . . . . . . . . . . . . . . . . . . . . . . . . . . . . . . . . . 329
xxxiiiCopyright © 2018, Juniper Networks, Inc.
List of Tables
Table 93: CloudLock Cloud Security Fabric DSM Specifications . . . . . . . . . . . . . 329
Table 94: CloudLock Cloud Security Fabric Log Source Parameters . . . . . . . . . . 330
Table 95: CloudLock Cloud Security Fabric Sample Message Supported by the
CloudLock Cloud Security Fabric Service . . . . . . . . . . . . . . . . . . . . . . . . . . . 330
Chapter 36 CRYPTOCard CRYPTO-Shield . . . . . . . . . . . . . . . . . . . . . . . . . . . . . . . . . . . . . 335
Table 96: Syslog Parameters . . . . . . . . . . . . . . . . . . . . . . . . . . . . . . . . . . . . . . . . . 336
Chapter 37 CyberArk . . . . . . . . . . . . . . . . . . . . . . . . . . . . . . . . . . . . . . . . . . . . . . . . . . . . . . . . 337
Table 97: CyberArk Privileged Threat Analytics DSM Specifications . . . . . . . . . . 337
Table 98: CyberArk Privileged Threat Analytics Log Source Parameters . . . . . . . 338
Table 99: Syslog Parameters . . . . . . . . . . . . . . . . . . . . . . . . . . . . . . . . . . . . . . . . 340
Table 100: Syslog Parameters . . . . . . . . . . . . . . . . . . . . . . . . . . . . . . . . . . . . . . . . 341
Chapter 39 Damballa Failsafe . . . . . . . . . . . . . . . . . . . . . . . . . . . . . . . . . . . . . . . . . . . . . . . 345
Table 101: Syslog Parameters . . . . . . . . . . . . . . . . . . . . . . . . . . . . . . . . . . . . . . . . 346
Chapter 40 DG Technology MEAS . . . . . . . . . . . . . . . . . . . . . . . . . . . . . . . . . . . . . . . . . . . . 349
Table 102: DSM Specifications for DG Technology MEAS . . . . . . . . . . . . . . . . . . 349
Chapter 41 Digital China Networks (DCN) . . . . . . . . . . . . . . . . . . . . . . . . . . . . . . . . . . . . . 351
Table 103: Syslog Parameters . . . . . . . . . . . . . . . . . . . . . . . . . . . . . . . . . . . . . . . . 352
Chapter 42 Enterprise-IT-Security.com SF-Sherlock . . . . . . . . . . . . . . . . . . . . . . . . . . . . 355
Table 104: Enterprise-IT-Security.com SF-Sherlock DSM Specifications . . . . . . 355
Table 105: Enterprise-IT-Security.com SF-Sherlock Log Source Parameters . . . 356
Chapter 43 Epic SIEM . . . . . . . . . . . . . . . . . . . . . . . . . . . . . . . . . . . . . . . . . . . . . . . . . . . . . . . 359
Table 106: Epic SIEM DSM Specifications . . . . . . . . . . . . . . . . . . . . . . . . . . . . . . . 359
Table 107: Epic SIEM Log Source Parameters . . . . . . . . . . . . . . . . . . . . . . . . . . . . 360
Chapter 44 Exabeam . . . . . . . . . . . . . . . . . . . . . . . . . . . . . . . . . . . . . . . . . . . . . . . . . . . . . . . 363
Table 108: Exabeam DSM Specifications . . . . . . . . . . . . . . . . . . . . . . . . . . . . . . . 363
Table 109: Exabeam Log Source Parameters . . . . . . . . . . . . . . . . . . . . . . . . . . . . 364
Chapter 45 Extreme . . . . . . . . . . . . . . . . . . . . . . . . . . . . . . . . . . . . . . . . . . . . . . . . . . . . . . . . 365
Table 110: Syslog Parameters . . . . . . . . . . . . . . . . . . . . . . . . . . . . . . . . . . . . . . . . . 367
Table 111: Syslog Parameters . . . . . . . . . . . . . . . . . . . . . . . . . . . . . . . . . . . . . . . . . 378
Table 112: Syslog Parameters . . . . . . . . . . . . . . . . . . . . . . . . . . . . . . . . . . . . . . . . 380
Table 113: Syslog Parameters . . . . . . . . . . . . . . . . . . . . . . . . . . . . . . . . . . . . . . . . . 384
Table 114: Syslog Parameters . . . . . . . . . . . . . . . . . . . . . . . . . . . . . . . . . . . . . . . . . 387
Chapter 46 F5 Networks . . . . . . . . . . . . . . . . . . . . . . . . . . . . . . . . . . . . . . . . . . . . . . . . . . . . 389
Table 115: Syslog Protocol Parameters . . . . . . . . . . . . . . . . . . . . . . . . . . . . . . . . . 394
Table 116: Syslog Protocol Parameters . . . . . . . . . . . . . . . . . . . . . . . . . . . . . . . . . 399
Table 117: Syslog Protocol Parameters . . . . . . . . . . . . . . . . . . . . . . . . . . . . . . . . . 400
Table 118: Syslog Protocol Parameters . . . . . . . . . . . . . . . . . . . . . . . . . . . . . . . . . 404
Chapter 48 Fidelis XPS . . . . . . . . . . . . . . . . . . . . . . . . . . . . . . . . . . . . . . . . . . . . . . . . . . . . . . 407
Table 119: Syslog Parameters . . . . . . . . . . . . . . . . . . . . . . . . . . . . . . . . . . . . . . . . 409
Chapter 49 FireEye . . . . . . . . . . . . . . . . . . . . . . . . . . . . . . . . . . . . . . . . . . . . . . . . . . . . . . . . . . 411
Table 120: FireEye DSM Specifications . . . . . . . . . . . . . . . . . . . . . . . . . . . . . . . . . . 411
Copyright © 2018, Juniper Networks, Inc.xxxiv
Juniper Secure Analytics Configuring DSMs Guide
Chapter 50 Forcepoint . . . . . . . . . . . . . . . . . . . . . . . . . . . . . . . . . . . . . . . . . . . . . . . . . . . . . . . 415
Table 121: Syslog Parameters . . . . . . . . . . . . . . . . . . . . . . . . . . . . . . . . . . . . . . . . . 418
Table 122: Syslog Parameters . . . . . . . . . . . . . . . . . . . . . . . . . . . . . . . . . . . . . . . . . 419
Table 123: Syslog Parameters . . . . . . . . . . . . . . . . . . . . . . . . . . . . . . . . . . . . . . . . 423
Chapter 51 ForeScout CounterACT . . . . . . . . . . . . . . . . . . . . . . . . . . . . . . . . . . . . . . . . . . . 427
Table 124: Syslog Protocol Parameters . . . . . . . . . . . . . . . . . . . . . . . . . . . . . . . . . 428
Chapter 52 Fortinet FortiGate . . . . . . . . . . . . . . . . . . . . . . . . . . . . . . . . . . . . . . . . . . . . . . . . 431
Table 125: Fortinet FortiGate DSM Specifications . . . . . . . . . . . . . . . . . . . . . . . . . 431
Chapter 54 FreeRADIUS . . . . . . . . . . . . . . . . . . . . . . . . . . . . . . . . . . . . . . . . . . . . . . . . . . . . . 437
Table 126: FreeRADIUS DSM Specifications . . . . . . . . . . . . . . . . . . . . . . . . . . . . . 437
Table 127: FreeRADIUS Log Source Parameters . . . . . . . . . . . . . . . . . . . . . . . . . . 438
Chapter 55 Generic . . . . . . . . . . . . . . . . . . . . . . . . . . . . . . . . . . . . . . . . . . . . . . . . . . . . . . . . . 441
Table 128: Syslog Parameters . . . . . . . . . . . . . . . . . . . . . . . . . . . . . . . . . . . . . . . . 445
Table 129: Syslog Parameters . . . . . . . . . . . . . . . . . . . . . . . . . . . . . . . . . . . . . . . . 448
Chapter 56 Genua Genugate . . . . . . . . . . . . . . . . . . . . . . . . . . . . . . . . . . . . . . . . . . . . . . . . . 449
Table 130: Genua Genugate DSM Specifications . . . . . . . . . . . . . . . . . . . . . . . . . 449
Table 131: Genua Genugate Log Source Parameters . . . . . . . . . . . . . . . . . . . . . . 450
Chapter 57 Great Bay Beacon . . . . . . . . . . . . . . . . . . . . . . . . . . . . . . . . . . . . . . . . . . . . . . . . 453
Table 132: Syslog Parameters . . . . . . . . . . . . . . . . . . . . . . . . . . . . . . . . . . . . . . . . 454
Chapter 58 HBGary Active Defense . . . . . . . . . . . . . . . . . . . . . . . . . . . . . . . . . . . . . . . . . . . 455
Table 133: HBGary Active Defense Syslog Protocol Parameters . . . . . . . . . . . . . 456
Chapter 59 H3C Technologies . . . . . . . . . . . . . . . . . . . . . . . . . . . . . . . . . . . . . . . . . . . . . . . 459
Table 134: H3C Comware Platform DSM Specifications . . . . . . . . . . . . . . . . . . . 459
Table 135: H3C Comware Platform Log Source Parameters . . . . . . . . . . . . . . . . 460
Table 136: H3C Comware Platform Sample Syslog Message . . . . . . . . . . . . . . . 460
Chapter 60 Honeycomb Lexicon File Integrity Monitor (FIM) . . . . . . . . . . . . . . . . . . . . . 463
Table 137: Syslog Protocol Parameters . . . . . . . . . . . . . . . . . . . . . . . . . . . . . . . . . 465
Chapter 61 Hewlett Packard (HP) . . . . . . . . . . . . . . . . . . . . . . . . . . . . . . . . . . . . . . . . . . . . 467
Table 138: HP Network Automation DSM Specifications . . . . . . . . . . . . . . . . . . . 467
Table 139: HP Network Automation Log Source Parameters . . . . . . . . . . . . . . . 468
Table 140: HP Network Automation Sample Message Supported by the HP
Network Automation Software . . . . . . . . . . . . . . . . . . . . . . . . . . . . . . . . . . . 468
Table 141: HP ProCurve Syslog Protocol Parameters . . . . . . . . . . . . . . . . . . . . . . . 471
Table 142: HP-UX Syslog Parameters . . . . . . . . . . . . . . . . . . . . . . . . . . . . . . . . . . 474
Chapter 62 Huawei . . . . . . . . . . . . . . . . . . . . . . . . . . . . . . . . . . . . . . . . . . . . . . . . . . . . . . . . . 475
Table 143: Syslog Protocol Parameters . . . . . . . . . . . . . . . . . . . . . . . . . . . . . . . . . 479
Chapter 63 HyTrust CloudControl . . . . . . . . . . . . . . . . . . . . . . . . . . . . . . . . . . . . . . . . . . . . . 481
Table 144: HyTrust CloudControl DSM Specifications . . . . . . . . . . . . . . . . . . . . . 481
Table 145: HyTrust CloudControl Log Source Parameters . . . . . . . . . . . . . . . . . . 482
Chapter 64 IBM . . . . . . . . . . . . . . . . . . . . . . . . . . . . . . . . . . . . . . . . . . . . . . . . . . . . . . . . . . . . 483
Table 146: IBM AIX Server DSM Specifications . . . . . . . . . . . . . . . . . . . . . . . . . . . 484
xxxvCopyright © 2018, Juniper Networks, Inc.
List of Tables
Table 147: IBM AIX Audit DSM Specifications . . . . . . . . . . . . . . . . . . . . . . . . . . . . 485
Table 148: IBM AS/400 ISeries DSM Specifications . . . . . . . . . . . . . . . . . . . . . . . 491
Table 149: IBM AS/400 ISeries Log Source Parameters . . . . . . . . . . . . . . . . . . . . 492
Table 150: Bluemix Platform DSM Specifications . . . . . . . . . . . . . . . . . . . . . . . . 496
Table 151: IBM CICS Log File Protocol Parameters . . . . . . . . . . . . . . . . . . . . . . . . . 501
Table 152: IBM DB2 Log File Protocol Parameters . . . . . . . . . . . . . . . . . . . . . . . . 506
Table 153: IBM DB2 Log File Protocol Parameters . . . . . . . . . . . . . . . . . . . . . . . . . 512
Table 154: IBM DataPower DSM Specifications . . . . . . . . . . . . . . . . . . . . . . . . . . . 514
Table 155: IBM Federated Directory Server DSM Specifications . . . . . . . . . . . . . . 517
Table 156: IBM Federated Directory Serve Log Source Parameters . . . . . . . . . . . . 517
Table 157: IBM Guardium Syslog Configuration . . . . . . . . . . . . . . . . . . . . . . . . . . . 523
Table 158: Log File Protocol Parameters . . . . . . . . . . . . . . . . . . . . . . . . . . . . . . . . 529
Table 159: SNMPv2 Protocol Parameters . . . . . . . . . . . . . . . . . . . . . . . . . . . . . . . 534
Table 160: IBM Privileged Session Recorder Specifications . . . . . . . . . . . . . . . . . 535
Table 161: IBM Privileged Session Recorder Log Source Parameters . . . . . . . . . . 536
Table 162: JDBC - SiteProtector Protocol Parameters . . . . . . . . . . . . . . . . . . . . . 540
Table 163: IBM RACF Log File Protocol Parameters . . . . . . . . . . . . . . . . . . . . . . . 545
Table 164: IBM RACF Log File Protocol Parameters . . . . . . . . . . . . . . . . . . . . . . . . 551
Table 165: IBM Security Directory Server DSM Specifications . . . . . . . . . . . . . . . 555
Table 166: IBM Security Identity Governance (ISIG) DSM Specifications . . . . . . 556
Table 167: IBM Security Identity Governance DSM Log Source Parameters . . . . 557
Table 168: IBM Security Network Protection (XGS) Specifications . . . . . . . . . . . 559
Table 169: Syslog Configuration Parameters . . . . . . . . . . . . . . . . . . . . . . . . . . . . 560
Table 170: Syslog Parameters . . . . . . . . . . . . . . . . . . . . . . . . . . . . . . . . . . . . . . . . . 561
Table 171: IBM Security Trusteer ApexAdvanced Malware Protection DSM
Specifications . . . . . . . . . . . . . . . . . . . . . . . . . . . . . . . . . . . . . . . . . . . . . . . . . 562
Table 172: IBMSecurity Trusteer Apex AdvancedMalware Protection Log Source
Parameters for Syslog . . . . . . . . . . . . . . . . . . . . . . . . . . . . . . . . . . . . . . . . . . 563
Table 173: IBMSecurity Trusteer ApexAdvancedMalware Protection LogSource
Parameters for TLS Syslog . . . . . . . . . . . . . . . . . . . . . . . . . . . . . . . . . . . . . . . 563
Table 174: IBMSecurity Trusteer ApexAdvancedMalware Protection LogSource
Parameters for Log File Protocol . . . . . . . . . . . . . . . . . . . . . . . . . . . . . . . . . . 564
Table 175: IBM Sense DSM Specifications . . . . . . . . . . . . . . . . . . . . . . . . . . . . . . 568
Table 176: IBM Sense Log Source Parameters . . . . . . . . . . . . . . . . . . . . . . . . . . . 569
Table 177: IBM Sense Sample Message. . . . . . . . . . . . . . . . . . . . . . . . . . . . . . . . . 569
Table 178: IBM Tivloi Access Manager for E-business Syslog Configuration . . . . 572
Table 179: Log File Parameters . . . . . . . . . . . . . . . . . . . . . . . . . . . . . . . . . . . . . . . 576
Table 180: Z/OS Log File Parameters . . . . . . . . . . . . . . . . . . . . . . . . . . . . . . . . . . 580
Table 181: Syslog Parameters . . . . . . . . . . . . . . . . . . . . . . . . . . . . . . . . . . . . . . . . 584
Chapter 65 ISC Bind . . . . . . . . . . . . . . . . . . . . . . . . . . . . . . . . . . . . . . . . . . . . . . . . . . . . . . . . 587
Table 182: Syslog Protocol Parameters . . . . . . . . . . . . . . . . . . . . . . . . . . . . . . . . . 589
Chapter 66 Imperva SecureSphere . . . . . . . . . . . . . . . . . . . . . . . . . . . . . . . . . . . . . . . . . . . . 591
Table 183: Imperva SecureSphere DSM . . . . . . . . . . . . . . . . . . . . . . . . . . . . . . . . . 591
Table 184: Imperva SecureSphere Log Source Parameters . . . . . . . . . . . . . . . . . 592
Chapter 68 IT-CUBE AgileSI . . . . . . . . . . . . . . . . . . . . . . . . . . . . . . . . . . . . . . . . . . . . . . . . . 599
Table 185: SMB Tail Protocol Parameters . . . . . . . . . . . . . . . . . . . . . . . . . . . . . . . 601
Chapter 69 Itron Smart Meter . . . . . . . . . . . . . . . . . . . . . . . . . . . . . . . . . . . . . . . . . . . . . . . . 603
Copyright © 2018, Juniper Networks, Inc.xxxvi
Juniper Secure Analytics Configuring DSMs Guide
Table 186: Syslog Protocol Parameters . . . . . . . . . . . . . . . . . . . . . . . . . . . . . . . . 604
Chapter 70 Juniper Networks . . . . . . . . . . . . . . . . . . . . . . . . . . . . . . . . . . . . . . . . . . . . . . . . 605
Table 187: JDBC Protocol Parameters . . . . . . . . . . . . . . . . . . . . . . . . . . . . . . . . . . 606
Table 188: Juniper Networks EX Series Switch Options . . . . . . . . . . . . . . . . . . . . 609
Table 189: Juniper NSM Protocol Parameters . . . . . . . . . . . . . . . . . . . . . . . . . . . . 616
Table 190: Juniper Security Binary Log Collector Protocol Parameters . . . . . . . . 625
Table 191: Juniper SBR Properties . . . . . . . . . . . . . . . . . . . . . . . . . . . . . . . . . . . . . 626
Table 192: Syslog Parameters . . . . . . . . . . . . . . . . . . . . . . . . . . . . . . . . . . . . . . . . 629
Table 193: Netflow Parameters . . . . . . . . . . . . . . . . . . . . . . . . . . . . . . . . . . . . . . . 629
Table 194: Juniper Junos WebApp Secure Logging Parameters . . . . . . . . . . . . . . 631
Table 195: Syslog Protocol Parameters . . . . . . . . . . . . . . . . . . . . . . . . . . . . . . . . . 633
Chapter 71 Kaspersky Security Center . . . . . . . . . . . . . . . . . . . . . . . . . . . . . . . . . . . . . . . . 635
Table 196: Kaspersky Security Center DSM Specifications . . . . . . . . . . . . . . . . . 635
Table 197: Kaspersky Security Center Syslog Log Source Parameters . . . . . . . . . 636
Table 198: Kaspersky Security Center JDBC Log Source Parameters . . . . . . . . . 636
Table 199: JDBC Protocol Parameters . . . . . . . . . . . . . . . . . . . . . . . . . . . . . . . . . 639
Chapter 72 Kisco Information Systems SafeNet/i . . . . . . . . . . . . . . . . . . . . . . . . . . . . . . 643
Table 200: Kisco Information Systems SafeNet/i DSM Specifications . . . . . . . . 643
Table 201: Kisco Information Systems SafeNet/i Log Source Parameters . . . . . 644
Table 202: FTP Access Settings . . . . . . . . . . . . . . . . . . . . . . . . . . . . . . . . . . . . . . 645
Chapter 73 Lastline Enterprise . . . . . . . . . . . . . . . . . . . . . . . . . . . . . . . . . . . . . . . . . . . . . . . 647
Table 203: Lastline Enterprise DSM Specifications . . . . . . . . . . . . . . . . . . . . . . . 647
Table 204: Lastline Enterprise Log Source Parameters . . . . . . . . . . . . . . . . . . . . 648
Chapter 75 Linux . . . . . . . . . . . . . . . . . . . . . . . . . . . . . . . . . . . . . . . . . . . . . . . . . . . . . . . . . . . 651
Table 205: Syslog Parameters . . . . . . . . . . . . . . . . . . . . . . . . . . . . . . . . . . . . . . . . 652
Table 206: Syslog Protocol Parameters . . . . . . . . . . . . . . . . . . . . . . . . . . . . . . . . 655
Chapter 76 LOGbinder . . . . . . . . . . . . . . . . . . . . . . . . . . . . . . . . . . . . . . . . . . . . . . . . . . . . . . 659
Table 207: LOGbinder for Microsoft Exchange Server . . . . . . . . . . . . . . . . . . . . . 659
Table 208: Microsoft Exchange Server Log Source Parameters for LOGbinder
Event Collection . . . . . . . . . . . . . . . . . . . . . . . . . . . . . . . . . . . . . . . . . . . . . . . 660
Table 209: LOGbinder for Microsoft SharePoint Specifications . . . . . . . . . . . . . . 661
Table 210: Microsoft SharePoint Log Source Parameters for LOGbinder Event
Collection . . . . . . . . . . . . . . . . . . . . . . . . . . . . . . . . . . . . . . . . . . . . . . . . . . . . 662
Table 211: LOGbinder for Microsoft SQL Server Specifications . . . . . . . . . . . . . . 663
Table 212: Microsoft SQL Server Log Source Parameters for LOGbinder Event
Collection . . . . . . . . . . . . . . . . . . . . . . . . . . . . . . . . . . . . . . . . . . . . . . . . . . . . 664
Chapter 77 McAfee . . . . . . . . . . . . . . . . . . . . . . . . . . . . . . . . . . . . . . . . . . . . . . . . . . . . . . . . . 667
Table 213: McAfee Application / Change Control JDBC Protocol Parameters . . 668
Table 214: McAfee EPolicy Orchestrator . . . . . . . . . . . . . . . . . . . . . . . . . . . . . . . . 670
Table 215: McAfee Firewall Enterprise DSM Specifications . . . . . . . . . . . . . . . . . 679
Table 216: McAfee Firewall Enterprise Log Source Parameters . . . . . . . . . . . . . . 679
Table 217: McAfee Intrushield V2.x - V5.x CustomMessage Formats . . . . . . . . . . 681
Table 218: McAfee Intrushield V6.x & 7.x Alert Notification Parameters . . . . . . . 682
Table 219: McAfee Intrushield V6.x - V7.x Fault Notification Parameters . . . . . . 684
Table 220: McAfee Web Gateway DSM Specifications . . . . . . . . . . . . . . . . . . . . 686
xxxviiCopyright © 2018, Juniper Networks, Inc.
List of Tables
Table 221: McAfee Web Gateway Required Log Handler File . . . . . . . . . . . . . . . . 688
Chapter 78 MetaInfo MetaIP . . . . . . . . . . . . . . . . . . . . . . . . . . . . . . . . . . . . . . . . . . . . . . . . . 695
Table 222: Syslog Parameters . . . . . . . . . . . . . . . . . . . . . . . . . . . . . . . . . . . . . . . . 696
Chapter 79 Microsoft . . . . . . . . . . . . . . . . . . . . . . . . . . . . . . . . . . . . . . . . . . . . . . . . . . . . . . . 697
Table 223: Microsoft DHCP Log File Examples . . . . . . . . . . . . . . . . . . . . . . . . . . . 698
Table 224: Microsoft EndPoint Protection JDBC Parameters . . . . . . . . . . . . . . . . 701
Table 225: Microsoft SQL Server DSM . . . . . . . . . . . . . . . . . . . . . . . . . . . . . . . . . 703
Table 226: Microsoft Exchange Server . . . . . . . . . . . . . . . . . . . . . . . . . . . . . . . . . 709
Table 227: Microsoft Hyper-V DSM Specifications . . . . . . . . . . . . . . . . . . . . . . . . 715
Table 228: Microsoft IIS Supported Log Types . . . . . . . . . . . . . . . . . . . . . . . . . . . . 717
Table 229: Required Properties for IIS Event Logs . . . . . . . . . . . . . . . . . . . . . . . . . 718
Table 230: Microsoft IIS Protocol Parameters . . . . . . . . . . . . . . . . . . . . . . . . . . . . 719
Table 231: Required Properties for IIS Event Logs . . . . . . . . . . . . . . . . . . . . . . . . . . 721
Table 232: Microsoft IIS Syslog Configuration . . . . . . . . . . . . . . . . . . . . . . . . . . . . 723
Table 233: Microsoft Office 365 DSM Specifications . . . . . . . . . . . . . . . . . . . . . . 725
Table 234: Microsoft Office 365 Log Source Parameters . . . . . . . . . . . . . . . . . . . 726
Table 235: Microsoft Office 365 Sample Message Supported by the Microsoft
Office 365 Service . . . . . . . . . . . . . . . . . . . . . . . . . . . . . . . . . . . . . . . . . . . . . . 727
Table 236: Microsoft Operations Manager JDBC Parameters . . . . . . . . . . . . . . . . 731
Table 237: Microsoft SharePoint JDBC Parameters . . . . . . . . . . . . . . . . . . . . . . . 736
Table 238: Microsoft SharePoint JDBC Parameters . . . . . . . . . . . . . . . . . . . . . . . 739
Table 239: Microsoft SCOM JDBC Parameters . . . . . . . . . . . . . . . . . . . . . . . . . . . 742
Chapter 80 Motorola Symbol APMotorola Symbol AP . . . . . . . . . . . . . . . . . . . . . . . . . . . 755
Table 240: Syslog Parameters . . . . . . . . . . . . . . . . . . . . . . . . . . . . . . . . . . . . . . . . 756
Chapter 81 Name Value Pair . . . . . . . . . . . . . . . . . . . . . . . . . . . . . . . . . . . . . . . . . . . . . . . . . 759
Table 241: Name Value Pair Log Format Tags . . . . . . . . . . . . . . . . . . . . . . . . . . . . 759
Chapter 83 Netskope Active . . . . . . . . . . . . . . . . . . . . . . . . . . . . . . . . . . . . . . . . . . . . . . . . . 765
Table 242: Netskope Active DSM Specifications . . . . . . . . . . . . . . . . . . . . . . . . . 765
Table 243: Netskope Active Log Source Parameters . . . . . . . . . . . . . . . . . . . . . . 766
Table 244: Netskope Active DSM Log Source Parameters . . . . . . . . . . . . . . . . . . 766
Chapter 84 Niksun . . . . . . . . . . . . . . . . . . . . . . . . . . . . . . . . . . . . . . . . . . . . . . . . . . . . . . . . . . 769
Table 245: Syslog Parameters . . . . . . . . . . . . . . . . . . . . . . . . . . . . . . . . . . . . . . . . 770
Chapter 85 Nokia Firewall . . . . . . . . . . . . . . . . . . . . . . . . . . . . . . . . . . . . . . . . . . . . . . . . . . . . 771
Table 246: OPSEC/LEA Protocol Parameters . . . . . . . . . . . . . . . . . . . . . . . . . . . . 776
Chapter 87 Nortel Networks . . . . . . . . . . . . . . . . . . . . . . . . . . . . . . . . . . . . . . . . . . . . . . . . . 783
Table 247: Syslog Filters . . . . . . . . . . . . . . . . . . . . . . . . . . . . . . . . . . . . . . . . . . . . . 785
Table 248: Syslog Host Log . . . . . . . . . . . . . . . . . . . . . . . . . . . . . . . . . . . . . . . . . . 786
Chapter 89 Observe IT JDBC . . . . . . . . . . . . . . . . . . . . . . . . . . . . . . . . . . . . . . . . . . . . . . . . . 805
Table 249: ObserveIT JDBC DSM Specifications . . . . . . . . . . . . . . . . . . . . . . . . . 805
Table 250: ObserveIT JDBC Log Source Parameters . . . . . . . . . . . . . . . . . . . . . . 806
Table 251: Log File Protocol Parameters . . . . . . . . . . . . . . . . . . . . . . . . . . . . . . . . 807
Chapter 90 Okta . . . . . . . . . . . . . . . . . . . . . . . . . . . . . . . . . . . . . . . . . . . . . . . . . . . . . . . . . . . 809
Table 252: Okta DSM Specifications . . . . . . . . . . . . . . . . . . . . . . . . . . . . . . . . . . 809
Copyright © 2018, Juniper Networks, Inc.xxxviii
Juniper Secure Analytics Configuring DSMs Guide
Table 253: Okta DSM Log Source Parameters . . . . . . . . . . . . . . . . . . . . . . . . . . . 810
Table 254: Okta Sample Message Supported by the Okta Device . . . . . . . . . . . . 811
Chapter 91 Onapsis Security Platform . . . . . . . . . . . . . . . . . . . . . . . . . . . . . . . . . . . . . . . . . 813
Table 255: Onapsis Security Platform DSM Specifications . . . . . . . . . . . . . . . . . 813
Table 256: Onapsis Security Platform Log Source Parameters . . . . . . . . . . . . . . 814
Chapter 92 OpenBSD . . . . . . . . . . . . . . . . . . . . . . . . . . . . . . . . . . . . . . . . . . . . . . . . . . . . . . . . 817
Table 257: Syslog Parameters . . . . . . . . . . . . . . . . . . . . . . . . . . . . . . . . . . . . . . . . 818
Chapter 93 Open LDAP . . . . . . . . . . . . . . . . . . . . . . . . . . . . . . . . . . . . . . . . . . . . . . . . . . . . . . 821
Table 258: UDP Multiline Protocol Configuration . . . . . . . . . . . . . . . . . . . . . . . . . 822
Chapter 94 Open Source SNORT . . . . . . . . . . . . . . . . . . . . . . . . . . . . . . . . . . . . . . . . . . . . . 827
Table 259: Syslog Parameters . . . . . . . . . . . . . . . . . . . . . . . . . . . . . . . . . . . . . . . . 829
Chapter 95 OpenStack . . . . . . . . . . . . . . . . . . . . . . . . . . . . . . . . . . . . . . . . . . . . . . . . . . . . . . 831
Table 260: OpenStack DSM Specifications . . . . . . . . . . . . . . . . . . . . . . . . . . . . . . 831
Table 261: OpenStack Log Source Parameters . . . . . . . . . . . . . . . . . . . . . . . . . . . 832
Table 262: OpenStack Sample Message Supported by the OpenStack
Device . . . . . . . . . . . . . . . . . . . . . . . . . . . . . . . . . . . . . . . . . . . . . . . . . . . . . . . 833
Chapter 96 Oracle . . . . . . . . . . . . . . . . . . . . . . . . . . . . . . . . . . . . . . . . . . . . . . . . . . . . . . . . . . 837
Table 263: Syslog Protocol Parameters . . . . . . . . . . . . . . . . . . . . . . . . . . . . . . . . 839
Table 264: Configuring Log Source Parameters . . . . . . . . . . . . . . . . . . . . . . . . . . 843
Table 265: Log File Parameters . . . . . . . . . . . . . . . . . . . . . . . . . . . . . . . . . . . . . . . 849
Table 266: Oracle Database Listener Parameters . . . . . . . . . . . . . . . . . . . . . . . . 852
Table 267: Command Parameters . . . . . . . . . . . . . . . . . . . . . . . . . . . . . . . . . . . . 854
Table 268: Oracle Enterprise Manager DSM Specifications . . . . . . . . . . . . . . . . 856
Table 269: Oracle Enterprise Manager Log Source Parameters . . . . . . . . . . . . . . 857
Table 270: Oracle Fine Grained Auditing JDBC Parameters . . . . . . . . . . . . . . . . . 859
Table 271: Oracle OS Audit Command Parameters . . . . . . . . . . . . . . . . . . . . . . . 863
Chapter 97 OSSEC . . . . . . . . . . . . . . . . . . . . . . . . . . . . . . . . . . . . . . . . . . . . . . . . . . . . . . . . . 865
Table 272: Syslog Parameters . . . . . . . . . . . . . . . . . . . . . . . . . . . . . . . . . . . . . . . . 867
Chapter 98 Palo Alto Networks . . . . . . . . . . . . . . . . . . . . . . . . . . . . . . . . . . . . . . . . . . . . . . 869
Table 273: DSM Specifications for Palo Alto PA Series . . . . . . . . . . . . . . . . . . . . 869
Chapter 99 Pirean Access: One . . . . . . . . . . . . . . . . . . . . . . . . . . . . . . . . . . . . . . . . . . . . . . . 879
Table 274: Pirean Access: One Log Source Parameters . . . . . . . . . . . . . . . . . . . . 880
Chapter 100 PostFix Mail Transfer Agent . . . . . . . . . . . . . . . . . . . . . . . . . . . . . . . . . . . . . . . 883
Table 275: PostFix MTA Log Source Parameters . . . . . . . . . . . . . . . . . . . . . . . . . 884
Chapter 101 ProFTPd . . . . . . . . . . . . . . . . . . . . . . . . . . . . . . . . . . . . . . . . . . . . . . . . . . . . . . . . 889
Table 276: Syslog Parameters . . . . . . . . . . . . . . . . . . . . . . . . . . . . . . . . . . . . . . . . 891
Chapter 102 Proofpoint Enterprise Protection and Enterprise Privacy . . . . . . . . . . . . . . 893
Table 277: Proofpoint Enterprise Protection and Enterprise Privacy DSM
Specifications . . . . . . . . . . . . . . . . . . . . . . . . . . . . . . . . . . . . . . . . . . . . . . . . . 893
Table 278: Syslog Parameters . . . . . . . . . . . . . . . . . . . . . . . . . . . . . . . . . . . . . . . . 896
Table 279: Log File Parameters . . . . . . . . . . . . . . . . . . . . . . . . . . . . . . . . . . . . . . . 896
xxxixCopyright © 2018, Juniper Networks, Inc.
List of Tables
Chapter 103 Radware . . . . . . . . . . . . . . . . . . . . . . . . . . . . . . . . . . . . . . . . . . . . . . . . . . . . . . . . 899
Table 280: Radware AppWall DSM Specifications . . . . . . . . . . . . . . . . . . . . . . . 899
Table 281: Radware AppWall Log Source Parameters . . . . . . . . . . . . . . . . . . . . . 900
Table 282: Syslog Parameters . . . . . . . . . . . . . . . . . . . . . . . . . . . . . . . . . . . . . . . . 903
Chapter 104 Raz-Lee ISecurity . . . . . . . . . . . . . . . . . . . . . . . . . . . . . . . . . . . . . . . . . . . . . . . . 905
Table 283: IBM AS/400 ISeries DSM Specifications for Raz-Lee ISecurity . . . . . 905
Chapter 105 Redback ASE . . . . . . . . . . . . . . . . . . . . . . . . . . . . . . . . . . . . . . . . . . . . . . . . . . . 909
Table 284: Syslog Parameters . . . . . . . . . . . . . . . . . . . . . . . . . . . . . . . . . . . . . . . . 911
Chapter 106 Resolution1 CyberSecurity . . . . . . . . . . . . . . . . . . . . . . . . . . . . . . . . . . . . . . . . . 913
Table 285: Resolution1 CyberSecurity DSM Specifications . . . . . . . . . . . . . . . . . . 913
Chapter 107 Riverbed . . . . . . . . . . . . . . . . . . . . . . . . . . . . . . . . . . . . . . . . . . . . . . . . . . . . . . . . 917
Table 286: Riverbed SteelCentral NetProfiler Specifications . . . . . . . . . . . . . . . . 917
Table 287: Riverbed SteelCentral NetProfiler Log Source Parameters . . . . . . . . 918
Table 288: Riverbed SteelCentral NetProfiler Specifications . . . . . . . . . . . . . . . 920
Table 289: Riverbed SteelCentral NetProfiler Log Source Parameters . . . . . . . . 920
Chapter 109 Salesforce . . . . . . . . . . . . . . . . . . . . . . . . . . . . . . . . . . . . . . . . . . . . . . . . . . . . . . 929
Table 290: Salesforce Security Auditing DSM Specifications . . . . . . . . . . . . . . . 929
Table 291: Salesforce Security Salesforce Security Monitoring DSM
Specifications . . . . . . . . . . . . . . . . . . . . . . . . . . . . . . . . . . . . . . . . . . . . . . . . . 932
Chapter 111 Seculert . . . . . . . . . . . . . . . . . . . . . . . . . . . . . . . . . . . . . . . . . . . . . . . . . . . . . . . . . 941
Table 292: Seculert DSM Specifications . . . . . . . . . . . . . . . . . . . . . . . . . . . . . . . . 941
Table 293: Seculert Log Source Parameters . . . . . . . . . . . . . . . . . . . . . . . . . . . . . 942
Chapter 113 Skyhigh Networks Cloud Security Platform . . . . . . . . . . . . . . . . . . . . . . . . . 945
Table 294: Skyhigh Networks Cloud Security Platform DSM Specifications . . . . 945
Table 295: Skyhigh Networks Cloud Security Platform Log Source
Parameters . . . . . . . . . . . . . . . . . . . . . . . . . . . . . . . . . . . . . . . . . . . . . . . . . . . 946
Chapter 115 SonicWALL . . . . . . . . . . . . . . . . . . . . . . . . . . . . . . . . . . . . . . . . . . . . . . . . . . . . . 949
Table 296: Syslog Parameters . . . . . . . . . . . . . . . . . . . . . . . . . . . . . . . . . . . . . . . 950
Chapter 116 Sophos . . . . . . . . . . . . . . . . . . . . . . . . . . . . . . . . . . . . . . . . . . . . . . . . . . . . . . . . . 951
Table 297: Sophos Enterprise Console JDBC Parameters . . . . . . . . . . . . . . . . . . 953
Table 298: Sophos Enterprise Console JDBC Parameters . . . . . . . . . . . . . . . . . . 956
Table 299: Sophos PureMessage JDBC Parameters . . . . . . . . . . . . . . . . . . . . . . 960
Chapter 117 Splunk . . . . . . . . . . . . . . . . . . . . . . . . . . . . . . . . . . . . . . . . . . . . . . . . . . . . . . . . . 969
Table 300: Protocol Parameters for TCP Multiline Syslog . . . . . . . . . . . . . . . . . . 971
Chapter 118 Squid Web Proxy . . . . . . . . . . . . . . . . . . . . . . . . . . . . . . . . . . . . . . . . . . . . . . . . . 973
Table 301: Syslog Parameters . . . . . . . . . . . . . . . . . . . . . . . . . . . . . . . . . . . . . . . . 975
Chapter 119 SSH CryptoAuditor . . . . . . . . . . . . . . . . . . . . . . . . . . . . . . . . . . . . . . . . . . . . . . . 977
Table 302: SSH CryptoAuditor DSM Specifications . . . . . . . . . . . . . . . . . . . . . . . 977
Chapter 120 Starent Networks . . . . . . . . . . . . . . . . . . . . . . . . . . . . . . . . . . . . . . . . . . . . . . . . 981
Table 303: Syslog Server Parameters . . . . . . . . . . . . . . . . . . . . . . . . . . . . . . . . . . 981
Table 304: Trace Log Parameters . . . . . . . . . . . . . . . . . . . . . . . . . . . . . . . . . . . . . 982
Copyright © 2018, Juniper Networks, Inc.xl
Juniper Secure Analytics Configuring DSMs Guide
Table 305: Active Log Parameters . . . . . . . . . . . . . . . . . . . . . . . . . . . . . . . . . . . . 983
Table 306: Monitor Log Parameters . . . . . . . . . . . . . . . . . . . . . . . . . . . . . . . . . . . 984
Chapter 121 STEALTHbits . . . . . . . . . . . . . . . . . . . . . . . . . . . . . . . . . . . . . . . . . . . . . . . . . . . . 985
Table 307: STEALTHbits StealthINTERCEPT DSM Specifications . . . . . . . . . . . 985
Table 308: Syslog Parameters . . . . . . . . . . . . . . . . . . . . . . . . . . . . . . . . . . . . . . . . 987
Table 309: STEALTHbits StealthINTERCEPT and STEALTHbits File Activity
Monitor Sample Event Message Supported by the STEALTHbits
StealthINTERCEPT DSM . . . . . . . . . . . . . . . . . . . . . . . . . . . . . . . . . . . . . . . . 989
Table 310: STEALTHbits StealthINTERCEPT Alerts DSM Specifications . . . . . . 990
Table 311: STEALTHbits StealthINTERCEPT Alerts Log Source Parameters . . . . 991
Table 312: STEALTHbits StealthINTERCEPT Analytics DSM Specifications . . . . 992
Table 313: STEALTHbits StealthINTERCEPT Analytics Log Source
Parameters . . . . . . . . . . . . . . . . . . . . . . . . . . . . . . . . . . . . . . . . . . . . . . . . . . . 993
Chapter 122 Stonesoft Management Center . . . . . . . . . . . . . . . . . . . . . . . . . . . . . . . . . . . . 995
Table 314: Log Server Configuration Options . . . . . . . . . . . . . . . . . . . . . . . . . . . . 996
Table 315: Syslog Parameters . . . . . . . . . . . . . . . . . . . . . . . . . . . . . . . . . . . . . . . . 998
Chapter 123 Sun . . . . . . . . . . . . . . . . . . . . . . . . . . . . . . . . . . . . . . . . . . . . . . . . . . . . . . . . . . . . 999
Table 316: Syslog Parameters . . . . . . . . . . . . . . . . . . . . . . . . . . . . . . . . . . . . . . . 1004
Table 317: Syslog Parameters . . . . . . . . . . . . . . . . . . . . . . . . . . . . . . . . . . . . . . . 1008
Table 318: Log File Parameters . . . . . . . . . . . . . . . . . . . . . . . . . . . . . . . . . . . . . . . 1011
Chapter 125 Symantec . . . . . . . . . . . . . . . . . . . . . . . . . . . . . . . . . . . . . . . . . . . . . . . . . . . . . . 1019
Table 319: Symantec Critical System Protection DSM Specifications . . . . . . . . 1019
Table 320: Syslog Protocol Parameters . . . . . . . . . . . . . . . . . . . . . . . . . . . . . . . 1029
Table 321: Symantec System Center JDBC Parameters . . . . . . . . . . . . . . . . . . . . 1031
Chapter 126 Symark . . . . . . . . . . . . . . . . . . . . . . . . . . . . . . . . . . . . . . . . . . . . . . . . . . . . . . . . 1035
Table 322: Adding a Syslog Log Source . . . . . . . . . . . . . . . . . . . . . . . . . . . . . . . . 1036
Table 323: Command Parameters . . . . . . . . . . . . . . . . . . . . . . . . . . . . . . . . . . . . 1037
Chapter 127 Sourcefire Intrusion Sensor . . . . . . . . . . . . . . . . . . . . . . . . . . . . . . . . . . . . . . 1039
Table 324: Cisco FireSIGHTManagement Center Sample Message Supported
by the Cisco FireSIGHT Management Center Device. . . . . . . . . . . . . . . . . . . 1041
Chapter 128 ThreatGRID Malware Threat Intelligence Platform . . . . . . . . . . . . . . . . . . 1047
Table 325: Syslog Protocol Parameters . . . . . . . . . . . . . . . . . . . . . . . . . . . . . . . 1049
Table 326: Log File Protocol Parameters . . . . . . . . . . . . . . . . . . . . . . . . . . . . . . 1050
Chapter 131 Townsend Security LogAgent . . . . . . . . . . . . . . . . . . . . . . . . . . . . . . . . . . . . . 1061
Table 327: Syslog Parameters . . . . . . . . . . . . . . . . . . . . . . . . . . . . . . . . . . . . . . . 1063
Chapter 132 Trend Micro . . . . . . . . . . . . . . . . . . . . . . . . . . . . . . . . . . . . . . . . . . . . . . . . . . . . 1065
Table 328: SNMPv2 Protocol Parameters . . . . . . . . . . . . . . . . . . . . . . . . . . . . . . 1066
Table 329: Trend Micro Deep Discovery Analyzer DSM Specifications . . . . . . . . 1067
Table 330: Trend Micro Deep Discovery Analyzer Log Source Parameters . . . . 1068
Table 331: Trend Micro Deep Discovery Email Inspector DSM Specifications . . 1069
Table 332: Trend Micro Deep Discovery Email Inspector Log Source
Parameters . . . . . . . . . . . . . . . . . . . . . . . . . . . . . . . . . . . . . . . . . . . . . . . . . . 1070
Table 333: Trend Micro Deep Security DSM Specifications . . . . . . . . . . . . . . . . . 1071
xliCopyright © 2018, Juniper Networks, Inc.
List of Tables
Table 334: Trend Micro Deep Security DSM Log Source Parameters . . . . . . . . . 1072
Chapter 135 Universal . . . . . . . . . . . . . . . . . . . . . . . . . . . . . . . . . . . . . . . . . . . . . . . . . . . . . . 1083
Table 335: Universal CEF DSM Specifications . . . . . . . . . . . . . . . . . . . . . . . . . . 1083
Table 336: Syslog Protocol Parameters . . . . . . . . . . . . . . . . . . . . . . . . . . . . . . . . 1087
Table 337: Log File Protocol Parameters . . . . . . . . . . . . . . . . . . . . . . . . . . . . . . . 1088
Chapter 136 Vectra Networks Vectra . . . . . . . . . . . . . . . . . . . . . . . . . . . . . . . . . . . . . . . . . . 1095
Table 338: Vectra Networks Vectra DSM Specifications . . . . . . . . . . . . . . . . . . 1095
Table 339: Vectra Networks Vectra Log Source Parameters . . . . . . . . . . . . . . . 1096
Table 340: Vectra Networks Vectra Sample Message. . . . . . . . . . . . . . . . . . . . . 1096
Chapter 138 Verdasys Digital Guardian . . . . . . . . . . . . . . . . . . . . . . . . . . . . . . . . . . . . . . . . 1103
Table 341: Syslog Parameters . . . . . . . . . . . . . . . . . . . . . . . . . . . . . . . . . . . . . . . . 1107
Chapter 140 VMWare . . . . . . . . . . . . . . . . . . . . . . . . . . . . . . . . . . . . . . . . . . . . . . . . . . . . . . . . . 1111
Table 342: VMWare Syslog Protocol Parameters . . . . . . . . . . . . . . . . . . . . . . . . . 1112
Table 343: Syslog Protocol Parameters . . . . . . . . . . . . . . . . . . . . . . . . . . . . . . . . . 1113
Table 344: VMWare Protocol Parameters . . . . . . . . . . . . . . . . . . . . . . . . . . . . . . . 1116
Table 345: VMware Protocol Parameters . . . . . . . . . . . . . . . . . . . . . . . . . . . . . . . 1118
Table 346: VMware VCloud Director Log Source Parameters . . . . . . . . . . . . . . . 1120
Table 347: VMware VShield DSM Specifications . . . . . . . . . . . . . . . . . . . . . . . . . . 1121
Chapter 142 WatchGuard Fireware OS . . . . . . . . . . . . . . . . . . . . . . . . . . . . . . . . . . . . . . . . . 1129
Table 348: WatchGuard Fireware DSM Specifications . . . . . . . . . . . . . . . . . . . . 1129
Chapter 144 Zscaler Nanolog Streaming Service . . . . . . . . . . . . . . . . . . . . . . . . . . . . . . . . 1137
Table 349: Syslog Protocol Parameters . . . . . . . . . . . . . . . . . . . . . . . . . . . . . . . . 1139
Chapter 145 JSA Supported DSMs . . . . . . . . . . . . . . . . . . . . . . . . . . . . . . . . . . . . . . . . . . . . . 1141
Table 350: JSA Supported DSMs . . . . . . . . . . . . . . . . . . . . . . . . . . . . . . . . . . . . . . 1141
Copyright © 2018, Juniper Networks, Inc.xlii
Juniper Secure Analytics Configuring DSMs Guide
About the Documentation
• Documentation and Release Notes on page xliii
• Documentation Conventions on page xliii
• Documentation Feedback on page xlv
• Requesting Technical Support on page xlvi
Documentation and Release Notes
To obtain the most current version of all Juniper Networks®technical documentation,
see the product documentation page on the Juniper Networks website at
http://www.juniper.net/techpubs/.
If the information in the latest release notes differs from the information in the
documentation, follow the product Release Notes.
Juniper Networks Books publishes books by Juniper Networks engineers and subject
matter experts. These books go beyond the technical documentation to explore the
nuances of network architecture, deployment, and administration. The current list can
be viewed at http://www.juniper.net/books.
Documentation Conventions
Table 1 on page xliv defines notice icons used in this guide.
xliiiCopyright © 2018, Juniper Networks, Inc.
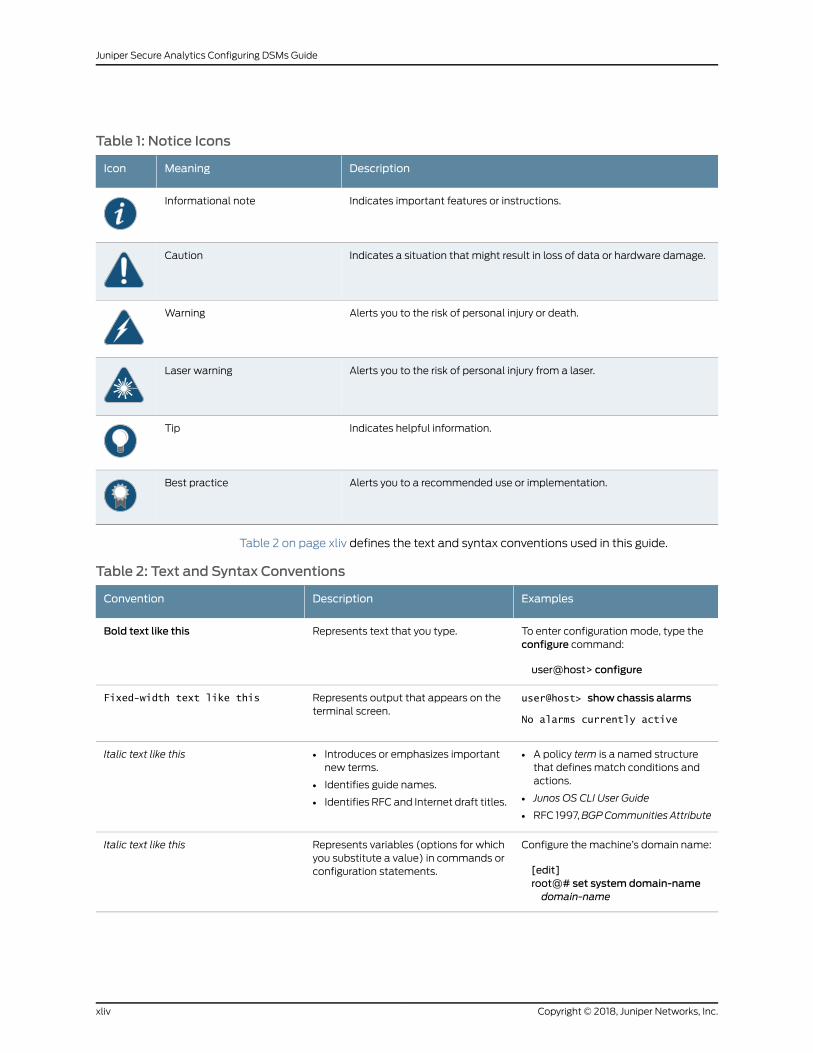
Table 1: Notice Icons
DescriptionMeaningIcon
Indicates important features or instructions.Informational note
Indicates a situation that might result in loss of data or hardware damage.Caution
Alerts you to the risk of personal injury or death.Warning
Alerts you to the risk of personal injury from a laser.Laser warning
Indicates helpful information.Tip
Alerts you to a recommended use or implementation.Best practice
Table 2 on page xliv defines the text and syntax conventions used in this guide.
Table 2: Text and Syntax Conventions
ExamplesDescriptionConvention
To enter configuration mode, type theconfigure command:
user@host> configure
Represents text that you type.Bold text like this
user@host> show chassis alarms
No alarms currently active
Represents output that appears on theterminal screen.
Fixed-width text like this
• A policy term is a named structurethat defines match conditions andactions.
• Junos OS CLI User Guide
• RFC 1997,BGPCommunities Attribute
• Introduces or emphasizes importantnew terms.
• Identifies guide names.
• Identifies RFC and Internet draft titles.
Italic text like this
Configure themachine’s domain name:
[edit]root@# set system domain-namedomain-name
Represents variables (options for whichyou substitute a value) in commands orconfiguration statements.
Italic text like this
Copyright © 2018, Juniper Networks, Inc.xliv
Juniper Secure Analytics Configuring DSMs Guide
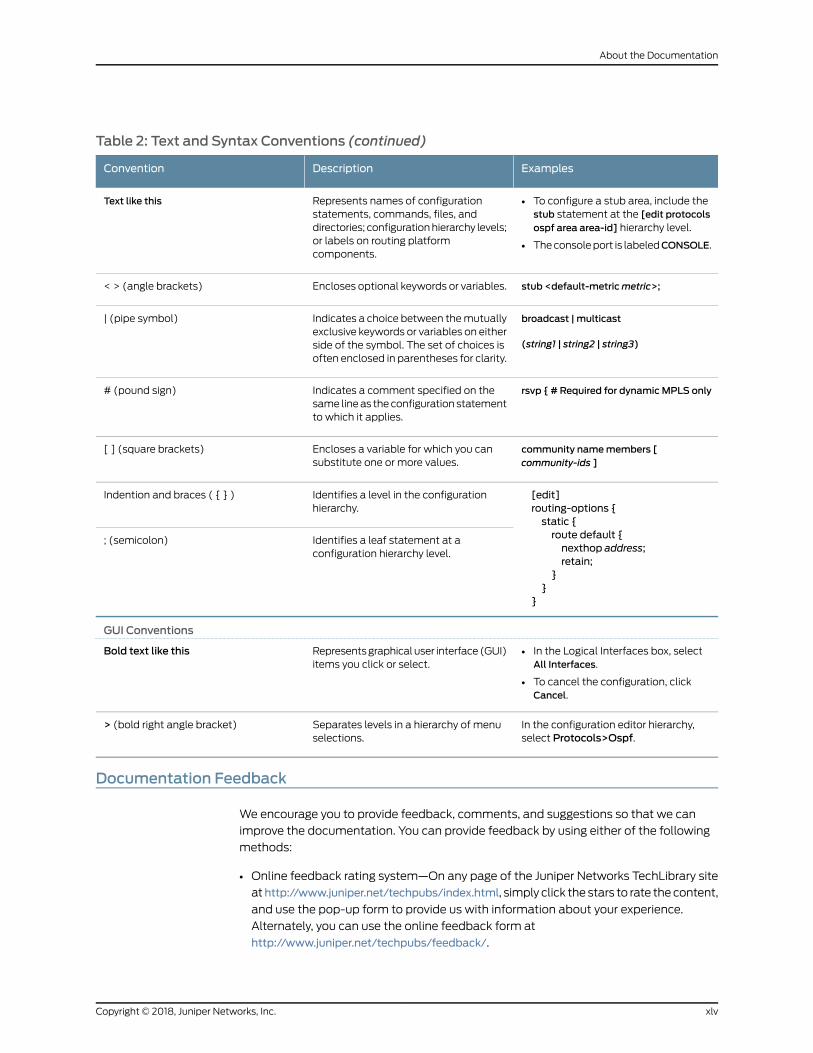
Table 2: Text and Syntax Conventions (continued)
ExamplesDescriptionConvention
• To configure a stub area, include thestub statement at the [edit protocolsospf area area-id] hierarchy level.
• Theconsoleport is labeledCONSOLE.
Represents names of configurationstatements, commands, files, anddirectories; configurationhierarchy levels;or labels on routing platformcomponents.
Text like this
stub <default-metricmetric>;Encloses optional keywords or variables.< > (angle brackets)
broadcast | multicast
(string1 | string2 | string3)
Indicates a choice between themutuallyexclusive keywords or variables on eitherside of the symbol. The set of choices isoften enclosed in parentheses for clarity.
| (pipe symbol)
rsvp { # Required for dynamicMPLS onlyIndicates a comment specified on thesame lineas theconfiguration statementto which it applies.
# (pound sign)
community namemembers [community-ids ]
Encloses a variable for which you cansubstitute one or more values.
[ ] (square brackets)
[edit]routing-options {static {route default {nexthop address;retain;
}}
}
Identifies a level in the configurationhierarchy.
Indention and braces ( { } )
Identifies a leaf statement at aconfiguration hierarchy level.
; (semicolon)
GUI Conventions
• In the Logical Interfaces box, selectAll Interfaces.
• To cancel the configuration, clickCancel.
Representsgraphicaluser interface(GUI)items you click or select.
Bold text like this
In the configuration editor hierarchy,select Protocols>Ospf.
Separates levels in a hierarchy of menuselections.
> (bold right angle bracket)
Documentation Feedback
We encourage you to provide feedback, comments, and suggestions so that we can
improve the documentation. You can provide feedback by using either of the following
methods:
• Online feedback rating system—On any page of the Juniper Networks TechLibrary site
athttp://www.juniper.net/techpubs/index.html, simply click the stars to rate thecontent,
and use the pop-up form to provide us with information about your experience.
Alternately, you can use the online feedback form at
http://www.juniper.net/techpubs/feedback/.
xlvCopyright © 2018, Juniper Networks, Inc.
About the Documentation
• E-mail—Sendyourcommentsto [email protected]. Includethedocument
or topic name, URL or page number, and software version (if applicable).
Requesting Technical Support
Technical product support is available through the JuniperNetworksTechnicalAssistance
Center (JTAC). If you are a customer with an active J-Care or Partner Support Service
support contract, or are covered under warranty, and need post-sales technical support,
you can access our tools and resources online or open a case with JTAC.
• JTAC policies—For a complete understanding of our JTAC procedures and policies,
review the JTAC User Guide located at
http://www.juniper.net/us/en/local/pdf/resource-guides/7100059-en.pdf.
• Product warranties—For product warranty information, visit
http://www.juniper.net/support/warranty/.
• JTAC hours of operation—The JTAC centers have resources available 24 hours a day,
7 days a week, 365 days a year.
Self-Help Online Tools and Resources
For quick and easy problem resolution, Juniper Networks has designed an online
self-service portal called the Customer Support Center (CSC) that provides youwith the
following features:
• Find CSC offerings: http://www.juniper.net/customers/support/
• Search for known bugs: https://prsearch.juniper.net/
• Find product documentation: http://www.juniper.net/documentation/
• Find solutions and answer questions using our Knowledge Base: http://kb.juniper.net/
• Download the latest versions of software and review release notes:
http://www.juniper.net/customers/csc/software/
• Search technical bulletins for relevant hardware and software notifications:
http://kb.juniper.net/InfoCenter/
• Join and participate in the Juniper Networks Community Forum:
http://www.juniper.net/company/communities/
• Open a case online in the CSC Case Management tool: http://www.juniper.net/cm/
Toverify serviceentitlementbyproduct serial number, useourSerialNumberEntitlement
(SNE) Tool: https://entitlementsearch.juniper.net/entitlementsearch/
Opening a Casewith JTAC
You can open a case with JTAC on theWeb or by telephone.
• Use the Case Management tool in the CSC at http://www.juniper.net/cm/.
• Call 1-888-314-JTAC (1-888-314-5822 toll-free in the USA, Canada, and Mexico).
Copyright © 2018, Juniper Networks, Inc.xlvi
Juniper Secure Analytics Configuring DSMs Guide

For international or direct-dial options in countries without toll-free numbers, see
http://www.juniper.net/support/requesting-support.html.
xlviiCopyright © 2018, Juniper Networks, Inc.
About the Documentation

Copyright © 2018, Juniper Networks, Inc.xlviii
Juniper Secure Analytics Configuring DSMs Guide
CHAPTER 1
EventCollection fromThird-partyDevices
• Event Collection from Third-party Devices on page 49
• Adding a DSM on page 51
Event Collection from Third-party Devices
Toconfigureevent collection fromthird-partydevices, youneed tocompleteconfiguration
taskson the third-party device, and your JSAConsole, EventCollector, or EventProcessor.
The key components that work together to collect events from third-party devices are
log sources, DSMs, and automatic updates.
Log Sources
A log source is any external device, system that is configured to either send events to
your JSA system or be collected by your JSA system. JSA shows events from log sources
in the Log Activity tab.
To receive raw events from log sources, JSA supports several protocols, including syslog
fromOS, applications, firewalls, IPS/IDS, SNMP, SOAP, JDBC for data from database
tables and views. JSA also supports proprietary vendor-specific protocols such as
OPSEC/LEA from Checkpoint.
DSMs
A Device Support Module (DSM) is a configuration file that parses received events from
multiple log sources and coverts them to a standard taxonomy format that can be
displayed as output. Each type of log source has a corresponding DSM.
Automatic Updates
JSA provides daily and weekly automatic updates on a recurring schedule. The weekly
automatic update includesnewDSMreleases, corrections toparsing issues, andprotocol
updates. Formore informationaboutautomatic updates, see the JuniperSecureAnalytics
Administration Guide.
Third-party Device Installation Process
To collect events from third-party device, youmust complete installation and
configuration steps on both the log source device and your JSA system. For some
49Copyright © 2018, Juniper Networks, Inc.
third-partydevices, extra configuration stepsareneeded, suchasconfiguringacertificate
to enable communication between that device and JSA.
The following steps represent a typical installation process:
1. Read the specific instructions for how to integrate your third-party device.
2. Download and install the RPM for your third-party device. RPMs are available for
download from the https://www.juniper.net/support/downloads/
TIP: If your JSA system is configured to accept automatic updates, thisstepmight not be required.
3. Configure the third-party device to send events to JSA.
After some events are received, JSA automatically detects some third-party devices
and creates a log source configuration. The log source is listed on the Log Sources list
and contains default information. You can customize the information.
4. If JSA does not automatically detect the log source, manually add a log source. The
list of supported DSMs and the device-specific topics indicate which third-party
devices are not automatically detected.
5. Deploy the configuration changes and restart your web services.
Universal DSMs for Unsupported Third-party Log Sources
After the events are collected and before the correlation can begin, individual events
fromyourdevicesmustbeproperly normalized.Normalizationmeans tomap information
to common field names, such as event name, IP addresses, protocol, and ports. If an
enterprise network hasoneormorenetworkor security devices that JSAdoesnotprovide
acorrespondingDSM, youcanuse theUniversalDSM. JSAcan integratewithmostdevices
and any common protocol sources by using the Universal DSM.
To configure the Universal DSM, youmust use device extensions to associate a Universal
DSMtodevices.Before youdefinedeviceextension information in theLogSourceswindow
in the Admin tab, youmust create an extensions document for the log source.
Copyright © 2018, Juniper Networks, Inc.50
Juniper Secure Analytics Configuring DSMs Guide
Adding a DSM
If your system is disconnected from the Internet, youmight need to install a DSM RPM
manually.
NOTE: Uninstalling aDevice SupportModule (DSM) is not supported in JSA.
NOTE: The rpm -Uvh<rpm_filename> command line to install was replacedwith the following command:
# yum localinstall -y --disablerepo=* --nogpgcheck<DSM/PROTOCOL>
1. Download the DSM RPM file from the https://www.juniper.net/support/downloads/.
2. Copy the RPM file to your JSA Console.
3. Using SSH, log in to the JSA host as the root user.
4. Navigate to the directory that includes the downloaded file.
5. Type the following command:
# yum localinstall -y --disablerepo=* --nogpgcheck<DSM/PROTOCOL>
6. Log in to the JSA user interface.
7. On the Admin tab, clickDeploy Changes.
8. On the Admin tab, select Advanced >RestartWeb Services.
RelatedDocumentation
• Adding a Log Source on page 54
• Adding Bulk Log Sources on page 55
• Adding a Log Source Parsing Order on page 55
51Copyright © 2018, Juniper Networks, Inc.
Chapter 1: Event Collection from Third-party Devices

Copyright © 2018, Juniper Networks, Inc.52
Juniper Secure Analytics Configuring DSMs Guide
CHAPTER 2
Introduction to Log Source Management
• Introduction to Log Source Management on page 53
• Adding a Log Source on page 54
• Adding Bulk Log Sources on page 55
• Adding a Log Source Parsing Order on page 55
Introduction to Log SourceManagement
You can configure JSA to accept event logs from log sources that are on your network.
A log source is a data source that creates an event log.
For example, a firewall or intrusion protection system (IPS) logs security-based events,
and switches or routers logs network-based events.
To receive raw events from log sources, JSA supports many protocols. Passive protocols
listen for events on specific ports. Active protocols use APIs or other communication
methods to connect to external systems that poll and retrieve events.
Depending on your license limits, JSA can read and interpret events frommore than 300
log sources.
To configure a log source for JSA, youmust do the following tasks:
1. Download and install a device support module (DSM) that supports the log source.
A DSM is software application that contains the event patterns that are required to
identify and parse events from the original format of the event log to the format that
JSA can use.
2. If automatic discovery is supported for the DSM, wait for JSA to automatically add
the log source to your list of configured log sources.
3. If automatic discover is not supported for the DSM, manually create the log source
configuration.
RelatedDocumentation
Adding a Log Source on page 54•
• Adding Bulk Log Sources on page 55
• Adding a Log Source Parsing Order on page 55
53Copyright © 2018, Juniper Networks, Inc.
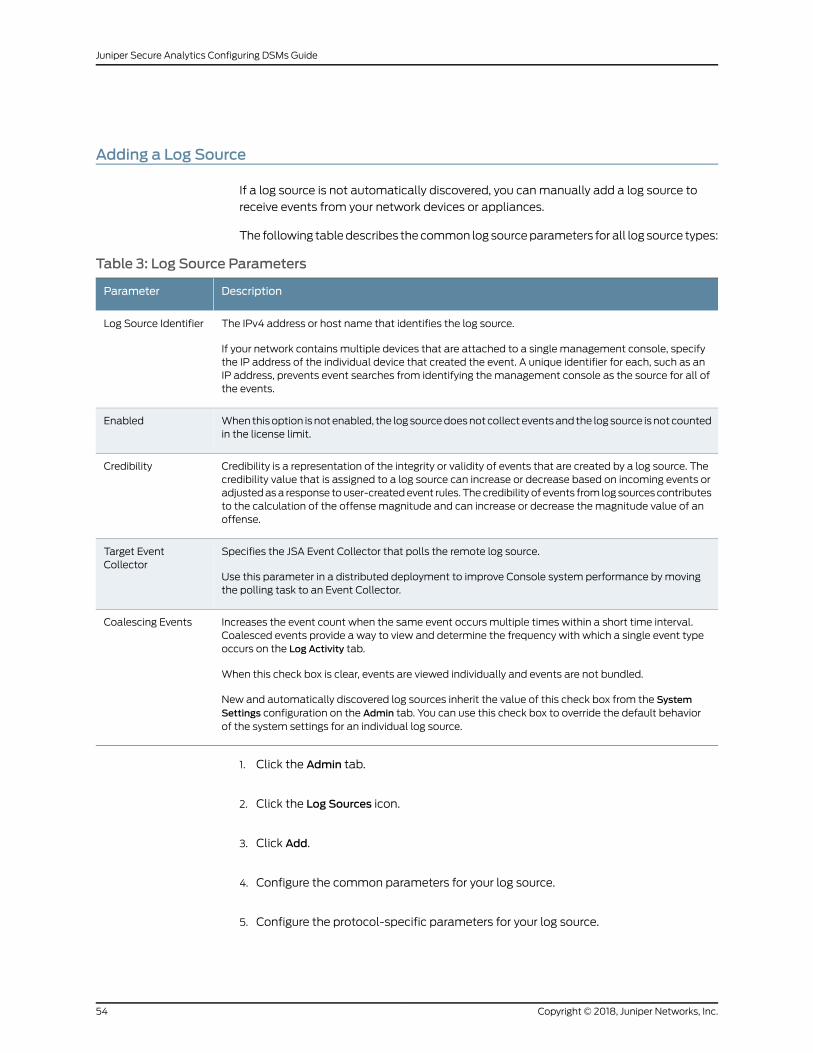
Adding a Log Source
If a log source is not automatically discovered, you canmanually add a log source to
receive events from your network devices or appliances.
The following tabledescribes thecommon log sourceparameters for all log source types:
Table 3: Log Source Parameters
DescriptionParameter
The IPv4 address or host name that identifies the log source.
If your network contains multiple devices that are attached to a single management console, specifythe IP address of the individual device that created the event. A unique identifier for each, such as anIP address, prevents event searches from identifying the management console as the source for all ofthe events.
Log Source Identifier
When thisoption isnotenabled, the logsourcedoesnot collect eventsand the logsource isnot countedin the license limit.
Enabled
Credibility is a representation of the integrity or validity of events that are created by a log source. Thecredibility value that is assigned to a log source can increase or decrease based on incoming events oradjustedasa response touser-createdevent rules. Thecredibility of events from log sources contributesto the calculation of the offense magnitude and can increase or decrease the magnitude value of anoffense.
Credibility
Specifies the JSA Event Collector that polls the remote log source.
Use this parameter in a distributed deployment to improve Console system performance bymovingthe polling task to an Event Collector.
Target EventCollector
Increases the event count when the same event occurs multiple times within a short time interval.Coalesced events provide a way to view and determine the frequency with which a single event typeoccurs on the Log Activity tab.
When this check box is clear, events are viewed individually and events are not bundled.
New and automatically discovered log sources inherit the value of this check box from the SystemSettings configuration on the Admin tab. You can use this check box to override the default behaviorof the system settings for an individual log source.
Coalescing Events
1. Click the Admin tab.
2. Click the Log Sources icon.
3. Click Add.
4. Configure the common parameters for your log source.
5. Configure the protocol-specific parameters for your log source.
Copyright © 2018, Juniper Networks, Inc.54
Juniper Secure Analytics Configuring DSMs Guide
6. Click Save.
7. On the Admin tab, click Deploy Changes.
RelatedDocumentation
Adding Bulk Log Sources on page 55•
• Adding a Log Source Parsing Order on page 55
• Adding a DSM on page 51
Adding Bulk Log Sources
You can add up to 500Microsoft Windows or Universal DSM log sources at one time.
When you addmultiple log sources at one time, you add a bulk log source in JSA. Bulk
log sources must share a common configuration.
1. Click the Admin tab.
2. Click the Log Sources icon.
3. From the Bulk Actions list, select Bulk Add.
4. Configure the parameters for the bulk log source.
• File Upload - Upload a text file that has one host name or IP per line
• Manual - Enter the host name or IP of the host that you wish to add
5. Click Save.
6. Click Continue to add the log sources.
7. On the Admin tab, click Deploy Changes.
RelatedDocumentation
Adding a Log Source Parsing Order on page 55•
• Adding a DSM on page 51
• Adding a Log Source on page 54
Adding a Log Source Parsing Order
Youcanassignapriority order forwhen theeventsareparsedby the target event collector.
You can order the importance of the log sources by defining the parsing order for log
sources that share a common IP address or host name. Defining the parsing order for log
sources ensures that certain log sources are parsed in a specific order, regardless of
changes to the log source configuration. The parsing order ensures that system
55Copyright © 2018, Juniper Networks, Inc.
Chapter 2: Introduction to Log Source Management
performance is not affected by changes to log source configuration by preventing
unnecessary parsing. The parsing order ensures that low-level event sources are not
parsed for events before more important log source.
1. Click the Admin tab.
2. Click the Log Source Parsing Ordering icon.
3. Select a log source.
4. From the Selected Event Collector list, select the Event Collector to define the log
source parsing order.
5. From the Log Source Host list, select a log source.
6. Prioritize the log source parsing order.
7. Click Save.
RelatedDocumentation
• Adding a DSM on page 51
• Adding a Log Source on page 54
• Adding Bulk Log Sources on page 55
Copyright © 2018, Juniper Networks, Inc.56
Juniper Secure Analytics Configuring DSMs Guide
CHAPTER 3
Log Source Extensions
• Log Source Extensions on page 57
• Patterns in Log Source Extension Documents on page 58
• Match Groups on page 58
• Extension Document Template on page 64
• Creating a Log Source Extensions Document on page 68
• Parsing Issues and Examples on page 77
• Log Source Type IDs on page 82
Log Source Extensions
Anextensiondocument canextendormodify howtheelementsof aparticular log source
are parsed. You can use the extension document correct a parsing issue or override the
default parsing for an event from an existing DSM.
An extension document can also provide event support when a DSM does not exist to
parse events for an appliance or security device in your network.
An extension document is an Extensible Markup Language (XML) formatted document
that you can create or edit one by using any common text, code or markup editor. You
can create multiple extension documents but a log source can have only one applied to
it.
The XML format requires that all regular expression (regex) patterns be contained in
character data (CDATA) sections to prevent the special characters that are required by
regular expressions from interfering with the markup format. For example, the following
code shows the regex for finding protocols:
<pattern id="ProtocolPattern" case-insensitive="true" xmlns=""> <![CDATA[(TCP|UDP|ICMP|GRE)]]></pattern>
(TCP|UDP|ICMP|GRE) is the regular expression pattern.
The log sources extension configuration consists of the following sections:
Pattern—Regular expressions patterns that you associate with a particular field name.Patterns are referencedmultiple times within the log source extension file.
57Copyright © 2018, Juniper Networks, Inc.
Match groups—An entity within a match group that is parsed, for example, EventName,and is paired with the appropriate pattern and group for parsing. Any number of
match groups can appear in the extension document.
RelatedDocumentation
Patterns in Log Source Extension Documents on page 58•
• Match Groups on page 58
Patterns in Log Source Extension Documents
Rather thanassociatinga regular expressiondirectlywithaparticular fieldname, patterns
(patterns) are declared separately at the top of the extension document. These regex
patterns can be then referencedmultiple times within the log source extension file.
All characters between the start tag <pattern> and end tag </pattern> are considered
part of the pattern. Do not use extra spaces or hard returns inside or around your pattern
or <CDATA> expression. Extra characters or spaces can prevent the DSM extension from
matching your intended pattern.
Table 4: Description Of Pattern Parameters
DescriptionTypePattern
A regular string that is unique within theextension document.
Stringid (Required)
If true, the character case is ignored. Forexample, abc is the same as ABC.
If not specified, this parameter defaultsto false.
Booleancase-insensitive (Optional)
If true, whitespace and carriage returnsare ignored. If the CDATA sections aresplit ontodifferent lines, anyextra spacesand carriage returns are not interpretedas part of the pattern.
If not specified, this parameter defaultsto false.
Booleantrim-whitespace (Optional)
RelatedDocumentation
Match Groups on page 58•
• Extension Document Template on page 64
• Creating a Log Source Extensions Document on page 68
Match Groups
Amatch group (match-group) is a set of patterns that are used for parsing or modifying
one or more types of events.
Copyright © 2018, Juniper Networks, Inc.58
Juniper Secure Analytics Configuring DSMs Guide
Amatcher is an entity within amatch group that is parsed, for example, EventName, and
is pairedwith theappropriatepatternandgroup for parsing. Anynumberofmatchgroups
can appear in the extension document.
Table 5: Description OfMatch Group Parameters
DescriptionParameter
An integer greater than zero that defines the order in which the match groups are executed.It must be unique within the extension document.
order (Required)
A description for thematch group, which can be any string. This information can appear in thelogs.
If not specified, this parameter defaults to empty.
description (Optional)
Define a different device ID to override the QID. Allows the particular match group to searchin the specified device for the event type. It must be a valid log source type ID, represented asan integer. A list of log source type IDs is presented in “Log Source Type IDs” on page 82.
If not specified, this parameter defaults to the log source type of the log source to which theextension is attached.
device-type-id-override(Optional)
Match groups can have these entities:
• Matcher (matcher) on page 59
• Multi-event Modifier (event-match-multiple) on page 62
• Single-event Modifier (event-match-single) on page 63
Matcher (matcher)
Amatcher entity is a field that is parsed, for example, EventName, and is paired with the
appropriate pattern and group for parsing.
Matchers have an associated order. If multiple matchers are specified for the same field
name, thematchers are run in theorder that is presenteduntil a successful parse is found
or a failure occurs.
Table 6: Description OfMatcher Parameters
DescriptionParameter
The field to which you want the pattern to apply, for example,EventName, or SourceIp. You can use any of the field names that arelisted in the List of valid matcher field names table.
field (Required)
The pattern that you want to use when the field is parsed from thepayload. This value must match (including case) the ID parameter ofthe pattern that is previously defined in a pattern ID parameter(“Patterns in Log Source Extension Documents” on page 58).
pattern-id (Required)
The order that you want this pattern to attempt amongmatchers thatare assigned to the same field. If twomatchers are assigned to theEventName field, the one with the lowest order is attempted first.
order (Required)
59Copyright © 2018, Juniper Networks, Inc.
Chapter 3: Log Source Extensions
Table 6: Description OfMatcher Parameters (continued)
DescriptionParameter
Referenced in the regular expression inside parenthesis ( ). Thesecaptures are indexed starting at one and processed from left to rightin the pattern. The capture-group field must be a positive integer lessthan or equal to the number of capture groups that are contained inthe pattern. The default value is zero, which is the entire match.
For example, you can define a single pattern for a source IP addressandport;where theSourceIpmatcher canusea capture groupof 1, andthe SourcePort matcher can use a capture group of 2, but only onepattern needs to be defined.
This field has a dual purpose when combined with theenable-substitutions parameter.
To see an example, review the “Extension Document Template” onpage 64.
capture-group (Optional)
Boolean
When you set to true, a field cannot be adequately represented with astraight group capture. You can combine multiple groups with extratext to form a value.
This parameter changes the meaning of the capture-group parameter.The capture-group parameter creates the new value, and groupsubstitutions are specified by using \xwhere x is a group number, 1 - 9.You can use groupsmultiple times, and any free-form text can also beinserted into the value. For example, to form a value out of group 1,followed by an underscore, followed by group 2, an@, and then group1 again, the appropriate capture-group syntax is shown in the followingcode:
capture-group=”\1_\2@\1”
In another example, a MAC address is separated by colons, but in JSA,MACaddresses are usually hyphen-separated. The syntax toparse andcapture the individual portions is shown in the following example:
capture-group=”\1:\2:\3:\4:\5:\6”
If no groups are specified in the capture-group when substitutions areenabled, a direct text replacement occurs.
Default is false.
enable-substitutions (Optional)
An extra-data parameter that defines any extra field information orformatting that a matcher field can provide in the extension.
The only field that uses this parameter is DeviceTime.
For example, youmight have a device that sends events by using aunique time stamp, but you want the event to be reformatted to astandard device time. Use the ext-data parameter included with theDeviceTime field to reformat the date and time stampof the event. Formore information, see the List of valid matcher field names.
ext-data (Optional)
Copyright © 2018, Juniper Networks, Inc.60
Juniper Secure Analytics Configuring DSMs Guide
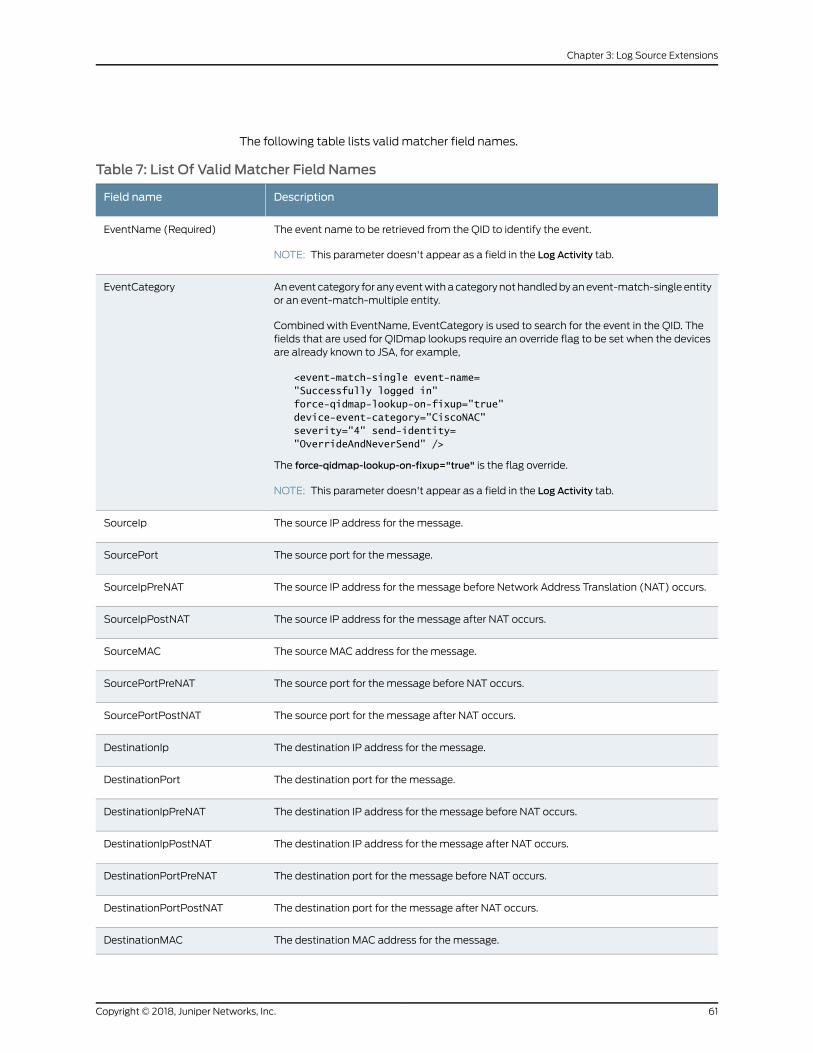
The following table lists valid matcher field names.
Table 7: List Of Valid Matcher Field Names
DescriptionField name
The event name to be retrieved from the QID to identify the event.
NOTE: This parameter doesn't appear as a field in the Log Activity tab.
EventName (Required)
Anevent category for anyeventwithacategorynot handledbyanevent-match-single entityor an event-match-multiple entity.
Combined with EventName, EventCategory is used to search for the event in the QID. Thefields that are used for QIDmap lookups require an override flag to be set when the devicesare already known to JSA, for example,
<event-match-single event-name="Successfully logged in" force-qidmap-lookup-on-fixup="true" device-event-category="CiscoNAC" severity="4" send-identity="OverrideAndNeverSend" />
The force-qidmap-lookup-on-fixup="true" is the flag override.
NOTE: This parameter doesn't appear as a field in the Log Activity tab.
EventCategory
The source IP address for the message.SourceIp
The source port for the message.SourcePort
The source IP address for the message before Network Address Translation (NAT) occurs.SourceIpPreNAT
The source IP address for the message after NAT occurs.SourceIpPostNAT
The source MAC address for the message.SourceMAC
The source port for the message before NAT occurs.SourcePortPreNAT
The source port for the message after NAT occurs.SourcePortPostNAT
The destination IP address for the message.DestinationIp
The destination port for the message.DestinationPort
The destination IP address for the message before NAT occurs.DestinationIpPreNAT
The destination IP address for the message after NAT occurs.DestinationIpPostNAT
The destination port for the message before NAT occurs.DestinationPortPreNAT
The destination port for the message after NAT occurs.DestinationPortPostNAT
The destination MAC address for the message.DestinationMAC
61Copyright © 2018, Juniper Networks, Inc.
Chapter 3: Log Source Extensions
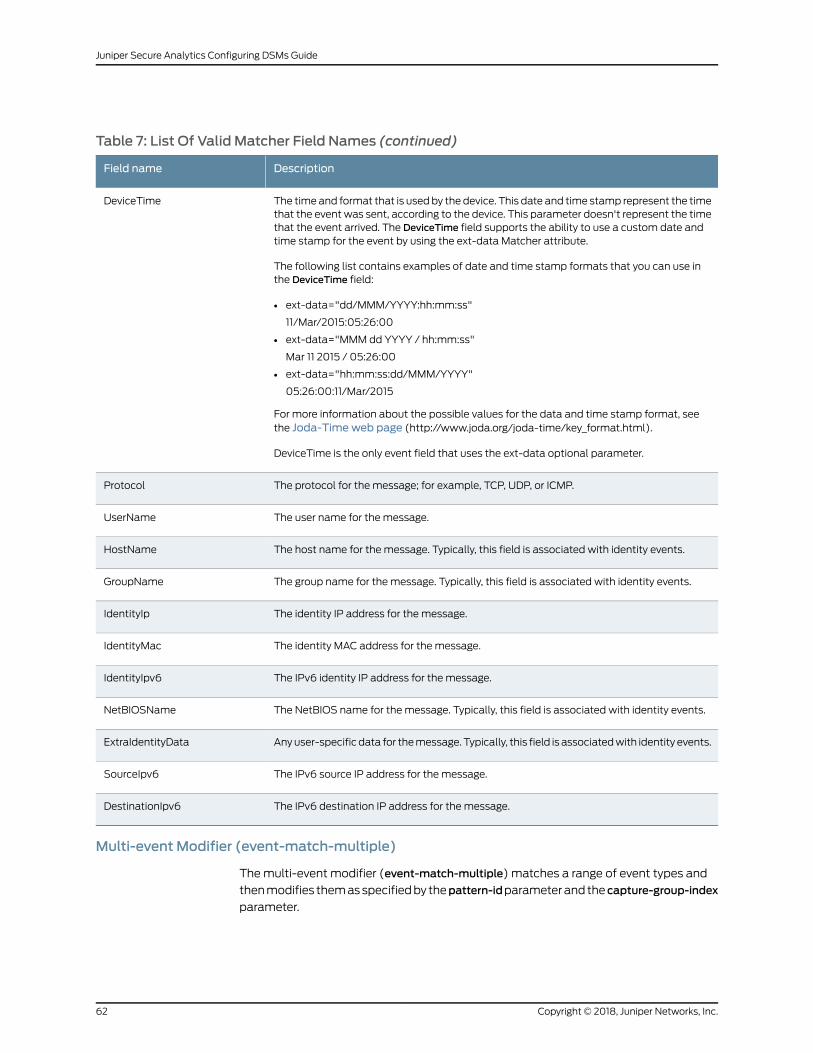
Table 7: List Of Valid Matcher Field Names (continued)
DescriptionField name
The timeand format that is usedby the device. This date and time stamp represent the timethat the event was sent, according to the device. This parameter doesn't represent the timethat the event arrived. The DeviceTime field supports the ability to use a custom date andtime stamp for the event by using the ext-data Matcher attribute.
The following list contains examples of date and time stamp formats that you can use inthe DeviceTime field:
• ext-data="dd/MMM/YYYY:hh:mm:ss"
11/Mar/2015:05:26:00
• ext-data="MMM dd YYYY / hh:mm:ss"
Mar 11 2015 / 05:26:00
• ext-data="hh:mm:ss:dd/MMM/YYYY"
05:26:00:11/Mar/2015
For more information about the possible values for the data and time stamp format, seethe Joda-Timeweb page (http://www.joda.org/joda-time/key_format.html).
DeviceTime is the only event field that uses the ext-data optional parameter.
DeviceTime
The protocol for the message; for example, TCP, UDP, or ICMP.Protocol
The user name for the message.UserName
The host name for the message. Typically, this field is associated with identity events.HostName
The group name for the message. Typically, this field is associated with identity events.GroupName
The identity IP address for the message.IdentityIp
The identity MAC address for the message.IdentityMac
The IPv6 identity IP address for the message.IdentityIpv6
The NetBIOS name for the message. Typically, this field is associated with identity events.NetBIOSName
Anyuser-specific data for themessage. Typically, this field is associatedwith identity events.ExtraIdentityData
The IPv6 source IP address for the message.SourceIpv6
The IPv6 destination IP address for the message.DestinationIpv6
Multi-event Modifier (event-match-multiple)
Themulti-event modifier (event-match-multiple) matches a range of event types and
thenmodifies themasspecifiedby thepattern-idparameterand thecapture-group-index
parameter.
Copyright © 2018, Juniper Networks, Inc.62
Juniper Secure Analytics Configuring DSMs Guide
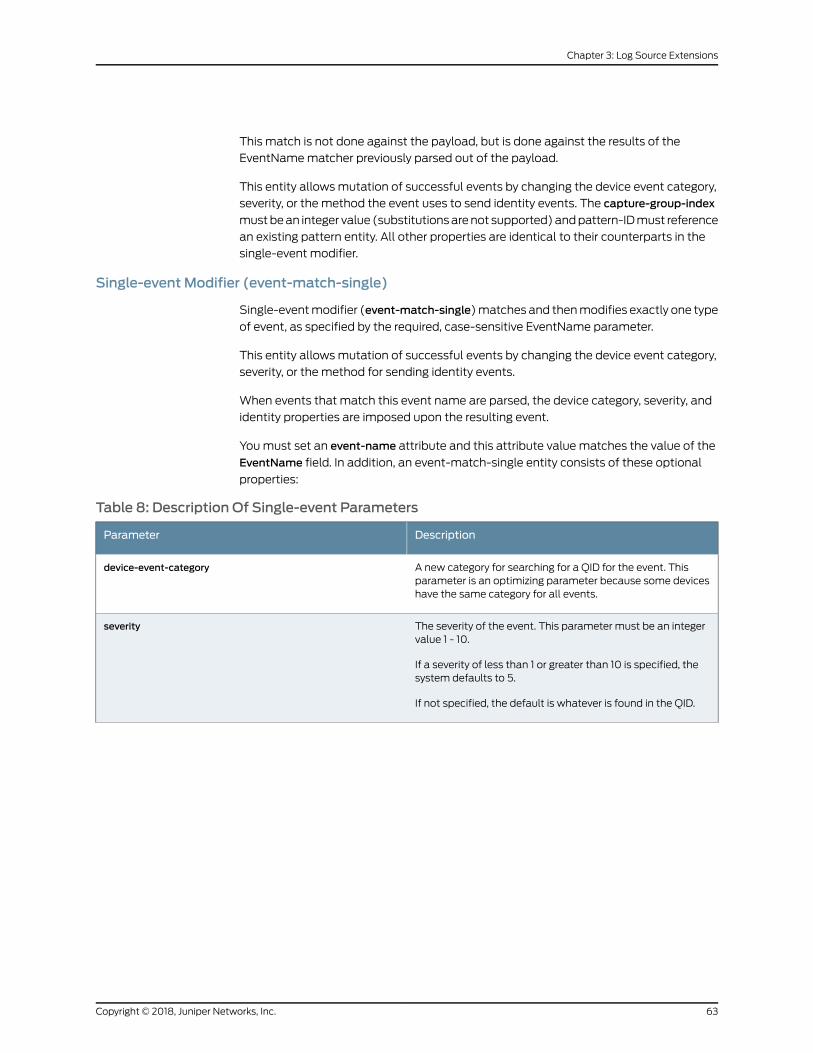
This match is not done against the payload, but is done against the results of the
EventNamematcher previously parsed out of the payload.
This entity allowsmutation of successful events by changing the device event category,
severity, or the method the event uses to send identity events. The capture-group-index
mustbean integer value (substitutionsarenot supported)andpattern-IDmust reference
an existing pattern entity. All other properties are identical to their counterparts in the
single-event modifier.
Single-event Modifier (event-match-single)
Single-eventmodifier (event-match-single)matches and thenmodifies exactly one type
of event, as specified by the required, case-sensitive EventName parameter.
This entity allowsmutation of successful events by changing the device event category,
severity, or the method for sending identity events.
When events that match this event name are parsed, the device category, severity, and
identity properties are imposed upon the resulting event.
Youmust set an event-name attribute and this attribute value matches the value of the
EventName field. In addition, an event-match-single entity consists of these optional
properties:
Table 8: Description Of Single-event Parameters
DescriptionParameter
A new category for searching for a QID for the event. Thisparameter is an optimizing parameter because some deviceshave the same category for all events.
device-event-category
The severity of the event. This parameter must be an integervalue 1 - 10.
If a severity of less than 1 or greater than 10 is specified, thesystem defaults to 5.
If not specified, the default is whatever is found in the QID.
severity
63Copyright © 2018, Juniper Networks, Inc.
Chapter 3: Log Source Extensions
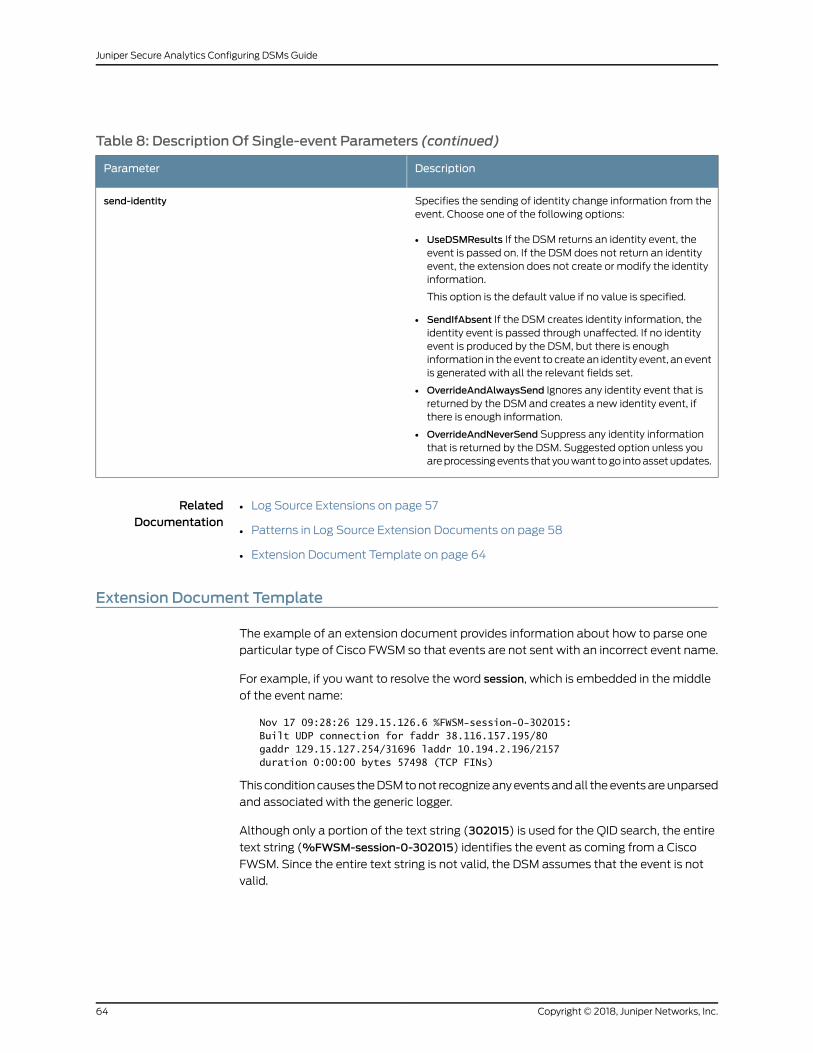
Table 8: Description Of Single-event Parameters (continued)
DescriptionParameter
Specifies the sending of identity change information from theevent. Choose one of the following options:
• UseDSMResults If the DSM returns an identity event, theevent is passed on. If the DSM does not return an identityevent, the extension does not create or modify the identityinformation.
This option is the default value if no value is specified.
• SendIfAbsent If the DSM creates identity information, theidentity event is passed through unaffected. If no identityevent is produced by the DSM, but there is enoughinformation in the event to create an identity event, an eventis generated with all the relevant fields set.
• OverrideAndAlwaysSend Ignores any identity event that isreturned by the DSM and creates a new identity event, ifthere is enough information.
• OverrideAndNeverSend Suppress any identity informationthat is returned by the DSM. Suggested option unless youareprocessingevents that youwant togo intoassetupdates.
send-identity
RelatedDocumentation
Log Source Extensions on page 57•
• Patterns in Log Source Extension Documents on page 58
• Extension Document Template on page 64
Extension Document Template
The example of an extension document provides information about how to parse one
particular type of Cisco FWSM so that events are not sent with an incorrect event name.
For example, if you want to resolve the word session, which is embedded in the middle
of the event name:
Nov 17 09:28:26 129.15.126.6 %FWSM-session-0-302015: Built UDP connection for faddr 38.116.157.195/80 gaddr 129.15.127.254/31696 laddr 10.194.2.196/2157 duration 0:00:00 bytes 57498 (TCP FINs)
This conditioncauses theDSMtonot recognizeanyeventsandall theeventsareunparsed
and associated with the generic logger.
Although only a portion of the text string (302015) is used for the QID search, the entire
text string (%FWSM-session-0-302015) identifies the event as coming from a Cisco
FWSM. Since the entire text string is not valid, the DSM assumes that the event is not
valid.
Copyright © 2018, Juniper Networks, Inc.64
Juniper Secure Analytics Configuring DSMs Guide
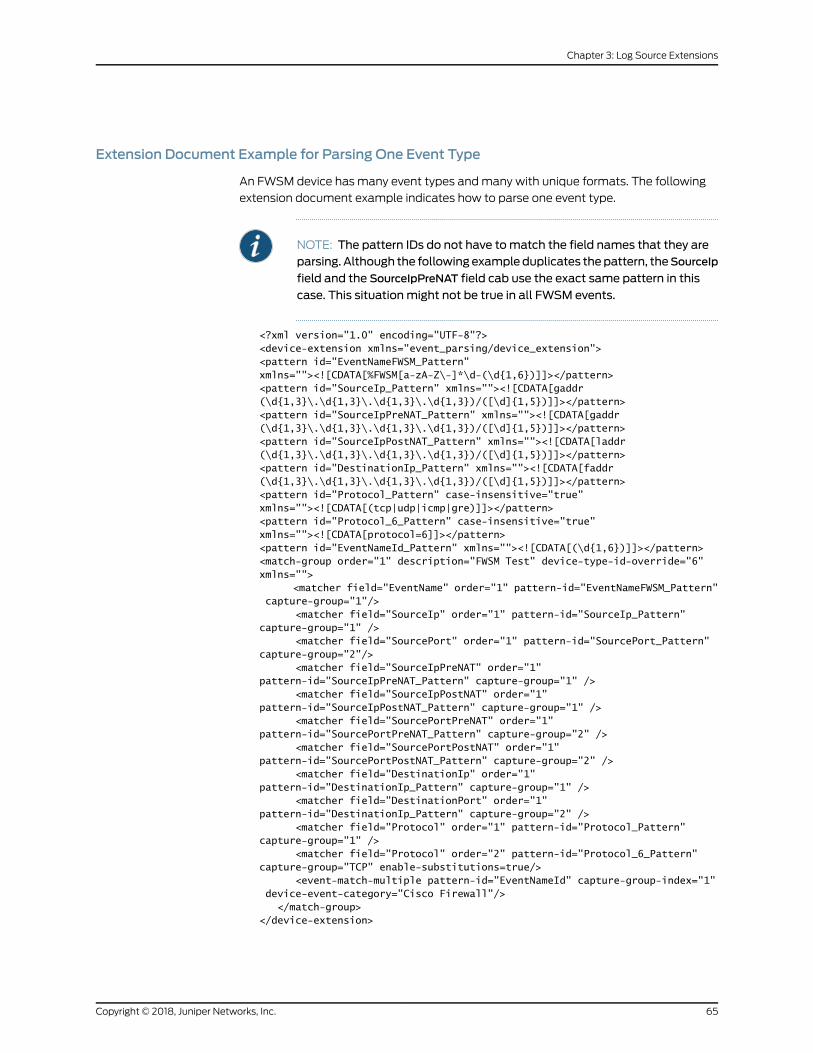
Extension Document Example for Parsing One Event Type
An FWSM device has many event types andmany with unique formats. The following
extension document example indicates how to parse one event type.
NOTE: The pattern IDs do not have tomatch the field names that they areparsing. Although the following exampleduplicates thepattern, theSourceIp
field and the SourceIpPreNAT field cab use the exact same pattern in this
case. This situationmight not be true in all FWSM events.
<?xml version="1.0" encoding="UTF-8"?><device-extension xmlns="event_parsing/device_extension"> <pattern id="EventNameFWSM_Pattern" xmlns=""><![CDATA[%FWSM[a-zA-Z\-]*\d-(\d{1,6})]]></pattern><pattern id="SourceIp_Pattern" xmlns=""><![CDATA[gaddr (\d{1,3}\.\d{1,3}\.\d{1,3}\.\d{1,3})/([\d]{1,5})]]></pattern> <pattern id="SourceIpPreNAT_Pattern" xmlns=""><![CDATA[gaddr (\d{1,3}\.\d{1,3}\.\d{1,3}\.\d{1,3})/([\d]{1,5})]]></pattern><pattern id="SourceIpPostNAT_Pattern" xmlns=""><![CDATA[laddr (\d{1,3}\.\d{1,3}\.\d{1,3}\.\d{1,3})/([\d]{1,5})]]></pattern><pattern id="DestinationIp_Pattern" xmlns=""><![CDATA[faddr (\d{1,3}\.\d{1,3}\.\d{1,3}\.\d{1,3})/([\d]{1,5})]]></pattern><pattern id="Protocol_Pattern" case-insensitive="true" xmlns=""><![CDATA[(tcp|udp|icmp|gre)]]></pattern><pattern id="Protocol_6_Pattern" case-insensitive="true" xmlns=""><![CDATA[protocol=6]]></pattern> <pattern id="EventNameId_Pattern" xmlns=""><![CDATA[(\d{1,6})]]></pattern><match-group order="1" description="FWSM Test" device-type-id-override="6" xmlns=""> <matcher field="EventName" order="1" pattern-id="EventNameFWSM_Pattern" capture-group="1"/> <matcher field="SourceIp" order="1" pattern-id="SourceIp_Pattern" capture-group="1" /> <matcher field="SourcePort" order="1" pattern-id="SourcePort_Pattern" capture-group="2"/> <matcher field="SourceIpPreNAT" order="1" pattern-id="SourceIpPreNAT_Pattern" capture-group="1" /> <matcher field="SourceIpPostNAT" order="1" pattern-id="SourceIpPostNAT_Pattern" capture-group="1" /> <matcher field="SourcePortPreNAT" order="1" pattern-id="SourcePortPreNAT_Pattern" capture-group="2" /> <matcher field="SourcePortPostNAT" order="1" pattern-id="SourcePortPostNAT_Pattern" capture-group="2" /> <matcher field="DestinationIp" order="1" pattern-id="DestinationIp_Pattern" capture-group="1" /> <matcher field="DestinationPort" order="1" pattern-id="DestinationIp_Pattern" capture-group="2" /> <matcher field="Protocol" order="1" pattern-id="Protocol_Pattern" capture-group="1" /> <matcher field="Protocol" order="2" pattern-id="Protocol_6_Pattern" capture-group="TCP" enable-substitutions=true/> <event-match-multiple pattern-id="EventNameId" capture-group-index="1" device-event-category="Cisco Firewall"/> </match-group> </device-extension>
65Copyright © 2018, Juniper Networks, Inc.
Chapter 3: Log Source Extensions
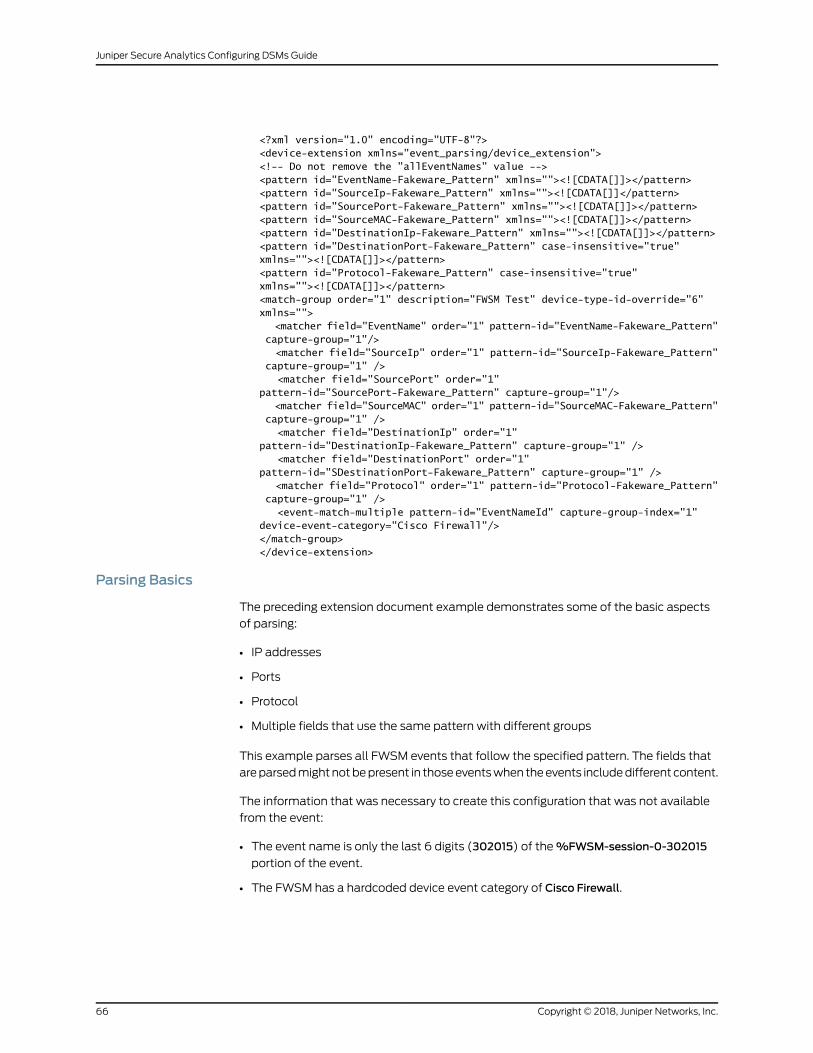
<?xml version="1.0" encoding="UTF-8"?> <device-extension xmlns="event_parsing/device_extension"> <!-- Do not remove the "allEventNames" value --><pattern id="EventName-Fakeware_Pattern" xmlns=""><![CDATA[]]></pattern><pattern id="SourceIp-Fakeware_Pattern" xmlns=""><![CDATA[]]</pattern><pattern id="SourcePort-Fakeware_Pattern" xmlns=""><![CDATA[]]></pattern><pattern id="SourceMAC-Fakeware_Pattern" xmlns=""><![CDATA[]]></pattern><pattern id="DestinationIp-Fakeware_Pattern" xmlns=""><![CDATA[]]></pattern><pattern id="DestinationPort-Fakeware_Pattern" case-insensitive="true" xmlns=""><![CDATA[]]></pattern><pattern id="Protocol-Fakeware_Pattern" case-insensitive="true" xmlns=""><![CDATA[]]></pattern> <match-group order="1" description="FWSM Test" device-type-id-override="6" xmlns=""> <matcher field="EventName" order="1" pattern-id="EventName-Fakeware_Pattern" capture-group="1"/> <matcher field="SourceIp" order="1" pattern-id="SourceIp-Fakeware_Pattern" capture-group="1" /> <matcher field="SourcePort" order="1" pattern-id="SourcePort-Fakeware_Pattern" capture-group="1"/> <matcher field="SourceMAC" order="1" pattern-id="SourceMAC-Fakeware_Pattern" capture-group="1" /> <matcher field="DestinationIp" order="1" pattern-id="DestinationIp-Fakeware_Pattern" capture-group="1" /> <matcher field="DestinationPort" order="1" pattern-id="SDestinationPort-Fakeware_Pattern" capture-group="1" /> <matcher field="Protocol" order="1" pattern-id="Protocol-Fakeware_Pattern" capture-group="1" /> <event-match-multiple pattern-id="EventNameId" capture-group-index="1" device-event-category="Cisco Firewall"/> </match-group> </device-extension>
Parsing Basics
The preceding extension document example demonstrates some of the basic aspects
of parsing:
• IP addresses
• Ports
• Protocol
• Multiple fields that use the same pattern with different groups
This example parses all FWSM events that follow the specified pattern. The fields that
areparsedmightnotbepresent in thoseeventswhen theevents includedifferent content.
The information that was necessary to create this configuration that was not available
from the event:
• The event name is only the last 6 digits (302015) of the%FWSM-session-0-302015
portion of the event.
• The FWSM has a hardcoded device event category of Cisco Firewall.
Copyright © 2018, Juniper Networks, Inc.66
Juniper Secure Analytics Configuring DSMs Guide
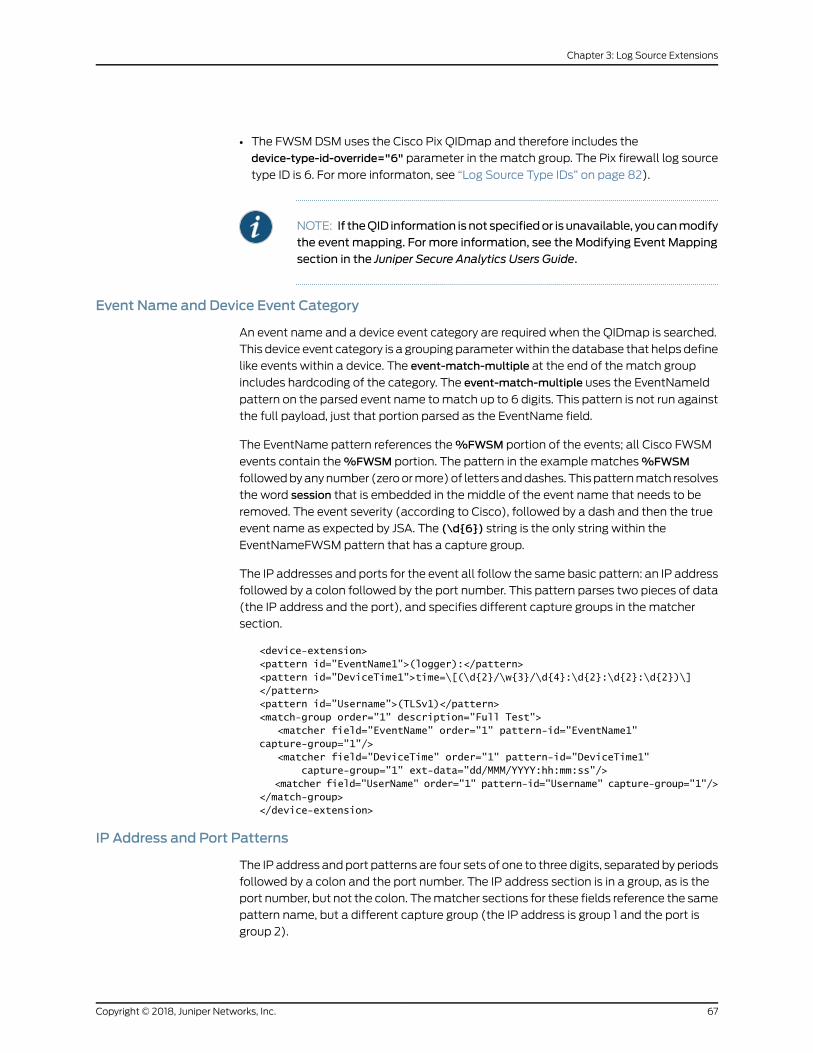
• The FWSMDSM uses the Cisco Pix QIDmap and therefore includes the
device-type-id-override="6" parameter in thematch group. The Pix firewall log source
type ID is 6. For more informaton, see “Log Source Type IDs” on page 82).
NOTE: If theQID information isnot specifiedor is unavailable, youcanmodifythe event mapping. For more information, see the Modifying Event Mappingsection in the Juniper Secure Analytics Users Guide.
Event Name and Device Event Category
An event name and a device event category are required when the QIDmap is searched.
This device event category is a grouping parameterwithin the database that helps define
like events within a device. The event-match-multiple at the end of the match group
includes hardcoding of the category. The event-match-multiple uses the EventNameId
pattern on the parsed event name tomatch up to 6 digits. This pattern is not run against
the full payload, just that portion parsed as the EventName field.
The EventName pattern references the%FWSM portion of the events; all Cisco FWSM
events contain the%FWSM portion. The pattern in the example matches%FWSM
followedbyanynumber (zeroormore)of letters anddashes. Thispatternmatch resolves
the word session that is embedded in the middle of the event name that needs to be
removed. The event severity (according to Cisco), followed by a dash and then the true
event name as expected by JSA. The (\d{6}) string is the only string within the
EventNameFWSM pattern that has a capture group.
The IP addresses and ports for the event all follow the same basic pattern: an IP address
followed by a colon followed by the port number. This pattern parses two pieces of data
(the IP address and the port), and specifies different capture groups in the matcher
section.
<device-extension><pattern id="EventName1">(logger):</pattern> <pattern id="DeviceTime1">time=\[(\d{2}/\w{3}/\d{4}:\d{2}:\d{2}:\d{2})\] </pattern><pattern id="Username">(TLSv1)</pattern> <match-group order="1" description="Full Test"> <matcher field="EventName" order="1" pattern-id="EventName1" capture-group="1"/> <matcher field="DeviceTime" order="1" pattern-id="DeviceTime1" capture-group="1" ext-data="dd/MMM/YYYY:hh:mm:ss"/> <matcher field="UserName" order="1" pattern-id="Username" capture-group="1"/></match-group></device-extension>
IP Address and Port Patterns
The IP address andport patterns are four sets of one to three digits, separated by periods
followed by a colon and the port number. The IP address section is in a group, as is the
port number, but not the colon. Thematcher sections for these fields reference the same
pattern name, but a different capture group (the IP address is group 1 and the port is
group 2).
67Copyright © 2018, Juniper Networks, Inc.
Chapter 3: Log Source Extensions
The protocol is a common pattern that searches the payload for the first instance of
TCP, UDP, ICMP, or GRE. The pattern is marked with the case-insensitive parameter so
that any occurrencematches.
Althoughasecondprotocolpatterndoesnotoccur in theevent that isused in theexample,
there is a second protocol pattern that is defined with an order of two. If the
lowest-ordered protocol pattern does not match, the next one is attempted, and so on.
The second protocol pattern also demonstrates direct substitution; there are nomatch
groups in the pattern, butwith the enable-substitutions parameter enabled, the text TCP
can be used in place of protocol=6.
RelatedDocumentation
Log Source Extensions on page 57•
• Patterns in Log Source Extension Documents on page 58
• Match Groups on page 58
Creating a Log Source Extensions Document
Create log source extensions (LSX) for log sources that don't have a supported DSM, or
to repair an event that has missing or incorrect information, or to parse an event when
the associated DSM fails to produce a result.
For log sources thatdon't haveanofficialDSM,useaUniversalDSM,orUDSM, to integrate
log sources. A log source extension (also known as a device extension) is then applied
to the UDSM to provide the logic for parsing the logs. The LSX is based on Java regular
expressions and can be used against any log protocol, such as syslog, JDBC, and LFPS.
Values can be extracted from the logs andmapped to all common fields within JSA.
Whenyouuse log sourceextensions to repairmissingor incorrect content, anynewevents
that are produced by the log source extensions are associated to the log source that
failed to parse the original payload. Creating an extension prevents unknown or
uncategorized events from being stored as unknown in JSA.
Follow these steps to create a log source extension:
1. Ensure that a log source is created in JSA.
Use Universal DSM as the log source type to handle items that are not in the list. You
can also manually create a log source to prevent the logs from being automatically
classified.
2. To determine what fields are available, use the Log Activity tab to export the logs for
evaluation.
3. Use the extension document example template to determine the fields that you can
use. ( “Extension Document Template” on page 64).
It is not necessary to use all of the fields in the template. Determine the values in the
log source that can bemapped to the fields in extension document template. For
more information, see “Extension Document Template” on page 64.
Copyright © 2018, Juniper Networks, Inc.68
Juniper Secure Analytics Configuring DSMs Guide

4. Remove any unused fields and their corresponding Pattern IDs from the log source
extension document.
5. Upload the extension document and apply the extension to the log source.
6. Map the events to their equivalents in the QIDmap.
This manual action on the Log Activity tab is used tomap unknown log source events
to known JSA events so that they can be categorized and processed.
• Building a Universal DSM on page 69
• Exporting the Logs on page 69
• Common Regular Expressions on page 71
• Building Regular Expression Patterns on page 72
• Uploading Extension Documents to JSA on page 75
• Mapping Unknown Events on page 76
Building a Universal DSM
The first step in building a Universal DSM is to create the log source in JSA. When you
create the log source, it prevents the logs from being automatically classified and you
can export the logs for review.
1. From the Admin tab, create a new source by clicking the Log Sources icon.
2. Click Add.
3. Specify the name in the Log Source Name field.
4. From the Log Source Type list, select Universal DSM.
Youmight not see the Log Source Extension unless you already applied a log source
extension to the JSA console
5. From the Protocol Configuration list, specify the protocol that you want to use.
This method is used by JSA to get the logs from the unsupported log source.
6. For the Log Source Identifier, enter either the IP address or host name of the
unsupported log source.
7. Click Save to save the new log source and close the window.
8. From the Admin tab, click Deploy Changes.
Exporting the Logs
Export the logs that are created after you build a Universal DSM
69Copyright © 2018, Juniper Networks, Inc.
Chapter 3: Log Source Extensions
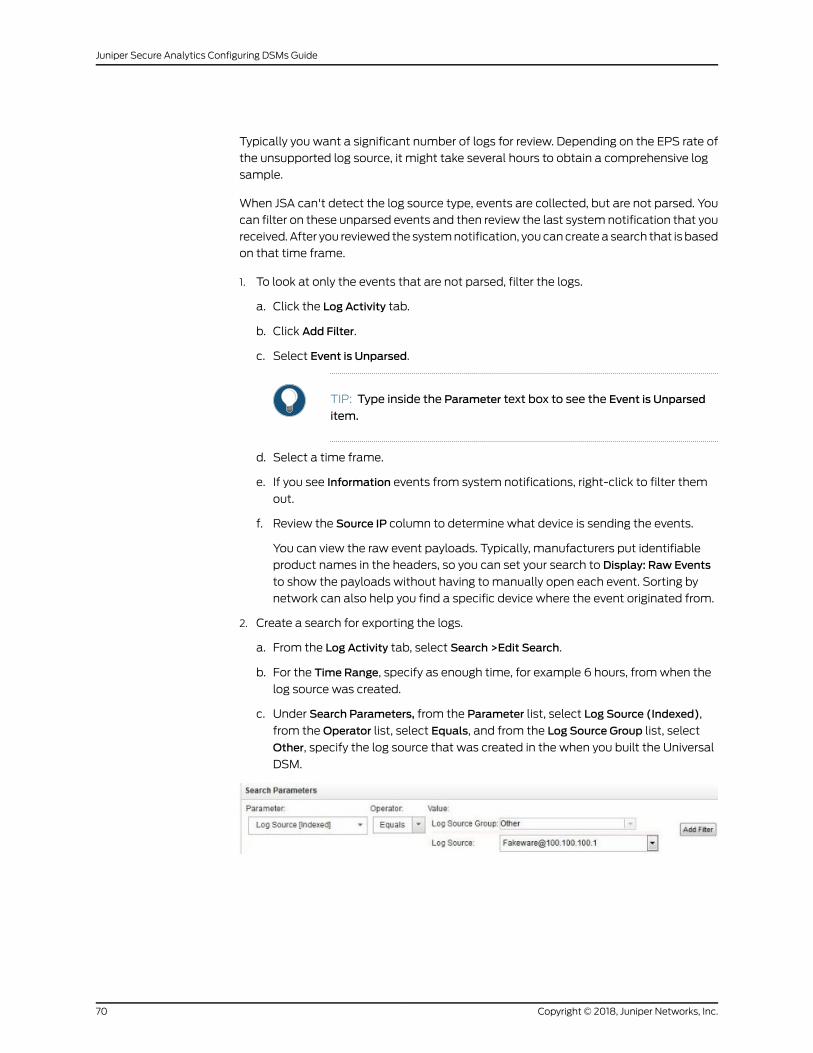
Typically you want a significant number of logs for review. Depending on the EPS rate of
the unsupported log source, it might take several hours to obtain a comprehensive log
sample.
When JSA can't detect the log source type, events are collected, but are not parsed. You
can filter on these unparsed events and then review the last system notification that you
received.After you reviewed the systemnotification, youcancreatea search that is based
on that time frame.
1. To look at only the events that are not parsed, filter the logs.
a. Click the Log Activity tab.
b. Click Add Filter.
c. Select Event is Unparsed.
TIP: Type inside the Parameter text box to see the Event is Unparsed
item.
d. Select a time frame.
e. If you see Information events from system notifications, right-click to filter them
out.
f. Review the Source IP column to determine what device is sending the events.
You can view the raw event payloads. Typically, manufacturers put identifiable
product names in the headers, so you can set your search to Display: Raw Events
to show the payloads without having to manually open each event. Sorting by
network can also help you find a specific device where the event originated from.
2. Create a search for exporting the logs.
a. From the Log Activity tab, select Search >Edit Search.
b. For the Time Range, specify as enough time, for example 6 hours, fromwhen the
log source was created.
c. Under Search Parameters, from the Parameter list, select Log Source (Indexed),
from theOperator list, select Equals, and from the Log Source Group list, select
Other, specify the log source that was created in the when you built the Universal
DSM.
Copyright © 2018, Juniper Networks, Inc.70
Juniper Secure Analytics Configuring DSMs Guide
NOTE: Depending on your settings, youmight see Log Source in the
Parameter list instead of Log Source (Indexed).
d. Click Search to view the results.
3. Review the results in the console to check the payload.
4. Optionally, you can export the results by clicking select Actions >Export to XML > Full
Export (All Columns).
Don't selectExport toCSVbecause thepayloadmightbesplit acrossmultiple columns,
therefore making it difficult to find the payload. XML is the preferred format for event
reviews.
a. You are prompted to download a compressed file. Open the compressed file and
then open the resulting file.
b. Review the logs.
Event payloads are between the following tags:
<payloadAsUTF>...</payloadAsUTF>
The following code shows an example payload:
<payloadAsUTF>ecs-ep (pid 4162 4163 4164) is running... </payloadAsUTF>
A critical step in creating a Universal DSM is reviewing the logs for usability. At a
minimum, the logs must have a value that can bemapped to an event name. The
event namemust be a unique value that can distinguish the various log types.
The following code shows an example of usable logs:
May 20 17:16:14 dropbear[22331]: bad password attempt for 'root' from 192.168.50.80:3364 May 20 17:16:26 dropbear[22331]: password auth succeeded for'root' from 192.168.50.80:3364 May 20 16:42:19 kernel: DROP IN=vlan2 OUT=MAC=00:01:5c:31:39:c2:08:00 SRC=172.29.255.121 DST=255.255.255.255 PROTO=UDP SPT=67 DPT=68
The following example codes shows slightly less usable logs:
Oct 26 08:12:08 loopback 1256559128 autotrace[215824]: W: trace:no map for prod 49420003, idf 010029a2, lal 00af0008 Oct 26 16:35:00 sxpgbd0081 last message repeated 7 timesNov 24 01:30:00 sxpgbd0081 /usr/local/monitor-rrd/sxpgbd0081/.rrd(rc=-1, opening '/usr/local/monitor-rrd/sxpgbd0081/.rrd': No such file or directory)
Common Regular Expressions
Use regular expressions to match patterns of text in the log source file. You can scan
messages for patterns of letters, numbers, or a combination of both. For example, you
71Copyright © 2018, Juniper Networks, Inc.
Chapter 3: Log Source Extensions
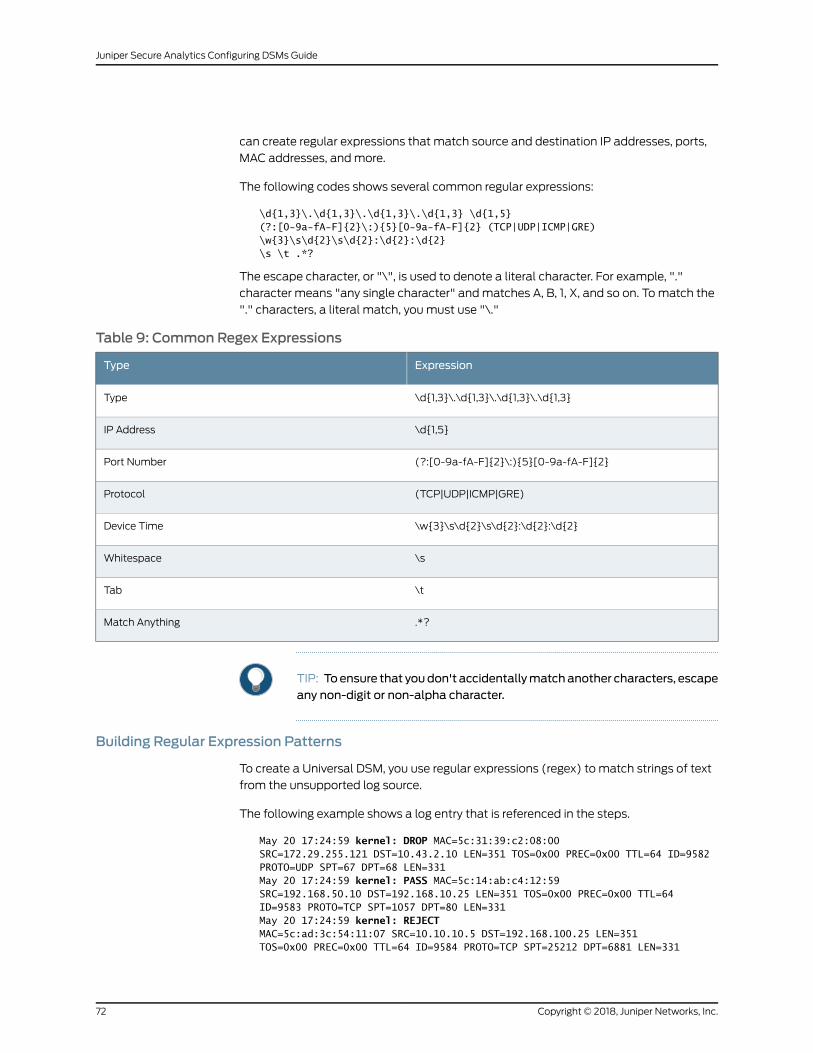
can create regular expressions that match source and destination IP addresses, ports,
MAC addresses, andmore.
The following codes shows several common regular expressions:
\d{1,3}\.\d{1,3}\.\d{1,3}\.\d{1,3} \d{1,5} (?:[0-9a-fA-F]{2}\:){5}[0-9a-fA-F]{2} (TCP|UDP|ICMP|GRE) \w{3}\s\d{2}\s\d{2}:\d{2}:\d{2} \s \t .*?
The escape character, or "\", is used to denote a literal character. For example, "."
character means "any single character" andmatches A, B, 1, X, and so on. Tomatch the
"." characters, a literal match, youmust use "\."
Table 9: Common Regex Expressions
ExpressionType
\d{1,3}\.\d{1,3}\.\d{1,3}\.\d{1,3}Type
\d{1,5}IP Address
(?:[0-9a-fA-F]{2}\:){5}[0-9a-fA-F]{2}Port Number
(TCP|UDP|ICMP|GRE)Protocol
\w{3}\s\d{2}\s\d{2}:\d{2}:\d{2}Device Time
\sWhitespace
\tTab
.*?Match Anything
TIP: Toensure that youdon't accidentallymatchanother characters, escapeany non-digit or non-alpha character.
Building Regular Expression Patterns
To create a Universal DSM, you use regular expressions (regex) to match strings of text
from the unsupported log source.
The following example shows a log entry that is referenced in the steps.
May 20 17:24:59 kernel: DROP MAC=5c:31:39:c2:08:00 SRC=172.29.255.121 DST=10.43.2.10 LEN=351 TOS=0x00 PREC=0x00 TTL=64 ID=9582 PROTO=UDP SPT=67 DPT=68 LEN=331May 20 17:24:59 kernel: PASS MAC=5c:14:ab:c4:12:59 SRC=192.168.50.10 DST=192.168.10.25 LEN=351 TOS=0x00 PREC=0x00 TTL=64 ID=9583 PROTO=TCP SPT=1057 DPT=80 LEN=331 May 20 17:24:59 kernel: REJECTMAC=5c:ad:3c:54:11:07 SRC=10.10.10.5 DST=192.168.100.25 LEN=351 TOS=0x00 PREC=0x00 TTL=64 ID=9584 PROTO=TCP SPT=25212 DPT=6881 LEN=331
Copyright © 2018, Juniper Networks, Inc.72
Juniper Secure Analytics Configuring DSMs Guide
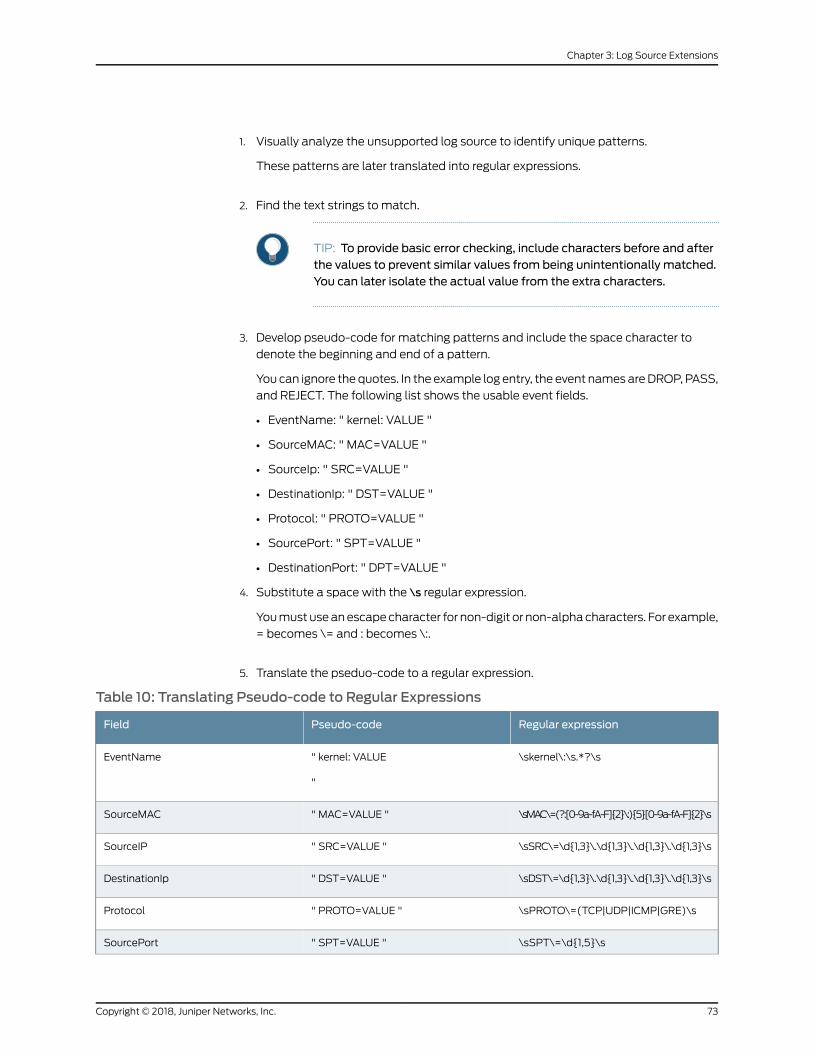
1. Visually analyze the unsupported log source to identify unique patterns.
These patterns are later translated into regular expressions.
2. Find the text strings to match.
TIP: To provide basic error checking, include characters before and afterthe values to prevent similar values from being unintentionally matched.You can later isolate the actual value from the extra characters.
3. Develop pseudo-code for matching patterns and include the space character to
denote the beginning and end of a pattern.
You can ignore the quotes. In the example log entry, the event names areDROP, PASS,
and REJECT. The following list shows the usable event fields.
• EventName: " kernel: VALUE "
• SourceMAC: " MAC=VALUE "
• SourceIp: " SRC=VALUE "
• DestinationIp: " DST=VALUE "
• Protocol: " PROTO=VALUE "
• SourcePort: " SPT=VALUE "
• DestinationPort: " DPT=VALUE "
4. Substitute a space with the \s regular expression.
Youmust useanescapecharacter for non-digit or non-alphacharacters. For example,
= becomes \= and : becomes \:.
5. Translate the pseduo-code to a regular expression.
Table 10: Translating Pseudo-code to Regular Expressions
Regular expressionPseudo-codeField
\skernel\:\s.*?\s" kernel: VALUE
"
EventName
\sMAC\=(?:[0-9a-fA-F]{2}\:){5}[0-9a-fA-F]{2}\s" MAC=VALUE "SourceMAC
\sSRC\=\d{1,3}\.\d{1,3}\.\d{1,3}\.\d{1,3}\s" SRC=VALUE "SourceIP
\sDST\=\d{1,3}\.\d{1,3}\.\d{1,3}\.\d{1,3}\s" DST=VALUE "DestinationIp
\sPROTO\=(TCP|UDP|ICMP|GRE)\s" PROTO=VALUE "Protocol
\sSPT\=\d{1,5}\s" SPT=VALUE "SourcePort
73Copyright © 2018, Juniper Networks, Inc.
Chapter 3: Log Source Extensions
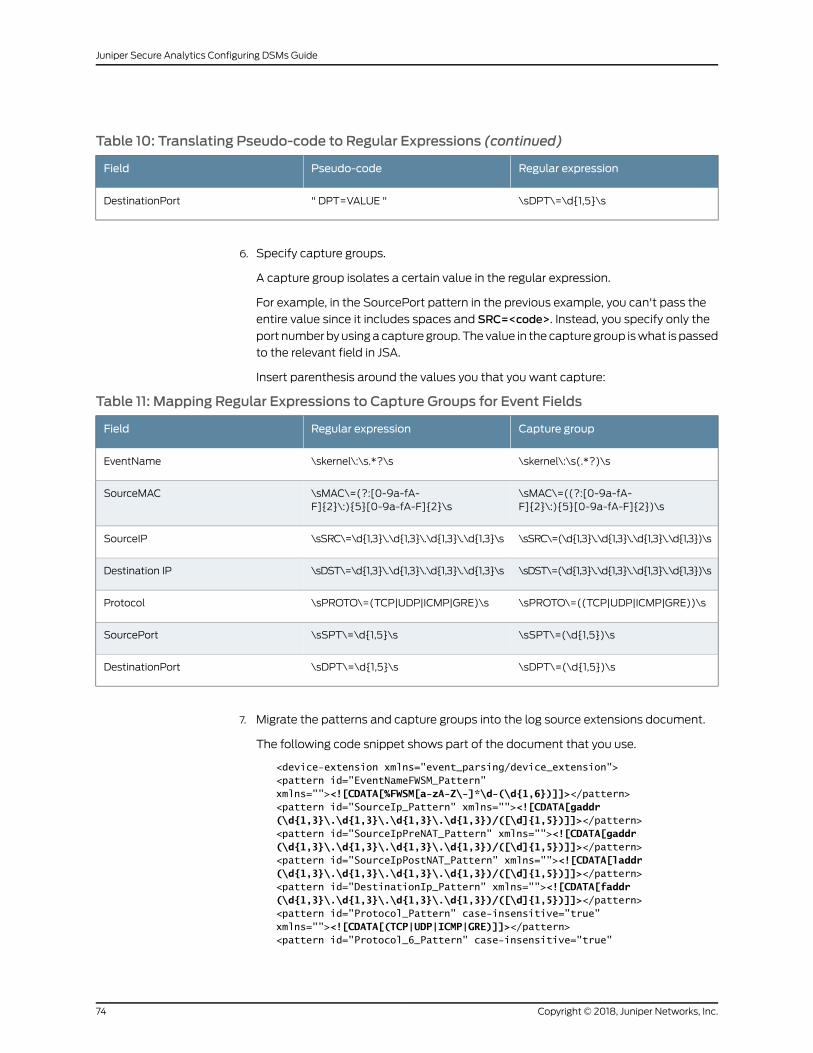
Table 10: Translating Pseudo-code to Regular Expressions (continued)
Regular expressionPseudo-codeField
\sDPT\=\d{1,5}\s" DPT=VALUE "DestinationPort
6. Specify capture groups.
A capture group isolates a certain value in the regular expression.
For example, in the SourcePort pattern in the previous example, you can't pass the
entire value since it includes spaces and SRC=<code>. Instead, you specify only the
port numberbyusingacapture group. Thevalue in thecapture group iswhat is passed
to the relevant field in JSA.
Insert parenthesis around the values you that you want capture:
Table 11: Mapping Regular Expressions to Capture Groups for Event Fields
Capture groupRegular expressionField
\skernel\:\s(.*?)\s\skernel\:\s.*?\sEventName
\sMAC\=((?:[0-9a-fA-F]{2}\:){5}[0-9a-fA-F]{2})\s
\sMAC\=(?:[0-9a-fA-F]{2}\:){5}[0-9a-fA-F]{2}\s
SourceMAC
\sSRC\=(\d{1,3}\.\d{1,3}\.\d{1,3}\.\d{1,3})\s\sSRC\=\d{1,3}\.\d{1,3}\.\d{1,3}\.\d{1,3}\sSourceIP
\sDST\=(\d{1,3}\.\d{1,3}\.\d{1,3}\.\d{1,3})\s\sDST\=\d{1,3}\.\d{1,3}\.\d{1,3}\.\d{1,3}\sDestination IP
\sPROTO\=((TCP|UDP|ICMP|GRE))\s\sPROTO\=(TCP|UDP|ICMP|GRE)\sProtocol
\sSPT\=(\d{1,5})\s\sSPT\=\d{1,5}\sSourcePort
\sDPT\=(\d{1,5})\s\sDPT\=\d{1,5}\sDestinationPort
7. Migrate the patterns and capture groups into the log source extensions document.
The following code snippet shows part of the document that you use.
<device-extension xmlns="event_parsing/device_extension"> <pattern id="EventNameFWSM_Pattern" xmlns=""><![CDATA[%FWSM[a-zA-Z\-]*\d-(\d{1,6})]]></pattern><pattern id="SourceIp_Pattern" xmlns=""><![CDATA[gaddr (\d{1,3}\.\d{1,3}\.\d{1,3}\.\d{1,3})/([\d]{1,5})]]></pattern> <pattern id="SourceIpPreNAT_Pattern" xmlns=""><![CDATA[gaddr (\d{1,3}\.\d{1,3}\.\d{1,3}\.\d{1,3})/([\d]{1,5})]]></pattern><pattern id="SourceIpPostNAT_Pattern" xmlns=""><![CDATA[laddr (\d{1,3}\.\d{1,3}\.\d{1,3}\.\d{1,3})/([\d]{1,5})]]></pattern><pattern id="DestinationIp_Pattern" xmlns=""><![CDATA[faddr (\d{1,3}\.\d{1,3}\.\d{1,3}\.\d{1,3})/([\d]{1,5})]]></pattern><pattern id="Protocol_Pattern" case-insensitive="true" xmlns=""><![CDATA[(TCP|UDP|ICMP|GRE)]]></pattern><pattern id="Protocol_6_Pattern" case-insensitive="true"
Copyright © 2018, Juniper Networks, Inc.74
Juniper Secure Analytics Configuring DSMs Guide
xmlns=""><![CDATA[protocol=6]]></pattern> <pattern id="EventNameId_Pattern" xmlns=""><![CDATA[(\d{1,6})]]></pattern>
Uploading Extension Documents to JSA
1. From the Admin tab, click the Data Sources >Log Source Extensions.
2. In the Add Log Source Extensionswindow, click Add.
3. Assign a name.
4. If youare using theUniversal DSM, don't select the extensiondocument as thedefault
for a Log Source Type.
By selecting the Universal DSM as the default, it affects all associated log sources. A
Universal DSM can be used to define the parsing logic for multiple custom and
unsupported event sources.
5. If youwant toapply this log sourceextension tomore thanone instanceofa log source
type, select the log source type from the available Log Source Type list and click the
add arrow to set it as the default.
Setting the default log source type applies the log source extension to all events of a
log source type, including those log sources that are automatically discovered.
Ensure that you test theextension for the logsource type first toensure that theevents
are parsed correctly.
6. Click Browse to locate the LSX that you saved and then click Upload.
JSA validates the document against the internal XSD and verifies the validity of the
document before the extension document is uploaded to the system.
7. Click Save and close the window.
8. Associate the log source extension to a log source.
a. From the Admin tab, click Data Sources >Log Sources.
b. Double-click the log source type that you created the extension document for.
c. From the Log Source Extension list, select the document that you created.
d. Click Save and close the window.
75Copyright © 2018, Juniper Networks, Inc.
Chapter 3: Log Source Extensions
You can create multiple extension documents and then upload them and associated
them to various log source types. The logic from the log source extension (LSX) is then
used to parse the logs from the unsupported log source.
Extension documents can be stored anywhere before you upload to JSA.
Mapping Unknown Events
Initially, all of the events from the Universal DSM appear as unknown in the Log Activity
tab in JSA. Youmust manually map all unknown events to their equivalents in the QID
map.
Although the event names, such as DROP, DENY, andACCEPT,might be understandable
values when you see them in the log files, JSA doesn't understand what these values
represent. To JSA, these values are strings of text that are not mapped to any known
values. The values appear as expected and are treated as normalized events until you
manually map them.
In some instances, such as an intrusion detection system (IDS) or an intrusion detection
and prevention system (IDP) thousands of events exist and require mapping. In these
situations, you canmap a category as the event name instead of the itself. For example,
in the following example, to reduce the number of mappings, instead of using the name
field for the Event Name, use the category field instead. You can use a custom property
to display the event name (Code Red v412):
date: "Feb 25 2010 00:43:26"; name: "SQL Slammer v312"; category: "Worm Activity"; source ip: "100.100.200.200"; date: "Feb 25 2015 00:43:26"; name: "Code Red v412"; category: "Worm Activity"; source ip: "100.100.200.200"; date: "Feb 25 2015 00:43:26"; name: "Annoying Toolbar"; category: "Malware"; source ip: "100.100.200.200";
Instead of using the name field for the Event Name, use the category field instead. he
actual event name, e.g. Code Red v412 can be displayed using a custom property.
Ensure that you uploaded the log source extension document and applied it to the
Universal DSM. For more information, see “Uploading Extension Documents to JSA” on
page 75.
1. From the Log Activity tab, click Search >Edit Search
2. From the Time Range options, choose enough time, such as 15 minutes, fromwhen
the log source extension was applied to the Universal DSM.
3. Under Search Parameters, select Log Source [Index] from the Parameter list, Equals
from theOperator list and then select the log source that you created from the Log
Source Group and the Log Source lists.
4. Click Search to view the results.
All of the events appear as unknown.
5. Double-click an unknown entry to view the event details.
Copyright © 2018, Juniper Networks, Inc.76
Juniper Secure Analytics Configuring DSMs Guide
6. ClickMap Event from the toolbar.
ThevalueLogSourceEvent IDdisplaysanEventNamevalue, for example,DROP,DENY,
or ACCEPT, from the log source extension. The value can't be blank. A blank value
indicates that there is an error in the log source extension document.
7. Map the value that is displayed as the Log Source Event ID to the appropriate QID.
Use the Browse By Category, orQID Search, or both to find a value that best matches
the Log Source Event ID value. For example, the value DROP can bemapped to the
QID Firewall Deny - Event CRE.
Use the QID with the Event CRE in the name. Most events are specific to a particular
log source type. For example, when youmap to a random firewall,Deny QID is similar
tomapping theUniversalDSMtoevents fromanother log source type. TheQIDentries
that contain thenameEventCREare generic andarenot tied toaparticular log source
type.
8. Repeat these steps until all unknown events are mapped successfully.
Fromthispoint, any further events fromtheUniversalDSMthat contain thatparticular
Log Source Event ID appear as the specified QID. Events that arrived before the QID
mapping remainunknown.There is nosupportedmethod formappingpreviousevents
to a current QID. This process must be repeated until all of the unknown event types
are successfully mapped to a QID.
RelatedDocumentation
Parsing Issues and Examples on page 77•
• Log Source Type IDs on page 82
• Log Source Extensions on page 57
Parsing Issues and Examples
When you create a log source extension, youmight encounter some parsing issues. Use
these XML examples to resolving specific parsing issues.
• Converting a Protocol on page 78
• Making a Single Substitution on page 78
• Generating a Colon-separated MAC Address on page 78
• Combining IP Address and Port on page 78
• Modifying an Event Category on page 79
• Suppressing Identity Change Events on page 79
• Encoding Logs on page 79
• Formatting Event Dates and Time Stamps on page 80
• Multiple Log Formats in a Single Log Source on page 80
• Parsing a CSV Log Format on page 81
77Copyright © 2018, Juniper Networks, Inc.
Chapter 3: Log Source Extensions
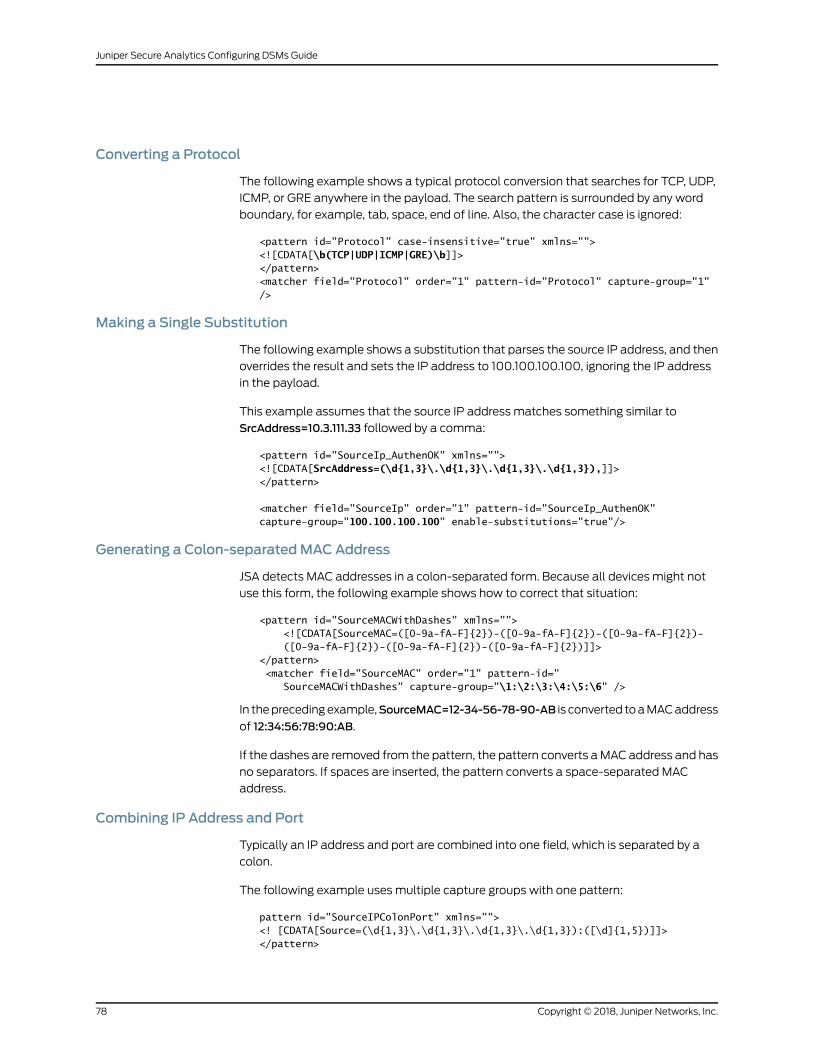
Converting a Protocol
The following example shows a typical protocol conversion that searches for TCP, UDP,
ICMP, or GRE anywhere in the payload. The search pattern is surrounded by any word
boundary, for example, tab, space, end of line. Also, the character case is ignored:
<pattern id="Protocol" case-insensitive="true" xmlns=""><![CDATA[\b(TCP|UDP|ICMP|GRE)\b]]></pattern> <matcher field="Protocol" order="1" pattern-id="Protocol" capture-group="1" />
Making a Single Substitution
The following example shows a substitution that parses the source IP address, and then
overrides the result and sets the IP address to 100.100.100.100, ignoring the IP address
in the payload.
This example assumes that the source IP address matches something similar to
SrcAddress=10.3.111.33 followed by a comma:
<pattern id="SourceIp_AuthenOK" xmlns=""> <![CDATA[SrcAddress=(\d{1,3}\.\d{1,3}\.\d{1,3}\.\d{1,3}),]]></pattern>
<matcher field="SourceIp" order="1" pattern-id="SourceIp_AuthenOK" capture-group="100.100.100.100" enable-substitutions="true"/>
Generating a Colon-separatedMACAddress
JSA detects MAC addresses in a colon-separated form. Because all devices might not
use this form, the following example shows how to correct that situation:
<pattern id="SourceMACWithDashes" xmlns=""> <![CDATA[SourceMAC=([0-9a-fA-F]{2})-([0-9a-fA-F]{2})-([0-9a-fA-F]{2})- ([0-9a-fA-F]{2})-([0-9a-fA-F]{2})-([0-9a-fA-F]{2})]]></pattern> <matcher field="SourceMAC" order="1" pattern-id=" SourceMACWithDashes" capture-group="\1:\2:\3:\4:\5:\6" />
In theprecedingexample,SourceMAC=12-34-56-78-90-AB is converted toaMACaddress
of 12:34:56:78:90:AB.
If the dashes are removed from the pattern, the pattern converts aMAC address and has
no separators. If spaces are inserted, the pattern converts a space-separated MAC
address.
Combining IP Address and Port
Typically an IP address and port are combined into one field, which is separated by a
colon.
The following example uses multiple capture groups with one pattern:
pattern id="SourceIPColonPort" xmlns=""><! [CDATA[Source=(\d{1,3}\.\d{1,3}\.\d{1,3}\.\d{1,3}):([\d]{1,5})]]></pattern>
Copyright © 2018, Juniper Networks, Inc.78
Juniper Secure Analytics Configuring DSMs Guide
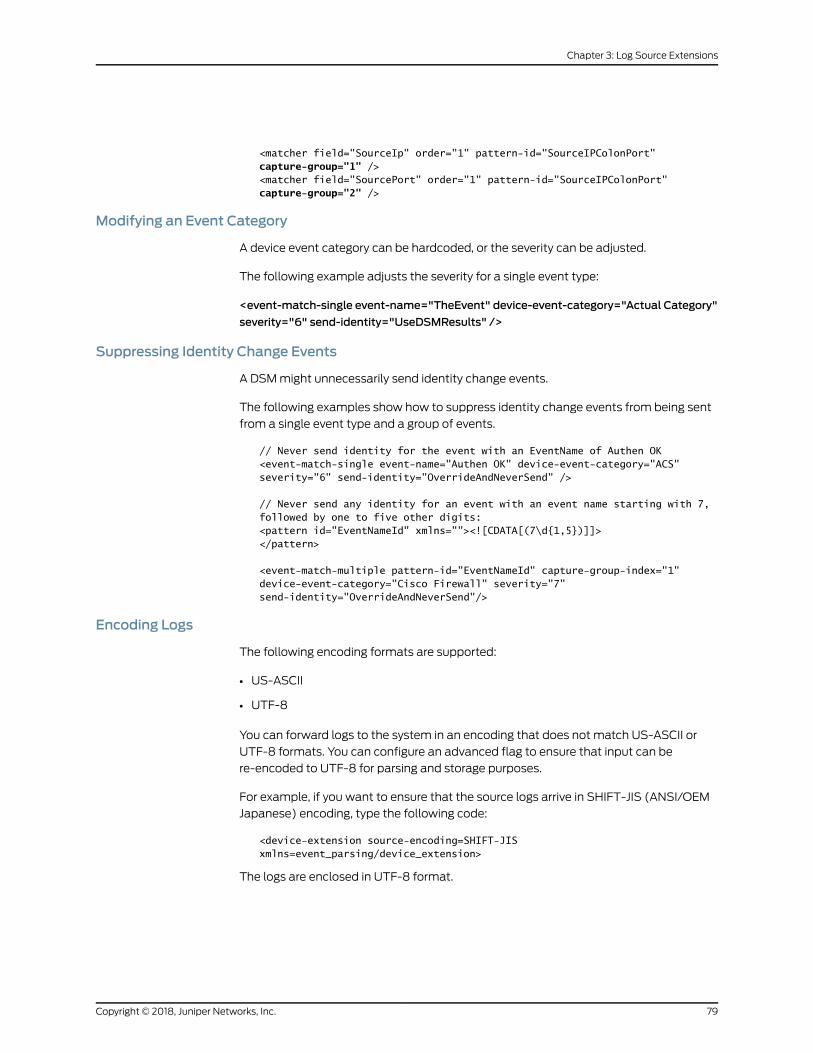
<matcher field="SourceIp" order="1" pattern-id="SourceIPColonPort" capture-group="1" /> <matcher field="SourcePort" order="1" pattern-id="SourceIPColonPort" capture-group="2" />
Modifying an Event Category
A device event category can be hardcoded, or the severity can be adjusted.
The following example adjusts the severity for a single event type:
<event-match-single event-name="TheEvent" device-event-category="Actual Category"
severity="6" send-identity="UseDSMResults" />
Suppressing Identity Change Events
A DSMmight unnecessarily send identity change events.
The following examples show how to suppress identity change events from being sent
from a single event type and a group of events.
// Never send identity for the event with an EventName of Authen OK <event-match-single event-name="Authen OK" device-event-category="ACS" severity="6" send-identity="OverrideAndNeverSend" />
// Never send any identity for an event with an event name starting with 7, followed by one to five other digits: <pattern id="EventNameId" xmlns=""><![CDATA[(7\d{1,5})]]></pattern>
<event-match-multiple pattern-id="EventNameId" capture-group-index="1" device-event-category="Cisco Firewall" severity="7" send-identity="OverrideAndNeverSend"/>
Encoding Logs
The following encoding formats are supported:
• US-ASCII
• UTF-8
You can forward logs to the system in an encoding that does not match US-ASCII or
UTF-8 formats. You can configure an advanced flag to ensure that input can be
re-encoded to UTF-8 for parsing and storage purposes.
For example, if you want to ensure that the source logs arrive in SHIFT-JIS (ANSI/OEM
Japanese) encoding, type the following code:
<device-extension source-encoding=SHIFT-JIS xmlns=event_parsing/device_extension>
The logs are enclosed in UTF-8 format.
79Copyright © 2018, Juniper Networks, Inc.
Chapter 3: Log Source Extensions
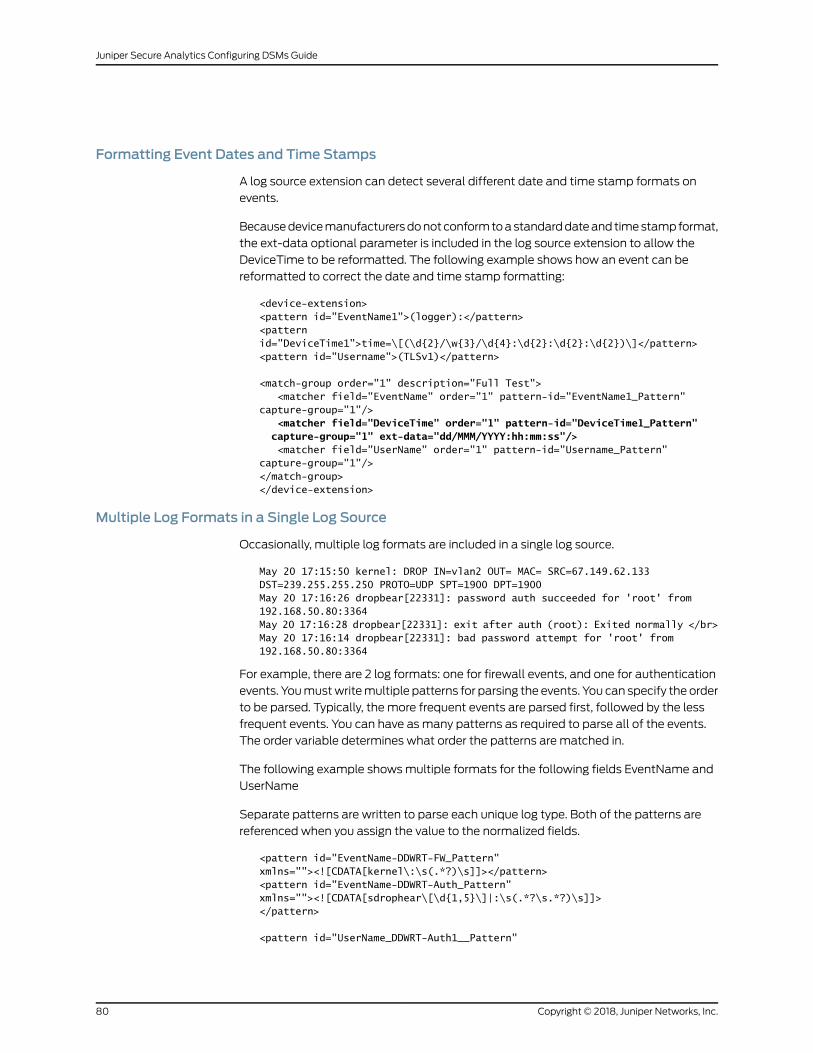
Formatting Event Dates and Time Stamps
A log source extension can detect several different date and time stamp formats on
events.
Becausedevicemanufacturersdonotconformtoastandarddateand timestampformat,
the ext-data optional parameter is included in the log source extension to allow the
DeviceTime to be reformatted. The following example shows how an event can be
reformatted to correct the date and time stamp formatting:
<device-extension> <pattern id="EventName1">(logger):</pattern> <pattern id="DeviceTime1">time=\[(\d{2}/\w{3}/\d{4}:\d{2}:\d{2}:\d{2})\]</pattern> <pattern id="Username">(TLSv1)</pattern>
<match-group order="1" description="Full Test"> <matcher field="EventName" order="1" pattern-id="EventName1_Pattern" capture-group="1"/>
<matcher field="DeviceTime" order="1" pattern-id="DeviceTime1_Pattern" capture-group="1" ext-data="dd/MMM/YYYY:hh:mm:ss"/> <matcher field="UserName" order="1" pattern-id="Username_Pattern" capture-group="1"/></match-group></device-extension>
Multiple Log Formats in a Single Log Source
Occasionally, multiple log formats are included in a single log source.
May 20 17:15:50 kernel: DROP IN=vlan2 OUT= MAC= SRC=67.149.62.133 DST=239.255.255.250 PROTO=UDP SPT=1900 DPT=1900May 20 17:16:26 dropbear[22331]: password auth succeeded for 'root' from 192.168.50.80:3364May 20 17:16:28 dropbear[22331]: exit after auth (root): Exited normally </br>May 20 17:16:14 dropbear[22331]: bad password attempt for 'root' from 192.168.50.80:3364
For example, there are 2 log formats: one for firewall events, and one for authentication
events. Youmustwritemultiple patterns for parsing the events. You can specify the order
to be parsed. Typically, the more frequent events are parsed first, followed by the less
frequent events. You can have as many patterns as required to parse all of the events.
The order variable determines what order the patterns are matched in.
The following example showsmultiple formats for the following fields EventName and
UserName
Separate patterns are written to parse each unique log type. Both of the patterns are
referenced when you assign the value to the normalized fields.
<pattern id="EventName-DDWRT-FW_Pattern" xmlns=""><![CDATA[kernel\:\s(.*?)\s]]></pattern><pattern id="EventName-DDWRT-Auth_Pattern" xmlns=""><![CDATA[sdrophear\[\d{1,5}\]|:\s(.*?\s.*?)\s]]></pattern>
<pattern id="UserName_DDWRT-Auth1__Pattern"
Copyright © 2018, Juniper Networks, Inc.80
Juniper Secure Analytics Configuring DSMs Guide
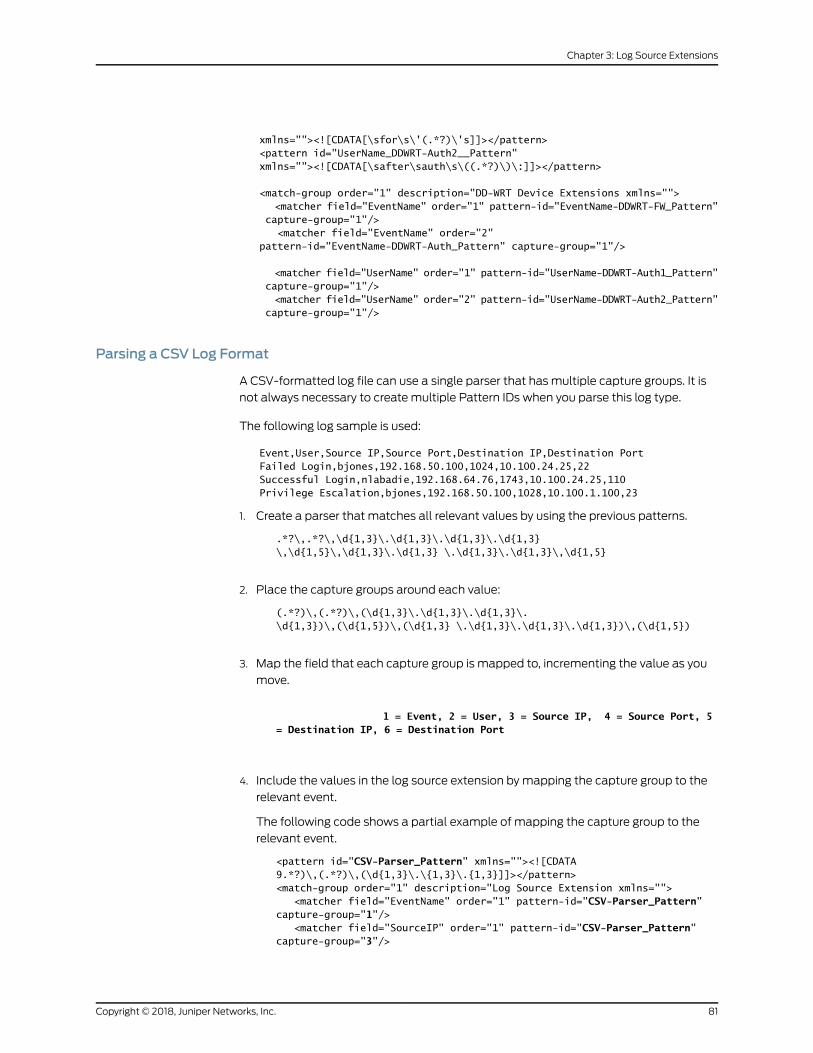
xmlns=""><![CDATA[\sfor\s\'(.*?)\'s]]></pattern><pattern id="UserName_DDWRT-Auth2__Pattern" xmlns=""><![CDATA[\safter\sauth\s\((.*?)\)\:]]></pattern>
<match-group order="1" description="DD-WRT Device Extensions xmlns=""> <matcher field="EventName" order="1" pattern-id="EventName-DDWRT-FW_Pattern" capture-group="1"/> <matcher field="EventName" order="2" pattern-id="EventName-DDWRT-Auth_Pattern" capture-group="1"/>
<matcher field="UserName" order="1" pattern-id="UserName-DDWRT-Auth1_Pattern" capture-group="1"/> <matcher field="UserName" order="2" pattern-id="UserName-DDWRT-Auth2_Pattern" capture-group="1"/>
Parsing a CSV Log Format
A CSV-formatted log file can use a single parser that has multiple capture groups. It is
not always necessary to create multiple Pattern IDs when you parse this log type.
The following log sample is used:
Event,User,Source IP,Source Port,Destination IP,Destination PortFailed Login,bjones,192.168.50.100,1024,10.100.24.25,22 Successful Login,nlabadie,192.168.64.76,1743,10.100.24.25,110 Privilege Escalation,bjones,192.168.50.100,1028,10.100.1.100,23
1. Create a parser that matches all relevant values by using the previous patterns.
.*?\,.*?\,\d{1,3}\.\d{1,3}\.\d{1,3}\.\d{1,3}\,\d{1,5}\,\d{1,3}\.\d{1,3} \.\d{1,3}\.\d{1,3}\,\d{1,5}
2. Place the capture groups around each value:
(.*?)\,(.*?)\,(\d{1,3}\.\d{1,3}\.\d{1,3}\.\d{1,3})\,(\d{1,5})\,(\d{1,3} \.\d{1,3}\.\d{1,3}\.\d{1,3})\,(\d{1,5})
3. Map the field that each capture group is mapped to, incrementing the value as you
move.
1 = Event, 2 = User, 3 = Source IP, 4 = Source Port, 5 = Destination IP, 6 = Destination Port
4. Include the values in the log source extension by mapping the capture group to the
relevant event.
The following code shows a partial example of mapping the capture group to the
relevant event.
<pattern id="CSV-Parser_Pattern" xmlns=""><![CDATA 9.*?)\,(.*?)\,(\d{1,3}\.\{1,3}\.{1,3}]]></pattern><match-group order="1" description="Log Source Extension xmlns=""> <matcher field="EventName" order="1" pattern-id="CSV-Parser_Pattern" capture-group="1"/> <matcher field="SourceIP" order="1" pattern-id="CSV-Parser_Pattern" capture-group="3"/>
81Copyright © 2018, Juniper Networks, Inc.
Chapter 3: Log Source Extensions
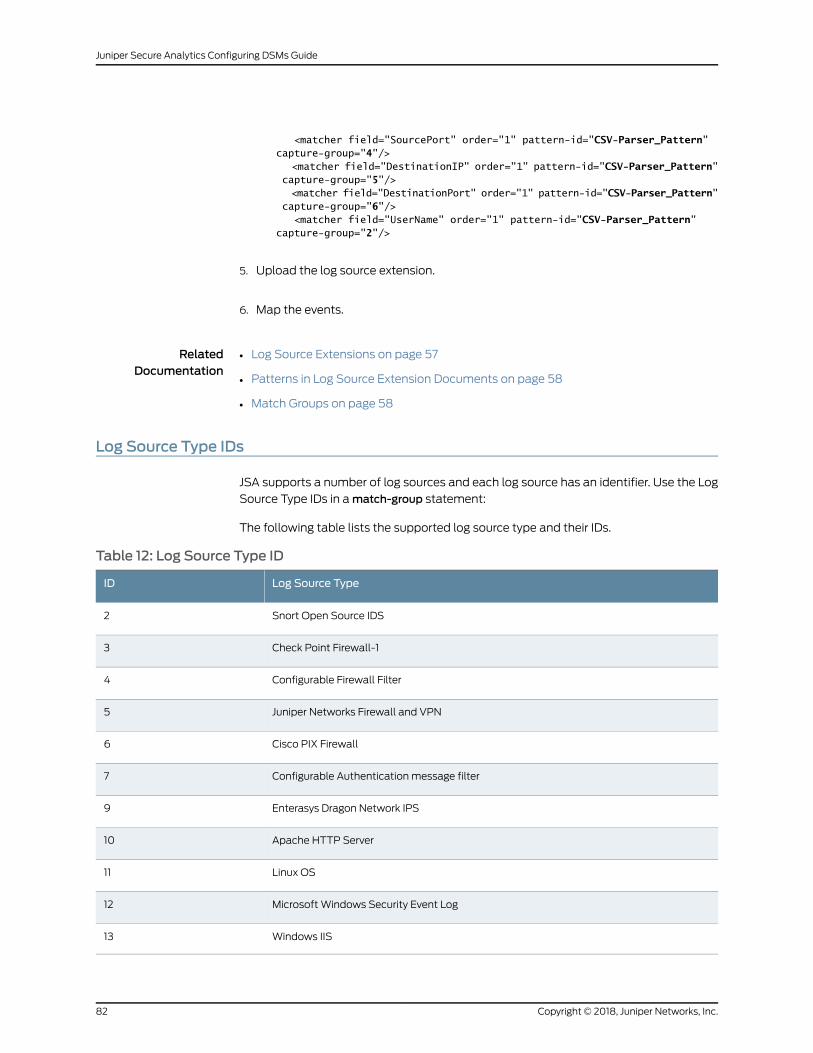
<matcher field="SourcePort" order="1" pattern-id="CSV-Parser_Pattern" capture-group="4"/> <matcher field="DestinationIP" order="1" pattern-id="CSV-Parser_Pattern" capture-group="5"/> <matcher field="DestinationPort" order="1" pattern-id="CSV-Parser_Pattern" capture-group="6"/> <matcher field="UserName" order="1" pattern-id="CSV-Parser_Pattern" capture-group="2"/>
5. Upload the log source extension.
6. Map the events.
RelatedDocumentation
Log Source Extensions on page 57•
• Patterns in Log Source Extension Documents on page 58
• Match Groups on page 58
Log Source Type IDs
JSA supports a number of log sources and each log source has an identifier. Use the Log
Source Type IDs in amatch-group statement:
The following table lists the supported log source type and their IDs.
Table 12: Log Source Type ID
Log Source TypeID
Snort Open Source IDS2
Check Point Firewall-13
Configurable Firewall Filter4
Juniper Networks Firewall and VPN5
Cisco PIX Firewall6
Configurable Authentication message filter7
Enterasys Dragon Network IPS9
Apache HTTP Server10
Linux OS11
Microsoft Windows Security Event Log12
Windows IIS13
Copyright © 2018, Juniper Networks, Inc.82
Juniper Secure Analytics Configuring DSMs Guide
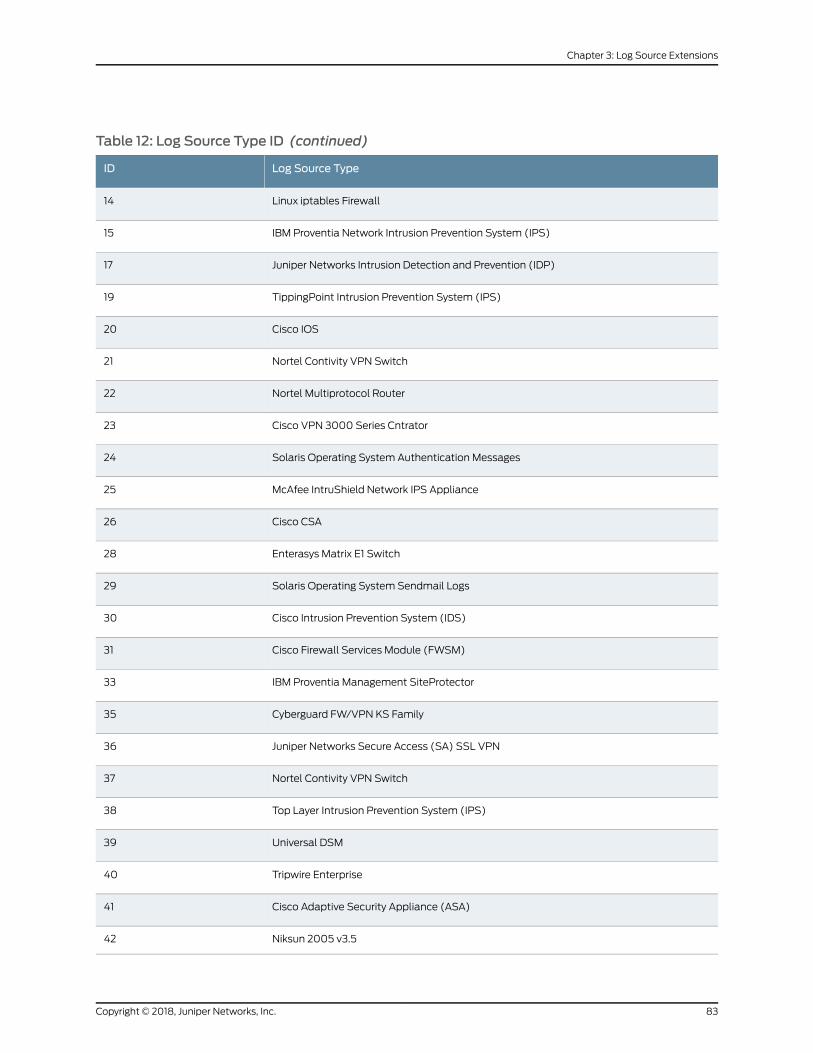
Table 12: Log Source Type ID (continued)
Log Source TypeID
Linux iptables Firewall14
IBM Proventia Network Intrusion Prevention System (IPS)15
Juniper Networks Intrusion Detection and Prevention (IDP)17
TippingPoint Intrusion Prevention System (IPS)19
Cisco IOS20
Nortel Contivity VPN Switch21
Nortel Multiprotocol Router22
Cisco VPN 3000 Series Cntrator23
Solaris Operating System Authentication Messages24
McAfee IntruShield Network IPS Appliance25
Cisco CSA26
Enterasys Matrix E1 Switch28
Solaris Operating System Sendmail Logs29
Cisco Intrusion Prevention System (IDS)30
Cisco Firewall Services Module (FWSM)31
IBM Proventia Management SiteProtector33
Cyberguard FW/VPN KS Family35
Juniper Networks Secure Access (SA) SSL VPN36
Nortel Contivity VPN Switch37
Top Layer Intrusion Prevention System (IPS)38
Universal DSM39
Tripwire Enterprise40
Cisco Adaptive Security Appliance (ASA)41
Niksun 2005 v3.542
83Copyright © 2018, Juniper Networks, Inc.
Chapter 3: Log Source Extensions
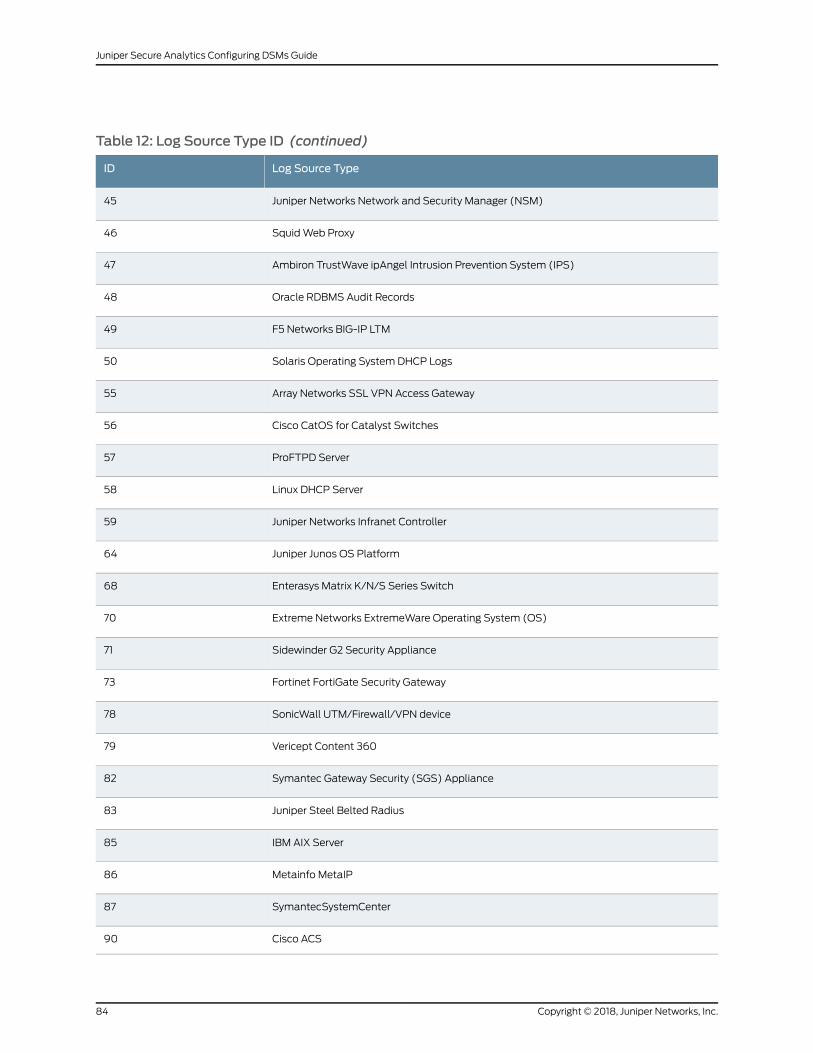
Table 12: Log Source Type ID (continued)
Log Source TypeID
Juniper Networks Network and Security Manager (NSM)45
SquidWeb Proxy46
Ambiron TrustWave ipAngel Intrusion Prevention System (IPS)47
Oracle RDBMS Audit Records48
F5 Networks BIG-IP LTM49
Solaris Operating System DHCP Logs50
Array Networks SSL VPN Access Gateway55
Cisco CatOS for Catalyst Switches56
ProFTPD Server57
Linux DHCP Server58
Juniper Networks Infranet Controller59
Juniper Junos OS Platform64
Enterasys Matrix K/N/S Series Switch68
Extreme Networks ExtremeWare Operating System (OS)70
Sidewinder G2 Security Appliance71
Fortinet FortiGate Security Gateway73
SonicWall UTM/Firewall/VPN device78
Vericept Content 36079
Symantec Gateway Security (SGS) Appliance82
Juniper Steel Belted Radius83
IBM AIX Server85
Metainfo MetaIP86
SymantecSystemCenter87
Cisco ACS90
Copyright © 2018, Juniper Networks, Inc.84
Juniper Secure Analytics Configuring DSMs Guide
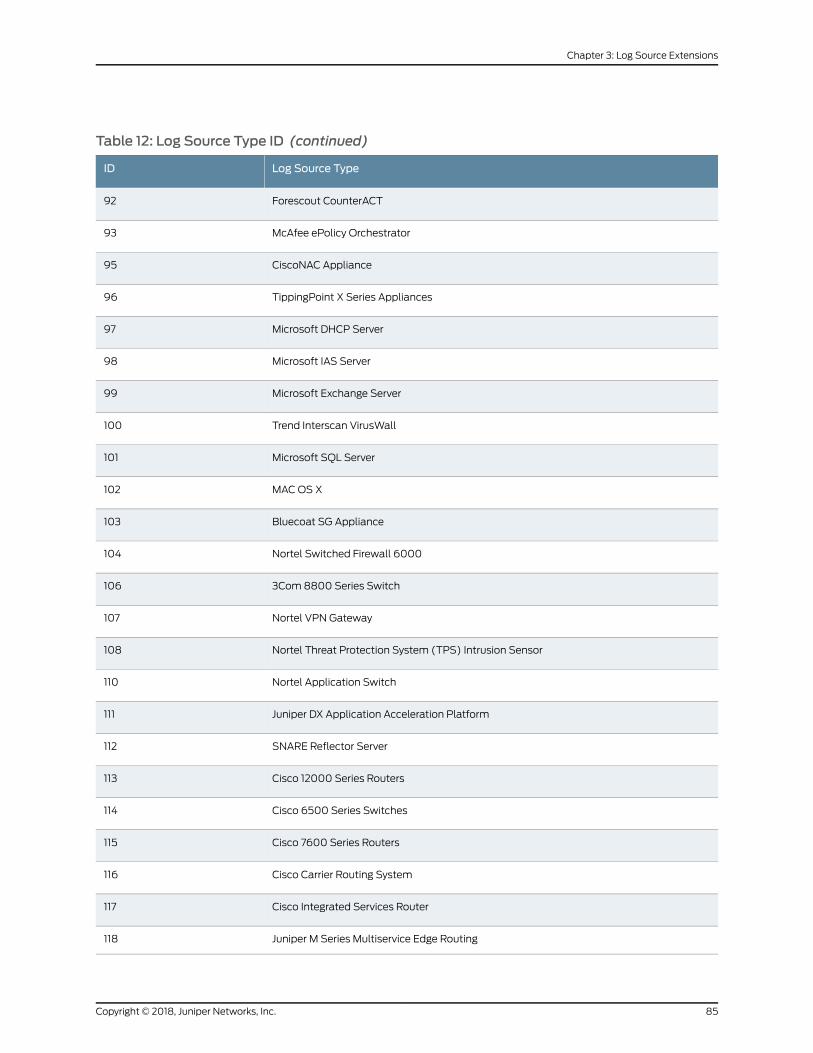
Table 12: Log Source Type ID (continued)
Log Source TypeID
Forescout CounterACT92
McAfee ePolicy Orchestrator93
CiscoNAC Appliance95
TippingPoint X Series Appliances96
Microsoft DHCP Server97
Microsoft IAS Server98
Microsoft Exchange Server99
Trend Interscan VirusWall100
Microsoft SQL Server101
MAC OS X102
Bluecoat SG Appliance103
Nortel Switched Firewall 6000104
3Com 8800 Series Switch106
Nortel VPN Gateway107
Nortel Threat Protection System (TPS) Intrusion Sensor108
Nortel Application Switch110
Juniper DX Application Acceleration Platform111
SNARE Reflector Server112
Cisco 12000 Series Routers113
Cisco 6500 Series Switches114
Cisco 7600 Series Routers115
Cisco Carrier Routing System116
Cisco Integrated Services Router117
Juniper M Series Multiservice Edge Routing118
85Copyright © 2018, Juniper Networks, Inc.
Chapter 3: Log Source Extensions
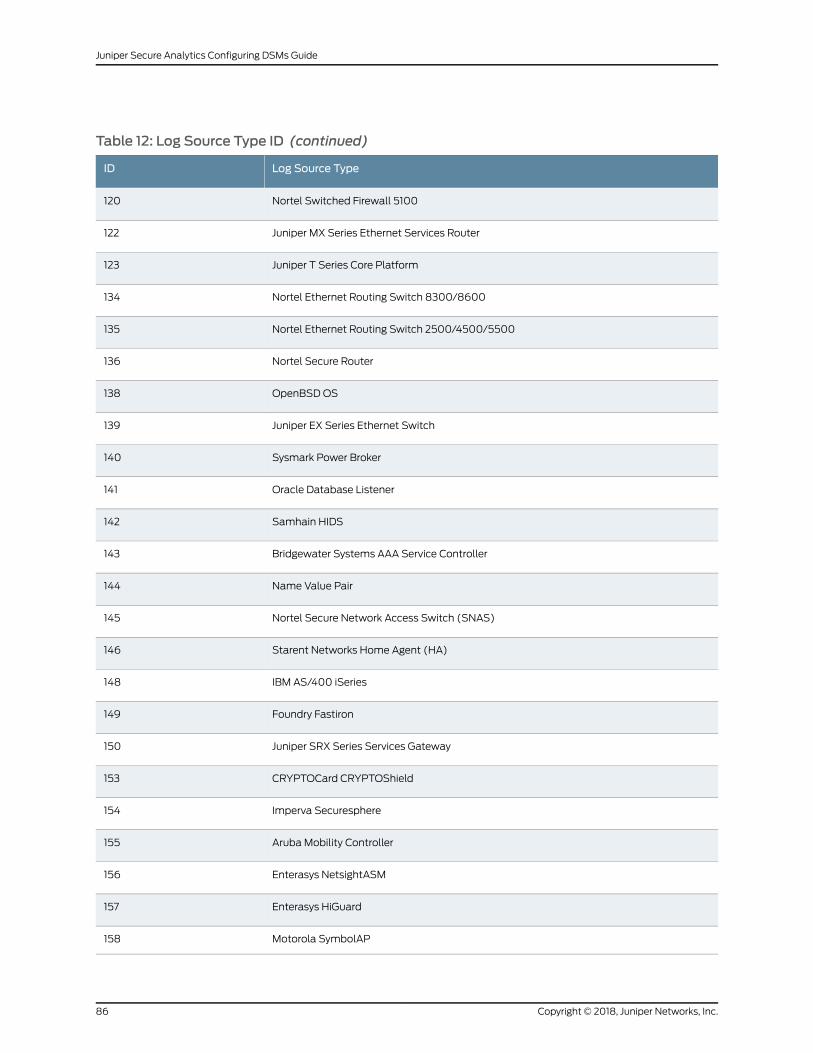
Table 12: Log Source Type ID (continued)
Log Source TypeID
Nortel Switched Firewall 5100120
Juniper MX Series Ethernet Services Router122
Juniper T Series Core Platform123
Nortel Ethernet Routing Switch 8300/8600134
Nortel Ethernet Routing Switch 2500/4500/5500135
Nortel Secure Router136
OpenBSD OS138
Juniper EX Series Ethernet Switch139
Sysmark Power Broker140
Oracle Database Listener141
Samhain HIDS142
Bridgewater Systems AAA Service Controller143
Name Value Pair144
Nortel Secure Network Access Switch (SNAS)145
Starent Networks Home Agent (HA)146
IBM AS/400 iSeries148
Foundry Fastiron149
Juniper SRX Series Services Gateway150
CRYPTOCard CRYPTOShield153
Imperva Securesphere154
Aruba Mobility Controller155
Enterasys NetsightASM156
Enterasys HiGuard157
Motorola SymbolAP158
Copyright © 2018, Juniper Networks, Inc.86
Juniper Secure Analytics Configuring DSMs Guide
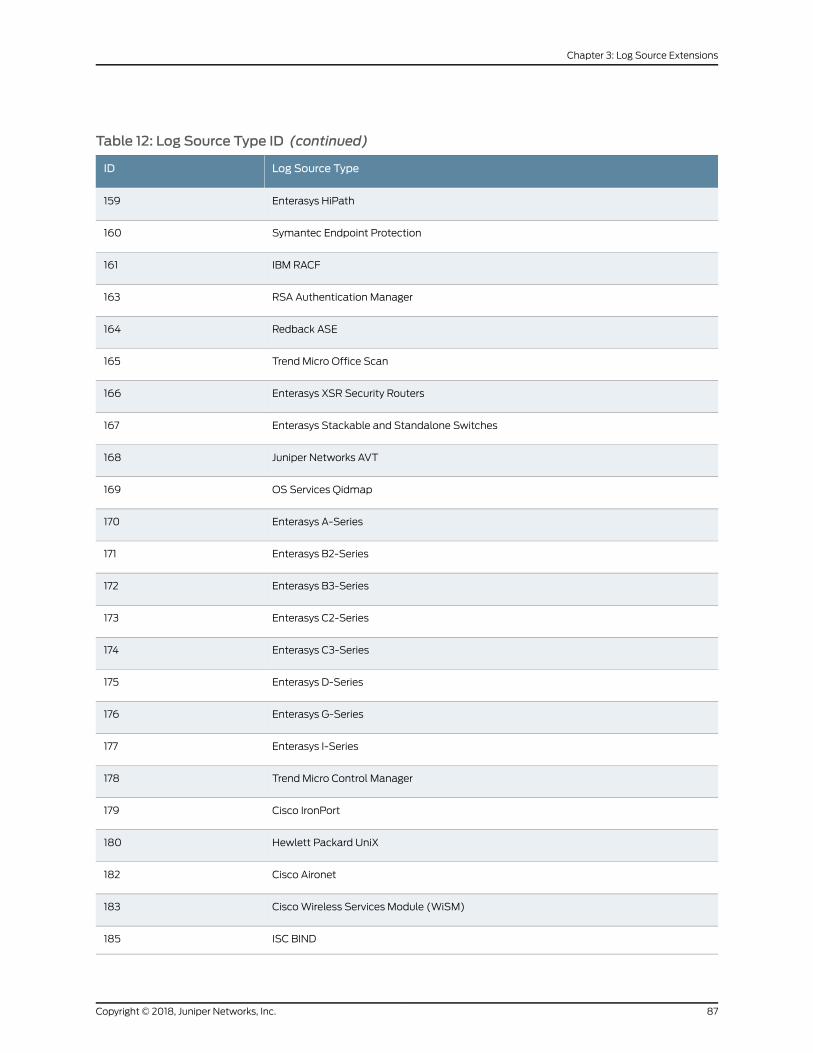
Table 12: Log Source Type ID (continued)
Log Source TypeID
Enterasys HiPath159
Symantec Endpoint Protection160
IBM RACF161
RSA Authentication Manager163
Redback ASE164
Trend Micro Office Scan165
Enterasys XSR Security Routers166
Enterasys Stackable and Standalone Switches167
Juniper Networks AVT168
OS Services Qidmap169
Enterasys A-Series170
Enterasys B2-Series171
Enterasys B3-Series172
Enterasys C2-Series173
Enterasys C3-Series174
Enterasys D-Series175
Enterasys G-Series176
Enterasys I-Series177
Trend Micro Control Manager178
Cisco IronPort179
Hewlett Packard UniX180
Cisco Aironet182
CiscoWireless Services Module (WiSM)183
ISC BIND185
87Copyright © 2018, Juniper Networks, Inc.
Chapter 3: Log Source Extensions

Table 12: Log Source Type ID (continued)
Log Source TypeID
IBM Lotus Domino186
HP Tandem187
Sentrigo Hedgehog188
Sybase ASE189
Microsoft ISA191
Juniper SRC192
Radware DefensePro193
Cisco ACE Firewall194
IBM DB2195
Oracle Audit Vault196
Sourcefire Defense Center197
Websense V Series198
Oracle RDBMSOS Audit Record199
Palo Alto PA Series206
HP ProCurve208
Microsoft Operations Manager209
EMC VMWare210
IBMWebSphere Application Server211
F5 Networks BIG-IP ASM213
FireEye214
Fair Warning215
IBM Informix216
CA Top Secret217
Enterasys NAC218
Copyright © 2018, Juniper Networks, Inc.88
Juniper Secure Analytics Configuring DSMs Guide
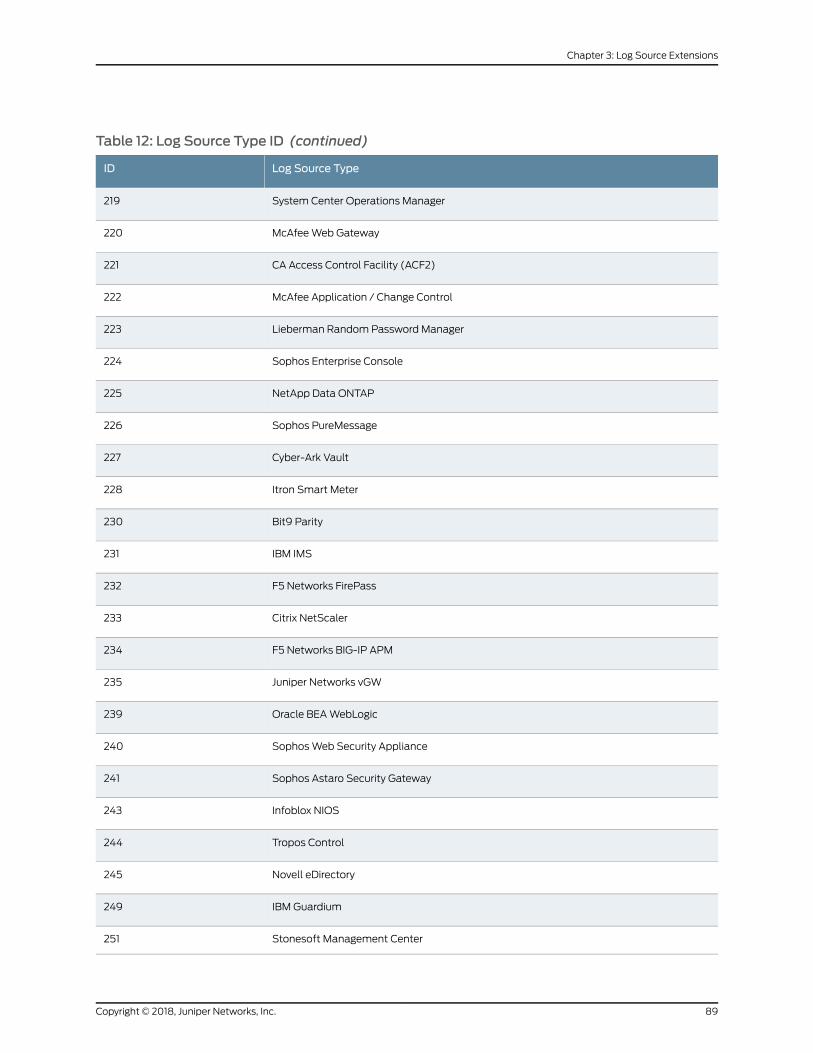
Table 12: Log Source Type ID (continued)
Log Source TypeID
System Center Operations Manager219
McAfeeWeb Gateway220
CA Access Control Facility (ACF2)221
McAfee Application / Change Control222
Lieberman Random Password Manager223
Sophos Enterprise Console224
NetApp Data ONTAP225
Sophos PureMessage226
Cyber-Ark Vault227
Itron Smart Meter228
Bit9 Parity230
IBM IMS231
F5 Networks FirePass232
Citrix NetScaler233
F5 Networks BIG-IP APM234
Juniper Networks vGW235
Oracle BEAWebLogic239
SophosWeb Security Appliance240
Sophos Astaro Security Gateway241
Infoblox NIOS243
Tropos Control244
Novell eDirectory245
IBM Guardium249
Stonesoft Management Center251
89Copyright © 2018, Juniper Networks, Inc.
Chapter 3: Log Source Extensions
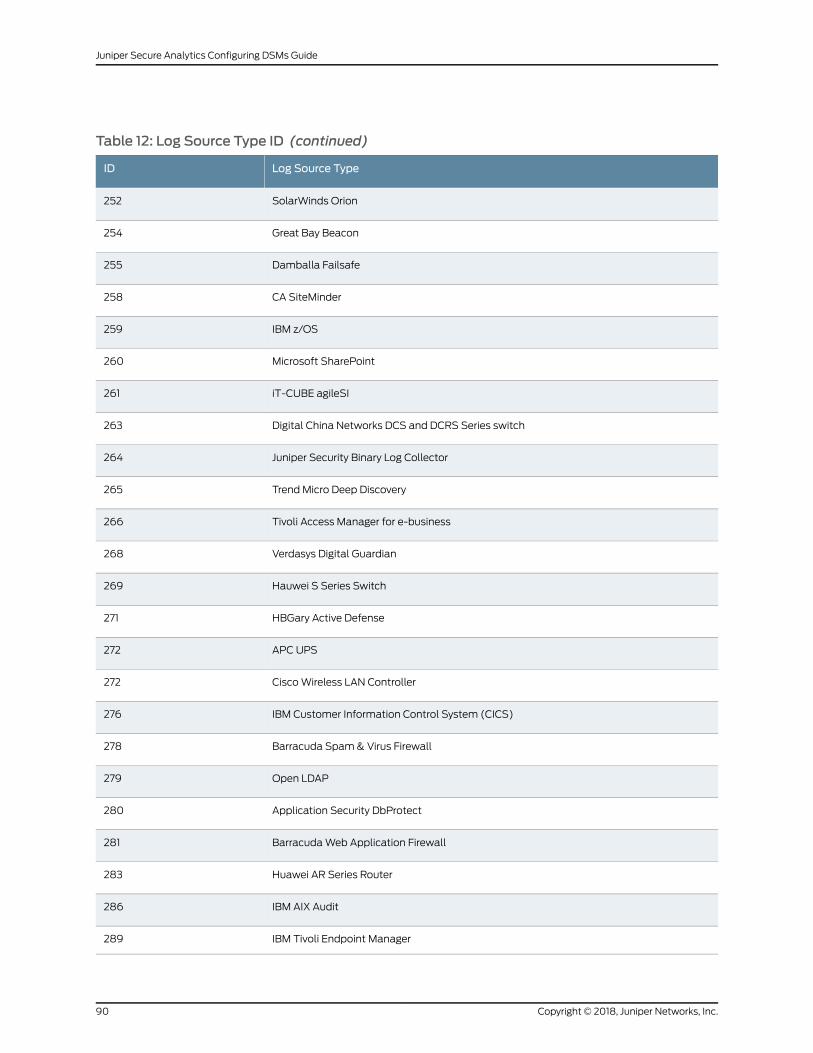
Table 12: Log Source Type ID (continued)
Log Source TypeID
SolarWinds Orion252
Great Bay Beacon254
Damballa Failsafe255
CA SiteMinder258
IBM z/OS259
Microsoft SharePoint260
iT-CUBE agileSI261
Digital China Networks DCS and DCRS Series switch263
Juniper Security Binary Log Collector264
Trend Micro Deep Discovery265
Tivoli Access Manager for e-business266
Verdasys Digital Guardian268
Hauwei S Series Switch269
HBGary Active Defense271
APC UPS272
CiscoWireless LAN Controller272
IBM Customer Information Control System (CICS)276
Barracuda Spam& Virus Firewall278
Open LDAP279
Application Security DbProtect280
BarracudaWeb Application Firewall281
Huawei AR Series Router283
IBM AIX Audit286
IBM Tivoli Endpoint Manager289
Copyright © 2018, Juniper Networks, Inc.90
Juniper Secure Analytics Configuring DSMs Guide
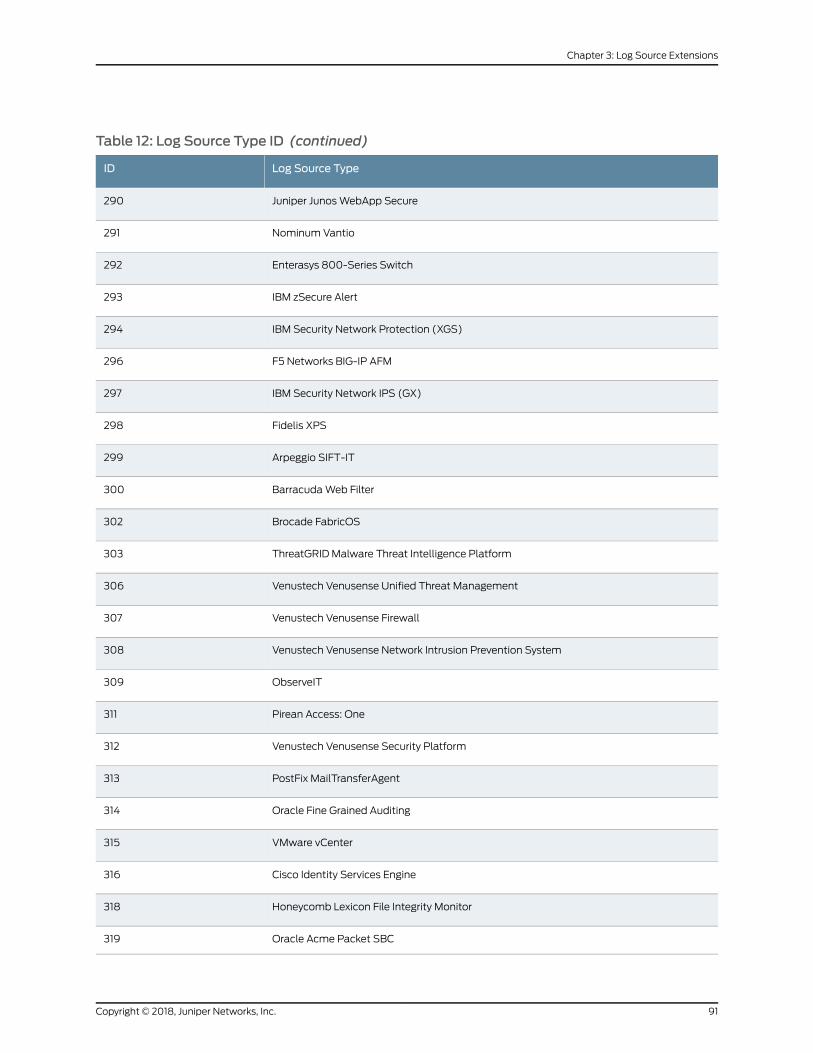
Table 12: Log Source Type ID (continued)
Log Source TypeID
Juniper JunosWebApp Secure290
Nominum Vantio291
Enterasys 800-Series Switch292
IBM zSecure Alert293
IBM Security Network Protection (XGS)294
F5 Networks BIG-IP AFM296
IBM Security Network IPS (GX)297
Fidelis XPS298
Arpeggio SIFT-IT299
BarracudaWeb Filter300
Brocade FabricOS302
ThreatGRID Malware Threat Intelligence Platform303
Venustech Venusense Unified Threat Management306
Venustech Venusense Firewall307
Venustech Venusense Network Intrusion Prevention System308
ObserveIT309
Pirean Access: One311
Venustech Venusense Security Platform312
PostFix MailTransferAgent313
Oracle Fine Grained Auditing314
VMware vCenter315
Cisco Identity Services Engine316
Honeycomb Lexicon File Integrity Monitor318
Oracle Acme Packet SBC319
91Copyright © 2018, Juniper Networks, Inc.
Chapter 3: Log Source Extensions
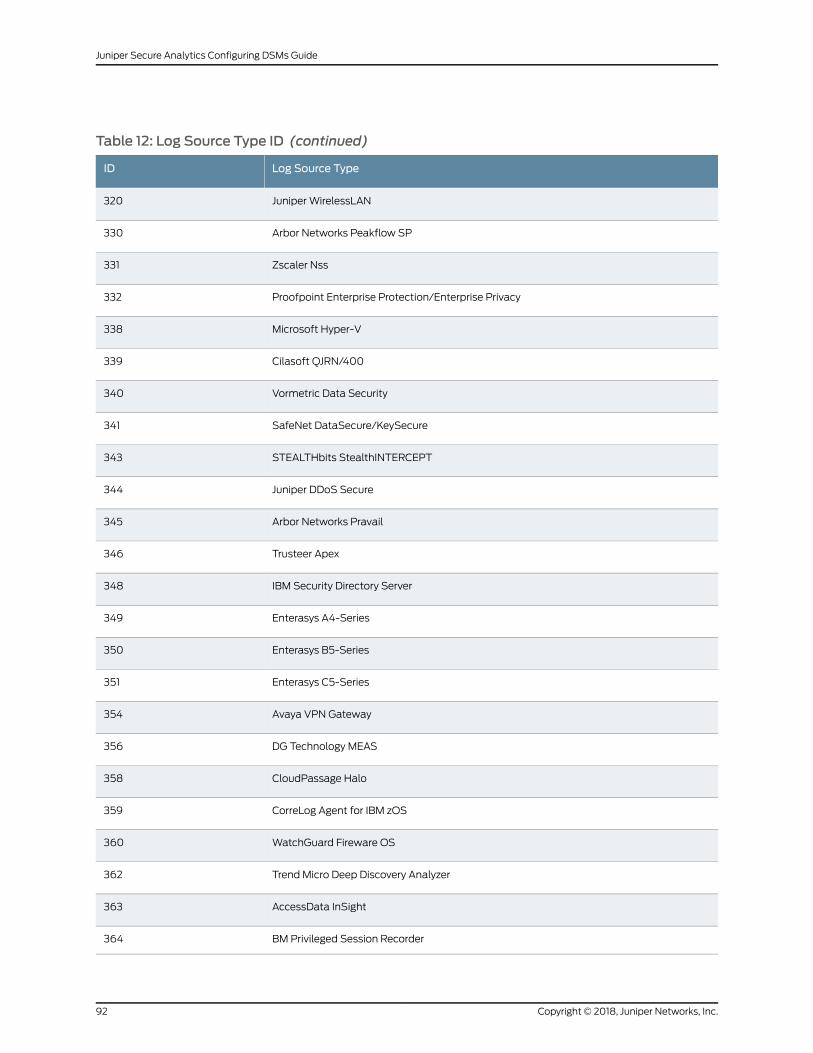
Table 12: Log Source Type ID (continued)
Log Source TypeID
Juniper WirelessLAN320
Arbor Networks Peakflow SP330
Zscaler Nss331
Proofpoint Enterprise Protection/Enterprise Privacy332
Microsoft Hyper-V338
Cilasoft QJRN/400339
Vormetric Data Security340
SafeNet DataSecure/KeySecure341
STEALTHbits StealthINTERCEPT343
Juniper DDoS Secure344
Arbor Networks Pravail345
Trusteer Apex346
IBM Security Directory Server348
Enterasys A4-Series349
Enterasys B5-Series350
Enterasys C5-Series351
Avaya VPN Gateway354
DG Technology MEAS356
CloudPassage Halo358
CorreLog Agent for IBM zOS359
WatchGuard Fireware OS360
Trend Micro Deep Discovery Analyzer362
AccessData InSight363
BM Privileged Session Recorder364
Copyright © 2018, Juniper Networks, Inc.92
Juniper Secure Analytics Configuring DSMs Guide
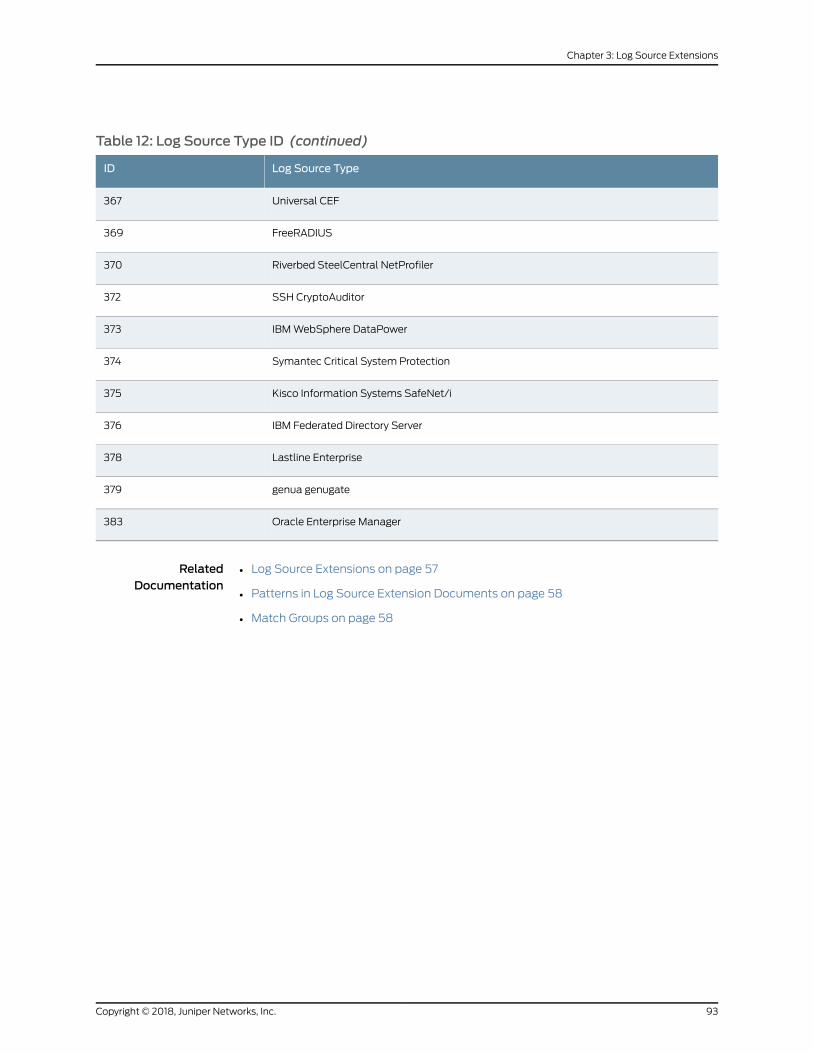
Table 12: Log Source Type ID (continued)
Log Source TypeID
Universal CEF367
FreeRADIUS369
Riverbed SteelCentral NetProfiler370
SSH CryptoAuditor372
IBMWebSphere DataPower373
Symantec Critical System Protection374
Kisco Information Systems SafeNet/i375
IBM Federated Directory Server376
Lastline Enterprise378
genua genugate379
Oracle Enterprise Manager383
RelatedDocumentation
• Log Source Extensions on page 57
• Patterns in Log Source Extension Documents on page 58
• Match Groups on page 58
93Copyright © 2018, Juniper Networks, Inc.
Chapter 3: Log Source Extensions

Copyright © 2018, Juniper Networks, Inc.94
Juniper Secure Analytics Configuring DSMs Guide

CHAPTER 4
Log Source Extension Management
• Log Source Extension Management on page 95
• Adding a Log Source Extension on page 96
Log Source ExtensionManagement
You can create log source extensions to extend ormodify the parsing routines of specific
devices.
A log source extension is an XML file that includes all of the regular expression patterns
that are required to identify and categorize events from the event payload. Extension
files can be used to parse events when youmust correct a parsing issue or youmust
override the default parsing for an event from a DSM.When a DSM does not exist to
parse events for anapplianceor security device in your network, an extension canprovide
event support. The Log Activity tab identifies log source events in these basic types:
• Log sources that properly parse the event. Properly parsed events are assigned to the
correct log source typeandcategory. In this case, no interventionor extension is required.
• Log sources that parse events, but have a valueUnknown in the LogSource parameter.
Unknown events are log source events where the log source type is identified, but the
payload information cannot be understood by theDSM. The systemcannot determine
an event identifier from the available information to properly categorize the event. In
this case, the event can bemapped to a category or a log source extension can be
written to repair the event parsing for unknown events.
• Log sources that cannot identify the log source type and have a value of Stored event
in the Log Source parameter. Stored events require you to update your DSM files or
write a log source extension to properly parse the event. After the event parses, you
can thenmap the events.
Before you can add a log source extension, youmust create the extension document.
The extension document is an XML document that you can create with any common
wordprocessingor text editingapplication.Multiple extensiondocuments canbecreated,
uploaded, and associated with various log source types. The format of the extension
document must conform to a standard XML schema document (XSD). To develop an
extension document, knowledge of and experience with XML coding is required.
95Copyright © 2018, Juniper Networks, Inc.
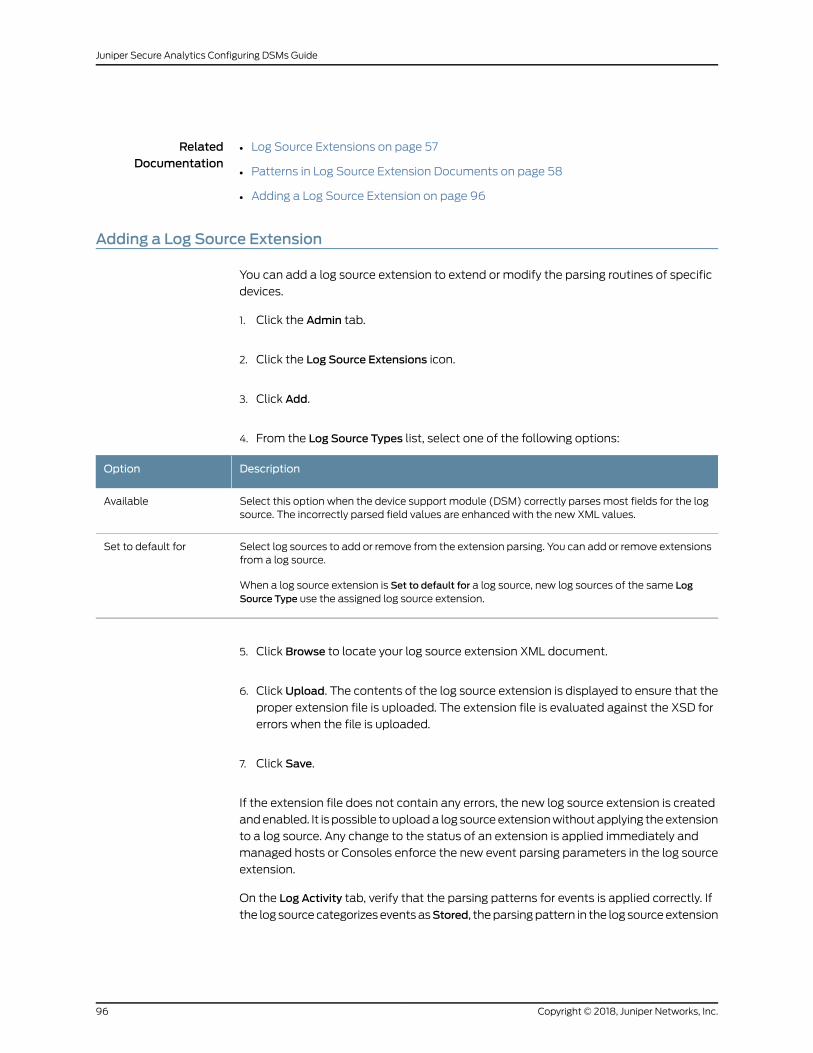
RelatedDocumentation
Log Source Extensions on page 57•
• Patterns in Log Source Extension Documents on page 58
• Adding a Log Source Extension on page 96
Adding a Log Source Extension
You can add a log source extension to extend or modify the parsing routines of specific
devices.
1. Click the Admin tab.
2. Click the Log Source Extensions icon.
3. Click Add.
4. From the Log Source Types list, select one of the following options:
DescriptionOption
Select this option when the device support module (DSM) correctly parses most fields for the logsource. The incorrectly parsed field values are enhanced with the new XML values.
Available
Select log sources to add or remove from the extension parsing. You can add or remove extensionsfrom a log source.
When a log source extension is Set to default for a log source, new log sources of the same LogSource Type use the assigned log source extension.
Set to default for
5. Click Browse to locate your log source extension XML document.
6. Click Upload. The contents of the log source extension is displayed to ensure that the
proper extension file is uploaded. The extension file is evaluated against the XSD for
errors when the file is uploaded.
7. Click Save.
If the extension file does not contain any errors, the new log source extension is created
andenabled. It is possible touploada log sourceextensionwithoutapplying theextension
to a log source. Any change to the status of an extension is applied immediately and
managed hosts or Consoles enforce the new event parsing parameters in the log source
extension.
On the Log Activity tab, verify that the parsing patterns for events is applied correctly. If
the log sourcecategorizeseventsasStored, theparsingpattern in the log sourceextension
Copyright © 2018, Juniper Networks, Inc.96
Juniper Secure Analytics Configuring DSMs Guide

requires adjustment. You can review the extension file against log source events to locate
any event parsing issues.
If the extension file does not contain any errors, the new log source extension is created
andenabled. It is possible touploada log sourceextensionwithoutapplying theextension
to a log source. Any change to the status of an extension is applied immediately and
managed hosts or Consoles enforce the new event parsing parameters in the log source
extension.
97Copyright © 2018, Juniper Networks, Inc.
Chapter 4: Log Source Extension Management

Copyright © 2018, Juniper Networks, Inc.98
Juniper Secure Analytics Configuring DSMs Guide
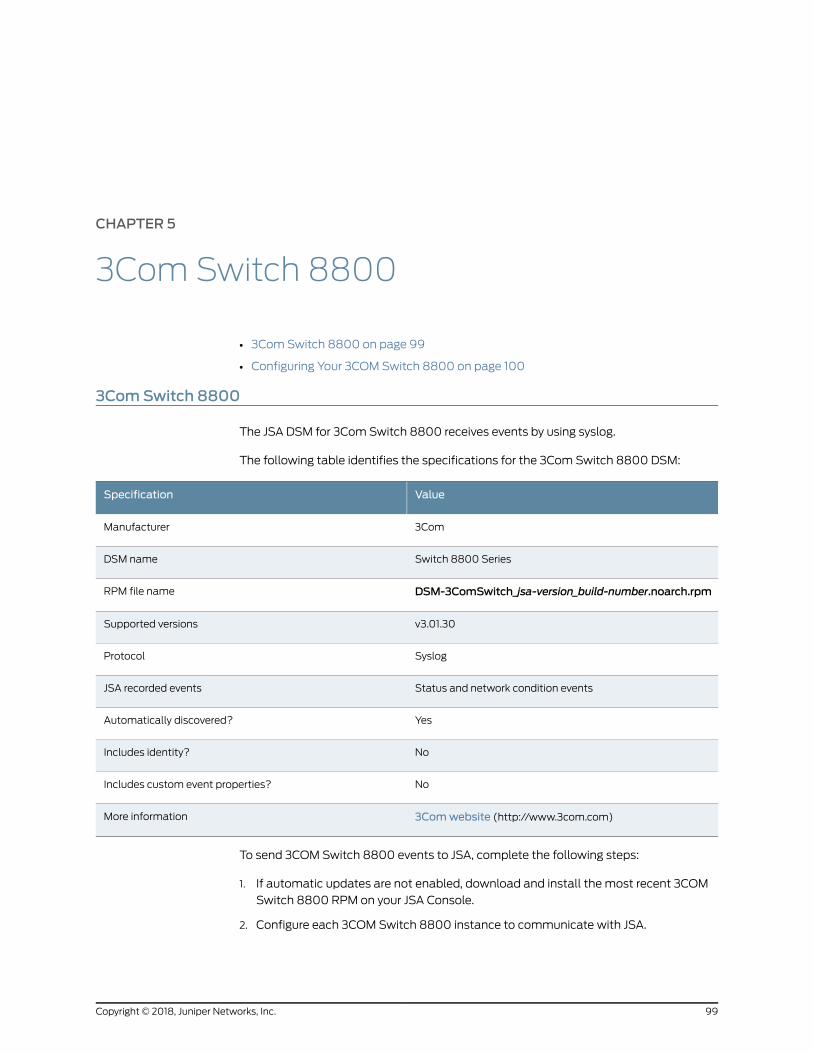
CHAPTER 5
3Com Switch 8800
• 3Com Switch 8800 on page 99
• Configuring Your 3COM Switch 8800 on page 100
3ComSwitch 8800
The JSA DSM for 3Com Switch 8800 receives events by using syslog.
The following table identifies the specifications for the 3Com Switch 8800 DSM:
ValueSpecification
3ComManufacturer
Switch 8800 SeriesDSM name
DSM-3ComSwitch_jsa-version_build-number.noarch.rpmRPM file name
v3.01.30Supported versions
SyslogProtocol
Status and network condition eventsJSA recorded events
YesAutomatically discovered?
NoIncludes identity?
NoIncludes custom event properties?
3Comwebsite (http://www.3com.com)More information
To send 3COM Switch 8800 events to JSA, complete the following steps:
1. If automatic updates are not enabled, download and install the most recent 3COM
Switch 8800 RPM on your JSA Console.
2. Configure each 3COM Switch 8800 instance to communicate with JSA.
99Copyright © 2018, Juniper Networks, Inc.
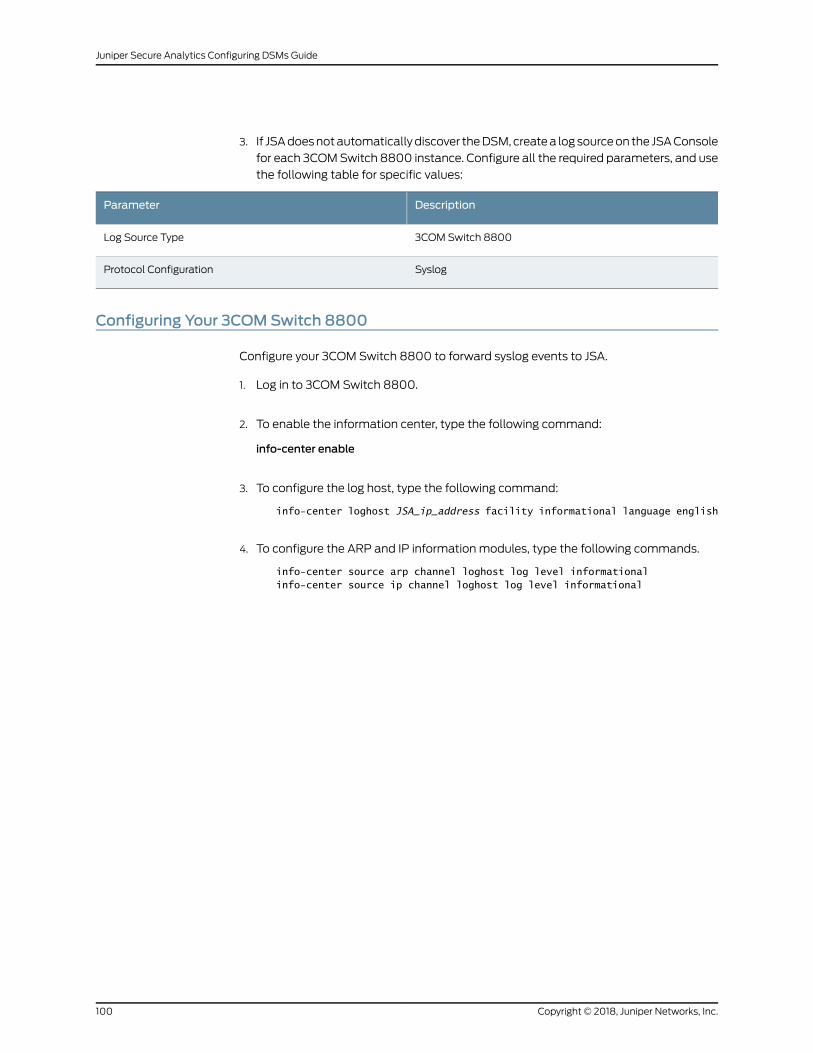
3. If JSAdoesnotautomaticallydiscover theDSM,createa logsourceon the JSAConsole
for each 3COMSwitch 8800 instance. Configure all the required parameters, and use
the following table for specific values:
DescriptionParameter
3COM Switch 8800Log Source Type
SyslogProtocol Configuration
Configuring Your 3COMSwitch 8800
Configure your 3COM Switch 8800 to forward syslog events to JSA.
1. Log in to 3COM Switch 8800.
2. To enable the information center, type the following command:
info-center enable
3. To configure the log host, type the following command:
info-center loghost JSA_ip_address facility informational language english
4. To configure the ARP and IP information modules, type the following commands.
info-center source arp channel loghost log level informationalinfo-center source ip channel loghost log level informational
Copyright © 2018, Juniper Networks, Inc.100
Juniper Secure Analytics Configuring DSMs Guide
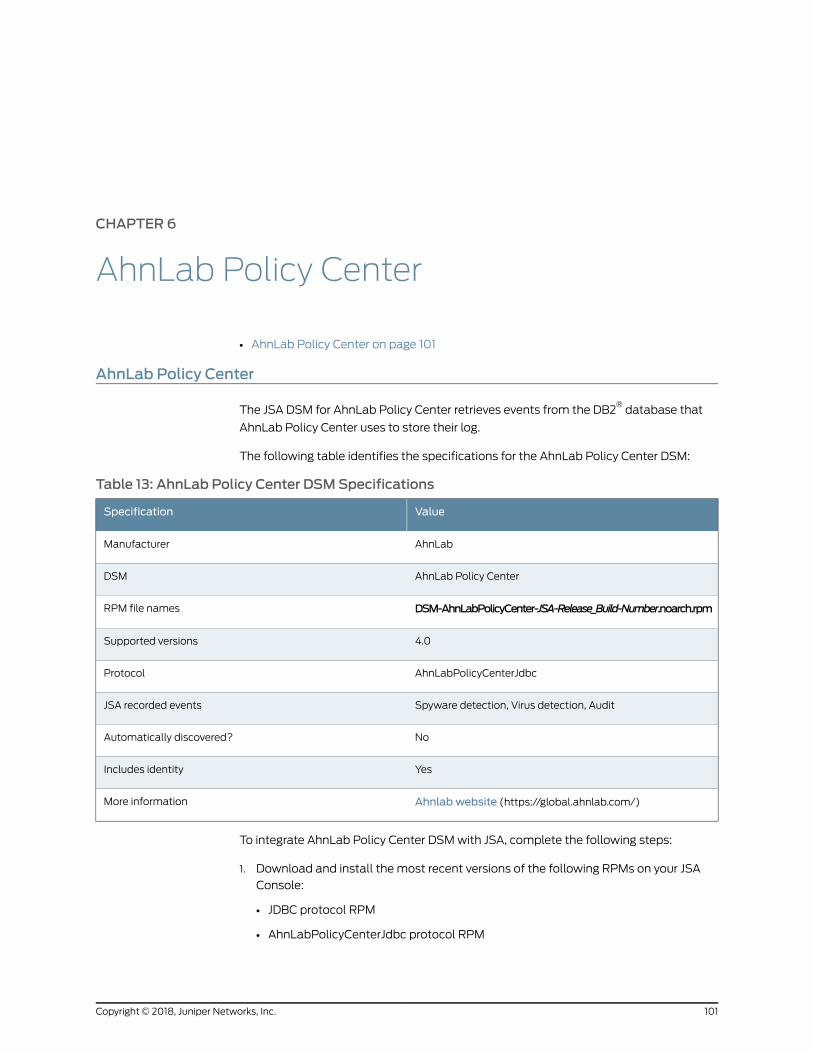
CHAPTER 6
AhnLab Policy Center
• AhnLab Policy Center on page 101
AhnLab Policy Center
The JSA DSM for AhnLab Policy Center retrieves events from the DB2®database that
AhnLab Policy Center uses to store their log.
The following table identifies the specifications for the AhnLab Policy Center DSM:
Table 13: AhnLab Policy Center DSMSpecifications
ValueSpecification
AhnLabManufacturer
AhnLab Policy CenterDSM
DSM-AhnLabPolicyCenter-JSA-Release_Build-Number.noarch.rpmRPM file names
4.0Supported versions
AhnLabPolicyCenterJdbcProtocol
Spyware detection, Virus detection, AuditJSA recorded events
NoAutomatically discovered?
YesIncludes identity
Ahnlab website (https://global.ahnlab.com/)More information
To integrate AhnLab Policy Center DSMwith JSA, complete the following steps:
1. Download and install the most recent versions of the following RPMs on your JSA
Console:
• JDBC protocol RPM
• AhnLabPolicyCenterJdbc protocol RPM
101Copyright © 2018, Juniper Networks, Inc.
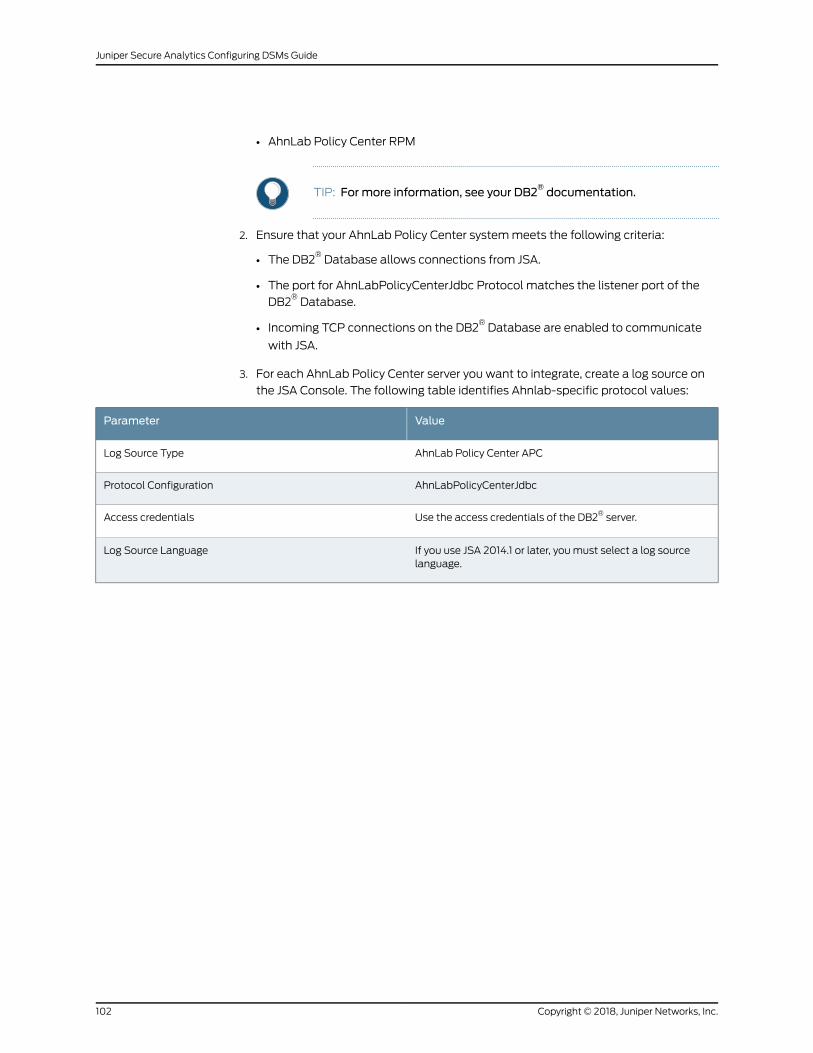
• AhnLab Policy Center RPM
TIP: For more information, see your DB2® documentation.
2. Ensure that your AhnLab Policy Center systemmeets the following criteria:
• The DB2®Database allows connections from JSA.
• The port for AhnLabPolicyCenterJdbc Protocol matches the listener port of the
DB2®Database.
• Incoming TCP connections on the DB2®Database are enabled to communicate
with JSA.
3. For each AhnLab Policy Center server you want to integrate, create a log source on
the JSA Console. The following table identifies Ahnlab-specific protocol values:
ValueParameter
AhnLab Policy Center APCLog Source Type
AhnLabPolicyCenterJdbcProtocol Configuration
Use the access credentials of the DB2® server.Access credentials
If you use JSA 2014.1 or later, you must select a log sourcelanguage.
Log Source Language
Copyright © 2018, Juniper Networks, Inc.102
Juniper Secure Analytics Configuring DSMs Guide

CHAPTER 7
Akamai Kona
• Akamai Kona on page 103
Akamai Kona
The JSA DSM for Akamai KONA collects event logs from your Akamai KONA servers.
The following table identifies the specifications for the Akamai KONA DSM:
Table 14: Akamai KONADSMSpecifications
ValueSpecification
AkamaiManufacturer
KonaProduct
DSM-AkamaiKona-JSA_Version-Build_Number.noarch.rpmDSM RPM name
HTTP ReceiverProtocol
Warn Rule Events
Deny Rule Events
JSA recorded events
NoAutomatically discovered?
NoIncludes identity?
NoIncludes custom properties?
Akamai website (http://www.akamai.com/)More information
To send Akamai KONA events to JSA, complete the following steps:
103Copyright © 2018, Juniper Networks, Inc.
NOTE: This integration requires you to open a non-standard port in yourfirewall for incoming Akamai connections. Use an internal proxy to route theincomingAkamai connections. Do not point theAkamai data streamdirectlyto the JSA console. Formore information about opening a non-standard portin your firewall, consult your network security professionals.
1. If automatic updates are not enabled, download and install themost recent versions
of the following RPMs on your JSA console:
• DSMCommon RPM
• HTTPReceiver Protocol RPM
• Akamai KONA RPM
2. For each instance of Akamai KONA, configure your Akamai KONA system to
communicate with JSA. For more information, contact Akamai.
3. If you plan to configure the log source to use the HTTPs and Client Authentication
options, copy the Akamai KONA certificate to the target JSA Event Collector.
4. For each Akamai KONA server that you want to integrate, create a log source on the
JSAconsole. Configure all the requiredparameters. Use this table to configureAkamai
Kona specific parameters:
Table 15: Akamai KONA Log Source Parameters
DescriptionParameter
The absolute file path to the client certificate on the targetJSAEvent Collector.
Ensure that the Akamai KONA certificate is already copied tothe Event Collector.
If you select the HTTPs and Client Authentication option fromthe Communication Type list, the Client Certificate Pathparameter is required .
Client Certificate Path
The destination port that is configured on the Akamai KONAsystem
Listen Port
TheMessage Pattern '\{"type' is for JSON format eventsMessage Pattern
Copyright © 2018, Juniper Networks, Inc.104
Juniper Secure Analytics Configuring DSMs Guide

CHAPTER 8
Amazon AWS CloudTrail
• Amazon AWS CloudTrail on page 105
• Enabling Communication Between JSA and AWS CloudTrail on page 108
• Verifying That Amazon AWS CloudTrail Events Are Received on page 109
• Troubleshooting Amazon AWS Log Source Integrations on page 109
• Configuring Amazon AWS CloudTrail to Communicate with JSA on page 110
Amazon AWSCloudTrail
The JSA DSM for Amazon AWS CloudTrail collects audit events from your Amazon AWS
CloudTrail S3 bucket.
The following table lists the specifications for the Amazon AWS CloudTrail DSM:
Table 16: Amazon AWSCloudTrail DSMSpecifications
ValueSpecification
AmazonManufacturer
Amazon AWS CloudTrailDSM
DSM-AmazonAWSCloudTrail-JSA_version-Build_number.noarch.rpmRPM name
N/ASupported versions
Amazon AWS S3 REST APIProtocol
All version 1.0, 1.02, 1.03, and 1.04 events.JSA recorded events
NoAutomatically discovered?
NoIncludes identity?
NoIncludes custom properties?
Amazon Cloud Trail documentation(http://docs.aws.amazon.com/awscloudtrail/latest/userguide/whatisawscloudtrail.html)
More information
105Copyright © 2018, Juniper Networks, Inc.

To integrate Amazon AWS CloudTrail with JSA, complete the following steps:
1. Obtain and install a certificate to enable JSA to communicate with the Amazon AWS
CloudTrail S3 bucket.
2. Create an Amazon AWS Identity and Access Management (IAM) user and then apply
the AmazonS3ReadOnlyAccess policy.
3. Install the most recent version of the following RPMs on your JSA Console.
• Protocol Common
• Amazon AWS REST API Protocol RPM
• Amazon AWS CloudTrail DSM RPM
4. Click the Admin tab.
5. Click the Log Sources icon.
6. From the navigation menu, click Add.
7. Configure the Amazon AWS CloudTrail log source in JSA. Configure all required
parameters and use the following table to help you determine values for Amazon
AWS CloudTrail parameters:
Table 17: Amazon AWSCloudTrail Log Source Parameters
DescriptionParameter
Amazon AWSCloudTrailLog Source Type
Amazon AWSS3 REST APIProtocol Configuration
Type a unique name for the log source.
The Log Source Identifier can be any valid value and does notneed to reference a specific server. The Log Source Identifiercan be the same value as the Log Source Name. If you havemore than one Amazon AWS CloudTrail log source that isconfigured, youmight want to identify the first log source asawscloudtrail1, the second log source as awscloudtrail2, andthe third log source as awscloudtrail3.
Log Source Identifier
Select Signature Version 2 or Signature Version 4.
SignatureVersion 2 does not support all AmazonAWS regions.If you are using a region that only supports Signature Version4, you must choose Signature Version 4 in the list.
Signature Version
The region that is associated with the Amazon S3 bucket.Region Name
The name of the AmazonWeb Service.Service Name
The nameof theAWSS3bucketwhere the log files are stored.Bucket Name
The public access key that is required to access the AWS S3bucket.
Access Key
Copyright © 2018, Juniper Networks, Inc.106
Juniper Secure Analytics Configuring DSMs Guide
Table 17: Amazon AWSCloudTrail Log Source Parameters (continued)
DescriptionParameter
The private access key that is required to access the AWS S3bucket.
Secret Key
When a proxy is configured, all traffic for the log source travelsthrough the proxy for JSA to access the Amazon AWS S3buckets.
Configure the Proxy Server, Proxy Port, Proxy Username, andProxy Password fields. If the proxy does not requireauthentication, you can leave the Proxy Username and ProxyPassword fields blank.
Use Proxy
The root directory location on the AWS S3 bucket fromwhichthe CloudTrail logs are retrieved, for example,AWSLogs/<AccountNumber>/CloudTrail/us-east-1/
Directory Prefix
.*?\.json\.gzFile Pattern
How often the Amazon AWS S3 REST API Protocol connectsto the Amazon cloud API, checks for new files, and retrievesthem if they exist. Every access to an AWS S3 bucket incurs acost to the account that owns the bucket. Therefore, a smallerrecurrence value increases the cost.
Recurrence
8. After the required values are entered in the log source configuration, click Save.
The following table provides a sample event message for the Amazon AWS CloudTrail
DSM:
107Copyright © 2018, Juniper Networks, Inc.
Chapter 8: Amazon AWS CloudTrail
Table 18: Amazon AWSCloudTrail SampleMessage Supported by Amazon AWSCloudTrail.
Sample logmessageLow-levelcategoryEvent name
{"eventVersion":"1.02","userIdentity":{"type":"IAMUser","principalId":"AIDAI56UNJ5SGCUDUOZEE","arn":"arn:aws:iam::005166929:user/xx.xxccountId":"05166929","userName":"x.x"},"eventTime":"2016-05-04T14:10:58Z","eventSource":"f.amazonaws.com","eventName":"ConsoleLogin","awsRegion":"us-east-1","sourceIPAddress":"1.1.1.1 Agent":"Mozilla/5.0 (Windows NT 6.1; Win64; x64) AppleWebKit/537.36 (KHTML, like Gecko) Chrome/50.0.1.1 Safari/537.36","requestParameters":null,"responseElements":{"ConsoleLogin":"Success"},"additionalEventData":{"LoginTo":"www.webpage.com","MobileVersion":"No","MFAUsed":"No"},"eventID":"e1866735-ea8b-4e66-be1a-8067dafe9898","eventType":"AwsConsoleSignIn","recipientAccountId":"237005166922"}
General AuditEvent
Console Login
Troubleshooting Amazon AWSCloudTrail Integration with JSA
If your system is disconnected from the Internet, youmight need to install a DSM RPM
manually. For more information, see “Adding a DSM” on page 51.
If a log source is not automatically discovered, you canmanually add a log source to
receiveevents fromyournetworkdevicesorappliances. Formore information, see “Adding
a Log Source” on page 54.
A certificate is required for the HTTP connection between JSA and Amazon AWS
CloudTrail. For more information, see “Enabling Communication Between JSA and AWS
CloudTrail” on page 108.
An Amazon administrator must create a user and then apply the
AmazonS3ReadOnlyAccess policy in the Amazon AWS user interface. The JSA user can
then create a log source in JSA. For more information, see “Configuring Amazon AWS
CloudTrail to Communicate with JSA” on page 110.
Enabling Communication Between JSA and AWSCloudTrail
A certificate is required for the HTTP connection between JSA and Amazon AWS
CloudTrail.
1. Access your Amazon AWS CloudTrail S3 bucket.
2. Export the certificate as a DER-encoded binary certificate to your desktop system.
The file extension must be .DER.
Copyright © 2018, Juniper Networks, Inc.108
Juniper Secure Analytics Configuring DSMs Guide
3. Copy the certificate to the /opt/QRadar/conf/trusted_certificates directory on the JSA
host on which you plan to configure the log source.
RelatedDocumentation
Verifying That Amazon AWS CloudTrail Events Are Received on page 109•
• Troubleshooting Amazon AWS Log Source Integrations on page 109
• Configuring Amazon AWS CloudTrail to Communicate with JSA on page 110
Verifying That Amazon AWSCloudTrail Events Are Received
You can verify that you are collecting event data from the Amazon AWS CloudTrail S3
bucket.
1. Log in to JSA as an administrator.
2. Click the Log Activity tab.
3. Click Add Filter.
4. Select Log Source [Indexed] >Equals and browse for the name of your Amazon AWS
CloudTrail log source.
5. Click Add Filter.
6. From the Viewmenu, select Last 15minutes or Last Interval.
If the log source parameters are correct, the Amazon AWS CloudTrail should display
events retrieved from the Amazon AWS ecosystem.
RelatedDocumentation
Troubleshooting Amazon AWS Log Source Integrations on page 109•
• Configuring Amazon AWS CloudTrail to Communicate with JSA on page 110
• Enabling Communication Between JSA and AWS CloudTrail on page 108
Troubleshooting Amazon AWS Log Source Integrations
You configured a log source in JSA to collect Amazon AWS logs, but the log source status
is Warn and events are not generated as expected.
NOTE: The certificatemust have a .DER extension. The .DER extension is
case-sensitive andmust be in uppercase. If the certificate is exported inlowercase, then the log sourcemight experience event collection issues.
109Copyright © 2018, Juniper Networks, Inc.
Chapter 8: Amazon AWS CloudTrail
1. Access your AWS CloudTrail S3 bucket at https://<bucketname>.s3.amazonaws.com
2. Use Firefox to export the SSL certificate from AWS as a DER certificate file. Firefox
can create the required certificate with the .DER extension.
3. Copy the DER certificate file to the /opt/qradar/conf/trusted_certificates directory on
the JSA appliance that manages the Amazon AWS CloudTrail log source.
NOTE: The JSAappliance thatmanages the log source is identified by theTarget Event Collect field in the Amazon AWS CloudTrail log source. The
JSA appliance that manages the Amazon AWS CloudTrail log source hasacopyof theDERcertificate file in the /opt/qradar/conf/trusted_certificates
folder.
4. Log in to JSA as an administrator.
5. Click the Admin tab.
6. Click the Log Sources icon.
7. Select the Amazon AWSCloudTrail log source.
8. Fromthenavigationmenu, clickEnable/Disable todisable, then re-enable theAmazon
AWS CloudTrail log source.
NOTE: Forcing the log source from disabled to enabled connects theprotocol to the Amazon AWS bucket as defined in the log source. Acertificate check takes place as part of the first communication.
9. If you continue to have issues, verify that the Amazon AWS bucket name in the Log
Source Identifier field is correct. Ensure that the Remote Directory path is correct in
the log source configuration.
RelatedDocumentation
Configuring Amazon AWS CloudTrail to Communicate with JSA on page 110•
• Enabling Communication Between JSA and AWS CloudTrail on page 108
• Verifying That Amazon AWS CloudTrail Events Are Received on page 109
Configuring Amazon AWSCloudTrail to Communicate with JSA
An Amazon administrator must create a user and then apply the
AmazonS3ReadOnlyAccess policy in the Amazon AWS user interface. The JSA user can
then create a log source in JSA.
1. Create a user:
a. Log in to the Amazon AWS user interface as administrator.
Copyright © 2018, Juniper Networks, Inc.110
Juniper Secure Analytics Configuring DSMs Guide
b. Create an Amazon AWS IAM user and then apply the AmazonS3ReadOnlyAccess
policy.
2. Find the S3 bucket name and directory prefix that you use to configure a log source
in JSA:
a. Click Services.
b. From the list, select CloudTrail.
c. From the Trails page, click the name of the trail.
d. Note the name of the S3 bucket that is displayed in the S3 bucket field.
e. Click the pencil icon on the right side of the window.
f. Click Advanced >>.
g. Note the location path for the S3 bucket that is displayed below the Log file prefix
field.
The JSA user is ready to configure the log source in JSA. The S3 bucket name is the value
for the Bucket name field. The location path for the S3 bucket is the value for Directory
prefix field.
RelatedDocumentation
• Enabling Communication Between JSA and AWS CloudTrail on page 108
• Verifying That Amazon AWS CloudTrail Events Are Received on page 109
• Troubleshooting Amazon AWS Log Source Integrations on page 109
111Copyright © 2018, Juniper Networks, Inc.
Chapter 8: Amazon AWS CloudTrail

Copyright © 2018, Juniper Networks, Inc.112
Juniper Secure Analytics Configuring DSMs Guide
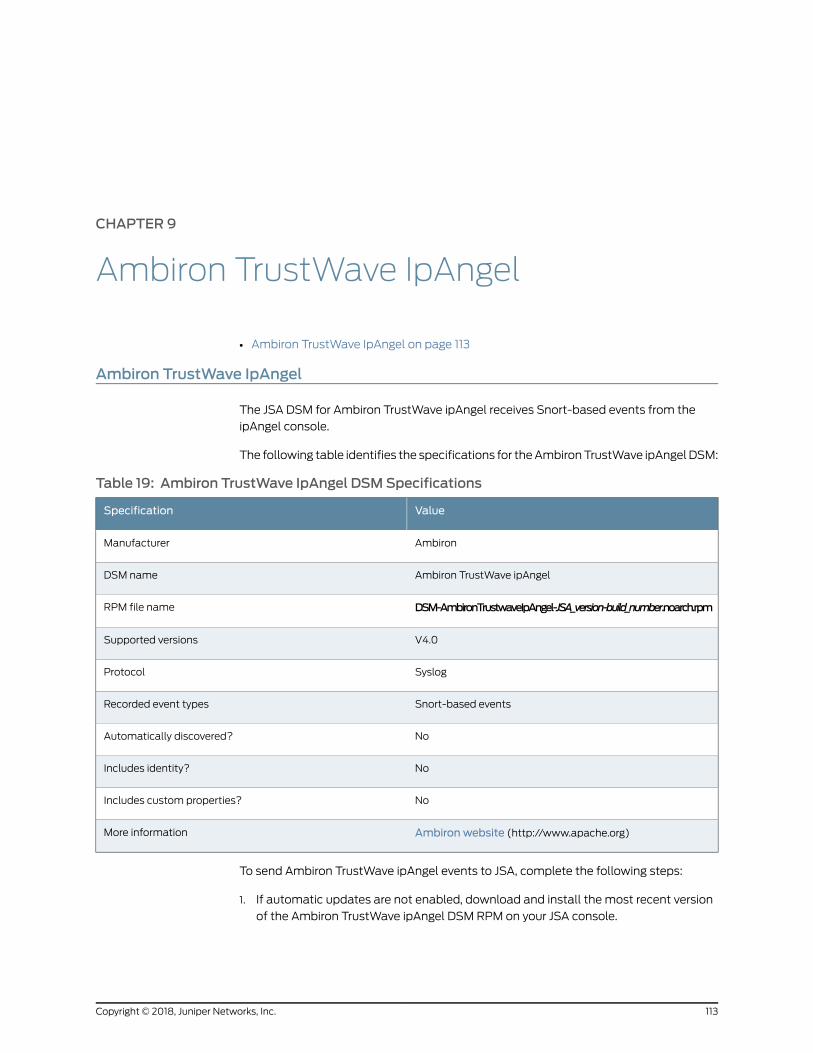
CHAPTER 9
Ambiron TrustWave IpAngel
• Ambiron TrustWave IpAngel on page 113
Ambiron TrustWave IpAngel
The JSA DSM for Ambiron TrustWave ipAngel receives Snort-based events from the
ipAngel console.
The following table identifies the specifications for theAmbironTrustWave ipAngelDSM:
Table 19: Ambiron TrustWave IpAngel DSMSpecifications
ValueSpecification
AmbironManufacturer
Ambiron TrustWave ipAngelDSM name
DSM-AmbironTrustwaveIpAngel-JSA_version-build_number.noarch.rpmRPM file name
V4.0Supported versions
SyslogProtocol
Snort-based eventsRecorded event types
NoAutomatically discovered?
NoIncludes identity?
NoIncludes custom properties?
Ambiron website (http://www.apache.org)More information
To send Ambiron TrustWave ipAngel events to JSA, complete the following steps:
1. If automatic updates are not enabled, download and install the most recent version
of the Ambiron TrustWave ipAngel DSM RPM on your JSA console.
113Copyright © 2018, Juniper Networks, Inc.
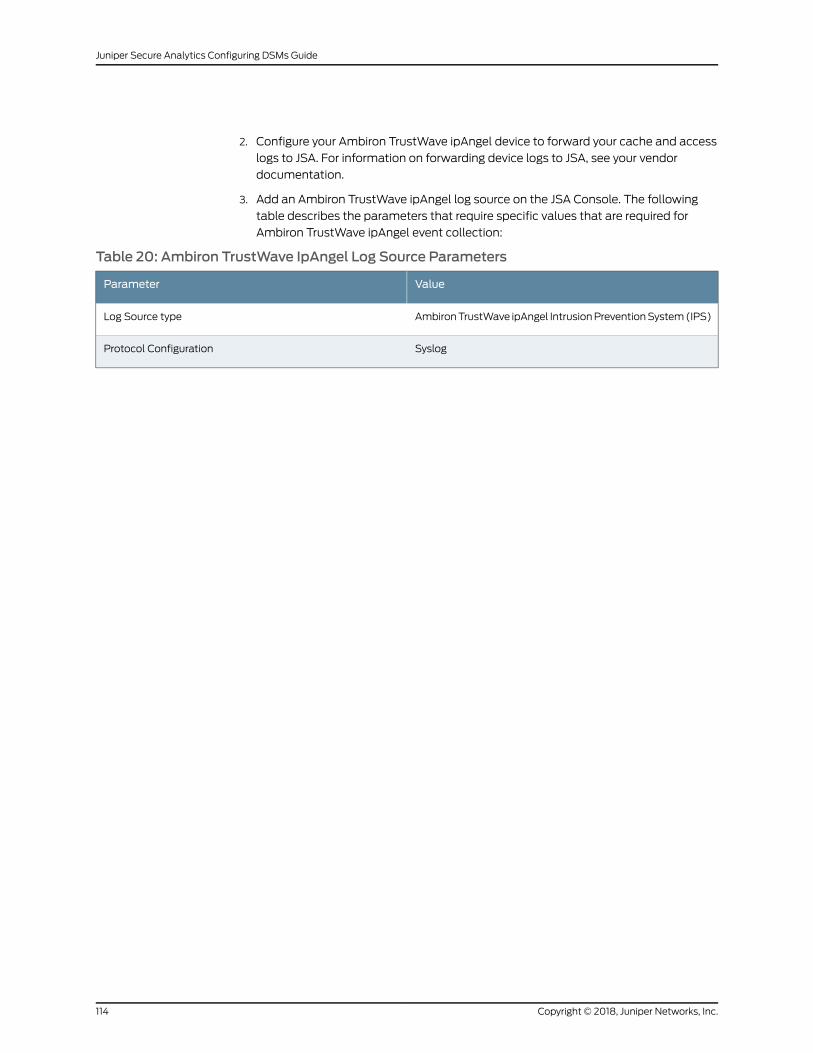
2. Configure your Ambiron TrustWave ipAngel device to forward your cache and access
logs to JSA. For information on forwarding device logs to JSA, see your vendor
documentation.
3. Add an Ambiron TrustWave ipAngel log source on the JSA Console. The following
table describes the parameters that require specific values that are required for
Ambiron TrustWave ipAngel event collection:
Table 20: Ambiron TrustWave IpAngel Log Source Parameters
ValueParameter
AmbironTrustWave ipAngel IntrusionPreventionSystem(IPS)Log Source type
SyslogProtocol Configuration
Copyright © 2018, Juniper Networks, Inc.114
Juniper Secure Analytics Configuring DSMs Guide
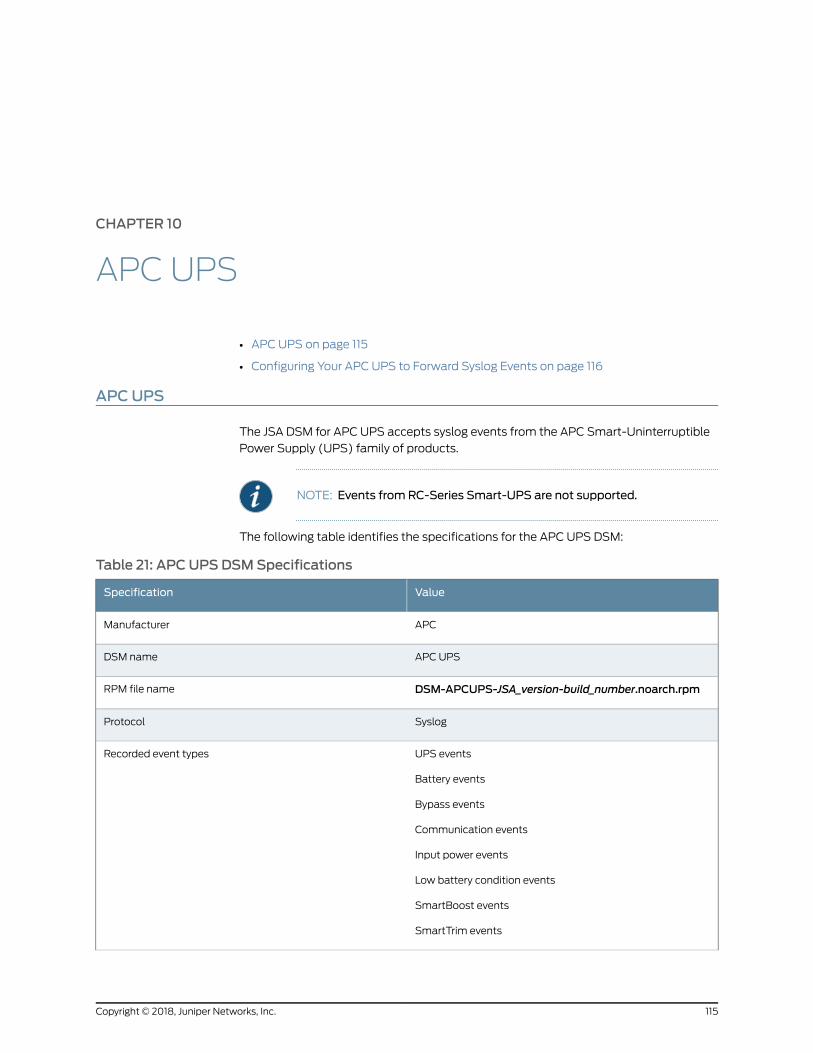
CHAPTER 10
APC UPS
• APC UPS on page 115
• Configuring Your APC UPS to Forward Syslog Events on page 116
APCUPS
The JSA DSM for APC UPS accepts syslog events from the APC Smart-Uninterruptible
Power Supply (UPS) family of products.
NOTE: Events from RC-Series Smart-UPS are not supported.
The following table identifies the specifications for the APC UPS DSM:
Table 21: APC UPS DSMSpecifications
ValueSpecification
APCManufacturer
APC UPSDSM name
DSM-APCUPS-JSA_version-build_number.noarch.rpmRPM file name
SyslogProtocol
UPS events
Battery events
Bypass events
Communication events
Input power events
Low battery condition events
SmartBoost events
SmartTrim events
Recorded event types
115Copyright © 2018, Juniper Networks, Inc.
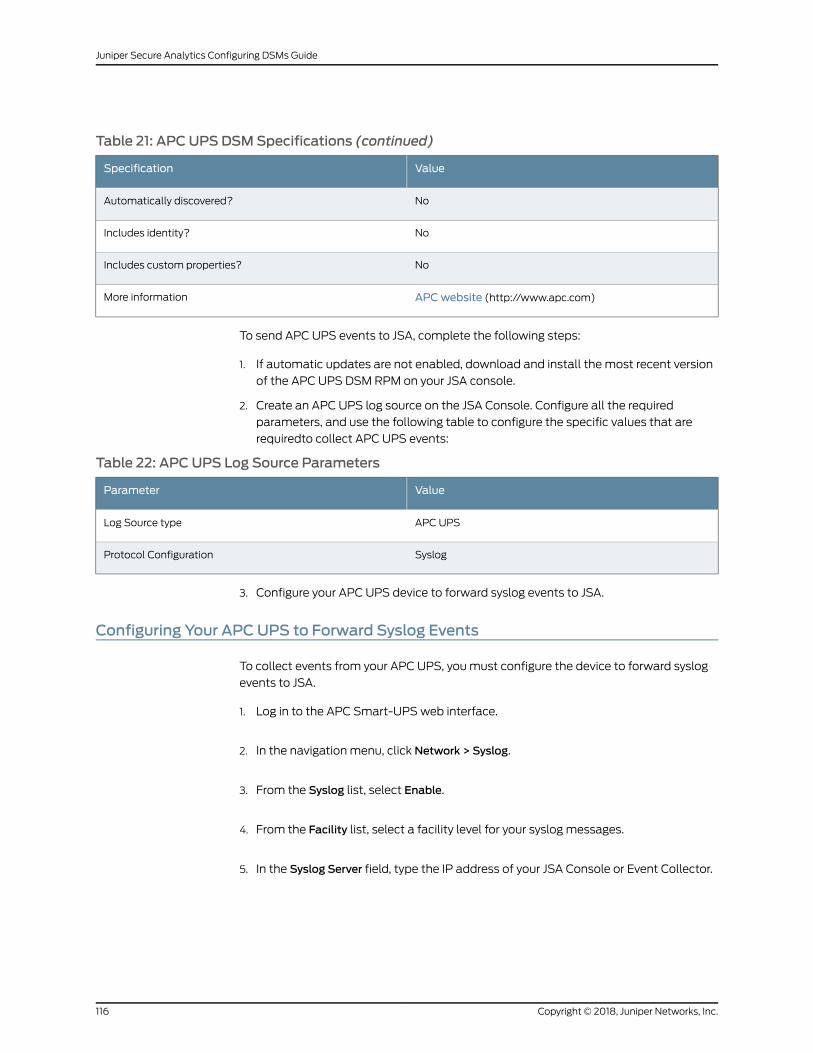
Table 21: APC UPS DSMSpecifications (continued)
ValueSpecification
NoAutomatically discovered?
NoIncludes identity?
NoIncludes custom properties?
APCwebsite (http://www.apc.com)More information
To send APC UPS events to JSA, complete the following steps:
1. If automatic updates are not enabled, download and install the most recent version
of the APC UPS DSM RPM on your JSA console.
2. Create an APC UPS log source on the JSA Console. Configure all the required
parameters, and use the following table to configure the specific values that are
requiredto collect APC UPS events:
Table 22: APCUPS Log Source Parameters
ValueParameter
APC UPSLog Source type
SyslogProtocol Configuration
3. Configure your APC UPS device to forward syslog events to JSA.
Configuring Your APCUPS to Forward Syslog Events
To collect events from your APC UPS, youmust configure the device to forward syslog
events to JSA.
1. Log in to the APC Smart-UPS web interface.
2. In the navigation menu, click Network > Syslog.
3. From the Syslog list, select Enable.
4. From the Facility list, select a facility level for your syslog messages.
5. In the Syslog Server field, type the IP address of your JSA Console or Event Collector.
Copyright © 2018, Juniper Networks, Inc.116
Juniper Secure Analytics Configuring DSMs Guide

6. From the Severity list, select Informational.
7. Click Apply.
117Copyright © 2018, Juniper Networks, Inc.
Chapter 10: APC UPS

Copyright © 2018, Juniper Networks, Inc.118
Juniper Secure Analytics Configuring DSMs Guide
CHAPTER 11
Apache HTTP Server
• Apache HTTP Server on page 119
• Configuring Apache HTTP Server with Syslog on page 119
• Configuring a Log Source on page 121
• Configuring Apache HTTP Server with Syslog-ng on page 121
• Configuring a Log Source on page 123
Apache HTTP Server
TheApacheHTTPServerDSMfor JSAacceptsApacheeventsbyusingsyslogor syslog-ng.
JSA records all relevant HTTP status events. The following procedure applies to Apache
DSMs operating on UNIX/Linux operating systems only.
Do not run both syslog and syslog-ng at the same time.
Select one of the following configuration methods:
• Configuring Apache HTTP Server with Syslog on page 119
• Configuring Apache HTTP Server with Syslog-ng on page 121
Configuring Apache HTTP Server with Syslog
You can configure your Apache HTTP Server to forward events with the syslog protocol.
1. Log in to the server that hosts Apache, as the root user.
2. Edit the Apache configuration file httpd.conf.
3. Add the following information in the Apache configuration file to specify the custom
log format:
LogFormat "%h%A%l%u%t \"%r\"%>s%p%b" <log format name>
Where <log format name> is a variable name you provide to define the log format.
119Copyright © 2018, Juniper Networks, Inc.
4. Add the following information in the Apache configuration file to specify a custom
path for the syslog events:
CustomLog "|/usr/bin/logger -t httpd -p <facility>.<priority>" <log format name>
Where:
• <facility> is a syslog facility, for example, local0.
• <priority> is a syslog priority, for example, info or notice.
• <log format name> is a variable name that you provide to define the custom log
format. The log format namemust match the log format that is defined in Step 3.
For example,
CustomLog "|/usr/bin/logger -t httpd -p local1.info" MyApacheLogs
5. Type the following command to disable hostname lookup:
HostnameLookups off
6. Save the Apache configuration file.
7. Edit the syslog configuration file.
/etc/syslog.conf
8. Add the following information to your syslog configuration file:
<facility>.<priority> <TAB><TAB>@<host>
Where:
• <facility> is the syslog facility, for example, local0. This valuemustmatch the value
that you typed in Step 8.
• <priority> is the syslog priority, for example, info or notice. This value must match
the value that you typed in 8.
• <TAB> indicates youmust press the Tab key.
• <host> is the IP address of the JSA console or Event Collector.
9. Save the syslog configuration file.
10. Type the following command to restart the syslog service:
/etc/init.d/syslog restart
11. Restart Apache to complete the syslog configuration.
The configuration is complete. The log source is added to JSA as syslog events from
ApacheHTTPServers are automatically discovered. Events that are forwarded to JSA
by Apache HTTP Servers are displayed on the Log Activity tab of JSA.
Copyright © 2018, Juniper Networks, Inc.120
Juniper Secure Analytics Configuring DSMs Guide

Configuring a Log Source
You can configure a log source manually for Apache HTTP Server events in JSA.
JSA automatically discovers and creates a log source for syslog-ng events from Apache
HTTP Server. However, you canmanually create a log source for JSA to receive syslog
events. These configuration steps are optional.
1. Log in to JSA.
2. Click the Admin tab.
3. On the navigation menu, click Data Sources.
4. Click the Log Sources icon.
5. Click Add.
6. In the Log Source Name field, type a name for your log source.
7. In the Log Source Description field, type a description for the log source.
8. From the Log Source Type list, select Apache HTTP Server.
9. Using the Protocol Configuration list, select Syslog.
10. Configure the following values:
Table 23: Syslog Parameters
DescriptionParameter
Type the IP address or host name for the log source as an identifier for events fromyour Apacheinstallations.
Log Source Identifier
11. Click Save.
12. On the Admin tab, click Deploy Changes.
The configuration is complete. For more information about Apache, see
http://www.apache.org/.
Configuring Apache HTTP Server with Syslog-ng
YoucanconfigureyourApacheHTTPServer to forwardeventswith thesyslog-ngprotocol.
121Copyright © 2018, Juniper Networks, Inc.
Chapter 11: Apache HTTP Server
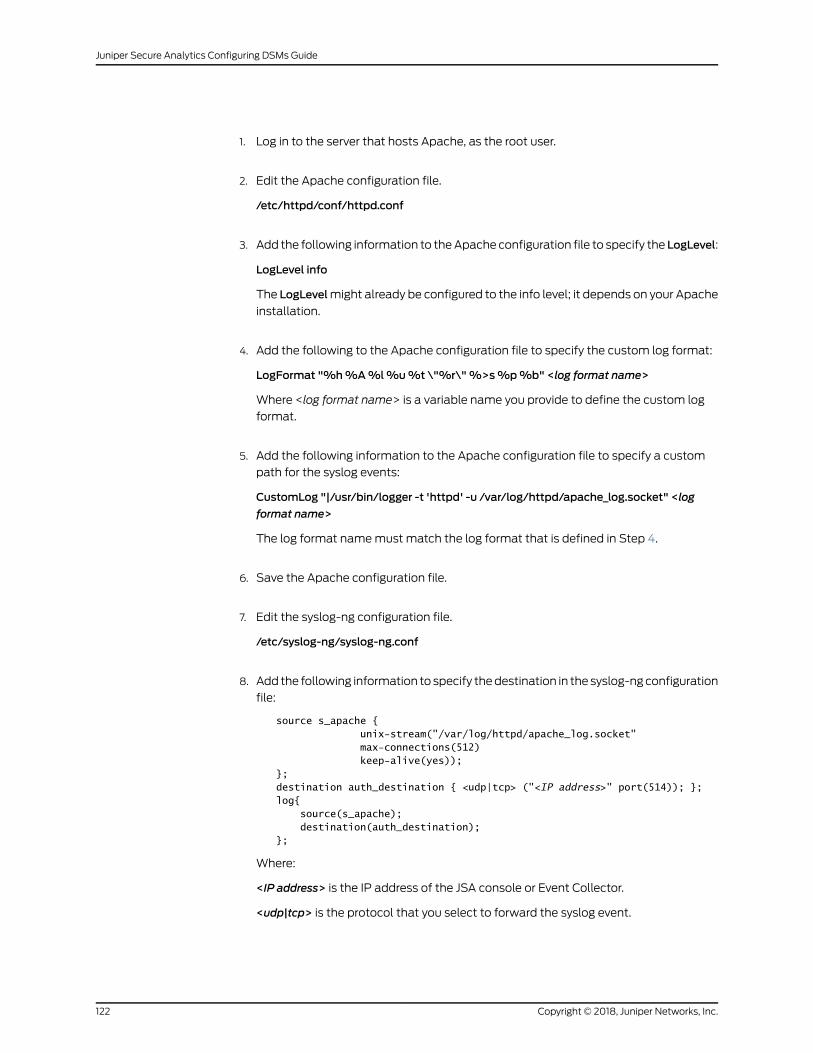
1. Log in to the server that hosts Apache, as the root user.
2. Edit the Apache configuration file.
/etc/httpd/conf/httpd.conf
3. Add the following information to theApache configuration file to specify the LogLevel:
LogLevel info
The LogLevelmight already be configured to the info level; it depends on your Apache
installation.
4. Add the following to the Apache configuration file to specify the custom log format:
LogFormat "%h%A%l%u%t \"%r\"%>s%p%b" <log format name>
Where <log format name> is a variable name you provide to define the custom log
format.
5. Add the following information to the Apache configuration file to specify a custom
path for the syslog events:
CustomLog "|/usr/bin/logger -t 'httpd' -u /var/log/httpd/apache_log.socket" <log
format name>
The log format namemust match the log format that is defined in Step 4.
6. Save the Apache configuration file.
7. Edit the syslog-ng configuration file.
/etc/syslog-ng/syslog-ng.conf
8. Add the following information to specify thedestination in the syslog-ngconfiguration
file:
source s_apache { unix-stream("/var/log/httpd/apache_log.socket" max-connections(512) keep-alive(yes));};destination auth_destination { <udp|tcp> ("<IP address>" port(514)); };log{ source(s_apache); destination(auth_destination);};
Where:
<IP address> is the IP address of the JSA console or Event Collector.
<udp|tcp> is the protocol that you select to forward the syslog event.
Copyright © 2018, Juniper Networks, Inc.122
Juniper Secure Analytics Configuring DSMs Guide
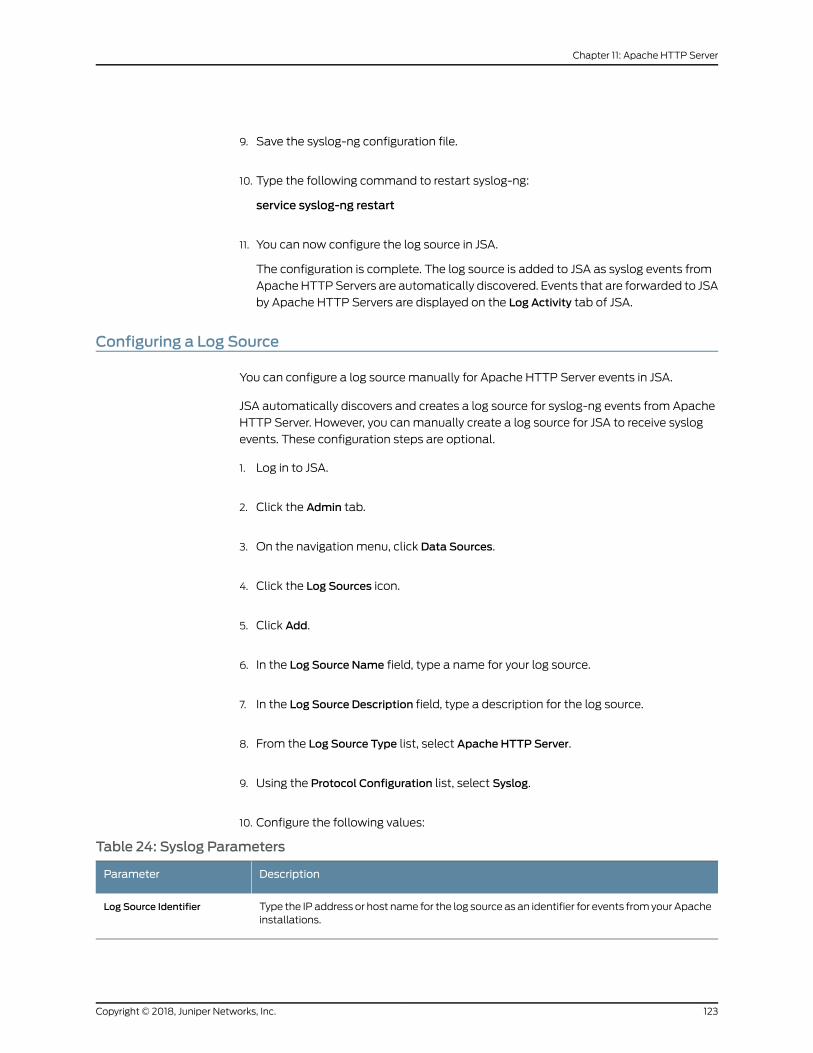
9. Save the syslog-ng configuration file.
10. Type the following command to restart syslog-ng:
service syslog-ng restart
11. You can now configure the log source in JSA.
The configuration is complete. The log source is added to JSA as syslog events from
ApacheHTTPServers are automatically discovered. Events that are forwarded to JSA
by Apache HTTP Servers are displayed on the Log Activity tab of JSA.
Configuring a Log Source
You can configure a log source manually for Apache HTTP Server events in JSA.
JSA automatically discovers and creates a log source for syslog-ng events from Apache
HTTP Server. However, you canmanually create a log source for JSA to receive syslog
events. These configuration steps are optional.
1. Log in to JSA.
2. Click the Admin tab.
3. On the navigation menu, click Data Sources.
4. Click the Log Sources icon.
5. Click Add.
6. In the Log Source Name field, type a name for your log source.
7. In the Log Source Description field, type a description for the log source.
8. From the Log Source Type list, select Apache HTTP Server.
9. Using the Protocol Configuration list, select Syslog.
10. Configure the following values:
Table 24: Syslog Parameters
DescriptionParameter
Type the IP address or host name for the log source as an identifier for events fromyour Apacheinstallations.
Log Source Identifier
123Copyright © 2018, Juniper Networks, Inc.
Chapter 11: Apache HTTP Server

11. Click Save.
12. On the Admin tab, click Deploy Changes.
The configuration is complete. For more information about Apache, see
http://www.apache.org/.
Copyright © 2018, Juniper Networks, Inc.124
Juniper Secure Analytics Configuring DSMs Guide
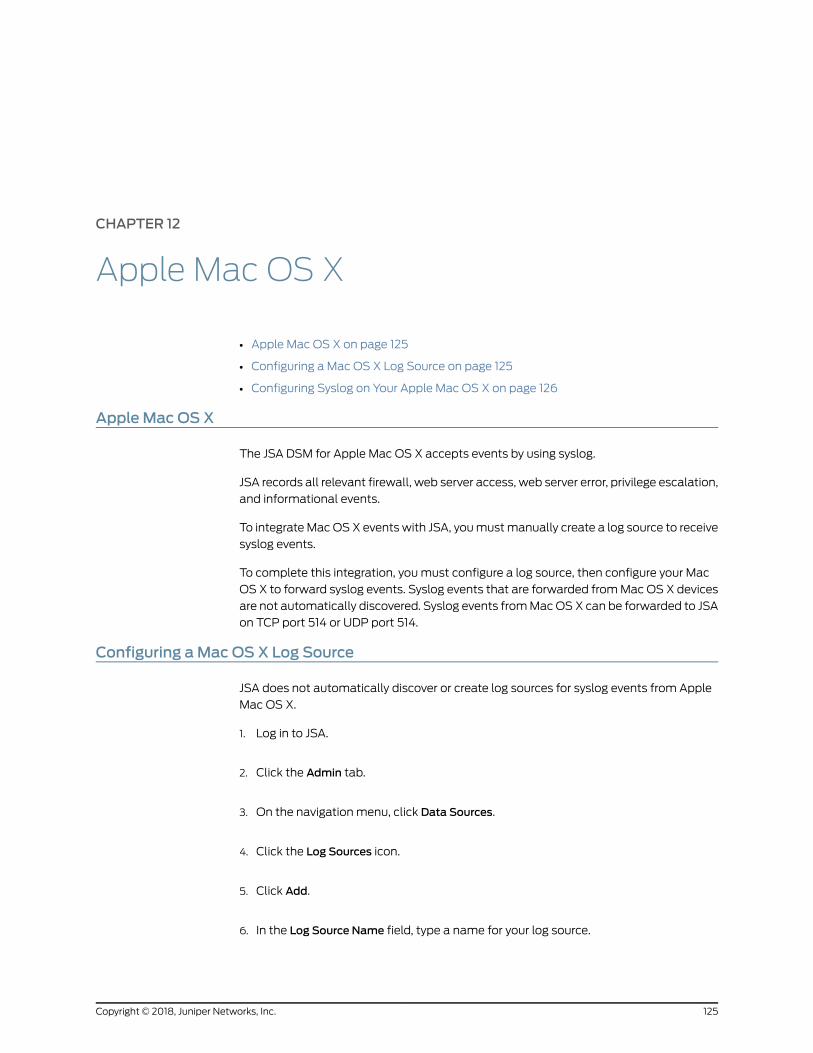
CHAPTER 12
Apple Mac OS X
• Apple Mac OS X on page 125
• Configuring a Mac OS X Log Source on page 125
• Configuring Syslog on Your Apple Mac OS X on page 126
AppleMac OS X
The JSA DSM for Apple Mac OS X accepts events by using syslog.
JSA records all relevant firewall, web server access, web server error, privilege escalation,
and informational events.
To integrateMacOS X events with JSA, youmustmanually create a log source to receive
syslog events.
To complete this integration, youmust configure a log source, then configure your Mac
OS X to forward syslog events. Syslog events that are forwarded fromMac OS X devices
are not automatically discovered. Syslog events fromMacOSX can be forwarded to JSA
on TCP port 514 or UDP port 514.
Configuring aMac OS X Log Source
JSA does not automatically discover or create log sources for syslog events from Apple
Mac OS X.
1. Log in to JSA.
2. Click the Admin tab.
3. On the navigation menu, click Data Sources.
4. Click the Log Sources icon.
5. Click Add.
6. In the Log Source Name field, type a name for your log source.
125Copyright © 2018, Juniper Networks, Inc.
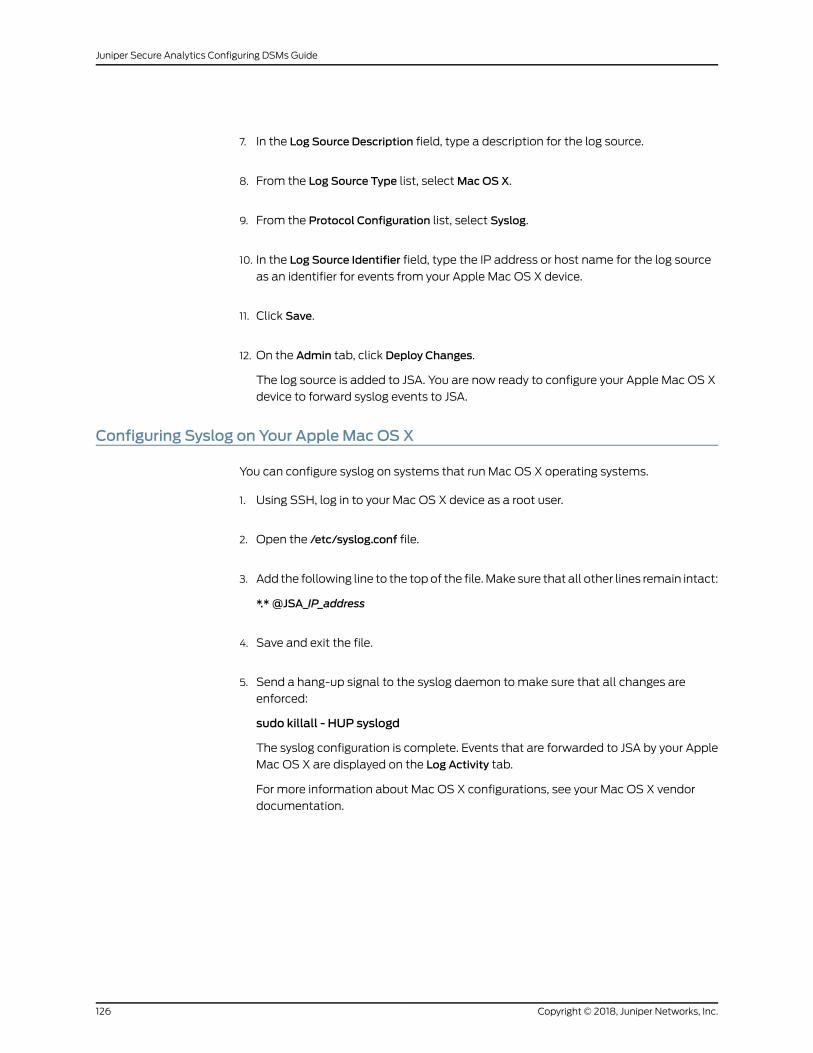
7. In the Log Source Description field, type a description for the log source.
8. From the Log Source Type list, selectMacOS X.
9. From the Protocol Configuration list, select Syslog.
10. In the Log Source Identifier field, type the IP address or host name for the log source
as an identifier for events from your Apple Mac OS X device.
11. Click Save.
12. On the Admin tab, click Deploy Changes.
The log source is added to JSA. You are now ready to configure your Apple Mac OS X
device to forward syslog events to JSA.
Configuring Syslog on Your Apple Mac OS X
You can configure syslog on systems that run Mac OS X operating systems.
1. Using SSH, log in to your Mac OS X device as a root user.
2. Open the /etc/syslog.conf file.
3. Add the following line to the topof the file.Make sure that all other lines remain intact:
*.*@JSA_IP_address
4. Save and exit the file.
5. Send a hang-up signal to the syslog daemon tomake sure that all changes are
enforced:
sudo killall - HUP syslogd
The syslog configuration is complete. Events that are forwarded to JSA by your Apple
Mac OS X are displayed on the Log Activity tab.
For more information about Mac OS X configurations, see your Mac OS X vendor
documentation.
Copyright © 2018, Juniper Networks, Inc.126
Juniper Secure Analytics Configuring DSMs Guide
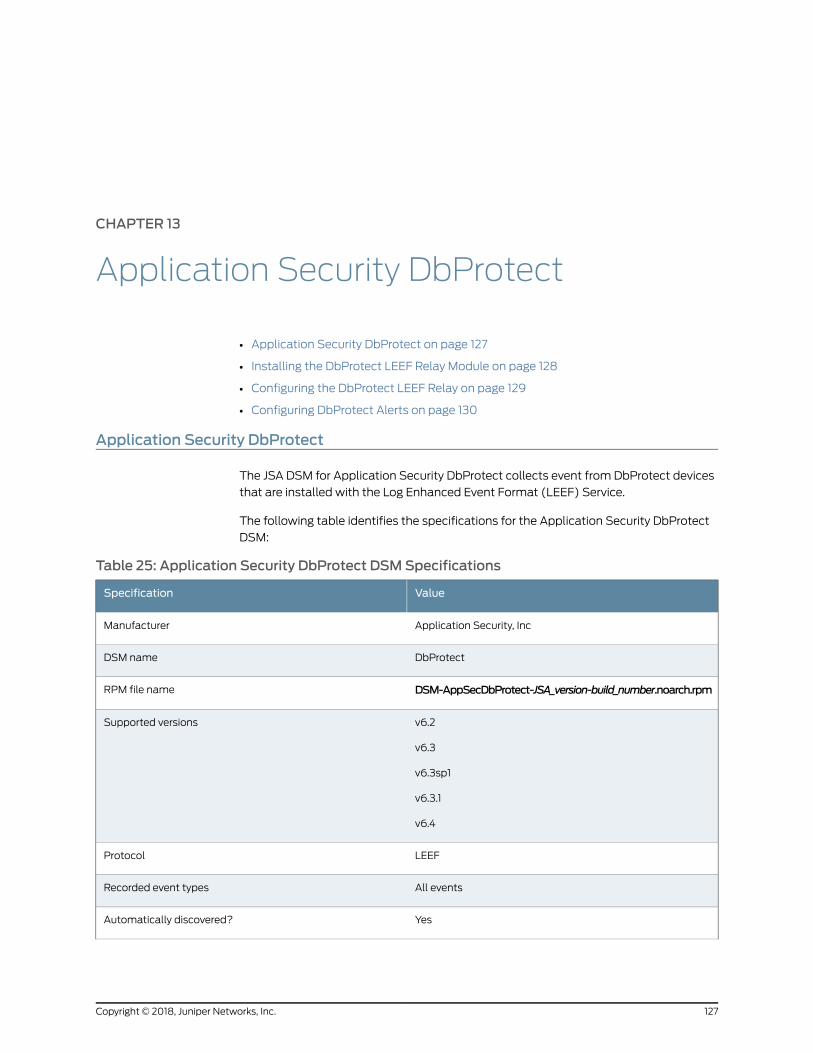
CHAPTER 13
Application Security DbProtect
• Application Security DbProtect on page 127
• Installing the DbProtect LEEF Relay Module on page 128
• Configuring the DbProtect LEEF Relay on page 129
• Configuring DbProtect Alerts on page 130
Application Security DbProtect
The JSA DSM for Application Security DbProtect collects event from DbProtect devices
that are installed with the Log Enhanced Event Format (LEEF) Service.
The following table identifies the specifications for the Application Security DbProtect
DSM:
Table 25: Application Security DbProtect DSMSpecifications
ValueSpecification
Application Security, IncManufacturer
DbProtectDSM name
DSM-AppSecDbProtect-JSA_version-build_number.noarch.rpmRPM file name
v6.2
v6.3
v6.3sp1
v6.3.1
v6.4
Supported versions
LEEFProtocol
All eventsRecorded event types
YesAutomatically discovered?
127Copyright © 2018, Juniper Networks, Inc.
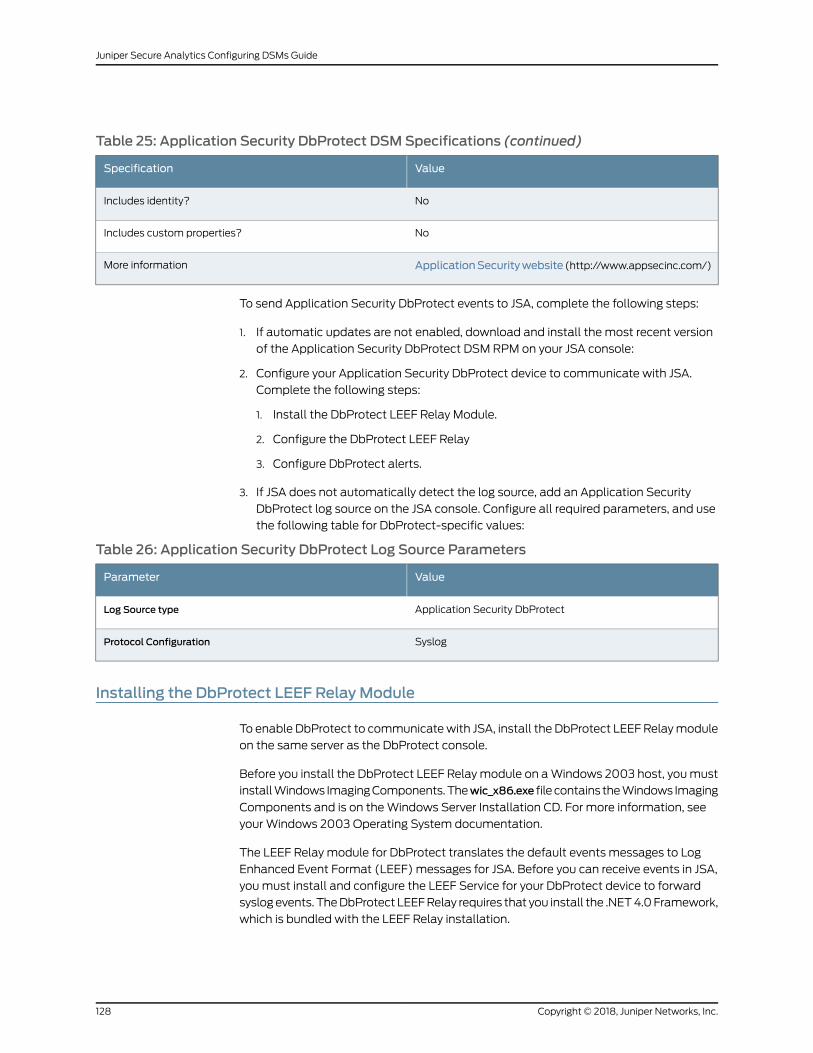
Table 25: Application Security DbProtect DSMSpecifications (continued)
ValueSpecification
NoIncludes identity?
NoIncludes custom properties?
ApplicationSecuritywebsite (http://www.appsecinc.com/)More information
To send Application Security DbProtect events to JSA, complete the following steps:
1. If automatic updates are not enabled, download and install the most recent version
of the Application Security DbProtect DSM RPM on your JSA console:
2. Configure your Application Security DbProtect device to communicate with JSA.
Complete the following steps:
1. Install the DbProtect LEEF Relay Module.
2. Configure the DbProtect LEEF Relay
3. Configure DbProtect alerts.
3. If JSA does not automatically detect the log source, add an Application Security
DbProtect log source on the JSA console. Configure all required parameters, and use
the following table for DbProtect-specific values:
Table 26: Application Security DbProtect Log Source Parameters
ValueParameter
Application Security DbProtectLog Source type
SyslogProtocol Configuration
Installing the DbProtect LEEF RelayModule
To enable DbProtect to communicatewith JSA, install the DbProtect LEEF Relaymodule
on the same server as the DbProtect console.
Before you install the DbProtect LEEF Relaymodule on aWindows 2003 host, youmust
installWindows ImagingComponents.Thewic_x86.exe file contains theWindows Imaging
Components and is on theWindows Server Installation CD. For more information, see
your Windows 2003 Operating System documentation.
The LEEF Relay module for DbProtect translates the default events messages to Log
Enhanced Event Format (LEEF) messages for JSA. Before you can receive events in JSA,
youmust install and configure the LEEF Service for your DbProtect device to forward
syslogevents. TheDbProtect LEEFRelay requires that you install the .NET4.0Framework,
which is bundled with the LEEF Relay installation.
Copyright © 2018, Juniper Networks, Inc.128
Juniper Secure Analytics Configuring DSMs Guide
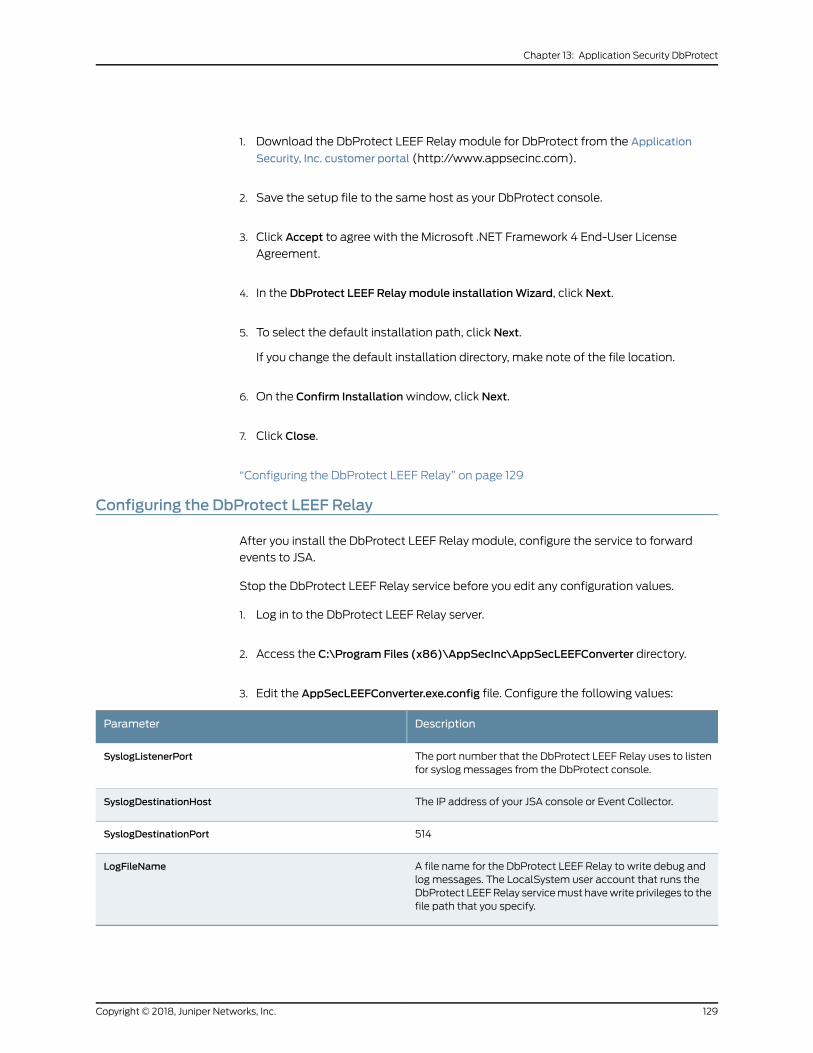
1. Download the DbProtect LEEF Relay module for DbProtect from the Application
Security, Inc. customer portal (http://www.appsecinc.com).
2. Save the setup file to the same host as your DbProtect console.
3. Click Accept to agree with the Microsoft .NET Framework 4 End-User License
Agreement.
4. In the DbProtect LEEF Relaymodule installationWizard, click Next.
5. To select the default installation path, click Next.
If you change the default installation directory, make note of the file location.
6. On the Confirm Installationwindow, click Next.
7. Click Close.
“Configuring the DbProtect LEEF Relay” on page 129
Configuring the DbProtect LEEF Relay
After you install the DbProtect LEEF Relay module, configure the service to forward
events to JSA.
Stop the DbProtect LEEF Relay service before you edit any configuration values.
1. Log in to the DbProtect LEEF Relay server.
2. Access the C:\Program Files (x86)\AppSecInc\AppSecLEEFConverter directory.
3. Edit the AppSecLEEFConverter.exe.config file. Configure the following values:
DescriptionParameter
The port number that the DbProtect LEEF Relay uses to listenfor syslog messages from the DbProtect console.
SyslogListenerPort
The IP address of your JSA console or Event Collector.SyslogDestinationHost
514SyslogDestinationPort
A file name for the DbProtect LEEF Relay to write debug andlog messages. The LocalSystem user account that runs theDbProtect LEEFRelay servicemust havewrite privileges to thefile path that you specify.
LogFileName
129Copyright © 2018, Juniper Networks, Inc.
Chapter 13: Application Security DbProtect
4. Save the configuration changes to the file.
5. On the desktop of the DbProtect console, select Start >Run.
6. Type the following command:
services.msc
7. ClickOK.
8. In the details pane of the Serviceswindow, verify the DbProtect LEEF Relay is started
and set to automatic startup.
9. To change a service property, right-click the service name, and then click Properties.
10. Using the Startup type list, select Automatic.
11. If the DbProtect LEEF Relay is not started, click Start.
“Configuring DbProtect Alerts” on page 130
Configuring DbProtect Alerts
Configure sensors on your DbProtect console to generate alerts.
1. Log in to the DbProtect console.
2. Click the Activity Monitoring tab.
3. Click the Sensors tab.
4. Select a sensor and click Reconfigure.
5. Select a database instance and click Reconfigure.
6. Click Next until the Sensor Manager Policywindow is displayed.
7. Select the Syslog check box and click Next.
8. In the Send Alerts to the following Syslog console field, type the IP address of your
DbProtect console.
9. In the Port field, type the port number that you configured in the SyslogListenerPort
field of the DbProtect LEEF Relay.
Copyright © 2018, Juniper Networks, Inc.130
Juniper Secure Analytics Configuring DSMs Guide

TIP: Bydefault, 514 is thedefaultSyslog listenport for theDbProtectLEEFRelay.
10. Click Add.
11. Click Next until you reach the Deploy to Sensorwindow.
12. Click Deploy to Sensor.
131Copyright © 2018, Juniper Networks, Inc.
Chapter 13: Application Security DbProtect

Copyright © 2018, Juniper Networks, Inc.132
Juniper Secure Analytics Configuring DSMs Guide
CHAPTER 14
Arbor Networks
• Arbor Networks on page 133
• Arbor Networks Peakflow SP on page 133
• Arbor Networks Pravail on page 138
Arbor Networks
Several Arbor Networks DSMs can be integrated with JSA.
This section provides information on the following DSMs:
• Arbor Networks Peakflow SP on page 133
• Arbor Networks Pravail on page 138
Arbor Networks Peakflow SP
JSAcancollectandcategorize syslogevents fromArborNetworksPeakflowSPappliances
that are in your network.
Arbor Networks Peakflow SP appliances store the syslog events locally.
To collect local syslog events, youmust configure your PeakflowSPappliance to forward
the syslog events to a remote host. JSA automatically discovers and creates log sources
for syslog events that are forwarded from Arbor Networks Peakflow SP appliances. JSA
supports syslog events that are forwarded from Peakflow V5.8.
To configure Arbor Networks Peakflow SP, complete the following tasks:
1. On your Peakflow SP appliance, create a notification group for JSA.
2. On your Peakflow SP appliance, configure the global notification settings.
3. On your Peakflow SP appliance, configure your alert notification rules.
4. On your JSA system, verify that the forwarded events are automatically discovered.
• Supported Event Types for Arbor Networks Peakflow SP on page 134
• Configuring a Remote Syslog in Arbor Networks Peakflow SP on page 134
133Copyright © 2018, Juniper Networks, Inc.
• Configuring Global Notifications Settings for Alerts in Arbor Networks Peakflow
SP on page 135
• Configuring Alert Notification Rules in Arbor Networks Peakflow SP on page 135
• Configuring an Arbor Networks Peakflow SP Log Source on page 136
Supported Event Types for Arbor Networks Peakflow SP
The Arbor Networks Peakflow DSM for JSA collects events from several categories.
Each event category contains low-level events that describe the action that is taken
within the event category. For example, authentication events can have low-level
categories of login successful or login failure.
The following list defines the event categories that are collected by JSA from Peakflow
SP appliances:
• Denial of Service (DoS) events
• Authentication events
• Exploit events
• Suspicious activity events
• System events
Configuring a Remote Syslog in Arbor Networks Peakflow SP
To collect events, youmust configure a new notification group or edit existing groups to
add JSA as a remote syslog destination.
1. Log in to your Peakflow SP configuration interface as an administrator.
2. In the navigation menu, select Administration >Notification >Groups.
3. Click Add Notification Group.
4. In the Destinations field, type the IP address of your JSA system.
5. In the Port field, type 514 as the port for your syslog destination.
6. From the Facility list, select a syslog facility.
7. From the Severity list, select info.
The informational severity collects all event messages at the informational event
level and higher severity.
Copyright © 2018, Juniper Networks, Inc.134
Juniper Secure Analytics Configuring DSMs Guide
8. Click Save.
9. Click Configuration Commit.
Configuring Global Notifications Settings for Alerts in Arbor Networks Peakflow SP
Global notifications in Arbor Networks Peakflow SP provide system notifications that
are not associated with rules.
This procedure defines how to add JSA as the default notification group and enable
system notifications.
1. Log in to the configuration interface for your Arbor Networks Peakflow SP appliance
as an administrator.
2. In the navigation menu, selectAdministration >Notification >Global Settings .
3. In the Default Notification Group field, select the notification group that you created
for JSA syslog events.
4. Click Save.
5. Click Configuration Commit to apply the configuration changes.
6. Log in to theArborNetworksPeakflowSPcommand-line interfaceasanadministrator.
7. Type the following command to list the current alert configuration:
services sp alerts system_errors show
8. Type the following command to list the fields names that can be configured:
services sp alerts system_errors ?
9. Type the following command to enable a notification for a system alert:
services sp alerts system_errors <name> notifications enable
Where <name> is the field name of the notification.
10. Type the following command to commit the configuration changes:
config write
Configuring Alert Notification Rules in Arbor Networks Peakflow SP
To generate events, youmust edit or add rules to use the notification group that JSA uses
as a remote syslog destination.
135Copyright © 2018, Juniper Networks, Inc.
Chapter 14: Arbor Networks
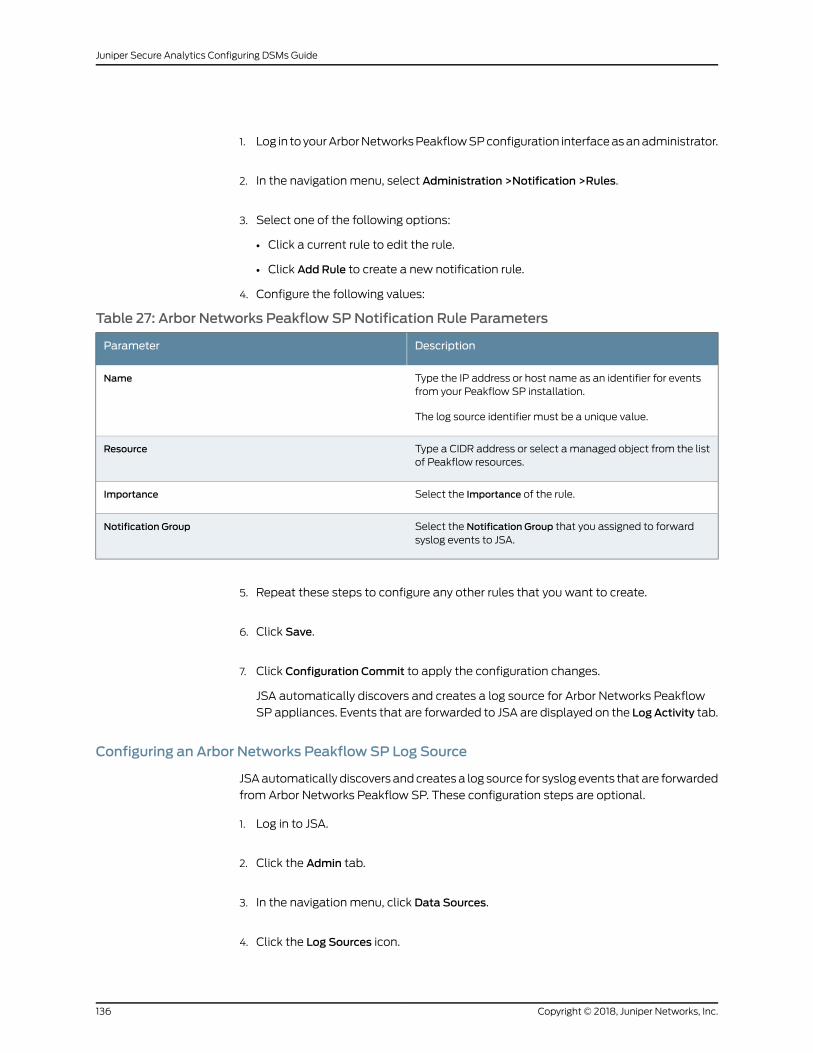
1. Log in toyourArborNetworksPeakflowSPconfiguration interfaceasanadministrator.
2. In the navigation menu, selectAdministration >Notification >Rules.
3. Select one of the following options:
• Click a current rule to edit the rule.
• Click Add Rule to create a new notification rule.
4. Configure the following values:
Table 27: Arbor Networks Peakflow SPNotification Rule Parameters
DescriptionParameter
Type the IP address or host name as an identifier for eventsfrom your Peakflow SP installation.
The log source identifier must be a unique value.
Name
Type a CIDR address or select a managed object from the listof Peakflow resources.
Resource
Select the Importance of the rule.Importance
Select the Notification Group that you assigned to forwardsyslog events to JSA.
Notification Group
5. Repeat these steps to configure any other rules that you want to create.
6. Click Save.
7. Click Configuration Commit to apply the configuration changes.
JSA automatically discovers and creates a log source for Arbor Networks Peakflow
SP appliances. Events that are forwarded to JSA are displayed on the LogActivity tab.
Configuring an Arbor Networks Peakflow SP Log Source
JSAautomatically discovers andcreatesa log source for syslogevents that are forwarded
from Arbor Networks Peakflow SP. These configuration steps are optional.
1. Log in to JSA.
2. Click the Admin tab.
3. In the navigation menu, click Data Sources.
4. Click the Log Sources icon.
Copyright © 2018, Juniper Networks, Inc.136
Juniper Secure Analytics Configuring DSMs Guide
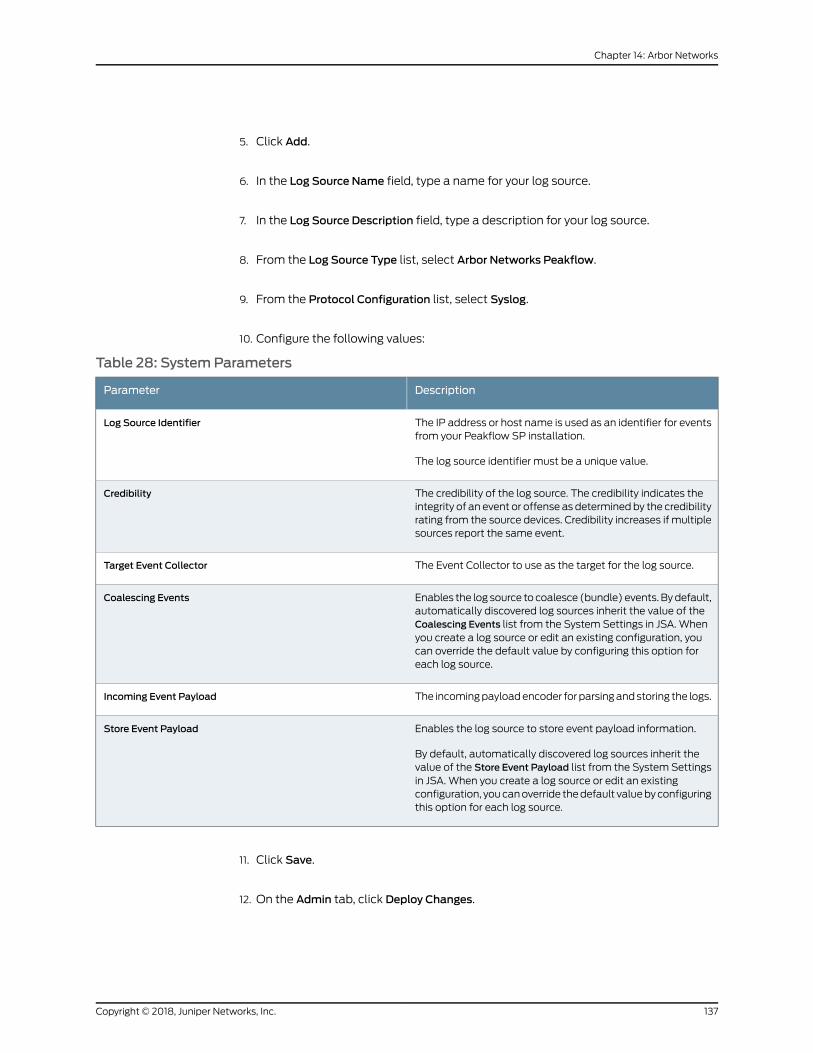
5. Click Add.
6. In the Log Source Name field, type a name for your log source.
7. In the Log Source Description field, type a description for your log source.
8. From the Log Source Type list, select Arbor Networks Peakflow.
9. From the Protocol Configuration list, select Syslog.
10. Configure the following values:
Table 28: SystemParameters
DescriptionParameter
The IP address or host name is used as an identifier for eventsfrom your Peakflow SP installation.
The log source identifier must be a unique value.
Log Source Identifier
The credibility of the log source. The credibility indicates theintegrity of an event or offense as determinedby the credibilityrating from the source devices. Credibility increases if multiplesources report the same event.
Credibility
The Event Collector to use as the target for the log source.Target Event Collector
Enables the log source to coalesce (bundle) events. Bydefault,automatically discovered log sources inherit the value of theCoalescing Events list from the System Settings in JSA. Whenyou create a log source or edit an existing configuration, youcan override the default value by configuring this option foreach log source.
Coalescing Events
The incomingpayloadencoder forparsingandstoring the logs.Incoming Event Payload
Enables the log source to store event payload information.
By default, automatically discovered log sources inherit thevalue of the Store Event Payload list from the System Settingsin JSA. When you create a log source or edit an existingconfiguration, youcanoverride thedefault valuebyconfiguringthis option for each log source.
Store Event Payload
11. Click Save.
12. On the Admin tab, click Deploy Changes.
137Copyright © 2018, Juniper Networks, Inc.
Chapter 14: Arbor Networks
Arbor Networks Pravail
The JSA DSM for Arbor Networks Pravail receives event logs from your Arbor Networks
Pravail servers.
The following table identifies the specifications for the Arbor Networks Pravail DSM:
Table 29: Arbor Networks Pravail DSMSpecifications
ValueSpecification
Arbor NetworksManufacturer
Arbor Networks PravailDSM
DSM-ArborNetworksPravail-build_number.noarch.rpmRPM file name
SyslogProtocol
All relevant eventsRecorded events
YesAutomatically discovered?
NoIncludes identity?
NoIncludes custom properties?
Arbor Networks website (www.arbornetworks.com)More information
To send Arbor Networks Pravail events to JSA, complete the following steps:
1. If automatic updates are not enabled, download and install the most recent Arbor
Networks Pravail RPM on your JSA console.
2. Configure each Arbor Networks Pravail system to send events to JSA.
3. If JSA does not automatically discover the Arbor Pravail system, create a log source
on the JSA console. Configure the required parameters, and use the following table
for the Arbor Pravail specific parameters:
Table 30: Arbor Pravail Parameters
ValueParameter
Arbor Networks PravailLog Source Type
SyslogProtocol Configuration
• Configuring Your Arbor Networks Pravail System to Send Events to JSA on page 139
Copyright © 2018, Juniper Networks, Inc.138
Juniper Secure Analytics Configuring DSMs Guide
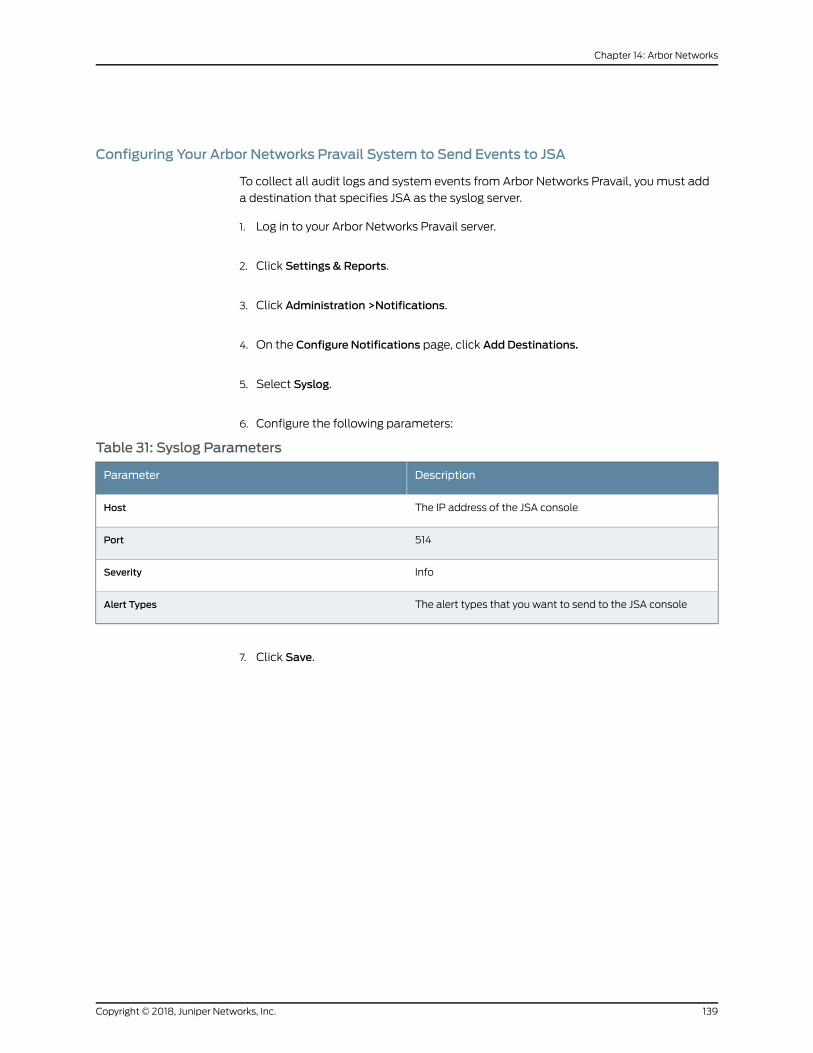
Configuring Your Arbor Networks Pravail System to Send Events to JSA
To collect all audit logs and system events from Arbor Networks Pravail, you must add
a destination that specifies JSA as the syslog server.
1. Log in to your Arbor Networks Pravail server.
2. Click Settings & Reports.
3. Click Administration >Notifications.
4. On the Configure Notifications page, click Add Destinations.
5. Select Syslog.
6. Configure the following parameters:
Table 31: Syslog Parameters
DescriptionParameter
The IP address of the JSA consoleHost
514Port
InfoSeverity
The alert types that you want to send to the JSA consoleAlert Types
7. Click Save.
139Copyright © 2018, Juniper Networks, Inc.
Chapter 14: Arbor Networks

Copyright © 2018, Juniper Networks, Inc.140
Juniper Secure Analytics Configuring DSMs Guide
CHAPTER 15
Arpeggio SIFT-IT
• Arpeggio SIFT-IT on page 141
• Configuring a SIFT-IT Agent on page 141
• Configuring a Arpeggio SIFT-IT Log Source on page 143
• Additional Information on page 144
Arpeggio SIFT-IT
The JSA SIFT-IT DSM accepts syslog events from Arpeggio SIFT-IT running on IBM®
iSeries that are formatted as Log Event Extended Format (LEEF).
JSA supports events fromArpeggio SIFT-IT 3.1 and later installed on IBM®iSeries version
5 revision 3 (V5R3) and later.
Arpeggio SIFT-IT supports syslog events from the journal QAUDJRN in LEEF format.
Example:
Jan 29 01:33:34 RUFUS LEEF:1.0|Arpeggio|SIFT-IT|3.1|PW_U|sev=3 usrName=ADMIN
src=100.100.100.114 srcPort=543 jJobNam=QBASE jJobUsr=ADMIN jJobNum=1664
jrmtIP=100.100.100.114 jrmtPort=543 jSeqNo=4755 jPgm=QWTMCMNL jPgmLib=QSYS
jMsgId=PWU0000 jType=U jUser=ROOT jDev=QPADEV000F jMsgTxt=Invalid user id
ROOT. Device QPADEV000F.
Events that SIFT-IT sends to JSAare determinedwith a configuration rule set file. SIFT-IT
includes a default configuration rule set file that you can edit to meet your security or
auditing requirements. For more information about configuring rule set files, see your
SIFT-IT User Guide.
Configuring a SIFT-IT Agent
Arpeggio SIFT-IT can forward syslog events in LEEF format with SIFT-IT agents.
A SIFT-IT agent configuration defines the location of your JSA installation, the protocol
and formatting of the event message, and the configuration rule set.
141Copyright © 2018, Juniper Networks, Inc.
1. Log in to your IBM®iSeries.
2. Type the following command and press Enter to add SIFT-IT to your library list:
ADDLIBLE SIFTITLIB0
3. Type the following command and press Enter to access the SIFT-IT main menu:
GOSIFTIT
4. From themain menu, select 1. Work with SIFT-IT Agent Definitions.
5. Type 1 to add an agent definition for JSA and press Enter.
6. In the SIFT-IT Agent Name field, type a name.
For example, JSA.
7. In the Description field, type a description for the agent.
For example, Arpeggio agent for JSA.
8. In the Server host name or IP address field, type the location of your JSA console or
Event Collector.
9. In the Connection type field, type either *TCP, *UDP, or *SECURE.
The <*SECURE> option requires the TLS protocol.
10. In the Remote port number field, type 514.
By default, JSA supports both TCP and UDP syslog messages on port 514.
11. In theMessage format options field, type *JSA.
12. Configure any additional parameters for attributes that are not JSA specific.
The additional operational parameters are described in the SIFT-IT User Guide.
13. Press F3 to exit to theWork with SIFT-IT Agents Descriptionmenu.
14. Type 9 and press Enter to load a configuration rule set for JSA.
15. In the Configuration file field, type the path to your JSA configuration rule set file.
Example:
/sifitit/Qradarconfig.txt
Copyright © 2018, Juniper Networks, Inc.142
Juniper Secure Analytics Configuring DSMs Guide
16. Press F3 to exit to theWork with SIFT-IT Agents Descriptionmenu.
17. Type 11 to start the JSA agent.
Syslog events that are forwarded by Arpeggio SIFT-IT in LEEF format are automatically
discovered by JSA. In most cases, the log source is automatically created in JSA after a
fewevents are detected. If the event rate is low, youmight be required tomanually create
a log source for Arpeggio SIFT-IT in JSA.
Until the log source is automatically discovered and identified, the event type displays
as Unknown on the Log Activity tab of JSA. Automatically discovered log sources can be
viewed on the Admin tab of JSA by clicking the Log Sources icon.
Configuring a Arpeggio SIFT-IT Log Source
JSA automatically discovers and creates a log source for system authentication events
forwarded from Arpeggio SIFT-IT.
This procedure is optional.
1. Log in to JSA.
2. Click the Admin tab.
3. On the navigation menu, click Data Sources.
4. Click the Log Sources icon.
5. Click Add.
6. In the Log Source Name field, type a name for your log source.
7. In the Log Source Description field, type a description for the log source.
8. From the Log Source Type list, select Arpeggio SIFT-IT.
9. From the Protocol Configuration list, select Syslog.
10. In the Log Source Identifier field, type the IP address or host name for the log source
as an identifier for events from your Arpeggio SIFT-IT installation.
11. Click Save.
12. On the Admin tab, click Deploy Changes.
143Copyright © 2018, Juniper Networks, Inc.
Chapter 15: Arpeggio SIFT-IT
Additional Information
After you create your JSA agent definition, you can use your Arpeggio SIFT-IT software
and JSA integration to customize your security and auditing requirements.
You can customize the following security and auditing requirements:
• Create custom configurations in Arpeggio SIFT-IT with granular filtering on event
attributes.
For example, filtering on job name, user, file or object name, system objects, or ports.
All events that are forwarded from SIFT-IT and the contents of the event payload in
JSA are easily searched.
• Configure rules in JSA to generate alerts or offenses for your security team to identify
potential security threats, data loss, or breaches in real time.
• Configuring processes in Arpeggio SIFT-IT to trigger real-time remediation of issues
on your IBM®iSeries.
• Creating offenses for your security team from Arpeggio SIFT-IT events in JSA with the
Offenses tabor configuringemail job logs inSIFT-IT for your IBM®iSeriesadministrators.
• Creating multiple configuration rule sets for multiple agents that run simultaneously
to handle specific security or audit events.
For example, you can configure one JSA agent with a specific rule set for forwarding all
IBM®iSeries events, thendevelopmultiple configuration rule sets for specific compliance
purposes. You can easily manage configuration rule sets for compliance regulations,
such as FISMA, PCI. HIPPA, SOX, or ISO 27001. All of the events that are forwarded by
SIFT-IT JSA agents are contained in a single log source and categorized to be easily
searched.
Copyright © 2018, Juniper Networks, Inc.144
Juniper Secure Analytics Configuring DSMs Guide
CHAPTER 16
Array Networks SSL VPN
• Array Networks SSL VPN on page 145
• Configuring a Log Source on page 145
Array Networks SSL VPN
The Array Networks SSL VPN DSM for JSA collects events from an ArrayVPN appliance
by using syslog.
JSA records all relevant SSL VPN events that are forwarded by using syslog on TCP port
514 or UDP port 514.
Configuring a Log Source
To send Array Networks SSL VPN events to JSA, youmust manually create a log source.
JSA does not automatically discover or create log sources for syslog events from Array
Networks SSL VPN.
1. Log in to JSA.
2. Click the Admin tab.
3. On the navigation menu, click Data Sources.
4. Click the Log Sources icon.
5. Click Add.
6. In the Log Source Name field, type a name for your log source.
7. In the Log Source Description field, type a description for the log source.
8. From the Log Source Type list, select Array Networks SSL VPNAccess Gateways.
145Copyright © 2018, Juniper Networks, Inc.
9. From the Protocol Configuration list, select Syslog.
10. In the Log Source Identifier field, type the IP address or host name for the log source.
11. Click Save.
12. On the Admin tab, click Deploy Changes.
You are now ready to configure your Array Networks SSL VPN appliance to forward
remote syslog events to JSA. For more information on configuring Array Networks SSL
VPN appliances, see your Array Networks documentation.
Copyright © 2018, Juniper Networks, Inc.146
Juniper Secure Analytics Configuring DSMs Guide
CHAPTER 17
Aruba Networks
• Aruba Networks on page 147
• Aruba ClearPass Policy Manager on page 147
• Aruba Mobility Controllers on page 149
Aruba Networks
Several Aruba DSMs can be integrated with JSA.
This section provides information on the following DSMs:
• Aruba ClearPass Policy Manager on page 147
• Aruba Mobility Controllers on page 149
Aruba ClearPass Policy Manager
The JSADSM for ArubaClearPass PolicyManager can collect event logs from your Aruba
ClearPass Policy Manager servers.
The following table identifies the specifications for the Aruba ClearPass Policy Manager
DSM:
Table 32: Aruba ClearPass Policy Manager DSMSpecifications
ValueSpecification
Aruba NetworksManufacturer
ClearPassDSM name
DSM-ArubaClearPass-JSA_version-build_number.noarch.rpmRPM file name
6.5.0.71095 and laterSupported versions
LEEFEvent format
147Copyright © 2018, Juniper Networks, Inc.
Table 32: Aruba ClearPass Policy Manager DSMSpecifications (continued)
ValueSpecification
Session
Audit
System
Insight
Recorded event types
YesAutomatically discovered?
YesIncludes identity?
NoIncludes custom properties?
Aruba Networks website(http://www.arubanetworks.com/products/security/)
More information
To integrate Aruba ClearPass Policy Manager with JSA, complete the following steps:
1. If automatic updates are not enabled, download and install the most recent version
of the following RPMs on your JSA console:
• Aruba ClearPass DSM RPM
• DSMCommon RPM
2. Configure your Aruba ClearPass Policy Manager device to send syslog events to JSA.
3. If JSAdoesnotautomaticallydetect the logsource, addanArubaClearPass logsource
on the JSAConsole. The following tabledescribes theparameters that require specific
values for Aruba ClearPass Policy Manager event collection:
Table 33: Aruba ClearPass Policy Manager Log Source Parameters
ValueParameter
Aruba ClearPass Policy ManagerLog Source type
SyslogProtocol Configuration
• Configuring Aruba ClearPass Policy Manager to Communicate with JSA on page 148
Configuring Aruba ClearPass Policy Manager to Communicate with JSA
To collect syslog events fromAruba ClearPass PolicyManager, youmust add an external
syslog server for the JSA host. You will then need to create one or more syslog filters for
your syslog server.
For Session and Insight events, full event parsing works only for the default fields that
are provided by Aruba ClearPass Policy Manager. Session and Insight events that are
Copyright © 2018, Juniper Networks, Inc.148
Juniper Secure Analytics Configuring DSMs Guide
created by a user, and have different combinations of fields, might appear as Unknown
Session Log, or Unknown Insight Log.
1. Log in to your Aruba ClearPass Policy Manager server.
2. Start the Administration Console.
3. Click External Servers >Syslog Targets.
4. Click Add, and then configure the details for the JSA host.
5. On the Administration Console, click External Servers >Syslog Export Filters
6. Click Add.
7. Select LEEF for the Export Event Format Type, and then select the Syslog Server that
you added.
8. Click Save.
RelatedDocumentation
Aruba Mobility Controllers on page 149•
ArubaMobility Controllers
The Aruba Mobility Controllers DSM for JSA accepts events by using syslog.
JSA records all relevant events that are forwarded by using syslog on TCP port 514 or
UDP port 514.
• Configuring Your Aruba Mobility Controller on page 149
• Configuring a Log Source on page 150
Configuring Your ArubaMobility Controller
You can configure the ArubaWireless Networks (Mobility Controller) device to forward
syslog events to JSA.
1. Log in to Aruba Mobility Controller.
2. From the topmenu, select Configuration.
3. From the Switchmenu, selectManagement.
4. Click the Logging tab.
149Copyright © 2018, Juniper Networks, Inc.
Chapter 17: Aruba Networks
5. From the Logging Serversmenu, select Add.
6. Type the IP address of the JSA server that you want to collect logs.
7. Click Add.
8. Change the logging level for a module:
a. Select the check box next to the name of the logging module.
b. Choose the logging level that you want to change from the list that is displayed at
the bottom of the window.
9. Click Done.
10. Click Apply.
Configuring a Log Source
JSAautomaticallydiscoversandcreatesa logsource for syslogevents fromArubaMobility
Controllers.
1. Log in to JSA.
2. Click the Admin tab.
3. On the navigation menu, click Data Sources.
4. Click the Log Sources icon.
5. Click Add.
6. In the Log Source Name field, type a name for your log source.
7. In the Log Source Description field, type a description for the log source.
8. From the Log Source Type list, select ArubaMobility Controller.
9. From the Protocol Configuration list, select Syslog.
10. In the Log Source Identifier field, type the IP address or host name for the log source.
11. Click Save.
12. On the Admin tab, click Deploy Changes.
Copyright © 2018, Juniper Networks, Inc.150
Juniper Secure Analytics Configuring DSMs Guide
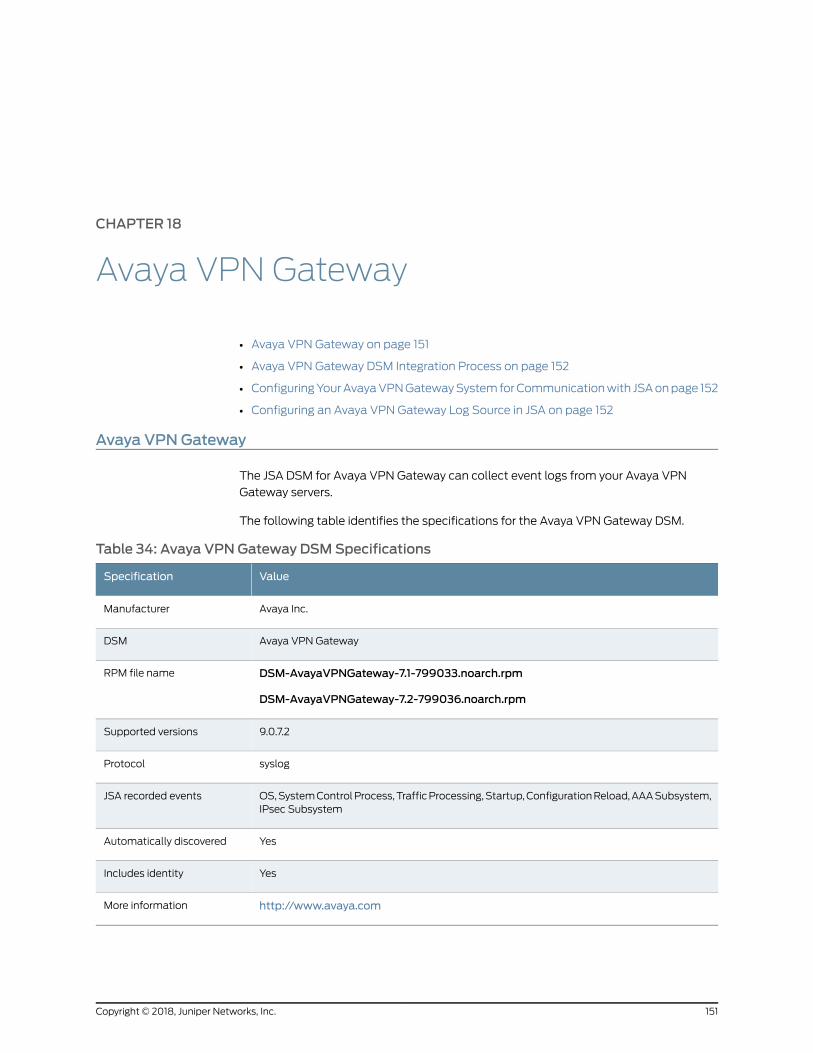
CHAPTER 18
Avaya VPN Gateway
• Avaya VPN Gateway on page 151
• Avaya VPN Gateway DSM Integration Process on page 152
• ConfiguringYourAvayaVPNGatewaySystemforCommunicationwith JSAonpage 152
• Configuring an Avaya VPN Gateway Log Source in JSA on page 152
Avaya VPNGateway
The JSA DSM for Avaya VPN Gateway can collect event logs from your Avaya VPN
Gateway servers.
The following table identifies the specifications for the Avaya VPN Gateway DSM.
Table 34: Avaya VPNGateway DSMSpecifications
ValueSpecification
Avaya Inc.Manufacturer
Avaya VPN GatewayDSM
DSM-AvayaVPNGateway-7.1-799033.noarch.rpm
DSM-AvayaVPNGateway-7.2-799036.noarch.rpm
RPM file name
9.0.7.2Supported versions
syslogProtocol
OS,SystemControlProcess,TrafficProcessing,Startup,ConfigurationReload,AAASubsystem,IPsec Subsystem
JSA recorded events
YesAutomatically discovered
YesIncludes identity
http://www.avaya.comMore information
151Copyright © 2018, Juniper Networks, Inc.
Avaya VPNGateway DSM Integration Process
You can integrate Avaya VPN Gateway DSMwith JSA.
To integrate Avaya VPN Gateway DSMwith JSA, use the following procedure:
1. If automatic updates are not enabled, download and install the most recent version
of the following RPMs on your JSA console:
• Syslog protocol RPM
• DSMCommon RPM
• Avaya VPN Gateway RPM
2. For each instance of Avaya VPNGateway, configure your Avaya VPNGateway system
to enable communication with JSA.
3. If JSA automatically discovers the log source, for each Avaya VPN Gateway server
you want to integrate, create a log source on the JSA console.
Configuring Your Avaya VPNGateway System for Communication with JSA
To collect all audit logs and system events from Avaya VPN Gateway, youmust specify
JSA as the syslog server and configure the message format.
1. Log in to your Avaya VPN Gateway command-line interface (CLI).
2. Type the following command:
/cfg/sys/syslog/add
3. At the prompt, type the IP address of your JSA system.
4. To apply the configuration, type the following command:
apply
5. To verify that the IP address of your JSA system is listed, type the following command:
/cfg/sys/syslog/list
Configuring an Avaya VPNGateway Log Source in JSA
To collect Avaya VPN Gateway events, configure a log source in JSA.
1. Log in to JSA.
2. Click the Admin tab.
Copyright © 2018, Juniper Networks, Inc.152
Juniper Secure Analytics Configuring DSMs Guide
3. In the navigation menu, click Data Sources.
4. Click the Log Sources icon.
5. Click Add.
6. From the Log Source Type list, select Avaya VPNGateway.
7. From the Protocol Configuration list, select Syslog.
8. Configure the remaining parameters.
9. Click Save.
10. On the Admin tab, click Deploy Changes.
153Copyright © 2018, Juniper Networks, Inc.
Chapter 18: Avaya VPN Gateway

Copyright © 2018, Juniper Networks, Inc.154
Juniper Secure Analytics Configuring DSMs Guide
CHAPTER 19
BalaBit IT Security
• BalaBit IT Security on page 155
• BalaBIt IT Security for Microsoft Windows Events on page 155
• BalaBit IT Security for Microsoft ISA or TMG Events on page 159
BalaBit IT Security
The BalaBit Syslog-ng Agent application can collect and forward syslog events for the
Microsoft Security Event Log DSM and the Microsoft ISA DSM in JSA.
BalaBIt IT Security for MicrosoftWindows Events
The Microsoft Windows Security Event Log DSM in JSA can accept Log Extended Event
Format (LEEF) events from BalaBit's Syslog-ng Agent.
The BalaBit Syslog-ng Agent forwards the followingWindows events to JSA by using
syslog:
• Windows security
• Application
• System
• DNS
• DHCP
• Custom container event logs
Before you can receive events fromBalaBit ITSecurity Syslog-ngAgents, youmust install
and configure the agent to forward events.
Before you begin
Review the following configuration steps before you configure the BalaBit Syslog-ng
Agent:
1. Install the BalaBit Syslog-ng Agent on yourWindows host. For more information, see
your BalaBit Syslog-ng Agent documentation.
2. Configure Syslog-ng Agent Events.
155Copyright © 2018, Juniper Networks, Inc.
3. Configure JSA as a destination for the Syslog-ng Agent.
4. Restart the Syslog-ng Agent service.
5. Optional. Configure the log source in JSA.
• Configuring the Syslog-ng Agent event source on page 156
• Configuring a syslog destination on page 157
• Restarting the Syslog-ng Agent service on page 158
• Configuring a log source on page 158
Configuring the Syslog-ng Agent event source
Before you can forward events to JSA, youmust specify whatWindows-based events
the Syslog-ng Agent collects.
1. From the Startmenu, select All Programs >syslog-ng Agent forWindows >Configure
syslog-ng Agent forWindows.
The Syslog-ng Agent window is displayed.
2. Expand the Syslog-ng Agent Settings pane, and select Eventlog Sources.
3. Double-click Event Containers.
The Event Containers Properties window is displayed.
4. From the Event Containers pane, select the Enable radio button.
5. Select a check box for each event type you want to collect:
• Application—Select this check box if you want the device to monitor theWindows
application event log.
• Security—Select this check box if you want the device to monitor theWindows
security event log.
• System—Select this check box if you want the device to monitor theWindows
system event log.
NOTE: BalaBit's Syslog-ng Agent supports other event types, such asDNS or DHCP events by using custom containers. For more information,see your BalaBit Syslog-ng Agent documentation.
6. Click Apply, and then clickOK.
The event configuration for your BalaBit Syslog-ng Agent is complete. You are now
ready to configure JSA as a destination for Syslog-ng Agent events.
Copyright © 2018, Juniper Networks, Inc.156
Juniper Secure Analytics Configuring DSMs Guide
Configuring a syslog destination
The Syslog-ng Agent allows you to configure multiple destinations for your Windows
based events.
To configure JSA as a destination, youmust specify the IP address for JSA, and then
configure a message template for the LEEF format.
1. From the Startmenu, select All Programs >Syslog-ng Agent forWindows >Configure
syslog-ng Agent forWindows.
The Syslog-ng Agent window is displayed.
2. Expand the Syslog-ng Agent Settings pane, and click Destinations.
3. Double-click Add new server.
The Server Property window is displayed.
4. On the Server tab, click Set Primary Server.
5. Configure the following parameters:
• Server Name—Type the IP address of your JSA Console or Event Collector.
• Server Port—Type 514 as the TCP port number for events to be forwarded to JSA.
6. Click theMessages tab.
7. From the Protocol list, select Legacy BSD Syslog Protocol.
8. In the Template field, define a custom template message for the protocol by typing:
<${PRI}>${BSDDATE} ${HOST} LEEF:${MSG}
The information that is typed in this field is space delimited.
9. From the Event Message Format pane, in theMessage Template field, type or copy
and paste the following text to define the format for the LEEF events:
NOTE: It is suggested that you do not change the text.
1.0|Microsoft|Windows|2k8r2|${EVENT_ID}|devTime=${R_YEAR}-${R_MONTH}-${R_DAY}T${R_HOUR}:$ {R_MIN}:${R_SEC}GMT${TZOFFSET}devTimeFormat=yyyy-MM-dd'T'HH:mm:ssz cat=${EVENT_TYPE}sev=${EVENT_LEVEL} resource=${HOST} usrName=${EVENT_USERNAME}application=$ {EVENT_SOURCE}message=${EVENT_MSG}
157Copyright © 2018, Juniper Networks, Inc.
Chapter 19: BalaBit IT Security
NOTE: TheLEEFformatuses tabasadelimiter toseparateeventattributesfrom each other. However, the delimiter does not start until after the lastpipe character for {Event_ID}. The following fields must include a tabbefore the event name: devTime, devTimeFormat, cat, sev, resource,usrName, application, andmessage.
Youmight need to use a text editor to copy and paste the LEEFmessage format into
theMessage Template field.
10. ClickOK.
The destination configuration is complete. You are now ready to restart the Syslog-ng
Agent service.
Restarting the Syslog-ng Agent service
Before the Syslog-ng Agent can forward LEEF formatted events, youmust restart the
Syslog-ng Agent service on theWindows host.
1. From the Startmenu, select Run.
The Run window is displayed.
2. Type the following text:
services.msc
3. ClickOK.
The Services window is displayed.
4. In the Name column, right-click on Syslog-ng Agent forWindows, and select Restart.
After the Syslog-ngAgent forWindows service restarts, the configuration is complete.
Syslog events from the BalaBit Syslog-ng Agent are automatically discovered by JSA.
TheWindows events that are automatically discovered are displayed as Microsoft
Windows Security Event Logs on the Log Activity tab.
Configuring a log source
JSA automatically discovers and creates a log source for syslog events from LEEF
formattedmessages.
These configuration steps are optional.
1. Log in to JSA.
2. Click the Admin tab.
Copyright © 2018, Juniper Networks, Inc.158
Juniper Secure Analytics Configuring DSMs Guide
3. On the navigation menu, click Data Sources.
4. Click the Log Sources icon.
5. Click Add.
6. In the LogSourceName field, type a name for your BalaBit Syslog-ngAgent log source.
7. In the Log Source Description field, type a description for the log source.
8. From the Log Source Type list, select Microsoft Windows Security Event Log.
9. Using the Protocol Configuration list, select Syslog.
10. Configure one of the following parameters from the table:
Table 35: Syslog Parameters
DescriptionParameter
Type the IP address or host name for the log source as an identifier for events from the BalaBitSyslog-ng Agent.
Log Source Identifier
11. Click Save.
12. On the Admin tab, click Deploy Changes.
The configuration is complete.
BalaBit IT Security for Microsoft ISA or TMG Events
You can integrate the BalaBit Syslog-ng Agent application to forward syslog events to
JSA.
The BalaBit Syslog-ng Agent reads Microsoft ISA or Microsoft TMG event logs, and
forwards syslog events by using the Log Extended Event Format (LEEF).
The events that are forwarded by BalaBit IT Security are parsed and categorized by the
Microsoft Internet and Acceleration (ISA) DSM for JSA. The DSM accepts bothMicrosoft
ISA and Microsoft Threat Management Gateway (TMG) events.
• Before You Begin on page 160
• Configure the BalaBit Syslog-ng Agent on page 160
• Configuring the BalaBit Syslog-ng Agent File Source on page 160
• Configuring a BalaBit Syslog-ng Agent Syslog Destination on page 161
159Copyright © 2018, Juniper Networks, Inc.
Chapter 19: BalaBit IT Security
• Filtering the Log File for Comment Lines on page 162
• Configuring a BalaBit Syslog-ng PE Relay on page 163
• Configuring a Log Source on page 164
Before You Begin
Before you can receive events fromBalaBit IT Security Syslog-ng Agents youmust install
and configure the agent to forward events.
NOTE: This integration uses BalaBit's Syslog-ng Agent forWindows andBalaBit's Syslog-ng PE to parse and forward events to JSA for the DSM tointerpret.
Review the following configuration steps before you attempt to configure the BalaBit
Syslog-ng Agent:
To configure the BalaBit Syslog-ng Agent, youmust take the following steps:
1. Install the BalaBit Syslog-ng Agent on yourWindows host. For more information, see
your BalaBit Syslog-ng Agent vendor documentation.
2. Configure the BalaBit Syslog-ng Agent.
3. Install a BalaBit Syslog-ng PE for Linux or Unix in relay mode to parse and forward
events to JSA. For more information, see your BalaBit Syslog-ng PE vendor
documentation.
4. Configure syslog for BalaBit Syslog-ng PE.
5. Optional. Configure the log source in JSA.
Configure the BalaBit Syslog-ng Agent
Before you can forward events to JSA, youmust specify the file source for Microsoft ISA
or Microsoft TMG events in the Syslog-ng Agent collects.
If your Microsoft ISA or Microsoft TMG appliance is generating event files for theWeb
Proxy Server and the Firewall Service, both files can be added.
Configuring the BalaBit Syslog-ng Agent File Source
Use the BalaBit Syslog-ng Agent file source to define the base log directory and files that
are to bemonitored by the Syslog-ng Agent.
1. From the Startmenu, select All Programs >syslog-ng Agent forWindows >Configure
syslog-ng Agent forWindows.
The Syslog-ng Agentwindow is displayed.
2. Expand the Syslog-ng Agent Settings pane, and select File Sources.
Copyright © 2018, Juniper Networks, Inc.160
Juniper Secure Analytics Configuring DSMs Guide
3. Select the Enable radio button.
4. Click Add to add your Microsoft ISA and TMG event files.
5. From the BaseDirectory field, click Browse and select the folder for your Microsoft ISA
or Microsoft TMG log files.
6. From the File Name Filter field, click Browse and select a log file that contains your
Microsoft ISA or Microsoft TMG events.
NOTE: The File Name Filter field supports the wild card (*) and question
mark (?) characters, which help you to find log files that are replaced,when they reach a specific file size or date.
7. In the Application Name field, type a name to identify the application.
8. From the Log Facility list, select Use Global Settings.
9. ClickOK. To add additional file sources, repeat steps 4 to 9.
10. Click Apply, and then clickOK.
The event configuration is complete. You are now ready to configure a syslog
destinations and formatting for your Microsoft TMG and ISA events.
Web Proxy Service events and Firewall Service events are stored in individual files by
Microsoft ISA and TMG.
Configuring a BalaBit Syslog-ng Agent Syslog Destination
The event logs captured by Microsoft ISA or TMG cannot be parsed by the BalaBit
Syslog-ng Agent for Windows, so youmust forward your logs to a BalaBit Syslog-ng
Premium Edition (PE) for Linux or UNIX.
To forward your TMG and ISA event logs, youmust specify the IP address for your PE
relay and configure a message template for the LEEF format. The BalaBit Syslog-ng PE
acts as an intermediate syslog server to parse the events and to forward the information
to JSA.
1. From the Startmenu, select All Programs >syslog-ng Agent forWindows >Configure
syslog-ng Agent forWindows.
The Syslog-ng Agentwindow is displayed.
2. Expand the Syslog-ng Agent Settings pane, and click Destinations.
161Copyright © 2018, Juniper Networks, Inc.
Chapter 19: BalaBit IT Security
3. Double-click Add new Server.
4. On the Server tab, click Set Primary Server.
5. Configure the following parameters:
• For the Server Name type the IP address of your BalaBit Syslog-ng PE relay.
• For the Server Port type 514 as the TCP port number for events that are forwardedto your BalaBit Syslog-ng PE relay.
6. Click theMessages tab.
7. From the Protocol list, select Legacy BSD Syslog Protocol.
8. From the FileMessage Format pane, in theMessage Template field, type the following
code:
${FILE_MESSAGE}${TZOFFSET}
9. Click Apply, and then clickOK.
The destination configuration is complete. You are now ready to filter comment lines
from the event log.
Filtering the Log File for Comment Lines
The event log file for Microsoft ISA or Microsoft TMGmight contain comment markers.
Comments must be filtered from the event message.
1. From the Startmenu, select All Programs >Syslog-ng Agent forWindows >Configure
syslog-ng Agent forWindows.
The Syslog-ng Agentwindow is displayed.
2. Expand the Syslog-ng Agent Settings pane, and select Destinations.
3. Right-click on your JSA Syslog destination and select Event Filters >Properties.
The Global event filters Propertieswindow is displayed.
4. Configure the following values:
• From the Global file filters pane, select Enable.
• From the Filter Type pane, select Black List Filtering.
5. ClickOK.
6. From the Filter Listmenu, double-clickMessage Contents.
Copyright © 2018, Juniper Networks, Inc.162
Juniper Secure Analytics Configuring DSMs Guide
TheMessage Contents Propertieswindow is displayed.
7. From theMessage Contents pane, select Enable.
8. In the Regular Expression field, type the following regular expression:
^#
9. Click Add.
10. Click Apply, and then clickOK.
The event messages with comments are no longer forwarded.
NOTE: Youmight need to restart Syslog-ng Agent forWindows serviceto begin syslog forwarding. For more information, see your BalaBitSyslog-ng Agent documentation.
Configuring a BalaBit Syslog-ng PE Relay
The BalaBit Syslog-ng Agent for Windows sends Microsoft TMG and ISA event logs to a
Balabit Syslog-ng PE installation, which is configured in relay mode.
The relay mode installation is responsible for receiving the event log from the BalaBit
Syslog-ng Agent for Windows, parsing the event logs in to the LEEF format, then
forwarding the events to JSA by using syslog.
To configure your BalaBit Syslog-ng PE Relay, youmust:
1. Install BalaBit Syslog-ng PE for Linux or Unix in relaymode. Formore information, see
your BalaBit Syslog-ne PE vendor documentation.
2. Configure syslog on your Syslog-ng PE relay.
The BalaBit Syslog-ng PE formats the TMG and ISA events in the LEEF format based on
the configuration of your syslog.conf file. The syslog.conf file is responsible for parsing
the event logs and forwarding the events to JSA.
1. Using SSH, log in to your BalaBit Syslog-ng PE relay command-line interface (CLI).
2. Edit the following file:
/etc/syslog-ng/etc/syslog.conf
3. From the destinations section, add an IP address and port number for each relay
destination.
For example,
163Copyright © 2018, Juniper Networks, Inc.
Chapter 19: BalaBit IT Security
####### destinations destination d_messages { file("/var/log/messages"); };
destination d_remote_tmgfw { tcp("QRadar_IP" port(QRadar_PORT)
log_disk_fifo_size(10000000) template(t_tmgfw)); }; destination d_remote_tmgweb
{ tcp("QRadar_IP" port(QRadar_PORT) log_disk_fifo_size(10000000)
template(t_tmgweb)); };
Where:
QRadar_IP is the IP address of your JSA console or Event Collector.
QRadar_Port is the port number that is required for JSA to receive syslog events. By
default, JSA receives syslog events on port 514.
4. Save the syslog configuration changes.
5. Restart Syslog-ng PE to force the configuration file to be read.
TheBalaBit Syslog-ngPE configuration is complete. Syslog events that are forwarded
from the BalaBit Syslog-ng relay are automatically discovered by JSA as Microsoft
Windows Security Event Logs on the Log Activity tab. For more information, see the
JSA Users Guide.
NOTE: When you are usingmultiple syslog destinations, messages areconsidered to be delivered when they successfully arrive at the primarysyslog destination.
Configuring a Log Source
JSA automatically discovers and creates a log source for syslog events from LEEF
formattedmessages that are provided by your BalaBit Syslog-ng relay.
The following configuration steps are optional.
1. Log in to JSA.
2. Click the Admin tab.
3. On the navigation menu, click Data Sources.
The Data Sources pane is displayed.
4. Click the Log Sources icon.
The Log Sourceswindow is displayed.
5. Click Add.
The Add a log sourcewindow is displayed.
Copyright © 2018, Juniper Networks, Inc.164
Juniper Secure Analytics Configuring DSMs Guide

6. In the Log Source Name field, type a name for the log source.
7. In the Log Source Description field, type a description for the log source.
8. From the Log Source Type list, select Microsoft ISA.
9. From the Protocol Configuration list, select Syslog.
The Syslog Protocol Configuration is displayed.
10. Configure one of the following parameters from the table:
Table 36: Syslog Parameters
DescriptionParameter
Type the IP address or host name for the log source as an identifier for Microsoft ISA orMicrosoft Threat Management Gateway events from the BalaBit Syslog-ng Agent.
Log Source Identifier
11. Click Save.
12. On the Admin tab, click Deploy Changes.
The BalaBit IT Security configuration for Microsoft ISA and Microsoft TMG events is
complete.
165Copyright © 2018, Juniper Networks, Inc.
Chapter 19: BalaBit IT Security

Copyright © 2018, Juniper Networks, Inc.166
Juniper Secure Analytics Configuring DSMs Guide
CHAPTER 20
Barracuda
• Barracuda on page 167
• Barracuda Spam& Virus Firewall on page 167
• BarracudaWeb Application Firewall on page 169
• BarracudaWeb Filter on page 172
Barracuda
JSA supports a range of Barracuda devices.
The devices JSA supports are:
• Barracuda Spam& Virus Firewall on page 167
• BarracudaWeb Application Firewall on page 169
• BarracudaWeb Filter on page 172
Barracuda Spam&Virus Firewall
You can integrate Barracuda Spam& Virus Firewall with JSA.
The Barracuda Spam& Virus Firewall DSM for JSA accepts both mail syslog events and
web syslog events from Barracuda Spam& Virus Firewall appliances.
Mail syslog events contain the event and action that is takenwhen the firewall processes
email. Web syslog events record information on user activity, and configuration changes
that occur on your Barracuda Spam& Virus Firewall appliance.
• Before You Begin on page 167
• Configuring Syslog Event Forwarding on page 168
• Configuring a Log Source on page 168
Before You Begin
Syslog messages are sent to JSA from Barracuda Spam& Virus Firewall by using UDP
port 514. Youmust verify that any firewalls between JSA and your Barracuda Spam&
Virus Firewall appliance allow UDP traffic on port 514.
167Copyright © 2018, Juniper Networks, Inc.

Configuring Syslog Event Forwarding
You can configure syslog forwarding for Barracuda Spam& Virus Firewall.
1. Log in to the Barracuda Spam& Virus Firewall web interface.
2. Click the Advanced tab.
3. From the Advancedmenu, select Advanced Networking.
4. In theMail Syslog field, type the IP address of your JSA console or Event Collector.
5. Click Add.
6. In theWeb Interface Syslog field, type the IP address of your JSA console or Event
Collector.
7. Click Add.
Configuring a Log Source
JSA automatically discovers and creates a log source for syslog events from Barracuda
Spam& Virus Firewall appliances.
The following configuration steps are optional.
1. Log in to JSA.
2. Click the Admin tab.
3. Click the Log Sources icon.
4. Click Add.
5. In the Log Source Name field, type a name for your log source.
6. In the Log Source Description field, type a description for the log source.
7. From the Log Source Type list, select Barracuda Spam&Virus Firewall.
8. From the Protocol Configuration list, select Syslog.
9. In the Log Source Identifier field, type the IP address or host name for the log source.
Copyright © 2018, Juniper Networks, Inc.168
Juniper Secure Analytics Configuring DSMs Guide
10. Click Save.
11. On the Admin tab, click Deploy Changes.
BarracudaWeb Application Firewall
The JSA DSM for BarracudaWeb Application Firewall collects syslog LEEF and custom
events from BarracudaWeb Application Firewall devices.
The following table identifies the specifications for the BarracudaWeb Application
Firewall DSM:
Table 37: BarracudaWeb Application Firewall DSMSpecifications
ValueSpecification
BarracudaManufacturer
Web Application FirewallDSM name
DSM-BarracudaWebApplicationFirewall-JSA_version-build_number.noarch.rpmRPM file name
V7.0.x and laterSupported versions
SyslogProtocol type
System
Web
Access
Audit
JSA recorded event types
If LEEF-formatted payloads, the log source is automaticallydiscovered.
If custom-formatted payloads, the log source is notautomatically discovered.
Automatically discovered?
YesIncluded identity?
Barracuda Networks website(https://www.barracudanetworks.com)
More information
To collect syslog events from BarracudaWeb Application Firewall, use the following
steps:
1. If automatic updates are not enabled, download themost recent version of the
following RPMs on your JSA console:
• BarracudaWeb Application Firewall DSM RPM
169Copyright © 2018, Juniper Networks, Inc.
Chapter 20: Barracuda

• DSMCommon RPM
2. Configure your BarracudaWeb Application Firewall device to send syslog events to
JSA.
3. AddaBarracudaWebApplicationFirewall logsourceon the JSAConsole.The following
table describes the parameters that require specific values that are required for
BarracudaWeb Application Firewall event collection:
Table 38: BarracudaWeb Application Firewall Log Source Parameters
ValueParameter
BarracudaWeb Application FirewallLog Source type
SyslogProtocol Configuration
• Configuring BarracudaWeb Application Firewall to Send Syslog Events to
JSA on page 170
• Configuring BarracudaWeb Application Firewall to Send Syslog Events to JSA for
Devices That do Not Support LEEF on page 171
Configuring BarracudaWeb Application Firewall to Send Syslog Events to JSA
Configure your BarracudaWeb Application Firewall appliance to send syslog events to
JSA.
Verify that firewalls between the Barracuda appliance and JSA allow UDP traffic on port
514.
1. Log in to the BarracudaWeb Application Firewall web interface.
2. Click the Advanced tab.
3. From the Advancedmenu, select Export Logs.
4. Click Add Syslog Server.
5. Configure the parameters:
The name of the JSA Console or Event CollectorName
The IP address of your JSA Console or Event Collector.Syslog Server
The port that is associated with the IP address of your JSAConsole or Event Collector.
If syslog messages are sent by UDP, use the default port, 514.
Port
Copyright © 2018, Juniper Networks, Inc.170
Juniper Secure Analytics Configuring DSMs Guide
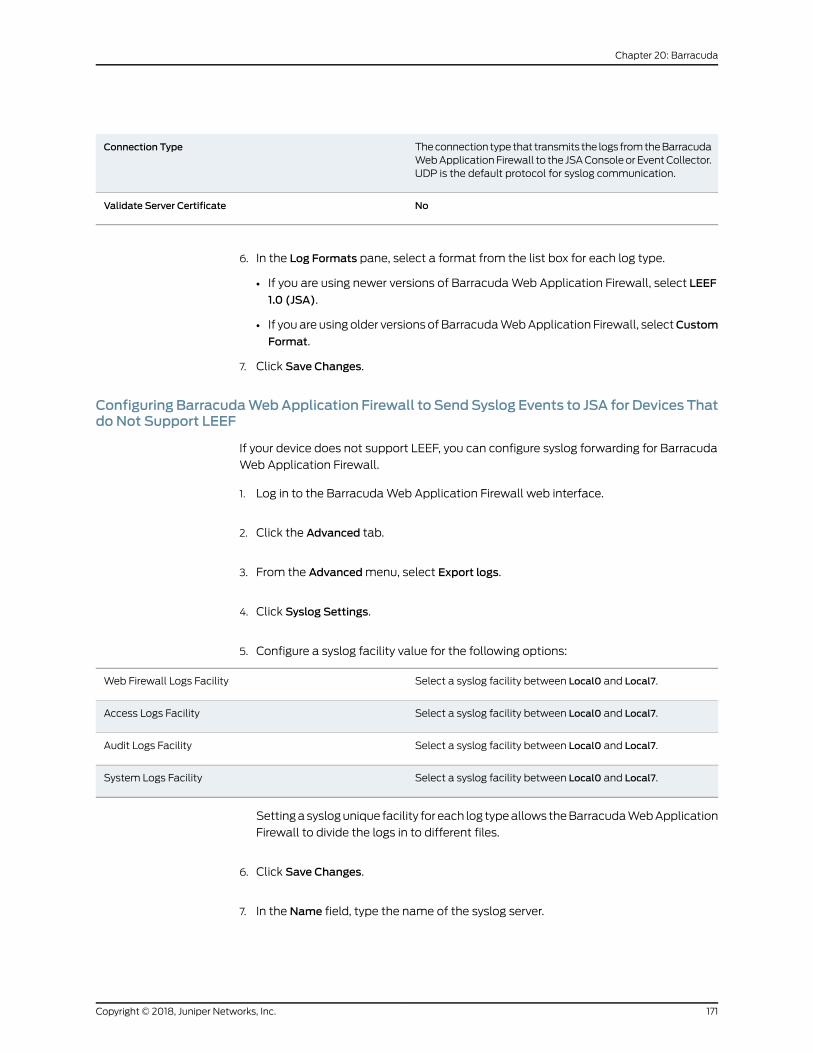
Theconnection type that transmits the logs fromtheBarracudaWebApplicationFirewall to the JSAConsoleor EventCollector.UDP is the default protocol for syslog communication.
Connection Type
NoValidate Server Certificate
6. In the Log Formats pane, select a format from the list box for each log type.
• If you are using newer versions of BarracudaWeb Application Firewall, select LEEF
1.0 (JSA).
• If youare usingolder versions ofBarracudaWebApplication Firewall, selectCustom
Format.
7. Click Save Changes.
Configuring BarracudaWebApplication Firewall to SendSyslog Events to JSA for Devices Thatdo Not Support LEEF
If your device does not support LEEF, you can configure syslog forwarding for Barracuda
Web Application Firewall.
1. Log in to the BarracudaWeb Application Firewall web interface.
2. Click the Advanced tab.
3. From the Advancedmenu, select Export logs.
4. Click Syslog Settings.
5. Configure a syslog facility value for the following options:
Select a syslog facility between Local0 and Local7.Web Firewall Logs Facility
Select a syslog facility between Local0 and Local7.Access Logs Facility
Select a syslog facility between Local0 and Local7.Audit Logs Facility
Select a syslog facility between Local0 and Local7.System Logs Facility
Settingasyslogunique facility for each log typeallows theBarracudaWebApplication
Firewall to divide the logs in to different files.
6. Click Save Changes.
7. In the Name field, type the name of the syslog server.
171Copyright © 2018, Juniper Networks, Inc.
Chapter 20: Barracuda
8. In the Syslog field, type the IP address of your JSA console or Event Collector.
9. From the Log Time Stamp option, select Yes.
10. From the Log Unit Name option, select Yes.
11. Click Add.
12. From theWeb Firewall Logs Format list box, select Custom Format.
13. In theWeb Firewall Logs Format field, type the following custom event format:
t=%t|ad=%ad|ci=%ci|cp=%cp|au=%au
14. From the Access Logs Format list box, select Custom Format.
15. In the Access Logs Format field, type the following custom event format:
t=%t|p=%p|s=%s|id=%id|ai=%ai|ap=%ap|ci=%ci|cp=%cp|si=%si|sp=%sp|cu=%cu
16. From the Access Logs Format list box, select Custom Format.
17. In the Access Logs Format field, type the following custom event format:
t=%t|trt=%trt|an=%an|li=%li|lp=%lp
18. Click Save Changes.
19. From the navigation menu, select Basic >Administration
20.From the System/Reload/Shutdown pane, click Restart.
The syslog configuration is complete after your BarracudaWeb Application Firewall
restarts. Events that are forwarded to JSA by BarracudaWeb Application Firewall are
displayed on the Log Activity tab.
RelatedDocumentation
BarracudaWeb Filter on page 172•
• Barracuda Spam& Virus Firewall on page 167
BarracudaWeb Filter
You can integrate BarracudaWeb Filter appliance events with JSA.
Copyright © 2018, Juniper Networks, Inc.172
Juniper Secure Analytics Configuring DSMs Guide
The BarracudaWeb Filter DSM for JSA accepts web traffic and web interface events in
syslog format that are forwarded by BarracudaWeb Filter appliances.
Web traffic events contain the events, andanyactions that are takenwhen theappliance
processes web traffic. Web interface events contain user login activity and configuration
changes to theWeb Filter appliance.
• Before You Begin on page 173
• Configuring Syslog Event Forwarding on page 173
• Configuring a Log Source on page 173
Before You Begin
Syslog messages are forward to JSA by using UDP port 514. Youmust verify that any
firewalls between JSAand your BarracudaWebFilter appliance allowUDP traffic on port
514.
Configuring Syslog Event Forwarding
Configure syslog forwarding for BarracudaWeb Filter.
1. Log in to the BarracudaWeb Filter web interface.
2. Click the Advanced tab.
3. From the Advancedmenu, select Syslog.
4. From theWeb Traffic Syslog field, type the IP address of your JSA console or Event
Collector.
5. Click Add.
6. From theWeb Interface Syslog field, type the IP address of your JSA console or Event
Collector.
7. Click Add.
The syslog configuration is complete.
Configuring a Log Source
JSA automatically discovers and creates a log source for syslog events from Barracuda
Web Filter appliances.
The following configuration steps are optional.
1. Log in to JSA.
2. Click the Admin tab.
173Copyright © 2018, Juniper Networks, Inc.
Chapter 20: Barracuda
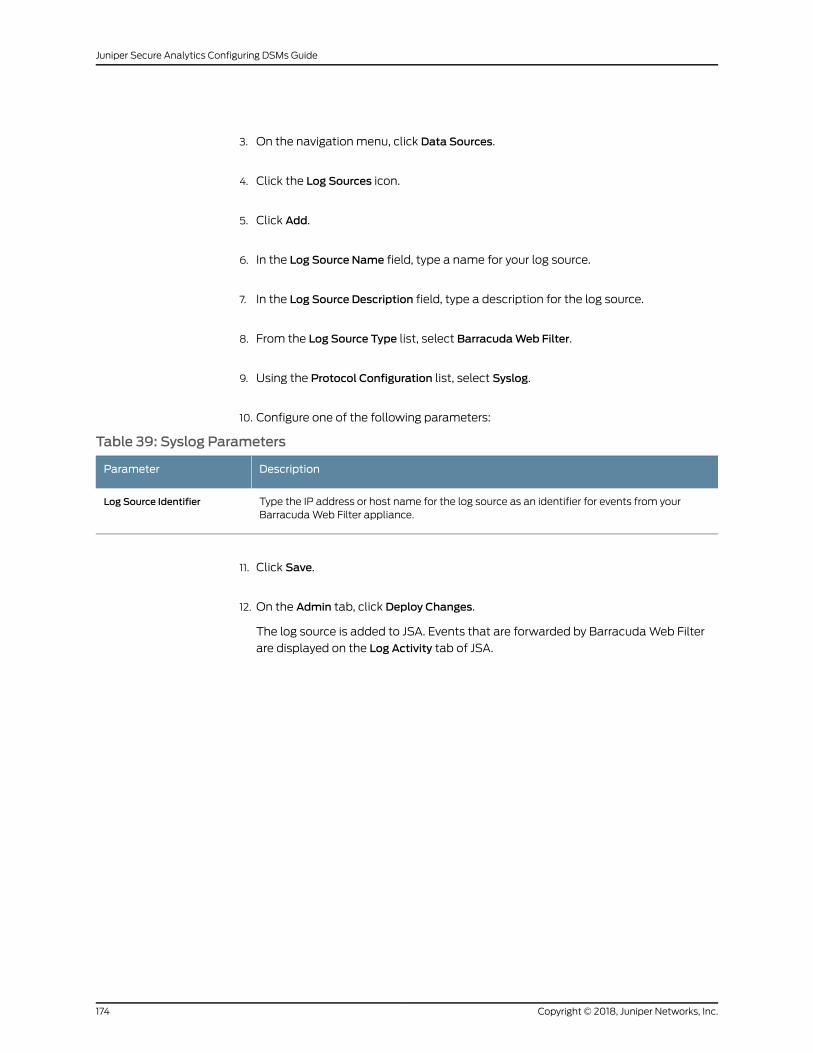
3. On the navigation menu, click Data Sources.
4. Click the Log Sources icon.
5. Click Add.
6. In the Log Source Name field, type a name for your log source.
7. In the Log Source Description field, type a description for the log source.
8. From the Log Source Type list, select BarracudaWeb Filter.
9. Using the Protocol Configuration list, select Syslog.
10. Configure one of the following parameters:
Table 39: Syslog Parameters
DescriptionParameter
Type the IP address or host name for the log source as an identifier for events from yourBarracudaWeb Filter appliance.
Log Source Identifier
11. Click Save.
12. On the Admin tab, click Deploy Changes.
The log source is added to JSA. Events that are forwarded by BarracudaWeb Filter
are displayed on the Log Activity tab of JSA.
Copyright © 2018, Juniper Networks, Inc.174
Juniper Secure Analytics Configuring DSMs Guide
CHAPTER 21
Bit9
• Bit9 on page 175
• Bit9 Parity on page 175
• Bit9 Security Platform on page 177
• Carbon Black on page 178
Bit9
Several Bit9 DSMs can be integrated with JSA
Bit9 Parity
To collect events, youmust configure your Bit9 Parity device to forward syslog events in
Log Event Extended Format (LEEF).
1. Log in to the Bit9 Parity console with Administrator or PowerUser privileges.
2. Fromthenavigationmenuon the left sideof theconsole, selectAdministration>System
Configuration.
The SystemConfigurationwindow is displayed.
3. Click Server Status.
The Server Statuswindow is displayed.
4. Click Edit.
5. In the Syslog address field, type the IP address of your JSA console or Event Collector.
6. From the Syslog format list, select LEEF (Q1Labs).
7. Select the Syslog enabled check box.
8. Click Update.
175Copyright © 2018, Juniper Networks, Inc.

The configuration is complete. The log source is added to JSA as Bit9 Parity events
are automatically discovered. Events that are forwarded to JSA by Bit9 Parity are
displayed on the Log Activity tab of JSA.
• Configure a Log Source on page 176
Configure a Log Source
JSA automatically discovers and creates a log source for syslog events from Bit9 Parity.
The following configuration steps are optional.
1. Log in to JSA.
2. Click the Admin tab.
3. On the navigation menu, click Data Sources.
4. Click the Log Sources icon.
5. Click Add.
6. In the Log Source Name field, type a name for your log source.
7. In the Log Source Description field, type a description for the log source.
8. From the Log Source Type list, select Bit9 Security Platform.
9. Using the Protocol Configuration list, select Syslog.
10. Configure the following values:
Table 40: Syslog Parameters
DescriptionParameter
Type the IP address or host name for the log source as an identifier for events from your Bit9Parity device.
Log Source Identifier
11. Click Save.
12. On the Admin tab, click Deploy Changes.
The configuration is complete.
Copyright © 2018, Juniper Networks, Inc.176
Juniper Secure Analytics Configuring DSMs Guide
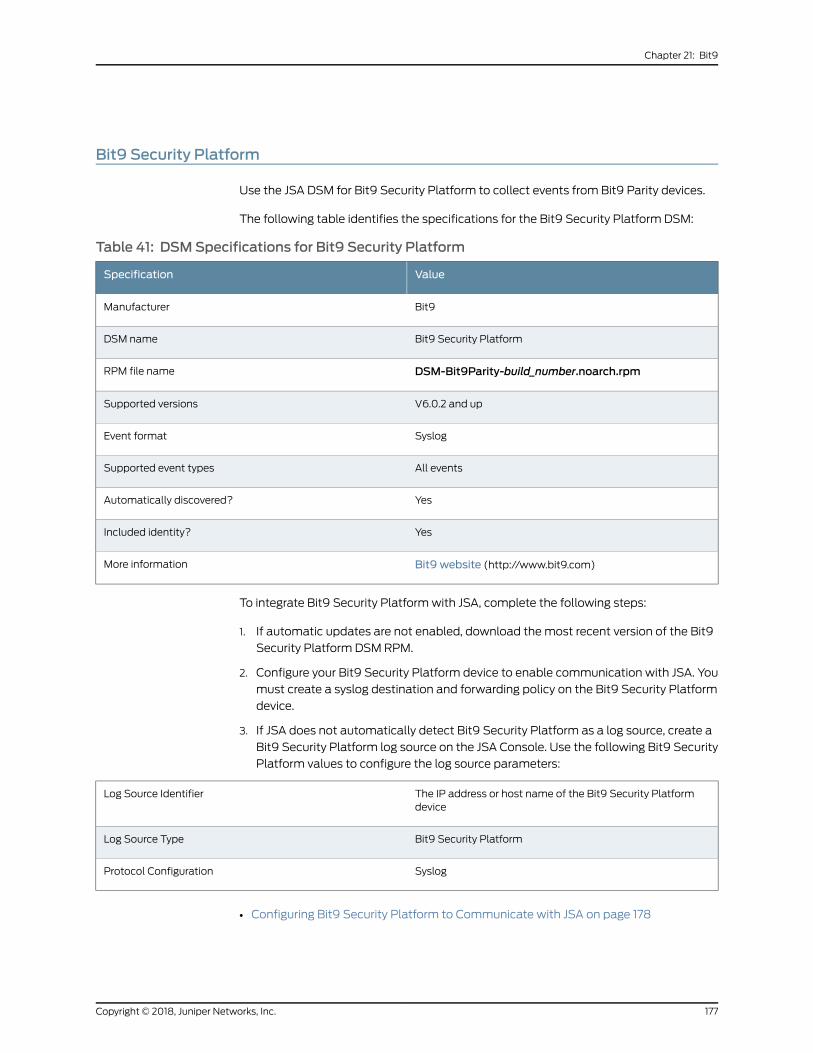
Bit9 Security Platform
Use the JSA DSM for Bit9 Security Platform to collect events from Bit9 Parity devices.
The following table identifies the specifications for the Bit9 Security Platform DSM:
Table 41: DSMSpecifications for Bit9 Security Platform
ValueSpecification
Bit9Manufacturer
Bit9 Security PlatformDSM name
DSM-Bit9Parity-build_number.noarch.rpmRPM file name
V6.0.2 and upSupported versions
SyslogEvent format
All eventsSupported event types
YesAutomatically discovered?
YesIncluded identity?
Bit9 website (http://www.bit9.com)More information
To integrate Bit9 Security Platformwith JSA, complete the following steps:
1. If automatic updates are not enabled, download themost recent version of the Bit9
Security Platform DSM RPM.
2. Configure your Bit9 Security Platform device to enable communication with JSA. You
must create a syslog destination and forwarding policy on the Bit9 Security Platform
device.
3. If JSA does not automatically detect Bit9 Security Platform as a log source, create a
Bit9 Security Platform log source on the JSA Console. Use the following Bit9 Security
Platform values to configure the log source parameters:
The IP address or host name of the Bit9 Security Platformdevice
Log Source Identifier
Bit9 Security PlatformLog Source Type
SyslogProtocol Configuration
• Configuring Bit9 Security Platform to Communicate with JSA on page 178
177Copyright © 2018, Juniper Networks, Inc.
Chapter 21: Bit9
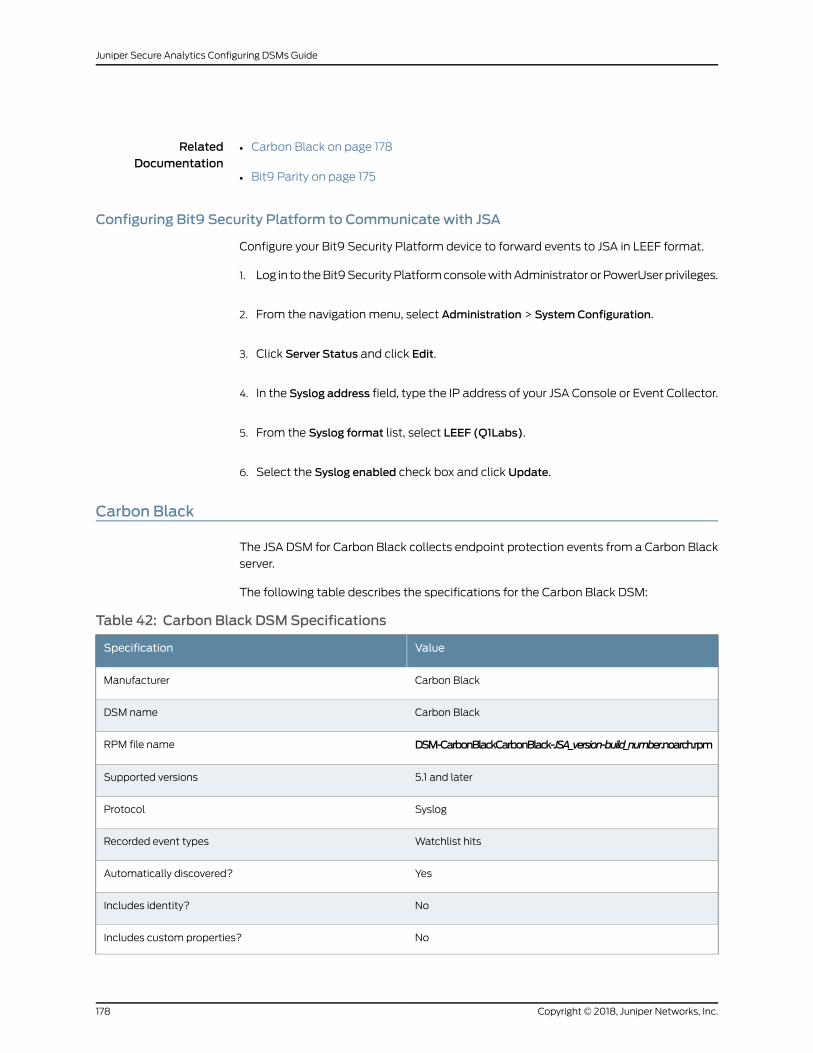
RelatedDocumentation
Carbon Black on page 178•
• Bit9 Parity on page 175
Configuring Bit9 Security Platform to Communicate with JSA
Configure your Bit9 Security Platform device to forward events to JSA in LEEF format.
1. Log in to theBit9SecurityPlatformconsolewithAdministrator orPowerUserprivileges.
2. From the navigation menu, select Administration > SystemConfiguration.
3. Click Server Status and click Edit.
4. In the Syslog address field, type the IP address of your JSA Console or Event Collector.
5. From the Syslog format list, select LEEF (Q1Labs).
6. Select the Syslog enabled check box and click Update.
Carbon Black
The JSA DSM for Carbon Black collects endpoint protection events from a Carbon Black
server.
The following table describes the specifications for the Carbon Black DSM:
Table 42: Carbon Black DSMSpecifications
ValueSpecification
Carbon BlackManufacturer
Carbon BlackDSM name
DSM-CarbonBlackCarbonBlack-JSA_version-build_number.noarch.rpmRPM file name
5.1 and laterSupported versions
SyslogProtocol
Watchlist hitsRecorded event types
YesAutomatically discovered?
NoIncludes identity?
NoIncludes custom properties?
Copyright © 2018, Juniper Networks, Inc.178
Juniper Secure Analytics Configuring DSMs Guide
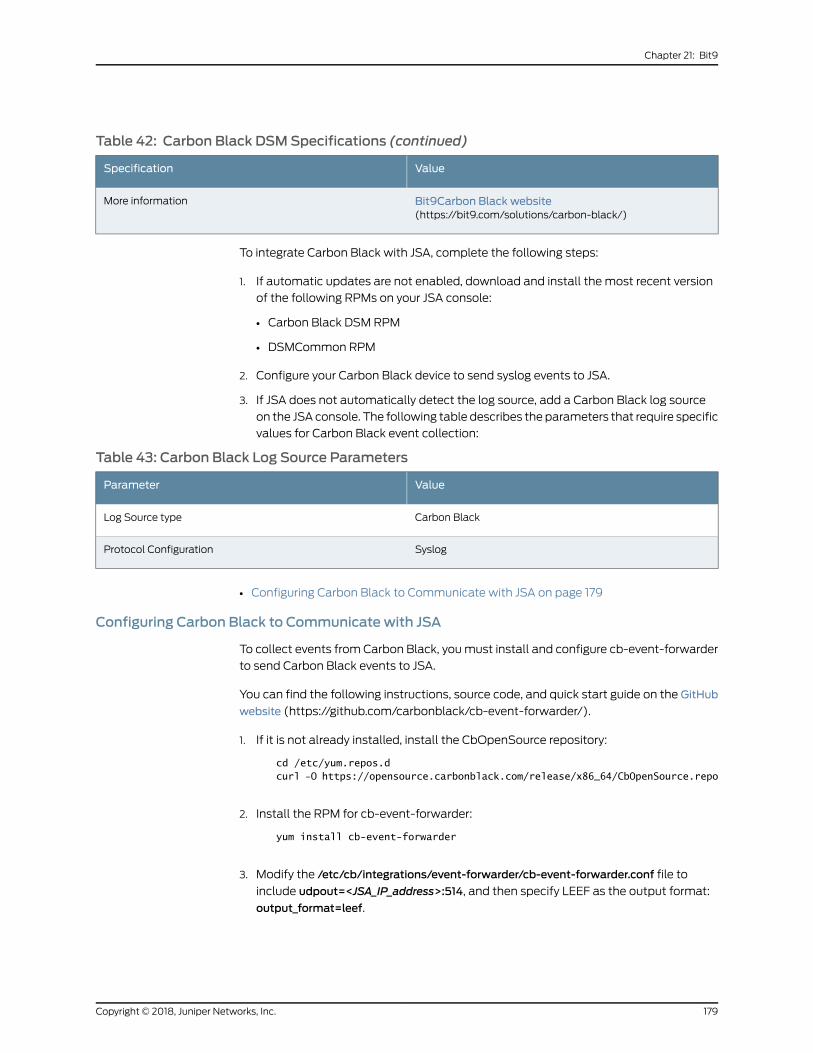
Table 42: Carbon Black DSMSpecifications (continued)
ValueSpecification
Bit9Carbon Black website(https://bit9.com/solutions/carbon-black/)
More information
To integrate Carbon Black with JSA, complete the following steps:
1. If automatic updates are not enabled, download and install the most recent version
of the following RPMs on your JSA console:
• Carbon Black DSM RPM
• DSMCommon RPM
2. Configure your Carbon Black device to send syslog events to JSA.
3. If JSA does not automatically detect the log source, add a Carbon Black log source
on the JSA console. The following table describes the parameters that require specific
values for Carbon Black event collection:
Table 43: Carbon Black Log Source Parameters
ValueParameter
Carbon BlackLog Source type
SyslogProtocol Configuration
• Configuring Carbon Black to Communicate with JSA on page 179
Configuring Carbon Black to Communicate with JSA
To collect events from Carbon Black, youmust install and configure cb-event-forwarder
to send Carbon Black events to JSA.
You can find the following instructions, source code, and quick start guide on the GitHub
website (https://github.com/carbonblack/cb-event-forwarder/).
1. If it is not already installed, install the CbOpenSource repository:
cd /etc/yum.repos.dcurl -O https://opensource.carbonblack.com/release/x86_64/CbOpenSource.repo
2. Install the RPM for cb-event-forwarder:
yum install cb-event-forwarder
3. Modify the /etc/cb/integrations/event-forwarder/cb-event-forwarder.conf file to
include udpout=<JSA_IP_address>:514, and then specify LEEF as the output format:
output_format=leef.
179Copyright © 2018, Juniper Networks, Inc.
Chapter 21: Bit9
4. If you are installing on a computer other than the Carbon Black server, copy the
RabbitMQ user name and password into the rabbit_mq_username and
rabbit_mq_password variables in the
/etc/cb/integrations/event-forwarder/cb-event-forwarder.conf file. In the
cb_server_hostname variable, enter the host name or IP address of the Carbon Black
server.
5. Ensure that the configuration is valid by running the cb-event-forwarder in check
mode:
/usr/share/cb/integrations/event-forwarder/cb-event-forwarder -check.
If valid, themessage Initializedoutputdisplays. If there are errors, the errors areprinted
to your screen.
6. Choose the type of event that you want to capture.
By default, Carbon Black publishes the all feed and watchlist events over the bus. If
youwant to capture raw sensor events or all binaryinfo notifications, youmust enable
those features in the /etc/cb/cb.conf file.
• To capture raw sensor events, edit the <DatastoreBroadcastEventTypes> option in
the /etc/cb/cb.conf file to enable broadcast of the raw sensor events that youwant
to export.
• To capture binary observed events, edit the <EnableSolrBinaryInfoNotifications>
option in the /etc/cb/cb.conf file and set it to True.
7. If any variables were changed in /etc/cb/cb.conf, restart the Carbon Black server:
"service cb-enterprise restart".
8. Start the cb-event-forwarder service by using the initctl command: initctl start
cb-event-forwarder.
NOTE: You can stop the cb-event-forwarder service by using the initctlcommand: initctl stop cb-event-forwarder.
RelatedDocumentation
• Bit9 Parity on page 175
• Bit9 Security Platform on page 177
Copyright © 2018, Juniper Networks, Inc.180
Juniper Secure Analytics Configuring DSMs Guide
CHAPTER 22
BlueCat Networks Adonis
• BlueCat Networks Adonis on page 181
• Supported Event Types on page 181
• Event Type Format on page 182
• Configuring BlueCat Adonis on page 182
• Configuring a Log Source in JSA on page 183
BlueCat Networks Adonis
The BlueCat Networks Adonis DSM for JSA accepts events that are forwarded in Log
Enhanced Event Protocol (LEEF) by using syslog from BlueCat Adonis appliances that
are managed with BlueCat Proteus.
JSA supports BlueCat Networks Adonis appliances by using version 6.7.1-P2 and later.
Youmight be required to include a patch on your BlueCat Networks Adonis to integrate
DNS and DHCP events with JSA. For more information, see KB-4670 and your BlueCat
Networks documentation.
Supported Event Types
JSA is capable of collecting all relevant events related to DNS and DHCP queries.
This includes the following events:
• DNS IPv4 and IPv6 query events
• DNS name server query events
• DNSmail exchange query events
• DNS text record query events
• DNS record update events
• DHCP discover events
• DHCP request events
• DHCP release events
181Copyright © 2018, Juniper Networks, Inc.

Event Type Format
The LEEF format consists of a pipe ( | ) delimited syslog header and a space delimited
event payload.
For example:
Aug 10 14:55:30 adonis671-184 LEEF:1.0|BCN|Adonis|6.7.1|DNS_Query|cat=A_record
src=10.10.10.10 url=test.example.com
If the syslog events forwarded from your BlueCat Adonis appliances are not formatted
similarly to the sample above, youmust examine your device configuration. Properly
formatted LEEF event messages are automatically discovered by the BlueCat Networks
Adonis DSM and added as a log source to JSA.
Before You Begin
BlueCat Adonis must be configured to generate events in Log Enhanced Event Protocol
(LEEF) and to redirect the event output to JSA using syslog.
BlueCat Networks provides a script on their appliances to assist you with configuring
syslog. To complete the syslog redirection, youmust have administrative or root access
to the command-line interface of the BlueCat Adonis or your BlueCat Proteus appliance.
If the syslog configuration script is not present on your appliance, contact your BlueCat
Networks representative.
Configuring BlueCat Adonis
You can configure your BlueCat Adonis appliance to forward DNS and DHCP events to
JSA.
1. Using SSH, log in to your BlueCat Adonis appliance.
2. On the command-line interface type the following command to start the syslog
configuration script:
/usr/local/bluecat/JSA/setup-JSA.sh
3. Type the IP address of your JSA console or Event Collector.
4. Type yes or no to confirm the IP address.
The configuration is complete when a success message is displayed.
The log source is added to JSA as BlueCat Networks Adonis syslog events are
automatically discovered. Events that are forwarded to JSA are displayed on the Log
Activity tab. If theevents arenot automatically discovered, youcanmanually configure
a log source.
Copyright © 2018, Juniper Networks, Inc.182
Juniper Secure Analytics Configuring DSMs Guide
Configuring a Log Source in JSA
JSA automatically discovers and creates a log source for syslog events from BlueCat
NetworksAdonis. However, you canmanually create a log source for JSA to receive syslog
events.
The following configuration steps are optional.
1. Log in to JSA.
2. Click the Admin tab.
3. On the navigation menu, click Data Sources.
4. Click the Log Sources icon.
5. Click Add.
6. In the Log Source Name field, type a name for your log source.
7. In the Log Source Description field, type a description for the log source.
8. From the Log Source Type list, select BlueCat Networks Adonis.
9. Using the Protocol Configuration list, select Syslog.
10. Configure the following values:
Table 44: Syslog Parameters
DescriptionParameter
Type the IPaddress or host name for the log source as an identifier for events fromyourBlueCatNetworks Adonis appliance.
Log Source Identifier
11. Click Save.
12. On the Admin tab, click Deploy Changes.
The configuration is complete.
183Copyright © 2018, Juniper Networks, Inc.
Chapter 22: BlueCat Networks Adonis

Copyright © 2018, Juniper Networks, Inc.184
Juniper Secure Analytics Configuring DSMs Guide
CHAPTER 23
Blue Coat SG
• Blue Coat SG on page 185
• Creating a Custom Event Format on page 187
• Creating a Log Facility on page 188
• Enabling Access Logging on page 188
• Configuring Blue Coat SG for FTP Uploads on page 189
• Configuring a Blue Coat SG Log Source on page 190
• Configuring Blue Coat SG for Syslog on page 193
• Creating Extra Custom Format Key-value Pairs on page 193
Blue Coat SG
The JSA DSM for Blue Coat SG collects events from Blue Coat SG appliances.
The following table lists the specifications for the Blue Coat SG DSM:
Table 45: Blue Coat SG DSMSpecifications
ValueSpecification
Blue CoatManufacturer
Blue Coat SG ApplianceDSM name
DSM-BluecoatProxySG-JSA_version-build_number.noarch.rpmRPM file name
SG v4.x and laterSupported versions
Syslog
Log File Protocol
Protocol
All eventsRecorded event types
NoAutomatically discovered?
NoIncludes identity?
185Copyright © 2018, Juniper Networks, Inc.
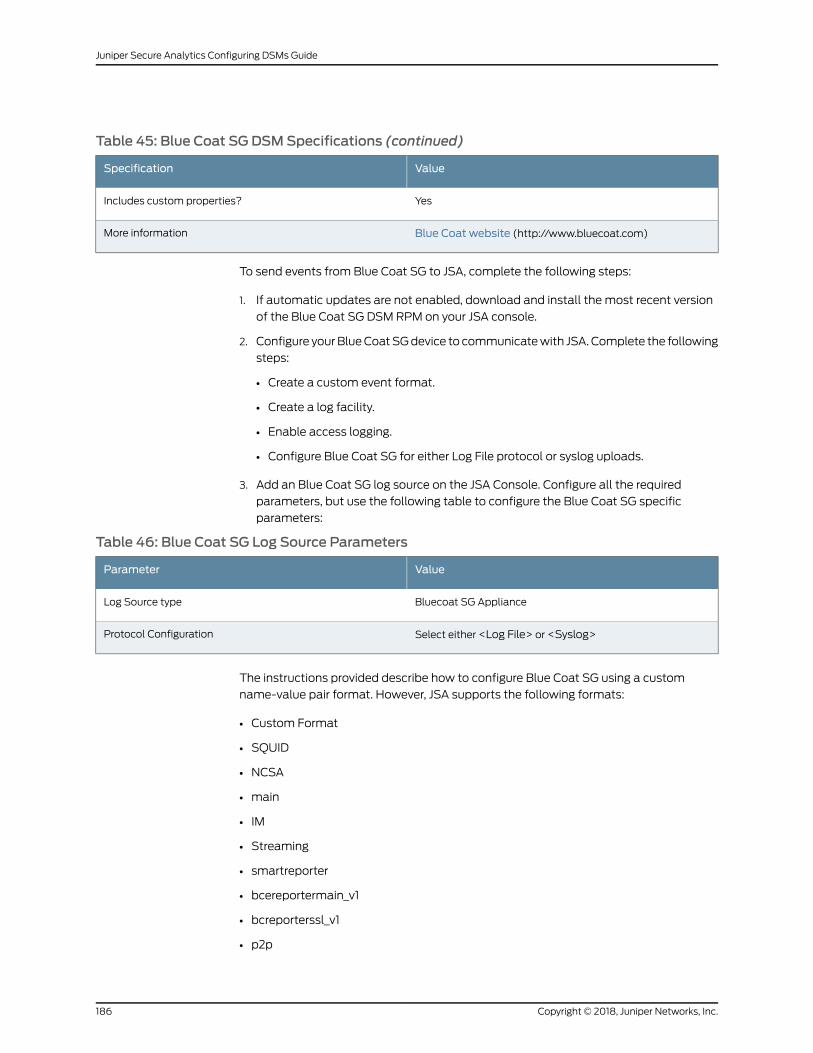
Table 45: Blue Coat SG DSMSpecifications (continued)
ValueSpecification
YesIncludes custom properties?
Blue Coat website (http://www.bluecoat.com)More information
To send events from Blue Coat SG to JSA, complete the following steps:
1. If automatic updates are not enabled, download and install the most recent version
of the Blue Coat SG DSM RPM on your JSA console.
2. Configure yourBlueCoatSGdevice to communicatewith JSA.Complete the following
steps:
• Create a custom event format.
• Create a log facility.
• Enable access logging.
• Configure Blue Coat SG for either Log File protocol or syslog uploads.
3. Add an Blue Coat SG log source on the JSA Console. Configure all the required
parameters, but use the following table to configure the Blue Coat SG specific
parameters:
Table 46: Blue Coat SG Log Source Parameters
ValueParameter
Bluecoat SG ApplianceLog Source type
Select either <Log File> or <Syslog>Protocol Configuration
The instructions provided describe how to configure Blue Coat SG using a custom
name-value pair format. However, JSA supports the following formats:
• Custom Format
• SQUID
• NCSA
• main
• IM
• Streaming
• smartreporter
• bcereportermain_v1
• bcreporterssl_v1
• p2p
Copyright © 2018, Juniper Networks, Inc.186
Juniper Secure Analytics Configuring DSMs Guide
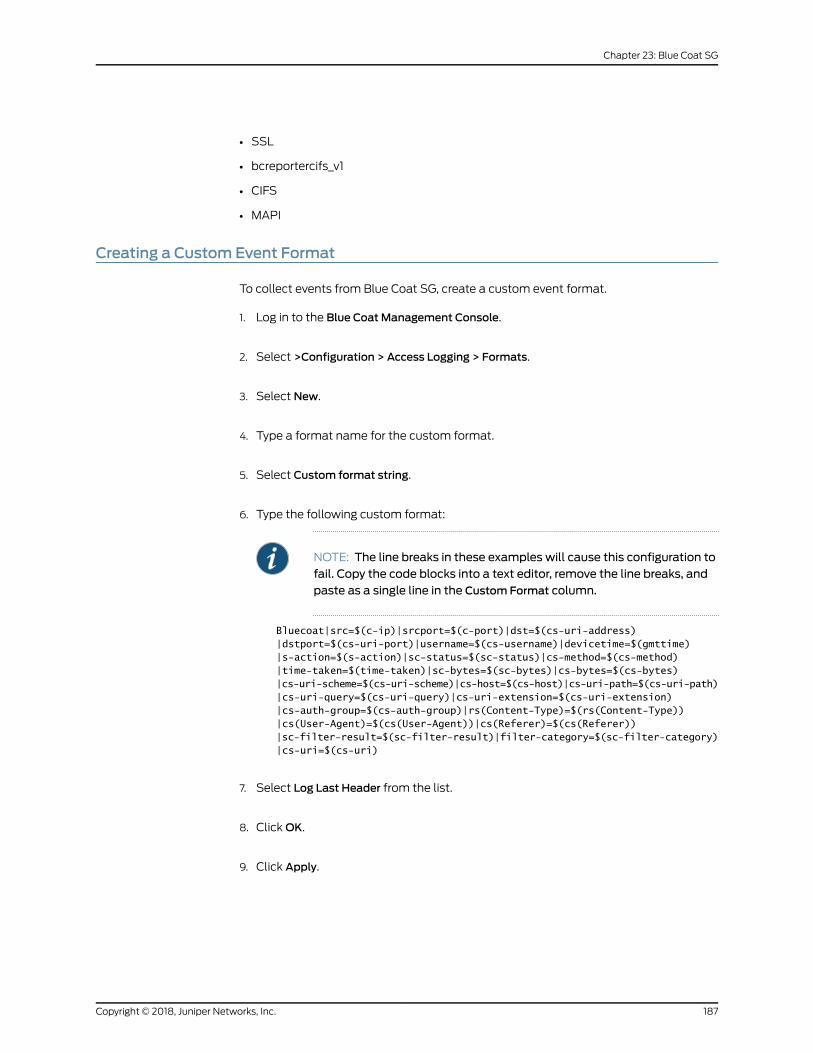
• SSL
• bcreportercifs_v1
• CIFS
• MAPI
Creating a Custom Event Format
To collect events from Blue Coat SG, create a custom event format.
1. Log in to the Blue Coat Management Console.
2. Select >Configuration > Access Logging > Formats.
3. Select New.
4. Type a format name for the custom format.
5. Select Custom format string.
6. Type the following custom format:
NOTE: The line breaks in these examples will cause this configuration tofail. Copy the code blocks into a text editor, remove the line breaks, andpaste as a single line in the Custom Format column.
Bluecoat|src=$(c-ip)|srcport=$(c-port)|dst=$(cs-uri-address)|dstport=$(cs-uri-port)|username=$(cs-username)|devicetime=$(gmttime)|s-action=$(s-action)|sc-status=$(sc-status)|cs-method=$(cs-method)|time-taken=$(time-taken)|sc-bytes=$(sc-bytes)|cs-bytes=$(cs-bytes)|cs-uri-scheme=$(cs-uri-scheme)|cs-host=$(cs-host)|cs-uri-path=$(cs-uri-path)|cs-uri-query=$(cs-uri-query)|cs-uri-extension=$(cs-uri-extension)|cs-auth-group=$(cs-auth-group)|rs(Content-Type)=$(rs(Content-Type))|cs(User-Agent)=$(cs(User-Agent))|cs(Referer)=$(cs(Referer))|sc-filter-result=$(sc-filter-result)|filter-category=$(sc-filter-category)|cs-uri=$(cs-uri)
7. Select Log Last Header from the list.
8. ClickOK.
9. Click Apply.
187Copyright © 2018, Juniper Networks, Inc.
Chapter 23: Blue Coat SG
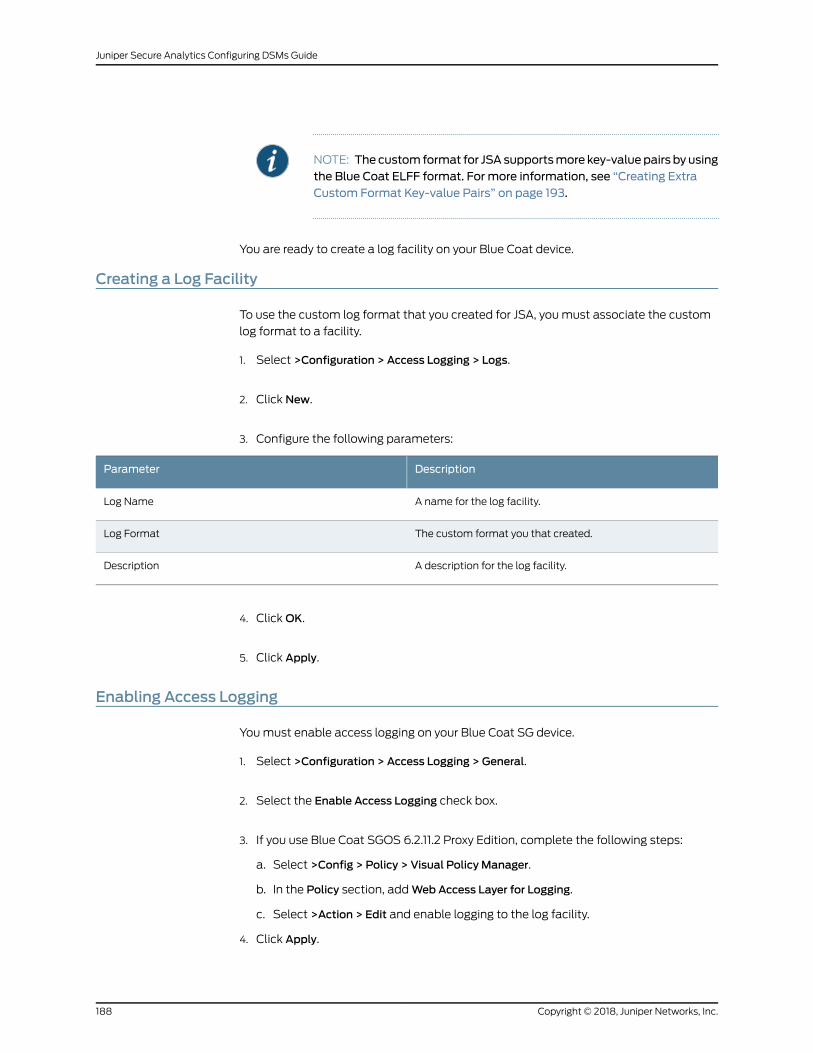
NOTE: Thecustom format for JSAsupportsmore key-valuepairs by usingthe Blue Coat ELFF format. For more information, see “Creating ExtraCustom Format Key-value Pairs” on page 193.
You are ready to create a log facility on your Blue Coat device.
Creating a Log Facility
To use the custom log format that you created for JSA, youmust associate the custom
log format to a facility.
1. Select >Configuration > Access Logging > Logs.
2. Click New.
3. Configure the following parameters:
DescriptionParameter
A name for the log facility.Log Name
The custom format you that created.Log Format
A description for the log facility.Description
4. ClickOK.
5. Click Apply.
Enabling Access Logging
Youmust enable access logging on your Blue Coat SG device.
1. Select >Configuration > Access Logging > General.
2. Select the Enable Access Logging check box.
3. If you use Blue Coat SGOS 6.2.11.2 Proxy Edition, complete the following steps:
a. Select >Config > Policy > Visual Policy Manager.
b. In the Policy section, addWebAccess Layer for Logging.
c. Select >Action > Edit and enable logging to the log facility.
4. Click Apply.
Copyright © 2018, Juniper Networks, Inc.188
Juniper Secure Analytics Configuring DSMs Guide
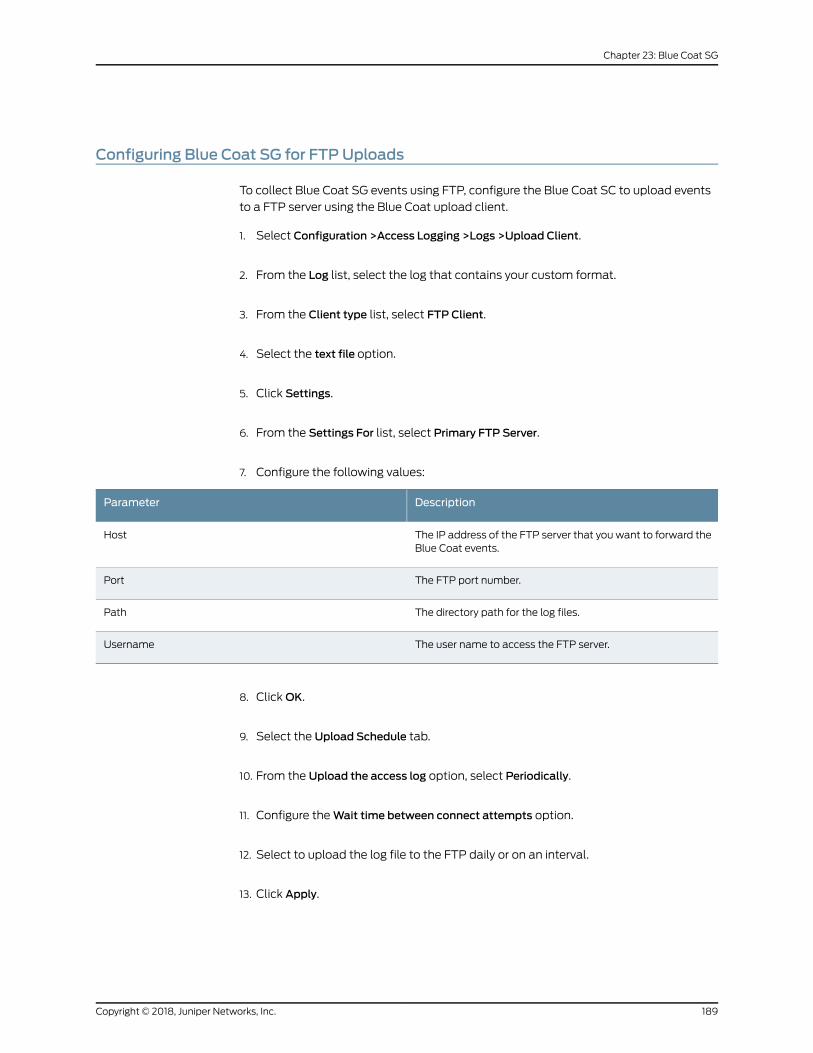
Configuring Blue Coat SG for FTP Uploads
To collect Blue Coat SG events using FTP, configure the Blue Coat SC to upload events
to a FTP server using the Blue Coat upload client.
1. Select Configuration >Access Logging >Logs >Upload Client.
2. From the Log list, select the log that contains your custom format.
3. From the Client type list, select FTP Client.
4. Select the text file option.
5. Click Settings.
6. From the Settings For list, select Primary FTP Server.
7. Configure the following values:
DescriptionParameter
The IP address of the FTP server that you want to forward theBlue Coat events.
Host
The FTP port number.Port
The directory path for the log files.Path
The user name to access the FTP server.Username
8. ClickOK.
9. Select the Upload Schedule tab.
10. From the Upload the access log option, select Periodically.
11. Configure theWait time between connect attempts option.
12. Select to upload the log file to the FTP daily or on an interval.
13. Click Apply.
189Copyright © 2018, Juniper Networks, Inc.
Chapter 23: Blue Coat SG
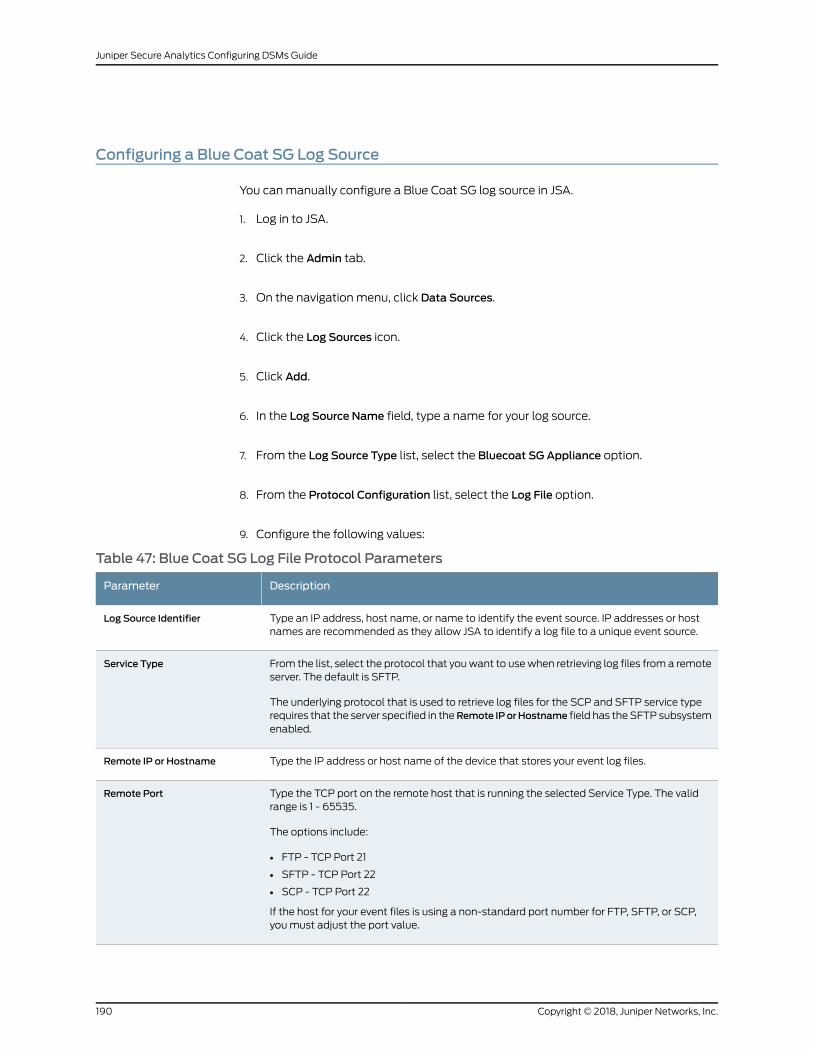
Configuring a Blue Coat SG Log Source
You canmanually configure a Blue Coat SG log source in JSA.
1. Log in to JSA.
2. Click the Admin tab.
3. On the navigation menu, click Data Sources.
4. Click the Log Sources icon.
5. Click Add.
6. In the Log Source Name field, type a name for your log source.
7. From the Log Source Type list, select the Bluecoat SG Appliance option.
8. From the Protocol Configuration list, select the Log File option.
9. Configure the following values:
Table 47: Blue Coat SG Log File Protocol Parameters
DescriptionParameter
Type an IP address, host name, or name to identify the event source. IP addresses or hostnames are recommended as they allow JSA to identify a log file to a unique event source.
Log Source Identifier
From the list, select the protocol that youwant to usewhen retrieving log files from a remoteserver. The default is SFTP.
The underlying protocol that is used to retrieve log files for the SCP and SFTP service typerequires that the server specified in theRemote IPorHostname field has the SFTP subsystemenabled.
Service Type
Type the IP address or host name of the device that stores your event log files.Remote IP or Hostname
Type the TCP port on the remote host that is running the selected Service Type. The validrange is 1 - 65535.
The options include:
• FTP - TCP Port 21
• SFTP - TCP Port 22
• SCP - TCP Port 22
If the host for your event files is using a non-standard port number for FTP, SFTP, or SCP,youmust adjust the port value.
Remote Port
Copyright © 2018, Juniper Networks, Inc.190
Juniper Secure Analytics Configuring DSMs Guide
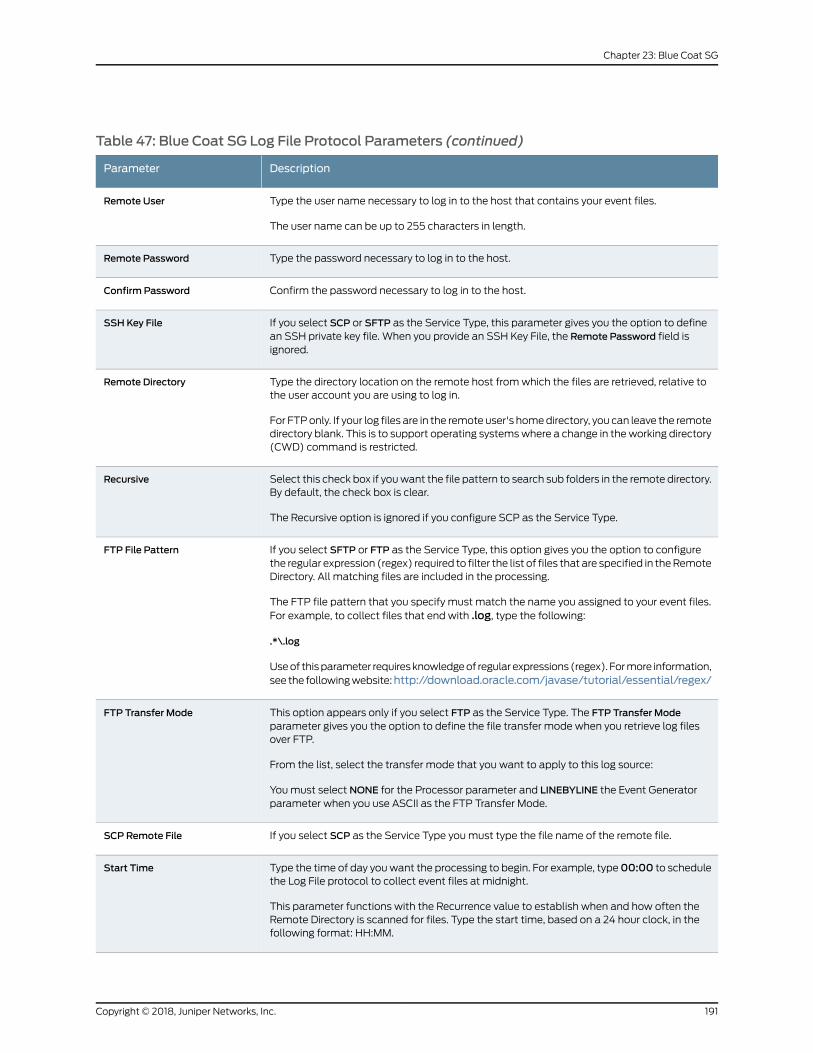
Table 47: Blue Coat SG Log File Protocol Parameters (continued)
DescriptionParameter
Type the user name necessary to log in to the host that contains your event files.
The user name can be up to 255 characters in length.
Remote User
Type the password necessary to log in to the host.Remote Password
Confirm the password necessary to log in to the host.Confirm Password
If you select SCP or SFTP as the Service Type, this parameter gives you the option to definean SSH private key file. When you provide an SSH Key File, the Remote Password field isignored.
SSH Key File
Type the directory location on the remote host fromwhich the files are retrieved, relative tothe user account you are using to log in.
For FTPonly. If your log files are in the remote user's homedirectory, you can leave the remotedirectory blank. This is to support operating systemswhere a change in theworking directory(CWD) command is restricted.
Remote Directory
Select this check box if youwant the file pattern to search sub folders in the remote directory.By default, the check box is clear.
The Recursive option is ignored if you configure SCP as the Service Type.
Recursive
If you select SFTP or FTP as the Service Type, this option gives you the option to configurethe regular expression (regex) required to filter the list of files that are specified in theRemoteDirectory. All matching files are included in the processing.
The FTP file pattern that you specify must match the name you assigned to your event files.For example, to collect files that end with .log, type the following:
.*\.log
Useof thisparameter requiresknowledgeof regular expressions (regex). Formore information,see the followingwebsite:http://download.oracle.com/javase/tutorial/essential/regex/
FTP File Pattern
This option appears only if you select FTP as the Service Type. The FTP Transfer Modeparameter gives you the option to define the file transfer mode when you retrieve log filesover FTP.
From the list, select the transfer mode that you want to apply to this log source:
Youmust select NONE for the Processor parameter and LINEBYLINE the Event Generatorparameter when you use ASCII as the FTP Transfer Mode.
FTP Transfer Mode
If you select SCP as the Service Type youmust type the file name of the remote file.SCP Remote File
Type the time of day youwant the processing to begin. For example, type00:00 to schedulethe Log File protocol to collect event files at midnight.
This parameter functions with the Recurrence value to establish when and how often theRemote Directory is scanned for files. Type the start time, based on a 24 hour clock, in thefollowing format: HH:MM.
Start Time
191Copyright © 2018, Juniper Networks, Inc.
Chapter 23: Blue Coat SG
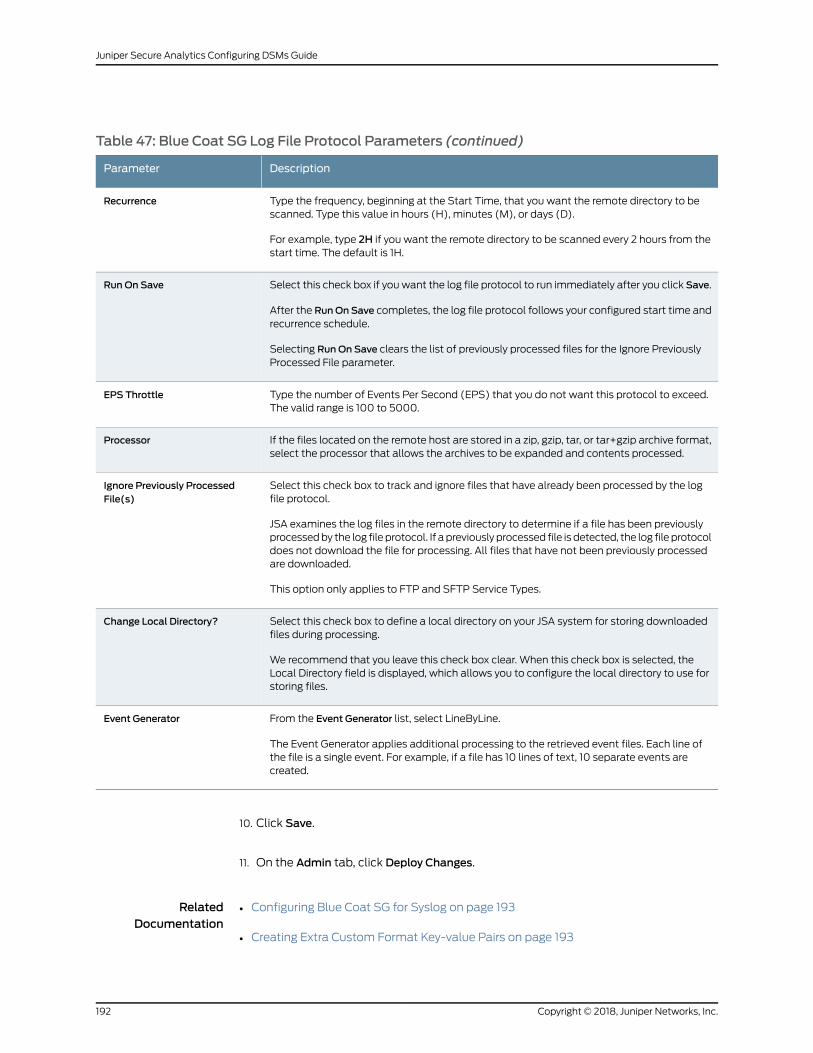
Table 47: Blue Coat SG Log File Protocol Parameters (continued)
DescriptionParameter
Type the frequency, beginning at the Start Time, that you want the remote directory to bescanned. Type this value in hours (H), minutes (M), or days (D).
For example, type 2H if you want the remote directory to be scanned every 2 hours from thestart time. The default is 1H.
Recurrence
Select this check box if youwant the log file protocol to run immediately after you click Save.
After the RunOn Save completes, the log file protocol follows your configured start time andrecurrence schedule.
Selecting RunOn Save clears the list of previously processed files for the Ignore PreviouslyProcessed File parameter.
RunOn Save
Type the number of Events Per Second (EPS) that you do not want this protocol to exceed.The valid range is 100 to 5000.
EPS Throttle
If the files located on the remote host are stored in a zip, gzip, tar, or tar+gzip archive format,select the processor that allows the archives to be expanded and contents processed.
Processor
Select this check box to track and ignore files that have already been processed by the logfile protocol.
JSA examines the log files in the remote directory to determine if a file has been previouslyprocessedby the log file protocol. If a previously processed file is detected, the log file protocoldoes not download the file for processing. All files that have not been previously processedare downloaded.
This option only applies to FTP and SFTP Service Types.
Ignore Previously ProcessedFile(s)
Select this check box to define a local directory on your JSA system for storing downloadedfiles during processing.
We recommend that you leave this check box clear. When this check box is selected, theLocal Directory field is displayed, which allows you to configure the local directory to use forstoring files.
Change Local Directory?
From the Event Generator list, select LineByLine.
The Event Generator applies additional processing to the retrieved event files. Each line ofthe file is a single event. For example, if a file has 10 lines of text, 10 separate events arecreated.
Event Generator
10. Click Save.
11. On the Admin tab, click Deploy Changes.
RelatedDocumentation
Configuring Blue Coat SG for Syslog on page 193•
• Creating Extra Custom Format Key-value Pairs on page 193
Copyright © 2018, Juniper Networks, Inc.192
Juniper Secure Analytics Configuring DSMs Guide
• Configuring Blue Coat SG for FTP Uploads on page 189
Configuring Blue Coat SG for Syslog
To allow syslog event collection, youmust configure your Blue Coat SG appliance to
forward syslog events to JSA.
NOTE: When you send syslog events tomultiple syslog destinations, adisruption in availability in one syslog destinationmight interrupt the streamof events to other syslog destinations from your Blue Coat SG appliance.
1. Select Configuration >Access Logging >Logs >Upload Client.
2. From the Log list, select the log that contains your custom format.
3. From the Client type list, select CustomClient.
4. Click Settings.
5. From the Settings For list, select Primary CustomServer.
6. In the Host field, type the IP address for your JSA system.
7. In the Port field, type 514.
8. ClickOK.
9. Select the Upload Schedule tab.
10. From the Upload the access log list, select Continuously.
11. Click Apply.
Creating Extra Custom Format Key-value Pairs
Use the Extended Log File Format (ELFF) custom format to forward specific Blue Coat
data or events to JSA.
The custom format is a series of pipe-delimited fields that start with the Bluecoat| field
and contains the $(Blue Coat ELFF) parameter.
For example:
193Copyright © 2018, Juniper Networks, Inc.
Chapter 23: Blue Coat SG
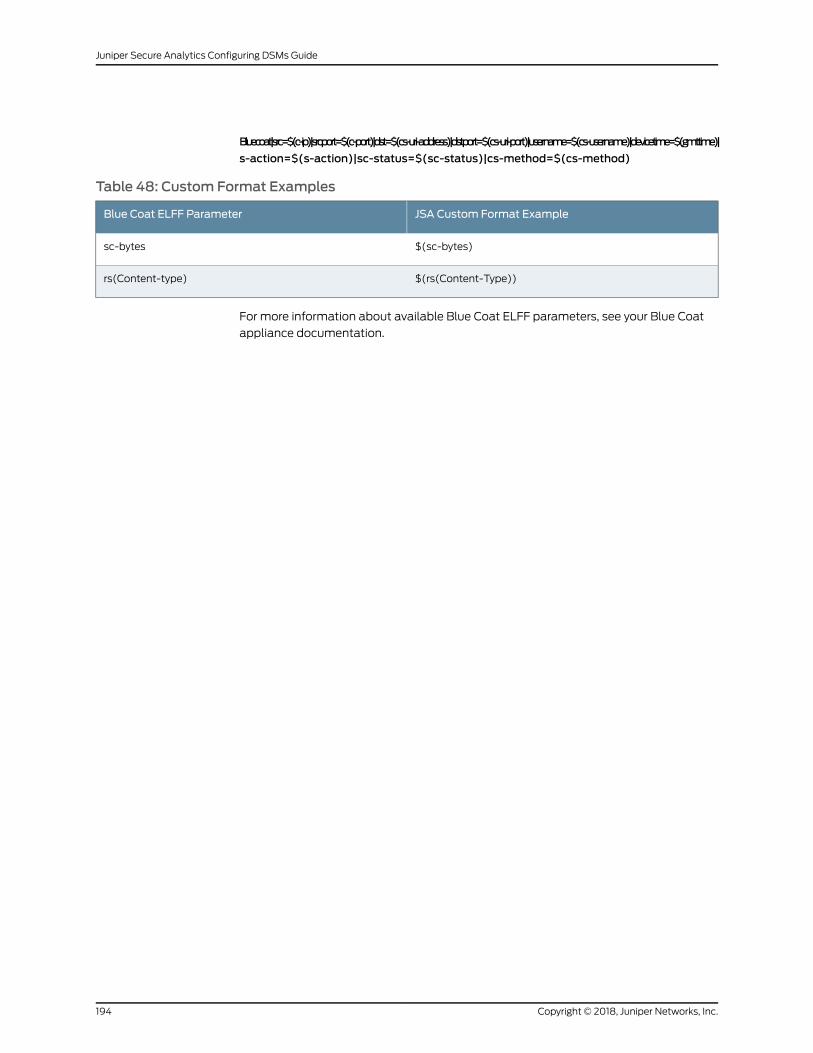
Bluecoat|src=$(c-ip)|srcport=$(c-port)|dst=$(cs-uri-address)|dstport=$(cs-uri-port)|username=$(cs-username)|devicetime=$(gmttime)|
s-action=$(s-action)|sc-status=$(sc-status)|cs-method=$(cs-method)
Table 48: Custom Format Examples
JSA Custom Format ExampleBlue Coat ELFF Parameter
$(sc-bytes)sc-bytes
$(rs(Content-Type))rs(Content-type)
For more information about available Blue Coat ELFF parameters, see your Blue Coat
appliance documentation.
Copyright © 2018, Juniper Networks, Inc.194
Juniper Secure Analytics Configuring DSMs Guide
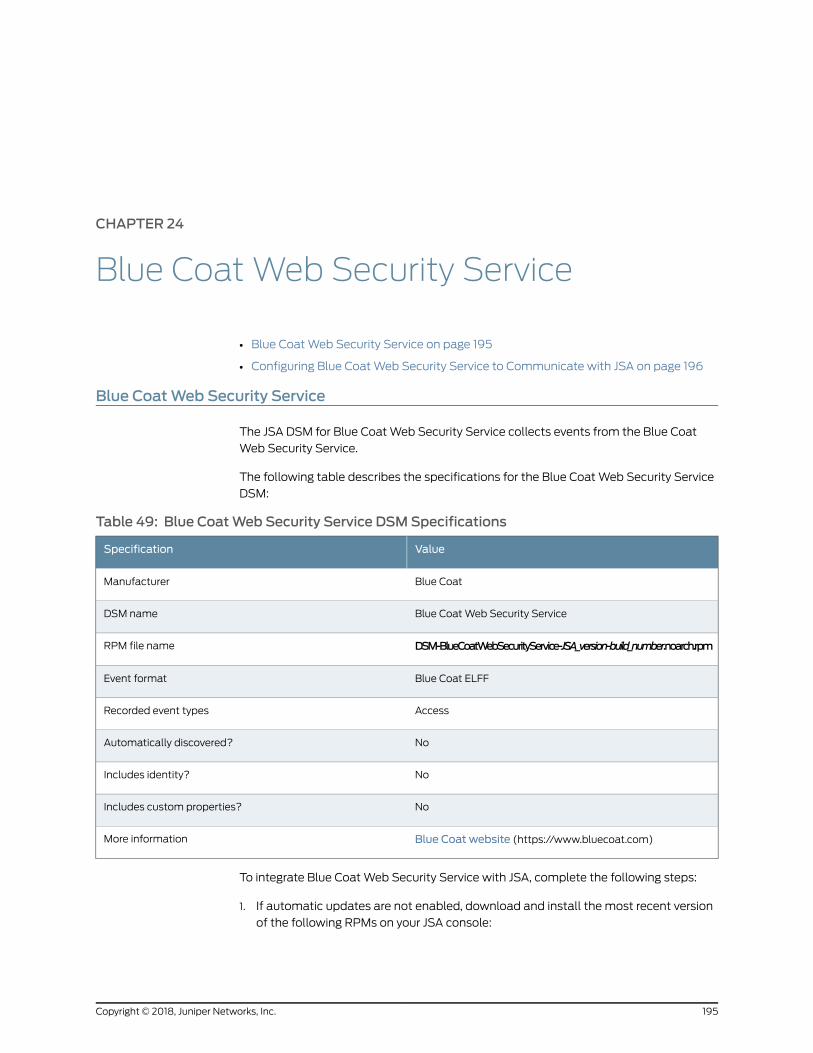
CHAPTER 24
Blue Coat Web Security Service
• Blue CoatWeb Security Service on page 195
• Configuring Blue CoatWeb Security Service to Communicate with JSA on page 196
Blue CoatWeb Security Service
The JSA DSM for Blue CoatWeb Security Service collects events from the Blue Coat
Web Security Service.
The following table describes the specifications for the Blue CoatWeb Security Service
DSM:
Table 49: Blue CoatWeb Security Service DSMSpecifications
ValueSpecification
Blue CoatManufacturer
Blue CoatWeb Security ServiceDSM name
DSM-BlueCoatWebSecurityService-JSA_version-build_number.noarch.rpmRPM file name
Blue Coat ELFFEvent format
AccessRecorded event types
NoAutomatically discovered?
NoIncludes identity?
NoIncludes custom properties?
Blue Coat website (https://www.bluecoat.com)More information
To integrate Blue CoatWeb Security Service with JSA, complete the following steps:
1. If automatic updates are not enabled, download and install the most recent version
of the following RPMs on your JSA console:
195Copyright © 2018, Juniper Networks, Inc.
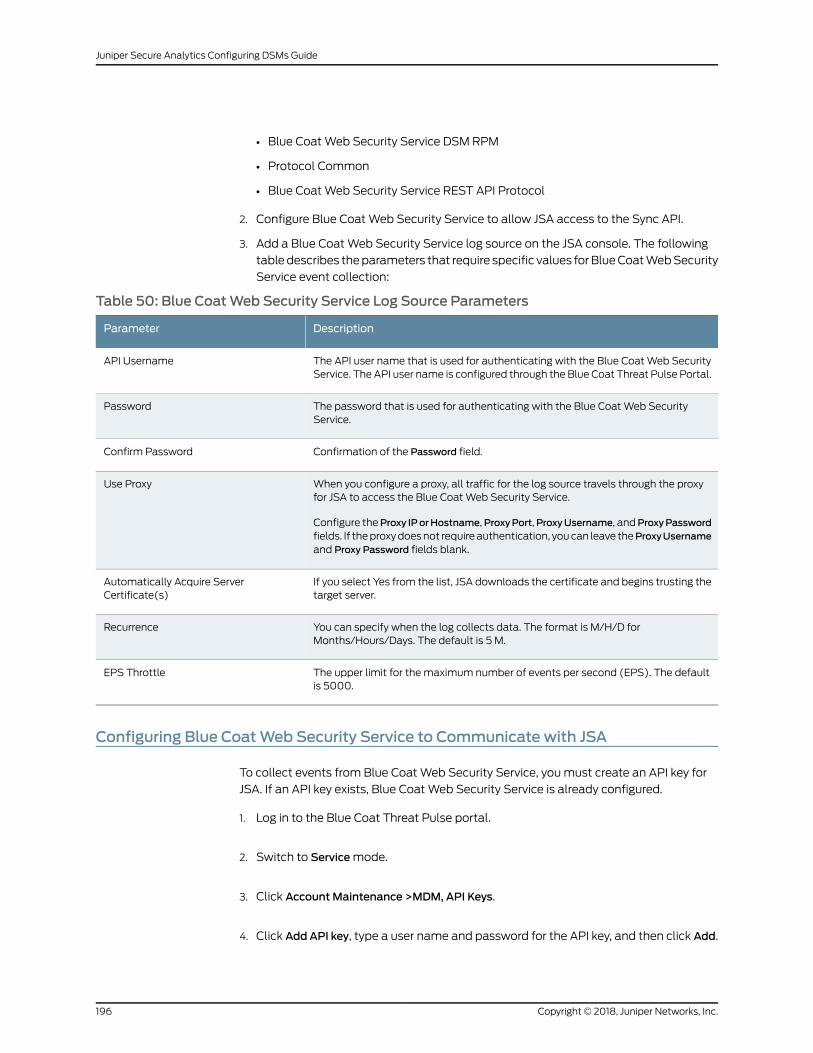
• Blue CoatWeb Security Service DSM RPM
• Protocol Common
• Blue CoatWeb Security Service REST API Protocol
2. Configure Blue CoatWeb Security Service to allow JSA access to the Sync API.
3. Add a Blue CoatWeb Security Service log source on the JSA console. The following
tabledescribes theparameters that require specific values forBlueCoatWebSecurity
Service event collection:
Table 50: Blue CoatWeb Security Service Log Source Parameters
DescriptionParameter
The API user name that is used for authenticating with the Blue CoatWeb SecurityService. The API user name is configured through the Blue Coat Threat Pulse Portal.
API Username
The password that is used for authenticating with the Blue CoatWeb SecurityService.
Password
Confirmation of the Password field.Confirm Password
When you configure a proxy, all traffic for the log source travels through the proxyfor JSA to access the Blue CoatWeb Security Service.
Configure theProxy IPorHostname,ProxyPort,ProxyUsername, andProxyPasswordfields. If theproxydoesnot requireauthentication, youcan leave theProxyUsernameand Proxy Password fields blank.
Use Proxy
If you select Yes from the list, JSA downloads the certificate and begins trusting thetarget server.
Automatically Acquire ServerCertificate(s)
You can specify when the log collects data. The format is M/H/D forMonths/Hours/Days. The default is 5 M.
Recurrence
The upper limit for the maximum number of events per second (EPS). The defaultis 5000.
EPS Throttle
Configuring Blue CoatWeb Security Service to Communicate with JSA
To collect events from Blue CoatWeb Security Service, youmust create an API key for
JSA. If an API key exists, Blue CoatWeb Security Service is already configured.
1. Log in to the Blue Coat Threat Pulse portal.
2. Switch to Servicemode.
3. Click Account Maintenance >MDM, API Keys.
4. Click AddAPI key, type a user name and password for the API key, and then click Add.
Copyright © 2018, Juniper Networks, Inc.196
Juniper Secure Analytics Configuring DSMs Guide

You need the user name and passwordwhen you configure the log source for the API.
197Copyright © 2018, Juniper Networks, Inc.
Chapter 24: Blue CoatWeb Security Service

Copyright © 2018, Juniper Networks, Inc.198
Juniper Secure Analytics Configuring DSMs Guide
CHAPTER 25
Bridgewater
• Bridgewater on page 199
• Configuring Syslog for Your Bridgewater Systems Device on page 199
• Configuring a Log Source on page 200
Bridgewater
The Bridgewater Systems DSM for JSA accepts events by using syslog.
JSA records all relevant events that are forwarded from Bridgewater AAA Service
Controller devices by using syslog.
Configuring Syslog for Your Bridgewater Systems Device
Youmust configure your Bridgewater Systems appliance to send syslog events to JSA.
1. Log in to your Bridgewater Systems device command-line interface (CLI).
2. To log operationalmessages to the RADIUS andDiameter servers, open the following
file:
/etc/syslog.conf
3. To log all operational messages, uncomment the following line:
local1.info/WideSpan/logs/oplog
4. To log error messages only, change the local1.info /WideSpan/logs/oplog line to the
following line:
local1.err/WideSpan/logs/oplog
NOTE: RADIUS and Diameter systemmessages are stored in the/var/adm/messages file.
5. Add the following line:
199Copyright © 2018, Juniper Networks, Inc.
local1.*@<IP address>
Where <IP address> is the IP address your JSA console.
6. The RADIUS and Diameter server systemmessages are stored in the
/var/adm/messages file. Add the following line for the systemmessages:
<facility>*@<IP address>
Where:
<facility> is the facility that is used for logging to the /var/adm/messages file.
<IP address> is the IP address of your JSA console.
7. Save and exit the file.
8. Send a hang-up signal to the syslog daemon tomake sure that all changes are
enforced:
kill -HUP`cat /var/run/syslog.pid`
The configuration is complete. The log source is added to JSAasBridgewater Systems
appliance events are automatically discovered. Events that are forwarded to JSA by
your Bridgewater Systems appliance are displayed on the Log Activity tab.
Configuring a Log Source
JSAautomatically discovers andcreatesa log source for syslogevents fromaBridgewater
Systems appliance.
The following configuration steps are optional.
1. Log in to JSA.
2. Click the Admin tab.
3. On the navigation menu, click Data Sources.
4. Click the Log Sources icon.
5. Click Add.
6. In the Log Source Name field, type a name for your log source.
7. In the Log Source Description field, type a description for the log source.
8. From the Log Source Type list, select Bridgewater Systems AAA Service Controller.
Copyright © 2018, Juniper Networks, Inc.200
Juniper Secure Analytics Configuring DSMs Guide

9. From the Protocol Configuration list, select Syslog.
10. Configure the following values:
Table 51: Syslog Parameters
DescriptionParameter
Type the IP address or host name for the log source as an identifier for events from yourBridgewater Systems appliance.
Log Source Identifier
11. Click Save.
12. On the Admin tab, click Deploy Changes.
The configuration is complete.
201Copyright © 2018, Juniper Networks, Inc.
Chapter 25: Bridgewater

Copyright © 2018, Juniper Networks, Inc.202
Juniper Secure Analytics Configuring DSMs Guide

CHAPTER 26
Brocade Fabric OS
• Brocade Fabric OS on page 203
• Configuring Syslog for Brocade Fabric OS Appliances on page 203
Brocade Fabric OS
JSA can collect and categorize syslog system and audit events from Brocade switches
and appliances that use Fabric OS V7.x.
To collect syslog events, youmust configure your switch to forward syslog events. Each
switch or appliancemust be configured to forward events.
Events that you forward from Brocade switches are automatically discovered. A log
source is configured for each switch or appliance that forwards events to JSA.
Configuring Syslog for Brocade Fabric OS Appliances
Tocollect events, youmust configure syslogonyourBrocadeappliance to forwardevents
to JSA.
1. Log in to your appliance as an admin user.
2. To configure an address to forward syslog events, type the following command:
syslogdipadd <IP address>
Where <IP address> is the IP address of the JSA console, Event Processor, Event
Collector, or all-in-one system.
3. To verify the address, type the following command:
syslogdipshow
As the Brocade switch generates events the switch forwards events to the syslog
destination you specified. The log source is automatically discoveredafter enoughevents
are forwarded by the Brocade appliance. It typically takes aminimum of 25 events to
automatically discover a log source.
203Copyright © 2018, Juniper Networks, Inc.

Administrators can log in to the JSA console and verify that the log source is created on
the JSAconsoleand that theLogActivity tabdisplays events fromtheBrocadeappliance.
As the Brocade switch generates events the switch forwards events to the syslog
destination you specified. The log source is automatically discoveredafter enoughevents
are forwarded by the Brocade appliance. It typically takes aminimum of 25 events to
automatically discover a log source.
Copyright © 2018, Juniper Networks, Inc.204
Juniper Secure Analytics Configuring DSMs Guide
CHAPTER 27
CA Technologies
• CA Technologies on page 205
• CA ACF2 on page 205
• CA SiteMinder on page 219
• CA Top Secret on page 221
CA Technologies
Several CA Technologies DSM can be integrated with JSA.
This section provides information on the following DSMs:
• CA ACF2 on page 205
• CA SiteMinder on page 219
• CA Top Secret on page 221
CAACF2
JSA can integrate with CA Access Control Facility (ACF2) events.
There are two options:
• IntegrationOfCAACF2with JSAbyUsing JuniperNetworksSecurityZSecureonpage205
• Integrate CA ACF2 with JSA by Using Audit Scripts on page 210
• IntegrationOfCAACF2with JSAbyUsing JuniperNetworksSecurityZSecureonpage205
• Creating a Log Source for ACF2 in JSA on page 206
• Integrate CA ACF2 with JSA by Using Audit Scripts on page 210
• Configuring CA ACF2 to Integrate with JSA on page 211
• Creating a Log Source on page 215
Integration Of CA ACF2with JSA by Using Juniper Networks Security ZSecure
TheCAACF2DSM integratesLEEFevents fromanACF2 imageonan IBMz/OSmainframe
by using IBM®Security zSecure.
205Copyright © 2018, Juniper Networks, Inc.
Using a zSecure process, events from the SystemManagement Facilities (SMF) are
recorded to an event file in the Log Enhanced Event format (LEEF). JSA retrieves the
LEEF event log files by using the log file protocol and processes the events. You can
schedule JSA to retrieve events on a polling interval, which allows JSA to retrieve the
events on the schedule that you defined.
To integrate CA ACF2 events:
1. Confirm that your installation meets any prerequisite installation requirements.
2. Configure your CA ACF2 z/OS®image to write events in LEEF format. For more
information, see the IBM®Security zSecureSuite:CARLa-DrivenComponents Installation
and Deployment Guide.
3. Create a log source in JSA for CA ACF2 to retrieve your LEEF formatted event logs.
4. Optional. Create a custom event property for CA ACF2 in JSA. For more information,
see the JSA Custom Event Properties for IBM z/O technical note.
Before You Begin
Before you can configure the data collection process, youmust complete the basic
zSecure installation process.
The following installation prerequisites are required:
• Youmustensureparmlibmember IFAPRDxx isenabled for IBM®Security zSecureAudit
on your z/OS®image.
• The SCKRLOAD library must be APF-authorized.
• Youmust configure a process to periodically refresh your CKFREEZE and UNLOAD
data sets.
• Youmust configure an SFTP, FTP, or SCP server on your z/OS®image for JSA to
download your LEEF event files.
• Youmust allow SFTP, FTP, or SCP traffic on firewalls that are located between JSA
and your z/OS®image.
After you install the software, youmust also do the post-installation activities to create
andmodify the configuration. For instructions on installing and configuring zSecure, see
the Juniper Networks Security zSecure Suite: CARLa-Driven Components Installation and
Deployment Guide.
Creating a Log Source for ACF2 in JSA
You can use the log file protocol to retrieve archived log files that contain events from a
remote host.
Log files are transferred, one at a time, to JSA for processing. The log file protocol can
manage plain text event logs, compressed files, or archives. Archives must contain
plain-text files that can be processed one line at a time. Multi-line event logs are not
supported by the log file protocol. IBM z/OSwith zSecure writes log files to a specified
Copyright © 2018, Juniper Networks, Inc.206
Juniper Secure Analytics Configuring DSMs Guide
directory as gzip archives. JSA extracts the archive and processes the events, which are
written as one event per line in the file.
To retrieve these events, youmust create a log source with the log file protocol. JSA
requires credentials to log in to the system that hosts your LEEF formatted event files
and a polling interval.
To configure a log source in JSA for CA ACF2:
1. Log in to JSA.
2. Click the Admin tab.
3. On the navigation menu, click Data Sources.
4. Click the Log Sources icon.
5. Click Add.
6. In the Log Source Name field, type a name for the log source.
7. In the Log Source Description field, type a description for the log source.
8. From the Log Source Type list, select CAACF2.
9. From the Protocol Configuration list, select Log File.
10. Configure the following values:
Table 52: CA ACF2 Log File Parameters
DescriptionParameter
Type an IP address, host name, or name to identify the eventsource. IP addresses or host names allow JSA tomatch a logfile to a unique event source.
Log Source Identifier
From the list, select the protocol that you want to use whenretrieving log files from a remote server. The default is SFTP.
• SFTP - SSH File Transfer Protocol
• FTP - File Transfer Protocol
• SCP - Secure Copy
The underlying protocol that retrieves log files for the SCP andSFTP service type requires that the server specified in theRemote IPorHostname field has theSFTPsubsystemenabled.
Service Type
Type the IP address or host name of the device that storesyour event log files.
Remote IP or Hostname
207Copyright © 2018, Juniper Networks, Inc.
Chapter 27: CA Technologies
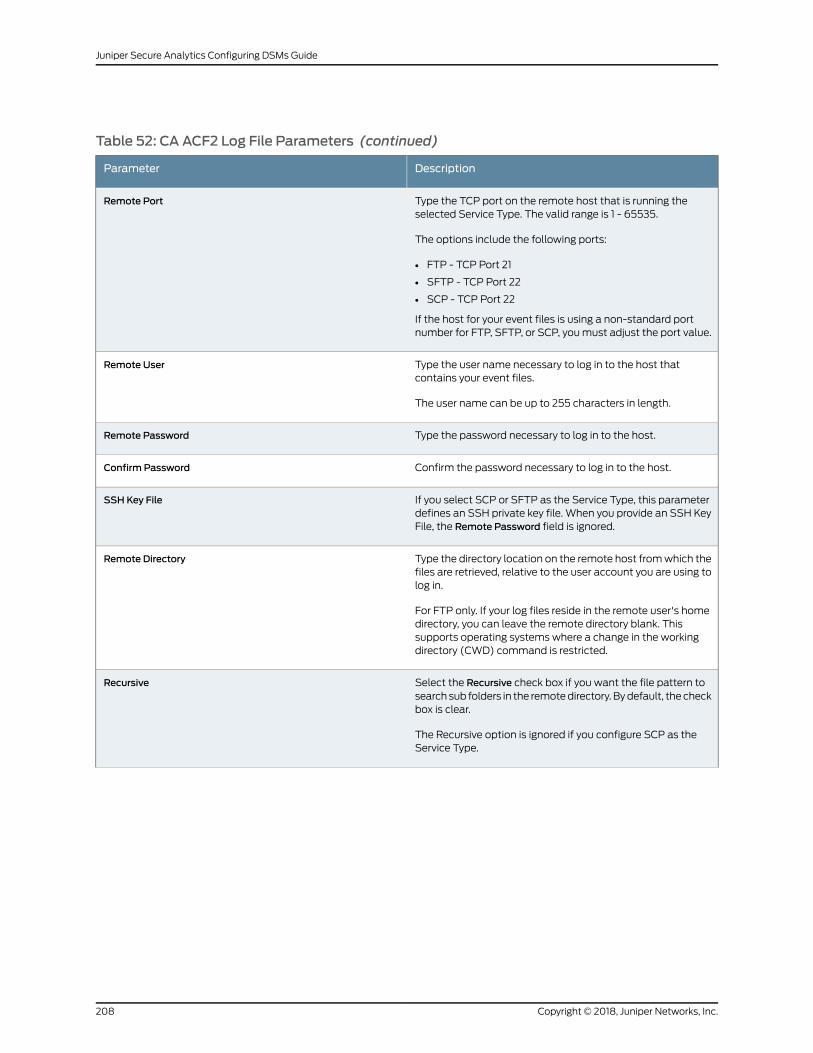
Table 52: CA ACF2 Log File Parameters (continued)
DescriptionParameter
Type the TCP port on the remote host that is running theselected Service Type. The valid range is 1 - 65535.
The options include the following ports:
• FTP - TCP Port 21
• SFTP - TCP Port 22
• SCP - TCP Port 22
If the host for your event files is using a non-standard portnumber for FTP, SFTP, or SCP, youmust adjust the port value.
Remote Port
Type the user name necessary to log in to the host thatcontains your event files.
The user name can be up to 255 characters in length.
Remote User
Type the password necessary to log in to the host.Remote Password
Confirm the password necessary to log in to the host.Confirm Password
If you select SCP or SFTP as the Service Type, this parameterdefines an SSH private key file. When you provide an SSH KeyFile, the Remote Password field is ignored.
SSH Key File
Type the directory location on the remote host fromwhich thefiles are retrieved, relative to the user account you are using tolog in.
For FTP only. If your log files reside in the remote user's homedirectory, you can leave the remote directory blank. Thissupports operating systems where a change in the workingdirectory (CWD) command is restricted.
Remote Directory
Select the Recursive check box if you want the file pattern tosearch sub folders in the remotedirectory. Bydefault, the checkbox is clear.
The Recursive option is ignored if you configure SCP as theService Type.
Recursive
Copyright © 2018, Juniper Networks, Inc.208
Juniper Secure Analytics Configuring DSMs Guide
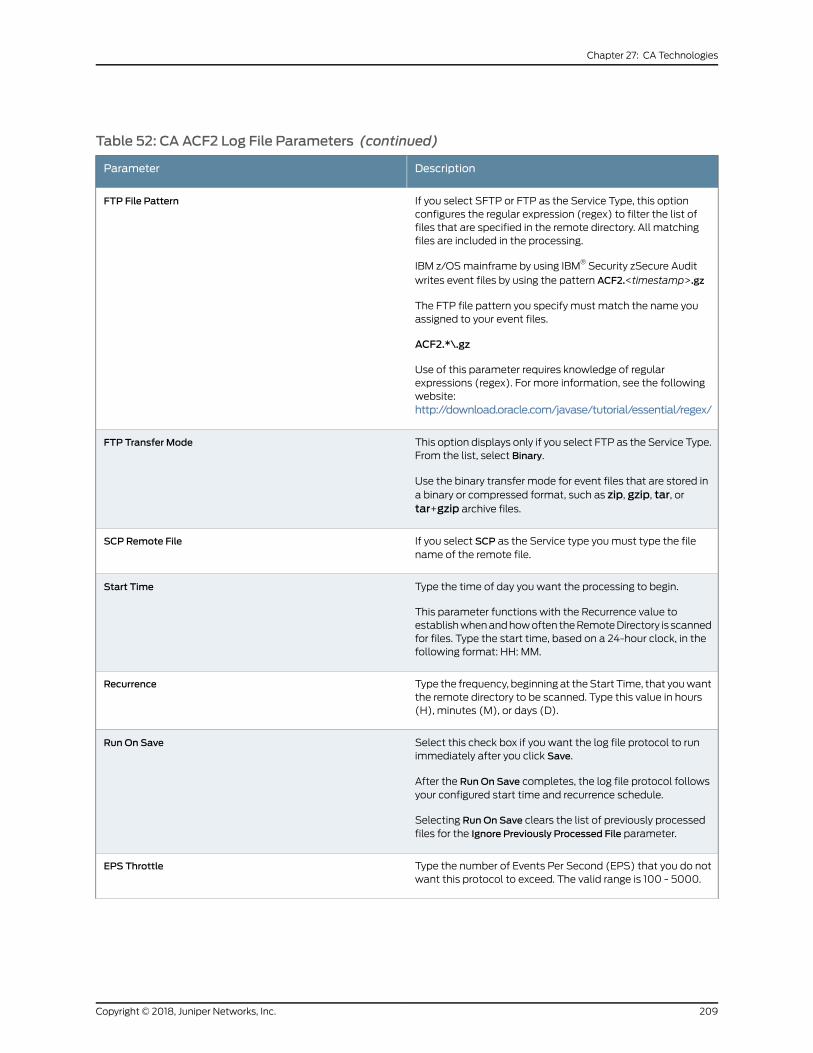
Table 52: CA ACF2 Log File Parameters (continued)
DescriptionParameter
If you select SFTP or FTP as the Service Type, this optionconfigures the regular expression (regex) to filter the list offiles that are specified in the remote directory. All matchingfiles are included in the processing.
IBM z/OSmainframe by using IBM® Security zSecure Auditwrites event files by using the pattern ACF2.<timestamp>.gz
The FTP file pattern you specify must match the name youassigned to your event files.
ACF2.*\.gz
Use of this parameter requires knowledge of regularexpressions (regex). For more information, see the followingwebsite:http://download.oracle.com/javase/tutorial/essential/regex/
FTP File Pattern
This option displays only if you select FTP as the Service Type.From the list, select Binary.
Use the binary transfer mode for event files that are stored ina binary or compressed format, such as zip, gzip, tar, ortar+gzip archive files.
FTP Transfer Mode
If you select SCP as the Service type youmust type the filename of the remote file.
SCP Remote File
Type the time of day you want the processing to begin.
This parameter functions with the Recurrence value toestablishwhenandhowoften theRemoteDirectory is scannedfor files. Type the start time, based on a 24-hour clock, in thefollowing format: HH: MM.
Start Time
Type the frequency, beginning at theStart Time, that youwantthe remote directory to be scanned. Type this value in hours(H), minutes (M), or days (D).
Recurrence
Select this check box if you want the log file protocol to runimmediately after you click Save.
After the RunOn Save completes, the log file protocol followsyour configured start time and recurrence schedule.
Selecting RunOn Save clears the list of previously processedfiles for the Ignore Previously Processed File parameter.
RunOn Save
Type the number of Events Per Second (EPS) that you do notwant this protocol to exceed. The valid range is 100 - 5000.
EPS Throttle
209Copyright © 2018, Juniper Networks, Inc.
Chapter 27: CA Technologies

Table 52: CA ACF2 Log File Parameters (continued)
DescriptionParameter
From the list, select gzip.
Processors allow event file archives to be expanded andcontents thatareprocessed for events. Filesareonlyprocessedafter they are downloaded to JSA. JSA can process files in zip,gzip, tar, or tar+gzip archive format.
Processor
Select this check box to track and ignore files that areprocessed by the log file protocol.
JSA examines the log files in the remote directory to determinewhethera filewaspreviouslyprocessedby the log fileprotocol.If a previously processed file is detected, the log file protocoldoes not download the file for processing. All files that werenot previously processed are downloaded.
This option applies only to FTP and SFTP Service Types.
Ignore Previously Processed File(s)
Select this check box to define a local directory on your JSAfor storing downloaded files during processing.
Do not select this check box clear. When this check box isselected, the LocalDirectory field is displayed,which configuresthe local directory for storing files.
Change Local Directory?
From the Event Generator list, select LineByLine.
The Event Generator applies more processing to the retrievedevent files. Each line of the file is a single event.
Event Generator
11. Click Save.
12. On the Admin tab, click Deploy Changes.
The CA ACF2 configuration is complete. If your configuration requires custom event
properties, see the JSA Custom Event Properties for Juniper Networks z/OS®technical
note.
Integrate CA ACF2with JSA by Using Audit Scripts
The CA Access Control Facility (ACF2) DSM collects events and audit transactions on
the IBM®mainframe with the log file protocol.
QexACF2.load.trs is aTERSED file that containsaPDS loadlibwith theQEXACF2program.
A TERSED file is similar to a zip file and requires you to use the TRSMAIN program to
decompress the contents.
To upload a TRS file from a workstation, youmust preallocate a file with the following
DCB attributes: DSORG=PS, RECFM=FB, LRECL= 1024, BLKSIZE=6144. The file transfer
Copyright © 2018, Juniper Networks, Inc.210
Juniper Secure Analytics Configuring DSMs Guide
typemust be BINARY APPEND. If the transfer type is TEXT or TEXT APPEND, then the
file cannot decompress properly.
After you upload the file to the mainframe into the allocated dataset, the TERSED file
can be UNPACKEDwith the TRSMAIN utility by using the sample JCL also included in
the tar package. A return code of 0008 from the TRSMAIN utility indicates that the
dataset is not recognized as a valid TERSED file. This code (0008) error might be the
result of the file not being uploaded to the mainframe with the correct DCB attributes,
orbecause the transferwasnotperformedwith theBINARYAPPENDtransfermechanism.
After youhavesuccessfullyUNPACKEDthe loadlib file, youcan run theQEXACF2program
with the sample JCL file. The sample JCL file is contained in the tar collection. To run the
QEXACF2 program, youmust modify the JCL to your local naming conventions and JOB
card requirements. Youmight also need to use the STEPLIB DD if the program is not
placed in a LINKLISTED library.
To integrate CA ACF2 events into JSA:
1. The IBM®mainframe records all security events as Service Management Framework
(SMF) records in a live repository.
2. The CAACF2 data is extracted from the live repository with the SMF dump utility. The
SMF file contains all of the events and fields from the previous day in rawSMF format.
3. TheQexACF2.load.trs program pulls data from the SMF formatted file. The
QexACF2.load.trs program pulls only the relevant events and fields for JSA andwrites
that information in a compressed format for compatibility. The information is saved
in a location accessible by JSA.
4. JSA uses the log file protocol source to retrieve the output file information on a
scheduled basis. JSA then imports and processes this file.
Configuring CA ACF2 to Integrate with JSA
JSA uses scripts to audit events from CA ACF2 installations, which are retrieved by using
the log file protocol.
1. Fromthe IBM®supportwebsite (http://www.ibm.com/support),downloadthe following
compressed file:
qexacf2_bundled.tar.gz
2. On a Linux operating system, extract the file:
tar -zxvf qexacf2_bundled.tar.gz
The following files are contained in the archive:
• QexACF2.JCL.txt - Job Control Language file
• QexACF2.load.trs - Compressed program library (requires IBM®TRSMAIN)
• trsmain sample JCL.txt - Job Control Language for TRSMAIN to decompress the .trs
file
211Copyright © 2018, Juniper Networks, Inc.
Chapter 27: CA Technologies

3. Load the files onto the IBM®mainframe by using the following methods:
Upload the sampleQexACF2_trsmain_JCL.txt andQexACF2.JCL.txt files by using the
TEXT protocol.
4. Upload theQexACF2.load.trs file by using a BINARYmode transfer and append to a
preallocated data set. TheQexACF2.load.trs file is a tersed file that contains the
executable file (themainframeprogramQexACF2).When youupload the .trs file from
a workstation, preallocate a file on themainframe with the following DCB attributes:
DSORG=PS, RECFM=FB, LRECL=1024, BLKSIZE=6144. The file transfer typemust be
binary mode and not text.
NOTE: QexACF2 is a small Cmainframe program that reads the output
of the TSSUTIL (EARLOUT data) line by line.QexACF2 adds a header to
each record thatcontainsevent information, forexample, recorddescriptor,the date, and time. The program places each field into the output record,suppresses trailing blank characters, and delimits each fieldwith the pipecharacter. This output file is formatted for JSA and the blank suppressionreduces network traffic to JSA. This program does not consume CPU orI/O disk resources.
5. Customize the trsmain sample_JCL.txt file according to your installation-specific
parameters.
The trsmain sample_JCL.txt file uses the IBM®utility TRSMAIN to extract the program
that is stored in theQexACF2.load.trs file.
An example of theQexACF2_trsmain_JCL.txt file includes the following information:
//TRSMAIN JOB (yourvalidjobcard),Q1labs,// MSGCLASS=V//DEL EXEC PGM=IEFBR14//D1 DD DISP=(MOD,DELETE),DSN=<yourhlq>.QEXACF2.LOAD.TRS// UNIT=SYSDA,// SPACE=(CYL,(10,10))//TRSMAIN EXEC PGM=TRSMAIN,PARM='UNPACK'//SYSPRINT DD SYSOUT=*,DCB=(LRECL=133,BLKSIZE=12901,RECFM=FBA)//INFILE DD DISP=SHR,DSN=<yourhlq>.QEXACF2.LOAD.TRS//OUTFILE DD DISP=(NEW,CATLG,DELETE),// DSN=<yourhlq>.LOAD,// SPACE=(CYL,(10,10,5),RLSE),UNIT=SYSDA//
The .trs input file is an IBM®TERSE formatted library and is extracted by running the
JCL, which calls the TRSMAIN. This tersed file, when extracted, creates a PDS linklib
with theQexACF2 program as amember.
6. You can STEPLIB to this library or choose tomove the program to one of the LINKLIBs
that are in LINKLST. The program does not require authorization.
Copyright © 2018, Juniper Networks, Inc.212
Juniper Secure Analytics Configuring DSMs Guide
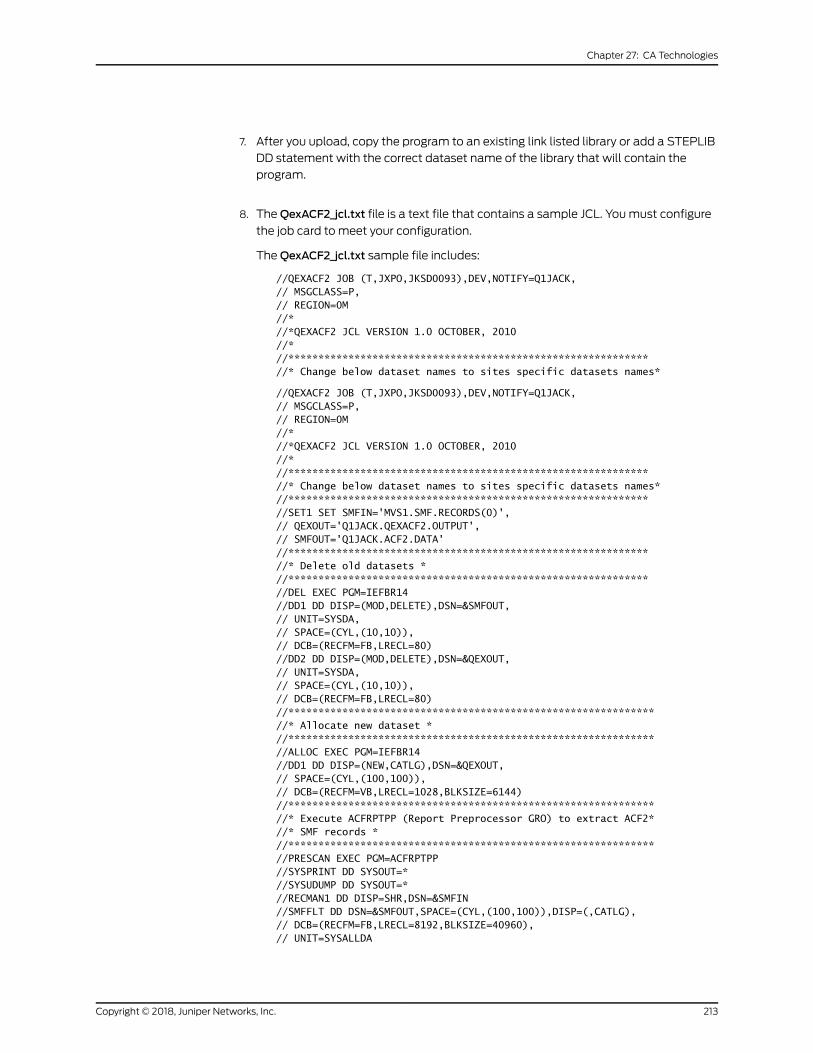
7. After you upload, copy the program to an existing link listed library or add a STEPLIB
DD statement with the correct dataset name of the library that will contain the
program.
8. TheQexACF2_jcl.txt file is a text file that contains a sample JCL. Youmust configure
the job card to meet your configuration.
TheQexACF2_jcl.txt sample file includes:
//QEXACF2 JOB (T,JXPO,JKSD0093),DEV,NOTIFY=Q1JACK,// MSGCLASS=P,// REGION=0M//*//*QEXACF2 JCL VERSION 1.0 OCTOBER, 2010//* //************************************************************//* Change below dataset names to sites specific datasets names*
//QEXACF2 JOB (T,JXPO,JKSD0093),DEV,NOTIFY=Q1JACK,// MSGCLASS=P,// REGION=0M//*//*QEXACF2 JCL VERSION 1.0 OCTOBER, 2010//*//************************************************************//* Change below dataset names to sites specific datasets names*//************************************************************//SET1 SET SMFIN='MVS1.SMF.RECORDS(0)',// QEXOUT='Q1JACK.QEXACF2.OUTPUT',// SMFOUT='Q1JACK.ACF2.DATA'//************************************************************//* Delete old datasets *//************************************************************//DEL EXEC PGM=IEFBR14//DD1 DD DISP=(MOD,DELETE),DSN=&SMFOUT,// UNIT=SYSDA,// SPACE=(CYL,(10,10)),// DCB=(RECFM=FB,LRECL=80)//DD2 DD DISP=(MOD,DELETE),DSN=&QEXOUT,// UNIT=SYSDA,// SPACE=(CYL,(10,10)),// DCB=(RECFM=FB,LRECL=80)//*************************************************************//* Allocate new dataset *//*************************************************************//ALLOC EXEC PGM=IEFBR14//DD1 DD DISP=(NEW,CATLG),DSN=&QEXOUT,// SPACE=(CYL,(100,100)),// DCB=(RECFM=VB,LRECL=1028,BLKSIZE=6144)//*************************************************************//* Execute ACFRPTPP (Report Preprocessor GRO) to extract ACF2*//* SMF records *//*************************************************************//PRESCAN EXEC PGM=ACFRPTPP//SYSPRINT DD SYSOUT=*//SYSUDUMP DD SYSOUT=*//RECMAN1 DD DISP=SHR,DSN=&SMFIN//SMFFLT DD DSN=&SMFOUT,SPACE=(CYL,(100,100)),DISP=(,CATLG),// DCB=(RECFM=FB,LRECL=8192,BLKSIZE=40960),// UNIT=SYSALLDA
213Copyright © 2018, Juniper Networks, Inc.
Chapter 27: CA Technologies
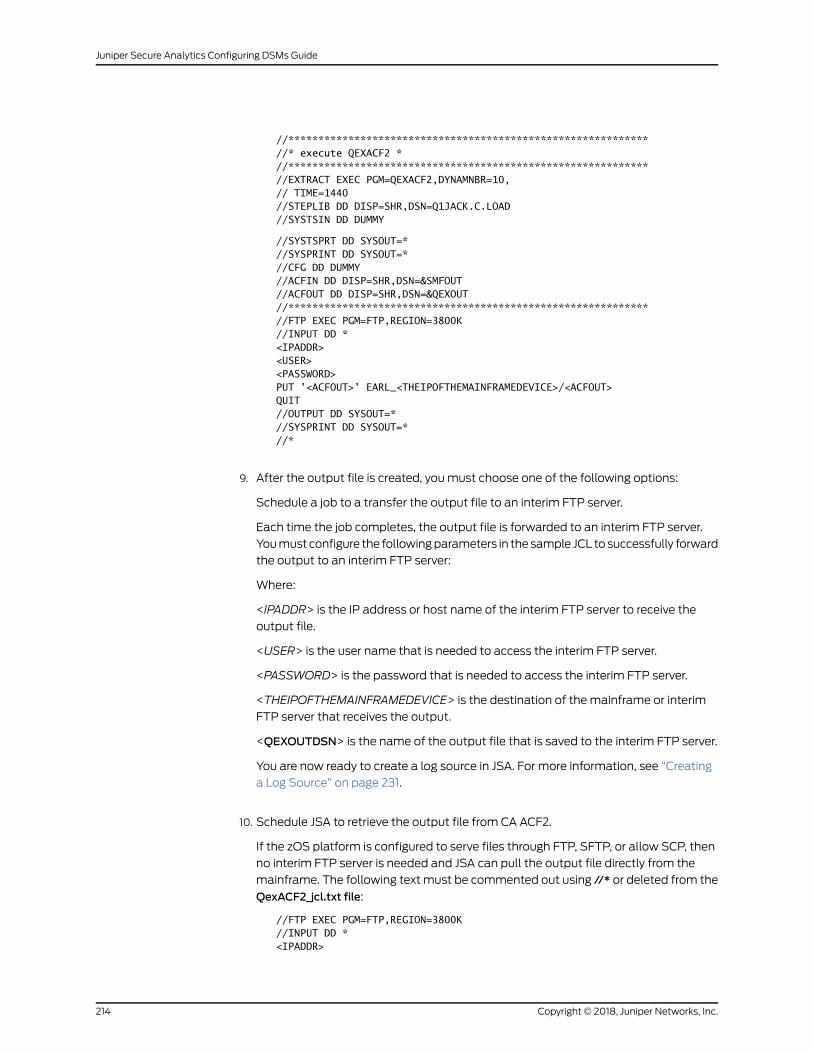
//************************************************************//* execute QEXACF2 *//************************************************************//EXTRACT EXEC PGM=QEXACF2,DYNAMNBR=10,// TIME=1440//STEPLIB DD DISP=SHR,DSN=Q1JACK.C.LOAD//SYSTSIN DD DUMMY
//SYSTSPRT DD SYSOUT=*//SYSPRINT DD SYSOUT=*//CFG DD DUMMY//ACFIN DD DISP=SHR,DSN=&SMFOUT//ACFOUT DD DISP=SHR,DSN=&QEXOUT//************************************************************//FTP EXEC PGM=FTP,REGION=3800K//INPUT DD *<IPADDR><USER><PASSWORD>PUT '<ACFOUT>' EARL_<THEIPOFTHEMAINFRAMEDEVICE>/<ACFOUT>QUIT//OUTPUT DD SYSOUT=*//SYSPRINT DD SYSOUT=*//*
9. After the output file is created, youmust choose one of the following options:
Schedule a job to a transfer the output file to an interim FTP server.
Each time the job completes, the output file is forwarded to an interim FTP server.
Youmust configure the followingparameters in the sample JCL to successfully forward
the output to an interim FTP server:
Where:
<IPADDR> is the IP address or host name of the interim FTP server to receive the
output file.
<USER> is the user name that is needed to access the interim FTP server.
<PASSWORD> is the password that is needed to access the interim FTP server.
<THEIPOFTHEMAINFRAMEDEVICE> is the destination of the mainframe or interim
FTP server that receives the output.
<QEXOUTDSN> is the name of the output file that is saved to the interim FTP server.
You are now ready to create a log source in JSA. For more information, see “Creating
a Log Source” on page 231.
10. Schedule JSA to retrieve the output file from CA ACF2.
If the zOS platform is configured to serve files through FTP, SFTP, or allow SCP, then
no interim FTP server is needed and JSA can pull the output file directly from the
mainframe. The following text must be commented out using //* or deleted from the
QexACF2_jcl.txt file:
//FTP EXEC PGM=FTP,REGION=3800K//INPUT DD *<IPADDR>
Copyright © 2018, Juniper Networks, Inc.214
Juniper Secure Analytics Configuring DSMs Guide
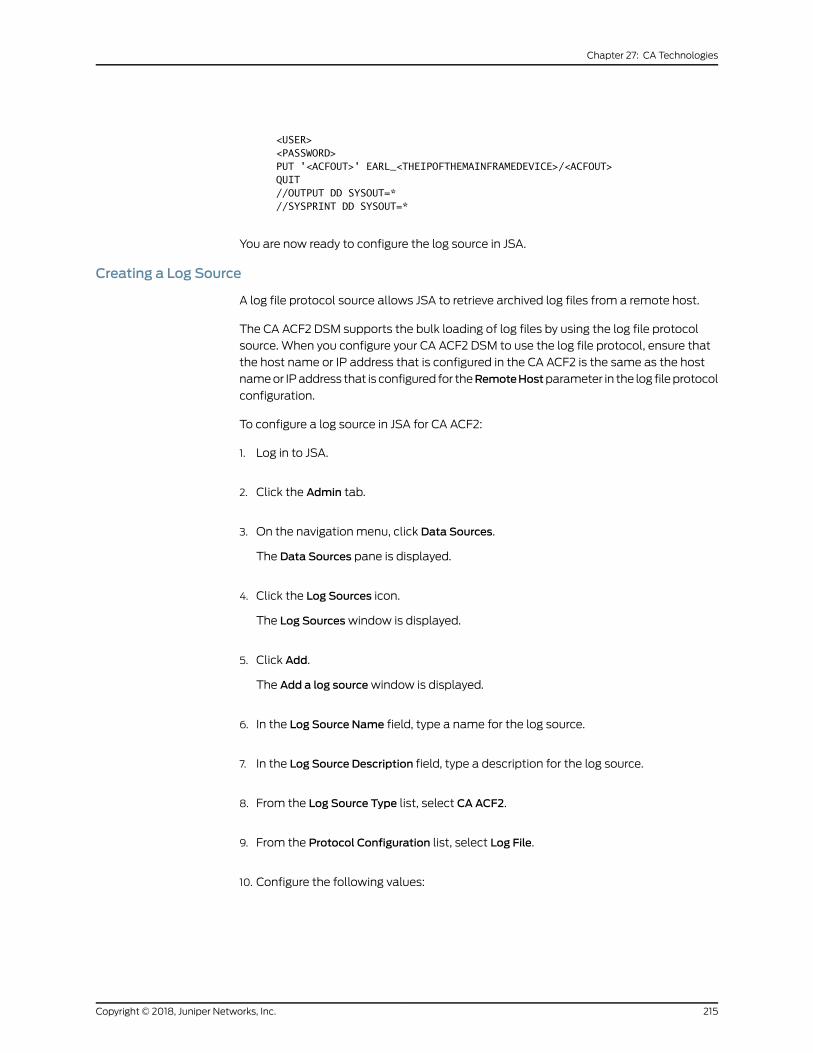
<USER><PASSWORD>PUT '<ACFOUT>' EARL_<THEIPOFTHEMAINFRAMEDEVICE>/<ACFOUT>QUIT//OUTPUT DD SYSOUT=*//SYSPRINT DD SYSOUT=*
You are now ready to configure the log source in JSA.
Creating a Log Source
A log file protocol source allows JSA to retrieve archived log files from a remote host.
The CA ACF2 DSM supports the bulk loading of log files by using the log file protocol
source. When you configure your CA ACF2 DSM to use the log file protocol, ensure that
the host name or IP address that is configured in the CA ACF2 is the same as the host
nameor IPaddress that is configured for theRemoteHostparameter in the log fileprotocol
configuration.
To configure a log source in JSA for CA ACF2:
1. Log in to JSA.
2. Click the Admin tab.
3. On the navigation menu, click Data Sources.
The Data Sources pane is displayed.
4. Click the Log Sources icon.
The Log Sourceswindow is displayed.
5. Click Add.
The Add a log sourcewindow is displayed.
6. In the Log Source Name field, type a name for the log source.
7. In the Log Source Description field, type a description for the log source.
8. From the Log Source Type list, select CAACF2.
9. From the Protocol Configuration list, select Log File.
10. Configure the following values:
215Copyright © 2018, Juniper Networks, Inc.
Chapter 27: CA Technologies
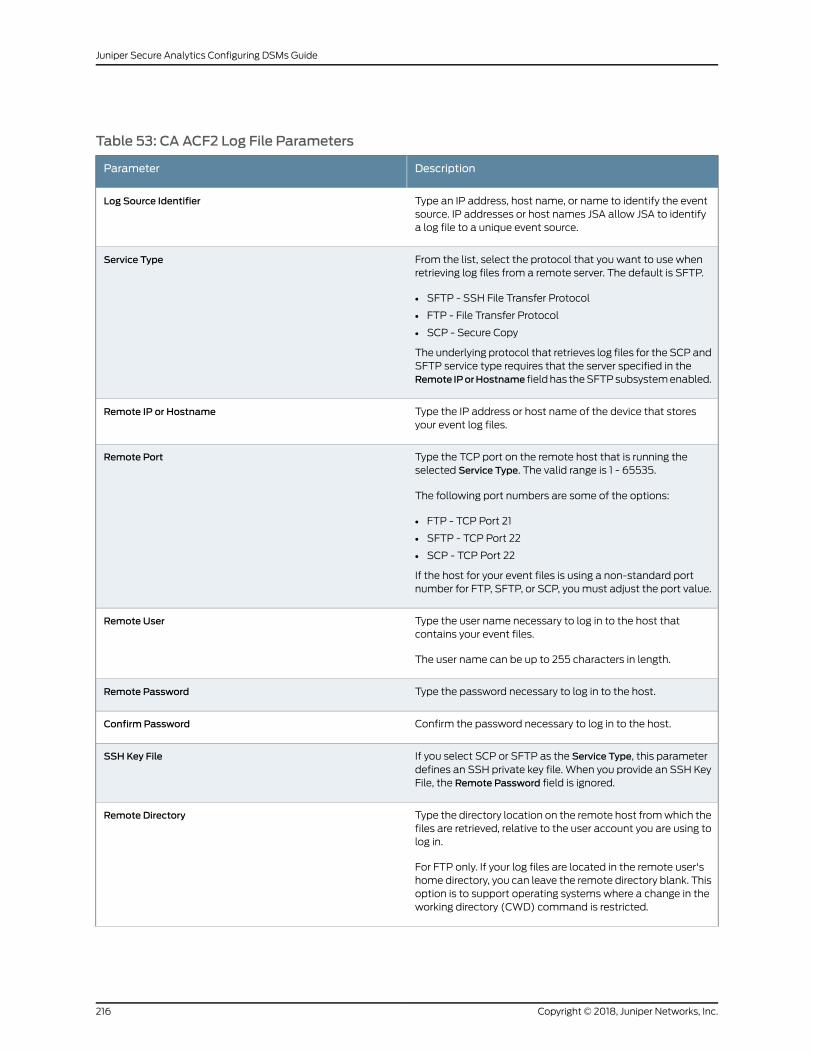
Table 53: CA ACF2 Log File Parameters
DescriptionParameter
Type an IP address, host name, or name to identify the eventsource. IP addresses or host names JSA allow JSA to identifya log file to a unique event source.
Log Source Identifier
From the list, select the protocol that you want to use whenretrieving log files from a remote server. The default is SFTP.
• SFTP - SSH File Transfer Protocol
• FTP - File Transfer Protocol
• SCP - Secure Copy
The underlying protocol that retrieves log files for the SCP andSFTP service type requires that the server specified in theRemote IPorHostname field has theSFTPsubsystemenabled.
Service Type
Type the IP address or host name of the device that storesyour event log files.
Remote IP or Hostname
Type the TCP port on the remote host that is running theselected Service Type. The valid range is 1 - 65535.
The following port numbers are some of the options:
• FTP - TCP Port 21
• SFTP - TCP Port 22
• SCP - TCP Port 22
If the host for your event files is using a non-standard portnumber for FTP, SFTP, or SCP, youmust adjust the port value.
Remote Port
Type the user name necessary to log in to the host thatcontains your event files.
The user name can be up to 255 characters in length.
Remote User
Type the password necessary to log in to the host.Remote Password
Confirm the password necessary to log in to the host.Confirm Password
If you select SCP or SFTP as the Service Type, this parameterdefines an SSH private key file. When you provide an SSH KeyFile, the Remote Password field is ignored.
SSH Key File
Type the directory location on the remote host fromwhich thefiles are retrieved, relative to the user account you are using tolog in.
For FTP only. If your log files are located in the remote user'shome directory, you can leave the remote directory blank. Thisoption is to support operating systems where a change in theworking directory (CWD) command is restricted.
Remote Directory
Copyright © 2018, Juniper Networks, Inc.216
Juniper Secure Analytics Configuring DSMs Guide
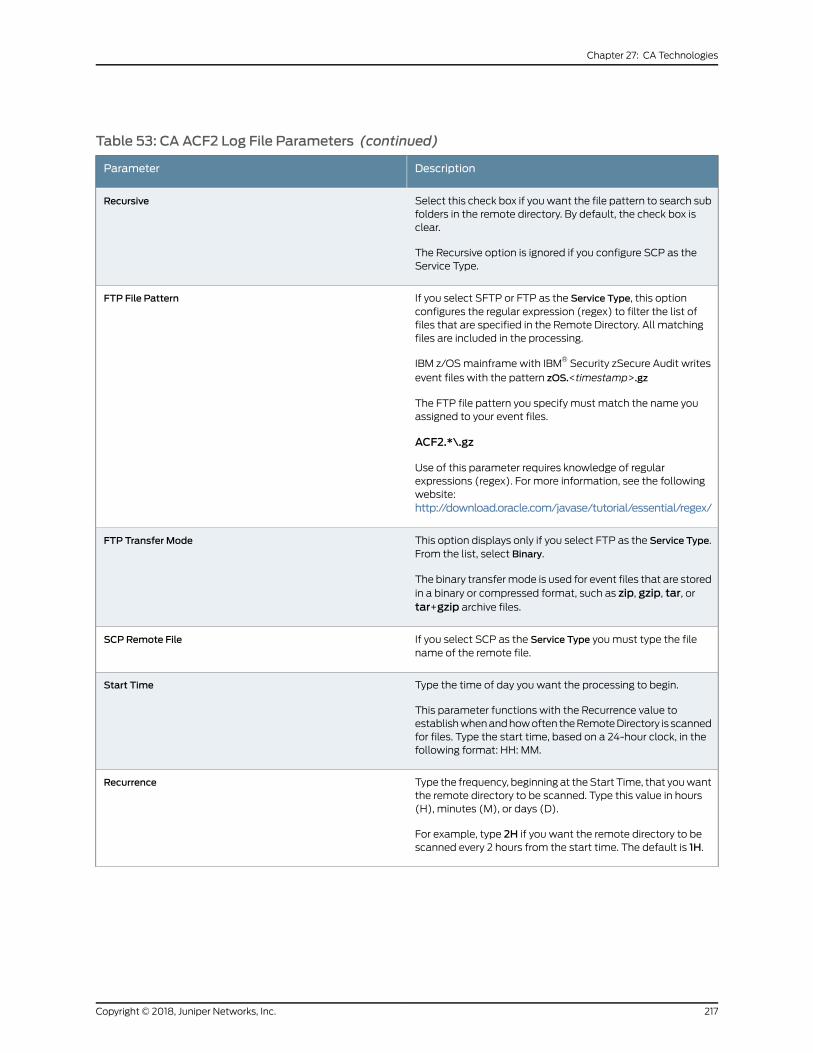
Table 53: CA ACF2 Log File Parameters (continued)
DescriptionParameter
Select this check box if youwant the file pattern to search subfolders in the remote directory. By default, the check box isclear.
The Recursive option is ignored if you configure SCP as theService Type.
Recursive
If you select SFTP or FTP as the Service Type, this optionconfigures the regular expression (regex) to filter the list offiles that are specified in the Remote Directory. All matchingfiles are included in the processing.
IBM z/OSmainframe with IBM® Security zSecure Audit writesevent files with the pattern zOS.<timestamp>.gz
The FTP file pattern you specify must match the name youassigned to your event files.
ACF2.*\.gz
Use of this parameter requires knowledge of regularexpressions (regex). For more information, see the followingwebsite:http://download.oracle.com/javase/tutorial/essential/regex/
FTP File Pattern
This option displays only if you select FTP as the Service Type.From the list, select Binary.
The binary transfermode is used for event files that are storedin a binary or compressed format, such as zip, gzip, tar, ortar+gzip archive files.
FTP Transfer Mode
If you select SCP as the Service Type youmust type the filename of the remote file.
SCP Remote File
Type the time of day you want the processing to begin.
This parameter functions with the Recurrence value toestablishwhenandhowoften theRemoteDirectory is scannedfor files. Type the start time, based on a 24-hour clock, in thefollowing format: HH: MM.
Start Time
Type the frequency, beginning at theStart Time, that youwantthe remote directory to be scanned. Type this value in hours(H), minutes (M), or days (D).
For example, type 2H if you want the remote directory to bescanned every 2 hours from the start time. The default is 1H.
Recurrence
217Copyright © 2018, Juniper Networks, Inc.
Chapter 27: CA Technologies
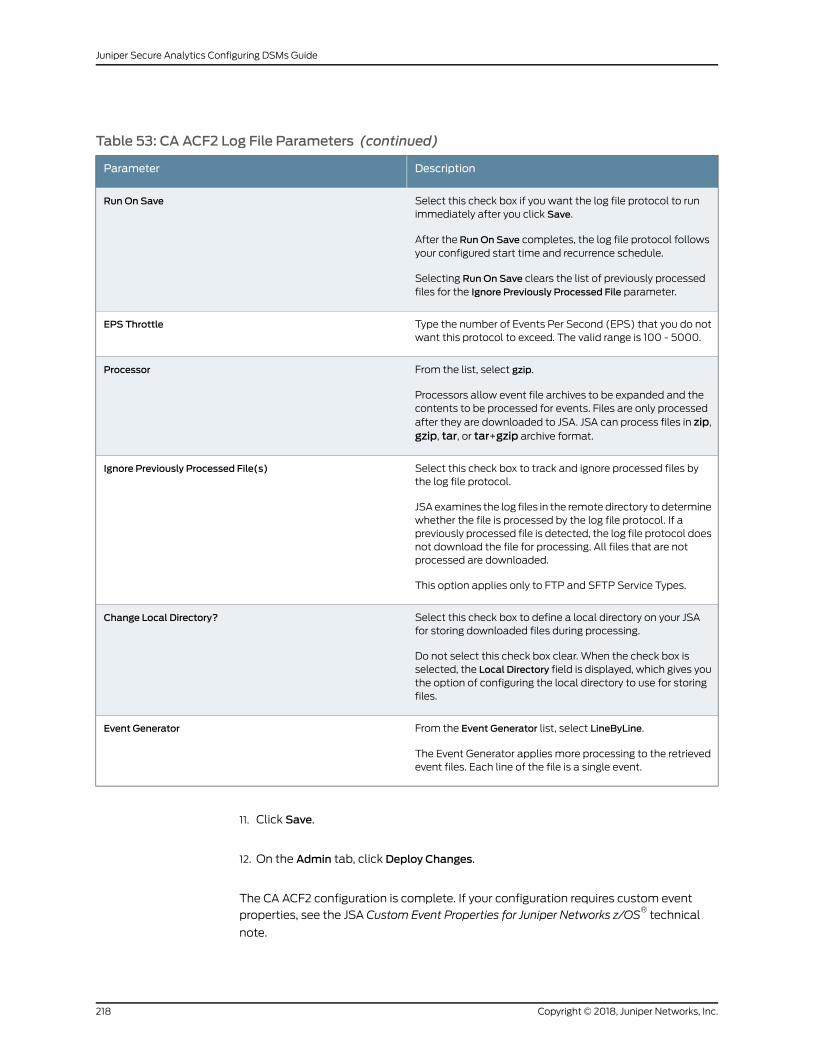
Table 53: CA ACF2 Log File Parameters (continued)
DescriptionParameter
Select this check box if you want the log file protocol to runimmediately after you click Save.
After the RunOn Save completes, the log file protocol followsyour configured start time and recurrence schedule.
Selecting RunOn Save clears the list of previously processedfiles for the Ignore Previously Processed File parameter.
RunOn Save
Type the number of Events Per Second (EPS) that you do notwant this protocol to exceed. The valid range is 100 - 5000.
EPS Throttle
From the list, select gzip.
Processors allow event file archives to be expanded and thecontents to be processed for events. Files are only processedafter they are downloaded to JSA. JSA can process files in zip,gzip, tar, or tar+gzip archive format.
Processor
Select this check box to track and ignore processed files bythe log file protocol.
JSA examines the log files in the remote directory to determinewhether the file is processed by the log file protocol. If apreviously processed file is detected, the log file protocol doesnot download the file for processing. All files that are notprocessed are downloaded.
This option applies only to FTP and SFTP Service Types.
Ignore Previously Processed File(s)
Select this check box to define a local directory on your JSAfor storing downloaded files during processing.
Do not select this check box clear. When the check box isselected, the Local Directory field is displayed, which gives youthe option of configuring the local directory to use for storingfiles.
Change Local Directory?
From the Event Generator list, select LineByLine.
The Event Generator applies more processing to the retrievedevent files. Each line of the file is a single event.
Event Generator
11. Click Save.
12. On the Admin tab, click Deploy Changes.
The CA ACF2 configuration is complete. If your configuration requires custom event
properties, see the JSA Custom Event Properties for Juniper Networks z/OS®technical
note.
Copyright © 2018, Juniper Networks, Inc.218
Juniper Secure Analytics Configuring DSMs Guide
CA SiteMinder
TheCASiteMinderDSMcollectsandcategorizesauthorizationevents fromCASiteMinder
appliances with syslog-ng.
The CA SiteMinder DSM accepts access and authorization events that are logged in
smaccess.log and forwards the events to JSA by using syslog-ng.
• Configuring a Log Source on page 219
• Configuring Syslog-ng for CA SiteMinder on page 221
Configuring a Log Source
CA SiteMinder with JSA does not automatically discover authorization events that are
forwarded with syslog-ng from CA SiteMinder appliances.
Tomanually create a CA SiteMinder log source:
1. Click the Admin tab.
2. On the navigation menu, click Data Sources.
The Data Sources pane is displayed.
3. Click the Log Sources icon.
The Log Sourceswindow is displayed.
4. In the Log Source Name field, type a name for your CA SiteMinder log source.
5. In the Log Source Description field, type a description for the log source.
6. From the Log Source Type list, select CA SiteMinder.
7. From the Protocol Configuration list, select Syslog.
The syslog protocol parameters are displayed.
NOTE: The log file protocol is displayed in the Protocol Configuration list,
however, polling for log files is not a suitable configuration.
8. Configure the following values:
219Copyright © 2018, Juniper Networks, Inc.
Chapter 27: CA Technologies
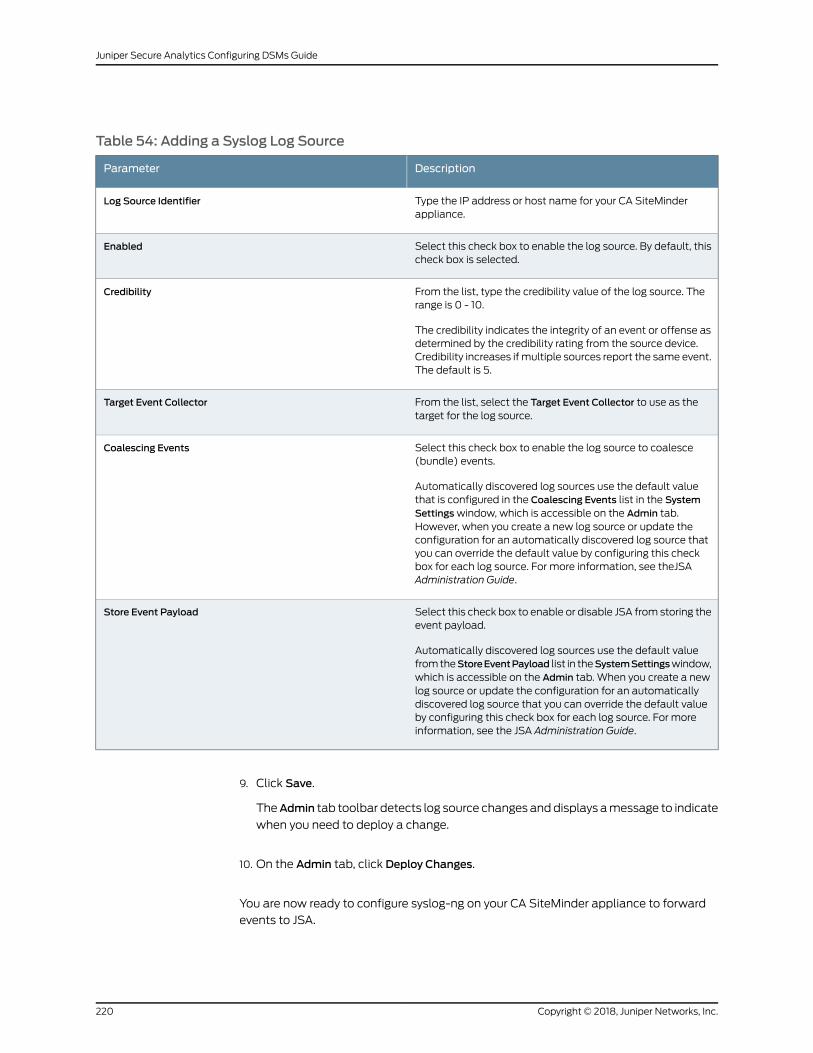
Table 54: Adding a Syslog Log Source
DescriptionParameter
Type the IP address or host name for your CA SiteMinderappliance.
Log Source Identifier
Select this check box to enable the log source. By default, thischeck box is selected.
Enabled
From the list, type the credibility value of the log source. Therange is 0 - 10.
The credibility indicates the integrity of an event or offense asdetermined by the credibility rating from the source device.Credibility increases ifmultiple sources report the same event.The default is 5.
Credibility
From the list, select the Target Event Collector to use as thetarget for the log source.
Target Event Collector
Select this check box to enable the log source to coalesce(bundle) events.
Automatically discovered log sources use the default valuethat is configured in the Coalescing Events list in the SystemSettingswindow, which is accessible on the Admin tab.However, when you create a new log source or update theconfiguration for an automatically discovered log source thatyou can override the default value by configuring this checkbox for each log source. For more information, see theJSAAdministration Guide.
Coalescing Events
Select this check box to enable or disable JSA from storing theevent payload.
Automatically discovered log sources use the default valuefromtheStoreEventPayload list in theSystemSettingswindow,which is accessible on the Admin tab. When you create a newlog source or update the configuration for an automaticallydiscovered log source that you can override the default valueby configuring this check box for each log source. For moreinformation, see the JSA Administration Guide.
Store Event Payload
9. Click Save.
TheAdmin tab toolbar detects log source changes anddisplays amessage to indicate
when you need to deploy a change.
10. On the Admin tab, click Deploy Changes.
You are now ready to configure syslog-ng on your CA SiteMinder appliance to forward
events to JSA.
Copyright © 2018, Juniper Networks, Inc.220
Juniper Secure Analytics Configuring DSMs Guide
Configuring Syslog-ng for CA SiteMinder
Youmust configure your CA SiteMinder appliance to forward syslog-ng events to your
JSA console or Event Collector.
JSA can collect syslog-ng events from TCP or UDP syslog sources on port 514.
To configure syslog-ng for CA SiteMinder:
1. Using SSH, log in to your CA SiteMinder appliance as a root user.
2. Edit the syslog-ng configuration file.
/etc/syslog-ng.conf
3. Add the following information to specify the access log as the event file for syslog-ng:
source s_siteminder_access { file("/opt/apps/siteminder/sm66/siteminder/log/smaccess.log"); };
4. Add the following information to specify the destination andmessage template:
destination d_remote_q1_siteminder {udp("<QRadar IP>" port(514) template ("$PROGRAM $MSG\n"));};
Where <QRadar IP> is the IP address of the JSA console or Event Collector.
5. Add the following log entry information:
log {source(s_siteminder_access);destination(d_remote_q1_siteminder);};
6. Save the syslog-ng.conf file.
7. Type the following command to restart syslog-ng:
service syslog-ng restart
After the syslog-ng service restarts, the CA SiteMinder configuration is complete.
Events that are forwarded to JSA by CA SiteMinder are displayed on the Log Activity
tab.
CA Top Secret
JSA integrates with CA Top Secret events.
There are two options:
• Integrate CA Top Secret with JSA by Using IBM Security ZSecure on page 222
221Copyright © 2018, Juniper Networks, Inc.
Chapter 27: CA Technologies
• Integrate CA Top Secret with JSA by Using Audit Scripts on page 227
• Integrate CA Top Secret with JSA by Using IBM Security ZSecure on page 222
• Configuring a CA Top Secret Log Source on page 223
• Integrate CA Top Secret with JSA by Using Audit Scripts on page 227
• Configuring CA Top Secret to Integrate with JSA on page 227
• Creating a Log Source on page 231
Integrate CA Top Secret with JSA by Using IBM Security ZSecure
The CATop Secret DSM integrates LEEF events fromaTop Secret image on an IBM z/OS
mainframe by using IBM®Security zSecure.
Using a zSecure process, events from the SystemManagement Facilities (SMF) are
recorded to an event file in the Log Enhanced Event format (LEEF). JSA retrieves the
LEEF event log files by using the log file protocol and processes the events. You can
schedule JSA to retrieve events on a polling interval, which allows JSA to retrieve the
events on the schedule that you defined.
To integrate CA Top Secret events:
1. Confirm that your installation meets any prerequisite installation requirements.
2. Configure your CA Top Secret z/OS®image to write events in LEEF format. For more
information, see the JuniperNetworksSecurity zSecureSuite:CARLa-DrivenComponents
Installation and Deployment Guide.
3. Create a log source in JSA for CA Top Secret to retrieve your LEEF formatted event
logs.
4. Optional. Create a custom event property for CA Top Secret in JSA. For more
information, see the JSACustomEvent Properties for JuniperNetworks z/OS®technical
note.
NOTE: If expected fields for the normalized event do not display, configureIBM z/OS. The parsing behavior might bemore consistent.
Before You Begin
Before you can configure the data collection process, youmust complete the basic
zSecure installation process.
The following prerequisites are required:
• Youmust ensure parmlib member IFAPRDxx is enabled for Juniper Networks Security
zSecure Audit on your z/OS®image.
• The SCKRLOAD library must be APF-authorized.
• Youmust configure a process to periodically refresh your CKFREEZE and UNLOAD
data sets.
Copyright © 2018, Juniper Networks, Inc.222
Juniper Secure Analytics Configuring DSMs Guide

• Youmust configure an SFTP, FTP, or SCP server on your z/OS®image for JSA to
download your LEEF event files.
• Youmust allow SFTP, FTP, or SCP traffic on firewalls that are located between JSA
and your z/OS®image.
After you install the software, youmust also create andmodify the configuration. For
instructions on installing and configuring zSecure, see the IBM®Security zSecure Suite:
CARLa-Driven Components Installation and Deployment Guide.
Configuring a CA Top Secret Log Source
The log file protocol allows JSA to retrieve archived log files from a remote host.
Log files are transferred, one at a time, to JSA for processing. The log file protocol can
manage plain text event logs, compressed files, or archives. Archives must contain
plain-text files that can be processed one line at a time. Multi-line event logs are not
supported by the log file protocol. IBM z/OSwith zSecure writes log files to a specified
directory as gzip archives. JSA extracts the archive and processes the events, which are
written as one event per line in the file.
To retrieve these events, youmust create a log source by using the log file protocol. JSA
requires credentials to log in to the system that hosts your LEEF formatted event files
and a polling interval.
1. Log in to JSA.
2. Click the Admin tab.
3. On the navigation menu, click Data Sources.
The Data Sources pane is displayed.
4. Click the Log Sources icon.
The Log Sourceswindow is displayed.
5. Click Add.
The Add a log source window is displayed.
6. In the Log Source Name field, type a name for the log source.
7. In the Log Source Description field, type a description for the log source.
8. From the Log Source Type list, select CA Top Secret.
9. From the Protocol Configuration list, select Log File.
223Copyright © 2018, Juniper Networks, Inc.
Chapter 27: CA Technologies
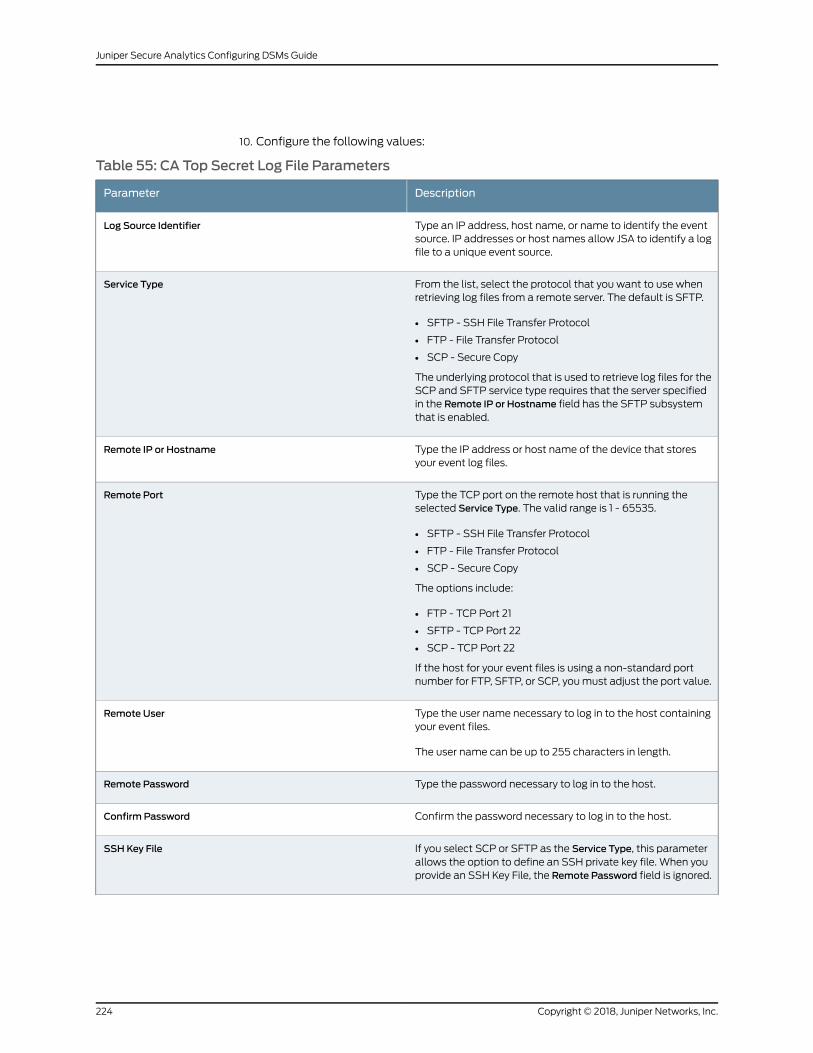
10. Configure the following values:
Table 55: CA Top Secret Log File Parameters
DescriptionParameter
Type an IP address, host name, or name to identify the eventsource. IP addresses or host names allow JSA to identify a logfile to a unique event source.
Log Source Identifier
From the list, select the protocol that you want to use whenretrieving log files from a remote server. The default is SFTP.
• SFTP - SSH File Transfer Protocol
• FTP - File Transfer Protocol
• SCP - Secure Copy
The underlying protocol that is used to retrieve log files for theSCP and SFTP service type requires that the server specifiedin the Remote IP or Hostname field has the SFTP subsystemthat is enabled.
Service Type
Type the IP address or host name of the device that storesyour event log files.
Remote IP or Hostname
Type the TCP port on the remote host that is running theselected Service Type. The valid range is 1 - 65535.
• SFTP - SSH File Transfer Protocol
• FTP - File Transfer Protocol
• SCP - Secure Copy
The options include:
• FTP - TCP Port 21
• SFTP - TCP Port 22
• SCP - TCP Port 22
If the host for your event files is using a non-standard portnumber for FTP, SFTP, or SCP, youmust adjust the port value.
Remote Port
Type the user name necessary to log in to the host containingyour event files.
The user name can be up to 255 characters in length.
Remote User
Type the password necessary to log in to the host.Remote Password
Confirm the password necessary to log in to the host.Confirm Password
If you select SCP or SFTP as the Service Type, this parameterallows the option to define an SSH private key file. When youprovide an SSH Key File, the Remote Password field is ignored.
SSH Key File
Copyright © 2018, Juniper Networks, Inc.224
Juniper Secure Analytics Configuring DSMs Guide
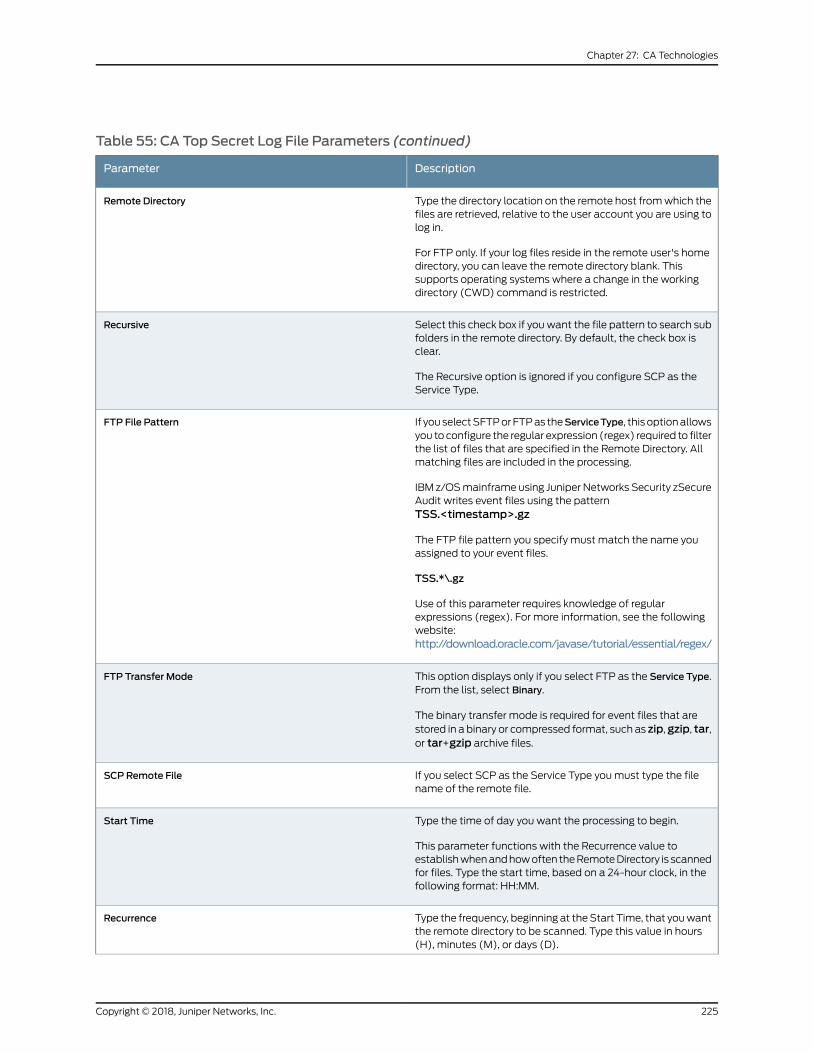
Table 55: CA Top Secret Log File Parameters (continued)
DescriptionParameter
Type the directory location on the remote host fromwhich thefiles are retrieved, relative to the user account you are using tolog in.
For FTP only. If your log files reside in the remote user's homedirectory, you can leave the remote directory blank. Thissupports operating systems where a change in the workingdirectory (CWD) command is restricted.
Remote Directory
Select this check box if youwant the file pattern to search subfolders in the remote directory. By default, the check box isclear.
The Recursive option is ignored if you configure SCP as theService Type.
Recursive
If youselectSFTPorFTPas theServiceType, thisoptionallowsyou to configure the regular expression (regex) required to filterthe list of files that are specified in the Remote Directory. Allmatching files are included in the processing.
IBM z/OSmainframe using Juniper Networks Security zSecureAudit writes event files using the patternTSS.<timestamp>.gz
The FTP file pattern you specify must match the name youassigned to your event files.
TSS.*\.gz
Use of this parameter requires knowledge of regularexpressions (regex). For more information, see the followingwebsite:http://download.oracle.com/javase/tutorial/essential/regex/
FTP File Pattern
This option displays only if you select FTP as the Service Type.From the list, select Binary.
The binary transfer mode is required for event files that arestored in a binary or compressed format, such as zip,gzip, tar,or tar+gzip archive files.
FTP Transfer Mode
If you select SCP as the Service Type youmust type the filename of the remote file.
SCP Remote File
Type the time of day you want the processing to begin.
This parameter functions with the Recurrence value toestablishwhenandhowoften theRemoteDirectory is scannedfor files. Type the start time, based on a 24-hour clock, in thefollowing format: HH:MM.
Start Time
Type the frequency, beginning at theStart Time, that youwantthe remote directory to be scanned. Type this value in hours(H), minutes (M), or days (D).
Recurrence
225Copyright © 2018, Juniper Networks, Inc.
Chapter 27: CA Technologies
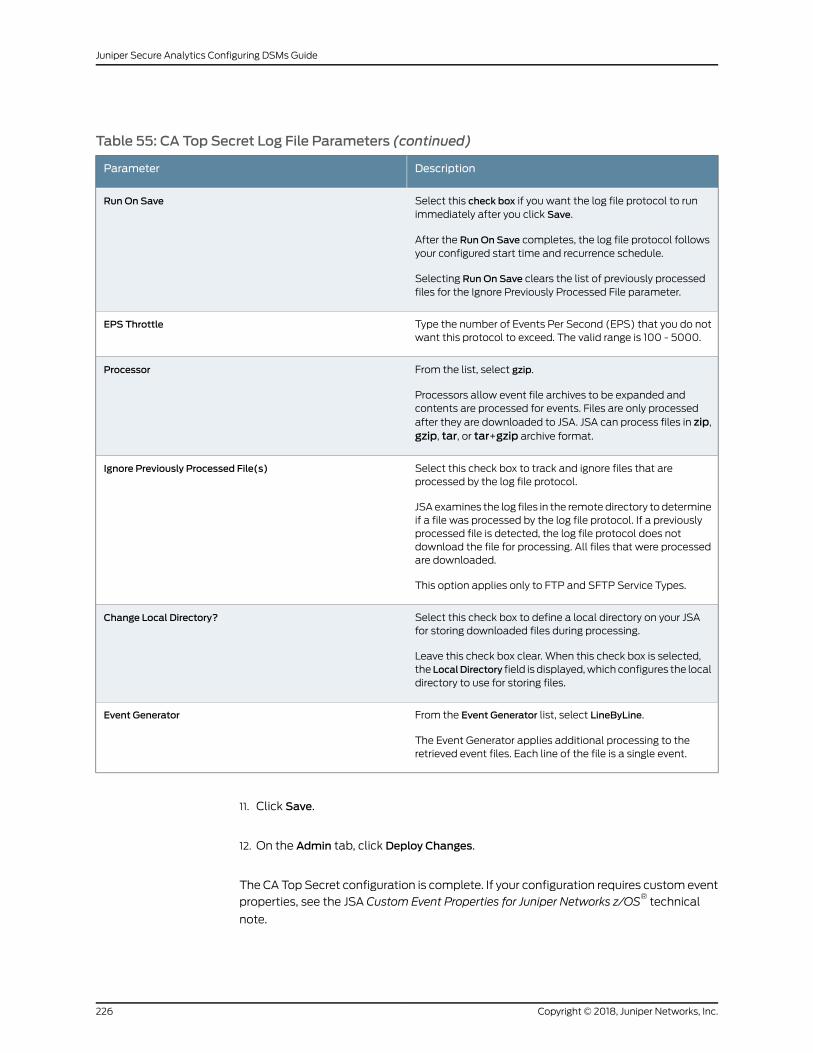
Table 55: CA Top Secret Log File Parameters (continued)
DescriptionParameter
Select this check box if you want the log file protocol to runimmediately after you click Save.
After the RunOn Save completes, the log file protocol followsyour configured start time and recurrence schedule.
Selecting RunOn Save clears the list of previously processedfiles for the Ignore Previously Processed File parameter.
RunOn Save
Type the number of Events Per Second (EPS) that you do notwant this protocol to exceed. The valid range is 100 - 5000.
EPS Throttle
From the list, select gzip.
Processors allow event file archives to be expanded andcontents are processed for events. Files are only processedafter they are downloaded to JSA. JSA can process files in zip,gzip, tar, or tar+gzip archive format.
Processor
Select this check box to track and ignore files that areprocessed by the log file protocol.
JSA examines the log files in the remote directory to determineif a file was processed by the log file protocol. If a previouslyprocessed file is detected, the log file protocol does notdownload the file for processing. All files that were processedare downloaded.
This option applies only to FTP and SFTP Service Types.
Ignore Previously Processed File(s)
Select this check box to define a local directory on your JSAfor storing downloaded files during processing.
Leave this check box clear. When this check box is selected,the LocalDirectory field is displayed,which configures the localdirectory to use for storing files.
Change Local Directory?
From the Event Generator list, select LineByLine.
The Event Generator applies additional processing to theretrieved event files. Each line of the file is a single event.
Event Generator
11. Click Save.
12. On the Admin tab, click Deploy Changes.
The CA Top Secret configuration is complete. If your configuration requires custom event
properties, see the JSA Custom Event Properties for Juniper Networks z/OS®technical
note.
Copyright © 2018, Juniper Networks, Inc.226
Juniper Secure Analytics Configuring DSMs Guide

Integrate CA Top Secret with JSA by Using Audit Scripts
The CA Top Secret DSM integrates with an IBM®zOSmainframe to collect events and
audit transactions.
JSA records all relevant and available information from the event.
To integrate CA Top Secret events into JSA:
1. The IBM®mainframe records all security events as Service Management Framework
(SMF) records in a live repository.
2. At midnight, the CA Top Secret data is extracted from the live repository by using the
SMF dump utility. The SMF file contains all of the events and fields from the previous
day in raw SMF format.
3. Theqextopsloadlibprogrampullsdata fromtheSMFformatted file. Theqextopsloadlib
program only pulls the relevant events and fields for JSA and writes that information
in a condensed format for compatibility. The information is saved in a location
accessible by JSA.
4. JSA uses the log file protocol source to retrieve the output file information on a
scheduled basis. JSA then imports and processes this file.
Configuring CA Top Secret to Integrate with JSA
You can integrate CA Top Secret with JSA.
1. Fromthe IBM®supportwebsite (http://www.ibm.com/support), downloadthe following
compressed file:
qextops_bundled.tar.gz
2. On a Linux operating system, extract the file:
tar -zxvf qextops_bundled.tar.gz
The following files are contained in the archive:
• qextops_jcl.txt
• qextopsloadlib.trs
• qextops_trsmain_JCL.txt
3. Load the files onto the IBM®mainframe by using any terminal emulator file transfer
method.
Upload thesampleqextops_trsmain_JCL.txtandqextops_jcl.txt filesbyusing theTEXT
protocol.
4. Upload the qextopsloadlib.trs file by using a BINARYmode transfer. The
qextopsloadlib.trs file isa tersed file containing theexecutable (themainframeprogram
qextops). When you upload the .trs file from a workstation, preallocate a file on the
227Copyright © 2018, Juniper Networks, Inc.
Chapter 27: CA Technologies
mainframewith the following DCB attributes: DSORG=PS, RECFM=FB, LRECL=1024,
BLKSIZE=6144. The file transfer typemust be binary mode and not text.
NOTE: Qextops is a small Cmainframe program that reads the output of
the TSSUTIL (EARLOUTdata) line by line.Qextops adds a header to each
record that contains event information, for example, record descriptor,the date, and time. The program places each field into the output record,suppresses trailing blank characters, and delimits each fieldwith the pipecharacter. This output file is formatted for JSA and the blank suppressionreduces network traffic to JSA. This program does not consume CPU orI/O disk resources.
5. Customize the qextops_trsmain_JCL.txt file according to your installation-specific
requirements.
Theqextops_trsmain_JCL.txt file uses the IBM®utility TRSMAIN toextract theprogram
that is stored in the qextopsloadlib.trs file.
An example of the qextops_trsmain_JCL.txt file includes:
//TRSMAIN JOB (yourvalidjobcard),Q1labs,// MSGCLASS=V//DEL EXEC PGM=IEFBR14//D1 DD DISP=(MOD,DELETE),DSN=<yourhlq>.QEXTOPS.TRS// UNIT=SYSDA,// SPACE=(CYL,(10,10))//TRSMAIN EXEC PGM=TRSMAIN,PARM='UNPACK'//SYSPRINT DD SYSOUT=*,DCB=(LRECL=133,BLKSIZE=12901,RECFM=FBA)//INFILE DD DISP=SHR,DSN=<yourhlq>.QEXTOPS.TRS//OUTFILE DD DISP=(NEW,CATLG,DELETE),// DSN=<yourhlq>.LOAD,// SPACE=(CYL,(10,10,5),RLSE),UNIT=SYSDA//
Youmust update the file with your installation specific information for parameters,
suchas, jobcard, data set naming conventions, output destinations, retentionperiods,
and space requirements.
The .trs input file is an IBM®TERSE formatted library and is extracted by running the
JCL, which calls the TRSMAIN. This tersed file, when extracted, creates a PDS linklib
with the qextops program as amember.
6. You can STEPLIB to this library or choose tomove the program to one of the LINKLIBs
that are in the LINKLST. The program does not require authorization.
7. Following the upload, copy the program to an existing link listed library or add a
STEPLIB DD statement with the correct dataset name of the library that contains the
program.
8. The qextops_jcl.txt file is a text file that contains a sample JCL. Youmust configure
the job card to meet your configuration.
Copyright © 2018, Juniper Networks, Inc.228
Juniper Secure Analytics Configuring DSMs Guide
The qextops_jcl.txt sample file includes:
//QEXTOPS JOB (T,JXPO,JKSD0093),DEV,NOTIFY=Q1JACK,// MSGCLASS=P,// REGION=0M//*//*QEXTOPS JCL version 1.0 September, 2010//*//*************************************************************//* Change below dataset names to sites specific datasets names*//************************************************************//SET1 SET TSSOUT='Q1JACK.EARLOUT.ALL',// EARLOUT='Q1JACK.QEXTOPS.PROGRAM.OUTPUT'//************************************************************//* Delete old datasets *//************************************************************//
DEL EXEC PGM=IEFBR14//DD1 DD DISP=(MOD,DELETE),DSN=&TSSOUT,// UNIT=SYSDA,// SPACE=(CYL,(10,10)),// DCB=(RECFM=FB,LRECL=80)//DD2 DD DISP=(MOD,DELETE),DSN=&EARLOUT,// UNIT=SYSDA,// SPACE=(CYL,(10,10)),// DCB=(RECFM=FB,LRECL=80)//************************************************************//* Allocate new dataset *//************************************************************//ALLOC EXEC PGM=IEFBR14//DD1 DD DISP=(NEW,CATLG),DSN=&EARLOUT,// SPACE=(CYL,(100,100)),// DCB=(RECFM=VB,LRECL=1028,BLKSIZE=6144)//************************************************************//* Execute Top Secret TSSUTIL utility to extract smf records*//************************************************************//REPORT EXEC PGM=TSSUTIL//SMFIN DD DISP=SHR,DSN=&SMFIN1//SMFIN1 DD DISP=SHR,DSN=&SMFIN2//UTILOUT DD DSN=&UTILOUT,// DISP=(,CATLG),UNIT=SYSDA,SPACE=(CYL,(50,10),RLSE),// DCB=(RECFM=FB,LRECL=133,BLKSIZE=0)//EARLOUT DD DSN=&TSSOUT,// DISP=(NEW,CATLG),UNIT=SYSDA,// SPACE=(CYL,(200,100),RLSE),// DCB=(RECFM=VB,LRECL=456,BLKSIZE=27816)//UTILIN DD *NOLEGENDREPORT EVENT(ALL) END/*//************************************************************//EXTRACT EXEC PGM=QEXTOPS,DYNAMNBR=10,// TIME=1440//STEPLIB DD DISP=SHR,DSN=Q1JACK.C.LOAD//SYSTSIN DD DUMMY//SYSTSPRT DD SYSOUT=*//SYSPRINT DD SYSOUT=*//CFG DD DUMMY//EARLIN DD DISP=SHR,DSN=&TSSOUT//EARLOUT DD DISP=SHR,DSN=&EARLOUT//************************************************************//FTP EXEC PGM=FTP,REGION=3800K
229Copyright © 2018, Juniper Networks, Inc.
Chapter 27: CA Technologies
//INPUT DD *<IPADDR><USER><PASSWORD>PUT '<EARLOUT>' EARL_<THEIPOFTHEMAINFRAMEDEVICE>/<QUIT//OUTPUT DD SYSOUT=*//SYSPRINT DD SYSOUT=*
9. After the output file is created, youmust choose one of the following options:
Schedule a job to a transfer the output file to an interim FTP server.
Each time the job completes, the output file is forwarded to an interim FTP server.
Youmust configure the followingparameters in the sample JCL to successfully forward
the output to an interim FTP server:
Where:
<IPADDR> is the IP address or host name of the interim FTP server to receive the
output file.
<USER> is the user name that is needed to access the interim FTP server.
<PASSWORD> is the password that is needed to access the interim FTP server.
<THEIPOFTHEMAINFRAMEDEVICE> is the destination of the mainframe or interim
FTP server that receives the output.
<QEXOUTDSN> is the name of the output file that is saved to the interim FTP server.
You are now ready to configure the log file protocol. See: “Creating a Log Source” on
page 231.
10. Schedule JSA to retrieve the output file from CA Top Secret.
If the zOS platform is configured to serve files through FTP, SFTP, or allow SCP, then
no interim FTP server is needed and JSA can pull the output file directly from the
mainframe. The following text must be commented out using //* or deleted from the
qextops_jcl.txt file:
//FTP EXEC PGM=FTP,REGION=3800K//INPUT DD *<IPADDR><USER><PASSWORD>PUT '<EARLOUT>' EARL_<THEIPOFTHEMAINFRAMEDEVICE>/<EARLOUT>QUIT//OUTPUT DD SYSOUT=*//SYSPRINT DD SYSOUT=*
You are now ready to configure the log file protocol. See: “Creating a Log Source” on
page 231.
Copyright © 2018, Juniper Networks, Inc.230
Juniper Secure Analytics Configuring DSMs Guide
Creating a Log Source
A log file protocol source allows JSA to retrieve archived log files from a remote host.
TheCATopSecretDSMsupports the bulk loading of log files by using the log file protocol
source.
When you configure your CA Top Secret DSM to use the log file protocol, make sure the
host name or IP address that is configured in the CA Top Secret is the same as that
configured in the Remote Host parameter in the log file protocol configuration.
To configure a log source in JSA for CA Top Secret:
1. Log in to JSA.
2. Click the Admin tab.
3. On the navigation menu, click Data Sources.
The Data Sources pane is displayed.
4. Click the Log Sources icon.
The Log Sourceswindow is displayed.
5. Click Add.
The Add a log source window is displayed.
6. In the Log Source Name field, type a name for the log source.
7. In the Log Source Description field, type a description for the log source.
8. From the Log Source Type list, select CA Top Secret.
9. From the Protocol Configuration list, select Log File.
10. Configure the following values:
Table 56: CA Top Secret Log File Parameters
DescriptionParameter
Type an IP address, host name, or name to identify the eventsource. IP addresses or host names allow JSA to identify a logfile to a unique event source.
Log Source Identifier
231Copyright © 2018, Juniper Networks, Inc.
Chapter 27: CA Technologies
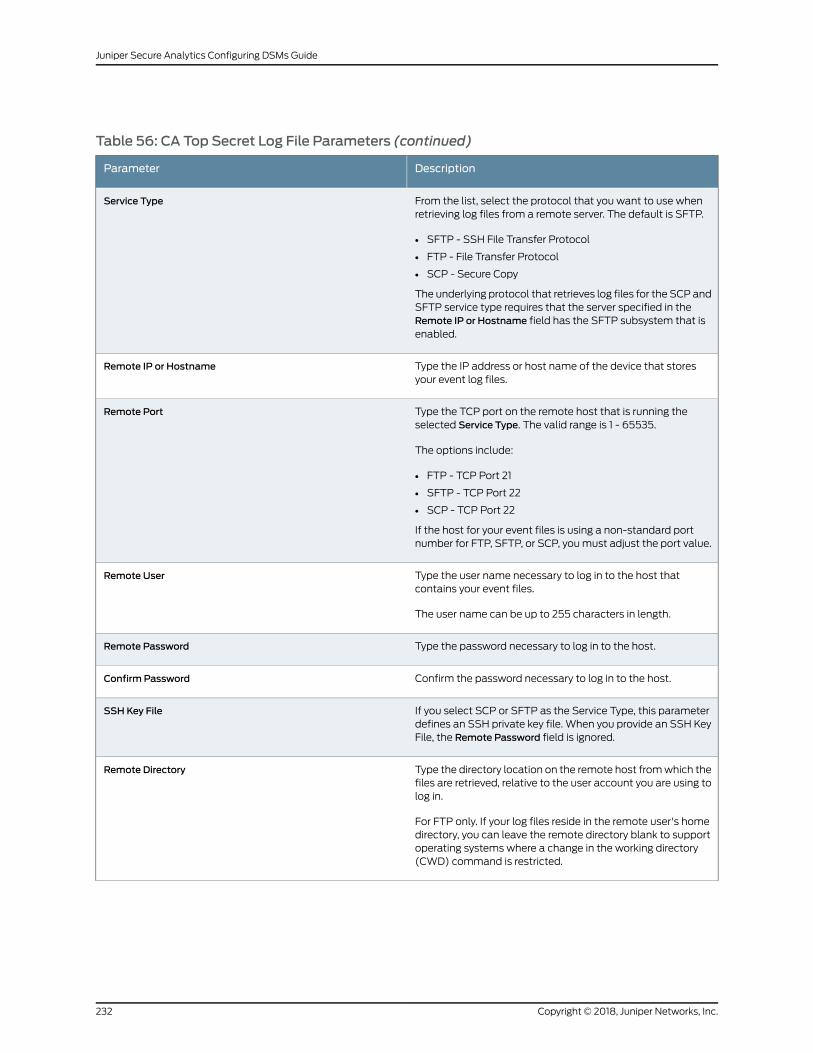
Table 56: CA Top Secret Log File Parameters (continued)
DescriptionParameter
From the list, select the protocol that you want to use whenretrieving log files from a remote server. The default is SFTP.
• SFTP - SSH File Transfer Protocol
• FTP - File Transfer Protocol
• SCP - Secure Copy
The underlying protocol that retrieves log files for the SCP andSFTP service type requires that the server specified in theRemote IP or Hostname field has the SFTP subsystem that isenabled.
Service Type
Type the IP address or host name of the device that storesyour event log files.
Remote IP or Hostname
Type the TCP port on the remote host that is running theselected Service Type. The valid range is 1 - 65535.
The options include:
• FTP - TCP Port 21
• SFTP - TCP Port 22
• SCP - TCP Port 22
If the host for your event files is using a non-standard portnumber for FTP, SFTP, or SCP, youmust adjust the port value.
Remote Port
Type the user name necessary to log in to the host thatcontains your event files.
The user name can be up to 255 characters in length.
Remote User
Type the password necessary to log in to the host.Remote Password
Confirm the password necessary to log in to the host.Confirm Password
If you select SCP or SFTP as the Service Type, this parameterdefines an SSH private key file. When you provide an SSH KeyFile, the Remote Password field is ignored.
SSH Key File
Type the directory location on the remote host fromwhich thefiles are retrieved, relative to the user account you are using tolog in.
For FTP only. If your log files reside in the remote user's homedirectory, you can leave the remote directory blank to supportoperating systems where a change in the working directory(CWD) command is restricted.
Remote Directory
Copyright © 2018, Juniper Networks, Inc.232
Juniper Secure Analytics Configuring DSMs Guide
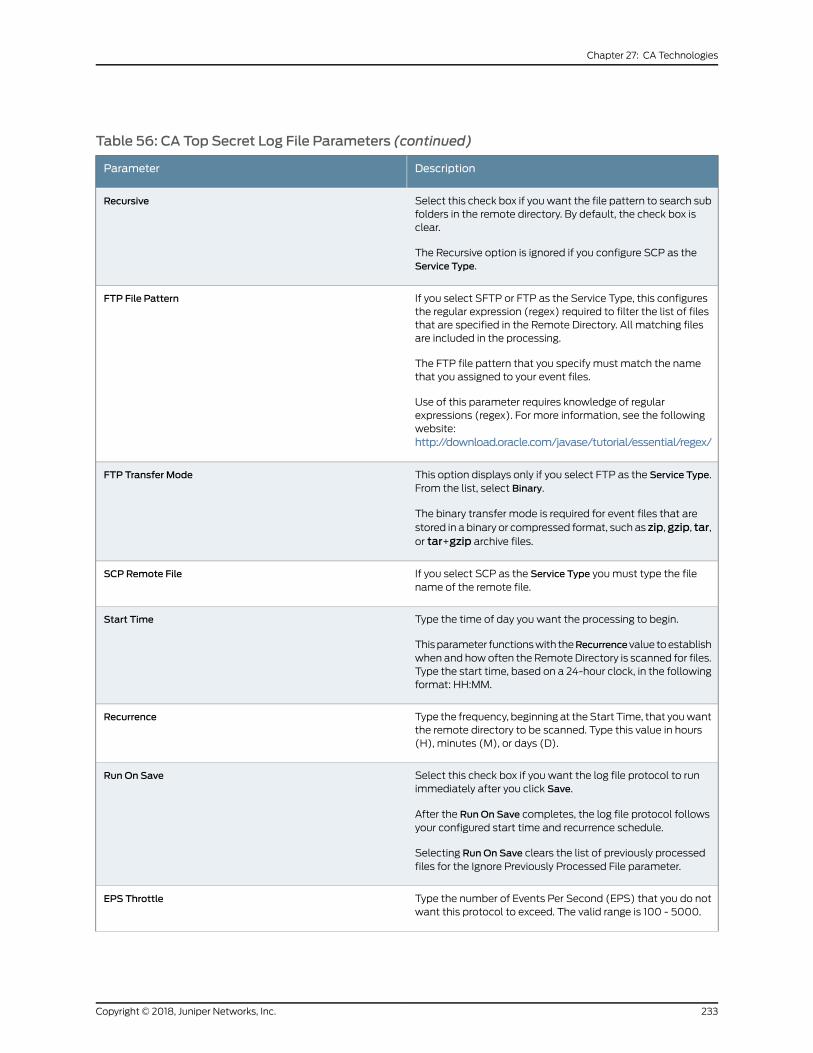
Table 56: CA Top Secret Log File Parameters (continued)
DescriptionParameter
Select this check box if youwant the file pattern to search subfolders in the remote directory. By default, the check box isclear.
The Recursive option is ignored if you configure SCP as theService Type.
Recursive
If you select SFTP or FTP as the Service Type, this configuresthe regular expression (regex) required to filter the list of filesthat are specified in the Remote Directory. All matching filesare included in the processing.
The FTP file pattern that you specify must match the namethat you assigned to your event files.
Use of this parameter requires knowledge of regularexpressions (regex). For more information, see the followingwebsite:http://download.oracle.com/javase/tutorial/essential/regex/
FTP File Pattern
This option displays only if you select FTP as the Service Type.From the list, select Binary.
The binary transfer mode is required for event files that arestored in a binary or compressed format, such as zip,gzip, tar,or tar+gzip archive files.
FTP Transfer Mode
If you select SCP as the Service Type youmust type the filename of the remote file.
SCP Remote File
Type the time of day you want the processing to begin.
Thisparameter functionswith theRecurrencevalue toestablishwhen and howoften the Remote Directory is scanned for files.Type the start time, based on a 24-hour clock, in the followingformat: HH:MM.
Start Time
Type the frequency, beginning at theStart Time, that youwantthe remote directory to be scanned. Type this value in hours(H), minutes (M), or days (D).
Recurrence
Select this check box if you want the log file protocol to runimmediately after you click Save.
After the RunOn Save completes, the log file protocol followsyour configured start time and recurrence schedule.
Selecting RunOn Save clears the list of previously processedfiles for the Ignore Previously Processed File parameter.
RunOn Save
Type the number of Events Per Second (EPS) that you do notwant this protocol to exceed. The valid range is 100 - 5000.
EPS Throttle
233Copyright © 2018, Juniper Networks, Inc.
Chapter 27: CA Technologies
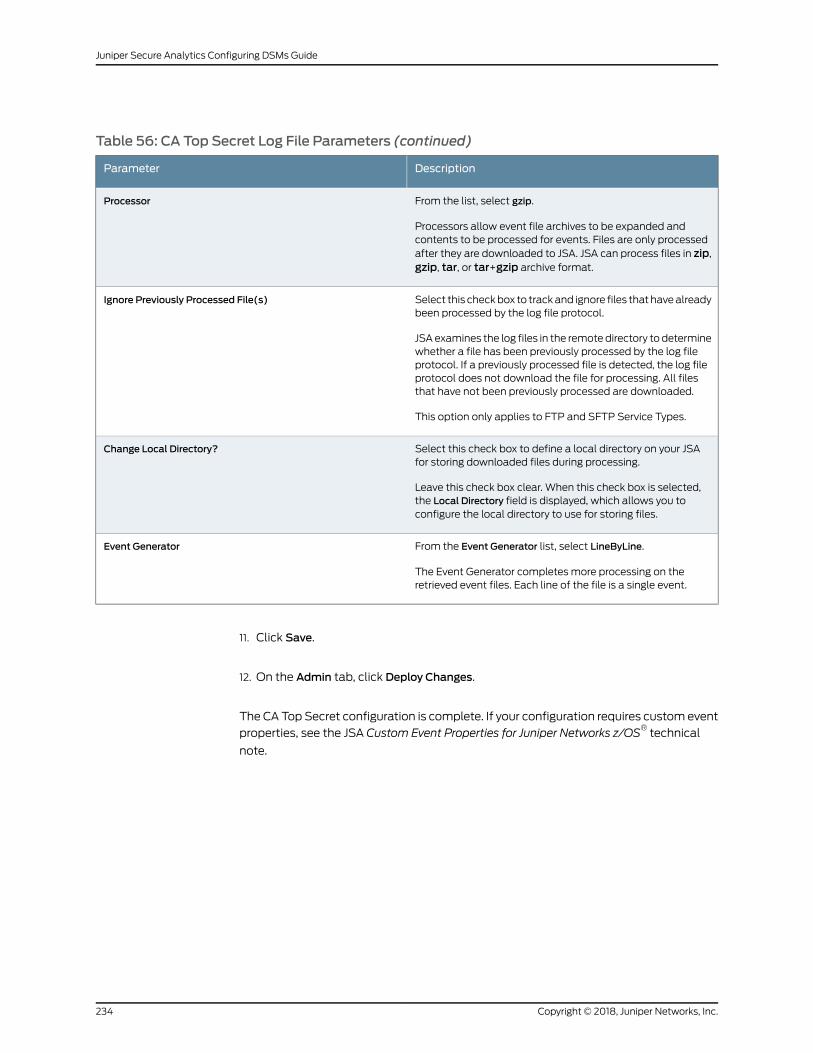
Table 56: CA Top Secret Log File Parameters (continued)
DescriptionParameter
From the list, select gzip.
Processors allow event file archives to be expanded andcontents to be processed for events. Files are only processedafter they are downloaded to JSA. JSA can process files in zip,gzip, tar, or tar+gzip archive format.
Processor
Select this checkbox to trackand ignore files that havealreadybeen processed by the log file protocol.
JSA examines the log files in the remote directory to determinewhether a file has been previously processed by the log fileprotocol. If a previously processed file is detected, the log fileprotocol does not download the file for processing. All filesthat have not been previously processed are downloaded.
This option only applies to FTP and SFTP Service Types.
Ignore Previously Processed File(s)
Select this check box to define a local directory on your JSAfor storing downloaded files during processing.
Leave this check box clear. When this check box is selected,the Local Directory field is displayed, which allows you toconfigure the local directory to use for storing files.
Change Local Directory?
From the Event Generator list, select LineByLine.
The Event Generator completes more processing on theretrieved event files. Each line of the file is a single event.
Event Generator
11. Click Save.
12. On the Admin tab, click Deploy Changes.
The CA Top Secret configuration is complete. If your configuration requires custom event
properties, see the JSA Custom Event Properties for Juniper Networks z/OS®technical
note.
Copyright © 2018, Juniper Networks, Inc.234
Juniper Secure Analytics Configuring DSMs Guide
CHAPTER 28
Check Point
• Check Point on page 235
• Check Point on page 236
• Check Point Multi-Domain Management (Provider-1) on page 249
Check Point
Several Check Point products can be integrated with JSA.
The following products are supported:
• Firewall
• SmartDefense
• IPS
• Anti Malware
• Anti-Bot
• Antivirus
• Mobile Access
• DDoS Protector
• Security Gateway/Management
• Threat Emulation
• URL Filtering
• DLP
• Application Control
• Identity Logging
• VPN
• Endpoint Security
235Copyright © 2018, Juniper Networks, Inc.
Check Point
You can configure JSA to integratewith a Check Point device by employing one of several
methods.
Employ one of the following methods:
• Integration Of Check Point by Using OPSEC on page 236
• Integrate Check Point by Using Syslog on page 245
• IntegrationOfCheckPoint Firewall Events fromExternalSyslogForwardersonpage247
NOTE: Depending on your Operating System, the procedures for the CheckPoint devicemight vary. The following procedures are based on the CheckPoint SecurePlatformOperating system.
• Integration Of Check Point by Using OPSEC on page 236
• Adding a Check Point Host on page 237
• Creating an OPSEC Application Object on page 237
• Locating the Log Source SIC on page 238
• Configuring an OPSEC/LEA Log Source in JSA on page 239
• Edit Your OPSEC Communications Configuration on page 241
• Updating Your Check Point OPSEC Log Source on page 241
• Changing the Default Port for OPSEC LEA Communication on page 242
• Configuring OPSEC LEA for Unencrypted Communications on page 243
• IntegrationOfCheckPoint Firewall Events fromExternalSyslogForwardersonpage247
Integration Of Check Point by Using OPSEC
This section describes how to ensure that JSA accepts Check Point events using Open
Platform for Security (OPSEC/LEA).
To integrate Check Point OPSEC/LEA with JSA, youmust create two Secure Internal
Communication (SIC) filesandenter the information in to JSAasaCheckPoint log source.
Check Point Configuration Overview
To integrate Check Point with JSA, youmust complete the following procedures in
sequence:
1. Add JSA as a host for Check Point.
2. Add an OPSEC application to Check Point.
3. Locate the Log Source Secure Internal Communications DN.
Copyright © 2018, Juniper Networks, Inc.236
Juniper Secure Analytics Configuring DSMs Guide
4. In JSA, configure the OPSEC LEA protocol.
5. Verify the OPSEC/LEA communications configuration.
Adding a Check Point Host
You can add JSA as a host in Check Point SmartCenter:
1. Log in to the Check Point SmartDashboard user interface.
2. SelectManage >Network Objects >New >Node >Host.
3. Enter the information for your Check Point host:
• Name: JSA
• IP address: IP address of JSA
• Comment: You do not need to comment.
4. ClickOK.
5. Select Close.
You are now ready to create an OPSEC Application Object for Check Point.
Creating an OPSEC Application Object
After you add JSA as a host in Check Point SmartCenter, you can create the OPSEC
Application Object:
1. Open the Check Point SmartDashboard user interface.
2. SelectManage>ServersandOPSECapplications>New>OPSECApplicationProperties.
3. Assign a name to the OPSEC Application Object.
4. From the Host list, select JSA.
5. From the Vendor list, select User Defined.
6. In Client Entities, select the LEA check box.
7. To generate a Secure Internal Communication (SIC) DN, click Communication.
8. Click Initialize.
The window updates the Trust state from Uninitialized to Initialized but trust not
established.
237Copyright © 2018, Juniper Networks, Inc.
Chapter 28: Check Point

9. Click Close.
TheOPSEC Application Propertieswindow is displayed.
10.Write down or copy the displayed SIC DN to a text file.
NOTE: The displayed SIC value is needed for the OPSEC ApplicationObject SIC Attribute parameter when you configure the Check Point logsource in JSA.
The OPSEC Application Object SIC resembles the following example:CN=JSA -OPSEC,O=cpmodule..tdfaaz.
You are now ready to locate the log source SIC for Check Point.
Locating the Log Source SIC
After you create the OPSEC Application Object, you can locate the Log Source SIC from
the Check Point SmartDashboard:
1. SelectManage >Network Objects.
2. Select your Check Point Log Host object.
NOTE: Youmust confirmwhether the Check Point Log Host is a separateobject in your configuration from the Check Point Management Server. Inmost cases, the Check Point Log Host is the same object as the CheckPoint Management Server.
3. Click Edit.
The Check Point Host General Propertieswindow is displayed.
4. Copy the Secure Internal Communication (SIC).
Copyright © 2018, Juniper Networks, Inc.238
Juniper Secure Analytics Configuring DSMs Guide
NOTE: DependingonyourCheckPointversion, theCommunicationbutton
does display the SIC attribute. You can locate the SIC attribute from theCheck Point Management Server command-line interface. Youmust usethecpca_client lscert
command from the command-line interface of the Management Serverto display all certificates.
NOTE: The Log Source SIC Attribute resembles the followingexample: cn=cp_mgmt,o=cpmodule...tdfaaz. For more
information, seeyourCheckPointCommandLine InterfaceGuide.
Youmust now install the Security Policy from the Check Point SmartDashboard user
interface.
5. Select Policy >Install >OK.
6. Select Policy >Install Database >OK
You are now ready to configure the OPSEC LEA protocol.
Configuring an OPSEC/LEA Log Source in JSA
After you locate the Log Source SIC, you configure the OPSEC LEA protocol:
1. Log in to JSA.
2. Click the Admin tab.
3. Click the Log Sources icon.
4. Click Add.
5. In the Log Source Name field, type a name for your log source.
6. In the Log Source Description field, type a description for the log source.
7. From the Log Source Type list, select Check Point.
8. Using the Protocol Configuration list, selectOPSEC/LEA.
9. Configure the following values:
239Copyright © 2018, Juniper Networks, Inc.
Chapter 28: Check Point
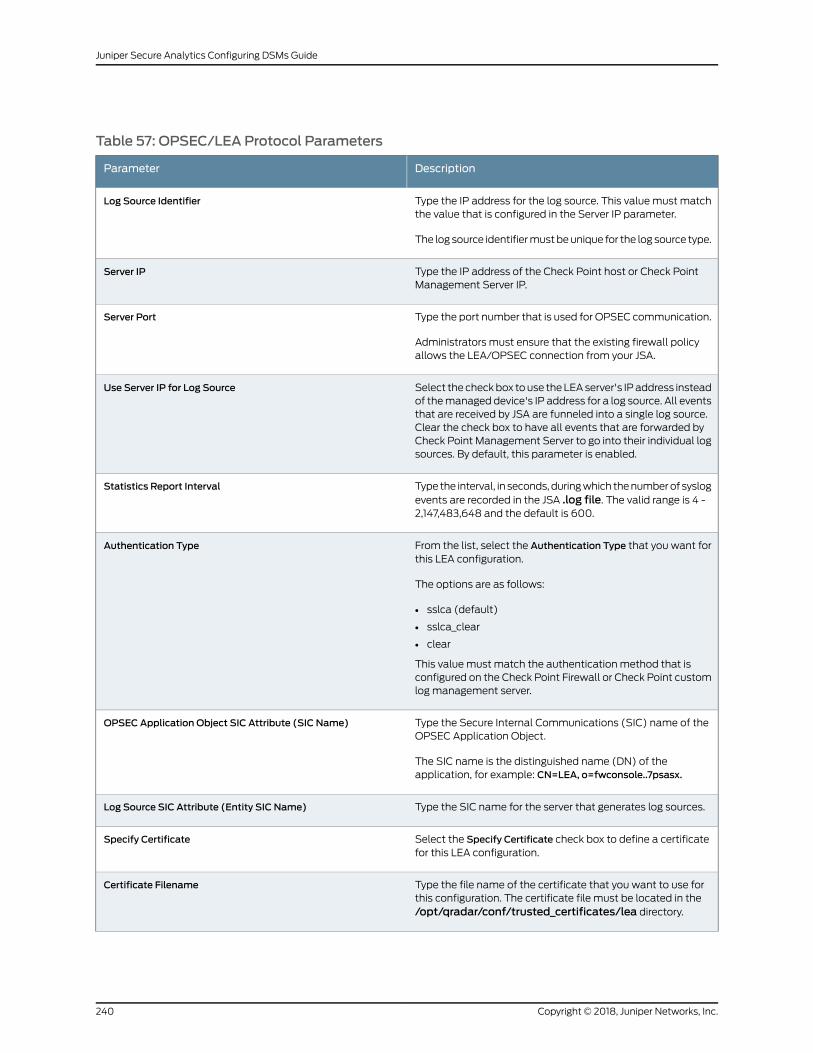
Table 57: OPSEC/LEA Protocol Parameters
DescriptionParameter
Type the IP address for the log source. This value must matchthe value that is configured in the Server IP parameter.
The log source identifiermustbeunique for the log source type.
Log Source Identifier
Type the IP address of the Check Point host or Check PointManagement Server IP.
Server IP
Type the port number that is used for OPSEC communication.
Administrators must ensure that the existing firewall policyallows the LEA/OPSEC connection from your JSA.
Server Port
Select the checkbox touse theLEAserver's IPaddress insteadof themanaged device's IP address for a log source. All eventsthat are received by JSA are funneled into a single log source.Clear the check box to have all events that are forwarded byCheck Point Management Server to go into their individual logsources. By default, this parameter is enabled.
Use Server IP for Log Source
Type the interval, in seconds, duringwhich thenumberof syslogevents are recorded in the JSA .log file. The valid range is 4 -2,147,483,648 and the default is 600.
Statistics Report Interval
From the list, select the Authentication Type that you want forthis LEA configuration.
The options are as follows:
• sslca (default)
• sslca_clear
• clear
This value must match the authentication method that isconfigured on the Check Point Firewall or Check Point customlogmanagement server.
Authentication Type
Type the Secure Internal Communications (SIC) name of theOPSEC Application Object.
The SIC name is the distinguished name (DN) of theapplication, for example: CN=LEA, o=fwconsole..7psasx.
OPSEC Application Object SIC Attribute (SIC Name)
Type the SIC name for the server that generates log sources.Log Source SIC Attribute (Entity SIC Name)
Select the Specify Certificate check box to define a certificatefor this LEA configuration.
Specify Certificate
Type the file name of the certificate that you want to use forthis configuration. The certificate file must be located in the/opt/qradar/conf/trusted_certificates/lea directory.
Certificate Filename
Copyright © 2018, Juniper Networks, Inc.240
Juniper Secure Analytics Configuring DSMs Guide
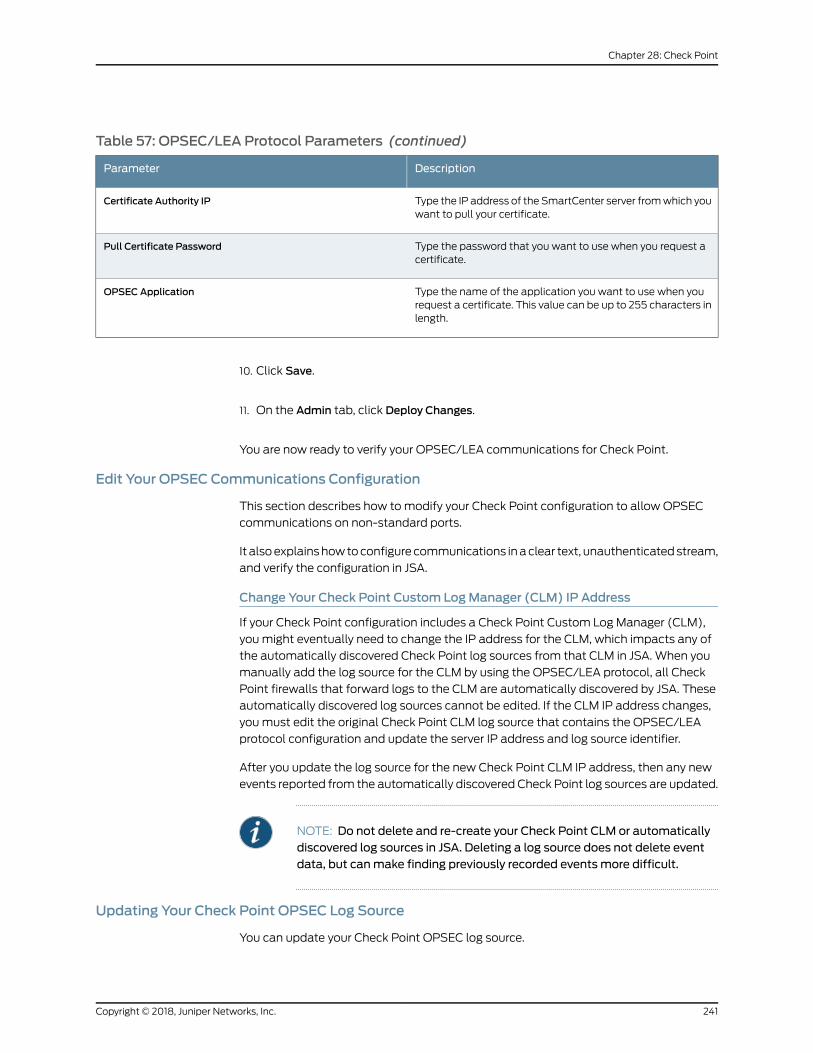
Table 57: OPSEC/LEA Protocol Parameters (continued)
DescriptionParameter
Type the IP address of the SmartCenter server fromwhich youwant to pull your certificate.
Certificate Authority IP
Type the password that you want to use when you request acertificate.
Pull Certificate Password
Type the name of the application you want to use when yourequest a certificate. This value can be up to 255 characters inlength.
OPSEC Application
10. Click Save.
11. On the Admin tab, click Deploy Changes.
You are now ready to verify your OPSEC/LEA communications for Check Point.
Edit Your OPSEC Communications Configuration
This section describes how tomodify your Check Point configuration to allow OPSEC
communications on non-standard ports.
It alsoexplainshowtoconfigurecommunications inaclear text, unauthenticatedstream,
and verify the configuration in JSA.
Change Your Check Point Custom LogManager (CLM) IP Address
If your Check Point configuration includes a Check Point Custom Log Manager (CLM),
youmight eventually need to change the IP address for the CLM, which impacts any of
the automatically discovered Check Point log sources from that CLM in JSA. When you
manually add the log source for the CLM by using the OPSEC/LEA protocol, all Check
Point firewalls that forward logs to the CLM are automatically discovered by JSA. These
automatically discovered log sources cannot be edited. If the CLM IP address changes,
youmust edit the original Check Point CLM log source that contains the OPSEC/LEA
protocol configuration and update the server IP address and log source identifier.
After you update the log source for the new Check Point CLM IP address, then any new
events reported from the automatically discovered Check Point log sources are updated.
NOTE: Do not delete and re-create your Check Point CLM or automaticallydiscovered log sources in JSA. Deleting a log source does not delete eventdata, but canmake finding previously recorded events more difficult.
Updating Your Check Point OPSEC Log Source
You can update your Check Point OPSEC log source.
241Copyright © 2018, Juniper Networks, Inc.
Chapter 28: Check Point
1. Log in to JSA.
2. Click the Admin tab.
3. On the navigation menu, click Data Sources.
4. Click the Log Sources icon.
5. Select theoriginal CheckPointCLM log source that contains theOPSEC/LEAprotocol
configuration and click Edit.
6. In the LogSource Identifier field, typeanew identifyingnameof yourCheckPointCLM.
7. In the Server IP field, type the new IP address of your Check Point CLM.
8. Click Save.
The IP address update for your Check Point CLM in JSA is complete.
Changing the Default Port for OPSEC LEA Communication
Change the default port (18184) on which OPSEC LEA communicates.
1. At the command-line prompt of your Check Point SmartCenter Server, type the
following command to stop the firewall services:
cpstop
2. Depending on your Check Point SmartCenter Server operating system, open the
following file:
• Linux - $FWDIR\conf\fwopsec.conf
• Windows -%FWDIR%\conf\fwopsec.conf
The default contents of this file are as follows:
# The VPN-1 default settings are: # # sam_server auth_port 0 # sam_server port 18183 # # lea_server auth_port 18184 # lea_server port 0 # # ela_server auth_port 18187 # ela_server port 0 # # cpmi_server auth_port 18190 # # uaa_server auth_port 19191 # uaa_server port 0 #
3. Change the default lea_server auth_port from 18184 to another port number.
4. Remove the hash (#) mark from that line.
Copyright © 2018, Juniper Networks, Inc.242
Juniper Secure Analytics Configuring DSMs Guide
5. Save and close the file.
6. Type the following command to start the firewall services:
cpstart
Configuring OPSEC LEA for Unencrypted Communications
You can configure the OPSEC LEA protocol for unencrypted communications:
1. At thecommand-linepromptof yourCheckPointSmartCenterServer, stop the firewall
services by typing the following command:
cpstop
2. Depending on your Check Point SmartCenter Server operating system, open the
following file:
• Linux - $FWDIR\conf\fwopsec.conf
• Windows -%FWDIR%\conf\fwopsec.conf
3. Change the default lea_server auth_port from 18184 to 0.
4. Change the default lea_server port from 0 to 18184.
5. Remove the hash (#) marks from both lines.
6. Save and close the file.
7. Type the following command to start the firewall services:
cpstart
Configuring JSA to Receive Events from a Check Point Device
Configure JSA to receive events from a Check Point device.
1. Login to JSA.
2. Click the Admin tab.
3. On the navigation menu, click Data Sources.
4. Click the Log Sources icon.
5. Click Add.
6. From the Log Source Type list, select Check Point.
243Copyright © 2018, Juniper Networks, Inc.
Chapter 28: Check Point
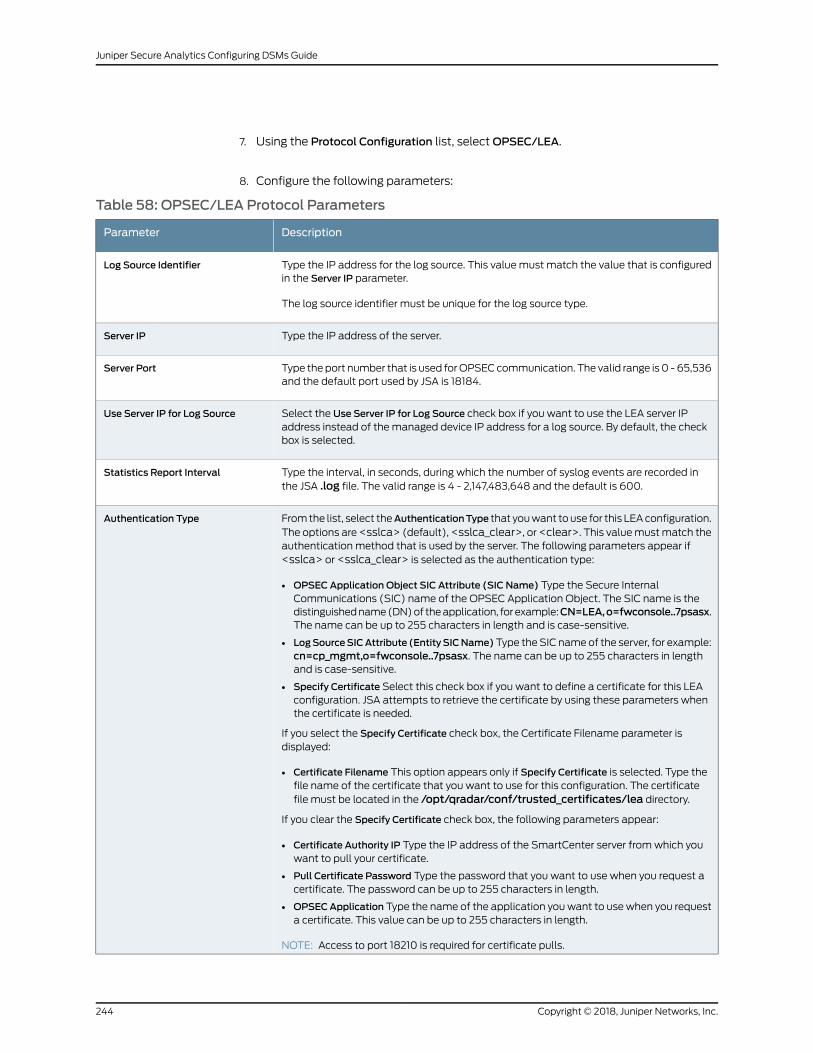
7. Using the Protocol Configuration list, selectOPSEC/LEA.
8. Configure the following parameters:
Table 58: OPSEC/LEA Protocol Parameters
DescriptionParameter
Type the IP address for the log source. This value must match the value that is configuredin the Server IP parameter.
The log source identifier must be unique for the log source type.
Log Source Identifier
Type the IP address of the server.Server IP
Type theport number that is used forOPSECcommunication. The valid range is 0 -65,536and the default port used by JSA is 18184.
Server Port
Select the Use Server IP for Log Source check box if you want to use the LEA server IPaddress instead of the managed device IP address for a log source. By default, the checkbox is selected.
Use Server IP for Log Source
Type the interval, in seconds, during which the number of syslog events are recorded inthe JSA .log file. The valid range is 4 - 2,147,483,648 and the default is 600.
Statistics Report Interval
Fromthe list, select theAuthenticationType that youwant touse for this LEAconfiguration.The options are<sslca> (default),<sslca_clear>, or<clear>. This valuemustmatch theauthentication method that is used by the server. The following parameters appear if<sslca> or <sslca_clear> is selected as the authentication type:
• OPSEC Application Object SIC Attribute (SIC Name) Type the Secure InternalCommunications (SIC) name of the OPSEC Application Object. The SIC name is thedistinguishedname(DN)of theapplication, forexample:CN=LEA,o=fwconsole..7psasx.The name can be up to 255 characters in length and is case-sensitive.
• LogSourceSICAttribute (EntitySICName)Type theSIC nameof the server, for example:cn=cp_mgmt,o=fwconsole..7psasx. The name can be up to 255 characters in lengthand is case-sensitive.
• Specify Certificate Select this check box if you want to define a certificate for this LEAconfiguration. JSA attempts to retrieve the certificate by using these parameters whenthe certificate is needed.
If you select the Specify Certificate check box, the Certificate Filename parameter isdisplayed:
• Certificate Filename This option appears only if Specify Certificate is selected. Type thefile name of the certificate that you want to use for this configuration. The certificatefile must be located in the /opt/qradar/conf/trusted_certificates/lea directory.
If you clear the Specify Certificate check box, the following parameters appear:
• Certificate Authority IP Type the IP address of the SmartCenter server fromwhich youwant to pull your certificate.
• Pull Certificate Password Type the password that you want to use when you request acertificate. The password can be up to 255 characters in length.
• OPSECApplication Type the name of the application youwant to usewhen you requesta certificate. This value can be up to 255 characters in length.
NOTE: Access to port 18210 is required for certificate pulls.
Authentication Type
Copyright © 2018, Juniper Networks, Inc.244
Juniper Secure Analytics Configuring DSMs Guide
9. Click Save.
10. On the Admin tab, click Deploy Changes.
Integrate Check Point by Using Syslog
This section describes how to ensure that the JSACheck Point DSMs accept Check Point
events with syslog.
Before you configure JSA to integrate with a Check Point device, youmust take the
following steps:
NOTE: If Check Point SmartCenter is installed onMicrosoftWindows, youmust integrate Check Point with JSA by using OPSEC.
1. Type the following command to access the Check Point console as an expert user:
expert
A password prompt appears.
2. Type your expert console password. Press the Enter key.
3. Open the following file:
/etc/rc.d/rc3.d/S99local
4. Add the following lines:
$FWDIR/bin/fw log -ftn | /usr/bin/logger -p <facility>.<priority> /dev/null 2>&1 &
Where:
• <facility> is a syslog facility, for example, local3.
• <priority> is a syslog priority, for example, info.
For example:
$FWDIR/bin/fw log -ftn | /usr/bin/logger -p local3.info > /dev/null 2>&1 &
5. Save and close the file.
6. Open the syslog.conf file.
7. Add the following line:
<facility>.<priority> <TAB><TAB>@<host>
Where:
• <facility> is the syslog facility, for example, local3. This valuemustmatch the value
that you typed in Step 4.
• <priority> is the syslog priority, for example, info or notice. This value must match
the value that you typed in Step 4.
<TAB> indicates youmust press the Tab key.
245Copyright © 2018, Juniper Networks, Inc.
Chapter 28: Check Point
<host> indicates the JSA Console or managed host.
8. Save and close the file.
9. Enter the following command to restart syslog:
• In Linux: service syslog restart
• In Solaris: /etc/init.d/syslog start
10. Enter the following command:
nohup$FWDIR/bin/fw log -ftn | /usr/bin/logger -p<facility>.<priority>>/dev/null 2>&1
&
Where:
• <facility> is a Syslog facility, for example, local3. This value must match the value
that you typed in Step 4.
• <priority> is a Syslog priority, for example, info. This value must match the value
that you typed in Step 4.
The configuration is complete. The log source is added to JSA as Check Point syslog
events are automatically discovered. Events that are forwarded to JSA are displayed on
the Log Activity tab.
Configuring a Log Source
JSA automatically discovers and creates a log source for syslog events fromCheck Point.
The following configuration steps are optional.
1. Log in to JSA.
2. Click the Admin tab.
3. On the navigation menu, click Data Sources.
4. Click the Log Sources icon.
5. Click Add.
6. In the Log Source Name field, type a name for your log source.
7. In the Log Source Description field, type a description for the log source.
8. From the Log Source Type list, select Check Point.
9. Using the Protocol Configuration list, select Syslog.
10. Configure the following values:
Copyright © 2018, Juniper Networks, Inc.246
Juniper Secure Analytics Configuring DSMs Guide
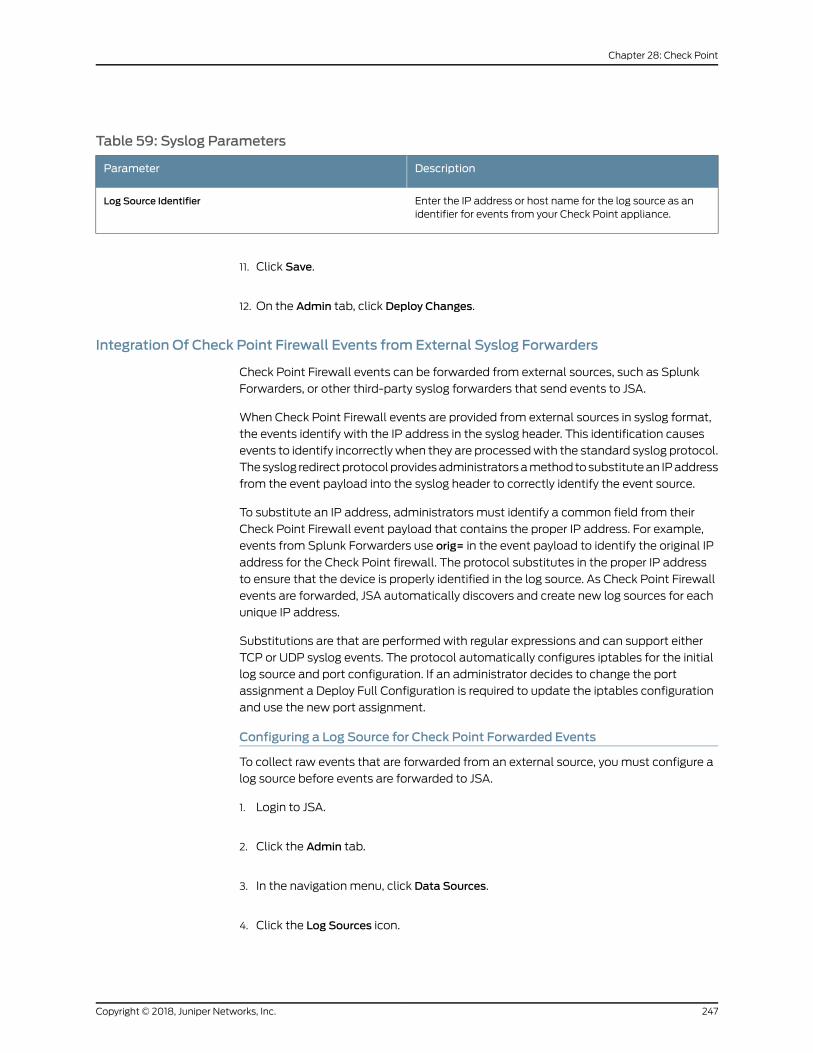
Table 59: Syslog Parameters
DescriptionParameter
Enter the IP address or host name for the log source as anidentifier for events from your Check Point appliance.
Log Source Identifier
11. Click Save.
12. On the Admin tab, click Deploy Changes.
Integration Of Check Point Firewall Events from External Syslog Forwarders
Check Point Firewall events can be forwarded from external sources, such as Splunk
Forwarders, or other third-party syslog forwarders that send events to JSA.
When Check Point Firewall events are provided from external sources in syslog format,
the events identify with the IP address in the syslog header. This identification causes
events to identify incorrectly when they are processedwith the standard syslog protocol.
Thesyslog redirectprotocolprovidesadministratorsamethod tosubstitutean IPaddress
from the event payload into the syslog header to correctly identify the event source.
To substitute an IP address, administrators must identify a common field from their
Check Point Firewall event payload that contains the proper IP address. For example,
events from Splunk Forwarders use orig= in the event payload to identify the original IP
address for the Check Point firewall. The protocol substitutes in the proper IP address
to ensure that the device is properly identified in the log source. As Check Point Firewall
events are forwarded, JSA automatically discovers and create new log sources for each
unique IP address.
Substitutions are that are performed with regular expressions and can support either
TCP or UDP syslog events. The protocol automatically configures iptables for the initial
log source and port configuration. If an administrator decides to change the port
assignment a Deploy Full Configuration is required to update the iptables configuration
and use the new port assignment.
Configuring a Log Source for Check Point Forwarded Events
To collect raw events that are forwarded from an external source, youmust configure a
log source before events are forwarded to JSA.
1. Login to JSA.
2. Click the Admin tab.
3. In the navigation menu, click Data Sources.
4. Click the Log Sources icon.
247Copyright © 2018, Juniper Networks, Inc.
Chapter 28: Check Point
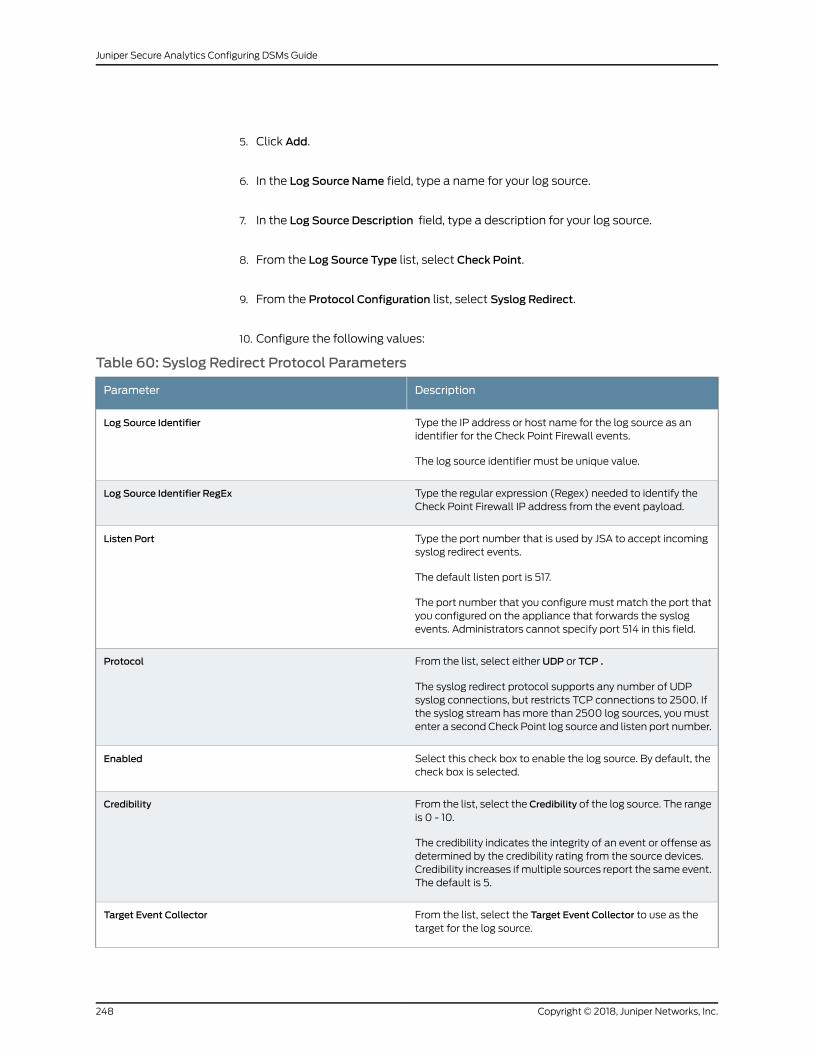
5. Click Add.
6. In the Log Source Name field, type a name for your log source.
7. In the Log Source Description field, type a description for your log source.
8. From the Log Source Type list, select Check Point.
9. From the Protocol Configuration list, select Syslog Redirect.
10. Configure the following values:
Table 60: Syslog Redirect Protocol Parameters
DescriptionParameter
Type the IP address or host name for the log source as anidentifier for the Check Point Firewall events.
The log source identifier must be unique value.
Log Source Identifier
Type the regular expression (Regex) needed to identify theCheck Point Firewall IP address from the event payload.
Log Source Identifier RegEx
Type the port number that is used by JSA to accept incomingsyslog redirect events.
The default listen port is 517.
The port number that you configuremust match the port thatyou configured on the appliance that forwards the syslogevents. Administrators cannot specify port 514 in this field.
Listen Port
From the list, select either UDP or TCP .
The syslog redirect protocol supports any number of UDPsyslog connections, but restricts TCP connections to 2500. Ifthe syslog stream hasmore than 2500 log sources, youmustenter a second Check Point log source and listen port number.
Protocol
Select this check box to enable the log source. By default, thecheck box is selected.
Enabled
From the list, select the Credibility of the log source. The rangeis 0 - 10.
The credibility indicates the integrity of an event or offense asdetermined by the credibility rating from the source devices.Credibility increases ifmultiple sources report the same event.The default is 5.
Credibility
From the list, select the Target Event Collector to use as thetarget for the log source.
Target Event Collector
Copyright © 2018, Juniper Networks, Inc.248
Juniper Secure Analytics Configuring DSMs Guide
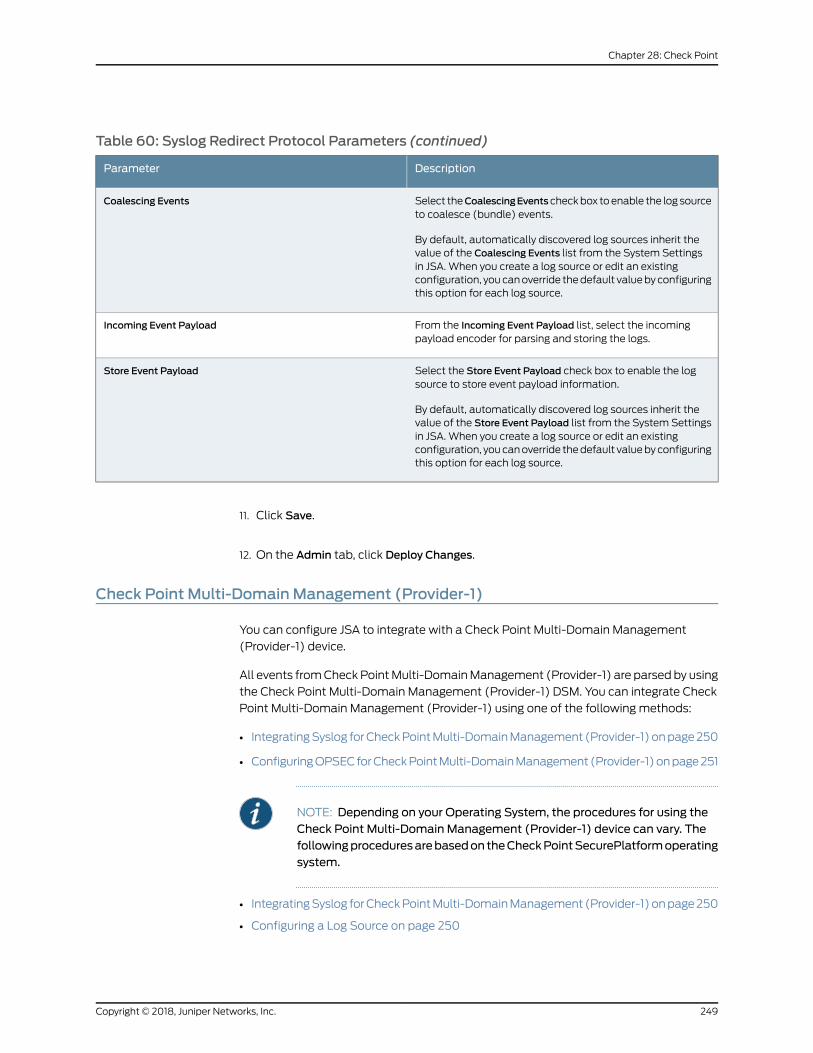
Table 60: Syslog Redirect Protocol Parameters (continued)
DescriptionParameter
Select theCoalescingEventscheckbox toenable the logsourceto coalesce (bundle) events.
By default, automatically discovered log sources inherit thevalue of the Coalescing Events list from the System Settingsin JSA. When you create a log source or edit an existingconfiguration, youcanoverride thedefault valuebyconfiguringthis option for each log source.
Coalescing Events
From the Incoming Event Payload list, select the incomingpayload encoder for parsing and storing the logs.
Incoming Event Payload
Select the Store Event Payload check box to enable the logsource to store event payload information.
By default, automatically discovered log sources inherit thevalue of the Store Event Payload list from the System Settingsin JSA. When you create a log source or edit an existingconfiguration, youcanoverride thedefault valuebyconfiguringthis option for each log source.
Store Event Payload
11. Click Save.
12. On the Admin tab, click Deploy Changes.
Check Point Multi-DomainManagement (Provider-1)
You can configure JSA to integrate with a Check Point Multi-Domain Management
(Provider-1) device.
All events fromCheck PointMulti-DomainManagement (Provider-1) are parsed by using
the Check Point Multi-Domain Management (Provider-1) DSM. You can integrate Check
Point Multi-Domain Management (Provider-1) using one of the following methods:
• IntegratingSyslog forCheckPointMulti-DomainManagement (Provider-1)onpage250
• ConfiguringOPSECforCheckPointMulti-DomainManagement(Provider-1)onpage251
NOTE: Depending on your Operating System, the procedures for using theCheck Point Multi-Domain Management (Provider-1) device can vary. Thefollowingproceduresarebasedon theCheckPointSecurePlatformoperatingsystem.
• IntegratingSyslog forCheckPointMulti-DomainManagement (Provider-1)onpage250
• Configuring a Log Source on page 250
249Copyright © 2018, Juniper Networks, Inc.
Chapter 28: Check Point
• ConfiguringOPSECforCheckPointMulti-DomainManagement(Provider-1)onpage251
• Configuring an OPSEC Log Source on page 252
Integrating Syslog for Check Point Multi-DomainManagement (Provider-1)
Thismethod ensures that the Check PointMulti-DomainManagement (Provider-1) DSM
for JSA accepts Check Point Multi-Domain Management (Provider-1) events by using
syslog.
JSA records all relevant Check Point Multi-Domain Management (Provider-1) events.
Configure syslog on your Check Point Multi-Domain Management (Provider-1) device:
1. Type the following command to access the console as an expert user:
expert
A password prompt is displayed.
2. Type your expert console password. Press the Enter key.
3. Type the following command:
csh
4. Select the wanted customer logs:
mdsenv <customer name>
5. Input the following command:
# nohup $FWDIR/bin/fw log -ftn | /usr/bin/logger -p <facility>.<priority> 2>&1 &
Where:
• <facility> is a syslog facility, for example, local3.
• <priority> is a syslog priority, for example, info.
You are now ready to configure the log source in JSA.
The configuration is complete. The log source is added to JSA as the Check Point
Multi-Domain Management Provider-1 syslog events are automatically discovered.
Events that are forwarded to JSA are displayed on the Log Activity tab.
Configuring a Log Source
JSA automatically discovers and creates a log source for syslog events from Check Point
Multi-Domain Management (Provider-1) as Check Point FireWall-1 events.
The following configuration steps are optional. To manually configure a log source for
Check Point Multi-Domain Management (Provider-1) syslog events:
Copyright © 2018, Juniper Networks, Inc.250
Juniper Secure Analytics Configuring DSMs Guide
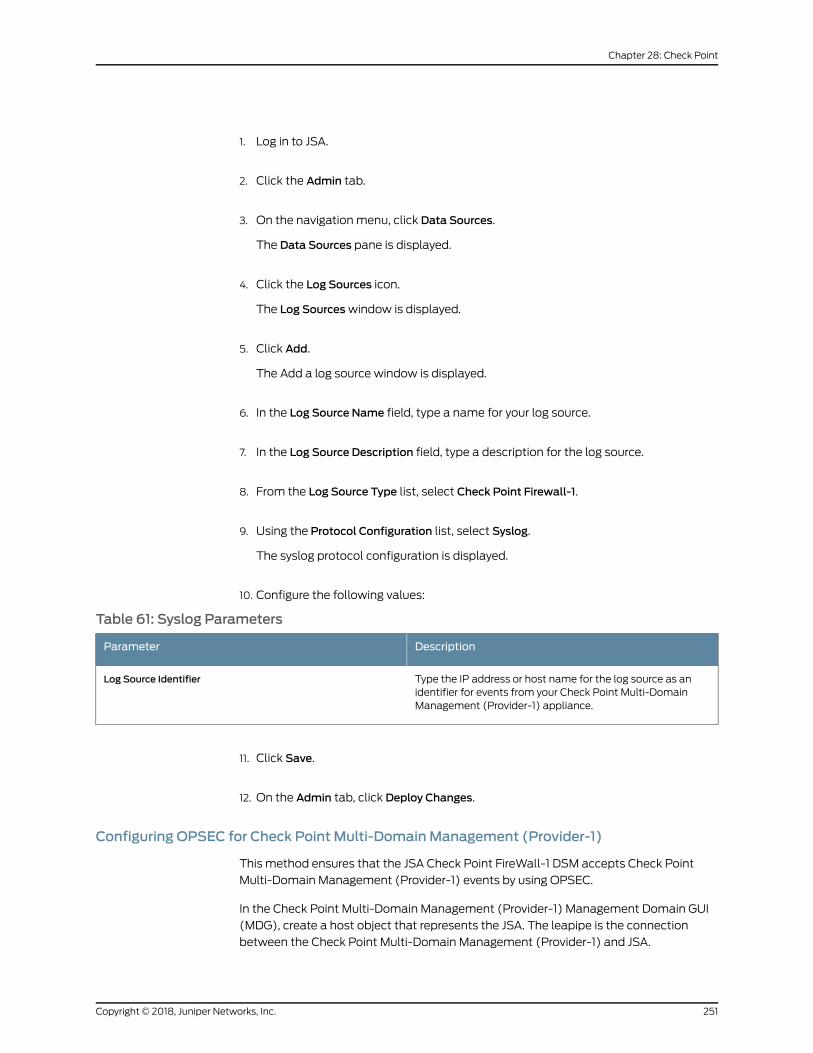
1. Log in to JSA.
2. Click the Admin tab.
3. On the navigation menu, click Data Sources.
The Data Sources pane is displayed.
4. Click the Log Sources icon.
The Log Sourceswindow is displayed.
5. Click Add.
The Add a log source window is displayed.
6. In the Log Source Name field, type a name for your log source.
7. In the Log Source Description field, type a description for the log source.
8. From the Log Source Type list, select Check Point Firewall-1.
9. Using the Protocol Configuration list, select Syslog.
The syslog protocol configuration is displayed.
10. Configure the following values:
Table 61: Syslog Parameters
DescriptionParameter
Type the IP address or host name for the log source as anidentifier for events from your Check Point Multi-DomainManagement (Provider-1) appliance.
Log Source Identifier
11. Click Save.
12. On the Admin tab, click Deploy Changes.
Configuring OPSEC for Check Point Multi-DomainManagement (Provider-1)
This method ensures that the JSA Check Point FireWall-1 DSM accepts Check Point
Multi-Domain Management (Provider-1) events by using OPSEC.
In the Check Point Multi-Domain Management (Provider-1) Management Domain GUI
(MDG), create a host object that represents the JSA. The leapipe is the connection
between the Check Point Multi-Domain Management (Provider-1) and JSA.
251Copyright © 2018, Juniper Networks, Inc.
Chapter 28: Check Point
To reconfigure the Check Point Multi-Domain Management (Provider-1) SmartCenter
(MDG):
1. To create a host object, open the Check Point SmartDashboard user interface and
selectManage >Network Objects >New >Node >Host.
2. Type the Name, IP address, and write comments if needed.
3. ClickOK.
4. Select Close.
5. To create the OPSEC connection, selectManage >Servers and OPSEC Applications
>New >OPSEC Application Properties.
6. Type a Name, and write comments if needed.
The Name that you enter must be different than the name used in Step 2.
7. From the Host drop-downmenu, select the JSA host object that you created.
8. From Application Properties, select User Defined as the Vendor type.
9. From Client Entries, select LEA.
10. SelectOK and then Close.
11. To install the Policy on your firewall, select Policy >Install >OK.
Configuring an OPSEC Log Source
You can configure the log source in JSA:
1. Login to JSA.
2. Click the Admin tab.
3. On the navigation menu, click Data Sources.
The Data Sources pane is displayed.
4. Click the Log Sources icon.
The Log Sourceswindow is displayed.
5. Click Add.
Copyright © 2018, Juniper Networks, Inc.252
Juniper Secure Analytics Configuring DSMs Guide
The Add a log sourcewindow is displayed.
6. From the Log Source Type list, select Check Point FireWall-1.
7. Using the Protocol Configuration list, selectOPSEC/LEA.
The OPSEC/LEA protocol parameters are displayed
8. Log Source Name Type a name for the log source.
9. Log Source Identifier Type the IP address for the log source. This value must match
the value that you typed in the Server IP parameter.
10. Server IP Type the IP address of the Check Point Multi-Domain Management
(Provider-1).
11. Server Port Type the Port number that is used for OPSEC/LEA. The default is 18184.
Youmust ensure that the existing firewall policy allows the LEA/OPSEC connection
from your JSA.
12. OPSEC Application Object SIC Attribute Type the SIC DN of the OPSEC Application
Object.
13. Log Source SIC Attribute Type the SIC Name for the server that generates the log
source.
SIC attribute names can be up to 255 characters in length and are case-sensitive.
14. Specify Certificate Ensure that the Specify Certificate check box is clear.
15. Certificate Authority IP Type the Check Point Manager Server IP address.
16. OPSECApplicationType thenameof theOPSECApplication that requestsacertificate.
17. Click Save.
18. On the Admin tab, click Deploy Changes.
253Copyright © 2018, Juniper Networks, Inc.
Chapter 28: Check Point

Copyright © 2018, Juniper Networks, Inc.254
Juniper Secure Analytics Configuring DSMs Guide
CHAPTER 29
Cilasoft QJRN/400
• Cilasoft QJRN/400 on page 255
• Configuring Cilasoft QJRN/400 on page 255
• Configuring a Cilasoft QJRN/400 Log Source on page 257
Cilasoft QJRN/400
JSAcollectsdetailedaudit events fromCilasoftQJRN/400®software for IBM
®i (AS/400
®,
iSeries, System i®).
To collect events, administrators can configure Cilasoft QJRN/400®to forward events
with syslog, or optionally configure the integrated file system (IFS) to write events to a
file. Syslog provides real-time events to JSA and provides automatic log source discovery
for administrators, which is the easiest configuration method for event collection. The
IFS option provides an optional configuration to write events to a log file, which can be
read remotely by using the log file protocol. JSA supports syslog events from Cilasoft
QJRN/400®V5.14.K and later.
To configure Cilasoft QJRN/400®, complete the following tasks:
1. On your Cilasoft QJRN/400®installation, configure the Cilasoft Security Suite to
forward syslog events to JSA or write events to a file.
2. For syslog configurations, administrators can verify that the events forwarded by
Cilasoft QJRN/400®are automatically discovered on the Log Activity tab.
Cilasoft QJRN/400®configurations that use IFS towrite event files to disk are considered
an alternative configuration for administrators that cannot use syslog. IFS configurations
require the administrator to locate the IFS file and configure the host system to allow
FTP, SFTP, or SCP communications. A log source can then be configured to use the log
file protocol with the location of the event log file.
Configuring Cilasoft QJRN/400
To collect events, youmust configure queries on your Cilasoft QJRN/400®to forward
syslog events to JSA.
255Copyright © 2018, Juniper Networks, Inc.
1. To start the Cilasoft Security Suite, type the following command:
IJRN/QJRN
The account that is used to make configuration changes must have ADM privileges
or USR privileges with access to specific queries through an Extended Access
parameter.
2. To configure the output type, select one of the following options:
To edit several selected queries, type 2EV to access the Execution Environment andchange theOutput Type field and type SEM.
3. To edit large numbers of queries, type the command CHGQJQRYA and change theOutput Type field and type SEM.
4. On the Additional Parameters screen, configure the following parameters:
Table 62: Cilasoft QJRN/400Output Parameters
DescriptionParameter
Type *LEEF to configure the syslog output to write events inLog Extended Event Format (LEEF).
LEEF is a special event format that is designed to for JSA.
Format
To configure an output type, use one of the followingparameters to select an output type:
*SYSLOG - Type this parameter to forward events with thesyslog protocol. This option provides real-time events.
*IFS - Type this parameter to write events to a file with theintegrated file system. This option requires the administratorto configure a log source with the log file protocol. This optionwrites events to a file, which can be read in only 15-minuteintervals.
Output
Enter the IP address of your JSA system.
If an IP address for JSA is defined as a special value in theWRKQJVAL command, you can type *CFG.
Events can be forwarded to either the JSA console, an EventCollector, anEventProcessor, or your JSAall-in-oneappliance.
IP Address
Type 514 or *CFG as the port for syslog events.
By default, *CFG automatically selects port 514.
Port
This field is not used by JSA.Tag
This field is not used by JSA.Facility
Copyright © 2018, Juniper Networks, Inc.256
Juniper Secure Analytics Configuring DSMs Guide
Table 62: Cilasoft QJRN/400Output Parameters (continued)
DescriptionParameter
Select a value for the event severity.
For more information about severity that is assigned to *QRYdestinations, look up the commandWRKQJFVALin your Cilasoft documentation.
Severity
Formore informationonCilasoft configurationparameters, see theCilasoftQJRN/400®
User's Guide.
Syslog events that are forwarded to JSA are viewable on the Log Activity tab.
Configuring a Cilasoft QJRN/400 Log Source
JSAautomatically discovers andcreatesa log source for syslogevents that are forwarded
from Cilasoft QJRN/400.
These configuration steps are optional.
1. Log in to JSA.
2. Click the Admin tab.
3. Click the Log Sources icon.
4. Click Add.
5. In the Log Source Name field, type a name for your log source.
6. From the Log Source Type list, select Cilasoft QJRN/400.
7. From the Protocol Configuration list, select Syslog.
NOTE: IfCilasoftQJRN/400 isconfigured towriteevents to the integratedfile systemwith the *IFS option, the administrator must select Log File,
and then configure the log file protocol.
8. Configure the protocol values.
9. Click Save.
10. On the Admin tab, click Deploy Changes.
257Copyright © 2018, Juniper Networks, Inc.
Chapter 29: Cilasoft QJRN/400

Copyright © 2018, Juniper Networks, Inc.258
Juniper Secure Analytics Configuring DSMs Guide
CHAPTER 30
Cisco
• Cisco on page 259
• Cisco ACE Firewall on page 259
• Cisco Aironet on page 261
• Cisco ACS on page 264
• Cisco ASA on page 270
• Cisco CallManager on page 276
• Cisco CatOS for Catalyst Switches on page 278
• Cisco CSA on page 280
• Cisco FireSIGHTManagement Center on page 282
• Cisco FWSM on page 288
• Cisco IDS/IPS on page 290
• Cisco IronPort on page 293
• Cisco IOS on page 295
• Cisco Identity Services Engine on page 298
• Cisco NAC on page 302
• Cisco Nexus on page 304
• Cisco Pix on page 305
• Cisco VPN 3000 Concentrator on page 307
• CiscoWireless Services Module on page 309
• CiscoWireless LAN Controllers on page 313
Cisco
Several Cisco DSMs can be integrated with JSA.
Cisco ACE Firewall
The Cisco ACE firewall can be integrated with JSA.
259Copyright © 2018, Juniper Networks, Inc.
JSA can accept events that are forwarded from Cisco ACE Firewalls by using syslog. JSA
records all relevant events. Before you configure JSA to integrate with an ACE firewall,
you must configure your Cisco ACE Firewall to forward all device logs to JSA.
• Configuring Cisco ACE Firewall on page 260
• Configuring a Log Source on page 260
Configuring Cisco ACE Firewall
To forward Cisco ACE device logs to JSA:
1. Log in to your Cisco ACE device.
2. From the Shell Interface, selectMainMenu >AdvancedOptions >Syslog Configuration.
3. The Syslog Configurationmenu varies depending on whether there are any syslog
destination hosts configured yet. If no syslog destinations are configured, create one
by selecting the Add First Server option. ClickOK.
4. Type the host name or IP address of the destination host and port in the First Syslog
Server field. ClickOK.
The system restarts with new settings. When finished, the Syslog server window
displays the host that is configured.
5. ClickOK.
The Syslog Configurationmenu is displayed. Notice that options for editing the server
configuration, removing the server, or adding a second server are now available.
6. If you want to add another server, click Add Second Server.
At any time, click the View Syslog options to view existing server configurations.
7. To return to the Advancedmenu, click Return.
The configuration is complete. The log source is added to JSA as Cisco ACE Firewall
events are automatically discovered. Events that are forwarded to JSA by Cisco ACE
Firewall appliances are displayed on the Log Activity tab of JSA.
Configuring a Log Source
JSA automatically discovers and creates a log source for syslog events from Cisco ACE
Firewalls.
The following configuration steps are optional. You canmanually create a log source for
JSA to receive syslog events.
Tomanually configure a log source for Cisco ACE Firewall:
Copyright © 2018, Juniper Networks, Inc.260
Juniper Secure Analytics Configuring DSMs Guide
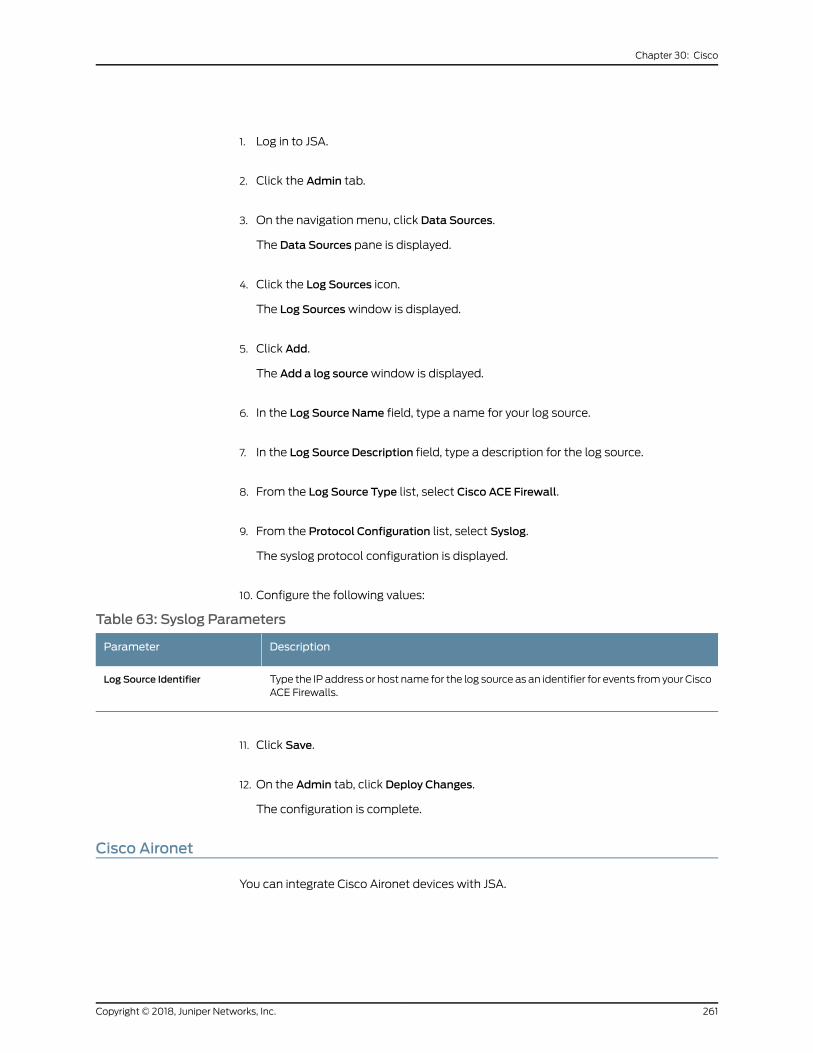
1. Log in to JSA.
2. Click the Admin tab.
3. On the navigation menu, click Data Sources.
The Data Sources pane is displayed.
4. Click the Log Sources icon.
The Log Sourceswindow is displayed.
5. Click Add.
The Add a log sourcewindow is displayed.
6. In the Log Source Name field, type a name for your log source.
7. In the Log Source Description field, type a description for the log source.
8. From the Log Source Type list, select Cisco ACE Firewall.
9. From the Protocol Configuration list, select Syslog.
The syslog protocol configuration is displayed.
10. Configure the following values:
Table 63: Syslog Parameters
DescriptionParameter
Type the IP address or host name for the log source as an identifier for events fromyour CiscoACE Firewalls.
Log Source Identifier
11. Click Save.
12. On the Admin tab, click Deploy Changes.
The configuration is complete.
Cisco Aironet
You can integrate Cisco Aironet devices with JSA.
261Copyright © 2018, Juniper Networks, Inc.
Chapter 30: Cisco
A Cisco Aironet DSM accepts Cisco Emblem Format events by using syslog. Before you
configure JSA to integrate with a Cisco Aironet device, youmust configure your Cisco
Aironet appliance to forward syslog events.
To configure Cisco Aironet to forward events:
1. Establish a connection to the Cisco Aironet device by using one of the following
methods:
• Telnet to the wireless access point
• Access the console
2. Type the following command to access privileged EXECmode:
enable
3. Type the following command to access global configuration mode:
config terminal
4. Type the following command to enable message logging:
logging on
5. Configure the syslog facility. The default is local7.
logging <facility>
where <facility> is, for example, local7.
6. Type the following command to log messages to your JSA:
logging <IP address>
where <IP address> is IP address of your JSA.
7. Enabletimestamp
on log messages:
service timestamp log datatime
8. Return to privileged EXECmode:
end
9. View your entries:
show running-config
10. Save your entries in the configuration file:
copy running-config startup-config
Copyright © 2018, Juniper Networks, Inc.262
Juniper Secure Analytics Configuring DSMs Guide
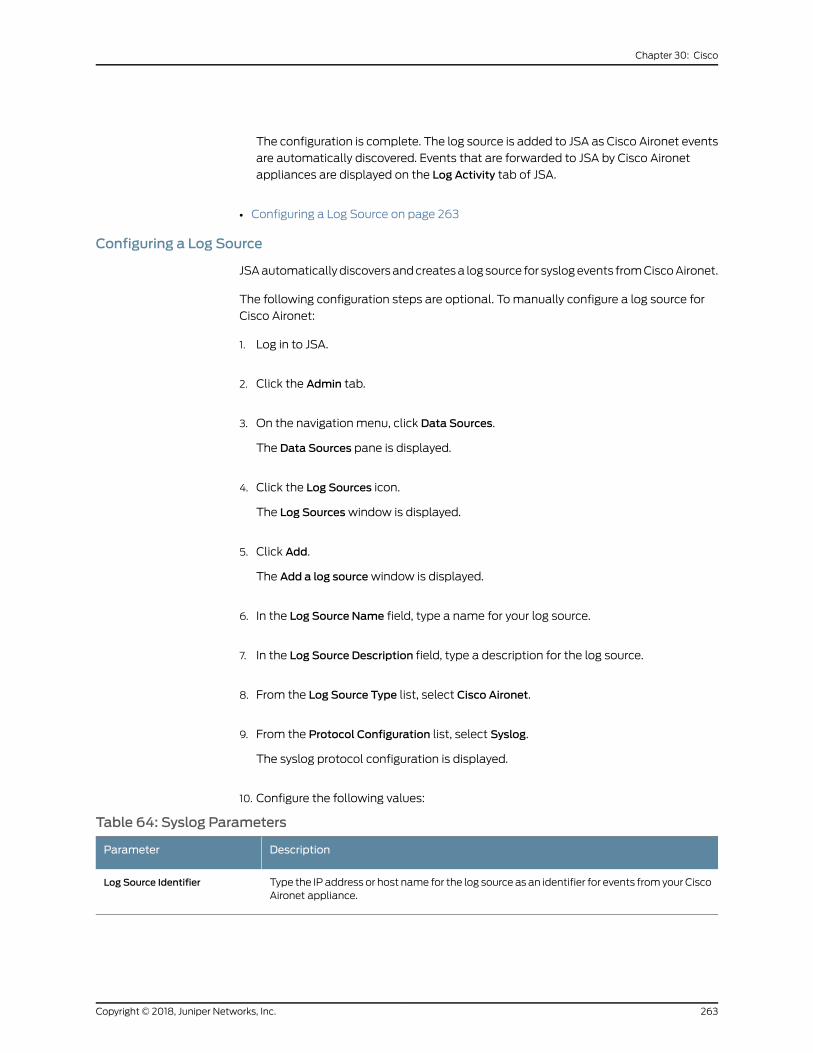
The configuration is complete. The log source is added to JSA as Cisco Aironet events
are automatically discovered. Events that are forwarded to JSA by Cisco Aironet
appliances are displayed on the Log Activity tab of JSA.
• Configuring a Log Source on page 263
Configuring a Log Source
JSAautomaticallydiscoversandcreatesa logsource for syslogevents fromCiscoAironet.
The following configuration steps are optional. To manually configure a log source for
Cisco Aironet:
1. Log in to JSA.
2. Click the Admin tab.
3. On the navigation menu, click Data Sources.
The Data Sources pane is displayed.
4. Click the Log Sources icon.
The Log Sourceswindow is displayed.
5. Click Add.
The Add a log sourcewindow is displayed.
6. In the Log Source Name field, type a name for your log source.
7. In the Log Source Description field, type a description for the log source.
8. From the Log Source Type list, select Cisco Aironet.
9. From the Protocol Configuration list, select Syslog.
The syslog protocol configuration is displayed.
10. Configure the following values:
Table 64: Syslog Parameters
DescriptionParameter
Type the IP address or host name for the log source as an identifier for events fromyour CiscoAironet appliance.
Log Source Identifier
263Copyright © 2018, Juniper Networks, Inc.
Chapter 30: Cisco

11. Click Save.
12. On the Admin tab, click Deploy Changes.
The configuration is complete.
Cisco ACS
The Cisco ACS DSM for JSA accepts syslog ACS events by using syslog.
JSA records all relevant and available information from the event. You can integrate
Cisco ACSwith JSA by using one of the following methods:
• Configure your Cisco ACS device to directly send syslog to JSA for Cisco ACS v5.x. See
“Configuring Syslog for Cisco ACS V5.x” on page 264.
• Configure your Cisco ACS device to directly send syslog to JSA for Cisco ACS v4.x. See
“Configuring Syslog for Cisco ACS V4.x” on page 267.
• A server that uses the JSAWinCollect or JSA ALE (Cisco ACS software version 3.x or
later). See “ConfigurationOf theCiscoACS for theAdaptiveLogExporter” onpage269.
NOTE: JSA supports only Cisco ACS versions before v3.x using a UniversalDSM.
• Configuring Syslog for Cisco ACS V5.x on page 264
• Creating a Remote Log Target on page 265
• Configuring Global Logging Categories on page 265
• Configuring a Log Source on page 266
• Configuring Syslog for Cisco ACS V4.x on page 267
• Configuring Syslog Forwarding for Cisco ACS V4.x on page 267
• Configuring a Log Source for Cisco ACS V4.x on page 268
• Configuration Of the Cisco ACS for the Adaptive Log Exporter on page 269
• Configuring Cisco ACS to Log Events on page 269
Configuring Syslog for Cisco ACS V5.x
The configuration of syslog forwarding fromaCiscoACSappliancewith software version
5.x involves several steps.
Youmust complete the following tasks:
1. Create a Remote Log Target
2. Configure global logging categories
Copyright © 2018, Juniper Networks, Inc.264
Juniper Secure Analytics Configuring DSMs Guide
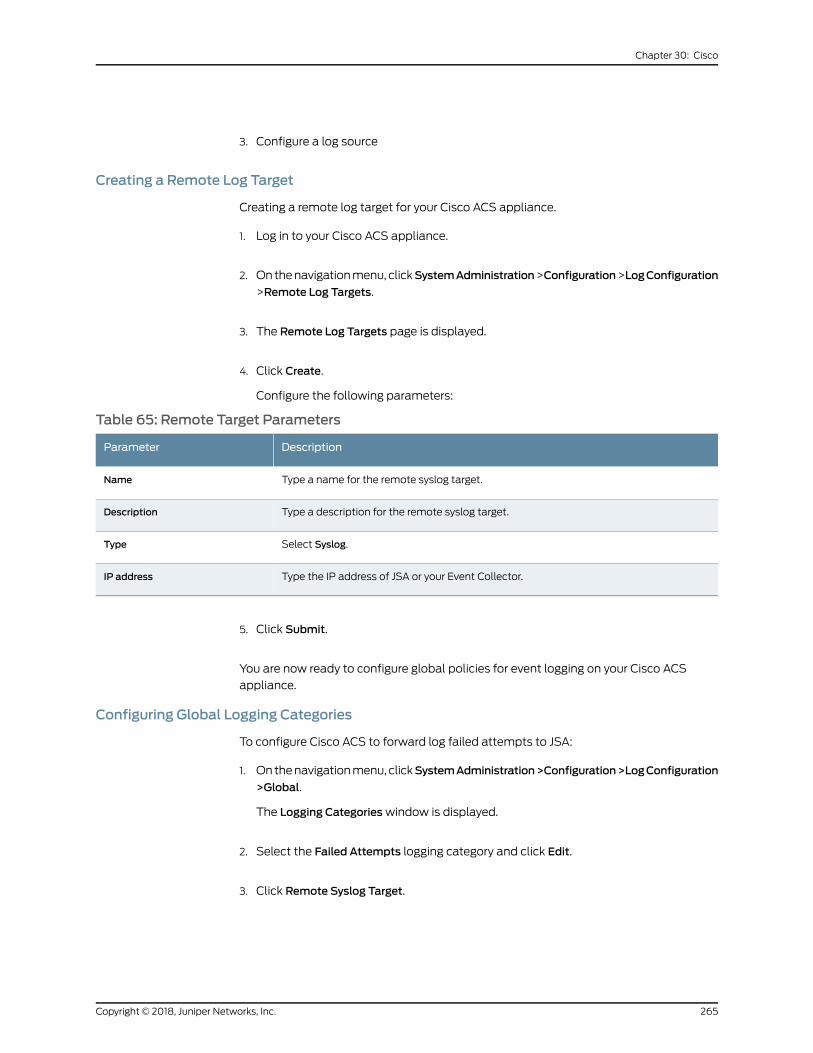
3. Configure a log source
Creating a Remote Log Target
Creating a remote log target for your Cisco ACS appliance.
1. Log in to your Cisco ACS appliance.
2. Onthenavigationmenu, clickSystemAdministration>Configuration>LogConfiguration
>Remote Log Targets.
3. The Remote Log Targets page is displayed.
4. Click Create.
Configure the following parameters:
Table 65: Remote Target Parameters
DescriptionParameter
Type a name for the remote syslog target.Name
Type a description for the remote syslog target.Description
Select Syslog.Type
Type the IP address of JSA or your Event Collector.IP address
5. Click Submit.
You are now ready to configure global policies for event logging on your Cisco ACS
appliance.
Configuring Global Logging Categories
To configure Cisco ACS to forward log failed attempts to JSA:
1. Onthenavigationmenu, clickSystemAdministration>Configuration>LogConfiguration
>Global.
The Logging Categorieswindow is displayed.
2. Select the Failed Attempts logging category and click Edit.
3. Click Remote Syslog Target.
265Copyright © 2018, Juniper Networks, Inc.
Chapter 30: Cisco

4. From the Available targetswindow, use the arrow key to move the syslog target for
JSA to the Selected targetswindow.
5. Click Submit.
You are now ready to configure the log source in JSA.
Configuring a Log Source
JSA automatically discovers and creates a log source for syslog events from Cisco ACS
v5.x.
However, you canmanually create a log source for JSA to receive Cisco ACS events.
Tomanually configure a log source for Cisco ACS:
1. Log in to JSA.
2. Click the Admin tab.
3. On the navigation menu, click Data Sources.
The Data Sources pane is displayed.
4. Click the Log Sources icon.
The Log Sourceswindow is displayed.
5. Click Add.
The Add a log sourcewindow is displayed.
6. From the Log Source Type list, select Cisco ACS.
7. Using the Protocol Configuration list, select Syslog.
The syslog protocol configuration is displayed.
8. Configure the following values:
Table 66: Syslog Parameters
DescriptionParameter
Type the IP address or host name for the log source as an identifier for Cisco ACS events.Log Source Identifier
9. Click Save.
10. On the Admin tab, click Deploy Changes.
Copyright © 2018, Juniper Networks, Inc.266
Juniper Secure Analytics Configuring DSMs Guide
The configuration is complete.
Configuring Syslog for Cisco ACS V4.x
The configuration of syslog forwarding fromaCiscoACSappliancewith software version
4.x involves a few steps.
Complete the following steps:
1. Configure syslog forwarding
2. Configure a log source
Configuring Syslog Forwarding for Cisco ACS V4.x
Configuration of an ACS device to forward syslog events to JSA.
Take the following steps to configure the ACS device to forward syslog events to JSA
1. Log in to your Cisco ACS device.
2. On the navigation menu, click SystemConfiguration.
The SystemConfiguration page opens.
3. Click Logging.
The logging configuration is displayed.
4. In the Syslog column for Failed Attempts, click Configure.
The Enable Loggingwindow is displayed.
5. Select the Log to Syslog Failed Attempts report check box.
6. Add the following Logged Attributes:
• Message-Type
• User-Name
• Nas-IP-Address
• Authen-Failure-Code
• Caller-ID
• NAS-Port
• Author-Data
• Group-Name
267Copyright © 2018, Juniper Networks, Inc.
Chapter 30: Cisco
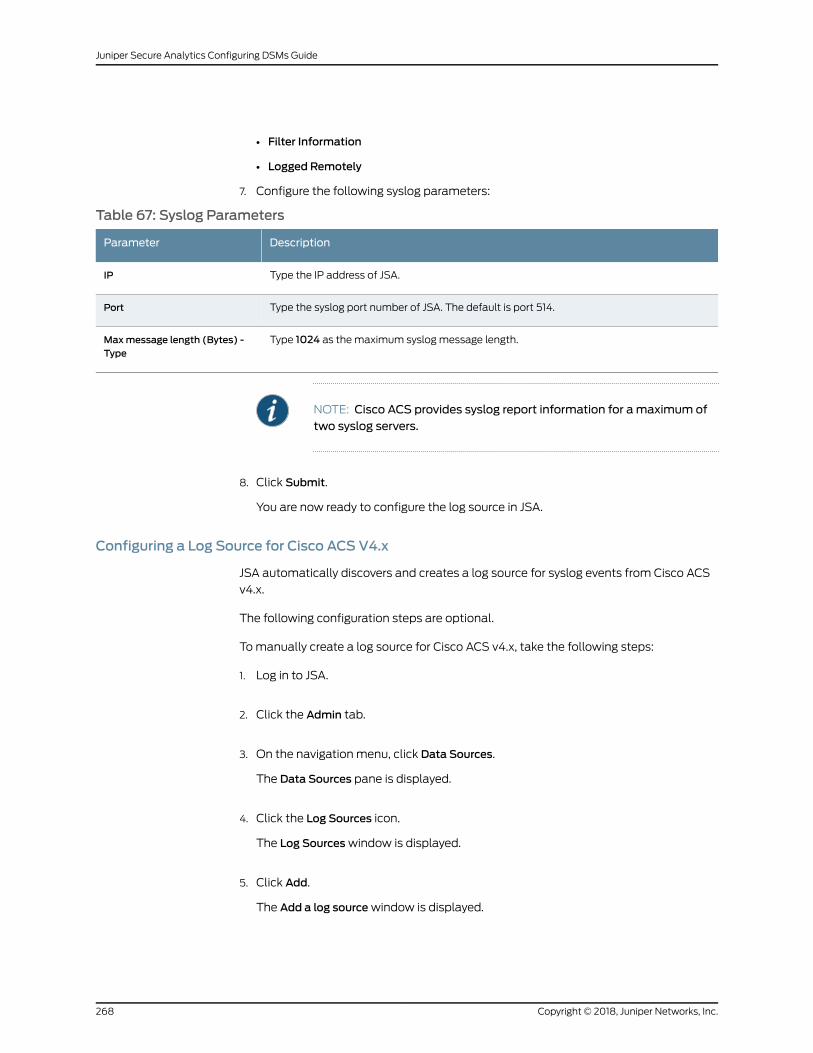
• Filter Information
• Logged Remotely
7. Configure the following syslog parameters:
Table 67: Syslog Parameters
DescriptionParameter
Type the IP address of JSA.IP
Type the syslog port number of JSA. The default is port 514.Port
Type 1024 as the maximum syslog message length.Maxmessage length (Bytes) -Type
NOTE: Cisco ACS provides syslog report information for amaximum oftwo syslog servers.
8. Click Submit.
You are now ready to configure the log source in JSA.
Configuring a Log Source for Cisco ACS V4.x
JSA automatically discovers and creates a log source for syslog events from Cisco ACS
v4.x.
The following configuration steps are optional.
To manually create a log source for Cisco ACS v4.x, take the following steps:
1. Log in to JSA.
2. Click the Admin tab.
3. On the navigation menu, click Data Sources.
The Data Sources pane is displayed.
4. Click the Log Sources icon.
The Log Sourceswindow is displayed.
5. Click Add.
The Add a log sourcewindow is displayed.
Copyright © 2018, Juniper Networks, Inc.268
Juniper Secure Analytics Configuring DSMs Guide
6. From the Log Source Type list, select Cisco ACS.
7. Using the Protocol Configuration list, select Syslog.
The syslog protocol configuration is displayed.
8. Configure the following values:
Table 68: Syslog Parameters
DescriptionParameter
Type the IP address or host name for the log source as an identifier for Cisco ACS events.Log Source Identifier
9. Click Save.
10. On the Admin tab, click Deploy Changes.
The configuration is complete.
Configuration Of the Cisco ACS for the Adaptive Log Exporter
If you are using an older version of Cisco ACS, such as v3.x, you can log events from your
Cisco ACS appliance to a comma-separated file.
The Cisco ACS device plug-in for the Adaptive Log Exporter can be used to read and
forward events from your comma-separated file to JSA.
Configuring Cisco ACS to Log Events
Your Cisco ACS appliancemust be configured to write comma-separated event files to
integrate with the Adaptive Log Exporter.
To configure Cisco ACS, complete the following steps:
1. Log in to your Cisco ACS appliance.
2. On the navigation menu, click SystemConfiguration.
The SystemConfiguration page opens.
3. Click Logging.
The logging configuration is displayed.
4. In the CSV column for Failed Attempts, click Configure.
The Enable Loggingwindow is displayed.
5. Select the Log to CSV Failed Attempts report check box.
269Copyright © 2018, Juniper Networks, Inc.
Chapter 30: Cisco
6. Add the following Logged Attributes:
• Message-Type
• User-Name
• Nas-IP-Address
• Authen-Failure-Code
• Caller-ID
• NAS-Port
• Author-Data
• Group-Name
• Filter Information
• Logged Remotely
7. Configure a time frame for Cisco ACS to generate a new comma-separated value
(CSV) file.
8. Click Submit.
You are now ready to configure the Adaptive Log Exporter. For more information, see the
Adaptive Log Exporter Users Guide.
Cisco ASA
You can integrate a Cisco Adaptive Security Appliance (ASA) with JSA.
A Cisco ASA DSM accepts events through syslog or NetFlow by using NetFlow Security
Event Logging (NSEL). JSA records all relevant events. Before you configure JSA, you
must configure your Cisco ASA device to forward syslog or NetFlow NSEL events.
Choose one of the following options:
• Forward events to JSA by using syslog. See “Integrate Cisco ASA Using Syslog” on
page 271
• Forward events to JSA by usingNetFlow (NSEL). See “Integrate Cisco ASA for NetFlow
by Using NSEL” on page 273
• Integrate Cisco ASA Using Syslog on page 271
• Configuring Syslog Forwarding on page 271
• Configuring a Log Source on page 272
• Integrate Cisco ASA for NetFlow by Using NSEL on page 273
• Configuring NetFlow Using NSEL on page 273
• Configuring a Log Source on page 275
Copyright © 2018, Juniper Networks, Inc.270
Juniper Secure Analytics Configuring DSMs Guide
Integrate Cisco ASAUsing Syslog
Integrating Cisco ASA by using syslog involves the configuration of a log source, and
syslog forwarding.
Complete the following tasks to integrate Cisco ASA by using syslog:
• Configuring Syslog Forwarding on page 271
• Configuring a Log Source on page 272
Configuring Syslog Forwarding
To configure Cisco ASA to forward syslog events, somemanual configuration is required.
1. Log in to the Cisco ASA device.
2. Type the following command to access privileged EXECmode:
enable
3. Type the following command to access global configuration mode:
conf t
4. Enable logging:
logging enable
5. Configure the logging details:
logging console warning
logging trap warning
logging asdmwarning
NOTE: The Cisco ASA device can also be configured with logging trapinformational to send additional events. However, this may increase theevent rate (Events Per Second) of your device.
6. Type the following command to configure logging to JSA:
logging host <interface> <IP address>
Where:
• <interface> is the name of the Cisco Adaptive Security Appliance interface.
• <IP address> is the IP address of JSA.
271Copyright © 2018, Juniper Networks, Inc.
Chapter 30: Cisco
NOTE: Using the commandshow interfaces
displays all available interfaces for your Cisco device.
7. Disable the output object name option:
no names
Disable the output object name option to ensure that the logs use IP addresses and
not the object names.
8. Exit the configuration:
exit
9. Save the changes:
writemem
The configuration is complete. The log source is added to JSA as Cisco ASA syslog events
areautomatically discovered. Events thatare forwarded to JSAbyCiscoASAaredisplayed
on the Log Activity tab of JSA.
Configuring a Log Source
JSA automatically discovers and creates a log source for syslog events from Cisco ASA.
The following configuration steps are optional.
To manually configure a log source for Cisco ASA syslog events:
1. Log in to JSA.
2. Click the Admin tab.
3. On the navigation menu, click Data Sources.
The Data Sources pane is displayed.
4. Click the Log Sources icon.
The Log Sourceswindow is displayed.
5. Click Add.
The Add a log source window is displayed.
6. In the Log Source Name field, type a name for your log source.
Copyright © 2018, Juniper Networks, Inc.272
Juniper Secure Analytics Configuring DSMs Guide
7. In the Log Source Description field, type a description for the log source.
8. From the Log Source Type list, select Cisco Adaptive Security Appliance (ASA).
9. From the Protocol Configuration list, select Syslog.
The syslog protocol configuration is displayed.
10. Configure the following values:
Table 69: Syslog Parameters
DescriptionParameter
Type the IP address or host name for the log source as an identifier for events from yourOSSEC installations.
Log Source Identifier
11. Click Save.
12. On the Admin tab, click Deploy Changes.
The configuration is complete.
Integrate Cisco ASA for NetFlow by Using NSEL
Integrating Cisco ASA for Netflow by using NSEL involves two steps.
This section includes the following topics:
• Configuring NetFlow Using NSEL on page 273
• Configuring a Log Source on page 275
Configuring NetFlowUsing NSEL
You can configure Cisco ASA to forward NetFlow events by using NSEL.
1. Log in to the Cisco ASA device command-line interface (CLI).
2. Type the following command to access privileged EXECmode:
enable
3. Type the following command to access global configuration mode:
conf t
4. Disable the output object name option:
no names
273Copyright © 2018, Juniper Networks, Inc.
Chapter 30: Cisco
5. Type the following command to enable NetFlow export:
flow-export destination <interface-name> <ipv4-address or hostname> <udp-port>
Where:
• <interface-name> is the name of the Cisco Adaptive Security Appliance interface
for the NetFlow collector.
• <ipv4-address or hostname> is the IP address or host nameof theCiscoASAdevice
with the NetFlow collector application.
• <udp-port> is the UDP port number to which NetFlow packets are sent.
NOTE: JSA typically uses port 2055 for NetFlow event data on JSA FlowProcessors.YoumustconfigureadifferentUDPportonyourCiscoAdaptiveSecurity Appliance for NetFlow by using NSEL.
6. Type the following command to configure the NSEL class-map:
class-map flow_export_class
7. Choose one of the following traffic options:
To configure a NetFlow access list to match specific traffic, type the command:
match access-list flow_export_acl
8. To configure NetFlow tomatch any traffic, type the command:
match any
NOTE: The Access Control List (ACL)must exist on the Cisco ASA devicebefore you define the traffic match option in Step 7.
9. Type the following command to configure the NSEL policy-map:
policy-map flow_export_policy
10. Type the following command to define a class for the flow-export action:
class flow_export_class
11. Type the following command to configure the flow-export action:
flow-export event-type all destination <IP address>
Where <IP address> is the IP address of JSA.
Copyright © 2018, Juniper Networks, Inc.274
Juniper Secure Analytics Configuring DSMs Guide
NOTE: If you are using a Cisco ASA version before v8.3 you can skip Step10 as the device defaults to the flow-export destination. For moreinformation, see your Cisco ASA documentation.
12. Type the following command to add the service policy globally:
service-policy flow_export_policy global
13. Exit the configuration:
exit
14. Save the changes:
writemem
Youmust verify that your collector applications use the Event Time field to correlate
events.
Configuring a Log Source
To integrate Cisco ASA that uses NetFlowwith JSA, youmust manually create a log
source to receive NetFlow events.
JSA does not automatically discover or create log sources for syslog events from Cisco
ASA devices that use NetFlow and NSEL.
NOTE: Your systemmustbe running thecurrent versionof theNSELprotocolto integrate with a Cisco ASA device that uses NetFlow andNSEL. The NSELprotocol is available on https://www.juniper.net/support/downloads/, or
through auto updates in JSA.
To configure a log source:
1. Log in to JSA.
2. Click the Admin tab.
3. On the navigation menu, click Data Sources.
The Data Sources pane is displayed.
4. Click the Log Sources icon.
The Log Sourceswindow is displayed.
5. Click Add.
275Copyright © 2018, Juniper Networks, Inc.
Chapter 30: Cisco
The Add a log sourcewindow is displayed.
6. In the Log Source Name field, type a name for your log source.
7. In the Log Source Description field, type a description for the log source.
8. From the Log Source Type list, select Cisco Adaptive Security Appliance (ASA).
9. Using the Protocol Configuration list, select Cisco NSEL.
The syslog protocol configuration is displayed.
10. Configure the following values:
Table 70: Syslog Parameters
DescriptionParameter
Type the IP address or host name for the log source.Log Source Identifier
Type theUDPport number that is usedbyCiscoASA to forwardNSEL events. The valid rangeof the Collector Port parameter is 1-65535.
JSA typically uses port 2055 for NetFlow event data on the JSA flow processor. Youmustdefine a different UDP port on your Cisco Adaptive Security Appliance for NetFlow that usesNSEL.
Collector Port
11. Click Save.
12. On the Admin tab, click Deploy Changes.
The log source is added to JSA. Events that are forwarded to JSA by Cisco ASA are
displayed on the Log Activity tab. For more information on configuring NetFlowwith
your Cisco ASA device, see your vendor documentation.
Cisco CallManager
The Cisco CallManager DSM for JSA collects application events that are forwarded from
Cisco CallManager devices that are using Syslog.
Before events can be received in JSA, youmust configure your Cisco Call Manager device
to forward events. After you forward Syslog events from Cisco CallManager, JSA
automatically detects and adds Cisco CallManager as a log source.
• Configuring Syslog Forwarding on page 277
• Configuring a Log Source on page 277
Copyright © 2018, Juniper Networks, Inc.276
Juniper Secure Analytics Configuring DSMs Guide
Configuring Syslog Forwarding
You can configure syslog on your Cisco CallManager:
1. Log in to your Cisco CallManager interface.
2. Select System Enterprise >Parameters.
The Enterprise Parameters Configuration is displayed.
3. In the Remote Syslog Server Name field, type the IP address of the JSA console.
4. From the Syslog Severity For Remote Syslogmessages list, select Informational.
The Informational severity selection allows the collection of all events at the
information level and later.
5. Click Save.
6. Click Apply Config.
The syslog configuration is complete. You are now ready to configure a syslog log
source for Cisco CallManager.
Configuring a Log Source
JSA automatically discovers and creates a log source for syslog events from Cisco
CallManager devices.
The following configuration steps are optional. Tomanually configure a syslog log source
for Cisco CallManager take the following steps:
1. Log in to JSA.
2. Click the Admin tab.
3. On the navigation menu, click Data Sources.
The Data Sources pane is displayed.
4. Click the Log Sources icon.
The Log Sourceswindow is displayed.
5. Click Add.
The Add a log sourcewindow is displayed.
6. In the Log Source Name field, type a name for your log source.
277Copyright © 2018, Juniper Networks, Inc.
Chapter 30: Cisco
7. In the Log Source Description field, type a description for the log source.
8. From the Log Source Type list, select Cisco Call Manager.
9. Using the Protocol Configuration list, select Syslog.
The syslog protocol configuration is displayed.
10. Configure the following values:
Table 71: Syslog Parameters
DescriptionParameter
Type the IP address or host name for the log source as an identifier for events fromyour CiscoCallManager.
Log Source Identifier
11. Click Save.
12. On the Admin tab, click Deploy Changes.
The configuration is complete.
Cisco CatOS for Catalyst Switches
The Cisco CatOS for Catalyst Switches DSM for JSA accepts events by using syslog.
JSA records all relevant device events. Before you configure a Cisco CatOS device in JSA,
youmust configure your device to forward syslog events.
• Configuring Syslog on page 278
• Configuring a Log Source on page 279
Configuring Syslog
Configuring your Cisco CatOS device to forward syslog events.
Take the following steps to configure your Cisco CatOS device to forward syslog events:
1. Log in to your Cisco CatOS user interface.
2. Type the following command to access privileged EXECmode:
enable
3. Configure the system totimestamp
messages:
set logging timestamp enable
Copyright © 2018, Juniper Networks, Inc.278
Juniper Secure Analytics Configuring DSMs Guide

4. Type the following command with the IP address of JSA:
set logging server <IP address>
5. Limit messages that are logged by selecting a severity level:
set logging server severity <server severity level>
6. Configure the facility level to be used in the message. The default is local7.
set logging server facility <server facility parameter>
7. Enable the switch to send syslog messages to the JSA.
set logging server enable
You are now ready to configure the log source in JSA.
Configuring a Log Source
JSA automatically discovers and creates a log source for syslog events fromCisco CatOS
appliances.
The following configuration steps are optional.
To manually configure a syslog log source for Cisco CatOS:
1. Log in to JSA.
2. Click the Admin tab.
3. On the navigation menu, click Data Sources.
The Data Sources pane is displayed.
4. Click the Log Sources icon.
The Log Sourceswindow is displayed.
5. Click Add.
The Add a log sourcewindow is displayed.
6. In the Log Source Name field, type a name for your log source.
7. In the Log Source Description field, type a description for the log source.
8. From the Log Source Type list, select Cisco CatOS for Catalyst Switches.
9. Using the Protocol Configuration list, select Syslog.
279Copyright © 2018, Juniper Networks, Inc.
Chapter 30: Cisco

The syslog protocol configuration is displayed.
10. Configure the following values:
Table 72: Syslog Parameters
DescriptionParameter
Type the IP address or host name for the log source as an identifier for events from yourCisco CatOS for Catalyst Switch appliance.
Log Source Identifier
11. Click Save.
12. On the Admin tab, click Deploy Changes.
The configuration is complete.
Cisco CSA
You can integrate a Cisco Security Agent (CSA) server with JSA.
The Cisco CSA DSM accepts events by using syslog, SNMPv1, and SNMPv2. JSA records
all configured Cisco CSA alerts.
• Configuring Syslog for Cisco CSA on page 280
• Configuring a Log Source on page 281
Configuring Syslog for Cisco CSA
Configuration of your Cisco CSA server to forward events.
Take the following steps to configure your Cisco CSA server to forward events:
1. Open the Cisco CSA user interface.
2. Select Events >Alerts.
3. Click New.
The Configuration Viewwindow is displayed.
4. Type in values for the following parameters:
• Name Type a name that you want to assign to your configuration.
• Description Type a description for the configuration. This step is not a requirement.
5. From the Send Alerts, select the event set from the list to generate alerts.
6. Select the SNMP check box.
Copyright © 2018, Juniper Networks, Inc.280
Juniper Secure Analytics Configuring DSMs Guide
7. Type a Community name.
The Community name that is entered in the CSA user interface must match the
Community name that is configured on JSA. This option is only available for the
SNMPv2 protocol.
8. For theManager IP address parameter, type the IP address of JSA.
9. Click Save.
You are now ready to configure the log source in JSA.
Configuring a Log Source
JSA automatically discovers and creates a log source for syslog events from Cisco CSA
appliances.
Tomanually configure a syslog log source for Cisco CSA, take the following configuration
steps, which are optional:
1. Log in to JSA.
2. Click the Admin tab.
3. On the navigation menu, click Data Sources.
The Data Sources pane is displayed.
4. Click the Log Sources icon.
The Log Sourceswindow is displayed.
5. Click Add.
The Add a log sourcewindow is displayed.
6. In the Log Source Name field, type a name for your log source.
7. In the Log Source Description field, type a description for the log source.
8. From the Log Source Type list, select Cisco CSA.
9. Using the Protocol Configuration list, select Syslog.
The syslog protocol configuration is displayed.
10. Configure the following values:
281Copyright © 2018, Juniper Networks, Inc.
Chapter 30: Cisco
Table 73: Syslog Parameters
DescriptionParameter
Type the IP address or host name for the log source as an identifier for events fromyour CiscoCSA appliance.
Log Source Identifier
11. Click Save.
12. On the Admin tab, click Deploy Changes.
The configuration is complete.
Cisco FireSIGHTManagement Center
JSA supports FireSIGHTManagement Center v4.8.0.2 to v6.0.0.
Youmust download and install one of the following patches from the Cisco FireSIGHT
Management Center website to collect FireSIGHTManagement Center 5.1.x events in
JSA:
• Sourcefire_hotfix-v5.1.0-0-build_1.tar
• Sourcefire_hotfix-v5.1.1-0-build_1.tar
Formore informationaboutpatches for yourFireSIGHTappliance, see theCiscoFireSIGHT
Management Center website.
• Configuration Overview on page 282
• Supported Event Types on page 283
• Creating FireSIGHTManagement Center 4.x Certificates on page 284
• Creating Cisco FireSIGHTManagement Center 5.x and 6.x Certificates on page 285
• Importing a Cisco FireSIGHTManagement Center Certificate to JSA on page 286
• Configuring a LogSource for Cisco FireSIGHTManagement Center Events on page 287
FireSIGHTManagement Center is formerly known as Sourcefire Defense Center.
The JSA DSM for Cisco FireSIGHTManagement Center accepts FireSIGHTManagement
Center events by using the eStreamer API service.
Configuration Overview
To integrate with FireSIGHTManagement Center, you must create certificates in the
FireSIGHTManagement Center interface, and then add the certificates to the JSA
appliances that receive eStreamer event data.
If your deployment includes multiple FireSIGHTManagement Center appliances, you
must copy the certificate for each appliance that receives eStreamer events. The
certificate allows the FireSIGHTManagement Center appliance and the JSA console or
JSA Event Collectors to communicate by using the eStreamer API to collect events.
Copyright © 2018, Juniper Networks, Inc.282
Juniper Secure Analytics Configuring DSMs Guide
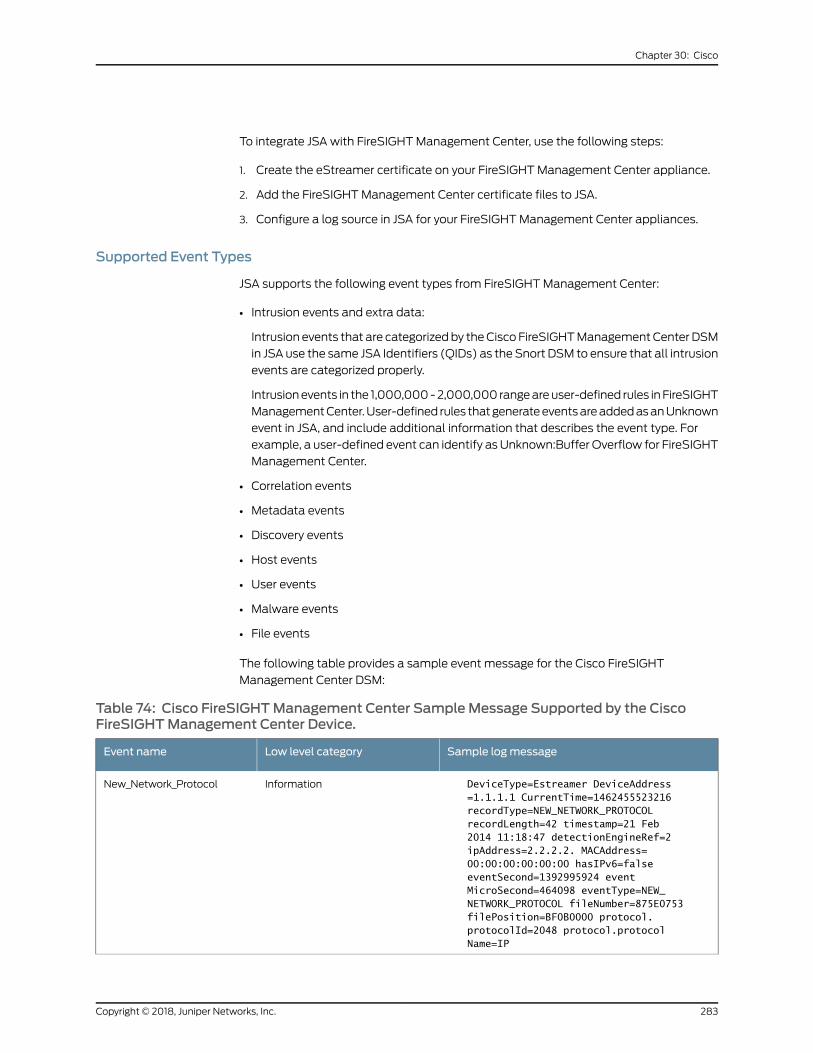
To integrate JSA with FireSIGHTManagement Center, use the following steps:
1. Create the eStreamer certificate on your FireSIGHTManagement Center appliance.
2. Add the FireSIGHTManagement Center certificate files to JSA.
3. Configure a log source in JSA for your FireSIGHTManagement Center appliances.
Supported Event Types
JSA supports the following event types from FireSIGHTManagement Center:
• Intrusion events and extra data:
Intrusion events that are categorizedby theCisco FireSIGHTManagementCenter DSM
in JSA use the same JSA Identifiers (QIDs) as the Snort DSM to ensure that all intrusion
events are categorized properly.
Intrusionevents in the 1,000,000-2,000,000 rangeareuser-defined rules inFireSIGHT
ManagementCenter.User-defined rules thatgenerateeventsareaddedasanUnknown
event in JSA, and include additional information that describes the event type. For
example, a user-defined event can identify as Unknown:Buffer Overflow for FireSIGHT
Management Center.
• Correlation events
• Metadata events
• Discovery events
• Host events
• User events
• Malware events
• File events
The following table provides a sample event message for the Cisco FireSIGHT
Management Center DSM:
Table 74: Cisco FireSIGHTManagement Center SampleMessage Supported by the CiscoFireSIGHTManagement Center Device.
Sample logmessageLow level categoryEvent name
DeviceType=Estreamer DeviceAddress=1.1.1.1 CurrentTime=1462455523216 recordType=NEW_NETWORK_PROTOCOL recordLength=42 timestamp=21 Feb 2014 11:18:47 detectionEngineRef=2 ipAddress=2.2.2.2. MACAddress=00:00:00:00:00:00 hasIPv6=false eventSecond=1392995924 eventMicroSecond=464098 eventType=NEW_NETWORK_PROTOCOL fileNumber=875E0753 filePosition=BF0B0000 protocol.protocolId=2048 protocol.protocolName=IP
InformationNew_Network_Protocol
283Copyright © 2018, Juniper Networks, Inc.
Chapter 30: Cisco
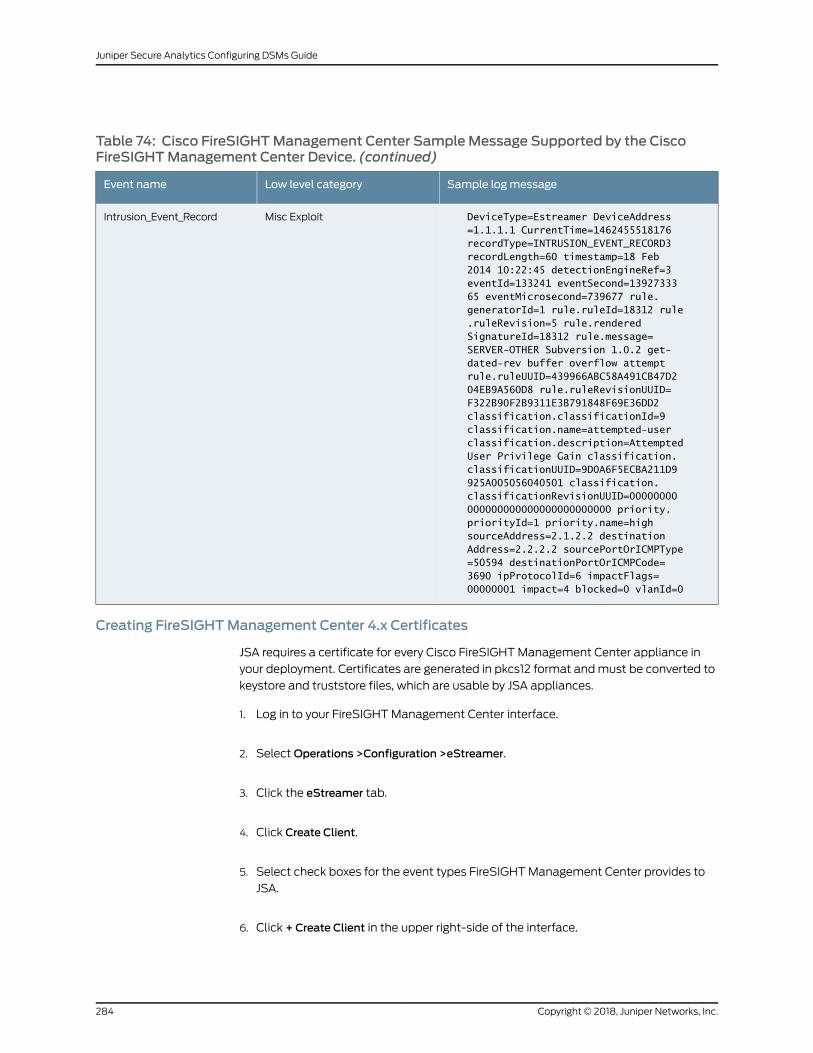
Table 74: Cisco FireSIGHTManagement Center SampleMessage Supported by the CiscoFireSIGHTManagement Center Device. (continued)
Sample logmessageLow level categoryEvent name
DeviceType=Estreamer DeviceAddress=1.1.1.1 CurrentTime=1462455518176 recordType=INTRUSION_EVENT_RECORD3 recordLength=60 timestamp=18 Feb 2014 10:22:45 detectionEngineRef=3 eventId=133241 eventSecond=1392733365 eventMicrosecond=739677 rule.generatorId=1 rule.ruleId=18312 rule.ruleRevision=5 rule.renderedSignatureId=18312 rule.message=SERVER-OTHER Subversion 1.0.2 get-dated-rev buffer overflow attempt rule.ruleUUID=439966ABC58A491CB47D204EB9A560D8 rule.ruleRevisionUUID=F322B90F2B9311E3B791848F69E36DD2 classification.classificationId=9 classification.name=attempted-user classification.description=Attempted User Privilege Gain classification.classificationUUID=9D0A6F5ECBA211D9925A005056040501 classification.classificationRevisionUUID=00000000000000000000000000000000 priority.priorityId=1 priority.name=high sourceAddress=2.1.2.2 destinationAddress=2.2.2.2 sourcePortOrICMPType=50594 destinationPortOrICMPCode=3690 ipProtocolId=6 impactFlags=00000001 impact=4 blocked=0 vlanId=0
Misc ExploitIntrusion_Event_Record
Creating FireSIGHTManagement Center 4.x Certificates
JSA requires a certificate for every Cisco FireSIGHTManagement Center appliance in
your deployment. Certificates are generated in pkcs12 format andmust be converted to
keystore and truststore files, which are usable by JSA appliances.
1. Log in to your FireSIGHTManagement Center interface.
2. SelectOperations >Configuration >eStreamer.
3. Click the eStreamer tab.
4. Click Create Client.
5. Select check boxes for the event types FireSIGHTManagement Center provides to
JSA.
6. Click + Create Client in the upper right-side of the interface.
Copyright © 2018, Juniper Networks, Inc.284
Juniper Secure Analytics Configuring DSMs Guide
7. In the Hostname field, type the IP address or host name.
• If you use a JSA console or use an All-in-one appliance to collect eStreamer events,
type the IP address or host name of your JSA console.
• If you use a remote Event Collector to collect eStreamer events, type the IP address
or host name for the remote Event Collector.
• If you use High Availability (HA), type the virtual IP address.
8. In the Password field, leave the password field blank or type a password for your
certificate and click Save.
The new client is added to the eStreamer Client list and the host is allowed to
communicate with the eStreamer API on port 8302.
9. From the Certificate Location column, click the client that you created to save the
pkcs12 certificate to a file location and clickOK.
You are now ready to import your FireSIGHTManagement Center certificate to your JSA
appliance.
Creating Cisco FireSIGHTManagement Center 5.x and 6.x Certificates
Certificates are created by Cisco FireSIGHTManagement Center appliances in your
deployment.
JSA requires a certificate for every FireSIGHTManagement Center appliance in your
deployment. Certificates are generated in pkcs12 format andmust be converted to a
keystore and truststore file, which are usable by JSA appliances.
1. Log in to your FireSIGHTManagement Center interface.
2. If you are using version 5.x, select System >Local >Registration.
3. If you are using version 6.x, select System >Integration
4. Click the eStreamer tab.
5. Select check boxes for the event types that FireSIGHTManagement Center provides
to JSA and click Save.
6. Click + Create Client in the upper right-side of the interface.
7. In the Hostname field, type the IP address or host name.
• If you use a JSAConsole or use anAll-in-one appliance to collect eStreamer events,
type the IP address or host name of your JSA Console.
• If you use an Event Collector to collect eStreamer events, type the IP address or
host name for the Event Collector.
285Copyright © 2018, Juniper Networks, Inc.
Chapter 30: Cisco

• If you use High Availability (HA), type the virtual IP address.
8. In the Password field, type a password for your certificate or leave the field blank and
click Save.
The new client is added to the Streamer Client list and the host is allowed to
communicate with the eStreamer API on port 8302.
9. Click the download arrow for your host to save the pkcs12 certificate to a file location.
10. ClickOK to download the file.
You are now ready to import your FireSIGHTManagement Center certificate to your JSA
appliance.
Importing a Cisco FireSIGHTManagement Center Certificate to JSA
The estreamer-cert-import.pl script for JSA converts your pkcs12 certificate file to a
keystore and truststore file and places the certificates in the proper directory on your JSA
appliance. Repeat this procedure for each Sourcefire Defense Center pcks12 certificate
you need to import to your JSA Console or Event Collector.
Youmusthave rootor su- rootprivileges to run theestreamer-cert-import.pl import script.
The estreamer-cert-import.pl script is stored on your JSA appliance when you install the
FireSIGHTManagement Center protocol.
The script converts and imports one pkcs12 file at a time. You are required only to import
a certificate for the JSA appliance that manages the FireSIGHTManagement Center log
source. For example, after the FireSIGHTManagement Center event is categorized and
normalized by an Event Collector in a JSAdeployment, it is forwarded to the JSAConsole.
In this scenario, you would import a certificate to the Event Collector.
When you import a new certificate, existing FireSIGHTManagement Center certificates
on the JSAapplianceare renamed toestreamer.keystore.oldandestreamer.truststore.old.
1. Log in to your JSA Console or Event Collector as the root user.
2. Copy the pkcs12 certificate from your FireSIGHTManagement Center appliance to
the following directory:
/opt/qradar/bin/
3. To import your pkcs12 file, type the following command and any extra parameters:
/opt/qradar/bin/estreamer-cert-import.pl -f pkcs12_file_name options
Extra parameters are described in the following table:
DescriptionParameter
Identifies the file name of the pkcs12 files to import.-f
Copyright © 2018, Juniper Networks, Inc.286
Juniper Secure Analytics Configuring DSMs Guide
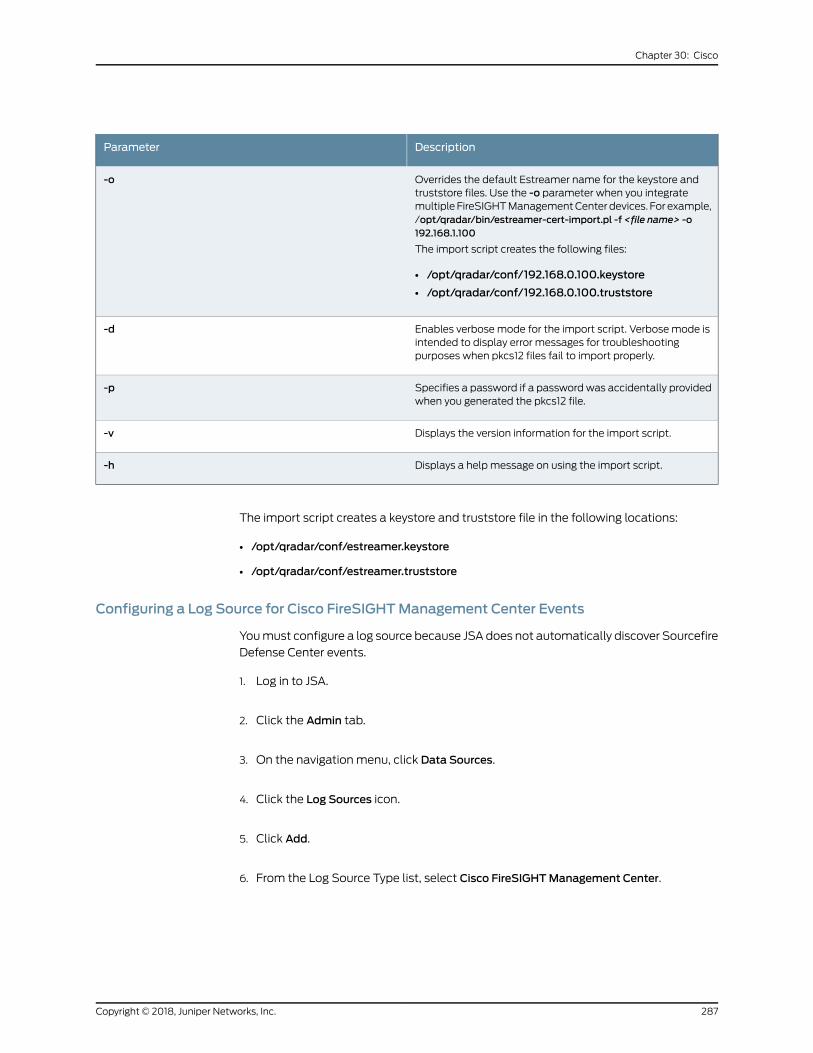
DescriptionParameter
Overrides the default Estreamer name for the keystore andtruststore files. Use the -o parameter when you integratemultiple FireSIGHTManagementCenter devices. For example,/opt/qradar/bin/estreamer-cert-import.pl -f <file name> -o192.168.1.100
The import script creates the following files:
• /opt/qradar/conf/192.168.0.100.keystore
• /opt/qradar/conf/192.168.0.100.truststore
-o
Enables verbosemode for the import script. Verbosemode isintended to display error messages for troubleshootingpurposes when pkcs12 files fail to import properly.
-d
Specifies a password if a password was accidentally providedwhen you generated the pkcs12 file.
-p
Displays the version information for the import script.-v
Displays a help message on using the import script.-h
The import script creates a keystore and truststore file in the following locations:
• /opt/qradar/conf/estreamer.keystore
• /opt/qradar/conf/estreamer.truststore
Configuring a Log Source for Cisco FireSIGHTManagement Center Events
Youmust configure a log source because JSA does not automatically discover Sourcefire
Defense Center events.
1. Log in to JSA.
2. Click the Admin tab.
3. On the navigation menu, click Data Sources.
4. Click the Log Sources icon.
5. Click Add.
6. From the Log Source Type list, select Cisco FireSIGHTManagement Center.
287Copyright © 2018, Juniper Networks, Inc.
Chapter 30: Cisco
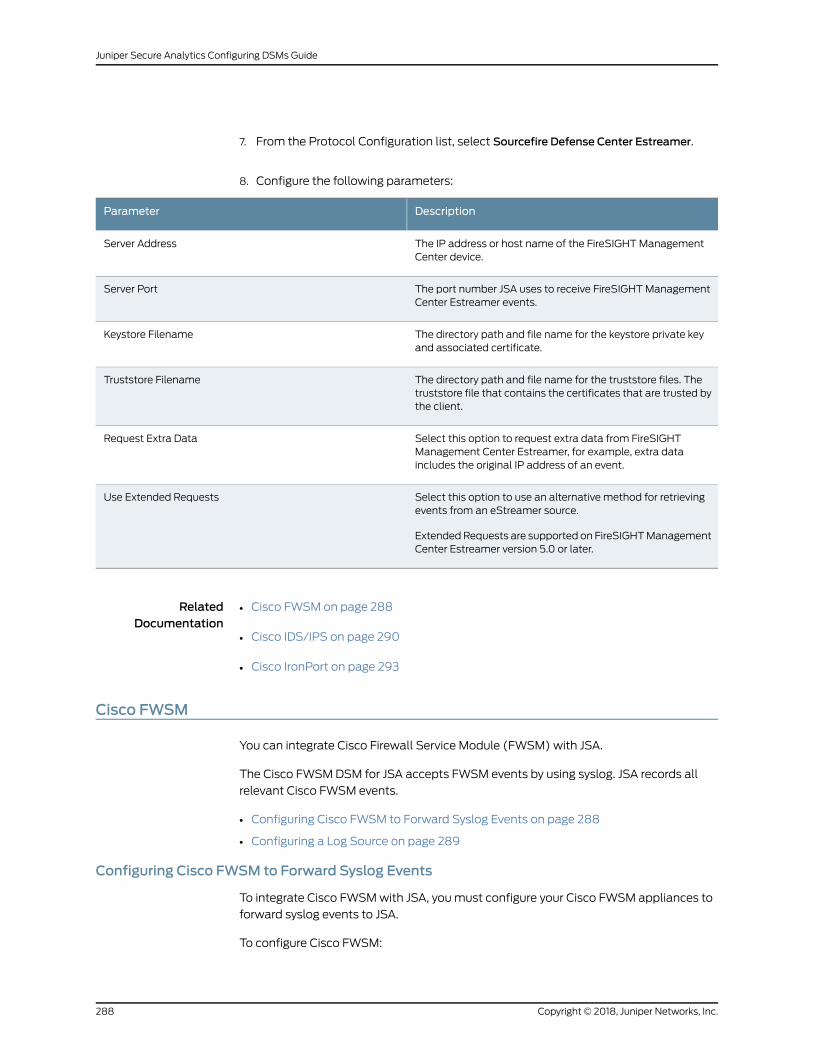
7. From the Protocol Configuration list, select Sourcefire Defense Center Estreamer.
8. Configure the following parameters:
DescriptionParameter
The IP address or host name of the FireSIGHTManagementCenter device.
Server Address
The port number JSA uses to receive FireSIGHTManagementCenter Estreamer events.
Server Port
The directory path and file name for the keystore private keyand associated certificate.
Keystore Filename
The directory path and file name for the truststore files. Thetruststore file that contains the certificates that are trusted bythe client.
Truststore Filename
Select this option to request extra data from FireSIGHTManagement Center Estreamer, for example, extra dataincludes the original IP address of an event.
Request Extra Data
Select this option to use an alternative method for retrievingevents from an eStreamer source.
ExtendedRequests are supported on FireSIGHTManagementCenter Estreamer version 5.0 or later.
Use Extended Requests
RelatedDocumentation
Cisco FWSM on page 288•
• Cisco IDS/IPS on page 290
• Cisco IronPort on page 293
Cisco FWSM
You can integrate Cisco Firewall Service Module (FWSM) with JSA.
The Cisco FWSMDSM for JSA accepts FWSM events by using syslog. JSA records all
relevant Cisco FWSM events.
• Configuring Cisco FWSM to Forward Syslog Events on page 288
• Configuring a Log Source on page 289
Configuring Cisco FWSM to Forward Syslog Events
To integrate Cisco FWSMwith JSA, youmust configure your Cisco FWSM appliances to
forward syslog events to JSA.
To configure Cisco FWSM:
Copyright © 2018, Juniper Networks, Inc.288
Juniper Secure Analytics Configuring DSMs Guide
1. Using a console connection, telnet, or SSH, log in to the Cisco FWSM.
2. Enable logging:
logging on
3. Change the logging level:
logging trap <level>
Where <level> is set from levels 1-7. By default, the logging trap level is set to 3 (error).
4. Designate JSA as a host to receive the messages:
logging host [interface] ip_address [tcp[/port] | udp[/port]] [format emblem]
For example:
logging host dmz1 192.168.1.5
Where 192.168.1.5 is the IP address of your JSA system.
You are now ready to configure the log source in JSA.
Configuring a Log Source
JSA automatically discovers and creates a log source for syslog events fromCisco FWSM
appliances.
The following configuration steps are optional. Tomanually configure a syslog log source
for Cisco FWSM, take the following steps:
1. Log in to JSA.
2. Click the Admin tab.
3. On the navigation menu, click Data Sources.
The Data Sources pane is displayed.
4. Click the Log Sources icon.
The Log Sourceswindow is displayed.
5. Click Add.
TheAdd a log sourcewindow is displayed.
6. In the Log Source Name field, type a name for your log source.
7. In the Log Source Description field, type a description for the log source.
289Copyright © 2018, Juniper Networks, Inc.
Chapter 30: Cisco
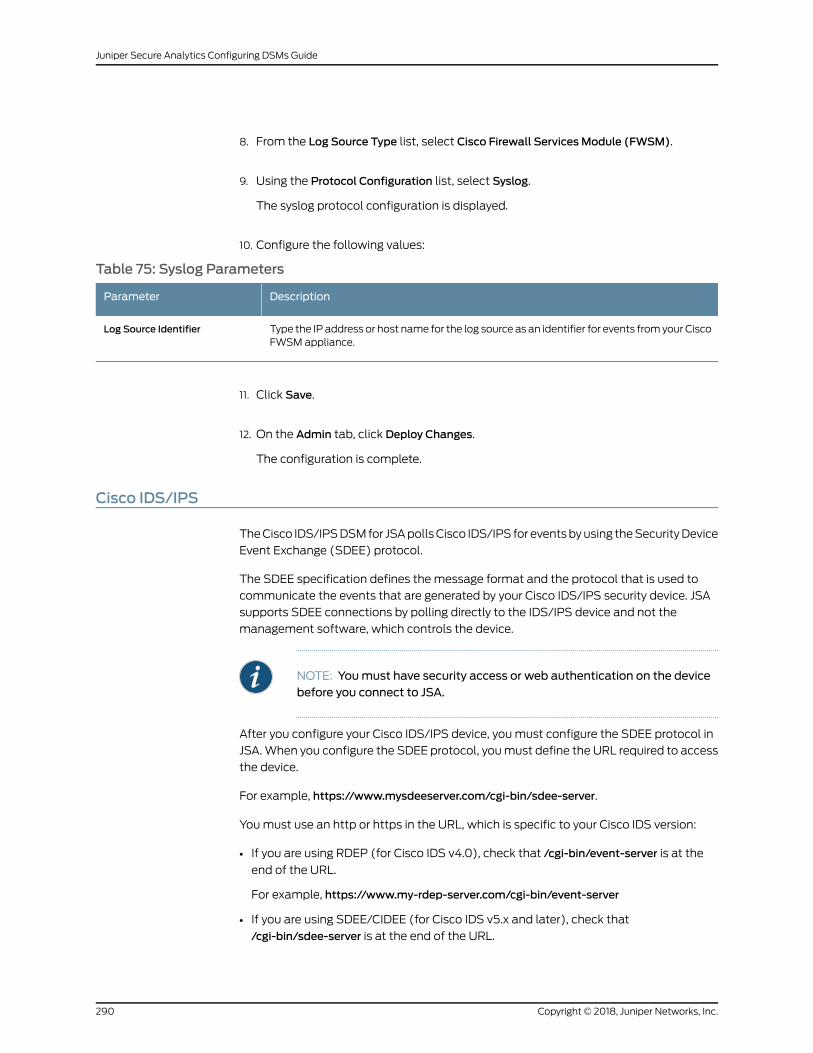
8. From the Log Source Type list, select Cisco Firewall Services Module (FWSM).
9. Using the Protocol Configuration list, select Syslog.
The syslog protocol configuration is displayed.
10. Configure the following values:
Table 75: Syslog Parameters
DescriptionParameter
Type the IP address or host name for the log source as an identifier for events fromyour CiscoFWSM appliance.
Log Source Identifier
11. Click Save.
12. On the Admin tab, click Deploy Changes.
The configuration is complete.
Cisco IDS/IPS
TheCisco IDS/IPSDSMfor JSApollsCisco IDS/IPS for eventsbyusing theSecurityDevice
Event Exchange (SDEE) protocol.
The SDEE specification defines the message format and the protocol that is used to
communicate the events that are generated by your Cisco IDS/IPS security device. JSA
supports SDEE connections by polling directly to the IDS/IPS device and not the
management software, which controls the device.
NOTE: Youmust have security access or web authentication on the devicebefore you connect to JSA.
After you configure your Cisco IDS/IPS device, youmust configure the SDEE protocol in
JSA.When you configure the SDEE protocol, youmust define the URL required to access
the device.
For example, https://www.mysdeeserver.com/cgi-bin/sdee-server.
Youmust use an http or https in the URL, which is specific to your Cisco IDS version:
• If you are using RDEP (for Cisco IDS v4.0), check that /cgi-bin/event-server is at the
end of the URL.
For example, https://www.my-rdep-server.com/cgi-bin/event-server
• If you are using SDEE/CIDEE (for Cisco IDS v5.x and later), check that
/cgi-bin/sdee-server is at the end of the URL.
Copyright © 2018, Juniper Networks, Inc.290
Juniper Secure Analytics Configuring DSMs Guide
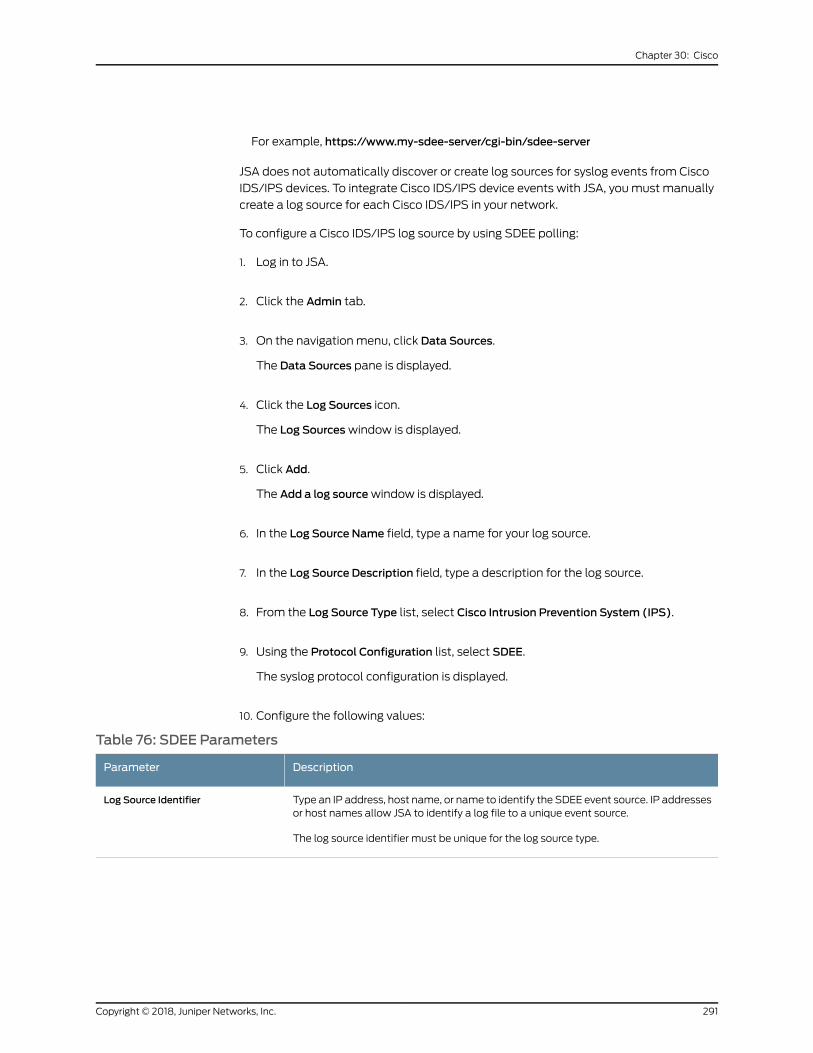
For example, https://www.my-sdee-server/cgi-bin/sdee-server
JSA does not automatically discover or create log sources for syslog events from Cisco
IDS/IPS devices. To integrate Cisco IDS/IPS device events with JSA, youmust manually
create a log source for each Cisco IDS/IPS in your network.
To configure a Cisco IDS/IPS log source by using SDEE polling:
1. Log in to JSA.
2. Click the Admin tab.
3. On the navigation menu, click Data Sources.
The Data Sources pane is displayed.
4. Click the Log Sources icon.
The Log Sourceswindow is displayed.
5. Click Add.
The Add a log sourcewindow is displayed.
6. In the Log Source Name field, type a name for your log source.
7. In the Log Source Description field, type a description for the log source.
8. From the Log Source Type list, select Cisco Intrusion Prevention System (IPS).
9. Using the Protocol Configuration list, select SDEE.
The syslog protocol configuration is displayed.
10. Configure the following values:
Table 76: SDEE Parameters
DescriptionParameter
Type an IP address, host name, or name to identify the SDEE event source. IP addressesor host names allow JSA to identify a log file to a unique event source.
The log source identifier must be unique for the log source type.
Log Source Identifier
291Copyright © 2018, Juniper Networks, Inc.
Chapter 30: Cisco
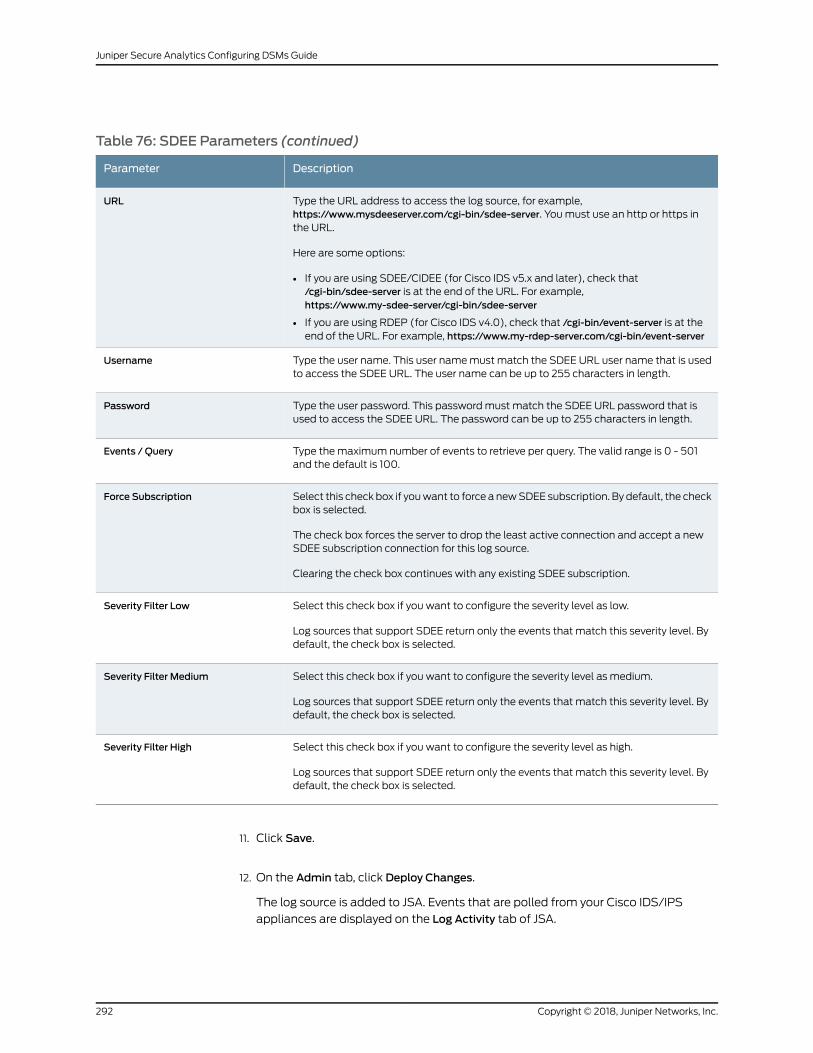
Table 76: SDEE Parameters (continued)
DescriptionParameter
Type the URL address to access the log source, for example,https://www.mysdeeserver.com/cgi-bin/sdee-server. Youmust use an http or https inthe URL.
Here are some options:
• If you are using SDEE/CIDEE (for Cisco IDS v5.x and later), check that/cgi-bin/sdee-server is at the end of the URL. For example,https://www.my-sdee-server/cgi-bin/sdee-server
• If you are using RDEP (for Cisco IDS v4.0), check that /cgi-bin/event-server is at theend of the URL. For example, https://www.my-rdep-server.com/cgi-bin/event-server
URL
Type the user name. This user namemust match the SDEE URL user name that is usedto access the SDEE URL. The user name can be up to 255 characters in length.
Username
Type the user password. This passwordmust match the SDEE URL password that isused to access the SDEE URL. The password can be up to 255 characters in length.
Password
Type themaximum number of events to retrieve per query. The valid range is 0 - 501and the default is 100.
Events / Query
Select this check box if youwant to force a newSDEE subscription. By default, the checkbox is selected.
The check box forces the server to drop the least active connection and accept a newSDEE subscription connection for this log source.
Clearing the check box continues with any existing SDEE subscription.
Force Subscription
Select this check box if you want to configure the severity level as low.
Log sources that support SDEE return only the events that match this severity level. Bydefault, the check box is selected.
Severity Filter Low
Select this check box if you want to configure the severity level as medium.
Log sources that support SDEE return only the events that match this severity level. Bydefault, the check box is selected.
Severity Filter Medium
Select this check box if you want to configure the severity level as high.
Log sources that support SDEE return only the events that match this severity level. Bydefault, the check box is selected.
Severity Filter High
11. Click Save.
12. On the Admin tab, click Deploy Changes.
The log source is added to JSA. Events that are polled from your Cisco IDS/IPS
appliances are displayed on the Log Activity tab of JSA.
Copyright © 2018, Juniper Networks, Inc.292
Juniper Secure Analytics Configuring DSMs Guide
Cisco IronPort
The Cisco IronPort DSM for JSA provides event information for email spam, web content
filtering, and corporate email policy enforcement.
Before you configure JSA to integrate with your Cisco IronPort device, youmust select
the log type to configure:
• To configure IronPort mail logs, see “Configuring IronPort Mail Log” on page 293.
• Toconfigure IronPortcontent filtering logs, see “IronPortWebContentFilter”onpage295.
• Configuring IronPort Mail Log on page 293
• Configuring a Log Source on page 294
• IronPort Web Content Filter on page 295
Configuring IronPort Mail Log
The JSA Cisco IronPort DSM accepts events by using syslog.
To configure your IronPort device to send syslog events to JSA, take the following steps:
1. Log in to your Cisco IronPort user interface.
2. Select SystemAdministration\Log Subscriptions.
3. Click Add Log Subscription.
4. Configure the following values:
• Log Type Define a log subscription for both Ironport Text Mail Logs and System
Logs.
• Log Name Type a log name.
• File Name Use the default configuration value.
• Maximum File Size Use the default configuration value.
• Log Level Select Information (Default).
• Retrieval Method Select Syslog Push.
• Hostname Type the IP address or server name of your JSA system.
• Protocol - Select UDP.
• Facility Use the default configuration value. This value depends on the configured
Log Type.
5. Save the subscription.
You are now ready to configure the log source in JSA.
293Copyright © 2018, Juniper Networks, Inc.
Chapter 30: Cisco
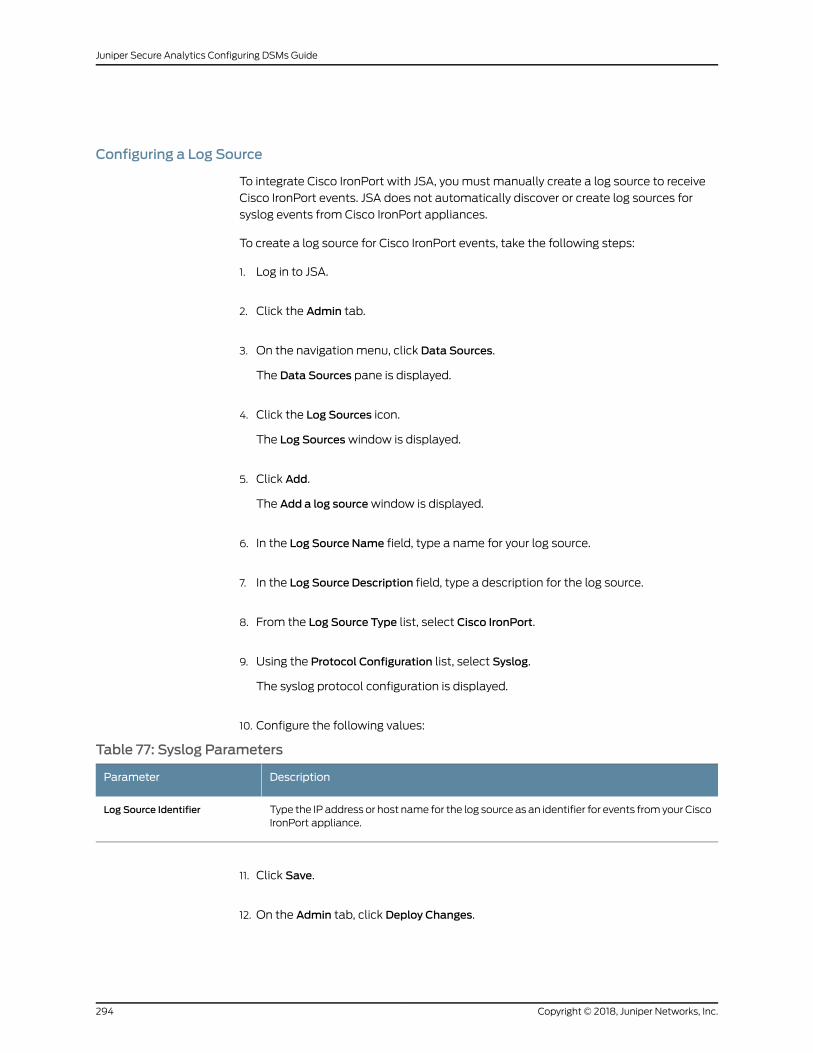
Configuring a Log Source
To integrate Cisco IronPort with JSA, youmust manually create a log source to receive
Cisco IronPort events. JSA does not automatically discover or create log sources for
syslog events from Cisco IronPort appliances.
To create a log source for Cisco IronPort events, take the following steps:
1. Log in to JSA.
2. Click the Admin tab.
3. On the navigation menu, click Data Sources.
The Data Sources pane is displayed.
4. Click the Log Sources icon.
The Log Sourceswindow is displayed.
5. Click Add.
The Add a log sourcewindow is displayed.
6. In the Log Source Name field, type a name for your log source.
7. In the Log Source Description field, type a description for the log source.
8. From the Log Source Type list, select Cisco IronPort.
9. Using the Protocol Configuration list, select Syslog.
The syslog protocol configuration is displayed.
10. Configure the following values:
Table 77: Syslog Parameters
DescriptionParameter
Type the IP address or host name for the log source as an identifier for events fromyour CiscoIronPort appliance.
Log Source Identifier
11. Click Save.
12. On the Admin tab, click Deploy Changes.
Copyright © 2018, Juniper Networks, Inc.294
Juniper Secure Analytics Configuring DSMs Guide
The log source is added to JSA. Events that are forwarded to JSA by Cisco IronPort
are displayed on the Log Activity tab.
IronPortWeb Content Filter
The Cisco IronPort DSM for JSA retrieves web content filtering events inW3C format
from a remote source by using the log file protocol.
Your systemmust be running the current version of log file protocol to integrate with a
Cisco IronPort device. To configure your Cisco IronPort device to push web content filter
events, youmust configure a log subscription for the web content filter that uses the
W3C format. For more information on configuring a log subscription, see your Cisco
IronPort documentation.
You are now ready to configure the log source and protocol JSA.
1. From the Log Source Type drop-down list box, select Cisco IronPort.
2. From the Protocol Configuration list, select Log File protocol option.
3. SelectW3C as the Event Generator used to process the web content filter log files.
4. The FTP File Pattern parameter must use a regular expression that matches the log
files that are generated by the web content filter logs.
Cisco IOS
You can integrate Cisco IOS series devices with JSA.
The Cisco IOS DSM for JSA accepts Cisco IOS events by using syslog. JSA records all
relevant events. The following Cisco Switches and Routers are automatically discovered
as Cisco IOS series devices, and their events are parsed by the Cisco IOS DSM:
• Cisco 12000 Series Routers
• Cisco 6500 Series Switches
• Cisco 7600 Series Routers
• Cisco Carrier Routing System
• Cisco Integrated Services Router.
NOTE: Make sure all Access Control Lists (ACLs) are set to <LOG>.
• Configuring Cisco IOS to Forward Events on page 296
• Configuring a Log Source on page 297
295Copyright © 2018, Juniper Networks, Inc.
Chapter 30: Cisco

Configuring Cisco IOS to Forward Events
You can configure a Cisco IOS-based device to forward events.
Take the following steps to configure your Cisco device:
1. Log in to your Cisco IOS Server, switch, or router.
2. Type the following command to log in to the router in privileged-exec:
enable
3. Type the following command to switch to configuration mode:
conf t
4. Type the following commands:
logging <IP address>
logging source-interface <interface>
Where:
• <IP address> is the IP address of the JSA host and the SIM components.
• <interface> is the name of the interface, for example, dmz, lan, ethernet0, or
ethernet1.
5. Type the following to configure the priority level:
logging trapwarning
logging consolewarning
Wherewarning is the priority setting for the logs.
6. Configure the syslog facility:
logging facility syslog
7. Save and exit the file.
8. Copy the running-config to startup-config by typing the following command:
copy running-config startup-config
You are now ready to configure the log source in JSA.
The configuration is complete. The log source is added to JSA as Cisco IOS events are
automatically discovered. Events that are forwarded to JSA by Cisco IOS-based
devices are displayed on the Log Activity tab of JSA.
Copyright © 2018, Juniper Networks, Inc.296
Juniper Secure Analytics Configuring DSMs Guide
Configuring a Log Source
JSA automatically discovers and creates a log source for syslog events from Cisco IOS.
The following configuration steps are optional. To manually configure a log source for
Cisco IOS-based devices, take the following steps:
1. Log in to JSA.
2. Click the Admin tab.
3. On the navigation menu, click Data Sources.
The Data Sources pane is displayed.
4. Click the Log Sources icon.
The Log Sourceswindow is displayed.
5. Click Add.
The Add a log sourcewindow is displayed.
6. In the Log Source Name field, type a name for your log source.
7. In the Log Source Description field, type a description for the log source.
8. From the Log Source Type list, select one of the following devices:
• Cisco IOS
• Cisco 12000 Series Routers
• Cisco 6500 Series Switches
• Cisco 7600 Series Routers
• Cisco Carrier Routing System
• Cisco Integrated Services Router
9. Using the Protocol Configuration list, select Syslog.
The syslog protocol configuration is displayed.
10. Configure the following values:
Table 78: Syslog Parameters
DescriptionParameter
Type the IP address or host name for the log source as an identifier for events fromyour CiscoIOS-based device.
Log Source Identifier
297Copyright © 2018, Juniper Networks, Inc.
Chapter 30: Cisco
11. Click Save.
12. On the Admin tab, click Deploy Changes.
The configuration is complete.
Cisco Identity Services Engine
The Cisco Identity Services Engine (ISE) DSM for JSA accepts syslog events from Cisco
ISE appliances with log sources configured to use the UDPMultiline protocol.
JSA supports syslog events that are forwarded by Cisco ISE versions 1.1. Before you
configure your Cisco ISE appliance, consider which logging categories you want to
configure on your Cisco ISE to forward to JSA. Each logging category must be configured
with a syslog severity and included as a remote target to allow Cisco ISE to forward the
event to JSA.
The log source that you configure in JSA receives the event that is forwarded from Cisco
ISE, and uses a regular expression to assemble the multiline syslog event into an event
that is readable by JSA.
To integrate Cisco ISE events with JSA, do the following tasks:
1. Configure a log source in JSA for your Cisco ISE appliance forwarding events to JSA.
2. Create a remote logging target for JSA on your Cisco ISE appliance.
3. Configure the logging categories on your Cisco ISE appliance.
• Supported Event Logging Categories on page 298
• Configuring a Cisco ISE Log Source in JSA on page 299
• Creating a Remote Logging Target in Cisco ISE on page 301
• Configuring Cisco ISE Logging Categories on page 301
Supported Event Logging Categories
The Cisco ISE DSM for JSA can receive syslog events frommultiple event logging
categories.
The following table shows supported event logging categories for the Cisco ISE DSM:
Table 79: Cisco ISE Event Logging Categories
Event logging category
AAA audit
Failed attempts
Passed authentication
AAA diagnostics
Copyright © 2018, Juniper Networks, Inc.298
Juniper Secure Analytics Configuring DSMs Guide
Table 79: Cisco ISE Event Logging Categories (continued)
Event logging category
Administrator authentication and authorization
Authentication flow diagnostics
Identity store diagnostics
Policy diagnostics
Radius diagnostics
Guest
Accounting
Radius accounting
Administrative and operational audit
Posture and client provisioning audit
Posture and client provisioning diagnostics
Profiler
System diagnostics
Distributedmanagement
Internal operations diagnostics
System statistics
Configuring a Cisco ISE Log Source in JSA
To collect syslog events, youmust configure a log source for Cisco ISE in JSA to use the
UDPMultiline Syslog protocol.
Configure a log source for each individual Cisco ISE appliance that forwards events to
JSA. However, all Cisco ISE appliances can forward their events to the same listen port
on JSA that you configure.
1. Log in to JSA.
2. Click the Admin tab.
3. In the navigation menu, click Data Sources.
299Copyright © 2018, Juniper Networks, Inc.
Chapter 30: Cisco
4. Click the Log Sources icon.
5. Click Add.
6. In the Log Source Name field, type a name for your log source.
7. In the Log Source Description field, type a description for your log source.
8. From the Log Source Type list, select Cisco Identity Services Engine.
9. From the Protocol Configuration list, select UDPMultiline Syslog.
10. Configure the following values:
Table 80: Cisco ISE Log Source Parameters
DescriptionParameter
Type the IP address to identify the log source or appliance that providesUDPMultiline Syslogevents to JSA.
Log Source Identifier
Type 517 as the port number used by JSA to accept incoming UDPMultiline Syslog events.The valid port range is 1 - 65535.
NOTE: UDPmultiline syslog events can be assigned to any port that is not in use, other thanport 514. The default port that is assigned to the UDPMultiline protocol is UDP port 517. Ifport 517 is used in your network, for a list of ports that are used by JSA.
To edit a saved configuration to use a new port number:
In the Listen Port field, type the new port number for receiving UDPMultiline Syslog events.
1. Click Save.
2. On the Admin tab, select Advanced >Deploy Full Configuration.
After the full deployment completes, JSA can receive events on the updated listen port.
When you click Deploy Full Configuration, JSA restarts all services, resulting in a gap in datacollection for events and flows until the deployment completes.
Listen Port
Type the following regular expression (regex) needed to filter the event payloadmessages.
CISE_\S+ (\d{10})
Message ID Pattern
11. Click Save.
12. On the Admin tab, click Deploy Changes.
You are now ready to configure your Cisco ISE appliance with a remote logging target.
Copyright © 2018, Juniper Networks, Inc.300
Juniper Secure Analytics Configuring DSMs Guide
Creating a Remote Logging Target in Cisco ISE
To forward syslog events to JSA, youmust configure your Cisco ISE appliance with a
remote logging target.
1. Log in to your Cisco ISE Administration Interface.
2. From the navigationmenu, selectAdministration>System>Logging>Remote Logging
Targets.
3. Click Add.
4. In the Name field, type a name for the remote target system.
5. In the Description field, type a description.
6. In the IP Address field, type the IP address of the JSA console or Event Collector.
7. In the Port field, type 517 or use the port value you specific in your Cisco ISE log sourcefor JSA.
8. From the Facility Code list, select the syslog facility to use for logging events.
9. In theMaximum Length field, type 1024 as the maximum packet length allowed for
the UDP syslog message.
10. Click Submit.
The remote logging target is created for JSA.
You are now ready to configure the logging categories that are forwarded by Cisco ISE
to JSA.
Configuring Cisco ISE Logging Categories
To define which events are forwarded by your Cisco ISE appliance, youmust configure
each logging category.
For a list of predefined event logging categories for Cisco ISE, see “Supported Event
Logging Categories” on page 298.
Configure each logging category with a syslog severity and the remote logging target.
Take the following steps to configure the event logging category:
301Copyright © 2018, Juniper Networks, Inc.
Chapter 30: Cisco
1. From the navigation menu, select Administration >System >Logging >Logging
Categories.
2. Select a logging category, and click Edit.
3. From the Log Severity list, select a severity for the logging category.
4. In the Target field, add your remote logging target for JSA to the Select box.
5. Click Save.
6. Repeat this process for each logging category that you want to forward to JSA.
The configuration is complete. Events that are forwarded by Cisco ISE are displayed
on the Log Activity tab in JSA.
Cisco NAC
The Cisco NAC DSM for JSA accepts events by using syslog.
JSA recordsall relevant audit, error, failure events, quarantine, and infected systemevents.
Before youconfigureaCiscoNACdevice in JSA, youmust configure yourdevice to forward
syslog events.
• Configuring Cisco NAC to Forward Events on page 302
• Configuring a Log Source on page 303
Configuring Cisco NAC to Forward Events
You can configure Cisco NAC to forward syslog events:
1. Log in to the Cisco NAC user interface.
2. In the Monitoring section, select Event Logs.
3. Click the Syslog Settings tab.
4. In the Syslog Server Address field, type the IP address of your JSA.
5. In the Syslog Server Port field, type the syslog port number. The default is 514.
6. In the SystemHealth Log Interval field, type the frequency, in minutes, for system
statistic log events.
7. Click Update.
Copyright © 2018, Juniper Networks, Inc.302
Juniper Secure Analytics Configuring DSMs Guide
You are now ready to configure the log source in JSA.
Configuring a Log Source
To integrate CiscoNACeventswith JSA, youmustmanually create a log source to receive
Cisco NAC events
JSA does not automatically discover or create log sources for syslog events from Cisco
NAC appliances.
1. Log in to JSA.
2. Click the Admin tab.
3. On the navigation menu, click Data Sources.
4. Click the Log Sources icon.
5. Click Add.
6. In the Log Source Name field, type a name for your log source.
7. In the Log Source Description field, type a description for the log source.
8. From the Log Source Type list, select Cisco NAC Appliance.
9. Using the Protocol Configuration list, select Syslog.
10. Configure the following values:
Table 81: Syslog Protocol Parameters
DescriptionParameter
Type the IP address or host name for the log source as an identifier for events fromyour CiscoNAC appliance.
Log Source Identifier
11. Click Save.
12. On the Admin tab, click Deploy Changes.
The log source is added to JSA. Events that are forwarded to JSA by Cisco NAC are
displayed on the Log Activity tab.
303Copyright © 2018, Juniper Networks, Inc.
Chapter 30: Cisco
Cisco Nexus
The Cisco Nexus DSM for JSA supports alerts from Cisco NX-OS devices.
Syslog is used to forwardevents fromCiscoNexus to JSA.Before youcan integrate events
with JSA, youmust configure your Cisco Nexus device to forward syslog events.
• Configuring Cisco Nexus to Forward Events on page 304
• Configuring a Log Source on page 304
Configuring Cisco Nexus to Forward Events
You can configure syslog on your Cisco Nexus server to forward events:
1. Type the following command to switch to configuration mode:
config t
2. Type the following commands:
logging server <IP address> <severity>
Where:
• <IP address> is the IP address of your JSA console.
• <severity> is the severity level of the event messages, that range 0 - 7 in value.
For example, logging server 100.100.10.1 6 forwards information level (6) syslog
messages to 100.100.10.1.
3. Type the following command to configure the interface for sending syslog events:
logging source-interface loopback
4. Type the following command to save your current configuration as the startup
configuration:
copy running-config startup-config
The configuration is complete. The log source is added to JSA as Cisco Nexus events
are automatically discovered. Events that are forwarded to JSA by Cisco Nexus are
displayed on the Log Activity tab of JSA.
Configuring a Log Source
JSA automatically discovers and creates a log source for syslog events fromCiscoNexus.
The following configuration steps are optional. To manually configure a log source for
Cisco Nexus, take the following steps:
Copyright © 2018, Juniper Networks, Inc.304
Juniper Secure Analytics Configuring DSMs Guide
1. Log in to JSA.
2. Click the Admin tab.
3. On the navigation menu, click Data Sources.
The Data Sources pane is displayed.
4. Click the Log Sources icon.
The Log Sourceswindow is displayed.
5. Click Add.
The Add a log sourcewindow is displayed.
6. In the Log Source Name field, type a name for your log source.
7. In the Log Source Description field, type a description for the log source.
8. From the Log Source Type list, select Cisco Nexus.
9. Using the Protocol Configuration list, select Syslog.
The syslog protocol configuration is displayed.
10. Configure the following values:
Table 82: Syslog Parameters
DescriptionParameter
Type the IP address or host name for the log source as an identifier for events fromyour CiscoNexus appliances.
Log Source Identifier
11. Click Save.
12. On the Admin tab, click Deploy Changes.
The configuration is complete. For more information on configuring a Virtual Device
Context (VDC) on your Cisco Nexus device, see your vendor documentation.
Cisco Pix
You can integrate Cisco Pix security appliances with JSA.
305Copyright © 2018, Juniper Networks, Inc.
Chapter 30: Cisco
The Cisco Pix DSM for JSA accepts Cisco Pix events by using syslog. JSA records all
relevant Cisco Pix events.
• Configuring Cisco Pix to Forward Events on page 306
• Configuring a Log Source on page 306
Configuring Cisco Pix to Forward Events
You can configure Cisco Pix to forward events.
1. Log in to your Cisco PIX appliance by using a console connection, telnet, or SSH.
2. Type the following command to access Privilegedmode:
enable
3. Type the following command to access Configuration mode:
conf t
4. Enable logging and time stamp the logs:
logging on
logging timestamp
5. Set the log level:
logging trap warning
6. Configure logging to JSA:
logging host <interface> <IP address>
Where:
• <interface> is the name of the interface, for example, DMZ, LAN, ethernet0, or
ethernet1.
• <IP address> is the IP address of the JSA host.
The configuration is complete. The log source is added to JSA as Cisco Pix Firewall
events are automatically discovered. Events that are forwarded to JSA by Cisco Pix
Firewalls are displayed on the Log Activity tab of JSA.
Configuring a Log Source
JSA automatically discovers and creates a log source for syslog events from Cisco Pix
Firewalls.
The following configuration steps are optional.
To manually configure a log source for Cisco Pix, take the following steps:
Copyright © 2018, Juniper Networks, Inc.306
Juniper Secure Analytics Configuring DSMs Guide

1. Log in to JSA.
2. Click the Admin tab.
3. On the navigation menu, click Data Sources.
The Data Sources pane is displayed.
4. Click the Log Sources icon.
The Log Sourceswindow is displayed.
5. Click Add.
The Add a log sourcewindow is displayed.
6. In the Log Source Name field, type a name for your log source.
7. In the Log Source Description field, type a description for the log source.
8. From the Log Source Type list, select Cisco PIX Firewall.
9. Using the Protocol Configuration list, select Syslog.
The syslog protocol configuration is displayed.
10. Configure the following values:
Table 83: Syslog Parameters
DescriptionParameter
Type the IP address or host name for the log source as an identifier for events fromyour CiscoPix Firewall.
Log Source Identifier
11. Click Save.
12. On the Admin tab, click Deploy Changes.
The configuration is complete.
Cisco VPN 3000 Concentrator
The Cisco VPN 3000Concentrator DSM for JSA accepts Cisco VPNConcentrator events
by using syslog.
307Copyright © 2018, Juniper Networks, Inc.
Chapter 30: Cisco

JSA records all relevant events. Before you can integrate with a Cisco VPN concentrator,
you must configure your device to forward syslog events to JSA.
To configure your Cisco VPN 3000 Concentrator:
1. Log in to the Cisco VPN 3000 Concentrator command-line interface (CLI).
2. Type the following command to add a syslog server to your configuration:
set logging server <IP address>
Where <IP address> is the IP address of JSA or your Event Collector.
3. Type the following command to enable systemmessages to be logged to the
configured syslog servers:
set logging server enable
4. Set the facility and severity level for syslog server messages:
• set logging server facility <server_facility_parameter>
• set logging server severity <server_severity_level>
The configuration is complete. The log source is added to JSA as Cisco VPN
Concentrator events are automatically discovered. Events that are forwarded to JSA
are displayed on the Log Activity tab of JSA.
• Configuring a Log Source on page 308
Configuring a Log Source
JSA automatically discovers and creates a log source for syslog events from Cisco VPN
3000 Series Concentrators.
These configuration steps are optional.
To manually configure a log source, take the following steps:
1. Log in to JSA.
2. Click the Admin tab.
3. On the navigation menu, click Data Sources.
The Data Sources pane is displayed.
4. Click the Log Sources icon.
The Log Sourceswindow is displayed.
5. Click Add.
Copyright © 2018, Juniper Networks, Inc.308
Juniper Secure Analytics Configuring DSMs Guide

The Add a log sourcewindow is displayed.
6. In the Log Source Name field, type a name for your log source.
7. In the Log Source Description field, type a description for the log source.
8. From the Log Source Type list, select Cisco VPN 3000 Series Concentrator.
9. Using the Protocol Configuration list, select Syslog.
The syslog protocol configuration is displayed.
10. Configure the following values:
Table 84: Syslog Parameters
DescriptionParameter
Type the IP address or host name for the log source as an identifier for events fromyour CiscoVPN 3000 Series Concentrators.
Log Source Identifier
11. Click Save.
12. On the Admin tab, click Deploy Changes.
The configuration is complete.
CiscoWireless Services Module
You can integrate a CiscoWireless Services Module (WiSM) device with JSA.
A CiscoWiSM DSM for JSA accepts events by using syslog. Before you can integrate JSA
with a CiscoWiSM device, youmust configure CiscoWiSM to forward syslog events.
• Configuring CiscoWiSM to Forward Events on page 309
• Configuring a Log Source on page 312
Configuring CiscoWiSM to Forward Events
You can configure CiscoWiSM to forward syslog events to JSA.
Take the following steps to configure CiscoWiSM to forward syslog events:
1. Log in to the CiscoWireless LAN Controller user interface.
2. ClickManagement >Logs >Config.
The Syslog Configurationwindow is displayed.
309Copyright © 2018, Juniper Networks, Inc.
Chapter 30: Cisco
3. In the Syslog Server IP Address field, type the IP address of the JSA host that receives
the syslog messages.
4. Click Add.
5. Using the Syslog Level list, set the severity level for filtering syslog messages to the
syslog servers by using one of the following severity levels:
• Emergencies Severity level 0
• Alerts Severity level 1 (Default)
• Critical Severity level 2
• Errors Severity level 3
• Warnings Severity level 4
• Notifications Severity level 5
• Informational Severity level 6
• Debugging Severity level 7
If you set a syslog level, only those messages whose severity level is equal to or less
than the selected syslog level are sent to the syslog server. For example, if you set the
syslog level toWarnings (severity level 4), only those messages whose severity is 0 -
4 are sent to the syslog servers.
6. From the Syslog Facility list, set the facility for outgoing syslogmessages to the syslog
server by using one of the following facility levels:
• Kernel Facility level 0
• User Process Facility level 1
• Mail Facility level 2
• SystemDaemons Facility level 3
• Authorization Facility level 4
• Syslog Facility level 5 (default value)
• Line Printer Facility level 6
• USENET Facility level 7
• Unix-to-Unix Copy Facility level 8
• Cron Facility level 9
• FTP Daemon Facility level 11
• SystemUse 1 Facility level 12
• SystemUse 2 Facility level 13
• SystemUse 3 Facility level 14
Copyright © 2018, Juniper Networks, Inc.310
Juniper Secure Analytics Configuring DSMs Guide
• SystemUse 4 Facility level 15
• Local Use 0 Facility level 16
• Local Use 1 Facility level 17
• Local Use 2 Facility level 18
• Local Use 3 Facility level 19
• Local Use 4 Facility level 20
• Local Use 5 Facility level 21
• Local Use 6 Facility level 22
• Local Use 7 Facility level 23
7. Click Apply.
8. From the Buffered Log Level and the Console Log Level lists, select the severity level
for logmessages sent to thecontroller buffer andconsolebyusingoneof the following
severity levels:
• Emergencies Severity level 0
• Alerts Severity level 1
• Critical Severity level 2
• Errors Severity level 3 (default value)
• Warnings Severity level 4
• Notifications Severity level 5
• Informational Severity level 6
• Debugging Severity level 7
If you set a logging level, only those messages whose severity is equal to or less than
that level are logged by the controller. For example, if you set the logging level to
Warnings (severity level 4), only those messages whose severity is 0 - 4 are logged.
9. Select the File Info check box if you want the message logs to include information
about the source file. The default value is enabled.
10. Select the Proc Info check box if you want the message logs to include process
information. The default value is disabled.
11. Select the Trace Info check box if you want the message logs to include trace back
information. The default value is disabled.
12. Click Apply to commit your changes.
13. Click Save Configuration to save your changes.
311Copyright © 2018, Juniper Networks, Inc.
Chapter 30: Cisco
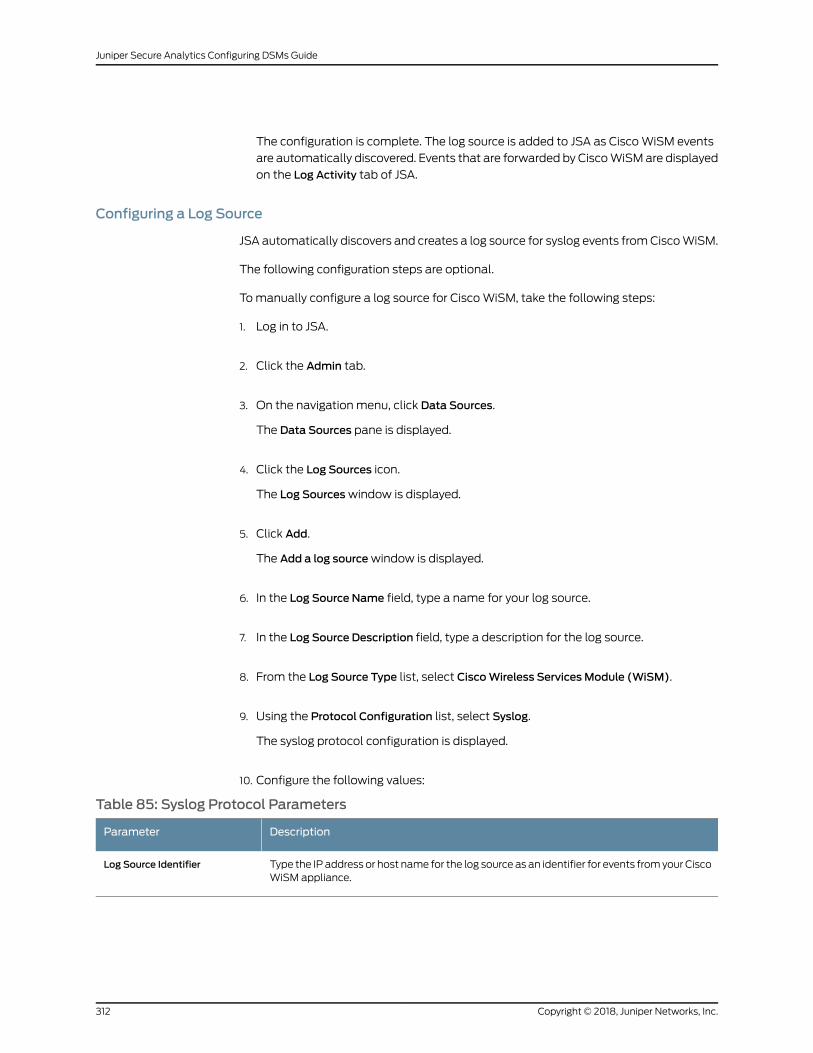
The configuration is complete. The log source is added to JSA as CiscoWiSM events
are automatically discovered. Events that are forwarded by CiscoWiSMare displayed
on the Log Activity tab of JSA.
Configuring a Log Source
JSA automatically discovers and creates a log source for syslog events fromCiscoWiSM.
The following configuration steps are optional.
To manually configure a log source for CiscoWiSM, take the following steps:
1. Log in to JSA.
2. Click the Admin tab.
3. On the navigation menu, click Data Sources.
The Data Sources pane is displayed.
4. Click the Log Sources icon.
The Log Sourceswindow is displayed.
5. Click Add.
The Add a log sourcewindow is displayed.
6. In the Log Source Name field, type a name for your log source.
7. In the Log Source Description field, type a description for the log source.
8. From the Log Source Type list, select CiscoWireless Services Module (WiSM).
9. Using the Protocol Configuration list, select Syslog.
The syslog protocol configuration is displayed.
10. Configure the following values:
Table 85: Syslog Protocol Parameters
DescriptionParameter
Type the IP address or host name for the log source as an identifier for events fromyour CiscoWiSM appliance.
Log Source Identifier
Copyright © 2018, Juniper Networks, Inc.312
Juniper Secure Analytics Configuring DSMs Guide

11. Click Save.
12. On the Admin tab, click Deploy Changes.
The configuration is complete.
CiscoWireless LAN Controllers
The CiscoWireless LAN Controllers DSM for JSAcollects events that are forwarded from
CiscoWireless LAN Controller devices by using syslog or SNMPv2.
This section includes the following topics:
• Configuring Syslog for CiscoWireless LAN Controller on page 313
• Configuring SNMPv2 for CiscoWireless LAN Controller on page 315
• Before You Begin on page 313
• Configuring Syslog for CiscoWireless LAN Controller on page 313
• Configuring a Syslog Log Source in JSA on page 314
• Configuring SNMPv2 for CiscoWireless LAN Controller on page 315
• Configuring a Trap Receiver for CiscoWireless LAN Controller on page 316
• Configuring a Log Source for the CiscoWireless LAN Controller That Uses
SNMPv2 on page 317
Before You Begin
If you collect events from CiscoWireless LAN Controllers, select the best collection
method for your configuration. The CiscoWireless LAN Controller DSM for JSA supports
both syslog and SNMPv2 events. However, syslog provides all available CiscoWireless
LAN Controller events, whereas SNMPv2 sends only a limited set of security events to
JSA.
Configuring Syslog for CiscoWireless LAN Controller
You can configure the CiscoWireless LAN Controller to forward syslog events to JSA.
1. Log in to your CiscoWireless LAN Controller interface.
2. Click theManagement tab.
3. From themenu, select Logs >Config.
4. In the Syslog Server IP Address field, type the IP address of your JSA console.
5. Click Add.
6. From the Syslog Level list, select a logging level.
313Copyright © 2018, Juniper Networks, Inc.
Chapter 30: Cisco
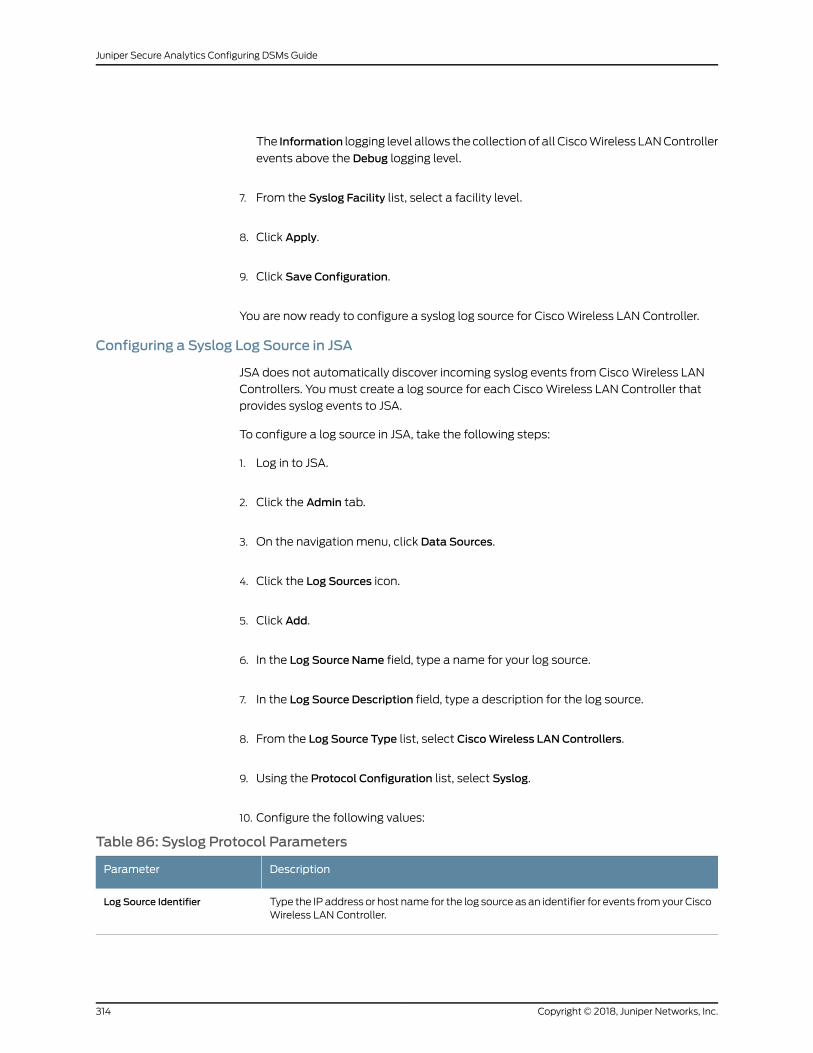
The Information logging level allows the collectionof all CiscoWireless LANController
events above the Debug logging level.
7. From the Syslog Facility list, select a facility level.
8. Click Apply.
9. Click Save Configuration.
You are now ready to configure a syslog log source for CiscoWireless LAN Controller.
Configuring a Syslog Log Source in JSA
JSA does not automatically discover incoming syslog events from CiscoWireless LAN
Controllers. Youmust create a log source for each CiscoWireless LAN Controller that
provides syslog events to JSA.
To configure a log source in JSA, take the following steps:
1. Log in to JSA.
2. Click the Admin tab.
3. On the navigation menu, click Data Sources.
4. Click the Log Sources icon.
5. Click Add.
6. In the Log Source Name field, type a name for your log source.
7. In the Log Source Description field, type a description for the log source.
8. From the Log Source Type list, select CiscoWireless LAN Controllers.
9. Using the Protocol Configuration list, select Syslog.
10. Configure the following values:
Table 86: Syslog Protocol Parameters
DescriptionParameter
Type the IP address or host name for the log source as an identifier for events fromyour CiscoWireless LAN Controller.
Log Source Identifier
Copyright © 2018, Juniper Networks, Inc.314
Juniper Secure Analytics Configuring DSMs Guide
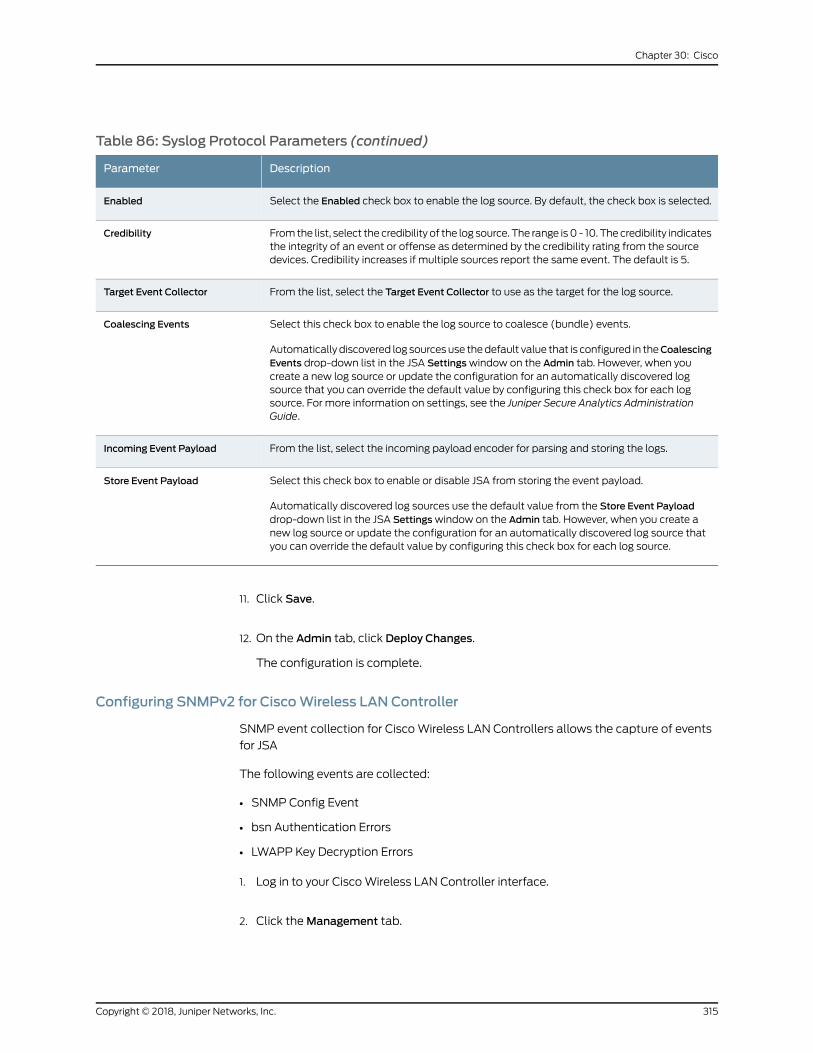
Table 86: Syslog Protocol Parameters (continued)
DescriptionParameter
Select the Enabled check box to enable the log source. By default, the check box is selected.Enabled
Fromthe list, select the credibility of the log source. The range is0 - 10. Thecredibility indicatesthe integrity of an event or offense as determined by the credibility rating from the sourcedevices. Credibility increases if multiple sources report the same event. The default is 5.
Credibility
From the list, select the Target Event Collector to use as the target for the log source.Target Event Collector
Select this check box to enable the log source to coalesce (bundle) events.
Automatically discovered log sourcesuse thedefault value that is configured in theCoalescingEvents drop-down list in the JSA Settingswindow on the Admin tab. However, when youcreate a new log source or update the configuration for an automatically discovered logsource that you can override the default value by configuring this check box for each logsource. For more information on settings, see the Juniper Secure Analytics AdministrationGuide.
Coalescing Events
From the list, select the incoming payload encoder for parsing and storing the logs.Incoming Event Payload
Select this check box to enable or disable JSA from storing the event payload.
Automatically discovered log sources use the default value from the Store Event Payloaddrop-down list in the JSA Settingswindow on the Admin tab. However, when you create anew log source or update the configuration for an automatically discovered log source thatyou can override the default value by configuring this check box for each log source.
Store Event Payload
11. Click Save.
12. On the Admin tab, click Deploy Changes.
The configuration is complete.
Configuring SNMPv2 for CiscoWireless LAN Controller
SNMP event collection for CiscoWireless LAN Controllers allows the capture of events
for JSA
The following events are collected:
• SNMP Config Event
• bsn Authentication Errors
• LWAPP Key Decryption Errors
1. Log in to your CiscoWireless LAN Controller interface.
2. Click theManagement tab.
315Copyright © 2018, Juniper Networks, Inc.
Chapter 30: Cisco
3. From themenu, select SNMP>Communities.
You can use the one of the default communities that are created or create a new
community.
4. Click New.
5. In the Community Name field, type the name of the community for your device.
6. In the IP Address field, type the IP address of JSA.
The IP address and IPmask that you specify is the address fromwhich your Cisco
Wireless LAN Controller accepts SNMP requests. You can treat these values as an
access list for SNMP requests.
7. In the IP Mask field, type a subnet mask.
8. From the AccessMode list, select ReadOnly or Read/Write.
9. From the Status list, select Enable.
10. Click Save Configuration to save your changes.
You are now ready to create a SNMPv2 trap receiver.
Configuring a Trap Receiver for CiscoWireless LAN Controller
Trap receivers that are configured on CiscoWireless LAN Controllers define where the
device can send SNMP trapmessages.
To configure a trap receiver on your CiscoWireless LAN Controller, take the following
steps:
1. Click theManagement tab.
2. From themenu, select SNMP>Trap Receivers.
3. In the Trap Receiver Name field, type a name for your trap receiver.
4. In the IP Address field, type the IP address of JSA.
The IP address you specify is the address towhich your CiscoWireless LANController
sends SNMPmessages. If you plan to configure this log source on an Event Collector,
you want to specify the Event Collector appliance IP address.
5. From the Status list, select Enable.
Copyright © 2018, Juniper Networks, Inc.316
Juniper Secure Analytics Configuring DSMs Guide
6. Click Apply to commit your changes.
7. Click Save Configuration to save your settings.
You are now ready to create a SNMPv2 log source in JSA.
Configuring a Log Source for the CiscoWireless LAN Controller That Uses SNMPv2
JSA does not automatically discover and create log sources for SNMP event data from
CiscoWireless LAN Controllers. Youmust create a log source for each CiscoWireless
LAN Controller providing SNMPv2 events.
Take the following steps to create a log source for your CiscoWireless LAN Controller:
1. Log in to JSA.
2. Click the Admin tab.
3. On the navigation menu, click Data Sources.
4. Click the Log Sources icon.
5. Click Add.
6. In the Log Source Name field, type a name for your log source.
7. In the Log Source Description field, type a description for the log source.
8. From the Log Source Type list, select CiscoWireless LAN Controllers.
9. Using the Protocol Configuration list, select SNMPv2.
10. Configure the following values:
Table 87: SNMPv2 Protocol Parameters
DescriptionParameter
Type the IP address or host name for the log source as an identifier for events fromyour CiscoWireless LAN Controller.
Log Source Identifier
Type the SNMP community name that is needed to access the system that contains theSNMP events. The default is Public.
Community
317Copyright © 2018, Juniper Networks, Inc.
Chapter 30: Cisco
Table 87: SNMPv2 Protocol Parameters (continued)
DescriptionParameter
Select the Include OIDs in Event Payload check box.
This option allows the SNMP event payload to be constructed by using name-value pairsinstead of the standard event payload format. OIDs in the event payload are needed toprocess SNMPv2 or SNMPv3 events from certain DSMs.
Include OIDs in Event Payload
Select the Enabled check box to enable the log source. By default, the check box is selected.Enabled
Fromthe list, select the credibility of the log source. The range is0 - 10. Thecredibility indicatesthe integrity of an event or offense as determined by the credibility rating from the sourcedevices. Credibility increases if multiple sources report the same event. The default is 5.
Credibility
From the list, select the Target Event Collector to use as the target for the log source.Target Event Collector
Select this check box to enable the log source to coalesce (bundle) events.
Automatically discovered log sourcesuse thedefault value that is configured in theCoalescingEvents drop-down in the JSA Settingswindow on the Admin tab. However, when you createa new log source or update the configuration for an automatically discovered log source, youcan override the default value by configuring this check box for each log source. For moreinformation on settings, see the Juniper Secure Analytics Administration Guide.
Coalescing Events
Select this check box to enable or disable JSA from storing the event payload.
Automatically discovered log sources use the default value from the Store Event Payloaddrop-down in the JSA Settingswindow on the Admin tab. However, when you create a newlog source or update the configuration for an automatically discovered log source, you canoverride the default value by configuring this check box for each log source.
Store Event Payload
11. Click Save.
12. On the Admin tab, click Deploy Changes.
The configuration is complete. Events that are forwarded to by CiscoWireless LAN
Controller are displayed on the Log Activity tab of JSA.
Copyright © 2018, Juniper Networks, Inc.318
Juniper Secure Analytics Configuring DSMs Guide
CHAPTER 31
Citrix
• Citrix on page 319
• Citrix NetScaler on page 319
• Citrix Access Gateway on page 321
Citrix
Citrix NetScaler and Citrix Access Gateway DSMs.
The Citrix NetScaler DSM for JSA accepts all relevant audit log events by using syslog.
The Citrix Access Gateway DSM accepts access, audit, and diagnostic events that are
forwarded from your Citrix Access Gateway appliance by using syslog.
Citrix NetScaler
To integrate Citrix NetScaler events with JSA, youmust configure Citrix NetScaler to
forward syslog events.
1. Using SSH, log in to your Citrix NetScaler device as a root user.
2. Type the following command to add a remote syslog server:
add audit syslogAction <ActionName> <IP Address> -serverPort 514 -logLevel Info-dateFormat DDMMYYYY
Where:
<ActionName> is a descriptive name for the syslog server action.
<IP Address> is the IP address or host name of your JSA console.
3. Type the following command to add an audit policy:
add audit syslogPolicy <PolicyName> <Rule> <ActionName>
Where:
<PolicyName> is a descriptive name for the syslog policy.
<Rule> is the rule or expression the policy uses. The only supported value is ns_true.
319Copyright © 2018, Juniper Networks, Inc.
<ActionName> is a descriptive name for the syslog server action.
4. Type the following command to bind the policy globally:
bind system global <PolicyName> -priority <Integer>
Where:
<PolicyName> is a descriptive name for the syslog policy.
<Integer> is a number value that is used to rankmessage priority for multiple policies
that are communicating by using syslog.
Whenmultiple policies have priority (represented by a number value that is assigned
to them) the lower number value is evaluated before the higher number value.
5. Type the following command to save the Citrix NetScaler configuration.
save config
6. Type the following command to verify that the policy is saved in your configuration:
sh system global
NOTE: For information on configuring syslog by using the Citrix NetScaleruser interface, seehttp://support.citrix.com/article/CTX121728oryourvendor
documentation.
The configuration is complete. The log source is added to JSA as Citrix NetScaler
events are automatically discovered. Events that are forwarded by Citrix NetScaler
are displayed on the Log Activity tab of JSA.
• Configuring a Citrix NetScaler Log Source on page 320
Configuring a Citrix NetScaler Log Source
JSA automatically discovers and creates a log source for syslog events from Citrix
NetScaler.
This procedure is optional.
1. Log in to JSA.
2. Click the Admin tab.
3. On the navigation menu, click Data Sources.
4. Click the Log Sources icon.
5. Click Add.
Copyright © 2018, Juniper Networks, Inc.320
Juniper Secure Analytics Configuring DSMs Guide
6. In the Log Source Name field, type a name for your log source.
7. In the Log Source Description field, type a description for the log source.
8. From the Log Source Type list, select Citrix NetScaler.
9. Using the Protocol Configuration list, select Syslog.
10. Configure the following values:
Table 88: Syslog Protocol Parameters
DescriptionParameter
Type the IP address or host name for the log source as an identifier for events from yourCitrix NetScaler devices.
Log Source Identifier
11. Click Save.
12. On the Admin tab, click Deploy Changes.
Citrix Access Gateway
Configuration of syslog on your Citrix Access Gateway to forward events to the JSA
console or Event Collector.
1. Log in to your Citrix Access Gateway web interface.
2. Click the Access Gateway Cluster tab.
3. Select Logging/Settings.
4. In the Server field, type the IP address of your JSA console or Event Collector.
5. From the Facility list, select a syslog facility level.
6. In the Broadcast interval (mins), type 0 to continuously forward syslog events to JSA.
7. Click Submit to save your changes.
321Copyright © 2018, Juniper Networks, Inc.
Chapter 31: Citrix
The configuration is complete. The log source is added to JSA as Citrix Access Gateway
events are automatically discovered. Events that are forwarded to JSA by Citrix Access
Gateway are displayed on the Log Activity tab in JSA.
• Configuring a Citrix Access Gateway Log Source on page 322
Configuring a Citrix Access Gateway Log Source
JSA automatically discovers and creates a log source for syslog events fromCitrix Access
Gateway appliances.
This procedure is optional.
1. Log in to JSA.
2. Click the Admin tab.
3. On the navigation menu, click Data Sources.
4. Click the Log Sources icon.
5. Click Add.
6. In the Log Source Name field, type a name for your log source.
7. In the Log Source Description field, type a description for the log source.
8. From the Log Source Type list, select Citrix Access Gateway.
9. Using the Protocol Configuration list, select Syslog.
10. Configure the following values:
Table 89: Syslog Parameters
DescriptionParameter
Type the IP address or host name for the log source as an identifier for events from yourCitrix Access Gateway appliance.
Log Source Identifier
11. Click Save.
12. On the Admin tab, click Deploy Changes.
Copyright © 2018, Juniper Networks, Inc.322
Juniper Secure Analytics Configuring DSMs Guide
CHAPTER 32
Cloudera Navigator
• Cloudera Navigator on page 323
• Configuring Cloudera Navigator to Communicate with JSA on page 324
Cloudera Navigator
The JSA DSM for Cloudera Navigator collects events from Cloudera Navigator.
The following table identifies the specifications for the Cloudera Navigator DSM:
Table 90: Cloudera Navigator DSMSpecifications
ValueSpecification
ClouderaManufacturer
Cloudera NavigatorDSM name
DSM-ClouderaNavigator-JSA_version-build_number.noarch.rpmRPM file name
v2.0Supported versions
SyslogProtocol
Audit events for HDFS, HBase, Hive, Hue, Cloudera Impala,Sentry
Recorded event types
YesAutomatically discovered?
NoIncludes identity?
NoIncludes custom properties?
Cloudera Navigator website (www.cloudera.com)More information
To integrate Cloudera Navigator with JSA, complete the following steps:
1. If automatic updates are not enabled, download and install the most recent version
of the following RPMs on your JSA console:
323Copyright © 2018, Juniper Networks, Inc.
• Cloudera Navigator DSM RPM
2. Configure your Cloudera Navigator device to send syslog events to JSA.
3. If JSA does not automatically detect the log source, add a Cloudera Navigator log
source on the JSA console. The following table describes the parameters that require
specific values for Cloudera Navigator event collection:
Table 91: Cloudera Navigator Log Source Parameters
ValueParameter
Cloudera NavigatorLog Source type
SyslogProtocol Configuration
The IP address or host name in the Syslog header. Use thepacket IP address, if the Syslog header does not contain an IPaddress or host name.
Log Source Identifier
Configuring Cloudera Navigator to Communicate with JSA
You can configure Cloudera Navigator device to send JSON format syslog events to JSA.
Ensure that Cloudera Navigator can access port 514 on the JSA system.
When you install Cloudera Navigator, all audit logs are collected automatically. However,
youmust configure Cloudera Navigator to send audits logs to JSA by using syslog.
1. Do one of the following tasks:
• Click Clusters >ClouderaManagement Service >ClouderaManagement Service.
• On the Status tab of the Home page, click the ClouderaManagement Service link in
ClouderaManagement Service table.
2. Click the Configuration tab.
3. Search for Navigator Audit Server Logging Advanced Configuration Snippet.
4. Depending on the format type, enter one of the following values in the Value field:
• log4j.logger.auditStream= TRACE,SYSLOG
• log4j.appender.SYSLOG = org.apache.log4j.net.SyslogAppender
• log4j.appender.SYSLOG.SyslogHost = <QRadar Hostname>
• log4j.appender.SYSLOG.Facility = Local2
• log4j.appender.SYSLOG.FacilityPrinting = true
• log4j.additivity.auditStream= false
5. Click Save Changes.
Copyright © 2018, Juniper Networks, Inc.324
Juniper Secure Analytics Configuring DSMs Guide
CHAPTER 33
CloudPassage Halo
• CloudPassage Halo on page 325
• Configuring CloudPassage Halo for Communication with JSA on page 326
• Configuring a CloudPassage Halo Log Source in JSA on page 328
CloudPassage Halo
The CloudPassage Halo DSM for JSA can collect event logs from the CloudPassage Halo
account.
The following table identifies the specifications for the CloudPassage Halo DSM:
Table 92: CloudPassage Halo DSMSpecifications
ValueSpecification
CloudPassageManufacturer
CloudPassage HaloDSM name
DSM-CloudPassageHalo-build_number.noarch.rpmRPM file name
AllSupported versions
Syslog, Log fileEvent format
All eventsJSA recorded event types
YesAutomatically discovered?
NoIncluded identity?
CloudPassage website (www.cloudpassage.com)More information
To integrate CloudPassage Halo with JSA, use the following steps:
1. If automatic updates are not enabled, download the latest versions of the following
RPMs:
325Copyright © 2018, Juniper Networks, Inc.
• DSMCommon RPM
• CloudPassage Halo RPM
2. Configure your CloudPassage Halo to enable communication with JSA.
3. If JSA does not automatically detect CloudPassage Halo as a log source, create a
CloudPassage Halo log source on the JSA Console.
Configuring CloudPassage Halo for Communication with JSA
To collect CloudPassage Halo events, download and configure the CloudPassage Halo
Event Connector script to send syslog events to JSA.
Before youcanconfigure theEventConnector, youmust createa read-onlyCloudPassage
API key. To create a read-only key, log in to your CloudPassage Portal and click Add New
Key on the Site Administrationwindow.
The Event Connector script requires Python 2.6 or later to be installed on the host on
which the Event Connector script runs. The Event Connector makes calls to the
CloudPassage Events API, which is available to all Halo subscribers.
NOTE: You can configure the CloudPassage Halo Event Collect to write theevents to file for JSA to retrieve by using the Log File Protocol, however, thismethod is not recommended.
1. Log in to the CloudPassage Portal.
2. Go to to Settings > Site Administration.
3. Click the API Keys tab.
4. Click Show for the key you want to use.
5. Copy the key ID and secret key into a text file.
Ensure that the file contains only one line,with the key ID and the secret key separated
by a vertical bar/pipe (|), for example, your_key_id|your_secret_key. If you want toretrieve events frommultiple Halo accounts, add an extra line for each account.
6. Save the file as haloEvents.auth.
7. Download the Event Connector script and associated files from
https://github.com/cloudpassage/halo-event-connector-python.
8. Copy the following files to a Linux or Windows system that has Python 2.6 (or later)
installed:
Copyright © 2018, Juniper Networks, Inc.326
Juniper Secure Analytics Configuring DSMs Guide
• haloEvents.py
• cpapi.py
• cputils.py
• remote_syslog.py (use this script only if youdeploy theEventConnector onWindows
and you want to send events through syslog)
• haloEvents.auth
9. Set the environment variables on the Linux or Windows system:
• On Linux, include the full path to the Python interpreter in the PATH environment
variable.
• OnWindows, set the following variables:
• Set the PATH variable to include the location of haloEvents.py and the Python
interpreter.
• Set the PYTHONPATH variable to include the location of the Python libraries and
the Python interpreter.
10. To send events through syslog with the Event Connector is deployed on aWindows
system, run the haloEvents.py script with the --leefsyslog=<QRadar IP> switch:
haloEvents.py --leefsyslog=1.2.3.4
By default, the Event Connector retrieves existing events on initial connection and
then retrieves onlynew events thereafter. To start event retrieval from a specific date,
rather than retrievingall historical eventsonstartup, use the --starting=<date> switch,
where date is in the YYYY-MM-DD format:
haloEvents.py --leefsyslog=1.2.3.4 --starting=2014-04-02
11. To send events through syslog and deploy the Event Connector on a Linux system,
configure the local logger daemon.
a. To check which logger the system uses, type the following command:
ls -d /etc/*syslog*
Depending on what Linus distribution you have, the following files might be listed:
• • rsyslog.conf
• syslog-ng.conf
• syslog.conf
b. Edit the appropriate .conf file with relevant information for your environment.
Example configuration for syslog-ng:
source s_src { file("/var/log/leefEvents.txt");}; destination d_qradar { udp("qradar_hostname" port(514));
327Copyright © 2018, Juniper Networks, Inc.
Chapter 33: CloudPassage Halo
}; log { source(s_src); destination(d_qradar); };
c. To run thehaloEvents.py scriptwith the leeffile=<filepath> switch, type the following
command:
haloEvents.py --leeffile=/var/log/leefEvents.txt
You can include --starting=YYYY-MM-DD switch to specify the date fromwhich
you want events to be collected for on initial startup.
RelatedDocumentation
Configuring a CloudPassage Halo Log Source in JSA on page 328•
Configuring a CloudPassage Halo Log Source in JSA
To collect CloudPassage Halo events, configure a log source in JSA.
1. Log in to JSA.
2. Click the Admin tab.
3. In the navigation menu, click Data Sources.
4. Click the Log Sources icon.
5. Click Add.
6. From the Log Source Type list, select CloudPassage Halo.
7. From the Protocol Configuration list, select Syslog or Log File.
8. Configure the remaining parameters:
9. Click Save.
10. On the Admin tab, click Deploy Changes.
RelatedDocumentation
• Configuring CloudPassage Halo for Communication with JSA on page 326
Copyright © 2018, Juniper Networks, Inc.328
Juniper Secure Analytics Configuring DSMs Guide
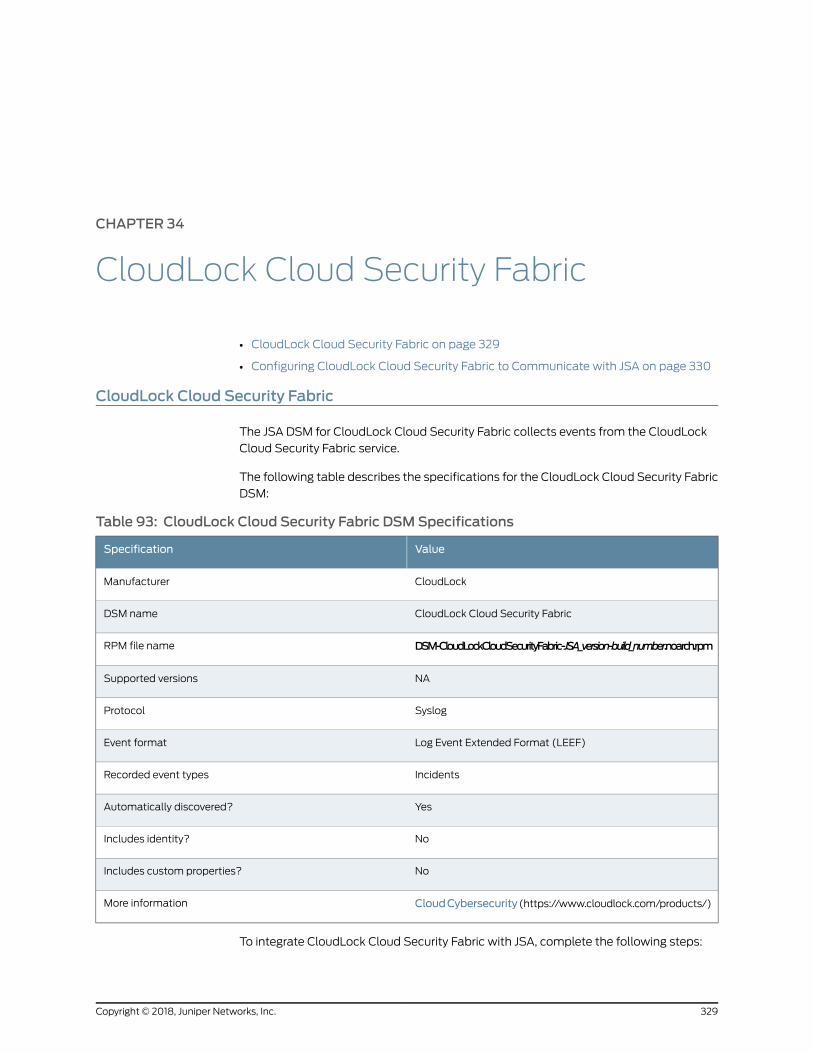
CHAPTER 34
CloudLock Cloud Security Fabric
• CloudLock Cloud Security Fabric on page 329
• Configuring CloudLock Cloud Security Fabric to Communicate with JSA on page 330
CloudLock Cloud Security Fabric
The JSA DSM for CloudLock Cloud Security Fabric collects events from the CloudLock
Cloud Security Fabric service.
The following table describes the specifications for the CloudLock Cloud Security Fabric
DSM:
Table 93: CloudLock Cloud Security Fabric DSMSpecifications
ValueSpecification
CloudLockManufacturer
CloudLock Cloud Security FabricDSM name
DSM-CloudLockCloudSecurityFabric-JSA_version-build_number.noarch.rpmRPM file name
NASupported versions
SyslogProtocol
Log Event Extended Format (LEEF)Event format
IncidentsRecorded event types
YesAutomatically discovered?
NoIncludes identity?
NoIncludes custom properties?
CloudCybersecurity (https://www.cloudlock.com/products/)More information
To integrate CloudLock Cloud Security Fabric with JSA, complete the following steps:
329Copyright © 2018, Juniper Networks, Inc.
1. If automatic updates are not enabled, download and install the most recent version
of the following RPMs on your JSA console in the order that they are listed:
• DSMCommon RPM
• CloudLock Cloud Security Fabric DSM RPM
2. Configure your CloudLock Cloud Security Fabric service to send Syslog events to JSA.
3. If JSA does not automatically detect the log source, add a CloudLock Cloud Security
Fabric log source on the JSA Console. The following table describes the parameters
that require specific values for CloudLock Cloud Security Fabric event collection:
Table 94: CloudLock Cloud Security Fabric Log Source Parameters
ValueParameter
CloudLock Cloud Security FabricLog Source type
SyslogProtocol Configuration
The following table provides a sample event message for the CloudLock Cloud Security
Fabric DSM:
Table95:CloudLockCloudSecurityFabricSampleMessageSupportedbytheCloudLockCloudSecurity Fabric Service
Sample logmessageLow levelcategoryEvent name
LEEF: 1.0|Cloudlock|API|v2|Incidents|match_count=2 sev=1 entity_id=ebR4q6DxvA entity_origin_type=document group=None url=https://drive.google.com/a/cloudlockplus.com/file/d/0B3FwRBjOyR6wS0M1VUdaLWxQODg/view?usp=drivesdk CloudLockID=NOpzejQ3v2 updated_at=2016¬01-20T15:42:15.128356+0000 [email protected] cat=NEW entity_origin_id=0B3FwRBjOyR6wS0M1VUdaLWxQODg entity_mime_type=text/plain devTime=2016¬01-20T15:42:14.913178+0000 policy=Custom Regex resource=confidential.txt usrName=Admin Admin realm=google policy_id=EW9zMXxNBY devTimeFormat=yyyy¬MM-dd'T'HH:mm:ss.SSSSSSZ
Suspicious ActivityNew Incident
Configuring CloudLock Cloud Security Fabric to Communicate with JSA
You can configure CloudLock Cloud Security Fabric to communicate with JSA by using
a Python script.
• Tocollect incidents fromCloudLock, a script thatmakesCloudLockAPI calls is required.
This script collects incidents and coverts them to Log Event Extended Format (LEEF).
• Python is required.
Copyright © 2018, Juniper Networks, Inc.330
Juniper Secure Analytics Configuring DSMs Guide

1. Generate a CloudLock API token. To generate an API token in CloudLock, open the
Settings. Go to the Integrations panel. Copy the Access token that appears on the
page.
2. Go to the CloudLock Support website (https://www.cloudlock.com/support/). Open
a support case to obtain the cl_sample_incidents.py file and then schedule the script
for event collection.
331Copyright © 2018, Juniper Networks, Inc.
Chapter 34: CloudLock Cloud Security Fabric

Copyright © 2018, Juniper Networks, Inc.332
Juniper Secure Analytics Configuring DSMs Guide

CHAPTER 35
Correlog Agent for IBM Z/OS
• Correlog Agent for IBM Z/OS on page 333
• Configuring Your CorreLog Agent System for Communication with JSA on page 334
Correlog Agent for IBM Z/OS
The CorreLog Agent for IBM z/OSDSM for JSA can collect event logs from your IBM z/OS
servers.
The following table identifies the specifications for the CorreLog Agent for IBM z/OS
DSM:
ValueSpecification
CorreLogManufacturer
CorreLog Agent for IBM z/OSDSM name
DSM-CorreLogzOSAgent_JSA-version_build-number.noarch.rpmRPM file name
7.1
7.2
Supported versions
Syslog LEEFProtocol
All eventsJSA recorded events
YesAutomatically discovered
NoIncludes identity
NoIncludes custom event properties
Correlog website(https://correlog.com/solutions-and-services/sas-correlog-mainframe.html)
More information
To integrate CorreLog Agent for IBM z/OS DSMwith JSA, complete the following steps:
333Copyright © 2018, Juniper Networks, Inc.
1. If automatic updates are not enabled, download and install themost recent CorreLog
Agent for IBM z/OS RPM on your JSA Console.
2. For each CorreLog Agent instance, configure your CorreLog Agent system to enable
communication with JSA.
3. If JSAdoesnotautomaticallydiscover theDSM,createa logsourceon the JSAConsole
for each CorreLog Agent system you want to integrate. Configure all the required
parameters, but use the following table for specific Correlog values:
DescriptionParameter
CorreLog Agent for IBM zOSLog Source Type
SyslogProtocol Configuration
Configuring Your CorreLog Agent System for Communication with JSA
For the procedure to configure your Correlog Agent system for communication with JSA,
see the CZA - CorreLog Agent for z/OS®manual that you received from CorreLog with
your Agent for z/OS®software distribution.
Use the following sections of the CZA - CorreLog Agent for z/OS®manual:
• General considerations in Section 1: Introduction.
• Procedure in Section 2: Installation.
• Procedure in the Section 3: Configuration.
Ensure that you complete the Tailoring the Installation for a Proprietary Syslog
Extension/JSA instructions.
When you start the CorreLog agent, if JSA does not collect z/OS®events, see the
Troubleshooting topic in Section 3.
• If you want to customize the optional CorreLog Agent parameter file, review JSA
normalized event attributes in Appendix G: Fields.
Copyright © 2018, Juniper Networks, Inc.334
Juniper Secure Analytics Configuring DSMs Guide
CHAPTER 36
CRYPTOCard CRYPTO-Shield
• CRYPTOCard CRYPTO-Shield on page 335
• Configuring a Log Source on page 335
• Configuring Syslog for CRYPTOCard CRYPTO-Shield on page 336
CRYPTOCard CRYPTO-Shield
The JSA CRYPTOCard CRYPTO-Shield DSM for JSA accepts events by using syslog.
To integrate CRYPTOCard CRYPTO-Shield events with JSA, youmust manually create
a log source to receive syslog events.
Before you can receive events in JSA, youmust configure a log source, then configure
your CRYPTOCard CRYPTO-Shield to forward syslog events. Syslog events that are
forwarded fromCRYPTOCardCRYPTO-Shield devices are not automatically discovered.
JSA can receive syslog events on port 514 for both TCP and UDP.
Configuring a Log Source
JSA does not automatically discover or create log sources for syslog events from
CRYPTOCard CRYPTO-Shield devices.
1. Log in to JSA.
2. Click the Admin tab.
3. On the navigation menu, click Data Sources.
4. Click the Log Sources icon.
5. Click Add.
6. In the Log Source Name field, type a name for your log source.
7. In the Log Source Description field, type a description for the log source.
335Copyright © 2018, Juniper Networks, Inc.
8. From the Log Source Type list, select CRYPTOCard CRYPTOShield.
9. From the Protocol Configuration list, select Syslog.
10. Configure the following values:
Table 96: Syslog Parameters
DescriptionParameter
Type the IP address or host name for the log source as anidentifier for events from your CRYPTOCard CRYPTO-Shielddevice.
Log Source Identifier
11. Click Save.
12. On the Admin tab, click Deploy Changes.
Configuring Syslog for CRYPTOCard CRYPTO-Shield
To configure your CRYPTOCard CRYPTO-Shield device to forward syslog events:
1. Log in to your CRYPTOCard CRYPTO-Shield device.
2. Configure the following System Configuration parameters:
NOTE: Youmust have CRYPTOCard Operator access with the assigneddefault Super-Operator system role to access the System Configurationparameters.
• log4j.appender.<protocol> - Directs the logs to a syslog host where:
• <protocol> is the type of log appender, that determines where you want to send
logs for storage. The options are as follows: ACC, DBG, or LOG. For this parameter,
type the following entry: org.apache.log4j.net.SyslogAppender
• log4j.appender.<protocol>.SyslogHost <IP address> - Type the IP address or host
name of the syslog server where:
• <Protocol> is the type of log appender, that determines where you want to send
logs for storage. The options are as follows: ACC, DBG, or LOG.
• <IP address> is the IP address of the JSA host to which you want to send logs.
Specify the IP address parameter after the log4j.apender.<protocol> parameter is
configured.
The configuration is complete. Events that are forwarded to JSA by CRYPTOCard
CRYPTO-Shield are displayed on the Log Activity tab.
Copyright © 2018, Juniper Networks, Inc.336
Juniper Secure Analytics Configuring DSMs Guide
CHAPTER 37
CyberArk
• CyberArk on page 337
• CyberArk Privileged Threat Analytics on page 337
• CyberArk Vault on page 339
CyberArk
JSA supports several CyberArk DSMs.
CyberArk Privileged Threat Analytics
The JSA DSM for CyberArk Privileged Threat Analytics collects events from a CyberArk
Privileged Threat Analytics device.
The following table describes the specifications for the CyberArk Privileged Threat
Analytics DSM:
Table 97: CyberArk Privileged Threat Analytics DSMSpecifications
ValueSpecification
CyberArkManufacturer
CyberArk Privileged Threat AnalyticsDSM name
DSM-CyberArkPrivilegedThreatAnalytics-JSA_version-build_number.noarch.rpmRPM file name
V3.1Supported versions
SyslogProtocol
Detected security eventsRecorded event types
YesAutomatically discovered?
NoIncludes identity?
NoIncludes custom properties?
337Copyright © 2018, Juniper Networks, Inc.
Table 97: CyberArk Privileged Threat Analytics DSMSpecifications (continued)
ValueSpecification
CyberArk website (http://www.cyberark.com)More information
To integrate CyberArk Privileged Threat Analyticswith JSA, complete the following steps:
1. If automatic updates are not enabled, download and install the most recent version
of the following RPMs on your JSA console:
• CyberArk Privileged Threat Analytics DSM RPM
• DSMCommon RPM
2. Configure your CyberArk Privileged Threat Analytics device to send syslog events to
JSA.
3. If JSA does not automatically detect the log source, add a CyberArk Privileged Threat
Analytics log sourceon the JSAConsole. The following tabledescribes theparameters
that require specific values for CyberArk Privileged Threat Analytics event collection:
Table 98: CyberArk Privileged Threat Analytics Log Source Parameters
ValueParameter
CyberArk Privileged Threat AnalyticsLog Source type
SyslogProtocol Configuration
• ConfiguringCyberArkPrivilegedThreatAnalytics toCommunicatewith JSAonpage338
Configuring CyberArk Privileged Threat Analytics to Communicate with JSA
To collect all events from CyberArk Privileged Threat Analytics, youmust specify JSA as
thesyslogserverandconfigure thesyslog format.TheCyberArkPrivilegedThreatAnalytics
device sends syslog events that are formatted as Log Event Extended Format (LEEF).
1. On the CyberArk Privileged Threat Analytics machine, go to the
/opt/tomcat/diamond-resources/local/directory, andopen the systemparm.properties
file in a text editor such as vi.
2. Uncomment the syslog_outbound property and then edit the following parameters:
ValueParameter
The host name or IP address of the JSA system.Host
514Port
UDPProtocol
JSAFormat
Copyright © 2018, Juniper Networks, Inc.338
Juniper Secure Analytics Configuring DSMs Guide
syslog_outbound=[{"host": "SIEM_MACHINE_ADDRESS", "port": 514, "format":
"QRadar", "protocol": "UDP"} , {"host": "SIEM_MACHINE_ADDRESS1", "port": 514,
"format": "QRadar", "protocol": "UDP"} , …]
3. Save the systemparm.properties configuration file, and then close it.
4. Restart CyberArk Privileged Threat Analytics.
RelatedDocumentation
CyberArk Vault on page 339•
CyberArk Vault
The CyberArk Vault DSM for JSA accepts events by using syslog that is formatted for Log
Enhanced Event Format (LEEF).
JSA records both user activities and safe activities from the CyberArk Vault in the audit
event logs. CyberArk Vault integrates with JSA to forward audit logs by using syslog to
create a detailed log of privileged account activities.
• Event Type Format on page 339
• Configuring Syslog for CyberArk Vault on page 339
• Configuring a Log Source for CyberArk Vault on page 340
Event Type Format
CyberArk Vault must be configured to generate events in Log Enhanced Event Protocol
(LEEF) and to forward these events by using syslog. The LEEF format consists of a pipe
( | ) delimited syslog header, and tab separated fields in the log payload section.
If the syslog events fromCyberArk Vault are not formatted properly, examine your device
configuration or software version to ensure that your appliance supports LEEF. Properly
formatted LEEF eventmessages are automatically discovered and added as a log source
to JSA.
Configuring Syslog for CyberArk Vault
To configure CyberArk Vault to forward syslog events to JSA:
1. Log in to your CyberArk device.
2. Edit the DBParm.ini file.
3. Configure the following parameters:
339Copyright © 2018, Juniper Networks, Inc.
Chapter 37: CyberArk
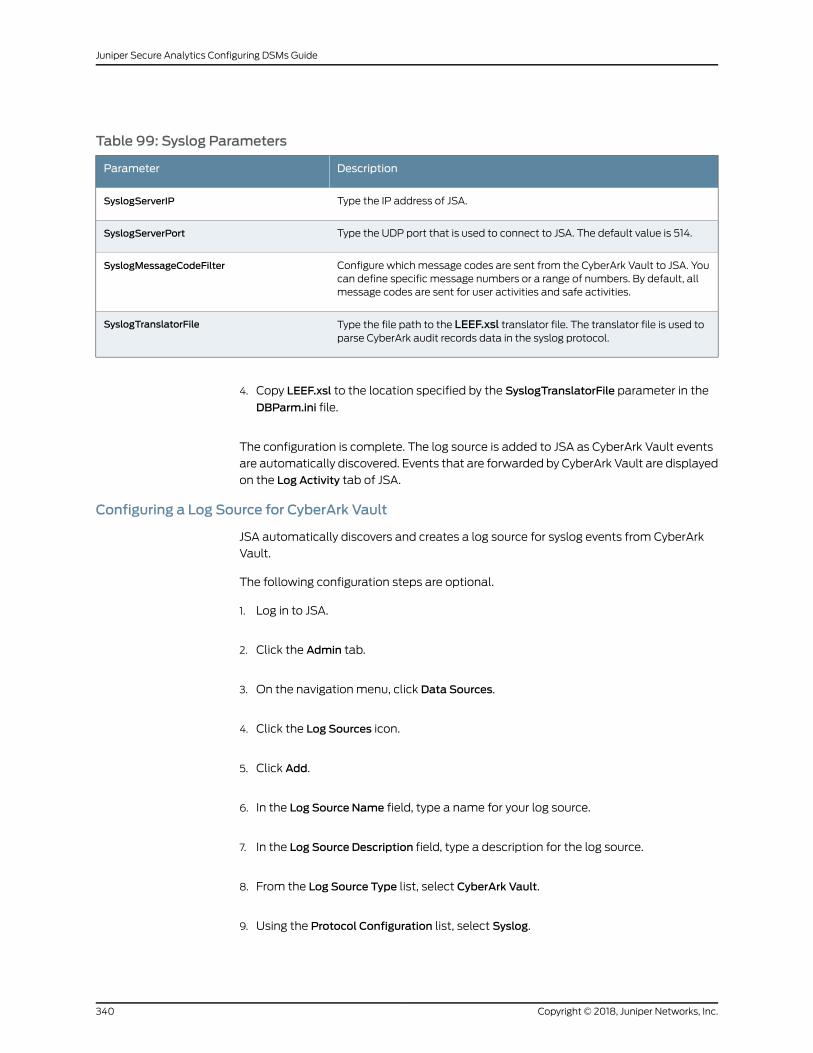
Table 99: Syslog Parameters
DescriptionParameter
Type the IP address of JSA.SyslogServerIP
Type the UDP port that is used to connect to JSA. The default value is 514.SyslogServerPort
Configure which message codes are sent from the CyberArk Vault to JSA. Youcan define specific message numbers or a range of numbers. By default, allmessage codes are sent for user activities and safe activities.
SyslogMessageCodeFilter
Type the file path to the LEEF.xsl translator file. The translator file is used toparse CyberArk audit records data in the syslog protocol.
SyslogTranslatorFile
4. Copy LEEF.xsl to the location specified by the SyslogTranslatorFile parameter in the
DBParm.ini file.
The configuration is complete. The log source is added to JSA as CyberArk Vault events
are automatically discovered. Events that are forwarded by CyberArk Vault are displayed
on the Log Activity tab of JSA.
Configuring a Log Source for CyberArk Vault
JSA automatically discovers and creates a log source for syslog events from CyberArk
Vault.
The following configuration steps are optional.
1. Log in to JSA.
2. Click the Admin tab.
3. On the navigation menu, click Data Sources.
4. Click the Log Sources icon.
5. Click Add.
6. In the Log Source Name field, type a name for your log source.
7. In the Log Source Description field, type a description for the log source.
8. From the Log Source Type list, select CyberArk Vault.
9. Using the Protocol Configuration list, select Syslog.
Copyright © 2018, Juniper Networks, Inc.340
Juniper Secure Analytics Configuring DSMs Guide
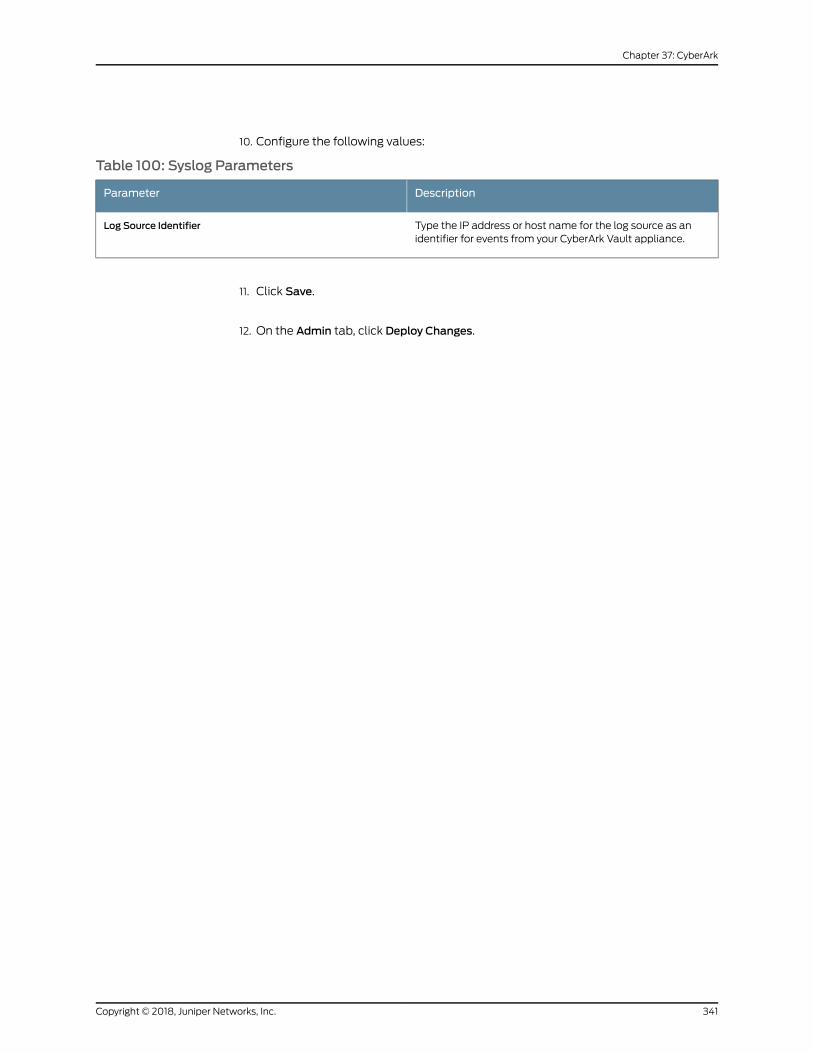
10. Configure the following values:
Table 100: Syslog Parameters
DescriptionParameter
Type the IP address or host name for the log source as anidentifier for events from your CyberArk Vault appliance.
Log Source Identifier
11. Click Save.
12. On the Admin tab, click Deploy Changes.
341Copyright © 2018, Juniper Networks, Inc.
Chapter 37: CyberArk

Copyright © 2018, Juniper Networks, Inc.342
Juniper Secure Analytics Configuring DSMs Guide
CHAPTER 38
CyberGuard Firewall/VPN Appliance
• CyberGuard Firewall/VPN Appliance on page 343
• Configuring Syslog Events on page 343
• Configuring a Log Source on page 343
CyberGuard Firewall/VPN Appliance
The CyberGuard Firewall VPN Appliance DSM for JSA accepts CyberGuard events by
using syslog.
JSA records all relevant CyberGuard events for CyberGuard KS series appliances that
are forwarded by using syslog.
Configuring Syslog Events
To configure a CyberGuard device to forward syslog events:
1. Log in to the CyberGuard user interface.
2. Select the Advanced page.
3. Under System Log, select Enable Remote Logging.
4. Type the IP address of JSA.
5. Click Apply.
The configuration is complete. The log source is added to JSA as CyberGuard events
are automatically discovered. Events that are forwarded by CyberGuard appliances
are displayed on the Log Activity tab of JSA.
Configuring a Log Source
JSA automatically discovers and creates a log source for syslog events from CyberGuard
appliances.
The following configuration steps are optional.
343Copyright © 2018, Juniper Networks, Inc.
1. Log in to JSA.
2. Click the Admin tab.
3. On the navigation menu, click Data Sources.
4. Click the Log Sources icon.
5. Click Add.
6. In the Log Source Name field, type a name for your log source.
7. In the Log Source Description field, type a description for the log source.
8. From the Log Source Type list, select CyberGuard TSP Firewall/VPN.
9. From the Protocol Configuration list, select Syslog.
10. For the Log Source Identifier parameter, enter the IP address or host name for the log
source as an identifier for events from your CyberGuard appliance.
11. Click Save.
12. On the Admin tab, click Deploy Changes.
Copyright © 2018, Juniper Networks, Inc.344
Juniper Secure Analytics Configuring DSMs Guide
CHAPTER 39
Damballa Failsafe
• Damballa Failsafe on page 345
• Configuring Syslog for Damballa Failsafe on page 345
• Configuring a Log Source on page 346
Damballa Failsafe
The Failsafe DSM for JSA accepts syslog events by using the Log Event Extended Format
(LEEF), enabling JSA to record all relevant Damballa Failsafe events.
Damballa Failsafe must be configured to generate events in Log Event Extended
Format(LEEF) and forward these events by using syslog. The LEEF format consists of a
pipe ( | ) delimited syslog header, and tab separated fields in the log event payload.
If the syslog events that are forwarded from your Damballa Failsafe are not correctly
formatted in LEEF format, youmust check your device configuration or software version
to ensure that your appliance supports LEEF. Properly formatted LEEF event messages
are automatically discovered and added as a log source to JSA.
Configuring Syslog for Damballa Failsafe
To collect events, youmust configure your Damballa Failsafe device to forward syslog
events to JSA.
1. Log in to your Damballa Failsafe Management Console.
2. From the navigation menu, select Setup >Integration Settings.
3. Click the JSA tab.
4. Select Enable Publishing to JSA.
5. Configure the following options:
• Hostname—Type the IPaddressor FullyQualifiedName(FQN)of your JSAconsole.
• Destination Port—Type 514. By default, JSA uses port 514 as the port for receivingsyslog events.
345Copyright © 2018, Juniper Networks, Inc.
• Source Port—This input is not a requirement. Type the Source Port your Damballa
Failsafe device uses for sending syslog events.
6. Click Save.
The configuration is complete. The log source is added to JSA as Damballa Failsafe
events are automatically discovered. Events that are forwarded by Damballa Failsafe
are displayed on the Log Activity tab of JSA.
Configuring a Log Source
JSA automatically discovers and creates a log source for syslog events from Damballa
Failsafe devices.
The following configuration steps are optional.
1. Log in to JSA.
2. Click the Admin tab.
3. On the navigation menu, click Data Sources.
4. Click the Log Sources icon.
5. Click Add.
6. In the Log Source Name field, type a name for your log source.
7. In the Log Source Description field, type a description for the log source.
8. From the Log Source Type list, select Damballa Failsafe.
9. Using the Protocol Configuration list, select Syslog.
10. Configure the following values:
Table 101: Syslog Parameters
DescriptionParameter
Type the IP address or host name for the log source as an identifier for events from yourDamballa Failsafe devices.
Log Source Identifier
11. Click Save.
12. On the Admin tab, click Deploy Changes.
Copyright © 2018, Juniper Networks, Inc.346
Juniper Secure Analytics Configuring DSMs Guide

The configuration is complete.
347Copyright © 2018, Juniper Networks, Inc.
Chapter 39: Damballa Failsafe

Copyright © 2018, Juniper Networks, Inc.348
Juniper Secure Analytics Configuring DSMs Guide
CHAPTER 40
DG Technology MEAS
• DG Technology MEAS on page 349
• ConfiguringYourDGTechnologyMEASSystemforCommunicationwith JSAonpage350
DG TechnologyMEAS
The JSA DSM for DG Technology MEAS can collect event logs from your DG Technology
MEAS servers.
The following table identifies the specifications for the DG Technology MEAS DSM:
Table 102: DSMSpecifications for DG TechnologyMEAS
ValueSpecification
DG TechnologyManufacturer
DG Technology MEASLog source type
DSM-DGTechnologyMEAS-build_number.noarch.rpmRPM file name
8.xSupported versions
LEEF SyslogProtocol configuration
Mainframe eventsSupported event types
YesAutomatically discovered?
NoIncludes identity?
NoIncludes custom event properties
DG Technology website (http://www.dgtechllc.com)More information
To integrate DG Technology MEAS DSMwith JSA, use the following procedures:
1. If automatic updates are not enabled, download and install the most recent DG
Technology MEAS RPM on your JSA Console.
349Copyright © 2018, Juniper Networks, Inc.
2. For each instance of DG Technology MEAS, configure your DG Technology MEAS
system to enable communication with JSA.
Configuring Your DG TechnologyMEAS System for Communication with JSA
To collect all audit logs and system events fromDG Technology MEAS, youmust specify
JSA as the syslog server.
1. Log in to your DG Technology MEAS server.
2. Type the following command:
java meas/MeasServer 41000 m=qwl lo=IP_address_of_QRadar_host
When JSA receives events from your DG Technology MEAS, a log source is automatically
created and listed on the Log Sourceswindow.
Copyright © 2018, Juniper Networks, Inc.350
Juniper Secure Analytics Configuring DSMs Guide
CHAPTER 41
Digital China Networks (DCN)
• Digital China Networks (DCN) on page 351
• Configuring a Log Source on page 351
• Configuring a DCN DCS/DCRS Series Switch on page 352
Digital China Networks (DCN)
The Digital China Networks (DCN) DCS/DCRS Series DSM for JSA can accept events
from Digital China Networks (DCN) switches by using syslog.
JSA records all relevant IPv4 events that are forwarded from DCN switches. To integrate
your device with JSA, youmust configure a log source, then configure your DCS or DCRS
switch to forward syslog events.
Supported Appliances
The DSM supports the following DCN DCS/DCRS Series switches:
• DCS - 3650
• DCS - 3950
• DCS - 4500
• DCRS - 5750
• DCRS - 5960
• DCRS - 5980
• DCRS - 7500
• DCRS - 9800
Configuring a Log Source
JSAdoesnot automatically discover incoming syslogevents fromDCNDCS/DCRSSeries
switches.
351Copyright © 2018, Juniper Networks, Inc.
1. Log in to JSA.
2. Click the Admin tab.
3. On the navigation menu, click Data Sources.
4. Click the Log Sources icon.
5. Click Add.
6. In the Log Source Name field, type a name for your log source.
7. In the Log Source Description field, type a description for the log source.
8. From the Log Source Type list, select DCNDCS/DCRS Series.
9. Using the Protocol Configuration list, select Syslog.
10. Configure the following value:
Table 103: Syslog Parameters
DescriptionParameter
Type the IP address, host name, or name for the log source for use as an identifier of yourDCN DCS/DCRS Series switch.
Each log source that you create for your DCN DCS/DCRS Series switch includes a uniqueidentifier, such as an IP address or host name.
Log Source Identifier
11. Click Save.
12. On the Admin tab, click Deploy Changes.
The log source is added to JSA. You are now ready to configure your Digital China
Networks DCS or DCRS Series switch to forward events to JSA.
Configuring a DCNDCS/DCRS Series Switch
To collect events, youmust configure your DCN DCS/DCRS Series switch in JSA.
1. Log in to your DCN DCS/DCRS Series Switch command-line interface (CLI).
2. Type the following command to access the administrative mode:
enable
Copyright © 2018, Juniper Networks, Inc.352
Juniper Secure Analytics Configuring DSMs Guide
3. Type the following command to access the global configuration mode:
config
The command-line interface displays the configuration mode prompt:
Switch(Config)#
4. Type the following command to configure a log host for your switch:
logging <IP address> facility <local> severity <level>
Where:
• <IP address> is the IP address of the JSA console.
• <local> is the syslog facility, for example, local0.
• <level> is the severity of the syslog events, for example, informational. If you specify
a value of informational, you forward all information level events and later (more
severe), such as, notifications, warnings, errors, critical, alerts, and emergencies.
For example,
logging 10.10.10.1 facility local0 severity informational
5. Type the following command to save your configuration changes:
write
The configuration is complete. You can verify the events that are forwarded to JSA
by viewing events in the Log Activity tab.
353Copyright © 2018, Juniper Networks, Inc.
Chapter 41: Digital China Networks (DCN)

Copyright © 2018, Juniper Networks, Inc.354
Juniper Secure Analytics Configuring DSMs Guide
CHAPTER 42
Enterprise-IT-Security.com SF-Sherlock
• Enterprise-IT-Security.com SF-Sherlock on page 355
• Configuring Enterprise-IT-Security.com SF-Sherlock to Communicate with
JSA on page 356
Enterprise-IT-Security.comSF-Sherlock
The JSA DSM for Enterprise-IT-Security.com SF-Sherlock collects logs from your
Enterprise-IT-Security.com SF-Sherlock servers.
The following table describes the specifications for the Enterprise-IT-Security.com
SF-Sherlock DSM:
Table 104: Enterprise-IT-Security.comSF-Sherlock DSMSpecifications
ValueSpecification
Enterprise-IT-Security.comManufacturer
Enterprise-IT-Security.com SF-SherlockDSM name
DSM-EnterpriseITSecuritySFSherlock-JSA_version-build_number.noarch.rpmRPM file name
v8.1 and laterSupported versions
Log Event Extended Format (LEEF)Event format
All_Checks, DB2_Security_Configuration, JES_Configuration,Job_Entry_System_Attack, Network_Parameter, Network_Security, No_Policy,Resource_Access_Viol, Resource_Allocation, Resource_Protection,Running_System_Change, Running_System_Security, Running_System_Status,Security_Dbase_Scan, Security_Dbase_Specialty, Security_Dbase_Status,Security_Parm_Change, Security_System_Attack, Security_System_Software,Security_System_Status, SF-Sherlock, Sherlock_Diverse, Sherlock_Diverse,Sherlock_Information,Sherlock_Specialties,Storage_Management,Subsystem_Scan,Sysplex_Security, Sysplex_Status, System_Catalog, System_File_Change,System_File_Security, System_File_Specialty, System_Log_Monitoring,System_Module_Security, System_Process_Security, System_Residence,System_Tampering, System_Volumes, TSO_Status, UNIX_OMVS_Security,UNIX_OMVS_System, User_Defined_Monitoring, xx_Resource_Prot_Templ
Recorded event types
355Copyright © 2018, Juniper Networks, Inc.
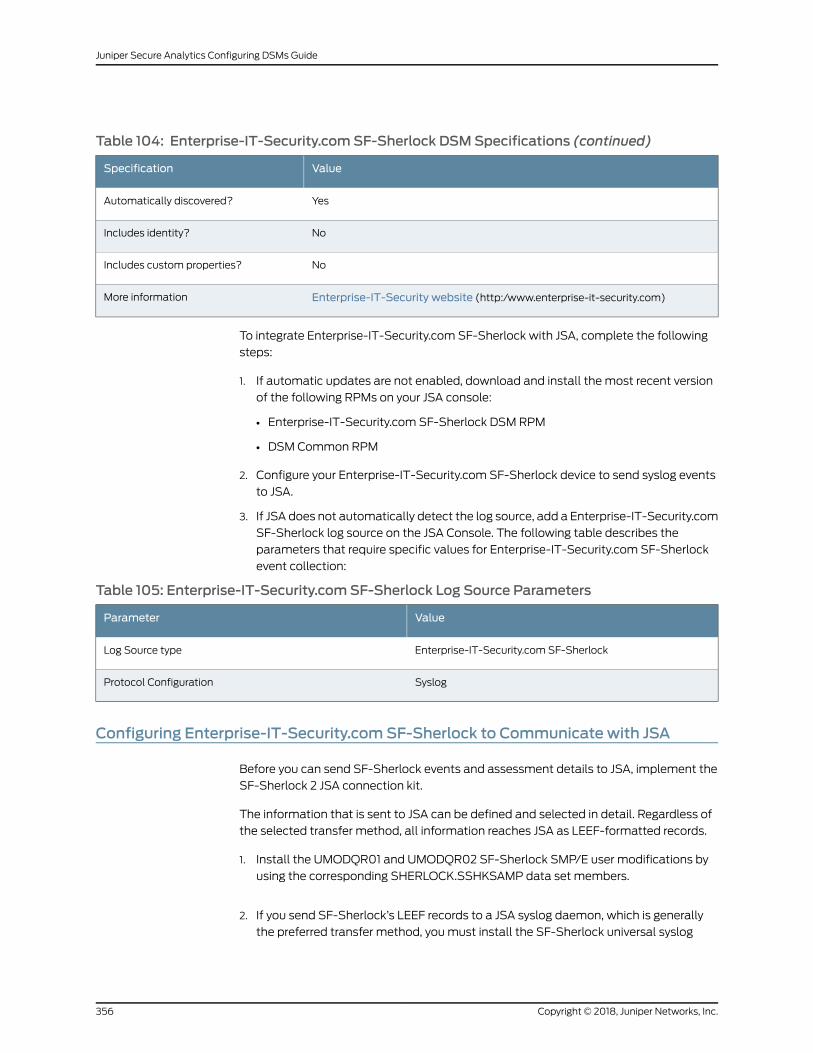
Table 104: Enterprise-IT-Security.comSF-Sherlock DSMSpecifications (continued)
ValueSpecification
YesAutomatically discovered?
NoIncludes identity?
NoIncludes custom properties?
Enterprise-IT-Security website (http:/www.enterprise-it-security.com)More information
To integrate Enterprise-IT-Security.com SF-Sherlock with JSA, complete the following
steps:
1. If automatic updates are not enabled, download and install the most recent version
of the following RPMs on your JSA console:
• Enterprise-IT-Security.com SF-Sherlock DSM RPM
• DSM Common RPM
2. Configure your Enterprise-IT-Security.com SF-Sherlock device to send syslog events
to JSA.
3. If JSA does not automatically detect the log source, add a Enterprise-IT-Security.com
SF-Sherlock log source on the JSA Console. The following table describes the
parameters that require specific values for Enterprise-IT-Security.com SF-Sherlock
event collection:
Table 105: Enterprise-IT-Security.comSF-Sherlock Log Source Parameters
ValueParameter
Enterprise-IT-Security.com SF-SherlockLog Source type
SyslogProtocol Configuration
Configuring Enterprise-IT-Security.comSF-Sherlock to Communicate with JSA
Before you can send SF-Sherlock events and assessment details to JSA, implement the
SF-Sherlock 2 JSA connection kit.
The information that is sent to JSA can be defined and selected in detail. Regardless of
the selected transfer method, all information reaches JSA as LEEF-formatted records.
1. Install the UMODQR01 and UMODQR02 SF-Sherlock SMP/E user modifications by
using the corresponding SHERLOCK.SSHKSAMP data set members.
2. If you send SF-Sherlock’s LEEF records to a JSA syslog daemon, which is generally
the preferred transfer method, youmust install the SF-Sherlock universal syslog
Copyright © 2018, Juniper Networks, Inc.356
Juniper Secure Analytics Configuring DSMs Guide

message router in the USS environment of z/OS®. You will find all installation details
within the UNIXCMDLmember of the SHERLOCK.SSHKSAMP data set.
3. If you transfer the logs by FTP or another technique, youmust adapt the UMODQR01
user modification.
4. Enter the IP address for the JSA LEEF syslog server, transfer method (UDP or TCP),
and port number (514) in the JSASEmember of SF-Sherlock’s init-deck parameter
configuration file.
5. Allocate the JSA related log data set by using the ALLOCQRG job of the
SHERLOCK.SSHKSAMP data set. It is used by the SHERLOCK started procedure
(STC) to keep all JSA LEEF records transferring to JSA.
6. The JSATSTmember of the SHERLOCK.SSHKSAMP data set can be used to test the
SF-Sherlock 2 QRadar message routing connection. If JSA receives the test events,
the implementation was successful.
7. Enable theSF-Sherlock2 JSAconnection in yourSF-Sherlock installationbyactivating
JSA00 (event monitoring) and optionally, the JSA01 (assessment details) init-deck
members, through the already preparedADD JSAxx statementswithin the $BUILD00
master control member.
8. Refresh or recycle the SHERLOCK started procedure to activate the newmaster
control member that enables the connection of SF-Sherlock to JSA.
357Copyright © 2018, Juniper Networks, Inc.
Chapter 42: Enterprise-IT-Security.com SF-Sherlock

Copyright © 2018, Juniper Networks, Inc.358
Juniper Secure Analytics Configuring DSMs Guide
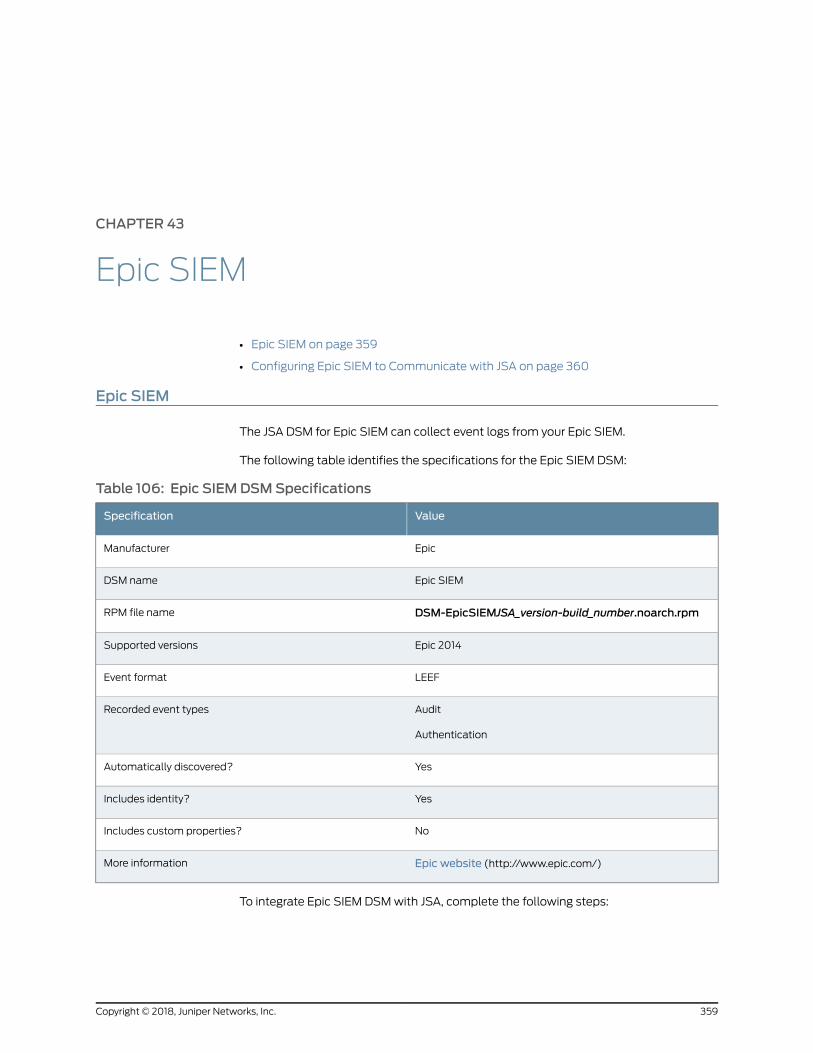
CHAPTER 43
Epic SIEM
• Epic SIEM on page 359
• Configuring Epic SIEM to Communicate with JSA on page 360
Epic SIEM
The JSA DSM for Epic SIEM can collect event logs from your Epic SIEM.
The following table identifies the specifications for the Epic SIEM DSM:
Table 106: Epic SIEMDSMSpecifications
ValueSpecification
EpicManufacturer
Epic SIEMDSM name
DSM-EpicSIEMJSA_version-build_number.noarch.rpmRPM file name
Epic 2014Supported versions
LEEFEvent format
Audit
Authentication
Recorded event types
YesAutomatically discovered?
YesIncludes identity?
NoIncludes custom properties?
Epic website (http://www.epic.com/)More information
To integrate Epic SIEM DSMwith JSA, complete the following steps:
359Copyright © 2018, Juniper Networks, Inc.
1. If automatic updates are not enabled, download and install the most recent version
of the following RPMs on your JSA console:
• Epic SIEM DSM RPM
• DSMCommon RPM
2. Configure your Epic SIEM device to send syslog events to JSA.
3. If JSA does not automatically detect the log source, add an Epic SIEM log source on
the JSA Console. The following table describes the parameters that require specific
values for Epic SIEM event collection:
Table 107: Epic SIEM Log Source Parameters
ValueParameter
Epic SIEMLog Source type
SyslogProtocol Configuration
Configuring Epic SIEM to Communicate with JSA
To collect syslog events from Epic SIEM, youmust add an external syslog server for the
JSA host.
1. If all web services are not enabled for your instance of Interconnect, complete the
following steps to run the required SendSIEMSyslogAudit service:
a. Toaccess the InterconnectConfigurationEditor, clickStart>Epic2014>Interconnect
>your_instance >Configuration Editor.
b. In the Configuration Editor, select the Business Services form.
c. On the Service Category tab, click SendSIEMSyslogAudit.
d. Click Save
2. Log in to your Epic server.
3. Click Epic SystemDefinitions (%ZeUSTBL) >Security >Auditing Options >SIEMSyslog
Settings >SIEM Syslog Configuration.
4. Use the following table to configure the parameters:
DescriptionParameter
The host name or IP address of the JSA appliance.SIEM Host
514SIEM Port
LEEF (Log Event Extended Format).SIEM Format
Copyright © 2018, Juniper Networks, Inc.360
Juniper Secure Analytics Configuring DSMs Guide
5. From the SIEM Syslog Settingsmenu, click SIEM Syslog and set it to enabled.
The SIEM Syslog Sending daemon is automatically started when the environment is
set to runlevel Up or when you enable SIEM Syslog.
6. If youwant to stop thedaemon, fromtheSIEMSyslogSettingsmenu, clickSIEMSyslog
and set it to disabled.
NOTE: If you stop the daemonwhen the syslog setting is enabled, thesystem continues to log data without purging. If you want to stop thedaemonwhen the syslog setting is enabled, contact your Epicrepresentative or your system administrator.
361Copyright © 2018, Juniper Networks, Inc.
Chapter 43: Epic SIEM

Copyright © 2018, Juniper Networks, Inc.362
Juniper Secure Analytics Configuring DSMs Guide
CHAPTER 44
Exabeam
• Exabeam on page 363
• Configuring Exabeam to Communicate with JSA on page 364
Exabeam
The JSA DSM for Exabeam collects events from an Exabeam device.
The following table describes the specifications for the Exabeam DSM:
Table 108: ExabeamDSMSpecifications
ValueSpecification
ExabeamManufacturer
ExabeamDSM name
DSM-ExabeamExabeam-JSA_version-build_number.noarch.rpmRPM file name
v1.7 and v2.0Supported versions
Critical
Anomalous
Recorded event types
YesAutomatically discovered?
NoIncludes identity?
NoIncludes custom properties?
Exabeamwebsite (http://www.exabeam.com)More information
To integrate Exabeamwith JSA, complete the following steps:
1. If automatic updates are not enabled, download and install the most recent version
of the Exabeam DSM RPM on your JSA console:
2. Configure your Exabeam device to send syslog events to JSA.
363Copyright © 2018, Juniper Networks, Inc.
3. If JSA does not automatically detect the log source, add an Exabeam log source on
the JSA Console. The following table describes the parameters that require specific
values for Exabeam event collection:
Table 109: Exabeam Log Source Parameters
ValueParameter
ExabeamLog Source type
SyslogProtocol Configuration
Configuring Exabeam to Communicate with JSA
To collect syslog events from Exabeam, youmust add a destination that specifies JSA
as the syslog server.
1. Log in to your Exabeam user interface (https://<Exabeam_IP>:8484).
2. Select https://<Exabeam_IP>:8484 and type #setup at the end of the url address.
https://<Exabeam_IP>:8484/#setup
3. In the Navigation pane, click Incident Notification.
4. Select Send via Syslog and configure the following syslog parameters.
DescriptionParameter
The IP address of the JSAEvent Collector .IP Address or Hostname
TCPProtocol
514Port
EmergencySyslog Severity Level
Copyright © 2018, Juniper Networks, Inc.364
Juniper Secure Analytics Configuring DSMs Guide
CHAPTER 45
Extreme
• Extreme on page 365
• Extreme 800-Series Switch on page 365
• Extreme Dragon on page 367
• Extreme HiGuardWireless IPS on page 376
• Extreme HiPathWireless Controller on page 378
• ExtremeMatrix Router on page 380
• ExtremeMatrix K/N/S Series Switch on page 381
• Extreme NetSight Automatic Security Manager on page 382
• Extreme NAC on page 383
• Extreme Stackable and Stand-alone Switches on page 385
• Extreme Networks ExtremeWare on page 386
• Extreme XSR Security Router on page 388
Extreme
JSA accepts events from a range of Extreme DSMs.
Extreme 800-Series Switch
The Extreme 800-Series Switch DSM for JSA accepts events by using syslog.
JSA records all relevant audit, authentication, system, and switch events. Before you
configure your Extreme 800-Series Switch in JSA, youmust configure your switch to
forward syslog events.
• Configuring Your Extreme 800-Series Switch on page 366
• Configuring a Log Source on page 366
RelatedDocumentation
Extreme Dragon on page 367•
• Extreme HiGuardWireless IPS on page 376
• Extreme HiPathWireless Controller on page 378
365Copyright © 2018, Juniper Networks, Inc.
Configuring Your Extreme 800-Series Switch
Configuring the Extreme 800-Series Switch to forward syslog events.
Tomanually configure the Extreme 800-Series Switch:
1. Log in to your Extreme 800-Series Switch command-line interface.
Youmust be a system administrator or operator-level user to complete these
configuration steps.
2. Type the following command to enable syslog:
enable syslog
3. Type the following command to create a syslog address for forwarding events to JSA:
create syslog host 1 <IP address>severity informational facility local7 udp_port 514state enable
Where: <IP address> is the IP address of your JSA Console or Event Collector.
4. Type the followingcommand to forwardsyslogeventsbyusingan IP interfaceaddress:
create syslog source_ipif <name> <IP address>
Where:
• <name> is the name of your IP interface.
• <IP address> is the IP address of your JSA console or Event Collector.
The configuration is complete. The log source is added to JSA as Extreme 800-Series
Switch events are automatically discovered. Events that are forwarded to JSA by
Extreme 800-Series Switches are displayed on the Log Activity tab of JSA.
Configuring a Log Source
JSA automatically discovers and creates a log source for syslog events from Extreme
800-Series Switches.
The following configuration steps are optional. To manually configure a log source:
1. Log in to JSA.
2. Click the Admin tab.
3. On the navigation menu, click Data Sources.
4. Click the Log Sources icon.
5. Click Add.
Copyright © 2018, Juniper Networks, Inc.366
Juniper Secure Analytics Configuring DSMs Guide
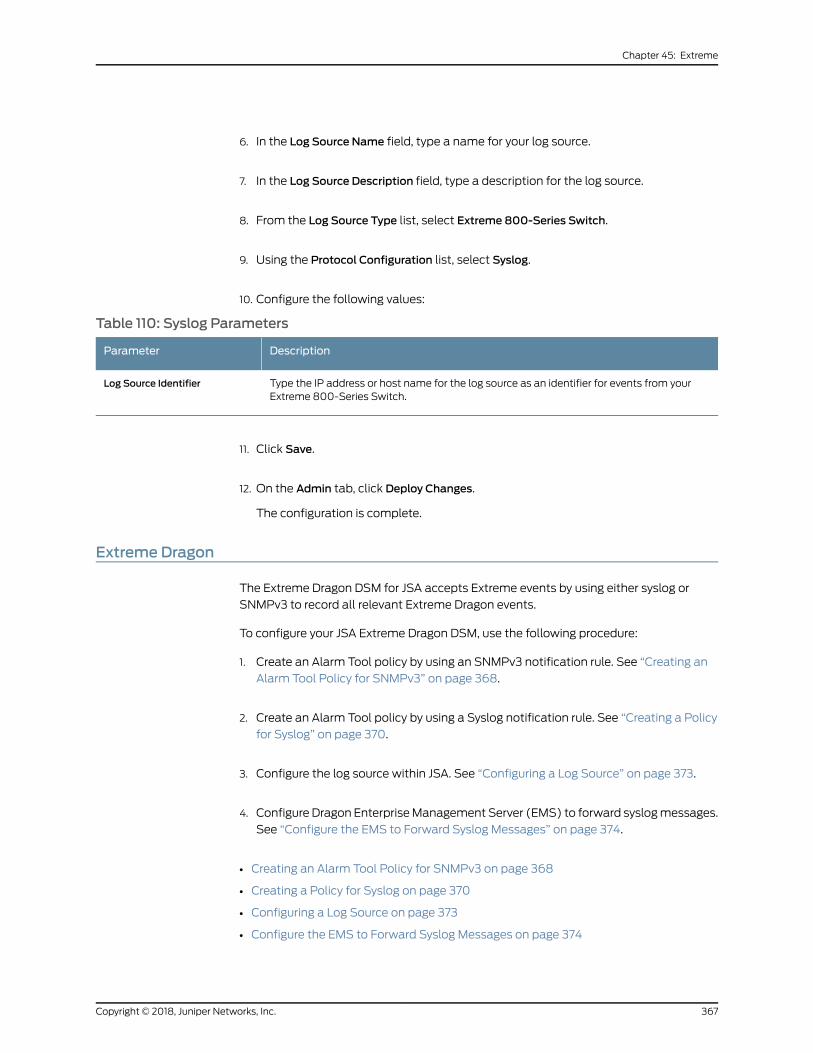
6. In the Log Source Name field, type a name for your log source.
7. In the Log Source Description field, type a description for the log source.
8. From the Log Source Type list, select Extreme 800-Series Switch.
9. Using the Protocol Configuration list, select Syslog.
10. Configure the following values:
Table 110: Syslog Parameters
DescriptionParameter
Type the IP address or host name for the log source as an identifier for events from yourExtreme 800-Series Switch.
Log Source Identifier
11. Click Save.
12. On the Admin tab, click Deploy Changes.
The configuration is complete.
Extreme Dragon
The Extreme Dragon DSM for JSA accepts Extreme events by using either syslog or
SNMPv3 to record all relevant Extreme Dragon events.
To configure your JSA Extreme Dragon DSM, use the following procedure:
1. Create an Alarm Tool policy by using an SNMPv3 notification rule. See “Creating an
Alarm Tool Policy for SNMPv3” on page 368.
2. Create an Alarm Tool policy by using a Syslog notification rule. See “Creating a Policy
for Syslog” on page 370.
3. Configure the log source within JSA. See “Configuring a Log Source” on page 373.
4. Configure Dragon EnterpriseManagement Server (EMS) to forward syslogmessages.
See “Configure the EMS to Forward Syslog Messages” on page 374.
• Creating an Alarm Tool Policy for SNMPv3 on page 368
• Creating a Policy for Syslog on page 370
• Configuring a Log Source on page 373
• Configure the EMS to Forward Syslog Messages on page 374
367Copyright © 2018, Juniper Networks, Inc.
Chapter 45: Extreme
• Configuring Syslog-ng Using Extreme Dragon EMS V7.4.0 and Later on page 374
• Configuring Syslogd Using Extreme Dragon EMS V7.4.0 and Below on page 375
Creating an Alarm Tool Policy for SNMPv3
This procedure describes how to configure an Alarm Tool policy by using an SNMPv3
notification rule. Use SNMPv3 notification rules if you need to transfer PDATA binary
data elements.
To configure Extreme Dragonwith an Alarm Tool policy by using an SNMPv3 notification
rule:
1. Log in to the Extreme Dragon EMS.
2. Click the Alarm Tool icon.
3. Configure the Alarm Tool Policy:
In the Alarm Tool Policy View >CustomPoliciesmenu tree, right-click and select Add
Alarm Tool Policy.
The Add Alarm Tool Policywindow is displayed.
4. In the Add Alarm Tool Policy field, type a policy name.
For example:
JSA
5. ClickOK.
6. In the menu tree, select the policy name that you entered from Step 4.
7. To configure the event group:
Click the Events Group tab.
8. Click New.
The Event Group Editor is displayed.
9. Select the event group or individual events to monitor.
10. Click Add.
A prompt is displayed.
11. Click Yes.
Copyright © 2018, Juniper Networks, Inc.368
Juniper Secure Analytics Configuring DSMs Guide
12. In the right column of the Event Group Editor, type Dragon-Events.
13. ClickOK.
14. Configure the SNMPv3 notification rules:
Click the Notification Rules tab.
15. Click New.
16. In the name field, type JSA -Rule.
17. ClickOK.
18. In the Notification Rules pane, select JSA -Rule.
19. Click the SNMPV3 tab.
20.Click New.
21. Update SNMP V3 values, as required:
• Server IP Address Type the JSA IP address.
NOTE: Do not change the OID.
• Inform Select the Inform check box.
• Security Name Type the SNMPv3 user name.
• Auth Password Type the appropriate password.
• Priv Password Type the appropriate password.
• Message Type the following on one line:
Dragon Event: %DATE%,,%TIME%,,%NAME%,,%SENSOR%,,%PROTO%,,%SIP%,,
%DIP%,,%SPORT%,,%DPORT%,,%DIR%,,%DATA%,,<<<%PDATA%>>>
NOTE: Verify that the security passwords and protocols match data thatis configured in the SNMP configuration.
22. ClickOK.
23.Verify that the notification events are logged as separate events:
369Copyright © 2018, Juniper Networks, Inc.
Chapter 45: Extreme
Click the Global Options tab.
24.Click theMain tab.
25.Make sure that Concatenate Events is not selected.
26.Configure the SNMP options:
Click the Global Options tab.
27. Click the SNMP tab
28.Type the IP address of the EMS server that sends the SNMP traps.
29.Configure the alarm information:
Click the Alarms tab.
30.Click New.
31. Type values for the following parameters:
• Name Type JSA -Alarm .
• Type Select Real Time.
• Event Group Select Dragon-Events.
• Notification Rule Select the JSA -Rule check box.
32.ClickOK.
33.Click Commit.
34.Navigate to the Enterprise View.
35.Right-click on the Alarm Tool and select Associate Alarm Tool Policy.
36.Select the JSA policy. ClickOK.
37. From the Enterprisemenu, right-click and select Deploy.
You are now ready to configure the log source SNMP protocol in JSA.
Creating a Policy for Syslog
This procedure describes how to configure an Alarm Tool policy by using a syslog
notification rule in the Log Event Extended Format (LEEF) message format.
Copyright © 2018, Juniper Networks, Inc.370
Juniper Secure Analytics Configuring DSMs Guide

LEEF is thepreferredmessage format for sendingnotifications toDragonNetworkDefense
when the notification rate is high or when IPv6 addresses are displayed. If you do not
want to use syslog notifications in LEEF format, refer to your Extreme Dragon
documentation for more information.
NOTE: Use SNMPv3 notification rules if you need to transfer PDATA, whichis a binary data element. Do not use a syslog notification rule.
To configure Extreme Dragon with an Alarm Tool policy by using a syslog notification
rule:
1. Log in to the Extreme Dragon EMS.
2. Click the Alarm Tool icon.
3. Configure the Alarm Tool Policy:
In the Alarm Tool Policy View >CustomPoliciesmenu tree, right-click and select Add
Alarm Tool Policy.
The Add Alarm Tool Policywindow is displayed.
4. In the Add Alarm Tool Policy field, type a policy name.
For example:
JSA
5. ClickOK.
6. In the menu tree, select JSA.
7. To configure the event group:
Click the Events Group tab.
8. Click New.
The Event Group Editor is displayed.
9. Select the event group or individual events to monitor.
10. Click Add.
A prompt is displayed.
11. Click Yes.
371Copyright © 2018, Juniper Networks, Inc.
Chapter 45: Extreme
12. In the right column of the Event Group Editor, type Dragon-Events.
13. ClickOK.
14. Configure the Syslog notification rule:
Click the Notification Rules tab.
15. Click New.
16. In the name field, type JSA -RuleSys.
17. ClickOK.
18. In the Notification Rules pane, select the newly created JSA -RuleSys item.
19. Click the Syslog tab.
20.Click New.
The Syslog Editor is displayed.
21. Update the following values:
• Facility Using the Facility list, select a facility.
• Level Using the Level list, select notice.
• Message Using the Type list, select LEEF.
LEEF:Version=1.0|Vendor|Product|ProductVersion|eventID|devTime|
proto|src|sensor|dst|srcPort|dstPort|direction|eventData|
TheLEEFmessage formatdelineatesbetween fieldsbyusingapipedelimiter between
each keyword.
22. ClickOK.
23.Verify that the notification events are logged as separate events:
Click the Global Options tab.
24.Click theMain tab.
25.Make sure that Concatenate Events is not selected.
26.Configure the alarm information:
Copyright © 2018, Juniper Networks, Inc.372
Juniper Secure Analytics Configuring DSMs Guide
Click the Alarms tab.
27. Click New.
28.Type values for the parameters:
• Name Type JSA -Alarm.
• Type Select Real Time.
• Event Group Select Dragon-Events.
• Notification Rule Select the JSA -RuleSys check box.
29.ClickOK.
30.Click Commit.
31. Navigate to the Enterprise View.
32.Right-click on the Alarm Tool and select Associate Alarm Tool Policy.
33.Select the newly created JSA policy. ClickOK.
34. In the Enterprisemenu, right-click the policy and select Deploy.
You are now ready to configure a syslog log source in JSA.
Configuring a Log Source
You are now ready to configure the log source in JSA.
1. Log in to JSA.
2. Click the Admin tab.
3. On the navigation menu, click Data Sources.
4. Click the Log Sources icon.
5. Click Add.
6. In the Log Source Name field, type a name for your log source.
7. In the Log Source Description field, type a description for the log source.
373Copyright © 2018, Juniper Networks, Inc.
Chapter 45: Extreme
8. From the Log Source Type list, select Extreme Dragon Network IPS.
9. From the Protocol Configuration list, select either the SNMPv3 or Syslog option.
For more information about Extreme Dragon device, see your Extreme Dragon
documentation.
NOTE: Using the event mapping tool in the Log Activity tab, you canmap
a normalized or raw event to a high-level and low-level category (or QID).However, you cannotmap combinationDragonmessages using the eventmapping tool. Formore information, see the JuniperSecureAnalyticsUsersGuide.
Configure the EMS to Forward SyslogMessages
Starting with Dragon Enterprise Management Server (EMS) v7.4.0 appliances, youmust
use syslog-ng for forwarding events to a Security and Information Manager such as JSA.
Syslogd has been replaced by syslog-ng in Dragon EMS v7.4.0 and later.
To configure EMS to forward syslog messages, youmust choose one of the following:
• If you are using syslog-ng and Extreme Dragon EMS v7.4.0 and later, see “Configuring
Syslog-ng Using Extreme Dragon EMS V7.4.0 and Later” on page 374.
• If you are using syslogd and Extreme Dragon EMS v7.4.0 and below, see “Configuring
Syslogd Using Extreme Dragon EMS V7.4.0 and Below” on page 375.
Configuring Syslog-ng Using Extreme Dragon EMSV7.4.0 and Later
This section describes the steps to configure syslog-ng in non-encryptedmode and
syslogd to forward syslog messages to JSA.
If you are using encrypted syslog-ng, refer to your Extreme documentation.
Do not run both syslog-ng and syslogd at the same time.
To configure syslog-ng in non-encryptedmode:
1. On your EMS system, open the following file:
/opt/syslog-ng/etc/syslog-ng.conf
2. Configure a Facility filter for the Syslog notification rule.
For example, if you selected facility local1:
filter filt_facility_local1 {facility(local1); };
3. Configure a Level filter for the Syslog notification rule.
Copyright © 2018, Juniper Networks, Inc.374
Juniper Secure Analytics Configuring DSMs Guide
For example, if you selected level notice:
filter filt_level_notice {level(notice); };
4. Configure a destination statement for the JSA.
For example, if the IP address of the JSA is 10.10.1.1 and you want to use syslog port
of 514, type:
destination siem { tcp("10.10.1.1" port(514)); };
5. Add a log statement for the notification rule:
log{source(s_local); filter (filt_facility_local1); filter (filt_level_notice);destination(siem);
};
6. Save the file and restart syslog-ng.
cd /etc/rc.d ./rc.syslog-ng stop ./rc.syslog-ng start
7. The Extreme Dragon EMS configuration is complete.
Configuring Syslogd Using Extreme Dragon EMSV7.4.0 and Below
If your Dragon EnterpriseManagement Server (EMS) is using a version earlier than v7.4.0
on theappliance, youmustusesyslogd for forwardingevents toaSecurityand Information
Manager such as JSA.
To configure syslogd, youmust:
1. On the Dragon EMS system, open the following file:
/etc/syslog.conf
2. Add a line to forward the facility and level you configured in the syslog notification
rule to JSA.
For example, to define the facility local1 and level notice:
local1.notice@<IP address>
Where:
<IP address> is the IP address of the JSA system.
3. Save the file and restart syslogd.
cd /etc/rc.d ./rc.syslog stop ./rc.syslog start
The Extreme Dragon EMS configuration is complete.
RelatedDocumentation
Extreme HiGuardWireless IPS on page 376•
375Copyright © 2018, Juniper Networks, Inc.
Chapter 45: Extreme
• Extreme HiPathWireless Controller on page 378
• ExtremeMatrix Router on page 380
Extreme HiGuardWireless IPS
TheExtremeHiGuardWireless IPSDSMfor JSA recordsall relevant eventsbyusing syslog
Before you configure the ExtremeHiGuardWireless IPSdevice in JSA, youmust configure
your device to forward syslog events.
• Configuring Enterasys HiGuard on page 376
• Configuring a Log Source on page 377
RelatedDocumentation
Extreme HiPathWireless Controller on page 378•
• ExtremeMatrix Router on page 380
• ExtremeMatrix K/N/S Series Switch on page 381
Configuring Enterasys HiGuard
To configure the device to forward syslog events:
1. Log in to the HiGuardWireless IPS user interface.
2. In the left navigation pane, click Syslog, which allows themanagement server to send
events to designated syslog receivers.
The Syslog Configuration pane is displayed.
3. In the System Integration Status section, enable syslog integration.
Enabling syslog integration allows themanagement server to sendmessages to the
configured syslog servers. By default, the management server enables syslog.
The Current Status field displays the status of the syslog server. The choices are:
Running or Stopped. An error status is displayed if one of the following occurs:
• Oneof the configured and enabled syslog servers includes a host name that cannot
be resolved.
• Themanagement server is stopped.
• An internal error occurred. If this error occurs, contact Enterasys Technical Support.
4. FromManage Syslog Servers, click Add.
The Syslog Configurationwindow is displayed.
5. Type values for the following parameters:
Copyright © 2018, Juniper Networks, Inc.376
Juniper Secure Analytics Configuring DSMs Guide
• SyslogServer (IPAddress/Hostname)Type the IPaddressor hostnameof the syslog
server where events are sent.
NOTE: Configured syslog servers use the DNS names and DNS suffixesconfigured in theServer initializationandSetupWizardontheHWMHConfig
Shell.
• Port Number - Type the port number of the syslog server to which HWMH sends
events. The default is 514.
• Message Format Select Plain Text as the format for sending events.
• Enabled? Select Enabled? if you want events to be sent to this syslog server.
6. Save your configuration.
The configuration is complete. The log source is added to JSA as HiGuard events are
automatically discovered. Events that are forwarded to JSA by Enterasys HiGuard are
displayed on the Log Activity tab of JSA.
Configuring a Log Source
JSA automatically discovers and creates a log source for syslog events from Extreme
HiGuard.
The following configuration steps are optional. To manually configure a log source for
Extreme HiGuard:
1. Log in to JSA.
2. Click the Admin tab.
3. On the navigation menu, click Data Sources.
4. Click the Log Sources icon.
5. Click Add.
6. In the Log Source Name field, type a name for your log source.
7. In the Log Source Description field, type a description for the log source.
8. From the Log Source Type list, select Extreme HiGuard.
9. Using the Protocol Configuration list, select Syslog.
10. Configure the following values:
377Copyright © 2018, Juniper Networks, Inc.
Chapter 45: Extreme
Table 111: Syslog Parameters
DescriptionParameter
Type the IP address or host name for the log source as an identifier for events from yourExtreme HiGuard.
Log Source Identifier
11. Click Save.
12. On the Admin tab, click Deploy Changes.
The configuration is complete.
Extreme HiPathWireless Controller
The Extreme HiPathWireless Controller DSM for JSA records all relevant events by using
syslog.
JSA supports the following Extreme HiPathWireless Controller events:
• Wireless access point events
• Application log events
• Service log events
• Audit log events
• Configuring Your HiPathWireless Controller on page 378
• Configuring a Log Source on page 379
RelatedDocumentation
ExtremeMatrix Router on page 380•
• ExtremeMatrix K/N/S Series Switch on page 381
• Extreme NetSight Automatic Security Manager on page 382
Configuring Your HiPathWireless Controller
To integrate your ExtremeHiPathWirelessController eventswith JSA, youmust configure
your device to forward syslog events.
To forward syslog events to JSA:
1. Log in to the HiPathWireless Assistant.
2. ClickWireless Controller Configuration.
The HiPathWireless Controller Configurationwindow is displayed.
Copyright © 2018, Juniper Networks, Inc.378
Juniper Secure Analytics Configuring DSMs Guide
3. From themenu, click SystemMaintenance.
4. From theSyslog section, select theSyslogServer IP check box and type the IP address
of the device that receives the syslog messages.
5. Using theWireless Controller Log Level list, select Information.
6. Using theWireless AP Log Level list, selectMajor.
7. Using the Application Logs list, select local.0.
8. Using the Service Logs list, select local.3.
9. Using the Audit Logs list, select local.6.
10. Click Apply.
You are now ready to configure the log source in JSA.
Configuring a Log Source
JSA automatically discovers and creates a log source for syslog events from Extreme
HiPath. The following configuration steps are optional.
To manually configure a log source for Extreme HiPath:
1. Log in to JSA.
2. Click the Admin tab.
3. On the navigation menu, click Data Sources.
4. Click the Log Sources icon.
5. Click Add.
6. In the Log Source Name field, type a name for your log source.
7. In the Log Source Description field, type a description for the log source.
8. From the Log Source Type list, select Extreme HiPath.
9. Using the Protocol Configuration list, select Syslog.
379Copyright © 2018, Juniper Networks, Inc.
Chapter 45: Extreme
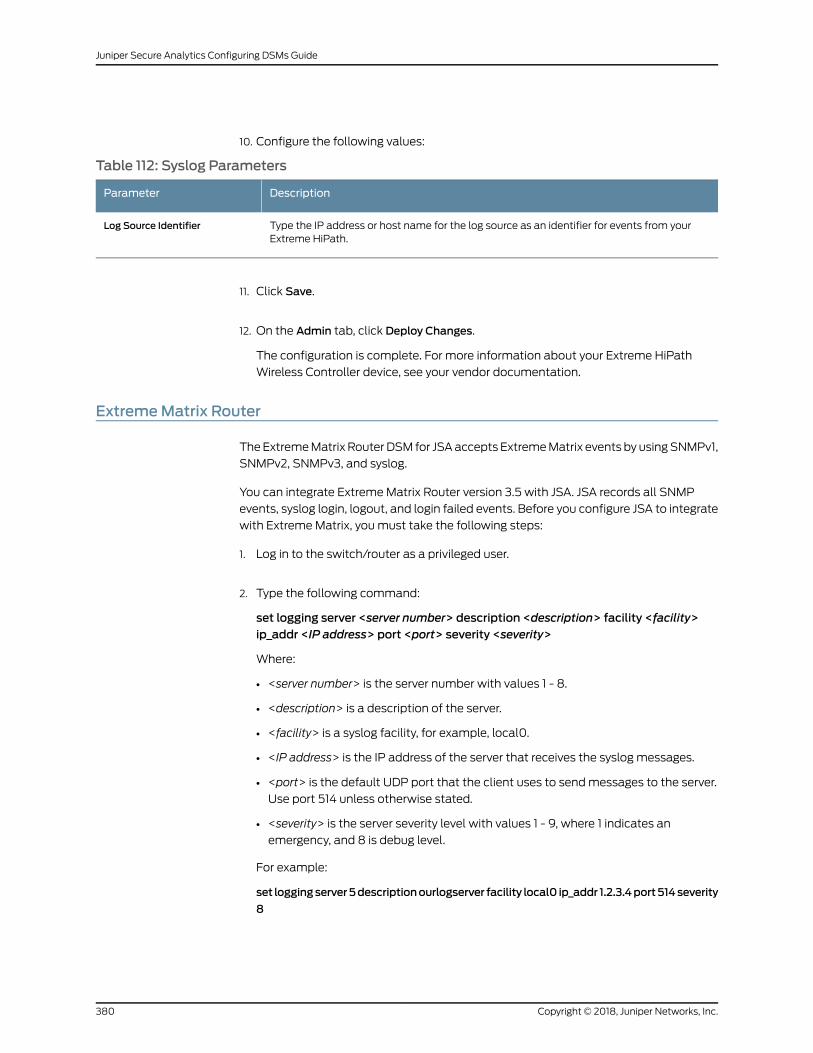
10. Configure the following values:
Table 112: Syslog Parameters
DescriptionParameter
Type the IP address or host name for the log source as an identifier for events from yourExtreme HiPath.
Log Source Identifier
11. Click Save.
12. On the Admin tab, click Deploy Changes.
The configuration is complete. For more information about your Extreme HiPath
Wireless Controller device, see your vendor documentation.
ExtremeMatrix Router
TheExtremeMatrix RouterDSM for JSAaccepts ExtremeMatrix events by usingSNMPv1,
SNMPv2, SNMPv3, and syslog.
You can integrate ExtremeMatrix Router version 3.5 with JSA. JSA records all SNMP
events, syslog login, logout, and login failed events. Before you configure JSA to integrate
with ExtremeMatrix, you must take the following steps:
1. Log in to the switch/router as a privileged user.
2. Type the following command:
set logging server <server number> description <description> facility <facility>ip_addr <IP address> port <port> severity <severity>
Where:
• <server number> is the server number with values 1 - 8.
• <description> is a description of the server.
• <facility> is a syslog facility, for example, local0.
• <IP address> is the IP address of the server that receives the syslog messages.
• <port> is the default UDP port that the client uses to sendmessages to the server.
Use port 514 unless otherwise stated.
• <severity> is the server severity level with values 1 - 9, where 1 indicates an
emergency, and 8 is debug level.
For example:
set loggingserver5descriptionourlogserver facility local0 ip_addr 1.2.3.4port514severity
8
Copyright © 2018, Juniper Networks, Inc.380
Juniper Secure Analytics Configuring DSMs Guide
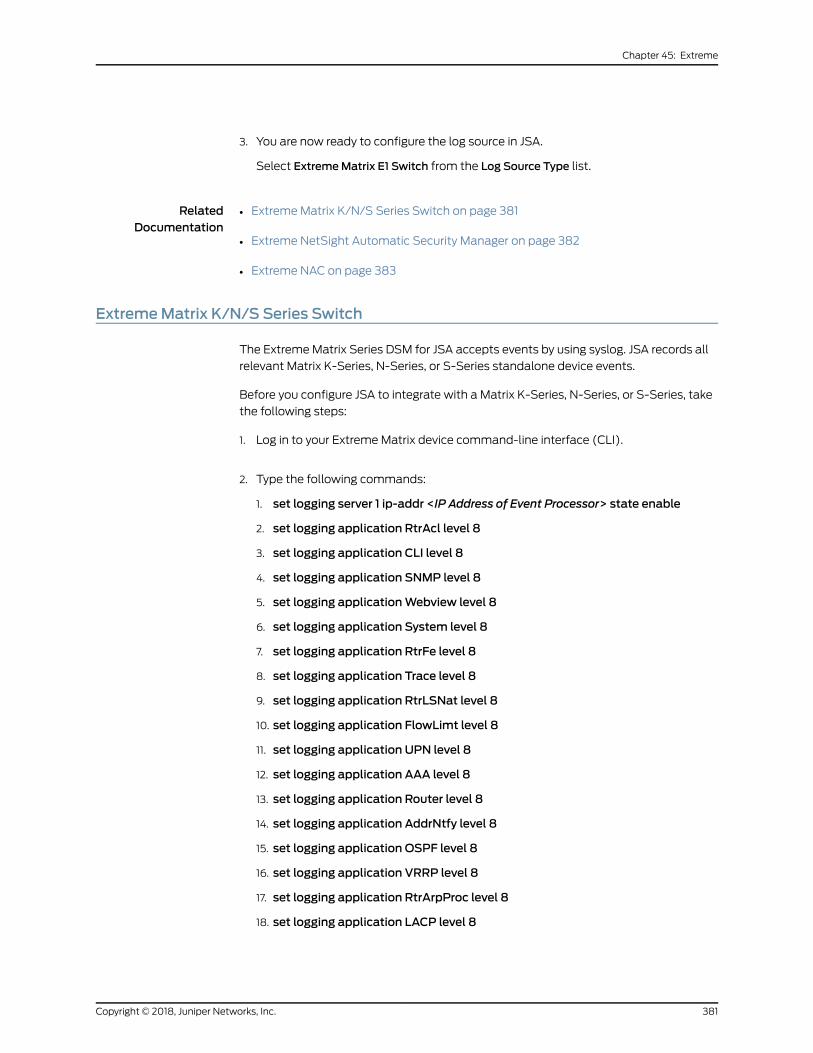
3. You are now ready to configure the log source in JSA.
Select ExtremeMatrix E1 Switch from the Log Source Type list.
RelatedDocumentation
ExtremeMatrix K/N/S Series Switch on page 381•
• Extreme NetSight Automatic Security Manager on page 382
• Extreme NAC on page 383
ExtremeMatrix K/N/S Series Switch
The ExtremeMatrix Series DSM for JSA accepts events by using syslog. JSA records all
relevant Matrix K-Series, N-Series, or S-Series standalone device events.
Before you configure JSA to integrate with a Matrix K-Series, N-Series, or S-Series, take
the following steps:
1. Log in to your ExtremeMatrix device command-line interface (CLI).
2. Type the following commands:
1. set logging server 1 ip-addr <IP Address of Event Processor> state enable
2. set logging application RtrAcl level 8
3. set logging application CLI level 8
4. set logging application SNMP level 8
5. set logging applicationWebview level 8
6. set logging application System level 8
7. set logging application RtrFe level 8
8. set logging application Trace level 8
9. set logging application RtrLSNat level 8
10. set logging application FlowLimt level 8
11. set logging application UPN level 8
12. set logging application AAA level 8
13. set logging application Router level 8
14. set logging application AddrNtfy level 8
15. set logging application OSPF level 8
16. set logging application VRRP level 8
17. set logging application RtrArpProc level 8
18. set logging application LACP level 8
381Copyright © 2018, Juniper Networks, Inc.
Chapter 45: Extreme
19. set logging application RtrNat level 8
20.set logging application RtrTwcb level 8
21. set logging application HostDoS level 8
22. set policy syslog extended-format enable
For more information on configuring the Matrix Series routers or switches, consult
your vendor documentation.
3. You are now ready to configure the log sources in JSA.
Toconfigure JSA to receiveevents fromanExtremeMatrixSeriesdevice, selectExtreme
Matrix K/N/S Series Switch from the Log Source Type list.
RelatedDocumentation
Extreme NetSight Automatic Security Manager on page 382•
• Extreme NAC on page 383
• Extreme Stackable and Stand-alone Switches on page 385
Extreme NetSight Automatic Security Manager
The ExtremeNetSight Automatic SecurityManager DSM for JSA accepts events by using
syslog.
JSA records all relevant events. Before you configure an Extreme NetSight Automatic
SecurityManager device in JSA, youmust configure your device to forward syslog events.
To configure the device to send syslog events to JSA:
1. Log in to the Automatic Security Manager user interface.
2. Click theAutomatedSecurityManager icon to access theAutomatedSecurityManager
Configurationwindow.
NOTE: Youcanalsoaccess theAutomatedSecurityManagerConfiguration
window from the Toolmenu.
3. From the left navigation menu, select Rule Definitions.
4. Choose one of the following options:
If a rule is configured, highlight the rule. Click Edit.
5. To create a new rule, click Create.
Copyright © 2018, Juniper Networks, Inc.382
Juniper Secure Analytics Configuring DSMs Guide
6. Select the Notifications check box.
7. Click Edit.
The Edit Notificationswindow is displayed.
8. Click Create.
The Create Notificationwindow is displayed.
9. Using the Type list, select Syslog.
10. In the Syslog Server IP/Name field, type the IP address of the device that receives
syslog traffic.
11. Click Apply.
12. Click Close.
13. In the Notification list, select the notification that is configured.
14. ClickOK.
15. You are now ready to configure the log source in JSA.
To configure JSA to receive events from an Extreme NetSight Automatic Security
Manager device, select Extreme NetsightASM from the Log Source Type list.
For more information about your Extreme NetSight Automatic Security Manager
device, see your vendor documentation.
RelatedDocumentation
Extreme NAC on page 383•
• Extreme Stackable and Stand-alone Switches on page 385
• Extreme Networks ExtremeWare on page 386
Extreme NAC
The Extreme NAC DSM for JSA accepts events by using syslog. JSA records all relevant
events.
For details on configuring your Extreme NAC appliances for syslog, consult your vendor
documentation. After the ExtremeNAC appliance is forwarding syslog events to JSA, the
configuration is complete. The log source is added to JSA as Extreme NAC events are
383Copyright © 2018, Juniper Networks, Inc.
Chapter 45: Extreme
automatically discovered. Events that are forwarded by Extreme NAC appliances are
displayed on the Log Activity tab of JSA.
• Configuring a Log Source on page 384
RelatedDocumentation
Extreme Stackable and Stand-alone Switches on page 385•
• Extreme Networks ExtremeWare on page 386
• Extreme XSR Security Router on page 388
Configuring a Log Source
JSA automatically discovers and creates a log source for syslog events from Extreme
NAC.
The following configuration steps are optional. To manually configure a log source for
Extreme NAC:
1. Log in to JSA.
2. Click the Admin tab.
3. On the navigation menu, click Data Sources.
4. Click the Log Sources icon.
5. Click Add.
6. In the Log Source Name field, type a name for your log source.
7. In the Log Source Description field, type a description for the log source.
8. From the Log Source Type list, select Extreme NAC.
9. Using the Protocol Configuration list, select Syslog.
10. Configure the following values:
Table 113: Syslog Parameters
DescriptionParameter
Type the IP address or host name for the log source as an identifier for events from yourExtreme NAC appliances.
Log Source Identifier
Copyright © 2018, Juniper Networks, Inc.384
Juniper Secure Analytics Configuring DSMs Guide
11. Click Save.
12. On the Admin tab, click Deploy Changes.
The configuration is complete.
Extreme Stackable and Stand-alone Switches
The Extreme stackable and stand-alone switches DSM for JSA accepts events by using
syslog.
JSA records all relevant events. Before you configure an Extreme stackable and
stand-alone switches device in JSA, youmust configure your device to forward syslog
events.
To configure the device to forward syslog events to JSA:
1. Log in to the Extreme stackable and stand-alone switch device.
2. Type the following command:
set logging server <index> [ip-addr <IP address>] [facility <facility>] [severity<severity>] [descr <description>] [port <port] [state <<enable | disable>>]
Where:
• <index> is the server table index number (1 - 8) for this server.
• <IP address> is the IP address of the server youwant to send syslogmessages. You
do not have to enter an IP address. If you do not define an IP address, an entry in
the Syslog server table is created with the specified index number, and amessage
is displayed indicating that there is no assigned IP address.
• <facility> is a syslog facility. Valid values are local0 to local7. You do not have to
enter a facility value. If the value is not specified, the default value that is configured
with theset logging
default command is applied.
• <description> is a description of the facility/server. You do not have to enter a
description.
• <port> is the default UDP port that the client uses to sendmessages to the server.
If not specified, the default value that is configured with theset logging
default command is applied. You do not have to enter a port value.
• <<enable | disable>> enables or disables this facility/server configuration. You do
not have to choose an option. If the state is not specified, it does not default to
either <enable> or <disable>.
• <severity> is the server severity level that the server will log messages. The valid
range is 1 - 8. If not specified, the default value that is configured with theset logging
385Copyright © 2018, Juniper Networks, Inc.
Chapter 45: Extreme
default command is applied. Youdonot have to input a severity value. The following
are valid values:
• 1: Emergencies (system is unusable)
• 2: Alerts (immediate action needed)
• 3: Critical conditions
• 4: Error conditions
• 5: Warning conditions
• 6: Notifications (significant conditions)
• 7: Informational messages
• 8: Debugging message
3. You can now ready to configure the log source in JSA.
To configure JSA to receive events fromanExtreme stackable and stand-alone switch
device:
From the Log Source Type list, select one of the following options:
• Extreme stackable and stand-alone switches
• Extreme A-Series
• Extreme B2-Series
• Extreme B3-Series
• Extreme C2-Series
• Extreme C3-Series
• Extreme D-Series
• Extreme G-Series
• Extreme I-Series
For more information about your Extreme stackable and stand-alone switches, see
your vendor documentation.
RelatedDocumentation
Extreme Networks ExtremeWare on page 386•
• Extreme XSR Security Router on page 388
• Extreme NAC on page 383
Extreme Networks ExtremeWare
The ExtremeNetworks ExtremeWareDSM for JSA records all relevant ExtremeNetworks
ExtremeWare and Extremeware XOS device events from using syslog.
Copyright © 2018, Juniper Networks, Inc.386
Juniper Secure Analytics Configuring DSMs Guide
To integrate JSA with an ExtremeWare device, youmust configure a log source in JSA,
then configure your Extreme Networks ExtremeWare and Extremeware XOS devices to
forward syslog events. JSA does not automatically discover or create log sources for
syslog events from ExtremeWare appliances.
• Configuring a Log Source on page 387
Configuring a Log Source
To integrate with JSA, youmust manually create a log source to receive the incoming
ExtremeWare events that are forwarded to JSA.
1. Log in to JSA.
2. Click the Admin tab.
3. On the navigation menu, click Data Sources.
4. Click the Log Sources icon.
5. Click Add.
6. In the Log Source Name field, type a name for your log source.
7. In the Log Source Description field, type a description for the log source.
8. FromtheLogSourceType list, selectExtremeNetworksExtremeWareOperatingSystem
(OS).
9. Using the Protocol Configuration list, select Syslog.
10. Configure the following values:
Table 114: Syslog Parameters
DescriptionParameter
Type the IP address or host name for the log source as an identifier for events from yourExtremeWare appliance.
Log Source Identifier
11. Click Save.
12. On the Admin tab, click Deploy Changes.
The log source is added to JSA. Events that are forwarded to JSAbyExtremeNetworks
ExtremeWare appliances are displayed on the Log Activity tab.
387Copyright © 2018, Juniper Networks, Inc.
Chapter 45: Extreme
For information on configuring syslog forwarding for your Extremeware appliances,
see your vendor documentation.
Extreme XSR Security Router
The Extreme XSR Security Router DSM for JSA accepts events by using syslog.
JSA records all relevant events. Before you configure an Extreme XSR Security Router in
JSA, youmust configure your device to forward syslog events.
To configure the device to send syslog events to JSA:
1. Using Telnet or SSH, log in to the XSR Security Router command-line interface.
2. Type the following commands to access config mode:
1. enable
2. config
3. Type the following command:
logging <IP address> low
Where: <IP address> is the IP address of your JSA.
4. Exit from config mode.
exit
5. Save the configuration:
copy running-config startup-config
6. You are now ready to configure the log sources in JSA.
Select Extreme XSR Security Routers from the Log Source Type list.
For more information about your Extreme XSR Security Router, see your vendor
documentation.
RelatedDocumentation
• Extreme NAC on page 383
• Extreme Stackable and Stand-alone Switches on page 385
• Extreme Networks ExtremeWare on page 386
Copyright © 2018, Juniper Networks, Inc.388
Juniper Secure Analytics Configuring DSMs Guide
CHAPTER 46
F5 Networks
• F5 Networks on page 389
• F5 Networks BIG-IP AFM on page 389
• F5 Networks BIG-IP APM on page 395
• Configuring F5 Networks BIG-IP ASM on page 397
• F5 Networks BIG-IP LTM on page 399
• F5 Networks FirePass on page 402
F5 Networks
JSA accepts events from a range of F5 Networks DSMs.
F5 Networks BIG-IP AFM
The F5 Networks BIG-IP Advanced Firewall Manager (AFM) DSM for JSA accepts syslog
events that are forwarded from F5 Networks BIG-IP AFM systems in name-value pair
format.
JSA can collect the following events from F5 BIG-IP appliances with Advanced Firewall
Managers:
• Network events
• Network Denial of Service (DoS) events
• Protocol security events
• DNS events
• DNS Denial of Service (DoS) events
Beforeyoucanconfigure theAdvancedFirewallManager, youmustverify that yourBIG-IP
appliance is licensed and provisioned to include Advanced Firewall Manager.
1. Log in to your BIG-IP appliance Management Interface.
2. From the navigation menu, select System >License.
389Copyright © 2018, Juniper Networks, Inc.
3. In the License Status column, verify that the Advanced Firewall Manager is licensed
and enabled.
4. To enable the Advanced Firewall Manager, select System >Resource >Provisioning.
5. From the Provisioning column, select the check box and select Nominal from the list.
6. Click Submit to save your changes.
• Configuring a Logging Pool on page 390
• Creating a High-speed Log Destination on page 391
• Creating a Formatted Log Destination on page 391
• Creating a Log Publisher on page 392
• Creating a Logging Profile on page 392
• Associating the Profile to a Virtual Server on page 393
• Configuring a Log Source on page 394
Configuring a Logging Pool
A logging pool is used to define a pool of servers that receive syslog events. The pool
contains the IP address, port, and a node name that you provide.
1. From the navigation menu, select Local Traffic >Pools.
2. Click Create.
3. In the Name field, type a name for the logging pool.
For example, Logging_Pool.
4. From the Health Monitor field, in the Available list, select TCP and click <<.
This clicking action moves the TCP option from the Available list to the Selected list.
5. In the Resource pane, from the Node Name list, select Logging_Node or the name you
defined in step 3.
6. In the Address field, type the IP address for the JSA console or Event Collector.
7. In the Service Port field, type 514.
8. Click Add.
9. Click Finish.
Copyright © 2018, Juniper Networks, Inc.390
Juniper Secure Analytics Configuring DSMs Guide
Creating a High-speed Log Destination
The process to configure logging for BIG-IP AFM requires that you create a high-speed
logging destination.
1. From the navigation menu, select System >Logs >Configuration >Log Destinations.
2. Click Create.
3. In the Name field, type a name for the destination.
For example, Logging_HSL_dest.
4. In the Description field, type a description.
5. From the Type list, select Remote High-Speed Log.
6. From the Pool Name list, select a logging pool from the list of remote log servers.
For example, Logging_Pool.
7. From the Protocol list, select TCP.
8. Click Finish.
Creating a Formatted Log Destination
The formatted log destination is used to specify any special formatting that is required
on the events that are forwarded to the high-speed logging destination.
1. From the navigation menu, select System >Logs >Configuration >Log Destinations.
2. Click Create.
3. In the Name field, type a name for the logging format destination.
For example, Logging_Format_dest.
4. In the Description field, type a description.
5. From the Type list, select Remote Syslog.
6. From the Syslog Format list, select Syslog.
7. From the High-Speed Log Destination list, select your high-speed logging destination.
391Copyright © 2018, Juniper Networks, Inc.
Chapter 46: F5 Networks
For example, Logging_HSL_dest.
8. Click Finished.
Creating a Log Publisher
Creating a publisher allows the BIG-IP appliance to publish the formatted log message
to the local syslog database.
1. From the navigation menu, select System >Logs >Configuration >Log Publishers.
2. Click Create.
3. In the Name field, type a name for the publisher.
For example, Logging_Pub.
4. In the Description field, type a description.
5. From the Destinations field, in the Available list, select the log destination name that
you created in “Configuring a Logging Pool” on page 390 and click << to add items to
the Selected list.
This clicking action moves your logging format destination from the Available list to
the Selected list. To include local logging in your publisher configuration, you can add
local-db and local-syslog to the Selected list.
Creating a Logging Profile
Use the Logging profile to configure the types of events that your Advanced Firewall
Manager is producing and to associate these events with the logging destination.
1. From the navigation menu, select Security >Event Logs >Logging Profile.
2. Click Create.
3. In the Name field, type a name for the log profile.
For example, Logging_Profile.
4. In the Network Firewall field, select the Enabled check box.
5. From the Publisher list, select the log publisher that you configured.
For example, Logging_Pub.
6. In the Log Rule Matches field, select the Accept, Drop, and Reject check boxes.
Copyright © 2018, Juniper Networks, Inc.392
Juniper Secure Analytics Configuring DSMs Guide

7. In the Log IP Errors field, select the Enabled check box.
8. In the Log TCP Errors field, select the Enabled check box.
9. In the Log TCP Events field, select the Enabled check box.
10. In the Storage Format field, from the list, select Field-List.
11. In the Delimiter field, type , (comma) as the delimiter for events.
12. In the Storage Format field, select all of the options in theAvailable Items list and click
<<.
This clicking action moves all of the Field-List options from the Available list to the
Selected list.
13. In the IP Intelligence pane, from the Publisher list, select the log publisher that you
configured.
For example, Logging_Pub.
14. Click Finished.
Associating the Profile to a Virtual Server
The log profile you createdmust be associated with a virtual server in the Security Policy
tab. This association allows the virtual server to process your network firewall events,
along with local traffic.
Take the following steps to associate the profile to a virtual server.
1. From the navigation menu, select Local Traffic >Virtual Servers.
2. Click the name of a virtual server to modify.
3. From the Security tab, select Policies.
4. From the Log Profile list, select Enabled.
5. From the Profile field, in the Available list, select Logging_Profile or the name you
specified in “Creating a Logging Profile” on page 392 and click <<.
This clicking action moves the Logging_Profile option from the Available list to the
Selected list.
6. Click Update to save your changes.
393Copyright © 2018, Juniper Networks, Inc.
Chapter 46: F5 Networks
The configuration is complete. The log source is added to JSA as F5 Networks BIG-IP
AFM syslog events are automatically discovered. Events that are forwarded to JSA
by F5 Networks BIG-IP AFM are displayed on the Log Activity tab of JSA.
Configuring a Log Source
JSA automatically discovers and creates a log source for syslog events fromF5Networks
BIG-IP AFM. However, you canmanually create a log source for JSA to receive syslog
events.
The following configuration steps are optional.
1. Log in to JSA.
2. Click the Admin tab.
3. On the navigation menu, click Data Sources.
4. Click the Log Sources icon.
5. Click Add.
6. In the Log Source Name field, type a name for your log source.
7. In the Log Source Description field, type a description for the log source.
8. From the Log Source Type list, select F5 Networks BIG-IP AFM.
9. Using the Protocol Configuration list, select Syslog.
10. Configure the following values:
Table 115: Syslog Protocol Parameters
DescriptionParameter
Type the IP address or host name for the log source as an identifier for events from your F5BIG-IP AFM appliance.
Log Source Identifier
11. Click Save.
12. On the Admin tab, click Deploy Changes.
The configuration is complete.
Copyright © 2018, Juniper Networks, Inc.394
Juniper Secure Analytics Configuring DSMs Guide
F5 Networks BIG-IP APM
The F5 Networks BIG-IP Access Policy Manager (APM) DSM for JSA collects access and
authentication security events from a BIG-IP APM device by using syslog.
To configure your BIG-IP LTM device to forward syslog events to a remote syslog source,
choose your BIG-IP APM software version:
• Configuring Remote Syslog for F5 BIG-IP APM 11.x on page 395
• Configuring a Remote Syslog for F5 BIG-IP APM 10.x on page 395
• Configuring Remote Syslog for F5 BIG-IP APM 11.x on page 395
• Configuring a Remote Syslog for F5 BIG-IP APM 10.x on page 395
• Configuring a Log Source on page 396
Configuring Remote Syslog for F5 BIG-IP APM 11.x
You can configure syslog for F5 BIG-IP APM 11.x.
To configure a remote syslog for F5 BIG-IP APM 11.x take the following steps:
1. Log in to the command-line of your F5 BIG-IP device.
2. Type the following command to add a single remote syslog server:
tmsh syslog remote server {<Name> {host <IP address>}}
Where:
• <Name> is the name of the F5 BIG-IP APM syslog source.
• <IP address> is the IP address of the JSA console.
For example,
bigpipe syslog remote server {BIGIP_APM {host 10.100.100.101}}
3. Type the following to save the configuration changes:
tmsh save sys config partitions all
The configuration is complete. The log source is added to JSA as F5 Networks BIG-IP
APM events are automatically discovered. Events that are forwarded to JSA by F5
Networks BIG-IP APM are displayed on the Log Activity tab in JSA.
Configuring a Remote Syslog for F5 BIG-IP APM 10.x
You can configure syslog for F5 BIG-IP APM 10.x
To configure a remote syslog for F5 BIG-IP APM 10.x take the following steps:
1. Log in to the command-line of your F5 BIG-IP device.
395Copyright © 2018, Juniper Networks, Inc.
Chapter 46: F5 Networks
2. Type the following command to add a single remote syslog server:
bigpipe syslog remote server {<Name> {host <IP address>}}
Where:
• <Name> is the name of the F5 BIG-IP APM syslog source.
• <IP address> is the IP address of JSA console.
For example,
bigpipe syslog remote server {BIGIP_APM {host 10.100.100.101}}
3. Type the following to save the configuration changes:
bigpipe save
The configuration is complete. The log source is added to JSA as F5 Networks BIG-IP
APM events are automatically discovered. Events that are forwarded to JSA by F5
Networks BIG-IP APM are displayed on the Log Activity tab.
Configuring a Log Source
JSA automatically discovers and creates a log source for syslog events fromF5Networks
BIG-IP APM appliances.
These configuration steps are optional.
1. Log in to JSA.
2. Click the Admin tab.
3. On the navigation menu, click Data Sources.
4. Click the Log Sources icon.
5. Click Add.
6. In the Log Source Name field, type a name for your log source.
7. In the Log Source Description field, type a description for the log source.
8. From the Log Source Type list, select F5 Networks BIG-IP APM.
9. Using the Protocol Configuration list, select Syslog.
Copyright © 2018, Juniper Networks, Inc.396
Juniper Secure Analytics Configuring DSMs Guide
10. Configure the following values:
DescriptionParameter
Type the IP address or host name for the log source as an identifier for events from your F5Networks BIG-IP APM appliance.
Log Source Identifier
11. Click Save.
12. On the Admin tab, click Deploy Changes.
The configuration is complete.
Configuring F5 Networks BIG-IP ASM
The JSA F5 Networks BIG-IP Application Security Manager (ASM) DSM collects web
application security events from BIG-IP ASM appliances by using syslog.
To forward syslog events from an F5 Networks BIG-IP ASM appliance to JSA, youmust
configure a logging profile.
A logging profile can be used to configure remote storage for syslog events, which can
be forwarded directly to JSA.
1. Log in to the F5 Networks BIG-IP ASM appliance user interface.
2. On the navigation pane, select Application Security >Options.
3. Click Logging Profiles.
4. Click Create.
5. From the Configuration list, select Advanced.
6. Type a descriptive name for the Profile Name property.
7. Type a Profile Description.
If you do not want data logged both locally and remotely, clear the Local Storage
check box.
8. Select the Remote Storage check box.
9. From the Type list, select Reporting Server.
10. From the Protocol list, select TCP.
397Copyright © 2018, Juniper Networks, Inc.
Chapter 46: F5 Networks
11. For the IP Address field, type the IP address of the JSA console and for the Port field,
type a port value of 514.
12. Select the Guarantee Logging check box.
13. Select the Report Detected Anomalies check box to allow the system to log details.
14. Click Create.
The display refreshes with the new logging profile. The log source is added to JSA as
F5 Networks BIG-IP ASM events are automatically discovered. Events that are
forwarded by F5 Networks BIG-IP ASM are displayed on the Log Activity tab of JSA.
• Configuring a Log Source on page 398
Configuring a Log Source
JSA automatically discovers and creates a log source for syslog events fromF5Networks
BIG-IP ASM appliances.
These configuration steps are optional.
1. Log in to JSA.
2. Click the Admin tab.
3. On the navigation menu, click Data Sources.
4. Click the Log Sources icon.
5. Click Add.
6. In the Log Source Name field, type a name for your log source.
7. In the Log Source Description field, type a description for the log source.
8. From the Log Source Type list, select F5 Networks BIG-IP ASM.
9. Using the Protocol Configuration list, select Syslog.
10. Configure the following values:
Copyright © 2018, Juniper Networks, Inc.398
Juniper Secure Analytics Configuring DSMs Guide
Table 116: Syslog Protocol Parameters
DescriptionParameter
Type the IP address or host name for the log source as an identifier for events from your F5Networks BIG-IP ASM appliance.
Log Source Identifier
11. Click Save.
12. On the Admin tab, click Deploy Changes.
The configuration is complete.
F5 Networks BIG-IP LTM
The F5 Networks BIG-IP Local Traffic Manager (LTM) DSM for JSA collects networks
security events from a BIG-IP device by using syslog.
Before events can be received in JSA, youmust configure a log source for JSA, then
configure your BIG-IP LTM device to forward syslog events. Create the log source before
events are forwarded as JSA does not automatically discover or create log sources for
syslog events from F5 BIG-IP LTM appliances.
• Configuring a Log Source on page 399
• Configuring Syslog Forwarding in BIG-IP LTM on page 400
• Configuring Remote Syslog for F5 BIG-IP LTM 11.x on page 400
• Configuring Remote Syslog for F5 BIG-IP LTM 10.x on page 401
• Configuring Remote Syslog for F5 BIG-IP LTM 9.4.2 to 9.4.8 on page 402
Configuring a Log Source
To integrate F5 BIG-IP LTMwith JSA, youmust manually create a log source to receive
syslog events.
1. Log in to JSA.
2. Click the Admin tab.
3. On the navigation menu, click Data Sources.
4. Click the Log Sources icon.
5. Click Add.
6. In the Log Source Name field, type a name for your log source.
399Copyright © 2018, Juniper Networks, Inc.
Chapter 46: F5 Networks
7. In the Log Source Description field, type a description for the log source.
8. From the Log Source Type list, select F5 Networks BIG-IP LTM.
9. Using the Protocol Configuration list, select Syslog.
10. Configure the following values:
Table 117: Syslog Protocol Parameters
DescriptionParameter
Type the IP address or host name for the log source as an identifier for events from yourBIG-IP LTM appliance.
Log Source Identifier
11. Click Save.
12. On the Admin tab, click Deploy Changes.
You are now ready to configure your BIG-IP LTM appliance to forward syslog events
to JSA.
Configuring Syslog Forwarding in BIG-IP LTM
You can configure your BIG-IP LTM device to forward syslog events.
You can configure syslog for the following BIG-IP LTM software version:
• Configuring Remote Syslog for F5 BIG-IP LTM 11.x on page 400
• Configuring Remote Syslog for F5 BIG-IP LTM 10.x on page 401
• Configuring Remote Syslog for F5 BIG-IP LTM 9.4.2 to 9.4.8 on page 402
Configuring Remote Syslog for F5 BIG-IP LTM 11.x
You can configure syslog for F5 BIG-IP LTM 11.x.
To configure syslog for F5 BIG-IP LTM 11.x take the following steps:
1. Log in to the command-line of your F5 BIG-IP device.
2. To log in to the Traffic Management Shell (tmsh), type the following command:
tmsh
3. To add a syslog server, type the following command:
modify /sys syslog remote-servers add {<Name> {host <IP address> remote-port514}}
Copyright © 2018, Juniper Networks, Inc.400
Juniper Secure Analytics Configuring DSMs Guide
Where:
• <Name> is a name that you assign to identify the syslog server on your BIG-IP LTM
appliance.
• <IP address> is the IP address of JSA.
For example,
modify /sys syslog remote-servers add {BIGIPsyslog {host 10.100.100.100 remote-port
514}}
4. Save the configuration changes:
save /sys config
Events that are forwarded fromyour F5Networks BIG-IP LTMappliance are displayed
on the Log Activity tab in JSA.
Configuring Remote Syslog for F5 BIG-IP LTM 10.x
You can configure syslog for F5 BIG-IP LTM 10.x.
To configure syslog for F5 BIG-IP LTM 10.x take the following steps:
1. Log in to the command-line of your F5 BIG-IP device.
2. Type the following command to add a single remote syslog server:
bigpipe syslog remote server {<Name> {host <IP address>}}
Where:
• <Name> is the name of the F5 BIG-IP LTM syslog source.
• <IP address> is the IP address of JSA.
For example:
bigpipe syslog remote server {BIGIPsyslog {host 10.100.100.100}}
3. Save the configuration changes:
bigpipe save
NOTE: F5 Networksmodified the syslog output format in BIG-IP v10.x toinclude the use of local/ before the host name in the syslog header. The
syslog header format that contains local/ is not supported in JSA, but a
workaround isavailable tocorrect thesyslogheader. Formore information,see https://www.juniper.net/support/downloads/.
Events that are forwarded fromyour F5Networks BIG-IP LTMappliance are displayed
on the Log Activity tab in JSA.
401Copyright © 2018, Juniper Networks, Inc.
Chapter 46: F5 Networks
Configuring Remote Syslog for F5 BIG-IP LTM9.4.2 to 9.4.8
You can configure syslog for F5 BIG-IP LTM 9.4.2 to 9.4.8.
To configure syslog for F5 BIG-IP LTM 9.4.2 to 9.4.8 take the following steps:
1. Log in to the command-line of your F5 BIG-IP device.
2. Type the following command to add a single remote syslog server:
bigpipe syslog remote server <IP address>
Where: <IP address> is the IP address of JSA.
For example:
bigpipe syslog remote server 10.100.100.100
3. Type the following to save the configuration changes:
bigpipe save
The configuration is complete. Events that are forwarded from your F5 Networks
BIG-IP LTM appliance are displayed on the Log Activity tab in JSA.
F5 Networks FirePass
The F5 Networks FirePass DSM for JSA collects system events from an F5 FirePass SSL
VPN device using syslog.
By default, remote logging is disabled andmust be enabled in the F5 Networks FirePass
device. Before receiving events in JSA, youmust configure your F5 Networks FirePass
device to forward system events to JSA as a remote syslog server.
• Configuring Syslog Forwarding for F5 FirePass on page 402
• Configuring a Log Source on page 403
Configuring Syslog Forwarding for F5 FirePass
To forward syslog events from an F5 Networks BIG-IP FirePass SSL VPN appliance to
JSA, youmust enable and configure a remote log server.
The remote log server can forward events directly to your JSA console or any Event
Collector in your deployment.
1. Log in to the F5 Networks FirePass Admin Console.
2. On the navigation pane, select DeviceManagement >Maintenance >Logs.
3. From the System Logsmenu, select the Enable Remote Log Server check box.
Copyright © 2018, Juniper Networks, Inc.402
Juniper Secure Analytics Configuring DSMs Guide
4. From the System Logsmenu, clear the Enable Extended System Logs check box.
5. In the Remote host parameter, type the IP address or host name of your JSA.
6. From the Log Level list, select Information.
The Log Level parameter monitors application level systemmessages.
7. From the Kernel Log Level list, select Information.
The Kernel Log Level parameter monitors Linux kernel systemmessages.
8. Click Apply System Log Changes.
The changes are applied and the configuration is complete. The log source is added
to JSA as F5 Networks FirePass events are automatically discovered. Events that are
forwarded to JSA by F5 Networks BIG-IP ASM are displayed on the Log Activity tab in
JSA.
Configuring a Log Source
JSA automatically discovers and creates a log source for syslog events fromF5Networks
FirePass appliances.
The following configuration steps are optional:
1. Log in to JSA.
2. Click the Admin tab.
3. On the navigation menu, click Data Sources.
4. Click the Log Sources icon.
5. Click Add.
6. In the Log Source Name field, type a name for your log source.
7. In the Log Source Description field, type a description for the log source.
8. From the Log Source Type list, select F5 Networks FirePass.
9. Using the Protocol Configuration list, select Syslog.
10. Configure the following values:
403Copyright © 2018, Juniper Networks, Inc.
Chapter 46: F5 Networks

Table 118: Syslog Protocol Parameters
DescriptionParameter
Type the IP address or host name for the log source as an identifier for events from your F5Networks FirePass appliance.
Log Source Identifier
11. Click Save.
12. On the Admin tab, click Deploy Changes.
The configuration is complete.
Copyright © 2018, Juniper Networks, Inc.404
Juniper Secure Analytics Configuring DSMs Guide
CHAPTER 47
Fair Warning
• Fair Warning on page 405
• Configuring a Log Source on page 405
Fair Warning
The Fair Warning DSM for JSA retrieves event files from a remote source by using the log
file protocol.
JSA records event categories from the Fair Warning log files about user activity that is
related to patient privacy and security threats tomedical records. Before you can retrieve
log files from Fair Warning, youmust verify that your device is configured to generate an
event log. Instructions for generating the event log can be found in your Fair Warning
documentation.
When you configure the log file protocol, make sure that the host name or IP address
that is configured in the Fair Warning system is the same as configured in the Remote
Host parameter in the log file protocol configuration.
Configuring a Log Source
You can configure JSA to download an event log from a Fair Warning device.
1. Log in to JSA.
2. Click the Admin tab.
3. On the navigation menu, click Data Sources.
4. Click the Log Sources icon.
5. Click Add.
6. In the Log Source Name field, type a name for your log source.
7. In the Log Source Description field, type a description for the log source.
405Copyright © 2018, Juniper Networks, Inc.
8. From the Log Source Type list box, select Fair Warning.
9. Select the Log File option from the Protocol Configuration list.
10. In the FTP File Pattern field, type a regular expression that matches the log files that
are generated by the Fair Warning system.
11. In the Remote Directory field, type the path to the directory that contains logs from
your Fair Warning device.
12. From the Event Generator list, select Fair Warning.
13. Click Save.
14. On the Admin tab, click Deploy Changes.
The configuration is complete. For more information on full parameters for the log
file protocol, see the JSA Managing Log Sources Guide.
Formore informationonconfiguringFairWarning, consult your vendordocumentation.
Copyright © 2018, Juniper Networks, Inc.406
Juniper Secure Analytics Configuring DSMs Guide
CHAPTER 48
Fidelis XPS
• Fidelis XPS on page 407
• Configuring Fidelis XPS on page 407
• Configuring a Log Source on page 408
Fidelis XPS
The Fidelis XPS DSM for JSA accepts events that are forwarded in Log Enhanced Event
Protocol (LEEF) from Fidelis XPS appliances by using syslog.
JSA can collect all relevant alerts that are triggered by policy and rule violations that are
configured on your Fidelis XPS appliance.
Event Type Format
FidelisXPSmustbeconfigured togenerateevents inLogEnhancedEventProtocol (LEEF)
and forward theseeventsbyusing syslog.TheLEEF formatconsistsofapipe ( | )delimited
syslog header, and tab separated fields that are positioned in the event payload.
If the syslog events forwarded from your Fidelis XPS are not formatted in LEEF format,
youmust examine your device configuration or software version to ensure that your
appliance supports LEEF. Properly formatted LEEF event messages are automatically
discovered and added as a log source to JSA.
Configuring Fidelis XPS
You can configure syslog forwarding of alerts from your Fidelis XPS appliance.
1. Log in to CommandPost to manage your Fidelis XPS appliance.
2. From the navigation menu, select System >Export.
A list of available exports is displayed. The list is empty the first timeyouuse theexport
function.
3. Select one of the following options:
• Click New to create a new export for your Fidelis XPS appliance.
407Copyright © 2018, Juniper Networks, Inc.
• Click Edit next to an export name to edit an existing export on your Fidelis XPS
appliance.
The Export Editor is displayed.
4. From the Export Method list, select Syslog LEEF.
5. In the Destination field, type the IP address or host name for JSA.
For example, 10.10.10.100:::514
The Destination field does not support non-ASCII characters.
6. From Export Alerts, select one of the following options:
• All alerts—Select this option to export all alerts to JSA. This option is
resource-intensive and it can take time to export all alerts.
• Alerts by Criteria—Select this option to export specific alerts to JSA. This option
displays a new field where you can define your alert criteria.
7. From Export Malware Events, select None.
8. From Export Frequency, select Every Alert / Malware.
9. In the Save As field, type a name for your export.
10. Click Save.
11. To verify that events are forwarded to JSA, you can click Run Now.
RunNow is intended as a test tool to verify that alerts selected by criteria are exported
from your Fidelis appliance. This option is not available if you selected to export all
events in Step 6.
The configuration is complete. The log source is added to JSA as Fidelis XPS syslog
events are automatically discovered. Events that are forwarded to JSA by Fidelis XPS
are displayed on the Log Activity tab of JSA.
Configuring a Log Source
JSA automatically discovers and creates a log source for syslog events from Fidelis XPS.
However, you canmanually create a log source for JSA to receive syslog events.
The following configuration steps are optional:
1. Log in to JSA.
2. Click the Admin tab.
Copyright © 2018, Juniper Networks, Inc.408
Juniper Secure Analytics Configuring DSMs Guide

3. On the navigation menu, click Data Sources.
4. Click the Log Sources icon.
5. Click Add.
6. In the Log Source Name field, type a name for your log source.
7. In the Log Source Description field, type a description for the log source.
8. From the Log Source Type list, select Fidelis XPS.
9. Using the Protocol Configuration list, select Syslog.
10. Configure the following values:
Table 119: Syslog Parameters
DescriptionParameter
Type the IP address or host name for the log source as an identifier for events from yourFidelis XPS appliance.
Log Source Identifier
11. Click Save.
12. On the Admin tab, click Deploy Changes.
The configuration is complete.
409Copyright © 2018, Juniper Networks, Inc.
Chapter 48: Fidelis XPS

Copyright © 2018, Juniper Networks, Inc.410
Juniper Secure Analytics Configuring DSMs Guide
CHAPTER 49
FireEye
• FireEye on page 411
• Configuring Your FireEye System for Communication with JSA on page 412
• Configuring Your FireEye HX System for Communication with JSA on page 413
• Configuring a FireEye Log Source in JSA on page 413
FireEye
The JSA DSM for FireEye accepts syslog events in Log Event Extended Format (LEEF)
and Common Event Format (CEF).
This DSM applies to FireEye CMS, MPS, EX, AX, NX, FX, and HX appliances. JSA records
all relevant notification alerts that are sent by FireEye appliances.
The following table identifies the specifications for the FireEye DSM.
Table 120: FireEye DSMSpecifications
ValueSpecification
FireEyeManufacturer
FireEye MPSDSM name
CMS, MPS, EX, AX, NX, FX, and HXSupported versions
DSM-FireEyeMPS-JSA_version-Build_number.noarch.rpmRPM file name
SyslogProtocol
All relevant eventsJSA recorded event types
YesAuto discovered?
NoIncludes identity?
FireEye website (www.fireeye.com)More information
411Copyright © 2018, Juniper Networks, Inc.

To integrate FireEye with JSA, use the following procedures:
1. If automatic updates are not enabled, download and install the DSM Common and
FireEye MPS RPM on your JSA Console.
2. For each instance of FireEye in your deployment, configure the FireEye system to
forward events to JSA.
3. For each instance of FireEye, create an FireEye log source on the JSA Console.
Configuring Your FireEye System for Communication with JSA
To enable FireEye to communicate with JSA, configure your FireEye appliance to forward
syslog events.
1. Log in to the FireEye appliance by using the CLI.
2. To activate configuration mode, type the following commands:
enable
configure terminal
3. To enable rsyslog notifications, type the following command:
fenotify rsyslog enable
4. To add JSA as an rsyslog notification consumer, type the following command:
fenotify rsyslog trap-sink QRadar
5. To specify the IP address for the JSA system that youwant to receive rsyslog trap-sink
notifications, type the following command:
fenotify rsyslog trap-sink QRadar address <QRadar_IP_address>
6. To define the rsyslog event format, type the following command:
fenotify rsyslog trap-sink QRadar prefer message format leef
7. To save the configuration changes to the FireEye appliance, type the following
command:
writememory
RelatedDocumentation
Configuring Your FireEye HX System for Communication with JSA on page 413•
• Configuring a FireEye Log Source in JSA on page 413
Copyright © 2018, Juniper Networks, Inc.412
Juniper Secure Analytics Configuring DSMs Guide
Configuring Your FireEye HX System for Communication with JSA
To enable FireEye HX to communicate with JSA, configure your FireEye HX appliance to
forward syslog events.
1. Log in to the FireEye HX appliance by using the CLI.
2. To activate configuration mode, type the following commands:
enable
configure terminal
3. To add a remote syslog server destination, type the following commands:
logging <remote_IP_address> trap none
logging <remote_IP_address> trap override class cef priority info
4. To save the configuration changes to the FireEye HX appliance, type the following
command:
writemem
RelatedDocumentation
Configuring a FireEye Log Source in JSA on page 413•
• Configuring Your FireEye System for Communication with JSA on page 412
Configuring a FireEye Log Source in JSA
JSA automatically creates a log source after your JSA Console receives FireEye events.
If JSA does not automatically discover FireEye events, you canmanually add a log source
for each instance fromwhich you want to collect event logs.
1. Log in to JSA
2. Click the Admin tab.
3. On the navigation menu, click Data Sources.
4. Click the Log Sources icon.
5. Click Add.
6. From the Log Source Type list, select FireEye.
7. Using the Protocol Configuration list, select Syslog.
413Copyright © 2018, Juniper Networks, Inc.
Chapter 49: FireEye
8. In the Log Source Identifier field, type the IP address or host name of the FireEye
appliance.
9. Configure the remaining parameters.
10. Click Save.
11. On the Admin tab, click Deploy Changes.
RelatedDocumentation
• Configuring Your FireEye System for Communication with JSA on page 412
• Configuring Your FireEye HX System for Communication with JSA on page 413
Copyright © 2018, Juniper Networks, Inc.414
Juniper Secure Analytics Configuring DSMs Guide
CHAPTER 50
Forcepoint
• Forcepoint on page 415
• Forcepoint TRITON on page 415
• Forcepoint V-Series Data Security Suite on page 418
• Forcepoint V-Series Content Gateway on page 420
Forcepoint
JSA supports a range of Forcepoint DSMs.
Forcepoint is formerly known asWebsense.
Forcepoint TRITON
The Forcepoint V-Series Content Gateway DSM for JSA supports events for web content
fromseveral ForcepointTRITONsolutions, includingWebSecurity,WebSecurityGateway,
Web Security Gateway Anywhere, and V-Series appliances.
ForcepointTRITONcollectsandstreamsevent information to JSAbyusing theForcepoint
Multiplexer component. Before you configure JSA, youmust configure the Forcepoint
TRITON solution to provide LEEF formatted syslog events.
Before you can configure Forcepoint TRITONWeb Security solutions to forward events
to JSA, youmust ensure that your deployment contains a Forcepoint Multiplexer.
The Forcepoint Multiplexer is supported onWindows, Linux, and on Forcepoint V-Series
appliances.
To configure a Forcepoint Multiplexer on a Forcepoint Triton or V-Series appliance:
415Copyright © 2018, Juniper Networks, Inc.
1. Install an instance of Forcepoint Multiplexer for each Forcepoint Policy Server
component in your network.
• For Microsoft Windows - To install the Forcepoint Multiplexer onWindows, use the
TRITON Unified Installer. The Triton Unified Installer is available for download at
http://www.myforcepoint.com.
• For Linux -To install the ForcepointMultiplexer on Linux, use theWebSecurity Linux
Installer. TheWeb Security Linux Installer is available for download at
http://www.myforcepoint.com.
For information on adding a Forcepoint Multiplexer to software installations, see your
Forcepoint Security Information Event Management (SIEM) Solutions documentation.
2. Enable the Forcepoint Multiplexer on a V-Series appliance that is configured as a full
policy source or user directory and filtering appliance:
a. Log in to your Forcepoint TRITONWeb Security Console or V-Series appliance.
3. From the Appliance Manager, select Administration >Toolbox >Command Line Utility.
4. Click the ForcepointWeb Security tab.
5. From the Command list, selectmultiplexer, then use the enable command.
6. Repeat “Forcepoint TRITON” on page 415 and “Forcepoint TRITON” on page 415 to
enable one Multiplexer instance for each Policy Server instance in your network.
If more than one Multiplexer is installed for a Policy Server, only the last installed
instance of the Forcepoint Multiplexer is used. The configuration for each Forcepoint
Multiplexer instance is stored by its Policy Server.
You can now configure your Forcepoint TRITON appliance to forward syslog events in
LEEF format to JSA.
• Configuring Syslog for Forcepoint TRITON on page 416
• Configuring a Log Source for Forcepoint TRITON on page 417
Configuring Syslog for Forcepoint TRITON
To collect events, youmust configure syslog forwarding for Forcepoint TRITON.
1. Log in to your Forcepoint TRITONWeb Security Console.
2. On the Settings tab, select General >SIEM Integration.
3. Select the Enable SIEM integration for this Policy Server check box.
4. In the IP address or hostname field, type the IP address of your JSA.
Copyright © 2018, Juniper Networks, Inc.416
Juniper Secure Analytics Configuring DSMs Guide

5. In the Port field, type 514.
6. From the Transport protocol list, select either the TCP or UDP protocol option.
JSA supports syslog events for TCP and UDP protocols on port 514.
7. From the SIEM format list, select syslog/LEEF (JSA)
8. ClickOK to cache any changes.
9. Click Deploy to update your Forcepoint TRITON security components or V-Series
appliances.
The Forcepoint Multiplexer connects to Forcepoint Filtering Service and ensures that
event log information is provided to JSA.
Configuring a Log Source for Forcepoint TRITON
JSA automatically discovers and creates a log source for syslog events in LEEF format
from Forcepoint TRITON and V-Series appliances.
The configuration steps for creating a log source are optional.
1. Log in to JSA.
2. Click the Admin tab.
3. On the navigation menu, click Data Sources.
4. Click the Log Sources icon.
5. Click Add.
6. In the Log Source Name field, type a name for your log source.
7. In the Log Source Description field, type a description for the log source.
8. From the Log Source Type list, select Forcepoint V Series.
NOTE: ForcepointTRITONuses theForcepointVSeriesContentGatewayDSM for parsing events. When youmanually add a log source to JSA forForcepoint TRITON, you should select Forcepoint V Series.
9. From the Protocol Configuration list, select Syslog.
417Copyright © 2018, Juniper Networks, Inc.
Chapter 50: Forcepoint
10. Configure the following values:
Table 121: Syslog Parameters
DescriptionParameter
Type the IP address or host name for the log source as an identifier for events from ForcepointTRITON or V-Series appliance.
Log Source Identifier
11. Click Save.
12. On the Admin tab, click Deploy Changes.
The log source is added to JSA.
Forcepoint V-Series Data Security Suite
• Configuring Syslog for Forcepoint V-Series Data Security Suite on page 418
• Configuring a Log Source for Forcepoint V-Series Data Security Suite on page 419
RelatedDocumentation
Forcepoint V-Series Content Gateway on page 420•
• Forcepoint TRITON on page 415
Configuring Syslog for Forcepoint V-Series Data Security Suite
The Forcepoint V-Series Data Security Suite DSM accepts events using syslog. Before
you can integrate JSA you, must enable the Forcepoint V-Series appliance to forward
syslog events in the Data Security Suite (DSS) Management Console.
1. Select Policies >Policy Components >Notification Templates.
2. Select an existing Notification Template or create a new template.
3. Click the General tab.
4. Click Send SyslogMessage.
5. SelectOptions >Settings >Syslog to access the Syslog window.
The syslog window enables administrators to define the IP address/host name and
port number of the syslog in their organization. The defined syslog receives incident
messages from the Forcepoint Data Security Suite DSSManager.
6. The syslog is composed of the following fields:
DSS Incident|ID={value}|action={display value - max}|urgency= {coded}|
Copyright © 2018, Juniper Networks, Inc.418
Juniper Secure Analytics Configuring DSMs Guide
policy categories={values,,,}|source={value-display name}|destinations={values...}|channel={display name}|matches= {value}|detaills={value}
• Max length for policy categories is 200 characters.
• Max length for destinations is 200 characters.
• Details and source are reduced to 30 characters.
7. Click Test Connection to verify that your syslog is accessible.
You can now configure the log source in JSA. The configuration is complete. The log
source is added to JSA as OSSEC events are automatically discovered. Events that are
forwarded to JSA by OSSEC are displayed on the Log Activity tab of JSA.
Configuring a Log Source for Forcepoint V-Series Data Security Suite
JSA automatically discovers and creates a log source for syslog events from Forcepoint
V-Series Data Security Suite.
The following configuration steps are optional.
1. Log in to JSA.
2. Click the Admin tab.
3. On the navigation menu, click Data Sources.
4. Click the Log Sources icon.
5. Click Add.
6. In the Log Source Name field, type a name for your log source.
7. In the Log Source Description field, type a description for the log source.
8. From the Log Source Type list, select Forcepoint V Series.
9. Using the Protocol Configuration list, select Syslog.
10. Configure the following values:
Table 122: Syslog Parameters
DescriptionParameter
Type the IP address or host name for the log source as an identifier for events from your ForcepointV-Series Data Security Suite DSM
Log Source Identifier
419Copyright © 2018, Juniper Networks, Inc.
Chapter 50: Forcepoint

11. Click Save.
12. On the Admin tab, click Deploy Changes.
The configuration is complete.
Forcepoint V-Series Content Gateway
The Forcepoint V-Series Content Gateway DSM for JSA supports events for web content
on Forcepoint V-Series appliances with the Content Gateway software.
The Forcepoint V-Series Content Gateway DSM accepts events using syslog to stream
events or by using the log file protocol to provide events to JSA. Before you can integrate
your appliance with JSA, youmust select one of the following configuration methods:
• To configure syslog for your Forcepoint V-Series, see “Configure Syslog for Forcepoint
V-Series Content Gateway” on page 420.
• To configure the log file protocol for your Forcepoint V-Series, see “Log File Protocol
for Forcepoint V-Series Content Gateway” on page 423.
• Configure Syslog for Forcepoint V-Series Content Gateway on page 420
• Configuring the Management Console for Forcepoint V-Series Content
Gateway on page 420
• Enabling Event Logging for Forcepoint V-Series Content Gateway on page 421
• Configuring a Log Source for Forcepoint V-Series Content Gateway on page 422
• Log File Protocol for Forcepoint V-Series Content Gateway on page 423
Configure Syslog for Forcepoint V-Series Content Gateway
The Forcepoint V-Series DSM supports Forcepoint V-Series appliances that run the
Forcepoint Content Gateway on Linux software installations.
Before you configure JSA, youmust configure the Forcepoint ContentGateway to provide
LEEF formatted syslog events.
Configuring theManagement Console for Forcepoint V-Series Content Gateway
You can configure event logging in the Content Gateway Manager.
1. Log into your Forcepoint Content Gateway Manager.
2. Click the Configure tab.
3. Select Subsystems >Logging.
The General Logging Configurationwindow is displayed.
4. Select Log Transactions and Errors.
Copyright © 2018, Juniper Networks, Inc.420
Juniper Secure Analytics Configuring DSMs Guide
5. Select Log Directory to specify the directory path of the stored event log files.
The directory that you define must exist and the Forcepoint user must have read and
write permissions for the specified directory.
The default directory is /opt/WGC/logs.
6. Click Apply.
7. Click the Custom tab.
8. In theCustomLog File Definitionswindow, type the following text for the LEEF format.
<LogFormat> <Name = "leef"/> <Format = "LEEF:1.0|Forcepoint|WCG|7.6| %<wsds>|cat=%<wc> src=%<chi> devTime=%<cqtn> devTimeFormat=dd/MMM/yyyy:HH:mm:ss Z http-username=%<caun> url=%<cquc> method=%<cqhm> httpversion=%<cqhv> cachecode=%<crc>dstBytes=%<sscl> dst=%<pqsi> srcBytes=%<pscl> proxy-status-code=%<pssc> server-status-code=%<sssc> usrName=%<wui> duration=%<ttms>"/> </LogFormat>
<LogObject> <Format = "leef"/> <Filename = "leef"/> </LogObject>
NOTE: The fields in the LEEF format string are tab separated. Youmightbe required to type the LEEF format in a text editor and then cut andpasteit into your web browser to retain the tab separations. The definitions fileignores extra white space, blank lines, and all comments.
9. Select Enabled to enable the custom logging definition.
10. Click Apply.
You can now enable event logging for your Forcepoint Content Gateway.
Enabling Event Logging for Forcepoint V-Series Content Gateway
If you are using a Forcepoint V-Series appliance, contact Forcepoint Technical Support
to enable this feature.
1. Log in to the command-line Interface (CLI) of the server running Forcepoint Content
Gateway.
421Copyright © 2018, Juniper Networks, Inc.
Chapter 50: Forcepoint
2. Add the following lines to the end of the /etc/rc.local file:
( while [ 1 ] ; do tail -n1000 -F /opt/WCG/logs/leef.log | nc <IP Address> 514 sleep 1 done ) &
Where <IP Address> is the IP address for JSA.
3. To start logging immediately, type the following command:
nohup /bin/bash -c "while [ 1 ] ; do tail -F /opt/WCG/logs/leef.log | nc <IP Address> 514; sleep 1; done" &
NOTE: Youmight need to type the logging command in “Enabling EventLogging forForcepointV-SeriesContentGateway”onpage421or copy thecommand to a text editor to interpret the quotationmarks.
The configuration is complete. The log source is added to JSA as syslog events from
ForcepointV-SeriesContentGatewayareautomatically discovered. Events forwarded
by Forcepoint V-Series Content Gateway are displayed on the Log Activity tab of JSA.
Configuring a Log Source for Forcepoint V-Series Content Gateway
JSA automatically discovers and creates a log source for syslog events from Forcepoint
V-Series Content Gateway.
The following configuration steps are optional.
1. Log in to JSA.
2. Click the Admin tab.
3. On the navigation menu, click Data Sources.
4. Click the Log Sources icon.
5. Click Add.
6. In the Log Source Name field, type a name for your log source.
7. In the Log Source Description field, type a description for the log source.
8. From the Log Source Type list, select Forcepoint V Series.
9. Using the Protocol Configuration list, select Syslog.
10. Configure the following values:
Copyright © 2018, Juniper Networks, Inc.422
Juniper Secure Analytics Configuring DSMs Guide
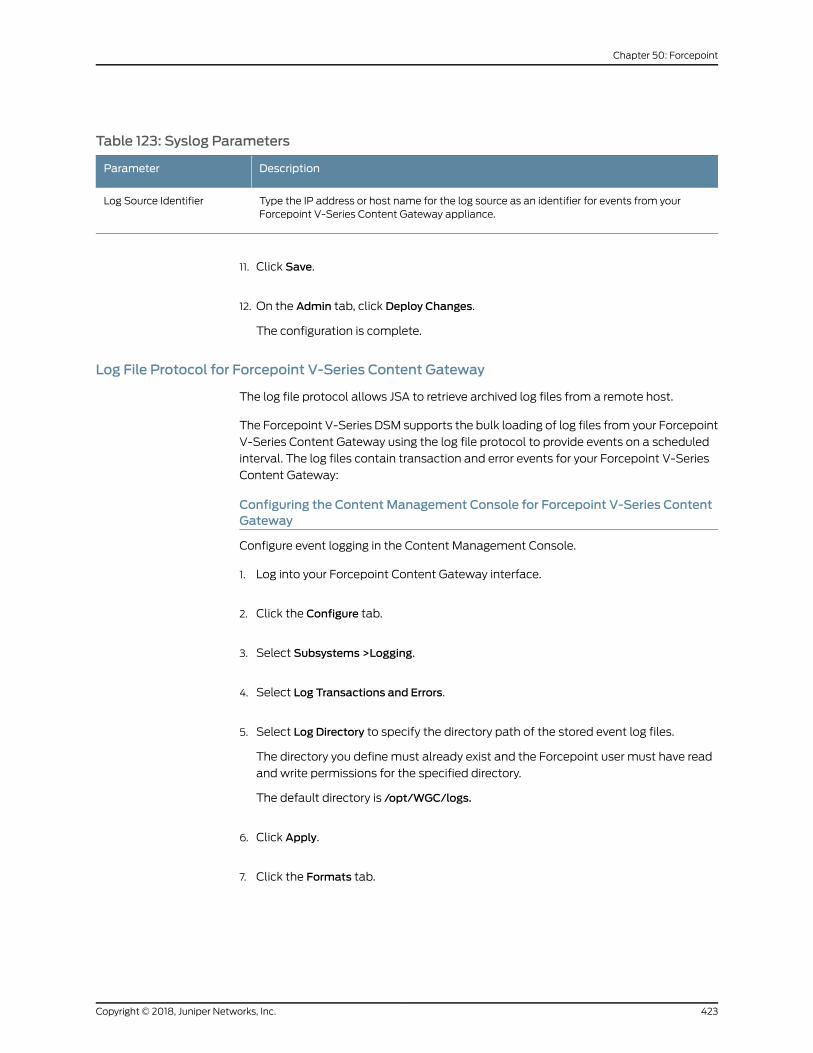
Table 123: Syslog Parameters
DescriptionParameter
Type the IP address or host name for the log source as an identifier for events from yourForcepoint V-Series Content Gateway appliance.
Log Source Identifier
11. Click Save.
12. On the Admin tab, click Deploy Changes.
The configuration is complete.
Log File Protocol for Forcepoint V-Series Content Gateway
The log file protocol allows JSA to retrieve archived log files from a remote host.
The Forcepoint V-Series DSM supports the bulk loading of log files from your Forcepoint
V-Series Content Gateway using the log file protocol to provide events on a scheduled
interval. The log files contain transaction and error events for your Forcepoint V-Series
Content Gateway:
Configuring the Content Management Console for Forcepoint V-Series ContentGateway
Configure event logging in the Content Management Console.
1. Log into your Forcepoint Content Gateway interface.
2. Click the Configure tab.
3. Select Subsystems >Logging.
4. Select Log Transactions and Errors.
5. Select Log Directory to specify the directory path of the stored event log files.
The directory you define must already exist and the Forcepoint user must have read
and write permissions for the specified directory.
The default directory is /opt/WGC/logs.
6. Click Apply.
7. Click the Formats tab.
423Copyright © 2018, Juniper Networks, Inc.
Chapter 50: Forcepoint
8. Select Netscape Extended Format as your format type.
9. Click Apply.
You can now enable event logging for your Forcepoint V-Series Content Gateway.
Configuring a Log File Protocol Log Source for Forcepoint V-Series ContentGateway
When you configure your Forcepoint V-Series DSM to use the log file protocol, ensure
that thehostnameor IPaddress that is configured in theForcepointV-Series is configured
the same as the Remote Host parameter in the log file protocol configuration.
1. Log in to JSA.
2. Click the Admin tab.
3. On the navigation menu, click Data Sources.
4. Click the Log Sources icon.
5. Click Add.
6. In the Log Source Name field, type a name for your log source.
7. In the Log Source Description field, type a description for the log source.
8. From the Log Source Type list, select the Forcepoint V Series.
9. From the Protocol Configuration list, select the Log File.
10. From the Service Type list, select the Secure File Transfer Protocol (SFTP) option.
11. In the FTP File Pattern field, type extended.log_.*.old.
12. In the Remote Directory field, type/opt/WCG/logs.
This is the default directory for storing the Forcepoint V-Series log files that you
specified in “Configuring the Content Management Console for Forcepoint V-Series
Content Gateway” on page 423.
13. From the Event Generator list, select LINEBYLINE.
Copyright © 2018, Juniper Networks, Inc.424
Juniper Secure Analytics Configuring DSMs Guide

14. Click Save.
15. On the Admin tab, click Deploy Changes.
The log source is added to JSA.
RelatedDocumentation
• Forcepoint TRITON on page 415
• Forcepoint V-Series Data Security Suite on page 418
425Copyright © 2018, Juniper Networks, Inc.
Chapter 50: Forcepoint

Copyright © 2018, Juniper Networks, Inc.426
Juniper Secure Analytics Configuring DSMs Guide
CHAPTER 51
ForeScout CounterACT
• ForeScout CounterACT on page 427
• Configuring a Log Source on page 427
• Configuring the ForeScout CounterACT Plug-in on page 428
• Configuring ForeScout CounterACT Policies on page 429
ForeScout CounterACT
The ForeScout CounterACT DSM for JSA accepts Log Extended Event Format (LEEF)
events from CounterACT using syslog.
JSA records the following ForeScout CounterACT events:
• Denial of Service (DoS)
• Authentication
• Exploit
• Suspicious
• System
Configuring a Log Source
To integrate ForeScout CounterACT with JSA, youmust manually create a log source to
receive policy-based syslog events.
JSA does not automatically discover or create log sources for syslog events from
ForeScout CounterACT appliances.
1. Log in to JSA.
2. Click the Admin tab.
3. On the navigation menu, click Data Sources.
4. Click the Log Sources icon.
427Copyright © 2018, Juniper Networks, Inc.
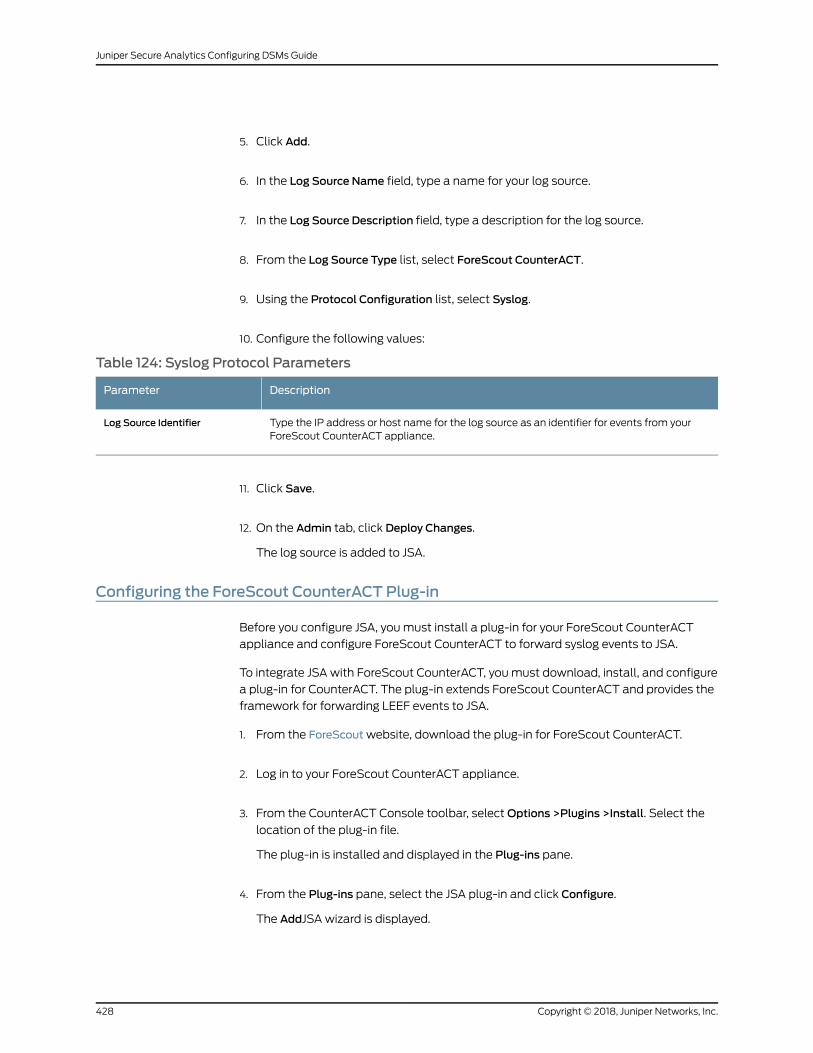
5. Click Add.
6. In the Log Source Name field, type a name for your log source.
7. In the Log Source Description field, type a description for the log source.
8. From the Log Source Type list, select ForeScout CounterACT.
9. Using the Protocol Configuration list, select Syslog.
10. Configure the following values:
Table 124: Syslog Protocol Parameters
DescriptionParameter
Type the IP address or host name for the log source as an identifier for events from yourForeScout CounterACT appliance.
Log Source Identifier
11. Click Save.
12. On the Admin tab, click Deploy Changes.
The log source is added to JSA.
Configuring the ForeScout CounterACT Plug-in
Before you configure JSA, youmust install a plug-in for your ForeScout CounterACT
appliance and configure ForeScout CounterACT to forward syslog events to JSA.
To integrate JSA with ForeScout CounterACT, youmust download, install, and configure
a plug-in for CounterACT. The plug-in extends ForeScout CounterACT and provides the
framework for forwarding LEEF events to JSA.
1. From the ForeScoutwebsite, download the plug-in for ForeScout CounterACT.
2. Log in to your ForeScout CounterACT appliance.
3. From the CounterACT Console toolbar, selectOptions >Plugins >Install. Select the
location of the plug-in file.
The plug-in is installed and displayed in the Plug-ins pane.
4. From the Plug-ins pane, select the JSA plug-in and click Configure.
The AddJSA wizard is displayed.
Copyright © 2018, Juniper Networks, Inc.428
Juniper Secure Analytics Configuring DSMs Guide
5. In the Server Address field, type the IP address of JSA.
6. From the Port list, select 514.
7. Click Next.
8. From the Assigned CounterACT devices pane, choose one of the following options:
• DefaultServer—Select thisoption tomakeall deviceson this ForeScoutCounterACT,
forward events to JSA.
• Assign CounterACT devices—Select this option to assign which individual devices
that are running on ForeScout CounterACT forward events to JSA. The Assign
CounterACT devices option is only available if you have one or more ForeScout
CounterACT servers.
9. Click Finish.
The plug-in configuration is complete. You are now ready to define the events that
are forwarded to JSA by ForeScout CounterACT policies.
Configuring ForeScout CounterACT Policies
ForeScout CounterACT policies test conditions to trigger management and remediation
actions on the appliance.
The plug-in provides an extra action for policies to forward the event to the JSA by using
syslog. To forward events to JSA, youmust define a CounterACT policy that includes the
JSA update action.
The policy condition must bemet at least one time to initiate an event send to JSA. You
must configure each policy to send updates to JSA for events you want to record.
1. Select a policy for ForeScout CounterACT.
2. From the Actions tree, select Audit >Send Updates to JSA Server.
3. From the Contents tab, configure the following value:
Select the Send host property results check box.
4. Choose one of the type of events to forward for the policy:
• Send All—Select this option to include all properties that are discovered for the
policy to JSA.
• SendSpecific—Select this option to select and send only specific properties for the
policy to JSA.
5. Select the Send policy status check box.
429Copyright © 2018, Juniper Networks, Inc.
Chapter 51: ForeScout CounterACT
6. From the Trigger tab, select the interval ForeScout CounterACT uses for forwarding
the event to JSA:
• Sendwhen the action starts—Select this check box to send a single event to JSA
when the conditions of your policy are met.
• Sendwhen information is updated—Select this check box to send a report when
there is a change in the host properties that are specified in the Contents tab.
• Send periodically every—Select this check box to send a reoccurring event to JSA
on an interval if the policy conditions are met.
7. ClickOK to save the policy changes.
8. Repeat this process to configureanyadditional policieswithanaction to sendupdates
to JSA.
The configuration is complete. Events that are forwarded by ForeScout CounterACT
are displayed on the Log Activity tab of JSA.
Copyright © 2018, Juniper Networks, Inc.430
Juniper Secure Analytics Configuring DSMs Guide
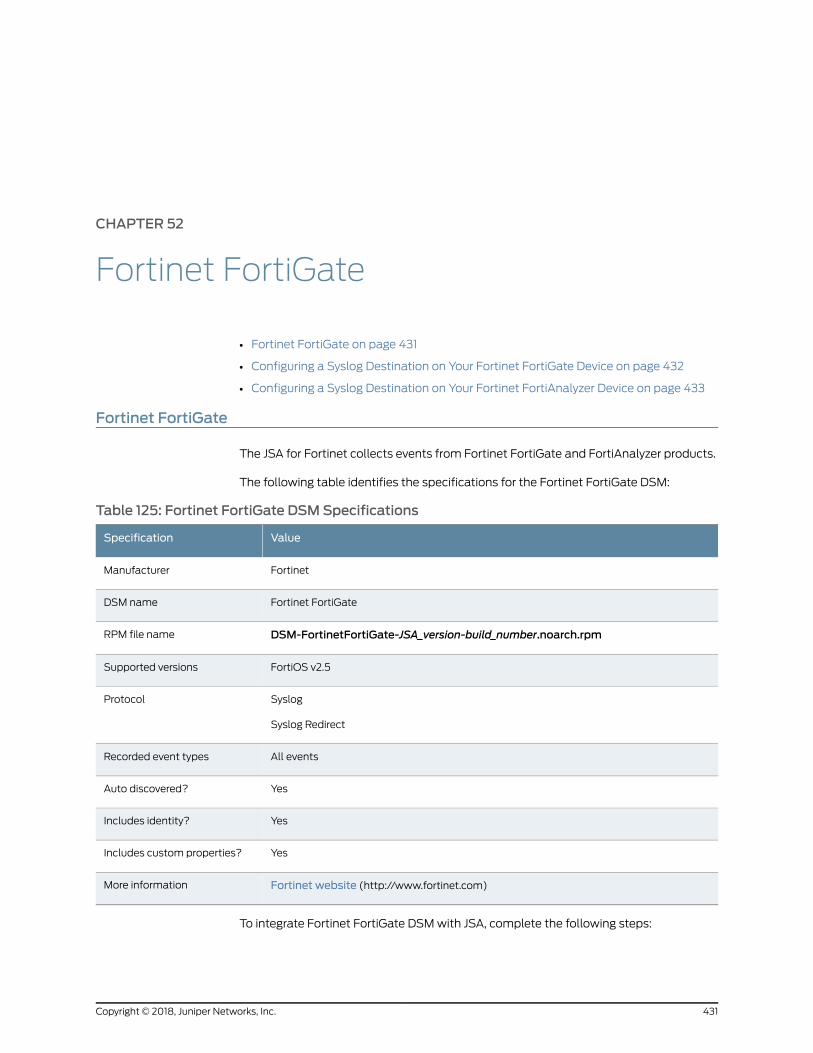
CHAPTER 52
Fortinet FortiGate
• Fortinet FortiGate on page 431
• Configuring a Syslog Destination on Your Fortinet FortiGate Device on page 432
• Configuring a Syslog Destination on Your Fortinet FortiAnalyzer Device on page 433
Fortinet FortiGate
The JSA for Fortinet collects events from Fortinet FortiGate and FortiAnalyzer products.
The following table identifies the specifications for the Fortinet FortiGate DSM:
Table 125: Fortinet FortiGate DSMSpecifications
ValueSpecification
FortinetManufacturer
Fortinet FortiGateDSM name
DSM-FortinetFortiGate-JSA_version-build_number.noarch.rpmRPM file name
FortiOS v2.5Supported versions
Syslog
Syslog Redirect
Protocol
All eventsRecorded event types
YesAuto discovered?
YesIncludes identity?
YesIncludes custom properties?
Fortinet website (http://www.fortinet.com)More information
To integrate Fortinet FortiGate DSMwith JSA, complete the following steps:
431Copyright © 2018, Juniper Networks, Inc.
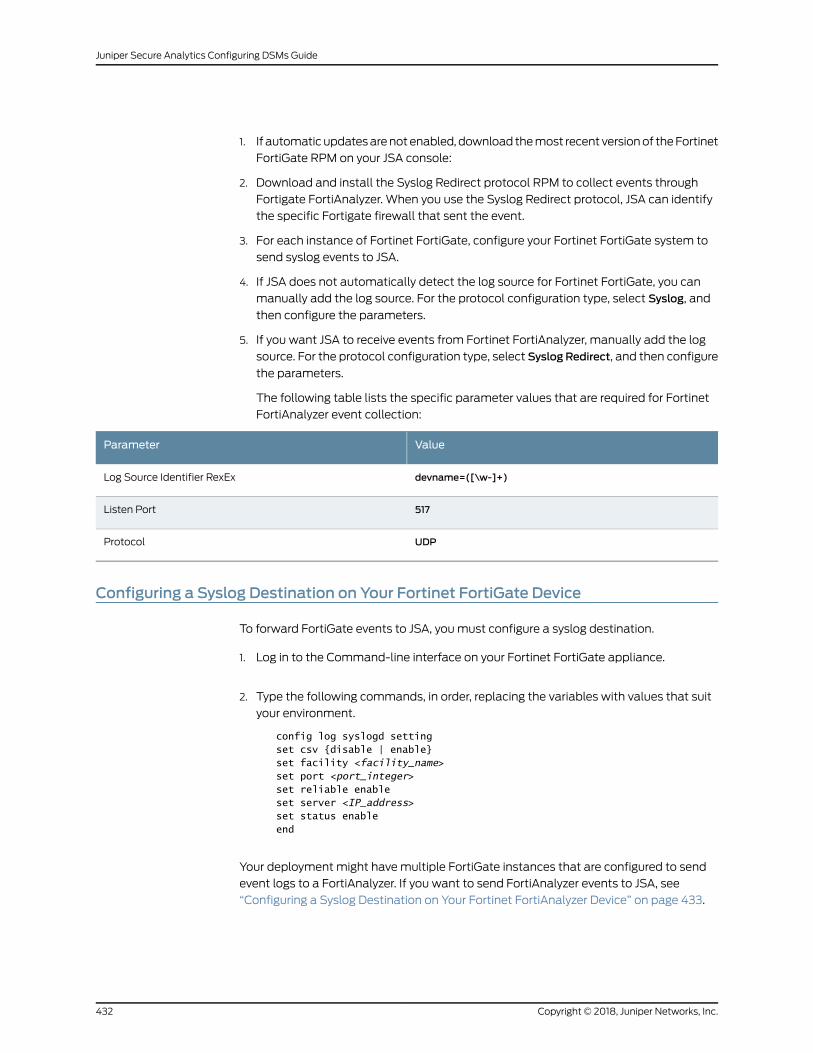
1. If automaticupdatesarenotenabled, download themost recent versionof theFortinet
FortiGate RPM on your JSA console:
2. Download and install the Syslog Redirect protocol RPM to collect events through
Fortigate FortiAnalyzer. When you use the Syslog Redirect protocol, JSA can identify
the specific Fortigate firewall that sent the event.
3. For each instance of Fortinet FortiGate, configure your Fortinet FortiGate system to
send syslog events to JSA.
4. If JSA does not automatically detect the log source for Fortinet FortiGate, you can
manually add the log source. For the protocol configuration type, select Syslog, and
then configure the parameters.
5. If you want JSA to receive events from Fortinet FortiAnalyzer, manually add the log
source. For the protocol configuration type, select Syslog Redirect, and then configure
the parameters.
The following table lists the specific parameter values that are required for Fortinet
FortiAnalyzer event collection:
ValueParameter
devname=([\w-]+)Log Source Identifier RexEx
517Listen Port
UDPProtocol
Configuring a Syslog Destination on Your Fortinet FortiGate Device
To forward FortiGate events to JSA, youmust configure a syslog destination.
1. Log in to the Command-line interface on your Fortinet FortiGate appliance.
2. Type the following commands, in order, replacing the variables with values that suit
your environment.
config log syslogd settingset csv {disable | enable}set facility <facility_name>set port <port_integer>set reliable enableset server <IP_address>set status enableend
Your deployment might havemultiple FortiGate instances that are configured to send
event logs to a FortiAnalyzer. If you want to send FortiAnalyzer events to JSA, see
“Configuring a Syslog Destination on Your Fortinet FortiAnalyzer Device” on page 433.
Copyright © 2018, Juniper Networks, Inc.432
Juniper Secure Analytics Configuring DSMs Guide
RelatedDocumentation
Configuring a Syslog Destination on Your Fortinet FortiAnalyzer Device on page 433•
Configuring a Syslog Destination on Your Fortinet FortiAnalyzer Device
To forward FortiGate events to JSA, youmust configure a syslog destination.
1. Log in to your FortiAnalyzer device.
2. On the Advanced tree menu, select Syslog Server.
3. On the toolbar, click Create New.
4. Configure the Syslog Server parameters:
DescriptionParameter
The default port is 514.Port
5. ClickOK.
RelatedDocumentation
• Configuring a Syslog Destination on Your Fortinet FortiGate Device on page 432
433Copyright © 2018, Juniper Networks, Inc.
Chapter 52: Fortinet FortiGate

Copyright © 2018, Juniper Networks, Inc.434
Juniper Secure Analytics Configuring DSMs Guide
CHAPTER 53
Foundry FastIron
• Foundry FastIron on page 435
• Configuring Syslog for Foundry FastIron on page 435
• Configuring a Log Source on page 436
Foundry FastIron
You can integrate a Foundry FastIron device with JSA to collect all relevant events using
syslog.
To do this youmust configure syslog and your log source.
Configuring Syslog for Foundry FastIron
To integrate JSA with a Foundry FastIron RX device, youmust configure the appliance
to forward syslog events.
1. Log in to the Foundry FastIron device command-line interface (CLI).
2. Type the following command to enable logging:
logging on
Local syslog is now enabled with the following defaults:
• Messages of all syslog levels (Emergencies - Debugging) are logged.
• Up to 50messages are retained in the local syslog buffer.
• No syslog server is specified.
3. Type the following command to define an IP address for the syslog server:
logging host <IP Address>
Where <IP Address> is the IP address of your JSA.
You are now ready to configure the log source in JSA.
435Copyright © 2018, Juniper Networks, Inc.
Configuring a Log Source
JSA automatically discovers and creates a log source for syslog events from Foundry
FastIron. The following configuration steps are optional.
1. Log in to JSA.
2. Click the Admin tab.
3. On the navigation menu, click Data Sources.
4. Click the Log Sources icon.
5. Click Add.
6. In the Log Source Name field, type a name for your log source.
7. In the Log Source Description field, type a description for the log source.
8. From the Log Source Type list, select Foundry FastIron.
9. Using the Protocol Configuration list, select Syslog.
10. Configure the following values:
DescriptionParameter
Type the IP address or host name for the log source as an identifier for events fromyour Foundry FastIron appliance.
Log Source Identifier
11. Click Save.
12. On the Admin tab, click Deploy Changes.
The configuration is complete.
Copyright © 2018, Juniper Networks, Inc.436
Juniper Secure Analytics Configuring DSMs Guide
CHAPTER 54
FreeRADIUS
• FreeRADIUS on page 437
• Configuring Your FreeRADIUS Device to Communicate with JSA on page 438
FreeRADIUS
The JSA DSM for FreeRADIUS collects events from your FreeRADIUS device.
The following table lists the specifications for the FreeRADIUS DSM:
Table 126: FreeRADIUS DSMSpecifications
ValueSpecification
FreeRADIUSManufacturer
FreeRADIUSDSM name
DSM-FreeRADIUS-JSA_version-build_number.noarch.rpmRPM file name
V2.xSupported versions
SyslogEvent format
All eventsRecorded event types
YesAutomatically discovered?
YesIncludes identity?
NoIncludes custom properties?
FreeRADIUS website (http://freeradius.org)More information
To send logs from FreeRADIUS to JSA, complete the following steps:
1. If automatic updates are not enabled, download and install the most recent version
of the FreeRADIUS DSM RPM on your JSA console.
437Copyright © 2018, Juniper Networks, Inc.
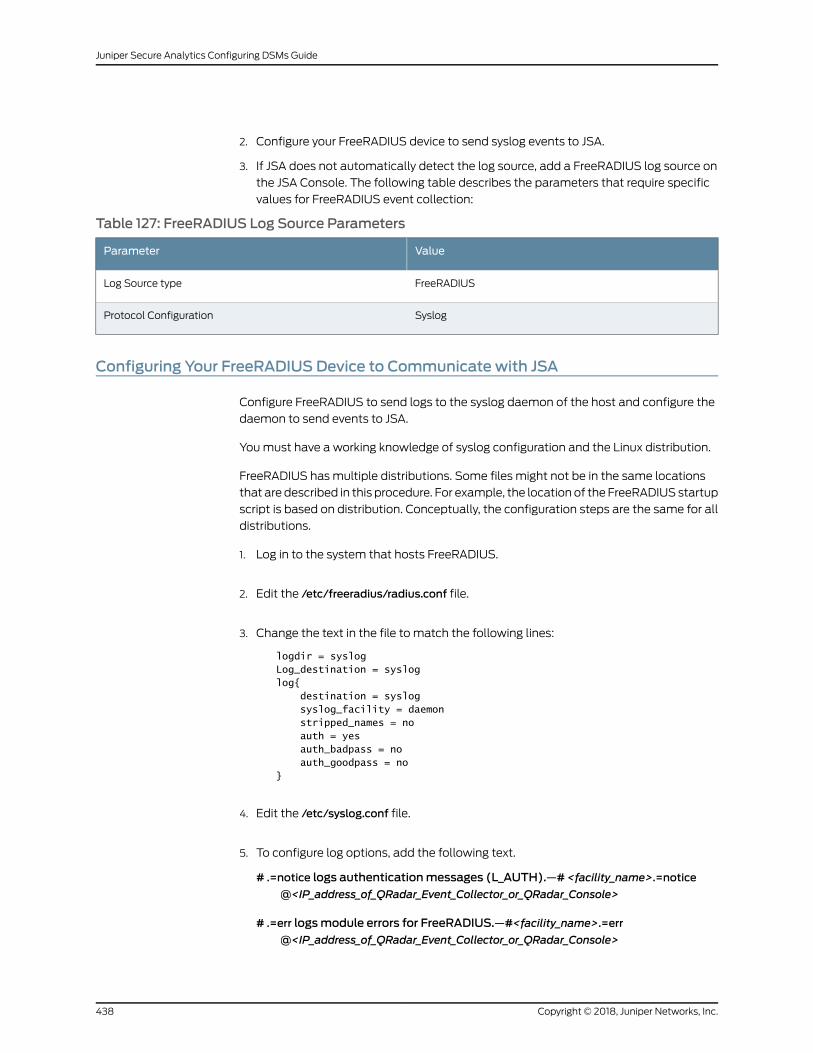
2. Configure your FreeRADIUS device to send syslog events to JSA.
3. If JSA does not automatically detect the log source, add a FreeRADIUS log source on
the JSA Console. The following table describes the parameters that require specific
values for FreeRADIUS event collection:
Table 127: FreeRADIUS Log Source Parameters
ValueParameter
FreeRADIUSLog Source type
SyslogProtocol Configuration
Configuring Your FreeRADIUS Device to Communicate with JSA
Configure FreeRADIUS to send logs to the syslog daemon of the host and configure the
daemon to send events to JSA.
Youmust have a working knowledge of syslog configuration and the Linux distribution.
FreeRADIUS hasmultiple distributions. Some files might not be in the same locations
that are described in this procedure. For example, the location of the FreeRADIUS startup
script is based on distribution. Conceptually, the configuration steps are the same for all
distributions.
1. Log in to the system that hosts FreeRADIUS.
2. Edit the /etc/freeradius/radius.conf file.
3. Change the text in the file to match the following lines:
logdir = syslogLog_destination = sysloglog{ destination = syslog syslog_facility = daemon stripped_names = no auth = yes auth_badpass = no auth_goodpass = no}
4. Edit the /etc/syslog.conf file.
5. To configure log options, add the following text.
# .=notice logs authenticationmessages (L_AUTH).—# <facility_name>.=notice
@<IP_address_of_QRadar_Event_Collector_or_QRadar_Console>
# .=err logsmodule errors for FreeRADIUS.—#<facility_name>.=err
@<IP_address_of_QRadar_Event_Collector_or_QRadar_Console>
Copyright © 2018, Juniper Networks, Inc.438
Juniper Secure Analytics Configuring DSMs Guide
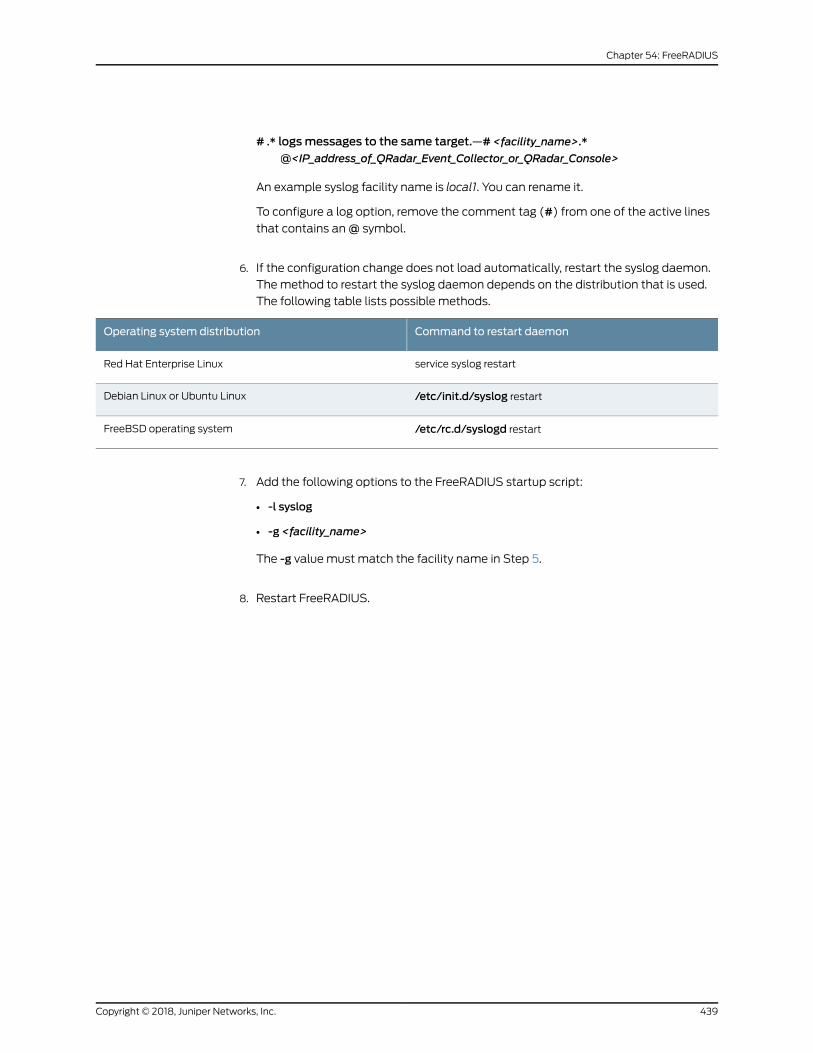
# .* logsmessages to the same target.—# <facility_name>.*
@<IP_address_of_QRadar_Event_Collector_or_QRadar_Console>
An example syslog facility name is local1. You can rename it.
To configure a log option, remove the comment tag (#) from one of the active lines
that contains an@ symbol.
6. If the configuration change does not load automatically, restart the syslog daemon.
Themethod to restart the syslog daemon depends on the distribution that is used.
The following table lists possible methods.
Command to restart daemonOperating system distribution
service syslog restartRed Hat Enterprise Linux
/etc/init.d/syslog restartDebian Linux or Ubuntu Linux
/etc/rc.d/syslogd restartFreeBSD operating system
7. Add the following options to the FreeRADIUS startup script:
• -l syslog
• -g <facility_name>
The -g value must match the facility name in Step 5.
8. Restart FreeRADIUS.
439Copyright © 2018, Juniper Networks, Inc.
Chapter 54: FreeRADIUS

Copyright © 2018, Juniper Networks, Inc.440
Juniper Secure Analytics Configuring DSMs Guide
CHAPTER 55
Generic
• Generic on page 441
• Generic Authorization Server on page 441
• Generic Firewall on page 445
Generic
JSA supports a range of Generic DSMs.
Generic Authorization Server
The generic authorization server DSM for JSA records all relevant generic authorization
events by using syslog.
You need to configure JSA to interpret the incoming generic authorization events, and
manually create a log source.
• Configuring Event Properties on page 441
• Configuring a Log Source on page 444
Configuring Event Properties
To configure JSA to interpret the incoming generic authorization events:
1. Forward all authentication server logs to your JSA system.
For information on forwarding authentication server logs to JSA, see your generic
authorization server vendor documentation.
2. Open the following file:
/opt/ qradar /conf/genericAuthServer.conf
Make sure you copy this file to systems that host the Event Collector and the JSA
console.
3. Restart the Tomcat server:
service tomcat restart
441Copyright © 2018, Juniper Networks, Inc.
Amessage is displayed indicating that the Tomcat server is restarted.
4. Enable or disable regular expressions in your patterns by setting the regex_enabled
property. By default, regular expressions are disabled.
For example:
regex_enabled=false
When you set the regex_enabled property to <false>, the system generates regular
expressions (regex) based on the tags you entered when you try to retrieve the
corresponding data values from the logs.
When you set the regex_enabled property to <true>, you can define custom regex to
control patterns. These regex configurations are applied directly to the logs and the
first captured group is returned. When you define custom regex patterns, youmust
adhere to regex rules, as defined by the Java programming language. For more
information, see the following website:
http://download.oracle.com/javase/tutorial/essential/regex/
To integrate the generic authorization server with JSA, make sure that you specify the
classes directly instead of using the predefined classes. For example, the digit
class(/\d/) becomes /[0-9]/. Also, instead of using numeric qualifiers, rewrite the
expression to use the primitive qualifiers (/?/,/*/ and /+/).
5. Review the file to determine a pattern for successful login:
For example, if your authentication server generates the following log message for
accepted packets:
Jun 27 12:11:21 expo sshd[19926]: Accepted password for root from 10.100.100.109 port
1727 ssh2
The pattern for successful login is:
Accepted password
.
6. Add the following entry to the file:
login_success_pattern=<login success pattern>
Where: <login success pattern> is the pattern that is determined in Step 5.
For example:
login_success_pattern=Accepted password
All entries are case insensitive.
7. Review the file to determine a pattern for login failures.
For example, if your authentication server generates the following log message for
login failures:
Copyright © 2018, Juniper Networks, Inc.442
Juniper Secure Analytics Configuring DSMs Guide
Jun 27 12:58:33 expo sshd[20627]: Failed password for root from 10.100.100.109 port
1849 ssh2
The pattern for login failures is Failed password.
8. Add the following to the file:
login_failed_pattern=<login failure pattern>
Where: <login failure pattern> is the pattern that is determined for login failure.
For example:
login_failed_pattern=Failed password
All entries are case insensitive.
9. Review the file to determine a pattern for logout:
For example, if your authentication server generates the following log message for
logout:
Jun 27 13:00:01 expo su(pam_unix)[22723]: session closed for user genuser
The pattern for lookout is session closed.
10. Add the following to the genericAuthServer.conf file:
logout_pattern=<logout pattern>
Where: <logout pattern> is the pattern that is determined for logout in step 9.
For example:
logout_pattern=session
All entries are case insensitive.
11. Review the file to determine a pattern, if present, for source IP address and source
port.
For example, if your authentication server generates the following log message:
Jun 27 12:11:21 expo sshd[19926]: Accepted password for root from 10.100.100.109 port
1727 ssh2
The pattern for source IP address is from and the pattern for source port is port.
12. Add an entry to the file for source IP address and source port:
source_ip_pattern=<source IP pattern>
source_port_pattern=<source port pattern>
Where: <source IP pattern> and <source port pattern> are the patterns that are
identified in 11 for source IP address and source port.
For example:
443Copyright © 2018, Juniper Networks, Inc.
Chapter 55: Generic
source_ip_pattern=from
source_port_pattern=port
13. Review the file to determine whether a pattern exists for user name.
For example:
Jun 27 12:11:21 expo sshd[19926]: Accepted password for root from 10.100.100.109 port
1727 ssh2
The pattern for user name is for.
14. Add an entry to the file for the user name pattern:
For example:
user_name_pattern=for
You are now ready to configure the log source in JSA.
Configuring a Log Source
To integrate generic authorization appliance event with JSA, youmust manually create
a log source to receive the events as JSA does not automatically discover or create log
sources for events from generic authorization appliances.
1. Log in to JSA.
2. Click the Admin tab.
3. On the navigation menu, click Data Sources.
4. Click the Log Sources icon.
5. Click Add.
6. In the Log Source Name field, type a name for your log source.
7. In the Log Source Description field, type a description for the log source.
8. From the Log Source Type list, select Configurable Authenticationmessage filter.
9. Using the Protocol Configuration list, select Syslog.
10. Configure the following values:
Copyright © 2018, Juniper Networks, Inc.444
Juniper Secure Analytics Configuring DSMs Guide
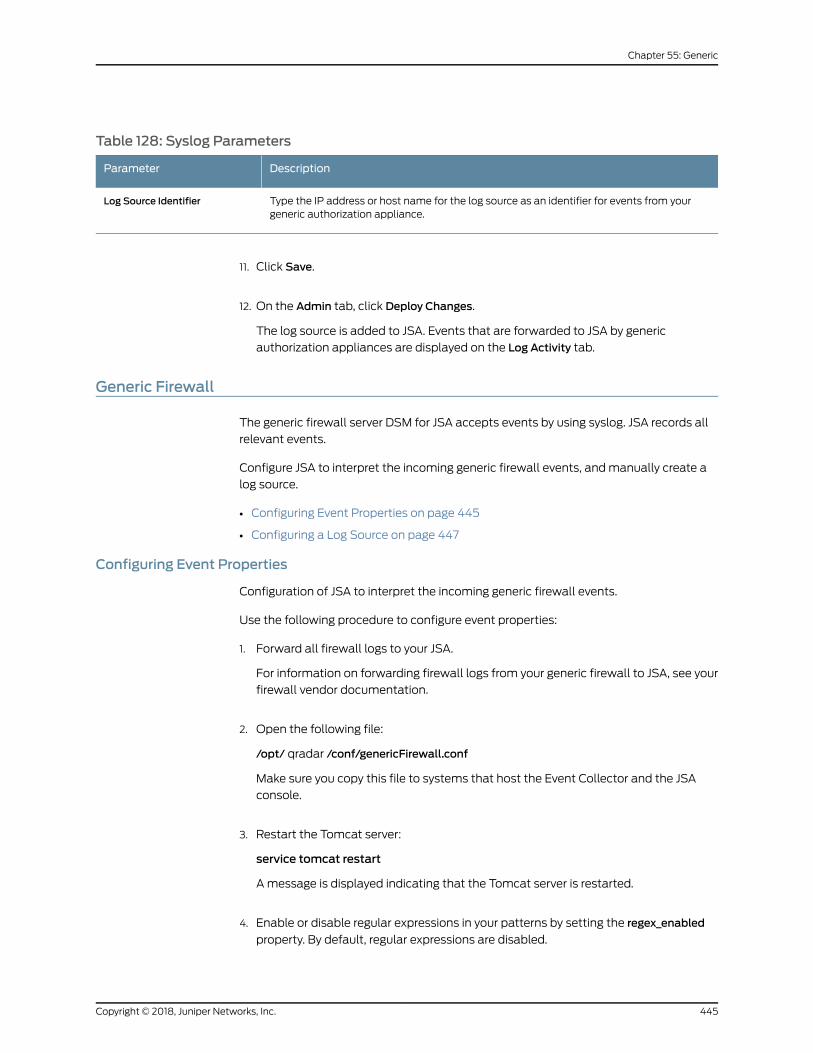
Table 128: Syslog Parameters
DescriptionParameter
Type the IP address or host name for the log source as an identifier for events from yourgeneric authorization appliance.
Log Source Identifier
11. Click Save.
12. On the Admin tab, click Deploy Changes.
The log source is added to JSA. Events that are forwarded to JSA by generic
authorization appliances are displayed on the Log Activity tab.
Generic Firewall
The generic firewall server DSM for JSA accepts events by using syslog. JSA records all
relevant events.
Configure JSA to interpret the incoming generic firewall events, andmanually create a
log source.
• Configuring Event Properties on page 445
• Configuring a Log Source on page 447
Configuring Event Properties
Configuration of JSA to interpret the incoming generic firewall events.
Use the following procedure to configure event properties:
1. Forward all firewall logs to your JSA.
For information on forwarding firewall logs from your generic firewall to JSA, see your
firewall vendor documentation.
2. Open the following file:
/opt/ qradar /conf/genericFirewall.conf
Make sure you copy this file to systems that host the Event Collector and the JSA
console.
3. Restart the Tomcat server:
service tomcat restart
Amessage is displayed indicating that the Tomcat server is restarted.
4. Enable or disable regular expressions in your patterns by setting the regex_enabled
property. By default, regular expressions are disabled.
445Copyright © 2018, Juniper Networks, Inc.
Chapter 55: Generic
For example:
regex_enabled=false
When you set the regex_enabled property to <false>, the system generates regular
expressions based on the tags you enteredwhile you try to retrieve the corresponding
data values from the logs.
When you set the regex_enabled property to <true>, you can define custom regex to
control patterns. These regex configurations are directly applied to the logs and the
first captured group is returned. When you define custom regex patterns, youmust
adhere to regex rules, as defined by the Java programming language. For more
information, see the following website:
http://download.oracle.com/javase/tutorial/essential/regex/
To integrate a generic firewallwith JSA,make sure that you specify the classes directly
instead of using the predefined classes. For example, the digit class (/\d/) becomes
/[0-9]/. Also, instead of using numeric qualifiers, rewrite the expression to use the
primitive qualifiers (/?/,/*/ and /+/).
5. Review the file to determine a pattern for accepted packets.
For example, if yourdevicegenerates the following logmessages for acceptedpackets:
Aug.5,200508:30:00Packetaccepted.Source IP: 192.168.1.1SourcePort:80Destination
IP: 192.168.1.2 Destination Port: 80 Protocol: tcp
The pattern for accepted packets is Packet accepted.
6. Add the following to the file:
accept_pattern=<accept pattern>
Where: <accept pattern> is the pattern that is determined in Step 5. For example:
accept pattern=Packet accepted
Patterns are case insensitive.
7. Review the file to determine a pattern for denied packets.
For example, if your device generates the following log messages for denied packets:
Aug. 5, 2005 08:30:00 Packet denied. Source IP: 192.168.1.1 Source Port: 21 Destination
IP: 192.168.1.2 Destination Port: 21 Protocol: tcp
The pattern for denied packets is Packet denied.
8. Add the following to the file:
deny_pattern=<deny pattern>
Where: <deny pattern> is the pattern that is determined in Step 7.
Patterns are case insensitive.
Copyright © 2018, Juniper Networks, Inc.446
Juniper Secure Analytics Configuring DSMs Guide
9. Review the file to determine a pattern, if present, for the following parameters:
• source ip
• source port
• destination ip
• destination port
• protocol
For example, if your device generates the following log message:
Aug.5,200508:30:00Packetaccepted.Source IP: 192.168.1.1SourcePort:80Destination
IP: 192.168.1.2 Destination Port: 80 Protocol: tcp
The pattern for source IP is Source IP.
10. Add the following to the file:
• source_ip_pattern=<source ip pattern>
• source_port_pattern=<source port pattern>
• destination_ip_pattern=<destination ip pattern>
• destination_port_pattern=<destination port pattern>
• protocol_pattern=<protocol pattern>
Where:<source ippattern>,<sourceportpattern>,<destination ippattern>,<destination
portpattern>, and<protocolpattern>are thecorrespondingpatterns thatare identified
in step 9.
NOTE: Patterns are case insensitive and you can addmultiple patterns.For multiple patterns, separate by using a # symbol.
11. Save and exit the file.
You are now ready to configure the log source in JSA.
Configuring a Log Source
To integrate generic firewalls with JSA, youmust manually create a log source to receive
the events as JSA does not automatically discover or create log sources for events from
generic firewall appliances.
1. Log in to JSA.
2. Click the Admin tab.
3. On the navigation menu, click Data Sources.
447Copyright © 2018, Juniper Networks, Inc.
Chapter 55: Generic
The Data Sources pane is displayed.
4. Click the Log Sources icon.
The Log Sourceswindow is displayed.
5. Click Add.
The Add a log sourcewindow is displayed.
6. In the Log Source Name field, type a name for your log source.
7. In the Log Source Description field, type a description for the log source.
8. From the Log Source Type list, select Configurable Firewall Filter.
9. Using the Protocol Configuration list, select Syslog.
The syslog protocol configuration is displayed.
10. Configure the following values:
Table 129: Syslog Parameters
DescriptionParameter
Type the IP address or host name for the log source as an identifier for events from yourgeneric firewall appliance.
Log Source Identifier
11. Click Save.
12. On the Admin tab, click Deploy Changes.
The log source is added to JSA. Events that are forwarded to JSA by generic firewalls
are displayed on the Log Activity tab.
Copyright © 2018, Juniper Networks, Inc.448
Juniper Secure Analytics Configuring DSMs Guide
CHAPTER 56
Genua Genugate
• Genua Genugate on page 449
• Configuring Genua Genugate to Send Events to JSA on page 451
Genua Genugate
The JSA DSM for genua genugate collects events from a genua genugate device.
genuagenugateproduces logs fromthird-party software suchasopenBSDandsendMail.
The genua genugate DSM provides basic parsing for the logs from these third-party
devices. To achieve more specify parsing for these logs, install the specific DSM for that
device.
The following table lists the specifications for the genua genugate DSM:
Table 130: Genua Genugate DSMSpecifications
ValueSpecification
genuaManufacturer
genua genugateDSM name
DSM-GenuaGenugate-JSA_version-build_number.noarch.rpmRPM file name
8.2 and laterSupported versions
SyslogProtocol
449Copyright © 2018, Juniper Networks, Inc.
Table 130: Genua Genugate DSMSpecifications (continued)
ValueSpecification
General error messages
High availability
General relay messages
Relay-specific messages
genua programs/daemons
EPSI
Accounting Daemon - gg/src/acctd
Configfw
FWConfig
ROFWConfig
User-Interface
Webserver
Recorded event types
YesAutomatically discovered?
YesIncludes identity?
NoIncludes custom properties?
genua website(https://www.genua.de/en/solutions/high-resistance-firewall-genugate.html)
More information
To send genua genugate events to JSA, complete the following steps:
1. If automatic updates are not enabled, download and install the most recent version
of the following RPMs on your JSA console:
• DSMCommon RPM
• genua genugate DSM RPM
2. Configure your genua genugate device to send syslog events to JSA.
3. If JSA does not automatically detect the log source, add a genua genugate log source
on the JSA Console. Configure all required parameters and use the following table to
identify specific values for genua genugate:
Table 131: Genua Genugate Log Source Parameters
ValueParameter
genua genugateLog Source type
Copyright © 2018, Juniper Networks, Inc.450
Juniper Secure Analytics Configuring DSMs Guide
Table 131: Genua Genugate Log Source Parameters (continued)
ValueParameter
SyslogProtocol Configuration
Configuring Genua Genugate to Send Events to JSA
Configure genua genugate to send events to JSA.
1. Log in to genua genugate.
2. Click System > Sysadmin >Logging page.
3. In the JSA IP Address field, type the IP address of your JSA Console or Event Collector.
4. Select the Accounting to External check box.
5. ClickOK.
451Copyright © 2018, Juniper Networks, Inc.
Chapter 56: Genua Genugate

Copyright © 2018, Juniper Networks, Inc.452
Juniper Secure Analytics Configuring DSMs Guide
CHAPTER 57
Great Bay Beacon
• Great Bay Beacon on page 453
• Configuring Syslog for Great Bay Beacon on page 453
• Configuring a Log Source on page 454
Great Bay Beacon
The Great Bay Beacon DSM for JSA supports syslog alerts from the Great Bay Beacon
Endpoint Profiler.
JSA records all relevant Endpoint security events. Before you can integrate Great Bay
Beaconwith JSA, youmust configure your Great Bay Beacon Endpoint Profiler to forward
syslog event messages to JSA.
Configuring Syslog for Great Bay Beacon
You can configure your Great Bay Beacon Endpoint Profiler to forward syslog events.
1. Log in to your Great Bay Beacon Endpoint Profiler.
2. To create an event, select Configuration > Events >Create Events.
A list of currently configured events is displayed.
3. From the Event Delivery Method pane, select the Syslog check box.
4. To apply your changes, select Configuration Apply Changes >UpdateModules.
5. Repeat Steps 1 to 4 to configure all of the events that you want to monitor in JSA.
6. Configure JSA as an external log source for your Great Bay Beacon Endpoint Profiler.
For information on configuring JSAas an external log source, see theGreat BayBeacon
Endpoint Profiler Configuration Guide.
You are now ready to configure the log source in JSA.
453Copyright © 2018, Juniper Networks, Inc.
Configuring a Log Source
JSA automatically discovers and creates a log source for syslog events from Great Bay
Beacon.
The following configuration steps are optional:
1. Log in to JSA.
2. Click the Admin tab.
3. On the navigation menu, click Data Sources.
4. Click the Log Sources icon.
5. Click Add.
6. In the Log Source Name field, type a name for your log source.
7. In the Log Source Description field, type a description for the log source.
8. From the Log Source Type list, select Great Bay Beacon.
9. Using the Protocol Configuration list, select Syslog.
10. Configure the following values:
Table 132: Syslog Parameters
DescriptionParameter
Type the IP address or host name for the log source as an identifier for events fromyourGreatBay Beacon appliance.
Log Source Identifier
11. Click Save.
12. On the Admin tab, click Deploy Changes.
The configuration is complete.
Copyright © 2018, Juniper Networks, Inc.454
Juniper Secure Analytics Configuring DSMs Guide
CHAPTER 58
HBGary Active Defense
• HBGary Active Defense on page 455
• Configuring HBGary Active Defense on page 455
• Configuring a Log Source on page 456
HBGary Active Defense
The HBGary Active Defense DSM for JSA accepts several event types that are forwarded
fromHBGary Active Defense devices, such as access, system, system configuration, and
policy events.
Events from Active Defense are forwarded in the Log Event Extended Format (LEEF) to
JSAusing syslog.Before youcanconfigure JSA, youmust configurea route for yourHBGary
Active Defense device to forward events to a syslog destination.
Configuring HBGary Active Defense
You can configure a route for syslog events in Active Defense for JSA.
1. Log in to the Active Defense Management Console.
2. From the navigation menu, select Settings >Alerts.
3. Click Add Route.
4. In the Route Name field, type a name for the syslog route you are adding to Active
Defense.
5. From the Route Type list, select LEEF (Q1 Labs).
6. In the Settings pane, configure the following values:
• Host—Type the IP address or hostname for your JSA console or Event Collector.
• Port—Type 514 as the port number.
455Copyright © 2018, Juniper Networks, Inc.
7. In the Events pane, select any events that you want to forward to JSA.
8. ClickOK to save your configuration changes.
The Active Defense device configuration is complete. You are now ready to configure
a log source in JSA. Formore information on configuring a route in Active Defense, see
your HBGary Active Defense User Guide.
Configuring a Log Source
JSA automatically discovers and creates a log source for LEEF formatted syslog events
that are forwarded from Active Defense.
The following configuration steps are optional:
1. Log in to JSA.
2. Click the Admin tab.
3. In the navigation menu, click Data Sources.
4. Click the Log Sources icon.
5. Click Add.
6. In the Log Source Name field, type a name for the log source.
7. In the Log Source Description field, type a description for the log source.
8. From the Log Source Type list, select HBGary Active Defense.
9. From the Protocol Configuration list, select Syslog.
10. Configure the following values:
Table 133: HBGary Active Defense Syslog Protocol Parameters
DescriptionParameter
Type the IP address or host name for your HBGary Active Defense device.
The IP address or host name identifies your HBGary Active Defense device as a unique eventsource in JSA.
Log Source Identifier
Copyright © 2018, Juniper Networks, Inc.456
Juniper Secure Analytics Configuring DSMs Guide

11. Click Save.
12. On the Admin tab, click Deploy Changes.
The HBGary Active Defense configuration is complete.
457Copyright © 2018, Juniper Networks, Inc.
Chapter 58: HBGary Active Defense

Copyright © 2018, Juniper Networks, Inc.458
Juniper Secure Analytics Configuring DSMs Guide
CHAPTER 59
H3C Technologies
• H3C Technologies on page 459
• H3C Comware Platform on page 459
H3C Technologies
JSA accepts events from a range of H3C Technologies DSMs.
H3C Comware Platform
The JSA DSM for the H3C Comware Platform collects events from a number of network
devices fromH3CTechnologies. JSA supports H3C Switches, H3C Routers, H3CWireless
LAN Devices, and H3C IP Security Devices.
The following table describes the specifications for the H3C Comware Platform DSM:
Table 134: H3C Comware PlatformDSMSpecifications
ValueSpecification
H3C Technologies Co., LimitedManufacturer
H3C Comware Platform, H3C Switches, H3C Routers, H3CWireless LAN Devices, and H3C IP Security Devices.
DSM name
DSM-H3CComware-JSA_version-build_number.noarch.rpmRPM file name
V7Supported versions
SyslogProtocol
NVPEvent format
SystemRecorded event types
NoAutomatically discovered?
NoIncludes identity?
459Copyright © 2018, Juniper Networks, Inc.
Table 134: H3C Comware PlatformDSMSpecifications (continued)
ValueSpecification
NoIncludes custom properties?
H3C%20Technologies (http://www.h3c.com)More information
To integrate H3C Comware Platform, H3C Switches, H3C Routers, H3CWireless LAN
Devices, or H3C IP Security Devices with JSA, complete the following steps:
1. If automatic updates are not enabled, download and install the most recent version
of the H3C Comware Platform DSM RPM on your JSA Console.
2. Configure your H3C Comware Platform router or device to send syslog events to JSA.
3. If JSA does not automatically detect the log source, add a H3C Comware Platform
log source on the JSA Console. The following table describes the parameters that
require specific values for H3C Comware Platform event collection:
Table 135: H3C Comware Platform Log Source Parameters
ValueParameter
H3C Comware PlatformLog Source type
SyslogProtocol Configuration
The following table provides a sample syslog event message for the H3C Comware
Platform DSM:
Table 136: H3C Comware Platform Sample SyslogMessage
Sample logmessageLow level categoryEvent name
<188>Jun 14 17:11:11 2013 HP %%10AAA/5/AAA_FAILURE: -AAAType=AUTHOR-AAADomain=domain1-Service=login-UserName=cwf@system; AAA is failed.
AAA Session DeniedA user's AAA request is rejected
• Configuring H3C Comware Platform to Communicate with JSA on page 460
Configuring H3C Comware Platform to Communicate with JSA
To collect H3C Comware Platform events, enable syslog settings and configure a log
host.H3CSwitches,H3CRouters,H3CWirelessLANDevices, andH3C IPSecurityDevices
are supported by JSA.
Copyright © 2018, Juniper Networks, Inc.460
Juniper Secure Analytics Configuring DSMs Guide
1. Log in to the command line interface by using the console port, or by using Telnet or
SSH.
For more information about loginmethods, see the Logging into the CLI section in the
configuration guide for your H3C devices.
2. To access the system view, type the <system_name> system-view command.
3. To enable the syslog settings, type the following commands in the order that they are
listed.
1. info-center source default loghost deny
2. info-center source AAA loghost level informational
3. info-center source ACL loghost level informational
4. info-center source FIPS loghost level informational
5. info-center source HTTPD loghost level informational
6. info-center source IKE loghost level informational
7. info-center source IPSEC loghost level informational
8. info-center source LOGIN loghost level informational
9. info-center source LS loghost level informational
10. info-center source PKI loghost level informational
11. info-center source PORTSEC loghost level informational
12. info-center source PWDCTL loghost level informational
13. info-center source RADIUS loghost level informational
14. info-center source SHELL loghost level informational
15. info-center source SNMP loghost level informational
16. info-center source SSHS loghost level informational
17. info-center source TACACS loghost level informational
18. info-center loghost <QRadar Event Collector IP> 514
4. To exit the system view, type the quit <system_name> command.
461Copyright © 2018, Juniper Networks, Inc.
Chapter 59: H3C Technologies

Copyright © 2018, Juniper Networks, Inc.462
Juniper Secure Analytics Configuring DSMs Guide
CHAPTER 60
Honeycomb Lexicon File Integrity Monitor(FIM)
• Honeycomb Lexicon File Integrity Monitor (FIM) on page 463
• Supported Honeycomb FIM Event Types Logged by JSA on page 463
• Configuring the Lexicon Mesh Service on page 464
• Configuring a Honeycomb Lexicon FIM Log Source in JSA on page 465
Honeycomb Lexicon File Integrity Monitor (FIM)
You can use the Honeycomb Lexicon File Integrity Monitor (FIM) DSMwith JSA to collect
detailed file integrity events from your network.
JSA supports syslog events that are forwarded from Lexicon File Integrity Monitor
installations that use Lexiconmesh v3.1 and later. The syslog events that are forwarded
byLexiconFIMare formattedasLogExtendedEventFormat (LEEF)eventsby theLexicon
mesh service.
To integrate Lexicon FIM events with JSA, youmust complete the following tasks:
1. On your Honeycomb installation, configure the Lexiconmesh service to generate
syslog events in LEEF.
2. On your Honeycomb installation, configure any Lexicon FIM policies for your
Honeycomb data collectors to forward FIM events to your JSA console or Event
Collector.
3. On your JSA console, verify that a Lexicon FIM log source is created and that events
are displayed on the Log Activity tab.
4. Optional. Ensure thatno firewall rulesblockcommunicationbetweenyourHoneycomb
data collectors and the JSA console or Event Collector that is responsible for receiving
events.
Supported Honeycomb FIM Event Types Logged by JSA
The Honeycomb FIM DSM for JSA can collect events from several event categories.
463Copyright © 2018, Juniper Networks, Inc.
Each event category contains low-level events that describe the action that is taken
within theevent category. For example, file renameeventsmighthavea low-level category
of either file rename successful or file rename failed.
The following list defines the event categories that are collected by JSA for Honeycomb
file integrity events:
• Baseline events
• Open file events
• Create file events
• Rename file events
• Modify file events
• Delete file events
• Move file events
• File attribute change events
• File ownership change events
JSA can also collect Windows and other log files that are forwarded from Honeycomb
Lexicon. However, any event that is not a file integrity event might require special
processing by a Universal DSM or a log source extension in JSA.
Configuring the LexiconMesh Service
Tocollect events in a format that is compatiblewith JSA, youmust configure your Lexicon
mesh service to generate syslog events in LEEF.
1. Log in to the Honeycomb LexCollect system that is configured as the dbContact
system in your network deployment.
2. Locate the Honeycomb installation directory for the installImage directory.
For example, c:\Program Files\Honeycomb\installImage\data.
3. Open themesh.properties file.
If your deployment does not contain Honeycomb LexCollect, you can edit
mesh.propertiesmanually.
For example, c:\Program Files\mesh
4. To export syslog events in LEEF, edit the formatter field.
For example, formatter=leef.
5. Save your changes.
Copyright © 2018, Juniper Networks, Inc.464
Juniper Secure Analytics Configuring DSMs Guide
Themesh service is configured to output LEEF events. For information about the
Lexiconmesh service, see your Honeycomb documentation.
Configuring a Honeycomb Lexicon FIM Log Source in JSA
JSA automatically discovers and creates a log source for file integrity events that are
forwarded from the Honeycomb Lexicon File Integrity Monitor.
The following procedure is optional:
1. Log in to JSA.
2. Click the Admin tab.
3. In the navigation menu, click Data Sources.
4. Click the Log Sources icon.
5. Click Add.
6. In the Log Source Name field, type a name for your log source.
7. In the Log Source Description field, type a description for your log source.
8. From the Log Source Type list, select Honeycomb Lexicon File Integrity Monitor.
9. From the Protocol Configuration list, select Syslog.
10. Configure the following values:
Table 137: Syslog Protocol Parameters
DescriptionParameter
Type the IP address or host name for the log source as an identifier for events from yourHoneycomb Lexicon FIM installation.
The Log Source Identifiermust be unique value.
Log Source Identifier
Select this check box to enable the log source. By default, the check box is selected.Enabled
From the list, select the Credibility of the log source. The range is 0 - 10.
The credibility indicates the integrity of an event or offense as determined by the credibilityrating from the sourcedevices. Credibility increases ifmultiple sources report the sameevent.The default is 5.
Credibility
From the list, select the Target Event Collector to use as the target for the log source.Target Event Collector
465Copyright © 2018, Juniper Networks, Inc.
Chapter 60: Honeycomb Lexicon File Integrity Monitor (FIM)
Table 137: Syslog Protocol Parameters (continued)
DescriptionParameter
Select this check box to enable the log source to coalesce (bundle) events.
By default, automatically discovered log sources inherit the value of the Coalescing Eventslist from the System Settings in JSA. When you create a log source or edit an existingconfiguration, youcanoverride thedefault valueby configuring this option for each log source.
Coalescing Events
From the list, select the incoming payload encoder for parsing and storing the logs.Incoming Event Payload
Select this check box to enable the log source to store event payload information.
By default, automatically discovered log sources inherit the value of the Store Event Payloadlist from the System Settings in JSA. When you create a log source or edit an existingconfiguration, youcanoverride thedefault valueby configuring this option for each log source.
Store Event Payload
11. Click Save.
12. On the Admin tab, click Deploy Changes.
Honeycomb Lexicon File Integrity Monitor events that are forwarded to JSA are
displayed on the Log Activity tab.
Copyright © 2018, Juniper Networks, Inc.466
Juniper Secure Analytics Configuring DSMs Guide
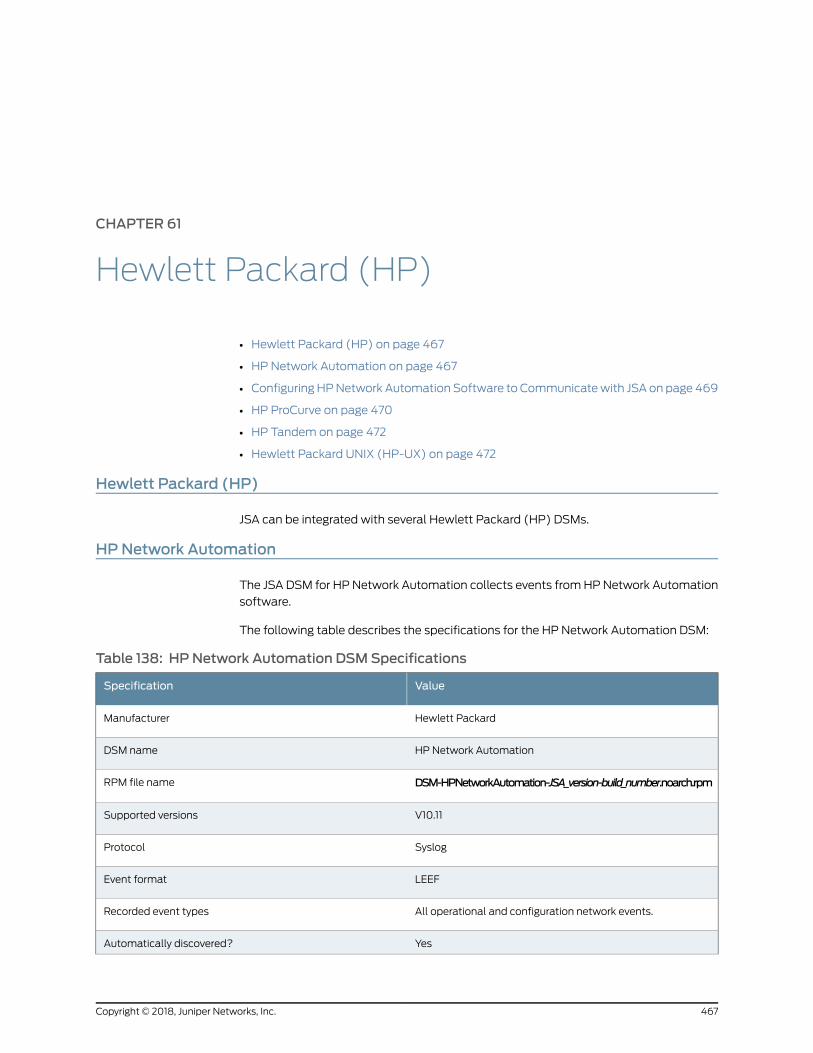
CHAPTER 61
Hewlett Packard (HP)
• Hewlett Packard (HP) on page 467
• HP Network Automation on page 467
• ConfiguringHPNetwork Automation Software to Communicatewith JSA on page 469
• HP ProCurve on page 470
• HP Tandem on page 472
• Hewlett Packard UNIX (HP-UX) on page 472
Hewlett Packard (HP)
JSA can be integrated with several Hewlett Packard (HP) DSMs.
HPNetwork Automation
The JSA DSM for HP Network Automation collects events fromHPNetwork Automation
software.
The following table describes the specifications for the HP Network Automation DSM:
Table 138: HP Network Automation DSMSpecifications
ValueSpecification
Hewlett PackardManufacturer
HP Network AutomationDSM name
DSM-HPNetworkAutomation-JSA_version-build_number.noarch.rpmRPM file name
V10.11Supported versions
SyslogProtocol
LEEFEvent format
All operational and configuration network events.Recorded event types
YesAutomatically discovered?
467Copyright © 2018, Juniper Networks, Inc.
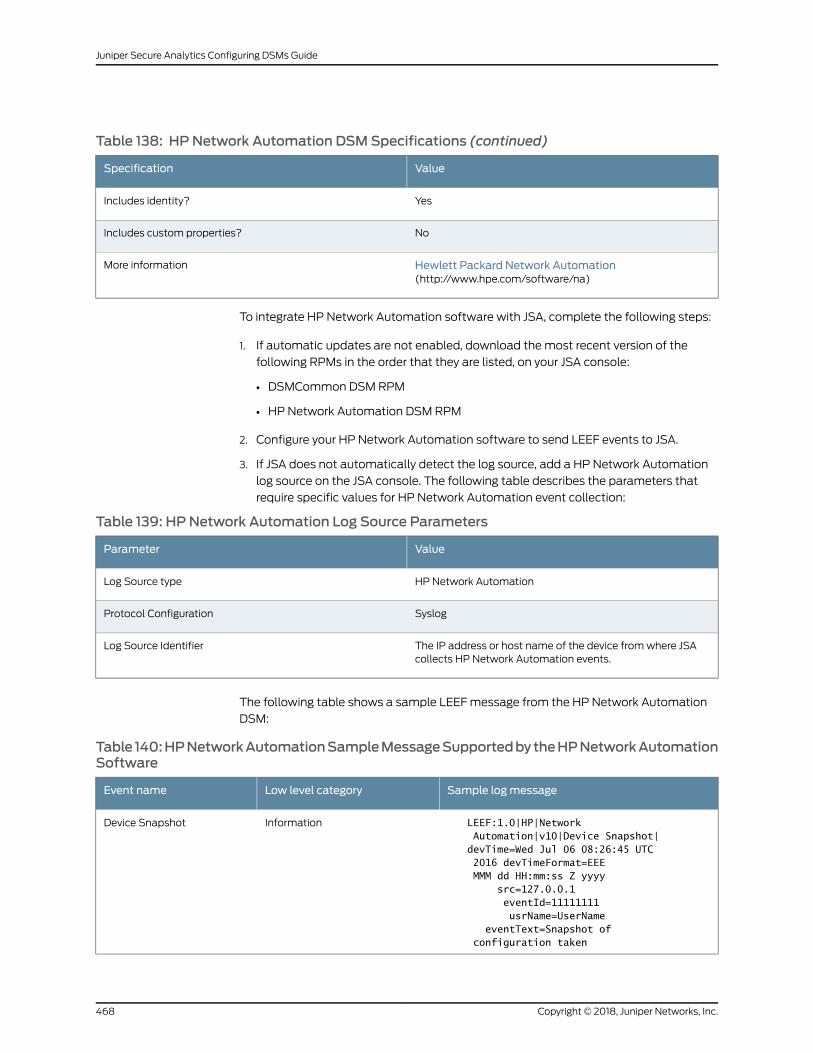
Table 138: HP Network Automation DSMSpecifications (continued)
ValueSpecification
YesIncludes identity?
NoIncludes custom properties?
Hewlett Packard Network Automation(http://www.hpe.com/software/na)
More information
To integrate HP Network Automation software with JSA, complete the following steps:
1. If automatic updates are not enabled, download themost recent version of the
following RPMs in the order that they are listed, on your JSA console:
• DSMCommon DSM RPM
• HP Network Automation DSM RPM
2. Configure your HP Network Automation software to send LEEF events to JSA.
3. If JSA does not automatically detect the log source, add a HP Network Automation
log source on the JSA console. The following table describes the parameters that
require specific values for HP Network Automation event collection:
Table 139: HP Network Automation Log Source Parameters
ValueParameter
HP Network AutomationLog Source type
SyslogProtocol Configuration
The IP address or host name of the device fromwhere JSAcollects HP Network Automation events.
Log Source Identifier
The following table shows a sample LEEFmessage from the HP Network Automation
DSM:
Table 140:HPNetworkAutomationSampleMessageSupportedbytheHPNetworkAutomationSoftware
Sample logmessageLow level categoryEvent name
LEEF:1.0|HP|Network Automation|v10|Device Snapshot|devTime=Wed Jul 06 08:26:45 UTC 2016 devTimeFormat=EEE MMM dd HH:mm:ss Z yyyy src=127.0.0.1 eventId=11111111 usrName=UserName eventText=Snapshot of configuration taken
InformationDevice Snapshot
Copyright © 2018, Juniper Networks, Inc.468
Juniper Secure Analytics Configuring DSMs Guide
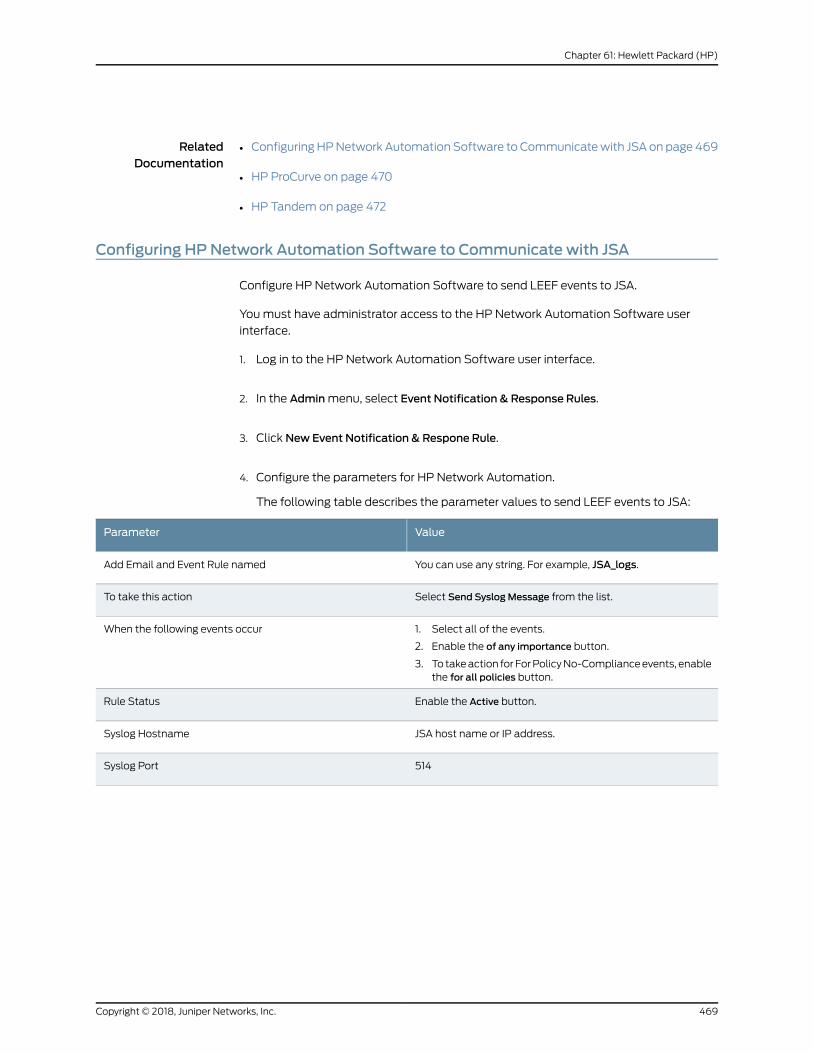
RelatedDocumentation
ConfiguringHPNetwork Automation Software to Communicatewith JSA on page 469•
• HP ProCurve on page 470
• HP Tandem on page 472
Configuring HPNetwork Automation Software to Communicate with JSA
Configure HP Network Automation Software to send LEEF events to JSA.
Youmust have administrator access to the HP Network Automation Software user
interface.
1. Log in to the HP Network Automation Software user interface.
2. In the Adminmenu, select Event Notification & Response Rules.
3. Click New Event Notification & Respone Rule.
4. Configure the parameters for HP Network Automation.
The following table describes the parameter values to send LEEF events to JSA:
ValueParameter
You can use any string. For example, JSA_logs.Add Email and Event Rule named
Select Send SyslogMessage from the list.To take this action
1. Select all of the events.
2. Enable the of any importance button.
3. To takeaction forForPolicyNo-Complianceevents, enablethe for all policies button.
When the following events occur
Enable the Active button.Rule Status
JSA host name or IP address.Syslog Hostname
514Syslog Port
469Copyright © 2018, Juniper Networks, Inc.
Chapter 61: Hewlett Packard (HP)
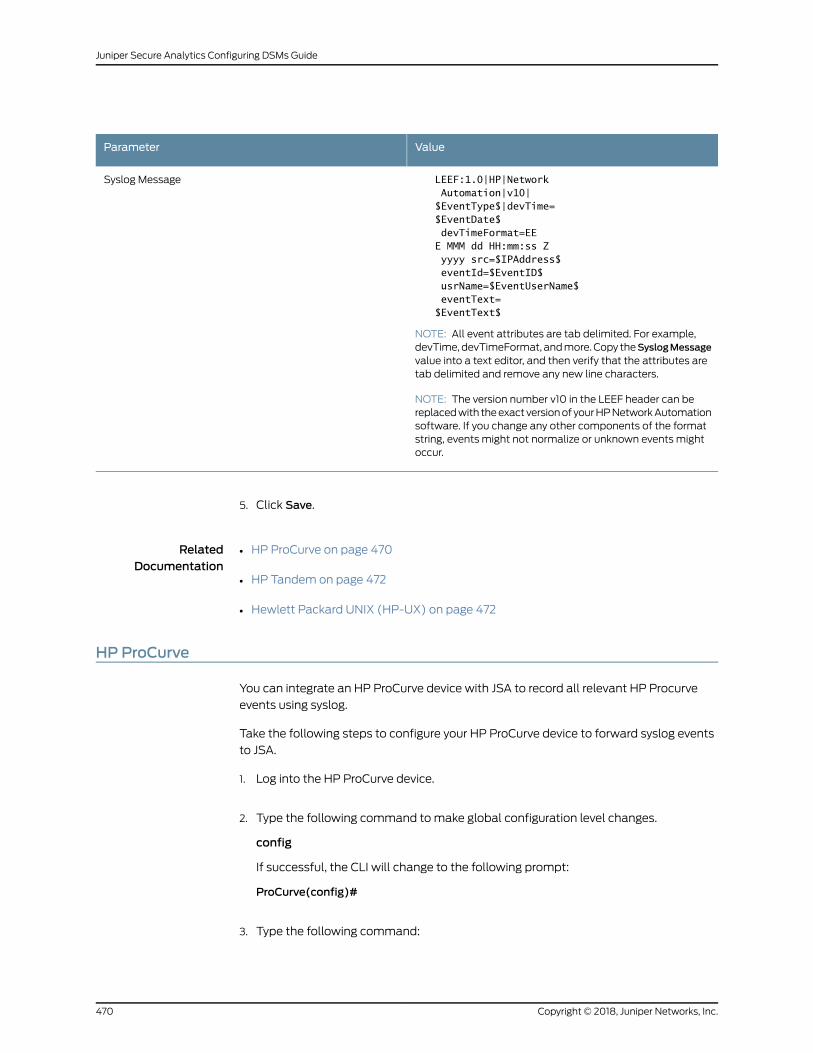
ValueParameter
LEEF:1.0|HP|Network Automation|v10|$EventType$|devTime=$EventDate$ devTimeFormat=EEE MMM dd HH:mm:ss Z yyyy src=$IPAddress$ eventId=$EventID$ usrName=$EventUserName$ eventText=$EventText$
NOTE: All event attributes are tab delimited. For example,devTime,devTimeFormat, andmore.Copy theSyslogMessagevalue into a text editor, and then verify that the attributes aretab delimited and remove any new line characters.
NOTE: The version number v10 in the LEEF header can bereplacedwith theexactversionof yourHPNetworkAutomationsoftware. If you change any other components of the formatstring, events might not normalize or unknown events mightoccur.
Syslog Message
5. Click Save.
RelatedDocumentation
HP ProCurve on page 470•
• HP Tandem on page 472
• Hewlett Packard UNIX (HP-UX) on page 472
HP ProCurve
You can integrate an HP ProCurve device with JSA to record all relevant HP Procurve
events using syslog.
Take the following steps to configure your HP ProCurve device to forward syslog events
to JSA.
1. Log into the HP ProCurve device.
2. Type the following command tomake global configuration level changes.
config
If successful, the CLI will change to the following prompt:
ProCurve(config)#
3. Type the following command:
Copyright © 2018, Juniper Networks, Inc.470
Juniper Secure Analytics Configuring DSMs Guide
logging <syslog-ip-addr>
Where: <syslog-ip-addr> is the IP address of JSA.
4. To exit config mode, press CTRL+Z.
5. Type the following command:writemem to save the current configuration to the
startup configuration for your HP ProCurve device.
You are now ready to configure the log source in JSA.
• Configuring a Log Source on page 471
Configuring a Log Source
JSA automatically discovers and creates a log source for LEEF formatted syslog events
that are forwarded from Active Defense.
These configuration steps are optional:
1. Log in to JSA.
2. Click the Admin tab.
3. In the navigation menu, click Data Sources.
4. Click the Log Sources icon.
5. Click Add.
6. In the Log Source Name field, type a name for the log source.
7. In the Log Source Description field, type a description for the log source.
8. From the Log Source Type list, select HP ProCurve.
9. From the Protocol Configuration list, select Syslog.
10. Configure the following values:
Table 141: HP ProCurve Syslog Protocol Parameters
DescriptionParameter
Type the IP address or host name for your HP ProCurve device.Log Source Identifier
471Copyright © 2018, Juniper Networks, Inc.
Chapter 61: Hewlett Packard (HP)
11. Click Save.
12. On the Admin tab, click Deploy Changes.
The configuration is complete.
HP Tandem
You can integrate an HP Tandem device with JSA. An HP Tandem device accepts
SafeGuard Audit file events by using a log file protocol source.
A log file protocol source allows JSA to retrieve archived log files from a remote host.
The HP Tandem DSM supports the bulk loading of log files by using the log file protocol
source.
When you configure your HP Tandem device to use the log file protocol, ensure that the
host name or IP address that is configured in the HP Tandem device and in the Remote
Host parameter are the same.
The SafeGuard Audit file names use the following format:
Annnnnnn
The single alphabet character A is followed by a seven-digit decimal integer nnnnnnn,
which increments by 1 each time a name is generated in the same audit pool.
You are now ready to configure the log source and protocol in JSA.
1. From the Log Source Type list, select HP Tandem.
2. To configure the log file protocol, from the Protocol Configuration list, select Log File.
3. From the Event Generator list, select HPTANDEM
NOTE: Your systemmust be running the current version of the log fileprotocol to integrate with an HP Tandem device:
For more information about HP Tandem, see your vendor documentation.
Hewlett Packard UNIX (HP-UX)
You can integrate an HP-UX device with JSA. An HP-UX DSM accepts events by using
syslog.
You can configure syslog on your HP-UX device to forward events to JSA.
Copyright © 2018, Juniper Networks, Inc.472
Juniper Secure Analytics Configuring DSMs Guide
1. Log in to the HP-UX device command-line interface.
2. Open the following file:
/etc/syslog.conf
3. Add the following line:
<facility>.<level><destination>
Where:
• <facility> is auth.
• <level> is info.
• <destination> is the IP address of the JSA.
4. Save and exit the file.
5. Type the following command to ensure that syslogd enforces the changes to the
syslog.conf file.
kill -HUP `cat /var/run/syslog.pid`
NOTE: Back quotationmarks are used in the command line.
You are now ready to configure the log source in JSA.
• Configure a Log Source on page 473
Configure a Log Source
JSA automatically discovers and creates a log source for syslog events forwarded from
HP-UX.
The following configuration steps are optional:
1. Log in to JSA.
2. Click the Admin tab.
3. In the navigation menu, click Data Sources.
4. Click the Log Sources icon.
5. Click Add.
6. In the Log Source Name field, type a name for the log source.
473Copyright © 2018, Juniper Networks, Inc.
Chapter 61: Hewlett Packard (HP)
7. In the Log Source Description field, type a description for the log source.
8. From the Log Source Type list, select Hewlett Packard UniX.
9. From the Protocol Configuration list, select Syslog.
10. Configure the following values:
Table 142: HP-UX Syslog Parameters
DescriptionParameter
Type the IP address or host name for your Hewlett Packard UniX device.Log Source Identifier
11. Click Save.
12. On the Admin tab, click Deploy Changes.
The configuration is complete.
Copyright © 2018, Juniper Networks, Inc.474
Juniper Secure Analytics Configuring DSMs Guide
CHAPTER 62
Huawei
• Huawei on page 475
• Huawei AR Series Router on page 475
• Huawei S Series Switch on page 477
Huawei
JSA can integrate with several Huawei DSMs.
Huawei AR Series Router
The Huawei AR Series Router DSM for JSA can accept events from Huawei AR Series
Routers by using syslog.
JSA records all relevant IPv4 events that are forwarded from Huawei AR Series Router.
To integrate your device with JSA, youmust create a log source, then configure your AR
Series Router to forward syslog events.
• Supported Routers on page 475
• Configuring a Log Source on page 475
• Configuring Your Huawei AR Series Router on page 476
Supported Routers
The DSM supports events from the following Huawei AR Series Routers:
• AR150
• AR200
• AR1200
• AR2200
• AR3200
Configuring a Log Source
JSA does not automatically discover incoming syslog events from Huawei AR Series
Routers.
475Copyright © 2018, Juniper Networks, Inc.
If your events are not automatically discovered, youmust manually create a log source
from the Admin tab in JSA.
1. Log in to JSA.
2. Click the Admin tab.
3. On the navigation menu, click Data Sources.
4. Click the Log Sources icon.
5. Click Add.
6. In the Log Source Name field, type a name for your log source.
7. In the Log Source Description field, type a description for the log source.
8. From the Log Source Type list, select Huawei AR Series Router.
9. From the Protocol Configuration list, select Syslog.
10. Configure the following values:
DescriptionParameter
Type the IP address, host name, or name for the log source as an identifier for your HuaweiAR Series Router.
Each log source that you create for your Huawei AR Series Router must include a uniqueidentifier, such as an IP address or host name.
Log Source Identifier
11. Click Save.
12. On the Admin tab, click Deploy Changes.
The log source is added to JSA. You are now ready to configure your Huawei AR Series
Router to forward events to JSA.
Configuring Your Huawei AR Series Router
To forward syslog events to JSA, youmust configure your Huawei AR Series Router as
an information center, then configure a log host.
The log host that you create for your Huawei AR Series Router can forward events to
your JSA console or an Event Collector.
Copyright © 2018, Juniper Networks, Inc.476
Juniper Secure Analytics Configuring DSMs Guide
1. Log in to your Huawei AR Series Router command-line Interface (CLI).
2. Type the following command to access the system view:
system-view
3. Type the following command to enable the information center:
info-center enable
4. Type the following command to send informational level logmessages to the default
channel:
info-center source default channel loghost log level informational debug state off trap
state off
5. To verify your Huawei AR Series Router source configuration, type the command:
display channel loghost
6. Type the following command to configure the IP address for JSA as the log host for
your switch:
info-center loghost <IP address> facility <local>
Where:
• <IP address> is the IP address of the JSA console or Event Collector.
• <local> is the syslog facility, for example, local0.
For example,
info-center loghost 10.10.10.1 facility local0
7. Type the following command to exit the configuration:
quit
The configuration is complete. You can verify events that are forwarded to JSA by
viewing events on the Log Activity tab.
Huawei S Series Switch
TheHuawei SSeries SwitchDSM for JSA can accept events fromHuawei SSeries Switch
appliances by using syslog.
477Copyright © 2018, Juniper Networks, Inc.
Chapter 62: Huawei

JSA records all relevant IPv4 events that are forwarded from Huawei S Series Switches.
To integrate your device with JSA, youmust configure a log source, then configure your
S Series Switch to forward syslog events.
• Supported Switches on page 478
• Configuring a Log Source on page 478
• Configuring Your Huawei S Series Switch on page 479
Supported Switches
The DSM supports events from the following Huawei S Series Switches:
• S5700
• S7700
• S9700
Configuring a Log Source
JSA does not automatically discover incoming syslog events from Huawei S Series
Switches.
If your events are not automatically discovered, youmust manually create a log source
from the Admin tab in JSA.
1. Log in to JSA.
2. Click the Admin tab.
3. On the navigation menu, click Data Sources.
4. Click the Log Sources icon.
5. Click Add.
6. In the Log Source Name field, type a name for your log source.
7. In the Log Source Description field, type a description for the log source.
8. From the Log Source Type list, select Huawei S Series Switch.
9. From the Protocol Configuration list, select Syslog.
10. Configure the following values:
Copyright © 2018, Juniper Networks, Inc.478
Juniper Secure Analytics Configuring DSMs Guide
Table 143: Syslog Protocol Parameters
DescriptionParameter
Type the IP address, host name, or name for the log source as an identifier for your HuaweiS Series switch.
Each log source that you create for your Huawei S Series switch must include a uniqueidentifier, such as an IP address or host name.
Log Source Identifier
11. Click Save.
12. On the Admin tab, click Deploy Changes.
The log source is added to JSA. You are now ready to configure your Huawei S Series
Switch to forward events to JSA.
Configuring Your Huawei S Series Switch
To forward syslog events to JSA, youmust configure your Huawei S Series Switch as an
information center, then configure a log host.
The log host you create for your Huawei S Series Switch can forward events to your JSA
console or an Event Collector.
1. Log in to your Huawei S Series Switch command-line Interface (CLI).
2. Type the following command to access the system view:
system-view
3. Type the following command to enable the information center:
info-center enable
4. Type the following command to send informational level logmessages to the default
channel:
info-center source default channel loghost log level informational debug state off trap
state off
5. To verify your Huawei S Series Switch source configuration, type the command:
display channel loghost
6. Type the following command to configure the IP address for JSA as the log host for
your switch:
info-center loghost <IP address> facility <local>
Where:
479Copyright © 2018, Juniper Networks, Inc.
Chapter 62: Huawei
• <IP address> is the IP address of the JSA console or Event Collector.
• <local> is the syslog facility, for example, local0.
For example,
info-center loghost 10.10.10.1 facility local0
7. Type the following command to exit the configuration:
quit
The configuration is complete. You can verify events that are forwarded to JSA by
viewing events on the Log Activity tab.
Copyright © 2018, Juniper Networks, Inc.480
Juniper Secure Analytics Configuring DSMs Guide
CHAPTER 63
HyTrust CloudControl
• HyTrust CloudControl on page 481
• Configuring HyTrust CloudControl to Communicate with JSA on page 482
HyTrust CloudControl
The JSA DSM for HyTrust CloudControl collects events from HyTrust CloudControl
devices.
The following table lists the specifications for the HyTrust CloudControl DSM:
Table 144: HyTrust CloudControl DSMSpecifications
ValueSpecification
HytrustManufacturer
HyTrust CloudControlDSM name
DSM-HyTrustCloudControl-JSA_version-build_number.noarch.rpmRPM file name
V3.0.2 through V3.6.0Supported versions
SyslogProtocol
All eventsRecorded event types
YesAutomatically discovered?
YesIncludes identity?
NoIncludes custom properties?
Hytrust web site (http://www.hytrust.com)More information
To collect HyTrust CloudControl events, complete the following steps:
1. If automatic updates are not enabled, download and install the most recent version
of the following RPMs on your JSA console:
481Copyright © 2018, Juniper Networks, Inc.
• DSMCommon RPM
• HyTrust CloudControl DSM RPM
2. Configure your HyTrust CloudControl device to send syslog events to JSA.
3. If JSA does not automatically detect the log source, add a HyTrust CloudControl log
source on the JSA Console. The following table describes the parameters that require
specific values that are required for HyTrust CloudControl event collection:
Table 145: HyTrust CloudControl Log Source Parameters
ValueParameter
HyTrust CloudControlLog Source type
SyslogProtocol Configuration
Configuring HyTrust CloudControl to Communicate with JSA
To collect HyTrust CloudControl events, youmust configure your third-party device to
send events to JSA
1. Log in to HyTrust CloudControl.
2. From the HTAManagement Console, select Configuration >Logging.
3. From the HTA Logging Aggregation options, select External.
4. From the LoggingAggregation Template Type options, select eitherProprietary orCEF.
5. In the HTA Syslog Servers field, type the IP address for JSA.
Copyright © 2018, Juniper Networks, Inc.482
Juniper Secure Analytics Configuring DSMs Guide
CHAPTER 64
IBM
• IBM on page 484
• IBM AIX DSMs on page 484
• IBM AS/400 ISeries DSM on page 491
• IBM Bluemix Platform on page 496
• IBM CICS on page 499
• IBM DB2 on page 504
• IBM DataPower on page 514
• IBM Federated Directory Server on page 516
• IBM Guardium on page 519
• IBM IMS on page 525
• IBM Informix Audit on page 531
• IBM Lotus Domino on page 531
• IBM Privileged Session Recorder on page 535
• IBM Proventia on page 538
• IBM RACF on page 543
• IBM Security Directory Server on page 555
• IBM Security Identity Governance on page 556
• IBM Security Network Protection (XGS) on page 559
• IBM Security Trusteer Apex Advanced Malware Protection on page 562
• IBM Security Trusteer Apex Local Event Aggregator on page 567
• IBM Sense on page 568
• IBM Tivoli Access Manager for E-business on page 570
• IBM Tivoli Endpoint Manager on page 572
• IBMWebSphere Application Server on page 574
• IBMWebSphere DataPower on page 579
• IBM Z/OS on page 579
• IBM Z/Secure® Audit on page 583
• IBM ZSecure Alert on page 584
483Copyright © 2018, Juniper Networks, Inc.
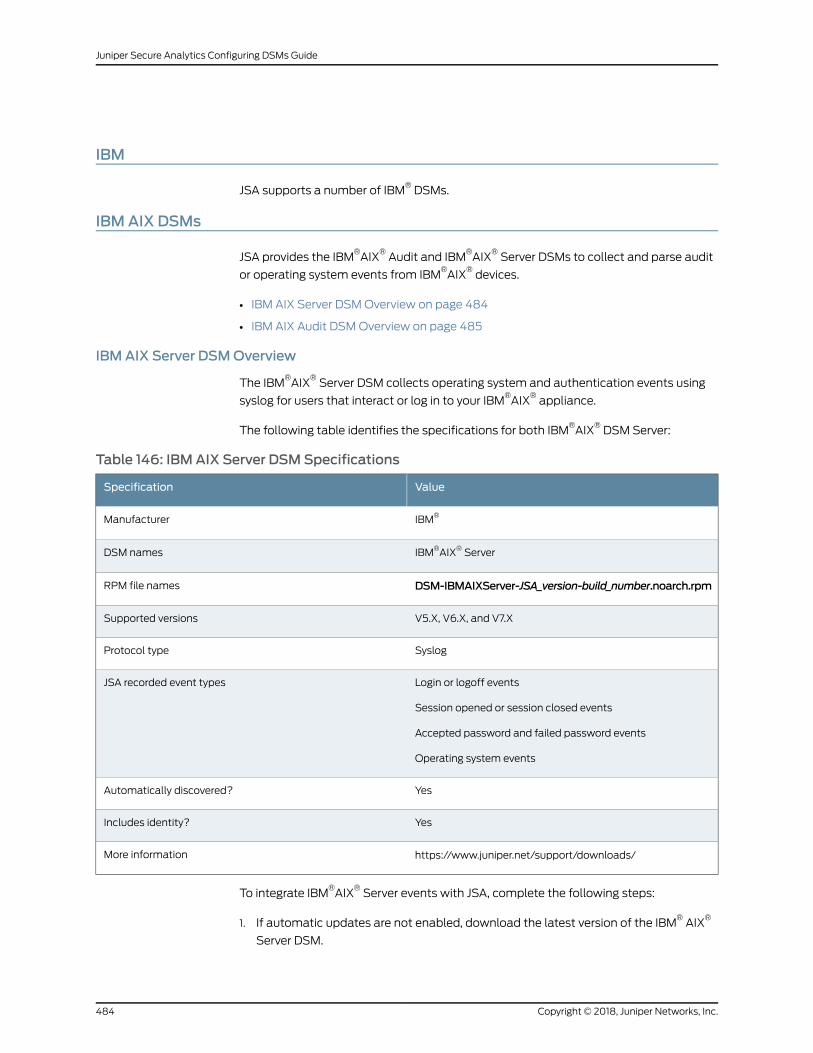
IBM
JSA supports a number of IBM®DSMs.
IBM AIX DSMs
JSA provides the IBM®AIX
®Audit and IBM
®AIX
®Server DSMs to collect and parse audit
or operating system events from IBM®AIX
®devices.
• IBM AIX Server DSMOverview on page 484
• IBM AIX Audit DSMOverview on page 485
IBM AIX Server DSMOverview
The IBM®AIX
®Server DSM collects operating system and authentication events using
syslog for users that interact or log in to your IBM®AIX
®appliance.
The following table identifies the specifications for both IBM®AIX
®DSM Server:
Table 146: IBMAIX Server DSMSpecifications
ValueSpecification
IBM®Manufacturer
IBM®AIX® ServerDSM names
DSM-IBMAIXServer-JSA_version-build_number.noarch.rpmRPM file names
V5.X, V6.X, and V7.XSupported versions
SyslogProtocol type
Login or logoff events
Session opened or session closed events
Accepted password and failed password events
Operating system events
JSA recorded event types
YesAutomatically discovered?
YesIncludes identity?
https://www.juniper.net/support/downloads/More information
To integrate IBM®AIX
®Server events with JSA, complete the following steps:
1. If automatic updates are not enabled, download the latest version of the IBM®AIX
®
Server DSM.
Copyright © 2018, Juniper Networks, Inc.484
Juniper Secure Analytics Configuring DSMs Guide
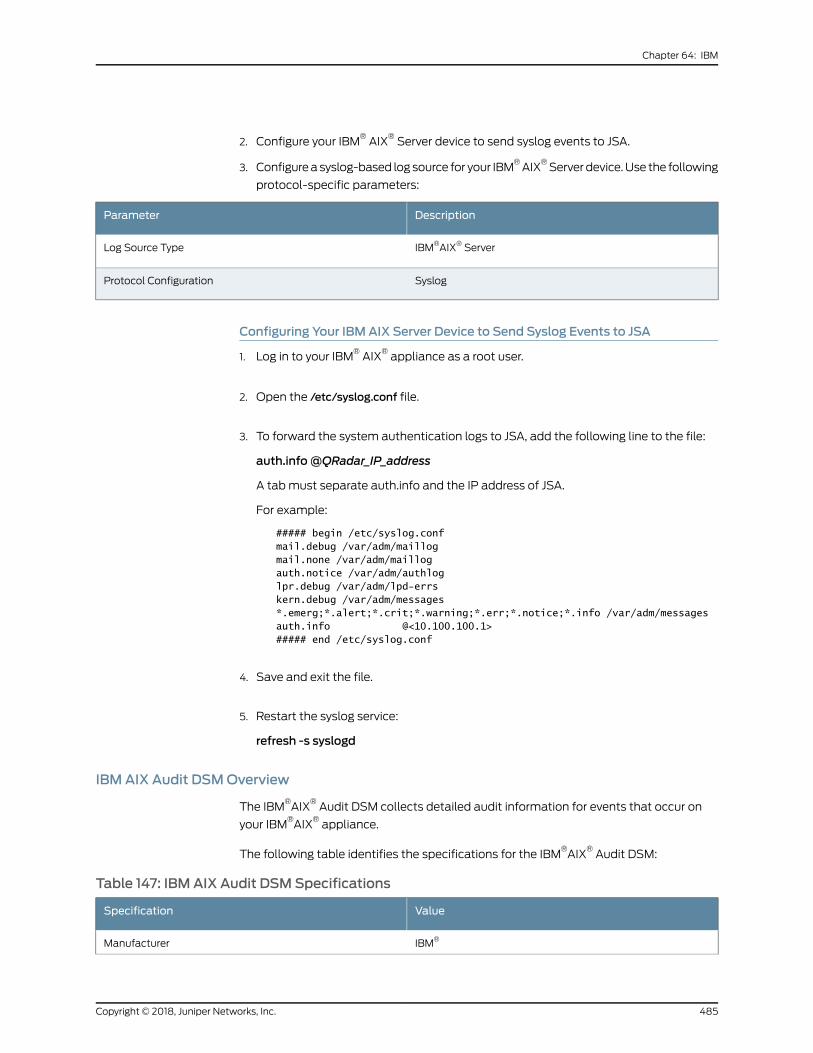
2. Configure your IBM®AIX
®Server device to send syslog events to JSA.
3. Configureasyslog-based logsource for your IBM®AIX
®Serverdevice.Use the following
protocol-specific parameters:
DescriptionParameter
IBM®AIX® ServerLog Source Type
SyslogProtocol Configuration
Configuring Your IBMAIX Server Device to Send Syslog Events to JSA
1. Log in to your IBM®AIX
®appliance as a root user.
2. Open the /etc/syslog.conf file.
3. To forward the system authentication logs to JSA, add the following line to the file:
auth.info@QRadar_IP_address
A tabmust separate auth.info and the IP address of JSA.
For example:
##### begin /etc/syslog.conf mail.debug /var/adm/maillogmail.none /var/adm/maillogauth.notice /var/adm/authloglpr.debug /var/adm/lpd-errskern.debug /var/adm/messages*.emerg;*.alert;*.crit;*.warning;*.err;*.notice;*.info /var/adm/messagesauth.info @<10.100.100.1>##### end /etc/syslog.conf
4. Save and exit the file.
5. Restart the syslog service:
refresh -s syslogd
IBM AIX Audit DSMOverview
The IBM®AIX
®Audit DSM collects detailed audit information for events that occur on
your IBM®AIX
®appliance.
The following table identifies the specifications for the IBM®AIX
®Audit DSM:
Table 147: IBMAIX Audit DSMSpecifications
ValueSpecification
IBM®Manufacturer
485Copyright © 2018, Juniper Networks, Inc.
Chapter 64: IBM
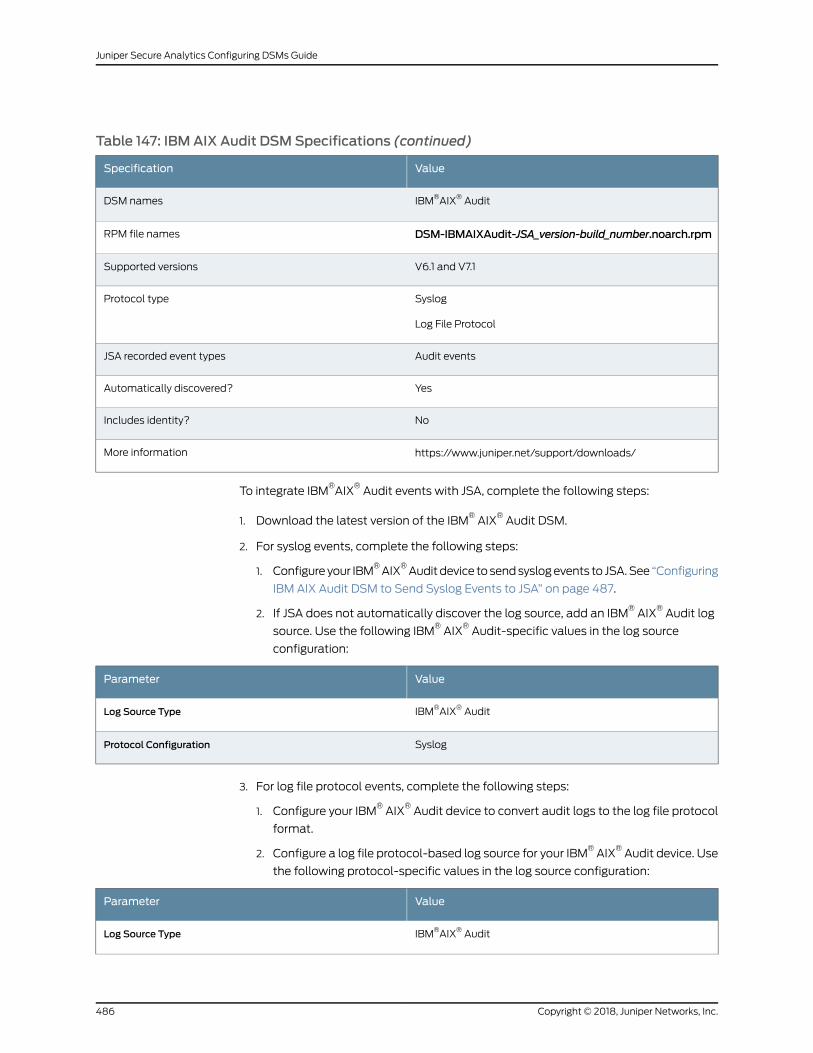
Table 147: IBMAIX Audit DSMSpecifications (continued)
ValueSpecification
IBM®AIX® AuditDSM names
DSM-IBMAIXAudit-JSA_version-build_number.noarch.rpmRPM file names
V6.1 and V7.1Supported versions
Syslog
Log File Protocol
Protocol type
Audit eventsJSA recorded event types
YesAutomatically discovered?
NoIncludes identity?
https://www.juniper.net/support/downloads/More information
To integrate IBM®AIX
®Audit events with JSA, complete the following steps:
1. Download the latest version of the IBM®AIX
®Audit DSM.
2. For syslog events, complete the following steps:
1. Configure your IBM®AIX
®Auditdevice tosendsyslogevents to JSA.See “Configuring
IBM AIX Audit DSM to Send Syslog Events to JSA” on page 487.
2. If JSA does not automatically discover the log source, add an IBM®AIX
®Audit log
source. Use the following IBM®AIX
®Audit-specific values in the log source
configuration:
ValueParameter
IBM®AIX® AuditLog Source Type
SyslogProtocol Configuration
3. For log file protocol events, complete the following steps:
1. Configure your IBM®AIX
®Audit device to convert audit logs to the log file protocol
format.
2. Configure a log file protocol-based log source for your IBM®AIX
®Audit device. Use
the following protocol-specific values in the log source configuration:
ValueParameter
IBM®AIX® AuditLog Source Type
Copyright © 2018, Juniper Networks, Inc.486
Juniper Secure Analytics Configuring DSMs Guide
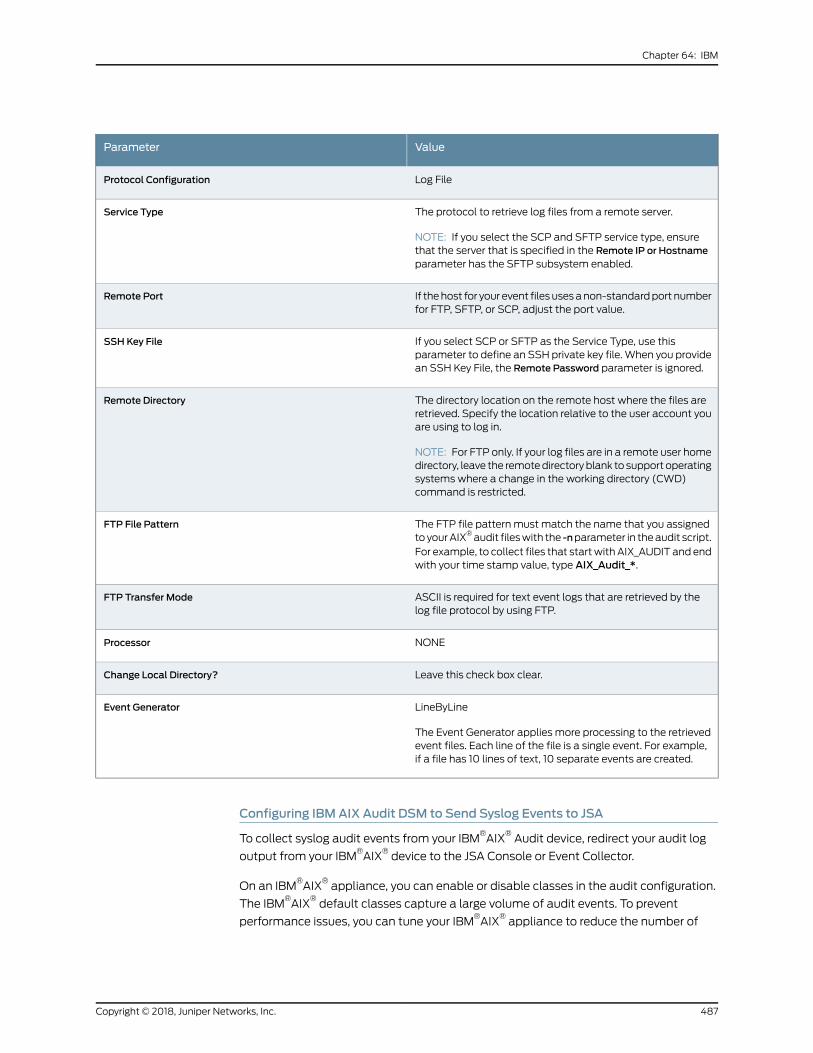
ValueParameter
Log FileProtocol Configuration
The protocol to retrieve log files from a remote server.
NOTE: If you select the SCP and SFTP service type, ensurethat the server that is specified in the Remote IP or Hostnameparameter has the SFTP subsystem enabled.
Service Type
If thehost for your event files usesanon-standardport numberfor FTP, SFTP, or SCP, adjust the port value.
Remote Port
If you select SCP or SFTP as the Service Type, use thisparameter to define an SSH private key file.When you providean SSH Key File, the Remote Password parameter is ignored.
SSH Key File
The directory location on the remote host where the files areretrieved. Specify the location relative to the user account youare using to log in.
NOTE: For FTP only. If your log files are in a remote user homedirectory, leave the remotedirectoryblank to support operatingsystems where a change in the working directory (CWD)command is restricted.
Remote Directory
The FTP file pattern must match the name that you assignedto yourAIX®audit fileswith the -nparameter in theaudit script.For example, to collect files that startwithAIX_AUDIT and endwith your time stamp value, type AIX_Audit_*.
FTP File Pattern
ASCII is required for text event logs that are retrieved by thelog file protocol by using FTP.
FTP Transfer Mode
NONEProcessor
Leave this check box clear.Change Local Directory?
LineByLine
The Event Generator applies more processing to the retrievedevent files. Each line of the file is a single event. For example,if a file has 10 lines of text, 10 separate events are created.
Event Generator
Configuring IBMAIX Audit DSM to Send Syslog Events to JSA
To collect syslog audit events from your IBM®AIX
®Audit device, redirect your audit log
output from your IBM®AIX
®device to the JSA Console or Event Collector.
On an IBM®AIX
®appliance, you can enable or disable classes in the audit configuration.
The IBM®AIX
®default classes capture a large volume of audit events. To prevent
performance issues, you can tune your IBM®AIX
®appliance to reduce the number of
487Copyright © 2018, Juniper Networks, Inc.
Chapter 64: IBM
classes that are collected. For more information about audit classes, see your IBM®AIX
®
appliance documentation.
1. Log in to your IBM®AIX
®appliance.
2. Open the audit configuration file:
/etc/security/audit/config
3. Edit the Start section to disable the binmode element and enable the streammode
element:
binmode = off
streammode = on
4. Edit the Classes section to specify which classes to audit.
5. Save the configuration changes.
6. Open the streamcmds file:
/etc/security/audit/streamcmds
7. Add the following line to the file:
/usr/sbin/auditstream | /usr/sbin/auditselect -m -e "command != logger &&command != auditstream&& command != auditpr && command !=auditselect"|auditpr -t0 -h eclrRdi -v |sed -e :a -e '$!N;s/\n / /;ta' -e 'P;D'|/usr/bin/logger -p local0.debug -r &
8. Save the configuration changes.
9. Edit the syslog configuration file to specify a debug entry and the IP address of the
JSA Console or Event Collector:
*.debug@ip_address
TIP: A tabmust separate *.debug from the IP address.
10. Save the configuration changes.
11. Reload your syslog configuration:
refresh -s syslogd
12. Start the audit script on your IBM®AIX
®appliance:
Copyright © 2018, Juniper Networks, Inc.488
Juniper Secure Analytics Configuring DSMs Guide
audit start
The IBM®AIX
®Audit DSMautomatically discovers syslog audit events that are forwarded
from IBM®AIX
®to JSA and creates a log source. If the events are not automatically
discovered, you canmanually configure a log source.
Configuring IBMAIX Audit DSM to Send Log File Protocol Events to JSA
Configure the audit.pl script to run each time that you want to convert your IBM®AIX
®
audit logs to a readable event log format for JSA.
To use the audit script, you are required to install a version of Perl 5.8 or above on your
IBM®AIX
®appliance
This procedure requires you to configure two files:
Audit configuration file—The audit configuration file identifies the event classes thatare audited and the location of the event log file on your IBM
®AIX
®appliance. The
IBM®AIX
®default classescapturemanyaudit events. Topreventperformance issues,
you can configure the classes in the audit configuration file. For more information
about configuring audit classes, see your IBM®AIX
®documentation.
Audit script—Theaudit script uses theaudit configuration file to identifywhichaudit logsto read and converts the binary logs to single-line events that JSA can read. The log
file protocol can then retrieve theevent log fromyour IBM®AIX
®applianceand import
the events to JSA. The audit script uses the audit.pr file to convert the binary audit
records to event log files JSA can read.
Run theaudit script each time that youwant to convert your audit records to readable
events. You can use a cron job to automate this process. for example, you can add
0 * * * * /audit.pl to allow the audit script to run hourly. For more information, see
your system documentation.
1. Log in to your IBM®AIX
®appliance.
2. Configure the audit configuration file:
a. Open the audit configuration file:
etc/security/audit/config
b. Edit the Start section to enable the binmode element.
binmode = on
c. In the Start section, edit the configuration to determine which directories contain
the binary audit logs.
The default configuration for IBM®AIX
®auditingwrites binary logs to the following
directories:
trail = /audit/trailbin1 = /audit/bin1bin2 = /audit/bin2
489Copyright © 2018, Juniper Networks, Inc.
Chapter 64: IBM
binsize = 10240cmds = /etc/security/audit/bincmds
Inmost cases, you do not have to edit the binary file in the bin1 and bin2 directories.
d. In theClasses section, edit theconfiguration todeterminewhichclassesareaudited.
For information on configuring classes, see your IBM®AIX
®documentation.
e. Save the configuration changes.
3. Start auditing on your IBM®AIX
®system:
audit start
4. Install the audit script:
a. Download the audit.pl.gz file.
b. Copy the audit script to a folder on your IBM®AIX
®appliance.
c. Extract the file:
tar -zxvf audit.pl.gz
d. Start the audit script:
./audit.pl
You can add the following parameters to modify the command:
DescriptionParameter
Defines the results directorywhere theaudit scriptwrites eventlog files for JSA.
If you do not specify a results directory, the script writes theevents to the following /audit/results/ directory. The resultsdirectory is used in the Remote Directory parameter in the logsource configuration uses this value. To prevent errors, verifythat the results directory exists on your IBM®AIX® system.
-r
Defines a unique name for the event log file that is generatedbyaudit script. TheFTPFilePatternparameter in the log sourceconfiguration uses this name to identify the event logs that thelog source must retrieve in JSA.
-n
Defines the name of the last record file.-l
Defines the maximum number of audit files to retain on yourIBM®AIX® system. By default, the script retains 30 audit files.When the number of audit files exceeds the value of the -mparameter, the script deletes the audit filewith the oldest timestamp.
-m
Defines the directory that contains the audit trail file. Thedefault directory is /audit/trail.
-t
Copyright © 2018, Juniper Networks, Inc.490
Juniper Secure Analytics Configuring DSMs Guide
The IBM®AIX
®Audit DSM automatically discovers log file protocol audit events that are
forwarded from IBM®AIX
®to JSA and creates a log source. If the events are not
automatically discovered, you canmanually configure a log source.
RelatedDocumentation
IBM AS/400 ISeries DSM on page 491•
• IBM Bluemix Platform on page 496
• IBM CICS on page 499
IBM AS/400 ISeries DSM
The JSA DSM for IBM®AS/400
®iSeries
®collects audit records and event information
from IBM®AS/400
®iSeries
®devices.
The following table identifies the specifications for the IBM®AS/400
®iSeries
®DSM:
Table 148: IBMAS/400 ISeries DSMSpecifications
ValueSpecification
IBM®Manufacturer
IBM®AS/400®iSeries®DSM name
V5R4 and laterSupported versions
DSM-IBMiSeries-JSA_version-build_number.noarch.rpmRPM file name
Log File Protocol
Syslog
Protocol
Audit records and eventsRecorded event types
NoAutomatically discovered?
YesIncludes identity?
NoIncludes custom properties?
IBMwebsite (http://www.ibm.com/)More information
To collect events from IBM®AS/400
®iSeries
®devices, complete the following steps:
1. If automatic updates are not enabled, download and install the most recent version
of the IBM®AS/400
®iSeries
®DSM RPM on your JSA console.
2. Configure your IBM®AS/400
®iSeries
®device to communicate with JSA.
491Copyright © 2018, Juniper Networks, Inc.
Chapter 64: IBM
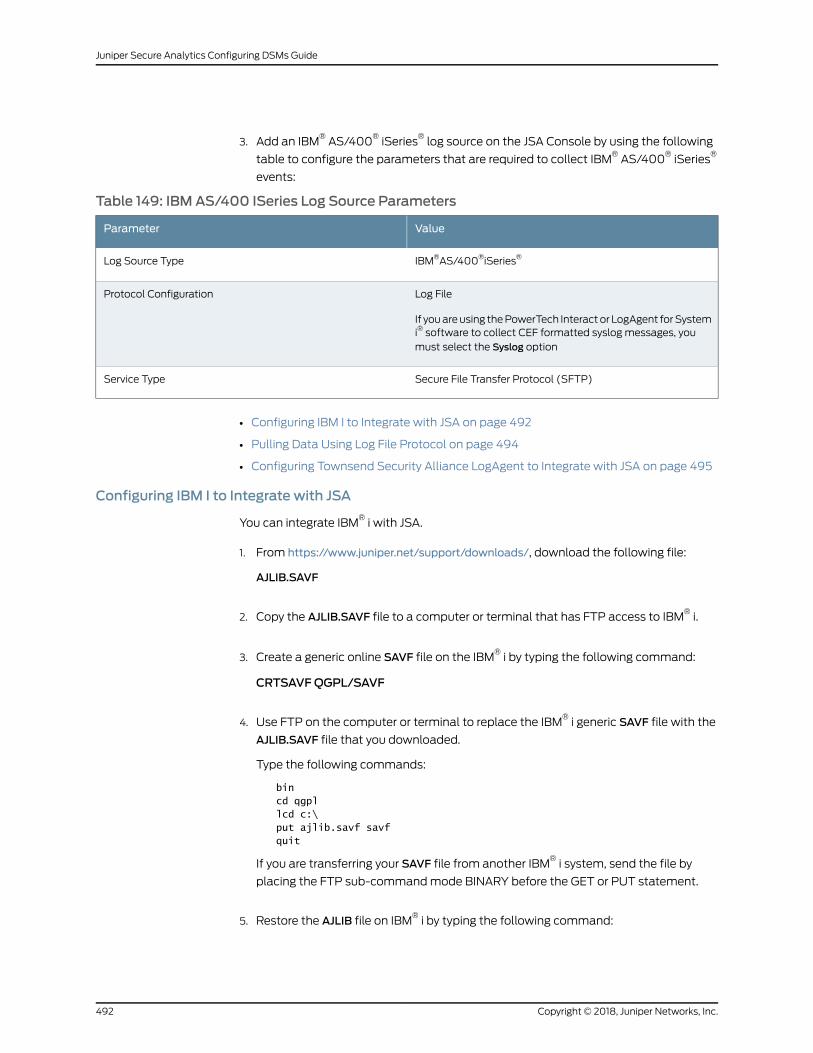
3. Add an IBM®AS/400
®iSeries
®log source on the JSA Console by using the following
table to configure the parameters that are required to collect IBM®AS/400
®iSeries
®
events:
Table 149: IBMAS/400 ISeries Log Source Parameters
ValueParameter
IBM®AS/400®iSeries®Log Source Type
Log File
If youareusing thePowerTech Interactor LogAgent forSystemi® software to collect CEF formatted syslog messages, youmust select the Syslog option
Protocol Configuration
Secure File Transfer Protocol (SFTP)Service Type
• Configuring IBM I to Integrate with JSA on page 492
• Pulling Data Using Log File Protocol on page 494
• Configuring Townsend Security Alliance LogAgent to Integrate with JSA on page 495
Configuring IBM I to Integrate with JSA
You can integrate IBM®i with JSA.
1. From https://www.juniper.net/support/downloads/, download the following file:
AJLIB.SAVF
2. Copy the AJLIB.SAVF file to a computer or terminal that has FTP access to IBM®i.
3. Create a generic online SAVF file on the IBM®i by typing the following command:
CRTSAVFQGPL/SAVF
4. Use FTP on the computer or terminal to replace the IBM®i generic SAVF file with the
AJLIB.SAVF file that you downloaded.
Type the following commands:
bincd qgpllcd c:\put ajlib.savf savfquit
If you are transferring your SAVF file from another IBM®i system, send the file by
placing the FTP sub-commandmode BINARY before the GET or PUT statement.
5. Restore the AJLIB file on IBM®i by typing the following command:
Copyright © 2018, Juniper Networks, Inc.492
Juniper Secure Analytics Configuring DSMs Guide
RSTLIB SAVLIB(AJLIB) DEV(*SAVF) SAVF(QGPL/AJLIB)
AJLIB provides the mapping and data transfer support that is needed to send IBM®i
audit journal entries to JSA.
6. RunAJLIB/SETUP
The setup screen is used to configure AJLIB for FTP, SFTP, or a local path to receive
the processed entries.
The server user ID is required for FTP or SFTP, and a password is required for FTP.
While FTP handles line delimiter conversions, you set the line feed to the expected
value for the type of system that receives the SFTP transfers.
7. If you want to use SFTP, runAJLIB/GENKEY
.
This command generates the SSH key pair that is required for SFTP authentication.
If the key pair exists, it is not replaced. If you want to generate a new key pair, before
you run this command, remove the existing key files from the /ajlib/.ssh directory.
Formore information about SSH key pair configuration on the Juniper Networks i , see
https://www.juniper.net/support/downloads/
8. After you generate a key pair, use the following steps to enable the use of the key pair
on the server:
a. Copy the id_rsa.pub file from the /ajlib directory to the SSH server, and then install
it in the appropriate folder.
b. Ensure that the SSH server is added to the known_hosts file of the user profile that
runs theAJLIB/AUDITJRN
command.
9. Use the appropriate user profile to do the following steps:
a. Start a PASE (Portable Application Solutions Environment) shell by typing the
following command:
call qp2term
b. Start a session with the SSH server by typing the following command:
ssh -T <user>@<serveraddress>
c. If prompted, accept the system key, and enter a password.
d. Type exit, to close the SSH session.
If you want to run these steps under a different IBM®i profile than the one that runs
theAJLIB/AUDITRN
493Copyright © 2018, Juniper Networks, Inc.
Chapter 64: IBM
command, copy the .ssh directory and known_hosts file to the home directory of the
profile that is used to run this command.
10. To configure the filtering of specific entry types, use theAJLIB/SETENTTYP
command.
11. Set up the data collection start date and time for the audit journal library (AJLIB) by
typing the following command:
AJLIB/DATETIME
If you start the audit journal collector, a failure message is sent toQSYSOPR.
The setup function sets a default start date and time for data collection from the
audit journal to 08:00:00 of the current day.
Topreserve your previous start date and time information fromaprevious installation,
youmust runAJLIB/DATETIME
. Record the previous start date and time and type those values when you runAJLIB/SETUP
. Thestartdateand timemustcontainavaliddateand time in thesix character system
date and system time format. The end date and timemust be a valid date and time
or left blank.
12. RunAJLIB/AUDITJRN
.
The audit journal collection program starts and sends the records to your remote FTP
server: If the transfer to the FTP server fails, a message is sent toQSYSOPR. The
process for startingAJLIB/AUDITJRN
is typically automated by an IBM®i job Scheduler, which collects records periodically.
If the FTP transfer is successful, the current date and time information is written into
the start time forAJLIB/DATETIME
to update the gather time, and the end time is set to blank. If the FTP transfer fails,
the export file is erased and no updates are made to the gather date or time.
Pulling Data Using Log File Protocol
You can configure IBM®AS/400
®iSeries as the log source, and to use the log file protocol
in JSA:
1. To configure JSA to receive events from an IBM®AS/400
®iSeries, youmust select
the IBM®AS/400
®iSeries option from the Log Source Type list.
Copyright © 2018, Juniper Networks, Inc.494
Juniper Secure Analytics Configuring DSMs Guide
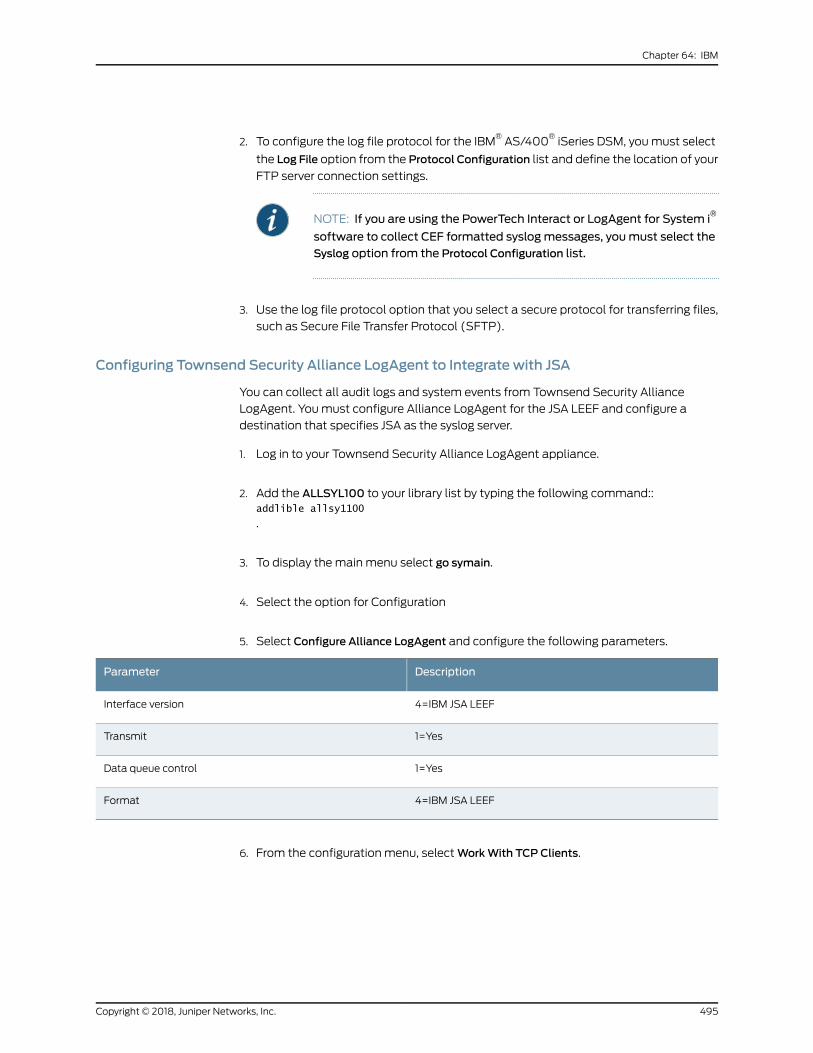
2. To configure the log file protocol for the IBM®AS/400
®iSeries DSM, youmust select
the Log File option from the Protocol Configuration list and define the location of your
FTP server connection settings.
NOTE: If you are using the PowerTech Interact or LogAgent for System i®
software to collect CEF formatted syslogmessages, youmust select theSyslog option from the Protocol Configuration list.
3. Use the log file protocol option that you select a secure protocol for transferring files,
such as Secure File Transfer Protocol (SFTP).
Configuring Townsend Security Alliance LogAgent to Integrate with JSA
You can collect all audit logs and system events from Townsend Security Alliance
LogAgent. Youmust configure Alliance LogAgent for the JSA LEEF and configure a
destination that specifies JSA as the syslog server.
1. Log in to your Townsend Security Alliance LogAgent appliance.
2. Add the ALLSYL100 to your library list by typing the following command::addlible allsy1100
.
3. To display the main menu select go symain.
4. Select the option for Configuration
5. Select Configure Alliance LogAgent and configure the following parameters.
DescriptionParameter
4=IBM JSA LEEFInterface version
1=YesTransmit
1=YesData queue control
4=IBM JSA LEEFFormat
6. From the configuration menu, selectWorkWith TCP Clients.
495Copyright © 2018, Juniper Networks, Inc.
Chapter 64: IBM
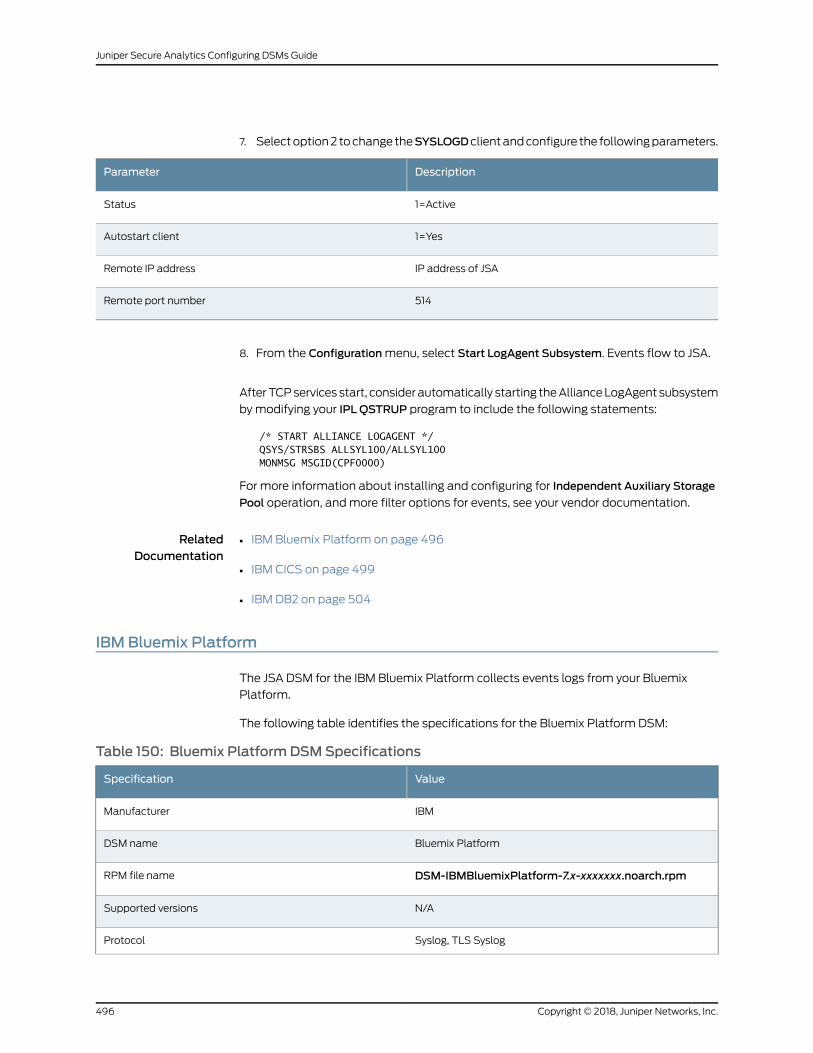
7. Selectoption2 tochange theSYSLOGDclientandconfigure the followingparameters.
DescriptionParameter
1=ActiveStatus
1=YesAutostart client
IP address of JSARemote IP address
514Remote port number
8. From the Configurationmenu, select Start LogAgent Subsystem. Events flow to JSA.
AfterTCPservices start, consider automatically starting theAllianceLogAgent subsystem
bymodifying your IPL QSTRUP program to include the following statements:
/* START ALLIANCE LOGAGENT */QSYS/STRSBS ALLSYL100/ALLSYL100MONMSG MSGID(CPF0000)
For more information about installing and configuring for Independent Auxiliary Storage
Pool operation, andmore filter options for events, see your vendor documentation.
RelatedDocumentation
IBM Bluemix Platform on page 496•
• IBM CICS on page 499
• IBM DB2 on page 504
IBM Bluemix Platform
The JSA DSM for the IBM Bluemix Platform collects events logs from your Bluemix
Platform.
The following table identifies the specifications for the Bluemix Platform DSM:
Table 150: Bluemix PlatformDSMSpecifications
ValueSpecification
IBMManufacturer
Bluemix PlatformDSM name
DSM-IBMBluemixPlatform-7.x-xxxxxxx.noarch.rpmRPM file name
N/ASupported versions
Syslog, TLS SyslogProtocol
Copyright © 2018, Juniper Networks, Inc.496
Juniper Secure Analytics Configuring DSMs Guide
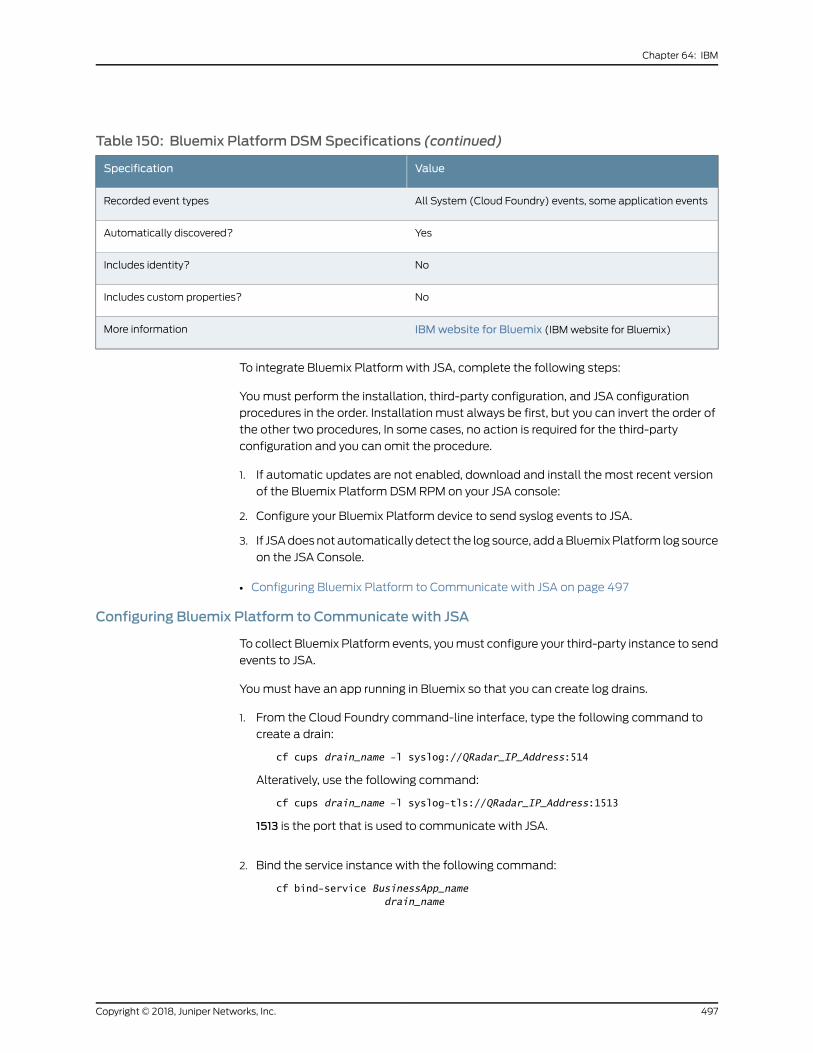
Table 150: Bluemix PlatformDSMSpecifications (continued)
ValueSpecification
All System (Cloud Foundry) events, some application eventsRecorded event types
YesAutomatically discovered?
NoIncludes identity?
NoIncludes custom properties?
IBMwebsite for Bluemix (IBMwebsite for Bluemix)More information
To integrate Bluemix Platformwith JSA, complete the following steps:
Youmust perform the installation, third-party configuration, and JSA configuration
procedures in the order. Installation must always be first, but you can invert the order of
the other two procedures, In some cases, no action is required for the third-party
configuration and you can omit the procedure.
1. If automatic updates are not enabled, download and install the most recent version
of the Bluemix Platform DSM RPM on your JSA console:
2. Configure your Bluemix Platform device to send syslog events to JSA.
3. If JSAdoesnot automatically detect the log source, addaBluemixPlatform log source
on the JSA Console.
• Configuring Bluemix Platform to Communicate with JSA on page 497
Configuring Bluemix Platform to Communicate with JSA
To collect Bluemix Platform events, youmust configure your third-party instance to send
events to JSA.
Youmust have an app running in Bluemix so that you can create log drains.
1. From the Cloud Foundry command-line interface, type the following command to
create a drain:
cf cups drain_name -l syslog://QRadar_IP_Address:514
Alteratively, use the following command:
cf cups drain_name -l syslog-tls://QRadar_IP_Address:1513
1513 is the port that is used to communicate with JSA.
2. Bind the service instance with the following command:
cf bind-service BusinessApp_namedrain_name
497Copyright © 2018, Juniper Networks, Inc.
Chapter 64: IBM
Integrating Bluemix Platformwith JSA
In most installations, there is only the RPM. For installations where there are multiple
RPMs required, (for example a PROTOCOL RPM and a DSMCommon RPM), ensure that
the installation sequence reflects RPM dependency.
1. If required, download and install the latest TLS Syslog RPM on your JSA console. You
can install a protocol by using the procedure to manually install a DSM. If automatic
updates are configured to install protocol updates, this procedure is not necessary.
2. Download and install the latest DSMCommonRPMon your JSA console. If automatic
updates are configured to install DSM updates, this procedure is not necessary.
3. Download and install the latest Bluemix Platform RPM on your JSA console. If
automatic updates are configured to install DSM updates, this procedure is not
necessary.
Youmust configure a Bluemix log source in JSA by using Syslog or Syslog TLS.
Configuring a Bluemix Log Source to Use Syslog
You can configure a Bluemix log source in JSA.
1. Log in to JSA to use Syslog.
2. On the Admin tab, click Data Sources >Log Sources >Add.
3. From the Log Source Type list, select Bluemix Platform.
4. From the Protocol Configuration list, select Syslog.
5. In the Log Source Identifier field, enter the IP address of the Bluemix Loggregator.
NOTE: Itmight benecessary to include the IP address and theport, as theLog Source Identifier. For example, 1.1.1.1:1234.
6. Configure the remaining fields in the Log Sourceswindow as required and click Save.
7. On the Admin tab toolbar, click Deploy Changes.
Configuring a Bluemix Log Source with TLS Syslog
You can configure a Bluemix log source in JSA to use TLS Syslog.
Copyright © 2018, Juniper Networks, Inc.498
Juniper Secure Analytics Configuring DSMs Guide
1. Log in to JSA.
2. On the Admin tab, click Data Sources >Log Sources >Add.
3. From the Log Source Type list, select Bluemix Platform.
4. From the Protocol Configuration list, select TLS Syslog.
5. In the Log Source Identifier field, enter the IP address of the Bluemix Loggregator.
6. In the TLS Listen Port field, enter a port number.
7. From the AuthenticationMode list, select TLS .
8. From the Certificate Type list, select Provide Certificate.
9. In the Provided Server Certificate Path field, enter the absolute path to the server
certificate, for example:
syslog-tls.cert
10. In the Provided Private Key Path field, enter the absolute path the private key.
The private key must be a DER-encoded PKCS8 key.
11. Configure the remaining fields in the Log Sourceswindow as required and click Save.
12. On the Admin tab toolbar, click Deploy Changes.
RelatedDocumentation
IBM CICS on page 499•
• IBM DB2 on page 504
• IBM DataPower on page 514
IBM CICS
The IBM®CICS
®®DSMgives theoption to integrateevents from IBM
®Custom Information
Control System (CICS®®) on an IBM z/OS
®mainframe using IBM
®Security zSecure.
Using a zSecure process, events from the SystemManagement Facilities (SMF) are
recorded to an event file in the Log Enhanced Event format (LEEF). JSA retrieves the
LEEF event log files by using the log file protocol and processes the events. You can
schedule JSA to retrieve events on a polling interval, which allows JSA to retrieve the
events on the schedule that you define.
499Copyright © 2018, Juniper Networks, Inc.
Chapter 64: IBM

To integrate IBM®CICS
®events:
1. Confirm that your installation meets any prerequisite installation requirements.
2. Configure your IBM z/OS image to write events in LEEF format. For more information,
see the IBM®Security zSecure Suite: CARLa-Driven Components Installation and
Deployment Guide.
3. Create a log source in JSA for IBM®CICS
®to retrieve your LEEF formatted event logs.
For more information, see “Creating a Log Source” on page 500.
4. Optional. Createa customevent property for IBM®CICS
®in JSA. Formore information,
see the JSA Custom Event Properties for IBM z/OS technical note.
• Before You Begin on page 500
• Creating a Log Source on page 500
Before You Begin
Before you can configure the data collection process, youmust complete the basic
zSecure installation process.
The following prerequisites are required:
• Youmustensureparmlibmember IFAPRDxx isenabled for IBM®Security zSecureAudit
on your z/OS®image.
• The SCKRLOAD library must be APF-authorized.
• Youmust configure a process to periodically refresh your CKFREEZE and UNLOAD
data sets.
• Youmust configure an SFTP, FTP, or SCP server on your z/OS®image for JSA to
download your LEEF event files.
• Youmust allow SFTP, FTP, or SCP traffic on firewalls that are located between JSA
and your z/OS®image.
When you install the software, complete the post-installation activities to create and
modify the configuration. For instructions on installing and configuring zSecure, see the
IBM®Security zSecure Suite: CARLa-Driven Components Installation and Deployment
Guide.
Creating a Log Source
The log file protocol allows JSA to retrieve archived log files from a remote host.
Log files are transferred, one at a time, to JSA for processing. The log file protocol can
manage plain text event logs, compressed files, or archives. Archives must contain
plain-text files that can be processed one line at a time. Multi-line event logs are not
supported by the log file protocol. IBM z/OSwith zSecure writes log files to a specified
directory as gzip archives. JSA extracts the archive and processes the events, which are
written as one event per line in the file.
Copyright © 2018, Juniper Networks, Inc.500
Juniper Secure Analytics Configuring DSMs Guide

To retrieve these events, youmust create a log source that uses the log file protocol. JSA
requires credentials to log in to the system that hosts your LEEF formatted event files
and a polling interval.
1. Click the Admin tab.
2. Click the Log Sources icon.
3. Click Add.
4. In the Log Source Name field, type a name for the log source.
5. In the Log Source Description field, type a description for the log source.
6. From the Log Source Type list, select IBM®CICS
®.
7. From the Protocol Configuration list, select Log File.
8. Configure the following values:
Table 151: IBM CICS Log File Protocol Parameters
DescriptionParameter
Type an IP address, host name, or name to identify the event source. IP addresses or hostnames are suggested as they allow JSA to identify a log file to a unique event source.
For example, if your network contains multiple devices, such as multiple z/OS® images or afile repository that contains all of your event logs, youmust specify a name, IP address, orhost name for the image or location that uniquely identifies events for the IBM®CICS® logsource. This specification enables events to be identified at the image or location level inyour network that your users can identify.
Log Source Identifier
From the list, select the protocol that youwant to usewhen retrieving log files from a remoteserver. The default is SFTP.
• SFTP - SSH File Transfer Protocol
• FTP - File Transfer Protocol
• SCP - Secure Copy
The underlying protocol that is used to retrieve log files for the SCP and SFTP service typerequires that the server specified in theRemote IPorHostname field has the SFTP subsystemenabled.
Service Type
Type the IP address or host name of the device that stores your event log files.Remote IP or Hostname
501Copyright © 2018, Juniper Networks, Inc.
Chapter 64: IBM
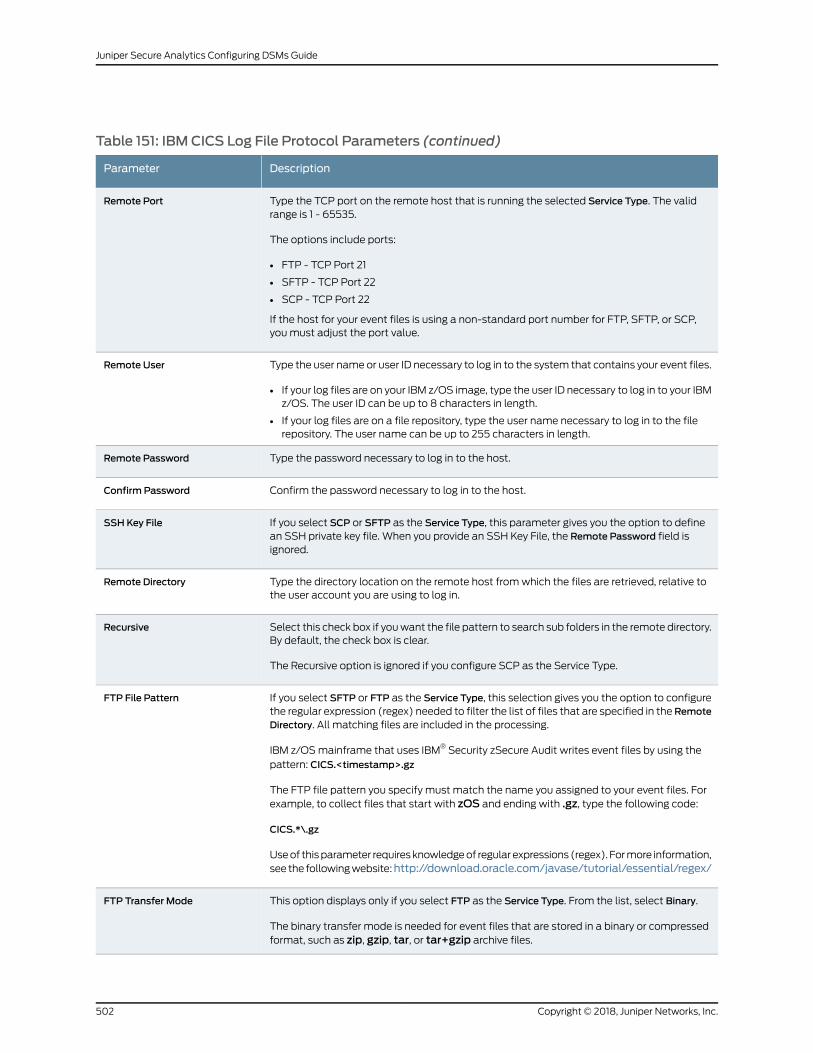
Table 151: IBM CICS Log File Protocol Parameters (continued)
DescriptionParameter
Type the TCP port on the remote host that is running the selected Service Type. The validrange is 1 - 65535.
The options include ports:
• FTP - TCP Port 21
• SFTP - TCP Port 22
• SCP - TCP Port 22
If the host for your event files is using a non-standard port number for FTP, SFTP, or SCP,youmust adjust the port value.
Remote Port
Type the user name or user ID necessary to log in to the system that contains your event files.
• If your log files are on your IBM z/OS image, type the user ID necessary to log in to your IBMz/OS. The user ID can be up to 8 characters in length.
• If your log files are on a file repository, type the user name necessary to log in to the filerepository. The user name can be up to 255 characters in length.
Remote User
Type the password necessary to log in to the host.Remote Password
Confirm the password necessary to log in to the host.Confirm Password
If you select SCP or SFTP as the Service Type, this parameter gives you the option to definean SSH private key file. When you provide an SSH Key File, the Remote Password field isignored.
SSH Key File
Type the directory location on the remote host fromwhich the files are retrieved, relative tothe user account you are using to log in.
Remote Directory
Select this check box if youwant the file pattern to search sub folders in the remote directory.By default, the check box is clear.
The Recursive option is ignored if you configure SCP as the Service Type.
Recursive
If you select SFTP or FTP as the Service Type, this selection gives you the option to configurethe regular expression (regex) needed to filter the list of files that are specified in theRemoteDirectory. All matching files are included in the processing.
IBM z/OSmainframe that uses IBM® Security zSecure Audit writes event files by using thepattern: CICS.<timestamp>.gz
The FTP file pattern you specify must match the name you assigned to your event files. Forexample, to collect files that start with zOS and ending with .gz, type the following code:
CICS.*\.gz
Useof thisparameter requiresknowledgeof regular expressions (regex). Formore information,see the followingwebsite:http://download.oracle.com/javase/tutorial/essential/regex/
FTP File Pattern
This option displays only if you select FTP as the Service Type. From the list, select Binary.
The binary transfer mode is needed for event files that are stored in a binary or compressedformat, such as zip, gzip, tar, or tar+gzip archive files.
FTP Transfer Mode
Copyright © 2018, Juniper Networks, Inc.502
Juniper Secure Analytics Configuring DSMs Guide
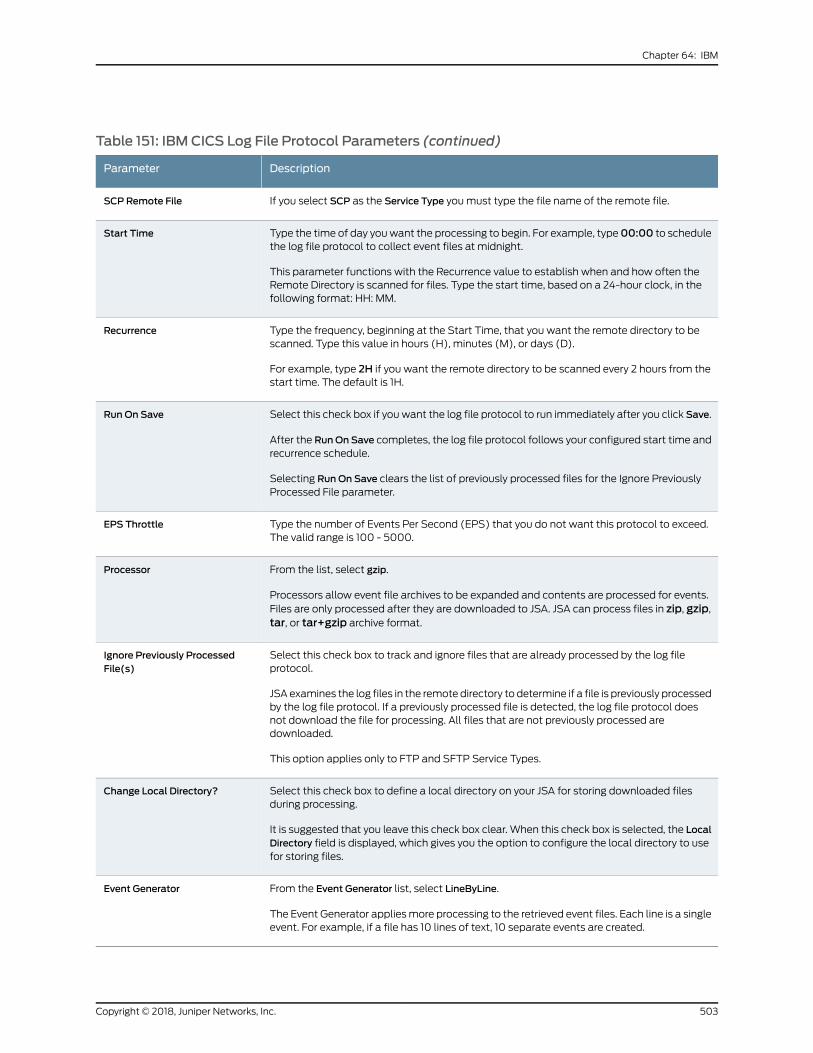
Table 151: IBM CICS Log File Protocol Parameters (continued)
DescriptionParameter
If you select SCP as the Service Type youmust type the file name of the remote file.SCP Remote File
Type the time of day youwant the processing to begin. For example, type00:00 to schedulethe log file protocol to collect event files at midnight.
This parameter functions with the Recurrence value to establish when and how often theRemote Directory is scanned for files. Type the start time, based on a 24-hour clock, in thefollowing format: HH: MM.
Start Time
Type the frequency, beginning at the Start Time, that you want the remote directory to bescanned. Type this value in hours (H), minutes (M), or days (D).
For example, type 2H if you want the remote directory to be scanned every 2 hours from thestart time. The default is 1H.
Recurrence
Select this check box if youwant the log file protocol to run immediately after you click Save.
After the RunOn Save completes, the log file protocol follows your configured start time andrecurrence schedule.
Selecting RunOn Save clears the list of previously processed files for the Ignore PreviouslyProcessed File parameter.
RunOn Save
Type the number of Events Per Second (EPS) that you do not want this protocol to exceed.The valid range is 100 - 5000.
EPS Throttle
From the list, select gzip.
Processors allow event file archives to be expanded and contents are processed for events.Files are only processed after they are downloaded to JSA. JSA can process files in zip, gzip,tar, or tar+gzip archive format.
Processor
Select this check box to track and ignore files that are already processed by the log fileprotocol.
JSA examines the log files in the remote directory to determine if a file is previously processedby the log file protocol. If a previously processed file is detected, the log file protocol doesnot download the file for processing. All files that are not previously processed aredownloaded.
This option applies only to FTP and SFTP Service Types.
Ignore Previously ProcessedFile(s)
Select this check box to define a local directory on your JSA for storing downloaded filesduring processing.
It is suggested that you leave this check box clear. When this check box is selected, the LocalDirectory field is displayed, which gives you the option to configure the local directory to usefor storing files.
Change Local Directory?
From the Event Generator list, select LineByLine.
The Event Generator appliesmore processing to the retrieved event files. Each line is a singleevent. For example, if a file has 10 lines of text, 10 separate events are created.
Event Generator
503Copyright © 2018, Juniper Networks, Inc.
Chapter 64: IBM
9. Click Save.
10. On the Admin tab, click Deploy Changes.
The IBM®CICS
®configuration is complete. If your IBM
®CICS
®requires custom event
properties, see the JSA Custom Event Properties for IBM z/OS technical note.
IBM DB2
JSA has two options for integrating events from IBM®DB2
®®.
See the following topics:
• Integration Of IBM DB2 with LEEF Events on page 504
• Integrating IBM DB2 Audit Events on page 508
• Integration Of IBM DB2 with LEEF Events on page 504
• Creating a Log Source for IBM DB2 on page 505
• Integrating IBM DB2 Audit Events on page 508
• Extracting Audit Data: DB2 V9.5 and Later on page 509
• Extract Audit Data: DB2 V8.x to V9.4 on page 510
• Creating a Log Source for IBM DB2 on page 511
Integration Of IBMDB2with LEEF Events
The IBM®DB2
®DSM allows the integration of DB2
®events in LEEF format from an IBM
z/OS®mainframe by using IBM
®Security zSecure
®.
Using a zSecure process, events from the SystemManagement Facilities (SMF) are
recorded to an event file in the Log Enhanced Event format (LEEF). JSA retrieves the
LEEF event log files by using the log file protocol and processes the events. You can
schedule JSA to retrieve events on a polling interval.
To integrate IBM®DB2
®events:
1. Confirm that your installation meets any prerequisite installation requirements. For
more information, see Before You Begin.
2. Configure your IBM®DB2
®image towrite events in LEEF format. Formore information,
see the IBM®Security zSecure Suite: CARLa-Driven Components Installation and
Deployment Guide.
3. Create a log source in JSA for IBM®DB2
®to retrieve your LEEF formatted event logs.
For more information, see “Creating a Log Source for IBM DB2” on page 505.
4. Optional. Create a customevent property for IBM®DB2
®in JSA. Formore information,
see the JSA Custom Event Properties for IBM z/OS technical note.
Copyright © 2018, Juniper Networks, Inc.504
Juniper Secure Analytics Configuring DSMs Guide
Before You Begin
Before you can configure the data collection process, youmust complete the basic
zSecure installation process.
The following prerequisites are required:
• Youmustensureparmlibmember IFAPRDxx isenabled for IBM®Security zSecureAudit
on your IBM®DB2
®z/OS
®image.
• The SCKRLOAD library must be APF-authorized.
• Youmust configure a process to periodically refresh your CKFREEZE and UNLOAD
data sets.
• Youmust configure an SFTP, FTP, or SCP server on your z/OS®image for JSA to
download your LEEF event files.
• Youmust allow SFTP, FTP, or SCP traffic on firewalls that are located between JSA
and your z/OS®image.
Following the software installation, youmust complete the postinstallation activities to
createandmodify theconfiguration. For instructionson installingandconfiguring zSecure,
see the IBM®Security zSecure Suite: CARLa-Driven Components Installation and
Deployment Guide.
Creating a Log Source for IBMDB2
A log file protocol source allows JSA to retrieve archived log files from a remote host.
The IBM®DB2
®DSM supports the bulk loading of log files by using the log file protocol
source. When you configure your IBM®DB2
®to use the log file protocol, make sure the
host name or IP address that is configured in the IBM®DB2
®system is the same as that
configured in the Remote Host parameter in the log file protocol configuration.
1. Log in to JSA.
2. Click the Admin tab.
3. Click the Log Sources icon.
4. Click Add.
5. In the Log Source Name field, type a name for the log source.
6. In the Log Source Description field, type a description for the log source.
7. From the Log Source Type list, select IBM®DB2
®.
505Copyright © 2018, Juniper Networks, Inc.
Chapter 64: IBM
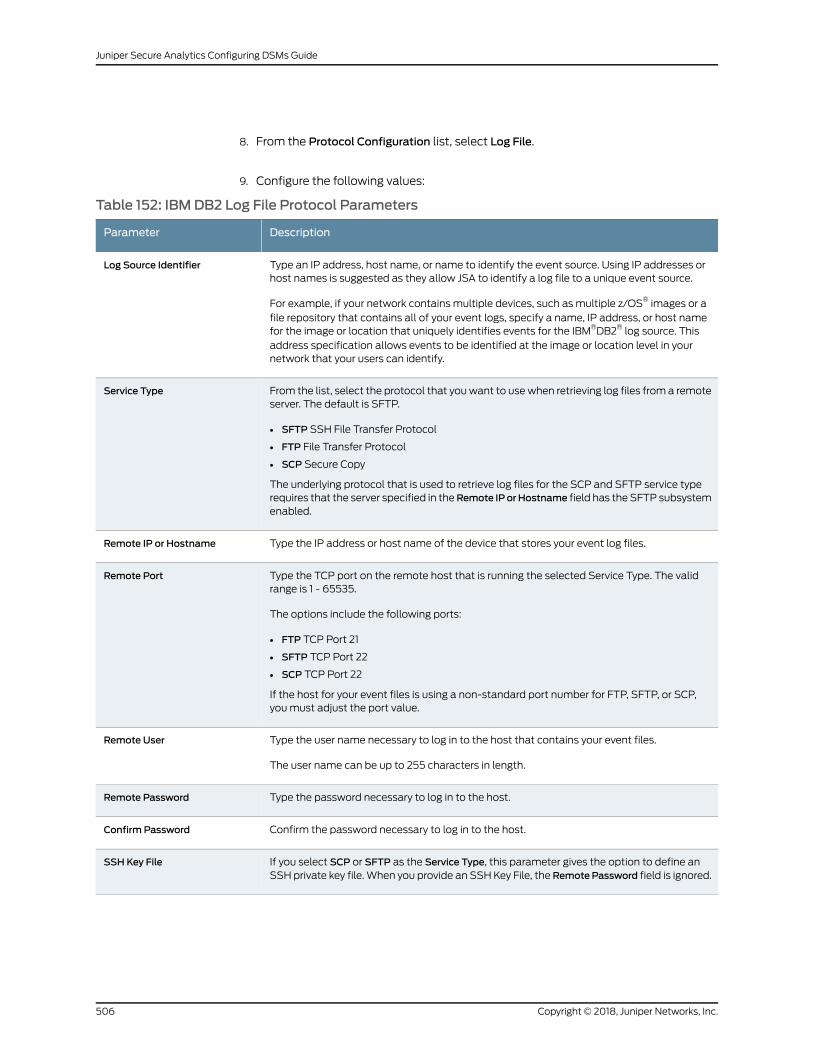
8. From the Protocol Configuration list, select Log File.
9. Configure the following values:
Table 152: IBMDB2 Log File Protocol Parameters
DescriptionParameter
Type an IP address, host name, or name to identify the event source. Using IP addresses orhost names is suggested as they allow JSA to identify a log file to a unique event source.
For example, if your network contains multiple devices, such as multiple z/OS® images or afile repository that contains all of your event logs, specify a name, IP address, or host namefor the image or location that uniquely identifies events for the IBM®DB2® log source. Thisaddress specification allows events to be identified at the image or location level in yournetwork that your users can identify.
Log Source Identifier
From the list, select the protocol that youwant to usewhen retrieving log files from a remoteserver. The default is SFTP.
• SFTP SSH File Transfer Protocol
• FTP File Transfer Protocol
• SCP Secure Copy
The underlying protocol that is used to retrieve log files for the SCP and SFTP service typerequires that the server specified in theRemote IPorHostname field has the SFTP subsystemenabled.
Service Type
Type the IP address or host name of the device that stores your event log files.Remote IP or Hostname
Type the TCP port on the remote host that is running the selected Service Type. The validrange is 1 - 65535.
The options include the following ports:
• FTP TCP Port 21
• SFTP TCP Port 22
• SCP TCP Port 22
If the host for your event files is using a non-standard port number for FTP, SFTP, or SCP,youmust adjust the port value.
Remote Port
Type the user name necessary to log in to the host that contains your event files.
The user name can be up to 255 characters in length.
Remote User
Type the password necessary to log in to the host.Remote Password
Confirm the password necessary to log in to the host.Confirm Password
If you select SCP or SFTP as the Service Type, this parameter gives the option to define anSSH private key file.When you provide an SSHKey File, the RemotePassword field is ignored.
SSH Key File
Copyright © 2018, Juniper Networks, Inc.506
Juniper Secure Analytics Configuring DSMs Guide
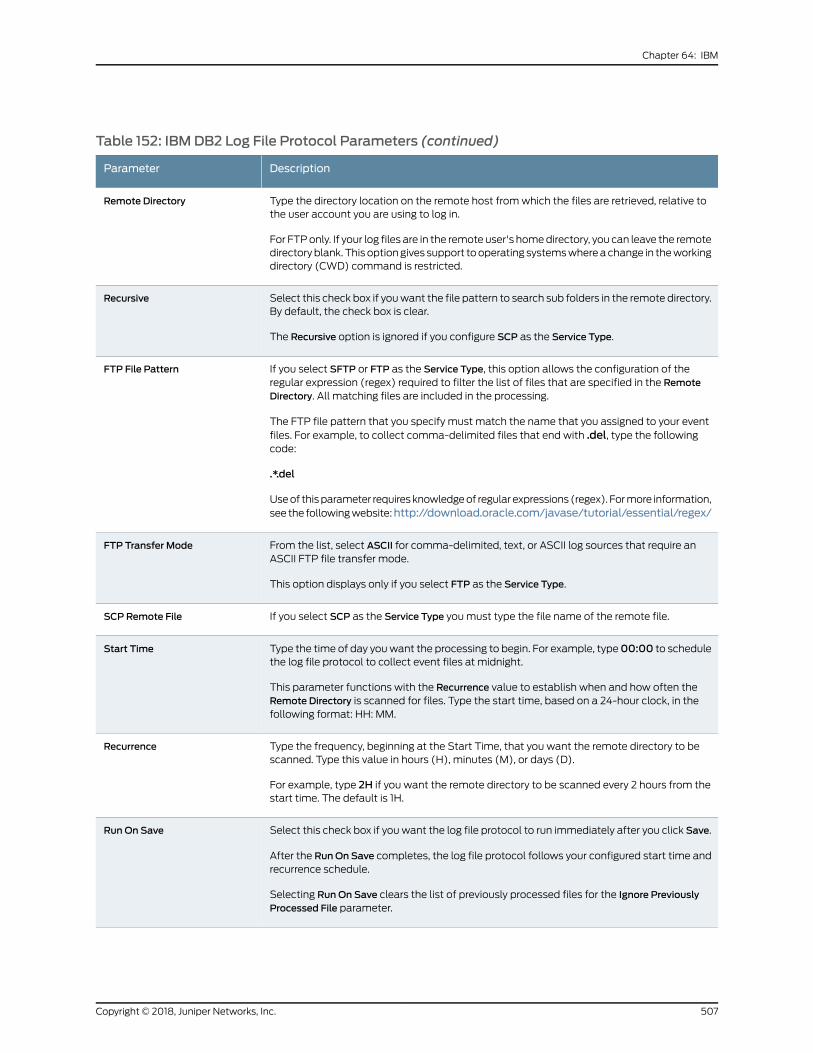
Table 152: IBMDB2 Log File Protocol Parameters (continued)
DescriptionParameter
Type the directory location on the remote host fromwhich the files are retrieved, relative tothe user account you are using to log in.
For FTPonly. If your log files are in the remote user's homedirectory, you can leave the remotedirectoryblank. This optiongives support tooperating systemswhereachange in theworkingdirectory (CWD) command is restricted.
Remote Directory
Select this check box if youwant the file pattern to search sub folders in the remote directory.By default, the check box is clear.
The Recursive option is ignored if you configure SCP as the Service Type.
Recursive
If you select SFTP or FTP as the Service Type, this option allows the configuration of theregular expression (regex) required to filter the list of files that are specified in the RemoteDirectory. All matching files are included in the processing.
The FTP file pattern that you specify must match the name that you assigned to your eventfiles. For example, to collect comma-delimited files that end with .del, type the followingcode:
.*.del
Useof thisparameter requiresknowledgeof regular expressions (regex). Formore information,see the followingwebsite:http://download.oracle.com/javase/tutorial/essential/regex/
FTP File Pattern
From the list, select ASCII for comma-delimited, text, or ASCII log sources that require anASCII FTP file transfer mode.
This option displays only if you select FTP as the Service Type.
FTP Transfer Mode
If you select SCP as the Service Type youmust type the file name of the remote file.SCP Remote File
Type the time of day youwant the processing to begin. For example, type00:00 to schedulethe log file protocol to collect event files at midnight.
This parameter functions with the Recurrence value to establish when and how often theRemote Directory is scanned for files. Type the start time, based on a 24-hour clock, in thefollowing format: HH: MM.
Start Time
Type the frequency, beginning at the Start Time, that you want the remote directory to bescanned. Type this value in hours (H), minutes (M), or days (D).
For example, type 2H if you want the remote directory to be scanned every 2 hours from thestart time. The default is 1H.
Recurrence
Select this check box if youwant the log file protocol to run immediately after you click Save.
After the RunOn Save completes, the log file protocol follows your configured start time andrecurrence schedule.
Selecting RunOn Save clears the list of previously processed files for the Ignore PreviouslyProcessed File parameter.
RunOn Save
507Copyright © 2018, Juniper Networks, Inc.
Chapter 64: IBM
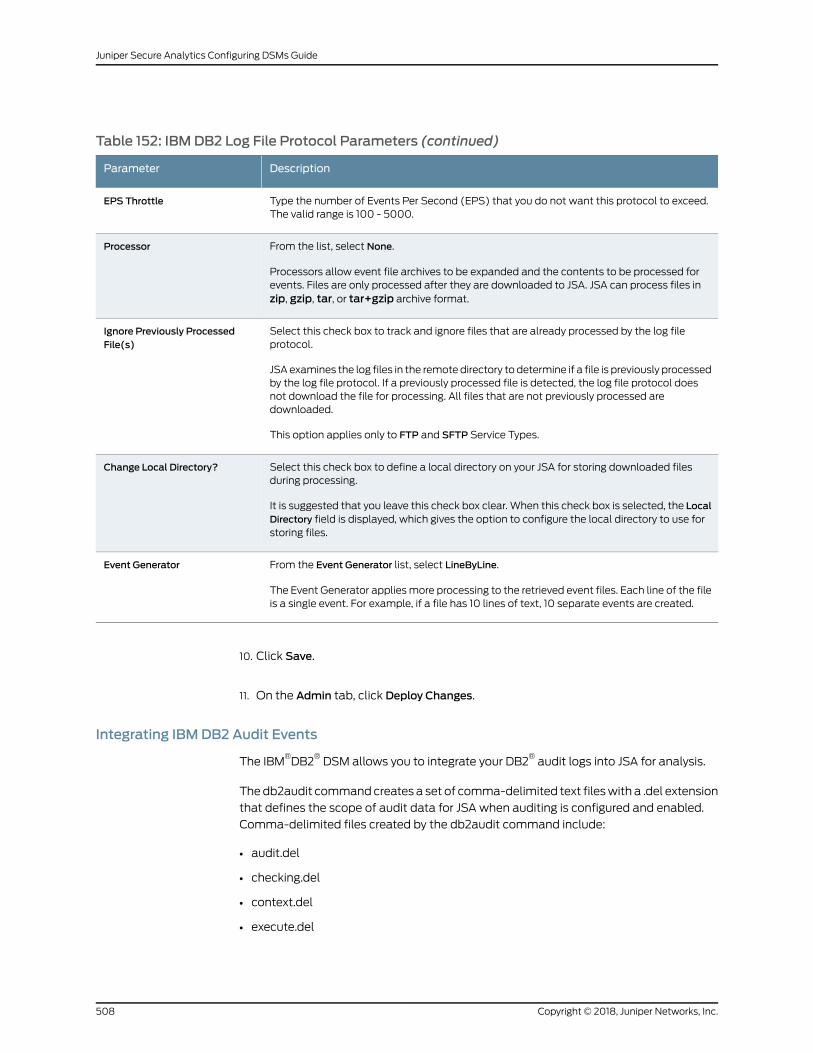
Table 152: IBMDB2 Log File Protocol Parameters (continued)
DescriptionParameter
Type the number of Events Per Second (EPS) that you do not want this protocol to exceed.The valid range is 100 - 5000.
EPS Throttle
From the list, select None.
Processors allow event file archives to be expanded and the contents to be processed forevents. Files are only processed after they are downloaded to JSA. JSA can process files inzip, gzip, tar, or tar+gzip archive format.
Processor
Select this check box to track and ignore files that are already processed by the log fileprotocol.
JSA examines the log files in the remote directory to determine if a file is previously processedby the log file protocol. If a previously processed file is detected, the log file protocol doesnot download the file for processing. All files that are not previously processed aredownloaded.
This option applies only to FTP and SFTP Service Types.
Ignore Previously ProcessedFile(s)
Select this check box to define a local directory on your JSA for storing downloaded filesduring processing.
It is suggested that you leave this check box clear. When this check box is selected, the LocalDirectory field is displayed, which gives the option to configure the local directory to use forstoring files.
Change Local Directory?
From the Event Generator list, select LineByLine.
The Event Generator appliesmore processing to the retrieved event files. Each line of the fileis a single event. For example, if a file has 10 lines of text, 10 separate events are created.
Event Generator
10. Click Save.
11. On the Admin tab, click Deploy Changes.
Integrating IBMDB2 Audit Events
The IBM®DB2
®DSM allows you to integrate your DB2
®audit logs into JSA for analysis.
Thedb2audit commandcreates a set of comma-delimited text fileswith a .del extension
that defines the scope of audit data for JSA when auditing is configured and enabled.
Comma-delimited files created by the db2audit command include:
• audit.del
• checking.del
• context.del
• execute.del
Copyright © 2018, Juniper Networks, Inc.508
Juniper Secure Analytics Configuring DSMs Guide
• objmaint.del
• secmaint.del
• sysadmin.del
• validate.del
To integrate the IBM®DB2
®DSMwith JSA, youmust:
1. Use the db2audit command to ensure the IBM®DB2
®records security events. See
your IBM®DB2
®vendor documentation for more information.
2. Extract theDB2®audit dataof events contained in the instance toa log file, depending
on your version of IBM®DB2
®:
If you are using DB2®v9.5 and later, see “Extracting Audit Data: DB2 V9.5 and Later”
on page 509,
or
If youareusingDB2®v8.x tov9.4, see “ExtractAuditData:DB2V8.x toV9.4”onpage510
3. Use the log file protocol source to pull the output instance log file and send that
information back to JSA on a scheduled basis. JSA then imports and processes this
file. See “Creating a Log Source for IBM DB2” on page 505.
NOTE: The IBM® DB2® DSM does not support the IBM z/OSmainframe
operating system.
Extracting Audit Data: DB2 V9.5 and Later
You can extract audit data when you are using IBM®DB2
®v9.5 and later.
1. Log in to a DB2®account with SYSADMIN privilege.
2. Move the audit records from the database instance to the audit log:
db2audit flush
For example, the flush command responsemight resemble the following output:
AUD00001 Operation succeeded.
3. Archive andmove the active instance to a new location for future extraction:
db2audit archive
For example, an archive command responsemight resemble the following output:
Node AUDArchived or Interim Log File Message ---- --- ----------------------------- - 0
AUD00001dbsaudit.instance.log.0.20091217125028AUD00001Operationsucceeded.
509Copyright © 2018, Juniper Networks, Inc.
Chapter 64: IBM

NOTE: In DB2® v9.5 and later, the archive command replaces the prune
command.
The archive commandmoves the active audit log to a new location,effectively pruning all non-active records from the log. An archivecommandmust be complete before an extract can be executed.
4. Extract the data from the archived audit log and write the data to .del files:
db2audit extract delasc from files db2audit.instance.log.0.200912171528
For example, an archive command responsemight resemble the following output:
AUD00001 Operation succeeded.
NOTE: Double-quotationmarks (") are used as the default text delimiter
in the ASCII files, do not change the delimiter.
5. Move the .del files to a storage location where JSA can pull the file. Themovement
of the comma-delimited (.del) files should be synchronized with the file pull interval
in JSA.
You are now ready to configure JSA to receive DB2®log files. See “Creating a Log
Source for IBM DB2” on page 505.
Extract Audit Data: DB2 V8.x to V9.4
You can extract audit data when you are using IBM®DB2
®v8.x to v9.4.
1. Log into a DB2®account with SYSADMIN privilege.
2. Type the following start command to audit a database instance:
db2audit start
For example, the start command responsemight resemble the following output:
AUD00001 Operation succeeded.
3. Move the audit records from the instance to the audit log:
db2audit flush
For example, the flush command responsemight resemble the following output:
AUD00001 Operation succeeded.
4. Extract the data from the archived audit log and write the data to .del files:
Copyright © 2018, Juniper Networks, Inc.510
Juniper Secure Analytics Configuring DSMs Guide

db2audit extract delasc
For example, an archive command responsemight resemble the following output:
AUD00001 Operation succeeded.
NOTE: Double-quotationmarks (") are used as the default text delimiter
in the ASCII files, do not change the delimiter.
5. Remove non-active records:
db2audit prune all
6. Move the .del files to a storage location where JSA can pull the file. Themovement
of the comma-delimited (.del) files should be synchronized with the file pull interval
in JSA.
You are now ready to create a log source in JSA to receive DB2®log files.
Creating a Log Source for IBMDB2
A log file protocol source allows JSA to retrieve archived log files from a remote host.
The IBM®DB2
®DSM supports the bulk loading of log files by using the log file protocol
source. When you configure your IBM®DB2
®to use the log file protocol, make sure the
host name or IP address that is configured in the IBM®DB2
®system is the same as that
configured in the Remote Host parameter in the log file protocol configuration.
1. Log in to JSA.
2. Click the Admin tab.
3. Click the Log Sources icon.
4. Click Add.
5. In the Log Source Name field, type a name for the log source.
6. In the Log Source Description field, type a description for the log source.
7. From the Log Source Type list, select IBM®DB2
®.
8. From the Protocol Configuration list, select Log File.
9. Configure the following values:
511Copyright © 2018, Juniper Networks, Inc.
Chapter 64: IBM
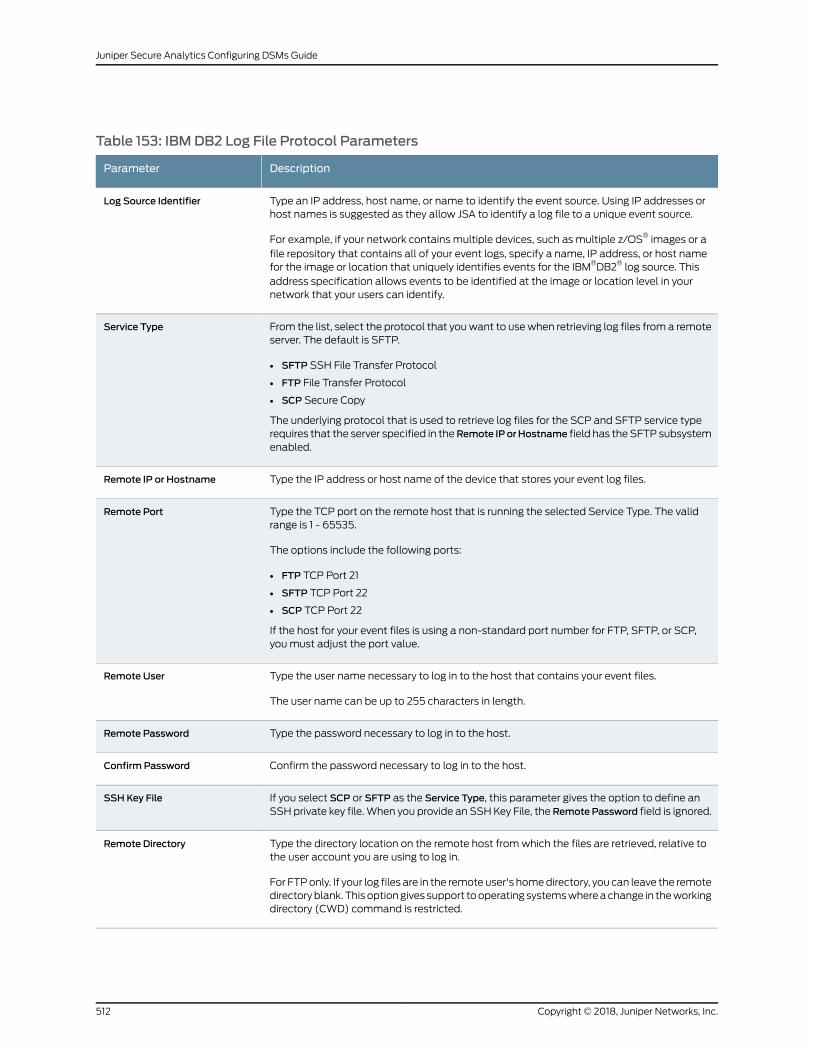
Table 153: IBMDB2 Log File Protocol Parameters
DescriptionParameter
Type an IP address, host name, or name to identify the event source. Using IP addresses orhost names is suggested as they allow JSA to identify a log file to a unique event source.
For example, if your network contains multiple devices, such as multiple z/OS® images or afile repository that contains all of your event logs, specify a name, IP address, or host namefor the image or location that uniquely identifies events for the IBM®DB2® log source. Thisaddress specification allows events to be identified at the image or location level in yournetwork that your users can identify.
Log Source Identifier
From the list, select the protocol that youwant to usewhen retrieving log files from a remoteserver. The default is SFTP.
• SFTP SSH File Transfer Protocol
• FTP File Transfer Protocol
• SCP Secure Copy
The underlying protocol that is used to retrieve log files for the SCP and SFTP service typerequires that the server specified in theRemote IPorHostname field has the SFTP subsystemenabled.
Service Type
Type the IP address or host name of the device that stores your event log files.Remote IP or Hostname
Type the TCP port on the remote host that is running the selected Service Type. The validrange is 1 - 65535.
The options include the following ports:
• FTP TCP Port 21
• SFTP TCP Port 22
• SCP TCP Port 22
If the host for your event files is using a non-standard port number for FTP, SFTP, or SCP,youmust adjust the port value.
Remote Port
Type the user name necessary to log in to the host that contains your event files.
The user name can be up to 255 characters in length.
Remote User
Type the password necessary to log in to the host.Remote Password
Confirm the password necessary to log in to the host.Confirm Password
If you select SCP or SFTP as the Service Type, this parameter gives the option to define anSSH private key file.When you provide an SSHKey File, the RemotePassword field is ignored.
SSH Key File
Type the directory location on the remote host fromwhich the files are retrieved, relative tothe user account you are using to log in.
For FTPonly. If your log files are in the remote user's homedirectory, you can leave the remotedirectoryblank. This optiongives support tooperating systemswhereachange in theworkingdirectory (CWD) command is restricted.
Remote Directory
Copyright © 2018, Juniper Networks, Inc.512
Juniper Secure Analytics Configuring DSMs Guide
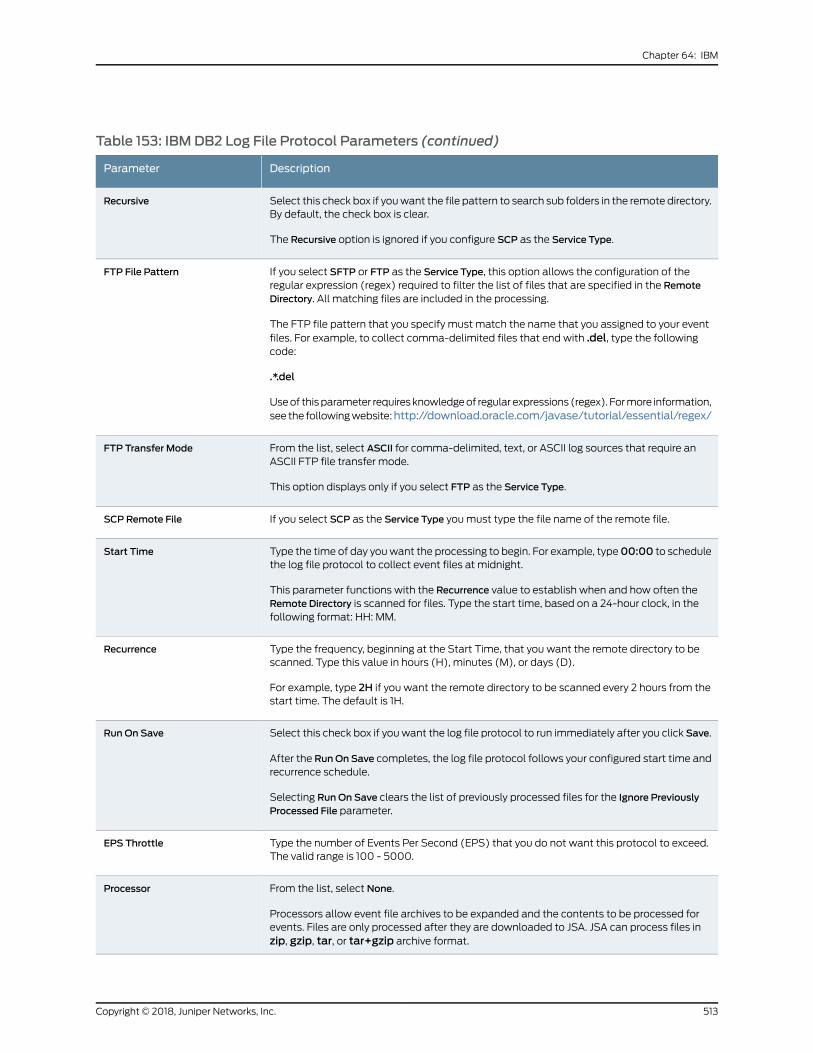
Table 153: IBMDB2 Log File Protocol Parameters (continued)
DescriptionParameter
Select this check box if youwant the file pattern to search sub folders in the remote directory.By default, the check box is clear.
The Recursive option is ignored if you configure SCP as the Service Type.
Recursive
If you select SFTP or FTP as the Service Type, this option allows the configuration of theregular expression (regex) required to filter the list of files that are specified in the RemoteDirectory. All matching files are included in the processing.
The FTP file pattern that you specify must match the name that you assigned to your eventfiles. For example, to collect comma-delimited files that end with .del, type the followingcode:
.*.del
Useof thisparameter requiresknowledgeof regular expressions (regex). Formore information,see the followingwebsite:http://download.oracle.com/javase/tutorial/essential/regex/
FTP File Pattern
From the list, select ASCII for comma-delimited, text, or ASCII log sources that require anASCII FTP file transfer mode.
This option displays only if you select FTP as the Service Type.
FTP Transfer Mode
If you select SCP as the Service Type youmust type the file name of the remote file.SCP Remote File
Type the time of day youwant the processing to begin. For example, type00:00 to schedulethe log file protocol to collect event files at midnight.
This parameter functions with the Recurrence value to establish when and how often theRemote Directory is scanned for files. Type the start time, based on a 24-hour clock, in thefollowing format: HH: MM.
Start Time
Type the frequency, beginning at the Start Time, that you want the remote directory to bescanned. Type this value in hours (H), minutes (M), or days (D).
For example, type 2H if you want the remote directory to be scanned every 2 hours from thestart time. The default is 1H.
Recurrence
Select this check box if youwant the log file protocol to run immediately after you click Save.
After the RunOn Save completes, the log file protocol follows your configured start time andrecurrence schedule.
Selecting RunOn Save clears the list of previously processed files for the Ignore PreviouslyProcessed File parameter.
RunOn Save
Type the number of Events Per Second (EPS) that you do not want this protocol to exceed.The valid range is 100 - 5000.
EPS Throttle
From the list, select None.
Processors allow event file archives to be expanded and the contents to be processed forevents. Files are only processed after they are downloaded to JSA. JSA can process files inzip, gzip, tar, or tar+gzip archive format.
Processor
513Copyright © 2018, Juniper Networks, Inc.
Chapter 64: IBM
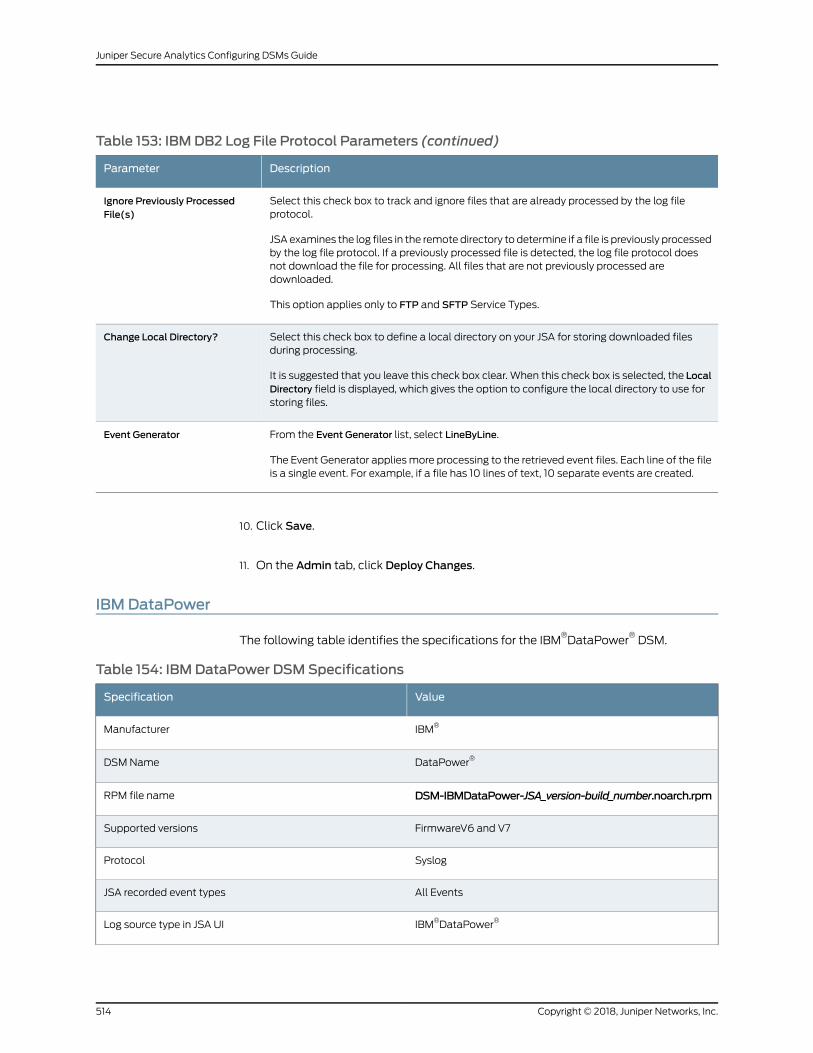
Table 153: IBMDB2 Log File Protocol Parameters (continued)
DescriptionParameter
Select this check box to track and ignore files that are already processed by the log fileprotocol.
JSA examines the log files in the remote directory to determine if a file is previously processedby the log file protocol. If a previously processed file is detected, the log file protocol doesnot download the file for processing. All files that are not previously processed aredownloaded.
This option applies only to FTP and SFTP Service Types.
Ignore Previously ProcessedFile(s)
Select this check box to define a local directory on your JSA for storing downloaded filesduring processing.
It is suggested that you leave this check box clear. When this check box is selected, the LocalDirectory field is displayed, which gives the option to configure the local directory to use forstoring files.
Change Local Directory?
From the Event Generator list, select LineByLine.
The Event Generator appliesmore processing to the retrieved event files. Each line of the fileis a single event. For example, if a file has 10 lines of text, 10 separate events are created.
Event Generator
10. Click Save.
11. On the Admin tab, click Deploy Changes.
IBM DataPower
The following table identifies the specifications for the IBM®DataPower
®DSM.
Table 154: IBMDataPower DSMSpecifications
ValueSpecification
IBM®Manufacturer
DataPower®DSMName
DSM-IBMDataPower-JSA_version-build_number.noarch.rpmRPM file name
FirmwareV6 and V7Supported versions
SyslogProtocol
All EventsJSA recorded event types
IBM®DataPower®Log source type in JSA UI
Copyright © 2018, Juniper Networks, Inc.514
Juniper Secure Analytics Configuring DSMs Guide
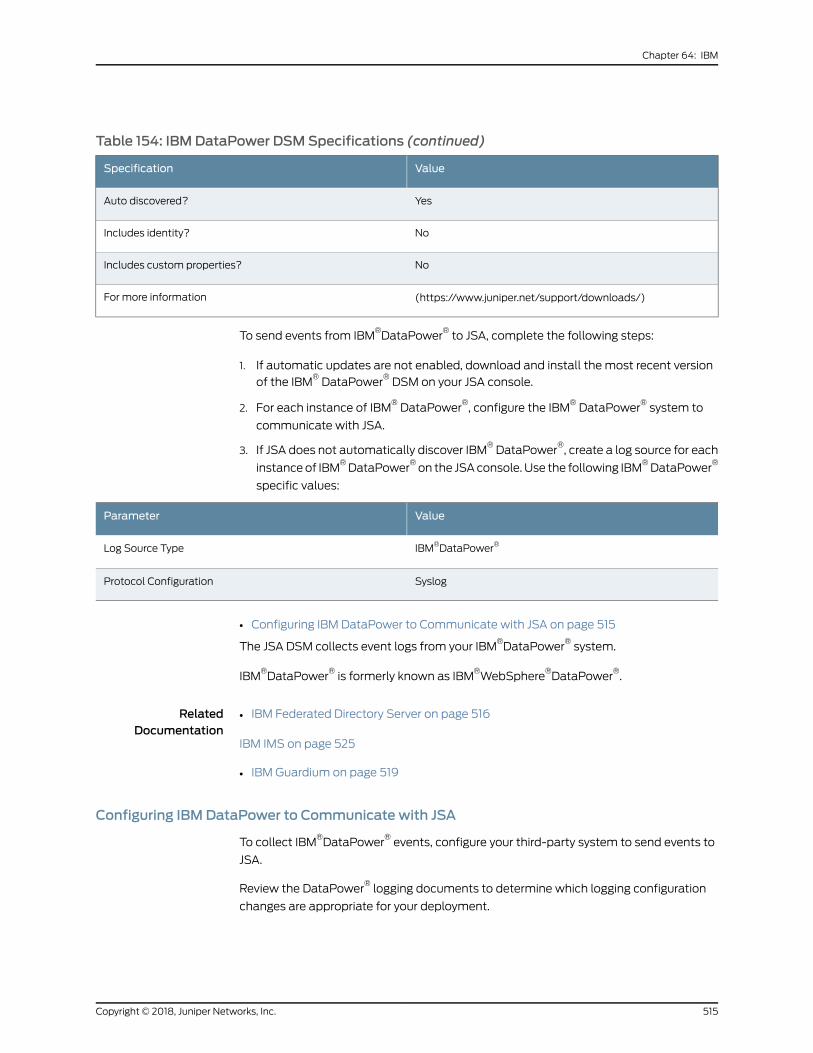
Table 154: IBMDataPower DSMSpecifications (continued)
ValueSpecification
YesAuto discovered?
NoIncludes identity?
NoIncludes custom properties?
(https://www.juniper.net/support/downloads/)For more information
To send events from IBM®DataPower
®to JSA, complete the following steps:
1. If automatic updates are not enabled, download and install the most recent version
of the IBM®DataPower
®DSM on your JSA console.
2. For each instance of IBM®DataPower
®, configure the IBM
®DataPower
®system to
communicate with JSA.
3. If JSA does not automatically discover IBM®DataPower
®, create a log source for each
instanceof IBM®DataPower
®on the JSAconsole. Use the following IBM
®DataPower
®
specific values:
ValueParameter
IBM®DataPower®Log Source Type
SyslogProtocol Configuration
• Configuring IBM DataPower to Communicate with JSA on page 515
The JSA DSM collects event logs from your IBM®DataPower
®system.
IBM®DataPower
®is formerly known as IBM
®WebSphere
®DataPower
®.
RelatedDocumentation
IBM Federated Directory Server on page 516•
IBM IMS on page 525
• IBM Guardium on page 519
Configuring IBMDataPower to Communicate with JSA
To collect IBM®DataPower
®events, configure your third-party system to send events to
JSA.
Review the DataPower®logging documents to determine which logging configuration
changes are appropriate for your deployment.
515Copyright © 2018, Juniper Networks, Inc.
Chapter 64: IBM

1. Log in to your IBM®DataPower
®system.
2. In the search box on the left navigation menu, type Log Target.
3. Select the matching result.
4. Click Add.
5. In theMain tab, type a name for the log target.
6. From the Target Type list, select syslog.
7. In theLocal Identifier field, typean identifier tobedisplayed in theSyslogeventpayloads
parameter on the JSA user interface.
8. In the Remote Host field, type the IP address or host name of your JSA Console or
Event Collector.
9. In the Remote Port field, type 514.
10. Under Event Subscriptions, add a base logging configuration with the following
parameters:
ValueParameter
allEvent Category
warning
NOTE: To prevent a decrease in system performance, do notuse more than one word for theMinimumEvent Priorityparameter.
MinimumEvent Priority
11. Apply the changes to the log target.
12. Review and save the configuration changes.
IBM Federated Directory Server
The JSA DSM collects events from IBM®Federated Directory Server systems.
The following table identifies the specifications for the IBM®Federated Directory Server
DSM:
Copyright © 2018, Juniper Networks, Inc.516
Juniper Secure Analytics Configuring DSMs Guide
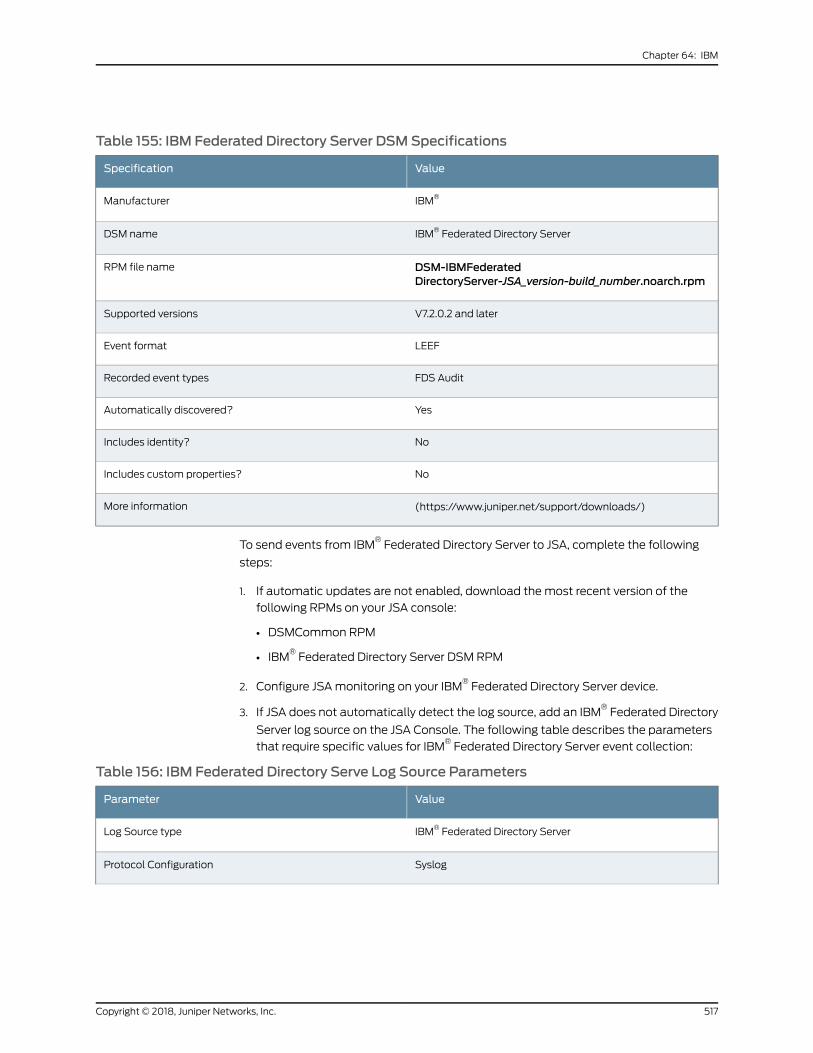
Table 155: IBM Federated Directory Server DSMSpecifications
ValueSpecification
IBM®Manufacturer
IBM® Federated Directory ServerDSM name
DSM-IBMFederatedDirectoryServer-JSA_version-build_number.noarch.rpm
RPM file name
V7.2.0.2 and laterSupported versions
LEEFEvent format
FDS AuditRecorded event types
YesAutomatically discovered?
NoIncludes identity?
NoIncludes custom properties?
(https://www.juniper.net/support/downloads/)More information
To send events from IBM®Federated Directory Server to JSA, complete the following
steps:
1. If automatic updates are not enabled, download themost recent version of the
following RPMs on your JSA console:
• DSMCommon RPM
• IBM®Federated Directory Server DSM RPM
2. Configure JSAmonitoring on your IBM®Federated Directory Server device.
3. If JSA does not automatically detect the log source, add an IBM®Federated Directory
Server log source on the JSA Console. The following table describes the parameters
that require specific values for IBM®Federated Directory Server event collection:
Table 156: IBM Federated Directory Serve Log Source Parameters
ValueParameter
IBM® Federated Directory ServerLog Source type
SyslogProtocol Configuration
517Copyright © 2018, Juniper Networks, Inc.
Chapter 64: IBM
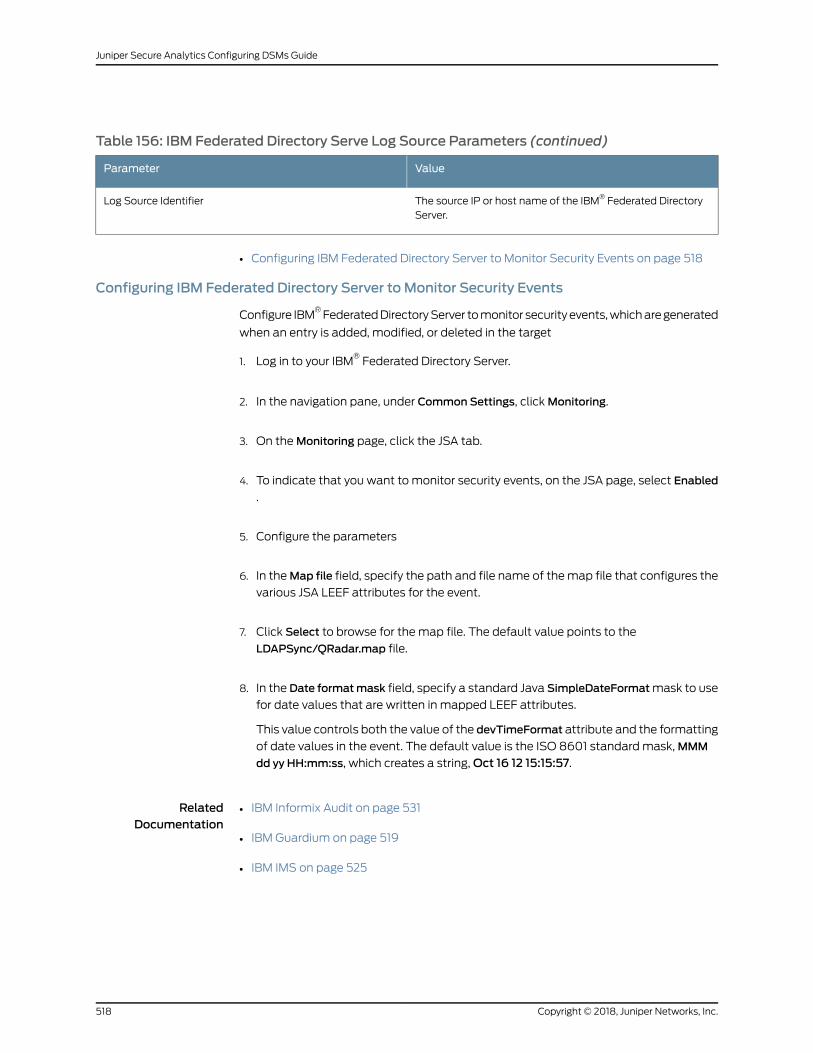
Table 156: IBM Federated Directory Serve Log Source Parameters (continued)
ValueParameter
The source IP or host name of the IBM® Federated DirectoryServer.
Log Source Identifier
• Configuring IBM Federated Directory Server to Monitor Security Events on page 518
Configuring IBM Federated Directory Server to Monitor Security Events
Configure IBM®FederatedDirectoryServer tomonitor security events,whicharegenerated
when an entry is added, modified, or deleted in the target
1. Log in to your IBM®Federated Directory Server.
2. In the navigation pane, under Common Settings, clickMonitoring.
3. On theMonitoring page, click the JSA tab.
4. To indicate that you want to monitor security events, on the JSA page, select Enabled
.
5. Configure the parameters
6. In theMap file field, specify the path and file name of themap file that configures the
various JSA LEEF attributes for the event.
7. Click Select to browse for the map file. The default value points to the
LDAPSync/QRadar.map file.
8. In the Date formatmask field, specify a standard Java SimpleDateFormatmask to use
for date values that are written in mapped LEEF attributes.
This value controls both the value of the devTimeFormat attribute and the formatting
of date values in the event. The default value is the ISO 8601 standard mask,MMM
dd yy HH:mm:ss, which creates a string,Oct 16 12 15:15:57.
RelatedDocumentation
IBM Informix Audit on page 531•
• IBM Guardium on page 519
• IBM IMS on page 525
Copyright © 2018, Juniper Networks, Inc.518
Juniper Secure Analytics Configuring DSMs Guide
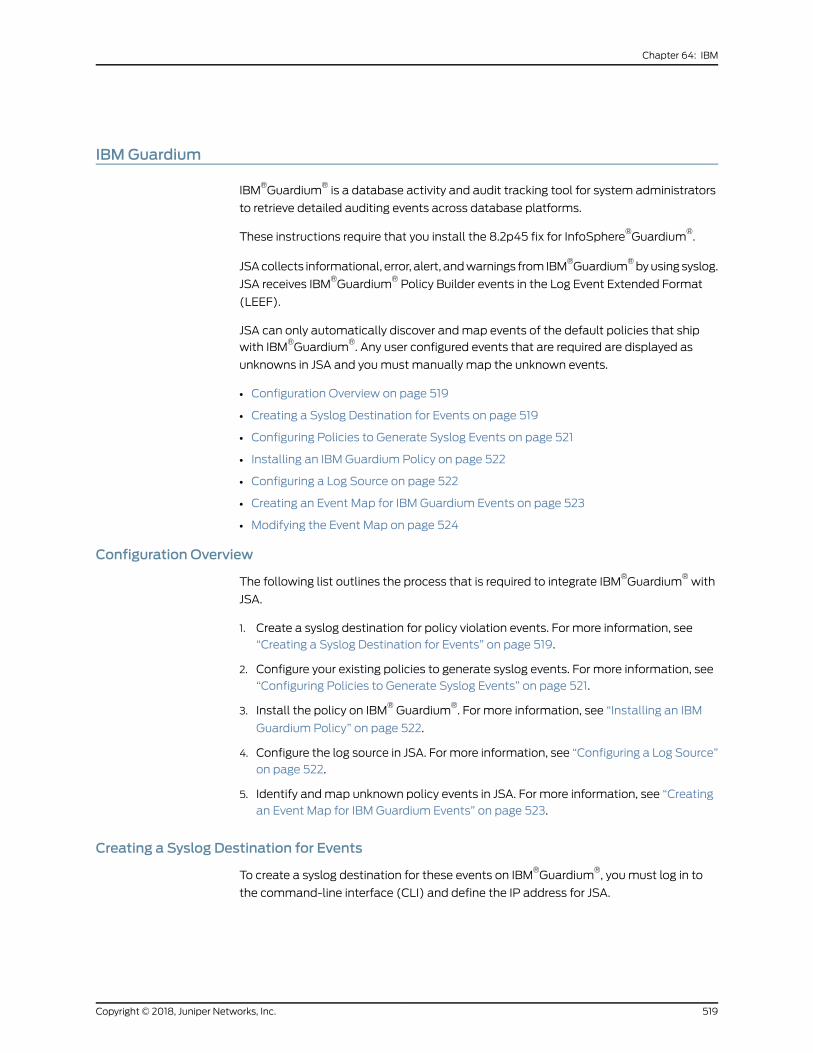
IBMGuardium
IBM®Guardium
®is a database activity and audit tracking tool for system administrators
to retrieve detailed auditing events across database platforms.
These instructions require that you install the 8.2p45 fix for InfoSphere®Guardium
®.
JSAcollects informational, error, alert, andwarnings from IBM®Guardium
®byusing syslog.
JSA receives IBM®Guardium
®Policy Builder events in the Log Event Extended Format
(LEEF).
JSA can only automatically discover andmap events of the default policies that ship
with IBM®Guardium
®. Any user configured events that are required are displayed as
unknowns in JSA and youmust manually map the unknown events.
• Configuration Overview on page 519
• Creating a Syslog Destination for Events on page 519
• Configuring Policies to Generate Syslog Events on page 521
• Installing an IBM Guardium Policy on page 522
• Configuring a Log Source on page 522
• Creating an Event Map for IBM Guardium Events on page 523
• Modifying the Event Map on page 524
Configuration Overview
The following list outlines the process that is required to integrate IBM®Guardium
®with
JSA.
1. Create a syslog destination for policy violation events. For more information, see
“Creating a Syslog Destination for Events” on page 519.
2. Configure your existing policies to generate syslog events. For more information, see
“Configuring Policies to Generate Syslog Events” on page 521.
3. Install the policy on IBM®Guardium
®. For more information, see “Installing an IBM
Guardium Policy” on page 522.
4. Configure the log source in JSA. For more information, see “Configuring a Log Source”
on page 522.
5. Identify andmap unknown policy events in JSA. For more information, see “Creating
an Event Map for IBM Guardium Events” on page 523.
Creating a Syslog Destination for Events
To create a syslog destination for these events on IBM®Guardium
®, you must log in to
the command-line interface (CLI) and define the IP address for JSA.
519Copyright © 2018, Juniper Networks, Inc.
Chapter 64: IBM
1. Using SSH, log in to IBM®Guardium
®as the root user.
Username: <username>
Password: <password>
2. Type the following command to configure the syslog destination for informational
events:
store remote add daemon.info <IP address>:<port> <<tcp>|<udp>>
For example,
store remote add daemon.info 10.10.1.1:514 tcp
Where:
• <IP address> is the IP address of your JSA console or Event Collector.
• <port> is the syslog port number that is used to communicate to the JSA console
or Event Collector.
• <<tcp>|<udp>> is the protocol that is used to communicate to the JSA console or
Event Collector.
3. Type the following command to configure the syslog destination for warning events:
store remote add daemon.warning <IP address>:<port> <<tcp>|<udp>>
Where:
• <IP address> is the IP address of your JSA console or Event Collector.
• <port> is the syslog port number that is used to communicate to the JSA console
or Event Collector.
• <<tcp>|<udp>> is the protocol that is used to communicate to the JSA console or
Event Collector.
4. Type the following command to configure the syslog destination for error events:
store remote add daemon.err <IP address>:<port> <<tcp>|<udp>>
Where:
• <IP address> is the IP address of your JSA console or Event Collector.
• <port> is the syslog port number that is used to communicate to the JSA console
or Event Collector.
• <<tcp>|<udp>> is the protocol that is used to communicate to the JSA console or
Event Collector.
5. Type the following command to configure the syslog destination for alert events:
store remote add daemon.alert <IP address>:<port> <<tcp>|<udp>>
Where:
• <IP address> is the IP address of your JSA console or Event Collector.
Copyright © 2018, Juniper Networks, Inc.520
Juniper Secure Analytics Configuring DSMs Guide
• <port> is the syslog port number that is used to communicate to the JSA console
or Event Collector.
• <<tcp>|<udp>> is the protocol that is used to communicate to the JSA console or
Event Collector.
You are now ready to configure a policy for IBM®InfoSphere
®Guardium
®.
Configuring Policies to Generate Syslog Events
Policies in IBM®Guardium
®are responsible for reacting to events and forwarding the
event information to JSA.
1. Click the Tools tab.
2. From the left navigation, select Policy Builder.
3. From the Policy Finder pane, select an existing policy and click Edit Rules.
4. Click Edit this Rule individually.
The Access Rule Definition is displayed.
5. Click Add Action.
6. From the Action list, select one of the following alert types:
• Alert Per Match A notification is provided for every policy violation.
• Alert Daily A notification is provided the first time a policy violation occurs that day.
• Alert Once Per Session A notification is provided per policy violation for unique
session.
• Alert Per Time Granularity A notification is provided per your selected time frame.
7. From theMessage Template list, select JSA.
8. From Notification Type, select SYSLOG.
9. Click Add, then click Apply.
10. Click Save.
11. Repeat Steps 1 to 10 for all rules within the policy that you want to forward to JSA.
For more information on configuring a policy, see your IBM®InfoSphere
®Guardium
®
vendor documentation. After you have configured all of your policies, you are now
ready to install the policy on your IBM®Guardium
®system.
521Copyright © 2018, Juniper Networks, Inc.
Chapter 64: IBM

NOTE: Due to the configurable policies, JSA can only automaticallydiscover the default policy events. If you have customized policies thatforward events to JSA, youmust manually create a log source to capturethose events.
Installing an IBMGuardiumPolicy
Any new or edited policy in IBM®Guardium
®must be installed before the updated alert
actions or rule changes can occur.
1. Click the Administration Console tab.
2. From the left navigation, select Configuration >Policy Installation.
3. FromthePolicy Installerpane, select apolicy that youmodified in “ConfiguringPolicies
to Generate Syslog Events” on page 521.
4. From the drop-down list, select Install and Override.
A confirmation is displayed to install the policy to all Inspection Engines.
5. ClickOK.
For more information on installing a policy, see your IBM®InfoSphere
®Guardium
®
vendor documentation. After you install all of your policies, you are ready to configure
the log source in JSA.
Configuring a Log Source
JSA only automatically discovers default policy events from IBM Guardium.
Because of the configurable nature of policies, it is suggested that you configure a log
source manually for IBM Guardium.
1. Log in to JSA.
2. Click the Admin tab.
3. Click the Log Sources icon.
4. Click Add.
5. In the Log Source Name field, type a name for the log source.
6. In the Log Source Description field, type a description for the log source.
Copyright © 2018, Juniper Networks, Inc.522
Juniper Secure Analytics Configuring DSMs Guide
7. From the Log Source Type list, select IBMGuardium.
8. From the Protocol Configuration list, select Syslog.
9. Configure the following values:
Table 157: IBMGuardium Syslog Configuration
DescriptionParameter
Type the IP address or host name for the IBM InfoSphere Guardium appliance.Log Source Identifier
10. Click Save.
11. On the Admin tab, click Deploy Changes.
Creating an Event Map for IBMGuardium Events
Event mapping is required for a number of IBM®Guardium
®events. Due to the
customizable nature of policy rules,most events, except the default policy events do not
contain a predefined JSA Identifier (QID) map to categorize security events.
You can individuallymap each event for your device to an event category in JSA.Mapping
events allows JSA to identify, coalesce, and track recurring events from your network
devices. Until you map an event, all events that are displayed in the Log Activity tab for
IBM®Guardium
®are categorized as unknown. Unknown events are easily identified as
the Event Name column and Low Level Category columns display Unknown.
As your device forwards events to JSA, it can take time to categorize all of the events for
a device, as some events might not be generated immediately by the event source
appliance or software. It is helpful to know how to quickly search for unknown events.
When you know how to search for unknown events, we suggest that you repeat this
search until you are satisfied that most of your events are identified.
1. Log in to JSA.
2. Click the Log Activity tab.
3. Click Add Filter.
4. From the first list, select Log Source.
5. From the Log Source Group list, select the log source group orOther.
Log sources that are not assigned to a group are categorized as Other.
6. From the Log Source list, select your IBM®Guardium
®log source.
523Copyright © 2018, Juniper Networks, Inc.
Chapter 64: IBM
7. Click Add Filter.
The Log Activity tab is displayed with a filter for your log source.
8. From the View list, select Last Hour.
Any events that are generated by the IBM®Guardium
®DSM in the last hour are
displayed. Events that are displayed as unknown in the Event Name column or Low
Level Category column require event mapping in JSA.
NOTE: You can save your existing search filter by clicking Save Criteria.
You are now ready to modify the event map.
Modifying the Event Map
Modifying an eventmapallows for themanual categorization of events to a JSA Identifier
(QID) map. Any event that is categorized to a log source can be remapped to a new JSA
Identifier (QID).
IBM®Guardium
®event map events that do not have a defined log source cannot be
mapped toanevent. Eventswithouta log sourcedisplaySIMGenericLog in theLogSource
column.
1. On the Event Name column, double-click an unknown event for IBM®Guardium
®.
The detailed event information is displayed.
2. ClickMap Event.
3. From the Browse for QID pane, select any of the following search options to narrow
the event categories for a JSA Identifier (QID):
• From the High-Level Category list, select a high-level event categorization.
• For a full list of high-level and low-level event categories or category definitions,
see theEventCategories sectionof the JuniperSecureAnalyticsAdministrationGuide.
• From the Low-Level Category list, select a low-level event categorization.
• From the Log Source Type list, select a log source type.
The Log Source Type list gives the option to search for QIDs from other log sources.
Searching for QIDs by log source is useful when events are similar to another existing
networkdevice. For example, IBM®Guardium
®providespolicyevents, youmight select
another product that likely captures similar events.
4. To search for a QID by name, type a name in theQID/Name field.
TheQID/Name field gives the option to filter the full list of QIDs for a specific word,
for example, policy.
Copyright © 2018, Juniper Networks, Inc.524
Juniper Secure Analytics Configuring DSMs Guide
5. Click Search.
A list of QIDs are displayed.
6. Select the QID you want to associate to your unknown event.
7. ClickOK.
JSAmaps any additional events that are forwarded from your device with the same
QID that matches the event payload. The event count increases each time that the
event is identified by JSA.
If youupdateaneventwithanewJSA Identifier (QID)map, past events that are stored
in JSA are not updated. Only new events are categorized with the newQID.
IBM IMS
The IBM®Information Management System (IMS) DSM for JSA allows you to use an
IBM®mainframe to collect events and audit IMS database transactions.
To integrate IBM®IMS events with JSA, youmust download scripts that allow IBM
®IMS
events to be written to a log file.
Overview of the event collection process:
1. The IBM®mainframe records all security events as Service Management Framework
(SMF) records in a live repository.
2. The IBM®IMS data is extracted from the live repository using the SMF dump utility.
The SMF file contains all of the events and fields from the previous day in raw SMF
format.
3. The qeximsloadlib.trs program pulls data from the SMF formatted file. The
qeximsloadlib.trs program only pulls the relevant events and fields for JSA and writes
that information in a condensed format for compatibility. The information is saved in
a location accessible by JSA.
4. JSA uses the log file protocol source to retrieve the output file information for JSA on
a scheduled basis. JSA then imports and processes this file.
• Configuring IBM IMS on page 525
• Configuring a Log Source on page 528
Configuring IBM IMS
You can integrate IBM®IMS with JSA:
525Copyright © 2018, Juniper Networks, Inc.
Chapter 64: IBM
1. From the IBM®support website ((http://www.ibm.com/support), download the
following compressed file:
QexIMS_bundled.tar.gz
2. On a Linux-based operating system, extract the file:
tar -zxvf qexims_bundled.tar.gz
The following files are contained in the archive:
• qexims_jcl.txt - Job Control Language file
• qeximsloadlib.trs - Compressed program library (requires IBM®TRSMAIN)
• qexims_trsmain_JCL.txt - Job Control Language for TRSMAIN to decompress the
.trs file
3. Load the files onto the IBM®mainframe by using the following methods:
Upload the sample qexims_trsmain_JCL.txt and qexims_jcl.txt files by using the TEXT
protocol.
4. Upload the qeximsloadlib.trs file by using BINARYmode transfer and append to a
pre-allocated data set. The qeximsloadlib.trs file is a tersed file that contains the
executable (the mainframe programQexIMS). When you upload the .trs file from a
workstation, pre-allocate a file on themainframe with the following DCB attributes:
DSORG=PS, RECFM=FB, LRECL= 1024, BLKSIZE=6144. The file transfer typemust
be binary mode and not text.
NOTE: QexIMS is a small Cmainframe program that reads the output ofthe IMS log file (EARLOUT data) line by line. QexIMS adds a header toeach record thatcontainsevent information, forexample, recorddescriptor,the date, and time. The program places each field into the output record,suppresses trailing blank characters, and delimits each fieldwith the pipecharacter. This output file is formatted for JSA and the blank suppressionreduces network traffic to JSA. This program does not needmuch CPU orI/O disk resources.
5. Customize the qexims_trsmain_JCL.txt file according to your installation-specific
information for parameters.
For example, jobcard, data set naming conventions, output destinations, retention
periods, and space requirements.
The qexims_trsmain_JCL.txt file uses the IBM®utility TRSMAIN to extract the program
that is stored in the qeximsloadlib.trs file.
An example of the qexims_trsmain_JCL.txt file includes:
//TRSMAIN JOB (yourvalidjobcard),Q1labs, // MSGCLASS=V //DEL EXEC PGM=IEFBR14 //D1 DD DISP=(MOD,DELETE),DSN=<yourhlq>.QEXIMS.TRS
Copyright © 2018, Juniper Networks, Inc.526
Juniper Secure Analytics Configuring DSMs Guide
// UNIT=SYSDA, // SPACE=(CYL,(10,10)) //TRSMAIN EXEC PGM=TRSMAIN,PARM='UNPACK' //SYSPRINT DD SYSOUT=*,DCB=(LRECL=133,BLKSIZE=12901,RECFM=FBA) //INFILE DD DISP=SHR,DSN=<yourhlq>.QEXIMS.TRS //OUTFILE DD DISP=(NEW,CATLG,DELETE), // DSN=<yourhlq>.LOAD, // SPACE=(CYL,(1,1,5),RLSE),UNIT=SYSDA //
The .trs input file is an IBM®TERSE formatted library and is extracted by running the
JCL, which calls the TRSMAIN. This tersed file, when extracted, creates a PDS linklib
with the qexims program as amember.
6. You can STEPLIB to this library or choose tomove the program to one of the LINKLIBs
that are in LINKLST. The program does not require authorization.
7. The qexims_jcl.txt file is a text file that contains a sample JCL. Youmust configure the
job card to meet your configuration.
The qexims_jcl.txt sample file includes:
//QEXIMS JOB (T,JXPO,JKSD0093),DEV,NOTIFY=Q1JACK, // MSGCLASS=P, // REGION=0M //* //*QEXIMS JCL VERSION 1.0 FEBRUARY 2011 //* //************************************************************ //* Change dataset names to site specific dataset names *
//************************************************************ //SET1 SET IMSOUT='Q1JACK.QEXIMS.OUTPUT', // IMSIN='Q1JACK.QEXIMS.INPUT.DATA' //************************************************************ //* Delete old datasets * //************************************************************ //DEL EXEC PGM=IEFBR14 //DD1 DD DISP=(MOD,DELETE),DSN=&IMSOUT, // UNIT=SYSDA, // SPACE=(CYL,(10,10)), // DCB=(RECFM=FB,LRECL=80) //************************************************************ //* Allocate new dataset //************************************************************ //ALLOC EXEC PGM=IEFBR14 //DD1 DD DISP=(NEW,CATLG),DSN=&IMSOUT, // SPACE=(CYL,(21,2)), // DCB=(RECFM=VB,LRECL=1028,BLKSIZE=6144) //EXTRACT EXEC PGM=QEXIMS,DYNAMNBR=10, // TIME=1440 //STEPLIB DD DISP=SHR,DSN=Q1JACK.C.LOAD //SYSTSIN DD DUMMY //SYSTSPRT DD SYSOUT=* //SYSPRINT DD SYSOUT=* //IMSIN DD DISP=SHR,DSN=&IMSIN //IMSOUT DD DISP=SHR,DSN=&IMSOUT //*FTP EXEC PGM=FTP,REGION=3800K //*INPUT DD * //*<target server> //*<USER> //*<PASSWORD> //*ASCII //*PUT '<IMSOUT>' /TARGET DIRECTORY>/<IMSOUT> //*QUIT //*OUTPUT DD SYSOUT=* //*SYSPRINT DD SYSOUT=* //*
8. After the output file is created, youmust make one of the following choices:
527Copyright © 2018, Juniper Networks, Inc.
Chapter 64: IBM
• Schedule a job to transfer the output file to an interim FTP server.
• Each time the job completes, the output file is forwarded to an interim FTP server.
Youmust configure the following parameters in the sample JCL to successfully
forward the output to an interim FTP server:
For example:
//*FTP EXEC PGM=FTP,REGION=3800K //*INPUT DD * //*<target server> //*<USER> //*<PASSWORD> //*ASCII //*PUT '<IMSOUT>' /TARGET DIRECTORY>/<IMSOUT> //*QUIT //*OUTPUT DD SYSOUT=* //*SYSPRINT DD SYSOUT=*
Where:
• <target server> is the IP address or host name of the interim FTP server to receive
the output file.
• <USER> is the user name required to access the interim FTP server.
• <PASSWORD> is the password required to access the interim FTP server.
• <IMSOUT> is the name of the output file saved to the interim FTP server.
For example:
PUT 'Q1JACK.QEXIMS.OUTPUT.C320' /192.168.1.101/IMS/QEXIMS.OUTPUT.C320
NOTE: Youmust remove commented lines that begin with //* for the
script to properly forward the output file to the interim FTP server.
You are now ready to configure the log file protocol.
9. Schedule JSA to retrieve the output file from IBM®IMS.
If themainframe is configured to serve files through FTP, SFTP, or allow SCP, then no
interim FTP server is required and JSA can pull the output file directly from the
mainframe. The following text must be commented out using //* or deleted from the
qexims_jcl.txt file:
//*FTP EXEC PGM=FTP,REGION=3800K //*INPUT DD * //*<target server> //*<USER> //*<PASSWORD> //*ASCII //*PUT '<IMSOUT>' /<TARGET DIRECTORY>/<IMSOUT> //*QUIT //*OUTPUT DD SYSOUT=* //*SYSPRINT DD SYSOUT=*
You are now ready to configure the log file protocol.
Configuring a Log Source
A log file protocol source allows JSA to retrieve archived log files from a remote host.
Copyright © 2018, Juniper Networks, Inc.528
Juniper Secure Analytics Configuring DSMs Guide
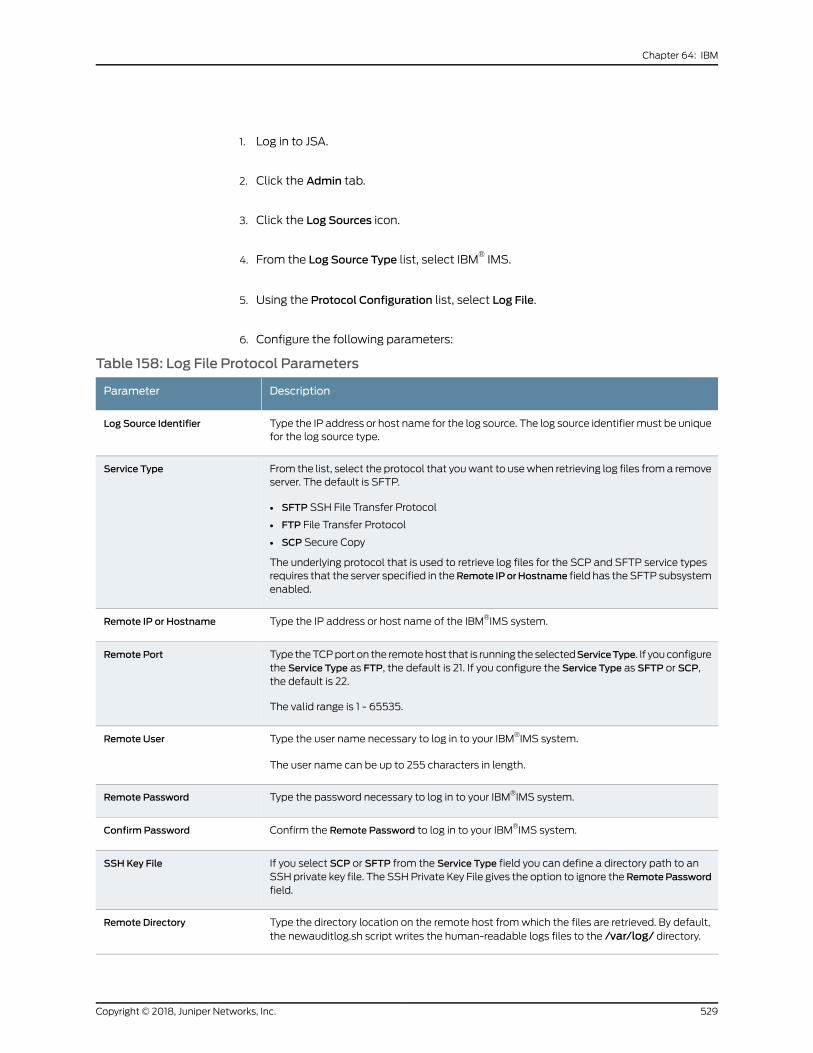
1. Log in to JSA.
2. Click the Admin tab.
3. Click the Log Sources icon.
4. From the Log Source Type list, select IBM®IMS.
5. Using the Protocol Configuration list, select Log File.
6. Configure the following parameters:
Table 158: Log File Protocol Parameters
DescriptionParameter
Type the IP address or host name for the log source. The log source identifiermust be uniquefor the log source type.
Log Source Identifier
From the list, select the protocol that youwant to usewhen retrieving log files froma removeserver. The default is SFTP.
• SFTP SSH File Transfer Protocol
• FTP File Transfer Protocol
• SCP Secure Copy
The underlying protocol that is used to retrieve log files for the SCP and SFTP service typesrequires that the server specified in theRemote IPorHostname field has the SFTP subsystemenabled.
Service Type
Type the IP address or host name of the IBM®IMS system.Remote IP or Hostname
Type theTCPport on the remotehost that is running the selectedServiceType. If youconfigurethe Service Type as FTP, the default is 21. If you configure the Service Type as SFTP or SCP,the default is 22.
The valid range is 1 - 65535.
Remote Port
Type the user name necessary to log in to your IBM®IMS system.
The user name can be up to 255 characters in length.
Remote User
Type the password necessary to log in to your IBM®IMS system.Remote Password
Confirm the Remote Password to log in to your IBM®IMS system.Confirm Password
If you select SCP or SFTP from the Service Type field you can define a directory path to anSSH private key file. The SSHPrivate Key File gives the option to ignore theRemotePasswordfield.
SSH Key File
Type the directory location on the remote host fromwhich the files are retrieved. By default,the newauditlog.sh script writes the human-readable logs files to the /var/log/ directory.
Remote Directory
529Copyright © 2018, Juniper Networks, Inc.
Chapter 64: IBM
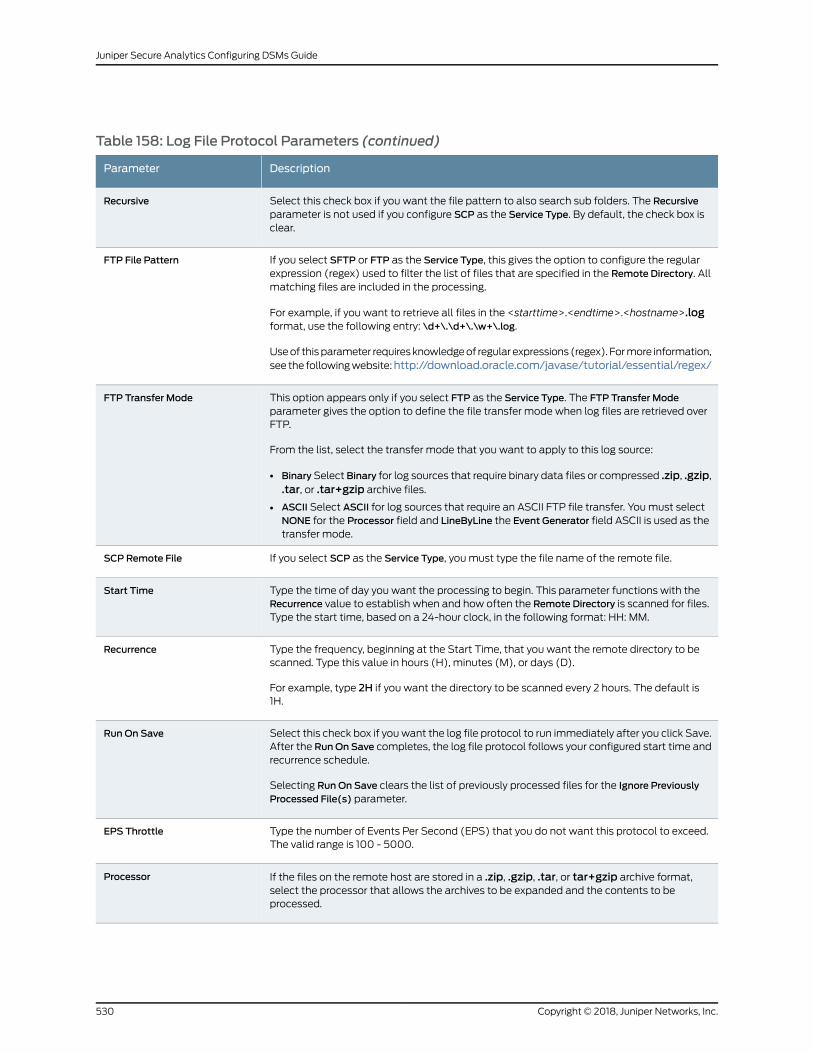
Table 158: Log File Protocol Parameters (continued)
DescriptionParameter
Select this check box if you want the file pattern to also search sub folders. The Recursiveparameter is not used if you configure SCP as the Service Type. By default, the check box isclear.
Recursive
If you select SFTP or FTP as the Service Type, this gives the option to configure the regularexpression (regex) used to filter the list of files that are specified in the Remote Directory. Allmatching files are included in the processing.
For example, if you want to retrieve all files in the <starttime>.<endtime>.<hostname>.logformat, use the following entry: \d+\.\d+\.\w+\.log.
Useof thisparameter requiresknowledgeof regular expressions (regex). Formore information,see the followingwebsite:http://download.oracle.com/javase/tutorial/essential/regex/
FTP File Pattern
This option appears only if you select FTP as the Service Type. The FTP Transfer Modeparameter gives the option to define the file transfer mode when log files are retrieved overFTP.
From the list, select the transfer mode that you want to apply to this log source:
• Binary Select Binary for log sources that require binary data files or compressed .zip, .gzip,.tar, or .tar+gzip archive files.
• ASCII Select ASCII for log sources that require an ASCII FTP file transfer. Youmust selectNONE for the Processor field and LineByLine the Event Generator field ASCII is used as thetransfer mode.
FTP Transfer Mode
If you select SCP as the Service Type, you must type the file name of the remote file.SCP Remote File
Type the time of day you want the processing to begin. This parameter functions with theRecurrence value to establish when and how often the Remote Directory is scanned for files.Type the start time, based on a 24-hour clock, in the following format: HH: MM.
Start Time
Type the frequency, beginning at the Start Time, that you want the remote directory to bescanned. Type this value in hours (H), minutes (M), or days (D).
For example, type 2H if you want the directory to be scanned every 2 hours. The default is1H.
Recurrence
Select this check box if youwant the log file protocol to run immediately after you click Save.After the RunOn Save completes, the log file protocol follows your configured start time andrecurrence schedule.
Selecting RunOn Save clears the list of previously processed files for the Ignore PreviouslyProcessed File(s) parameter.
RunOn Save
Type the number of Events Per Second (EPS) that you do not want this protocol to exceed.The valid range is 100 - 5000.
EPS Throttle
If the files on the remote host are stored in a .zip, .gzip, .tar, or tar+gzip archive format,select the processor that allows the archives to be expanded and the contents to beprocessed.
Processor
Copyright © 2018, Juniper Networks, Inc.530
Juniper Secure Analytics Configuring DSMs Guide
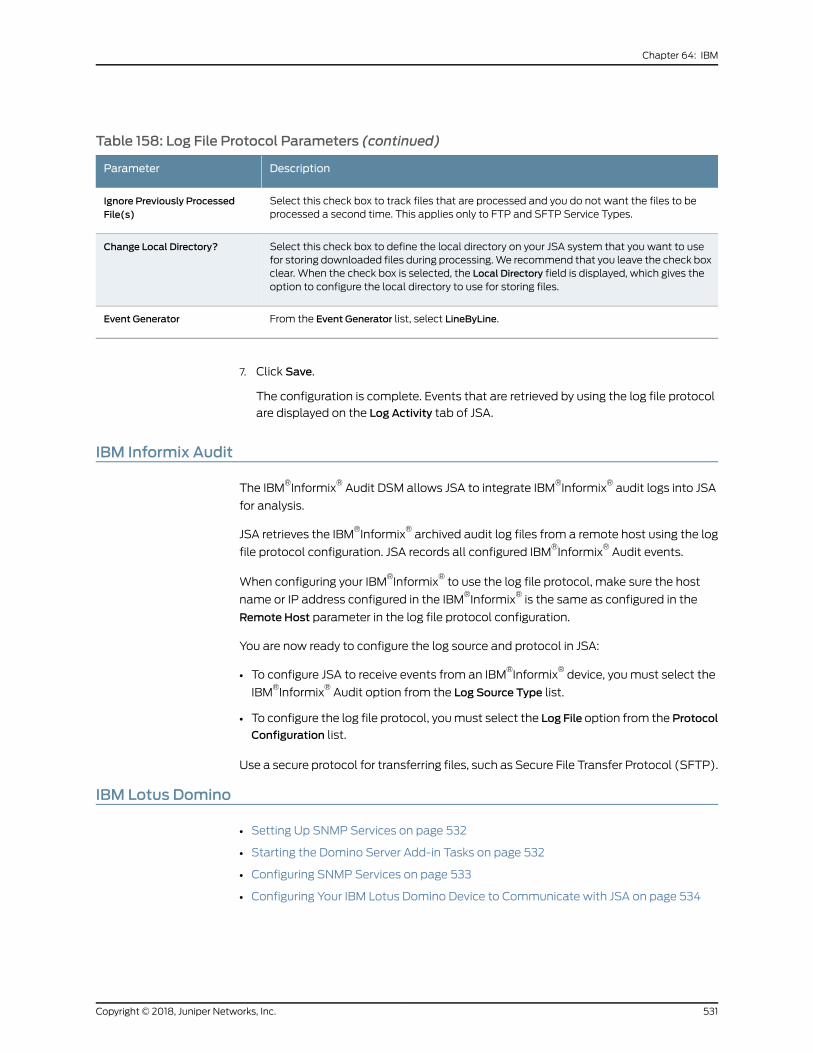
Table 158: Log File Protocol Parameters (continued)
DescriptionParameter
Select this check box to track files that are processed and you do not want the files to beprocessed a second time. This applies only to FTP and SFTP Service Types.
Ignore Previously ProcessedFile(s)
Select this check box to define the local directory on your JSA system that you want to usefor storing downloaded files during processing.We recommend that you leave the check boxclear. When the check box is selected, the Local Directory field is displayed, which gives theoption to configure the local directory to use for storing files.
Change Local Directory?
From the Event Generator list, select LineByLine.Event Generator
7. Click Save.
The configuration is complete. Events that are retrieved by using the log file protocol
are displayed on the Log Activity tab of JSA.
IBM Informix Audit
The IBM®Informix
®Audit DSM allows JSA to integrate IBM
®Informix
®audit logs into JSA
for analysis.
JSA retrieves the IBM®Informix
®archived audit log files from a remote host using the log
file protocol configuration. JSA records all configured IBM®Informix
®Audit events.
When configuring your IBM®Informix
®to use the log file protocol, make sure the host
name or IP address configured in the IBM®Informix
®is the same as configured in the
Remote Host parameter in the log file protocol configuration.
You are now ready to configure the log source and protocol in JSA:
• To configure JSA to receive events from an IBM®Informix
®device, youmust select the
IBM®Informix
®Audit option from the Log Source Type list.
• To configure the log file protocol, youmust select the Log File option from the Protocol
Configuration list.
Use a secure protocol for transferring files, such as Secure File Transfer Protocol (SFTP).
IBM Lotus Domino
• Setting Up SNMP Services on page 532
• Starting the Domino Server Add-in Tasks on page 532
• Configuring SNMP Services on page 533
• Configuring Your IBM Lotus Domino Device to Communicate with JSA on page 534
531Copyright © 2018, Juniper Networks, Inc.
Chapter 64: IBM
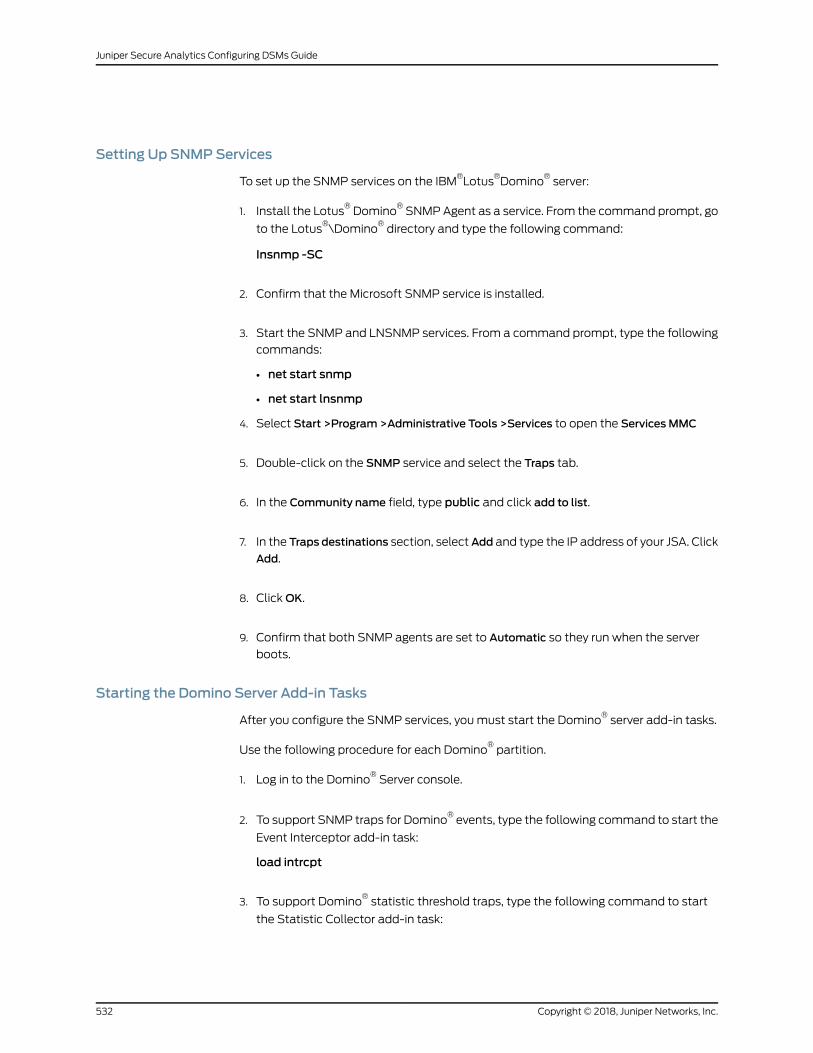
Setting Up SNMPServices
To set up the SNMP services on the IBM®Lotus
®Domino
®server:
1. Install the Lotus®Domino
®SNMPAgent as a service. From the command prompt, go
to the Lotus®\Domino
®directory and type the following command:
Insnmp -SC
2. Confirm that the Microsoft SNMP service is installed.
3. Start the SNMP and LNSNMP services. From a command prompt, type the following
commands:
• net start snmp
• net start lnsnmp
4. Select Start >Program >Administrative Tools >Services to open the Services MMC
5. Double-click on the SNMP service and select the Traps tab.
6. In the Community name field, type public and click add to list.
7. In the Traps destinations section, selectAdd and type the IP address of your JSA. Click
Add.
8. ClickOK.
9. Confirm that both SNMP agents are set to Automatic so they run when the server
boots.
Starting the Domino Server Add-in Tasks
After you configure the SNMP services, youmust start the Domino®server add-in tasks.
Use the following procedure for each Domino®partition.
1. Log in to the Domino®Server console.
2. To support SNMP traps for Domino®events, type the following command to start the
Event Interceptor add-in task:
load intrcpt
3. To support Domino®statistic threshold traps, type the following command to start
the Statistic Collector add-in task:
Copyright © 2018, Juniper Networks, Inc.532
Juniper Secure Analytics Configuring DSMs Guide
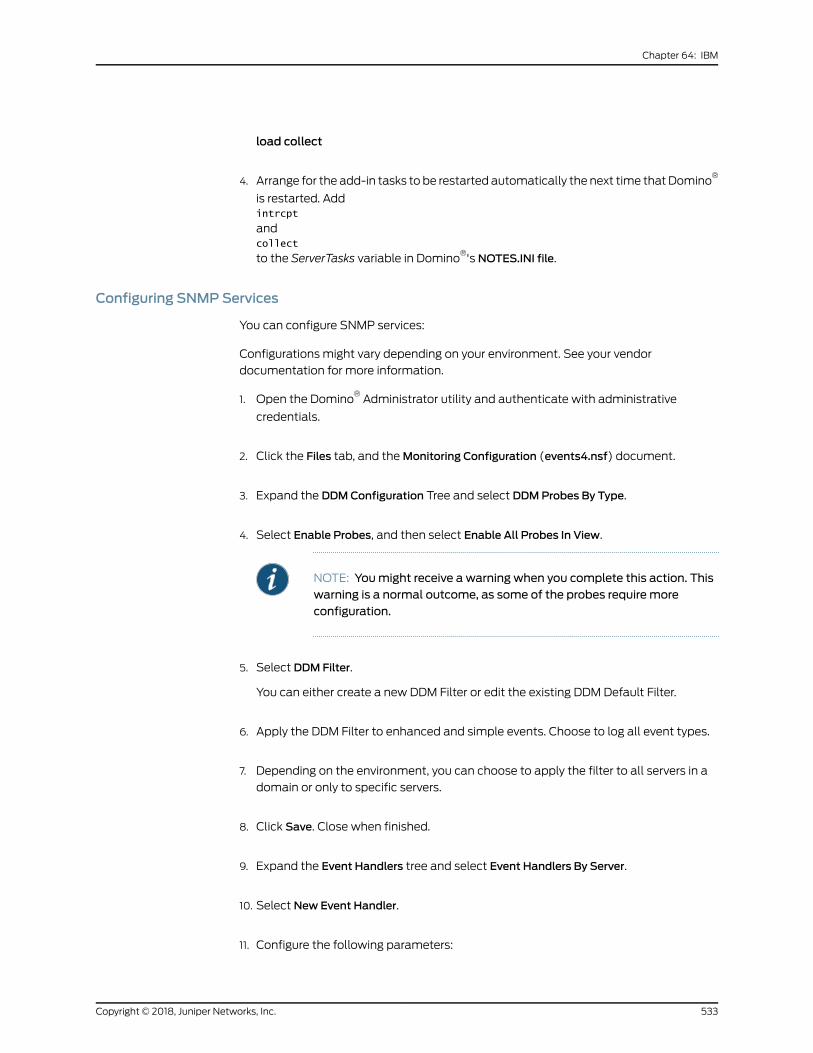
load collect
4. Arrange for the add-in tasks to be restarted automatically the next time that Domino®
is restarted. Addintrcpt
andcollect
to the ServerTasks variable in Domino®'s NOTES.INI file.
Configuring SNMPServices
You can configure SNMP services:
Configurations might vary depending on your environment. See your vendor
documentation for more information.
1. Open the Domino®Administrator utility and authenticate with administrative
credentials.
2. Click the Files tab, and theMonitoring Configuration (events4.nsf) document.
3. Expand the DDMConfiguration Tree and select DDMProbes By Type.
4. Select Enable Probes, and then select Enable All Probes In View.
NOTE: Youmight receive a warning when you complete this action. Thiswarning is a normal outcome, as some of the probes require moreconfiguration.
5. Select DDM Filter.
You can either create a new DDM Filter or edit the existing DDM Default Filter.
6. Apply the DDM Filter to enhanced and simple events. Choose to log all event types.
7. Depending on the environment, you can choose to apply the filter to all servers in a
domain or only to specific servers.
8. Click Save. Close when finished.
9. Expand the Event Handlers tree and select Event Handlers By Server.
10. Select New Event Handler.
11. Configure the following parameters:
533Copyright © 2018, Juniper Networks, Inc.
Chapter 64: IBM
• Basic - Servers tomonitor: Choose tomonitor either all servers in the domain or only
specific servers.
• Basic - Notification trigger: Any event that matches the criteria.
• Event - Criteria tomatch: Events can be any type.
• Event -Criteria tomatch: Eventsmustbeoneof thesepriorities (Checkall theboxes).
• Event - Criteria tomatch: Events can have any message.
• Action - Notificationmethod: SNMP Trap.
• Action - Enablement: Enable this notification.
12. Click Save. Close when finished.
You are now ready to configure the log source in JSA.
Configuring Your IBM Lotus Domino Device to Communicate with JSA
JSA does not automatically discover incoming syslog events from your
IBM®Lotus
®Domino
®device.
Youmust manually create a log source from the Admin tab in JSA.
1. Click the Admin tab.
2. Click the Log Sources icon.
3. Click Add.
4. In the Log Source Name field, type a name for your log source.
5. From the Log Source Type list, select IBM®Lotus
®Domino
®.
6. From the Protocol Configuration list, select SNMPv2.
7. Configure the following values:
Table 159: SNMPv2 Protocol Parameters
DescriptionParameter
Type an IP address, host name, or name to identify the SNMPv2 event source.
IP addresses or host names are recommended as they allow JSA to identify a log file to aunique event source.
Log Source Identifier
Type the SNMP community name required to access the system containing SNMP events.Community
Copyright © 2018, Juniper Networks, Inc.534
Juniper Secure Analytics Configuring DSMs Guide
Table 159: SNMPv2 Protocol Parameters (continued)
DescriptionParameter
Clear the value from this check box.
When selected, this option constructs SNMP events with name-value pairs instead of thestandard event payload format.
Include OIDs in Event Payload
8. Click Save.
9. On the Admin tab, click Deploy Changes.
IBM Privileged Session Recorder
The JSADSM for IBM®Privileged Session Recorder can collect event logs from your IBM
®
Privileged Session Recorder device.
The following table lists the specifications for the IBM®PrivilegedSessionRecorder DSM.
Table 160: IBM Privileged Session Recorder Specifications
ValueSpecification
IBM®Manufacturer
Privileged Session RecorderDSM name
DSM-IBMPrivilegedSessionRecorderRPM filename
JDBCProtocol
Command Execution Audit EventsJSA recorded event types
NoAutomatically discovered?
NoIncludes identity?
(https://www.juniper.net/support/downloads/)More information
To collect IBM®Privileged Session Recorder events, use the following procedures:
1. If automatic updates are not enabled, download and install the following RPMs on
your JSA Console:
• Protocol-JDBC RPM
• IBM®Privileged Session Recorder DSM RPM
535Copyright © 2018, Juniper Networks, Inc.
Chapter 64: IBM
2. On the IBM®Security Privileged Identity Manager dashboard, obtain the database
information for the Privileged Session Recorder data store and configure your IBM®
Privileged Session Recorder DB2®database to allow incoming TCP connections.
3. For each instance of IBM®Privileged Session Recorder, create an IBM
®Privileged
Session Recorder log source on the JSA Console. Use the following table to define
the Imperva SecureSphere parameters:
Table 161: IBM Privileged Session Recorder Log Source Parameters
DescriptionParameter
IBM® Privileged Session RecorderLog Source Type
JDBCProtocol Configuration
DATABASE@HOSTNAMELog Source Identifier
DB2®Database Type
The Session Recorder data store name that you configured onthe IBM® Privileged Identity Manager dashboard.
Database Name
The Session Recorder database server address.IP or Hostname
The port that is specified on IBM® Privileged Identity Managerdashboard.
Port
The DB2® database user nameUsername
The DB2® database passwordPassword
IBM® Privileged Session RecorderPredefined Query
This option must be selected.Use Prepared Statements
The initial date and time for the JDBC retrieval.Start Date and Time
• Configuring IBM Privileged Session Recorder to Communicate with JSA on page 536
• Configuring a Log Source for IBM Privileged Session Recorder on page 537
Configuring IBM Privileged Session Recorder to Communicate with JSA
1. Log in to the IBM®Security Privileged Identity Manager web user interface.
2. Select the Configure Privileged Identity Manager tab.
3. Select Database Server Configuration in theManage External Entities section.
Copyright © 2018, Juniper Networks, Inc.536
Juniper Secure Analytics Configuring DSMs Guide
4. In the table, double-click the Session Recording data store row in the Database Server
Configuration column.
5. 5. Record the following parameters to use when you configure a log source in JSA:
JSA Log Source FieldIBM® Privileged Session Recorder Field
IP or HostnameHostname
PortPort
Database NameDatabase name
UsernameDatabase administrator ID
Before you can configure a log source in IBM®Privileged Session Recorder for JSA, obtain
the database information for the Privileged Session Recorder data store. Youmust also
configure your IBM®Privileged Session Recorder DB2
®database to allow incoming TCP
connections from JSA.
IBM®Privileged Session Recorder is a component of IBM
®Security Privileged Identity
Manager.
Configuring a Log Source for IBM Privileged Session Recorder
JSAdoesnotautomaticallydiscover IBM®PrivilegedSessionRecorder events. To integrate
IBM®Privileged Session Recorder event data, youmust create a log source for each
instance fromwhich you want to collect event logs.
1. Log in to JSA.
2. Click the Admin tab.
3. In the navigation menu, click Data Sources.
4. Click the Log Sources icon.
5. Click Add.
6. From the Log Source Type list, select IBM®Privileged Session Recorder.
7. From the Protocol Configuration list, select JDBC.
8. From the Predefined Query list, select IBM®Privileged Session Recorder.
537Copyright © 2018, Juniper Networks, Inc.
Chapter 64: IBM
9. Select the Prepared Statement check box.
10. Configure the remaining parameters.
11. Click Save.
12. On theAdmin tab, click Deploy Changes.
RelatedDocumentation
IBM Proventia on page 538•
• IBM RACF on page 543
• IBM Lotus Domino on page 531
IBM Proventia
JSA supports a number of IBM®Proventia DSMs.
Several IBM®Proventia DSMs are supported by JSA:
• IBM Proventia Management SiteProtector on page 538
• IBM ISS Proventia on page 542
IBM Proventia Management SiteProtector
The IBM®Proventia
®Management SiteProtector DSM for JSA accepts SiteProtector
events by polling the SiteProtector database.
TheDSMallows JSA to record IntrusionPreventionSystem(IPS) events andaudit events
directly from the IBM®SiteProtector database.
NOTE: The IBM® Proventia Management SiteProtector DSM requires the
latest JDBC Protocol to collect audit events.
The IBM®Proventia Management SiteProtector DSM for JSA can accept detailed
SiteProtector events by reading information from the primary SensorData1 table. The
SensorData1 table is generated with information from several other tables in the
IBM®SiteProtectordatabase.SensorData1 remains theprimary table for collectingevents.
IDP events include information from SensorData1, along with information from the
following tables:
• SensorDataAVP1
• SensorDataReponse1
Audit events include information from the following tables:
Copyright © 2018, Juniper Networks, Inc.538
Juniper Secure Analytics Configuring DSMs Guide
• AuditInfo
• AuditTrail
Audit events are not collected by default andmake a separate query to the AuditInfo
and AuditTrail tables when you select the Include Audit Events check box. For more
information about your SiteProtector database tables, see your vendor documentation.
Before you configure JSA to integrate with SiteProtector, we suggest that you create a
database user account and password in SiteProtector for JSA.
Your JSA user must have read permissions for the SensorData1 table, which stores
SiteProtector events. The JDBC - SiteProtector protocol allows JSA to log in and poll for
events from the database. Creating a JSA account is not required, but it is recommended
for tracking and securing your event data.
NOTE: Ensure thatno firewall rulesareblocking thecommunicationbetweenthe SiteProtector console and JSA.
Configuring a Log Source
You can configure JSA to poll for IBM®SiteProtector events:
1. Click the Admin tab.
2. Click the Log Sources icon.
3. Click Add.
4. In the Log Source Name field, type a name for your log source.
5. From the Log Source Type list, select IBM®Proventia Management SiteProtector.
6. Using the Protocol Configuration list, select JDBC SiteProtector.
7. Configure the following values:
539Copyright © 2018, Juniper Networks, Inc.
Chapter 64: IBM
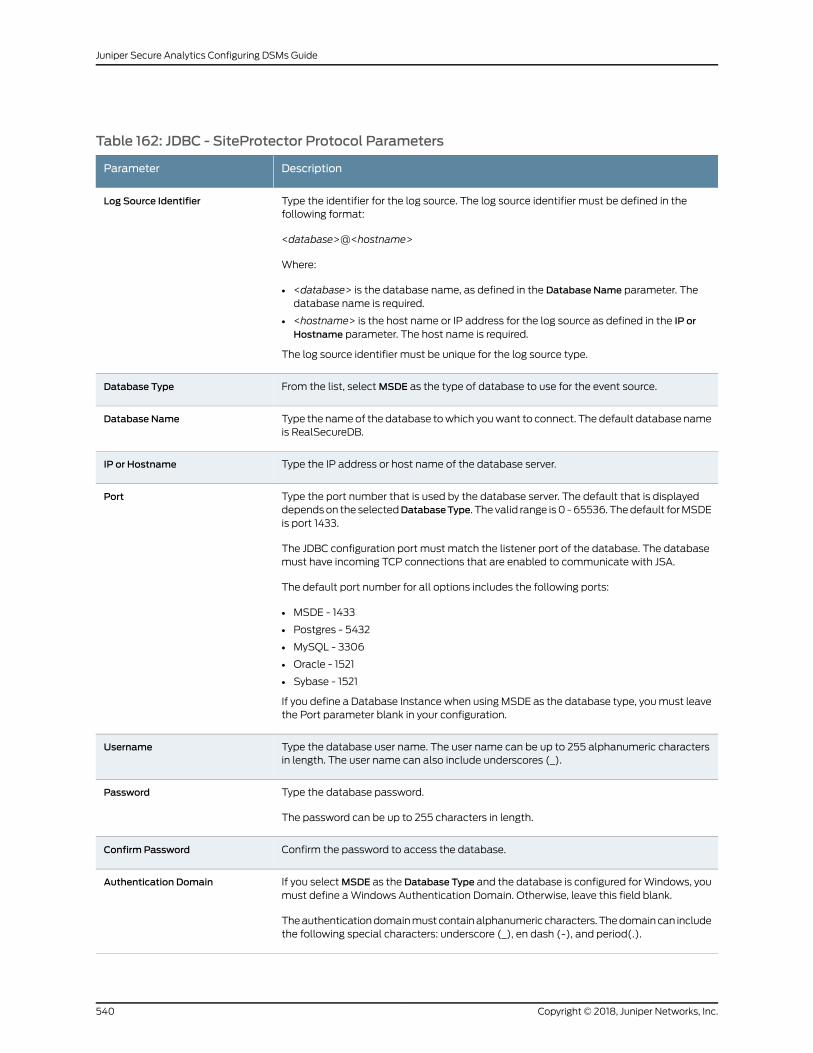
Table 162: JDBC - SiteProtector Protocol Parameters
DescriptionParameter
Type the identifier for the log source. The log source identifier must be defined in thefollowing format:
<database>@<hostname>
Where:
• <database> is the database name, as defined in the Database Name parameter. Thedatabase name is required.
• <hostname> is the host name or IP address for the log source as defined in the IP orHostname parameter. The host name is required.
The log source identifier must be unique for the log source type.
Log Source Identifier
From the list, selectMSDE as the type of database to use for the event source.Database Type
Type the nameof the database towhich youwant to connect. The default database nameis RealSecureDB.
Database Name
Type the IP address or host name of the database server.IP or Hostname
Type the port number that is used by the database server. The default that is displayeddependson the selectedDatabaseType. The valid range is0 -65536.Thedefault forMSDEis port 1433.
The JDBC configuration port must match the listener port of the database. The databasemust have incoming TCP connections that are enabled to communicate with JSA.
The default port number for all options includes the following ports:
• MSDE - 1433
• Postgres - 5432
• MySQL - 3306
• Oracle - 1521
• Sybase - 1521
If you define a Database Instancewhen usingMSDE as the database type, youmust leavethe Port parameter blank in your configuration.
Port
Type the database user name. The user name can be up to 255 alphanumeric charactersin length. The user name can also include underscores (_).
Username
Type the database password.
The password can be up to 255 characters in length.
Password
Confirm the password to access the database.Confirm Password
If you selectMSDE as the Database Type and the database is configured forWindows, youmust define aWindows Authentication Domain. Otherwise, leave this field blank.
Theauthenticationdomainmustcontainalphanumericcharacters.Thedomaincan includethe following special characters: underscore (_), en dash (-), and period(.).
Authentication Domain
Copyright © 2018, Juniper Networks, Inc.540
Juniper Secure Analytics Configuring DSMs Guide
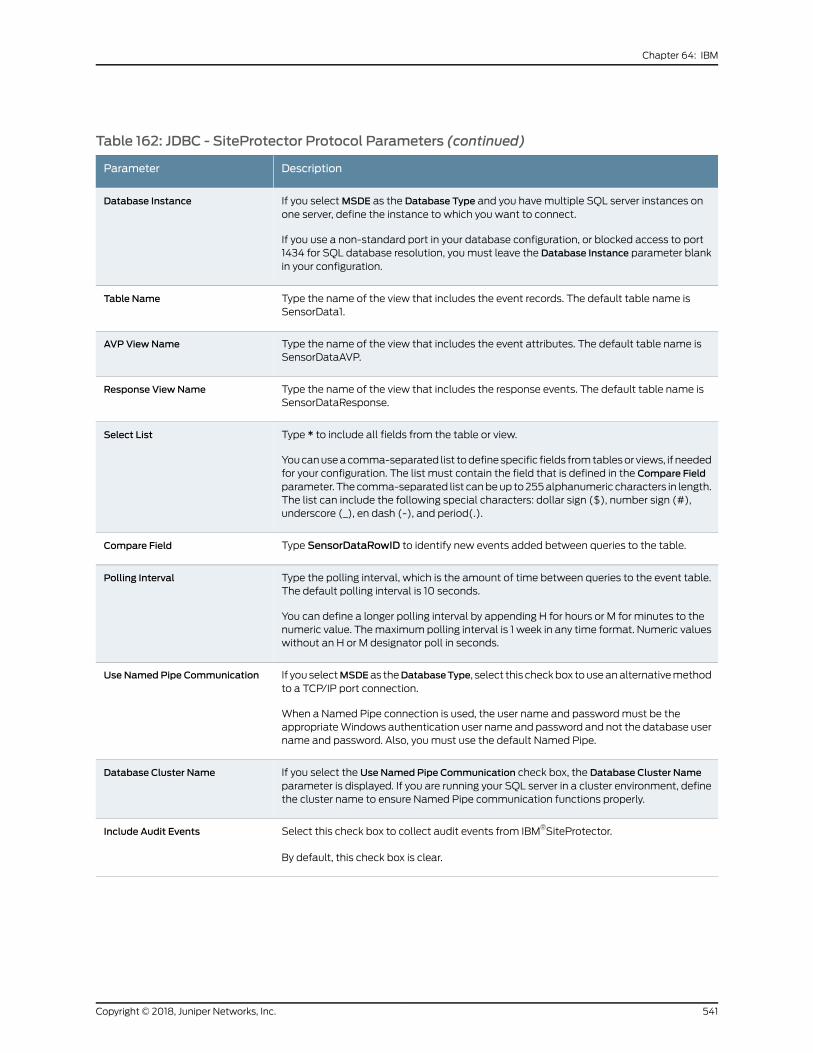
Table 162: JDBC - SiteProtector Protocol Parameters (continued)
DescriptionParameter
If you selectMSDE as the Database Type and you havemultiple SQL server instances onone server, define the instance to which you want to connect.
If you use a non-standard port in your database configuration, or blocked access to port1434 for SQL database resolution, youmust leave the Database Instance parameter blankin your configuration.
Database Instance
Type the name of the view that includes the event records. The default table name isSensorData1.
Table Name
Type the name of the view that includes the event attributes. The default table name isSensorDataAVP.
AVP ViewName
Type the name of the view that includes the response events. The default table name isSensorDataResponse.
Response ViewName
Type * to include all fields from the table or view.
Youcanuseacomma-separated list todefine specific fields fromtablesor views, if neededfor your configuration. The list must contain the field that is defined in the Compare Fieldparameter. Thecomma-separated list canbeup to255alphanumeric characters in length.The list can include the following special characters: dollar sign ($), number sign (#),underscore (_), en dash (-), and period(.).
Select List
Type SensorDataRowID to identify new events added between queries to the table.Compare Field
Type the polling interval, which is the amount of time between queries to the event table.The default polling interval is 10 seconds.
You can define a longer polling interval by appending H for hours or M for minutes to thenumeric value. Themaximumpolling interval is 1 week in any time format. Numeric valueswithout an H or M designator poll in seconds.
Polling Interval
If you selectMSDEas theDatabaseType, select this checkbox touseanalternativemethodto a TCP/IP port connection.
When a Named Pipe connection is used, the user name and passwordmust be theappropriateWindows authentication user name and password and not the database username and password. Also, youmust use the default Named Pipe.
Use Named Pipe Communication
If you select the Use Named Pipe Communication check box, the Database Cluster Nameparameter is displayed. If you are running your SQL server in a cluster environment, definethe cluster name to ensure Named Pipe communication functions properly.
Database Cluster Name
Select this check box to collect audit events from IBM®SiteProtector.
By default, this check box is clear.
Include Audit Events
541Copyright © 2018, Juniper Networks, Inc.
Chapter 64: IBM
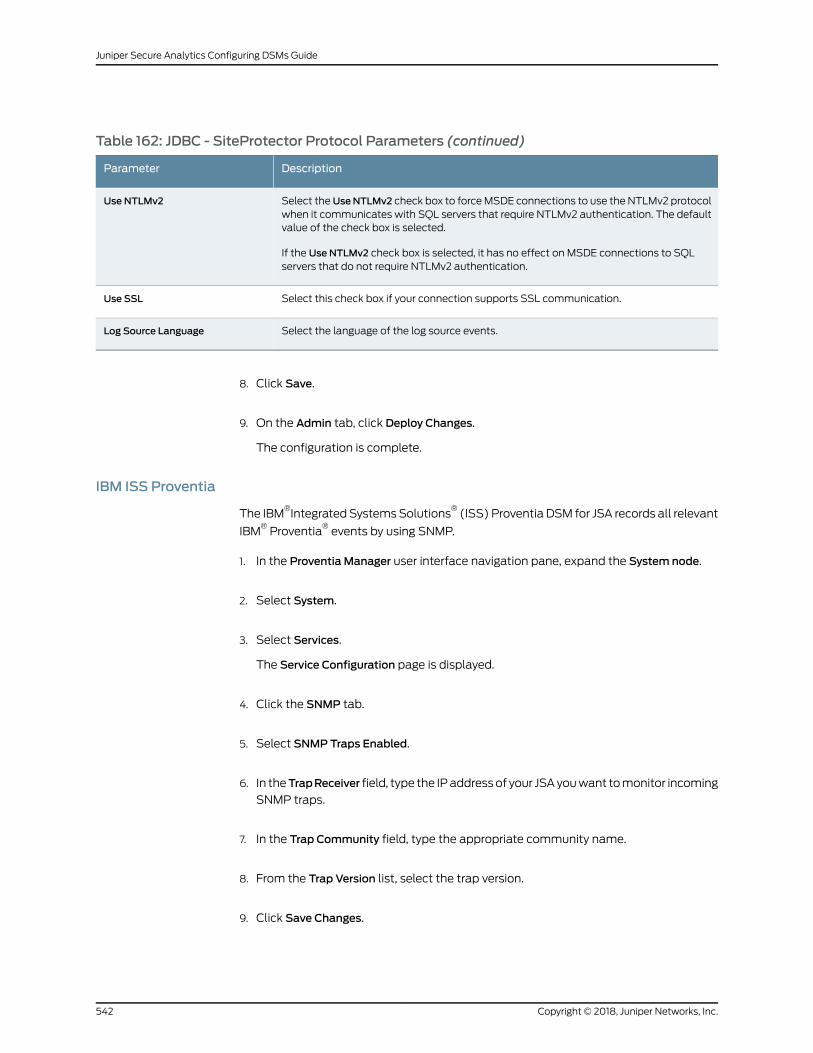
Table 162: JDBC - SiteProtector Protocol Parameters (continued)
DescriptionParameter
Select theUseNTLMv2 check box to forceMSDE connections to use the NTLMv2 protocolwhen it communicates with SQL servers that require NTLMv2 authentication. The defaultvalue of the check box is selected.
If the Use NTLMv2 check box is selected, it has no effect on MSDE connections to SQLservers that do not require NTLMv2 authentication.
Use NTLMv2
Select this check box if your connection supports SSL communication.Use SSL
Select the language of the log source events.Log Source Language
8. Click Save.
9. On the Admin tab, click Deploy Changes.
The configuration is complete.
IBM ISS Proventia
The IBM®Integrated SystemsSolutions
®(ISS) Proventia DSM for JSA records all relevant
IBM®Proventia
®events by using SNMP.
1. In the Proventia Manager user interface navigation pane, expand the System node.
2. Select System.
3. Select Services.
The Service Configuration page is displayed.
4. Click the SNMP tab.
5. Select SNMP Traps Enabled.
6. In theTrapReceiver field, type the IPaddressof your JSAyouwant tomonitor incoming
SNMP traps.
7. In the Trap Community field, type the appropriate community name.
8. From the Trap Version list, select the trap version.
9. Click Save Changes.
Copyright © 2018, Juniper Networks, Inc.542
Juniper Secure Analytics Configuring DSMs Guide
You are now ready to configure JSA to receive SNMP traps.
10. To configure JSA to receive events from an ISS Proventia device. From the Log Source
Type list, select IBM®Proventia Network Intrusion Prevention System (IPS).
Formore informationabout your ISSProventiadevice, seeyour vendordocumentation.
RelatedDocumentation
IBM RACF on page 543•
• IBM Lotus Domino on page 531
• IBM Privileged Session Recorder on page 535
IBM RACF
JSA includes two options for integrating event from IBM®RACF
®.
See the following options:
• Integrate IBM RACF with JSA by Using Audit Scripts on page 547
• Integrate IBM RACF with JSA Using IBM Security ZSecure on page 543
• Integrate IBM RACF with JSA Using IBM Security ZSecure on page 543
• Creating an IBM RACF Log Source in JSA on page 544
• Integrate IBM RACF with JSA by Using Audit Scripts on page 547
• Configuring IBM RACF to Integrate with JSA on page 548
• Create an IBM RACF Log Source on page 550
Integrate IBMRACFwith JSA Using IBM Security ZSecure
The IBM®RACF
®DSM allows the integration of events from an IBM z/OS
®mainframe by
using IBM®Security zSecure.
Using a zSecure process, events from the SystemManagement Facilities (SMF) are
recorded to an event file in the Log Enhanced Event format (LEEF). JSA retrieves the
LEEF event log files by using the log file protocol and processes the events. You can
schedule JSA to retrieve events on a polling interval, which allows JSA to retrieve the
events on the defined schedule.
To integrate IBM®RACF
®LEEF events:
1. Confirm that your installation meets any prerequisite installation requirements. For
more information, see Before you begin.
2. Configure your IBM z/OS image to write events in LEEF format. For more information,
see the IBM®Security zSecure Suite: CARLa-Driven Components Installation and
Deployment Guide.
543Copyright © 2018, Juniper Networks, Inc.
Chapter 64: IBM
3. Create a log source in JSA for IBM®RACF
®to retrieve your LEEF formatted event logs.
For more information, see “Creating an IBM RACF Log Source in JSA” on page 544.
4. Optional. Createacustomeventproperty for IBM®RACF
®in JSA. Formore information,
see the JSA Custom Event Properties for IBM z/OS technical note.
Before You Begin
Before you can configure the data collection process, youmust complete the basic
zSecure installation process.
The following prerequisites are required:
• Youmustensureparmlibmember IFAPRDxx isenabled for IBM®Security zSecureAudit
on your z/OS®image.
• The SCKRLOAD library must be APF-authorized.
• Youmust configure a process to periodically refresh your CKFREEZE and UNLOAD
data sets.
• Youmust configure an SFTP, FTP, or SCP server on your z/OS®image for JSA to
download your LEEF event files.
• Youmust allow SFTP, FTP, or SCP traffic on firewalls that are located between JSA
and your z/OS®image.
When the software is installed, youmust complete the post-installation activities to
createandmodify theconfiguration. For instructionson installingandconfiguring zSecure,
see the IBM®Security zSecure Suite: CARLa-Driven Components Installation and
Deployment Guide.
Creating an IBMRACF Log Source in JSA
The log file protocol allows JSA to retrieve archived log files from a remote host.
Log files are transferred, one at a time, to JSA for processing. The log file protocol can
manage plain text event logs, compressed files, or archives. Archives must contain
plain-text files that can be processed one line at a time. Multi-line event logs are not
supported by the log file protocol. IBM z/OSwith zSecure writes log files to a specified
directory as gzip archives. JSA extracts the archive and processes the events, which are
written as one event per line in the file.
To retrieve these events, youmust create a log source by using the log file protocol. JSA
requires credentials to log in to the system that hosts your LEEF formatted event files
and a polling interval.
1. Click the Admin tab.
2. Click the Log Sources icon.
3. Click Add.
Copyright © 2018, Juniper Networks, Inc.544
Juniper Secure Analytics Configuring DSMs Guide
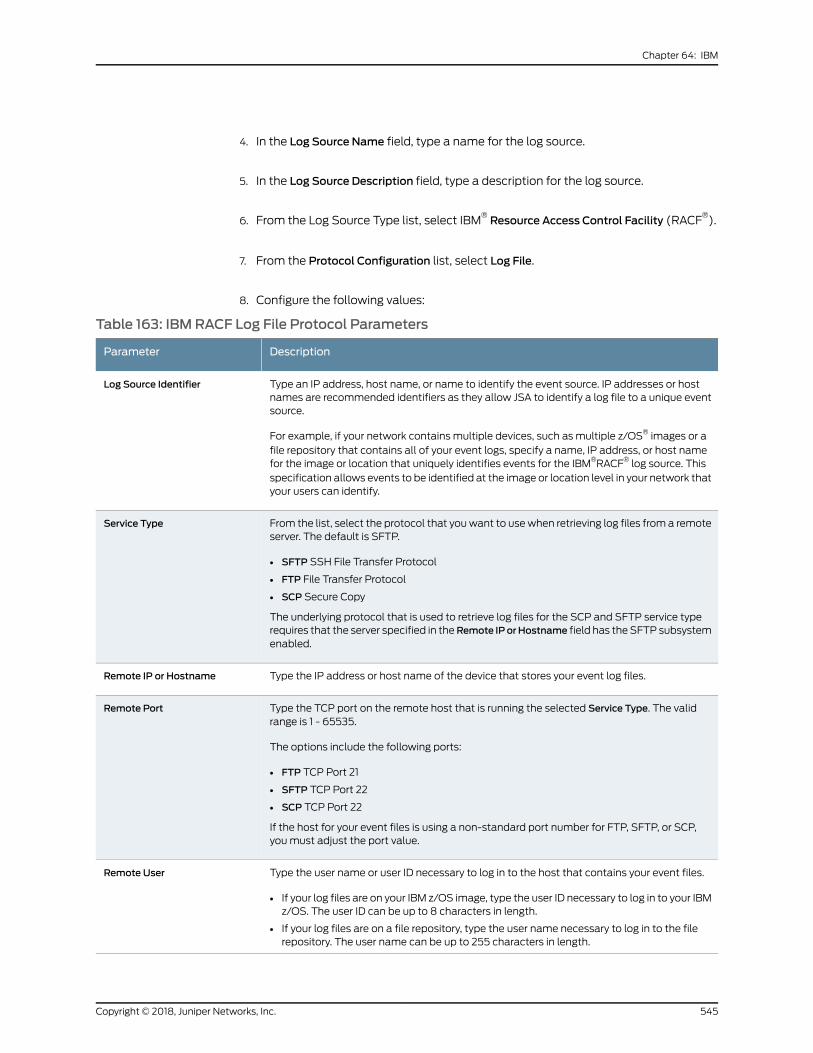
4. In the Log Source Name field, type a name for the log source.
5. In the Log Source Description field, type a description for the log source.
6. From the Log Source Type list, select IBM®Resource Access Control Facility (RACF
®).
7. From the Protocol Configuration list, select Log File.
8. Configure the following values:
Table 163: IBM RACF Log File Protocol Parameters
DescriptionParameter
Type an IP address, host name, or name to identify the event source. IP addresses or hostnames are recommended identifiers as they allow JSA to identify a log file to a unique eventsource.
For example, if your network contains multiple devices, such as multiple z/OS® images or afile repository that contains all of your event logs, specify a name, IP address, or host namefor the image or location that uniquely identifies events for the IBM®RACF® log source. Thisspecification allows events to be identified at the image or location level in your network thatyour users can identify.
Log Source Identifier
From the list, select the protocol that youwant to usewhen retrieving log files from a remoteserver. The default is SFTP.
• SFTP SSH File Transfer Protocol
• FTP File Transfer Protocol
• SCP Secure Copy
The underlying protocol that is used to retrieve log files for the SCP and SFTP service typerequires that the server specified in theRemote IPorHostname field has the SFTP subsystemenabled.
Service Type
Type the IP address or host name of the device that stores your event log files.Remote IP or Hostname
Type the TCP port on the remote host that is running the selected Service Type. The validrange is 1 - 65535.
The options include the following ports:
• FTP TCP Port 21
• SFTP TCP Port 22
• SCP TCP Port 22
If the host for your event files is using a non-standard port number for FTP, SFTP, or SCP,youmust adjust the port value.
Remote Port
Type the user name or user ID necessary to log in to the host that contains your event files.
• If your log files are on your IBM z/OS image, type the user ID necessary to log in to your IBMz/OS. The user ID can be up to 8 characters in length.
• If your log files are on a file repository, type the user name necessary to log in to the filerepository. The user name can be up to 255 characters in length.
Remote User
545Copyright © 2018, Juniper Networks, Inc.
Chapter 64: IBM
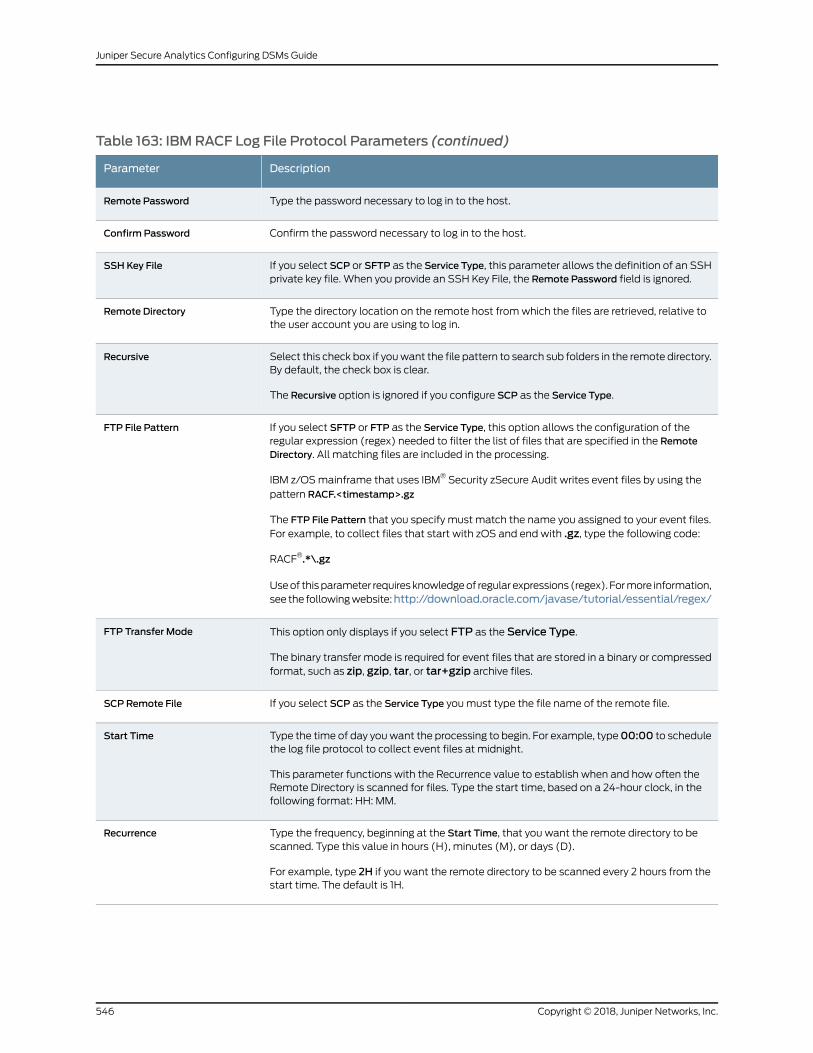
Table 163: IBM RACF Log File Protocol Parameters (continued)
DescriptionParameter
Type the password necessary to log in to the host.Remote Password
Confirm the password necessary to log in to the host.Confirm Password
If you select SCP or SFTP as the Service Type, this parameter allows the definition of an SSHprivate key file. When you provide an SSH Key File, the Remote Password field is ignored.
SSH Key File
Type the directory location on the remote host fromwhich the files are retrieved, relative tothe user account you are using to log in.
Remote Directory
Select this check box if youwant the file pattern to search sub folders in the remote directory.By default, the check box is clear.
The Recursive option is ignored if you configure SCP as the Service Type.
Recursive
If you select SFTP or FTP as the Service Type, this option allows the configuration of theregular expression (regex) needed to filter the list of files that are specified in the RemoteDirectory. All matching files are included in the processing.
IBM z/OSmainframe that uses IBM® Security zSecure Audit writes event files by using thepattern RACF.<timestamp>.gz
The FTP File Pattern that you specify must match the name you assigned to your event files.For example, to collect files that start with zOS and end with .gz, type the following code:
RACF®.*\.gz
Useof thisparameter requiresknowledgeof regular expressions (regex). Formore information,see the followingwebsite:http://download.oracle.com/javase/tutorial/essential/regex/
FTP File Pattern
This option only displays if you select FTP as the Service Type.
The binary transfer mode is required for event files that are stored in a binary or compressedformat, such as zip, gzip, tar, or tar+gzip archive files.
FTP Transfer Mode
If you select SCP as the Service Type youmust type the file name of the remote file.SCP Remote File
Type the time of day youwant the processing to begin. For example, type00:00 to schedulethe log file protocol to collect event files at midnight.
This parameter functions with the Recurrence value to establish when and how often theRemote Directory is scanned for files. Type the start time, based on a 24-hour clock, in thefollowing format: HH: MM.
Start Time
Type the frequency, beginning at the Start Time, that you want the remote directory to bescanned. Type this value in hours (H), minutes (M), or days (D).
For example, type 2H if you want the remote directory to be scanned every 2 hours from thestart time. The default is 1H.
Recurrence
Copyright © 2018, Juniper Networks, Inc.546
Juniper Secure Analytics Configuring DSMs Guide
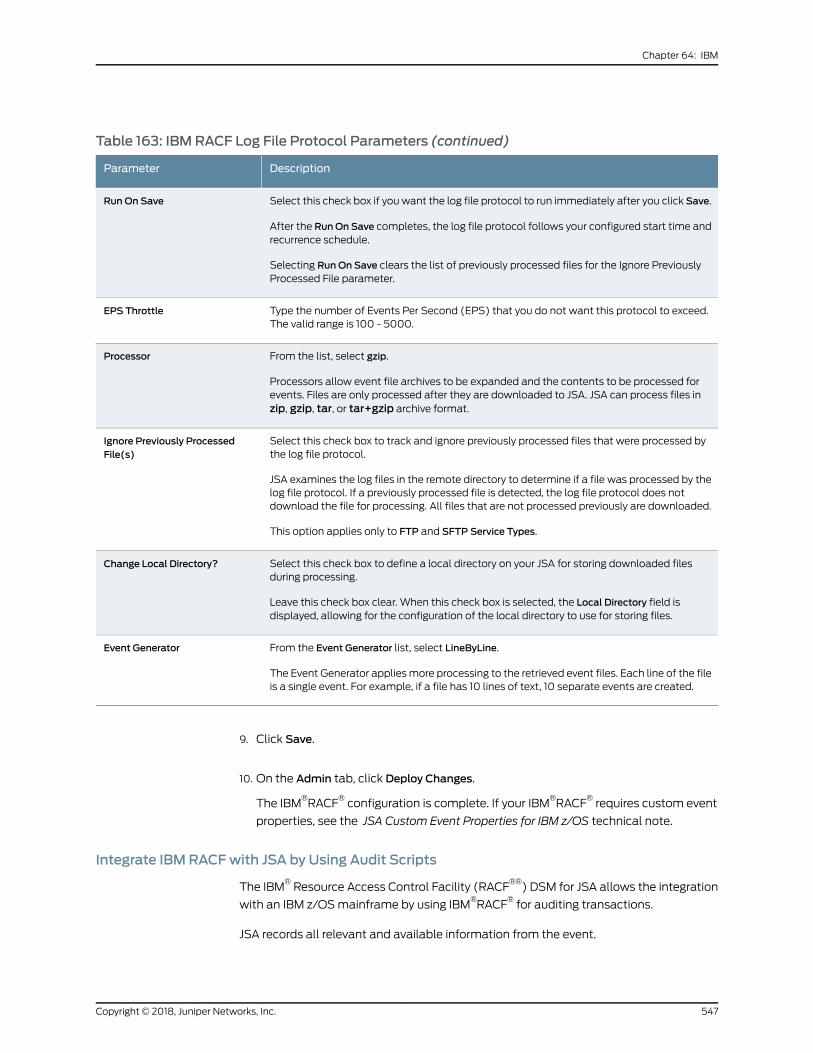
Table 163: IBM RACF Log File Protocol Parameters (continued)
DescriptionParameter
Select this check box if youwant the log file protocol to run immediately after you click Save.
After the RunOn Save completes, the log file protocol follows your configured start time andrecurrence schedule.
Selecting RunOn Save clears the list of previously processed files for the Ignore PreviouslyProcessed File parameter.
RunOn Save
Type the number of Events Per Second (EPS) that you do not want this protocol to exceed.The valid range is 100 - 5000.
EPS Throttle
From the list, select gzip.
Processors allow event file archives to be expanded and the contents to be processed forevents. Files are only processed after they are downloaded to JSA. JSA can process files inzip, gzip, tar, or tar+gzip archive format.
Processor
Select this check box to track and ignore previously processed files that were processed bythe log file protocol.
JSA examines the log files in the remote directory to determine if a file was processed by thelog file protocol. If a previously processed file is detected, the log file protocol does notdownload the file for processing. All files that are not processed previously are downloaded.
This option applies only to FTP and SFTP Service Types.
Ignore Previously ProcessedFile(s)
Select this check box to define a local directory on your JSA for storing downloaded filesduring processing.
Leave this check box clear. When this check box is selected, the Local Directory field isdisplayed, allowing for the configuration of the local directory to use for storing files.
Change Local Directory?
From the Event Generator list, select LineByLine.
The Event Generator appliesmore processing to the retrieved event files. Each line of the fileis a single event. For example, if a file has 10 lines of text, 10 separate events are created.
Event Generator
9. Click Save.
10. On the Admin tab, click Deploy Changes.
The IBM®RACF
®configuration is complete. If your IBM
®RACF
®requires custom event
properties, see the JSA Custom Event Properties for IBM z/OS technical note.
Integrate IBMRACFwith JSA by Using Audit Scripts
The IBM®Resource Access Control Facility (RACF
®®) DSM for JSA allows the integration
with an IBM z/OSmainframe by using IBM®RACF
®for auditing transactions.
JSA records all relevant and available information from the event.
547Copyright © 2018, Juniper Networks, Inc.
Chapter 64: IBM
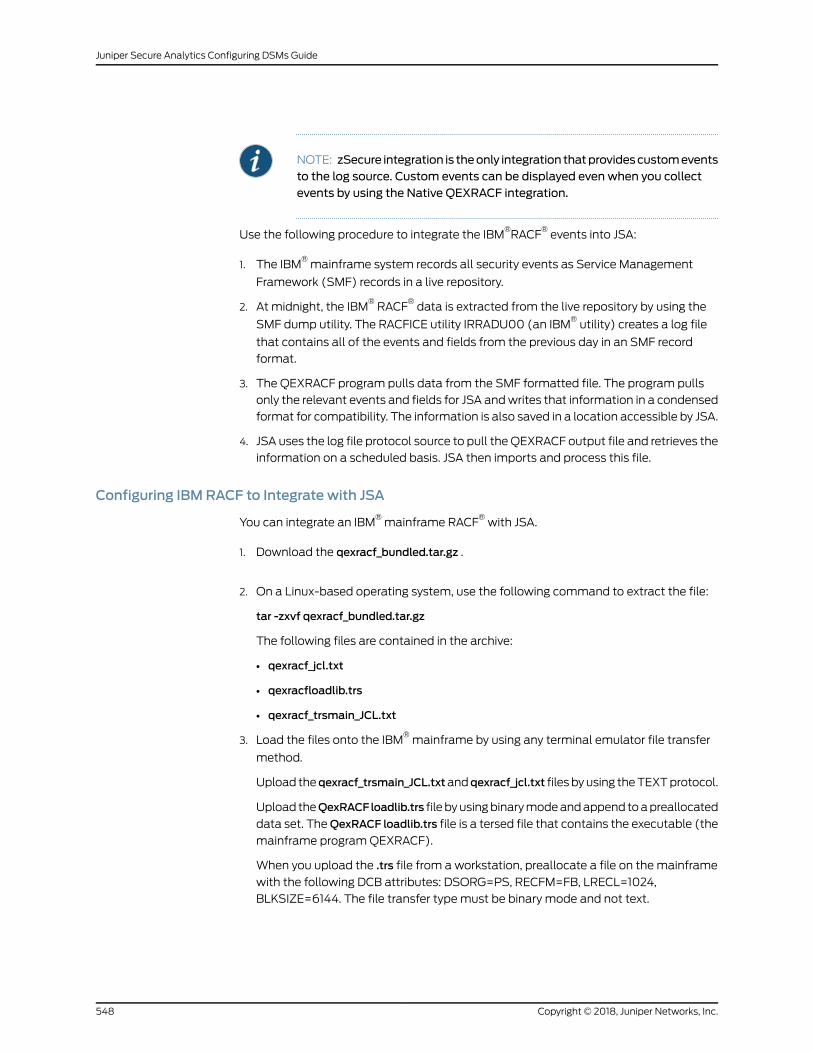
NOTE: zSecure integration is theonly integration thatprovidescustomeventsto the log source. Custom events can be displayed even when you collectevents by using the Native QEXRACF integration.
Use the following procedure to integrate the IBM®RACF
®events into JSA:
1. The IBM®mainframe system records all security events as Service Management
Framework (SMF) records in a live repository.
2. At midnight, the IBM®RACF
®data is extracted from the live repository by using the
SMF dump utility. The RACFICE utility IRRADU00 (an IBM®utility) creates a log file
that contains all of the events and fields from the previous day in an SMF record
format.
3. The QEXRACF program pulls data from the SMF formatted file. The program pulls
only the relevant events and fields for JSA andwrites that information in a condensed
format for compatibility. The information is also saved in a location accessible by JSA.
4. JSA uses the log file protocol source to pull theQEXRACF output file and retrieves the
information on a scheduled basis. JSA then imports and process this file.
Configuring IBMRACF to Integrate with JSA
You can integrate an IBM®mainframe RACF
®with JSA.
1. Download the qexracf_bundled.tar.gz .
2. On a Linux-based operating system, use the following command to extract the file:
tar -zxvf qexracf_bundled.tar.gz
The following files are contained in the archive:
• qexracf_jcl.txt
• qexracfloadlib.trs
• qexracf_trsmain_JCL.txt
3. Load the files onto the IBM®mainframe by using any terminal emulator file transfer
method.
Upload theqexracf_trsmain_JCL.txtandqexracf_jcl.txt filesbyusing theTEXTprotocol.
Upload theQexRACF loadlib.trs file byusingbinarymodeandappend toapreallocated
data set. TheQexRACF loadlib.trs file is a tersed file that contains the executable (the
mainframe programQEXRACF).
When you upload the .trs file from a workstation, preallocate a file on themainframe
with the following DCB attributes: DSORG=PS, RECFM=FB, LRECL=1024,
BLKSIZE=6144. The file transfer typemust be binary mode and not text.
Copyright © 2018, Juniper Networks, Inc.548
Juniper Secure Analytics Configuring DSMs Guide

4. Customize the qexracf_trsmain_JCL.txt file according to your installation-specific
requirements.
The qexracf_trsmain_JCL.txt file uses the IBM®utility Trsmain to decompress the
program that is stored in theQexRACF loadlib.trs file.
The following is an example of the qexracf_trsmain_JCL.txt file includes the following
code:
//TRSMAIN JOB (yourvalidjobcard),Q1labs, // MSGCLASS=V //DEL EXEC PGM=IEFBR14 //D1 DD DISP=(MOD,DELETE),DSN=<yourhlq>.QEXRACF.TRS // UNIT=SYSDA, // SPACE=(CYL,(10,10)) //TRSMAIN EXEC PGM=TRSMAIN,PARM='UNPACK' //SYSPRINT DD SYSOUT=*,DCB=(LRECL=133,BLKSIZE=12901,RECFM=FBA) //INFILE DD DISP=SHR,DSN=<yourhlq>.QEXRACF.TRS //OUTFILE DD DISP=(NEW,CATLG,DELETE), // DSN=<yourhlq>.LOAD, // SPACE=(CYL,(10,10,5),RLSE),UNIT=SYSDA //
Youmust update the file with your installation specific information for parameters,
suchas, jobcard, data set naming conventions, output destinations, retentionperiods,
and space needs.
The .trs input file is an IBM®TERSE formatted library and is extracted by running the
JCL, which calls the TRSMAIN. This tersed file, when extracted, creates a PDS linklib
with the QEXRACF program as amember.
5. You can STEPLIB to this library or choose tomove the program to one of the LINKLIBs
that are in the LINKLST. The program does not require authorization.
6. When the upload is complete, copy the program to an existing link listed library or add
a STEPLIB DD statement that has the correct dataset name of the library that will
contain the program.
7. The qexracf_jcl.txt file is a text file that contains a sample JCL deck to provide you
with the necessary JCL to run the IBM®IRRADU00 utility. This allows JSA to obtain
thenecessary IBM®RACF
®events. Configure the jobcard tomeet your local standards.
An example of the qexracf_jcl.txt file has the following code.
//QEXRACF JOB (<your valid jobcard>),Q1LABS, // MSGCLASS=P, // REGION=0M //* //*QEXRACF JCL version 1.0 April 2009 //* //************************************************************* //* Change below dataset names to sites specific datasets names * //************************************************************* //SET1 SET SMFOUT='<your hlq>.CUSTNAME.IRRADU00.OUTPUT', // SMFIN='<your SMF dump ouput dataset>', // QRACFOUT='<your hlq>.QEXRACF.OUTPUT' //************************************************************* //* Delete old datasets * //************************************************************* //DEL EXEC PGM=IEFBR14 //DD2 DD DISP=(MOD,DELETE),DSN=&QRACFOUT, // UNIT=SYSDA, // SPACE=(TRK,(1,1)), // DCB=(RECFM=FB,LRECL=80)
549Copyright © 2018, Juniper Networks, Inc.
Chapter 64: IBM
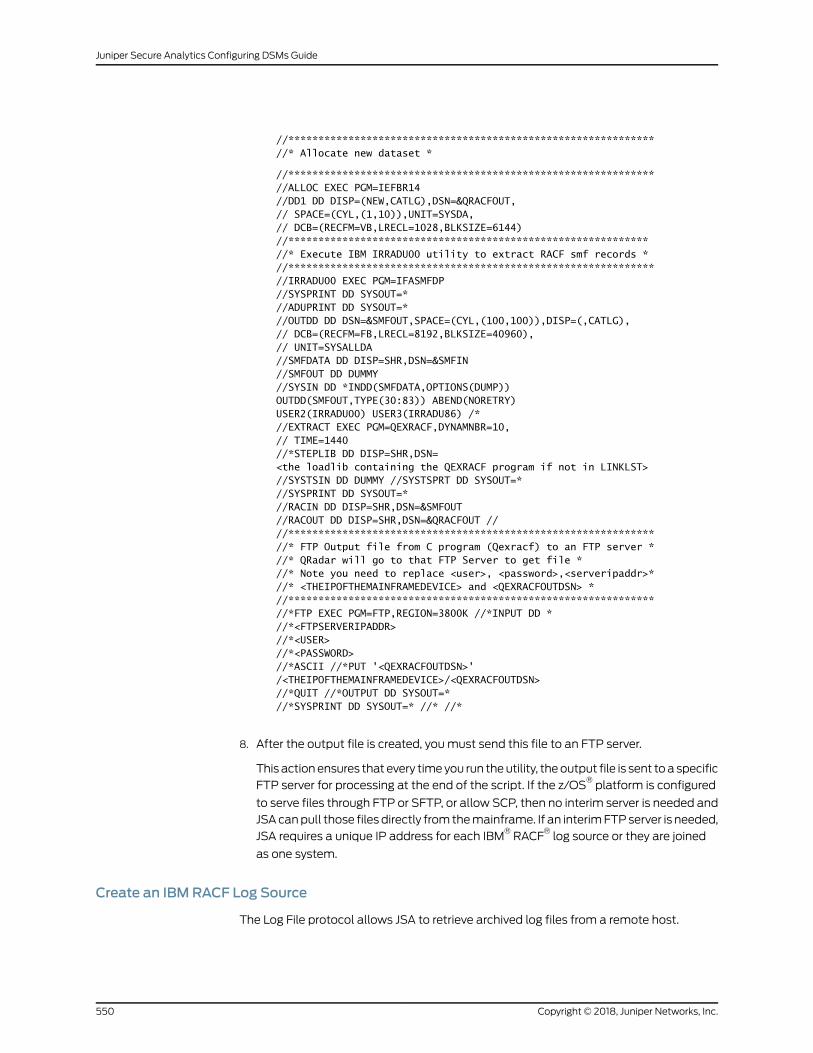
//************************************************************* //* Allocate new dataset *
//************************************************************* //ALLOC EXEC PGM=IEFBR14 //DD1 DD DISP=(NEW,CATLG),DSN=&QRACFOUT, // SPACE=(CYL,(1,10)),UNIT=SYSDA, // DCB=(RECFM=VB,LRECL=1028,BLKSIZE=6144) //************************************************************ //* Execute IBM IRRADU00 utility to extract RACF smf records * //************************************************************* //IRRADU00 EXEC PGM=IFASMFDP //SYSPRINT DD SYSOUT=* //ADUPRINT DD SYSOUT=* //OUTDD DD DSN=&SMFOUT,SPACE=(CYL,(100,100)),DISP=(,CATLG), // DCB=(RECFM=FB,LRECL=8192,BLKSIZE=40960), // UNIT=SYSALLDA //SMFDATA DD DISP=SHR,DSN=&SMFIN //SMFOUT DD DUMMY //SYSIN DD *INDD(SMFDATA,OPTIONS(DUMP)) OUTDD(SMFOUT,TYPE(30:83)) ABEND(NORETRY) USER2(IRRADU00) USER3(IRRADU86) /* //EXTRACT EXEC PGM=QEXRACF,DYNAMNBR=10, // TIME=1440 //*STEPLIB DD DISP=SHR,DSN=<the loadlib containing the QEXRACF program if not in LINKLST> //SYSTSIN DD DUMMY //SYSTSPRT DD SYSOUT=* //SYSPRINT DD SYSOUT=* //RACIN DD DISP=SHR,DSN=&SMFOUT //RACOUT DD DISP=SHR,DSN=&QRACFOUT // //************************************************************* //* FTP Output file from C program (Qexracf) to an FTP server * //* QRadar will go to that FTP Server to get file * //* Note you need to replace <user>, <password>,<serveripaddr>* //* <THEIPOFTHEMAINFRAMEDEVICE> and <QEXRACFOUTDSN> * //************************************************************* //*FTP EXEC PGM=FTP,REGION=3800K //*INPUT DD * //*<FTPSERVERIPADDR> //*<USER> //*<PASSWORD> //*ASCII //*PUT '<QEXRACFOUTDSN>' /<THEIPOFTHEMAINFRAMEDEVICE>/<QEXRACFOUTDSN> //*QUIT //*OUTPUT DD SYSOUT=* //*SYSPRINT DD SYSOUT=* //* //*
8. After the output file is created, youmust send this file to an FTP server.
This actionensures that every timeyou run theutility, theoutput file is sent toa specific
FTP server for processing at the end of the script. If the z/OS®platform is configured
to serve files through FTP or SFTP, or allow SCP, then no interim server is needed and
JSAcanpull those files directly from themainframe. If an interimFTPserver is needed,
JSA requires a unique IP address for each IBM®RACF
®log source or they are joined
as one system.
Create an IBMRACF Log Source
The Log File protocol allows JSA to retrieve archived log files from a remote host.
Copyright © 2018, Juniper Networks, Inc.550
Juniper Secure Analytics Configuring DSMs Guide
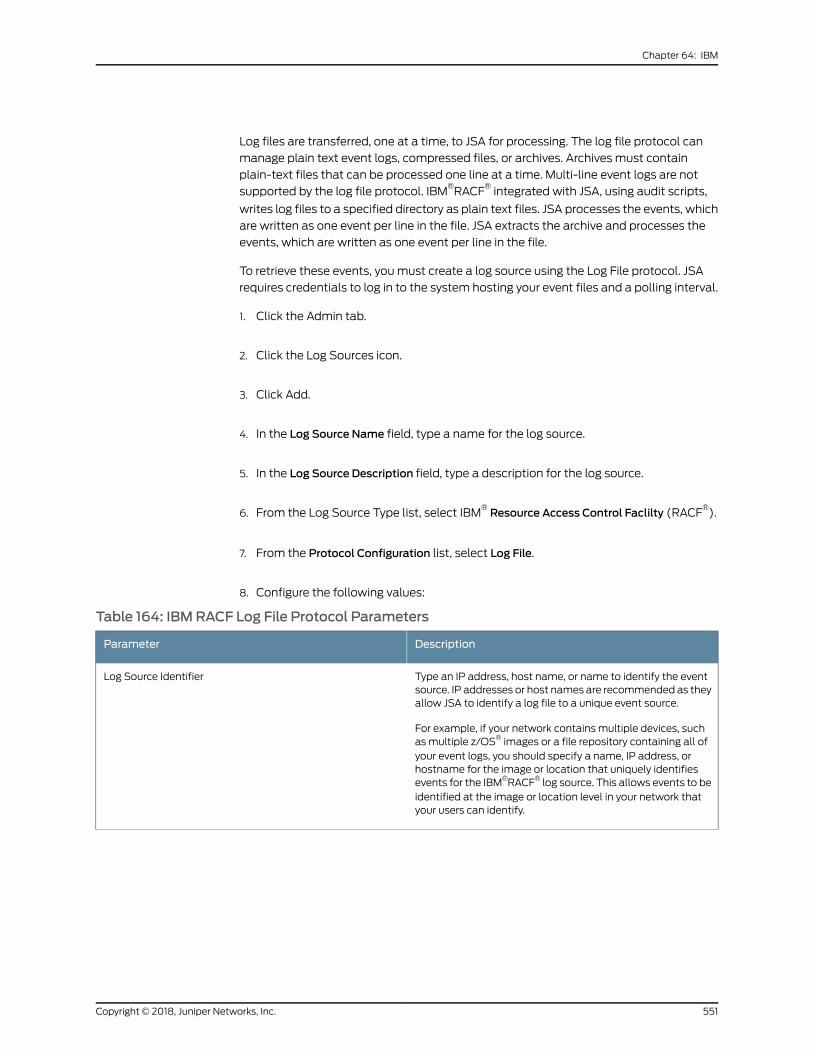
Log files are transferred, one at a time, to JSA for processing. The log file protocol can
manage plain text event logs, compressed files, or archives. Archives must contain
plain-text files that can be processed one line at a time. Multi-line event logs are not
supported by the log file protocol. IBM®RACF
®integrated with JSA, using audit scripts,
writes log files to a specified directory as plain text files. JSA processes the events, which
are written as one event per line in the file. JSA extracts the archive and processes the
events, which are written as one event per line in the file.
To retrieve these events, youmust create a log source using the Log File protocol. JSA
requires credentials to log in to the system hosting your event files and a polling interval.
1. Click the Admin tab.
2. Click the Log Sources icon.
3. Click Add.
4. In the Log Source Name field, type a name for the log source.
5. In the Log Source Description field, type a description for the log source.
6. From the Log Source Type list, select IBM®Resource Access Control Faclilty (RACF
®).
7. From the Protocol Configuration list, select Log File.
8. Configure the following values:
Table 164: IBM RACF Log File Protocol Parameters
DescriptionParameter
Type an IP address, host name, or name to identify the eventsource. IP addresses or host names are recommended as theyallow JSA to identify a log file to a unique event source.
For example, if your network contains multiple devices, suchas multiple z/OS® images or a file repository containing all ofyour event logs, you should specify a name, IP address, orhostname for the image or location that uniquely identifiesevents for the IBM®RACF® log source. This allows events to beidentified at the image or location level in your network thatyour users can identify.
Log Source Identifier
551Copyright © 2018, Juniper Networks, Inc.
Chapter 64: IBM
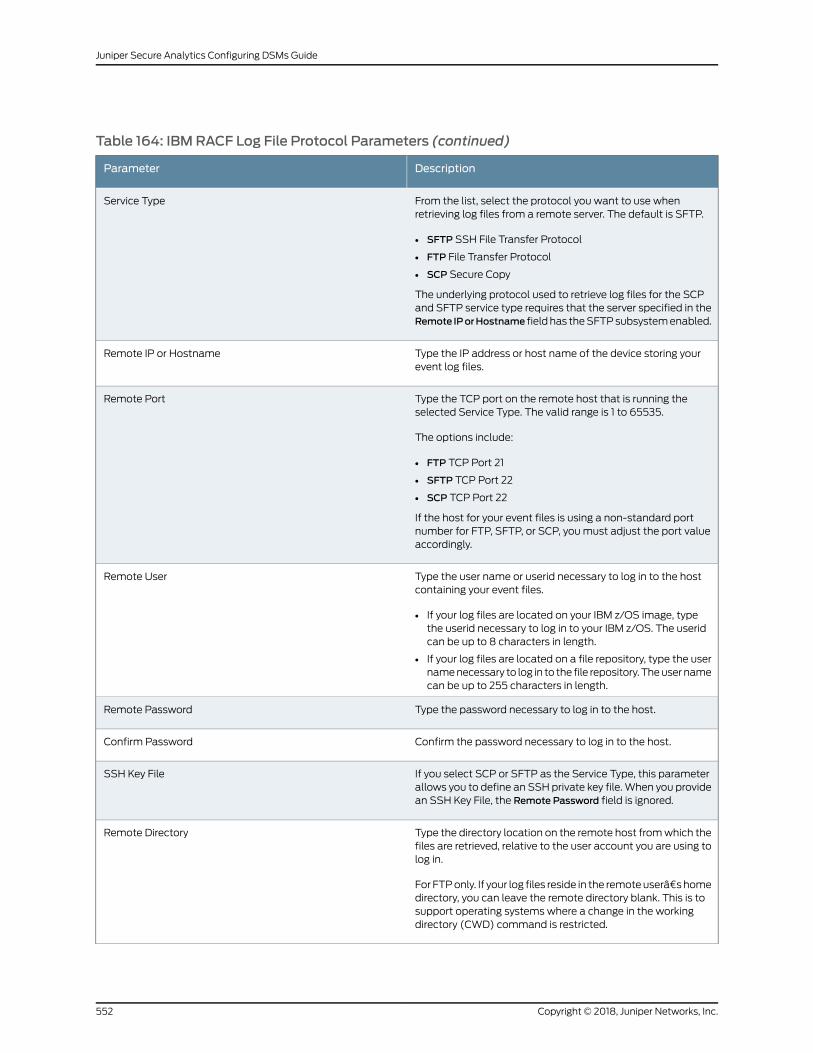
Table 164: IBM RACF Log File Protocol Parameters (continued)
DescriptionParameter
From the list, select the protocol you want to use whenretrieving log files from a remote server. The default is SFTP.
• SFTP SSH File Transfer Protocol
• FTP File Transfer Protocol
• SCP Secure Copy
The underlying protocol used to retrieve log files for the SCPand SFTP service type requires that the server specified in theRemote IPorHostname field has theSFTPsubsystemenabled.
Service Type
Type the IP address or host name of the device storing yourevent log files.
Remote IP or Hostname
Type the TCP port on the remote host that is running theselected Service Type. The valid range is 1 to 65535.
The options include:
• FTP TCP Port 21
• SFTP TCP Port 22
• SCP TCP Port 22
If the host for your event files is using a non-standard portnumber for FTP, SFTP, or SCP, youmust adjust the port valueaccordingly.
Remote Port
Type the user name or userid necessary to log in to the hostcontaining your event files.
• If your log files are located on your IBM z/OS image, typethe userid necessary to log in to your IBM z/OS. The useridcan be up to 8 characters in length.
• If your log files are located on a file repository, type the usernamenecessary to log in to the file repository. Theusernamecan be up to 255 characters in length.
Remote User
Type the password necessary to log in to the host.Remote Password
Confirm the password necessary to log in to the host.Confirm Password
If you select SCP or SFTP as the Service Type, this parameterallows you to define an SSH private key file.When you providean SSH Key File, the Remote Password field is ignored.
SSH Key File
Type the directory location on the remote host fromwhich thefiles are retrieved, relative to the user account you are using tolog in.
For FTPonly. If your log files reside in the remoteuserâ€shomedirectory, you can leave the remote directory blank. This is tosupport operating systems where a change in the workingdirectory (CWD) command is restricted.
Remote Directory
Copyright © 2018, Juniper Networks, Inc.552
Juniper Secure Analytics Configuring DSMs Guide
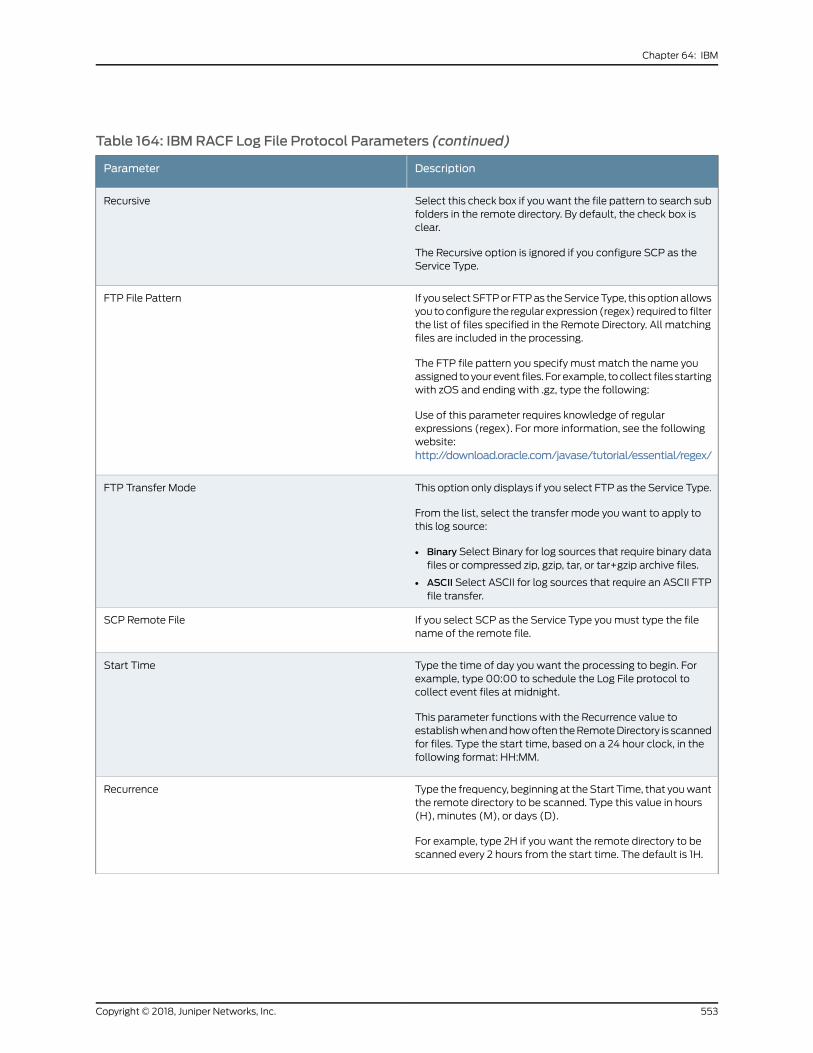
Table 164: IBM RACF Log File Protocol Parameters (continued)
DescriptionParameter
Select this check box if youwant the file pattern to search subfolders in the remote directory. By default, the check box isclear.
The Recursive option is ignored if you configure SCP as theService Type.
Recursive
If youselectSFTPorFTPas theServiceType, this optionallowsyou to configure the regular expression (regex) required to filterthe list of files specified in the Remote Directory. All matchingfiles are included in the processing.
The FTP file pattern you specify must match the name youassigned toyour event files. For example, to collect files startingwith zOS and ending with .gz, type the following:
Use of this parameter requires knowledge of regularexpressions (regex). For more information, see the followingwebsite:http://download.oracle.com/javase/tutorial/essential/regex/
FTP File Pattern
This option only displays if you select FTP as the Service Type.
From the list, select the transfer mode you want to apply tothis log source:
• Binary Select Binary for log sources that require binary datafiles or compressed zip, gzip, tar, or tar+gzip archive files.
• ASCII Select ASCII for log sources that require an ASCII FTPfile transfer.
FTP Transfer Mode
If you select SCP as the Service Type youmust type the filename of the remote file.
SCP Remote File
Type the time of day you want the processing to begin. Forexample, type 00:00 to schedule the Log File protocol tocollect event files at midnight.
This parameter functions with the Recurrence value toestablishwhenandhowoften theRemoteDirectory is scannedfor files. Type the start time, based on a 24 hour clock, in thefollowing format: HH:MM.
Start Time
Type the frequency, beginning at theStart Time, that youwantthe remote directory to be scanned. Type this value in hours(H), minutes (M), or days (D).
For example, type 2H if you want the remote directory to bescanned every 2 hours from the start time. The default is 1H.
Recurrence
553Copyright © 2018, Juniper Networks, Inc.
Chapter 64: IBM
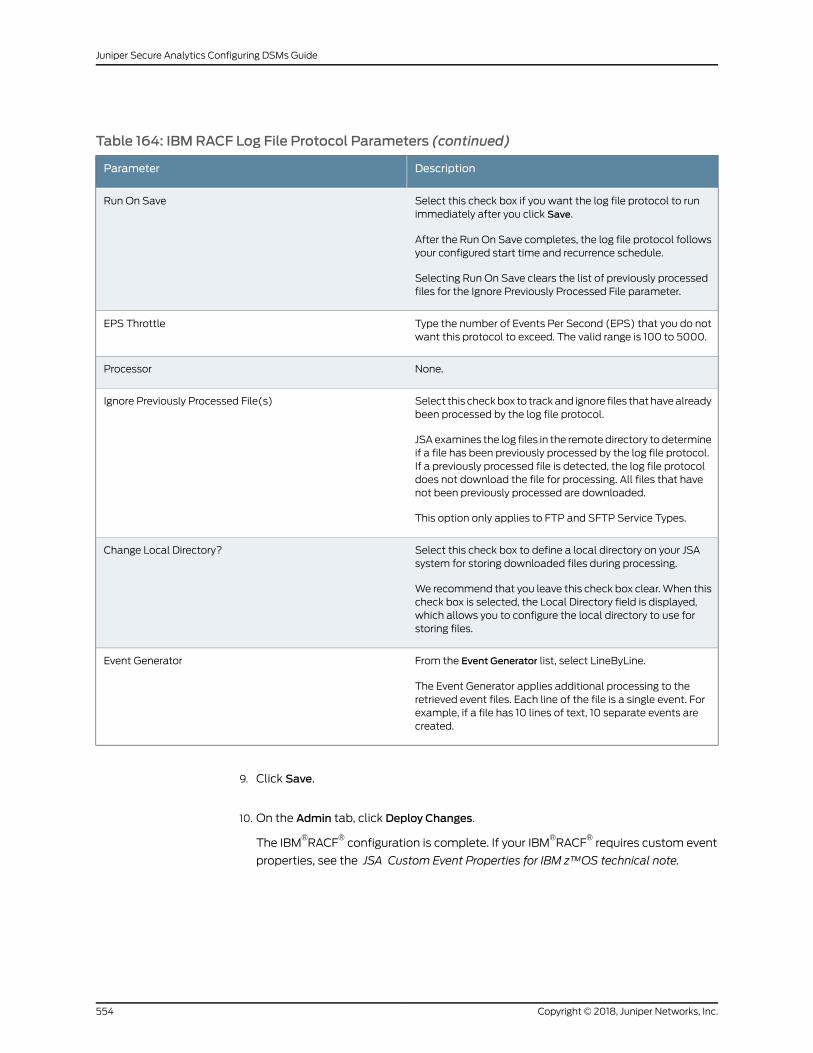
Table 164: IBM RACF Log File Protocol Parameters (continued)
DescriptionParameter
Select this check box if you want the log file protocol to runimmediately after you click Save.
After the Run On Save completes, the log file protocol followsyour configured start time and recurrence schedule.
Selecting Run On Save clears the list of previously processedfiles for the Ignore Previously Processed File parameter.
Run On Save
Type the number of Events Per Second (EPS) that you do notwant this protocol to exceed. The valid range is 100 to 5000.
EPS Throttle
None.Processor
Select this checkbox to trackand ignore files that havealreadybeen processed by the log file protocol.
JSA examines the log files in the remote directory to determineif a file has been previously processed by the log file protocol.If a previously processed file is detected, the log file protocoldoes not download the file for processing. All files that havenot been previously processed are downloaded.
This option only applies to FTP and SFTP Service Types.
Ignore Previously Processed File(s)
Select this check box to define a local directory on your JSAsystem for storing downloaded files during processing.
We recommend that you leave this check box clear.When thischeck box is selected, the Local Directory field is displayed,which allows you to configure the local directory to use forstoring files.
Change Local Directory?
From the Event Generator list, select LineByLine.
The Event Generator applies additional processing to theretrieved event files. Each line of the file is a single event. Forexample, if a file has 10 lines of text, 10 separate events arecreated.
Event Generator
9. Click Save.
10. On the Admin tab, click Deploy Changes.
The IBM®RACF
®configuration is complete. If your IBM
®RACF
®requires custom event
properties, see the JSA Custom Event Properties for IBM z™OS technical note.
Copyright © 2018, Juniper Networks, Inc.554
Juniper Secure Analytics Configuring DSMs Guide
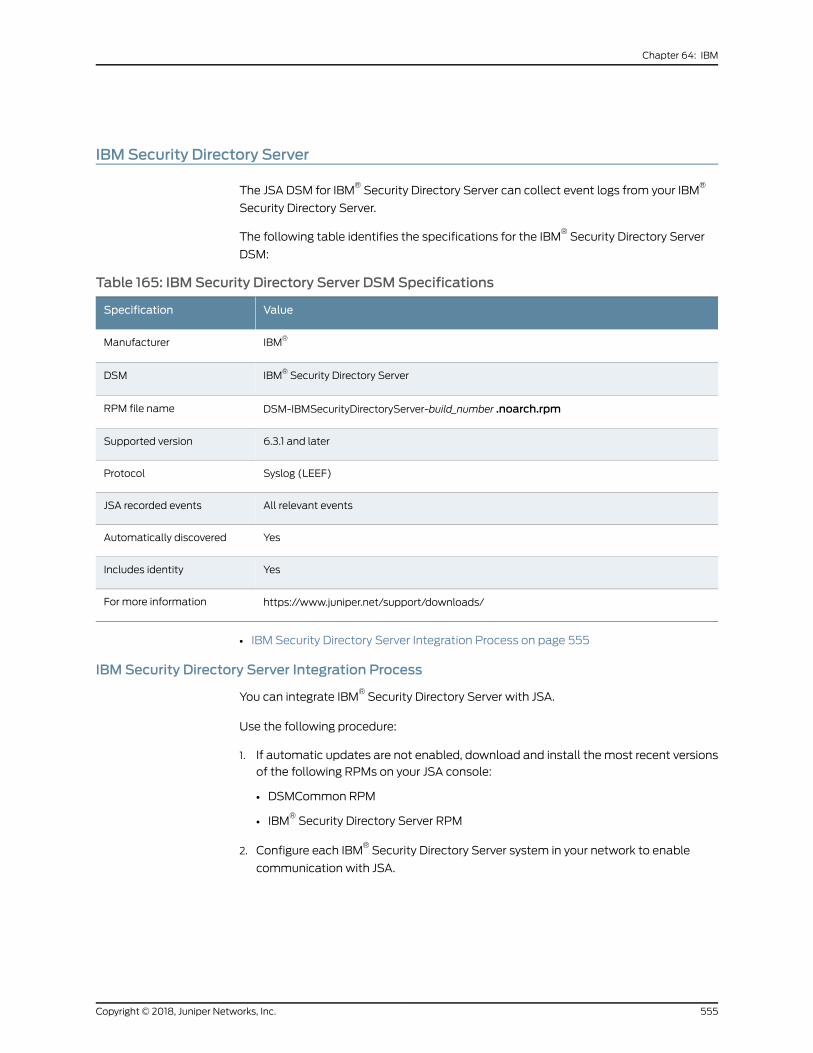
IBM Security Directory Server
The JSA DSM for IBM®Security Directory Server can collect event logs from your IBM
®
Security Directory Server.
The following table identifies the specifications for the IBM®Security Directory Server
DSM:
Table 165: IBM Security Directory Server DSMSpecifications
ValueSpecification
IBM®Manufacturer
IBM® Security Directory ServerDSM
DSM-IBMSecurityDirectoryServer-build_number .noarch.rpmRPM file name
6.3.1 and laterSupported version
Syslog (LEEF)Protocol
All relevant eventsJSA recorded events
YesAutomatically discovered
YesIncludes identity
https://www.juniper.net/support/downloads/For more information
• IBM Security Directory Server Integration Process on page 555
IBM Security Directory Server Integration Process
You can integrate IBM®Security Directory Server with JSA.
Use the following procedure:
1. If automatic updates are not enabled, download and install themost recent versions
of the following RPMs on your JSA console:
• DSMCommon RPM
• IBM®Security Directory Server RPM
2. Configure each IBM®Security Directory Server system in your network to enable
communication with JSA.
555Copyright © 2018, Juniper Networks, Inc.
Chapter 64: IBM
1. If JSA does not automatically discover the log source, for each IBM®Security Directory
Server on your network, create a log source on the JSA console.
Configuring an IBM Security Directory Server Log Source in JSA
You can collect IBM®Security Directory Server events, configure a log source in JSA.
Ensure that theDSM-IBMSecurityDirectoryServer-build_number.noarch.rpm file is installed
and deployed on your JSA host.
1. Log in to JSA.
2. Click the Admin tab.
3. In the navigation menu, click Data Sources.
4. Click the Log Sources icon.
5. Click Add.
6. From the Log Source Type list, select IBM®Security Directory Server.
7. From the Protocol Configuration list, select Syslog.
8. Configure the remaining parameters.
9. Click Save.
10. On the Admin tab, click Deploy Changes.
IBM Security Identity Governance
The JSA DSM for IBM®Security Identity Governance collects audit events from IBM
®
Security Governance servers.
The following table identifies the specifications for the IBM®Security IdentityGovernance
DSM:
Table 166: IBM Security Identity Governance (ISIG) DSMSpecifications
ValueSpecification
IBM®Manufacturer
IBM® Security Identity GovernanceDSM name
DSM-IBMSecurityIdentityGovernance-JSA_version-build_number.noarch.rpmRPM file name
Copyright © 2018, Juniper Networks, Inc.556
Juniper Secure Analytics Configuring DSMs Guide
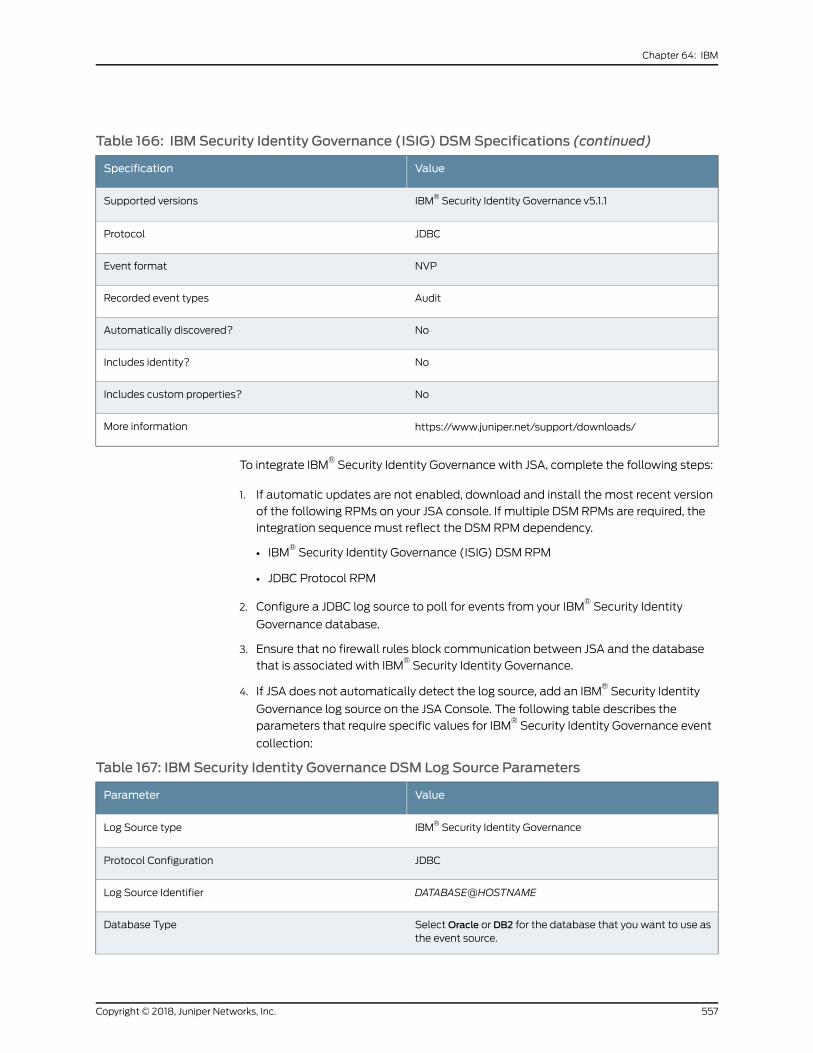
Table 166: IBM Security Identity Governance (ISIG) DSMSpecifications (continued)
ValueSpecification
IBM® Security Identity Governance v5.1.1Supported versions
JDBCProtocol
NVPEvent format
AuditRecorded event types
NoAutomatically discovered?
NoIncludes identity?
NoIncludes custom properties?
https://www.juniper.net/support/downloads/More information
To integrate IBM®Security Identity Governance with JSA, complete the following steps:
1. If automatic updates are not enabled, download and install the most recent version
of the following RPMs on your JSA console. If multiple DSM RPMs are required, the
integration sequencemust reflect the DSM RPM dependency.
• IBM®Security Identity Governance (ISIG) DSM RPM
• JDBC Protocol RPM
2. Configure a JDBC log source to poll for events from your IBM®Security Identity
Governance database.
3. Ensure that no firewall rules block communication between JSA and the database
that is associated with IBM®Security Identity Governance.
4. If JSA does not automatically detect the log source, add an IBM®Security Identity
Governance log source on the JSA Console. The following table describes the
parameters that require specific values for IBM®Security Identity Governance event
collection:
Table 167: IBM Security Identity Governance DSM Log Source Parameters
ValueParameter
IBM® Security Identity GovernanceLog Source type
JDBCProtocol Configuration
DATABASE@HOSTNAMELog Source Identifier
SelectOracle or DB2 for the database that you want to use asthe event source.
Database Type
557Copyright © 2018, Juniper Networks, Inc.
Chapter 64: IBM
Table 167: IBM Security Identity Governance DSM Log Source Parameters (continued)
ValueParameter
The name of the IBM Security Identity Governance database.Itmust be the sameas theDATABASEname for the LogSourceIdentifier.
Database Name
The IP address or host name of the IBM Security Governancedatabase. Itmustbe thesameas theHOSTNAMEofLogSourceIdentifier.
IP or Hostname
The port number that is used by the database server. Thedefaults areOracle: 1521 and DB2: 50000. The default that isdisplayed depends on the selected database type.
Port
The database user name.Username
The database password.Password
The default is none.Predefined Query
AUDIT_LOGTable Name
*Select List
IDCompare Field
Enable the check box.Use Prepared Statements
The initial date and time for database polling.Start Date and Time
The amount of time, in seconds, between queries to thedatabase table. The default polling interval is 10 seconds.
Polling interval
The number of events per second (EPS) that you do not wantthis protocol to exceed. The default value is 20000 EPS.
EPS Throttle
• Configuring JSA to Communicate with Your IBM Security Identity Governance
Database on page 558
Configuring JSA to Communicate with Your IBM Security Identity Governance Database
To forward audit logs from your IBM®Security Identity Governance database to JSA, you
must add a log source. Log sources are not automatically detected.
1. Log in to JSA.
2. Click the Admin tab.
3. In the navigation menu, clickData Sources.
Copyright © 2018, Juniper Networks, Inc.558
Juniper Secure Analytics Configuring DSMs Guide
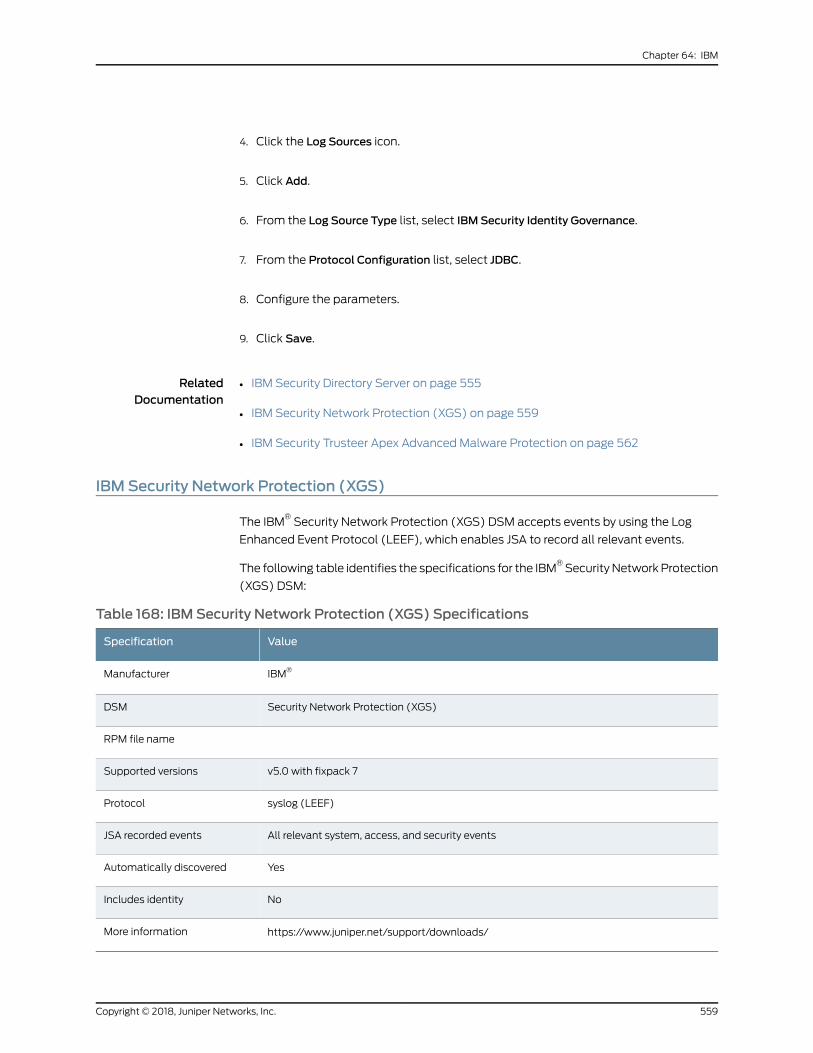
4. Click the Log Sources icon.
5. Click Add.
6. From the Log Source Type list, select IBM Security Identity Governance.
7. From the Protocol Configuration list, select JDBC.
8. Configure the parameters.
9. Click Save.
RelatedDocumentation
IBM Security Directory Server on page 555•
• IBM Security Network Protection (XGS) on page 559
• IBM Security Trusteer Apex Advanced Malware Protection on page 562
IBM Security Network Protection (XGS)
The IBM®Security Network Protection (XGS) DSM accepts events by using the Log
Enhanced Event Protocol (LEEF), which enables JSA to record all relevant events.
The following table identifies the specifications for the IBM®SecurityNetwork Protection
(XGS) DSM:
Table 168: IBM Security Network Protection (XGS) Specifications
ValueSpecification
IBM®Manufacturer
Security Network Protection (XGS)DSM
RPM file name
v5.0 with fixpack 7Supported versions
syslog (LEEF)Protocol
All relevant system, access, and security eventsJSA recorded events
YesAutomatically discovered
NoIncludes identity
https://www.juniper.net/support/downloads/More information
559Copyright © 2018, Juniper Networks, Inc.
Chapter 64: IBM
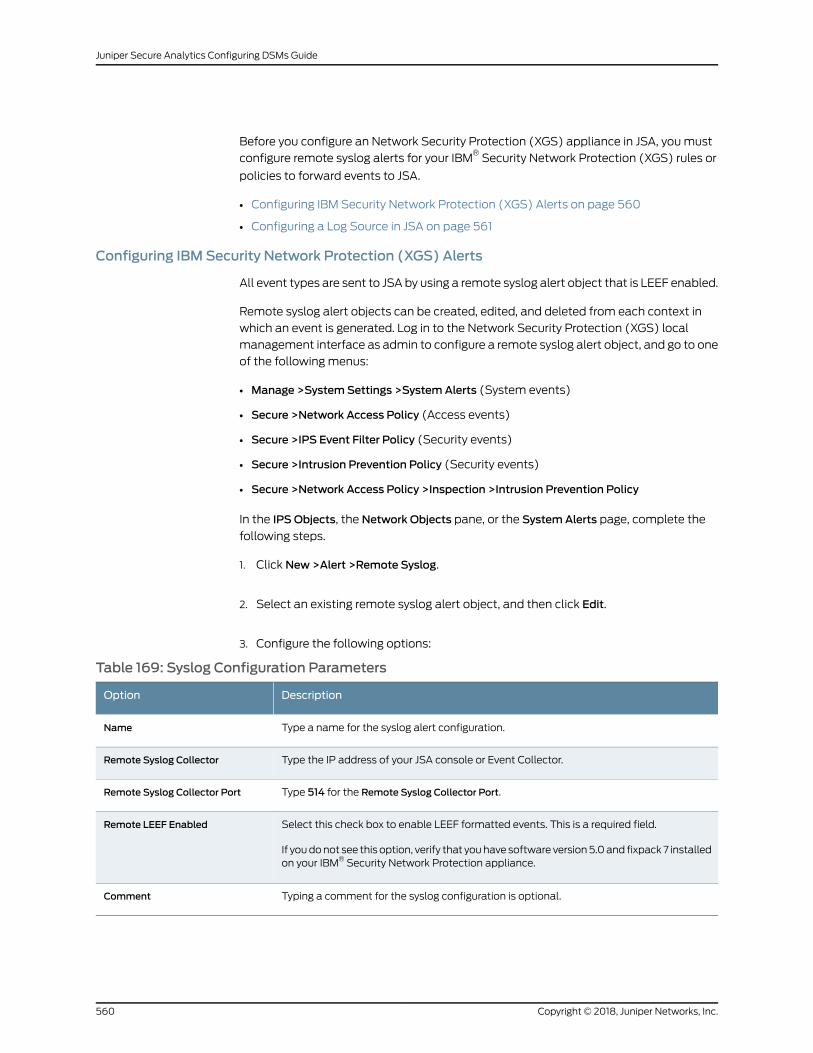
Before you configure an Network Security Protection (XGS) appliance in JSA, youmust
configure remote syslog alerts for your IBM®Security Network Protection (XGS) rules or
policies to forward events to JSA.
• Configuring IBM Security Network Protection (XGS) Alerts on page 560
• Configuring a Log Source in JSA on page 561
Configuring IBM Security Network Protection (XGS) Alerts
All event types are sent to JSA by using a remote syslog alert object that is LEEF enabled.
Remote syslog alert objects can be created, edited, and deleted from each context in
which an event is generated. Log in to the Network Security Protection (XGS) local
management interface as admin to configure a remote syslog alert object, and go to one
of the following menus:
• Manage >SystemSettings >SystemAlerts (System events)
• Secure >Network Access Policy (Access events)
• Secure >IPS Event Filter Policy (Security events)
• Secure >Intrusion Prevention Policy (Security events)
• Secure >Network Access Policy >Inspection >Intrusion Prevention Policy
In the IPS Objects, the Network Objects pane, or the SystemAlerts page, complete the
following steps.
1. Click New>Alert >Remote Syslog.
2. Select an existing remote syslog alert object, and then click Edit.
3. Configure the following options:
Table 169: Syslog Configuration Parameters
DescriptionOption
Type a name for the syslog alert configuration.Name
Type the IP address of your JSA console or Event Collector.Remote Syslog Collector
Type 514 for the Remote Syslog Collector Port.Remote Syslog Collector Port
Select this check box to enable LEEF formatted events. This is a required field.
If youdonot see this option, verify that youhave software version5.0and fixpack 7 installedon your IBM® Security Network Protection appliance.
Remote LEEF Enabled
Typing a comment for the syslog configuration is optional.Comment
Copyright © 2018, Juniper Networks, Inc.560
Juniper Secure Analytics Configuring DSMs Guide
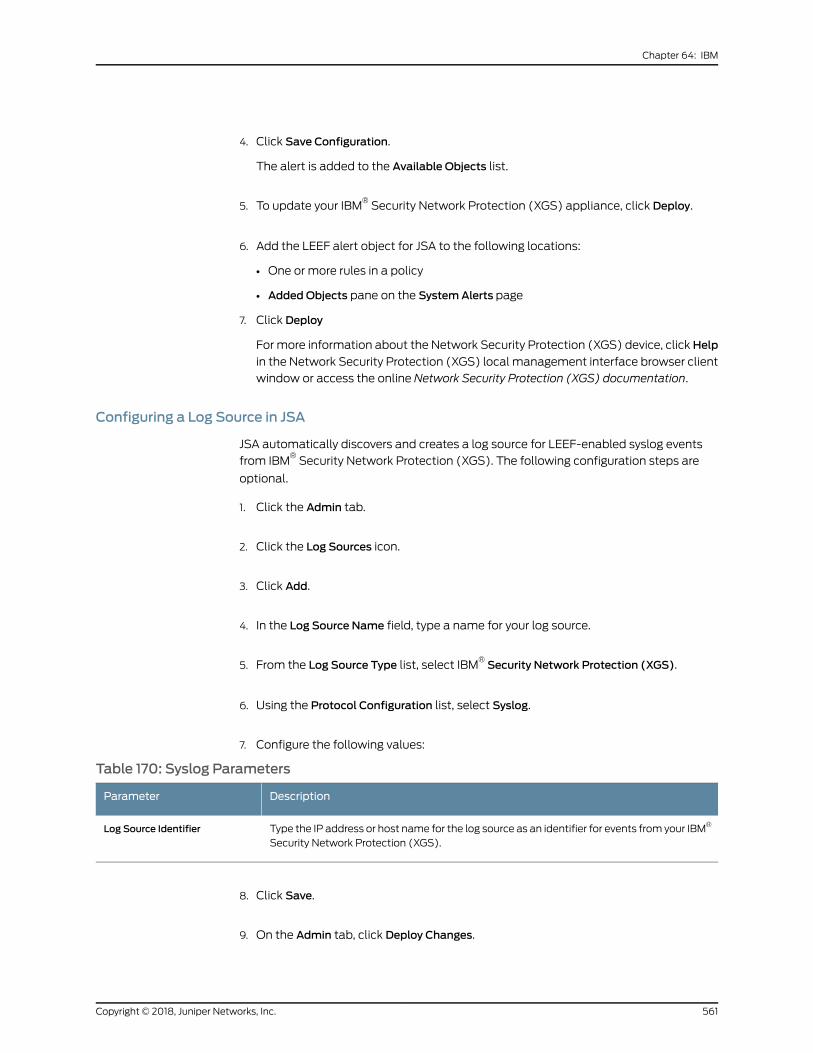
4. Click Save Configuration.
The alert is added to the Available Objects list.
5. To update your IBM®Security Network Protection (XGS) appliance, click Deploy.
6. Add the LEEF alert object for JSA to the following locations:
• One or more rules in a policy
• Added Objects pane on the SystemAlerts page
7. Click Deploy
Formore information about the Network Security Protection (XGS) device, clickHelp
in the Network Security Protection (XGS) local management interface browser client
window or access the online Network Security Protection (XGS) documentation.
Configuring a Log Source in JSA
JSA automatically discovers and creates a log source for LEEF-enabled syslog events
from IBM®Security Network Protection (XGS). The following configuration steps are
optional.
1. Click the Admin tab.
2. Click the Log Sources icon.
3. Click Add.
4. In the Log Source Name field, type a name for your log source.
5. From the Log Source Type list, select IBM®Security Network Protection (XGS).
6. Using the Protocol Configuration list, select Syslog.
7. Configure the following values:
Table 170: Syslog Parameters
DescriptionParameter
Type the IP address or host name for the log source as an identifier for events from your IBM®
Security Network Protection (XGS).Log Source Identifier
8. Click Save.
9. On the Admin tab, click Deploy Changes.
561Copyright © 2018, Juniper Networks, Inc.
Chapter 64: IBM
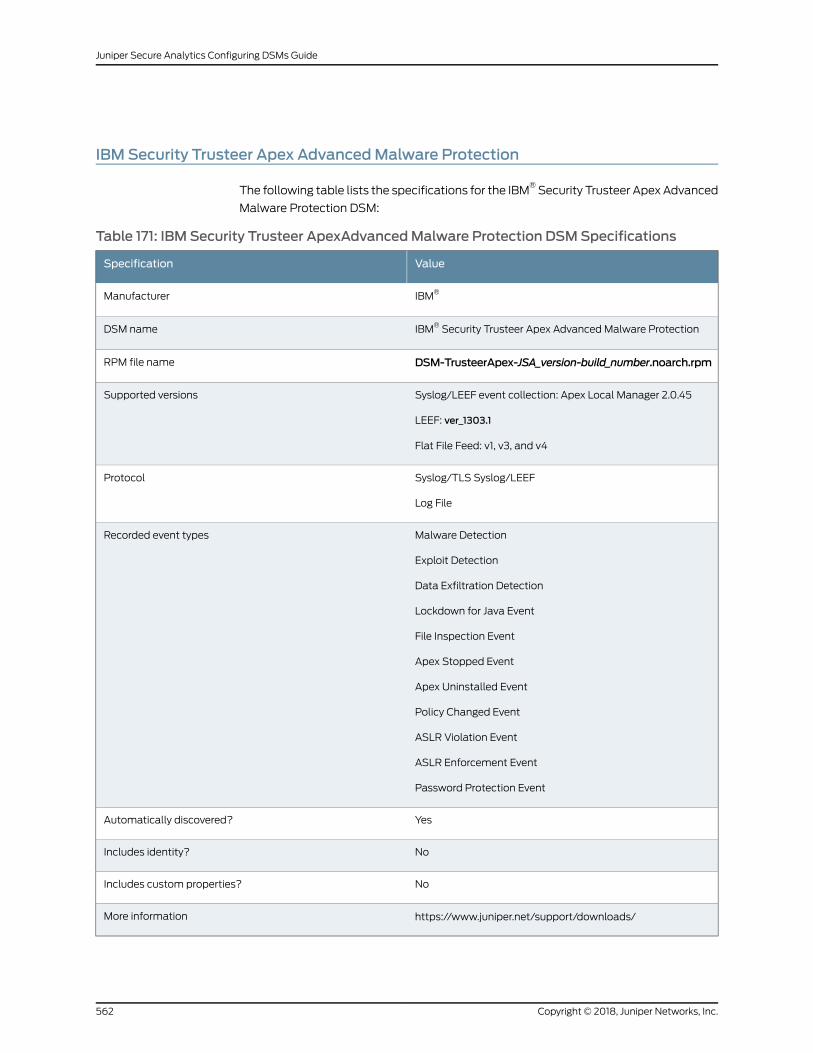
IBM Security Trusteer Apex AdvancedMalware Protection
The following table lists the specifications for the IBM®Security Trusteer Apex Advanced
Malware Protection DSM:
Table 171: IBM Security Trusteer ApexAdvancedMalware Protection DSMSpecifications
ValueSpecification
IBM®Manufacturer
IBM® Security Trusteer Apex Advanced Malware ProtectionDSM name
DSM-TrusteerApex-JSA_version-build_number.noarch.rpmRPM file name
Syslog/LEEF event collection: Apex Local Manager 2.0.45
LEEF: ver_1303.1
Flat File Feed: v1, v3, and v4
Supported versions
Syslog/TLS Syslog/LEEF
Log File
Protocol
Malware Detection
Exploit Detection
Data Exfiltration Detection
Lockdown for Java Event
File Inspection Event
Apex Stopped Event
Apex Uninstalled Event
Policy Changed Event
ASLR Violation Event
ASLR Enforcement Event
Password Protection Event
Recorded event types
YesAutomatically discovered?
NoIncludes identity?
NoIncludes custom properties?
https://www.juniper.net/support/downloads/More information
Copyright © 2018, Juniper Networks, Inc.562
Juniper Secure Analytics Configuring DSMs Guide
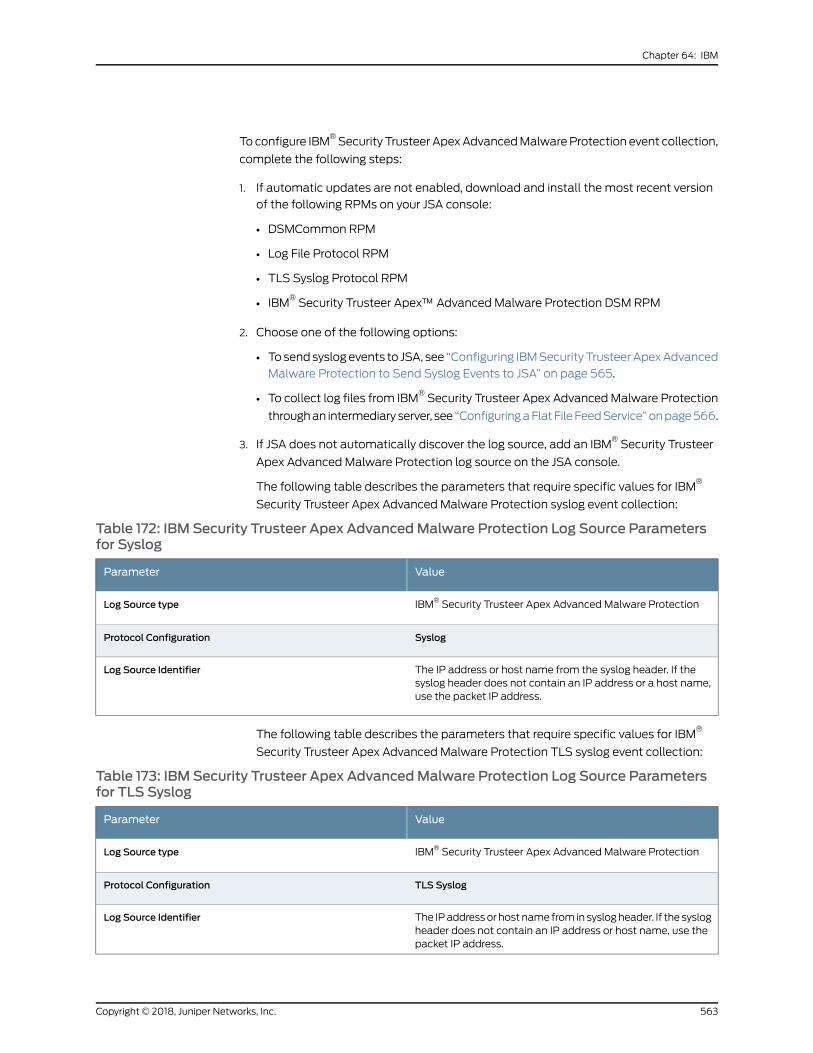
Toconfigure IBM®Security Trusteer ApexAdvancedMalwareProtection event collection,
complete the following steps:
1. If automatic updates are not enabled, download and install the most recent version
of the following RPMs on your JSA console:
• DSMCommon RPM
• Log File Protocol RPM
• TLS Syslog Protocol RPM
• IBM®Security Trusteer Apex™ Advanced Malware Protection DSM RPM
2. Choose one of the following options:
• Tosendsyslogevents to JSA, see “Configuring IBMSecurityTrusteerApexAdvanced
Malware Protection to Send Syslog Events to JSA” on page 565.
• To collect log files from IBM®Security Trusteer Apex AdvancedMalware Protection
throughan intermediary server, see “ConfiguringaFlatFileFeedService”onpage566.
3. If JSA does not automatically discover the log source, add an IBM®Security Trusteer
Apex Advanced Malware Protection log source on the JSA console.
The following table describes the parameters that require specific values for IBM®
Security Trusteer Apex Advanced Malware Protection syslog event collection:
Table 172: IBM Security Trusteer Apex AdvancedMalware Protection Log Source Parametersfor Syslog
ValueParameter
IBM® Security Trusteer Apex Advanced Malware ProtectionLog Source type
SyslogProtocol Configuration
The IP address or host name from the syslog header. If thesyslog header does not contain an IP address or a host name,use the packet IP address.
Log Source Identifier
The following table describes the parameters that require specific values for IBM®
Security Trusteer Apex Advanced Malware Protection TLS syslog event collection:
Table 173: IBM Security Trusteer Apex AdvancedMalware Protection Log Source Parametersfor TLS Syslog
ValueParameter
IBM® Security Trusteer Apex Advanced Malware ProtectionLog Source type
TLS SyslogProtocol Configuration
The IPaddressor host name from in syslogheader. If the syslogheader does not contain an IP address or host name, use thepacket IP address.
Log Source Identifier
563Copyright © 2018, Juniper Networks, Inc.
Chapter 64: IBM
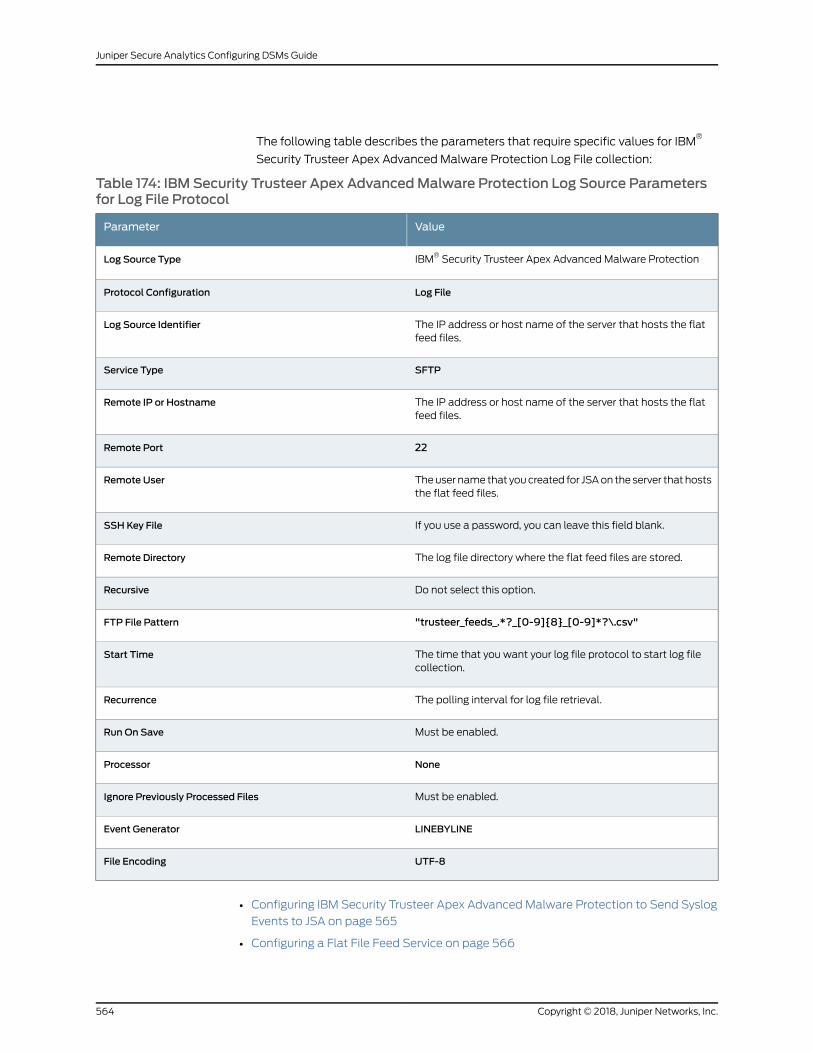
The following table describes the parameters that require specific values for IBM®
Security Trusteer Apex Advanced Malware Protection Log File collection:
Table 174: IBM Security Trusteer Apex AdvancedMalware Protection Log Source Parametersfor Log File Protocol
ValueParameter
IBM® Security Trusteer Apex Advanced Malware ProtectionLog Source Type
Log FileProtocol Configuration
The IP address or host name of the server that hosts the flatfeed files.
Log Source Identifier
SFTPService Type
The IP address or host name of the server that hosts the flatfeed files.
Remote IP or Hostname
22Remote Port
Theuser name that youcreated for JSAon the server thathoststhe flat feed files.
Remote User
If you use a password, you can leave this field blank.SSH Key File
The log file directory where the flat feed files are stored.Remote Directory
Do not select this option.Recursive
"trusteer_feeds_.*?_[0-9]{8}_[0-9]*?\.csv"FTP File Pattern
The time that you want your log file protocol to start log filecollection.
Start Time
The polling interval for log file retrieval.Recurrence
Must be enabled.RunOn Save
NoneProcessor
Must be enabled.Ignore Previously Processed Files
LINEBYLINEEvent Generator
UTF-8File Encoding
• Configuring IBM Security Trusteer Apex Advanced Malware Protection to Send Syslog
Events to JSA on page 565
• Configuring a Flat File Feed Service on page 566
Copyright © 2018, Juniper Networks, Inc.564
Juniper Secure Analytics Configuring DSMs Guide
The IBM®Security Trusteer
®Apex Advanced Malware Protection DSM collects event
data from a Trusteer Apex Advanced Malware Protection system.
JSAcancollect the following items fromtheTrusteerApexAdvancedMalwareProtection
system:
• Syslog events
• Log files (from an intermediary server that hosts flat feed files from the system.)
Configuring IBM Security Trusteer Apex AdvancedMalware Protection to Send Syslog Eventsto JSA
Configure IBM®Security Trusteer Apex Advanced Malware Protection to send syslog
events to JSA.
Install an Apex Local Manager on your Trusteer Management Application (TMA).
For more information about configuring your IBM®Security Trusteer Apex Advanced
Malware Protection to communicate with JSA, use the following documentation from
the Juniper Networks Knowledge Center:
• IBM®Security Trusteer Apex Advanced Malware Protection Local Manager - Hybrid
Solution Reference Guide
• IBM®Security Trusteer Apex Advanced Malware Protection Feeds Reference Guide
SSL/TLS authentication is not supported.
1. Log in to Trusteer Management Application (TMA).
2. Select Apex Local Manager & SIEM Settings.
3. If the Apex Local Manager wizard does not automatically display, click Add.
4. Type the name of the Apex Local Manager.
5. Check the Enable box and click Next.
6. Type the server settings for JSA and click Next.
7. If you use a separate syslog server for the Apex Local Manager system events, type
the settings.
8. Click Finish.
565Copyright © 2018, Juniper Networks, Inc.
Chapter 64: IBM
Configuring a Flat File Feed Service
Flat File Feeds use a CSV format. Each feed item is written to the file on a separate line,
which contains several comma-separated fields. Each field contains data that describes
the feed item. The first field in each feed line contains the feed type.
1. Enable an SFTP-enabled server and ensure that external devices can reach it.
2. Log on to the SFTP-enabled server.
3. Createauser accounton theserver for IBM®SecurityTrusteerApexAdvancedMalware
Protection.
4. Create a user account for JSA.
5. Enable SSH key-based authentication.
After you set up the intermediary server, record the following details:
• Target SFTP server name and IP addresses
• SFTP server port (standard port is 22)
• The file path for the target directory
• SFTP user name if SSH authentication is not configured
• Upload frequency (from 1 minute to 24 hours)
• SSH public key in RSA format
IBM®Trusteer
®support uses the intermediary server details when they configure IBM
®
Security TrusteerApex Advanced Malware Protection to send flat feel files.
For JSA to retrieve log files from IBM®Security TrusteerApex Advanced Malware
Protection, youmust set up a flat file feed service on an intermediary SFTP-enabled
server. The service enables the intermediary server to host the flat files that it receives
from IBM®Security TrusteerApex Advanced Malware Protection and allows for
connections from external devices so that JSA can retrieve the log files.
To configure IBM®Security Trusteer
®Apex Advanced Malware Protection to send flat
file feed to the intermediary server, contact IBM®Trusteer
®support.
RelatedDocumentation
IBM Security Trusteer Apex Local Event Aggregator on page 567•
• IBM Sense on page 568
• IBM Tivoli Access Manager for E-business on page 570
Copyright © 2018, Juniper Networks, Inc.566
Juniper Secure Analytics Configuring DSMs Guide
IBM Security Trusteer Apex Local Event Aggregator
JSA can collect and categorize malware, exploit, and data exfiltration detection events
from Trusteer Apex Local Event Aggregator.
To collect syslog events, youmust configure your Trusteer Apex Local Event Aggregator
to forward syslog events to JSA. Administrators can use the Apex L.E.A. management
console interface to configure a syslog target for events. JSA automatically discovers
and creates log sources for syslog events that are forwarded from Trusteer Apex Local
EventAggregator appliances. JSA supports syslog events fromTrusteer Apex Local Event
Aggregator V1304.x and later.
To integrate events with JSA, administrators can complete the following tasks:
1. On your Trusteer Apex Local Event Aggregator appliance, configure syslog server.
2. On your JSA system, verify that the forwarded events are automatically discovered.
• Configuring Syslog for Trusteer Apex Local Event Aggregator on page 567
Configuring Syslog for Trusteer Apex Local Event Aggregator
To collect events, youmust configure a syslog server on your Trusteer Apex Local Event
Aggregator to forward syslog events.
1. Log in to the Trusteer Apex L.E.A. management console.
2. From the navigation menu, select Configuration.
3. To export the current Trusteer Apex Local Event Aggregator configuration, click Export
and save the file.
4. Open the configuration file with a text editor.
5. From the syslog.event_targets section, add the following information:
{
host": "<QRadar IP address>", "port": "514", "proto": "tcp"
}
6. Save the configuration file.
7. From the navigation menu, select Configuration.
567Copyright © 2018, Juniper Networks, Inc.
Chapter 64: IBM
8. Click Choose file and select the new configuration file that contains the event target
IP address.
9. Click Import.
As syslog events are generated by the Trusteer Apex Local Event Aggregator, they are
forwarded to the target specified in the configuration file. The log source is
automatically discovered after enough events are forwarded to JSA. It typically takes
aminimum of 25 events to automatically discover a log source.
Administrators can log in to the JSA console and verify that the log source is created. The
Log Activity tab displays events from Trusteer Apex Local Event Aggregator.
IBM Sense
The JSA DSM for IBM®Sense collects notable events from a local or external system
that generates Sense events.
The following table describes the specifications for the IBM®Sense DSM:
Table 175: IBM Sense DSMSpecifications
ValueSpecification
IBM®Manufacturer
IBM® SenseDSM name
DSM-IBMSense-JSA_version-build_number.noarch.rpmRPM file name
1Supported versions
SyslogProtocol
LEEFEvent format
User Behavior
User Geography
User Time
User Access
User Privilege
User Risk
Sense Offense
Resource Risk
Recorded event types
YesAutomatically discovered?
Copyright © 2018, Juniper Networks, Inc.568
Juniper Secure Analytics Configuring DSMs Guide
Table 175: IBM Sense DSMSpecifications (continued)
ValueSpecification
NoIncludes identity?
NoIncludes custom properties?
https://www.juniper.net/support/downloads/More information
To integrate IBM®Sense with JSA, complete the following steps:
1. If automatic updates are not enabled, download and install the most recent version
of the following RPMs on your JSA console:
• IBM®Sense DSM RPM
• DSMCommon RPM
2. If JSA does not automatically detect the log source, add an IBM®Sense log source on
the JSA console. The following table describes the parameters that require specific
values for IBM®Sense event collection:
Table 176: IBM Sense Log Source Parameters
ValueParameter
IBM® SenseLog Source type
SyslogProtocol Configuration
The following table provides a sample event message:
Table 177: IBM Sense SampleMessage.
Sample logmessageLow level categoryEvent name
LEEF:2.0|IBM|Sense|1.0|Behavior Change|cat=UserBehavior description= score= scoreType= confidence=primaryEntity= primaryEntityType= additionalEntity=additionalEntityType= beginningTimestamp=endTimestamp= sensorDomain= referenceId1=referenceId2=referenceId3=referenceId4=referenceURL=originalSenseEventName=
User BehaviorBehavior Change
• Configuring IBM Sense to Communicate with JSA on page 569
Configuring IBM Sense to Communicate with JSA
The User Behavior Analytics (UBA) app uses the IBM Sense DSM to add user risk scores
andoffenses into JSA.When theapp is installed, an IBMSense logsource isautomatically
created and configured by the app. No user input or configuration is required.
569Copyright © 2018, Juniper Networks, Inc.
Chapter 64: IBM
RelatedDocumentation
IBM Tivoli Access Manager for E-business on page 570•
• IBM Tivoli Endpoint Manager on page 572
• IBMWebSphere Application Server on page 574
IBM Tivoli AccessManager for E-business
The IBM®Tivoli
®Access Manager for e-business DSM for JSA accepts access, audit, and
HTTP events forwarded from IBM®Tivoli
®Access Manager.
JSA collects audit, access, and HTTP events from IBM®Tivoli
®Access Manager for
e-business using syslog. Before you can configure JSA, youmust configure Tivoli®Access
Manager for e-business to forward events to a syslog destination.
• Configure Tivoli Access Manager for E-business on page 570
• Configuring a Log Source on page 571
Configure Tivoli AccessManager for E-business
Youcanconfigure syslogonyourTivoli®AccessManager for e-business to forwardevents.
1. Log in to Tivoli®Access Manager's IBM
®Security Web Gateway.
2. From the navigation menu, select Secure Reverse Proxy Settings >Manage >Reverse
Proxy.
The Reverse Proxy pane is displayed.
3. From the Instance column, select an instance.
4. Click theManage list and select Configuration >Advanced.
The text of theWebSEAL configuration file is displayed.
5. Locate the Authorization API Logging configuration.
The remote syslog configuration begins with logcfg.
For example, to send authorization events to a remote syslog server:
# logcfg = audit.azn:rsyslog server=<IP address>,port=514,log_id=<log name>
6. Copy the remote syslog configuration (logcfg) to a new line without the comment
(#) marker.
7. Edit the remote syslog configuration.
For example,
Copyright © 2018, Juniper Networks, Inc.570
Juniper Secure Analytics Configuring DSMs Guide
logcfg = audit.azn:rsyslog server=<IP address>,port=514,log_id=<log name> logcfg =
audit.authn:rsyslog server=<IP address>,port=514,log_id=<log name> logcfg =
http:rsyslog server=<IP address>,port=514,log_id=<log name>
Where:
• <IP address> is the IP address of your JSA console or Event Collector.
• <Log name> is the name assigned to the log that is forwarded to JSA. For example,
log_id=WebSEAL-log.
8. Click Submit.
The Deploy button is displayed in the navigation menu.
9. From the navigation menu, click Deploy.
10. Click Deploy.
Youmust restart the reverse proxy instance to continue.
11. From the Instance column, select your instance configuration.
12. Click theManage list and select Control >Restart.
A status message is displayed after the restart completes. For more information on
configuring a syslog destination, see your IBM®Tivoli
®Access Manager for e-business
vendor documentation. You are now ready to configure a log source in JSA.
Configuring a Log Source
JSA Risk Manager automatically discovers syslog audit and access events, but does not
automaticallydiscoverHTTPevents thatare forwarded from IBM®Tivoli
®AccessManager
for e-business.
Since JSAautomatically discovers audit andaccess events, you are not required to create
a log source.However, you canmanually create a log source for JSA to receive IBM®Tivoli
®
Access Manager for e-business syslog events. The following configuration steps for
creating a log source are optional.
1. Log in to JSA.
2. Click the Admin tab.
3. Click the Log Sources icon.
4. Click Add.
5. In the Log Source Name field, type a name for the log source.
571Copyright © 2018, Juniper Networks, Inc.
Chapter 64: IBM
6. In the Log Source Description field, type a description for the log source.
7. From the Log Source Type list, select IBM®Tivoli
®AccessManager for e-business.
8. From the Protocol Configuration list, select Syslog.
9. Configure the following values:
Table 178: IBM Tivloi AccessManager for E-business Syslog Configuration
DescriptionParameter
Type the IP address or host name for your IBM®Tivoli® Access Manager for e-businessappliance.
The IP address or host name identifies your IBM®Tivoli® Access Manager for e-business as aunique event source in JSA.
Log Source Identifier
10. Click Save.
11. On the Admin tab, click Deploy Changes.
IBM Tivoli Endpoint Manager
The IBM®Tivoli
®Endpoint Manager DSM for JSA accepts system events in Log Extended
Event Format (LEEF) retrieved from IBM®Tivoli
®Endpoint Manager.
JSA uses the Tivoli®Endpoint Manager SOAP protocol to retrieve events on a 30-second
interval. As events are retrieved the IBM®Tivoli
®Endpoint Manager DSM parses and
categorizes the events for JSA. The SOAP API for IBM®Tivoli
®Endpoint Manager is only
available after you install theWeb Reports application. TheWeb Reports application for
Tivoli®Endpoint Manager is required to retrieve and integrate IBM
®Tivoli
®Endpoint
Manager system event data with JSA.
NOTE: JSA is compatiblewith IBM® Tivoli® EndpointManager versions 8.2.x.
However, it is suggested that you update and use the current version of IBM®
Tivoli® Endpoint Manager that is available.
To integrate IBM®Tivoli
®Endpoint Manager with JSA, youmust manually configure a log
source as events from IBM®Tivoli
®Endpoint Manager are not automatically discovered.
1. Log in to JSA.
2. Click the Admin tab.
Copyright © 2018, Juniper Networks, Inc.572
Juniper Secure Analytics Configuring DSMs Guide
3. Click the Log Sources icon.
4. Click Add.
5. In the Log Source Name field, type a name for the log source.
6. In the Log Source Description field, type a description for the log source.
7. From the Log Source Type list, select IBM®Tivoli
®Endpoint Manager.
8. From the Protocol Configuration list, select IBM®Tivoli
®Endpoint Manager SOAP.
Configure the following values:
DescriptionParameter
Type the IP address or host name for your IBM®Tivoli® Endpoint Manager appliance.
The IP address or host name identifies your IBM®Tivoli® EndpointManager as a unique eventsource in JSA.
Log Source Identifier
Type the port number that is used to connect to the IBM®Tivoli® Endpoint Manager by usingthe SOAP API.
Bydefault, port80 is theport number for communicatingwith IBM®Tivoli®EndpointManager.If you are useHTTPS, youmust update this field to theHTTPSport number for your network.Most configurations use port 443 for HTTPS communications.
Port
Select this check box to connect by using HTTPS.
If you select this check box, the host name or IP address you specify uses HTTPS to connectto your IBM®Tivoli® Endpoint Manager. If a certificate is required to connect by using HTTPS,youmust copy any certificates that are required by the JSA console or managed host to thefollowing directory:
/opt/qradar/conf/trusted_certificates
JSAsupport certificateswith the following file extensions: .crt,cert, or .der. Copyany requiredcertificates to the trusted certificates directory before you save and deploy your changes.
Use HTTPS
Type the user name that is required to access your IBM®Tivoli® Endpoint Manager.Username
Type the password that is required to access your IBM®Tivoli® Endpoint Manager.Password
Confirm the password necessary to access your IBM®Tivoli® Endpoint Manager.Confirm Password
For more information on configuring JSA to import IBM®Tivoli
®Endpoint Manager
vulnerabilitiesassessment information, see the JSAManagingVulnerabilityAssessment
Guide.
573Copyright © 2018, Juniper Networks, Inc.
Chapter 64: IBM
9. Click Save.
10. On the Admin tab, click Deploy Changes.
The IBM®Tivoli
®Endpoint Manager configuration is complete.
IBMWebSphere Application Server
The IBM®WebSphere
®Application Server DSM for JSA accepts events using the log file
protocol source.
JSA recordsall relevantapplicationandsecurity events fromtheWebSphere®Application
Server log files.
• Configuring IBMWebSphere on page 574
• Customizing the Logging Option on page 575
• Creating a Log Source on page 576
Configuring IBMWebSphere
You can configure IBM®WebSphere
®Application Server events for JSA.
1. Using a web browser, log in to the IBM®WebSphere
®administrative console.
2. Click Environment >WebSphere Variables.
3. Define Cell as the Scope level for the variable.
4. Click New.
5. Configure the following values:
• Name Type a name for the cell variable.
• Description Type a description for the variable (optional).
• Value Type a directory path for the log files.
For example:
{QRADAR_LOG_ROOT} =
/opt/IBM/WebSphere/AppServer/profiles/Custom01/logs/QRadar
Youmust create the target directory that is specified in Step 5 before proceeding.
6. ClickOK.
Copyright © 2018, Juniper Networks, Inc.574
Juniper Secure Analytics Configuring DSMs Guide
7. Click Save.
8. Youmust restart theWebSphere®Application Server to save the configuration
changes.
NOTE: If the variable you created affects a cell, youmust restart allWebSphere® Application Servers in the cell before you continue.
You are now ready to customize the logging option for the IBM®WebSphere
®Application
Server DSM.
Customizing the Logging Option
Youmust customize the logging option for each application server WebSphere®uses
and change the settings for the JVM Logs (Java Virtual Machine logs).
1. Select Servers >Application Servers.
2. Select your WebSphere®Application Server to load the server properties.
3. Select Logging and Tracing >JVM Logs.
4. Configure a name for the JVM log files.
For example:
System.Out log file name:
${QRADAR_LOG_ROOT}/${WAS_SERVER_NAME}-SystemOut.log
System.Err log file name:
${QRADAR_LOG_ROOT}/${WAS_SERVER_NAME}-SystemErr.log
5. Select a time of day to save the log files to the target directory.
6. ClickOK.
7. Youmust restart theWebSphere®Application Server to save the configuration
changes.
NOTE: If the JVM Logs changes affect the cell, youmust restart all of theWebSphere® Application Servers in the cell before you continue.
You are now ready to import the file into JSA using the log file protocol.
575Copyright © 2018, Juniper Networks, Inc.
Chapter 64: IBM
Creating a Log Source
The log file protocol allows JSA to retrieve archived log files from a remote host. The
IBM®WebSphere
®Application Server DSM supports the bulk loading of log files by using
the log file protocol source.
1. Log in to JSA.
2. Click the Admin tab.
3. Click the Log Sources icon.
4. Click Add.
5. In the Log Source Name field, type a name for the log source.
6. In the Log Source Description field, type a description for the log source.
7. From the Log Source Type list, select IBM®WebSphere
®Application Server.
8. Using the Protocol Configuration list, select Log File.
9. Configure the following values:
Table 179: Log File Parameters
DescriptionParameter
Typean IPaddress, host name, or name to identify your IBM®WebSphere®ApplicationServeras an event source in JSA. IP addresses or host names are recommended as they allow JSAto identify a log file to a unique event source.
For example, if your network contains multiple IBM®WebSphere® Application Serves thatprovides logs toa file repository, specify the IPaddressor host nameof thedevice that createdthe event log. This allows events to be identified at the device level in your network, insteadof identifying the file repository.
Log Source Identifier
From the list, select the protocol that youwant to usewhen retrieving log files froma removeserver. The default is SFTP.
• SFTP SSH File Transfer Protocol
• FTP File Transfer Protocol
• SCP Secure Copy
The underlying protocol that is used to retrieve log files for the SCP and SFTP service typerequires that the server specified in theRemote IPorHostname field has the SFTP subsystemenabled.
Service Type
Type the IP address or host name of your IBM®WebSphere® Application Server storing yourevent log files.
Remote IP or Hostname
Copyright © 2018, Juniper Networks, Inc.576
Juniper Secure Analytics Configuring DSMs Guide
Table 179: Log File Parameters (continued)
DescriptionParameter
Type the TCP port on the remote host that is running the selected Service Type. The validrange is 1 - 65535.
The options include FTP ports:
• FTP TCP Port 21
• SFTP TCP Port 22
• SCP TCP Port 22
If the host for your event files is using a non-standard port number for FTP, SFTP, or SCP,youmust adjust the port value.
Remote Port
Type the user name necessary to log in to the host that contains your event files.
The user name can be up to 255 characters in length.
Remote User
Type the password necessary to log in to the host.Remote Password
Confirm the password necessary to log in to the host.Confirm Password
If you select SCP or SFTP as the Service Type, this parameter allows for the definition of anSSH private key file.
The Remote Password field is ignored when you provide an SSH Key File.
SSH Key File
Type the directory location on the remote host to the cell and file path you specified in“Configuring IBMWebSphere” on page 574. This is the directory that you created containingyour IBM®WebSphere® Application Server event files.
For FTP only. If your log files are located in the remote user's home directory, you can leavethe remotedirectoryblank.This is to support operating systemswhereachange in theworkingdirectory (CWD) command is restricted.
Remote Directory
Select this check box if you want the file pattern to search sub folders. By default, the checkbox is clear.
The Recursive option is ignored if you configure SCP as the Service Type.
Recursive
If you select SFTP or FTP as the Service Type, this option allows for the configuration of theregular expression (regex) to filter the list of files that are specified in the Remote Directory.All matching files are included in the processing.
The FTP file pattern that you specify must match the name that you assigned to your JVMlogs in “Customizing the Logging Option” on page 575. For example, to collect system logs,type the following code:
System.*\.log
Useof thisparameter requiresknowledgeof regular expressions (regex). Formore information,see the followingwebsite:http://download.oracle.com/javase/tutorial/essential/regex/
FTP File Pattern
577Copyright © 2018, Juniper Networks, Inc.
Chapter 64: IBM

Table 179: Log File Parameters (continued)
DescriptionParameter
This option appears only if you select FTP as the Service Type. The FTP Transfer Modeparameter allows for the definition of the file transfer mode when log files are retrieved overFTP.
From the list, select the transfer mode that you want to apply to this log source:
• Binary Select Binary for log sources that require binary data files or compressed zip, gzip,tar, or tar+gzip archive files.
• ASCII Select ASCII for log sources that require an ASCII FTP file transfer.
Youmust select None for the Processor parameter and LINEBYLINE the Event Generatorparameter when you use ASCII as the FTP Transfer Mode.
FTP Transfer Mode
If you select SCP as the Service Type youmust type the file name of the remote file.SCP Remote File
Type the time of day you want the processing to begin. This parameter functions with theRecurrence value to establish when and how often the Remote Directory is scanned for files.Type the start time, based on a 24-hour clock, in the following format: HH: MM.
Start Time
Type the frequency, beginning at the Start Time, that you want the remote directory to bescanned. Type this value in hours (H), minutes (M), or days (D). For example, type 2H if youwant the directory to be scanned every 2 hours. The default is 1H.
When you schedule a log file protocol, select a recurrence time for the log file protocol shorterthan thescheduledwrite interval of theWebSphere®ApplicationServer log files. This ensuresthatWebSphere®eventsarecollectedby the log fileprotocolbefore thenew log fileoverwritesthe old event log.
Recurrence
Select this check box if youwant the log file protocol to run immediately after you click Save.After the RunOn Save completes, the log file protocol follows your configured start timeand recurrence schedule.
Selecting RunOn Save clears the list of previously processed files for the Ignore PreviouslyProcessed File parameter.
RunOn Save
Type the number of Events Per Second (EPS) that you do not want this protocol to exceed.The valid range is 100 - 5000.
EPS Throttle
If the files on the remote host are stored in a zip, gzip, tar, or tar+gzip archive format, selectthe processor that allows the archives to be expanded and the contents to be processed.
Processor
Select this check box to track files that are processed. Files that are previously processedare not processed a second time.
This check box applies only to FTP and SFTP Service Types.
Ignore Previously ProcessedFile(s)
Select this check box to define the local directory on your JSA that youwant to use for storingdownloaded files during processing. We recommend that you leave the check box clear.When the check box is selected, the Local Directory field is displayed, which gives the optionof configuring the local directory to use for storing files.
Change Local Directory?
Copyright © 2018, Juniper Networks, Inc.578
Juniper Secure Analytics Configuring DSMs Guide
Table 179: Log File Parameters (continued)
DescriptionParameter
From the Event Generator list, select WebSphere®Application Server.
The Event Generator applies more processing, which is specific to retrieved event files forIBM®WebSphere® Application Server events.
Event Generator
10. Click Save.
11. On the Admin tab, click Deploy Changes.
Theconfiguration iscomplete. Formore informationabout IBM®WebServerApplication
Server, see your vendor documentation.
IBMWebSphere DataPower
RelatedDocumentation
IBM Z/OS on page 579•
• IBM Z/Secure® Audit on page 583
• IBM ZSecure Alert on page 584
IBM Z/OS
The Log file protocol allows JSA to retrieve archived log files from a remote host.
Log files are transferred, one at a time, to JSA for processing. The log file protocol can
manage plain text event logs, compressed files, or archives. Archives must contain
plain-text files that can be processed one line at a time. Multi-line event logs are not
supported by the log file protocol. IBM z/OSwith zSecure writes log files to a specified
directory as gzip archives. JSA extracts the archive and processes the events, which are
written as one event per line in the file.
To retrieve these events, youmust create a log source by using the log file protocol. JSA
requires credentials to log in to the system that hosts your LEEF formatted event files
and a polling interval.
1. Log in to JSA.
2. Click the Admin tab.
3. Click the Log Sources icon.
4. Click Add.
579Copyright © 2018, Juniper Networks, Inc.
Chapter 64: IBM
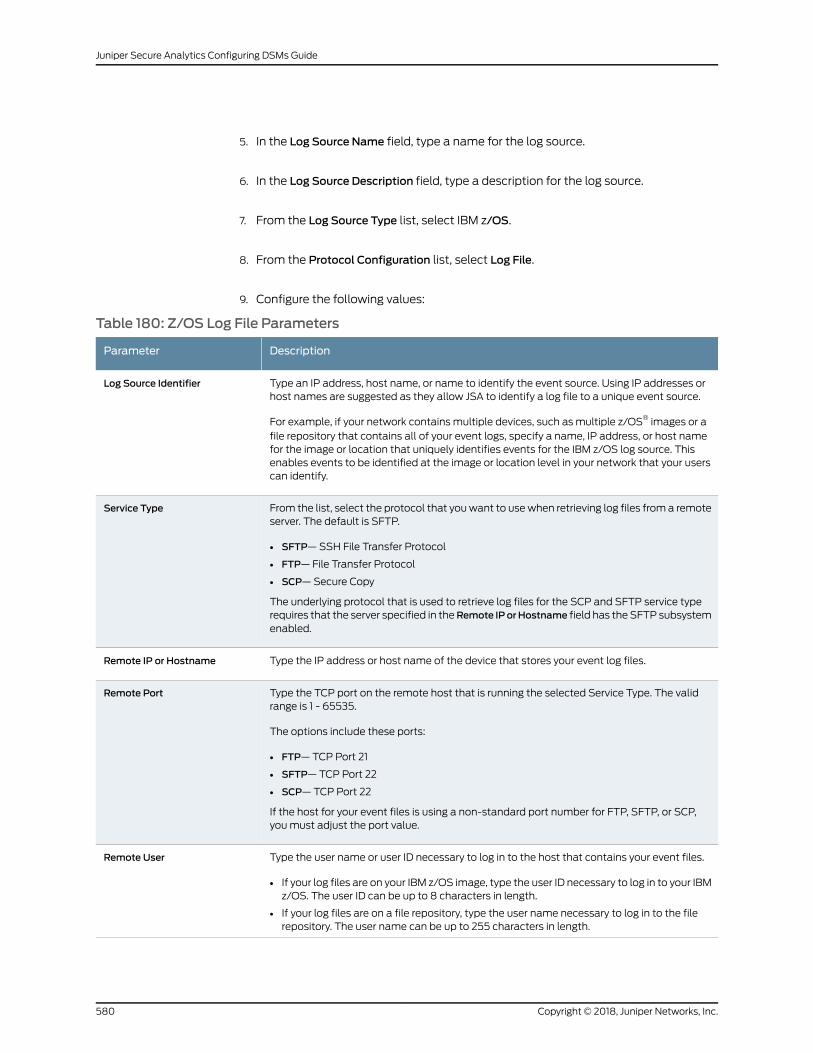
5. In the Log Source Name field, type a name for the log source.
6. In the Log Source Description field, type a description for the log source.
7. From the Log Source Type list, select IBM z/OS.
8. From the Protocol Configuration list, select Log File.
9. Configure the following values:
Table 180: Z/OS Log File Parameters
DescriptionParameter
Type an IP address, host name, or name to identify the event source. Using IP addresses orhost names are suggested as they allow JSA to identify a log file to a unique event source.
For example, if your network contains multiple devices, such as multiple z/OS® images or afile repository that contains all of your event logs, specify a name, IP address, or host namefor the image or location that uniquely identifies events for the IBM z/OS log source. Thisenables events to be identified at the image or location level in your network that your userscan identify.
Log Source Identifier
From the list, select the protocol that youwant to usewhen retrieving log files from a remoteserver. The default is SFTP.
• SFTP—SSH File Transfer Protocol
• FTP— File Transfer Protocol
• SCP—Secure Copy
The underlying protocol that is used to retrieve log files for the SCP and SFTP service typerequires that the server specified in theRemote IPorHostname field has the SFTP subsystemenabled.
Service Type
Type the IP address or host name of the device that stores your event log files.Remote IP or Hostname
Type the TCP port on the remote host that is running the selected Service Type. The validrange is 1 - 65535.
The options include these ports:
• FTP—TCP Port 21
• SFTP—TCP Port 22
• SCP—TCP Port 22
If the host for your event files is using a non-standard port number for FTP, SFTP, or SCP,youmust adjust the port value.
Remote Port
Type the user name or user ID necessary to log in to the host that contains your event files.
• If your log files are on your IBM z/OS image, type the user ID necessary to log in to your IBMz/OS. The user ID can be up to 8 characters in length.
• If your log files are on a file repository, type the user name necessary to log in to the filerepository. The user name can be up to 255 characters in length.
Remote User
Copyright © 2018, Juniper Networks, Inc.580
Juniper Secure Analytics Configuring DSMs Guide
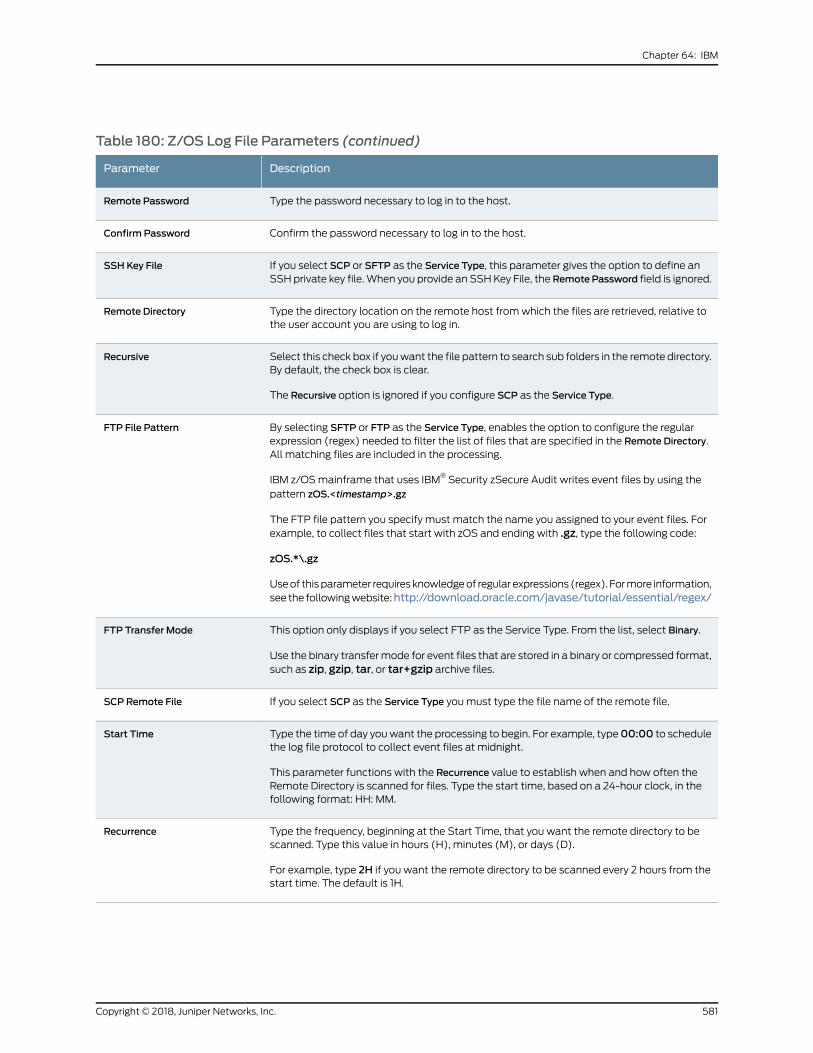
Table 180: Z/OS Log File Parameters (continued)
DescriptionParameter
Type the password necessary to log in to the host.Remote Password
Confirm the password necessary to log in to the host.Confirm Password
If you select SCP or SFTP as the Service Type, this parameter gives the option to define anSSH private key file.When you provide an SSHKey File, the RemotePassword field is ignored.
SSH Key File
Type the directory location on the remote host fromwhich the files are retrieved, relative tothe user account you are using to log in.
Remote Directory
Select this check box if youwant the file pattern to search sub folders in the remote directory.By default, the check box is clear.
The Recursive option is ignored if you configure SCP as the Service Type.
Recursive
By selecting SFTP or FTP as the Service Type, enables the option to configure the regularexpression (regex) needed to filter the list of files that are specified in the Remote Directory.All matching files are included in the processing.
IBM z/OSmainframe that uses IBM® Security zSecure Audit writes event files by using thepattern zOS.<timestamp>.gz
The FTP file pattern you specify must match the name you assigned to your event files. Forexample, to collect files that start with zOS and ending with .gz, type the following code:
zOS.*\.gz
Useof thisparameter requiresknowledgeof regular expressions (regex). Formore information,see the followingwebsite:http://download.oracle.com/javase/tutorial/essential/regex/
FTP File Pattern
This option only displays if you select FTP as the Service Type. From the list, select Binary.
Use the binary transfermode for event files that are stored in a binary or compressed format,such as zip, gzip, tar, or tar+gzip archive files.
FTP Transfer Mode
If you select SCP as the Service Type youmust type the file name of the remote file.SCP Remote File
Type the time of day youwant the processing to begin. For example, type00:00 to schedulethe log file protocol to collect event files at midnight.
This parameter functions with the Recurrence value to establish when and how often theRemote Directory is scanned for files. Type the start time, based on a 24-hour clock, in thefollowing format: HH: MM.
Start Time
Type the frequency, beginning at the Start Time, that you want the remote directory to bescanned. Type this value in hours (H), minutes (M), or days (D).
For example, type 2H if you want the remote directory to be scanned every 2 hours from thestart time. The default is 1H.
Recurrence
581Copyright © 2018, Juniper Networks, Inc.
Chapter 64: IBM
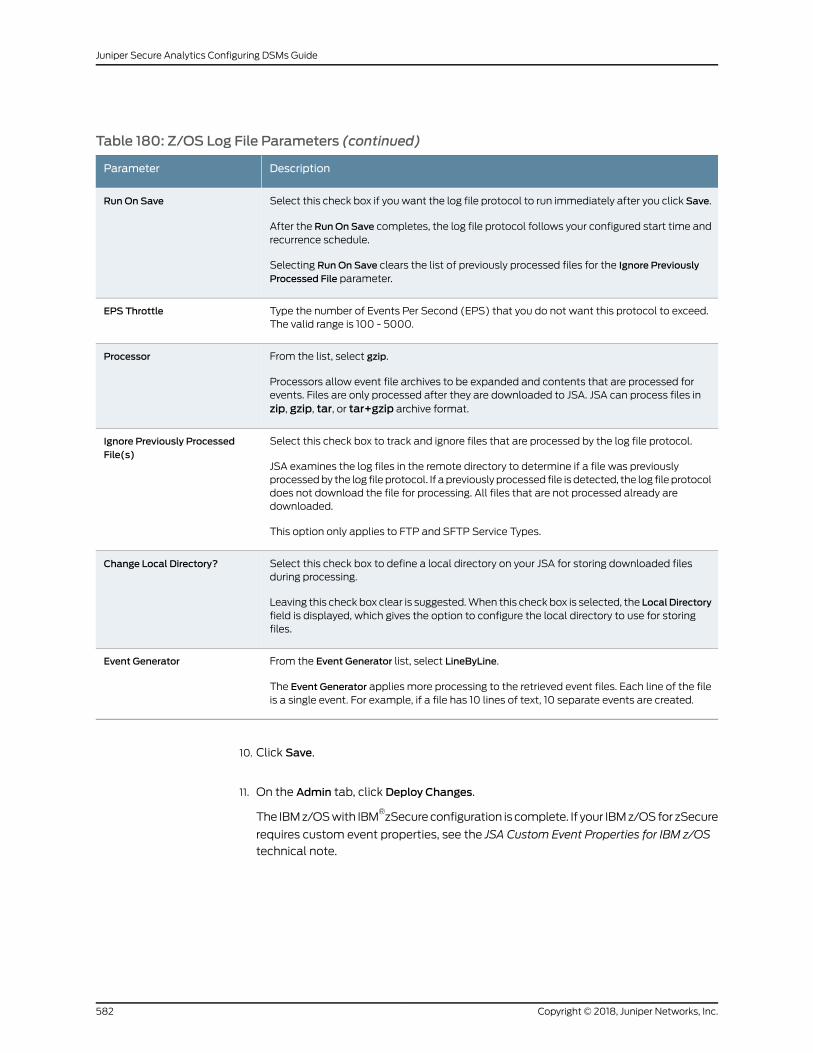
Table 180: Z/OS Log File Parameters (continued)
DescriptionParameter
Select this check box if youwant the log file protocol to run immediately after you click Save.
After the RunOn Save completes, the log file protocol follows your configured start time andrecurrence schedule.
Selecting RunOn Save clears the list of previously processed files for the Ignore PreviouslyProcessed File parameter.
RunOn Save
Type the number of Events Per Second (EPS) that you do not want this protocol to exceed.The valid range is 100 - 5000.
EPS Throttle
From the list, select gzip.
Processors allow event file archives to be expanded and contents that are processed forevents. Files are only processed after they are downloaded to JSA. JSA can process files inzip, gzip, tar, or tar+gzip archive format.
Processor
Select this check box to track and ignore files that are processed by the log file protocol.
JSA examines the log files in the remote directory to determine if a file was previouslyprocessedby the log file protocol. If a previously processed file is detected, the log file protocoldoes not download the file for processing. All files that are not processed already aredownloaded.
This option only applies to FTP and SFTP Service Types.
Ignore Previously ProcessedFile(s)
Select this check box to define a local directory on your JSA for storing downloaded filesduring processing.
Leaving this check box clear is suggested.When this check box is selected, the LocalDirectoryfield is displayed, which gives the option to configure the local directory to use for storingfiles.
Change Local Directory?
From the Event Generator list, select LineByLine.
The Event Generator applies more processing to the retrieved event files. Each line of the fileis a single event. For example, if a file has 10 lines of text, 10 separate events are created.
Event Generator
10. Click Save.
11. On the Admin tab, click Deploy Changes.
The IBMz/OSwith IBM®zSecureconfiguration is complete. If your IBMz/OSfor zSecure
requires custom event properties, see the JSA Custom Event Properties for IBM z/OS
technical note.
Copyright © 2018, Juniper Networks, Inc.582
Juniper Secure Analytics Configuring DSMs Guide
IBM Z/Secure®Audit
The IBM z/OS®DSM for JSA integrates with an IBM z/OSmainframe by using IBM
®
Security zSecure®Audit to collect security, authorization, and audit events.
Using a zSecure process, events from the SystemManagement Facilities (SMF) are
recorded to an event file in the Log Enhanced Event format (LEEF). JSA retrieves the
LEEF event log files by using the log file protocol and processes the events. You can
schedule JSA to retrieve events on a polling interval, which allows JSA to retrieve the
events on defined schedule.
To integrate IBM z/OS events from IBM®Security zSecure Audit into JSA:
1. Confirm that your installation meets any prerequisite installation requirements.
2. Configure your IBM z/OS image. For more information, see the IBM®Security zSecure
Suite: CARLa-Driven Components Installation and Deployment Guide.
3. Create a log source in JSA for IBM z/OS to retrieve your LEEF formatted event logs.
For more information, see “IBM Z/OS” on page 579.
4. Optional. Create a custom event property for IBM z/OS in JSA. For more information,
see the JSA Custom Event Properties for IBM z/OS technical note.
Before You Begin
Before you can configure the data collection process, youmust complete the basic
zSecure installation process.
The following prerequisites are required:
• Youmustensureparmlibmember IFAPRDxx isenabled for IBM®Security zSecureAudit
on your z/OS®image.
• The SCKRLOAD library must be APF-authorized.
• Youmust configure a process to periodically refresh your CKFREEZE and UNLOAD
data sets.
• Youmust configure an SFTP, FTP, or SCP server on your z/OS®image for JSA to
download your LEEF event files.
• Youmust allow SFTP, FTP, or SCP traffic on firewalls that are located between JSA
and your z/OS®image.
After you install the software, complete the post-installation activities to create and
modify the configuration. For instructions on installing and configuring zSecure, see the
IBM®Security zSecure Suite: CARLa-Driven Components Installation and Deployment
Guide.
583Copyright © 2018, Juniper Networks, Inc.
Chapter 64: IBM
IBM ZSecure Alert
The IBM®zSecure Alert DSM for JSA accepts alert events by using syslog, allowing JSA
to receive alert events in real time.
The alert configuration on your IBM®zSecure Alert appliance determines which alert
conditions you want to monitor and forward to JSA. To collect events in JSA, youmust
configure your IBM®zSecure Alert appliance to forward events in a UNIX syslog event
format by using the JSA IP address as the destination. For information on configuring
UNIX syslog alerts and destinations, see the IBM®Security zSecure Alert User Reference
Manual.
JSAautomatically discovers and creates a log source for syslog events from IBM®zSecure
Alert. However, you canmanually create a log source for JSA to receive syslog events.
The following configuration steps are optional.
1. Log in to JSA.
2. Click the Admin tab.
3. Click the Log Sources icon.
4. Click Add.
5. In the Log Source Name field, type a name for your log source.
6. In the Log Source Description field, type a description for the log source.
7. From the Log Source Type list, select IBM®zSecure Alert.
8. Using the Protocol Configuration list, select Syslog.
9. Configure the following values:
Table 181: Syslog Parameters
DescriptionParameter
Type the IP address or host name for the log source as an identifier for events from yourIBM®zSecure Alert.
Log Source Identifier
10. Click Save.
11. On the Admin tab, click Deploy Changes.
Copyright © 2018, Juniper Networks, Inc.584
Juniper Secure Analytics Configuring DSMs Guide

The configuration is complete.
585Copyright © 2018, Juniper Networks, Inc.
Chapter 64: IBM

Copyright © 2018, Juniper Networks, Inc.586
Juniper Secure Analytics Configuring DSMs Guide
CHAPTER 65
ISC Bind
• ISC Bind on page 587
• Configuring a Log Source on page 589
ISC Bind
You can integrate an Internet System Consortium (ISC) BIND device with JSA. An ISC
BIND device accepts events using syslog.
You can configure syslog on your ISC BIND device to forward events to JSA.
1. Log in to the ISC BIND device.
2. Open the following file to add a logging clause:
named.conf
logging {
channel <channel_name> {
syslog <syslog_facility>;
severity <critical | error | warning | notice | info | debug [level ] | dynamic >;
print-category yes;
print-severity yes;
print-time yes;
};
category queries {
<channel_name>;
};
category notify {
<channel_name>;
};
category network {
587Copyright © 2018, Juniper Networks, Inc.
<channel_name>;
};
category client {
<channel_name>;
};
};
For Example:
logging {
channel QRadar {
syslog local3;
severity info;
};
category queries {
QRadar;
};
category notify {
QRadar;
};
category network {
QRadar;
};
category client {
QRadar;
};
};
3. Save and exit the file.
4. Edit the syslog configuration to log to your JSA using the facility you selected in Step
2:
<syslog_facility>.*@<IP Address>
Where <IP Address> is the IP address of your JSA.
For example:
local3.*@192.16.10.10
Copyright © 2018, Juniper Networks, Inc.588
Juniper Secure Analytics Configuring DSMs Guide
NOTE: JSA only parses logs with a severity level of info or higher.
5. Restart the following services.
service syslog restart
service named restart
You can now configure the log source in JSA.
Configuring a Log Source
JSA automatically discovers and creates a log source for syslog events from ISC BIND.
The following configuration steps are optional.
1. Log in to JSA.
2. Click the Admin tab.
3. On the navigation menu, click Data Sources.
4. Click the Log Sources icon.
5. Click Add.
6. In the Log Source Name field, type a name for your log source.
7. In the Log Source Description field, type a description for the log source.
8. From the Log Source Type list, select ISC BIND.
9. Using the Protocol Configuration list, select Syslog.
10. Configure the following values:
Table 182: Syslog Protocol Parameters
DescriptionParameter
Type the IP address or host name for the log source as an identifier for events from your ISCBIND appliance.
Log Source Identifier
589Copyright © 2018, Juniper Networks, Inc.
Chapter 65: ISC Bind

11. Click Save.
12. On the Admin tab, click Deploy Changes.
The configuration is complete.
Copyright © 2018, Juniper Networks, Inc.590
Juniper Secure Analytics Configuring DSMs Guide
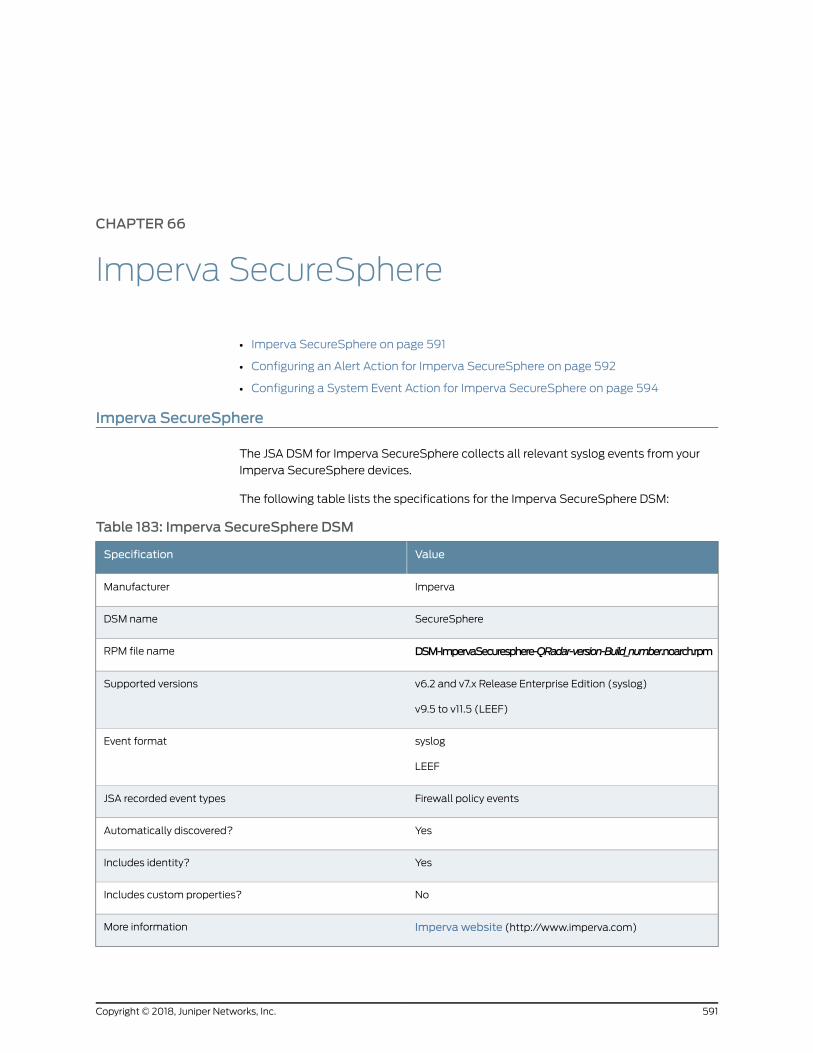
CHAPTER 66
Imperva SecureSphere
• Imperva SecureSphere on page 591
• Configuring an Alert Action for Imperva SecureSphere on page 592
• Configuring a System Event Action for Imperva SecureSphere on page 594
Imperva SecureSphere
The JSA DSM for Imperva SecureSphere collects all relevant syslog events from your
Imperva SecureSphere devices.
The following table lists the specifications for the Imperva SecureSphere DSM:
Table 183: Imperva SecureSphere DSM
ValueSpecification
ImpervaManufacturer
SecureSphereDSM name
DSM-ImpervaSecuresphere-QRadar-version-Build_number.noarch.rpmRPM file name
v6.2 and v7.x Release Enterprise Edition (syslog)
v9.5 to v11.5 (LEEF)
Supported versions
syslog
LEEF
Event format
Firewall policy eventsJSA recorded event types
YesAutomatically discovered?
YesIncludes identity?
NoIncludes custom properties?
Imperva website (http://www.imperva.com)More information
591Copyright © 2018, Juniper Networks, Inc.

Tosendevents from ImpervaSecureSpheredevices to JSA, complete the followingsteps:
1. If automatic updates are not enabled, download and install the most recent version
of the Imperva SecureSphere DSM RPM on your JSA Console.
2. For each instance of Imperva SecureSphere, configure the Imperva SecureSphere
appliance to communicate with JSA. On your Imperva SecureSphere appliance,
complete the following steps
1. Configure an alert action. See “Configuring an Alert Action for Imperva
SecureSphere” on page 592.
2. Configure a system event action. See “Configuring a System Event Action for
Imperva SecureSphere” on page 594.
3. If JSA does not automatically discover the Imperva SecureSphere log source, create
a log source for each instance of Imperva SecureSphere on your network. Use the
following table to define the Imperva SecureSphere-specific parameters:
Table 184: Imperva SecureSphere Log Source Parameters
DescriptionParameter
Imperva SecureSphereLog Source Type
SyslogProtocol Configuration
Configuring an Alert Action for Imperva SecureSphere
Configure your Imperva SecureSphere appliance to forward syslog events for firewall
policy alerts to JSA.
Use the following list to define amessage string in theMessage field for each event type
you want to forward:
NOTE: The line breaks in the code examplesmight cause this configurationto fail. For each alert, copy the code blocks into a text editor, remove the linebreaks, and paste as a single line in the Custom Format column.
Database alerts (v9.5 to v11.5)—
LEEF:1.0|Imperva|SecureSphere|${SecureSphereVersion}|${Alert.alertType}${Alert.immediateAction}|Alert ID=${Alert.dn}|devTimeFormat=[see note]|devTime=${Alert.createTime}|Alert type=${Alert.alertType}|src=${Alert.sourceIp}|usrName=${Event.struct.user.user}|Application name=${Alert.applicationName}|dst=${Event.destInfo.serverIp}|Alert Description=${Alert.description}|Severity=${Alert.severity}|Immediate Action=${Alert.immediateAction}|SecureSphere Version=${SecureSphereVersion}
File server alerts (v9.5 to v11.5)—
Copyright © 2018, Juniper Networks, Inc.592
Juniper Secure Analytics Configuring DSMs Guide
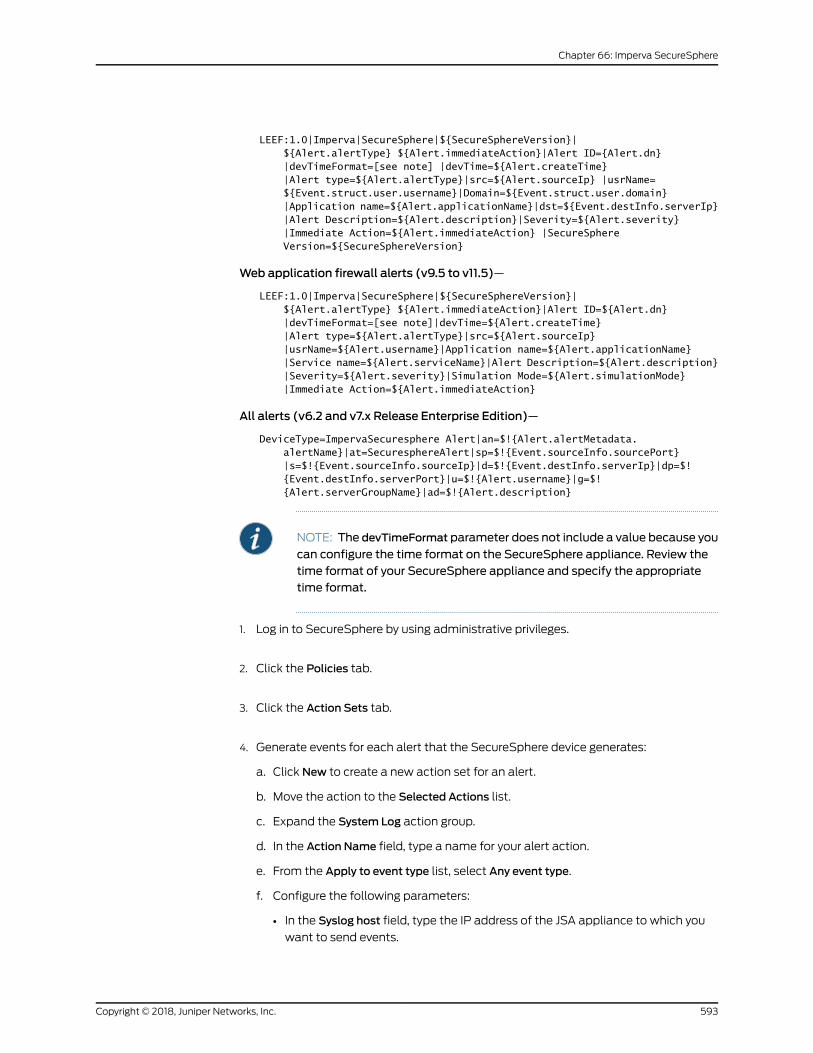
LEEF:1.0|Imperva|SecureSphere|${SecureSphereVersion}|${Alert.alertType} ${Alert.immediateAction}|Alert ID={Alert.dn}|devTimeFormat=[see note] |devTime=${Alert.createTime}|Alert type=${Alert.alertType}|src=${Alert.sourceIp} |usrName=${Event.struct.user.username}|Domain=${Event.struct.user.domain}|Application name=${Alert.applicationName}|dst=${Event.destInfo.serverIp}|Alert Description=${Alert.description}|Severity=${Alert.severity} |Immediate Action=${Alert.immediateAction} |SecureSphere Version=${SecureSphereVersion}
Web application firewall alerts (v9.5 to v11.5)—
LEEF:1.0|Imperva|SecureSphere|${SecureSphereVersion}|${Alert.alertType} ${Alert.immediateAction}|Alert ID=${Alert.dn}|devTimeFormat=[see note]|devTime=${Alert.createTime}|Alert type=${Alert.alertType}|src=${Alert.sourceIp} |usrName=${Alert.username}|Application name=${Alert.applicationName} |Service name=${Alert.serviceName}|Alert Description=${Alert.description}|Severity=${Alert.severity}|Simulation Mode=${Alert.simulationMode}|Immediate Action=${Alert.immediateAction}
All alerts (v6.2 and v7.x Release Enterprise Edition)—
DeviceType=ImpervaSecuresphere Alert|an=$!{Alert.alertMetadata.alertName}|at=SecuresphereAlert|sp=$!{Event.sourceInfo.sourcePort}|s=$!{Event.sourceInfo.sourceIp}|d=$!{Event.destInfo.serverIp}|dp=$!{Event.destInfo.serverPort}|u=$!{Alert.username}|g=$!{Alert.serverGroupName}|ad=$!{Alert.description}
NOTE: The devTimeFormat parameter does not include a value because you
can configure the time format on the SecureSphere appliance. Review thetime format of your SecureSphere appliance and specify the appropriatetime format.
1. Log in to SecureSphere by using administrative privileges.
2. Click the Policies tab.
3. Click the Action Sets tab.
4. Generate events for each alert that the SecureSphere device generates:
a. Click New to create a new action set for an alert.
b. Move the action to the Selected Actions list.
c. Expand the System Log action group.
d. In the Action Name field, type a name for your alert action.
e. From the Apply to event type list, select Any event type.
f. Configure the following parameters:
• In the Syslog host field, type the IP address of the JSA appliance to which you
want to send events.
593Copyright © 2018, Juniper Networks, Inc.
Chapter 66: Imperva SecureSphere

• In the Syslog log level list, select INFO.
• In theMessage field, define amessage string for your event type.
g. In the Facility field, type syslog.
h. Select the Run on Every Event check box.
i. Click Save.
5. To trigger syslog events, associate each of your firewall policies to an alert action:
a. From the navigation menu, click >Policies > Security > Firewall Policy.
b. Select the policy that you want to use for the alert action.
c. Click the Policy tab.
d. FromtheFollowedAction list, select yournewactionandconfigure theparameters.
TIP: Configure established connections as either blocked, inbound, oroutbound. Always allow applicable service ports.
e. Ensure that your policy is configured as enabled and is applied to the appropriate
server groups.
f. Click Save.
RelatedDocumentation
Configuring a System Event Action for Imperva SecureSphere on page 594•
Configuring a System Event Action for Imperva SecureSphere
Configure your Imperva SecureSphere appliance to forward syslog system policy events
to JSA.
Use the following list to define amessage string in theMessage field for each event type
you want to forward:
NOTE: The line breaks in the code examplesmight cause this configurationto fail. For each alert, copy the code blocks into a text editor, remove the linebreaks, and paste as a single line in the Custom Format column.
System events (v9.5 to v11.5)—
LEEF:1.0|Imperva|SecureSphere|${SecureSphereVersion}|${Event.eventType}|Event ID=${Event.dn}|devTimeFormat=[see note]|devTime=${Event.createTime}|Event Type=${Event.eventType}|Message=${Event.message}|Severity=${Event.severity.displayName}|usrName=${Event.username}|SecureSphere Version=${SecureSphereVersion}
Database audit records (v9.5 to v11.5)—
Copyright © 2018, Juniper Networks, Inc.594
Juniper Secure Analytics Configuring DSMs Guide
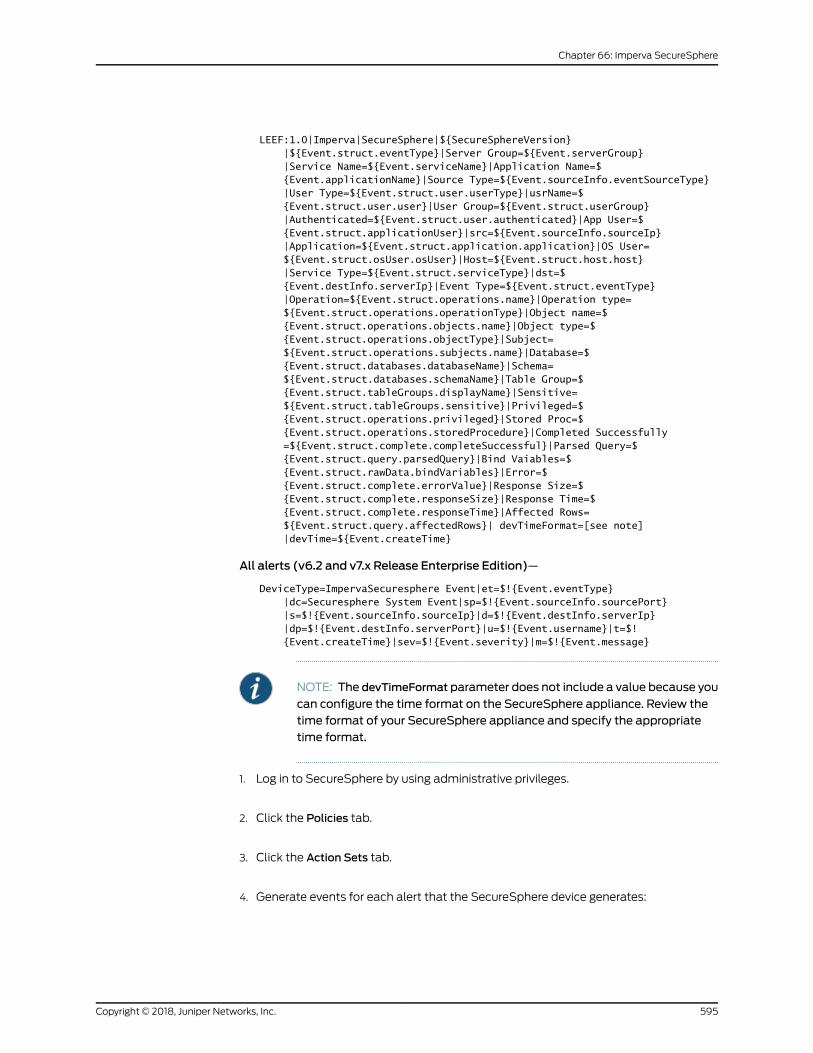
LEEF:1.0|Imperva|SecureSphere|${SecureSphereVersion}|${Event.struct.eventType}|Server Group=${Event.serverGroup}|Service Name=${Event.serviceName}|Application Name=${Event.applicationName}|Source Type=${Event.sourceInfo.eventSourceType}|User Type=${Event.struct.user.userType}|usrName=${Event.struct.user.user}|User Group=${Event.struct.userGroup}|Authenticated=${Event.struct.user.authenticated}|App User=${Event.struct.applicationUser}|src=${Event.sourceInfo.sourceIp}|Application=${Event.struct.application.application}|OS User=${Event.struct.osUser.osUser}|Host=${Event.struct.host.host}|Service Type=${Event.struct.serviceType}|dst=${Event.destInfo.serverIp}|Event Type=${Event.struct.eventType}|Operation=${Event.struct.operations.name}|Operation type=${Event.struct.operations.operationType}|Object name=${Event.struct.operations.objects.name}|Object type=${Event.struct.operations.objectType}|Subject=${Event.struct.operations.subjects.name}|Database=${Event.struct.databases.databaseName}|Schema=${Event.struct.databases.schemaName}|Table Group=${Event.struct.tableGroups.displayName}|Sensitive=${Event.struct.tableGroups.sensitive}|Privileged=${Event.struct.operations.privileged}|Stored Proc=${Event.struct.operations.storedProcedure}|Completed Successfully=${Event.struct.complete.completeSuccessful}|Parsed Query=${Event.struct.query.parsedQuery}|Bind Vaiables=${Event.struct.rawData.bindVariables}|Error=${Event.struct.complete.errorValue}|Response Size=${Event.struct.complete.responseSize}|Response Time=${Event.struct.complete.responseTime}|Affected Rows=${Event.struct.query.affectedRows}| devTimeFormat=[see note]|devTime=${Event.createTime}
All alerts (v6.2 and v7.x Release Enterprise Edition)—
DeviceType=ImpervaSecuresphere Event|et=$!{Event.eventType}|dc=Securesphere System Event|sp=$!{Event.sourceInfo.sourcePort}|s=$!{Event.sourceInfo.sourceIp}|d=$!{Event.destInfo.serverIp}|dp=$!{Event.destInfo.serverPort}|u=$!{Event.username}|t=$!{Event.createTime}|sev=$!{Event.severity}|m=$!{Event.message}
NOTE: The devTimeFormat parameter does not include a value because you
can configure the time format on the SecureSphere appliance. Review thetime format of your SecureSphere appliance and specify the appropriatetime format.
1. Log in to SecureSphere by using administrative privileges.
2. Click the Policies tab.
3. Click the Action Sets tab.
4. Generate events for each alert that the SecureSphere device generates:
595Copyright © 2018, Juniper Networks, Inc.
Chapter 66: Imperva SecureSphere

a. Click New to create a new action set for an alert.
b. Type a name for the new action set.
c. Move the action to the Selected Actions list.
d. Expand the System Log action group.
e. In the Action Name field, type a name for your alert action.
f. From the Apply to event type list, select Any event type.
g. Configure the following parameters:
• In the Syslog host field, type the IP address of the JSA appliance to which you
want to send events.
• In the Syslog log level list, select INFO.
• In theMessage field, define amessage string for your event type.
h. In the Facility field, type syslog.
i. Select the Run on Every Event check box.
j. Click Save.
5. To trigger syslog events, associate each of your system event policies to an alert
action:
a. From the navigation menu, click Policies > System Events.
b. Select or create the system event policy that you want to use for the alert action.
c. Click the Followed Action tab.
d. FromtheFollowedAction list, select yournewactionandconfigure theparameters.
TIP: Configure established connections as either blocked, inbound, oroutbound. Always allow applicable service ports.
e. Click Save.
RelatedDocumentation
• Configuring an Alert Action for Imperva SecureSphere on page 592
Copyright © 2018, Juniper Networks, Inc.596
Juniper Secure Analytics Configuring DSMs Guide
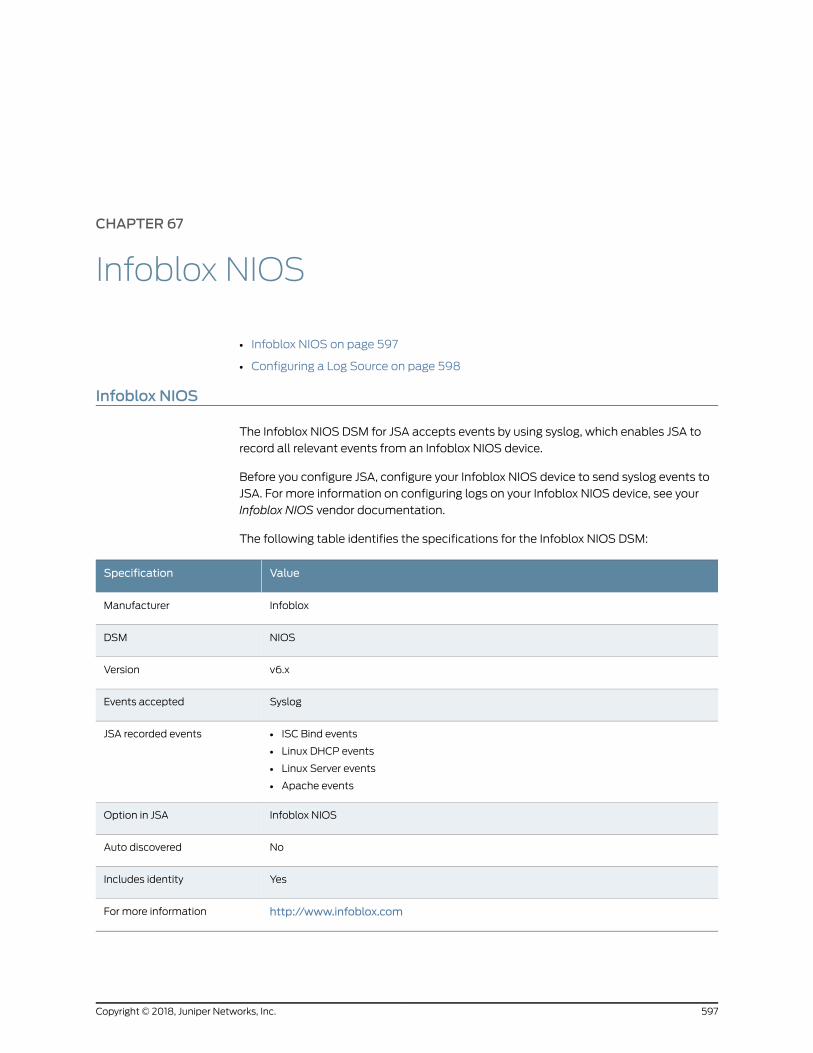
CHAPTER 67
Infoblox NIOS
• Infoblox NIOS on page 597
• Configuring a Log Source on page 598
Infoblox NIOS
The Infoblox NIOS DSM for JSA accepts events by using syslog, which enables JSA to
record all relevant events from an Infoblox NIOS device.
Before you configure JSA, configure your Infoblox NIOS device to send syslog events to
JSA. For more information on configuring logs on your Infoblox NIOS device, see your
Infoblox NIOS vendor documentation.
The following table identifies the specifications for the Infoblox NIOS DSM:
ValueSpecification
InfobloxManufacturer
NIOSDSM
v6.xVersion
SyslogEvents accepted
• ISC Bind events
• Linux DHCP events
• Linux Server events
• Apache events
JSA recorded events
Infoblox NIOSOption in JSA
NoAuto discovered
YesIncludes identity
http://www.infoblox.comFor more information
597Copyright © 2018, Juniper Networks, Inc.
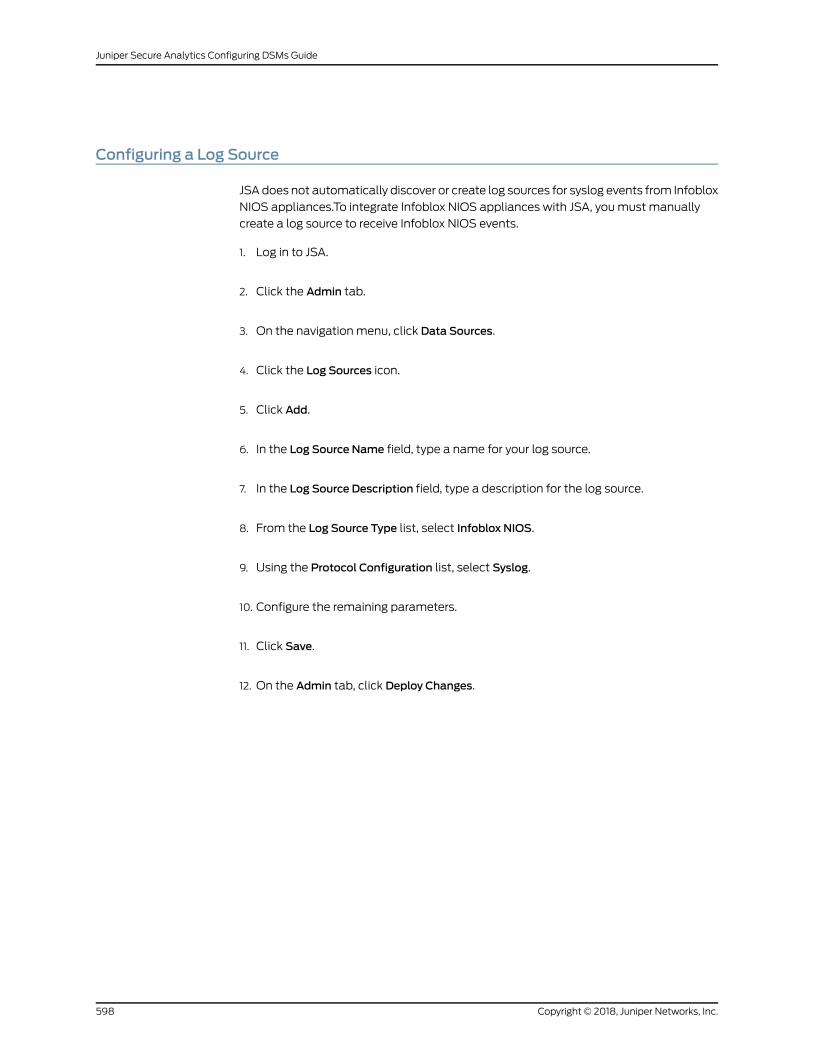
Configuring a Log Source
JSA does not automatically discover or create log sources for syslog events from Infoblox
NIOS appliances.To integrate Infoblox NIOS appliances with JSA, youmust manually
create a log source to receive Infoblox NIOS events.
1. Log in to JSA.
2. Click the Admin tab.
3. On the navigation menu, click Data Sources.
4. Click the Log Sources icon.
5. Click Add.
6. In the Log Source Name field, type a name for your log source.
7. In the Log Source Description field, type a description for the log source.
8. From the Log Source Type list, select Infoblox NIOS.
9. Using the Protocol Configuration list, select Syslog.
10. Configure the remaining parameters.
11. Click Save.
12. On the Admin tab, click Deploy Changes.
Copyright © 2018, Juniper Networks, Inc.598
Juniper Secure Analytics Configuring DSMs Guide

CHAPTER 68
IT-CUBE AgileSI
• IT-CUBE AgileSI on page 599
• Configuring AgileSI to Forward Events on page 599
• Configuring an AgileSI Log Source on page 600
IT-CUBE AgileSI
The iT-CUBE agileSI DSM for JSAcan accept security-based and audit SAP events from
agileSI installations that are integrated with your SAP system.
JSA uses the event data that is defined as security risks in your SAP environment to
generate offenses and correlate event data for your security team. SAP security events
are written in Log Event Extended Format (LEEF) to a log file produced by agileSI. JSA
retrieves the new events by using the SMB Tail protocol. To retrieve events from agileSI,
youmust create a log source by using the SMB Tail protocol and provide JSA credentials
to log in and poll the LEEF formatted agileSI event file. JSA is updated with new events
each time the SMB Tail protocol polls the event file for new SAP events.
Configuring AgileSI to Forward Events
To configure agileSI, you must create a logical file name for your events and configure
the connector settings with the path to your agileSI event log.
The location of the LEEF formatted event file must be in a location viewable by Samba
and accessible with the credentials you configure for the log source in JSA.
1. In agileSI core system installation, define a logical file name for the output file that
contains your SAP security events.
SAPprovides a concept that gives you theoption to useplatform-independent logical
file names in your application programs. Create a logical file name and path by using
transaction "FILE" (Logical File Path Definition) according to your organization's
requirements.
2. Log in to agileSI.
For example, http://<sap-system-url:port>/sap/bc/webdynpro/itcube/
ccf?sap-client=<client>&sap-language=EN
599Copyright © 2018, Juniper Networks, Inc.
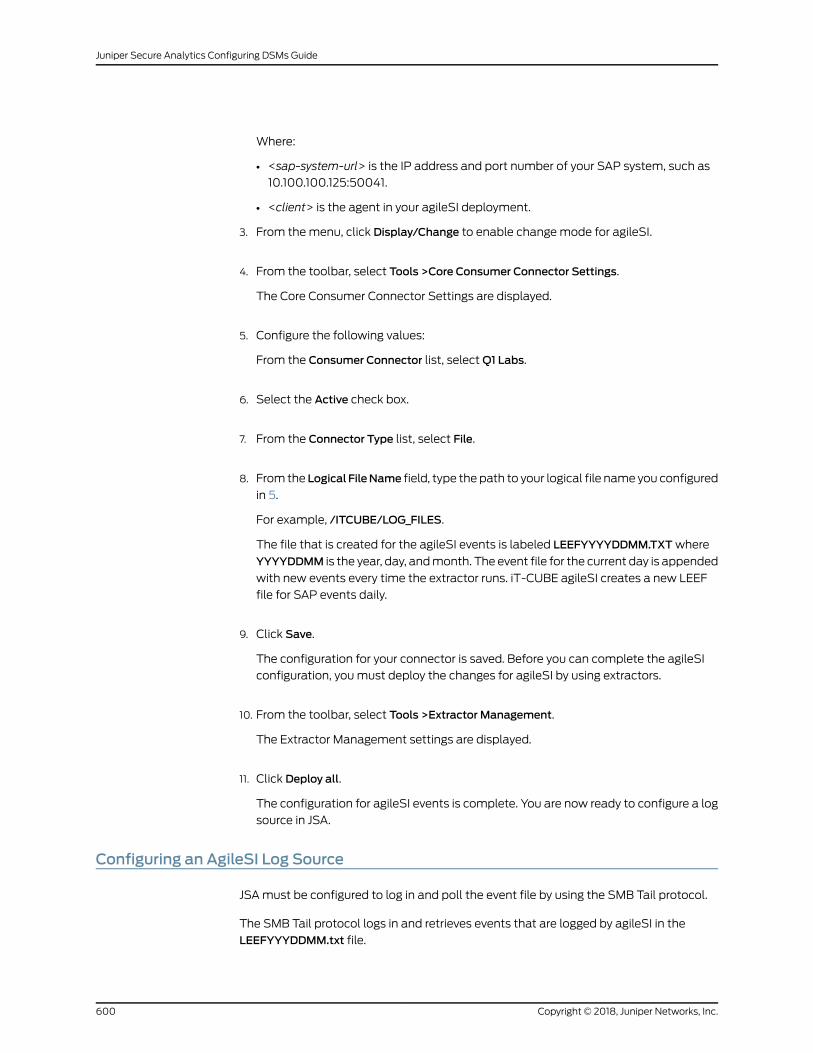
Where:
• <sap-system-url> is the IP address and port number of your SAP system, such as
10.100.100.125:50041.
• <client> is the agent in your agileSI deployment.
3. From themenu, click Display/Change to enable changemode for agileSI.
4. From the toolbar, select Tools >Core Consumer Connector Settings.
The Core Consumer Connector Settings are displayed.
5. Configure the following values:
From the Consumer Connector list, selectQ1 Labs.
6. Select the Active check box.
7. From the Connector Type list, select File.
8. From the Logical FileName field, type the path to your logical file name you configured
in 5.
For example, /ITCUBE/LOG_FILES.
The file that is created for the agileSI events is labeled LEEFYYYYDDMM.TXTwhere
YYYYDDMM is the year, day, andmonth. The event file for the current day is appended
with new events every time the extractor runs. iT-CUBE agileSI creates a new LEEF
file for SAP events daily.
9. Click Save.
The configuration for your connector is saved. Before you can complete the agileSI
configuration, youmust deploy the changes for agileSI by using extractors.
10. From the toolbar, select Tools >Extractor Management.
The Extractor Management settings are displayed.
11. Click Deploy all.
The configuration for agileSI events is complete. You are now ready to configure a log
source in JSA.
Configuring an AgileSI Log Source
JSAmust be configured to log in and poll the event file by using the SMB Tail protocol.
The SMB Tail protocol logs in and retrieves events that are logged by agileSI in the
LEEFYYYDDMM.txt file.
Copyright © 2018, Juniper Networks, Inc.600
Juniper Secure Analytics Configuring DSMs Guide
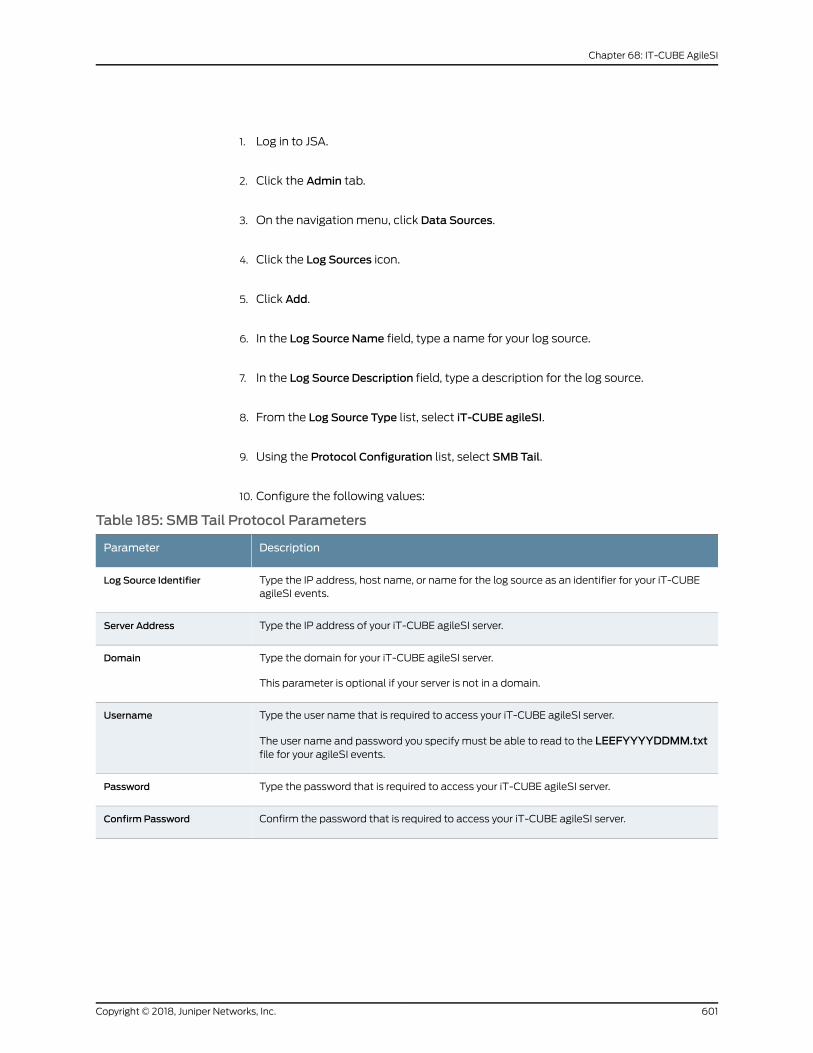
1. Log in to JSA.
2. Click the Admin tab.
3. On the navigation menu, click Data Sources.
4. Click the Log Sources icon.
5. Click Add.
6. In the Log Source Name field, type a name for your log source.
7. In the Log Source Description field, type a description for the log source.
8. From the Log Source Type list, select iT-CUBE agileSI.
9. Using the Protocol Configuration list, select SMB Tail.
10. Configure the following values:
Table 185: SMB Tail Protocol Parameters
DescriptionParameter
Type the IP address, host name, or name for the log source as an identifier for your iT-CUBEagileSI events.
Log Source Identifier
Type the IP address of your iT-CUBE agileSI server.Server Address
Type the domain for your iT-CUBE agileSI server.
This parameter is optional if your server is not in a domain.
Domain
Type the user name that is required to access your iT-CUBE agileSI server.
The user name and password you specify must be able to read to the LEEFYYYYDDMM.txtfile for your agileSI events.
Username
Type the password that is required to access your iT-CUBE agileSI server.Password
Confirm the password that is required to access your iT-CUBE agileSI server.Confirm Password
601Copyright © 2018, Juniper Networks, Inc.
Chapter 68: IT-CUBE AgileSI
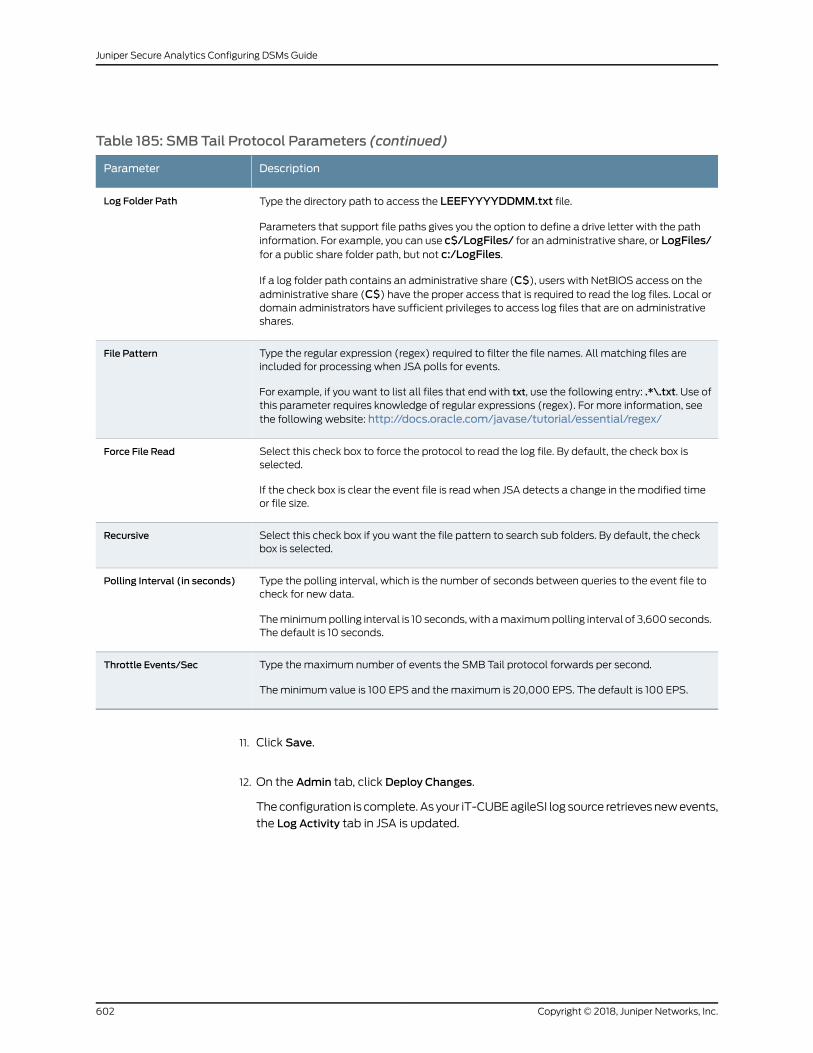
Table 185: SMB Tail Protocol Parameters (continued)
DescriptionParameter
Type the directory path to access the LEEFYYYYDDMM.txt file.
Parameters that support file paths gives you the option to define a drive letter with the pathinformation. For example, you can use c$/LogFiles/ for an administrative share, or LogFiles/for a public share folder path, but not c:/LogFiles.
If a log folder path contains an administrative share (C$), users with NetBIOS access on theadministrative share (C$) have the proper access that is required to read the log files. Local ordomain administrators have sufficient privileges to access log files that are on administrativeshares.
Log Folder Path
Type the regular expression (regex) required to filter the file names. All matching files areincluded for processing when JSA polls for events.
For example, if you want to list all files that end with txt, use the following entry: .*\.txt. Use ofthis parameter requires knowledge of regular expressions (regex). For more information, seethe following website: http://docs.oracle.com/javase/tutorial/essential/regex/
File Pattern
Select this check box to force the protocol to read the log file. By default, the check box isselected.
If the check box is clear the event file is read when JSA detects a change in the modified timeor file size.
Force File Read
Select this check box if you want the file pattern to search sub folders. By default, the checkbox is selected.
Recursive
Type the polling interval, which is the number of seconds between queries to the event file tocheck for new data.
Theminimumpolling interval is 10 seconds,with amaximumpolling interval of 3,600 seconds.The default is 10 seconds.
Polling Interval (in seconds)
Type themaximum number of events the SMB Tail protocol forwards per second.
Theminimum value is 100 EPS and themaximum is 20,000 EPS. The default is 100 EPS.
Throttle Events/Sec
11. Click Save.
12. On the Admin tab, click Deploy Changes.
Theconfiguration is complete.As your iT-CUBEagileSI log source retrievesnewevents,
the Log Activity tab in JSA is updated.
Copyright © 2018, Juniper Networks, Inc.602
Juniper Secure Analytics Configuring DSMs Guide

CHAPTER 69
Itron Smart Meter
• Itron Smart Meter on page 603
Itron Smart Meter
The Itron Smart Meter DSM for JSA collects events from an Itron Openway Smart Meter
by using syslog.
The ItronOpenway SmartMeter sends syslog events to JSA by using Port 514. For details
of configuring yourmeter for syslog, see your ItronOpenwaySmartMeterdocumentation.
JSAautomaticallydiscoversandcreatesa logsource for syslogevents from ItronOpenway
Smart Meters. However, you canmanually create a log source for JSA to receive syslog
events. The following configuration steps are optional.
1. Log in to JSA.
2. Click the Admin tab.
3. On the navigation menu, click Data Sources.
4. Click the Log Sources icon.
5. Click Add.
6. In the Log Source Name field, type a name for your log source.
7. In the Log Source Description field, type a description for the log source.
8. From the Log Source Type list, select Itron Smart Meter.
9. Using the Protocol Configuration list, select Syslog.
10. Configure the following values:
603Copyright © 2018, Juniper Networks, Inc.

Table 186: Syslog Protocol Parameters
DescriptionParameter
Type the IP address or host name for the log source as an identifier for events from your ItronOpenway Smart Meter installation.
Log Source Identifier
11. Click Save.
12. On the Admin tab, click Deploy Changes.
The configuration is complete.
Copyright © 2018, Juniper Networks, Inc.604
Juniper Secure Analytics Configuring DSMs Guide
CHAPTER 70
Juniper Networks
• Juniper Networks on page 605
• Juniper Networks AVT on page 605
• Juniper Networks DDoS Secure on page 607
• Juniper Networks DX Application Acceleration Platform on page 608
• Juniper Networks EX Series Ethernet Switch on page 609
• Juniper Networks IDP on page 610
• Juniper Networks Infranet Controller on page 612
• Juniper Networks Firewall and VPN on page 612
• Juniper Networks Junos OS on page 613
• Juniper Networks Secure Access on page 619
• Juniper Networks Security Binary Log Collector on page 623
• Juniper Networks Steel-Belted Radius on page 626
• Juniper Networks VGWVirtual Gateway on page 628
• Juniper Networks JunosWebApp Secure on page 630
• Juniper NetworksWLC SeriesWireless LAN Controller on page 633
Juniper Networks
JSA supports the a range of Juniper Networks DSMs.
Juniper Networks AVT
The Juniper Networks Application Volume Tracking (AVT) DSM for JSA accepts events
by using Java Database Connectivity (JDBC) protocol.
JSA records all relevant events. To integrate with Juniper Networks NSM AVT data, you
must create a view in the database on the Juniper Networks NSM server. Youmust also
configure the Postgres database configuration on the Juniper Networks NSM server to
allow connections to the database since, by default, only local connections are allowed.
605Copyright © 2018, Juniper Networks, Inc.
NOTE: This procedure is provided as a guideline. For specific instructions,see your vendor documentation.
1. Log in to your Juniper Networks AVT device command-line interface (CLI).
2. Open the following file:
/var/netscreen/DevSvr/pgsql/data/pg_hba.conf file
3. Add the following line to the end of the file:
host all all <IP address>/32 trust
Where: <IP address> is the IP address of your JSA console or Event Collector that you
want to connect to the database.
4. Reload the Postgres service:
su - nsm -c "pg_ctl reload -D /var/netscreen/DevSvr/pgsql/data"
5. As the Juniper Networks NSM user, create the view by using the following input:
create view strm_avt_view as SELECT a.name, a.category, v.srcip,v.dstip,v.dstport, v."last", u.name as userinfo, v.id, v.device, v.vlan,v.sessionid, v.bytecnt,v.pktcnt, v."first" FROM avt_part v JOIN app a ON v.app =a.id JOIN userinfo u ON v.userinfo = u.id;
The view is created.
You are now ready to configure the log source in JSA.
• Configuring JSA to Receive Events from a Juniper Networks AVT Device on page 606
Configuring JSA to Receive Events from a Juniper Networks AVT Device
You can configure JSA to receive events from a Juniper Networks AVT device.
1. From the Log Source Type list, select Juniper Networks AVT.
2. Youmust also configure the JDBC protocol for the log source. Use the following
parameters to configure the JDBC protocol:
Table 187: JDBC Protocol Parameters
DescriptionParameter
From the Database Type list, select PostgresDatabase Type
Type profilerDbDatabase Name
Type the IP address of the Juniper Networks NSM systemIP or Hostname
Copyright © 2018, Juniper Networks, Inc.606
Juniper Secure Analytics Configuring DSMs Guide
Table 187: JDBC Protocol Parameters (continued)
DescriptionParameter
Type 5432Port
Type the user name for the profilerDb databaseUsername
Type the password for profilerDB databasePassword
Type strm_avt_viewTable Name
Type *Select List
Type idCompare Field
The Use Prepared Statements check boxmust be clear. The Juniper Networks AVT DSM doesnot support prepared statements.
Use Prepared Statements
Type 10 for the Polling intervalPolling Interval
NOTE: Thedatabasenameandtablenameparametersarecase-sensitive.
Juniper Networks DDoS Secure
The Juniper DDoSSecureDSM for JSA receives events from Juniper DDoSSecure devices
by using syslog in Log Event Extended Format (LEEF) format. JSA records all relevant
status and network condition events.
1. Log in to Juniper DDoS Secure.
2. Go to the Structured Syslog Serverwindow.
3. In the Server IP Address(es) field, type the IP address of the JSA console.
4. From the Format list, select LEEF.
5. If you do not want to use the default of local0 in the Facility field, type a facility value.
6. From the Priority list, select the syslog priority level that you want to include. Events
that meet or exceed the syslog priority level that you select are forwarded to JSA.
7. Log in to JSA.
8. Click the Admin tab.
607Copyright © 2018, Juniper Networks, Inc.
Chapter 70: Juniper Networks
9. From the navigation menu, click Data Sources.
10. Click the Log Sources icon.
11. Click Add.
12. From the Log Source Type list, select the Juniper DDoS Secure option.
13. Configure the parameters.
14. Click Save.
Juniper Networks DX Application Acceleration Platform
The Juniper DX Application Acceleration Platform DSM for JSA uses syslog to receive
events. JSA recordsall relevant statusandnetwork conditionevents. Before youconfigure
JSA, youmust configure your Juniper device to forward syslog events.
1. Log in to the Juniper DX user interface.
2. Browse to thewantedcluster configuration (Services -ClusterName), Loggingsection.
3. Select the Enable Logging check box.
4. Select your log format.
JSA supports Juniper DX logs by using the common and perf2 formats only.
5. Select the log delimiter format.
JSA supports comma delimited logs only.
6. In the Log Host section, type the IP address of your JSA system.
7. In the Log Port section, type the UDP port on which you want to export logs.
8. You are now ready to configure the log source in JSA.
• Configuring JSA to Receive Events from a Juniper DX Application Acceleration
Platform on page 608
Configuring JSA to Receive Events from a Juniper DX Application Acceleration Platform
You can configure JSA to receive events from a Juniper DX Application Acceleration
Platform.
Copyright © 2018, Juniper Networks, Inc.608
Juniper Secure Analytics Configuring DSMs Guide
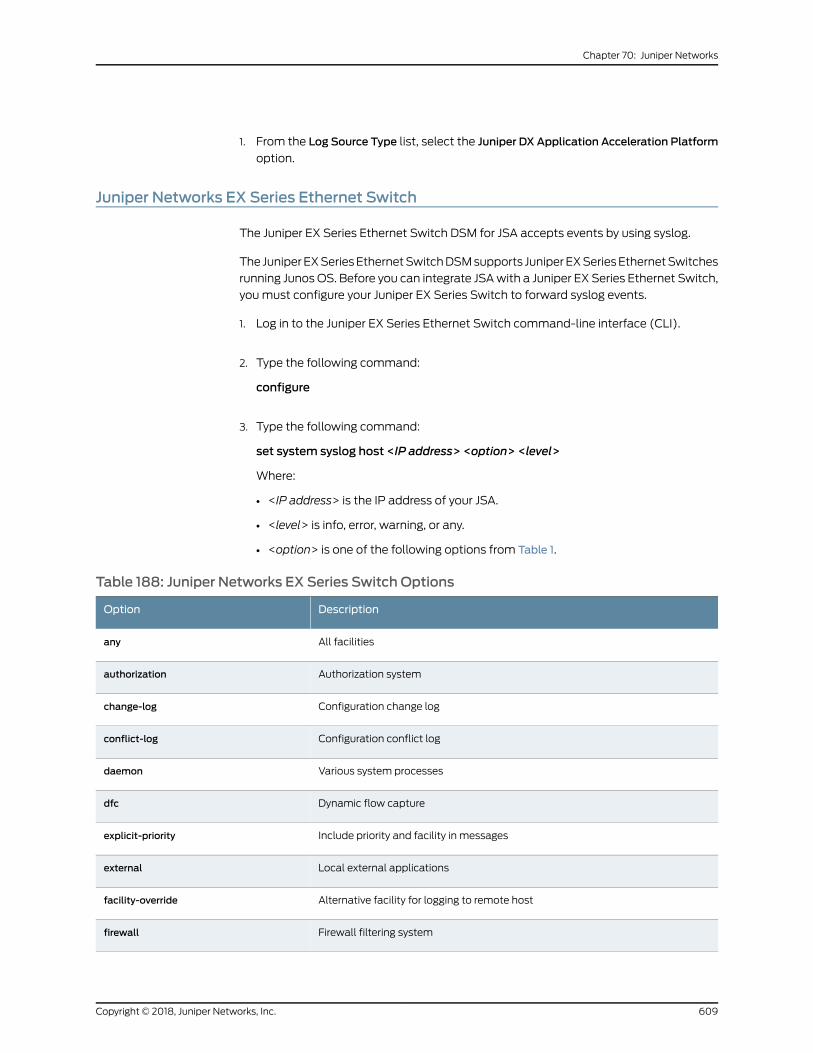
1. From the Log Source Type list, select the Juniper DX Application Acceleration Platform
option.
Juniper Networks EX Series Ethernet Switch
The Juniper EX Series Ethernet Switch DSM for JSA accepts events by using syslog.
The JuniperEXSeriesEthernetSwitchDSMsupports JuniperEXSeriesEthernetSwitches
running JunosOS. Before you can integrate JSAwith a Juniper EX Series Ethernet Switch,
youmust configure your Juniper EX Series Switch to forward syslog events.
1. Log in to the Juniper EX Series Ethernet Switch command-line interface (CLI).
2. Type the following command:
configure
3. Type the following command:
set system syslog host <IP address> <option> <level>
Where:
• <IP address> is the IP address of your JSA.
• <level> is info, error, warning, or any.
• <option> is one of the following options from Table 1.
Table 188: Juniper Networks EX Series Switch Options
DescriptionOption
All facilitiesany
Authorization systemauthorization
Configuration change logchange-log
Configuration conflict logconflict-log
Various system processesdaemon
Dynamic flow capturedfc
Include priority and facility in messagesexplicit-priority
Local external applicationsexternal
Alternative facility for logging to remote hostfacility-override
Firewall filtering systemfirewall
609Copyright © 2018, Juniper Networks, Inc.
Chapter 70: Juniper Networks

Table 188: Juniper Networks EX Series Switch Options (continued)
DescriptionOption
FTP processftp
Commands run by the UIinteractive-commands
Kernelkernel
Prefix for all logging to this hostlog-prefix
Regular expression for lines to be loggedmatch
Packet Forwarding Enginepfe
User processesuser
For example:
set system syslog host 10.77.12.12 firewall info
This commandexample configures the Juniper EXSeries Ethernet Switch to send info
messages from firewall filter systems to your JSA.
4. Repeat steps 1-3 to configure any additional syslog destinations and options. Each
additional option must be identified by using a separate syslog destination
configuration.
5. You are now ready to configure the Juniper EX Series Ethernet Switch in JSA.
• Configuring JSA toReceiveEvents froma Juniper EXSeriesEthernetSwitchonpage610
Configuring JSA to Receive Events from a Juniper EX Series Ethernet Switch
You can configure JSA to receive events from a Juniper EX Series Ethernet Switch:
1. From the Log Source Type list, select Juniper EX Series Ethernet Switch option.
Juniper Networks IDP
The Juniper IDPDSM for JSA accepts events using syslog. JSA records all relevant Juniper
IDP events.
You can configure a sensor on your Juniper IDP to send logs to a syslog server:
1. Log in to the Juniper NSM user interface.
2. In NSM, double-click on the Sensor in DeviceManager.
Copyright © 2018, Juniper Networks, Inc.610
Juniper Secure Analytics Configuring DSMs Guide
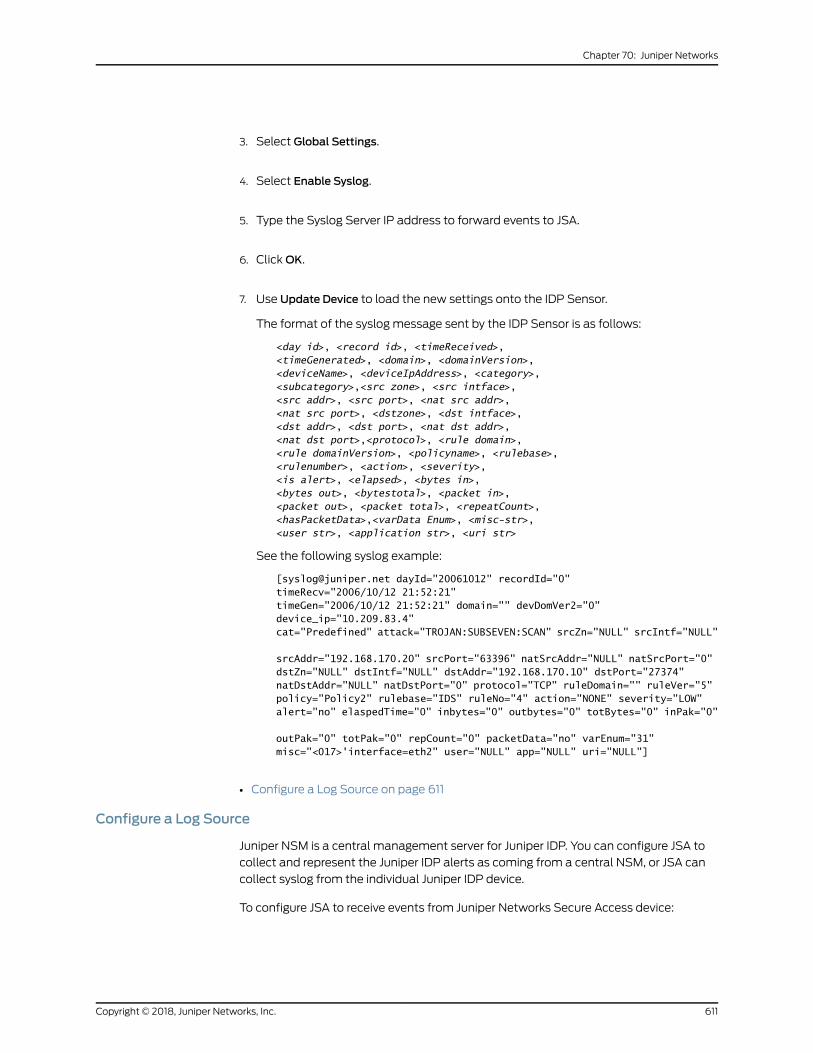
3. Select Global Settings.
4. Select Enable Syslog.
5. Type the Syslog Server IP address to forward events to JSA.
6. ClickOK.
7. Use Update Device to load the new settings onto the IDP Sensor.
The format of the syslog message sent by the IDP Sensor is as follows:
<day id>, <record id>, <timeReceived>, <timeGenerated>, <domain>, <domainVersion>, <deviceName>, <deviceIpAddress>, <category>, <subcategory>,<src zone>, <src intface>, <src addr>, <src port>, <nat src addr>, <nat src port>, <dstzone>, <dst intface>, <dst addr>, <dst port>, <nat dst addr>, <nat dst port>,<protocol>, <rule domain>, <rule domainVersion>, <policyname>, <rulebase>, <rulenumber>, <action>, <severity>, <is alert>, <elapsed>, <bytes in>, <bytes out>, <bytestotal>, <packet in>, <packet out>, <packet total>, <repeatCount>, <hasPacketData>,<varData Enum>, <misc-str>, <user str>, <application str>, <uri str>
See the following syslog example:
[[email protected] dayId="20061012" recordId="0" timeRecv="2006/10/12 21:52:21" timeGen="2006/10/12 21:52:21" domain="" devDomVer2="0" device_ip="10.209.83.4" cat="Predefined" attack="TROJAN:SUBSEVEN:SCAN" srcZn="NULL" srcIntf="NULL"
srcAddr="192.168.170.20" srcPort="63396" natSrcAddr="NULL" natSrcPort="0" dstZn="NULL" dstIntf="NULL" dstAddr="192.168.170.10" dstPort="27374" natDstAddr="NULL" natDstPort="0" protocol="TCP" ruleDomain="" ruleVer="5" policy="Policy2" rulebase="IDS" ruleNo="4" action="NONE" severity="LOW" alert="no" elaspedTime="0" inbytes="0" outbytes="0" totBytes="0" inPak="0"
outPak="0" totPak="0" repCount="0" packetData="no" varEnum="31" misc="<017>'interface=eth2" user="NULL" app="NULL" uri="NULL"]
• Configure a Log Source on page 611
Configure a Log Source
Juniper NSM is a central management server for Juniper IDP. You can configure JSA to
collect and represent the Juniper IDP alerts as coming from a central NSM, or JSA can
collect syslog from the individual Juniper IDP device.
To configure JSA to receive events from Juniper Networks Secure Access device:
611Copyright © 2018, Juniper Networks, Inc.
Chapter 70: Juniper Networks
From the Log Source Type list, select Juniper Networks IntrusionDetection andPrevention
(IDP).
. For more information about Juniper IDP, see your Network and Security Manager
documentation.
Juniper Networks Infranet Controller
The Juniper Networks Infranet Controller DSM for JSA accepts DHCP events by using
syslog. JSA records all relevant events from a Juniper Networks Infranet Controller.
Before you configure JSA to integrate with a Juniper Networks Infranet Controller, you
must configure syslog in the server. For more information on configuring your Juniper
Networks Infranet Controller, consult your vendor documentation.
After you configure syslog for your Juniper Infranet Controller, you are now ready to
configure the log source in JSA.
To configure JSA to receive events from your Juniper Networks Infranet Controller:
1. From the Log Source Type list, select Juniper Networks Infranet Controller option.
Formore information on configuring devices, see the JSAManaging Log Sources Guide.
Juniper Networks Firewall and VPN
The Juniper Networks Firewall and VPN DSM for JSA accepts Juniper Firewall and VPN
events by using UDP syslog.
JSA records all relevant firewall and VPN events.
NOTE: TCP syslog is not supported. Youmust use UDP syslog.
You can configure your Juniper Networks Firewall and VPN device to export events to
JSA.
1. Log in to your Juniper Networks Firewall and VPN user interface.
2. Select Configuration >Report Settings >Syslog.
3. Select the Enable SyslogMessages check box.
4. Type the IP address of your JSA console or Event Collector.
5. Click Apply.
Copyright © 2018, Juniper Networks, Inc.612
Juniper Secure Analytics Configuring DSMs Guide
You are now ready to configure the log source in JSA.
• Configuring JSA to Receive Events on page 613
Configuring JSA to Receive Events
Youcanconfigure JSA to receiveevents froma JuniperNetworksFirewall andVPNdevice.
1. From the Log Source Type list, select Juniper Networks Firewall and VPN option.
For more information about your Juniper Networks Firewall and VPN device, see your
Juniper documentation.
Juniper Networks Junos OS
The Juniper Junos OS Platform DSM for JSA accepts events that use syslog,
structured-data syslog, or PCAP (SRX Series only). JSA records all valid syslog or
structured-data syslog events.
The Juniper Junos OS Platform DSM supports the following Juniper devices that are
running Junos OS:
• Juniper M Series Multiservice Edge Routing
• Juniper MX Series Ethernet Services Router
• Juniper T Series Core Platform
• Juniper SRX Series Services Gateway
For information on configuring PCAP data that uses a Juniper Networks SRX Series
appliance, see “Configure the PCAP Protocol” on page 617.
NOTE: Formore information about structured-data syslog, see RFC 5424 atthe Internet Engineering Task Force: http://www.ietf.org/
Before you configure JSA to integrate with a Juniper device, youmust forward data to
JSA using syslog or structured-data syslog.
1. Log in to your Juniper platform command-line interface (CLI).
2. Include the following syslog statements at the set system hierarchy level:
[set system] syslog {host (hostname) {facility <severity>; explicit-priority; any any;
authorization any; firewall any;
} source-address source-address; structured-data {brief;} }
613Copyright © 2018, Juniper Networks, Inc.
Chapter 70: Juniper Networks
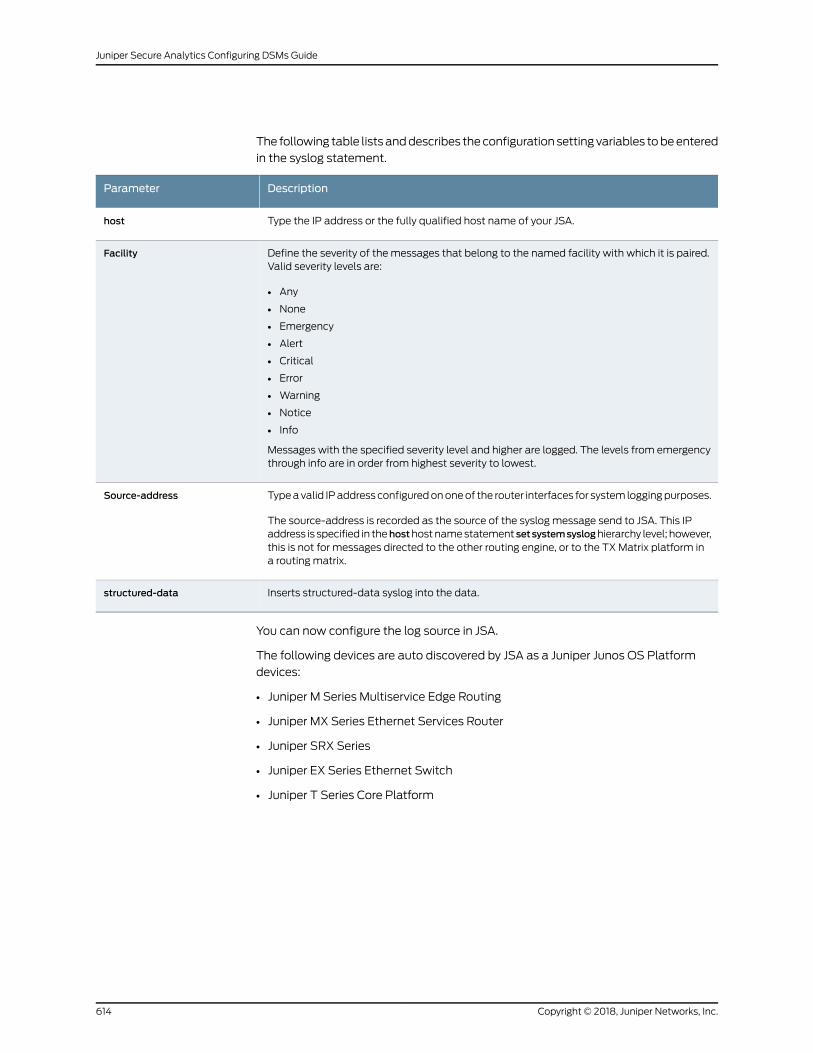
The following table lists anddescribes theconfiguration setting variables tobeentered
in the syslog statement.
DescriptionParameter
Type the IP address or the fully qualified host name of your JSA.host
Define the severity of the messages that belong to the named facility with which it is paired.Valid severity levels are:
• Any
• None
• Emergency
• Alert
• Critical
• Error
• Warning
• Notice
• Info
Messages with the specified severity level and higher are logged. The levels from emergencythrough info are in order from highest severity to lowest.
Facility
Typeavalid IPaddress configuredononeof the router interfaces for system loggingpurposes.
The source-address is recorded as the source of the syslog message send to JSA. This IPaddress is specified in thehosthostnamestatement setsystemsysloghierarchy level; however,this is not for messages directed to the other routing engine, or to the TXMatrix platform ina routing matrix.
Source-address
Inserts structured-data syslog into the data.structured-data
You can now configure the log source in JSA.
The following devices are auto discovered by JSA as a Juniper Junos OS Platform
devices:
• Juniper M Series Multiservice Edge Routing
• Juniper MX Series Ethernet Services Router
• Juniper SRX Series
• Juniper EX Series Ethernet Switch
• Juniper T Series Core Platform
Copyright © 2018, Juniper Networks, Inc.614
Juniper Secure Analytics Configuring DSMs Guide
NOTE: Due to logging similarities for various devices in the JunOS family,expectedeventsmightnotbe receivedby thecorrect logsource typewhenyourdevice isautomaticallydiscovered.Reviewtheautomatically createdlog source for your device and then adjust the configurationmanually.You can add anymissed log source type or remove any incorrectly addedlog source type.
• Juniper Networks Network and Security Manager on page 615
• Configuring JSA toReceiveEvents froma Juniper JunosOSPlatformDeviceonpage617
• Configure the PCAP Protocol on page 617
• Configuring a New Juniper Networks SRX Log Source with PCAP on page 618
Juniper Networks Network and Security Manager
The JuniperNetworksNetworkandSecurityManager (NSM)DSMfor JSAaccepts Juniper
Networks NSM and Juniper Networks Secure Service Gateway (SSG) logs. All Juniper
SSG logs must be forwarded through Juniper NSM to JSA. All other Juniper devices logs
can be forwarded directly to JSA.
Formore informationonadvanced filteringof JuniperNetworksNSM logs, see your Juniper
Networks vendor documentation.
To integrate a Juniper Networks NSM device with JSA, youmust complete the following
tasks:
• Configuring Juniper Networks NSM to Export Logs to Syslog on page 615
• Configuring a Log Source for Juniper Networks NSM on page 616
Configuring Juniper Networks NSM to Export Logs to Syslog
Juniper Networks NSM uses the syslog server to export qualified log entries to syslog.
Configuring the syslog settings for the management system defines only the syslog
settings for themanagement system. It does not export logs from the individual devices.
You can enable the management system to export logs to syslog.
1. Log in to the Juniper Networks NSM user interface.
2. From the ActionManagermenu, select Action Parameters.
3. Type the IP address for the syslog server that you want to send qualified logs.
4. Type the syslog server facility for the syslog server towhich youwant to send qualified
logs.
615Copyright © 2018, Juniper Networks, Inc.
Chapter 70: Juniper Networks
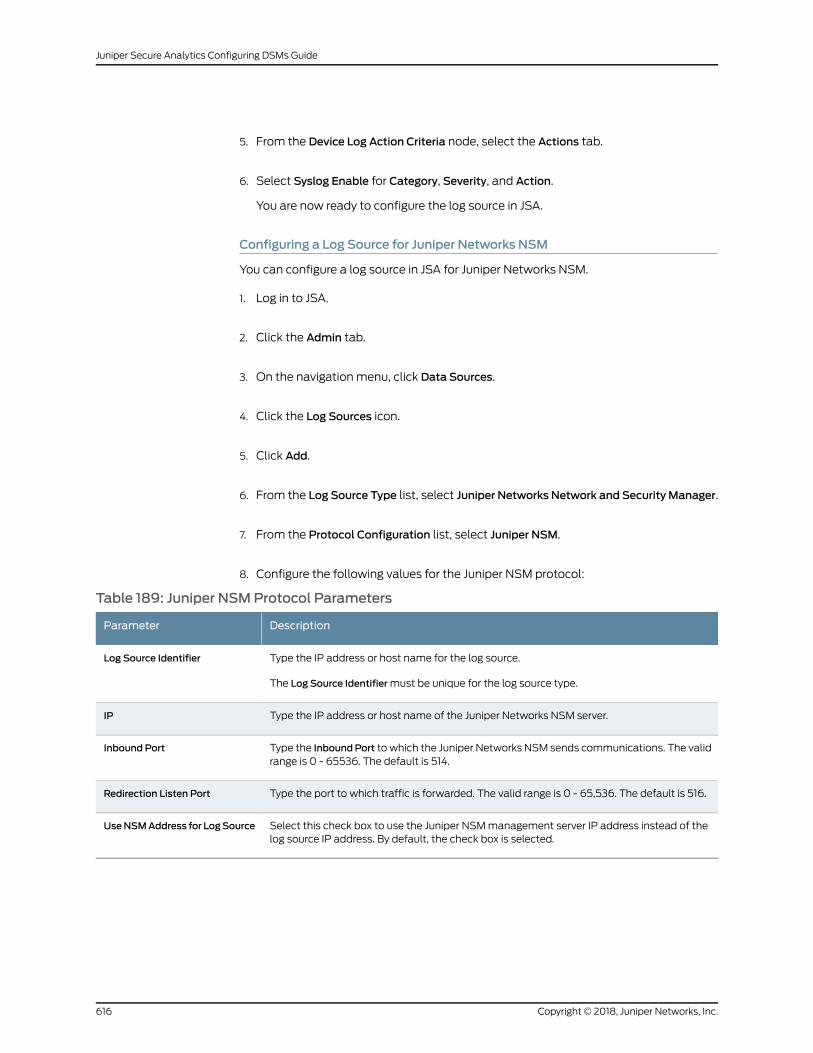
5. From the Device Log Action Criteria node, select the Actions tab.
6. Select Syslog Enable for Category, Severity, and Action.
You are now ready to configure the log source in JSA.
Configuring a Log Source for Juniper Networks NSM
You can configure a log source in JSA for Juniper Networks NSM.
1. Log in to JSA.
2. Click the Admin tab.
3. On the navigation menu, click Data Sources.
4. Click the Log Sources icon.
5. Click Add.
6. From the Log Source Type list, select Juniper Networks Network and Security Manager.
7. From the Protocol Configuration list, select Juniper NSM.
8. Configure the following values for the Juniper NSM protocol:
Table 189: Juniper NSMProtocol Parameters
DescriptionParameter
Type the IP address or host name for the log source.
The Log Source Identifiermust be unique for the log source type.
Log Source Identifier
Type the IP address or host name of the Juniper Networks NSM server.IP
Type the InboundPort to which the Juniper Networks NSM sends communications. The validrange is 0 - 65536. The default is 514.
Inbound Port
Type the port to which traffic is forwarded. The valid range is 0 - 65,536. The default is 516.Redirection Listen Port
Select this check box to use the Juniper NSMmanagement server IP address instead of thelog source IP address. By default, the check box is selected.
UseNSMAddress for LogSource
Copyright © 2018, Juniper Networks, Inc.616
Juniper Secure Analytics Configuring DSMs Guide
NOTE: In the JSA interface, the Juniper NSM protocol configurationprovides the option to use the Juniper Networks NSM IP address byselecting the Use NSMAddress for Log Source check box. If you wish to
change theconfiguration touse theoriginating IPaddress (clear thecheckbox), youmust log in to your JSA console, as a root user, and restart theConsole (for an all-in-one system) or the Event Collector hosting the logsources (in a distributed environment) by using theshutdown -r now
command.
Configuring JSA to Receive Events from a Juniper Junos OS PlatformDevice
You canmanually configure JSA to receive events from a Juniper Junos OS Platform
device
1. From the Log Source Type list, select one of the following options:
• Juniper Junos OS Platform
• Juniper M Series Multiservice Edge Routing
• Juniper MX Series Ethernet Services Router
• Juniper SRX series
• Juniper T Series Core Platform
For more information about your Juniper device, see your vendor documentation.
Configure the PCAP Protocol
The Juniper SRX Series appliance supports forwarding of packet capture (PCAP) and
syslog data to JSA.
Syslog data is forwarded to JSA on port 514. The IP address and outgoing PCAP port
number are configured on the Juniper Networks SRX Series appliance interface. The
Juniper Networks SRX Series appliancemust be configured in the following format to
forward PCAP data:
<IP Address>:<Port>
Where,
• <IP Address> is the IP address of JSA.
• <Port> is the outgoing port address for the PCAP data.
Formore information about Configuring Packet Capture, see your Juniper Networks Junos
OS documentation.
You are now ready to configure the new Juniper Networks SRX Log Source with PCAP
protocol in JSA.
617Copyright © 2018, Juniper Networks, Inc.
Chapter 70: Juniper Networks
Configuring a New Juniper Networks SRX Log Source with PCAP
The Juniper Networks SRX Series appliance is automatically discovered by JSA as a
Juniper Junos OS Platform.
Depending on your operating system, expected events might not be received when the
log source is automatically detected. You canmanually configure the log source.
JSA detects the syslog data and adds the log source automatically. The PCAP data can
be added to JSA as Juniper SRX Series Services Gateway log source by using the PCAP
Syslog combination protocol. Adding the PCAP Syslog Combination protocol after JSA
auto discovers the Junos OS syslog data adds a log source to your existing log source
limit.Deleting theexisting syslogentry, thenadding thePCAPSyslogCombinationprotocol
adds both syslog and PCAP data as single log source.
1. Log in to JSA.
2. Click the Admin tab.
3. On the navigation menu, click Data Sources.
4. Click the Log Sources icon.
5. Click Add.
6. From the Log Source Type list, select Juniper SRX Series Services Gateway.
7. From the Protocol Configuration list, select PCAP Syslog Combination.
8. Type the Log Source Identifier.
S
9. Type the Incoming PCAP Port.
To configure the Incoming PCAP Port parameter in the log source, enter the outgoing
port address for the PCAP data as configured on the Juniper Networks SRX Series
appliance interface. .
10. Click Save.
11. Select the auto discovered syslog-only Junos OS log source for your Juniper Networks
SRX Series appliance.
12. Click Delete.
A delete log source confirmation window is displayed.
Copyright © 2018, Juniper Networks, Inc.618
Juniper Secure Analytics Configuring DSMs Guide
13. Click Yes.
The Junos OS syslog log source is deleted from the Log Source list. The PCAP Syslog
Combination protocol is now visible in your log source list.
14. On the Admin tab, click Deploy Changes.
Juniper Networks Secure Access
The Juniper Networks Secure Access DSM for JSA accepts login and session information
using syslog inWebTrends Enhanced Log File (WELF) format.
You can integrate Juniper SA and Juniper IC with JSA.
NOTE: If your Juniper device is running release 5.5R3-HF2 - 6.1 or above, werecommendthatyouuse theWELF:WELFformat for logging.Seeyourvendordocumentation to determine if your device and license support logging inWELF:WELF format.
This document provides information about integrating a Juniper Secure Access device
using one of the following formats:
• For theWELF:WELF format, see “Using theWELF:WELF Format” on page 619.
• For Syslog, see “Using the Syslog Format” on page 622.
• Using theWELF:WELF Format on page 619
• Configuring JSA to Receive Events from the Juniper Networks Secure Access
Device on page 621
• Using the Syslog Format on page 622
Using theWELF:WELF Format
You can integrate a Juniper Networks Secure Access device with JSA by using the
WELF:WELF format.
1. Log in to your Juniper device administration user interface:
https://10.xx.xx.xx/admin
You can configure syslog server information for events by taking the following steps:
2. From the left pane, select System >Log/Monitoring >Events >Filter.
3. Click New Filter.
4. SelectWELF.
619Copyright © 2018, Juniper Networks, Inc.
Chapter 70: Juniper Networks

5. Click Save Changes.
6. From the left pane, select System >Log/Monitoring >Events >Settings.
7. From the Select Events to Log pane, select the events that you want to log.
8. In the Server name/IP field, type the name or IP address of the syslog server.
9. From the Facility list, select the facility.
10. From the Filter list, selectWELF:WELF.
11. Click Add, then click Save Changes.
You can Configure syslog server information for user access by taking the following
steps:
12. From the left pane, select System >Log/Monitoring >User Access >Filter.
13. Click New Filter.
14. SelectWELF. Click Save Changes.
15. From the left pane, select System >Log/Monitoring >User Access >Settings.
16. From the Select Events to Log pane, select the events that you wish to log.
17. In the Server name/IP field, type the name or IP address of the syslog server.
18. From the Facility list, select the facility.
19. From the Filter list, selectWELF:WELF.
20.Click Add and click Save Changes.
You can Configure syslog server information for administrator access by taking the
following steps:
21. From the left pane, select System >Log/Monitoring >Admin Access >Filter.
22. Click New Filter.
23. SelectWELF.
Copyright © 2018, Juniper Networks, Inc.620
Juniper Secure Analytics Configuring DSMs Guide
24.Click Save Changes.
25. From the left pane, select System >Log/Monitoring >Admin Access >Settings.
26. From the Select Events to Log pane, select the events that you want to log.
27. In the Server name/IP field, type the name or IP address of the syslog server.
28. From the Facility list, select the facility.
29. From the Filter list, selectWELF:WELF.
30.Click Add, then click Save Changes.
You can Configure syslog server information for client logs by taking the following
steps:
31. From the left pane, select System >Log/Monitoring >Client Logs >Filter.
The Filtermenu is displayed.
32.Click New Filter.
33.SelectWELF. Click Save Changes.
34. From the left pane, select System >Log/Monitoring >Client Logs >Settings.
35. From the Select Events to Log pane, select the events that you want to log.
36. In the Server name/IP field, type the name or IP address of the syslog server.
37. From the Facility list, select the facility.
38.From the Filter list, selectWELF:WELF.
39.Click Add, then click Save Changes.
You are now ready to configure the log source.
Configuring JSA to Receive Events from the Juniper Networks Secure Access Device
You can configure JSA to receive events from the Juniper Networks Secure Access device.
621Copyright © 2018, Juniper Networks, Inc.
Chapter 70: Juniper Networks

1. From the Log Source Type list, select Juniper Networks Secure Access (SA) SSL VPN.
For more information about your Juniper device, see your vendor documentation.
Using the Syslog Format
You can use the syslog format to integrate a Juniper Networks Secure Access devicewith
JSA.
1. Log in to your Juniper device administration user interface:
https://10.xx.xx.xx/admin
You can configure syslog server information for events by taking the following steps:
2. From the left pane, select System >Log/Monitoring >Events >Settings.
3. From the Select Events to Log section, select the events that you want to log.
4. In the Server name/IP field, type the name or IP address of the syslog server.
You can configure syslog server information for user access by taking the following
steps:
5. From the left pane, select System >Log/Monitoring >User Access >Settings.
6. From the Select Events to Log section, select the events that you want to log.
7. In the Server name/IP field, type the name or IP address of the syslog server.
You can configure syslog server information for Admin access by taking the following
steps:
8. From the left pane, select System >Log/Monitoring >Admin Access >Settings.
9. From the Select Events to Log section, select the events that you want to log.
10. In the Server name/IP field, type the name or IP address of the syslog server.
You can configure syslog server information for client logs by taking the following
steps:
11. From the left pane, select System >Log/Monitoring >Client Logs >Settings.
12. From the Select Events to Log section, select the events that you want to log.
13. In the Server name/IP field, type the name or IP address of the syslog server.
Copyright © 2018, Juniper Networks, Inc.622
Juniper Secure Analytics Configuring DSMs Guide
You are now ready to configure the log source in JSA.
Juniper Networks Security Binary Log Collector
The Juniper Security Binary Log Collector DSM for JSA can accept audit, system, firewall,
and intrusionpreventionsystem(IPS)events inbinary format fromJuniperSRXor Juniper
Networks J Series appliances.
The Juniper Networks binary log file format is intended to increase performance when
large amounts of data are sent to an event log. To integrate your device with JSA, you
must configure your Juniper appliance to streambinary formatted events, then configure
a log source in JSA.
See the following topics:
• Configuring the Juniper Networks Binary Log Format on page 623
• Configuring a Log Source on page 624
• Configuring the Juniper Networks Binary Log Format on page 623
• Configuring a Log Source on page 624
Configuring the Juniper Networks Binary Log Format
The binary log format from Juniper SRX or J Series appliances are streamed to JSA by
using the UDP protocol. Youmust specify a unique port for streaming binary formatted
events, because the standard syslog port for JSA cannot understand binary formatted
events.
Thedefault port that is assigned to JSA for receiving streamingbinary events fromJuniper
appliances is port 40798.
NOTE: The Juniper Binary Log Collector DSM supports only events that areforwarded in Streamingmode. The Event mode is not supported.
1. Log in to your Juniper SRX or J Series by using the command-line interface (CLI).
2. Type the following command to edit your device configuration:
configure
3. Type the following command to configure the IP address and port number for
streaming binary formatted events:
set security log stream<Name> host <IP address> port <Port>
Where:
• <Name> is the name that is assigned to the stream.
• <IP address> is the IP address of your JSA console or Event Collector.
623Copyright © 2018, Juniper Networks, Inc.
Chapter 70: Juniper Networks
• <Port> is a unique port number that is assigned for streaming binary formatted
events to JSA. By default, JSA listens for binary streaming data on port 40798. For
a list of ports that are used by JSA , see the JSA Common Ports List technical note.
4. Type the following command to set the security log format to binary:
set security log stream<Name> format binary
Where: <Name> is the name that you specified for your binary format stream in Step
3.
5. Type the following command to enable security log streaming:
set security logmode stream
6. Type the following command to set the source IP address for the event stream:
set security log source-address <IP address>
Where: <IP address> is the IP address of your Juniper SRX Series or Juniper J Series
appliance.
7. Type the following command to save the configuration changes:
commit
8. Type the following command to exit the configuration mode:
exit
The configuration of your Juniper SRX or J Series appliance is complete. You can now
configure a log source in JSA.
Configuring a Log Source
JSA does not automatically discover incoming Juniper Security Binary Log Collector
events from Juniper SRX or Juniper J Series appliances.
If your events are not automatically discovered, youmust manually create a log source
by using the Admin tab in JSA.
1. Log in to JSA.
2. Click the Admin tab.
3. On the navigation menu, click Data Sources.
4. Click the Log Sources icon.
5. Click Add.
Copyright © 2018, Juniper Networks, Inc.624
Juniper Secure Analytics Configuring DSMs Guide
6. In the Log Source Name field, type a name for your log source.
7. In the Log Source Description field, type a description for the log source.
8. From the Log Source Type list, select Juniper Security Binary Log Collector.
9. Using the Protocol Configuration list, select Juniper Security Binary Log Collector.
10. Configure the following values:
Table 190: Juniper Security Binary Log Collector Protocol Parameters
DescriptionParameter
Typean IPaddressor host name to identify the log source. The identifier address is the JuniperSRX or J Series appliance that generates the binary event stream.
Log Source Identifier
Specify the port number that is used by the Juniper Networks SRX or J Series appliance toforward incoming binary data to JSA. The UDP port number for binary data is the same portthat is configured in “Configuring the Juniper Networks Binary Log Format” on page 623.
If you edit the outgoing port number for the binary event stream from your Juniper NetworksSRX or J Series appliance, youmust also edit your Juniper log source and update the BinaryCollector Port parameter in JSA.
To edit the port:
1. In theBinaryCollector Port field, type the newport number for receiving binary event data.
2. Click Save.
3. From the Admin tab, click Advanced >Deploy Full Configuration.
The port update is complete and event collection starts on the new port number.
Event collection is stopped for the log source until you fully deploy JSA.
4. When you click Deploy Full Configuration, JSA restarts all services, resulting in a gap indata collection for events and flows until the deployment completes.
Binary Collector Port
Type the path to the XML file used to decode the binary stream from your Juniper SRX orJuniper J Series appliance.
By default, JSA includes an XML template file for decoding the binary stream in the followingdirectory:
/opt//conf/security_log.xml
XML Template File Location
11. Click Save.
12. On the Admin tab, click Deploy Changes.
The configuration is complete. You can verify events that are forwarded to JSA by
viewing events in the Log Activity tab.
625Copyright © 2018, Juniper Networks, Inc.
Chapter 70: Juniper Networks
Juniper Networks Steel-Belted Radius
The Juniper Steel-Belted Radius DSM for JSA accepts syslog events from clients that
run theWinCollect or the Adaptive Log Exporter utility onWindows or Linux by using
syslog.
JSA records all successful and unsuccessful login attempts. You can integrate Juniper
Networks Steel-Belted Radius with JSA by using one of the following methods:
• Configure Juniper Steel Belted-Radius to useWinCollect or ALE onMicrosoftWindows
operating systems. Formore information, see “Configuring Juniper Steel-BeltedRadius
for the Adaptive Log Exporter” on page 626 or the JSAWinCollect User Guide.
• Configure Juniper Steel-Belted Radius by using syslog on Linux-based operating
systems. Formore information, see “Configuring JuniperSteel-BeltedRadius forSyslog”
on page 627.
• Configuring Juniper Steel-Belted Radius for the Adaptive Log Exporter on page 626
• Configuring Juniper Steel-Belted Radius for Syslog on page 627
Configuring Juniper Steel-Belted Radius for the Adaptive Log Exporter
You can integrate a Juniper Steel-Belted Radius DSMwith JSA by using the Adaptive Log
Exporter.
1. From the Startmenu, click Programs >Adaptive Log Exporter >Configure Adapter Log
Exporter.
The Adaptive Log Exportermust be installed on the same systemas your Juniper SBR
system.TheAdaptiveLogExportermustbeupdated to include the JuniperSBRdevice
plug-in. For more information, see your Adaptive Log Exporter Users Guide.
2. Click the Devices tab.
3. Select Juniper SBR, right-click, and select Add Device.
The New Juniper SBR Propertieswindow is displayed.
4. Configure the following parameters:
Table 191: Juniper SBR Properties
DescriptionParameter
Type a name for the device. The name can include alphanumeric characters and underscore(_) characters.
Name
Type a description for this device.Description
Copyright © 2018, Juniper Networks, Inc.626
Juniper Secure Analytics Configuring DSMs Guide
Table 191: Juniper SBR Properties (continued)
DescriptionParameter
Type the IP address or host name of the device. The IP address or host name is used to identifythe device in syslogmessages that are forwarded to JSA. This address is the IP address or hostname that appears in JSA.
Device Address
Type the location where Juniper SBR stores log files. Report log files are in the Steel-BeltedRadius directory <radiusdir>\authReports. The Adaptive Log Exporter monitors the RootLog Directory for any .CSV files that have a date stamp in the file name that matches thecurrent day.
Root Log Directory
5. From the Adaptive Log Exporter toolbar, click Save.
6. From the Adaptive Log Exporter toolbar, click Deploy.
NOTE: Youmust use the default values for the log file heading in theJuniperSteel-BeltedRadiusappliance. If the log fileheadingsarechangedfromthedefault valuesandJSA isnotparsingSBReventsproperly, contactJuniper Customer Support.
7. You are now ready to configure the log source in JSA.
Juniper SBR events that come from the Adaptive Log Exporter are automatically
discoveredby JSA. If youwant tomanually configure JSA to receiveevents fromJuniper
Steel-Belted Radius:
From the Log Source Type drop-down box, select the Juniper Steel-Belted Radius
option.
Configuring Juniper Steel-Belted Radius for Syslog
You can integrate a Juniper Steel-Belted Radius DSMwith JSA by using syslog on a
Linux-based operating system.
1. Use SSH to log in to your Juniper Steel-Belted Radius device, as a root user.
2. Edit the following file:
/etc/syslog.conf
3. Add the following information:
<facility>.<priority>@<IP address>
Where:
627Copyright © 2018, Juniper Networks, Inc.
Chapter 70: Juniper Networks
• <facility> is the syslog facility, for example, local3.
• <priority> is the syslog priority, for example, info.
• <IP address> is the IP address of JSA.
4. Save the file.
5. From the command-line, type the following command to restart syslog:
service syslog restart
6. You can now configure the log source in JSA.
To configure JSA to receive events from Juniper Steel-Belted Radius:
From the Log Source Type list, select the Juniper Steel-Belted Radius option.
For more information on configuring your Steel-Belted Radius server consult your
vendor documentation.
Juniper Networks VGWVirtual Gateway
The Juniper Networks vGWVirtual Gateway DSM for JSA accepts events by using syslog
and NetFlow from your vGWmanagement server or firewall.
JSA recordsall relevant events, suchasadmin, policy, IDS logs, and firewall events. Before
you configure a Juniper Networks vGWVirtual Gateway in JSA, youmust configure vGW
to forward syslog events.
1. Log in to your Juniper Networks vGW user interface.
2. Select Settings.
3. From Security Settings, select Global.
4. From External Logging, select one of the following options:
• Send Syslog from vGWmanagement server—Central logging with syslog event
provided from amanagement server.
• Send Syslog from Firewalls—Distribute logging with each Firewall Security VM
providing syslog events.
If you select the option Send Syslog from vGWmanagement server, all events that are
forwarded to JSA contain the IP address of the vGWmanagement server.
5. Type values for the following parameters:
Copyright © 2018, Juniper Networks, Inc.628
Juniper Secure Analytics Configuring DSMs Guide
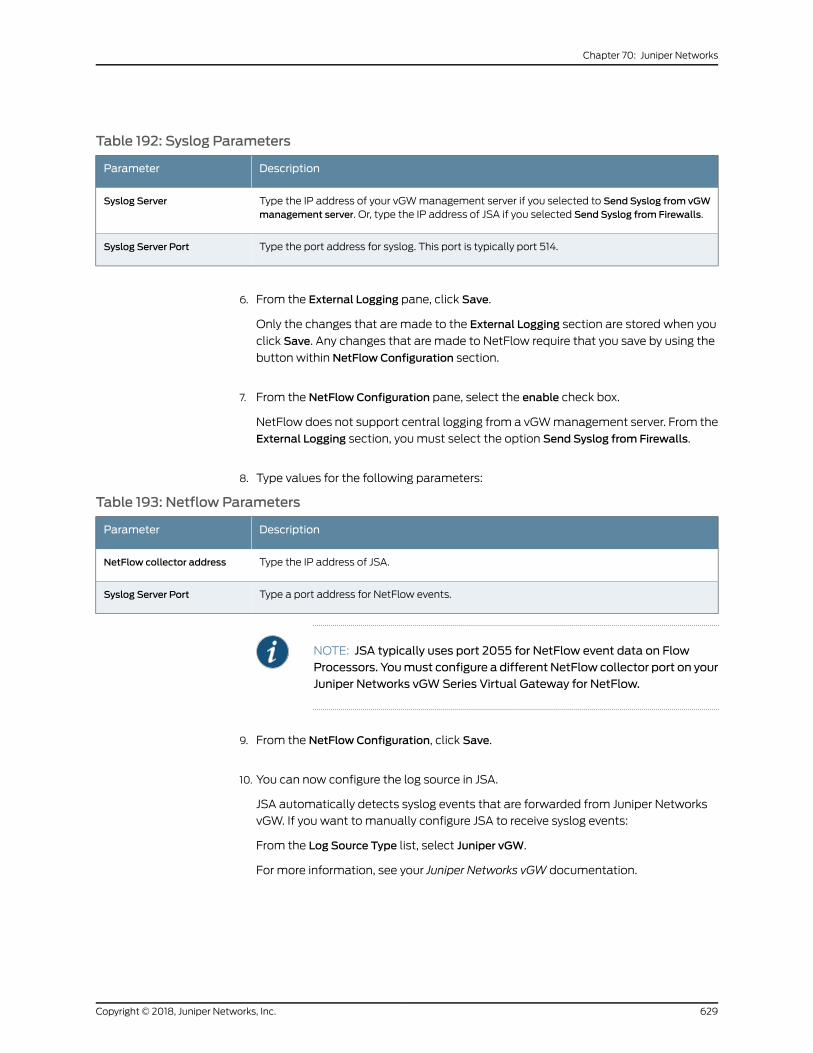
Table 192: Syslog Parameters
DescriptionParameter
Type the IP address of your vGWmanagement server if you selected to Send Syslog from vGWmanagement server. Or, type the IP address of JSA if you selected Send Syslog from Firewalls.
Syslog Server
Type the port address for syslog. This port is typically port 514.Syslog Server Port
6. From the External Logging pane, click Save.
Only the changes that are made to the External Logging section are stored when you
click Save. Any changes that are made to NetFlow require that you save by using the
button within NetFlow Configuration section.
7. From the NetFlow Configuration pane, select the enable check box.
NetFlow does not support central logging from a vGWmanagement server. From the
External Logging section, youmust select the option Send Syslog from Firewalls.
8. Type values for the following parameters:
Table 193: Netflow Parameters
DescriptionParameter
Type the IP address of JSA.NetFlow collector address
Type a port address for NetFlow events.Syslog Server Port
NOTE: JSA typically uses port 2055 for NetFlow event data on FlowProcessors. Youmust configure a different NetFlow collector port on yourJuniper Networks vGWSeries Virtual Gateway for NetFlow.
9. From the NetFlow Configuration, click Save.
10. You can now configure the log source in JSA.
JSA automatically detects syslog events that are forwarded from Juniper Networks
vGW. If you want to manually configure JSA to receive syslog events:
From the Log Source Type list, select Juniper vGW.
For more information, see your Juniper Networks vGW documentation.
629Copyright © 2018, Juniper Networks, Inc.
Chapter 70: Juniper Networks
Juniper Networks JunosWebApp Secure
The JuniperWebAppSecureDSM for JSAaccepts events that are forwarded from Juniper
JunosWebApp Secure appliances by using syslog.
Juniper JunosWebApp Secure provides incident logging and access logging events to
JSA. Before you can receive events in JSA, youmust configure event forwarding on your
Juniper JunosWebApp Secure, then define the events that you want to forward.
• Configuring Syslog Forwarding on page 630
• Configuring Event Logging on page 631
• Configuring a Log Source on page 632
Configuring Syslog Forwarding
To configure a remote syslog server for Juniper JunosWebAppSecure, youmust use SSH
to connect to a configuration interface. You can use the configuration interface to set up
or configure core settings on your Juniper JunosWebApp Secure appliance.
1. Use SSH on port 2022 to log in to your Juniper JunosWebApp device.
https://<IP address>:<port>
Where:
• <IP address> is the IP address of your Juniper JunosWebApp Secure appliance.
• <Port> is the port number of your Juniper JunosWebApp Secure appliance
configuration interface.
The default SSH configuration port is 2022.
2. From the Choose a Toolmenu, select Logging.
3. Click Run Tool.
4. From the Log Destinationmenu, select Remote Syslog Server.
5. In the Syslog Server field, type the IP address of your JSA console or Event Collector.
6. Click Save.
7. From the Choose a Toolmenu, selectQuit.
8. Type Exit to close your SSH session.
You are now ready to configure event logging on your Juniper JunosWebApp Secure
appliance.
Copyright © 2018, Juniper Networks, Inc.630
Juniper Secure Analytics Configuring DSMs Guide
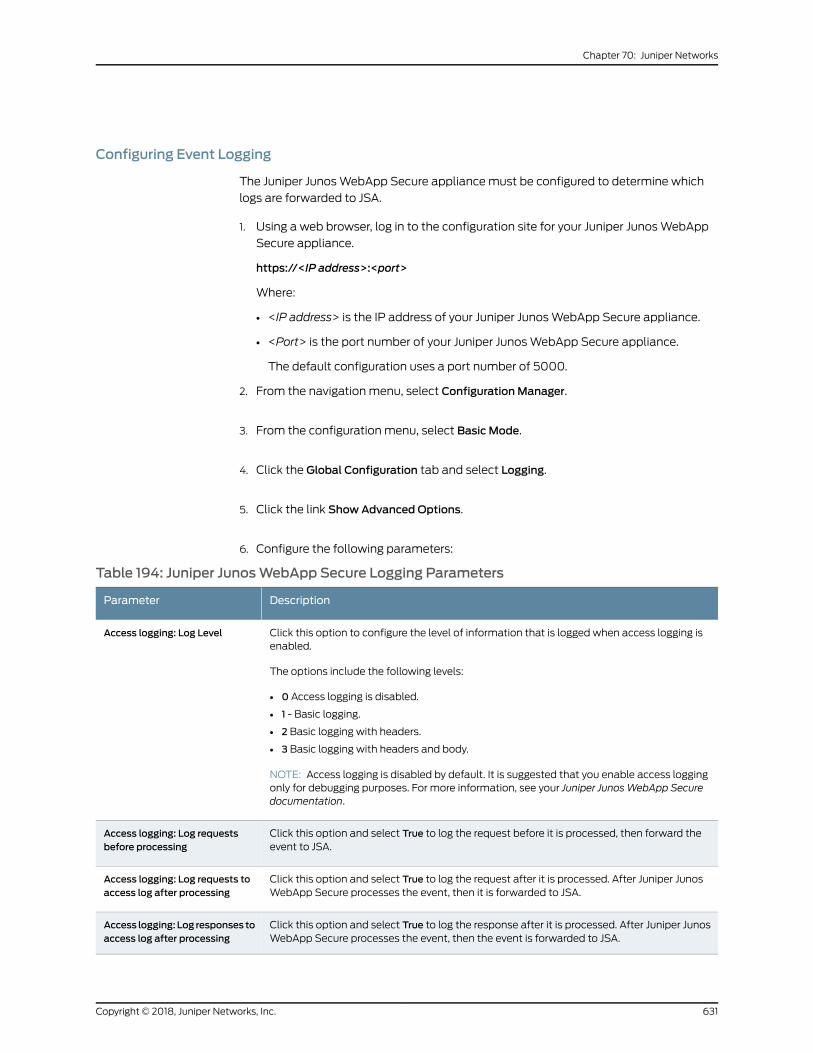
Configuring Event Logging
The Juniper JunosWebApp Secure appliancemust be configured to determine which
logs are forwarded to JSA.
1. Using a web browser, log in to the configuration site for your Juniper JunosWebApp
Secure appliance.
https://<IP address>:<port>
Where:
• <IP address> is the IP address of your Juniper JunosWebApp Secure appliance.
• <Port> is the port number of your Juniper JunosWebApp Secure appliance.
The default configuration uses a port number of 5000.
2. From the navigation menu, select ConfigurationManager.
3. From the configuration menu, select Basic Mode.
4. Click the Global Configuration tab and select Logging.
5. Click the link ShowAdvanced Options.
6. Configure the following parameters:
Table 194: Juniper JunosWebApp Secure Logging Parameters
DescriptionParameter
Click this option to configure the level of information that is logged when access logging isenabled.
The options include the following levels:
• 0 Access logging is disabled.
• 1 - Basic logging.
• 2 Basic logging with headers.
• 3 Basic logging with headers and body.
NOTE: Access logging is disabled by default. It is suggested that you enable access loggingonly for debugging purposes. For more information, see your Juniper JunosWebApp Securedocumentation.
Access logging: Log Level
Click this option and select True to log the request before it is processed, then forward theevent to JSA.
Access logging: Log requestsbefore processing
Click this option and select True to log the request after it is processed. After Juniper JunosWebApp Secure processes the event, then it is forwarded to JSA.
Access logging: Log requests toaccess log after processing
Click this option and select True to log the response after it is processed. After Juniper JunosWebApp Secure processes the event, then the event is forwarded to JSA.
Access logging: Log responses toaccess log after processing
631Copyright © 2018, Juniper Networks, Inc.
Chapter 70: Juniper Networks
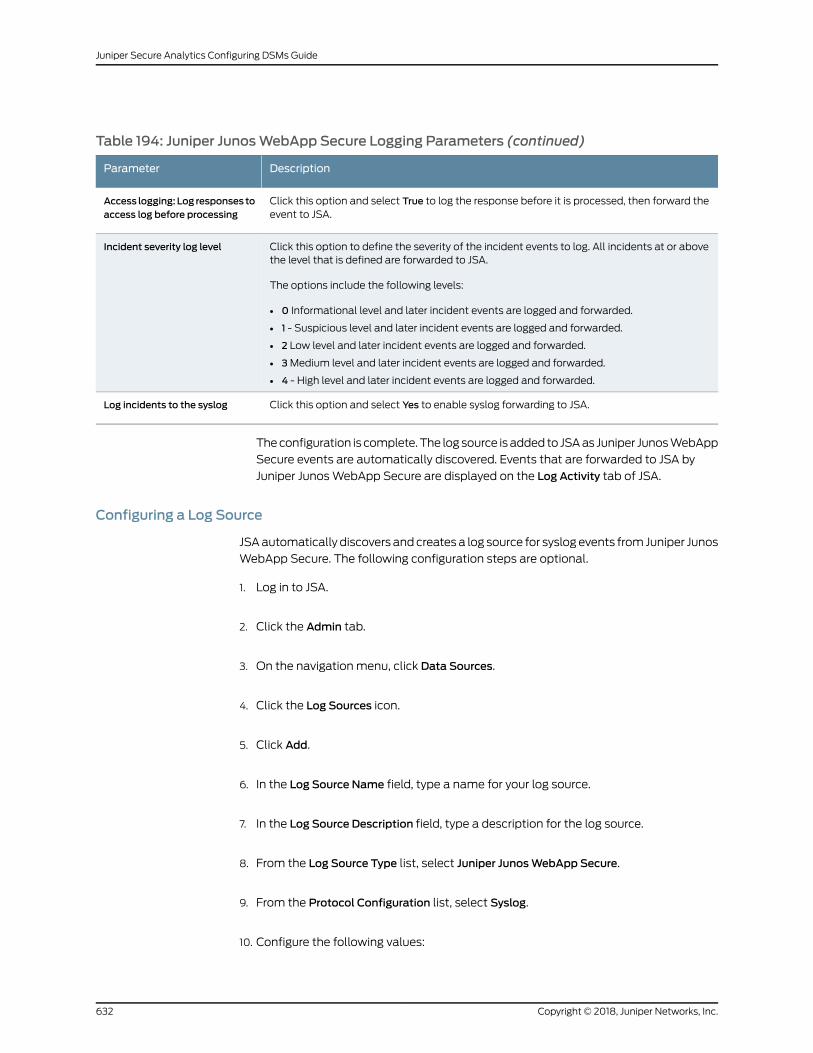
Table 194: Juniper JunosWebApp Secure Logging Parameters (continued)
DescriptionParameter
Click this option and select True to log the response before it is processed, then forward theevent to JSA.
Access logging: Log responses toaccess log before processing
Click this option to define the severity of the incident events to log. All incidents at or abovethe level that is defined are forwarded to JSA.
The options include the following levels:
• 0 Informational level and later incident events are logged and forwarded.
• 1 - Suspicious level and later incident events are logged and forwarded.
• 2 Low level and later incident events are logged and forwarded.
• 3Medium level and later incident events are logged and forwarded.
• 4 - High level and later incident events are logged and forwarded.
Incident severity log level
Click this option and select Yes to enable syslog forwarding to JSA.Log incidents to the syslog
Theconfiguration is complete. The logsource is added to JSAas Juniper JunosWebApp
Secure events are automatically discovered. Events that are forwarded to JSA by
Juniper JunosWebApp Secure are displayed on the Log Activity tab of JSA.
Configuring a Log Source
JSAautomatically discovers andcreates a log source for syslog events from Juniper Junos
WebApp Secure. The following configuration steps are optional.
1. Log in to JSA.
2. Click the Admin tab.
3. On the navigation menu, click Data Sources.
4. Click the Log Sources icon.
5. Click Add.
6. In the Log Source Name field, type a name for your log source.
7. In the Log Source Description field, type a description for the log source.
8. From the Log Source Type list, select Juniper JunosWebApp Secure.
9. From the Protocol Configuration list, select Syslog.
10. Configure the following values:
Copyright © 2018, Juniper Networks, Inc.632
Juniper Secure Analytics Configuring DSMs Guide
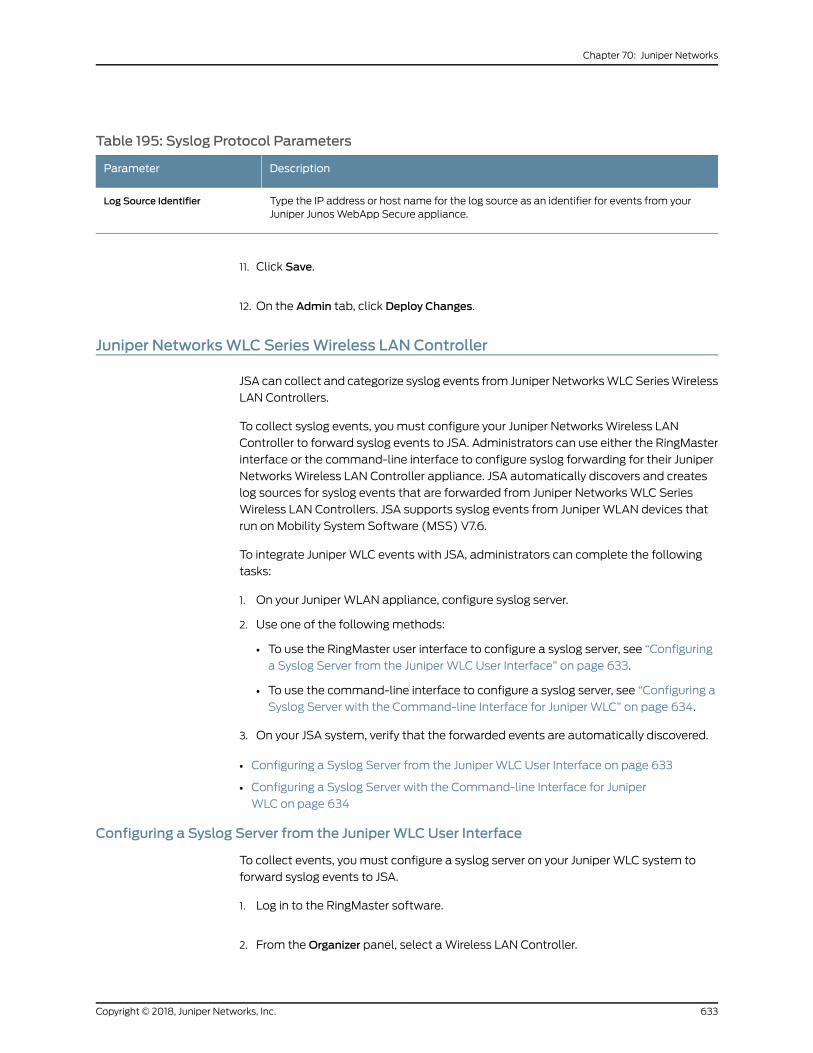
Table 195: Syslog Protocol Parameters
DescriptionParameter
Type the IP address or host name for the log source as an identifier for events from yourJuniper JunosWebApp Secure appliance.
Log Source Identifier
11. Click Save.
12. On the Admin tab, click Deploy Changes.
Juniper NetworksWLC SeriesWireless LAN Controller
JSA can collect and categorize syslog events from Juniper NetworksWLCSeriesWireless
LAN Controllers.
To collect syslog events, youmust configure your Juniper NetworksWireless LAN
Controller to forward syslog events to JSA. Administrators can use either the RingMaster
interface or the command-line interface to configure syslog forwarding for their Juniper
NetworksWireless LAN Controller appliance. JSA automatically discovers and creates
log sources for syslog events that are forwarded from Juniper NetworksWLC Series
Wireless LAN Controllers. JSA supports syslog events from Juniper WLAN devices that
run on Mobility System Software (MSS) V7.6.
To integrate Juniper WLC events with JSA, administrators can complete the following
tasks:
1. On your Juniper WLAN appliance, configure syslog server.
2. Use one of the following methods:
• To use the RingMaster user interface to configure a syslog server, see “Configuring
a Syslog Server from the Juniper WLC User Interface” on page 633.
• To use the command-line interface to configure a syslog server, see “Configuring a
Syslog Server with the Command-line Interface for Juniper WLC” on page 634.
3. On your JSA system, verify that the forwarded events are automatically discovered.
• Configuring a Syslog Server from the Juniper WLC User Interface on page 633
• Configuring a Syslog Server with the Command-line Interface for Juniper
WLC on page 634
Configuring a Syslog Server from the JuniperWLCUser Interface
To collect events, youmust configure a syslog server on your Juniper WLC system to
forward syslog events to JSA.
1. Log in to the RingMaster software.
2. From theOrganizer panel, select aWireless LAN Controller.
633Copyright © 2018, Juniper Networks, Inc.
Chapter 70: Juniper Networks
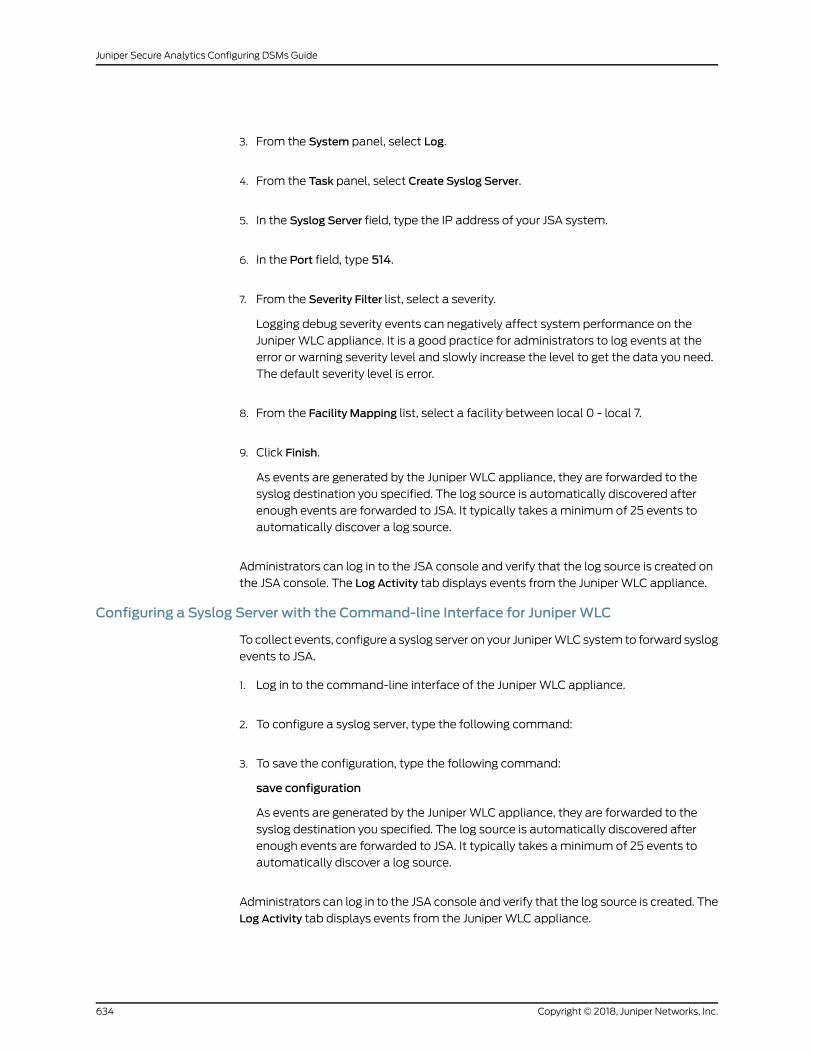
3. From the System panel, select Log.
4. From the Task panel, select Create Syslog Server.
5. In the Syslog Server field, type the IP address of your JSA system.
6. In the Port field, type 514.
7. From the Severity Filter list, select a severity.
Logging debug severity events can negatively affect system performance on the
Juniper WLC appliance. It is a good practice for administrators to log events at the
error or warning severity level and slowly increase the level to get the data you need.
The default severity level is error.
8. From the Facility Mapping list, select a facility between local 0 - local 7.
9. Click Finish.
As events are generated by the Juniper WLC appliance, they are forwarded to the
syslog destination you specified. The log source is automatically discovered after
enough events are forwarded to JSA. It typically takes aminimum of 25 events to
automatically discover a log source.
Administrators can log in to the JSA console and verify that the log source is created on
the JSA console. The Log Activity tab displays events from the Juniper WLC appliance.
Configuring a Syslog Server with the Command-line Interface for JuniperWLC
To collect events, configure a syslog server on your JuniperWLC system to forward syslog
events to JSA.
1. Log in to the command-line interface of the Juniper WLC appliance.
2. To configure a syslog server, type the following command:
3. To save the configuration, type the following command:
save configuration
As events are generated by the Juniper WLC appliance, they are forwarded to the
syslog destination you specified. The log source is automatically discovered after
enough events are forwarded to JSA. It typically takes aminimum of 25 events to
automatically discover a log source.
Administrators can log in to the JSA console and verify that the log source is created. The
Log Activity tab displays events from the Juniper WLC appliance.
Copyright © 2018, Juniper Networks, Inc.634
Juniper Secure Analytics Configuring DSMs Guide
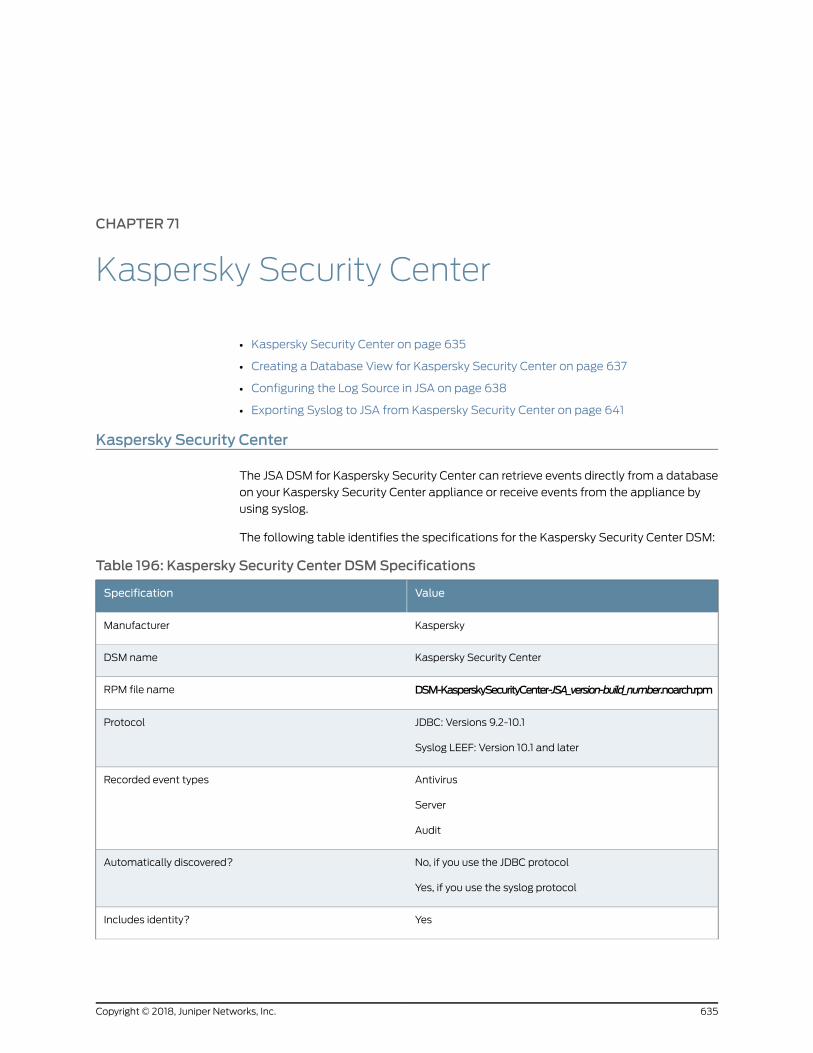
CHAPTER 71
Kaspersky Security Center
• Kaspersky Security Center on page 635
• Creating a Database View for Kaspersky Security Center on page 637
• Configuring the Log Source in JSA on page 638
• Exporting Syslog to JSA from Kaspersky Security Center on page 641
Kaspersky Security Center
The JSA DSM for Kaspersky Security Center can retrieve events directly from a database
on your Kaspersky Security Center appliance or receive events from the appliance by
using syslog.
The following table identifies the specifications for the Kaspersky Security Center DSM:
Table 196: Kaspersky Security Center DSMSpecifications
ValueSpecification
KasperskyManufacturer
Kaspersky Security CenterDSM name
DSM-KasperskySecurityCenter-JSA_version-build_number.noarch.rpmRPM file name
JDBC: Versions 9.2-10.1
Syslog LEEF: Version 10.1 and later
Protocol
Antivirus
Server
Audit
Recorded event types
No, if you use the JDBC protocol
Yes, if you use the syslog protocol
Automatically discovered?
YesIncludes identity?
635Copyright © 2018, Juniper Networks, Inc.
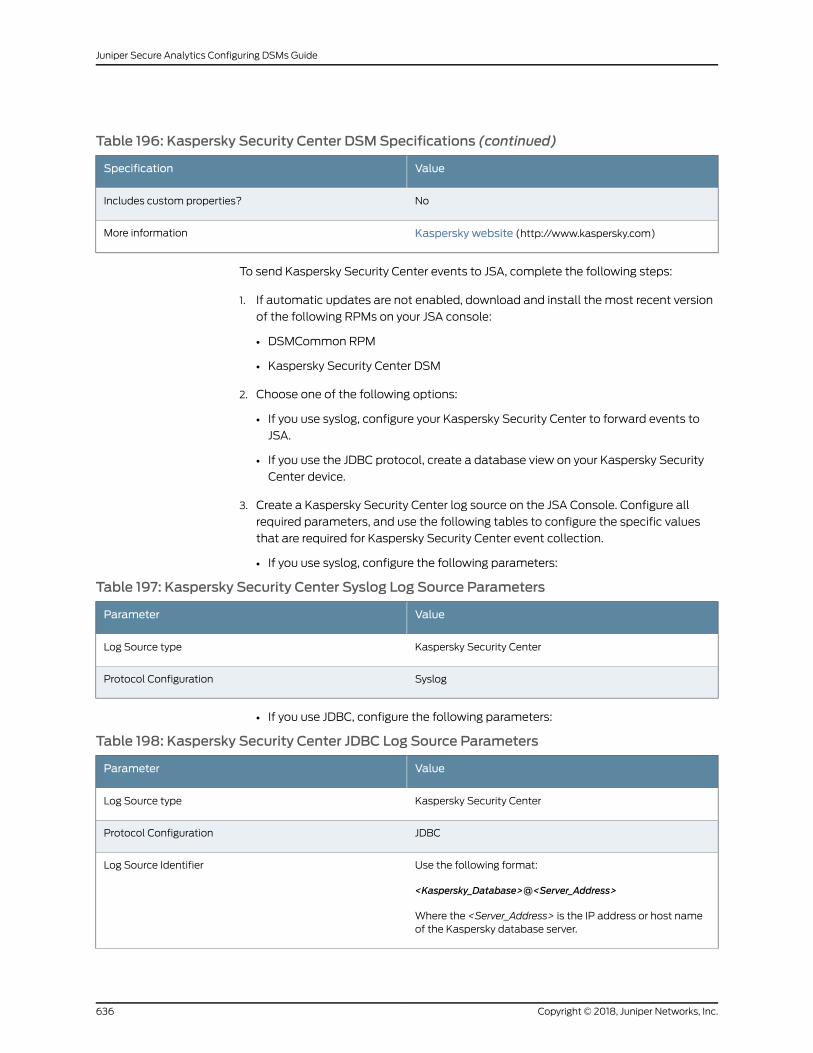
Table 196: Kaspersky Security Center DSMSpecifications (continued)
ValueSpecification
NoIncludes custom properties?
Kaspersky website (http://www.kaspersky.com)More information
To send Kaspersky Security Center events to JSA, complete the following steps:
1. If automatic updates are not enabled, download and install the most recent version
of the following RPMs on your JSA console:
• DSMCommon RPM
• Kaspersky Security Center DSM
2. Choose one of the following options:
• If you use syslog, configure your Kaspersky Security Center to forward events to
JSA.
• If you use the JDBC protocol, create a database view on your Kaspersky Security
Center device.
3. Create a Kaspersky Security Center log source on the JSA Console. Configure all
required parameters, and use the following tables to configure the specific values
that are required for Kaspersky Security Center event collection.
• If you use syslog, configure the following parameters:
Table 197: Kaspersky Security Center Syslog Log Source Parameters
ValueParameter
Kaspersky Security CenterLog Source type
SyslogProtocol Configuration
• If you use JDBC, configure the following parameters:
Table 198: Kaspersky Security Center JDBC Log Source Parameters
ValueParameter
Kaspersky Security CenterLog Source type
JDBCProtocol Configuration
Use the following format:
<Kaspersky_Database>@<Server_Address>
Where the <Server_Address> is the IP address or host nameof the Kaspersky database server.
Log Source Identifier
Copyright © 2018, Juniper Networks, Inc.636
Juniper Secure Analytics Configuring DSMs Guide
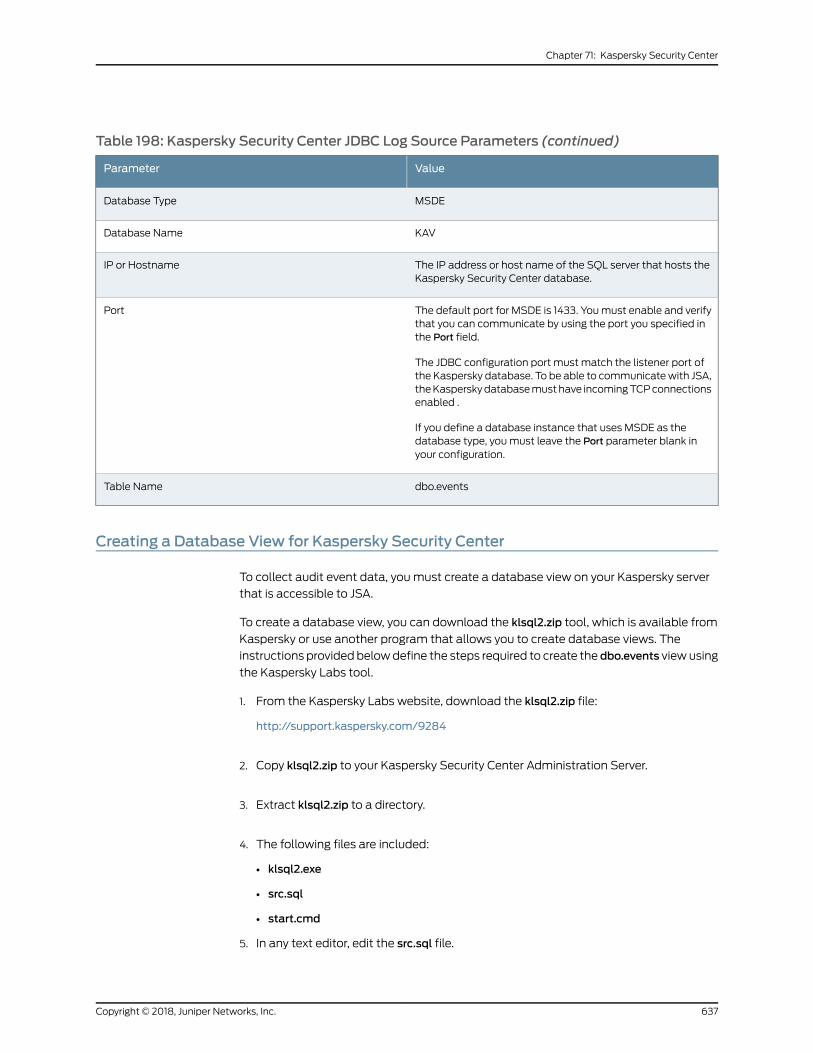
Table 198: Kaspersky Security Center JDBC Log Source Parameters (continued)
ValueParameter
MSDEDatabase Type
KAVDatabase Name
The IP address or host name of the SQL server that hosts theKaspersky Security Center database.
IP or Hostname
The default port for MSDE is 1433. Youmust enable and verifythat you can communicate by using the port you specified inthe Port field.
The JDBC configuration port must match the listener port ofthe Kaspersky database. To be able to communicatewith JSA,theKasperskydatabasemusthave incomingTCPconnectionsenabled .
If you define a database instance that uses MSDE as thedatabase type, youmust leave the Port parameter blank inyour configuration.
Port
dbo.eventsTable Name
Creating a Database View for Kaspersky Security Center
To collect audit event data, youmust create a database view on your Kaspersky server
that is accessible to JSA.
To create a database view, you can download the klsql2.zip tool, which is available from
Kaspersky or use another program that allows you to create database views. The
instructions provided belowdefine the steps required to create the dbo.events viewusing
the Kaspersky Labs tool.
1. From the Kaspersky Labs website, download the klsql2.zip file:
http://support.kaspersky.com/9284
2. Copy klsql2.zip to your Kaspersky Security Center Administration Server.
3. Extract klsql2.zip to a directory.
4. The following files are included:
• klsql2.exe
• src.sql
• start.cmd
5. In any text editor, edit the src.sql file.
637Copyright © 2018, Juniper Networks, Inc.
Chapter 71: Kaspersky Security Center
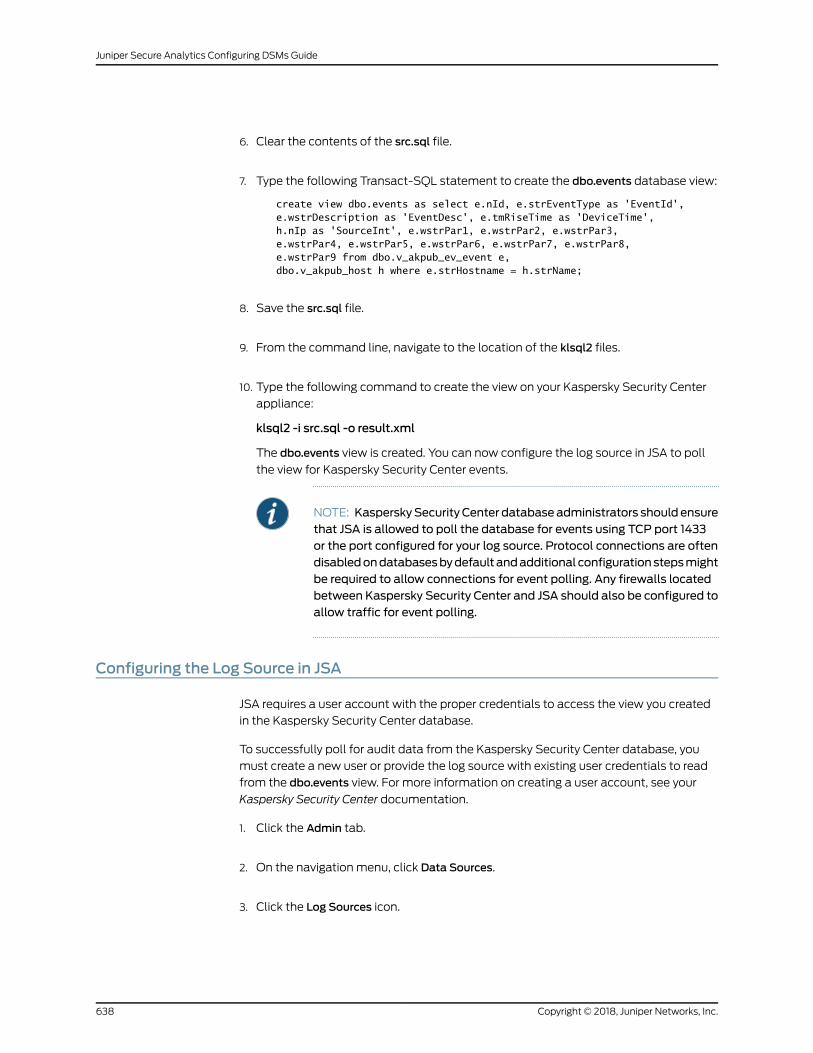
6. Clear the contents of the src.sql file.
7. Type the following Transact-SQL statement to create the dbo.events database view:
create view dbo.events as select e.nId, e.strEventType as 'EventId', e.wstrDescription as 'EventDesc', e.tmRiseTime as 'DeviceTime', h.nIp as 'SourceInt', e.wstrPar1, e.wstrPar2, e.wstrPar3, e.wstrPar4, e.wstrPar5, e.wstrPar6, e.wstrPar7, e.wstrPar8, e.wstrPar9 from dbo.v_akpub_ev_event e, dbo.v_akpub_host h where e.strHostname = h.strName;
8. Save the src.sql file.
9. From the command line, navigate to the location of the klsql2 files.
10. Type the following command to create the view on your Kaspersky Security Center
appliance:
klsql2 -i src.sql -o result.xml
The dbo.events view is created. You can now configure the log source in JSA to poll
the view for Kaspersky Security Center events.
NOTE: KasperskySecurityCenter databaseadministrators should ensurethat JSA is allowed to poll the database for events using TCP port 1433or the port configured for your log source. Protocol connections are oftendisabledondatabasesbydefaultandadditional configurationstepsmightbe required to allow connections for event polling. Any firewalls locatedbetween Kaspersky Security Center and JSA should also be configured toallow traffic for event polling.
Configuring the Log Source in JSA
JSA requires a user account with the proper credentials to access the view you created
in the Kaspersky Security Center database.
To successfully poll for audit data from the Kaspersky Security Center database, you
must create a new user or provide the log source with existing user credentials to read
from the dbo.events view. For more information on creating a user account, see your
Kaspersky Security Center documentation.
1. Click the Admin tab.
2. On the navigation menu, click Data Sources.
3. Click the Log Sources icon.
Copyright © 2018, Juniper Networks, Inc.638
Juniper Secure Analytics Configuring DSMs Guide
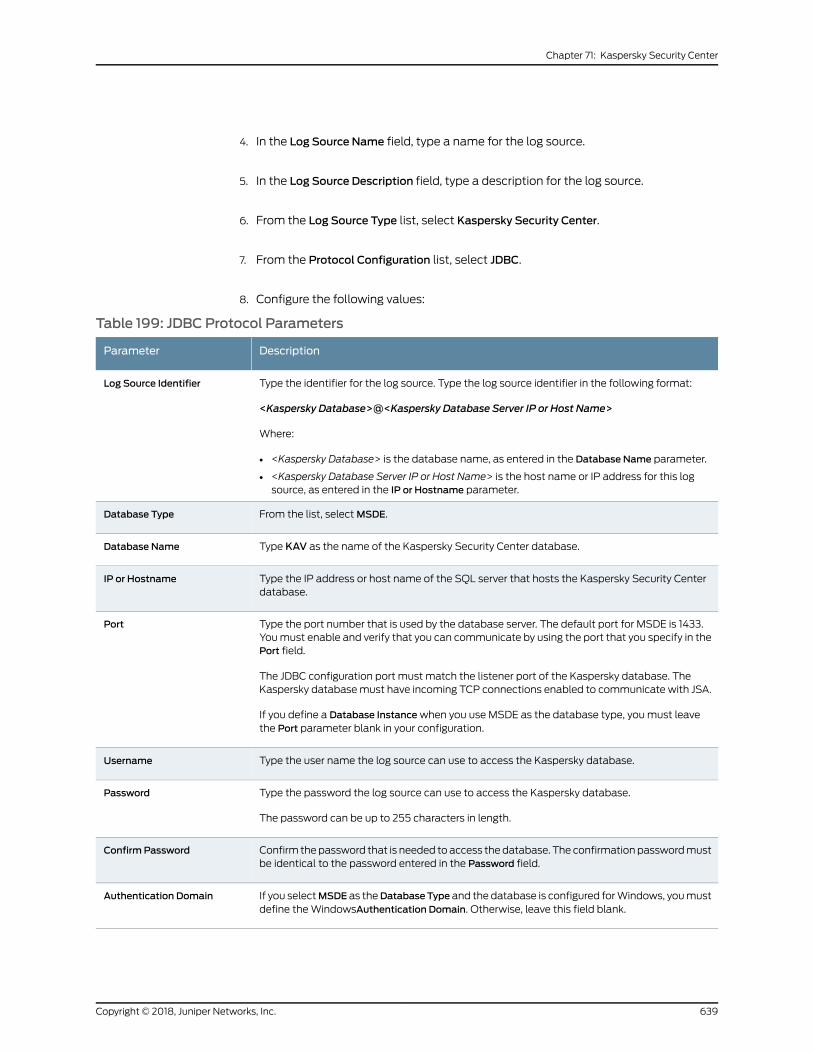
4. In the Log Source Name field, type a name for the log source.
5. In the Log Source Description field, type a description for the log source.
6. From the Log Source Type list, select Kaspersky Security Center.
7. From the Protocol Configuration list, select JDBC.
8. Configure the following values:
Table 199: JDBC Protocol Parameters
DescriptionParameter
Type the identifier for the log source. Type the log source identifier in the following format:
<Kaspersky Database>@<Kaspersky Database Server IP or Host Name>
Where:
• <Kaspersky Database> is the database name, as entered in the Database Name parameter.
• <Kaspersky Database Server IP or Host Name> is the host name or IP address for this logsource, as entered in the IP or Hostname parameter.
Log Source Identifier
From the list, selectMSDE.Database Type
Type KAV as the name of the Kaspersky Security Center database.Database Name
Type the IP address or host name of the SQL server that hosts the Kaspersky Security Centerdatabase.
IP or Hostname
Type the port number that is used by the database server. The default port for MSDE is 1433.Youmust enable and verify that you can communicate by using the port that you specify in thePort field.
The JDBC configuration port must match the listener port of the Kaspersky database. TheKaspersky databasemust have incoming TCP connections enabled to communicate with JSA.
If you define a Database Instancewhen you use MSDE as the database type, youmust leavethe Port parameter blank in your configuration.
Port
Type the user name the log source can use to access the Kaspersky database.Username
Type the password the log source can use to access the Kaspersky database.
The password can be up to 255 characters in length.
Password
Confirm thepassword that is needed to access thedatabase. The confirmation passwordmustbe identical to the password entered in the Password field.
Confirm Password
If you selectMSDE as theDatabaseType and the database is configured forWindows, youmustdefine theWindowsAuthentication Domain. Otherwise, leave this field blank.
Authentication Domain
639Copyright © 2018, Juniper Networks, Inc.
Chapter 71: Kaspersky Security Center
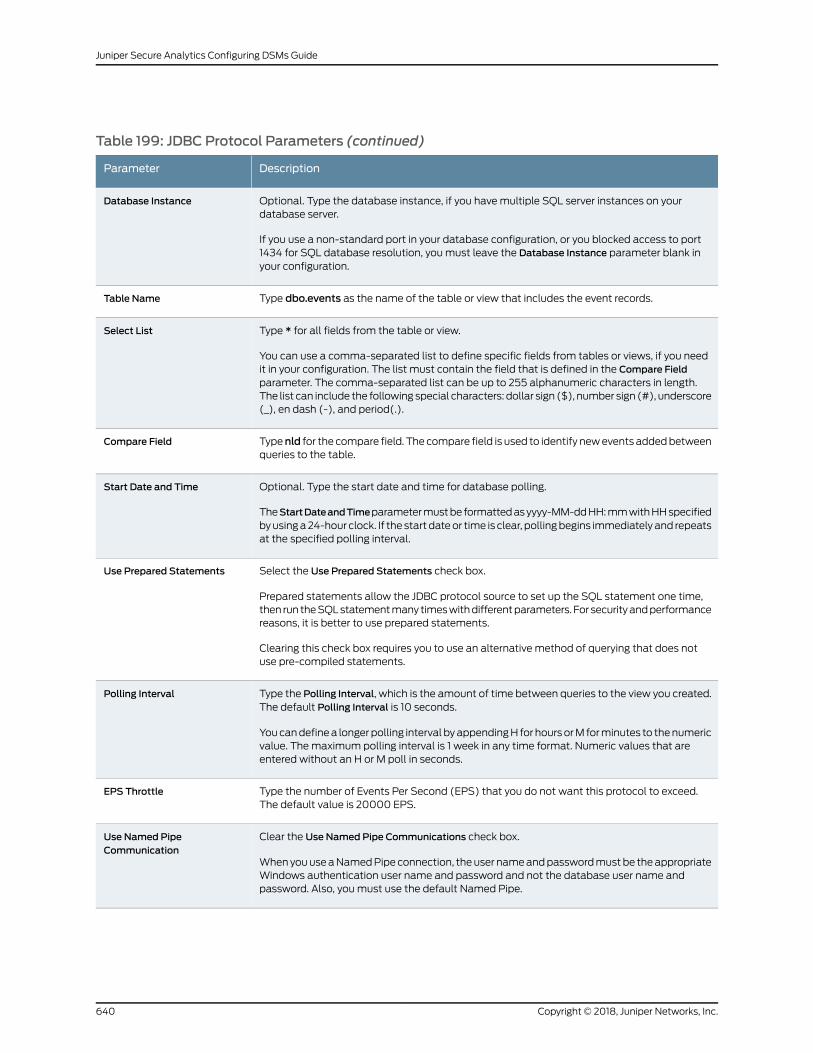
Table 199: JDBC Protocol Parameters (continued)
DescriptionParameter
Optional. Type the database instance, if you havemultiple SQL server instances on yourdatabase server.
If you use a non-standard port in your database configuration, or you blocked access to port1434 for SQL database resolution, youmust leave the Database Instance parameter blank inyour configuration.
Database Instance
Type dbo.events as the name of the table or view that includes the event records.Table Name
Type * for all fields from the table or view.
You can use a comma-separated list to define specific fields from tables or views, if you needit in your configuration. The list must contain the field that is defined in the Compare Fieldparameter. The comma-separated list can be up to 255 alphanumeric characters in length.The list can include the following special characters: dollar sign ($), number sign (#), underscore(_), en dash (-), and period(.).
Select List
Typenld for the compare field. The compare field is used to identify newevents addedbetweenqueries to the table.
Compare Field
Optional. Type the start date and time for database polling.
TheStartDateandTimeparametermustbe formattedasyyyy-MM-ddHH:mmwithHHspecifiedbyusinga24-hour clock. If the start dateor time is clear, pollingbegins immediatelyand repeatsat the specified polling interval.
Start Date and Time
Select the Use Prepared Statements check box.
Prepared statements allow the JDBC protocol source to set up the SQL statement one time,then run theSQLstatementmany timeswithdifferentparameters. For securityandperformancereasons, it is better to use prepared statements.
Clearing this check box requires you to use an alternative method of querying that does notuse pre-compiled statements.
Use Prepared Statements
Type the Polling Interval, which is the amount of time between queries to the view you created.The default Polling Interval is 10 seconds.
Youcandefinea longerpolling interval byappendingH for hoursorM forminutes to thenumericvalue. Themaximum polling interval is 1 week in any time format. Numeric values that areentered without an H or M poll in seconds.
Polling Interval
Type the number of Events Per Second (EPS) that you do not want this protocol to exceed.The default value is 20000 EPS.
EPS Throttle
Clear the Use Named Pipe Communications check box.
WhenyouuseaNamedPipe connection, theuser nameandpasswordmustbe theappropriateWindows authentication user name and password and not the database user name andpassword. Also, youmust use the default Named Pipe.
Use Named PipeCommunication
Copyright © 2018, Juniper Networks, Inc.640
Juniper Secure Analytics Configuring DSMs Guide
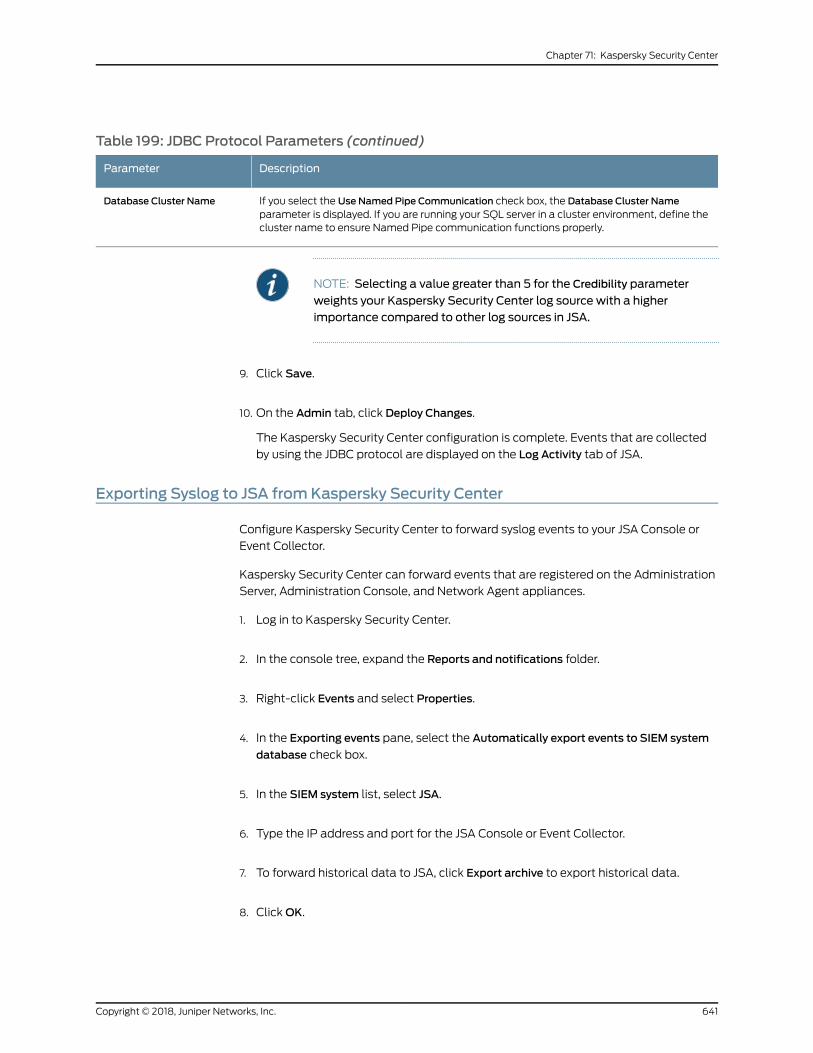
Table 199: JDBC Protocol Parameters (continued)
DescriptionParameter
If you select the Use Named Pipe Communication check box, the Database Cluster Nameparameter is displayed. If you are running your SQL server in a cluster environment, define thecluster name to ensure Named Pipe communication functions properly.
Database Cluster Name
NOTE: Selecting a value greater than 5 for the Credibility parameter
weights your Kaspersky Security Center log source with a higherimportance compared to other log sources in JSA.
9. Click Save.
10. On the Admin tab, click Deploy Changes.
The Kaspersky Security Center configuration is complete. Events that are collected
by using the JDBC protocol are displayed on the Log Activity tab of JSA.
Exporting Syslog to JSA fromKaspersky Security Center
Configure Kaspersky Security Center to forward syslog events to your JSA Console or
Event Collector.
Kaspersky Security Center can forward events that are registered on the Administration
Server, Administration Console, and Network Agent appliances.
1. Log in to Kaspersky Security Center.
2. In the console tree, expand the Reports and notifications folder.
3. Right-click Events and select Properties.
4. In the Exporting events pane, select the Automatically export events to SIEM system
database check box.
5. In the SIEM system list, select JSA.
6. Type the IP address and port for the JSA Console or Event Collector.
7. To forward historical data to JSA, click Export archive to export historical data.
8. ClickOK.
641Copyright © 2018, Juniper Networks, Inc.
Chapter 71: Kaspersky Security Center

RelatedDocumentation
• Creating a Database View for Kaspersky Security Center on page 637
• Configuring the Log Source in JSA on page 638
Copyright © 2018, Juniper Networks, Inc.642
Juniper Secure Analytics Configuring DSMs Guide
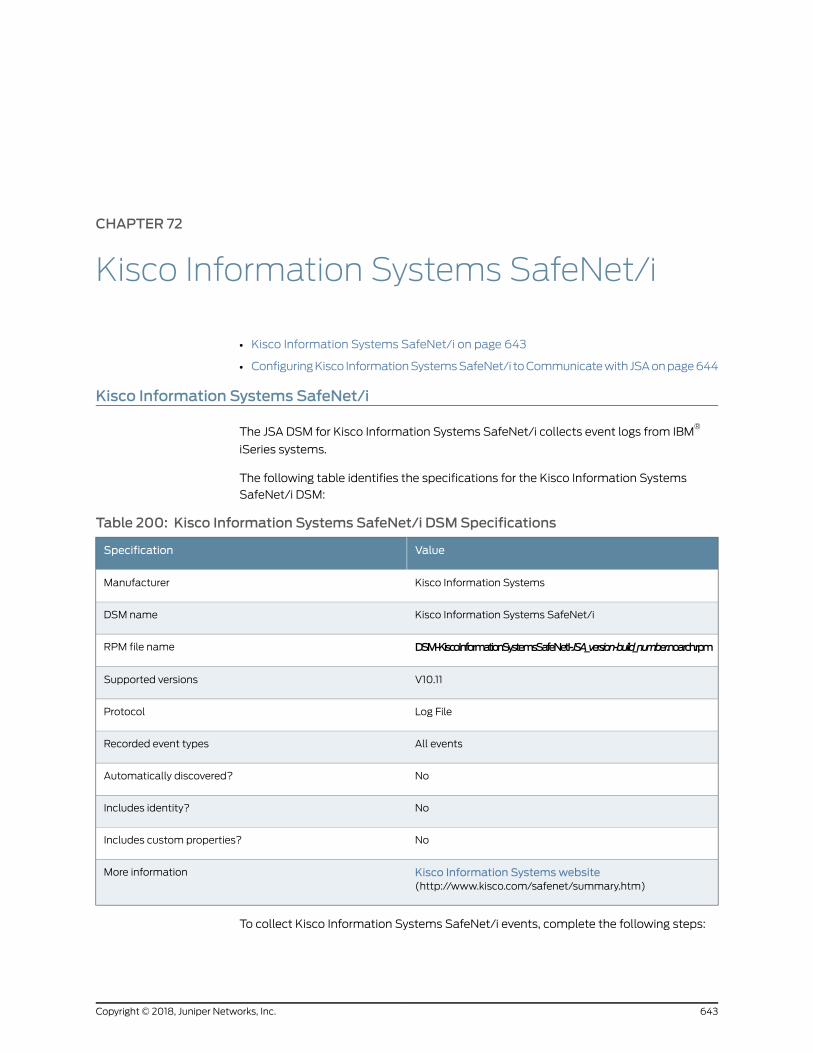
CHAPTER 72
Kisco Information Systems SafeNet/i
• Kisco Information Systems SafeNet/i on page 643
• ConfiguringKisco InformationSystemsSafeNet/i toCommunicatewith JSAonpage644
Kisco Information Systems SafeNet/i
The JSA DSM for Kisco Information Systems SafeNet/i collects event logs from IBM®
iSeries systems.
The following table identifies the specifications for the Kisco Information Systems
SafeNet/i DSM:
Table 200: Kisco Information Systems SafeNet/i DSMSpecifications
ValueSpecification
Kisco Information SystemsManufacturer
Kisco Information Systems SafeNet/iDSM name
DSM-KiscoInformationSystemsSafeNetI-JSA_version-build_number.noarch.rpmRPM file name
V10.11Supported versions
Log FileProtocol
All eventsRecorded event types
NoAutomatically discovered?
NoIncludes identity?
NoIncludes custom properties?
Kisco Information Systemswebsite(http://www.kisco.com/safenet/summary.htm)
More information
To collect Kisco Information Systems SafeNet/i events, complete the following steps:
643Copyright © 2018, Juniper Networks, Inc.
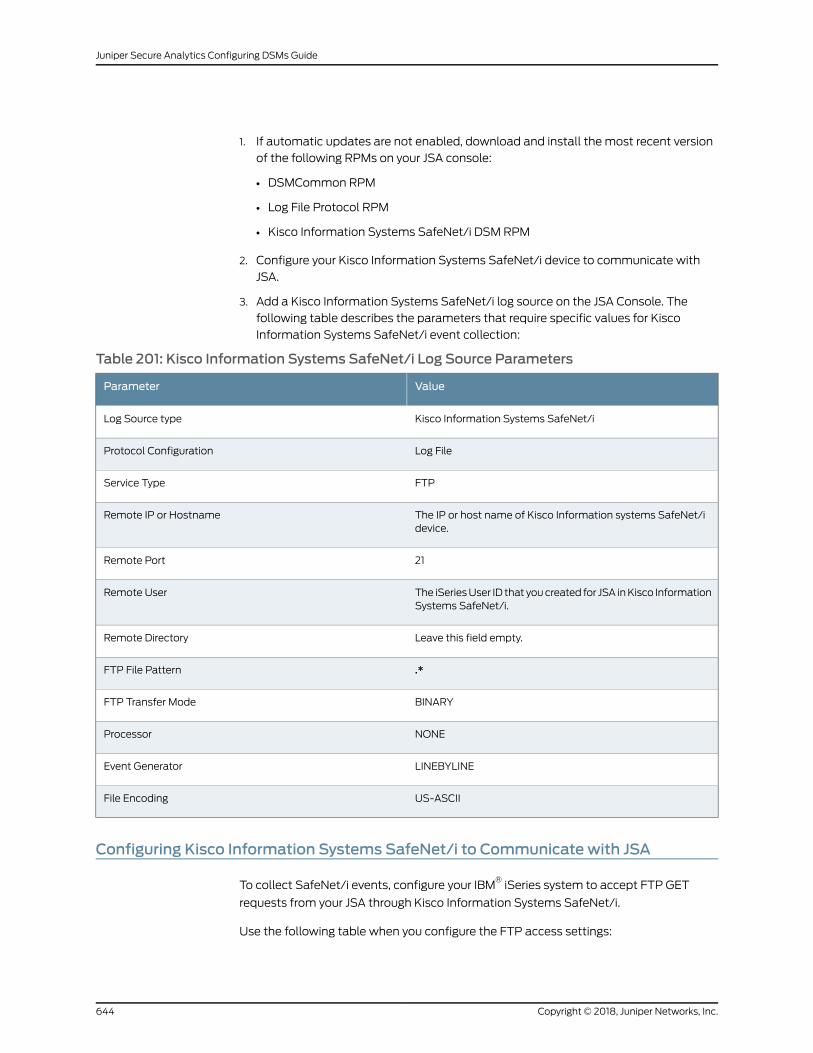
1. If automatic updates are not enabled, download and install the most recent version
of the following RPMs on your JSA console:
• DSMCommon RPM
• Log File Protocol RPM
• Kisco Information Systems SafeNet/i DSM RPM
2. Configure your Kisco Information Systems SafeNet/i device to communicate with
JSA.
3. Add a Kisco Information Systems SafeNet/i log source on the JSA Console. The
following table describes the parameters that require specific values for Kisco
Information Systems SafeNet/i event collection:
Table 201: Kisco Information Systems SafeNet/i Log Source Parameters
ValueParameter
Kisco Information Systems SafeNet/iLog Source type
Log FileProtocol Configuration
FTPService Type
The IP or host name of Kisco Information systems SafeNet/idevice.
Remote IP or Hostname
21Remote Port
The iSeriesUser ID that youcreated for JSA inKisco InformationSystems SafeNet/i.
Remote User
Leave this field empty.Remote Directory
.*FTP File Pattern
BINARYFTP Transfer Mode
NONEProcessor
LINEBYLINEEvent Generator
US-ASCIIFile Encoding
Configuring Kisco Information Systems SafeNet/i to Communicate with JSA
To collect SafeNet/i events, configure your IBM®iSeries system to accept FTP GET
requests from your JSA through Kisco Information Systems SafeNet/i.
Use the following table when you configure the FTP access settings:
Copyright © 2018, Juniper Networks, Inc.644
Juniper Secure Analytics Configuring DSMs Guide
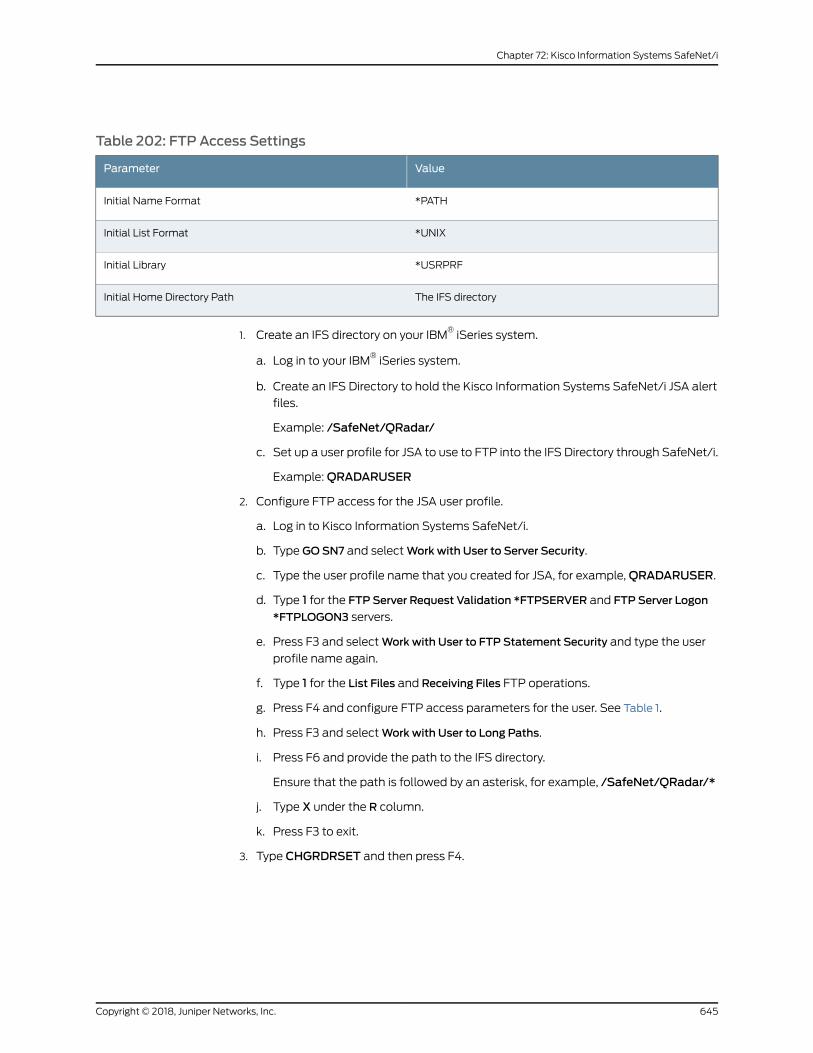
Table 202: FTP Access Settings
ValueParameter
*PATHInitial Name Format
*UNIXInitial List Format
*USRPRFInitial Library
The IFS directoryInitial Home Directory Path
1. Create an IFS directory on your IBM®iSeries system.
a. Log in to your IBM®iSeries system.
b. Create an IFS Directory to hold the Kisco Information Systems SafeNet/i JSA alert
files.
Example: /SafeNet/QRadar/
c. Set up a user profile for JSA to use to FTP into the IFS Directory through SafeNet/i.
Example:QRADARUSER
2. Configure FTP access for the JSA user profile.
a. Log in to Kisco Information Systems SafeNet/i.
b. Type GOSN7 and selectWork with User to Server Security.
c. Type the user profile name that you created for JSA, for example,QRADARUSER.
d. Type 1 for the FTP Server Request Validation *FTPSERVER and FTP Server Logon*FTPLOGON3 servers.
e. Press F3 and selectWork with User to FTP Statement Security and type the user
profile name again.
f. Type 1 for the List Files and Receiving Files FTP operations.
g. Press F4 and configure FTP access parameters for the user. See Table 1.
h. Press F3 and selectWork with User to Long Paths.
i. Press F6 and provide the path to the IFS directory.
Ensure that the path is followed by an asterisk, for example, /SafeNet/QRadar/*
j. Type X under the R column.
k. Press F3 to exit.
3. Type CHGRDRSET and then press F4.
645Copyright © 2018, Juniper Networks, Inc.
Chapter 72: Kisco Information Systems SafeNet/i
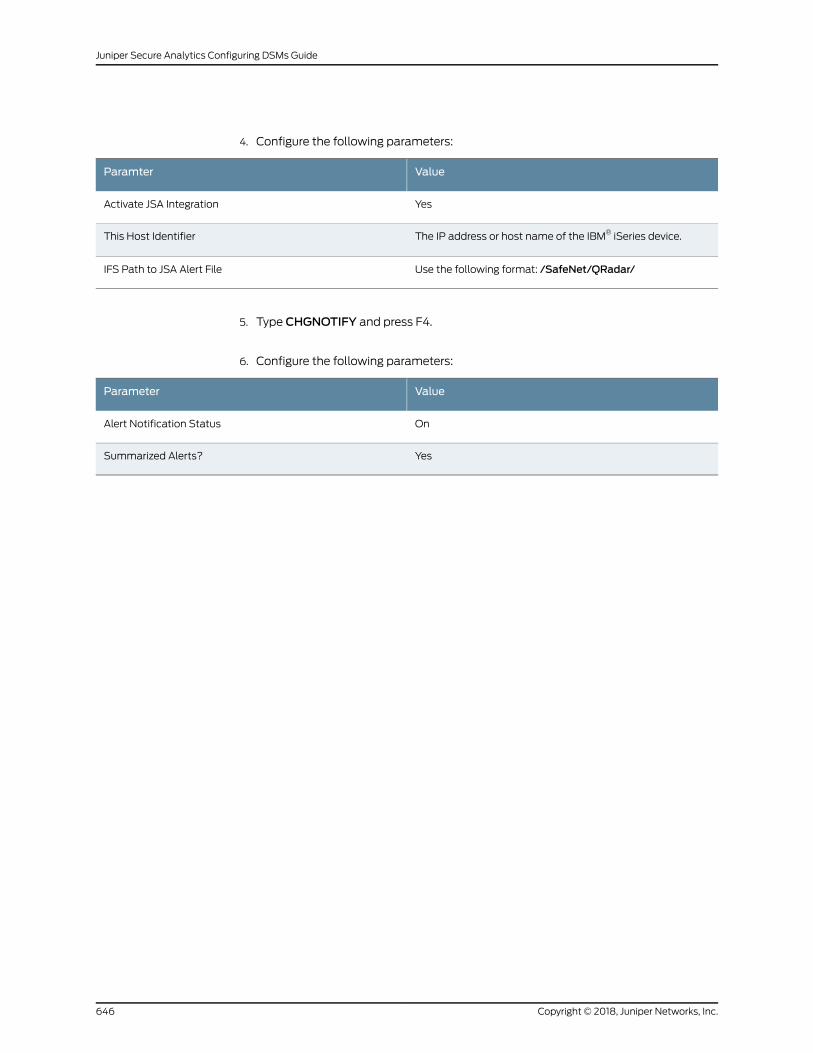
4. Configure the following parameters:
ValueParamter
YesActivate JSA Integration
The IP address or host name of the IBM® iSeries device.This Host Identifier
Use the following format: /SafeNet/QRadar/IFS Path to JSA Alert File
5. Type CHGNOTIFY and press F4.
6. Configure the following parameters:
ValueParameter
OnAlert Notification Status
YesSummarized Alerts?
Copyright © 2018, Juniper Networks, Inc.646
Juniper Secure Analytics Configuring DSMs Guide
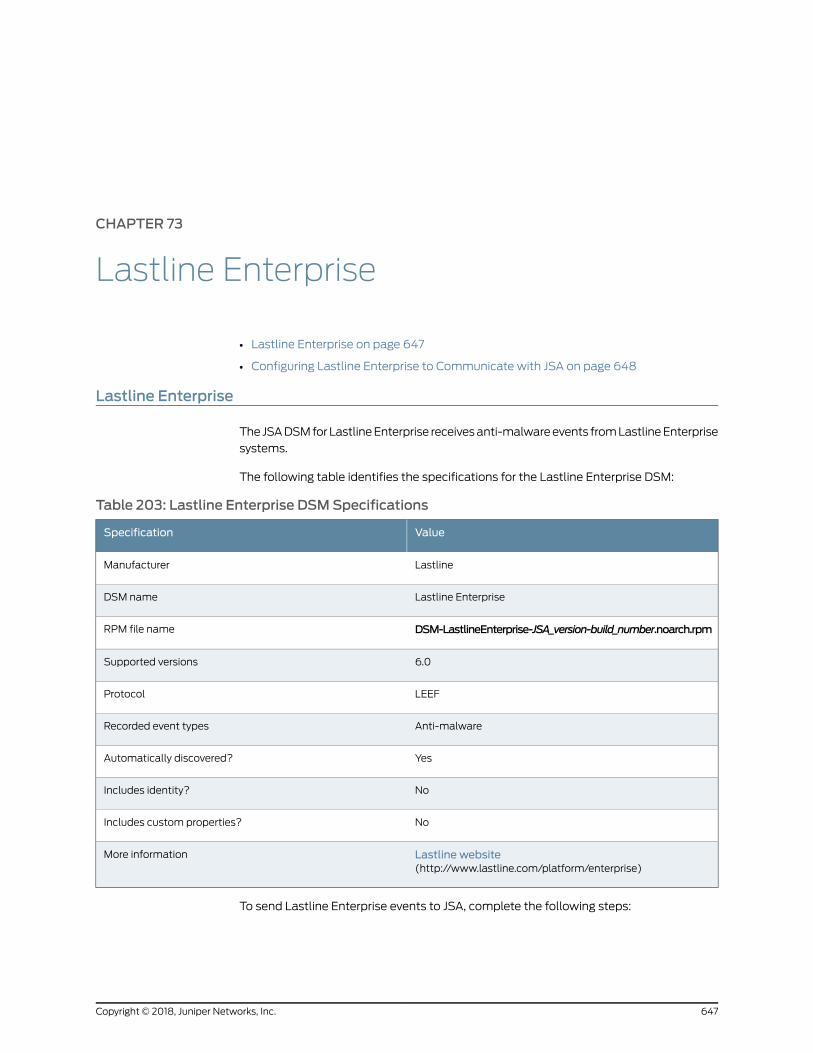
CHAPTER 73
Lastline Enterprise
• Lastline Enterprise on page 647
• Configuring Lastline Enterprise to Communicate with JSA on page 648
Lastline Enterprise
The JSADSMforLastlineEnterprise receivesanti-malwareevents fromLastlineEnterprise
systems.
The following table identifies the specifications for the Lastline Enterprise DSM:
Table 203: Lastline Enterprise DSMSpecifications
ValueSpecification
LastlineManufacturer
Lastline EnterpriseDSM name
DSM-LastlineEnterprise-JSA_version-build_number.noarch.rpmRPM file name
6.0Supported versions
LEEFProtocol
Anti-malwareRecorded event types
YesAutomatically discovered?
NoIncludes identity?
NoIncludes custom properties?
Lastline website(http://www.lastline.com/platform/enterprise)
More information
To send Lastline Enterprise events to JSA, complete the following steps:
647Copyright © 2018, Juniper Networks, Inc.
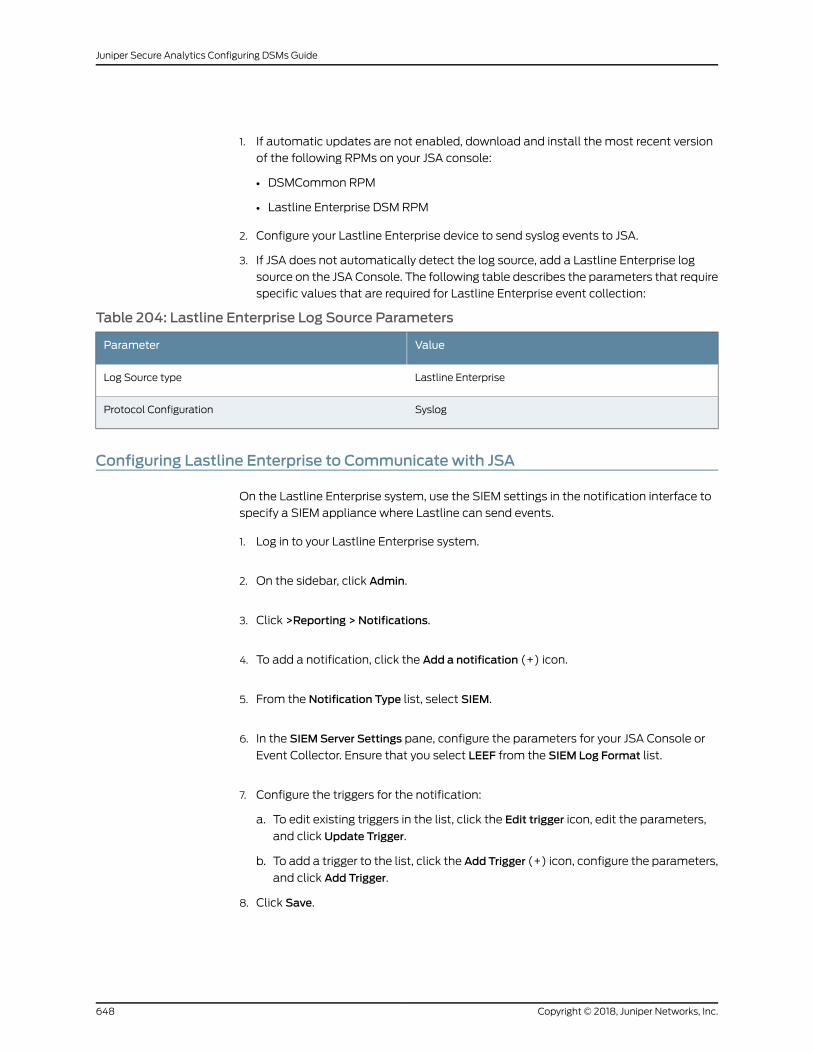
1. If automatic updates are not enabled, download and install the most recent version
of the following RPMs on your JSA console:
• DSMCommon RPM
• Lastline Enterprise DSM RPM
2. Configure your Lastline Enterprise device to send syslog events to JSA.
3. If JSA does not automatically detect the log source, add a Lastline Enterprise log
source on the JSA Console. The following table describes the parameters that require
specific values that are required for Lastline Enterprise event collection:
Table 204: Lastline Enterprise Log Source Parameters
ValueParameter
Lastline EnterpriseLog Source type
SyslogProtocol Configuration
Configuring Lastline Enterprise to Communicate with JSA
On the Lastline Enterprise system, use the SIEM settings in the notification interface to
specify a SIEM appliance where Lastline can send events.
1. Log in to your Lastline Enterprise system.
2. On the sidebar, click Admin.
3. Click >Reporting > Notifications.
4. To add a notification, click the Add a notification (+) icon.
5. From the Notification Type list, select SIEM.
6. In the SIEM Server Settings pane, configure the parameters for your JSA Console or
Event Collector. Ensure that you select LEEF from the SIEM Log Format list.
7. Configure the triggers for the notification:
a. To edit existing triggers in the list, click the Edit trigger icon, edit the parameters,
and click Update Trigger.
b. To add a trigger to the list, click the AddTrigger (+) icon, configure the parameters,
and click Add Trigger.
8. Click Save.
Copyright © 2018, Juniper Networks, Inc.648
Juniper Secure Analytics Configuring DSMs Guide

CHAPTER 74
Lieberman Random Password Manager
• Lieberman Random Password Manager on page 649
Lieberman RandomPasswordManager
The Lieberman Random Password Manager DSM gives the option to integrate JSA with
Lieberman Enterprise Random Password Manager and Lieberman Random Password
Manager software by using syslog events in the Log Extended Event Format (LEEF).
The Lieberman Random Password Manager uses Port 514 to forward syslog events to
JSA. JSA recordsall relevantpasswordmanagementevents. For informationonconfiguring
syslog forwarding, see your vendor documentation.
JSA automatically detects syslog events that are forwarded from Lieberman Random
Password Manager and Lieberman Enterprise Random Password Manager devices.
However, if you want to manually configure JSA to receive events from these devices:
1. From the Log Source Type list, select Lieberman RandomPasswordManager.
649Copyright © 2018, Juniper Networks, Inc.

Copyright © 2018, Juniper Networks, Inc.650
Juniper Secure Analytics Configuring DSMs Guide
CHAPTER 75
Linux
• Linux on page 651
• Linux DHCP on page 651
• Linux IPtables on page 652
• Linux OS on page 655
Linux
JSA supports a range of Linux DSMs.
Linux DHCP
The Linux DHCP Server DSM for JSA accepts DHCP events using syslog.
JSA records all relevant events from a Linux DHCP Server. Before you configure JSA to
integrate with a Linux DHCP Server, youmust configure syslog within your Linux DHCP
Server to forward syslog events to JSA.
For more information on configuring your Linux DHCP Server, consult the man pages or
associated documentation for your DHCP daemon.
• Configuring a Log Source on page 651
Configuring a Log Source
JSA automatically discovers and creates log sources for syslog events that are forwarded
from Linux DHCP Servers. The following procedure is optional.
1. Log in to JSA.
2. Click the Admin tab.
3. On the navigation menu, click Data Sources.
4. Click the Log Sources icon.
5. Click Add.
651Copyright © 2018, Juniper Networks, Inc.
6. In the Log Source Name field, type a name for your Linux DHCP Server.
7. In the Log Source Description field, type a description for the log source.
8. From the Log Source Type list, select Linux DHCP Server.
9. Using the Protocol Configuration list, select Syslog.
10. Configure the following values:
Table 205: Syslog Parameters
DescriptionParameter
Type the IP address or host name for the log source as an identifier for events from your LinuxDHCP Server.
Log Source Identifier
11. Click Save.
12. On the Admin tab, click Deploy Changes.
The configuration is complete.
Linux IPtables
The Linux IPtables DSM for JSA accepts firewall IPtables events by using syslog.
JSA records all relevant from Linux IPtables where the syslog event contains any of the
following words: Accept, Drop, Deny, or Reject. Creating a customized log prefix in the
event payload enables JSA to easily identify IPtables behavior.
• Configuring IPtables on page 652
• Configuring a Log Source on page 654
Configuring IPtables
IPtables is a powerful tool, which is used to create rules on the Linux kernel firewall for
routing traffic.
To configure IPtables, youmust examine the existing rules, modify the rule to log the
event, and assign a log identifier to your IPtables rule that can be identified by JSA. This
process is used to determine which rules are logged by JSA. JSA includes any logged
events that include the words: accept, drop, reject, or deny in the event payload.
1. Using SSH, log in to your Linux Server as a root user.
2. Edit the IPtables file in the following directory:
/etc/iptables.conf
Copyright © 2018, Juniper Networks, Inc.652
Juniper Secure Analytics Configuring DSMs Guide
NOTE: The file that contains the IPtables rules can vary according to thespecific Linuxoperatingsystemyouareconfiguring. For example, a systemusingRedHatEnterprisehas the file in the/etc/sysconfig/iptablesdirectory.
Consult your Linux operating system documentation for more informationabout configuring IPtables.
3. Review the file to determine the IPtables rule you want to log.
For example, if you want to log the rule that is defined by the entry, use:
-A INPUT -i eth0 --dport 31337 -j DROP
4. Insert a matching rule immediately before each rule you want to log:
-A INPUT -i eth0 --dport 31337 -j DROP -A INPUT -i eth0 --dport 31337 -j DROP
5. Update the target of the new rule to LOG for each rule you want to log,For example:
-A INPUT -i eth0 --dport 31337 -j LOG -A INPUT -i eth0 --dport 31337 -j DROP
6. Set the log level of the LOG target to a SYSLOG priority level, such as info or notice:
-A INPUT -i eth0 --dport 31337 -j LOG --log-level info -A INPUT -i eth0 --dport 31337 -j
DROP
7. Configure a log prefix to identify the rule behavior. Set the log prefix parameter to :
Q1Target=<rule>
Where <rule> is one of the following: fw_accept, fw_drop, fw_reject, or fw_deny.
For example, if the rule that is logged by the firewall targets dropped events, the log
prefix setting is:
Q1Target=fw_drop
-A INPUT -i eth0 --dport 31337 -j LOG --log-level info --log-prefix "Q1Target=fw_drop " -A INPUT -i eth0 --dport 31337 -j DROP
NOTE: Youmust have a trailing space before the closing quotationmark.
8. Save and exit the file.
9. Restart IPtables using the following command:
/etc/init.d/iptables restart
10. Open the syslog.conf file.
653Copyright © 2018, Juniper Networks, Inc.
Chapter 75: Linux
11. Add the following line:
kern.<log level>@<IP address>
Where:
• <log level> is the previously set log level.
• <IP address> is the IP address of JSA.
12. Save and exit the file.
13. Restart the syslog daemon by using the following command:
/etc/init.d/syslog restart
After the syslog daemon restarts, events are forwarded to JSA. IPtable events that
are forwarded from Linux Servers are automatically discovered and displayed in the
Log Activity tab of JSA.
Configuring a Log Source
JSA automatically discovers and creates log sources for IPtables syslog events that are
forwarded fromLinuxServers. The followingsteps for configuringa logsourceareoptional.
1. Log in to JSA.
2. Click the Admin tab.
3. On the navigation menu, click Data Sources.
4. Click the Log Sources icon.
5. Click Add.
6. In the Log Source Name field, type a name for your Linux DHCP Server.
7. In the Log Source Description field, type a description for the log source.
8. From the Log Source Type list, select Linux iptables Firewall.
9. From the Protocol Configuration list, select Syslog.
10. Configure the following values:
Copyright © 2018, Juniper Networks, Inc.654
Juniper Secure Analytics Configuring DSMs Guide
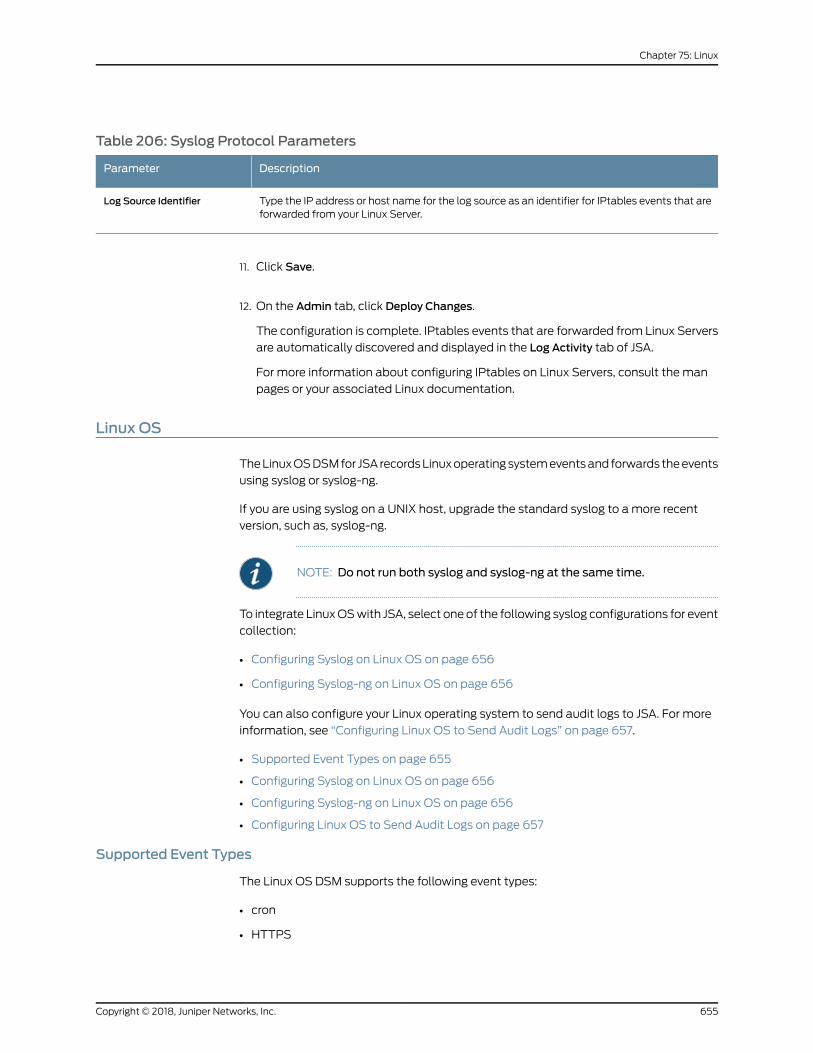
Table 206: Syslog Protocol Parameters
DescriptionParameter
Type the IP address or host name for the log source as an identifier for IPtables events that areforwarded from your Linux Server.
Log Source Identifier
11. Click Save.
12. On the Admin tab, click Deploy Changes.
The configuration is complete. IPtables events that are forwarded from Linux Servers
are automatically discovered and displayed in the Log Activity tab of JSA.
For more information about configuring IPtables on Linux Servers, consult the man
pages or your associated Linux documentation.
Linux OS
TheLinuxOSDSMfor JSA recordsLinuxoperatingsystemeventsand forwards theevents
using syslog or syslog-ng.
If you are using syslog on a UNIX host, upgrade the standard syslog to amore recent
version, such as, syslog-ng.
NOTE: Do not run both syslog and syslog-ng at the same time.
To integrate LinuxOSwith JSA, select one of the following syslog configurations for event
collection:
• Configuring Syslog on Linux OS on page 656
• Configuring Syslog-ng on Linux OS on page 656
You can also configure your Linux operating system to send audit logs to JSA. For more
information, see “Configuring Linux OS to Send Audit Logs” on page 657.
• Supported Event Types on page 655
• Configuring Syslog on Linux OS on page 656
• Configuring Syslog-ng on Linux OS on page 656
• Configuring Linux OS to Send Audit Logs on page 657
Supported Event Types
The Linux OS DSM supports the following event types:
• cron
• HTTPS
655Copyright © 2018, Juniper Networks, Inc.
Chapter 75: Linux
• FTP
• NTP
• Simple Authentication Security Layer (SASL)
• SMTP
• SNMP
• SSH
• Switch User (SU)
• Pluggable Authentication Module (PAM) events.
Configuring Syslog on Linux OS
Configure the syslog protocol on Linux OS.
1. Log in to your Linux OS device, as a root user.
2. Open the /etc/syslog.conf file.
3. Add the following facility information:
authpriv.*@<IP address>
Where: <IP address> is the IP address of JSA.
4. Save the file.
5. Restart syslog by using the following command:
service syslog restart
6. Log in to the JSA user interface.
7. Add a Linux OS log source.
8. On the Admin tab, click Deploy Changes.
For more information on syslog, see your Linux operating system documentation.
Configuring Syslog-ng on Linux OS
Configure Linux OS to use the syslog-ng protocol.
1. Log in to your Linux OS device, as a root user.
2. Open the /etc/syslog-ng/syslog-ng.conf file.
Copyright © 2018, Juniper Networks, Inc.656
Juniper Secure Analytics Configuring DSMs Guide
3. Add the following facility information:
filter auth_filter{ facility(authpriv); };
destination auth_destination { tcp("<IP address>" port(514)); };
log{
source(<Sourcename>);
filter(auth_filter);
destination(auth_destination);
};
Where:
• <IP address> is the IP address of the JSA.
• <Source name> is the name of the source that is defined in the configuration file.
4. Save the file.
5. Restart syslog-ng by using the following command:
service syslog-ng restart
6. Log in to the JSA user interface.
7. Add a Linux OS log source.
8. On the Admin tab, click Deploy Changes.
Formore informationabout syslog-ng, see yourLinuxoperating systemdocumentation.
Configuring Linux OS to Send Audit Logs
Configure Linux OS to send audit logs to JSA.
This task applies to Red Hat Enterprise Linux v6 operating systems.
If you use SUSE, Debian, or Ubuntu operating system, see your vendor documentation
for specific steps for your operating system.
1. Log in to your Linux OS device, as a root user.
2. Type the following command:
yum install audit service auditd start chkconfig auditd on
3. Open the following file:
/etc/audisp/plugins.d/syslog.conf
657Copyright © 2018, Juniper Networks, Inc.
Chapter 75: Linux

4. Verify that the parameters match the following values:
active = yes direction = out path = builtin_syslog type = builtin args = LOG_LOCAL6
format = string
5. Open the following file:
/etc/rsyslog.conf
6. Add the following line to the end of the file:
local6.*@@ JSA_Collector_IP_address
7. Log in to the JSA user interface.
8. Add a Linux OS log source.
9. On the Admin tab, click Deploy Changes.
10. Log in to JSA as the root user.
11. Type the following command:
service auditd restart service syslog restart
Copyright © 2018, Juniper Networks, Inc.658
Juniper Secure Analytics Configuring DSMs Guide
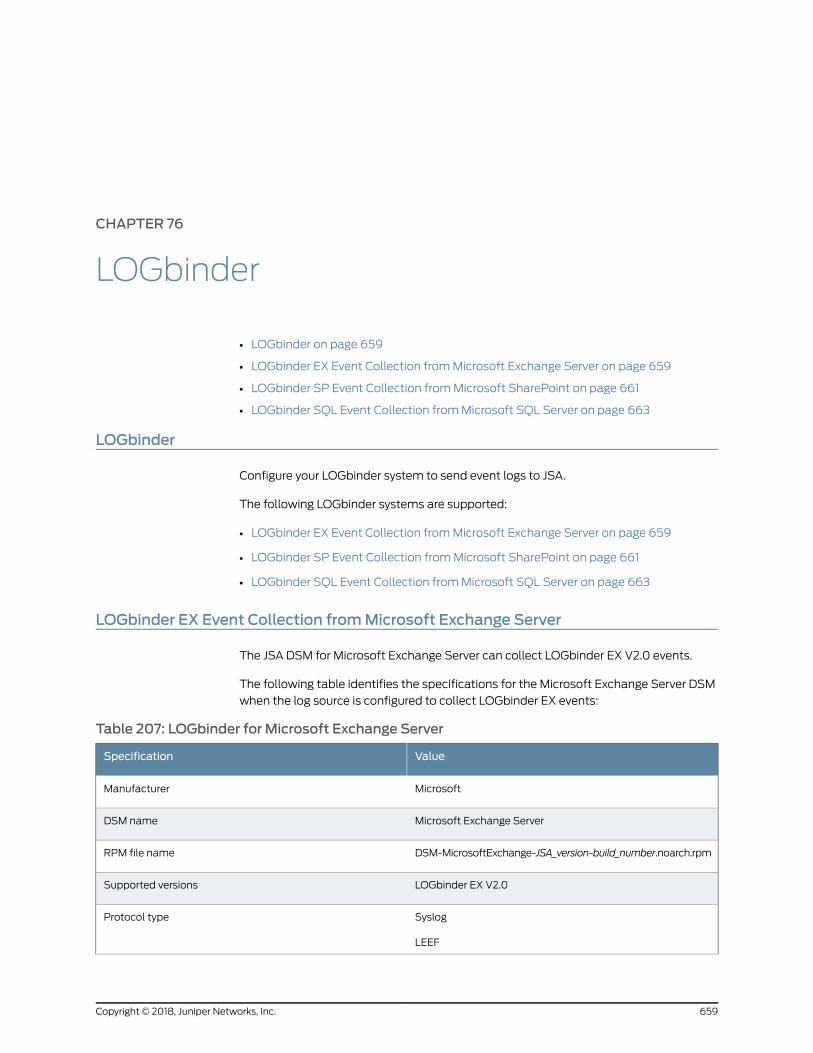
CHAPTER 76
LOGbinder
• LOGbinder on page 659
• LOGbinder EX Event Collection fromMicrosoft Exchange Server on page 659
• LOGbinder SP Event Collection fromMicrosoft SharePoint on page 661
• LOGbinder SQL Event Collection fromMicrosoft SQL Server on page 663
LOGbinder
Configure your LOGbinder system to send event logs to JSA.
The following LOGbinder systems are supported:
• LOGbinder EX Event Collection fromMicrosoft Exchange Server on page 659
• LOGbinder SP Event Collection fromMicrosoft SharePoint on page 661
• LOGbinder SQL Event Collection fromMicrosoft SQL Server on page 663
LOGbinder EX Event Collection fromMicrosoft Exchange Server
The JSA DSM for Microsoft Exchange Server can collect LOGbinder EX V2.0 events.
The following table identifies the specifications for the Microsoft Exchange Server DSM
when the log source is configured to collect LOGbinder EX events:
Table 207: LOGbinder for Microsoft Exchange Server
ValueSpecification
MicrosoftManufacturer
Microsoft Exchange ServerDSM name
DSM-MicrosoftExchange-JSA_version-build_number.noarch.rpmRPM file name
LOGbinder EX V2.0Supported versions
Syslog
LEEF
Protocol type
659Copyright © 2018, Juniper Networks, Inc.
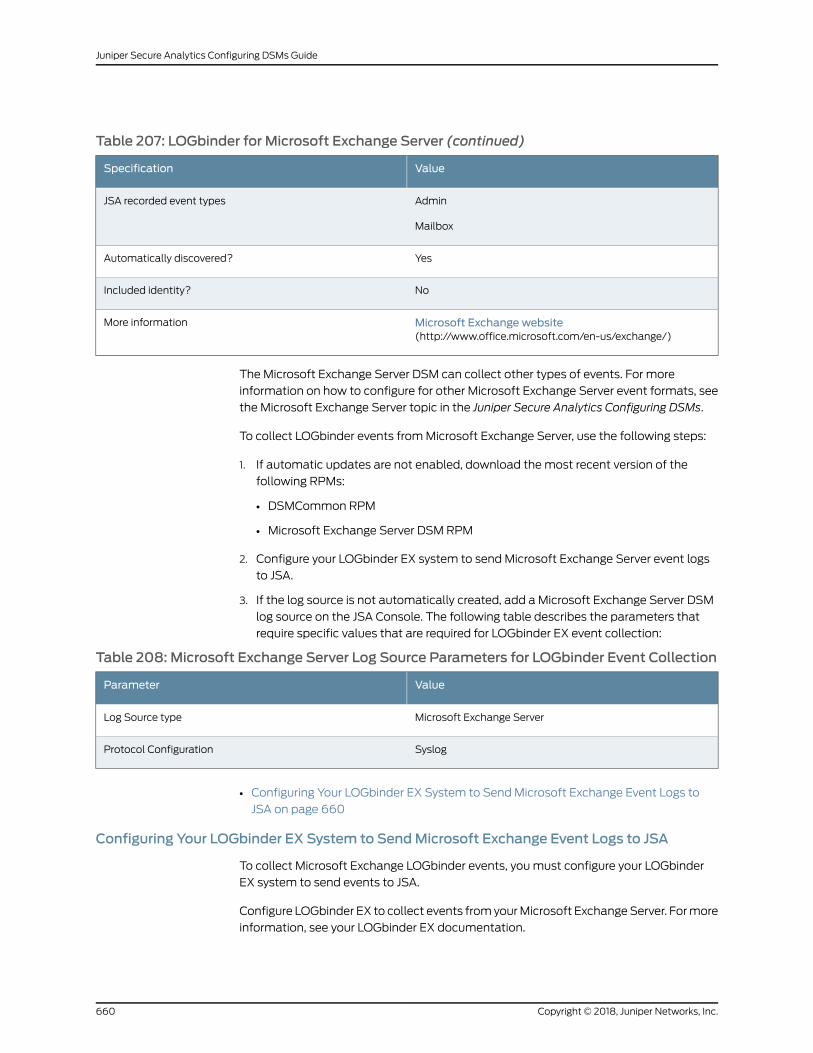
Table 207: LOGbinder for Microsoft Exchange Server (continued)
ValueSpecification
Admin
Mailbox
JSA recorded event types
YesAutomatically discovered?
NoIncluded identity?
Microsoft Exchange website(http://www.office.microsoft.com/en-us/exchange/)
More information
The Microsoft Exchange Server DSM can collect other types of events. For more
information on how to configure for other Microsoft Exchange Server event formats, see
the Microsoft Exchange Server topic in the Juniper Secure Analytics Configuring DSMs.
To collect LOGbinder events fromMicrosoft Exchange Server, use the following steps:
1. If automatic updates are not enabled, download themost recent version of the
following RPMs:
• DSMCommon RPM
• Microsoft Exchange Server DSM RPM
2. Configure your LOGbinder EX system to send Microsoft Exchange Server event logs
to JSA.
3. If the log source is not automatically created, add a Microsoft Exchange Server DSM
log source on the JSA Console. The following table describes the parameters that
require specific values that are required for LOGbinder EX event collection:
Table 208: Microsoft Exchange Server Log Source Parameters for LOGbinder Event Collection
ValueParameter
Microsoft Exchange ServerLog Source type
SyslogProtocol Configuration
• Configuring Your LOGbinder EX System to Send Microsoft Exchange Event Logs to
JSA on page 660
Configuring Your LOGbinder EX System to SendMicrosoft Exchange Event Logs to JSA
To collect Microsoft Exchange LOGbinder events, youmust configure your LOGbinder
EX system to send events to JSA.
Configure LOGbinder EX to collect events fromyourMicrosoft ExchangeServer. Formore
information, see your LOGbinder EX documentation.
Copyright © 2018, Juniper Networks, Inc.660
Juniper Secure Analytics Configuring DSMs Guide
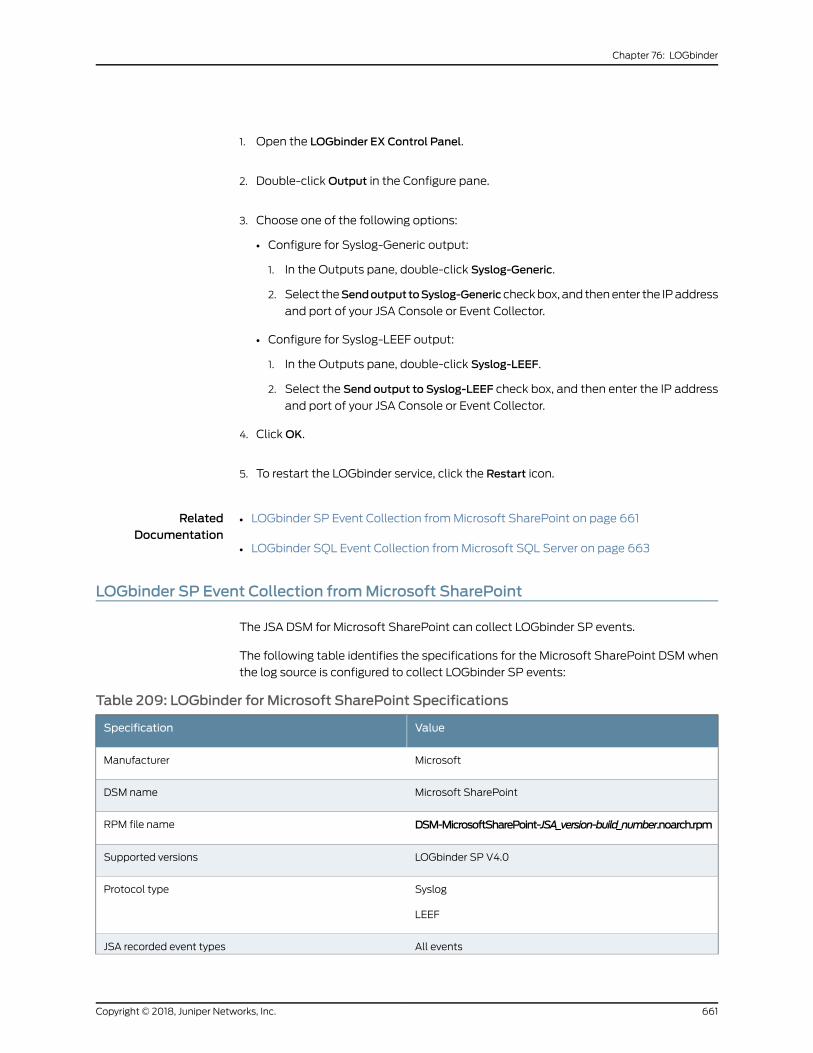
1. Open the LOGbinder EX Control Panel.
2. Double-clickOutput in the Configure pane.
3. Choose one of the following options:
• Configure for Syslog-Generic output:
1. In the Outputs pane, double-click Syslog-Generic.
2. Select theSendoutput toSyslog-Genericcheckbox, and thenenter the IPaddress
and port of your JSA Console or Event Collector.
• Configure for Syslog-LEEF output:
1. In the Outputs pane, double-click Syslog-LEEF.
2. Select the Send output to Syslog-LEEF check box, and then enter the IP address
and port of your JSA Console or Event Collector.
4. ClickOK.
5. To restart the LOGbinder service, click the Restart icon.
RelatedDocumentation
LOGbinder SP Event Collection fromMicrosoft SharePoint on page 661•
• LOGbinder SQL Event Collection fromMicrosoft SQL Server on page 663
LOGbinder SP Event Collection fromMicrosoft SharePoint
The JSA DSM for Microsoft SharePoint can collect LOGbinder SP events.
The following table identifies the specifications for the Microsoft SharePoint DSMwhen
the log source is configured to collect LOGbinder SP events:
Table 209: LOGbinder for Microsoft SharePoint Specifications
ValueSpecification
MicrosoftManufacturer
Microsoft SharePointDSM name
DSM-MicrosoftSharePoint-JSA_version-build_number.noarch.rpmRPM file name
LOGbinder SP V4.0Supported versions
Syslog
LEEF
Protocol type
All eventsJSA recorded event types
661Copyright © 2018, Juniper Networks, Inc.
Chapter 76: LOGbinder
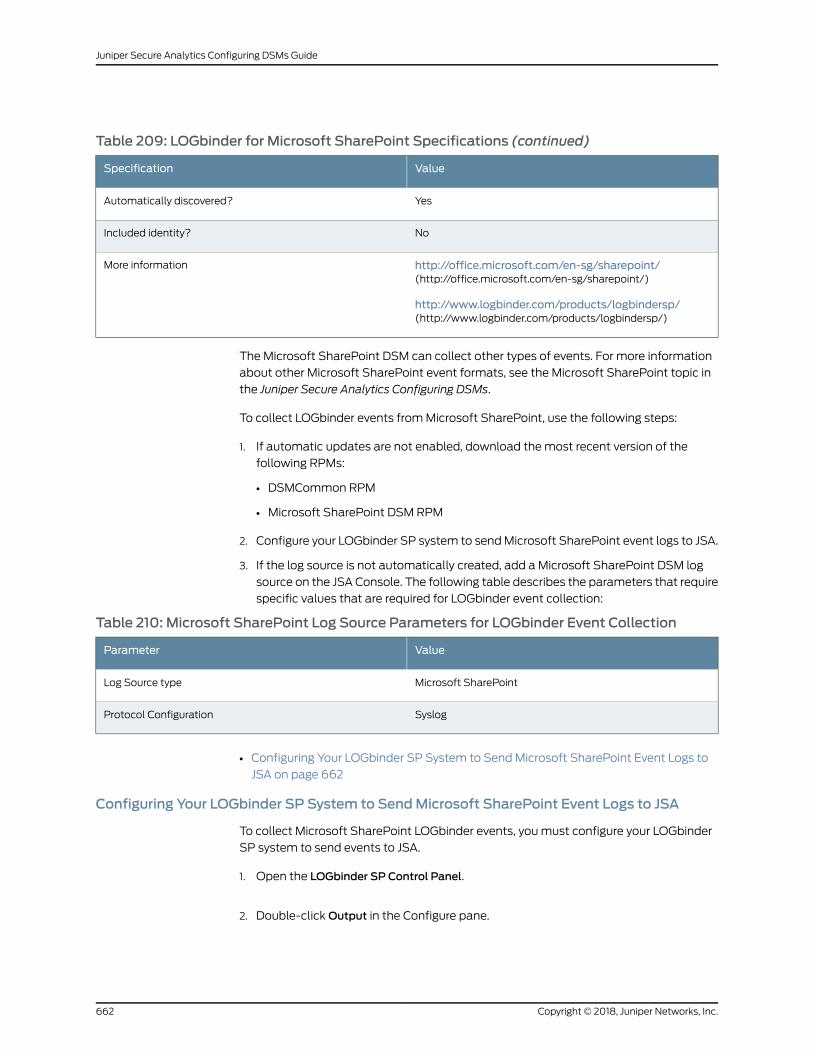
Table 209: LOGbinder for Microsoft SharePoint Specifications (continued)
ValueSpecification
YesAutomatically discovered?
NoIncluded identity?
http://office.microsoft.com/en-sg/sharepoint/(http://office.microsoft.com/en-sg/sharepoint/)
http://www.logbinder.com/products/logbindersp/(http://www.logbinder.com/products/logbindersp/)
More information
The Microsoft SharePoint DSM can collect other types of events. For more information
about other Microsoft SharePoint event formats, see the Microsoft SharePoint topic in
the Juniper Secure Analytics Configuring DSMs.
To collect LOGbinder events fromMicrosoft SharePoint, use the following steps:
1. If automatic updates are not enabled, download themost recent version of the
following RPMs:
• DSMCommon RPM
• Microsoft SharePoint DSM RPM
2. Configure your LOGbinder SP system to sendMicrosoft SharePoint event logs to JSA.
3. If the log source is not automatically created, add a Microsoft SharePoint DSM log
source on the JSA Console. The following table describes the parameters that require
specific values that are required for LOGbinder event collection:
Table 210: Microsoft SharePoint Log Source Parameters for LOGbinder Event Collection
ValueParameter
Microsoft SharePointLog Source type
SyslogProtocol Configuration
• Configuring Your LOGbinder SP System to Send Microsoft SharePoint Event Logs to
JSA on page 662
Configuring Your LOGbinder SP System to SendMicrosoft SharePoint Event Logs to JSA
To collect Microsoft SharePoint LOGbinder events, youmust configure your LOGbinder
SP system to send events to JSA.
1. Open the LOGbinder SP Control Panel.
2. Double-clickOutput in the Configure pane.
Copyright © 2018, Juniper Networks, Inc.662
Juniper Secure Analytics Configuring DSMs Guide
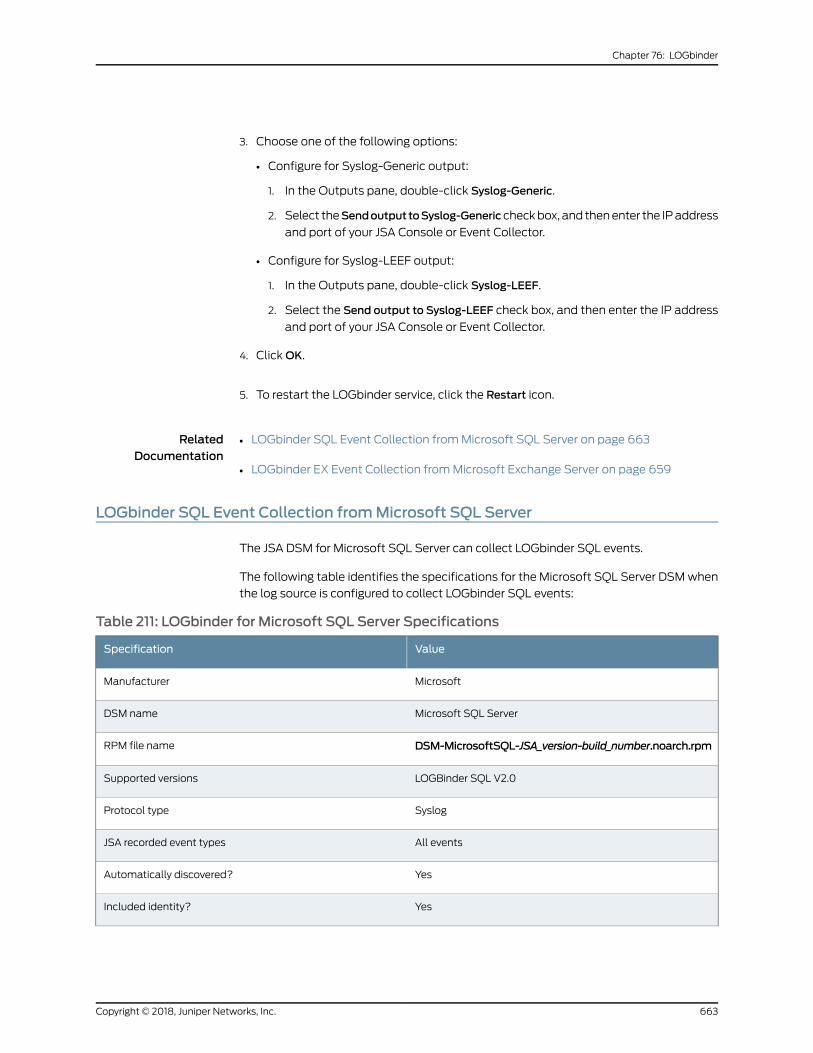
3. Choose one of the following options:
• Configure for Syslog-Generic output:
1. In the Outputs pane, double-click Syslog-Generic.
2. Select theSendoutput toSyslog-Genericcheckbox, and thenenter the IPaddress
and port of your JSA Console or Event Collector.
• Configure for Syslog-LEEF output:
1. In the Outputs pane, double-click Syslog-LEEF.
2. Select the Send output to Syslog-LEEF check box, and then enter the IP address
and port of your JSA Console or Event Collector.
4. ClickOK.
5. To restart the LOGbinder service, click the Restart icon.
RelatedDocumentation
LOGbinder SQL Event Collection fromMicrosoft SQL Server on page 663•
• LOGbinder EX Event Collection fromMicrosoft Exchange Server on page 659
LOGbinder SQL Event Collection fromMicrosoft SQL Server
The JSA DSM for Microsoft SQL Server can collect LOGbinder SQL events.
The following table identifies the specifications for the Microsoft SQL Server DSMwhen
the log source is configured to collect LOGbinder SQL events:
Table 211: LOGbinder for Microsoft SQL Server Specifications
ValueSpecification
MicrosoftManufacturer
Microsoft SQL ServerDSM name
DSM-MicrosoftSQL-JSA_version-build_number.noarch.rpmRPM file name
LOGBinder SQL V2.0Supported versions
SyslogProtocol type
All eventsJSA recorded event types
YesAutomatically discovered?
YesIncluded identity?
663Copyright © 2018, Juniper Networks, Inc.
Chapter 76: LOGbinder
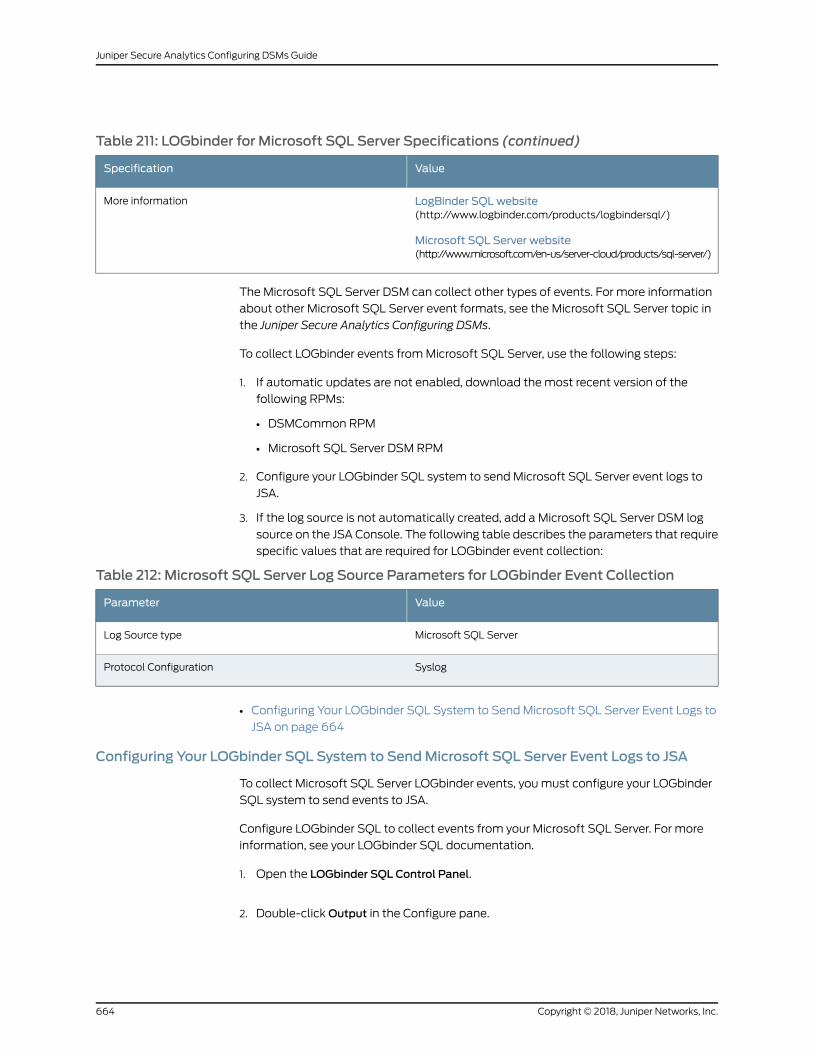
Table 211: LOGbinder for Microsoft SQL Server Specifications (continued)
ValueSpecification
LogBinder SQLwebsite(http://www.logbinder.com/products/logbindersql/)
Microsoft SQL Server website(http://www.microsoft.com/en-us/server-cloud/products/sql-server/)
More information
The Microsoft SQL Server DSM can collect other types of events. For more information
about other Microsoft SQL Server event formats, see the Microsoft SQL Server topic in
the Juniper Secure Analytics Configuring DSMs.
To collect LOGbinder events fromMicrosoft SQL Server, use the following steps:
1. If automatic updates are not enabled, download themost recent version of the
following RPMs:
• DSMCommon RPM
• Microsoft SQL Server DSM RPM
2. Configure your LOGbinder SQL system to send Microsoft SQL Server event logs to
JSA.
3. If the log source is not automatically created, add a Microsoft SQL Server DSM log
source on the JSA Console. The following table describes the parameters that require
specific values that are required for LOGbinder event collection:
Table 212: Microsoft SQL Server Log Source Parameters for LOGbinder Event Collection
ValueParameter
Microsoft SQL ServerLog Source type
SyslogProtocol Configuration
• Configuring Your LOGbinder SQL System to Send Microsoft SQL Server Event Logs to
JSA on page 664
Configuring Your LOGbinder SQL System to SendMicrosoft SQL Server Event Logs to JSA
To collect Microsoft SQL Server LOGbinder events, youmust configure your LOGbinder
SQL system to send events to JSA.
Configure LOGbinder SQL to collect events from your Microsoft SQL Server. For more
information, see your LOGbinder SQL documentation.
1. Open the LOGbinder SQL Control Panel.
2. Double-clickOutput in the Configure pane.
Copyright © 2018, Juniper Networks, Inc.664
Juniper Secure Analytics Configuring DSMs Guide
3. Choose one of the following options:
• Configure for Syslog-Generic output:
1. In the Outputs pane, double-click Syslog-Generic.
2. Select theSendoutput toSyslog-Genericcheckbox, and thenenter the IPaddress
and port of your JSA Console or Event Collector.
• Configure for Syslog-LEEF output:
1. In the Outputs pane, double-click Syslog-LEEF.
2. Select the Send output to Syslog-LEEF check box, and then enter the IP address
and port of your JSA Console or Event Collector.
4. ClickOK.
5. To restart the LOGbinder service, click the Restart icon.
RelatedDocumentation
• LOGbinder EX Event Collection fromMicrosoft Exchange Server on page 659
• LOGbinder SP Event Collection fromMicrosoft SharePoint on page 661
665Copyright © 2018, Juniper Networks, Inc.
Chapter 76: LOGbinder

Copyright © 2018, Juniper Networks, Inc.666
Juniper Secure Analytics Configuring DSMs Guide
CHAPTER 77
McAfee
• McAfee on page 667
• McAfee Application / Change Control on page 667
• McAfee EPolicy Orchestrator on page 670
• McAfee Firewall Enterprise on page 679
• McAfee Intrushield on page 680
• McAfeeWeb Gateway on page 685
McAfee
JSA supports a range of McAfee products.
McAfee Application / Change Control
The McAfee Application / Change Control DSM for JSA accepts change control events
by using JavaDatabaseConnectivity (JDBC). JSA records all relevantMcAfeeApplication
/ Change Control events. This document includes information on configuring JSA to
access the database that contains events by using the JDBC protocol.
1. Log in to JSA.
2. Click the Admin tab.
3. Click the Log Sources icon.
4. Click Add.
5. From the Log Source Type list, selectMcAfee Application / Change Control.
6. From the Protocol Configuration list, select JDBC.
Youmust refer to theConfigureDatabaseSettingsonyourApplication /ChangeControl
Management Console to configure the McAfee Application / Change Control DSM in
JSA.
667Copyright © 2018, Juniper Networks, Inc.
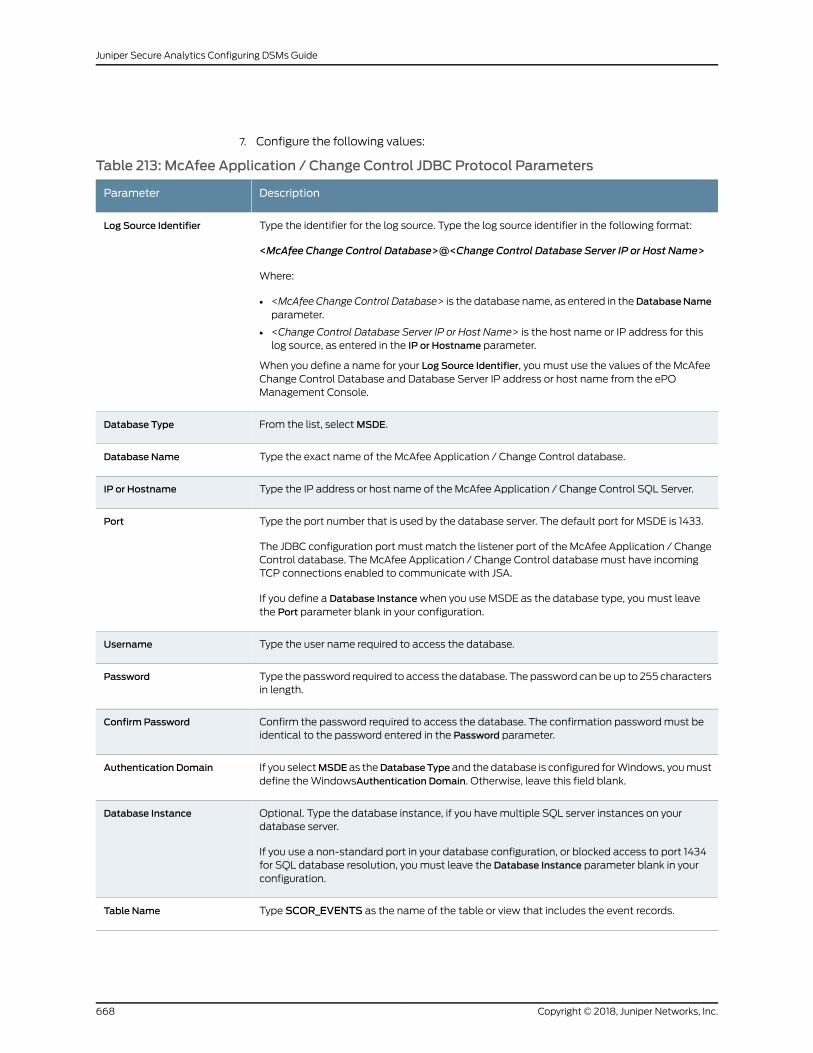
7. Configure the following values:
Table 213: McAfee Application / Change Control JDBC Protocol Parameters
DescriptionParameter
Type the identifier for the log source. Type the log source identifier in the following format:
<McAfee Change Control Database>@<Change Control Database Server IP or Host Name>
Where:
• <McAfee Change Control Database> is the database name, as entered in theDatabaseNameparameter.
• <Change Control Database Server IP or Host Name> is the host name or IP address for thislog source, as entered in the IP or Hostname parameter.
When you define a name for your Log Source Identifier, you must use the values of the McAfeeChange Control Database and Database Server IP address or host name from the ePOManagement Console.
Log Source Identifier
From the list, selectMSDE.Database Type
Type the exact name of the McAfee Application / Change Control database.Database Name
Type the IP address or host name of the McAfee Application / Change Control SQL Server.IP or Hostname
Type the port number that is used by the database server. The default port for MSDE is 1433.
The JDBC configuration port must match the listener port of the McAfee Application / ChangeControl database. The McAfee Application / Change Control databasemust have incomingTCP connections enabled to communicate with JSA.
If you define a Database Instancewhen you use MSDE as the database type, youmust leavethe Port parameter blank in your configuration.
Port
Type the user name required to access the database.Username
Type the password required to access the database. The password can be up to 255 charactersin length.
Password
Confirm the password required to access the database. The confirmation passwordmust beidentical to the password entered in the Password parameter.
Confirm Password
If you selectMSDE as theDatabaseType and the database is configured forWindows, youmustdefine theWindowsAuthentication Domain. Otherwise, leave this field blank.
Authentication Domain
Optional. Type the database instance, if you havemultiple SQL server instances on yourdatabase server.
If you use a non-standard port in your database configuration, or blocked access to port 1434for SQL database resolution, youmust leave the Database Instance parameter blank in yourconfiguration.
Database Instance
Type SCOR_EVENTS as the name of the table or view that includes the event records.Table Name
Copyright © 2018, Juniper Networks, Inc.668
Juniper Secure Analytics Configuring DSMs Guide
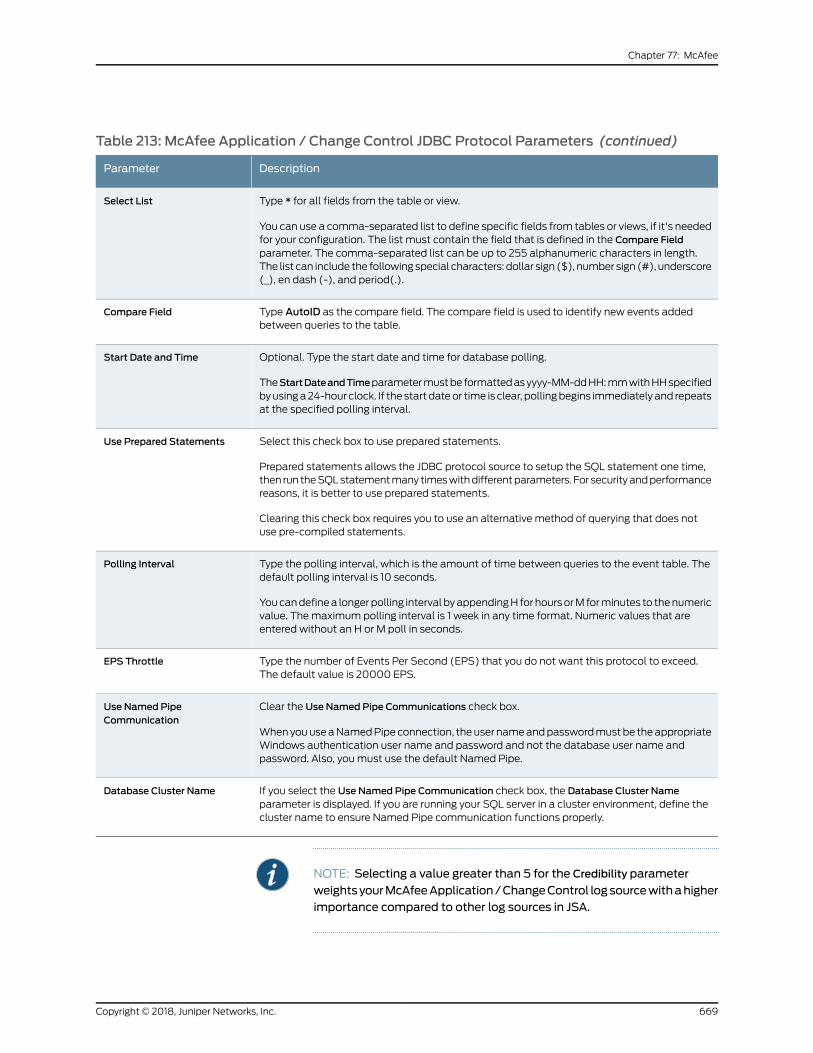
Table 213: McAfee Application / Change Control JDBC Protocol Parameters (continued)
DescriptionParameter
Type * for all fields from the table or view.
You can use a comma-separated list to define specific fields from tables or views, if it's neededfor your configuration. The list must contain the field that is defined in the Compare Fieldparameter. The comma-separated list can be up to 255 alphanumeric characters in length.The list can include the following special characters: dollar sign ($), number sign (#), underscore(_), en dash (-), and period(.).
Select List
Type AutoID as the compare field. The compare field is used to identify new events addedbetween queries to the table.
Compare Field
Optional. Type the start date and time for database polling.
TheStartDateandTimeparametermustbe formattedasyyyy-MM-ddHH:mmwithHHspecifiedbyusinga24-hour clock. If the start dateor time is clear, pollingbegins immediatelyand repeatsat the specified polling interval.
Start Date and Time
Select this check box to use prepared statements.
Prepared statements allows the JDBC protocol source to setup the SQL statement one time,then run theSQLstatementmany timeswithdifferentparameters. For securityandperformancereasons, it is better to use prepared statements.
Clearing this check box requires you to use an alternative method of querying that does notuse pre-compiled statements.
Use Prepared Statements
Type the polling interval, which is the amount of time between queries to the event table. Thedefault polling interval is 10 seconds.
Youcandefinea longerpolling interval byappendingH for hoursorM forminutes to thenumericvalue. Themaximum polling interval is 1 week in any time format. Numeric values that areentered without an H or M poll in seconds.
Polling Interval
Type the number of Events Per Second (EPS) that you do not want this protocol to exceed.The default value is 20000 EPS.
EPS Throttle
Clear the Use Named Pipe Communications check box.
WhenyouuseaNamedPipe connection, theuser nameandpasswordmustbe theappropriateWindows authentication user name and password and not the database user name andpassword. Also, youmust use the default Named Pipe.
Use Named PipeCommunication
If you select the Use Named Pipe Communication check box, the Database Cluster Nameparameter is displayed. If you are running your SQL server in a cluster environment, define thecluster name to ensure Named Pipe communication functions properly.
Database Cluster Name
NOTE: Selecting a value greater than 5 for the Credibility parameter
weightsyourMcAfeeApplication/ChangeControl logsourcewithahigherimportance compared to other log sources in JSA.
669Copyright © 2018, Juniper Networks, Inc.
Chapter 77: McAfee
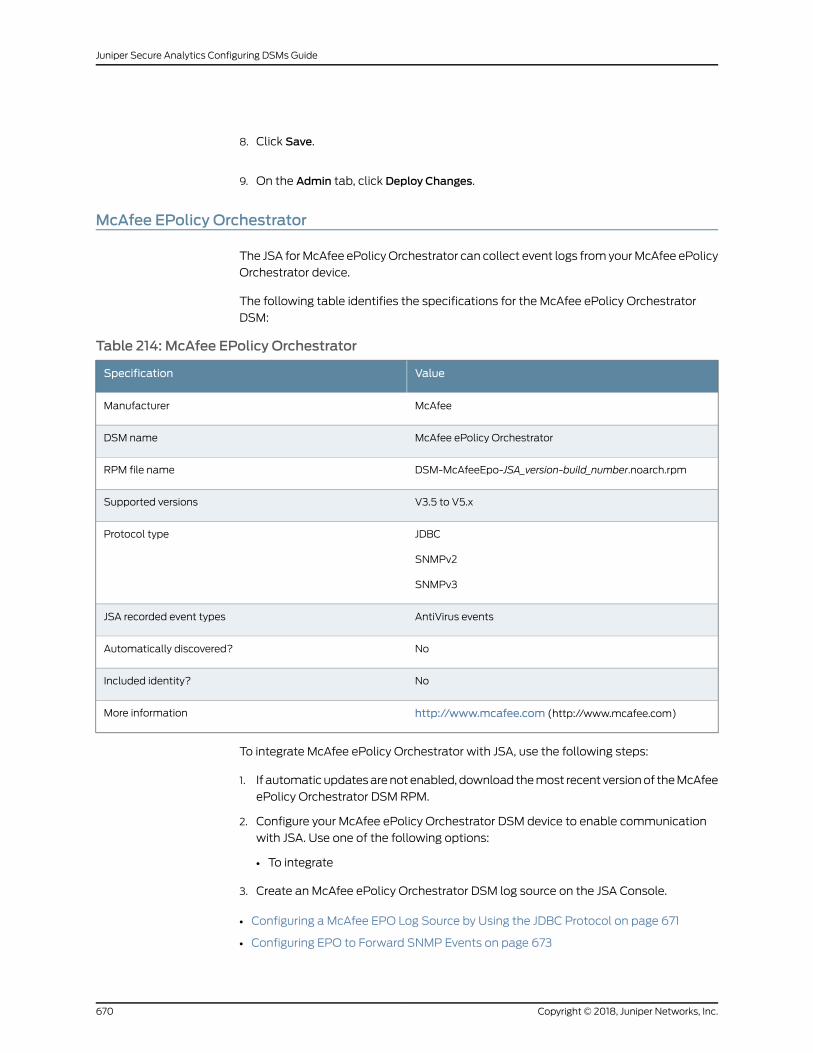
8. Click Save.
9. On the Admin tab, click Deploy Changes.
McAfee EPolicy Orchestrator
The JSA forMcAfee ePolicyOrchestrator can collect event logs fromyourMcAfee ePolicy
Orchestrator device.
The following table identifies the specifications for the McAfee ePolicy Orchestrator
DSM:
Table 214: McAfee EPolicy Orchestrator
ValueSpecification
McAfeeManufacturer
McAfee ePolicy OrchestratorDSM name
DSM-McAfeeEpo-JSA_version-build_number.noarch.rpmRPM file name
V3.5 to V5.xSupported versions
JDBC
SNMPv2
SNMPv3
Protocol type
AntiVirus eventsJSA recorded event types
NoAutomatically discovered?
NoIncluded identity?
http://www.mcafee.com (http://www.mcafee.com)More information
To integrate McAfee ePolicy Orchestrator with JSA, use the following steps:
1. If automaticupdatesarenotenabled, download themost recent versionof theMcAfee
ePolicy Orchestrator DSM RPM.
2. Configure your McAfee ePolicy Orchestrator DSM device to enable communication
with JSA. Use one of the following options:
• To integrate
3. Create an McAfee ePolicy Orchestrator DSM log source on the JSA Console.
• Configuring a McAfee EPO Log Source by Using the JDBC Protocol on page 671
• Configuring EPO to Forward SNMP Events on page 673
Copyright © 2018, Juniper Networks, Inc.670
Juniper Secure Analytics Configuring DSMs Guide
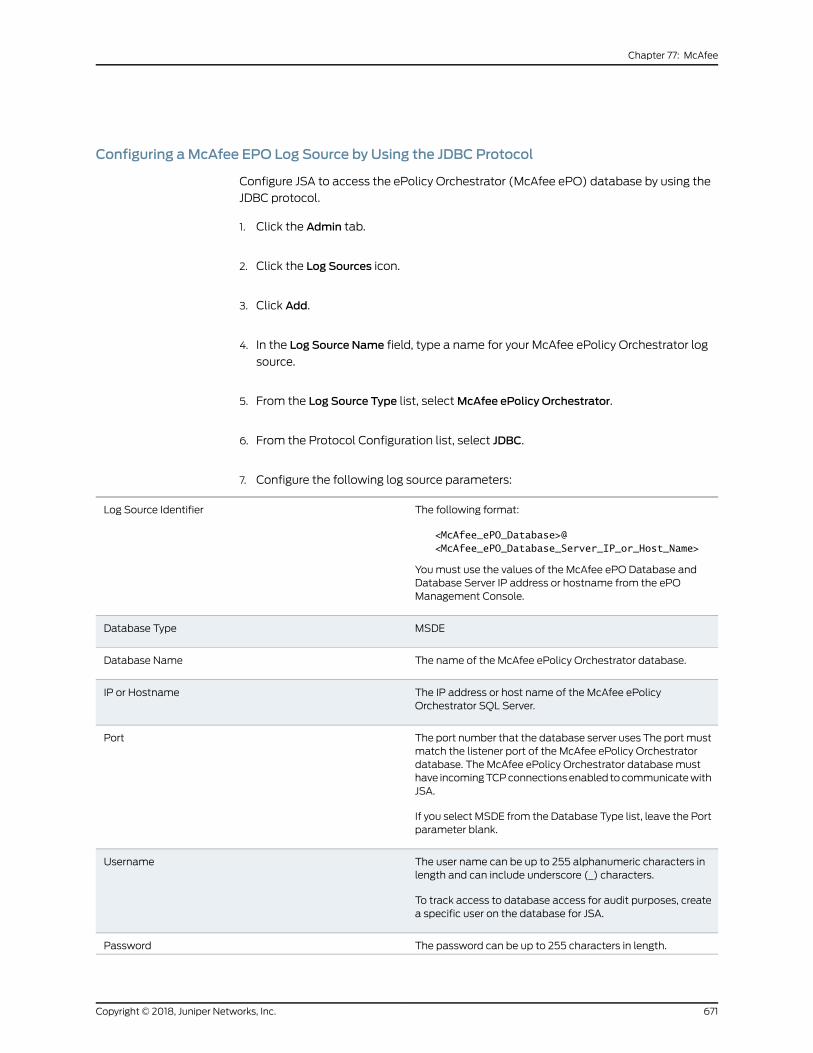
Configuring aMcAfee EPO Log Source by Using the JDBC Protocol
Configure JSA to access the ePolicy Orchestrator (McAfee ePO) database by using the
JDBC protocol.
1. Click the Admin tab.
2. Click the Log Sources icon.
3. Click Add.
4. In the Log Source Name field, type a name for your McAfee ePolicy Orchestrator log
source.
5. From the Log Source Type list, selectMcAfee ePolicy Orchestrator.
6. From the Protocol Configuration list, select JDBC.
7. Configure the following log source parameters:
The following format:
<McAfee_ePO_Database>@<McAfee_ePO_Database_Server_IP_or_Host_Name>
Youmust use the values of the McAfee ePO Database andDatabase Server IP address or hostname from the ePOManagement Console.
Log Source Identifier
MSDEDatabase Type
The name of the McAfee ePolicy Orchestrator database.Database Name
The IP address or host name of the McAfee ePolicyOrchestrator SQL Server.
IP or Hostname
The port number that the database server uses The portmustmatch the listener port of the McAfee ePolicy Orchestratordatabase. The McAfee ePolicy Orchestrator databasemusthave incomingTCPconnectionsenabled tocommunicatewithJSA.
If you select MSDE from the Database Type list, leave the Portparameter blank.
Port
The user name can be up to 255 alphanumeric characters inlength and can include underscore (_) characters.
To track access to database access for audit purposes, createa specific user on the database for JSA.
Username
The password can be up to 255 characters in length.Password
671Copyright © 2018, Juniper Networks, Inc.
Chapter 77: McAfee
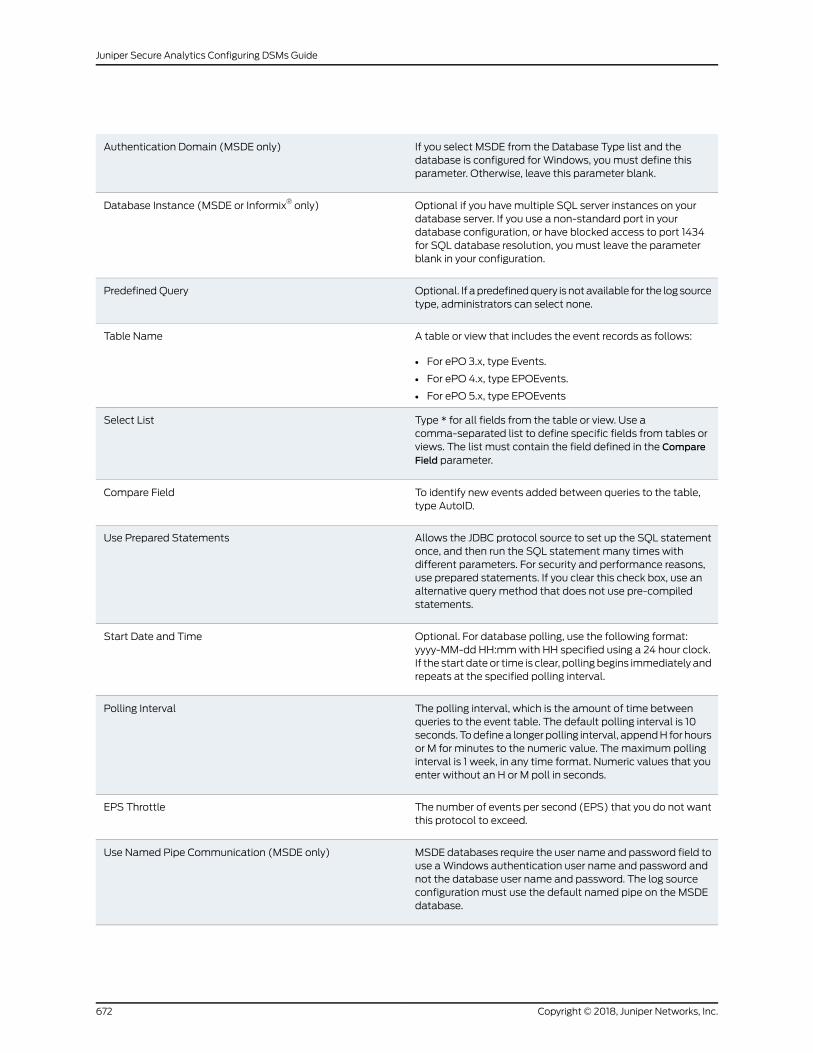
If you select MSDE from the Database Type list and thedatabase is configured for Windows, youmust define thisparameter. Otherwise, leave this parameter blank.
Authentication Domain (MSDE only)
Optional if you havemultiple SQL server instances on yourdatabase server. If you use a non-standard port in yourdatabase configuration, or have blocked access to port 1434for SQL database resolution, youmust leave the parameterblank in your configuration.
Database Instance (MSDE or Informix® only)
Optional. If apredefinedquery is notavailable for the logsourcetype, administrators can select none.
Predefined Query
A table or view that includes the event records as follows:
• For ePO 3.x, type Events.
• For ePO 4.x, type EPOEvents.
• For ePO 5.x, type EPOEvents
Table Name
Type * for all fields from the table or view. Use acomma-separated list to define specific fields from tables orviews. The list must contain the field defined in the CompareField parameter.
Select List
To identify new events added between queries to the table,type AutoID.
Compare Field
Allows the JDBC protocol source to set up the SQL statementonce, and then run the SQL statement many times withdifferent parameters. For security and performance reasons,use prepared statements. If you clear this check box, use analternative query method that does not use pre-compiledstatements.
Use Prepared Statements
Optional. For database polling, use the following format:yyyy-MM-dd HH:mmwith HH specified using a 24 hour clock.If the start dateor time is clear, pollingbegins immediately andrepeats at the specified polling interval.
Start Date and Time
The polling interval, which is the amount of time betweenqueries to the event table. The default polling interval is 10seconds. Todefinea longerpolling interval, appendH for hoursor M for minutes to the numeric value. Themaximum pollinginterval is 1 week, in any time format. Numeric values that youenter without an H or M poll in seconds.
Polling Interval
The number of events per second (EPS) that you do not wantthis protocol to exceed.
EPS Throttle
MSDE databases require the user name and password field touse aWindows authentication user name and password andnot the database user name and password. The log sourceconfiguration must use the default named pipe on the MSDEdatabase.
Use Named Pipe Communication (MSDE only)
Copyright © 2018, Juniper Networks, Inc.672
Juniper Secure Analytics Configuring DSMs Guide
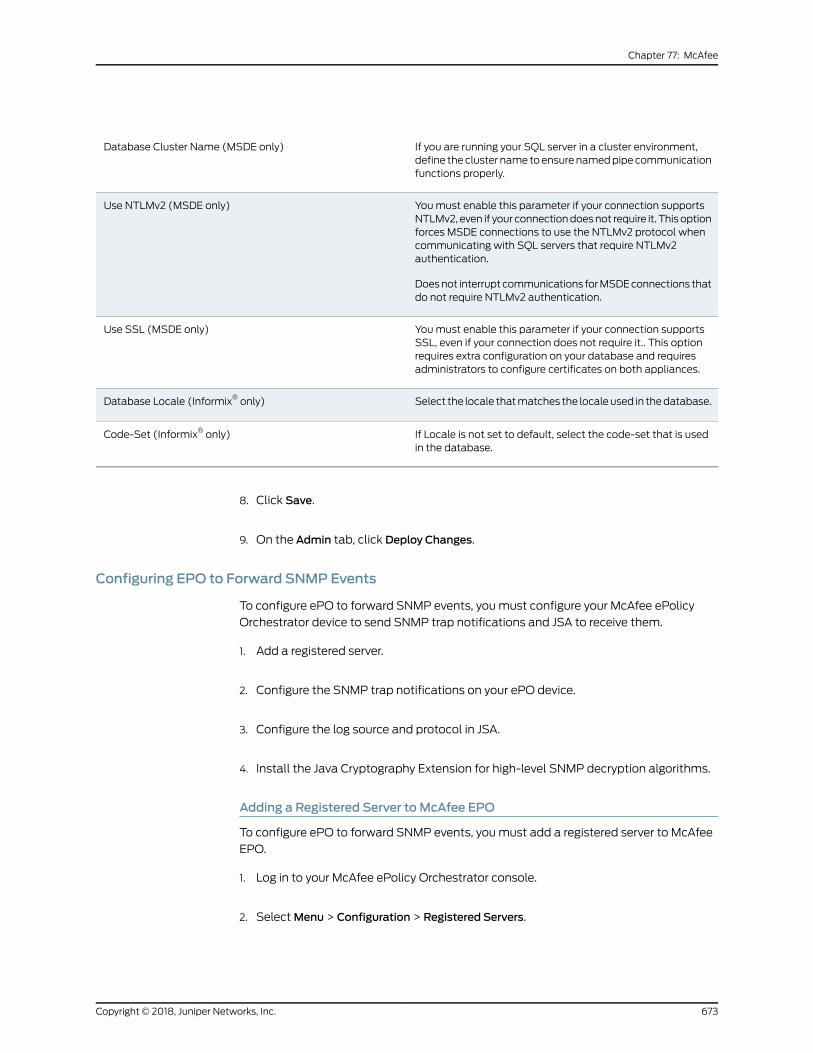
If you are running your SQL server in a cluster environment,define thecluster name toensurenamedpipecommunicationfunctions properly.
Database Cluster Name (MSDE only)
Youmust enable this parameter if your connection supportsNTLMv2, even if your connectiondoesnot require it. This optionforces MSDE connections to use the NTLMv2 protocol whencommunicating with SQL servers that require NTLMv2authentication.
Doesnot interrupt communications forMSDEconnections thatdo not require NTLMv2 authentication.
Use NTLMv2 (MSDE only)
Youmust enable this parameter if your connection supportsSSL, even if your connection does not require it.. This optionrequires extra configuration on your database and requiresadministrators to configure certificates on both appliances.
Use SSL (MSDE only)
Select the locale thatmatches the localeused in thedatabase.Database Locale (Informix® only)
If Locale is not set to default, select the code-set that is usedin the database.
Code-Set (Informix® only)
8. Click Save.
9. On theAdmin tab, click Deploy Changes.
Configuring EPO to Forward SNMP Events
To configure ePO to forward SNMP events, youmust configure your McAfee ePolicy
Orchestrator device to send SNMP trap notifications and JSA to receive them.
1. Add a registered server.
2. Configure the SNMP trap notifications on your ePO device.
3. Configure the log source and protocol in JSA.
4. Install the Java Cryptography Extension for high-level SNMP decryption algorithms.
Adding a Registered Server to McAfee EPO
To configure ePO to forward SNMP events, youmust add a registered server to McAfee
EPO.
1. Log in to your McAfee ePolicy Orchestrator console.
2. SelectMenu > Configuration > Registered Servers.
673Copyright © 2018, Juniper Networks, Inc.
Chapter 77: McAfee
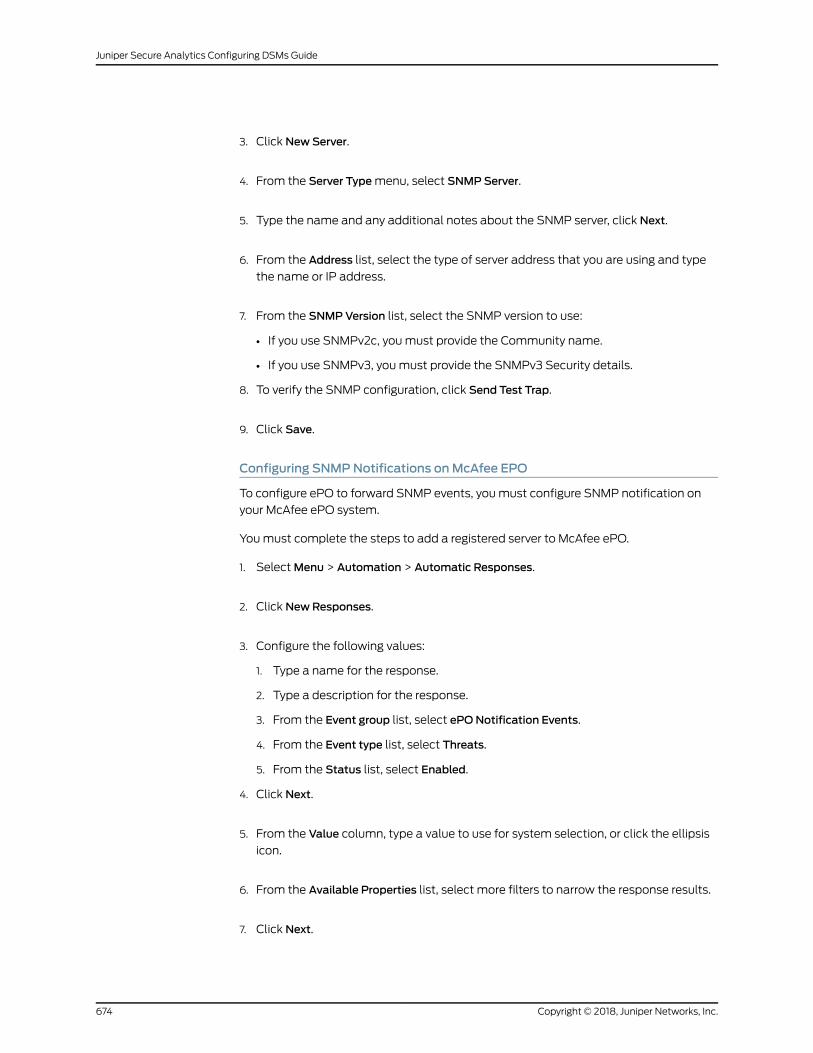
3. Click NewServer.
4. From the Server Typemenu, select SNMPServer.
5. Type the name and any additional notes about the SNMP server, click Next.
6. From the Address list, select the type of server address that you are using and type
the name or IP address.
7. From the SNMPVersion list, select the SNMP version to use:
• If you use SNMPv2c, youmust provide the Community name.
• If you use SNMPv3, youmust provide the SNMPv3 Security details.
8. To verify the SNMP configuration, click Send Test Trap.
9. Click Save.
Configuring SNMPNotifications onMcAfee EPO
To configure ePO to forward SNMP events, youmust configure SNMP notification on
your McAfee ePO system.
Youmust complete the steps to add a registered server to McAfee ePO.
1. SelectMenu > Automation > Automatic Responses.
2. Click NewResponses.
3. Configure the following values:
1. Type a name for the response.
2. Type a description for the response.
3. From the Event group list, select ePONotification Events.
4. From the Event type list, select Threats.
5. From the Status list, select Enabled.
4. Click Next.
5. From the Value column, type a value to use for system selection, or click the ellipsis
icon.
6. From the Available Properties list, select more filters to narrow the response results.
7. Click Next.
Copyright © 2018, Juniper Networks, Inc.674
Juniper Secure Analytics Configuring DSMs Guide
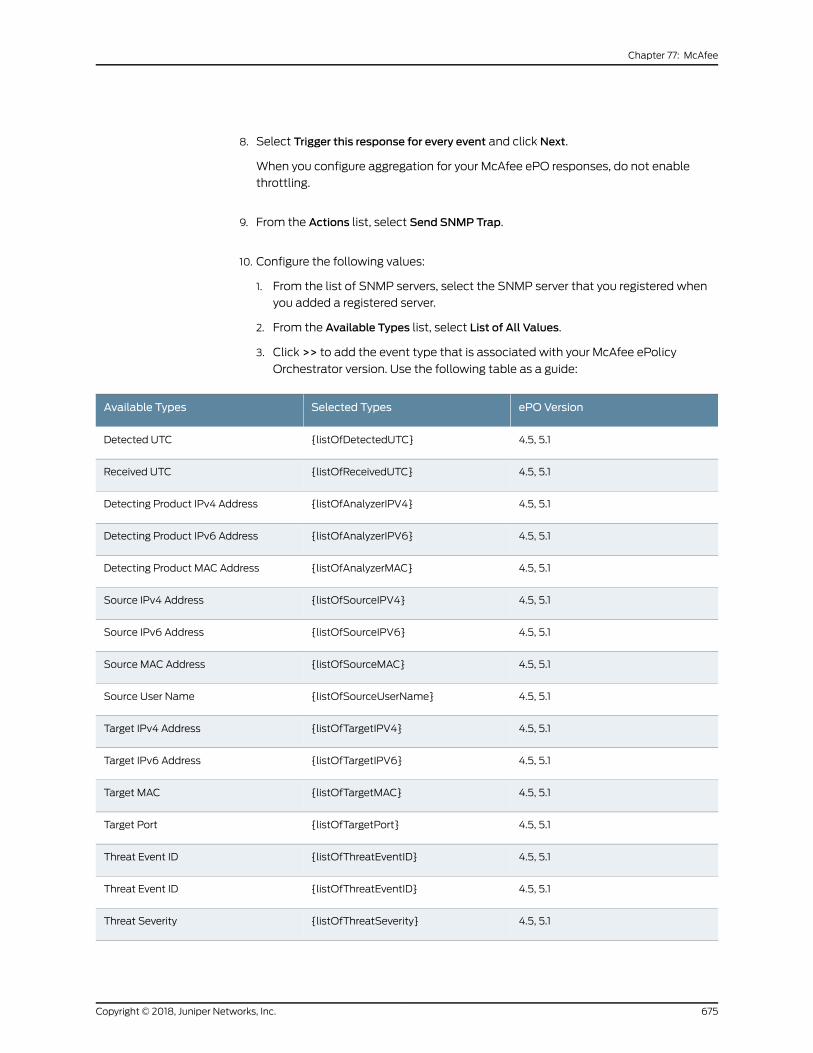
8. Select Trigger this response for every event and click Next.
When you configure aggregation for your McAfee ePO responses, do not enable
throttling.
9. From the Actions list, select Send SNMP Trap.
10. Configure the following values:
1. From the list of SNMP servers, select the SNMP server that you registered when
you added a registered server.
2. From the Available Types list, select List of All Values.
3. Click >> to add the event type that is associated with your McAfee ePolicy
Orchestrator version. Use the following table as a guide:
ePO VersionSelected TypesAvailable Types
4.5, 5.1{listOfDetectedUTC}Detected UTC
4.5, 5.1{listOfReceivedUTC}Received UTC
4.5, 5.1{listOfAnalyzerIPV4}Detecting Product IPv4 Address
4.5, 5.1{listOfAnalyzerIPV6}Detecting Product IPv6 Address
4.5, 5.1{listOfAnalyzerMAC}Detecting Product MAC Address
4.5, 5.1{listOfSourceIPV4}Source IPv4 Address
4.5, 5.1{listOfSourceIPV6}Source IPv6 Address
4.5, 5.1{listOfSourceMAC}Source MAC Address
4.5, 5.1{listOfSourceUserName}Source User Name
4.5, 5.1{listOfTargetIPV4}Target IPv4 Address
4.5, 5.1{listOfTargetIPV6}Target IPv6 Address
4.5, 5.1{listOfTargetMAC}Target MAC
4.5, 5.1{listOfTargetPort}Target Port
4.5, 5.1{listOfThreatEventID}Threat Event ID
4.5, 5.1{listOfThreatEventID}Threat Event ID
4.5, 5.1{listOfThreatSeverity}Threat Severity
675Copyright © 2018, Juniper Networks, Inc.
Chapter 77: McAfee
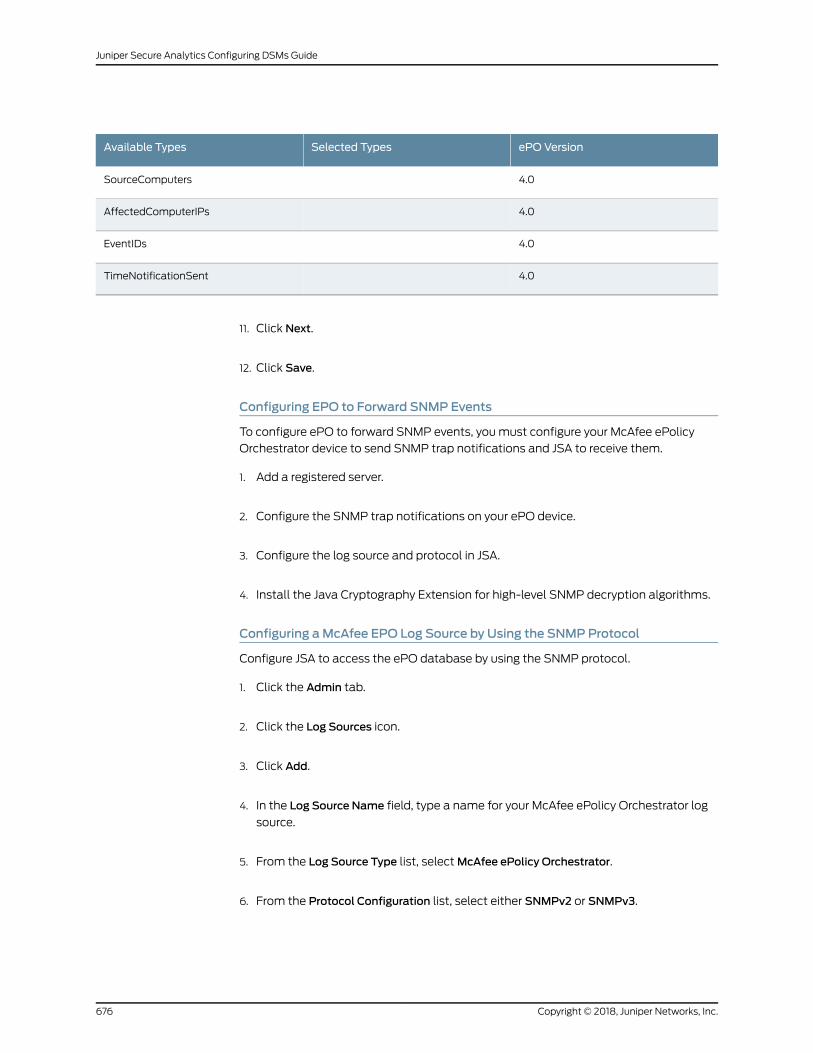
ePO VersionSelected TypesAvailable Types
4.0SourceComputers
4.0AffectedComputerIPs
4.0EventIDs
4.0TimeNotificationSent
11. Click Next.
12. Click Save.
Configuring EPO to Forward SNMP Events
To configure ePO to forward SNMP events, youmust configure your McAfee ePolicy
Orchestrator device to send SNMP trap notifications and JSA to receive them.
1. Add a registered server.
2. Configure the SNMP trap notifications on your ePO device.
3. Configure the log source and protocol in JSA.
4. Install the Java Cryptography Extension for high-level SNMP decryption algorithms.
Configuring aMcAfee EPO Log Source by Using the SNMPProtocol
Configure JSA to access the ePO database by using the SNMP protocol.
1. Click the Admin tab.
2. Click the Log Sources icon.
3. Click Add.
4. In the Log Source Name field, type a name for your McAfee ePolicy Orchestrator log
source.
5. From the Log Source Type list, selectMcAfee ePolicy Orchestrator.
6. From the Protocol Configuration list, select either SNMPv2 or SNMPv3.
Copyright © 2018, Juniper Networks, Inc.676
Juniper Secure Analytics Configuring DSMs Guide
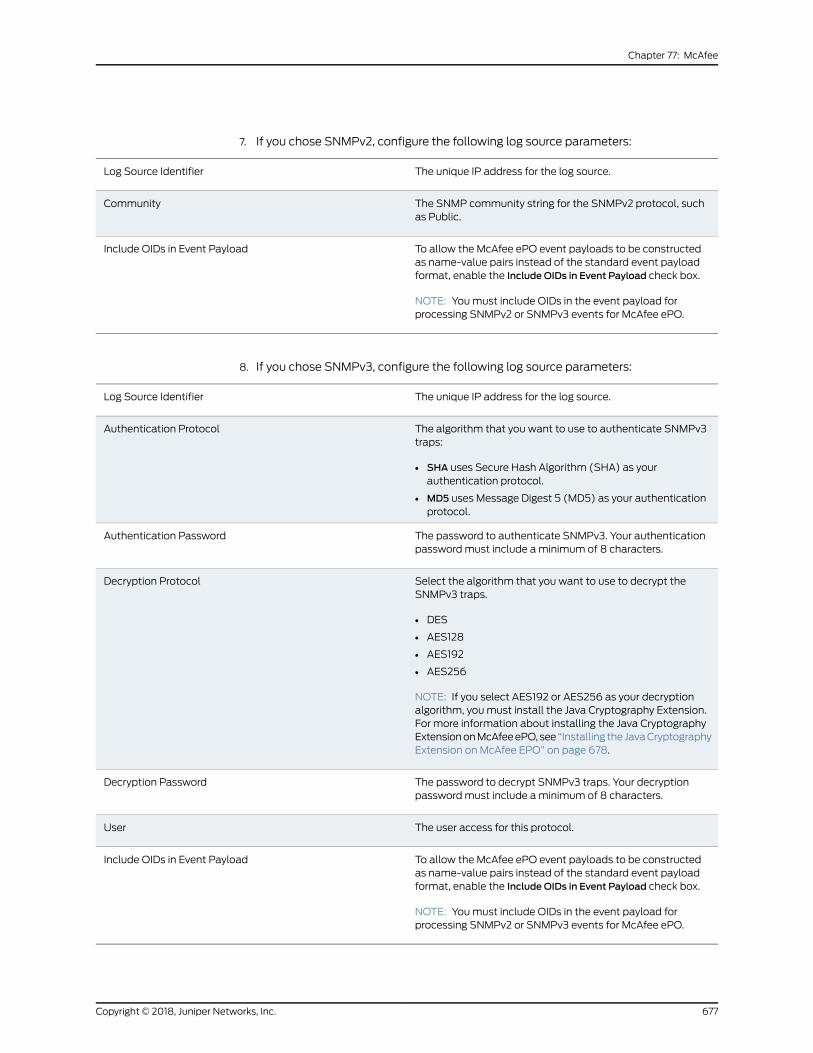
7. If you chose SNMPv2, configure the following log source parameters:
The unique IP address for the log source.Log Source Identifier
The SNMP community string for the SNMPv2 protocol, suchas Public.
Community
To allow the McAfee ePO event payloads to be constructedas name-value pairs instead of the standard event payloadformat, enable the Include OIDs in Event Payload check box.
NOTE: Youmust include OIDs in the event payload forprocessing SNMPv2 or SNMPv3 events for McAfee ePO.
Include OIDs in Event Payload
8. If you chose SNMPv3, configure the following log source parameters:
The unique IP address for the log source.Log Source Identifier
The algorithm that you want to use to authenticate SNMPv3traps:
• SHA uses Secure Hash Algorithm (SHA) as yourauthentication protocol.
• MD5 uses Message Digest 5 (MD5) as your authenticationprotocol.
Authentication Protocol
The password to authenticate SNMPv3. Your authenticationpasswordmust include aminimum of 8 characters.
Authentication Password
Select the algorithm that you want to use to decrypt theSNMPv3 traps.
• DES
• AES128
• AES192
• AES256
NOTE: If you select AES192 or AES256 as your decryptionalgorithm, youmust install the Java Cryptography Extension.For more information about installing the Java CryptographyExtensiononMcAfeeePO, see “Installing the JavaCryptographyExtension on McAfee EPO” on page 678.
Decryption Protocol
The password to decrypt SNMPv3 traps. Your decryptionpasswordmust include aminimum of 8 characters.
Decryption Password
The user access for this protocol.User
To allow the McAfee ePO event payloads to be constructedas name-value pairs instead of the standard event payloadformat, enable the Include OIDs in Event Payload check box.
NOTE: Youmust include OIDs in the event payload forprocessing SNMPv2 or SNMPv3 events for McAfee ePO.
Include OIDs in Event Payload
677Copyright © 2018, Juniper Networks, Inc.
Chapter 77: McAfee
9. Click Save.
10. On the Admin tab, click Deploy Changes.
Installing the Java Cryptography Extension onMcAfee EPO
The Java Cryptography Extension (JCE) is a Java framework that is required for JSA to
decrypt advanced cryptography algorithms for AES192 or AES256. The following
information describes how to install Oracle JCE on your McAfee ePO appliance.
1. Download the latest version of the JavaTM Cryptography Extension.
The JavaTM Cryptography Extension version must match the version of the Java
installed on your McAfee ePO appliance.
2. Copy the JCEcompressed file to the followingdirectoryonyourMcAfeeePOappliance:
<installation path to McAfee ePO>/jre/lib/security
Installing the Java Cryptography Extension on JSA
The Java Cryptography Extension (JCE) is a Java framework that is required for JSA to
decrypt advanced cryptography algorithms for AES192 or AES256. The following
information describes how to install Oracle JCE on your JSA appliance.
1. Download the latest version of the JavaTM Cryptography Extension.
The JavaTM Cryptography Extension version must match the version of the Java
installed on JSA.
2. Extract the JCE file.
The following Java archive (JAR) files are included in the JCE download:
• local_policy.jar
• US_export_policy.jar
3. Log in to your JSA Console or Event Collector as a root user.
4. Copy the JCE jar files to the following directory on your JSAConsole or Event Collector:
/usr/java/latest/jre/lib/
The JCE jar filesareonly copied to thesystemthat receives theAES192orAE256encrypted
files fromMcAfee ePolicy Orchestrator.
RelatedDocumentation
McAfee Firewall Enterprise on page 679•
• McAfee Intrushield on page 680
• McAfeeWeb Gateway on page 685
Copyright © 2018, Juniper Networks, Inc.678
Juniper Secure Analytics Configuring DSMs Guide
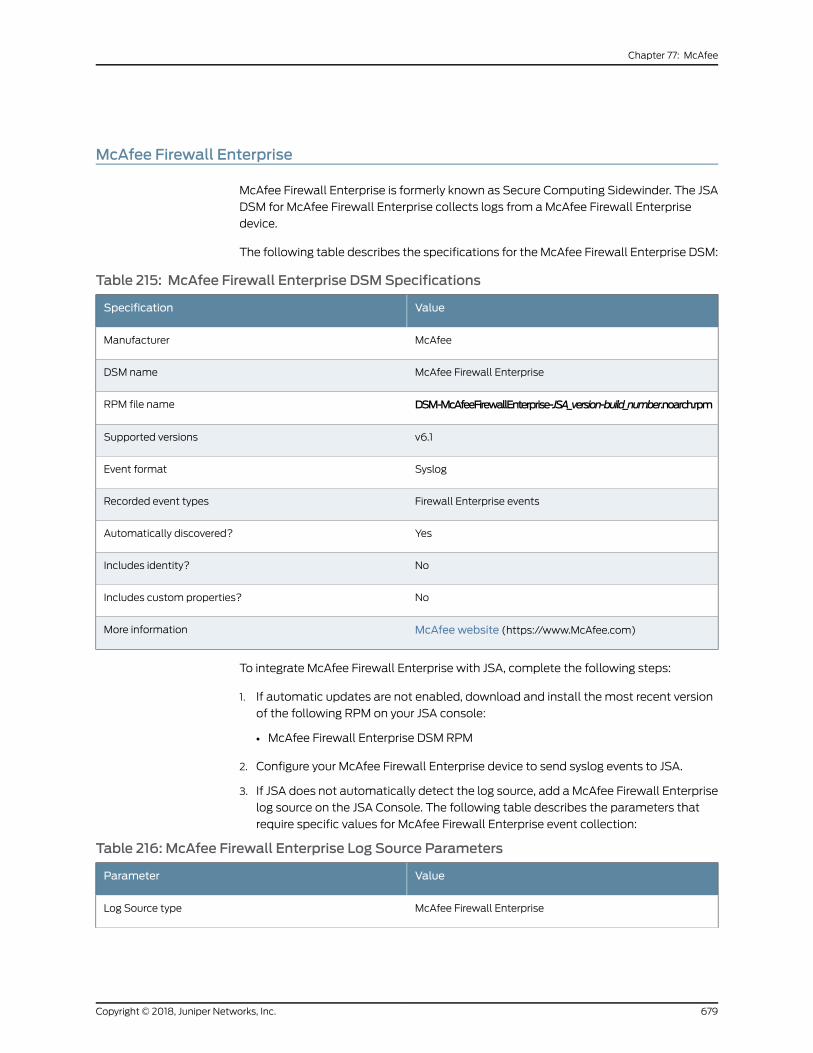
McAfee Firewall Enterprise
McAfee Firewall Enterprise is formerly known as Secure Computing Sidewinder. The JSA
DSM for McAfee Firewall Enterprise collects logs from aMcAfee Firewall Enterprise
device.
The following table describes the specifications for theMcAfee Firewall Enterprise DSM:
Table 215: McAfee Firewall Enterprise DSMSpecifications
ValueSpecification
McAfeeManufacturer
McAfee Firewall EnterpriseDSM name
DSM-McAfeeFirewallEnterprise-JSA_version-build_number.noarch.rpmRPM file name
v6.1Supported versions
SyslogEvent format
Firewall Enterprise eventsRecorded event types
YesAutomatically discovered?
NoIncludes identity?
NoIncludes custom properties?
McAfee website (https://www.McAfee.com)More information
To integrate McAfee Firewall Enterprise with JSA, complete the following steps:
1. If automatic updates are not enabled, download and install the most recent version
of the following RPM on your JSA console:
• McAfee Firewall Enterprise DSM RPM
2. Configure your McAfee Firewall Enterprise device to send syslog events to JSA.
3. If JSA does not automatically detect the log source, add aMcAfee Firewall Enterprise
log source on the JSA Console. The following table describes the parameters that
require specific values for McAfee Firewall Enterprise event collection:
Table 216: McAfee Firewall Enterprise Log Source Parameters
ValueParameter
McAfee Firewall EnterpriseLog Source type
679Copyright © 2018, Juniper Networks, Inc.
Chapter 77: McAfee
Table 216: McAfee Firewall Enterprise Log Source Parameters (continued)
ValueParameter
SyslogProtocol Configuration
• Configuring McAfee Firewall Enterprise to Communicate with JSA on page 680
ConfiguringMcAfee Firewall Enterprise to Communicate with JSA
The JSA DSM for McAfee Firewall Enterprise collects events by using syslog.
Before youconfigure JSA to integratewithaFirewall Enterprisedevice, youmust configure
syslog within your McAfee Firewall Enterprise device. When you configure the McAfee
Firewall Enterprise device to forward syslog events to JSA, export the logs in Sidewinder
Export Format (SEF).
1. See your vendor documentation for information about configuring McAfee Firewall
Enterprise.
After you configure syslog to forward events to JSA, you are ready to configure the log
source in JSA.
RelatedDocumentation
McAfee Intrushield on page 680•
• McAfeeWeb Gateway on page 685
• McAfee EPolicy Orchestrator on page 670
McAfee Intrushield
A JSAMcAfee Intrushield DSM accepts events that use syslog. JSA records all relevant
events.
Before you configure JSA to integrate with a McAfee Intrushield device, youmust select
your McAfee Intrushield version.
• Tocollect alert events fromMcAfee IntrushieldV2.x -V5.x, see “ConfiguringAlert Events
for McAfee Intrushield V2.x - V5.x” on page 681.
• Tocollect alert events fromMcAfee IntrushieldV6.x -V7.x, see “ConfiguringAlert Events
for McAfee Intrushield V6.x and V7.x” on page 682.
• Tocollect fault notificationevents fromMcAfee IntrushieldV6.x -V7.x, see “Configuring
Fault Notification Events for McAfee Intrushield V6.x and V7.x” on page 684.
• Configuring Alert Events for McAfee Intrushield V2.x - V5.x on page 681
• Configuring Alert Events for McAfee Intrushield V6.x and V7.x on page 682
• Configuring Fault Notification Events forMcAfee Intrushield V6.x andV7.x on page684
Copyright © 2018, Juniper Networks, Inc.680
Juniper Secure Analytics Configuring DSMs Guide
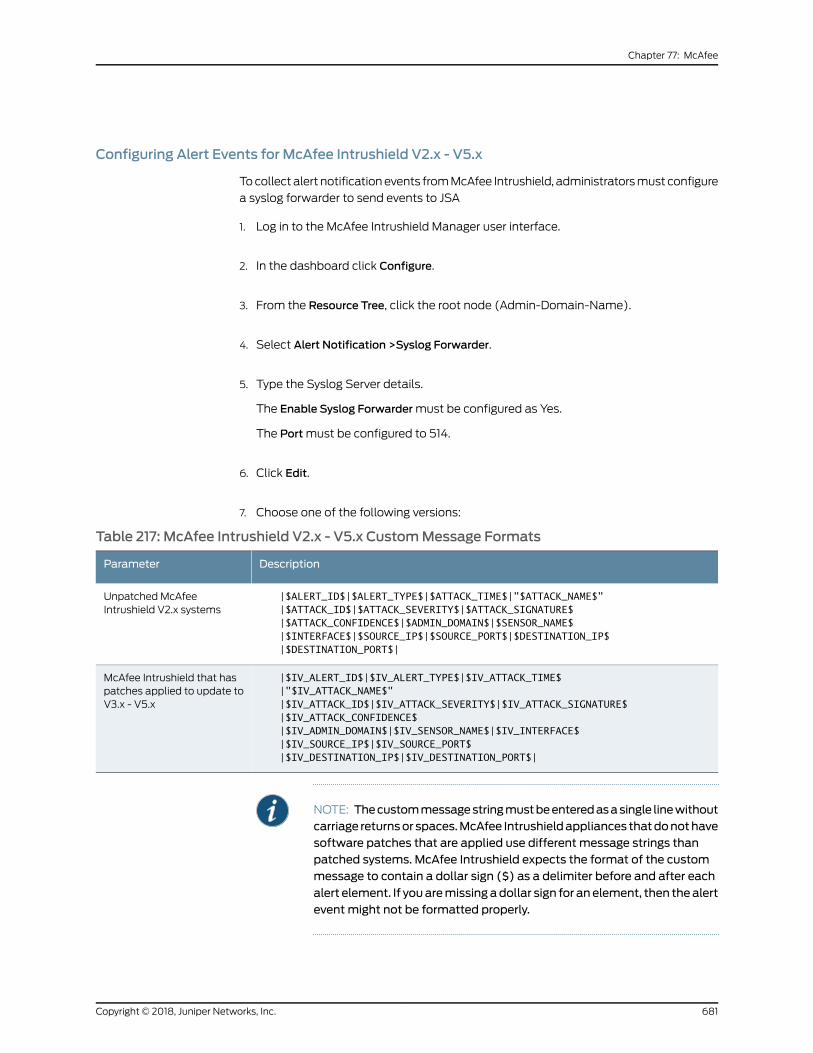
Configuring Alert Events for McAfee Intrushield V2.x - V5.x
Tocollect alert notificationevents fromMcAfee Intrushield, administratorsmust configure
a syslog forwarder to send events to JSA
1. Log in to the McAfee Intrushield Manager user interface.
2. In the dashboard click Configure.
3. From the Resource Tree, click the root node (Admin-Domain-Name).
4. Select Alert Notification >Syslog Forwarder.
5. Type the Syslog Server details.
The Enable Syslog Forwardermust be configured as Yes.
The Portmust be configured to 514.
6. Click Edit.
7. Choose one of the following versions:
Table 217: McAfee Intrushield V2.x - V5.x CustomMessage Formats
DescriptionParameter
|$ALERT_ID$|$ALERT_TYPE$|$ATTACK_TIME$|"$ATTACK_NAME$"|$ATTACK_ID$|$ATTACK_SEVERITY$|$ATTACK_SIGNATURE$|$ATTACK_CONFIDENCE$|$ADMIN_DOMAIN$|$SENSOR_NAME$|$INTERFACE$|$SOURCE_IP$|$SOURCE_PORT$|$DESTINATION_IP$|$DESTINATION_PORT$|
Unpatched McAfeeIntrushield V2.x systems
|$IV_ALERT_ID$|$IV_ALERT_TYPE$|$IV_ATTACK_TIME$|"$IV_ATTACK_NAME$"|$IV_ATTACK_ID$|$IV_ATTACK_SEVERITY$|$IV_ATTACK_SIGNATURE$|$IV_ATTACK_CONFIDENCE$|$IV_ADMIN_DOMAIN$|$IV_SENSOR_NAME$|$IV_INTERFACE$|$IV_SOURCE_IP$|$IV_SOURCE_PORT$|$IV_DESTINATION_IP$|$IV_DESTINATION_PORT$|
McAfee Intrushield that haspatches applied to update toV3.x - V5.x
NOTE: Thecustommessagestringmustbeenteredasasingle linewithoutcarriage returnsor spaces.McAfee Intrushieldappliances thatdonothavesoftware patches that are applied use different message strings thanpatched systems. McAfee Intrushield expects the format of the custommessage to contain a dollar sign ($) as a delimiter before and after each
alert element. If youaremissingadollar sign for anelement, then thealertevent might not be formatted properly.
681Copyright © 2018, Juniper Networks, Inc.
Chapter 77: McAfee
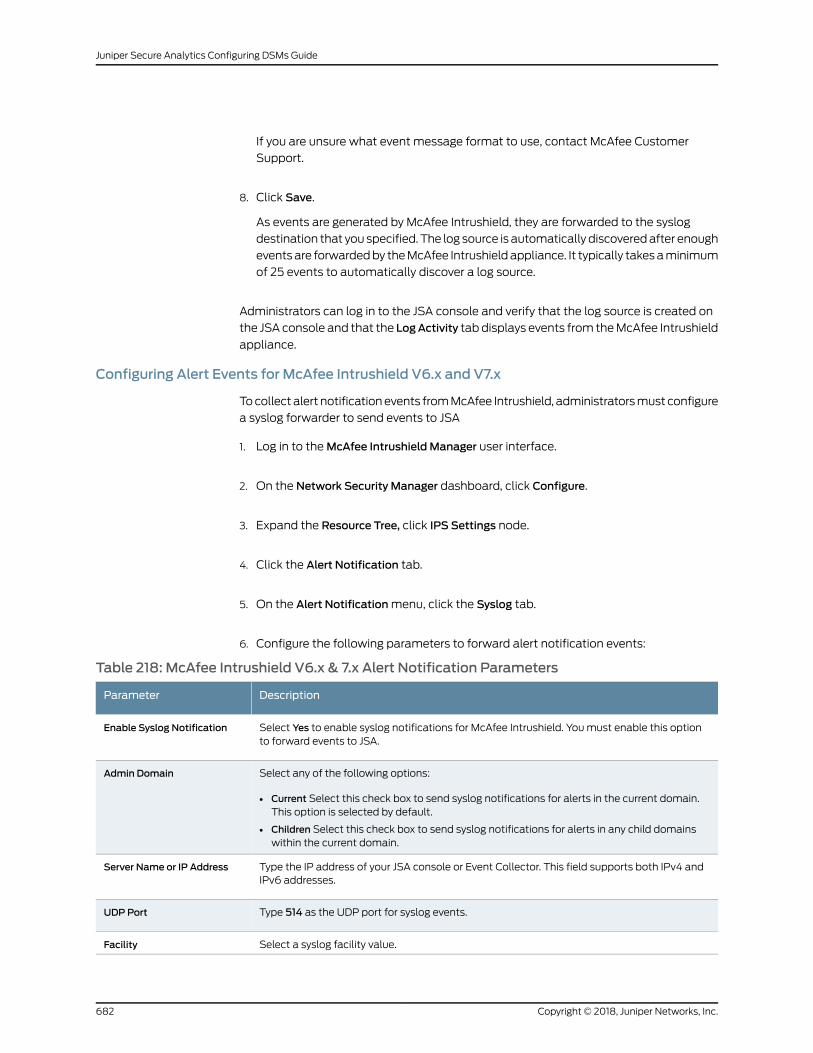
If you are unsure what event message format to use, contact McAfee Customer
Support.
8. Click Save.
As events are generated by McAfee Intrushield, they are forwarded to the syslog
destination that you specified. The log source is automatically discoveredafter enough
eventsare forwardedby theMcAfee Intrushieldappliance. It typically takesaminimum
of 25 events to automatically discover a log source.
Administrators can log in to the JSA console and verify that the log source is created on
the JSA console and that the LogActivity tab displays events from theMcAfee Intrushield
appliance.
Configuring Alert Events for McAfee Intrushield V6.x and V7.x
Tocollect alert notificationevents fromMcAfee Intrushield, administratorsmust configure
a syslog forwarder to send events to JSA
1. Log in to theMcAfee Intrushield Manager user interface.
2. On the Network Security Manager dashboard, click Configure.
3. Expand the Resource Tree, click IPS Settings node.
4. Click the Alert Notification tab.
5. On the Alert Notificationmenu, click the Syslog tab.
6. Configure the following parameters to forward alert notification events:
Table 218: McAfee Intrushield V6.x & 7.x Alert Notification Parameters
DescriptionParameter
Select Yes to enable syslog notifications for McAfee Intrushield. Youmust enable this optionto forward events to JSA.
Enable Syslog Notification
Select any of the following options:
• Current Select this check box to send syslog notifications for alerts in the current domain.This option is selected by default.
• Children Select this check box to send syslog notifications for alerts in any child domainswithin the current domain.
Admin Domain
Type the IP address of your JSA console or Event Collector. This field supports both IPv4 andIPv6 addresses.
Server Name or IP Address
Type 514 as the UDP port for syslog events.UDP Port
Select a syslog facility value.Facility
Copyright © 2018, Juniper Networks, Inc.682
Juniper Secure Analytics Configuring DSMs Guide
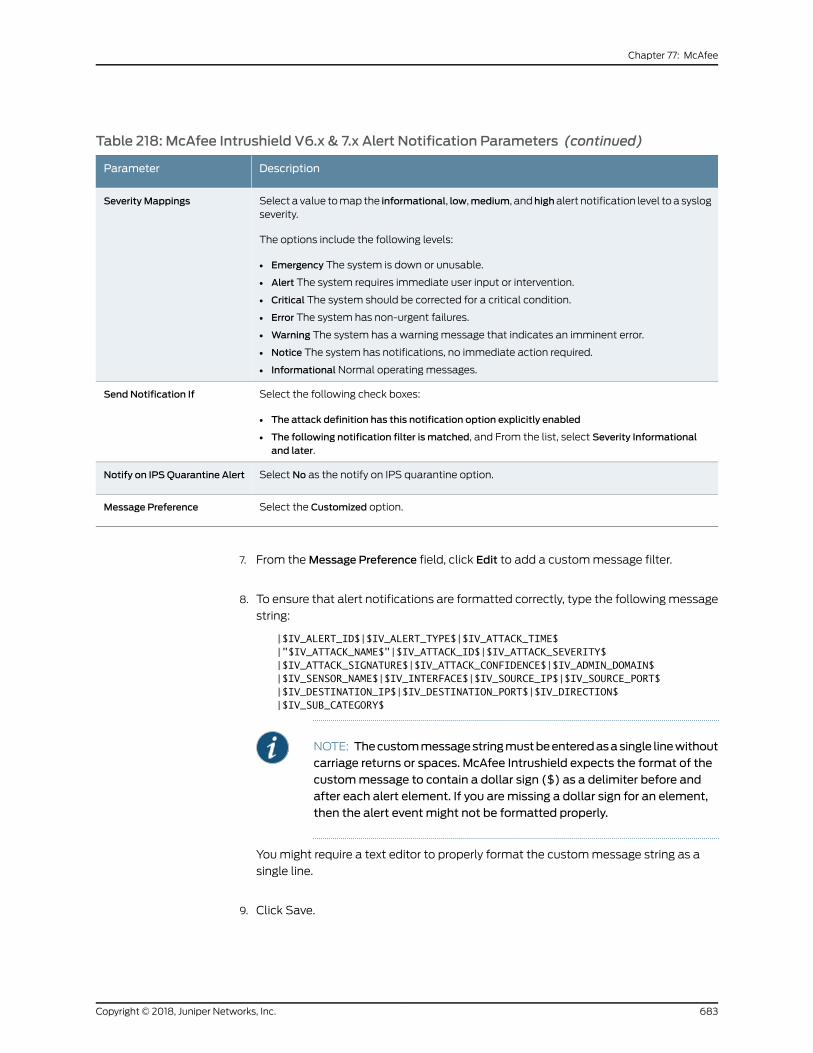
Table 218: McAfee Intrushield V6.x & 7.x Alert Notification Parameters (continued)
DescriptionParameter
Select a value tomap the informational, low,medium, andhighalert notification level toa syslogseverity.
The options include the following levels:
• Emergency The system is down or unusable.
• Alert The system requires immediate user input or intervention.
• Critical The system should be corrected for a critical condition.
• Error The system has non-urgent failures.
• Warning The system has a warning message that indicates an imminent error.
• Notice The system has notifications, no immediate action required.
• Informational Normal operating messages.
Severity Mappings
Select the following check boxes:
• The attack definition has this notification option explicitly enabled
• The following notification filter is matched, and From the list, select Severity Informationaland later.
Send Notification If
Select No as the notify on IPS quarantine option.Notify on IPSQuarantine Alert
Select the Customized option.Message Preference
7. From theMessage Preference field, click Edit to add a custommessage filter.
8. To ensure that alert notifications are formatted correctly, type the followingmessage
string:
|$IV_ALERT_ID$|$IV_ALERT_TYPE$|$IV_ATTACK_TIME$|"$IV_ATTACK_NAME$"|$IV_ATTACK_ID$|$IV_ATTACK_SEVERITY$|$IV_ATTACK_SIGNATURE$|$IV_ATTACK_CONFIDENCE$|$IV_ADMIN_DOMAIN$|$IV_SENSOR_NAME$|$IV_INTERFACE$|$IV_SOURCE_IP$|$IV_SOURCE_PORT$|$IV_DESTINATION_IP$|$IV_DESTINATION_PORT$|$IV_DIRECTION$|$IV_SUB_CATEGORY$
NOTE: Thecustommessagestringmustbeenteredasasingle linewithoutcarriage returns or spaces. McAfee Intrushield expects the format of thecustommessage to contain a dollar sign ($) as a delimiter before andafter each alert element. If you aremissing a dollar sign for an element,then the alert event might not be formatted properly.
Youmight require a text editor to properly format the custommessage string as a
single line.
9. Click Save.
683Copyright © 2018, Juniper Networks, Inc.
Chapter 77: McAfee
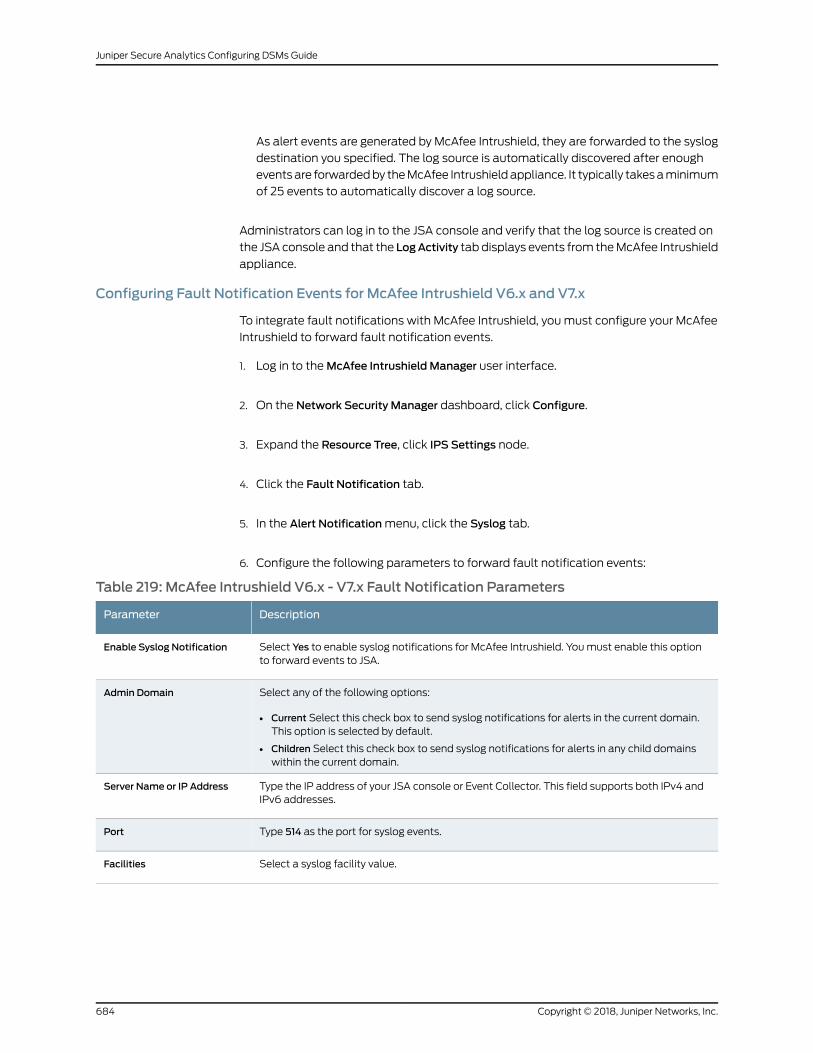
As alert events are generated by McAfee Intrushield, they are forwarded to the syslog
destination you specified. The log source is automatically discovered after enough
eventsare forwardedby theMcAfee Intrushieldappliance. It typically takesaminimum
of 25 events to automatically discover a log source.
Administrators can log in to the JSA console and verify that the log source is created on
the JSA console and that the LogActivity tab displays events from theMcAfee Intrushield
appliance.
Configuring Fault Notification Events for McAfee Intrushield V6.x and V7.x
To integrate fault notifications with McAfee Intrushield, youmust configure your McAfee
Intrushield to forward fault notification events.
1. Log in to theMcAfee Intrushield Manager user interface.
2. On the Network Security Manager dashboard, click Configure.
3. Expand the Resource Tree, click IPS Settings node.
4. Click the Fault Notification tab.
5. In the Alert Notificationmenu, click the Syslog tab.
6. Configure the following parameters to forward fault notification events:
Table 219: McAfee Intrushield V6.x - V7.x Fault Notification Parameters
DescriptionParameter
Select Yes to enable syslog notifications for McAfee Intrushield. Youmust enable this optionto forward events to JSA.
Enable Syslog Notification
Select any of the following options:
• Current Select this check box to send syslog notifications for alerts in the current domain.This option is selected by default.
• Children Select this check box to send syslog notifications for alerts in any child domainswithin the current domain.
Admin Domain
Type the IP address of your JSA console or Event Collector. This field supports both IPv4 andIPv6 addresses.
Server Name or IP Address
Type 514 as the port for syslog events.Port
Select a syslog facility value.Facilities
Copyright © 2018, Juniper Networks, Inc.684
Juniper Secure Analytics Configuring DSMs Guide
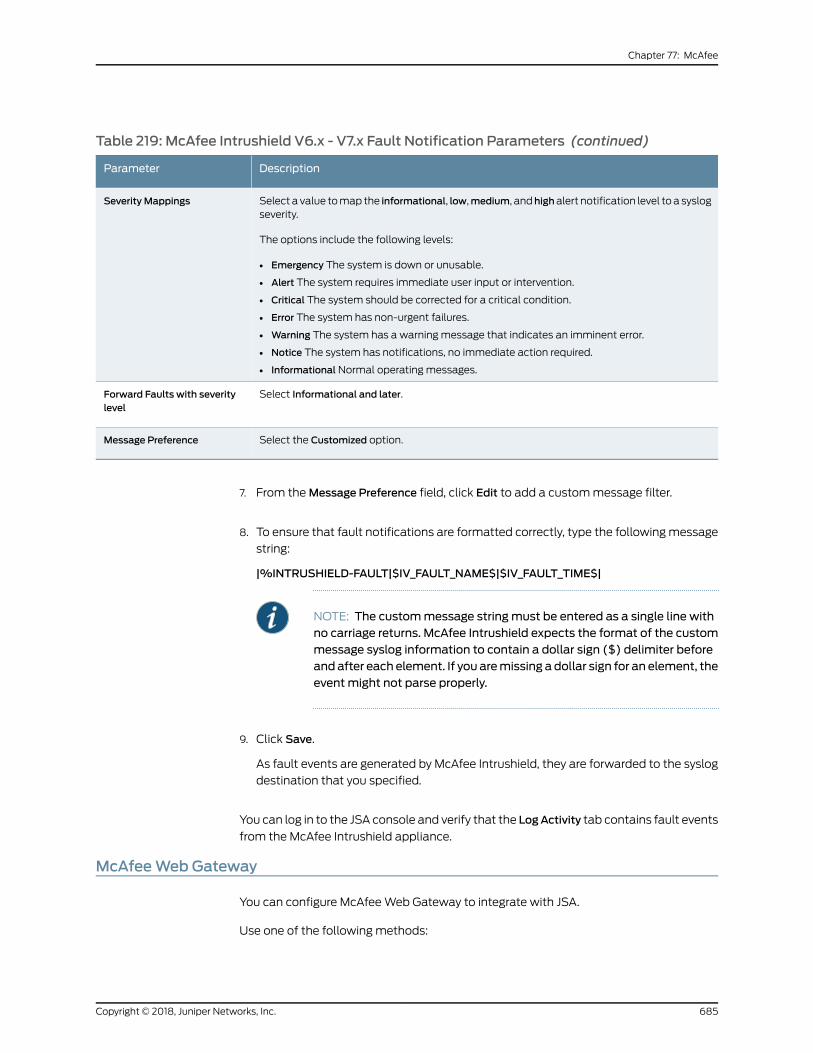
Table 219: McAfee Intrushield V6.x - V7.x Fault Notification Parameters (continued)
DescriptionParameter
Select a value tomap the informational, low,medium, andhighalert notification level toa syslogseverity.
The options include the following levels:
• Emergency The system is down or unusable.
• Alert The system requires immediate user input or intervention.
• Critical The system should be corrected for a critical condition.
• Error The system has non-urgent failures.
• Warning The system has a warning message that indicates an imminent error.
• Notice The system has notifications, no immediate action required.
• Informational Normal operating messages.
Severity Mappings
Select Informational and later.Forward Faults with severitylevel
Select the Customized option.Message Preference
7. From theMessage Preference field, click Edit to add a custommessage filter.
8. To ensure that fault notifications are formatted correctly, type the followingmessage
string:
|%INTRUSHIELD-FAULT|$IV_FAULT_NAME$|$IV_FAULT_TIME$|
NOTE: The custommessage stringmust be entered as a single line withno carriage returns. McAfee Intrushield expects the format of the custommessage syslog information to contain a dollar sign ($) delimiter beforeandafter each element. If you aremissing adollar sign for an element, theevent might not parse properly.
9. Click Save.
As fault events are generated by McAfee Intrushield, they are forwarded to the syslog
destination that you specified.
You can log in to the JSA console and verify that the LogActivity tab contains fault events
from the McAfee Intrushield appliance.
McAfeeWeb Gateway
You can configure McAfeeWeb Gateway to integrate with JSA.
Use one of the following methods:
685Copyright © 2018, Juniper Networks, Inc.
Chapter 77: McAfee
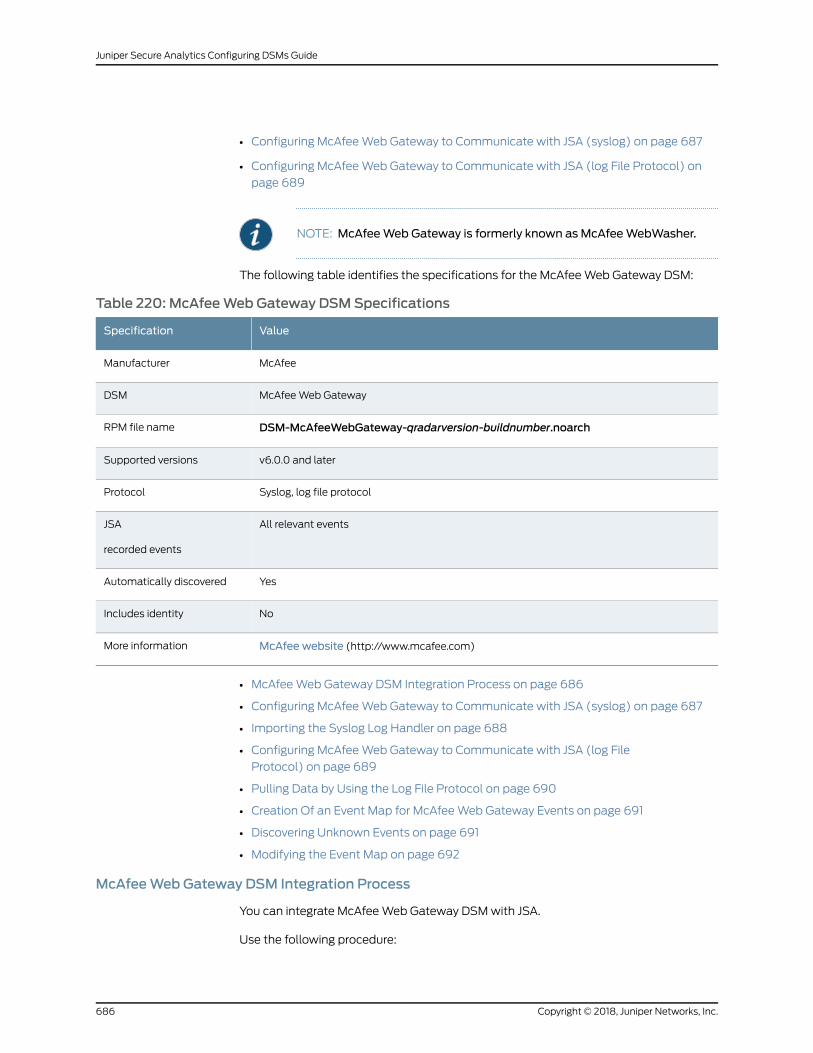
• Configuring McAfeeWeb Gateway to Communicate with JSA (syslog) on page 687
• Configuring McAfeeWeb Gateway to Communicate with JSA (log File Protocol) on
page 689
NOTE: McAfeeWeb Gateway is formerly known as McAfeeWebWasher.
The following table identifies the specifications for the McAfeeWeb Gateway DSM:
Table 220: McAfeeWeb Gateway DSMSpecifications
ValueSpecification
McAfeeManufacturer
McAfeeWeb GatewayDSM
DSM-McAfeeWebGateway-qradarversion-buildnumber.noarchRPM file name
v6.0.0 and laterSupported versions
Syslog, log file protocolProtocol
All relevant eventsJSA
recorded events
YesAutomatically discovered
NoIncludes identity
McAfee website (http://www.mcafee.com)More information
• McAfeeWeb Gateway DSM Integration Process on page 686
• Configuring McAfeeWeb Gateway to Communicate with JSA (syslog) on page 687
• Importing the Syslog Log Handler on page 688
• Configuring McAfeeWeb Gateway to Communicate with JSA (log File
Protocol) on page 689
• Pulling Data by Using the Log File Protocol on page 690
• Creation Of an Event Map for McAfeeWeb Gateway Events on page 691
• Discovering Unknown Events on page 691
• Modifying the Event Map on page 692
McAfeeWeb Gateway DSM Integration Process
You can integrate McAfeeWeb Gateway DSMwith JSA.
Use the following procedure:
Copyright © 2018, Juniper Networks, Inc.686
Juniper Secure Analytics Configuring DSMs Guide
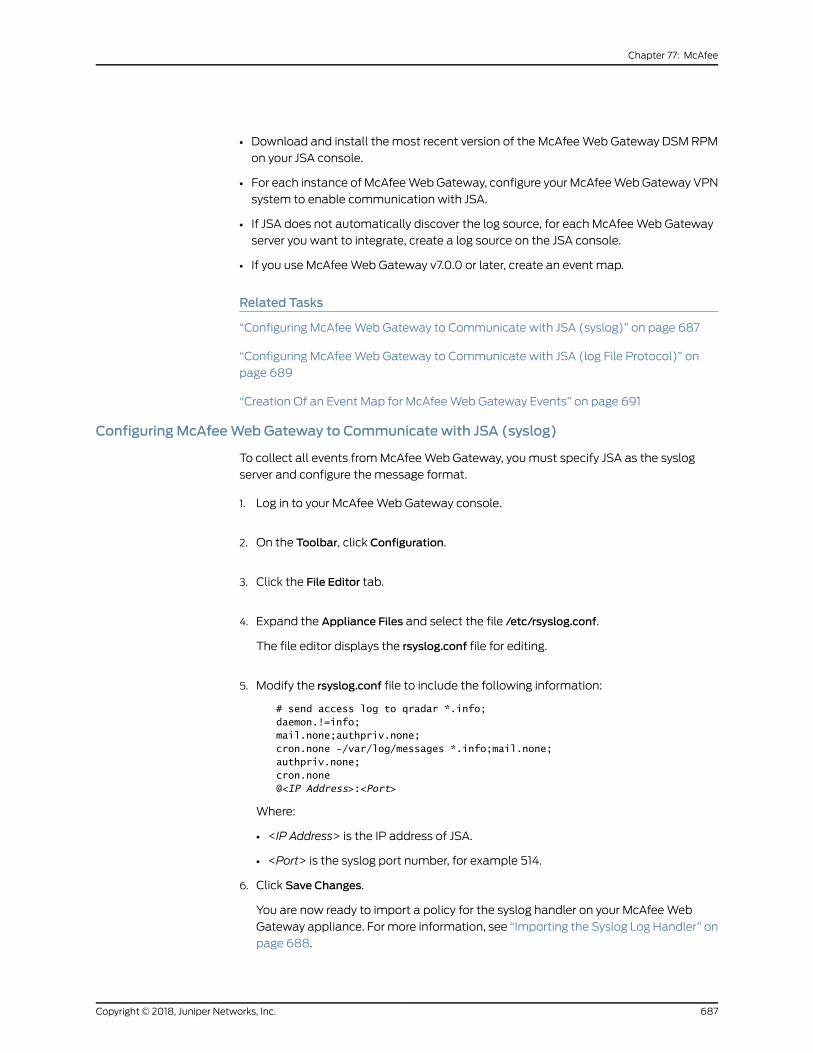
• Download and install the most recent version of the McAfeeWeb Gateway DSM RPM
on your JSA console.
• For each instance of McAfeeWebGateway, configure your McAfeeWebGateway VPN
system to enable communication with JSA.
• If JSA does not automatically discover the log source, for each McAfeeWeb Gateway
server you want to integrate, create a log source on the JSA console.
• If you use McAfeeWeb Gateway v7.0.0 or later, create an event map.
Related Tasks
“Configuring McAfeeWeb Gateway to Communicate with JSA (syslog)” on page 687
“Configuring McAfeeWeb Gateway to Communicate with JSA (log File Protocol)” on
page 689
“Creation Of an Event Map for McAfeeWeb Gateway Events” on page 691
ConfiguringMcAfeeWeb Gateway to Communicate with JSA (syslog)
To collect all events fromMcAfeeWeb Gateway, youmust specify JSA as the syslog
server and configure the message format.
1. Log in to your McAfeeWeb Gateway console.
2. On the Toolbar, click Configuration.
3. Click the File Editor tab.
4. Expand the Appliance Files and select the file /etc/rsyslog.conf.
The file editor displays the rsyslog.conf file for editing.
5. Modify the rsyslog.conf file to include the following information:
# send access log to qradar *.info;daemon.!=info;mail.none;authpriv.none;cron.none -/var/log/messages *.info;mail.none;authpriv.none;cron.none @<IP Address>:<Port>
Where:
• <IP Address> is the IP address of JSA.
• <Port> is the syslog port number, for example 514.
6. Click Save Changes.
You are now ready to import a policy for the syslog handler on your McAfeeWeb
Gateway appliance. Formore information, see “Importing the Syslog Log Handler” on
page 688.
687Copyright © 2018, Juniper Networks, Inc.
Chapter 77: McAfee
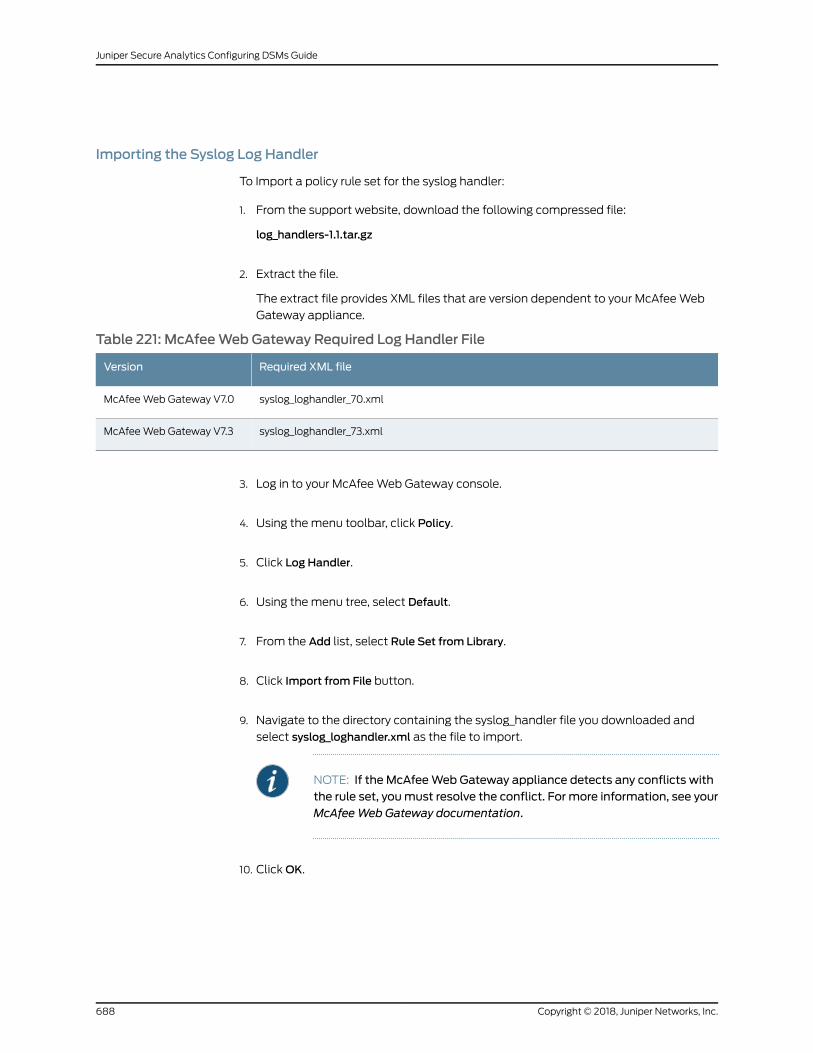
Importing the Syslog Log Handler
To Import a policy rule set for the syslog handler:
1. From the support website, download the following compressed file:
log_handlers-1.1.tar.gz
2. Extract the file.
The extract file provides XML files that are version dependent to your McAfeeWeb
Gateway appliance.
Table 221: McAfeeWeb Gateway Required Log Handler File
Required XML fileVersion
syslog_loghandler_70.xmlMcAfeeWeb Gateway V7.0
syslog_loghandler_73.xmlMcAfeeWeb Gateway V7.3
3. Log in to your McAfeeWeb Gateway console.
4. Using the menu toolbar, click Policy.
5. Click Log Handler.
6. Using the menu tree, select Default.
7. From the Add list, select Rule Set from Library.
8. Click Import from File button.
9. Navigate to the directory containing the syslog_handler file you downloaded and
select syslog_loghandler.xml as the file to import.
NOTE: If the McAfeeWeb Gateway appliance detects any conflicts withthe rule set, youmust resolve the conflict. For more information, see yourMcAfeeWeb Gateway documentation.
10. ClickOK.
Copyright © 2018, Juniper Networks, Inc.688
Juniper Secure Analytics Configuring DSMs Guide
11. Click Save Changes.
12. You are now ready to configure the log source in JSA.
JSA automatically discovers syslog events from aMcAfeeWeb Gateway appliance.
If you want to manually configure JSA to receive syslog events, select McAfeeWeb
Gateway from the Log Source Type list.
ConfiguringMcAfeeWeb Gateway to Communicate with JSA (log File Protocol)
The McAfeeWeb Gateway appliance gives the option to forward event log files to an
interim file server for retrieval by JSA.
1. From the support website, download the following file:
log_handlers-1.1.tar.gz
2. Extract the file.
This gives you the access handler file that is needed to configure your McAfeeWeb
Gateway appliance.
access_log_file_loghandler.xml
3. Log in to your McAfeeWeb Gateway console.
4. Using the menu toolbar, click Policy.
NOTE: If there is an existing access log configuration in your McAfeeWebGateway appliance, youmust delete the existing access log from theRule
Set Library before you add the access_log_file_loghandler.xml.
5. Click Log Handler.
6. Using the menu tree, select Default.
7. From the Add list, select Rule Set from Library.
8. Click Import from File button.
9. Navigate to the directory that contains the access_log_file_loghandler.xml file you
downloaded and select syslog_loghandler.xml as the file to import.
When the rule set is imported for access_log_file_loghandler.xml, a conflict can occur
stating the Access Log Configuration exists already in the current configuration and
a conflict solution is presented.
689Copyright © 2018, Juniper Networks, Inc.
Chapter 77: McAfee
10. If the McAfeeWeb Gateway appliance detects that the Access Log Configuration
exists already, select the Conflict Solution: Change name option that is presented to
resolve the rule set conflict.
For more information on resolving conflicts, see yourMcAfeeWeb Gateway vendor
documentation.
Youmust configure your access.log file to be pushed to an interim server on an auto
rotation. It does not matter if you push your files to the interim server based on time
or size for your access.log file. For more information on auto rotation, see yourMcAfee
Web Gateway vendor documentation.
NOTE: Due to the sizeofaccess.log files that aregenerated, it is suggested
that you select the option GZIP files after rotation in your McAfeeWeb
Gate appliance.
11. ClickOK.
12. Click Save Changes.
NOTE: BydefaultMcAfeeWebGateway is configured towrite access logsto the /opt/mwg/log/user-defined-logs/access.log/ directory.
Youare now ready to configure JSA to receive access.log files fromMcAfeeWebGateway.
For more information, see “Pulling Data by Using the Log File Protocol” on page 690.
Pulling Data by Using the Log File Protocol
A log file protocol source allows JSA to retrieve archived log files from a remote host.
The McAfeeWeb Gateway DSM supports the bulk loading of access.log files by using
the log file protocol source. The default directory for the McAfeeWeb Gateway access
logs is the /opt/mwg/log/user-defined-logs/access.log/ directory.
You can now configure the log source and protocol in JSA.
1. To configure JSA to receive events from aMcAfeeWeb Gateway appliance, select
McAfeeWeb Gateway from the Log Source Type list.
2. To configure the protocol, you must select the Log File option from the Protocol
Configuration list.
3. To configure the FilePatternparameter, youmust type a regex string for the access.log
file, such as access[0-9]+\.log.
Copyright © 2018, Juniper Networks, Inc.690
Juniper Secure Analytics Configuring DSMs Guide
NOTE: If you selected to GZIP your access.log files, youmust type
access[0-9]+\.log\.gz for the FIle Pattern field and from the Processor
list, select GZIP.
Creation Of an Event Map for McAfeeWeb Gateway Events
Event mapping is required for all events that are collected fromMcAfeeWeb Gateway
v7.0.0 and later.
You can individuallymap each event for your device to an event category in JSA.Mapping
events allows JSA to identify, coalesce, and track recurring events from your network
devices. Until you map an event, some events that are displayed in the Log Activity tab
forMcAfeeWebGatewayarecategorizedasUnknown, andsomeeventsmightbealready
assigned to an existingQIDmap. Unknownevents are easily identified as the EventName
column and Low Level Category columns display Unknown.
Discovering Unknown Events
This procedure ensures that youmap all event types and that you do not miss events
that are not generated frequently, repeat this procedure several times over a period.
1. Log in to JSA.
2. Click the Log Activity tab.
3. Click Add Filter.
4. From the first list, select Log Source.
5. From the Log Source Group list, select the log source group orOther.
Log sources that are not assigned to a group are categorized asOther.
6. From the Log Source list, select your McAfeeWeb Gateway log source.
7. Click Add Filter.
The Log Activity tab is displayed with a filter for your log source.
8. From the View list, select Last Hour.
Any events that are generated by the McAfeeWeb Gateway DSM in the last hour are
displayed. Events that are displayed as Unknown in the Event Name column or Low
Level Category column require event mapping.
691Copyright © 2018, Juniper Networks, Inc.
Chapter 77: McAfee
NOTE: You can save your existing search filter by clicking Save Criteria.
You are now ready to modify the event map.
Modifying the Event Map
Modify an event map tomanually categorize events to a JSA Identifier (QID) map.
Any event that is categorized to a log source can be remapped to a new JSA Identifier
(QID).
NOTE: Events that do not have a defined log source cannot bemapped toanevent. Eventswithouta logsourcedisplaySIMGenericLog in theLogSource
column.
1. OntheEventName column, double-click anunknownevent forMcAfeeWebGateway.
The detailed event information is displayed.
2. ClickMap Event.
3. From the Browse for JSA Identifier pane, select any of the following search options to
narrow the event categories for a JSA Identifier (QID):
• From the High-Level Category list, select a high-level event categorization.
• From the Low-Level Category list, select a low-level event categorization.
• From the Log Source Type list, select a log source type.
The Log Source Type list gives the option to search for QIDs from other log sources.
Searching for QIDs by log source is useful when events are similar to another existing
network device. For example,McAfeeWebGateway provides policy events, youmight
select another product that likely captures similar events.
To search for a QID by name, type a name in theQID/Name field.
TheQID/Name field gives the option to filter the full list of QIDs for a specific word,
for example, policy.
4. Click Search.
A list of QIDs are displayed.
5. Select the QID that you want to associate to your unknown event.
6. ClickOK.
Copyright © 2018, Juniper Networks, Inc.692
Juniper Secure Analytics Configuring DSMs Guide

JSAmaps any additional events that are forwarded from your device with the same
QID that matches the event payload. The event count increases each time that the
event is identified by JSA.
If youupdateaneventwithanewJSA Identifier (QID)map, past events that are stored
in JSA are not updated. Only new events are categorized with the newQID.
693Copyright © 2018, Juniper Networks, Inc.
Chapter 77: McAfee

Copyright © 2018, Juniper Networks, Inc.694
Juniper Secure Analytics Configuring DSMs Guide

CHAPTER 78
MetaInfo MetaIP
• MetaInfo MetaIP on page 695
MetaInfoMetaIP
The MetaInfo MetaIP DSM for JSA accepts MetaIP events by using syslog.
JSA records all relevant and available information from the event. Before you configure
a MetaIP device in JSA, youmust configure your device to forward syslog events. For
information on configuring your MetaInfo MetaIP appliance, see your vendor
documentation.
After youconfigure yourMetaInfoMetaIPappliance, the configuration for JSA is complete.
JSAautomatically discovers andcreatesa log source for syslogevents that are forwarded
fromMetaInfo MetaIP appliances. However, you canmanually create a log source for
JSA to receive syslog events. The following configuration steps are optional.
To manually configure a log source for MetaInfo MetaIP:
1. Log in to JSA.
2. Click the Admin tab.
3. On the navigation menu, click Data Sources.
The Data Sources pane is displayed.
4. Click the Log Sources icon.
The Log Sourceswindow is displayed.
5. Click Add.
The Add a log sourcewindow is displayed.
6. In the Log Source Name field, type a name for your log source.
7. In the Log Source Description field, type a description for the log source.
695Copyright © 2018, Juniper Networks, Inc.

8. From the Log Source Type list, selectMetainfoMetaIP.
9. Using the Protocol Configuration list, select Syslog.
The syslog protocol configuration is displayed.
10. Configure the following values:
Table 222: Syslog Parameters
DescriptionParameter
Type the IPaddressor host name for the log sourceasan identifier for events fromyourMetaInfoMetaIP appliances.
Log Source Identifier
11. Click Save.
12. On the Admin tab, click Deploy Changes.
The configuration is complete.
Copyright © 2018, Juniper Networks, Inc.696
Juniper Secure Analytics Configuring DSMs Guide
CHAPTER 79
Microsoft
• Microsoft on page 697
• Microsoft DHCP Server on page 697
• Microsoft Endpoint Protection on page 698
• Microsoft SQL Server on page 703
• Microsoft Exchange Server on page 708
• Microsoft Hyper-V on page 715
• Microsoft IAS Server on page 716
• Microsoft IIS Server on page 717
• Microsoft ISA on page 724
• Microsoft Office 365 on page 725
• Microsoft Operations Manager on page 730
• Microsoft SharePoint on page 733
• Microsoft System Center Operations Manager on page 741
• Microsoft Windows Security Event Log on page 744
Microsoft
JSA supports a range of Microsoft products.
Microsoft DHCP Server
The Microsoft DHCP Server DSM for JSA accepts DHCP events by using the Microsoft
DHCP Server protocol or WinCollect.
Before you can integrate your Microsoft DHCP Server with JSA, youmust enable audit
logging.
To configure the Microsoft DHCP Server:
1. Log in to the DHCP Server Administration Tool.
2. From the DHCP Administration Tool, right-click on the DHCP server and select
Properties.
697Copyright © 2018, Juniper Networks, Inc.
The Propertieswindow is displayed.
3. Click the General tab.
The General pane is displayed.
4. Click Enable DHCP Audit Logging.
The audit log file is created at midnight andmust contain a three-character day of
the week abbreviation.
Table 223: Microsoft DHCP Log File Examples
ExampleLog Type
DhcpSrvLog-Mon.logIPv4
DhcpV6SrvLog-Wed.logIPv6
By default Microsoft DHCP is configured to write audit logs to the
%WINDIR%\system32\dhcp\ directory.
5. Restart the DHCP service.
6. You can now configure the log source and protocol in JSA.
a. To configure JSA to receive events from aMicrosoft DHCP Server, youmust select
the Microsoft DHCP Server option from the Log Source Type list.
b. To configure the protocol, you must select the Microsoft DHCP option from the
Protocol Configuration list.
NOTE: To integrate Microsoft DHCP Server versions 2000/2003withJSA by usingWinCollect, see the JSAWinCollect User Guide.
Microsoft Endpoint Protection
The Microsoft Endpoint Protection DSM forJSA can collect malware detection events.
Malware detection events are retrieved by JSA by configuring the JDBC protocol. Adding
malware detection events to JSA gives the capability to monitor and detect malware
infected computers in your deployment.
Malware detection events include the following event types:
• Site name and the source fromwhich the malware was detected.
• Threat name, threat ID, and severity.
Copyright © 2018, Juniper Networks, Inc.698
Juniper Secure Analytics Configuring DSMs Guide
• User ID associated with the threat.
• Event type, time stamp, and the cleaning action that is taken on themalware.
• Configuration Overview on page 699
• Creating a Database View on page 699
• Configuring a Log Source on page 700
Configuration Overview
TheMicrosoft Endpoint Protection DSMuses JDBC to poll an SQL database formalware
detection event data. This DSM does not automatically discover. To integrate Microsoft
EndPoint Protection with JSA, take the following steps:
1. Create an SQL database view for JSA with the malware detection event data.
2. Configure a JDBC log source to poll for events from theMicrosoft EndPoint Protection
database.
3. Ensure that no firewall rules are blocking communication between JSA and the
database that is associated with Microsoft EndPoint Protection.
Creating a Database View
Microsoft EndPoint Protection uses SQLServerManagement Studio (SSMS) tomanage
the EndPoint Protection SQL databases.
1. Log in to the system that hosts your Microsoft EndPoint Protection SQL database.
2. From the Startmenu, select Run.
3. Type the following command:
ssms
4. ClickOK.
5. Log in to your Microsoft Endpoint Protection database.
6. From theObject Explorer, select Databases .
7. Select your database and click Views.
8. From the navigation menu, click NewQuery.
9. In theQuery pane, type the following Transact-SQL statement to create the database
view:
create view dbo.MalwareView as select n.Type , n.RowID , n.Name , n.Description , n.Timestamp
699Copyright © 2018, Juniper Networks, Inc.
Chapter 79: Microsoft
, n.SchemaVersion , n.ObserverHost , n.ObserverUser , n.ObserverProductName , n.ObserverProductversion , n.ObserverProtectionType , n.ObserverProtectionVersion , n.ObserverProtectionSignatureVersion , n.ObserverDetection , n.ObserverDetectionTime , n.ActorHost , n.ActorUser , n.ActorProcess , n.ActorResource , n.ActionType , n.TargetHost , n.TargetUser , n.TargetProcess , n.TargetResource , n.ClassificationID , n.ClassificationType , n.ClassificationSeverity , n.ClassificationCategory , n.RemediationType , n.RemediationResult , n.RemediationErrorCode , n.RemediationPendingAction , n.IsActiveMalware , i.IP_Addresses0 as 'SrcAddress'
from v_AM_NormalizedDetectionHistory n, System_IP_Address_ARR i, v_RA_System_ResourceNames s, Network_DATA d where n.ObserverHost = s.Resource_Names0 and s.ResourceID = d.MachineID and d.IPEnabled00 = 1 and d.MachineID = i.ItemKey and i.IP_Addresses0 like '%.%.%.%';
10. From theQuery pane, right-click and select Execute.
If the view is created, the following message is displayed in the results pane:
Command(s) completed successfully.
You are now ready to configure a log source in JSA.
Configuring a Log Source
JSA requires a user account with the proper credentials to access the view you created
in the Microsoft EndPoint Protection database.
To successfully poll formalwaredetectionevents fromtheMicrosoft EndPointProtection
database, youmust create a new user or provide the log source with existing user
credentials to read from the database view that you created. For more information on
creating a user account, see your vendor documentation.
1. Click the Admin tab.
2. On the navigation menu, click Data Sources.
3. Click the Log Sources icon.
4. In the Log Source Name field, type a name for the log source.
5. In the Log Source Description field, type a description for the log source.
6. From the Log Source Type list, select Microsoft EndPoint Protection.
7. From the Protocol Configuration list, select JDBC.
Copyright © 2018, Juniper Networks, Inc.700
Juniper Secure Analytics Configuring DSMs Guide
8. Configure the following values:
Table 224: Microsoft EndPoint Protection JDBC Parameters
DescriptionParameter
Type the identifier for the log source. Type the log source identifier in the following format:
<Database>@<Database Server IP or Host Name>
Where:
• <Database> is the database name, as entered in the Database Name parameter.
• <Database Server IP or Host Name> is the host name or IP address for this log source, asentered in the IP or Hostname parameter.
Log Source Identifier
From the list, selectMSDE.Database Type
Type the name of the Microsoft EndPoint Protection database.
This namemust match the database name that you select when you create your view in“Creating a Database View” on page 699.
Database Name
Type the IP address or host name of the Microsoft EndPoint Protection SQL Server.IP or Hostname
Type the port number that is used by the database server. The default port for MSDE is 1433.
The JDBC configuration portmustmatch the listener port of theMicrosoft EndPoint Protectiondatabase. The Microsoft EndPoint Protection databasemust have incoming TCP connectionsthat are enabled to communicate with JSA.
If you define aDatabase InstancewhenMSDE is used as the database type, youmust leave thePort parameter blank in your configuration.
Port
Type the user name the log source can use to access the Microsoft EndPoint Protectiondatabase.
Username
Type thepassword the logsourcecanuse toaccess theMicrosoftEndPointProtectiondatabase.
The password can be up to 255 characters in length.
Password
Confirm the password that is required to access the database. The confirmation passwordmust be identical to the password entered in the Password field.
Confirm Password
If you selectMSDE as theDatabaseType and the database is configured forWindows, youmustdefine theWindow Authentication Domain. Otherwise, leave this field blank.
Authentication Domain
Optional. Type the database instance, if you havemultiple SQL server instances on yourdatabase server.
If you use a non-standard port in your database configuration, or block access to port 1434 forSQL database resolution, youmust leave the Database Instance parameter blank in yourconfiguration.
Database Instance
Type dbo.MalwareView as the name of the table or view that includes the event records.Table Name
701Copyright © 2018, Juniper Networks, Inc.
Chapter 79: Microsoft
Table 224: Microsoft EndPoint Protection JDBC Parameters (continued)
DescriptionParameter
Type * for all fields from the table or view.
You can use a comma-separated list to define specific fields from tables or views, if you needit for your configuration. The list must contain the field that is defined in the Compare Fieldparameter. The comma-separated list can be up to 255 alphanumeric characters in length.The list can include the following special characters: dollar sign ($), number sign (#), underscore(_), en dash (-), and period(.).
Select List
TypeTimestamp as the compare field. The compare field is used to identify new events addedbetween queries to the table.
Compare Field
Optional. Type the start date and time for database polling.
TheStartDateandTimeparametermustbe formattedasyyyy-MM-ddHH:mmwithHHspecifiedbyusinga24-hour clock. If the start dateor time is clear, pollingbegins immediatelyand repeatsat the specified polling interval.
Start Date and Time
Select the Use Prepared Statements check box.
Prepared statements allow the JDBC protocol source to setup the SQL statement one time,then run theSQLstatementmany timeswithdifferentparameters. For securityandperformancereasons, it is suggested that you use prepared statements.
Clearing this check box requires you to use an alternative method of querying that does notuse pre-compiled statements.
Use Prepared Statements
Type the polling interval, which is the amount of time between queries to the view you created.The default polling interval is 10 seconds.
Youcandefinea longerpolling interval byappendingH for hoursorM forminutes to thenumericvalue. Themaximum polling interval is 1 week in any time format. Numeric values that areentered without an H or M poll in seconds.
Polling Interval
Type the number of Events Per Second (EPS) that you do not want this protocol to exceed.The default value is 20000 EPS.
EPS Throttle
Clear the Use Named Pipe Communications check box.
WhenyouuseaNamedPipe connection, theuser nameandpasswordmustbe theappropriateWindows authentication user name and password and not the database user name andpassword. Also, youmust use the default Named Pipe.
Use Named PipeCommunication
If you select the Use Named Pipe Communication check box, the Database Cluster Nameparameter is displayed. If you are running your SQL server in a cluster environment, define thecluster name to ensure Named Pipe communication functions properly.
Database Cluster Name
Select the Use NTLMv2 check box.
This option forces MSDE connections to use the NTLMv2 protocol when they communicatewith SQL servers that require NTLMv2 authentication. The default value of the check box isselected.
If the Use NTLMv2 check box is selected, it has no effect on MSDE connections to SQL serversthat do not require NTLMv2 authentication.
Use NTLMv2
Copyright © 2018, Juniper Networks, Inc.702
Juniper Secure Analytics Configuring DSMs Guide
NOTE: Selecting a value greater than 5 for the Credibility parameter
weights your Microsoft EndPoint Protection log source with a higherimportance compared to other log sources in JSA.
9. Click Save.
10. On the Admin tab, click Deploy Changes.
The Microsoft EndPoint Protection configuration is complete.
Microsoft SQL Server
The JSADSM forMicrosoft SQLServer collect SQLevents by using the syslog,WinCollect
Microsoft SQL, or JDBC protocol.
The following table identifies the specifications for the Microsoft SQL Server DSM:
Table 225: Microsoft SQL Server DSM
ValueSpecification
MicrosoftManufacturer
SQL ServerDSM name
DSM-MicrosoftSQL-QRadar-version-Build_number.noarch.rpmRPM file name
2008, 2012, and 2014 (Enterprise editions only)Supported versions
syslog, JDBC, WinCollectEvent format
SQL error log eventsJSA recorded event types
YesAutomatically discovered?
YesIncludes identity?
Microsoft website(http://www.microsoft.com/en-us/server-cloud/products/sql-server/)
More information
You can integrate Microsoft SQL Server with JSA by using one of the followingmethods:
JDBC—Microsoft SQL Server Enterprise can capture audit events by using the JDBCprotocol. The audit events are stored in a table view. Audit events are only available
in Microsoft SQL Server 2008, 2012, and 2014 Enterprise.
WinCollect—You can integrateMicrosoft SQL Server 2000, 2005, 2008, 2012, and 2014
with JSA by usingWinCollect to collect ERRORLOGmessages from the databases
703Copyright © 2018, Juniper Networks, Inc.
Chapter 79: Microsoft
that are managed by your Microsoft SQL Server. For more information, see your
WinCollect documentation.
To integrate the Microsoft SQL Server DSMwith JSA, use the following steps:
1. If automatic updates are not enabled, download and install the most recent version
of the Microsoft SQL Server RPM on your JSA Console.
2. For each instance of Microsoft SQL Server, configure your Microsoft SQL Server
appliance to enable communication with JSA.
3. If JSA does not automatically discover the Microsoft SQL Server log source, create a
log source for each instance of Microsoft SQL Server on your network.
• Microsoft SQL Server Preparation for Communication with JSA on page 704
• Configuring a Microsoft SQL Server Log Source on page 706
Microsoft SQL Server Preparation for Communication with JSA
To prepare Microsoft SQL Server for communication with JSA, youmust create an audit
object, audit specification, and database view.
Creating aMicrosoft SQL Server Auditing Object
Create an auditing object to store audit events.
1. Log in to your Microsoft SQL Server Management Studio.
2. From the navigation menu, select Security > Audits.
3. Right-click Audits and select NewAudit.
4. In the Audit name field, type a name for the new audit file.
5. From theAudit destination list, select File.
6. From the File path field, type the directory path for your Microsoft SQL Server audit
file.
7. ClickOK.
8. Right-click your audit object and select Enable Audit.
Creating aMicrosoft SQL Server Audit Specification
Create an audit specification to define the level of auditing events that are written to an
audit file.
Youmust create an audit object. See “Creating a Microsoft SQL Server Auditing Object”
on page 704.
Copyright © 2018, Juniper Networks, Inc.704
Juniper Secure Analytics Configuring DSMs Guide
You can create an audit specification at the server level or at the database level.
Depending on your requirements, youmight require both a server and database audit
specification.
1. From the Microsoft SQL Server Management Studio navigation menu, select one of
the following options:
• Security > Server Audit Specifications
• <Database> > Security > Database Audit Specifications
2. Right-click Server Audit Specifications, and then select one of the following options:
• NewServer Audit Specifications
• NewDatabase Audit Specifications
3. In the Name field, type a name for the new audit file.
4. From the Audit list, select the audit object that you created.
5. In the Actions pane, add actions and objects to the server audit.
6. ClickOK.
7. Right-click your server audit specification and select one of the following options:
• Enable Server Audit Specification
• Enable Database Audit Specification
Creating aMicrosoft SQL Server Database View
Create the dbo.AuditData database view to allow JSA to poll for audit events from a
database table by using the JDBC protocol. The database view contains the audit events
from your server audit specification and database audit specification.
1. From the Microsoft SQL Server Management Studio toolbar, click NewQuery.
2. Type the following Transact-SQL statement:
create view dbo.AuditData as SELECT * FROM sys.fn_get_audit_file ('<Audit File Path and Name>',default,default); GOa
For example:
create view dbo.AuditData as SELECT * FROM sys.fn_get_audit_file ('C:\inetpub\logs\SQLAudits*’,default,default); GO
3. From the Standard toolbar, click Execute.
705Copyright © 2018, Juniper Networks, Inc.
Chapter 79: Microsoft
Configuring aMicrosoft SQL Server Log Source
Use this procedure if your JSA Console did not automatically discover the Microsoft
Windows Security Event log source.
1. Click the Admin tab.
2. On the navigation menu, click Data Sources.
3. Click the Log Sources icon.
4. Click the Add button.
5. From the Log Source Type list, selectMicrosoft SQL Server.
6. From the Protocol Configuration list, select JDBC orWinCollect.
7. <Optional>. If youwant to configure events for JDBC, configure the followingMicrosoft
SQL Server log source parameters:
DescriptionParameter
Type the identifier for the log source in the following format:
<SQL Database>@<SQL DB Server IP or Host Name>
Where:
<SQL Database> is the database name, as entered in theDatabase Name parameter.
<SQL DB Server IP or Host Name> is the hostname or IPaddress for this log source, as entered in the IP or Hostnameparameter.
Log Source Identifier
From the list, selectMSDE.Database Type
TypeMaster as the name of the Microsoft SQL database.Database Name
Type the IP address or host name of theMicrosoft SQL server.IP or Hostname
Type the port number that is used by the database server. Thedefault port for MSDE is 1433.
The JDBC configuration port must match the listener port ofthe Microsoft SQL database. The Microsoft SQL databasemust have incoming TCP connections that are enabled tocommunicate with JSA.
NOTE: If you define a Database Instancewhen you are usingMSDEas theDatabaseType, youmust leave thePortparameterblank in your configuration.
Port
Copyright © 2018, Juniper Networks, Inc.706
Juniper Secure Analytics Configuring DSMs Guide
DescriptionParameter
Type the user name to access the SQL database.Username
Type the password to access the SQL database.Password
Type the password to access the SQL database.Confirm Password
If you select MSDE as the Database Type and the database isconfigured for Windows, youmust define aWindowAuthentication Domain. Otherwise, leave this field blank.
Authentication Domain
NOTE: If you have a non-standard port in your databaseconfiguration, or access is blocked to port 1434 for SQLdatabase resolution, youmust leave the Database Instanceparameter blank.
Database Instance
Type dbo.AuditData as the name of the table or view thatincludes the audit event records.
Table Name
Type * for all fields from the table or view.
You can use a comma-separated list to define specific fieldsfrom tables or views. The list must contain the field that isdefined in theCompareFieldparameter.Thecomma-separatedlist can be amaximum of 255 characters. You can include thespecial characters, dollar sign ($), number sign (#), underscore(_), en dash (-), and period (.).
Select List
Typeevent_time in theCompareFieldparameter. TheCompareField identifies new events that are added between queries, inthe table.
Compare Field
The Start Date and Time parameter must be formatted asyyyy-MM-dd HH:mmwithHH specified by using a 24-hourclock. If the start date or time is clear, polling beginsimmediately and repeats at the specified polling interval.
Start Date and Time
Select this check box to use prepared statements
Prepared statements allow the JDBC protocol source to setup the SQL statement, and then run the SQL statementmanytimeswithdifferent parameters. For security andperformancereasons, youmight want to use prepared statements.
Clearing this check box requires you to use an alternativemethod of querying that does not use pre-compiledstatements.
Use Prepared Statements
707Copyright © 2018, Juniper Networks, Inc.
Chapter 79: Microsoft
DescriptionParameter
You can type a polling interval number. The polling interval isthe amount of time between queries to the event table. Thedefault polling interval is 10 seconds.
You can define a longer polling interval by appendingH forhours orM for minutes to the numeric value. Themaximumpolling interval is 1 week in any time format. Numeric valuesthat are entered without anH orM, poll in seconds.
Polling Interval
Type the number of Events Per Second (EPS) that you do notwant this protocol to exceed. The default value is 20000 EPS.
EPS Throttle
Clear the Use Named Pipe Communications check box.
If you use a Named Pipe connection, the user name andpasswordmust be the appropriateWindows authenticationuser name and password, and not the database user nameand password. Also, youmust use the default Named Pipe.
Use Named Pipe Communication
If you select the Use Named Pipe Communication check box,the Database Cluster Name parameter is displayed. If you arerunning your SQL server in a cluster environment, define thecluster name.
Database Cluster Name
8. <Optional>. If you want to configure events forWinCollect, see the JSAWinCollect
User Guide.
9. Click Save.
10. On theAdmin tab, click Deploy Changes.
RelatedDocumentation
Microsoft Exchange Server on page 708•
• Microsoft Hyper-V on page 715
• Microsoft IAS Server on page 716
Microsoft Exchange Server
The JSADSMforMicrosoft ExchangeServer collectsExchangeeventsbypolling for event
log files.
The following table identifies the specifications for the Microsoft Exchange Server DSM:
Copyright © 2018, Juniper Networks, Inc.708
Juniper Secure Analytics Configuring DSMs Guide
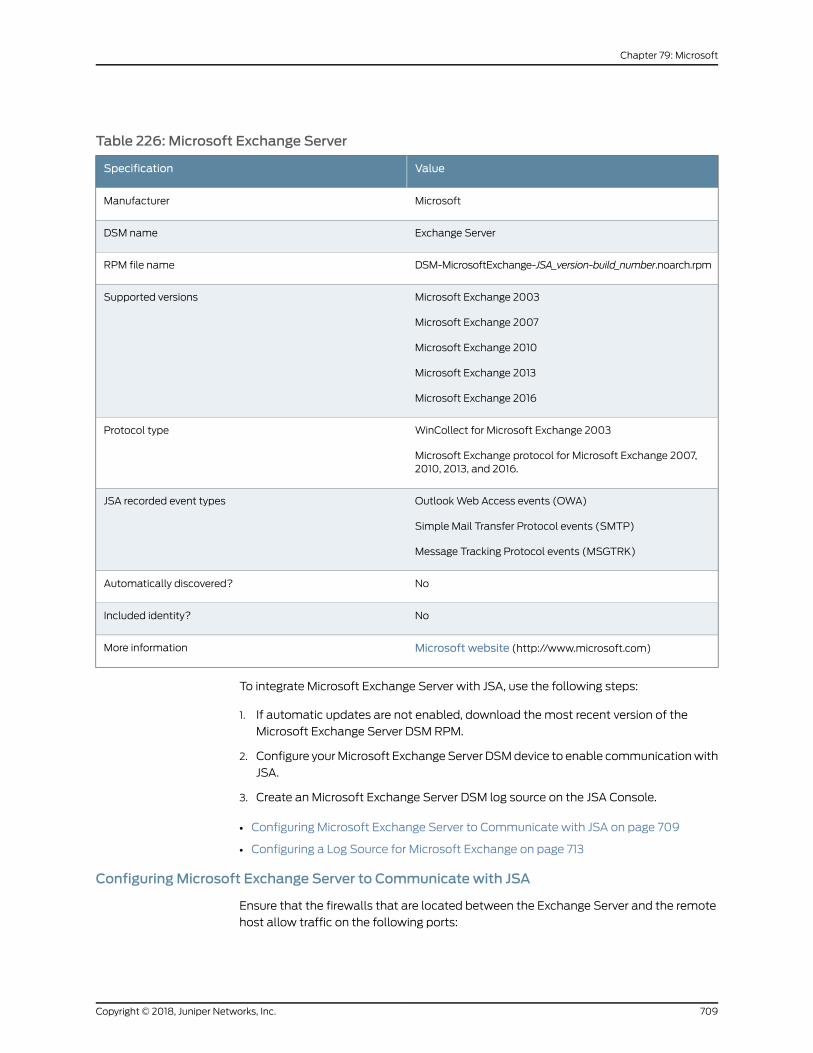
Table 226: Microsoft Exchange Server
ValueSpecification
MicrosoftManufacturer
Exchange ServerDSM name
DSM-MicrosoftExchange-JSA_version-build_number.noarch.rpmRPM file name
Microsoft Exchange 2003
Microsoft Exchange 2007
Microsoft Exchange 2010
Microsoft Exchange 2013
Microsoft Exchange 2016
Supported versions
WinCollect for Microsoft Exchange 2003
Microsoft Exchange protocol for Microsoft Exchange 2007,2010, 2013, and 2016.
Protocol type
OutlookWeb Access events (OWA)
Simple Mail Transfer Protocol events (SMTP)
Message Tracking Protocol events (MSGTRK)
JSA recorded event types
NoAutomatically discovered?
NoIncluded identity?
Microsoft website (http://www.microsoft.com)More information
To integrate Microsoft Exchange Server with JSA, use the following steps:
1. If automatic updates are not enabled, download themost recent version of the
Microsoft Exchange Server DSM RPM.
2. Configure yourMicrosoft ExchangeServer DSMdevice to enable communicationwith
JSA.
3. Create an Microsoft Exchange Server DSM log source on the JSA Console.
• Configuring Microsoft Exchange Server to Communicate with JSA on page 709
• Configuring a Log Source for Microsoft Exchange on page 713
ConfiguringMicrosoft Exchange Server to Communicate with JSA
Ensure that the firewalls that are located between the Exchange Server and the remote
host allow traffic on the following ports:
709Copyright © 2018, Juniper Networks, Inc.
Chapter 79: Microsoft
• TCP port 13 for Microsoft Endpoint Mapper.
• UDP port 137 for NetBIOS name service.
• UDP port 138 for NetBIOS datagram service.
• TCP port 139 for NetBIOS session service.
• TCP port 445 for Microsoft Directory Services to transfer files across aWindows share.
1. Configure OWA logs.
2. Configure SMTP logs.
3. Configure MSGTRK logs.
Configuring OWA Logs on Your Microsoft Exchange Server
To prepare your Microsoft Exchange Server to communicate with JSA, configure Outlook
Web Access (OWA) event logs.
1. Log into your Microsoft Internet Information System (IIS) Manager.
2. On the desktop, select Start > Run.
3. Type the following command:
inetmgr
4. ClickOK.
5. In the menu tree, expand Local Computer.
6. If you use IIS 6.0 Manager for Microsoft Server 2003, complete the following steps:
a. ExpandWeb Sites.
b. Right-click DefaultWeb Site and select Properties.
c. From the Active Log Format list, selectW3C.
d. Click Properties.
e. Click the Advanced tab.
f. From the list of properties, select theMethod (cs-method) and Protocol Version
(cs-version) check boxes
g. ClickOK.
7. If you use IIS 7.0 Manager for Microsoft Server 2008 R2, or IIS 8.5 for Microsoft Server
2012 R2, complete the following steps:
Copyright © 2018, Juniper Networks, Inc.710
Juniper Secure Analytics Configuring DSMs Guide
a. Click Logging.
b. From the Format list, selectW3C.
c. Click Select Fields.
d. From the list of properties, select theMethod (cs-method) and Protocol Version
(cs-version) check boxes
e. ClickOK.
Enabling SMTP Logs on Your Microsoft Exchange Server 2003, 2007, and 2010
To prepare your Microsoft Exchange Server 2003, 2007 and 2010 to communicate with
JSA, enable SMTP event logs.
1. Start the Exchange Management Console.
2. To configure your receive connector, choose one of the following options:
• For edge transport servers, select Edge Transport in the console tree and click the
Receive Connectors tab.
• For hub transport servers, selectServerConfiguration>HubTransport in the console
tree, select the server, and then click the Receive Connectors tab.
3. Select your receive connector and click Properties.
4. Click the General tab.
5. From the Protocol logging level list, select Verbose.
6. Click Apply.
7. ClickOK.
8. To configure your send connector, choose one of the following options:
• For edge transport servers, select Edge Transport in the console tree and click the
Send Connectors tab.
• For hub transport servers, selectOrganization Configuration > Hub Transport in the
console tree, select your server, and then click the Send Connectors tab.
9. Select your send connector and click Properties.
10. Click the General tab.
11. From the Protocol logging level list, select Verbose.
711Copyright © 2018, Juniper Networks, Inc.
Chapter 79: Microsoft
12. Click Apply.
13. ClickOK.
Enabling SMTP Logs on Your Microsoft Exchange Server 2013, and 2016
To prepare your Microsoft Exchange Server 2013 and 2016 to communicate with JSA,
enable SMTP event logs.
1. Start the Exchange Administration Center.
2. To configure your receive connector, selectMail Flow >Receive Connectors.
3. Select your receive connector and click Edit.
4. Click the General tab.
5. From the Protocol logging level list, select Verbose.
6. Click Save.
7. To configure your send connector, selectMail Flow >Send Connectors
8. Select your send connector and click Edit.
9. Click the General tab.
10. From the Protocol logging level list, select Verbose.
11. Click Save.
ConfiguringMSGTRK Logs for Microsoft Exchange 2003, 2007, and 2010
Message Tracking logs created by the Microsoft Exchange Server detail the message
activity that takes place on your Microsoft Exchange Server, including themessage path
information.
MSGTRK logs are enabled by default on Microsoft Exchange 2007 or Exchange 2010
installations. The following configuration steps are optional.
To enable MSGTRK event logs:
1. Start the Exchange Management Console.
2. Configure your receive connector based on the server type:
Copyright © 2018, Juniper Networks, Inc.712
Juniper Secure Analytics Configuring DSMs Guide
• For edge transport servers - In the console tree, select Edge Transport and click
Properties.
• For hub transport servers - In the console tree, select Server Configuration >Hub
Transport, and then select the server and click Properties.
3. Click the Log Settings tab.
4. Select the Enablemessage tracking check box.
5. Click Apply.
6. ClickOK.
MSGTRK events are now enabled on your Exchange Server.
ConfiguringMSGTRK Logs for Exchange 2013 and 2016
Message Tracking logs created by the Microsoft Exchange Server detail the message
activity that takesplaceonyourExchangeServer, including themessagepath information.
1. Start the Exchange Administration Center.
2. Click Servers >Servers.
3. Select the mailbox server that you want to configure, and then click Edit.
4. Click Transport Logs.
5. In theMessage tracking log section, configure the following parameters:
DescriptionParameter
Enable or disable message tracking on the server.Enable message tracking log
The value that you specify must be on the local Exchangeserver. If the folder does not exist, it is created when you clickSave.
Message tracking log path
6. Click Save.
Configuring a Log Source for Microsoft Exchange
JSA does not automatically discover Microsoft Exchange events. To integrate Microsoft
Exchange event data, youmust create a log source for each instance fromwhich you
want to collect event logs.
713Copyright © 2018, Juniper Networks, Inc.
Chapter 79: Microsoft
If a log folder path on the Exchange Server contains an administrative share (C$), ensure
that users with NetBIOS access have local or domain administrator permissions.
The folder path fields for OWA, SNMP, and MSGTRK define the default file path with a
drive letter and path information. If you changed the location of the log files on the
Microsoft ExchangeServer, ensure that youprovide the correct file paths in the log source
configuration. The Microsoft Exchange Protocol can read subdirectories of the OWA,
SMTP, and MSGTRK folders for event logs.
Directory paths can be specified in the following formats:
• Correct - c$/LogFiles/
• Correct - LogFiles/
• Incorrect - c:/LogFiles
• Incorrect - c$\LogFiles
1. Click the Admin tab.
2. On the navigation menu, click Data Sources.
3. Click the Log Sources icon.
4. In the Log Source Name field, type a name for the log source.
5. In the Log Source Description field, type a description for the log source.
6. From the Log Source Type list, selectMicrosoft Exchange Server.
7. From the Protocol Configuration list, selectMicrosoft Exchange.
8. Configure the log source parameters.
9. Configure the remaining parameters.
10. Click Save.
11. On the Admin tab, click Deploy Changes.
RelatedDocumentation
Microsoft Hyper-V on page 715•
• Microsoft IAS Server on page 716
• Microsoft IIS Server on page 717
Copyright © 2018, Juniper Networks, Inc.714
Juniper Secure Analytics Configuring DSMs Guide
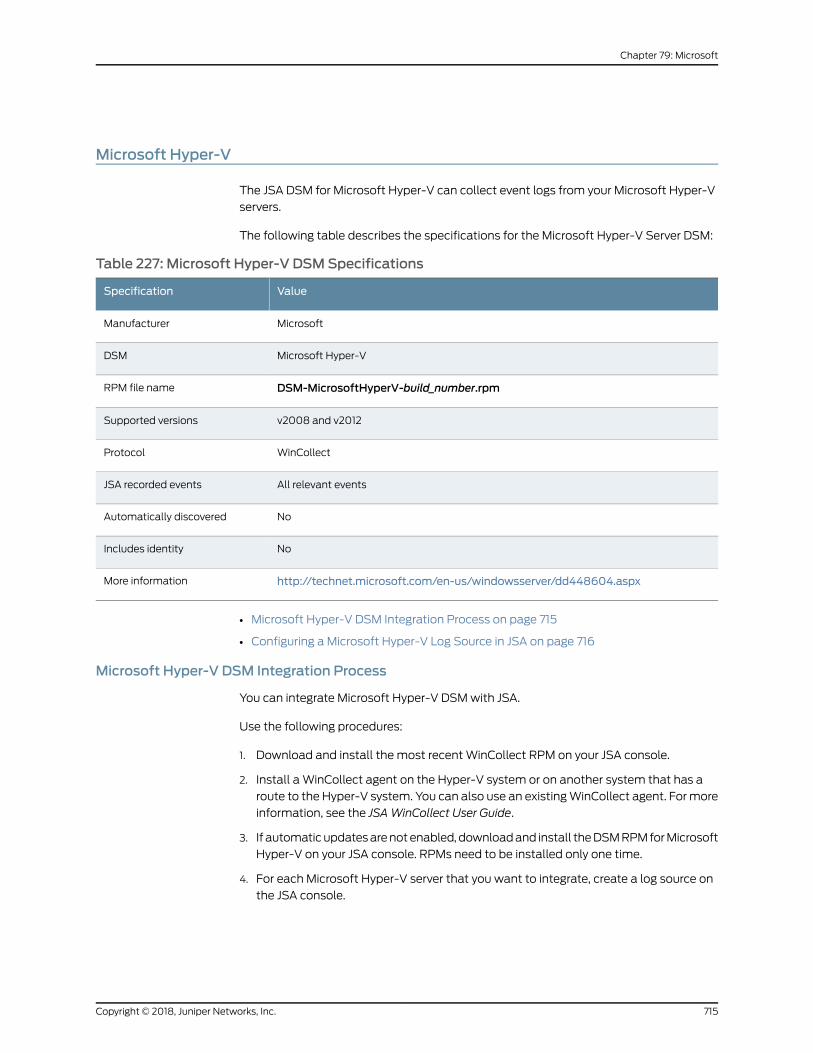
Microsoft Hyper-V
The JSA DSM for Microsoft Hyper-V can collect event logs from your Microsoft Hyper-V
servers.
The following table describes the specifications for the Microsoft Hyper-V Server DSM:
Table 227: Microsoft Hyper-V DSMSpecifications
ValueSpecification
MicrosoftManufacturer
Microsoft Hyper-VDSM
DSM-MicrosoftHyperV-build_number.rpmRPM file name
v2008 and v2012Supported versions
WinCollectProtocol
All relevant eventsJSA recorded events
NoAutomatically discovered
NoIncludes identity
http://technet.microsoft.com/en-us/windowsserver/dd448604.aspxMore information
• Microsoft Hyper-V DSM Integration Process on page 715
• Configuring a Microsoft Hyper-V Log Source in JSA on page 716
Microsoft Hyper-V DSM Integration Process
You can integrate Microsoft Hyper-V DSMwith JSA.
Use the following procedures:
1. Download and install the most recentWinCollect RPM on your JSA console.
2. Install aWinCollect agent on the Hyper-V system or on another system that has a
route to the Hyper-V system. You can also use an existingWinCollect agent. Formore
information, see the JSAWinCollect User Guide.
3. If automaticupdatesarenotenabled, downloadand install theDSMRPMforMicrosoft
Hyper-V on your JSA console. RPMs need to be installed only one time.
4. For each Microsoft Hyper-V server that you want to integrate, create a log source on
the JSA console.
715Copyright © 2018, Juniper Networks, Inc.
Chapter 79: Microsoft
Related Tasks
“Configuring a Microsoft Hyper-V Log Source in JSA” on page 716
Configuring aMicrosoft Hyper-V Log Source in JSA
To collect Microsoft Hyper-V events, configure a log source in JSA.
Ensure that you have the current credentials for the Microsoft Hyper-V server and the
WinCollect agent can access it.
1. Log in to JSA.
2. Click the Admin tab.
3. In the navigation menu, click Data Sources.
4. Click the Log Sources icon.
5. Click Add.
6. From the Log Source Type list, select Microsoft Hyper-V.
7. From the Protocol Configuration list, selectWinCollect.
8. From the Application or Service Log Type list, select Microsoft Hyper-V.
9. FromtheWinCollectAgent list, select theWinCollectagent thataccesses theMicrosoft
Hyper-V server.
10. Configure the remaining parameters.
11. Click Save.
12. On the Admin tab, click Deploy Changes.
Microsoft IAS Server
The Microsoft IAS Server DSM for JSA accepts RADIUS events by using syslog.
You can integrate Internet Authentication Service (IAS) or Network Policy Server (NPS®)
logs with JSA by usingWinCollect. For more information, see the JSAWinCollect User
Guide.
You can now configure the log source in JSA.
Copyright © 2018, Juniper Networks, Inc.716
Juniper Secure Analytics Configuring DSMs Guide
To configure JSA to receive events from aMicrosoft Windows IAS Server.
1. From the Log Source Type list, select the Microsoft IAS Server option.
For more information about your server, see your vendor documentation.
Microsoft IIS Server
TheMicrosoft Internet Information Services (IIS) Server DSM for JSA accepts FTP, HTTP,
NNTP, and SMTP events using syslog.
You can integrate a Microsoft IIS Server with JSA using one of the following methods:
• Configure JSA to connect to your Microsoft IIS Server using the IIS Protocol. The IIS
Protocol collects HTTP events fromMicrosoft IIS servers. For more information, see
“Configuring Microsoft IIS by Using the IIS Protocol” on page 717.
• Configure a Snare Agent with your Microsoft IIS Server to forward event information
to JSA. For more information, see “Configuring Microsoft IIS Using a Snare Agent” on
page 720.
• ConfigureWinCollect to forward IIS events to JSA. For more information, see
“Configuring Microsoft IIS by Using Adaptive Log Exporter” on page 724.
For more information, see the JSAWinCollect User Guide.
Table 228: Microsoft IIS Supported Log Types
Method of ImportSupported Log TypeVersion
IIS ProtocolSMTP, NNTP, FTP, HTTPMicrosoft IIS 6.0
WinCollect or SnareSMTP, NNTP, FTP, HTTPMicrosoft IIS 6.0
IIS ProtocolHTTPMicrosoft IIS 7.0
WinCollect or SnareSMTP, NNTP, FTP, HTTPMicrosoft IIS 7.0
• Configuring Microsoft IIS by Using the IIS Protocol on page 717
• Configuring the Microsoft IIS Protocol in JSA on page 719
• Configuring Microsoft IIS Using a Snare Agent on page 720
• Configuring Your Microsoft IIS Server for Snare on page 721
• Configure the Snare Agent on page 722
• Configuring a Microsoft IIS Log Source on page 723
• Configuring Microsoft IIS by Using Adaptive Log Exporter on page 724
ConfiguringMicrosoft IIS by Using the IIS Protocol
Beforeyouconfigure JSAwith theMicrosoft IISprotocol, youmustconfigure yourMicrosoft
IIS Server to generate the proper log format.
717Copyright © 2018, Juniper Networks, Inc.
Chapter 79: Microsoft
TheMicrosoft IISProtocol supports only theW3CExtended log file format. TheMicrosoft
authentication protocol NTLMv2 Session is not supported by the Microsoft IIS protocol.
To configure theW3C event log format in Microsoft IIS:
1. Log in to your Microsoft Information Services (IIS) Manager.
2. In the IIS Managermenu tree, expand Local Computer.
3. SelectWeb Sites.
4. Right-click on DefaultWeb Sites and select Properties.
The DefaultWeb Site Propertieswindow is displayed.
5. Select theWeb Site tab.
6. Select the Enable logging check box.
7. From the Active Log Format list, selectW3C Extended Log File Format.
8. From the Enable Logging pane, click Properties.
The Logging Propertieswindow is displayed.
9. Click the Advanced tab.
10. From the list of properties, select check boxes for the followingW3C properties:
Table 229: Required Properties for IIS Event Logs
IIS 7.0 Required PropertiesIIS 6.0 Required Properties
Date (date)Date (date)
Time (time)Time (time)
Client IP Address (c-ip)Client IP Address (c-ip)
User Name (cs-username)User Name (cs-username)
Server IP Address (s-ip)Server IP Address (s-ip)
Server Port (s-port)Server Port (s-port)
Method (cs-method)Method (cs-method)
URI Stem (cs-uri-stem)URI Stem (cs-uri-stem)
Copyright © 2018, Juniper Networks, Inc.718
Juniper Secure Analytics Configuring DSMs Guide
Table 229: Required Properties for IIS Event Logs (continued)
IIS 7.0 Required PropertiesIIS 6.0 Required Properties
URI Query (cs-uri-query)URI Query (cs-uri-query)
Protocol Status (sc-status)Protocol Status (sc-status)
User Agent (cs(User-Agent))Protocol Version (cs-version)
User Agent (cs(User-Agent))
11. ClickOK.
You are now ready to configure the log source in JSA.
Configuring theMicrosoft IIS Protocol in JSA
You can configure the log source for Microsoft IIS in JSA.
1. Log in to JSA.
2. Click the Admin tab.
3. On the navigation menu, click Data Sources.
The Data Sources pane is displayed.
4. Click the Log Sources icon.
The Log Sourceswindow is displayed.
5. Click Add.
The Add a log sourcewindow is displayed.
6. From the Log Source Type list, selectMicrosoft IIS Server.
7. From the Protocol Configuration list, select Microsoft IIS.
8. Configure the following values:
Table 230: Microsoft IIS Protocol Parameters
DescriptionParameter
Type the IP address or host name for the log source.Log Source Identifier
Type the IP address of the Microsoft IIS server.Server Address
719Copyright © 2018, Juniper Networks, Inc.
Chapter 79: Microsoft
Table 230: Microsoft IIS Protocol Parameters (continued)
DescriptionParameter
Type the user name that is required to access the Microsoft IIS server.Username
Type the password that is required to access the Microsoft IIS server.Password
Confirm the password that is required to access the Microsoft IIS server.Confirm Password
Type the domain that is required to access the Microsoft IIS server.Domain
Type the directory path to access the IIS log files. The default is\WINDOWS\system32\LogFiles\W3SVC1\
Parameters that support file paths give you the option to define a drive letter with the pathinformation. For example, you can use c$/LogFiles/ for an administrative share or LogFiles/for a public share folder path, but not c:/LogFiles.
If a log folder path contains an administrative share (C$), users with NetBIOS access on theadministrative share (C$) have the proper access that is needed to read the log files.Local ordomain administrators have sufficient privileges to access log files on administrative shares.
Folder Path
Type the regular expression (regex) that is needed to filter the file names. All matching filesare included in the processing. The default is (?:u_)?ex.*\.(?:log|LOG)
For example, to list all files that start with the word log, followed by one or more digits andending with tar.gz, use the following entry: log[0-9]+\.tar\.gz. Use of this parameter requiresknowledge of regular expressions (regex). For more information, see the following website:http://download.oracle.com/javase/tutorial/essential/regex/
File Pattern
Select this check box if you want the file pattern to search sub folders. By default, the checkbox is selected.
Recursive
Type the polling interval, which is the number of seconds between queries to the log files tocheck for new data. The default is 10 seconds.
Polling Interval (s)
9. Click Save.
10. The Microsoft IIS protocol configuration is complete.
ConfiguringMicrosoft IIS Using a Snare Agent
If you want to use a snare agent to integrate the Microsoft IIS server with JSA, youmust
configure a Snare Agent to forward events.
Copyright © 2018, Juniper Networks, Inc.720
Juniper Secure Analytics Configuring DSMs Guide
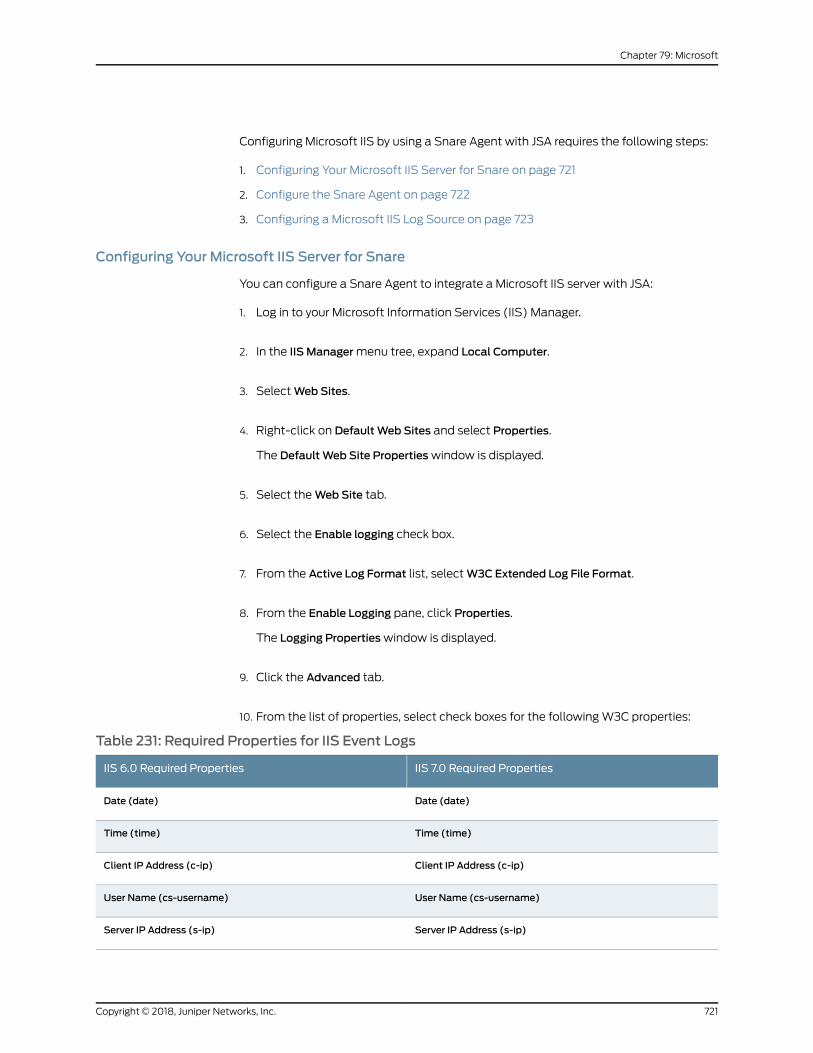
Configuring Microsoft IIS by using a Snare Agent with JSA requires the following steps:
1. Configuring Your Microsoft IIS Server for Snare on page 721
2. Configure the Snare Agent on page 722
3. Configuring a Microsoft IIS Log Source on page 723
Configuring Your Microsoft IIS Server for Snare
You can configure a Snare Agent to integrate a Microsoft IIS server with JSA:
1. Log in to your Microsoft Information Services (IIS) Manager.
2. In the IIS Managermenu tree, expand Local Computer.
3. SelectWeb Sites.
4. Right-click on DefaultWeb Sites and select Properties.
The DefaultWeb Site Propertieswindow is displayed.
5. Select theWeb Site tab.
6. Select the Enable logging check box.
7. From the Active Log Format list, selectW3C Extended Log File Format.
8. From the Enable Logging pane, click Properties.
The Logging Propertieswindow is displayed.
9. Click the Advanced tab.
10. From the list of properties, select check boxes for the followingW3C properties:
Table 231: Required Properties for IIS Event Logs
IIS 7.0 Required PropertiesIIS 6.0 Required Properties
Date (date)Date (date)
Time (time)Time (time)
Client IP Address (c-ip)Client IP Address (c-ip)
User Name (cs-username)User Name (cs-username)
Server IP Address (s-ip)Server IP Address (s-ip)
721Copyright © 2018, Juniper Networks, Inc.
Chapter 79: Microsoft
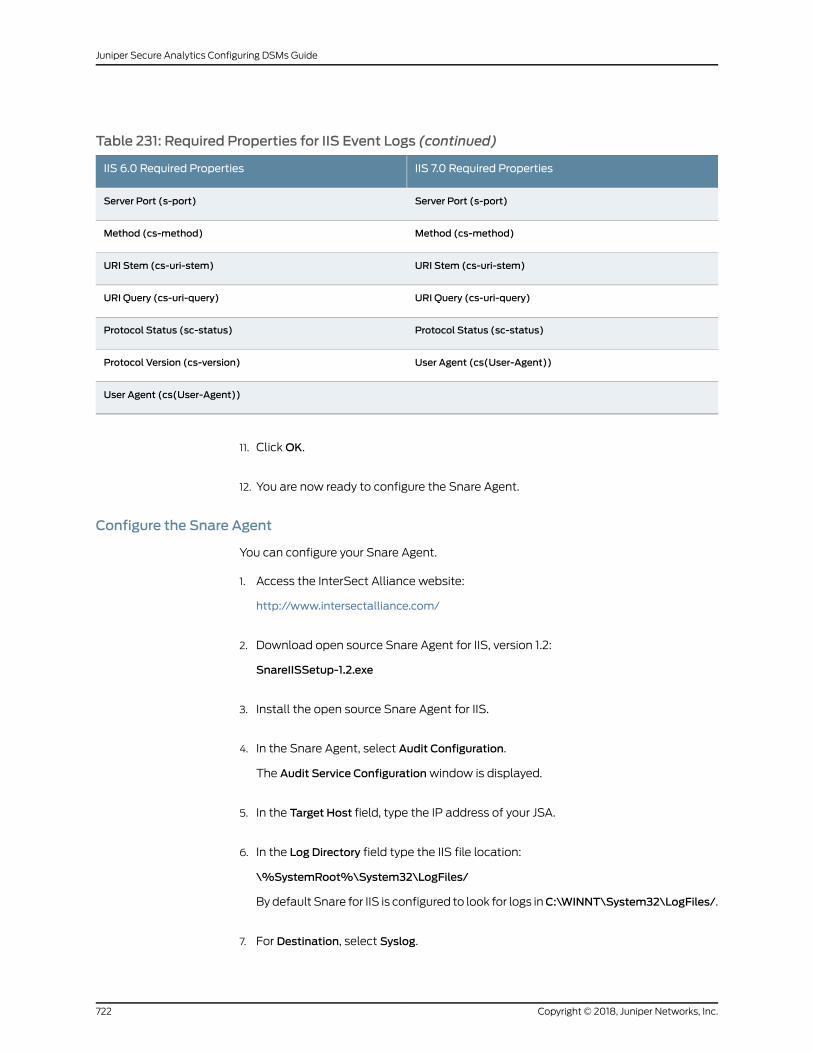
Table 231: Required Properties for IIS Event Logs (continued)
IIS 7.0 Required PropertiesIIS 6.0 Required Properties
Server Port (s-port)Server Port (s-port)
Method (cs-method)Method (cs-method)
URI Stem (cs-uri-stem)URI Stem (cs-uri-stem)
URI Query (cs-uri-query)URI Query (cs-uri-query)
Protocol Status (sc-status)Protocol Status (sc-status)
User Agent (cs(User-Agent))Protocol Version (cs-version)
User Agent (cs(User-Agent))
11. ClickOK.
12. You are now ready to configure the Snare Agent.
Configure the Snare Agent
You can configure your Snare Agent.
1. Access the InterSect Alliance website:
http://www.intersectalliance.com/
2. Download open source Snare Agent for IIS, version 1.2:
SnareIISSetup-1.2.exe
3. Install the open source Snare Agent for IIS.
4. In the Snare Agent, select Audit Configuration.
The Audit Service Configurationwindow is displayed.
5. In the Target Host field, type the IP address of your JSA.
6. In the Log Directory field type the IIS file location:
\%SystemRoot%\System32\LogFiles/
Bydefault Snare for IIS is configured to look for logs inC:\WINNT\System32\LogFiles/.
7. For Destination, select Syslog.
Copyright © 2018, Juniper Networks, Inc.722
Juniper Secure Analytics Configuring DSMs Guide
8. For Delimiter, select TAB.
9. Select the Display IIS Header Information check box.
10. ClickOK.
Configuring aMicrosoft IIS Log Source
JSA automatically discovers and creates a log source for syslog events fromMicrosoft
IIS forwarded from a Snare agent. These configuration steps are optional.
To manually create a Microsoft IIS log source in JSA:
1. Log in to JSA.
2. Click the Admin tab.
3. On the navigation menu, click Data Sources.
The Data Sources pane is displayed.
4. Click the Log Sources icon.
The Log Sourceswindow is displayed.
5. Click Add.
The Add a log source window is displayed.
6. From the Log Source Type list, select Microsoft IIS Server.
7. From the Protocol Configuration list, select Syslog.
8. Configure the following values:
Table 232: Microsoft IIS Syslog Configuration
DescriptionParameter
Type the IP address or host name for the log source.Log Source Identifier
9. Click Save.
10. On the Admin tab, click Deploy Changes.
The configuration is complete.
723Copyright © 2018, Juniper Networks, Inc.
Chapter 79: Microsoft
ConfiguringMicrosoft IIS by Using Adaptive Log Exporter
WinCollect is a stand-alone application that gives the option to integrate device logs or
application event data with JSA or Log Manager.
To integrate the Adaptive Log Exporter with Microsoft IIS:
1. Log in to your Microsoft Information Services (IIS) Manager.
2. In the IIS Managermenu tree, expand Local Computer.
3. SelectWeb Sites.
4. Right-click on DefaultWeb Site and select Properties.
TheWeb Sites Propertieswindow is displayed.
5. From the Active Log Format list, select one of the following options:
• Select NCSA. Go to “Configuring Microsoft IIS by Using Adaptive Log Exporter” on
page 724.
• Select IIS. Go to “Configuring Microsoft IIS by Using Adaptive Log Exporter” on
page 724.
• SelectW3C. Go to “Configuring Microsoft IIS by Using Adaptive Log Exporter” on
page 724.
6. Click Properties.
The Propertieswindow is displayed.
7. Click the Advanced tab.
8. From the list of properties, select all event properties that you want to apply to the
Microsoft IIS event log. The selected propertiesmust include the following selections:
a. Select theMethod (cs-method) check box.
b. Select the Protocol Version (cs-version) check box.
9. ClickOK.
You are now ready to configure the Adaptive Log Exporter. For more information on
installing and configuring Microsoft IIS for the Adaptive Log Exporter, see the Adaptive
Log Exporter User Guide.
Microsoft ISA
The Microsoft Internet and Acceleration (ISA) DSM for JSA accepts events by using
syslog.
Copyright © 2018, Juniper Networks, Inc.724
Juniper Secure Analytics Configuring DSMs Guide
Youcan integrateMicrosoft ISAServerwith JSAbyusingWinCollect. Formore information,
see the JSAWinCollect User Guide.
NOTE: TheMicrosoft ISA DSM also supports events fromMicrosoft ThreatManagement Gateway by usingWinCollect.
Microsoft Office 365
The JSA DSM for Microsoft Office 365 collects events fromMicrosoft Office 365 online
services.
The following table describes the specifications for the Microsoft Office 365 DSM:
Table 233: Microsoft Office 365 DSMSpecifications
ValueSpecification
MicrosoftManufacturer
Microsoft Office 365DSM name
DSM-MicrosoftOffice365-JSA_version-build_number.noarch.rpmRPM file name
N/ASupported versions
Office 365 REST APIProtocol
JSONEvent format
ExchangeAudit, SharePointAudit, AzureActiveDirectoryAudit,Service Communications
Recorded event types
NoAutomatically discovered?
NoIncludes identity?
NoIncludes custom properties?
Microsoft website (https://www.microsoft.com)More information
To integrate Microsoft Office 365 with JSA, complete the following steps:
1. If automatic updates are not enabled, download and install the most recent version
of the following RPMs on your JSA console:
• Protocol Common RPM
• Office 365 REST API Protocol RPM
• Microsoft Office 365 DSM RPM
725Copyright © 2018, Juniper Networks, Inc.
Chapter 79: Microsoft
2. Register an application in Azure Active Directory.
3. AddaMicrosoftOffice365 logsourceon the JSAconsole.The following tabledescribes
the parameters that require specific values for Microsoft Office 365 event collection:
Table 234: Microsoft Office 365 Log Source Parameters
ValueParameter
Microsoft Office 365Log Source type
Office 365 REST APIProtocol Configuration
A unique identifier for the log source.
The Log Source Identifier can be any valid value and does notneed to reference a specific server. The Log Source Identifiercan be the same value as the Log Source Name. If you haveconfiguredmultipleMicrosoftOffice365 logsources, youmightwant to identify the first log source as MSOffice365-1, thesecond log source as MSOffice365-2, and the third log sourceas MSOffice365-3.
Log Source Identifier
In your application configuration of Azure Active Directory, thisparameter is under Client ID.
Client ID
In your application configuration of Azure Active Directory, thisparameter is under Keys.
Client Secret
Used for Azure AD authentication.Tenant ID
The type of audit events to retrieve fromMicrosoft Office.
• Azure Active Directory
• Exchange
• SharePoint
• Service Communications
Event Filter
For JSA to access the Office 365 Management APIs, all trafficfor the log source travels through configured proxies.
Configure the Proxy Server, Proxy Port, Proxy Username, andProxy Password fields.
If the proxy does not require authentication, keep the ProxyUsername and Proxy Password fields empty.
Use Proxy
Automatically downloads the server certificate and beginstrusting the target server when selected.
Automatically Acquire Server Certificate(s)
Themaximum number of events per second.
The default is 5000.
EPS Throttle
The following table provides a sample eventmessage for theMicrosoft Office 365 DSM:
Copyright © 2018, Juniper Networks, Inc.726
Juniper Secure Analytics Configuring DSMs Guide
Table235:MicrosoftOffice365SampleMessageSupportedbytheMicrosoftOffice365Service
Sample logmessageLow level categoryEvent name
{"CreationTime":"2016-05-05T08:53:46","Id":"8c1-b601-446b-accd-5db1bb544200","Operation":"Update user.","OrganizationId":"d3fc05f9-1eb4-4a92-bd0b-220dc6614f75","RecordType":8,"ResultStatus":"fail","UserKey":"Not Available","UserType":6,"Workload":"AzureActiveDirectory","ObjectId":"10033FFF9706BDBF","UserId":"e5-f79d-4402-916f-46a467ce1140","AzureActiveDirectoryEventType":1,"ExtendedProperties":[{"Name":"MethodExecutionResult.","Value":"Microsoft.Online.Workflows.ValidationException"}],"Actor":[{"ID":"5-f79d-4402-916f-46a467ce1140","Type":4},{"ID":"ncipal_b0c7c0a8-203a-4dbc-b76c-78f82d0c96f4","Type":2}],"ActorContextId":"d3fc05f9-1eb4-4a92-bd0b-220dc6614f75","InterSystemsId":"72021b83-22b2-4f7f-ac80-774efca27742","IntraSystemId":"e546cb1d-f0f2-4488-853e-c1c6928287f6","Target":[{"ID":"5-d9f4-4761-b70a-3128d3b43700","Type":2},{"ID":"[email protected]","Type":1},{"ID":"1706BDBF","Type":3}],"TargetContextId":"d3fc05f9-1eb4-4a92-bd0b-220dc6614f75"}
Update Activity FailedUpdate user-fail
727Copyright © 2018, Juniper Networks, Inc.
Chapter 79: Microsoft
Table 235: Microsoft Office 365 SampleMessage Supported by theMicrosoft Office 365Service (continued)
Sample logmessageLow level categoryEvent name
{"CreationTime":"2015-10-20T15:54:05","Id":"ea3942ca-3096-4487-f59e-08d2d966af07","Operation":"SitePermissionsModified","OrganizationId":"d3fc05f9-1eb4-4a92-bd0b-220dc6614f75","RecordType":4,"UserKey":"(empty)","UserType":0,"Workload":"SharePoint","ClientIP":"32.97.110.60","ObjectId":"https://ibmsecurity-my.sharepoint.com/personal/qradar_admin_ibmsecurity_onmicrosoft_com","UserId":"SHAREPOINT\\system","EventSource":"SharePoint","ItemType":"Web","Site":"308d9383-a3de-4f38-837d-50ac91fa5588","UserAgent":"Mozilla/5.0 (X11; Linux x86_64; rv:38.0) Gecko/20100101 Firefox/38.0"}
Update Activity SucceededSite permissions modified
• Configuring Microsoft Office 365 to Communicate with JSA on page 728
ConfiguringMicrosoft Office 365 to Communicate with JSA
Before you can configure a log source forMicrosoftOffice 365, youmight need to request
that Microsoft enables content subscriptions for your Tenant ID. By enabling content
subscription, JSA can retrieve data frommanagement activity APIs.
The Tenant ID, Client ID, and Client Secret are required.
1. Run Azure Active Directory PowerShell cmdlet. For more information, see How to
install and configure Azure PowerShell
(https://azure.microsoft.com/en-us/documentation/articles/powershell-install-configure/).
2. To obtain the Tenant ID of the tenant that is subscribed to Microsoft Office 365, type
the following commands:
import-module MSOnline
$userCredential = Get-Credential
Connect-MsolService -Credential $userCredential
Get-MsolAccountSku |% {$_.AccountObjectID}
3. Use Azure Management Portal to register an application in Azure Active Directory.
Copyright © 2018, Juniper Networks, Inc.728
Juniper Secure Analytics Configuring DSMs Guide
a. To sign in Azure Management Portal, use the credentials of the tenant that is
subscribed to Microsoft Office 365
b. Click Active Directory.
c. Select the directory namewhere the new application is registered under.
d. On the directory page, select Applications.
e. Click Add.
f. Select Add an applicationmy organization is developing.
g. Enter a name for the application.
h. For the type, selectWeb application and/or web API.
i. For the Sign-on URL field, type the following:
http://localhost
j. For theApp IDURL, enter a unique identifier in the formof aURL for theapplication.
An example of a unique identifier is the following URL:
http://company_name.onmicrosoft.com/QRadarApp.
4. Configure the application properties.
a. Select the newly created application in Azure AD.
b. Select Configure.
c. Verify that the Application is Multi-Tenant option is set to NO.
d. Copy the client ID for future use.
e. Save the configuration.
5. Generate a client secret for the application.
a. Under Keys, click Select Duration.
b. Choose either 1 year or 2 years.
c. Save the configuration.
The client secret displays after the configuration is saved. Copy and store the client
secret because it appears only once and cannot be retrieved.
6. Specify thepermissions that theapplication requires toaccessOffice365Management
APIs.
a. Under Permissions to other applications, select Add application.
b. SelectOffice 365Management APIs.
c. Click the check mark to save the selection.
d. Under Application Permissions and Delegated Permissions, select the following
options:
• Read Activity data for your organization
729Copyright © 2018, Juniper Networks, Inc.
Chapter 79: Microsoft
• Read service health information for your organization
• Read activity reports for your organization
e. Save the configuration.
The application configuration in Azure AD is complete. You can create a log source
for Microsoft Office 365 in JSA. For more information, see Getting started with Office
365Management APIs
(https://msdn.microsoft.com/EN-US/library/office/dn707383.aspx).
RelatedDocumentation
Microsoft Operations Manager on page 730•
• Microsoft SharePoint on page 733
• Microsoft System Center Operations Manager on page 741
Microsoft OperationsManager
The Microsoft Operations Manager DSM for JSA accepts Microsoft Operations Manager
(MOM) events by polling the OnePoint database that allows JSA to record the relevant
events.
Before you configure JSA to integrate with the Microsoft Operations Manager, youmust
ensure thatadatabaseuser account is configuredwithappropriatepermissions toaccess
the MOMOnePoint SQL Server database. Access to the OnePoint database SDK views
is managed through the MOM SDK View User database role. For more information, see
yourMicrosoft Operations Manager documentation.
NOTE: Make sure that the firewall rules are not blocking the communicationbetween JSA and the SQL Server database that is associatedwithMOM. ForMOM installations that use a separate, dedicated computer for the SQLServer database, theSDKEventViewview is queriedon thedatabase system,not the system that runs MOM.
To configure JSA to receive MOM events:
1. Click the Admin tab.
2. On the navigation menu, click Data Sources.
The Data Sources pane is displayed.
3. Click the Log Sources icon.
The Log Sourceswindow is displayed.
4. From the Log Source Type list, select Microsoft Operations Manager.
Copyright © 2018, Juniper Networks, Inc.730
Juniper Secure Analytics Configuring DSMs Guide
5. From the Protocol Configuration list, select JDBC.
The JDBC protocol parameters appear.
6. Configure the following values:
Table 236: Microsoft OperationsManager JDBC Parameters
DescriptionParameter
Type the identifier for the log source. Type the log source identifier in the following format:
<MOMDatabase>@<MOMDatabase Server IP or Host Name>
Where:
• <MOMDatabase> is the database name, as entered in the Database Name parameter.
• <MOMDatabase Server IP or Host Name> is the host name or IP address for this log source,as entered in the IP or Host name parameter.
Log Source Identifier
From the list, selectMSDE.Database Type
TypeOnePoint as the name of the Microsoft Operations Manager database.Database Name
Type the IP address or host name of the Microsoft Operations Manager SQL Server.IP or Hostname
Type the port number that is used by the database server. The default port for MSDE is 1433.
The JDBC configuration portmustmatch the listener port of theMicrosoftOperationsManagerdatabase. The Microsoft Operations Manager databasemust have incoming TCP connectionsthat are enabled to communicate with JSA.
If you define aDatabase InstancewhenMSDE is used as the database type, youmust leave thePort parameter blank in your configuration.
Port
Type the user name that is required to access the database.Username
Type the password that is required to access the database. The password can be up to 255characters in length.
Password
Confirm the password that is required to access the database. The confirmation passwordmust be identical to the password entered in the Password parameter.
Confirm Password
If you selectMSDE as theDatabaseType and the database is configured forWindows, youmustdefine theWindow Authentication Domain. Otherwise, leave this field blank.
Authentication Domain
Optional. Type the database instance, if you havemultiple SQL server instances on yourdatabase server.
If you use a non-standard port in your database configuration, or block access to port 1434 forSQL database resolution, youmust leave the Database Instance parameter blank in yourconfiguration.
Database Instance
Type SDKEventView as the name of the table or view that includes the event records.Table Name
731Copyright © 2018, Juniper Networks, Inc.
Chapter 79: Microsoft
Table 236: Microsoft OperationsManager JDBC Parameters (continued)
DescriptionParameter
Type * for all fields from the table or view.
You can use a comma-separated list to define specific fields from tables or views, if you needit for your configuration. The list must contain the field that is defined in the Compare Fieldparameter. The comma-separated list can be up to 255 alphanumeric characters in length.The list can include the following special characters: dollar sign ($), number sign (#), underscore(_), en dash (-), and period(.).
Select List
TypeTimeStored as the compare field. The compare field is used to identify newevents addedbetween queries to the table.
Compare Field
Optional. Type the start date and time for database polling.
TheStartDateandTimeparametermustbe formattedasyyyy-MM-ddHH:mmwithHHspecifiedbyusinga24-hour clock. If the start dateor time is clear, pollingbegins immediatelyand repeatsat the specified polling interval.
Start Date and Time
Select this check box to use prepared statements.
Prepared statements allow the JDBC protocol source to set up the SQL statement one time,then run theSQLstatementmany timeswithdifferentparameters. For securityandperformancereasons, it is suggested that you use prepared statements.
Clearing this check box requires you to use an alternative method of querying that does notuse pre-compiled statements.
Use Prepared Statements
Type the polling interval, which is the amount of time between queries to the event table. Thedefault polling interval is 10 seconds.
Youcandefinea longerpolling interval byappendingH for hoursorM forminutes to thenumericvalue. Themaximum polling interval is 1 week in any time format. Numeric values that areentered without an H or M poll in seconds.
Polling Interval
Type the number of Events Per Second (EPS) that you do not want this protocol to exceed.The default value is 20000 EPS.
EPS Throttle
Clear the Use Named Pipe Communications check box.
WhenyouuseaNamedPipe connection, theuser nameandpasswordmustbe theappropriateWindows authentication user name and password and not the database user name andpassword. Also, youmust use the default Named Pipe.
Use Named PipeCommunication
If you select the Use Named Pipe Communication check box, the Database Cluster Nameparameter is displayed. If you are running your SQL server in a cluster environment, define thecluster name to ensure Named Pipe communication functions properly.
Database Cluster Name
NOTE: Selecting a value greater than 5 for the Credibility parameter
weights your Microsoft Operations Manager log source with a higherimportance compared to other log sources in JSA.
Copyright © 2018, Juniper Networks, Inc.732
Juniper Secure Analytics Configuring DSMs Guide
7. Click Save.
8. On the Admin tab, click Deploy Changes.
Microsoft SharePoint
TheMicrosoftSharePointDSMfor JSAcollectsaudit events fromtheSharePointdatabase
by using JDBC to poll an SQL database for audit events.
Audit events can track changes that aremade to sites, files, and content that ismanaged
by Microsoft SharePoint.
Microsoft SharePoint audit events include the following elements:
• Site name and the source fromwhich the event originated
• Item ID, item name, and event location
• User ID associated with the event
• Event type, time stamp, and event action
Two log source configurations can be used to collect Microsoft SharePoint database
events.
1. Create a database view in your SharePoint database to poll for events with the JDBC
protocol. See “Configuring a Database View to Collect Audit Events” on page 733.
2. Create a JDBC log source and use predefined database queries to collect SharePoint
events. This option does not require an administrator to create database view. See
“Configuring a SharePoint Log Source for Predefined DatabaseQueries” on page 738.
NOTE: The collection ofMicrosoft Sharepoint events nowuses a predefinedquery, instead of requiring an administrator to create a database view. If youareanadministrator, youmightwant toupdateexistingMicrosoftSharepointlog sources so that they use the Microsoft Sharepoint predefined query.
• Configuring a Database View to Collect Audit Events on page 733
• Configuring Microsoft SharePoint Audit Events on page 734
• Creating a Database View for Microsoft SharePoint on page 734
• Configuring a SharePoint Log Source for a Database View on page 735
• Configuring a SharePoint Log Source for Predefined Database Queries on page 738
Configuring a Database View to Collect Audit Events
Before you can integrateMicrosoft SharePoint eventswith JSA, youmust complete three
tasks.
Use the following procedure:
733Copyright © 2018, Juniper Networks, Inc.
Chapter 79: Microsoft
1. Configure the audit events you want to collect for Microsoft SharePoint.
2. Create an SQL database view for JSA in Microsoft SharePoint.
3. Configure a log source to collect audit events fromMicrosoft SharePoint.
NOTE: Ensure that firewall rules are not blocking the communicationbetween JSA and the database associated with Microsoft SharePoint.
ConfiguringMicrosoft SharePoint Audit Events
The audit settings for Microsoft SharePoint give you the option to define what events
are tracked for each site that is managed by Microsoft SharePoint.
1. Log in to your Microsoft SharePoint site.
2. From the Site Actions list, select Site Settings.
3. From the Site Collection Administration list, click Site collection audit settings.
4. From the Documents and Items section, select a check box for each document and
item audit event you want to audit.
5. From the Lists, Libraries, and Sites section, select a check box for each content audit
event you want to enable.
6. ClickOK.
You are now ready to create a database view for JSA to poll Microsoft SharePoint
events.
Creating a Database View for Microsoft SharePoint
Microsoft SharePoint uses SQL Server Management Studio (SSMS) to manage the
SharePoint SQL databases. To collect audit event data, youmust create a database
view on your Microsoft SharePoint server that is accessible to JSA.
1. Log in to the system that hosts your Microsoft SharePoint SQL database.
2. From the Startmenu, select Run.
3. Type the following command:
ssms
Copyright © 2018, Juniper Networks, Inc.734
Juniper Secure Analytics Configuring DSMs Guide
4. ClickOK.
The Microsoft SQL Server 2008 displays the Connect to Serverwindow.
5. Log in to your Microsoft SharePoint database.
6. Click Connect.
7. FromtheObjectExplorer for yourSharePointdatabase, clickDatabases>WSS_Logging
>Views.
8. From the navigation menu, click NewQuery.
9. In theQuerypane, type the followingTransact-SQLstatement tocreate theAuditEvent
database view:
create view dbo.AuditEvent as select a.siteID
,a.ItemId ,a.ItemType ,u.tp_Title as "User" ,a.MachineName ,a.MachineIp ,a.DocLocation ,a.LocationType ,a.Occurred as "EventTime" ,a.Event as "EventID" ,a.EventName ,a.EventSource ,a.SourceName ,a.EventData
from WSS_Content.dbo.AuditData a, WSS_Content.dbo.UserInfo u where a.UserId = u.tp_ID and a.SiteId = u.tp_SiteID;
10. From theQuery pane, right-click and select Execute.
If the view is created, the following message is displayed in the results pane:
Command(s) completed successfully.
The dbo.AuditEvent view is created. You are now ready to configure the log source in
JSA to poll the view for audit events.
Configuring a SharePoint Log Source for a Database View
JSA requires a user account with the proper credentials to access the view you created
in the Microsoft SharePoint database.
To successfully poll for audit data from the Microsoft SharePoint database, youmust
create a new user or provide the log source with existing user credentials to read from
the AuditEvent view. For more information on creating a user account, see your vendor
documentation.
To configure JSA to receive SharePoint events:
1. Click the Admin tab.
2. On the navigation menu, click Data Sources.
735Copyright © 2018, Juniper Networks, Inc.
Chapter 79: Microsoft
3. Click the Log Sources icon.
4. In the Log Source Name field, type a name for the log source.
5. In the Log Source Description field, type a description for the log source.
6. From the Log Source Type list, select Microsoft SharePoint.
7. From the Protocol Configuration list, select JDBC.
8. Configure the following values:
Table 237: Microsoft SharePoint JDBC Parameters
DescriptionParameter
Type the identifier for the log source. Type the log source identifier in the following format:
<SharePoint Database>@<SharePoint Database Server IP or Host Name>
Where:
• <SharePoint Database> is the database name, as entered in the Database Name parameter.
• <SharePoint Database Server IP or Host Name> is the host name or IP address for this logsource, as entered in the IP or Hostname parameter.
Log Source Identifier
From the list, selectMSDE.Database Type
TypeWSS_Logging as the name of the Microsoft SharePoint database.Database Name
Type the IP address or host name of the Microsoft SharePoint SQL Server.IP or Hostname
Type the port number that is used by the database server. The default port for MSDE is 1433.
The JDBCconfigurationportmustmatch the listenerport of theMicrosoftSharePointdatabase.The Microsoft SharePoint databasemust have incoming TCP connections that are enabled tocommunicate with JSA.
If you define a Database Instancewhen you useMSDE as the database type, youmust leavethe Port parameter blank in your configuration.
Port
Type the user name the log source can use to access the Microsoft SharePoint database.Username
Type the password the log source can use to access the Microsoft SharePoint database.
The password can be up to 255 characters in length.
Password
Confirm the password that is required to access the database. The confirmation passwordmust be identical to the password entered in the Password field.
Confirm Password
If you selectMSDE as theDatabaseType and the database is configured forWindows, youmustdefine theWindow Authentication Domain. Otherwise, leave this field blank.
Authentication Domain
Copyright © 2018, Juniper Networks, Inc.736
Juniper Secure Analytics Configuring DSMs Guide

Table 237: Microsoft SharePoint JDBC Parameters (continued)
DescriptionParameter
Optional. Type the database instance, if you havemultiple SQL server instances on yourdatabase server.
If you use a non-standard port in your database configuration, or you block access to port 1434for SQL database resolution, youmust leave the Database Instance parameter blank in yourconfiguration.
Database Instance
Type AuditEvent as the name of the table or view that includes the event records.Table Name
Type * for all fields from the table or view.
You can use a comma-separated list to define specific fields from tables or views, if it is neededfor your configuration. The list must contain the field that is defined in the Compare Fieldparameter. The comma-separated list can be up to 255 alphanumeric characters in length.The list can include the following special characters: dollar sign ($), number sign (#), underscore(_), en dash (-), and period(.).
Select List
Type EventTime as the compare field. The compare field is used to identify new events addedbetween queries to the table.
Compare Field
Optional. Type the start date and time for database polling.
The Start Date and Time parameter must be formatted as yyyy-MM-dd HH: mmwith HHspecified by using a 24-hour clock. If the start date or time is clear, polling begins immediatelyand repeats at the specified polling interval.
Start Date and Time
Select the Use Prepared Statements check box.
Prepared statements allow the JDBC protocol source to set up the SQL statement one time,then run theSQLstatementmany timeswithdifferentparameters. For securityandperformancereasons, it is suggested that you use prepared statements.
Clearing this check box requires you to use an alternative method of querying that does notuse pre-compiled statements.
Use Prepared Statements
Type the polling interval, which is the amount of time between queries to the AuditEvent viewyou created. The default polling interval is 10 seconds.
Youcandefinea longerpolling interval byappendingH for hoursorM forminutes to thenumericvalue. Themaximum polling interval is 1 week in any time format. Numeric values that areentered without an H or M poll in seconds.
Polling Interval
Type the number of Events Per Second (EPS) that you do not want this protocol to exceed.The default value is 20000 EPS.
EPS Throttle
Clear the Use Named Pipe Communications check box.
WhenyouuseaNamedPipe connection, theuser nameandpasswordmustbe theappropriateWindows authentication user name and password and not the database user name andpassword. Also, youmust use the default Named Pipe.
Use Named PipeCommunication
737Copyright © 2018, Juniper Networks, Inc.
Chapter 79: Microsoft
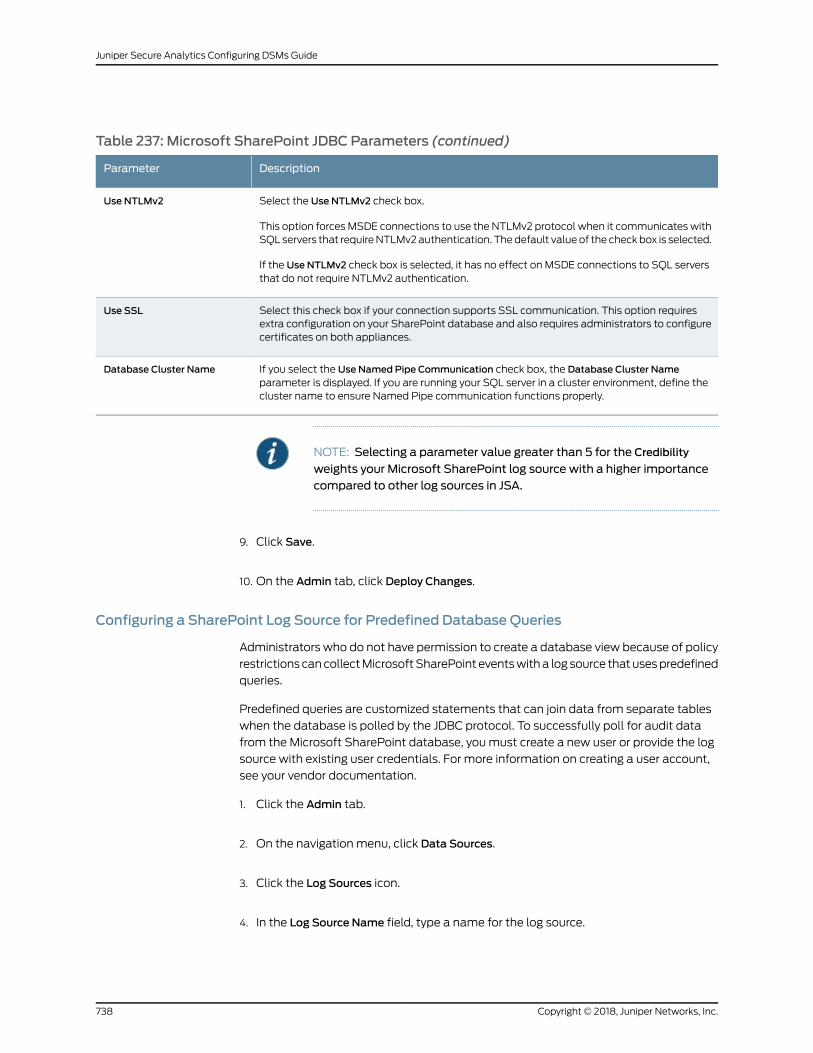
Table 237: Microsoft SharePoint JDBC Parameters (continued)
DescriptionParameter
Select the Use NTLMv2 check box.
This option forces MSDE connections to use the NTLMv2 protocol when it communicates withSQL servers that requireNTLMv2authentication. Thedefault valueof the checkbox is selected.
If the Use NTLMv2 check box is selected, it has no effect on MSDE connections to SQL serversthat do not require NTLMv2 authentication.
Use NTLMv2
Select this check box if your connection supports SSL communication. This option requiresextra configuration on your SharePoint database and also requires administrators to configurecertificates on both appliances.
Use SSL
If you select the Use Named Pipe Communication check box, the Database Cluster Nameparameter is displayed. If you are running your SQL server in a cluster environment, define thecluster name to ensure Named Pipe communication functions properly.
Database Cluster Name
NOTE: Selecting a parameter value greater than 5 for the Credibility
weights your Microsoft SharePoint log source with a higher importancecompared to other log sources in JSA.
9. Click Save.
10. On the Admin tab, click Deploy Changes.
Configuring a SharePoint Log Source for Predefined Database Queries
Administrators who do not have permission to create a database view because of policy
restrictionscancollectMicrosoftSharePoint eventswitha log source thatusespredefined
queries.
Predefined queries are customized statements that can join data from separate tables
when the database is polled by the JDBC protocol. To successfully poll for audit data
from the Microsoft SharePoint database, youmust create a new user or provide the log
source with existing user credentials. For more information on creating a user account,
see your vendor documentation.
1. Click the Admin tab.
2. On the navigation menu, click Data Sources.
3. Click the Log Sources icon.
4. In the Log Source Name field, type a name for the log source.
Copyright © 2018, Juniper Networks, Inc.738
Juniper Secure Analytics Configuring DSMs Guide
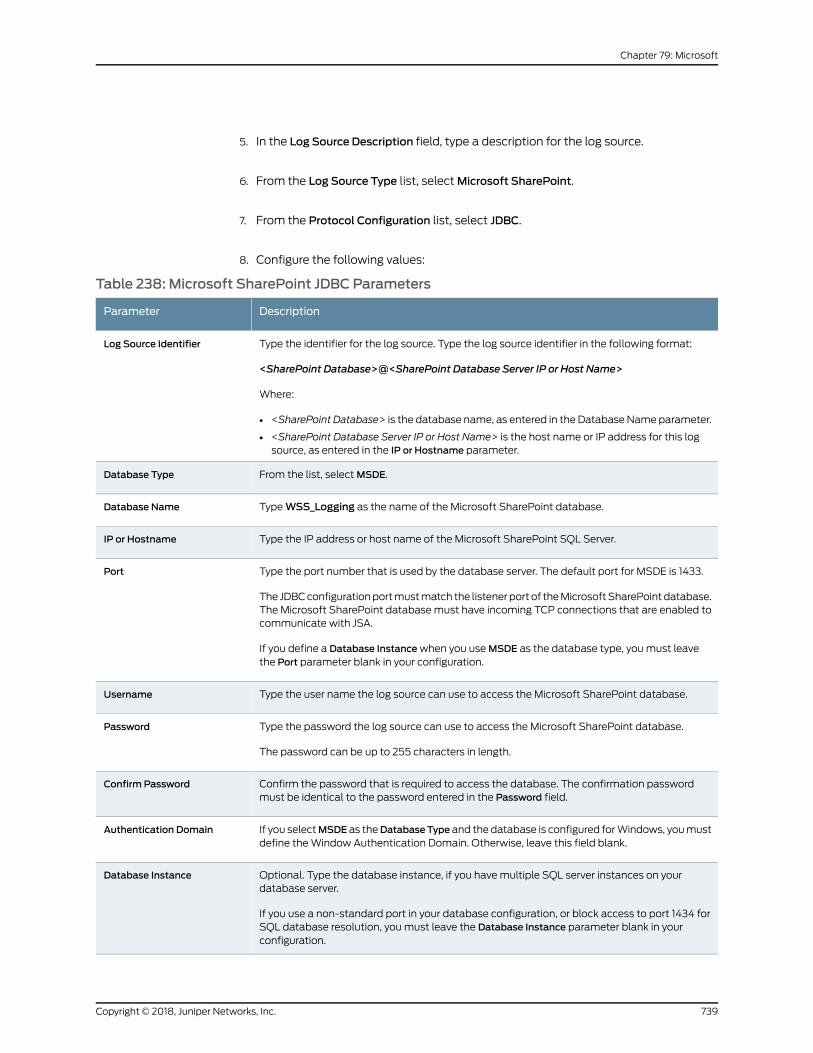
5. In the Log Source Description field, type a description for the log source.
6. From the Log Source Type list, selectMicrosoft SharePoint.
7. From the Protocol Configuration list, select JDBC.
8. Configure the following values:
Table 238: Microsoft SharePoint JDBC Parameters
DescriptionParameter
Type the identifier for the log source. Type the log source identifier in the following format:
<SharePoint Database>@<SharePoint Database Server IP or Host Name>
Where:
• <SharePoint Database> is the database name, as entered in the Database Name parameter.
• <SharePoint Database Server IP or Host Name> is the host name or IP address for this logsource, as entered in the IP or Hostname parameter.
Log Source Identifier
From the list, selectMSDE.Database Type
TypeWSS_Logging as the name of the Microsoft SharePoint database.Database Name
Type the IP address or host name of the Microsoft SharePoint SQL Server.IP or Hostname
Type the port number that is used by the database server. The default port for MSDE is 1433.
The JDBCconfigurationportmustmatch the listenerport of theMicrosoftSharePointdatabase.The Microsoft SharePoint databasemust have incoming TCP connections that are enabled tocommunicate with JSA.
If you define a Database Instancewhen you useMSDE as the database type, youmust leavethe Port parameter blank in your configuration.
Port
Type the user name the log source can use to access the Microsoft SharePoint database.Username
Type the password the log source can use to access the Microsoft SharePoint database.
The password can be up to 255 characters in length.
Password
Confirm the password that is required to access the database. The confirmation passwordmust be identical to the password entered in the Password field.
Confirm Password
If you selectMSDE as theDatabaseType and the database is configured forWindows, youmustdefine theWindow Authentication Domain. Otherwise, leave this field blank.
Authentication Domain
Optional. Type the database instance, if you havemultiple SQL server instances on yourdatabase server.
If you use a non-standard port in your database configuration, or block access to port 1434 forSQL database resolution, youmust leave the Database Instance parameter blank in yourconfiguration.
Database Instance
739Copyright © 2018, Juniper Networks, Inc.
Chapter 79: Microsoft
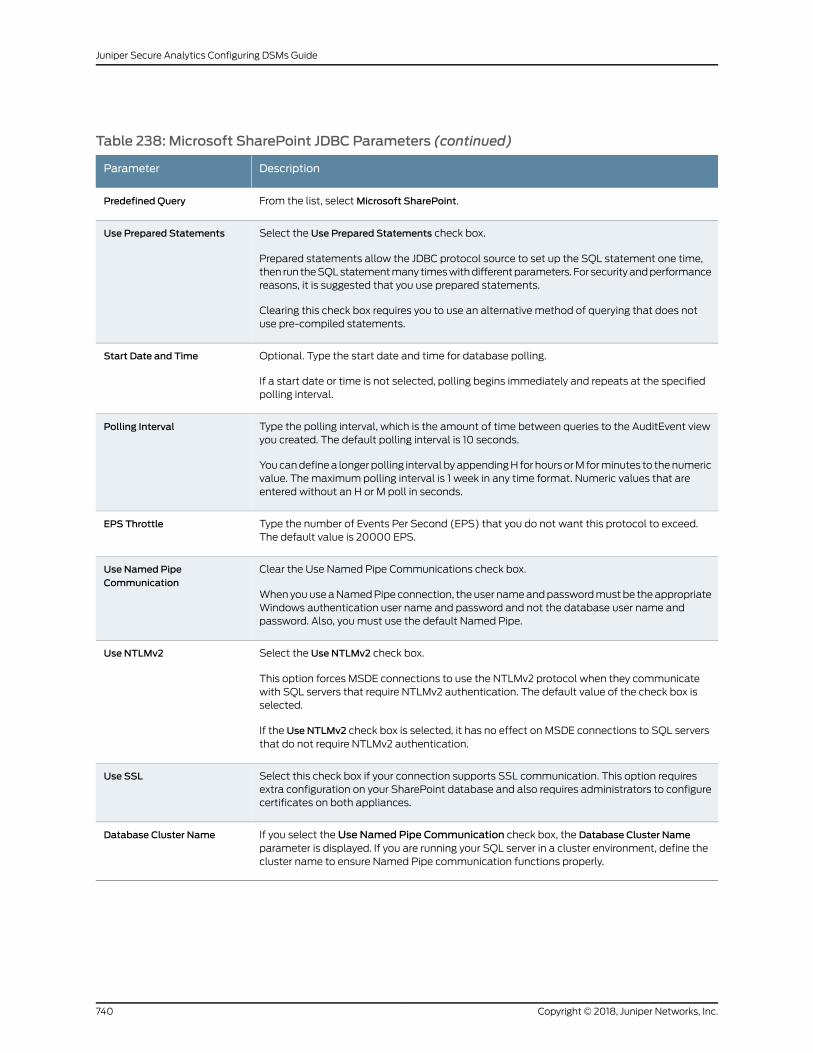
Table 238: Microsoft SharePoint JDBC Parameters (continued)
DescriptionParameter
From the list, selectMicrosoft SharePoint.Predefined Query
Select the Use Prepared Statements check box.
Prepared statements allow the JDBC protocol source to set up the SQL statement one time,then run theSQLstatementmany timeswithdifferentparameters. For securityandperformancereasons, it is suggested that you use prepared statements.
Clearing this check box requires you to use an alternative method of querying that does notuse pre-compiled statements.
Use Prepared Statements
Optional. Type the start date and time for database polling.
If a start date or time is not selected, polling begins immediately and repeats at the specifiedpolling interval.
Start Date and Time
Type the polling interval, which is the amount of time between queries to the AuditEvent viewyou created. The default polling interval is 10 seconds.
Youcandefinea longerpolling interval byappendingH for hoursorM forminutes to thenumericvalue. Themaximum polling interval is 1 week in any time format. Numeric values that areentered without an H or M poll in seconds.
Polling Interval
Type the number of Events Per Second (EPS) that you do not want this protocol to exceed.The default value is 20000 EPS.
EPS Throttle
Clear the Use Named Pipe Communications check box.
WhenyouuseaNamedPipe connection, theuser nameandpasswordmustbe theappropriateWindows authentication user name and password and not the database user name andpassword. Also, youmust use the default Named Pipe.
Use Named PipeCommunication
Select the Use NTLMv2 check box.
This option forces MSDE connections to use the NTLMv2 protocol when they communicatewith SQL servers that require NTLMv2 authentication. The default value of the check box isselected.
If the Use NTLMv2 check box is selected, it has no effect on MSDE connections to SQL serversthat do not require NTLMv2 authentication.
Use NTLMv2
Select this check box if your connection supports SSL communication. This option requiresextra configuration on your SharePoint database and also requires administrators to configurecertificates on both appliances.
Use SSL
If you select theUse Named Pipe Communication check box, the Database Cluster Nameparameter is displayed. If you are running your SQL server in a cluster environment, define thecluster name to ensure Named Pipe communication functions properly.
Database Cluster Name
Copyright © 2018, Juniper Networks, Inc.740
Juniper Secure Analytics Configuring DSMs Guide
NOTE: Selecting a parameter value greater than 5 for the Credibility
weights your Microsoft SharePoint log source with a higher importancecompared to other log sources in JSA.
9. Click Save.
10. On the Admin tab, click Deploy Changes.
RelatedDocumentation
Microsoft System Center Operations Manager on page 741•
• Microsoft Windows Security Event Log on page 744
• Microsoft Operations Manager on page 730
Microsoft SystemCenter OperationsManager
A JSAMicrosoft SystemCenterOperationsManager (SCOM)DSMaccepts SCOMevents
by polling the OperationsManager database and this allows JSA to record the relevant
events.
Before you configure JSA to integrate with the Microsoft SCOM, check that a database
user account is configured with appropriate permissions to access the SCOM
OperationsManager SQL Server database. The appropriate authentication modemight
need to be enabled in the Security settings of the SQL Server properties. For more
information, see your Microsoft SCOM documentation.
NOTE: Ensure thatno firewall rulesareblocking thecommunicationbetweenJSA and the SQL Server database that is associated with SCOM. For SCOMinstallations that use a separate, dedicated computer for the SQL Serverdatabase, the EventView view is queried on the database system, not thesystem that runs SCOM.
To configure JSA to receive SCOM events:
1. Click the Admin tab.
2. On the navigation menu, click Data Sources.
The Data Sources pane is displayed.
3. Click the Log Sources icon.
The Log Sourceswindow is displayed.
741Copyright © 2018, Juniper Networks, Inc.
Chapter 79: Microsoft
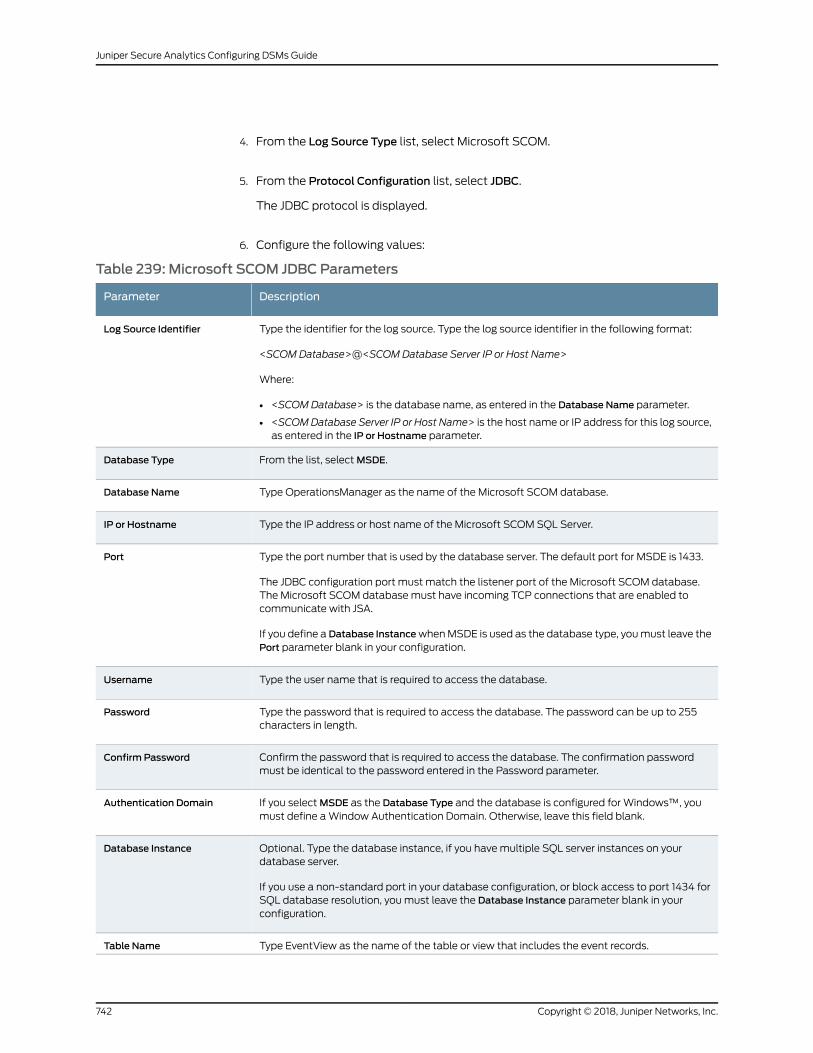
4. From the Log Source Type list, select Microsoft SCOM.
5. From the Protocol Configuration list, select JDBC.
The JDBC protocol is displayed.
6. Configure the following values:
Table 239: Microsoft SCOM JDBC Parameters
DescriptionParameter
Type the identifier for the log source. Type the log source identifier in the following format:
<SCOM Database>@<SCOM Database Server IP or Host Name>
Where:
• <SCOM Database> is the database name, as entered in the Database Name parameter.
• <SCOMDatabase Server IP or Host Name> is the host name or IP address for this log source,as entered in the IP or Hostname parameter.
Log Source Identifier
From the list, selectMSDE.Database Type
Type OperationsManager as the name of the Microsoft SCOM database.Database Name
Type the IP address or host name of the Microsoft SCOM SQL Server.IP or Hostname
Type the port number that is used by the database server. The default port for MSDE is 1433.
The JDBC configuration port must match the listener port of the Microsoft SCOM database.The Microsoft SCOM databasemust have incoming TCP connections that are enabled tocommunicate with JSA.
If you define aDatabase InstancewhenMSDE is used as the database type, youmust leave thePort parameter blank in your configuration.
Port
Type the user name that is required to access the database.Username
Type the password that is required to access the database. The password can be up to 255characters in length.
Password
Confirm the password that is required to access the database. The confirmation passwordmust be identical to the password entered in the Password parameter.
Confirm Password
If you selectMSDE as the Database Type and the database is configured for Windows™, youmust define aWindow Authentication Domain. Otherwise, leave this field blank.
Authentication Domain
Optional. Type the database instance, if you havemultiple SQL server instances on yourdatabase server.
If you use a non-standard port in your database configuration, or block access to port 1434 forSQL database resolution, youmust leave the Database Instance parameter blank in yourconfiguration.
Database Instance
Type EventView as the name of the table or view that includes the event records.Table Name
Copyright © 2018, Juniper Networks, Inc.742
Juniper Secure Analytics Configuring DSMs Guide

Table 239: Microsoft SCOM JDBC Parameters (continued)
DescriptionParameter
Type * for all fields from the table or view.
You can use a comma-separated list to define specific fields from tables or views, if you needit for your configuration. The list must contain the field that is defined in the Compare Fieldparameter. The comma-separated list can be up to 255 alphanumeric characters in length.The list can include the following special characters: dollar sign ($), number sign (#), underscore(_), en dash (-), and period(.).
Select List
Type TimeAdded as the compare field. The compare field is used to identify new events addedbetween queries to the table.
Compare Field
Optional. Type the start date and time for database polling.
TheStartDateandTimeparametermustbe formattedasyyyy-MM-ddHH:mmwithHHspecifiedby using the 24-hour clock. If the start date or time is clear, polling begins immediately andrepeats at the specified polling interval.
Start Date and Time
Select this check box to use prepared statements.
Prepared statements allow the JDBC protocol source to set up the SQL statement one time,then run theSQLstatementmany timeswithdifferentparameters. For securityandperformancereasons, it is suggested that you use prepared statements.
Clearing this check box requires you to use an alternative method of querying that does notuse pre-compiled statements.
Use Prepared Statements
Type the polling interval, which is the amount of time between queries to the event table. Thedefault polling interval is 10 seconds.
Youcandefinea longerpolling interval byappendingH for hoursorM forminutes to thenumericvalue. Themaximum polling interval is 1 week in any time format. Numeric values that areentered without an H or M poll in seconds.
Polling Interval
Type the number of Events Per Second (EPS) that you do not want this protocol to exceed.The default value is 20000 EPS.
EPS Throttle
Clear the Use Named Pipe Communications check box.
WhenyouuseaNamedPipe connection, theuser nameandpasswordmustbe theappropriateWindows authentication user name and password and not the database user name andpassword. Also, youmust use the default Named Pipe.
Use Named PipeCommunication
If you select the Use Named Pipe Communication check box, the Database Cluster Nameparameter is displayed. If you are running your SQL server in a cluster environment, define thecluster name to ensure Named Pipe communication functions properly.
Database Cluster Name
NOTE: Selecting a value greater than 5 for the Credibility parameter
weights your Microsoft SCOM log source with a higher importancecompared to other log sources in JSA.
743Copyright © 2018, Juniper Networks, Inc.
Chapter 79: Microsoft
7. Click Save.
8. On the Admin tab, click Deploy Changes.
MicrosoftWindows Security Event Log
The JSA DSM for Microsoft Windows Security Event Log accepts syslog events from
Microsoft Windows systems.
For event collection fromMicrosoft operating systems, JSA supports the following
protocols:
• MSRPC (Microsoft Security Event Log over MSRPC)
• Syslog (Intended for Snare, BalaBit, and other third-partyWindows solutions)
• Common Event Format (CEF) is also supported.
• WMI ( Microsoft Security Event Log). This is a legacy protocol.
• WinCollect. See theWinCollect User Guide
• Enabling MSRPC onWindows Hosts on page 744
• Enabling a Snare Agent onWindows Hosts on page 748
• EnablingWMI onWindows Hosts on page 750
EnablingMSRPC onWindows Hosts
To enable communication between your Windows host and JSA over MSRPC, configure
the Remote Procedure Calls (RPC) settings on theWindows host for the Microsoft
Remote Procedure Calls (MSRPC) protocol.
Youmust be amember of the administrators group to enable communication over
MSRPC between your Windows host and the JSA appliance.
Based on performance tests on an JSA Event Processor appliance with 128 GB of RAM
and 40 cores (Intel(R) Xeon(R) CPU E5-2680 v2@ 2.80 GHz), a rate of 8500 events
per second (eps) was achieved successfully, while simultaneously receiving and
processing logs from other non-Windows systems. The log source limit is 500.
ValueSpecification
MicrosoftManufacturer
Copyright © 2018, Juniper Networks, Inc.744
Juniper Secure Analytics Configuring DSMs Guide
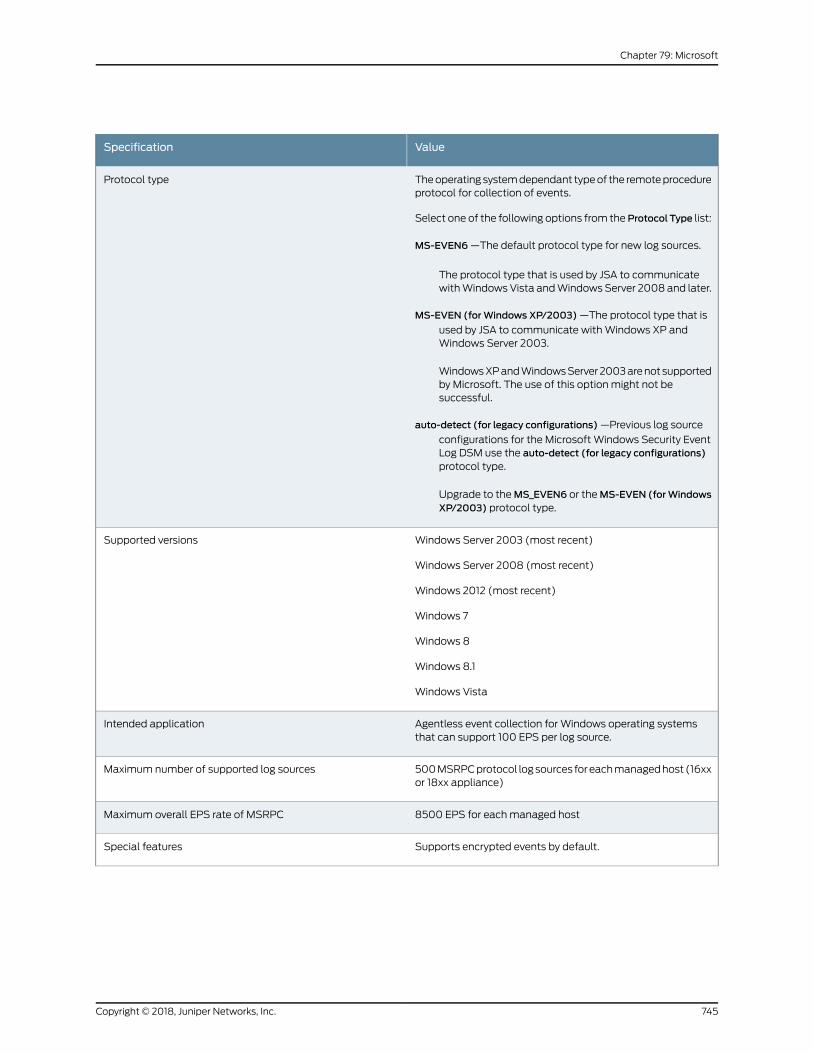
ValueSpecification
Theoperatingsystemdependant typeof the remoteprocedureprotocol for collection of events.
Select one of the following options from theProtocol Type list:
MS-EVEN6—The default protocol type for new log sources.
The protocol type that is used by JSA to communicatewithWindowsVista andWindowsServer 2008 and later.
MS-EVEN (forWindows XP/2003)—The protocol type that is
used by JSA to communicate withWindows XP andWindows Server 2003.
WindowsXPandWindowsServer2003arenotsupportedby Microsoft. The use of this option might not besuccessful.
auto-detect (for legacy configurations)—Previous log source
configurations for the Microsoft Windows Security EventLog DSM use the auto-detect (for legacy configurations)protocol type.
Upgrade to theMS_EVEN6 or theMS-EVEN (forWindowsXP/2003) protocol type.
Protocol type
Windows Server 2003 (most recent)
Windows Server 2008 (most recent)
Windows 2012 (most recent)
Windows 7
Windows 8
Windows 8.1
Windows Vista
Supported versions
Agentless event collection for Windows operating systemsthat can support 100 EPS per log source.
Intended application
500MSRPCprotocol logsources foreachmanagedhost (16xxor 18xx appliance)
Maximum number of supported log sources
8500 EPS for eachmanaged hostMaximum overall EPS rate of MSRPC
Supports encrypted events by default.Special features
745Copyright © 2018, Juniper Networks, Inc.
Chapter 79: Microsoft
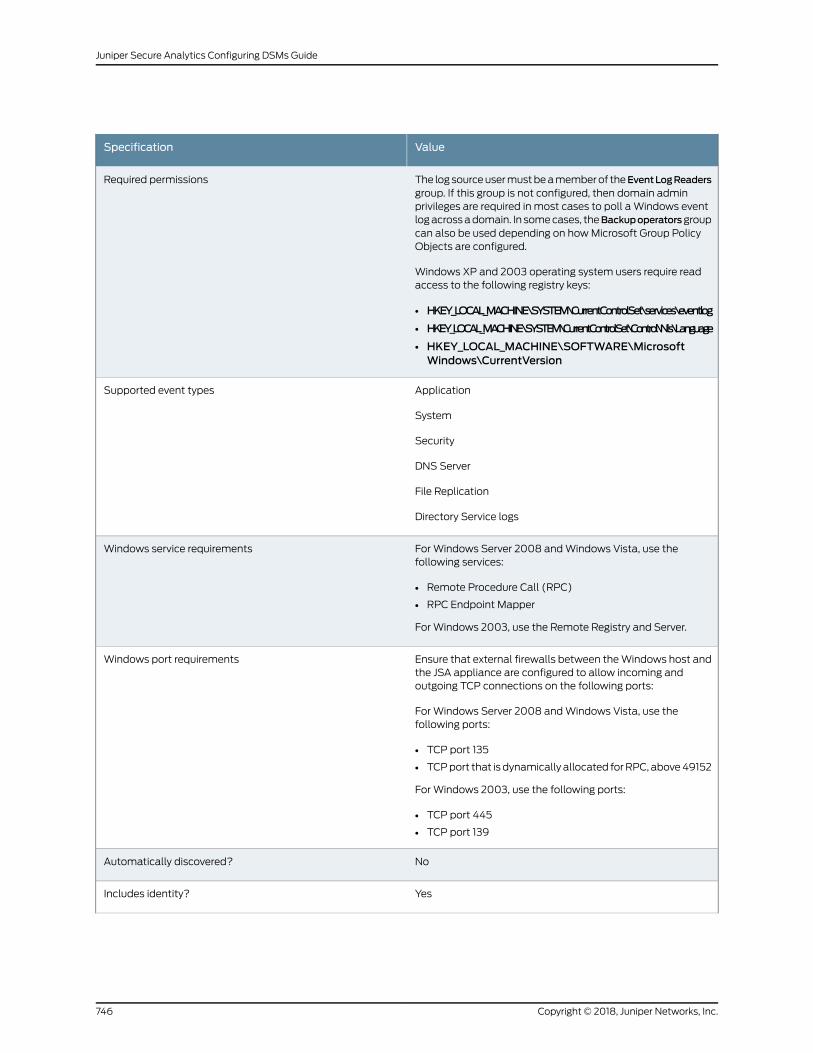
ValueSpecification
The logsourceusermustbeamemberof theEventLogReadersgroup. If this group is not configured, then domain adminprivileges are required in most cases to poll aWindows eventlogacrossadomain. In somecases, theBackupoperatorsgroupcan also be used depending on howMicrosoft Group PolicyObjects are configured.
Windows XP and 2003 operating system users require readaccess to the following registry keys:
• HKEY_LOCAL_MACHINE\SYSTEM\CurrentControlSet\services\eventlog
• HKEY_LOCAL_MACHINE\SYSTEM\CurrentControlSet\Control\Nls\Language
• HKEY_LOCAL_MACHINE\SOFTWARE\MicrosoftWindows\CurrentVersion
Required permissions
Application
System
Security
DNS Server
File Replication
Directory Service logs
Supported event types
For Windows Server 2008 andWindows Vista, use thefollowing services:
• Remote Procedure Call (RPC)
• RPC Endpoint Mapper
For Windows 2003, use the Remote Registry and Server.
Windows service requirements
Ensure that external firewalls between theWindows host andthe JSA appliance are configured to allow incoming andoutgoing TCP connections on the following ports:
For Windows Server 2008 andWindows Vista, use thefollowing ports:
• TCP port 135
• TCPport that is dynamically allocated forRPC, above49152
ForWindows 2003, use the following ports:
• TCP port 445
• TCP port 139
Windows port requirements
NoAutomatically discovered?
YesIncludes identity?
Copyright © 2018, Juniper Networks, Inc.746
Juniper Secure Analytics Configuring DSMs Guide
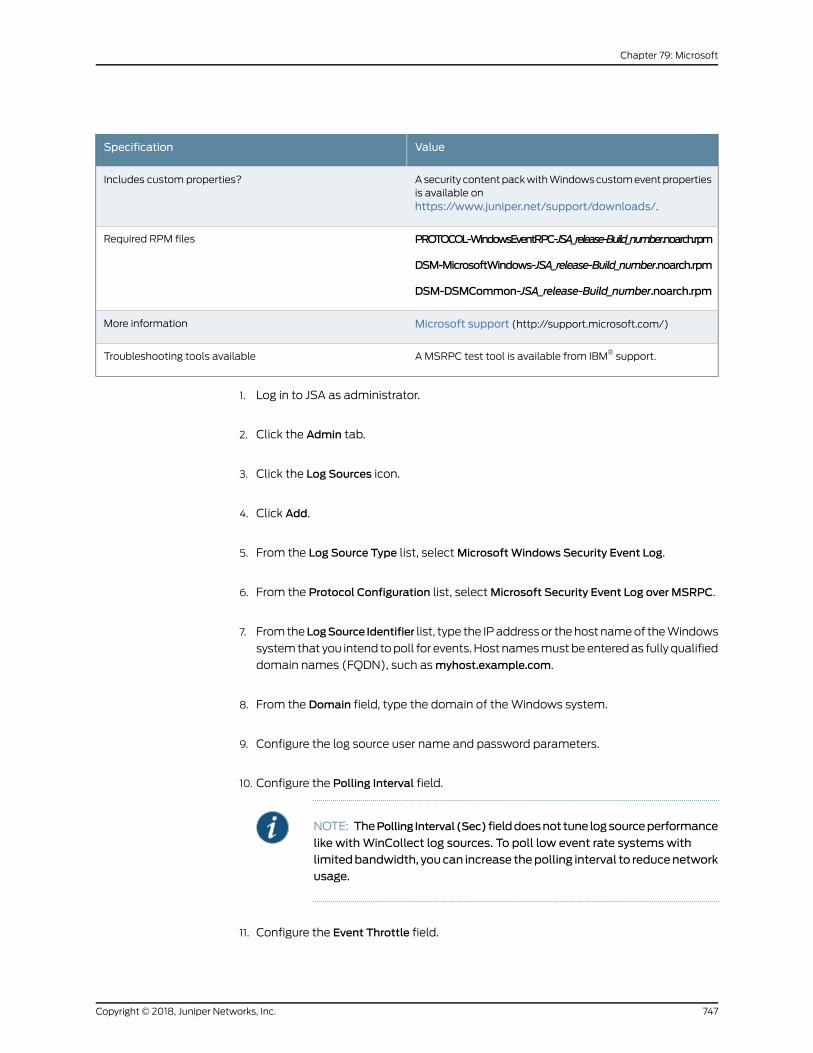
ValueSpecification
Asecurity contentpackwithWindowscustomeventpropertiesis available onhttps://www.juniper.net/support/downloads/.
Includes custom properties?
PROTOCOL-WindowsEventRPC-JSA_release-Build_number.noarch.rpm
DSM-MicrosoftWindows-JSA_release-Build_number.noarch.rpm
DSM-DSMCommon-JSA_release-Build_number.noarch.rpm
Required RPM files
Microsoft support (http://support.microsoft.com/)More information
A MSRPC test tool is available from IBM® support.Troubleshooting tools available
1. Log in to JSA as administrator.
2. Click the Admin tab.
3. Click the Log Sources icon.
4. Click Add.
5. From the Log Source Type list, selectMicrosoftWindows Security Event Log.
6. From the Protocol Configuration list, selectMicrosoft Security Event Log over MSRPC.
7. FromtheLogSource Identifier list, type the IPaddressor thehostnameof theWindows
systemthat you intend topoll for events.Hostnamesmustbeenteredas fully qualified
domain names (FQDN), such asmyhost.example.com.
8. From the Domain field, type the domain of theWindows system.
9. Configure the log source user name and password parameters.
10. Configure the Polling Interval field.
NOTE: ThePolling Interval(Sec) fielddoesnot tune logsourceperformance
like withWinCollect log sources. To poll low event rate systemswithlimitedbandwidth, youcan increase thepolling interval to reducenetworkusage.
11. Configure the Event Throttle field.
747Copyright © 2018, Juniper Networks, Inc.
Chapter 79: Microsoft
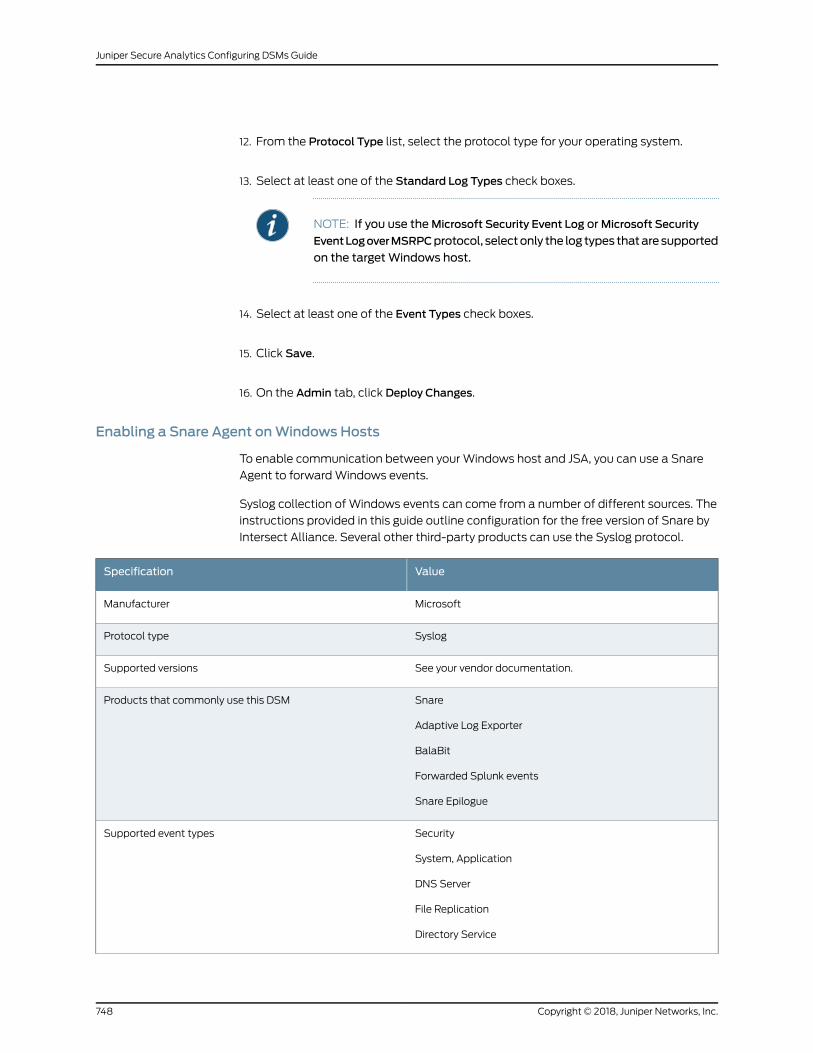
12. From the Protocol Type list, select the protocol type for your operating system.
13. Select at least one of the Standard Log Types check boxes.
NOTE: If you use theMicrosoft Security Event Log orMicrosoft Security
EventLogoverMSRPCprotocol, selectonly the log types thataresupported
on the targetWindows host.
14. Select at least one of the Event Types check boxes.
15. Click Save.
16. On the Admin tab, click Deploy Changes.
Enabling a Snare Agent onWindows Hosts
To enable communication between your Windows host and JSA, you can use a Snare
Agent to forwardWindows events.
Syslog collection ofWindows events can come from a number of different sources. The
instructions provided in this guide outline configuration for the free version of Snare by
Intersect Alliance. Several other third-party products can use the Syslog protocol.
ValueSpecification
MicrosoftManufacturer
SyslogProtocol type
See your vendor documentation.Supported versions
Snare
Adaptive Log Exporter
BalaBit
Forwarded Splunk events
Snare Epilogue
Products that commonly use this DSM
Security
System, Application
DNS Server
File Replication
Directory Service
Supported event types
Copyright © 2018, Juniper Networks, Inc.748
Juniper Secure Analytics Configuring DSMs Guide
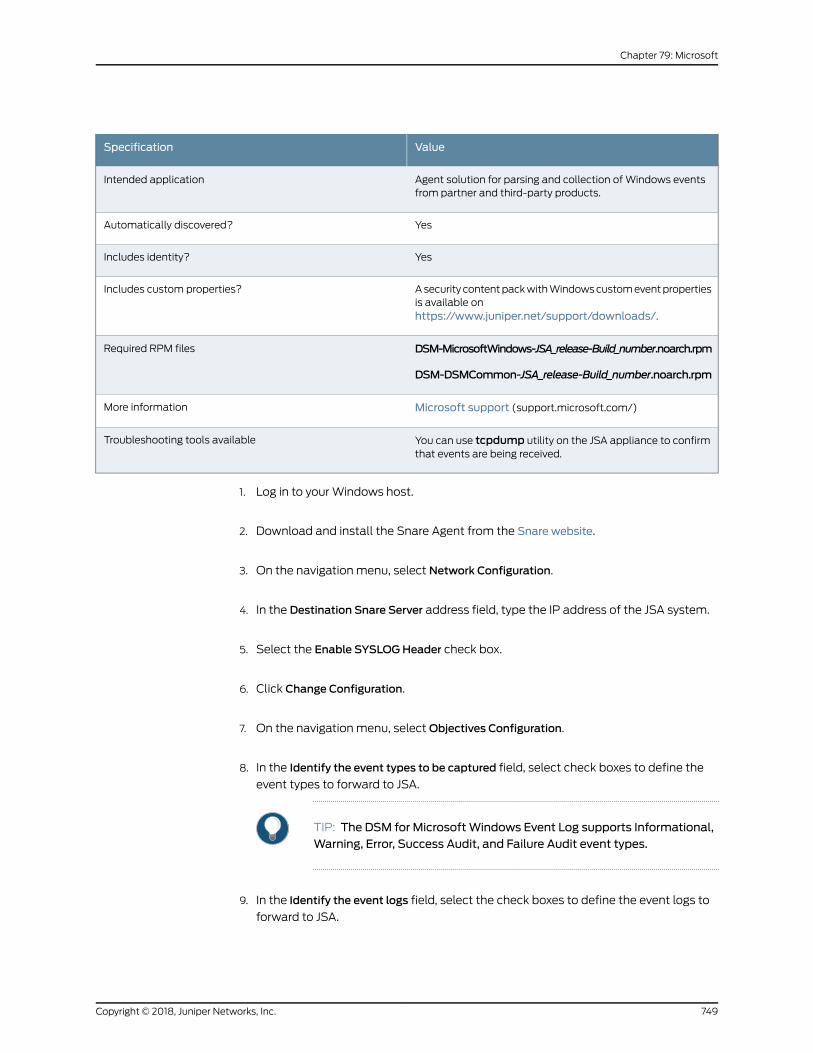
ValueSpecification
Agent solution for parsing and collection ofWindows eventsfrom partner and third-party products.
Intended application
YesAutomatically discovered?
YesIncludes identity?
Asecurity contentpackwithWindowscustomeventpropertiesis available onhttps://www.juniper.net/support/downloads/.
Includes custom properties?
DSM-MicrosoftWindows-JSA_release-Build_number.noarch.rpm
DSM-DSMCommon-JSA_release-Build_number.noarch.rpm
Required RPM files
Microsoft support (support.microsoft.com/)More information
You can use tcpdump utility on the JSA appliance to confirmthat events are being received.
Troubleshooting tools available
1. Log in to your Windows host.
2. Download and install the Snare Agent from the Snare website.
3. On the navigation menu, select Network Configuration.
4. In the Destination Snare Server address field, type the IP address of the JSA system.
5. Select the Enable SYSLOGHeader check box.
6. Click Change Configuration.
7. On the navigation menu, selectObjectives Configuration.
8. In the Identify the event types to be captured field, select check boxes to define the
event types to forward to JSA.
TIP: The DSM for MicrosoftWindows Event Log supports Informational,Warning, Error, Success Audit, and Failure Audit event types.
9. In the Identify the event logs field, select the check boxes to define the event logs to
forward to JSA.
749Copyright © 2018, Juniper Networks, Inc.
Chapter 79: Microsoft
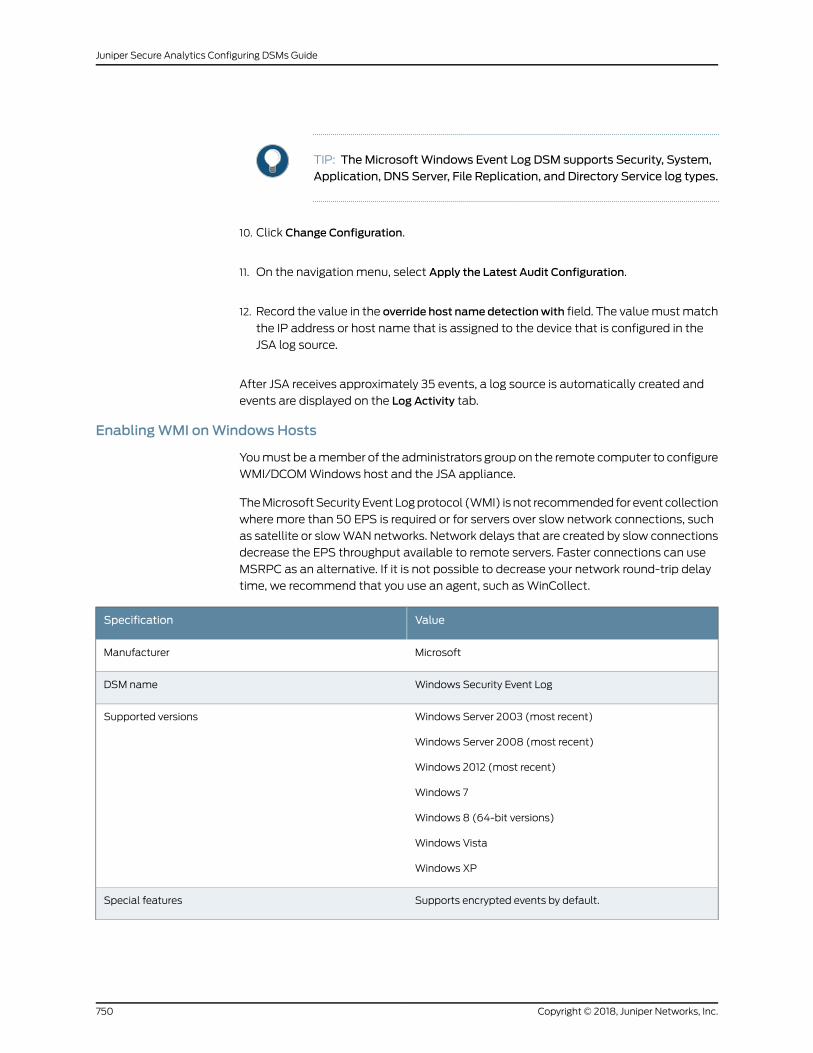
TIP: TheMicrosoftWindows Event Log DSM supports Security, System,Application, DNS Server, File Replication, and Directory Service log types.
10. Click Change Configuration.
11. On the navigation menu, select Apply the Latest Audit Configuration.
12. Record the value in the override host namedetectionwith field. The valuemustmatch
the IP address or host name that is assigned to the device that is configured in the
JSA log source.
After JSA receives approximately 35 events, a log source is automatically created and
events are displayed on the Log Activity tab.
EnablingWMI onWindows Hosts
Youmust be amember of the administrators group on the remote computer to configure
WMI/DCOMWindows host and the JSA appliance.
TheMicrosoftSecurityEventLogprotocol (WMI) is not recommended for event collection
where more than 50 EPS is required or for servers over slow network connections, such
as satellite or slowWAN networks. Network delays that are created by slow connections
decrease the EPS throughput available to remote servers. Faster connections can use
MSRPC as an alternative. If it is not possible to decrease your network round-trip delay
time, we recommend that you use an agent, such asWinCollect.
ValueSpecification
MicrosoftManufacturer
Windows Security Event LogDSM name
Windows Server 2003 (most recent)
Windows Server 2008 (most recent)
Windows 2012 (most recent)
Windows 7
Windows 8 (64-bit versions)
Windows Vista
Windows XP
Supported versions
Supports encrypted events by default.Special features
Copyright © 2018, Juniper Networks, Inc.750
Juniper Secure Analytics Configuring DSMs Guide
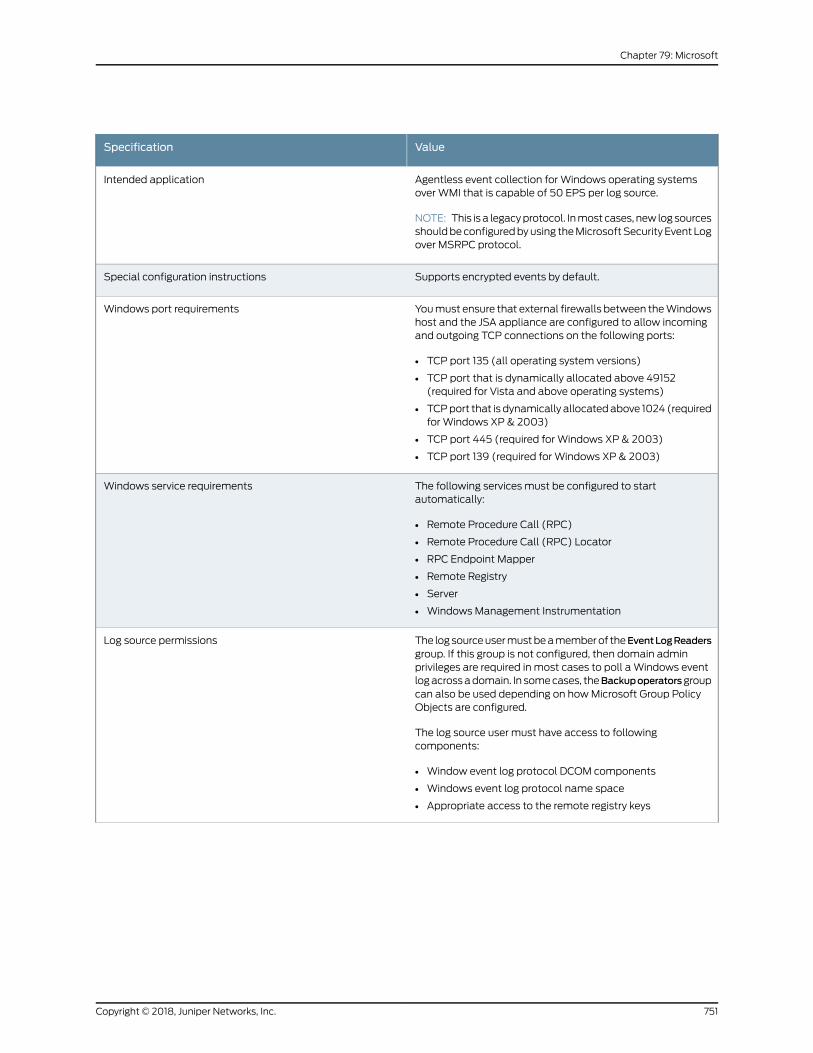
ValueSpecification
Agentless event collection for Windows operating systemsover WMI that is capable of 50 EPS per log source.
NOTE: This is a legacyprotocol. Inmost cases, new logsourcesshouldbeconfiguredbyusing theMicrosoftSecurity Event Logover MSRPC protocol.
Intended application
Supports encrypted events by default.Special configuration instructions
Youmust ensure that external firewalls between theWindowshost and the JSA appliance are configured to allow incomingand outgoing TCP connections on the following ports:
• TCP port 135 (all operating system versions)
• TCP port that is dynamically allocated above 49152(required for Vista and above operating systems)
• TCPport that is dynamically allocatedabove 1024 (requiredfor Windows XP & 2003)
• TCP port 445 (required for Windows XP & 2003)
• TCP port 139 (required for Windows XP & 2003)
Windows port requirements
The following services must be configured to startautomatically:
• Remote Procedure Call (RPC)
• Remote Procedure Call (RPC) Locator
• RPC Endpoint Mapper
• Remote Registry
• Server
• Windows Management Instrumentation
Windows service requirements
The logsourceusermustbeamemberof theEventLogReadersgroup. If this group is not configured, then domain adminprivileges are required in most cases to poll aWindows eventlogacrossadomain. In somecases, theBackupoperatorsgroupcan also be used depending on howMicrosoft Group PolicyObjects are configured.
The log source user must have access to followingcomponents:
• Window event log protocol DCOM components
• Windows event log protocol name space
• Appropriate access to the remote registry keys
Log source permissions
751Copyright © 2018, Juniper Networks, Inc.
Chapter 79: Microsoft

ValueSpecification
Application
System
Security
DNS Server
File Replication
Directory Service logs
Supported event types
No, manual log source creation is requiredAutomatically discovered?
YesIncludes identity?
Asecurity contentpackwithWindowscustomeventpropertiesis available onhttps://www.juniper.net/support/downloads/.
Includes custom properties?
PROTOCOL-WinCollectWindowsEventLog-JSA_release-Build_number.noarch.rpm
DSM-MicrosoftWindows-JSA_release-Build_number.noarch.rpm
DSM-DSMCommon-JSA_release-Build_number.noarch.rpm
Required RPM files
Microsoft support (support.microsoft.com/)More information
Yes, aWMI test tool is available in /opt/qradar/jars.Troubleshooting tools available
1. Log in to JSA.
2. Click the Admin tab.
3. Click the Log Sources icon.
4. From the Log Source Type list, selectMicrosoftWindows Security Event Log.
5. From the Protocol Configuration list, selectMicrosoft Security Event Log.
6. FromtheLogSource Identifier list, type the IPaddressor thehostnameof theWindows
systemthat you intend topoll for events.Hostnamesmustbeenteredas fully qualified
domain names (FQDN), such asmyhost.example.com.
7. From the Domain field, type the domain of theWindows system.
8. Configure the log source user name and password parameters.
Copyright © 2018, Juniper Networks, Inc.752
Juniper Secure Analytics Configuring DSMs Guide
9. Select at least one of the Standard Log Types check boxes.
NOTE: If you use theMicrosoft Security Event Log orMicrosoft Security
EventLogoverMSRPCprotocol, selectonly the log types thataresupported
on the targetWindows host.
10. Select at least one of the Event Types check boxes.
11. Click Save.
12. On the Admin tab, click Deploy Changes.
To enable communication between your Windows host and JSA, you can useWindows
Management Instrumentation (WMI).
RelatedDocumentation
• Microsoft Operations Manager on page 730
• Microsoft SharePoint on page 733
• Microsoft System Center Operations Manager on page 741
753Copyright © 2018, Juniper Networks, Inc.
Chapter 79: Microsoft

Copyright © 2018, Juniper Networks, Inc.754
Juniper Secure Analytics Configuring DSMs Guide
CHAPTER 80
MotorolaSymbolAPMotorolaSymbolAP
• Motorola Symbol APMotorola Symbol AP on page 755
• Configuring a Log Source on page 755
• Configure Syslog Events for Motorola Symbol AP on page 756
Motorola Symbol APMotorola Symbol AP
The Motorola Symbol AP DSM for Juniper Security Analytics (JSA) records all relevant
events forwarded fromMotorola Symbol AP devices using syslog.
Configuring a Log Source
To integrate Motorola SymbolAP with JSA, youmust manually create a log source to
receive events.
JSAdoesnotautomaticallydiscoveror create logsources for syslogevents fromMotorola
SymbolAP appliances. In cases where the log source is not automatically discovered, it
is suggested that you create a log source before you forward events to JSA.
To configure a log source:
1. Log in to JSA.
2. Click the Admin tab.
3. On the navigation menu, click Data Sources.
The Data Sources pane is displayed.
4. Click the Log Sources icon.
The Log Sourceswindow is displayed.
5. Click Add.
The Add a log sourcewindow is displayed.
6. In the Log Source Name field, type a name for your log source.
755Copyright © 2018, Juniper Networks, Inc.
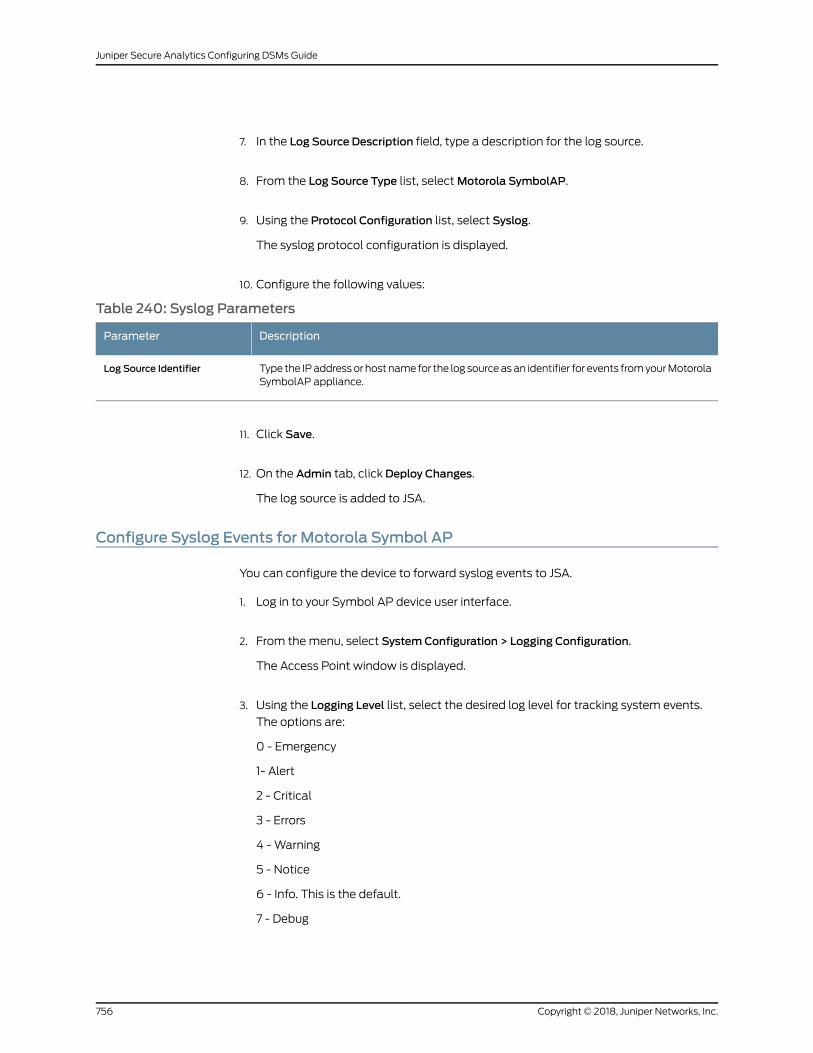
7. In the Log Source Description field, type a description for the log source.
8. From the Log Source Type list, selectMotorola SymbolAP.
9. Using the Protocol Configuration list, select Syslog.
The syslog protocol configuration is displayed.
10. Configure the following values:
Table 240: Syslog Parameters
DescriptionParameter
Type the IPaddressor host name for the log sourceasan identifier for events fromyourMotorolaSymbolAP appliance.
Log Source Identifier
11. Click Save.
12. On the Admin tab, clickDeploy Changes.
The log source is added to JSA.
Configure Syslog Events for Motorola Symbol AP
You can configure the device to forward syslog events to JSA.
1. Log in to your Symbol AP device user interface.
2. From themenu, select SystemConfiguration > Logging Configuration.
The Access Point window is displayed.
3. Using the Logging Level list, select the desired log level for tracking system events.
The options are:
0 - Emergency
1- Alert
2 - Critical
3 - Errors
4 -Warning
5 - Notice
6 - Info. This is the default.
7 - Debug
Copyright © 2018, Juniper Networks, Inc.756
Juniper Secure Analytics Configuring DSMs Guide
4. Select the Enable logging to an external syslog server check box.
5. In the Syslog Server IP Address field, type the IP address of an external syslog server,
such as JSA.
This is required to route the syslog events to JSA.
6. Click Apply.
7. Click Logout.
A confirmation window is displayed.
8. ClickOK to exit the application.
The configuration is complete. Events forwarded to JSA are displayed on the Log
Activity tab.
757Copyright © 2018, Juniper Networks, Inc.
Chapter 80: Motorola Symbol APMotorola Symbol AP

Copyright © 2018, Juniper Networks, Inc.758
Juniper Secure Analytics Configuring DSMs Guide
CHAPTER 81
Name Value Pair
• Name Value Pair on page 759
Name Value Pair
The Name Value Pair DSM gives you the option to integrate JSA with devices that might
not normally send syslog logs.
The Name Value Pair DSM provides a log format that gives you the option to send logs
to JSA. For example, for a device that does not export logs natively with syslog, you can
create a script to export the logs from a device that JSA does not support, format the
logs in the Name Value Pair log format, and send the logs to JSA using syslog.
The Name Value Pair DSM log source that is configured in JSA then receives the logs and
is able to parse the data since the logs are received in the Name Value Pair log format.
NOTE: Events for theNameValuePairDSMarenotautomaticallydiscoveredby JSA.
TheNameValuePairDSMaccepts eventsbyusing syslog. JSA recordsall relevant events.
The log format for the Name Value Pair DSMmust be a tab-separated single-line list of
Name=Parameter. The Name Value Pair DSM does not require a valid syslog header.
NOTE: TheNameValuePairDSMassumesanability tocreatecustomscriptsor thorough knowledge of your device capabilities to send logs to JSA usingsyslog in Name Value Pair format.
The Name Value Pair DSM is able to parse the following tags:
Table 241: Name Value Pair Log Format Tags
DescriptionTag
TypeNVP as theDeviceType. This identifies the log formats as a NameValue Pairlog message.
This is a required parameter andDeviceType=NVPmust be the first pair in the list.
DeviceType
759Copyright © 2018, Juniper Networks, Inc.
Table 241: Name Value Pair Log Format Tags (continued)
DescriptionTag
Type the event name that you want to use to identity the event in the Eventsinterface when using the Event Mapping functions. For more information onmapping events, see the Juniper Secure Analytics Users Guide.
This is a required parameter.
EventName
Type the event category that you want to use to identify the event in the Eventsinterface. If this value is not included in the logmessage, the valueNameValuePairvalue is used.
EventCategory
Type the source IP address for the message.SourceIp
Type the source port for the message.SourcePort
Type the source IP address for the message before Network Address Translation(NAT) occurred.
SourceIpPreNAT
Type the source IP address for the message after NAT occurs.SourceIpPostNAT
Type the source MAC address for the message.SourceMAC
Type the source port for the message before NAT occurs.SourcePortPreNAT
Type the source port for the message after NAT occurs.SourcePortPostNAT
Type the destination IP address for the message.DestinationIp
Type the destination port for the message.DestinationPort
Type the destination IP address for the message before NAT occurs.DestinationIpPreNAT
Type the IP address for the message after NAT occurs.DestinationIpPostNAT
Type the destination port for the message before NAT occurs.DestinationPortPreNAT
Type the destination port for the message after NAT occurs.DestinationPortPostNAT
Type the destination MAC address for the message.DestinationMAC
Type the time that the event was sent, according to the device. The format is:YY/MM/DD hh:mm:ss. If no specific time is provided, the syslog header orDeviceType parameter is applied.
DeviceTime
Type the user name that is associated with the event.UserName
Type the host name that is associated with the event. Typically, this parameteris only associated with identity events.
HostName
Copyright © 2018, Juniper Networks, Inc.760
Juniper Secure Analytics Configuring DSMs Guide
Table 241: Name Value Pair Log Format Tags (continued)
DescriptionTag
Type the group name that is associated with the event. Typically, this parameteris only associated with identity events.
GroupName
Type theNetBIOSnamethat is associatedwith theevent. Typically, this parameteris only associated with identity events.
NetBIOSName
Type TRUE or FALSE to indicate whether you wish this event to generate anidentity event.
An identity event is generated if the log message contains the SourceIp (if theIdentityUseSrcIpparameter is set toTRUE)orDestinationIp (if the IdentityUseSrcIpparameter is set to FALSE) and one of the following parameters: UserName,SourceMAC, HostName, NetBIOSName, or GroupName.
Identity
Type TRUE or FALSE (default).
TRUE indicates that you wish to use the source IP address for identity. FALSEindicates that you wish to use the destination IP address for identity. Thisparameter is used only if the Identity parameter is set to TRUE.
IdentityUseSrcIp
Example 1
The following example parses all fields:
DeviceType=NVP EventName=Test DestinationIpPostNAT=172.16.45.10 DeviceTime=2007/12/14 09:53:49 SourcePort=1111 Identity=FALSE SourcePortPostNAT=3333 DestinationPortPostNAT=6666 HostName=testhost DestinationIpPreNAT=172.16.10.10 SourcePortPreNAT=2222 DestinationPortPreNAT=5555 SourceMAC=AA:15:C5:BF:C4:9D SourceIp=172.16.200.10 SourceIpPostNAT=172.16.40.50 NetBIOSName=testbois DestinationMAC=00:41:C5:BF:C4:9D EventCategory=Accept DestinationPort=4444 GroupName=testgroup SourceIpPreNAT=172.16.70.87 UserName=root DestinationIp=172.16.30.30
Example 2
The following example provides identity by using the destination IP address:
<133>Apr 16 12:41:00 172.16.10.10 namevaluepair: DeviceType=NVP EventName=Test EventCategory=Accept Identity=TRUE SourceMAC=AA:15:C5:BF:C4:9D SourceIp=172.15.210.113 DestinationIp=172.16.10.10 UserName=root
Example 3
The following example provides identity by using the source IP address:
DeviceType=NVP EventName=Test EventCategory=Accept DeviceTime=2007/12/14 09:53:49 SourcePort=5014 Identity=TRUE IdentityUseSrcIp=TRUE
761Copyright © 2018, Juniper Networks, Inc.
Chapter 81: Name Value Pair
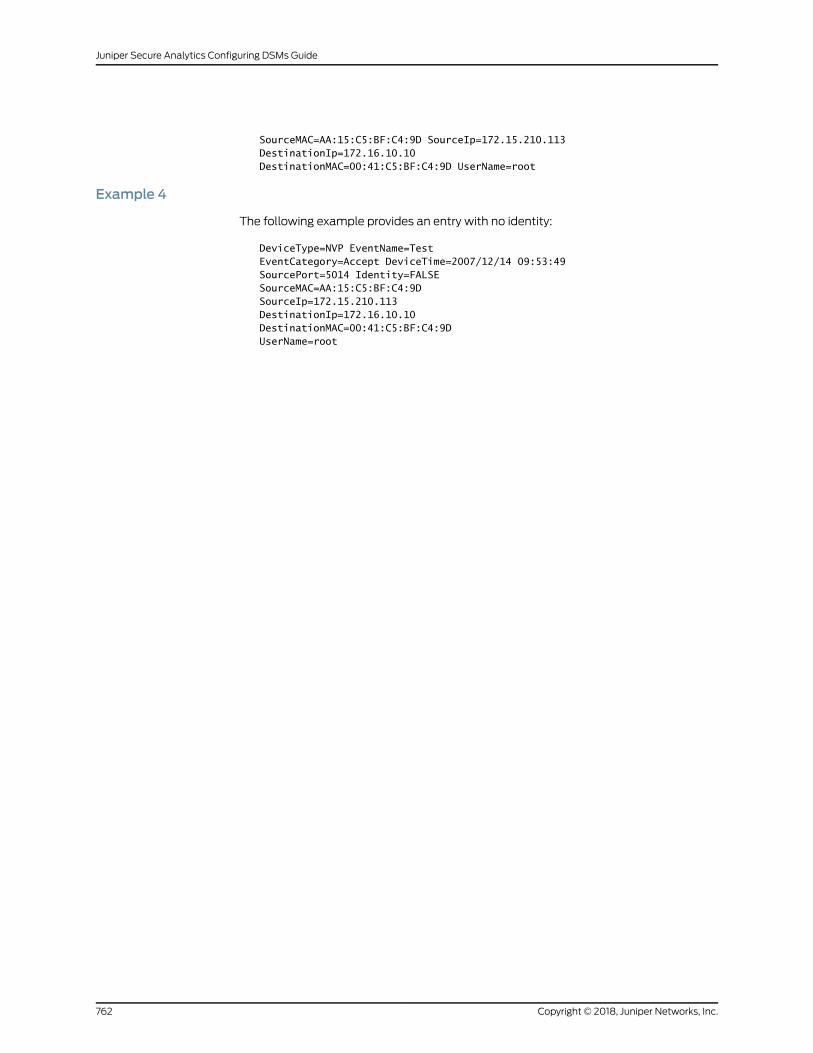
SourceMAC=AA:15:C5:BF:C4:9D SourceIp=172.15.210.113 DestinationIp=172.16.10.10 DestinationMAC=00:41:C5:BF:C4:9D UserName=root
Example 4
The following example provides an entry with no identity:
DeviceType=NVP EventName=Test EventCategory=Accept DeviceTime=2007/12/14 09:53:49 SourcePort=5014 Identity=FALSE SourceMAC=AA:15:C5:BF:C4:9D SourceIp=172.15.210.113 DestinationIp=172.16.10.10 DestinationMAC=00:41:C5:BF:C4:9D UserName=root
Copyright © 2018, Juniper Networks, Inc.762
Juniper Secure Analytics Configuring DSMs Guide
CHAPTER 82
NetApp Data ONTAP
• NetApp Data ONTAP on page 763
NetApp Data ONTAP
JSA accepts syslog events from aWindows agent that is installed with the Adaptive Log
Exporter.
TheAdaptiveLogExporter is anexternal eventcollectionagent.TheAdaptiveLogExporter
gives you the option to collect events by using a NetApp Data ONTAP plug-in. The
Adaptive Log Exporter can read andprocess event logmessages that are generated from
Common Internet File System (CIFS) auditing on the NetApp Data ONTAP device and
forward the events.
Formore informationaboutusing theAdaptiveLogExporter, see theAdaptiveLogExporter
Users Guide.
NOTE: The NetApp Data ONTAP plug-in for the Adaptive Log Exportersupports onlyCIFS. For informationonconfiguringCIFSonyourNetAppDataONTAP device, see your vendor documentation.
JSA automatically detects the NetApp Data ONTAP events from the Adaptive Log
Exporter. To manually configure JSA to receive events from NetApp Data ONTAP:
From the Log Source Type list, select the NetApp Data ONTAP option.
763Copyright © 2018, Juniper Networks, Inc.

Copyright © 2018, Juniper Networks, Inc.764
Juniper Secure Analytics Configuring DSMs Guide
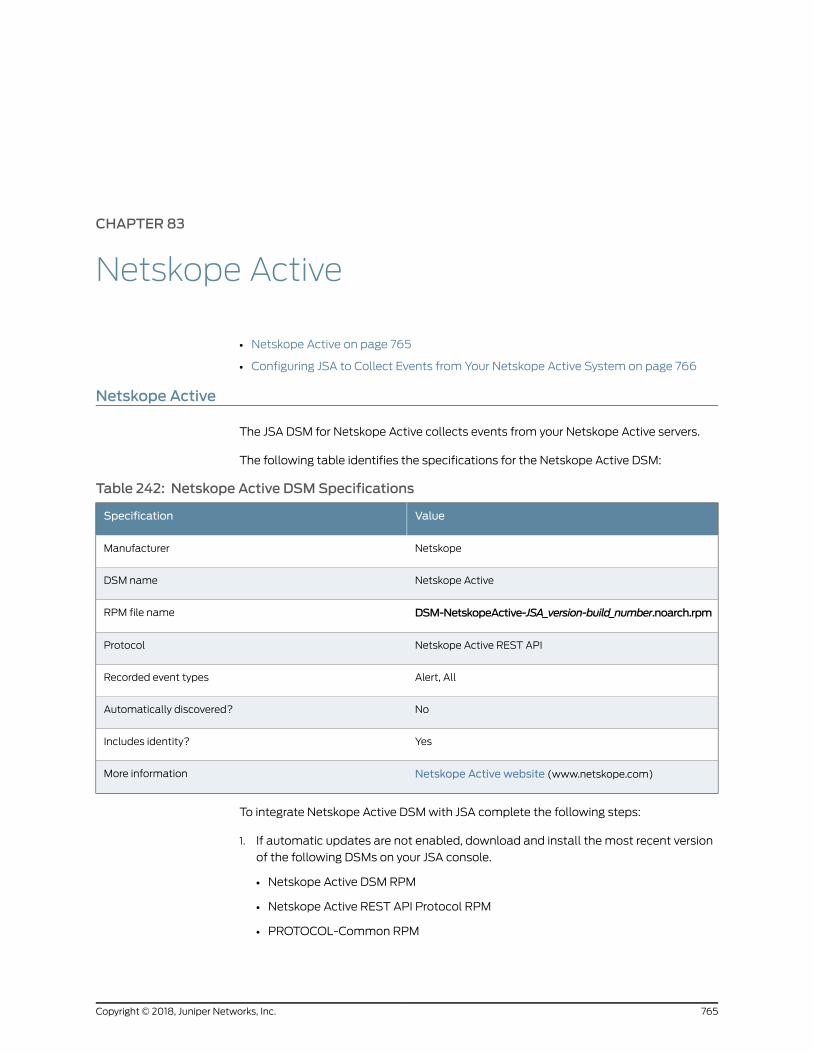
CHAPTER 83
Netskope Active
• Netskope Active on page 765
• Configuring JSA to Collect Events from Your Netskope Active System on page 766
Netskope Active
The JSA DSM for Netskope Active collects events from your Netskope Active servers.
The following table identifies the specifications for the Netskope Active DSM:
Table 242: Netskope Active DSMSpecifications
ValueSpecification
NetskopeManufacturer
Netskope ActiveDSM name
DSM-NetskopeActive-JSA_version-build_number.noarch.rpmRPM file name
Netskope Active REST APIProtocol
Alert, AllRecorded event types
NoAutomatically discovered?
YesIncludes identity?
Netskope Active website (www.netskope.com)More information
To integrate Netskope Active DSMwith JSA complete the following steps:
1. If automatic updates are not enabled, download and install the most recent version
of the following DSMs on your JSA console.
• Netskope Active DSM RPM
• Netskope Active REST API Protocol RPM
• PROTOCOL-Common RPM
765Copyright © 2018, Juniper Networks, Inc.
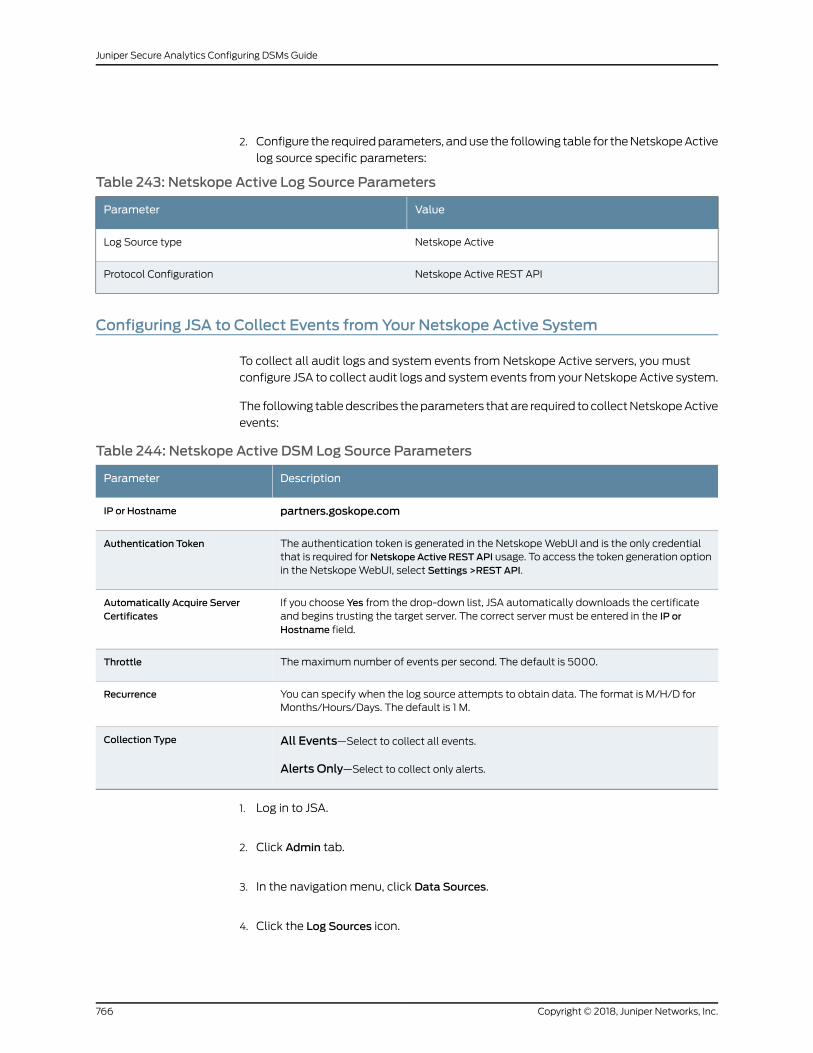
2. Configure the requiredparameters, anduse the following table for theNetskopeActive
log source specific parameters:
Table 243: Netskope Active Log Source Parameters
ValueParameter
Netskope ActiveLog Source type
Netskope Active REST APIProtocol Configuration
Configuring JSA to Collect Events fromYour Netskope Active System
To collect all audit logs and system events from Netskope Active servers, youmust
configure JSA to collect audit logs and system events from your Netskope Active system.
The following tabledescribes theparameters thatare required tocollectNetskopeActive
events:
Table 244: Netskope Active DSM Log Source Parameters
DescriptionParameter
partners.goskope.comIP or Hostname
The authentication token is generated in the NetskopeWebUI and is the only credentialthat is required forNetskopeActive RESTAPI usage. To access the token generation optionin the NetskopeWebUI, select Settings >REST API.
Authentication Token
If you choose Yes from the drop-down list, JSA automatically downloads the certificateand begins trusting the target server. The correct server must be entered in the IP orHostname field.
Automatically Acquire ServerCertificates
Themaximum number of events per second. The default is 5000.Throttle
You can specify when the log source attempts to obtain data. The format is M/H/D forMonths/Hours/Days. The default is 1 M.
Recurrence
All Events—Select to collect all events.
Alerts Only—Select to collect only alerts.
Collection Type
1. Log in to JSA.
2. Click Admin tab.
3. In the navigation menu, click Data Sources.
4. Click the Log Sources icon.
Copyright © 2018, Juniper Networks, Inc.766
Juniper Secure Analytics Configuring DSMs Guide

5. Click Add.
6. From the Log Source Type list, select Netskope Active.
7. From the Protocol Configuration list, select Netskope Active REST API.
8. Configure the parameters.
9. Click Save.
10. On the Admin tab, click Deploy Changes.
767Copyright © 2018, Juniper Networks, Inc.
Chapter 83: Netskope Active

Copyright © 2018, Juniper Networks, Inc.768
Juniper Secure Analytics Configuring DSMs Guide
CHAPTER 84
Niksun
• Niksun on page 769
• Configuring a Log Source on page 769
Niksun
The Niksun DSM for JSA records all relevant Niksun events by using syslog.
You can integrate NetDetector/NetVCR2005, version 3.2.1sp1_2 with JSA. Before you
configure JSA to integrate with a Niksun device, youmust configure a log source, then
enablesyslog forwardingonyourNiksunappliance.Formore informationaboutconfiguring
Niksun, see your Niksun appliance documentation.
Configuring a Log Source
To integrate Niksun with JSA, youmust manually create a log source to receive events.
JSA does not automatically discover or create log sources for syslog events from Niksun
appliances. In caseswhere the log source is not automatically discovered, it is suggested
that you create a log source before you forward events to JSA.
To configure a log source:
1. Log in to JSA.
2. Click the Admin tab.
3. On the navigation menu, click Data Sources.
The Data Sources pane is displayed.
4. Click the Log Sources icon.
The Log Sourceswindow is displayed.
5. Click Add.
The Add a log source window is displayed.
769Copyright © 2018, Juniper Networks, Inc.
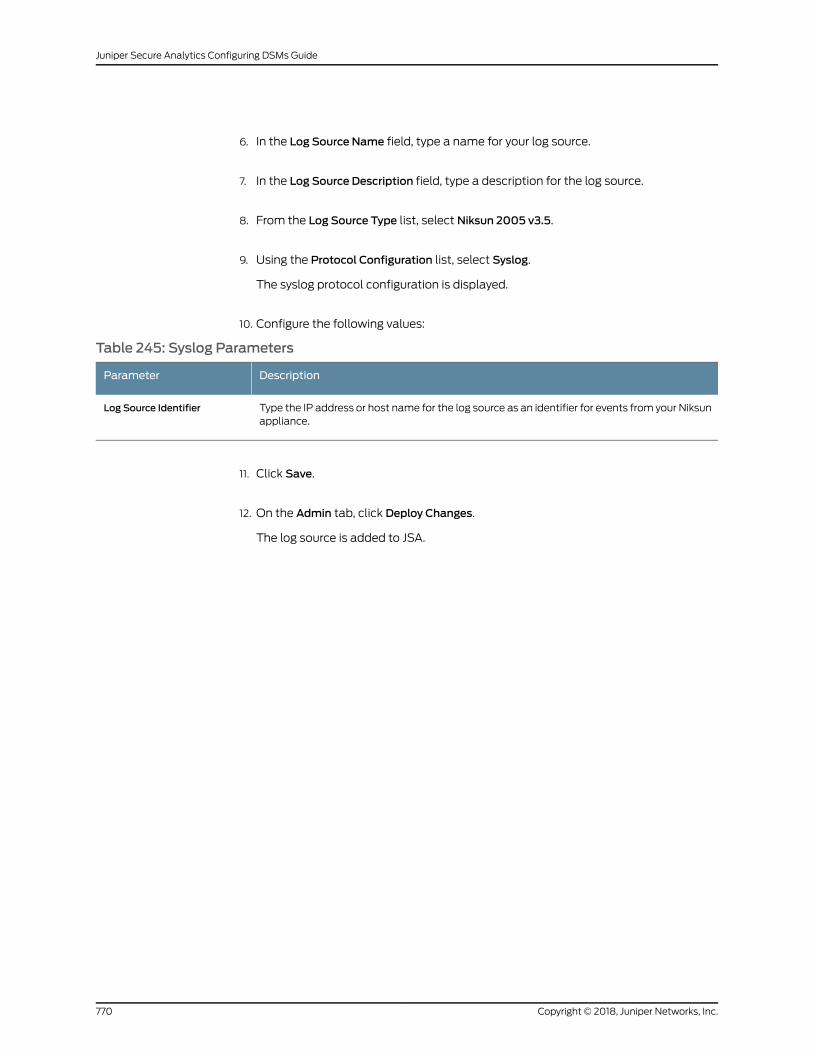
6. In the Log Source Name field, type a name for your log source.
7. In the Log Source Description field, type a description for the log source.
8. From the Log Source Type list, select Niksun 2005 v3.5.
9. Using the Protocol Configuration list, select Syslog.
The syslog protocol configuration is displayed.
10. Configure the following values:
Table 245: Syslog Parameters
DescriptionParameter
Type the IP address or host name for the log source as an identifier for events from your Niksunappliance.
Log Source Identifier
11. Click Save.
12. On the Admin tab, click Deploy Changes.
The log source is added to JSA.
Copyright © 2018, Juniper Networks, Inc.770
Juniper Secure Analytics Configuring DSMs Guide
CHAPTER 85
Nokia Firewall
• Nokia Firewall on page 771
• Integration with a Nokia Firewall by Using Syslog on page 771
• Integration with a Nokia Firewall by Using OPSEC on page 774
Nokia Firewall
The Check Point Firewall-1 DSMallows JSA to accept Check Point-based Firewall events
sent from Nokia Firewall appliances by using syslog or OPSEC protocols.
Integration with a Nokia Firewall by Using Syslog
This method gives you the option to configure your Nokia Firewall to accept Check Point
syslog events that are forwarded from your Nokia Firewall appliance.
To configure JSA to integrate with a Nokia Firewall device, take the following steps:
1. Configure iptables on yourJSA console or Event Collector to receive syslog events
from Nokia Firewall.
2. Configure your Nokia Firewall to forward syslog event data.
3. Configure the events that are logged by the Nokia Firewall.
4. Optional. Configure a log source in JSA.
• Configuring IPtables on page 771
• Configuring Syslog on page 772
• Configuring the Logged Events Custom Script on page 773
• Configuring a Log Source on page 773
Configuring IPtables
Nokia Firewalls require a TCP reset (rst) or a TCP acknowledge (ack) from JSA on port
256 before they forward syslog events.
The Nokia Firewall TCP request is an online status request that is designed to ensure
that JSA is online and able to receive syslog events. If a valid reset or acknowledge is
771Copyright © 2018, Juniper Networks, Inc.
received from JSA, then Nokia Firewall begins forwarding events to JSA on UDP port 514.
By default, JSA does not respond to any online status requests from TCP port 256.
Youmust configure IPtables on your JSA console or any Event Collector that receives
Check Point events from a Nokia Firewall to respond to an online status request.
1. Using SSH, log in to JSA as the root user.
Login: root
Password: <password>
2. Type the following command to edit the IPtables file:
vi /opt/qradar/conf/iptables.pre
The IPtables configuration file is displayed.
3. Type the following command to instruct JSA to respond to your Nokia Firewall with
a TCP reset on port 256:
-A INPUT -s <IP address> -p tcp --dport 256 -j REJECT --reject-with tcp-reset
Where <IP address> is the IP address of your Nokia Firewall. Youmust include a TCP
reset for eachNokia Firewall IP address that sendsevents to your JSAconsole or Event
Collector, for example,
• -A INPUT -s 10.10.100.10/32 -p tcp --dport 256 -j REJECT --reject-with tcp-reset
• -A INPUT -s 10.10.110.11/32 -p tcp --dport 256 -j REJECT --reject-with tcp-reset
• -A INPUT -s 10.10.120.12/32 -p tcp --dport 256 -j REJECT --reject-with tcp-reset
4. Save your IPtables configuration.
5. Type the following command to update IPtables in JSA:
./opt/qradar/bin/iptables_update.pl
6. Repeat steps 1 - 5 to configure any additional JSA Event Collectors that receive syslog
events from a Nokia Firewall.
You are now ready to configure your Nokia Firewall to forward events to JSA.
Configuring Syslog
To configure your Nokia Firewall to forward syslog events to JSA:
1. Log in to the Nokia Voyager.
2. Click Config.
3. In the SystemConfiguration pane, click System Logging.
Copyright © 2018, Juniper Networks, Inc.772
Juniper Secure Analytics Configuring DSMs Guide
4. In theAddnewremote IPaddress to log to field, type the IP address of your JSAconsole
orEvent Collector.
5. Click Apply.
6. Click Save.
You are now ready to configure which events are logged by your Nokia Firewall to the
logger.
Configuring the Logged Events CustomScript
To configure which events are logged by your Nokia Firewall and forwarded to JSA, you
must configure a custom script for your Nokia Firewall.
1. Using SSH, log in to Nokia Firewall as an administrative user.
If you cannot connect to your Nokia Firewall, check that SSH is enabled. Youmust
enable thecommand-linebyusing theNokiaVoyagerweb interfaceor connectdirectly
by using a serial connection. For more information, see your Nokia Voyager
documentation.
2. Type the following command to edit your Nokia Firewall rc.local file:
vi /var/etc/rc.local
3. Add the following command to your rc.local file:
$FWDIR/bin/fw log -ftn | /bin/logger -p local1.info &
4. Save the changes to your rc.local file.
The terminal is displayed.
5. To begin logging immediately, type the following command:
nohup $FWDIR/bin/fw log -ftn | /bin/logger -p local1.info &
You can now configure the log source in JSA.
Configuring a Log Source
Events that are forwarded by your Nokia Firewall are automatically discovered by the
Check Point Firewall-1 DSM. The automatic discovery process creates a log source for
syslog events from Nokia Firewall appliances.
The following steps are optional.
1. Log in to JSA.
2. Click the Admin tab.
773Copyright © 2018, Juniper Networks, Inc.
Chapter 85: Nokia Firewall

3. On the navigation menu, click Data Sources.
4. Click the Log Sources icon.
5. Click Add.
6. In the Log Source Name field, type a name for your log source.
7. In the Log Source Description field, type a description for the log source.
8. From the Log Source Type list, select Check Point Firewall-1.
9. Using the Protocol Configuration list, select Syslog.
10. Configure the following values:
DescriptionParameter
Type the IP address or host name for the log source as an identifier for events from your NokiaFirewall appliance.
Log Source Identifier
11. Click Save.
12. On the Admin tab, click Deploy Changes.
The syslog configuration for receiving Check Point events from Nokia Firewalls over
syslog is complete. Check Point events from your Nokia Firewall are displayed in the
Log Activity tab in JSA.
Integration with a Nokia Firewall by Using OPSEC
JSA can accept Check Point FireWall-1 events fromNokia Firewalls using theCheckPoint
FireWall-1 DSM configured using the OPSEC/LEA protocol.
Before you configure JSA to integrate with a Nokia Firewall device, youmust:
1. Configure Nokia Firewall using OPSEC, see “Configuring a Nokia Firewall for OPSEC”
on page 775.
2. Configure a log source in JSA for your Nokia Firewall using the OPSEC LEA protocol,
see “Configuring an OPSEC Log Source” on page 775.
• Configuring a Nokia Firewall for OPSEC on page 775
• Configuring an OPSEC Log Source on page 775
Copyright © 2018, Juniper Networks, Inc.774
Juniper Secure Analytics Configuring DSMs Guide
Configuring a Nokia Firewall for OPSEC
You can configure Nokia Firewall by using OPSEC.
1. To create a host object for your JSA, open up the Check Point SmartDashboard GUI,
and selectManage >Network Objects >New >Node >Host.
2. Type the Name, IP address, and an optional comment for your JSA.
3. ClickOK.
4. Select Close.
5. To create the OPSEC connection, selectManage >Servers and OPSEC Applications
>New >OPSEC Application Properties.
6. Type the Name and an optional comment.
The name that you typemust be different from the name in Step 2.
7. From the Host drop-downmenu, select the JSA host object that you created.
8. From Application Properties, select User Defined as the Vendor Type.
9. From Client Entries, select LEA.
10. SelectOK and then select Close.
11. To install the policy on your firewall, select Policy >Install >OK.
For more information on policies, see your vendor documentation. You can now
configure a log source for your Nokia Firewall in JSA.
Configuring an OPSEC Log Source
Youmust createanOPSEC log source to collect events, becauseOPSEC/LEA log sources
are not automatically discovered in JSA.
1. Log in to JSA.
2. Click the Admin tab.
3. On the navigation menu, click Data Sources.
4. Click the Log Sources icon.
775Copyright © 2018, Juniper Networks, Inc.
Chapter 85: Nokia Firewall
5. Click Add.
6. In the Log Source Name field, type a name for your log source.
7. In the Log Source Description field, type a description for the log source.
8. From the Log Source Type list, select Check Point FireWall-1.
9. Using the Protocol Configuration list, selectOPSEC/LEA.
10. Configure the following values:
Table 246: OPSEC/LEA Protocol Parameters
DescriptionParameter
Typean IPaddress, hostname,ornameto identify theevent source. IPaddressesorhostnamesare better because they enable JSA tomatch a log file to a unique event source.
Log Source Identifier
Type the IP address of the server.Server IP
Type the port that is used for OPSEC communication. The valid range is 0 - 65,536 and thedefault is 18184.
Server Port
Select this check box if you want to use the LEA server's IP address instead of the manageddevice's IP address for a log source. By default, the check box is selected.
Use Server IP for Log Source
Type the interval, in seconds, during which syslog events are recorded in the qradar.log file.
The valid range is 4 - 2,147,483,648 and the default is 600.
Statistics Report Interval
Copyright © 2018, Juniper Networks, Inc.776
Juniper Secure Analytics Configuring DSMs Guide
Table 246: OPSEC/LEA Protocol Parameters (continued)
DescriptionParameter
From the list, select the authentication type that you want to use for this LEA configuration.The options are sslca (default), sslca_clear, or clear. This value must match the authenticationmethod that is used by the server. The following parameters appear if sslca or sslca_clear isselected as the authentication type:
• OPSECApplicationObjectSICAttribute(SICName)Type theSecure InternalCommunications(SIC) name of theOPSECApplicationObject. The SIC name is the distinguished name (DN)of the application, for example: CN=LEA, o=fwconsole..7psasx.The name can be up to 255characters in length and is case-sensitive.
• Log Source SIC Attribute (Entity SIC Name) Type the SIC name of the server, for example:cn=cp_mgmt,o=fwconsole..7psasx. The name can be up to 255 characters in length and iscase-sensitive.
• Specify Certificate Select this check box if you want to define a certificate for this LEAconfiguration. JSA attempts to retrieve the certificate by using these parameters when thecertificate is required.
If you select the Specify Certificate check box, the Certificate Filename parameter is displayed:
• Certificate Filename This option appears only if Specify Certificate is selected. Type the filename of the certificate that you want to use for this configuration. The certificate file mustbe located in the /opt/qradar/conf/trusted_certificates/lea directory.
If you clear the Specify Certificate check box, the following parameters appear:
• Certificate Authority IP Type the IP address of the SmartCenter server fromwhich you wantto pull your certificate.
• Pull Certificate Password Type the password that you want to use when a certificate isrequested. The password can be up to 255 characters in length.
• OPSEC Application Type the name of the application you want to use when a certificate isrequested. This value can be up to 255 characters in length.
Authentication Type
11. Click Save.
12. On the Admin tab, click Deploy Changes.
The configuration is complete. As events are received, they are displayed in the Log
Activity tab in JSA.
777Copyright © 2018, Juniper Networks, Inc.
Chapter 85: Nokia Firewall

Copyright © 2018, Juniper Networks, Inc.778
Juniper Secure Analytics Configuring DSMs Guide
CHAPTER 86
Nominum Vantio
• Nominum Vantio on page 779
• Configure the Vantio LEEF Adapter on page 779
• Configuring a Log Source on page 780
NominumVantio
The Nominum Vantio DSM for JSA accepts syslog events in Log Extended Event Format
(LEEF) forwarded from Nominum Vantio engines that are installed with the Nominum
Vantio LEEF Adapter.
JSA accepts all relevant events that are forwarded from Nominum Vantio.
The Vantio LEEF Adapter creates LEEFmessages based on Lightweight View Policy
(LVP) matches. To generate LVPmatches for the Vantio LEEF Adapter to process, you
most configure Lightweight Views and the lvp-monitor for the Vantio engine. LVP is an
optionally licensed component of the Nominum Vantio product. For more information
about configuring LVP, see the Vantio Administrator's Manual.
Before youcan integrateNominumVantioeventswith JSA, youmust install andconfigure
the Vantio LEEF adapter. To obtain the Vantio LEEF adapter or request additional
information, email Nominum at the following address: [email protected].
Configure the Vantio LEEF Adapter
You can install and configure your Vantio LEEF Adapter.
1. Use SSH to log in to your Vantio engine server.
2. Install the Vantio LEEF Adapter:
sudo rpm -I VantioLEEFAdapter-0.1-a.x86_64.rpm
3. Edit the Vantio LEEF Adapter configuration file.
usr/local/nom/sbin/VantioLEEFAdapter
4. Configure the Vantio LEEF Adapter configuration to forward LEEF events to JSA:
779Copyright © 2018, Juniper Networks, Inc.
-qradar-dest-addr=<IP Address>
Where <IP Address> is the IP address of your JSA console or Event Collector.
5. Save the Vantio LEEF configuration file.
6. Type the following command to start the Vantio Adapter:
usr/local/nom/sbin/VantioLEEFAdapter &
The configuration is complete. The log source is added to JSA as Nominum Vantio
events are automatically discovered. Events forwarded to JSA by the Vantio LEEF
Adapter are displayed on the Log Activity tab of JSA.
Configuring a Log Source
JSA automatically discovers and creates a log source for syslog events from the Vantio
LEEF Adapter. The following configuration steps are optional.
To manually configure a log source for Nominum Vantio:
1. Log in to JSA.
2. Click the Admin tab.
3. On the navigation menu, click Data Sources.
The Data Sources pane is displayed.
4. Click the Log Sources icon.
The Log Sourceswindow is displayed.
5. Click Add.
The Add a log source window is displayed.
6. In the Log Source Name field, type a name for your log source.
7. In the Log Source Description field, type a description for the log source.
8. From the Log Source Type list, select NominumVantio.
9. Using the Protocol Configuration list, select Syslog.
The syslog protocol configuration is displayed.
Copyright © 2018, Juniper Networks, Inc.780
Juniper Secure Analytics Configuring DSMs Guide

10. Configure the following values:
DescriptionParameter
Type the IP address or host name for the log source as an identifier for events from NominumVantio.
Log Source Identifier
11. Click Save.
12. On the Admin tab, click Deploy Changes.
The configuration is complete.
781Copyright © 2018, Juniper Networks, Inc.
Chapter 86: Nominum Vantio

Copyright © 2018, Juniper Networks, Inc.782
Juniper Secure Analytics Configuring DSMs Guide

CHAPTER 87
Nortel Networks
• Nortel Networks on page 783
• Nortel Multiprotocol Router on page 783
• Nortel Application Switch on page 786
• Nortel Contivity on page 787
• Nortel Ethernet Routing Switch 2500/4500/5500 on page 788
• Nortel Ethernet Routing Switch 8300/8600 on page 789
• Nortel Secure Router on page 790
• Nortel Secure Network Access Switch on page 792
• Nortel Switched Firewall 5100 on page 792
• Nortel Switched Firewall 6000 on page 794
• Nortel Threat Protection System (TPS) on page 796
• Nortel VPN Gateway on page 797
Nortel Networks
Several Nortel Networks DSMs can be integrated with JSA.
Nortel Multiprotocol Router
The Nortel Multiprotocol Router DSM for JSA records all relevant Nortel Multiprotocol
Router events by using syslog.
Before youconfigure JSA to integratewithaNortelMultiprotocolRouter device, youmust:
1. Log in to your Nortel Multiprotocol Router device.
2. At the prompt, type the following command:
bcc
The Bay Command Console prompt is displayed.
Welcome to the Bay Command Console!
* To enter configurationmode, type config
783Copyright © 2018, Juniper Networks, Inc.
* To list all system commands, type ?
* To exit the BCC, type exit
bcc>
3. Type the following command to access configuration mode:
config
4. Type the following command to access syslog configuration:
syslog
5. Type the following commands:
log-host address <IP address>
Where <IP address> is the IP address of your JSA.
6. View current default settings for your JSA:
info
For example:
log-host/10.11.12.210# info
address 10.11.12.210
log-facility local0
state enabled
7. If the output of the commandentered inStep5 indicates that the state is not enabled,
type the following command to enable forwarding for the syslog host:
state enable
8. Configure the log facility parameter:
log-facility local0
9. Create a filter for the hardware slots to enable them to forward the syslog events.
Type the following command to create a filter with the nameWILDCARD:
filter nameWILDCARD entity all
10. Configure the slot-upper bound parameter:
slot-upper bound <number of slots>
Where <number of slots> is the number of slots available on your device. This
parameter can require different configurationwhichdependson your versionofNortel
Copyright © 2018, Juniper Networks, Inc.784
Juniper Secure Analytics Configuring DSMs Guide
MultiprotocolRouterdevice,whichdetermines themaximumnumberof slotsavailable
on the device.
11. Configure the level of syslog messages you want to send to your JSA.
severity-mask all
12. View the current settings for this filter:
info
For example:
filter/10.11.12.210/WILDCARD# info
debug-map debug
entity all
event-lower-bound 0
event-upper-bound 255
fault-map critical
info-map info
nameWILDCARD
severity-mask {fault warning info trace debug}
slot-lower-bound 0
slot-upper-bound 1
state enabled
trace-map debug
warning-mapwarning
13. View the currently configured settings for the syslog filters:
show syslog filters
When the syslog and filter parameters are correctly configured, the Operational State
indicates up.
For example:
syslog# show syslog filters
show syslog filters Sep 15, 2008 18:21:25 [GMT+8]
Table 247: Syslog Filters
Operational StateConfigured StateEntity CodeEntity NameFilter NameHost IP address
upenabled255allWILDCARD10.11.12.130
785Copyright © 2018, Juniper Networks, Inc.
Chapter 87: Nortel Networks
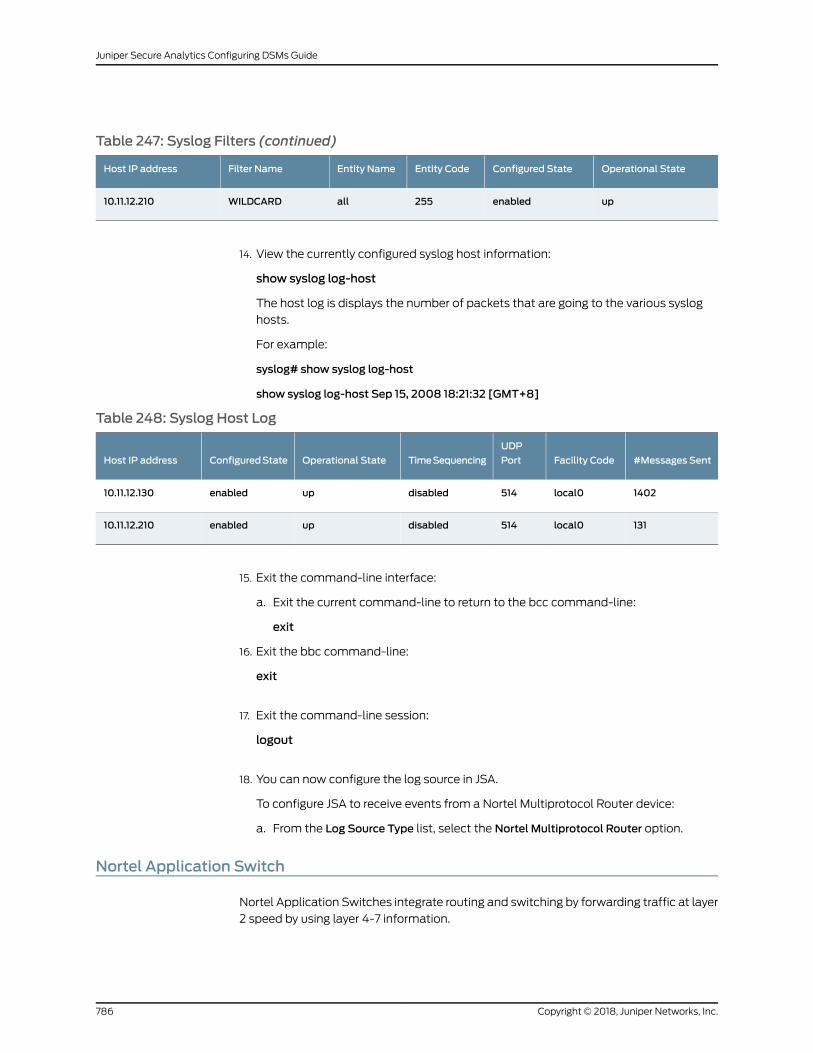
Table 247: Syslog Filters (continued)
Operational StateConfigured StateEntity CodeEntity NameFilter NameHost IP address
upenabled255allWILDCARD10.11.12.210
14. View the currently configured syslog host information:
show syslog log-host
The host log is displays the number of packets that are going to the various syslog
hosts.
For example:
syslog# show syslog log-host
show syslog log-host Sep 15, 2008 18:21:32 [GMT+8]
Table 248: Syslog Host Log
#Messages SentFacility Code
UDP
PortTimeSequencingOperational StateConfiguredStateHost IP address
1402local0514disabledupenabled10.11.12.130
131local0514disabledupenabled10.11.12.210
15. Exit the command-line interface:
a. Exit the current command-line to return to the bcc command-line:
exit
16. Exit the bbc command-line:
exit
17. Exit the command-line session:
logout
18. You can now configure the log source in JSA.
To configure JSA to receive events from a Nortel Multiprotocol Router device:
a. From the Log Source Type list, select the Nortel Multiprotocol Router option.
Nortel Application Switch
Nortel Application Switches integrate routing and switching by forwarding traffic at layer
2 speed by using layer 4-7 information.
Copyright © 2018, Juniper Networks, Inc.786
Juniper Secure Analytics Configuring DSMs Guide
The Nortel Application Switch DSM for JSA accepts events by using syslog. JSA records
all relevant statusandnetworkconditionevents.Before youconfigureaNortelApplication
Switch device in JSA, youmust configure your device to send syslog events to JSA.
To configure the device to send syslog events to JSA:
1. Log in to the Nortel Application Switch command-line interface (CLI).
2. Type the following command:
/cfg/sys/syslog/host
3. At the prompt, type the IP address of your JSA:
Enter new syslog host: <IP address>
Where <IP address> is the IP address of your JSA.
4. Apply the configuration:
apply
5. After the new configuration is applied, save your configuration:
save
6. Type y at the prompt to confirm that you want to save the configuration to flash.
See the following example:
Confirm saving to FLASH [y/n]: y
New config successfully saved to FLASH
Next youwill need to configure JSA to receive events fromaNortel ApplicationSwitch:
7. Configure the log source in JSA. From the Log Source Type list, select the Nortel
Application Switch option.
For more information about the Nortel Application Switch, see your vendor
documentation.
Nortel Contivity
A JSA Nortel Contivity DSM records all relevant Nortel Contivity events by using syslog.
Before you configure JSA to integrate with a Nortel Contivity device, take the following
steps:
1. Log in to the Nortel Contivity command-line interface (CLI).
2. Type the following command:
787Copyright © 2018, Juniper Networks, Inc.
Chapter 87: Nortel Networks
enable <password>
Where <password> is the Nortel Contivity device administrative password.
3. Type the following command:
config t
4. Configure the logging information:
logging <IP address> facility-filter all level all
Where <IP address> is the IP address of the JSA.
5. Type the following command to exit the command-line:
exit
Next you will need to configure JSA to receive events from a Nortel Contivity device.
6. You can now configure the log source in JSA. From the Log Source Type list, select the
Nortel Contivity VPN Switch
For more information about your Nortel Contivity device, see your vendor
documentation.
Nortel Ethernet Routing Switch 2500/4500/5500
The JSANortelEthernetRoutingSwitch(ERS)2500/4500/5500DSMrecordsall relevant
routing switch events by using syslog.
Before configuring a Nortel ERS 2500/4500/5500 device in JSA, youmust configure
your device to send syslog events to JSA.
To configure the device to send syslog events to JSA:
1. Log in to the Nortel ERS 2500/4500/5500 user interface.
2. Type the following commands to access global configuration mode:
ena
config term
3. Type informational as the severity level for the logs you want to send to the remoteserver.
For example, logging remote level {critical|informational|serious|none}
logging remote level informational
Where a severity level of informational sends all logs to the syslog server.
Copyright © 2018, Juniper Networks, Inc.788
Juniper Secure Analytics Configuring DSMs Guide
4. Enable the host:
host enable
5. Type the remote logging address:
logging remote address <IP address>
Where <IP address> is the IP address of the JSA system.
6. Ensure that remote logging is enabled:
logging remote enable
You can now configure the log source in JSA.
7. To configure to receive events from a Nortel ERS 2500/4500/5500 device: From the
Log Source Type list, select the Nortel Ethernet Routing Switch 2500/4500/5500
option.
Nortel Ethernet Routing Switch 8300/8600
The JSA Nortel Ethernet Routing Switch (ERS) 8300/8600 DSM records all relevant
events by using syslog.
Before you configure a Nortel ERS 8600 device in JSA, youmust configure your device
to send syslog events to JSA.
To configure the device to send syslog events to JSA:
1. Log in to the Nortel ERS 8300/8600 command-line interface (CLI).
2. Type the following command:
config sys syslog host <ID>
Where <ID> is the ID of the host you wish to configure to send syslog events to JSA.
For the syslog host ID, the valid range is 1 - 10.
3. Type the IP address of your JSA system:
address <IP address>
Where <IP address> is the IP address of your JSA system.
4. Type the facility for accessing the syslog host.
host <ID> facility local0
Where <ID> is the ID specified in “Nortel Ethernet Routing Switch 8300/8600” on
page 789.
789Copyright © 2018, Juniper Networks, Inc.
Chapter 87: Nortel Networks
5. Enable the host:
host enable
6. Type the severity level for which syslog messages are sent:
host <ID> severity info
Where <ID> is the ID specified in “Nortel Ethernet Routing Switch 8300/8600” on
page 789.
7. Enable the ability to send syslog messages:
state enable
8. Verify the syslog configuration for the host:
sylog host <ID> info
For example, the output might resemble the following:
ERS-8606:5/config/sys/syslog/host/1# info Sub-Context: Current Context: address :
10.10.10.1 create : 1 delete : N/A facility : local6 host : enablemapinfo : infomapwarning
:warningmaperror :errormapfatal :emergencyseverity : info|warning|error|fataludp-port
: 514 ERS-8606:5/config/sys/syslog/host/1#
You can now configure the log source in JSA.
9. To configure JSA to receive events from a Nortel ERS 8300/8600 device: From the
Log Source Type list, select the Nortel Ethernet Routing Switch 8300/8600 option.
Nortel Secure Router
The JSA Nortel Secure Router DSM records all relevant router events by using syslog.
Before youconfigure aNortel SecureRouter device in JSA, youmust configure your device
to send syslog events to JSA.
To configure the device to send syslog events to JSA:
1. Log in to the Nortel Secure Router command-line interface (CLI).
2. Type the following to access global configuration mode:
config term
3. Type the following command:
system logging syslog
4. Type the IP address of the syslog server (JSA system):
Copyright © 2018, Juniper Networks, Inc.790
Juniper Secure Analytics Configuring DSMs Guide
host_ipaddr <IP address>
Where <IP address> is the IP address of the JSA system.
5. Ensure that remote logging is enabled:
enable
6. Verify that the logging levels are configured correctly:
show system logging syslog
The following code is an example of the output:
------------------------------------ Syslog Setting
------------------------------------ Syslog:
Enabled Host IP Address: 10.10.10.1 Host UDP Port: 514
Facility Priority Setting:
facility priority
======== ========
auth: info
bootp: warning
daemon: warning
domainname: warning
gated: warning
kern: info
mail: warning
ntp: warning
system: info
fr: warning
ppp: warning
ipmux: warning
bundle: warning
qos: warning
hdlc: warning
local7: warning
vpn: warning
firewall: warning
791Copyright © 2018, Juniper Networks, Inc.
Chapter 87: Nortel Networks
You can now configure the log source in JSA.
7. To configure JSA to receive events from a Nortel Secure Router device: From the Log
Source Type list, select the Nortel Secure Router option.
Nortel Secure Network Access Switch
The JSA Nortel Secure Network Access Switch (SNAS) DSM records all relevant switch
events by using syslog.
Before you configure a Nortel SNAS device in JSA, take the following steps:
1. Log in to the Nortel SNAS user interface.
2. Select the Config tab.
3. Select Secure Access Domain and Syslog from the Navigation pane.
The Secure Access Domainwindow is displayed.
4. From the Secure Access Domain list, select the secure access domain. Click Refresh.
5. Click Add.
The Add NewRemote Serverwindow is displayed.
6. Click Update.
The server is displayed in the secure access domain table.
7. Using the toolbar, click Apply to send the current changes to the Nortel SNAS.
You are now ready to configure the log source in JSA.
8. To configure JSA to receive events from a Nortel SNAS device: From the Log Source
Type list, select the Nortel Secure Network Access Switch (SNAS) option.
Nortel Switched Firewall 5100
A JSA Nortel Switched Firewall 5100 DSM records all relevant firewall events by using
either syslog or OPSEC.
Before you configure a Nortel Switched Firewall device in JSA, youmust configure your
device to send events to JSA.
See information about configuring a Nortel Switched Firewall by using one the following
methods:
Copyright © 2018, Juniper Networks, Inc.792
Juniper Secure Analytics Configuring DSMs Guide
• Integrating Nortel Switched Firewall by Using Syslog on page 793
• Integrate Nortel Switched Firewall by Using OPSEC on page 794
• Integrating Nortel Switched Firewall by Using Syslog on page 793
• Integrate Nortel Switched Firewall by Using OPSEC on page 794
• Configuring a Log Source on page 794
Integrating Nortel Switched Firewall by Using Syslog
This method ensures the JSA Nortel Switched Firewall 5100 DSM accepts events by
using syslog.
To configure your Nortel Switched Firewall 5100:
1. Log into your Nortel Switched Firewall device command-line interface (CLI).
2. Type the following command:
/cfg/sys/log/syslog/add
3. Type the IP address of your JSA system at the following prompt:
Enter IP address of syslog server:
A prompt is displayed to configure the severity level.
4. Configure info as the severity level.
For example, Enter minimum logging severity
(emerg | alert | crit | err | warning | notice | info | debug): info
A prompt is displayed to configure the facility.
5. Configure auto as the local facility.
For example, Enter the local facility (auto | local0-local7): auto
6. Apply the configuration:
apply
7. Repeat for each firewall in your cluster.
You are now ready to configure the log source in JSA.
8. To configure JSA to receive events from a Nortel Switched Firewall 5100 device by
using syslog: From the Log Source Type list, select the Nortel Switched Firewall 5100
option.
793Copyright © 2018, Juniper Networks, Inc.
Chapter 87: Nortel Networks

Integrate Nortel Switched Firewall by Using OPSEC
This method ensures the JSA Nortel Switched Firewall 5100 DSM accepts Check Point
FireWall-1 events by using OPSEC.
Depending on your Operating System, the procedures for the Check Point SmartCenter
Server can vary. The following procedures are based on the Check Point SecurePlatform
Operating system.
To enable Nortel Switched Firewall and JSA integration, take the following steps:
1. Reconfigure Check Point SmartCenter Server.
2. Configure the log source in JSA.
Configuring a Log Source
Configure the log source in JSA.
1. To configure JSA to receive events from a Nortel Switched Firewall 5100 device that
uses OPSEC, youmust select the Nortel Switched Firewall 5100 option from the Log
Source Type list.
2. To configure JSA to receive events from a Check Point SmartCenter Server that uses
OPSEC LEA, youmust select the LEA option from theProtocol Configuration list when
you configure your protocol configuration.
Nortel Switched Firewall 6000
A JSA Nortel Switched Firewall 6000 DSM records all relevant firewall events by using
either syslog or OPSEC.
Before you configure a Nortel Switched Firewall device in JSA, youmust configure your
device to send events to JSA.
The following information is about configuring a Nortel Switched Firewall 6000 device
with JSA by using one of the following methods:
• Configuring Syslog for Nortel Switched Firewalls on page 794
• Configuring OPSEC for Nortel Switched Firewalls on page 795
• Reconfiguring the Check Point SmartCenter Server on page 796
Configuring Syslog for Nortel Switched Firewalls
This method ensures the JSA Nortel Switched Firewall 6000 DSM accepts events by
using syslog.
To configure your Nortel Switched Firewall 6000:
Copyright © 2018, Juniper Networks, Inc.794
Juniper Secure Analytics Configuring DSMs Guide
1. Log into your Nortel Switched Firewall device command-line interface (CLI).
2. Type the following command:
/cfg/sys/log/syslog/add
3. Type the IP address of your JSA system at the following prompt:
Enter IP address of syslog server:
A prompt is displayed to configure the severity level.
4. Configure info as the severity level.
For example, Enter minimum logging severity
(emerg | alert | crit | err | warning | notice | info | debug): info
A prompt is displayed to configure the facility.
5. Configure auto as the local facility.
For example, Enter the local facility (auto | local0-local7): auto
6. Apply the configuration:
apply
You can now configure the log source in JSA.
7. To configure JSA to receive events fromaNortel Switched Firewall 6000using syslog:
From the Log Source Type list, select the Nortel Switched Firewall 6000 option.
Configuring OPSEC for Nortel Switched Firewalls
This method ensures the JSA Nortel Switched Firewall 6000 DSM accepts Check Point
FireWall-1 events by using OPSEC.
Depending on your Operating System, the procedures for the Check Point SmartCenter
Server can vary. The following procedures are based on the Check Point SecurePlatform
Operating system.
To enable Nortel Switched Firewall and JSA integration, take the following steps:
1. Reconfigure Check Point SmartCenter Server. See “Reconfiguring the Check Point
SmartCenter Server” on page 796.
2. Configure the OPSEC LEA protocol in JSA.
To configure JSA to receive events from a Check Point SmartCenter Server that uses
OPSEC LEA, youmust select the LEA option from theProtocol Configuration list when
you configure LEA.
795Copyright © 2018, Juniper Networks, Inc.
Chapter 87: Nortel Networks
3. Configure the log source in JSA.
To configure JSA to receive events fromaNortel Switched Firewall 6000 device using
OPSECyoumust select theNortelSwitchedFirewall 6000option from the LogSource
Type list.
Reconfiguring the Check Point SmartCenter Server
In the Check Point SmartCenter Server, you can create a host object that represents the
JSA system. The leapipe is the connection between the Check Point SmartCenter Server
and JSA.
To reconfigure the Check Point SmartCenter Server:
1. To create a host object, open the Check Point SmartDashboard user interface and
selectManage >Network Objects >New >Node >Host.
2. Type the Name, IP address, and type a comment for your host if you want.
3. ClickOK.
4. Select Close.
5. To create the OPSEC connection, selectManage >Servers and OPSEC applications
>New >OPSEC Application Properties.
6. Type the Name, and type a comment if you want.
The name that you typemust be different from the name in Step 2.
7. From theHost drop-downmenu, select the host object that you have created in Step
1.
8. From Application Properties, select User Defined as the vendor.
9. From Client Entries, select LEA.
10. ClickOK and then click Close.
11. To install the Security Policy on your firewall, select Policy >Install >OK.
The configuration is complete.
Nortel Threat Protection System (TPS)
The JSA Nortel Threat Protection System (TPS) DSM records all relevant threat and
system events by using syslog.
Copyright © 2018, Juniper Networks, Inc.796
Juniper Secure Analytics Configuring DSMs Guide
Before you configure a Nortel TPS device in JSA, take the following steps:
1. Log in to the Nortel TPS user interface.
2. Select Policy & Response >Intrusion Sensor >Detection & Prevention.
The Detection & Preventionwindow is displayed.
3. Click Edit next to the intrusion policy you want to configure alerting option.
The Edit Policywindow is displayed.
4. Click Alerting.
The Alertingwindow is displayed.
5. Under Syslog Configuration, select on next to State to enable syslog alerting.
6. From the list, select the facility and priority levels.
7. In the Logging Host field, type the IP address of your JSA system. This configures your
JSA system to be your logging host. Separate multiple hosts with commas.
8. Click Save.
The syslog alerting configuration is saved.
9. Apply the policy to your appropriate detection engines.
You can now configure the log source in JSA.
10. To configure JSA to receive events from a Nortel TPS device: From the Log Source
Type list, select the Nortel Threat Protection System (TPS) Intrusion Sensor option.
Nortel VPNGateway
The JSA Nortel VPN Gateway DSM accepts events by using syslog.
JSA recordsall relevantoperating system(OS), systemcontrol, traffic processing, startup,
configuration reload, AAA, and IPsec events. Before you configure a Nortel VPNGateway
device in JSA, youmust configure your device to send syslog events to JSA.
To configure the device to send syslog events to JSA:
1. Log in to the Nortel VPN Gateway command-line interface (CLI).
2. Type the following command:
/cfg/sys/syslog/add
797Copyright © 2018, Juniper Networks, Inc.
Chapter 87: Nortel Networks
3. At the prompt, type the IP address of your JSA system:
Enter new syslog host: <IP address>
Where <IP address> is the IP address of your JSA system.
4. Apply the configuration:
apply
5. View all syslog servers currently added to your system configuration:
/cfg/sys/syslog/list
You can now configure the log source in JSA.
6. To configure JSA to receive events from a Nortel VPN Gateway device: From the Log
Source Type list, select the Nortel VPNGateway option.
Copyright © 2018, Juniper Networks, Inc.798
Juniper Secure Analytics Configuring DSMs Guide
CHAPTER 88
Novell EDirectory
• Novell EDirectory on page 799
• Configure XDASv2 to Forward Events on page 800
• Load the XDASv2 Module on page 801
• Loading the XDASv2 on a Linux Operating System on page 801
• Loading the XDASv2 on aWindows Operating System on page 802
• Configure Event Auditing Using Novell IManager on page 802
• Configure a Log Source on page 804
Novell EDirectory
The Novell eDirectory DSM for JSA accepts audit events from Novell eDirectory using
syslog.
To use the Novell eDirectory DSM, youmust have the following components installed:
• Novell eDirectory v8.8 with service pack 6 (sp6)
• Novell Audit Plug-in
• Novell iManager v2.7
• XDASv2
To configure Novell eDirectory with JSA, youmust:
1. Configure the XDASv2 property file to forward events to JSA.
2. Load the XDASv2module on your Linux or Windows Operating System.
3. Install the Novell Audit Plug-in on the Novell iManager.
4. Configure auditing using Novell iManager.
5. Configure JSA.
799Copyright © 2018, Juniper Networks, Inc.
Configure XDASv2 to Forward Events
By default, XDASv2 is configured to log events to a file. To forward events from XDASv2
to JSA, youmust edit the xdasconfig.properties.template and configure the file for syslog
forwarding.
Audit events must be forwarded by syslog to JSA, instead of being logged to a file.
To configure XDASv2 to forward syslog events:
1. Log in to the server hosting Novell eDirectory.
2. Open the following file for editing:
• Windows - C:\Novell\NDS\xdasconfig.properties.template
• Linux or Solaris - etc/opt/novell/eDirectory/conf/xdasconfig.properties.template
3. To set the root logger, remove the comment marker (#) from the following line:
log4j.rootLogger=debug, S, R
4. To set the appender, remove the comment marker (#) from the following line:
log4j.appender.S=org.apache.log4j.net.SyslogAppender
5. To configure the IP address for the syslog destination, remove the comment marker
(#) and edit the following lines:
log4j.appender.S.Host=<IP address> log4j.appender.S.Port=<Port>
Where,
<IP address> is the IP address or hostname of JSA.
<Port> is the port number for the UDP or TCP protocol. The default port for syslog
communication is port 514 for JSA or Event Collectors.
6. To configure the syslog protocol, remove the comment marker (#) and type the
protocol (UDP, TCP, or SSL) use in the following line:
log4j.appender.S.Protocol=TCP
The encrypted protocol SSL is not supported by JSA.
7. To set the severity level for logging events, remove the commentmarker (#) from the
following line:
log4j.appender.S.Threshold=INFO
The default value of INFO is the correct severity level for events.
Copyright © 2018, Juniper Networks, Inc.800
Juniper Secure Analytics Configuring DSMs Guide
8. To set the facility for logging events, remove the comment marker (#) from the
following line:
log4j.appender.S.Facility=USER
The default value of USER is the correct facility value for events.
9. To set the facility for logging events, remove the comment marker (#) from the
following line:
log4j.appender.R.MaxBackupIndex=10
10. Save the xdasconfig.properties.template file.
After you configure the syslog properties for XDASv2 events, you are ready to load
the XDASv2module.
Load the XDASv2Module
Before youcanconfigure events inNovell iManager, youmust load thechanges youmade
to the XDASv2module.
To load the XDASv2module, select your operating system.
• To load the XDASv2 in Linux, see “Loading the XDASv2 on a Linux Operating System”
on page 801.
• To load the XDASv2 inWindows, see “Loading the XDASv2 on aWindows Operating
System” on page 802.
NOTE: If your Novell eDirectory has Novell Module Authentication Service(NMAS) installedwithNMASauditingenabled, thechangesmadetoXDASv2modules are loaded automatically. If you have NMAS installed, you shouldconfigure event auditing. For information on configuring event auditing, see“Configure Event Auditing Using Novell IManager” on page 802.
Loading the XDASv2 on a Linux Operating System
You can load XDASv2 on a Linux Operating System.
1. Log in to your Linux server hosting Novell eDirectory, as a root user.
2. Type the following command:
ndstrace -c "load xdasauditds"
You are now ready to configure event auditing in Novell eDirectory. Formore information,
see “Configure Event Auditing Using Novell IManager” on page 802.
801Copyright © 2018, Juniper Networks, Inc.
Chapter 88: Novell EDirectory
Loading the XDASv2 on aWindowsOperating System
You can load XDASv2 on aWindows Operating System.
1. Log in to your Windows server hosting Novell eDirectory.
2. On your desktop, click Start > Run.
The Run window is displayed.
3. Type the following:
C:\Novell\NDS\ndscons.exe
This is the default installation path for theWindowsOperatingSystem. If you installed
Novell eDirectory to a different directory, then the correct path is required.
4. ClickOK.
The Novell Directory Service console displays a list of available modules.
5. From the Services tab, select xdasauditds.
6. Click Start.
The xdasauditds service is started for Novell eDirectory.
7. Click Startup.
The Service window is displayed.
8. In the Startup Type panel, select the Automatic check box.
9. ClickOK.
10. Close the Novell eDirectory Services window.
You are now ready to configure event auditing in Novell eDirectory. Formore information,
see “Configure Event Auditing Using Novell IManager” on page 802.
Configure Event Auditing Using Novell IManager
You can configure event auditing for XDASv2 in Novell iManager.
1. Log in to your Novell iManager console user interface.
2. From the navigation bar, click Roles and Tasks.
Copyright © 2018, Juniper Networks, Inc.802
Juniper Secure Analytics Configuring DSMs Guide
3. In the left-hand navigation, click eDirectory Auditing >Audit Configuration.
The Audit Configuration panel is displayed.
4. In the NPC Server name field, type the name of your NPC Server.
5. ClickOK.
The Audit Configuration for the NPC Server is displayed.
6. Configure the following parameters:
a. On the Components panel, select one or both of the following:
DS—Select this check box to audit XDASv2 events for an eDirectory object.
LDAP—Select this check box to audit XDASv2 events for a Lightweight Directory
Access Protocol (LDAP) object.
7. On the Log Event's Large Values panel, select one of the following:
Log Large Values—Select this option to log events that are larger than 768 bytes.
Don't Log LargeValues—Select this option to log events less than 768 bytes. If a value
exceeds 768 bytes, then the event is truncated.
8. On the XDAS Events Configuration, select the check boxes of the events you want
XDAS to capture and forward to JSA.
9. Click Apply.
10. On the XDAS tab, click XDASRoles.
The XDAS Roles Configuration panel is displayed.
11. Configure the following role parameters:
a. Select a check box for each object class to support event collection.
12. From the Available Attribute(s) list, select any attributes and click the arrow to add
these to the Selected Attribute(s) list.
13. ClickOK after you have added the object attributes.
14. Click Apply.
15. On the XDAS tab, click XDASAccounts.
The XDAS Accounts Configuration panel is displayed.
16. Configure the following account parameters:
803Copyright © 2018, Juniper Networks, Inc.
Chapter 88: Novell EDirectory
a. From theAvailable Classes list, select any classes and click the arrow to add these
to the Selected Attribute(s) list.
17. ClickOK after you have added the object attributes.
18. Click Apply.
You are now ready to configure JSA .
Configure a Log Source
JSA automatically detects syslog events from Novell eDirectory. This configuration step
is optional.
1. From the Log Source Type list, select Novell eDirectory.
For more information about Novell eDirectory, Novell iManager, or XDASv2, see your
vendor documentation.
Copyright © 2018, Juniper Networks, Inc.804
Juniper Secure Analytics Configuring DSMs Guide
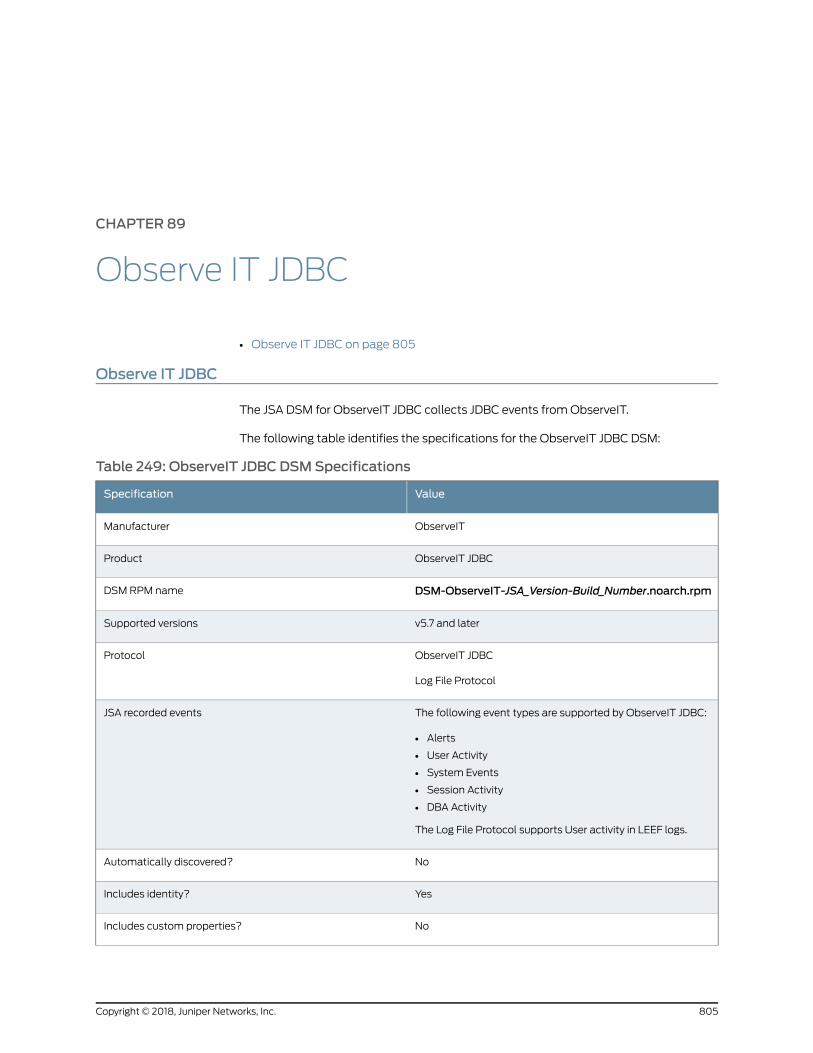
CHAPTER 89
Observe IT JDBC
• Observe IT JDBC on page 805
Observe IT JDBC
The JSA DSM for ObserveIT JDBC collects JDBC events fromObserveIT.
The following table identifies the specifications for the ObserveIT JDBC DSM:
Table 249: ObserveIT JDBC DSMSpecifications
ValueSpecification
ObserveITManufacturer
ObserveIT JDBCProduct
DSM-ObserveIT-JSA_Version-Build_Number.noarch.rpmDSM RPM name
v5.7 and laterSupported versions
ObserveIT JDBC
Log File Protocol
Protocol
The following event types are supported by ObserveIT JDBC:
• Alerts
• User Activity
• System Events
• Session Activity
• DBA Activity
The Log File Protocol supports User activity in LEEF logs.
JSA recorded events
NoAutomatically discovered?
YesIncludes identity?
NoIncludes custom properties?
805Copyright © 2018, Juniper Networks, Inc.
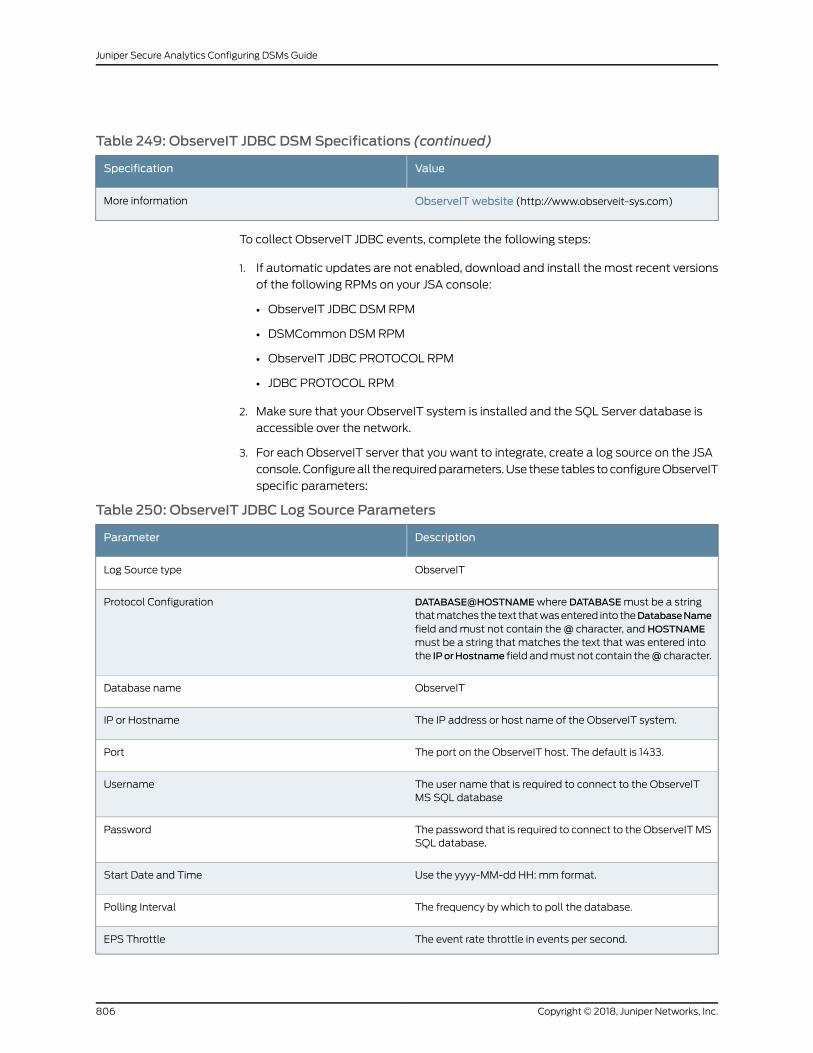
Table 249: ObserveIT JDBC DSMSpecifications (continued)
ValueSpecification
ObserveIT website (http://www.observeit-sys.com)More information
To collect ObserveIT JDBC events, complete the following steps:
1. If automatic updates are not enabled, download and install themost recent versions
of the following RPMs on your JSA console:
• ObserveIT JDBC DSM RPM
• DSMCommon DSM RPM
• ObserveIT JDBC PROTOCOL RPM
• JDBC PROTOCOL RPM
2. Make sure that your ObserveIT system is installed and the SQL Server database is
accessible over the network.
3. For each ObserveIT server that you want to integrate, create a log source on the JSA
console.Configureall the requiredparameters.Use these tables toconfigureObserveIT
specific parameters:
Table 250: ObserveIT JDBC Log Source Parameters
DescriptionParameter
ObserveITLog Source type
DATABASE@HOSTNAMEwhere DATABASEmust be a stringthatmatches the text thatwasentered into theDatabaseNamefield andmust not contain the@ character, and HOSTNAMEmust be a string that matches the text that was entered intothe IPorHostname field andmust not contain the@ character.
Protocol Configuration
ObserveITDatabase name
The IP address or host name of the ObserveIT system.IP or Hostname
The port on the ObserveIT host. The default is 1433.Port
The user name that is required to connect to the ObserveITMS SQL database
Username
The password that is required to connect to theObserveITMSSQL database.
Password
Use the yyyy-MM-dd HH: mm format.Start Date and Time
The frequency by which to poll the database.Polling Interval
The event rate throttle in events per second.EPS Throttle
Copyright © 2018, Juniper Networks, Inc.806
Juniper Secure Analytics Configuring DSMs Guide
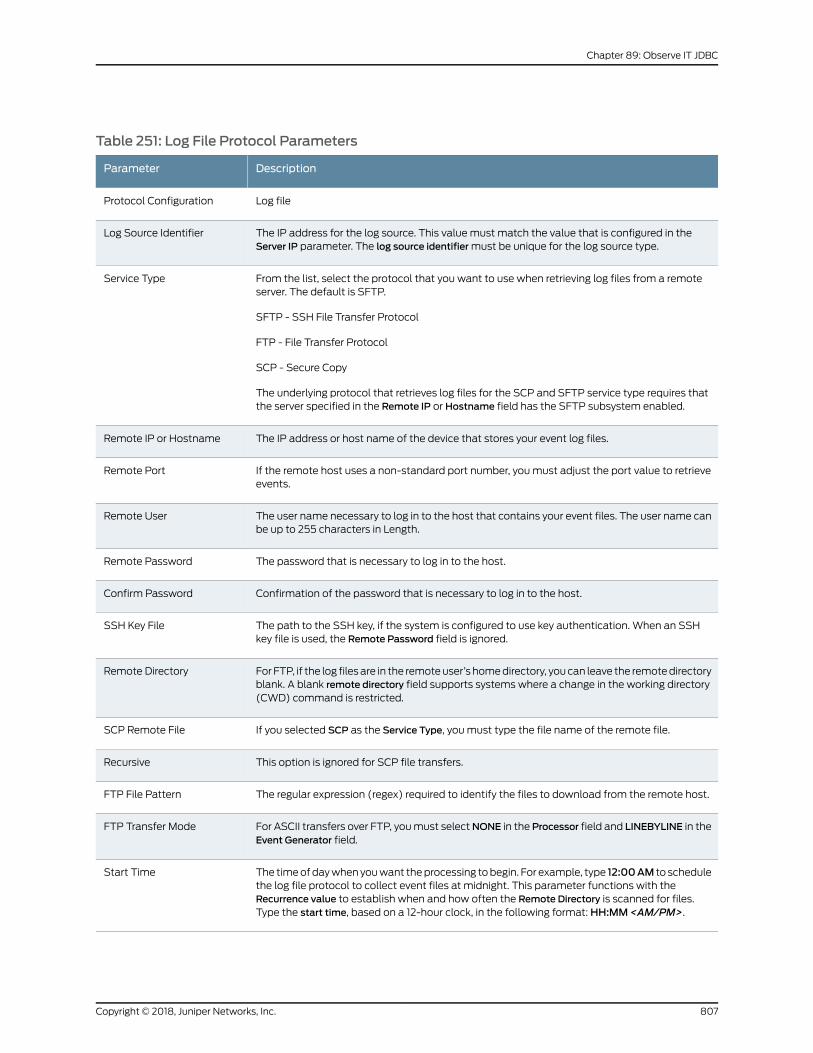
Table 251: Log File Protocol Parameters
DescriptionParameter
Log fileProtocol Configuration
The IP address for the log source. This value must match the value that is configured in theServer IP parameter. The log source identifiermust be unique for the log source type.
Log Source Identifier
From the list, select the protocol that you want to use when retrieving log files from a remoteserver. The default is SFTP.
SFTP - SSH File Transfer Protocol
FTP - File Transfer Protocol
SCP - Secure Copy
The underlying protocol that retrieves log files for the SCP and SFTP service type requires thatthe server specified in the Remote IP or Hostname field has the SFTP subsystem enabled.
Service Type
The IP address or host name of the device that stores your event log files.Remote IP or Hostname
If the remote host uses a non-standard port number, youmust adjust the port value to retrieveevents.
Remote Port
The user name necessary to log in to the host that contains your event files. The user name canbe up to 255 characters in Length.
Remote User
The password that is necessary to log in to the host.Remote Password
Confirmation of the password that is necessary to log in to the host.Confirm Password
The path to the SSH key, if the system is configured to use key authentication. When an SSHkey file is used, the Remote Password field is ignored.
SSH Key File
For FTP, if the log files are in the remoteuser’s homedirectory, youcan leave the remotedirectoryblank. A blank remote directory field supports systems where a change in the working directory(CWD) command is restricted.
Remote Directory
If you selected SCP as the Service Type, you must type the file name of the remote file.SCP Remote File
This option is ignored for SCP file transfers.Recursive
The regular expression (regex) required to identify the files to download from the remote host.FTP File Pattern
For ASCII transfers over FTP, youmust selectNONE in the Processor field and LINEBYLINE in theEvent Generator field.
FTP Transfer Mode
The timeofdaywhenyouwant theprocessing tobegin. For example, type 12:00AM to schedulethe log file protocol to collect event files at midnight. This parameter functions with theRecurrence value to establish when and how often the Remote Directory is scanned for files.Type the start time, based on a 12-hour clock, in the following format:HH:MM <AM/PM>.
Start Time
807Copyright © 2018, Juniper Networks, Inc.
Chapter 89: Observe IT JDBC
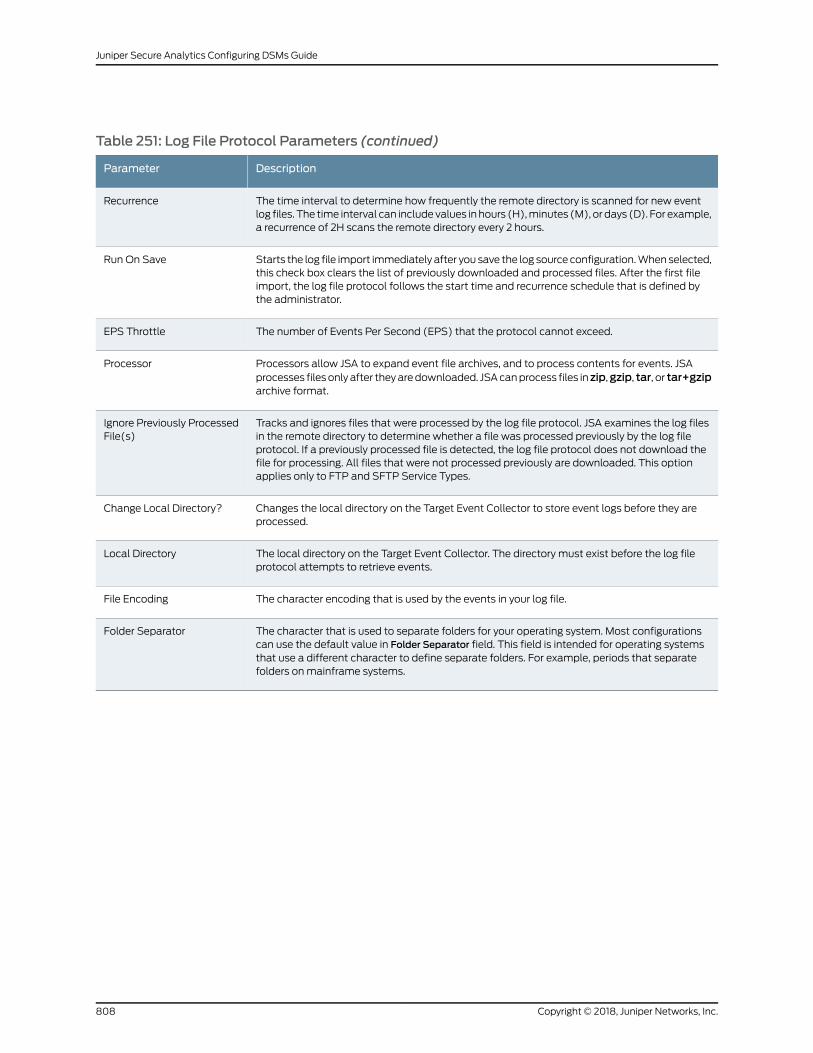
Table 251: Log File Protocol Parameters (continued)
DescriptionParameter
The time interval to determine how frequently the remote directory is scanned for new eventlog files. The time interval can includevalues in hours (H),minutes (M), or days (D). For example,a recurrence of 2H scans the remote directory every 2 hours.
Recurrence
Starts the log file import immediately after you save the log source configuration.Whenselected,this check box clears the list of previously downloaded and processed files. After the first fileimport, the log file protocol follows the start time and recurrence schedule that is defined bythe administrator.
Run On Save
The number of Events Per Second (EPS) that the protocol cannot exceed.EPS Throttle
Processors allow JSA to expand event file archives, and to process contents for events. JSAprocesses filesonly after theyaredownloaded. JSAcanprocess files in zip,gzip, tar, or tar+gziparchive format.
Processor
Tracks and ignores files that were processed by the log file protocol. JSA examines the log filesin the remote directory to determine whether a file was processed previously by the log fileprotocol. If a previously processed file is detected, the log file protocol does not download thefile for processing. All files that were not processed previously are downloaded. This optionapplies only to FTP and SFTP Service Types.
Ignore Previously ProcessedFile(s)
Changes the local directory on the Target Event Collector to store event logs before they areprocessed.
Change Local Directory?
The local directory on the Target Event Collector. The directory must exist before the log fileprotocol attempts to retrieve events.
Local Directory
The character encoding that is used by the events in your log file.File Encoding
The character that is used to separate folders for your operating system. Most configurationscan use the default value in Folder Separator field. This field is intended for operating systemsthat use a different character to define separate folders. For example, periods that separatefolders onmainframe systems.
Folder Separator
Copyright © 2018, Juniper Networks, Inc.808
Juniper Secure Analytics Configuring DSMs Guide
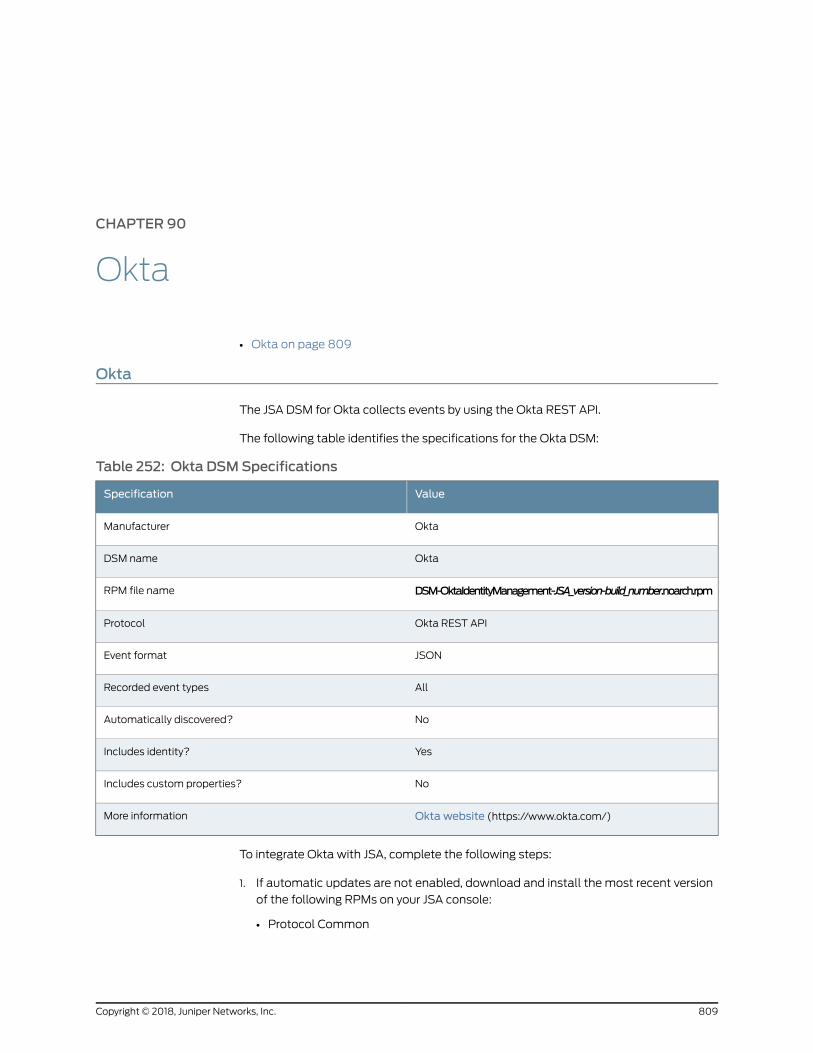
CHAPTER 90
Okta
• Okta on page 809
Okta
The JSA DSM for Okta collects events by using the Okta REST API.
The following table identifies the specifications for the Okta DSM:
Table 252: Okta DSMSpecifications
ValueSpecification
OktaManufacturer
OktaDSM name
DSM-OktaIdentityManagement-JSA_version-build_number.noarch.rpmRPM file name
Okta REST APIProtocol
JSONEvent format
AllRecorded event types
NoAutomatically discovered?
YesIncludes identity?
NoIncludes custom properties?
Okta website (https://www.okta.com/)More information
To integrate Okta with JSA, complete the following steps:
1. If automatic updates are not enabled, download and install the most recent version
of the following RPMs on your JSA console:
• Protocol Common
809Copyright © 2018, Juniper Networks, Inc.
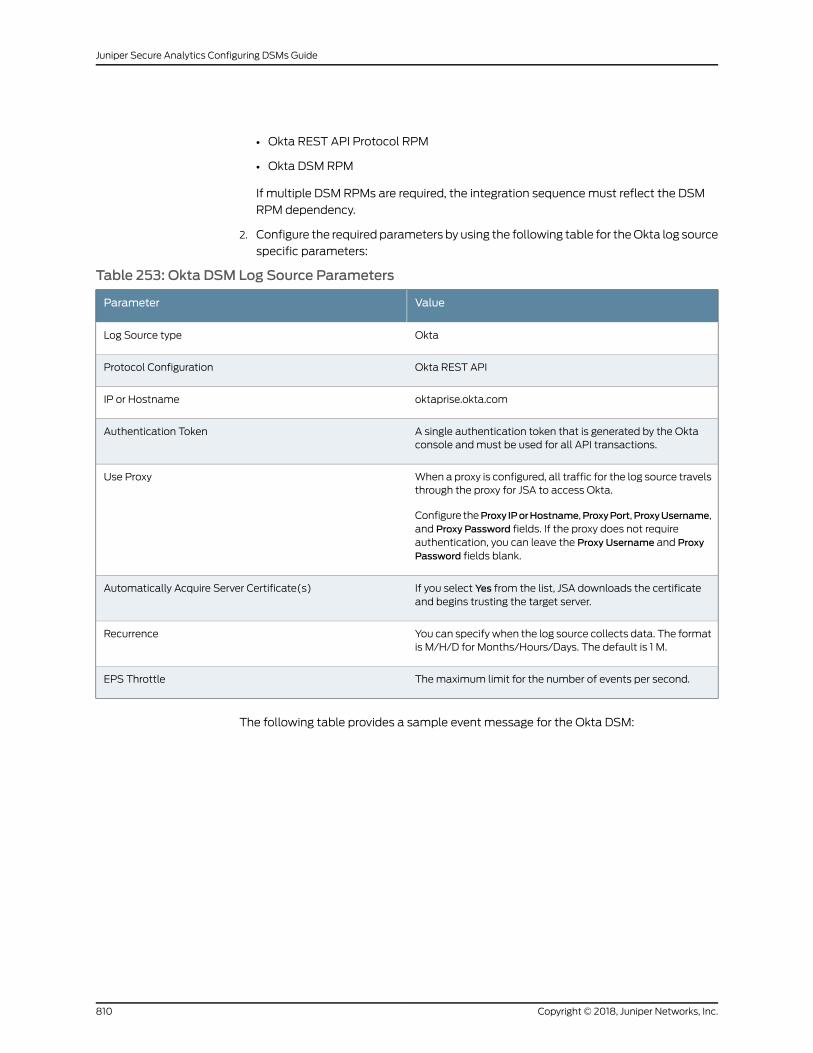
• Okta REST API Protocol RPM
• Okta DSM RPM
If multiple DSM RPMs are required, the integration sequencemust reflect the DSM
RPM dependency.
2. Configure the required parameters by using the following table for theOkta log source
specific parameters:
Table 253: Okta DSM Log Source Parameters
ValueParameter
OktaLog Source type
Okta REST APIProtocol Configuration
oktaprise.okta.comIP or Hostname
A single authentication token that is generated by the Oktaconsole andmust be used for all API transactions.
Authentication Token
When a proxy is configured, all traffic for the log source travelsthrough the proxy for JSA to access Okta.
Configure theProxy IPorHostname,ProxyPort,ProxyUsername,and Proxy Password fields. If the proxy does not requireauthentication, you can leave the Proxy Username and ProxyPassword fields blank.
Use Proxy
If you select Yes from the list, JSA downloads the certificateand begins trusting the target server.
Automatically Acquire Server Certificate(s)
You can specify when the log source collects data. The formatis M/H/D for Months/Hours/Days. The default is 1 M.
Recurrence
Themaximum limit for the number of events per second.EPS Throttle
The following table provides a sample event message for the Okta DSM:
Copyright © 2018, Juniper Networks, Inc.810
Juniper Secure Analytics Configuring DSMs Guide
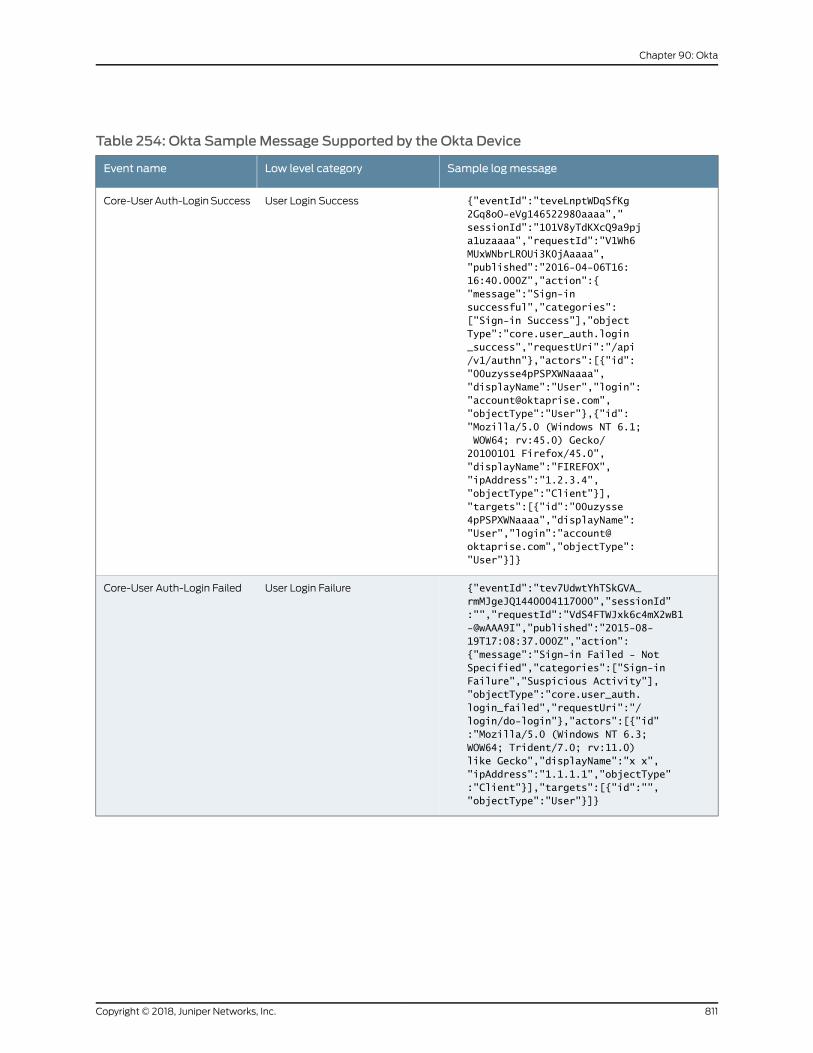
Table 254: Okta SampleMessage Supported by the Okta Device
Sample logmessageLow level categoryEvent name
{"eventId":"teveLnptWDqSfKg2Gq8oO-eVg146522980aaaa","sessionId":"101V8yTdKXcQ9a9pja1uzaaaa","requestId":"V1Wh6MUxWNbrLROUi3K0jAaaaa","published":"2016-04-06T16:16:40.000Z","action":{"message":"Sign-in successful","categories":["Sign-in Success"],"objectType":"core.user_auth.login_success","requestUri":"/api/v1/authn"},"actors":[{"id":"00uzysse4pPSPXWNaaaa","displayName":"User","login":"[email protected]","objectType":"User"},{"id":"Mozilla/5.0 (Windows NT 6.1; WOW64; rv:45.0) Gecko/20100101 Firefox/45.0","displayName":"FIREFOX","ipAddress":"1.2.3.4","objectType":"Client"}],"targets":[{"id":"00uzysse4pPSPXWNaaaa","displayName":"User","login":"[email protected]","objectType":"User"}]}
User Login SuccessCore-UserAuth-LoginSuccess
{"eventId":"tev7UdwtYhTSkGVA_rmMJgeJQ1440004117000","sessionId":"","requestId":"VdS4FTWJxk6c4mX2wB1-@wAAA9I","published":"2015-08-19T17:08:37.000Z","action":{"message":"Sign-in Failed - Not Specified","categories":["Sign-in Failure","Suspicious Activity"],"objectType":"core.user_auth.login_failed","requestUri":"/login/do-login"},"actors":[{"id":"Mozilla/5.0 (Windows NT 6.3; WOW64; Trident/7.0; rv:11.0) like Gecko","displayName":"x x","ipAddress":"1.1.1.1","objectType":"Client"}],"targets":[{"id":"","objectType":"User"}]}
User Login FailureCore-User Auth-Login Failed
811Copyright © 2018, Juniper Networks, Inc.
Chapter 90: Okta

Copyright © 2018, Juniper Networks, Inc.812
Juniper Secure Analytics Configuring DSMs Guide
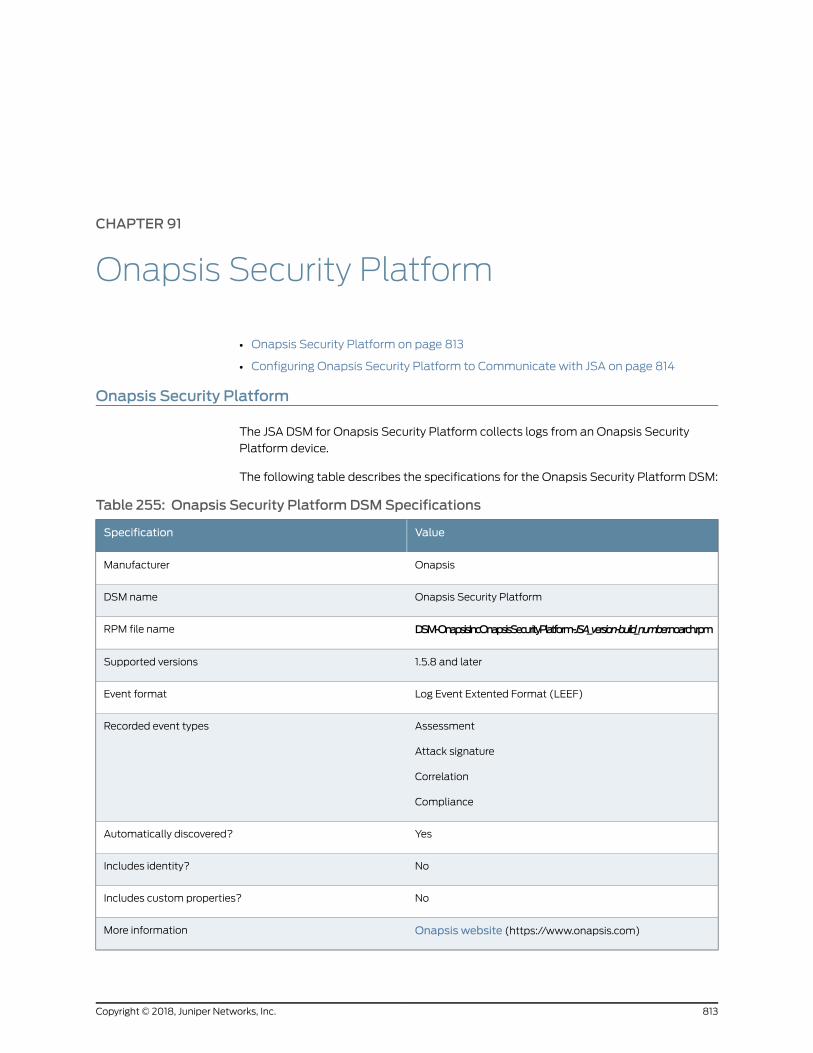
CHAPTER 91
Onapsis Security Platform
• Onapsis Security Platform on page 813
• Configuring Onapsis Security Platform to Communicate with JSA on page 814
Onapsis Security Platform
The JSA DSM for Onapsis Security Platform collects logs from an Onapsis Security
Platform device.
The following table describes the specifications for the Onapsis Security Platform DSM:
Table 255: Onapsis Security PlatformDSMSpecifications
ValueSpecification
OnapsisManufacturer
Onapsis Security PlatformDSM name
DSM-OnapsisIncOnapsisSecurityPlatform-JSA_version-build_number.noarch.rpmRPM file name
1.5.8 and laterSupported versions
Log Event Extented Format (LEEF)Event format
Assessment
Attack signature
Correlation
Compliance
Recorded event types
YesAutomatically discovered?
NoIncludes identity?
NoIncludes custom properties?
Onapsis website (https://www.onapsis.com)More information
813Copyright © 2018, Juniper Networks, Inc.
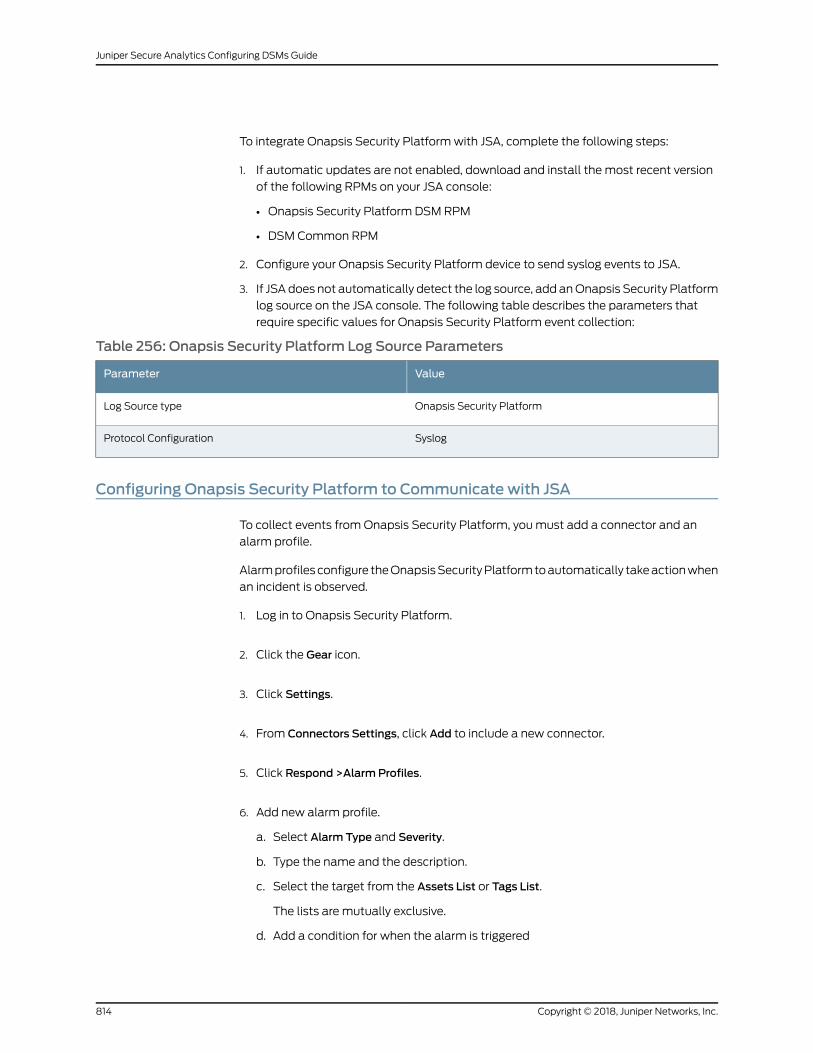
To integrate Onapsis Security Platformwith JSA, complete the following steps:
1. If automatic updates are not enabled, download and install the most recent version
of the following RPMs on your JSA console:
• Onapsis Security Platform DSM RPM
• DSM Common RPM
2. Configure your Onapsis Security Platform device to send syslog events to JSA.
3. If JSA does not automatically detect the log source, add anOnapsis Security Platform
log source on the JSA console. The following table describes the parameters that
require specific values for Onapsis Security Platform event collection:
Table 256: Onapsis Security Platform Log Source Parameters
ValueParameter
Onapsis Security PlatformLog Source type
SyslogProtocol Configuration
Configuring Onapsis Security Platform to Communicate with JSA
To collect events fromOnapsis Security Platform, youmust add a connector and an
alarm profile.
Alarmprofilesconfigure theOnapsisSecurityPlatformtoautomatically takeactionwhen
an incident is observed.
1. Log in to Onapsis Security Platform.
2. Click the Gear icon.
3. Click Settings.
4. From Connectors Settings, click Add to include a new connector.
5. Click Respond >Alarm Profiles.
6. Add new alarm profile.
a. Select Alarm Type and Severity.
b. Type the name and the description.
c. Select the target from the Assets List or Tags List.
The lists are mutually exclusive.
d. Add a condition for when the alarm is triggered
Copyright © 2018, Juniper Networks, Inc.814
Juniper Secure Analytics Configuring DSMs Guide

e. To add an action that runs when the alarm is triggered, click Action.
f. Select the JSA connector that was created in step 4.
815Copyright © 2018, Juniper Networks, Inc.
Chapter 91: Onapsis Security Platform

Copyright © 2018, Juniper Networks, Inc.816
Juniper Secure Analytics Configuring DSMs Guide
CHAPTER 92
OpenBSD
• OpenBSD on page 817
• Configuring a Log Source on page 817
• Configuring Syslog for OpenBSD on page 818
OpenBSD
The OpenBSD DSM for JSA accepts events by using syslog.
JSA records all relevant informational, authentication, and system level events that are
forwarded fromOpenBSD operating systems.
Configuring a Log Source
To integrate OpenBSD events with JSA, youmustmanually create a log source. JSA does
not automatically discover or create log sources for syslog events fromOpenBSD
operating systems.
To create a log source for OpenBSD:
1. Log in to JSA.
2. Click the Admin tab.
3. On the navigation menu, click Data Sources.
The Data Sources pane is displayed.
4. Click the Log Sources icon.
The Log Sourceswindow is displayed.
5. Click Add.
The Add a log sourcewindow is displayed.
6. In the Log Source Name field, type a name for your log source.
817Copyright © 2018, Juniper Networks, Inc.
7. In the Log Source Description field, type a description for the log source.
8. From the Log Source Type list, selectOpenBSDOS.
9. From the Protocol Configuration list, select Syslog.
The syslog protocol configuration is displayed.
10. Configure the following values:
Table 257: Syslog Parameters
DescriptionParameter
Type the IP address or host name for the log source as an identifier for events from yourOpenBSD appliance.
Log Source Identifier
11. Click Save.
12. On the Admin tab, click Deploy Changes.
The log source is added to JSA. You are now ready to configure your OpenBSD appliance
to forward syslog events.
Configuring Syslog for OpenBSD
You can configure OpenBSD to forward syslog events.
1. Use SHH, to log in to your OpenBSD device, as a root user.
2. Open the /etc/syslog.conf file.
3. Add the following line to the topof the file.Make sure that all other lines remain intact:
*.*@<IP address>
Where <IP address> is the IP address of your JSA.
4. Save and exit the file.
5. Send a hang-up signal to the syslog daemon to ensure that all changes are applied:
kill -HUP `cat /var/run/syslog.pid`
NOTE: This command line uses the back quotationmark character (`),
which is located to the left of the number one onmost keyboard layouts.
Copyright © 2018, Juniper Networks, Inc.818
Juniper Secure Analytics Configuring DSMs Guide

The configuration is complete. Events that are forwarded to JSA by OpenBSD are
displayed on the Log Activity tab.
819Copyright © 2018, Juniper Networks, Inc.
Chapter 92: OpenBSD

Copyright © 2018, Juniper Networks, Inc.820
Juniper Secure Analytics Configuring DSMs Guide
CHAPTER 93
Open LDAP
• Open LDAP on page 821
• Configuring a Log Source on page 821
• Configuring IPtables for Multiline UDP Syslog Events on page 823
• Configuring Event Forwarding for Open LDAP on page 825
Open LDAP
The Open LDAP DSM for JSA accepts multiline UDP syslog events fromOpen LDAP
installations that are configured to log stats events by using logging level 256.
Open LDAP events are forwarded to JSA using port 514, but must be redirected to the
port configured in the UDPMultiline protocol. This redirect that uses iptables is required
because JSA does not support multiline UDP syslog on the standard listen port.
NOTE: UDPmultiline syslog events can be assigned to any port other thanport 514. The default port that is assigned to the UDPMultiline protocol isUDP port 517. If port 517 is used in your network, see the JSA Common PortsTechnical Note for a list of ports that are used by JSA.
Configuring a Log Source
JSA does not automatically discover Open LDAP events that are forwarded in UDP
multiline format. To complete the integration, youmust manually create a log source for
the UDPMultiline Syslog protocol by using the Admin tab in JSA. Creating the log source
allows JSA to establish a listen port for incoming Open LDAPmultiline events.
To configure an Open LDAP log source in JSA:
1. Log in to JSA.
2. Click the Admin tab.
3. In the navigation menu, click Data Sources.
The Data Sources pane is displayed.
821Copyright © 2018, Juniper Networks, Inc.
4. Click the Log Sources icon.
The Log Sourceswindow is displayed.
5. Click Add.
The Add a log sourcewindow is displayed.
6. In the Log Source Name field, type a name for your log source.
7. In the Log Source Description field, type a description for your log source.
8. From the Log Source Type list, selectOpen LDAP Software.
9. From the Protocol Configuration list, select UDPMultiline Syslog.
10. Configure the following values:
Table 258: UDPMultiline Protocol Configuration
DescriptionParameter
Type the IP address or host name for the log source as an identifier for events from your OpenLDAP server.
Log Source Identifier
Type the port number that is used by JSA to accept incoming UDPMultiline Syslog events. Thevalid port range is 1 - 65536.
The default UDPMultiline Syslog listen port is 517.
If you do not see the Listen Port field, youmust restart Tomcat on JSA.
To edit the Listen Port number:
Update IPtables on your JSA console or Event Collector with the newUDPMultiline Syslog portnumber. For more information, see “Configuring IPtables for Multiline UDP Syslog Events” onpage 823.
In the Listen Port field, type the new port number for receiving UDPMultiline Syslog events.
Click Save.
On the Admin tab, select Advanced > Deploy Full Configuration.
When you click Deploy Full Configuration, JSA restarts all services, resulting in a gap in datacollection for events and flows until the deployment completes.
Listen Port
Copyright © 2018, Juniper Networks, Inc.822
Juniper Secure Analytics Configuring DSMs Guide
Table 258: UDPMultiline Protocol Configuration (continued)
DescriptionParameter
Type the regular expression (regex) that is needed to filter the event payloadmessages. Allmatching events are included when processing Open LDAP events.
The following regular expression is suggested for Open LDAP events:
conn=(\d+)
For example, Open LDAP starts connectionmessageswith theword conn, followed by the restof the event payload. Use of this parameter requires knowledge of regular expressions (regex).For more information, see the following website:http://download.oracle.com/javase/tutorial/essential/regex/
Message ID Pattern
11. Click Save.
12. On the Admin tab, click Deploy Changes.
The log source is created for Open LDAP events. You are now ready to configure IPtables
for JSA to redirect Open LDAP events to the proper UDPmultiline syslog port on your JSA
console or Event Collector.
Configuring IPtables for Multiline UDP Syslog Events
Open LDAP requires that events are redirected from your Open LDAP servers from port
514 to another JSA port for the UDPmultiline protocol. Youmust configure IPtables on
your JSA console or for each JSA Event Collectors that receives multiline UDP syslog
events from an Open LDAP server.
To configure JSA to redirect multiline UDP syslog events:
1. Using SSH, log in to JSA as the root user.
Login: <root>
Password: <password>
2. Type the following command to edit the IPtables file:
vi /opt/qradar/conf/iptables-nat.post
The IPtables NAT configuration file is displayed.
3. Type the following command to instruct JSA to redirect syslog events from UDP port
514 to UDP port 517:
-A PREROUTING -p udp --dport 514 -j REDIRECT --to-port <new-port> -s <IP address>
Where:
<IP address> is the IP address of your Open LDAP server.
823Copyright © 2018, Juniper Networks, Inc.
Chapter 93: Open LDAP
<New port> is the port number that is configured in the UDPMultiline protocol for
Open LDAP.
Youmust include a redirect for each Open LDAP IP address that sends events to your
JSA console or Event Collector. For example, if you had three Open LDAP servers that
communicate to an Event Collect, type the following code:
-A PREROUTING -p udp --dport 514 -j REDIRECT --to-port 517 -s 10.10.10.10 -A PREROUTING -p udp --dport 514 -j REDIRECT --to-port 517 -s 10.10.10.11 -A PREROUTING -p udp --dport 514 -j REDIRECT --to-port 517 -s 10.10.10.12
4. Save your IPtables NAT configuration.
You are now ready to configure IPtables on your JSA console or Event Collector to
accept events from your Open LDAP servers.
5. Type the following command to edit the IPtables file:
vi /opt/qradar/conf/iptables.post
The IPtables configuration file is displayed.
6. Type the following command to instruct JSA to allow communication from yourOpen
LDAP servers:
-I QChain 1 -m udp -p udp --src <IP address> --dport <New port> -j ACCEPT
Where:
<IP address> is the IP address of your Open LDAP server.
<New port> is the port number that is configured in the UDPMultiline protocol for
Open LDAP.
Youmust include a redirect for each Open LDAP IP address that sends events to your
JSA console or Event Collector. For example, if you had three Open LDAP servers that
communicate to an Event Collect, you would type the following code:
-I QChain 1 -m udp -p udp --src 10.10.10.10 --dport 517 -j ACCEPT -I QChain 1 -m udp -p udp --src 10.10.10.11 --dport 517 -j ACCEPT -I QChain 1 -m udp -p udp --src 10.10.10.12 --dport 517 -j ACCEPT
7. Type the following command to update IPtables in JSA:
./opt/qradar/bin/iptables_update.pl
Repeat theses steps if you need to configure another JSA console or Event Collector
that receives syslog events from an Open LDAP server.
You can now configure your Open LDAP server to forward events to JSA.
Copyright © 2018, Juniper Networks, Inc.824
Juniper Secure Analytics Configuring DSMs Guide
Configuring Event Forwarding for Open LDAP
You can configure syslog forwarding for Open LDAP:
1. Log in to the command-line interface for your Open LDAP server.
2. Edit the following file:
/etc/syslog.conf
3. Add the following information to the syslog configuration file:
<facility>@<IP address>
Where:
<facility> is the syslog facility, for example local4.
<IP address> is the IP address of your JSA console or Event Collector.
For example,
#Logging for SLAPD local4.debug /var/log/messages local4.debug @10.10.10.1
NOTE: If your Open LDAP server stores event messages in a directoryother than/var/log/messages, youmust edit the directory path.
4. Save the syslog configuration file.
5. Type the following command to restart the syslog service:
/etc/init.d/syslog restart
Theconfiguration forOpenLDAP is complete.UDPmultilineevents thatare forwarded
to JSA are displayed on the Log Activity tab.
825Copyright © 2018, Juniper Networks, Inc.
Chapter 93: Open LDAP

Copyright © 2018, Juniper Networks, Inc.826
Juniper Secure Analytics Configuring DSMs Guide

CHAPTER 94
Open Source SNORT
• Open Source SNORT on page 827
• Configuring Open Source SNORT on page 827
• Configuring a Log Source on page 828
Open Source SNORT
The Open Source SNORT DSM for JSA records all relevant SNORT events using syslog.
The SourceFire VRT certified rules for registered SNORT users are supported. Rule sets
for Bleeding Edge, Emerging Threat, and other vendor rule sets might not be fully
supported by the Open Source SNORT DSM.
Configuring Open Source SNORT
To configure syslog on an Open Source SNORT device:
The following procedure applies to a system that runs Red Hat Enterprise. The following
procedures can vary for other operating systems.
1. Configure SNORT on a remote system.
2. Open the snort.conf file.
3. Uncomment the following line:
output alert_syslog:LOG_AUTH LOG_INFO
4. Save and exit the file.
5. Open the following file:
/etc/init.d/snortd
6. Add a -s to the following lines, as shown in the example:
daemon /usr/sbin/snort $ALERTMODE $BINARY_LOG $NO PACKET_LOG $DUMP_APP -D
827Copyright © 2018, Juniper Networks, Inc.

$PRINT_INTERFACE -i $i -s -u $USER -g $GROUP $CONF -i $LOGIR/$i $PASS_FIRST
daemon /usr/sbin/snort $ALERTMODE $BINARY_LOG $NO_PACKET_LOG $DUMP_APP -D $PRINT_INTERFACE $INTERFACE -s -u $USER -g $GROUP $CONF -i $LOGDIR
7. Save and exit the file.
8. Restart SNORT by typing the following command:
/etc/init.d/snortd restart
9. Open the syslog.conf file.
10. Update the file to reflect the following code:
auth.info@<IP Address>
Where <IP Address> is the system to which you want logs sent.
11. Save and exit the file.
12. Restart syslog:
/etc/init.d/syslog restart
You can now configure the log source in JSA.
Configuring a Log Source
JSA automatically discovers and creates log sources for Open Source SNORT syslog
events.
The following configuration steps are optional.
To create a log source in JSA:
1. Log in to JSA.
2. Click the Admin tab.
3. On the navigation menu, click Data Sources.
The Data Sources pane is displayed.
4. Click the Log Sources icon.
The Log Sourceswindow is displayed.
Copyright © 2018, Juniper Networks, Inc.828
Juniper Secure Analytics Configuring DSMs Guide

5. Click Add.
The Add a log sourcewindow is displayed.
6. In the Log Source Name field, type a name for your log source.
7. In the Log Source Description field, type a description for the log source.
8. From the Log Source Type list, selectOpen Source IDS.
9. Using the Protocol Configuration list, select Syslog.
The syslog protocol configuration is displayed.
10. Configure the following values:
Table 259: Syslog Parameters
DescriptionParameter
Type the IPaddressorhostnamefor the logsourceasan identifier for yourOpenSourceSNORTevents.
Log Source Identifier
11. Click Save.
12. On the Admin tab, click Deploy Changes.
The configuration is complete.
For more information about SNORT, see the SNORT documentation at
http://www.snort.org/docs/.
829Copyright © 2018, Juniper Networks, Inc.
Chapter 94: Open Source SNORT

Copyright © 2018, Juniper Networks, Inc.830
Juniper Secure Analytics Configuring DSMs Guide
CHAPTER 95
OpenStack
• OpenStack on page 831
• Configuring OpenStack to Communicate with JSA on page 833
OpenStack
The JSA DSM for OpenStack collects event logs from your OpenStack device.
The following table identifies the specifications for the OpenStack DSM:
Table 260: OpenStack DSMSpecifications
ValueSpecification
OpenStackManufacturer
OpenStackDSM name
DSM-OpenStackCeilometer-JSA_version-build_number.noarch.rpmRPM file name
v 2015.1Supported versions
HTTP ReceiverProtocol
Audit eventRecorded event types
NoAutomatically discovered?
NoIncludes identity?
NoIncludes custom properties?
OpenStack website (http://www.openstack.org/)More information
To send events fromOpenStack to JSA, complete the following steps:
1. If automatic updates are not enabled, download and install the most recent version
of the following RPMs on your JSA console:
831Copyright © 2018, Juniper Networks, Inc.
• PROTOCOL-HTTPReceiver RPM
• OpenStack DSM RPM
2. Add an OpenStack log source on the JSA Console. The following table describes the
parameters that are required to collect OpenStack events:
Table 261: OpenStack Log Source Parameters
ValueParameter
OpenStackLog Source type
HTTPReceiverProtocol Configuration
HTTPCommunication Type
The port number that OpenStack uses to communicate withJSA.
NOTE: Use a non-standard port. Make note of this portbecause it is required to configure your OpenStack device.
Listen Port
^\{"typeURIMessage Pattern
3. Configure your OpenStack device to communicate with JSA.
The following table provides a sample event message for the OpenStack DSM:
Copyright © 2018, Juniper Networks, Inc.832
Juniper Secure Analytics Configuring DSMs Guide
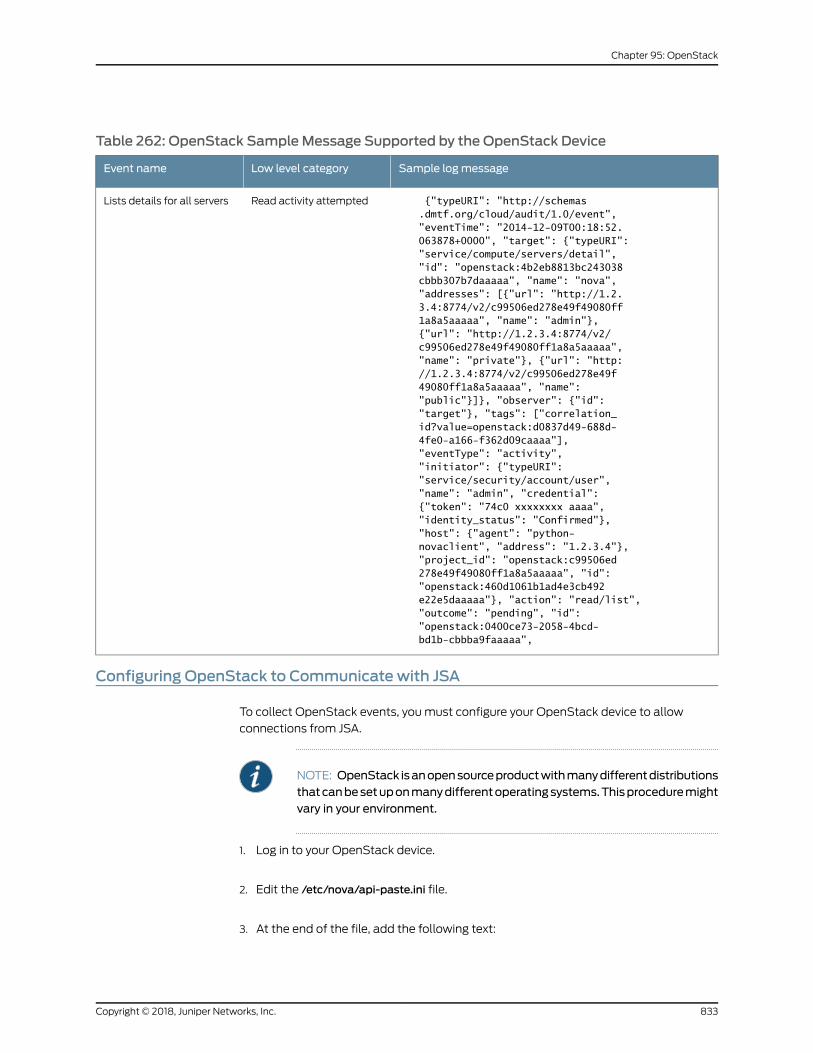
Table 262: OpenStack SampleMessage Supported by the OpenStack Device
Sample logmessageLow level categoryEvent name
{"typeURI": "http://schemas.dmtf.org/cloud/audit/1.0/event", "eventTime": "2014-12-09T00:18:52.063878+0000", "target": {"typeURI": "service/compute/servers/detail", "id": "openstack:4b2eb8813bc243038cbbb307b7daaaaa", "name": "nova", "addresses": [{"url": "http://1.2.3.4:8774/v2/c99506ed278e49f49080ff1a8a5aaaaa", "name": "admin"}, {"url": "http://1.2.3.4:8774/v2/c99506ed278e49f49080ff1a8a5aaaaa", "name": "private"}, {"url": "http://1.2.3.4:8774/v2/c99506ed278e49f49080ff1a8a5aaaaa", "name": "public"}]}, "observer": {"id": "target"}, "tags": ["correlation_id?value=openstack:d0837d49-688d-4fe0-a166-f362d09caaaa"], "eventType": "activity", "initiator": {"typeURI": "service/security/account/user", "name": "admin", "credential": {"token": "74c0 xxxxxxxx aaaa", "identity_status": "Confirmed"}, "host": {"agent": "python-novaclient", "address": "1.2.3.4"}, "project_id": "openstack:c99506ed278e49f49080ff1a8a5aaaaa", "id": "openstack:460d1061b1ad4e3cb492e22e5daaaaa"}, "action": "read/list", "outcome": "pending", "id": "openstack:0400ce73-2058-4bcd-bd1b-cbbba9faaaaa",
Read activity attemptedLists details for all servers
Configuring OpenStack to Communicate with JSA
To collect OpenStack events, youmust configure your OpenStack device to allow
connections from JSA.
NOTE: OpenStack isanopensourceproductwithmanydifferentdistributionsthatcanbesetuponmanydifferentoperatingsystems.Thisproceduremightvary in your environment.
1. Log in to your OpenStack device.
2. Edit the /etc/nova/api-paste.ini file.
3. At the end of the file, add the following text:
833Copyright © 2018, Juniper Networks, Inc.
Chapter 95: OpenStack
[filter:audit]paste.filter_factory = pycadf.middleware.audit:AuditMiddleware.factoryaudit_map_file = /etc/nova/api_audit_map.conf
4. Reviewthe [composite:openstack_compute_api_v2] settingsandverify that thevalues
match the following sample:
[composite:openstack_compute_api_v2]use = call:nova.api.auth:pipeline_factorynoauth = faultwrap sizelimit noauth ratelimit osapi_compute_app_v2keystone = faultwrap sizelimit authtoken keystonecontext ratelimit audit osapi_compute_app_v2keystone_nolimit = faultwrap sizelimit authtoken keystonecontext audit osapi_compute_app_v2
5. Copy the api_audit_map.conf file to the /etc/nova/ directory.
6. Restart the api service.
The command to restart the API service depends on what operating system your
OpenStack node is hosted on. On Redhat Enterprise Linux systems, the command is
service openstack-nova-api restart.
7. Opentheentry_points.txt file in theegg-info subdirectoryof yourOpenStack installation
directory.
For PackStack installations, the file path resembles the following path:
/usr/lib/python2.7/site-packages/ceilometer-2014.2-py2.7.egg-info/entry_points.txt.
8. Add the http dispatcher to the [ceilometer.dispatcher] section.
[ceilometer.dispatcher]file = ceilometer.dispatcher.file:FileDispatcherdatabase = ceilometer.dispatcher.database:DatabaseDispatcherhttp = ceilometer.dispatcher.http:HttpDispatcher
9. Copy the supplied http.py script to the dispatcher subdirectory of the Ceilometer
installation directory.
The exact location depends on your operating system and OpenStack distribution.
On the Redhat Enterprise Linux Distribution of OpenStack, the directory is
/usr/lib/python2.7/site-packages/ceilometer/dispatcher/.
10. Edit the /etc/ceilometer/ceilometer.conf file.
11. Under the [default] section, add dispatcher=http.
12. At the bottom of the file, add this section:
[dispatcher_http]target = http://<QRadar-IP>:<QRadar-Port>cadf_only = True
Copyright © 2018, Juniper Networks, Inc.834
Juniper Secure Analytics Configuring DSMs Guide

Use the port that you configured for OpenStack when you created the log source on
your JSA system.
13. Restart the ceilometer collector and notification services.
The command to restart the ceilometer collector and notification services depends
on what operating system your OpenStack device is hosted on. On devices that use
the Redhat Enterprise Linux operating system, use the following commands:
service openstack-ceilometer-collector restartservice openstack-ceilometer-notification restart
835Copyright © 2018, Juniper Networks, Inc.
Chapter 95: OpenStack

Copyright © 2018, Juniper Networks, Inc.836
Juniper Secure Analytics Configuring DSMs Guide
CHAPTER 96
Oracle
• Oracle on page 837
• Oracle Acme Packet Session Border Controller on page 837
• Oracle Audit Records on page 841
• Oracle Audit Vault on page 845
• Oracle BEAWebLogic on page 847
• Oracle DB Listener on page 851
• Oracle Enterprise Manager on page 856
• Oracle Fine Grained Auditing on page 858
• Oracle OS Audit on page 861
Oracle
JSA supports a number of Oracle DSMs.
Oracle Acme Packet Session Border Controller
You can use JSA to collect events fromOracle Acme Packet Session Border Controller
(SBC) installations in your network.
TheOracle AcmePacket SBC installations generate events from syslog andSNMP traps.
SNMPtrapeventsareconverted tosyslogandall eventsare forwarded to JSAover syslog.
JSA does not automatically discover syslog events that are forwarded fromOracle
Communications SBC. JSA supports syslog events fromOracle Acme Packet SBC V6.2
and later.
To collect Oracle Acme Packet SBC events, youmust complete the following tasks:
1. On your JSA system, configure a log source with the Oracle Acme Packet Session
Border Controller DSM.
2. On your Oracle Acme Packet SBC installation, enable SNMP and configure the
destination IP address for syslog events.
3. On your Oracle Acme Packet SBC installation, enable syslog settings on the
media-manager object.
837Copyright © 2018, Juniper Networks, Inc.
4. Restart your Oracle Acme Packet SBC installation.
5. Optional. Ensure that firewall rules do not block syslog communication between your
Oracle Acme Packet SBC installation and the JSA console or managed host that
collects syslog events.
• Supported Oracle Acme Packet Event Types That Are Logged by JSA on page 838
• Configuring an Oracle Acme Packet SBC Log Source on page 838
• Configuring SNMP to Syslog Conversion on Oracle Acme Packet SBC on page 839
• Enabling Syslog Settings on the Media Manager Object on page 840
Supported Oracle Acme Packet Event Types That Are Logged by JSA
TheOracleAcmePacketSBCDSMfor JSAcancollect syslogevents fromtheauthorization
and the systemmonitor event categories.
Each event category can contain low-level events that describe the action that is taken
within theevent category. For example, authorizationeventscanhave low-level categories
of login success or login failed.
Configuring an Oracle Acme Packet SBC Log Source
To collect syslog events fromOracle Acme Packet SBC, youmust configure a log source
in JSA. Oracle Acme Packet SBC syslog events do not automatically discover in JSA.
1. Log in to JSA.
2. Click the Admin tab.
3. In the navigation menu, click Data Sources.
4. Click the Log Sources icon.
5. Click Add.
6. In the Log Source Name field, type a name for your log source.
7. In the Log Source Description field, type a description for your log source.
8. From the Log Source Type list, selectOracle Acme Packet SBC.
9. From the Protocol Configuration list, select Syslog.
10. Configure the following values:
Copyright © 2018, Juniper Networks, Inc.838
Juniper Secure Analytics Configuring DSMs Guide

Table 263: Syslog Protocol Parameters
DescriptionParameter
Type the IP address or host name as an identifier for events from your Oracle Acme PacketSBC installation.
The log source identifier must be unique value.
Log Source Identifier
Select this check box to enable the log source. By default, the check box is selected.Enabled
Select the Credibility of the log source. The range is 0 - 10.
The credibility indicates the integrity of an event or offense as determined by the credibilityrating from the source devices. Credibility increases if multiple sources report the same event.The default is 5.
Credibility
Select the Event Collector to use as the target for the log source.Target Event Collector
Select this check box to enable the log source to coalesce (bundle) events.
By default, automatically discovered log sources inherit the value of the Coalescing Events listfrom the SystemSettings in JSA.When you create a log source or edit an existing configuration,you can override the default value by configuring this option for each log source.
Coalescing Events
From the list, select the incoming payload encoder for parsing and storing the logs.Incoming Event Payload
Select this check box to enable the log source to store event payload information.
By default, automatically discovered log sources inherit the value of the Store Event Payloadlist from the System Settings in JSA. When you create a log source or edit an existingconfiguration, you can override the default value by configuring this option for each log source.
Store Event Payload
11. Click Save.
12. On the Admin tab, click Deploy Changes.
You can now configure your Oracle Acme Packet SBC installation.
Configuring SNMP to Syslog Conversion on Oracle Acme Packet SBC
To collect events in a format compatible with JSA, youmust enable SNMP to syslog
conversion and configure a syslog destination.
1. Use SSH to log in to the command-line interface of your Oracle Acme Packet SBC
installation, as an administrator.
2. Type the following command to start the configuration mode:
config t
3. Type the following commands to start the system configuration:
839Copyright © 2018, Juniper Networks, Inc.
Chapter 96: Oracle
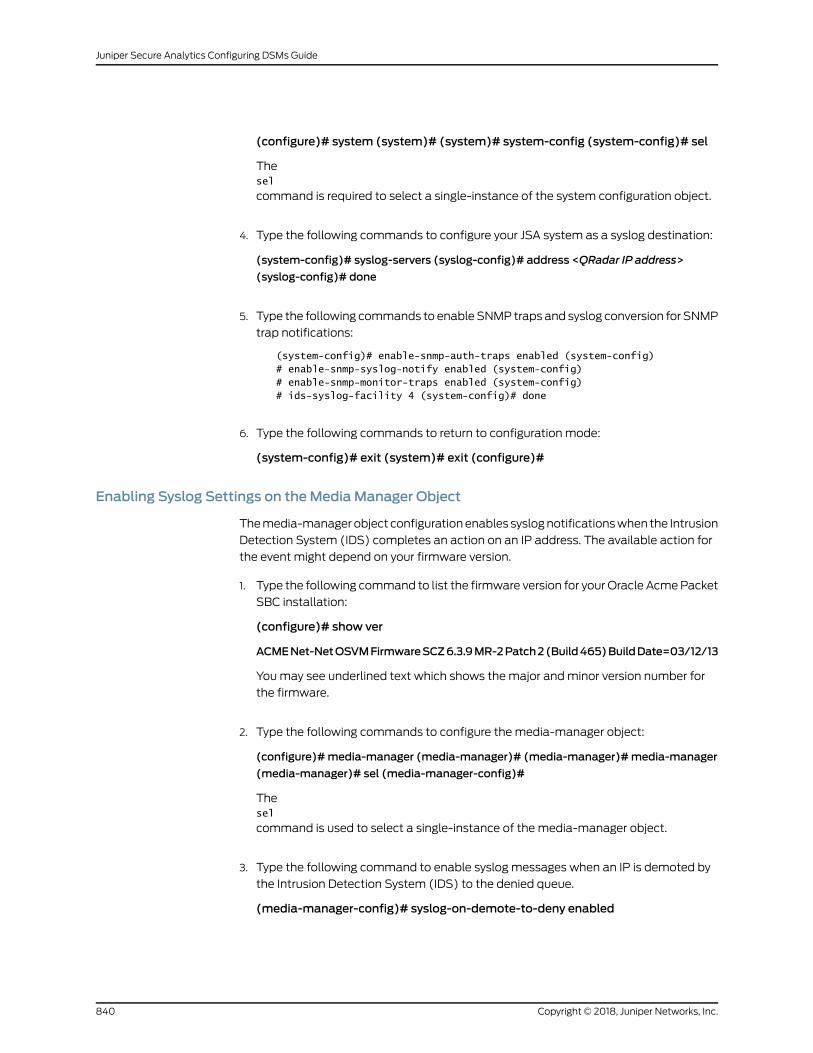
(configure)# system (system)# (system)# system-config (system-config)# sel
Thesel
command is required to select a single-instance of the system configuration object.
4. Type the following commands to configure your JSA system as a syslog destination:
(system-config)# syslog-servers (syslog-config)# address <QRadar IP address>
(syslog-config)# done
5. Type the following commands to enableSNMP traps and syslog conversion for SNMP
trap notifications:
(system-config)# enable-snmp-auth-traps enabled (system-config)# enable-snmp-syslog-notify enabled (system-config)# enable-snmp-monitor-traps enabled (system-config)# ids-syslog-facility 4 (system-config)# done
6. Type the following commands to return to configuration mode:
(system-config)# exit (system)# exit (configure)#
Enabling Syslog Settings on theMedia Manager Object
Themedia-managerobject configurationenables syslognotificationswhen the Intrusion
Detection System (IDS) completes an action on an IP address. The available action for
the event might depend on your firmware version.
1. Type the following command to list the firmware version for yourOracle AcmePacket
SBC installation:
(configure)# show ver
ACMENet-NetOSVMFirmwareSCZ6.3.9MR-2Patch2(Build465)BuildDate=03/12/13
Youmay see underlined text which shows themajor andminor version number for
the firmware.
2. Type the following commands to configure the media-manager object:
(configure)#media-manager (media-manager)# (media-manager)#media-manager
(media-manager)# sel (media-manager-config)#
Thesel
command is used to select a single-instance of the media-manager object.
3. Type the following command to enable syslog messages when an IP is demoted by
the Intrusion Detection System (IDS) to the denied queue.
(media-manager-config)# syslog-on-demote-to-deny enabled
Copyright © 2018, Juniper Networks, Inc.840
Juniper Secure Analytics Configuring DSMs Guide
4. For firmware version C6.3.0 and later, type the following command to enable syslog
message when sessions are rejected.
(media-manager-config)# syslog-on-call-reject enabled
5. For firmware version C6.4.0 and later, type the following command to enable syslog
messages when an IP is demoted to the untrusted queue
(media-manager-config)# syslog-on-demote-to-untrusted enabled
6. Type the following commands to return to configuration mode:
(media-manager-config)#done(media-manager-config)#exit(media-manager)#exit (configure)# exit
7. Type the following commands to save and activate the configuration:
# save Save complete # activate
8. Type reboot to restart your Oracle Acme Packet SBC installation.
After the systemrestarts, eventsare forwarded to JSAanddisplayedon theLogActivity
tab.
Oracle Audit Records
Oracledatabases trackaudit events, suchas, user loginand logouts, permissionchanges,
table creation, and deletion and database inserts.
JSA can collect these events for correlation and reporting purposes by using the Oracle
Audit DSM. For more information, see your Oracle documentation.
NOTE: Oracle provides twomodes of audit logs. JSA does not support finegrained auditing.
• Before You Begin on page 841
• Configuring Oracle Audit Logs on page 842
• Improving Performance with Large Audit Tables on page 844
Before You Begin
Oracle RDBMS is supported on Linux only when syslog is used. MicrosoftWindows hosts
and Linux are supported when you use JDBC to view database audit tables. When you
use a Microsoft Windows host, verify that database audit tables are enabled. These
procedures are considered guidelines only. It is suggested that you have someexperience
with Oracle DBA before you complete the procedures in this document. For more
information, see your vendor documentation.
841Copyright © 2018, Juniper Networks, Inc.
Chapter 96: Oracle
Before JSAcancollectOracleAudit events fromanOracleRDBMS instance, that instance
must be configured to write audit records to either syslog or the database audit tables.
For complete details and instructions for configuring auditing, see your vendor
documentation.
NOTE: Notall versionsofOraclecansendaudit eventsbyusingsyslog.Oraclev9i and 10gRelease 1 can sendonly audit events to thedatabase.Oracle v10gRelease 2 andOracle v11g canwrite audit events to the database or to syslog.If you are using v10gRelease 1 or v9i, youmust use JDBC-based events. If youare using Oracle v10g Release 2, you can use syslog or JDBC-based events.
To configure an Oracle Audit device to write audit logs to JSA, see “Configuring Oracle
Audit Logs” on page 842. If your system includes a large Oracle audit table (greater than
1 GB), see “Improving Performance with Large Audit Tables” on page 844.
Configuring Oracle Audit Logs
You can configure the device to write audit logs:
1. Log in to the Oracle host as an Oracle user (This user was used to install Oracle, for
example, oracle).
2. Make sure that theORACLE_HOME andORACLE_SID environment variables are
configured properly for your deployment.
3. Open the following file:
${ORACLE_HOME}/dbs/init${ORACLE_SID}.ora
4. Choose one of the following options:
a. For database audit trails, type the following command:
*.audit_trail='DB'
b. For syslog, type the following command:
*.audit_trail='os'
*.audit_syslog_level='local0.info'
Youmust make sure that the syslog daemon on the Oracle host is configured to
forward the audit log to JSA. For systems that runRedHat Enterprise, the following
line in the /etc/syslog.conf file affects the forwarding:
Where qradar.domain.tld is the host name of JSA that receives the events. The
syslog configurationmust be reloaded for the command (above) to be recognized.
On a system that runs Red Hat Enterprise, type the following line to reload the
syslog configuration:
kill -HUP /var/run/syslogd.pid
Copyright © 2018, Juniper Networks, Inc.842
Juniper Secure Analytics Configuring DSMs Guide
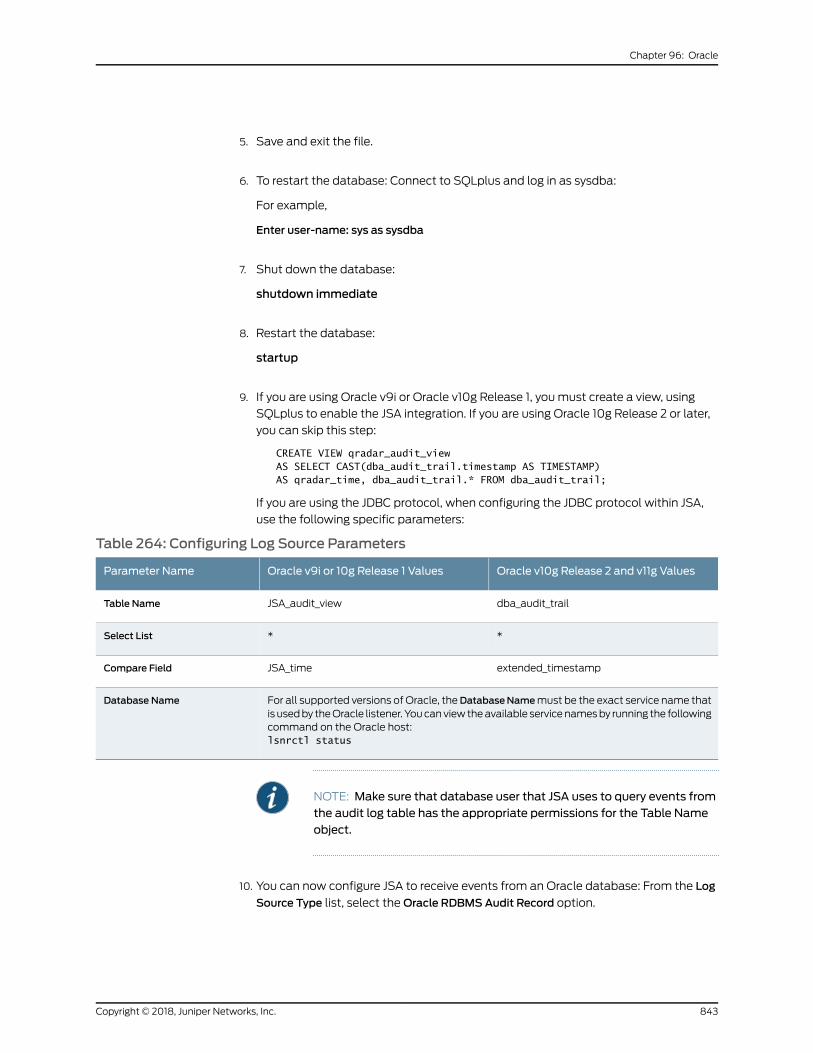
5. Save and exit the file.
6. To restart the database: Connect to SQLplus and log in as sysdba:
For example,
Enter user-name: sys as sysdba
7. Shut down the database:
shutdown immediate
8. Restart the database:
startup
9. If you are using Oracle v9i or Oracle v10g Release 1, youmust create a view, using
SQLplus to enable the JSA integration. If you are using Oracle 10g Release 2 or later,
you can skip this step:
CREATE VIEW qradar_audit_view AS SELECT CAST(dba_audit_trail.timestamp AS TIMESTAMP) AS qradar_time, dba_audit_trail.* FROM dba_audit_trail;
If you are using the JDBC protocol, when configuring the JDBC protocol within JSA,
use the following specific parameters:
Table 264: Configuring Log Source Parameters
Oracle v10g Release 2 and v11g ValuesOracle v9i or 10g Release 1 ValuesParameter Name
dba_audit_trailJSA_audit_viewTable Name
**Select List
extended_timestampJSA_timeCompare Field
For all supported versions ofOracle, theDatabaseNamemust be the exact service name thatis usedby theOracle listener. Youcanviewtheavailable servicenamesby running the followingcommand on the Oracle host:lsnrctl status
Database Name
NOTE: Make sure that database user that JSA uses to query events fromthe audit log table has the appropriate permissions for the Table Nameobject.
10. You can now configure JSA to receive events from an Oracle database: From the Log
Source Type list, select theOracle RDBMSAudit Record option.
843Copyright © 2018, Juniper Networks, Inc.
Chapter 96: Oracle
Improving Performancewith Large Audit Tables
The size of theOracle audit table affects the amount of time that JSA requires to process
the DBA_AUDIT_TRAIL view.
If your sys.sud$ table is large (close or exceeding 1 GB), extended processing time is
required. To ensure JSA processes the large sys.sud$ table quickly, youmust create an
index and a new view.
Themaximum characters size for the SQL_BIND and SQL_TEXT fields is 2000.
NOTE: If auditing isextensiveor thedatabaseserver isactive, youmightneedto shut down the database to complete the following procedure.
To create an index and a new view:
1. Go to the following website to download the files:
https://www.juniper.net/support/downloads/
2. From the Software tab, select Scripts.
3. Download the appropriate file for your version of Oracle:
a. If you are using Oracle 9i or 10g Release 1, download the following file:
oracle_9i_dba_audit_view.sql
b. If you are using Oracle v10g Release 2 and v11g, download the following file:
oracle_alt_dba_audit_view.sql
4. Copy the downloaded file to a local directory.
5. Change the directory to the location where you copied the file in Step 4.
6. Log in to SQLplus and log in as sysdba:
sqlplus / as sysdba
7. At the SQL prompt, type one of the following commands, depending on your version
of Oracle Audit:
To create an index, the file might already be in use andmust have exclusive access.
a. If you are using Oracle 9i or 10g Release 1, type the following command:
@oracle_9i_dba_audit_view.sql
b. If you are using Oracle v10g Release 2 and v11g, type the following command:
@oracle_alt_dba_audit_view.sql
Copyright © 2018, Juniper Networks, Inc.844
Juniper Secure Analytics Configuring DSMs Guide
8. Make sure the database user who is configured in JSA has SELECT permissions on
the view.
For example, if the user is USER1:
grant select on sys.alt_dba_audit_view to USER1;
9. Log out of SQLplus.
10. Log in to JSA.
11. Update the JDBC protocol configuration for this entry to include the following entries:
• Table Name Update the table name from DBA_AUDIT_TRAIL to
sys.alt_dba_audit_view.
• Compare Field Update the field from entended_timestamp to ntimestamp.
12. Click Save.
Oracle Audit Vault
The Oracle Audit Vault DSM for JSA accepts events on Oracle v10.2.3.2 and later using
Java Database Connectivity (JDBC) to accesses alerts on the JDBC protocol.
JSA records Oracle Audit Vault alerts from the source database and captures events as
configured by the Oracle Audit Policy Setting. When events occur, the alerts are stored
in avsys.av$alert_store table. Customized events are created in Oracle Audit Vault by a
user with AV_AUDITOR permissions.
See your vendor documentation about configuration of Audit Policy Settings in Oracle
Audit Vault.
In Oracle Audit Vault, alert names are not mapped to a JSA Identifier (QID). Using the
MapEvent function in the JSAEvents interface anormalizedor rawevent canbemapped
toahigh-level and low-level category (orQID).Using theOracleAuditVaultDSM, category
mapping can be done bymapping your high or low category alerts directly to an alert
name (ALERT_NAME field) in the payload. For information about the Events interface,
see the Juniper Secure Analytics Users Guide.
• Configuring a Log Source on page 845
Configuring a Log Source
You can configure a JSA log source to access the Oracle Audit Vault database by using
the JDBC protocol:
1. Log in to JSA.
2. Click the Admin tab.
845Copyright © 2018, Juniper Networks, Inc.
Chapter 96: Oracle
3. On the navigation menu, click Data Sources.
The Data Sources pane is displayed.
4. Click the Log Sources icon.
The Log Sourceswindow is displayed.
5. Click Add.
6. Using the Log Source Type list, selectOracle Audit Vault.
7. Using the Protocol Configuration list, select JDBC.
8. Configure the following values:
a. Database Type: Oracle
b. Database Name: <Audit Vault Database Name>
c. Table Name: avsys.av$alert_store
d. Select List: *
e. Compare Field: ALERT_SEQUENCE
f. IP or Hostname: <Location of Oracle Audit Vault Server>
g. Port: <Default Port>
h. Username: <Database Access Username having AV_AUDITOR role>
i. Password: <Password>
j. Polling Interval: <Default Interval>
Verify that the AV_AUDITOR password is entered correctly before the JDBC protocol
configuration is saved. Oracle Audit Vault might lock the user account because of
repeated failed login attempts.
When the AV_AUDITOR account is locked, data in the avsys.av$alert_store cannot be
accessed. To unlock this user account, first, it is necessary to correct the password
entry in the protocol configuration. Then, log in to Oracle Audit Vault through the
Oraclesqlpluspromptas theavadmindvauser tocompleteanalter user<AV_AUDITOR
USER> account unlock command.
9. Click Save.
10. On the Admin tab, click Deploy Changes.
The local time zone conversion-dependent Oracle time stamps are not supported in
earlier versions of the JDBC protocol for JSA so fields AV_ALERT_TIME,
ACTUAL_ALERT_TIME, andTIME_CLEARED in thepayloaddisplayonlyobject identifiers
until your JDBC protocol is updated.
Copyright © 2018, Juniper Networks, Inc.846
Juniper Secure Analytics Configuring DSMs Guide
Oracle BEAWebLogic
TheOracle BEAWebLogic DSMallows JSA to retrieve archived server logs and audit logs
from any remote host, such as your Oracle BEAWebLogic server.
JSA uses the log file protocol to retrieve events from your Oracle BEAWebLogic server
and provides information on application events that occur in your domain or on a single
server.
To integrate Oracle BEAWebLogic events, take the following steps:
1. Enable auditing on your Oracle BEAWebLogic server.
2. Configure domain logging on your Oracle BEAWebLogic server.
3. Configure application logging on your Oracle BEAWebLogic server.
4. Configure an audit provider for Oracle BEAWebLogic.
5. Configure JSA to retrieve log files fromOracle BEAWebLogic.
• Enabling Event Logs on page 847
• Configuring Domain Logging on page 847
• Configuring Application Logging on page 848
• Configuring an Audit Provider on page 848
• Configuring a Log Source on page 849
Enabling Event Logs
By default, Oracle BEAWebLogic does not enable event logging.
To enable event logging on your OracleWebLogic console:
1. Log in to your OracleWebLogic console user interface.
2. Select Domain >Configuration >General.
3. Click Advanced.
4. From the Configuration Audit Type list, select Change Log and Audit.
5. Click Save.
You can now configure the collection of domain logs for Oracle BEAWebLogic.
Configuring Domain Logging
Oracle BEAWebLogic supports multiple instances. Event messages from instances are
collected in a single domain-wide log for the Oracle BEAWebLogic server.
847Copyright © 2018, Juniper Networks, Inc.
Chapter 96: Oracle
To configure the log file for the domain:
1. From your OracleWebLogic console, select Domain >Configuration >Logging.
2. FromtheLogfilenameparameter, type thedirectorypathand file name for thedomain
log.
For example,OracleDomain.log.
3. Configure any additional domain log file rotation parameters.
4. Click Save.
You can now configure application logging for the server.
Configuring Application Logging
You can configure application logging for Oracle BEAWebLogic:
1. From your OracleWebLogic console, select Server >Logging >General.
2. From the Log file name parameter, type the directory path and file name for the
application log.
For example,OracleDomain.log.
3. Configure any additional application log file rotation parameters.
4. Click Save.
You can now configure an audit provider for Oracle BEAWebLogic.
Configuring an Audit Provider
You can configure an audit provider:
1. Select Security Realms >RealmName >Providers >Auditing.
2. Click New.
3. Configureanauditproviderby typinganamefor theauditprovider that youarecreating.
4. From the Type list, select DefaultAuditor.
5. ClickOK.
The Settingswindow is displayed.
Copyright © 2018, Juniper Networks, Inc.848
Juniper Secure Analytics Configuring DSMs Guide
6. Click the auditing provider that you created in “Configuring an Audit Provider” on
page 848.
7. Click the Provider Specific tab.
8. Add any Active Context Handler Enteries that are needed.
9. From the Severity list, select Information.
10. Click Save.
You can now configure JSA to pull log files fromOracle BEAWebLogic.
Configuring a Log Source
You can configure JSA to retrieve log files fromOracle BEAWebLogic.
1. Log in to JSA.
2. Click the Admin tab.
3. On the navigation menu, click Data Sources.
The Data Sources pane is displayed.
4. Click the Log Sources icon.
The Log Sourceswindow is displayed.
5. From the Log Source Type list, selectOracle BEAWebLogic.
6. Using the Protocol Configuration list, select Log File.
7. Configure the following parameters:
Table 265: Log File Parameters
DescriptionParameter
Type the IP address or host name for the log source. This value must match the value that isconfigured in the Remote Host IP or Hostname parameter.
The log source identifier must be unique for the log source type.
Log Source Identifier
From the list, select the File Transfer Protocol (FTP) you want to use for retrieving files. You canchoose: SSH File Transfer Protocol (SFTP), File Transfer Protocol (FTP), or Secure Copy (SCP).The default is SFTP.
Service Type
Type the IP address or host name of the host fromwhich you want to receive files.Remote IP or Hostname
849Copyright © 2018, Juniper Networks, Inc.
Chapter 96: Oracle
Table 265: Log File Parameters (continued)
DescriptionParameter
Type the TCP port on the remote host that is running the selected Service Type. If you configurethe Service Type as FTP, the default is 21. If you configure the Service Type as SFTP or SCP, thedefault is 22.
The valid range is 1 - 65535.
Remote Port
Type the user name necessary to log in to the host that runs the selected Service Type.
The user name can be up to 255 characters in length.
Remote User
Type the password necessary to log in to the host that runs the selected Service Type.Remote Password
Confirm the Remote Password to log in to the host that runs the selected Service Type.Confirm Password
If you select SCP or SFTP as the Service Type, this parameter gives the option to define an SSHprivate key file. Also, when you provide an SSHKey File, the RemotePassword option is ignored.
SSH Key File
Type the directory location on the remote host fromwhich the files are retrieved.Remote Directory
Select this check box if you want the file pattern to also search sub folders. The Recursiveparameter is not used if you configure SCP as the Service Type. By default, the check box isclear.
Recursive
If you select SFTP or FTP as the Service Type, this gives the option to configure the regularexpression (regex) that is needed to filter the list of files that are specified in the RemoteDirectory. All matching files are included in the processing.
For example, if you want to list all files that start with the word server, followed by one or moredigits and ending with .log, use the following entry: server[0-9]+\.log. Use of this parameterrequires knowledge of regular expressions (regex). For more information, see the followingwebsite: http://docs.oracle.com/javase/tutorial/essential/regex/
FTP File Pattern
This optionappearsonly if you selectFTPas theServiceType. TheFTPTransferModeparametergives the option to define the file transfer mode when log files are retrieved over FTP.
From the list, select the transfer mode that you want to apply to this log source:
• Binary - Select a binary FTP transfer mode for log sources that require binary data files orcompressed .zip, .gzip, .tar, or .tar+gz archive files.
• ASCII Select ASCII for log sources that require an ASCII FTP file transfer. Youmust selectNone for the Processor parameter and LineByLine the Event Generator parameter when youuse ASCII as the FTP Transfer Mode.
FTP Transfer Mode
If you select SCP as the Service Type youmust type the file name of the remote file.SCP Remote File
Type the time of day you want the processing to begin. This parameter functions with theRecurrence value to establish when and how often the Remote Directory is scanned for files.Type the start time, based on a 24-hour clock, in the following format: HH:MM.
Start Time
Type the frequency, beginning at the Start Time, that you want the remote directory to bescanned. Type this value in hours (H), minutes (M), or days (D).
For example, type 2H if you want the directory to be scanned every 2 hours. The default is 1H.
Recurrence
Copyright © 2018, Juniper Networks, Inc.850
Juniper Secure Analytics Configuring DSMs Guide
Table 265: Log File Parameters (continued)
DescriptionParameter
Select this check box if you want the log file protocol to run immediately after you click Save.After the RunOn Save completes, the log file protocol follows your configured start time andrecurrence schedule.
Selecting RunOn Save clears the list of previously processed files for the Ignore PreviouslyProcessed File(s) parameter.
RunOn Save
Type the number of Events Per Second (EPS) that you do not want this protocol to exceed.The valid range is 100 - 5000.
EPS Throttle
If the files on the remote host are stored in a .zip, .gzip, .tar, or .tar.gz archive format, selectthe processor that allows the archives to be expanded and contents that are processed.
Processor
Select this check box to track files that are already processed and you do not want these filesto be processed a second time. This applies only to FTP and SFTP Service Types.
Ignore Previously ProcessedFile(s)
Select this check box to define the local directory on your JSA system that you want to use forstoring downloaded files during processing. It is suggested that you leave the check box clear.When the check box is selected, the Local Directory field is displayed, and this gives you theoption to configure the local directory for storing files.
Change Local Directory?
From the Event Generator list, selectOracle BEAWebLogic.Event Generator
8. Click Save.
9. On the Admin tab, click Deploy Changes.
The configuration is complete.
Oracle DB Listener
The Oracle Database Listener application stores logs on the database server.
To integrate JSA with Oracle DB Listener, select one of the following methods for event
collection:
• Collecting Events by Using the Oracle Database Listener Protocol on page 851
• Collecting Oracle Database Events by Using Perl on page 853
• Collecting Events by Using the Oracle Database Listener Protocol on page 851
• Collecting Oracle Database Events by Using Perl on page 853
• Configuring the Oracle Database Listener Within JSA on page 855
Collecting Events by Using the Oracle Database Listener Protocol
The Oracle Database Listener protocol source allows JSA tomonitor log files that are
generated from an Oracle Listener database. Before you configure the Oracle Database
851Copyright © 2018, Juniper Networks, Inc.
Chapter 96: Oracle
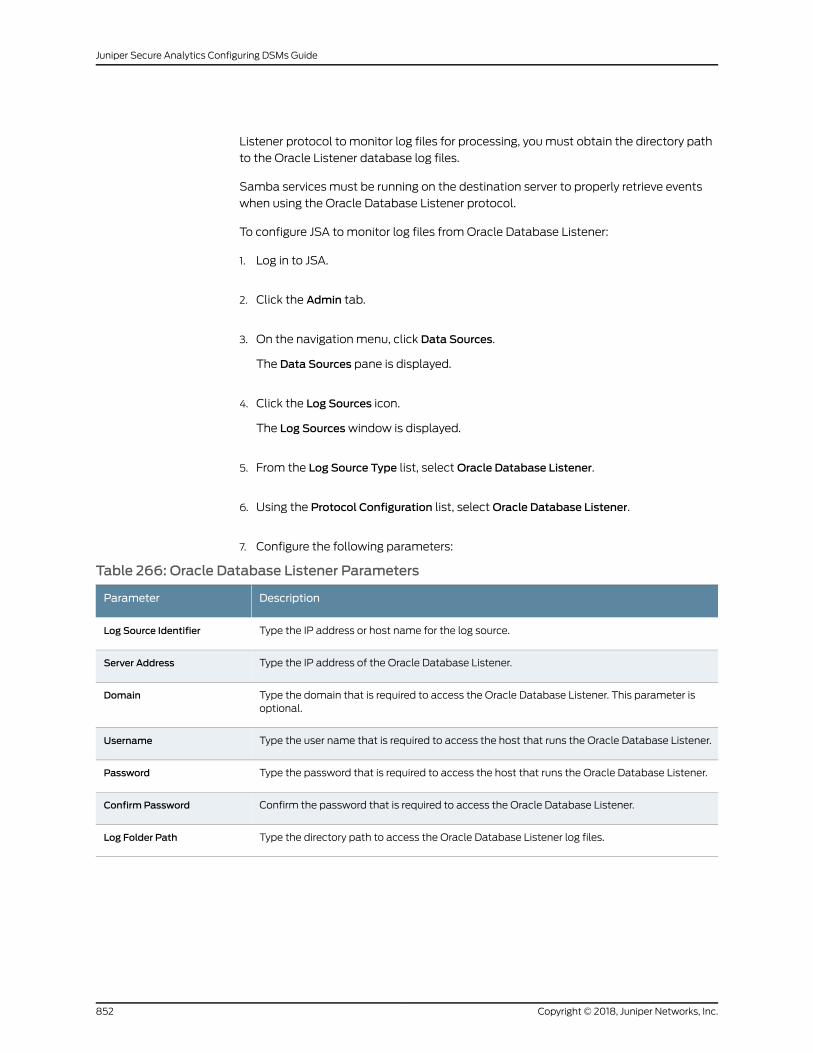
Listener protocol to monitor log files for processing, youmust obtain the directory path
to the Oracle Listener database log files.
Samba services must be running on the destination server to properly retrieve events
when using the Oracle Database Listener protocol.
To configure JSA tomonitor log files fromOracle Database Listener:
1. Log in to JSA.
2. Click the Admin tab.
3. On the navigation menu, click Data Sources.
The Data Sources pane is displayed.
4. Click the Log Sources icon.
The Log Sourceswindow is displayed.
5. From the Log Source Type list, selectOracle Database Listener.
6. Using the Protocol Configuration list, selectOracle Database Listener.
7. Configure the following parameters:
Table 266: Oracle Database Listener Parameters
DescriptionParameter
Type the IP address or host name for the log source.Log Source Identifier
Type the IP address of the Oracle Database Listener.Server Address
Type the domain that is required to access the Oracle Database Listener. This parameter isoptional.
Domain
Type the user name that is required to access the host that runs the Oracle Database Listener.Username
Type the password that is required to access the host that runs the Oracle Database Listener.Password
Confirm the password that is required to access the Oracle Database Listener.Confirm Password
Type the directory path to access the Oracle Database Listener log files.Log Folder Path
Copyright © 2018, Juniper Networks, Inc.852
Juniper Secure Analytics Configuring DSMs Guide
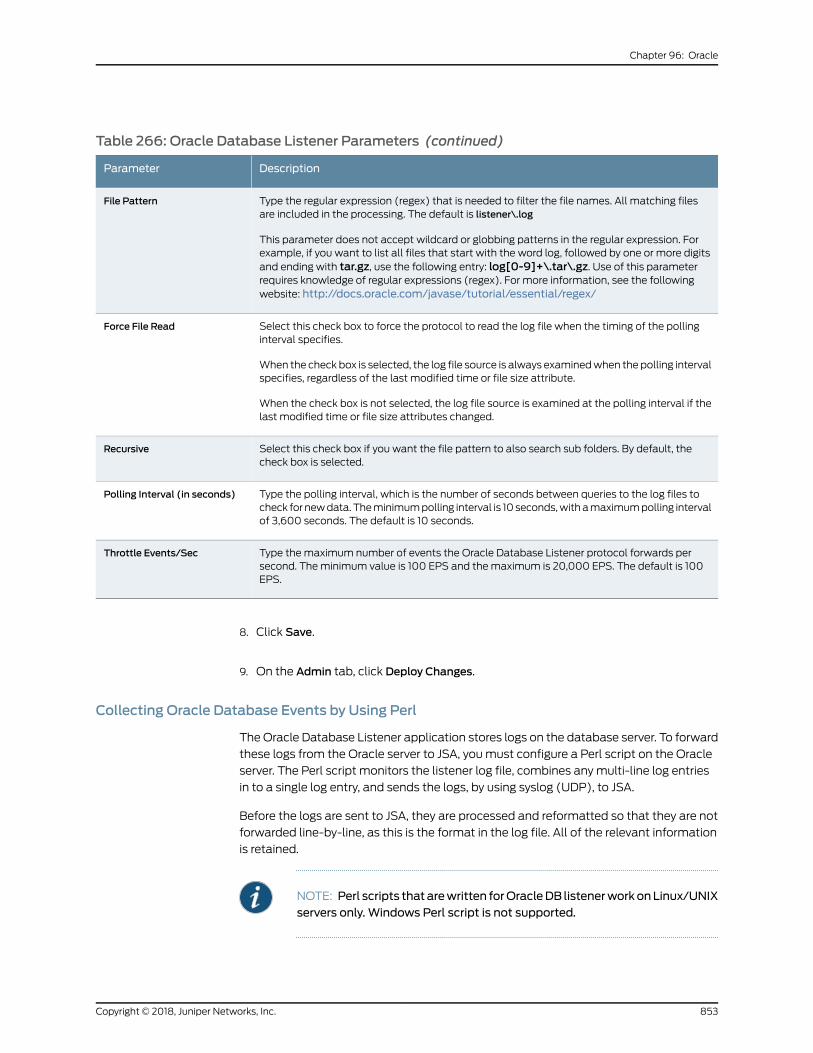
Table 266: Oracle Database Listener Parameters (continued)
DescriptionParameter
Type the regular expression (regex) that is needed to filter the file names. All matching filesare included in the processing. The default is listener\.log
This parameter does not accept wildcard or globbing patterns in the regular expression. Forexample, if you want to list all files that start with the word log, followed by one or more digitsand ending with tar.gz, use the following entry: log[0-9]+\.tar\.gz. Use of this parameterrequires knowledge of regular expressions (regex). For more information, see the followingwebsite: http://docs.oracle.com/javase/tutorial/essential/regex/
File Pattern
Select this check box to force the protocol to read the log file when the timing of the pollinginterval specifies.
When the check box is selected, the log file source is always examinedwhen the polling intervalspecifies, regardless of the last modified time or file size attribute.
When the check box is not selected, the log file source is examined at the polling interval if thelast modified time or file size attributes changed.
Force File Read
Select this check box if you want the file pattern to also search sub folders. By default, thecheck box is selected.
Recursive
Type the polling interval, which is the number of seconds between queries to the log files tocheck for newdata. Theminimumpolling interval is 10 seconds,withamaximumpolling intervalof 3,600 seconds. The default is 10 seconds.
Polling Interval (in seconds)
Type themaximum number of events the Oracle Database Listener protocol forwards persecond. Theminimum value is 100 EPS and themaximum is 20,000 EPS. The default is 100EPS.
Throttle Events/Sec
8. Click Save.
9. On the Admin tab, click Deploy Changes.
Collecting Oracle Database Events by Using Perl
TheOracle Database Listener application stores logs on the database server. To forward
these logs from the Oracle server to JSA, youmust configure a Perl script on the Oracle
server. The Perl script monitors the listener log file, combines any multi-line log entries
in to a single log entry, and sends the logs, by using syslog (UDP), to JSA.
Before the logs are sent to JSA, they are processed and reformatted so that they are not
forwarded line-by-line, as this is the format in the log file. All of the relevant information
is retained.
NOTE: Perl scripts that arewritten forOracleDB listenerworkonLinux/UNIXservers only. Windows Perl script is not supported.
853Copyright © 2018, Juniper Networks, Inc.
Chapter 96: Oracle
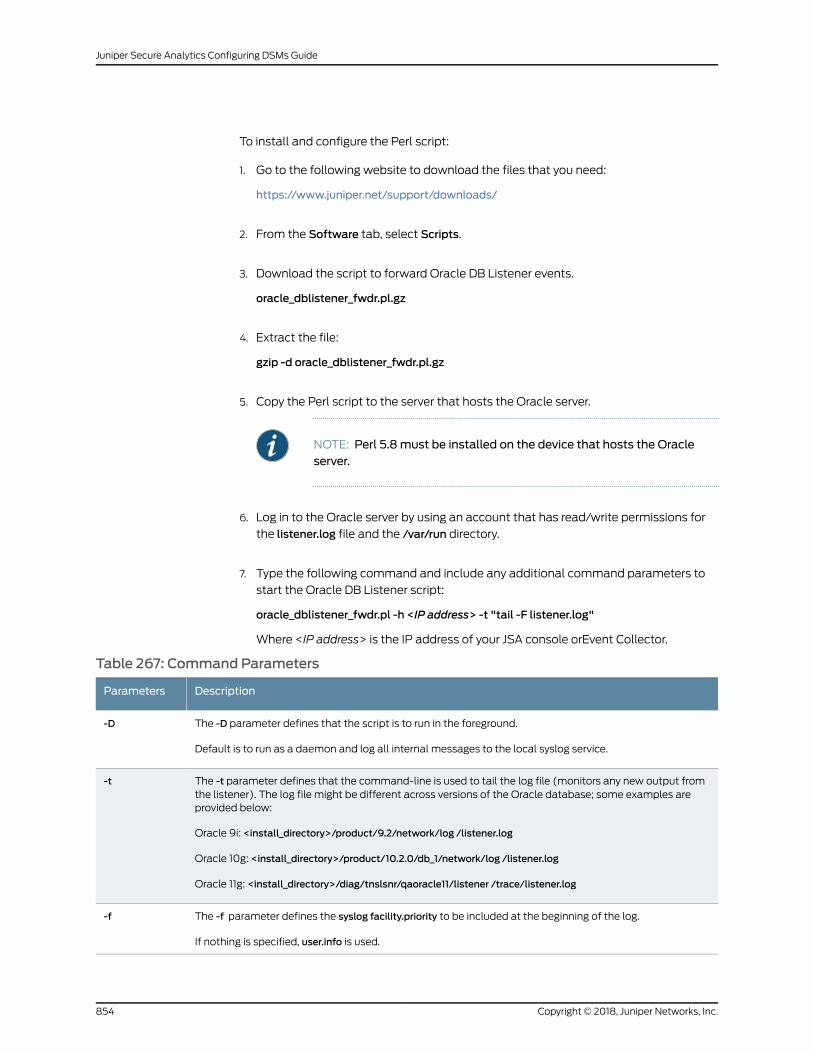
To install and configure the Perl script:
1. Go to the following website to download the files that you need:
https://www.juniper.net/support/downloads/
2. From the Software tab, select Scripts.
3. Download the script to forward Oracle DB Listener events.
oracle_dblistener_fwdr.pl.gz
4. Extract the file:
gzip -d oracle_dblistener_fwdr.pl.gz
5. Copy the Perl script to the server that hosts the Oracle server.
NOTE: Perl 5.8must be installed on the device that hosts the Oracleserver.
6. Log in to the Oracle server by using an account that has read/write permissions for
the listener.log file and the /var/run directory.
7. Type the following command and include any additional command parameters to
start the Oracle DB Listener script:
oracle_dblistener_fwdr.pl -h <IP address> -t "tail -F listener.log"
Where <IP address> is the IP address of your JSA console orEvent Collector.
Table 267: Command Parameters
DescriptionParameters
The -D parameter defines that the script is to run in the foreground.
Default is to run as a daemon and log all internal messages to the local syslog service.
-D
The -t parameter defines that the command-line is used to tail the log file (monitors any new output fromthe listener). The log file might be different across versions of the Oracle database; some examples areprovided below:
Oracle 9i: <install_directory>/product/9.2/network/log /listener.log
Oracle 10g: <install_directory>/product/10.2.0/db_1/network/log /listener.log
Oracle 11g: <install_directory>/diag/tnslsnr/qaoracle11/listener /trace/listener.log
-t
The -f parameter defines the syslog facility.priority to be included at the beginning of the log.
If nothing is specified, user.info is used.
-f
Copyright © 2018, Juniper Networks, Inc.854
Juniper Secure Analytics Configuring DSMs Guide

Table 267: Command Parameters (continued)
DescriptionParameters
The -H parameter defines the host name or IP address for the syslog header. It is suggested that is the IPaddress of the Oracle server on which the script is running.
-H
The -h parameter defines the receiving syslog host (the Event Collector host name or IP address used toreceive the logs).
-h
The -p parameter defines the receiving UDP syslog port.
If a port is not specified, 514 is used.
-p
The -r parameter defines the directory namewhere you wish to create the .pid file. The default is /var/run.This parameter is ignored if -D is specified.
-r
The -I parameter defines the directory namewhere you wish to create the lock file. The default is /var/lock.This parameter is ignored if -D is specified.
-l
For example, to monitor the listener log on an Oracle 9i server with an IP address of
192.168.12.44 and forward events to JSAwith the IP address of 192.168.1.100, type the
following code:
oracle_dblistener_fwdr.pl -t tail -f
<install_directory>/product/9.2/network/log/listener.log -f user.info -H 192.168.12.44
-h 192.168.1.100 -p 514
A sample log from this setup would appear as follows:
<14>Apr 14 13:23:37 192.168.12.44 AgentDevice=OracleDBListener
Command=SERVICE_UPDATEDeviceTime=18-AUG-200616:51:43Status=0SID=qora9
NOTE: Thekill
commandcanbeused to stop the script if youneed to reconfigure a scriptparameter or stop the script from sending events to JSA. For example,
kill -QUIT `cat /var/run/oracle_dblistener_fwdr.pl.pid`
Theexamplecommanduses thebackquotecharacter (`),which is located
to the left of the number one onmost keyboard layouts.
You can now configure the Oracle Database Listener within JSA.
Configuring the Oracle Database ListenerWithin JSA
You can configure the Oracle Database Listener within JSA.
1. From the Log Source Type list, selectOracle Database Listener.
855Copyright © 2018, Juniper Networks, Inc.
Chapter 96: Oracle
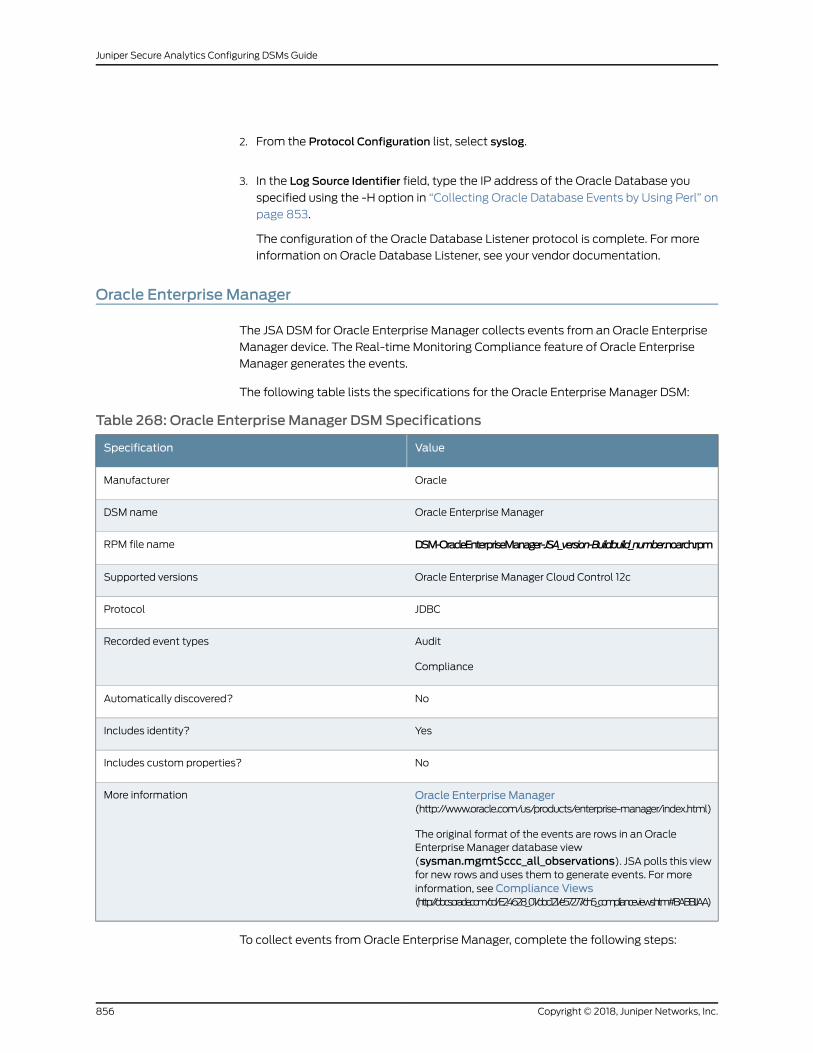
2. From the Protocol Configuration list, select syslog.
3. In the Log Source Identifier field, type the IP address of the Oracle Database you
specified using the -H option in “Collecting Oracle Database Events by Using Perl” on
page 853.
The configuration of the Oracle Database Listener protocol is complete. For more
information on Oracle Database Listener, see your vendor documentation.
Oracle Enterprise Manager
The JSA DSM for Oracle Enterprise Manager collects events from an Oracle Enterprise
Manager device. The Real-time Monitoring Compliance feature of Oracle Enterprise
Manager generates the events.
The following table lists the specifications for the Oracle Enterprise Manager DSM:
Table 268: Oracle Enterprise Manager DSMSpecifications
ValueSpecification
OracleManufacturer
Oracle Enterprise ManagerDSM name
DSM-OracleEnterpriseManager-JSA_version-Buildbuild_number.noarch.rpmRPM file name
Oracle Enterprise Manager Cloud Control 12cSupported versions
JDBCProtocol
Audit
Compliance
Recorded event types
NoAutomatically discovered?
YesIncludes identity?
NoIncludes custom properties?
Oracle Enterprise Manager(http://www.oracle.com/us/products/enterprise-manager/index.html)
The original format of the events are rows in an OracleEnterprise Manager database view(sysman.mgmt$ccc_all_observations). JSA polls this viewfor new rows and uses them to generate events. For moreinformation, see Compliance Views(http://docs.oracle.com/cd/E24628_01/doc.121/e57277/ch5_complianceviews.htm#BABBIJAA)
More information
To collect events fromOracle Enterprise Manager, complete the following steps:
Copyright © 2018, Juniper Networks, Inc.856
Juniper Secure Analytics Configuring DSMs Guide
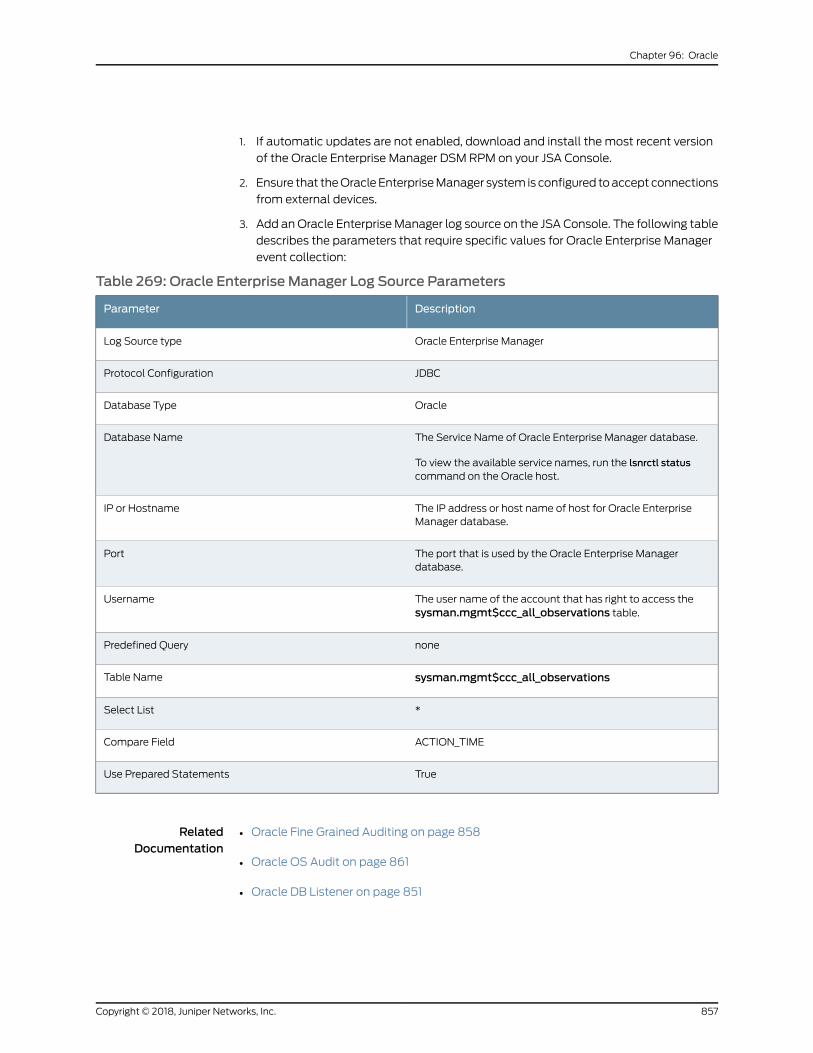
1. If automatic updates are not enabled, download and install the most recent version
of the Oracle Enterprise Manager DSM RPM on your JSA Console.
2. Ensure that theOracleEnterpriseManager system is configured toaccept connections
from external devices.
3. Add anOracle EnterpriseManager log source on the JSA Console. The following table
describes the parameters that require specific values for Oracle Enterprise Manager
event collection:
Table 269: Oracle Enterprise Manager Log Source Parameters
DescriptionParameter
Oracle Enterprise ManagerLog Source type
JDBCProtocol Configuration
OracleDatabase Type
The Service Name of Oracle Enterprise Manager database.
To view the available service names, run the lsnrctl statuscommand on the Oracle host.
Database Name
The IP address or host name of host for Oracle EnterpriseManager database.
IP or Hostname
The port that is used by the Oracle Enterprise Managerdatabase.
Port
The user name of the account that has right to access thesysman.mgmt$ccc_all_observations table.
Username
nonePredefined Query
sysman.mgmt$ccc_all_observationsTable Name
*Select List
ACTION_TIMECompare Field
TrueUse Prepared Statements
RelatedDocumentation
Oracle Fine Grained Auditing on page 858•
• Oracle OS Audit on page 861
• Oracle DB Listener on page 851
857Copyright © 2018, Juniper Networks, Inc.
Chapter 96: Oracle
Oracle Fine Grained Auditing
The Oracle Fine Grained Auditing DSM can poll for database audit events fromOracle
9i and later by using the Java Database Connectivity (JDBC) protocol.
To collect events, administrators must enable fine grained auditing on their Oracle
databases. Fine grained auditing provides events on select, update, delete, and insert
actions that occur in the source database and the records that the data changed. The
database table dba_fga_audit_trail is updatedwith a new row each time a change occurs
on a database table where the administrator enabled an audit policy.
To configure Oracle fine grained auditing, administrators can complete the following
tasks:
1. Configureonaudit onany tables that require policymonitoring in theOracledatabase.
2. Configure a log source for the Oracle Fine Grained Auditing DSM to poll the Oracle
database for events.
3. Verify that the events polled are collected and displayed on the Log Activity tab of
JSA.
• Configuring a Log Source on page 858
Configuring a Log Source
After the database administrator has configured database policies, you can configure a
log source to access the Oracle database with the JDBC protocol.
1. Log in to JSA.
2. Click the Admin tab.
3. On the navigation menu, click Data Sources.
4. Click the Log Sources icon.
5. Click Add.
6. Using the Log Source Type list, selectOracle Fine Grained Auditing.
7. From the Protocol Configuration list, select JDBC.
8. Configure the following values:
Copyright © 2018, Juniper Networks, Inc.858
Juniper Secure Analytics Configuring DSMs Guide

Table 270: Oracle Fine Grained Auditing JDBC Parameters
DescriptionParameter
Type the log source identifier in the following format:
<database>@<hostname> or
<table name>|<database>@<hostname>
Where:
• <table name> is the name of the table or view of the database that contains the event records.This parameter is optional. If you include the table name, youmust include a pipe (|) characterand the table namemust match the Table Name parameter.
• <database> is the database name, as defined in the Database Name parameter. The databasename is a required parameter.
• <hostname> is the host name or IP address for this log source, as defined in the IP or Hostnameparameter. The host name is a required parameter.
The log source identifier must be unique for the log source type.
Log Source Identifier
SelectMSDE as the database type.Database Type
Type the name of the database to which you want to connect.
The table name can be up to 255 alphanumeric characters in length. The table name can includethe following special characters: dollar sign ($), number sign (#), underscore (_), en dash (-), andperiod(.).
Database Name
Type the IP address or host name of the database.IP or Hostname
Type the port number that is used by the database server. The default that is displayed depends onthe selected Database Type. The valid range is 0 - 65536.
The JDBC configuration portmustmatch the listener port of the database. The databasemust haveincoming TCP connections that are enabled to communicate with JSA.
The default port number for all options includes the following ports:
• DB2® - 50000
• MSDE - 1433
• Oracle - 1521
If you define aDatabase Instancewhen MSDE is used as the database type, youmust leave thePort parameter blank in your configuration.
Port
Type the database user name.
The user name can be up to 255 alphanumeric characters in length. The user name can also includeunderscores (_).
Username
Type the database password.
The password can be up to 255 characters in length.
Password
Confirm the password to access the database.Confirm Password
859Copyright © 2018, Juniper Networks, Inc.
Chapter 96: Oracle
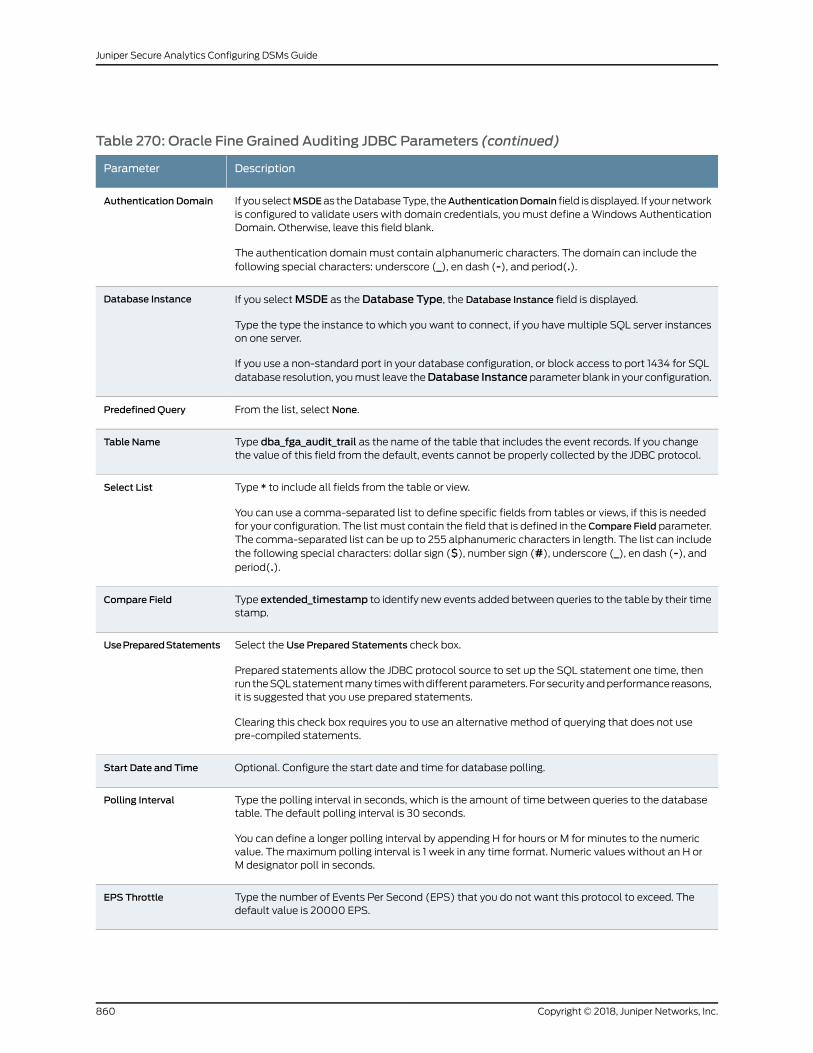
Table 270: Oracle Fine Grained Auditing JDBC Parameters (continued)
DescriptionParameter
If you selectMSDEas theDatabaseType, theAuthenticationDomain field is displayed. If your networkis configured to validate users with domain credentials, youmust define aWindows AuthenticationDomain. Otherwise, leave this field blank.
The authentication domain must contain alphanumeric characters. The domain can include thefollowing special characters: underscore (_), en dash (-), and period(.).
Authentication Domain
If you selectMSDE as theDatabase Type, the Database Instance field is displayed.
Type the type the instance to which you want to connect, if you havemultiple SQL server instanceson one server.
If you use a non-standard port in your database configuration, or block access to port 1434 for SQLdatabase resolution, youmust leave theDatabase Instanceparameter blank in your configuration.
Database Instance
From the list, select None.Predefined Query
Type dba_fga_audit_trail as the name of the table that includes the event records. If you changethe value of this field from the default, events cannot be properly collected by the JDBC protocol.
Table Name
Type * to include all fields from the table or view.
You can use a comma-separated list to define specific fields from tables or views, if this is neededfor your configuration. The list must contain the field that is defined in the Compare Field parameter.The comma-separated list can be up to 255 alphanumeric characters in length. The list can includethe following special characters: dollar sign ($), number sign (#), underscore (_), en dash (-), andperiod(.).
Select List
Type extended_timestamp to identify new events added between queries to the table by their timestamp.
Compare Field
Select the Use Prepared Statements check box.
Prepared statements allow the JDBC protocol source to set up the SQL statement one time, thenrun theSQLstatementmany timeswithdifferentparameters. For securityandperformance reasons,it is suggested that you use prepared statements.
Clearing this check box requires you to use an alternative method of querying that does not usepre-compiled statements.
UsePreparedStatements
Optional. Configure the start date and time for database polling.Start Date and Time
Type the polling interval in seconds, which is the amount of time between queries to the databasetable. The default polling interval is 30 seconds.
You can define a longer polling interval by appending H for hours or M for minutes to the numericvalue. Themaximum polling interval is 1 week in any time format. Numeric values without an H orM designator poll in seconds.
Polling Interval
Type the number of Events Per Second (EPS) that you do not want this protocol to exceed. Thedefault value is 20000 EPS.
EPS Throttle
Copyright © 2018, Juniper Networks, Inc.860
Juniper Secure Analytics Configuring DSMs Guide
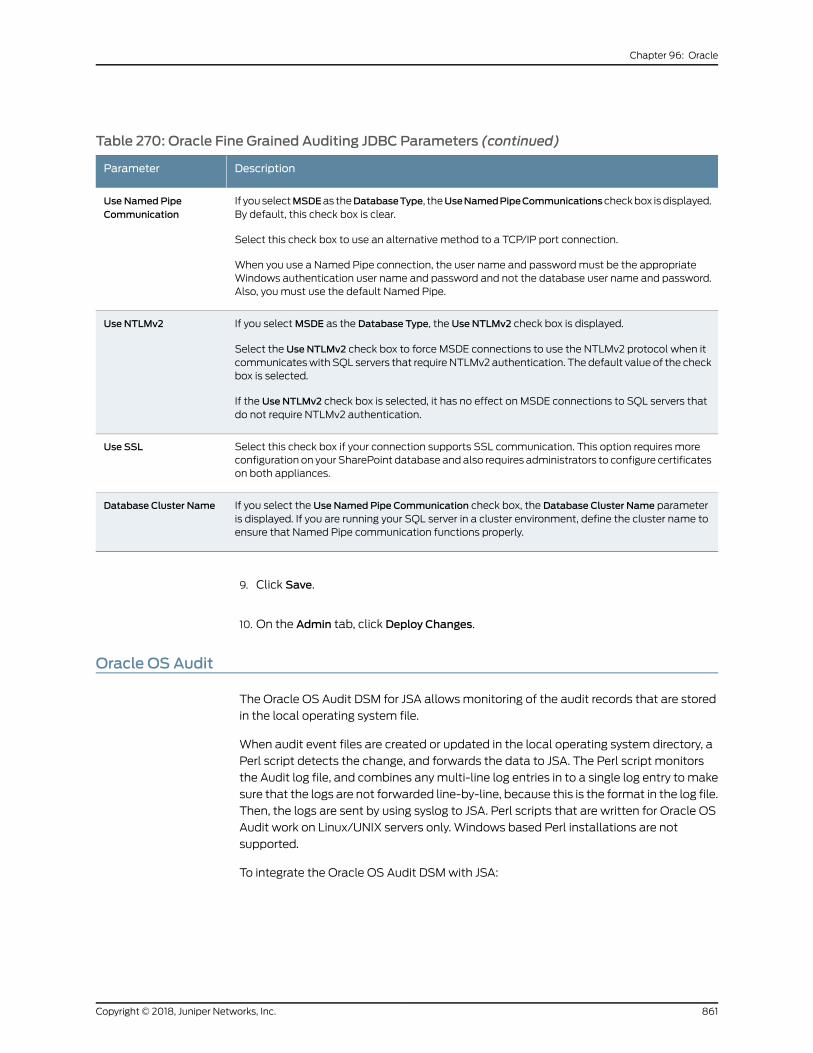
Table 270: Oracle Fine Grained Auditing JDBC Parameters (continued)
DescriptionParameter
If youselectMSDEas theDatabaseType, theUseNamedPipeCommunicationscheckbox isdisplayed.By default, this check box is clear.
Select this check box to use an alternative method to a TCP/IP port connection.
When you use a Named Pipe connection, the user name and passwordmust be the appropriateWindows authentication user name and password and not the database user name and password.Also, youmust use the default Named Pipe.
Use Named PipeCommunication
If you selectMSDE as the Database Type, the Use NTLMv2 check box is displayed.
Select the Use NTLMv2 check box to force MSDE connections to use the NTLMv2 protocol when itcommunicateswith SQL servers that requireNTLMv2 authentication. The default value of the checkbox is selected.
If the Use NTLMv2 check box is selected, it has no effect on MSDE connections to SQL servers thatdo not require NTLMv2 authentication.
Use NTLMv2
Select this check box if your connection supports SSL communication. This option requires moreconfiguration on your SharePoint database and also requires administrators to configure certificateson both appliances.
Use SSL
If you select the Use Named Pipe Communication check box, the Database Cluster Name parameteris displayed. If you are running your SQL server in a cluster environment, define the cluster name toensure that Named Pipe communication functions properly.
Database Cluster Name
9. Click Save.
10. On the Admin tab, click Deploy Changes.
Oracle OS Audit
The Oracle OS Audit DSM for JSA allowsmonitoring of the audit records that are stored
in the local operating system file.
When audit event files are created or updated in the local operating system directory, a
Perl script detects the change, and forwards the data to JSA. The Perl script monitors
the Audit log file, and combines anymulti-line log entries in to a single log entry tomake
sure that the logs are not forwarded line-by-line, because this is the format in the log file.
Then, the logs are sent by using syslog to JSA. Perl scripts that are written for Oracle OS
Audit work on Linux/UNIX servers only. Windows based Perl installations are not
supported.
To integrate the Oracle OS Audit DSMwith JSA:
861Copyright © 2018, Juniper Networks, Inc.
Chapter 96: Oracle

1. Go to the following website to download the files that you need:
https://www.juniper.net/support/downloads/
2. From the Software tab, select Scripts.
3. Download the Oracle OS Audit script:
oracle_osauditlog_fwdr_5.3.tar.gz
4. Type the following command to extract the file:
tar -zxvf oracle_osauditlog_fwdr_5.3.tar.gz
5. Copy the Perl script to the server that hosts the Oracle server.
NOTE: Perl 5.8must be installed on the device that hosts the Oracleserver. If you do not have Perl 5.8 installed, youmight be prompted thatlibrary files aremissing when you attempt to start the Oracle OS Auditscript. It is suggested that you verify that Perl 5.8 is installed before youcontinue.
6. Log in to the Oracle host as an Oracle user that has SYS or root privilege.
7. Make sure theORACLE_HOMEandORACLE_SIDenvironment variables are configured
properly for your deployment.
8. Open the following file:
${ORACLE_HOME}/dbs/init${ORACLE_SID}.ora
9. For syslog, add the following lines to the file:
*.audit_trail=os *.audit_syslog_level=local0.info
10. Verify account has read/write permissions for the following directory:
/var/lock/ /var/run/
11. Restart the Oracle database instance.
12. Start the OS Audit DSM script:
oracle_osauditlog_fwdr_5.3.pl -t target_host -d logs_directory
Copyright © 2018, Juniper Networks, Inc.862
Juniper Secure Analytics Configuring DSMs Guide
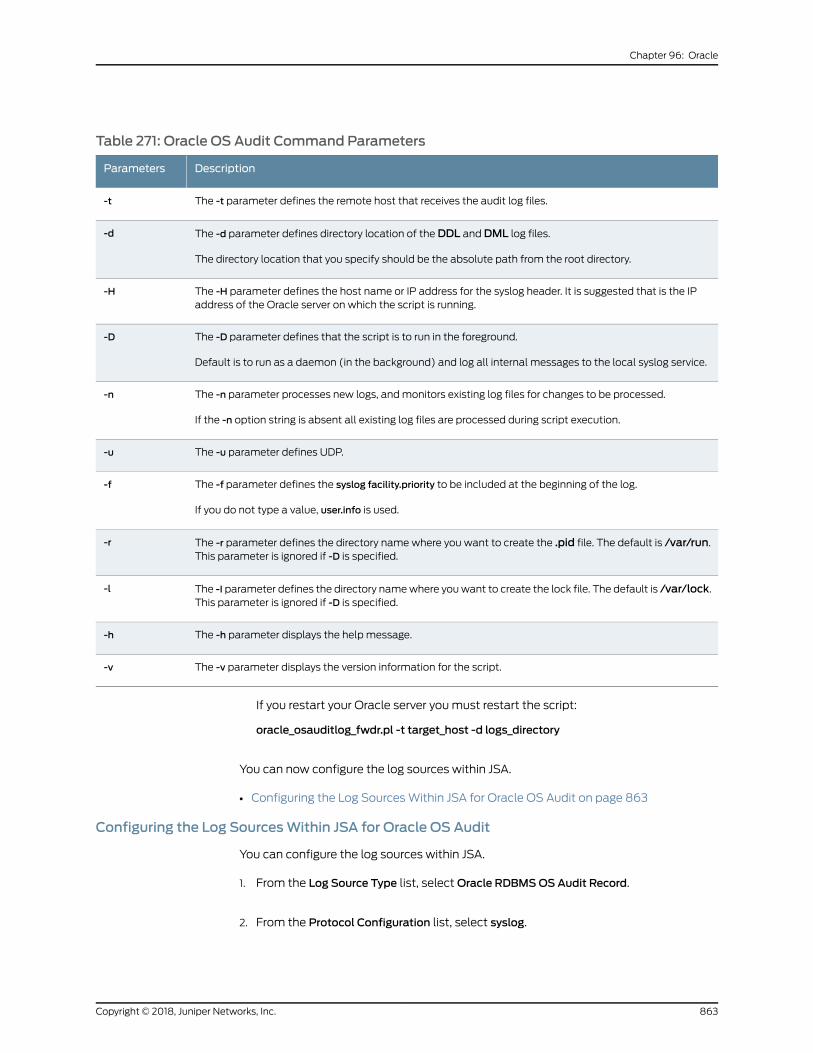
Table 271: Oracle OS Audit Command Parameters
DescriptionParameters
The -t parameter defines the remote host that receives the audit log files.-t
The -d parameter defines directory location of theDDL andDML log files.
The directory location that you specify should be the absolute path from the root directory.
-d
The -H parameter defines the host name or IP address for the syslog header. It is suggested that is the IPaddress of the Oracle server on which the script is running.
-H
The -D parameter defines that the script is to run in the foreground.
Default is to run as a daemon (in the background) and log all internal messages to the local syslog service.
-D
The -n parameter processes new logs, andmonitors existing log files for changes to be processed.
If the -n option string is absent all existing log files are processed during script execution.
-n
The -u parameter defines UDP.-u
The -f parameter defines the syslog facility.priority to be included at the beginning of the log.
If you do not type a value, user.info is used.
-f
The -r parameter defines the directory namewhere you want to create the .pid file. The default is /var/run.This parameter is ignored if -D is specified.
-r
The -I parameter defines the directory namewhere youwant to create the lock file. The default is /var/lock.This parameter is ignored if -D is specified.
-l
The -h parameter displays the help message.-h
The -v parameter displays the version information for the script.-v
If you restart your Oracle server youmust restart the script:
oracle_osauditlog_fwdr.pl -t target_host -d logs_directory
You can now configure the log sources within JSA.
• Configuring the Log SourcesWithin JSA for Oracle OS Audit on page 863
Configuring the Log SourcesWithin JSA for Oracle OS Audit
You can configure the log sources within JSA.
1. From the Log Source Type list, selectOracle RDBMSOSAudit Record.
2. From the Protocol Configuration list, select syslog.
863Copyright © 2018, Juniper Networks, Inc.
Chapter 96: Oracle

3. From the Log Source Identifier field, type the address that is specified by using the -H
option in “Oracle OS Audit” on page 861.
Formore informationabout yourOracleAuditRecord, see your vendordocumentation.
Copyright © 2018, Juniper Networks, Inc.864
Juniper Secure Analytics Configuring DSMs Guide
CHAPTER 97
OSSEC
• OSSEC on page 865
• Configuring OSSEC on page 865
• Configuring a Log Source on page 866
OSSEC
The OSSEC DSM for JSA accepts events that are forwarded fromOSSEC installations
by using syslog.
OSSEC isanopensourceHost-based IntrusionDetectionSystem(HIDS) that canprovide
intrusion events to JSA. If you have OSSEC agents that are installed, youmust configure
syslog on the OSSECmanagement server. If you have local or stand-alone installations
ofOSSEC, then youmust configure syslog on each stand-aloneOSSEC to forward syslog
events to JSA.
Configuring OSSEC
Youcanconfigure syslog forOSSECona stand-alone installationormanagement server:
1. Use SSH to log in to your OSSEC device.
2. Edit the OSSEC configuration ossec.conf file.
<installation directory>/ossec/etc/ossec.conf
3. Add the following syslog configuration:
NOTE: Add the syslog configuration after the alerts entry and before the
localfile entry.
</alerts>
<syslog_output> <server>(QRadar IP Address)</server> <port>514</port>
</syslog_output>
<localfile>
865Copyright © 2018, Juniper Networks, Inc.

For example,
<syslog_output> <server>10.100.100.2</server> <port>514</port> </syslog_output>
4. Save the OSSEC configuration file.
5. Type the following command to enable the syslog daemon:
<installation directory>/ossec/bin/ossec-control enable client-syslog
6. Type the following command to restart the syslog daemon:
<installation directory>/ossec/bin/ossec-control restart
The configuration is complete. The log source is added to JSA as OSSEC events are
automatically discovered. Events that are forwarded to JSA by OSSEC are displayed
on the Log Activity tab of JSA.
Configuring a Log Source
JSA automatically discovers and creates a log source for syslog events fromOSSEC.
The following configuration steps are optional.
To manually configure a log source for OSSEC:
1. Log in to JSA.
2. Click the Admin tab.
3. On the navigation menu, click Data Sources.
The Data Sources pane is displayed.
4. Click the Log Sources icon.
The Log Sourceswindow is displayed.
5. Click Add.
The Add a log sourcewindow is displayed.
6. In the Log Source Name field, type a name for your log source.
7. In the Log Source Description field, type a description for the log source.
8. From the Log Source Type list, selectOSSEC.
9. Using the Protocol Configuration list, select Syslog.
Copyright © 2018, Juniper Networks, Inc.866
Juniper Secure Analytics Configuring DSMs Guide
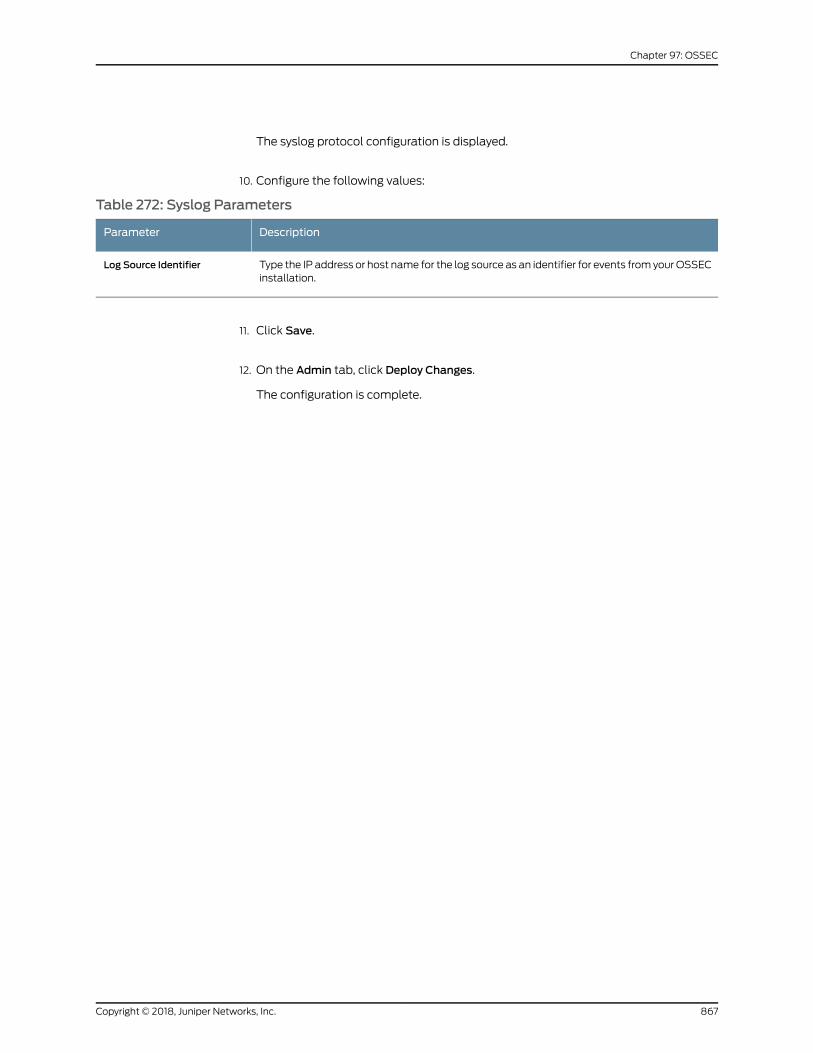
The syslog protocol configuration is displayed.
10. Configure the following values:
Table 272: Syslog Parameters
DescriptionParameter
Type the IP address or host name for the log source as an identifier for events from yourOSSECinstallation.
Log Source Identifier
11. Click Save.
12. On the Admin tab, click Deploy Changes.
The configuration is complete.
867Copyright © 2018, Juniper Networks, Inc.
Chapter 97: OSSEC

Copyright © 2018, Juniper Networks, Inc.868
Juniper Secure Analytics Configuring DSMs Guide
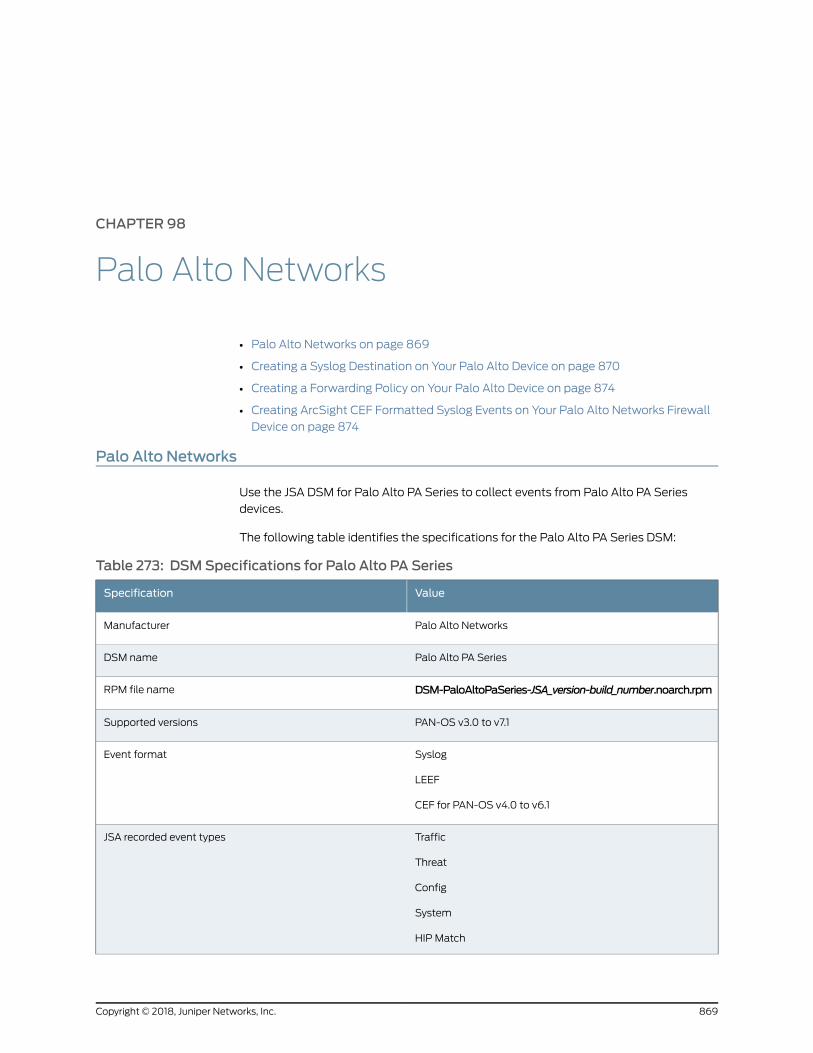
CHAPTER 98
Palo Alto Networks
• Palo Alto Networks on page 869
• Creating a Syslog Destination on Your Palo Alto Device on page 870
• Creating a Forwarding Policy on Your Palo Alto Device on page 874
• Creating ArcSight CEF Formatted Syslog Events on Your Palo Alto Networks Firewall
Device on page 874
Palo Alto Networks
Use the JSA DSM for Palo Alto PA Series to collect events from Palo Alto PA Series
devices.
The following table identifies the specifications for the Palo Alto PA Series DSM:
Table 273: DSMSpecifications for Palo Alto PA Series
ValueSpecification
Palo Alto NetworksManufacturer
Palo Alto PA SeriesDSM name
DSM-PaloAltoPaSeries-JSA_version-build_number.noarch.rpmRPM file name
PAN-OS v3.0 to v7.1Supported versions
Syslog
LEEF
CEF for PAN-OS v4.0 to v6.1
Event format
Traffic
Threat
Config
System
HIP Match
JSA recorded event types
869Copyright © 2018, Juniper Networks, Inc.
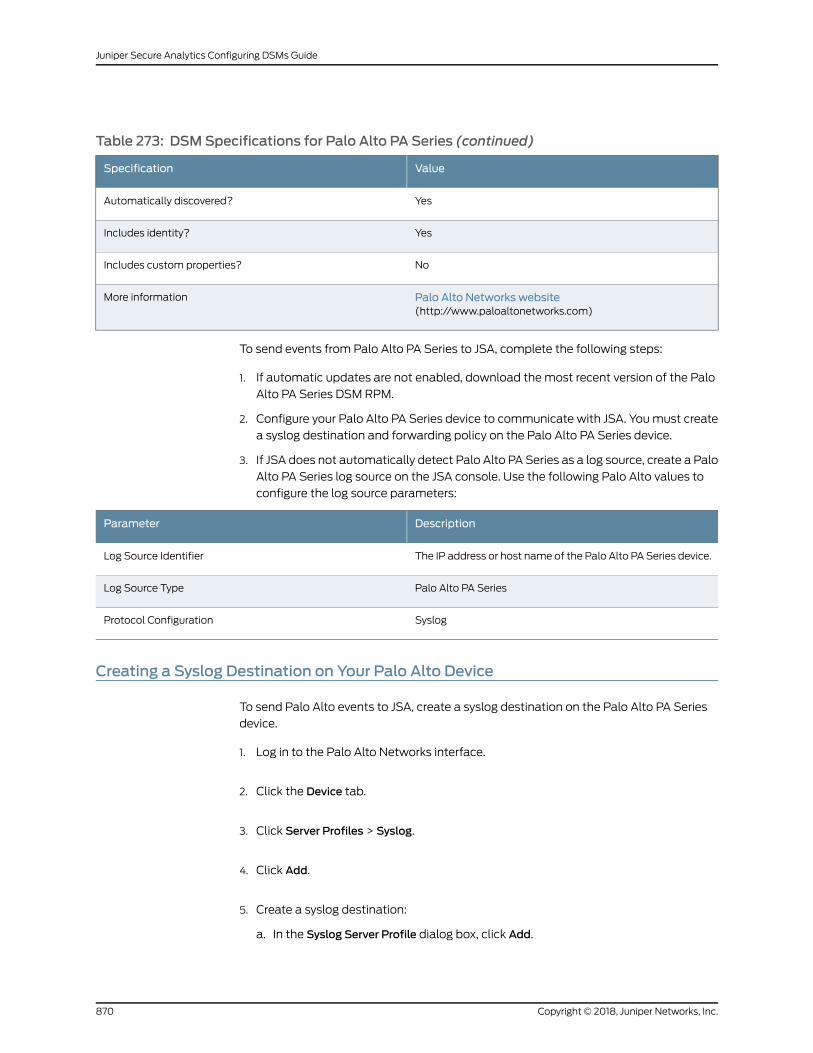
Table 273: DSMSpecifications for Palo Alto PA Series (continued)
ValueSpecification
YesAutomatically discovered?
YesIncludes identity?
NoIncludes custom properties?
Palo Alto Networks website(http://www.paloaltonetworks.com)
More information
To send events from Palo Alto PA Series to JSA, complete the following steps:
1. If automatic updates are not enabled, download themost recent version of the Palo
Alto PA Series DSM RPM.
2. Configure your Palo Alto PA Series device to communicate with JSA. Youmust create
a syslog destination and forwarding policy on the Palo Alto PA Series device.
3. If JSA does not automatically detect Palo Alto PA Series as a log source, create a Palo
Alto PA Series log source on the JSA console. Use the following Palo Alto values to
configure the log source parameters:
DescriptionParameter
The IP address or host name of the Palo Alto PA Series device.Log Source Identifier
Palo Alto PA SeriesLog Source Type
SyslogProtocol Configuration
Creating a Syslog Destination on Your Palo Alto Device
To send Palo Alto events to JSA, create a syslog destination on the Palo Alto PA Series
device.
1. Log in to the Palo Alto Networks interface.
2. Click the Device tab.
3. Click Server Profiles > Syslog.
4. Click Add.
5. Create a syslog destination:
a. In the Syslog Server Profile dialog box, click Add.
Copyright © 2018, Juniper Networks, Inc.870
Juniper Secure Analytics Configuring DSMs Guide
b. Specify the name, server IP address, port, and facility of the JSA system that you
want to use as a syslog server.
c. ClickOK.
6. Configure LEEF events:
NOTE: If you are using syslog, choose the default option.
NOTE: The line breaks in these examples will cause this configuration tofail. For each of the substeps, copy the code blocks into a text editor,remove the line breaks, and paste as a single line in the Custom Format
column.
a. Click the Custom Log Format tab.
b. Copy the following text and paste it in the Custom Format column for the Config
log type.
PAN-OS v3.0 - v6.1—
LEEF:1.0|Palo Alto Networks|PAN-OS Syslog Integration|4.0|$result|cat=$type|usrName=$admin|src=$host|devTime=$cef-formatted-receive_time|client=$client|sequence=$seqno|serial=$serial|msg=$cmd
PAN-OS v7.1—
LEEF:1.0|Palo Alto Networks|PAN-OS Syslog Integration|$sender_sw_version|$result|ReceiveTime=$receive_time|SerialNumber=$serial|cat=$type|devTime=$cef-formatted-receive_time|src=$host|VirtualSystem=$vsys|msg=$cmd|usrName=$admin|client=$client|Result=$result|ConfigurationPath=$path|sequence=$seqno|ActionFlags=$actionflags|BeforeChangeDetail=$before-change-detail|AfterChangeDetail=$after-change-detail|DeviceGroupHierarchyL1=$dg_hier_level_1|DeviceGroupHierarchyL2=$dg_hier_level_2|DeviceGroupHierarchyL3=$dg_hier_level_3|DeviceGroupHierarchyL4=$dg_hier_level_4|vSrcName=$vsys_name|DeviceName=$device_name
c. Copy the following text and paste it in the Custom Format column for the System
log type.
PAN-OS v3.0 - v6.1—
LEEF:1.0|PaloAlto Networks|PAN-OS Syslog Integration|4.0|$eventid|cat=$type|subtype=$subtype|devTime=$cef-formatted-receive_time|sev=$severity|Severity=$number-of-severity|msg=$opaque|Filename=$object
PAN-OS v7.1—
LEEF:1.0|Palo Alto Networks|PAN-OS Syslog Integration|$sender_sw_version|$eventid| ReceiveTime=$receive_time|SerialNumber=$serial|cat=$type|subtype=$subtype|devTime=$cef-formatted-receive_time|VirtualSystem=$vsys|Filename=$object| Module=$module|sev=$number-of-severity|Severity=$severity|msg=$opaque| sequence=$seqno|ActionFlags=$actionflags|DeviceGroupHierarchyL1=$dg_hier_level_1|DeviceGroupHierarchyL2
871Copyright © 2018, Juniper Networks, Inc.
Chapter 98: Palo Alto Networks
=$dg_hier_level_2|DeviceGroupHierarchyL3=$dg_hier_level_3|DeviceGroupHierarchyL4=$dg_hier_level_4|vSrcName=$vsys_name|DeviceName=$device_name
d. Copy the following text and paste it in the Custom Format column for the Threat
log type.
PAN-OS v3.0 - v6.1—
LEEF:1.0|Palo Alto Networks|PAN-OS Syslog Integration|4.0|$threatid|cat=$type|subtype=$subtype|src=$src|dst=$dst|srcPort=$sport|dstPort=$dport|proto=$proto|usrName=$srcuser|SerialNumber=$serial|srcPostNAT=$natsrc|dstPostNAT=$natdst|RuleName=$rule|SourceUser=$srcuser|DestinationUser=$dstuser|Application=$app|VirtualSystem=$vsys|SourceZone=$fromDestinationZone=$to|IngressInterface=$inbound_if|EgressInterface=$outbound_if|LogForwardingProfile=$logset|SessionID=$sessionid|RepeatCount=$repeatcnt|srcPostNATPort=$natsport|dstPostNATPort=$natdport|Flags=$flags|URLCategory=$category|sev=$severity|Severity=$number-of-severity|Direction=$direction|ContentType=$contenttype|action=$action|Miscellaneous=$misc
PAN-OS v7.1—
LEEF:1.0|Palo Alto Networks|PAN-OS Syslog Integration|$sender_sw_version|$threatid|ReceiveTime=$receive_time|SerialNumber=$serial|cat=$type|subtype=$subtype|devTime=$cef-formatted-receive_time|src=$src|dst=$dst|srcPostNAT=$natsrc|dstPostNAT=$natdst|RuleName=$rule|usrName=$srcuser|SourceUser=$srcuser|DestinationUser=$dstuser|Application=$app|VirtualSystem=$vsys|SourceZone=$from|DestinationZone=$to|IngressInterface=$inbound_if|EgressInterface=$outbound_if|LogForwardingProfile=$logset|SessionID=$sessionid|RepeatCount=$repeatcnt|srcPort=$sport|dstPort=$dport|srcPostNATPort=$natsport|dstPostNATPort=$natdport|Flags=$flags|proto=$proto|action=$action|Miscellaneous=$misc|ThreatID=$threatid|URLCategory=$category|sev=$number-of-severity|Severity=$severity|Direction=$direction|sequence=$seqno|ActionFlags=$actionflags|SourceLocation=$srcloc|DestinationLocation=$dstloc|ContentType=$contenttype|PCAP_ID=$pcap_id|FileDigest=$filedigest|Cloud=$cloud|URLIndex=$url_idx|UserAgent=$user_agent|FileType=$filetype|identSrc=$xff|Referer=$referer|Sender=$sender|Subject=$subject|Recipient=$recipient|ReportID=$reportid|DeviceGroupHierarchyL1=$dg_hier_level_1|DeviceGroupHierarchyL2=$dg_hier_level_2|DeviceGroupHierarchyL3=$dg_hier_level_3|DeviceGroupHierarchyL4=$dg_hier_level_4|vSrcName=$vsys_name|DeviceName=$device_name
e. Copy the following text and paste it in the Custom Format column for the Traffic
log type.
PAN-OS v3.0 - v6.1—
LEEF:1.0|Palo Alto Networks|PAN-OS Syslog Integration|4.0|$action|cat=$type|src=$src|dst=$dst|srcPort=$sport|dstPort=$dport|proto=$proto|usrName=$srcuser| SerialNumber=$serial|Type=$type|Subtype=$subtype|srcPostNAT=$natsrc|dstPostNAT=$natdst|RuleName=$rule|SourceUser=$srcuser|DestinationUser=$dstuser|Application=$app| VirtualSystem=$vsys|SourceZone=$from|DestinationZone=$to|IngressInterface=$inbound_if|EgressInterface=$outbound_if|LogForwardingProfile=$logset|SessionID=$sessionid|RepeatCount=$repeatcnt|srcPostNATPort=$natsport|dstPostNATPort=$natdport|Flags=$flags|totalBytes=$bytes|totalPackets=$packets|ElapsedTime=$elapsed|URLCategory=$category|dstBytes=$bytes_received|srcBytes=$bytes_sent|action=$action
PAN-OS v7.1—
LEEF:1.0|Palo Alto Networks|PAN-OS Syslog Integration|$sender_sw_version|$action|cat=$type|ReceiveTime=$receive_time|SerialNumber=$serial|Type=$type|subtype=$subtype|devTime=$cef-formatted-receive_time|src=$src|dst=$dst|
Copyright © 2018, Juniper Networks, Inc.872
Juniper Secure Analytics Configuring DSMs Guide
srcPostNAT=$natsrc|dstPostNAT=$natdst|RuleName=$rule|usrName=$srcuser|SourceUser=$srcuser|DestinationUser=$dstuser|Application=$app|VirtualSystem=$vsys|SourceZone=$from|DestinationZone=$to|IngressInterface=$inbound_if|EgressInterface=$outbound_if|LogForwardingProfile=$logset|SessionID=$sessionid|RepeatCount=$repeatcnt|srcPort=$sport|dstPort=$dport|srcPostNATPort=$natsport|dstPostNATPort=$natdport|Flags=$flags|proto=$proto|action=$action|totalBytes=$bytes|dstBytes=$bytes_received|srcBytes=$bytes_sent|totalPackets=$packets|StartTime=$start|ElapsedTime=$elapsed|URLCategory=$category|sequence=$seqno|ActionFlags=$actionflags|SourceLocation=$srcloc|DestinationLocation=$dstloc|dstPackets=$pkts_received|srcPackets=$pkts_sent|SessionEndReason=$session_end_reason|DeviceGroupHierarchyL1=$dg_hier_level_1|DeviceGroupHierarchyL2=$dg_hier_level_2|DeviceGroupHierarchyL3=$dg_hier_level_3|DeviceGroupHierarchyL4=$dg_hier_level_4|vSrcName=$vsys_name|DeviceName=$device_name|ActionSource=$action_source
f. Copy the following text andpaste it in theCustomFormat column for theHIPMatch
log type. Omit this step is you are using PAN-OS v3.0 - v6.1.
PAN-OS v7.1—
LEEF:1.0|Palo Alto Networks|PAN-OS Syslog Integration|$sender_sw_version|$matchname|ReceiveTime=$receive_time|SerialNumber=$serial|cat=$type|subtype=$subtype|devTime=$cef-formatted-receive_time|usrName=$srcuser|VirtualSystem=$vsys|identHostName=$machinename|OS=$os|identSrc=$src|HIP=$matchname|RepeatCount=$repeatcnt|HIPType=$matchtype|sequence=$seqno|ActionFlags=$actionflags|DeviceGroupHierarchyL1=$dg_hier_level_1|DeviceGroupHierarchyL2=$dg_hier_level_2|DeviceGroupHierarchyL3=$dg_hier_level_3|DeviceGroupHierarchyL4=$dg_hier_level_4|vSrcName=$vsys_name|DeviceName=$device_name
NOTE:DeviceGroupHierarchy
andURLIndex
fields are included for completeness and consistency. However,these fields are experimental and should be used only for archivalpurposes.
7. ClickOK.
8. Specify the severity of events that are contained in the syslog messages.
a. Click Log Setting > System and then click Edit.
b. Select the check box for each event severity level that you want contained in the
syslog message.
c. Type the name of the syslog destination.
d. ClickOK.
9. Click the Device tab and then click Commit.
To allow communication between your Palo Alto Networks device and JSA, create a
forwardingpolicy.See “CreatingaForwardingPolicyonYourPaloAltoDevice”onpage874.
873Copyright © 2018, Juniper Networks, Inc.
Chapter 98: Palo Alto Networks
RelatedDocumentation
Creating a Forwarding Policy on Your Palo Alto Device on page 874•
• Creating ArcSight CEF Formatted Syslog Events on Your Palo Alto Networks Firewall
Device on page 874
Creating a Forwarding Policy on Your Palo Alto Device
If your JSA Console or Event Collector is in a different security zone than your Palo Alto
PA Series device, create a forwarding policy rule.
1. Log in to Palo Alto Networks.
2. On the dashboard, click the Policies tab.
3. Click Policies > Policy Based Forwarding.
4. Click New.
5. Configure the parameters. For descriptions of the policy-based forwarding values,
see your Palo Alto Networks Administrator’s Guide.
RelatedDocumentation
Creating ArcSight CEF Formatted Syslog Events on Your Palo Alto Networks Firewall
Device on page 874
•
• Creating a Syslog Destination on Your Palo Alto Device on page 870
Creating ArcSight CEF Formatted Syslog Events on Your Palo Alto Networks FirewallDevice
You can configure your Palo Alto Networks firewall to send ArcSight CEF formatted
Syslog events to JSA.
1. Log in to the Palo Alto Networks interface.
2. Select Panorama/Device >Setup >Management, to configure the device to include its
IP Address in the header of Syslog messages.
3. In the Logging and Reporting Settings section, click Edit.
4. In the Syslog HOSTNAME Format list, select ipv4-address or ipv6-address, and then
clickOK.
5. Select Device >Server Profiles >Syslog, and then click Add.
Copyright © 2018, Juniper Networks, Inc.874
Juniper Secure Analytics Configuring DSMs Guide
6. Specify the Name and Location. Location refers to a virtual system if the device is
enabled for virtual systems.
7. On the Servers tab, click Add.
8. Specify the name, server IP address, port, and facility of the JSA system that youwant
to use as a syslog server:
a. Name is Syslog server name.
b. Syslog Server is the IP address for the Syslog server.
c. The Transport/Port default is 514.
d. The Faculty default is LOG_USER.
9. Toselect anyof the listed log types thatdefineacustomformat, basedon theArcSight
CEF for that log type, complete the following steps:
a. Click the Custom Log Format tab and select any of the listed log types to define a
custom format based on the ArcSight CEF for that log type. The listed log types
are Config, System, Threat, Traffic, and HIPMatch.
b. ClickOK twice to save your entries, then click Commit.
10. TodefineyourownCEF-style formats thatuse theeventmapping table that isprovided
in the ArcSight document, Implementing ArcSight CEF, you can use the following
information about defining CEF style formats:
The Custom Log Format tab supports escaping any characters that are defined in the
CEF as special characters. For example, to use a backslash to escape the backslash
and equal characters, enable the Escaping check box, specify \=as the EscapedCharacters and \as the Escape Character.
The following list displays the CEF-style format that was used during the certification
process for each log type. These custom formats include all of the fields, in a similar
order, that the default format of the Syslogs display.
NOTE: DuetoPDFformatting,donotcopyandpaste themessage formatsdirectly into the PAN-OSweb interface. Instead, paste into a text editor,remove any carriage return or line feed characters, and then copy andpaste into the web interface.
Traffic—
CEF:0|Palo Alto Networks|PAN-OS|6.0.0|$subtype|$type|1|rt=$cef-formatted-receive_time deviceExternalId=$serial src=$src dst=$dst sourceTranslatedAddress=$natsrc destinationTranslatedAddress=$natdst cs1Label=Rule cs1=$rule suser=$srcuser duser=$dstuser app=$app cs3Label=Virtual System cs3=$vsys cs4Label=Source Zone cs4=$from cs5Label=Destination Zone cs5=$to deviceInboundInterface=$inbound_if deviceOutboundInterface=$outbound_if cs6Label=LogProfile cs6=$logset cn1Label=SessionID
875Copyright © 2018, Juniper Networks, Inc.
Chapter 98: Palo Alto Networks
cn1=$sessionid cnt=$repeatcnt spt=$sport dpt=$dport sourceTranslatedPort=$natsport destinationTranslatedPort=$natdport flexString1Label=Flags flexString1=$flags proto=$proto act=$action flexNumber1Label=Total bytes flexNumber1=$bytes in=$bytes_sent out=$bytes_received cn2Label=Packets cn2=$packets PanOSPacketsReceived=$pkts_received PanOSPacketsSent=$pkts_sent start=$cef-formatted-time_generated cn3Label=Elapsed time in seconds cn3=$elapsed cs2Label=URL Category cs2=$category externalId=$seqno
Threat—
CEF:0|Palo Alto Networks|PAN-OS|6.0.0|$subtype|$type|$number-of-severity|rt=$cef-formatted-receive_time deviceExternalId=$serial src=$src dst=$dst sourceTranslatedAddress=$natsrc destinationTranslatedAddress=$natdst cs1Label=Rule cs1=$rule suser=$srcuser duser=$dstuser app=$app cs3Label=Virtual System cs3=$vsys cs4Label=Source Zone cs4=$from cs5Label=Destination Zone cs5=$to deviceInboundInterface=$inbound_if deviceOutboundInterface=$outbound_if cs6Label=LogProfile cs6=$logset cn1Label=SessionID cn1=$sessionid cnt=$repeatcnt spt=$sport dpt=$dport sourceTranslatedPort=$natsport destinationTranslatedPort=$natdport flexString1Label=Flags flexString1=$flags proto=$proto act=$action request=$misc cs2Label=URL Category cs2=$category flexString2Label=Direction flexString2=$direction externalId=$seqno requestContext=$contenttype cat=$threatid filePath=$cloud fileId=$pcap_id fileHash=$filedigest
Config—
CEF:0|Palo Alto Networks|PAN-OS|6.0.0|$result|$type|1|rt=$cef-formatted-receive_time deviceExternalId=$serial dvchost=$host cs3Label=Virtual System cs3=$vsys act=$cmd duser=$admin destinationServiceName=$client msg=$path externalId=$seqno
System—
CEF:0|Palo Alto Networks|PAN-OS|6.0.0|$subtype|$type|$number-of-severity|rt=$cef-formatted-receive_time deviceExternalId=$serial cs3Label=Virtual System cs3=$vsys fname=$object flexString2Label=Module flexString2=$module msg=$opaque externalId=$seqno cat=$eventid
HIPMatch—
CEF:0|Palo Alto Networks|PAN-OS|6.0.0|$matchtype|$type|1|rt=$cef-formatted-receive_time deviceExternalId=$serial suser=$srcuser cs3Label=Virtual System cs3=$vsys shost=$machinename src=$src cnt=$repeatcnt externalId=$seqno cat=$matchname cs2Label=Operating System cs2=$os
For more information about Syslog configuration, see the PAN-OS Administrator's Guide
on the Palo Alto Networks website (https://www.paloaltonetworks.com).
RelatedDocumentation
• Creating a Syslog Destination on Your Palo Alto Device on page 870
Copyright © 2018, Juniper Networks, Inc.876
Juniper Secure Analytics Configuring DSMs Guide

• Creating a Forwarding Policy on Your Palo Alto Device on page 874
877Copyright © 2018, Juniper Networks, Inc.
Chapter 98: Palo Alto Networks

Copyright © 2018, Juniper Networks, Inc.878
Juniper Secure Analytics Configuring DSMs Guide
CHAPTER 99
Pirean Access: One
• Pirean Access: One on page 879
• Configuring a Log Source on page 879
Pirean Access: One
The Pirean Access: One DSM for JSA collects events by polling the DB2®audit database
for access management, and authentication events.
JSA supports Pirean Access: One software installations at v2.2 that use a DB2®v9.7
database to store access management and authentication events.
Before You Begin
Before you configure JSA to integratewith PireanAccess: One, you can create a database
useraccountandpassword for JSA.Creatinga JSAaccount is not required, but isbeneficial
as it secures your access management and authentication event table data for the JSA
user.
Your JSA user needs read permission access for the database table that contains your
events. The JDBC protocol allows JSA to log in and poll for events from the database
based on the time stamp to ensure that the most recent data is retrieved.
NOTE: Ensure that firewall rules do not block communication between yourPirean Access: One installation and the JSA console or managed hostresponsible for event polling with JDBC.
Configuring a Log Source
To collect events, youmust configure a log source in JSA to poll your Access: One
installation database with the JDBC protocol.
1. Click the Admin tab.
2. On the navigation menu, click Data Sources.
879Copyright © 2018, Juniper Networks, Inc.
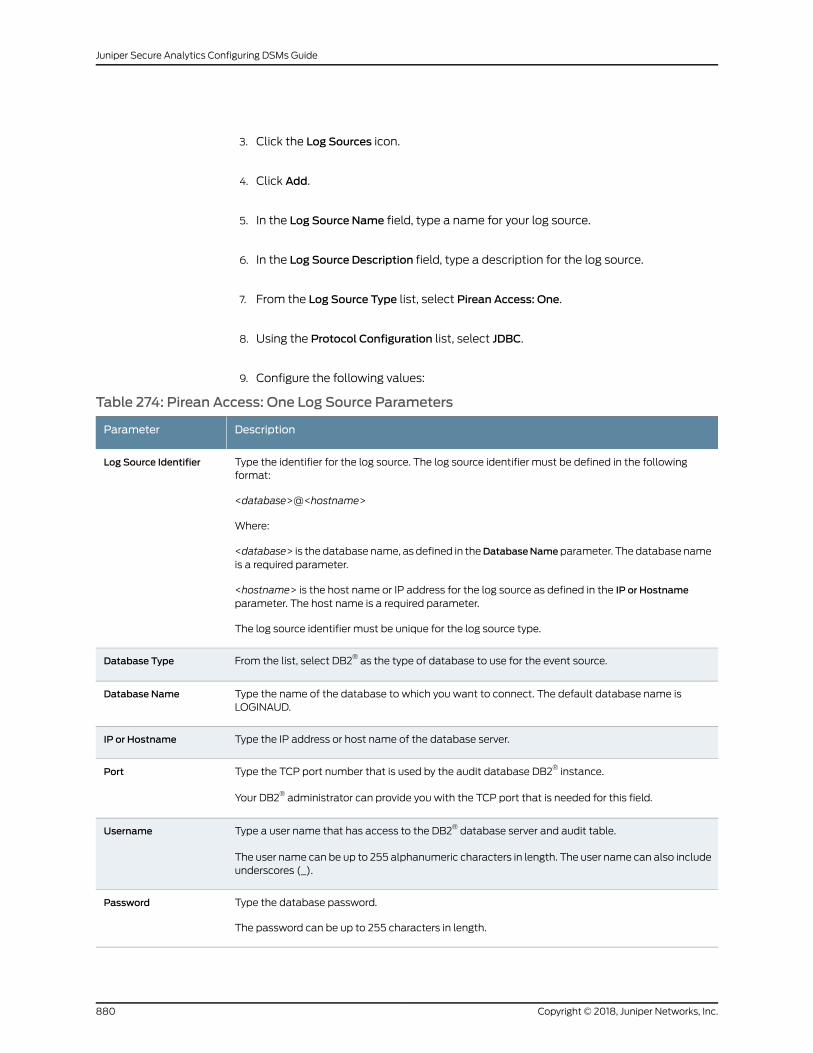
3. Click the Log Sources icon.
4. Click Add.
5. In the Log Source Name field, type a name for your log source.
6. In the Log Source Description field, type a description for the log source.
7. From the Log Source Type list, select Pirean Access: One.
8. Using the Protocol Configuration list, select JDBC.
9. Configure the following values:
Table 274: Pirean Access: One Log Source Parameters
DescriptionParameter
Type the identifier for the log source. The log source identifier must be defined in the followingformat:
<database>@<hostname>
Where:
<database> is the database name, as defined in theDatabaseNameparameter. The database nameis a required parameter.
<hostname> is the host name or IP address for the log source as defined in the IP or Hostnameparameter. The host name is a required parameter.
The log source identifier must be unique for the log source type.
Log Source Identifier
From the list, select DB2® as the type of database to use for the event source.Database Type
Type the name of the database to which you want to connect. The default database name isLOGINAUD.
Database Name
Type the IP address or host name of the database server.IP or Hostname
Type the TCP port number that is used by the audit database DB2® instance.
Your DB2® administrator can provide you with the TCP port that is needed for this field.
Port
Type a user name that has access to the DB2® database server and audit table.
The user name can be up to 255 alphanumeric characters in length. The user name can also includeunderscores (_).
Username
Type the database password.
The password can be up to 255 characters in length.
Password
Copyright © 2018, Juniper Networks, Inc.880
Juniper Secure Analytics Configuring DSMs Guide
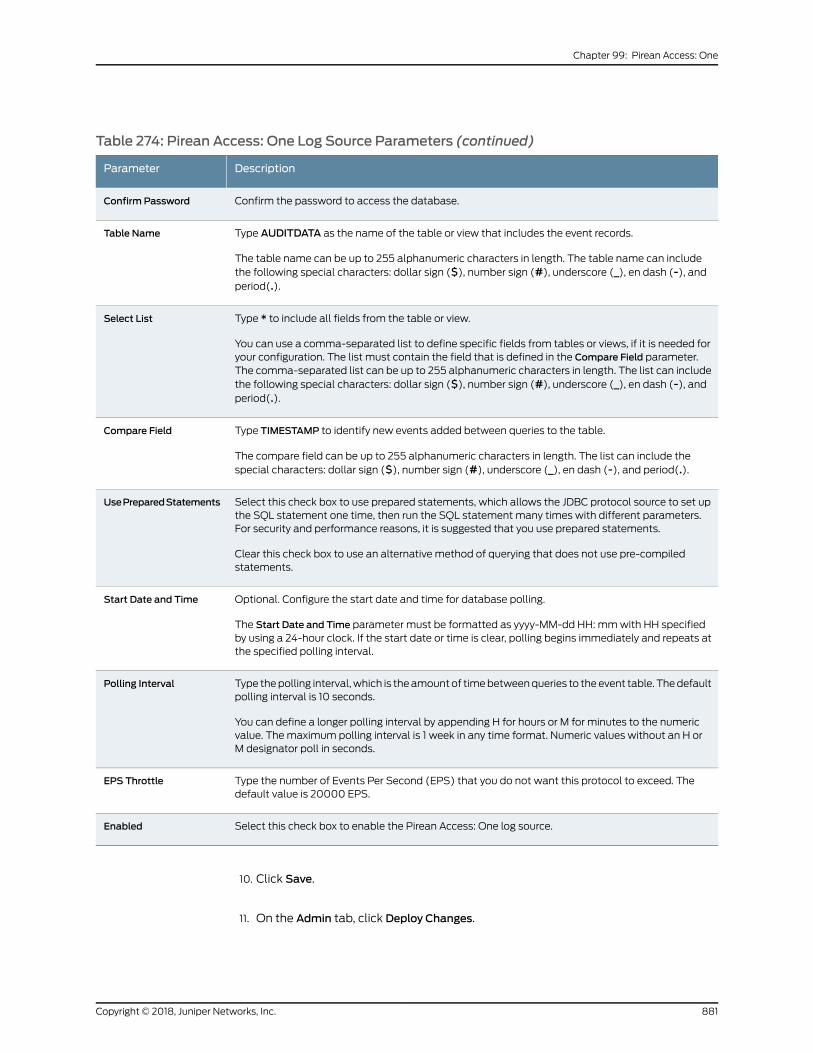
Table 274: Pirean Access: One Log Source Parameters (continued)
DescriptionParameter
Confirm the password to access the database.Confirm Password
Type AUDITDATA as the name of the table or view that includes the event records.
The table name can be up to 255 alphanumeric characters in length. The table name can includethe following special characters: dollar sign ($), number sign (#), underscore (_), en dash (-), andperiod(.).
Table Name
Type * to include all fields from the table or view.
You can use a comma-separated list to define specific fields from tables or views, if it is needed foryour configuration. The list must contain the field that is defined in the Compare Field parameter.The comma-separated list can be up to 255 alphanumeric characters in length. The list can includethe following special characters: dollar sign ($), number sign (#), underscore (_), en dash (-), andperiod(.).
Select List
Type TIMESTAMP to identify new events added between queries to the table.
The compare field can be up to 255 alphanumeric characters in length. The list can include thespecial characters: dollar sign ($), number sign (#), underscore (_), en dash (-), and period(.).
Compare Field
Select this check box to use prepared statements, which allows the JDBC protocol source to set upthe SQL statement one time, then run the SQL statement many times with different parameters.For security and performance reasons, it is suggested that you use prepared statements.
Clear this check box to use an alternative method of querying that does not use pre-compiledstatements.
UsePreparedStatements
Optional. Configure the start date and time for database polling.
The Start Date and Time parameter must be formatted as yyyy-MM-dd HH: mmwith HH specifiedby using a 24-hour clock. If the start date or time is clear, polling begins immediately and repeats atthe specified polling interval.
Start Date and Time
Type thepolling interval,which is theamountof timebetweenqueries to theevent table. Thedefaultpolling interval is 10 seconds.
You can define a longer polling interval by appending H for hours or M for minutes to the numericvalue. Themaximum polling interval is 1 week in any time format. Numeric values without an H orM designator poll in seconds.
Polling Interval
Type the number of Events Per Second (EPS) that you do not want this protocol to exceed. Thedefault value is 20000 EPS.
EPS Throttle
Select this check box to enable the Pirean Access: One log source.Enabled
10. Click Save.
11. On the Admin tab, click Deploy Changes.
881Copyright © 2018, Juniper Networks, Inc.
Chapter 99: Pirean Access: One

The configuration is complete. Access Management and authentication events for
Pirean Access: One are displayed on the Log Activity tab of JSA.
Copyright © 2018, Juniper Networks, Inc.882
Juniper Secure Analytics Configuring DSMs Guide
CHAPTER 100
PostFix Mail Transfer Agent
• PostFix Mail Transfer Agent on page 883
• Configuring Syslog for PostFix Mail Transfer Agent on page 883
• Configuring a PostFix MTA Log Source on page 884
• Configuring IPtables for Multiline UDP Syslog Events on page 886
PostFix Mail Transfer Agent
JSA can collect and categorize syslog mail events from PostFix Mail Transfer Agents
(MTA) installed in your network.
To collect syslog events, youmust configure PostFix MTA installation to forward syslog
events to JSA. JSA does not automatically discover syslog events that are forwarded
from PostFix MTA installations as they are multiline events. JSA supports syslog events
from PostFix MTA V2.6.6.
To configure PostFix MTA, complete the following tasks:
1. On your PostFix MTA system, configure syslog.conf to forward mail events to JSA.
2. On your JSA system, create a log source for PostFix MTA to use the UDPmultiline
syslog protocol.
3. On your JSA system, configure IPtables to redirect events to the port defined for UDP
multiline syslog events.
4. On your JSA system, verify that your PostFix MTA events are displayed on the Log
Activity tab.
If you havemultiple PostFix MTA installations where events go to different JSA systems,
youmust configure a log source and IPtables for each JSA system that receives PostFix
MTAmultiline UDP syslog events.
Configuring Syslog for PostFix Mail Transfer Agent
To collect events, youmust configure syslog on your PostFix MTA installation to forward
mail events to JSA.
883Copyright © 2018, Juniper Networks, Inc.
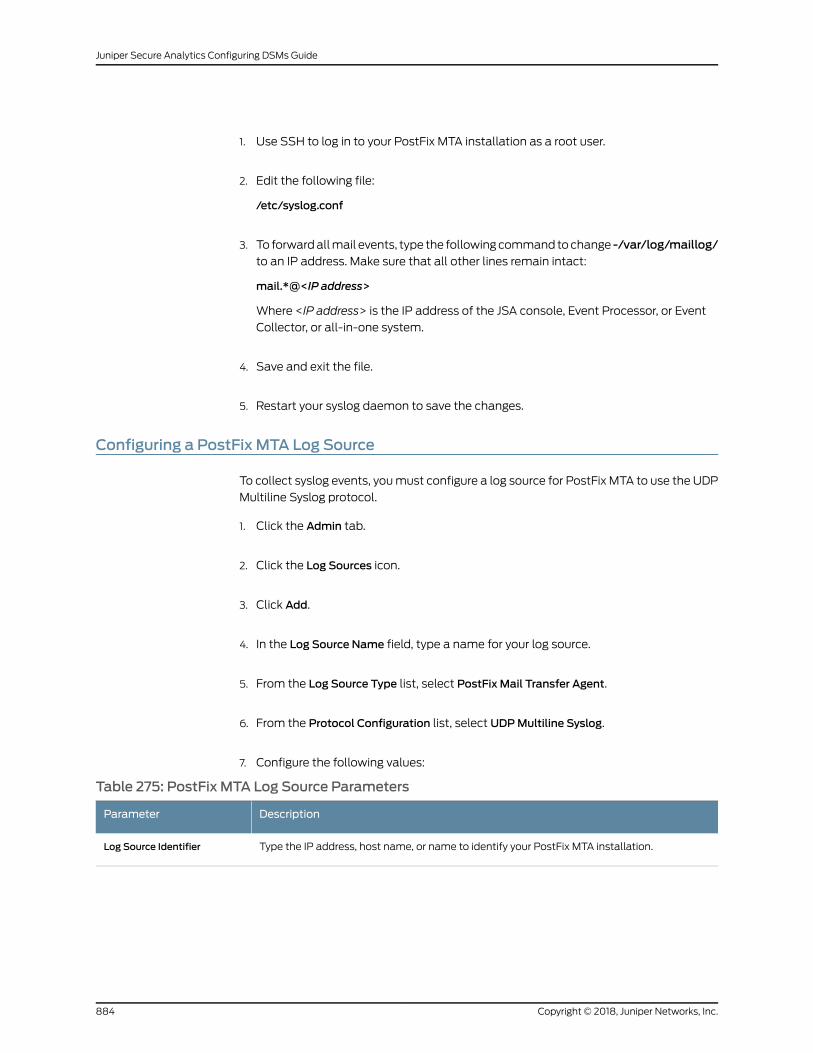
1. Use SSH to log in to your PostFix MTA installation as a root user.
2. Edit the following file:
/etc/syslog.conf
3. To forwardallmail events, type the followingcommand tochange -/var/log/maillog/to an IP address. Make sure that all other lines remain intact:
mail.*@<IP address>
Where <IP address> is the IP address of the JSA console, Event Processor, or Event
Collector, or all-in-one system.
4. Save and exit the file.
5. Restart your syslog daemon to save the changes.
Configuring a PostFix MTA Log Source
To collect syslog events, youmust configure a log source for PostFix MTA to use the UDP
Multiline Syslog protocol.
1. Click the Admin tab.
2. Click the Log Sources icon.
3. Click Add.
4. In the Log Source Name field, type a name for your log source.
5. From the Log Source Type list, select PostFix Mail Transfer Agent.
6. From the Protocol Configuration list, select UDPMultiline Syslog.
7. Configure the following values:
Table 275: PostFix MTA Log Source Parameters
DescriptionParameter
Type the IP address, host name, or name to identify your PostFix MTA installation.Log Source Identifier
Copyright © 2018, Juniper Networks, Inc.884
Juniper Secure Analytics Configuring DSMs Guide
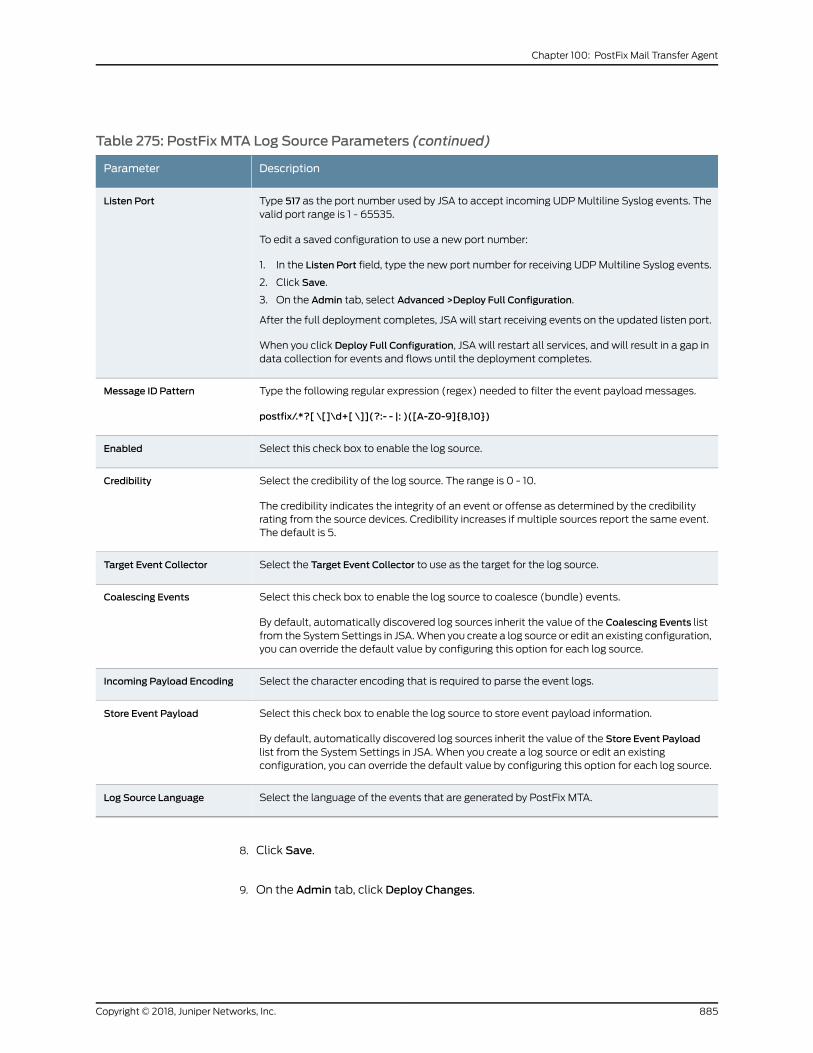
Table 275: PostFix MTA Log Source Parameters (continued)
DescriptionParameter
Type 517 as the port number used by JSA to accept incoming UDPMultiline Syslog events. Thevalid port range is 1 - 65535.
To edit a saved configuration to use a new port number:
1. In the Listen Port field, type the new port number for receiving UDPMultiline Syslog events.
2. Click Save.
3. On the Admin tab, select Advanced >Deploy Full Configuration.
After the full deployment completes, JSA will start receiving events on the updated listen port.
When you click Deploy Full Configuration, JSA will restart all services, and will result in a gap indata collection for events and flows until the deployment completes.
Listen Port
Type the following regular expression (regex) needed to filter the event payloadmessages.
postfix/.*?[ \[]\d+[ \]](?:- - |: )([A-Z0-9]{8,10})
Message ID Pattern
Select this check box to enable the log source.Enabled
Select the credibility of the log source. The range is 0 - 10.
The credibility indicates the integrity of an event or offense as determined by the credibilityrating from the source devices. Credibility increases if multiple sources report the same event.The default is 5.
Credibility
Select the Target Event Collector to use as the target for the log source.Target Event Collector
Select this check box to enable the log source to coalesce (bundle) events.
By default, automatically discovered log sources inherit the value of the Coalescing Events listfrom the SystemSettings in JSA.When you create a log source or edit an existing configuration,you can override the default value by configuring this option for each log source.
Coalescing Events
Select the character encoding that is required to parse the event logs.Incoming Payload Encoding
Select this check box to enable the log source to store event payload information.
By default, automatically discovered log sources inherit the value of the Store Event Payloadlist from the System Settings in JSA. When you create a log source or edit an existingconfiguration, you can override the default value by configuring this option for each log source.
Store Event Payload
Select the language of the events that are generated by PostFix MTA.Log Source Language
8. Click Save.
9. On the Admin tab, click Deploy Changes.
885Copyright © 2018, Juniper Networks, Inc.
Chapter 100: PostFix Mail Transfer Agent
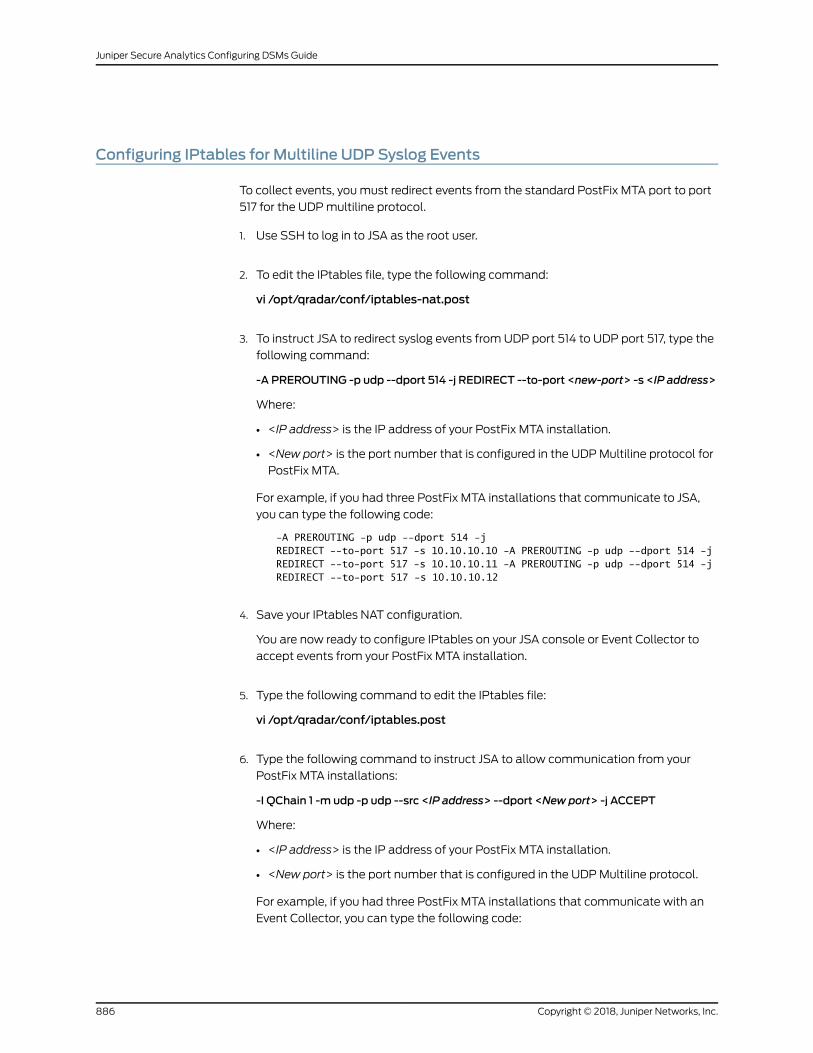
Configuring IPtables for Multiline UDP Syslog Events
To collect events, youmust redirect events from the standard PostFix MTA port to port
517 for the UDPmultiline protocol.
1. Use SSH to log in to JSA as the root user.
2. To edit the IPtables file, type the following command:
vi /opt/qradar/conf/iptables-nat.post
3. To instruct JSA to redirect syslog events from UDP port 514 to UDP port 517, type the
following command:
-A PREROUTING -p udp --dport 514 -j REDIRECT --to-port <new-port> -s <IP address>
Where:
• <IP address> is the IP address of your PostFix MTA installation.
• <New port> is the port number that is configured in the UDPMultiline protocol for
PostFix MTA.
For example, if you had three PostFix MTA installations that communicate to JSA,
you can type the following code:
-A PREROUTING -p udp --dport 514 -j REDIRECT --to-port 517 -s 10.10.10.10 -A PREROUTING -p udp --dport 514 -j REDIRECT --to-port 517 -s 10.10.10.11 -A PREROUTING -p udp --dport 514 -j REDIRECT --to-port 517 -s 10.10.10.12
4. Save your IPtables NAT configuration.
You are now ready to configure IPtables on your JSA console or Event Collector to
accept events from your PostFix MTA installation.
5. Type the following command to edit the IPtables file:
vi /opt/qradar/conf/iptables.post
6. Type the following command to instruct JSA to allow communication from your
PostFix MTA installations:
-I QChain 1 -m udp -p udp --src <IP address> --dport <New port> -j ACCEPT
Where:
• <IP address> is the IP address of your PostFix MTA installation.
• <New port> is the port number that is configured in the UDPMultiline protocol.
For example, if you had three PostFix MTA installations that communicate with an
Event Collector, you can type the following code:
Copyright © 2018, Juniper Networks, Inc.886
Juniper Secure Analytics Configuring DSMs Guide

-I QChain 1 -m udp -p udp --src 10.10.10.10 --dport 517 -j ACCEPT -I QChain 1 -m udp -p udp --src 10.10.10.11 --dport 517 -j ACCEPT -I QChain 1 -m udp -p udp --src 10.10.10.12 --dport 517 -j ACCEPT
7. To save the changes and update IPtables, type the following command:
./opt/qradar/bin/iptables_update.pl
887Copyright © 2018, Juniper Networks, Inc.
Chapter 100: PostFix Mail Transfer Agent

Copyright © 2018, Juniper Networks, Inc.888
Juniper Secure Analytics Configuring DSMs Guide
CHAPTER 101
ProFTPd
• ProFTPd on page 889
• Configuring ProFTPd on page 889
• Configuring a Log Source on page 890
ProFTPd
JSA can collect events from a ProFTP server through syslog.
By default, ProFTPd logs authentication relatedmessages to the local syslog using the
auth (or authpriv) facility. All other logging is done using the daemon facility. To log
ProFTPdmessages to JSA, use the SyslogFacility directive to change the default facility.
Configuring ProFTPd
You can configure syslog on a ProFTPd device:
1. Open the /etc/proftd.conf file.
2. Below the LogFormat directives add the following line:
SyslogFacility <facility>
Where<facility> isoneof the followingoptions:AUTH (orAUTHPRIV),CRON,DAEMON,
KERN, LPR,MAIL, NEWS, USER, UUCP, LOCAL0, LOCAL1, LOCAL2, LOCAL3, LOCAL4,
LOCAL5, LOCAL6, or LOCAL7.
3. Save the file and exit.
4. Open the /etc/syslog.conf file
5. Add the following line at the end of the file:
<facility>@<JSA host>
Where:
<facility>matches the facility that is chosen in Step 2. The facility must be typed in
lowercase.
889Copyright © 2018, Juniper Networks, Inc.
<JSA host> is the IP address of your JSA console or Event Collector.
6. Restart syslog and ProFTPd:
/etc/init.d/syslog restart
/etc/init.d/proftpd restart
You can now configure the log source in JSA.
Configuring a Log Source
JSA automatically discovers and creates a log source for syslog events from ProFTPd.
The following configuration steps are optional.
To manually configure a log source for ProFTPd:
1. Log in to JSA.
2. Click the Admin tab.
3. On the navigation menu, click Data Sources.
The Data Sources pane is displayed.
4. Click the Log Sources icon.
The Log Sourceswindow is displayed.
5. Click Add.
The Add a log sourcewindow is displayed.
6. In the Log Source Name field, type a name for your log source.
7. In the Log Source Description field, type a description for the log source.
8. From the Log Source Type list, select ProFTPd Server.
9. Using the Protocol Configuration list, select Syslog.
The syslog protocol configuration is displayed.
10. Configure the following values:
Copyright © 2018, Juniper Networks, Inc.890
Juniper Secure Analytics Configuring DSMs Guide

Table 276: Syslog Parameters
DescriptionParameter
Type the IPaddressor host name for the log sourceasan identifier for events fromyourProFTPdinstallation.
Log Source Identifier
11. Click Save.
12. On the Admin tab, click Deploy Changes.
The configuration is complete.
891Copyright © 2018, Juniper Networks, Inc.
Chapter 101: ProFTPd

Copyright © 2018, Juniper Networks, Inc.892
Juniper Secure Analytics Configuring DSMs Guide
CHAPTER 102
Proofpoint Enterprise Protection andEnterprise Privacy
• Proofpoint Enterprise Protection and Enterprise Privacy on page 893
• Configuring Proofpoint Enterprise Protection and Enterprise Privacy DSM to
Communicate with JSA on page 894
• Configuring a Proofpoint Enterprise Protection and Enterprise Privacy Log
Source on page 895
Proofpoint Enterprise Protection and Enterprise Privacy
The JSA DSM for Proofpoint Enterprise Protection and Enterprise privacy can collect
events from your Proofpoint Enterprise Protection and Enterprise Privacy DSM servers.
The following table identifies the specifications for the Proofpoint Enterprise Protection
and Enterprise Privacy DSM:
Table 277: Proofpoint Enterprise Protection and Enterprise Privacy DSMSpecifications
ValueSpecification
ProofpointManufacturer
Proofpoint Enterprise Protection/Enterprise PrivacyDSM name
DSM-Proofpoint_Enterprise_Protection/Enterprise_PrivacyJSA_version-build_number.noarch.rpmRPM file name
V7.02
V7.1
V7.2
V7.5
V8.0
Supported versions
Syslog
Log File
Protocol
893Copyright © 2018, Juniper Networks, Inc.
Table 277: Proofpoint Enterprise Protection and Enterprise Privacy DSMSpecifications (continued)
ValueSpecification
System
Email security threat classification
Email audit and encryption
Recorded event types
NoAutomatically discovered?
NoIncludes identity?
NoIncludes custom properties?
Proofpoint website(https://www.proofpoint.com/us/solutions/products/enterprise-protection)
More information
To integrate the Proofpoint Enterprise Protection and Enterprise Privacy DSMwith JSA,
complete the following steps:
1. If automatic updates are not enabled, download and install the most recent version
of the Proofpoint Enterprise Protection and Enterprise Privacy DSM RPM on your JSA
console.
2. For each instanceofProofpoint EnterpriseProtectionandEnterprisePrivacy, configure
yourProofpointEnterpriseProtectionandEnterprisePrivacyDSMappliance toenable
communication with JSA.
3. If JSA does not automatically discover the Proofpoint Enterprise Protection and
Enterprise Privacy log source, create a log source for each instance of Proofpoint
Enterprise and Enterprise Privacy DSM on your network.
Configuring Proofpoint Enterprise Protection and Enterprise Privacy DSM toCommunicate with JSA
To collect all audit logs and system events from your Proofpoint Enterprise Protection
and Enterprise Privacy DSM, youmust add a destination that specifies JSA as the syslog
server.
1. Log in to the Proofpoint Enterprise interface.
2. Click Logs and Reports.
3. Click Log Settings.
4. From the Remote Log Settings pane, configure the following options to enable syslog
communication:
Copyright © 2018, Juniper Networks, Inc.894
Juniper Secure Analytics Configuring DSMs Guide
a. Select Syslog as the communication protocol.
5. Type the IP address of the JSA console or Event Collector.
6. In the Port field, type 514 as the port number for syslog communication.
7. From the Syslog Filter Enable list, selectOn.
8. From the Facility list, select local1.
9. From the Level list, select Information.
10. From the SyslogMTA Enable list, selectOn.
11. Click Save
RelatedDocumentation
Configuring a Proofpoint Enterprise Protection and Enterprise Privacy Log Source on
page 895
•
Configuring a Proofpoint Enterprise Protection and Enterprise Privacy Log Source
JSA automatically discovers and creates a log source for syslog events from Proofpoint
Enterprise Protection and Enterprise Privacy appliances.
1. Log in to JSA.
2. Click the Admin tab.
3. On the navigation menu, click Data Sources.
4. Click the Log Sources icon.
5. Click Add.
6. In the Log Source Name field, type a name for your log source.
7. In the Log Source Description field, type a description for the log source.
8. From the Log Source Type list, select Proofpoint Enterprise Protection/Enterprise
Privacy.
9. If you want to configure the Syslog protocol, select it from the Protocol Configuration
list and configure the following values:
895Copyright © 2018, Juniper Networks, Inc.
Chapter 102: Proofpoint Enterprise Protection and Enterprise Privacy
Table 278: Syslog Parameters
DescriptionParameter
The IP address or host name for the log source as an identifier for events from ProofpointEnterprise Protection and Enterprise Privacy installations.
For Each additional log source that you create when you havemultiple installations, include aunique identifier, such as an IP address or host name
Log Source Identifier
10. If you want to configure a Log File protocol, select it from the Protocol Configuration
list and configure the following values:
Table 279: Log File Parameters
DescriptionParameter
Type the IP address or host name for the log source. The log source identifier must be unique forthe log source type.
Log Source Identifier
From the list, select the protocol that youwant to usewhen retrieving log files froma remove server.The default is SFTP.
• SFTP—SSH File Transfer Protocol
• FTP— File Transfer Protocol
• SCP—Secure Copy
The underlying protocol that is used to retrieve log files for the SCP andSFTP service types requiresthat the server specified in the Remote IP or Hostname field has the SFTP subsystem enabled.
Service Type
Type the IP address or host name of the Proofpoint Enterprise Protection and Enterprise Privacysystem.
Remote IP or Hostname
Type the TCP port on the remote host that is running the selected Service Type. If you configurethe Service Type as FTP, the default is 21. If you configure the Service Type as SFTP or SCP, thedefault is 22.
The valid range is 1 - 65535.
Remote Port
Type the user name necessary to log in to your Proofpoint Enterprise Protection and EnterprisePrivacy system.
The user name can be up to 255 characters in length.
Remote User
Type the password necessary to log in to your Proofpoint Enterprise Protection and EnterprisePrivacy system.
Remote Password
Confirm the Remote Password to log in to yourProofpoint Enterprise Protection and EnterprisePrivacy system.
Confirm Password
If you select SCP or SFTP from the Service Type field you can define a directory path to an SSHprivate key file. The SSH Private Key File allows you to ignore the Remote Password field.
SSH Key File
Type the directory location on the remote host fromwhich the files are retrieved.Remote Directory
Copyright © 2018, Juniper Networks, Inc.896
Juniper Secure Analytics Configuring DSMs Guide
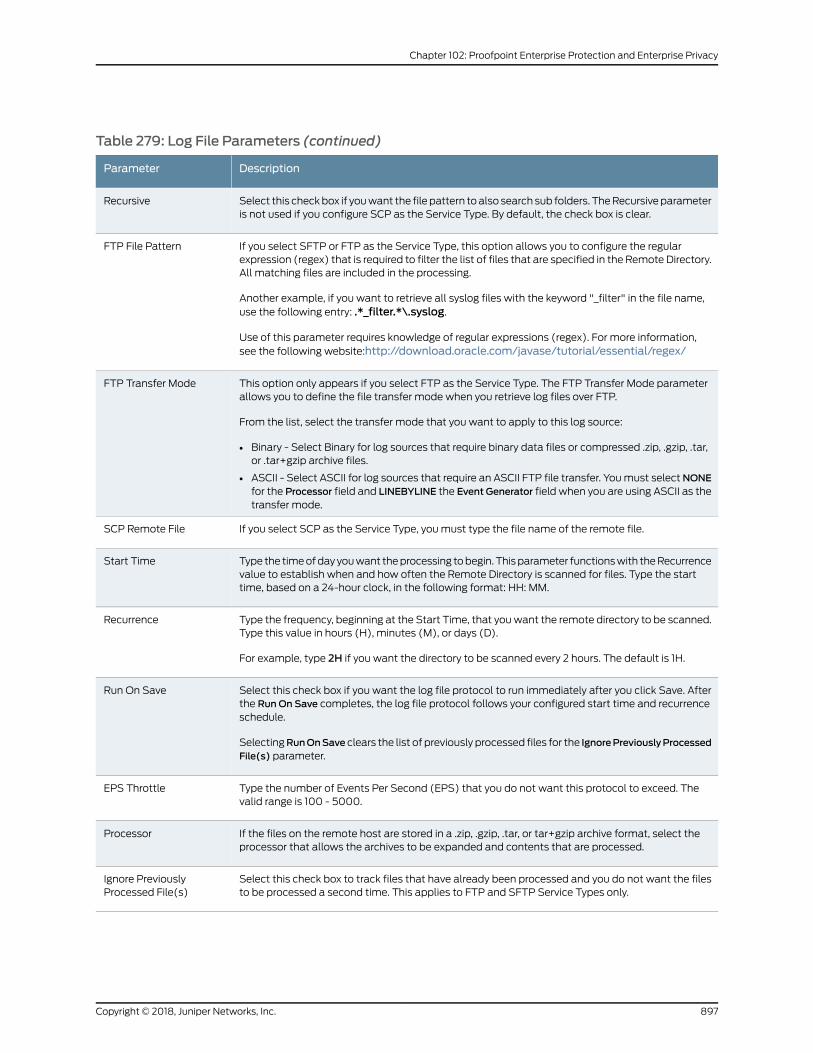
Table 279: Log File Parameters (continued)
DescriptionParameter
Select this checkbox if youwant the file pattern toalso search sub folders. TheRecursiveparameteris not used if you configure SCP as the Service Type. By default, the check box is clear.
Recursive
If you select SFTP or FTP as the Service Type, this option allows you to configure the regularexpression (regex) that is required to filter the list of files that are specified in the Remote Directory.All matching files are included in the processing.
Another example, if you want to retrieve all syslog files with the keyword "_filter" in the file name,use the following entry: .*_filter.*\.syslog.
Use of this parameter requires knowledge of regular expressions (regex). For more information,see the following website:http://download.oracle.com/javase/tutorial/essential/regex/
FTP File Pattern
This option only appears if you select FTP as the Service Type. The FTP Transfer Mode parameterallows you to define the file transfer mode when you retrieve log files over FTP.
From the list, select the transfer mode that you want to apply to this log source:
• Binary - Select Binary for log sources that require binary data files or compressed .zip, .gzip, .tar,or .tar+gzip archive files.
• ASCII - Select ASCII for log sources that require an ASCII FTP file transfer. Youmust selectNONEfor the Processor field and LINEBYLINE the Event Generator field when you are using ASCII as thetransfer mode.
FTP Transfer Mode
If you select SCP as the Service Type, youmust type the file name of the remote file.SCP Remote File
Type the timeofdayyouwant theprocessing tobegin. Thisparameter functionswith theRecurrencevalue to establish when and how often the Remote Directory is scanned for files. Type the starttime, based on a 24-hour clock, in the following format: HH: MM.
Start Time
Type the frequency, beginning at the Start Time, that youwant the remote directory to be scanned.Type this value in hours (H), minutes (M), or days (D).
For example, type 2H if you want the directory to be scanned every 2 hours. The default is 1H.
Recurrence
Select this check box if you want the log file protocol to run immediately after you click Save. Afterthe RunOn Save completes, the log file protocol follows your configured start time and recurrenceschedule.
SelectingRunOnSave clears the list of previously processed files for the IgnorePreviouslyProcessedFile(s) parameter.
Run On Save
Type the number of Events Per Second (EPS) that you do not want this protocol to exceed. Thevalid range is 100 - 5000.
EPS Throttle
If the files on the remote host are stored in a .zip, .gzip, .tar, or tar+gzip archive format, select theprocessor that allows the archives to be expanded and contents that are processed.
Processor
Select this check box to track files that have already been processed and you do not want the filesto be processed a second time. This applies to FTP and SFTP Service Types only.
Ignore PreviouslyProcessed File(s)
897Copyright © 2018, Juniper Networks, Inc.
Chapter 102: Proofpoint Enterprise Protection and Enterprise Privacy
Table 279: Log File Parameters (continued)
DescriptionParameter
Select this check box to define the local directory on your JSA system that you want to use forstoring downloaded files during processing. We recommend that you leave the check box clear.When the check box is selected, the Local Directory field is displayed, which allows you to configurethe local directory to use for storing files.
Change Local Directory?
From the Event Generator list, select LINEBYLINE.Event Generator
11. Click Save.
12. On the Admin tab, click Deploy Changes.
The log source is added to JSA. Events that are forwarded to JSA by Proofpoint
Enterprise Protection and Enterprise Privacy are displayed on the Log Activity tab.
RelatedDocumentation
• Configuring Proofpoint Enterprise Protection and Enterprise Privacy DSM to
Communicate with JSA on page 894
Copyright © 2018, Juniper Networks, Inc.898
Juniper Secure Analytics Configuring DSMs Guide
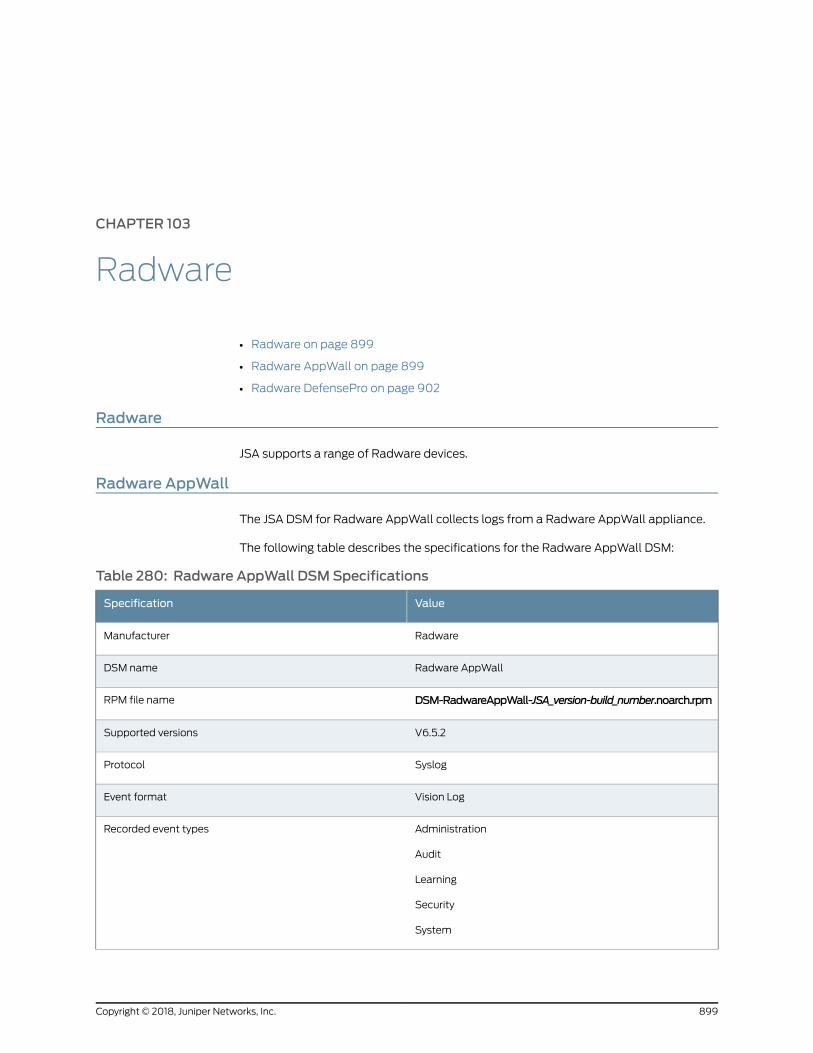
CHAPTER 103
Radware
• Radware on page 899
• Radware AppWall on page 899
• Radware DefensePro on page 902
Radware
JSA supports a range of Radware devices.
Radware AppWall
The JSA DSM for Radware AppWall collects logs from a Radware AppWall appliance.
The following table describes the specifications for the Radware AppWall DSM:
Table 280: Radware AppWall DSMSpecifications
ValueSpecification
RadwareManufacturer
Radware AppWallDSM name
DSM-RadwareAppWall-JSA_version-build_number.noarch.rpmRPM file name
V6.5.2Supported versions
SyslogProtocol
Vision LogEvent format
Administration
Audit
Learning
Security
System
Recorded event types
899Copyright © 2018, Juniper Networks, Inc.
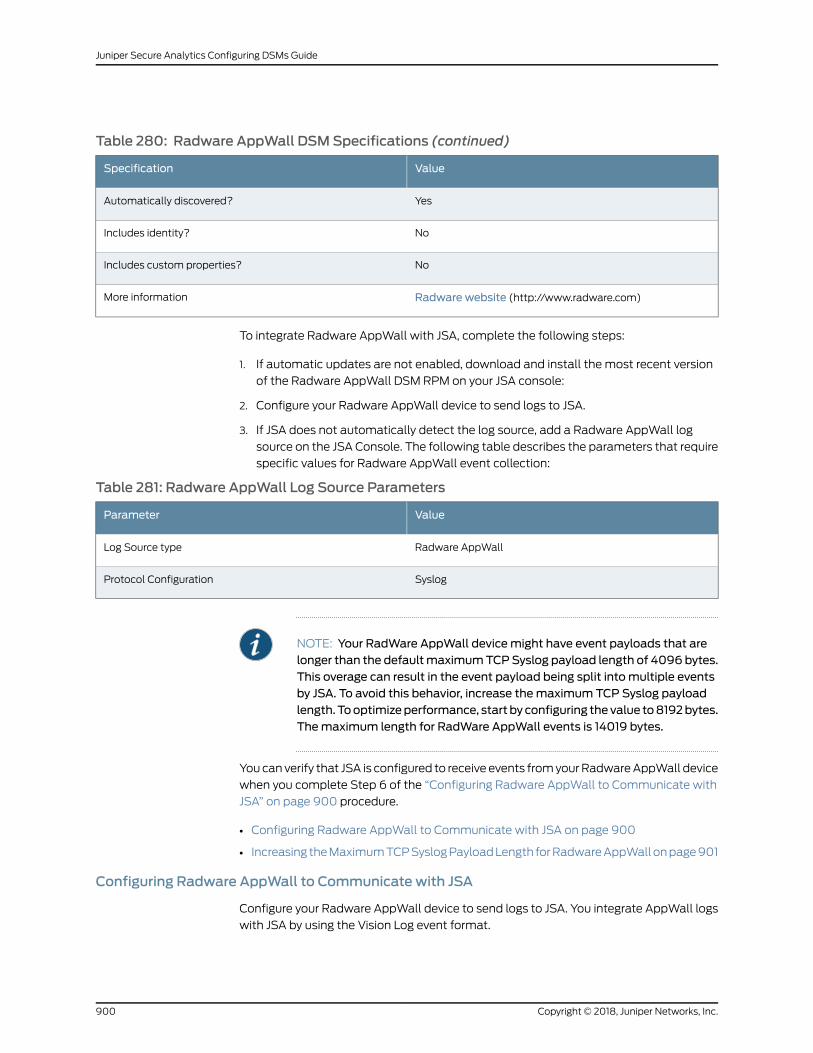
Table 280: Radware AppWall DSMSpecifications (continued)
ValueSpecification
YesAutomatically discovered?
NoIncludes identity?
NoIncludes custom properties?
Radware website (http://www.radware.com)More information
To integrate Radware AppWall with JSA, complete the following steps:
1. If automatic updates are not enabled, download and install the most recent version
of the Radware AppWall DSM RPM on your JSA console:
2. Configure your Radware AppWall device to send logs to JSA.
3. If JSA does not automatically detect the log source, add a Radware AppWall log
source on the JSA Console. The following table describes the parameters that require
specific values for Radware AppWall event collection:
Table 281: Radware AppWall Log Source Parameters
ValueParameter
Radware AppWallLog Source type
SyslogProtocol Configuration
NOTE: Your RadWare AppWall devicemight have event payloads that arelonger than the defaultmaximumTCPSyslog payload length of 4096 bytes.This overage can result in the event payload being split intomultiple eventsby JSA. To avoid this behavior, increase themaximum TCP Syslog payloadlength. Tooptimizeperformance, start byconfiguring thevalue to8192bytes.Themaximum length for RadWare AppWall events is 14019 bytes.
Youcan verify that JSA is configured to receive events fromyourRadwareAppWall device
when you complete Step 6 of the “Configuring Radware AppWall to Communicate with
JSA” on page 900 procedure.
• Configuring Radware AppWall to Communicate with JSA on page 900
• Increasing theMaximumTCPSyslogPayloadLength forRadwareAppWallonpage901
Configuring Radware AppWall to Communicate with JSA
Configure your Radware AppWall device to send logs to JSA. You integrate AppWall logs
with JSA by using the Vision Log event format.
Copyright © 2018, Juniper Networks, Inc.900
Juniper Secure Analytics Configuring DSMs Guide
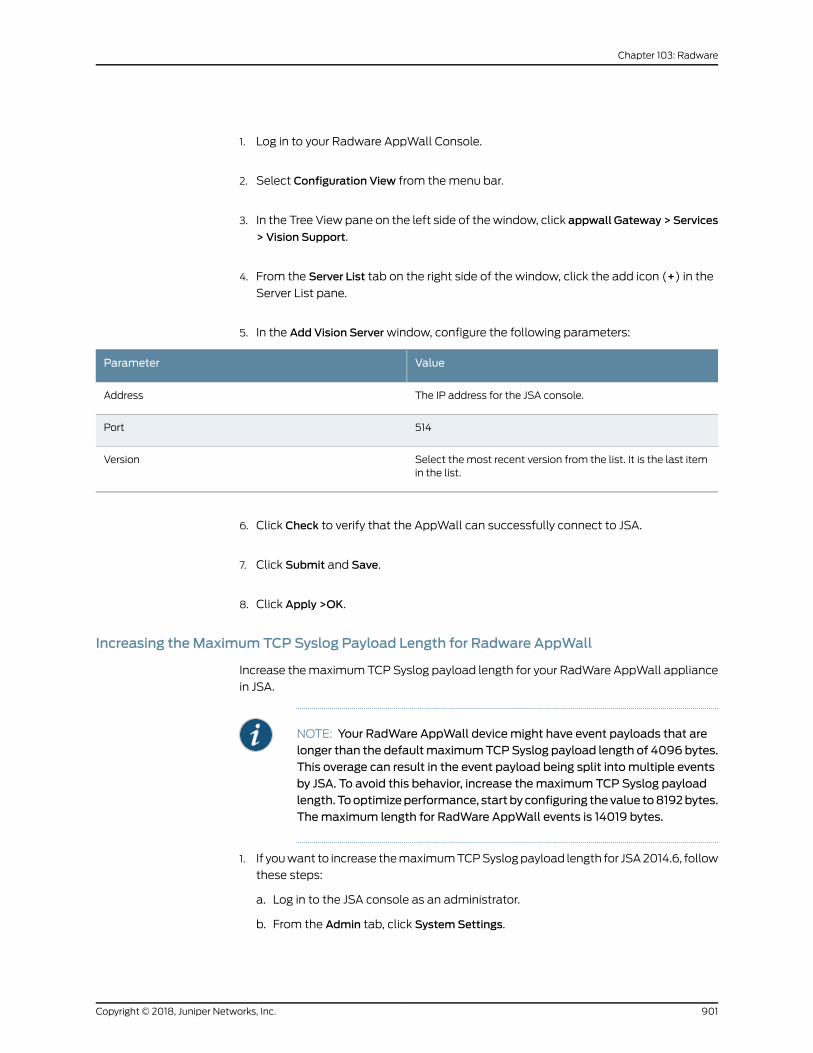
1. Log in to your Radware AppWall Console.
2. Select Configuration View from themenu bar.
3. In the Tree View pane on the left side of thewindow, click appwall Gateway>Services
> Vision Support.
4. From the Server List tab on the right side of the window, click the add icon (+) in the
Server List pane.
5. In the Add Vision Serverwindow, configure the following parameters:
ValueParameter
The IP address for the JSA console.Address
514Port
Select the most recent version from the list. It is the last itemin the list.
Version
6. Click Check to verify that the AppWall can successfully connect to JSA.
7. Click Submit and Save.
8. Click Apply >OK.
Increasing theMaximumTCP Syslog Payload Length for Radware AppWall
Increase themaximumTCPSyslog payload length for your RadWare AppWall appliance
in JSA.
NOTE: Your RadWare AppWall devicemight have event payloads that arelonger than the defaultmaximumTCPSyslog payload length of 4096 bytes.This overage can result in the event payload being split intomultiple eventsby JSA. To avoid this behavior, increase themaximum TCP Syslog payloadlength. Tooptimizeperformance, start byconfiguring thevalue to8192bytes.Themaximum length for RadWare AppWall events is 14019 bytes.
1. If youwant to increase themaximumTCPSyslogpayload length for JSA2014.6, follow
these steps:
a. Log in to the JSA console as an administrator.
b. From the Admin tab, click SystemSettings.
901Copyright © 2018, Juniper Networks, Inc.
Chapter 103: Radware
c. Click Advanced.
d. In theMax TCP Syslog Payload Length field, type 8192.
e. Click Save.
f. From the Admin tab, click Deploy Changes.
2. If you want to increase the maximum TCP Syslog payload length for JSA 2014.5 and
earlier, follow these steps:
a. Use SSH to log in to the JSA console.
b. Go to the /opt/qradar/conf/templates/configservice/pluggablesources/ directory,
and edit the TCPSyslog.vm file.
c. Type 8192 for the value for theMaxPayload parameter.
For example, <parameter type=MaxPayload>8192</parameter>.
d. Save the TCPSyslog.vm file.
e. Log in to the JSA console as an administrator.
f. From the Admin tab, click Advanced >Deploy Full Configuration.
RelatedDocumentation
Radware DefensePro on page 902•
Radware DefensePro
The Radware DefensePro DSM for JSA accepts events by using syslog. Event traps can
also bemirrored to a syslog server.
Before you configure JSA to integrate with a Radware DefensePro device, youmust
configure your Radware DefensePro device to forward syslog events to JSA. Youmust
configure the appropriate information by using the Device > Trap and SMTP option.
Any traps that are generated by the Radware device are mirrored to the specified syslog
server. The current Radware Syslog server gives you the option to define the status and
the event log server address.
You can also define more notification criteria, such as Facility and Severity, which are
expressed by numerical values:
• Facility is a user-defined value that indicates the type of device that is used by the
sender. This criteria is applied when the device sends syslog messages. The default
value is 21, meaning Local Use 6.
• Severity indicates the importance or impact of the reported event. The Severity is
determined dynamically by the device for eachmessage sent.
In the Security Settingswindow, youmust enable security reporting by using the connect
and protect/security settings. Youmust enable security reports to syslog and configure
the severity (syslog risk).
Copyright © 2018, Juniper Networks, Inc.902
Juniper Secure Analytics Configuring DSMs Guide
You are now ready to configure the log source in JSA.
• Configuring a Log Source on page 903
RelatedDocumentation
Radware AppWall on page 899•
Configuring a Log Source
JSA automatically discovers and creates a log source for syslog events from Radware
DefensePro. The following configuration steps are optional.
To manually configure a log source for Radware DefensePro:
1. Log in to JSA.
2. Click the Admin tab.
3. On the navigation menu, click Data Sources.
The Data Sources pane is displayed.
4. Click the Log Sources icon.
The Log Sourceswindow is displayed.
5. Click Add.
The Add a log sourcewindow is displayed.
6. In the Log Source Name field, type a name for your log source.
7. In the Log Source Description field, type a description for the log source.
8. From the Log Source Type list, select Radware DefensePro.
9. Using the Protocol Configuration list, select Syslog.
The syslog protocol configuration is displayed.
10. Configure the following values:
Table 282: Syslog Parameters
DescriptionParameter
Type the IPaddressor host name for the log sourceasan identifier for events fromyourRadwareDefensePro installation.
Log Source Identifier
903Copyright © 2018, Juniper Networks, Inc.
Chapter 103: Radware

11. Click Save.
12. On the Admin tab, click Deploy Changes.
The configuration is complete.
Copyright © 2018, Juniper Networks, Inc.904
Juniper Secure Analytics Configuring DSMs Guide
CHAPTER 104
Raz-Lee ISecurity
• Raz-Lee ISecurity on page 905
• Configuring Raz-Lee ISecurity to Communicate with JSA on page 906
• Configuring a Log Source for Raz-Lee ISecurity on page 907
Raz-Lee ISecurity
JSA collects and parses Log Event Extended Format (LEEF) events that are forwarded
from Raz-Lee iSecurity installations on IBM®iSeries
®. The events are parsed and
categorized by the IBM®AS/400
®iSeries DSM.
JSA supports events from Raz-Lee iSecurity installations for iSecurity Firewall V15.7 and
iSecurity Audit V11.7.
The following table describes the specifications for the IBM®iSeries
®DSM for Raz-Lee
iSecurity installations:
Table 283: IBMAS/400 ISeries DSMSpecifications for Raz-Lee ISecurity
ValueSpecification
IBM®Manufacturer
IBM® AS/400® iSeriesDSM name
DSM-IBMiSeries-JSA_version-build_number.noarch.rpmRPM file name
iSecurity Firewall V15.7
iSecurity Audit V11.7
Supported versions
SyslogProtocol
LEEFEvent format
All security, compliance, and audit events.Recorded event types
YesAutomatically discovered?
905Copyright © 2018, Juniper Networks, Inc.
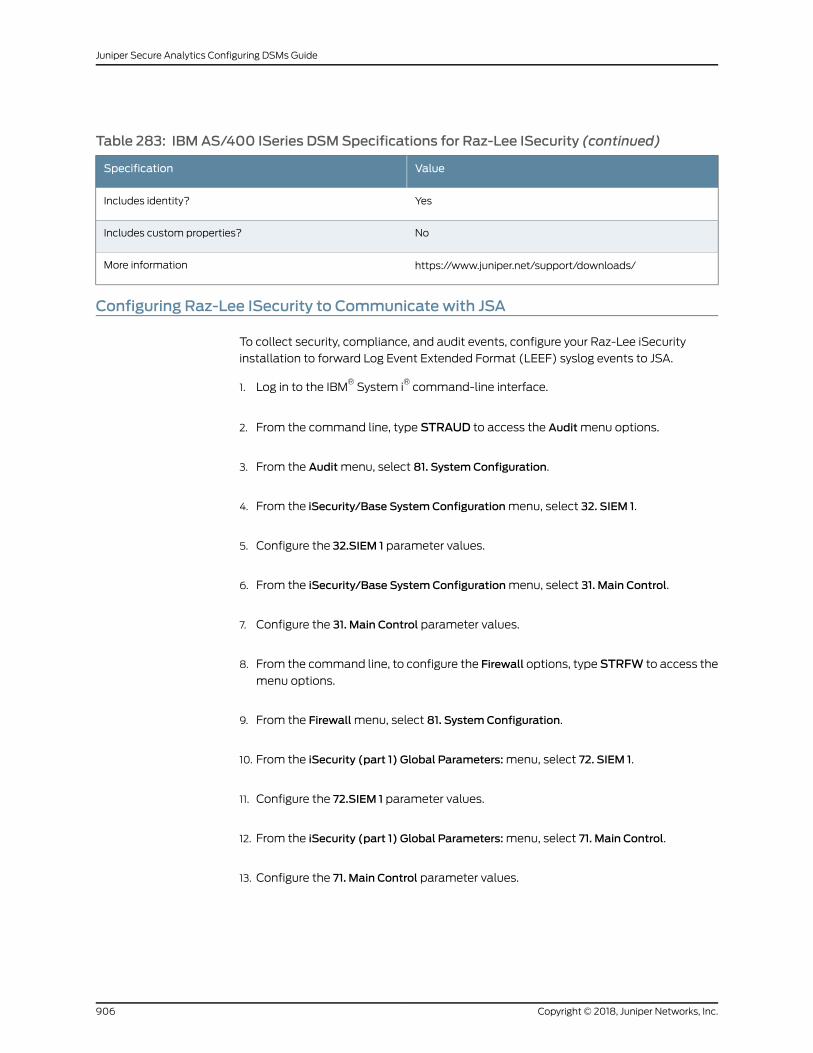
Table 283: IBMAS/400 ISeries DSMSpecifications for Raz-Lee ISecurity (continued)
ValueSpecification
YesIncludes identity?
NoIncludes custom properties?
https://www.juniper.net/support/downloads/More information
Configuring Raz-Lee ISecurity to Communicate with JSA
To collect security, compliance, and audit events, configure your Raz-Lee iSecurity
installation to forward Log Event Extended Format (LEEF) syslog events to JSA.
1. Log in to the IBM®System i
®command-line interface.
2. From the command line, type STRAUD to access the Auditmenu options.
3. From the Auditmenu, select 81. SystemConfiguration.
4. From the iSecurity/Base SystemConfigurationmenu, select 32. SIEM 1.
5. Configure the 32.SIEM 1 parameter values.
6. From the iSecurity/Base SystemConfigurationmenu, select 31. Main Control.
7. Configure the 31. Main Control parameter values.
8. From the command line, to configure the Firewall options, typeSTRFW to access the
menu options.
9. From the Firewallmenu, select 81. SystemConfiguration.
10. From the iSecurity (part 1) Global Parameters:menu, select 72. SIEM 1.
11. Configure the 72.SIEM 1 parameter values.
12. From the iSecurity (part 1) Global Parameters:menu, select 71. Main Control.
13. Configure the 71. Main Control parameter values.
Copyright © 2018, Juniper Networks, Inc.906
Juniper Secure Analytics Configuring DSMs Guide
Syslog LEEFevents that are forwardedbyRaz-Lee iSecurity are automatically discovered
by the JSA DSM for IBM®AS/400
®iSeries. In most cases, the log source is automatically
created in JSA after a few events are detected.
If the event rate is low, you canmanually configure a log source for Raz-Lee iSecurity in
JSA.Until the log source is automatically discoveredand identified, theevent typedisplays
as Unknown on the Log Activity tab. View automatically discovered log sources on the
Admin tab by clicking the Log Sources icon.
Syslog LEEFevents that are forwardedbyRaz-Lee iSecurity are automatically discovered
by the JSA DSM for IBM AS/400 iSeries. In most cases, the log source is automatically
created in JSA after a few events are detected. If the event rate is low, you canmanually
configure a log source for Raz-Lee iSecurity in JSA. Until the log source is automatically
discovered and identified, the event type displays as Unknown on the Log Activity tab.
View automatically discovered log sources on the Admin tab by clicking the Log Sources
icon.
Configuring a Log Source for Raz-Lee ISecurity
JSA automatically discovers and creates a log source for Syslog LEEF events that are
forwarded from Raz-Lee iSecurity. If the log source isn't automatically discovered, you
canmanually create it.
1. Click the Admin tab.
2. Click the Log Sources icon.
3. Click Add.
4. In the Log Source Name field, type a name for your log source.
5. In the Log Source Description field, type a description for the log source.
6. From the Log Source Type list, select IBM AS/400 iSeries.
7. From the Protocol Configuration list, select Syslog.
8. Configure the syslog protocol values.
9. Click Save.
10. On the Admin tab, click Deploy Changes.
907Copyright © 2018, Juniper Networks, Inc.
Chapter 104: Raz-Lee ISecurity

Copyright © 2018, Juniper Networks, Inc.908
Juniper Secure Analytics Configuring DSMs Guide
CHAPTER 105
Redback ASE
• Redback ASE on page 909
• Configuring Redback ASE on page 909
• Configuring a Log Source on page 910
Redback ASE
The Redback ASE DSM for JSA accepts events by using syslog.
The Redback ASE device can send log messages to the Redback device console or to a
log server that is integrated with JSA to generate deployment-specific reports. Before
you configure a Redback ASE device in JSA, youmust configure your device to forward
syslog events.
Configuring Redback ASE
You can configure the device to send syslog events to JSA.
1. Log in to your Redback ASE device user interface.
2. Start the CLI configuration mode.
3. In global configuration mode, configure the default settings for the security service:
asp security default
4. In ASP security default configurationmode, configure the IP address of the log server
and the optional transport protocol:
log server <IP address> transport udp port 9345
Where <IP address> is the IP address of the JSA.
5. Configure the IP address that you want to use as the source IP address in the log
messages:
log source <source IP address>
909Copyright © 2018, Juniper Networks, Inc.
Where<source IP address> is the IP address of the loopback interface in context local.
6. Commit the transaction.
For more information about Redback ASE device configuration, see your vendor
documentation.
For example, if you want to configure:
• Log source server IP address 10.172.55.55
• Default transport protocol: UDP
• Default server port: 514
The source IP address that is used for logmessages is 10.192.22.24. This addressmust
be an IP address of a loopback interface in context local.
asp security default log server 10.172.55.55 log source 10.192.22.24
You can now configure the log sources in JSA.
Configuring a Log Source
JSA automatically discovers and creates a log source for syslog events from Redback
ASE. The following configuration steps are optional.
To manually configure a log source for Redback ASE:
1. Log in to JSA.
2. Click the Admin tab.
3. On the navigation menu, click Data Sources.
The Data Sources pane is displayed.
4. Click the Log Sources icon.
The Log Sourceswindow is displayed.
5. Click Add.
The Add a log source window is displayed.
6. In the Log Source Name field, type a name for your log source.
7. In the Log Source Description field, type a description for the log source.
8. From the Log Source Type list, select Redback ASE.
Copyright © 2018, Juniper Networks, Inc.910
Juniper Secure Analytics Configuring DSMs Guide
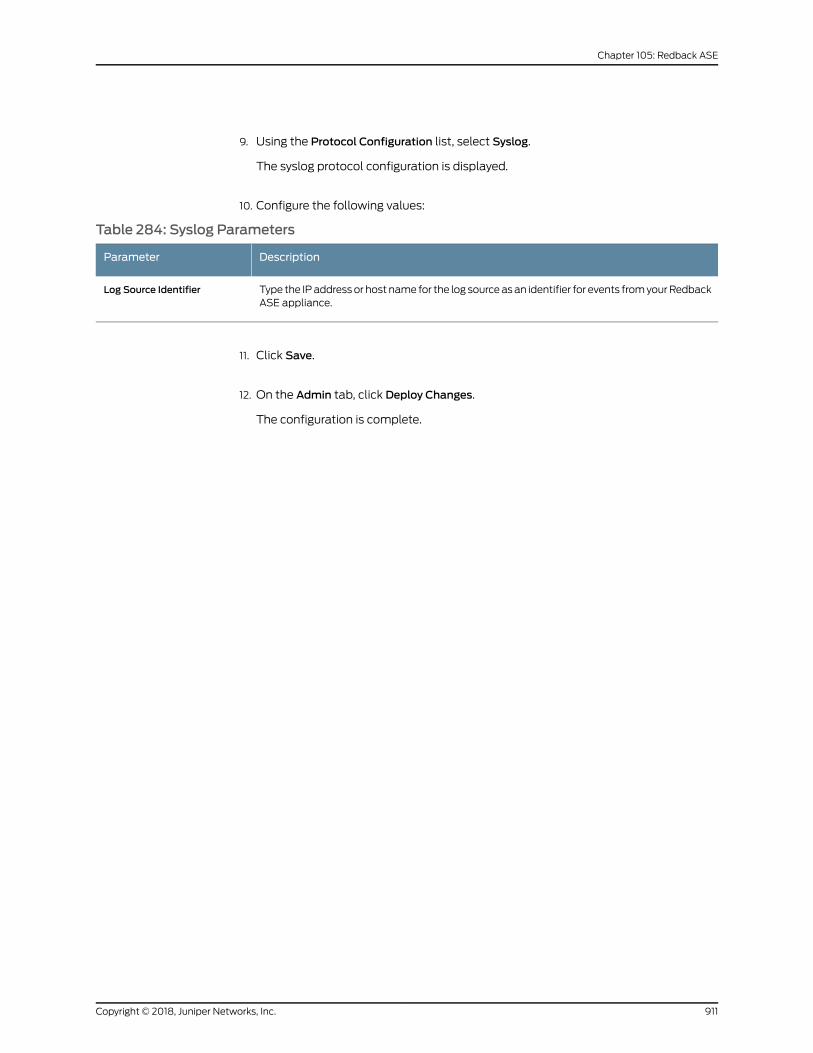
9. Using the Protocol Configuration list, select Syslog.
The syslog protocol configuration is displayed.
10. Configure the following values:
Table 284: Syslog Parameters
DescriptionParameter
Type the IPaddressor host name for the log sourceasan identifier for events fromyourRedbackASE appliance.
Log Source Identifier
11. Click Save.
12. On the Admin tab, click Deploy Changes.
The configuration is complete.
911Copyright © 2018, Juniper Networks, Inc.
Chapter 105: Redback ASE

Copyright © 2018, Juniper Networks, Inc.912
Juniper Secure Analytics Configuring DSMs Guide
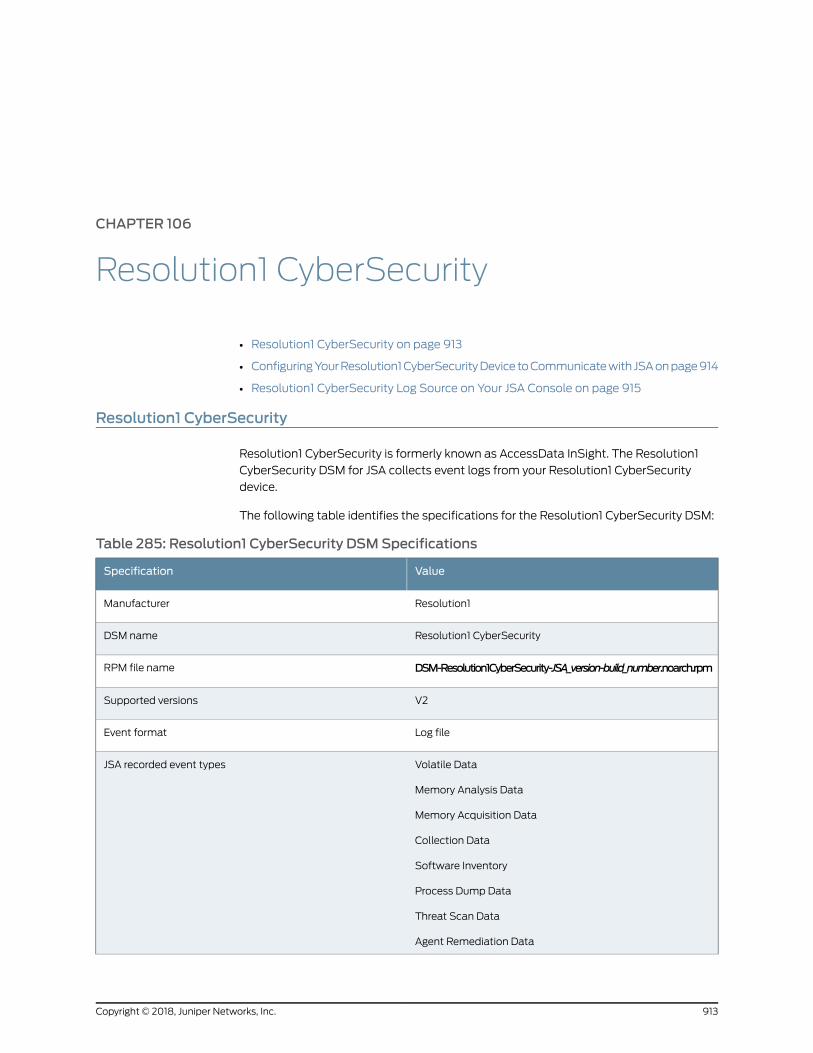
CHAPTER 106
Resolution1 CyberSecurity
• Resolution1 CyberSecurity on page 913
• ConfiguringYourResolution1CyberSecurityDevice toCommunicatewith JSAonpage914
• Resolution1 CyberSecurity Log Source on Your JSA Console on page 915
Resolution1 CyberSecurity
Resolution1 CyberSecurity is formerly known as AccessData InSight. The Resolution1
CyberSecurity DSM for JSA collects event logs from your Resolution1 CyberSecurity
device.
The following table identifies the specifications for the Resolution1 CyberSecurity DSM:
Table 285: Resolution1 CyberSecurity DSMSpecifications
ValueSpecification
Resolution1Manufacturer
Resolution1 CyberSecurityDSM name
DSM-Resolution1CyberSecurity-JSA_version-build_number.noarch.rpmRPM file name
V2Supported versions
Log fileEvent format
Volatile Data
Memory Analysis Data
Memory Acquisition Data
Collection Data
Software Inventory
Process Dump Data
Threat Scan Data
Agent Remediation Data
JSA recorded event types
913Copyright © 2018, Juniper Networks, Inc.
Table 285: Resolution1 CyberSecurity DSMSpecifications (continued)
ValueSpecification
NoAutomatically discovered?
NoIncluded identity?
To send events from Resolution1 CyberSecurity to JSA, use the following steps:
1. If automatic updates are not enabled, download themost recent versions of the
following RPMs.
• LogFileProtocol
• DSMCommon
• Resolution1 CyberSecurity DSM
2. Configure your Resolution1 CyberSecurity device to communicate with JSA.
3. Create a Resolution1 CyberSecurity log source on the JSA Console.
Configuring Your Resolution1 CyberSecurity Device to Communicate with JSA
To collect Resolution1 CyberSecurity events, youmust configure your third-party device
to generate event logs in LEEF format. Youmust also create an FTP site for Resolution1
CyberSecurity to transfer the LEEF files. JSA can then pull the logs from the FTP server.
1. Log in to your Resolution1 CyberSecurity device.
2. Open the ADGIntegrationServiceHost.exe.config file, which is in the C:\Program
Files\AccessData\eDiscovery\Integration Services directory.
3. Change the text in the file to match the following lines:
<Option Name="Version" Value="2.0" /> <Option Name="Version" Value="2.0" /> <Option Name="OutputFormat" Value="LEEF" /> <Option Name="LogOnly" Value="1" /> <Option Name="OutputPath" Value="C:\CIRT\logs" />
4. Restart the Resolution1 Third-Party Integration service.
5. Create an FTP site for the C:\CIRT\logs output folder:
a. Open Internet Information Services Manager (IIS).
b. Right-click the Sites tab and click Add FTP Site.
c. Name the FTP site, and enter C:\CIRT\logs as the location for the generated LEEF
files.
d. Restart the web service.
Copyright © 2018, Juniper Networks, Inc.914
Juniper Secure Analytics Configuring DSMs Guide
RelatedDocumentation
Resolution1 CyberSecurity Log Source on Your JSA Console on page 915•
Resolution1 CyberSecurity Log Source on Your JSA Console
JSA does not automatically discover the Resolution1 CyberSecurity log source. Youmust
manually add the log source.
1. Log in to JSA.
2. Click the Admin tab.
3. In the navigation menu, click Data Sources.
4. Click the Log Sources icon.
5. Click Add.
6. In the Log Source Identifier field, type the IP address or host name of the Resolution1
CyberSecurity device.
7. From the Log Source Type list, select Resolution1 CyberSecurity.
8. From the Protocol Configuration list, select Log File.
9. Configure the remaining parameters.
10. Click Save.
RelatedDocumentation
• ConfiguringYourResolution1CyberSecurityDevice toCommunicatewith JSAonpage914
915Copyright © 2018, Juniper Networks, Inc.
Chapter 106: Resolution1 CyberSecurity

Copyright © 2018, Juniper Networks, Inc.916
Juniper Secure Analytics Configuring DSMs Guide
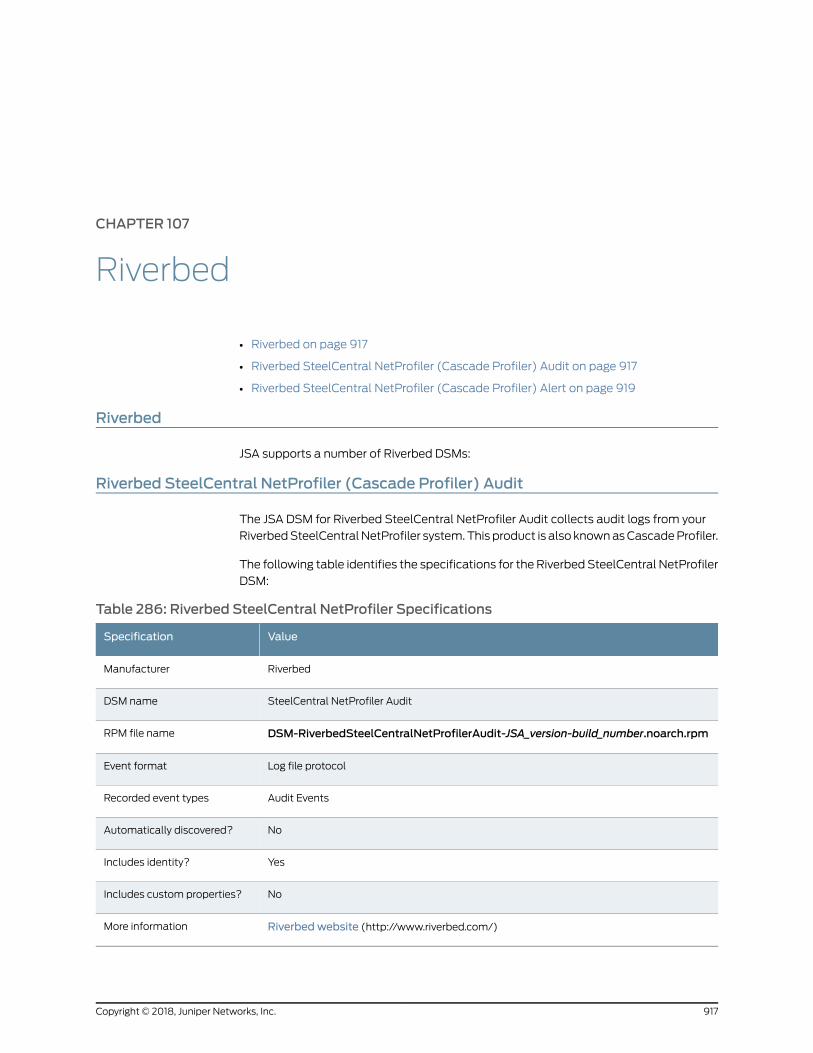
CHAPTER 107
Riverbed
• Riverbed on page 917
• Riverbed SteelCentral NetProfiler (Cascade Profiler) Audit on page 917
• Riverbed SteelCentral NetProfiler (Cascade Profiler) Alert on page 919
Riverbed
JSA supports a number of Riverbed DSMs:
Riverbed SteelCentral NetProfiler (Cascade Profiler) Audit
The JSA DSM for Riverbed SteelCentral NetProfiler Audit collects audit logs from your
RiverbedSteelCentralNetProfiler system.This product is also knownasCascadeProfiler.
The following table identifies the specifications for the Riverbed SteelCentral NetProfiler
DSM:
Table 286: Riverbed SteelCentral NetProfiler Specifications
ValueSpecification
RiverbedManufacturer
SteelCentral NetProfiler AuditDSM name
DSM-RiverbedSteelCentralNetProfilerAudit-JSA_version-build_number.noarch.rpmRPM file name
Log file protocolEvent format
Audit EventsRecorded event types
NoAutomatically discovered?
YesIncludes identity?
NoIncludes custom properties?
Riverbed website (http://www.riverbed.com/)More information
917Copyright © 2018, Juniper Networks, Inc.

To integrate Riverbed SteelCentral NetProfiler Audit with JSA, complete the following
steps:
1. If automatic updates are not enabled, download and install themost recent versions
of the following RPMs on your JSA Console.
• Protocol-LogFile RPM
• Riverbed SteelCentral NetProfiler Audit RPM
2. Createanaudit report templateonyourRiverbedhostand thenconfigurea third-party
host to use the template to generate the audit file. See “Creating a Riverbed
SteelCentral NetProfiler Report Template and Generating an Audit File” on page 918.
3. Create a log source on the JSA Console. The log source allows JSA to access the
third-party host to retrieve the audit file. Use the following table to define the
Riverbed-specific parameters:
Table 287: Riverbed SteelCentral NetProfiler Log Source Parameters
DescriptionParameter
Riverbed SteelCentral NetProfiler AuditLog Source Type
LogFileProtocol Configuration
The IP address or host name of the third-party host that stores the generatedaudit file
Remote IP or Hostname
The user name for the account that can access the host.Remote User
The password for the user account.Remote Password
The absolute file path on the third-party host that contains the generated auditfile.
Remote Directory
A regex pattern that matches the name of the audit file.FTP File Pattern
Ensure that recurrencematches the frequency at which the SteelScript forPython SDK script is run on the remote host.
Recurrence
Line MatcherEvent Generator
^\d+/\d+/\d+ \d+:\d+,Line Matcher RegEx
• Creating aRiverbedSteelCentral NetProfiler Report Template andGenerating anAudit
File on page 918
Creating a Riverbed SteelCentral NetProfiler Report Template and Generating an Audit File
To prepare for Riverbed SteelCentral NetProfiler integration with JSA, create a report
template on the Riverbed SteelCentral NetProfiler and then use a third-party host to
Copyright © 2018, Juniper Networks, Inc.918
Juniper Secure Analytics Configuring DSMs Guide
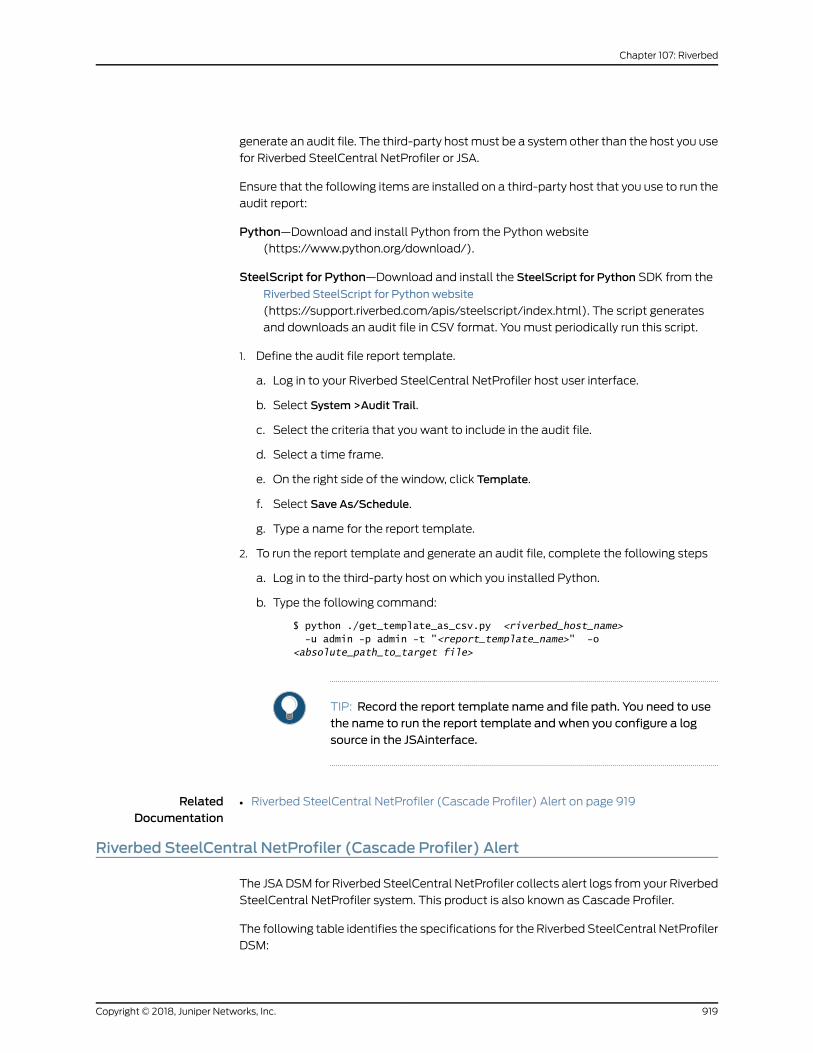
generate an audit file. The third-party hostmust be a systemother than the host you use
for Riverbed SteelCentral NetProfiler or JSA.
Ensure that the following items are installed on a third-party host that you use to run the
audit report:
Python—Download and install Python from the Python website
(https://www.python.org/download/).
SteelScript for Python—Download and install the SteelScript for Python SDK from the
Riverbed SteelScript for Python website
(https://support.riverbed.com/apis/steelscript/index.html). The script generates
and downloads an audit file in CSV format. Youmust periodically run this script.
1. Define the audit file report template.
a. Log in to your Riverbed SteelCentral NetProfiler host user interface.
b. Select System >Audit Trail.
c. Select the criteria that you want to include in the audit file.
d. Select a time frame.
e. On the right side of the window, click Template.
f. Select Save As/Schedule.
g. Type a name for the report template.
2. To run the report template and generate an audit file, complete the following steps
a. Log in to the third-party host on which you installed Python.
b. Type the following command:
$ python ./get_template_as_csv.py <riverbed_host_name> -u admin -p admin -t "<report_template_name>" -o <absolute_path_to_target file>
TIP: Record the report template name and file path. You need to usethe name to run the report template and when you configure a logsource in the JSAinterface.
RelatedDocumentation
Riverbed SteelCentral NetProfiler (Cascade Profiler) Alert on page 919•
Riverbed SteelCentral NetProfiler (Cascade Profiler) Alert
The JSADSM for Riverbed SteelCentral NetProfiler collects alert logs from your Riverbed
SteelCentral NetProfiler system. This product is also known as Cascade Profiler.
The following table identifies the specifications for the Riverbed SteelCentral NetProfiler
DSM:
919Copyright © 2018, Juniper Networks, Inc.
Chapter 107: Riverbed
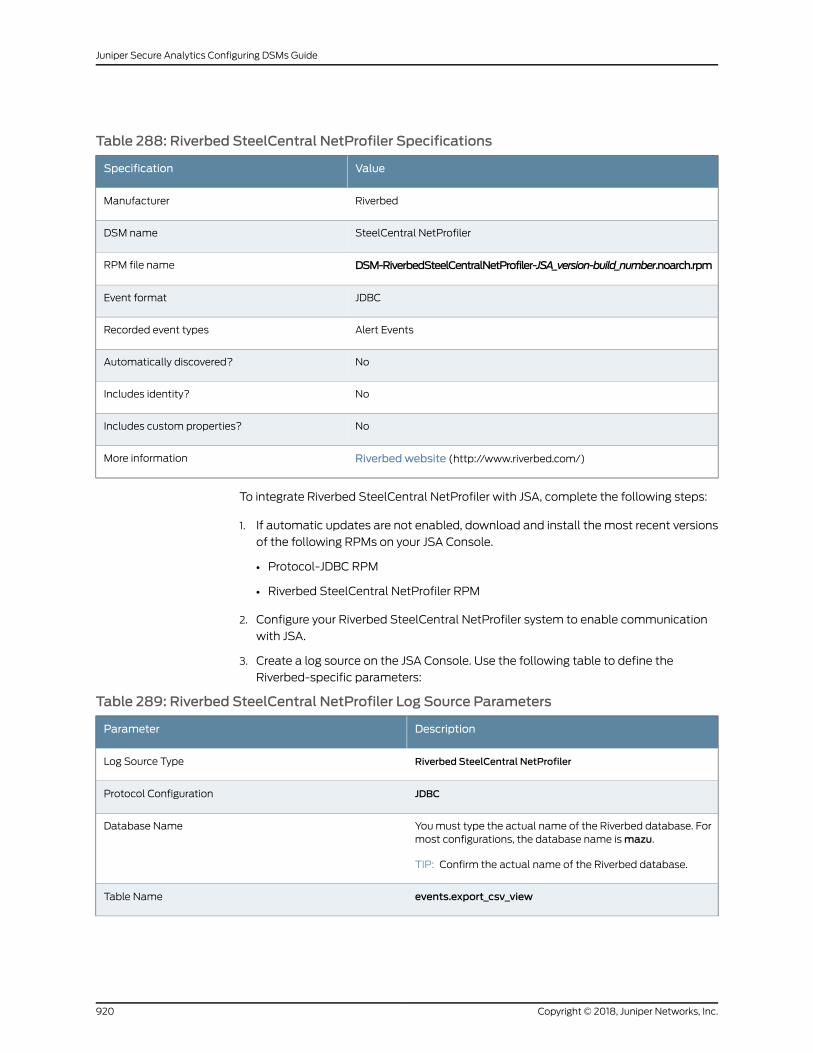
Table 288: Riverbed SteelCentral NetProfiler Specifications
ValueSpecification
RiverbedManufacturer
SteelCentral NetProfilerDSM name
DSM-RiverbedSteelCentralNetProfiler-JSA_version-build_number.noarch.rpmRPM file name
JDBCEvent format
Alert EventsRecorded event types
NoAutomatically discovered?
NoIncludes identity?
NoIncludes custom properties?
Riverbed website (http://www.riverbed.com/)More information
To integrate Riverbed SteelCentral NetProfiler with JSA, complete the following steps:
1. If automatic updates are not enabled, download and install themost recent versions
of the following RPMs on your JSA Console.
• Protocol-JDBC RPM
• Riverbed SteelCentral NetProfiler RPM
2. Configure your Riverbed SteelCentral NetProfiler system to enable communication
with JSA.
3. Create a log source on the JSA Console. Use the following table to define the
Riverbed-specific parameters:
Table 289: Riverbed SteelCentral NetProfiler Log Source Parameters
DescriptionParameter
Riverbed SteelCentral NetProfilerLog Source Type
JDBCProtocol Configuration
Youmust type the actual name of the Riverbed database. Formost configurations, the database name ismazu.
TIP: Confirm the actual name of the Riverbed database.
Database Name
events.export_csv_viewTable Name
Copyright © 2018, Juniper Networks, Inc.920
Juniper Secure Analytics Configuring DSMs Guide
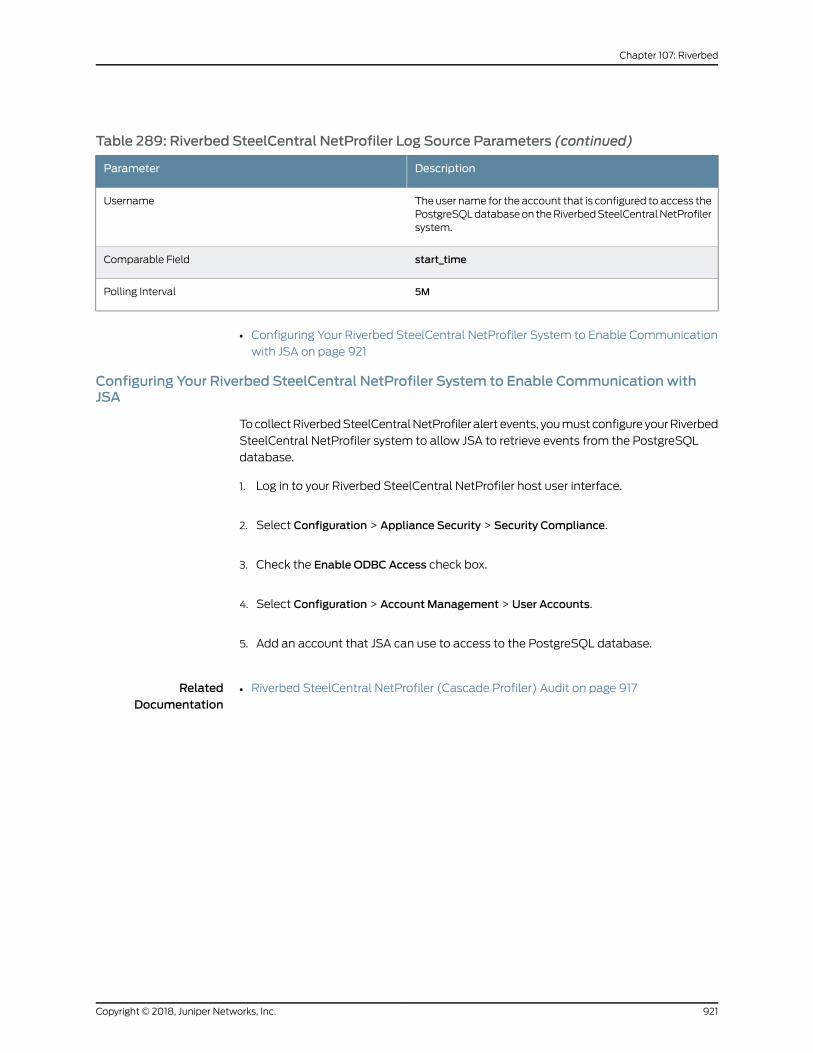
Table 289: Riverbed SteelCentral NetProfiler Log Source Parameters (continued)
DescriptionParameter
The user name for the account that is configured to access thePostgreSQLdatabaseon theRiverbedSteelCentralNetProfilersystem.
Username
start_timeComparable Field
5MPolling Interval
• Configuring Your Riverbed SteelCentral NetProfiler System to Enable Communication
with JSA on page 921
Configuring Your Riverbed SteelCentral NetProfiler System to Enable Communication withJSA
TocollectRiverbedSteelCentralNetProfiler alert events, youmustconfigure yourRiverbed
SteelCentral NetProfiler system to allow JSA to retrieve events from the PostgreSQL
database.
1. Log in to your Riverbed SteelCentral NetProfiler host user interface.
2. Select Configuration > Appliance Security > Security Compliance.
3. Check the Enable ODBC Access check box.
4. Select Configuration > Account Management > User Accounts.
5. Add an account that JSA can use to access to the PostgreSQL database.
RelatedDocumentation
• Riverbed SteelCentral NetProfiler (Cascade Profiler) Audit on page 917
921Copyright © 2018, Juniper Networks, Inc.
Chapter 107: Riverbed

Copyright © 2018, Juniper Networks, Inc.922
Juniper Secure Analytics Configuring DSMs Guide
CHAPTER 108
RSA Authentication Manager
• RSA Authentication Manager on page 923
• Configuration Of Syslog for RSA Authentication Manager 6.x, 7.x and 8.x on page 923
• Configuring Linux on page 924
• ConfiguringWindows on page 925
• Configuring theLogFileProtocol forRSAAuthenticationManager6.xand7.xonpage925
• Configuring RSA Authentication Manager 6.x on page 926
• Configuring RSA Authentication Manager 7.x on page 927
RSAAuthenticationManager
You can use an RSA Authentication Manager DSM to integrate JSA with an RSA
Authentication Manager 6.x or 7.x by using syslog or the log file protocol. RSA
Authentication Manager 8.x uses syslog only.
Before you configure JSA to integrate with RSA Authentication Manager, select your
configuration preference:
• Configuration Of Syslog for RSA Authentication Manager 6.x, 7.x and 8.x on page 923
• Configuring theLogFileProtocol forRSAAuthenticationManager6.xand7.xonpage925
NOTE: Youmust apply themost recent hot fix on RSA AuthenticationManager 7.1 primary, replica, node, database, and radius installations beforeyou configure syslog.
Configuration Of Syslog for RSA AuthenticationManager 6.x, 7.x and 8.x
Theprocedure to configure yourRSAAuthenticationManager 6.x, 7.x and8.x using syslog
dependsontheoperatingsystemversion for yourRSAAuthenticationManagerorSecureID
3.0 appliance.
If youareusingRSAAuthenticationManageronLinux, see “ConfiguringLinux”onpage924.
923Copyright © 2018, Juniper Networks, Inc.
If you are using RSA Authentication Manager onWindows, see “ConfiguringWindows”
on page 925.
RelatedDocumentation
Configuring Linux on page 924•
• ConfiguringWindows on page 925
• Configuring theLogFileProtocol forRSAAuthenticationManager6.xand7.xonpage925
Configuring Linux
You can configure RSA Authentication Manager for syslog on Linux based operating
systems:
1. Log in to the RSA Security Console command-line interface (CLI).
2. Open the following file for editing based on your operating system:
/usr/local/RSASecurity/RSAAuthenticationManager/utils/resources /ims.properties
3. Add the following entries to the ims.properties file:
ims.logging.audit.admin.syslog_host = <IP address> ims.logging.audit.admin.use_os_logger = true ims.logging.audit.runtime.syslog_host = <IP address> ims.logging.audit.runtime.use_os_logger = true ims.logging.system.syslog_host = <IP address> ims.logging.system.use_os_logger = true
Where <IP address> is the IP address or host name of JSA.
4. Save the ims.properties files.
5. Open the following file for editing:
/etc/syslog.conf
6. Type the following command to add JSA as a syslog entry:
*.*@<IP address>
Where <IP address> is the IP address or host name of JSA.
7. Type the following command to restart the syslog services for Linux.
service syslog restart
8. You can nowconfigure the log sources and protocol in JSA: To configure JSA to receive
events from your RSA Authentication Manager: From the Log Source Type list, select
the RSAAuthenticationManager option.
Copyright © 2018, Juniper Networks, Inc.924
Juniper Secure Analytics Configuring DSMs Guide
For more information on configuring syslog forwarding, see your RSA Authentication
Manager documentation.
RelatedDocumentation
ConfiguringWindows on page 925•
• Configuring theLogFileProtocol forRSAAuthenticationManager6.xand7.xonpage925
• Configuring RSA Authentication Manager 6.x on page 926
ConfiguringWindows
To configure RSA Authentication Manager for syslog using Microsoft Windows.
1. Log in to the system that hosts your RSA Security Console.
2. Open the following file for editing based on your operating system:
/ProgramFiles/RSASecurity/RSAAuthenticationManager/utils/resources/ims.properties
3. Add the following entries to the ims.properties file:
ims.logging.audit.admin.syslog_host = <IP address> ims.logging.audit.admin.use_os_logger = true ims.logging.audit.runtime.syslog_host = <IP address> ims.logging.audit.runtime.use_os_logger = true ims.logging.system.syslog_host = <IP address> ims.logging.system.use_os_logger = true
Where <IP address> is the IP address or host name of JSA.
4. Save the ims.properties files.
5. Restart RSA services.
You are now ready to configure the log source in JSA.
6. To configure JSA to receive events from your RSA Authentication Manager: From the
Log Source Type list, select the RSAAuthenticationManager option.
For more information on configuring syslog forwarding, see your RSA Authentication
Manager documentation.
Configuring the Log File Protocol for RSA AuthenticationManager 6.x and 7.x
The log file protocol allows JSA to retrieve archived log files froma remote host. The RSA
Authentication Manager DSM supports the bulk loading of log files using the log file
protocol source.
The procedure to configure your RSA Authentication Manager using the log file protocol
depends on the version of RSA Authentication Manager:
925Copyright © 2018, Juniper Networks, Inc.
Chapter 108: RSA Authentication Manager
• If youareusingRSAAuthenticationManager v6.x, see “ConfiguringRSAAuthentication
Manager 6.x” on page 926.
• If you are usingRSAAuthenticationManager v7.x, see “ConfiguringRSAAuthentication
Manager 7.x” on page 927.
Configuring RSA AuthenticationManager 6.x
You can configure your RSA Authentication Manager 6.x device.
1. Log in to the RSA Security Console.
2. Log in to the RSA Database Administration tool:
3. Click the Advanced tool.
The system prompts you to log in again.
4. Click Database Administration.
For complete information on using SecurID, see your vendor documentation.
5. From the Log list, select Automate LogMaintenance.
The Automatic LogMaintenancewindow is displayed.
6. Select the Enable Automatic Audit LogMaintenance check box.
7. Select Delete and Archive.
8. Select Replace files.
9. Type an archive file name.
10. In the Cycle Through Version(s) field, type a value.
11. For example 1, Select Select all Logs.
12. Select a frequency.
13. ClickOK.
14. You are now ready to configure the log sources and protocol in JSA:
a. To configure JSA to receive events from an RSA device, youmust select the RSA
AuthenticationManager option from the Log Source Type list.
Copyright © 2018, Juniper Networks, Inc.926
Juniper Secure Analytics Configuring DSMs Guide
b. To configure the log file protocol, you must select the Log File option from the
Protocol Configuration list.
RelatedDocumentation
Configuring RSA Authentication Manager 7.x on page 927•
• ConfiguringWindows on page 925
• Configuring theLogFileProtocol forRSAAuthenticationManager6.xand7.xonpage925
Configuring RSA AuthenticationManager 7.x
You can configure your RSA Authentication Manager 7.x device.
1. Log in to the RSA Security Console.
2. Click Administration >LogManagement >Recurring Log Archive Jobs.
3. In the Schedule section, configure values for the Job Starts, Frequency, Run Time, and
Job Expires parameters.
4. For theOperations field, select Export Only or Export and Purge for the following
settings: Administration Log Settings, Runtime Log Settings, and System Log Settings.
NOTE: The Export and Purge operation exports log records from the
database to the archive and then purges the logs form the database. TheExportOnlyoperationexports log records fromthedatabase to thearchive
and the records remain in the database.
5. For Administration, Runtime, and System, configure an Export Directory to which you
want to export your archive files.
Ensure that you can access the Administration Log, Runtime Log, and System Log by
using FTP before you continue.
6. For Administration, Runtime, and System parameters, set the Days Kept Online
parameter to 1. Logs older than 1 day are exported. If you selected Export and Purge,
the logs are also purged from the database.
7. Click Save.
8. You are now ready to configure the log sources and protocol within JSA:
a. To configure JSA to receive events from an RSA device, youmust select the RSA
AuthenticationManager option from the Log Source Type list.
927Copyright © 2018, Juniper Networks, Inc.
Chapter 108: RSA Authentication Manager
b. To configure the log file protocol, you must select the Log File option from the
Protocol Configuration list.
RelatedDocumentation
• ConfiguringWindows on page 925
• Configuring theLogFileProtocol forRSAAuthenticationManager6.xand7.xonpage925
• Configuring RSA Authentication Manager 6.x on page 926
Copyright © 2018, Juniper Networks, Inc.928
Juniper Secure Analytics Configuring DSMs Guide
CHAPTER 109
Salesforce
• Salesforce on page 929
• Salesforce Security Auditing on page 929
• Salesforce Security Monitoring on page 932
Salesforce
JSA supports a range of Salesforce DSMs.
Salesforce Security Auditing
The JSA DSM for Salesforce Security Auditing can collect Salesforce Security Auditing
audit trail logs that you copy from the cloud to a location that JSA can access.
The following table identifies the specifications for theSalesforceSecurityAuditingDSM:
Table 290: Salesforce Security Auditing DSMSpecifications
ValueSpecification
SalesforceManufacturer
Salesforce Security AuditingDSM
DSM-SalesforceSecurityAuditing-JSA_Version-Build_Number.noarch.rpmRPM file name
Log FileProtocol
Setup Audit RecordsJSA recorded events
NoAutomatically discovered
NoIncludes identity
929Copyright © 2018, Juniper Networks, Inc.
Table 290: Salesforce Security Auditing DSMSpecifications (continued)
ValueSpecification
Salesforce web site (http://www.salesforce.com/)More information
• Salesforce Security Auditing DSM Integration Process on page 930
• Downloading the Salesforce Audit Trail File on page 930
• Configuring a Salesforce Security Auditing Log Source in JSA on page 931
Salesforce Security Auditing DSM Integration Process
To integrate Salesforce Security Auditing DSMwith JSA, use the following procedures:
1. If automatic updates are not enabled, download and install themost recent versions
of the following RPMs on your JSA Console:
• Log File Protocol RPM
• Salesforce Security Auditing RPM
2. Download the Salesforce audit trail file to a remote host that JSA can access.
3. For each instance of Salesforce Security Auditing, create a log source on the JSA
Console.
Downloading the Salesforce Audit Trail File
To collect Salesforce Security Auditing events, youmust download the Salesforce audit
trail file to a remote host that JSA can access.
Youmust use this procedure each time that you want to import an updated set of audit
data into JSA. When you download the audit trail file, you can overwrite the previous
audit trail CSV file. When JSA retrieves data from the audit trail file, JSA processes only
audit records that were not imported before.
1. Log in to your Salesforce Security Auditing server.
2. Go to the Setup section.
3. Click Security Controls.
4. Click View Setup Audit Trail.
5. Click Download setup audit trail for last six months (Excel.csv file).
6. Copy the downloaded file to a location that JSA can reach by using Log File Protocol.
Copyright © 2018, Juniper Networks, Inc.930
Juniper Secure Analytics Configuring DSMs Guide
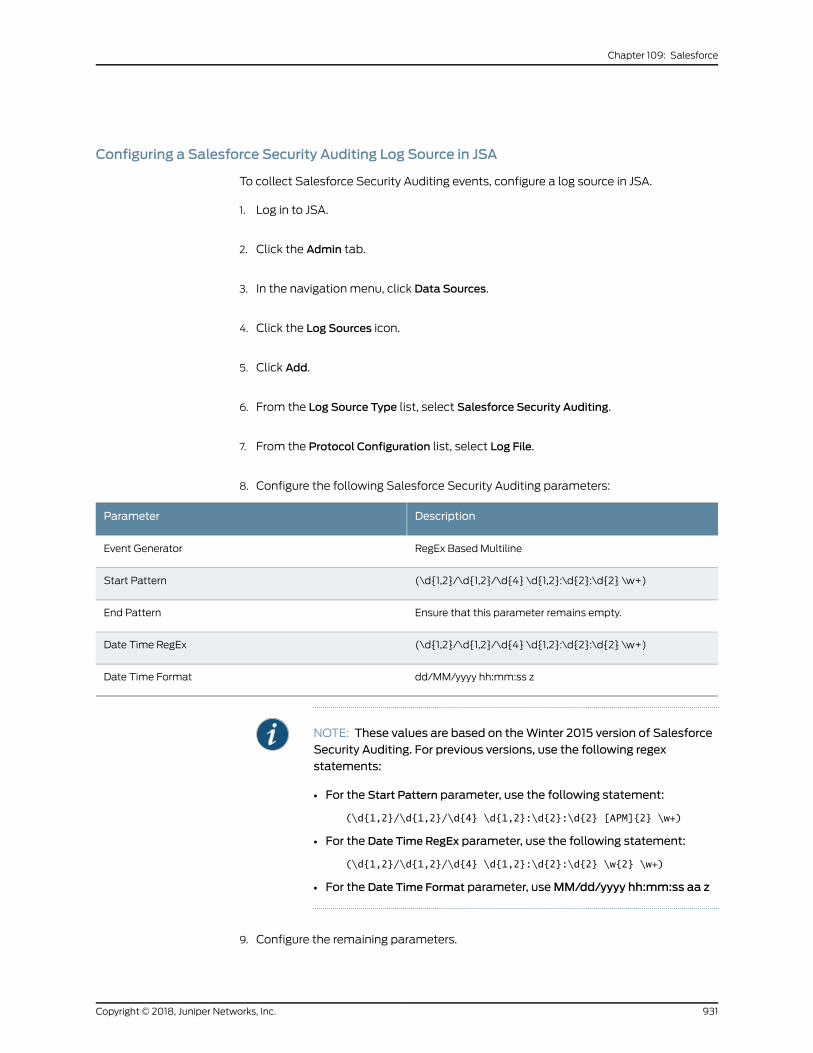
Configuring a Salesforce Security Auditing Log Source in JSA
To collect Salesforce Security Auditing events, configure a log source in JSA.
1. Log in to JSA.
2. Click the Admin tab.
3. In the navigation menu, click Data Sources.
4. Click the Log Sources icon.
5. Click Add.
6. From the Log Source Type list, select Salesforce Security Auditing.
7. From the Protocol Configuration list, select Log File.
8. Configure the following Salesforce Security Auditing parameters:
DescriptionParameter
RegEx Based MultilineEvent Generator
(\d{1,2}/\d{1,2}/\d{4} \d{1,2}:\d{2}:\d{2} \w+)Start Pattern
Ensure that this parameter remains empty.End Pattern
(\d{1,2}/\d{1,2}/\d{4} \d{1,2}:\d{2}:\d{2} \w+)Date Time RegEx
dd/MM/yyyy hh:mm:ss zDate Time Format
NOTE: These values are based on theWinter 2015 version of SalesforceSecurity Auditing. For previous versions, use the following regexstatements:
• For the Start Pattern parameter, use the following statement:
(\d{1,2}/\d{1,2}/\d{4} \d{1,2}:\d{2}:\d{2} [APM]{2} \w+)
• For the Date Time RegEx parameter, use the following statement:
(\d{1,2}/\d{1,2}/\d{4} \d{1,2}:\d{2}:\d{2} \w{2} \w+)
• For the Date Time Format parameter, useMM/dd/yyyy hh:mm:ss aa z
9. Configure the remaining parameters.
931Copyright © 2018, Juniper Networks, Inc.
Chapter 109: Salesforce
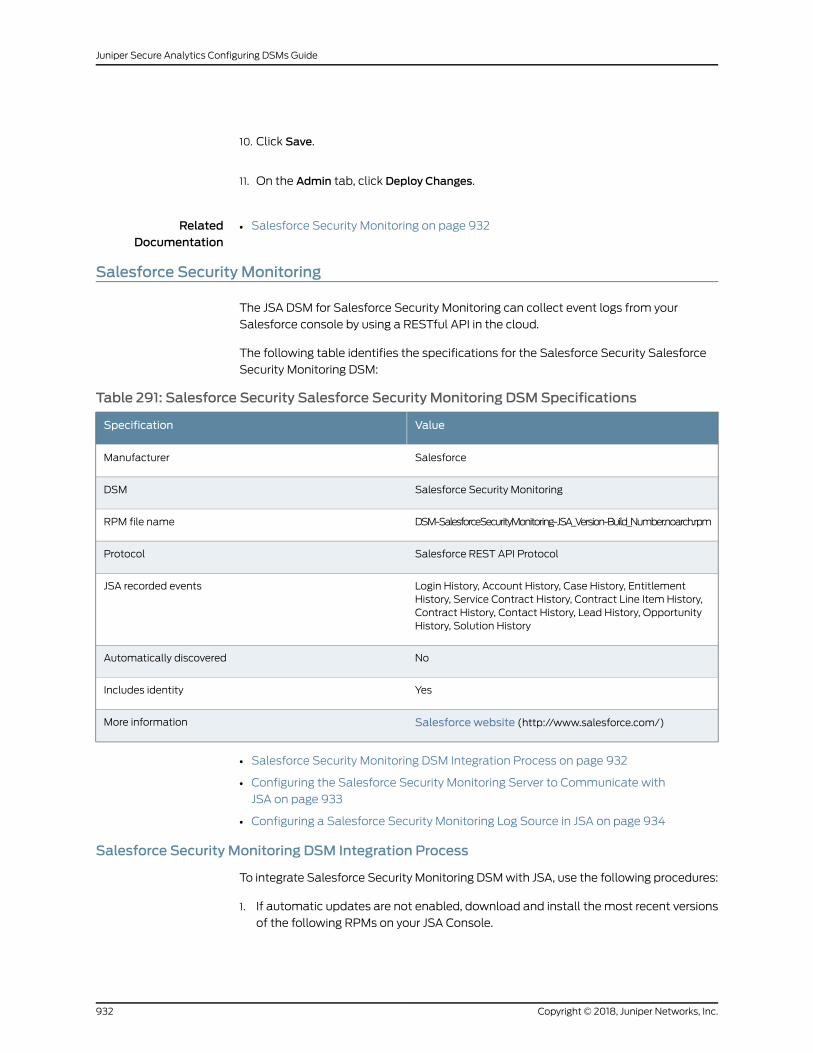
10. Click Save.
11. On the Admin tab, click Deploy Changes.
RelatedDocumentation
Salesforce Security Monitoring on page 932•
Salesforce Security Monitoring
The JSA DSM for Salesforce Security Monitoring can collect event logs from your
Salesforce console by using a RESTful API in the cloud.
The following table identifies the specifications for the Salesforce Security Salesforce
Security Monitoring DSM:
Table 291: Salesforce Security Salesforce Security Monitoring DSMSpecifications
ValueSpecification
SalesforceManufacturer
Salesforce Security MonitoringDSM
DSM-SalesforceSecurityMonitoring-JSA_Version-Build_Number.noarch.rpmRPM file name
Salesforce REST API ProtocolProtocol
Login History, Account History, Case History, EntitlementHistory, Service Contract History, Contract Line Item History,Contract History, Contact History, Lead History, OpportunityHistory, Solution History
JSA recorded events
NoAutomatically discovered
YesIncludes identity
Salesforce website (http://www.salesforce.com/)More information
• Salesforce Security Monitoring DSM Integration Process on page 932
• Configuring the Salesforce Security Monitoring Server to Communicate with
JSA on page 933
• Configuring a Salesforce Security Monitoring Log Source in JSA on page 934
Salesforce Security Monitoring DSM Integration Process
To integrate Salesforce Security Monitoring DSMwith JSA, use the following procedures:
1. If automatic updates are not enabled, download and install themost recent versions
of the following RPMs on your JSA Console.
Copyright © 2018, Juniper Networks, Inc.932
Juniper Secure Analytics Configuring DSMs Guide
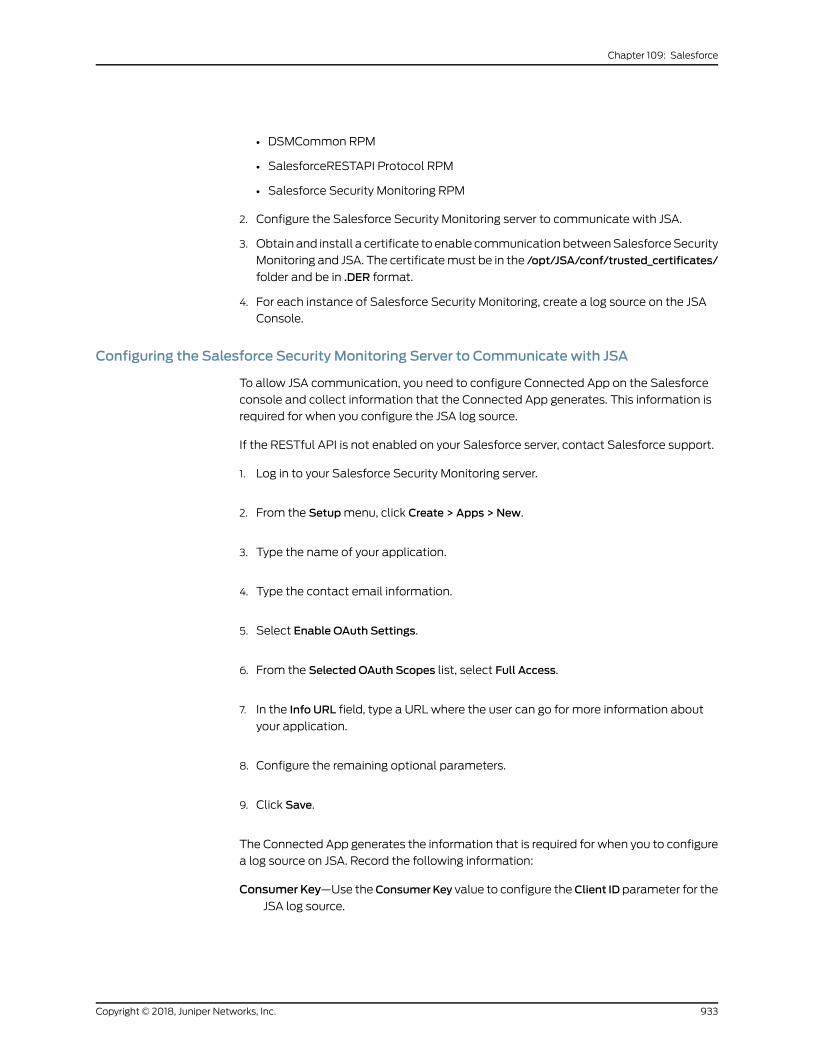
• DSMCommon RPM
• SalesforceRESTAPI Protocol RPM
• Salesforce Security Monitoring RPM
2. Configure the Salesforce Security Monitoring server to communicate with JSA.
3. Obtain and install a certificate to enable communicationbetweenSalesforceSecurity
Monitoring and JSA. The certificatemust be in the /opt/JSA/conf/trusted_certificates/
folder and be in .DER format.
4. For each instance of Salesforce Security Monitoring, create a log source on the JSA
Console.
Configuring the Salesforce Security Monitoring Server to Communicate with JSA
To allow JSA communication, you need to configure Connected App on the Salesforce
console and collect information that the Connected App generates. This information is
required for when you configure the JSA log source.
If the RESTful API is not enabled on your Salesforce server, contact Salesforce support.
1. Log in to your Salesforce Security Monitoring server.
2. From the Setupmenu, click Create > Apps > New.
3. Type the name of your application.
4. Type the contact email information.
5. Select Enable OAuth Settings.
6. From the Selected OAuth Scopes list, select Full Access.
7. In the Info URL field, type a URL where the user can go for more information about
your application.
8. Configure the remaining optional parameters.
9. Click Save.
The Connected App generates the information that is required for when you to configure
a log source on JSA. Record the following information:
ConsumerKey—Use theConsumerKey value to configure theClient ID parameter for theJSA log source.
933Copyright © 2018, Juniper Networks, Inc.
Chapter 109: Salesforce
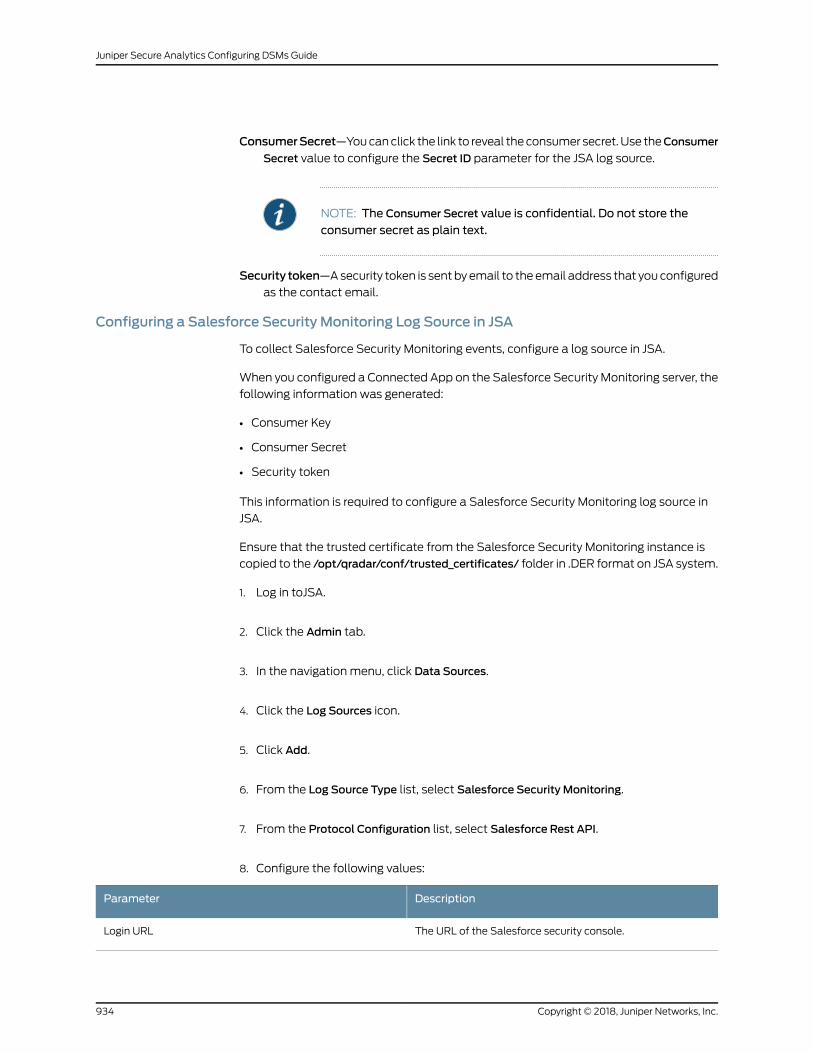
ConsumerSecret—Youcanclick the link to reveal theconsumer secret.Use theConsumerSecret value to configure the Secret ID parameter for the JSA log source.
NOTE: The Consumer Secret value is confidential. Do not store the
consumer secret as plain text.
Security token—Asecurity token is sentbyemail to theemail address that youconfiguredas the contact email.
Configuring a Salesforce Security Monitoring Log Source in JSA
To collect Salesforce Security Monitoring events, configure a log source in JSA.
When you configured a Connected App on the Salesforce Security Monitoring server, the
following information was generated:
• Consumer Key
• Consumer Secret
• Security token
This information is required to configure a Salesforce Security Monitoring log source in
JSA.
Ensure that the trusted certificate from the Salesforce Security Monitoring instance is
copied to the /opt/qradar/conf/trusted_certificates/ folder in .DER format on JSA system.
1. Log in toJSA.
2. Click the Admin tab.
3. In the navigation menu, click Data Sources.
4. Click the Log Sources icon.
5. Click Add.
6. From the Log Source Type list, select Salesforce Security Monitoring.
7. From the Protocol Configuration list, select Salesforce Rest API.
8. Configure the following values:
DescriptionParameter
The URL of the Salesforce security console.Login URL
Copyright © 2018, Juniper Networks, Inc.934
Juniper Secure Analytics Configuring DSMs Guide
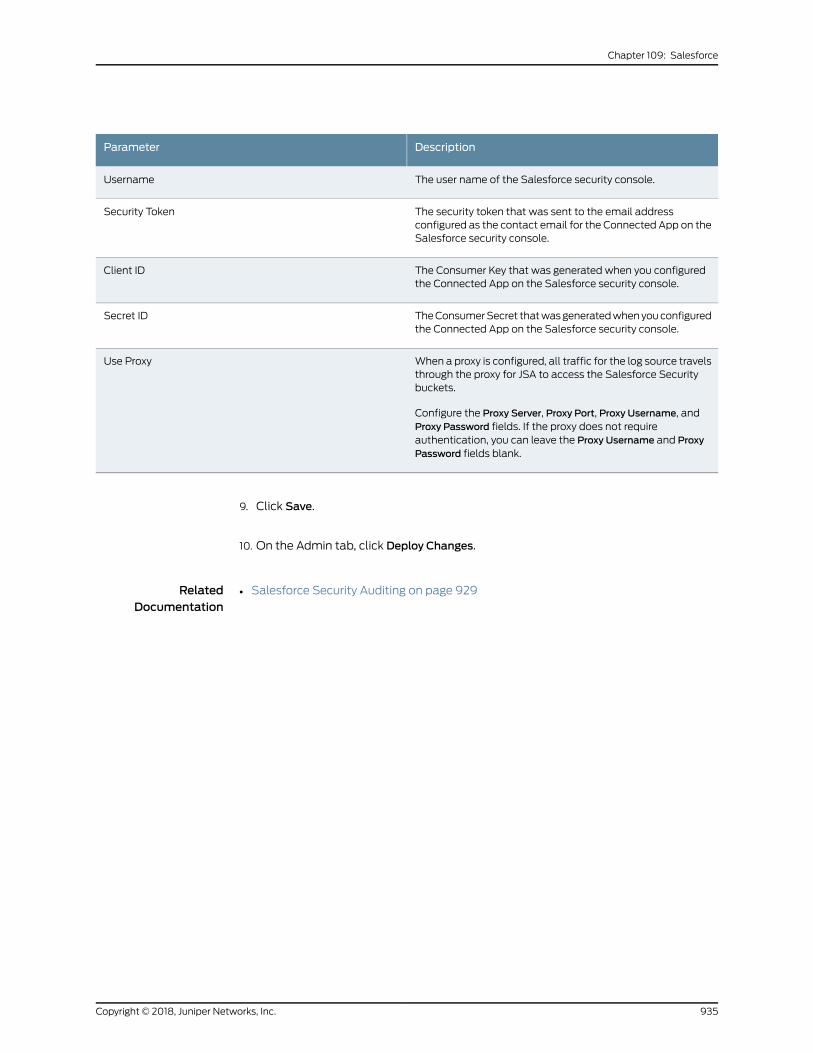
DescriptionParameter
The user name of the Salesforce security console.Username
The security token that was sent to the email addressconfigured as the contact email for the Connected App on theSalesforce security console.
Security Token
The Consumer Key that was generated when you configuredthe Connected App on the Salesforce security console.
Client ID
TheConsumerSecret thatwasgeneratedwhenyouconfiguredthe Connected App on the Salesforce security console.
Secret ID
When a proxy is configured, all traffic for the log source travelsthrough the proxy for JSA to access the Salesforce Securitybuckets.
Configure the Proxy Server, Proxy Port, Proxy Username, andProxy Password fields. If the proxy does not requireauthentication, you can leave the Proxy Username and ProxyPassword fields blank.
Use Proxy
9. Click Save.
10. On the Admin tab, click Deploy Changes.
RelatedDocumentation
• Salesforce Security Auditing on page 929
935Copyright © 2018, Juniper Networks, Inc.
Chapter 109: Salesforce

Copyright © 2018, Juniper Networks, Inc.936
Juniper Secure Analytics Configuring DSMs Guide
CHAPTER 110
Samhain Labs
• Samhain Labs on page 937
• Configuring Syslog to Collect Samhain Events on page 937
• Configuring JDBC to Collect Samhain Events on page 938
Samhain Labs
The Samhain Labs Host-Based Intrusion Detection System (HIDS)monitors changes to
files on the system.
TheSamhainHIDSDSMfor JSAsupportsSamhain version2.4whenused for File Integrity
Monitoring (FIM).
You can configure the Samhain HIDS DSM to collect events by using syslog or JDBC.
Configuring Syslog to Collect Samhain Events
Before youconfigure JSA to integratewithSamhainHIDSusing syslog, youmust configure
the Samhain HIDS system to forward logs to your JSA system.
The following procedure is based on the default samhainrc file. If the samhainrc file is
modified, some values might be different, such as the syslog facility,
1. Log in to Samhain HIDS from the command-line interface.
2. Open the following file:
/etc/samhainrc
3. Remove the comment marker (#) from the following line:
SetLogServer=info
4. Save and exit the file.
Alerts are sent to the local system by using syslog.
5. Open the following file:
937Copyright © 2018, Juniper Networks, Inc.
/etc/syslog.conf
6. Add the following line:
local2.*@<IP Address>
Where <IP Address> is the IP address of your JSA.
7. Save and exit the file.
8. Restart syslog:
/etc/init.d/syslog restart
Samhain sends logs by using syslog to JSA.
You are now ready to configure Samhain HIDSDSM in JSA. To configure JSA to receive
events from Samhain:
9. From the Log Source Type list, select the Samhain HIDS option.
Configuring JDBC to Collect Samhain Events
You can configure Samhain HIDS to send log alerts to a database. Oracle, PostgreSQL,
and MySQL are natively supported by Samhain.
You can also configure JSA to collect events from these databases by using the JDBC
protocol.
NOTE: JSA does not include aMySQL driver for JDBC. If you are using a DSMorprotocol that requiresaMySQLJDBCdriver, youmustdownloadand installthe platform independentMySQL Connector/J from
http://dev.mysql.com/downloads/connector/j/.
1. Log into JSA.
2. Click the Admin tab.
3. On the navigation menu, click Data Sources.
4. Click the Log Sources icon.
5. Click Add.
6. From the Log Source Type list, select the Samhain HIDS option.
Copyright © 2018, Juniper Networks, Inc.938
Juniper Secure Analytics Configuring DSMs Guide
7. Using the Protocol Configuration list, select JDBC.
8. Update the JDBC configuration to include the following values:
a. Database Type: <Samhain Database Type>
b. Database Name: <Samhain SetDBName>
c. Table Name: <Samhain SetDBTable>
d. Select List: *
e. Compare Field: log_index
f. IP or Hostname: <Samhain SetDBHost>
g. Port: <Default Port>
h. Username: <Samhain SetDBUser>
i. Password: <Samhain SetDBPassword>
j. Polling Interval: <Default Interval>
Where:
• <Samhain Database Type> is the database type that is used by Samhain (see your
Samhain system administrator).
• <Samhain SetDBName> is the database name that is specified in the samhainrc
file.
• <Samhain SetDBTable> is the database table that is specified in the samhainrc file.
• <Samhain SetDBHost> is the database host that is specified in the samhainrc file.
• <Samhain SetDBUser> is the database user who is specified in the samhainrc file.
• <Samhain SetDBPassword> is the database password that is specified in the
samhainrc file.
9. You can now configure the log source in JSA. To configure JSA to receive events from
Samhain: From the Log Source Type list, select the Samhain HIDS option.
Formore informationaboutSamhain, see http://www.la-samhna.de/samhain/manual.
939Copyright © 2018, Juniper Networks, Inc.
Chapter 110: Samhain Labs

Copyright © 2018, Juniper Networks, Inc.940
Juniper Secure Analytics Configuring DSMs Guide
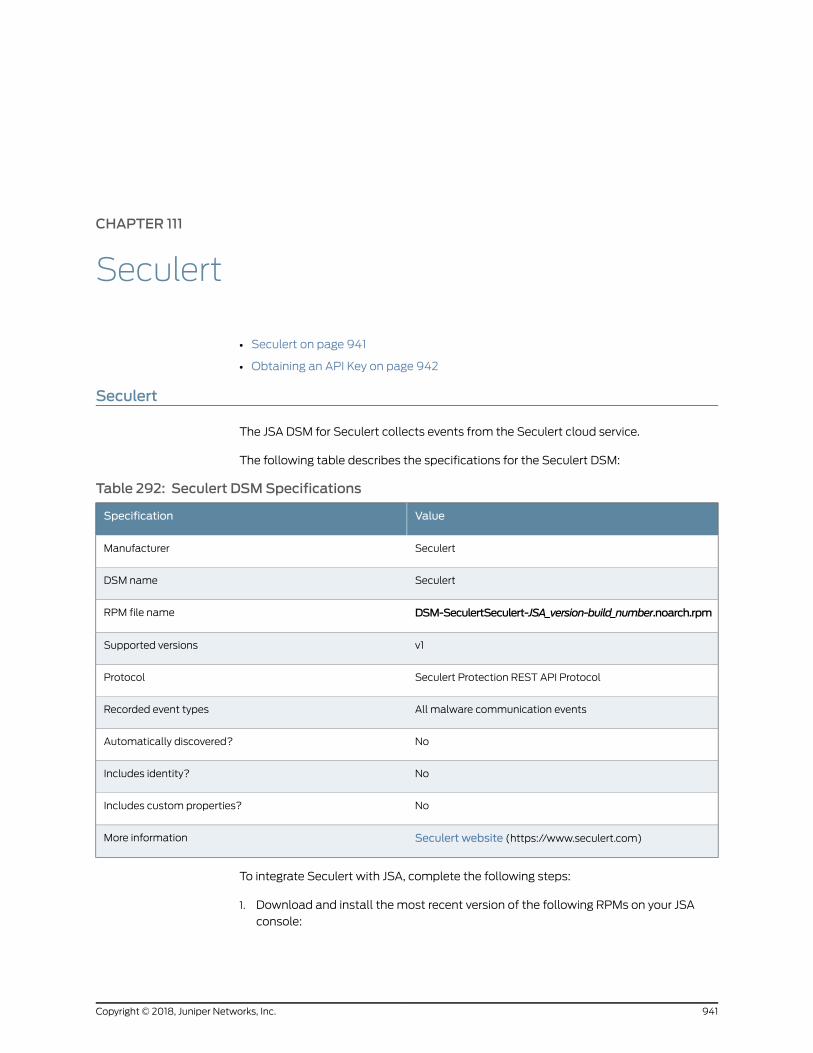
CHAPTER 111
Seculert
• Seculert on page 941
• Obtaining an API Key on page 942
Seculert
The JSA DSM for Seculert collects events from the Seculert cloud service.
The following table describes the specifications for the Seculert DSM:
Table 292: Seculert DSMSpecifications
ValueSpecification
SeculertManufacturer
SeculertDSM name
DSM-SeculertSeculert-JSA_version-build_number.noarch.rpmRPM file name
v1Supported versions
Seculert Protection REST API ProtocolProtocol
All malware communication eventsRecorded event types
NoAutomatically discovered?
NoIncludes identity?
NoIncludes custom properties?
Seculert website (https://www.seculert.com)More information
To integrate Seculert with JSA, complete the following steps:
1. Download and install the most recent version of the following RPMs on your JSA
console:
941Copyright © 2018, Juniper Networks, Inc.

• Protocol-Common
• DSM-DSMCommon
• Seculert DSM RPM
• SeculertProtectionRESTAPI PROTOCOL RPM
2. Add a Seculert log source on the JSA Console. The following table describes the
parameters that require specific values for Seculert event collection:
Table 293: Seculert Log Source Parameters
ValueParameter
SeculertLog Source type
Seculert Protection REST APIProtocol Configuration
32 character UUID
For more information about obtaining an API key, see“Obtaining an API Key” on page 942.
API Key
Obtaining an API Key
Beforeyoucancollectevents fromSeculert, youmustcopyyourAPI key fromtheSeculert
cloud service user interface to JSA.
1. Log in to the Seculert web portal.
2. On the dashboard, click the API tab.
3. Copy the value for Your API Key.
You will need the API key that you copied when you configure a log source for Seculert
in JSA.
Copyright © 2018, Juniper Networks, Inc.942
Juniper Secure Analytics Configuring DSMs Guide
CHAPTER 112
Sentrigo Hedgehog
• Sentrigo Hedgehog on page 943
Sentrigo Hedgehog
You can integrate a Sentrigo Hedgehog device with JSA.
A Sentrigo Hedgehog device accepts LEEF events by using syslog. Before you configure
JSA to integrate with a Sentrigo Hedgehog device, take the following steps:
1. Log in to the Sentrigo Hedgehog command-line interface (CLI).
2. Open the following file for editing:
<Installation directory>/conf/sentrigo-custom.properties
Where <Installation directory> is the directory that contains your Sentrigo Hedgehog
installation.
3. Add the following log.format entries to the custom properties file:
NOTE: DependingonyourSentrigoHedgehogconfigurationor installation,youmight need to replace or overwrite the existing log.format entry.
sentrigo.comm.ListenAddress=1996 log.format.body.custom=usrName=$osUser:20$|duser=$execUser:20$| severity=$severity$|identHostName=$sourceHost$|src=$sourceIP$| dst=$agent.ip$|devTime=$logonTime$|devTimeFormat=EEE MMM dd HH:mm:ss z yyyy|cmdType=$cmdType$|externalId=$id$| execTime=$executionTime.time$|dstServiceName=$database.name:20$|srcHost=$sourceHost:30$|execProgram=$execProgram:20$| cmdType=$cmdType:15$|oper=$operation:225$| accessedObj=$accessedObjects.name:200$
log.format.header.custom=LEEF:1.0|Sentrigo|Hedgehog|$serverVersion$|$rules.name:150$| log.format.header.escaping.custom=\\| log.format.header.seperator.custom=, log.format.header.escape.char.custom=\\
943Copyright © 2018, Juniper Networks, Inc.
log.format.body.escaping.custom=\= log.format.body.escape.char.custom=\\ log.format.body.seperator.custom=| log.format.empty.value.custom=NULL log.format.length.value.custom=10000 log.format.convert.newline.custom=true
4. Save the custom properties file.
5. Stopand restart yourSentrigoHedgehogservice to implement the log.formatchanges.
You can now configure the log source in JSA.
6. To configure JSA to receive events from a Sentrigo Hedgehog device: From the Log
Source Type list, select the Sentrigo Hedgehog option.
For more information about Sentrigo Hedgehog see your vendor documentation.
Copyright © 2018, Juniper Networks, Inc.944
Juniper Secure Analytics Configuring DSMs Guide

CHAPTER 113
SkyhighNetworksCloudSecurityPlatform
• Skyhigh Networks Cloud Security Platform on page 945
• Configuring Skyhigh Networks Cloud Security Platform to Communicate with
JSA on page 946
Skyhigh Networks Cloud Security Platform
The JSA DSM for Skyhigh Networks Cloud Security Platform DSM collects logs from a
Skyhigh Networks Cloud Security Platform.
The following table identifies the specifications for the Skyhigh Networks Cloud Security
Platform DSM:
Table 294: Skyhigh Networks Cloud Security PlatformDSMSpecifications
ValueSpecification
Skyhigh NetworksManufacturer
Skyhigh Networks Cloud Security PlatformDSM name
DSM-SkyhighNetworksCloudSecurityPlatform-JSA_version-build_number.noarch.rpmRPM file name
2.4Supported versions
LEEFEvent format
Anomaly EventRecorded event types
YesAutomatically discovered?
NoIncludes identity?
NoIncludes custom properties?
Skyhigh Networks website (www.skyhighnetworks.com/)More information
To integrate Skyhigh Networks Cloud Security Platformwith JSA, complete the following
steps:
945Copyright © 2018, Juniper Networks, Inc.
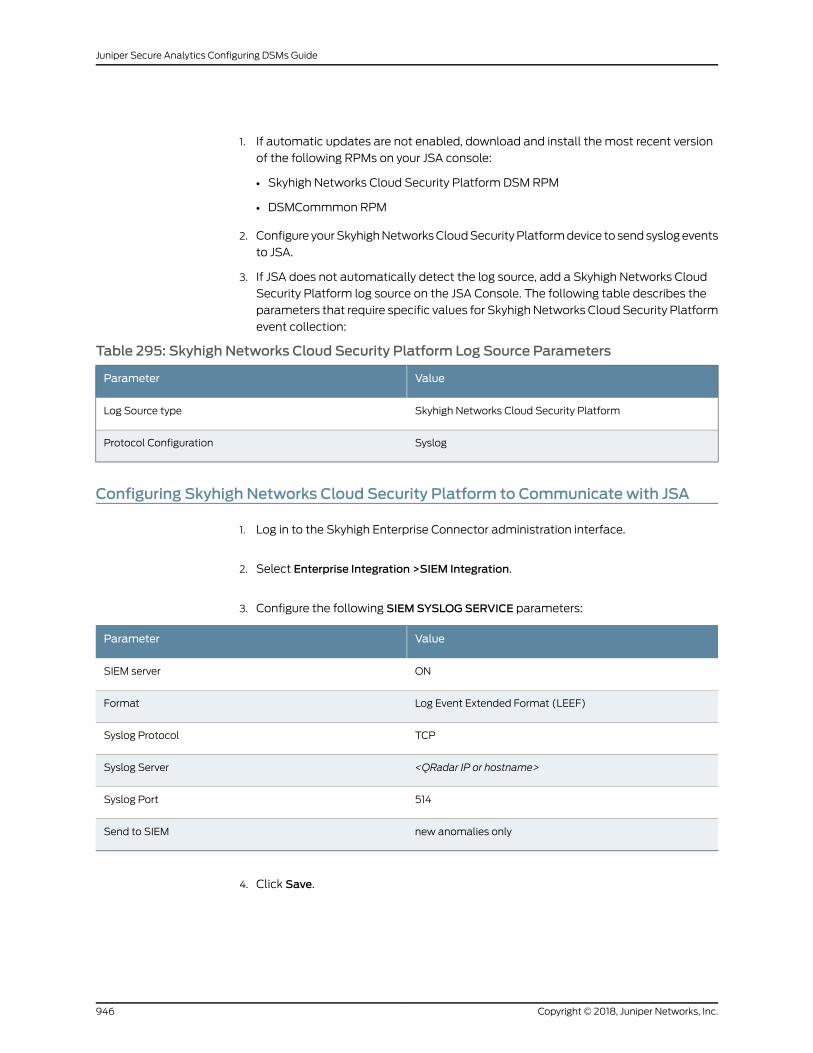
1. If automatic updates are not enabled, download and install the most recent version
of the following RPMs on your JSA console:
• Skyhigh Networks Cloud Security Platform DSM RPM
• DSMCommmon RPM
2. Configure yourSkyhighNetworksCloudSecurityPlatformdevice to sendsyslogevents
to JSA.
3. If JSA does not automatically detect the log source, add a Skyhigh Networks Cloud
Security Platform log source on the JSA Console. The following table describes the
parameters that require specific values for SkyhighNetworks Cloud Security Platform
event collection:
Table 295: Skyhigh Networks Cloud Security Platform Log Source Parameters
ValueParameter
Skyhigh Networks Cloud Security PlatformLog Source type
SyslogProtocol Configuration
Configuring Skyhigh Networks Cloud Security Platform to Communicate with JSA
1. Log in to the Skyhigh Enterprise Connector administration interface.
2. Select Enterprise Integration >SIEM Integration.
3. Configure the following SIEM SYSLOG SERVICE parameters:
ValueParameter
ONSIEM server
Log Event Extended Format (LEEF)Format
TCPSyslog Protocol
<QRadar IP or hostname>Syslog Server
514Syslog Port
new anomalies onlySend to SIEM
4. Click Save.
Copyright © 2018, Juniper Networks, Inc.946
Juniper Secure Analytics Configuring DSMs Guide

CHAPTER 114
SolarWinds Orion
• SolarWinds Orion on page 947
SolarWinds Orion
The SolarWinds Orion DSM for JSAsupports SNMPv2 and SNMPv3 configured alerts
from the SolarWinds Alert Manager.
The events are sent to JSA using syslog. Before you can integrate JSA, youmust configure
the SolarWinds Alert Manager to create SNMP traps and forward syslog events.
To configure SNMP traps in the SolarWinds Orion Alert Manager:
1. Select Start >All Programs >SolarWinds Orion >Alerting, Reporting, andMapping
>Advanced Alert Manager.
The Alert Manager Quick Start is displayed.
2. Click Configure Alerts.
TheManage Alertswindow is displayed.
3. Select an existing alert and click Edit.
4. Select the Triggered Actions tab.
5. Click Add NewAction.
The Select an Action window is displayed.
6. Select Send an SNMP Trap and clickOK.
7. Configure theSNMPTrapDefinitions—Type the IP address of the JSA consoleor Event
Collector
8. Configure the Trap Template—Select ForwardSyslog.
947Copyright © 2018, Juniper Networks, Inc.
9. Configure the SNMPVersion—Select the SNMP Version to use to forward the event.
JSA supports SNMPv2c or SNMPv3.
SNMPv2c—Type the SNMP Community String to use for SNMPv2c authentication.
The default Community String value is public.
SNMPv3—Type the User name and select the AuthenticationMethod to use for
SNMPv3.
JSA supports MD5 or SH1 as methods of authentication and DES56 or AES128 bit
encryption.
10. ClickOK to save the SNMP trigger action.
TheManage Alertswindow is displayed.
NOTE: Toverify that yourSNMPtrap is configuredproperly, select analertthat you edited and click Test. This action will trigger and forward the
syslog event to JSA.
Repeat these steps to configure the Alert Manager with all of the SNMP trap alerts
that you want to monitor in JSA
You can now configure the log source in JSA.
11. JSA automatically detects syslog events from properly configured SNMP trap alert
triggers. However, if you want to manually configure JSA to receive events from
SolarWinds Orion: From the Log Source Type list, select SolarWinds Orion
Copyright © 2018, Juniper Networks, Inc.948
Juniper Secure Analytics Configuring DSMs Guide
CHAPTER 115
SonicWALL
• SonicWALL on page 949
• Configuring SonicWALL to Forward Syslog Events on page 949
• Configuring a Log Source on page 950
SonicWALL
The SonicWALL SonicOS DSM accepts events by using syslog.
JSA records all relevant syslog events that are forwarded from SonicWALL appliances
by using SonicOS firmware. Before you can integrate with a SonicWALL SonicOS device,
youmust configure syslog forwarding on your SonicWALL SonicOS appliance.
Configuring SonicWALL to Forward Syslog Events
SonicWALL captures all SonicOS event activity. The events can be forwarded to JSA by
using SonicWALL's default event format.
1. Log in to your SonicWALL web interface.
2. From the navigation menu, select Log >Syslog.
3. From the Syslog Servers pane, click Add.
4. In the Name or IP Address field, type the IP address of your JSA console or Event
Collector.
5. In the Port field, type 514.
SonicWALL syslog forwarders send events to JSA by using UDP port 514.
6. ClickOK.
7. From the Syslog Format list, select Default.
8. Click Apply.
949Copyright © 2018, Juniper Networks, Inc.
Syslog events are forwarded to JSA. SonicWALL events that are forwarded to JSA are
automatically discovered and log sources are created automatically. For more
information on configuring your SonicWALL appliance or for information on specific
events, see your vendor documentation.
Configuring a Log Source
JSA automatically discovers and creates a log source for syslog events from SonicWALL
appliances. The following configuration steps are optional.
To manually configure a log source for SonicWALL syslog events:
1. Log in to JSA.
2. Click the Admin tab.
3. Click the Log Sources icon.
4. Click Add.
5. In the Log Source Name field, type a name for your log source.
6. In the Log Source Description field, type a description for the log source.
7. From the Log Source Type list, select SonicWALL SonicOS.
8. From the Protocol Configuration list, select Syslog.
9. Configure the following values:
Table 296: Syslog Parameters
DescriptionParameter
Type the IP address or host name for the log source as an identifier for events fromSonicWALLappliances.
Each log source that you create for your SonicWALL SonicOS appliance ideally includes aunique identifier, such as an IP address or host name.
Log Source Identifier
10. Click Save.
11. On the Admin tab, click Deploy Changes.
The log source is added to JSA. Events that are forwarded to JSA by SonicWALL
SonicOS appliances are displayed on the Log Activity tab. For more information, see
the Juniper Secure Analytics Users Guide.
Copyright © 2018, Juniper Networks, Inc.950
Juniper Secure Analytics Configuring DSMs Guide
CHAPTER 116
Sophos
• Sophos on page 951
• Sophos Enterprise Console on page 951
• Sophos PureMessage on page 958
• Sophos Astaro Security Gateway on page 965
• SophosWeb Security Appliance on page 966
Sophos
JSA supports a number of Sophos DSMs.
Sophos Enterprise Console
JSA has two options for gathering events from a Sophos Enterprise Console by using
JDBC.
Select the method that best applies to your Sophos Enterprise Console installation:
• Configuring JSA Using the Sophos Enterprise Console Protocol on page 952
• Configure JSA by Using the JDBC Protocol on page 955
NOTE: Touse theSophos Enterprise Console protocol, youmust ensure thatthe Sophos Reporting Interface is installed with your Sophos EnterpriseConsole. If you do not have the Sophos Reporting Interface, youmustconfigure JSA by using the JDBC protocol. For information on installing theSophos Reporting Interface, see your Sophos Enterprise Consoledocumentation.
• Configuring JSA Using the Sophos Enterprise Console Protocol on page 952
• Configure JSA by Using the JDBC Protocol on page 955
• Configuring the Database View on page 955
• Configuring a JDBC Log Source in JSA on page 955
951Copyright © 2018, Juniper Networks, Inc.
Configuring JSA Using the Sophos Enterprise Console Protocol
The Sophos Enterprise Console DSM for JSA accepts events by using Java Database
Connectivity (JDBC).
The Sophos Enterprise Console DSMworks in coordination with the Sophos Enterprise
Console protocol to combine payload information from anti-virus, application control,
device control, data control, tamper protection, and firewall logs in the
vEventsCommonData table andprovide these events to JSA. Youmust install theSophos
Enterprise Console protocol before you configure JSA.
To configure JSA to access the Sophos database by using the JDBC protocol:
1. Log in to JSA.
2. Click the Admin tab.
3. On the navigation menu, click Data Sources.
The Data Sources pane is displayed.
4. Click the Log Sources icon.
The Log Sourceswindow is displayed.
5. Click Add.
The Add a log sourcewindow is displayed.
6. From the Log Source Type list, select Sophos Enterprise Console.
7. From the Protocol Configuration list, select Sophos Enterprise Console JDBC.
NOTE: Youmust refer to the Configure Database Settings on your Sophos
EnterpriseConsole todefine theparameters thatare required toconfigurethe Sophos Enterprise Console JDBC protocol in JSA.
8. Configure the following values:
Copyright © 2018, Juniper Networks, Inc.952
Juniper Secure Analytics Configuring DSMs Guide

Table 297: Sophos Enterprise Console JDBC Parameters
DescriptionParameter
Type the identifier for the log source. Type the log source identifier in the following format:
<Sophos Database>@<Sophos Database Server IP or Host Name>
Where:
• <Sophos Database> is the database name, as entered in the Database Name parameter.
• <SophosDatabase Server IP or Host Name> is the host nameor IP address for this log source,as entered in the IP or Hostname parameter.
When you define a name for your log source identifier, you must use the values of the SophosDatabase and Database Server IP address or host name from the Management EnterpriseConsole.
Log Source Identifier
From the list, selectMSDE.Database Type
Type the exact name of the Sophos database.Database Name
Type the IP address or host name of the Sophos SQL Server.IP or Hostname
Type the port number that is used by the database server. The default port forMSDE in SophosEnterprise Console is 1168.
The JDBCconfiguration portmustmatch the listener port of theSophos database. TheSophosdatabasemust have incoming TCP connections are enabled to communicate with JSA.
If you define a Database Instancewhen you useMSDE as the database type, youmust leavethe Port parameter blank in your configuration.
Port
Type the user name that is required to access the database.Username
Type the password that is required to access the database. The password can be up to 255characters in length.
Password
Confirm the password that is required to access the database. The confirmation passwordmust be identical to the password entered in the Password parameter.
Confirm Password
If you selectMSDE as theDatabaseType and the database is configured forWindows, youmustdefine aWindow Authentication Domain. Otherwise, leave this field blank.
Authentication Domain
Optional. Type the database instance, if you havemultiple SQL server instances on yourdatabase server.
If you use a non-standard port in your database configuration, or block access to port 1434 forSQL database resolution, youmust leave the Database Instance parameter blank in yourconfiguration.
Database Instance
Type vEventsCommonData as the name of the table or view that includes the event records.Table Name
953Copyright © 2018, Juniper Networks, Inc.
Chapter 116: Sophos
Table 297: Sophos Enterprise Console JDBC Parameters (continued)
DescriptionParameter
Type * for all fields from the table or view.
You can use a comma-separated list to define specific fields from tables or views, if this isneeded for your configuration. The list must contain the field that is defined in the CompareFieldparameter. Thecomma-separated list canbeup to255alphanumeric characters in length.The list can include the followingspecial characters: dollar sign ($), number sign (#), underscore(_), en dash (-), and period(.).
Select List
Type InsertedAt as the compare field. The compare field is used to identify new events addedbetween queries to the table.
Compare Field
Optional. Type the start date and time for database polling.
TheStartDateandTimeparametermustbe formattedasyyyy-MM-ddHH:mmwithHHspecifiedbyusinga24-hour clock. If the start dateor time is clear, pollingbegins immediatelyand repeatsat the specified polling interval.
Start Date and Time
Type the polling interval, which is the amount of time between queries to the event table. Thedefault polling interval is 10 seconds.
Youcandefinea longerpolling interval byappendingH for hoursorM forminutes to thenumericvalue. Themaximum polling interval is 1 week in any time format. Numeric values that areentered without an H or M poll in seconds.
Polling Interval
Type the number of Events Per Second (EPS) that you do not want this protocol to exceed.The default value is 20000 EPS.
EPS Throttle
Clear the Use Named Pipe Communications check box.
WhenyouuseaNamedPipe connection, theuser nameandpasswordmustbe theappropriateWindows authentication user name and password and not the database user name andpassword. Also, youmust use the default Named Pipe.
Use Named PipeCommunication
If you select the Use Named Pipe Communication check box, the Database Cluster Nameparameter is displayed. If you are running your SQL server in a cluster environment, define thecluster name to ensure Named Pipe communication functions properly.
Database Cluster Name
If you select MSDE as the Database Type, the Use NTLMv2 check box is displayed.
Select theUseNTLMv2checkbox to forceMSDEconnections touse theNTLMv2protocolwhenthey communicate with SQL servers that require NTLMv2 authentication. The default value ofthe check box is selected.
If the Use NTLMv2 check box is selected, it has no effect on MSDE connections to SQL serversthat do not require NTLMv2 authentication.
Use NTLMv2
NOTE: Selecting a value greater than 5 for the Credibility parameter
weights your Sophos log source with a higher importance compared toother log sources in JSA.
Copyright © 2018, Juniper Networks, Inc.954
Juniper Secure Analytics Configuring DSMs Guide
9. Click Save.
10. On the Admin tab, click Deploy Changes.
The configuration is complete.
Configure JSA by Using the JDBC Protocol
The Sophos Enterprise Console DSM for JSA accepts events by using Java Database
Connectivity (JDBC).
JSA records all relevant anti-virus events. This document provides information on
configuring JSA to access the Sophos Enterprise Console database by using the JDBC
protocol.
Configuring the Database View
To integrate JSA with Sophos Enterprise Console:
1. Log in to your Sophos Enterprise Console device command-line interface (CLI).
2. Type the following command to create a custom view in your Sophos database to
support JSA:
CREATE VIEW threats_view AS SELECT t.ThreatInstanceID, t.ThreatType, t.FirstDetectedAt, c.Name, c.LastLoggedOnUser, c.IPAddress, c.DomainName, c.OperatingSystem, c.ServicePack, t.ThreatSubType, t.Priority, t.ThreatLocalID, t.ThreatLocalIDSource, t.ThreatName, t.FullFilePathCheckSum, t.FullFilePath, t.FileNameOffset, t.FileVersion, t.CheckSum, t.ActionSubmittedAt, t.DealtWithAt, t.CleanUpable, t.IsFragment, t.IsRebootRequired, t.Outstanding, t.Status, InsertedAt FROM <Database Name>.dbo.ThreatInstancesAll t, <Database Name>.dbo.Computers c WHERE t.ComputerID = c.ID;
Where <Database Name> is the name of the Sophos database.
NOTE: The database namemust not contain any spaces.
After you create your custom view, youmust configure JSA to receive event information
that uses the JDBC protocol. To configure the Sophos Enterprise Console DSMwith JSA,
see “Configuring a JDBC Log Source in JSA” on page 955.
Configuring a JDBC Log Source in JSA
You can configure JSA to access the Sophos database using the JDBC protocol.
1. Log in to JSA
2. Click the Admin tab.
955Copyright © 2018, Juniper Networks, Inc.
Chapter 116: Sophos
3. On the navigation menu, click Data Sources.
The Data Sources pane is displayed.
4. Click the Log Sources icon.
The Log Sourceswindow is displayed.
5. Click Add.
The Add a log sourcewindow is displayed.
6. From the Log Source Type list, select Sophos Enterprise Console.
7. From the Protocol Configuration list, select JDBC.
NOTE: Youmust refer to the Configure Database Settings on your Sophos
EnterpriseConsole todefine theparameters thatare required toconfigurethe Sophos Enterprise Console DSM in JSA.
8. Configure the following values:
Table 298: Sophos Enterprise Console JDBC Parameters
DescriptionParameter
Type the identifier for the log source. Type the log source identifier in the following format:
<Sophos Database>@<Sophos Database Server IP or Host Name>
Where:
• <Sophos Database> is the database name, as entered in the Database Name parameter.
• <SophosDatabase Server IP or Host Name> is the host nameor IP address for this log source,as entered in the IP or Hostname parameter.
When defining a name for your log source identifier, you must use the values of the SophosDatabase and Database Server IP address or host name from the Management EnterpriseConsole.
Log Source Identifier
From the list, selectMSDE.Database Type
Type the exact name of the Sophos database.Database Name
Type the IP address or host name of the Sophos SQL Server.IP or Hostname
Copyright © 2018, Juniper Networks, Inc.956
Juniper Secure Analytics Configuring DSMs Guide
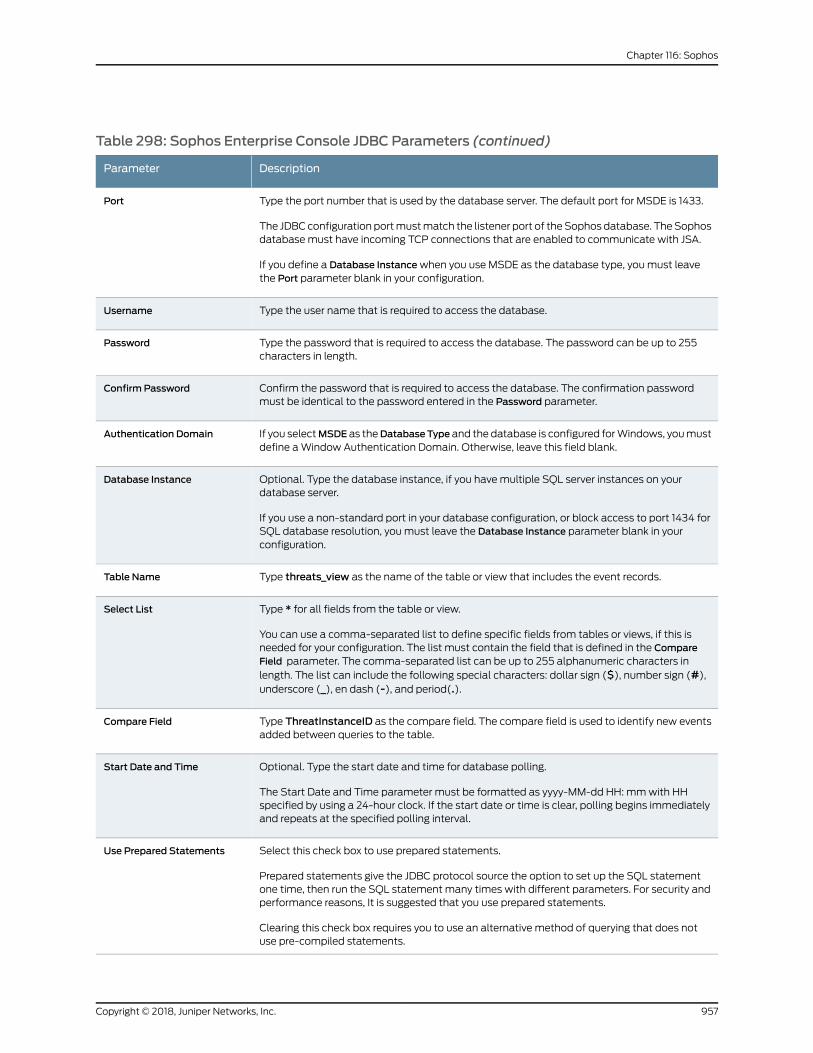
Table 298: Sophos Enterprise Console JDBC Parameters (continued)
DescriptionParameter
Type the port number that is used by the database server. The default port for MSDE is 1433.
The JDBCconfiguration portmustmatch the listener port of theSophos database. TheSophosdatabasemust have incoming TCP connections that are enabled to communicate with JSA.
If you define a Database Instancewhen you use MSDE as the database type, youmust leavethe Port parameter blank in your configuration.
Port
Type the user name that is required to access the database.Username
Type the password that is required to access the database. The password can be up to 255characters in length.
Password
Confirm the password that is required to access the database. The confirmation passwordmust be identical to the password entered in the Password parameter.
Confirm Password
If you selectMSDE as theDatabaseType and the database is configured forWindows, youmustdefine aWindow Authentication Domain. Otherwise, leave this field blank.
Authentication Domain
Optional. Type the database instance, if you havemultiple SQL server instances on yourdatabase server.
If you use a non-standard port in your database configuration, or block access to port 1434 forSQL database resolution, youmust leave the Database Instance parameter blank in yourconfiguration.
Database Instance
Type threats_view as the name of the table or view that includes the event records.Table Name
Type * for all fields from the table or view.
You can use a comma-separated list to define specific fields from tables or views, if this isneeded for your configuration. The list must contain the field that is defined in the CompareField parameter. The comma-separated list can be up to 255 alphanumeric characters inlength. The list can include the following special characters: dollar sign ($), number sign (#),underscore (_), en dash (-), and period(.).
Select List
Type ThreatInstanceID as the compare field. The compare field is used to identify new eventsadded between queries to the table.
Compare Field
Optional. Type the start date and time for database polling.
The Start Date and Time parameter must be formatted as yyyy-MM-dd HH: mmwith HHspecified by using a 24-hour clock. If the start date or time is clear, polling begins immediatelyand repeats at the specified polling interval.
Start Date and Time
Select this check box to use prepared statements.
Prepared statements give the JDBC protocol source the option to set up the SQL statementone time, then run the SQL statement many times with different parameters. For security andperformance reasons, It is suggested that you use prepared statements.
Clearing this check box requires you to use an alternative method of querying that does notuse pre-compiled statements.
Use Prepared Statements
957Copyright © 2018, Juniper Networks, Inc.
Chapter 116: Sophos
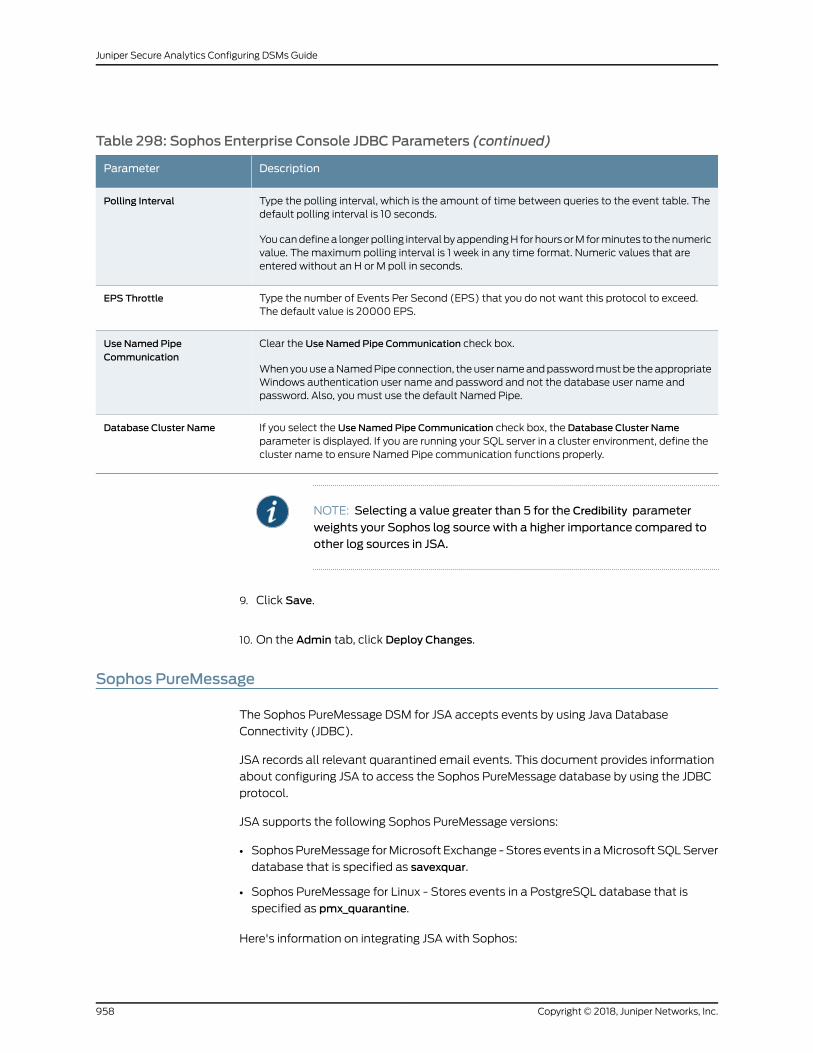
Table 298: Sophos Enterprise Console JDBC Parameters (continued)
DescriptionParameter
Type the polling interval, which is the amount of time between queries to the event table. Thedefault polling interval is 10 seconds.
Youcandefinea longerpolling interval byappendingH for hoursorM forminutes to thenumericvalue. Themaximum polling interval is 1 week in any time format. Numeric values that areentered without an H or M poll in seconds.
Polling Interval
Type the number of Events Per Second (EPS) that you do not want this protocol to exceed.The default value is 20000 EPS.
EPS Throttle
Clear the Use Named Pipe Communication check box.
WhenyouuseaNamedPipe connection, theuser nameandpasswordmustbe theappropriateWindows authentication user name and password and not the database user name andpassword. Also, youmust use the default Named Pipe.
Use Named PipeCommunication
If you select the Use Named Pipe Communication check box, the Database Cluster Nameparameter is displayed. If you are running your SQL server in a cluster environment, define thecluster name to ensure Named Pipe communication functions properly.
Database Cluster Name
NOTE: Selecting a value greater than 5 for the Credibility parameter
weights your Sophos log source with a higher importance compared toother log sources in JSA.
9. Click Save.
10. On the Admin tab, click Deploy Changes.
Sophos PureMessage
The Sophos PureMessage DSM for JSA accepts events by using Java Database
Connectivity (JDBC).
JSA records all relevant quarantined email events. This document provides information
about configuring JSA to access the Sophos PureMessage database by using the JDBC
protocol.
JSA supports the following Sophos PureMessage versions:
• SophosPureMessage forMicrosoft Exchange -Stores events in aMicrosoft SQLServer
database that is specified as savexquar.
• Sophos PureMessage for Linux - Stores events in a PostgreSQL database that is
specified as pmx_quarantine.
Here's information on integrating JSA with Sophos:
Copyright © 2018, Juniper Networks, Inc.958
Juniper Secure Analytics Configuring DSMs Guide
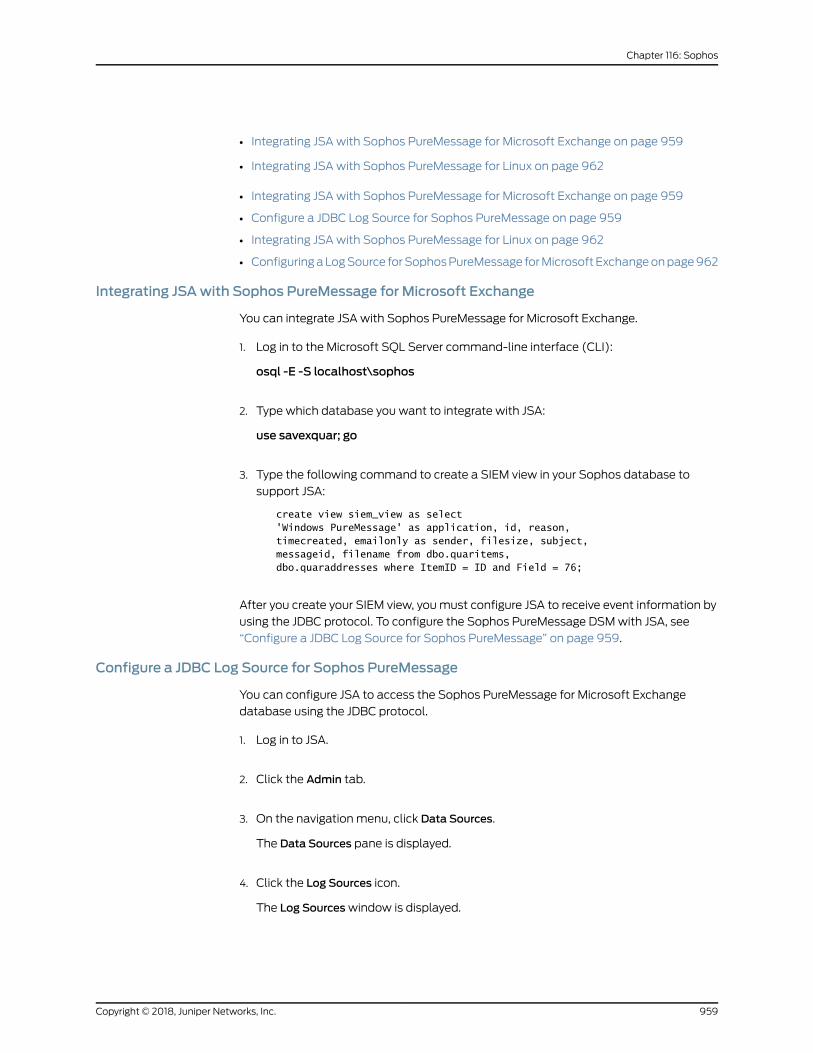
• Integrating JSA with Sophos PureMessage for Microsoft Exchange on page 959
• Integrating JSA with Sophos PureMessage for Linux on page 962
• Integrating JSA with Sophos PureMessage for Microsoft Exchange on page 959
• Configure a JDBC Log Source for Sophos PureMessage on page 959
• Integrating JSA with Sophos PureMessage for Linux on page 962
• ConfiguringaLogSource forSophosPureMessage forMicrosoftExchangeonpage962
Integrating JSAwith Sophos PureMessage for Microsoft Exchange
You can integrate JSA with Sophos PureMessage for Microsoft Exchange.
1. Log in to the Microsoft SQL Server command-line interface (CLI):
osql -E -S localhost\sophos
2. Type which database you want to integrate with JSA:
use savexquar; go
3. Type the following command to create a SIEM view in your Sophos database to
support JSA:
create view siem_view as select 'Windows PureMessage' as application, id, reason, timecreated, emailonly as sender, filesize, subject, messageid, filename from dbo.quaritems, dbo.quaraddresses where ItemID = ID and Field = 76;
After you create your SIEM view, youmust configure JSA to receive event information by
using the JDBC protocol. To configure the Sophos PureMessage DSMwith JSA, see
“Configure a JDBC Log Source for Sophos PureMessage” on page 959.
Configure a JDBC Log Source for Sophos PureMessage
You can configure JSA to access the Sophos PureMessage for Microsoft Exchange
database using the JDBC protocol.
1. Log in to JSA.
2. Click the Admin tab.
3. On the navigation menu, click Data Sources.
The Data Sources pane is displayed.
4. Click the Log Sources icon.
The Log Sourceswindow is displayed.
959Copyright © 2018, Juniper Networks, Inc.
Chapter 116: Sophos
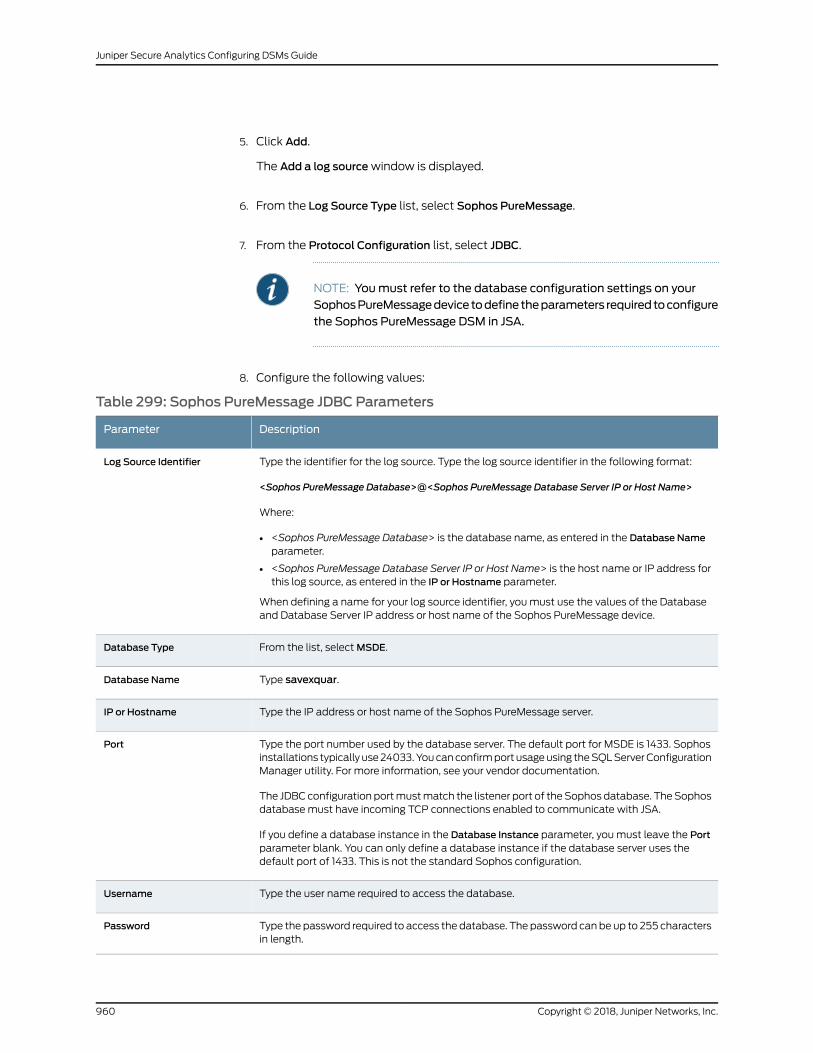
5. Click Add.
The Add a log sourcewindow is displayed.
6. From the Log Source Type list, select Sophos PureMessage.
7. From the Protocol Configuration list, select JDBC.
NOTE: Youmust refer to the database configuration settings on yourSophosPureMessagedevice todefine theparameters requiredtoconfigurethe Sophos PureMessage DSM in JSA.
8. Configure the following values:
Table 299: Sophos PureMessage JDBC Parameters
DescriptionParameter
Type the identifier for the log source. Type the log source identifier in the following format:
<Sophos PureMessage Database>@<Sophos PureMessage Database Server IP or Host Name>
Where:
• <Sophos PureMessage Database> is the database name, as entered in the Database Nameparameter.
• <Sophos PureMessage Database Server IP or Host Name> is the host name or IP address forthis log source, as entered in the IP or Hostname parameter.
When defining a name for your log source identifier, you must use the values of the Databaseand Database Server IP address or host name of the Sophos PureMessage device.
Log Source Identifier
From the list, selectMSDE.Database Type
Type savexquar.Database Name
Type the IP address or host name of the Sophos PureMessage server.IP or Hostname
Type the port number used by the database server. The default port for MSDE is 1433. Sophosinstallations typically use24033.Youcanconfirmport usageusing theSQLServerConfigurationManager utility. For more information, see your vendor documentation.
The JDBCconfiguration portmustmatch the listener port of theSophos database. TheSophosdatabasemust have incoming TCP connections enabled to communicate with JSA.
If you define a database instance in the Database Instance parameter, youmust leave the Portparameter blank. You can only define a database instance if the database server uses thedefault port of 1433. This is not the standard Sophos configuration.
Port
Type the user name required to access the database.Username
Type the password required to access the database. The password can be up to 255 charactersin length.
Password
Copyright © 2018, Juniper Networks, Inc.960
Juniper Secure Analytics Configuring DSMs Guide
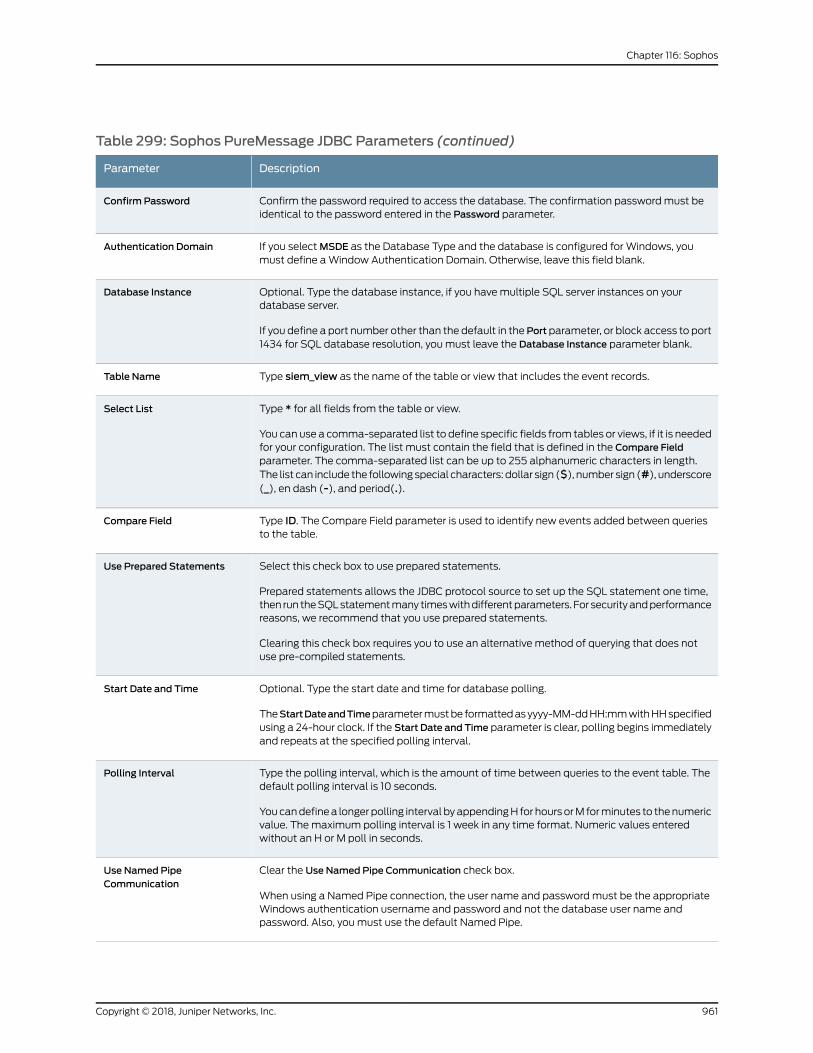
Table 299: Sophos PureMessage JDBC Parameters (continued)
DescriptionParameter
Confirm the password required to access the database. The confirmation passwordmust beidentical to the password entered in the Password parameter.
Confirm Password
If you selectMSDE as the Database Type and the database is configured for Windows, youmust define aWindow Authentication Domain. Otherwise, leave this field blank.
Authentication Domain
Optional. Type the database instance, if you havemultiple SQL server instances on yourdatabase server.
If you define a port number other than the default in thePort parameter, or block access to port1434 for SQL database resolution, youmust leave the Database Instance parameter blank.
Database Instance
Type siem_view as the name of the table or view that includes the event records.Table Name
Type * for all fields from the table or view.
You can use a comma-separated list to define specific fields from tables or views, if it is neededfor your configuration. The list must contain the field that is defined in the Compare Fieldparameter. The comma-separated list can be up to 255 alphanumeric characters in length.The list can include the followingspecial characters: dollar sign ($), number sign (#), underscore(_), en dash (-), and period(.).
Select List
Type ID. The Compare Field parameter is used to identify new events added between queriesto the table.
Compare Field
Select this check box to use prepared statements.
Prepared statements allows the JDBC protocol source to set up the SQL statement one time,then run theSQLstatementmany timeswithdifferentparameters. For securityandperformancereasons, we recommend that you use prepared statements.
Clearing this check box requires you to use an alternative method of querying that does notuse pre-compiled statements.
Use Prepared Statements
Optional. Type the start date and time for database polling.
TheStartDateandTimeparametermustbe formattedasyyyy-MM-ddHH:mmwithHHspecifiedusing a 24-hour clock. If the Start Date and Time parameter is clear, polling begins immediatelyand repeats at the specified polling interval.
Start Date and Time
Type the polling interval, which is the amount of time between queries to the event table. Thedefault polling interval is 10 seconds.
Youcandefinea longerpolling interval byappendingH for hoursorM forminutes to thenumericvalue. Themaximum polling interval is 1 week in any time format. Numeric values enteredwithout an H or M poll in seconds.
Polling Interval
Clear the Use Named Pipe Communication check box.
When using a Named Pipe connection, the user name and passwordmust be the appropriateWindows authentication username and password and not the database user name andpassword. Also, youmust use the default Named Pipe.
Use Named PipeCommunication
961Copyright © 2018, Juniper Networks, Inc.
Chapter 116: Sophos

Table 299: Sophos PureMessage JDBC Parameters (continued)
DescriptionParameter
If you select the Use Named Pipe Communication check box, the Database Cluster Nameparameter is displayed. If you are running your SQL server in a cluster environment, define thecluster name to ensure Named Pipe communication functions properly.
Database Cluster Name
NOTE: Selecting a value greater than 5 for the Credibility parameter
weights your Sophos PureMessage log source with a higher importancecompared to other log sources in JSA.
9. Click Save.
10. On the Admin tab, click Deploy Changes.
Integrating JSAwith Sophos PureMessage for Linux
You can integrate JSA with Sophos PureMessage for Linux.
1. Navigate to your Sophos PureMessage PostgreSQL database directory:
cd /opt/pmx/postgres-8.3.3/bin
2. Access the pmx_quarantine database SQL prompt:
./psql -d pmx_quarantine
3. Type the following command to create a SIEM view in your Sophos database to
support JSA:
create view siem_view as select 'Linux PureMessage' as application, id, b.name, m_date, h_from_local, h_from_domain, m_global_id, m_message_size, outbound, h_to, c_subject_utf8 from message a, m_reason b where a.reason_id = b.reason_id;
After you create your database view, youmust configure JSA to receive event information
by using the JDBC protocol.
Configuring a Log Source for Sophos PureMessage for Microsoft Exchange
You can configure JSA to access the Sophos PureMessage database using the JDBC
protocol:
1. Log in to JSA.
2. Click the Admin tab.
Copyright © 2018, Juniper Networks, Inc.962
Juniper Secure Analytics Configuring DSMs Guide
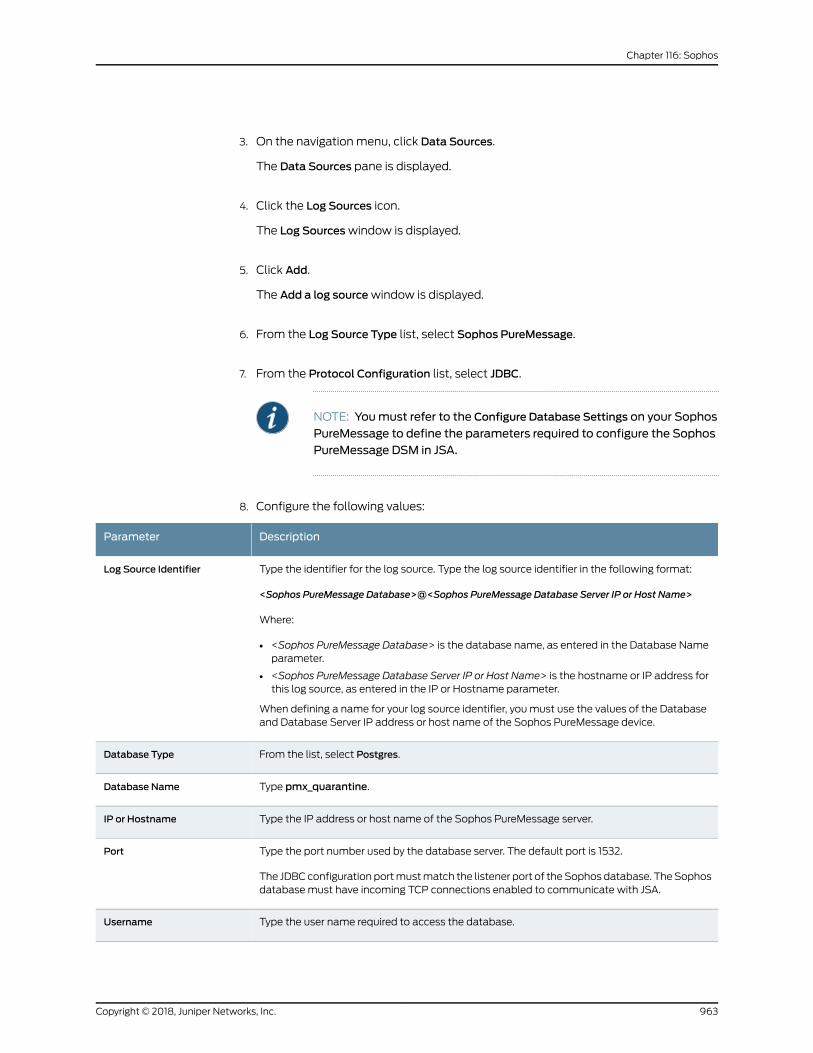
3. On the navigation menu, click Data Sources.
The Data Sources pane is displayed.
4. Click the Log Sources icon.
The Log Sourceswindow is displayed.
5. Click Add.
The Add a log sourcewindow is displayed.
6. From the Log Source Type list, select Sophos PureMessage.
7. From the Protocol Configuration list, select JDBC.
NOTE: Youmust refer to the Configure Database Settings on your Sophos
PureMessage to define the parameters required to configure the SophosPureMessage DSM in JSA.
8. Configure the following values:
DescriptionParameter
Type the identifier for the log source. Type the log source identifier in the following format:
<Sophos PureMessage Database>@<Sophos PureMessage Database Server IP or Host Name>
Where:
• <Sophos PureMessage Database> is the database name, as entered in the Database Nameparameter.
• <Sophos PureMessage Database Server IP or Host Name> is the hostname or IP address forthis log source, as entered in the IP or Hostname parameter.
When defining a name for your log source identifier, you must use the values of the Databaseand Database Server IP address or host name of the Sophos PureMessage device.
Log Source Identifier
From the list, select Postgres.Database Type
Type pmx_quarantine.Database Name
Type the IP address or host name of the Sophos PureMessage server.IP or Hostname
Type the port number used by the database server. The default port is 1532.
The JDBCconfiguration portmustmatch the listener port of theSophos database. TheSophosdatabasemust have incoming TCP connections enabled to communicate with JSA.
Port
Type the user name required to access the database.Username
963Copyright © 2018, Juniper Networks, Inc.
Chapter 116: Sophos
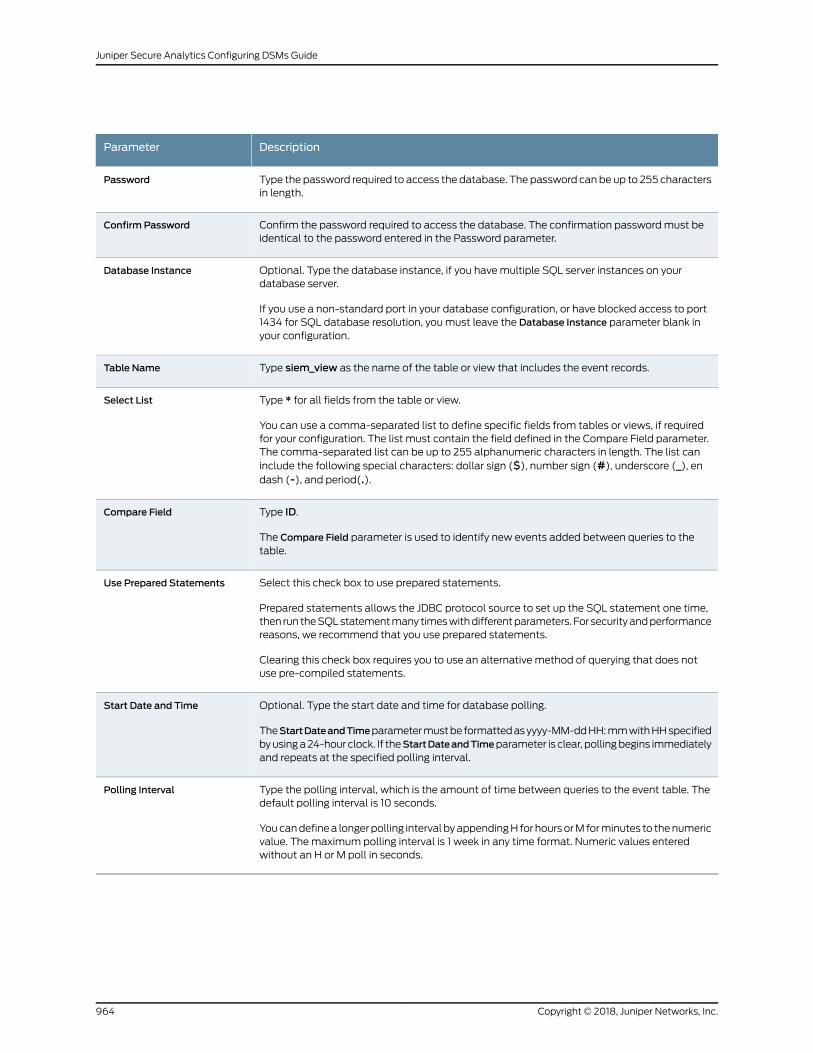
DescriptionParameter
Type the password required to access the database. The password can be up to 255 charactersin length.
Password
Confirm the password required to access the database. The confirmation passwordmust beidentical to the password entered in the Password parameter.
Confirm Password
Optional. Type the database instance, if you havemultiple SQL server instances on yourdatabase server.
If you use a non-standard port in your database configuration, or have blocked access to port1434 for SQL database resolution, youmust leave the Database Instance parameter blank inyour configuration.
Database Instance
Type siem_view as the name of the table or view that includes the event records.Table Name
Type * for all fields from the table or view.
You can use a comma-separated list to define specific fields from tables or views, if requiredfor your configuration. The list must contain the field defined in the Compare Field parameter.The comma-separated list can be up to 255 alphanumeric characters in length. The list caninclude the following special characters: dollar sign ($), number sign (#), underscore (_), endash (-), and period(.).
Select List
Type ID.
The Compare Field parameter is used to identify new events added between queries to thetable.
Compare Field
Select this check box to use prepared statements.
Prepared statements allows the JDBC protocol source to set up the SQL statement one time,then run theSQLstatementmany timeswithdifferentparameters. For securityandperformancereasons, we recommend that you use prepared statements.
Clearing this check box requires you to use an alternative method of querying that does notuse pre-compiled statements.
Use Prepared Statements
Optional. Type the start date and time for database polling.
TheStartDateandTimeparametermustbe formattedasyyyy-MM-ddHH:mmwithHHspecifiedbyusinga24-hour clock. If theStartDateandTimeparameter is clear, pollingbegins immediatelyand repeats at the specified polling interval.
Start Date and Time
Type the polling interval, which is the amount of time between queries to the event table. Thedefault polling interval is 10 seconds.
Youcandefinea longerpolling interval byappendingH for hoursorM forminutes to thenumericvalue. Themaximum polling interval is 1 week in any time format. Numeric values enteredwithout an H or M poll in seconds.
Polling Interval
Copyright © 2018, Juniper Networks, Inc.964
Juniper Secure Analytics Configuring DSMs Guide
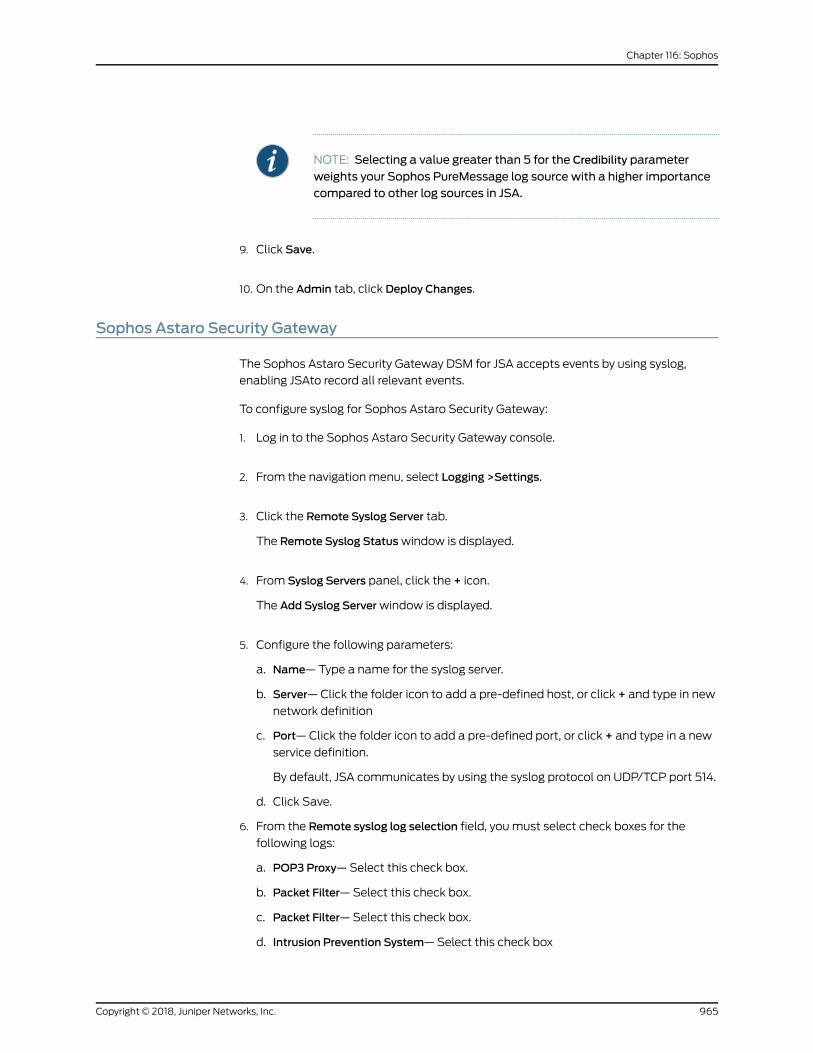
NOTE: Selecting a value greater than 5 for the Credibility parameter
weights your Sophos PureMessage log source with a higher importancecompared to other log sources in JSA.
9. Click Save.
10. On the Admin tab, click Deploy Changes.
Sophos Astaro Security Gateway
The Sophos Astaro Security Gateway DSM for JSA accepts events by using syslog,
enabling JSAto record all relevant events.
To configure syslog for Sophos Astaro Security Gateway:
1. Log in to the Sophos Astaro Security Gateway console.
2. From the navigation menu, select Logging >Settings.
3. Click the Remote Syslog Server tab.
The Remote Syslog Statuswindow is displayed.
4. From Syslog Servers panel, click the + icon.
The Add Syslog Serverwindow is displayed.
5. Configure the following parameters:
a. Name—Type a name for the syslog server.
b. Server—Click the folder icon to add a pre-defined host, or click + and type in new
network definition
c. Port—Click the folder icon to add a pre-defined port, or click + and type in a new
service definition.
By default, JSA communicates by using the syslog protocol on UDP/TCP port 514.
d. Click Save.
6. From the Remote syslog log selection field, youmust select check boxes for the
following logs:
a. POP3 Proxy—Select this check box.
b. Packet Filter—Select this check box.
c. Packet Filter—Select this check box.
d. Intrusion Prevention System—Select this check box
965Copyright © 2018, Juniper Networks, Inc.
Chapter 116: Sophos
e. Content Filter(HTTPS)—Select this check box.
f. High availability - Select this check box
g. FTP Proxy - Select this check box.
h. SSL VPN - Select this check box.
i. PPTP daemon- Select this check box.
j. IPSEC VPN - Select this check box.
k. HTTP daemon - Select this check box
l. User authentication daemon - Select this check box.
m. SMTP proxy - Select this check box.
n. Click Apply.
o. From Remote syslog status section, click Enable
You can now configure the log source in JSA.
7. To configure JSA to receive events from your Sophos Astaro Security Gateway device:
From the Log Source Type list, select Sophos Astaro Security Gateway.
SophosWeb Security Appliance
The SophosWeb Security Appliance (WSA) DSM for JSA accepts events using syslog.
JSA records all relevant events forwarded from the transaction log of the SophosWeb
Security Appliance. Before configuring JSA, youmust configure your SophosWSA
appliance to forward syslog events.
To configure your SophosWeb Security Appliance to forward syslog events:
1. Log in to your SophosWeb Security Appliance.
2. From themenu, select Configuration >System >Alerts &Monitoring.
3. Select the Syslog tab.
4. Select the Enable syslog transfer of web traffic check box.
5. In the Hostname/IP text box, type the IP address or host name of JSA.
6. In the Port text box, type 514.
7. From the Protocol list, select a protocol. The options are:
• TCP—The TCP protocol is supported with JSA on port 514.
Copyright © 2018, Juniper Networks, Inc.966
Juniper Secure Analytics Configuring DSMs Guide

• UDP—The UDP protocol is supported with JSA on port 514.
• TCP - Encrypted—TCP Encrypted is an unsupported protocol for JSA.
8. Click Apply.
You can now configure the SophosWeb Security Appliance DSM in JSA.
9. JSA automatically detects syslog data from a SophosWeb Security Appliance. To
manually configure JSA to receive events fromSophosWebSecurity Appliance: From
the Log Source Type list, select SophosWeb Security Appliance.
967Copyright © 2018, Juniper Networks, Inc.
Chapter 116: Sophos

Copyright © 2018, Juniper Networks, Inc.968
Juniper Secure Analytics Configuring DSMs Guide
CHAPTER 117
Splunk
• Splunk on page 969
• Collect Windows Events That Are Forwarded from Splunk Appliances on page 969
• Configuring a Log Source for Splunk Forwarded Events on page 970
Splunk
JSAaccepts andparsesmultiple event types that are forwarded fromSplunk appliances.
For Check Point events that are forwarded from Splunk, see “Check Point” on page 235.
CollectWindows Events That Are Forwarded fromSplunk Appliances
To collect events, you can configure your Windows end points to forward events to your
JSA console and your Splunk indexer.
ForwardingWindows events from aggregation nodes in your Splunk deployment is not
suggested. Splunk indexers that forward events frommultipleWindows end points to
JSA can obscure the true source of the events with the IP address of the Splunk indexer.
To prevent a situation where an incorrect IP address association might occur in the log
source, youcanupdate yourWindows™end-point systems to forward toboth the indexer
and your JSA console.
Splunk events are parsed by using the Microsoft Windows Security Event Log DSMwith
theTCPmultiline syslogprotocol. The regular expression that is configured in theprotocol
defines where a Splunk event starts or ends in the event payload. The event pattern
allows JSA to assemble the rawWindows event payload as a single-line event that is
readable by JSA. The regular expression that is required to collect Windows events is
outlined in the log source configuration.
To configure event collection for Splunk syslog events, youmust complete the following
tasks:
969Copyright © 2018, Juniper Networks, Inc.
1. On your JSA appliance, configure a log source to use the Microsoft Windows Security
Event Log DSM.
NOTE: Youmust configure 1 log source for Splunk events. JSA can use thefirst log source to autodiscover moreWindows end points.
2. OnyourSplunk appliance, configure eachSplunk Forwarder on theWindows instance
to sendWindows event data to your JSA console or Event Collector.
To configure a Splunk Forwarder, youmust edit the props.conf, transforms.conf, and
output.conf configuration files. For more information on event forwarding, see your
Splunk documentation.
3. Ensure that no firewall rules block communication between your Splunk appliance
and the JSA console or managed host that is responsible for retrieving events.
4. On your JSA appliance, verify the LogActivity tab to ensure that the Splunk events are
forwarded to JSA.
Configuring a Log Source for Splunk Forwarded Events
To collect raw events that are forwarded from Splunk, youmust configure a log source
in JSA.
On your Splunk forwarder, youmust set sendCookedData to false, so that the forwarder
sends raw data to JSA.
1. Log in to JSA.
2. Click the Admin tab.
3. In the navigation menu, click Data Sources.
4. Click the Log Sources icon.
5. Click Add.
6. In the Log Source Name field, type a name for your log source.
7. In the Log Source Description field, type a description for your log source.
8. From the Log Source Type list, select Microsoft Windows Security Event Log.
9. From the Protocol Configuration list, select TCPMultiline Syslog.
10. Configure the following values:
Copyright © 2018, Juniper Networks, Inc.970
Juniper Secure Analytics Configuring DSMs Guide
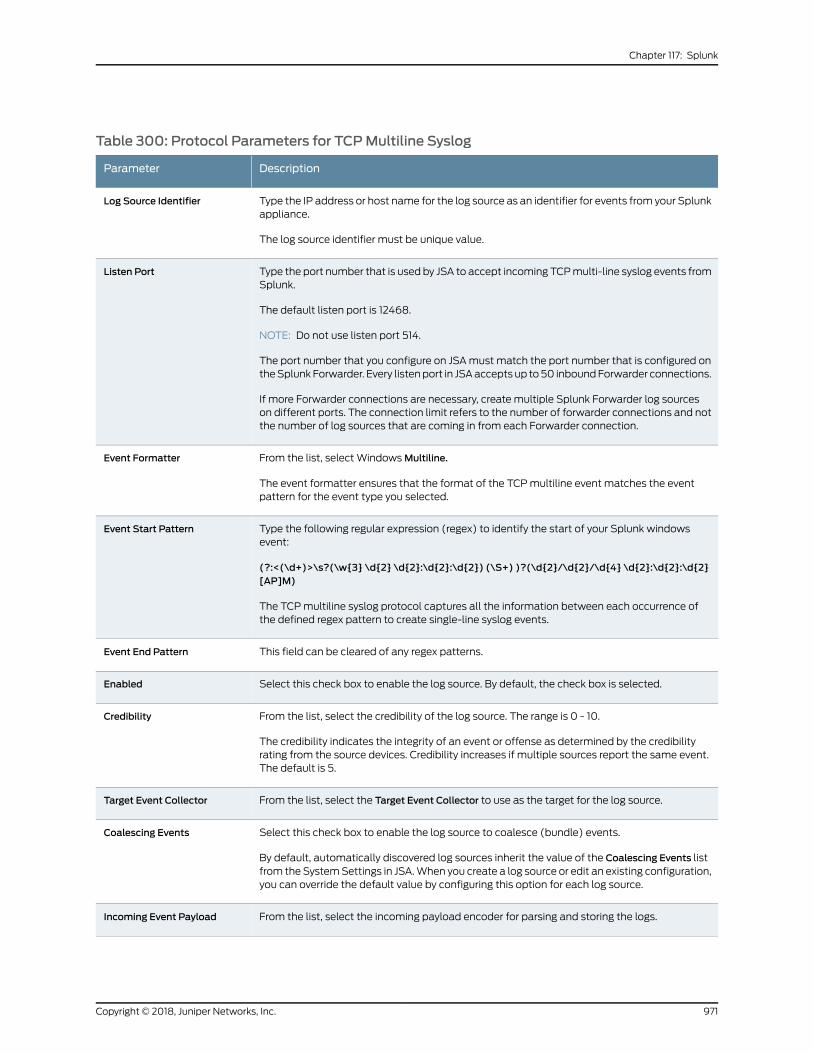
Table 300: Protocol Parameters for TCPMultiline Syslog
DescriptionParameter
Type the IP address or host name for the log source as an identifier for events from your Splunkappliance.
The log source identifier must be unique value.
Log Source Identifier
Type the port number that is used by JSA to accept incoming TCPmulti-line syslog events fromSplunk.
The default listen port is 12468.
NOTE: Do not use listen port 514.
The port number that you configure on JSAmust match the port number that is configured ontheSplunk Forwarder. Every listenport in JSAaccepts up to50 inboundForwarder connections.
If more Forwarder connections are necessary, create multiple Splunk Forwarder log sourceson different ports. The connection limit refers to the number of forwarder connections and notthe number of log sources that are coming in from each Forwarder connection.
Listen Port
From the list, select WindowsMultiline.
The event formatter ensures that the format of the TCPmultiline event matches the eventpattern for the event type you selected.
Event Formatter
Type the following regular expression (regex) to identify the start of your Splunk windowsevent:
(?:<(\d+)>\s?(\w{3} \d{2} \d{2}:\d{2}:\d{2}) (\S+) )?(\d{2}/\d{2}/\d{4} \d{2}:\d{2}:\d{2}[AP]M)
The TCPmultiline syslog protocol captures all the information between each occurrence ofthe defined regex pattern to create single-line syslog events.
Event Start Pattern
This field can be cleared of any regex patterns.Event End Pattern
Select this check box to enable the log source. By default, the check box is selected.Enabled
From the list, select the credibility of the log source. The range is 0 - 10.
The credibility indicates the integrity of an event or offense as determined by the credibilityrating from the source devices. Credibility increases if multiple sources report the same event.The default is 5.
Credibility
From the list, select the Target Event Collector to use as the target for the log source.Target Event Collector
Select this check box to enable the log source to coalesce (bundle) events.
By default, automatically discovered log sources inherit the value of the Coalescing Events listfrom the SystemSettings in JSA.When you create a log source or edit an existing configuration,you can override the default value by configuring this option for each log source.
Coalescing Events
From the list, select the incoming payload encoder for parsing and storing the logs.Incoming Event Payload
971Copyright © 2018, Juniper Networks, Inc.
Chapter 117: Splunk
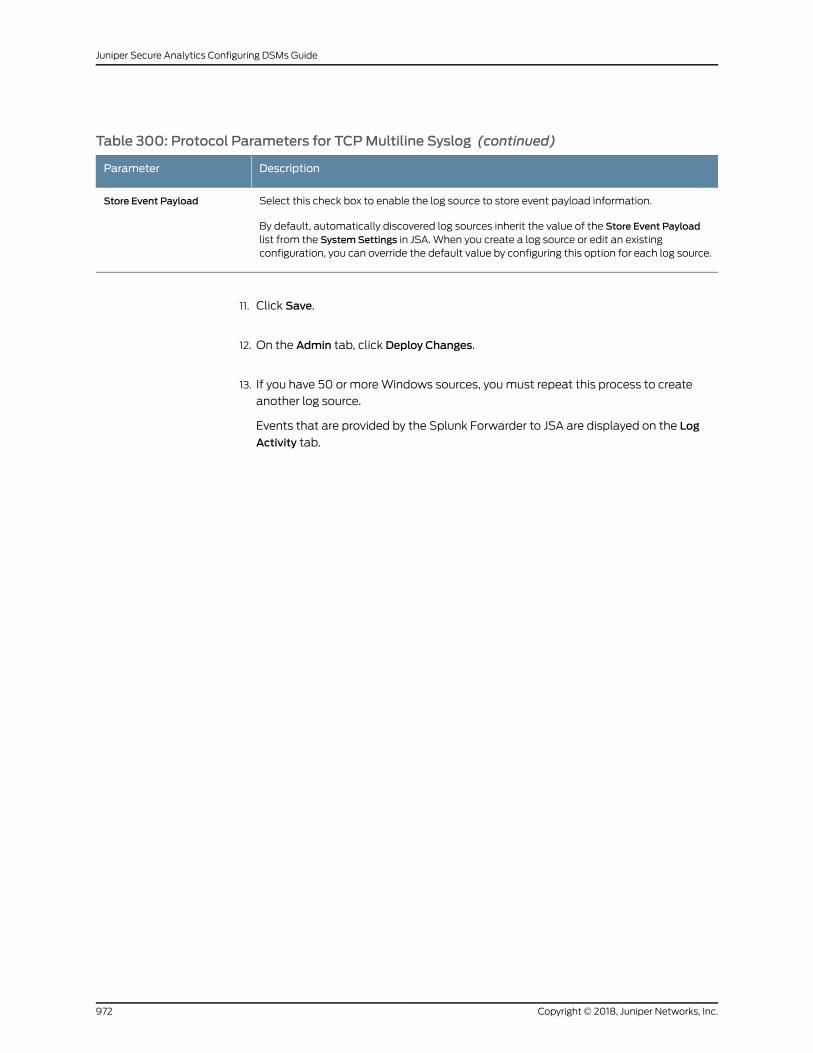
Table 300: Protocol Parameters for TCPMultiline Syslog (continued)
DescriptionParameter
Select this check box to enable the log source to store event payload information.
By default, automatically discovered log sources inherit the value of the Store Event Payloadlist from the SystemSettings in JSA. When you create a log source or edit an existingconfiguration, you can override the default value by configuring this option for each log source.
Store Event Payload
11. Click Save.
12. On the Admin tab, click Deploy Changes.
13. If you have 50 or moreWindows sources, youmust repeat this process to create
another log source.
Events that are provided by the Splunk Forwarder to JSA are displayed on the Log
Activity tab.
Copyright © 2018, Juniper Networks, Inc.972
Juniper Secure Analytics Configuring DSMs Guide
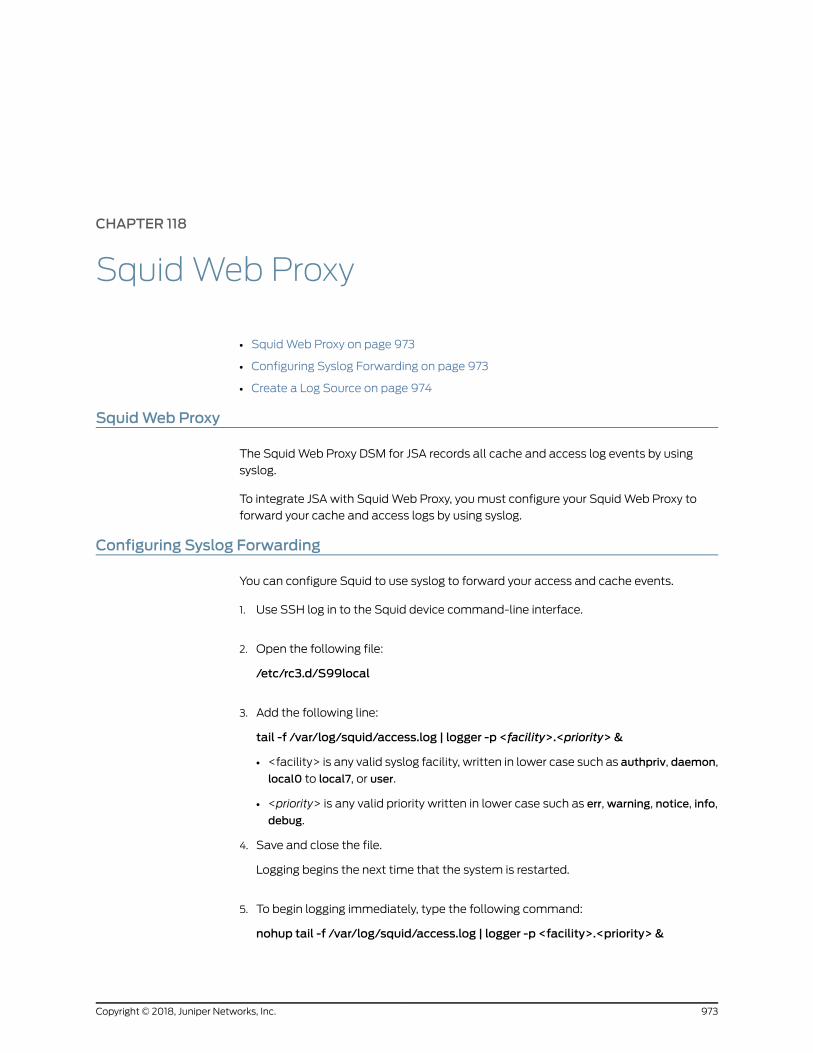
CHAPTER 118
SquidWeb Proxy
• SquidWeb Proxy on page 973
• Configuring Syslog Forwarding on page 973
• Create a Log Source on page 974
SquidWeb Proxy
The SquidWeb Proxy DSM for JSA records all cache and access log events by using
syslog.
To integrate JSA with SquidWeb Proxy, youmust configure your SquidWeb Proxy to
forward your cache and access logs by using syslog.
Configuring Syslog Forwarding
You can configure Squid to use syslog to forward your access and cache events.
1. Use SSH log in to the Squid device command-line interface.
2. Open the following file:
/etc/rc3.d/S99local
3. Add the following line:
tail -f /var/log/squid/access.log | logger -p <facility>.<priority>&
• <facility> is any valid syslog facility, written in lower case such as authpriv, daemon,
local0 to local7, or user.
• <priority> is any valid priority written in lower case such as err,warning, notice, info,
debug.
4. Save and close the file.
Logging begins the next time that the system is restarted.
5. To begin logging immediately, type the following command:
nohup tail -f /var/log/squid/access.log | logger -p <facility>.<priority> &
973Copyright © 2018, Juniper Networks, Inc.
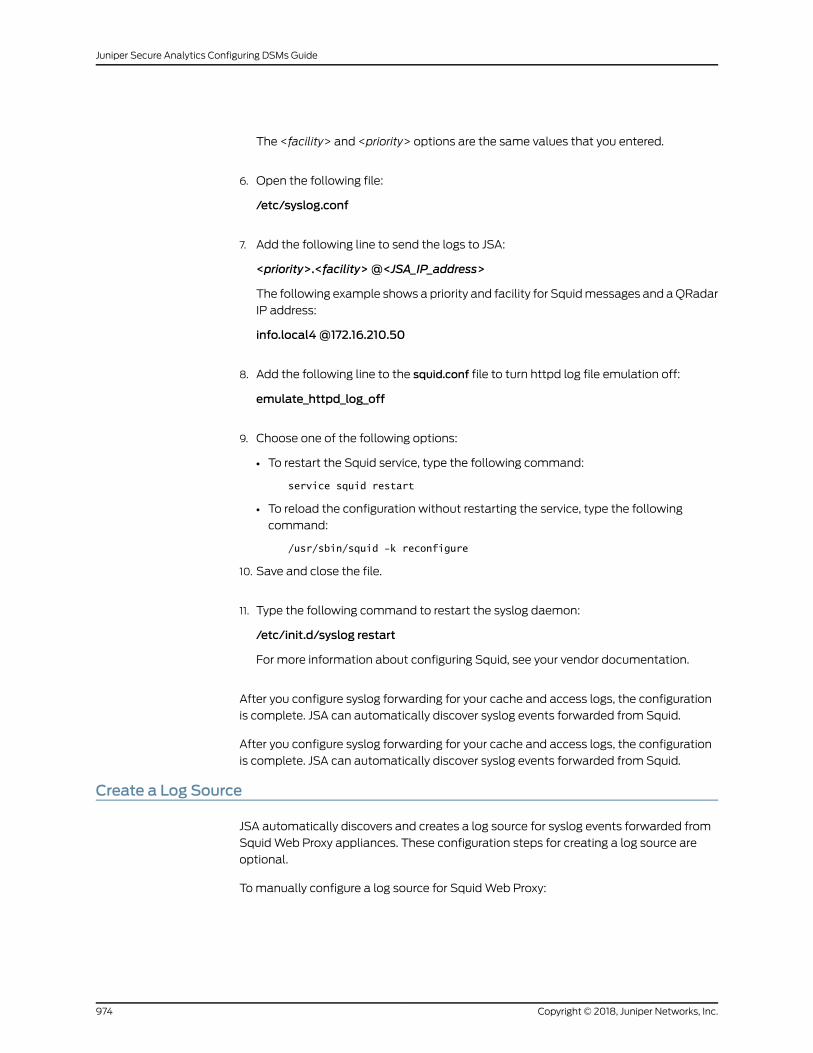
The <facility> and <priority> options are the same values that you entered.
6. Open the following file:
/etc/syslog.conf
7. Add the following line to send the logs to JSA:
<priority>.<facility>@<JSA_IP_address>
The following example shows a priority and facility for Squidmessages and aQRadar
IP address:
8. Add the following line to the squid.conf file to turn httpd log file emulation off:
emulate_httpd_log_off
9. Choose one of the following options:
• To restart the Squid service, type the following command:
service squid restart
• To reload the configuration without restarting the service, type the following
command:
/usr/sbin/squid -k reconfigure
10. Save and close the file.
11. Type the following command to restart the syslog daemon:
/etc/init.d/syslog restart
For more information about configuring Squid, see your vendor documentation.
After you configure syslog forwarding for your cache and access logs, the configuration
is complete. JSA can automatically discover syslog events forwarded from Squid.
After you configure syslog forwarding for your cache and access logs, the configuration
is complete. JSA can automatically discover syslog events forwarded from Squid.
Create a Log Source
JSA automatically discovers and creates a log source for syslog events forwarded from
SquidWeb Proxy appliances. These configuration steps for creating a log source are
optional.
To manually configure a log source for SquidWeb Proxy:
Copyright © 2018, Juniper Networks, Inc.974
Juniper Secure Analytics Configuring DSMs Guide
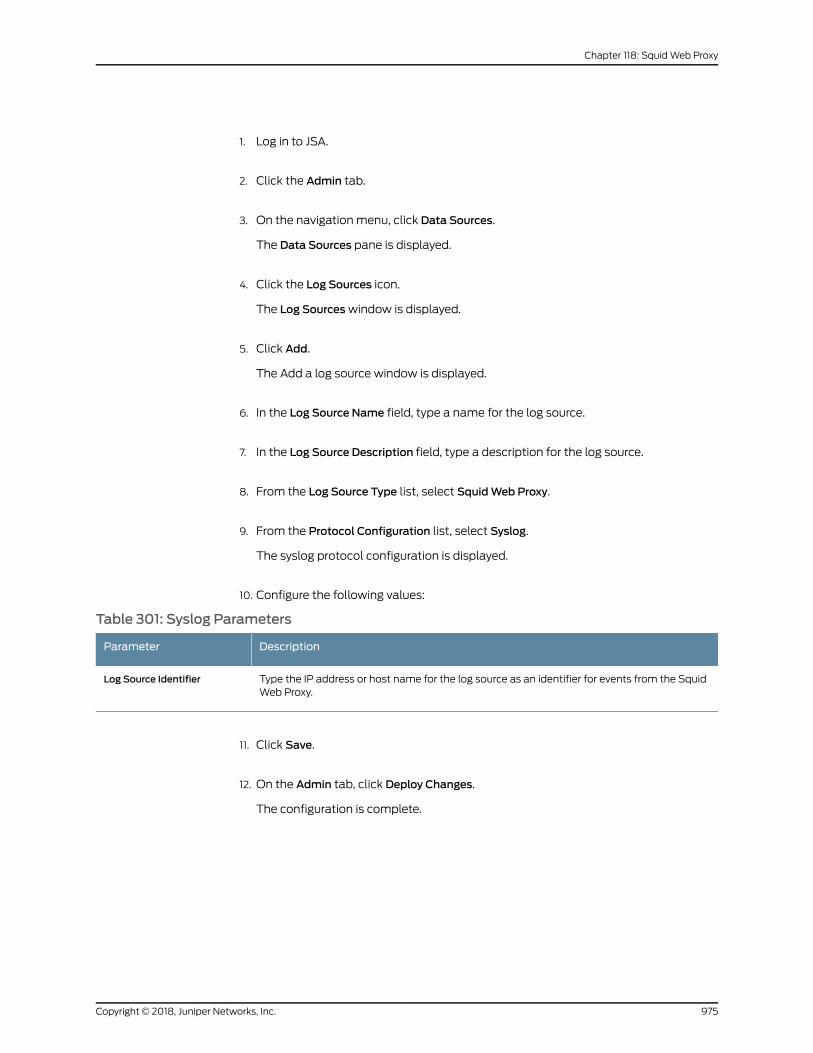
1. Log in to JSA.
2. Click the Admin tab.
3. On the navigation menu, click Data Sources.
The Data Sources pane is displayed.
4. Click the Log Sources icon.
The Log Sourceswindow is displayed.
5. Click Add.
The Add a log source window is displayed.
6. In the Log Source Name field, type a name for the log source.
7. In the Log Source Description field, type a description for the log source.
8. From the Log Source Type list, select SquidWeb Proxy.
9. From the Protocol Configuration list, select Syslog.
The syslog protocol configuration is displayed.
10. Configure the following values:
Table 301: Syslog Parameters
DescriptionParameter
Type the IP address or host name for the log source as an identifier for events from the SquidWeb Proxy.
Log Source Identifier
11. Click Save.
12. On the Admin tab, click Deploy Changes.
The configuration is complete.
975Copyright © 2018, Juniper Networks, Inc.
Chapter 118: SquidWeb Proxy

Copyright © 2018, Juniper Networks, Inc.976
Juniper Secure Analytics Configuring DSMs Guide
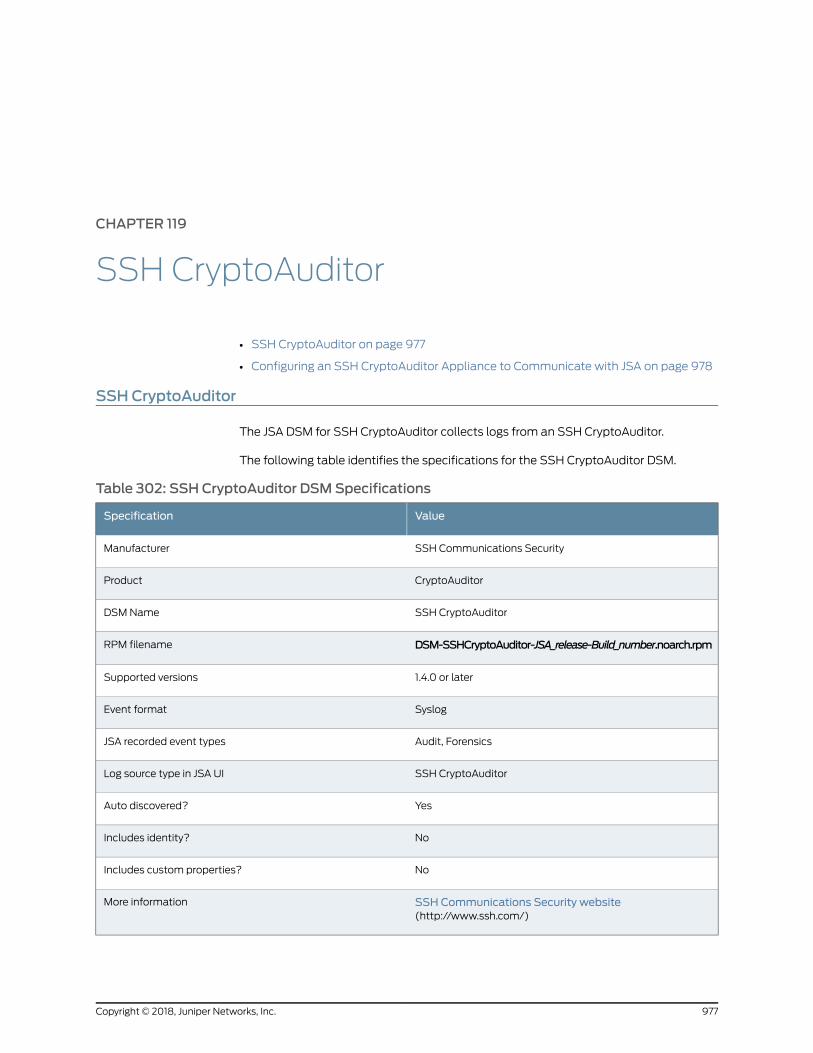
CHAPTER 119
SSH CryptoAuditor
• SSH CryptoAuditor on page 977
• Configuring an SSH CryptoAuditor Appliance to Communicate with JSA on page 978
SSH CryptoAuditor
The JSA DSM for SSH CryptoAuditor collects logs from an SSH CryptoAuditor.
The following table identifies the specifications for the SSH CryptoAuditor DSM.
Table 302: SSH CryptoAuditor DSMSpecifications
ValueSpecification
SSH Communications SecurityManufacturer
CryptoAuditorProduct
SSH CryptoAuditorDSM Name
DSM-SSHCryptoAuditor-JSA_release-Build_number.noarch.rpmRPM filename
1.4.0 or laterSupported versions
SyslogEvent format
Audit, ForensicsJSA recorded event types
SSH CryptoAuditorLog source type in JSA UI
YesAuto discovered?
NoIncludes identity?
NoIncludes custom properties?
SSH Communications Security website(http://www.ssh.com/)
More information
977Copyright © 2018, Juniper Networks, Inc.
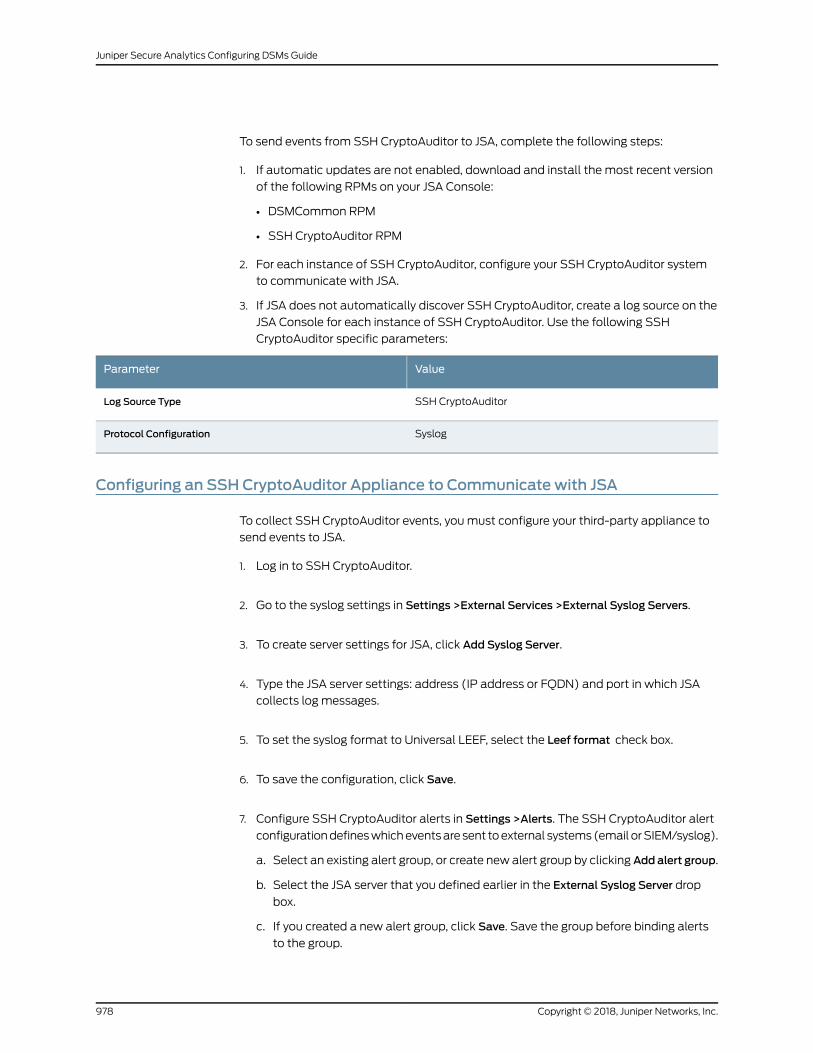
To send events from SSH CryptoAuditor to JSA, complete the following steps:
1. If automatic updates are not enabled, download and install the most recent version
of the following RPMs on your JSA Console:
• DSMCommon RPM
• SSH CryptoAuditor RPM
2. For each instance of SSH CryptoAuditor, configure your SSH CryptoAuditor system
to communicate with JSA.
3. If JSA does not automatically discover SSH CryptoAuditor, create a log source on the
JSA Console for each instance of SSH CryptoAuditor. Use the following SSH
CryptoAuditor specific parameters:
ValueParameter
SSH CryptoAuditorLog Source Type
SyslogProtocol Configuration
Configuring an SSH CryptoAuditor Appliance to Communicate with JSA
To collect SSH CryptoAuditor events, youmust configure your third-party appliance to
send events to JSA.
1. Log in to SSH CryptoAuditor.
2. Go to the syslog settings in Settings >External Services >External Syslog Servers.
3. To create server settings for JSA, click Add Syslog Server.
4. Type the JSA server settings: address (IP address or FQDN) and port in which JSA
collects log messages.
5. To set the syslog format to Universal LEEF, select the Leef format check box.
6. To save the configuration, click Save.
7. Configure SSH CryptoAuditor alerts in Settings >Alerts. The SSH CryptoAuditor alert
configurationdefineswhicheventsaresent toexternal systems(email orSIEM/syslog).
a. Select an existing alert group, or create new alert group by clickingAddalert group.
b. Select the JSA server that you defined earlier in the External Syslog Server drop
box.
c. If you created a new alert group, click Save. Save the group before binding alerts
to the group.
Copyright © 2018, Juniper Networks, Inc.978
Juniper Secure Analytics Configuring DSMs Guide
d. Define which alerts are sent to JSA by binding alerts to the alert group. Click [+]
next to the alert that youwant to collect in JSA, and select the alert group that has
JSA as external syslog server. Repeat this step for each alert that you want to
collect in JSA.
e. Click Save.
8. Apply the pending configuration changes. The saved configuration changes do not
take effect until you apply them from pending state.
979Copyright © 2018, Juniper Networks, Inc.
Chapter 119: SSH CryptoAuditor

Copyright © 2018, Juniper Networks, Inc.980
Juniper Secure Analytics Configuring DSMs Guide
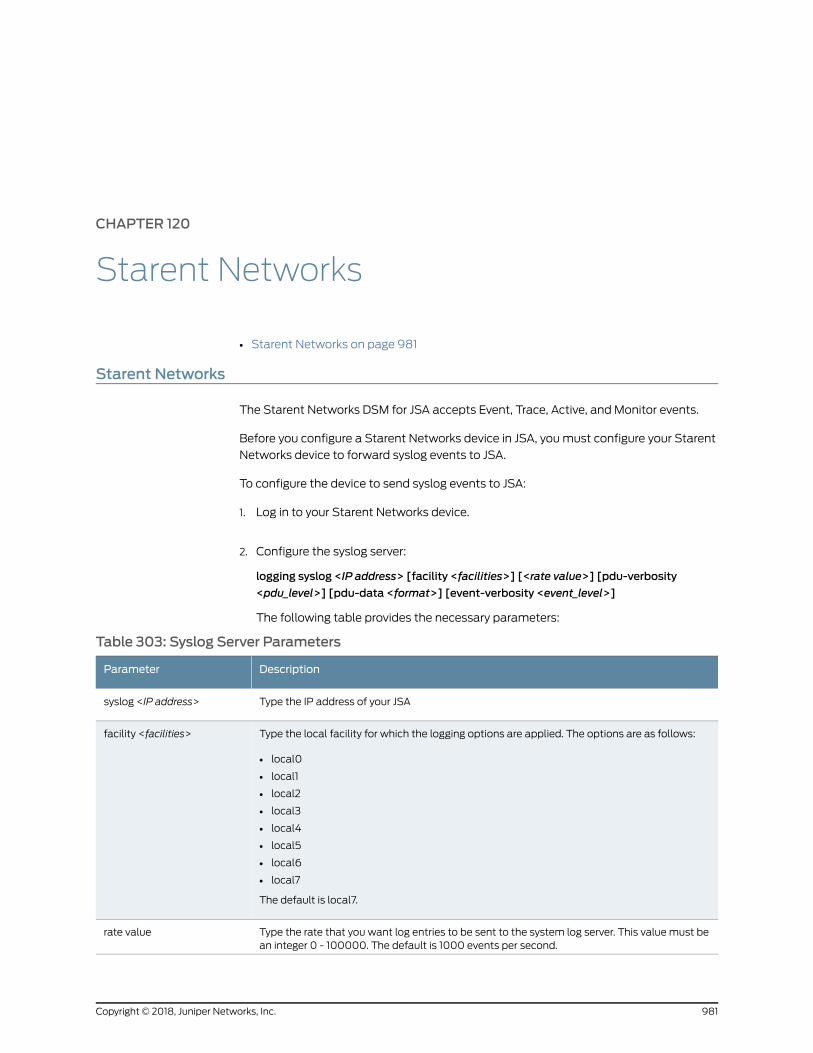
CHAPTER 120
Starent Networks
• Starent Networks on page 981
Starent Networks
The Starent Networks DSM for JSA accepts Event, Trace, Active, and Monitor events.
Before you configure a Starent Networks device in JSA, youmust configure your Starent
Networks device to forward syslog events to JSA.
To configure the device to send syslog events to JSA:
1. Log in to your Starent Networks device.
2. Configure the syslog server:
logging syslog <IP address> [facility <facilities>] [<rate value>] [pdu-verbosity
<pdu_level>] [pdu-data <format>] [event-verbosity <event_level>]
The following table provides the necessary parameters:
Table 303: Syslog Server Parameters
DescriptionParameter
Type the IP address of your JSAsyslog <IP address>
Type the local facility for which the logging options are applied. The options are as follows:
• local0
• local1
• local2
• local3
• local4
• local5
• local6
• local7
The default is local7.
facility <facilities>
Type the rate that you want log entries to be sent to the system log server. This value must bean integer 0 - 100000. The default is 1000 events per second.
rate value
981Copyright © 2018, Juniper Networks, Inc.
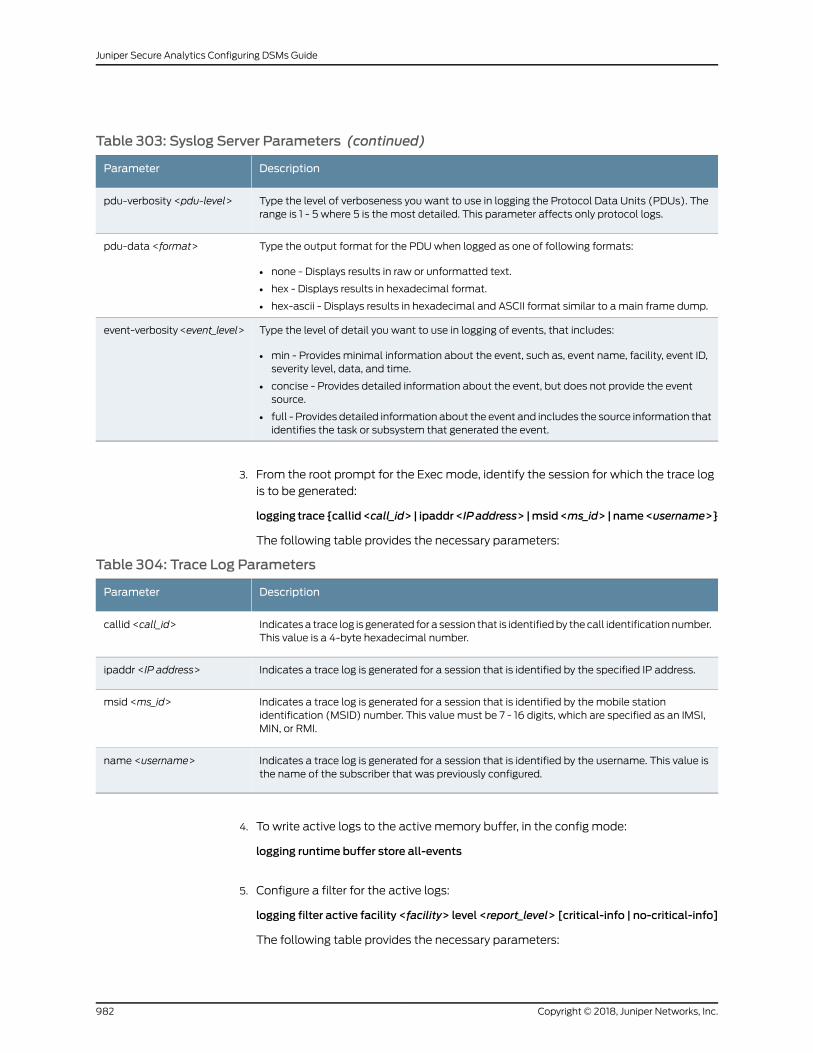
Table 303: Syslog Server Parameters (continued)
DescriptionParameter
Type the level of verboseness you want to use in logging the Protocol Data Units (PDUs). Therange is 1 - 5 where 5 is the most detailed. This parameter affects only protocol logs.
pdu-verbosity <pdu-level>
Type the output format for the PDUwhen logged as one of following formats:
• none - Displays results in raw or unformatted text.
• hex - Displays results in hexadecimal format.
• hex-ascii - Displays results in hexadecimal and ASCII format similar to a main frame dump.
pdu-data <format>
Type the level of detail you want to use in logging of events, that includes:
• min - Provides minimal information about the event, such as, event name, facility, event ID,severity level, data, and time.
• concise - Provides detailed information about the event, but does not provide the eventsource.
• full - Provides detailed information about the event and includes the source information thatidentifies the task or subsystem that generated the event.
event-verbosity<event_level>
3. From the root prompt for the Exec mode, identify the session for which the trace log
is to be generated:
logging trace {callid<call_id> | ipaddr<IPaddress> |msid<ms_id> |name<username>}
The following table provides the necessary parameters:
Table 304: Trace Log Parameters
DescriptionParameter
Indicatesa trace log is generated for a session that is identifiedby thecall identificationnumber.This value is a 4-byte hexadecimal number.
callid <call_id>
Indicates a trace log is generated for a session that is identified by the specified IP address.ipaddr <IP address>
Indicates a trace log is generated for a session that is identified by the mobile stationidentification (MSID) number. This value must be 7 - 16 digits, which are specified as an IMSI,MIN, or RMI.
msid <ms_id>
Indicates a trace log is generated for a session that is identified by the username. This value isthe name of the subscriber that was previously configured.
name <username>
4. To write active logs to the active memory buffer, in the config mode:
logging runtime buffer store all-events
5. Configure a filter for the active logs:
logging filter active facility <facility> level <report_level> [critical-info | no-critical-info]
The following table provides the necessary parameters:
Copyright © 2018, Juniper Networks, Inc.982
Juniper Secure Analytics Configuring DSMs Guide

Table 305: Active Log Parameters
DescriptionParameter
Type the facility message level. A facility is a protocol or task that is in use by the system. Thelocal facility defineswhich loggingoptionsareapplied for processes that run locally. Theoptionsare as follows:
• local0
• local1
• local2
• local3
• local4
• local5
• local6
• local7
The default is local7.
facility <facility>
Type the log severity level, including:
• critical - Logs only those events that indicate a serious error is occurring and that is causingthe system or a system component to cease functioning. Critical is the highest level severity.
• error - Logs events that indicate an error is occurring that is causing the system or a systemcomponent to operate in a degraded state. This level also logs events with a higher severitylevel.
• warning - Logs events that can indicate a potential problem. This level also logs events witha higher severity level.
• unusual - Logs events that are unusual andmight need to be investigated. This level alsologs events with a higher severity level.
• info - Logs informational events and events with a higher severity level.
• debug - Logs all events regardless of the severity.
It is suggested that a level of error or critical can be configured to maximize the value of thelogged information and lower the quantity of logs that are generated.
level <report_level>
The critical-info parameter identifies and displays events with a category attribute of criticalinformation. Examples of these types of events can be seen at bootupwhen systemprocessesor tasks are being initiated.
critical-info
The no-critical-info parameter specifies that events with a category attribute of criticalinformation are not displayed.
no-critical-info
6. Configure the monitor log targets:
loggingmonitor {msid <ms_id>|username <username>}
The following table provides the necessary parameters:
983Copyright © 2018, Juniper Networks, Inc.
Chapter 120: Starent Networks
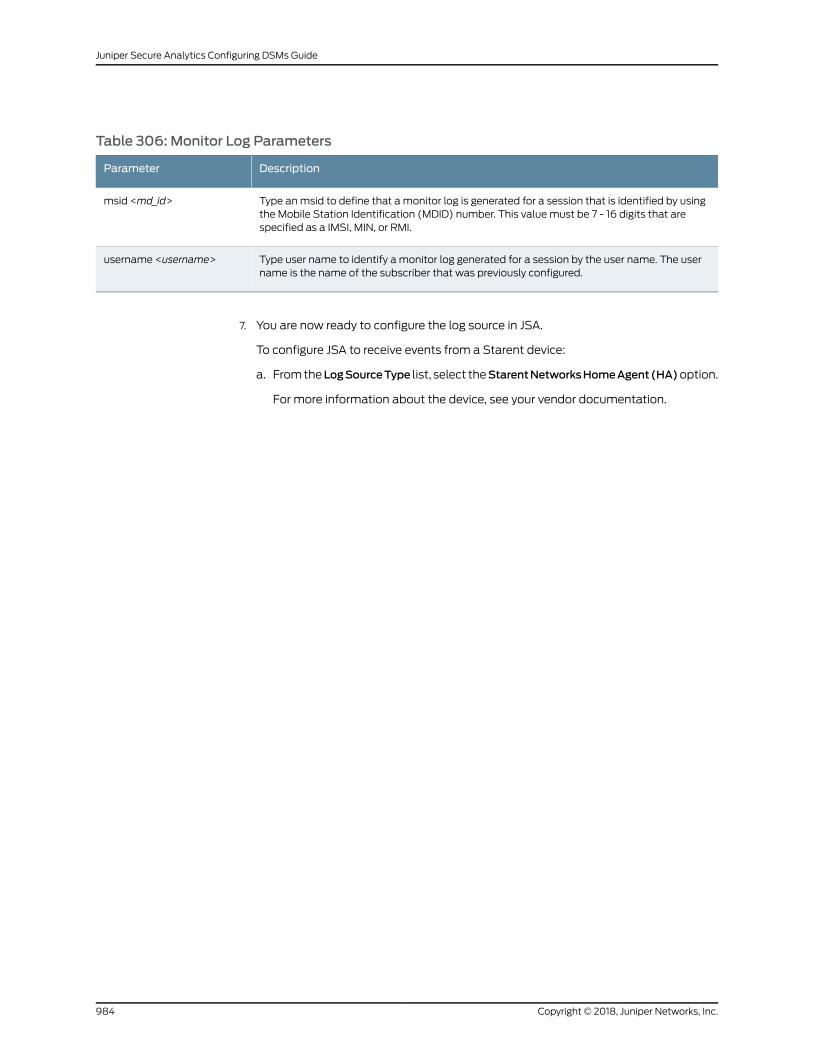
Table 306: Monitor Log Parameters
DescriptionParameter
Type anmsid to define that a monitor log is generated for a session that is identified by usingthe Mobile Station Identification (MDID) number. This value must be 7 - 16 digits that arespecified as a IMSI, MIN, or RMI.
msid <md_id>
Type user name to identify a monitor log generated for a session by the user name. The username is the name of the subscriber that was previously configured.
username <username>
7. You are now ready to configure the log source in JSA.
To configure JSA to receive events from a Starent device:
a. FromtheLogSourceType list, select theStarentNetworksHomeAgent(HA)option.
For more information about the device, see your vendor documentation.
Copyright © 2018, Juniper Networks, Inc.984
Juniper Secure Analytics Configuring DSMs Guide
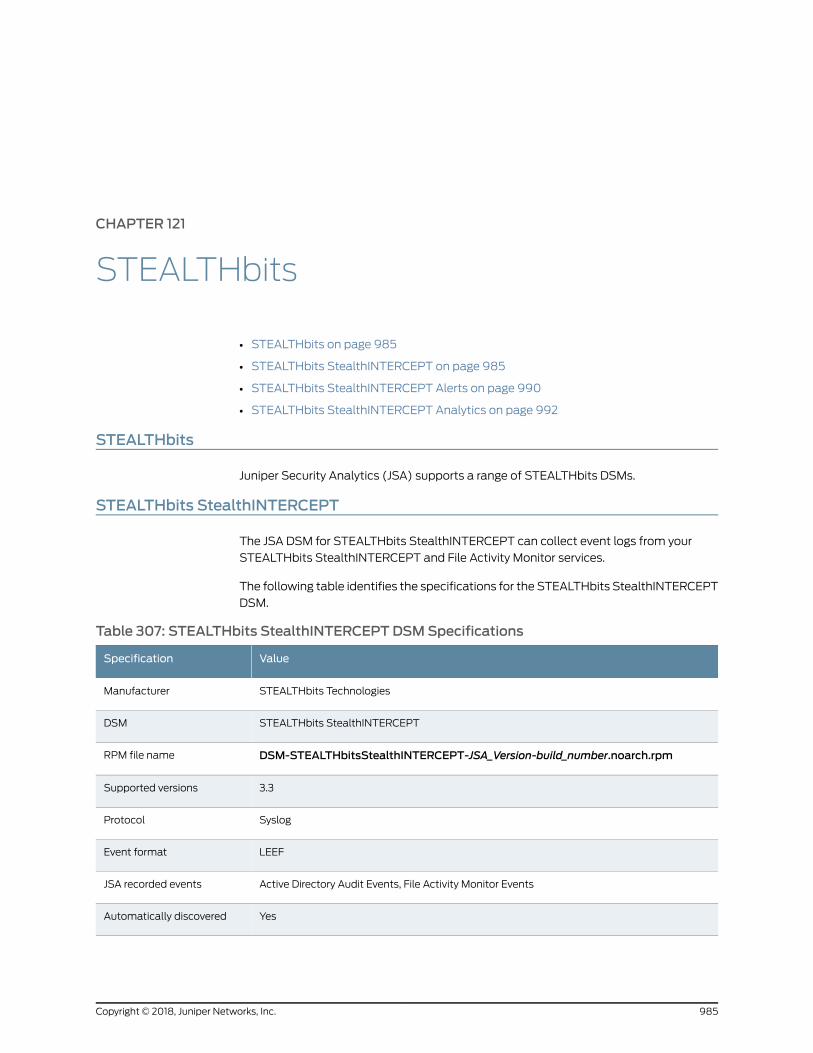
CHAPTER 121
STEALTHbits
• STEALTHbits on page 985
• STEALTHbits StealthINTERCEPT on page 985
• STEALTHbits StealthINTERCEPT Alerts on page 990
• STEALTHbits StealthINTERCEPT Analytics on page 992
STEALTHbits
Juniper Security Analytics (JSA) supports a range of STEALTHbits DSMs.
STEALTHbits StealthINTERCEPT
The JSA DSM for STEALTHbits StealthINTERCEPT can collect event logs from your
STEALTHbits StealthINTERCEPT and File Activity Monitor services.
The following table identifies the specifications for the STEALTHbits StealthINTERCEPT
DSM.
Table 307: STEALTHbits StealthINTERCEPT DSMSpecifications
ValueSpecification
STEALTHbits TechnologiesManufacturer
STEALTHbits StealthINTERCEPTDSM
DSM-STEALTHbitsStealthINTERCEPT-JSA_Version-build_number.noarch.rpmRPM file name
3.3Supported versions
SyslogProtocol
LEEFEvent format
Active Directory Audit Events, File Activity Monitor EventsJSA recorded events
YesAutomatically discovered
985Copyright © 2018, Juniper Networks, Inc.
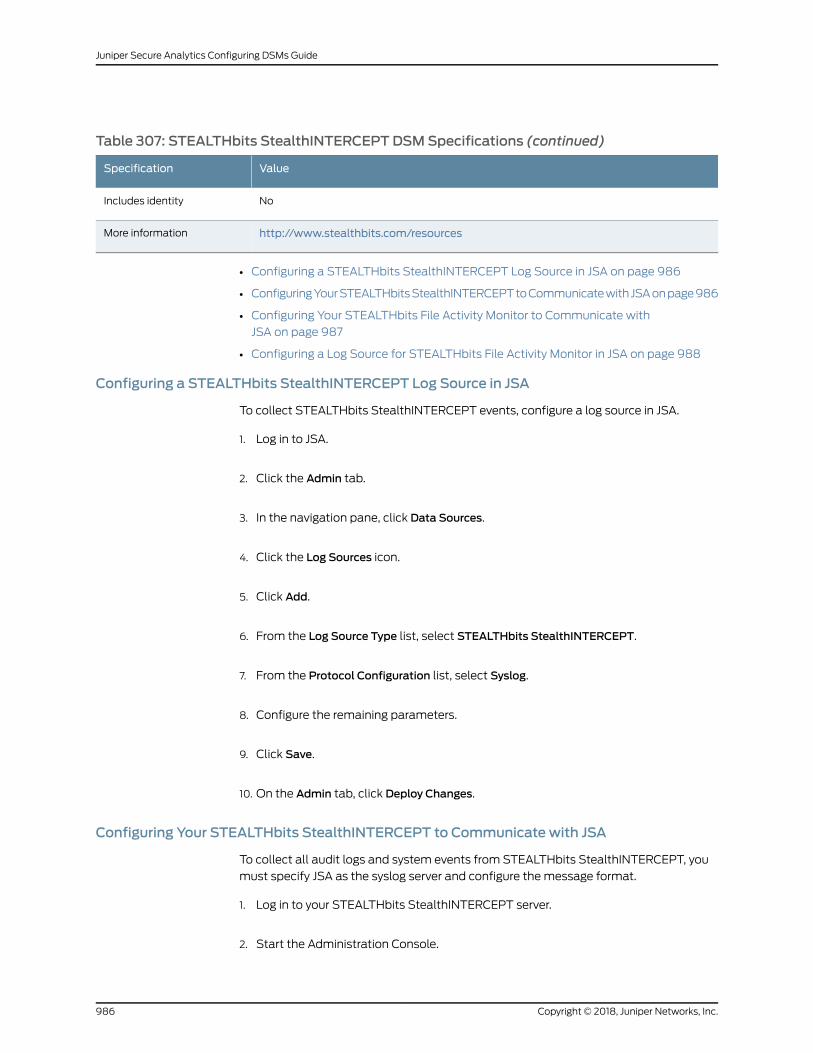
Table 307: STEALTHbits StealthINTERCEPT DSMSpecifications (continued)
ValueSpecification
NoIncludes identity
http://www.stealthbits.com/resourcesMore information
• Configuring a STEALTHbits StealthINTERCEPT Log Source in JSA on page 986
• ConfiguringYourSTEALTHbitsStealthINTERCEPTtoCommunicatewithJSAonpage986
• Configuring Your STEALTHbits File Activity Monitor to Communicate with
JSA on page 987
• Configuring a Log Source for STEALTHbits File Activity Monitor in JSA on page 988
Configuring a STEALTHbits StealthINTERCEPT Log Source in JSA
To collect STEALTHbits StealthINTERCEPT events, configure a log source in JSA.
1. Log in to JSA.
2. Click the Admin tab.
3. In the navigation pane, click Data Sources.
4. Click the Log Sources icon.
5. Click Add.
6. From the Log Source Type list, select STEALTHbits StealthINTERCEPT.
7. From the Protocol Configuration list, select Syslog.
8. Configure the remaining parameters.
9. Click Save.
10. On the Admin tab, click Deploy Changes.
Configuring Your STEALTHbits StealthINTERCEPT to Communicate with JSA
To collect all audit logs and system events from STEALTHbits StealthINTERCEPT, you
must specify JSA as the syslog server and configure the message format.
1. Log in to your STEALTHbits StealthINTERCEPT server.
2. Start the Administration Console.
Copyright © 2018, Juniper Networks, Inc.986
Juniper Secure Analytics Configuring DSMs Guide
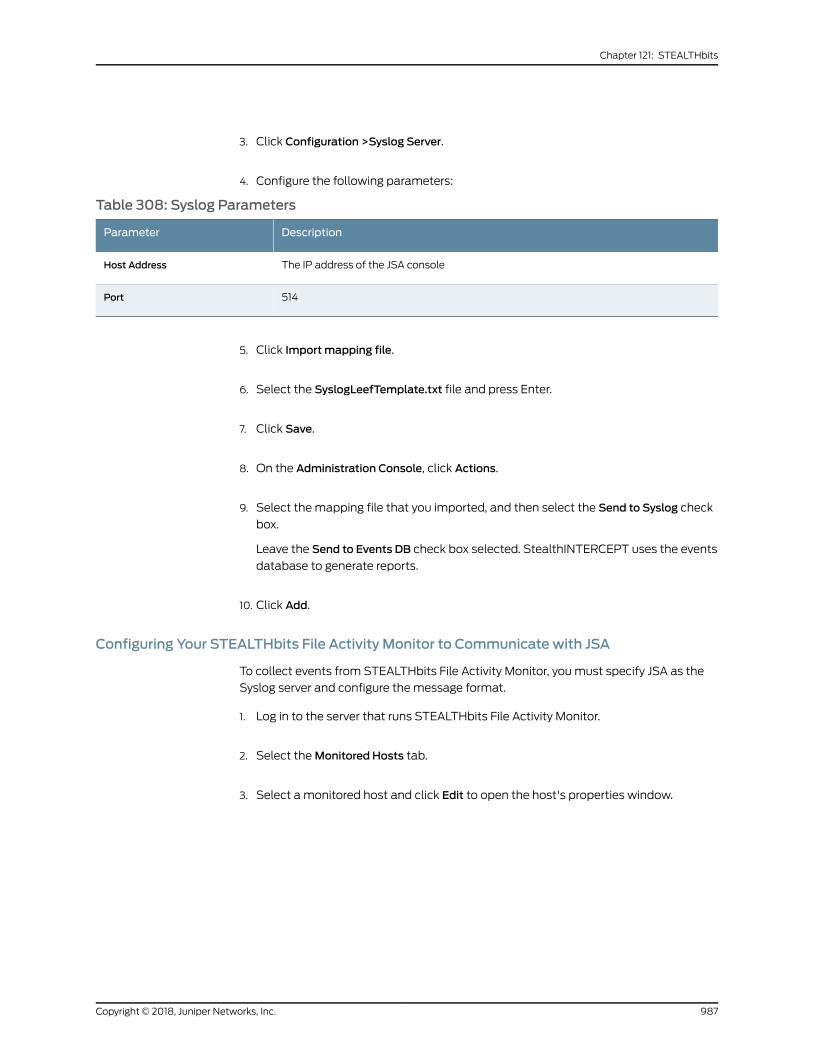
3. Click Configuration >Syslog Server.
4. Configure the following parameters:
Table 308: Syslog Parameters
DescriptionParameter
The IP address of the JSA consoleHost Address
514Port
5. Click Import mapping file.
6. Select the SyslogLeefTemplate.txt file and press Enter.
7. Click Save.
8. On the Administration Console, click Actions.
9. Select the mapping file that you imported, and then select the Send to Syslog check
box.
Leave the Send to Events DB check box selected. StealthINTERCEPT uses the events
database to generate reports.
10. Click Add.
Configuring Your STEALTHbits File Activity Monitor to Communicate with JSA
To collect events from STEALTHbits File Activity Monitor, you must specify JSA as the
Syslog server and configure the message format.
1. Log in to the server that runs STEALTHbits File Activity Monitor.
2. Select theMonitored Hosts tab.
3. Select a monitored host and click Edit to open the host's properties window.
987Copyright © 2018, Juniper Networks, Inc.
Chapter 121: STEALTHbits
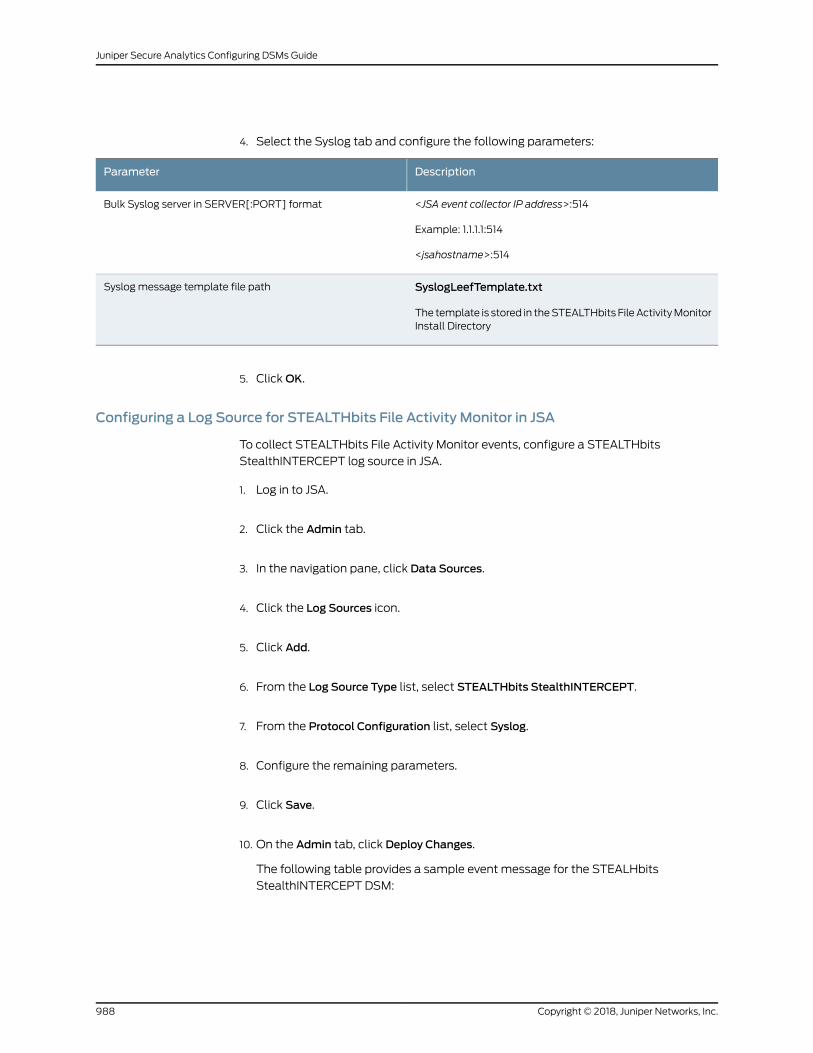
4. Select the Syslog tab and configure the following parameters:
DescriptionParameter
<JSA event collector IP address>:514
Example: 1.1.1.1:514
<jsahostname>:514
Bulk Syslog server in SERVER[:PORT] format
SyslogLeefTemplate.txt
The template is stored in theSTEALTHbits FileActivityMonitorInstall Directory
Syslog message template file path
5. ClickOK.
Configuring a Log Source for STEALTHbits File Activity Monitor in JSA
To collect STEALTHbits File Activity Monitor events, configure a STEALTHbits
StealthINTERCEPT log source in JSA.
1. Log in to JSA.
2. Click the Admin tab.
3. In the navigation pane, click Data Sources.
4. Click the Log Sources icon.
5. Click Add.
6. From the Log Source Type list, select STEALTHbits StealthINTERCEPT.
7. From the Protocol Configuration list, select Syslog.
8. Configure the remaining parameters.
9. Click Save.
10. On the Admin tab, click Deploy Changes.
The following table provides a sample event message for the STEALHbits
StealthINTERCEPT DSM:
Copyright © 2018, Juniper Networks, Inc.988
Juniper Secure Analytics Configuring DSMs Guide
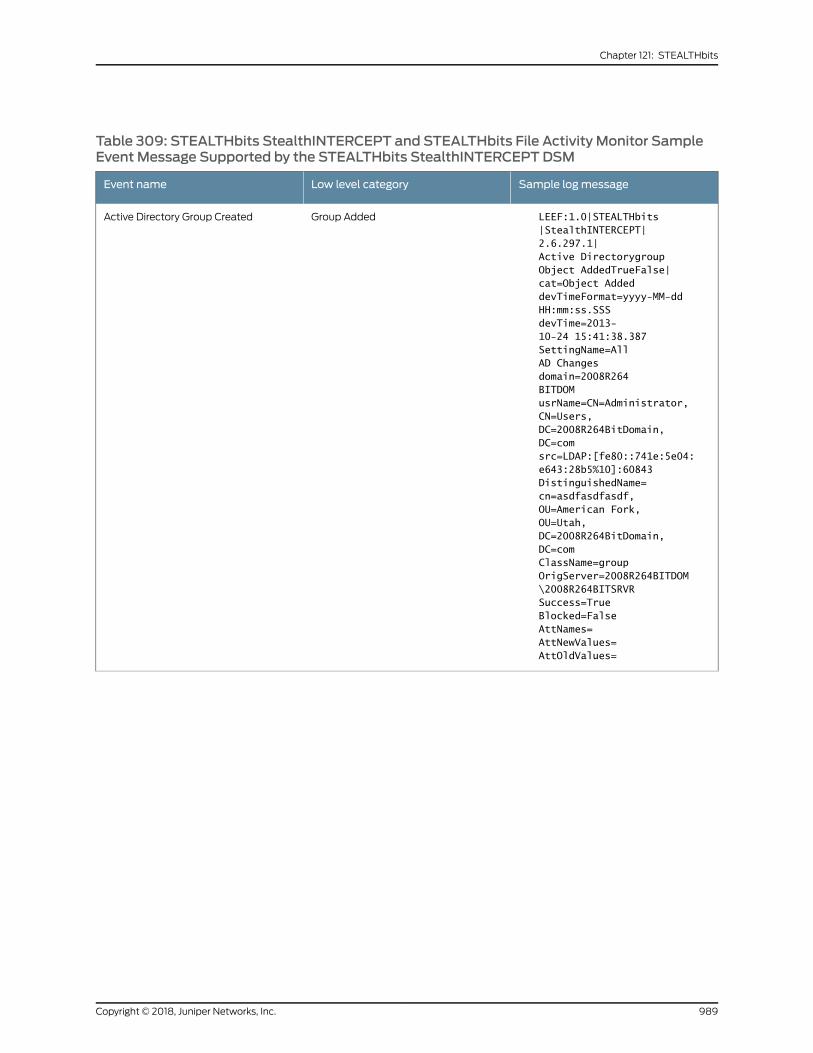
Table 309: STEALTHbits StealthINTERCEPT and STEALTHbits File Activity Monitor SampleEvent Message Supported by the STEALTHbits StealthINTERCEPT DSM
Sample logmessageLow level categoryEvent name
LEEF:1.0|STEALTHbits|StealthINTERCEPT|2.6.297.1|Active DirectorygroupObject AddedTrueFalse|cat=Object AddeddevTimeFormat=yyyy-MM-dd HH:mm:ss.SSS devTime=2013-10-24 15:41:38.387 SettingName=All AD Changes domain=2008R264BITDOM usrName=CN=Administrator,CN=Users,DC=2008R264BitDomain,DC=comsrc=LDAP:[fe80::741e:5e04:e643:28b5%10]:60843 DistinguishedName=cn=asdfasdfasdf,OU=American Fork,OU=Utah,DC=2008R264BitDomain,DC=com ClassName=group OrigServer=2008R264BITDOM\2008R264BITSRVR Success=True Blocked=False AttNames= AttNewValues= AttOldValues=
Group AddedActive Directory Group Created
989Copyright © 2018, Juniper Networks, Inc.
Chapter 121: STEALTHbits
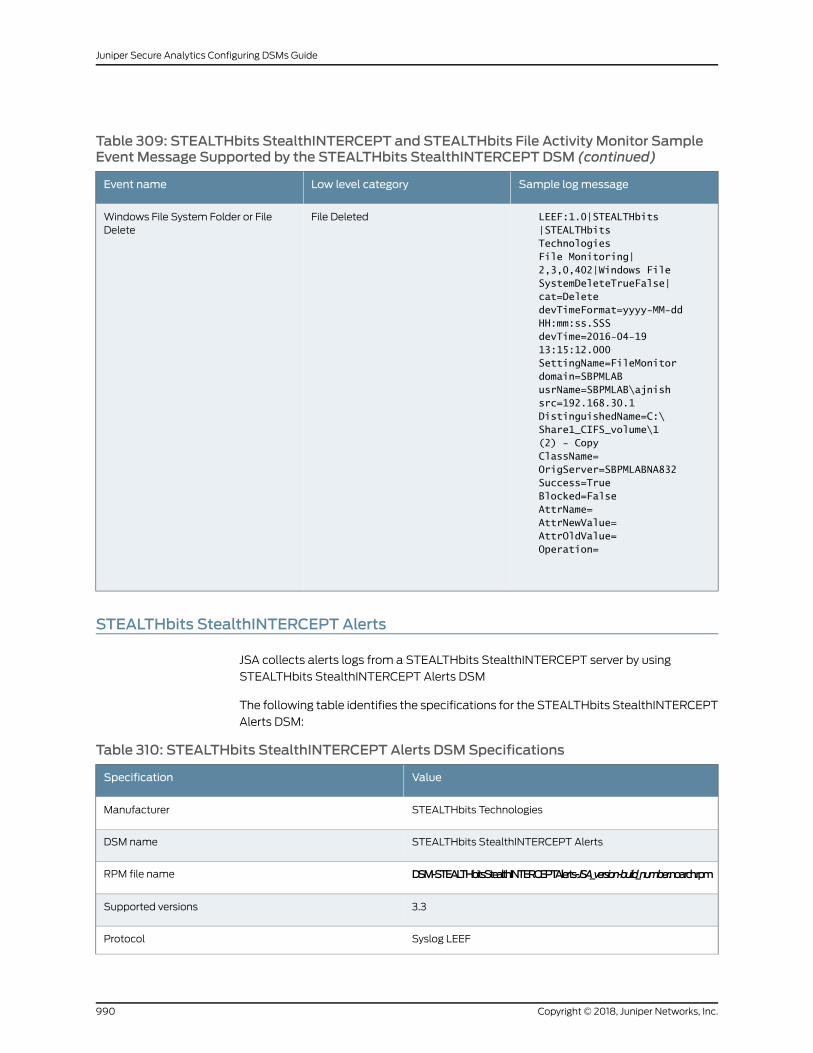
Table 309: STEALTHbits StealthINTERCEPT and STEALTHbits File Activity Monitor SampleEvent Message Supported by the STEALTHbits StealthINTERCEPT DSM (continued)
Sample logmessageLow level categoryEvent name
LEEF:1.0|STEALTHbits|STEALTHbitsTechnologies File Monitoring|2,3,0,402|Windows FileSystemDeleteTrueFalse|cat=DeletedevTimeFormat=yyyy-MM-dd HH:mm:ss.SSSdevTime=2016-04-19 13:15:12.000SettingName=FileMonitor domain=SBPMLABusrName=SBPMLAB\ajnish src=192.168.30.1 DistinguishedName=C:\Share1_CIFS_volume\1(2) - Copy ClassName=OrigServer=SBPMLABNA832Success=True Blocked=False AttrName= AttrNewValue= AttrOldValue= Operation=
File DeletedWindows File System Folder or FileDelete
STEALTHbits StealthINTERCEPT Alerts
JSA collects alerts logs from a STEALTHbits StealthINTERCEPT server by using
STEALTHbits StealthINTERCEPT Alerts DSM
The following table identifies the specifications for the STEALTHbits StealthINTERCEPT
Alerts DSM:
Table 310: STEALTHbits StealthINTERCEPT Alerts DSMSpecifications
ValueSpecification
STEALTHbits TechnologiesManufacturer
STEALTHbits StealthINTERCEPT AlertsDSM name
DSM-STEALTHbitsStealthINTERCEPTAlerts-JSA_version-build_number.noarch.rpmRPM file name
3.3Supported versions
Syslog LEEFProtocol
Copyright © 2018, Juniper Networks, Inc.990
Juniper Secure Analytics Configuring DSMs Guide
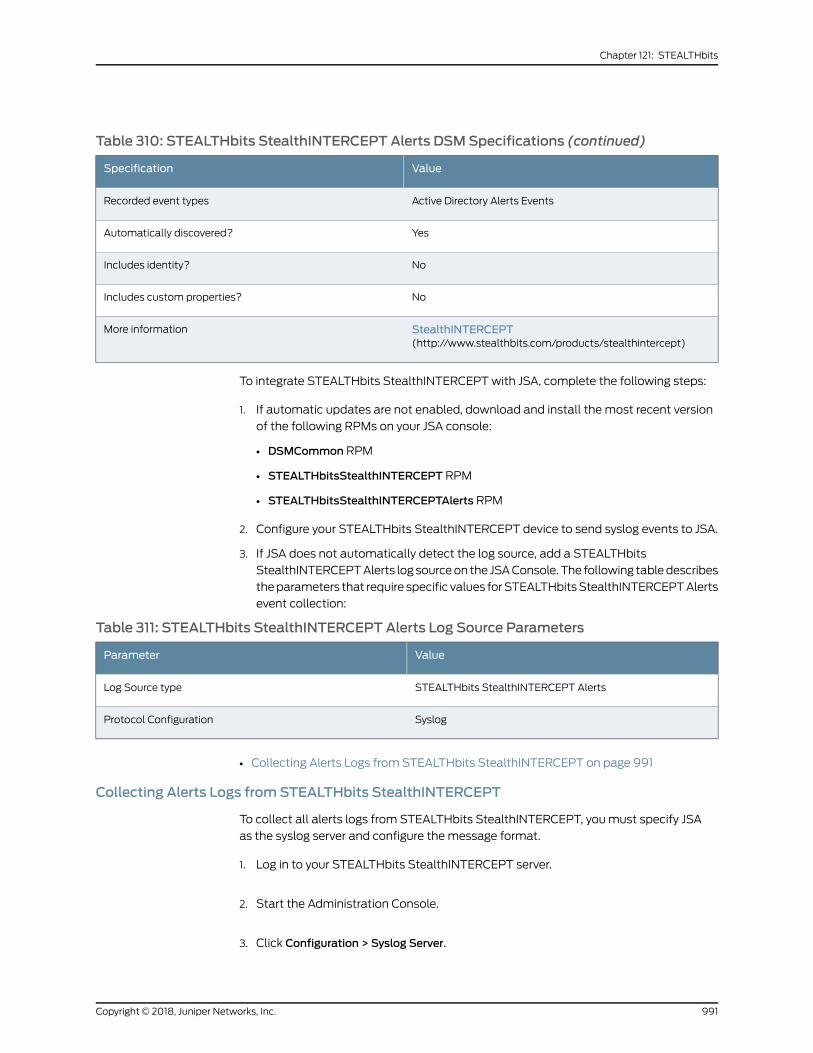
Table 310: STEALTHbits StealthINTERCEPT Alerts DSMSpecifications (continued)
ValueSpecification
Active Directory Alerts EventsRecorded event types
YesAutomatically discovered?
NoIncludes identity?
NoIncludes custom properties?
StealthINTERCEPT(http://www.stealthbits.com/products/stealthintercept)
More information
To integrate STEALTHbits StealthINTERCEPT with JSA, complete the following steps:
1. If automatic updates are not enabled, download and install the most recent version
of the following RPMs on your JSA console:
• DSMCommon RPM
• STEALTHbitsStealthINTERCEPT RPM
• STEALTHbitsStealthINTERCEPTAlerts RPM
2. Configure your STEALTHbits StealthINTERCEPT device to send syslog events to JSA.
3. If JSA does not automatically detect the log source, add a STEALTHbits
StealthINTERCEPTAlerts log sourceon the JSAConsole. The following tabledescribes
theparameters that require specific values forSTEALTHbitsStealthINTERCEPTAlerts
event collection:
Table 311: STEALTHbits StealthINTERCEPT Alerts Log Source Parameters
ValueParameter
STEALTHbits StealthINTERCEPT AlertsLog Source type
SyslogProtocol Configuration
• Collecting Alerts Logs from STEALTHbits StealthINTERCEPT on page 991
Collecting Alerts Logs from STEALTHbits StealthINTERCEPT
To collect all alerts logs from STEALTHbits StealthINTERCEPT, youmust specify JSA
as the syslog server and configure the message format.
1. Log in to your STEALTHbits StealthINTERCEPT server.
2. Start the Administration Console.
3. Click Configuration > Syslog Server.
991Copyright © 2018, Juniper Networks, Inc.
Chapter 121: STEALTHbits
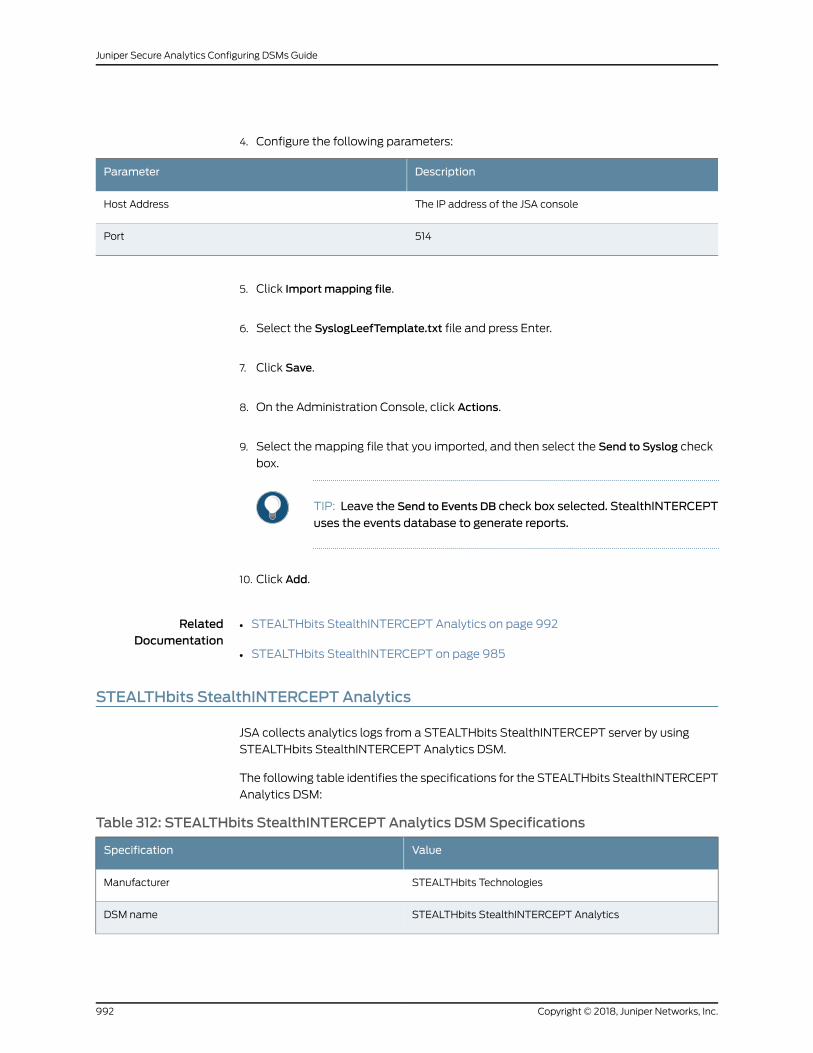
4. Configure the following parameters:
DescriptionParameter
The IP address of the JSA consoleHost Address
514Port
5. Click Import mapping file.
6. Select the SyslogLeefTemplate.txt file and press Enter.
7. Click Save.
8. On the Administration Console, click Actions.
9. Select the mapping file that you imported, and then select the Send to Syslog check
box.
TIP: Leave the Send to Events DB check box selected. StealthINTERCEPT
uses the events database to generate reports.
10. Click Add.
RelatedDocumentation
STEALTHbits StealthINTERCEPT Analytics on page 992•
• STEALTHbits StealthINTERCEPT on page 985
STEALTHbits StealthINTERCEPT Analytics
JSA collects analytics logs from a STEALTHbits StealthINTERCEPT server by using
STEALTHbits StealthINTERCEPT Analytics DSM.
The following table identifies the specifications for the STEALTHbits StealthINTERCEPT
Analytics DSM:
Table 312: STEALTHbits StealthINTERCEPT Analytics DSMSpecifications
ValueSpecification
STEALTHbits TechnologiesManufacturer
STEALTHbits StealthINTERCEPT AnalyticsDSM name
Copyright © 2018, Juniper Networks, Inc.992
Juniper Secure Analytics Configuring DSMs Guide
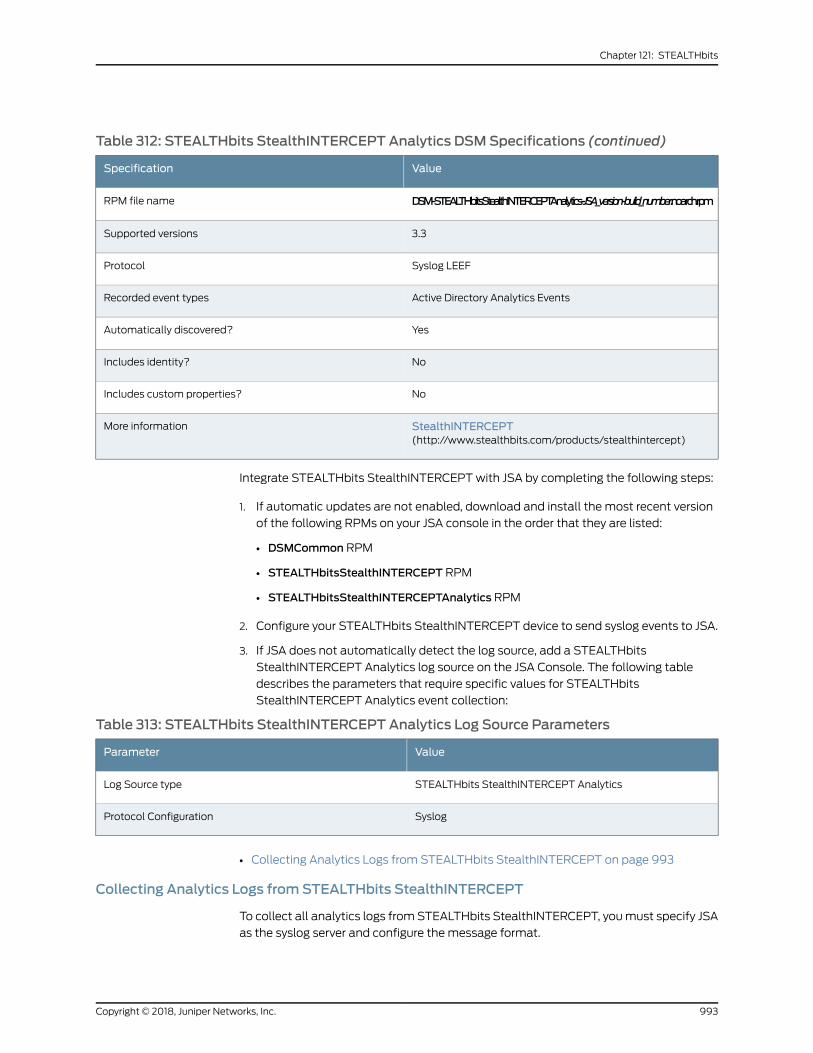
Table 312: STEALTHbits StealthINTERCEPT Analytics DSMSpecifications (continued)
ValueSpecification
DSM-STEALTHbitsStealthINTERCEPTAnalytics-JSA_version-build_number.noarch.rpmRPM file name
3.3Supported versions
Syslog LEEFProtocol
Active Directory Analytics EventsRecorded event types
YesAutomatically discovered?
NoIncludes identity?
NoIncludes custom properties?
StealthINTERCEPT(http://www.stealthbits.com/products/stealthintercept)
More information
Integrate STEALTHbits StealthINTERCEPT with JSA by completing the following steps:
1. If automatic updates are not enabled, download and install the most recent version
of the following RPMs on your JSA console in the order that they are listed:
• DSMCommon RPM
• STEALTHbitsStealthINTERCEPT RPM
• STEALTHbitsStealthINTERCEPTAnalytics RPM
2. Configure your STEALTHbits StealthINTERCEPT device to send syslog events to JSA.
3. If JSA does not automatically detect the log source, add a STEALTHbits
StealthINTERCEPT Analytics log source on the JSA Console. The following table
describes the parameters that require specific values for STEALTHbits
StealthINTERCEPT Analytics event collection:
Table 313: STEALTHbits StealthINTERCEPT Analytics Log Source Parameters
ValueParameter
STEALTHbits StealthINTERCEPT AnalyticsLog Source type
SyslogProtocol Configuration
• Collecting Analytics Logs from STEALTHbits StealthINTERCEPT on page 993
Collecting Analytics Logs from STEALTHbits StealthINTERCEPT
To collect all analytics logs from STEALTHbits StealthINTERCEPT, youmust specify JSA
as the syslog server and configure the message format.
993Copyright © 2018, Juniper Networks, Inc.
Chapter 121: STEALTHbits
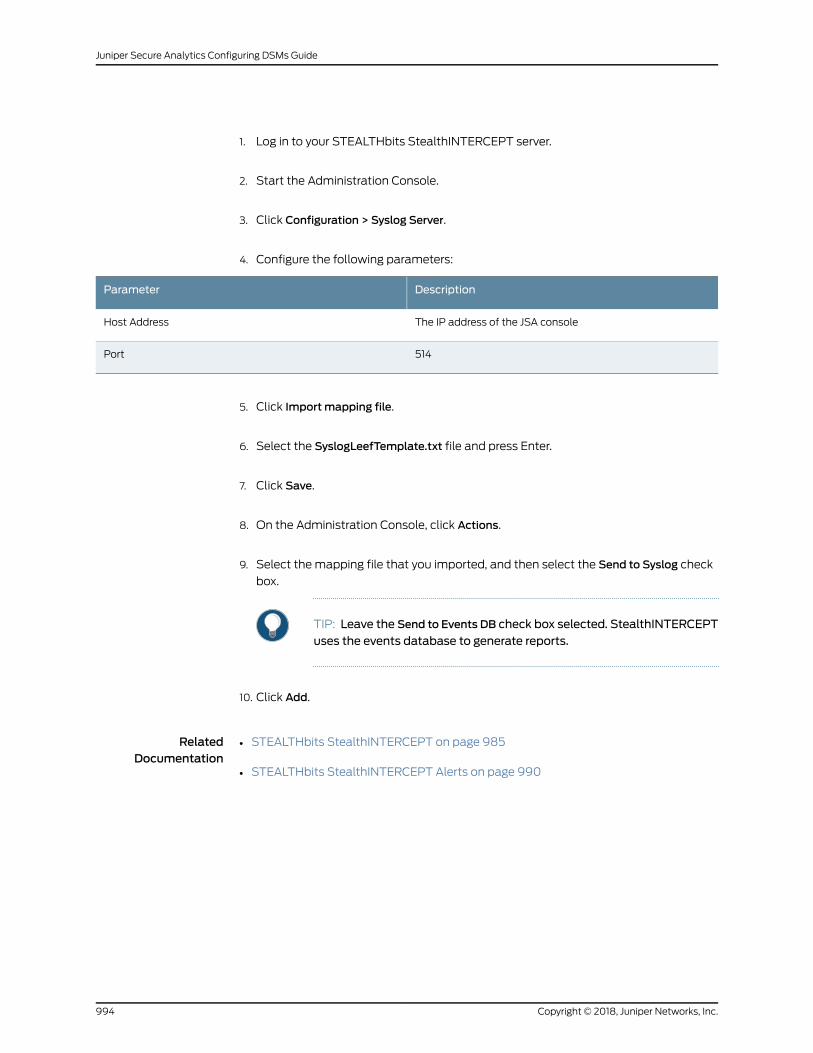
1. Log in to your STEALTHbits StealthINTERCEPT server.
2. Start the Administration Console.
3. Click Configuration > Syslog Server.
4. Configure the following parameters:
DescriptionParameter
The IP address of the JSA consoleHost Address
514Port
5. Click Import mapping file.
6. Select the SyslogLeefTemplate.txt file and press Enter.
7. Click Save.
8. On the Administration Console, click Actions.
9. Select the mapping file that you imported, and then select the Send to Syslog check
box.
TIP: Leave the Send to Events DB check box selected. StealthINTERCEPT
uses the events database to generate reports.
10. Click Add.
RelatedDocumentation
• STEALTHbits StealthINTERCEPT on page 985
• STEALTHbits StealthINTERCEPT Alerts on page 990
Copyright © 2018, Juniper Networks, Inc.994
Juniper Secure Analytics Configuring DSMs Guide
CHAPTER 122
Stonesoft Management Center
• Stonesoft Management Center on page 995
• Configuring Stonesoft Management Center on page 995
• Configuring a Syslog Traffic Rule on page 997
• Configuring a Log Source on page 997
Stonesoft Management Center
The Stonesoft Management Center DSM for JSA accepts events using syslog.
JSA records all relevant LEEF formatted syslog events. Before configuring JSA, youmust
configure your Stonesoft Management Center to export LEEF formatted syslog events.
This document includes the steps required to edit LogServerConfiguration.txt file.
Configuring the text file allows Stonesoft Management Center to export event data in
LEEF formatusingsyslog to JSA. Fordetailedconfiguration instructions, see theStoneGate
Management Center Administrator's Guide.
Configuring Stonesoft Management Center
You can configure Stonesoft Management Center.
1. Log in to the appliance that hosts your Stonesoft Management Center.
2. Stop the Stonesoft Management Center Log Server.
3. In Windows - Select one of the following methods to stop the Log Server:
• Stop the Log Server in theWindows Services list.
• Run the batch file <installation path>/bin/sgStopLogSrv.bat.
In Linux - To stop the Log Server in Linux, run the script <installation
path>/bin/sgStopLogSrv.sh
4. Edit the LogServerConfiguration.txt file. Theconfiguration file is located in the following
directory:
995Copyright © 2018, Juniper Networks, Inc.
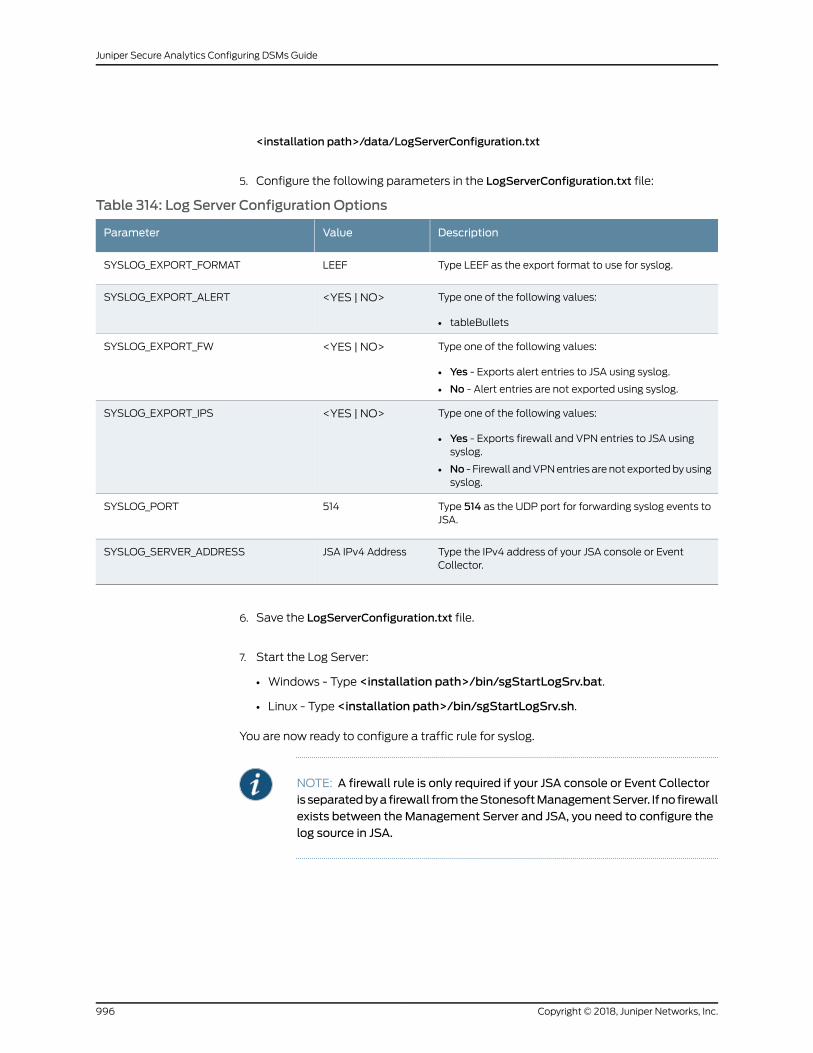
<installation path>/data/LogServerConfiguration.txt
5. Configure the following parameters in the LogServerConfiguration.txt file:
Table 314: Log Server Configuration Options
DescriptionValueParameter
Type LEEF as the export format to use for syslog.LEEFSYSLOG_EXPORT_FORMAT
Type one of the following values:
• tableBullets
<YES | NO>SYSLOG_EXPORT_ALERT
Type one of the following values:
• Yes - Exports alert entries to JSA using syslog.
• No - Alert entries are not exported using syslog.
<YES | NO>SYSLOG_EXPORT_FW
Type one of the following values:
• Yes - Exports firewall and VPN entries to JSA usingsyslog.
• No - Firewall andVPNentries are not exportedbyusingsyslog.
<YES | NO>SYSLOG_EXPORT_IPS
Type 514 as the UDP port for forwarding syslog events toJSA.
514SYSLOG_PORT
Type the IPv4 address of your JSA console or EventCollector.
JSA IPv4 AddressSYSLOG_SERVER_ADDRESS
6. Save the LogServerConfiguration.txt file.
7. Start the Log Server:
• Windows - Type <installation path>/bin/sgStartLogSrv.bat.
• Linux - Type <installation path>/bin/sgStartLogSrv.sh.
You are now ready to configure a traffic rule for syslog.
NOTE: A firewall rule is only required if your JSA console or Event Collectoris separatedbyafirewall fromtheStonesoftManagementServer. If no firewallexists between the Management Server and JSA, you need to configure thelog source in JSA.
Copyright © 2018, Juniper Networks, Inc.996
Juniper Secure Analytics Configuring DSMs Guide
Configuring a Syslog Traffic Rule
If the StonesoftManagement Center and JSA are separated by a firewall in your network,
youmust modify your firewall or IPS policy to allow traffic between the Stonesoft
Management Center and JSA.
1. From the Stonesoft Management Center, select one of the following methods for
modifying a traffic rule:
• Firewall policies—Select Configuration >Configuration >Firewall.
• IPS policies—Select Configuration >Configuration >IPS.
2. Select the type of policy to modify:
• Firewall - Select Firewall Policies >Edit Firewall Policy.
• IPS - Select IPS Policies >Edit Firewall Policy.
3. Add an IPv4 Access rule with the following values to the firewall policy:
Source—Type the IPv4 address of your Stonesoft Management Center Log Server
4. Destination—Type the IPv4 address of your JSA console or Event Collector.
5. Service—Select Syslog (UDP).
6. Action—Select Allow.
7. Logging—Select None.
NOTE: In most cases, it is suggested to set the logging value to None.
Logging syslog connections without configuring a syslog filter can createa loop. For more information, see the StoneGate Management CenterAdministrator's Guide.
8. Save your changes and refresh the policy on the firewall or IPS.
You are now ready to configure the log source in JSA.
Configuring a Log Source
JSA automatically discovers and creates a log source for syslog events from Stonesoft
Management Center.
The following configuration steps are optional.
997Copyright © 2018, Juniper Networks, Inc.
Chapter 122: Stonesoft Management Center
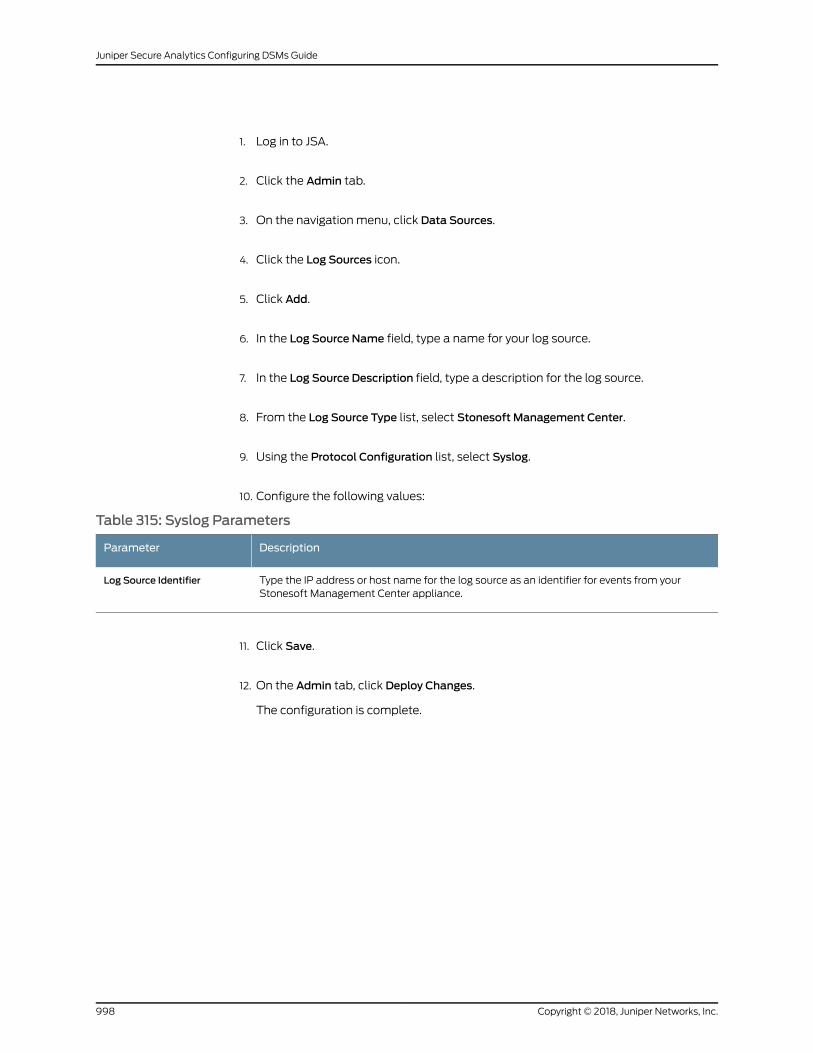
1. Log in to JSA.
2. Click the Admin tab.
3. On the navigation menu, click Data Sources.
4. Click the Log Sources icon.
5. Click Add.
6. In the Log Source Name field, type a name for your log source.
7. In the Log Source Description field, type a description for the log source.
8. From the Log Source Type list, select Stonesoft Management Center.
9. Using the Protocol Configuration list, select Syslog.
10. Configure the following values:
Table 315: Syslog Parameters
DescriptionParameter
Type the IP address or host name for the log source as an identifier for events from yourStonesoft Management Center appliance.
Log Source Identifier
11. Click Save.
12. On the Admin tab, click Deploy Changes.
The configuration is complete.
Copyright © 2018, Juniper Networks, Inc.998
Juniper Secure Analytics Configuring DSMs Guide
CHAPTER 123
Sun
• Sun on page 999
• Sun ONE LDAP on page 999
• Sun Solaris DHCP on page 1004
• Sun Solaris Sendmail on page 1006
• Sun Solaris Basic Security Mode (BSM) on page 1008
Sun
JSA supports a range of Sun DSMs.
SunONE LDAP
The Sun ONE LDAP DSM for JSA accepts multiline UDP access and LDAP events from
Sun ONE Directory Servers with the log file protocol.
JSA retrieves access and LDAP events from Sun ONE Directory Servers by connecting to
each server to download the event log. The event file must be written to a location
accessible by the log file protocol of JSA with FTP, SFTP, or SCP. The event log is written
inamultilineevent format,which requiresa special event generator in the log fileprotocol
to properly parse the event. The ID-Linked Multiline event generator is capable of using
regex to assemble multiline events for JSA when each line of a multiline event shares a
common starting value.
TheSunONELDAPDSMalsocanacceptevents streamedusing theUDPMultilineSyslog
protocol. However, in most situations your system requires a 3rd party syslog forwarder
to forward the event log to JSA. This can require you to redirect traffic on your JSA console
to use the port defined by the UDPMultiline protocol.
• Enabling the Event Log for Sun ONE Directory Server on page 1000
• Configuring a Log Source for Sun ONE LDAP on page 1000
RelatedDocumentation
Sun Solaris DHCP on page 1004•
• Sun Solaris Sendmail on page 1006
• Sun Solaris Basic Security Mode (BSM) on page 1008
999Copyright © 2018, Juniper Networks, Inc.
Enabling the Event Log for Sun ONE Directory Server
To collect events from your Sun ONE Directory Server, you must enable the event log to
write events to a file.
1. Log in to your Sun ONE Directory Server console.
2. Click the Configuration tab.
3. From the navigation menu, select Logs.
4. Click the Access Log tab.
5. Select the Enable Logging check box.
6. Type or click Browse to identify the directory path for your Sun ONE Directory Server
access logs.
7. Click Save.
You are now ready to configure a log source in JSA.
Configuring a Log Source for Sun ONE LDAP
To receive events, youmust manually create a log source for your Sun ONE Directory
Server. JSA does not automatically discover log file protocol events.
1. Log in to JSA.
2. Click the Admin tab.
3. In the navigation menu, click Data Sources.
4. Click the Log Sources icon.
5. Click Add.
6. In the Log Source Name field, type a name for your log source.
7. In the Log Source Description field, type a description for your log source.
8. From the Log Source Type list box, select SunONE LDAP.
9. From the Protocol Configuration list box, select Log File.
Copyright © 2018, Juniper Networks, Inc.1000
Juniper Secure Analytics Configuring DSMs Guide
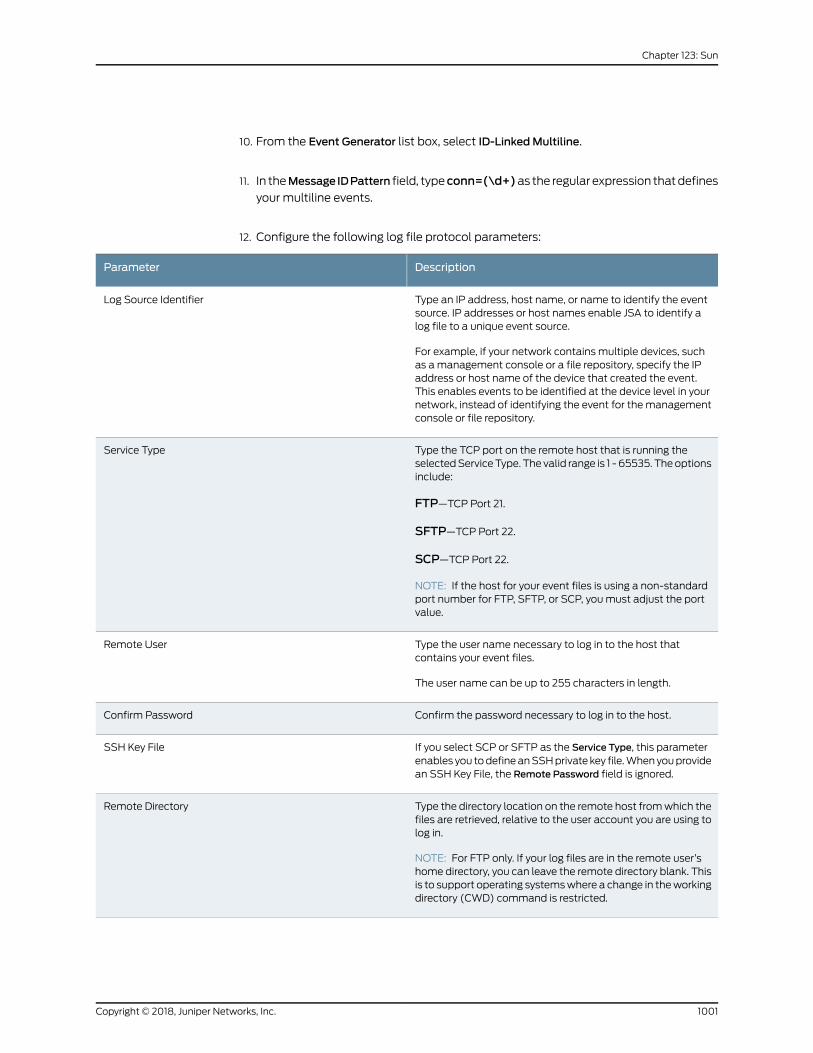
10. From the Event Generator list box, select ID-LinkedMultiline.
11. In theMessage IDPattern field, typeconn=(\d+)as the regular expression thatdefinesyour multiline events.
12. Configure the following log file protocol parameters:
DescriptionParameter
Type an IP address, host name, or name to identify the eventsource. IP addresses or host names enable JSA to identify alog file to a unique event source.
For example, if your network contains multiple devices, suchas amanagement console or a file repository, specify the IPaddress or host name of the device that created the event.This enables events to be identified at the device level in yournetwork, instead of identifying the event for themanagementconsole or file repository.
Log Source Identifier
Type the TCP port on the remote host that is running theselectedServiceType. The valid range is 1 - 65535. Theoptionsinclude:
FTP—TCP Port 21.
SFTP—TCP Port 22.
SCP—TCP Port 22.
NOTE: If the host for your event files is using a non-standardport number for FTP, SFTP, or SCP, youmust adjust the portvalue.
Service Type
Type the user name necessary to log in to the host thatcontains your event files.
The user name can be up to 255 characters in length.
Remote User
Confirm the password necessary to log in to the host.Confirm Password
If you select SCP or SFTP as the Service Type, this parameterenables you todefineanSSHprivate key file.Whenyouprovidean SSH Key File, the Remote Password field is ignored.
SSH Key File
Type the directory location on the remote host fromwhich thefiles are retrieved, relative to the user account you are using tolog in.
NOTE: For FTP only. If your log files are in the remote user’shome directory, you can leave the remote directory blank. Thisis to support operating systemswhere a change in theworkingdirectory (CWD) command is restricted.
Remote Directory
1001Copyright © 2018, Juniper Networks, Inc.
Chapter 123: Sun
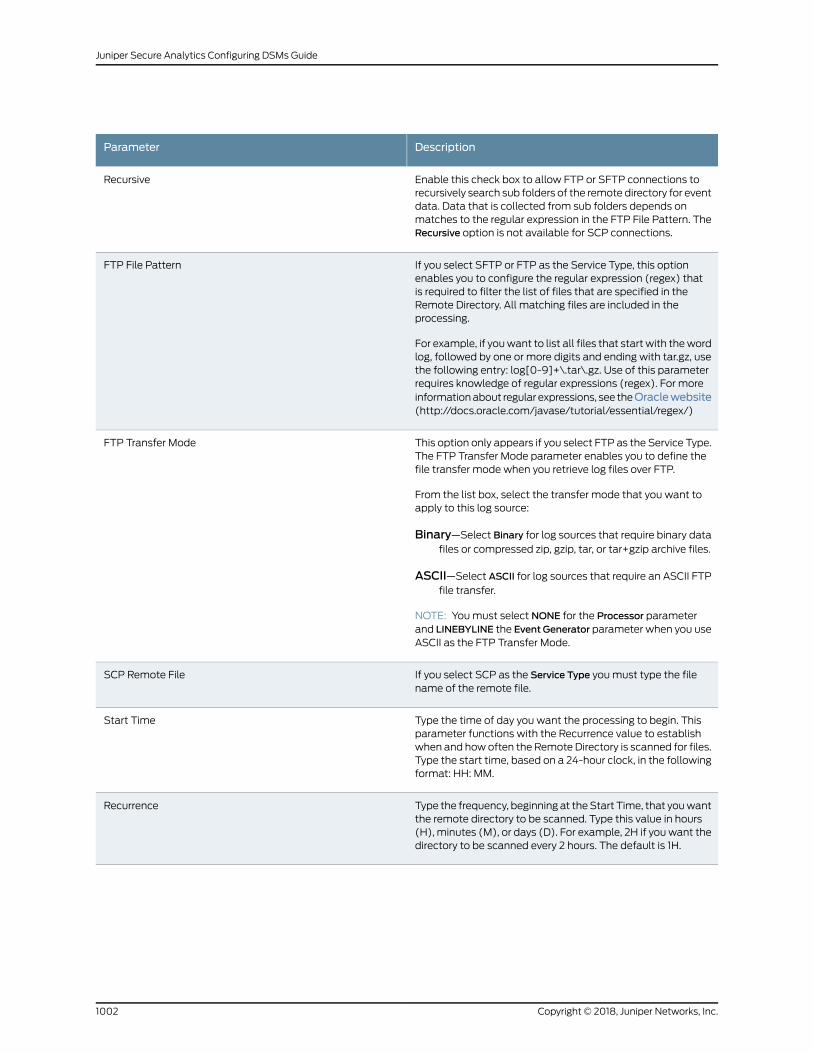
DescriptionParameter
Enable this check box to allow FTP or SFTP connections torecursively search sub folders of the remote directory for eventdata. Data that is collected from sub folders depends onmatches to the regular expression in the FTP File Pattern. TheRecursive option is not available for SCP connections.
Recursive
If you select SFTP or FTP as the Service Type, this optionenables you to configure the regular expression (regex) thatis required to filter the list of files that are specified in theRemote Directory. All matching files are included in theprocessing.
For example, if youwant to list all files that start with thewordlog, followed by one or more digits and ending with tar.gz, usethe following entry: log[0-9]+\.tar\.gz. Use of this parameterrequires knowledge of regular expressions (regex). For moreinformationabout regular expressions, see theOraclewebsite(http://docs.oracle.com/javase/tutorial/essential/regex/)
FTP File Pattern
This option only appears if you select FTP as the Service Type.The FTP Transfer Mode parameter enables you to define thefile transfer mode when you retrieve log files over FTP.
From the list box, select the transfer mode that you want toapply to this log source:
Binary—Select Binary for log sources that require binary datafiles or compressed zip, gzip, tar, or tar+gzip archive files.
ASCII—Select ASCII for log sources that require an ASCII FTPfile transfer.
NOTE: Youmust select NONE for the Processor parameterand LINEBYLINE the Event Generator parameter when you useASCII as the FTP Transfer Mode.
FTP Transfer Mode
If you select SCP as the Service Type youmust type the filename of the remote file.
SCP Remote File
Type the time of day you want the processing to begin. Thisparameter functions with the Recurrence value to establishwhen and howoften the Remote Directory is scanned for files.Type the start time, based on a 24-hour clock, in the followingformat: HH: MM.
Start Time
Type the frequency, beginning at theStart Time, that youwantthe remote directory to be scanned. Type this value in hours(H), minutes (M), or days (D). For example, 2H if youwant thedirectory to be scanned every 2 hours. The default is 1H.
Recurrence
Copyright © 2018, Juniper Networks, Inc.1002
Juniper Secure Analytics Configuring DSMs Guide
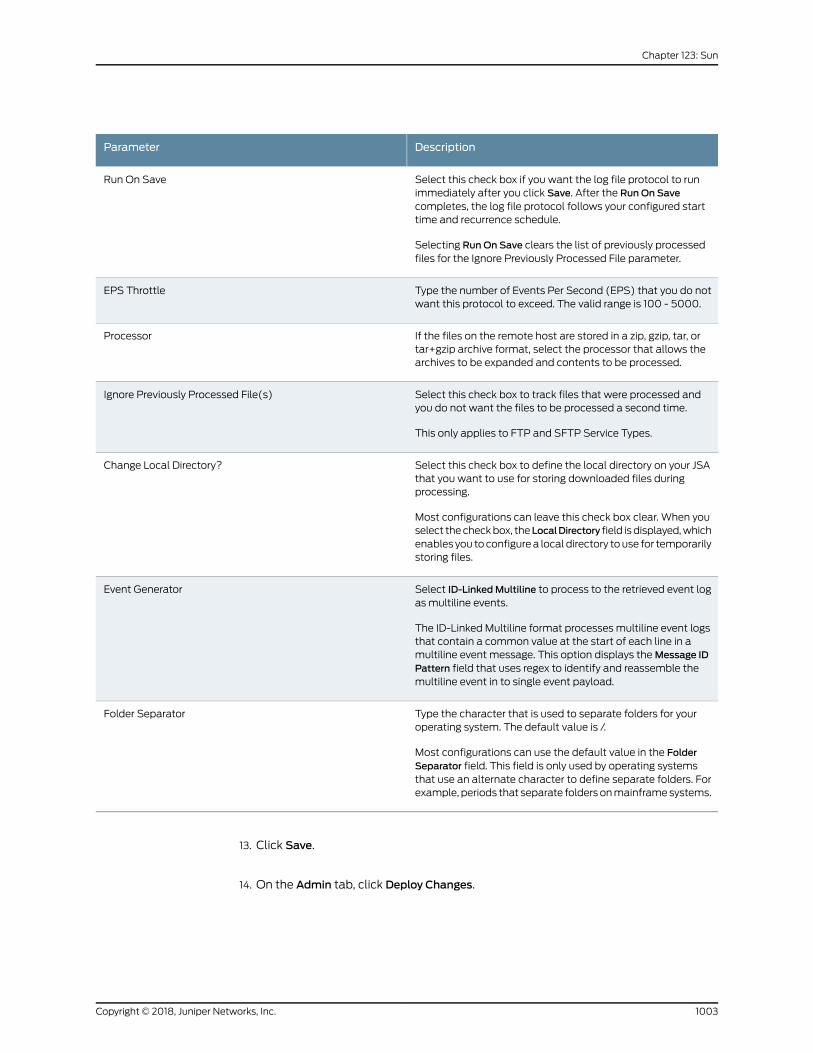
DescriptionParameter
Select this check box if you want the log file protocol to runimmediately after you click Save. After the RunOn Savecompletes, the log file protocol follows your configured starttime and recurrence schedule.
Selecting RunOn Save clears the list of previously processedfiles for the Ignore Previously Processed File parameter.
Run On Save
Type the number of Events Per Second (EPS) that you do notwant this protocol to exceed. The valid range is 100 - 5000.
EPS Throttle
If the files on the remote host are stored in a zip, gzip, tar, ortar+gzip archive format, select the processor that allows thearchives to be expanded and contents to be processed.
Processor
Select this check box to track files that were processed andyou do not want the files to be processed a second time.
This only applies to FTP and SFTP Service Types.
Ignore Previously Processed File(s)
Select this check box to define the local directory on your JSAthat you want to use for storing downloaded files duringprocessing.
Most configurations can leave this check box clear. When youselect thecheckbox, theLocalDirectory field isdisplayed,whichenables you toconfigurea local directory touse for temporarilystoring files.
Change Local Directory?
Select ID-LinkedMultiline to process to the retrieved event logas multiline events.
The ID-Linked Multiline format processes multiline event logsthat contain a common value at the start of each line in amultiline event message. This option displays theMessage IDPattern field that uses regex to identify and reassemble themultiline event in to single event payload.
Event Generator
Type the character that is used to separate folders for youroperating system. The default value is /.
Most configurations can use the default value in the FolderSeparator field. This field is only used by operating systemsthat use an alternate character to define separate folders. Forexample, periods that separate foldersonmainframesystems.
Folder Separator
13. Click Save.
14. On the Admin tab, click Deploy Changes.
1003Copyright © 2018, Juniper Networks, Inc.
Chapter 123: Sun
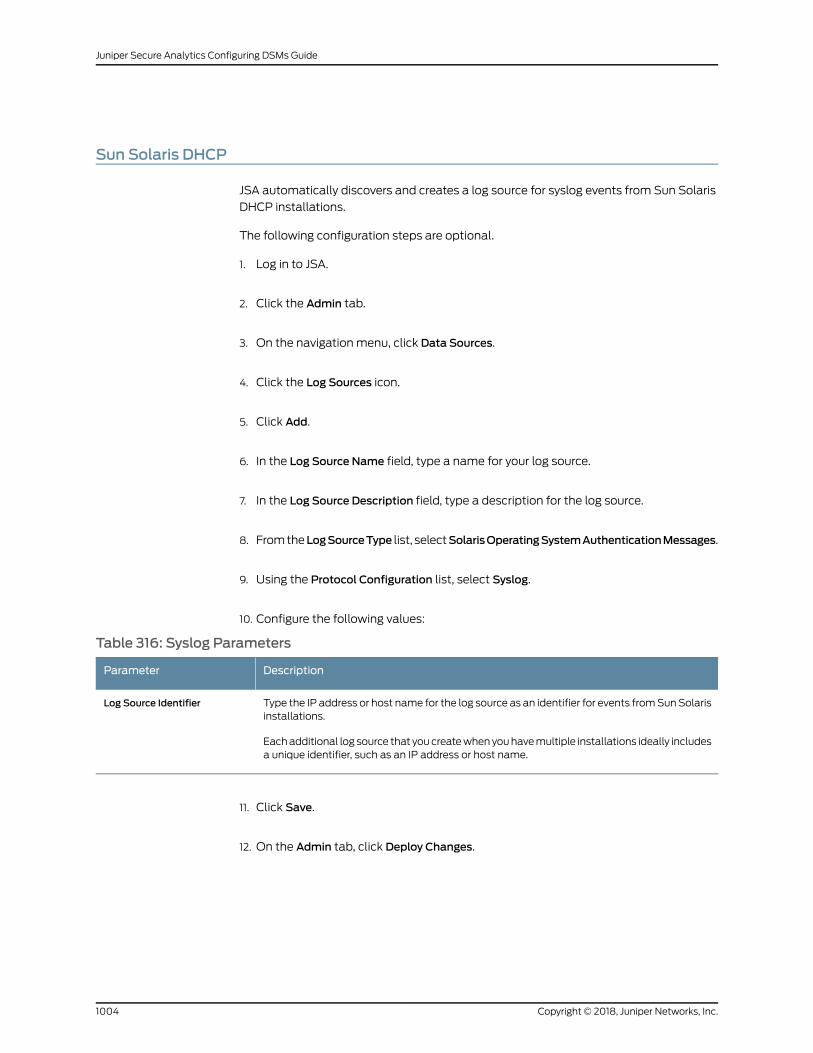
Sun Solaris DHCP
JSA automatically discovers and creates a log source for syslog events from Sun Solaris
DHCP installations.
The following configuration steps are optional.
1. Log in to JSA.
2. Click the Admin tab.
3. On the navigation menu, click Data Sources.
4. Click the Log Sources icon.
5. Click Add.
6. In the Log Source Name field, type a name for your log source.
7. In the Log Source Description field, type a description for the log source.
8. FromtheLogSourceType list, selectSolarisOperatingSystemAuthenticationMessages.
9. Using the Protocol Configuration list, select Syslog.
10. Configure the following values:
Table 316: Syslog Parameters
DescriptionParameter
Type the IP address or host name for the log source as an identifier for events fromSunSolarisinstallations.
Eachadditional log source that youcreatewhenyouhavemultiple installations ideally includesa unique identifier, such as an IP address or host name.
Log Source Identifier
11. Click Save.
12. On the Admin tab, click Deploy Changes.
Copyright © 2018, Juniper Networks, Inc.1004
Juniper Secure Analytics Configuring DSMs Guide
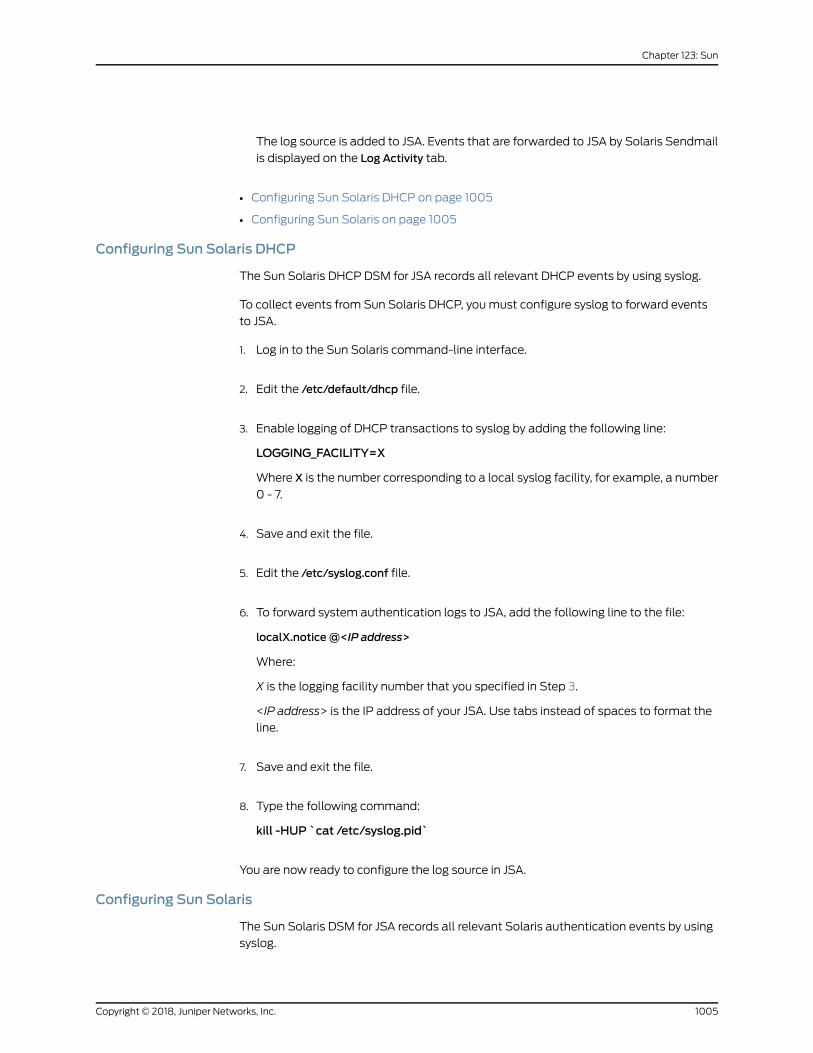
The log source is added to JSA. Events that are forwarded to JSA by Solaris Sendmail
is displayed on the Log Activity tab.
• Configuring Sun Solaris DHCP on page 1005
• Configuring Sun Solaris on page 1005
Configuring Sun Solaris DHCP
The Sun Solaris DHCP DSM for JSA records all relevant DHCP events by using syslog.
To collect events from Sun Solaris DHCP, youmust configure syslog to forward events
to JSA.
1. Log in to the Sun Solaris command-line interface.
2. Edit the /etc/default/dhcp file.
3. Enable logging of DHCP transactions to syslog by adding the following line:
LOGGING_FACILITY=X
Where X is the number corresponding to a local syslog facility, for example, a number
0 - 7.
4. Save and exit the file.
5. Edit the /etc/syslog.conf file.
6. To forward system authentication logs to JSA, add the following line to the file:
localX.notice@<IP address>
Where:
X is the logging facility number that you specified in Step 3.
<IP address> is the IP address of your JSA. Use tabs instead of spaces to format the
line.
7. Save and exit the file.
8. Type the following command:
kill -HUP `cat /etc/syslog.pid`
You are now ready to configure the log source in JSA.
Configuring Sun Solaris
The Sun Solaris DSM for JSA records all relevant Solaris authentication events by using
syslog.
1005Copyright © 2018, Juniper Networks, Inc.
Chapter 123: Sun
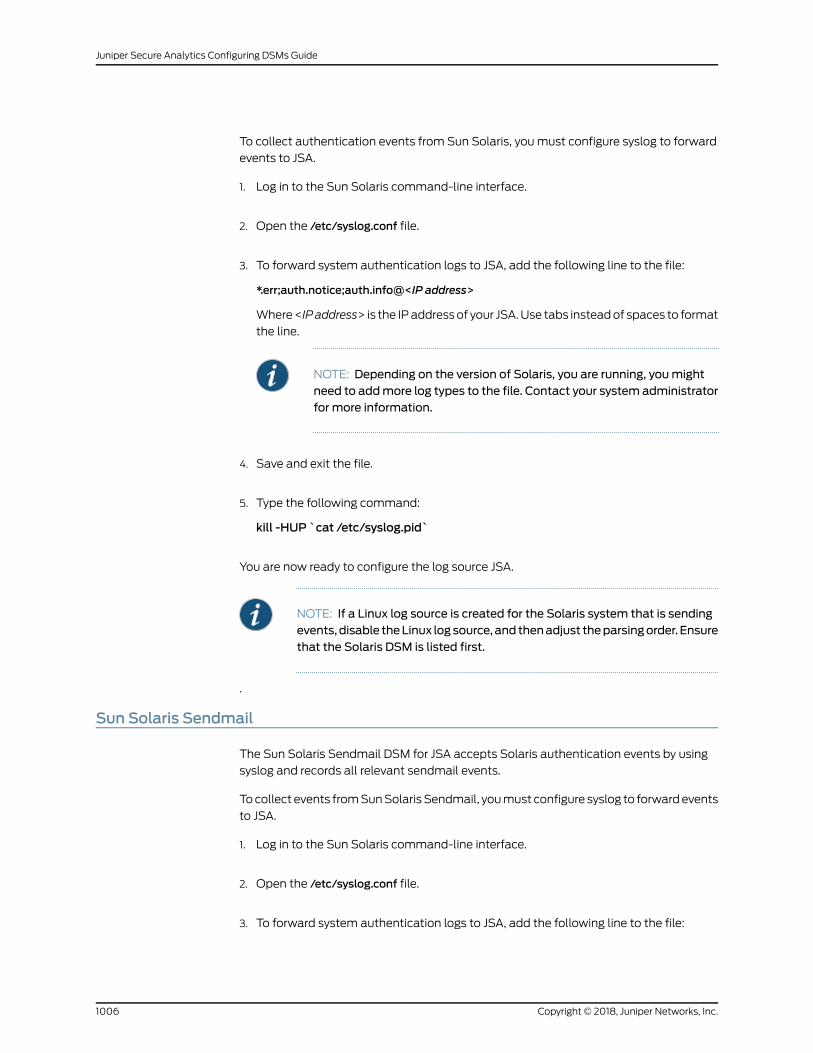
To collect authentication events from Sun Solaris, you must configure syslog to forward
events to JSA.
1. Log in to the Sun Solaris command-line interface.
2. Open the /etc/syslog.conf file.
3. To forward system authentication logs to JSA, add the following line to the file:
*.err;auth.notice;auth.info@<IP address>
Where<IP address> is the IPaddressof your JSA.Use tabs insteadof spaces to format
the line.
NOTE: Depending on the version of Solaris, you are running, youmightneed to addmore log types to the file. Contact your system administratorfor more information.
4. Save and exit the file.
5. Type the following command:
kill -HUP `cat /etc/syslog.pid`
You are now ready to configure the log source JSA.
NOTE: If a Linux log source is created for the Solaris system that is sendingevents, disable theLinux logsource, and thenadjust theparsingorder. Ensurethat the Solaris DSM is listed first.
.
Sun Solaris Sendmail
The Sun Solaris Sendmail DSM for JSA accepts Solaris authentication events by using
syslog and records all relevant sendmail events.
Tocollect events fromSunSolarisSendmail, youmust configure syslog to forwardevents
to JSA.
1. Log in to the Sun Solaris command-line interface.
2. Open the /etc/syslog.conf file.
3. To forward system authentication logs to JSA, add the following line to the file:
Copyright © 2018, Juniper Networks, Inc.1006
Juniper Secure Analytics Configuring DSMs Guide
mail.*; @<IP address>
Where<IP address> is the IPaddressof your JSA.Use tabs insteadof spaces to format
the line.
NOTE: Depending on the version of Solaris, you are running, youmightneed to addmore log types to the file. Contact your system administratorfor more information.
4. Save and exit the file.
5. Type the following command:
kill -HUP 'cat /etc/syslog.pid'
You are now ready to configure the log source JSA.
• Configuring a Sun Solaris Sendmail Log Source on page 1007
Configuring a Sun Solaris Sendmail Log Source
JSA automatically discovers and creates a log source for syslog events from Sun Solaris
Sendmail appliances.
The following configuration steps are optional.
1. Log in to JSA.
2. Click the Admin tab.
3. On the navigation menu, click Data Sources.
4. Click the Log Sources icon.
5. Click Add.
6. In the Log Source Name field, type a name for your log source.
7. In the Log Source Description field, type a description for the log source.
8. From the Log Source Type list, select Solaris Operating SystemSendmail Logs.
9. Using the Protocol Configuration list, select Syslog.
10. Configure the following values:
1007Copyright © 2018, Juniper Networks, Inc.
Chapter 123: Sun
Table 317: Syslog Parameters
DescriptionParameter
Type the IP address or host name for the log source as an identifier for events from Sun SolarisSendmail installations.
Each additional log source that you createwhen youhavemultiple installations ideally includesa unique identifier, such as an IP address or host name.
Log Source Identifier
11. Click Save.
12. On the Admin tab, click Deploy Changes.
The log source is added to JSA. Events that are forwarded to JSA by Solaris Sendmail
are displayed on the Log Activity tab.
Sun Solaris Basic Security Mode (BSM)
Sun Solaris Basic Security Mode (BSM) is an audit tracking tool for the system
administrator to retrieve detailed auditing events from Sun Solaris systems.
JSA retrieves Sun Solaris BSM events by using the log file Protocol. To you configure JSA
to integrate with Solaris Basic Security Mode, take the following steps:
1. Enable Solaris Basic Security Mode.
2. Convert audit logs from binary to a human-readable format.
3. Schedule a cron job to run the conversion script on a schedule.
4. Collect Sun Solaris events in JSA by using the log file protocol.
• Enabling Basic Security Mode on page 1008
• Converting Sun Solaris BSM Audit Logs on page 1009
• Creating a Cron Job on page 1010
• Configuring a Log Source for Sun Solaris BSM on page 1011
Enabling Basic Security Mode
ToconfigureSunSolarisBSM, youmustenableSolarisBasicSecurityModeandconfigure
the classes of events the system logs to an audit log file.
1. Log in to your Solaris console as a superuser or root user.
2. Enable single-user mode on your Solaris console.
3. Type the following command to run the bsmconv script and enable auditing:
/etc/security/bsmconv
Copyright © 2018, Juniper Networks, Inc.1008
Juniper Secure Analytics Configuring DSMs Guide
Thebsmconv script enablesSolarisBasicSecurityModeandstarts theauditing service
auditd.
4. Type the following command to open the audit control log for editing:
vi /etc/security/audit_control
5. Edit the audit control file to contain the following information:
dir:/var/audit flags:lo,ad,ex,-fw,-fc,-fd,-fr naflags:lo,ad
6. Save the changes to the audit_control file, then reboot the Solaris console to start
auditd.
7. Type the following command to verify that auditd starts :
/user/sbin/auditconfig -getcond
If the auditd process is started, the following string is returned:
audit condition = auditing
You can now convert the binary Solaris Basic Security Mode logs to a human-readable
log format.
Converting Sun Solaris BSMAudit Logs
JSA cannot process binary files directly from Sun Solaris BSM. Youmust convert the
audit log fromtheexistingbinary format toahuman-readable log formatbyusingpraudit
before the audit log data can be retrieved by JSA.
1. Type the following command to create a new script on your Sun Solaris console:
vi /etc/security/newauditlog.sh
2. Add the following information to the newauditlog.sh script:
#!/bin/bash # # newauditlog.sh - Start a new audit file and expire the old logs #
AUDIT_EXPIRE=30 AUDIT_DIR="/var/audit" LOG_DIR="/var/log/"
/usr/sbin/audit -n cd $AUDIT_DIR # in case it is a link # Get a listing of the files based on creation date that are not current in use FILES=$(ls -lrt | tr -s " " | cut -d" " -f9 | grep -v "not_terminated")
# We just created a new audit log by doing 'audit -n', so we can # be sure that the last file in the list will be the latest # archived binary log file.
lastFile="" for file in $FILES; do
lastFile=$file
done
1009Copyright © 2018, Juniper Networks, Inc.
Chapter 123: Sun
# Extract a human-readable file from the binary log file echo "Beginning praudit of $lastFile" praudit -l $lastFile > "$LOG_DIR$lastFile.log" echo "Done praudit, creating log file at: $LOG_DIR$lastFile.log"
/usr/bin/find . $AUDIT_DIR -type f -mtime +$AUDIT_EXPIRE \ -exec rm {} > /dev/null
2>&1 \;
# End script
The script outputs log files in the <starttime>.<endtime>.<hostname>.log format.
For example, the log directory in /var/logwould contain a filewith the following name:
20111026030000.20111027030000.qasparc10.log
3. Edit the script to change the default directory for the log files.
a. AUDIT_DIR="/var/audit" - The Audit directory must match the location that is
specified by the audit control file you configured in “Enabling Basic SecurityMode”
on page 1008.
4. LOG_DIR="/var/log/" - The log directory is the location of the human-readable log
files of your Sun Solaris system that are ready to be retrieved by JSA.
5. Save your changes to the newauditlog.sh script.
Youcannowautomate this scriptbyusingCRONtoconvert theSunSolarisBasicSecurity
Mode log to human-readable format.
Creating a Cron Job
Cron isaSolarisdaemonutility thatautomatesscriptsandcommands to runsystem-wide
on a scheduled basis.
The following steps provide an example for automating newauditlog.sh to run daily at
midnight. If you need to retrieve log files multiple times a day from your Solaris system,
youmust alter your cron schedule.
1. Type the following command to create a copy of your cron file:
crontab -l > cronfile
2. Type the following command to edit the cronfile:
vi cronfile
3. Add the following information to your cronfile:
00 * * * /etc/security/newauditlog.sh
4. Save the change to the cronfile.
Copyright © 2018, Juniper Networks, Inc.1010
Juniper Secure Analytics Configuring DSMs Guide
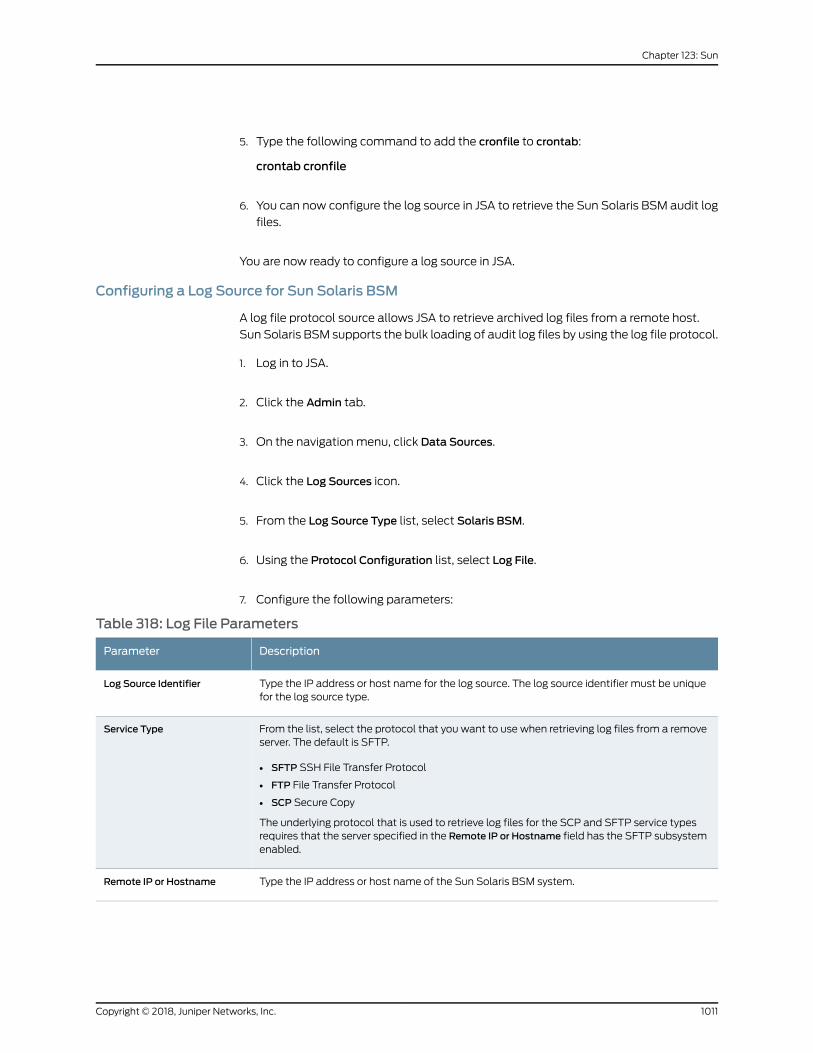
5. Type the following command to add the cronfile to crontab:
crontab cronfile
6. You can now configure the log source in JSA to retrieve the Sun Solaris BSM audit log
files.
You are now ready to configure a log source in JSA.
Configuring a Log Source for Sun Solaris BSM
A log file protocol source allows JSA to retrieve archived log files from a remote host.
Sun Solaris BSM supports the bulk loading of audit log files by using the log file protocol.
1. Log in to JSA.
2. Click the Admin tab.
3. On the navigation menu, click Data Sources.
4. Click the Log Sources icon.
5. From the Log Source Type list, select Solaris BSM.
6. Using the Protocol Configuration list, select Log File.
7. Configure the following parameters:
Table 318: Log File Parameters
DescriptionParameter
Type the IP address or host name for the log source. The log source identifier must be uniquefor the log source type.
Log Source Identifier
From the list, select the protocol that you want to use when retrieving log files from a removeserver. The default is SFTP.
• SFTP SSH File Transfer Protocol
• FTP File Transfer Protocol
• SCP Secure Copy
The underlying protocol that is used to retrieve log files for the SCP and SFTP service typesrequires that the server specified in the Remote IP or Hostname field has the SFTP subsystemenabled.
Service Type
Type the IP address or host name of the Sun Solaris BSM system.Remote IP or Hostname
1011Copyright © 2018, Juniper Networks, Inc.
Chapter 123: Sun
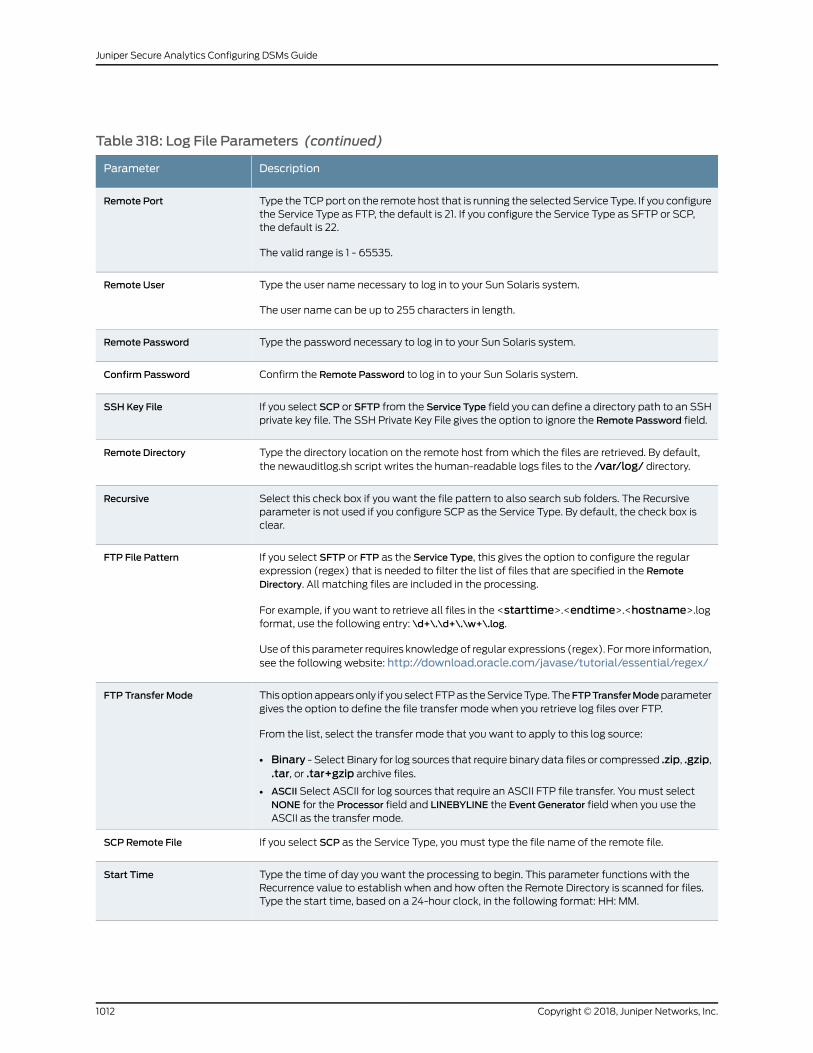
Table 318: Log File Parameters (continued)
DescriptionParameter
Type the TCPport on the remote host that is running the selected Service Type. If you configurethe Service Type as FTP, the default is 21. If you configure the Service Type as SFTP or SCP,the default is 22.
The valid range is 1 - 65535.
Remote Port
Type the user name necessary to log in to your Sun Solaris system.
The user name can be up to 255 characters in length.
Remote User
Type the password necessary to log in to your Sun Solaris system.Remote Password
Confirm the Remote Password to log in to your Sun Solaris system.Confirm Password
If you select SCP or SFTP from the Service Type field you can define a directory path to an SSHprivate key file. The SSH Private Key File gives the option to ignore the Remote Password field.
SSH Key File
Type the directory location on the remote host fromwhich the files are retrieved. By default,the newauditlog.sh script writes the human-readable logs files to the /var/log/ directory.
Remote Directory
Select this check box if you want the file pattern to also search sub folders. The Recursiveparameter is not used if you configure SCP as the Service Type. By default, the check box isclear.
Recursive
If you select SFTP or FTP as the Service Type, this gives the option to configure the regularexpression (regex) that is needed to filter the list of files that are specified in the RemoteDirectory. All matching files are included in the processing.
For example, if you want to retrieve all files in the <starttime>.<endtime>.<hostname>.logformat, use the following entry: \d+\.\d+\.\w+\.log.
Use of this parameter requires knowledge of regular expressions (regex). Formore information,see the following website: http://download.oracle.com/javase/tutorial/essential/regex/
FTP File Pattern
This optionappearsonly if you select FTPas theServiceType. TheFTPTransferModeparametergives the option to define the file transfer mode when you retrieve log files over FTP.
From the list, select the transfer mode that you want to apply to this log source:
• Binary - Select Binary for log sources that require binary data files or compressed .zip, .gzip,.tar, or .tar+gzip archive files.
• ASCII Select ASCII for log sources that require an ASCII FTP file transfer. Youmust selectNONE for the Processor field and LINEBYLINE the Event Generator field when you use theASCII as the transfer mode.
FTP Transfer Mode
If you select SCP as the Service Type, youmust type the file name of the remote file.SCP Remote File
Type the time of day you want the processing to begin. This parameter functions with theRecurrence value to establish when and how often the Remote Directory is scanned for files.Type the start time, based on a 24-hour clock, in the following format: HH: MM.
Start Time
Copyright © 2018, Juniper Networks, Inc.1012
Juniper Secure Analytics Configuring DSMs Guide
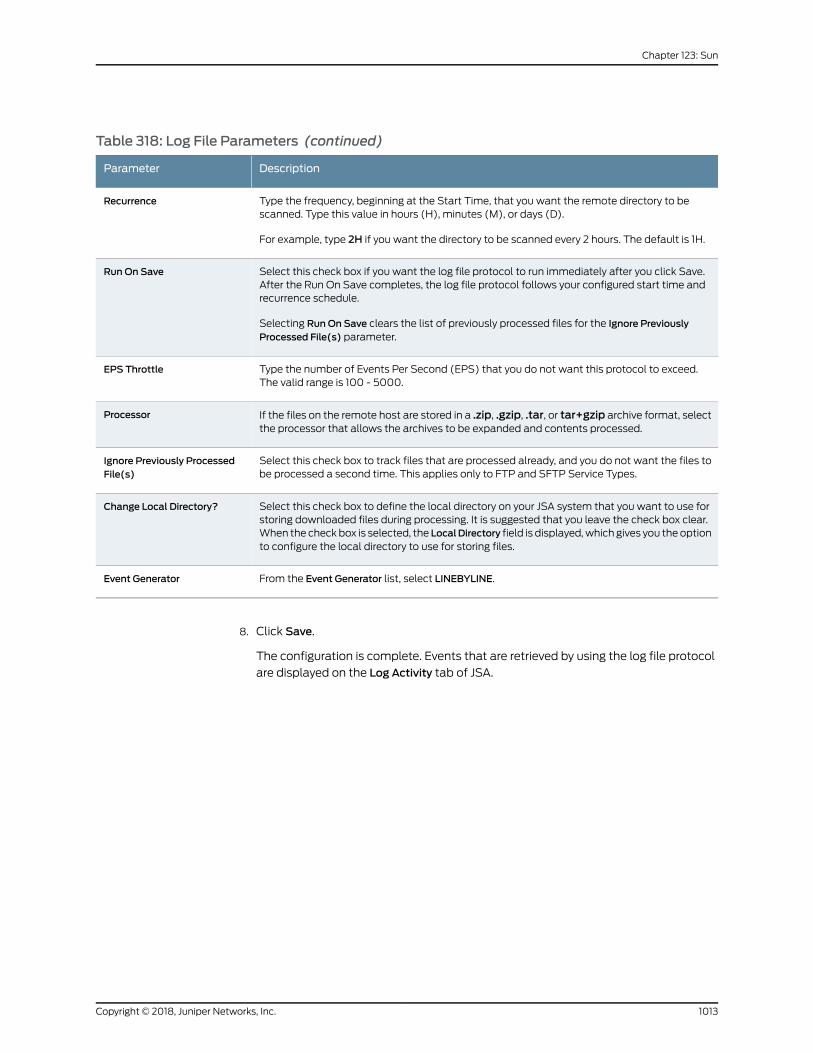
Table 318: Log File Parameters (continued)
DescriptionParameter
Type the frequency, beginning at the Start Time, that you want the remote directory to bescanned. Type this value in hours (H), minutes (M), or days (D).
For example, type 2H if you want the directory to be scanned every 2 hours. The default is 1H.
Recurrence
Select this check box if you want the log file protocol to run immediately after you click Save.After the Run On Save completes, the log file protocol follows your configured start time andrecurrence schedule.
Selecting RunOn Save clears the list of previously processed files for the Ignore PreviouslyProcessed File(s) parameter.
RunOn Save
Type the number of Events Per Second (EPS) that you do not want this protocol to exceed.The valid range is 100 - 5000.
EPS Throttle
If the files on the remote host are stored in a .zip, .gzip, .tar, or tar+gzip archive format, selectthe processor that allows the archives to be expanded and contents processed.
Processor
Select this check box to track files that are processed already, and you do not want the files tobe processed a second time. This applies only to FTP and SFTP Service Types.
Ignore Previously ProcessedFile(s)
Select this check box to define the local directory on your JSA system that you want to use forstoring downloaded files during processing. It is suggested that you leave the check box clear.When the check box is selected, the LocalDirectory field is displayed,which gives you the optionto configure the local directory to use for storing files.
Change Local Directory?
From the Event Generator list, select LINEBYLINE.Event Generator
8. Click Save.
The configuration is complete. Events that are retrieved by using the log file protocol
are displayed on the Log Activity tab of JSA.
1013Copyright © 2018, Juniper Networks, Inc.
Chapter 123: Sun

Copyright © 2018, Juniper Networks, Inc.1014
Juniper Secure Analytics Configuring DSMs Guide
CHAPTER 124
Sybase ASE
• Sybase ASE on page 1015
• Configuring JSA to Receive Events from a Sybase ASE Device on page 1016
Sybase ASE
You can integrate a Sybase Adaptive Server Enterprise (ASE) device with JSA to record
all relevant events by using JDBC.
To configure a Sybase ASE device:
1. Configure Sybase auditing.
For information about configuring Sybase auditing, see your Sybase documentation.
2. Log in to the Sybase database as a sa user:
isql -Usa -P<password>
Where <password> is the password necessary to access the database.
3. Switch to the security database:
• use sybsecurity
• go
4. Create a view for JSA.
• create view audit_view
• as
• select audit_event_name(event) as event_name, * from <audit_table_1>
• union
• select audit_event_name(event) as event_name, * from <audit_table_2>
• go
5. For each additional audit table in the audit configuration, make sure that the union
select parameter is repeated for each additional audit table.
1015Copyright © 2018, Juniper Networks, Inc.
For example, if you want to configure auditing with four audit tables (sysaudits_01,
sysaudits_02, sysaudits_03, sysaudits_04), type the following commands:
• create view audit_view as select audit_event_name(event) as event_name, *from sysaudits_01
• union select audit_event_name(event) as event_name, * from sysaudits_02,
• union select audit_event_name(event) as event_name, * from sysaudits_03,
• union select audit_event_name(event) as event_name, * from sysaudits_04
You can now configure the log source JSA.
Configuring JSA to Receive Events from a Sybase ASE Device
You can configure JSA to receive events from a Sybase ASE device:
1. Log in to JSA.
2. Click the Admin tab.
3. On the navigation menu, click Data Sources.
The Data Sources pane is displayed.
4. Click the Log Sources icon.
The Log Sourceswindow is displayed.
5. Click Add.
The Add a log sourcewindow is displayed.
6. From the Log Source Type list, select the Sybase ASE option.
7. Using the Protocol Configuration list, select JDBC.
The JDBC protocol configuration is displayed.
8. Update the JDBC configuration to include the following values:
• Database Name: sybsecurity
• Port: 5000 (Default)
• Username: sa
• Table Name: audit_view
• Compare Field: eventtime
TheDatabase Name and Table Name parameters are case-sensitive.
Copyright © 2018, Juniper Networks, Inc.1016
Juniper Secure Analytics Configuring DSMs Guide

For more information about the Sybase ASE device, see your vendor documentation.
1017Copyright © 2018, Juniper Networks, Inc.
Chapter 124: Sybase ASE

Copyright © 2018, Juniper Networks, Inc.1018
Juniper Secure Analytics Configuring DSMs Guide
CHAPTER 125
Symantec
• Symantec on page 1019
• Symantec Critical System Protection on page 1019
• Symantec Data Loss Prevention (DLP) on page 1021
• Symantec Endpoint Protection on page 1026
• Symantec PGP Universal Server on page 1027
• Symantec SGS on page 1029
• Symantec System Center on page 1029
Symantec
JSA supports a number of Symantec DSMs.
Symantec Critical SystemProtection
The JSA DSM for Symantec Critical System Protection can collect event logs from
Symantec Critical System Protection systems.
The following table identifies the specifications for the Symantec Critical System
Protection DSM.
Table 319: Symantec Critical SystemProtection DSMSpecifications
ValueSpecification
SymantecManufacturer
Critical System ProtectionDSMName
DSM-SymantecCriticalSystemProtection-Qradar_version_buildnumber.noarch.rpm
RPM file name
5.1.1Supported versions
DB EntriesEvent format
All events from the ‘CSPEVENT_VW´ viewJSA recorded event types
1019Copyright © 2018, Juniper Networks, Inc.
Table 319: Symantec Critical SystemProtection DSMSpecifications (continued)
ValueSpecification
Symantec Critical System ProtectionLog source type in JSA UI
NoAuto discovered?
NoIncludes identity?
NoIncludes custom properties
SymantecWeb Page (http://www.symantec.com/)For more information
To integrateSymantecCritical SystemProtectionwith JSA, complete the following steps:
1. If automatic updates are not enabled, download and install the most current version
of the following RPMs on your JSA console:
• Protocol-JDBC RPM
• Symantec Critical System Protection RPM
2. For each Symantec Critical System Protection instance, configure Symantec Critical
System Protection to enable communication with JSA.
Ensure that JSA can poll the database for events by using TCP port 1433 or the port
that is configured for your log source. Protocol connections are often disabled on
databases and extra configuration steps are required in certain situations to allow
connections for event polling. Configure firewalls that are located betweenSymantec
Critical System Protection and JSA to allow traffic for event polling.
3. If JSA does not automatically discover Symantec Critical System Protection, create
a log source for eachSymantecCriticalSystemProtection instanceon the JSAconsole.
Use the following values for the required log source parameters:
DescriptionParameter
Symantec Critical System ProtectionLog Source Type
JDBCProtocol Configuration
MSDEDatabase Type
SCSPInstance
SCSPDBDatabase Name
CSPEVENT_VWTable Name
EVENT_IDCompare Field
Copyright © 2018, Juniper Networks, Inc.1020
Juniper Secure Analytics Configuring DSMs Guide
RelatedDocumentation
Symantec Data Loss Prevention (DLP) on page 1021•
• Symantec Endpoint Protection on page 1026
• Symantec PGP Universal Server on page 1027
Symantec Data Loss Prevention (DLP)
TheSymantecData LossProtection (DLP)DSM for JSAaccepts events fromaSymantec
DLP appliance by using syslog.
Before you configure JSA, youmust configure response rules on your Symantec DLP. The
response rule allows the Symantec DLP appliance to forward syslog events to JSAwhen
a data loss policy violation occurs. Integrating Symantec DLP requires you to create two
protocol response rules (SMTP and None of SMTP) for JSA. These protocol response
rules create an action to forward the event information, using syslog, when an incident
is triggered.
To configure Symantec DLP with JSA, take the following steps:
1. Create an SMTP response rule.
2. Create a None of SMTP response rule.
3. Configure a log source in JSA.
4. Map Symantec DLP events in JSA.
• Creating an SMTP Response Rule on page 1021
• Creating a None Of SMTP Response Rule on page 1022
• Configuring a Log Source on page 1024
• Event Map Creation for Symantec DLP Events on page 1024
• Discovering Unknown Events on page 1024
• Modifying the Event Map on page 1025
Creating an SMTP Response Rule
You can configure an SMTP response rule in Symantec DLP.
1. Log in to your Symantec DLP user interface.
2. From themenu, select theManage >Policies >Response Rules.
3. Click Add Response Rule.
4. Select one of the following response rule types:
• Automated Response Automated response rules are triggered automatically as
incidents occur. This is the default value.
1021Copyright © 2018, Juniper Networks, Inc.
Chapter 125: Symantec
• Smart Response Smart response rules are added to the Incident Command screen
and handled by an authorized Symantec DLP user.
5. Click Next.
Configure the following values:
6. Rule Name Type a name for the rule you are creating. This name ideally is descriptive
enough for policy authors to identify the rule. For example,QRadar Syslog SMTP.
7. DescriptionOptional. Type a description for the rule you are creating.
8. Click Add Condition.
9. On the Conditions panel, select the following conditions:
• From the first list, select Protocol or Endpoint Monitoring.
• From the second list, select Is Any Of.
• From the third list, select SMTP.
10. On the Actions pane, click Add Action.
11. From the Actions list, select All: Log to a Syslog Server.
12. Configure the following options:
a. Host Type the IP address of your JSA.
13. Port Type 514 as the syslog port.
14. MessageType the following string to add amessage for SMTP events.
LEEF:1.0|Symantec|DLP|2:medium|$POLICY$|usrName=$SENDER$|duser=$RECIPIENTS$|rules=$RULES$|matchCount=$MATCH_COUNT$|blocked=$BLOCKED$|incidentID=$INCIDENT_ID$|incidentSnapshot=$INCIDENT_SNAPSHOT$|subject=$SUBJECT$|fileName=$FILE_NAME$|parentPath=$PARENT_PATH$|path=$PATH$|quarantineParentPath=$QUARANTINE_PARENT_PATH$|scan=$SCAN$|target=$TARGET$
15. Level From this list, select 6 - Informational.
16. Click Save.
You can now configure your None Of SMTP response rule.
Creating a None Of SMTP Response Rule
You can configure a None Of SMTP response rule in Symantec DLP:
Copyright © 2018, Juniper Networks, Inc.1022
Juniper Secure Analytics Configuring DSMs Guide
1. From themenu, select theManage >Policies >Response Rules.
2. Click Add Response Rule.
3. Select one of the following response rule types:
• Automated Response Automated response rules are triggered automatically as
incidents occur. This is the default value.
• Smart Response Smart response rules are added to the Incident Command screen
and handled by an authorized Symantec DLP user.
4. Click Next.
Configure the following values:
5. Rule Name Type a name for the rule you are creating. This name ideally is descriptive
enough for policy authors to identify the rule. For example,QRadar Syslog None Of
SMTP
6. DescriptionOptional. Type a description for the rule you are creating.
7. Click Add Condition.
8. On the Conditions pane, select the following conditions:
• From the first list, select Protocol or Endpoint Monitoring.
• From the second list, select Is Any Of.
• From the third list, select None Of SMTP.
9. On the Actions pane, click Add Action.
10. From the Actions list, select All: Log to a Syslog Server.
11. Configure the following options:
a. Host Type the IP address of your JSA.
12. Port - Type 514 as the syslog port.
13. MessageType the following string to add amessage for None Of SMTP events.
LEEF:1.0|Symantec|DLP|2:medium|$POLICY$|src=$SENDER$|dst=$RECIPIENTS$|rules=$RULES$|matchCount=$MATCH_COUNT$|blocked=$BLOCKED$|incidentID=$INCIDENT_ID$|incidentSnapshot=$INCIDENT_SNAPSHOT$|subject=$SUBJECT$|fileName=$FILE_NAME$|parentPath=$PARENT_PATH$|path=$PATH$|quarantineParentPath=$QUARANTINE_PARENT_PATH$|scan=$SCAN$|target=$TARGET$
1023Copyright © 2018, Juniper Networks, Inc.
Chapter 125: Symantec
14. Level From this list, select 6 - Informational.
15. Click Save.
You are now ready to configure JSA.
Configuring a Log Source
Youcanconfigure the log source in JSA to receiveevents fromaSymantecDLPappliance.
JSA automatically detects syslog events for the SMTPandNone of SMTP response rules
that you create. However, if you want to manually configure JSAto receive events from
a Symantec DLP appliance:
1. From the Log Source Type list, select the Symantec DLP option.
For more information about Symantec DLP, see your vendor documentation.
Event Map Creation for Symantec DLP Events
Eventmapping is required for anumberofSymantecDLPevents.Due to thecustomizable
nature of policy rules, most events, except the default policy events do not contain a
predefined JSA Identifier (QID) map to categorize security events.
You can individuallymap each event for your device to an event category in JSA.Mapping
events allows JSA to identify, coalesce, and track reoccurring events from your network
devices. Until you map an event, all events that are displayed in the Log Activity tab for
Symantec DLP are categorized as unknown. Unknown events are easily identified as the
Event Name column and Low Level Category columns display Unknown.
Discovering Unknown Events
As your device forwards events to JSA, it can take time to categorize all of the events for
a device, as some events might not be generated immediately by the event source
appliance or software.
It is helpful to know how to quickly search for unknown events. When you know how to
search for unknownevents, it is suggestedyou repeat this searchuntil youarecomfortable
that you can identify most of your events.
1. Log in to JSA.
2. Click the Log Activity tab.
3. Click Add Filter.
4. From the first list, select Log Source.
5. From the Log Source Group list, select the log source group orOther.
Copyright © 2018, Juniper Networks, Inc.1024
Juniper Secure Analytics Configuring DSMs Guide
Log sources that are not assigned to a group are categorized as Other.
6. From the Log Source list, select your Symantec DLP log source.
7. Click Add Filter.
The Log Activity tab is displayed with a filter for your log source.
8. From the View list, select Last Hour.
Anyevents thataregeneratedby theSymantecDLPDSM in the last houraredisplayed.
Events thataredisplayedasunknown in theEventNamecolumnorLowLevelCategory
column require event mapping in JSA.
NOTE: You can save your existing search filter by clicking Save Criteria.
You can nowmodify the event map.
Modifying the Event Map
Modifying an event map gives you the option to manually categorize events to a JSA
Identifier (QID) map.
Any event that is categorized to a log source can be remapped to a new JSA Identifier
(QID).
NOTE: Events that do not have a defined log source cannot bemapped toan event. Events without a log source display SIM Generic Log in the Log
Source column.
1. On the Event Name column, double-click an unknown event for Symantec DLP.
The detailed event information is displayed.
2. ClickMap Event.
3. From the Browse for QID pane, select any of the following search options to narrow
the event categories for a JSA Identifier (QID):
a. From the High-Level Category list, select a high-level event categorization.
For a full list of high-level and low-level event categories or category definitions,
see the Event Categories section of the Juniper Secure Analytics Administration
Guide.
4. From the Low-Level Category list, select a low-level event categorization.
1025Copyright © 2018, Juniper Networks, Inc.
Chapter 125: Symantec

5. From the Log Source Type list, select a log source type.
The LogSourceType list gives you theoption to search forQIDs fromother log sources.
Searching for QIDs by log source is useful when events are similar to another existing
network device. For example, Symantec provides policy and data loss prevention
events, youmight select another product that likely captures similar events.
6. To search for a QID by name, type a name in theQID/Name field.
TheQID/Name field gives you theoption to filter the full list ofQIDs for a specificword,
for example, policy.
7. Click Search.
A list of QIDs are displayed.
8. Select the QID you want to associate to your unknown event.
9. ClickOK.
Maps any additional events that are forwarded from your device with the same QID
that matches the event payload. The event count increases each time that the event
is identified by JSA.
If youupdateaneventwithanewJSA Identifier (QID)map, past events that are stored
in JSA are not updated. Only new events are categorized with the newQID.
Symantec Endpoint Protection
The Symantec Endpoint Protection DSM for JSA accepts events by using syslog.
JSA records all Audit and Security log events. Before you configure a Symantec Endpoint
Protection device in JSA, youmust configure your device to forward syslog events.
1. Log in to the Symantec Endpoint Protection Manager
2. On the left pane, click the Admin icon.
The View Servers option is displayed.
3. From the bottom of the View Servers pane, click Servers.
4. From the View Servers pane, click Local Site.
5. From the Tasks pane, click Configure External Logging.
6. On the Generals tab, select the Enable Transmission of Logs to a Syslog Server check
box.
Copyright © 2018, Juniper Networks, Inc.1026
Juniper Secure Analytics Configuring DSMs Guide
7. In the Syslog Server field, type the IP address of your JSA you want to parse the logs.
8. In the UDPDestination Port field, type 514.
9. In the Log Facility field, type 6.
10. In the Log Filter tab:
a. Under theManagement Server Logs, select the Audit Logs check box.
11. Under the Client Log pane, select the Security Logs check box.
12. Under the Client Log pane, select the Risks check box.
13. ClickOK.
14. You can now configure the log source in JSA.
To configure JSA to receive events from a Symantec Endpoint Protection device:
a. From the Log Source Type list, select the Symantec Endpoint Protection option.
Symantec PGPUniversal Server
ThePGPUniversalServerDSMfor JSAaccepts syslogevents fromPGPUniversalServers.
JSA accepts all relevant events from the following categories:
• Administration
• Software updates
• Clustering
• Backups
• WebMessenger
• Verified Directory
• Postfix
• Client logs
• Whole Disk Encryption logs
Before you can integrate PGP Universal Server events with JSA, youmust enable and
configure PGP Universal Server to forward syslog events to JSA.
• Configuring Syslog for PGP Universal Server on page 1028
• Configuring a Log Source on page 1028
1027Copyright © 2018, Juniper Networks, Inc.
Chapter 125: Symantec
Configuring Syslog for PGPUniversal Server
You can enable external logging to forward syslog events to JSA.
1. In a web browser, log in to your PGP server's administrative interface.
https://<PGP Server IP address>:9000
2. Click Settings.
3. Select the Enable External Syslog check box.
4. From the Protocol list, select either UDP or TCP.
By default, JSA uses port 514 to receive UDP syslog or TCP syslog event messages.
5. In the Hostname field, type the IP address of your JSA console or Event Collector.
6. In the Port field, type 514.
7. Click Save.
The configuration is complete. The log source is added to JSAasPGPUniversal Server
events are automatically discovered. Events that are forwarded to JSA by the PGP
Universal Servers are displayed on the Log Activity tab of JSA.
Configuring a Log Source
JSAautomatically discoversandcreatesa log source for syslogevents fromPGPUniversal
Servers.
The following configuration steps are optional.
1. Log in to JSA.
2. Click the Admin tab.
3. On the navigation menu, click Data Sources.
4. Click the Log Sources icon.
5. Click Add.
6. In the Log Source Name field, type a name for your log source.
7. In the Log Source Description field, type a description for the log source.
Copyright © 2018, Juniper Networks, Inc.1028
Juniper Secure Analytics Configuring DSMs Guide
8. From the Log Source Type list, select PGPUniversal Server.
9. Using the Protocol Configuration list, select Syslog.
10. Configure the following values:
Table 320: Syslog Protocol Parameters
DescriptionParameter
Type the IP address or host name for the log source as an identifier for events from your PGPUniversal Server.
Log Source Identifier
11. Click Save.
12. On the Admin tab, click Deploy Changes.
The configuration is complete.
Symantec SGS
The Symantec Gateway Security (SGS) Appliance DSM for JSA accepts SGS events by
using syslog.
JSA records all relevant events from SGS. Before you configure JSA to integrate with an
SGS, youmust configure syslog within your SGS appliance. For more information on
Symantec SGS, see your vendor documentation.
After you configure syslog to forward events to JSA, the configuration is complete. Events
forward from Symantec SGS to JSA using syslog are automatically discovered. However,
if you want to manually create a log source for Symantec SGS:
1. From the LogSource Type list, select theSymantecGatewaySecurity (SGS)Appliance
option.
Symantec SystemCenter
TheSymantecSystemCenter (SSC)DSM for JSA retrieves events fromanSSCdatabase
by using a custom view that is created for JSA.
JSA records all SSC events. Youmust configure the SSC database with a user that has
read and write privileges for the custom JSA view to be able to poll the view for
information. Symantec System Center (SSC) supports only the JDBC protocol.
• Configuring a Database View for Symantec System Center on page 1030
• Configuring a Log Source on page 1030
1029Copyright © 2018, Juniper Networks, Inc.
Chapter 125: Symantec
Configuring a Database View for Symantec SystemCenter
A database view is required by the JDBC protocol to poll for SSC events.
1. In the Microsoft SQL Server database that is used by the SSC device, configure a
custom default view to support JSA:
NOTE: The database namemust not contain any spaces.
• CREATE VIEW dbo.vw_qradar AS SELECT
• dbo.alerts.Idx AS idx,
• dbo.inventory.IP_Address AS ip,
• dbo.inventory.Computer AS computer_name,
• dbo.virus.Virusname AS virus_name,
• dbo.alerts.Filepath AS filepath,
• dbo.alerts.NoOfViruses AS no_of_virus,
• dbo.actualaction.Actualaction AS [action],
• dbo.alerts.Alertdatetime AS [date],
• dbo.clientuser.Clientuser AS user_name FROM
• dbo.alerts INNER JOIN
• dbo.virus ON dbo.alerts.Virusname_Idx = dbo.virus.Virusname_Idx INNER JOIN
• dbo.inventoryONdbo.alerts.Computer_Idx=dbo.inventory.Computer_Idx INNERJOIN
• dbo.actualaction ON dbo.alerts.Actualaction_Idx =
• dbo.actualaction.Actualaction_Idx INNER JOIN
• dbo.clientuser ON dbo.alerts.Clientuser_Idx = dbo.clientuser.Clientuser_Idx
After you create your custom view, youmust configure JSA to receive event information
by using the JDBC protocol.
Configuring a Log Source
You can configure JSA to access the SSC database by using the JDBC protocol.
1. Log in to JSA.
2. Click the Admin tab.
3. On the navigation menu, click Data Sources.
4. Click the Log Sources icon.
Copyright © 2018, Juniper Networks, Inc.1030
Juniper Secure Analytics Configuring DSMs Guide
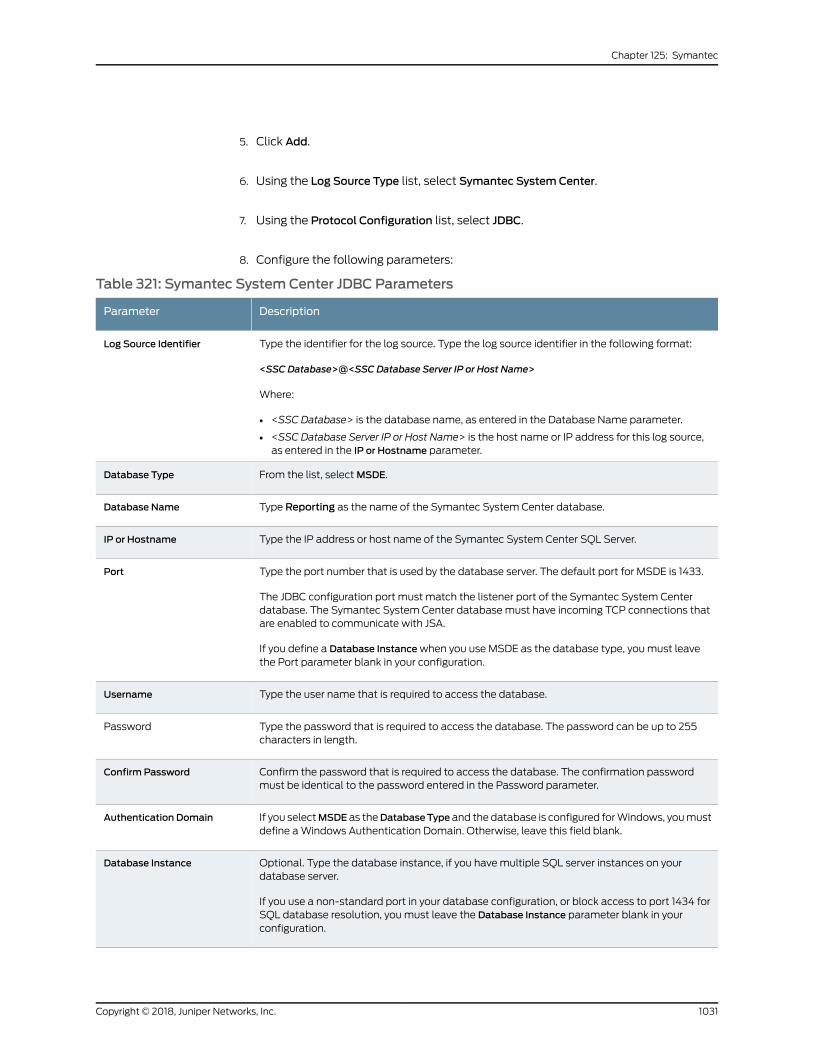
5. Click Add.
6. Using the Log Source Type list, select Symantec SystemCenter.
7. Using the Protocol Configuration list, select JDBC.
8. Configure the following parameters:
Table 321: Symantec SystemCenter JDBC Parameters
DescriptionParameter
Type the identifier for the log source. Type the log source identifier in the following format:
<SSC Database>@<SSC Database Server IP or Host Name>
Where:
• <SSC Database> is the database name, as entered in the Database Name parameter.
• <SSC Database Server IP or Host Name> is the host name or IP address for this log source,as entered in the IP or Hostname parameter.
Log Source Identifier
From the list, selectMSDE.Database Type
Type Reporting as the name of the Symantec System Center database.Database Name
Type the IP address or host name of the Symantec System Center SQL Server.IP or Hostname
Type the port number that is used by the database server. The default port for MSDE is 1433.
The JDBC configuration port must match the listener port of the Symantec System Centerdatabase. The Symantec System Center databasemust have incoming TCP connections thatare enabled to communicate with JSA.
If you define a Database Instancewhen you use MSDE as the database type, youmust leavethe Port parameter blank in your configuration.
Port
Type the user name that is required to access the database.Username
Type the password that is required to access the database. The password can be up to 255characters in length.
Password
Confirm the password that is required to access the database. The confirmation passwordmust be identical to the password entered in the Password parameter.
Confirm Password
If you selectMSDE as theDatabaseType and the database is configured forWindows, youmustdefine aWindows Authentication Domain. Otherwise, leave this field blank.
Authentication Domain
Optional. Type the database instance, if you havemultiple SQL server instances on yourdatabase server.
If you use a non-standard port in your database configuration, or block access to port 1434 forSQL database resolution, youmust leave the Database Instance parameter blank in yourconfiguration.
Database Instance
1031Copyright © 2018, Juniper Networks, Inc.
Chapter 125: Symantec

Table 321: Symantec SystemCenter JDBC Parameters (continued)
DescriptionParameter
Type vw_qradar as the name of the table or view that includes the event records.Table Name
Type * for all fields from the table or view.
You can use a comma-separated list to define specific tables or views, if you need it for yourconfiguration. The comma-separated list can be up to 255 alphanumeric characters in length.The list can include the followingspecial characters: dollar sign ($), number sign (#), underscore(_), en dash (-), and period(.).
Select List
Type idx as the compare field. The compare field is used to identify newevents added betweenqueries to the table.
Compare Field
Optional. Type the start date and time for database polling.
The Start Date and Time parameter must be formatted as yyyy-MM-dd HH: mmwith HHspecified you use a 24-hour clock. If the start date or time is clear, polling begins immediatelyand repeats at the specified polling interval.
Start Date and Time
Select this check box to use prepared statements.
Prepared statements allow the JDBC protocol source to set up the SQL statement one time,then run theSQLstatementmany timeswithdifferentparameters. For securityandperformancereasons, it is suggested that you use prepared statements.
Clearing this check box requires you to use an alternative method of querying that does notuse pre-compiled statements.
Use Prepared Statements
Type the polling interval, which is the amount of time between queries to the event table. Thedefault polling interval is 10 seconds.
Youcandefinea longerpolling interval byappendingH for hoursorM forminutes to thenumericvalue. Themaximum polling interval is 1 week in any time format. Numeric values that areentered without an H or M poll in seconds.
Polling Interval
Type the number of Events Per Second (EPS) that you do not want this protocol to exceed.The default value is 20000 EPS.
EPS Throttle
Clear the Use Named Pipe Communication check box.
When using a Named Pipe connection, the user name and passwordmust be the appropriateWindows authentication user name and password and not the database user name andpassword. Also, youmust use the default Named Pipe.
Use Named PipeCommunication
If you select the Use Named Pipe Communication check box, the Database Cluster Nameparameter is displayed. If you are running your SQL server in a cluster environment, define thecluster name to ensure Named Pipe communication functions properly.
Database Cluster Name
NOTE: Selecting a value greater than 5 for the Credibility parameter
weightsyourSymantecSystemCenter logsourcewithahigher importancecompared to other log sources in JSA.
Copyright © 2018, Juniper Networks, Inc.1032
Juniper Secure Analytics Configuring DSMs Guide

9. Click Save.
10. On the Admin tab, click Deploy Changes.
The configuration is complete.
1033Copyright © 2018, Juniper Networks, Inc.
Chapter 125: Symantec

Copyright © 2018, Juniper Networks, Inc.1034
Juniper Secure Analytics Configuring DSMs Guide
CHAPTER 126
Symark
• Symark on page 1035
• Configuring a Log Source on page 1035
• Configuring Symark PowerBroker on page 1036
Symark
Symark PowerBroker logs all events to amulti-line format in a single event log file, which
is viewed by using Symark's pblog utility.
PowerBroker pblogs must be reformatted by using a script and then forwarded to JSA.
This configuration requires you download and configure a script for your Symark
PowerBroker appliance before you can forward events to JSA.
Configuring a Log Source
JSA automatically discovers and identifies most incoming syslog events from external
sources.
The following configuration steps are optional.
To create a log source:
1. Click the Admin tab.
2. On the navigation menu, click Data Sources.
The Data Sources pane is displayed.
3. Click the Log Sources icon.
The Log Sourceswindow is displayed.
4. In the Log Source Name field, type a name for your Symark PowerBroker log source.
5. In the Log Source Description field, type a description for the log source.
1035Copyright © 2018, Juniper Networks, Inc.
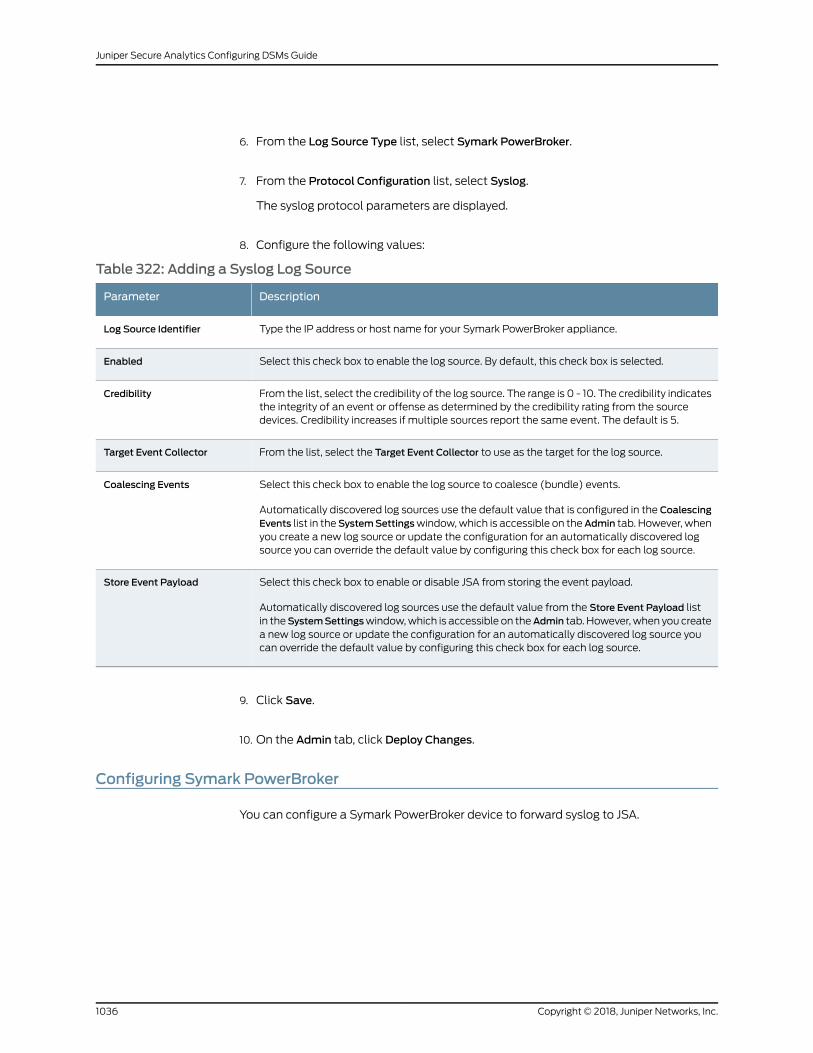
6. From the Log Source Type list, select Symark PowerBroker.
7. From the Protocol Configuration list, select Syslog.
The syslog protocol parameters are displayed.
8. Configure the following values:
Table 322: Adding a Syslog Log Source
DescriptionParameter
Type the IP address or host name for your Symark PowerBroker appliance.Log Source Identifier
Select this check box to enable the log source. By default, this check box is selected.Enabled
From the list, select the credibility of the log source. The range is 0 - 10. The credibility indicatesthe integrity of an event or offense as determined by the credibility rating from the sourcedevices. Credibility increases if multiple sources report the same event. The default is 5.
Credibility
From the list, select the Target Event Collector to use as the target for the log source.Target Event Collector
Select this check box to enable the log source to coalesce (bundle) events.
Automatically discovered log sources use the default value that is configured in the CoalescingEvents list in theSystemSettingswindow,which is accessible on theAdmin tab. However, whenyou create a new log source or update the configuration for an automatically discovered logsource you can override the default value by configuring this check box for each log source.
Coalescing Events
Select this check box to enable or disable JSA from storing the event payload.
Automatically discovered log sources use the default value from the Store Event Payload listin theSystemSettingswindow,which is accessible on theAdmin tab. However,when you createa new log source or update the configuration for an automatically discovered log source youcan override the default value by configuring this check box for each log source.
Store Event Payload
9. Click Save.
10. On the Admin tab, click Deploy Changes.
Configuring Symark PowerBroker
You can configure a Symark PowerBroker device to forward syslog to JSA.
Copyright © 2018, Juniper Networks, Inc.1036
Juniper Secure Analytics Configuring DSMs Guide
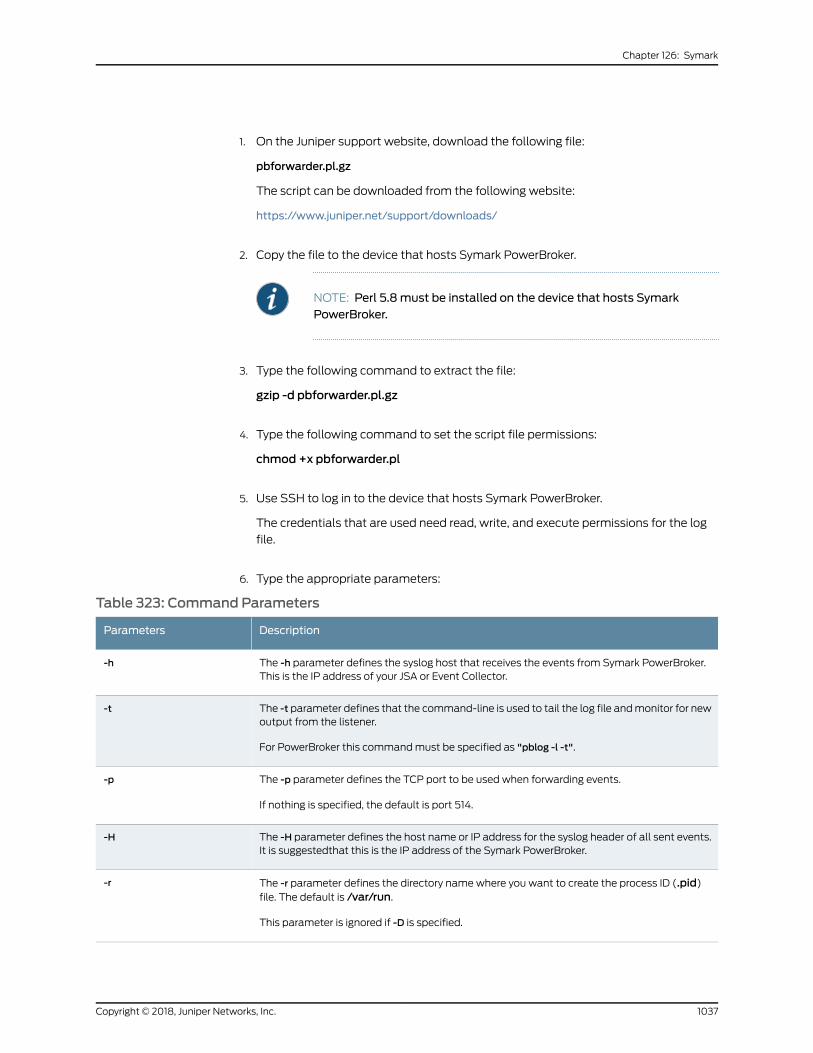
1. On the Juniper support website, download the following file:
pbforwarder.pl.gz
The script can be downloaded from the following website:
https://www.juniper.net/support/downloads/
2. Copy the file to the device that hosts Symark PowerBroker.
NOTE: Perl 5.8must be installed on the device that hosts SymarkPowerBroker.
3. Type the following command to extract the file:
gzip -d pbforwarder.pl.gz
4. Type the following command to set the script file permissions:
chmod +x pbforwarder.pl
5. Use SSH to log in to the device that hosts Symark PowerBroker.
The credentials that are used need read, write, and execute permissions for the log
file.
6. Type the appropriate parameters:
Table 323: Command Parameters
DescriptionParameters
The -h parameter defines the syslog host that receives the events from Symark PowerBroker.This is the IP address of your JSA or Event Collector.
-h
The -t parameter defines that the command-line is used to tail the log file andmonitor for newoutput from the listener.
For PowerBroker this commandmust be specified as "pblog -l -t".
-t
The -p parameter defines the TCP port to be used when forwarding events.
If nothing is specified, the default is port 514.
-p
The -H parameter defines the host name or IP address for the syslog header of all sent events.It is suggestedthat this is the IP address of the Symark PowerBroker.
-H
The -r parameter defines the directory namewhere you want to create the process ID (.pid)file. The default is /var/run.
This parameter is ignored if -D is specified.
-r
1037Copyright © 2018, Juniper Networks, Inc.
Chapter 126: Symark
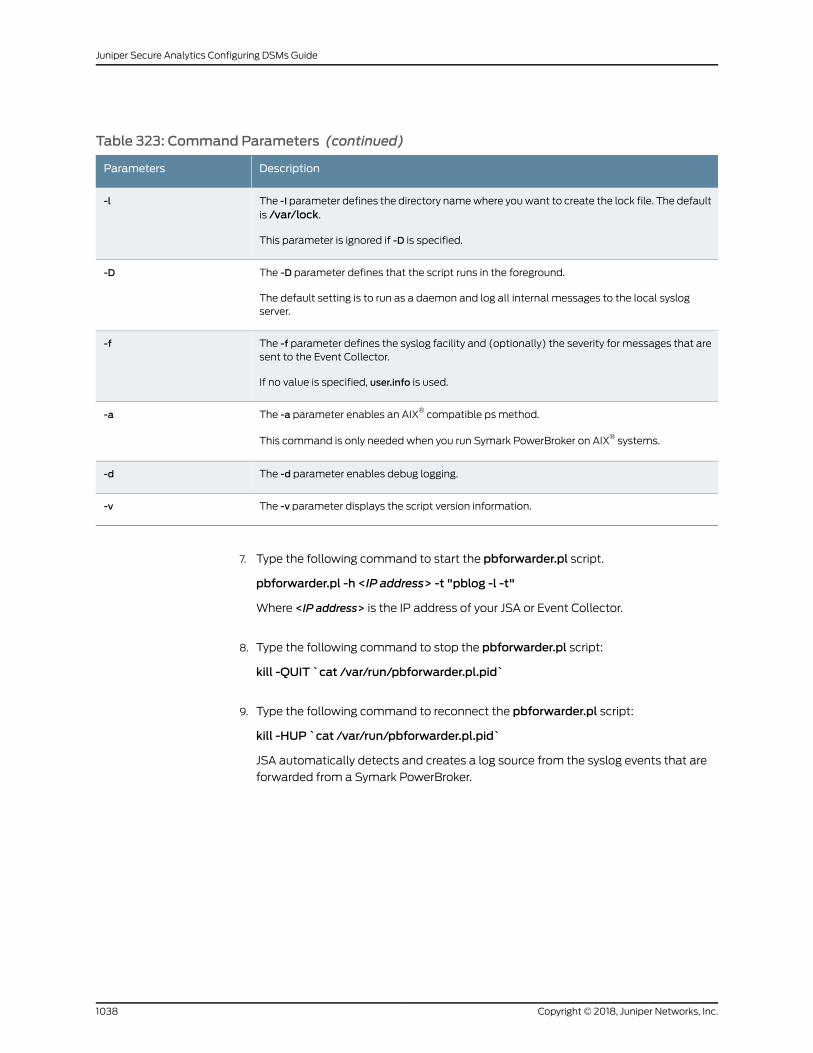
Table 323: Command Parameters (continued)
DescriptionParameters
The -I parameter defines the directory namewhere youwant to create the lock file. The defaultis /var/lock.
This parameter is ignored if -D is specified.
-l
The -D parameter defines that the script runs in the foreground.
The default setting is to run as a daemon and log all internal messages to the local syslogserver.
-D
The -f parameter defines the syslog facility and (optionally) the severity for messages that aresent to the Event Collector.
If no value is specified, user.info is used.
-f
The -a parameter enables an AIX® compatible ps method.
This command is only needed when you run Symark PowerBroker on AIX® systems.
-a
The -d parameter enables debug logging.-d
The -v parameter displays the script version information.-v
7. Type the following command to start the pbforwarder.pl script.
pbforwarder.pl -h <IP address> -t "pblog -l -t"
Where <IP address> is the IP address of your JSA or Event Collector.
8. Type the following command to stop the pbforwarder.pl script:
kill -QUIT `cat /var/run/pbforwarder.pl.pid`
9. Type the following command to reconnect the pbforwarder.pl script:
kill -HUP `cat /var/run/pbforwarder.pl.pid`
JSA automatically detects and creates a log source from the syslog events that are
forwarded from a Symark PowerBroker.
Copyright © 2018, Juniper Networks, Inc.1038
Juniper Secure Analytics Configuring DSMs Guide
CHAPTER 127
Sourcefire Intrusion Sensor
• Sourcefire Intrusion Sensor on page 1039
• Configuring Sourcefire Intrusion Sensor on page 1039
• Cisco FireSIGHTManagement Center on page 1040
Sourcefire Intrusion Sensor
TheSourcefire IntrusionSensorDSMfor JSAacceptsSnortbased intrusionandprevention
syslog events from Sourcefire devices.
Configuring Sourcefire Intrusion Sensor
Toconfigure yourSourcefire IntrusionSensor, youmustenablepolicyalertsandconfigure
your appliance to forward the event to JSA.
1. Log in to your Sourcefire user interface.
2. On the navigation menu, select Intrusion Sensor > Detection Policy > Edit.
3. Select an active policy and click Edit.
4. Click Alerting.
5. In the State field, select on to enable the syslog alert for your policy.
6. From the Facility list, select Alert.
7. From the Priority list, select Alert.
8. In the Logging Host field, type the IP address of the JSA Console or Event Collector.
9. Click Save.
1039Copyright © 2018, Juniper Networks, Inc.
10. On the navigation menu, select Intrusion Sensor > Detection Policy > Apply.
11. Click Apply.
You are now ready to configure the log source in JSA.
RelatedDocumentation
Configuring a LogSource for Cisco FireSIGHTManagement Center Events on page 287•
Cisco FireSIGHTManagement Center
JSA supports FireSIGHTManagement Center v4.8.0.2 to v6.0.0.
Youmust download and install one of the following patches from the Cisco FireSIGHT
Management Center website to collect FireSIGHTManagement Center 5.1.x events in
JSA:
• Sourcefire_hotfix-v5.1.0-0-build_1.tar
• Sourcefire_hotfix-v5.1.1-0-build_1.tar
Formore informationaboutpatches for yourFireSIGHTappliance, see theCiscoFireSIGHT
Management Center website.
• Configuration Overview on page 1040
• Supported Event Types on page 1041
• Creating FireSIGHTManagement Center 4.x Certificates on page 1042
• Creating Cisco FireSIGHTManagement Center 5.x and 6.x Certificates on page 1043
• Importing a Cisco FireSIGHTManagement Center Certificate to JSA on page 1044
• ConfiguringaLogSource forCiscoFireSIGHTManagementCenter Eventsonpage 1045
FireSIGHTManagement Center is formerly known as Sourcefire Defense Center.
The JSA DSM for Cisco FireSIGHTManagement Center accepts FireSIGHTManagement
Center events by using the eStreamer API service.
Configuration Overview
To integrate with FireSIGHTManagement Center, you must create certificates in the
FireSIGHTManagement Center interface, and then add the certificates to the JSA
appliances that receive eStreamer event data.
If your deployment includes multiple FireSIGHTManagement Center appliances, you
must copy the certificate for each appliance that receives eStreamer events. The
certificate allows the FireSIGHTManagement Center appliance and the JSA console or
JSA Event Collectors to communicate by using the eStreamer API to collect events.
To integrate JSA with FireSIGHTManagement Center, use the following steps:
1. Create the eStreamer certificate on your FireSIGHTManagement Center appliance.
Copyright © 2018, Juniper Networks, Inc.1040
Juniper Secure Analytics Configuring DSMs Guide

2. Add the FireSIGHTManagement Center certificate files to JSA.
3. Configure a log source in JSA for your FireSIGHTManagement Center appliances.
Supported Event Types
JSA supports the following event types from FireSIGHTManagement Center:
• Intrusion events and extra data:
Intrusion events that are categorizedby theCisco FireSIGHTManagementCenter DSM
in JSA use the same JSA Identifiers (QIDs) as the Snort DSM to ensure that all intrusion
events are categorized properly.
Intrusionevents in the 1,000,000-2,000,000 rangeareuser-defined rules inFireSIGHT
ManagementCenter.User-defined rules thatgenerateeventsareaddedasanUnknown
event in JSA, and include additional information that describes the event type. For
example, a user-defined event can identify as Unknown:Buffer Overflow for FireSIGHT
Management Center.
• Correlation events
• Metadata events
• Discovery events
• Host events
• User events
• Malware events
• File events
The following table provides a sample event message for the Cisco FireSIGHT
Management Center DSM:
Table 324: Cisco FireSIGHTManagement Center SampleMessage Supported by the CiscoFireSIGHTManagement Center Device.
Sample logmessageLow level categoryEvent name
DeviceType=Estreamer DeviceAddress=1.1.1.1 CurrentTime=1462455523216 recordType=NEW_NETWORK_PROTOCOL recordLength=42 timestamp=21 Feb 2014 11:18:47 detectionEngineRef=2 ipAddress=2.2.2.2. MACAddress=00:00:00:00:00:00 hasIPv6=false eventSecond=1392995924 eventMicroSecond=464098 eventType=NEW_NETWORK_PROTOCOL fileNumber=875E0753 filePosition=BF0B0000 protocol.protocolId=2048 protocol.protocolName=IP
InformationNew_Network_Protocol
1041Copyright © 2018, Juniper Networks, Inc.
Chapter 127: Sourcefire Intrusion Sensor

Table 324: Cisco FireSIGHTManagement Center SampleMessage Supported by the CiscoFireSIGHTManagement Center Device. (continued)
Sample logmessageLow level categoryEvent name
DeviceType=Estreamer DeviceAddress=1.1.1.1 CurrentTime=1462455518176 recordType=INTRUSION_EVENT_RECORD3 recordLength=60 timestamp=18 Feb 2014 10:22:45 detectionEngineRef=3 eventId=133241 eventSecond=1392733365 eventMicrosecond=739677 rule.generatorId=1 rule.ruleId=18312 rule.ruleRevision=5 rule.renderedSignatureId=18312 rule.message=SERVER-OTHER Subversion 1.0.2 get-dated-rev buffer overflow attempt rule.ruleUUID=439966ABC58A491CB47D204EB9A560D8 rule.ruleRevisionUUID=F322B90F2B9311E3B791848F69E36DD2 classification.classificationId=9 classification.name=attempted-user classification.description=Attempted User Privilege Gain classification.classificationUUID=9D0A6F5ECBA211D9925A005056040501 classification.classificationRevisionUUID=00000000000000000000000000000000 priority.priorityId=1 priority.name=high sourceAddress=2.1.2.2 destinationAddress=2.2.2.2 sourcePortOrICMPType=50594 destinationPortOrICMPCode=3690 ipProtocolId=6 impactFlags=00000001 impact=4 blocked=0 vlanId=0
Misc ExploitIntrusion_Event_Record
Creating FireSIGHTManagement Center 4.x Certificates
JSA requires a certificate for every Cisco FireSIGHTManagement Center appliance in
your deployment. Certificates are generated in pkcs12 format andmust be converted to
keystore and truststore files, which are usable by JSA appliances.
1. Log in to your FireSIGHTManagement Center interface.
2. SelectOperations >Configuration >eStreamer.
3. Click the eStreamer tab.
4. Click Create Client.
5. Select check boxes for the event types FireSIGHTManagement Center provides to
JSA.
6. Click + Create Client in the upper right-side of the interface.
Copyright © 2018, Juniper Networks, Inc.1042
Juniper Secure Analytics Configuring DSMs Guide
7. In the Hostname field, type the IP address or host name.
• If you use a JSA console or use an All-in-one appliance to collect eStreamer events,
type the IP address or host name of your JSA console.
• If you use a remote Event Collector to collect eStreamer events, type the IP address
or host name for the remote Event Collector.
• If you use High Availability (HA), type the virtual IP address.
8. In the Password field, leave the password field blank or type a password for your
certificate and click Save.
The new client is added to the eStreamer Client list and the host is allowed to
communicate with the eStreamer API on port 8302.
9. From the Certificate Location column, click the client that you created to save the
pkcs12 certificate to a file location and clickOK.
You are now ready to import your FireSIGHTManagement Center certificate to your JSA
appliance.
Creating Cisco FireSIGHTManagement Center 5.x and 6.x Certificates
Certificates are created by Cisco FireSIGHTManagement Center appliances in your
deployment.
JSA requires a certificate for every FireSIGHTManagement Center appliance in your
deployment. Certificates are generated in pkcs12 format andmust be converted to a
keystore and truststore file, which are usable by JSA appliances.
1. Log in to your FireSIGHTManagement Center interface.
2. If you are using version 5.x, select System >Local >Registration.
3. If you are using version 6.x, select System >Integration
4. Click the eStreamer tab.
5. Select check boxes for the event types that FireSIGHTManagement Center provides
to JSA and click Save.
6. Click + Create Client in the upper right-side of the interface.
7. In the Hostname field, type the IP address or host name.
• If you use a JSAConsole or use anAll-in-one appliance to collect eStreamer events,
type the IP address or host name of your JSA Console.
• If you use an Event Collector to collect eStreamer events, type the IP address or
host name for the Event Collector.
1043Copyright © 2018, Juniper Networks, Inc.
Chapter 127: Sourcefire Intrusion Sensor
• If you use High Availability (HA), type the virtual IP address.
8. In the Password field, type a password for your certificate or leave the field blank and
click Save.
The new client is added to the Streamer Client list and the host is allowed to
communicate with the eStreamer API on port 8302.
9. Click the download arrow for your host to save the pkcs12 certificate to a file location.
10. ClickOK to download the file.
You are now ready to import your FireSIGHTManagement Center certificate to your JSA
appliance.
Importing a Cisco FireSIGHTManagement Center Certificate to JSA
The estreamer-cert-import.pl script for JSA converts your pkcs12 certificate file to a
keystore and truststore file and places the certificates in the proper directory on your JSA
appliance. Repeat this procedure for each Sourcefire Defense Center pcks12 certificate
you need to import to your JSA Console or Event Collector.
Youmusthave rootor su- rootprivileges to run theestreamer-cert-import.pl import script.
The estreamer-cert-import.pl script is stored on your JSA appliance when you install the
FireSIGHTManagement Center protocol.
The script converts and imports one pkcs12 file at a time. You are required only to import
a certificate for the JSA appliance that manages the FireSIGHTManagement Center log
source. For example, after the FireSIGHTManagement Center event is categorized and
normalized by an Event Collector in a JSAdeployment, it is forwarded to the JSAConsole.
In this scenario, you would import a certificate to the Event Collector.
When you import a new certificate, existing FireSIGHTManagement Center certificates
on the JSAapplianceare renamed toestreamer.keystore.oldandestreamer.truststore.old.
1. Log in to your JSA Console or Event Collector as the root user.
2. Copy the pkcs12 certificate from your FireSIGHTManagement Center appliance to
the following directory:
/opt/qradar/bin/
3. To import your pkcs12 file, type the following command and any extra parameters:
/opt/qradar/bin/estreamer-cert-import.pl -f pkcs12_file_name options
Extra parameters are described in the following table:
DescriptionParameter
Identifies the file name of the pkcs12 files to import.-f
Copyright © 2018, Juniper Networks, Inc.1044
Juniper Secure Analytics Configuring DSMs Guide
DescriptionParameter
Overrides the default Estreamer name for the keystore andtruststore files. Use the -o parameter when you integratemultiple FireSIGHTManagementCenter devices. For example,/opt/qradar/bin/estreamer-cert-import.pl -f <file name> -o192.168.1.100
The import script creates the following files:
• /opt/qradar/conf/192.168.0.100.keystore
• /opt/qradar/conf/192.168.0.100.truststore
-o
Enables verbosemode for the import script. Verbosemode isintended to display error messages for troubleshootingpurposes when pkcs12 files fail to import properly.
-d
Specifies a password if a password was accidentally providedwhen you generated the pkcs12 file.
-p
Displays the version information for the import script.-v
Displays a help message on using the import script.-h
The import script creates a keystore and truststore file in the following locations:
• /opt/qradar/conf/estreamer.keystore
• /opt/qradar/conf/estreamer.truststore
Configuring a Log Source for Cisco FireSIGHTManagement Center Events
Youmust configure a log source because JSA does not automatically discover Sourcefire
Defense Center events.
1. Log in to JSA.
2. Click the Admin tab.
3. On the navigation menu, click Data Sources.
4. Click the Log Sources icon.
5. Click Add.
6. From the Log Source Type list, select Cisco FireSIGHTManagement Center.
1045Copyright © 2018, Juniper Networks, Inc.
Chapter 127: Sourcefire Intrusion Sensor
7. From the Protocol Configuration list, select Sourcefire Defense Center Estreamer.
8. Configure the following parameters:
DescriptionParameter
The IP address or host name of the FireSIGHTManagementCenter device.
Server Address
The port number JSA uses to receive FireSIGHTManagementCenter Estreamer events.
Server Port
The directory path and file name for the keystore private keyand associated certificate.
Keystore Filename
The directory path and file name for the truststore files. Thetruststore file that contains the certificates that are trusted bythe client.
Truststore Filename
Select this option to request extra data from FireSIGHTManagement Center Estreamer, for example, extra dataincludes the original IP address of an event.
Request Extra Data
Select this option to use an alternative method for retrievingevents from an eStreamer source.
ExtendedRequests are supported on FireSIGHTManagementCenter Estreamer version 5.0 or later.
Use Extended Requests
RelatedDocumentation
• Cisco FWSM on page 288
• Cisco IDS/IPS on page 290
• Cisco IronPort on page 293
Copyright © 2018, Juniper Networks, Inc.1046
Juniper Secure Analytics Configuring DSMs Guide
CHAPTER 128
ThreatGRID Malware Threat IntelligencePlatform
• ThreatGRID Malware Threat Intelligence Platform on page 1047
• Supported Event Collection Protocols for ThreatGRID Malware Threat
Intelligence on page 1047
• ThreatGRID Malware Threat Intelligence Configuration Overview on page 1048
ThreatGRIDMalware Threat Intelligence Platform
The ThreatGRID Malware Threat Intelligence Platform DSM for JSA collects malware
events by using the log file protocol or syslog.
JSA supports ThreatGRID Malware Threat Intelligence Platform appliances with v2.0
software that use the JSA Log Enhanced Event Format (LEEF) Creation script.
Supported Event Collection Protocols for ThreatGRIDMalware Threat Intelligence
ThreatGRIDMalwareThreat IntelligencePlatformwritesmalwareevents thatare readable
by JSA.
The LEEF creation script is configured on the ThreatGRID appliance and queries the
ThreatGRID API to write LEEF events that are readable by JSA. The event collection
protocol your log source uses to collectmalware events is based on the script you install
on your ThreatGRID appliance.
Two script options are available for collecting LEEF formatted events:
• Syslog -Thesyslogversionof theLEEFcreationscript allowsyourThreatGRIDappliance
to forward events directly to JSA. Events that are forwarded by the syslog script are
automatically discovered by JSA.
• Log file - The log file protocol version of the LEEF creation script allows the ThreatGRID
appliance to write malware events to a file. JSA uses the log file protocol to
communicate with the event log host to retrieve and parse malware events.
The LEEF creation script is available from ThreatGRID customer support. For more
information, see the ThreatGRIDwebsitehttp://www.threatgrid.com or email ThreatGRID
support at [email protected].
1047Copyright © 2018, Juniper Networks, Inc.
ThreatGRIDMalware Threat Intelligence Configuration Overview
You can integrate ThreatGRID Malware Threat Intelligence events with JSA.
Youmust complete the following tasks:
1. Download the JSALogEnhancedEvent FormatCreation script for your collection type
from the ThreatGRID support website to your appliance.
2. On your ThreatGRID appliance, install and configure the script to poll the ThreatGRID
API for events.
3. On your JSA appliance, configure a log source to collect events based on the script
you installed on your ThreatGRID appliance.
4. Ensure that no firewall rules block communication between your ThreatGRID
installation and the JSA console or managed host that is responsible for retrieving
events.
• Configuring a ThreatGRID Syslog Log Source on page 1048
• Configuring a ThreatGRID Log File Protocol Log Source on page 1049
Configuring a ThreatGRID Syslog Log Source
JSA automatically discovers and creates a log source for malware events that are
forwarded from the ThreatGRID Malware Threat Intelligence Platform.
This procedure is optional.
1. Log in to JSA.
2. Click the Admin tab.
3. On the navigation menu, click Data Sources.
4. Click the Log Sources icon.
5. Click Add.
6. In the Log Source Name field, type a name for your log source.
7. In the Log Source Description field, type a description for the log source.
8. From the Log Source Type list, select ThreatGRIDMalware Intelligence Platform.
9. From the Protocol Configuration list, select Syslog.
10. Configure the following values:
Copyright © 2018, Juniper Networks, Inc.1048
Juniper Secure Analytics Configuring DSMs Guide
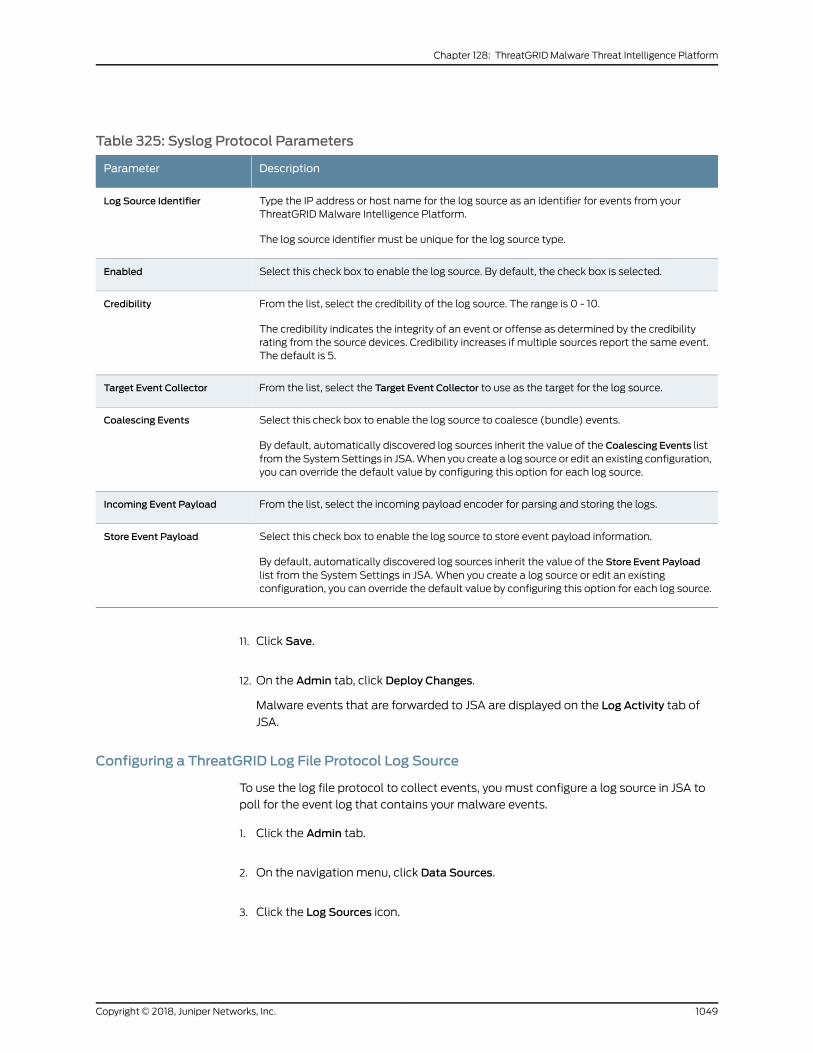
Table 325: Syslog Protocol Parameters
DescriptionParameter
Type the IP address or host name for the log source as an identifier for events from yourThreatGRID Malware Intelligence Platform.
The log source identifier must be unique for the log source type.
Log Source Identifier
Select this check box to enable the log source. By default, the check box is selected.Enabled
From the list, select the credibility of the log source. The range is 0 - 10.
The credibility indicates the integrity of an event or offense as determined by the credibilityrating from the source devices. Credibility increases if multiple sources report the same event.The default is 5.
Credibility
From the list, select the Target Event Collector to use as the target for the log source.Target Event Collector
Select this check box to enable the log source to coalesce (bundle) events.
By default, automatically discovered log sources inherit the value of the Coalescing Events listfrom the SystemSettings in JSA.When you create a log source or edit an existing configuration,you can override the default value by configuring this option for each log source.
Coalescing Events
From the list, select the incoming payload encoder for parsing and storing the logs.Incoming Event Payload
Select this check box to enable the log source to store event payload information.
By default, automatically discovered log sources inherit the value of the Store Event Payloadlist from the System Settings in JSA. When you create a log source or edit an existingconfiguration, you can override the default value by configuring this option for each log source.
Store Event Payload
11. Click Save.
12. On the Admin tab, click Deploy Changes.
Malware events that are forwarded to JSA are displayed on the Log Activity tab of
JSA.
Configuring a ThreatGRID Log File Protocol Log Source
To use the log file protocol to collect events, youmust configure a log source in JSA to
poll for the event log that contains your malware events.
1. Click the Admin tab.
2. On the navigation menu, click Data Sources.
3. Click the Log Sources icon.
1049Copyright © 2018, Juniper Networks, Inc.
Chapter 128: ThreatGRID Malware Threat Intelligence Platform
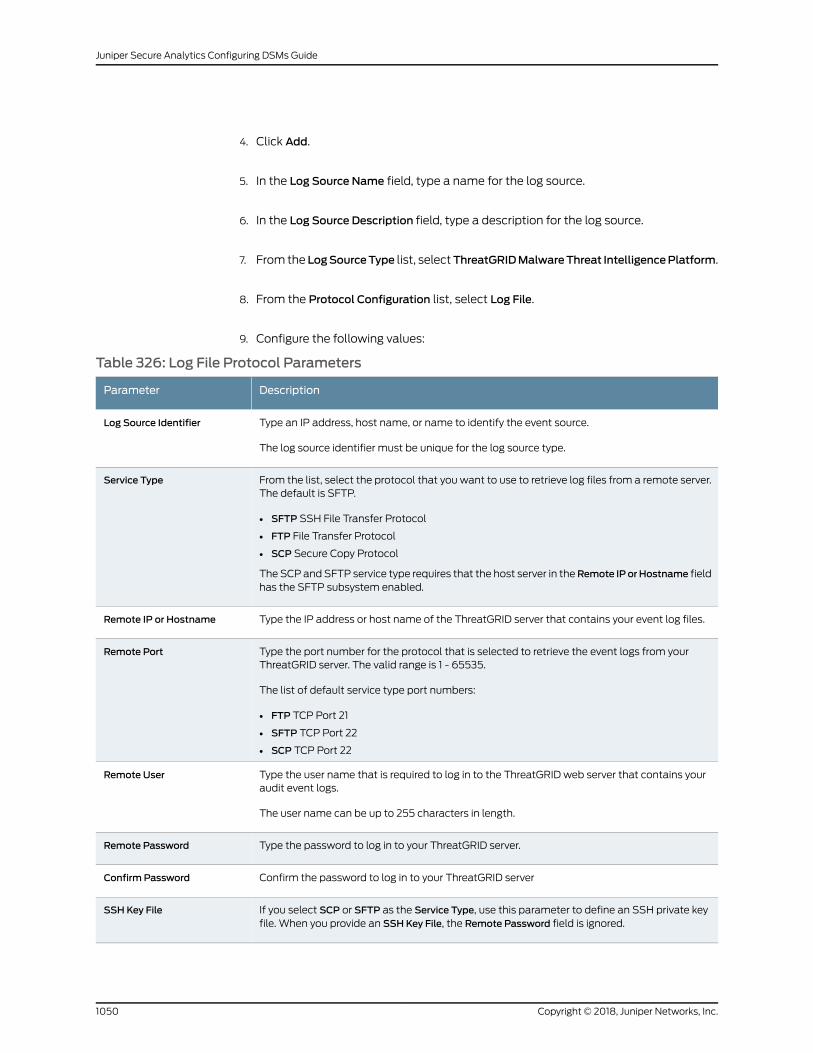
4. Click Add.
5. In the Log Source Name field, type a name for the log source.
6. In the Log Source Description field, type a description for the log source.
7. From the LogSourceType list, selectThreatGRIDMalwareThreat IntelligencePlatform.
8. From the Protocol Configuration list, select Log File.
9. Configure the following values:
Table 326: Log File Protocol Parameters
DescriptionParameter
Type an IP address, host name, or name to identify the event source.
The log source identifier must be unique for the log source type.
Log Source Identifier
From the list, select the protocol that you want to use to retrieve log files from a remote server.The default is SFTP.
• SFTP SSH File Transfer Protocol
• FTP File Transfer Protocol
• SCP Secure Copy Protocol
The SCP and SFTP service type requires that the host server in theRemote IP orHostname fieldhas the SFTP subsystem enabled.
Service Type
Type the IP address or host name of the ThreatGRID server that contains your event log files.Remote IP or Hostname
Type the port number for the protocol that is selected to retrieve the event logs from yourThreatGRID server. The valid range is 1 - 65535.
The list of default service type port numbers:
• FTP TCP Port 21
• SFTP TCP Port 22
• SCP TCP Port 22
Remote Port
Type the user name that is required to log in to the ThreatGRID web server that contains youraudit event logs.
The user name can be up to 255 characters in length.
Remote User
Type the password to log in to your ThreatGRID server.Remote Password
Confirm the password to log in to your ThreatGRID serverConfirm Password
If you select SCP or SFTP as the Service Type, use this parameter to define an SSH private keyfile. When you provide an SSH Key File, the Remote Password field is ignored.
SSH Key File
Copyright © 2018, Juniper Networks, Inc.1050
Juniper Secure Analytics Configuring DSMs Guide
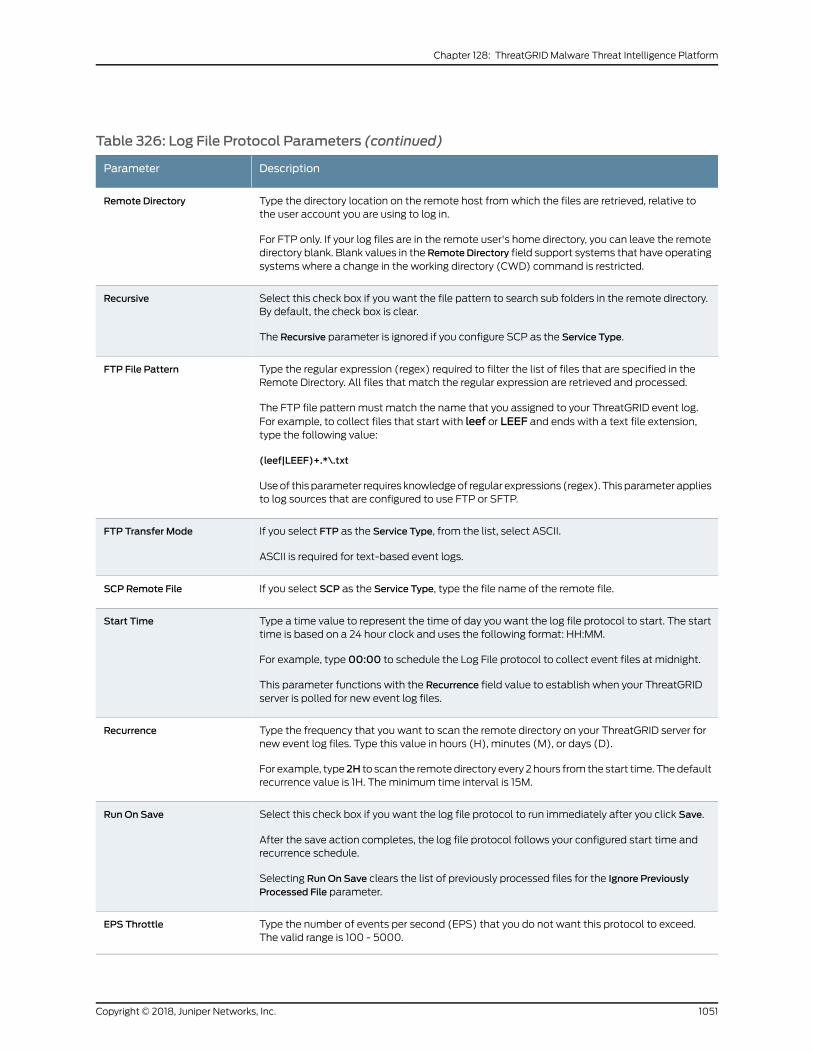
Table 326: Log File Protocol Parameters (continued)
DescriptionParameter
Type the directory location on the remote host fromwhich the files are retrieved, relative tothe user account you are using to log in.
For FTP only. If your log files are in the remote user's home directory, you can leave the remotedirectory blank. Blank values in the RemoteDirectory field support systems that have operatingsystems where a change in the working directory (CWD) command is restricted.
Remote Directory
Select this check box if you want the file pattern to search sub folders in the remote directory.By default, the check box is clear.
The Recursive parameter is ignored if you configure SCP as the Service Type.
Recursive
Type the regular expression (regex) required to filter the list of files that are specified in theRemote Directory. All files that match the regular expression are retrieved and processed.
The FTP file pattern must match the name that you assigned to your ThreatGRID event log.For example, to collect files that start with leef or LEEF and ends with a text file extension,type the following value:
(leef|LEEF)+.*\.txt
Useof thisparameter requires knowledgeof regular expressions (regex). Thisparameter appliesto log sources that are configured to use FTP or SFTP.
FTP File Pattern
If you select FTP as the Service Type, from the list, select ASCII.
ASCII is required for text-based event logs.
FTP Transfer Mode
If you select SCP as the Service Type, type the file name of the remote file.SCP Remote File
Type a time value to represent the time of day you want the log file protocol to start. The starttime is based on a 24 hour clock and uses the following format: HH:MM.
For example, type 00:00 to schedule the Log File protocol to collect event files at midnight.
This parameter functions with the Recurrence field value to establish when your ThreatGRIDserver is polled for new event log files.
Start Time
Type the frequency that you want to scan the remote directory on your ThreatGRID server fornew event log files. Type this value in hours (H), minutes (M), or days (D).
For example, type2H to scan the remotedirectory every 2 hours from the start time. Thedefaultrecurrence value is 1H. Theminimum time interval is 15M.
Recurrence
Select this check box if you want the log file protocol to run immediately after you click Save.
After the save action completes, the log file protocol follows your configured start time andrecurrence schedule.
Selecting RunOn Save clears the list of previously processed files for the Ignore PreviouslyProcessed File parameter.
RunOn Save
Type the number of events per second (EPS) that you do not want this protocol to exceed.The valid range is 100 - 5000.
EPS Throttle
1051Copyright © 2018, Juniper Networks, Inc.
Chapter 128: ThreatGRID Malware Threat Intelligence Platform
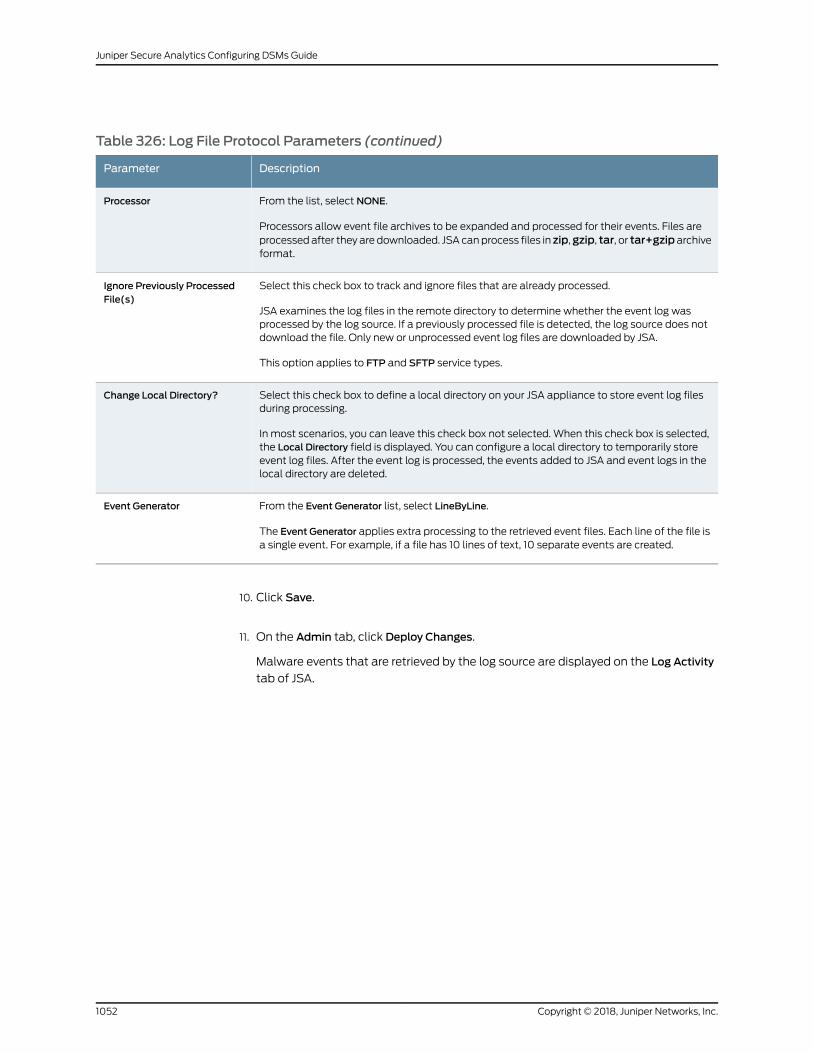
Table 326: Log File Protocol Parameters (continued)
DescriptionParameter
From the list, select NONE.
Processors allow event file archives to be expanded and processed for their events. Files areprocessedafter they are downloaded. JSA canprocess files in zip,gzip, tar, or tar+gziparchiveformat.
Processor
Select this check box to track and ignore files that are already processed.
JSA examines the log files in the remote directory to determine whether the event log wasprocessed by the log source. If a previously processed file is detected, the log source does notdownload the file. Only new or unprocessed event log files are downloaded by JSA.
This option applies to FTP and SFTP service types.
Ignore Previously ProcessedFile(s)
Select this check box to define a local directory on your JSA appliance to store event log filesduring processing.
In most scenarios, you can leave this check box not selected. When this check box is selected,the Local Directory field is displayed. You can configure a local directory to temporarily storeevent log files. After the event log is processed, the events added to JSA and event logs in thelocal directory are deleted.
Change Local Directory?
From the Event Generator list, select LineByLine.
The Event Generator applies extra processing to the retrieved event files. Each line of the file isa single event. For example, if a file has 10 lines of text, 10 separate events are created.
Event Generator
10. Click Save.
11. On the Admin tab, click Deploy Changes.
Malware events that are retrieved by the log source are displayed on the Log Activity
tab of JSA.
Copyright © 2018, Juniper Networks, Inc.1052
Juniper Secure Analytics Configuring DSMs Guide
CHAPTER 129
TippingPoint
• TippingPoint on page 1053
• Tipping Point Intrusion Prevention System on page 1053
• Tipping Point X505/X506 Device on page 1056
TippingPoint
JSA supports a range of Tipping Point DSMs.
Tipping Point Intrusion Prevention System
The Tipping Point Intrusion Prevention System (IPS) DSM for JSA accepts Tipping Point
events by using syslog.
JSA records all relevant events from either a Local Security Management (LMS) device
or multiple devices with a Security Management System (SMS).
Before you configure JSA to integrate with Tipping Point, youmust configure your device
based on type:
• If you are using an SMS, see “Configure Remote Syslog for SMS” on page 1053.
• If you are using an LSM, see “Configuring Notification Contacts for LSM” on page 1054.
• Configure Remote Syslog for SMS on page 1053
• Configuring Notification Contacts for LSM on page 1054
• Configuring an Action Set for LSM on page 1055
Configure Remote Syslog for SMS
To configure Tipping Point for SMS, youmust enable and configure your appliance to
forward events to a remote host using syslog.
To configure your Tipping Point SMS:
1. Log in to the Tipping Point system.
2. On the Admin Navigation menu, select Server Properties.
1053Copyright © 2018, Juniper Networks, Inc.
3. Select theManagement tab.
4. Click Add.
The Edit Syslog Notificationwindow is displayed.
5. Select the Enable check box.
6. Configure the following values:
a. Syslog Server Type the IP address of the JSA to receive syslog event messages.
b. Port Type 514 as the port address.
c. Log Type Select SMS 2.0 / 2.1 Syslog format from the list.
d. Facility Select Log Audit from the list.
e. Severity Select Severity in Event from the list.
f. Delimiter Select TAB as the delimiter for the generated logs.
g. Include Timestamp in Header Select Use original event timestamp.
h. Select the Include SMSHostname in Header check box.
i. ClickOK.
j. You are now ready to configure the log source in JSA.
7. To configure JSA to receive events from a Tipping Point device: From the Log Source
Type list, select the Tipping Point Intrusion Prevention System (IPS) option.
Formore informationabout yourTippingPointdevice, seeyour vendordocumentation.
Configuring Notification Contacts for LSM
You can configure LSM notification contacts.
1. Log in to the Tipping Point system.
2. From the LSMmenu, select IPS >Action Sets.
The IPS Profile - Action Setswindow is displayed.
3. Click the Notification Contacts tab.
4. In the Contacts List, click Remote System Log.
The Edit Notification Contact page is displayed.
5. Configure the following values:
Copyright © 2018, Juniper Networks, Inc.1054
Juniper Secure Analytics Configuring DSMs Guide
a. Syslog Server Type the IP address of the JSA to receive syslog event messages.
b. Port - Type 514 as the port address.
c. Alert Facility Select none or a numeric value 0-31 from the list. Syslog uses these
numbers to identify the message source.
d. Block Facility Select none or a numeric value 0-31 from the list. Syslog uses these
numbers to identify the message source.
e. Delimiter Select TAB from the list.
f. Click Add to table below.
g. Configure a Remote system log aggregation period in minutes.
6. Click Save.
NOTE: If your JSA is in a different subnet than your Tipping Point device,youmighthave toaddstatic routes. Formore information, seeyour vendordocumentation.
You are now ready to configure the action set for your LSM, see “Configuring an Action
Set for LSM” on page 1055.
Configuring an Action Set for LSM
You can configure an action set for your LSM.
1. Log in to the Tipping Point system.
2. From the LSMmenu, select IPS Action Sets.
The IPS Profile - Action Setswindow is displayed.
3. Click Create Action Set.
The Create/Edit Action Setwindow is displayed.
4. Type the Action Set Name.
5. For Actions, select a flow control action setting:
• Permit Allows traffic.
• Rate Limit Limits the speed of traffic. If you select Rate Limit, you must also select
the desired rate.
• Block Does not permit traffic.
1055Copyright © 2018, Juniper Networks, Inc.
Chapter 129: TippingPoint
• TCPResetWhen this is usedwith the Block action, it resets the source, destination,
or both IP addresses of an attack. This option resets blocked TCP flows.
• QuarantineWhen this is used with the Block action, it blocks an IP address (source
or destination) that triggers the filter.
6. Select the Remote System Log check box for each action you that you select.
7. Click Create.
You are now ready to configure the log source in JSA.
8. To configure JSA to receive events from a Tipping Point device: From the Log Source
Type list, select the Tipping Point Intrusion Prevention System (IPS) option.
Formore informationabout yourTippingPointdevice, seeyour vendordocumentation.
Tipping Point X505/X506 Device
The Tipping Point X505/X506 DSM for JSA accepts events by using syslog.
JSA records all relevant system, audit, VPN, and firewall session events.
• Configuring Syslog on page 1056
Configuring Syslog
You can configure your device to forward events to JSA.
1. Log in to the Tipping Point X505/X506 device.
2. From the LSMmenu, select System >Configuration >Syslog Servers.
The Syslog Serverswindow is displayed.
3. For each log type you want to forward, select a check box and type the IP address of
your JSA.
NOTE: If your JSA is in a different subnet than your Tipping Point device,youmighthave toaddstatic routes. Formore information, seeyour vendordocumentation.
You are now ready to configure the log source in JSA.
4. To configure JSA to receive events from a Tipping Point X505/X506 device: From the
Log Source Type list, select the Tipping Point X Series Appliances option.
Copyright © 2018, Juniper Networks, Inc.1056
Juniper Secure Analytics Configuring DSMs Guide

NOTE: If youhaveapreviously configuredTippingPointX505/X506DSMinstalledandconfiguredonyour JSA, theTippingPointXSeriesAppliancesoption is still displayed in the Log Source Type list. However, for any new
Tipping Point X505/X506 DSM that you configure, youmust select theTipping Point Intrusion Prevention System (IPS) option.
1057Copyright © 2018, Juniper Networks, Inc.
Chapter 129: TippingPoint

Copyright © 2018, Juniper Networks, Inc.1058
Juniper Secure Analytics Configuring DSMs Guide
CHAPTER 130
Top Layer IPS
• Top Layer IPS on page 1059
Top Layer IPS
The Top Layer IPS DSM for JSA accepts Top Layer IPS events by using syslog.
JSA records and processes Top Layer events. Before you configure JSA to integrate with
a Top Layer device, youmust configure syslog within your Top Layer IPS device. Formore
information on configuring Top Layer, see your Top Layer documentation.
The configuration is complete. The log source is added to JSA as Top Layer IPS events
are automatically discovered. Events that are forwarded to JSA by Top Layer IPS are
displayed on the Log Activity tab of JSA.
To configure JSA to receive events from a Top Layer IPS device:
From the Log Source Type list, select the Top Layer Intrusion Prevention System (IPS)
option.
For more information about your Top Layer device, see your vendor documentation.
1059Copyright © 2018, Juniper Networks, Inc.

Copyright © 2018, Juniper Networks, Inc.1060
Juniper Secure Analytics Configuring DSMs Guide
CHAPTER 131
Townsend Security LogAgent
• Townsend Security LogAgent on page 1061
• Configuring Raz-Lee ISecurity on page 1061
• Configuring a Log Source on page 1062
Townsend Security LogAgent
JSA can collect CEF format events from Townsend Security LogAgent installations on
IBM®iSeries
®infrastructure.
JSA supports CEF events from Townsend Security software that is installed on IBM®
iSeries V5.1 and above.
Supported Event Types
Townsend Security LogAgent installations on IBM®iSeries can write to forward syslog
events for security, compliance, and auditing to JSA.
All syslog events that are forwarded by Raz-Lee iSecurity automatically discover and the
events are parsed and categorized with the IBM®AS/400
®iSeries DSM.
Configuring Raz-Lee ISecurity
Tocollect security andaudit events, youmust configure yourRaz-Lee iSecurity installation
to forward syslog events to JSA.
1. Log in to the IBM®System i
®command-line interface.
2. Type the following command to access the audit menu options:
STRAUD
3. From the Auditmenu, select 81. SystemConfiguration.
4. From the iSecurity/Base SystemConfigurationmenu, select 31. SYSLOGDefinitions.
5. Configure the following parameters:
1061Copyright © 2018, Juniper Networks, Inc.
a. Send SYSLOGmessage - Select Yes.
b. Destination address—Type the IP address of JSA.
c. "Facility" to use—Type a facility level.
d. "Severity" range to auto send - Type a severity level.
e. Message structure—Type any additional message structure parameters that are
needed for your syslog messages.
Syslog events that are forwarded by Raz-Lee iSecurity are automatically discovered by
JSA by the IBM®AS/400
®iSeries DSM. In most cases, the log source is automatically
created in JSA after a few events are detected. If the event rate is low, then youmight
be required to manually create a log source for Raz-Lee iSecurity in JSA.
Until the log source is automatically discovered and identified, the event type displays
as Unknown on the Log Activity tab of JSA. Automatically discovered log sources can be
viewed on the Admin tab of JSA by clicking the Log Sources icon.
Configuring a Log Source
JSA automatically discovers and creates a log source for syslog events forwarded from
Raz-Lee i Security. This procedure is optional.
1. Log in to JSA.
2. Click the Admin tab.
3. On the navigation menu, click Data Sources.
4. Click the Log Sources icon.
5. Click Add.
6. In the Log Source Name field, type a name for your log source.
7. In the Log Source Description field, type a description for the log source.
8. From the Log Source Type list box, select IBM®AS/400
®iSeries.
9. Using the Protocol Configuration list box, select Syslog.
10. Configure the following values:
Copyright © 2018, Juniper Networks, Inc.1062
Juniper Secure Analytics Configuring DSMs Guide
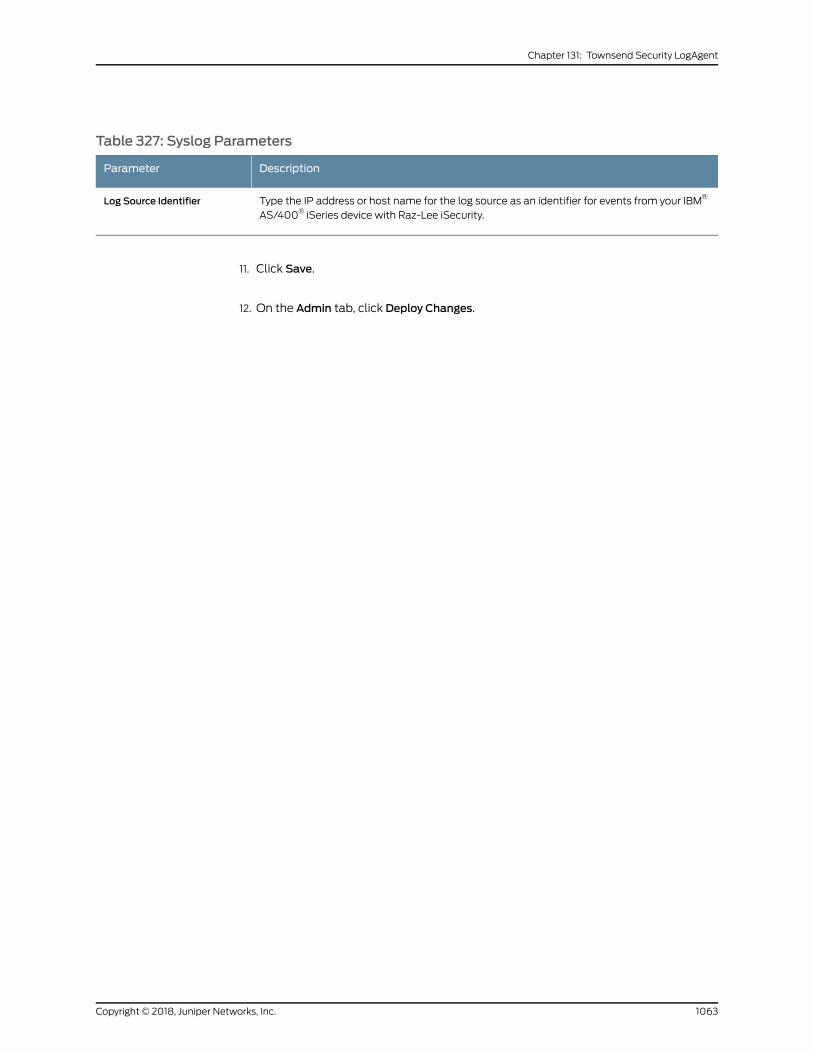
Table 327: Syslog Parameters
DescriptionParameter
Type the IP address or host name for the log source as an identifier for events from your IBM®
AS/400® iSeries device with Raz-Lee iSecurity.Log Source Identifier
11. Click Save.
12. On the Admin tab, click Deploy Changes.
1063Copyright © 2018, Juniper Networks, Inc.
Chapter 131: Townsend Security LogAgent

Copyright © 2018, Juniper Networks, Inc.1064
Juniper Secure Analytics Configuring DSMs Guide

CHAPTER 132
Trend Micro
• Trend Micro on page 1065
• Trend Micro Control Manager on page 1065
• Trend Micro Deep Discovery Analyzer on page 1067
• Trend Micro Deep Discovery Email Inspector on page 1069
• Trend Micro Deep Security on page 1071
• Trend Micro InterScan VirusWall on page 1073
• Trend Micro Office Scan on page 1073
TrendMicro
JSA supports several Trend Micro DSMs.
TrendMicro Control Manager
You can integrate a Trend Micro Control Manager device with JSA.
A Trend Micro Control Manager accepts events using SNMPv1 or SNMPv2. Before you
configure JSA to integratewith aTrendMicroControlManager device, youmust configure
a log source, then configure SNMP trap settings for your Trend Micro Control Manager.
• Configuring a Log Source on page 1065
• Configuring SNMP Traps on page 1066
Configuring a Log Source
JSA does not automatically discover SNMP events from Trend Micro Control Manager.
Youmust configure an SNMP log source for your Trend Micro Control Manager to use
the SNMPv1 or SNMPv2 protocol. SNMPv3 is not supported by Trend Micro Control
Manager.
1. Log in to JSA.
2. Click the Admin tab.
3. On the navigation menu, click Data Sources.
1065Copyright © 2018, Juniper Networks, Inc.
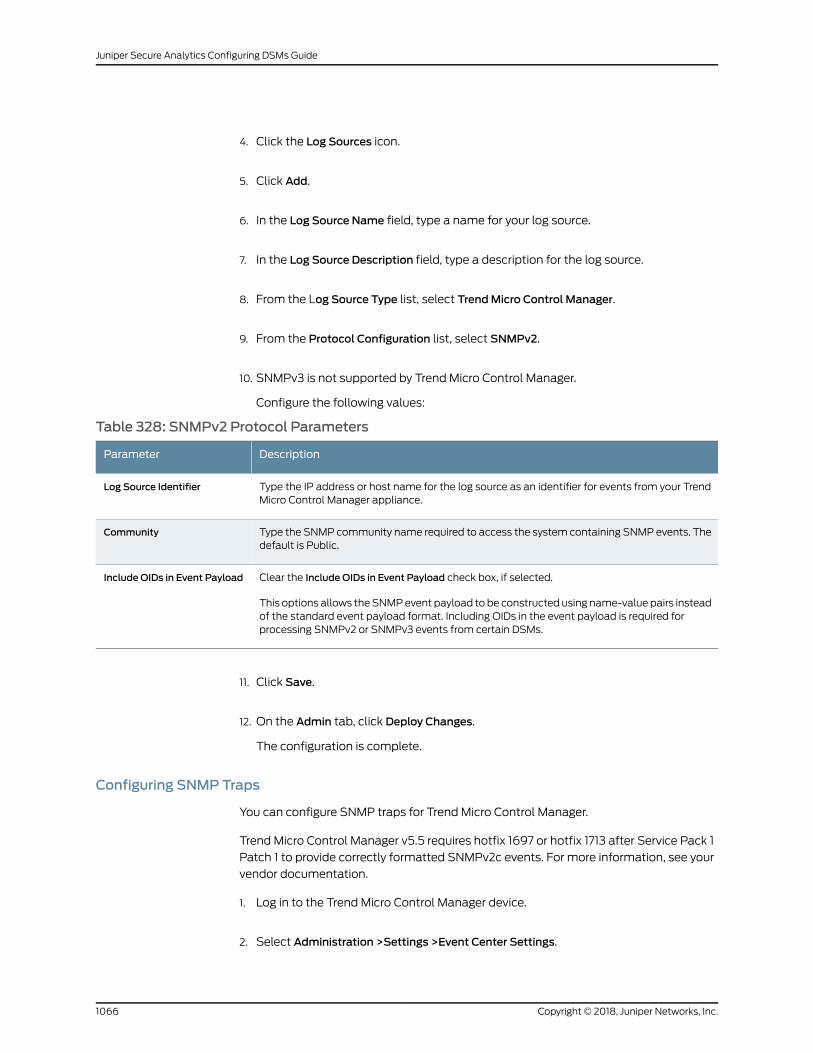
4. Click the Log Sources icon.
5. Click Add.
6. In the Log Source Name field, type a name for your log source.
7. In the Log Source Description field, type a description for the log source.
8. From the Log Source Type list, select TrendMicro Control Manager.
9. From the Protocol Configuration list, select SNMPv2.
10. SNMPv3 is not supported by Trend Micro Control Manager.
Configure the following values:
Table 328: SNMPv2 Protocol Parameters
DescriptionParameter
Type the IP address or host name for the log source as an identifier for events from your TrendMicro Control Manager appliance.
Log Source Identifier
Type the SNMP community name required to access the system containing SNMP events. Thedefault is Public.
Community
Clear the Include OIDs in Event Payload check box, if selected.
This options allows theSNMPevent payload to be constructed using name-value pairs insteadof the standard event payload format. Including OIDs in the event payload is required forprocessing SNMPv2 or SNMPv3 events from certain DSMs.
Include OIDs in Event Payload
11. Click Save.
12. On the Admin tab, click Deploy Changes.
The configuration is complete.
Configuring SNMP Traps
You can configure SNMP traps for Trend Micro Control Manager.
Trend Micro Control Manager v5.5 requires hotfix 1697 or hotfix 1713 after Service Pack 1
Patch 1 to provide correctly formatted SNMPv2c events. For more information, see your
vendor documentation.
1. Log in to the Trend Micro Control Manager device.
2. Select Administration >Settings >Event Center Settings.
Copyright © 2018, Juniper Networks, Inc.1066
Juniper Secure Analytics Configuring DSMs Guide
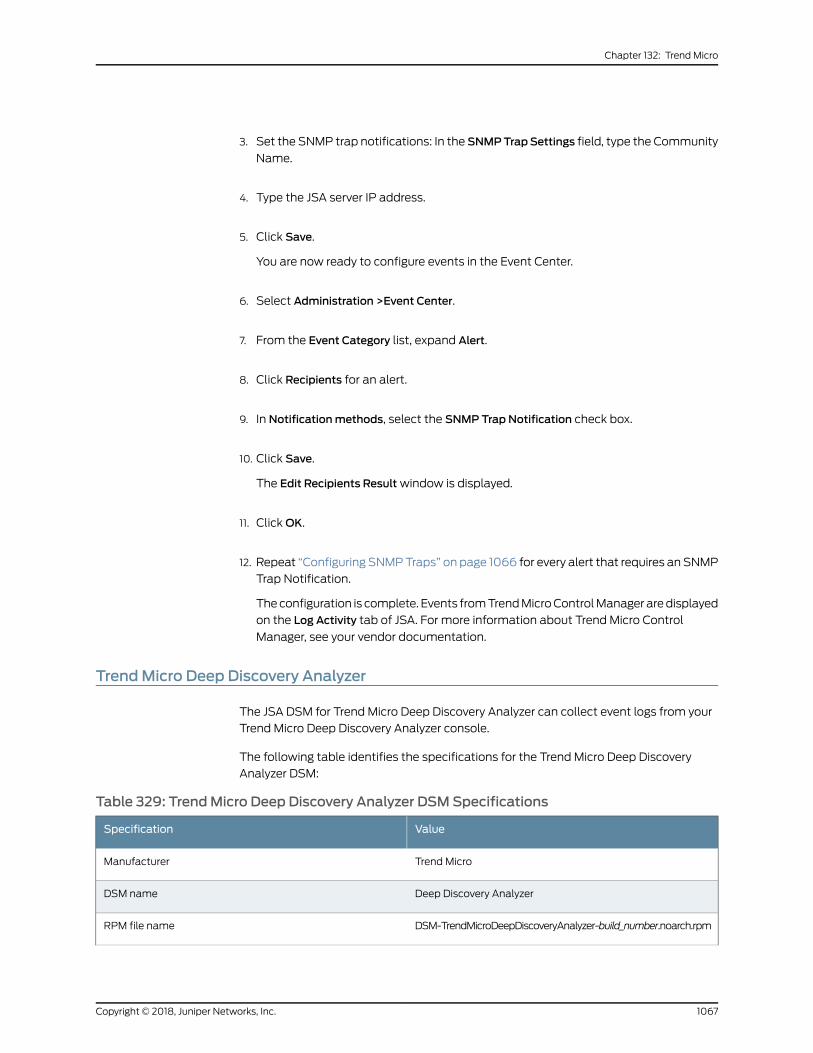
3. Set the SNMP trap notifications: In the SNMPTrapSettings field, type the Community
Name.
4. Type the JSA server IP address.
5. Click Save.
You are now ready to configure events in the Event Center.
6. Select Administration >Event Center.
7. From the Event Category list, expand Alert.
8. Click Recipients for an alert.
9. In Notificationmethods, select the SNMP Trap Notification check box.
10. Click Save.
The Edit Recipients Resultwindow is displayed.
11. ClickOK.
12. Repeat “Configuring SNMPTraps” on page 1066 for every alert that requires an SNMP
Trap Notification.
Theconfiguration is complete. Events fromTrendMicroControlManager aredisplayed
on the Log Activity tab of JSA. For more information about Trend Micro Control
Manager, see your vendor documentation.
TrendMicro Deep Discovery Analyzer
The JSA DSM for Trend Micro Deep Discovery Analyzer can collect event logs from your
Trend Micro Deep Discovery Analyzer console.
The following table identifies the specifications for the Trend Micro Deep Discovery
Analyzer DSM:
Table 329: TrendMicro Deep Discovery Analyzer DSMSpecifications
ValueSpecification
Trend MicroManufacturer
Deep Discovery AnalyzerDSM name
DSM-TrendMicroDeepDiscoveryAnalyzer-build_number.noarch.rpmRPM file name
1067Copyright © 2018, Juniper Networks, Inc.
Chapter 132: Trend Micro
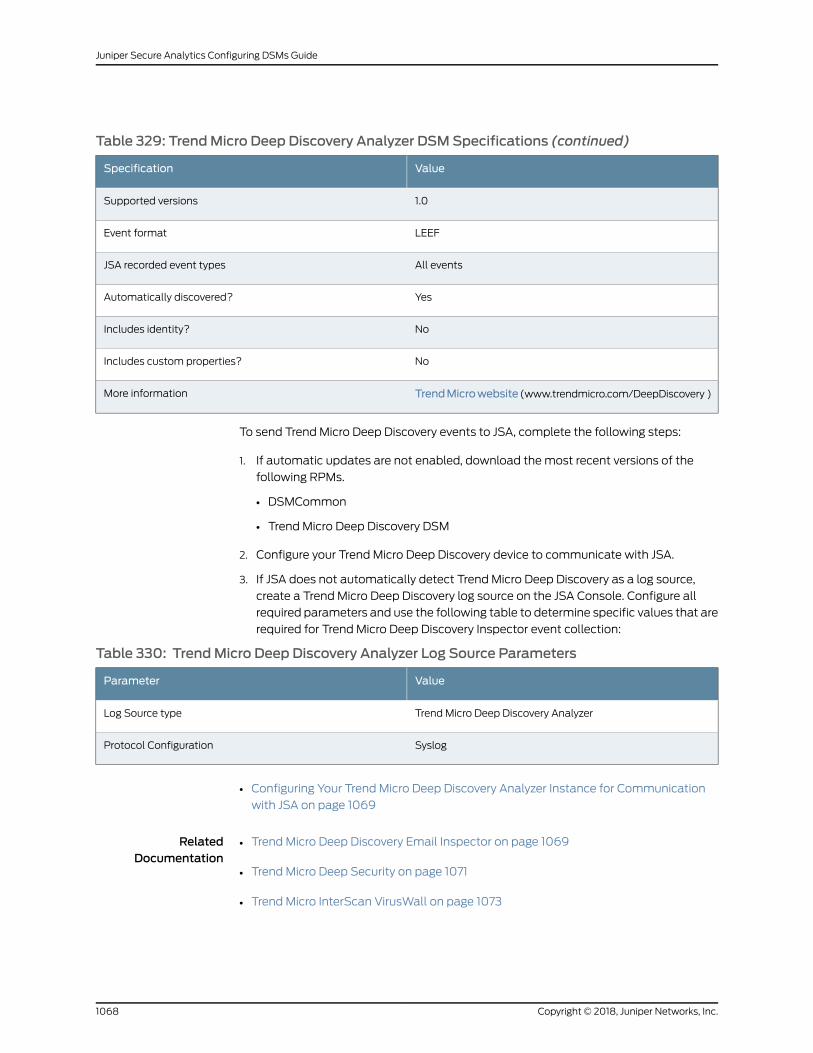
Table 329: TrendMicro Deep Discovery Analyzer DSMSpecifications (continued)
ValueSpecification
1.0Supported versions
LEEFEvent format
All eventsJSA recorded event types
YesAutomatically discovered?
NoIncludes identity?
NoIncludes custom properties?
TrendMicrowebsite (www.trendmicro.com/DeepDiscovery )More information
To send Trend Micro Deep Discovery events to JSA, complete the following steps:
1. If automatic updates are not enabled, download themost recent versions of the
following RPMs.
• DSMCommon
• Trend Micro Deep Discovery DSM
2. Configure your Trend Micro Deep Discovery device to communicate with JSA.
3. If JSA does not automatically detect Trend Micro Deep Discovery as a log source,
create a Trend Micro Deep Discovery log source on the JSA Console. Configure all
required parameters and use the following table to determine specific values that are
required for Trend Micro Deep Discovery Inspector event collection:
Table 330: TrendMicro Deep Discovery Analyzer Log Source Parameters
ValueParameter
Trend Micro Deep Discovery AnalyzerLog Source type
SyslogProtocol Configuration
• Configuring Your Trend Micro Deep Discovery Analyzer Instance for Communication
with JSA on page 1069
RelatedDocumentation
Trend Micro Deep Discovery Email Inspector on page 1069•
• Trend Micro Deep Security on page 1071
• Trend Micro InterScan VirusWall on page 1073
Copyright © 2018, Juniper Networks, Inc.1068
Juniper Secure Analytics Configuring DSMs Guide
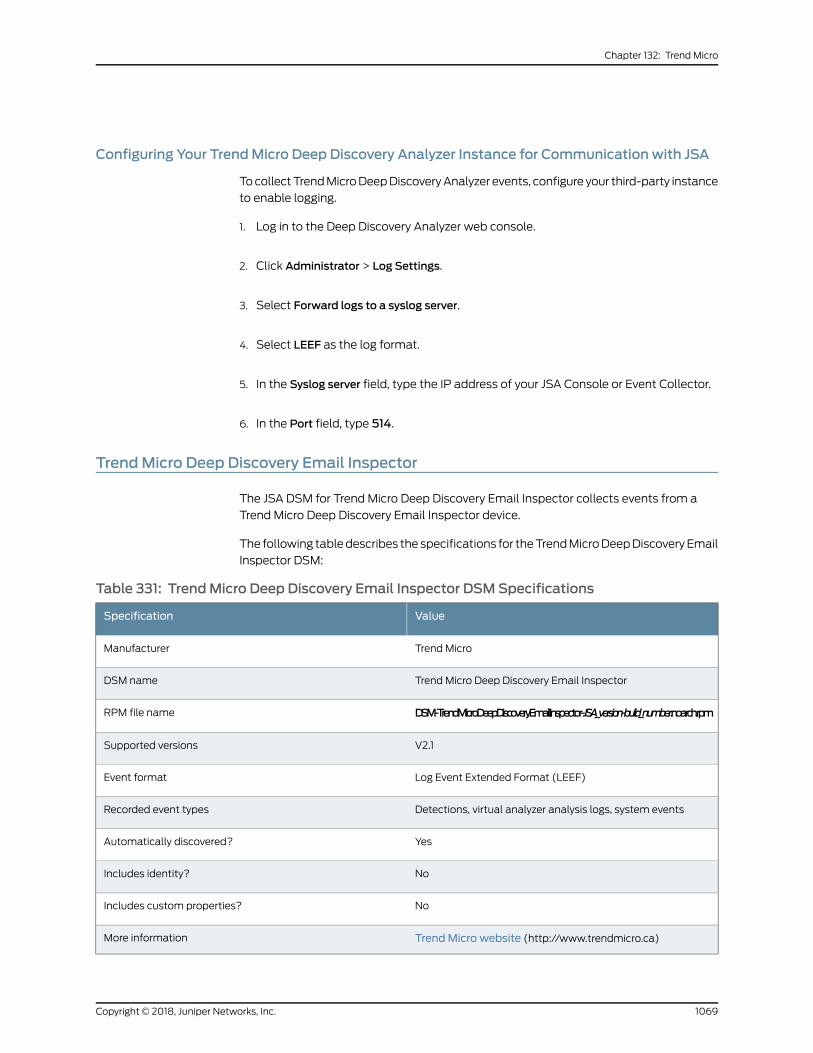
Configuring Your TrendMicro Deep Discovery Analyzer Instance for Communication with JSA
TocollectTrendMicroDeepDiscoveryAnalyzer events, configure your third-party instance
to enable logging.
1. Log in to the Deep Discovery Analyzer web console.
2. Click Administrator > Log Settings.
3. Select Forward logs to a syslog server.
4. Select LEEF as the log format.
5. In the Syslog server field, type the IP address of your JSA Console or Event Collector.
6. In the Port field, type 514.
TrendMicro Deep Discovery Email Inspector
The JSA DSM for Trend Micro Deep Discovery Email Inspector collects events from a
Trend Micro Deep Discovery Email Inspector device.
The following tabledescribes the specifications for theTrendMicroDeepDiscoveryEmail
Inspector DSM:
Table 331: TrendMicro Deep Discovery Email Inspector DSMSpecifications
ValueSpecification
Trend MicroManufacturer
Trend Micro Deep Discovery Email InspectorDSM name
DSM-TrendMicroDeepDiscoveryEmailInspector-JSA_version-build_number.noarch.rpmRPM file name
V2.1Supported versions
Log Event Extended Format (LEEF)Event format
Detections, virtual analyzer analysis logs, system eventsRecorded event types
YesAutomatically discovered?
NoIncludes identity?
NoIncludes custom properties?
TrendMicro website (http://www.trendmicro.ca)More information
1069Copyright © 2018, Juniper Networks, Inc.
Chapter 132: Trend Micro
To integrateTrendMicroDeepDiscoveryEmail Inspectorwith JSA, complete the following
steps:
1. If automatic updates are not enabled, download and install the most recent version
of the following RPMs on your JSA console:
• Trend Micro Deep Discovery Email Inspector DSM RPM
• DSM Common RPM
2. Configure your Trend Micro Deep Discovery Email Inspector device to send syslog
events to JSA.
3. If JSAdoes not automatically detect the log source, add aTrendMicroDeepDiscovery
Email Inspector log source on the JSA console. The following table describes the
parameters that require specific values forTrendMicroDeepDiscoveryEmail Inspector
event collection:
Table 332: TrendMicro Deep Discovery Email Inspector Log Source Parameters
DescriptionParameter
Trend Micro Deep Discovery Email InspectorLog Source type
SyslogProtocol Configuration
• Configuring Trend Micro Deep Discovery Email Inspector to Communicate with
JSA on page 1070
Configuring TrendMicro Deep Discovery Email Inspector to Communicate with JSA
To collect events from Trend Micro Deep Discovery Email Inspector, configure a syslog
server profile for the JSA host.
1. Log in to the Trend Micro Deep Discovery Email Inspector user interface.
2. Click Administration >Log Settings.
3. Click Add.
4. Verify that Enabled is selected for Status. The default is Enabled.
5. Configure the following parameters:
DescriptionParameter
Specify a name for the profile.Profile name
The host name or IP of the JSA server.Syslog server
514Port
Copyright © 2018, Juniper Networks, Inc.1070
Juniper Secure Analytics Configuring DSMs Guide
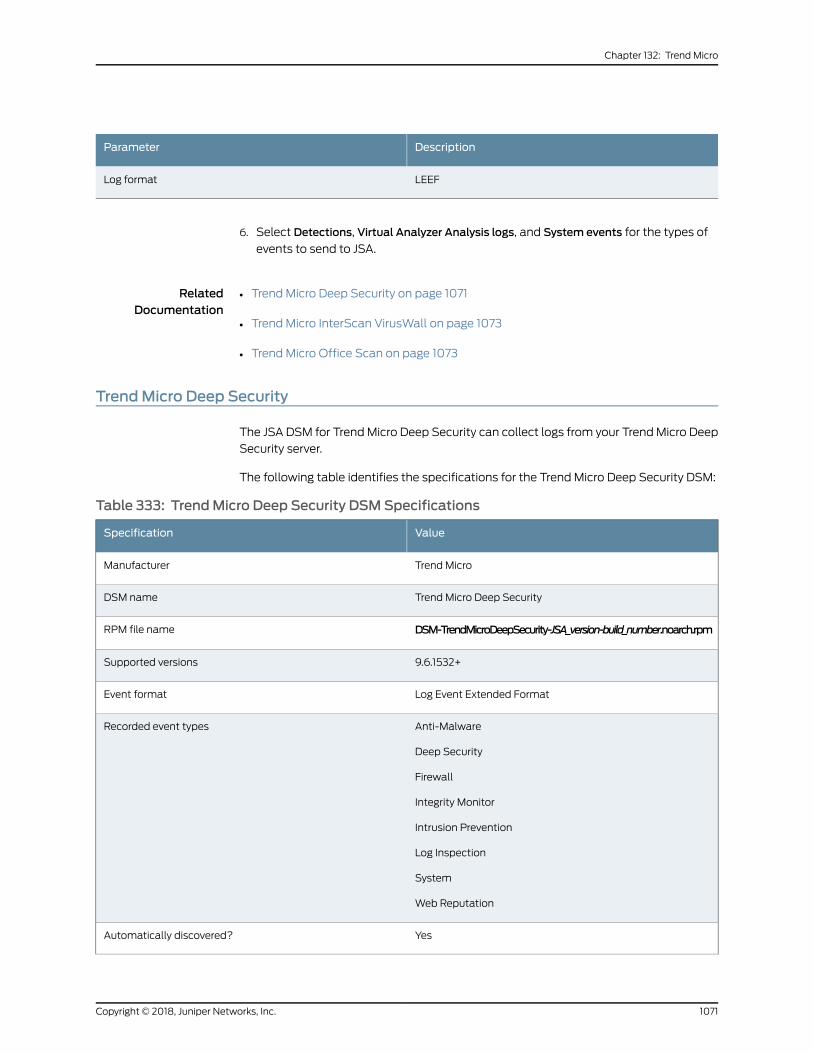
DescriptionParameter
LEEFLog format
6. Select Detections, Virtual Analyzer Analysis logs, and System events for the types of
events to send to JSA.
RelatedDocumentation
Trend Micro Deep Security on page 1071•
• Trend Micro InterScan VirusWall on page 1073
• Trend Micro Office Scan on page 1073
TrendMicro Deep Security
The JSA DSM for TrendMicro Deep Security can collect logs from your TrendMicro Deep
Security server.
The following table identifies the specifications for the Trend Micro Deep Security DSM:
Table 333: TrendMicro Deep Security DSMSpecifications
ValueSpecification
Trend MicroManufacturer
Trend Micro Deep SecurityDSM name
DSM-TrendMicroDeepSecurity-JSA_version-build_number.noarch.rpmRPM file name
9.6.1532+Supported versions
Log Event Extended FormatEvent format
Anti-Malware
Deep Security
Firewall
Integrity Monitor
Intrusion Prevention
Log Inspection
System
Web Reputation
Recorded event types
YesAutomatically discovered?
1071Copyright © 2018, Juniper Networks, Inc.
Chapter 132: Trend Micro
Table 333: TrendMicro Deep Security DSMSpecifications (continued)
ValueSpecification
NoIncludes identity?
NoIncludes custom properties?
TrendMicro website (https://www.trendmicro.com/us/)More information
To integrate Trend Micro Deep Security with JSA, complete the following steps:
1. If automatic updates are not enabled, download and install the most recent version
of the following RPMs on your JSA console:
• Trend Micro Deep Security DSM RPM
• DSMCommon RPM
2. Configure your Trend Micro Deep Security device to send syslog events to JSA.
3. If JSA does not automatically detect the log source, add a Trend Micro Deep Security
DSM log source on the JSA Console. The following table describes the parameters
that require specific values for Trend Micro Deep Security DSM event collection:
Table 334: TrendMicro Deep Security DSM Log Source Parameters
ValueParameter
Trend Micro Deep SecurityLog Source type
SyslogProtocol Configuration
• Configuring Trend Micro Deep Security to Communicate with JSA on page 1072
Configuring TrendMicro Deep Security to Communicate with JSA
To collect all events from Trend Micro Deep Security, youmust specify JSA as the syslog
server and configure the syslog format.
Ensure that your Deep Security Manager is installed and configured.
1. Click the Administration >SystemSettings >SIEM tab.
2. From the System Event Notification (from theManager) area, set the Forward System
Events to remote computer (via Syslog) option.
3. Type the host name or the IP address of the JSA system.
4. Type 514 for the UDP port.
Copyright © 2018, Juniper Networks, Inc.1072
Juniper Secure Analytics Configuring DSMs Guide
5. Select the Syslog Facility that you want to use.
6. Select LEEF for the Syslog Format.
NOTE: Deep Security can only send events in LEEF format from theManager. If youselect theDirect forwardoptionon theSIEM tab, youcannot
select Log Event Extended Format 2.0 for the Syslog Format.
RelatedDocumentation
Trend Micro InterScan VirusWall on page 1073•
• Trend Micro Office Scan on page 1073
• Trend Micro Deep Discovery Email Inspector on page 1069
TrendMicro InterScan VirusWall
The Trend Micro InterScan VirusWall DSM for JSA accepts events by using syslog.
You can integrate InterScan VirusWall logs with JSA by using the Adaptive Log Exporter.
For more information on the Adaptive Log Exporter, see the JSAAdaptive Log Exporter
Users Guide.
After you configure the Adaptive Log Exporter, the configuration is complete. The log
source is added to JSA as Trend Micro InterScan VirusWall events are automatically
discovered. Events that are forwarded to JSA by Trend Micro InterScan VirusWall are
displayed on the Log Activity tab of JSA.
Tomanually configure JSA to receive events from an InterScan VirusWall device:
From the Log Source Type list, select the Trend InterScan VirusWall option.
Formore informationabout yourTrendMicro InterScanVirusWall device, see your vendor
documentation.
TrendMicro Office Scan
A Trend Micro Office Scan DSM for JSA accepts events by using SNMPv2.
JSA records events relevant to virus and spyware events. Before you configure a Trend
Micro device in JSA, youmust configure your device to forward SNMPv2 events.
JSA has two options for integrating with a Trend Micro device. The integration option
that you choose depends on your device version:
• Integrating with Trend Micro Office Scan 8.x on page 1074
• Integrating with Trend Micro Office Scan 10.x on page 1075
• Configuring General Settings on page 1075
1073Copyright © 2018, Juniper Networks, Inc.
Chapter 132: Trend Micro
• Configure Standard Notifications on page 1076
• Configuring Outbreak Criteria and Alert Notifications on page 1076
Integrating with TrendMicro Office Scan 8.x
You can integrate a Trend Micro Office Scan 8.x device with JSA.
1. Log in to the Office Scan Administration interface.
2. Select Notifications.
3. Configure the General Settings for SNMP Traps: In the Server IP Address field, type
the IP address of the JSA.
NOTE: Do not change the community trap information.
4. Click Save.
5. Configure the Standard Alert Notification: Select Standard Notifications.
6. Click the SNMP Trap tab.
7. Select the Enable notification via SNMP Trap for Virus/Malware Detections check box.
8. Type the following message in the field (this should be the default):
Virus/Malware:%v Computer:%s Domain:%mFile:%p Date/Time:%y Result:%a
9. Select the Enable notification via SNMP Trap for Spyware/Grayware Detections check
box.
10. Type the following message in the field (this should be the default):
Spyware/Grayware:%v Computer:%s Domain:%mDate/Time:%y Result:%a
11. Click Save.
12. Configure Outbreak Alert Notifications: SelectOut Notifications.
13. Click the SNMP Trap tab.
14. Select the Enable notification via SNMP Trap for Virus/Malware Outbreaks check box.
15. Type the following message in the field (this should be the default):
Copyright © 2018, Juniper Networks, Inc.1074
Juniper Secure Analytics Configuring DSMs Guide
Number of viruses/malware:%CVNumber of computers:%CCLogTypeExceeded:%A
Numberof firewall violation logs:%CNumberofsharedfoldersessions:%STimePeriod:
%T
16. Select the Enable notification via SNMP Trap for Spyware/Grayware Outbreaks check
box.
17. Type the following message in the field (this should be the default):
Number of spyware/grayware:%CVNumber of computers:%CC Log Type Exceeded:
%ANumber of firewall violation logs:%CNumber of shared folder sessions:%S Time
Period:%T
18. Click Save.
You are now ready to configure the log sources in JSA.
19. To configure the Trend Micro Office Scan device:
a. From the Log Source Type list, select the TrendMicro Office Scan option.
b. From the Protocol Configuration list, select the SNMPv2 option.
Integrating with TrendMicro Office Scan 10.x
Several preparatory steps are necessary before you configure JSA to integrate with a
Trend Micro Office Scan 10.x device.
Youmust:
1. Configure the SNMP settings for Trend Micro Office Scan 10.x.
2. Configure standard notifications.
3. Configure outbreak criteria and alert notifications.
Configuring General Settings
You can integrate a Trend Micro Office Scan 10.x device with JSA.
1. Log in to the Office Scan Administration interface.
2. Select Notifications >Administrator Notifications >General Settings.
3. Configure the General Settings for SNMP Traps: In the Server IP Address field, type
the IP address of your JSA.
4. Type a community name for your Trend Micro Office Scan device.
5. Click Save.
1075Copyright © 2018, Juniper Networks, Inc.
Chapter 132: Trend Micro
Youmust now configure the Standard Notifications for Office Scan.
Configure Standard Notifications
You can configure standard notifications.
1. Select Notifications >Administrator Notifications >Standard Notifications.
2. Define the Criteria settings. Click the Criteria tab.
3. Select the option to alert administrators on the detection of virus/malware and
spyware/grayware, or when the action on these security risks is unsuccessful.
4. To enable notifications: Configure the SNMP Trap tab.
5. Select the Enable notification via SNMP Trap check box.
6. Type the following message in the field:
Virus/Malware:%vSpyware/Grayware:%TComputer:%s IPaddress:%iDomain:%m
File:%p Date/Time:%y Result:%a User name:%n
7. Click Save.
Youmust now configure Outbreak Notifications.
Configuring Outbreak Criteria and Alert Notifications
You can configure outbreak criteria and alert notifications.
1. Select Notifications >Administrator Notifications >Outbreak Notifications.
2. Click the Criteria tab.
3. Type the number of detections and detection period for each security risk.
Notification messages are sent to an administrator when the criteria exceeds the
specified detection limit.
NOTE: TrendMicro suggests that you use the default values for thedetection number and detection period.
4. Select Shared Folder Session Link and enable Office Scan to monitor for firewall
violations and shared folder sessions.
Copyright © 2018, Juniper Networks, Inc.1076
Juniper Secure Analytics Configuring DSMs Guide
NOTE: To view computers on the network with shared folders orcomputers currently browsing shared folders, you can select the numberlink in the interface.
5. Click the SNMP Trap tab.
a. Select the Enable notification via SNMP Trap check box.
6. Type the following message in the field:
Number of viruses/malware:%CVNumber of computers:%CCLogTypeExceeded:%A
Numberof firewall violation logs:%CNumberofsharedfoldersessions:%STimePeriod:
%T
7. Click Save.
8. You are now ready to configure the log source in JSA.
To configure the Trend Micro Office Scan device:
a. From the Log Source Type list, select the TrendMicro Office Scan option.
b. From the Protocol Configuration list, select the SNMPv2 option.
1077Copyright © 2018, Juniper Networks, Inc.
Chapter 132: Trend Micro

Copyright © 2018, Juniper Networks, Inc.1078
Juniper Secure Analytics Configuring DSMs Guide
CHAPTER 133
Tripwire
• Tripwire on page 1079
Tripwire
The Tripwire DSMaccepts resource additions, removal, andmodification events by using
syslog.
1. Log in to the Tripwire interface.
2. On the left navigation, click Actions.
3. Click NewAction.
4. Configure the new action.
5. Select Rules and click the rule that you want to monitor.
6. Select the Actions tab.
7. Make sure that the new action is selected.
8. ClickOK.
9. Repeat “Tripwire” on page 1079 to “Tripwire” on page 1079 for each rule you want to
monitor.
You are now ready to configure the log source in JSA.
10. To configure JSA to receive events from a Tripwire device: From the Log Source Type
list, select the Tripwire Enterprise option.
For more information about your Tripwire device, see your vendor documentation.
1079Copyright © 2018, Juniper Networks, Inc.

Copyright © 2018, Juniper Networks, Inc.1080
Juniper Secure Analytics Configuring DSMs Guide
CHAPTER 134
Tropos Control
• Tropos Control on page 1081
Tropos Control
The Tropos Control DSM for JSA accepts events by using syslog.
JSA can record all fault management, login and logout events, provisioning events, and
device image upload events. Before you configure JSA, youmust configure your Tropos
Control to forward syslog events.
You can configure Tropos Control to forward logs by using syslog to JSA.
1. Use an SSH to log in to your Tropos Control device as a root user.
2. Open the following file for editing:
/opt/ControlServer/ems/conf/logging.properties
3. To enable syslog, remove the comment marker (#) from the following line:
#log4j.category.syslog = INFO, syslog
4. To configure the IP address for the syslog destination, edit the following line:
log4j.appender.syslog.SyslogHost = <IP address>
Where <IP address> is the IP address or host name of JSA.
By default, Tropos Control uses a facility of USER and a default log level of INFO.
These default settings are correct for syslog event collection from a Tropos Control
device.
5. Save and exit the file.
6. You are now ready to configure the Tropos Control DSM in JSA.
To configure JSA to receive events from Tropos Control:
a. From the Log Source Type list, select Tropos Control.
1081Copyright © 2018, Juniper Networks, Inc.

Copyright © 2018, Juniper Networks, Inc.1082
Juniper Secure Analytics Configuring DSMs Guide
CHAPTER 135
Universal
• Universal on page 1083
• Universal CEF on page 1083
• Universal LEEF on page 1086
Universal
JSA can collect and correlates events from any network infrastructure or security device
by using the Universal DSM.
After the events are collected and before the correlation can begin. The individual events
from your devices must be properly parsed to determine the event name, IP addresses,
protocol, and ports. For common network devices, such as Cisco Firewalls, predefined
DSMs are engineered for JSA to properly parse and classify the eventmessages from the
respectivedevices.After theevents fromadeviceareparsedby theDSM, JSAcancontinue
to correlate events into offenses.
If an enterprise network hasoneormorenetwork or security devices that are not officially
supported, where no specific DSM for the device exists, you can use the Universal DSM.
The Universal DSM gives you the option to forward events andmessages from
unsupported devices and use the Universal DSM to categorize the events for JSA. JSA
can integrate with virtually any device or any common protocol source by using the
Universal DSM.
To configure the Universal DSM, youmust use device extensions to associate a Universal
DSM to devices. Before you define device extension information by using the log sources
window from theAdmin tab, youmust create an extensions document for the log source.
Universal CEF
The following table identifies the specifications for the Universal CEF DSM:
Table 335: Universal CEF DSMSpecifications
ValueSpecification
Universal CEFDSM name
DSM-UniversalCEF-JSA_version-build_number.noarch.rpmRPM file name
1083Copyright © 2018, Juniper Networks, Inc.
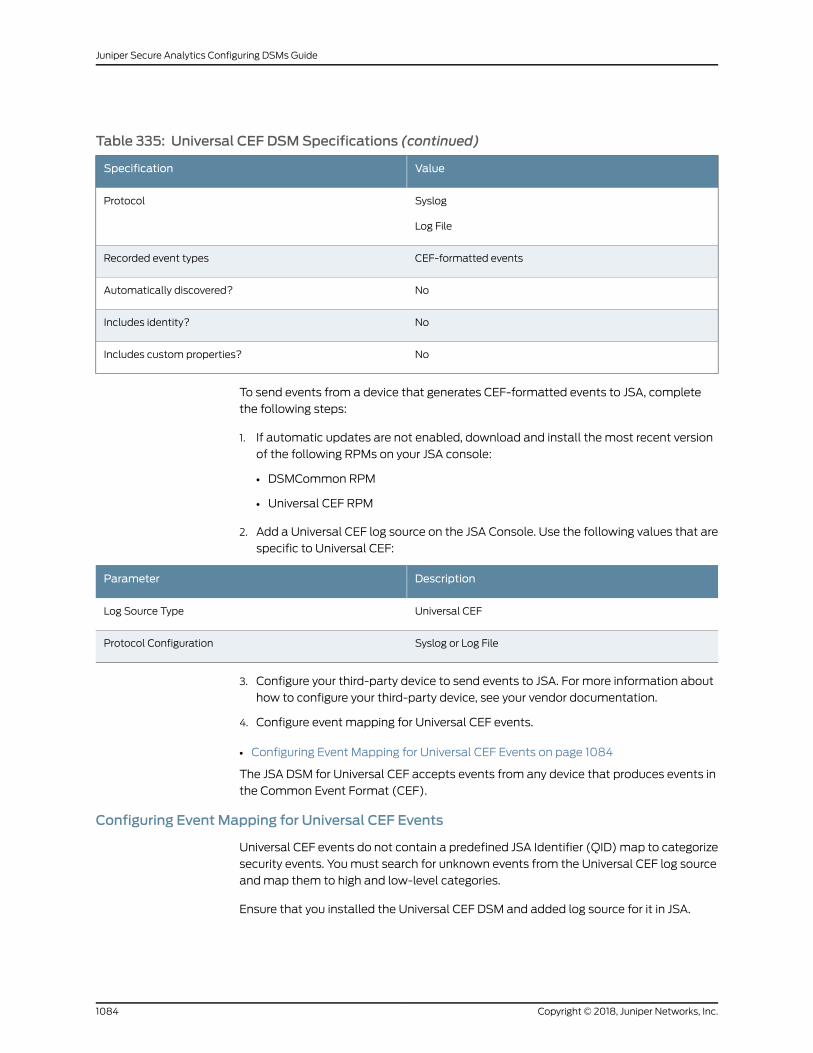
Table 335: Universal CEF DSMSpecifications (continued)
ValueSpecification
Syslog
Log File
Protocol
CEF-formatted eventsRecorded event types
NoAutomatically discovered?
NoIncludes identity?
NoIncludes custom properties?
To send events from a device that generates CEF-formatted events to JSA, complete
the following steps:
1. If automatic updates are not enabled, download and install the most recent version
of the following RPMs on your JSA console:
• DSMCommon RPM
• Universal CEF RPM
2. Add a Universal CEF log source on the JSA Console. Use the following values that are
specific to Universal CEF:
DescriptionParameter
Universal CEFLog Source Type
Syslog or Log FileProtocol Configuration
3. Configure your third-party device to send events to JSA. For more information about
how to configure your third-party device, see your vendor documentation.
4. Configure event mapping for Universal CEF events.
• Configuring Event Mapping for Universal CEF Events on page 1084
The JSA DSM for Universal CEF accepts events from any device that produces events in
the Common Event Format (CEF).
Configuring Event Mapping for Universal CEF Events
Universal CEF events do not contain a predefined JSA Identifier (QID)map to categorize
security events. Youmust search for unknown events from the Universal CEF log source
andmap them to high and low-level categories.
Ensure that you installed the Universal CEF DSM and added log source for it in JSA.
Copyright © 2018, Juniper Networks, Inc.1084
Juniper Secure Analytics Configuring DSMs Guide
By default, the Universal CEF DSM categorizes all events as unknown. All Universal CEF
events display a value of unknown in the Event Name and Low Level Category columns
on the Log Activity tab. Youmustmodify the QIDmap to individually map each event for
your device to an event category in JSA. Mapping events allows JSA to identify, coalesce,
and track events from your network devices.
Formore information about eventmapping, see the Juniper Secure Analytics Users Guide.
1. Log in to JSA.
2. Click the Log Activity tab.
3. Click Add Filter.
4. From the first list, select Log Source.
5. From the Log Source Group list, selectOther.
6. From the Log Source list, select your Universal CEF log source.
7. Click Add Filter.
8. From the View list, select Last Hour.
9. Click Save Criteria to save your existing search filter.
10. On the Event Name column, double-click an unknown event for your Universal CEF
DSM.
11. ClickMap Event.
12. From the Browse for QID pane, select any of the following search options to narrow
the event categories for a JSA Identifier (QID):
• From the High-Level Category list, select a high-level event category. For a full list
of high-level and low-level event categories or category definitions, see the Event
Categories section of the Juniper Secure Analytics Administration Guide.
• From the Low-Level Category list, select a low-level event category.
• From the Log Source Type list, select a log source type.
TIP: Searching for QIDs by log source is useful when the events fromyour Universal CEF DSM are similar to another existing network device.For example, if your Universal CEF provides firewall events, youmight
1085Copyright © 2018, Juniper Networks, Inc.
Chapter 135: Universal
selectCiscoASA, asanother firewall product that likely captures similarevents.
• To search for a QID by name, type a name in theQID/Name field.
13. Click Search.
14. Select the QID that you want to associate to your unknown Universal CEF DSM event
and clickOK.
RelatedDocumentation
Universal LEEF on page 1086•
Universal LEEF
The Universal LEEF DSM for JSA can accept events from devices that produce events
using the Log Event Extended Format (LEEF).
The LEEF event format is a proprietary event format, which allows hardware
manufacturers and software product manufacturers to read andmap device events
specifically designed for JSA integration.
LEEF formatted events sent to JSA outside of the partnership program require you to
have installed the Universal LEEF DSM andmanually identify each event forwarded to
JSA bymapping unknown events. The Universal LEEF DSM can parse events forwarded
from syslog or files containing events in the LEEF format polled fromadevice or directory
using the Log File protocol.
To configure events in JSA using Universal LEEF, youmust:
1. Configure a Universal LEEF log source in JSA.
2. Send LEEF formatted events from your device to JSA. For more information on
forwarding events, see your vendor documentation.
3. Map unknown events to JSA Identifiers (QIDs).
• Configuring a Universal LEEF Log Source on page 1086
• Forwarding Events to JSA on page 1090
• Universal LEEF Event Map Creation on page 1090
Configuring a Universal LEEF Log Source
Before you configure your device to send events to JSA, youmust add a log source for
the device providing LEEF events.
JSA can receive events from a real-time source using syslog or files stored on a device
or in a repository using the Log File protocol.
To configure a log source for Universal LEEF using syslog:
Copyright © 2018, Juniper Networks, Inc.1086
Juniper Secure Analytics Configuring DSMs Guide
1. Log in to JSA.
2. Click the Admin tab.
3. On the navigation menu, click Data Sources.
4. Click the Log Sources icon.
5. Click Add.
6. In the Log Source Name field, type a name for your log source.
7. In the Log Source Description field, type a description for the log source.
8. From the Log Source Type list, select Universal LEEF.
9. Using the Protocol Configuration list, select Syslog.
10. Configure the following values:
Table 336: Syslog Protocol Parameters
DescriptionParameter
Type the IP address or host name for the log source as an identifier for Universal LEEF events.Log Source Identifier
11. Click Save.
12. On the Admin tab, click Deploy Changes.
The log source is added to JSA. You are now ready to forward LEEF events to JSA.
Configuring the Log File Protocol to Collect Universal LEEF Events
The Log File protocol allows JSA to retrieve archived event or log files froma remote host
or file repository.
The files are transferred, one at a time, to JSA for processing. JSA reads the event files
and updates the log source with new events. Due to the Log File protocol polling for
archive files, the events are not provided in real-time, but added in bulk. The log file
protocol canmanage plain text, compressed files, or archives.
1. Log in to JSA.
2. Click the Admin tab.
1087Copyright © 2018, Juniper Networks, Inc.
Chapter 135: Universal
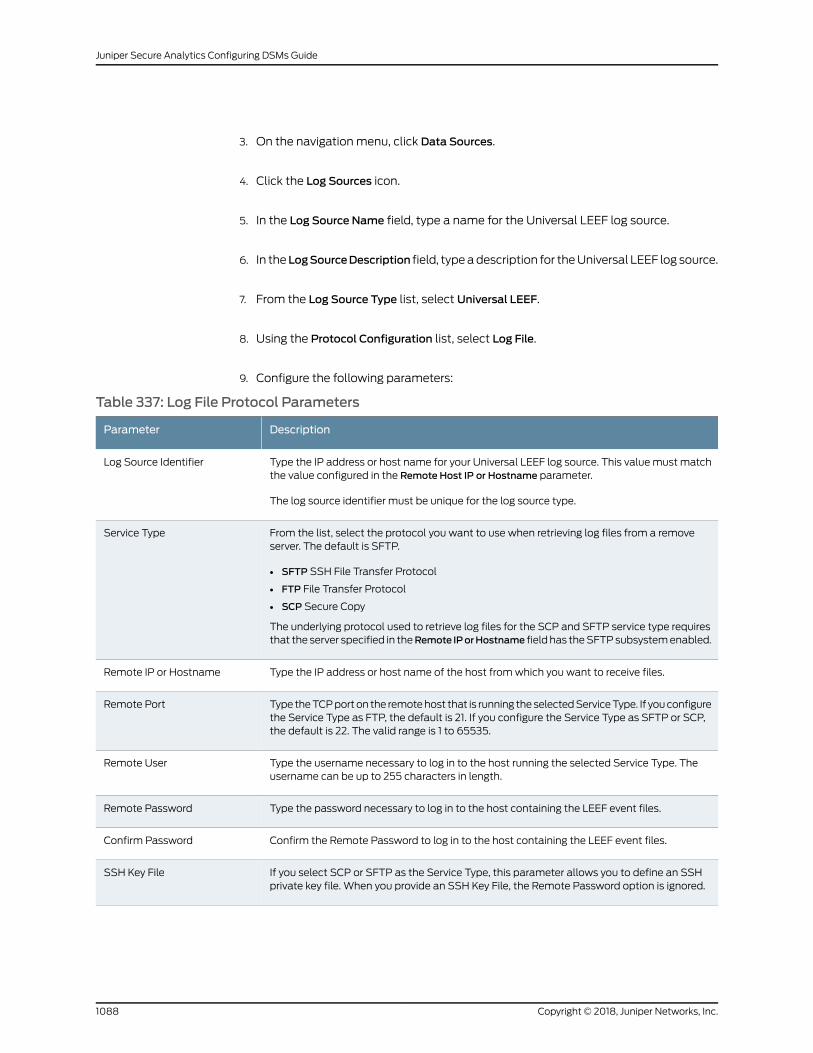
3. On the navigation menu, click Data Sources.
4. Click the Log Sources icon.
5. In the Log Source Name field, type a name for the Universal LEEF log source.
6. In the LogSourceDescription field, typeadescription for theUniversal LEEF log source.
7. From the Log Source Type list, select Universal LEEF.
8. Using the Protocol Configuration list, select Log File.
9. Configure the following parameters:
Table 337: Log File Protocol Parameters
DescriptionParameter
Type the IP address or host name for your Universal LEEF log source. This valuemust matchthe value configured in the Remote Host IP or Hostname parameter.
The log source identifier must be unique for the log source type.
Log Source Identifier
From the list, select the protocol you want to use when retrieving log files from a removeserver. The default is SFTP.
• SFTP SSH File Transfer Protocol
• FTP File Transfer Protocol
• SCP Secure Copy
The underlying protocol used to retrieve log files for the SCP and SFTP service type requiresthat the server specified in theRemote IPorHostname field has theSFTPsubsystemenabled.
Service Type
Type the IP address or host name of the host fromwhich you want to receive files.Remote IP or Hostname
Type theTCPporton the remotehost that is running theselectedServiceType. If youconfigurethe Service Type as FTP, the default is 21. If you configure the Service Type as SFTP or SCP,the default is 22. The valid range is 1 to 65535.
Remote Port
Type the username necessary to log in to the host running the selected Service Type. Theusername can be up to 255 characters in length.
Remote User
Type the password necessary to log in to the host containing the LEEF event files.Remote Password
Confirm the Remote Password to log in to the host containing the LEEF event files.Confirm Password
If you select SCP or SFTP as the Service Type, this parameter allows you to define an SSHprivate key file. When you provide an SSH Key File, the Remote Password option is ignored.
SSH Key File
Copyright © 2018, Juniper Networks, Inc.1088
Juniper Secure Analytics Configuring DSMs Guide
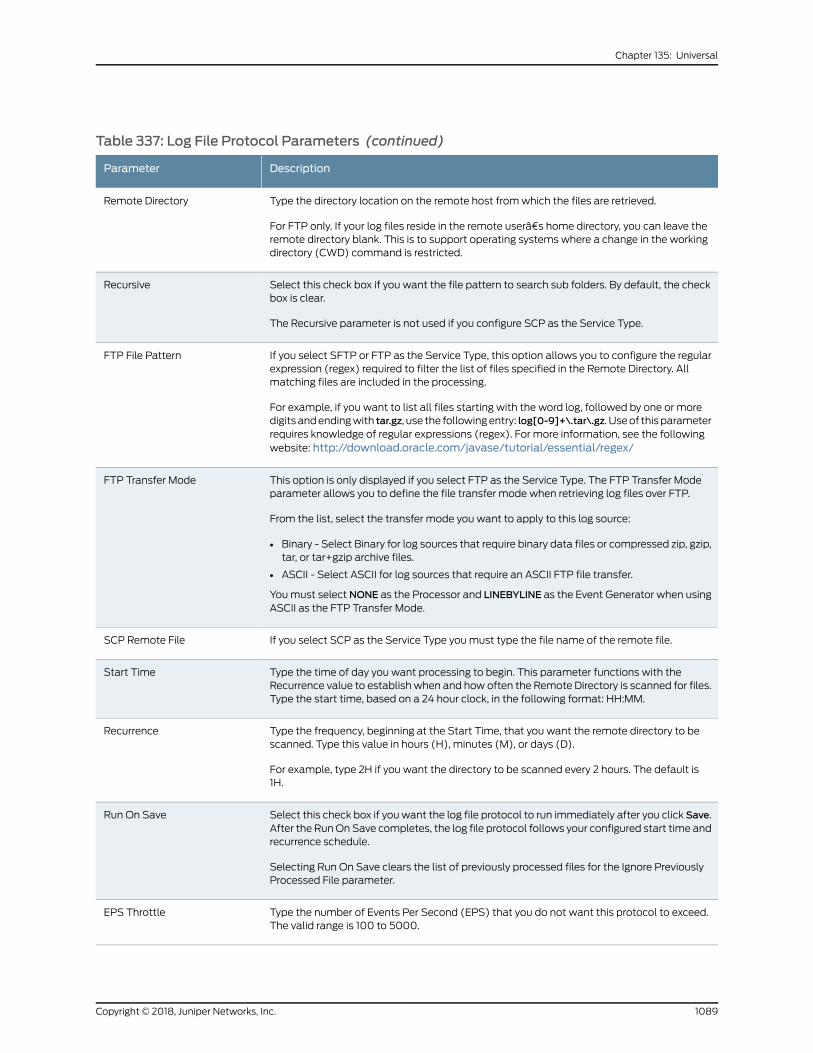
Table 337: Log File Protocol Parameters (continued)
DescriptionParameter
Type the directory location on the remote host fromwhich the files are retrieved.
For FTP only. If your log files reside in the remote userâ€s home directory, you can leave theremote directory blank. This is to support operating systems where a change in the workingdirectory (CWD) command is restricted.
Remote Directory
Select this check box if you want the file pattern to search sub folders. By default, the checkbox is clear.
The Recursive parameter is not used if you configure SCP as the Service Type.
Recursive
If you select SFTP or FTP as the Service Type, this option allows you to configure the regularexpression (regex) required to filter the list of files specified in the Remote Directory. Allmatching files are included in the processing.
For example, if you want to list all files starting with the word log, followed by one or moredigits andendingwith tar.gz, use the followingentry: log[0-9]+\.tar\.gz. Useof thisparameterrequires knowledge of regular expressions (regex). For more information, see the followingwebsite: http://download.oracle.com/javase/tutorial/essential/regex/
FTP File Pattern
This option is only displayed if you select FTP as the Service Type. The FTP Transfer Modeparameter allows you to define the file transfer mode when retrieving log files over FTP.
From the list, select the transfer mode you want to apply to this log source:
• Binary - Select Binary for log sources that require binary data files or compressed zip, gzip,tar, or tar+gzip archive files.
• ASCII - Select ASCII for log sources that require an ASCII FTP file transfer.
Youmust select NONE as the Processor and LINEBYLINE as the Event Generator when usingASCII as the FTP Transfer Mode.
FTP Transfer Mode
If you select SCP as the Service Type youmust type the file name of the remote file.SCP Remote File
Type the time of day you want processing to begin. This parameter functions with theRecurrence value to establish when and how often the Remote Directory is scanned for files.Type the start time, based on a 24 hour clock, in the following format: HH:MM.
Start Time
Type the frequency, beginning at the Start Time, that you want the remote directory to bescanned. Type this value in hours (H), minutes (M), or days (D).
For example, type 2H if you want the directory to be scanned every 2 hours. The default is1H.
Recurrence
Select this check box if youwant the log file protocol to run immediately after you click Save.After the RunOn Save completes, the log file protocol follows your configured start time andrecurrence schedule.
Selecting Run On Save clears the list of previously processed files for the Ignore PreviouslyProcessed File parameter.
Run On Save
Type the number of Events Per Second (EPS) that you do not want this protocol to exceed.The valid range is 100 to 5000.
EPS Throttle
1089Copyright © 2018, Juniper Networks, Inc.
Chapter 135: Universal
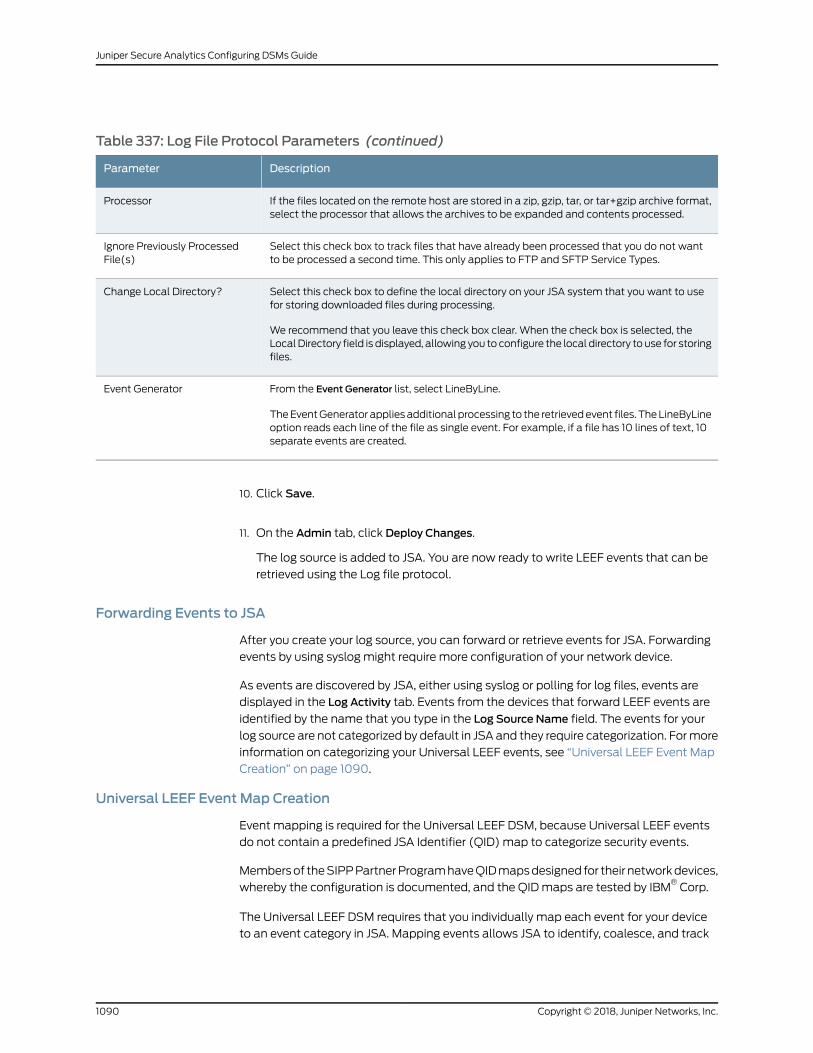
Table 337: Log File Protocol Parameters (continued)
DescriptionParameter
If the files located on the remote host are stored in a zip, gzip, tar, or tar+gzip archive format,select the processor that allows the archives to be expanded and contents processed.
Processor
Select this check box to track files that have already been processed that you do not wantto be processed a second time. This only applies to FTP and SFTP Service Types.
Ignore Previously ProcessedFile(s)
Select this check box to define the local directory on your JSA system that you want to usefor storing downloaded files during processing.
We recommend that you leave this check box clear. When the check box is selected, theLocalDirectory field is displayed, allowing you to configure the local directory to use for storingfiles.
Change Local Directory?
From the Event Generator list, select LineByLine.
TheEventGenerator appliesadditional processing to the retrievedevent files. TheLineByLineoption reads each line of the file as single event. For example, if a file has 10 lines of text, 10separate events are created.
Event Generator
10. Click Save.
11. On the Admin tab, click Deploy Changes.
The log source is added to JSA. You are now ready to write LEEF events that can be
retrieved using the Log file protocol.
Forwarding Events to JSA
After you create your log source, you can forward or retrieve events for JSA. Forwarding
events by using syslog might require more configuration of your network device.
As events are discovered by JSA, either using syslog or polling for log files, events are
displayed in the Log Activity tab. Events from the devices that forward LEEF events are
identified by the name that you type in the Log Source Name field. The events for your
log source are not categorized by default in JSA and they require categorization. Formore
information on categorizing your Universal LEEF events, see “Universal LEEF Event Map
Creation” on page 1090.
Universal LEEF Event Map Creation
Event mapping is required for the Universal LEEF DSM, because Universal LEEF events
do not contain a predefined JSA Identifier (QID) map to categorize security events.
Membersof theSIPPPartnerProgramhaveQIDmapsdesigned for their networkdevices,
whereby the configuration is documented, and the QIDmaps are tested by IBM®Corp.
The Universal LEEF DSM requires that you individually map each event for your device
to an event category in JSA. Mapping events allows JSA to identify, coalesce, and track
Copyright © 2018, Juniper Networks, Inc.1090
Juniper Secure Analytics Configuring DSMs Guide
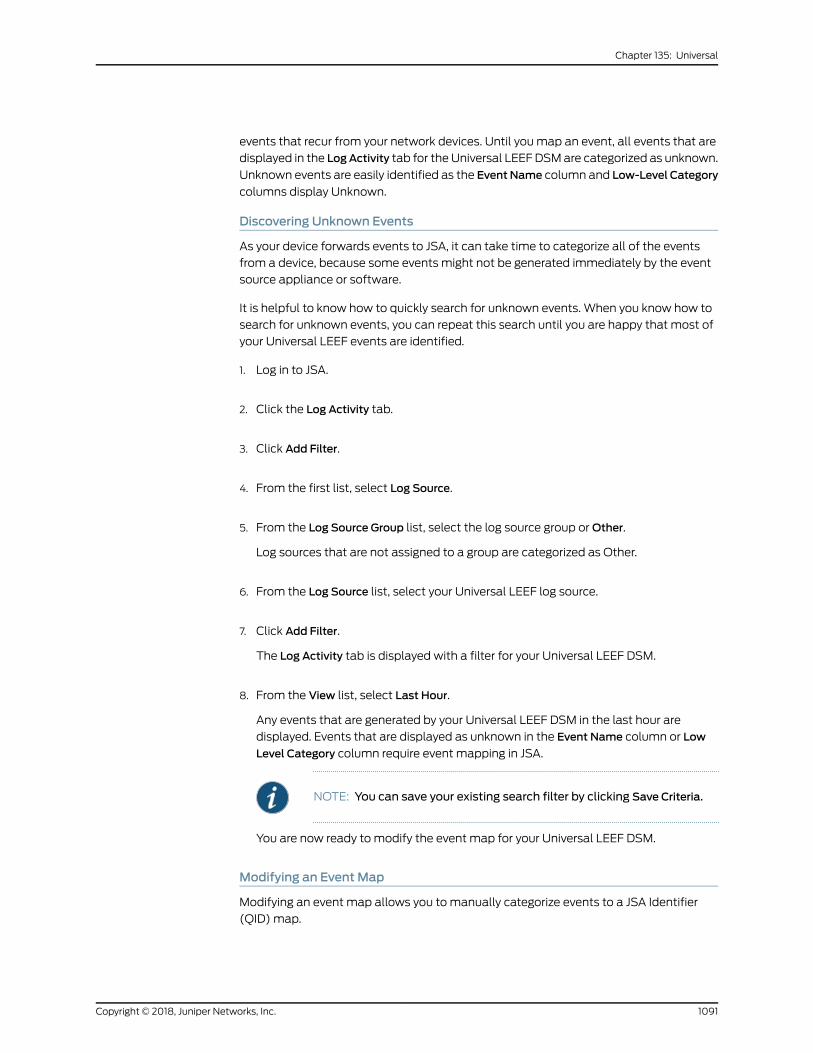
events that recur from your network devices. Until you map an event, all events that are
displayed in the LogActivity tab for the Universal LEEF DSMare categorized as unknown.
Unknown events are easily identified as the Event Name column and Low-Level Category
columns display Unknown.
Discovering Unknown Events
As your device forwards events to JSA, it can take time to categorize all of the events
from a device, because some events might not be generated immediately by the event
source appliance or software.
It is helpful to know how to quickly search for unknown events. When you know how to
search for unknown events, you can repeat this search until you are happy that most of
your Universal LEEF events are identified.
1. Log in to JSA.
2. Click the Log Activity tab.
3. Click Add Filter.
4. From the first list, select Log Source.
5. From the Log Source Group list, select the log source group orOther.
Log sources that are not assigned to a group are categorized as Other.
6. From the Log Source list, select your Universal LEEF log source.
7. Click Add Filter.
The Log Activity tab is displayed with a filter for your Universal LEEF DSM.
8. From the View list, select Last Hour.
Any events that are generated by your Universal LEEF DSM in the last hour are
displayed. Events that are displayed as unknown in the Event Name column or Low
Level Category column require event mapping in JSA.
NOTE: You can save your existing search filter by clicking Save Criteria.
You are now ready to modify the event map for your Universal LEEF DSM.
Modifying an Event Map
Modifying an event map allows you to manually categorize events to a JSA Identifier
(QID) map.
1091Copyright © 2018, Juniper Networks, Inc.
Chapter 135: Universal
Any event categorized to a log source can be remapped to a new JSA Identifier (QID). By
default, the Universal LEEF DSM categorizes all events as unknown.
NOTE: Events that do not have a defined log source cannot bemapped toan event. Events without a log source display SIM Generic Log in the LogSource column.
1. On the Event Name column, double-click an unknown event for your Universal LEEF
DSM.
The detailed event information is displayed.
2. ClickMap Event.
3. From the Browse for QID pane, select any of the following search options to narrow
the event categories for a JSA Identifier (QID):
a. From the High-Level Category list, select a high-level event categorization.
For a full list of high-level and low-level event categories or category definitions,
see the Event Categories section of the Juniper Secure Analytics Administration
Guide.
4. From the Low-Level Category list, select a low-level event categorization.
5. From the Log Source Type list, select a log source type.
TheLogSourceType list allowsyou to search forQIDs fromother individual log sources.
Searching for QIDs by log source is useful when the events from your Universal LEEF
DSM are similar to another existing network device. For example, if your Universal
DSMprovides firewall events, youmight select Cisco ASA, as another firewall product
that likely captures similar events.
6. To search for a QID by name, type a name in theQID/Name field.
The QID/Name field allows you to filter the full list of QIDs for a specific word, for
example, MySQL.
7. Click Search.
A list of QIDs is displayed.
8. Select the QID you want to associate to your unknown Universal LEEF DSM event.
9. ClickOK.
JSAmaps any additional events forwarded from your device with the same QID that
matches theeventpayload.Theevent count increaseseach time theevent is identified
by JSA.
Copyright © 2018, Juniper Networks, Inc.1092
Juniper Secure Analytics Configuring DSMs Guide

NOTE: If you update an event with a new JSA Identifier (QID)map, pastevents stored in JSA are not updated. Only new events are categorizedwith the newQID.
1093Copyright © 2018, Juniper Networks, Inc.
Chapter 135: Universal

Copyright © 2018, Juniper Networks, Inc.1094
Juniper Secure Analytics Configuring DSMs Guide
CHAPTER 136
Vectra Networks Vectra
• Vectra Networks Vectra on page 1095
• Configuring Vectra Networks Vectra to Communicate with JSA on page 1096
Vectra Networks Vectra
The JSA DSM for Vectra Networks Vectra collects events from the Vectra Networks
Vectra X-Series platform.
The following table describes the specifications for the Vectra Networks Vectra DSM:
Table 338: Vectra Networks Vectra DSMSpecifications
ValueSpecification
Vectra NetworksManufacturer
Vectra Networks VectraDSM name
DSM-VectraNetworksVectra-JSA_version-build_number.noarch.rpmRPM file name
V2.2Supported versions
SyslogProtocol
Common Event FormatEvent Format
Host scoring, command and control, botnet activity,reconnaissance, lateral movement, exfiltration
Recorded event types
YesAutomatically discovered?
NoIncludes identity?
NoIncludes custom properties?
VectraNetworksWebsite (http://www.vectranetworks.com)More information
To integrate Vectra Networks Vectra with JSA, complete the following steps:
1095Copyright © 2018, Juniper Networks, Inc.
1. If automatic updates are not enabled, download and install the most recent version
of the following RPMs on your JSA console in the order that they are listed:
• DSMCommon RPM
• Vectra Networks Vectra DSM RPM
2. Configure your Vectra Networks Vectra device to send syslog events to JSA.
3. If JSA does not automatically detect the log source, add a Vectra Networks Vectra
log source on the JSA Console. The following table describes the parameters that
require specific values for Vectra Networks Vectra event collection:
Table 339: Vectra Networks Vectra Log Source Parameters
ValueParameter
Vectra Networks VectraLog Source type
SyslogProtocol Configuration
A unique identifier for the log source.Log Source Identifier
The following table provides a sample event message for the Vectra Networks Vectra
DSM:
Table 340: Vectra Networks Vectra SampleMessage.
Sample logmessageLow level categoryEvent Name
<13>Dec 22 16:38:53 S11181714900481 - -: CEF:0|Vectra Networks|Vectra|2.3|HSC|Host Score Change|3|externalId=283 cat=HOST SCORING shost=IP-20.20.1.2 src=20.20.1.2 flexNumber1=26 flexNumber1Label=threat flexNumber2=60 flexNumber2Label=certainty cs4=https://10.0.4.49/hosts/283 cs4Label=URL start=1450831133169 end=1450831133169
Backdoor DetectedHost Scoring
Configuring Vectra Networks Vectra to Communicate with JSA
To collect Vectra Networks Vectra events, configure the JSA syslog daemon listener.
1. Log in to the Vectra web console.
2. Click settings >Notifications.
Copyright © 2018, Juniper Networks, Inc.1096
Juniper Secure Analytics Configuring DSMs Guide
3. In the Syslog section, click Edit.
4. Configure the following JSA syslog daemon listener parameters:
The JSAEvent Collector IP address.Destination
514Port
UDPProtocol
CEFFormat
1097Copyright © 2018, Juniper Networks, Inc.
Chapter 136: Vectra Networks Vectra

Copyright © 2018, Juniper Networks, Inc.1098
Juniper Secure Analytics Configuring DSMs Guide
CHAPTER 137
Venustech Venusense
• Venustech Venusense on page 1099
• Venusense Configuration Overview on page 1099
• Configuring a Venusense Syslog Server on page 1100
• Configuring Venusense Event Filtering on page 1100
• Configuring a Venusense Log Source on page 1100
Venustech Venusense
The Venustech Venusense DSM for JSA can collect events from Venusense appliances
by using syslog.
JSA records all relevant unified threat, firewall, or network intrusion prevention events
that are forwarded by using syslog on port 514.
The following Venustech appliances are supported by JSA:
• Venustech Venusense Security Platform
• Venusense Unified Threat Management (UTM)
• Venusense Firewall
• Venusense Network Intrusion Prevention System (NIPS)
Venusense Configuration Overview
JSA can collect events fromVenustech appliances that are configured to forward filtered
event logs in syslog format to JSA.
The following process outlines the steps that are required to collect events from a
Venusense Venustech appliance:
1. Configure the syslog server on your Venusense appliance.
2. Configure a log filter on your Venusense appliance to forward specific event logs.
3. Configure a log source in JSA to correspond to the filtered log events.
1099Copyright © 2018, Juniper Networks, Inc.
Configuring a Venusense Syslog Server
To forward events to JSA, youmust configure and enable a syslog server on your
Venusense appliance with the IP address of your JSA console or Event Collector.
1. Log in to the configuration interface for your Venusense appliance.
2. From the navigation menu, select Logs >Log Configuration >Log Servers.
3. In the IP Address field, type the IP address of your JSA console or Event Collector.
4. In the Port field, type 514.
5. Select the Enable check box.
6. ClickOK.
You are ready to configure your Venusense appliance to filterwhich events are forwarded
to JSA.
Configuring Venusense Event Filtering
Event filtering determines which events your Venusense appliance forwards to JSA.
1. From the navigation menu, select Logs >Log Configuration >Log Filtering.
2. In the Syslog Log column, select a check box for each event log you want to forward
to JSA.
3. From the list, select a syslog facility for the event log you enabled.
4. Repeat“ConfiguringVenusenseEventFiltering”onpage1100and“ConfiguringVenusense
Event Filtering” on page 1100 to configure any additional syslog event filters.
5. ClickOK.
You can now configure a log source for your Venusense appliance in JSA. JSA does not
automatically discoveror create log sources for syslogevents fromVenusenseappliances.
Configuring a Venusense Log Source
To integrate Venusense syslog events, youmust manually create a log source in JSA as
Venusense events to not automatically discover.
Copyright © 2018, Juniper Networks, Inc.1100
Juniper Secure Analytics Configuring DSMs Guide
1. Log in to JSA.
2. Click the Admin tab.
3. On the navigation menu, click Data Sources.
4. Click the Log Sources icon.
5. Click Add.
6. In the Log Source Name field, type a name for your log source.
7. In the Log Source Description field, type a description for the log source.
8. From the Log Source Type list, select your Venustech Venusense appliance.
The typeof log source that youselect is determinedby theevent filter that is configured
on your Venusense appliance. The options include the following types:
• VenustechVenusense Security Platform—Select this option if you enabled all event
filter options.
• VenustechVenusenseUTM—Select this option if youenabledunified filteringevents.
• VenustechVenusenseFirewall—Select this option if youenabled filtering for firewall
events.
• Venustech Venusense NIPS—Select this option if you enabled filtering for firewall
events.
9. From the Protocol Configuration list, select Syslog.
10. In the Log Source Identifier field, type the IP address or host name for the log source
as an identifier for your Venusense appliance.
11. Click Save.
12. On the Admin tab, click Deploy Changes.
The configuration is complete. Events that are forwarded to JSA by your Venusense
appliance are displayed on the Log Activity tab.
1101Copyright © 2018, Juniper Networks, Inc.
Chapter 137: Venustech Venusense

Copyright © 2018, Juniper Networks, Inc.1102
Juniper Secure Analytics Configuring DSMs Guide
CHAPTER 138
Verdasys Digital Guardian
• Verdasys Digital Guardian on page 1103
• Configuring IPtables on page 1104
• Configuring a Data Export on page 1105
• Configuring a Log Source on page 1107
Verdasys Digital Guardian
The Verdasys Digital Guardian DSM for JSA accepts and categorizes all alert events from
Verdasys Digital Guardian appliances.
Verdasys Digital Guardian is a comprehensive Enterprise Information Protection (EIP)
platform. Digital Guardian serves as a cornerstone of policy driven, data-centric security
by enabling organizations to solve the information risk challenges that exist in today's
highly collaborative andmobile business environment. Digital Guardian's endpoint agent
architecture makes it possible to implement a data-centric security framework.
Verdasys Digital Guardian allows business and IT managers to:
• Discover and classify sensitive data by context and content.
• Monitor data access and usage by user or process.
• Implement policy driven information protection automatically.
• Alert, block, and record high risk behavior to prevent costly and damaging data loss
incidents.
Digital Guardian's integration with JSA provides context from the endpoint and enables
a new level of detection andmitigation for Insider Threat and Cyber Threat (Advanced
Persistent Threat).
Digital Guardian provides JSA with a rich data stream from the end-point that includes:
visibility of every data access by users or processes that include the file name, file
classification, application that is used to access the data and other contextual variables.
1103Copyright © 2018, Juniper Networks, Inc.
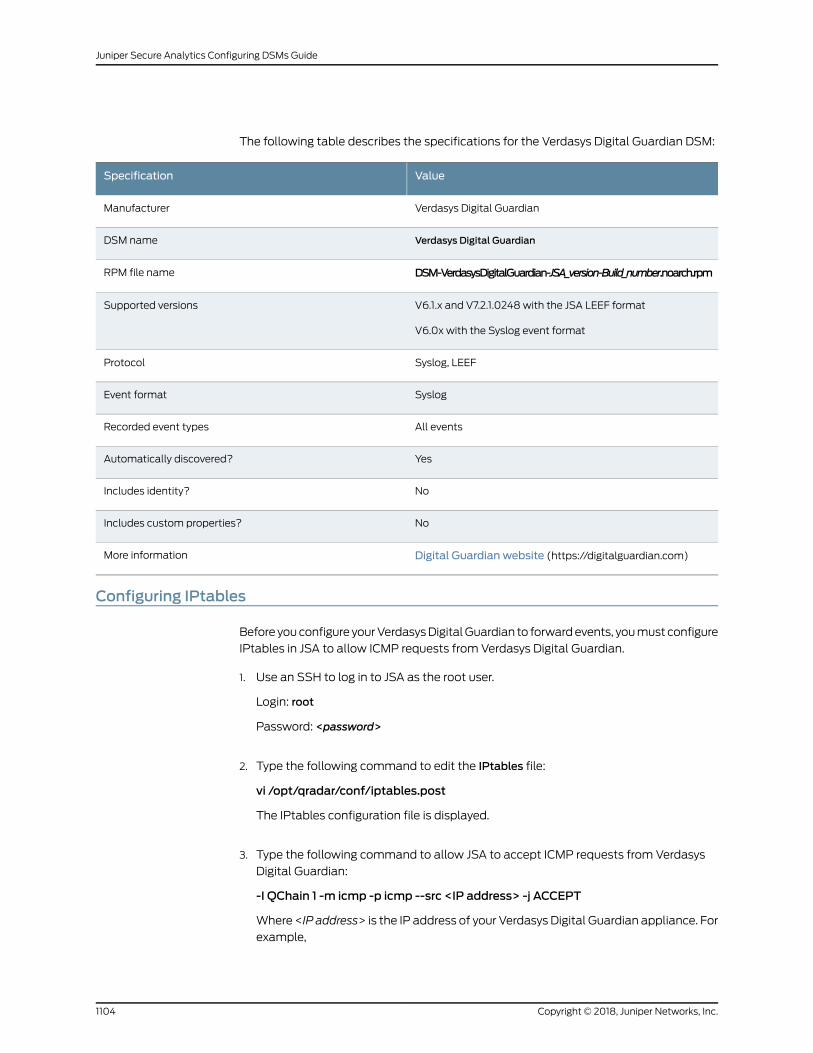
The following table describes the specifications for the Verdasys Digital Guardian DSM:
ValueSpecification
Verdasys Digital GuardianManufacturer
Verdasys Digital GuardianDSM name
DSM-VerdasysDigitalGuardian-JSA_version-Build_number.noarch.rpmRPM file name
V6.1.x and V7.2.1.0248 with the JSA LEEF format
V6.0x with the Syslog event format
Supported versions
Syslog, LEEFProtocol
SyslogEvent format
All eventsRecorded event types
YesAutomatically discovered?
NoIncludes identity?
NoIncludes custom properties?
Digital Guardian website (https://digitalguardian.com)More information
Configuring IPtables
Before youconfigure yourVerdasysDigitalGuardian to forwardevents, youmust configure
IPtables in JSA to allow ICMP requests from Verdasys Digital Guardian.
1. Use an SSH to log in to JSA as the root user.
Login: root
Password: <password>
2. Type the following command to edit the IPtables file:
vi /opt/qradar/conf/iptables.post
The IPtables configuration file is displayed.
3. Type the following command to allow JSA to accept ICMP requests from Verdasys
Digital Guardian:
-I QChain 1 -m icmp -p icmp --src <IP address> -j ACCEPT
Where <IP address> is the IP address of your Verdasys Digital Guardian appliance. For
example,
Copyright © 2018, Juniper Networks, Inc.1104
Juniper Secure Analytics Configuring DSMs Guide
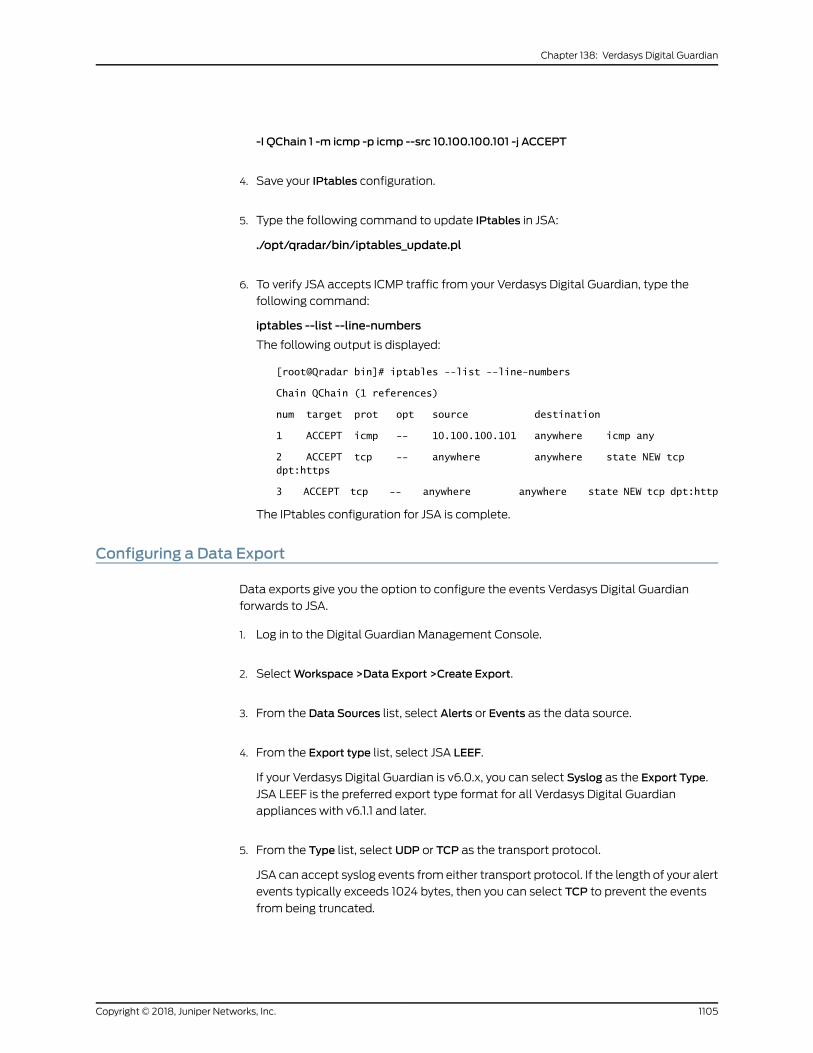
-I QChain 1 -m icmp -p icmp --src 10.100.100.101 -j ACCEPT
4. Save your IPtables configuration.
5. Type the following command to update IPtables in JSA:
./opt/qradar/bin/iptables_update.pl
6. To verify JSA accepts ICMP traffic from your Verdasys Digital Guardian, type the
following command:
iptables --list --line-numbers
The following output is displayed:
[root@Qradar bin]# iptables --list --line-numbers
Chain QChain (1 references)
num target prot opt source destination
1 ACCEPT icmp -- 10.100.100.101 anywhere icmp any
2 ACCEPT tcp -- anywhere anywhere state NEW tcp dpt:https
3 ACCEPT tcp -- anywhere anywhere state NEW tcp dpt:http
The IPtables configuration for JSA is complete.
Configuring a Data Export
Data exports give you the option to configure the events Verdasys Digital Guardian
forwards to JSA.
1. Log in to the Digital Guardian Management Console.
2. SelectWorkspace >Data Export >Create Export.
3. From the Data Sources list, select Alerts or Events as the data source.
4. From the Export type list, select JSA LEEF.
If your Verdasys Digital Guardian is v6.0.x, you can select Syslog as the Export Type.
JSA LEEF is the preferred export type format for all Verdasys Digital Guardian
appliances with v6.1.1 and later.
5. From the Type list, select UDP or TCP as the transport protocol.
JSA can accept syslog events from either transport protocol. If the length of your alert
events typically exceeds 1024 bytes, then you can select TCP to prevent the events
from being truncated.
1105Copyright © 2018, Juniper Networks, Inc.
Chapter 138: Verdasys Digital Guardian

6. In the Server field, type the IP address of your JSA console or Event Collector.
7. In the Port field, type 514.
8. From the Severity Level list, select a severity level.
9. Select the Is Active check box.
10. Click Next.
11. From the list of available fields, add the following Alert or Event fields for your data
export:
• Agent Local Time
• Application
• Computer Name
• Detail File Size
• IP Address
• Local Port
• Operation (required)
• Policy
• Remote Port
• Rule
• Severity
• Source IP Address
• User Name
• Was Blocked
• Was Classified
12. Select a Criteria for the fields in your data export and click Next.
By default, the Criterion is blank.
13. Select a group for the criteria and click Next.
By default, the Group is blank.
14. Click Test Query.
A Test Query ensures that the database runs properly.
Copyright © 2018, Juniper Networks, Inc.1106
Juniper Secure Analytics Configuring DSMs Guide
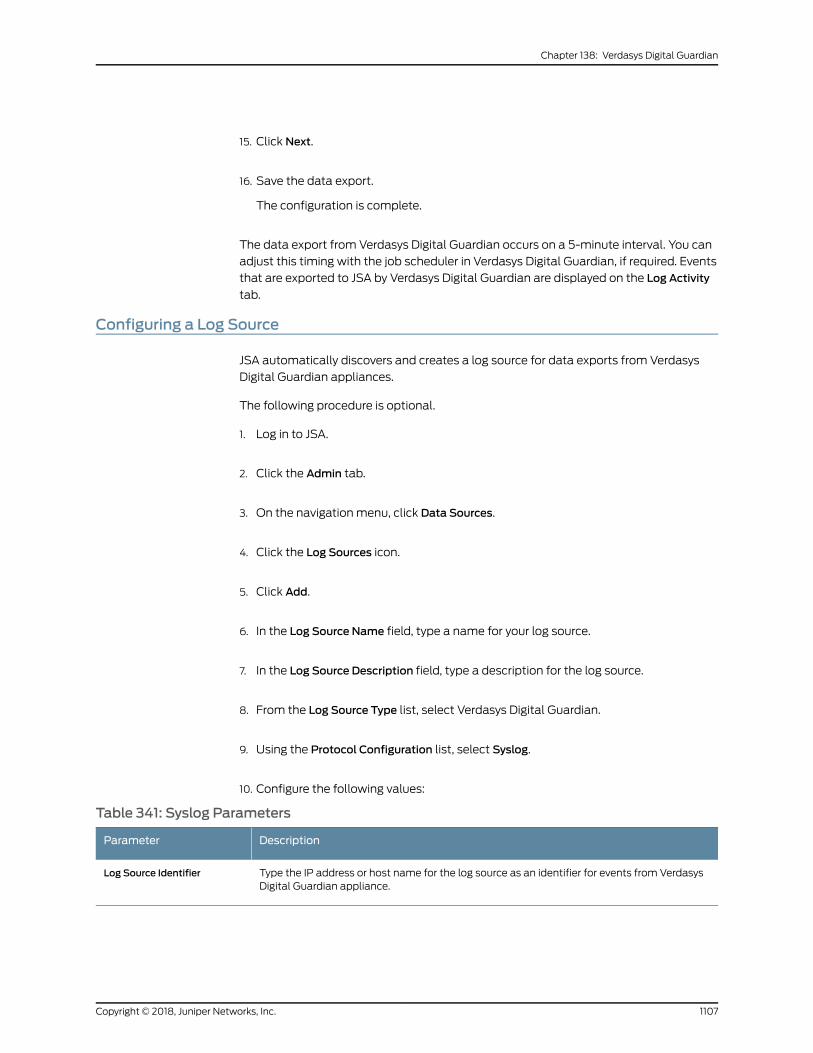
15. Click Next.
16. Save the data export.
The configuration is complete.
The data export from Verdasys Digital Guardian occurs on a 5-minute interval. You can
adjust this timing with the job scheduler in Verdasys Digital Guardian, if required. Events
that are exported to JSA by Verdasys Digital Guardian are displayed on the Log Activity
tab.
Configuring a Log Source
JSA automatically discovers and creates a log source for data exports from Verdasys
Digital Guardian appliances.
The following procedure is optional.
1. Log in to JSA.
2. Click the Admin tab.
3. On the navigation menu, click Data Sources.
4. Click the Log Sources icon.
5. Click Add.
6. In the Log Source Name field, type a name for your log source.
7. In the Log Source Description field, type a description for the log source.
8. From the Log Source Type list, select Verdasys Digital Guardian.
9. Using the Protocol Configuration list, select Syslog.
10. Configure the following values:
Table 341: Syslog Parameters
DescriptionParameter
Type the IP address or host name for the log source as an identifier for events from VerdasysDigital Guardian appliance.
Log Source Identifier
1107Copyright © 2018, Juniper Networks, Inc.
Chapter 138: Verdasys Digital Guardian

11. Click Save.
12. On the Admin tab, click Deploy Changes.
The log source is added to JSA.
Copyright © 2018, Juniper Networks, Inc.1108
Juniper Secure Analytics Configuring DSMs Guide
CHAPTER 139
Vericept Content 360 DSM
• Vericept Content 360 DSM on page 1109
Vericept Content 360 DSM
The Vericept Content 360 DSM for JSA accepts Vericept events by using syslog.
JSA records all relevant and available information from the event. Before you configure
a Vericept device in JSA, youmust configure your device to forward syslog. For more
information about configuring your Vericept device, consult your vendor documentation.
After you configure syslog to forward events to JSA, the configuration is complete. The
log source is added to JSA as Vericept Content 360 events are automatically discovered.
Events that are forwarded to JSA by your Vericept Content 360 appliance are displayed
on the Log Activity tab.
Tomanually configure a log source for JSA to receive events from a Vericept device:
1. From the Log Source Type list, select the Vericept Content 360 option.
1109Copyright © 2018, Juniper Networks, Inc.

Copyright © 2018, Juniper Networks, Inc.1110
Juniper Secure Analytics Configuring DSMs Guide
CHAPTER 140
VMWare
• VMWare on page 1111
• VMware ESX and ESXi on page 1111
• VMware VCenter on page 1117
• VMware VCloud Director on page 1119
• VMware VShield on page 1121
VMWare
JSA supports a range of VMWare products.
VMware ESX and ESXi
The EMCVMware DSM for JSA collects ESX and ESXi server events by using the VMware
protocol or syslog. The EMC VMware DSM supports events from VMware ESX or ESXi
3.x, 4.x, or 5.x servers.
TocollectVMwareESXorESXi events, youcanselect oneof the followingevent collection
methods:
• Configuring Syslog on VMWare ESX and ESXi Servers on page 1111
• Configuring the VMWare Protocol for ESX or ESXi Servers on page 1114
• Configuring Syslog on VMWare ESX and ESXi Servers on page 1111
• Enabling Syslog Firewall Settings on VSphere Clients on page 1113
• Configuring a Syslog Log Source for VMware ESX or ESXi on page 1113
• Configuring the VMWare Protocol for ESX or ESXi Servers on page 1114
• Creating an Account for JSA in ESX on page 1115
• Configuring Read-only Account Permissions on page 1116
• Configuring a Log Source for the VMWare Protocol on page 1116
Configuring Syslog on VMWare ESX and ESXi Servers
To collect syslog events for VMWare, youmust configure the server to forward events
by using syslogd from your ESXi server to JSA.
1111Copyright © 2018, Juniper Networks, Inc.
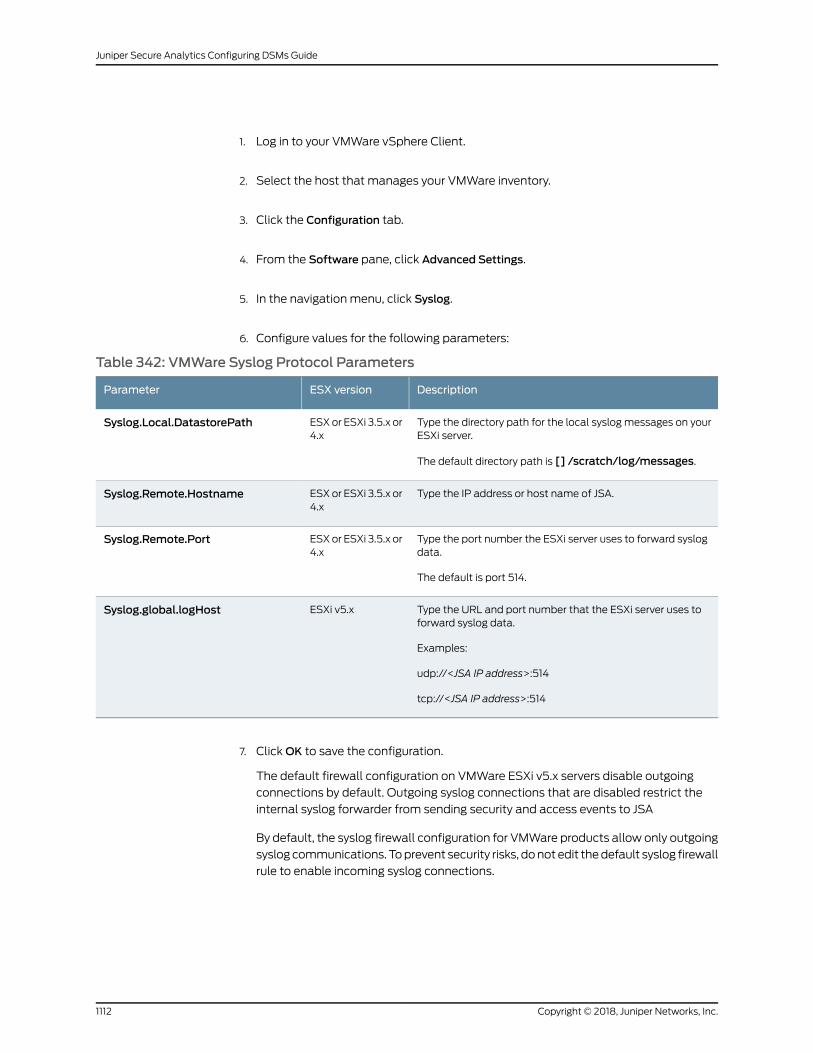
1. Log in to your VMWare vSphere Client.
2. Select the host that manages your VMWare inventory.
3. Click the Configuration tab.
4. From the Software pane, click Advanced Settings.
5. In the navigation menu, click Syslog.
6. Configure values for the following parameters:
Table 342: VMWare Syslog Protocol Parameters
DescriptionESX versionParameter
Type the directory path for the local syslog messages on yourESXi server.
The default directory path is [] /scratch/log/messages.
ESX or ESXi 3.5.x or4.x
Syslog.Local.DatastorePath
Type the IP address or host name of JSA.ESXor ESXi 3.5.x or4.x
Syslog.Remote.Hostname
Type the port number the ESXi server uses to forward syslogdata.
The default is port 514.
ESXor ESXi 3.5.x or4.x
Syslog.Remote.Port
Type the URL and port number that the ESXi server uses toforward syslog data.
Examples:
udp://<JSA IP address>:514
tcp://<JSA IP address>:514
ESXi v5.xSyslog.global.logHost
7. ClickOK to save the configuration.
The default firewall configuration on VMWare ESXi v5.x servers disable outgoing
connections by default. Outgoing syslog connections that are disabled restrict the
internal syslog forwarder from sending security and access events to JSA
By default, the syslog firewall configuration for VMWare products allow only outgoing
syslog communications. Toprevent security risks, donot edit thedefault syslog firewall
rule to enable incoming syslog connections.
Copyright © 2018, Juniper Networks, Inc.1112
Juniper Secure Analytics Configuring DSMs Guide
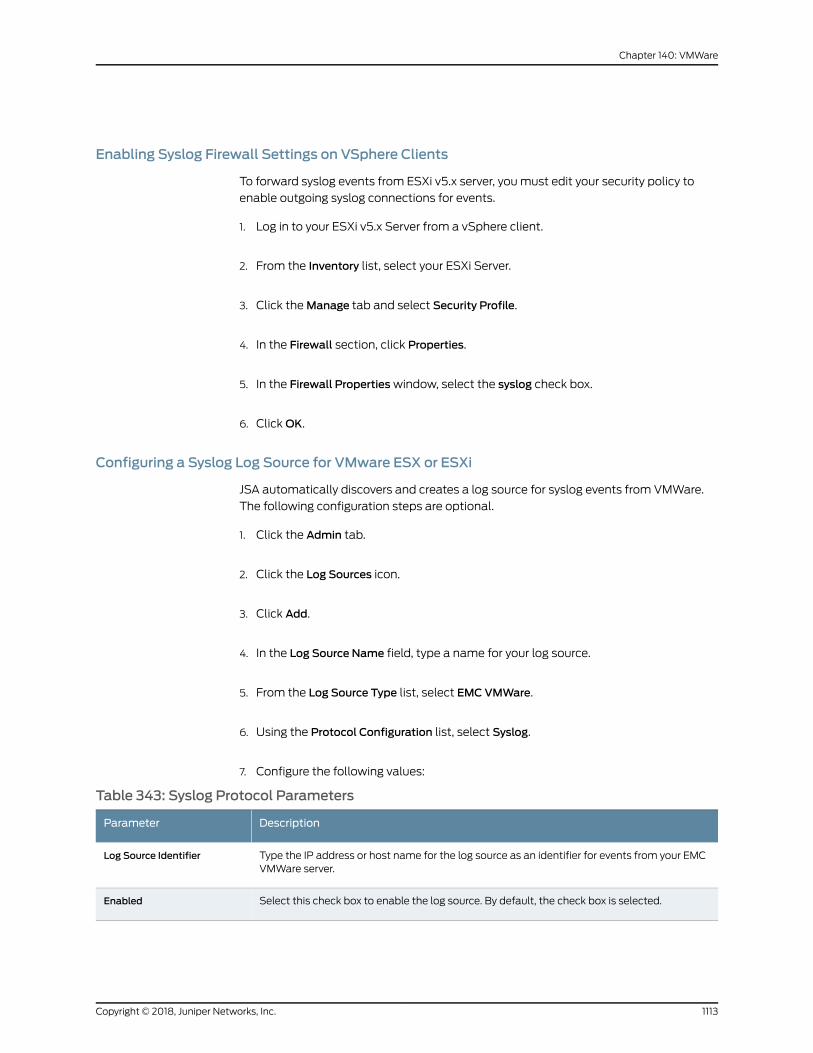
Enabling Syslog Firewall Settings on VSphere Clients
To forward syslog events from ESXi v5.x server, you must edit your security policy to
enable outgoing syslog connections for events.
1. Log in to your ESXi v5.x Server from a vSphere client.
2. From the Inventory list, select your ESXi Server.
3. Click theManage tab and select Security Profile.
4. In the Firewall section, click Properties.
5. In the Firewall Propertieswindow, select the syslog check box.
6. ClickOK.
Configuring a Syslog Log Source for VMware ESX or ESXi
JSA automatically discovers and creates a log source for syslog events from VMWare.
The following configuration steps are optional.
1. Click the Admin tab.
2. Click the Log Sources icon.
3. Click Add.
4. In the Log Source Name field, type a name for your log source.
5. From the Log Source Type list, select EMCVMWare.
6. Using the Protocol Configuration list, select Syslog.
7. Configure the following values:
Table 343: Syslog Protocol Parameters
DescriptionParameter
Type the IP address or host name for the log source as an identifier for events from your EMCVMWare server.
Log Source Identifier
Select this check box to enable the log source. By default, the check box is selected.Enabled
1113Copyright © 2018, Juniper Networks, Inc.
Chapter 140: VMWare
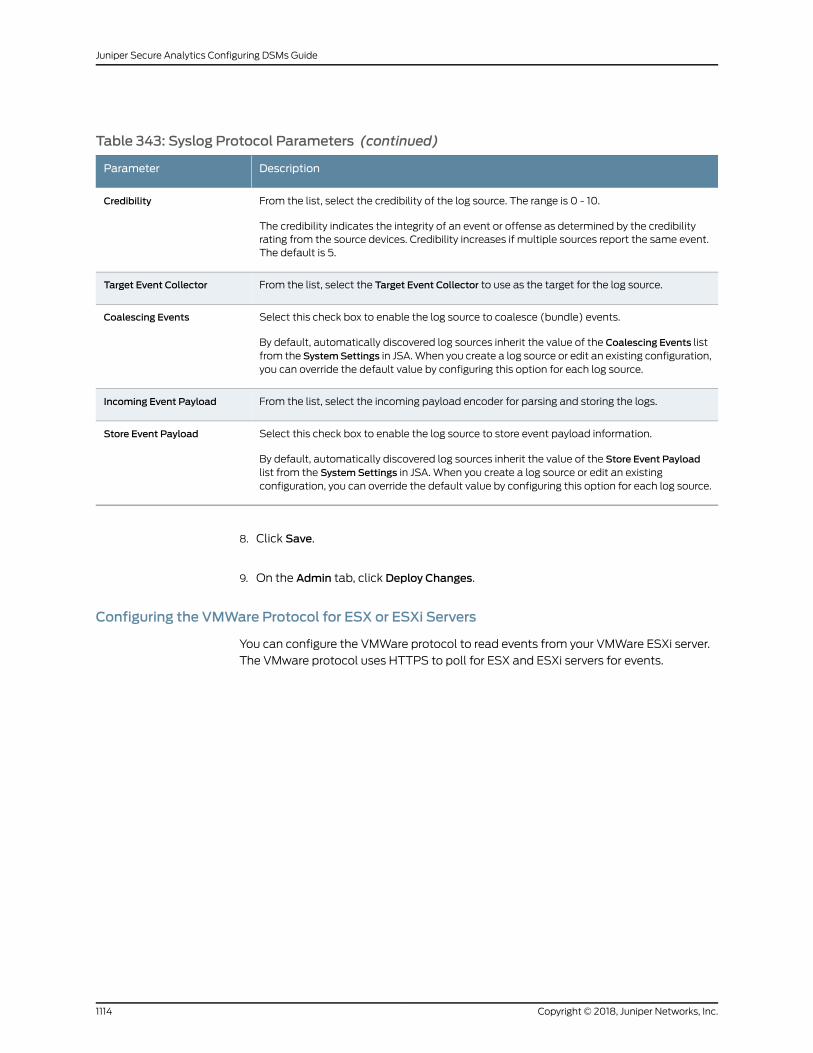
Table 343: Syslog Protocol Parameters (continued)
DescriptionParameter
From the list, select the credibility of the log source. The range is 0 - 10.
The credibility indicates the integrity of an event or offense as determined by the credibilityrating from the source devices. Credibility increases if multiple sources report the same event.The default is 5.
Credibility
From the list, select the Target Event Collector to use as the target for the log source.Target Event Collector
Select this check box to enable the log source to coalesce (bundle) events.
By default, automatically discovered log sources inherit the value of the Coalescing Events listfrom the SystemSettings in JSA.When you create a log source or edit an existing configuration,you can override the default value by configuring this option for each log source.
Coalescing Events
From the list, select the incoming payload encoder for parsing and storing the logs.Incoming Event Payload
Select this check box to enable the log source to store event payload information.
By default, automatically discovered log sources inherit the value of the Store Event Payloadlist from the SystemSettings in JSA. When you create a log source or edit an existingconfiguration, you can override the default value by configuring this option for each log source.
Store Event Payload
8. Click Save.
9. On the Admin tab, click Deploy Changes.
Configuring the VMWare Protocol for ESX or ESXi Servers
You can configure the VMWare protocol to read events from your VMWare ESXi server.
The VMware protocol uses HTTPS to poll for ESX and ESXi servers for events.
Copyright © 2018, Juniper Networks, Inc.1114
Juniper Secure Analytics Configuring DSMs Guide
Before you configure your log source to use the VMWare protocol, it is suggested that
you create a unique user to poll for events. This user can be created as amember of the
root or administrative group, but youmust provide the user with an assigned role of
read-only permission. This ensures that JSA can collect themaximum number of events
and retain a level of security for your virtual servers. For more information about user
roles, see your VMWare documentation.
To integrate EMC VMWare with JSA, youmust complete the following tasks:
1. Create an ESX account for JSA.
2. Configure account permissions for the JSA user.
3. Configure the VMWare protocol in JSA.
Creating a user who is not part of the root or an administrative groupmight lead to some
events not being collected by JSA. It is suggested that you create your JSA user to include
administrative privileges, but assign this custom user a read-only role.
Creating an Account for JSA in ESX
You can create a JSA user account for EMC VMWare to allow the protocol to properly
poll for events.
1. Log in to your ESX host by using the vSphere Client.
2. Click the Local Users & Groups tab.
3. Click Users.
4. Right-click and select Add.
5. Configure the following parameters:
a. Login Type a login name for the new user.
b. UIDOptional. Type a user ID.
c. User NameType a user name for the account.
d. Password Type a password for the account.
e. Confirm Password Type the password again as confirmation.
f. Group From the Group list, select root
6. Click Add.
7. ClickOK.
1115Copyright © 2018, Juniper Networks, Inc.
Chapter 140: VMWare
Configuring Read-only Account Permissions
For security reasons, configure your JSA user account as amember of your root or admin
group, but select an assigned role of read-only permissions.
Read-only permission allows the JSA user account to view and collect events by using
the VMWare protocol.
1. Click the Permissions tab.
2. Right-click and select Add Permissions.
3. On the Users and Groupswindow, click Add.
4. Select your JSA user and click Add.
5. ClickOK.
6. From the Assigned Role list, select Read-only.
7. ClickOK.
Configuring a Log Source for the VMWare Protocol
Youcanconfigure a log sourcewith theVMWareprotocol topoll for EMCVMWareevents.
1. Click the Admin tab.
2. Click the Log Sources icon.
3. Click Add.
4. In the Log Source Name field, type a name for your log source.
5. From the Log Source Type list, select EMCVMWare.
6. Using the Protocol Configuration list, select EMCVMWare.
7. Configure the following values:
Table 344: VMWare Protocol Parameters
DescriptionParameter
Type the IP address or host name for the log source. This value must match the value that isconfigured in the ESX IP field.
Log Source Identifier
Copyright © 2018, Juniper Networks, Inc.1116
Juniper Secure Analytics Configuring DSMs Guide
Table 344: VMWare Protocol Parameters (continued)
DescriptionParameter
Type the IP address of the VMWare ESX or ESXi server.
For example, 1.1.1.1.
The VMware protocol prepends the IP address of your VMware ESX or ESXi server with HTTPSbefore the protocol requests event data.
ESX IP
Type the user name that is required to access the VMWare server.User Name
Type the password that is required to access the VMWare server.Password
8. Click Save.
9. On the Admin tab, click Deploy Changes.
VMware VCenter
The VMware vCenter DSM for JSA collects vCenter server events by using the VMware
protocol.
The VMware protocol uses HTTPS to poll for vCenter appliances for events. Youmust
configure a log source in JSA to collect VMware vCenter events.
Before you configure your log source to use the VMWare protocol, it is suggested that
you create a unique user to poll for events. This user can be created as amember of the
root or administrative group, but youmust provide the user with an assigned role of
read-only permission. This ensures that JSA can collect themaximum number of events
and retain a level of security for your virtual servers. For more information about user
roles, see your VMWare documentation.
• Configuring a Log Source for the VMWare VCenter on page 1117
• Supported VCloud Event Types Logged by JSA on page 1118
Configuring a Log Source for the VMWare VCenter
To collect vCenter events with the VMware protocol, you must configure a log source in
JSA.
1. Click the Admin tab.
2. Click the Log Sources icon.
3. Click Add.
4. In the Log Source Name field, type a name for your log source.
1117Copyright © 2018, Juniper Networks, Inc.
Chapter 140: VMWare

5. From the Log Source Type list, select VMWare vCenter.
6. Using the Protocol Configuration list, select EMCVMWare.
7. Configure the following values:
Table 345: VMware Protocol Parameters
DescriptionParameter
Type the IP address or host name for the log source. This value must match the value that isconfigured in the ESX IP field.
Log Source Identifier
Type the IP address of the VMWare vCenter server.
For example, 1.1.1.1.
The VMware protocol prepends the IP address of your VMware vCenter server with HTTPSbefore the protocol requests event data.
ESX IP
Type the user name that is required to access the VMWare vCenter server.User Name
Type the password that is required to access the VMWare vCenter server.Password
8. Click Save.
9. On the Admin tab, click Deploy Changes.
Supported VCloud Event Types Logged by JSA
The VMware vCloud DSM for JSA can collect events from several categories.
Each event category contains low-level events that describe the action that is taken
within the event category. For example, user events can have user created or user deleted
as a low-level event.
The following list is the default event categories that are collected by JSA from vCloud
Director:
• User events
• Group events
• User role events
• Session events
• Organization events
• Network events
• Catalog events
• Virtual data center (VDC) events
Copyright © 2018, Juniper Networks, Inc.1118
Juniper Secure Analytics Configuring DSMs Guide
• Virtual application (vApp) events
• Virtual machine (VM) events
• Media events
• Task operation events
VMware VCloud Director
You can use the VMware vCloud Director DSM and the vCloud protocol for JSA to poll
the vCloud REST API for events.
JSA supports polling for VMware vCloud Director events from vCloud Directory 5.1
appliances. Events that are collected by using the vCloud REST API are assembled as
Log Extended Event Format (LEEF) events.
To integrate vCloud events with JSA, youmust complete the following tasks:
1. On your vCloud appliance, configure a public address for the vCloud REST API.
2. On your JSA appliance, configure a log source to poll for vCloud events.
3. Ensure that no firewall rules block communication between your vCloud appliance
and the JSA console or the managed host that is responsible for polling the vCloud
REST API.
• Configuring the VCloud REST API Public Address on page 1119
• Configuring a VCloud Log Source in JSA on page 1120
Configuring the VCloud REST API Public Address
JSA collects security data from the vCloud API by polling the REST API of the vCloud
appliance for events. Before JSA can collect any data, youmust configure the public
REST API base URL.
1. Log in to your vCloud appliance as an administrator.
2. Click the Administration tab.
3. From the Administrationmenu, select SystemSettings >Public Addresses.
4. In the VCD public REST API base URL field, type an IP address or host name.
The address that you specify becomes a publically available address outside of the
firewall or NAT on your vCloud appliance. For example, https://1.1.1.1/.
5. Click Apply.
The public API URL is created on the vCloud appliance.
You can now configure a log source in JSA.
1119Copyright © 2018, Juniper Networks, Inc.
Chapter 140: VMWare

Configuring a VCloud Log Source in JSA
To collect vCloud events, youmust configure a log source in JSA with the location and
credentials that are required to poll the vCloud API.
1. Log in to JSA.
2. Click the Admin tab.
3. In the navigation menu, click Data Sources.
4. Click the Log Sources icon.
5. Click Add.
6. In the Log Source Name field, type a name for your log source.
7. In the Log Source Description field, type a description for your log source.
8. From the Log Source Type list, select VMware vCloud Director.
9. From the Protocol Configuration list, select VMware vCloud Director.
10. Configure the following values:
Table 346: VMware VCloud Director Log Source Parameters
DescriptionParameter
Type the IP address, host name, or name that identifies the vCloud appliance events to JSA.Log Source Identifier
Type the URL configured on your vCloud appliance to access the REST API.
TheURL you typemustmatch the address that you configured in theVCDpublic RESTAPI baseURL field on your vCloud Server.
For example, https://10.10.10.1.
vCloud URL
Type the user name that is required to remotely access the vCloud Server.
For example, console/user@organization.
If you want to configure a read-only account to use with JSA, you can create a vCloud user inyour organization who has the Console Access Only permission.
User Name
Type the password that is required to remotely access the vCloud Server.Password
Confirm the password that is required to remotely access the vCloud Server.Confirm Password
Copyright © 2018, Juniper Networks, Inc.1120
Juniper Secure Analytics Configuring DSMs Guide

Table 346: VMware VCloud Director Log Source Parameters (continued)
DescriptionParameter
Type a polling interval, which is the amount of time between queries to the vCloud Server fornew events.
The default polling interval is 10 seconds.
Polling Interval
Select this check box to enable the log source. By default, the check box is selected.Enabled
From the list, select the credibility of the log source. The range is 0 - 10.
The credibility indicates the integrity of an event or offense as determined by the credibilityrating from the source devices. Credibility increases if multiple sources report the same event.The default is 5.
Credibility
From the list, select the Target Event Collector to use as the target for the log source.Target Event Collector
Select this check box to enable the log source to coalesce (bundle) events.
By default, automatically discovered log sources inherit the value of the Coalescing Events listfrom the SystemSettings in JSA.When you create a log source or edit an existing configuration,you can override the default value by configuring this option for each log source.
Coalescing Events
From the list, select the incoming payload encoder for parsing and storing the logs.Incoming Event Payload
Select this check box to enable the log source to store event payload information.
By default, automatically discovered log sources inherit the value of the Store Event Payloadlist from the SystemSettings in JSA. When you create a log source or edit an existingconfiguration, you can override the default value by configuring this option for each log source.
Store Event Payload
11. Click Save.
12. On the Admin tab, click Deploy Changes.
vCloud events that are forwarded to JSA are displayed on the Log Activity tab of JSA.
VMware VShield
The JSA DSM for VMware vShield can collect event logs from your VMware vShield
servers.
The following table identifies the specifications for the VMware vShield Server DSM:
Table 347: VMware VShield DSMSpecifications
ValueSpecification
VMwareManufacturer
vShieldDSM
1121Copyright © 2018, Juniper Networks, Inc.
Chapter 140: VMWare
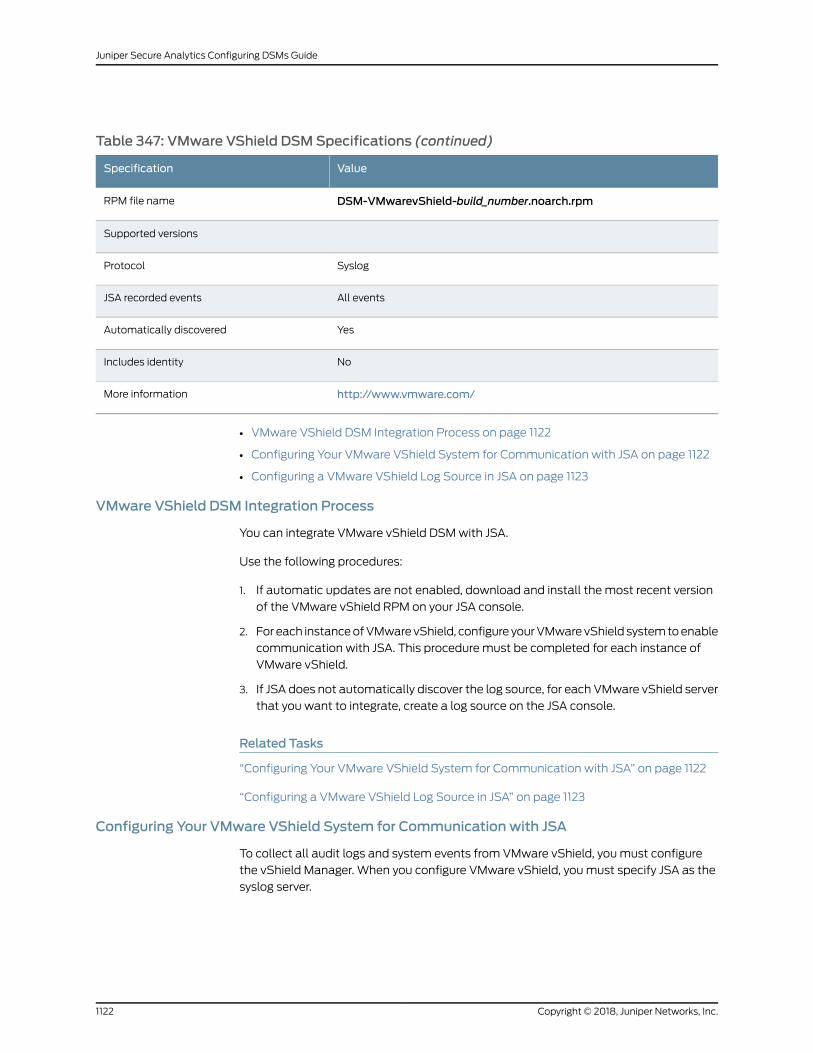
Table 347: VMware VShield DSMSpecifications (continued)
ValueSpecification
DSM-VMwarevShield-build_number.noarch.rpmRPM file name
Supported versions
SyslogProtocol
All eventsJSA recorded events
YesAutomatically discovered
NoIncludes identity
http://www.vmware.com/More information
• VMware VShield DSM Integration Process on page 1122
• Configuring Your VMware VShield System for Communication with JSA on page 1122
• Configuring a VMware VShield Log Source in JSA on page 1123
VMware VShield DSM Integration Process
You can integrate VMware vShield DSMwith JSA.
Use the following procedures:
1. If automatic updates are not enabled, download and install the most recent version
of the VMware vShield RPM on your JSA console.
2. For each instanceofVMwarevShield, configure yourVMwarevShield systemtoenable
communication with JSA. This procedure must be completed for each instance of
VMware vShield.
3. If JSA does not automatically discover the log source, for each VMware vShield server
that you want to integrate, create a log source on the JSA console.
Related Tasks
“Configuring Your VMware VShield System for Communication with JSA” on page 1122
“Configuring a VMware VShield Log Source in JSA” on page 1123
Configuring Your VMware VShield System for Communication with JSA
To collect all audit logs and system events from VMware vShield, youmust configure
the vShield Manager. When you configure VMware vShield, youmust specify JSA as the
syslog server.
Copyright © 2018, Juniper Networks, Inc.1122
Juniper Secure Analytics Configuring DSMs Guide
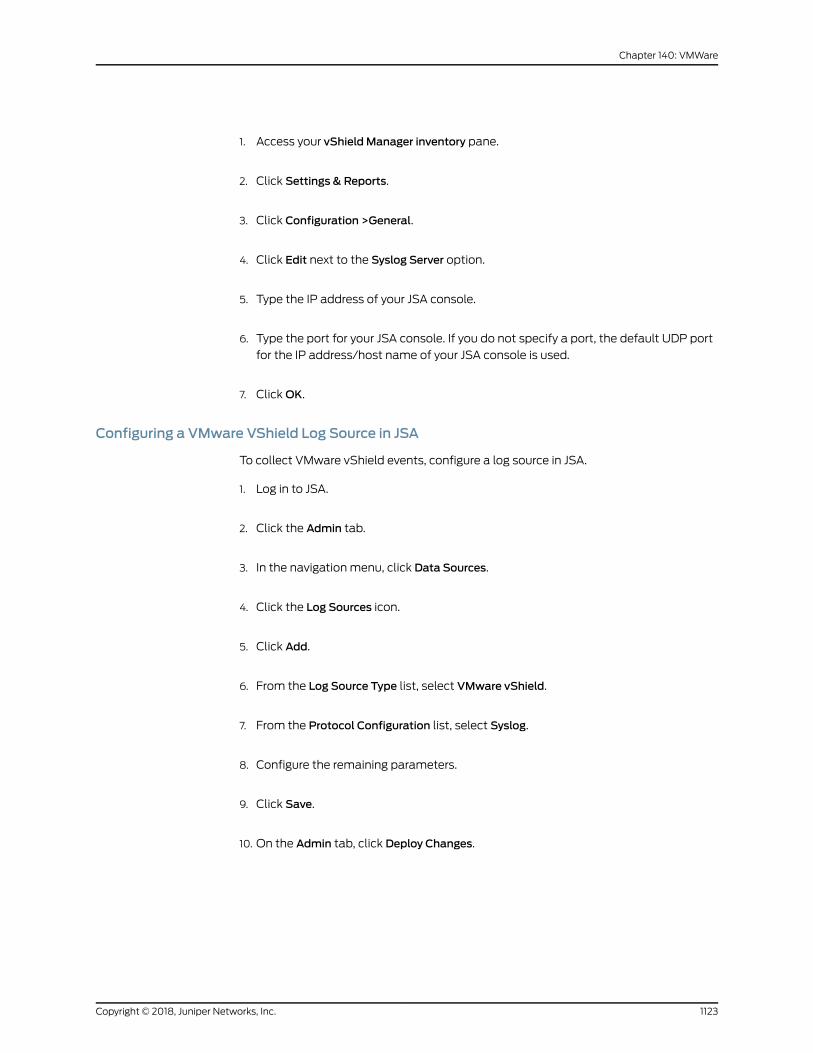
1. Access your vShield Manager inventory pane.
2. Click Settings & Reports.
3. Click Configuration >General.
4. Click Edit next to the Syslog Server option.
5. Type the IP address of your JSA console.
6. Type the port for your JSA console. If you do not specify a port, the default UDP port
for the IP address/host name of your JSA console is used.
7. ClickOK.
Configuring a VMware VShield Log Source in JSA
To collect VMware vShield events, configure a log source in JSA.
1. Log in to JSA.
2. Click the Admin tab.
3. In the navigation menu, click Data Sources.
4. Click the Log Sources icon.
5. Click Add.
6. From the Log Source Type list, select VMware vShield.
7. From the Protocol Configuration list, select Syslog.
8. Configure the remaining parameters.
9. Click Save.
10. On the Admin tab, click Deploy Changes.
1123Copyright © 2018, Juniper Networks, Inc.
Chapter 140: VMWare

Copyright © 2018, Juniper Networks, Inc.1124
Juniper Secure Analytics Configuring DSMs Guide
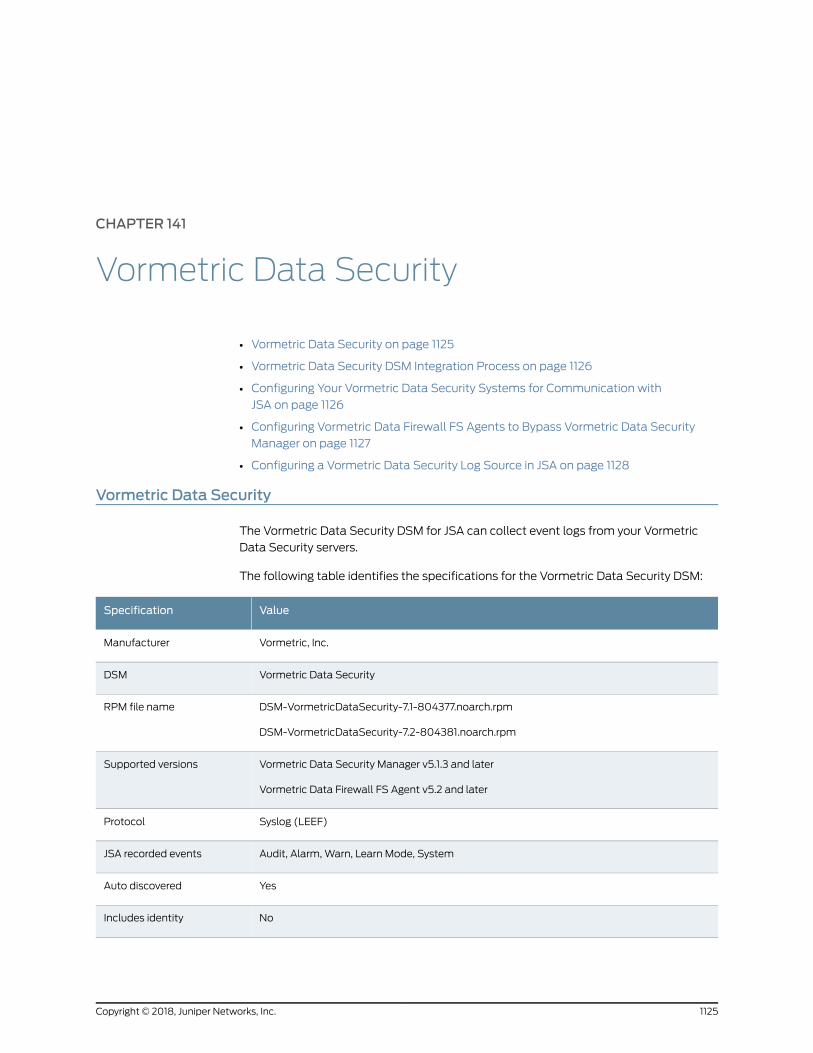
CHAPTER 141
Vormetric Data Security
• Vormetric Data Security on page 1125
• Vormetric Data Security DSM Integration Process on page 1126
• Configuring Your Vormetric Data Security Systems for Communication with
JSA on page 1126
• Configuring Vormetric Data Firewall FS Agents to Bypass Vormetric Data Security
Manager on page 1127
• Configuring a Vormetric Data Security Log Source in JSA on page 1128
Vormetric Data Security
The Vormetric Data Security DSM for JSA can collect event logs from your Vormetric
Data Security servers.
The following table identifies the specifications for the Vormetric Data Security DSM:
ValueSpecification
Vormetric, Inc.Manufacturer
Vormetric Data SecurityDSM
DSM-VormetricDataSecurity-7.1-804377.noarch.rpm
DSM-VormetricDataSecurity-7.2-804381.noarch.rpm
RPM file name
Vormetric Data Security Manager v5.1.3 and later
Vormetric Data Firewall FS Agent v5.2 and later
Supported versions
Syslog (LEEF)Protocol
Audit, Alarm, Warn, Learn Mode, SystemJSA recorded events
YesAuto discovered
NoIncludes identity
1125Copyright © 2018, Juniper Networks, Inc.
ValueSpecification
Vormetric website (http://www.vormetric.com)More information
Vormetric Data Security DSM Integration Process
You can integrate Vormetric Data Security DSMwith JSA.
Use the following procedures:
1. If automatic updates are not enabled, download and install the most recent version
of the following RPMs on your JSA console:
2. Syslog protocol RPM•
• DSMCommon RPM
Theminimum version of the DSMCommon RPM that you can use is the
DSM-DSMCommon-7.1-530016.noarch.rpm or
DSM-DSMCommon-7.2-572972.noarch.rpm
• Vormetric Data Security RPM
3. For each instance of Vormetric Data Security, configure your Vormetric Data Security
system to enable communication with JSA.
4. If JSA does not automatically discover the DSM, for each Vormetric Data Security
server you want to integrate, create a log source on the JSA console.
Related Tasks
“Configuring Your Vormetric Data Security Systems for Communication with JSA” on
page 1126
“Configuring a Vormetric Data Security Log Source in JSA” on page 1128
Configuring Your Vormetric Data Security Systems for Communication with JSA
To collect all audit logs and system events from Vormetric Data Security, youmust
configure your Vormetric Data Security Manager to enable communication with JSA.
Your Vormetric Data Security Manager user account must have System Administrator
permissions.
1. Log in to your Vormetric Data Security Manager as an administrator that is assigned
System Administrator permissions.
2. On the navigation menu, click Log >Syslog.
3. Click Add.
Copyright © 2018, Juniper Networks, Inc.1126
Juniper Secure Analytics Configuring DSMs Guide
4. In the Server Name field, type the IP address or host name of your JSA system.
5. From the Transport Protocol list, select TCP or a value that matches the log source
protocol configuration on your JSA system.
6. In the Port Number field, type 514 or a value that matches the log source protocolconfiguration on your JSA system.
7. From theMessage Format list, select LEEF.
8. ClickOK.
9. On the Syslog Server summary screen, verify the details that you have entered for
your JSA system. If the Logging to SysLog value isOFF, complete the following steps.
On the navigation menu, click System >General Preferences
10. Click the System tab.
11. In the Syslog Settings pane, select the Syslog Enabled check box.
“Configuring Vormetric Data Firewall FS Agents to Bypass Vormetric Data Security
Manager” on page 1127
Configuring Vormetric Data Firewall FS Agents to Bypass Vormetric Data SecurityManager
When the Vormetric Data Security Manager is enabled to communicate with JSA, all
events from the Vormetric Data Firewall FS Agents are also forwarded to the JSA system
through the Vormetric Data Security Manager.
To bypass the Vormetric Data Security Manager, you can configure Vormetric Data
Firewall FS Agents to send LEEF events directly to the JSA system.
Your Vormetric Data Security Manager user account must have System Administrator
permissions.
1. Log in to your Vormetric Data Security Manager.
2. On the navigation menu, click System >Log Preferences.
3. Click the FS Agent Log tab.
4. In the Policy Evaluation row, configure the following parameters:
a. Select the Log to Syslog/Event Log check box.
5. Clear the Upload to Server check box.
1127Copyright © 2018, Juniper Networks, Inc.
Chapter 141: Vormetric Data Security
6. From the Level list, select INFO.
This set up enables a full audit trail from the policy evaluation module to be sent
directly to a syslog server, and not to the Security Manager. Leaving both destinations
enabledmight result in duplication of events to the JSA system.
7. Under the Syslog Settings section, configure the following parameters. In the Server
field, use the following syntax to type the IP address or host name and port number
of your JSA system.
JSA_IP address_or_host:port
8. From theProtocol list, selectTCP or a value thatmatches the log source configuration
on your JSA system.
9. From theMessage Format list, select LEEF.
This configuration is applied to all hosts or host groups later added to theVormetric Data
Security Manager. For each existing host or host group, select the required host or host
group from the Hosts list and repeat the procedure.
Configuring a Vormetric Data Security Log Source in JSA
To collect Vormetric Data Security events, configure a log source in JSA.
1. Log in to JSA.
2. Click the Admin tab.
3. In the navigation menu, click Data Sources.
4. Click the Log Sources icon.
5. Click Add.
6. From the Log Source Type list, select Vormetric Data Security.
7. From the Protocol Configuration list, select Syslog.
8. Configure the remaining parameters.
9. Click Save.
10. On the Admin tab, click Deploy Changes.
Copyright © 2018, Juniper Networks, Inc.1128
Juniper Secure Analytics Configuring DSMs Guide
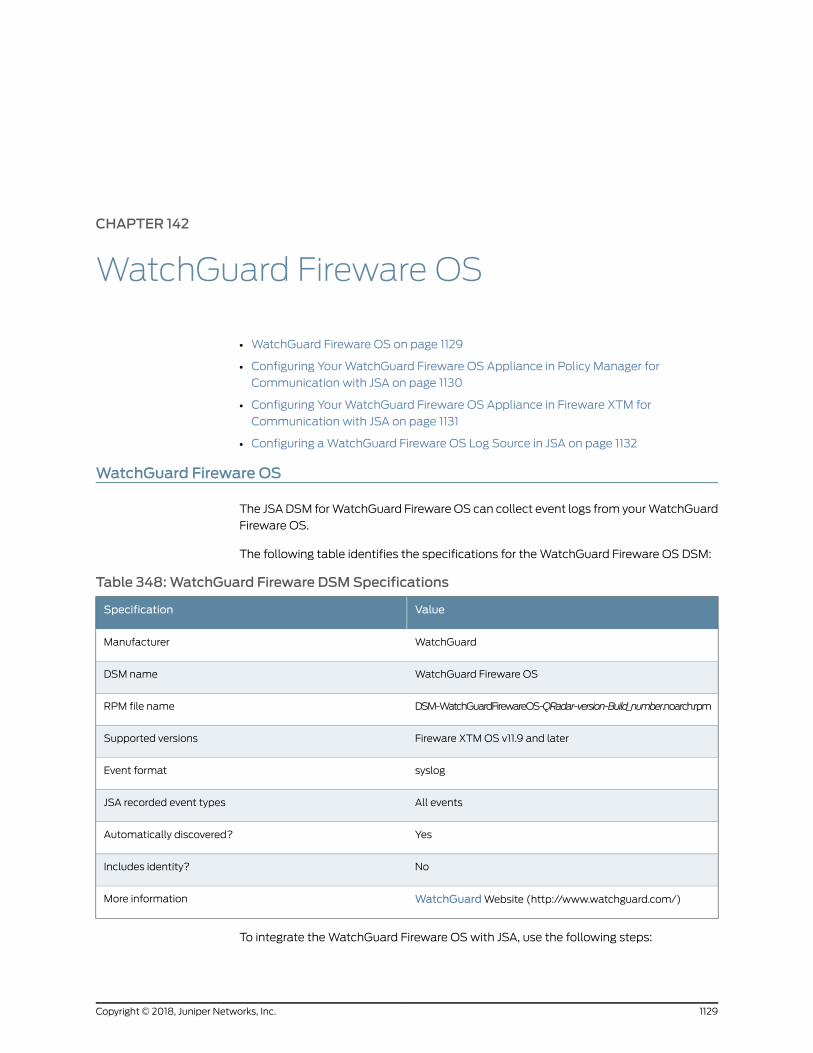
CHAPTER 142
WatchGuard Fireware OS
• WatchGuard Fireware OS on page 1129
• Configuring YourWatchGuard Fireware OS Appliance in Policy Manager for
Communication with JSA on page 1130
• Configuring YourWatchGuard Fireware OS Appliance in Fireware XTM for
Communication with JSA on page 1131
• Configuring aWatchGuard Fireware OS Log Source in JSA on page 1132
WatchGuard Fireware OS
The JSADSM forWatchGuard FirewareOS can collect event logs from yourWatchGuard
Fireware OS.
The following table identifies the specifications for theWatchGuard Fireware OS DSM:
Table 348:WatchGuard Fireware DSMSpecifications
ValueSpecification
WatchGuardManufacturer
WatchGuard Fireware OSDSM name
DSM-WatchGuardFirewareOS-QRadar-version-Build_number.noarch.rpmRPM file name
Fireware XTMOS v11.9 and laterSupported versions
syslogEvent format
All eventsJSA recorded event types
YesAutomatically discovered?
NoIncludes identity?
WatchGuardWebsite (http://www.watchguard.com/)More information
To integrate theWatchGuard Fireware OSwith JSA, use the following steps:
1129Copyright © 2018, Juniper Networks, Inc.
1. If automatic updates are not enabled, download and install themost recent versions
of the following RPMs on your JSA Console.
• DSMCommon RPM
• WatchGuard Fireware OS RPM
2. For each instance ofWatchGuard Fireware OS, configure your WatchGuard Fireware
OS appliance to enable communication with JSA. You can use one the following
procedures:
• Configuring YourWatchGuard Fireware OS Appliance in Policy Manager for
Communication with JSA on page 1130
• Configuring YourWatchGuard Fireware OS Appliance in Fireware XTM for
Communication with JSA on page 1131
3. If JSAdoesnot automatically discover theWatchGuard FirewareOS log source, create
a log source for each instance ofWatchGuard Fireware OS on your network.
Configuring YourWatchGuard Fireware OS Appliance in Policy Manager forCommunication with JSA
To collectWatchGuard Fireware OS events, you can use the Policy Manager to configure
your third-party appliance to send events to JSA.
Youmust have Device Administrator access credentials.
1. Open theWatchGuard SystemManager.
2. Connect to your Firebox or XTM device.
3. Start the Policy Manager for your device.
4. To open the Logging Setupwindow, select Setup > Logging.
5. Select the Send logmessages to this syslog server check box.
6. In the IP address text box, type the IP address for your JSA Console or Event Collector.
7. In the Port text box, type 514.
8. From the Log Format list, select IBM®LEEF.
9. Specify the details to include in the log messages.
a. Click Configure.
b. To include the serial number of the XTM device in the log message details, select
the The serial number of the device check box.
Copyright © 2018, Juniper Networks, Inc.1130
Juniper Secure Analytics Configuring DSMs Guide
c. To include the syslog header in the log message details, select the The syslog
header check box.
d. For each type of log message, select one of the following syslog facilities:
• For high-priority syslog messages, such as alarms, select Local0.
• To assign priorities to other types of log messages, select an option from Local1
through Local7. Lower numbers have greater priority.
• To not send details for a log message type, select NONE.
e. ClickOK.
10. ClickOK.
11. Save the configuration file to your device.
RelatedDocumentation
Configuring YourWatchGuard Fireware OS Appliance in Fireware XTM for
Communication with JSA on page 1131
•
• Configuring aWatchGuard Fireware OS Log Source in JSA on page 1132
Configuring YourWatchGuard Fireware OS Appliance in Fireware XTM forCommunication with JSA
To collect WatchGuard Fireware OS events, you can use the Fireware XTMweb user
interface to configure your third-party appliance to send events to JSA.
Youmust have Device Administrator access credentials.
1. Log in to the Fireware XTMweb user interface for your Fireware or XTM device.
2. Select System > Logging.
3. In the Syslog Server pane, select the Send logmessages to the syslog server at this IP
address check box.
4. In the IP Address text box, type the IP address for the JSA Console or Event Collector.
5. In the Port text box, type 514.
6. From the Log Format list, select IBM®LEEF.
7. Specify the details to include in the log messages.
a. To include the serial number of the XTM device in the log message details, select
the The serial number of the device check box.
1131Copyright © 2018, Juniper Networks, Inc.
Chapter 142: WatchGuard Fireware OS
b. To include the syslog header in the log message details, select the The syslog
header check box.
c. For each type of log message, select one of the following syslog facilities:
• For high-priority syslog messages, such as alarms, select Local0.
• To assign priorities to other types of log messages, select an option from Local1
through Local7. Lower numbers have greater priority.
• To not send details for a log message type, select NONE.
8. Click Save.
RelatedDocumentation
Configuring aWatchGuard Fireware OS Log Source in JSA on page 1132•
• Configuring YourWatchGuard Fireware OS Appliance in Policy Manager for
Communication with JSA on page 1130
Configuring aWatchGuard Fireware OS Log Source in JSA
Use this procedure if your JSA Console did not automatically discover theWatchGuard
Fireware OS log source.
1. Log in to JSA
2. Click the Admin tab.
3. In the navigation menu, click Data Sources.
4. Click the Log Sources icon.
5. Click Add.
6. In the Log Source Identifier field, type the IP address or host name of theWatchGuard
Fireware OS device.
7. From the Log Source Type list, selectWatchGuard Fireware OS.
8. From the Protocol Configuration list, select Syslog.
9. Configure the remaining parameters.
10. Click Save.
Copyright © 2018, Juniper Networks, Inc.1132
Juniper Secure Analytics Configuring DSMs Guide

RelatedDocumentation
• Configuring YourWatchGuard Fireware OS Appliance in Policy Manager for
Communication with JSA on page 1130
• Configuring YourWatchGuard Fireware OS Appliance in Fireware XTM for
Communication with JSA on page 1131
1133Copyright © 2018, Juniper Networks, Inc.
Chapter 142: WatchGuard Fireware OS

Copyright © 2018, Juniper Networks, Inc.1134
Juniper Secure Analytics Configuring DSMs Guide
CHAPTER 143
Websense
• Websense on page 1135
Websense
Websense is now known as Forcepoint.
1135Copyright © 2018, Juniper Networks, Inc.

Copyright © 2018, Juniper Networks, Inc.1136
Juniper Secure Analytics Configuring DSMs Guide
CHAPTER 144
Zscaler Nanolog Streaming Service
• Zscaler Nanolog Streaming Service on page 1137
• Configuring a Syslog Feed in Zscaler NSS on page 1137
• Configuring a Zscaler NSS Log Source on page 1139
Zscaler Nanolog Streaming Service
JSA can collect and categorize events from Zscaler Nanolog Streaming Service (NSS)
log feeds that forward syslog event to JSA.
To collect syslog events, youmust configure your Zscaler NSS with an NSS feed to
forward TCP syslog events to JSA. JSA automatically discovers and creates log sources
for syslog events that are forwarded from Zscaler NSS log feeds. JSA supports syslog
events from Zscaler NSS V4.1.
To configure Zscaler NSS, complete the following tasks:
1. On your Zscaler NSS appliance, create a log feed for JSA.
2. On your JSA system, verify that the forwarded events are automatically discovered.
Supported Event Types for Zscaler NSS
The ZScaler NSS DSM for JSA collects information about web browsing events from
Zscaler NSS installations.
Each Zscaler NSS event contains information on the action that is taken on the web
browsing in the event category. For example, web browsing events can have a category
that is allowed or blocked website traffic. Each event defines the website that was
allowed or blocked and includes all of the event details in the event payload.
Configuring a Syslog Feed in Zscaler NSS
To collect events, youmust configure a log feed on your Zscaler NSS to forward syslog
events to JSA.
1137Copyright © 2018, Juniper Networks, Inc.
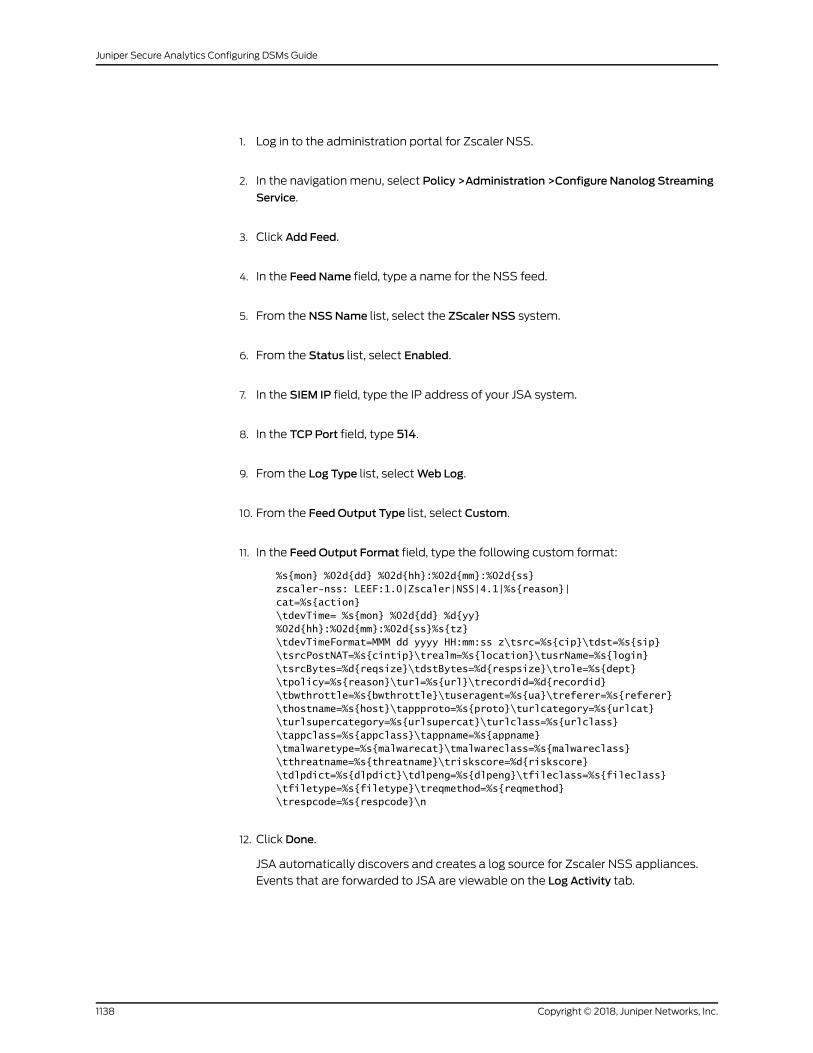
1. Log in to the administration portal for Zscaler NSS.
2. In the navigation menu, select Policy >Administration >Configure Nanolog Streaming
Service.
3. Click Add Feed.
4. In the Feed Name field, type a name for the NSS feed.
5. From the NSSName list, select the ZScaler NSS system.
6. From the Status list, select Enabled.
7. In the SIEM IP field, type the IP address of your JSA system.
8. In the TCP Port field, type 514.
9. From the Log Type list, selectWeb Log.
10. From the Feed Output Type list, select Custom.
11. In the Feed Output Format field, type the following custom format:
%s{mon} %02d{dd} %02d{hh}:%02d{mm}:%02d{ss} zscaler-nss: LEEF:1.0|Zscaler|NSS|4.1|%s{reason}|cat=%s{action}\tdevTime= %s{mon} %02d{dd} %d{yy} %02d{hh}:%02d{mm}:%02d{ss}%s{tz}\tdevTimeFormat=MMM dd yyyy HH:mm:ss z\tsrc=%s{cip}\tdst=%s{sip} \tsrcPostNAT=%s{cintip}\trealm=%s{location}\tusrName=%s{login}\tsrcBytes=%d{reqsize}\tdstBytes=%d{respsize}\trole=%s{dept}\tpolicy=%s{reason}\turl=%s{url}\trecordid=%d{recordid}\tbwthrottle=%s{bwthrottle}\tuseragent=%s{ua}\treferer=%s{referer}\thostname=%s{host}\tappproto=%s{proto}\turlcategory=%s{urlcat}\turlsupercategory=%s{urlsupercat}\turlclass=%s{urlclass}\tappclass=%s{appclass}\tappname=%s{appname}\tmalwaretype=%s{malwarecat}\tmalwareclass=%s{malwareclass}\tthreatname=%s{threatname}\triskscore=%d{riskscore}\tdlpdict=%s{dlpdict}\tdlpeng=%s{dlpeng}\tfileclass=%s{fileclass}\tfiletype=%s{filetype}\treqmethod=%s{reqmethod}\trespcode=%s{respcode}\n
12. Click Done.
JSA automatically discovers and creates a log source for Zscaler NSS appliances.
Events that are forwarded to JSA are viewable on the Log Activity tab.
Copyright © 2018, Juniper Networks, Inc.1138
Juniper Secure Analytics Configuring DSMs Guide
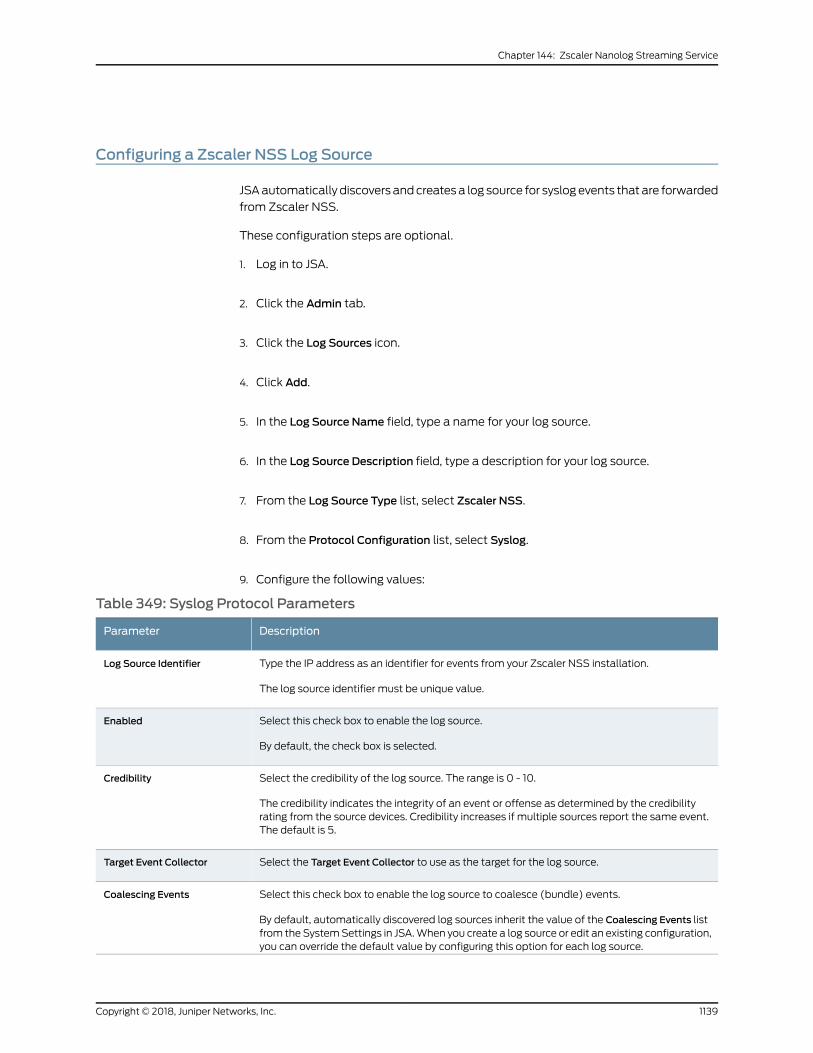
Configuring a Zscaler NSS Log Source
JSAautomatically discovers andcreatesa log source for syslogevents that are forwarded
from Zscaler NSS.
These configuration steps are optional.
1. Log in to JSA.
2. Click the Admin tab.
3. Click the Log Sources icon.
4. Click Add.
5. In the Log Source Name field, type a name for your log source.
6. In the Log Source Description field, type a description for your log source.
7. From the Log Source Type list, select Zscaler NSS.
8. From the Protocol Configuration list, select Syslog.
9. Configure the following values:
Table 349: Syslog Protocol Parameters
DescriptionParameter
Type the IP address as an identifier for events from your Zscaler NSS installation.
The log source identifier must be unique value.
Log Source Identifier
Select this check box to enable the log source.
By default, the check box is selected.
Enabled
Select the credibility of the log source. The range is 0 - 10.
The credibility indicates the integrity of an event or offense as determined by the credibilityrating from the source devices. Credibility increases if multiple sources report the same event.The default is 5.
Credibility
Select the Target Event Collector to use as the target for the log source.Target Event Collector
Select this check box to enable the log source to coalesce (bundle) events.
By default, automatically discovered log sources inherit the value of the Coalescing Events listfrom the SystemSettings in JSA.When you create a log source or edit an existing configuration,you can override the default value by configuring this option for each log source.
Coalescing Events
1139Copyright © 2018, Juniper Networks, Inc.
Chapter 144: Zscaler Nanolog Streaming Service
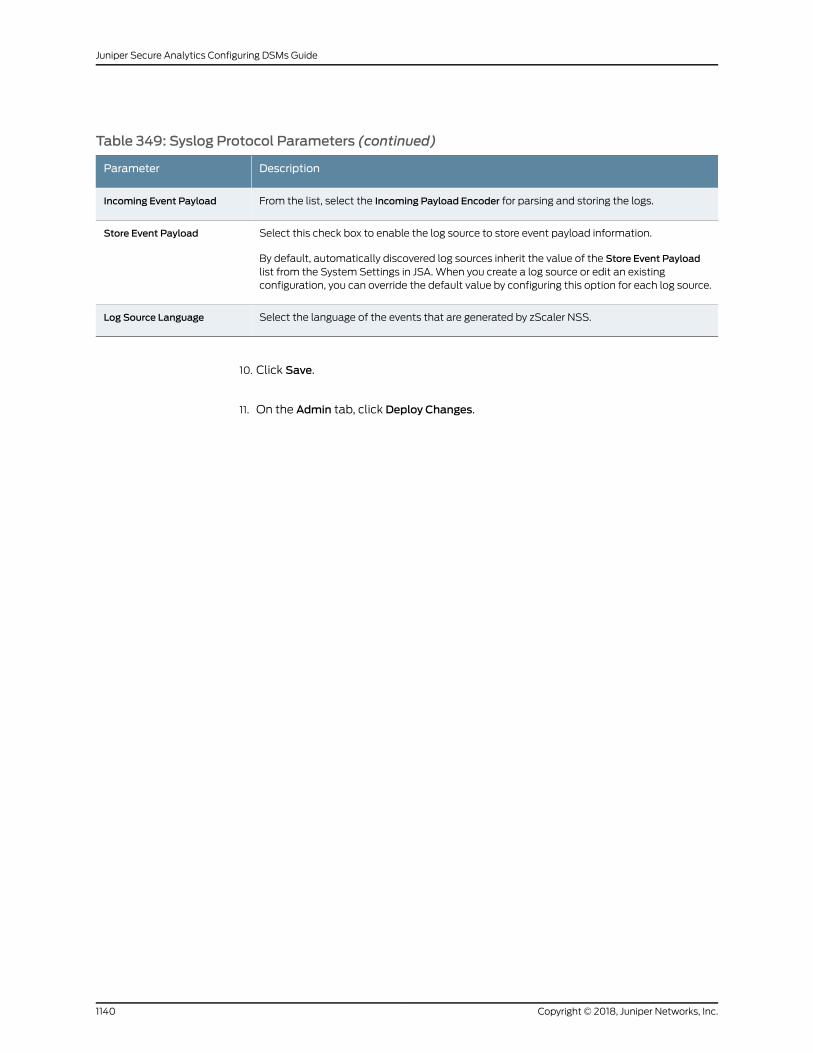
Table 349: Syslog Protocol Parameters (continued)
DescriptionParameter
From the list, select the Incoming Payload Encoder for parsing and storing the logs.Incoming Event Payload
Select this check box to enable the log source to store event payload information.
By default, automatically discovered log sources inherit the value of the Store Event Payloadlist from the System Settings in JSA. When you create a log source or edit an existingconfiguration, you can override the default value by configuring this option for each log source.
Store Event Payload
Select the language of the events that are generated by zScaler NSS.Log Source Language
10. Click Save.
11. On the Admin tab, click Deploy Changes.
Copyright © 2018, Juniper Networks, Inc.1140
Juniper Secure Analytics Configuring DSMs Guide

CHAPTER 145
JSA Supported DSMs
• JSA Supported DSMs on page 1141
JSA Supported DSMs
JSA can collect events from your security products by using a plugin file that is called a
Device Support Module (DSM).
The following table lists supported DSMs for third-party and JSA solutions.
Table 350: JSA Supported DSMs
Includescustomproperties?
Includesidentity?
Autodiscovered?
Recorded events andformatsProtocolDevice name and versionManufacturer
NoNoYesStatus and networkcondition events
Syslog8800SeriesSwitchV3.01.303Com
NoYesNoSpyware detection
Virus detection
Audit
AhnLabPolicy
CenterJdbc
AhnLab Policy CenterAhnLab
NoNoNoWarn Rule Events
Deny Rule Events
HTTP ReceiverAkamai KONAAkamai
NoNoNoAll version 1.0, 1.02, 1.03,and 1.04 events.
Amazon AWS S3REST API
Amazon AWS CloudTrailAmazon
NoNoNoSnort-based eventsSyslogTrustWave ipAngel V4.0Ambiron
NoNoYesHTTP statusSyslogHTTP Server V1.3+Apache
NoNoNoSmart-UPS seriesevents
SyslogUPSAPC
NoYesNoFirewall, web server(access/error), privilege,and information events
SyslogMac OS X (10)Apple
1141Copyright © 2018, Juniper Networks, Inc.
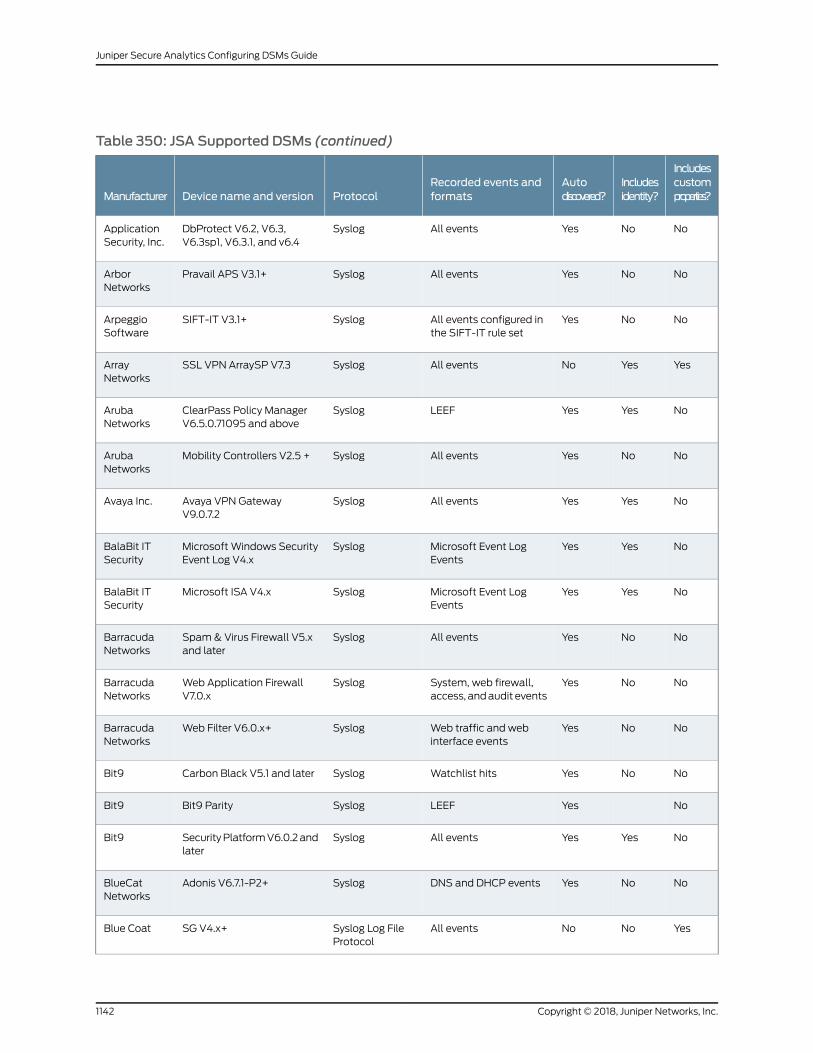
Table 350: JSA Supported DSMs (continued)
Includescustomproperties?
Includesidentity?
Autodiscovered?
Recorded events andformatsProtocolDevice name and versionManufacturer
NoNoYesAll eventsSyslogDbProtect V6.2, V6.3,V6.3sp1, V6.3.1, and v6.4
ApplicationSecurity, Inc.
NoNoYesAll eventsSyslogPravail APS V3.1+ArborNetworks
NoNoYesAll events configured inthe SIFT-IT rule set
SyslogSIFT-IT V3.1+ArpeggioSoftware
YesYesNoAll eventsSyslogSSL VPN ArraySP V7.3ArrayNetworks
NoYesYesLEEFSyslogClearPass Policy ManagerV6.5.0.71095 and above
ArubaNetworks
NoNoYesAll eventsSyslogMobility Controllers V2.5 +ArubaNetworks
NoYesYesAll eventsSyslogAvaya VPN GatewayV9.0.7.2
Avaya Inc.
NoYesYesMicrosoft Event LogEvents
SyslogMicrosoft Windows SecurityEvent Log V4.x
BalaBit ITSecurity
NoYesYesMicrosoft Event LogEvents
SyslogMicrosoft ISA V4.xBalaBit ITSecurity
NoNoYesAll eventsSyslogSpam& Virus Firewall V5.xand later
BarracudaNetworks
NoNoYesSystem, web firewall,access, andaudit events
SyslogWeb Application FirewallV7.0.x
BarracudaNetworks
NoNoYesWeb traffic and webinterface events
SyslogWeb Filter V6.0.x+BarracudaNetworks
NoNoYesWatchlist hitsSyslogCarbon Black V5.1 and laterBit9
NoYesLEEFSyslogBit9 ParityBit9
NoYesYesAll eventsSyslogSecurityPlatformV6.0.2andlater
Bit9
NoNoYesDNS and DHCP eventsSyslogAdonis V6.7.1-P2+BlueCatNetworks
YesNoNoAll eventsSyslog Log FileProtocol
SG V4.x+Blue Coat
Copyright © 2018, Juniper Networks, Inc.1142
Juniper Secure Analytics Configuring DSMs Guide
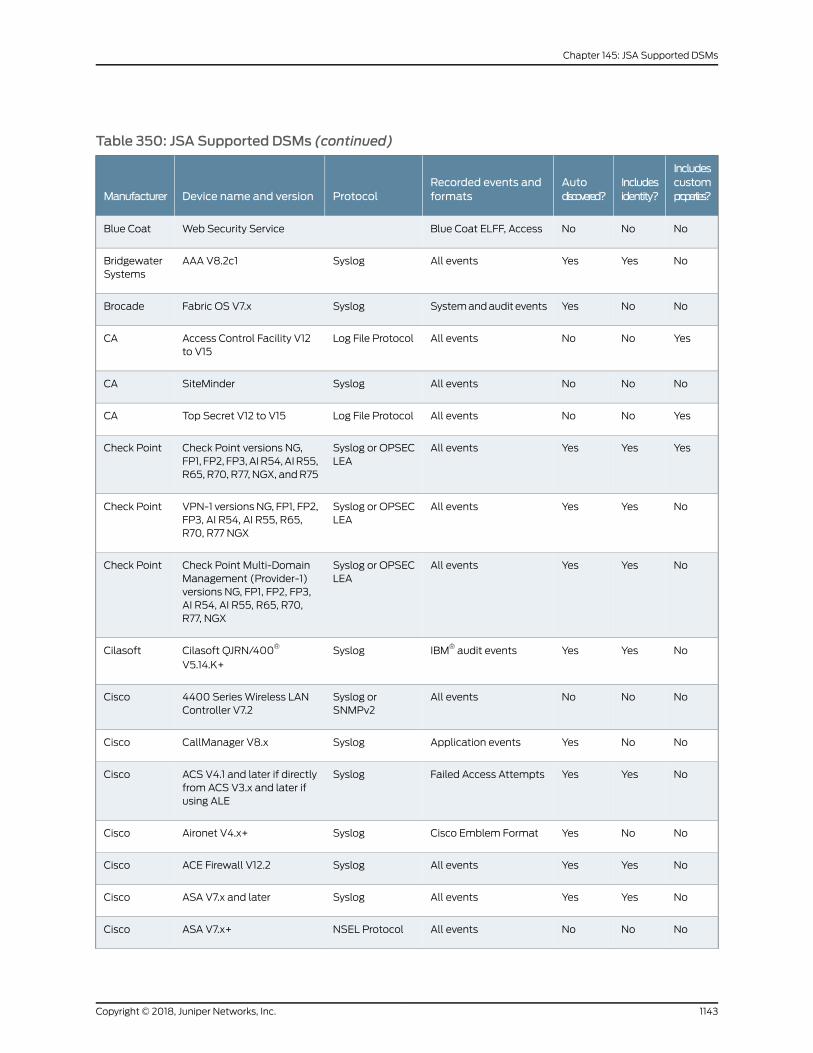
Table 350: JSA Supported DSMs (continued)
Includescustomproperties?
Includesidentity?
Autodiscovered?
Recorded events andformatsProtocolDevice name and versionManufacturer
NoNoNoBlue Coat ELFF, AccessWeb Security ServiceBlue Coat
NoYesYesAll eventsSyslogAAA V8.2c1BridgewaterSystems
NoNoYesSystemandaudit eventsSyslogFabric OS V7.xBrocade
YesNoNoAll eventsLog File ProtocolAccess Control Facility V12to V15
CA
NoNoNoAll eventsSyslogSiteMinderCA
YesNoNoAll eventsLog File ProtocolTop Secret V12 to V15CA
YesYesYesAll eventsSyslog or OPSECLEA
Check Point versions NG,FP1, FP2, FP3,AIR54,AIR55,R65, R70, R77, NGX, andR75
Check Point
NoYesYesAll eventsSyslog or OPSECLEA
VPN-1 versionsNG, FP1, FP2,FP3, AI R54, AI R55, R65,R70, R77 NGX
Check Point
NoYesYesAll eventsSyslog or OPSECLEA
Check Point Multi-DomainManagement (Provider-1)versions NG, FP1, FP2, FP3,AI R54, AI R55, R65, R70,R77, NGX
Check Point
NoYesYesIBM® audit eventsSyslogCilasoft QJRN/400®
V5.14.K+Cilasoft
NoNoNoAll eventsSyslog orSNMPv2
4400 SeriesWireless LANController V7.2
Cisco
NoNoYesApplication eventsSyslogCallManager V8.xCisco
NoYesYesFailed Access AttemptsSyslogACS V4.1 and later if directlyfrom ACS V3.x and later ifusing ALE
Cisco
NoNoYesCisco Emblem FormatSyslogAironet V4.x+Cisco
NoYesYesAll eventsSyslogACE Firewall V12.2Cisco
NoYesYesAll eventsSyslogASA V7.x and laterCisco
NoNoNoAll eventsNSEL ProtocolASA V7.x+Cisco
1143Copyright © 2018, Juniper Networks, Inc.
Chapter 145: JSA Supported DSMs
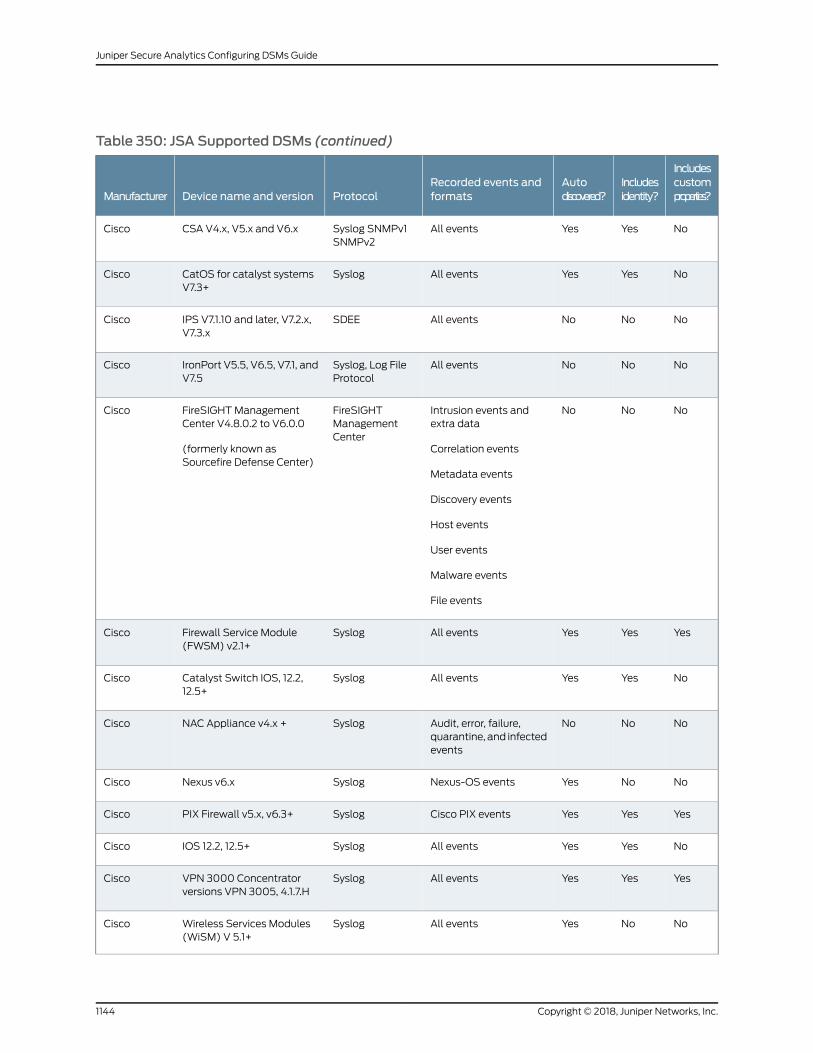
Table 350: JSA Supported DSMs (continued)
Includescustomproperties?
Includesidentity?
Autodiscovered?
Recorded events andformatsProtocolDevice name and versionManufacturer
NoYesYesAll eventsSyslog SNMPv1SNMPv2
CSA V4.x, V5.x and V6.xCisco
NoYesYesAll eventsSyslogCatOS for catalyst systemsV7.3+
Cisco
NoNoNoAll eventsSDEEIPS V7.1.10 and later, V7.2.x,V7.3.x
Cisco
NoNoNoAll eventsSyslog, Log FileProtocol
IronPort V5.5, V6.5, V7.1, andV7.5
Cisco
NoNoNoIntrusion events andextra data
Correlation events
Metadata events
Discovery events
Host events
User events
Malware events
File events
FireSIGHTManagementCenter
FireSIGHTManagementCenter V4.8.0.2 to V6.0.0
(formerly known asSourcefire Defense Center)
Cisco
YesYesYesAll eventsSyslogFirewall Service Module(FWSM) v2.1+
Cisco
NoYesYesAll eventsSyslogCatalyst Switch IOS, 12.2,12.5+
Cisco
NoNoNoAudit, error, failure,quarantine, and infectedevents
SyslogNAC Appliance v4.x +Cisco
NoNoYesNexus-OS eventsSyslogNexus v6.xCisco
YesYesYesCisco PIX eventsSyslogPIX Firewall v5.x, v6.3+Cisco
NoYesYesAll eventsSyslogIOS 12.2, 12.5+Cisco
YesYesYesAll eventsSyslogVPN 3000 Concentratorversions VPN 3005, 4.1.7.H
Cisco
NoNoYesAll eventsSyslogWireless Services Modules(WiSM) V 5.1+
Cisco
Copyright © 2018, Juniper Networks, Inc.1144
Juniper Secure Analytics Configuring DSMs Guide
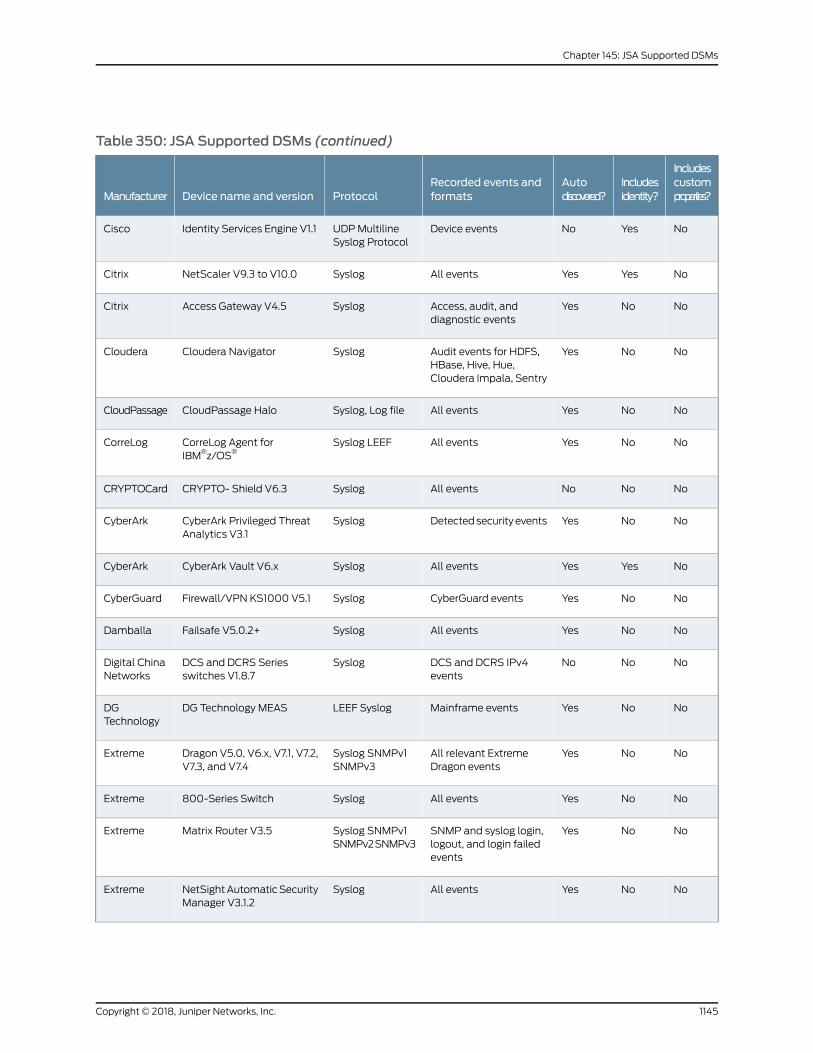
Table 350: JSA Supported DSMs (continued)
Includescustomproperties?
Includesidentity?
Autodiscovered?
Recorded events andformatsProtocolDevice name and versionManufacturer
NoYesNoDevice eventsUDPMultilineSyslog Protocol
Identity Services Engine V1.1Cisco
NoYesYesAll eventsSyslogNetScaler V9.3 to V10.0Citrix
NoNoYesAccess, audit, anddiagnostic events
SyslogAccess Gateway V4.5Citrix
NoNoYesAudit events for HDFS,HBase, Hive, Hue,Cloudera Impala, Sentry
SyslogCloudera NavigatorCloudera
NoNoYesAll eventsSyslog, Log fileCloudPassage HaloCloudPassage
NoNoYesAll eventsSyslog LEEFCorreLog Agent forIBM®z/OS®
CorreLog
NoNoNoAll eventsSyslogCRYPTO- Shield V6.3CRYPTOCard
NoNoYesDetectedsecurity eventsSyslogCyberArk Privileged ThreatAnalytics V3.1
CyberArk
NoYesYesAll eventsSyslogCyberArk Vault V6.xCyberArk
NoNoYesCyberGuard eventsSyslogFirewall/VPN KS1000 V5.1CyberGuard
NoNoYesAll eventsSyslogFailsafe V5.0.2+Damballa
NoNoNoDCS and DCRS IPv4events
SyslogDCS and DCRS Seriesswitches V1.8.7
Digital ChinaNetworks
NoNoYesMainframe eventsLEEF SyslogDG Technology MEASDGTechnology
NoNoYesAll relevant ExtremeDragon events
Syslog SNMPv1SNMPv3
Dragon V5.0, V6.x, V7.1, V7.2,V7.3, and V7.4
Extreme
NoNoYesAll eventsSyslog800-Series SwitchExtreme
NoNoYesSNMP and syslog login,logout, and login failedevents
Syslog SNMPv1SNMPv2SNMPv3
Matrix Router V3.5Extreme
NoNoYesAll eventsSyslogNetSightAutomaticSecurityManager V3.1.2
Extreme
1145Copyright © 2018, Juniper Networks, Inc.
Chapter 145: JSA Supported DSMs
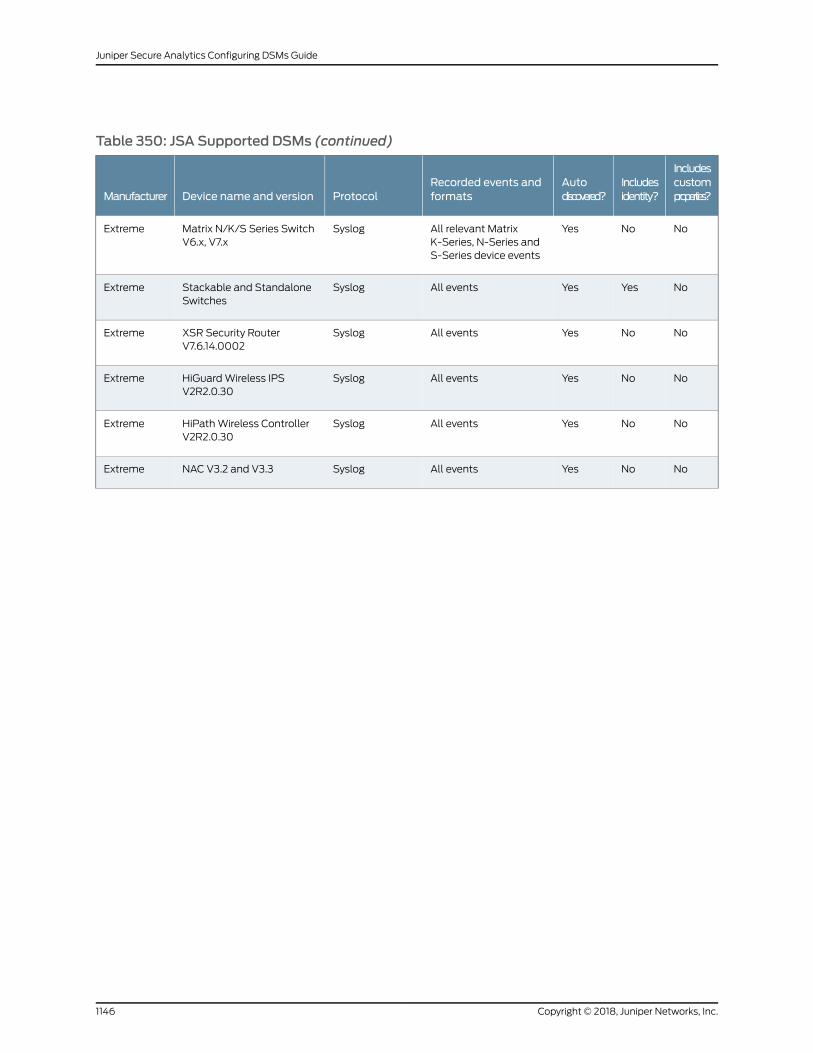
Table 350: JSA Supported DSMs (continued)
Includescustomproperties?
Includesidentity?
Autodiscovered?
Recorded events andformatsProtocolDevice name and versionManufacturer
NoNoYesAll relevant MatrixK-Series, N-Series andS-Series device events
SyslogMatrix N/K/S Series SwitchV6.x, V7.x
Extreme
NoYesYesAll eventsSyslogStackable and StandaloneSwitches
Extreme
NoNoYesAll eventsSyslogXSR Security RouterV7.6.14.0002
Extreme
NoNoYesAll eventsSyslogHiGuardWireless IPSV2R2.0.30
Extreme
NoNoYesAll eventsSyslogHiPathWireless ControllerV2R2.0.30
Extreme
NoNoYesAll eventsSyslogNAC V3.2 and V3.3Extreme
Copyright © 2018, Juniper Networks, Inc.1146
Juniper Secure Analytics Configuring DSMs Guide
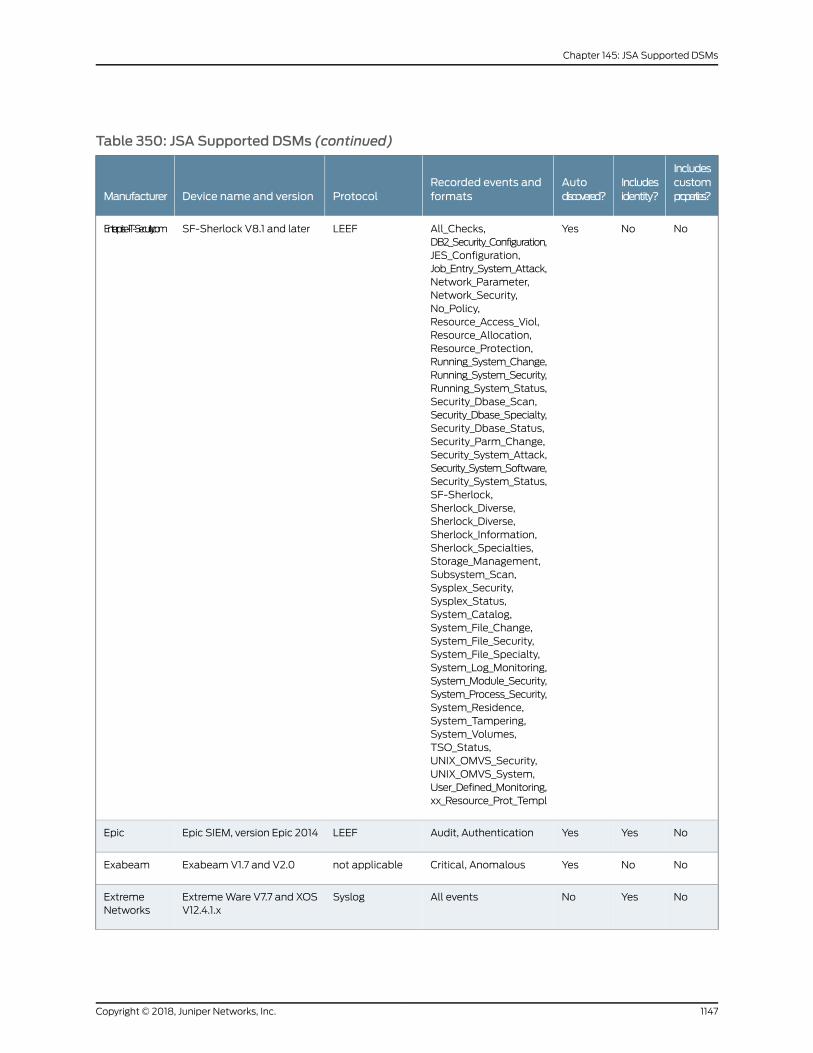
Table 350: JSA Supported DSMs (continued)
Includescustomproperties?
Includesidentity?
Autodiscovered?
Recorded events andformatsProtocolDevice name and versionManufacturer
NoNoYesAll_Checks,DB2_Security_Configuration,JES_Configuration,Job_Entry_System_Attack,Network_Parameter,Network_Security,No_Policy,Resource_Access_Viol,Resource_Allocation,Resource_Protection,Running_System_Change,Running_System_Security,Running_System_Status,Security_Dbase_Scan,Security_Dbase_Specialty,Security_Dbase_Status,Security_Parm_Change,Security_System_Attack,Security_System_Software,Security_System_Status,SF-Sherlock,Sherlock_Diverse,Sherlock_Diverse,Sherlock_Information,Sherlock_Specialties,Storage_Management,Subsystem_Scan,Sysplex_Security,Sysplex_Status,System_Catalog,System_File_Change,System_File_Security,System_File_Specialty,System_Log_Monitoring,System_Module_Security,System_Process_Security,System_Residence,System_Tampering,System_Volumes,TSO_Status,UNIX_OMVS_Security,UNIX_OMVS_System,User_Defined_Monitoring,xx_Resource_Prot_Templ
LEEFSF-Sherlock V8.1 and laterEnterprise-IT-Security.com
NoYesYesAudit, AuthenticationLEEFEpic SIEM, version Epic 2014Epic
NoNoYesCritical, Anomalousnot applicableExabeam V1.7 and V2.0Exabeam
NoYesNoAll eventsSyslogExtremeWare V7.7 and XOSV12.4.1.x
ExtremeNetworks
1147Copyright © 2018, Juniper Networks, Inc.
Chapter 145: JSA Supported DSMs
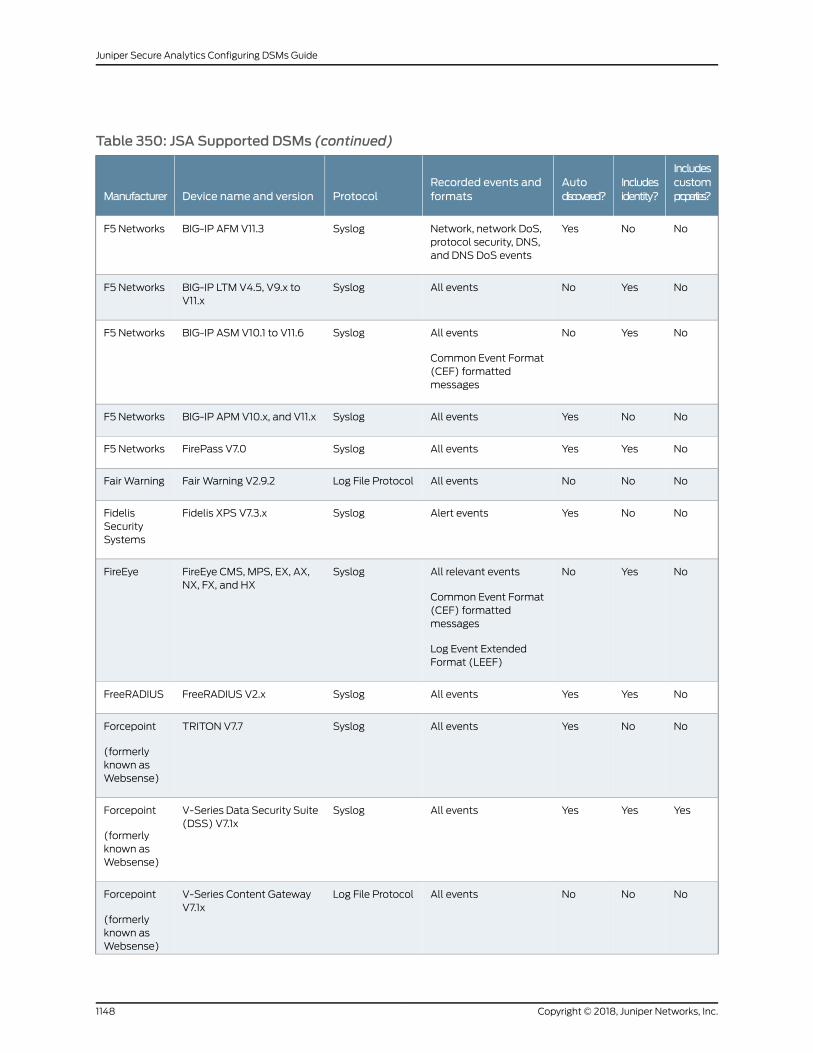
Table 350: JSA Supported DSMs (continued)
Includescustomproperties?
Includesidentity?
Autodiscovered?
Recorded events andformatsProtocolDevice name and versionManufacturer
NoNoYesNetwork, network DoS,protocol security, DNS,and DNS DoS events
SyslogBIG-IP AFM V11.3F5 Networks
NoYesNoAll eventsSyslogBIG-IP LTM V4.5, V9.x toV11.x
F5 Networks
NoYesNoAll events
Common Event Format(CEF) formattedmessages
SyslogBIG-IP ASM V10.1 to V11.6F5 Networks
NoNoYesAll eventsSyslogBIG-IP APM V10.x, and V11.xF5 Networks
NoYesYesAll eventsSyslogFirePass V7.0F5 Networks
NoNoNoAll eventsLog File ProtocolFair Warning V2.9.2Fair Warning
NoNoYesAlert eventsSyslogFidelis XPS V7.3.xFidelisSecuritySystems
NoYesNoAll relevant events
Common Event Format(CEF) formattedmessages
Log Event ExtendedFormat (LEEF)
SyslogFireEye CMS, MPS, EX, AX,NX, FX, and HX
FireEye
NoYesYesAll eventsSyslogFreeRADIUS V2.xFreeRADIUS
NoNoYesAll eventsSyslogTRITON V7.7Forcepoint
(formerlyknown asWebsense)
YesYesYesAll eventsSyslogV-Series Data Security Suite(DSS) V7.1x
Forcepoint
(formerlyknown asWebsense)
NoNoNoAll eventsLog File ProtocolV-Series Content GatewayV7.1x
Forcepoint
(formerlyknown asWebsense)
Copyright © 2018, Juniper Networks, Inc.1148
Juniper Secure Analytics Configuring DSMs Guide
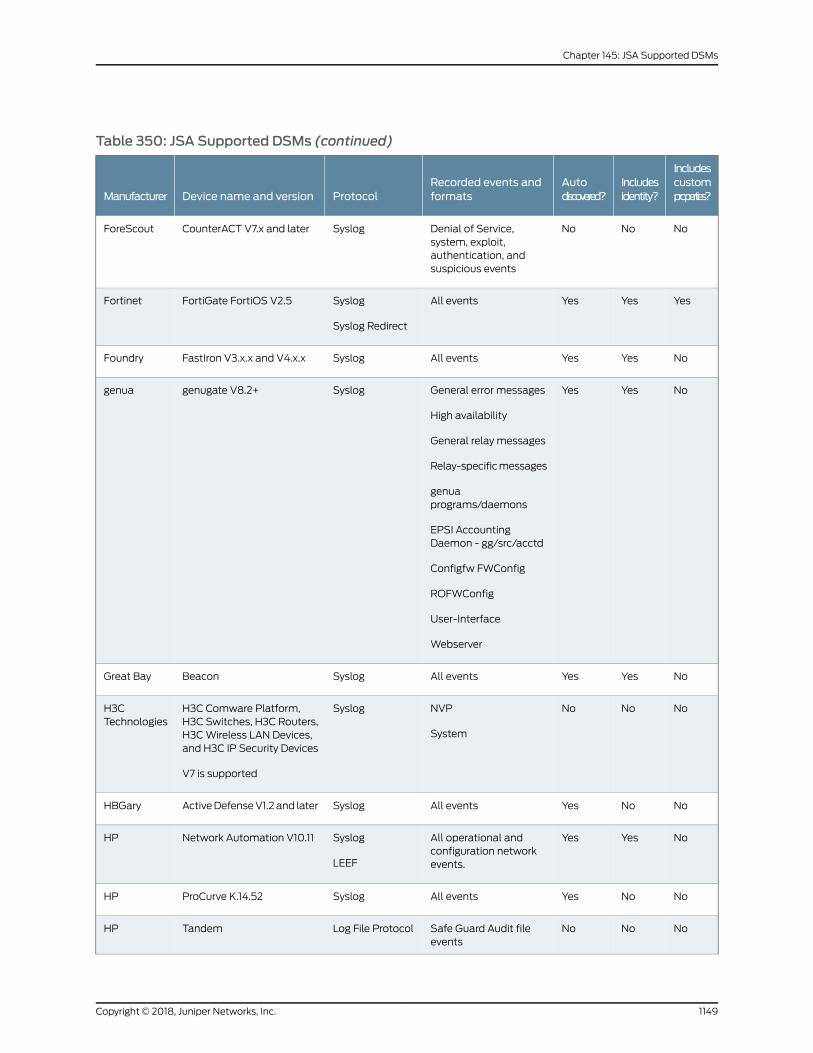
Table 350: JSA Supported DSMs (continued)
Includescustomproperties?
Includesidentity?
Autodiscovered?
Recorded events andformatsProtocolDevice name and versionManufacturer
NoNoNoDenial of Service,system, exploit,authentication, andsuspicious events
SyslogCounterACT V7.x and laterForeScout
YesYesYesAll eventsSyslog
Syslog Redirect
FortiGate FortiOS V2.5Fortinet
NoYesYesAll eventsSyslogFastIron V3.x.x and V4.x.xFoundry
NoYesYesGeneral error messages
High availability
General relay messages
Relay-specificmessages
genuaprograms/daemons
EPSI AccountingDaemon - gg/src/acctd
Configfw FWConfig
ROFWConfig
User-Interface
Webserver
Sysloggenugate V8.2+genua
NoYesYesAll eventsSyslogBeaconGreat Bay
NoNoNoNVP
System
SyslogH3C Comware Platform,H3C Switches, H3C Routers,H3CWireless LAN Devices,and H3C IP Security Devices
V7 is supported
H3CTechnologies
NoNoYesAll eventsSyslogActiveDefenseV1.2 and laterHBGary
NoYesYesAll operational andconfiguration networkevents.
Syslog
LEEF
Network Automation V10.11HP
NoNoYesAll eventsSyslogProCurve K.14.52HP
NoNoNoSafe Guard Audit fileevents
Log File ProtocolTandemHP
1149Copyright © 2018, Juniper Networks, Inc.
Chapter 145: JSA Supported DSMs
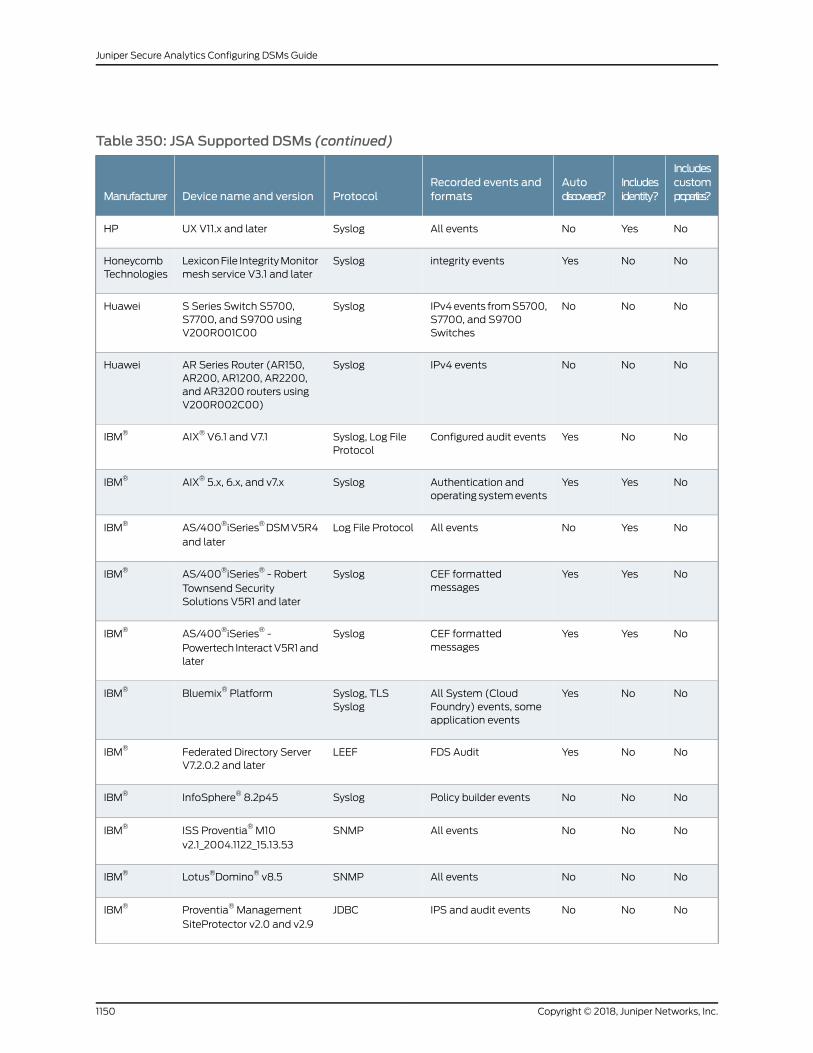
Table 350: JSA Supported DSMs (continued)
Includescustomproperties?
Includesidentity?
Autodiscovered?
Recorded events andformatsProtocolDevice name and versionManufacturer
NoYesNoAll eventsSyslogUX V11.x and laterHP
NoNoYesintegrity eventsSyslogLexiconFile IntegrityMonitormesh service V3.1 and later
HoneycombTechnologies
NoNoNoIPv4events fromS5700,S7700, and S9700Switches
SyslogS Series Switch S5700,S7700, and S9700 usingV200R001C00
Huawei
NoNoNoIPv4 eventsSyslogAR Series Router (AR150,AR200, AR1200, AR2200,and AR3200 routers usingV200R002C00)
Huawei
NoNoYesConfigured audit eventsSyslog, Log FileProtocol
AIX® V6.1 and V7.1IBM®
NoYesYesAuthentication andoperating systemevents
SyslogAIX® 5.x, 6.x, and v7.xIBM®
NoYesNoAll eventsLog File ProtocolAS/400®iSeries®DSMV5R4and later
IBM®
NoYesYesCEF formattedmessages
SyslogAS/400®iSeries® - RobertTownsend SecuritySolutions V5R1 and later
IBM®
NoYesYesCEF formattedmessages
SyslogAS/400®iSeries® -Powertech InteractV5R1andlater
IBM®
NoNoYesAll System (CloudFoundry) events, someapplication events
Syslog, TLSSyslog
Bluemix® PlatformIBM®
NoNoYesFDS AuditLEEFFederated Directory ServerV7.2.0.2 and later
IBM®
NoNoNoPolicy builder eventsSyslogInfoSphere® 8.2p45IBM®
NoNoNoAll eventsSNMPISS Proventia®M10v2.1_2004.1122_15.13.53
IBM®
NoNoNoAll eventsSNMPLotus®Domino® v8.5IBM®
NoNoNoIPS and audit eventsJDBCProventia®ManagementSiteProtector v2.0 and v2.9
IBM®
Copyright © 2018, Juniper Networks, Inc.1150
Juniper Secure Analytics Configuring DSMs Guide
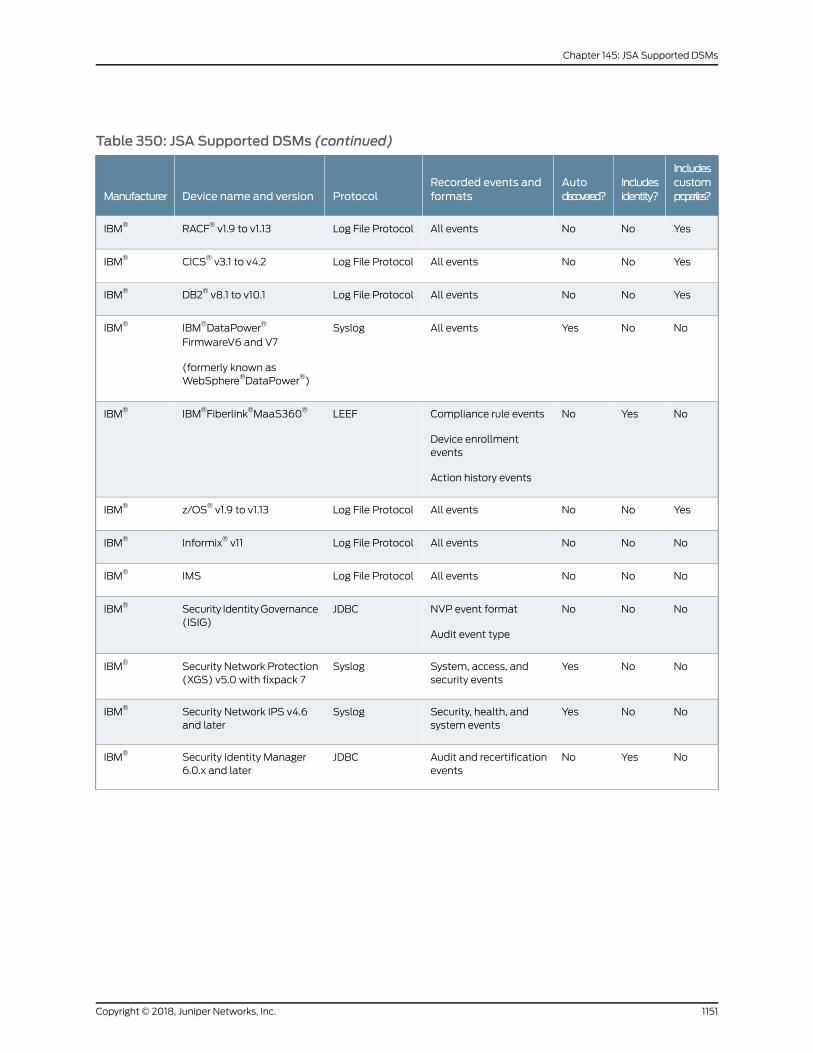
Table 350: JSA Supported DSMs (continued)
Includescustomproperties?
Includesidentity?
Autodiscovered?
Recorded events andformatsProtocolDevice name and versionManufacturer
YesNoNoAll eventsLog File ProtocolRACF® v1.9 to v1.13IBM®
YesNoNoAll eventsLog File ProtocolCICS® v3.1 to v4.2IBM®
YesNoNoAll eventsLog File ProtocolDB2® v8.1 to v10.1IBM®
NoNoYesAll eventsSyslogIBM®DataPower®
FirmwareV6 and V7
(formerly known asWebSphere®DataPower®)
IBM®
NoYesNoCompliance rule events
Device enrollmentevents
Action history events
LEEFIBM®Fiberlink®MaaS360®IBM®
YesNoNoAll eventsLog File Protocolz/OS® v1.9 to v1.13IBM®
NoNoNoAll eventsLog File ProtocolInformix® v11IBM®
NoNoNoAll eventsLog File ProtocolIMSIBM®
NoNoNoNVP event format
Audit event type
JDBCSecurity IdentityGovernance(ISIG)
IBM®
NoNoYesSystem, access, andsecurity events
SyslogSecurity Network Protection(XGS) v5.0 with fixpack 7
IBM®
NoNoYesSecurity, health, andsystem events
SyslogSecurity Network IPS v4.6and later
IBM®
NoYesNoAudit and recertificationevents
JDBCSecurity Identity Manager6.0.x and later
IBM®
1151Copyright © 2018, Juniper Networks, Inc.
Chapter 145: JSA Supported DSMs
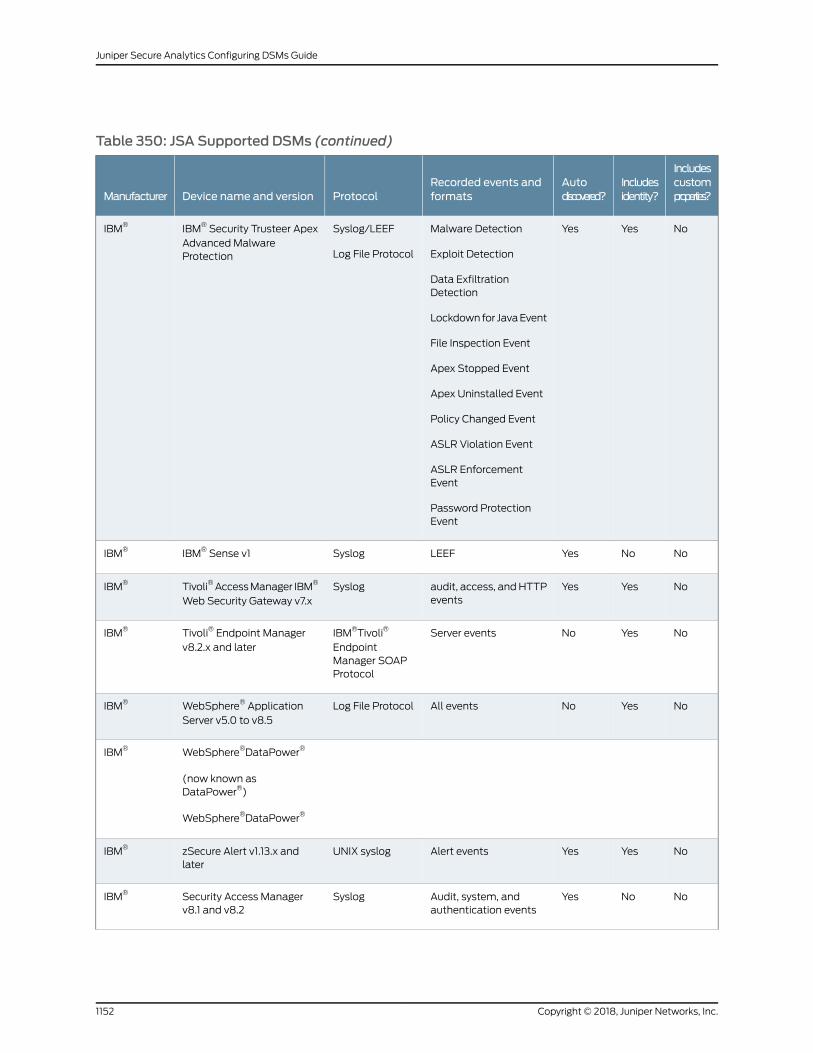
Table 350: JSA Supported DSMs (continued)
Includescustomproperties?
Includesidentity?
Autodiscovered?
Recorded events andformatsProtocolDevice name and versionManufacturer
NoYesYesMalware Detection
Exploit Detection
Data ExfiltrationDetection
Lockdownfor JavaEvent
File Inspection Event
Apex Stopped Event
Apex Uninstalled Event
Policy Changed Event
ASLR Violation Event
ASLR EnforcementEvent
Password ProtectionEvent
Syslog/LEEF
Log File Protocol
IBM® Security Trusteer ApexAdvanced MalwareProtection
IBM®
NoNoYesLEEFSyslogIBM® Sense v1IBM®
NoYesYesaudit, access, andHTTPevents
SyslogTivoli®AccessManager IBM®
Web Security Gateway v7.xIBM®
NoYesNoServer eventsIBM®Tivoli®
EndpointManager SOAPProtocol
Tivoli® Endpoint Managerv8.2.x and later
IBM®
NoYesNoAll eventsLog File ProtocolWebSphere® ApplicationServer v5.0 to v8.5
IBM®
WebSphere®DataPower®
(now known asDataPower®)
WebSphere®DataPower®
IBM®
NoYesYesAlert eventsUNIX syslogzSecure Alert v1.13.x andlater
IBM®
NoNoYesAudit, system, andauthentication events
SyslogSecurity Access Managerv8.1 and v8.2
IBM®
Copyright © 2018, Juniper Networks, Inc.1152
Juniper Secure Analytics Configuring DSMs Guide
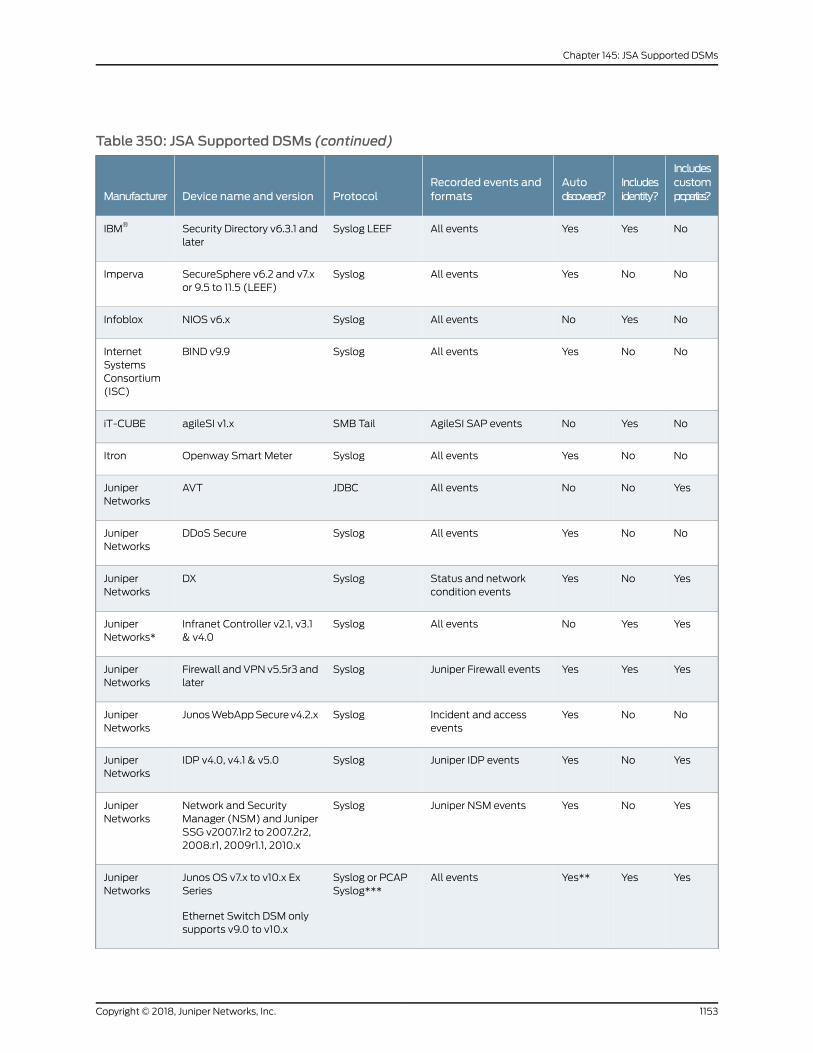
Table 350: JSA Supported DSMs (continued)
Includescustomproperties?
Includesidentity?
Autodiscovered?
Recorded events andformatsProtocolDevice name and versionManufacturer
NoYesYesAll eventsSyslog LEEFSecurity Directory v6.3.1 andlater
IBM®
NoNoYesAll eventsSyslogSecureSphere v6.2 and v7.xor 9.5 to 11.5 (LEEF)
Imperva
NoYesNoAll eventsSyslogNIOS v6.xInfoblox
NoNoYesAll eventsSyslogBIND v9.9InternetSystemsConsortium(ISC)
NoYesNoAgileSI SAP eventsSMB TailagileSI v1.xiT-CUBE
NoNoYesAll eventsSyslogOpenway Smart MeterItron
YesNoNoAll eventsJDBCAVTJuniperNetworks
NoNoYesAll eventsSyslogDDoS SecureJuniperNetworks
YesNoYesStatus and networkcondition events
SyslogDXJuniperNetworks
YesYesNoAll eventsSyslogInfranet Controller v2.1, v3.1& v4.0
JuniperNetworks*
YesYesYesJuniper Firewall eventsSyslogFirewall and VPN v5.5r3 andlater
JuniperNetworks
NoNoYesIncident and accessevents
SyslogJunosWebAppSecurev4.2.xJuniperNetworks
YesNoYesJuniper IDP eventsSyslogIDP v4.0, v4.1 & v5.0JuniperNetworks
YesNoYesJuniper NSM eventsSyslogNetwork and SecurityManager (NSM) and JuniperSSG v2007.1r2 to 2007.2r2,2008.r1, 2009r1.1, 2010.x
JuniperNetworks
YesYesYes**All eventsSyslog or PCAPSyslog***
Junos OS v7.x to v10.x ExSeries
Ethernet Switch DSM onlysupports v9.0 to v10.x
JuniperNetworks
1153Copyright © 2018, Juniper Networks, Inc.
Chapter 145: JSA Supported DSMs
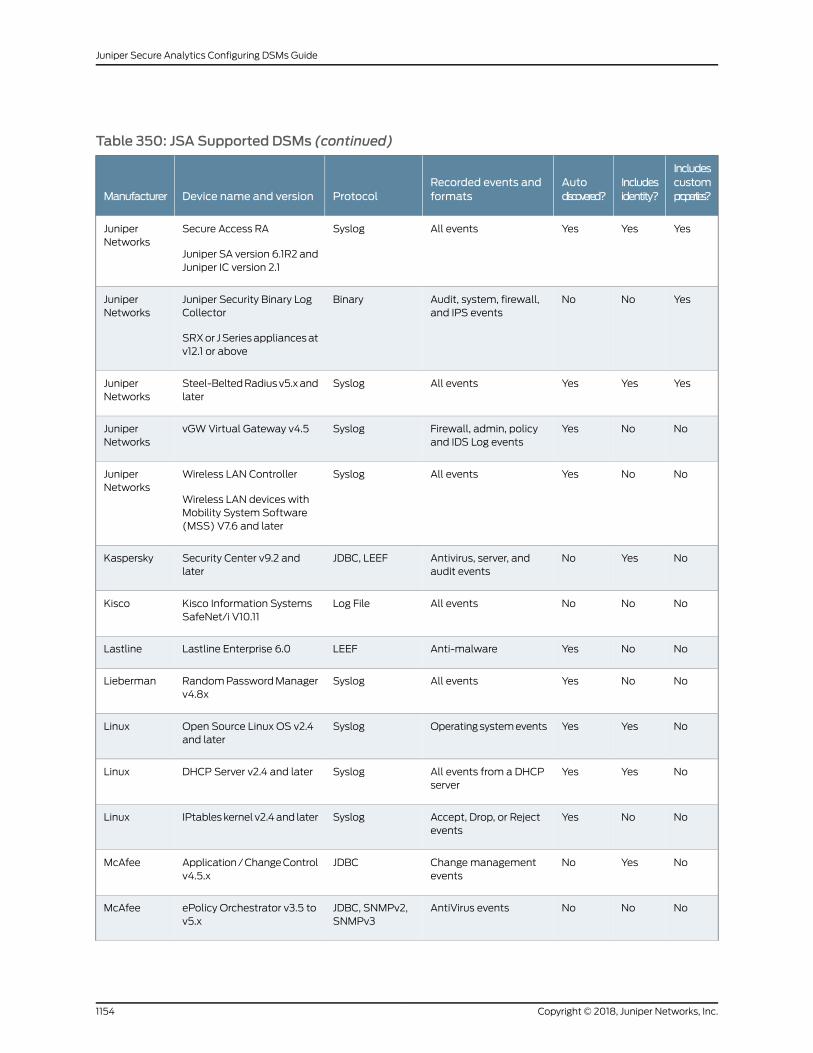
Table 350: JSA Supported DSMs (continued)
Includescustomproperties?
Includesidentity?
Autodiscovered?
Recorded events andformatsProtocolDevice name and versionManufacturer
YesYesYesAll eventsSyslogSecure Access RA
Juniper SA version 6.1R2 andJuniper IC version 2.1
JuniperNetworks
YesNoNoAudit, system, firewall,and IPS events
BinaryJuniper Security Binary LogCollector
SRXor JSeriesappliancesatv12.1 or above
JuniperNetworks
YesYesYesAll eventsSyslogSteel-BeltedRadiusv5.xandlater
JuniperNetworks
NoNoYesFirewall, admin, policyand IDS Log events
SyslogvGWVirtual Gateway v4.5JuniperNetworks
NoNoYesAll eventsSyslogWireless LAN Controller
Wireless LAN devices withMobility System Software(MSS) V7.6 and later
JuniperNetworks
NoYesNoAntivirus, server, andaudit events
JDBC, LEEFSecurity Center v9.2 andlater
Kaspersky
NoNoNoAll eventsLog FileKisco Information SystemsSafeNet/i V10.11
Kisco
NoNoYesAnti-malwareLEEFLastline Enterprise 6.0Lastline
NoNoYesAll eventsSyslogRandomPasswordManagerv4.8x
Lieberman
NoYesYesOperatingsystemeventsSyslogOpen Source Linux OS v2.4and later
Linux
NoYesYesAll events from a DHCPserver
SyslogDHCP Server v2.4 and laterLinux
NoNoYesAccept, Drop, or Rejectevents
SyslogIPtables kernel v2.4and laterLinux
NoYesNoChangemanagementevents
JDBCApplication/ChangeControlv4.5.x
McAfee
NoNoNoAntiVirus eventsJDBC, SNMPv2,SNMPv3
ePolicy Orchestrator v3.5 tov5.x
McAfee
Copyright © 2018, Juniper Networks, Inc.1154
Juniper Secure Analytics Configuring DSMs Guide
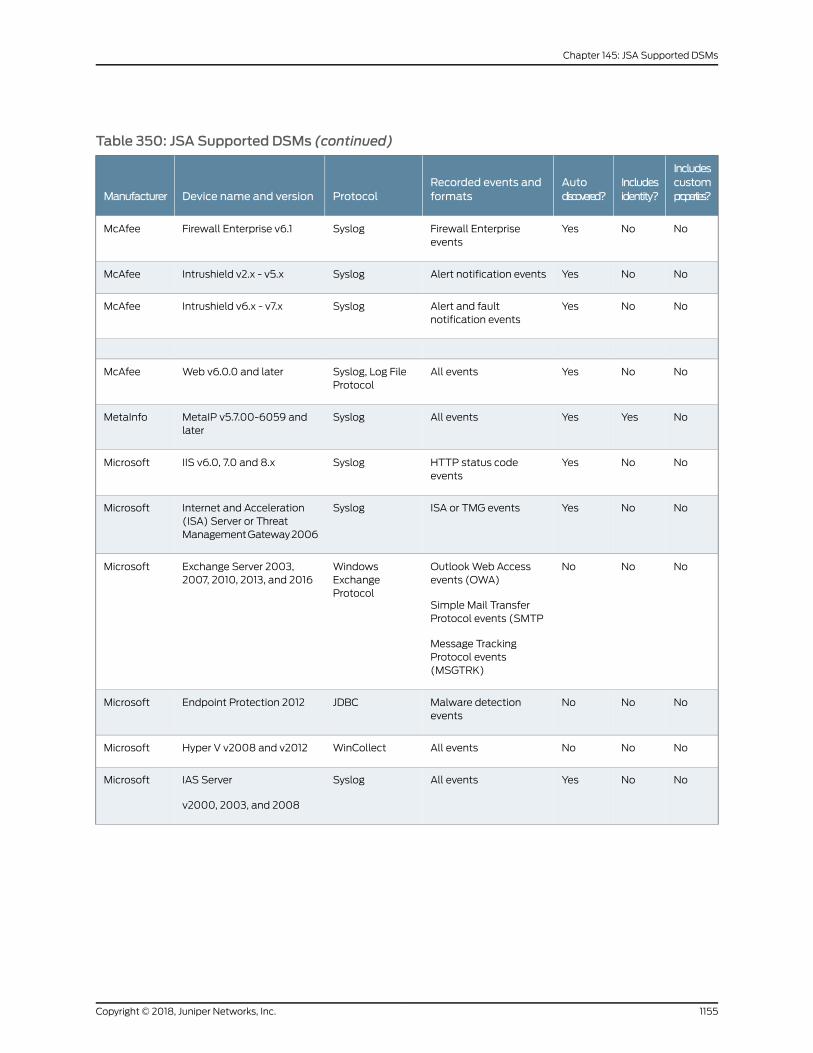
Table 350: JSA Supported DSMs (continued)
Includescustomproperties?
Includesidentity?
Autodiscovered?
Recorded events andformatsProtocolDevice name and versionManufacturer
NoNoYesFirewall Enterpriseevents
SyslogFirewall Enterprise v6.1McAfee
NoNoYesAlert notification eventsSyslogIntrushield v2.x - v5.xMcAfee
NoNoYesAlert and faultnotification events
SyslogIntrushield v6.x - v7.xMcAfee
NoNoYesAll eventsSyslog, Log FileProtocol
Web v6.0.0 and laterMcAfee
NoYesYesAll eventsSyslogMetaIP v5.7.00-6059 andlater
MetaInfo
NoNoYesHTTP status codeevents
SyslogIIS v6.0, 7.0 and 8.xMicrosoft
NoNoYesISA or TMG eventsSyslogInternet and Acceleration(ISA) Server or ThreatManagementGateway2006
Microsoft
NoNoNoOutlookWeb Accessevents (OWA)
Simple Mail TransferProtocol events (SMTP
Message TrackingProtocol events(MSGTRK)
WindowsExchangeProtocol
Exchange Server 2003,2007, 2010, 2013, and 2016
Microsoft
NoNoNoMalware detectionevents
JDBCEndpoint Protection 2012Microsoft
NoNoNoAll eventsWinCollectHyper V v2008 and v2012Microsoft
NoNoYesAll eventsSyslogIAS Server
v2000, 2003, and 2008
Microsoft
1155Copyright © 2018, Juniper Networks, Inc.
Chapter 145: JSA Supported DSMs
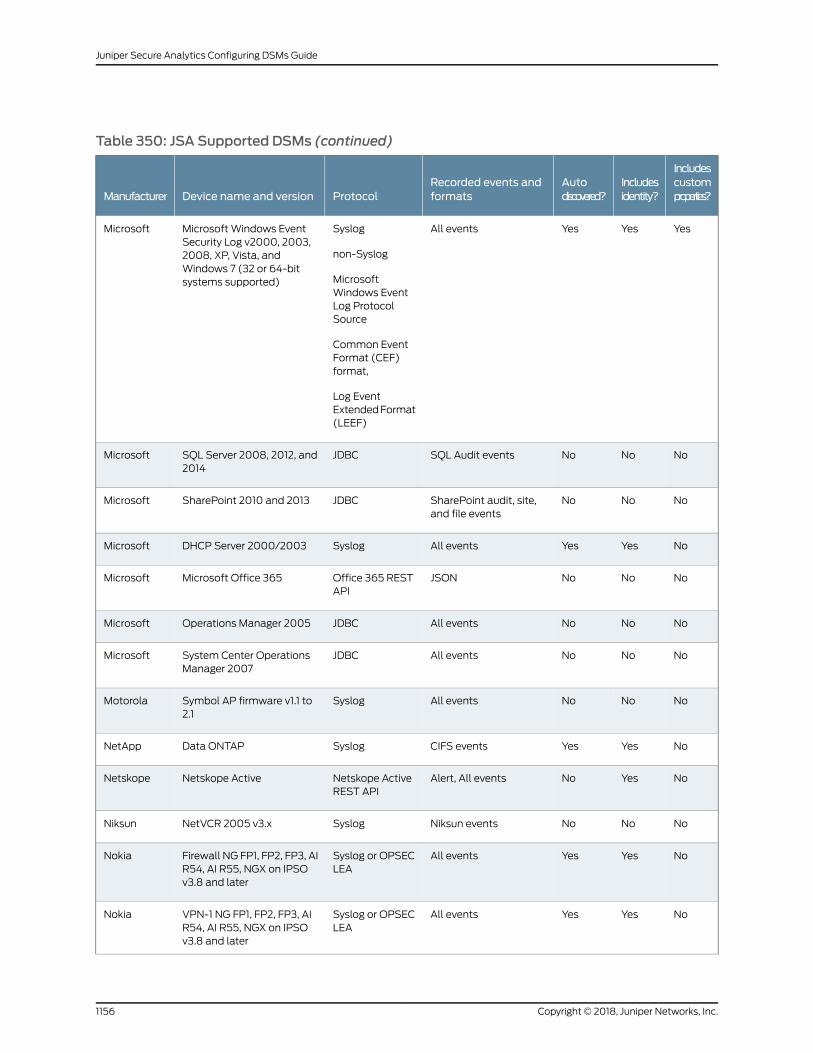
Table 350: JSA Supported DSMs (continued)
Includescustomproperties?
Includesidentity?
Autodiscovered?
Recorded events andformatsProtocolDevice name and versionManufacturer
YesYesYesAll eventsSyslog
non-Syslog
MicrosoftWindows EventLog ProtocolSource
Common EventFormat (CEF)format,
Log EventExtendedFormat(LEEF)
Microsoft Windows EventSecurity Log v2000, 2003,2008, XP, Vista, andWindows 7 (32 or 64-bitsystems supported)
Microsoft
NoNoNoSQL Audit eventsJDBCSQL Server 2008, 2012, and2014
Microsoft
NoNoNoSharePoint audit, site,and file events
JDBCSharePoint 2010 and 2013Microsoft
NoYesYesAll eventsSyslogDHCP Server 2000/2003Microsoft
NoNoNoJSONOffice 365 RESTAPI
Microsoft Office 365Microsoft
NoNoNoAll eventsJDBCOperations Manager 2005Microsoft
NoNoNoAll eventsJDBCSystem Center OperationsManager 2007
Microsoft
NoNoNoAll eventsSyslogSymbol AP firmware v1.1 to2.1
Motorola
NoYesYesCIFS eventsSyslogData ONTAPNetApp
NoYesNoAlert, All eventsNetskope ActiveREST API
Netskope ActiveNetskope
NoNoNoNiksun eventsSyslogNetVCR 2005 v3.xNiksun
NoYesYesAll eventsSyslog or OPSECLEA
Firewall NG FP1, FP2, FP3, AIR54, AI R55, NGX on IPSOv3.8 and later
Nokia
NoYesYesAll eventsSyslog or OPSECLEA
VPN-1 NG FP1, FP2, FP3, AIR54, AI R55, NGX on IPSOv3.8 and later
Nokia
Copyright © 2018, Juniper Networks, Inc.1156
Juniper Secure Analytics Configuring DSMs Guide
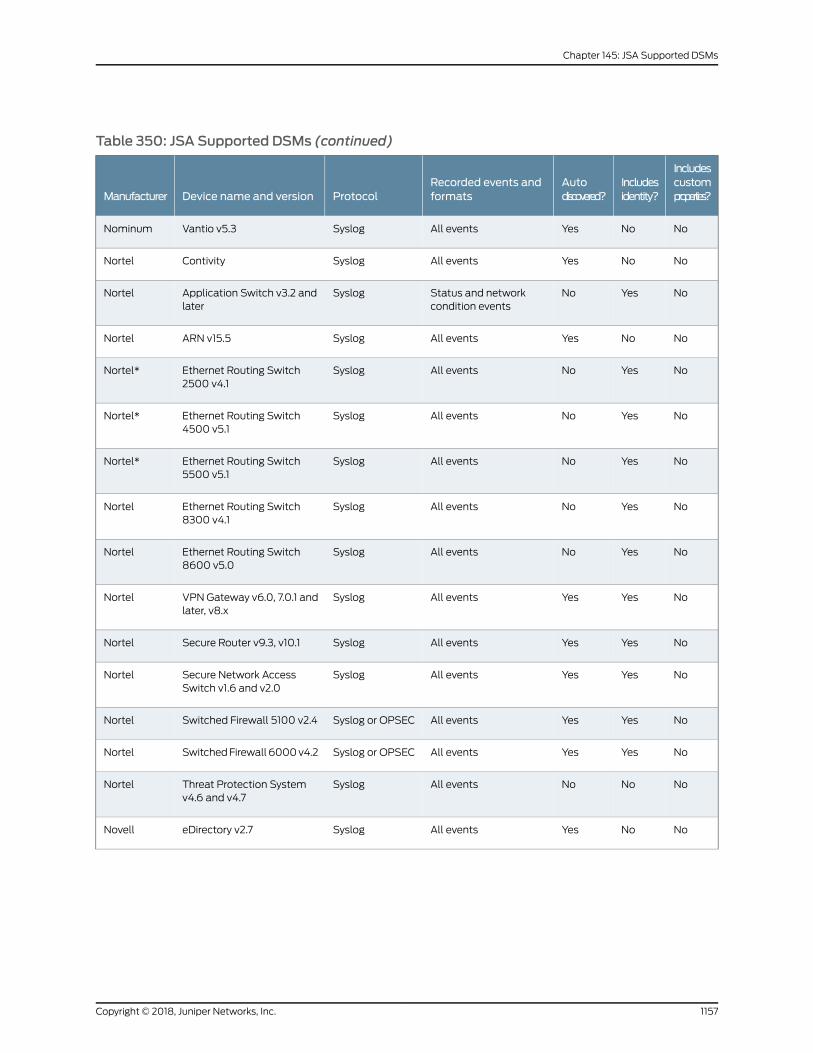
Table 350: JSA Supported DSMs (continued)
Includescustomproperties?
Includesidentity?
Autodiscovered?
Recorded events andformatsProtocolDevice name and versionManufacturer
NoNoYesAll eventsSyslogVantio v5.3Nominum
NoNoYesAll eventsSyslogContivityNortel
NoYesNoStatus and networkcondition events
SyslogApplication Switch v3.2 andlater
Nortel
NoNoYesAll eventsSyslogARN v15.5Nortel
NoYesNoAll eventsSyslogEthernet Routing Switch2500 v4.1
Nortel*
NoYesNoAll eventsSyslogEthernet Routing Switch4500 v5.1
Nortel*
NoYesNoAll eventsSyslogEthernet Routing Switch5500 v5.1
Nortel*
NoYesNoAll eventsSyslogEthernet Routing Switch8300 v4.1
Nortel
NoYesNoAll eventsSyslogEthernet Routing Switch8600 v5.0
Nortel
NoYesYesAll eventsSyslogVPNGateway v6.0, 7.0.1 andlater, v8.x
Nortel
NoYesYesAll eventsSyslogSecure Router v9.3, v10.1Nortel
NoYesYesAll eventsSyslogSecure Network AccessSwitch v1.6 and v2.0
Nortel
NoYesYesAll eventsSyslog or OPSECSwitched Firewall 5100 v2.4Nortel
NoYesYesAll eventsSyslog or OPSECSwitchedFirewall6000v4.2Nortel
NoNoNoAll eventsSyslogThreat Protection Systemv4.6 and v4.7
Nortel
NoNoYesAll eventsSyslogeDirectory v2.7Novell
1157Copyright © 2018, Juniper Networks, Inc.
Chapter 145: JSA Supported DSMs
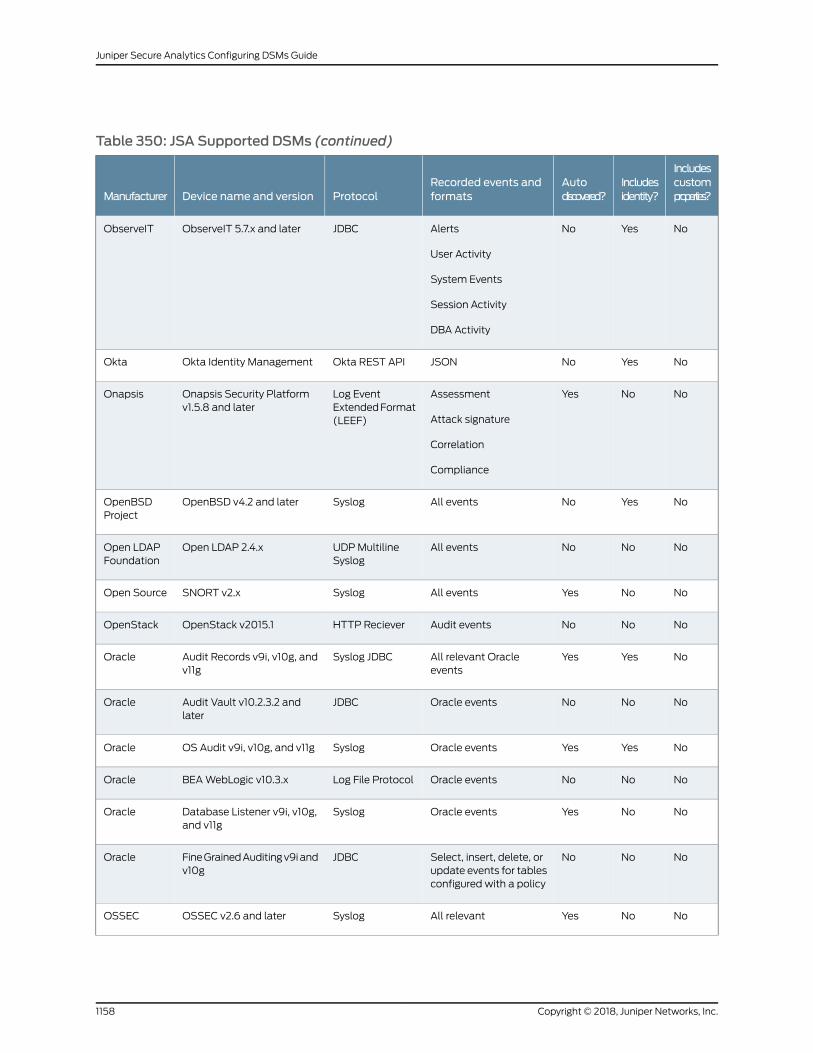
Table 350: JSA Supported DSMs (continued)
Includescustomproperties?
Includesidentity?
Autodiscovered?
Recorded events andformatsProtocolDevice name and versionManufacturer
NoYesNoAlerts
User Activity
System Events
Session Activity
DBA Activity
JDBCObserveIT 5.7.x and laterObserveIT
NoYesNoJSONOkta REST APIOkta Identity ManagementOkta
NoNoYesAssessment
Attack signature
Correlation
Compliance
Log EventExtendedFormat(LEEF)
Onapsis Security Platformv1.5.8 and later
Onapsis
NoYesNoAll eventsSyslogOpenBSD v4.2 and laterOpenBSDProject
NoNoNoAll eventsUDPMultilineSyslog
Open LDAP 2.4.xOpen LDAPFoundation
NoNoYesAll eventsSyslogSNORT v2.xOpen Source
NoNoNoAudit eventsHTTP RecieverOpenStack v2015.1OpenStack
NoYesYesAll relevant Oracleevents
Syslog JDBCAudit Records v9i, v10g, andv11g
Oracle
NoNoNoOracle eventsJDBCAudit Vault v10.2.3.2 andlater
Oracle
NoYesYesOracle eventsSyslogOS Audit v9i, v10g, and v11gOracle
NoNoNoOracle eventsLog File ProtocolBEAWebLogic v10.3.xOracle
NoNoYesOracle eventsSyslogDatabase Listener v9i, v10g,and v11g
Oracle
NoNoNoSelect, insert, delete, orupdate events for tablesconfigured with a policy
JDBCFineGrainedAuditingv9iandv10g
Oracle
NoNoYesAll relevantSyslogOSSEC v2.6 and laterOSSEC
Copyright © 2018, Juniper Networks, Inc.1158
Juniper Secure Analytics Configuring DSMs Guide
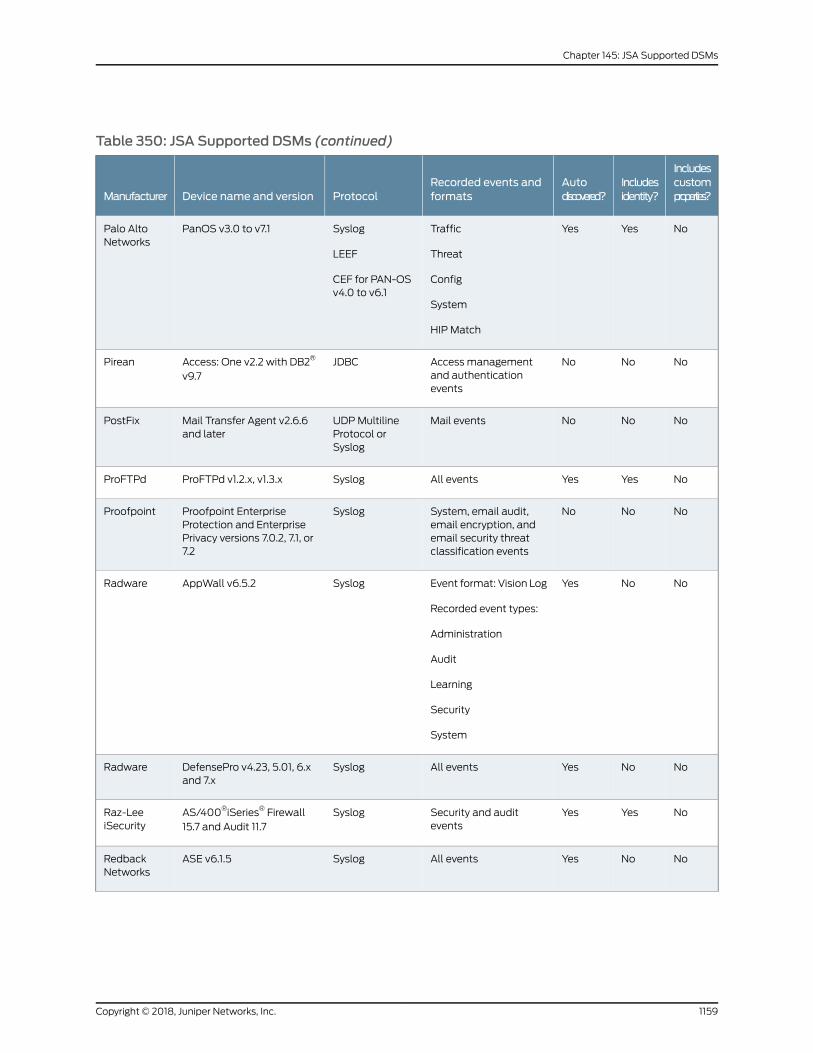
Table 350: JSA Supported DSMs (continued)
Includescustomproperties?
Includesidentity?
Autodiscovered?
Recorded events andformatsProtocolDevice name and versionManufacturer
NoYesYesTraffic
Threat
Config
System
HIP Match
Syslog
LEEF
CEF for PAN-OSv4.0 to v6.1
PanOS v3.0 to v7.1Palo AltoNetworks
NoNoNoAccess managementand authenticationevents
JDBCAccess: One v2.2 with DB2®
v9.7Pirean
NoNoNoMail eventsUDPMultilineProtocol orSyslog
Mail Transfer Agent v2.6.6and later
PostFix
NoYesYesAll eventsSyslogProFTPd v1.2.x, v1.3.xProFTPd
NoNoNoSystem, email audit,email encryption, andemail security threatclassification events
SyslogProofpoint EnterpriseProtection and EnterprisePrivacy versions 7.0.2, 7.1, or7.2
Proofpoint
NoNoYesEvent format: Vision Log
Recorded event types:
Administration
Audit
Learning
Security
System
SyslogAppWall v6.5.2Radware
NoNoYesAll eventsSyslogDefensePro v4.23, 5.01, 6.xand 7.x
Radware
NoYesYesSecurity and auditevents
SyslogAS/400®iSeries® Firewall15.7 and Audit 11.7
Raz-LeeiSecurity
NoNoYesAll eventsSyslogASE v6.1.5RedbackNetworks
1159Copyright © 2018, Juniper Networks, Inc.
Chapter 145: JSA Supported DSMs
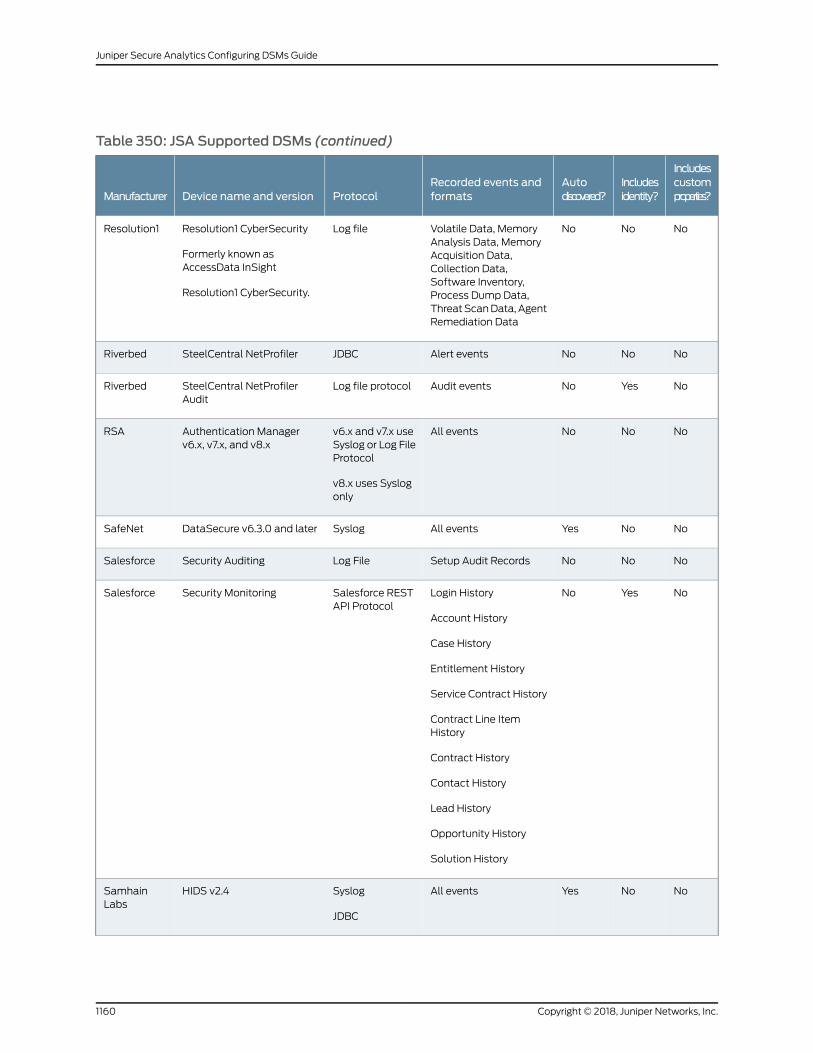
Table 350: JSA Supported DSMs (continued)
Includescustomproperties?
Includesidentity?
Autodiscovered?
Recorded events andformatsProtocolDevice name and versionManufacturer
NoNoNoVolatile Data, MemoryAnalysis Data, MemoryAcquisition Data,Collection Data,Software Inventory,Process Dump Data,ThreatScanData,AgentRemediation Data
Log fileResolution1 CyberSecurity
Formerly known asAccessData InSight
Resolution1 CyberSecurity.
Resolution1
NoNoNoAlert eventsJDBCSteelCentral NetProfilerRiverbed
NoYesNoAudit eventsLog file protocolSteelCentral NetProfilerAudit
Riverbed
NoNoNoAll eventsv6.x and v7.x useSyslog or Log FileProtocol
v8.x uses Syslogonly
Authentication Managerv6.x, v7.x, and v8.x
RSA
NoNoYesAll eventsSyslogDataSecure v6.3.0 and laterSafeNet
NoNoNoSetup Audit RecordsLog FileSecurity AuditingSalesforce
NoYesNoLogin History
Account History
Case History
Entitlement History
Service Contract History
Contract Line ItemHistory
Contract History
Contact History
Lead History
Opportunity History
Solution History
Salesforce RESTAPI Protocol
Security MonitoringSalesforce
NoNoYesAll eventsSyslog
JDBC
HIDS v2.4SamhainLabs
Copyright © 2018, Juniper Networks, Inc.1160
Juniper Secure Analytics Configuring DSMs Guide
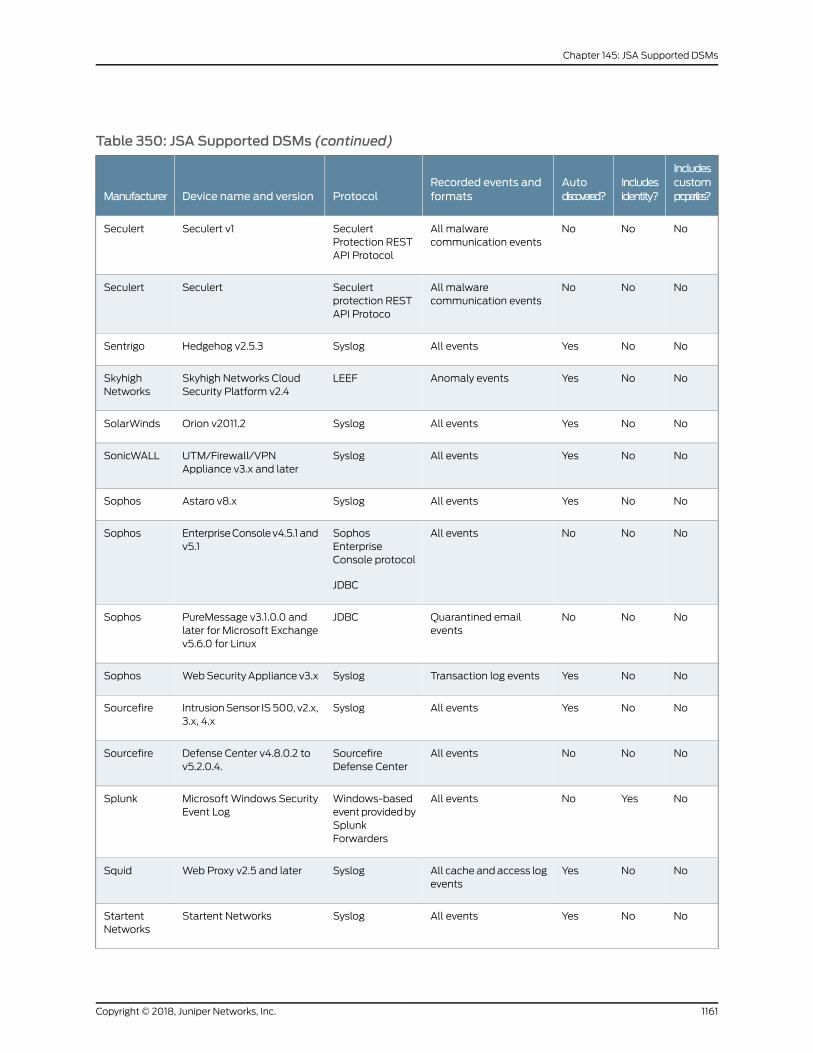
Table 350: JSA Supported DSMs (continued)
Includescustomproperties?
Includesidentity?
Autodiscovered?
Recorded events andformatsProtocolDevice name and versionManufacturer
NoNoNoAll malwarecommunication events
SeculertProtection RESTAPI Protocol
Seculert v1Seculert
NoNoNoAll malwarecommunication events
Seculertprotection RESTAPI Protoco
SeculertSeculert
NoNoYesAll eventsSyslogHedgehog v2.5.3Sentrigo
NoNoYesAnomaly eventsLEEFSkyhigh Networks CloudSecurity Platform v2.4
SkyhighNetworks
NoNoYesAll eventsSyslogOrion v2011.2SolarWinds
NoNoYesAll eventsSyslogUTM/Firewall/VPNAppliance v3.x and later
SonicWALL
NoNoYesAll eventsSyslogAstaro v8.xSophos
NoNoNoAll eventsSophosEnterpriseConsole protocol
JDBC
EnterpriseConsolev4.5.1 andv5.1
Sophos
NoNoNoQuarantined emailevents
JDBCPureMessage v3.1.0.0 andlater for Microsoft Exchangev5.6.0 for Linux
Sophos
NoNoYesTransaction log eventsSyslogWebSecurity Appliance v3.xSophos
NoNoYesAll eventsSyslogIntrusionSensor IS500, v2.x,3.x, 4.x
Sourcefire
NoNoNoAll eventsSourcefireDefense Center
Defense Center v4.8.0.2 tov5.2.0.4.
Sourcefire
NoYesNoAll eventsWindows-basedeventprovidedbySplunkForwarders
Microsoft Windows SecurityEvent Log
Splunk
NoNoYesAll cache andaccess logevents
SyslogWeb Proxy v2.5 and laterSquid
NoNoYesAll eventsSyslogStartent NetworksStartentNetworks
1161Copyright © 2018, Juniper Networks, Inc.
Chapter 145: JSA Supported DSMs
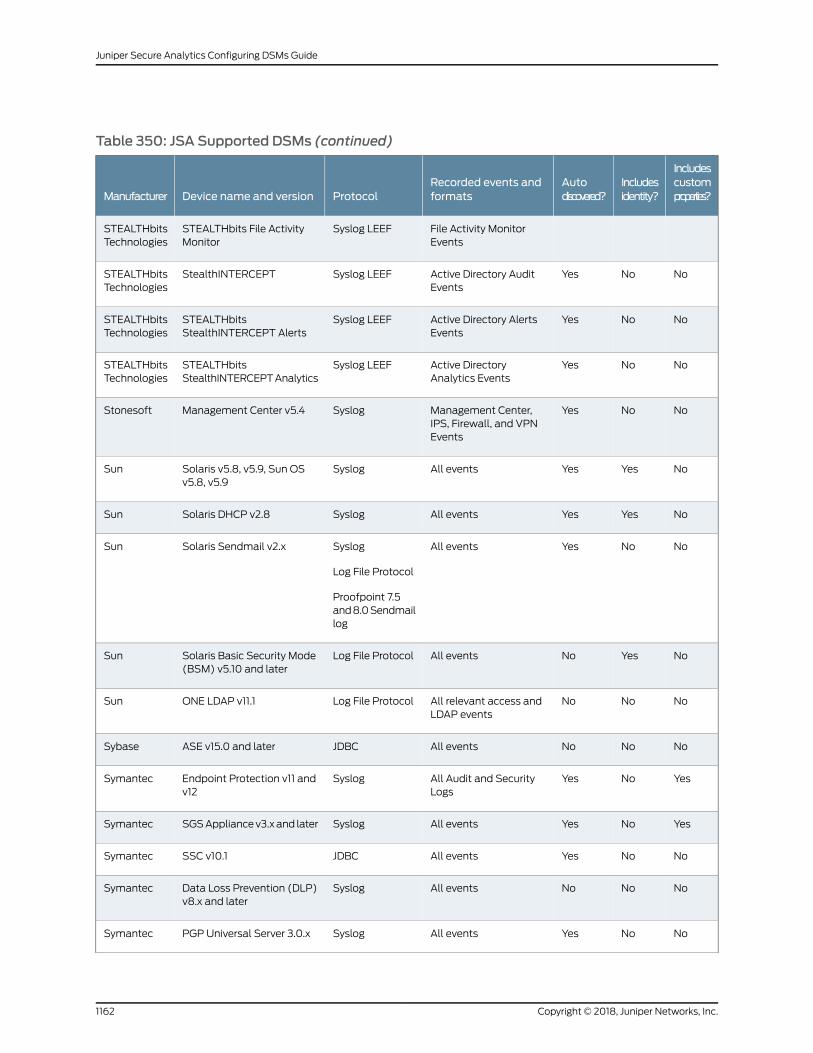
Table 350: JSA Supported DSMs (continued)
Includescustomproperties?
Includesidentity?
Autodiscovered?
Recorded events andformatsProtocolDevice name and versionManufacturer
File Activity MonitorEvents
Syslog LEEFSTEALTHbits File ActivityMonitor
STEALTHbitsTechnologies
NoNoYesActive Directory AuditEvents
Syslog LEEFStealthINTERCEPTSTEALTHbitsTechnologies
NoNoYesActive Directory AlertsEvents
Syslog LEEFSTEALTHbitsStealthINTERCEPT Alerts
STEALTHbitsTechnologies
NoNoYesActive DirectoryAnalytics Events
Syslog LEEFSTEALTHbitsStealthINTERCEPTAnalytics
STEALTHbitsTechnologies
NoNoYesManagement Center,IPS, Firewall, and VPNEvents
SyslogManagement Center v5.4Stonesoft
NoYesYesAll eventsSyslogSolaris v5.8, v5.9, Sun OSv5.8, v5.9
Sun
NoYesYesAll eventsSyslogSolaris DHCP v2.8Sun
NoNoYesAll eventsSyslog
Log File Protocol
Proofpoint 7.5and8.0Sendmaillog
Solaris Sendmail v2.xSun
NoYesNoAll eventsLog File ProtocolSolaris Basic Security Mode(BSM) v5.10 and later
Sun
NoNoNoAll relevant access andLDAP events
Log File ProtocolONE LDAP v11.1Sun
NoNoNoAll eventsJDBCASE v15.0 and laterSybase
YesNoYesAll Audit and SecurityLogs
SyslogEndpoint Protection v11 andv12
Symantec
YesNoYesAll eventsSyslogSGSAppliancev3.xand laterSymantec
NoNoYesAll eventsJDBCSSC v10.1Symantec
NoNoNoAll eventsSyslogData Loss Prevention (DLP)v8.x and later
Symantec
NoNoYesAll eventsSyslogPGP Universal Server 3.0.xSymantec
Copyright © 2018, Juniper Networks, Inc.1162
Juniper Secure Analytics Configuring DSMs Guide
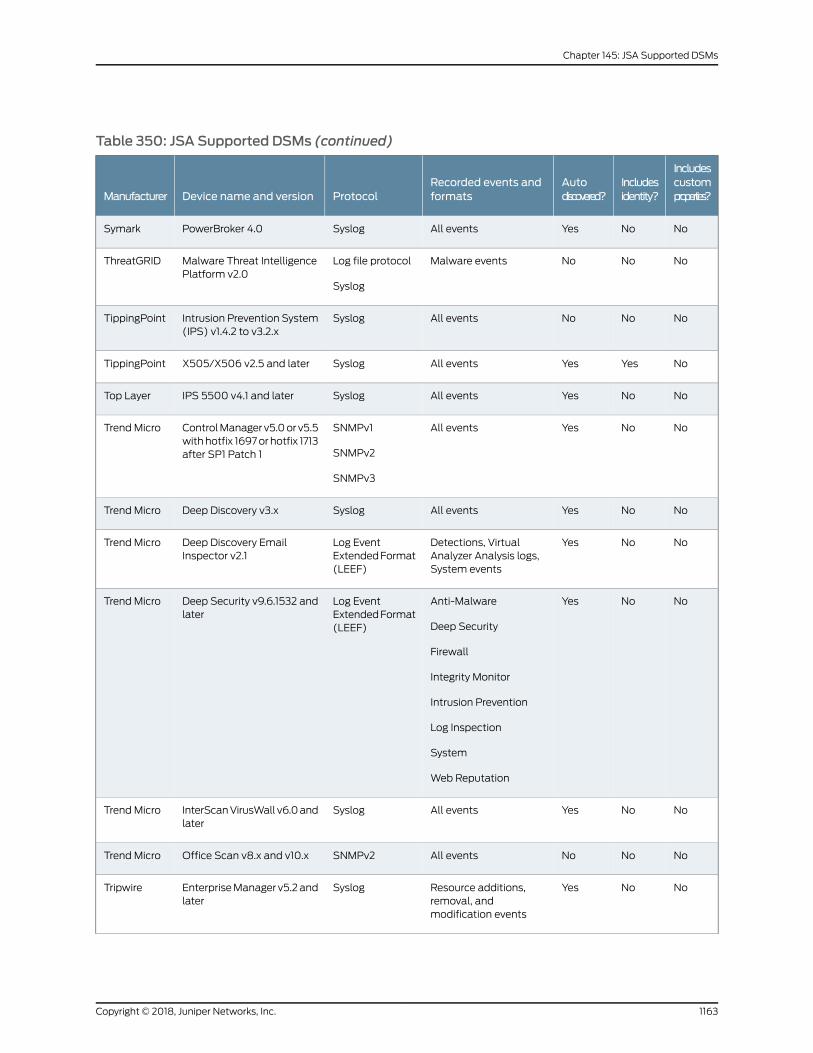
Table 350: JSA Supported DSMs (continued)
Includescustomproperties?
Includesidentity?
Autodiscovered?
Recorded events andformatsProtocolDevice name and versionManufacturer
NoNoYesAll eventsSyslogPowerBroker 4.0Symark
NoNoNoMalware eventsLog file protocol
Syslog
Malware Threat IntelligencePlatform v2.0
ThreatGRID
NoNoNoAll eventsSyslogIntrusion Prevention System(IPS) v1.4.2 to v3.2.x
TippingPoint
NoYesYesAll eventsSyslogX505/X506 v2.5 and laterTippingPoint
NoNoYesAll eventsSyslogIPS 5500 v4.1 and laterTop Layer
NoNoYesAll eventsSNMPv1
SNMPv2
SNMPv3
ControlManager v5.0or v5.5withhotfix 1697or hotfix 1713after SP1 Patch 1
Trend Micro
NoNoYesAll eventsSyslogDeep Discovery v3.xTrend Micro
NoNoYesDetections, VirtualAnalyzer Analysis logs,System events
Log EventExtendedFormat(LEEF)
Deep Discovery EmailInspector v2.1
Trend Micro
NoNoYesAnti-Malware
Deep Security
Firewall
Integrity Monitor
Intrusion Prevention
Log Inspection
System
Web Reputation
Log EventExtendedFormat(LEEF)
Deep Security v9.6.1532 andlater
Trend Micro
NoNoYesAll eventsSyslogInterScanVirusWall v6.0andlater
Trend Micro
NoNoNoAll eventsSNMPv2Office Scan v8.x and v10.xTrend Micro
NoNoYesResource additions,removal, andmodification events
SyslogEnterpriseManager v5.2andlater
Tripwire
1163Copyright © 2018, Juniper Networks, Inc.
Chapter 145: JSA Supported DSMs
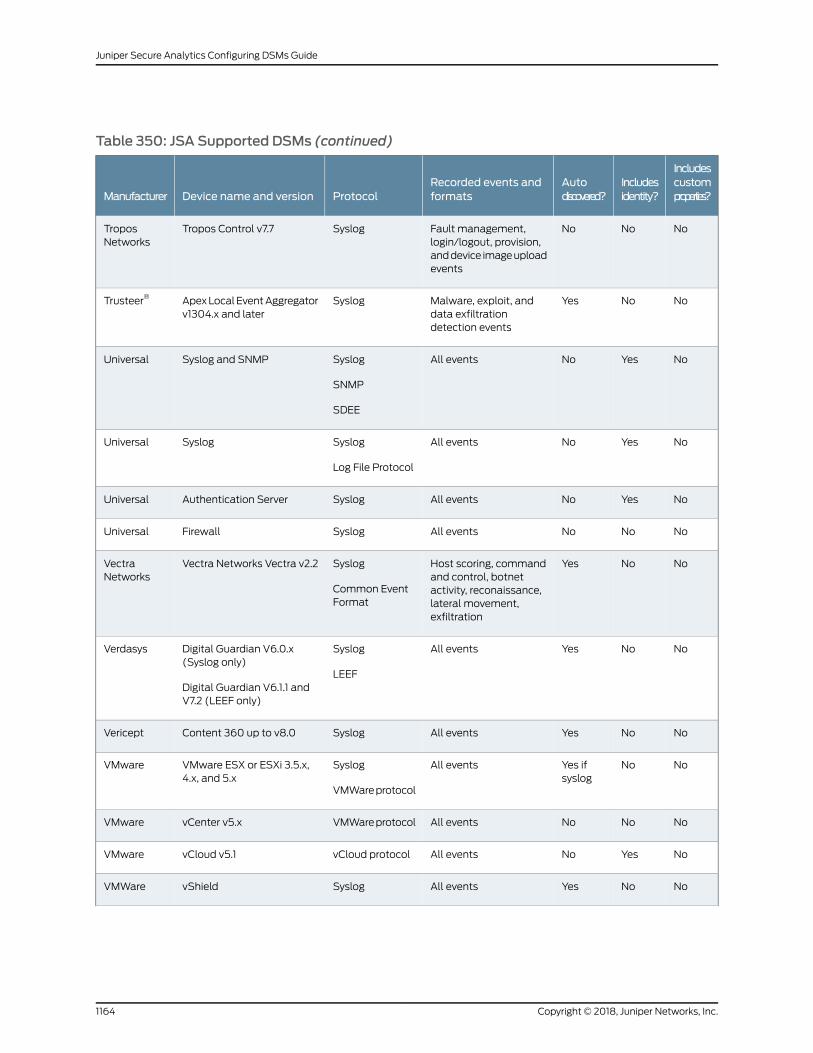
Table 350: JSA Supported DSMs (continued)
Includescustomproperties?
Includesidentity?
Autodiscovered?
Recorded events andformatsProtocolDevice name and versionManufacturer
NoNoNoFault management,login/logout, provision,anddevice imageuploadevents
SyslogTropos Control v7.7TroposNetworks
NoNoYesMalware, exploit, anddata exfiltrationdetection events
SyslogApexLocalEventAggregatorv1304.x and later
Trusteer®
NoYesNoAll eventsSyslog
SNMP
SDEE
Syslog and SNMPUniversal
NoYesNoAll eventsSyslog
Log File Protocol
SyslogUniversal
NoYesNoAll eventsSyslogAuthentication ServerUniversal
NoNoNoAll eventsSyslogFirewallUniversal
NoNoYesHost scoring, commandand control, botnetactivity, reconaissance,lateral movement,exfiltration
Syslog
Common EventFormat
Vectra Networks Vectra v2.2VectraNetworks
NoNoYesAll eventsSyslog
LEEF
Digital Guardian V6.0.x(Syslog only)
Digital Guardian V6.1.1 andV7.2 (LEEF only)
Verdasys
NoNoYesAll eventsSyslogContent 360 up to v8.0Vericept
NoNoYes ifsyslog
All eventsSyslog
VMWareprotocol
VMware ESX or ESXi 3.5.x,4.x, and 5.x
VMware
NoNoNoAll eventsVMWareprotocolvCenter v5.xVMware
NoYesNoAll eventsvCloud protocolvCloud v5.1VMware
NoNoYesAll eventsSyslogvShieldVMWare
Copyright © 2018, Juniper Networks, Inc.1164
Juniper Secure Analytics Configuring DSMs Guide
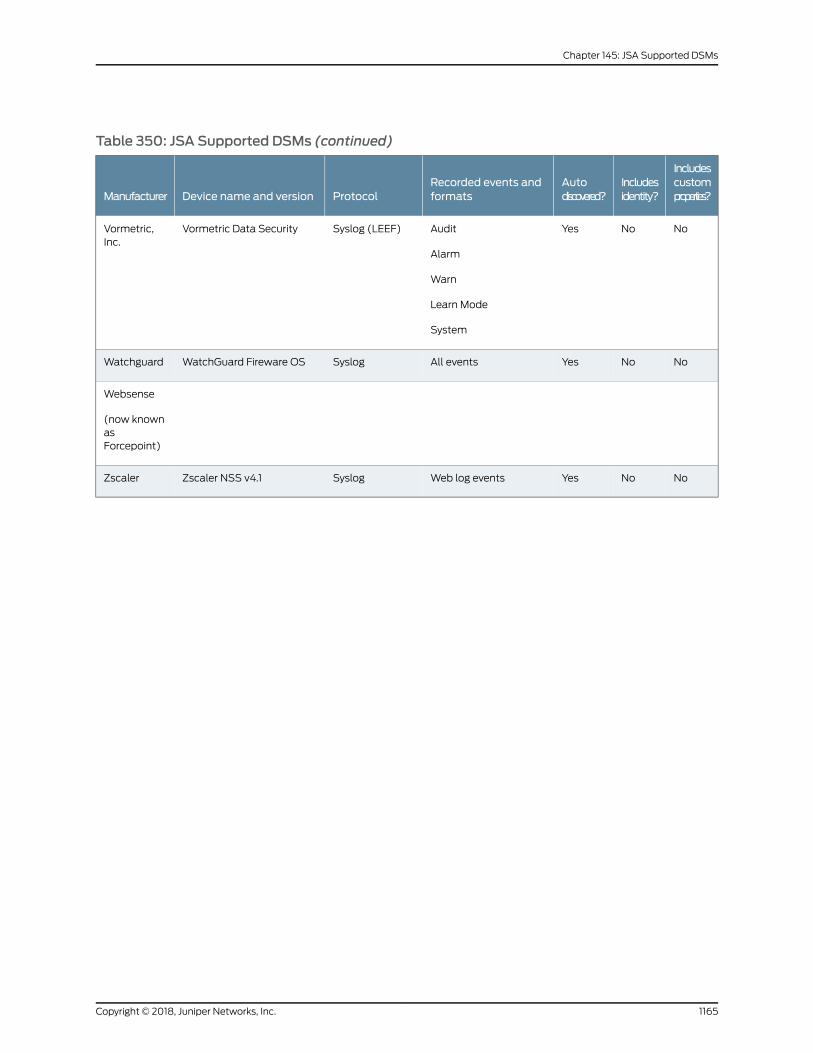
Table 350: JSA Supported DSMs (continued)
Includescustomproperties?
Includesidentity?
Autodiscovered?
Recorded events andformatsProtocolDevice name and versionManufacturer
NoNoYesAudit
Alarm
Warn
Learn Mode
System
Syslog (LEEF)Vormetric Data SecurityVormetric,Inc.
NoNoYesAll eventsSyslogWatchGuard Fireware OSWatchguard
Websense
(now knownasForcepoint)
NoNoYesWeb log eventsSyslogZscaler NSS v4.1Zscaler
1165Copyright © 2018, Juniper Networks, Inc.
Chapter 145: JSA Supported DSMs

Copyright © 2018, Juniper Networks, Inc.1166
Juniper Secure Analytics Configuring DSMs Guide
Related Documents


