JUC700 USB 3.0 Wormhole Switch DSS KVM Swap & File Transfer User Manual Manuel de l'utilisateur Benutzerhandbuch Manual del usuario 使用手冊 JUC700

Welcome message from author
This document is posted to help you gain knowledge. Please leave a comment to let me know what you think about it! Share it to your friends and learn new things together.
Transcript

JUC700 USB 3.0 Wormhole Switch DSS
KVM Swap & File Transfer
User Manual
Manuel de l'utilisateur
Benutzerhandbuch
Manual del usuario
使用手冊
JUC700
JUC700 Wormhole Switch DSS USB 3.0 Display Device with Data Sharing
User Manual
JUC700

3
JUC700 USB 3.0 Wormhole Switch DSS USER MANUAL
CONTENTS INTRODUCTION ..........................................................................4
Features ................................................................................................................ 4
System Requirements............................................................................................4
Package Contents ..................................................................................................4
Specifications ........................................................................................................ 5
Functions............................................................................................................... 5
GETTING STARTED ......................................................................6
I. Driver Installation on both computers ....................................... 6
Driver installation: Windows 10/8.1/8/7 ...................................................... 6
Driver installation: Windows XP ............................................................... 12
III. Device connection .................................................................... 17
IV. Settings for both computers .................................................... 20
Functions and how to use ......................................................... 22
I. Display Share ............................................................................ 23
I. Data share ................................................................................. 25
II. Device Share: Keyboard and Mouse Sharing .......................... 27
Driver Un-Installation ............................................................... 29
4
JUC700 USB 3.0 Wormhole Switch DSS USER MANUAL
INTRODUCTION
Thank you for purchasing the JUC700 USB 3.0 Wormhole Switch DSS (Dual System Swap)! This amazing device gives you the capability to share video graphics card resources between two computers, and quickly transfer data, pictures, music, videos or other files between two computers at the super-speed rate of 5Gbps. The JUC700 USB 3.0 Wormhole Switch DSS not only lets you share the keyboard and mouse with another computer, but also supports multi-display environments.
Features Easily transfer your data, photos, music, and videos between your computer & tablet Mirror & extend your display between two computers Share hard-drive resources between two computers Save additional cost by utilizing multiple computer/tablet hard drives and/or monitors Conforms to USB 3.0, 2.0 and 1.1. Conforms to Super-speed USB 3.0 (5Gbps) transfer rate. Supports touch screen function
System Requirements OS: Windows 10/8.1/8/7/XP Available on USB 3.0 port CPU: i3 Dual core 2.8 GHz RAM: 2GB memory or higher
Package Contents JUC700 USB 3.0 Wormhole Switch DSS *1pcs QIG *1pcs Driver CD*1pcs

5
JUC700 USB 3.0 Wormhole Switch DSS USER MANUAL
Specifications
Power Power Mode Bus-powered Interface Interface USB 3.0 Type-A male connector *2 Video Display Supports Modes Video Playback: 1080P
Extended/Mirror Display Physical Specifications Housing Material Aluminum Dimensions Main body: 61(W) X 19 (H) X 10.5 (D)
mm Cable length 150 cm (5ft) Weight Approximately 45 g (including cable)
Functions
Supported Operation Systems Windows to Windows
Device Share: Keyboard & Mouse Control Switching Use your mouse to move off the edge of the screen
Yes
Keyboard & Mouse sharing Yes Display Share Video Display Sharing Yes (Mirror/Extend) Touch Screen Control Yes Data Share Data Transfer Application Yes
6
JUC700 USB 3.0 Wormhole Switch DSS USER MANUAL
GETTING STARTED
Please read BEFORE Installation
Install driver completely on both computers before inserting the USB Cable of JUC700
USB 3.0 Wormhole Switch DSS into your computers. You can connect any side/color of the USB Cable of JUC700 USB 3.0 Wormhole Switch
DSS to either of your computers. Run the setup program as An administrator to avoid errors in installation. Uninstall the previous driver first before updating the latest driver. The display screen will flash during installation.
I. Driver Installation on both computers: Please install the driver on both of the computers that will be connected to the JUC700. In the future, please also remember to update the driver on both sides.
*Please make sure the USB cable of JUC700 USB 3.0 Wormhole Switch DSS is unplugged from your PC or Notebook before executing the installation program.
Driver installation: Windows 10/8.1/8/7 Please complete the following steps to start the application. Insert the Driver CD into your computer’s CD-ROM drive. The setup program should be launched automatically. If Autorun does not begin, go to Computer, click on your CD drive and manually run the setup CD by double-clicking on Setup.exe.
1. The installation page will be launched. To start click on Install the Latest Driver (Please make sure your computer is connected to the internet or press Install Driver to start the installation).

7
JUC700 USB 3.0 Wormhole Switch DSS USER MANUAL
When the User Account Control appears, please press Yes to continue installation

8
JUC700 USB 3.0 Wormhole Switch DSS USER MANUAL
Next> 2. After pressing the installation option, the InstallShield Wizard will launch, click to continue.

9
JUC700 USB 3.0 Wormhole Switch DSS USER MANUAL
Next > 3. Read the license agreement and check I accept the terms of the license agreement. Click
to accept and continue.

10
JUC700 USB 3.0 Wormhole Switch DSS USER MANUAL
4. Driver installation in process
11
JUC700 USB 3.0 Wormhole Switch DSS USER MANUAL
Finish
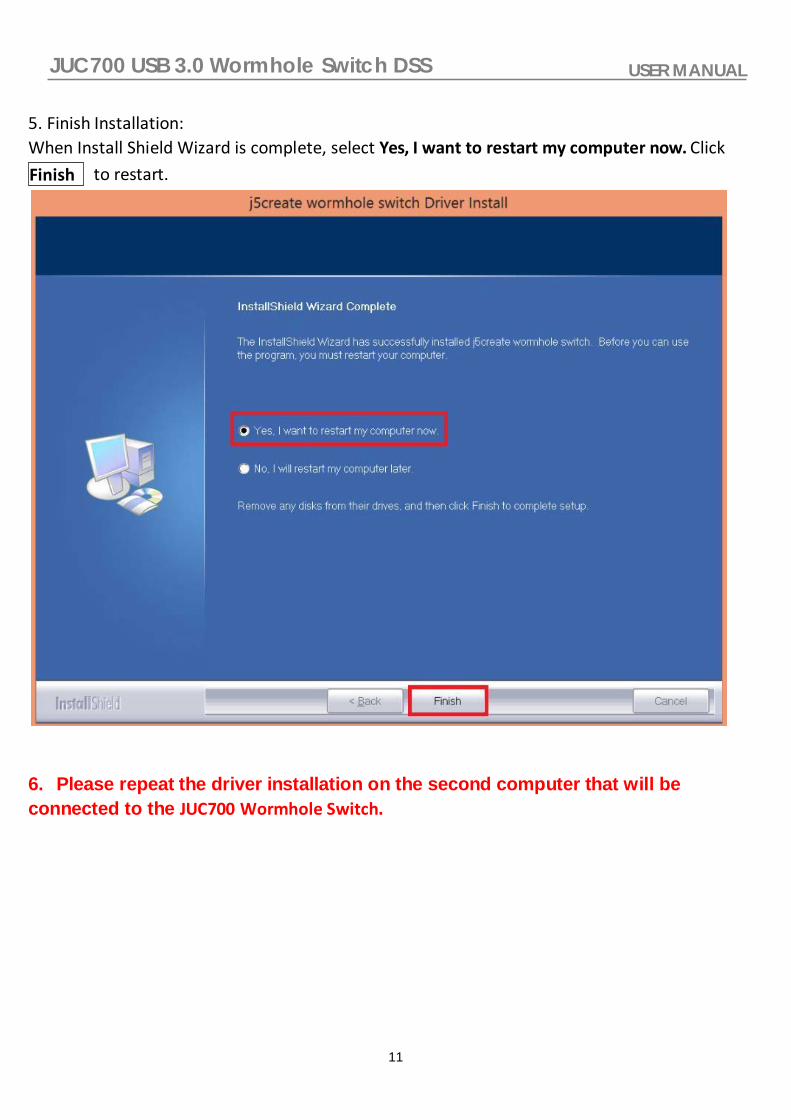
5. Finish Installation: When Install Shield Wizard is complete, select Yes, I want to restart my computer now. Click
to restart.
6. Please repeat the driver installation on the second computer that will be connected to the JUC700 Wormhole Switch.

12
JUC700 USB 3.0 Wormhole Switch DSS USER MANUAL
Driver installation: Windows XP
Device Driver Installation This section illustrates the procedure for the installation of the device driver on Windows XP. To start, insert the Driver CD into your computer’s CD-ROM drive. The setup program should be launched automatically. If Autorun does not begin, go to Computer, click on your CD drive, and manually run the setup CD by double-clicking on Setup.exe
*Please make sure the USB cable of JUC700 USB 3.0 Wormhole Switch DSS is unplugged from your PC or Notebook before executing the installation program.
1. The installation page will be launched. To start click on Install the Latest Driver (Please make
sure your computer is connected to the internet or press Install Driver to start the installation).
13
JUC700 USB 3.0 Wormhole Switch DSS USER MANUAL
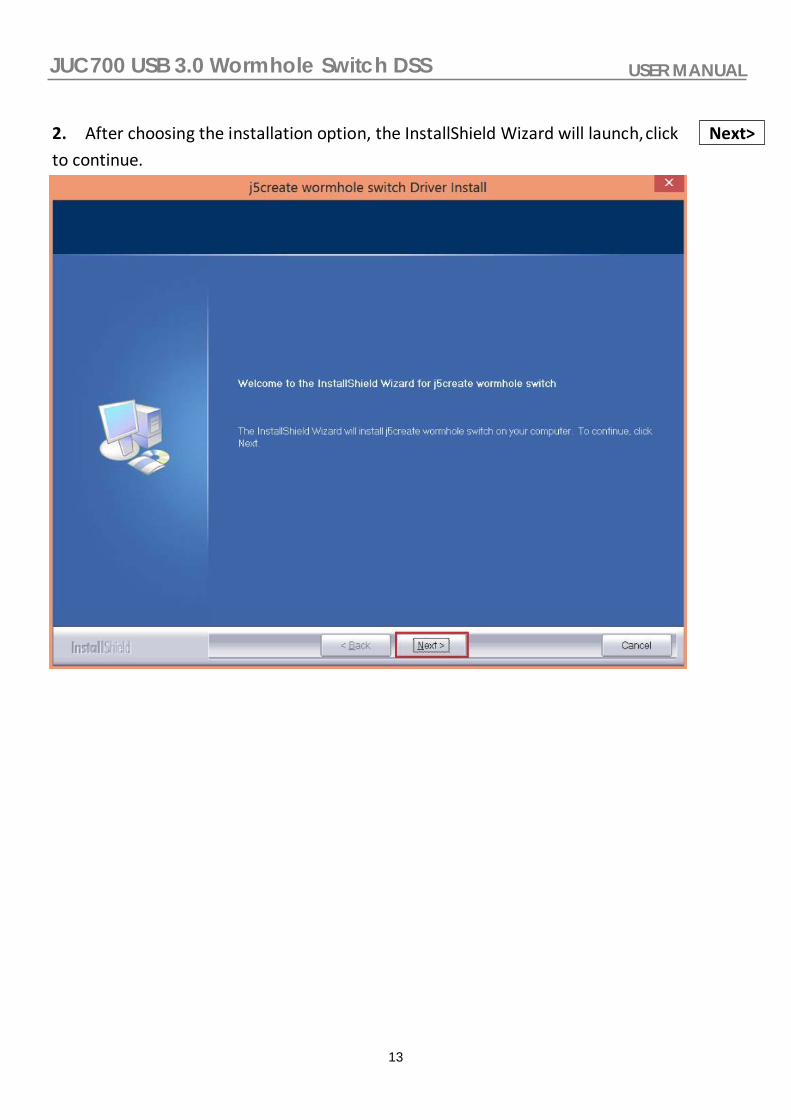
2. After choosing the installation option, the InstallShield Wizard will launch, click to continue.
Next>

14
JUC700 USB 3.0 Wormhole Switch DSS USER MANUAL
Next > 3. Read the license agreement and check I accept the terms of the license agreement. Click
to accept and continue.

15
JUC700 USB 3.0 Wormhole Switch DSS USER MANUAL
4. Driver installation in process
16
JUC700 USB 3.0 Wormhole Switch DSS USER MANUAL
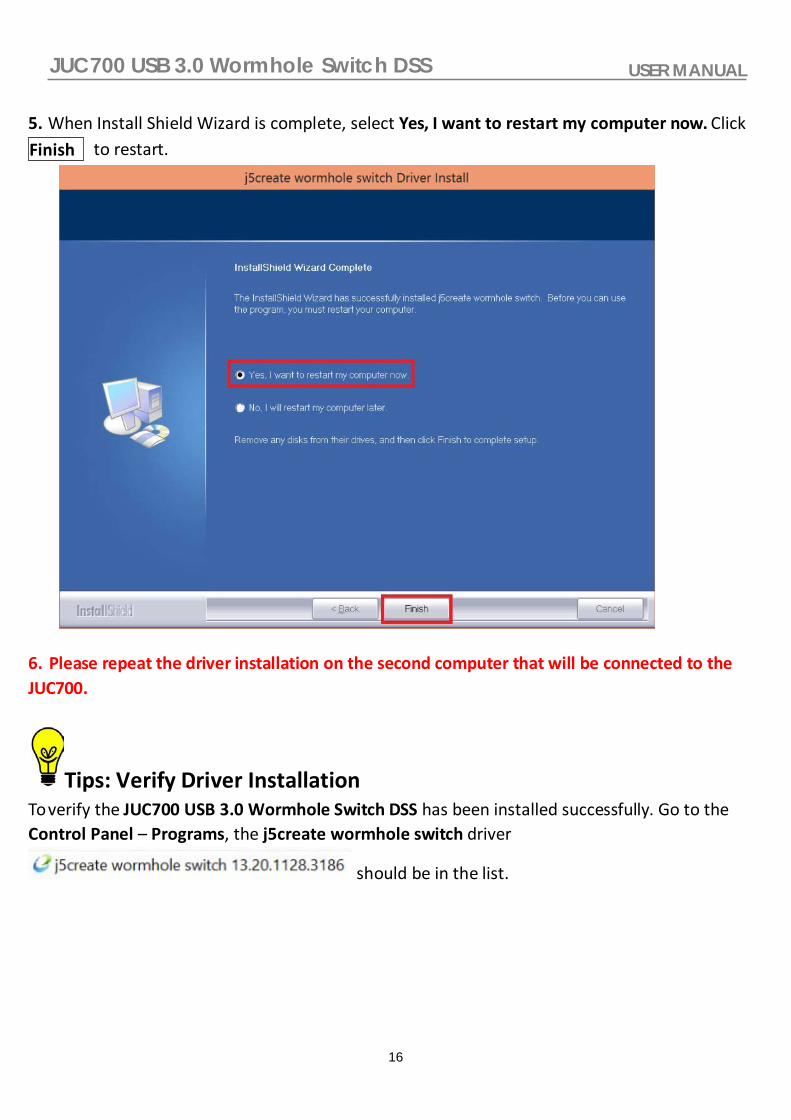
Finish 5. When Install Shield Wizard is complete, select Yes, I want to restart my computer now. Click
to restart.
6. Please repeat the driver installation on the second computer that will be connected to the JUC700.
Tips: Verify Driver Installation To verify the JUC700 USB 3.0 Wormhole Switch DSS has been installed successfully. Go to the Control Panel – Programs, the j5create wormhole switch driver
should be in the list.

17
JUC700 USB 3.0 Wormhole Switch DSS USER MANUAL
II. Device connection After the computer is rebooted, connect either end of the JUC700 USB 3.0 Wormhole Switch DSS into a USB 3.0 port on one of the two computers. And connect the other end of the JUC700 USB 3.0 Wormhole Switch DSS into the second computer. (The computer might take some time to recognize the JUC700 the 1st time it is plugged in.)
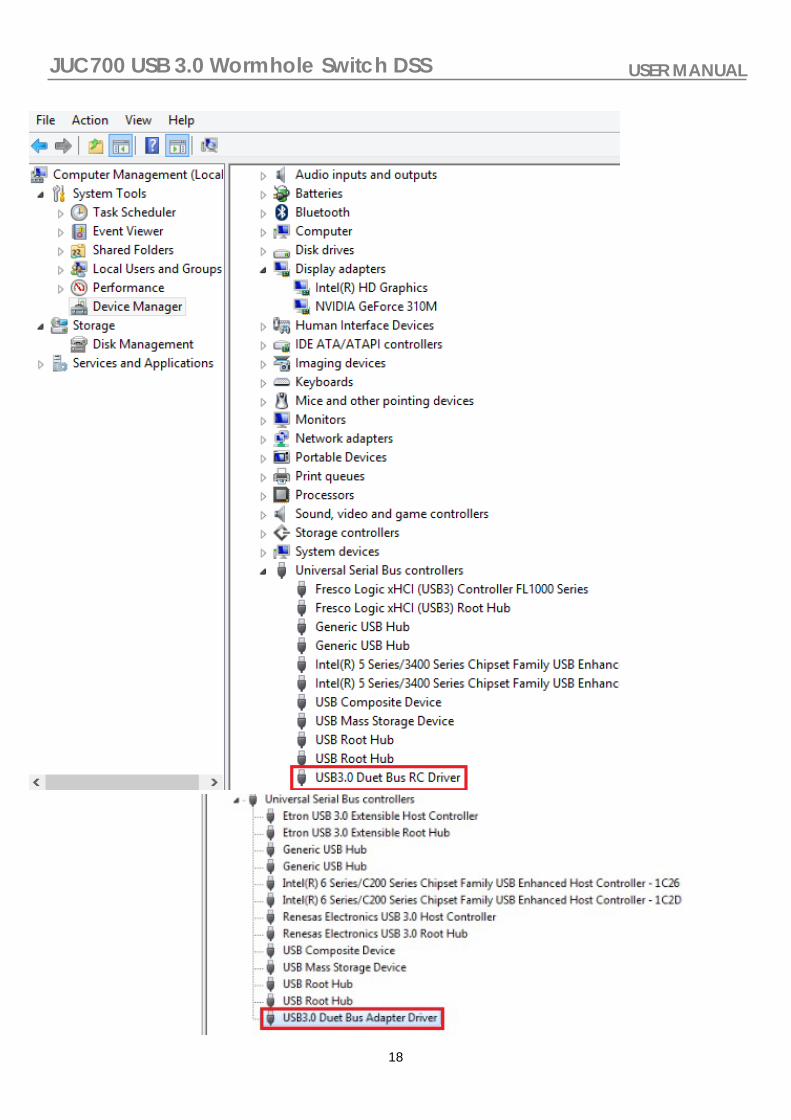
Tips: Verify Device Driver Installation and Hardware connections The following procedure helps you to verify the success of JUC700 USB 3.0 Wormhole Switch DSS driver installation after connecting it to both computers.
Right-click My Computer Manage Device Manager and click + sign of Universal Serial Bus controllers, the device name for the JUC700 USB 3.0 Wormhole Switch DSS will be shown on the list.
18
JUC700 USB 3.0 Wormhole Switch DSS USER MANUAL

19
JUC700 USB 3.0 Wormhole Switch DSS USER MANUAL
Tips: JUC700 USB 3.0 Wormhole Switch DSS has two side connectors in two colors (blue & green) the icons that appear in the control bar will help you to distinguish between the two computers.
On the computer with the blue side of the cable plugged in, the computer shows the blue icon along with the blue control bar.
This will be the Blue computer .
On the computer with the green side of the cable plugged in, the computer shows the green icon along with the green control bar.
This will be the .
Green computer

20
JUC700 USB 3.0 Wormhole Switch DSS USER MANUAL
III. Settings for both computers Once the JUC700 USB 3.0 Wormhole Switch DSS is plugged in, there are a few settings to adjust on both computers (NB/PC/AIO/Tablet):
Select the position of the other computer.
21
JUC700 USB 3.0 Wormhole Switch DSS USER MANUAL
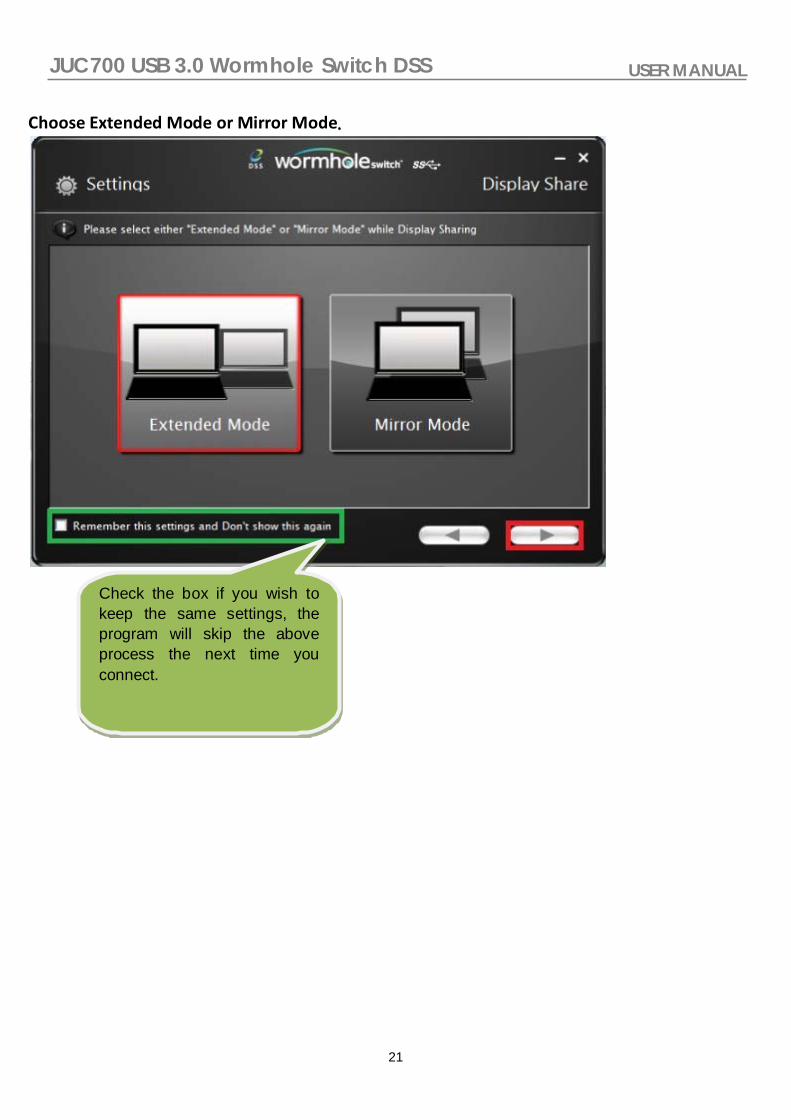
Check the box if you wish to keep the same settings, the program will skip the above process the next time you connect.
Choose Extended Mode or Mirror Mode.

22
JUC700 USB 3.0 Wormhole Switch DSS USER MANUAL
Functions and how to use After the settings have been adjusted, a control bar appears in the righthand corner of both screens. The control bar allows you to control Display and Data sharing between the two computers.
Close Control bar: Re-start Control bar: Double click the icon on the tast bar.
23
JUC700 USB 3.0 Wormhole Switch DSS USER MANUAL
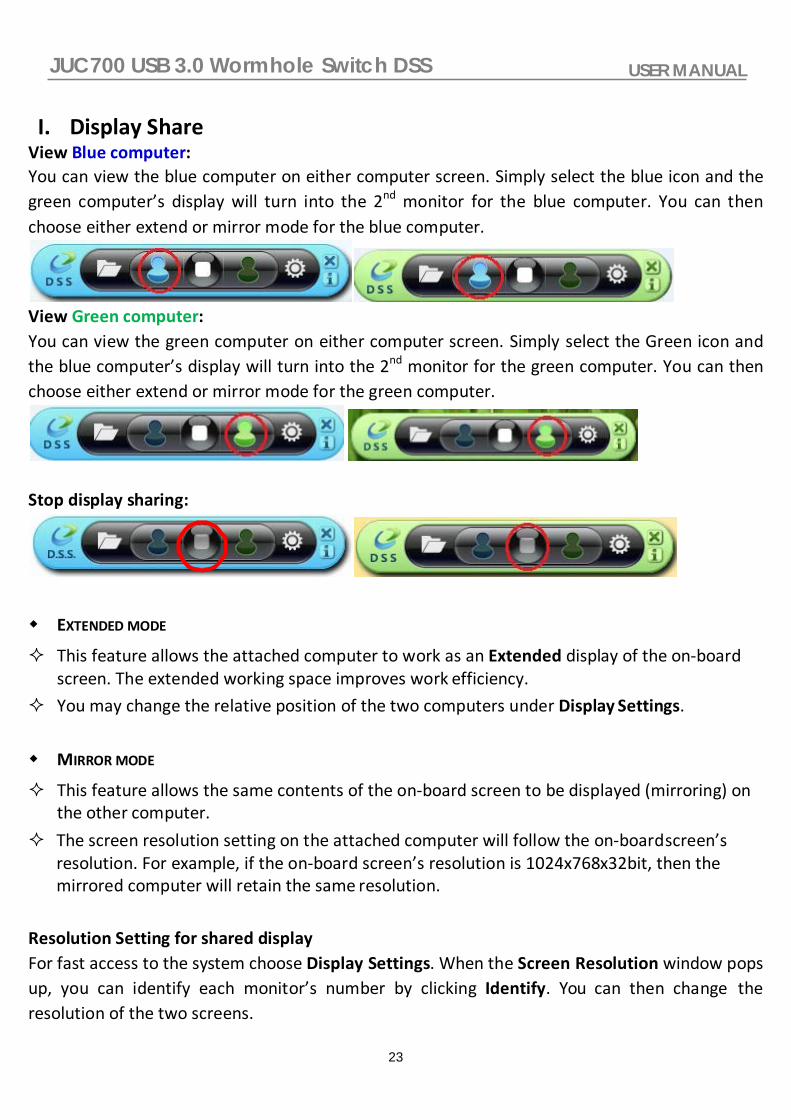
I. Display Share View Blue computer: You can view the blue computer on either computer screen. Simply select the blue icon and the green computer’s display will turn into the 2nd monitor for the blue computer. You can then choose either extend or mirror mode for the blue computer.
View Green computer: You can view the green computer on either computer screen. Simply select the Green icon and the blue computer’s display will turn into the 2nd monitor for the green computer. You can then choose either extend or mirror mode for the green computer.
Stop display sharing:
EXTENDED MODE
This feature allows the attached computer to work as an Extended display of the on-board screen. The extended working space improves work efficiency.
You may change the relative position of the two computers under Display Settings.
MIRROR MODE
This feature allows the same contents of the on-board screen to be displayed (mirroring) on the other computer.
The screen resolution setting on the attached computer will follow the on-board screen’s resolution. For example, if the on-board screen’s resolution is 1024x768x32bit, then the mirrored computer will retain the same resolution.
Resolution Setting for shared display For fast access to the system choose Display Settings. When the Screen Resolution window pops up, you can identify each monitor’s number by clicking Identify. You can then change the
resolution of the two screens.

24
JUC700 USB 3.0 Wormhole Switch DSS USER MANUAL
Touch Screen Control sharing: If the computer has a touch screen, you can directly use the touch screen to control the computer being mirrored or extended on the touch screen.

25
JUC700 USB 3.0 Wormhole Switch DSS USER MANUAL
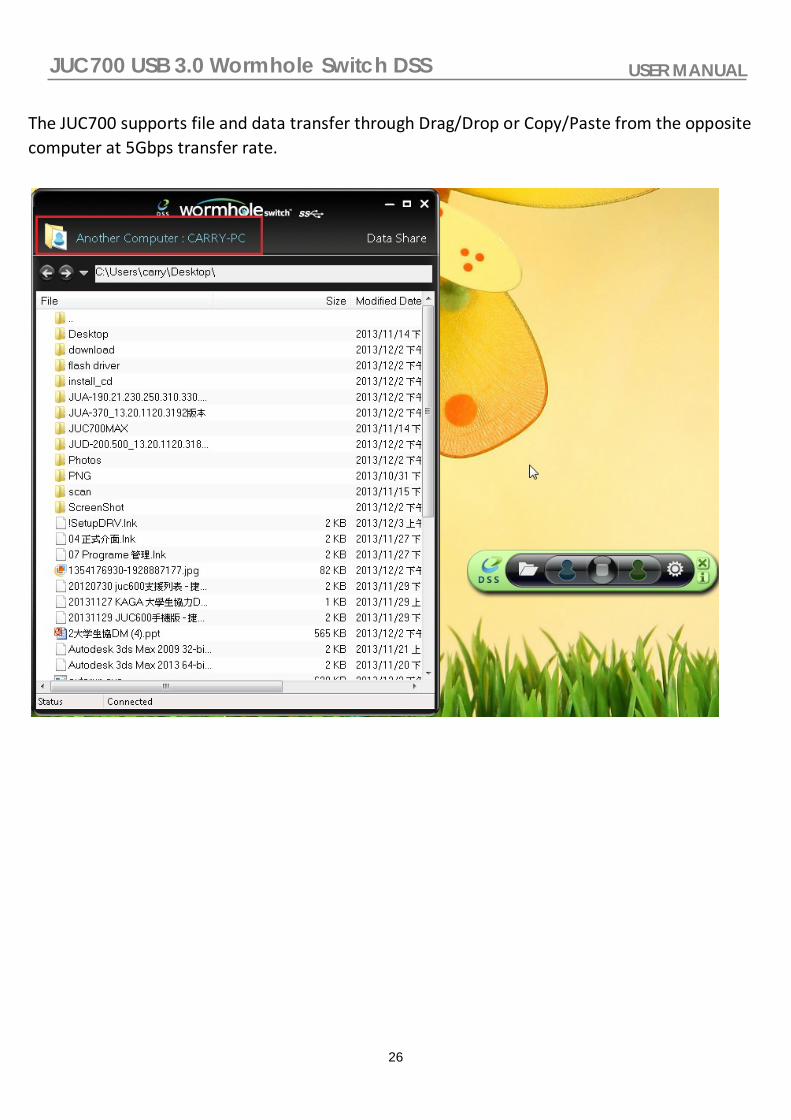
II. Data share View and transfer data from the opposite computer (Green computer), by clicking the folder icon on the blue tool bar.
A file transfer shuttle tool will appear enabling you to transfer data from the Green computer to the Blue computer. The JUC700 supports file and data transfer through Drag/Drop or Copy/Paste from the opposite computer at 5Gbps transfer rate.
View and transfer data from the opposite computer (Blue computer) by clicking the folder icon in the tool bar in the green tool bar.
A file transfer shuttle tool will appear enabling you to transfer data from the Blue computer to the Green computer.
26
JUC700 USB 3.0 Wormhole Switch DSS USER MANUAL
The JUC700 supports file and data transfer through Drag/Drop or Copy/Paste from the opposite computer at 5Gbps transfer rate.

27
JUC700 USB 3.0 Wormhole Switch DSS USER MANUAL
III. Device Share: Keyboard and Mouse Sharing Move your mouse cursor between two computers naturally and seamlessly.
Switch the Keyboard usage to the other computer. Use the keyboard of the first computer to
type on the second computer.
Note: Please use a Mouse and Keyboard set, because the Keyboard Switching function always follows the mouse cursor.
Clipboard Sharing With the clipboard sharing feature you can easily edit, copy or paste clipboard content bi-directionally between two computers.

28
JUC700 USB 3.0 Wormhole Switch DSS USER MANUAL
1. Open a file and select the content (text/ pictures) you want from the first computer, right
click and select “Copy”. 2. Move the cursor to the location of the 2nd computer to place the Content (text/ pictures),
and right click and select “Paste”.
29
JUC700 USB 3.0 Wormhole Switch DSS USER MANUAL
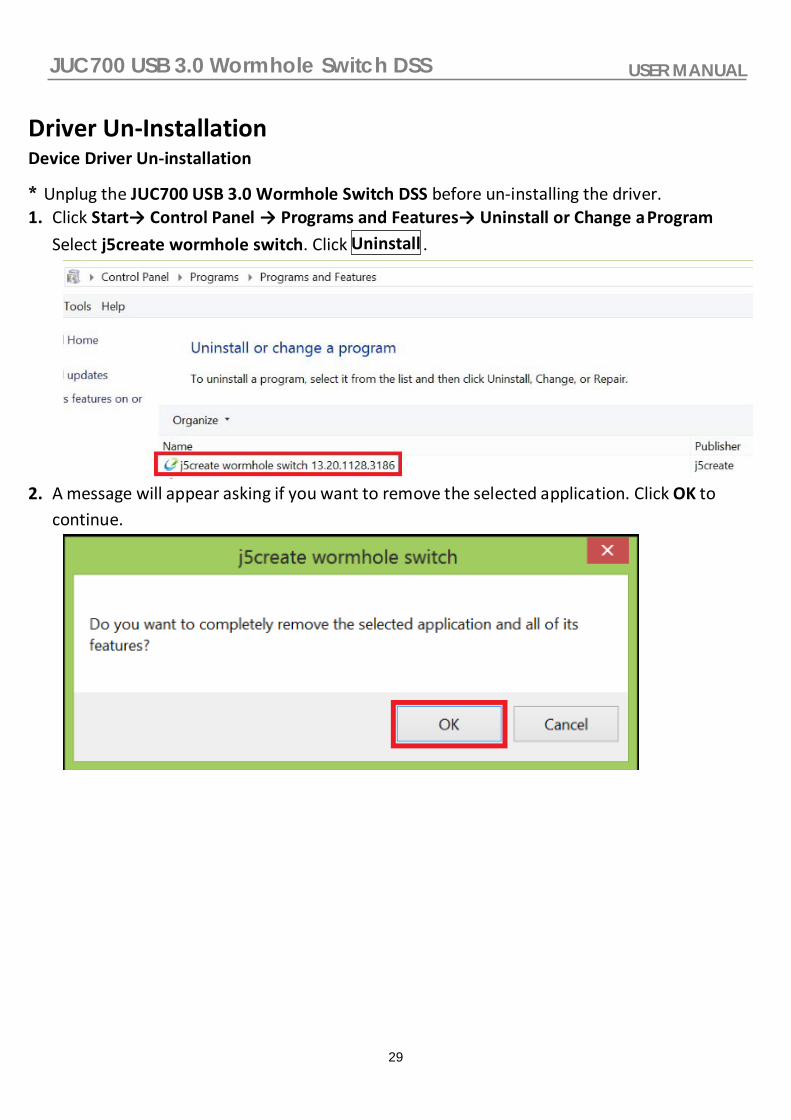
Driver Un-Installation Device Driver Un-installation
* Unplug the JUC700 USB 3.0 Wormhole Switch DSS before un-installing the driver. 1. Click Start→ Control Panel → Programs and Features→ Uninstall or Change a Program
Select j5create wormhole switch. Click .
2. A message will appear asking if you want to remove the selected application. Click OK to continue.
Uninstall
30
JUC700 USB 3.0 Wormhole Switch DSS USER MANUAL
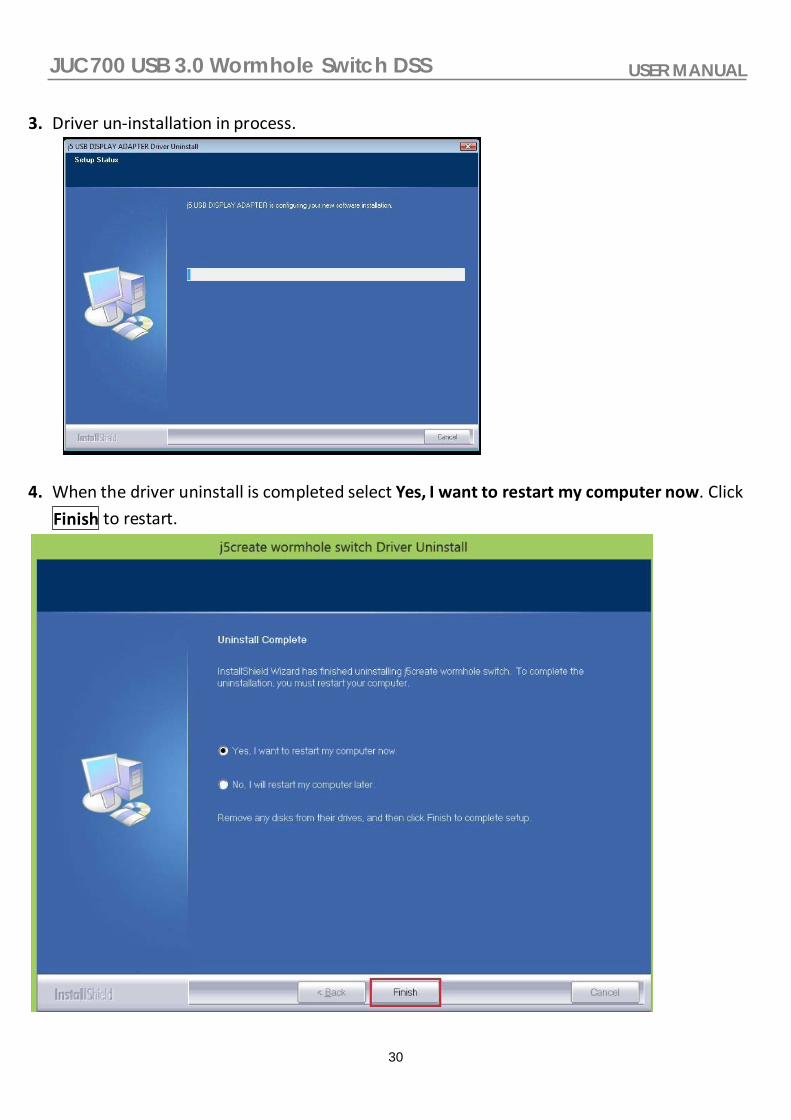
Finish
3. Driver un-installation in process.
4. When the driver uninstall is completed select Yes, I want to restart my computer now. Click
to restart.

31
JUC700 USB 3.0 Wormhole Switch DSS USER MANUAL
TROUBLESHOOTING If you have any questions about the use of the JUC700, please follow the instructions below. If any further assistance is needed, please visit our website or call j5create support hotline. Known Issues
- Direct 3D is not supported under XP. It would be supported under Win 7 Aero mode. General Recommendations
- Incompatibilities exist when using other Video over USB Devices on a single system. Please ensure that all other Video over USB drivers are uninstalled before continuing with j5create installation.
- Check to make sure that the device is plugged in correctly to the host system. - Make sure that the USB port that you are using is for JUC700. - Unplug the USB cable of USB Display device and re-insert it. - Check to see that the monitor is connected correctly and is powered ON. - Make sure to restart your computer after the driver installation. - Try a different USB port and/or computer. - Unplug all other USB devices from the system. - Try connecting the USB cable of USB Display device directly to the computer instead of through a hub. - Reset/refresh/resynchronize your monitor.
Media Playback
- During video playback on all platforms, please do not change the display mode, position or arrangement of the video player window (such as dragging the video player window between the main display and attached display). This may cause the video player to stop playing. We suggest stopping the video playback, moving the window to the USB graphics device attached display and then selecting the video clip to start playing.
- Cursor movement is slower when the mouse hovers on the video region of the Flash player. - Downsizing your screen landscape lower than 50 % will help smooth out Jerky video playback for videos
running in Full Screen Mode. - You may experience poor video performance on USB graphics devices with low spec PC systems. - Video rendering using hardware overlays is supported. - Some DVD playback software packages do not support playing on a second display adapter of any kind.
You may try to open the media player in the secondary display first before you start playing the DVD. - Your PC may lack certain media codec to support the playback of certain video formats. Please use the
link below to install license free media codec. K- Lite: http://www.free-codecs.com/download/K_Lite_Codec_Pack.htm
- Video/Media players have different decoding capabilities under different display modes. For better performance watching DVDs or certain video formats on the attached USB graphics display attached, it is recommended to use the following license free software: Media Player Classic: http://sourceforge.net/projects/guliverkli/
Others
- Some graphics card, i.e. Intel, prevents other secondary graphics chipset from being set as the primary card. As the result of this, primary mode might not work or the display maybe disabled.
- If you have problems during the boot up process, start your computer in Safe Mode and uninstall the driver. Hold the CTRL key until the Windows startup menu appears and select Safe Mode.
- To verify the driver version that you installed, please click “Control Panel” → “Add or Remove Programs” to check the program: USB Display Device (the number means the driver version). Some limitation exists in different media player on file format support. We enclose our compliance test result in the tables according to different operating system, main system graphics card/chipset, media players, and the supported media format. It will be updated periodically with new version of media players or our latest driver.

32
JUC700 USB 3.0 Wormhole Switch DSS USER MANUAL
TECHNICAL SUPPORT If you have any issue using this product please follow instruction below before returning this product to the store.
1. The User Manual It contains the detail instruction and troubleshooting section. Many common issues can be easily resolved by reading the user manual.
2. Online Support Please visit the j5create website (www.j5create.com) to find the latest software for your device. If you are still experiencing the same issue, you can submit a description of your problem via email [email protected] . Our j5create technical service support team will reply to you within the next 24 business hours.
3. Telephone Support Please feel free to call us at 888-689-4088 and one of our support technicians will be happy to assist you.
Customer Service: Toll free number: 888-988-0488 Technical Support: Toll free number: 888-689-4088
Email: [email protected]
Please contact Technical Support during business hours. 10:00AM-6:00PM E.S.T Monday- Friday for further assistance.

33
JUC700 USB 3.0 Wormhole Switch DSS USER MANUAL
WARRANTY OF j5create j5create offers a limited 1-year warranty. User’s wear & tear damage is not included. The user shall call or email j5create customer service with defect information of the product and obtain a return authorization number. Users are responsible for one way return freight cost and we will take care of one way freight back. In order to obtain a return authorization, user should have the following information handy when calling or emailing the service team: (i) A copy of original purchase invoice to verify your warranty (ii) A product serial number (iii) A description of the problem (iv) A return Material authorization number (v) Customer’s Name, address, and telephone number j5create does not warrant that the operation of the product will be uninterrupted or error-free. j5create is not responsible for damage arising from failure to follow instructions relating to the product’s use. This warranty does not apply to:(a) consumable parts, unless damage has occurred due to a defect in materials or workmanship; (b) cosmetic damage, including but not limited to scratches, dents ,and broken plastic on ports; (c) damage caused by use with non-j5create products; (d) damage cause by natural disasters (flood, fire, earthquake, lightning strike, typhoon, etc.); (e) damage caused by human misuse( lost, accident, abuse, misuse or other external causes); (f) damage caused by operating the product outside the permitted or intended uses described by j5create; (g) damage caused by service (including upgrades and expansions) performed by anyone who is not a representative of j5create or a j5create Authorized Service Provider; (h) a product or part that has been modified to alter functionality or capability without the written permission of j5create; or (i) if any j5create serial number on the product has been removed or defaced. If such a situation occurs, j5create will calculate the cost of materials and repair for your reference. This warranty is given by j5create in lieu of any other warranties express or implied. For more information, please visit our website http://www.j5create.com Copyright© 2019 j5create. All rights reserved. All trade names are registered trademarks of their respective owners. Features and specifications are subject to change without notice. Product may not be exactly as shown in the diagram.

34
JUC700 USB 3.0 Wormhole Switch DSS USER MANUAL
REGULATORY COMPLIANCE FCC This equipment has been tested and found to comply with FCC Part 15 Subpart B § 15.109/15.107 Class B. Operation is subject to the following two conditions: • This device may not cause harmful interference • This device must accept any interference, including interference that may cause undesired operation of the device. CE This equipment is in compliance with the requirements of the following regulations: EN 55022 Class B (2006), EN 55024 (1998+A1:2001+ A2:2003), (IEC/EN 61000-4-2 (1995+A1:1998+A2:2001)/-3(2006) C-Tick This equipment is in compliance with the requirements of the following regulations: EN 55022 (2006) Class B, AS/NZS CISPR22 © IEC: 2005. VCCI This equipment is in compliance with the requirements of the following regulations: CISPR22 © IEC: 2005 Disclaimer Information in this document is subject to change without notice. The manufacturer does not make any representations or warranties (implied or otherwise) regarding the accuracy and completeness of this document and shall in no event be liable for any loss of profit or any commercial damage, including but not limited to special, incidental, consequential, or other damage. No part of this document may be reproduced or transmitted in any form by any means, electronic or mechanical, including photocopying, recording or information recording and retrieval systems without the expressed written permission of the manufacturer.
JUC700 Wormhole Switch DSS Périphérique d'affichage USB 3.0 avec partage de données
Manuel de l'utilisateur
JUC700

JUC700 USB 3.0 Wormhole Switch DSS MANUEL D'UTILISATION
JUC700
SOMMAIRE INTRODUCTION ..........................................................................1
Fonctionnalités ......................................................................................... 1
Environnements requis ............................................................................. 1
Contenu de l'emballage ............................................................................ 1
Caractéristiques ....................................................................................... 2
Fonctions ................................................................................................. 2
MISE EN ROUTE ..........................................................................3
I. Installation du pilote sur les deux ordinateurs ......................... 3
Installation du pilote : Windows 10/8.1/8/7 ................................................ 3
Installation du pilote : Windows XP ........................................................... 9
I. Branchement du périphérique ................................................. 14
Tips: Vérification de l'installation du pilote ........................................ 14
II. Paramètres pour les deux ordinateurs.................................... 17
Fonctions et mode d'emploi ...................................................... 19
I. Partage d'écran ........................................................................ 20
II. Partage de données ................................................................. 22
III. Partage de périphérique : Partage de clavier et souris .......... 24
Désinstallation du pilote ..................................................26
JUC700 USB 3.0 Wormhole Switch DSS MANUEL D'UTILISATION
JUC700
INTRODUCTION
Merci d'avoir acheté le JUC700 USB 3.0 Wormhole Switch DSS (Dual System Swap, Échange de système double) ! Cet étonnant périphérique vous donne la possibilité de partager les ressources vidéo de la carte graphique entre deux ordinateurs, et de transférer rapidement des données, des images, de la musique, des vidéos ou d'autres fichiers entre deux ordinateurs avec un super taux de 5 Gbit/s. Le JUC700 USB 3.0 Wormhole Switch DSS vous permet non seulement de partager le clavier et la souris avec un autre ordinateur, mais il prend également en charge les environnements multi-écrans.
Fonctionnalités Transférez facilement vos données, photos, musiques et vidéos entre votre ordinateur
et votre tablette. Faites une copie miroir ou étendez votre écran entre deux ordinateurs. Partagez les ressources de disque dur entre deux ordinateurs. Faites des économie supplémentaires en utilisant plusieurs disques durs d'ordinateurs /
tablettes et / ou moniteurs. Conforme à l'USB 3.0, 2.0 et 1.1. Conforme au taux de transfert de l'USB 3.0 Super-speed (5 Gbit/s). Prend en charge la fonction d'écran tactile.
Environnements requis
Windows 10 / 8.1 / 8 / 7 / XP Un Port USB disponible (USB 3.0 est recommandé) CPU: i3 Dual core 2.8 GHz RAM: 2GB memory or higher
Contenu de l'emballage
JUC700 USB 3.0 Wormhole Switch DSS CD de pilotes avec E-manuel
Guide d'installation rapide

JUC700 USB 3.0 Wormhole Switch DSS MANUEL D'UTILISATION
JUC700
Caractéristiques
Alimentation Mode d'alimentation Alimenté par le bus Interface Interface Connecteur mâle USB 3.0 Type-A * 2 Affichage vidéo Modes pris en charge Lecture vidéo : 1080P
Affichage miroir / étendu Caractéristiques physiques Matériau du boîtier Aluminium Dimensions Corps principal : 61(L) X 19 (H) X
10,5 (P) mm Longueur du câble 150 cm (5 pi) Poids Environ 45 g (câble compris)
Fonctions
Systèmes d'exploitation pris en charge Windows vers Windows
Partage de périphérique : Commutation des contrôle clavier et souris Utilisez votre souris pour déplacer le bord de l'écran
Oui
Partage de clavier et souris Oui Partage d'écran Partage d'affichage vidéo Oui (Miroir / Étendu) Contrôle d'écran tactile Oui Partage de données Application de transfert de données
Oui
JUC700 USB 3.0 Wormhole Switch DSS MANUEL D'UTILISATION
JUC700
MISE EN ROUTE Veuillez lire AVANT installation
Installez le pilote complètement sur les deux ordinateurs avant d'insérer le câble
USB du JUC700 USB 3.0 Wormhole Switch DSS dans vos ordinateurs.
Vous pouvez connecter n'importe quel côté / couleur du câble USB du JUC700
USB 3.0 Wormhole Switch DSS à chacun de vos ordinateurs.
Exécutez le programme d'installation en tant que administrateur pour éviter les
erreurs d'installation.
Désinstallez d'abord la version précédente du pilote avant de mettre le pilote le
plus récent.
L'écran d'affichage clignote lors de l'installation.
I. Installation du pilote sur les deux ordinateurs : Veuillez installer le pilote sur les deux ordinateurs qui seront connectés au JUC700. Dans l'avenir, s'il vous plaît me souviens aussi de mettre à jour le pilote sur les deux côtés.
*Veuillez vous assurer que le câble USB du JUC700 USB 3.0 Wormhole Switch DSS est
débranché de votre PC ou portable avant d'exécuter le programme d'installation.
Installation du pilote : Windows 10 / 8.1 / 8 / 7 Veuillez effectuer les étapes suivantes pour démarrer l'application. Insérez le CD de pilotes dans le lecteur de CD-ROM de votre ordinateur. Le programme d'installation doit se lancer automatiquement. Si l'autorun ne démarre pas, aller dans Ordinateur, cliquez sur votre lecteur de CD et exécutez manuellement le CD d'installation en double-cliquant sur Setup.exe
1. La page d'installation sera lancée. Pour commencer installation, cliquez sur « Installer
le dernier pilote ». Assurez-vous que le réseau est disponible appuyez sur « Installer le
pilote » pour démarrer l'installation.

JUC700 USB 3.0 Wormhole Switch DSS MANUEL D'UTILISATION
JUC700
2. Si la fenêtre « Contrôle de compte utilisateur » apparaît à l'écran, cliquez sur « Oui
» pour continuer.

JUC700 USB 3.0 Wormhole Switch DSS MANUEL D'UTILISATION
JUC700
Suivant>
3. Après avoir appuyé sur l'option d'installation, l'assistant d'installation va se lancer,
cliquez sur pour continuer.

JUC700 USB 3.0 Wormhole Switch DSS MANUEL D'UTILISATION
JUC700
Suivant > 4. Lisez le contrat de licence et cochez la case « J'accepte les termes du contrat de licence. » Cliquez sur pour l'accepter et continuer.

JUC700 USB 3.0 Wormhole Switch DSS MANUEL D'UTILISATION
JUC700
JUC700 USB 3.0 Wormhole Switch DSS MANUEL D'UTILISATION
JUC700
Terminer
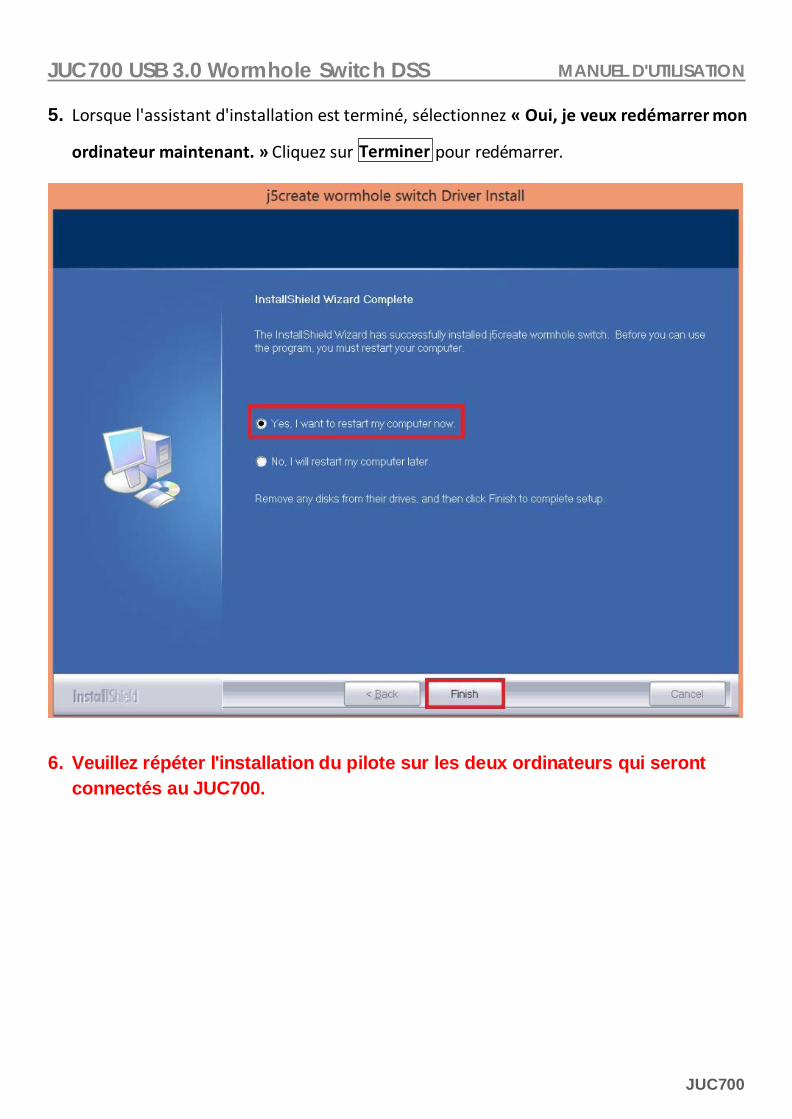
5. Lorsque l'assistant d'installation est terminé, sélectionnez « Oui, je veux redémarrer mon
ordinateur maintenant. » Cliquez sur pour redémarrer.
6. Veuillez répéter l'installation du pilote sur les deux ordinateurs qui seront connectés au JUC700.
JUC700 USB 3.0 Wormhole Switch DSS MANUEL D'UTILISATION
JUC700
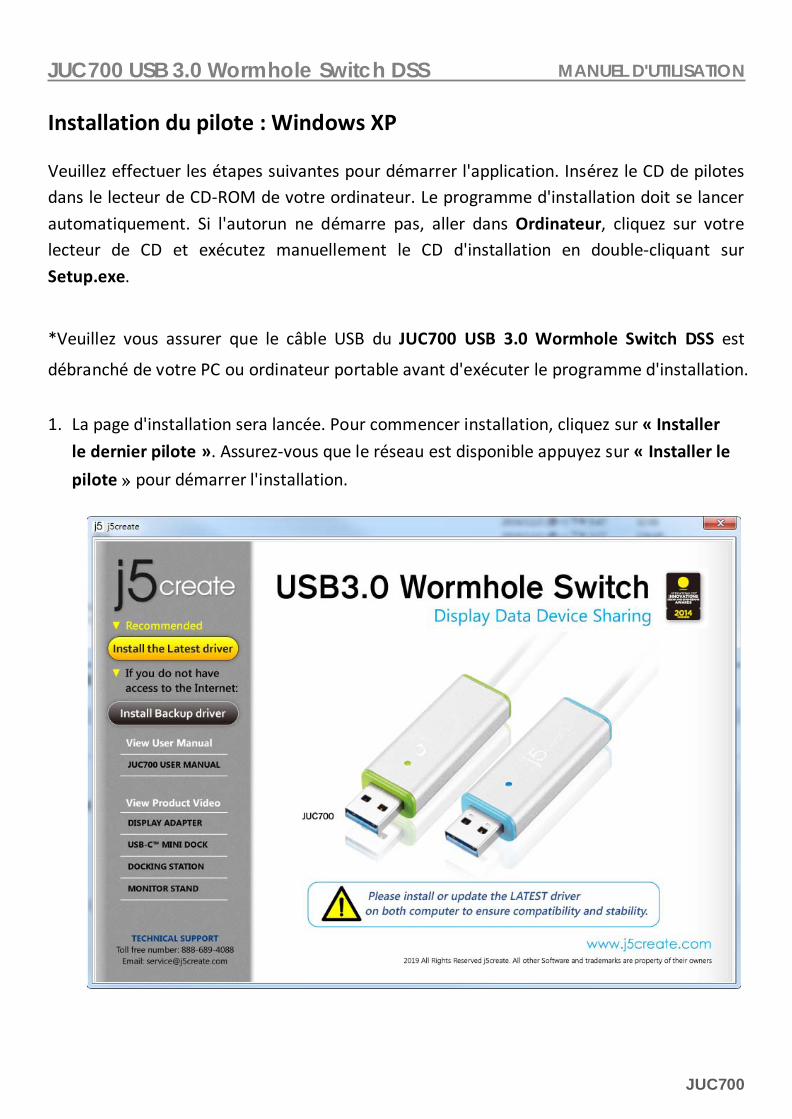
Installation du pilote : Windows XP Veuillez effectuer les étapes suivantes pour démarrer l'application. Insérez le CD de pilotes dans le lecteur de CD-ROM de votre ordinateur. Le programme d'installation doit se lancer automatiquement. Si l'autorun ne démarre pas, aller dans Ordinateur, cliquez sur votre lecteur de CD et exécutez manuellement le CD d'installation en double-cliquant sur Setup.exe.
*Veuillez vous assurer que le câble USB du JUC700 USB 3.0 Wormhole Switch DSS est
débranché de votre PC ou ordinateur portable avant d'exécuter le programme d'installation.
1. La page d'installation sera lancée. Pour commencer installation, cliquez sur « Installer
le dernier pilote ». Assurez-vous que le réseau est disponible appuyez sur « Installer le
pilote » pour démarrer l'installation.

JUC700 USB 3.0 Wormhole Switch DSS MANUEL D'UTILISATION
JUC700
Suivant>
2. Après avoir appuyé sur l'option d'installation, l'assistant d'installation va se lancer,
cliquez sur pour continuer.

JUC700 USB 3.0 Wormhole Switch DSS MANUEL D'UTILISATION
JUC700
Suivant >
3. Lisez le contrat de licence et cochez la case « J'accepte les termes du contrat de licence. »
Cliquez sur pour l'accepter et continuer.

JUC700 USB 3.0 Wormhole Switch DSS MANUEL D'UTILISATION
JUC700

JUC700 USB 3.0 Wormhole Switch DSS MANUEL D'UTILISATION
JUC700
Terminer
4. Lorsque l'assistant d'installation est terminé, sélectionnez « Oui, je veux redémarrer mon
ordinateur maintenant. » Cliquez sur pour redémarrer.
5. Veuillez répéter l'installation du pilote sur les deux ordinateurs qui seront connectés au JUC700.
6. Lorsque vous démarrez la fonction de partage d'écran la première fois, vous pouvez voir l'installation automatique du pilote d'affichage MIROIR / ÉTENDU.
Conseils : Vérifiez l'installation du pilote Pour vérifier que le JUC700 Wormhole Switch a été installé avec succès. Aller dans le Control Panel (Panneau de configuration) - Programs (Programmes), le pilote j5create wormhole
switch doit être dans la liste.

JUC700 USB 3.0 Wormhole Switch DSS MANUEL D'UTILISATION
JUC700
I. Branchement du périphérique Après redémarrage de l'ordinateur, connectez une extrémité du JUC700 USB 3.0 Wormhole Switch DSS dans à un port USB 3.0 sur l'un des deux ordinateurs. Et connectez l'autre extrémité du JUC700 USB 3.0 Wormhole Switch DSS sur le second ordinateur. (L'ordinateur peut prendre un certain temps pour reconnaître le JUC700 à la 1ère connexion)
Tips: Vérification de l'installation du pilote La procédure suivante sert à vérifier l'état de l'installation du pilote de la Wormhole Switch
Faites un clic droit sur « Poste de travail » → « Gérer » → « Gestionnaire de périphériques
» → cliquez sur le signe « + » et « Contrôleurs de bus USB ».

JUC700 USB 3.0 Wormhole Switch DSS MANUEL D'UTILISATION
JUC700

JUC700 USB 3.0 Wormhole Switch DSS MANUEL D'UTILISATION
JUC700
Conseils : Le JUC700 USB 3.0 Wormhole Switch DSS dispose de deux connecteurs latéraux de deux couleurs (bleu et vert), les icônes qui apparaissent dans la barre de contrôle vous aident à faire la distinction entre les deux ordinateurs.
Sur l'ordinateur raccordé au côté bleu du câble, l'ordinateur affiche l'icône en bleu avec la barre de contrôle bleue.
Il s'agit de l'ordinateur Bleu .
.
Sur l'ordinateur raccordé au côté vert du câble, l'ordinateur affiche l'icône en vert avec la barre de contrôle verte.
Il s'agit de l'ordinateur Vert

JUC700 USB 3.0 Wormhole Switch DSS MANUEL D'UTILISATION
JUC700
II. Paramètres pour les deux ordinateurs Une fois que le JUC700 USB 3.0 Wormhole Switch DSS est branché, il y a quelques paramètres à régler sur les deux ordinateurs (Portable / PC / All-In-One / Tablette) :
Sélectionner la position de l'autre ordinateur.

JUC700 USB 3.0 Wormhole Switch DSS MANUEL D'UTILISATION
JUC700
Cochez la case si vous souhaitez
conserver les mêmes paramètres,
le programme sautera ainsi le
processus ci-dessus la prochaine
fois que vous vous connectez.
Choisissez le Extended Mode (mode Étendu) ou le Mirror Mode (mode Miroir).
JUC700 USB 3.0 Wormhole Switch DSS MANUEL D'UTILISATION
JUC700
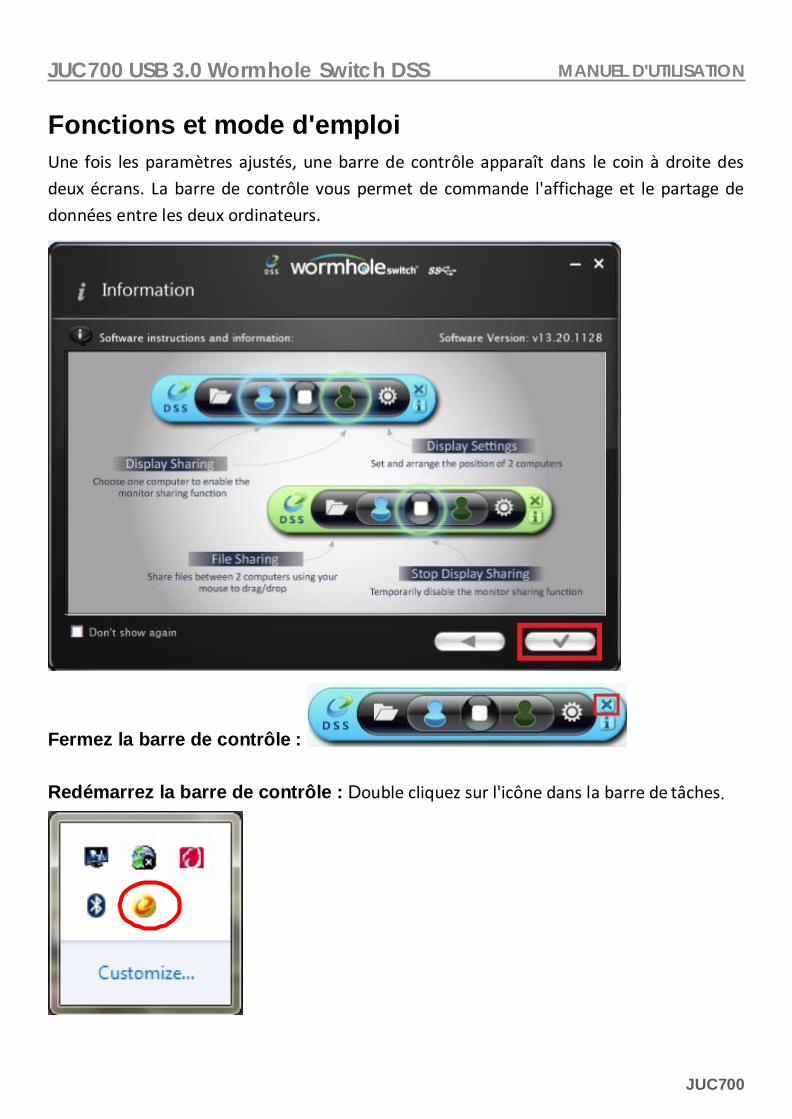
Fonctions et mode d'emploi Une fois les paramètres ajustés, une barre de contrôle apparaît dans le coin à droite des deux écrans. La barre de contrôle vous permet de commande l'affichage et le partage de données entre les deux ordinateurs.
Fermez la barre de contrôle :
Redémarrez la barre de contrôle : Double cliquez sur l'icône dans la barre de tâches.

JUC700 USB 3.0 Wormhole Switch DSS MANUEL D'UTILISATION
JUC700
I. Partage d'écran Visualisez l'ordinateur Bleu : Vous pouvez visualiser l'ordinateur bleu sur l'un ou l'autre des écrans d'ordinateur. Il suffit de sélectionner l'icône bleue et l'écran de l'ordinateur vert devient le 2e moniteur de l'ordinateur bleu. Vous pouvez alors choisir le mode étendu ou miroir pour l'ordinateur bleu.
Visualisez l'ordinateur Vert : Vous pouvez visualiser l'ordinateur vert sur l'un ou l'autre des écrans d'ordinateur. Il suffit de sélectionner l'icône verte et l'écran de l'ordinateur bleu devient le 2e moniteur de l'ordinateur vert. Vous pouvez alors choisir le mode étendu ou miroir pour l'ordinateur vert.
Arrêtez le partage de l'affichage :
EXTENDED MODE (MODE ETENDU)
Cette fonction permet à l'ordinateur relié de fonctionner en tant que affichage Extended (Étendu) de l'écran principal. L'espace de travail étendu améliore l'efficacité du travail.
Vous pouvez modifier la position relative des deux ordinateurs sous Display Settings (Paramètres d'affichage).
MIRROR MODE (MODE MIROIR)
Cette fonction permet d'afficher le même contenu que l'écran principal (en miroir) sur l'autre ordinateur.

JUC700 USB 3.0 Wormhole Switch DSS MANUEL D'UTILISATION
JUC700
Le réglage de la résolution de l'écran sur l'ordinateur connecté suit celle de l'écran principal. Par exemple, si la résolution de l'écran principal est de 1024x768x32bit, alors l'ordinateur miroir conserve la même résolution.
Réglage de la résolution pour l'affichage partagé Pour un accès rapide au système, choisissez Display Settings (Paramètres d'affichage). Lorsque la fenêtre Screen Resolution (Résolution de l'écran) apparaît, vous pouvez identifier le numéro de chaque moniteur en cliquant sur Identify (Identifier). Vous pouvez ensuite modifier la résolution des deux écrans.
Partage de la contrôle d'écran tactile : Si l'ordinateur dispose d'un écran tactile, vous pouvez directement utiliser l'écran tactile pour contrôler l'ordinateur qui est en mode miroir ou étendu sur l'écran tactile.
JUC700 USB 3.0 Wormhole Switch DSS MANUEL D'UTILISATION
JUC700
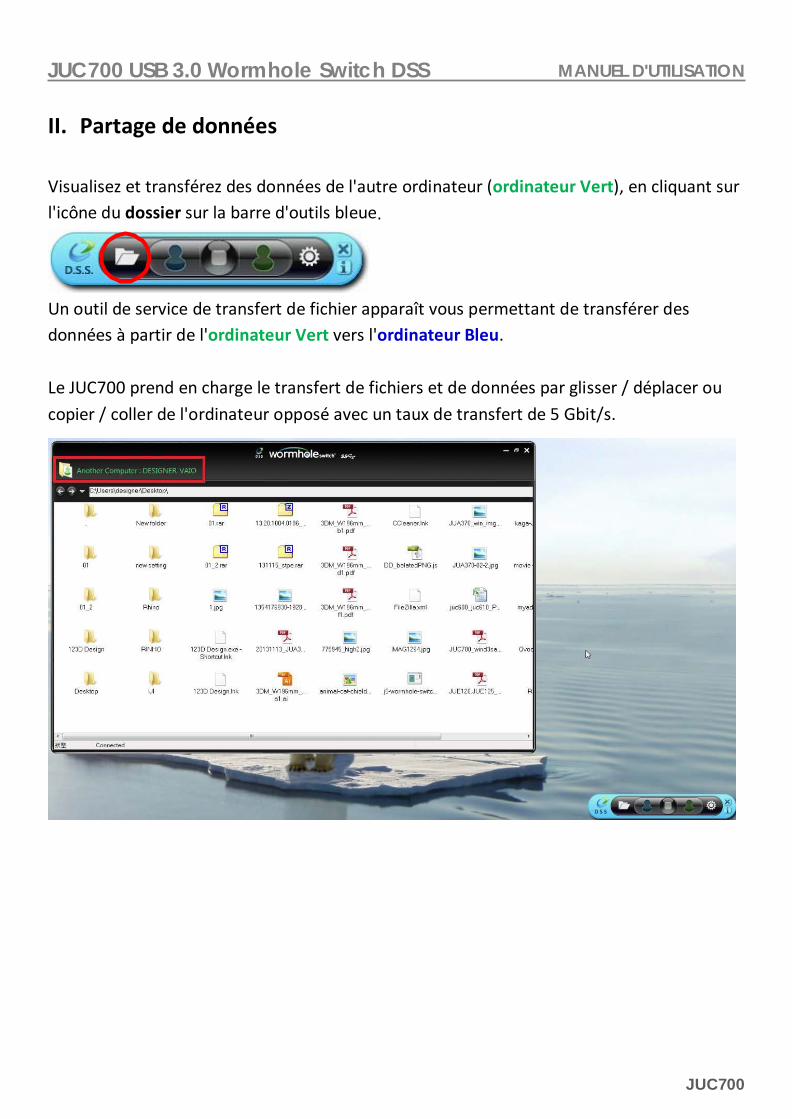
II. Partage de données Visualisez et transférez des données de l'autre ordinateur (ordinateur Vert), en cliquant sur l'icône du dossier sur la barre d'outils bleue.
Un outil de service de transfert de fichier apparaît vous permettant de transférer des données à partir de l'ordinateur Vert vers l'ordinateur Bleu.
Le JUC700 prend en charge le transfert de fichiers et de données par glisser / déplacer ou copier / coller de l'ordinateur opposé avec un taux de transfert de 5 Gbit/s.

JUC700 USB 3.0 Wormhole Switch DSS MANUEL D'UTILISATION
JUC700
Visualisez et transférez des données de l'autre ordinateur (ordinateur Bleu), en cliquant sur l'icône du dossier sur la barre d'outils verte.
Un outil de service de transfert de fichier apparaît vous permettant de transférer des
données à partir de l'ordinateur Bleu vers l'ordinateur Vert.
Le JUC700 prend en charge le transfert de fichiers et de données par glisser / déplacer ou copier / coller de l'ordinateur opposé avec un taux de transfert de 5 Gbit/s.
JUC700 USB 3.0 Wormhole Switch DSS MANUEL D'UTILISATION
JUC700
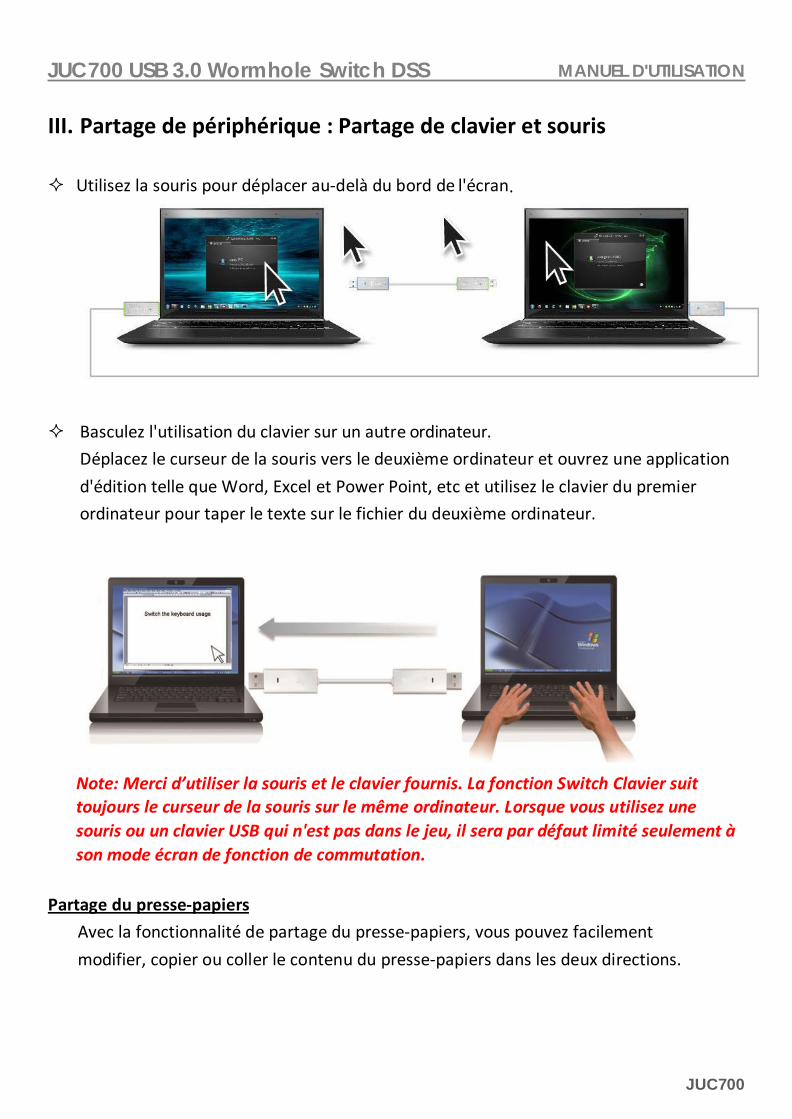
III. Partage de périphérique : Partage de clavier et souris Utilisez la souris pour déplacer au-delà du bord de l'écran.
Basculez l'utilisation du clavier sur un autre ordinateur.
Déplacez le curseur de la souris vers le deuxième ordinateur et ouvrez une application
d'édition telle que Word, Excel et Power Point, etc et utilisez le clavier du premier
ordinateur pour taper le texte sur le fichier du deuxième ordinateur.
Note: Merci d’utiliser la souris et le clavier fournis. La fonction Switch Clavier suit toujours le curseur de la souris sur le même ordinateur. Lorsque vous utilisez une souris ou un clavier USB qui n'est pas dans le jeu, il sera par défaut limité seulement à son mode écran de fonction de commutation.
Partage du presse-papiers
Avec la fonctionnalité de partage du presse-papiers, vous pouvez facilement
modifier, copier ou coller le contenu du presse-papiers dans les deux directions.
JUC700 USB 3.0 Wormhole Switch DSS MANUEL D'UTILISATION
JUC700
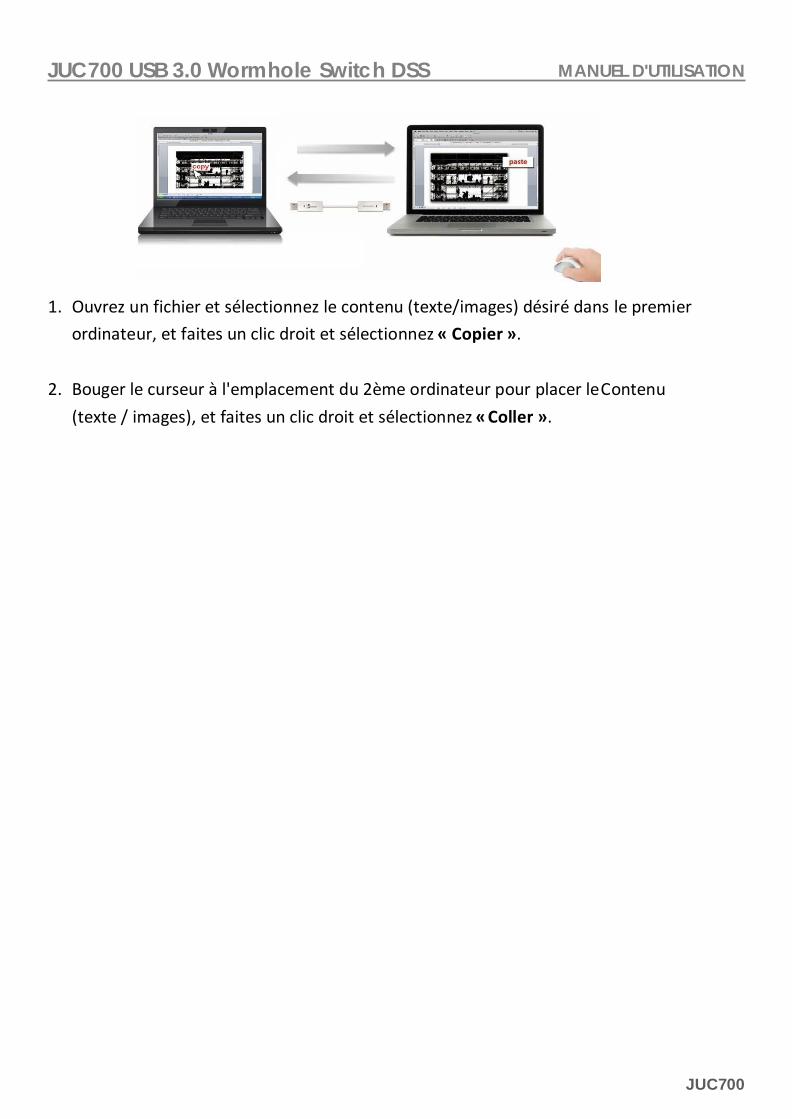
1. Ouvrez un fichier et sélectionnez le contenu (texte/images) désiré dans le premier
ordinateur, et faites un clic droit et sélectionnez « Copier ».
2. Bouger le curseur à l'emplacement du 2ème ordinateur pour placer le Contenu
(texte / images), et faites un clic droit et sélectionnez « Coller ».

JUC700 USB 3.0 Wormhole Switch DSS MANUEL D'UTILISATION
JUC700
Désinstaller
Désinstallation du pilote * Débranchez le câble USB de la JUC700 USB 3.0 Wormhole Switch avant de désinstaller le
pilote.
1. Cliquez sur « Démarrer » → « Panneau de configuration » → « Programmes et fonctionnalités » → « Désinstaller ou modifier un programme ». Sélectionnez j5create wormhole switch... Cliquez sur .
2. Un message apparaîtra confirmant que vous souhaitez désinstaller l'application. Cliquez
sur « OK » pour continuer.

JUC700 USB 3.0 Wormhole Switch DSS MANUEL D'UTILISATION
JUC700
Terminer
3. Quand le pilote est complètement désinstallé, sélectionnez « Oui, je veux redémarrer
mon ordinateur maintenant ». Cliquez sur pour redémarrer.
JUC700 USB 3.0 Wormhole Switch DSS MANUEL D'UTILISATION
JUC700
DEPANNAGE Si vous avez des questions concernant l'utilisation de la JUC700, veuillez suivre les instructions ci-dessous. Si une aide supplémentaire est nécessaire, visitez notre site Web ou appelez l'assistance en ligne de j5create. Problèmes connus
- Direct 3D n'est pas pris en charge sous XP. Il serait pris en charge sous Windows 7 en mode Aero.
Recommandations générales
- Il existe des incompatibilités lors de l'utilisation d'autres périphériques de Vidéo par USB sur un seul système. Veuillez faire en sorte que tous les autres pilotes de Vidéo par USB soient désinstallés avant de poursuivre l'installation de j5create.
- Assurez-vous que le périphérique est correctement branché au système hôte.
- Assurez-vous que le port USB que vous utilisez est pour JUC700.
- Débranchez le câble USB du dispositif d'affichage USB et réinsérez-le.
- Vérifiez que le moniteur est connecté correctement et qu'il est sous tension.
- Prenez soin de redémarrer votre ordinateur après l'installation du pilote.
- Essayez un autre port USB et/ou ordinateur.
- Débranchez tous les autres périphériques USB du système.
- Essayez de brancher le câble USB du dispositif d'affichage USB directement à l'ordinateur et non via un concentrateur.
- Réinitialiser/rafraîchir/resynchroniser votre moniteur.
Lecture des médias
- Pendant la lecture vidéo sur toutes les plates-formes, ne pas changer le mode d'affichage, la position ou l'emplacement de la fenêtre du lecteur vidéo (tels que de glisser la fenêtre du lecteur vidéo entre l'écran principal et l'affichage connecté). Cela peut entraîner le lecteur vidéo d'arrêter la lecture. Nous vous proposons d'arrêter la lecture vidéo, déplacer la fenêtre sur l'affichage du dispositif graphique USB connecté, puis de sélectionner le clip vidéo pour commencer la lecture.
- Le mouvement du curseur est plus lent lorsque la souris passe sur la région de la vidéo du lecteur Flash.
- La réduction de votre paysage d'écran à moins de 50 % aidera à atténuer la lecture saccadée de la vidéo pour les vidéos en cours d'exécution en mode plein écran.
- Vous pouvez rencontrer de mauvaises performances vidéo sur les dispositifs graphiques USB avec les systèmes à faible spec. PC.
- Le rendu vidéo utilisant les superpositions matérielles est pris en charge. - Certains logiciels de lecture de DVD ne supportent pas la lecture sur une seconde carte
graphique d'aucune sorte. Vous pouvez essayer d'ouvrir le lecteur multimédia sur l'écran secondaire avant de commencer la lecture du DVD.
- Votre PC peut manquer de certains codecs média pour prendre en charge la lecture de certains formats vidéo. Utilisez le lien ci-dessous pour installer le codec média gratuit.
K- Lite : http://www.free-codecs.com/download/K_Lite_Codec_Pack.htm

JUC700 USB 3.0 Wormhole Switch DSS MANUEL D'UTILISATION
JUC700
- Les lecteurs Vidéo/Média ont différentes capacités de décodage sous différents modes d'affichage. Pour une meilleure performance de visualisation des DVD ou de certains formats vidéo sur l'affichage graphique USB connecté, il est recommandé d'utiliser le logiciel libre suivant: Media Player Classic : http://sourceforge.net/projects/guliverkli/
Autres
- Certaines cartes graphiques, comme Intel, empêchent les autres chipsets graphiques secondaires d'être défini comme carte principale. À la suite de cela, le mode principal peut ne pas fonctionner ou l'affichage peut être désactivé.
- Si vous rencontrez des problèmes lors du processus de démarrage, démarrez votre ordinateur en mode sans échec et désinstallez le pilote. Maintenez la touche CTRL jusqu'à ce que le menu de démarrage de Windows s'affiche, puis sélectionnez Mode sans échec.
- Pour vérifier la version du pilote que vous avez installé, cliquez sur « Panneau de configuration » → « Ajouter ou supprimer des programmes » pour vérifier le programme: USB Display Device (Trigger 2) 9.xx.xxxx.0159 (le nombre représente la version du pilote).
- Certaines limitations existent dans différents lecteurs multimédias pour la prise en charge du format de fichier. Nous joignons notre résultat de test de conformité dans les tableaux en fonction des différents systèmes d'exploitation, des cartes graphiques/chipset des principaux systèmes, des lecteurs multimédias, et des formats de média pris en charge. Il sera mis à jour périodiquement avec la nouvelle version de lecteurs multimédias ou de notre dernière version du pilote.

JUC700 USB 3.0 Wormhole Switch DSS MANUEL D'UTILISATION
JUC700
SUPPORT TECHNIQUE Si vous rencontrez des problèmes lors de l'utilisation de ce produit, suivez les instructions ci-dessous avant de retourner ce produit au magasin.
1. Le Manuel de l'utilisateur Il contient les instructions détaillées et la section de dépannage; de nombreux problèmes courants peuvent être facilement résolus en lisant le manuel de l'utilisateur. 2. Support en ligne Visitez le site Web de j5create (www.j5create.com) pour trouver la dernière version du logiciel pour votre appareil. Si vous rencontrez toujours le même problème, vous pouvez soumettre une description du problème par email à [email protected]. j5create, l'équipe de l'assistance technique vous répondra sous 24 heures. 3. Assistance téléphonique Veuillez nous appeler au +1-888-689-4088 et nos techniciens se feront un plaisir de vous aider.
Service clientèle : Numéro gratuit : +1-888-988-0488 Assistance technique : Numéro gratuit : +1 888-689-4088 E-mail : [email protected] Veuillez contacter l'Assistance technique pendant les heures ouvrables. 10:00AM-6:00PM
U.S.A E.S.T. du lundi au vendredi pour toute assistance supplémentaire.

JUC700 USB 3.0 Wormhole Switch DSS MANUEL D'UTILISATION
JUC700
GARANTIE DE j5create j5create offre une garantie limitée de 1 ans. L'usure due à l'utilisation n'est pas incluse.
L'utilisateur doit appeler ou envoyer un e-mail au service clientèle de j5create pour donner des informations sur le défaut du produit et obtenir un numéro d'autorisation de retour. Les utilisateurs sont responsables du coût d'expédition de retour et nous prendrons en charge le renvoi de l'appareil. Afin d'obtenir une autorisation de retour, l'utilisateur doit avoir les informations suivantes à portée de main lors de l'appel ou de l'envoi d'e-mail à l'équipe de l'assistance: (i) une copie de la facture d'achat originale pour vérifier votre garantie (ii) un numéro de série du produit (iii) une description du problème (iv) un numéro d'autorisation de retour du matériel (v) Nom, adresse et numéro de téléphone du client
j5create ne garantit pas que le fonctionnement du produit sera ininterrompu ou sans erreur. j5create n'est pas responsable des dommages résultant du non-respect des instructions d'utilisation du produit. Cette garantie ne s'applique pas : (a) à des pièces consommables, à moins que le dommage ne soit dû à un défaut de matériaux ou de fabrication; (b) aux dommages cosmétiques, y compris mais non limité aux rayures, entailles, et plastique cassé sur les ports; (c) les dommages causés par l'utilisation de produits non-j5create; (d) les dommages causés par les catastrophes naturelles (inondations, incendie, tremblement de terre, foudre, typhon etc.,) (e) les dommages causés par une mauvaise utilisation (perte, accident, abus, mauvais usage ou d'autres causes externes) (f) les dommages causés par l'utilisation du produit en dehors des utilisations auxquelles il est destiné décrites par j5create; (g) les dommages causés par l'entretien (y compris les mises à niveau et extensions) effectué par une personne autre qu'un représentant de j5create ou un fournisseur de services autorisé de j5create; (h) un produit ou une pièce qui a été modifié afin d'altérer la fonctionnalité ou les capacités sans l'autorisation écrite de j5create; ou (i) le cas échéant le numéro de série de j5create du produit a été retiré ou effacé. Si une telle situation se produit, j5create va calculer le coût des matériaux et de la réparation pour référence. Cette garantie est donnée par j5create en lieu et place de toute autre garantie expresse ou implicite. Pour plus d'informations, veuillez visiter notre site Web http://www.j5create.com Copyright © 2019 j5create. Tous les droits sont réservés. Tous les noms commerciaux sont des marques déposées de leurs propriétaires respectifs. Les caractéristiques et spécifications sont sujets à changement sans préavis. Le produit peut ne pas être exactement comme indiqué sur le schéma.

JUC700 USB 3.0 Wormhole Switch DSS MANUEL D'UTILISATION
JUC700
CONFORMITÉ RÉGLEMENTAIRE FCC Cet équipement a été testé et déclaré conforme aux normes FCC Partie 15 Sous-partie B § 15.109/15.107 Classe B. Son fonctionnement est soumis aux deux conditions suivantes: • Cet appareil ne peut causer des interférences nuisibles • Cet appareil doit accepter toute interférence, y compris les interférences qui peuvent causer un mauvais fonctionnement de l'appareil.
CE
Cet équipement est conforme aux exigences des règlements suivants : EN 55022 Classe B (2006), EN 55024 (1998+A1 : 2001+ A2:2003), (IEC/EN 61000-4-2 (1995+A1 : 1998+A2:2001)/-3(2006) C-Tick Cet équipement est conforme aux exigences des règlements suivants:
EN 55022 (2006) Classe B, AS/NZS CISPR22 © IEC : 2005. VCCI Cet équipement est conforme aux exigences des règlements suivants: CISPR22 © IEC : 2005 Avis de non responsabilité Les informations contenues dans ce document sont sujettes à changement sans préavis. Le fabricant ne fait aucune représentation ou garantie (expresse ou implicite) quant à l'exactitude et l'exhaustivité de ce document et ne doit en aucun cas être tenu responsable de toute perte de profits ou de tout préjudice commercial, y compris mais sans s'y limiter des dommages spéciaux, indirects, accessoires, ou autres. Aucune partie de ce document ne peut être reproduite ou transmise sous quelque forme et par quelque moyen, électronique ou mécanique, y compris la photocopie, l'enregistrement ou l'enregistrement des informations et les systèmes de récupération, sans la permission écrite expresse du fabricant.

JUC700 Wormhole Switch DSS USB 3.0-Anzeigegerät mit Datenfreigabe
Bedienungsanleitung
JUC700

JUC700 USB 3.0 Wormhole Switch DSS BENUTZERHANDBUCH
3
INHALT EINFÜHRUNG ............................................................................. 4
Funktionsmerkmale .............................................................................................. 4
Systemvoraussetzungen ....................................................................................... 4
Packungsinhalt ..................................................................................................... 4
Technische Daten ................................................................................................. 5
Funktionen ........................................................................................................... 5
ERSTE SCHRITTE .......................................................................... 6
I. Treiberinstallation auf beiden Computern ............................................. 6
Treiberinstallation: Windows 10/8.1/8/7 ............................................................. 6
Treiberinstallation: Windows XP ......................................................................... 12
II. Geräteanschluss .................................................................................... 17
III. Einstellungen auf beiden Computern .................................................... 20
Funktionen und ihre Verwendung ............................................ 22
I. Anzeigefreigabe ..................................................................................... 23
II. Datenfreigabe ........................................................................................ 25
III. Gerätefreigabe: Tastatur- und Mausfreigabe........................................ 27

JUC700 USB 3.0 Wormhole Switch DSS BENUTZERHANDBUCH
4
EINFÜHRUNG
Vielen Dank für den Kauf des JUC700 USB 3.0 Wormhole Switch DSS (Dual System Swap, Doppelter Systemtausch)! Dieses wundervolle Gerät versetzt Sie in die Lage, Ressourcen von Videografikkarten auf zwei Computern gemeinsam zu nutzen und rasch Daten, Bilder, Musik, Videos oder andere Dateien mit einer Höchstgeschwindigkeit von 5 Gbit/s zwischen den beiden Computern zu übertragen. The JUC700 USB 3.0 Wormhole Switch DSS gestattet nicht nur die gemeinsame Nutzung von Tastatur und Maus mit einem anderen Computer, sondern unterstützt auch Umgebungen mit mehreren Anzeigegeräten.
Funktionsmerkmale Problemlose Übertragung Ihrer Daten, Fotos, Musik und Videos zwischen Ihrem
Computer & einem Tablet-PC Spiegelung & Erweiterung Ihrer Anzeige auf zwei Computern Gemeinsame Nutzung von Festplattenressourcen auf zwei Computern Einsparung zusätzlicher Kosten durch Nutzung mehrerer
Computer-/Tablet-Festplatten und/oder Monitore Übereinstimmung mit USB 3.0, 2.0 und 1.1. Übereinstimmung mit der USB 3.0-Übertragungsrate in Höchstgeschwindigkeit (5
Gbit/s) Unterstützung der Touchscreen-Funktion
Systemvoraussetzungen
Windows 10 / 8.1 / 8 / 7 / XP Freier USB-Anschluss (USB 3.0 empfohlen) CPU: i3 Dual core 2.8 GHz RAM: 2GB memory or higher
Packungsinhalt
JUC700 USB 3.0 Wormhole Switch DSS Treiber-CD mit elektronischem Benutzerhandbuch Kurzanleitung

JUC700 USB 3.0 Wormhole Switch DSS BENUTZERHANDBUCH
5
Technische Daten
Stromversorgung Stromversorgungmodus Bus-Strom Schnittstelle Schnittstelle USB 3.0-Anschlussstecker Type-A x 2 Videoanzeige Unterstützte Modi Videowiedergabe: 1080P
Erweiterte/gespiegelte Anzeige Physikalische Daten Gehäusematerial Aluminium
Abmessungen Hauptgerät: 61 (B) x 19 (H) x 10,5 (T) mm Kabellänge 150 cm (5 Fuß) Gewicht Ca. 45 g (mit Kabel)
Funktionen
Unterstützte Betriebssysteme Windows zu Windows
Gerätefreigabe: Tastatur- & Maus-Kontrollschalter Maus über den Bildschirmrand hinaus verschieben
Ja
Tastatur- & Mausfreigabe Ja Anzeigefreigabe Gemeinsame Nutzung der Videoanzeige
Ja (Spiegelung/Erweiterung)
Touchscreen-Kontrolle Ja Datenfreigabe Anwendung zur Datenübertragung Ja

JUC700 USB 3.0 Wormhole Switch DSS BENUTZERHANDBUCH
6
ERSTE SCHRITTE
VOR der Installation bitte lesen
Installieren Sie den vollständigen Treiber auf beiden Computern, bevor Sie das USB-Kabel des JUC700 USB 3.0 Wormhole Switch DSS an Ihre Computer anschließen.
Sie können eine beliebige Seite/Farbe des USB-Kabels vom JUC700 USB 3.0 Wormhole Switch DSS an einen Ihrer beiden Computer anschließen.
Führen Sie das Setup-Programm als Administrator aus, um Fehler bei der Installation zu vermeiden.
Deinstallieren Sie erst den vorherigen Treiber, bevor Sie den aktuellen Treiber installieren.
Während der Installation blinkt die Bildschirmanzeige.
I. Treiberinstallation auf beiden Computern: Installieren Sie den Treiber bitte auf den beiden Computern, die an das JUC700 angeschlossen werden. In der Zukunft, denken Sie bitte daran auch, um den Fahrer auf beiden Seiten zu aktualisieren.
*Achten Sie bitte darauf, dass das USB-Kabel des JUC700 USB 3.0 Wormhole Switch DSS von Ihrem PC oder Notebook getrennt wird, bevor Sie das Installationsprogramm ausführen.
Treiberinstallation: Windows 10 / 8.1 / 8 / 7
Zum Start der Anwendung durchlaufen Sie bitte folgenden Schritt. Legen Sie die Treiber-CD in das CD-ROM-Laufwerk Ihres Computers. Das Setup-Programm sollte sich automatisch ausführen. Sollte Autorun nicht starten, wechseln Sie zu Computer, klicken Sie Ihr CD-Laufwerk an und führen Sie die Setup-CD durch Doppelklick auf Setup.exe manuell aus.
1. Die Installationsseite wird gestartet. Um die Installation zu starten, klicken Sie auf
“ Den neuesten Treiber installieren”. Stellen Sie sicher, dass das Netzwerk verfügbar ist, oder klicken sie auf “ Treiber installieren”, um die Installation zu starten

JUC700 USB 3.0 Wormhole Switch DSS BENUTZERHANDBUCH
7
Wenn das Fenster “Benutzerkontensteuerung” auf dem Bildschirm erscheint, klicken Sie zum Fortfahren auf “Ja”.

JUC700 USB 3.0 Wormhole Switch DSS BENUTZERHANDBUCH
8
Next>
2. Jetzt wird der InstallShield Wizard (Installationsassistent) gestartet. Klicken Sie zum Fortfahren auf (Weiter).

JUC700 USB 3.0 Wormhole Switch DSS BENUTZERHANDBUCH
9
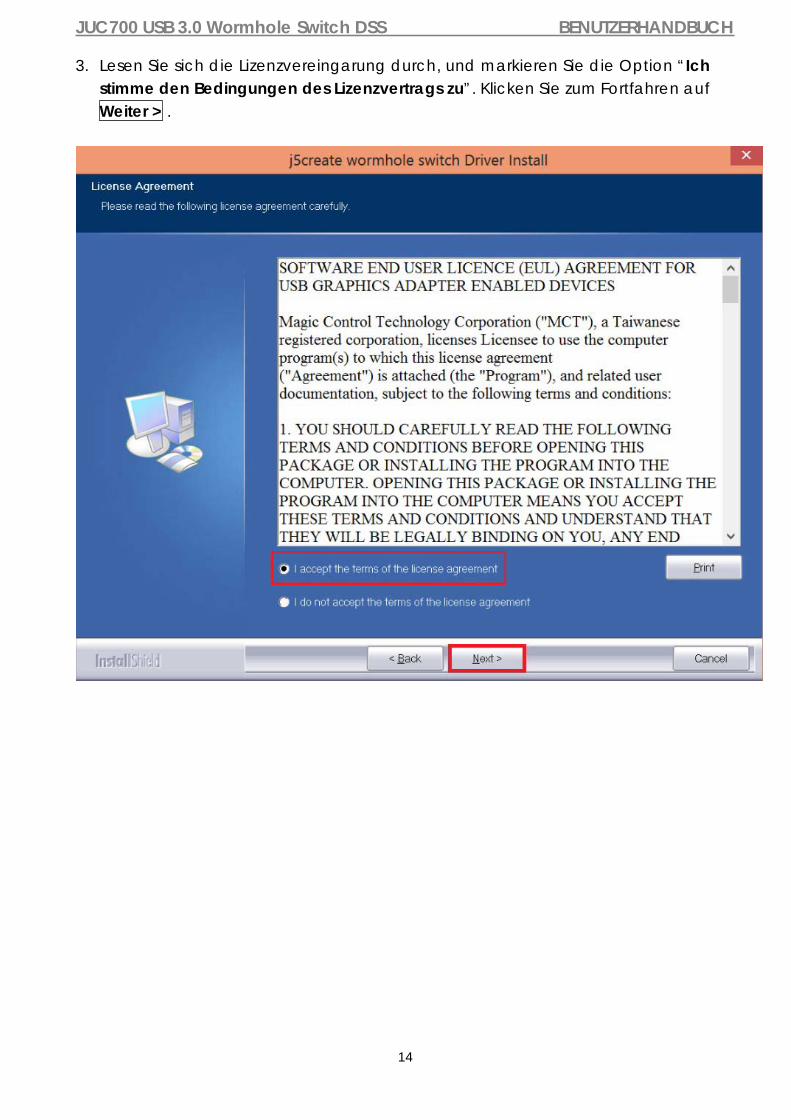
3. Lesen Sie sich die Lizenzvereingarung durch, und markieren Sie die Option “Ich stimme den Bedingungen des Lizenzvertrags zu”. Klicken Sie zum Fortfahren auf Weiter > .

JUC700 USB 3.0 Wormhole Switch DSS BENUTZERHANDBUCH
10
4. Der Treiber wird installiert....

JUC700 USB 3.0 Wormhole Switch DSS BENUTZERHANDBUCH
11
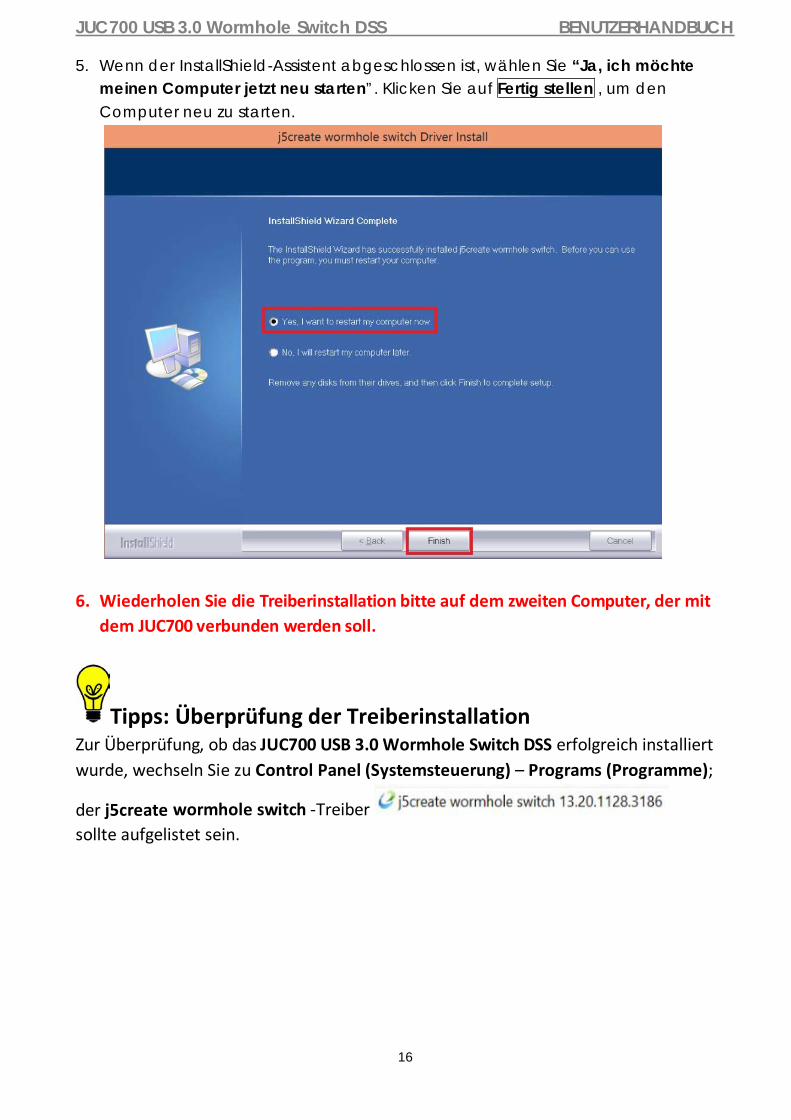
5. Wenn der InstallShield-Assistent abgeschlossen ist, wählen Sie “Ja, ich möchte meinen Computer jetzt neu starten”. Klicken Sie auf Fertig stellen, um den Computer neu zu starten.
6. Wiederholen Sie die Treiberinstallation bitte auf dem zweiten Computer, der mit dem JUC700 verbunden werden soll.

JUC700 USB 3.0 Wormhole Switch DSS BENUTZERHANDBUCH
12
Treiberinstallation: Windows XP Zum Start der Anwendung durchlaufen Sie bitte folgenden Schritt. Legen Sie die Treiber-CD in das CD-ROM-Laufwerk Ihres Computers. Das Setup-Programm sollte sich automatisch ausführen. Sollte Autorun nicht starten, wechseln Sie zu Computer, klicken Sie Ihr CD-Laufwerk an und führen Sie die Setup-CD durch Doppelklick auf Setup.exe manuell aus.
*Stellen Sie sicher, dass das USB-Kabel des JUC700 USB 3.0 Wormhole Switch DSS von Ihrem PC oder Notebook getrennt ist, bevor Sie das Installationsprogramm ausführen.
1. Die Installationsseite wird gestartet. Um die Installation zu starten, klicken Sie auf
“Den neuesten Treiber installieren”. Stellen Sie sicher, dass das Netzwerk verfügbar ist, oder klicken sie auf “Treiber installieren”, um die Installation zu starten.

JUC700 USB 3.0 Wormhole Switch DSS BENUTZERHANDBUCH
13
Next> 2. Jetzt wird der InstallShield Wizard (Installationsassistent) gestartet. Klicken Sie zum
Fortfahren auf (Weiter).
JUC700 USB 3.0 Wormhole Switch DSS BENUTZERHANDBUCH
14
3. Lesen Sie sich die Lizenzvereingarung durch, und markieren Sie die Option “Ich stimme den Bedingungen des Lizenzvertrags zu”. Klicken Sie zum Fortfahren auf Weiter > .

JUC700 USB 3.0 Wormhole Switch DSS BENUTZERHANDBUCH
15
4. Der Treiber wird installiert....
JUC700 USB 3.0 Wormhole Switch DSS BENUTZERHANDBUCH
16
5. Wenn der InstallShield-Assistent abgeschlossen ist, wählen Sie “Ja, ich möchte meinen Computer jetzt neu starten”. Klicken Sie auf Fertig stellen , um den Computer neu zu starten.
6. Wiederholen Sie die Treiberinstallation bitte auf dem zweiten Computer, der mit
dem JUC700 verbunden werden soll.
Tipps: Überprüfung der Treiberinstallation Zur Überprüfung, ob das JUC700 USB 3.0 Wormhole Switch DSS erfolgreich installiert wurde, wechseln Sie zu Control Panel (Systemsteuerung) – Programs (Programme);
der j5create wormhole switch -Treiber sollte aufgelistet sein.
JUC700 USB 3.0 Wormhole Switch DSS BENUTZERHANDBUCH
17
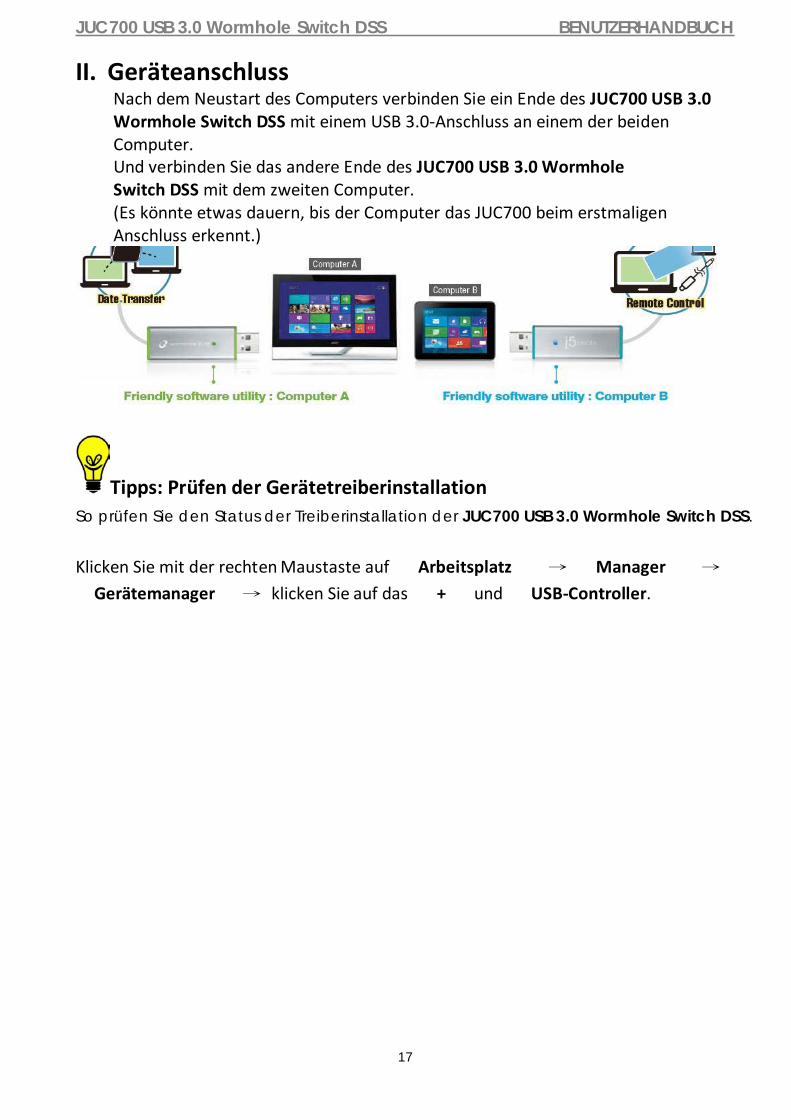
II. Geräteanschluss Nach dem Neustart des Computers verbinden Sie ein Ende des JUC700 USB 3.0 Wormhole Switch DSS mit einem USB 3.0-Anschluss an einem der beiden Computer. Und verbinden Sie das andere Ende des JUC700 USB 3.0 Wormhole Switch DSS mit dem zweiten Computer. (Es könnte etwas dauern, bis der Computer das JUC700 beim erstmaligen Anschluss erkennt.)
Tipps: Prüfen der Gerätetreiberinstallation So prüfen Sie den Status der Treiberinstallation der JUC700 USB 3.0 Wormhole Switch DSS.
Klicken Sie mit der rechten Maustaste auf Arbeitsplatz → Manager →
Gerätemanager → klicken Sie auf das + und USB-Controller.

JUC700 USB 3.0 Wormhole Switch DSS BENUTZERHANDBUCH
18

JUC700 USB 3.0 Wormhole Switch DSS BENUTZERHANDBUCH
19
Tipps: Das JUC700 USB 3.0 Wormhole Switch besitzt Anschlüsse in zwei Farben (blau & grün) an beiden Seiten, deren Symbole in der Kontrollleiste Ihnen helfen, zwischen den beiden Computern zu unterscheiden.
Am Computer, der mit der blauen Kabelseite verbunden ist, wird ein blaues Symbol zusammen mit einer blauen Kontrollleiste angezeigt.
Er ist dann der blaue Computer .
Am Computer, der mit der grünen Kabelseite verbunden ist, wird ein grünes Symbol zusammen mit einer grünen Kontrollleiste angezeigt.
Er ist dann der grüne Computer
.
JUC700 USB 3.0 Wormhole Switch DSS BENUTZERHANDBUCH
20
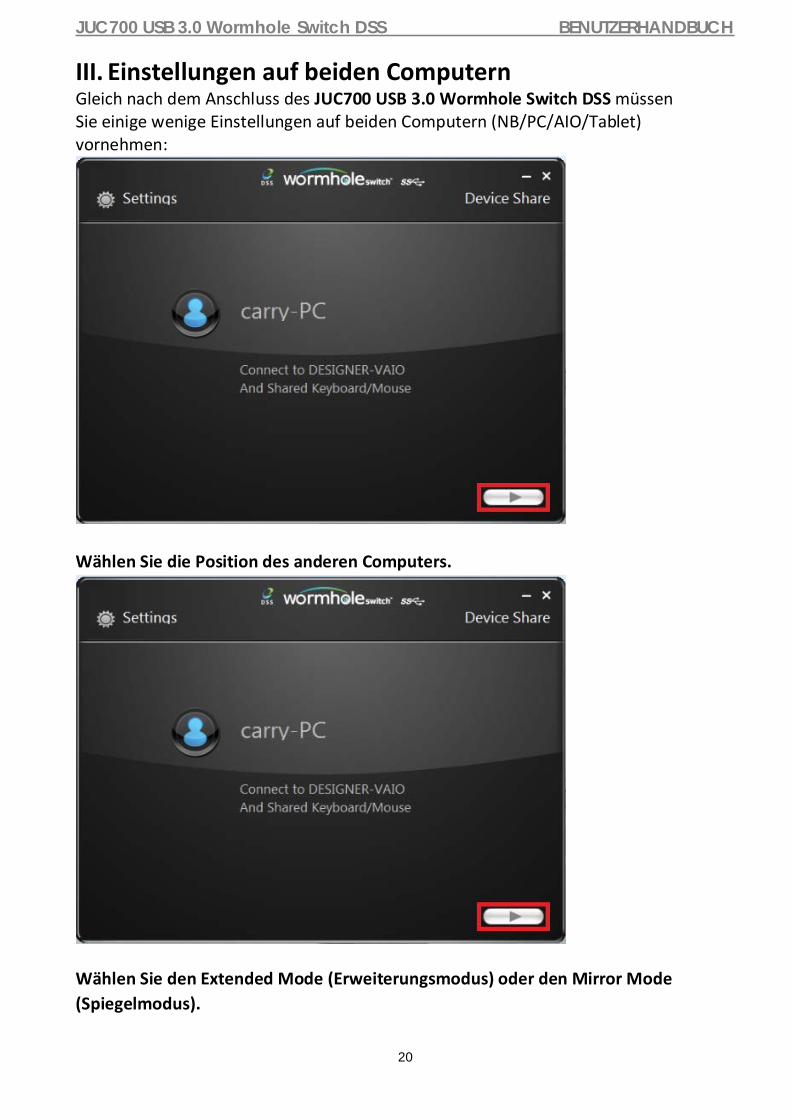
III. Einstellungen auf beiden Computern Gleich nach dem Anschluss des JUC700 USB 3.0 Wormhole Switch DSS müssen Sie einige wenige Einstellungen auf beiden Computern (NB/PC/AIO/Tablet) vornehmen:
Wählen Sie die Position des anderen Computers.
Wählen Sie den Extended Mode (Erweiterungsmodus) oder den Mirror Mode (Spiegelmodus).

JUC700 USB 3.0 Wormhole Switch DSS BENUTZERHANDBUCH
21
Wählen Sie dieses Feld an, wenn Sie diese Einstellungen beibehalten möchten, und das Programm überspringt den obigen Schritt bei der nächsten Verbindungsherstellung.
JUC700 USB 3.0 Wormhole Switch DSS BENUTZERHANDBUCH
22
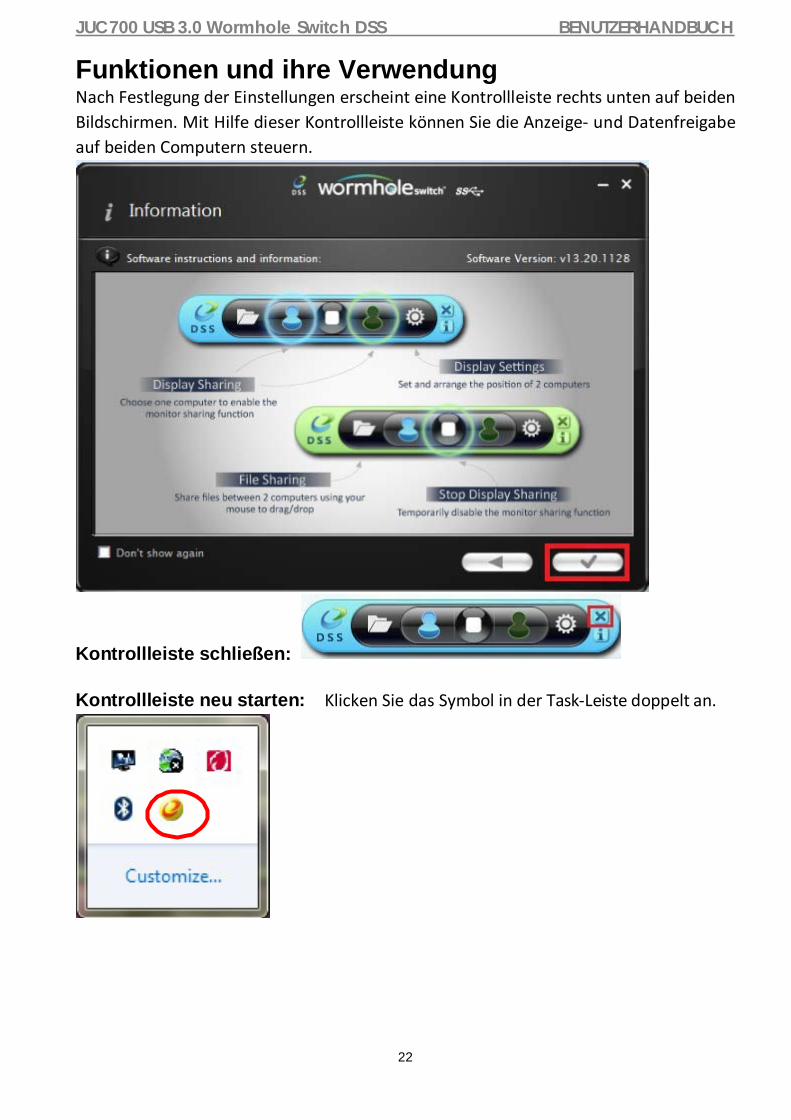
Funktionen und ihre Verwendung Nach Festlegung der Einstellungen erscheint eine Kontrollleiste rechts unten auf beiden Bildschirmen. Mit Hilfe dieser Kontrollleiste können Sie die Anzeige- und Datenfreigabe auf beiden Computern steuern.
Kontrollleiste neu starten: Klicken Sie das Symbol in der Task-Leiste doppelt an.
Kontrollleiste schließen:

JUC700 USB 3.0 Wormhole Switch DSS BENUTZERHANDBUCH
23
I. Anzeigefreigabe Anzeige des blauen Computers: Sie können den blauen Computer auf einem der beiden Computerbildschirme anzeigen. Wählen Sie einfach das blaue Symbol, woraufhin die Anzeige des grünen Computers zum 2. Monitor für den blauen Computer wird. Sie können dann den Erweiterungs- oder Spiegelmodus für den blauen Computer festlegen.
Anzeige des grünen Computers: Sie können den grünen Computer auf einem der beiden Computerbildschirme anzeigen. Wählen Sie einfach das grüne Symbol, woraufhin die Anzeige des blauen Computers zum 2. Monitor für den grünen Computer wird. Sie können dann den Erweiterungs- oder Spiegelmodus für den grünen Computer festlegen.
Anzeigefreigabe stoppen:
EXTENDED MODE (ERWEITERUNGSMODUS)
Mit Hilfe dieser Funktion wird der angeschlossene Computer zu einer Extended (Erweiterten) Anzeige auf dem aktuellen Bildschirm. Dieser erweiterte Arbeitsplatz verbessert die Arbeitseffizienz.
Sie können die relative Position dieser beiden Computer unter Display Settings (Anzeigeeinstellungen) ändern.
JUC700 USB 3.0 Wormhole Switch DSS BENUTZERHANDBUCH
24
MIRROR MODE (SPIEGELMODUS)
Mit Hilfe dieser Funktion können Sie den Inhalt des aktuellen Bildschirms auch auf dem anderen Computer anzeigen (spiegeln).
Die Bildschirmauflösung des angeschlossenen Computers richtet sich nach der Auflösung des aktuellen Bildschirms. Beträgt die Auflösung des aktuellen Bildschirms z. B. 1024 x 768 x 32-Bit, wird auch auf dem gespiegelten Computer dieselbe Auflösung dargestellt.
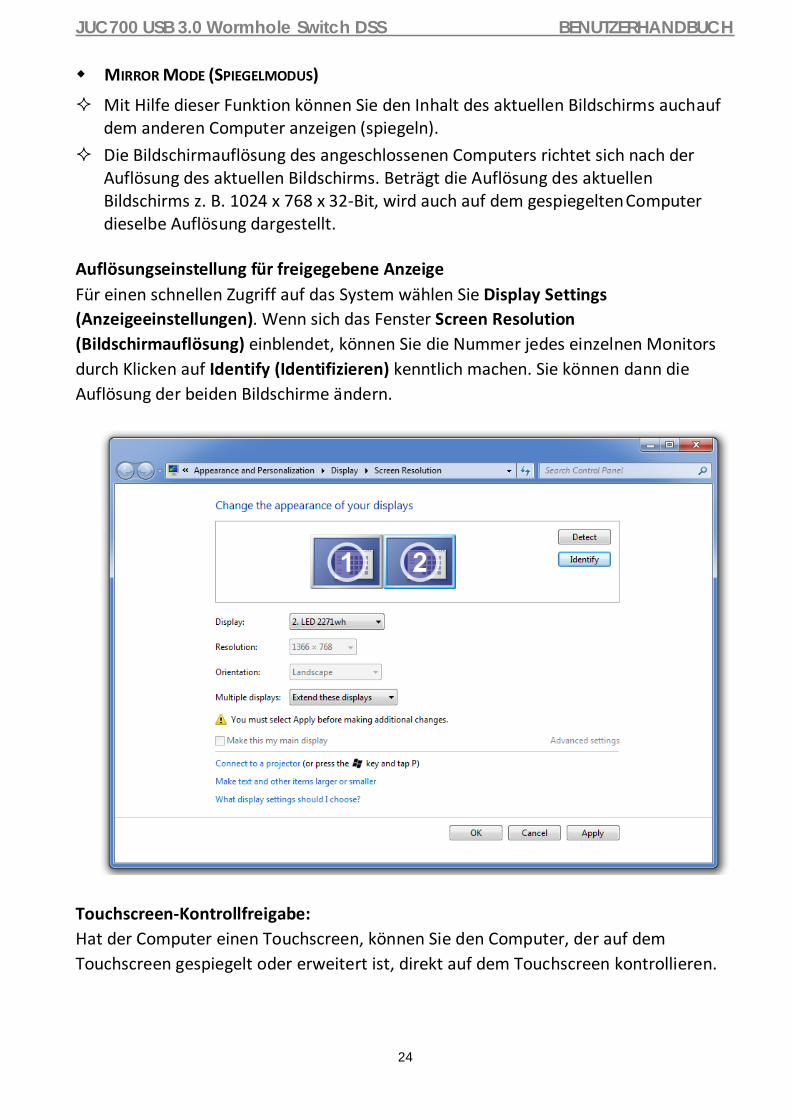
Auflösungseinstellung für freigegebene Anzeige Für einen schnellen Zugriff auf das System wählen Sie Display Settings (Anzeigeeinstellungen). Wenn sich das Fenster Screen Resolution (Bildschirmauflösung) einblendet, können Sie die Nummer jedes einzelnen Monitors durch Klicken auf Identify (Identifizieren) kenntlich machen. Sie können dann die Auflösung der beiden Bildschirme ändern.
Touchscreen-Kontrollfreigabe: Hat der Computer einen Touchscreen, können Sie den Computer, der auf dem Touchscreen gespiegelt oder erweitert ist, direkt auf dem Touchscreen kontrollieren.
JUC700 USB 3.0 Wormhole Switch DSS BENUTZERHANDBUCH
25
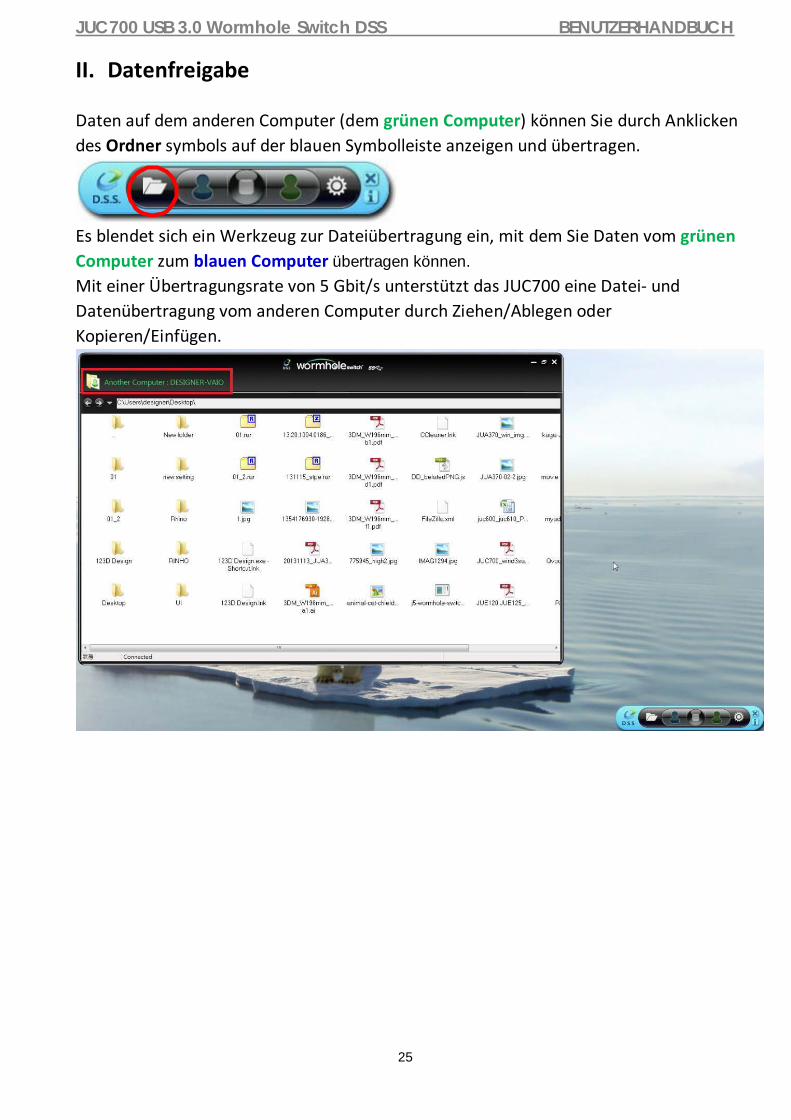
II. Datenfreigabe Daten auf dem anderen Computer (dem grünen Computer) können Sie durch Anklicken des Ordner symbols auf der blauen Symbolleiste anzeigen und übertragen.
Es blendet sich ein Werkzeug zur Dateiübertragung ein, mit dem Sie Daten vom grünen Computer zum blauen Computer übertragen können.
Mit einer Übertragungsrate von 5 Gbit/s unterstützt das JUC700 eine Datei- und Datenübertragung vom anderen Computer durch Ziehen/Ablegen oder Kopieren/Einfügen.

JUC700 USB 3.0 Wormhole Switch DSS BENUTZERHANDBUCH
26
Daten auf dem anderen Computer (dem blauen Computer) können Sie durch Anklicken des Ordner symbols auf der grünen Symbolleiste anzeigen und übertragen.
Es blendet sich ein Werkzeug zur Dateiübertragung ein, mit dem Sie Daten vom blauen Computer zum grünen Computer übertragen können.
Mit einer Übertragungsrate von 5 Gbit/s unterstützt das JUC700 eine Datei- und Datenübertragung vom anderen Computer durch Ziehen/Ablegen oder Kopieren/Einfügen.

JUC700 USB 3.0 Wormhole Switch DSS BENUTZERHANDBUCH
27
III. Gerätefreigabe: Tastatur- und Mausfreigabe Bewegen der Maus außerhalb des Bildschirmsrandes verwenden:
Wechseln der Tastatursteuerung auf den anderen Computer
Schieben Sie den Cursor auf den zweiten Computer, und öffnen Sie dort eine beliebige Anwendung wie Word, Excel, Power Point usw. Jetzt können Sie mit der Tastatur des ersten Computers Text in die Datei des zweiten Computers eingeben.
Anmerkung: Bitte nutzen Sie ein Maus- und Keyboard-Set. Die Schaltfunktion für das Keyboard folgt immer dem Maus-Cursor des selben Computers. Wenn Sie eine Maus oder ein Keyboard über USB-Anschluss nutzen, die nicht richtig eingestellt sind, wird sofort auf den nur begrenzten Bildschirmmodus umgeschaltet.
Zwischenablage-Freigabe
Mit der Zwischenablage-Freigabe können Sie Inhalte aus der Zwischenablage direkt in zwei Richtungen verschieben.
JUC700 USB 3.0 Wormhole Switch DSS BENUTZERHANDBUCH
28
1. Öffnen Sie eine Datei und wählen Sie den Inhalt (Text/Bilder), die vom ersten Computer auf den zweiten verschoben werden sollen. Klicken Sie dann auf “Kopieren”.
2. Bewegen Sie den Cursor auf den Ort des zweiten Computers, um den Inhalt (Text/Bilder) zu platzieren und klicken Sie rechts, um “Einzufügen”.
JUC700 USB 3.0 Wormhole Switch DSS BENUTZERHANDBUCH
29
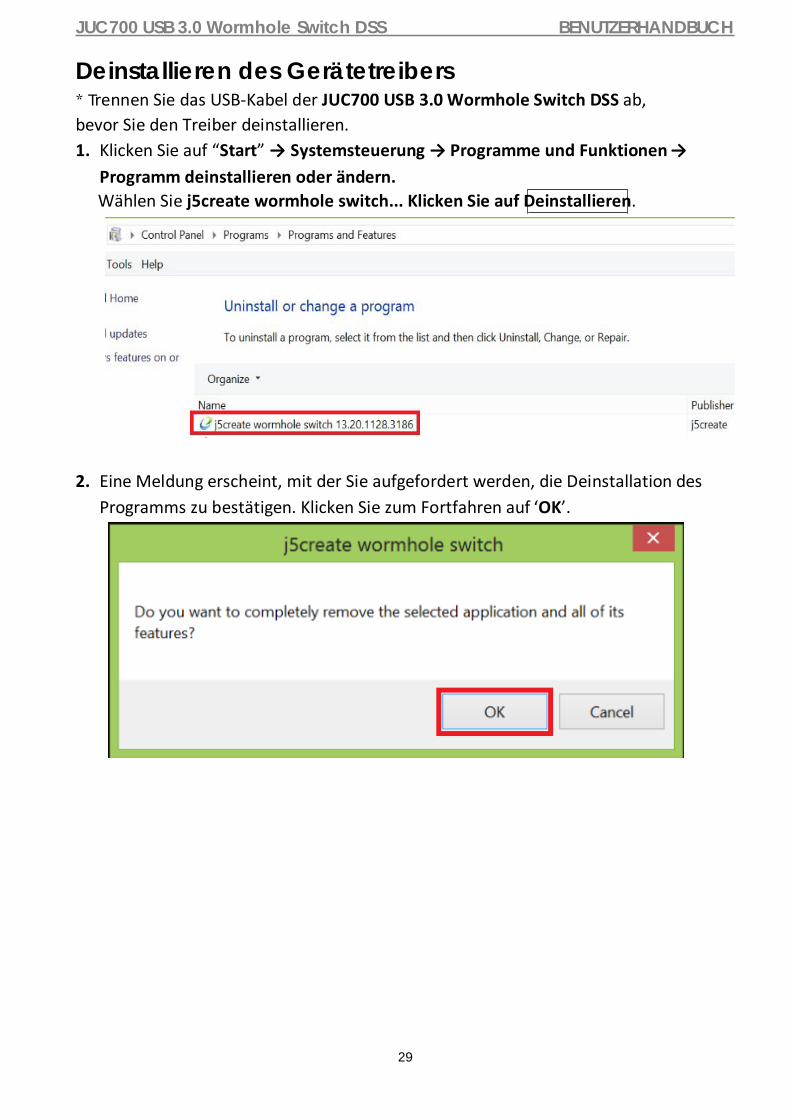
Deinstallieren des Gerätetreibers * Trennen Sie das USB-Kabel der JUC700 USB 3.0 Wormhole Switch DSS ab, bevor Sie den Treiber deinstallieren. 1. Klicken Sie auf “Start” → Systemsteuerung → Programme und Funktionen →
Programm deinstallieren oder ändern.
2. Eine Meldung erscheint, mit der Sie aufgefordert werden, die Deinstallation des Programms zu bestätigen. Klicken Sie zum Fortfahren auf ‘OK’.
Wählen Sie j5create wormhole switch... Klicken Sie auf Deinstallieren.

JUC700 USB 3.0 Wormhole Switch DSS BENUTZERHANDBUCH
30
3. Wenn der Treiber fertig deinstalliert wurde, wählen Sie “Ja, ich möchte meinen Computer jetzt neu starten”. Klicken Sie auf Fertig stellen, um den Computer neu
zu starten.

JUC700 USB 3.0 Wormhole Switch DSS BENUTZERHANDBUCH
31
FEHLERBEHEBUNG Wenn Sie Fragen zur Verwendung dieses Geräts haben, gehen Sie folgendermaßen vor. Hilfe finden Sie auf unserer Website, aber Sie können auch die Support-Hotline von j5create anrufen. Bekannte Probleme
- Direct 3D wird unter XP nicht unterstützt. Es wird aber im Win 7 Aero-Modus unterstützt.
Allgemeine Empfehlungen
- Kompatibilitätsprobleme treten auf, wenn mehrere Video-über-USB-Geräte an einem System angeschlossen sind. Stellen Sie sicher, dass alle anderen Video-über-USB-Treiber deinstalliert wurden, bevor Sie j5create installieren.
- Prüfen Sie, ob das Gerät richtig an das Host-System angeschlossen wurde. - Stellen Sie sicher, dass Sie den USB-Anschluss für JUC700
verwenden. - Trennen Sie das USB-Kabel des USB-Anzeigegeräts ab, und schließen Sie es wieder an. - Prüfen Sie, ob der Monitor richtig angeschlossen und eingeschaltet wurde. - Stellen Sie sicher, dass der Computer nach der Treiberinstallation neu gestartet wurde. - Verwenden Sie einen anderen USB 2.0-Anschluss und/oder Computer. - Trennen Sie alle anderen USB-Geräte vom System ab. - Schließen Sie das USB-Kabel des USB-Anzeigegeräts ohne den Umweg über
einen Hub direkt an den Computer an. - Führen Sie ein Reset/eine Aktualisierung/Synchronisierung Ihres Monitors durch.
Medienwiedergabe
- Wechseln Sie unabhängig von der Plattform während der Videowiedergabe niemals den Anzeigemodus oder die Position oder die Anordnung des Videoplayer-Fensters (z. B. darf das Videoplayerfenster nicht zwischen die Hauptanzeige und das angeschlossene Anzeigegerät verschoben werden). Anderenfalls kann der Videoplayer dadurch gestoppt werden. Es wird empfohlen, zunächst die Videowiedergabe zu stoppen, dann das Fenster in das an das USB-Grafikgerät angeschlossene Anzeigegerät zu verschieben und dann den Videoclip zu starten. Die Cursorbewegung ist langsamer, als wenn sich die Maus über den Videobereich des Flash Players bewegt.
- Wenn Sie das Videofenster auf unter 50 % verkleinern, ist die Videoübertragung glatter und ruckelfreier als im Vollbildmodus.
- Auch bei PC-Systemen mit unzureichenden Spezifikationen kann die Wiedergabequalität auf USB-Grafikgeräten sehr schlecht sein.
- Die Videoaufnahme mit Hardware-Overlays wird unterstützt. - Einige Softwarepakete für DVD-Wiedergabe unterstützen nicht die Wiedergabe auf
einer zweiten Grafikkarte. Versuchen Sie, zuerst auf dem zweiten Anzeigegerät den Mediaplayer zu starten und dann die DVD wiederzugeben.
- Möglicherweise fehlen dem PC Mediencodecs, um die Wiedergabe bestimmter Videoformate zu unterstützen. Auf den folgenden Links können Sie sich lizenzfreie Mediencodecs herunterladen. K- Lite: http://www.free-codecs.com/download/K_Lite_Codec_Pack.htm
- Video-/Medienplayer haben bei verschiedenen Anzeigemodi verschiedene

JUC700 USB 3.0 Wormhole Switch DSS BENUTZERHANDBUCH
32
Decodierungsmöglichkeiten. Für eine bessere Wiedergabe von DVDs und bestimmter Videoformate auf dem angeschlossenen USB-Grafikanzeigegerät wird die Verwendung der folgenden lizenzfreien Programme empfohlen: Media Player Classic: http://sourceforge.net/projects/guliverkli/
Sonstiges
- Manche Grafikkarten (z. B. Intel) verhindern es, dass ein zweiter Grafik-Chipsatz als Primärkarte eingestellt werden kann. Daher ist es möglich, dass der primäre Bildschirmmodus nicht funktioniert oder das Anzeigegerät deaktiviert wird.
- Wenn während des Bootvorgangs Probleme auftreten, starten Sie den Computer im abgesicherten Modus, und deinstallieren Sie den Treiber. Halten Sie die STRG-Taste gedrückt, bis das Windows-Startmenü erscheint. Wählen Sie den abgesicherten Modus.
- Um die Version des installierten Treibers zu ermitteln, klicken Sie auf “Systemsteuerung” → “Programme hinzufügen oder entfernen”: USB Display Device (j5create) 9.xx.xxxx.0159 (die Zahl steht für die Treiberversion).
- Manche Mediaplayer unterstützen nur eine beschränkte Anzahl an Dateiformaten. Die Ergebnisse der Kompatibilitätstests finden Sie in den Tabellen. Dort werden die unterschiedlichen Betriebssysteme, die Haupt-Grafikkarte/der Haupt-Chipsatz, die Mediaplayer und die unterstützten Medienformate aufgeführt. Sie werden regelmäßig aktualisiert, wenn eine neue Version von Mediaplayern oder ein neuer Treiber auf den Markt kommen.

JUC700 USB 3.0 Wormhole Switch DSS BENUTZERHANDBUCH
33
TECHNISCHE HILFE Sollten Sie Probleme bei der Verwendung dieses Produkts haben, führen Sie die folgenden Schritte aus, bevor Sie mit dem Produkt wieder zu Ihrem Händler gehen.
1. Das Benutzerhandbuch Das Benutzerhandbuch enthält ausführliche Anleitungen und Vorschläge zur Problembehebung. Viele Probleme können ganz einfach gelöst werden, wenn Sie sich zunächst sorgfältig das Benutzerhandbuch durchlesen. 2. Online-Hilfe Auf der Website von j5create (www.j5create.com) finden Sie die neueste Software für Ihr Gerät. Wenn das Problem weiterhin bestehen bleibt, können Sie eine E-Mail an [email protected] senden, in der Sie Ihr Problem beschreiben. Das Support-Team von j5create wird Ihnen auf diese E-Mail innerhalb von 24 Geschäftsstunden antworten. 3. Telefonische Hilfe Rufen Sie uns unter der Telefonnummer +1 888-689-4088 an. Einer unserer Techniker wird dann versuchen, Ihr Problem mit Ihnen zusammen telefonisch zu beheben.
Kundendienst: Kostenlose Rufnummer: +1 888-988-0488 Technische Hilfe: Kostenlose Rufnummer: +1 888-689-4088 E-Mail:
Kontaktieren Sie unsere Technische Hilfe Montags – Freitags während der Geschäftszeiten. 10:00-18:00 U.S.A EST (Eastern Standard Time = Mitteleuropäische Sommerzeit -6 Stunden).

JUC700 USB 3.0 Wormhole Switch DSS BENUTZERHANDBUCH
34
GARANTIE VON j5create j5create gibt eine beschränkte einjährigen Garantie. Schäden aus natürlicher Abnutzung fallen nicht unter die Garantie. Im Garantiefall muss der Nutzer den Kundendienst von j5create per Telefon oder E-Mail kontaktieren und den Defekt schildern. Vom Kundendienst erhält der Nutzer eine Rücksendenummer (RMA). Der Nutzer trägt die Kosten für den Versand zur Reparatur, j5create trägt die Kosten für den Rückversand zum Kunden. Um eine Rücksendenummer zu erhalten, muss der Nutzer dem Kundendienst folgende Dokumente vorlegen und Daten angeben: (i) eine Kopie der Originalrechnung, um die Garantieansprüche zu belegen (ii) die Produktseriennummer (iii) eine Beschreibung des Problems (iv) eine RMA-Nummer (Rücksendenummer) (v) Name, Adresse und Telefonnummer des Kunden j5create garantiert nicht für einen ununterbrochenen und fehlerfreien Betrieb des Produkts. j5create ist nicht haftbar für Schäden, die aus der Nichtbeachtung der Anweisungen zur Verwendung des Produkts resultieren. Diese Garantie umfasst nicht: (a) Verschleißteile, wenn der Schaden nicht auf Material- und Herstellungsfehler zurückzuführen ist; (b) kosmetische Schäden, einschließlich, aber nicht beschränkt auf Schäden wie Kratzer, Dellen und gebrochene Kunststoffteile an Anschlüssen; (c) Schäden, die aus der Verwendung mit Produkten resultieren, die nicht von j5create sind; (d) Schäden, die auf höhere Gewalt (Naturkatastrophen, Überflutungen, Brände, Erdbeben, Blitzschlag, Tornados usw.) zurückzuführen sind; (e) Schäden, die auf Missbrauch (Verluste, Unfälle, Missbrauch, Fehlgebrauch und andere externe Ursachen) zurückzuführen sind; (f) Schäden, die durch eine unerlaubten oder nicht von j5create vorgesehenen Betrieb, entstanden sind; (g) Schäden, die auf nicht zulässige Reparaturen (einschließlich Aktualisierungen und Erweiterungen) zurückzuführen sind, oder die von Personen durchgeführt wurden, die nicht von j5create autorisiert oder keine autorisierten j5create Reparaturfachbetriebe sind; (h) Produkte oder Teile, die ohne die schriftliche Genehmigung von j5create geändert wurden, um den Funktionsumfang zu ändern und (i) Produkte, bei denen die j5create-Seriennummer entfernt oder unkenntlich gemacht wurde. In einem solchen Fall berechnet j5create für Sie die Kosten für Material und Reparatur. j5create gibt diese Garantie anstatt anderer sonstiger ausdrücklicher oder stillschweigender Garantien Weitere Informationen finden Sie auf unserer Website unter http://www.j5create.com Copyright © 2019 j5create. Alle Rechte vorbehalten. Alle Handelsnamen sind eingetragene Warenzeichen ihrer jeweiligen Eigentümer. Funktionen und Spezifikationen können ohne vorherige Ankündigung geändert werden. Das Produkt entspricht möglicherweise nicht genau der Abbildung.
JUC700 USB 3.0 Wormhole Switch DSS BENUTZERHANDBUCH
35
EINHALTUNG GESETZLICHER VORSCHRIFTEN FCC Dieses Gerät wurde geprüft, und es entspricht gemäß Abschnitt 15, Unterabschnitt B, § 15,109/15,107 der FCC einem Gerät der Klasse B.
Der Betrieb unterliegt den folgenden zwei Bedingungen: • Dieses Gerät darf keine Störungen verursachen. • Dieses Gerät muss alle Störungen aufnehmen können, auch solche, die einen unerwünschten Betrieb zur Folge haben.
CE Dieses Gerät entspricht den Anforderungen der folgenden Verordnungen: EN 55022 Klasse B (2006), EN 55024 (1998+A1:2001+ A2:2003), (IEC/EN 61000-4-2 (1995+A1:1998+A2:2001)/-3 (2006)
C-Tick Dieses Gerät entspricht den Anforderungen der folgenden Verordnungen: EN 55022 (2006) Klasse B, AS/NZS CISPR22 © IEC: 2005.
VCCI Dieses Gerät entspricht den Anforderungen der folgenden Verordnungen: CISPR22 © IEC: 2005
Haftungsausschlusserklärung Die in diesem Dokument enthaltenen Informationen können ohne Ankündigung geändert werden. Der Hersteller macht keine Zusicherungen und gibt keine Garantien (weder implizit noch anderweitig) hinsichtlich der Genauigkeit und Vollständigkeit dieses Dokuments. Er ist in keinem Fall haftbar für Gewinnverluste und sonstige wirtschaftliche Schäden, einschließlich, aber nicht beschränkt auf direkte und indirekte Schäden, Folgeschäden und sonstige Schäden. Dieses Dokument darf ohne die ausdrückliche schriftliche Genehmigung des Herstellers weder als Ganzes noch in Teilen, in keiner Form und mit keinen Mitteln, weder elektronisch noch mechanisch (darunter fällt auch das Fotokopieren, Aufnehmen oder Datenaufzeichnung und das Nutzen von Abrufsystems) reproduziert oder übertragen werden.

JUC700 Wormhole Switch DSS Dispositivos de visualización USB 3.0 con uso
compartido de datos
Manual del usuario
JUC700

JUC700 USB 3.0 Wormhole Switch DSS MANUAL DEL USUARIO
0
CONTENIDO INTRODUCCIÓN ..........................................................................1
Características ....................................................................................................... 1
Requisitos Del Entorno .......................................................................................... 1
Contenido del paquete .......................................................................................... 1
Especificaciones .................................................................................................... 2
Funciones .............................................................................................................. 2
PROCEDIMIENTOS INICIALES .......................................................3
I. Instalación del controlador en ambos equipos ....................................... 3
Instalación del controlador: Windows 10/8.1/8/7 ................................................. 3
Instalación del controlador: Windows XP .............................................................. 9
I. Conexión de dispositivos ....................................................................... 14
Sugerencias: Verificar la instalación del controlador del dispositivo.................. 14
II. Configuración para ambos equipos ....................................................... 17
Funciones y forma de uso ......................................................... 19
I. Uso compartido de la pantalla .............................................................. 20
II. Uso compartido de datos ...................................................................... 22
III. Uso compartido de dispositivos: uso compartido de teclado y ratón.....................24
Desinstalación del controlador de dispositivo ................................................... 26

JUC700 USB 3.0 Wormhole Switch DSS MANUAL DEL USUARIO
1
INTRODUCCIÓN
¡Gracias por adquirir el JUC700 USB 3.0 Wormhole Switch DSS (Dual System Swap, Intercambio de sistema dual)! Este magnífico dispositivo ofrece la posibilidad de compartir recursos de la tarjeta gráfica de vídeo entre dos equipos y transferir datos, imágenes, música, vídeos u otros archivos rápidamente entre dichos equipos con una tasa de transferencia ultrarrápida de 5 Gbps. Su JUC700 USB 3.0 Wormhole Switch DSS no solo le permite compartir el teclado y ratón con otro equipo, sino que también admite entornos con varias pantallas.
Características Transferencia sencilla de datos, fotografías, música y vídeos entre su PC y la tableta Duplicidad y extensión de la pantalla entre dos equipos Uso compartido de recursos de disco duro entre dos equipos Ahorro de coste adicional utilizando varias unidades de disco duro de PC o tableta y/o
monitores Compatible con USB 3.0, 2.0 y 1.1. Compatible con tasas de transferencia USB 3.0 (5 Gbps) de supervelocidad. Compatibilidad con la función de pantalla táctil
Requisitos Del Entorno
Windows 10 / 8.1 / 8 / 7 / XP Un puerto USB disponible (USB 3.0 recomendado) CPU: i3 Dual core 2.8 GHz RAM: 2GB memory or higher
Contenido del paquete
JUC700 Wormhole Switch DSS CD de controladores con manual electrónico
Guía de instalación rápida

JUC700 USB 3.0 Wormhole Switch DSS MANUAL DEL USUARIO
2
Especificaciones
Alimentación Modo de alimentación Alimentación a través de bus Interfaz Interfaz Conector macho USB 3.0 Type-A *2 Visualización de vídeo Modos admitidos Reproducción de vídeo: 1080P
Pantalla extendida o duplicada Especificaciones físicas Material de la carcasa Aluminio Dimensiones Estructura principal: 61 (AN) X 19 (AL)
X 10,5 (FO) mm Longitud del cable 150 cm (5 pies) Peso 45 g aproximadamente (cable incluido)
Funciones
Sistemas operativos admitidos Windows a Windows
Uso compartido de dispositivos: conmutación de control de teclado y ratón Uso del ratón para alejarse del borde de la pantalla
Sí
Uso compartido de teclado y ratón Sí Uso compartido de la pantalla Uso compartido de pantalla de vídeo
Sí (duplicidad y extensión)
Control de pantalla táctil Sí Uso compartido de datos Aplicación de transferencia de datos
Sí
JUC700 USB 3.0 Wormhole Switch DSS MANUAL DEL USUARIO
3
PROCEDIMIENTOS INICIALES Lea esta información ANTES de llevar a cabo la instalación
Instale el controlador completamente en ambos equipos antes de insertar el
cable JUC700 USB 3.0 Wormhole Switch DSS en dichos equipos.
Puede conectar cualquier lado y color del cable USB JUC700 USB 3.0 Wormhole
Switch DSS a cualquiera de los equipos.
Para evitar errores de instalación, ejecute el programa de instalación como
administrador.
En primer lugar, desinstale el controlador anterior antes de actualizar al
controlador más reciente.
La pantalla de visualización parpadeará durante la instalación.
I. Instalación del controlador en ambos equipos: Instale el controlador en los dos equipos que conectará a su JUC700. En el futuro, por favor, también recuerde que debe actualizar el controlador en ambos lados.
*Asegúrese de que el cable USB JUC700 USB 3.0 Wormhole Switch DSS está desenchufado
de su equipo de sobremesa o portátil antes de ejecutar el programa de instalación.
Instalación del controlador: Windows 10/8.1/8/7 Complete los pasos siguientes para iniciar la aplicación. Inserte el CD con los controladores en la unidad de CD-ROM del equipo. El programa de instalación se debe iniciar automáticamente. Si la función de ejecución automática no se inicia, vaya a Computer (Equipo), haga clic en la unidad de CD y ejecute manualmente el CD de instalación haciendo doble clic en el archivo Setup.exe.
1. La página de instalación se abrirá. Para iniciar la instalación haga clic en “Instalar el
último controlador”. Asegúrese de que la red esté disponible o presione “Instalar
controlador” para iniciar la instalación.

JUC700 USB 3.0 Wormhole Switch DSS MANUAL DEL USUARIO
4
2. Si la ventana “Control de cuentas de usuario” aparece en la pantalla, haga clic en
“Sí” para continuar.

JUC700 USB 3.0 Wormhole Switch DSS MANUAL DEL USUARIO
5
3. Tras presionar la opción de instalación, el Asistente InstallShield se abrirá, haga clic en
para continuar.
Siguiente>

JUC700 USB 3.0 Wormhole Switch DSS MANUAL DEL USUARIO
6
Siguiente >
4. Lea el acuerdo de licencia, marque “Acepto los términos del acuerdo de licencia” y haga
clic en .

JUC700 USB 3.0 Wormhole Switch DSS MANUAL DEL USUARIO
7

JUC700 USB 3.0 Wormhole Switch DSS MANUAL DEL USUARIO
8
Finalizar
5. Cuando el Asistente para la instalación InstallShield Wizard haya finalizado, seleccione
“Si, deseo reiniciar el equipo ahora.” Haga clic en para reiniciar.
6. Repita la instalación del controlador en el segundo equipo que conectará a su JUC700.

JUC700 USB 3.0 Wormhole Switch DSS MANUAL DEL USUARIO
9
Instalación del controlador: Windows XP Complete los pasos siguientes para iniciar la aplicación. Inserte el CD con los controladores en la unidad de CD-ROM del equipo. El programa de instalación se debe iniciar automáticamente. Si la función de ejecución automática no se inicia, vaya a Computer (Equipo), haga clic en la unidad de CD y ejecute manualmente el CD de instalación haciendo doble clic en el archivo Setup.exe.
*Asegúrese de que el cable USB del JUC700 USB 3.0 Wormhole Switch DSS esté
desconectado de su PC o computadora portátil antes de ejecutar el programa de
instalación.
1. La página de instalación se abrirá. Para iniciar la instalación haga clic en “Instalar el
último controlador”. Asegúrese de que la red esté disponible o presione “Instalar
controlador” para iniciar la instalación.

JUC700 USB 3.0 Wormhole Switch DSS MANUAL DEL USUARIO
10
2. Tras presionar la opción de instalación, el Asistente InstallShield se abrirá, haga clic en para continuar.
Siguiente>

JUC700 USB 3.0 Wormhole Switch DSS MANUAL DEL USUARIO
11
Siguiente >
3. Lea el acuerdo de licencia, marque “Acepto los términos del acuerdo de licencia” y haga
clic en .
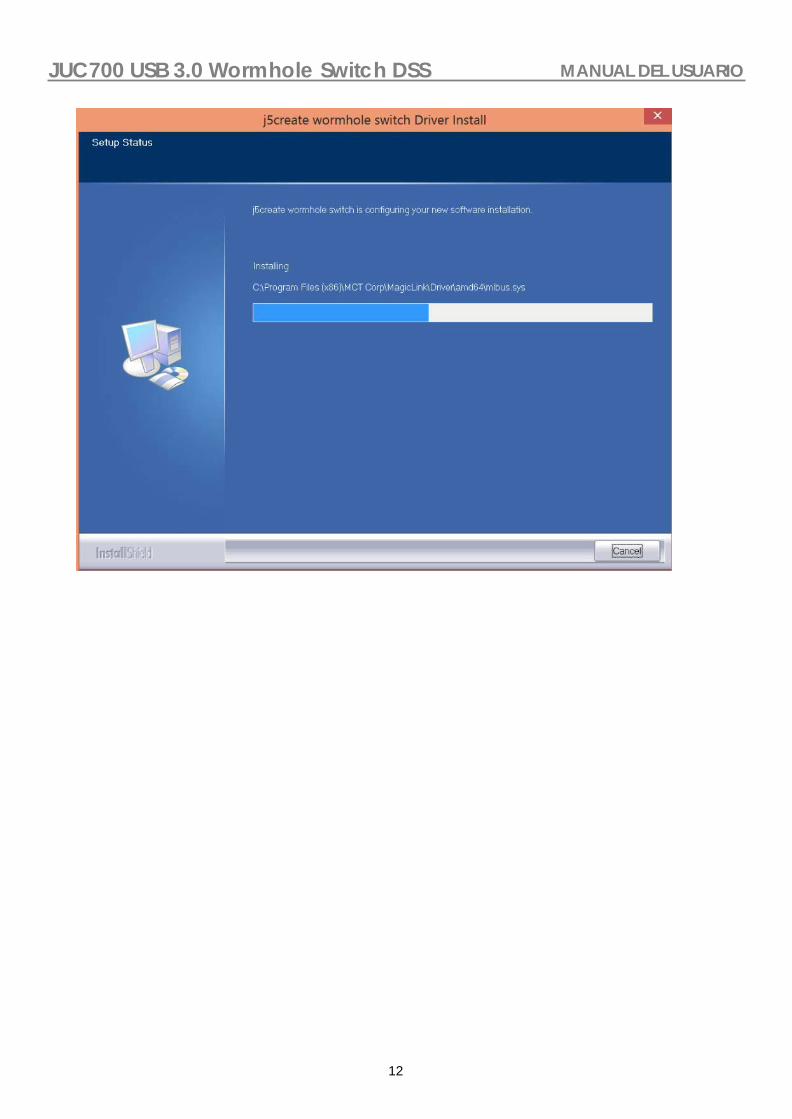
JUC700 USB 3.0 Wormhole Switch DSS MANUAL DEL USUARIO
12

JUC700 USB 3.0 Wormhole Switch DSS MANUAL DEL USUARIO
13
Finalizar 4. Cuando el Asistente para la instalación InstallShield Wizard haya finalizado, seleccione“Si,
deseo reiniciar el equipo ahora.” Haga clic en para reiniciar.
5. Repita la instalación del controlador en el segundo equipo que conectará a su JUC700. 6. Cuando inicie la función de uso compartido de la pantalla por primera vez, podría ver una instalación automática del controlador de pantalla de DUPLICIDAD Y EXTENSIÓN.
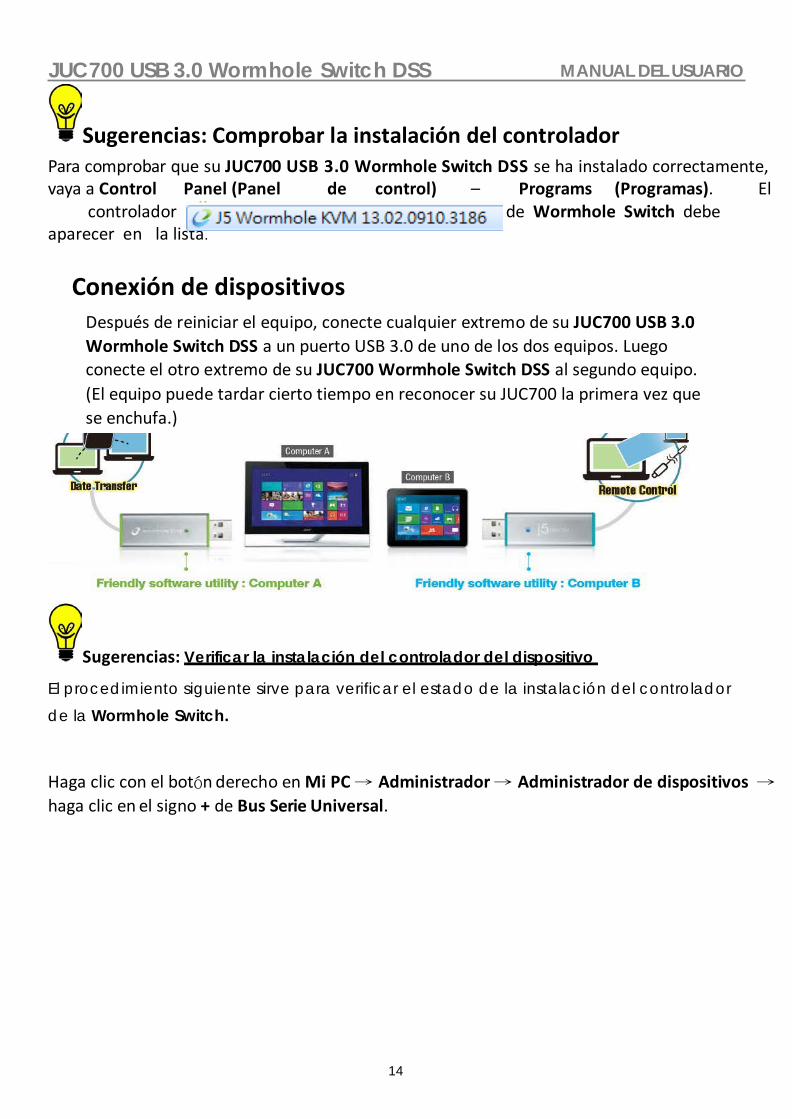
JUC700 USB 3.0 Wormhole Switch DSS MANUAL DEL USUARIO
14
Sugerencias: Comprobar la instalación del controlador Para comprobar que su JUC700 USB 3.0 Wormhole Switch DSS se ha instalado correctamente, vaya a Control Panel (Panel de control) – Programs (Programas). El controlador de Wormhole Switch debe aparecer en la lista.
Conexión de dispositivos Después de reiniciar el equipo, conecte cualquier extremo de su JUC700 USB 3.0 Wormhole Switch DSS a un puerto USB 3.0 de uno de los dos equipos. Luego conecte el otro extremo de su JUC700 Wormhole Switch DSS al segundo equipo. (El equipo puede tardar cierto tiempo en reconocer su JUC700 la primera vez que se enchufa.)
Sugerencias: Verificar la instalación del controlador del dispositivo
El procedimiento siguiente sirve para verificar el estado de la instalación del controlador de la Wormhole Switch.
Haga clic con el botón derecho en Mi PC → Administrador → Administrador de dispositivos →
haga clic en el signo + de Bus Serie Universal.
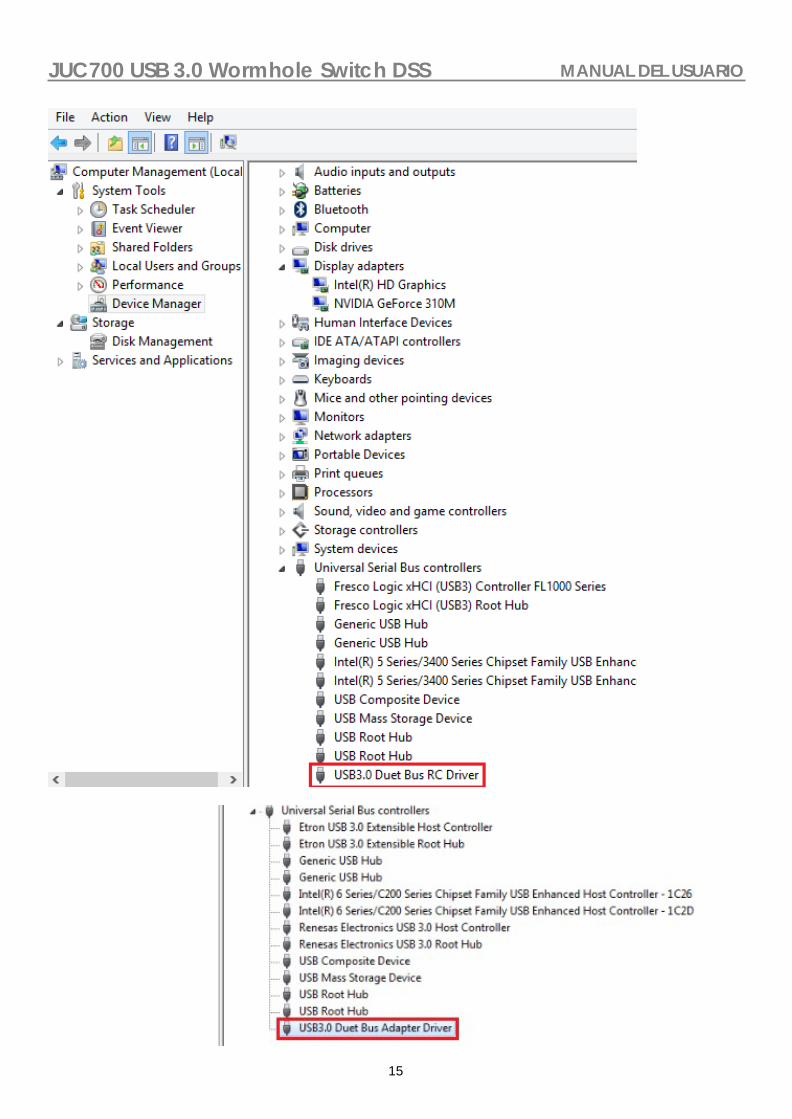
JUC700 USB 3.0 Wormhole Switch DSS MANUAL DEL USUARIO
15
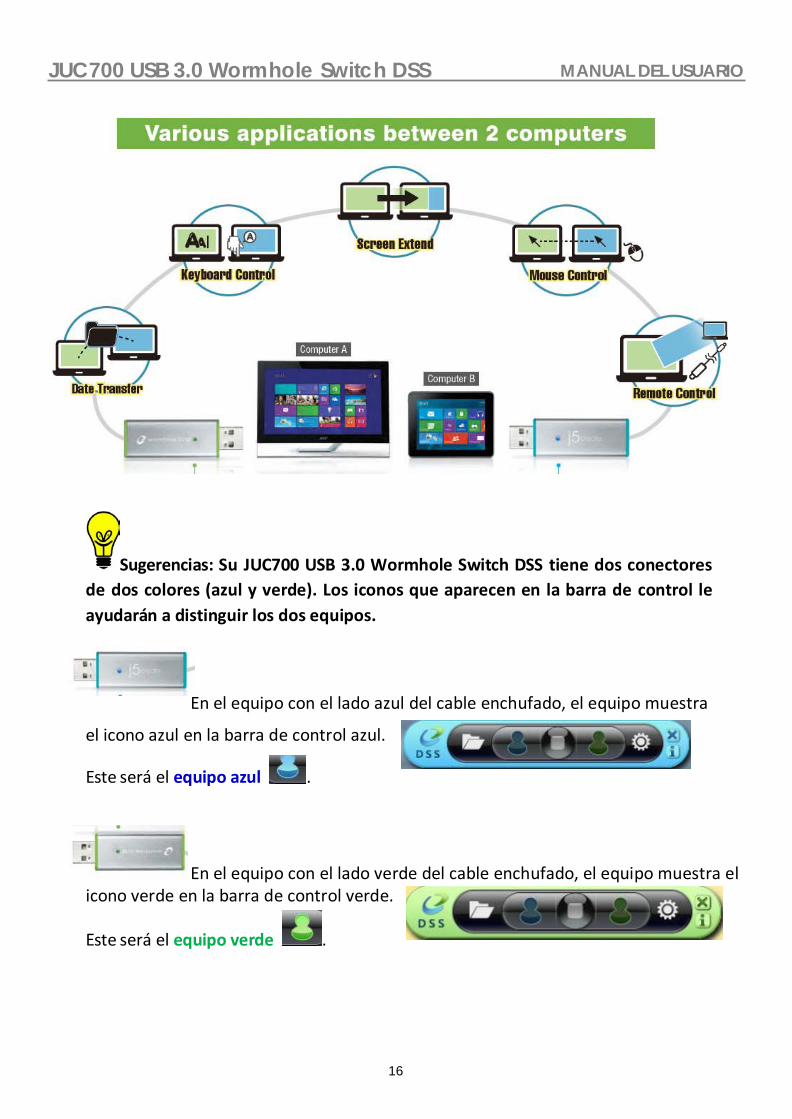
JUC700 USB 3.0 Wormhole Switch DSS MANUAL DEL USUARIO
16
Sugerencias: Su JUC700 USB 3.0 Wormhole Switch DSS tiene dos conectores de dos colores (azul y verde). Los iconos que aparecen en la barra de control le ayudarán a distinguir los dos equipos.
En el equipo con el lado azul del cable enchufado, el equipo muestra
el icono azul en la barra de control azul.
Este será el equipo azul .
En el equipo con el lado verde del cable enchufado, el equipo muestra el icono verde en la barra de control verde.
Este será el equipo verde .

JUC700 USB 3.0 Wormhole Switch DSS MANUAL DEL USUARIO
17
I. Configuración para ambos equipos Cuando su JUC700 USB 3.0 Wormhole Switch DSS esté enchufado, será necesario ajustar algunas configuraciones en ambos equipos (equipo portátil, equipo de sobremesa, equipo todo en uno o tableta):
Seleccionar la posición del otro equipo.
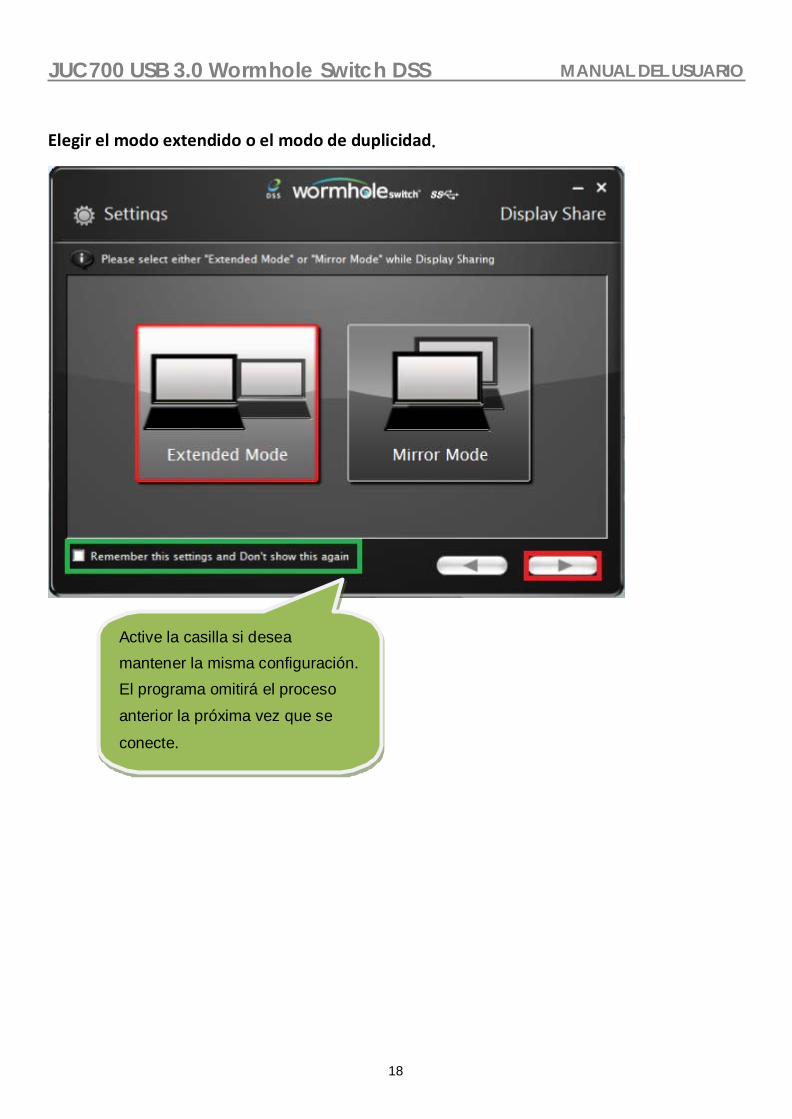
JUC700 USB 3.0 Wormhole Switch DSS MANUAL DEL USUARIO
18
Active la casilla si desea
mantener la misma configuración.
El programa omitirá el proceso
anterior la próxima vez que se
conecte.
Elegir el modo extendido o el modo de duplicidad.
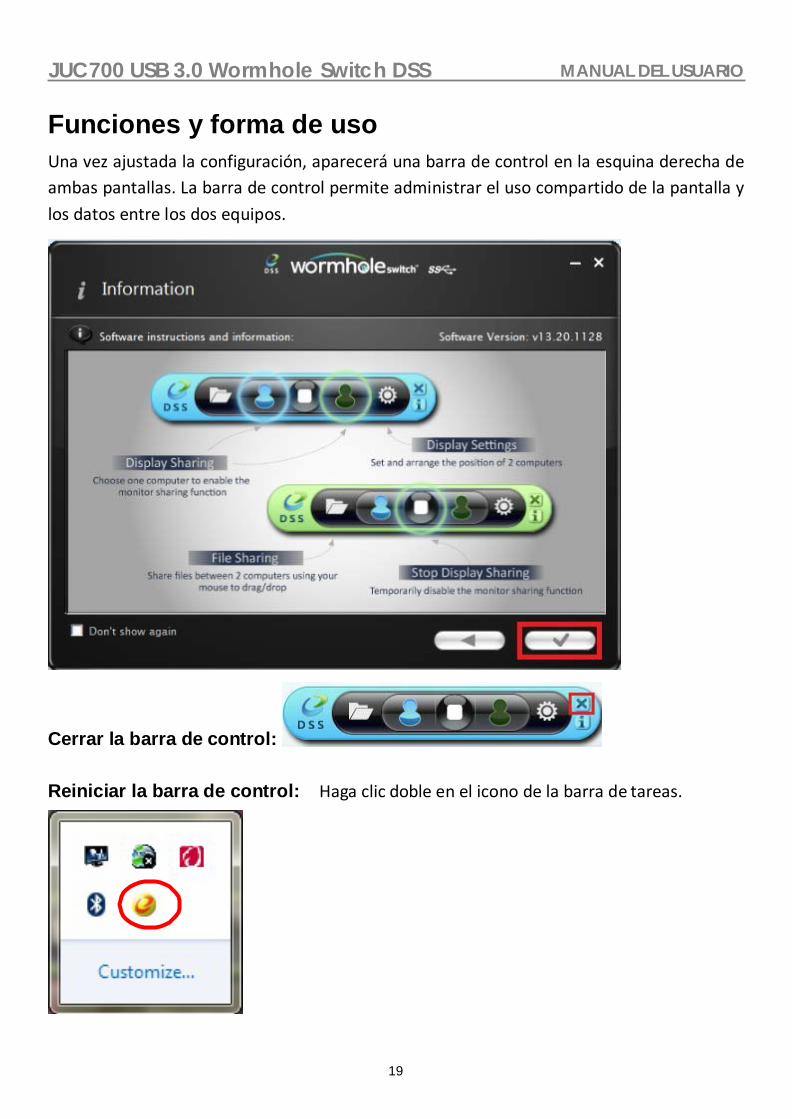
JUC700 USB 3.0 Wormhole Switch DSS MANUAL DEL USUARIO
19
Funciones y forma de uso Una vez ajustada la configuración, aparecerá una barra de control en la esquina derecha de ambas pantallas. La barra de control permite administrar el uso compartido de la pantalla y los datos entre los dos equipos.
Cerrar la barra de control:
Reiniciar la barra de control: Haga clic doble en el icono de la barra de tareas.

JUC700 USB 3.0 Wormhole Switch DSS MANUAL DEL USUARIO
20
I. Uso compartido de la pantalla Ver el equipo azul: Puede ver el equipo azul en la pantalla de cualquier equipo. Simplemente seleccione el icono azul y la pantalla del equipo verde se convertirá en el segundo monitor para el equipo azul. A continuación puede elegir el modo de extensión o duplicación para el equipo azul.
Ver el equipo verde: Puede ver el equipo verde en la pantalla de cualquier equipo. Simplemente seleccione el icono verde y la pantalla del equipo azul se convertirá en el segundo monitor para el equipo verde. A continuación puede elegir el modo de extensión o duplicación para el equipo verde.
Detener el uso compartido de la pantalla:
EXTENDED MODE (MODO EXTENDIDO)
Esta función permite al equipo conectado trabajar como pantalla Extended (Extendida) de la pantalla principal. El espacio de trabajo extendido mejora la eficiencia en el trabajo.
Puede cambiar la posición relativa de los dos equipos en Display Settings (Configuración de la pantalla).
MIRROR MODE (MODO DUPLICADO)
Esta función permite mostrar el mismo contenido de la pantalla principal (duplicidad) en el otro equipo.
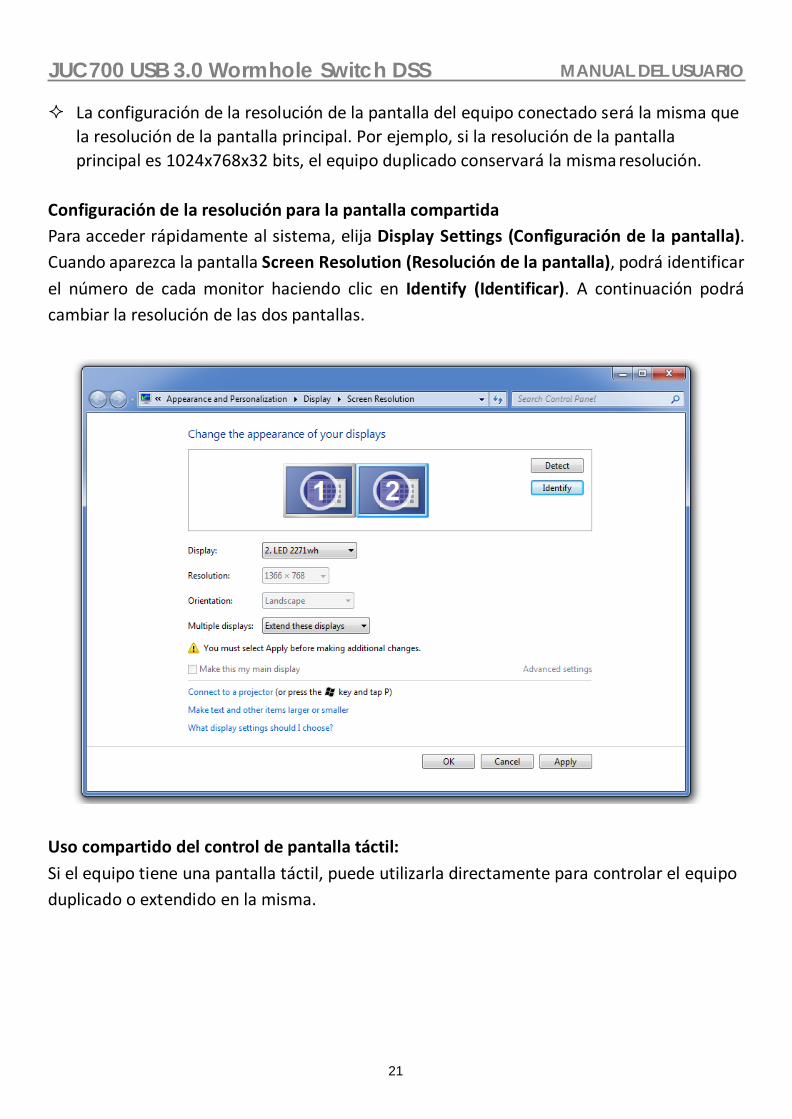
JUC700 USB 3.0 Wormhole Switch DSS MANUAL DEL USUARIO
21
La configuración de la resolución de la pantalla del equipo conectado será la misma que la resolución de la pantalla principal. Por ejemplo, si la resolución de la pantalla principal es 1024x768x32 bits, el equipo duplicado conservará la misma resolución.
Configuración de la resolución para la pantalla compartida Para acceder rápidamente al sistema, elija Display Settings (Configuración de la pantalla). Cuando aparezca la pantalla Screen Resolution (Resolución de la pantalla), podrá identificar el número de cada monitor haciendo clic en Identify (Identificar). A continuación podrá cambiar la resolución de las dos pantallas.
Uso compartido del control de pantalla táctil: Si el equipo tiene una pantalla táctil, puede utilizarla directamente para controlar el equipo duplicado o extendido en la misma.

JUC700 USB 3.0 Wormhole Switch DSS MANUAL DEL USUARIO
22
II. Uso compartido de datos
Puede ver y transferir datos desde el equipo contrario (equipo verde), haciendo clic en el icono carpeta de la barra de herramientas azul.
Aparecerá una herramienta de enlace para transferir archivos que le permitirá transferir datos desde el equipo verde al equipo azul. Su JUC700 admite transferencia de archivos y datos mediante las funciones Arrastrar y Colocar o Copiar y Pegar desde el equipo contrario con una tasa de transferencia de 5 Gbps.
Puede ver y transferir datos desde el equipo contrario (equipo azul), haciendo clic en el icono carpeta de la barra de herramientas verde.
Aparecerá una herramienta de enlace para transferir archivos que le permitirá transferir datos desde el equipo azul al equipo verde.

JUC700 USB 3.0 Wormhole Switch DSS MANUAL DEL USUARIO
23
Su JUC700 admite transferencia de archivos y datos mediante las funciones Arrastrar y Colocar o Copiar y Pegar desde el equipo contrario con una tasa de transferencia de 5 Gbps.
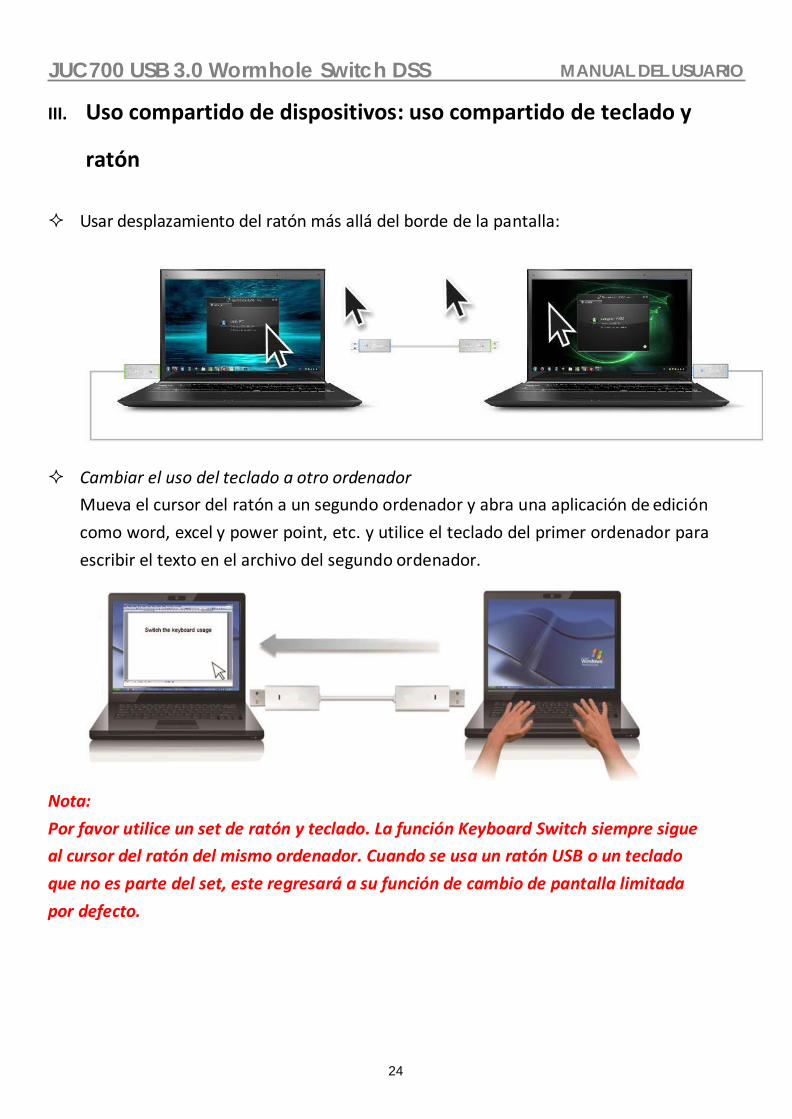
JUC700 USB 3.0 Wormhole Switch DSS MANUAL DEL USUARIO
24
III. Uso compartido de dispositivos: uso compartido de teclado y
ratón
Usar desplazamiento del ratón más allá del borde de la pantalla:
Cambiar el uso del teclado a otro ordenador Mueva el cursor del ratón a un segundo ordenador y abra una aplicación de edición
como word, excel y power point, etc. y utilice el teclado del primer ordenador para
escribir el texto en el archivo del segundo ordenador.
Nota:
Por favor utilice un set de ratón y teclado. La función Keyboard Switch siempre sigue
al cursor del ratón del mismo ordenador. Cuando se usa un ratón USB o un teclado
que no es parte del set, este regresará a su función de cambio de pantalla limitada
por defecto.

JUC700 USB 3.0 Wormhole Switch DSS MANUAL DEL USUARIO
25
Compartir el portapapeles
Con la característica compartir portapapeles, puede editar, copiar o pegar fácilmente el
contenido del portapapeles bidireccionalmente.
1. Abra un archivo y seleccione el contenido (texto o imágenes) que desea en el primer
ordenador y haga clic con el botón derecho y seleccione “Copiar”.
2. Mueva el cursor a la ubicación del 2do ordenador para colocar el Contenido (texto/fotos),
y haga clic derecho y seleccione “Pegar” .

JUC700 USB 3.0 Wormhole Switch DSS MANUAL DEL USUARIO
26
Desinstalación del controlador de dispositivo
* Desenchufe el cable USB de la Wormhole Switch antes de desinstalar el controlador
1. Haga clic en “Inicio” → Panel de control → Programas y características → Desinstalar o
cambiar un programa.
Seleccione j5create wormhole switch... Haga clic en .
2. Aparecerá un mensaje confirmando que desea desinstalar la aplicación. Haga clic en ‘ok’
para continuar.
Desinstalar

JUC700 USB 3.0 Wormhole Switch DSS MANUAL DEL USUARIO
27
Finalizar
3. Cuando el controlador haya sido desinstalado por completo, seleccione “Sí, deseo
reiniciar mi ordenador ahora”. Haga clic en para reiniciar.

JUC700 USB 3.0 Wormhole Switch DSS MANUAL DEL USUARIO
28
SOLUCIÓN DE PROBLEMAS Si tiene preguntas acerca del uso de este dispositivo, siga las instrucciones siguientes. Si necesita más ayuda, visite nuestra página web o llame a la línea directa de soporte de j5create. Problemas conocidos
- Direct 3D no es compatible con XP. Sería compatible con el modo Win 7 Aero. Recomendaciones generales
- Existen incompatibilidades al usar otros dispositivos Video over USB en un mismo sistema. Asegúrese de que todos los controladores de Video over USB están instalados antes de continuar con la instalación de j5create.
- Compruebe si el dispositivo está enchufado correctamente en el sistema anfitrión.
- Asegúrese de que el puerto USB que está usando sea el del JUC700.
- Desenchufe el cable USB del dispositivo de pantalla USB y vuelva a insertarlo.
- Compruebe si el monitor está conectado correctamente y encendido.
- Asegúrese de reiniciar el ordenador tras la instalación del controlador.
- Pruebe en un puerto USB y/u ordenador diferente.
- Desenchufe todos los demás dispositivos USB del sistema.
- Intente conectar el cable USB del dispositivo de pantalla USB directamente al ordenador en lugar de a través de un hub.
- Reinicie o refresque o resincronice su monitor.
Reproducción multimedia
- Durante la reproducción de vídeo en todas las plataformas, no cambie el modo de pantalla, ni coloque ni cambie la ventana del reproductor de vídeo (como arrastrar la ventana del reproductor de vídeo entre la pantalla principal y la pantalla conectada). Esto puede hacer que el reproductor de vídeo detenga la reproducción. Aconsejamos detener la reproducción de vídeo, mover la ventana a la pantalla del dispositivo gráfico USB conectado y luego seleccionar el clic de vídeo para iniciar la reproducción.
- El movimiento del cursor es más lento cuando el ratón se mueve por la región de vídeo del reproductor Flash,
- Si baja la visualización de su pantalla a menos del 50 % ayudará a suavizar la reproducción de vídeo entrecortado para vídeos en modo pantalla completa.
- Puede que experimente un rendimiento de vídeo pobre en dispositivos gráficos USB con sistemas PC de especificaciones bajas.
- Se soporta el renderizado de vídeo con superposiciones por hardware.
- Algunos paquetes reproductores de DVD no soportan la reproducción en un segundo adaptador de pantalla de ningún tipo. Puede intentar abrir el reproductor multimedia en la pantalla secundaria antes de comenzar a reproducir el DVD.
- Puede que su PC no tenga ciertos códecs multimedia para soportar la reproducción de ciertos formatos de vídeo. Utilice el enlace siguiente para instalar el códec multimedia gratuito con licencia.

JUC700 USB 3.0 Wormhole Switch DSS MANUAL DEL USUARIO
29
K- Lite: http://www.free-codecs.com/download/K_Lite_Codec_Pack.htm
- Los reproductores de vídeo/multimedia tienen diferentes capacidades bajo distintos modos de pantalla. Para un mejor rendimiento viendo DVDs en ciertos formatos de vídeo en la pantalla gráfica USB conectada, se recomienda que utilice el siguiente software gratuito con licencia: Media Player Classic: http://sourceforge.net/projects/guliverkli/
Otros
- Algunas tarjetas gráficas, como Intel, no permiten que chipset de gráficos secundarios sean ajustados como tarjetas primarias. Como resultado, el modo primario podría no funcionar o la pantalla quedar deshabilitada.
- Si experimenta problemas durante el proceso de arranque, inicie su ordenador en Modo Seguro y desinstale el controlador. Mantenga la tecla CTRL hasta que aparezca el menú de arranque de Windows y seleccione el Modo seguro.
- Para verificar la versión del controlador instalado, haga clic en “Panel de control” → “Agregar o quitar programas” para comprobar el programa: USB Display Device (j5create) 9.xx.xxxx.0159 (el número significa la versión del controlador).
- Existen algunas limitaciones en diferentes reproductores multimedia por su soporte de archivos. Acompañamos nuestros resultados de la prueba de compatibilidad en las tablas según los diferentes sistemas operativos, tarjeta o chipset gráfico del sistema principal, reproductores multimedia y el formato multimedia soportado. Se actualizará periódicamente con la nueva versión de reproductores multimedia o nuestro último controlador.

JUC700 USB 3.0 Wormhole Switch DSS MANUAL DEL USUARIO
30
SOPORTE TÉCNICO Si surge algún problema al usar este producto, siga las instrucciones siguientes antes de devolver el producto a la tienda.
1. Manual del usuario Contiene instrucciones detalladas y una sección para la solución de problemas; muchos problemas comunes pueden resolverse fácilmente leyendo el manual del usuario. 2. Soporte en línea Visite el sitio web j5create (www.j5create.com) para encontrar el último software para su dispositivo. Si el mismo problema persiste, puede enviar una descripción de éste por correo electrónico a [email protected]. El equipo de soporte técnico de j5create le contestará en las 24 horas siguientes. 3. Soporte telefónico Llámenos al +1 888-689-4088 y uno de nuestros técnicos de soporte le atenderá con sumo gusto.
Servicio al cliente: Número gratuito: +1 888-988-0488 Soporte técnico: Número gratuito: +1 888-689-4088 Correo electrónico: [email protected] Contacte con el Servicio técnico en horario de oficina. 09:00-18:00 U.S.A E.S.T. Lunes a viernes para mayor asistencia.

JUC700 USB 3.0 Wormhole Switch DSS MANUAL DEL USUARIO
31
GARANTÍA DE j5create j5create ofrece una garantía limitada de 1 años. Los daños por desgaste y roturas no están incluidos. El usuario deberá llamar o enviar un correo electrónico al servicio al cliente de j5create con información sobre el defecto del producto y obtendrá un número de autorización de devolución. Los usuarios se hacen responsables del coste de la devolución y nosotros nos ocuparemos del envío posterior. Para obtener una autorización de devolución, el usuario deberá tener la información siguiente a mano cuando llame o envíe correo electrónico al equipo de servicio: (i) una copia de la factura de compra original para verificar la garantía (ii) el número de serie del producto (iii) una descripción del problema (iv) el número de autorización de material devuelto (v) el nombre, dirección y número de teléfono del cliente j5create no garantiza que la funcionalidad del producto será continua y estará libre de errores. j5create no se hace responsable por los daños por no seguir las instrucciones relativas al uso del producto. Esta garantía no se aplica a: (a) partes consumibles, a menos que el daño haya ocurrido debido a un defecto en materiales o mano de obra; (b) daños estéticos, incluyendo, pero no limitándose a rayas, roturas y plástico roto en los puertos; (c) daños causados por el uso con productos que no son j5create; (d) daños causados por fuerzas mayores (desastres naturales, inundaciones, fuego, terremotos, rayos, tifones, etc.); (e) daños causados por un mal uso (f) daños usados por una utilización del producto fuera de los usos permitidos o normales descritos por j5create ; (g) daños causados por reparaciones (incluyendo actualizaciones y ampliaciones) realizadas por cualquier persona que no sea representante de j5create o del Servicio Autorizado de j5create; (h) un producto o parte de él ha sido modificado para alterar la funcionalidad o capacidad sin el permiso por escrito de j5create; o (i) si el número de serie de j5create ha sido quitado o deformado en el producto. Si se da alguna de las situaciones anteriores, j5create calculará el coste de los materiales y reparación para comunicárselo.
Esta garantía es ofrecida por j5create sustituyendo cualquier otra garantía expresa o implícita.
Para obtener más información, visite nuestro sitio web http://www.j5create.com
Copyright© 2019 j5create. Todos los derechos reservados. Todos los nombres de marcas son
marcas registradas de sus respectivos propietarios. Las características y especificaciones están
sujetas a cambios sin previo aviso. El producto puede no ser exactamente como aparece en las
imágenes.

JUC700 USB 3.0 Wormhole Switch DSS MANUAL DEL USUARIO
32
CUMPLIMIENTO DE LA REGULACIÓN FCC Este equipo ha sido probado y cumple con el Apartado 15 de la FCC Subapartado B § 15.109/15.107 Clase B. Su utilización está sujeta a estas dos condiciones:
• Este dispositivo no puede causar interferencias dañinas
• Este dispositivo debe aceptar cualquier interferencia, incluyendo interferencias que puedan causar un funcionamiento no deseado en el dispositivo CE Este equipo cumple los requisitos de las regulaciones siguientes:
EN 55022 Clase B (2006),
EN 55024 (1998+A1:2001+ A2:2003), (IEC/EN 61000-4-2 (1995+A1:1998+A2:2001)/-3(2006)
C-Tick Este equipo cumple los requisitos de las regulaciones siguientes: EN 55022 (2006) Clase B, AS/NZS CISPR22 © IEC: 2005.
VCCI Este equipo cumple los requisitos de las regulaciones siguientes: CISPR22 © IEC: 2005 Renuncias
La información de este documento está sujeta a cambios sin previo aviso. El fabricante no hace representaciones o garantías (implícitas o no) en lo concerniente a la precisión e integridad de este documento y en ningún caso se hará responsable por la pérdida de beneficios o cualquier daño comercial, incluyendo, pero no limitándose a, daños especiales, incidentales, consecuentes u otros. Ninguna parte de este documento puede ser reproducida o transmitida en modo alguno o por ningún medio, ya sea electrónico o mecánico, incluyendo fotocopias, grabación o grabación de información y sistemas de recuperación de datos sin el permiso expreso por escrito del fabricante.

JUC700 Wormhole Switch DSS
USB 3.0 ディスプレイシェア
ユーザー マニュアル
JUC700

JUC700 USB 3.0 Wormhole Switch DSS ユーザーマニュアル
0
目次
序文.............................................................................................................. 1
特長 ........................................................................................................................................................1
パッケージ内容..................................................................................................................................1
仕様 ........................................................................................................................................................2
機能 ........................................................................................................................................................2
はじめに ...................................................................................................... 3
I. 両方のコンピュータへのドライバーのインストール ...........................................3
ドライバーのインストール Windows 10/8.1/8/7 .............................................. 3
Windows XP へのインストール ...............................................................................................9
デバイス ドライバーのインストール ....................................................................................................... 9
II. 接続 .......................................................................................................................... 14
III. 両方のコンピュータの設定 .................................................................................. 17
機能と使用方法 ..................................................................................... 19
I. ディスプレイの共有 ............................................................................................... 20
II. データ共有 .............................................................................................................. 21
III. 装置共有 キーボードとマウスの共有 .............................................................. 24
デバイス ドライバーのアンインストール ......................................... 25

JUC700 USB 3.0 Wormhole Switch DSS ユーザーマニュアル
1
序文
JUC700 USB 3.0 Wormhole Switch DSS (Dual System Swap, デュアルシステムスワッ
プ) をご購入いただき、ありがとうございます。
本製品は、ビデオグラフィックを2台のコンピュータ間で共有でき、データ、画像、ミュージッ ク、
映像、その他のファイルを5Gbpsという超高速で素早く転送できる機能を持っています。
JUC700 USB 3.0 Wormhole Switch DSSは、キーボードとマウスを別のコンピュータと共有
できるだけでなく、マルチディスプレイ環境もサポートします。
特長
データ、写真、音楽、映像をコンピュータ間で簡単に転送できます。 2 台のコンピュータ間でディスプレイをミラー化および拡張できます。 2 台のコンピュータ間でハードドライブリソースを共有できます。 USB 3.0、2.0 および 1.1 に適合しています。 USB 3.0 接続時は、超高速な転送(5Gbps)に適合します。 タッチスクリーン機能をサポートしています。※ Windows 8 以降
必須環境
Windows 10 / 8.1 / 8 / 7 / XP またはこれらと互換性のある環境
USB ポート使用可能 (USB 3.0 を推奨) 最小システム要件
CPU: i3 Dual core 2.8 GHz メモリ: 2 GB DDR2
パッケージ内容
JUC700 USB 3.0 Wormhole Switch DSS クイック インストール ガイド、保証書
電子マニュアルとドライバー CD

JUC700 USB 3.0 Wormhole Switch DSS ユーザーマニュアル
2
仕様
電源
電源モード USB バスパワー
インターフェース
インターフェース USB 3.0 Type-A オスコネクタ*2 ビデオディスプレイ
サポートモード ビデオ再生: 1080P 拡張/ミラーディスプレイ
物理的仕様
ハウジング材料 アルミニウム
寸法 本体: 61(幅) X 19 (高さ) X 10.5 (奥行) mm
ケーブルの長さ 150 cm 重量 約 45g (ケーブルを含む)
機能
サポートしているオペレーションシス
テム Windows
装置共有 キーボードおよびマウスのコントロールスイッチ
複数画面の間でマウスを移動できま
す。 はい
キーボードとマウスの共有 はい
ディスプレイの共有
ビデオディスプレイの共有 はい(ミラー/拡張)
タッチスクリーンコントロール はい
データ共有
データ転送アプリケーション はい

JUC700 USB 3.0 Wormhole Switch DSS ユーザーマニュアル
3
はじめに
インストールする前にお読みください。
JUC700 USB 3.0 Wormhole Switch DSS のUSBケーブルをコンピュータに装着
する前に、必ずドライバーを両方のコンピュータにインストールしてください。
どちらの側/色のJUC700 USB 3.0 Wormhole Switch DSS のUSBケーブルを
どちらのコンピュータに接続しても構いません。
インストール時のエラーを回避するため、セットアッププログラムを管理者として実
行してください。
最新のドライバーをアップデートする前に、まず以前のドライバーをアンインストー
ルしてください。
インストール中は画面が点滅します。
I. 両方のコンピュータへのドライバーのインストール
JUC700 に接続する両方のコンピュータにドライバーをインストールしてください。将来的
には、また、両側にドライバを更新することを忘れないでください。
※このインストールプログラムを実行する前に、必ず、JUC700 USB 3.0 Wormhole Switch DSS のUSB ケーブルを PC から外してください。
ドライバーのインストール Windows 10/8.1/8/7 次のステップを完了してアプリケーションを起動してください。 ドライバーCD をコンピュータ
のCD-ROM ドライブに装着してください。 セットアッププログラムが自動的に起動します。
Auto run が開始しない場合、コンピュータの CD ドライブをクリックし、Setup.exe をダブ
ルクリックしてセットアップ CD を手動で実行してください。
1. インストール ページが開きます。 インストールを開始するには ”最新のドライバーをインストール”
をクリックします。 ネットワークが利用可能かどうか確認するか、または ”ドライバーのインストール” を
押してインストールを開始します
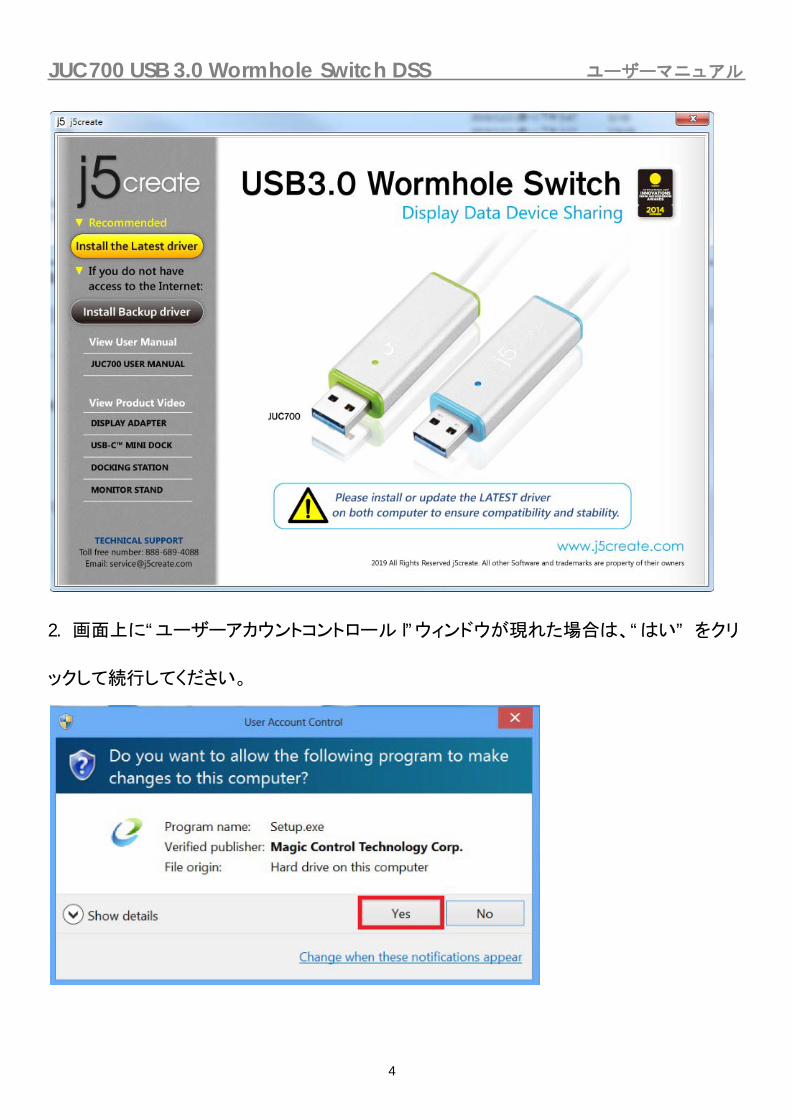
JUC700 USB 3.0 Wormhole Switch DSS ユーザーマニュアル
4
2. 画面上に“ユーザーアカウントコントロール l”ウィンドウが現れた場合は、“はい” をクリ
ックして続行してください。

JUC700 USB 3.0 Wormhole Switch DSS ユーザーマニュアル
5
3. インストール オプションを押した後、InstallShield ウィザードが始まります。
をクリックして続行します。
次へ>

JUC700 USB 3.0 Wormhole Switch DSS ユーザーマニュアル
6
4. 使用許諾契約書を読んで、“私は使用許諾契約の条項に同意します” にチェックを入
れます。同意したら、次へ> をクリックします。
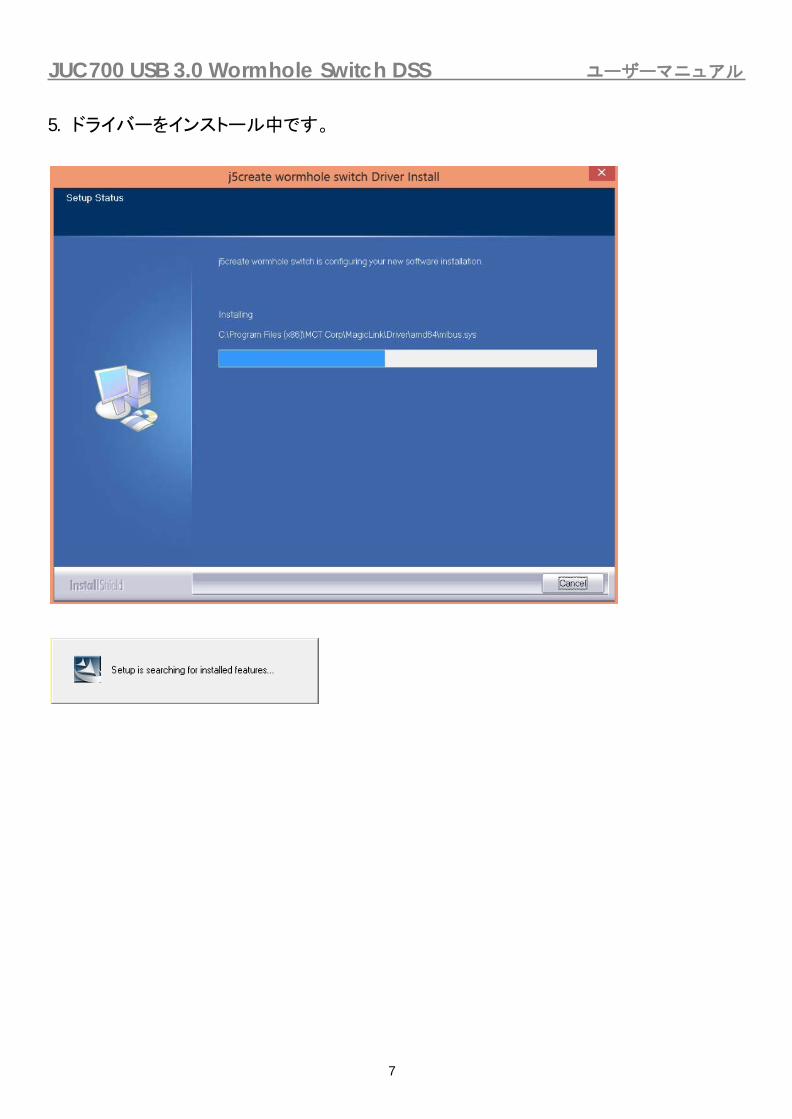
JUC700 USB 3.0 Wormhole Switch DSS ユーザーマニュアル
7
5. ドライバーをインストール中です。
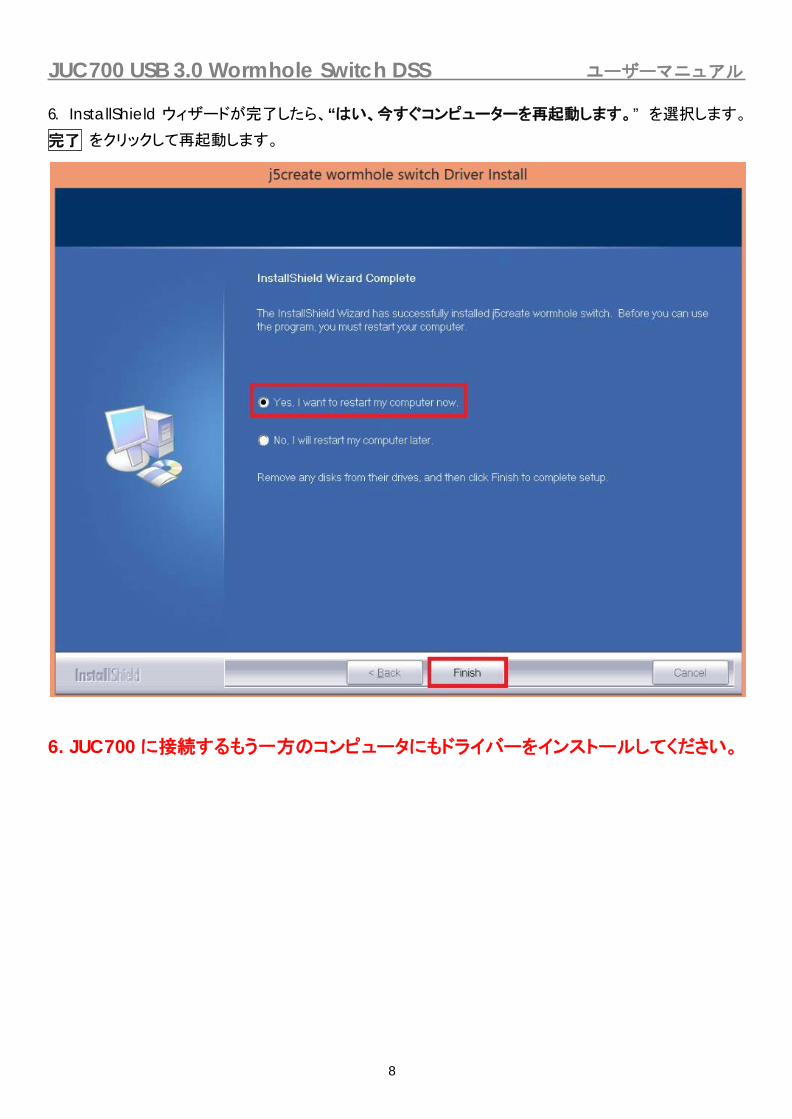
JUC700 USB 3.0 Wormhole Switch DSS ユーザーマニュアル
8
完了
6. InstallShield ウィザードが完了したら、“はい、今すぐコンピューターを再起動します。” を選択します。
をクリックして再起動します。
6. JUC700 に接続するもう一方のコンピュータにもドライバーをインストールしてください。

JUC700 USB 3.0 Wormhole Switch DSS ユーザーマニュアル
9
Windows XP へのインストール
デバイス ドライバーのインストール
このセクションでは Windows XP 向けに、デバイス ドライバーのインストール手順を説明しています。コ
ンピューターの CD-ROM ドライブにドライバー CD を挿入し、インストールを開始します。セットアップ
プログラムが自動的に起動します。もし自動的に起動しない場合は、“マイ コンピュータ” を開き、その中
にある光学式ドライブの上をクリックし、“Setup.exe” をダブル クリックして手動でセットアップ CD を実行してください。
※インストール プログラムを実行する前に、必ず JUC700 USB 3.0 Wormhole Switch DSS の USB ケーブルがデスクトップ PC やノート PC から抜いてあることをご確認ください。
1. インストール ページが開きます。 インストールを開始するときは[最新のドライバーをインストール]を
クリックします。 インストールを開始するときはネットワークが利用可能であることを確認するか[ドライ
バーをインストール]をクリックします。

JUC700 USB 3.0 Wormhole Switch DSS ユーザーマニュアル
10
2. インストール オプションを押した後、InstallShield ウィザードが始まります。次へ> をクリ
ックして続行します。

JUC700 USB 3.0 Wormhole Switch DSS ユーザーマニュアル
11
3. 使用許諾契約書を読んで、“私は使用許諾契約の条項に同意します” にチェックを入
れます。同意したら、次へ> をクリックします。

JUC700 USB 3.0 Wormhole Switch DSS ユーザーマニュアル
12
4. ドライバーをインストール中です。

JUC700 USB 3.0 Wormhole Switch DSS ユーザーマニュアル
13
5. InstallShield ウィザードが完了したら、“はい、今すぐコンピューターを再起動します。” を選択します。完了 をクリックして再起動します。
6. JUC700 に接続するもう一方のコンピュータにもドライバーをインストールしてください。
ヒント: ドライバーインストールの確認 JUC700 USB 3.0 Wormhole Switch DSS が正常にインストールされたことを検証す
るには、Control Panels (コントロールパネル)の Programs (プログラム)に進み、
j5create wormhole switch ド ラ イ バ ー が 一 覧 に 入 っ て い る こ と を
確 認 し ま す 。

JUC700 USB 3.0 Wormhole Switch DSS ユーザーマニュアル
14
II. 接続
コンピュータを再起動したら、JUC700 USB 3.0 Wormhole Switch DSS のいず
れかのコネクターを2台のコンピュータのいずれかのUSB 3.0ポートに接続します。
次に、JUC700 USB 3.0 Wormhole Switch DSS のもう一方のコネクターをもう
一方のコンピュータに接続します。
(初めての接続の場合、コンピュータがJUC700を認識するのに時間がかかるこ
とがあります。)
ヒント: デバイス ドライバーのインストール点検
次の手順により、JUC700 USB 3.0 Wormhole Switch DSS のドライバーのインストール状態を確認する
ことができます。
“マイ コンピューター” を右クリック “管理” “デバイス マネージャー”、次の項目の “+” をクリッ
クして状態を確認: “ディスプレイ アダプター” “ユニバーサル シリアル バス コントローラー”。 下の図は、単一の JUC700 USB 3.0 Wormhole Switch DSS をインストールした場合の状態を示しています。

JUC700 USB 3.0 Wormhole Switch DSS ユーザーマニュアル
15

JUC700 USB 3.0 Wormhole Switch DSS ユーザーマニュアル
16
ヒント:JUC700 USB 3.0 Wormhole Switch DSS には両端に2色(ブルーと
グリーン) のコネクターがあります。コントロールバーに現れるアイコンによって、
2台のコンピュータを識別できます。
ケーブルのブルー側が接続されたコンピュータでは、ブルーのコ
ントロールバーにブルーのアイコンが表示されます。
これがブルーのコンピュータ です。
ケーブルのグリーン側が接続されたコンピュータでは、グリーンの
コントロールバーにグリーンのアイコンが表示されます。
これがグリーンのコンピュータ です。

JUC700 USB 3.0 Wormhole Switch DSS ユーザーマニュアル
17
III. 両方のコンピュータの設定
JUC700 USB 3.0 Wormhole Switch DSS を接続したら、両方のコンピュータで
設定を行います。
もう一方のコンピュータの位置を選択します。
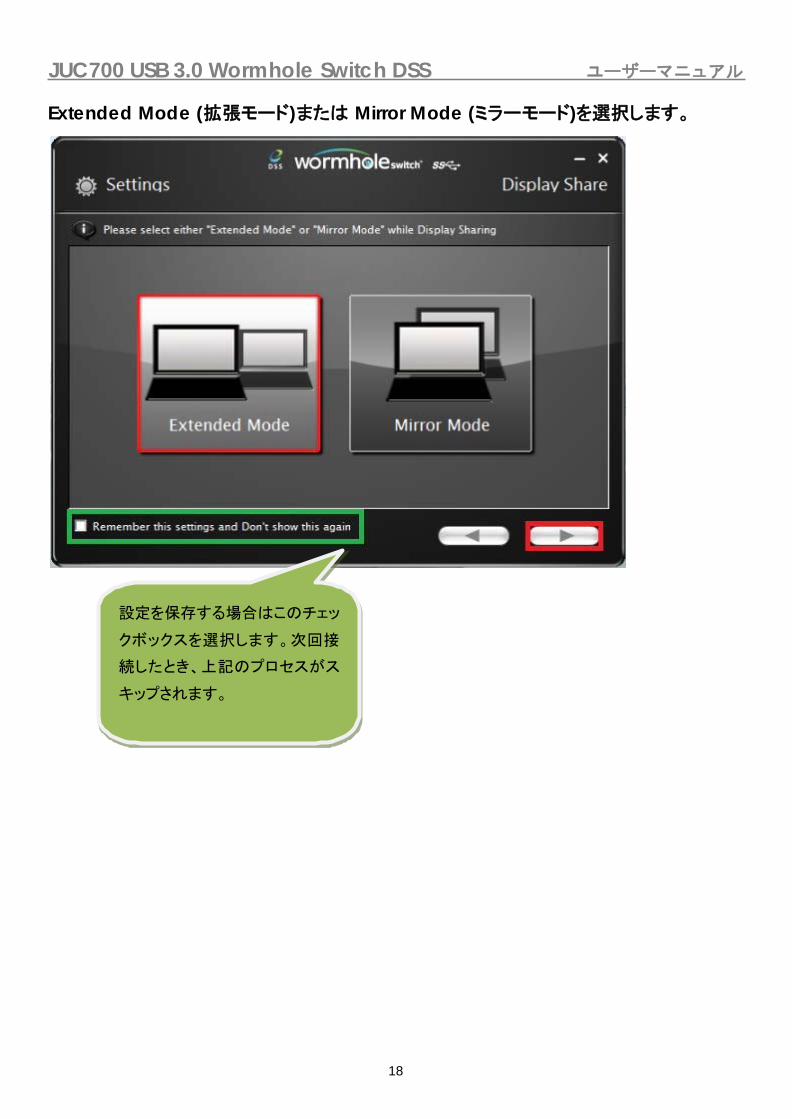
JUC700 USB 3.0 Wormhole Switch DSS ユーザーマニュアル
18
設定を保存する場合はこのチェッ
クボックスを選択します。次回接
続したとき、上記のプロセスがス
キップされます。
Extended Mode (拡張モード)または Mirror Mode (ミラーモード)を選択します。

JUC700 USB 3.0 Wormhole Switch DSS ユーザーマニュアル
19
機能と使用方法
設定の調整後、両方の画面の右隅にコントロールバーが表示されます。 このコントロール
バーで、2 台のコンピュータ間のディスプレイとデータの共有をコントロールできます。
コントロールバーを閉じます。
コントロールバーを再起動します。タスクバーのアイコンをダブルクリックしてください。

JUC700 USB 3.0 Wormhole Switch DSS ユーザーマニュアル
20
I. ディスプレイの共有
ブルーのコンピュータを見る
いずれのコンピュータ画面でもブルーのコンピュータを見ることができます。 ブルーアイコ
ンを選択するだけで、グリーンのコンピュータのディスプレイがブルーのコンピュータの2 番目のモニタになります。 それから、ブルーのコンピュータのモード (拡張モードまたはミラー
モード) を選択できます。
グリーンのコンピュータを見る
いずれのコンピュータ画面でもグリーンのコンピュータを見ることができます。 グリーンアイ
コンを選択するだけで、ブルーのコンピュータのディスプレイがグリーンのコンピュータの
2 番目のモニタになります。 それから、グリーンのコンピュータのモード (拡張モードまたは
ミラーモード) を選択できます。
ディスプレイの共有を停止する
EXTENDED MODE (拡張モード)
この機能では、接続したコンピュータをオンボード画面のExtended (拡張)ディスプレ
イとして機能させることができます。 この拡張作業空間は作業効率を向上させます。
Display Settings (ディスプレイ設定)で2つのコンピュータの相対的位置を変更できま
す。
MIRROR MODE (ミラーモード)
この機能では、オンボード画面の同じ内容をもう一方のコンピュータに表示 (ミラーリン
グ) できます。
接続したコンピュータの画面解像度設定はオンボード画面の解像度に従います。 たと
えば、オンボード画面の解像度が1024x768x32ビットの場合、ミラーされたコンピュータ
は同じ解像度を保持します。
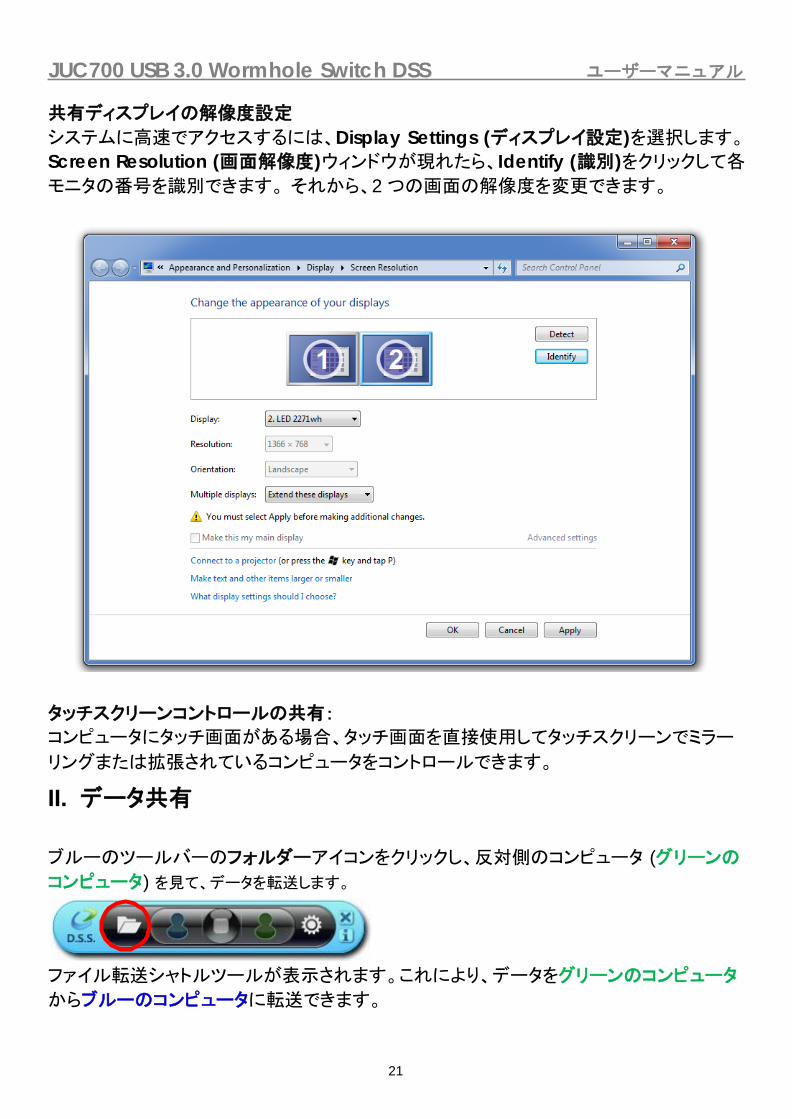
JUC700 USB 3.0 Wormhole Switch DSS ユーザーマニュアル
21
共有ディスプレイの解像度設定
システムに高速でアクセスするには、Display Settings (ディスプレイ設定)を選択します。
Screen Resolution (画面解像度)ウィンドウが現れたら、Identify (識別)をクリックして各
モニタの番号を識別できます。 それから、2 つの画面の解像度を変更できます。
タッチスクリーンコントロールの共有:
コンピュータにタッチ画面がある場合、タッチ画面を直接使用してタッチスクリーンでミラー
リングまたは拡張されているコンピュータをコントロールできます。
II. データ共有
ブルーのツールバーのフォルダーアイコンをクリックし、反対側のコンピュータ (グリーンの
コンピュータ) を見て、データを転送します。
ファイル転送シャトルツールが表示されます。これにより、データをグリーンのコンピュータ
からブルーのコンピュータに転送できます。

JUC700 USB 3.0 Wormhole Switch DSS ユーザーマニュアル
22
JUC700 では、ドラッグ/ドロップまたはコピー/ペーストを利用し、反対側のコンピュータか
ら 5Gbps の転送速度でファイルとデータを転送できます。
グリーンのツールバーのフォルダーアイコンをクリックし、反対側のコンピュータ (ブルーの
コンピュータ) を見て、データを転送します。
ファイル転送シャトルツールが表示されます。これにより、データをブルーのコンピュータか
らグリーンのコンピュータに転送できます。
JUC700 では、ドラッグ/ドロップまたはコピー/ペーストを利用し、反対側のコンピュータか
ら 5Gbps の転送速度でファイルとデータを転送できます。

JUC700 USB 3.0 Wormhole Switch DSS ユーザーマニュアル
23

JUC700 USB 3.0 Wormhole Switch DSS ユーザーマニュアル
24
III. 装置共有 キーボードとマウスの共有
2つの画面間で、直感的かつシームレスにマウス カーソルを移動させる。
キーボードをもう 1 台のコンピューターでの使用に切り替える。
注意: マウスとキーボードはセットで使用してください。
クリップボードを共有
クリップボード共有機能を使えば、クリップボードの内容を双方向にコピー、ペースト(貼り
付け)して簡単に編集することが可能です。
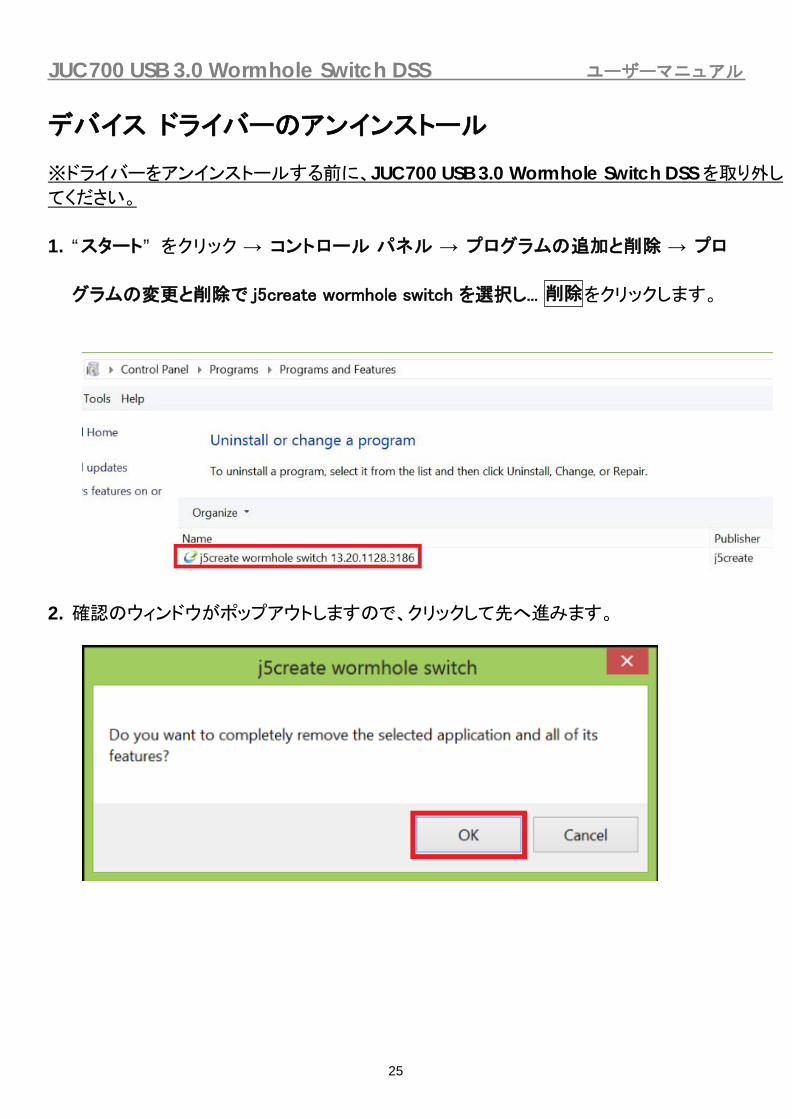
JUC700 USB 3.0 Wormhole Switch DSS ユーザーマニュアル
25
デバイス ドライバーのアンインストール
※ドライバーをアンインストールする前に、JUC700 USB 3.0 Wormhole Switch DSS を取り外し
てください。
1. “スタート” をクリック → コントロール パネル → プログラムの追加と削除 → プロ
グラムの変更と削除で j5create wormhole switch を選択し... をクリックします。
2. 確認のウィンドウがポップアウトしますので、クリックして先へ進みます。
削除
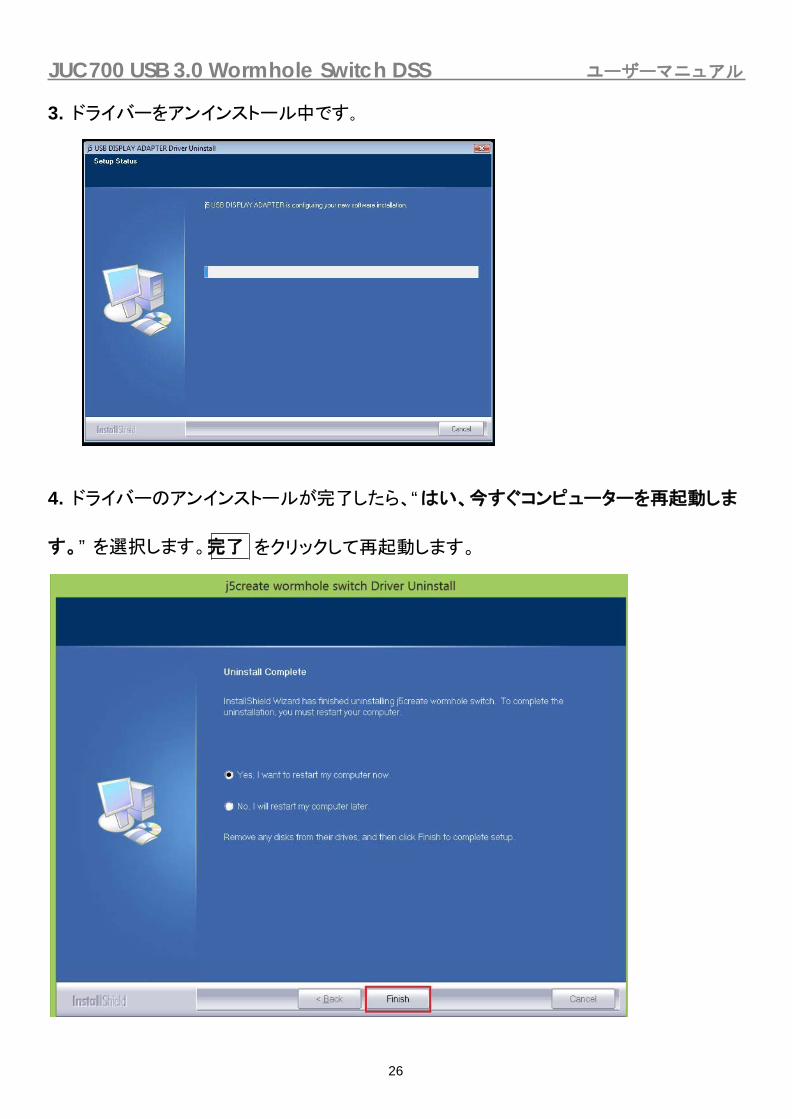
JUC700 USB 3.0 Wormhole Switch DSS ユーザーマニュアル
26
3. ドライバーをアンインストール中です。
4. ドライバーのアンインストールが完了したら、“はい、今すぐコンピューターを再起動しま
す。” を選択します。完了 をクリックして再起動します。

JUC700 USB 3.0 Wormhole Switch DSS ユーザーマニュアル
27
トラブルシューティング
本機のご使用についてなんらかの問題が生じた場合は、次の手順に従ってください。
その他にもご質問などありましたら、j5create のウェブサイトへアクセスするか、またはサポート
窓口にお電話くださいますようお願い申し上げます。

JUC700 USB 3.0 Wormhole Switch DSS ユーザーマニュアル
28
テクニカル サポート
本製品のご使用について何らかの支障が生じた場合は、お買い求めの販売店に返品する前に、まずは
次の手順に従ってご確認くださいますようお願いいたします。
1. ユーザー マニュアル
本製品に関する詳細な説明とトラブルシューティングが記載されており、一般的問題の多くは、ユーザーマニュ
アルをお読みいただくことで解決できます。
2. オンライン サポート
j5create のウェブサイト (www.j5create.com/jpn/) にアクセスしてください。本製品用の最新ソフトウェア
を ご 提 供 し て おり ま す 。 以上 の方 法 を お 試 し に なっ ても 問題 が 解決さ れ な い 場 合 は 、
[email protected] までトラブルの内容をお寄せください。j5create テクニカル サポート チームが
24 営業時間以内にお返事いたします。
3. 電話サポート
時間帯によっては電話が繋がり難い場合がございますので、メールにてお急ぎであることをご一報いただくこと
をお勧めします。またお問い合わせの内容によっては、確認・ご回答までに数日お時間を頂く場合も御座いま
すので、ご了承ください。土日祝日は休業となっております。休業期間に頂いたメールにつきましては、翌営業
日以降にご返信させていただきます。
お客様相談センター:03-5540-9010
電子メール: [email protected]
テクニカル サポートやその他のご相談は、下記の時間にくださいますようお願い申し上げます。営業時
間:平日:AM 9:30~11:30 / PM 13:30~17:30

JUC700 USB 3.0 Wormhole Switch DSS ユーザーマニュアル
29
j5create の保証
j5create は 1 年間のメーカー保証を提供しています。
ただし、お客様のご使用による損耗や傷は保証の対象に含まれておりません。
弊社カスタマーサービスで製品の機能確認をする際は、次の資料をお手元にご用意ください。
・保証期間を確認するため、購入時の請求書コピー
・製品のシリアル番号
・不具合に関する説明
・お客様のお名前、ご住所、電話番号
j5create は、本製品の操作に中断やエラーがないことを保証するものではありません。j5create はまた、本製品
の使用に関する指示に従わなかったことにより生じた損害に対しては責任を負いません。この保証は、次に該当する
ものには適用されません。(a) 消耗部品。ただし、損傷が材質または製造上の欠陥により生じた場合を除く。
(b) 擦り傷、へこみ、などを含むがこれらに限定されない表面的な損傷、および、ポート部分のプラスチックの損壊。
(c) 非 j5create 製品と一緒に使用したことにより生じた損害。(d) 不可抗力 (自然災害、洪水、火災、地震、落
雷、台風など) により生じた損害。(e) 人為的な誤用 (紛失、事故、不正使用、誤用、またはその他の外的要因) に
より生じた損害。(f) j5create によって説明されている、容認されたまたは意図された使用以外の方法で本製品を
操作することにより生じた損害。(g) j5create または j5create の指定サービスプロバイダを代表しない者によっ
て実施されたサービス (サービスのアップグレードや拡張を含む) により生じた損害。(h) j5create の書面による
許可なく、一部改造して機能や性能を変更した製品または部品。(i) j5create の本製品上のシリアル番号が除去
または汚損されている。
このような状況が発生した場合、j5create はお客様にご参考いただけますよう、材料費と修理費用をお見積もりい
たします。
この保証は j5create により、明示的かまたは黙示的かを問わず、他のあらゆる保証に代わってご提供させていた
だくものです。
詳細については、当社のWebサイトhttp://www.j5create.comをご覧ください。
Copyright©2019 j5create。全著作権所有。すべての商品名は、それぞれの所有者の登録商標です。機能および仕
様は予告なく変更される場合があります。製品は、図に示されているとおりではない場合があります。

JUC700 USB 3.0 Wormhole Switch DSS ユーザーマニュアル
30
法規制の遵守
FCC (米連邦通信委員会)
本機器は、FCC 規則 パート 15、サブパート B、セクション 15.109/15.107、クラス B の規制要件に基づいて所定
の試験が実施され、それに適合するものであると認定されています。
操作には、次の 2 つの条件が適用されます。
• 本機器は、有害な干渉を引き起こさない。
• 本機器は望ましくない動作を引き起こす可能性のある干渉を含め、あらゆる干渉を受け入れなければなりません。
CE
本機器は、次の規制の要件に準拠しています。
EN 55022 クラス B (2006)、
EN 55024 (1998+A1:2001+ A2:2003)、(IEC/EN 61000-4-2 (1995+A1:1998+A2:2001)/-3 (2006)
C-Tick 本機器は、次の規制の要件に準拠しています。
EN 55022 (2006) クラス B、AS/NZS CISPR22 © IEC:2005.
VCCI 本機器は、次の規制の要件に準拠しています。
CISPR22 © IEC:2005
免責事項
本文書の内容は、予告なしに変更されることがあります。この製造業者は、この文書の正確性と完全性について、
なんらかの表明または保証を (明示または黙示を問わず) 行うことはなく、またいかなる場合にも、特別の、または
偶発的な、または間接的な損害を含むがこれらに限定されない、あらゆる利益の損失や商業上の損害に対して責
任を負うものではありません。本文書のいかなる部分も、この製造業者の書面による明確な許可なしに、複写、記
録、情報記録検索システムの使用を含むあらゆる電子的もしくは機械的な手段により、複製または伝送することは
できません。

JUC700 Wormhole Switch DSS USB 3.0 Display Device with Data Sharing
使用手冊
JUC700
JUC700 USB 3.0 Wormhole Switch DSS 使用手冊
0 JUC700
目錄 產品介紹 ........................................................................................... 1
特色 .....................................................................................................................................1
電腦環境需求....................................................................................................................1
包裝內容 ............................................................................................................................1
機構規格 ............................................................................................................................1
功能 .....................................................................................................................................2
開始使用 ........................................................................................... 2
I. 安裝流程: ...................................................................................................... 3
安裝流程: Windows 10/8.1/8/7 ................................................................................3
安裝流程: Windows XP .................................................................................................8
II. 連接 ............................................................................................................ 12
III. 設定 ............................................................................................................ 15
功能操作和使用方法..................................................................... 17
I. 螢幕分享 .................................................................................................... 18
II. 資料分享 .................................................................................................... 19
III. 鍵盤和滑鼠分享......................................................................................... 21
移除流程 ......................................................................................... 22

JUC700 USB 3.0 Wormhole Switch DSS 使用手冊
1 JUC700
產品介紹
感謝您購買 JUC700 USB 3.0 Wormhole Switch DSS (Dual System Swap, 雙系統
交換) 本產品提供兩台電腦間共享顯示設備,及兩台電腦間以 5Gbps 超高速率傳輸
資料、圖片、音樂、影音、檔案。
並讓您和另一台電腦共享鍵盤和滑鼠。
特色
兩台電腦間,輕鬆傳輸資料、照片、音樂、影音
兩台電腦同步螢幕顯示、延伸螢幕顯示
共享兩台電腦的硬碟資源
利用多台電腦的硬碟和螢幕設備,節省額外花費
支援 USB 3.0、USB 2.0
支援超高速USB 3.0(5Gbps)的傳輸速率
支援螢幕觸控功能
電腦環境需求
支 援 Windows 10 / 8.1 / 8 / 7 / XP
USB 3.0埠向下相容2.0
CPU處理器: i3 Dual core 2.8 GHz
RAM記憶體: 2GB 或以上規格
包裝內容
JUC700 USB 3.0 Wormhole Switch DSS 本體
安裝手冊
驅動光碟
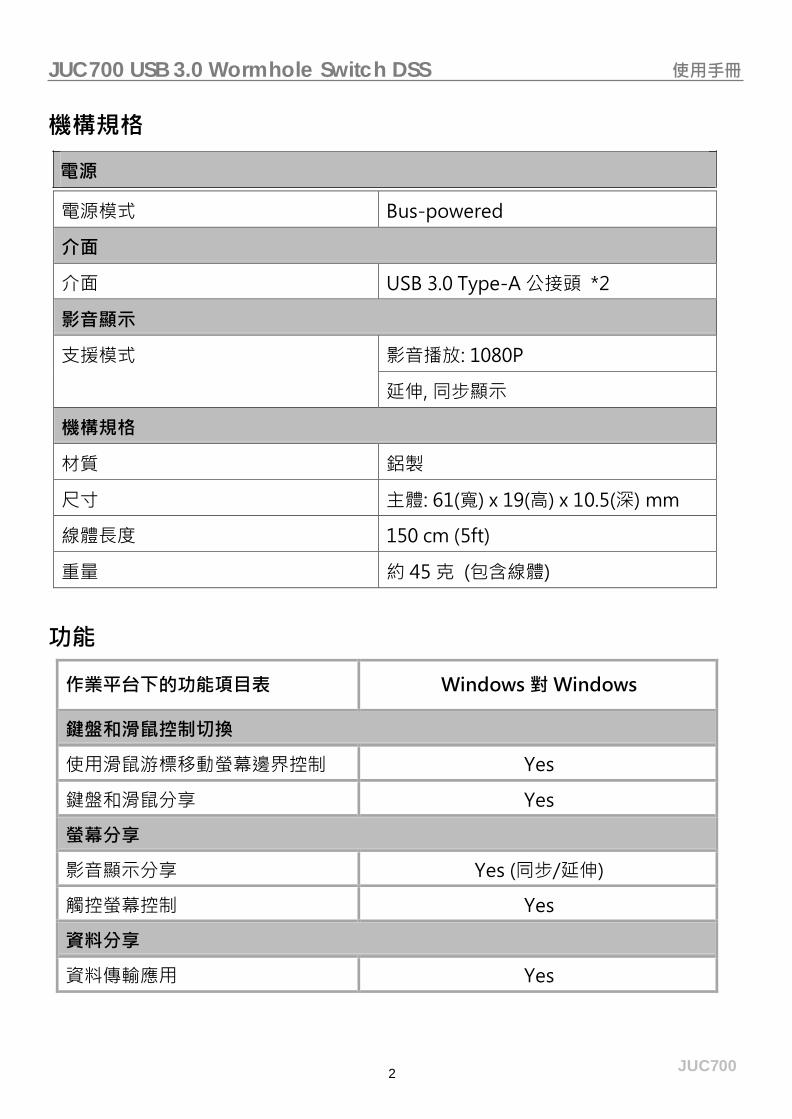
JUC700 USB 3.0 Wormhole Switch DSS 使用手冊
2 JUC700
電源
機構規格
電源模式 Bus-powered
介面
介面 USB 3.0 Type-A 公接頭 *2
影音顯示
支援模式 影音播放: 1080P
延伸, 同步顯示
機構規格
材質 鋁製
尺寸 主體: 61(寬) x 19(高) x 10.5(深) mm
線體長度 150 cm (5ft)
重量 約 45 克 (包含線體)
功能
作業平台下的功能項目表 Windows 對 Windows
鍵盤和滑鼠控制切換
使用滑鼠游標移動螢幕邊界控制 Yes
鍵盤和滑鼠分享 Yes
螢幕分享
影音顯示分享 Yes (同步/延伸)
觸控螢幕控制 Yes
資料分享
資料傳輸應用 Yes
JUC700 USB 3.0 Wormhole Switch DSS 使用手冊
3 JUC700
開始使用
安裝前請仔細閱讀
在兩台電腦的驅動程式安裝完成之前,請勿將 JUC700 USB 3.0 Wormhole
Switch DSS 連接到電腦 USB 埠上。
安裝驅動程式完成後,將 JUC700 USB 3.0 Wormhole Switch DSS USB 線
的任何一端/顏色接上電腦的 USB 埠。
為避免發生錯誤,請以管理者權限進行安裝。
更新驅動程式之前,請完全移除舊版驅動程式。
在安裝過程當中及安裝完成後,每次開機的時候,螢幕會有全黑或閃爍的情形, 此為
顯示裝置安裝偵測過程。
I. 安裝流程: 請在兩台電腦上安裝JUC700 的驅動程式
※驅動程式尚未安裝完成前,請勿將 JUC700 USB 3.0 Wormhole Switch DSS 接到電
腦USB 埠上。
安裝流程: Windows 10/8.1/8/7
請完成以下步驟來啟動應用程式,將驅動程式光碟放入光碟機中,安裝精靈會自動開
始執行。如果自動安裝沒有執行,可以手動啟動安裝,請至“電腦”下點選“磁碟機”,並雙擊
“Setup.exe”即可。
1. 將會出現軟體安裝介面,將可以進行安裝,請按“安裝最新驅動程式”。請注意需
要開啟網際網路進行下載,或是點選“安裝驅動程式”進行安裝光碟驅動程式。

JUC700 USB 3.0 Wormhole Switch DSS 使用手冊
4 JUC700
允許
如果在使用過程中出現“使用者帳戶控制”視窗,請選取 來接續下個步驟。

JUC700 USB 3.0 Wormhole Switch DSS 使用手冊
5 JUC700
下一步 >
下一步> 2. 點選“安裝驅動程式”後,安裝精靈開始進行安裝, 按 繼續。
3. 詳閱授權合約並點選“我接受授權合約的條款”,再按 繼續。
4. 驅動程式安裝中。

JUC700 USB 3.0 Wormhole Switch DSS 使用手冊
6 JUC700
5. 安裝完成
驅動程式已成功安裝了,請點選“是,立即重新啟動電腦”,並按
機。
立即重新開 完成

JUC700 USB 3.0 Wormhole Switch DSS 使用手冊
7 JUC700
6. 請於另一台電腦上重覆以上安裝驅動程式步驟。
提示:確認安裝狀態 確認 JUC700 USB 3.0 Wormhole Switch DSS 已成功安裝,進入“控制台”-“程
式集”,j5create wormhole switch 驅動程式 應該
在列表中。
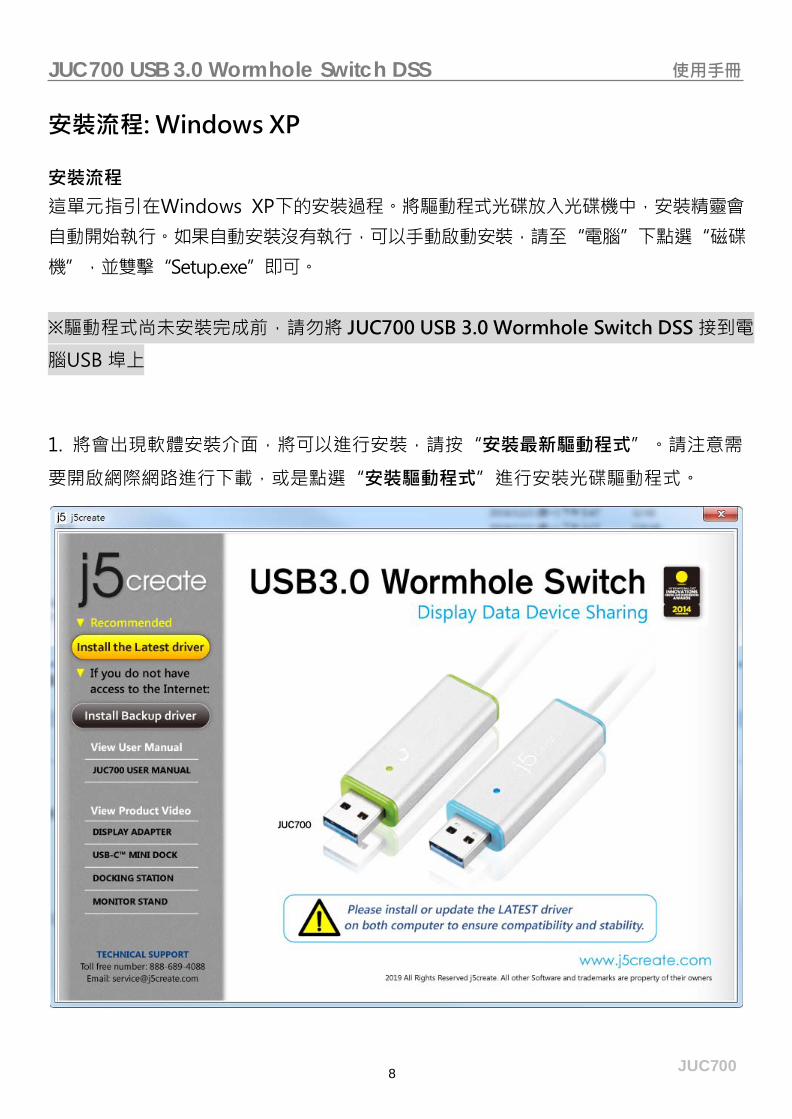
JUC700 USB 3.0 Wormhole Switch DSS 使用手冊
8 JUC700
安裝流程: Windows XP
安裝流程 這單元指引在Windows XP下的安裝過程。將驅動程式光碟放入光碟機中,安裝精靈會
自動開始執行。如果自動安裝沒有執行,可以手動啟動安裝,請至“電腦”下點選“磁碟
機”,並雙擊“Setup.exe”即可。
※驅動程式尚未安裝完成前,請勿將 JUC700 USB 3.0 Wormhole Switch DSS 接到電
腦USB 埠上
1. 將會出現軟體安裝介面,將可以進行安裝,請按“安裝最新驅動程式”。請注意需
要開啟網際網路進行下載,或是點選“安裝驅動程式”進行安裝光碟驅動程式。

JUC700 USB 3.0 Wormhole Switch DSS 使用手冊
9 JUC700
下一步 >
下一步> 2. 點選“安裝驅動程式”後,安裝精靈開始進行安裝, 按 繼續。
3. 詳閱授權合約並點選“我接受授權合約的條款”,再按 繼續。
4. 驅動程式安裝中。

JUC700 USB 3.0 Wormhole Switch DSS 使用手冊
10 JUC700
5. 驅動程式已成功安裝了,請點選“是,立即重新啟動電腦”,並按 立
即重新開機。
6. 請於另一台電腦上重覆以上驅動程式安裝步驟。
完成

JUC700 USB 3.0 Wormhole Switch DSS 使用手冊
11 JUC700
提示:確認安裝狀態 確認 JUC700 USB 3.0 Wormhole Switch DSS 已成功安裝,進入“控制台”-“程式
集”,j5create wormhole switch 驅動程式 應該在
列表中。
II. 連接 電腦重新啟動後,將 JUC700 USB 3.0 Wormhole Switch DSS 一端連接至
電腦的 USB 埠,再將 JUC700 USB 3.0 Wormhole Switch DSS 另一端連接
至第二台電腦的 USB 埠。
(第一次連接時,電腦可能需要一些時間識別JUC700。)
提示:確認安裝狀態和硬體連接狀態
將 JUC700 USB 3.0 Wormhole Switch DSS 連接至兩台電腦後,以下步驟幫助您確認安
裝狀態。
在“我的電腦”點右鍵 → 點選“管理”→“裝置管理員”,點選位於“通用序
列匯流排控制器”前的“+”號展開所有裝置,JUC700 USB 3.0 Wormhole Switch DSS 應該在列表中。

JUC700 USB 3.0 Wormhole Switch DSS 使用手冊
12 JUC700
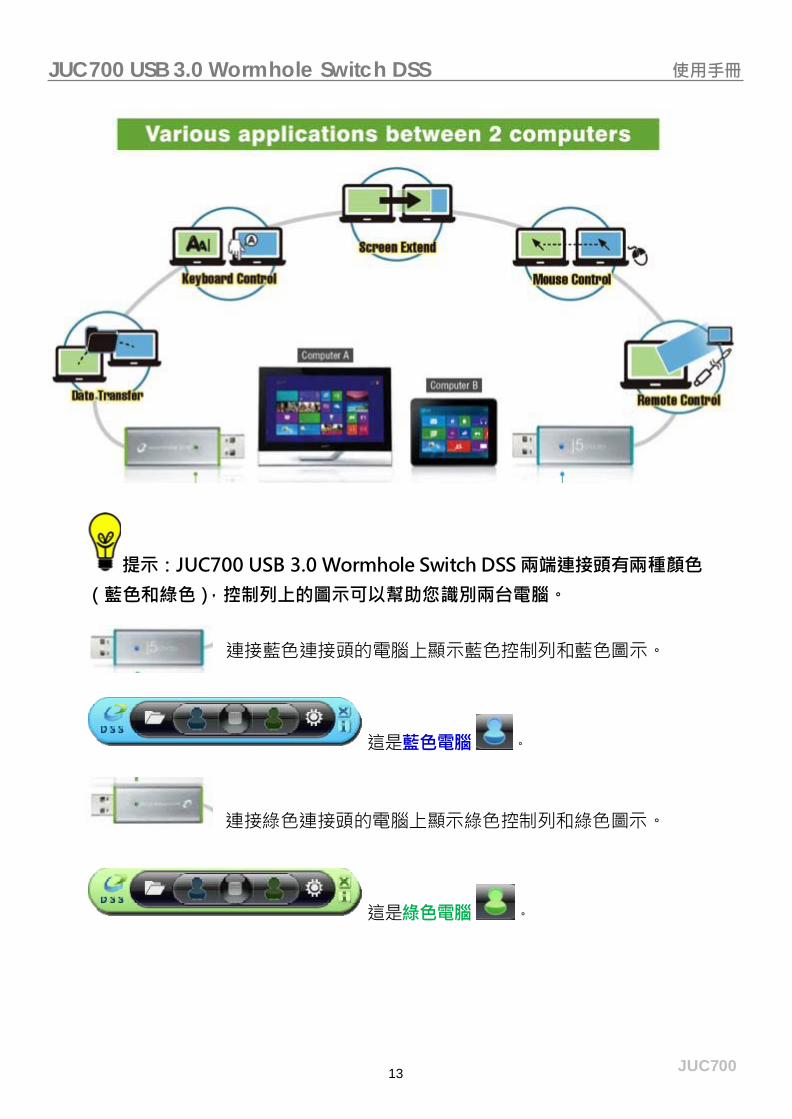
JUC700 USB 3.0 Wormhole Switch DSS 使用手冊
13 JUC700
提示:JUC700 USB 3.0 Wormhole Switch DSS 兩端連接頭有兩種顏色
(藍色和綠色),控制列上的圖示可以幫助您識別兩台電腦。
連接藍色連接頭的電腦上顯示藍色控制列和藍色圖示。
這是藍色電腦 。
連接綠色連接頭的電腦上顯示綠色控制列和綠色圖示。
這是綠色電腦 。

JUC700 USB 3.0 Wormhole Switch DSS 使用手冊
14 JUC700
III. 設定 JUC700 USB 3.0 Wormhole Switch DSS 連接至電腦後,請於兩台電腦(筆記
型電腦/個人電腦/一體成型電腦/平板電腦)上完成調整設定:
點選另一台電腦的位置。

JUC700 USB 3.0 Wormhole Switch DSS 使用手冊
15 JUC700
如果想保留相同設定,請勾選方
框,下次連接時,將跳過以上步
驟。
選擇「延伸」或「同步」顯示。

JUC700 USB 3.0 Wormhole Switch DSS 使用手冊
16 JUC700
功能操作和使用方法 調整設定完成後,控制列會出現在兩台螢幕的右下角。透過控制列可以控制兩台電腦
間的螢幕和資料分享。
關閉控制列:
重新啟動控制列:雙擊工具列上的圖示
功能說明與軟體資訊:點選
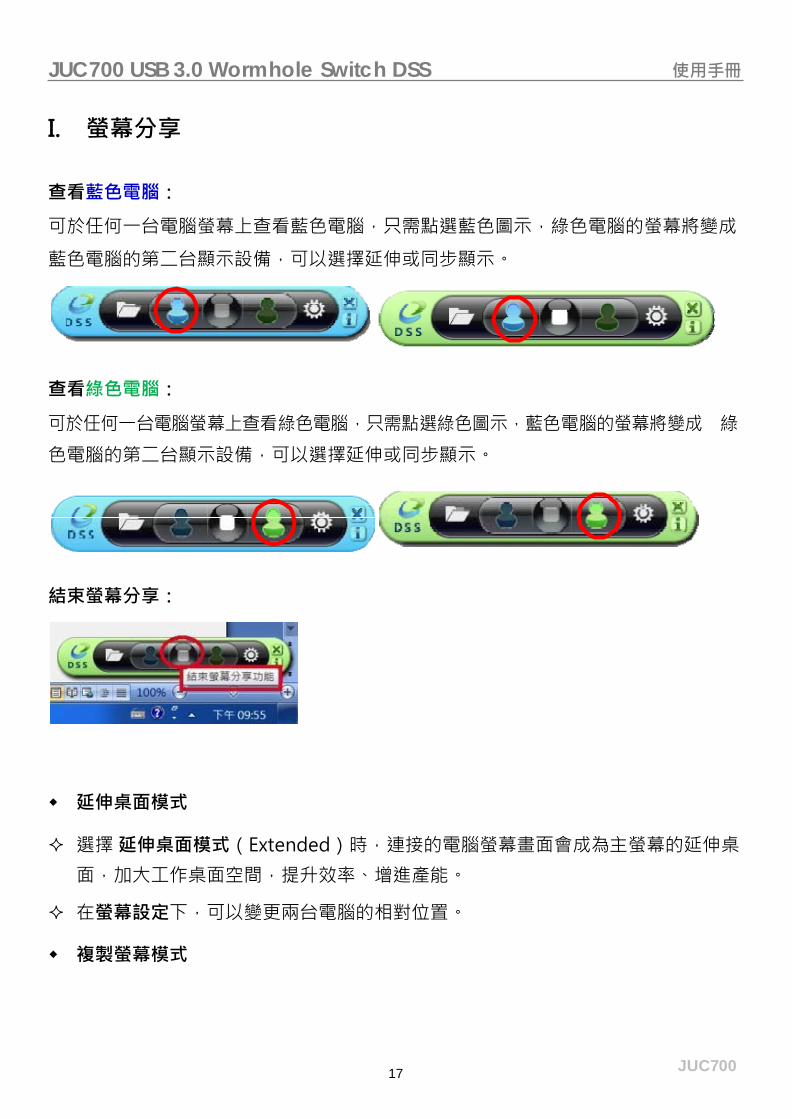
JUC700 USB 3.0 Wormhole Switch DSS 使用手冊
17 JUC700
查看綠色電腦:
可於任何一台電腦螢幕上查看綠色電腦,只需點選綠色圖示,藍色電腦的螢幕將變成 綠
色電腦的第二台顯示設備,可以選擇延伸或同步顯示。
I. 螢幕分享
查看藍色電腦:
可於任何一台電腦螢幕上查看藍色電腦,只需點選藍色圖示,綠色電腦的螢幕將變成
藍色電腦的第二台顯示設備,可以選擇延伸或同步顯示。
結束螢幕分享:
延伸桌面模式
選擇 延伸桌面模式(Extended)時,連接的電腦螢幕畫面會成為主螢幕的延伸桌
面,加大工作桌面空間,提升效率、增進產能。
在螢幕設定下,可以變更兩台電腦的相對位置。
複製螢幕模式

JUC700 USB 3.0 Wormhole Switch DSS 使用手冊
18 JUC700
選擇 複製螢幕模式(Mirror)時,連接的電腦螢幕畫面會仿製主螢幕的顯示畫面,
兩個顯示設備的畫面會完全相同,並且同步顯示。
連接的電腦螢幕解析度會與主螢幕的解析度相同,例如:如果主螢幕的解析度為
1024x768x32bit,連接的電腦螢幕解析度將保持相同。
螢幕解析度設定
系統快速設定可以點選“螢幕設定”,開啟“螢幕解析度”後,可以按 識別(I) 按鈕瞭
解各顯示器編號,可以變更兩台螢幕的解析度。
觸控螢幕控制分享:
如果電腦有觸控螢幕,可以直接使用觸控螢幕來控制電腦同步或延伸顯示。

JUC700 USB 3.0 Wormhole Switch DSS 使用手冊
19 JUC700
II. 資料傳輸 點選控制列上的資料夾圖示,可以查看和傳輸另一台電腦的資料。
出現檔案傳輸功能視窗,透過 JUC700 連結另一台電腦,選擇您要複製/貼上的檔案,
用直覺的(滑鼠拖曳)方式傳輸到另一台電腦上。
可選擇您要的檔案位置是遠端桌面或遠端電腦。

JUC700 USB 3.0 Wormhole Switch DSS 使用手冊
20 JUC700
III. 鍵盤和滑鼠分享
在兩台電腦間快速而順暢的移動滑鼠游標。
切換鍵盤使用到另一台電腦,使用第一台電腦的鍵盤來編輯連接的第二台電腦的應 用
程式。
注意:請使用同一組滑鼠與鍵盤設定來控制電腦,因為鍵盤控制功能永遠會跟隨著
滑鼠游標來控制同一台電腦。
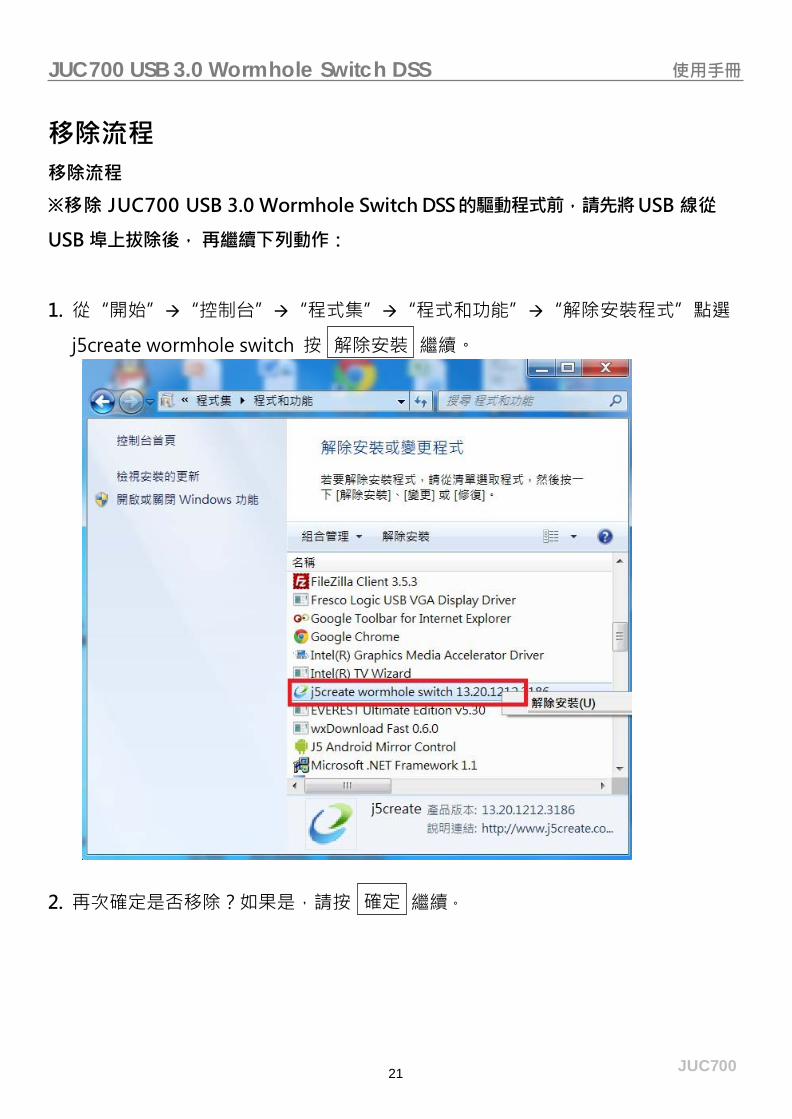
JUC700 USB 3.0 Wormhole Switch DSS 使用手冊
21 JUC700
確定
解除安裝
移除流程 移除流程
※移除 JUC700 USB 3.0 Wormhole Switch DSS 的驅動程式前,請先將 USB 線從
USB 埠上拔除後, 再繼續下列動作:
1. 從“開始”“控制台”“程式集”“程式和功能”“解除安裝程式”點選
j5create wormhole switch 按 繼續。
2. 再次確定是否移除?如果是,請按 繼續。
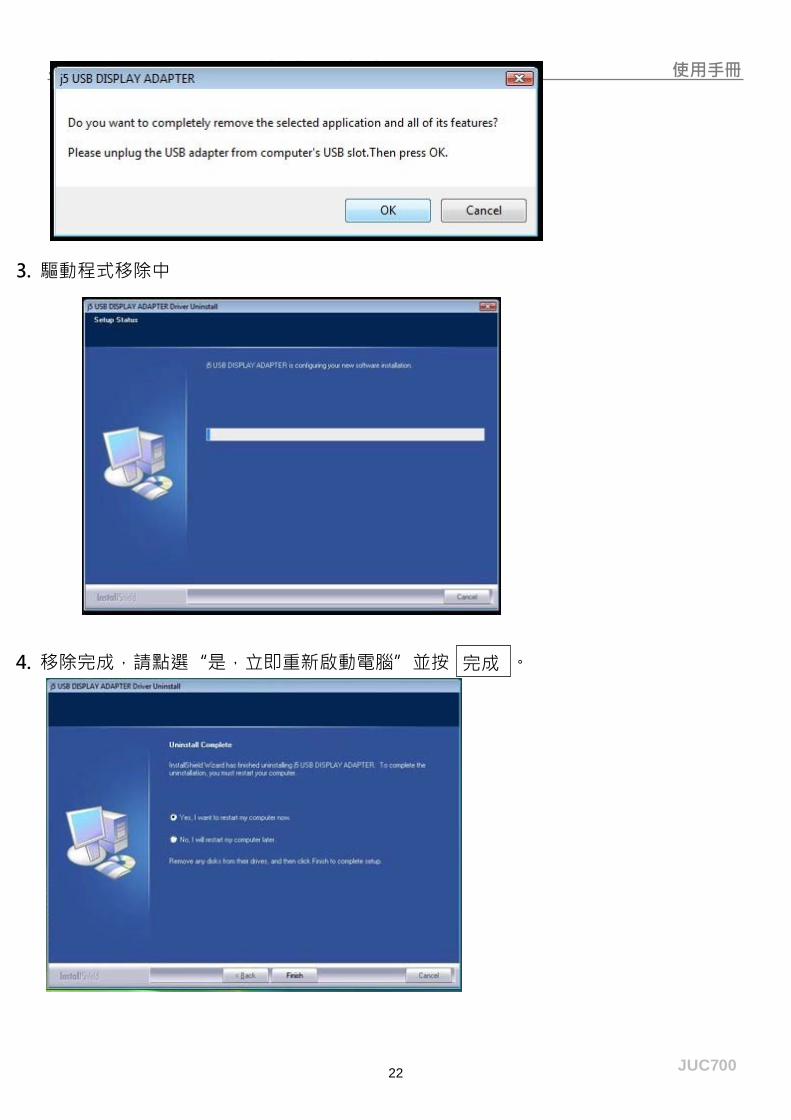
JUC700 USB 3.0 Wormhole Switch DSS 使用手冊
22 JUC700
3. 驅動程式移除中
4. 移除完成,請點選“是,立即重新啟動電腦”並按 。
完成
JUC700 USB 3.0 Wormhole Switch DSS 使用手冊
23 JUC700
故障排除
如果您有關於 JUC700 使用上的任何問題,請按照下面的說明處理。如果需要進一步的幫助,請造訪我們的網站或
撥打 j5create 支援熱線。
已知問題
- Direct 3D 在 XP 下沒有支援,而在 Win 7 Aero 模式下則有支援。
一般建議
- 在單一的系統上使用其他 USB 視頻裝置時,會存在不相容的問題。請確保在 USB 驅動器的所有其它視頻與
j5create 繼續安裝之前移除。
- 檢查並確保該設備已正確連接到主機系統。
- 確保所使用的 USB 連接埠為 JUC700 所用。
- 拔除 USB 顯示裝置的 USB 纜線並重新插入。
- 檢查顯示器是否正確連接且電源有開啟。
- 驅動程式安裝後務必重新啟動電腦。
- 嘗試使用不同的 USB 連接埠和/或電腦。
- 拔除系統中所有其他的 USB 裝置。
- 嘗試將 USB 顯示裝置的 USB 纜線直接連接到電腦,而非經由一個集線器進行連接。
- 將您的顯示器重設/更新/重新同步。
媒體播放
- 在所有的平台上播放視頻時,請不要更改視頻播放器視窗的顯示方式、位置或排列(如將視頻播放器視窗拖曳
於主顯示器和連接顯示器之間的)。這可能會導致視頻播放器停止播放。我們建議停止視頻播放,將視窗移動
到 USB 圖像裝置連接的顯示器,然後選擇視頻片段開始播放。
- 滑鼠游標懸停於閃存播放器的視頻區域時,游標移動會較為緩慢。
- 將螢幕景觀縮小於 50% 對在全屏模式下運作的視頻將有助讓忽動忽停的視頻播放較為平順。
- 您可能會遇到搭配低規 PC 系統 USB 圖像裝置較差的視頻效能。
- 支援使用硬體重疊進行視頻彩現。
- 部份 DVD 播放軟體包不支援在任何類型的第二個顯示適配器上播放影片。你可以試試在開始播放 DVD 之前
先開啟輔助顯示幕上的媒體播放器。
- 您的電腦可能缺乏某些媒體編解碼器支援某些視頻格式的影片播放。請使用以下的連結安裝免授權的媒體編解
碼器。
K- Lite 精簡版: http://www.free-codecs.com/download/K_Lite_Codec_Pack.htm

JUC700 USB 3.0 Wormhole Switch DSS 使用手冊
24 JUC700
- 視頻/媒體播放器在不同的顯示模式下有不同的解碼能力。為在隨附的 USB 圖像顯示器上觀看 DVD 或特定的
視頻格式時有更佳的效能呈現,建議使用以下免授權的軟體:
Media Player Classic (媒體播放器經典版): http://sourceforge.net/projects/guliverkli/
其他
- 有些顯卡,即英特爾,會防止其他次級圖像晶片組被設置為主要顯卡。因此,主模式可能無法正常工作,顯示
器可能會被停用。
- 如果在開機過程中有問題,從安全模式啟動電腦並移除驅動程式。按住 CTRL 鍵直到出現 Windows 啟動選單,
然後選擇安全模式。
- 需檢查您所安裝的驅動程式版本,請單擊“控制台”→“新增或移除程式”檢查該程式:USB 顯示裝置(數字
代表驅動程式版本)。不同的媒體播放器在檔案格式支援上存在有些許限制。根據不同的作業系統、主系統的
圖像卡/晶片組、媒體播放器及所支援的媒體格式,以圖表方式附上我們的合規測試結果。該資訊會定期進行
更新,伴隨推出的新版媒體播放器或最新驅動程式。

JUC700 USB 3.0 Wormhole Switch DSS 使用手冊
25 JUC700
技術支援 如果在使用 j5create 產品時,若有任何疑問或使用上之問題。請依循下列所示流程,將可解決您的問題
1. 參閱使用手冊 The User Manual
使用手冊包含完整的安裝流程以及問題解答單元,可以快速解決一般消費者使用習慣上的問題。
2. 網站技術支援 Online Support
請至 j5create 官網 (www.j5create.com) 下載最新的驅動程式。如果安裝最新驅動程式後,仍有一樣的問
題,請至"聯絡我們"留下故障狀況或 email 至 [email protected],j5create 技術客服人員將會
立即處理您的問題。
3. 技術支援專線 Telephone Support
請聯絡 j5create 台灣技術支援 02-2269-5533 # 19 ,客服人員將立即會為您服務。
技術支援資訊:
美國技術服務專線:+1-888-689-4088
台灣技術服務專線:+886-2-2269-5533#19
Email 信箱:[email protected]
客服時間:星期一至星期五 9:30 AM -6:00 PM (台灣時間)
JUC700 USB 3.0 Wormhole Switch DSS 使用手冊
26 JUC700
j5create 產品保固
j5create 提供兩年產品保固。不包含產品正常的磨損跟老化或自行拆卸或進行改裝。 若您的產品有安裝或維修上的問題時,可先致電或 email 至 j5create 客戶服務中心,如須寄回,客服人
員將會提供您一組追蹤號碼。 使用者將需要負擔寄回 j5create 客戶服務中心的運費。
維修流程
步驟 1. 請詳細敘述產品型號及故障狀況
步驟 2. 與本公司客戶服務部門聯絡:
(1) 電話詢問
美國技術服務專線:+1-888-689-4088 台灣技術服務專線 : +886-2-2269-5533 # 19
(2 ) 線上聯絡
www.j5create.com ->Contact 客戶聯絡
步驟 3. 如須寄回維修 請詳細準備以下資料
(i) 購買證明發票副本
(ii) 註明產品序號&產品型號
(iii) 詳細紀錄故障狀況 (iv) 附上個人聯絡方式(姓名、 電話、 地址)
步驟 4. 請依以下優先順序送回
( 1 ) 原購買經銷商
( 2 ) j5 客戶服務部
j5create 保固須知 若本產品質量問題而引起的故障與損壞,請即送修; 自購買日期起保固期限內,將提供免費保修服務;
新品退換貨務必保持包裝原貌即配件完整性。
產品保固基準
本產品保固不適用於以下各種情況: 正常的磨損或老化 、自行拆除或進行改裝(不是由 j5create 或
授權之專業人員進行);產品之毀損係受不可抗力(天災、火災、水災、地震、雷擊、颱風、龍捲風等)
人為破壞 人為疏失(遺失、未妥善保管、不正確的安裝等)或其他非正常因素所致者:仿冒品、產品
運輸至 j5 過程中丟失或損壞; 因潮濕、腐壞、電壓過高、工作環境惡劣造成的損壞等。若有上述之情
況發生,將收取材料及維修費用。如須維修費用,j5create 將提供報價單。
維修服務須知 消費者於本公司提供維修服務時,應須先行儲存輩分資料,對任何程式資料或是其他媒體上的資訊,
或任何非不在 j5create 產品保固範圍損壞或遺失,恕不負責。系統、應用軟體、使用者資料的重新安
裝以及資料恢復將不包含在j5create 的產品保固範圍之內。
產品保固服務說明,j5create 保有書面修正,解釋說明之權利。

JUC700 USB 3.0 Wormhole Switch DSS 使用手冊
27 JUC700
認證 FCC This equipment has been tested and is found to comply with FCC Part 15 Subpart B § 15.109/15.107 Class B. Operation is subject to the following two conditions: • This device may not cause harmful interference • This device must accept any interference, including interference that may cause undesired operation of the device. CE This equipment is in compliance with the requirements of the following regulations: EN 55022 Class B (2006), EN 55024 (1998+A1:2001+ A2:2003), (IEC/EN 61000-4-2 (1995+A1:1998+A2:2001)/-3(2006) C-Tick This equipment is in compliance with the requirements of the following regulations: EN 55022 (2006) Class B, AS/NZS CISPR22 © IEC: 2005. VCCI This equipment is in compliance with the requirements of the following regulations: CISPR22 © IEC: 2005
免責聲明 本文件中的資訊如有更改,恕不另行通知。製造商不對本文件的準確性和完整性做任何陳述或擔保(暗示
或其他方式),並且在任何情況下均不對任何利潤損失或任何商業損失負責,包括但不限於特殊、偶然、
因果性或其他性質之損壞。未經製造商明確的書面許可,不得以任何形式通過任何電子或機械方式複製或
傳播本文件的任何部分,包括影印、錄製或資訊記錄及檢索系統。
Related Documents