ILOG JRules ™ 6.6 Installing the JRules Modules on Sun Application Server 8.2

Jrules installation on SUN app server
Oct 15, 2014
Welcome message from author
This document is posted to help you gain knowledge. Please leave a comment to let me know what you think about it! Share it to your friends and learn new things together.
Transcript
ILOG JRules™ 6.6
Installing the JRules Modules on
Sun Application Server 8.2
COPYRIGHT NOTICE
Copyright © 1987-2007, by ILOG S.A., 9 Rue de Verdun, 94253 Gentilly Cedex, France, and ILOG, Inc., 1195 West Fremont Avenue, Sunnyvale, California 94087-3832, USA. All rights reserved.
General Use Restrictions
This document and the software described in this document are the property of ILOG and are protected as ILOG trade secrets. They are furnished under a license or nondisclosure agreement, and may be used or copied only within the terms of such license or nondisclosure agreement.
No part of this work may be reproduced or disseminated in any form or by any means, without the prior written permission of ILOG S.A, or ILOG, Inc.
Trademarks
ILOG, the ILOG design, CPLEX, and all other logos and product and service names of ILOG are registered trademarks or trademarks of ILOG in France, the U.S. and/or other countries.
All other company and product names are trademarks or registered trademarks of their respective holders.
Java and all Java-based marks are either trademarks or registered trademarks of Sun Microsystems, Inc. in the United States and other countries.
Microsoft, Windows, and Windows NT are either trademarks or registered trademarks of Microsoft Corporation in the United States and other countries.
C O N T E N T S
Contents
Installing the JRules Modules on Sun Application Server 8.2
Installation Overview . . . . . . . . . . . . . . . . . . . . . . . . . . . . . . . . . . . . . . . . . . . . . . . . . . . . . . . . . . . . . 7
Installing Rule Team Server on Sun Application Servers . . . . . . . . . . . . . . . . . . . . . . . . . . . . . . . 9
Installing Rule Team Server on Sun Application Server 8.2 . . . . . . . . . . . . . . . . . . . . . . . . .9
Database User Permissions . . . . . . . . . . . . . . . . . . . . . . . . . . . . . . . . . . . . . . . . . . . . . . . . . .16
Completing the Installation Using the Installation Manager . . . . . . . . . . . . . . . . . . . . . . . .18
Completing the Installation Using Ant Tasks . . . . . . . . . . . . . . . . . . . . . . . . . . . . . . . . . . . .24
Opening Rule Team Server . . . . . . . . . . . . . . . . . . . . . . . . . . . . . . . . . . . . . . . . . . . . . . . . . . .36
Installing Rule Execution Server on Sun Application Servers . . . . . . . . . . . . . . . . . . . . . . . . . . 39
Installing Rule Execution Server on Sun Application Server 8.2 . . . . . . . . . . . . . . . . . . . .39
Rule Execution Server Database Driver Issues . . . . . . . . . . . . . . . . . . . . . . . . . . . . . . . . . .52
Installing Rule Scenario Manager on Sun Application Servers. . . . . . . . . . . . . . . . . . . . . . . . . . 53
Installing Rule Scenario Manager on Sun Application Server 8.2. . . . . . . . . . . . . . . . . . . .53
I L O G J R U L E S 6 . 6 — I N S T A L L I N G T H E J R U L E S M O D U L E S 3

4 I L O G J R U L E S 6 . 6 — I N S T A L L I N G T H E J R U L E S M O D U L E S
P R E F A C E
Preface
This section contains instructions on how to install the JRules modules on the Sun Application Server, Version 8.2 (formerly Sun ONE Application Server).
The intended audience for this guide is the person who develops, assembles, and deploys J2EE applications in a corporate enterprise. This guide assumes you are familiar with the following topics:
◆ J2EE specification
◆ HTML
◆ Java programming
◆ Java APIs as defined in the Java Servlet, JavaServer Pages (JSP), Enterprise JavaBeans (EJB), and Java Database Connectivity (JDBC) specifications
◆ Structured database query languages such as SQL
◆ Relational database concepts
◆ Software development processes, including debugging and source code control
This guide is organized as follows:
◆ Installation Overview—Provides a description of some basic concepts involved in the installation.
I L O G J R U L E S 6 . 6 — I N S T A L L I N G T H E J R U L E S M O D U L E S 5
◆ Installing Rule Team Server on Sun Application Servers—Provides instructions for installing Rule Team Server on the Sun Application Server.
◆ Installing Rule Execution Server on Sun Application Servers—Provides instructions for installing Rule Execution Server on the Sun Application Server.
◆ Installing Rule Scenario Manager on Sun Application Servers—Provides instructions for installing Rule Scenario Manager Server on the Sun Application Server.
Note: Sun Application Server 8.2 Personal Edition does not support clustering
6 I L O G J R U L E S 6 . 6 — I N S T A L L I N G T H E J R U L E S M O D U L E S
Installation Overview
This section contains instructions on how to install the JRules modules on the supported application servers. To use any of the JRules modules on the J2EE platform, you will need to install a set of components on one of the supported application servers.
Each of the JRules modules requires that you first prepare your application server for installation. Preparing your application server will involve creating a data source and configuring the necessary security. Installation will consist of deploying an archive (or a set of archives), enabling the online help, and in the case of Rule Team Server an additional configuration step.
This configuration step includes:
◆ Configuring the database.
◆ Uploading message files.
◆ Uploading roles.
◆ Setting the persistence locale.
◆ Adding configuration parameters.
It is also possible to customize the behavior of Rule Team Server. For more information, see Customizing Rule Team Server in the JRules developer documentation.
The following sections provide a basic introduction to archive deployment and security.
I L O G J R U L E S 6 . 6 — I N S T A L L I N G T H E J R U L E S M O D U L E S 7
In this Section
Archive Deployment
Security
Archive Deployment
The archive files (EAR/WAR/RAR) included in the application server installers can be deployed to a server in different ways. You should refer to the application server documentation for a full understanding of the different options.
Security
Configuration of a secure mode on an application server provides ways to increase the security of the application that you deploy.
In secure mode an application server:
◆ Checks access to the resources (access to a class using the reflection mechanism is not permitted without the correct security rights).
◆ Manages access rights (the Rule Execution Server Console access is managed with this mechanism).
By default, Rule Execution Server is installed with a minimum of security. The Rule Execution Server Console application defines a specific role bres_admin. This role controls the access to the various JSP/Servlets.
There are no specific permissions implementation for Rule Execution Server MBeans. All that is required to access the MBeans using JMX is the right credentials.
The installation of Rule Team Server is completed using an installation manager. This ensures that you create the right groups in your application server when you setup security access.
Note: Security configuration of the Rule Execution Server may relate to your application/domain or server scoped enterprise security policy. You should review security settings for applications that call the Rule Execution Server with your J2EE application architect/system administrator as appropriate.
8 I L O G J R U L E S 6 . 6 — I N S T A L L I N G T H E J R U L E S M O D U L E S
Installing Rule Team Server on SunApplication Servers
This section provides instructions on installing the Rule Team Server JRules module on Sun Application Servers.
In this Section
Installing Rule Team Server on Sun Application Server 8.2
Database User Permissions
Completing the Installation Using the Installation Manager
Completing the Installation Using Ant Tasks
Opening Rule Team Server
Installing Rule Team Server on Sun Application Server 8.2
Please take note of the introductory information in Installation Overview.
The following section describes how to prepare your application server Sun AS 8.2:
◆ Step 1. Configuring Java 2 Security Permissions
◆ Step 2. Creating a Connection Pool and a Data Source on Sun AS
I L O G J R U L E S 6 . 6 — I N S T A L L I N G T H E J R U L E S M O D U L E S 9
◆ Step 3. Configuring Security on Sun
◆ Step 4. Deploying the Rule Team Server EAR on Sun
◆ Step 5. Deploying the Online Help on Sun
With your application server configured, you will finish the installation by Completing the Installation Using the Installation Manager.
Once your installation is complete, Rule Team Server will be ready to use (see Opening Rule Team Server) but will not contain a rule project. You will have to publish a project (see Publish a Project) from Rule Studio.
Step 1. Configuring Java 2 Security Permissions
The security manager on Sun AS is activated by default. Rule Team Server needs special permissions to run.
To define the special permissions:
1. Open the file <ServerInstanceDir>/config/server.policy. By default, this is located at <SUNAS_HOME>/domains/domain1/config.
2. At the end of the file add the following:
// RTS Console Permissionsgrant { permission java.util.logging.LoggingPermission "control"; permission java.lang.reflect.ReflectPermission "suppressAccessChecks"; permission java.lang.RuntimePermission "getClassLoader"; permission java.lang.RuntimePermission "createClassLoader"; permission java.lang.RuntimePermission "accessDeclaredMembers"; permission java.lang.RuntimePermission "accessClassInPackage.ilog.views"; permission java.lang.RuntimePermission "accessClassInPackage.sun.util.logging.resources"; permission java.lang.RuntimePermission "accessClassInPackage.sun.beans.editors"; permission java.lang.RuntimePermission "charsetProvider"; permission java.lang.RuntimePermission "modifyThreadGroup"; permission java.lang.RuntimePermission "modifyThread"; permission java.lang.RuntimePermission "accessClassInPackage.sun.beans.editors"; permission java.awt.AWTPermission "accessClipboard"; permission java.lang.RuntimePermission "accessClassInPackage.sun.misc"; permission java.io.FilePermission "<<ALL FILES>>", "read"; permission java.io.FilePermission "${java.io.tmpdir}${/}-", "read, write, delete"; permission java.util.PropertyPermission "*", "read, write"; permission java.util.PropertyPermission "org.eclipse.emf.ecore.EPackage.Registry.INSTANCE", "write"; permission com.sun.appserv.security.ProgrammaticLoginPermission "login";
Note: If you have rule projects created before the 6.6 version of JRules, you will have to migrate the database schema, as described in the About ILOG JRules 6.6 guide.
10 I L O G J R U L E S 6 . 6 — I N S T A L L I N G T H E J R U L E S M O D U L E S
Installing Rule Team Server on Sun Application Server 8.2
};
// RTS Online Help Permissionsgrant { permission org.apache.naming.JndiPermission "jndi:/server/rtsonlinehelp/helpsets/rtsonlinehelp.jar";};
Restart the server to activate changes in the server.policy file.
Step 2. Creating a Connection Pool and a Data Source on Sun AS
Creating a connection pool and a data source assumes that your database is already running (see the Readme for more information on supported databases).
To create a connection pool:
1. Log in to the Sun Application Server Administration Console.
2. Open Resources > JDBC and click Connection Pools.
3. In the Connection Pool page, under Current Pools click New.
a. Enter the connection pool name (for example, RTSPool)
b. Select a non-XA resource type (for example, javax.sql.DataSource).
c. Select the database vendor.
4. Click Next.
Review the connection pool general settings.
5. Click Next.
Review the settings for your connection pool.
Click Finish.
Your new connection pool is visible:
6. Test the connection before moving on:
a. Click the Connection Pool name (RTSPool).
b. Click the Ping button.
To create a data source:
1. Open Resources > JDBC and click JDBC Resources.
2. In the JDBC Resources page, under Current Resources click New.
a. Type jdbc/ilogDataSource for the JNDI Name and choose the connection pool that you created (for example, RTSPool).
I L O G J R U L E S 6 . 6 — I N S T A L L I N G T H E J R U L E S M O D U L E S 11
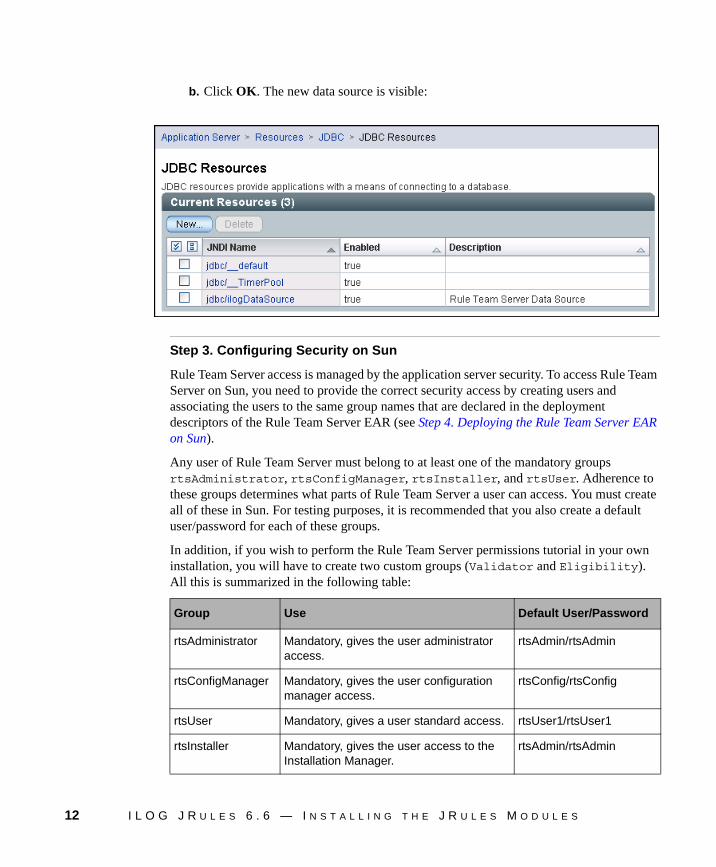
b. Click OK. The new data source is visible:
Step 3. Configuring Security on Sun
Rule Team Server access is managed by the application server security. To access Rule Team Server on Sun, you need to provide the correct security access by creating users and associating the users to the same group names that are declared in the deployment descriptors of the Rule Team Server EAR (see Step 4. Deploying the Rule Team Server EAR on Sun).
Any user of Rule Team Server must belong to at least one of the mandatory groups rtsAdministrator, rtsConfigManager, rtsInstaller, and rtsUser. Adherence to these groups determines what parts of Rule Team Server a user can access. You must create all of these in Sun. For testing purposes, it is recommended that you also create a default user/password for each of these groups.
In addition, if you wish to perform the Rule Team Server permissions tutorial in your own installation, you will have to create two custom groups (Validator and Eligibility). All this is summarized in the following table:
Group Use Default User/Password
rtsAdministrator Mandatory, gives the user administrator access.
rtsAdmin/rtsAdmin
rtsConfigManager Mandatory, gives the user configuration manager access.
rtsConfig/rtsConfig
rtsUser Mandatory, gives a user standard access. rtsUser1/rtsUser1
rtsInstaller Mandatory, gives the user access to the Installation Manager.
rtsAdmin/rtsAdmin
12 I L O G J R U L E S 6 . 6 — I N S T A L L I N G T H E J R U L E S M O D U L E S

Installing Rule Team Server on Sun Application Server 8.2
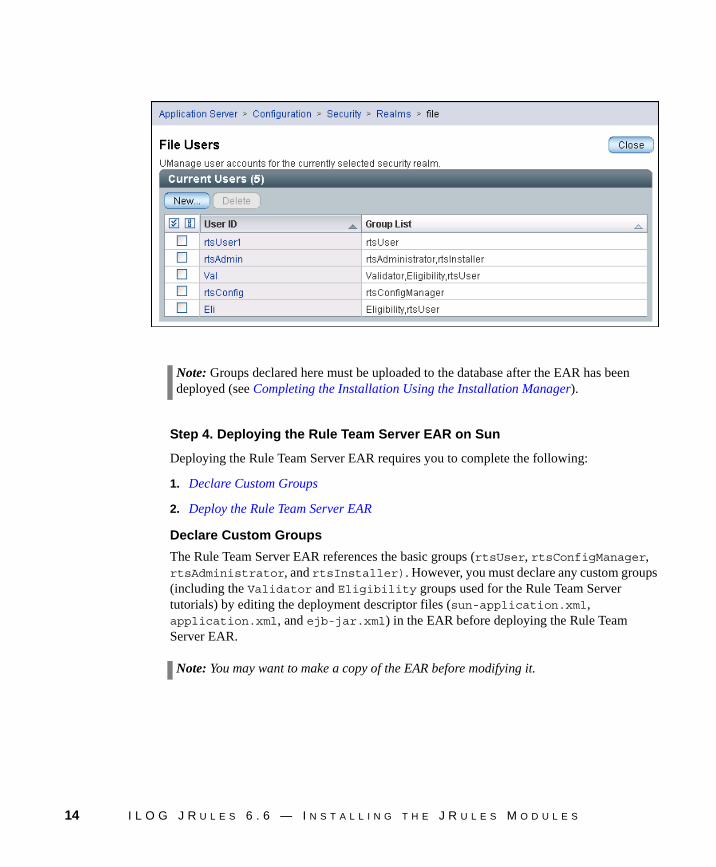
Creating Users on Sun
The following table gives a suggested configuration where you create a default user for each of the basic groups. Also, remember that users Val and Eli are only necessary if you wish to do the Rule Team Server permissions tutorial in your installation.
To add a user:
1. In the Sun Application Server Administration Console, open Configuration > Security > Realms and click file.
2. In the Edit Realms page, under Current Realms click Manage Users.
The File Users window is displayed. For each user shown in the table, click New, type the user, password, and group, then click OK.
Validator Optional custom group, used in the Rule Team Server permissions tutorial.
Val/Val
Eligibility Optional custom group, used in the Rule Team Server permissions tutorial.
Eli/Eli
User Password Will be associated with groups...
rtsAdmin rtsAdmin rtsAdministrator, rtsInstaller
rtsConfig rtsConfig rtsConfigManager
rtsUser1 rtsUser1 rtsUser
Val Val Validator, Eligibility, rtsUser
Eli Eli Eligibility, rtsUser
Group Use Default User/Password
I L O G J R U L E S 6 . 6 — I N S T A L L I N G T H E J R U L E S M O D U L E S 13
Step 4. Deploying the Rule Team Server EAR on Sun
Deploying the Rule Team Server EAR requires you to complete the following:
1. Declare Custom Groups
2. Deploy the Rule Team Server EAR
Declare Custom Groups
The Rule Team Server EAR references the basic groups (rtsUser, rtsConfigManager, rtsAdministrator, and rtsInstaller). However, you must declare any custom groups (including the Validator and Eligibility groups used for the Rule Team Server tutorials) by editing the deployment descriptor files (sun-application.xml, application.xml, and ejb-jar.xml) in the EAR before deploying the Rule Team Server EAR.
Note: Groups declared here must be uploaded to the database after the EAR has been deployed (see Completing the Installation Using the Installation Manager).
Note: You may want to make a copy of the EAR before modifying it.
14 I L O G J R U L E S 6 . 6 — I N S T A L L I N G T H E J R U L E S M O D U L E S
Installing Rule Team Server on Sun Application Server 8.2
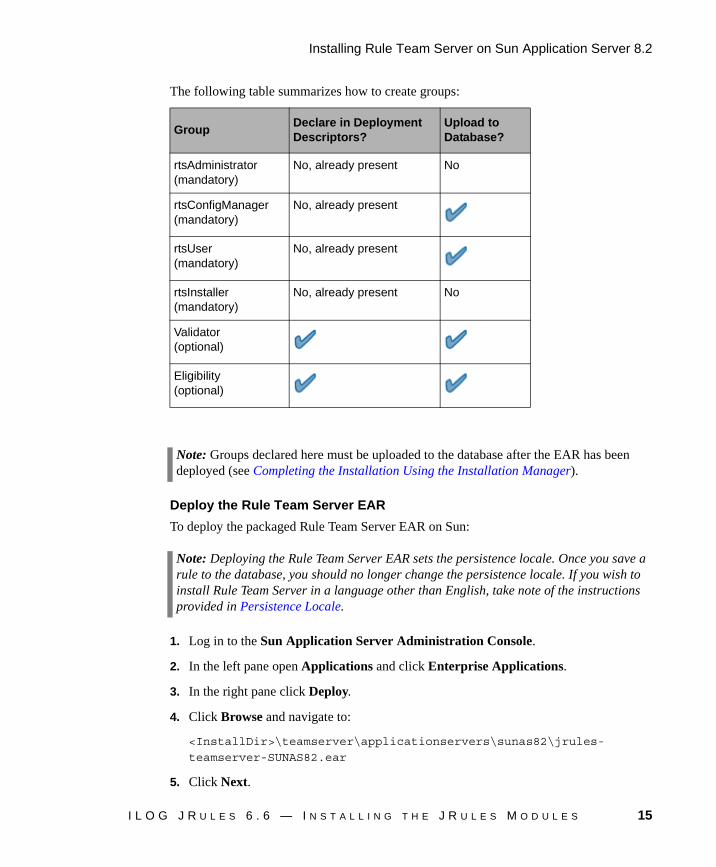
The following table summarizes how to create groups:
Deploy the Rule Team Server EAR
To deploy the packaged Rule Team Server EAR on Sun:
1. Log in to the Sun Application Server Administration Console.
2. In the left pane open Applications and click Enterprise Applications.
3. In the right pane click Deploy.
4. Click Browse and navigate to:
<InstallDir>\teamserver\applicationservers\sunas82\jrules-
teamserver-SUNAS82.ear
5. Click Next.
GroupDeclare in Deployment Descriptors?
Upload to Database?
rtsAdministrator(mandatory)
No, already present No
rtsConfigManager(mandatory)
No, already present
rtsUser(mandatory)
No, already present
rtsInstaller(mandatory)
No, already present No
Validator(optional)
Eligibility(optional)
Note: Groups declared here must be uploaded to the database after the EAR has been deployed (see Completing the Installation Using the Installation Manager).
Note: Deploying the Rule Team Server EAR sets the persistence locale. Once you save a rule to the database, you should no longer change the persistence locale. If you wish to install Rule Team Server in a language other than English, take note of the instructions provided in Persistence Locale.
I L O G J R U L E S 6 . 6 — I N S T A L L I N G T H E J R U L E S M O D U L E S 15
6. Click OK.
7. Restart the server.
Step 5. Deploying the Online Help on Sun
To deploy the online help:
1. Log in to the Sun Application Server Administration Console.
2. In the left pane open Applications and click Enterprise Applications.
3. In the right pane click Deploy.
4. Click Browse and navigate to:
<InstallDir>\teamserver\online-help\rtsonlinehelp.ear
5. Click Next.
6. Click OK.
7. Restart the server.
This completes the preparation of your application server. You can now open Rule Team Server (see Opening Rule Team Server) to complete the installation (see Completing the Installation Using the Installation Manager).
Related Tasks
Opening Rule Team Server
Database User Permissions
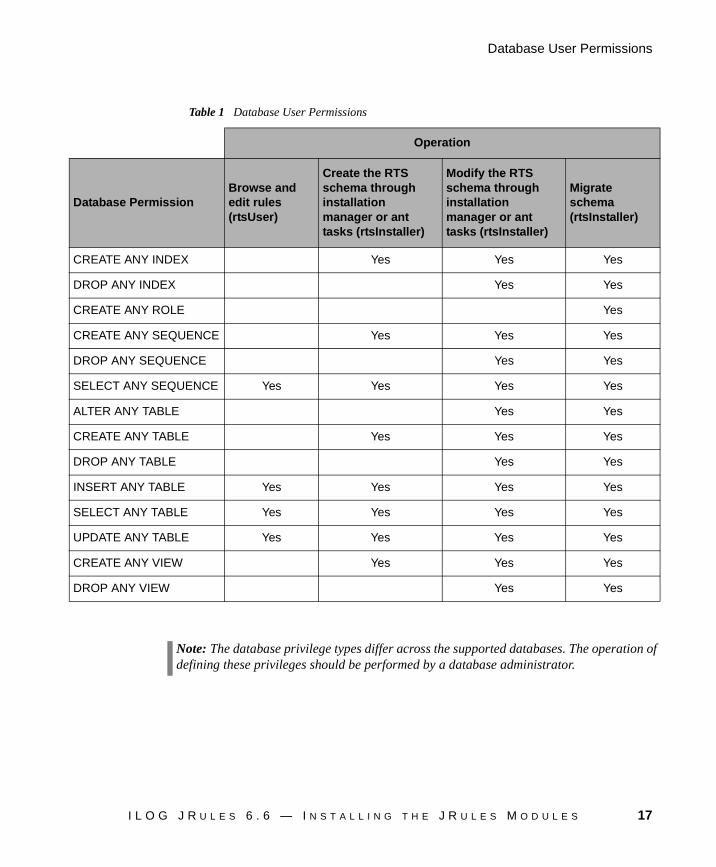
The data source that contains the Rule Team Server data is always mapped to a database user.
The following table highlights the database permissions you must enforce for the database user with attention given to the type of operation you wish them to perform:
16 I L O G J R U L E S 6 . 6 — I N S T A L L I N G T H E J R U L E S M O D U L E S
Database User Permissions
Table 1 Database User Permissions
Operation
Database PermissionBrowse and edit rules (rtsUser)
Create the RTS schema through installation manager or ant tasks (rtsInstaller)
Modify the RTS schema through installation manager or ant tasks (rtsInstaller)
Migrate schema (rtsInstaller)
CREATE ANY INDEX Yes Yes Yes
DROP ANY INDEX Yes Yes
CREATE ANY ROLE Yes
CREATE ANY SEQUENCE Yes Yes Yes
DROP ANY SEQUENCE Yes Yes
SELECT ANY SEQUENCE Yes Yes Yes Yes
ALTER ANY TABLE Yes Yes
CREATE ANY TABLE Yes Yes Yes
DROP ANY TABLE Yes Yes
INSERT ANY TABLE Yes Yes Yes Yes
SELECT ANY TABLE Yes Yes Yes Yes
UPDATE ANY TABLE Yes Yes Yes Yes
CREATE ANY VIEW Yes Yes Yes
DROP ANY VIEW Yes Yes
Note: The database privilege types differ across the supported databases. The operation of defining these privileges should be performed by a database administrator.
I L O G J R U L E S 6 . 6 — I N S T A L L I N G T H E J R U L E S M O D U L E S 17

Completing the Installation Using the Installation Manager
The Installation Manager is available in Rule Team Server and is displayed automatically if you are completing the installation, and by clicking Admin > Installation Manager once your initial installation is complete.
If you open Rule Team Server when completing the installation, only the Install tab is available.
Using the Installation Manager is the recommended way to complete/modify the installation once you have deployed the Rule Team Server EAR to your application server.
You use the Installation Manager to:
◆ Create or modify the Database Schema - the most important step, it is mandatory when completing the initial installation.
◆ Setup Message Files - mandatory during the installation only if you have some custom rule model extension files.
◆ Setup Groups - you must set up the same groups declared in the application server if you want to use the Rule Team Server security and permissions mechanisms.
◆ Change the Persistence Locale - if different from en_US.
◆ Change Configuration Parameters - optional, used in certain tasks related to customizing Rule Team Server.
Alternatively, you can use Ant tasks to perform these actions, though this requires you to configure your environment to correctly run these tasks.
Note: To access the Installation Manager, you must have administrator privileges as well as the rtsInstaller role when you log on. For example, if you followed the sample users creation steps, log on as rtsAdmin.
18 I L O G J R U L E S 6 . 6 — I N S T A L L I N G T H E J R U L E S M O D U L E S
Completing the Installation Using the Installation Manager
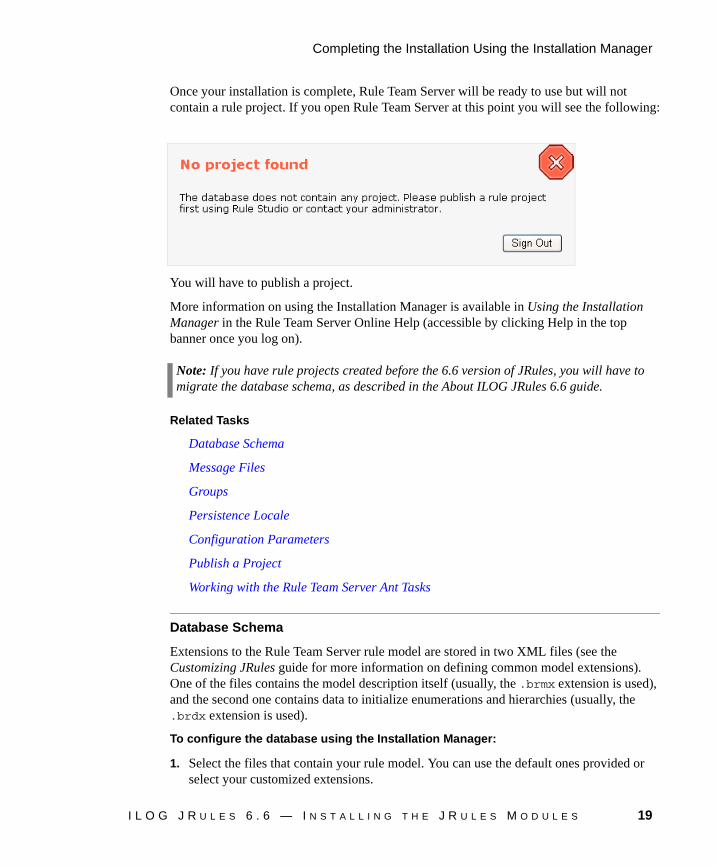
Once your installation is complete, Rule Team Server will be ready to use but will not contain a rule project. If you open Rule Team Server at this point you will see the following:
You will have to publish a project.
More information on using the Installation Manager is available in Using the Installation Manager in the Rule Team Server Online Help (accessible by clicking Help in the top banner once you log on).
Related Tasks
Database Schema
Message Files
Groups
Persistence Locale
Configuration Parameters
Publish a Project
Working with the Rule Team Server Ant Tasks
Database Schema
Extensions to the Rule Team Server rule model are stored in two XML files (see the Customizing JRules guide for more information on defining common model extensions). One of the files contains the model description itself (usually, the .brmx extension is used), and the second one contains data to initialize enumerations and hierarchies (usually, the .brdx extension is used).
To configure the database using the Installation Manager:
1. Select the files that contain your rule model. You can use the default ones provided or select your customized extensions.
Note: If you have rule projects created before the 6.6 version of JRules, you will have to migrate the database schema, as described in the About ILOG JRules 6.6 guide.
I L O G J R U L E S 6 . 6 — I N S T A L L I N G T H E J R U L E S M O D U L E S 19
2. Click Generate SQL to generate the script that creates the tables of your database based on the contents of your rule model files.
3. When the script has been generated, select the Execute the SQL script checkbox, then click Next.
4. Initialize the database tables that you created.
Once you have completed these steps, you will be able to publish rule projects to your database.
Related Tasks
Message Files
Groups
Persistence Locale
Configuration Parameters
Publish a Project
Working with the Rule Team Server Ant Tasks
Message Files
Message files contain the display text associated with the extensions to the rule model contained in the .brmx and .brdx files, for example:
status=StatuseffectiveDate=Effective DateexpirationDate=Expiration Datenew=Newdefined=Defined
The default messages file is provided in:
<InstallDir>\teamserver\bin\defaultextensionmessages.properties
If you use the default rule model when creating your database, this default messages file will automatically be sent to the database. Otherwise, use the Installation Manager to upload your own message files.
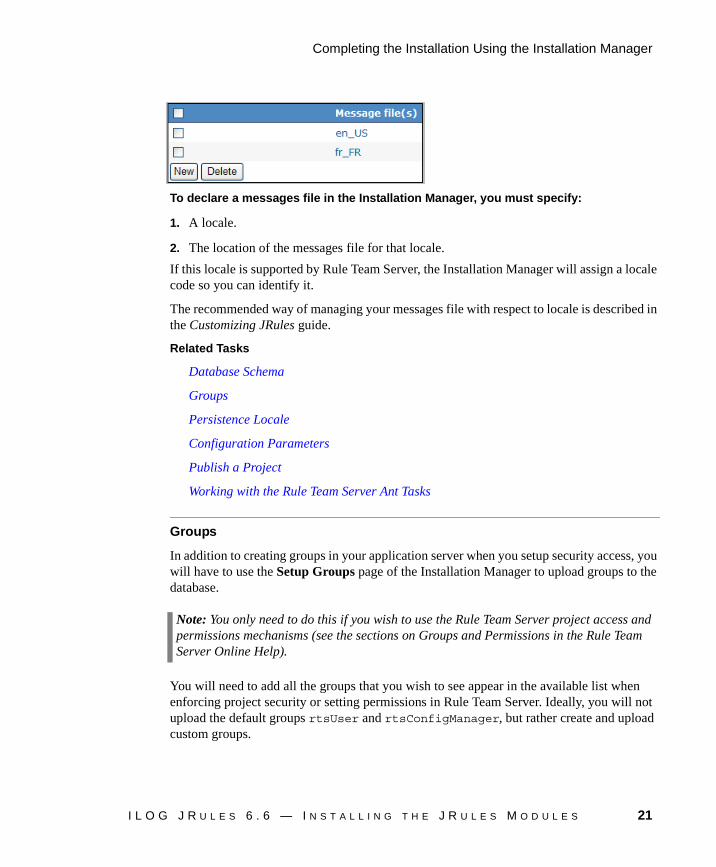
You will need a messages file for each locale that you use. Messages files are identified in the Installation Manager by their locale:
Note: The contents of the messages files must respect the ISO-LATIN-1 standard (see http://java.sun.com/j2se/1.4.2/docs/api/java/util/Properties.html).
20 I L O G J R U L E S 6 . 6 — I N S T A L L I N G T H E J R U L E S M O D U L E S
Completing the Installation Using the Installation Manager
To declare a messages file in the Installation Manager, you must specify:
1. A locale.
2. The location of the messages file for that locale.
If this locale is supported by Rule Team Server, the Installation Manager will assign a locale code so you can identify it.
The recommended way of managing your messages file with respect to locale is described in the Customizing JRules guide.
Related Tasks
Database Schema
Groups
Persistence Locale
Configuration Parameters
Publish a Project
Working with the Rule Team Server Ant Tasks
Groups
In addition to creating groups in your application server when you setup security access, you will have to use the Setup Groups page of the Installation Manager to upload groups to the database.
You will need to add all the groups that you wish to see appear in the available list when enforcing project security or setting permissions in Rule Team Server. Ideally, you will not upload the default groups rtsUser and rtsConfigManager, but rather create and upload custom groups.
Note: You only need to do this if you wish to use the Rule Team Server project access and permissions mechanisms (see the sections on Groups and Permissions in the Rule Team Server Online Help).
I L O G J R U L E S 6 . 6 — I N S T A L L I N G T H E J R U L E S M O D U L E S 21
You should not upload either the rtsAdministrator group (because the Administrator has all security access and permissions regardless) or the rtsInstaller group (because a user cannot be a member of this group only).
Related Tasks
Database Schema
Message Files
Persistence Locale
Configuration Parameters
Publish a Project
Working with the Rule Team Server Ant Tasks
Persistence Locale
The persistence locale is used to determine the language in which rules are stored in the Rule Team Server database. It is set initially to en_US when you deploy the Rule Team Server EAR to your application server, which means that the rules in the database are stored in US English.
Changing the persistence locale does not change the language in which rules appear in Rule Team Server. Changing the persistence locale in Rule Team Server is only necessary to match the locale of Rule Studio when synchronizing your rule projects.
You should not change the persistence locale after you save a rule to the database.
Related Tasks
Database Schema
Message Files
Groups
Configuration Parameters
Publish a Project
Working with the Rule Team Server Ant Tasks
Note: The persistence locale is controlled by the value of the <locale> key in ilog/rules/teamserver/preferences.properties in the lib/rts.jar and set when the EAR is deployed. The Installation Manager overrides this setting.
22 I L O G J R U L E S 6 . 6 — I N S T A L L I N G T H E J R U L E S M O D U L E S
Completing the Installation Using the Installation Manager
Configuration Parameters
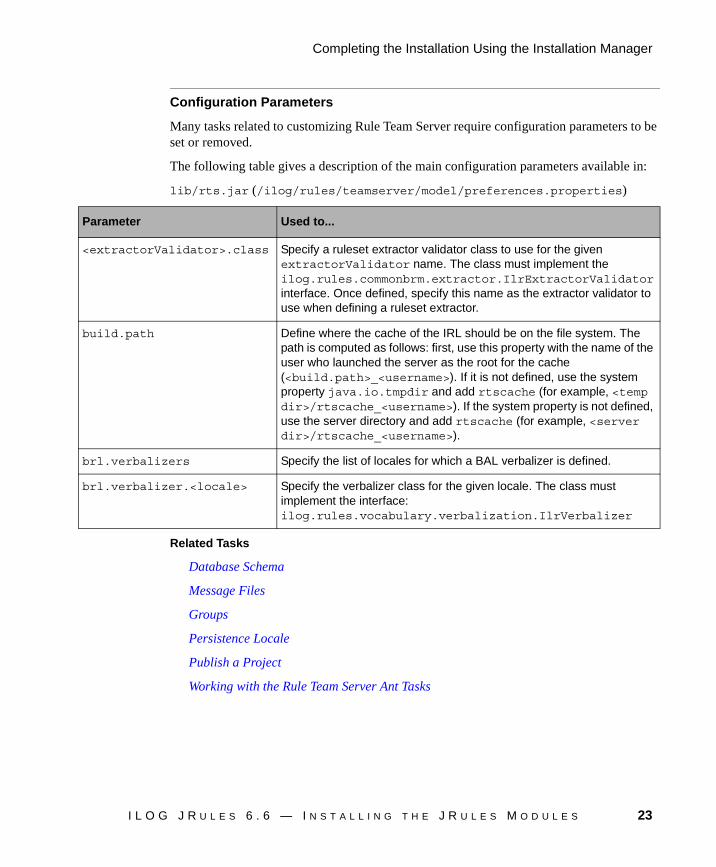
Many tasks related to customizing Rule Team Server require configuration parameters to be set or removed.
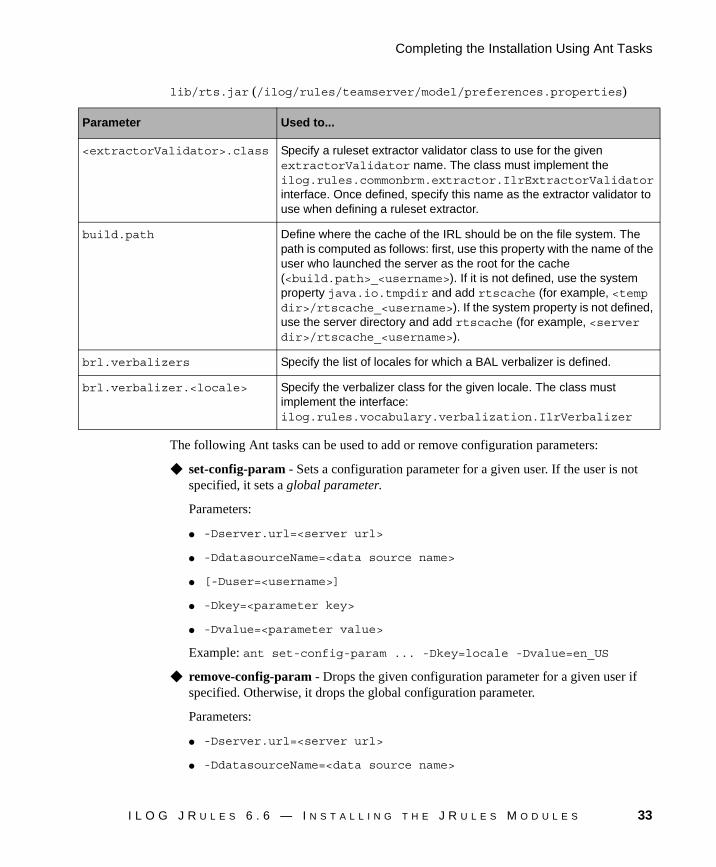
The following table gives a description of the main configuration parameters available in:
lib/rts.jar (/ilog/rules/teamserver/model/preferences.properties)
Related Tasks
Database Schema
Message Files
Groups
Persistence Locale
Publish a Project
Working with the Rule Team Server Ant Tasks
Parameter Used to...
<extractorValidator>.class Specify a ruleset extractor validator class to use for the given extractorValidator name. The class must implement the ilog.rules.commonbrm.extractor.IlrExtractorValidator interface. Once defined, specify this name as the extractor validator to use when defining a ruleset extractor.
build.path Define where the cache of the IRL should be on the file system. The path is computed as follows: first, use this property with the name of the user who launched the server as the root for the cache (<build.path>_<username>). If it is not defined, use the system property java.io.tmpdir and add rtscache (for example, <temp dir>/rtscache_<username>). If the system property is not defined, use the server directory and add rtscache (for example, <server dir>/rtscache_<username>).
brl.verbalizers Specify the list of locales for which a BAL verbalizer is defined.
brl.verbalizer.<locale> Specify the verbalizer class for the given locale. The class must implement the interface: ilog.rules.vocabulary.verbalization.IlrVerbalizer
I L O G J R U L E S 6 . 6 — I N S T A L L I N G T H E J R U L E S M O D U L E S 23

Completing the Installation Using Ant Tasks
As an alternative to using the Installation Manager, you can use the Rule Team Server Ant tasks to complete or modify your installation.
Once your installation is complete, Rule Team Server will be ready to use but will not contain a rule project. You will have to publish a project from Rule Studio.
This section includes the following:
Working with the Rule Team Server Ant Tasks
Creating the Database Schema (or dropping a database schema)
Defining and Uploading Message Files (mandatory during the installation)
Uploading Groups to the Database
Setting the Persistence Locale
Adding or Removing Configuration Parameters
Repackaging the Rule Team Server EAR
Erasing a Project from the Database
Working with the Rule Team Server Ant Tasks
To use the Ant tasks, your environment must be correctly set up.
The Rule Team Server Ant tasks are defined in <installDir>/teamserver/bin/build.xml, and executed by commands of the form:
ant <taskName> <parameters list>
The Ant task parameters start with -D and allow you to set some values such as:
◆ -Dserver.url=<server url> - Used to specify the URL of the application server to connect to.
◆ -DdatasourceName=<data source name> - Used to specify the JNDI name of the data source to use for the task (default is jdbc/ilogDataSource).
For example:
Note: If you have rule projects created before the 6.6 version of JRules, you will have to migrate the database schema, as described in the About ILOG JRules 6.6 guide.
Note: To execute these Ant tasks, you must use the same Java Virtual Machine version and vendor as the one used by the application server.
24 I L O G J R U L E S 6 . 6 — I N S T A L L I N G T H E J R U L E S M O D U L E S
Completing the Installation Using Ant Tasks
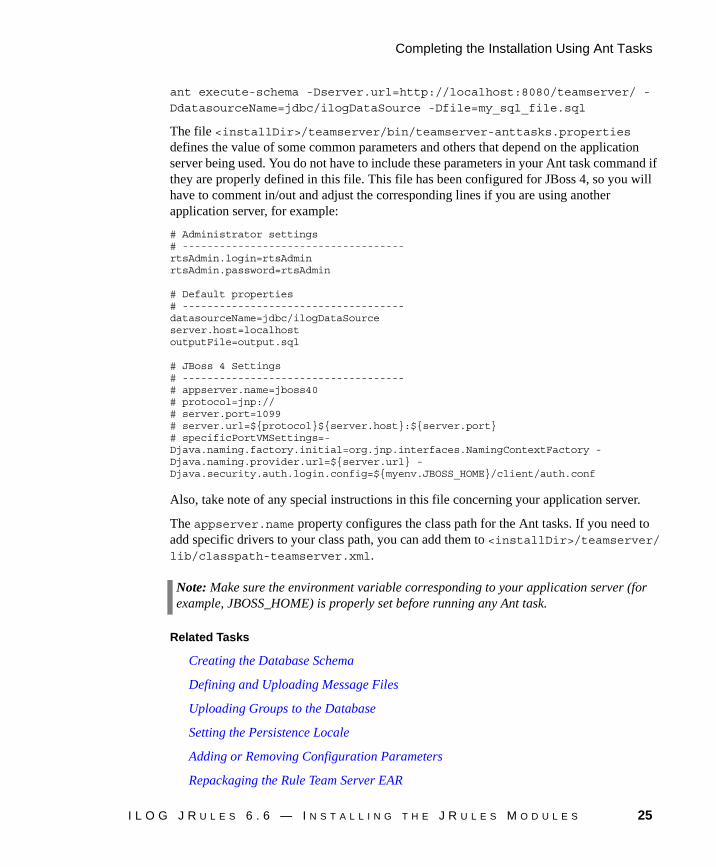
ant execute-schema -Dserver.url=http://localhost:8080/teamserver/ -
DdatasourceName=jdbc/ilogDataSource -Dfile=my_sql_file.sql
The file <installDir>/teamserver/bin/teamserver-anttasks.properties defines the value of some common parameters and others that depend on the application server being used. You do not have to include these parameters in your Ant task command if they are properly defined in this file. This file has been configured for JBoss 4, so you will have to comment in/out and adjust the corresponding lines if you are using another application server, for example:
# Administrator settings# ------------------------------------rtsAdmin.login=rtsAdminrtsAdmin.password=rtsAdmin
# Default properties# ------------------------------------datasourceName=jdbc/ilogDataSourceserver.host=localhostoutputFile=output.sql
# JBoss 4 Settings# ------------------------------------# appserver.name=jboss40# protocol=jnp://# server.port=1099# server.url=${protocol}${server.host}:${server.port}# specificPortVMSettings=-Djava.naming.factory.initial=org.jnp.interfaces.NamingContextFactory -Djava.naming.provider.url=${server.url} -Djava.security.auth.login.config=${myenv.JBOSS_HOME}/client/auth.conf
Also, take note of any special instructions in this file concerning your application server.
The appserver.name property configures the class path for the Ant tasks. If you need to add specific drivers to your class path, you can add them to <installDir>/teamserver/lib/classpath-teamserver.xml.
Related Tasks
Creating the Database Schema
Defining and Uploading Message Files
Uploading Groups to the Database
Setting the Persistence Locale
Adding or Removing Configuration Parameters
Repackaging the Rule Team Server EAR
Note: Make sure the environment variable corresponding to your application server (for example, JBOSS_HOME) is properly set before running any Ant task.
I L O G J R U L E S 6 . 6 — I N S T A L L I N G T H E J R U L E S M O D U L E S 25
Erasing a Project from the Database
Creating the Database Schema
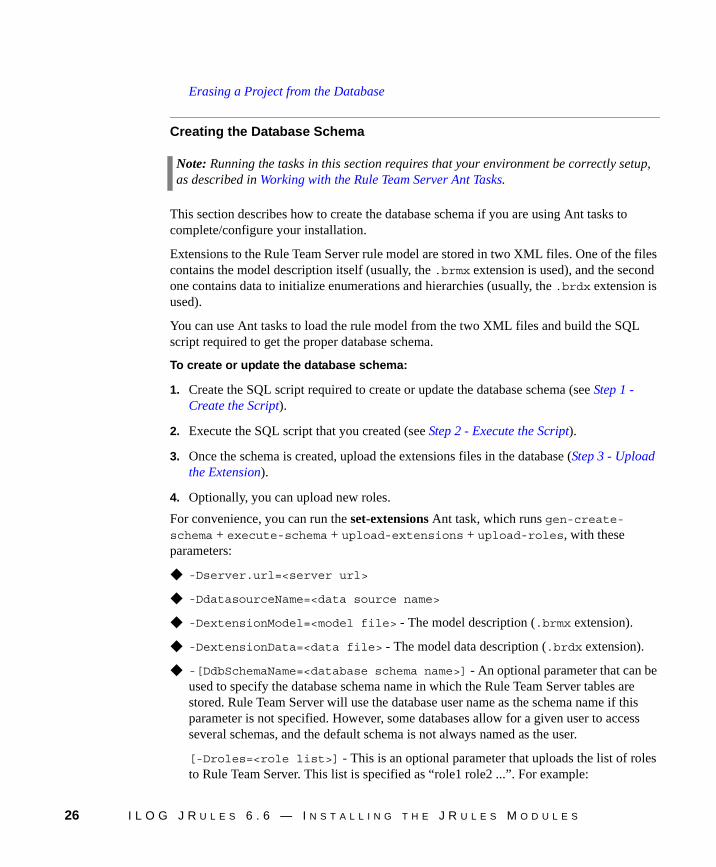
This section describes how to create the database schema if you are using Ant tasks to complete/configure your installation.
Extensions to the Rule Team Server rule model are stored in two XML files. One of the files contains the model description itself (usually, the .brmx extension is used), and the second one contains data to initialize enumerations and hierarchies (usually, the .brdx extension is used).
You can use Ant tasks to load the rule model from the two XML files and build the SQL script required to get the proper database schema.
To create or update the database schema:
1. Create the SQL script required to create or update the database schema (see Step 1 - Create the Script).
2. Execute the SQL script that you created (see Step 2 - Execute the Script).
3. Once the schema is created, upload the extensions files in the database (Step 3 - Upload the Extension).
4. Optionally, you can upload new roles.
For convenience, you can run the set-extensions Ant task, which runs gen-create-schema + execute-schema + upload-extensions + upload-roles, with these parameters:
◆ -Dserver.url=<server url>
◆ -DdatasourceName=<data source name>
◆ -DextensionModel=<model file> - The model description (.brmx extension).
◆ -DextensionData=<data file> - The model data description (.brdx extension).
◆ -[DdbSchemaName=<database schema name>] - An optional parameter that can be used to specify the database schema name in which the Rule Team Server tables are stored. Rule Team Server will use the database user name as the schema name if this parameter is not specified. However, some databases allow for a given user to access several schemas, and the default schema is not always named as the user.
[-Droles=<role list>] - This is an optional parameter that uploads the list of roles to Rule Team Server. This list is specified as “role1 role2 ...”. For example:
Note: Running the tasks in this section requires that your environment be correctly setup, as described in Working with the Rule Team Server Ant Tasks.
26 I L O G J R U L E S 6 . 6 — I N S T A L L I N G T H E J R U L E S M O D U L E S
Completing the Installation Using Ant Tasks
ant upload-roles ... -Droles="rtsUser rtsConfigManager Eligibility
Validator".
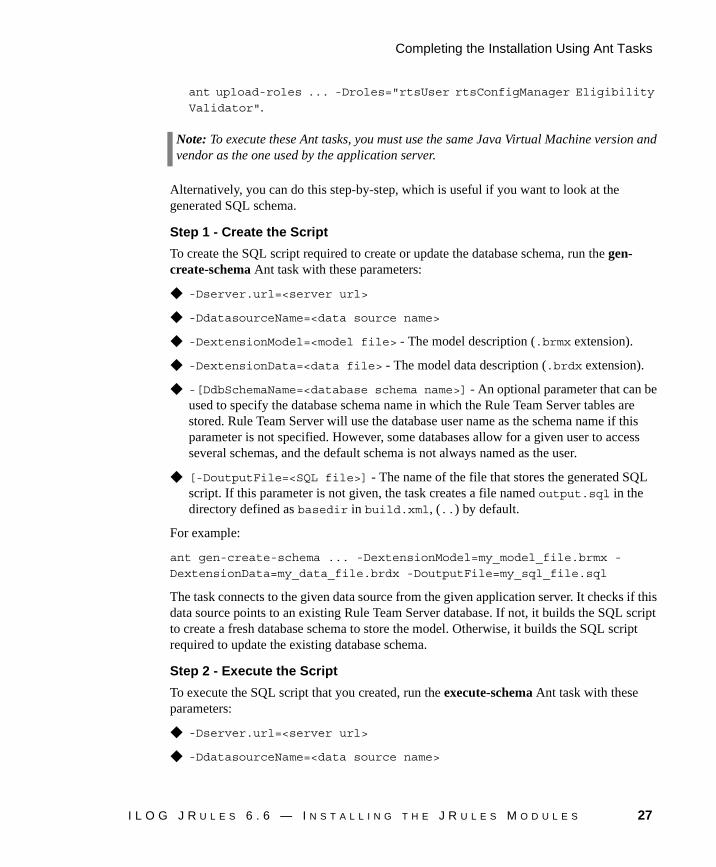
Alternatively, you can do this step-by-step, which is useful if you want to look at the generated SQL schema.
Step 1 - Create the Script
To create the SQL script required to create or update the database schema, run the gen-create-schema Ant task with these parameters:
◆ -Dserver.url=<server url>
◆ -DdatasourceName=<data source name>
◆ -DextensionModel=<model file> - The model description (.brmx extension).
◆ -DextensionData=<data file> - The model data description (.brdx extension).
◆ -[DdbSchemaName=<database schema name>] - An optional parameter that can be used to specify the database schema name in which the Rule Team Server tables are stored. Rule Team Server will use the database user name as the schema name if this parameter is not specified. However, some databases allow for a given user to access several schemas, and the default schema is not always named as the user.
◆ [-DoutputFile=<SQL file>] - The name of the file that stores the generated SQL script. If this parameter is not given, the task creates a file named output.sql in the directory defined as basedir in build.xml, (..) by default.
For example:
ant gen-create-schema ... -DextensionModel=my_model_file.brmx -
DextensionData=my_data_file.brdx -DoutputFile=my_sql_file.sql
The task connects to the given data source from the given application server. It checks if this data source points to an existing Rule Team Server database. If not, it builds the SQL script to create a fresh database schema to store the model. Otherwise, it builds the SQL script required to update the existing database schema.
Step 2 - Execute the Script
To execute the SQL script that you created, run the execute-schema Ant task with these parameters:
◆ -Dserver.url=<server url>
◆ -DdatasourceName=<data source name>
Note: To execute these Ant tasks, you must use the same Java Virtual Machine version and vendor as the one used by the application server.
I L O G J R U L E S 6 . 6 — I N S T A L L I N G T H E J R U L E S M O D U L E S 27
◆ [-Dfile=<SQL file>] - The name of the file to execute, which corresponds to the script you created. If this parameter is not given, the task attempts to execute a file named output.sql in the directory defined as basedir in build.xml, (..) by default.
For example:
ant execute-schema ... -Dfile=my_sql_file.sql
Step 3 - Upload the Extension
To store the rule model description in the database schema, run the upload-extensions Ant task with these parameters:
◆ -Dserver.url=<server url>
◆ -DdatasourceName=<data source name>
◆ -DextensionModel=<model file> - The model description (.brmx extension).
◆ -DextensionData=<data file> - The model data description (.brdx extension).
For example:
ant upload-extensions ... -DextensionModel=my_model_file.brmx -
DextensionData=my_data_file.brdx
The description is stored in the database so that Rule Team Server applications may load it when they start. It is also used by gen-create-schema to get the current model description in order to run a diff with the new schema.
Drop a Database Schema
You can drop a database schema in two steps:
1. Create the SQL script required to drop the database schema.
2. Execute the SQL script that you created.
To create the SQL script required to drop a database schema, run the gen-drop-schema Ant task with the following parameters:
◆ -Dserver.url=<server url>
◆ -DdatasourceName=<data source name>
◆ -DextensionModel=<model file> - The description of the database schema to drop.
◆ -[DdbSchemaName=<database schema name>] - An optional parameter that can be used to specify the database schema name in which the Rule Team Server tables are stored. Rule Team Server will use the database user name as the schema name if this parameter is not specified. However, some databases allow for a given user to access several schemas, and the default schema is not always named as the user.
28 I L O G J R U L E S 6 . 6 — I N S T A L L I N G T H E J R U L E S M O D U L E S
Completing the Installation Using Ant Tasks
◆ [-DoutputFile=<SQL file>] - The name of the file that stores the generated SQL script. If this parameter is not given, the task creates a file named output.sql in the directory defined as basedir in build.xml, (..) by default.
For example:
ant gen-drop-schema ... -DextensionModel=my_model_file.brmx -
DoutputFile=my_sql_file.sql
The task connects to the given data source from the given application server. It reads the model description given in the parameters, and generates the SQL script required to drop the existing schema. Since many database tables are linked through foreign keys, they have to be dropped in a specific order, and the script generation will handle these constraints.
To execute the SQL script that you created, run the execute-schema Ant task with these parameters:
◆ -Dserver.url=<server url>
◆ -DdatasourceName=<data source name>
◆ [-Dfile=<SQL file>] - The name of the file to execute, which corresponds to the script you created. If this parameter is not given, the task attempts to execute a file named output.sql in the directory defined as basedir in build.xml, (..) by default.
For example:
ant execute-schema ... -Dfile=my_sql_file.sql
Related Tasks
Publish a Project
Working with the Rule Team Server Ant Tasks
Defining and Uploading Message Files
Uploading Groups to the Database
Setting the Persistence Locale
Adding or Removing Configuration Parameters
Repackaging the Rule Team Server EAR
Erasing a Project from the Database
Defining and Uploading Message Files
This section describes how to upload messages files if you are using Ant tasks to complete/configure your installation.
I L O G J R U L E S 6 . 6 — I N S T A L L I N G T H E J R U L E S M O D U L E S 29
Message files contain the display text associated with the extensions to the rule model contained in the .brmx and .brdx files, for example:
status=StatuseffectiveDate=Effective DateexpirationDate=Expiration Datenew=Newdefined=Defined
The default messages file is provided in:
<InstallDir>\teamserver\bin\defaultextensionmessages.properties
You will need a messages file for each locale that you use. Upload the messages file to Rule Team Server by running the upload-messages Ant task with these parameters:
◆ -Dserver.url=<server url>
◆ -DdatasourceName=<data source name>
◆ -Dlocale=<locale>
◆ -DmessageFile=<message file>
For example:
ant upload-messages ... -Dlocale=en_US -
DmessageFile=mymessages.properties
Related Tasks
Working with the Rule Team Server Ant Tasks
Creating the Database Schema
Uploading Groups to the Database
Setting the Persistence Locale
Adding or Removing Configuration Parameters
Repackaging the Rule Team Server EAR
Erasing a Project from the Database
Note: The contents of the messages files must respect the ISO-LATIN-1 standard (see http://java.sun.com/j2se/1.4.2/docs/api/java/util/Properties.html).
Note: Running this task requires that your environment be correctly setup, as described in Working with the Rule Team Server Ant Tasks.
30 I L O G J R U L E S 6 . 6 — I N S T A L L I N G T H E J R U L E S M O D U L E S
Completing the Installation Using Ant Tasks
Uploading Groups to the Database
This section describes how to upload groups to the database if you are using Ant tasks to complete/configure your installation.
In addition to creating groups in your application server when you setup security access, you will have to upload groups to the database.
Add all the groups that you wish to see appear in the available list when enforcing project security or setting permissions in Rule Team Server. Ideally, you will not upload the default groups rtsUser and rtsConfigManager, but rather create and upload new groups.
You should not upload either the rtsAdministrator group (since the Administrator has all security access and permissions regardless) or the rtsInstaller group (since a user cannot be a member of this group only).
To store in the database the list of groups that will be used by the application, run the upload-roles Ant task with these parameters:
◆ -Dserver.url=<server url>
◆ -DdatasourceName=<data source name>
◆ -Droles=<role list>
Where <role list> is the list of groups to upload to Rule Team Server, specified as “group1 group2 ...”.
For example:
ant upload-roles ... -Droles="rtsUser rtsConfigManager Eligibility
Validator"
Related Tasks
Working with the Rule Team Server Ant Tasks
Creating the Database Schema
Defining and Uploading Message Files
Setting the Persistence Locale
Note: You only need to do this if you wish to use the Rule Team Server project access and permissions mechanisms (see the sections on Groups and Permissions in the Rule Team Server Online Help).
Note: To execute these Ant tasks, you must use the same Java Virtual Machine version and vendor as the one used by the application server.
I L O G J R U L E S 6 . 6 — I N S T A L L I N G T H E J R U L E S M O D U L E S 31
Adding or Removing Configuration Parameters
Repackaging the Rule Team Server EAR
Erasing a Project from the Database
Setting the Persistence Locale
The persistence locale is used to determine the language in which rules are stored in the Rule Team Server database. It is set initially to en_US when you deploy the Rule Team Server EAR to your application server, which means that the rules in the database are stored in US English.
Changing the persistence locale does not change the language in which rules appear in Rule Team Server. Changing the persistence locale in Rule Team Server is only necessary to match the locale of Rule Studio when synchronizing your rule projects.
You should not change the persistence locale after you save a rule to the database.
Related Tasks
Working with the Rule Team Server Ant Tasks
Creating the Database Schema
Defining and Uploading Message Files
Uploading Groups to the Database
Adding or Removing Configuration Parameters
Repackaging the Rule Team Server EAR
Erasing a Project from the Database
Adding or Removing Configuration Parameters
This section describes how to set configuration parameters if you are using Ant tasks to complete/configure your installation.
Many tasks related to customizing Rule Team Server require configuration parameters to be set or removed.
The following table gives a description of the main configuration parameters available in:
Note: The persistence locale is controlled by the value of the <locale> key in ilog/rules/teamserver/preferences.properties in the lib/rts.jar and set when the EAR is deployed. The Installation Manager overrides this setting.
32 I L O G J R U L E S 6 . 6 — I N S T A L L I N G T H E J R U L E S M O D U L E S
Completing the Installation Using Ant Tasks
lib/rts.jar (/ilog/rules/teamserver/model/preferences.properties)
The following Ant tasks can be used to add or remove configuration parameters:
◆ set-config-param - Sets a configuration parameter for a given user. If the user is not specified, it sets a global parameter.
Parameters:
● -Dserver.url=<server url>
● -DdatasourceName=<data source name>
● [-Duser=<username>]
● -Dkey=<parameter key>
● -Dvalue=<parameter value>
Example: ant set-config-param ... -Dkey=locale -Dvalue=en_US
◆ remove-config-param - Drops the given configuration parameter for a given user if specified. Otherwise, it drops the global configuration parameter.
Parameters:
● -Dserver.url=<server url>
● -DdatasourceName=<data source name>
Parameter Used to...
<extractorValidator>.class Specify a ruleset extractor validator class to use for the given extractorValidator name. The class must implement the ilog.rules.commonbrm.extractor.IlrExtractorValidator interface. Once defined, specify this name as the extractor validator to use when defining a ruleset extractor.
build.path Define where the cache of the IRL should be on the file system. The path is computed as follows: first, use this property with the name of the user who launched the server as the root for the cache (<build.path>_<username>). If it is not defined, use the system property java.io.tmpdir and add rtscache (for example, <temp dir>/rtscache_<username>). If the system property is not defined, use the server directory and add rtscache (for example, <server dir>/rtscache_<username>).
brl.verbalizers Specify the list of locales for which a BAL verbalizer is defined.
brl.verbalizer.<locale> Specify the verbalizer class for the given locale. The class must implement the interface: ilog.rules.vocabulary.verbalization.IlrVerbalizer
I L O G J R U L E S 6 . 6 — I N S T A L L I N G T H E J R U L E S M O D U L E S 33

● [-Duser=<username>]
● -Dkey=<parameter key>
◆ print-config-param - Prints the global parameters or given user parameters if username is specified. If no key is specified, all keys are printed.
Parameters:
● -Dserver.url=<server url>
● -DdatasourceName=<data source name>
● [-Duser=<username>]
● -Dkey=<parameter key>
Related Tasks
Working with the Rule Team Server Ant Tasks
Creating the Database Schema
Defining and Uploading Message Files
Uploading Groups to the Database
Setting the Persistence Locale
Repackaging the Rule Team Server EAR
Erasing a Project from the Database
Repackaging the Rule Team Server EAR
You can add new .jar files to the Rule Team Server EAR by running the repackage-ear Ant task with these parameters:
◆ -DtargetEar=<target ear>
◆ -DsourceEar=<source ear>
◆ -DdescriptorsDir=<descriptors directory> - A directory that is copied into the META-INF directory of the target EAR (not mandatory).
Note: See Working with the Rule Team Server Ant Tasks for help on setting up your environment to correctly execute the Rule Team Server Ant tasks.
Note: See Working with the Rule Team Server Ant Tasks for help on setting up your environment to correctly execute the Rule Team Server Ant tasks.
34 I L O G J R U L E S 6 . 6 — I N S T A L L I N G T H E J R U L E S M O D U L E S
Completing the Installation Using Ant Tasks
◆ -DadditionalJars=<“myjar1.jar myjar2.jar ... myjarn.jar”> - Additional .jar files to store in the lib directory of the target EAR (not mandatory).
◆ -DtmpDir=<directory> - A directory that can be specified to store temporary files (not mandatory).
◆ -DwebResourcesDir=<web resources directory> - A directory that is copied into the WAR library (not mandatory).
This task does not use the server.url and datasourceName parameters. Because the application may be configured with extensions, the original EAR files have to be modified to include these extensions.
Related Tasks
Working with the Rule Team Server Ant Tasks
Creating the Database Schema
Defining and Uploading Message Files
Uploading Groups to the Database
Setting the Persistence Locale
Adding or Removing Configuration Parameters
Erasing a Project from the Database
Erasing a Project from the Database
You can erase a project from Rule Team Server, including all its content, by running the drop-project Ant task with the following parameters:
◆ -Dserver.url=<server url>
◆ -DdatasourceName=<data source name>
◆ -DprojectName=<project name>
Note that the project cannot be dropped if some other projects depend on it.
Related Tasks
Working with the Rule Team Server Ant Tasks
Creating the Database Schema
Defining and Uploading Message Files
Note: See Working with the Rule Team Server Ant Tasks for help on setting up your environment to correctly execute the Rule Team Server Ant tasks.
I L O G J R U L E S 6 . 6 — I N S T A L L I N G T H E J R U L E S M O D U L E S 35
Uploading Groups to the Database
Setting the Persistence Locale
Adding or Removing Configuration Parameters
Repackaging the Rule Team Server EAR
Opening Rule Team Server
Once you have deployed the Rule Team Server EAR on your application server, Rule Team Server can be opened by typing teamserver at the root URL. The following URL is the default for the application server:
http://localhost:8080/teamserver
If your browser is not running on the same host as the application server, replace localhost with the address of the machine.
By default, the data source used is jdbc/ilogDataSource. If you want to specify a different data source, you have to pass it as a request parameter in the URL, for example http://localhost:8080/teamserver?datasource=jdbc/serverextendedbrm.
The locale of the login page is English by default. You can specify a locale parameter in the teamserver URL that will switch the login page to the desired locale, for example http://localhost:8080/teamserver?locale=es (assuming that your message files are localized). If you log in with another locale in the URL and want to change the locale afterwards, go to Options > Edit Display Options. This will save the locale and restore it the next time you log in.
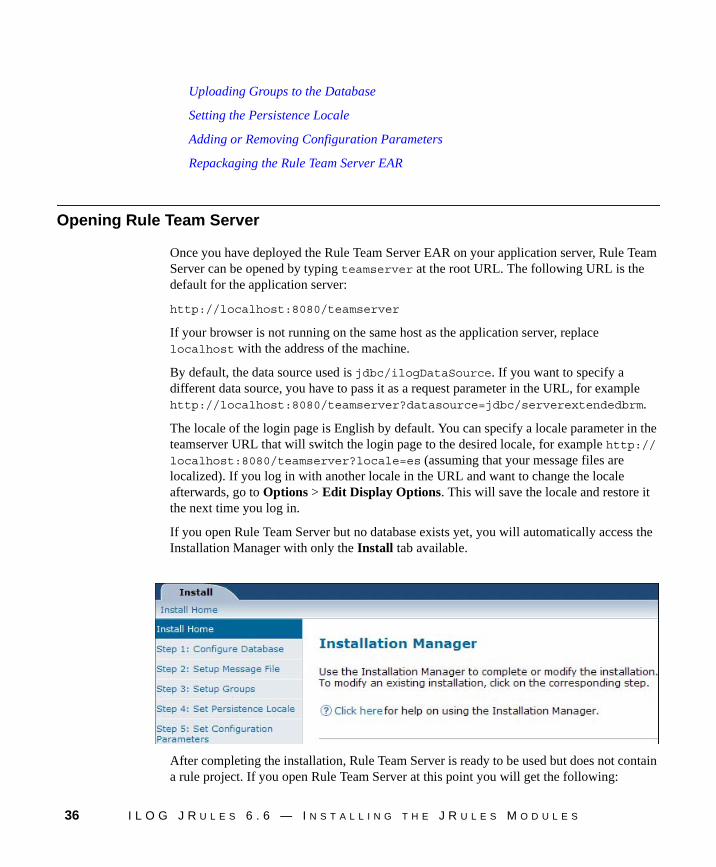
If you open Rule Team Server but no database exists yet, you will automatically access the Installation Manager with only the Install tab available.
After completing the installation, Rule Team Server is ready to be used but does not contain a rule project. If you open Rule Team Server at this point you will get the following:
36 I L O G J R U L E S 6 . 6 — I N S T A L L I N G T H E J R U L E S M O D U L E S

Opening Rule Team Server
You will have to publish a rule project from Rule Studio.
Related Tasks
Publish a Project
Completing the Installation Using Ant Tasks
Completing the Installation Using the Installation Manager
Publish a Project
After completing the installation, Rule Team Server is ready to be used but does not contain a rule project. If you open Rule Team Server at this point you will get the following:
You will have to publish a rule project from Rule Studio. Also, if you want to carry out the tutorials found in the Rule Team Server online help, you will have to publish the following rule projects from Rule Studio:
◆ loanvalidation-rules (with loanvalidation-xom)
◆ loanvalidation-rules-dependent
◆ squery-loanvalidation-rules (with squery-loanvalidation-xom)
To publish the projects needed for the Rule Team Server tutorials:
1. In Rule Studio click File > Import > General > Existing Projects into Workspace, and click Next.
I L O G J R U L E S 6 . 6 — I N S T A L L I N G T H E J R U L E S M O D U L E S 37
2. Click Select root directory and browse to <InstallDir>/studio/tutorials/shared and click OK.
3. Select the projects and click Finish. Then publish them to Rule Team Server.
Related Tasks
Completing the Installation Using Ant Tasks
Completing the Installation Using the Installation Manager
38 I L O G J R U L E S 6 . 6 — I N S T A L L I N G T H E J R U L E S M O D U L E S
Installing Rule Execution Server on SunApplication Servers
This section provides instructions on installing the Rule Execution Server JRules module on Sun Application Servers.
In this Section
Installing Rule Execution Server on Sun Application Server 8.2
Rule Execution Server Database Driver Issues
Installing Rule Execution Server on Sun Application Server 8.2
The installation of Rule Execution Server on Sun Application Server 8.2 requires the following:
◆ Step 1. Configuring Java 2 Security Permissions.
◆ Step 2. Creating Database Resources.
◆ Step 3. Creating a JDBC Data Source.
◆ Step 4. Configuring Security.
◆ Step 5. Configure JDK Logging to Include the XU Log
I L O G J R U L E S 6 . 6 — I N S T A L L I N G T H E J R U L E S M O D U L E S 39

◆ Step 6. Deploying the XU RAR.
◆ Step 7. Deploying the Rule Execution Server EAR.
◆ Step 8. Deploying the Rule Execution Server Online Help.
◆ Step 9. Running the Rule Execution Server Diagnostic to confirm connectivity.
◆ To enable optional features, refer to:
● Deploying the Scenario Service Provider EAR.
● Deploying the Hosted Transparent Decision Service EAR.
Step 1. Configuring Java 2 Security Permissions
The security manager on Sun Application Server is activated by default. Rule Execution Server needs special permissions due to MBeans, or file persistence.
To define the special permissions:
1. Open the file <ServerInstanceDir>/config/server.policy. By default, this is located at <SUNAS_HOME>/domains/domain1/config.
2. At the end of the file add the following:
// RES Console Permissionsgrant codeBase "file:${com.sun.aas.instanceRoot}${/}applications${/}j2ee-apps${/}jrules-bres-management-SUNAS82${/}-" { // MBean permission javax.management.MBeanServerPermission "findMBeanServer"; permission javax.management.MBeanTrustPermission "register"; permission javax.management.MBeanPermission "*", "*"; permission java.lang.RuntimePermission "getClassLoader"; // MYFaces permission java.lang.reflect.ReflectPermission "suppressAccessChecks"; // File persistence permission java.io.FilePermission "${com.sun.aas.instanceRoot}${/}-", "read,write,delete"; // Archive uploads permission java.io.FilePermission "${java.io.tmpdir}${/}-", "read,write,delete"; // SSP permission java.io.SerializablePermission "enableSubclassImplementation"; // SAM permission java.util.PropertyPermission "user.dir", "read"; permission java.util.PropertyPermission "user.name", "read"; permission java.util.PropertyPermission "ilog.sam.*", "read"; permission java.util.PropertyPermission "ilog.sam.application", "read,write"; permission java.lang.RuntimePermission "modifyThreadGroup"; permission java.lang.RuntimePermission "modifyThread"; permission java.lang.RuntimePermission "stopThread"; permission java.net.SocketPermission "*", "resolve"; permission java.net.SocketPermission "usagereport.p.jum1.ilog.com:80", "connect";
40 I L O G J R U L E S 6 . 6 — I N S T A L L I N G T H E J R U L E S M O D U L E S
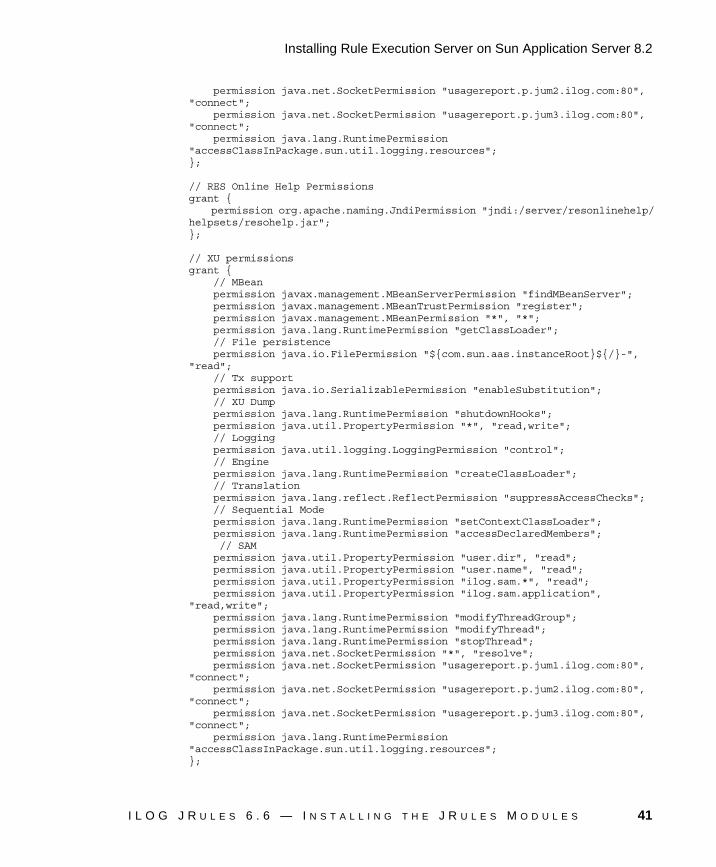
Installing Rule Execution Server on Sun Application Server 8.2
permission java.net.SocketPermission "usagereport.p.jum2.ilog.com:80", "connect"; permission java.net.SocketPermission "usagereport.p.jum3.ilog.com:80", "connect"; permission java.lang.RuntimePermission "accessClassInPackage.sun.util.logging.resources";};
// RES Online Help Permissionsgrant { permission org.apache.naming.JndiPermission "jndi:/server/resonlinehelp/ helpsets/resohelp.jar";};
// XU permissionsgrant { // MBean permission javax.management.MBeanServerPermission "findMBeanServer"; permission javax.management.MBeanTrustPermission "register"; permission javax.management.MBeanPermission "*", "*"; permission java.lang.RuntimePermission "getClassLoader"; // File persistence permission java.io.FilePermission "${com.sun.aas.instanceRoot}${/}-", "read"; // Tx support permission java.io.SerializablePermission "enableSubstitution"; // XU Dump permission java.lang.RuntimePermission "shutdownHooks"; permission java.util.PropertyPermission "*", "read,write"; // Logging permission java.util.logging.LoggingPermission "control"; // Engine permission java.lang.RuntimePermission "createClassLoader"; // Translation permission java.lang.reflect.ReflectPermission "suppressAccessChecks"; // Sequential Mode permission java.lang.RuntimePermission "setContextClassLoader"; permission java.lang.RuntimePermission "accessDeclaredMembers"; // SAM permission java.util.PropertyPermission "user.dir", "read"; permission java.util.PropertyPermission "user.name", "read"; permission java.util.PropertyPermission "ilog.sam.*", "read"; permission java.util.PropertyPermission "ilog.sam.application", "read,write"; permission java.lang.RuntimePermission "modifyThreadGroup"; permission java.lang.RuntimePermission "modifyThread"; permission java.lang.RuntimePermission "stopThread"; permission java.net.SocketPermission "*", "resolve"; permission java.net.SocketPermission "usagereport.p.jum1.ilog.com:80", "connect"; permission java.net.SocketPermission "usagereport.p.jum2.ilog.com:80", "connect"; permission java.net.SocketPermission "usagereport.p.jum3.ilog.com:80", "connect"; permission java.lang.RuntimePermission "accessClassInPackage.sun.util.logging.resources";};
I L O G J R U L E S 6 . 6 — I N S T A L L I N G T H E J R U L E S M O D U L E S 41
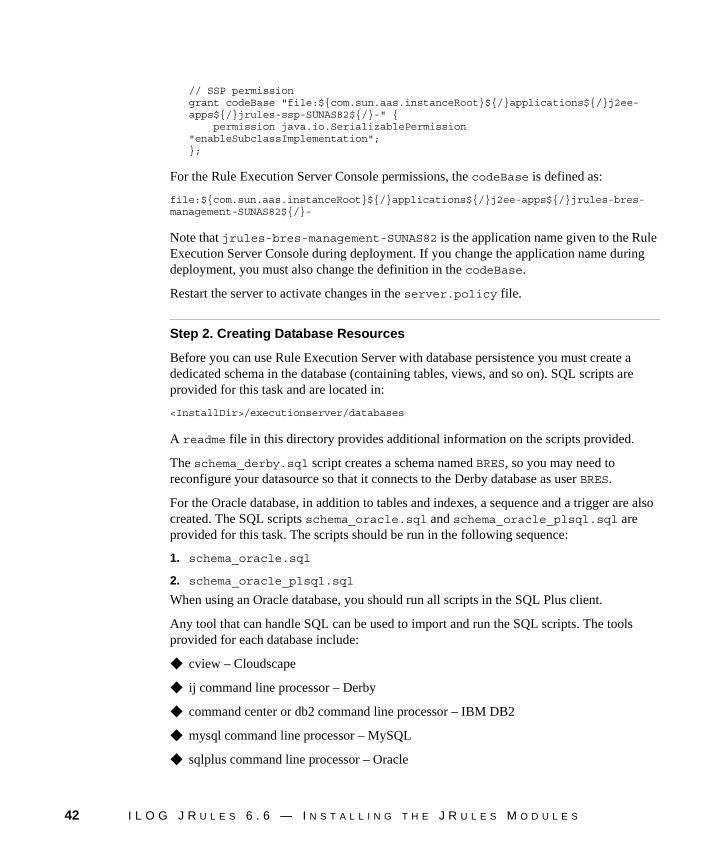
// SSP permissiongrant codeBase "file:${com.sun.aas.instanceRoot}${/}applications${/}j2ee-apps${/}jrules-ssp-SUNAS82${/}-" { permission java.io.SerializablePermission "enableSubclassImplementation";};
For the Rule Execution Server Console permissions, the codeBase is defined as:
file:${com.sun.aas.instanceRoot}${/}applications${/}j2ee-apps${/}jrules-bres-management-SUNAS82${/}-
Note that jrules-bres-management-SUNAS82 is the application name given to the Rule Execution Server Console during deployment. If you change the application name during deployment, you must also change the definition in the codeBase.
Restart the server to activate changes in the server.policy file.
Step 2. Creating Database Resources
Before you can use Rule Execution Server with database persistence you must create a dedicated schema in the database (containing tables, views, and so on). SQL scripts are provided for this task and are located in:
<InstallDir>/executionserver/databases
A readme file in this directory provides additional information on the scripts provided.
The schema_derby.sql script creates a schema named BRES, so you may need to reconfigure your datasource so that it connects to the Derby database as user BRES.
For the Oracle database, in addition to tables and indexes, a sequence and a trigger are also created. The SQL scripts schema_oracle.sql and schema_oracle_plsql.sql are provided for this task. The scripts should be run in the following sequence:
1. schema_oracle.sql
2. schema_oracle_plsql.sql
When using an Oracle database, you should run all scripts in the SQL Plus client.
Any tool that can handle SQL can be used to import and run the SQL scripts. The tools provided for each database include:
◆ cview – Cloudscape
◆ ij command line processor – Derby
◆ command center or db2 command line processor – IBM DB2
◆ mysql command line processor – MySQL
◆ sqlplus command line processor – Oracle
42 I L O G J R U L E S 6 . 6 — I N S T A L L I N G T H E J R U L E S M O D U L E S
Installing Rule Execution Server on Sun Application Server 8.2
◆ PointBase console – Pointbase
◆ Query Tool – SQL Server
◆ isql command line processor – Sybase.
To access the database, the database user must have a user ID and a password. The database user must have complete privileges on the tables and view of the schema (create, insert, delete). They must also have create index privileges.
On Oracle, the database user must also have create trigger and create sequence privileges.
A client should be installed for the database that you use. Please refer to the documentation of these tools for more information.
Step 3. Creating a JDBC Data Source
The data source is based on the database schema created using the guidelines in Step 2. Creating Database Resources.
To create a JDBC data source:
1. Log on to the Admin Console.
2. In the left pane open Resources > JDBC, and then in the right pane click Connection Pools.
3. In the Connection Pool window, click New.
a. Enter the connection pool name (for example, RESPool)
b. Select the resource type javax.sql.XADataSource.
c. Select the database vendor (for example, Derby).
4. Click Next.
You can change the datasource classname if needed.
5. Click Next.
Review the settings for your connection pool. Complete additional properties for the database (for example, User, Password, ServerName and DatabaseName if you have selected a Derby database).
6. Click Finish.
Note: There is no optimization in the scripts. For better performance, you can modify the parameters that create the resources to fit your database configuration and data.
Note: Selecting an implementation that supports XA features is mandatory.
I L O G J R U L E S 6 . 6 — I N S T A L L I N G T H E J R U L E S M O D U L E S 43
7. In the left pane under JDBC, click JDBC Resources.
8. In the right pane click New.
a. Enter the JNDI Name jdbc/bresdatasource
b. Select the pool name you created (for example, RESPool)
9. Click OK.
Step 4. Configuring Security
To access the Rule Execution Server Console you will need to provide the correct security access through the definition of a group and user.
By default Sun AS 8.2 uses the file realm, so you must create a Rule Execution Server user in this realm.
To configure minimum security.
1. Log on to the Admin Console.
2. In the left pane click Configuration, and then in the right pane click Security.
The Default Realm used is displayed in the right pane.
3. In the left pane, under Security open Realms and click file.
4. In the right pane click Manage Users.
5. Click New and enter the following:
a. User ID (for example, bres)
b. Password and confirmation
c. Group List bres_admin
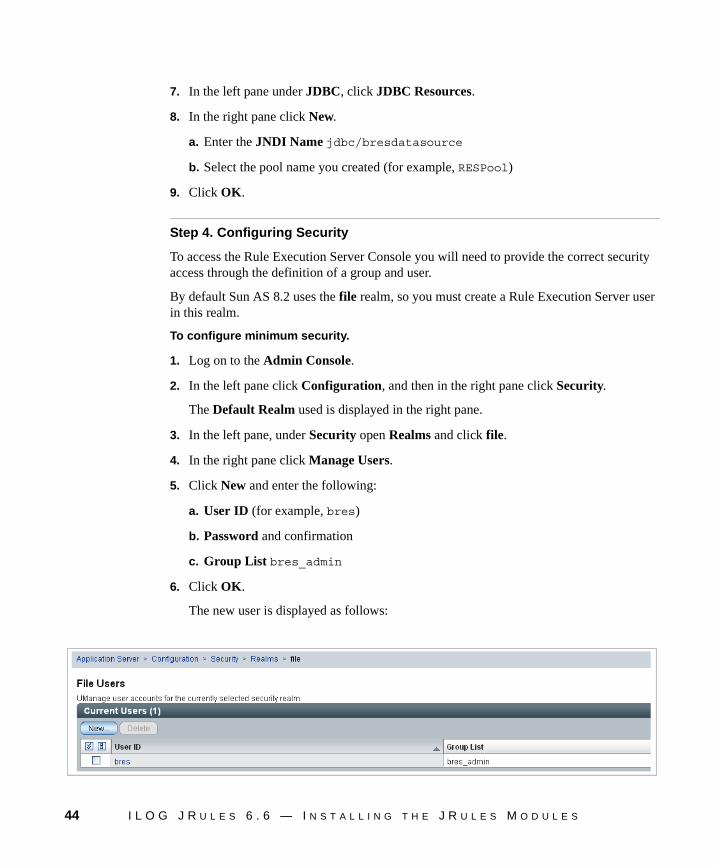
6. Click OK.
The new user is displayed as follows:
44 I L O G J R U L E S 6 . 6 — I N S T A L L I N G T H E J R U L E S M O D U L E S
Installing Rule Execution Server on Sun Application Server 8.2
Step 5. Configure JDK Logging to Include the XU Log
The JDK logging APIs are described in detail in the J2SE API specification (http://java.sun.com/j2se/1.4.2/docs/api/java/util/logging/package-
summary.html).
Firstly, you must enable JDK logging in the XU. To configure the logging, you should use the management console of the Sun AS.
To enable JDK logging in the XU:
1. Open the RAR deployment descriptor ra.xml, located in (<InstallDir>\executionserver\applicationservers\sunas82\jrules-bres-xu-SUNAS82.rar) using an XML editor with DTD validation.
2. Locate the property name <config-property-name>jdkLoggingEnabled</config-property-name> and make sure the value of <config-property-value> is set to true.
Secondly, to make use of this API you must configure your JDK logging file to include the ilog.rules.bres.xu logger.
The following logging.properties file provides an example of a configuration file that includes the XU log:
############################################################# Logging configuration file for RES XU############################################################# Global properties############################################################
# "handlers" specifies a comma separated list of log Handler classes. # These handlers will be installed during VM startup.# Note that these classes must be in the system classpath.# By default a ConsoleHandler is configured, which will show messages # at the INFO and above levels.handlers= java.util.logging.ConsoleHandler
# To add the FileHandler, use the following line instead.handlers= java.util.logging.FileHandler, java.util.logging.ConsoleHandler
# Default global logging level.# This specifies which kinds of events are logged across all loggers. # For any given facility this global level can be overriden by a facility # specific level. Note that the ConsoleHandler also has a separate level# setting to limit messages printed to the console..level= ALL
############################################################# Handler specific properties# Describes specific configuration info for Handlers.############################################################
# The default file output is in the user's home directory.java.util.logging.FileHandler.pattern = %h/resXU%u.log
I L O G J R U L E S 6 . 6 — I N S T A L L I N G T H E J R U L E S M O D U L E S 45
java.util.logging.FileHandler.limit = 50000java.util.logging.FileHandler.count = 1
#java.util.logging.FileHandler.formatter = java.util.logging.XMLFormatterjava.util.logging.FileHandler.formatter = java.util.logging.SimpleFormatter
# Limit the messages that are printed on the console to INFO and above.java.util.logging.ConsoleHandler.level = INFOjava.util.logging.ConsoleHandler.formatter = java.util.logging.SimpleFormatter
# All messages from the XU logger are allowed.ilog.rules.bres.xu.level = ALL
The logging.properties file is used directly by the virtual machine (VM). You set the location with the properties of the VM. You can use a different file by specifying a file name with the java.util.logging.config.file system property. For example java -Djava.util.logging.config.file=myfile.
The default configuration file is located in JAVA_HOME/jre/lib/logging.properties.
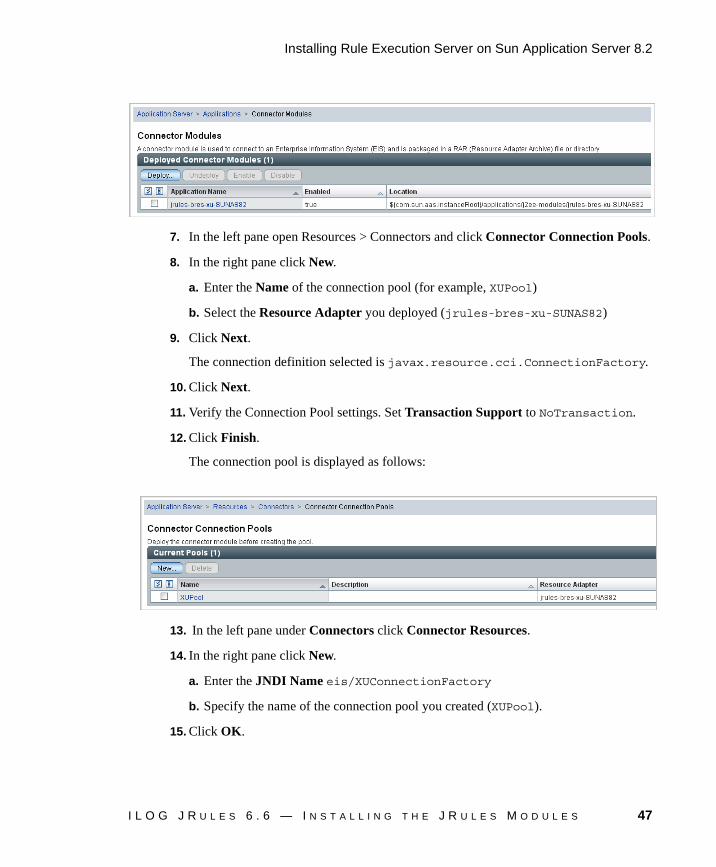
Step 6. Deploying the XU RAR
The XU RAR must be deployed on the application server.
To deploy the RAR file:
1. Log on to the Admin Console.
2. In the left pane open Applications and click Connector Modules.
3. In the right pane click Deploy.
4. Click Browse and navigate to:
<InstallDir>\executionserver\applicationservers\sunas82\jrules-bres-xu-SUNAS82.rar
5. Click Next.
The upload may take a few moments to complete.
6. Click OK.
The deployed module is displayed as follows:
Note: The inclusion of the XU log in the JDK logging is not supported in J2SE.
46 I L O G J R U L E S 6 . 6 — I N S T A L L I N G T H E J R U L E S M O D U L E S
Installing Rule Execution Server on Sun Application Server 8.2
7. In the left pane open Resources > Connectors and click Connector Connection Pools.
8. In the right pane click New.
a. Enter the Name of the connection pool (for example, XUPool)
b. Select the Resource Adapter you deployed (jrules-bres-xu-SUNAS82)
9. Click Next.
The connection definition selected is javax.resource.cci.ConnectionFactory.
10. Click Next.
11. Verify the Connection Pool settings. Set Transaction Support to NoTransaction.
12. Click Finish.
The connection pool is displayed as follows:
13. In the left pane under Connectors click Connector Resources.
14. In the right pane click New.
a. Enter the JNDI Name eis/XUConnectionFactory
b. Specify the name of the connection pool you created (XUPool).
15. Click OK.
I L O G J R U L E S 6 . 6 — I N S T A L L I N G T H E J R U L E S M O D U L E S 47

Step 7. Deploying the Rule Execution Server EAR
The Rule Execution Server EAR must be deployed on the application server.
To deploy the EAR:
1. Log on to the Admin Console.
2. In the left pane open Applications and click Enterprise Applications.
3. In the right pane click Deploy.
4. Click Browse and navigate to:
<InstallDir>\executionserver\applicationservers\sunas82\jrules-bres-management-SUNAS82.ear
5. Click Next. If you change the Application Name, you must also change the name in the codeBase used in server.policy. See Step 1. Configuring Java 2 Security Permissions for more information.
6. Click OK.
Step 8. Deploying the Rule Execution Server Online Help
Optionally, deploy the Rule Execution Server online help on the application server.
To deploy the online help:
1. Log on to the Admin Console.
2. In the left pane open Applications and click Enterprise Applications.
3. In the right pane click Deploy.
4. Click Browse and navigate to:
<InstallDir>\executionserver\online-help\resonlinehelp.ear
5. Click Next.
6. Click OK.
Step 9. Running the Rule Execution Server Diagnostic
Verify that the Rule Execution Server has been successfully installed by launching the Rule Execution Server Diagnostic:
1. Before you run the Rule Execution Server Diagnostic, restart the application server.
2. Open the Rule Execution Server Console by typing bres at the root URL on the host machine:
48 I L O G J R U L E S 6 . 6 — I N S T A L L I N G T H E J R U L E S M O D U L E S
Installing Rule Execution Server on Sun Application Server 8.2
http://localhost:8080/bres
If your browser is not running on the same host as the application server, you can replace localhost with <host>.
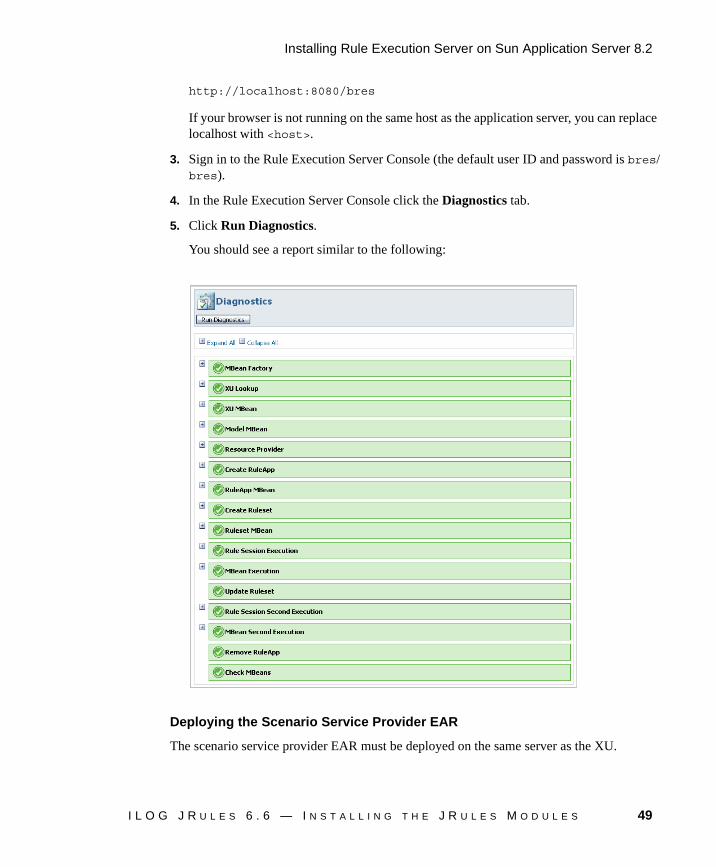
3. Sign in to the Rule Execution Server Console (the default user ID and password is bres/bres).
4. In the Rule Execution Server Console click the Diagnostics tab.
5. Click Run Diagnostics.
You should see a report similar to the following:
Deploying the Scenario Service Provider EAR
The scenario service provider EAR must be deployed on the same server as the XU.
I L O G J R U L E S 6 . 6 — I N S T A L L I N G T H E J R U L E S M O D U L E S 49
To deploy the EAR:
1. Log on to the Admin Console.
2. In the left pane open Applications and click Enterprise Applications.
3. In the right pane click Deploy.
4. Click Browse and navigate to:
<InstallDir>\executionserver\applicationservers\sunas82\jrules-ssp-SUNAS82.ear
5. Click Next.
6. Click OK.
7. Verify that the SSP module has been correctly deployed and is working:
a. Open the http://yourserver:yourport/ssp URL (for example: http://localhost:8080/ssp)
b. Log on as user bres (or the user you created in the bres_admin group at Step 4. Configuring Security)
c. Verify that the message The SSP application appears to have been loaded successfully is displayed on a blank page.
Configuring the Scenario Service Provider
The following is an example ANT task to change the configuration of the SSP archive. To update the scenario service provider archive, you must use the new library of jrules-bres-setup.jar, located in <InstallDir>/executionserver/lib/ .
<taskdef resource="bres-tasks.properties" > <classpath> <pathelement location="<InstallDir>/executionserver/lib/jrules-bres-setup.jar"/> <pathelement location="<InstallDir>/executionserver/lib/jrules-engine.jar"/> </classpath></taskdef><property name="ssp.in" value="<InstallDir>/executionserver/applicationservers/vendor/jrules-ssp-vendor.ear"/><property name="ssp.out" value="${basedir}/jrules-ssp-My.ear"/><target name="setup"> <ssp-setup sspInput="${ssp.in}" sspOutput="${ssp.out}" verbose="true"> <xom> <fileset dir="./data"> <include name="loan.jar"/> </fileset> </xom>
50 I L O G J R U L E S 6 . 6 — I N S T A L L I N G T H E J R U L E S M O D U L E S
Installing Rule Execution Server on Sun Application Server 8.2
<configuration log4jFile="./data/log4j.properties" handler="execution.trace.Handler"/> <j2seExecution persistenceMode="file" persistenceProperties="ilog.rules.bres.xu.ruleset.fs.IlrFileRulesetInformationProvider.repositoryDirPath=c:/res-data-v6" traceLevel="FINE" traceAutoflush="true" plugins="{pluginClass=ilog.rules.bres.ras.plugin.IlrExecutionTracePlugin}, {pluginClass=ilog.rules.res.decisionservice.plugin.IlrWsdlGeneratorPlugin}"/> </ssp-setup></target>
Where jrules-ssp-vendor.ear and jrules-ssp-My.ear are the filenames of the application server .EAR files.
Checking the Availability of Scenario Service Provider
You can check on the availability of the Scenario Service Provider (SSP) as follows:
◆ Enter the URL http://<host>:<port>/ssp. A log on page will appear if SSP is available.
◆ Through the Rule Execution Server Console. If you use the Test Ruleset feature and SSP is not available, you will get the error message:
Host and port appear to be responsive but the service does not
exist: /ssp/unsecured/XS
◆ Through the Rule Scenario Manager Console, by selecting Admin > SSP Servers.
Deploying the Hosted Transparent Decision Service EAR
The hosted transparent decision service must be deployed on the server as the XU:
To deploy the EAR:
1. Log on to the Admin Console
2. In the left pane open Applications and click Enterprise Applications.
3. In the right pane click Deploy.
4. Click Browse and navigate to:
<InstallDir>\executionserver\applicationservers\sunas82\jrules-bres-ootbds-SUNAS82.ear
5. Click Next.
6. Click OK.
I L O G J R U L E S 6 . 6 — I N S T A L L I N G T H E J R U L E S M O D U L E S 51
For more information on checking that the hosted transparent decision service has been deployed successfully, refer to the Rule Execution Server Console online help.
Related Reference
Rule Execution Server Database Driver Issues
Rule Execution Server Database Driver Issues
The known issues include:
◆ ORACLE XA Features
◆ JDBC Not Bound
ORACLE XA Features
If you need to use XA features with an Oracle 9i database, you have to configure your database and the server JVM. To do so, you have to run the two scripts initjvm.sql and initxa.sql that are located in the directory:
ORACLE_HOME/javavm/install
For more information, please contact your DBA or your local ORACLE support.
JDBC Not Bound
This error message is raised when an error occurs during the creation of the data source.
Refer to the traces to locate the original cause. In the vast majority of cases one of the following is likely:
◆ A directory does not exist or cannot be read or written to (Derby).
◆ There is a missing schema or table.
◆ There are missing privileges to access the database resource.
52 I L O G J R U L E S 6 . 6 — I N S T A L L I N G T H E J R U L E S M O D U L E S
Installing Rule Scenario Manager on SunApplication Servers
This section provides instructions on installing the Rule Scenario Manager JRules module on Sun Application Servers.
In this Section
Installing Rule Scenario Manager on Sun Application Server 8.2
Installing Rule Scenario Manager on Sun Application Server 8.2
Installing Rule Scenario Manager on Sun AS 8.2 requires the prior deployment of Rule Execution Server (see Installing Rule Execution Server on Sun Application Servers).
Installing Rule Scenario Manager on Sun AS 8.2 includes:
◆ Step 1. Configuring Java 2 Security Permissions.
◆ Step 2. Creating Database Resources.
◆ Step 3. Setting the JVM Memory Size.
◆ Step 4. Creating a JDBC Data Source
◆ Step 5. Configuring Security.
I L O G J R U L E S 6 . 6 — I N S T A L L I N G T H E J R U L E S M O D U L E S 53
◆ Step 6. Optional: Configuring the Rule Scenario Manager Console.
◆ Step 7. Deploying the Rule Scenario Manager EAR.
◆ Step 8. Deploying the Rule Scenario Manager Online Help.
◆ Step 9. Opening the Rule Scenario Manager Console.
By default, persistence is set at the database level. For information on configuring the persistence mode of the Rule Execution Server, see Installing Rule Execution Server on Sun Application Servers.
Step 1. Configuring Java 2 Security Permissions
The security manager on Sun AS is activated by default. Rule Execution Server needs special permissions due to MBeans, or file persistence.
To define the special permissions:
1. Open the file <ServerInstanceDir>/config/server.policy. By default, this is located at <SUNAS_HOME>/domains/domain1/config.
2. At the end of the file add the following:
// RSM Console Permissions
grant codeBase "file:${com.sun.aas.instanceRoot}${/}applications${/}j2ee-apps${/}jrules-rsm-SUNAS82${/}-" { // MYFaces permission java.lang.reflect.ReflectPermission "suppressAccessChecks"; // SAM permission java.util.PropertyPermission "user.dir", "read"; permission java.util.PropertyPermission "user.name", "read"; permission java.util.PropertyPermission "ilog.sam.*", "read"; permission java.util.PropertyPermission "ilog.sam.application", "read,write"; permission java.lang.RuntimePermission "modifyThreadGroup"; permission java.lang.RuntimePermission "modifyThread"; permission java.lang.RuntimePermission "stopThread"; permission java.net.SocketPermission "*", "resolve"; permission java.net.SocketPermission "usagereport.p.jum1.ilog.com:80", "connect"; permission java.net.SocketPermission "usagereport.p.jum2.ilog.com:80", "connect"; permission java.net.SocketPermission "usagereport.p.jum3.ilog.com:80", "connect"; permission java.lang.RuntimePermission "accessClassInPackage.sun.util.logging.resources"; permission java.io.SerializablePermission "enableSubclassImplementation";};
// SSP Permissiongrant codeBase "file:${com.sun.aas.instanceRoot}${/}applications${/}j2ee-apps${/}jrules-ssp-SUNAS82${/}-" {
54 I L O G J R U L E S 6 . 6 — I N S T A L L I N G T H E J R U L E S M O D U L E S
Installing Rule Scenario Manager on Sun Application Server 8.2
permission java.io.SerializablePermission "enableSubclassImplementation";};
// Global JPOX Permissions for RSM Consolegrant { // JPOX permission javax.jdo.spi.JDOPermission "getMetadata"; permission javax.jdo.spi.JDOPermission "setStateManager"; permission java.io.FilePermission "${com.sun.aas.instanceRoot}${/}-", "read,write,delete";};
// RSM Online Help Permissionsgrant { permission org.apache.naming.JndiPermission "jndi:/server/rsmonlinehelp/helpsets/rsmohelp.jar";};
For the Rule Scenario Manager Console permissions, the codeBase is set to:
file:${com.sun.aas.instanceRoot}${/}applications${/}j2ee-apps${/}jrules-ssp-SUNAS82${/}-
Note that jrules-ssp-SUNAS82$ is the application name given to the Rule Scenario Manager Console during deployment. If you change the application name during deployment, you must also change the definition in the codeBase.
Restart the server to activate changes in the server.policy file.
Step 2. Creating Database Resources
Before you can use Rule Scenario Manager with database persistence you must create a dedicated schema in the database (containing tables, views, and so on). Refer to Step 2. Creating Database Resources for more information.
Step 3. Setting the JVM Memory Size
For better performance, you can modify the JVM memory size.
Set the memory size for your data source as follows:
1. Log on to the Admin Console.
2. In the left pane click Application Server.
3. In the right pane click the tab JVM Settings then JVM Options.
Note: There is no optimization in the scripts. For better performance, you can modify the parameters that create the resources to fit your database configuration and data, described in Step 3. Setting the JVM Memory Size.
I L O G J R U L E S 6 . 6 — I N S T A L L I N G T H E J R U L E S M O D U L E S 55

4. In the right pane click Add JVM Option.
5. Enter the appropriate Java memory setting for your data source using the parameter -XX:MaxPermSize.
An appropriate value for the samples shipped with the product is -XX:MaxPermSize=256m. You can change this value for your specific memory requirements.
6. Click Save.
Step 4. Creating a JDBC Data Source
The data source is based on the database schema created using the guidelines in Step 2. Creating Database Resources.
To create a JDBC data source:
1. Log on to the Admin Console.
2. In the left pane open Resources and JDBC. Click Connection Pools.
3. In the right pane click New and:
a. Enter the connection pool name (for example, RSMPool)
b. Select the resource type javax.sql.XADataSource.
Selecting an implementation that supports XA features is mandatory.
c. Select the database vendor (for example, Derby).
4. Click Next.
You can change the datasource classname if needed.
5. Click Next.
Review the settings for your connection pool. Complete additional properties for the database (for example, User, Password, ServerName and DatabaseName for a Derby database).
6. Click the Ping button to verify the connection to the datasource.
7. Click Finish.
8. In the left pane under JDBC, click JDBC Resources.
9. In the right pane click New.
a. Enter the JNDI Name jdbc/rsmdatasource
b. Select the pool name you created (for example, RSMPool)
56 I L O G J R U L E S 6 . 6 — I N S T A L L I N G T H E J R U L E S M O D U L E S
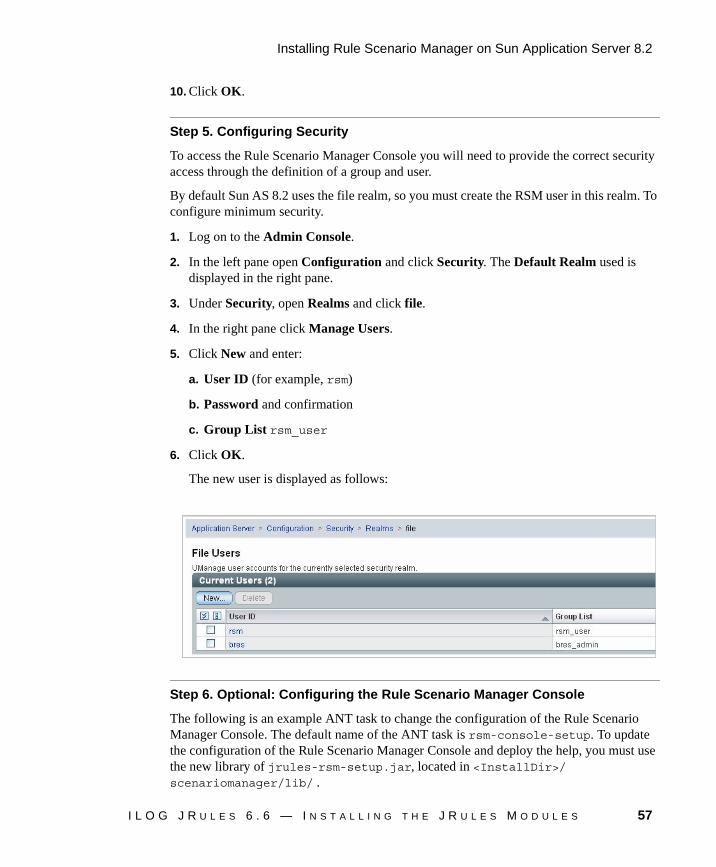
Installing Rule Scenario Manager on Sun Application Server 8.2
10. Click OK.
Step 5. Configuring Security
To access the Rule Scenario Manager Console you will need to provide the correct security access through the definition of a group and user.
By default Sun AS 8.2 uses the file realm, so you must create the RSM user in this realm. To configure minimum security.
1. Log on to the Admin Console.
2. In the left pane open Configuration and click Security. The Default Realm used is displayed in the right pane.
3. Under Security, open Realms and click file.
4. In the right pane click Manage Users.
5. Click New and enter:
a. User ID (for example, rsm)
b. Password and confirmation
c. Group List rsm_user
6. Click OK.
The new user is displayed as follows:
Step 6. Optional: Configuring the Rule Scenario Manager Console
The following is an example ANT task to change the configuration of the Rule Scenario Manager Console. The default name of the ANT task is rsm-console-setup. To update the configuration of the Rule Scenario Manager Console and deploy the help, you must use the new library of jrules-rsm-setup.jar, located in <InstallDir>/scenariomanager/lib/ .
I L O G J R U L E S 6 . 6 — I N S T A L L I N G T H E J R U L E S M O D U L E S 57
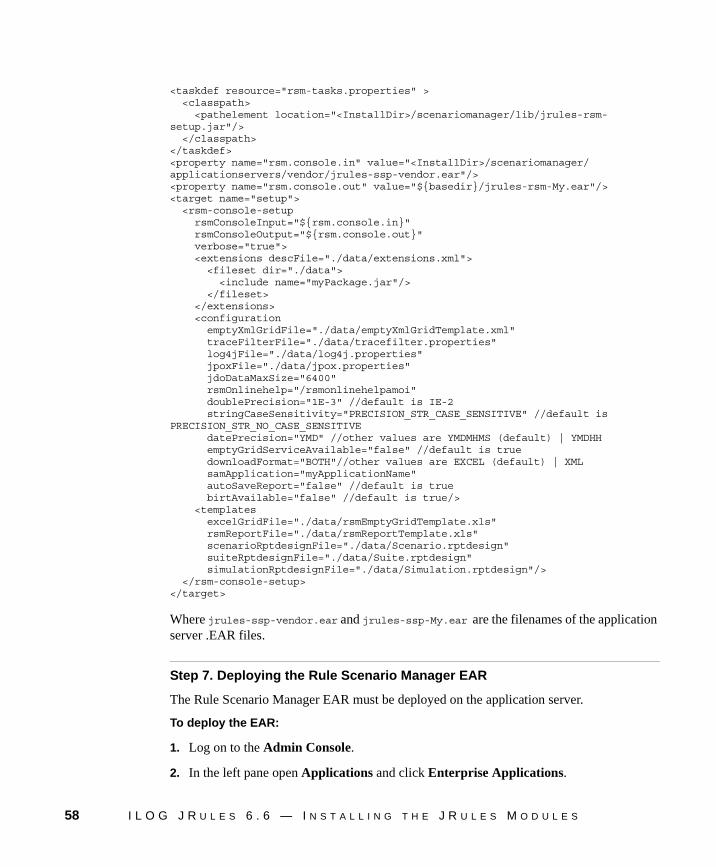
<taskdef resource="rsm-tasks.properties" > <classpath> <pathelement location="<InstallDir>/scenariomanager/lib/jrules-rsm-setup.jar"/> </classpath></taskdef><property name="rsm.console.in" value="<InstallDir>/scenariomanager/applicationservers/vendor/jrules-ssp-vendor.ear"/><property name="rsm.console.out" value="${basedir}/jrules-rsm-My.ear"/><target name="setup"> <rsm-console-setup rsmConsoleInput="${rsm.console.in}" rsmConsoleOutput="${rsm.console.out}" verbose="true"> <extensions descFile="./data/extensions.xml"> <fileset dir="./data"> <include name="myPackage.jar"/> </fileset> </extensions> <configuration emptyXmlGridFile="./data/emptyXmlGridTemplate.xml" traceFilterFile="./data/tracefilter.properties" log4jFile="./data/log4j.properties" jpoxFile="./data/jpox.properties" jdoDataMaxSize="6400" rsmOnlinehelp="/rsmonlinehelpamoi" doublePrecision="1E-3" //default is IE-2 stringCaseSensitivity="PRECISION_STR_CASE_SENSITIVE" //default is PRECISION_STR_NO_CASE_SENSITIVE datePrecision="YMD" //other values are YMDMHMS (default) | YMDHH emptyGridServiceAvailable="false" //default is true downloadFormat="BOTH"//other values are EXCEL (default) | XML samApplication="myApplicationName" autoSaveReport="false" //default is true birtAvailable="false" //default is true/> <templates excelGridFile="./data/rsmEmptyGridTemplate.xls" rsmReportFile="./data/rsmReportTemplate.xls" scenarioRptdesignFile="./data/Scenario.rptdesign" suiteRptdesignFile="./data/Suite.rptdesign" simulationRptdesignFile="./data/Simulation.rptdesign"/> </rsm-console-setup></target>
Where jrules-ssp-vendor.ear and jrules-ssp-My.ear are the filenames of the application server .EAR files.
Step 7. Deploying the Rule Scenario Manager EAR
The Rule Scenario Manager EAR must be deployed on the application server.
To deploy the EAR:
1. Log on to the Admin Console.
2. In the left pane open Applications and click Enterprise Applications.
58 I L O G J R U L E S 6 . 6 — I N S T A L L I N G T H E J R U L E S M O D U L E S
Installing Rule Scenario Manager on Sun Application Server 8.2
3. In the right pane click Deploy.
4. Click Browse and navigate to:
<InstallDir>\scenariomanager\applicationservers\sunas82\jrules-rsm-SUNAS82.ear
5. Click Next.
If you change the Application Name, you must also change the name in the codeBase used in server.policy. See Step 1. Configuring Java 2 Security Permissions for more information.
6. Click OK.
Step 8. Deploying the Rule Scenario Manager Online Help
Optionally, deploy the Rule Scenario Manager online help on the application server.
To deploy the online help:
1. Log on to the Admin Console.
2. In the left pane open Applications and click Enterprise Applications.
3. In the right pane click Deploy.
4. Click Browse and navigate to:
<InstallDir>\scenariomanager\online-help\rsmonlinehelp.ear
5. Click Next.
6. Click OK.
Step 9. Opening the Rule Scenario Manager Console
Verify that the Rule Scenario Manager Console has been successfully installed by launching it in a browser. Type rsm at the root URL on the host machine:
http://localhost:8080/rsm
If your browser is not running on the same host as the application server, you can replace localhost with <host> or the TCP/IP address.
According to the application server security assignment, enter the login name and password of a Rule Scenario Manager user and click Log in. The rsm_user role must be assigned a user with a password. The default username/password for Rule Scenario Manager is rsm/rsm.
I L O G J R U L E S 6 . 6 — I N S T A L L I N G T H E J R U L E S M O D U L E S 59

60 I L O G J R U L E S 6 . 6 — I N S T A L L I N G T H E J R U L E S M O D U L E S
Related Documents