7/27/2019 JposGuideLite-ray.pdf http://slidepdf.com/reader/full/jposguidelite-raypdf 1/117 Panasonic JS-925WS JPOS Guide For Windows User 2010/01/15 Rev. 0.10 Panasonic Corporation. System Solutions Company

Welcome message from author
This document is posted to help you gain knowledge. Please leave a comment to let me know what you think about it! Share it to your friends and learn new things together.
Transcript
7/27/2019 JposGuideLite-ray.pdf
http://slidepdf.com/reader/full/jposguidelite-raypdf 1/117
Panasonic JS-925WS
JPOS GuideFor Windows User
2010/01/15 Rev. 0.10
Panasonic Corporation.
System Solutions Company
7/27/2019 JposGuideLite-ray.pdf
http://slidepdf.com/reader/full/jposguidelite-raypdf 2/117
SOFTWARE SPECIFICATION
MODEL No. VERSION FUNC/PAGE NO
JS-925WS All 1 -i
REV /No NAME DATE
Rev 0.09 2009/12/28
FUNCTION APPROVE CHECK DESIGN
JPOS Guide
i
<<Revision History>>No Date Rev Contents Design
1 2009/09/03 0.08 Draft Haroc
2 2009/12/28 0.09 Initial release Haroc
3 2010/01/15 0.10 Modify pictures Cindy
NOTES:
¾ Any reproduction of this documentation in part or in whole is strictly prohibited.
¾ Documentation contents are subject to change without prior notice.
Trademarks:
¾ All other company names and trademarks mentioned in this documentation are the property of their
respective owners.
Copyright of this document:
Copyright © 2009 Panasonic Corporation. All rights reserved.
7/27/2019 JposGuideLite-ray.pdf
http://slidepdf.com/reader/full/jposguidelite-raypdf 3/117
SOFTWARE SPECIFICATION
MODEL No. VERSION FUNC/PAGE NO
JS-925WS All 1 -ii
REV /No NAME DATE
Rev 0.09 2009/12/28
FUNCTION APPROVE CHECK DESIGN
JPOS Guide
ii
1 PURPOSE..............................................................................................................................................1 2 PREPARATION......................................................................................................................................1 3 BASIC FLOW ........................................................................................................................................ 2 4 OPERATION..........................................................................................................................................3
4.1 INSTALL J AVA2 SDK .......................................................................................................................... 3 4.1.1 Run “ jdk-6u3-windows-i586-p.exe” .........................................................................................3 4.1.2 “License” screen ...................................................................................................................... 4 4.1.3 “Custom Setup” screen ............................................................................................................ 5 4.1.4 “Custom” screen ...................................................................................................................... 6 4.1.5 “End of Installation for Java2 SDK” ..........................................................................................7
4.2 INSTALLING THE J AVA COMMUNICATIONS API ...................................................................................... 8 4.2.1 Copy the “win32com.dll” .......................................................................................................... 8 4.2.2 Copy the “comm.jar” ................................................................................................................ 9 4.2.3 Copy the “javax.comm.properties” .........................................................................................10
4.3 INSTALL MSR_ISO (VIRTUAL COM) DRIVER .................................................................................... 11 4.3.1 Install MSR_ISO (HID Driver) Driver...................................................................................... 11 4.3.2 Right Click and Install the “MTHIDSR.inf” .............................................................................. 12 4.3.3 Configure Virtual COM port....................................................................................................13 4.3.4 Select “COM7” as “HID Swipe Reader” ................................................................................. 14 4.3.5 Reboot OS ............................................................................................................................. 14
4.4 INSTALL MSR_JIS (VIRTUAL COM) DRIVER ..................................................................................... 15 4.4.1 Run “XP2KME98_Driver_Setup.exe”..................................................................................... 15 4.4.2 “Welcome” screen.................................................................................................................. 15 4.4.3 “License Agreement” screen .................................................................................................. 16 4.4.4 Installing................................................................................................................................. 18
7/27/2019 JposGuideLite-ray.pdf
http://slidepdf.com/reader/full/jposguidelite-raypdf 4/117
SOFTWARE SPECIFICATION
MODEL No. VERSION FUNC/PAGE NO
JS-925WS All 1 -iii
REV /No NAME DATE
Rev 0.09 2009/12/28
FUNCTION APPROVE CHECK DESIGN
JPOS Guide
iii
4.4.5 End of Installation for Fingerprint Sensor Unit Driver ............................................................. 18 4.5 CHECKING MSR DRIVER.................................................................................................................. 19
4.5.1 Run “MSR (Virtual COM).ht” .................................................................................................. 19 4.5.2 Swipe a card ..........................................................................................................................21 4.5.3 Setting for MSR (Virtual COM)............................................................................................... 23
4.6 INSTALL FINGERPRINT JPOS DRIVERS. ............................................................................................ 24 4.6.1
Run “Setup.exe”..................................................................................................................... 24
4.6.2 “Welcome” screen.................................................................................................................. 25 4.6.3 “License Agreement” screen .................................................................................................. 26 4.6.4 Destination Folder.................................................................................................................. 27 4.6.5 Ready to Install ...................................................................................................................... 28 4.6.6 End of Installation for Fingerprint Sensor Unit Driver ............................................................. 29 4.6.7 Rebooting .............................................................................................................................. 30
4.7 CHECKING FINGERPRINT JPOS DRIVER............................................................................................ 31 4.7.1 Plug Fingerprint Sensor Unit into USB port............................................................................31 4.7.2 Set up JAVA_HOME environment variable ............................................................................ 31 4.7.3 Run run.bat ............................................................................................................................35 4.7.4 Open the device.....................................................................................................................36 4.7.5 Close the device .................................................................................................................... 37 4.7.6 Claim the device for exclusive access ................................................................................... 38 4.7.7 Release exclusively claimed device.......................................................................................39 4.7.8 Enable the device .................................................................................................................. 40 4.7.9 Disable the device.................................................................................................................. 41 4.7.10
Activates the device to begin data capturing.......................................................................... 42
4.7.11 End data capturing................................................................................................................. 43 4.7.12 Starts capturing biometrics data for the purposes of verification............................................ 44 4.7.13 Used for data comparison purposes ......................................................................................45 4.7.14 Used for data matching purposes ..........................................................................................46 4.7.15 Used for synchronous biometric identifications ......................................................................47
7/27/2019 JposGuideLite-ray.pdf
http://slidepdf.com/reader/full/jposguidelite-raypdf 5/117
SOFTWARE SPECIFICATION
MODEL No. VERSION FUNC/PAGE NO
JS-925WS All 1 -iv
REV /No NAME DATE
Rev 0.09 2009/12/28
FUNCTION APPROVE CHECK DESIGN
JPOS Guide
iv
4.7.16 Used for synchronous biometric verifications......................................................................... 48 4.8 INSTALL JS-925WS JPOS DRIVERS ................................................................................................ 49
4.8.1 Run “Panasonic JPOS.exe” ................................................................................................... 49 4.8.2 “Welcome” screen.................................................................................................................. 50 4.8.3 “Destination Folder” screen....................................................................................................51 4.8.4 End of Installation for JS-925WS JPOS Driver ...................................................................... 52
4.9
MSR_JIS CONFIGURATION .............................................................................................................53
4.9.1 Run “MSR Configuration”....................................................................................................... 53 4.9.2 Reboot OS ............................................................................................................................. 54
4.10 MSR CONFIGURATION..................................................................................................................... 54 4.10.1 Run “MSR Configuration”....................................................................................................... 54 4.10.2 Reboot OS ............................................................................................................................. 55
4.11 CHECK THE JS-925WS JPOS DRIVERS...........................................................................................56 4.11.1 Plug all the devices into each jack. ........................................................................................ 56 4.11.2 Cash Drawer JPOS Drivers ................................................................................................... 57 4.11.3 The 2 Line Customer Display JPOS Drivers .......................................................................... 63 4.11.4 Trouble Shooting for the 2 Line Customer Display................................................................. 85 4.11.5 The MSR JPOS Drivers .........................................................................................................89 4.11.6 The MSR_JIS JPOS Drivers .................................................................................................. 95 4.11.7 The Fingerprint JPOS Drivers ................................................................................................ 95 4.11.8 LineDisplay FontEditor (2 Lines) ..........................................................................................102 4.11.9 Uninstall JS-925WS JPOS Drivers................................................................................. 1088
7/27/2019 JposGuideLite-ray.pdf
http://slidepdf.com/reader/full/jposguidelite-raypdf 6/117
SOFTWARE SPECIFICATION
MODEL No. VERSION FUNC/PAGE NO
JS-925WS All 1 -1
REV /No NAME DATE
Rev 0.09 2009/12/28
FUNCTION APPROVE CHECK DESIGN
JPOS Guide
- 1 -
1 Purpose
This specification is written for “ Using JPOS in JS-925WS” .
2 PreparationYou needs following equipments to install JPOS drivers.
1. JS-925WS (already OS and device drivers are installed.)
2. USB Key Board3. External USB CD-ROM Drive.
4. USB Mouse. (It is option. But it is useful, if USB Key board has USB hub for mouse)
5. JPOS Drivers
Java2 SDK
Java Communications API
MSR (Virtual COM) Driver
Fingerprint JPOS Driver
JS-925WS JPOS Driver
(Including 2 lines Customer Display FontEditor, JPOS Manager)
6. POS Specific Devices
Cash Drawer (DIN type)
Cash Drawer (RJ-11 type)
2 Line Customer Display (Internal COM6, JS-925RD-010)
MSR (USB, JS-925MG-010)
Fingerprint Sensor Unit (USB, JS-925FS-010)
7/27/2019 JposGuideLite-ray.pdf
http://slidepdf.com/reader/full/jposguidelite-raypdf 7/117
SOFTWARE SPECIFICATION
MODEL No. VERSION FUNC/PAGE NO
JS-925WS All 1 -2
REV /No NAME DATE
Rev 0.09 2009/12/28
FUNCTION APPROVE CHECK DESIGN
JPOS Guide
- 2 -
3 Basic Flow
Basically these flow are needed to setup JS-925WS JPOS drivers under Windows XP Pro.
Detail operation is written in Operation
1. Prepare the JS-925WS Installed OS
2. Install JPOS Drivers
Following setup is needed. Install java2 SDK
Install the Java Communications API
Install MSR (Virtual COM) Driver
Install Fingerprint JPOS Driver
Install JS-925WS JPOS Driver
7/27/2019 JposGuideLite-ray.pdf
http://slidepdf.com/reader/full/jposguidelite-raypdf 8/117
SOFTWARE SPECIFICATION
MODEL No. VERSION FUNC/PAGE NO
JS-925WS All 1 -3
REV /No NAME DATE
Rev 0.09 2009/12/28
FUNCTION APPROVE CHECK DESIGN
JPOS Guide
- 3 -
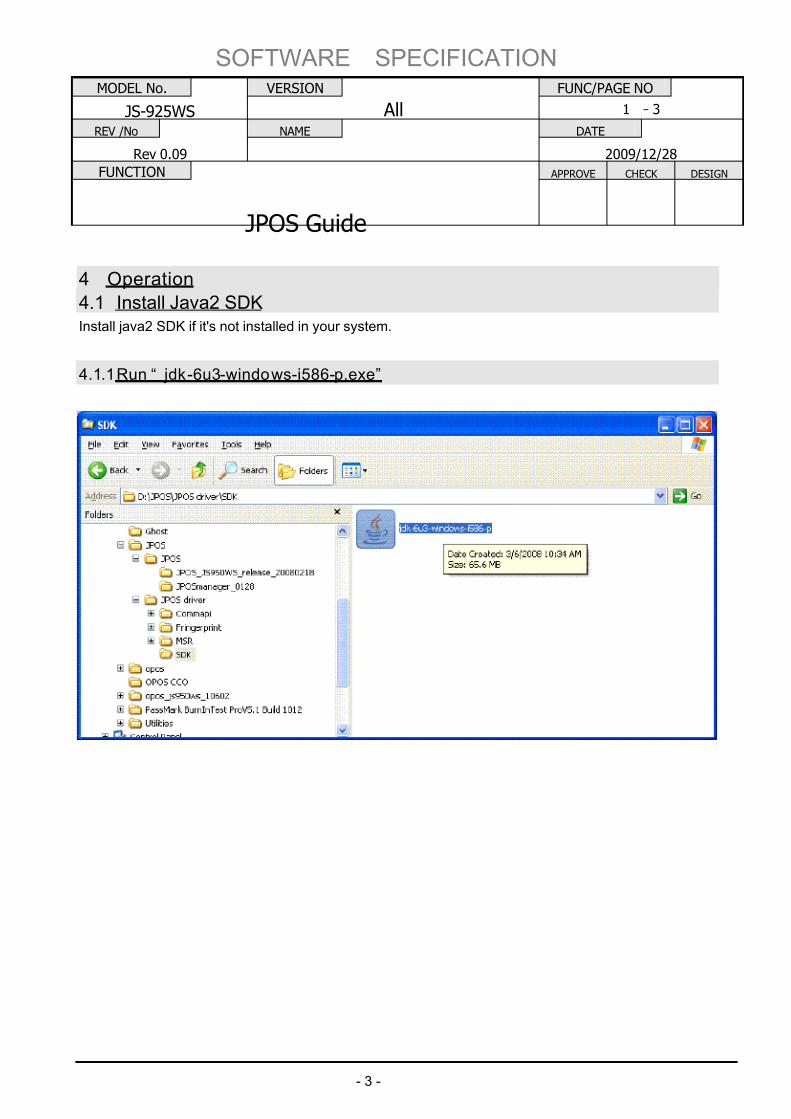
4 Operation
4.1 Install Java2 SDKInstall java2 SDK if it's not installed in your system.
4.1.1 Run “ jdk-6u3-windows-i586-p.exe”
7/27/2019 JposGuideLite-ray.pdf
http://slidepdf.com/reader/full/jposguidelite-raypdf 9/117
SOFTWARE SPECIFICATION
MODEL No. VERSION FUNC/PAGE NO
JS-925WS All 1 -4
REV /No NAME DATE
Rev 0.09 2009/12/28
FUNCTION APPROVE CHECK DESIGN
JPOS Guide
- 4 -
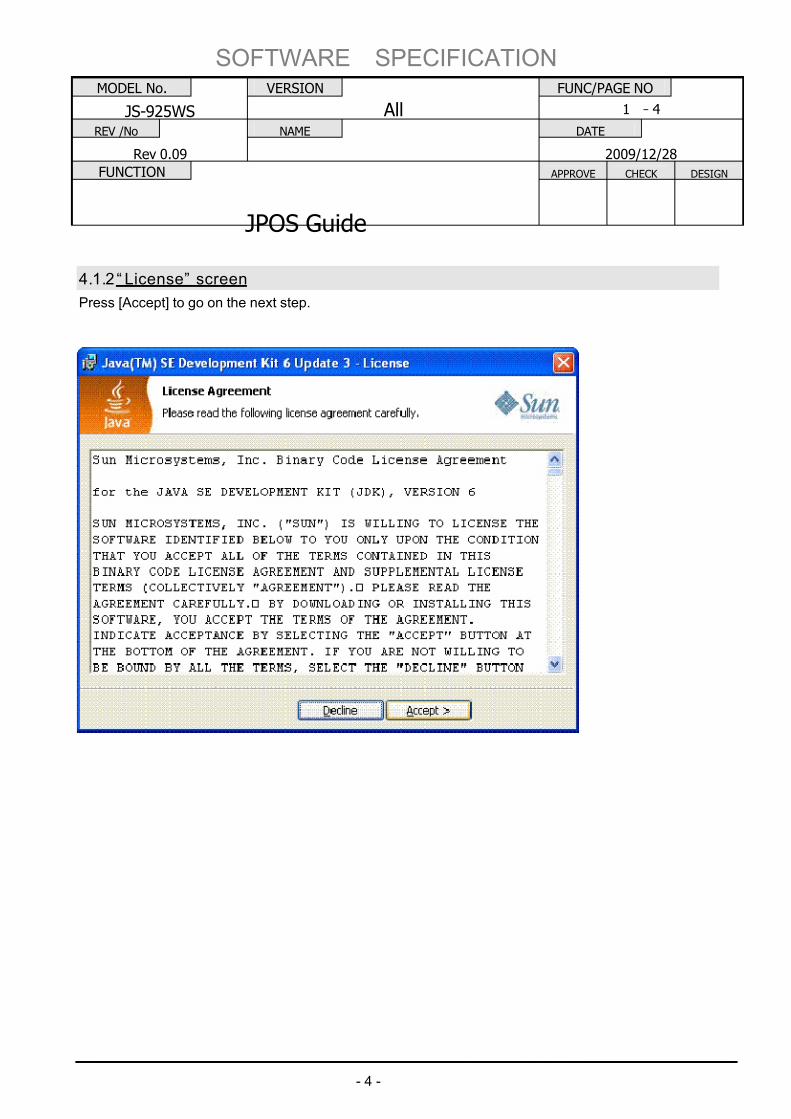
4.1.2 “ License” screen
Press [Accept] to go on the next step.
7/27/2019 JposGuideLite-ray.pdf
http://slidepdf.com/reader/full/jposguidelite-raypdf 10/117
SOFTWARE SPECIFICATION
MODEL No. VERSION FUNC/PAGE NO
JS-925WS All 1 -5
REV /No NAME DATE
Rev 0.09 2009/12/28
FUNCTION APPROVE CHECK DESIGN
JPOS Guide
- 5 -
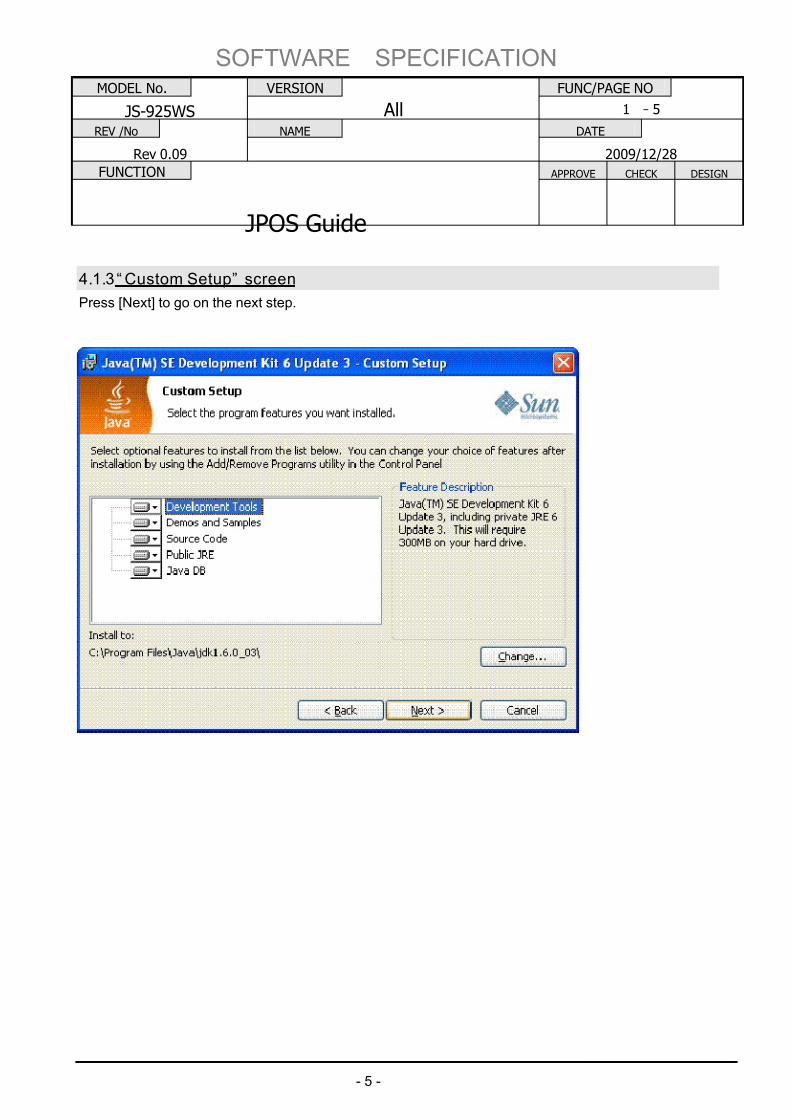
4.1.3 “ Custom Setup” screen
Press [Next] to go on the next step.
7/27/2019 JposGuideLite-ray.pdf
http://slidepdf.com/reader/full/jposguidelite-raypdf 11/117
SOFTWARE SPECIFICATION
MODEL No. VERSION FUNC/PAGE NO
JS-925WS All 1 -6
REV /No NAME DATE
Rev 0.09 2009/12/28
FUNCTION APPROVE CHECK DESIGN
JPOS Guide
- 6 -
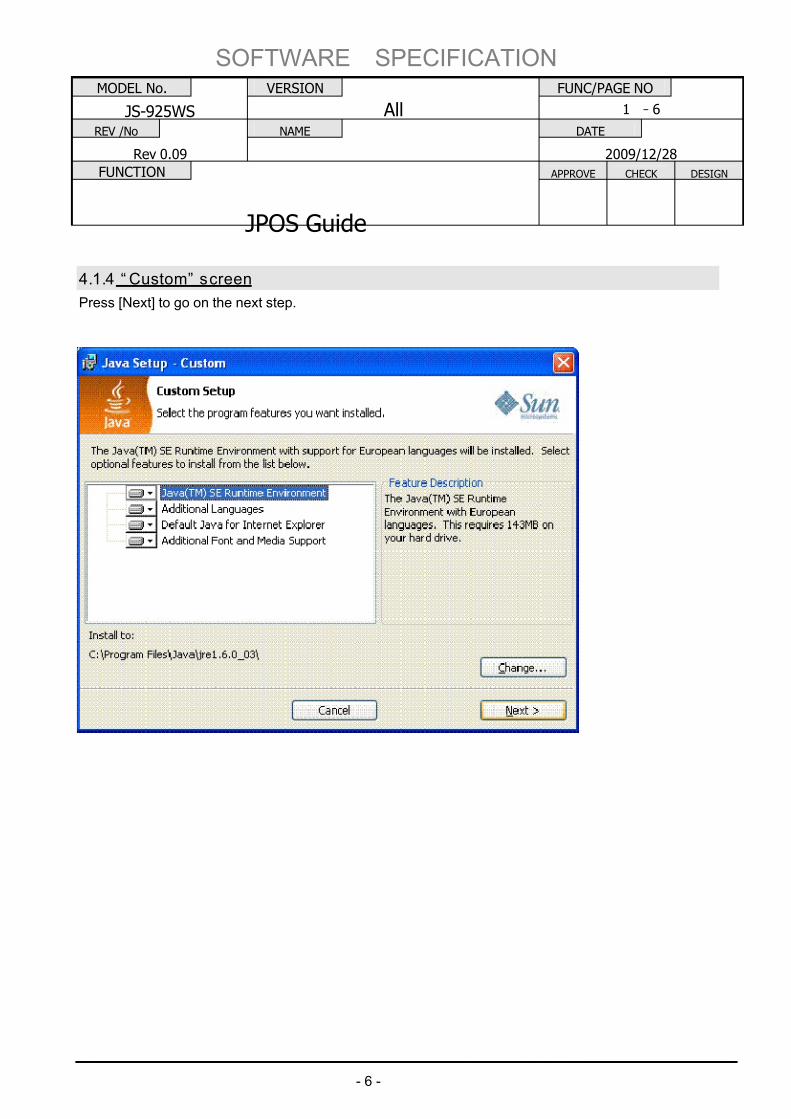
4.1.4 “ Custom” screen
Press [Next] to go on the next step.

7/27/2019 JposGuideLite-ray.pdf
http://slidepdf.com/reader/full/jposguidelite-raypdf 12/117
SOFTWARE SPECIFICATION
MODEL No. VERSION FUNC/PAGE NO
JS-925WS All 1 -7
REV /No NAME DATE
Rev 0.09 2009/12/28
FUNCTION APPROVE CHECK DESIGN
JPOS Guide
- 7 -
4.1.5 “ End of Installation for Java2 SDK”
Installation is complete. Press [Finish] to finish installation in following screen.
7/27/2019 JposGuideLite-ray.pdf
http://slidepdf.com/reader/full/jposguidelite-raypdf 13/117
SOFTWARE SPECIFICATION
MODEL No. VERSION FUNC/PAGE NO
JS-925WS All 1 -8
REV /No NAME DATE
Rev 0.09 2009/12/28
FUNCTION APPROVE CHECK DESIGN
JPOS Guide
- 8 -
4.2 Installing the Java Communications API
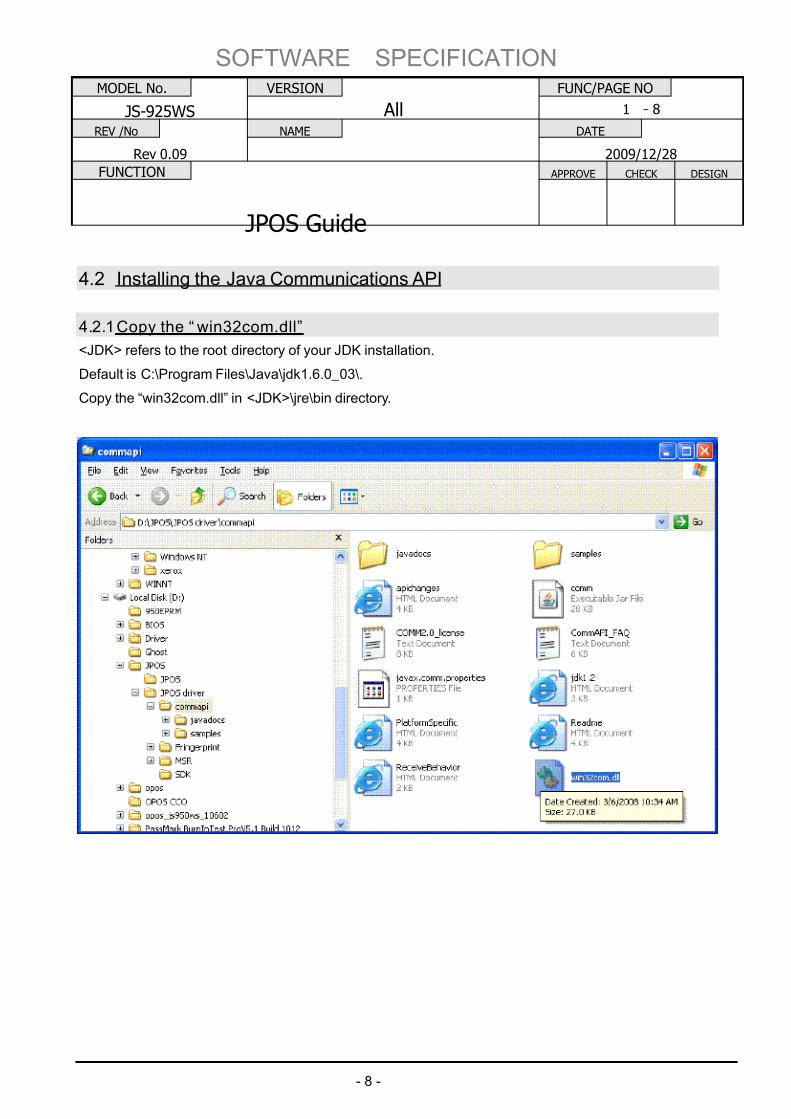
4.2.1 Copy the “ win32com.dll”
<JDK> refers to the root directory of your JDK installation.
Default is C:\Program Files\Java\jdk1.6.0_03\.
Copy the “win32com.dll” in <JDK>\jre\bin directory.
7/27/2019 JposGuideLite-ray.pdf
http://slidepdf.com/reader/full/jposguidelite-raypdf 14/117
SOFTWARE SPECIFICATION
MODEL No. VERSION FUNC/PAGE NO
JS-925WS All 1 -9
REV /No NAME DATE
Rev 0.09 2009/12/28
FUNCTION APPROVE CHECK DESIGN
JPOS Guide
- 9 -
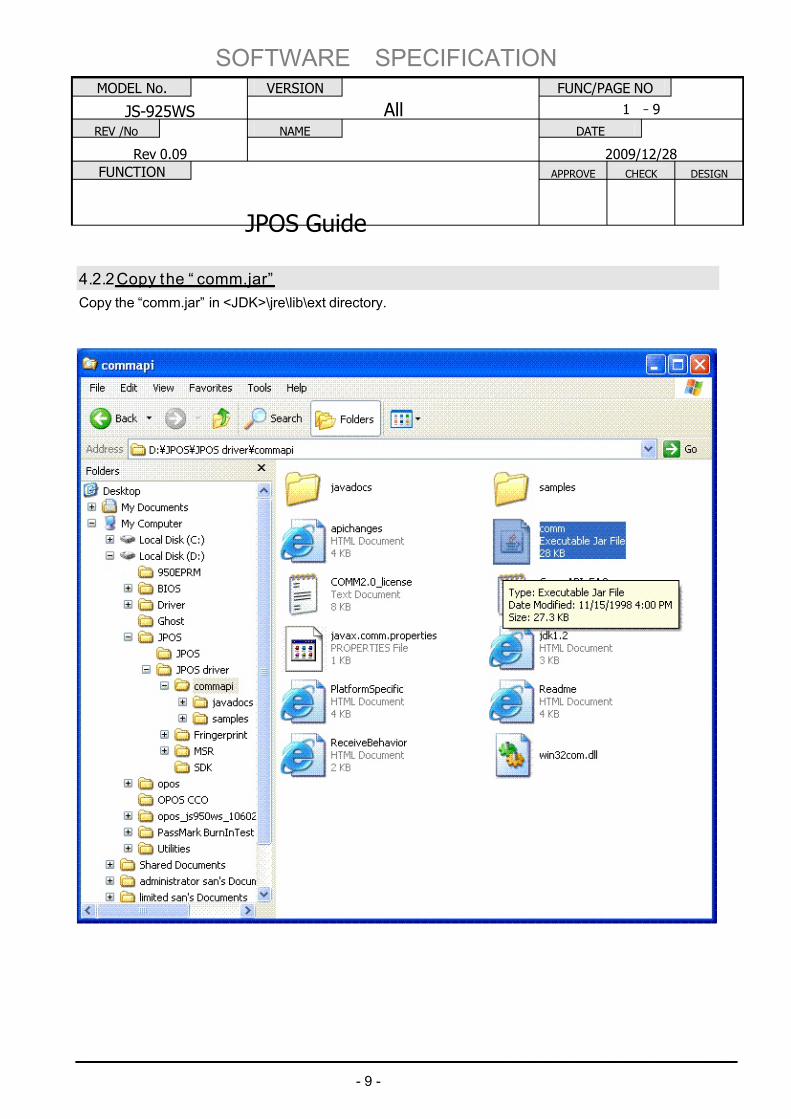
4.2.2 Copy the “ comm.jar”
Copy the “comm.jar” in <JDK>\jre\lib\ext directory.

7/27/2019 JposGuideLite-ray.pdf
http://slidepdf.com/reader/full/jposguidelite-raypdf 15/117
SOFTWARE SPECIFICATION
MODEL No. VERSION FUNC/PAGE NO
JS-925WS All 1 -10
REV /No NAME DATE
Rev 0.09 2009/12/28
FUNCTION APPROVE CHECK DESIGN
JPOS Guide
- 10 -
4.2.3 Copy the “ javax.comm.properties”
Copy the javax.comm.properties in <JDK>\jre\lib directory.
7/27/2019 JposGuideLite-ray.pdf
http://slidepdf.com/reader/full/jposguidelite-raypdf 16/117
SOFTWARE SPECIFICATION
MODEL No. VERSION FUNC/PAGE NO
JS-925WS All 1 -11
REV /No NAME DATE
Rev 0.09 2009/12/28
FUNCTION APPROVE CHECK DESIGN
JPOS Guide
- 11 -
4.3 Install MSR_ISO (Virtual COM) Driver
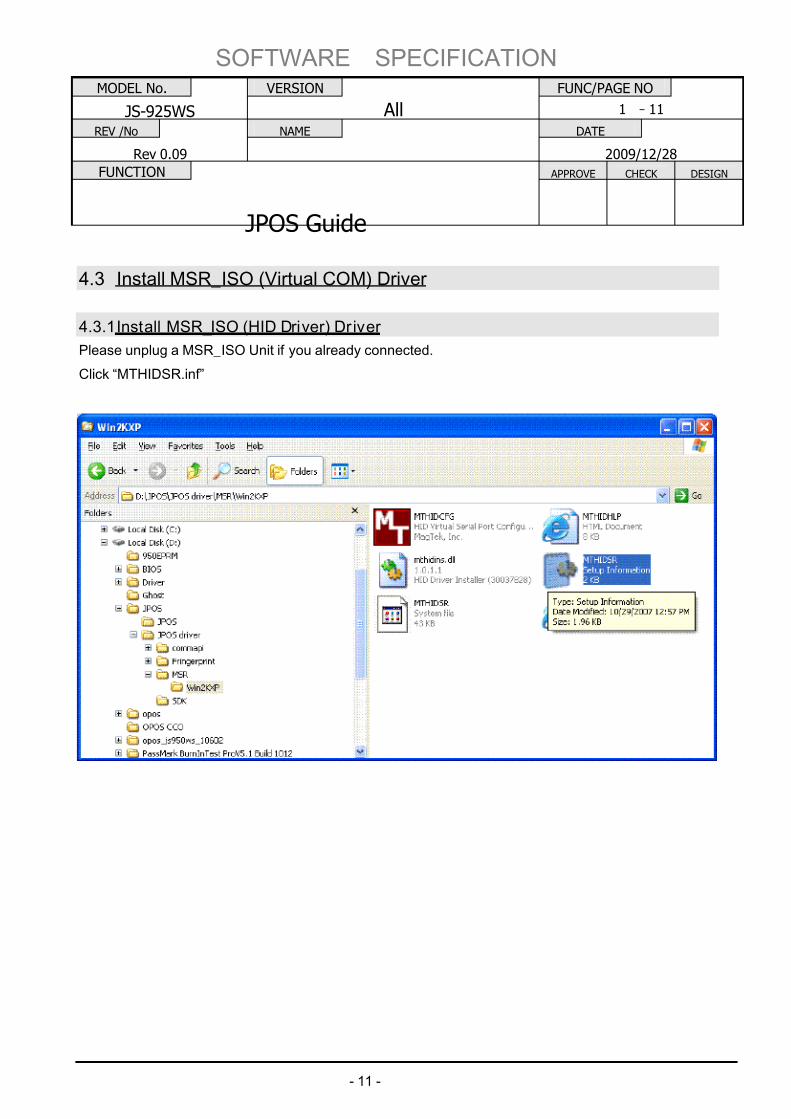
4.3.1 Install MSR_ISO (HID Driver) Driver
Please unplug a MSR_ISO Unit if you already connected.
Click “MTHIDSR.inf”
7/27/2019 JposGuideLite-ray.pdf
http://slidepdf.com/reader/full/jposguidelite-raypdf 17/117
SOFTWARE SPECIFICATION
MODEL No. VERSION FUNC/PAGE NO
JS-925WS All 1 -12
REV /No NAME DATE
Rev 0.09 2009/12/28
FUNCTION APPROVE CHECK DESIGN
JPOS Guide
- 12 -
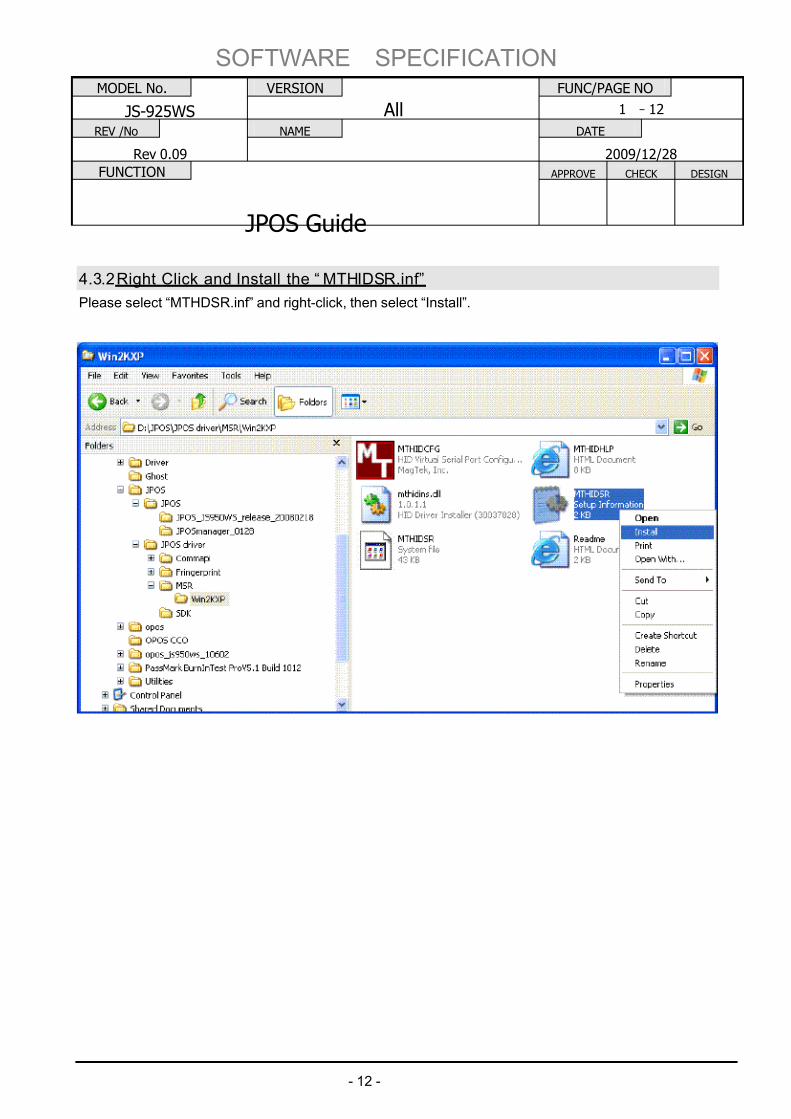
4.3.2 Right Click and Install the “ MTHIDSR.inf”
Please select “MTHDSR.inf” and right-click, then select “Install”.

7/27/2019 JposGuideLite-ray.pdf
http://slidepdf.com/reader/full/jposguidelite-raypdf 18/117
SOFTWARE SPECIFICATION
MODEL No. VERSION FUNC/PAGE NO
JS-925WS All 1 -13
REV /No NAME DATE
Rev 0.09 2009/12/28
FUNCTION APPROVE CHECK DESIGN
JPOS Guide
- 13 -
4.3.3 Configure Virtual COM port
Run “MTHIDCFG.exe”, please
7/27/2019 JposGuideLite-ray.pdf
http://slidepdf.com/reader/full/jposguidelite-raypdf 19/117
SOFTWARE SPECIFICATION
MODEL No. VERSION FUNC/PAGE NO
JS-925WS All 1 -14
REV /No NAME DATE
Rev 0.09 2009/12/28
FUNCTION APPROVE CHECK DESIGN
JPOS Guide
- 14 -
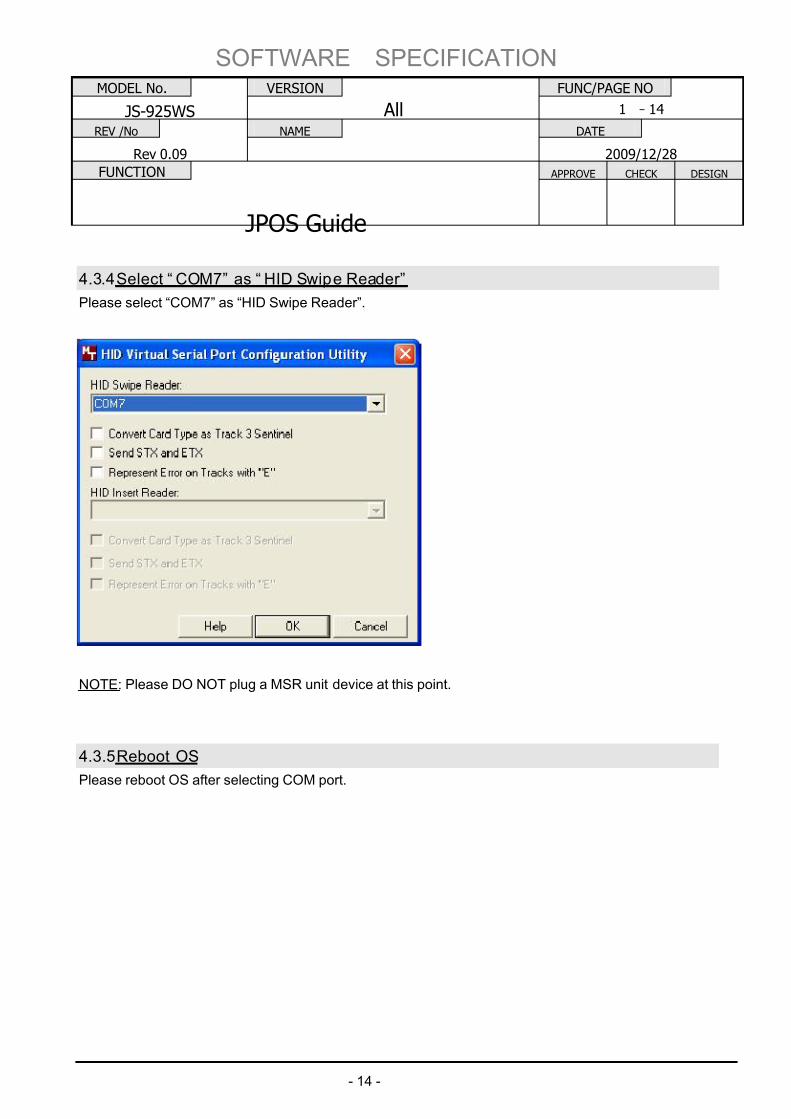
4.3.4 Select “ COM7” as “ HID Swipe Reader”
Please select “COM7” as “HID Swipe Reader”.
NOTE: Please DO NOT plug a MSR unit device at this point.
4.3.5 Reboot OS
Please reboot OS after selecting COM port.
7/27/2019 JposGuideLite-ray.pdf
http://slidepdf.com/reader/full/jposguidelite-raypdf 20/117
SOFTWARE SPECIFICATION
MODEL No. VERSION FUNC/PAGE NO
JS-925WS All 1 -15
REV /No NAME DATE
Rev 0.09 2009/12/28
FUNCTION APPROVE CHECK DESIGN
JPOS Guide
- 15 -
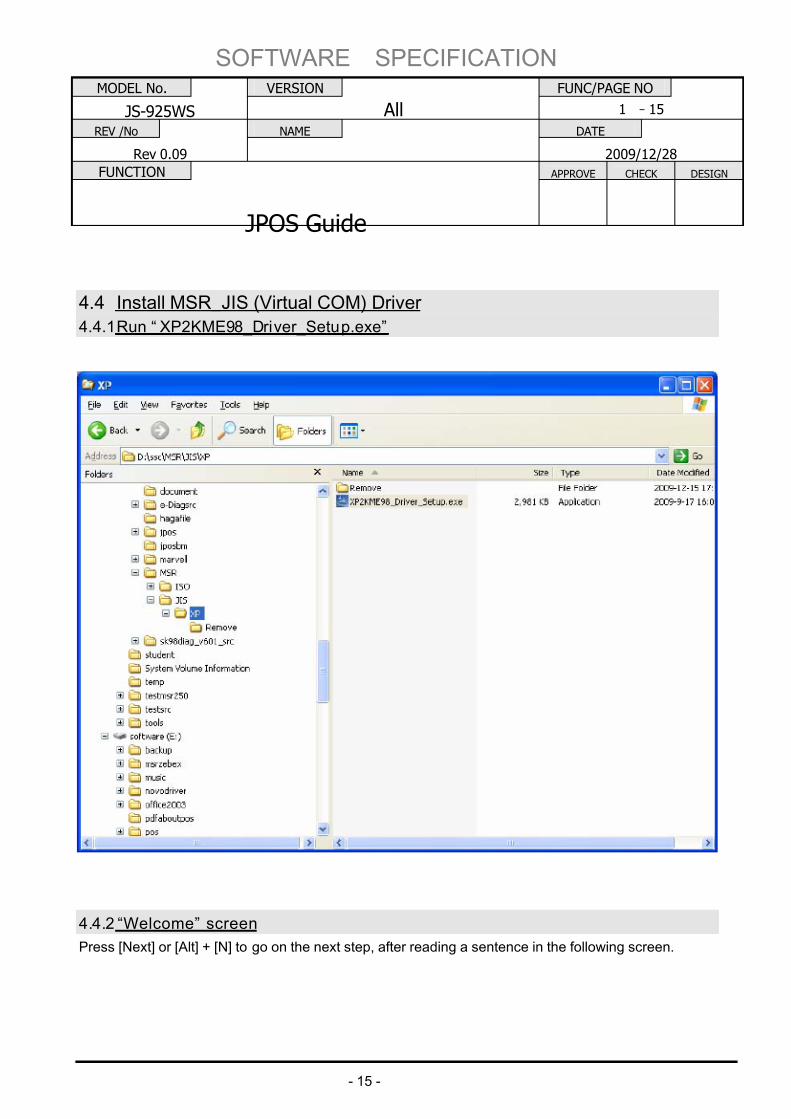
4.4 Install MSR_JIS (Virtual COM) Driver
4.4.1 Run “ XP2KME98_Driver_Setup.exe”
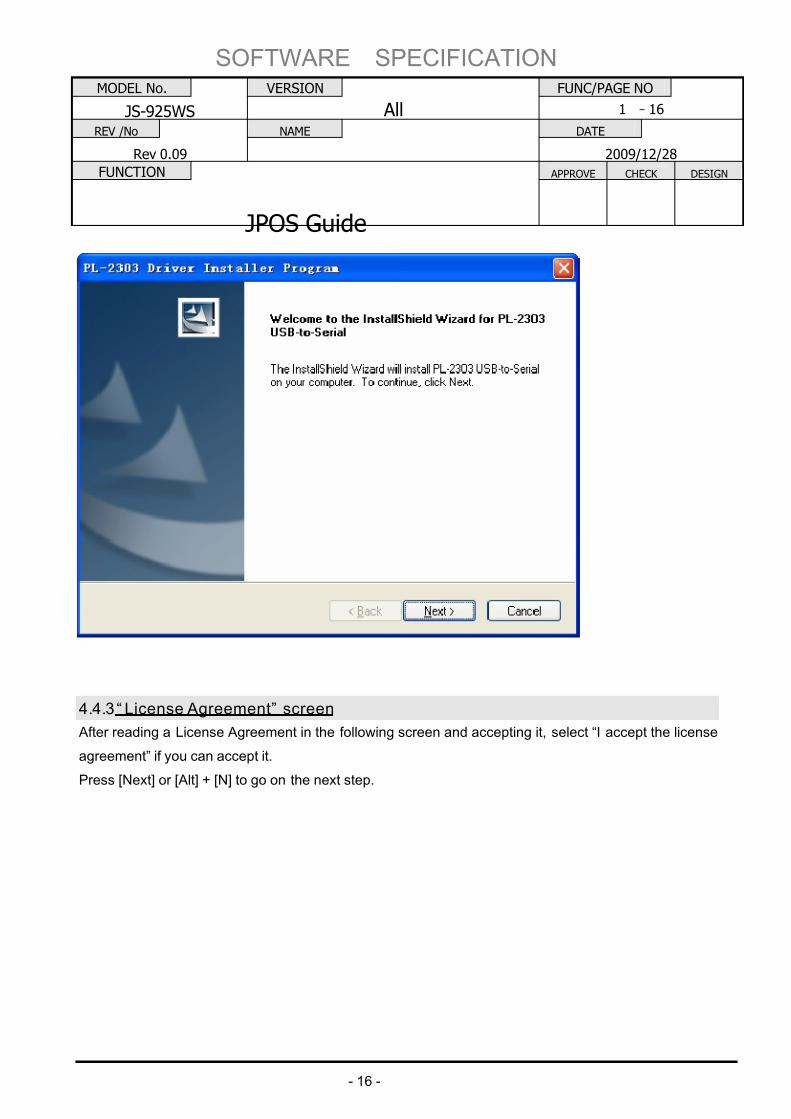
4.4.2 “Welcome” screen
Press [Next] or [Alt] + [N] to go on the next step, after reading a sentence in the following screen.
7/27/2019 JposGuideLite-ray.pdf
http://slidepdf.com/reader/full/jposguidelite-raypdf 21/117
SOFTWARE SPECIFICATION
MODEL No. VERSION FUNC/PAGE NO
JS-925WS All 1 -16
REV /No NAME DATE
Rev 0.09 2009/12/28
FUNCTION APPROVE CHECK DESIGN
JPOS Guide
- 16 -
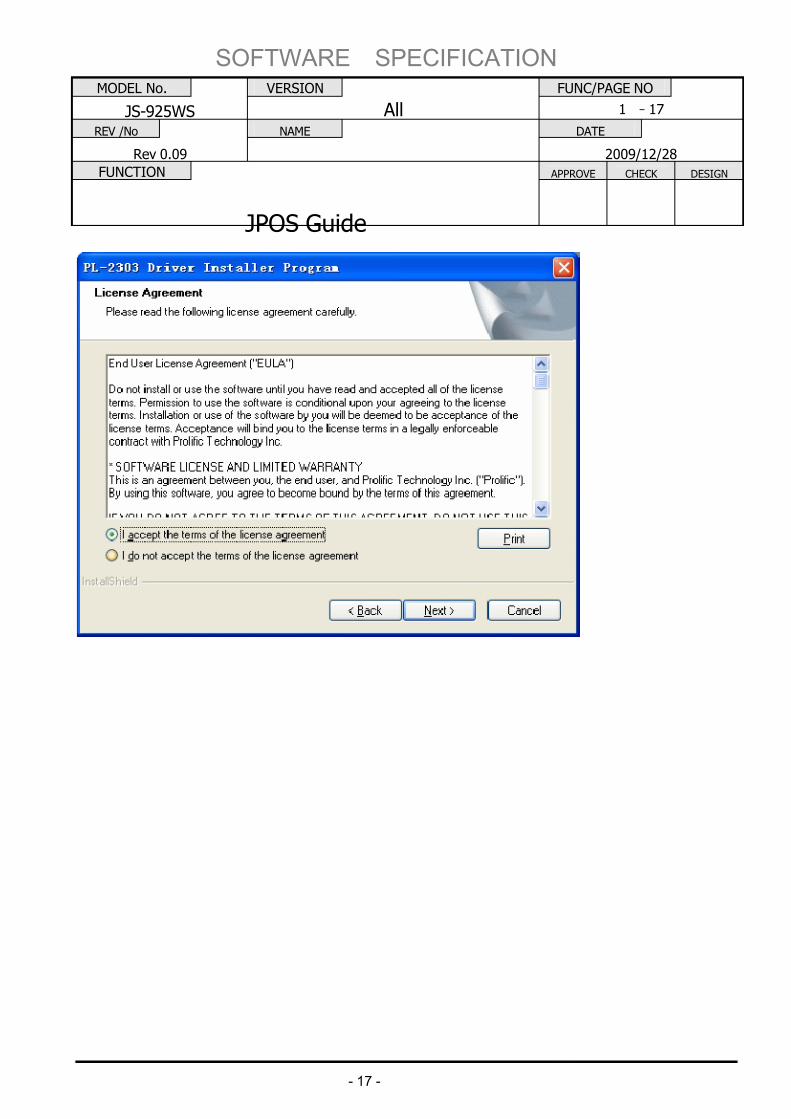
4.4.3 “ License Agreement” screen
After reading a License Agreement in the following screen and accepting it, select “I accept the license
agreement” if you can accept it.
Press [Next] or [Alt] + [N] to go on the next step.
7/27/2019 JposGuideLite-ray.pdf
http://slidepdf.com/reader/full/jposguidelite-raypdf 22/117
SOFTWARE SPECIFICATION
MODEL No. VERSION FUNC/PAGE NO
JS-925WS All 1 -17
REV /No NAME DATE
Rev 0.09 2009/12/28
FUNCTION APPROVE CHECK DESIGN
JPOS Guide
- 17 -
7/27/2019 JposGuideLite-ray.pdf
http://slidepdf.com/reader/full/jposguidelite-raypdf 23/117
SOFTWARE SPECIFICATION
MODEL No. VERSION FUNC/PAGE NO
JS-925WS All 1 -18
REV /No NAME DATE
Rev 0.09 2009/12/28
FUNCTION APPROVE CHECK DESIGN
JPOS Guide
- 18 -
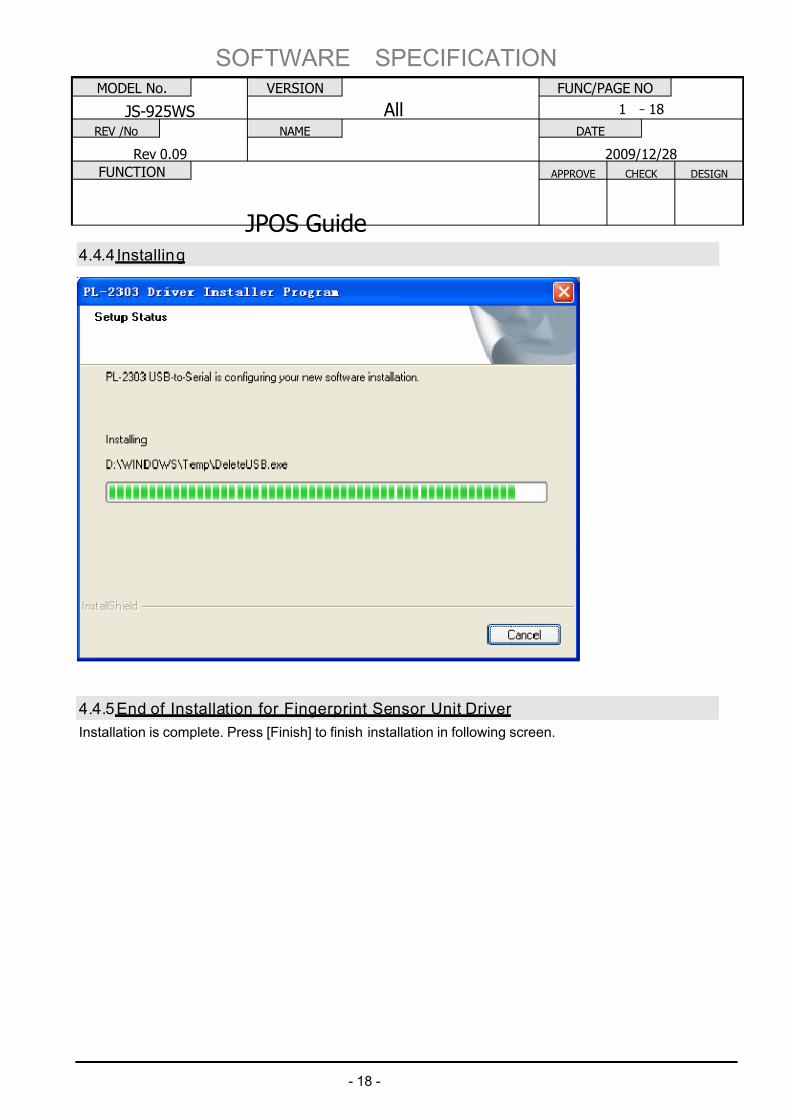
4.4.4 Installing
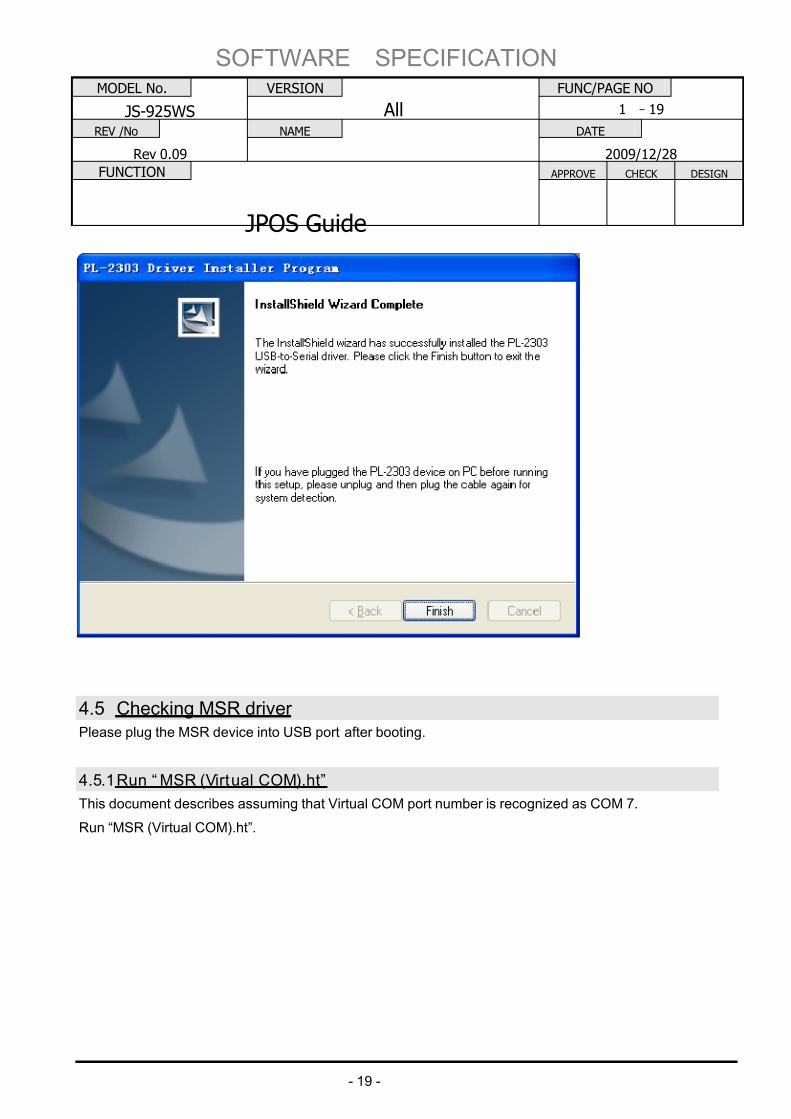
4.4.5 End of Installation for Fingerprint Sensor Unit Driver
Installation is complete. Press [Finish] to finish installation in following screen.
7/27/2019 JposGuideLite-ray.pdf
http://slidepdf.com/reader/full/jposguidelite-raypdf 24/117
SOFTWARE SPECIFICATION
MODEL No. VERSION FUNC/PAGE NO
JS-925WS All 1 -19
REV /No NAME DATE
Rev 0.09 2009/12/28
FUNCTION APPROVE CHECK DESIGN
JPOS Guide
- 19 -
4.5 Checking MSR driver Please plug the MSR device into USB port after booting.
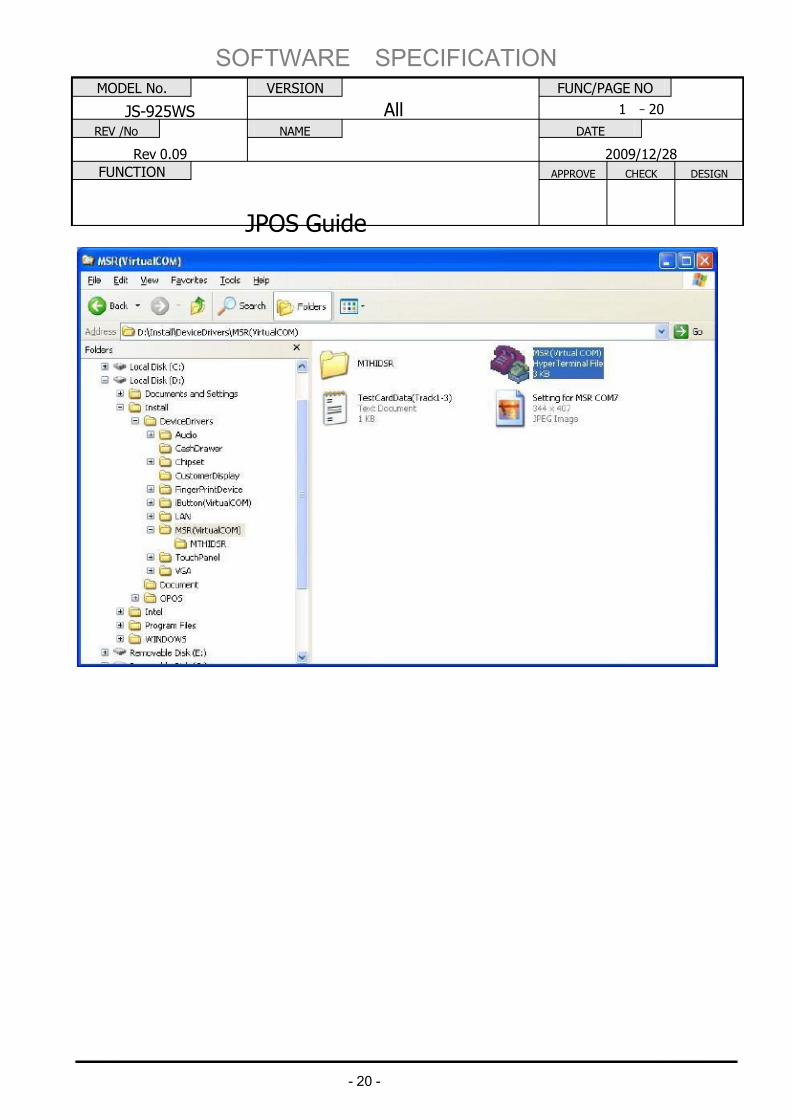
4.5.1 Run “ MSR (Virtual COM).ht”
This document describes assuming that Virtual COM port number is recognized as COM 7.
Run “MSR (Virtual COM).ht”.
7/27/2019 JposGuideLite-ray.pdf
http://slidepdf.com/reader/full/jposguidelite-raypdf 25/117
SOFTWARE SPECIFICATION
MODEL No. VERSION FUNC/PAGE NO
JS-925WS All 1 -20
REV /No NAME DATE
Rev 0.09 2009/12/28
FUNCTION APPROVE CHECK DESIGN
JPOS Guide
- 20 -
7/27/2019 JposGuideLite-ray.pdf
http://slidepdf.com/reader/full/jposguidelite-raypdf 26/117
SOFTWARE SPECIFICATION
MODEL No. VERSION FUNC/PAGE NO
JS-925WS All 1 -21
REV /No NAME DATE
Rev 0.09 2009/12/28
FUNCTION APPROVE CHECK DESIGN
JPOS Guide
- 21 -
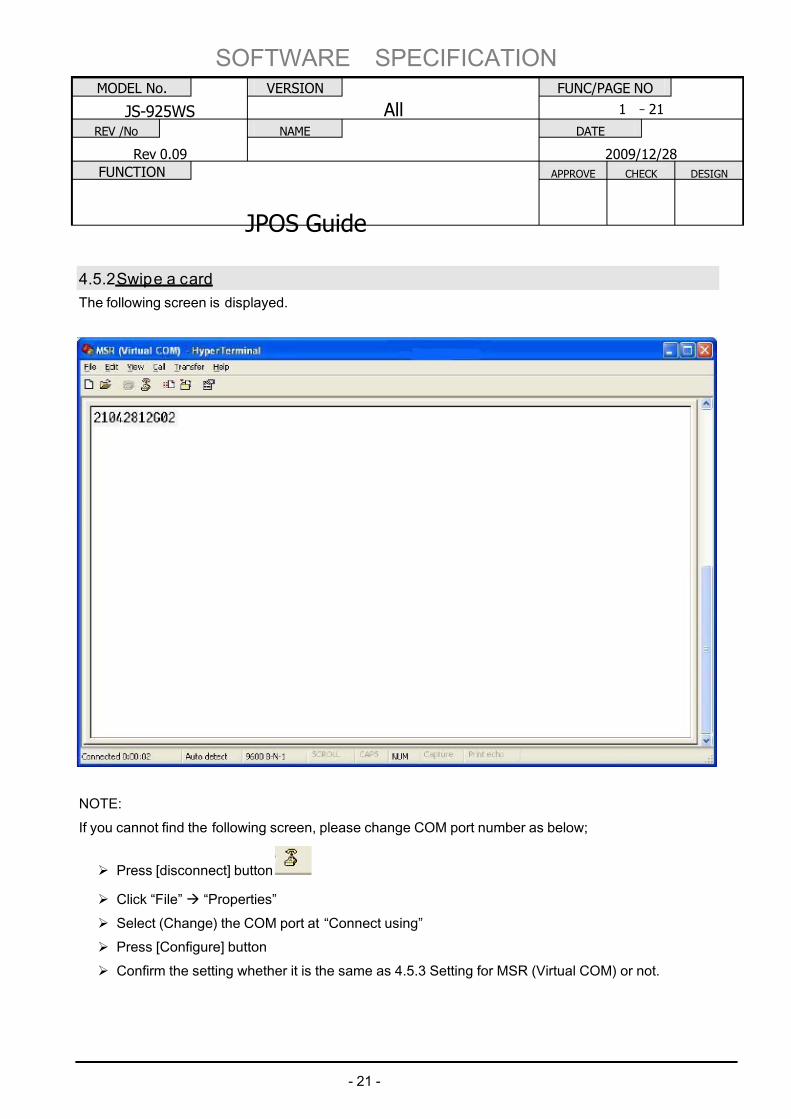
4.5.2 Swipe a card
The following screen is displayed.
NOTE:
If you cannot find the following screen, please change COM port number as below;
¾ Press [disconnect] button
¾ Click “File”Æ “Properties”
¾ Select (Change) the COM port at “Connect using”
¾ Press [Configure] button
¾ Confirm the setting whether it is the same as 4.5.3 Setting for MSR (Virtual COM) or not.
7/27/2019 JposGuideLite-ray.pdf
http://slidepdf.com/reader/full/jposguidelite-raypdf 27/117
SOFTWARE SPECIFICATION
MODEL No. VERSION FUNC/PAGE NO
JS-925WS All 1 -22
REV /No NAME DATE
Rev 0.09 2009/12/28
FUNCTION APPROVE CHECK DESIGN
JPOS Guide
- 22 -
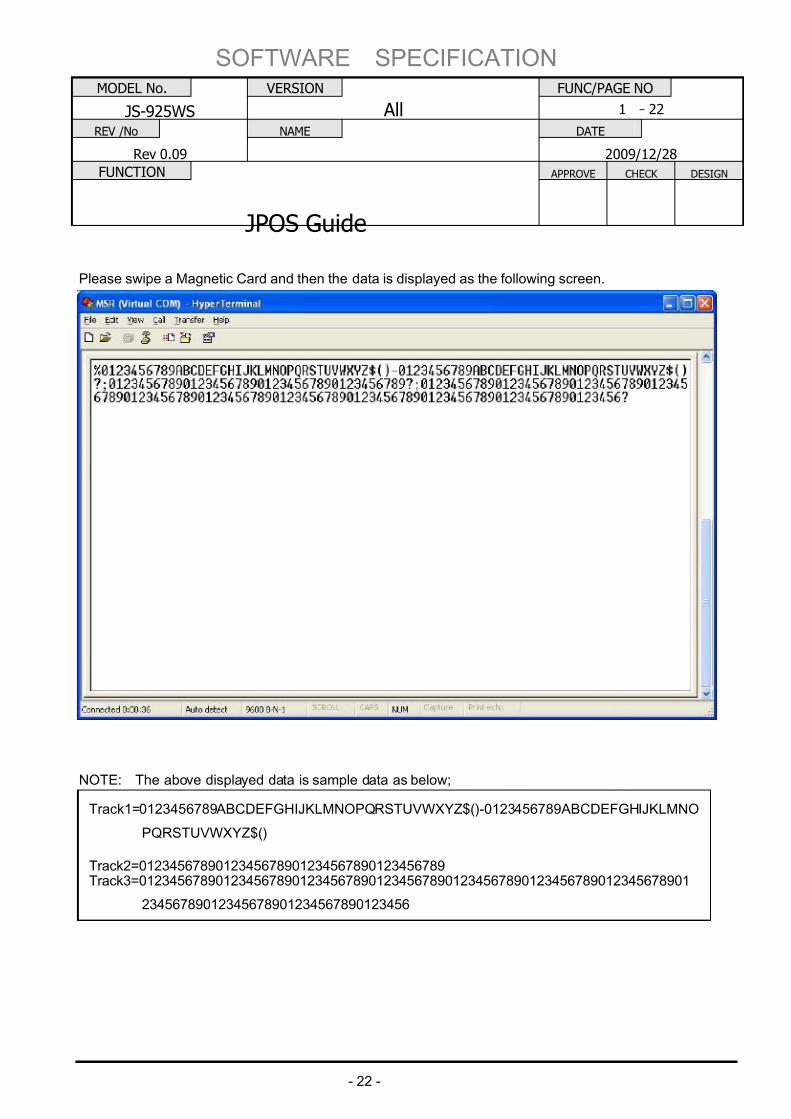
Please swipe a Magnetic Card and then the data is displayed as the following screen.
NOTE: The above displayed data is sample data as below;
Track1=0123456789ABCDEFGHIJKLMNOPQRSTUVWXYZ$()-0123456789ABCDEFGHIJKLMNO
PQRSTUVWXYZ$()
Track2=0123456789012345678901234567890123456789Track3=012345678901234567890123456789012345678901234567890123456789012345678901
23456789012345678901234567890123456
7/27/2019 JposGuideLite-ray.pdf
http://slidepdf.com/reader/full/jposguidelite-raypdf 28/117
SOFTWARE SPECIFICATION
MODEL No. VERSION FUNC/PAGE NO
JS-925WS All 1 -23
REV /No NAME DATE
Rev 0.09 2009/12/28
FUNCTION APPROVE CHECK DESIGN
JPOS Guide
- 23 -
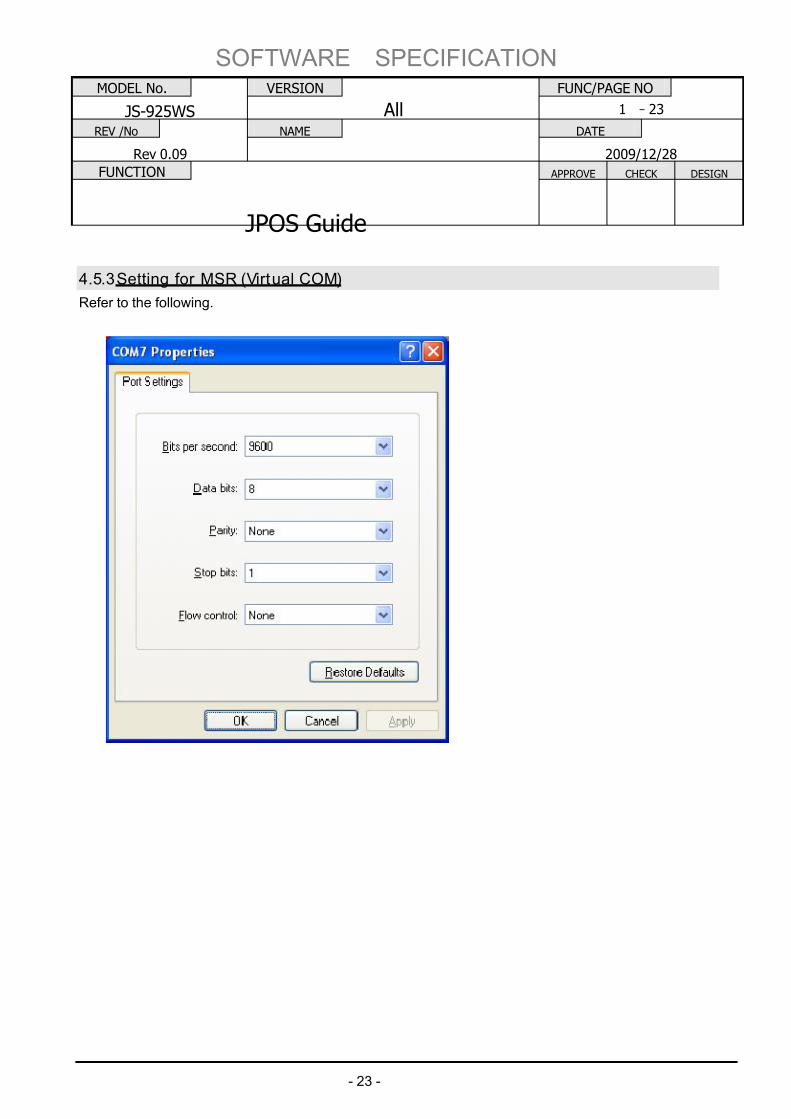
4.5.3 Setting for MSR (Virtual COM)
Refer to the following.
7/27/2019 JposGuideLite-ray.pdf
http://slidepdf.com/reader/full/jposguidelite-raypdf 29/117
SOFTWARE SPECIFICATION
MODEL No. VERSION FUNC/PAGE NO
JS-925WS All 1 -24
REV /No NAME DATE
Rev 0.09 2009/12/28
FUNCTION APPROVE CHECK DESIGN
JPOS Guide
- 24 -
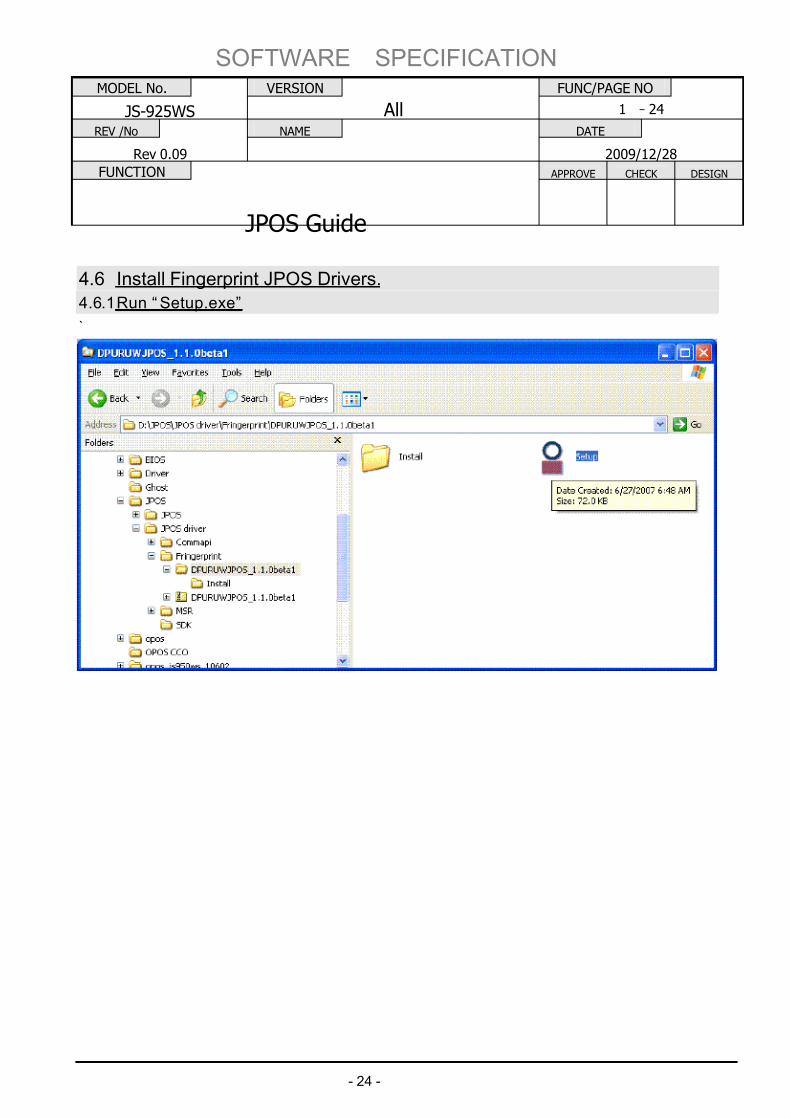
4.6 Install Fingerprint JPOS Drivers.4.6.1 Run “ Setup.exe”
`
7/27/2019 JposGuideLite-ray.pdf
http://slidepdf.com/reader/full/jposguidelite-raypdf 30/117
SOFTWARE SPECIFICATION
MODEL No. VERSION FUNC/PAGE NO
JS-925WS All 1 -25
REV /No NAME DATE
Rev 0.09 2009/12/28
FUNCTION APPROVE CHECK DESIGN
JPOS Guide
- 25 -
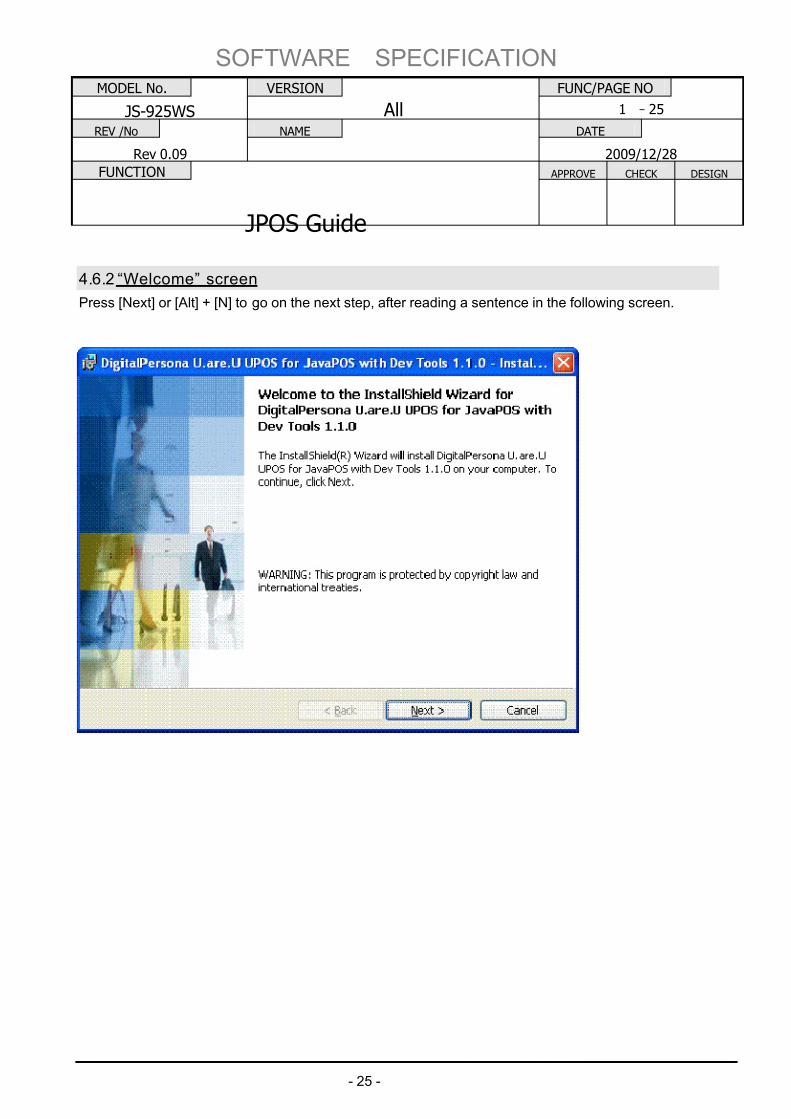
4.6.2 “Welcome” screen
Press [Next] or [Alt] + [N] to go on the next step, after reading a sentence in the following screen.
7/27/2019 JposGuideLite-ray.pdf
http://slidepdf.com/reader/full/jposguidelite-raypdf 31/117
SOFTWARE SPECIFICATION
MODEL No. VERSION FUNC/PAGE NO
JS-925WS All 1 -26
REV /No NAME DATE
Rev 0.09 2009/12/28
FUNCTION APPROVE CHECK DESIGN
JPOS Guide
- 26 -
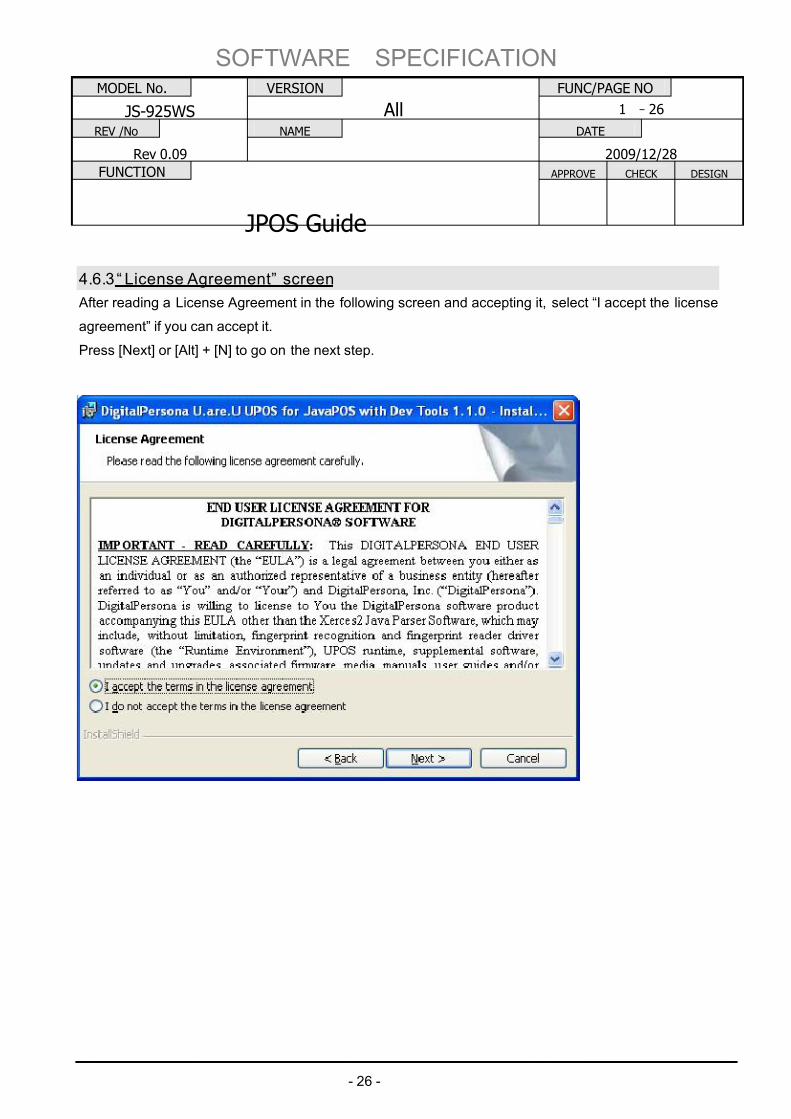
4.6.3 “ License Agreement” screen
After reading a License Agreement in the following screen and accepting it, select “I accept the license
agreement” if you can accept it.
Press [Next] or [Alt] + [N] to go on the next step.
7/27/2019 JposGuideLite-ray.pdf
http://slidepdf.com/reader/full/jposguidelite-raypdf 32/117
SOFTWARE SPECIFICATION
MODEL No. VERSION FUNC/PAGE NO
JS-925WS All 1 -27
REV /No NAME DATE
Rev 0.09 2009/12/28
FUNCTION APPROVE CHECK DESIGN
JPOS Guide
- 27 -
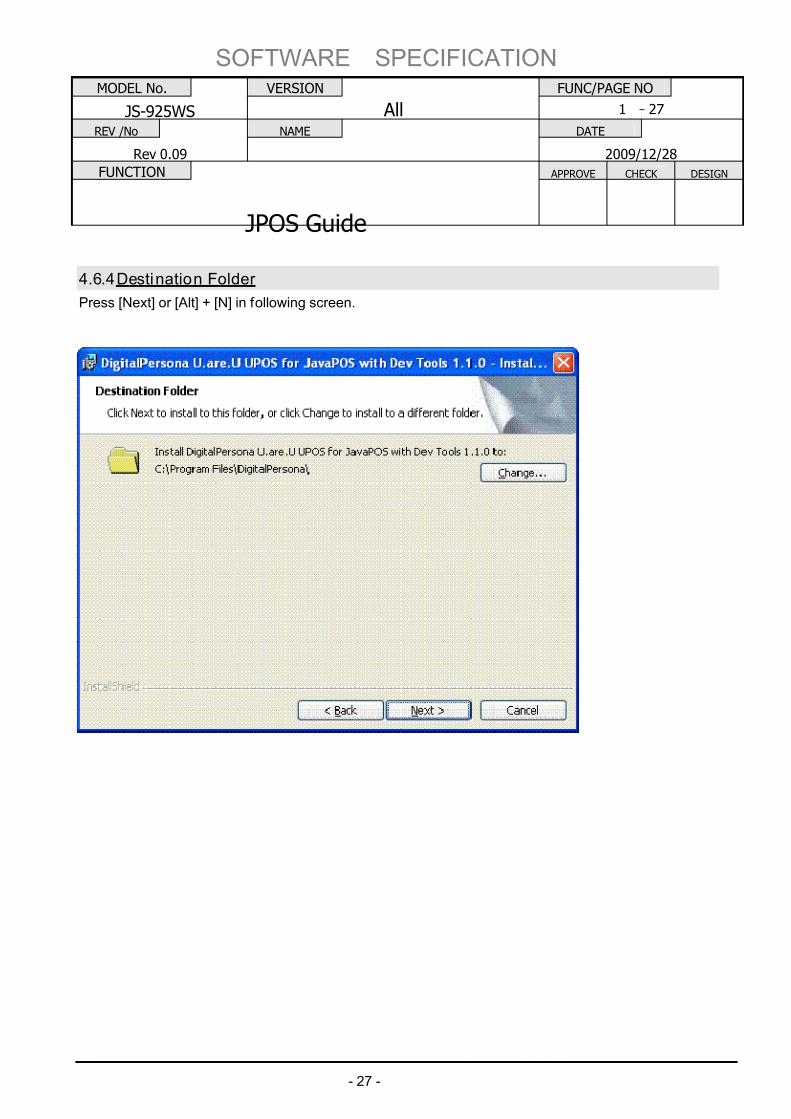
4.6.4 Destination Folder
Press [Next] or [Alt] + [N] in following screen.
7/27/2019 JposGuideLite-ray.pdf
http://slidepdf.com/reader/full/jposguidelite-raypdf 33/117
SOFTWARE SPECIFICATION
MODEL No. VERSION FUNC/PAGE NO
JS-925WS All 1 -28
REV /No NAME DATE
Rev 0.09 2009/12/28
FUNCTION APPROVE CHECK DESIGN
JPOS Guide
- 28 -
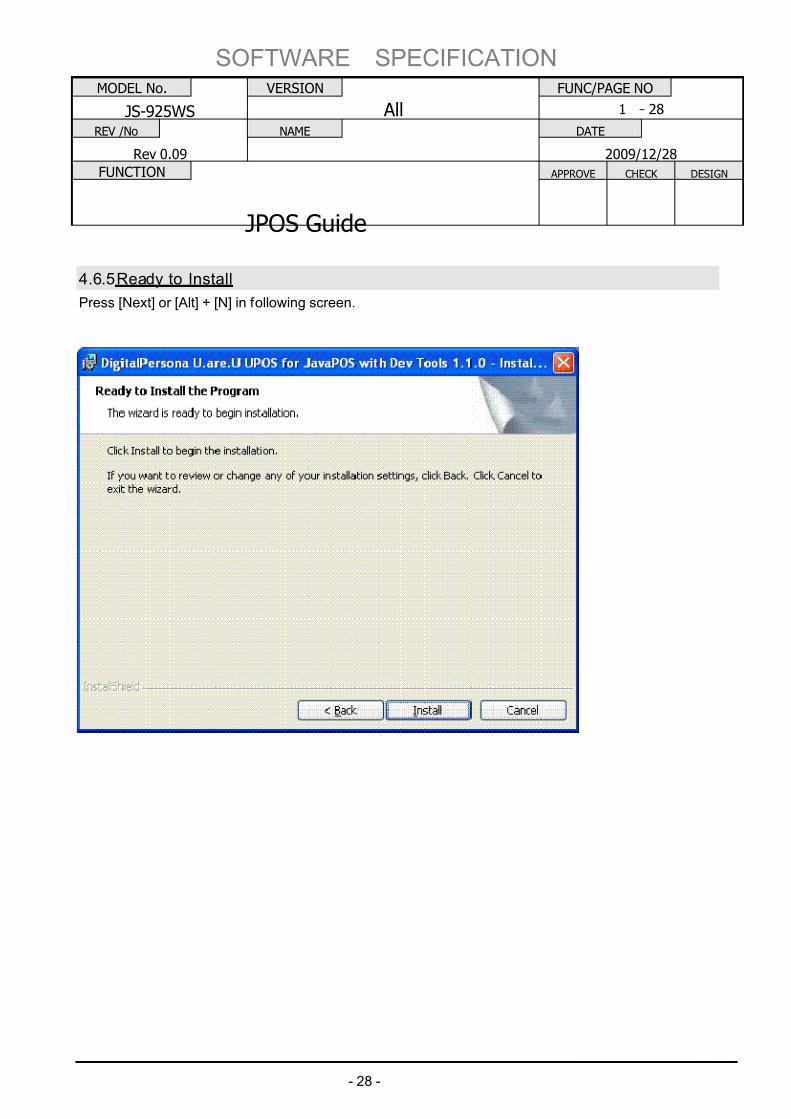
4.6.5 Ready to Install
Press [Next] or [Alt] + [N] in following screen.
7/27/2019 JposGuideLite-ray.pdf
http://slidepdf.com/reader/full/jposguidelite-raypdf 34/117
SOFTWARE SPECIFICATION
MODEL No. VERSION FUNC/PAGE NO
JS-925WS All 1 -29
REV /No NAME DATE
Rev 0.09 2009/12/28
FUNCTION APPROVE CHECK DESIGN
JPOS Guide
- 29 -
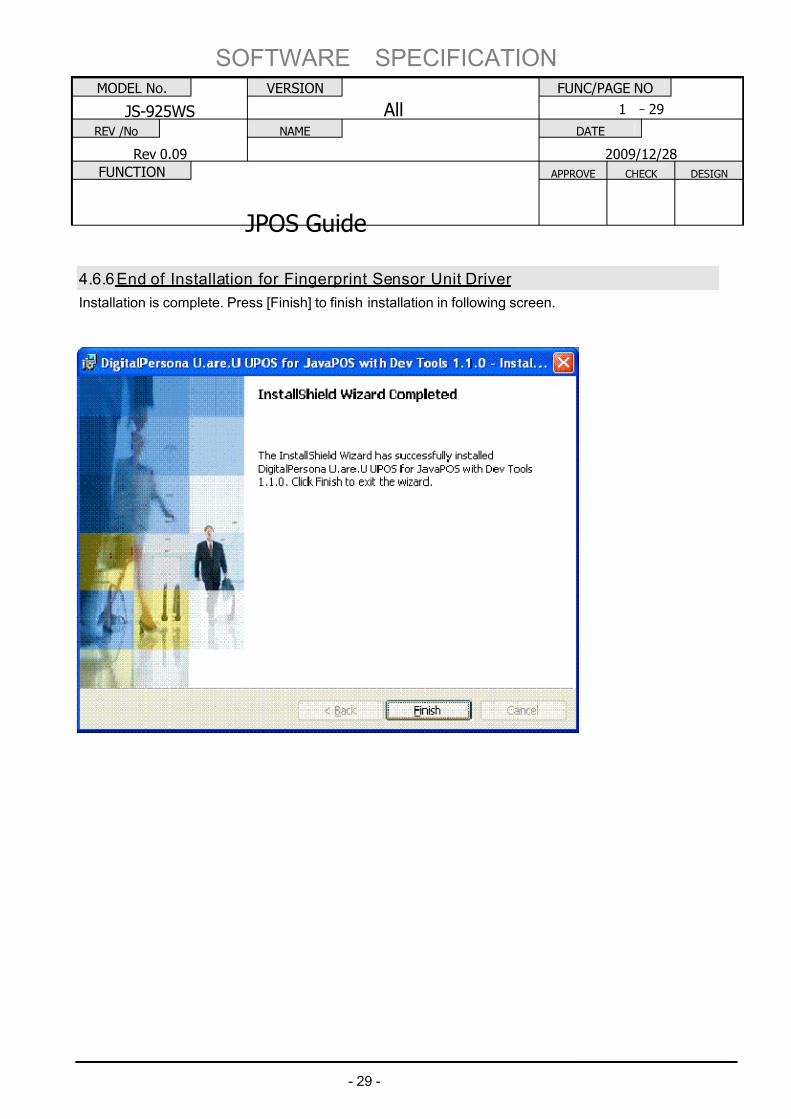
4.6.6 End of Installation for Fingerprint Sensor Unit Driver
Installation is complete. Press [Finish] to finish installation in following screen.
7/27/2019 JposGuideLite-ray.pdf
http://slidepdf.com/reader/full/jposguidelite-raypdf 35/117
SOFTWARE SPECIFICATION
MODEL No. VERSION FUNC/PAGE NO
JS-925WS All 1 -30
REV /No NAME DATE
Rev 0.09 2009/12/28
FUNCTION APPROVE CHECK DESIGN
JPOS Guide
- 30 -
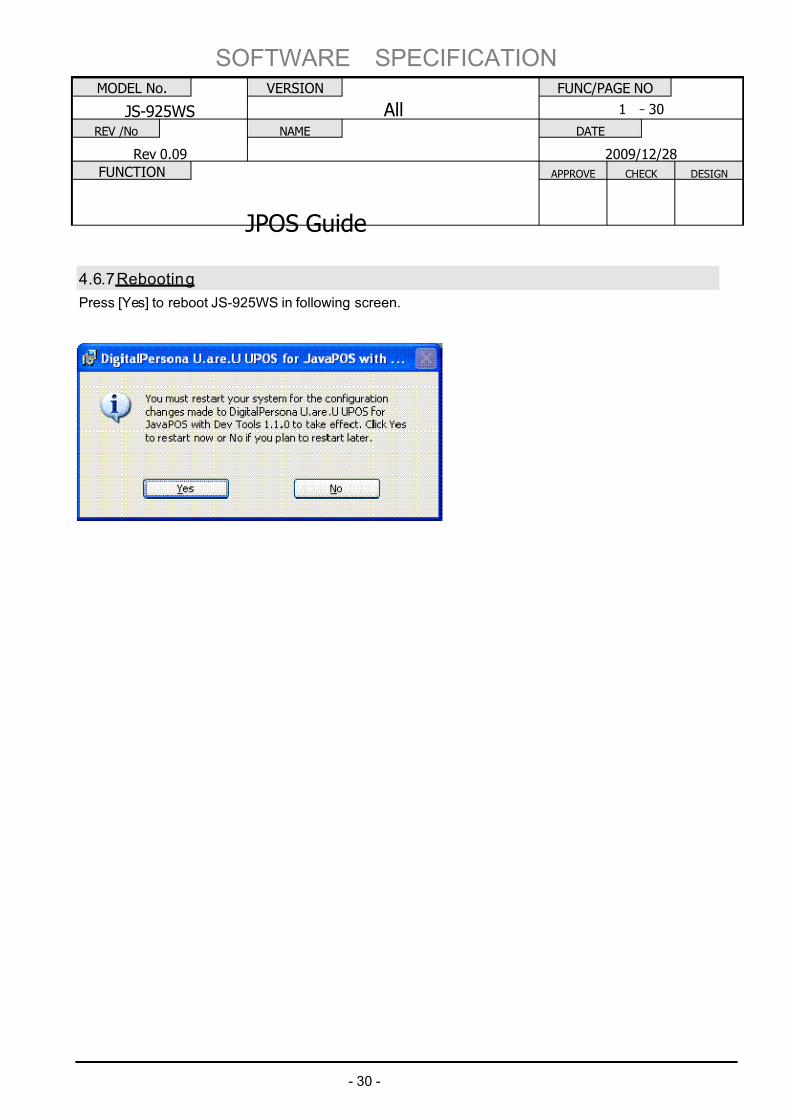
4.6.7 Rebooting
Press [Yes] to reboot JS-925WS in following screen.
7/27/2019 JposGuideLite-ray.pdf
http://slidepdf.com/reader/full/jposguidelite-raypdf 36/117
SOFTWARE SPECIFICATION
MODEL No. VERSION FUNC/PAGE NO
JS-925WS All 1 -31
REV /No NAME DATE
Rev 0.09 2009/12/28
FUNCTION APPROVE CHECK DESIGN
JPOS Guide
- 31 -
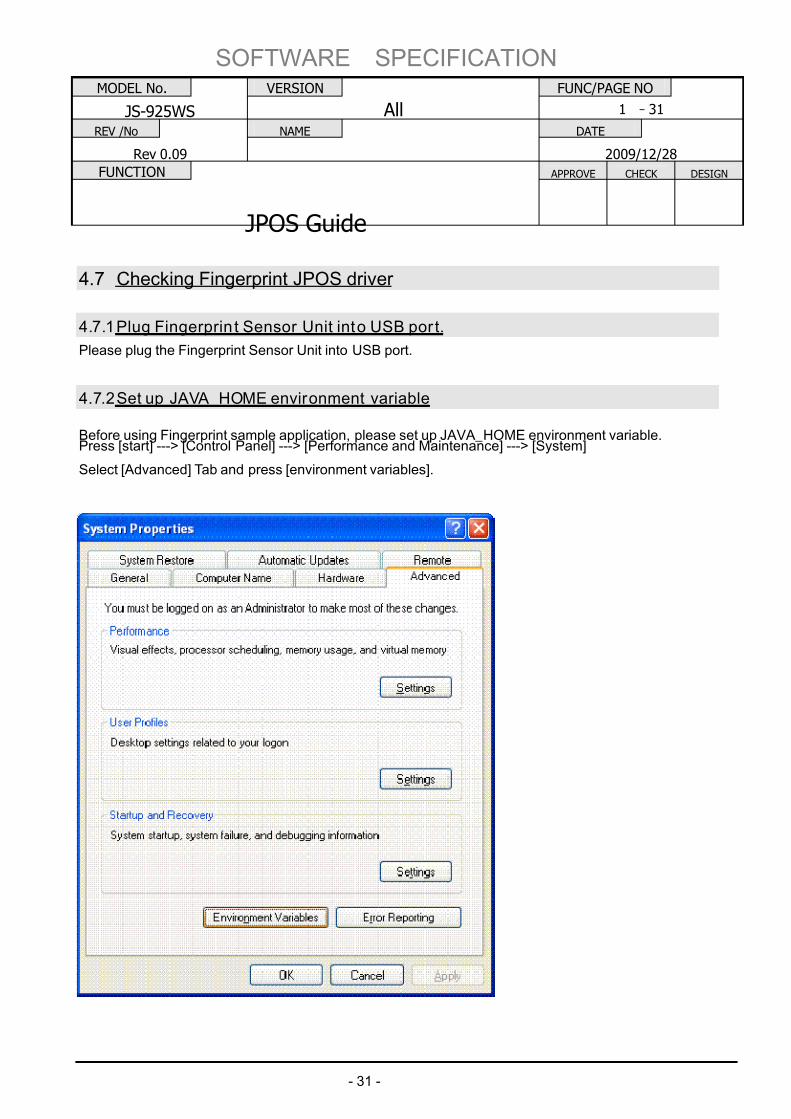
4.7 Checking Fingerprint JPOS driver
4.7.1 Plug Fingerprin t Sensor Unit into USB por t.
Please plug the Fingerprint Sensor Unit into USB port.
4.7.2 Set up JAVA_HOME environment variable
Before using Fingerprint sample application, please set up JAVA_HOME environment variable.Press [start] ---> [Control Panel] ---> [Performance and Maintenance] ---> [System]
Select [Advanced] Tab and press [environment variables].
7/27/2019 JposGuideLite-ray.pdf
http://slidepdf.com/reader/full/jposguidelite-raypdf 37/117
SOFTWARE SPECIFICATION
MODEL No. VERSION FUNC/PAGE NO
JS-925WS All 1 -32
REV /No NAME DATE
Rev 0.09 2009/12/28
FUNCTION APPROVE CHECK DESIGN
JPOS Guide
- 32 -
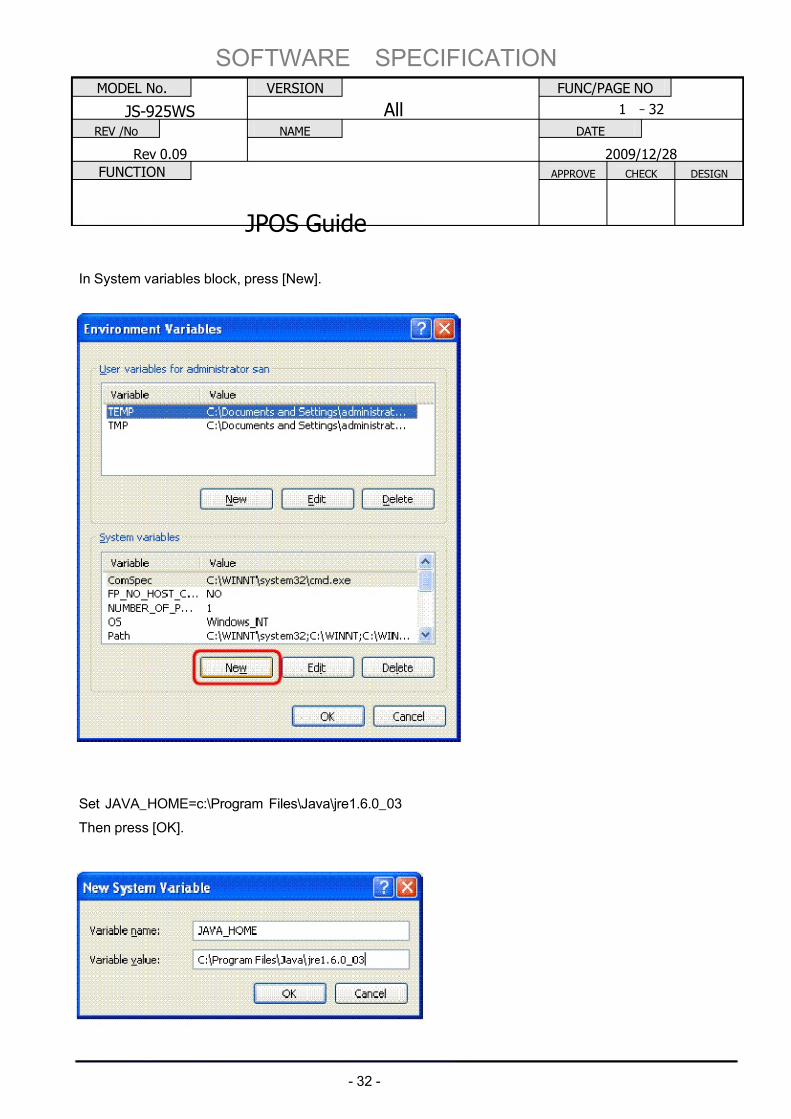
In System variables block, press [New].
Set JAVA_HOME=c:\Program Files\Java\jre1.6.0_03
Then press [OK].
7/27/2019 JposGuideLite-ray.pdf
http://slidepdf.com/reader/full/jposguidelite-raypdf 38/117
SOFTWARE SPECIFICATION
MODEL No. VERSION FUNC/PAGE NO
JS-925WS All 1 -33
REV /No NAME DATE
Rev 0.09 2009/12/28
FUNCTION APPROVE CHECK DESIGN
JPOS Guide
- 33 -
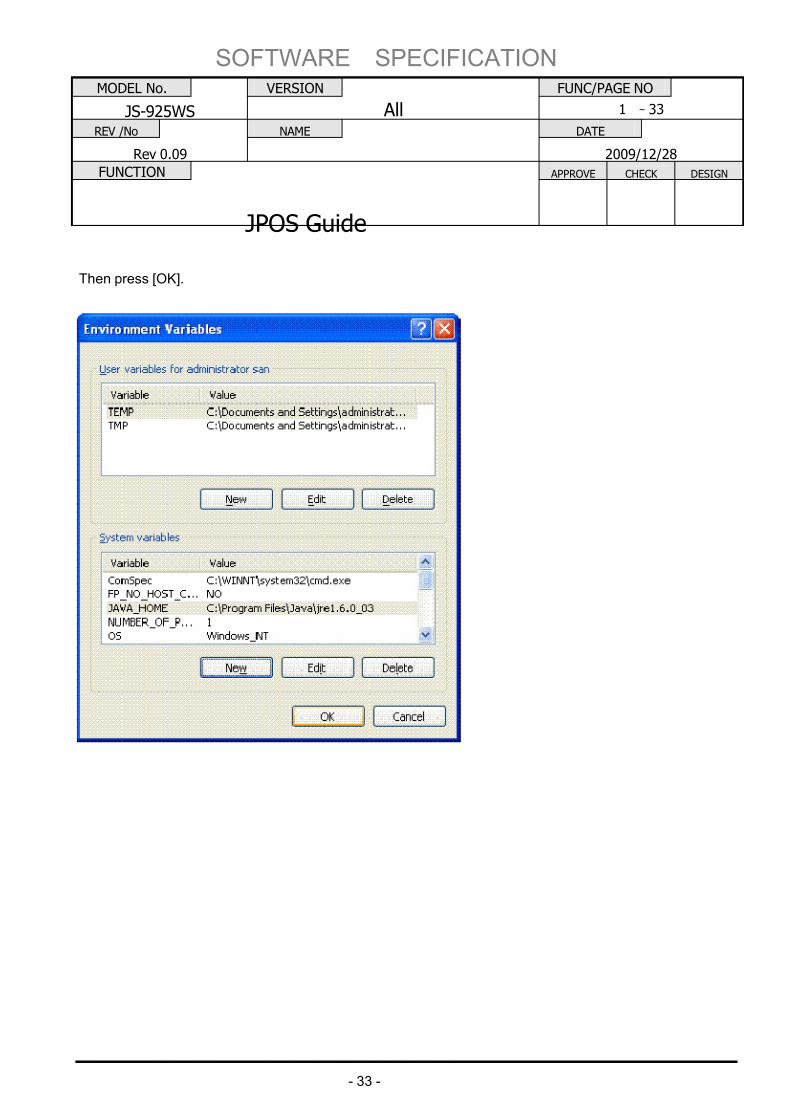
Then press [OK].
7/27/2019 JposGuideLite-ray.pdf
http://slidepdf.com/reader/full/jposguidelite-raypdf 39/117
SOFTWARE SPECIFICATION
MODEL No. VERSION FUNC/PAGE NO
JS-925WS All 1 -34
REV /No NAME DATE
Rev 0.09 2009/12/28
FUNCTION APPROVE CHECK DESIGN
JPOS Guide
- 34 -
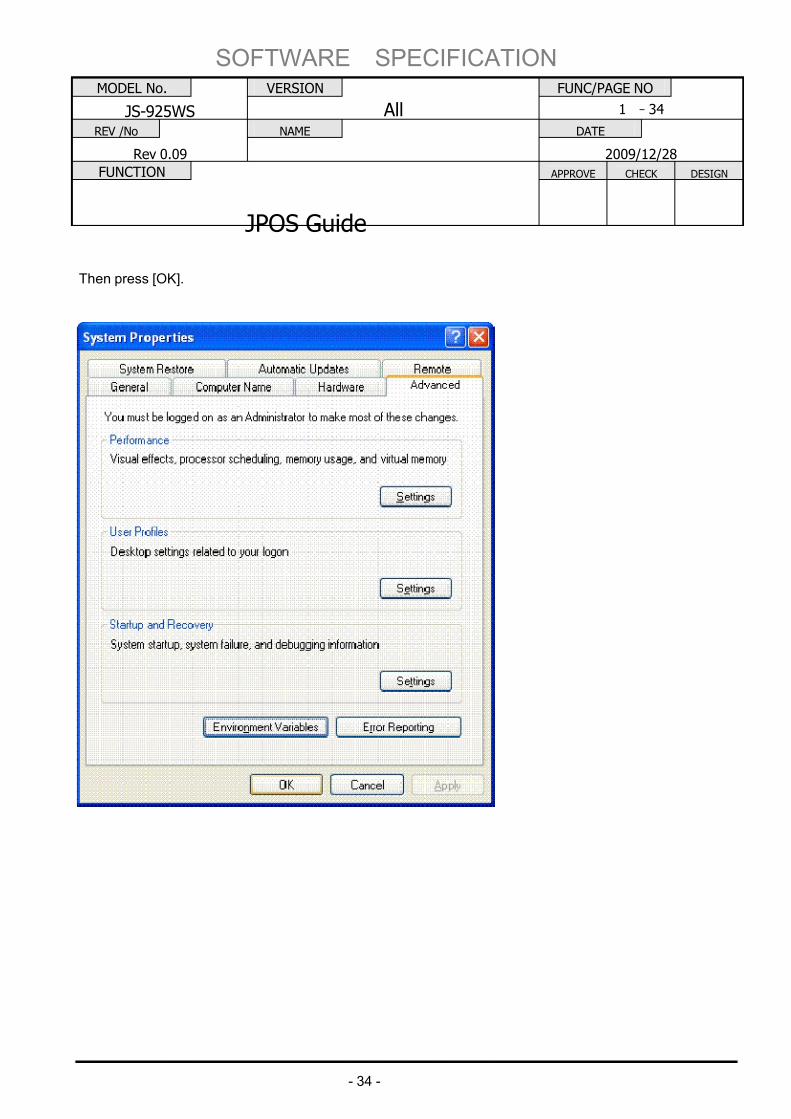
Then press [OK].
7/27/2019 JposGuideLite-ray.pdf
http://slidepdf.com/reader/full/jposguidelite-raypdf 40/117
SOFTWARE SPECIFICATION
MODEL No. VERSION FUNC/PAGE NO
JS-925WS All 1 -35
REV /No NAME DATE
Rev 0.09 2009/12/28
FUNCTION APPROVE CHECK DESIGN
JPOS Guide
- 35 -
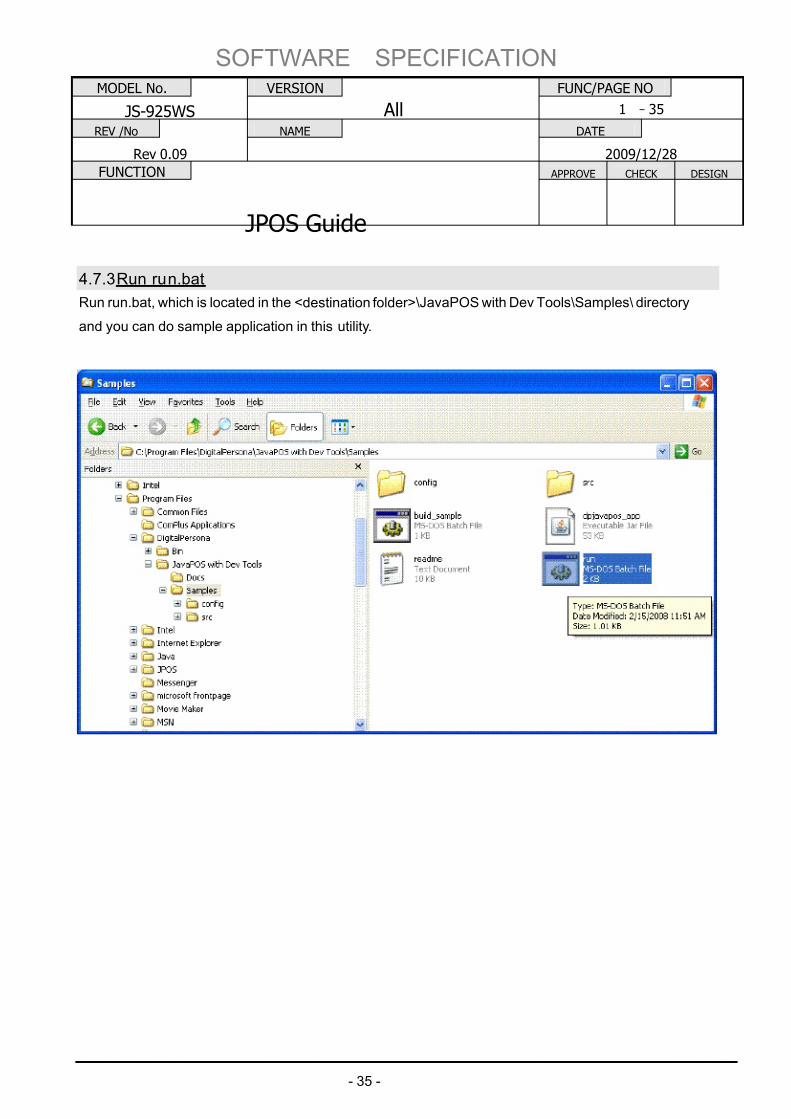
4.7.3 Run run.bat
Run run.bat, which is located in the <destination folder>\JavaPOS with Dev Tools\Samples\ directory
and you can do sample application in this utility.
7/27/2019 JposGuideLite-ray.pdf
http://slidepdf.com/reader/full/jposguidelite-raypdf 41/117
SOFTWARE SPECIFICATION
MODEL No. VERSION FUNC/PAGE NO
JS-925WS All 1 -36
REV /No NAME DATE
Rev 0.09 2009/12/28
FUNCTION APPROVE CHECK DESIGN
JPOS Guide
- 36 -
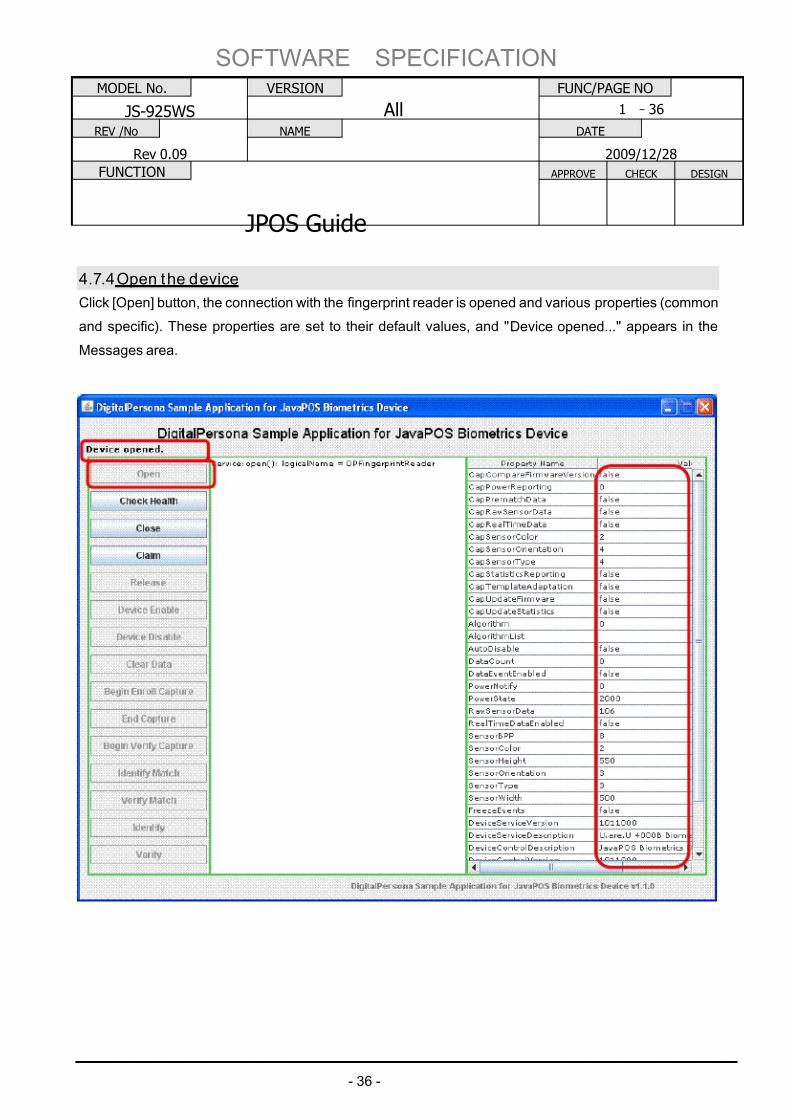
4.7.4 Open the device
Click [Open] button, the connection with the fingerprint reader is opened and various properties (common
and specific). These properties are set to their default values, and "Device opened..." appears in the
Messages area.
7/27/2019 JposGuideLite-ray.pdf
http://slidepdf.com/reader/full/jposguidelite-raypdf 42/117
SOFTWARE SPECIFICATION
MODEL No. VERSION FUNC/PAGE NO
JS-925WS All 1 -37
REV /No NAME DATE
Rev 0.09 2009/12/28
FUNCTION APPROVE CHECK DESIGN
JPOS Guide
- 37 -
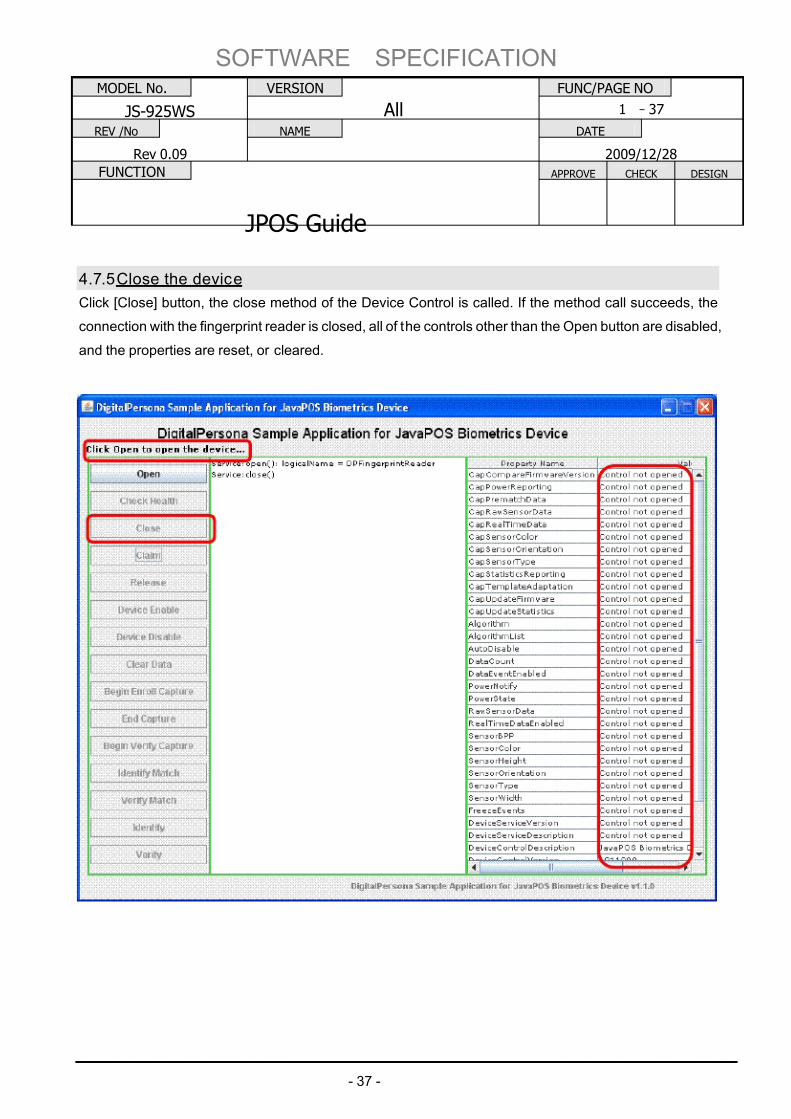
4.7.5 Close the device
Click [Close] button, the close method of the Device Control is called. If the method call succeeds, the
connection with the fingerprint reader is closed, all of the controls other than the Open button are disabled,
and the properties are reset, or cleared.
7/27/2019 JposGuideLite-ray.pdf
http://slidepdf.com/reader/full/jposguidelite-raypdf 43/117
SOFTWARE SPECIFICATION
MODEL No. VERSION FUNC/PAGE NO
JS-925WS All 1 -38
REV /No NAME DATE
Rev 0.09 2009/12/28
FUNCTION APPROVE CHECK DESIGN
JPOS Guide
- 38 -
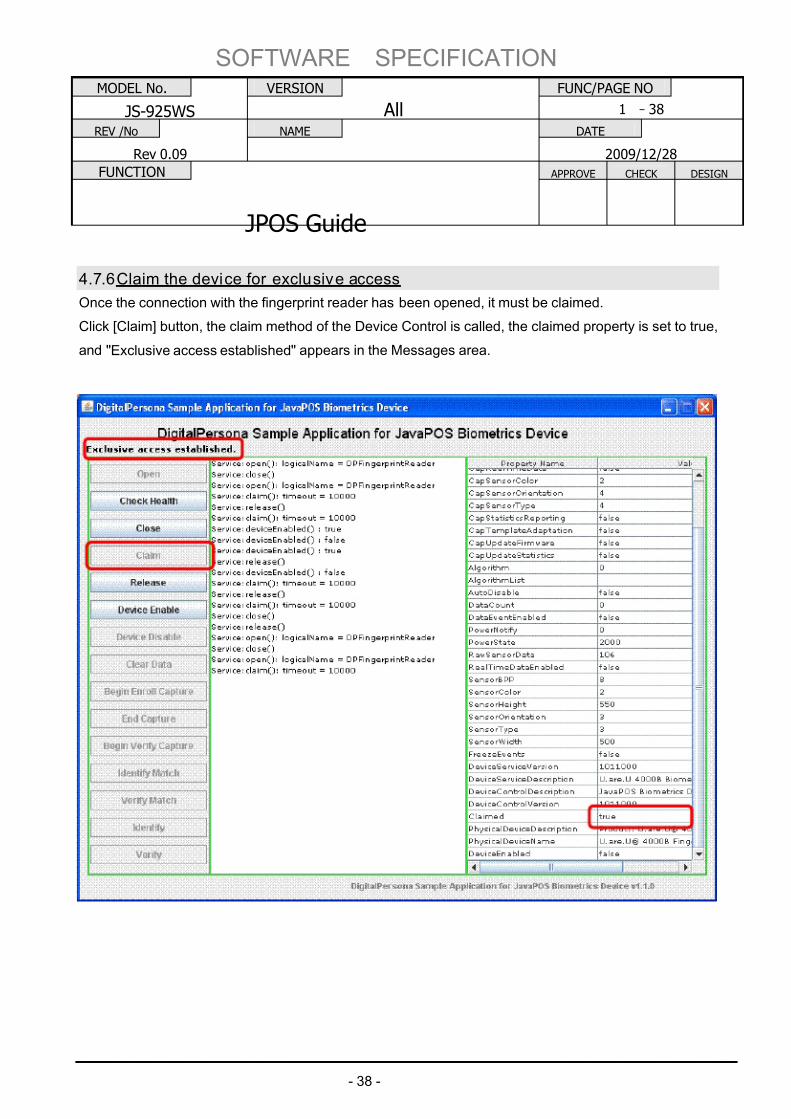
4.7.6 Claim the device for exclusive access
Once the connection with the fingerprint reader has been opened, it must be claimed.
Click [Claim] button, the claim method of the Device Control is called, the claimed property is set to true,
and "Exclusive access established" appears in the Messages area.
7/27/2019 JposGuideLite-ray.pdf
http://slidepdf.com/reader/full/jposguidelite-raypdf 44/117
SOFTWARE SPECIFICATION
MODEL No. VERSION FUNC/PAGE NO
JS-925WS All 1 -39
REV /No NAME DATE
Rev 0.09 2009/12/28
FUNCTION APPROVE CHECK DESIGN
JPOS Guide
- 39 -
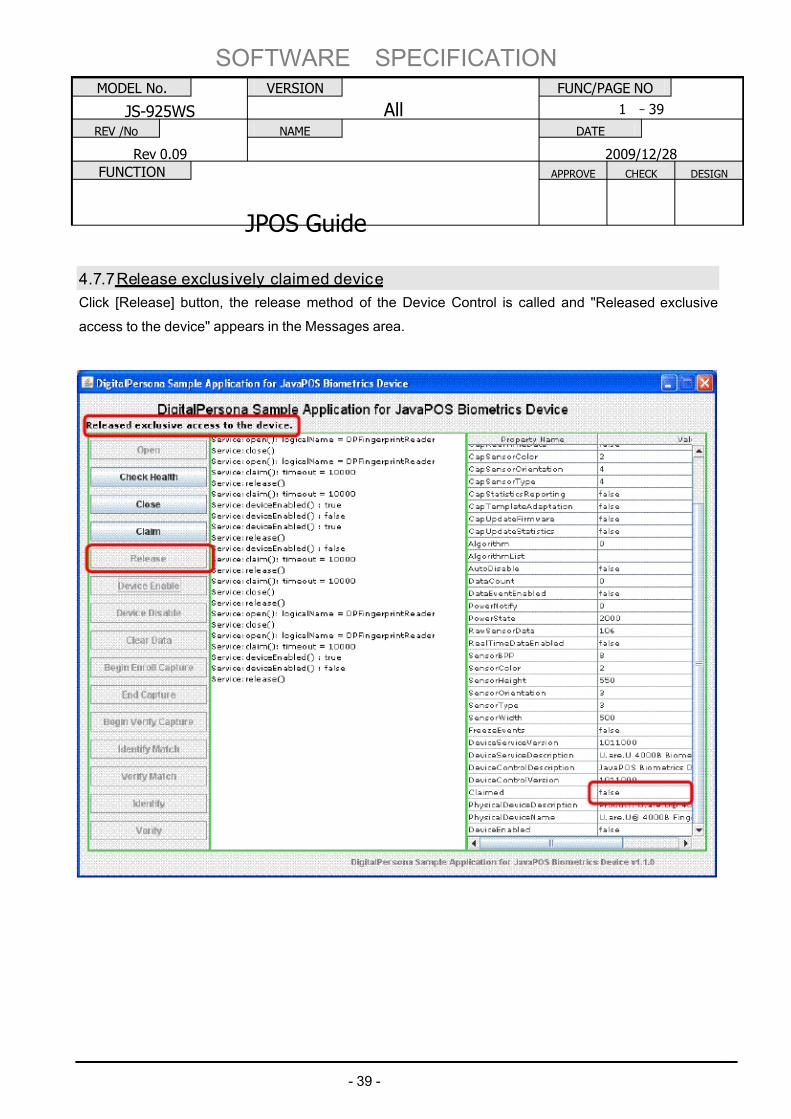
4.7.7 Release exclusively claimed device
Click [Release] button, the release method of the Device Control is called and "Released exclusive
access to the device" appears in the Messages area.
7/27/2019 JposGuideLite-ray.pdf
http://slidepdf.com/reader/full/jposguidelite-raypdf 45/117
SOFTWARE SPECIFICATION
MODEL No. VERSION FUNC/PAGE NO
JS-925WS All 1 -40
REV /No NAME DATE
Rev 0.09 2009/12/28
FUNCTION APPROVE CHECK DESIGN
JPOS Guide
- 40 -
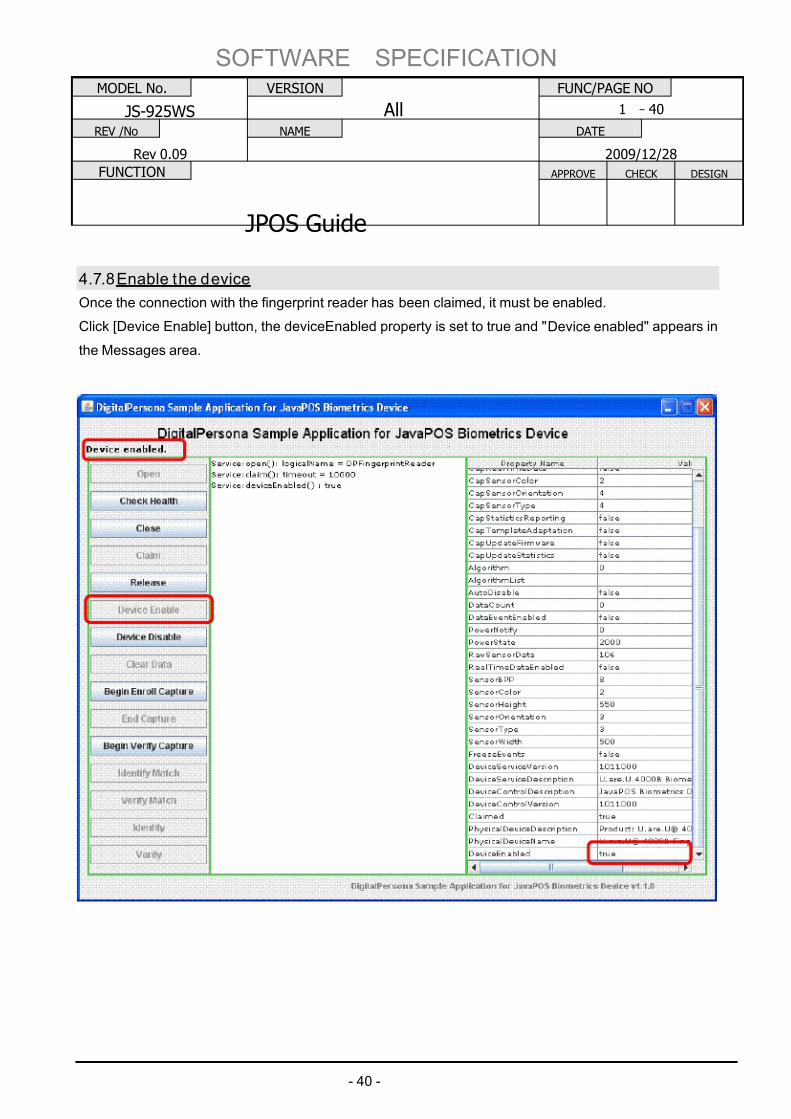
4.7.8 Enable the device
Once the connection with the fingerprint reader has been claimed, it must be enabled.
Click [Device Enable] button, the deviceEnabled property is set to true and "Device enabled" appears in
the Messages area.
7/27/2019 JposGuideLite-ray.pdf
http://slidepdf.com/reader/full/jposguidelite-raypdf 46/117
SOFTWARE SPECIFICATION
MODEL No. VERSION FUNC/PAGE NO
JS-925WS All 1 -41
REV /No NAME DATE
Rev 0.09 2009/12/28
FUNCTION APPROVE CHECK DESIGN
JPOS Guide
- 41 -
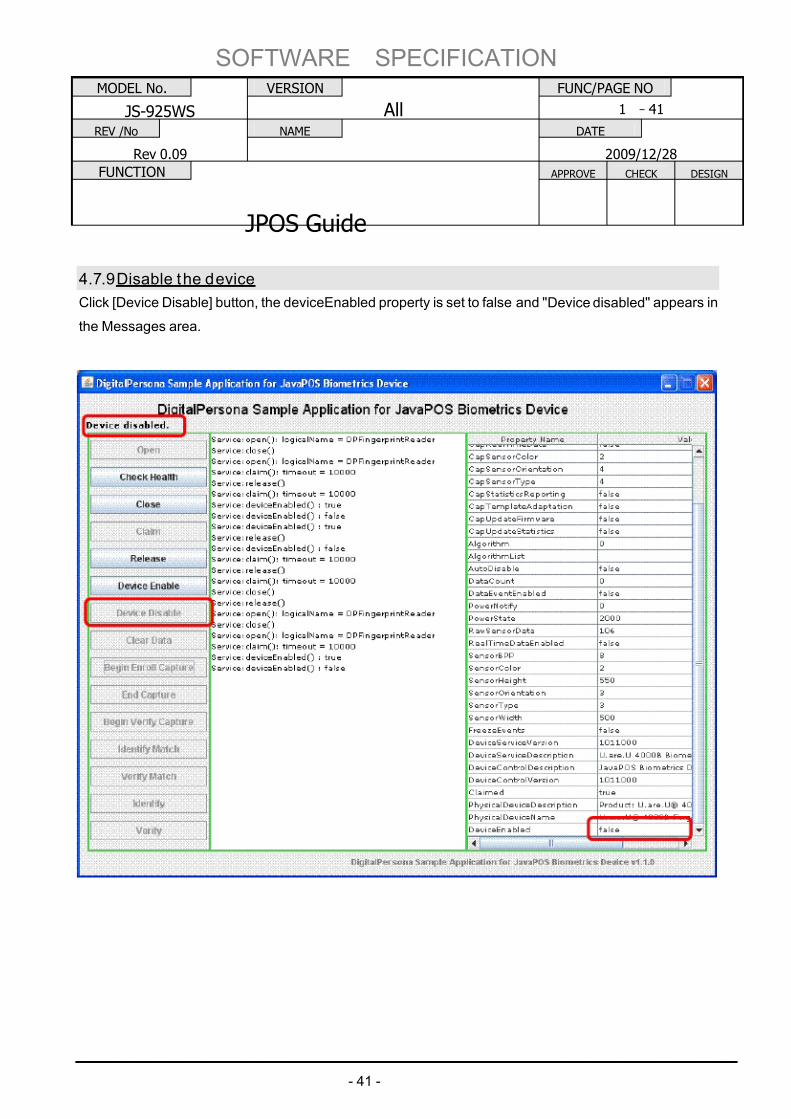
4.7.9 Disable the device
Click [Device Disable] button, the deviceEnabled property is set to false and "Device disabled" appears in
the Messages area.
7/27/2019 JposGuideLite-ray.pdf
http://slidepdf.com/reader/full/jposguidelite-raypdf 47/117
SOFTWARE SPECIFICATION
MODEL No. VERSION FUNC/PAGE NO
JS-925WS All 1 -42
REV /No NAME DATE
Rev 0.09 2009/12/28
FUNCTION APPROVE CHECK DESIGN
JPOS Guide
- 42 -
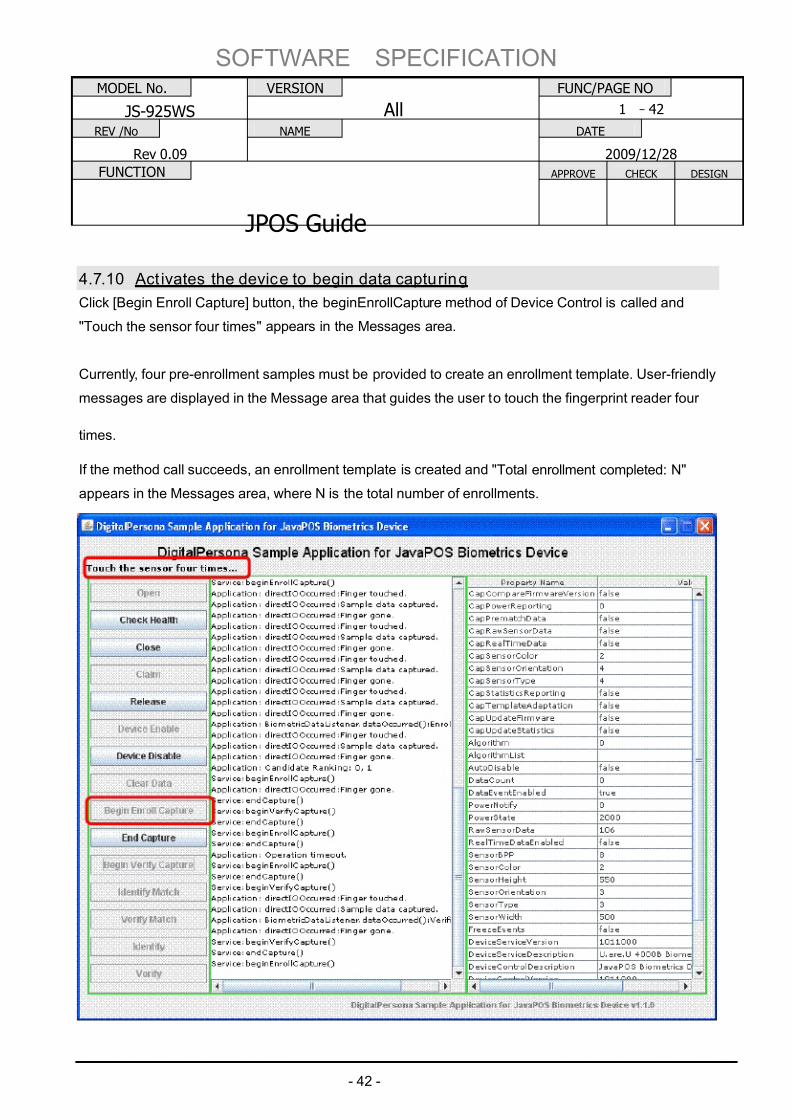
4.7.10 Act ivates the device to begin data capturing
Click [Begin Enroll Capture] button, the beginEnrollCapture method of Device Control is called and
"Touch the sensor four times" appears in the Messages area.
Currently, four pre-enrollment samples must be provided to create an enrollment template. User-friendly
messages are displayed in the Message area that guides the user to touch the fingerprint reader four
times.
If the method call succeeds, an enrollment template is created and "Total enrollment completed: N"
appears in the Messages area, where N is the total number of enrollments.
7/27/2019 JposGuideLite-ray.pdf
http://slidepdf.com/reader/full/jposguidelite-raypdf 48/117
SOFTWARE SPECIFICATION
MODEL No. VERSION FUNC/PAGE NO
JS-925WS All 1 -43
REV /No NAME DATE
Rev 0.09 2009/12/28
FUNCTION APPROVE CHECK DESIGN
JPOS Guide
- 43 -
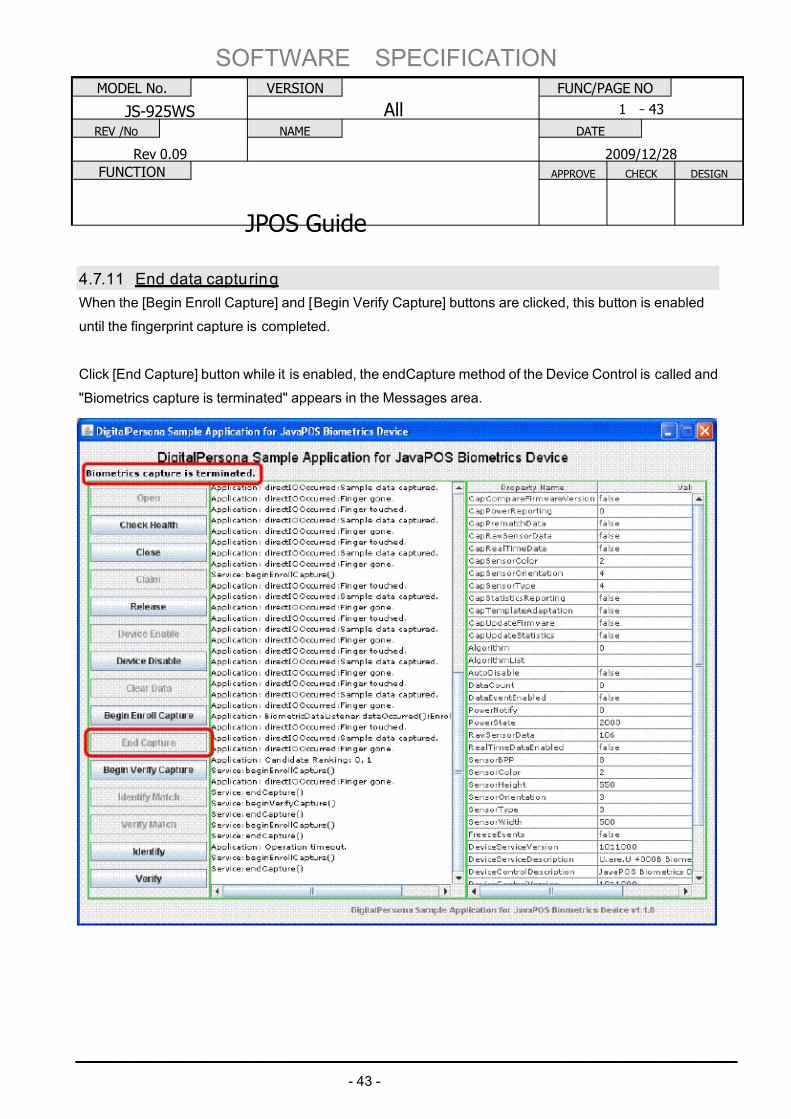
4.7.11 End data capturing
When the [Begin Enroll Capture] and [Begin Verify Capture] buttons are clicked, this button is enabled
until the fingerprint capture is completed.
Click [End Capture] button while it is enabled, the endCapture method of the Device Control is called and
"Biometrics capture is terminated" appears in the Messages area.

7/27/2019 JposGuideLite-ray.pdf
http://slidepdf.com/reader/full/jposguidelite-raypdf 49/117
SOFTWARE SPECIFICATION
MODEL No. VERSION FUNC/PAGE NO
JS-925WS All 1 -44
REV /No NAME DATE
Rev 0.09 2009/12/28
FUNCTION APPROVE CHECK DESIGN
JPOS Guide
- 44 -
4.7.12 Starts capturing biometrics data for the purposes of verification
Click [Begin Verify Capture] button is clicked, the beginVerifyCapture method of the Device Control is
called and "Touch the sensor to capture sample data" appears in the Messages area.
The user touches the fingerprint reader.
If the method call succeeds, a verification template is created and "Sample Data Captured" appears in theMessages area.
7/27/2019 JposGuideLite-ray.pdf
http://slidepdf.com/reader/full/jposguidelite-raypdf 50/117
SOFTWARE SPECIFICATION
MODEL No. VERSION FUNC/PAGE NO
JS-925WS All 1 -45
REV /No NAME DATE
Rev 0.09 2009/12/28
FUNCTION APPROVE CHECK DESIGN
JPOS Guide
- 45 -
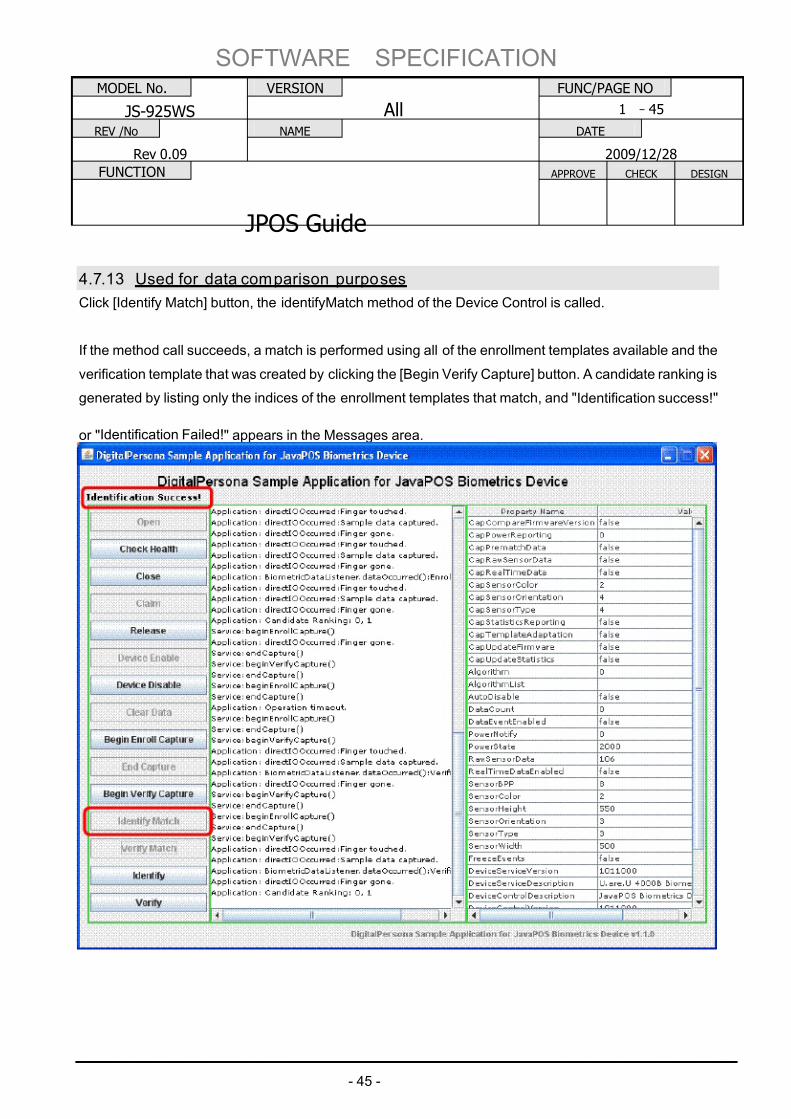
4.7.13 Used for data comparison purposes
Click [Identify Match] button, the identifyMatch method of the Device Control is called.
If the method call succeeds, a match is performed using all of the enrollment templates available and the
verification template that was created by clicking the [Begin Verify Capture] button. A candidate ranking is
generated by listing only the indices of the enrollment templates that match, and "Identification success!"
or "Identification Failed!" appears in the Messages area.
7/27/2019 JposGuideLite-ray.pdf
http://slidepdf.com/reader/full/jposguidelite-raypdf 51/117
SOFTWARE SPECIFICATION
MODEL No. VERSION FUNC/PAGE NO
JS-925WS All 1 -46
REV /No NAME DATE
Rev 0.09 2009/12/28
FUNCTION APPROVE CHECK DESIGN
JPOS Guide
- 46 -
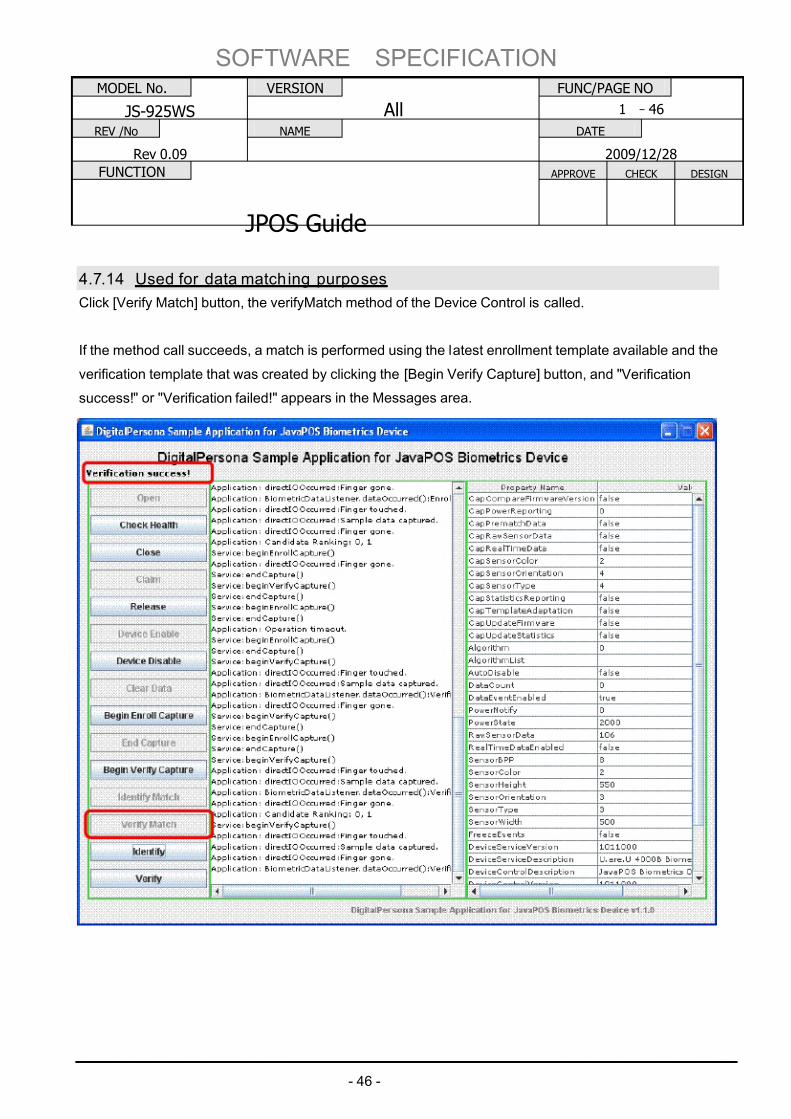
4.7.14 Used for data matching purposes
Click [Verify Match] button, the verifyMatch method of the Device Control is called.
If the method call succeeds, a match is performed using the latest enrollment template available and the
verification template that was created by clicking the [Begin Verify Capture] button, and "Verification
success!" or "Verification failed!" appears in the Messages area.

7/27/2019 JposGuideLite-ray.pdf
http://slidepdf.com/reader/full/jposguidelite-raypdf 52/117
SOFTWARE SPECIFICATION
MODEL No. VERSION FUNC/PAGE NO
JS-925WS All 1 -47
REV /No NAME DATE
Rev 0.09 2009/12/28
FUNCTION APPROVE CHECK DESIGN
JPOS Guide
- 47 -
4.7.15 Used for synchronous biometric identifications
Click [Identify] button, the identify method of the Device Control is called and "Please touch the sensor for
Identification" appears in the Messages area.
The user touches the fingerprint reader.
If the method call succeeds, a verification template is created on-the-fly. Then a match is performed usingall of the enrollment templates available and the verification template. A candidate ranking is generated
by listing only the indices of the enrollment templates that match, and "Identification success!" or
"Identification Failed!" appears in the Messages area.
7/27/2019 JposGuideLite-ray.pdf
http://slidepdf.com/reader/full/jposguidelite-raypdf 53/117
SOFTWARE SPECIFICATION
MODEL No. VERSION FUNC/PAGE NO
JS-925WS All 1 -48
REV /No NAME DATE
Rev 0.09 2009/12/28
FUNCTION APPROVE CHECK DESIGN
JPOS Guide
- 48 -
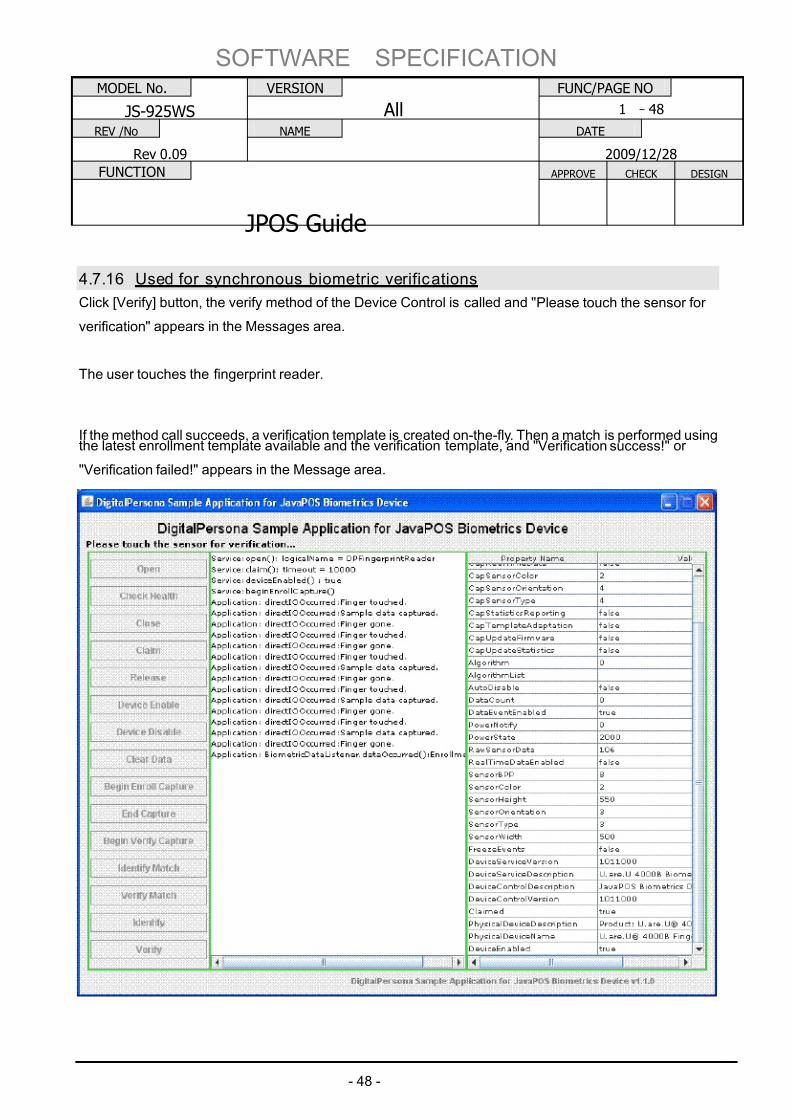
4.7.16 Used for synchronous biometric verifications
Click [Verify] button, the verify method of the Device Control is called and "Please touch the sensor for
verification" appears in the Messages area.
The user touches the fingerprint reader.
If the method call succeeds, a verification template is created on-the-fly. Then a match is performed usingthe latest enrollment template available and the verification template, and "Verification success!" or
"Verification failed!" appears in the Message area.
7/27/2019 JposGuideLite-ray.pdf
http://slidepdf.com/reader/full/jposguidelite-raypdf 54/117
SOFTWARE SPECIFICATION
MODEL No. VERSION FUNC/PAGE NO
JS-925WS All 1 -49
REV /No NAME DATE
Rev 0.09 2009/12/28
FUNCTION APPROVE CHECK DESIGN
JPOS Guide
- 49 -
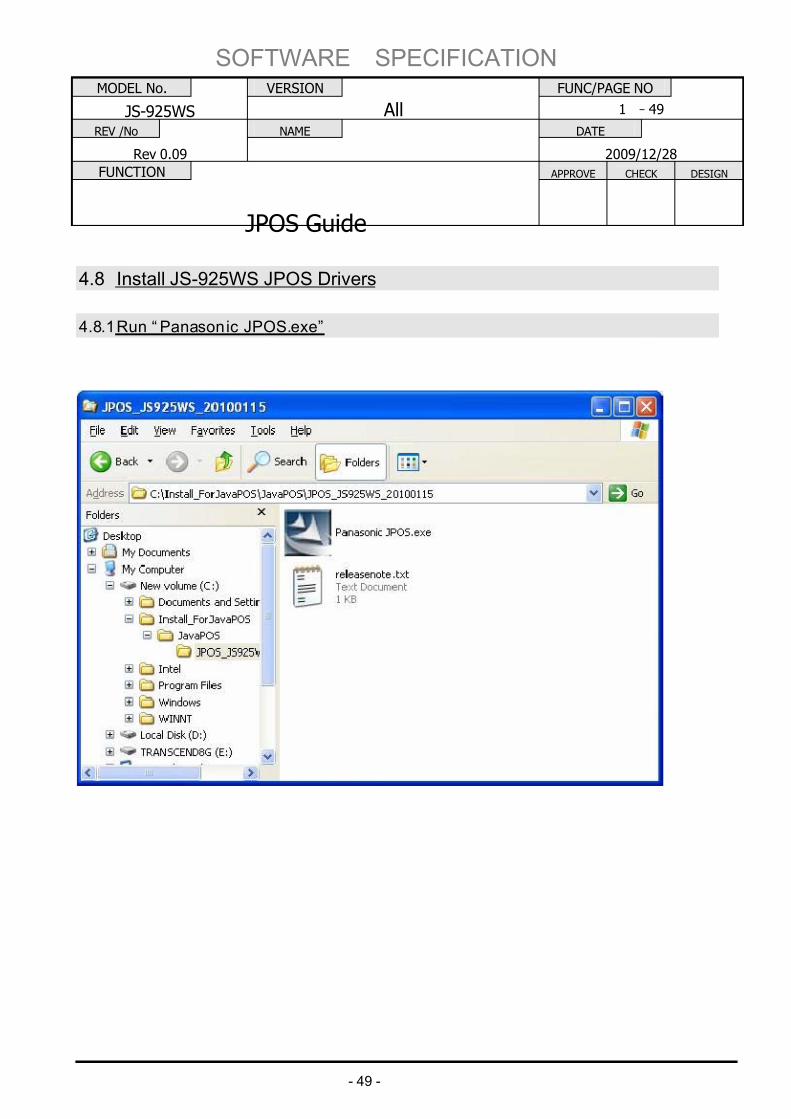
4.8 Install JS-925WS JPOS Drivers
4.8.1 Run “ Panasonic JPOS.exe”
7/27/2019 JposGuideLite-ray.pdf
http://slidepdf.com/reader/full/jposguidelite-raypdf 55/117
SOFTWARE SPECIFICATION
MODEL No. VERSION FUNC/PAGE NO
JS-925WS All 1 -50
REV /No NAME DATE
Rev 0.09 2009/12/28
FUNCTION APPROVE CHECK DESIGN
JPOS Guide
- 50 -
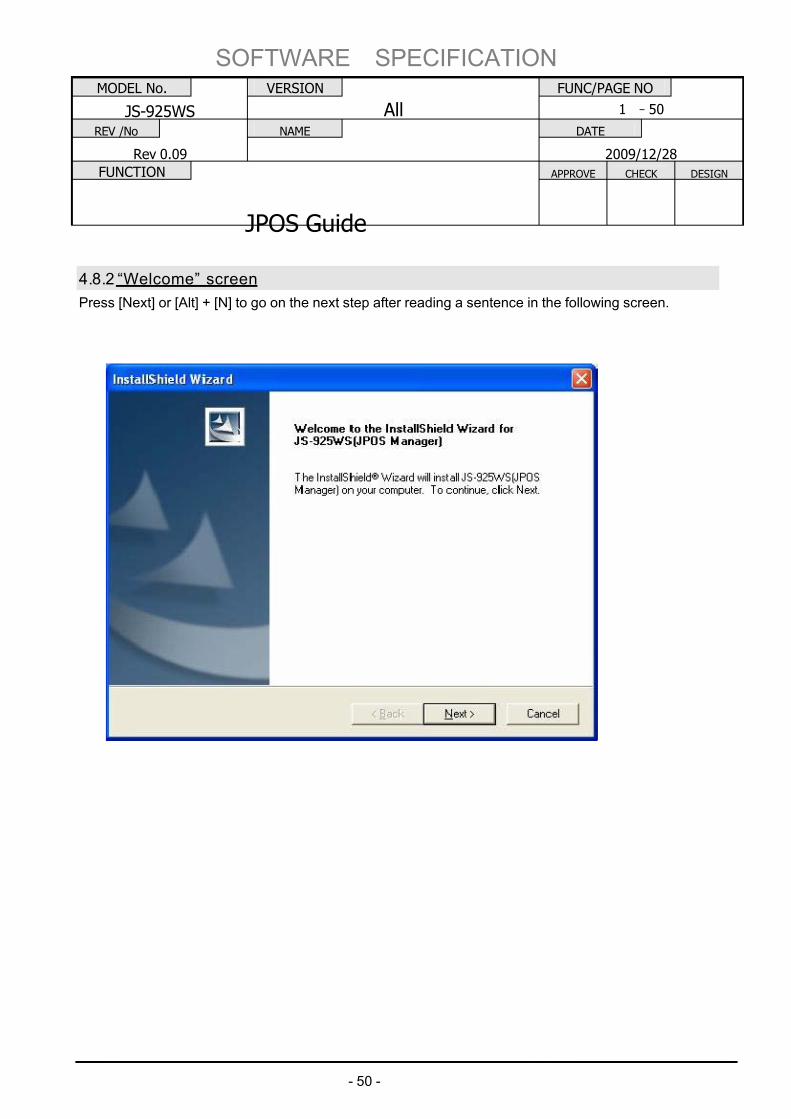
4.8.2 “Welcome” screen
Press [Next] or [Alt] + [N] to go on the next step after reading a sentence in the following screen.

7/27/2019 JposGuideLite-ray.pdf
http://slidepdf.com/reader/full/jposguidelite-raypdf 56/117
SOFTWARE SPECIFICATION
MODEL No. VERSION FUNC/PAGE NO
JS-925WS All 1 -51
REV /No NAME DATE
Rev 0.09 2009/12/28
FUNCTION APPROVE CHECK DESIGN
JPOS Guide
- 51 -
4.8.3 “ Destination Folder” screen
Press [Next] or [Alt] + [N] in following screen.
7/27/2019 JposGuideLite-ray.pdf
http://slidepdf.com/reader/full/jposguidelite-raypdf 57/117
SOFTWARE SPECIFICATION
MODEL No. VERSION FUNC/PAGE NO
JS-925WS All 1 -52
REV /No NAME DATE
Rev 0.09 2009/12/28
FUNCTION APPROVE CHECK DESIGN
JPOS Guide
- 52 -
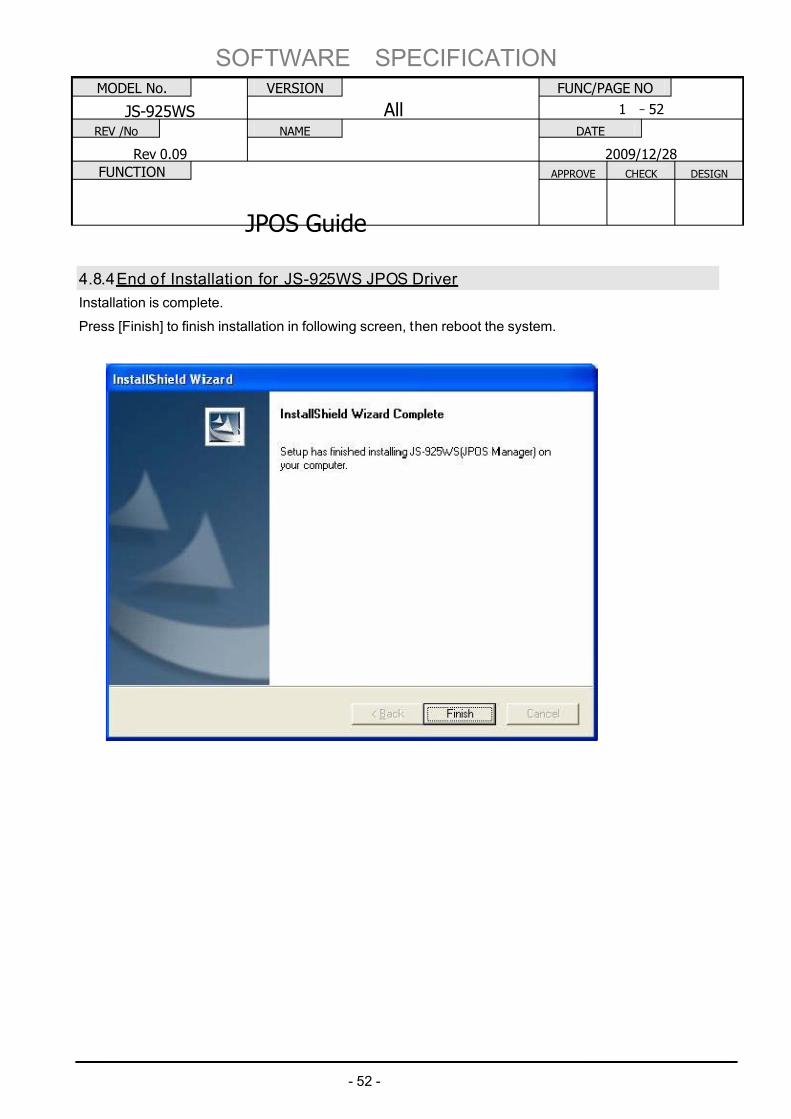
4.8.4 End of Installation for JS-925WS JPOS Driver
Installation is complete.
Press [Finish] to finish installation in following screen, then reboot the system.
7/27/2019 JposGuideLite-ray.pdf
http://slidepdf.com/reader/full/jposguidelite-raypdf 58/117
SOFTWARE SPECIFICATION
MODEL No. VERSION FUNC/PAGE NO
JS-925WS All 1 -53
REV /No NAME DATE
Rev 0.09 2009/12/28
FUNCTION APPROVE CHECK DESIGN
JPOS Guide
- 53 -
4.9 MSR_JIS ConfigurationMSR_JIS Configuration is necessary before using MSR_JIS reader device.
Please plug-in the MSR_JIS reader unit to JS-925WS.
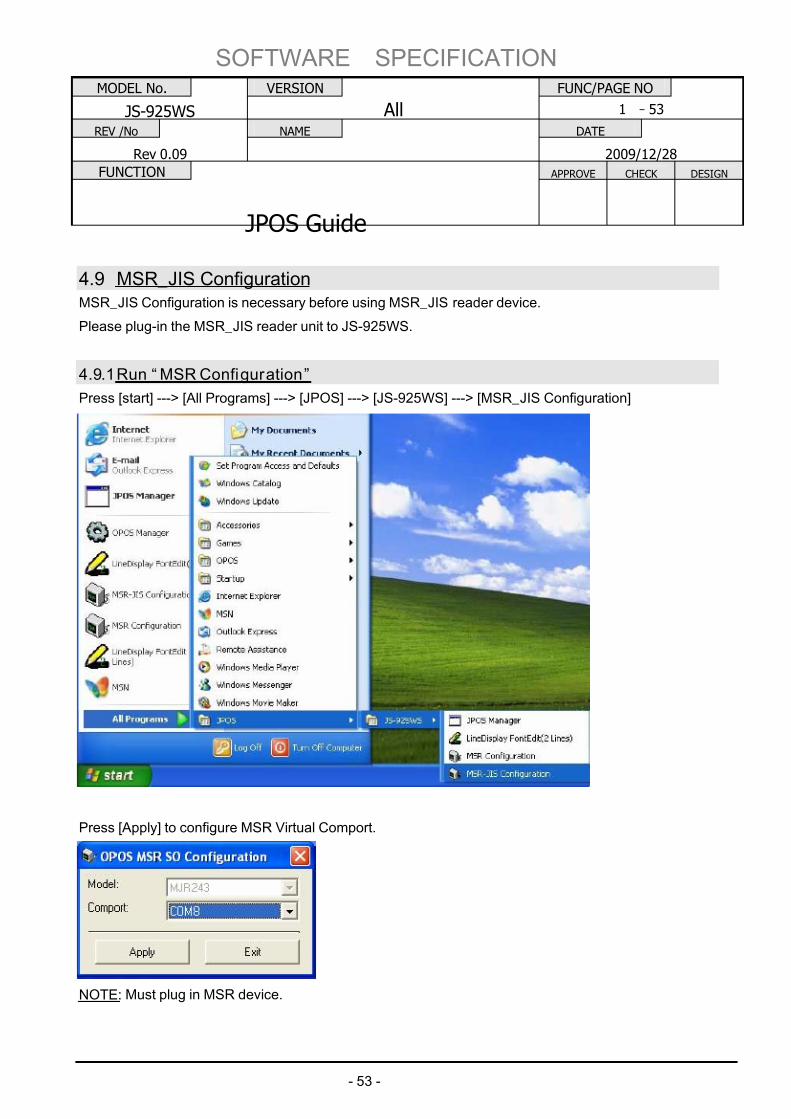
4.9.1 Run “ MSR Configuration”
Press [start] ---> [All Programs] ---> [JPOS] ---> [JS-925WS] ---> [MSR_JIS Configuration]
Press [Apply] to configure MSR Virtual Comport.
NOTE: Must plug in MSR device.
7/27/2019 JposGuideLite-ray.pdf
http://slidepdf.com/reader/full/jposguidelite-raypdf 59/117
SOFTWARE SPECIFICATION
MODEL No. VERSION FUNC/PAGE NO
JS-925WS All 1 -54
REV /No NAME DATE
Rev 0.09 2009/12/28
FUNCTION APPROVE CHECK DESIGN
JPOS Guide
- 54 -
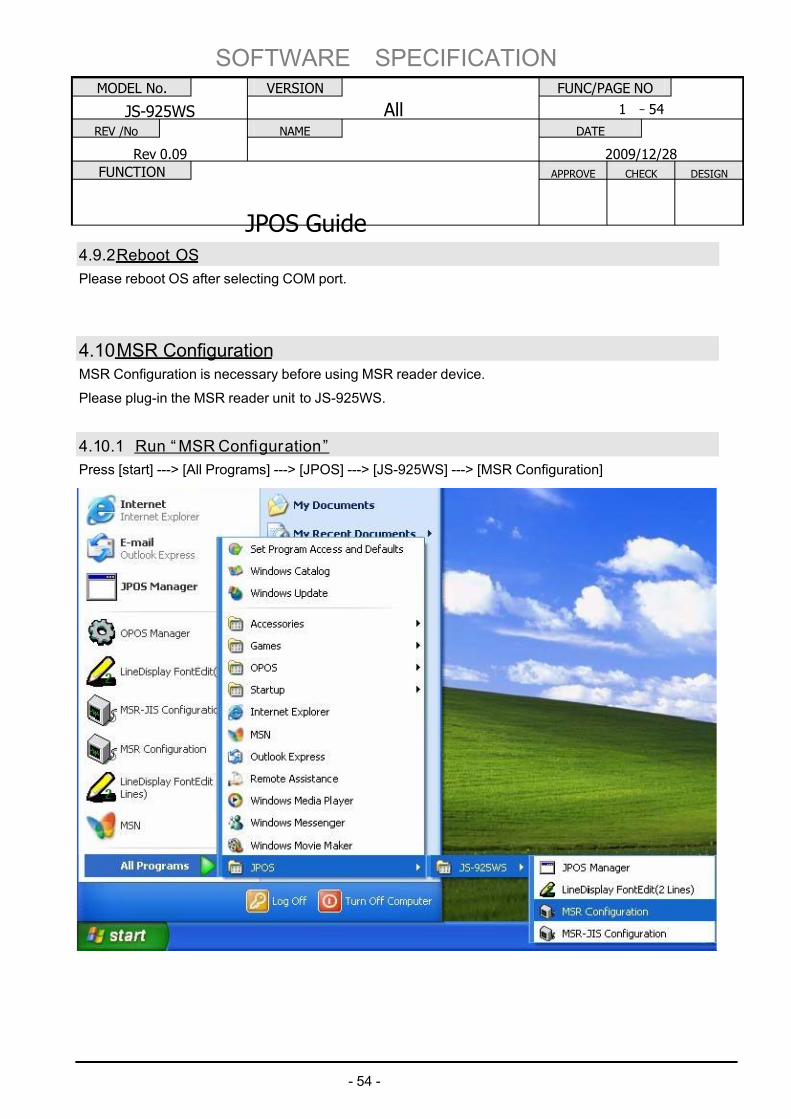
4.9.2 Reboot OS
Please reboot OS after selecting COM port.
4.10 MSR ConfigurationMSR Configuration is necessary before using MSR reader device.
Please plug-in the MSR reader unit to JS-925WS.
4.10.1 Run “ MSR Configuration”
Press [start] ---> [All Programs] ---> [JPOS] ---> [JS-925WS] ---> [MSR Configuration]
7/27/2019 JposGuideLite-ray.pdf
http://slidepdf.com/reader/full/jposguidelite-raypdf 60/117
SOFTWARE SPECIFICATION
MODEL No. VERSION FUNC/PAGE NO
JS-925WS All 1 -55
REV /No NAME DATE
Rev 0.09 2009/12/28
FUNCTION APPROVE CHECK DESIGN
JPOS Guide
- 55 -
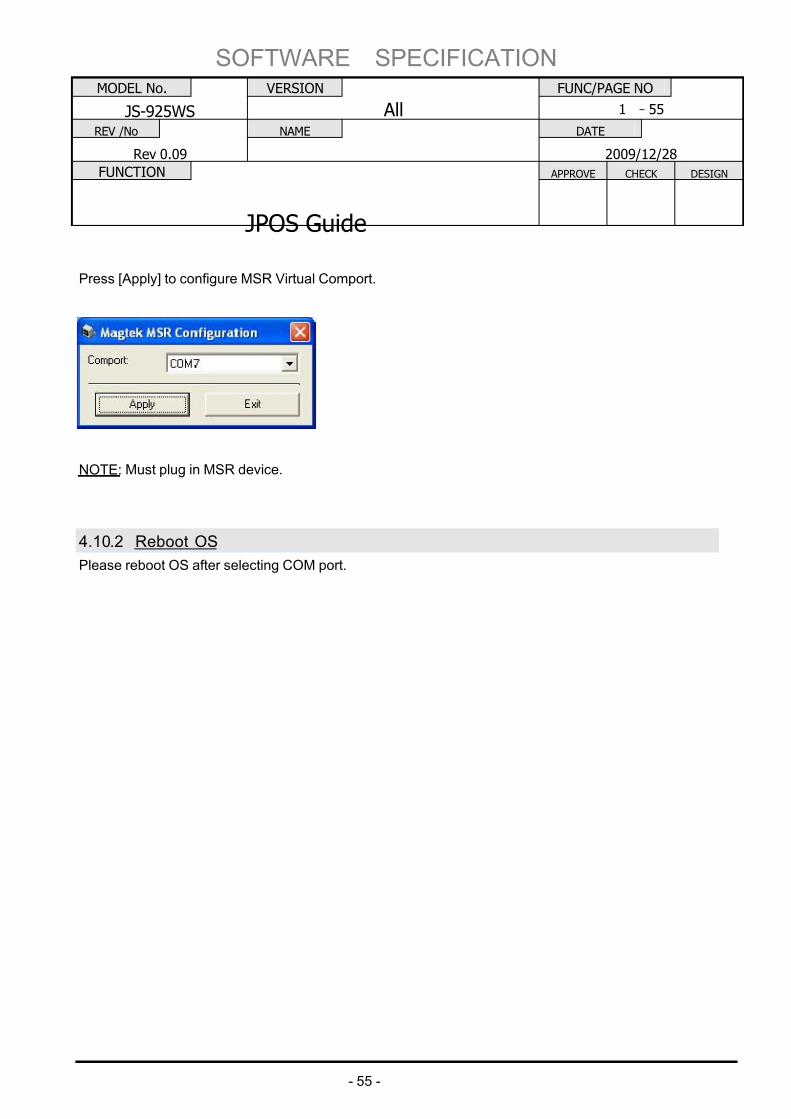
Press [Apply] to configure MSR Virtual Comport.
NOTE: Must plug in MSR device.
4.10.2 Reboot OS
Please reboot OS after selecting COM port.
7/27/2019 JposGuideLite-ray.pdf
http://slidepdf.com/reader/full/jposguidelite-raypdf 61/117
SOFTWARE SPECIFICATION
MODEL No. VERSION FUNC/PAGE NO
JS-925WS All 1 -56
REV /No NAME DATE
Rev 0.09 2009/12/28
FUNCTION APPROVE CHECK DESIGN
JPOS Guide
- 56 -
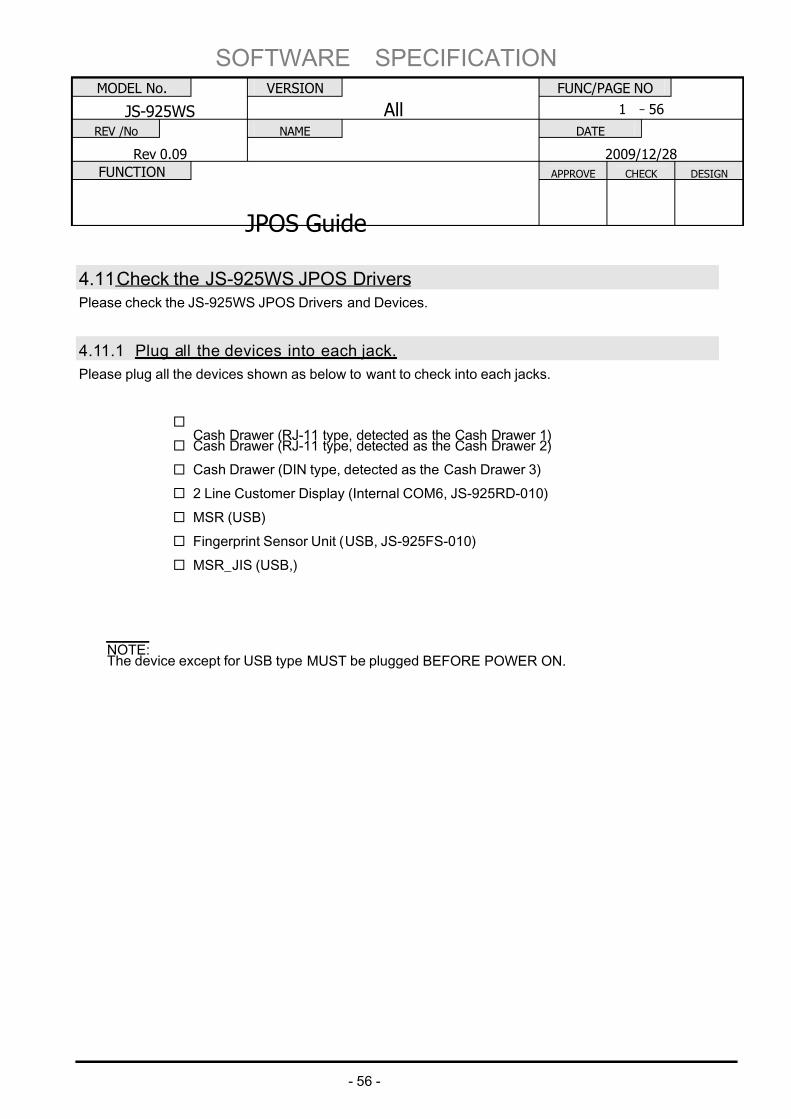
4.11 Check the JS-925WS JPOS DriversPlease check the JS-925WS JPOS Drivers and Devices.
4.11.1 Plug all the devices into each jack.
Please plug all the devices shown as below to want to check into each jacks.
Cash Drawer (RJ-11 type, detected as the Cash Drawer 1) Cash Drawer (RJ-11 type, detected as the Cash Drawer 2)
Cash Drawer (DIN type, detected as the Cash Drawer 3)
2 Line Customer Display (Internal COM6, JS-925RD-010)
MSR (USB)
Fingerprint Sensor Unit (USB, JS-925FS-010)
MSR_JIS (USB,)
NOTE:The device except for USB type MUST be plugged BEFORE POWER ON.
7/27/2019 JposGuideLite-ray.pdf
http://slidepdf.com/reader/full/jposguidelite-raypdf 62/117
SOFTWARE SPECIFICATION
MODEL No. VERSION FUNC/PAGE NO
JS-925WS All 1 -57
REV /No NAME DATE
Rev 0.09 2009/12/28
FUNCTION APPROVE CHECK DESIGN
JPOS Guide
- 57 -
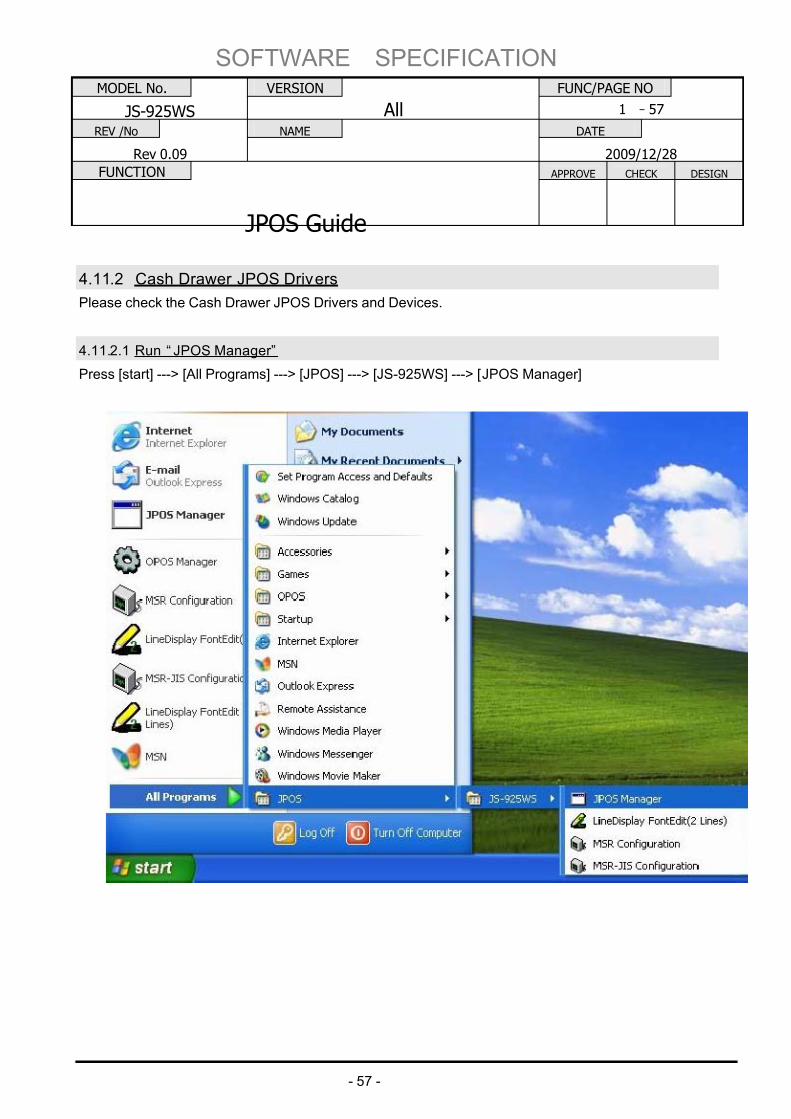
4.11.2 Cash Drawer JPOS Drivers
Please check the Cash Drawer JPOS Drivers and Devices.
4.11.2.1 Run “ JPOS Manager”
Press [start] ---> [All Programs] ---> [JPOS] ---> [JS-925WS] ---> [JPOS Manager]
7/27/2019 JposGuideLite-ray.pdf
http://slidepdf.com/reader/full/jposguidelite-raypdf 63/117
SOFTWARE SPECIFICATION
MODEL No. VERSION FUNC/PAGE NO
JS-925WS All 1 -58
REV /No NAME DATE
Rev 0.09 2009/12/28
FUNCTION APPROVE CHECK DESIGN
JPOS Guide
- 58 -
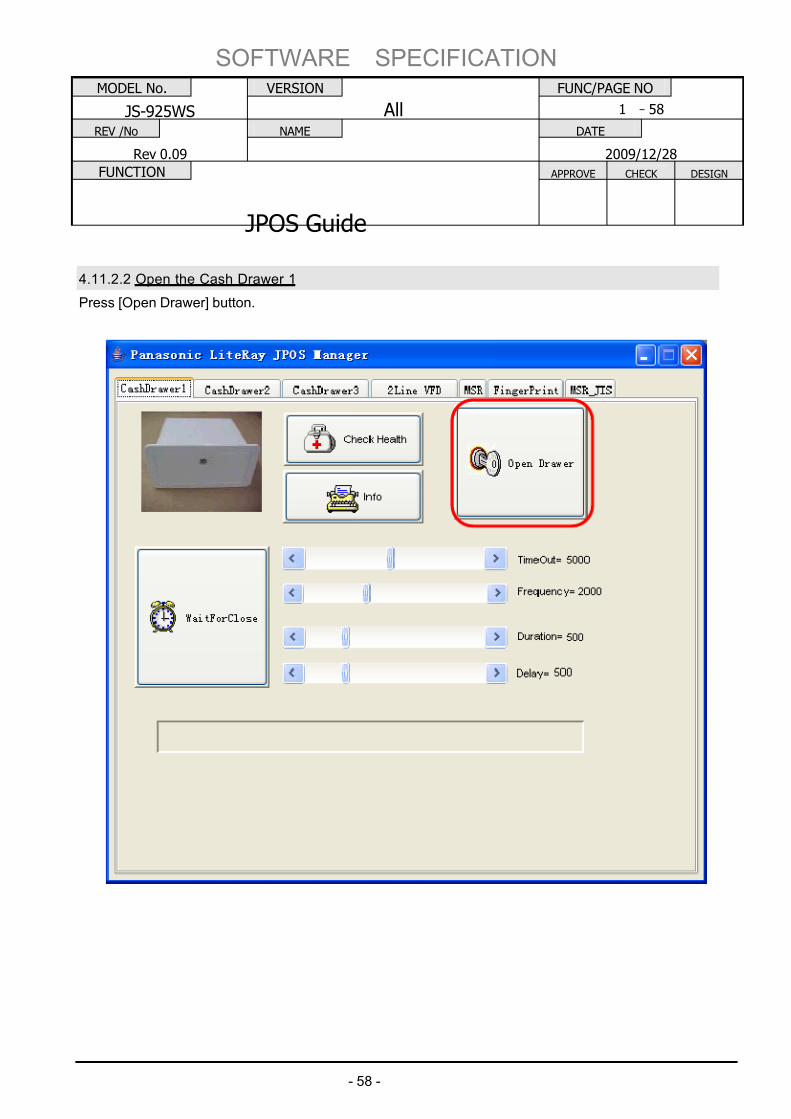
4.11.2.2 Open the Cash Drawer 1
Press [Open Drawer] button.
7/27/2019 JposGuideLite-ray.pdf
http://slidepdf.com/reader/full/jposguidelite-raypdf 64/117
SOFTWARE SPECIFICATION
MODEL No. VERSION FUNC/PAGE NO
JS-925WS All 1 -59
REV /No NAME DATE
Rev 0.09 2009/12/28
FUNCTION APPROVE CHECK DESIGN
JPOS Guide
- 59 -
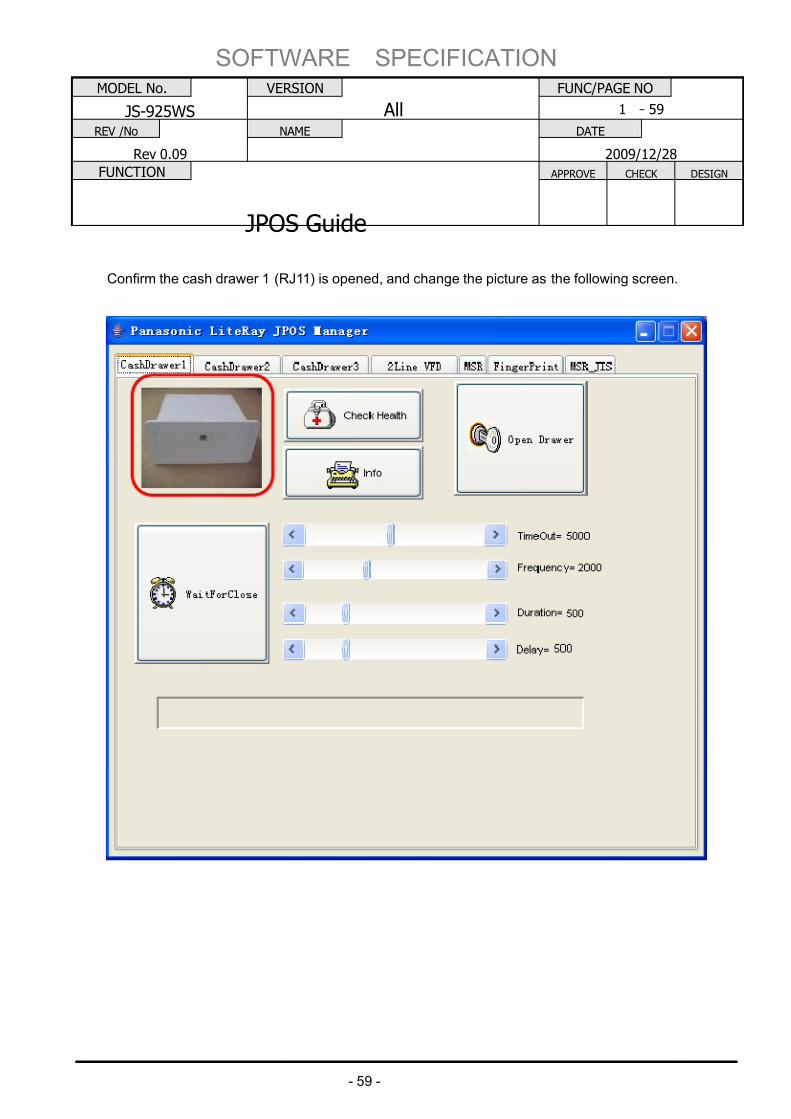
Confirm the cash drawer 1 (RJ11) is opened, and change the picture as the following screen.
7/27/2019 JposGuideLite-ray.pdf
http://slidepdf.com/reader/full/jposguidelite-raypdf 65/117
SOFTWARE SPECIFICATION
MODEL No. VERSION FUNC/PAGE NO
JS-925WS All 1 -60
REV /No NAME DATE
Rev 0.09 2009/12/28
FUNCTION APPROVE CHECK DESIGN
JPOS Guide
- 60 -
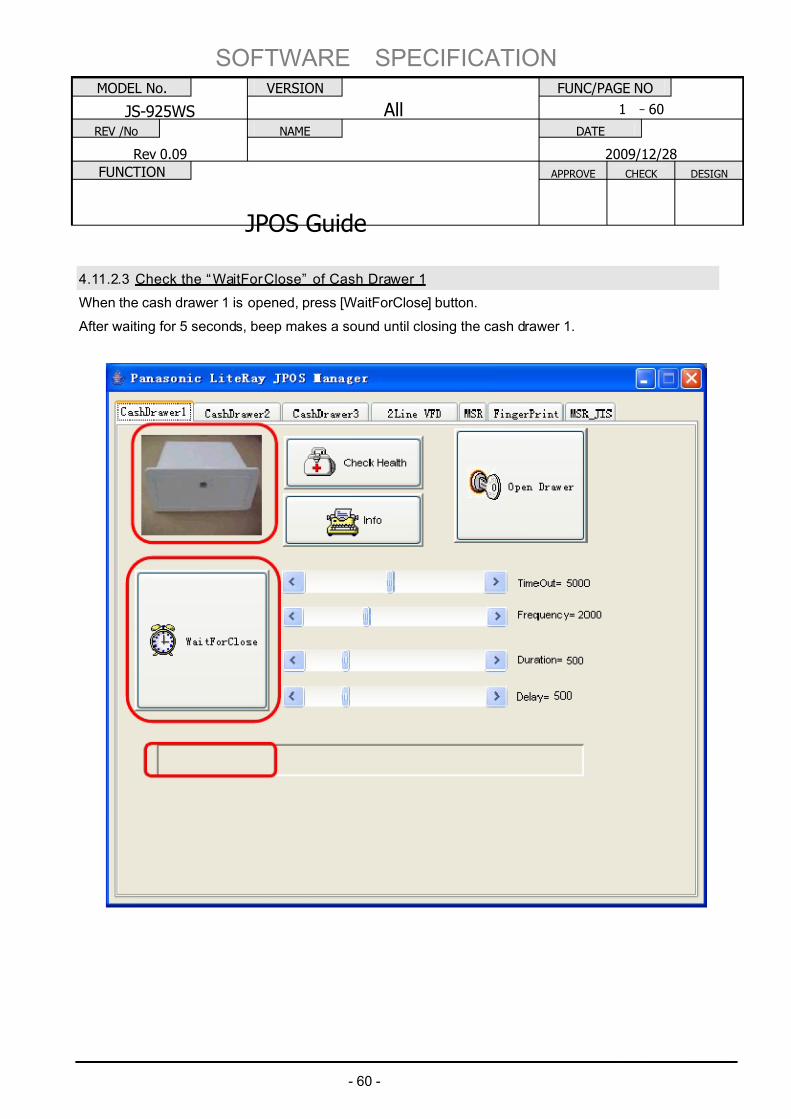
4.11.2.3 Check the “WaitForClose” of Cash Drawer 1
When the cash drawer 1 is opened, press [WaitForClose] button.
After waiting for 5 seconds, beep makes a sound until closing the cash drawer 1.
7/27/2019 JposGuideLite-ray.pdf
http://slidepdf.com/reader/full/jposguidelite-raypdf 66/117
SOFTWARE SPECIFICATION
MODEL No. VERSION FUNC/PAGE NO
JS-925WS All 1 -61
REV /No NAME DATE
Rev 0.09 2009/12/28
FUNCTION APPROVE CHECK DESIGN
JPOS Guide
- 61 -
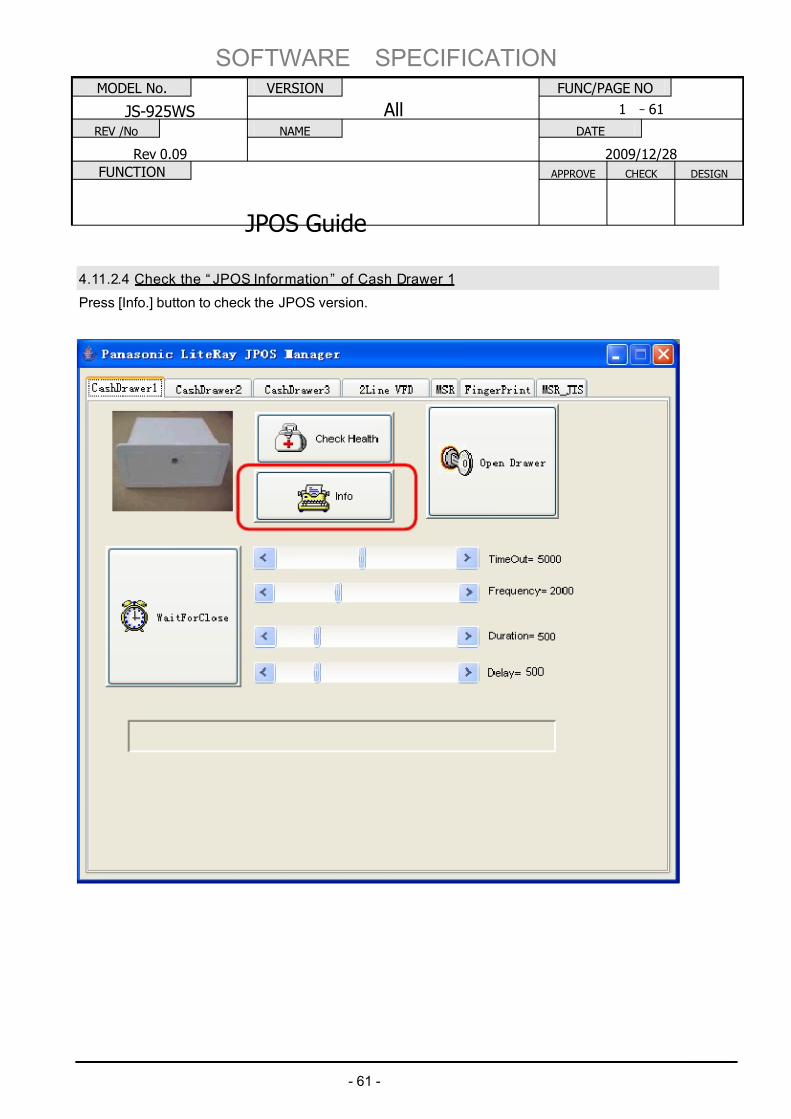
4.11.2.4 Check the “ JPOS Information” of Cash Drawer 1
Press [Info.] button to check the JPOS version.

7/27/2019 JposGuideLite-ray.pdf
http://slidepdf.com/reader/full/jposguidelite-raypdf 67/117
SOFTWARE SPECIFICATION
MODEL No. VERSION FUNC/PAGE NO
JS-925WS All 1 -62
REV /No NAME DATE
Rev 0.09 2009/12/28
FUNCTION APPROVE CHECK DESIGN
JPOS Guide
- 62 -
The following screen pops up to check the JPOS Information of the Cash Drawer 1.
4.11.2.5 Check the Cash Drawer 2 and the Cash Drawer3
Please check the same way as the Cash Drawer 1.
7/27/2019 JposGuideLite-ray.pdf
http://slidepdf.com/reader/full/jposguidelite-raypdf 68/117
SOFTWARE SPECIFICATION
MODEL No. VERSION FUNC/PAGE NO
JS-925WS All 1 -63
REV /No NAME DATE
Rev 0.09 2009/12/28
FUNCTION APPROVE CHECK DESIGN
JPOS Guide
- 63 -
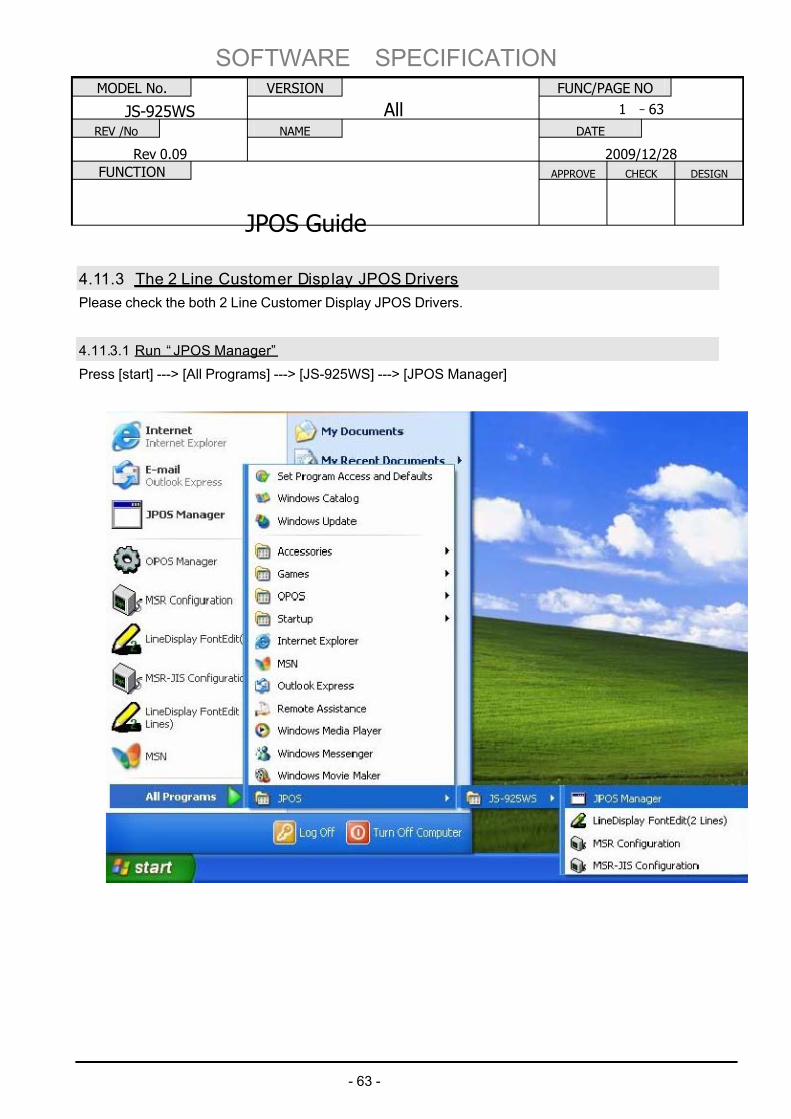
4.11.3 The 2 Line Customer Display JPOS Drivers
Please check the both 2 Line Customer Display JPOS Drivers.
4.11.3.1 Run “ JPOS Manager”
Press [start] ---> [All Programs] ---> [JS-925WS] ---> [JPOS Manager]
7/27/2019 JposGuideLite-ray.pdf
http://slidepdf.com/reader/full/jposguidelite-raypdf 69/117
SOFTWARE SPECIFICATION
MODEL No. VERSION FUNC/PAGE NO
JS-925WS All 1 -64
REV /No NAME DATE
Rev 0.09 2009/12/28
FUNCTION APPROVE CHECK DESIGN
JPOS Guide
- 64 -
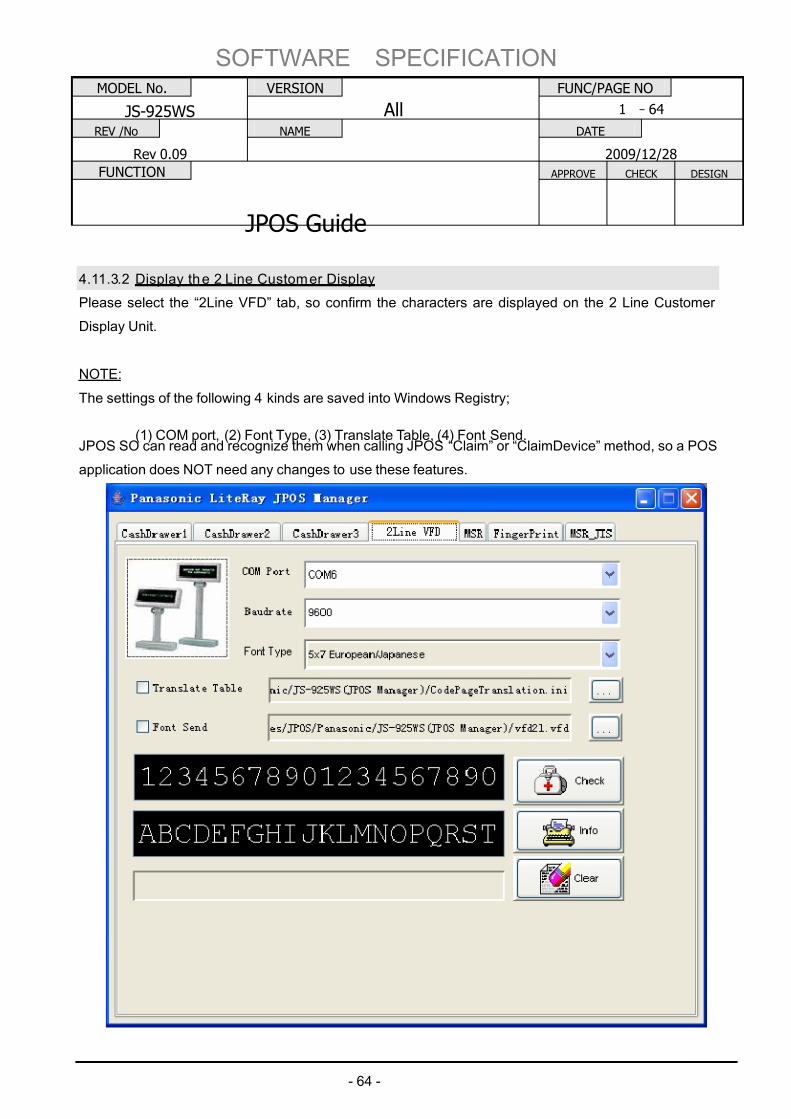
4.11.3.2 Display the 2 Line Customer Display
Please select the “2Line VFD” tab, so confirm the characters are displayed on the 2 Line Customer
Display Unit.
NOTE:
The settings of the following 4 kinds are saved into Windows Registry;
(1) COM port, (2) Font Type, (3) Translate Table, (4) Font Send.JPOS SO can read and recognize them when calling JPOS “Claim” or “ClaimDevice” method, so a POS
application does NOT need any changes to use these features.
7/27/2019 JposGuideLite-ray.pdf
http://slidepdf.com/reader/full/jposguidelite-raypdf 70/117
SOFTWARE SPECIFICATION
MODEL No. VERSION FUNC/PAGE NO
JS-925WS All 1 -65
REV /No NAME DATE
Rev 0.09 2009/12/28
FUNCTION APPROVE CHECK DESIGN
JPOS Guide
- 65 -
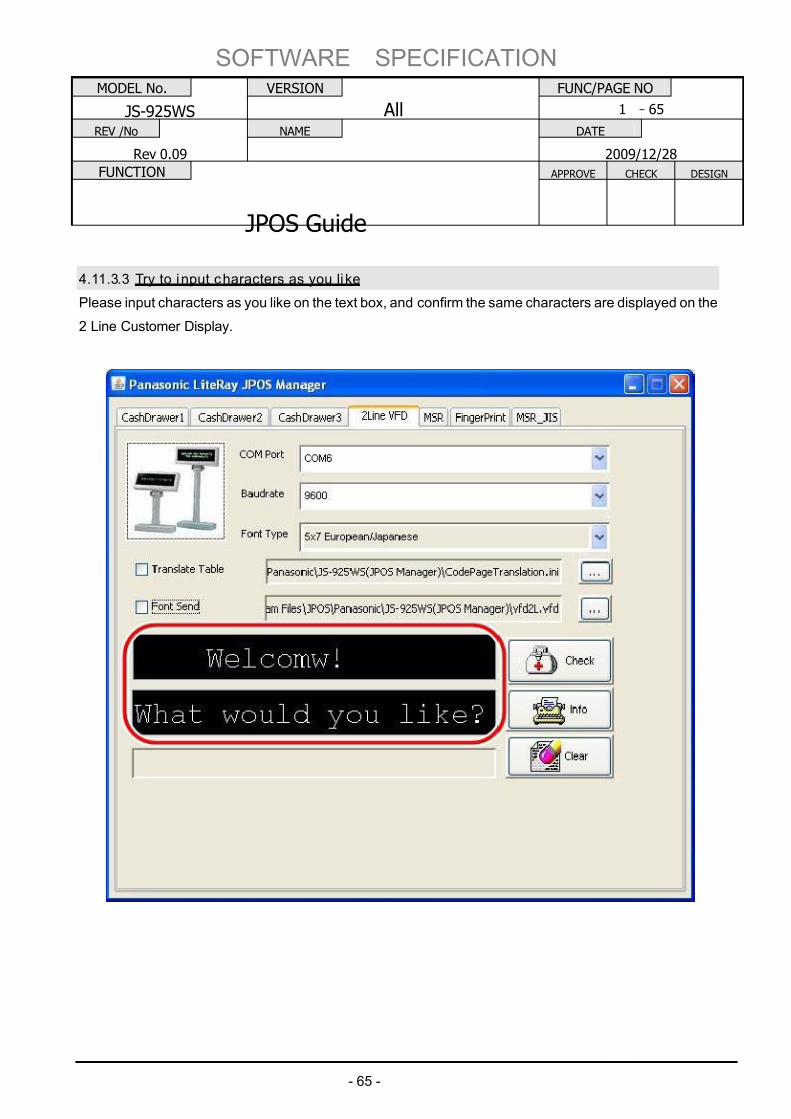
4.11.3.3 Try to input characters as you li ke
Please input characters as you like on the text box, and confirm the same characters are displayed on the
2 Line Customer Display.
7/27/2019 JposGuideLite-ray.pdf
http://slidepdf.com/reader/full/jposguidelite-raypdf 71/117
SOFTWARE SPECIFICATION
MODEL No. VERSION FUNC/PAGE NO
JS-925WS All 1 -66
REV /No NAME DATE
Rev 0.09 2009/12/28
FUNCTION APPROVE CHECK DESIGN
JPOS Guide
- 66 -
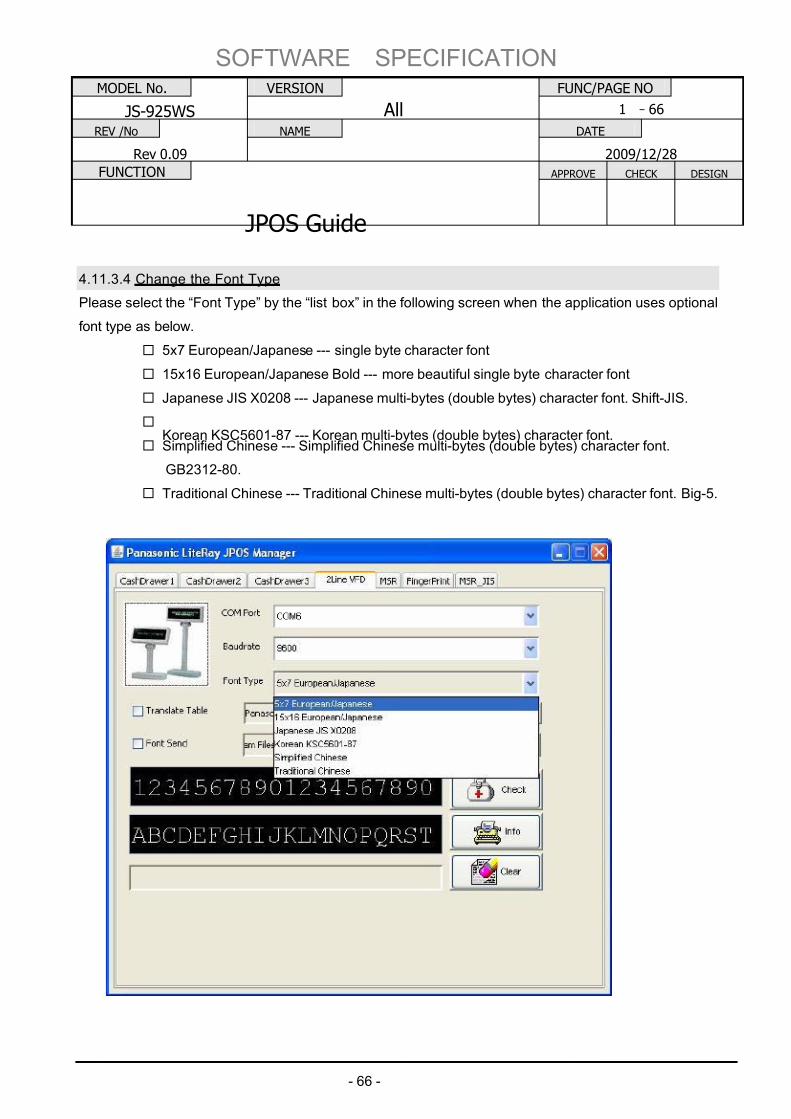
4.11.3.4 Change the Font Type
Please select the “Font Type” by the “list box” in the following screen when the application uses optional
font type as below.
5x7 European/Japanese --- single byte character font
15x16 European/Japanese Bold --- more beautiful single byte character font
Japanese JIS X0208 --- Japanese multi-bytes (double bytes) character font. Shift-JIS.
Korean KSC5601-87 --- Korean multi-bytes (double bytes) character font. Simplified Chinese --- Simplified Chinese multi-bytes (double bytes) character font.
GB2312-80.
Traditional Chinese --- Traditional Chinese multi-bytes (double bytes) character font. Big-5.
7/27/2019 JposGuideLite-ray.pdf
http://slidepdf.com/reader/full/jposguidelite-raypdf 72/117
SOFTWARE SPECIFICATION
MODEL No. VERSION FUNC/PAGE NO
JS-925WS All 1 -67
REV /No NAME DATE
Rev 0.09 2009/12/28
FUNCTION APPROVE CHECK DESIGN
JPOS Guide
- 67 -
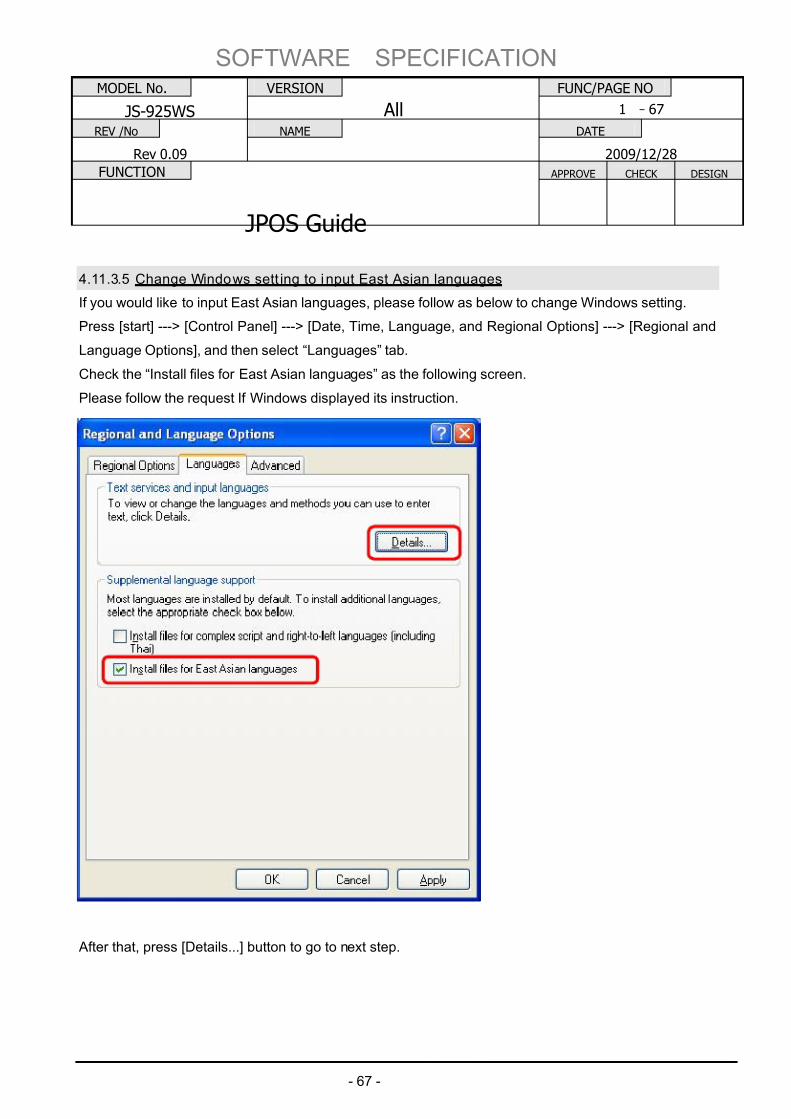
4.11.3.5 Change Windows sett ing to i nput East Asian languages
If you would like to input East Asian languages, please follow as below to change Windows setting.
Press [start] ---> [Control Panel] ---> [Date, Time, Language, and Regional Options] ---> [Regional and
Language Options], and then select “Languages” tab.
Check the “Install files for East Asian languages” as the following screen.
Please follow the request If Windows displayed its instruction.
After that, press [Details...] button to go to next step.
7/27/2019 JposGuideLite-ray.pdf
http://slidepdf.com/reader/full/jposguidelite-raypdf 73/117
SOFTWARE SPECIFICATION
MODEL No. VERSION FUNC/PAGE NO
JS-925WS All 1 -68
REV /No NAME DATE
Rev 0.09 2009/12/28
FUNCTION APPROVE CHECK DESIGN
JPOS Guide
- 68 -
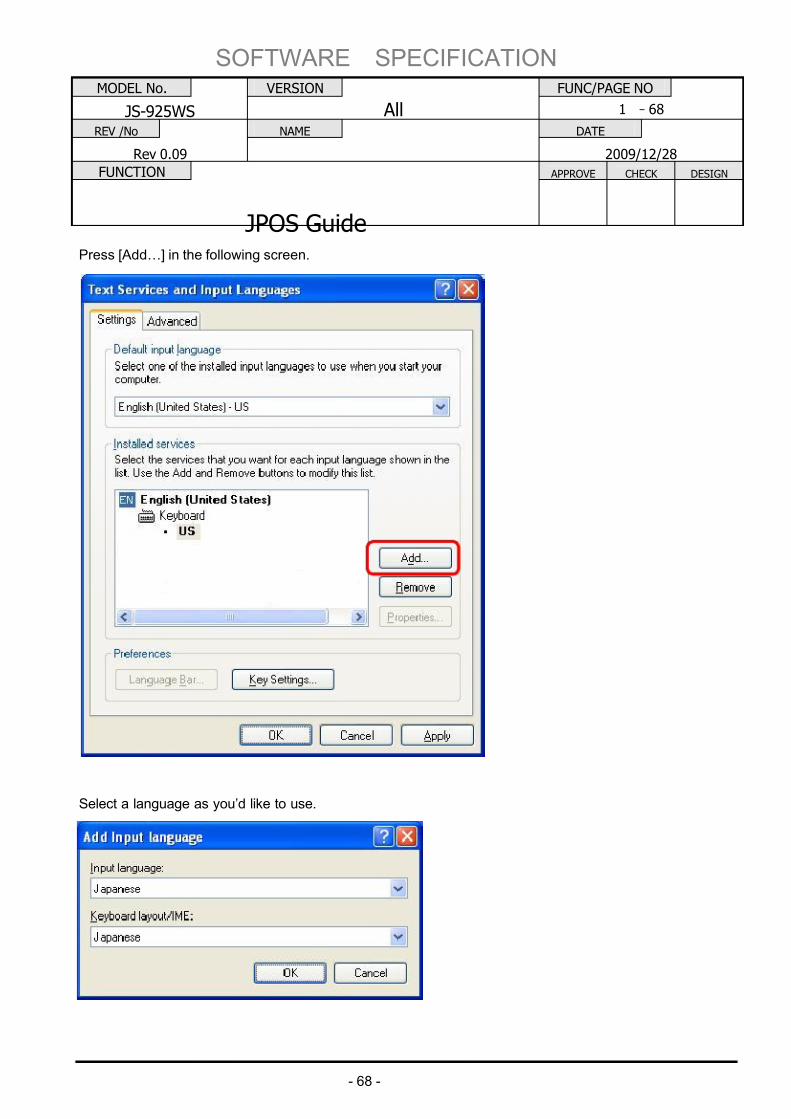
Press [Add…] in the following screen.
Select a language as you’d like to use.
7/27/2019 JposGuideLite-ray.pdf
http://slidepdf.com/reader/full/jposguidelite-raypdf 74/117
SOFTWARE SPECIFICATION
MODEL No. VERSION FUNC/PAGE NO
JS-925WS All 1 -69
REV /No NAME DATE
Rev 0.09 2009/12/28
FUNCTION APPROVE CHECK DESIGN
JPOS Guide
- 69 -
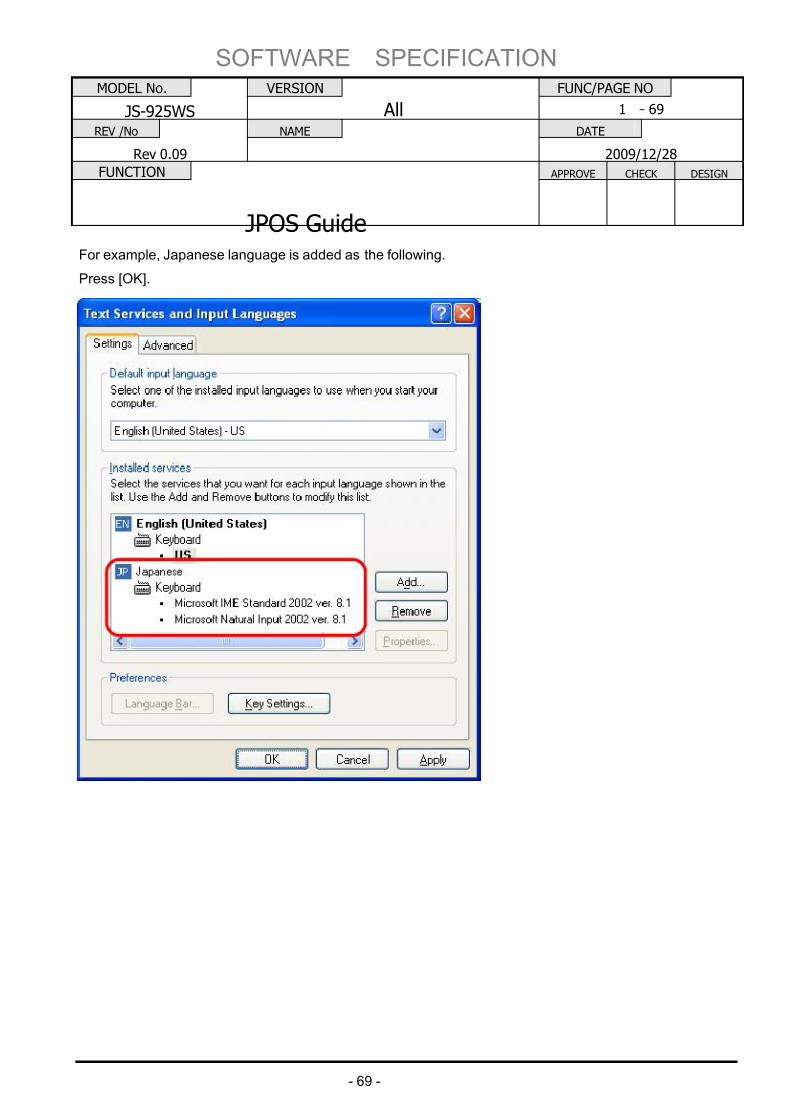
For example, Japanese language is added as the following.
Press [OK].
7/27/2019 JposGuideLite-ray.pdf
http://slidepdf.com/reader/full/jposguidelite-raypdf 75/117
SOFTWARE SPECIFICATION
MODEL No. VERSION FUNC/PAGE NO
JS-925WS All 1 -70
REV /No NAME DATE
Rev 0.09 2009/12/28
FUNCTION APPROVE CHECK DESIGN
JPOS Guide
- 70 -
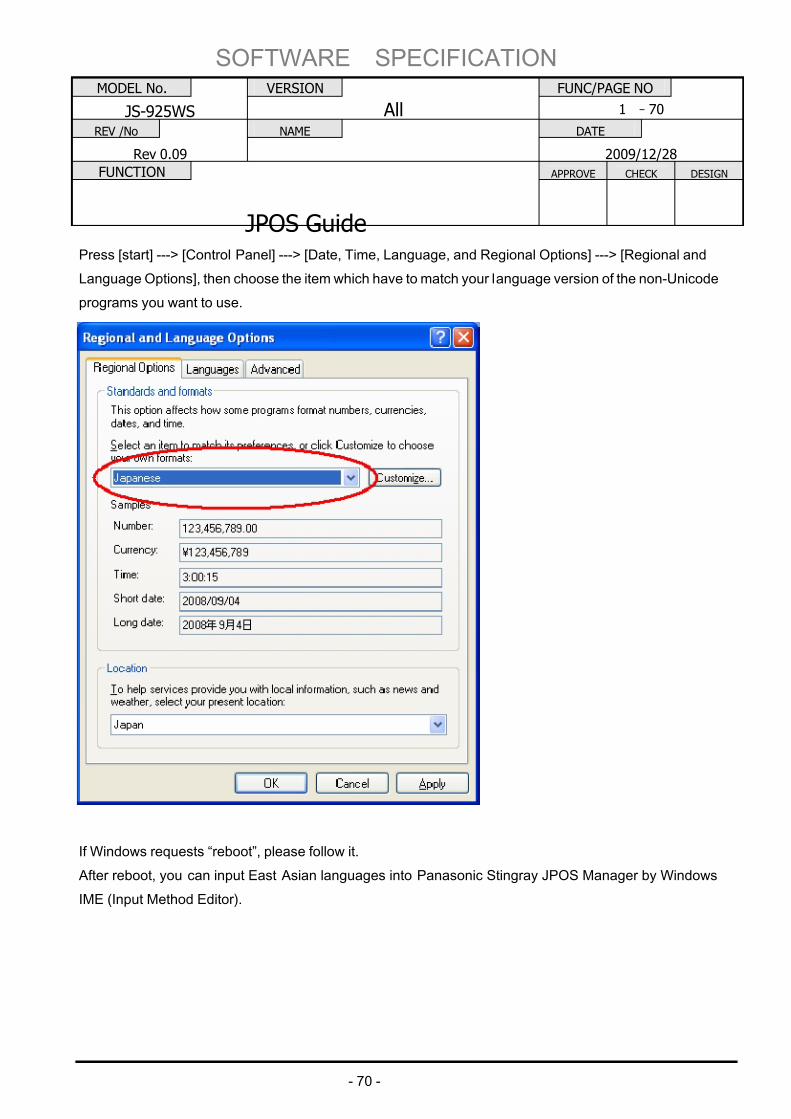
Press [start] ---> [Control Panel] ---> [Date, Time, Language, and Regional Options] ---> [Regional and
Language Options], then choose the item which have to match your language version of the non-Unicode
programs you want to use.
If Windows requests “reboot”, please follow it.
After reboot, you can input East Asian languages into Panasonic Stingray JPOS Manager by Windows
IME (Input Method Editor).
7/27/2019 JposGuideLite-ray.pdf
http://slidepdf.com/reader/full/jposguidelite-raypdf 76/117
SOFTWARE SPECIFICATION
MODEL No. VERSION FUNC/PAGE NO
JS-925WS All 1 -71
REV /No NAME DATE
Rev 0.09 2009/12/28
FUNCTION APPROVE CHECK DESIGN
JPOS Guide
- 71 -
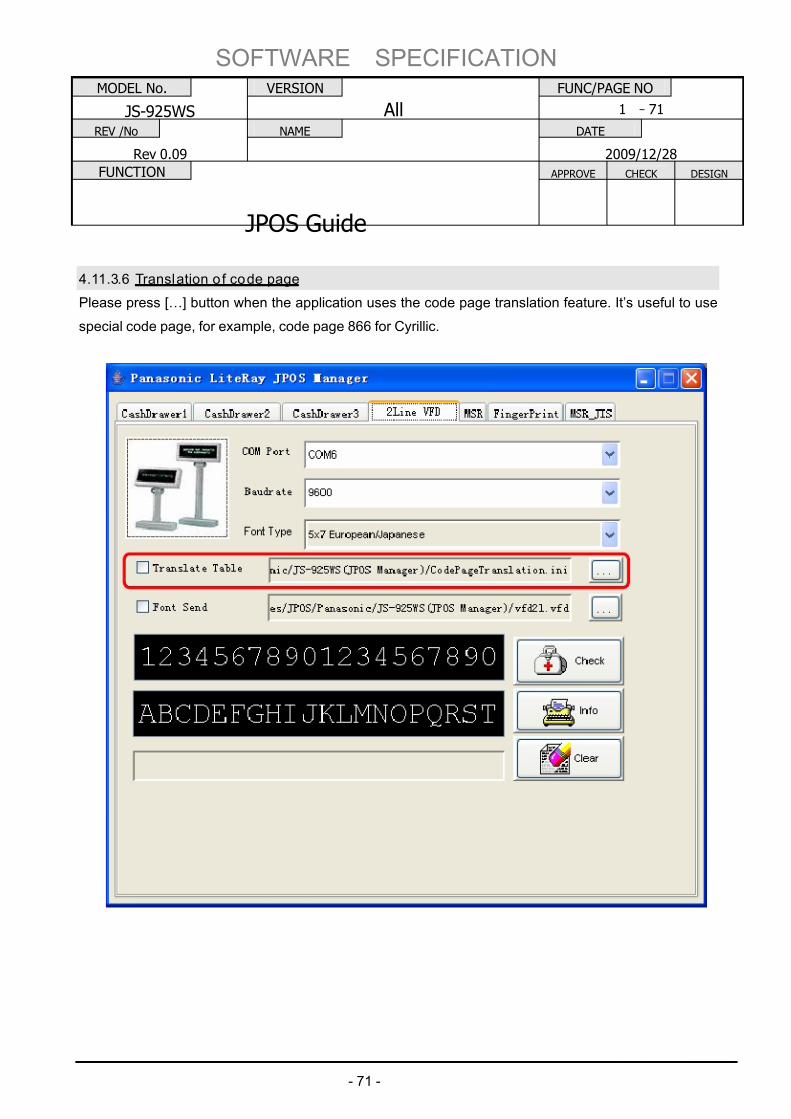
4.11.3.6 Translation of code page
Please press […] button when the application uses the code page translation feature. It’s useful to use
special code page, for example, code page 866 for Cyrillic.
7/27/2019 JposGuideLite-ray.pdf
http://slidepdf.com/reader/full/jposguidelite-raypdf 77/117
SOFTWARE SPECIFICATION
MODEL No. VERSION FUNC/PAGE NO
JS-925WS All 1 -72
REV /No NAME DATE
Rev 0.09 2009/12/28
FUNCTION APPROVE CHECK DESIGN
JPOS Guide
- 72 -
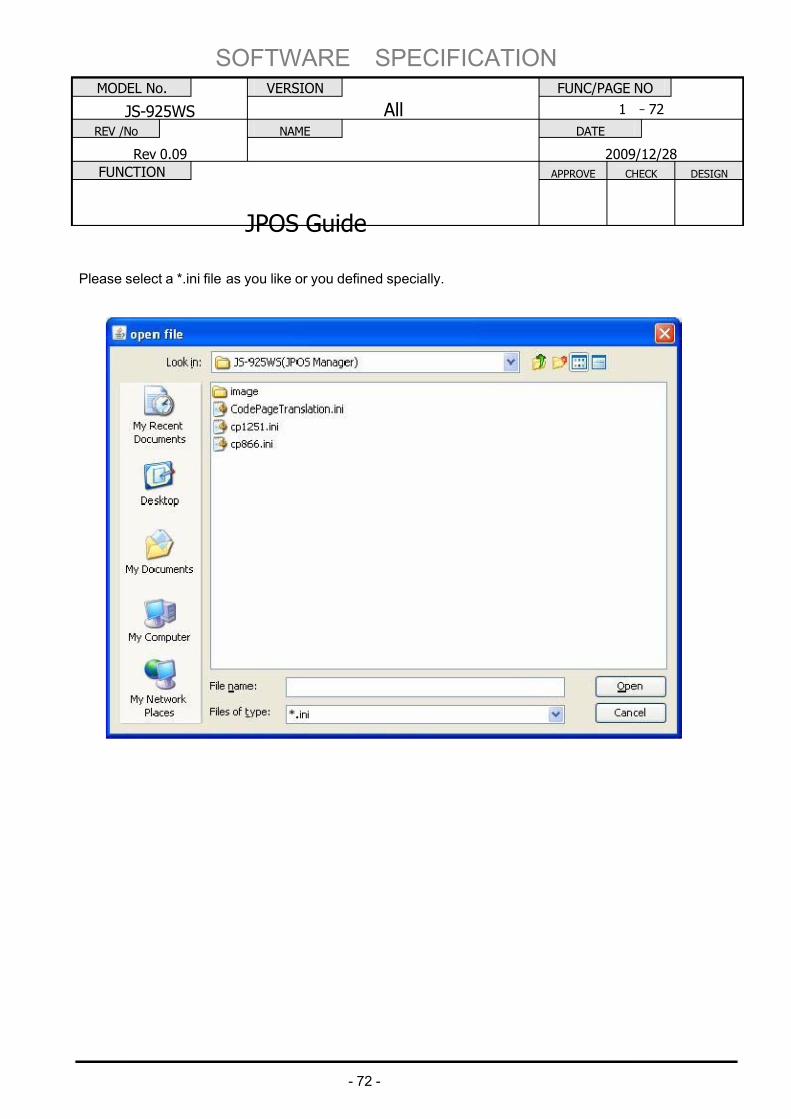
Please select a *.ini file as you like or you defined specially.
7/27/2019 JposGuideLite-ray.pdf
http://slidepdf.com/reader/full/jposguidelite-raypdf 78/117
SOFTWARE SPECIFICATION
MODEL No. VERSION FUNC/PAGE NO
JS-925WS All 1 -73
REV /No NAME DATE
Rev 0.09 2009/12/28
FUNCTION APPROVE CHECK DESIGN
JPOS Guide
- 73 -
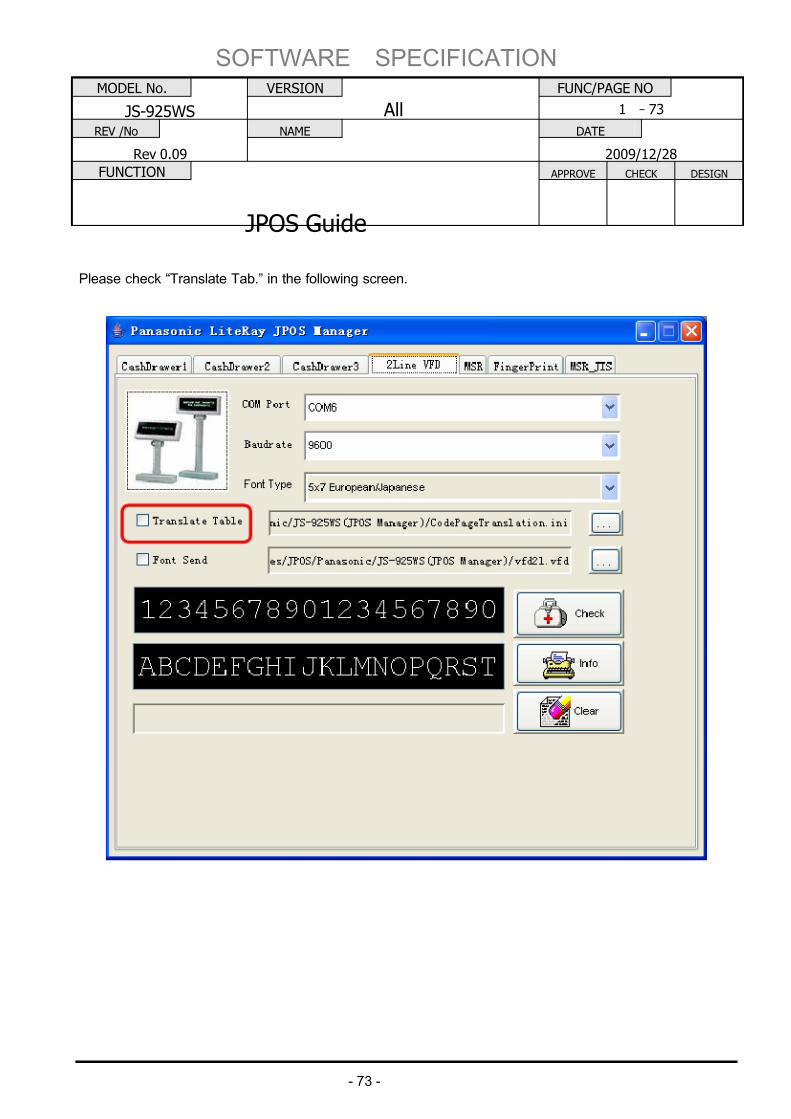
Please check “Translate Tab.” in the following screen.
7/27/2019 JposGuideLite-ray.pdf
http://slidepdf.com/reader/full/jposguidelite-raypdf 79/117
SOFTWARE SPECIFICATION
MODEL No. VERSION FUNC/PAGE NO
JS-925WS All 1 -74
REV /No NAME DATE
Rev 0.09 2009/12/28
FUNCTION APPROVE CHECK DESIGN
JPOS Guide
- 74 -
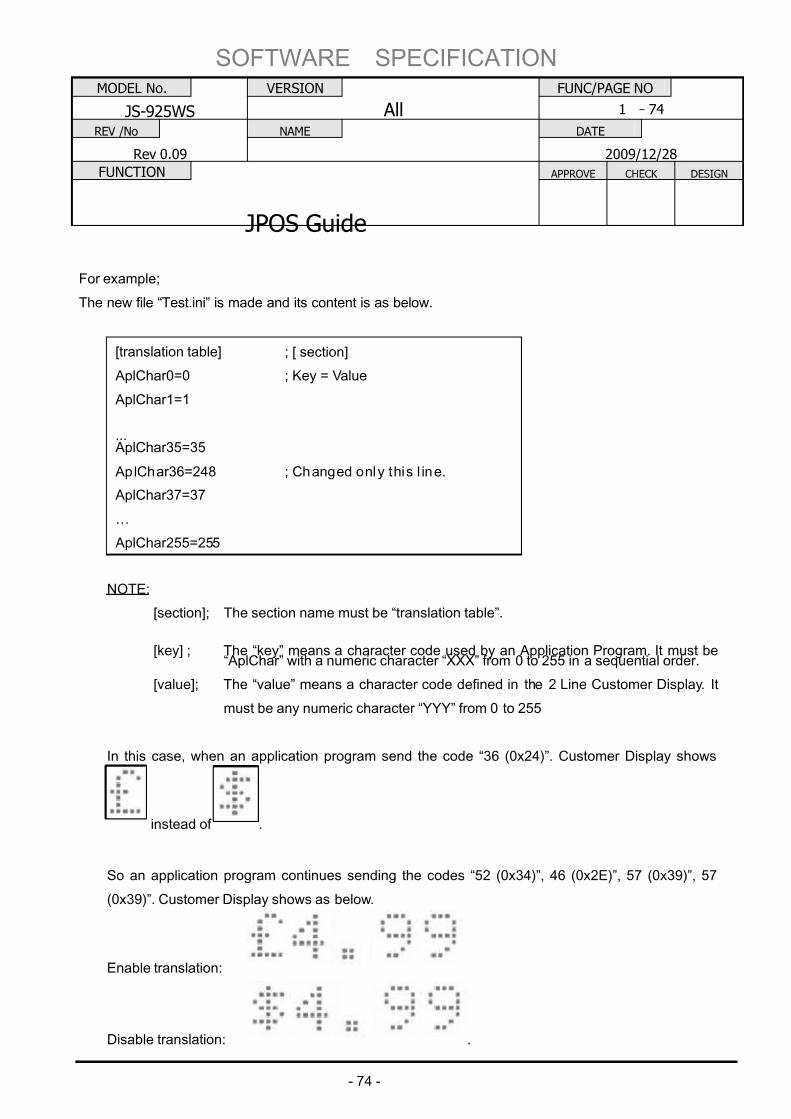
For example;
The new file “Test.ini” is made and its content is as below.
NOTE:
[section]; The section name must be “translation table”.
[key] ; The “key” means a character code used by an Application Program. It must be“AplChar” with a numeric character “XXX” from 0 to 255 in a sequential order.
[value]; The “value” means a character code defined in the 2 Line Customer Display. It
must be any numeric character “YYY” from 0 to 255
In this case, when an application program send the code “36 (0x24)”. Customer Display shows
instead of .
So an application program continues sending the codes “52 (0x34)”, 46 (0x2E)”, 57 (0x39)”, 57
(0x39)”. Customer Display shows as below.
Enable translation:
Disable translation: .
[translation table] ; [ section]
AplChar0=0 ; Key = Value
AplChar1=1
... AplChar35=35
AplChar36=248 ; Changed only this l ine.
AplChar37=37
…
AplChar255=255
7/27/2019 JposGuideLite-ray.pdf
http://slidepdf.com/reader/full/jposguidelite-raypdf 80/117
SOFTWARE SPECIFICATION
MODEL No. VERSION FUNC/PAGE NO
JS-925WS All 1 -75
REV /No NAME DATE
Rev 0.09 2009/12/28
FUNCTION APPROVE CHECK DESIGN
JPOS Guide
- 75 -
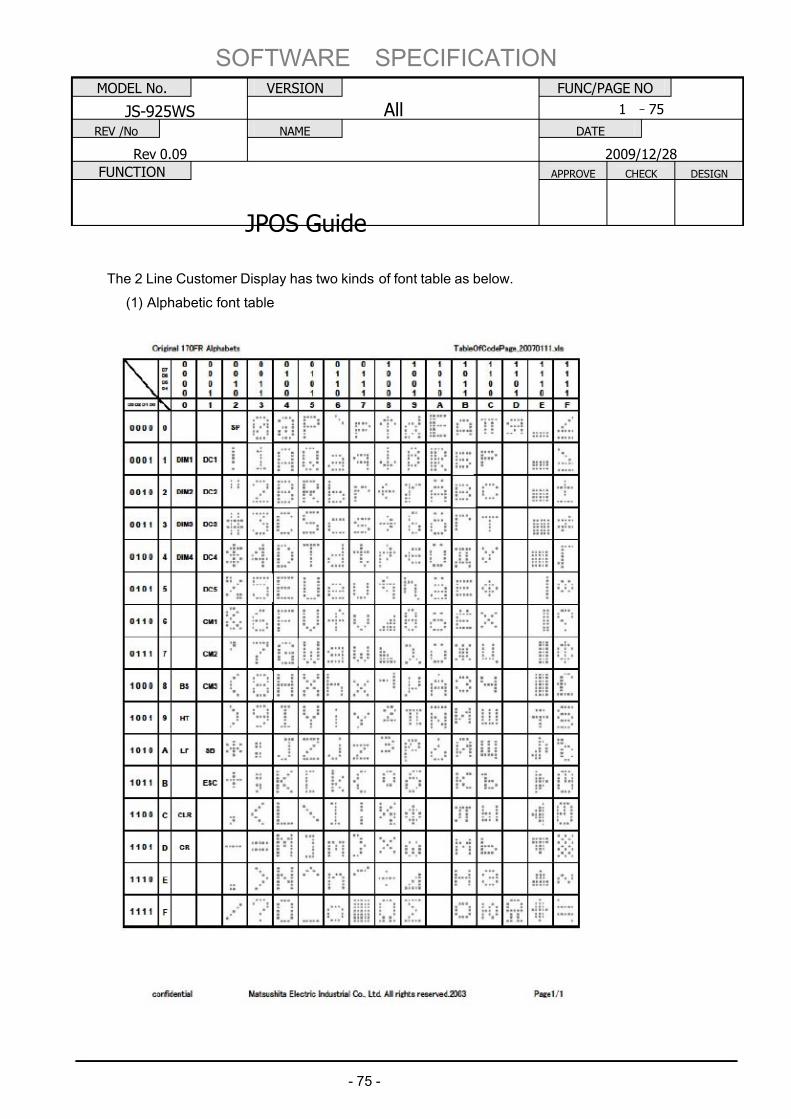
The 2 Line Customer Display has two kinds of font table as below.
(1) Alphabetic font table
7/27/2019 JposGuideLite-ray.pdf
http://slidepdf.com/reader/full/jposguidelite-raypdf 81/117
SOFTWARE SPECIFICATION
MODEL No. VERSION FUNC/PAGE NO
JS-925WS All 1 -76
REV /No NAME DATE
Rev 0.09 2009/12/28
FUNCTION APPROVE CHECK DESIGN
JPOS Guide
- 76 -
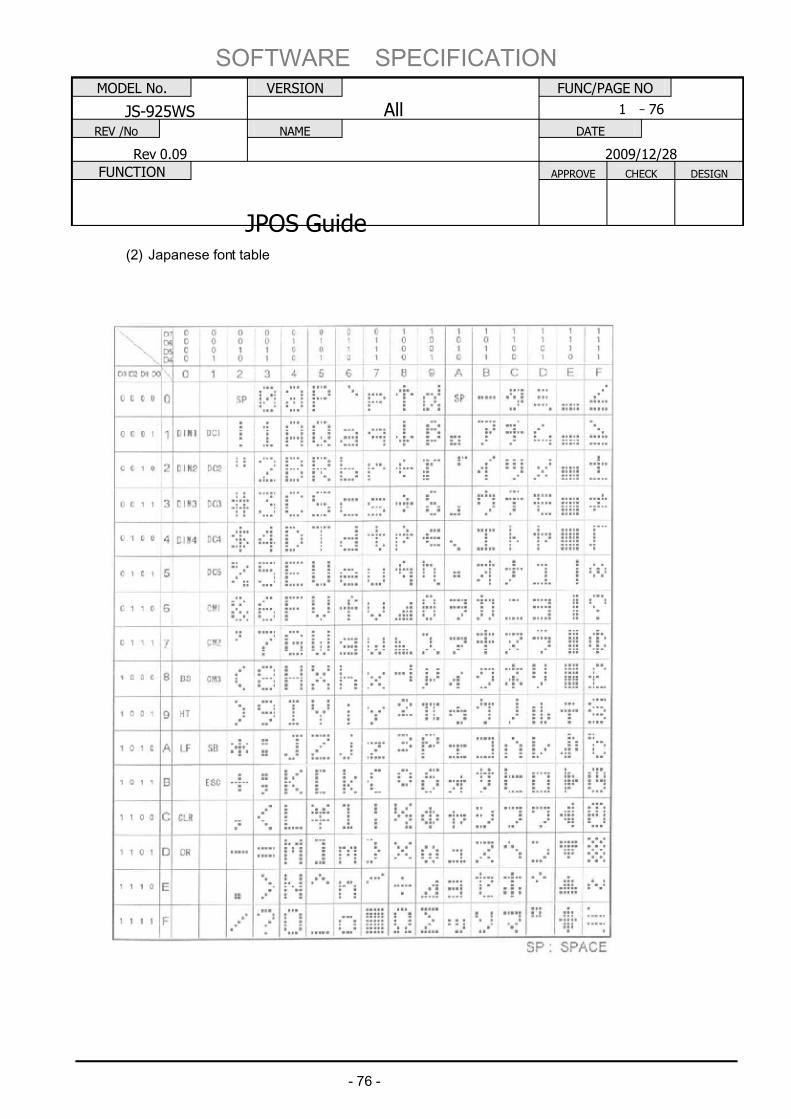
(2) Japanese font table
7/27/2019 JposGuideLite-ray.pdf
http://slidepdf.com/reader/full/jposguidelite-raypdf 82/117
SOFTWARE SPECIFICATION
MODEL No. VERSION FUNC/PAGE NO
JS-925WS All 1 -77
REV /No NAME DATE
Rev 0.09 2009/12/28
FUNCTION APPROVE CHECK DESIGN
JPOS Guide
- 77 -
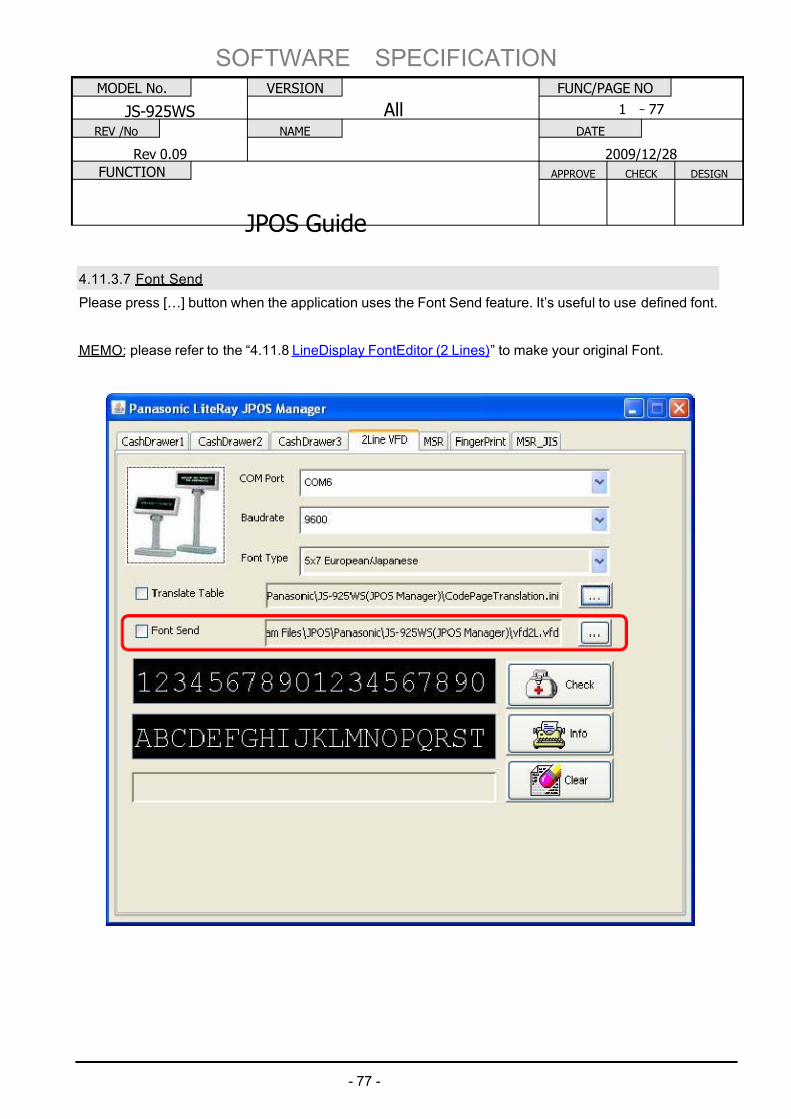
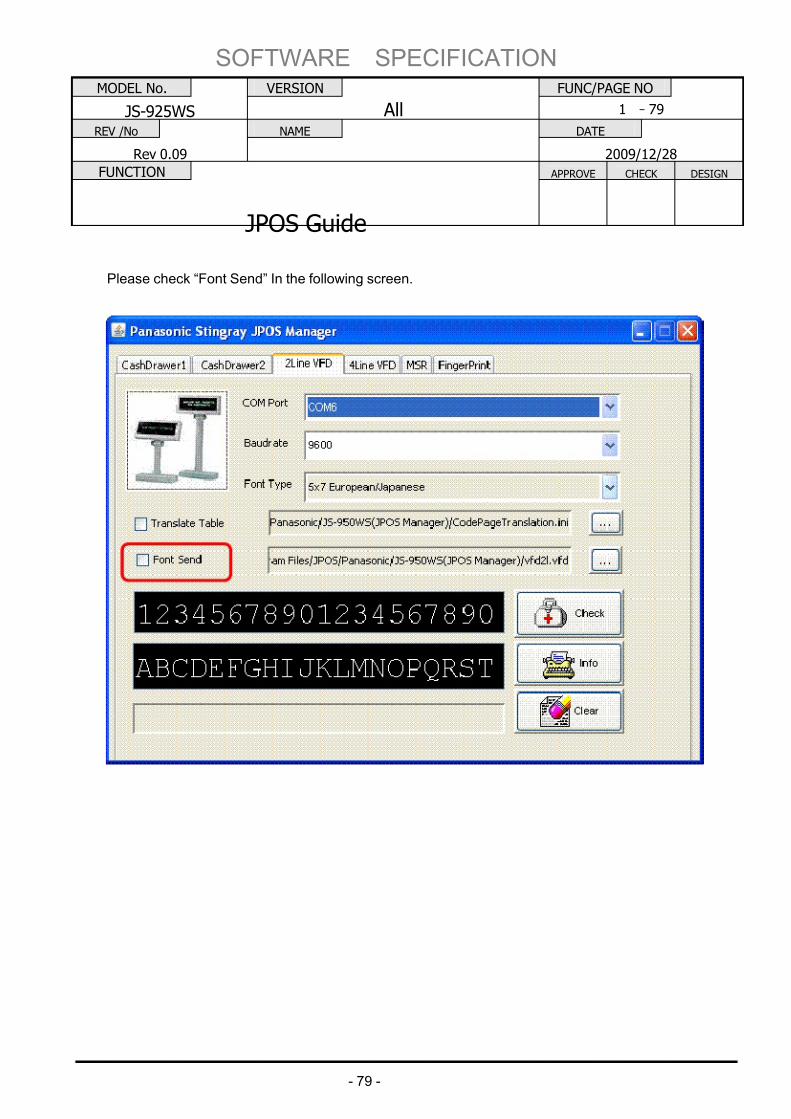
4.11.3.7 Font Send
Please press […] button when the application uses the Font Send feature. It’s useful to use defined font.
MEMO: please refer to the “4.11.8 LineDisplay FontEditor (2 Lines)” to make your original Font.
7/27/2019 JposGuideLite-ray.pdf
http://slidepdf.com/reader/full/jposguidelite-raypdf 83/117
SOFTWARE SPECIFICATION
MODEL No. VERSION FUNC/PAGE NO
JS-925WS All 1 -78
REV /No NAME DATE
Rev 0.09 2009/12/28
FUNCTION APPROVE CHECK DESIGN
JPOS Guide
- 78 -
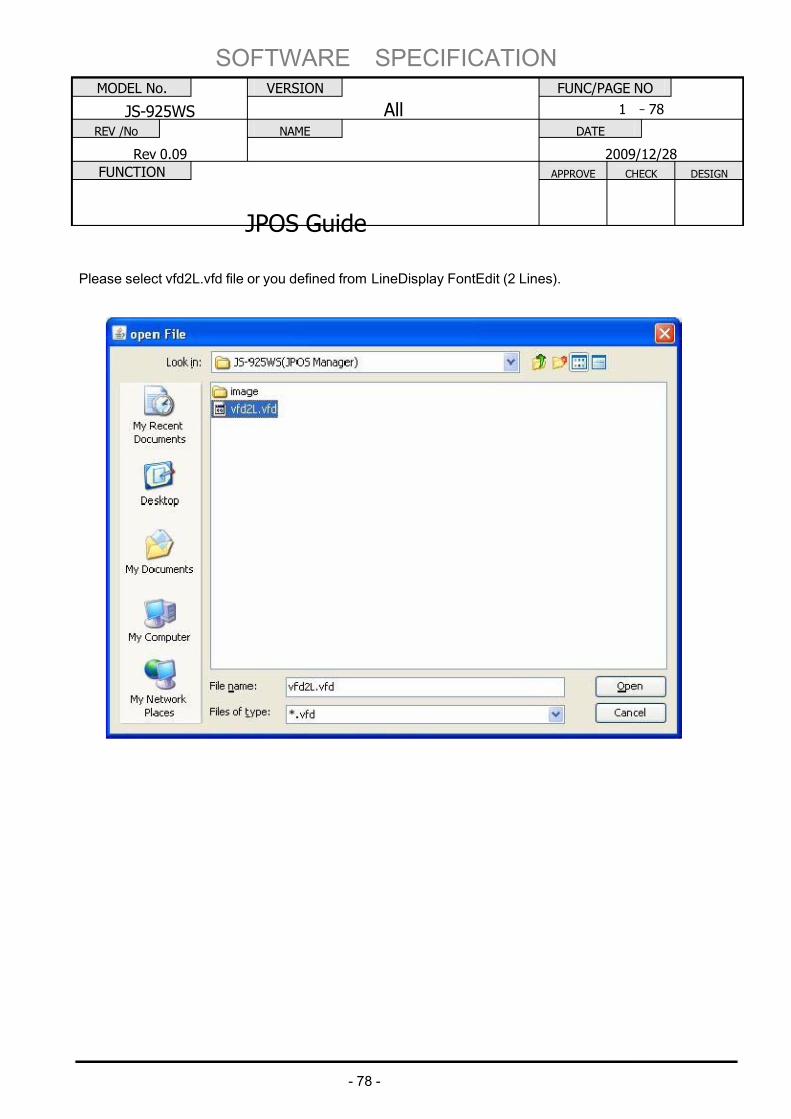
Please select vfd2L.vfd file or you defined from LineDisplay FontEdit (2 Lines).
7/27/2019 JposGuideLite-ray.pdf
http://slidepdf.com/reader/full/jposguidelite-raypdf 84/117
SOFTWARE SPECIFICATION
MODEL No. VERSION FUNC/PAGE NO
JS-925WS All 1 -79
REV /No NAME DATE
Rev 0.09 2009/12/28
FUNCTION APPROVE CHECK DESIGN
JPOS Guide
- 79 -
Please check “Font Send” In the following screen.
7/27/2019 JposGuideLite-ray.pdf
http://slidepdf.com/reader/full/jposguidelite-raypdf 85/117
SOFTWARE SPECIFICATION
MODEL No. VERSION FUNC/PAGE NO
JS-925WS All 1 -80
REV /No NAME DATE
Rev 0.09 2009/12/28
FUNCTION APPROVE CHECK DESIGN
JPOS Guide
- 80 -
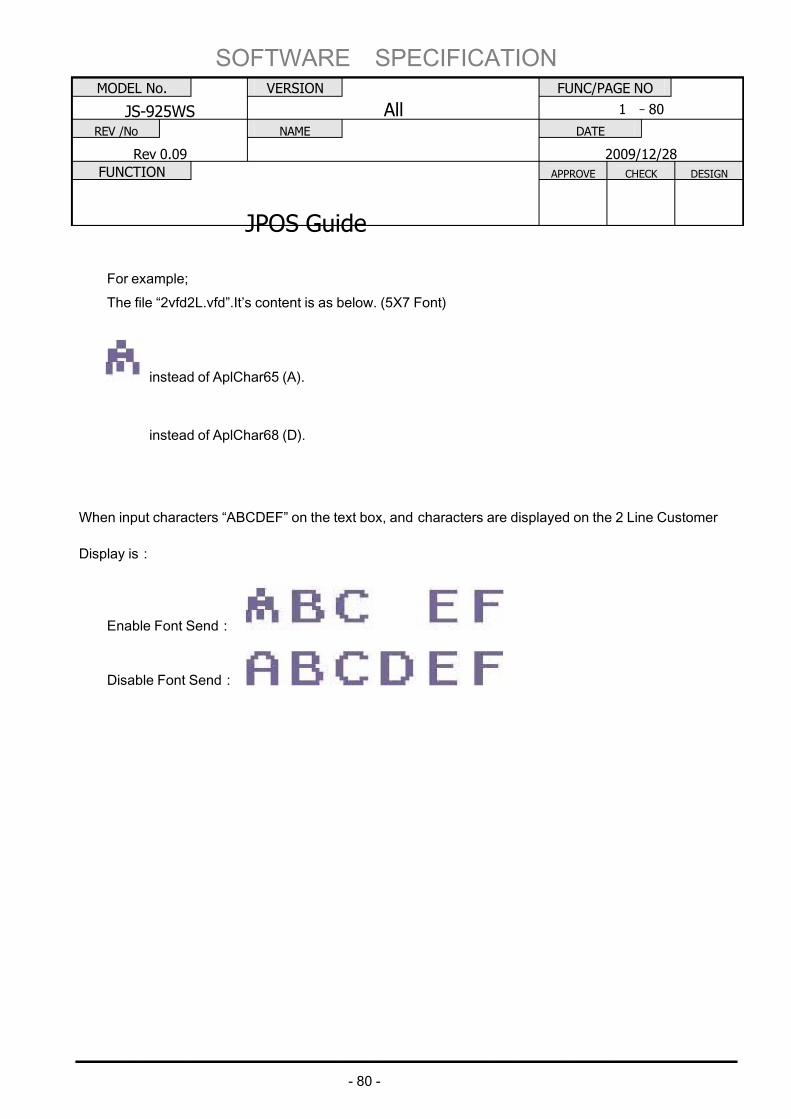
For example;
The file “2vfd2L.vfd”.It’s content is as below. (5X7 Font)
instead of AplChar65 (A).
instead of AplChar68 (D).
When input characters “ABCDEF” on the text box, and characters are displayed on the 2 Line Customer
Display is:
Enable Font Send:
Disable Font Send:
7/27/2019 JposGuideLite-ray.pdf
http://slidepdf.com/reader/full/jposguidelite-raypdf 86/117
SOFTWARE SPECIFICATION
MODEL No. VERSION FUNC/PAGE NO
JS-925WS All 1 -81
REV /No NAME DATE
Rev 0.09 2009/12/28
FUNCTION APPROVE CHECK DESIGN
JPOS Guide
- 81 -
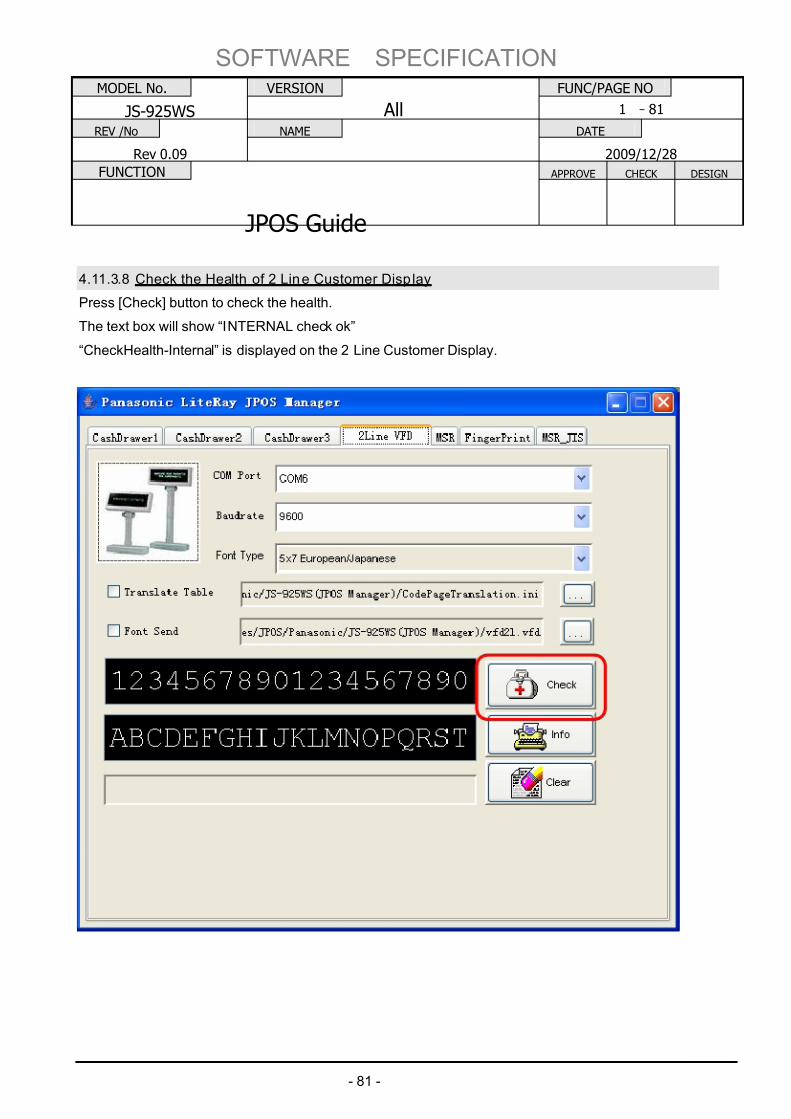
4.11.3.8 Check the Health of 2 Line Customer Disp lay
Press [Check] button to check the health.
The text box will show “INTERNAL check ok”
“CheckHealth-Internal” is displayed on the 2 Line Customer Display.
7/27/2019 JposGuideLite-ray.pdf
http://slidepdf.com/reader/full/jposguidelite-raypdf 87/117
SOFTWARE SPECIFICATION
MODEL No. VERSION FUNC/PAGE NO
JS-925WS All 1 -82
REV /No NAME DATE
Rev 0.09 2009/12/28
FUNCTION APPROVE CHECK DESIGN
JPOS Guide
- 82 -
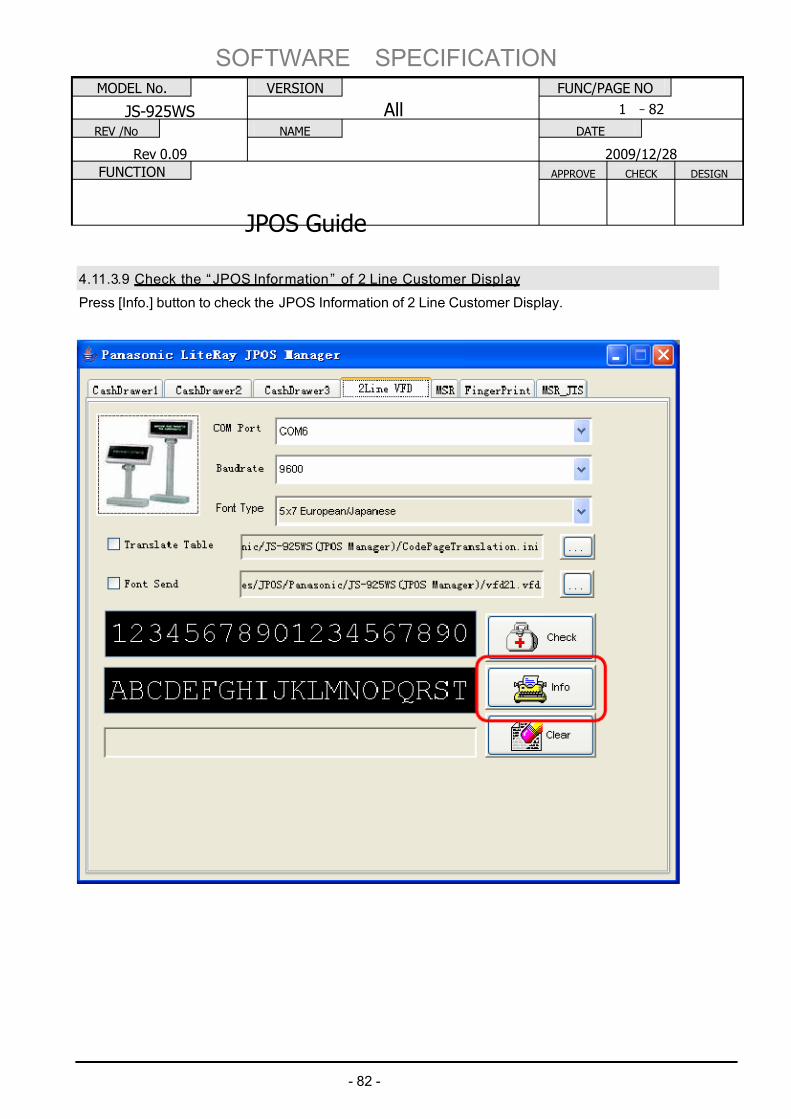
4.11.3.9 Check the “ JPOS Information” of 2 Line Customer Display
Press [Info.] button to check the JPOS Information of 2 Line Customer Display.
7/27/2019 JposGuideLite-ray.pdf
http://slidepdf.com/reader/full/jposguidelite-raypdf 88/117
SOFTWARE SPECIFICATION
MODEL No. VERSION FUNC/PAGE NO
JS-925WS All 1 -83
REV /No NAME DATE
Rev 0.09 2009/12/28
FUNCTION APPROVE CHECK DESIGN
JPOS Guide
- 83 -
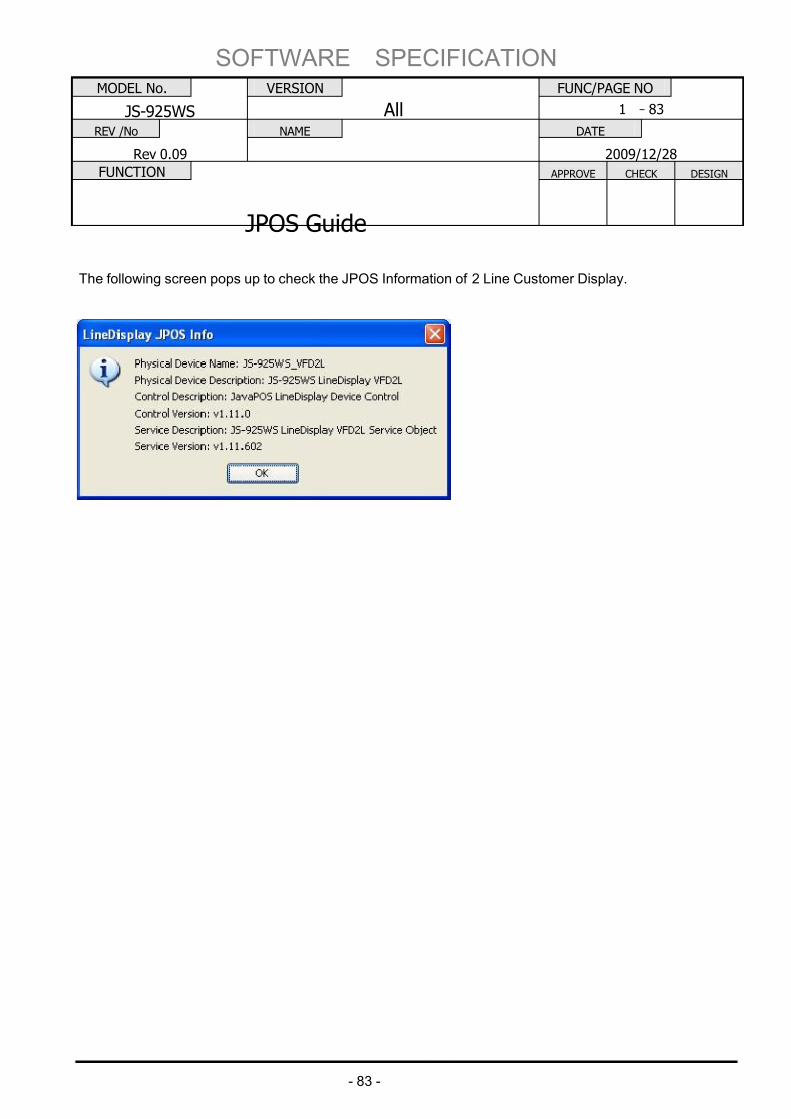
The following screen pops up to check the JPOS Information of 2 Line Customer Display.
7/27/2019 JposGuideLite-ray.pdf
http://slidepdf.com/reader/full/jposguidelite-raypdf 89/117
SOFTWARE SPECIFICATION
MODEL No. VERSION FUNC/PAGE NO
JS-925WS All 1 -84
REV /No NAME DATE
Rev 0.09 2009/12/28
FUNCTION APPROVE CHECK DESIGN
JPOS Guide
- 84 -
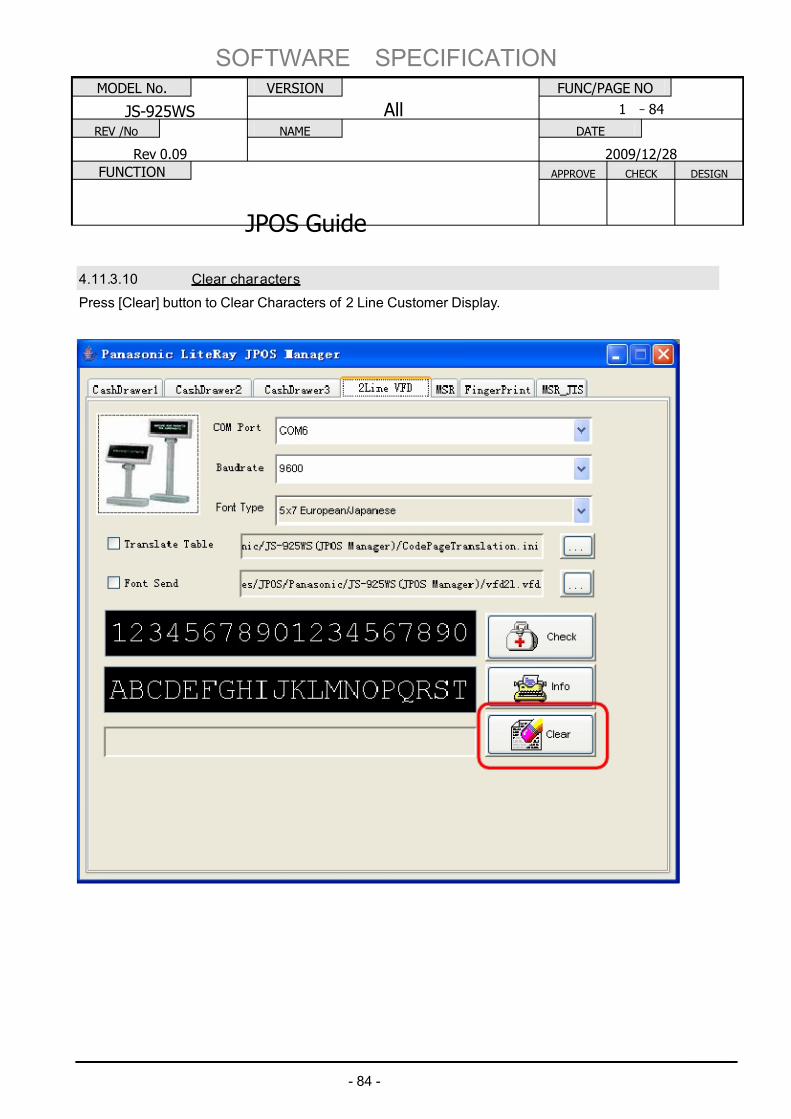
4.11.3.10 Clear characters
Press [Clear] button to Clear Characters of 2 Line Customer Display.

7/27/2019 JposGuideLite-ray.pdf
http://slidepdf.com/reader/full/jposguidelite-raypdf 90/117
SOFTWARE SPECIFICATION
MODEL No. VERSION FUNC/PAGE NO
JS-925WS All 1 -85
REV /No NAME DATE
Rev 0.09 2009/12/28
FUNCTION APPROVE CHECK DESIGN
JPOS Guide
- 85 -
4.11.4 Trouble Shooting for the 2 Line Customer Display
Please refer to this chapter if you have troubles about the 2 Line Customer Display.
4.11.4.1 Plug USB-Keyboard.
Please plug the USB-Keyboard into a USB port to send character data, and confirm the 2 Line Customer
Display is connected
4.11.4.2 Run “ 2 Line Customer Display COM6.ht”
7/27/2019 JposGuideLite-ray.pdf
http://slidepdf.com/reader/full/jposguidelite-raypdf 91/117
SOFTWARE SPECIFICATION
MODEL No. VERSION FUNC/PAGE NO
JS-925WS All 1 -86
REV /No NAME DATE
Rev 0.09 2009/12/28
FUNCTION APPROVE CHECK DESIGN
JPOS Guide
- 86 -
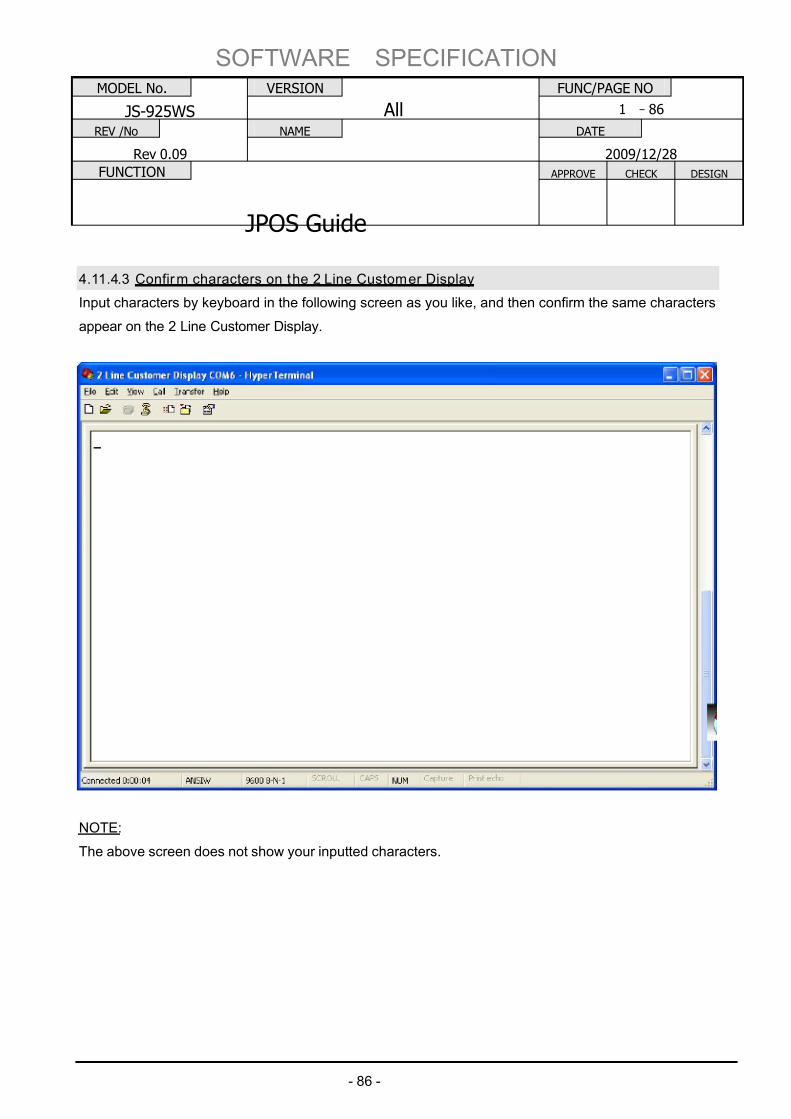
4.11.4.3 Confirm characters on the 2 Line Customer Display
Input characters by keyboard in the following screen as you like, and then confirm the same characters
appear on the 2 Line Customer Display.
NOTE:
The above screen does not show your inputted characters.
7/27/2019 JposGuideLite-ray.pdf
http://slidepdf.com/reader/full/jposguidelite-raypdf 92/117
SOFTWARE SPECIFICATION
MODEL No. VERSION FUNC/PAGE NO
JS-925WS All 1 -87
REV /No NAME DATE
Rev 0.09 2009/12/28
FUNCTION APPROVE CHECK DESIGN
JPOS Guide
- 87 -
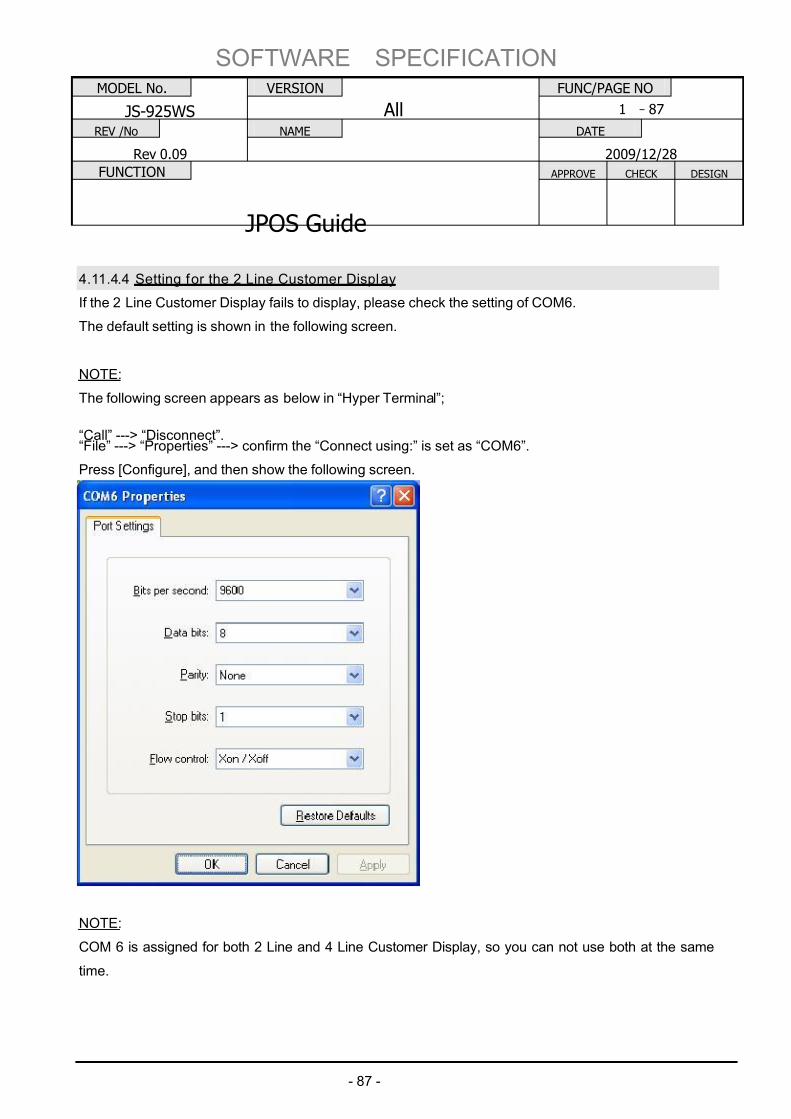
4.11.4.4 Setting for the 2 Line Customer Display
If the 2 Line Customer Display fails to display, please check the setting of COM6.
The default setting is shown in the following screen.
NOTE:
The following screen appears as below in “Hyper Terminal”;
“Call” ---> “Disconnect”.“File” ---> “Properties” ---> confirm the “Connect using:” is set as “COM6”.
Press [Configure], and then show the following screen.
NOTE:
COM 6 is assigned for both 2 Line and 4 Line Customer Display, so you can not use both at the same
time.

7/27/2019 JposGuideLite-ray.pdf
http://slidepdf.com/reader/full/jposguidelite-raypdf 93/117
SOFTWARE SPECIFICATION
MODEL No. VERSION FUNC/PAGE NO
JS-925WS All 1 -88
REV /No NAME DATE
Rev 0.09 2009/12/28
FUNCTION APPROVE CHECK DESIGN
JPOS Guide
- 88 -
4.11.4.5 End of checking the 2 Line Customer Display
Please press the “X” mark at the right top of window of “Hyper Terminal” when you finished.
The following screen pops up, and then press [Yes] to finish.
7/27/2019 JposGuideLite-ray.pdf
http://slidepdf.com/reader/full/jposguidelite-raypdf 94/117
SOFTWARE SPECIFICATION
MODEL No. VERSION FUNC/PAGE NO
JS-925WS All 1 -89
REV /No NAME DATE
Rev 0.09 2009/12/28
FUNCTION APPROVE CHECK DESIGN
JPOS Guide
- 89 -
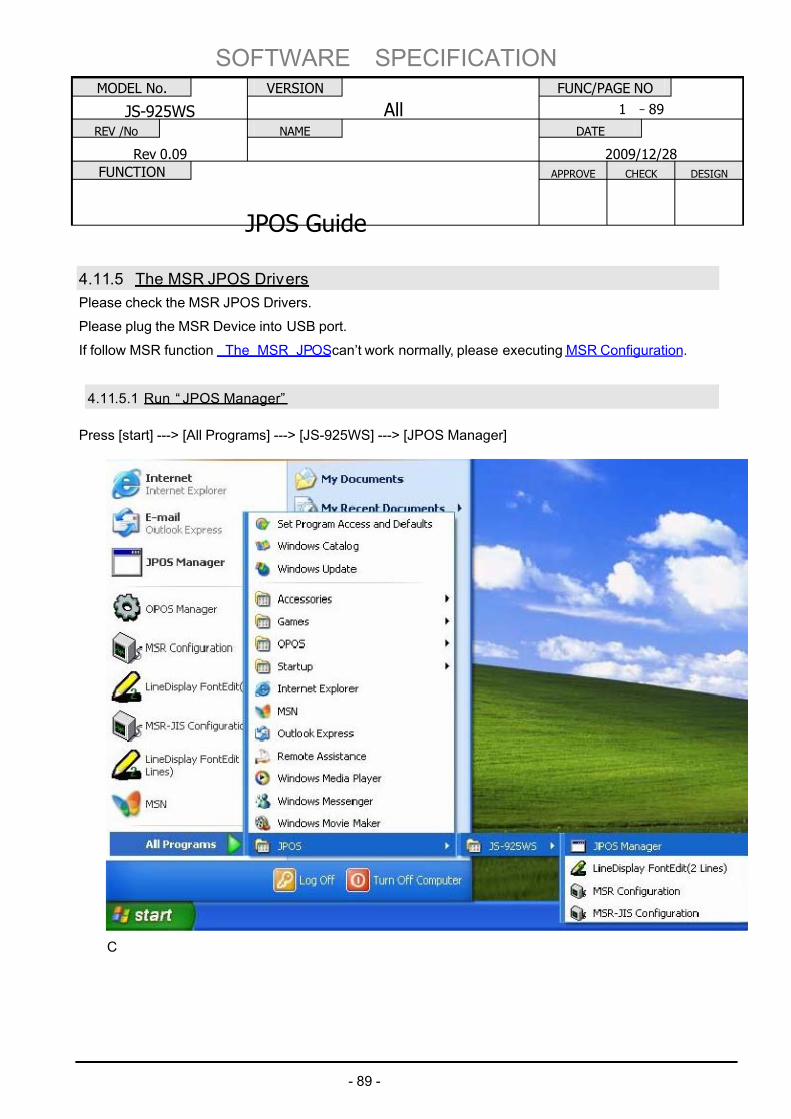
4.11.5 The MSR JPOS Drivers
Please check the MSR JPOS Drivers.
Please plug the MSR Device into USB port.
If follow MSR function _The_MSR_JPOScan’t work normally, please executing MSR Configuration.
4.11.5.1 Run “ JPOS Manager”
Press [start] ---> [All Programs] ---> [JS-925WS] ---> [JPOS Manager]
C
7/27/2019 JposGuideLite-ray.pdf
http://slidepdf.com/reader/full/jposguidelite-raypdf 95/117
SOFTWARE SPECIFICATION
MODEL No. VERSION FUNC/PAGE NO
JS-925WS All 1 -90
REV /No NAME DATE
Rev 0.09 2009/12/28
FUNCTION APPROVE CHECK DESIGN
JPOS Guide
- 90 -
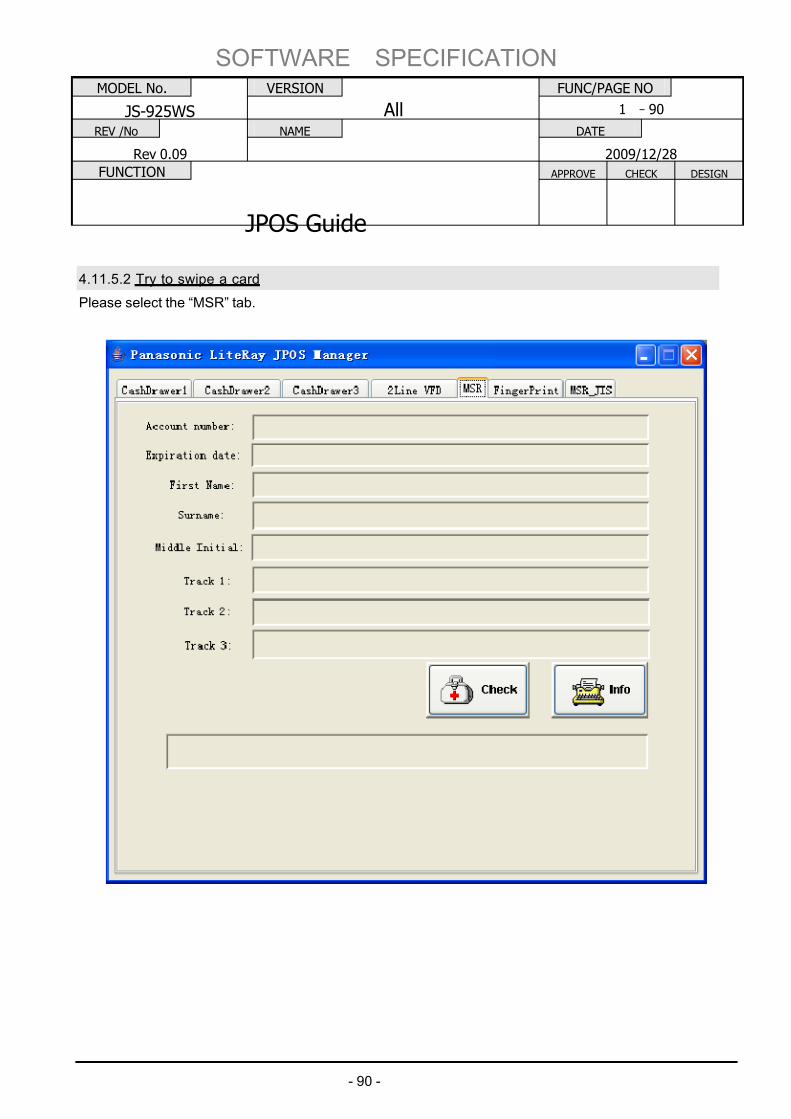
4.11.5.2 Try to swipe a card
Please select the “MSR” tab.
7/27/2019 JposGuideLite-ray.pdf
http://slidepdf.com/reader/full/jposguidelite-raypdf 96/117
SOFTWARE SPECIFICATION
MODEL No. VERSION FUNC/PAGE NO
JS-925WS All 1 -91
REV /No NAME DATE
Rev 0.09 2009/12/28
FUNCTION APPROVE CHECK DESIGN
JPOS Guide
- 91 -
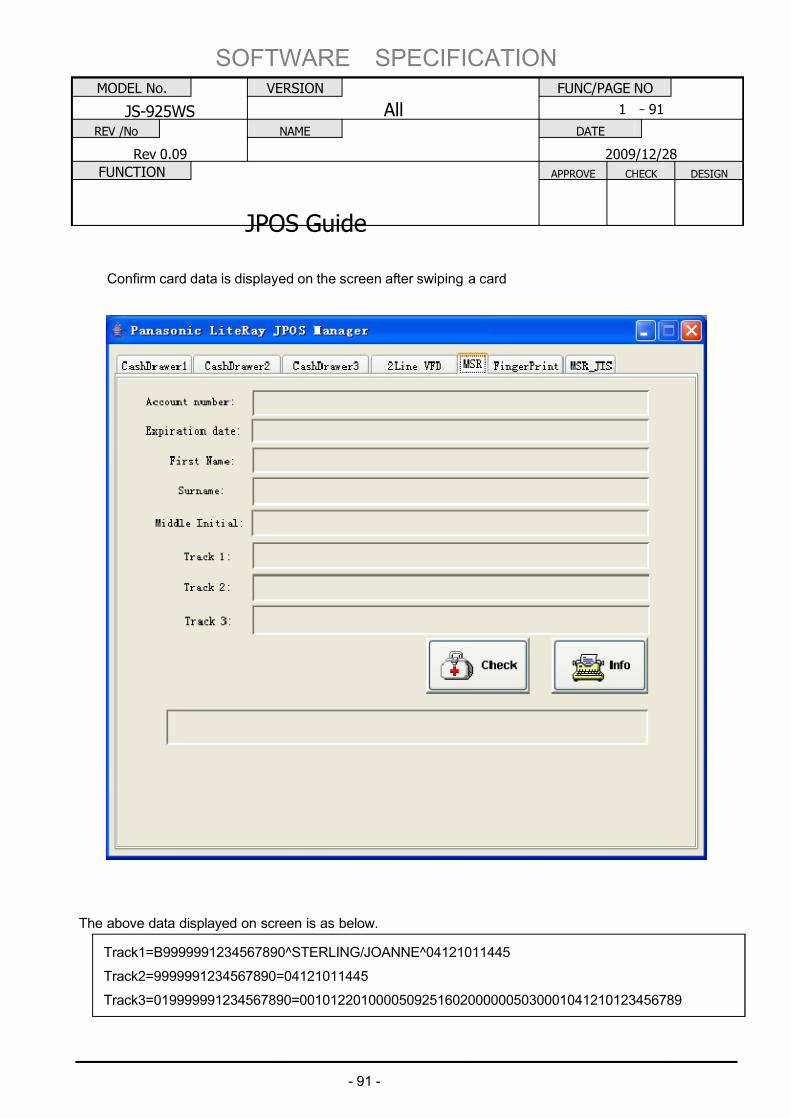
Confirm card data is displayed on the screen after swiping a card
The above data displayed on screen is as below.
Track1=B9999991234567890^STERLING/JOANNE^04121011445
Track2=9999991234567890=04121011445
Track3=019999991234567890=00101220100005092516020000005030001041210123456789
7/27/2019 JposGuideLite-ray.pdf
http://slidepdf.com/reader/full/jposguidelite-raypdf 97/117
SOFTWARE SPECIFICATION
MODEL No. VERSION FUNC/PAGE NO
JS-925WS All 1 -92
REV /No NAME DATE
Rev 0.09 2009/12/28
FUNCTION APPROVE CHECK DESIGN
JPOS Guide
- 92 -
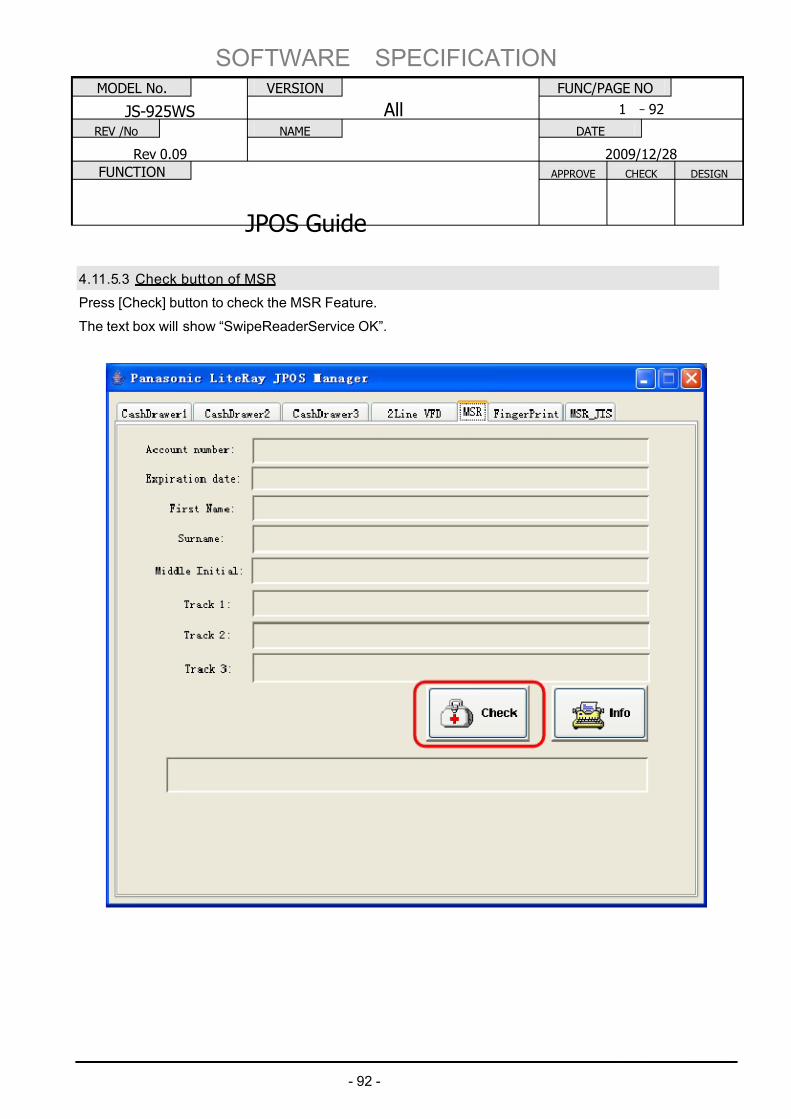
4.11.5.3 Check button of MSR
Press [Check] button to check the MSR Feature.
The text box will show “SwipeReaderService OK”.
7/27/2019 JposGuideLite-ray.pdf
http://slidepdf.com/reader/full/jposguidelite-raypdf 98/117
SOFTWARE SPECIFICATION
MODEL No. VERSION FUNC/PAGE NO
JS-925WS All 1 -93
REV /No NAME DATE
Rev 0.09 2009/12/28
FUNCTION APPROVE CHECK DESIGN
JPOS Guide
- 93 -
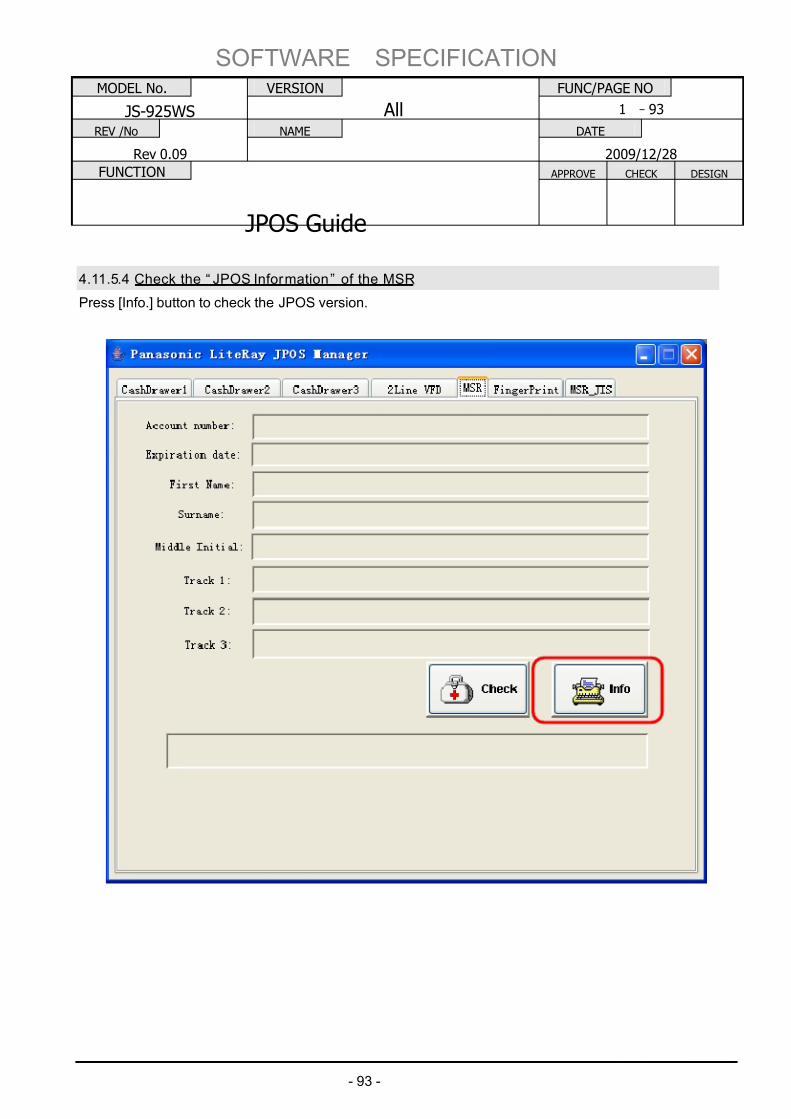
4.11.5.4 Check the “ JPOS Information” of the MSR
Press [Info.] button to check the JPOS version.
7/27/2019 JposGuideLite-ray.pdf
http://slidepdf.com/reader/full/jposguidelite-raypdf 99/117
SOFTWARE SPECIFICATION
MODEL No. VERSION FUNC/PAGE NO
JS-925WS All 1 -94
REV /No NAME DATE
Rev 0.09 2009/12/28
FUNCTION APPROVE CHECK DESIGN
JPOS Guide
- 94 -
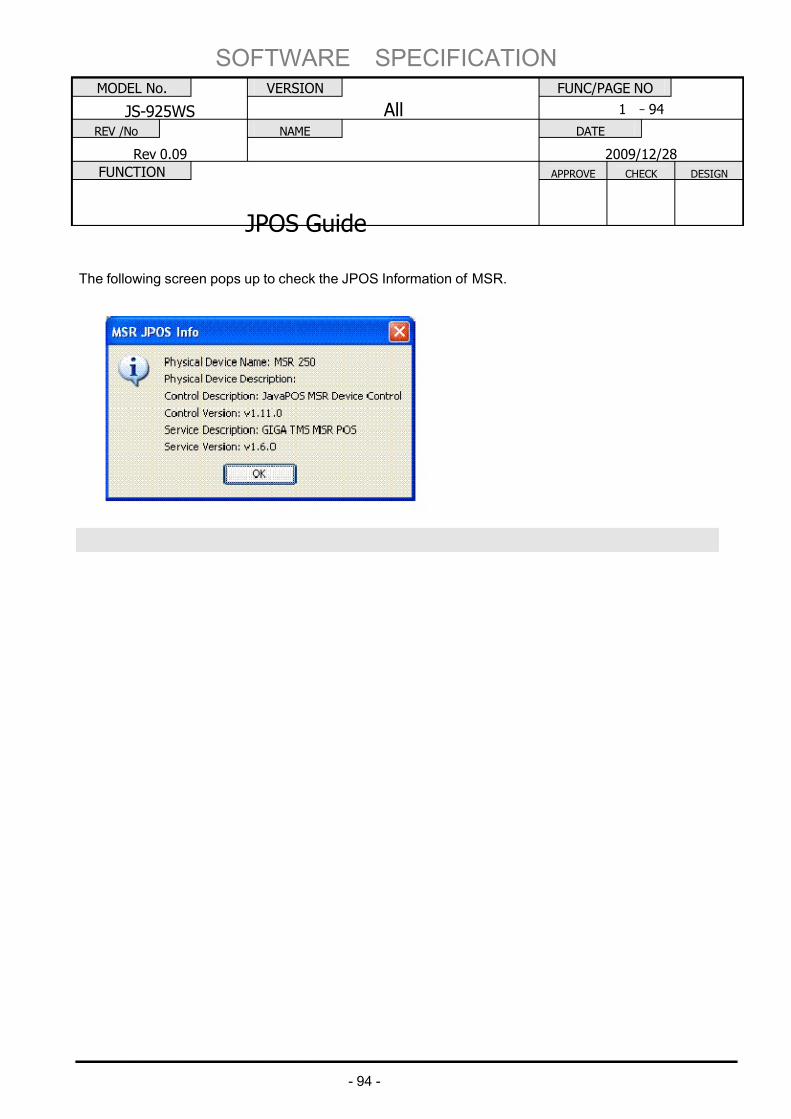
The following screen pops up to check the JPOS Information of MSR.
7/27/2019 JposGuideLite-ray.pdf
http://slidepdf.com/reader/full/jposguidelite-raypdf 100/117
SOFTWARE SPECIFICATION
MODEL No. VERSION FUNC/PAGE NO
JS-925WS All 1 -95
REV /No NAME DATE
Rev 0.09 2009/12/28
FUNCTION APPROVE CHECK DESIGN
JPOS Guide
- 95 -
4.11.6 The MSR_JIS JPOS Drivers
The same as MSR.
4.11.7 The Fingerpr int JPOS Drivers
Please check the Fingerprint JPOS Drivers.
Please plug the Fingerprint Device into USB port.
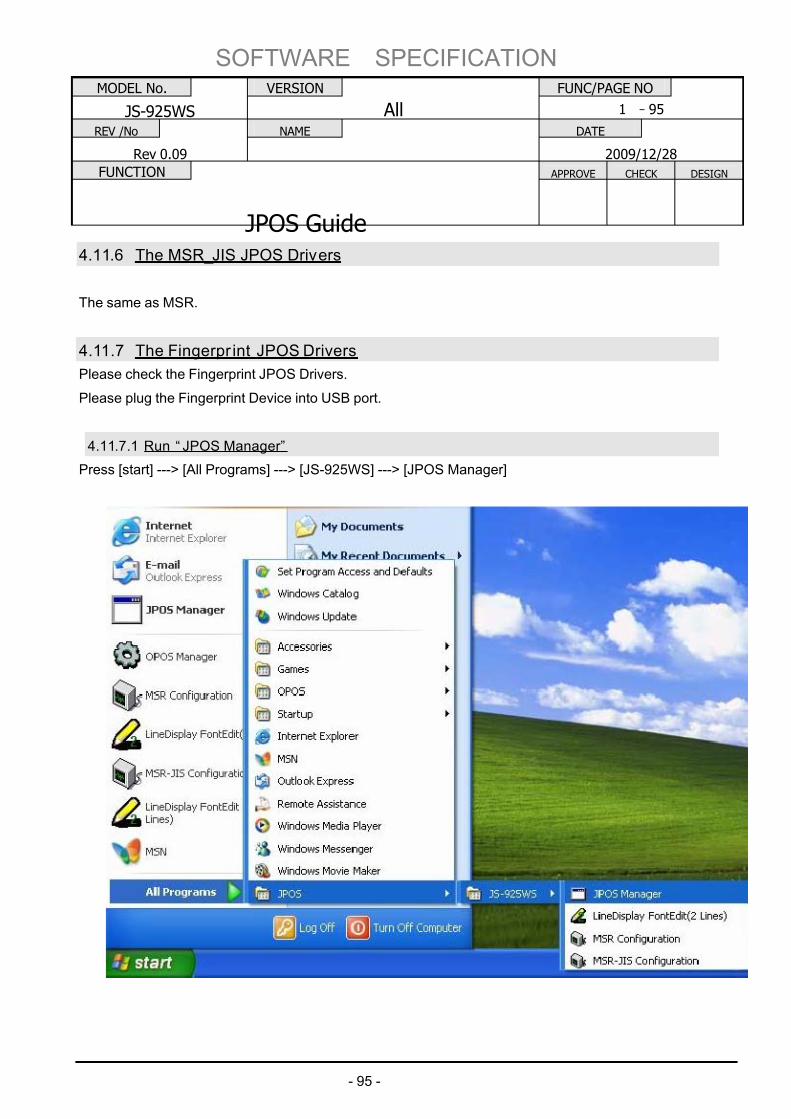
4.11.7.1 Run “ JPOS Manager”
Press [start] ---> [All Programs] ---> [JS-925WS] ---> [JPOS Manager]
7/27/2019 JposGuideLite-ray.pdf
http://slidepdf.com/reader/full/jposguidelite-raypdf 101/117
SOFTWARE SPECIFICATION
MODEL No. VERSION FUNC/PAGE NO
JS-925WS All 1 -96
REV /No NAME DATE
Rev 0.09 2009/12/28
FUNCTION APPROVE CHECK DESIGN
JPOS Guide
- 96 -
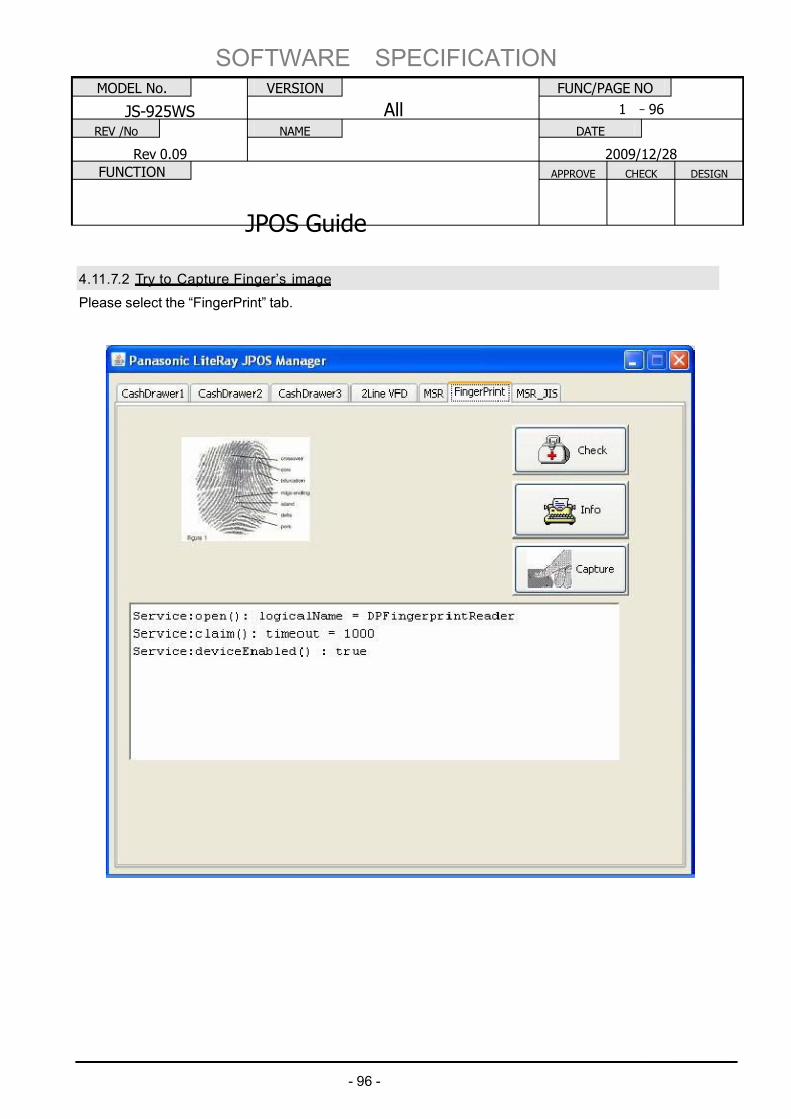
4.11.7.2 Try to Capture Finger’s image
Please select the “FingerPrint” tab.
7/27/2019 JposGuideLite-ray.pdf
http://slidepdf.com/reader/full/jposguidelite-raypdf 102/117
SOFTWARE SPECIFICATION
MODEL No. VERSION FUNC/PAGE NO
JS-925WS All 1 -97
REV /No NAME DATE
Rev 0.09 2009/12/28
FUNCTION APPROVE CHECK DESIGN
JPOS Guide
- 97 -
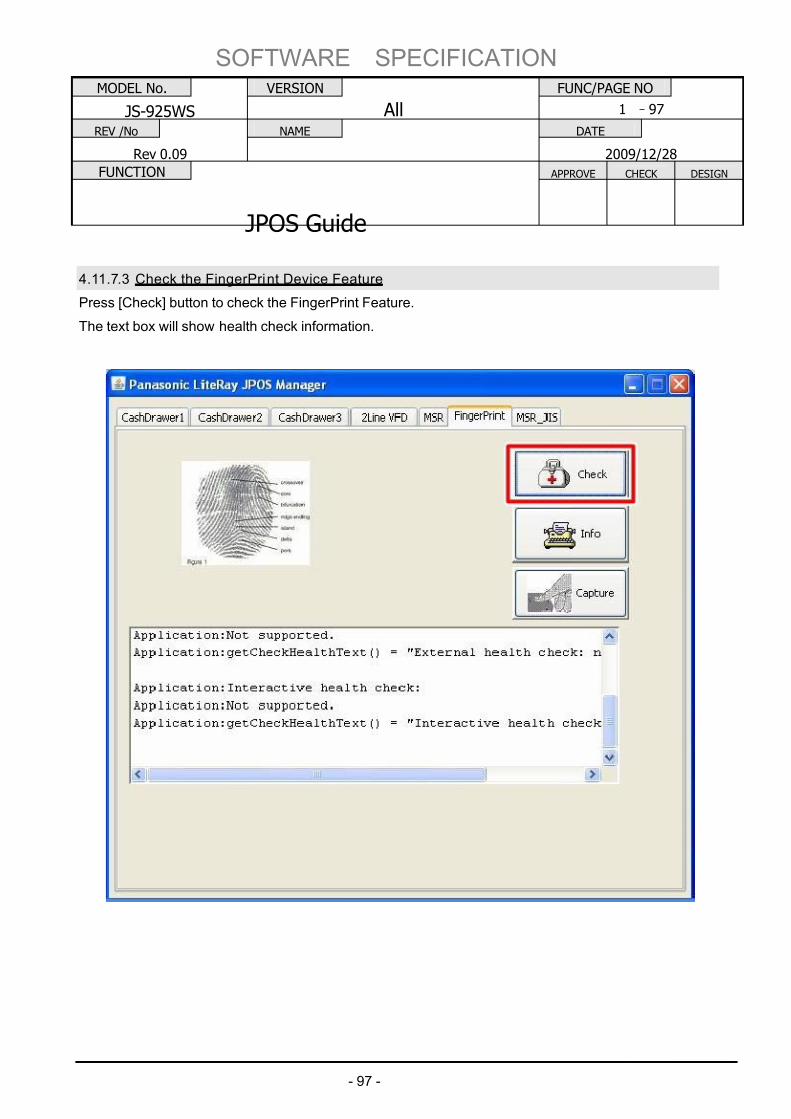
4.11.7.3 Check the FingerPrint Device Feature
Press [Check] button to check the FingerPrint Feature.
The text box will show health check information.
7/27/2019 JposGuideLite-ray.pdf
http://slidepdf.com/reader/full/jposguidelite-raypdf 103/117
SOFTWARE SPECIFICATION
MODEL No. VERSION FUNC/PAGE NO
JS-925WS All 1 -98
REV /No NAME DATE
Rev 0.09 2009/12/28
FUNCTION APPROVE CHECK DESIGN
JPOS Guide
- 98 -
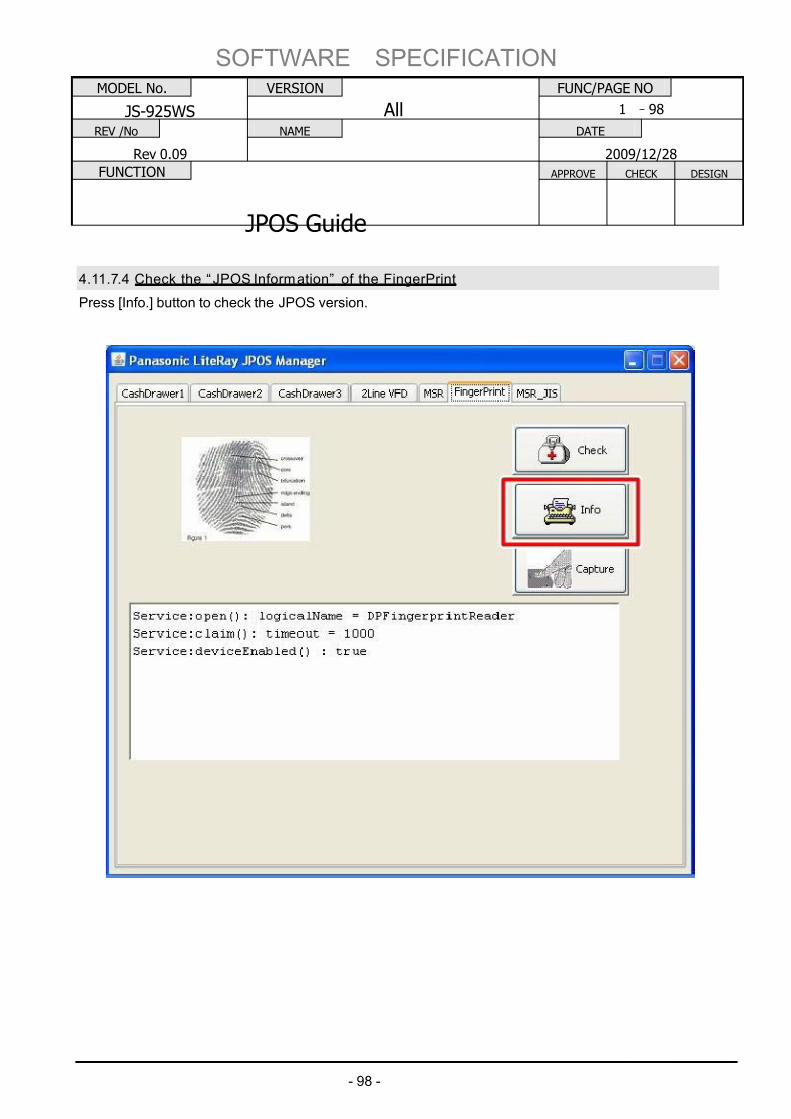
4.11.7.4 Check the “ JPOS Information” of the FingerPrint
Press [Info.] button to check the JPOS version.
7/27/2019 JposGuideLite-ray.pdf
http://slidepdf.com/reader/full/jposguidelite-raypdf 104/117
SOFTWARE SPECIFICATION
MODEL No. VERSION FUNC/PAGE NO
JS-925WS All 1 -99
REV /No NAME DATE
Rev 0.09 2009/12/28
FUNCTION APPROVE CHECK DESIGN
JPOS Guide
- 99 -
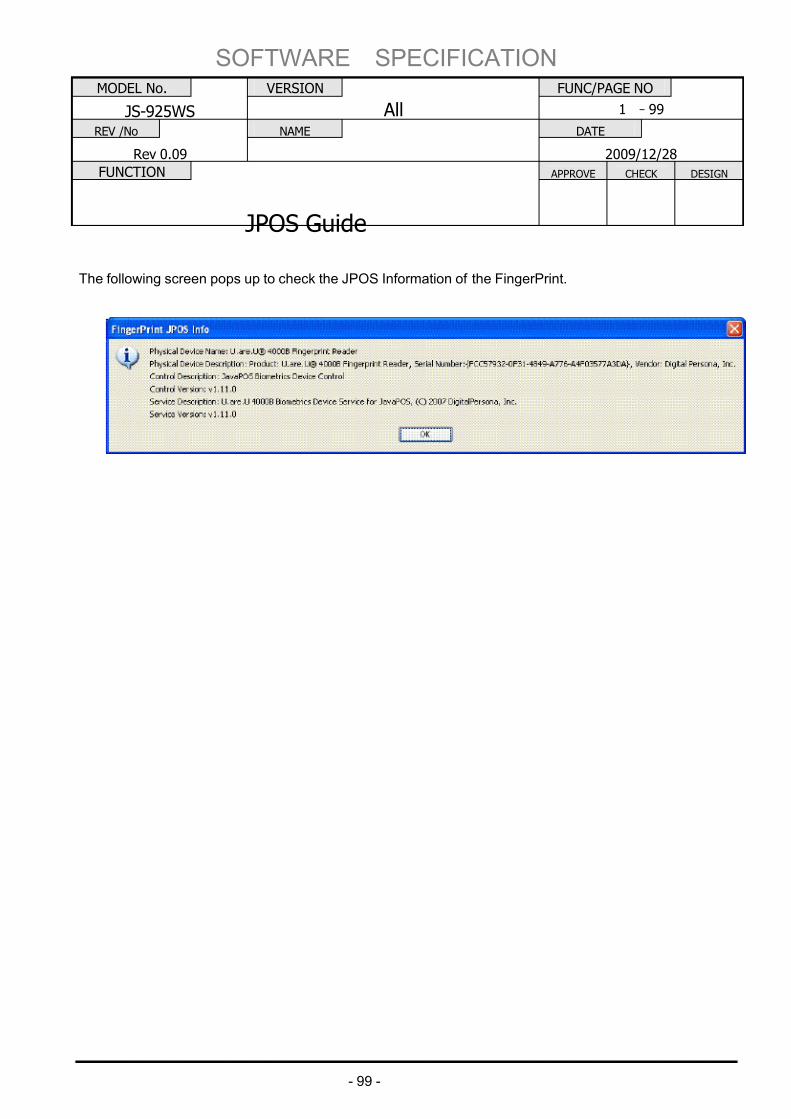
The following screen pops up to check the JPOS Information of the FingerPrint.
7/27/2019 JposGuideLite-ray.pdf
http://slidepdf.com/reader/full/jposguidelite-raypdf 105/117
SOFTWARE SPECIFICATION
MODEL No. VERSION FUNC/PAGE NO
JS-925WS All 1 -100
REV /No NAME DATE
Rev 0.09 2009/12/28
FUNCTION APPROVE CHECK DESIGN
JPOS Guide
- 100-
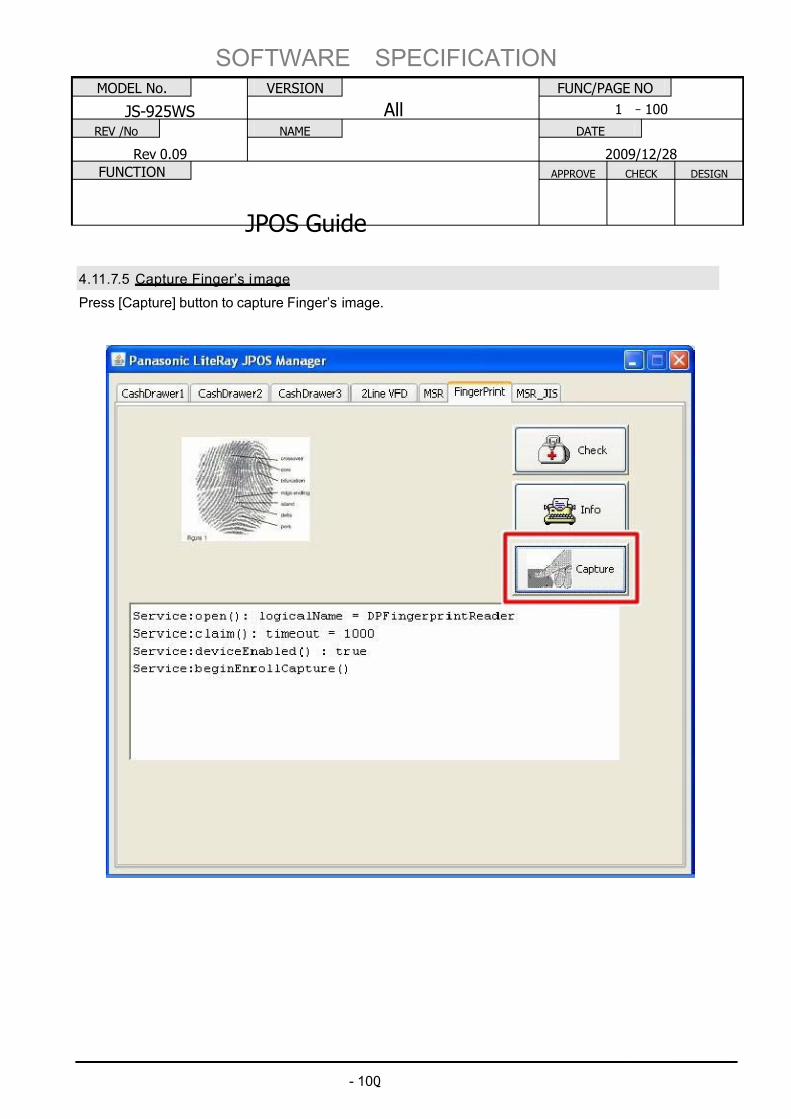
4.11.7.5 Capture Finger’s image
Press [Capture] button to capture Finger’s image.

7/27/2019 JposGuideLite-ray.pdf
http://slidepdf.com/reader/full/jposguidelite-raypdf 106/117
SOFTWARE SPECIFICATION
MODEL No. VERSION FUNC/PAGE NO
JS-925WS All 1 -101
REV /No NAME DATE
Rev 0.09 2009/12/28
FUNCTION APPROVE CHECK DESIGN
JPOS Guide
- 101-
Touch finger on scanner 4 times.
The following screen and messages mean that this driver can work fine.
7/27/2019 JposGuideLite-ray.pdf
http://slidepdf.com/reader/full/jposguidelite-raypdf 107/117
SOFTWARE SPECIFICATION
MODEL No. VERSION FUNC/PAGE NO
JS-925WS All 1 -102
REV /No NAME DATE
Rev 0.09 2009/12/28
FUNCTION APPROVE CHECK DESIGN
JPOS Guide
- 102-
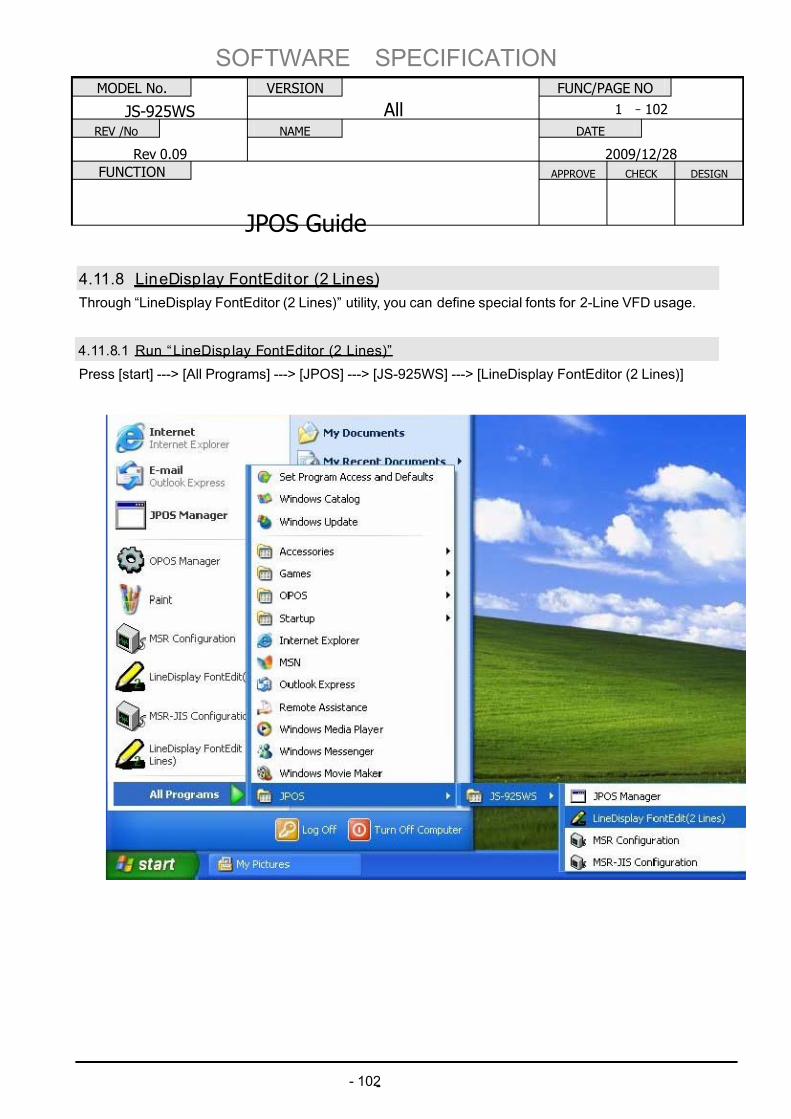
4.11.8 LineDisp lay FontEditor (2 Lines)
Through “LineDisplay FontEditor (2 Lines)” utility, you can define special fonts for 2-Line VFD usage.
4.11.8.1 Run “LineDisp lay FontEditor (2 Lines)”
Press [start] ---> [All Programs] ---> [JPOS] ---> [JS-925WS] ---> [LineDisplay FontEditor (2 Lines)]
7/27/2019 JposGuideLite-ray.pdf
http://slidepdf.com/reader/full/jposguidelite-raypdf 108/117
SOFTWARE SPECIFICATION
MODEL No. VERSION FUNC/PAGE NO
JS-925WS All 1 -103
REV /No NAME DATE
Rev 0.09 2009/12/28
FUNCTION APPROVE CHECK DESIGN
JPOS Guide
- 103-
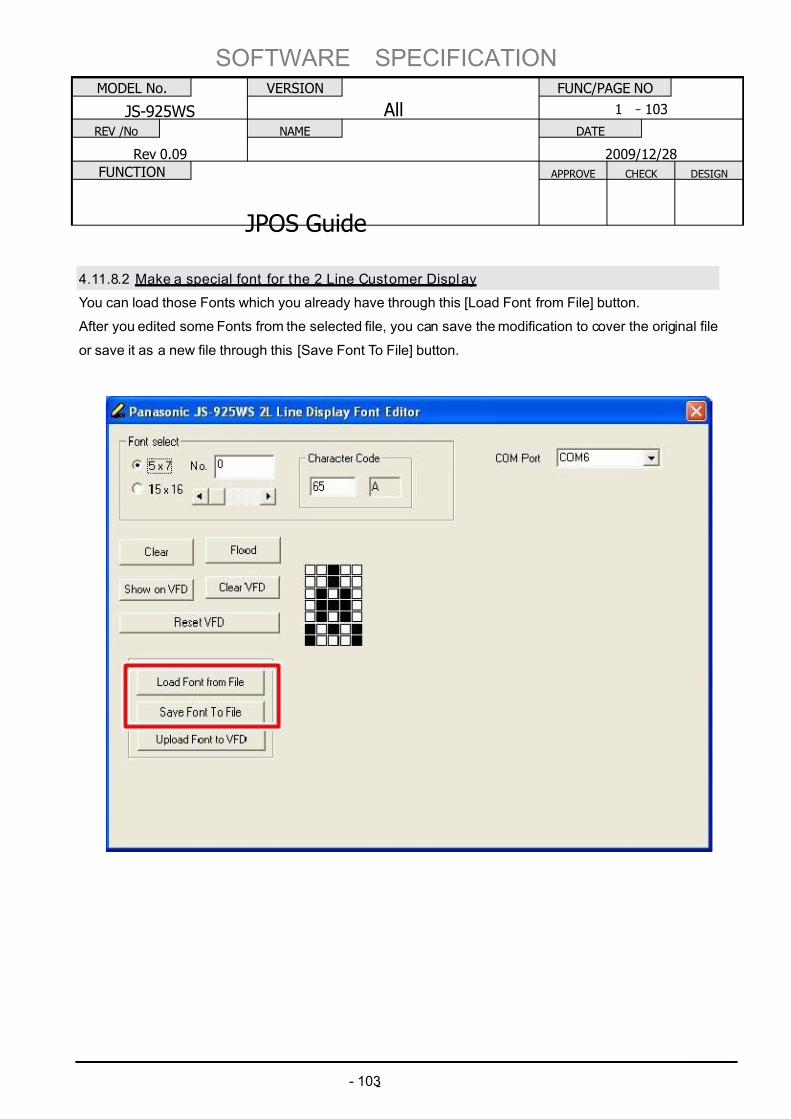
4.11.8.2 Make a special font for the 2 Line Customer Display
You can load those Fonts which you already have through this [Load Font from File] button.
After you edited some Fonts from the selected file, you can save the modification to cover the original file
or save it as a new file through this [Save Font To File] button.
7/27/2019 JposGuideLite-ray.pdf
http://slidepdf.com/reader/full/jposguidelite-raypdf 109/117
SOFTWARE SPECIFICATION
MODEL No. VERSION FUNC/PAGE NO
JS-925WS All 1 -104
REV /No NAME DATE
Rev 0.09 2009/12/28
FUNCTION APPROVE CHECK DESIGN
JPOS Guide
- 104-
For each “5x7” and “15x16” font sizes, user can define 8 fonts as user likes to replace the selected
character code.
7/27/2019 JposGuideLite-ray.pdf
http://slidepdf.com/reader/full/jposguidelite-raypdf 110/117
SOFTWARE SPECIFICATION
MODEL No. VERSION FUNC/PAGE NO
JS-925WS All 1 -105
REV /No NAME DATE
Rev 0.09 2009/12/28
FUNCTION APPROVE CHECK DESIGN
JPOS Guide
- 105-
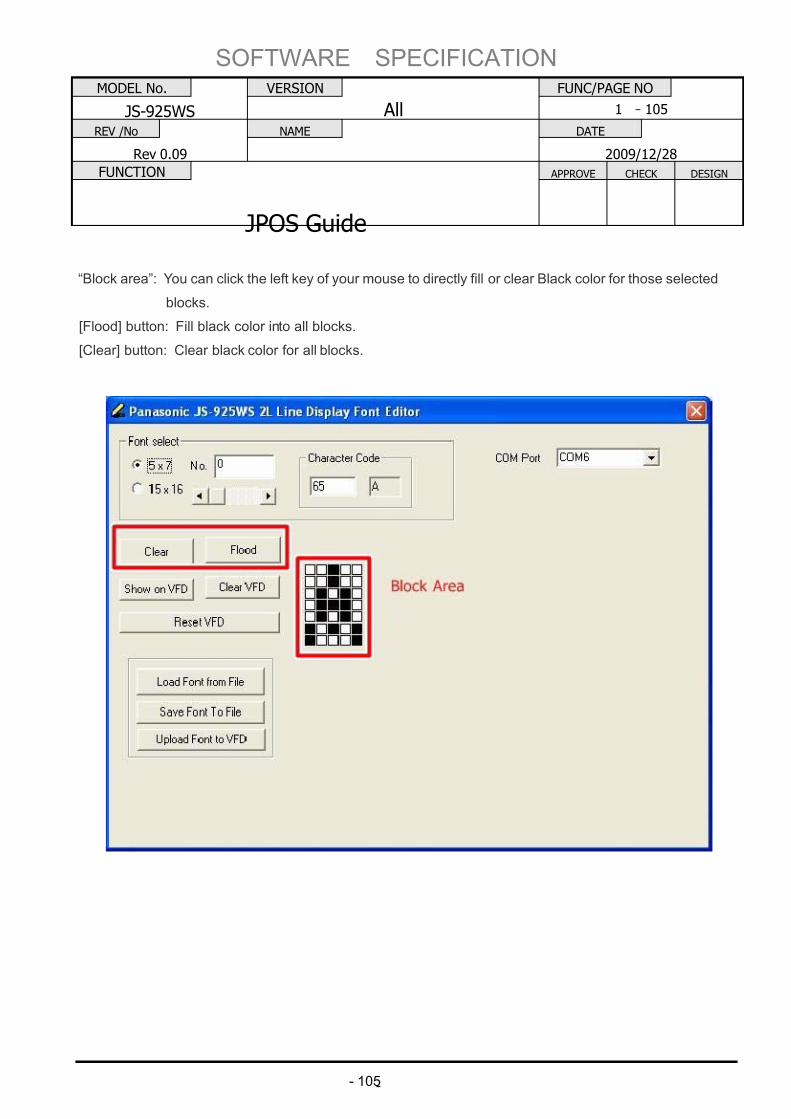
“Block area”: You can click the left key of your mouse to directly fill or clear Black color for those selected
blocks.
[Flood] button: Fill black color into all blocks.
[Clear] button: Clear black color for all blocks.
7/27/2019 JposGuideLite-ray.pdf
http://slidepdf.com/reader/full/jposguidelite-raypdf 111/117
SOFTWARE SPECIFICATION
MODEL No. VERSION FUNC/PAGE NO
JS-925WS All 1 -106
REV /No NAME DATE
Rev 0.09 2009/12/28
FUNCTION APPROVE CHECK DESIGN
JPOS Guide
- 106-
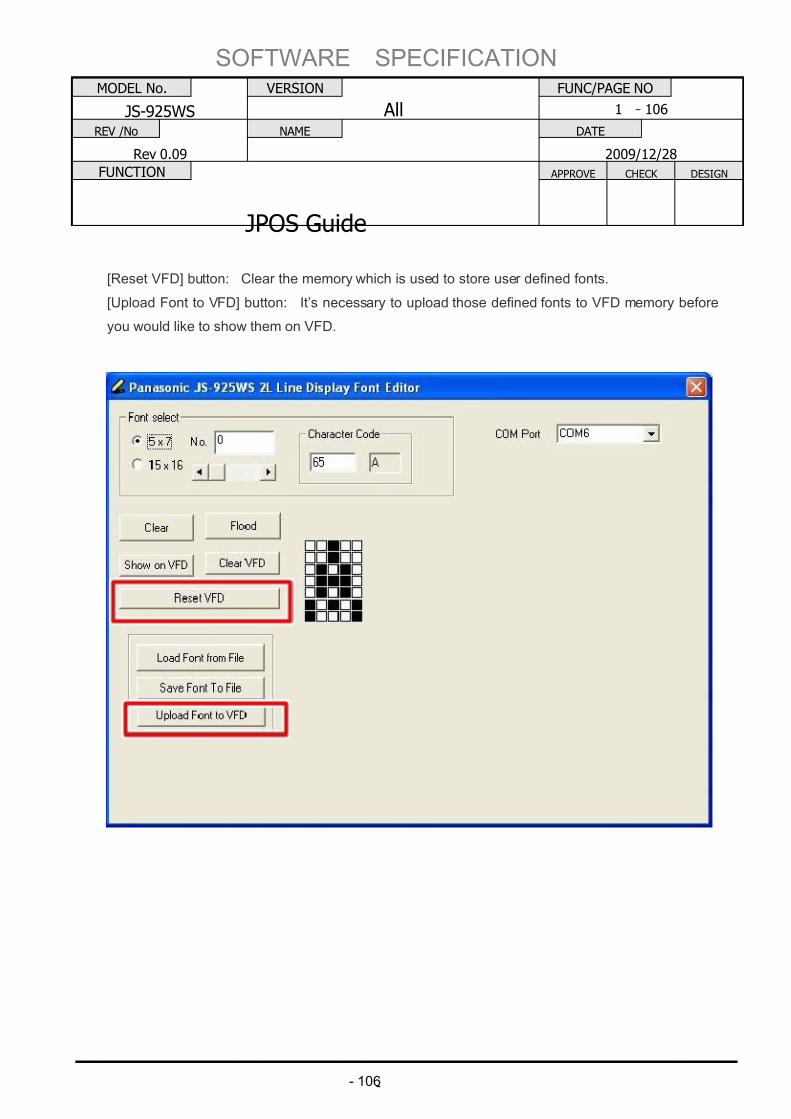
[Reset VFD] button: Clear the memory which is used to store user defined fonts.
[Upload Font to VFD] button: It’s necessary to upload those defined fonts to VFD memory before
you would like to show them on VFD.
7/27/2019 JposGuideLite-ray.pdf
http://slidepdf.com/reader/full/jposguidelite-raypdf 112/117
SOFTWARE SPECIFICATION
MODEL No. VERSION FUNC/PAGE NO
JS-925WS All 1 -107
REV /No NAME DATE
Rev 0.09 2009/12/28
FUNCTION APPROVE CHECK DESIGN
JPOS Guide
- 107-
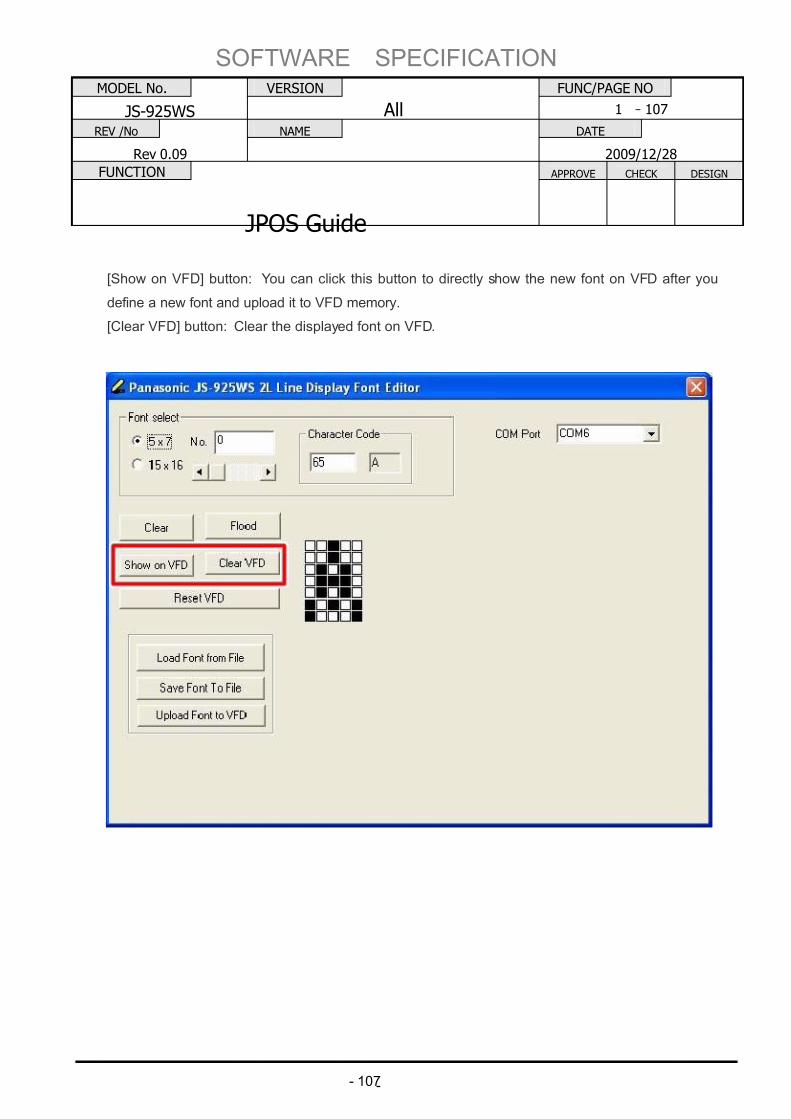
[Show on VFD] button: You can click this button to directly show the new font on VFD after you
define a new font and upload it to VFD memory.
[Clear VFD] button: Clear the displayed font on VFD.
7/27/2019 JposGuideLite-ray.pdf
http://slidepdf.com/reader/full/jposguidelite-raypdf 113/117
SOFTWARE SPECIFICATION
MODEL No. VERSION FUNC/PAGE NO
JS-925WS All 1 -108
REV /No NAME DATE
Rev 0.09 2009/12/28
FUNCTION APPROVE CHECK DESIGN
JPOS Guide
- 108-
4.11.9 Uninstal l JS-925WS JPOS Drivers
4.11.9.1 Run “ Add or Remove Programs”
Press [start] ---> [Control Panel]
Run “Add or Remove Programs”.
7/27/2019 JposGuideLite-ray.pdf
http://slidepdf.com/reader/full/jposguidelite-raypdf 114/117
SOFTWARE SPECIFICATION
MODEL No. VERSION FUNC/PAGE NO
JS-925WS All 1 -109
REV /No NAME DATE
Rev 0.09 2009/12/28
FUNCTION APPROVE CHECK DESIGN
JPOS Guide
- 109-
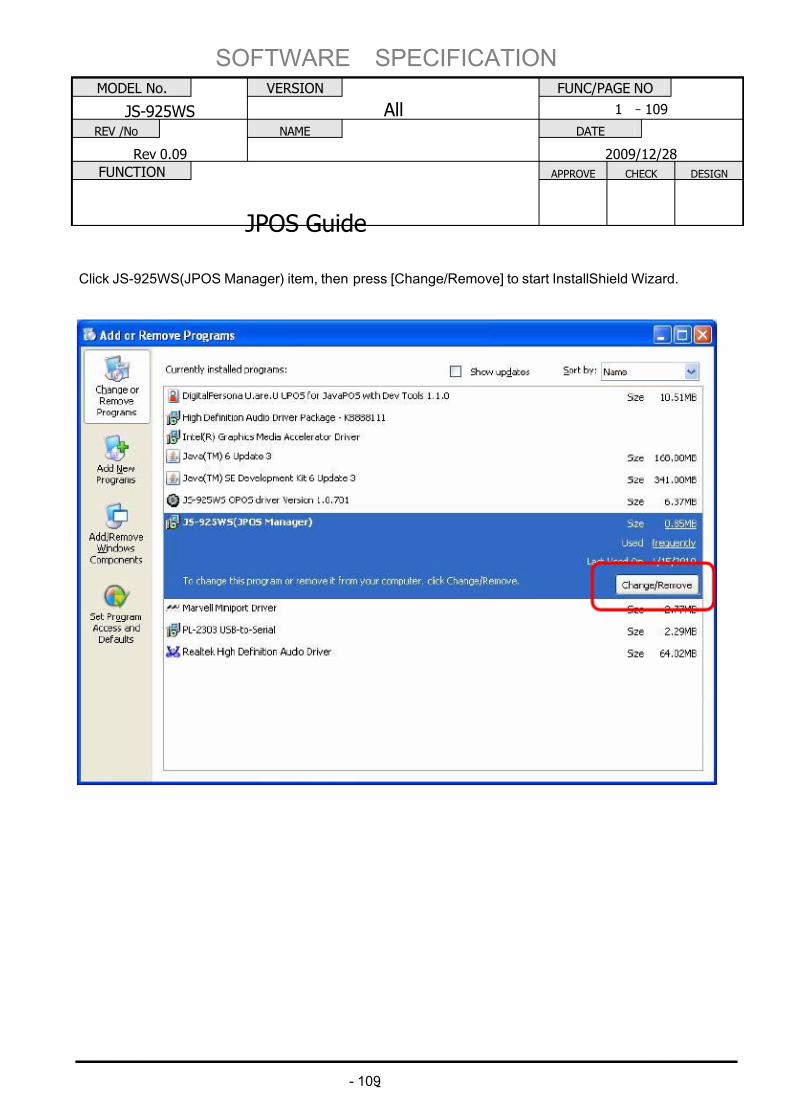
Click JS-925WS(JPOS Manager) item, then press [Change/Remove] to start InstallShield Wizard.
7/27/2019 JposGuideLite-ray.pdf
http://slidepdf.com/reader/full/jposguidelite-raypdf 115/117
SOFTWARE SPECIFICATION
MODEL No. VERSION FUNC/PAGE NO
JS-925WS All 1 -110
REV /No NAME DATE
Rev 0.09 2009/12/28
FUNCTION APPROVE CHECK DESIGN
JPOS Guide
- 110-
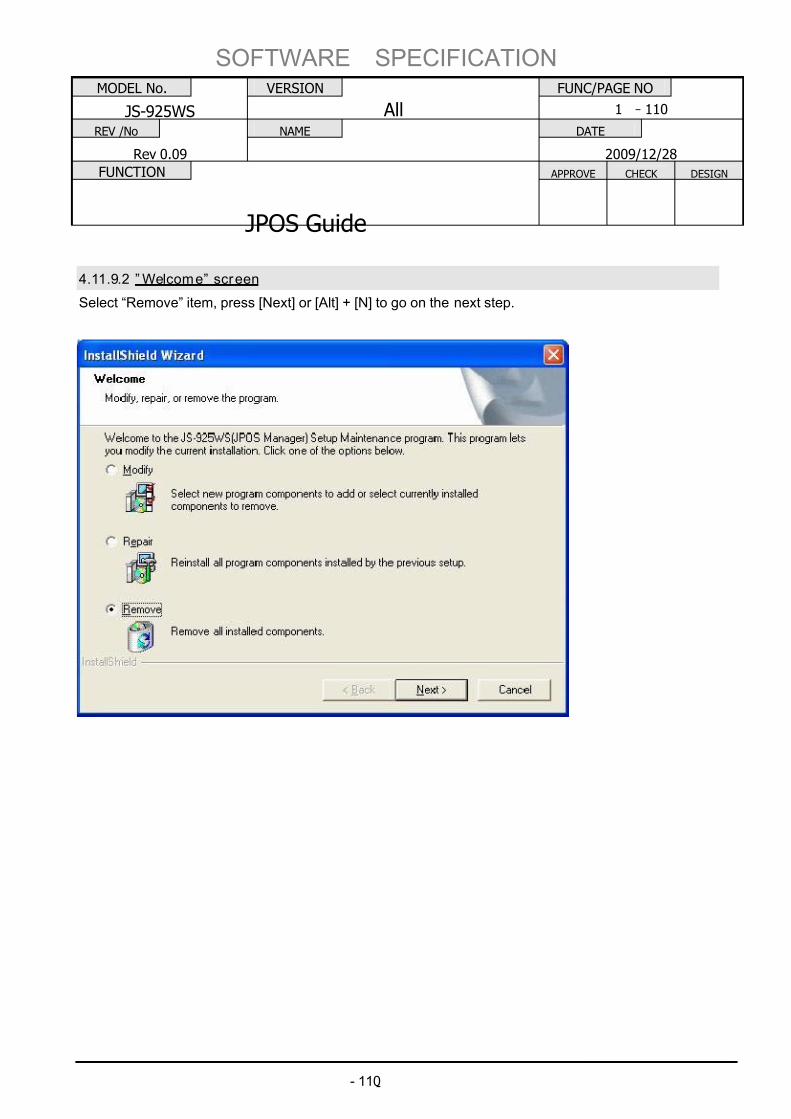
4.11.9.2 ” Welcome” screen
Select “Remove” item, press [Next] or [Alt] + [N] to go on the next step.
7/27/2019 JposGuideLite-ray.pdf
http://slidepdf.com/reader/full/jposguidelite-raypdf 116/117
SOFTWARE SPECIFICATION
MODEL No. VERSION FUNC/PAGE NO
JS-925WS All 1 -111
REV /No NAME DATE
Rev 0.09 2009/12/28
FUNCTION APPROVE CHECK DESIGN
JPOS Guide
- 111 -
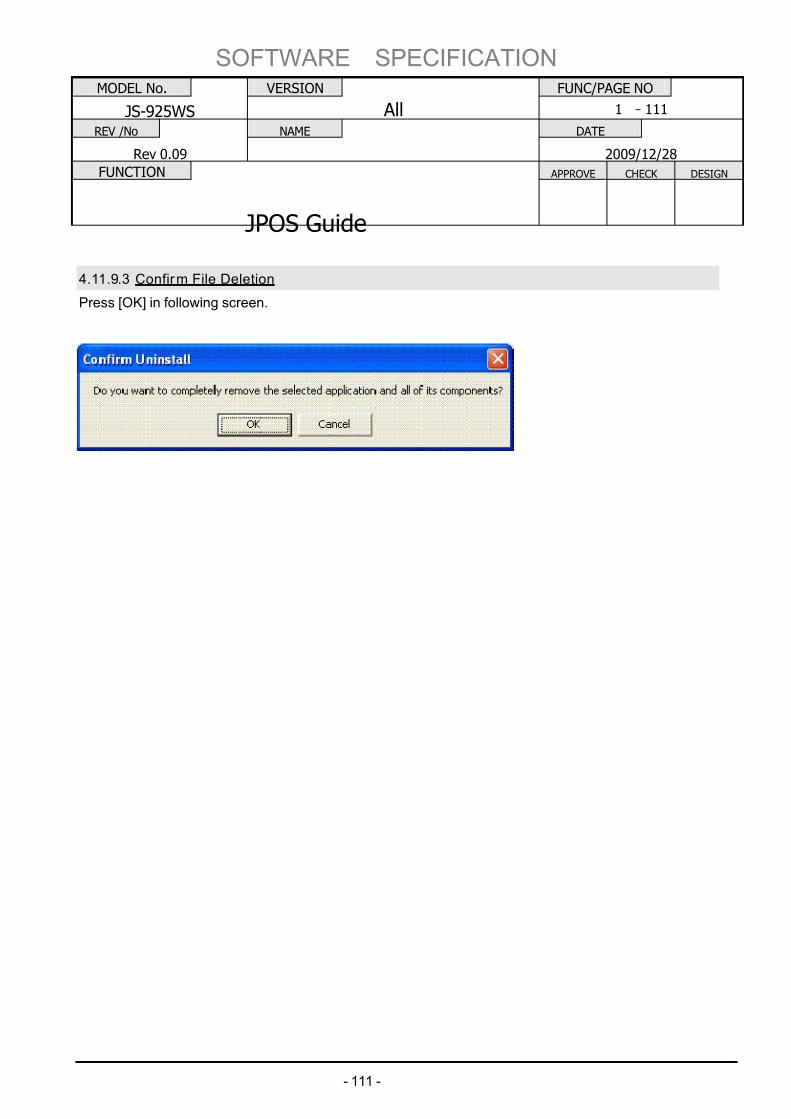
4.11.9.3 Confirm File Deletion
Press [OK] in following screen.
7/27/2019 JposGuideLite-ray.pdf
http://slidepdf.com/reader/full/jposguidelite-raypdf 117/117
SOFTWARE SPECIFICATION
MODEL No. VERSION FUNC/PAGE NO
JS-925WS All 1 -112
REV /No NAME DATE
Rev 0.09 2009/12/28
FUNCTION APPROVE CHECK DESIGN
JPOS Guide
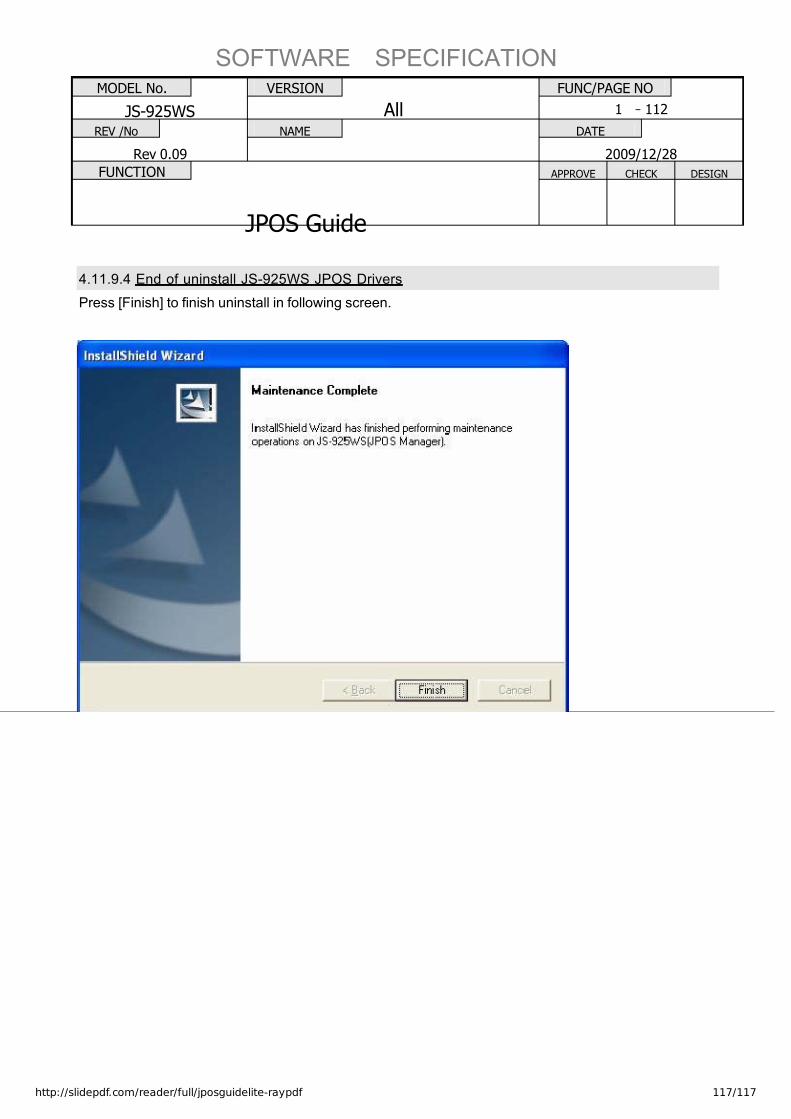
4.11.9.4 End of uninstall JS-925WS JPOS Drivers
Press [Finish] to finish uninstall in following screen.
Related Documents