S PRING 2016 Building with Control Sean Park, MDC 2 Big Hitters in Principles & Lessons Chiche and Kois—AACD Toronto The Power of... Emotional Digital Design Bichacho and Coachman Journal of Cosmetic Dentistry vol. 32 issue 1

Welcome message from author
This document is posted to help you gain knowledge. Please leave a comment to let me know what you think about it! Share it to your friends and learn new things together.
Transcript
J
ou
rna
l of C
osm
etiC Den
tistry V
olu
me 32 • n
um
ber 1 s
pring 20
16 w
ww
.aacd.com
s p r i n g 2 0 1 6
Building with ControlSean Park, MDC
2 Big Hitters in Principles & LessonsChiche and Kois —AACD Toronto
The Power of... Emotional Digital DesignBichacho and Coachman
Journal of Cosmetic Dentistryvol. 32 issue 1
Adhese® UniversalDental adhesive
Fast and convenient direct intra-oral application
Virtually NO WASTE!
For more information, call us at 1-800-533-6825 in the U.S., 1-800-263-8182 in Canada.© 2016 Ivoclar Vivadent, Inc. Ivoclar Vivadent, VivaPen and Adhese are registered trademarks of Ivoclar Vivadent, Inc.
100% CUSTOMER SATISFACTIONG U A R A N T E E D ! ivoclarvivadent.com
• Effi cient VivaPen® delivery - 3X more applications per ml compared to bottles
• Universal application - Developed for all bonding and etching techniques
• Predictable results - High bond strength and virtually no sensitivity
9085_ADHESE UNIVERSAL_JCD.indd 1 2/9/16 10:13 AM
3 Journal of Cosmetic Dentistry
EDITORIAL REVIEW BOARD
Pinhas Adar, MDT, CDT, Atlanta, GA
Irfan Ahmad, BDS, Middlesex, United Kingdom
Gary Alex, DMD, AAACD, Huntington, NY
Edward P. Allen, DDS, PhD, Dallas, TX
Chad J. Anderson, DMD, MS, Fresno, CA
Elizabeth M. Bakeman, DDS, FAACD, Grand Rapids, MI
Lee Ann Brady, DMD, Glendale, AZ
Ricardo M. Carvalho, DDS, PhD, Vancouver, BC, Canada
Christian Coachman, DDS, CDT, Sáo Paulo, Brazil
John C. Cranham, DDS, Chesapeake, VA
Michael W. Davis, DDS, Santa Fe, NM
Gerald E. Denehy, DDS, Iowa City, IA
Newton Fahl Jr., DDS, MS, Curitiba-PR, Brazil
Jonathan L. Ferencz, DDS, FACP, New York, NY
Scott W. Finlay, DDS, FAACD, Arnold, MD
Hugh D. Flax, DDS, AAACD, Atlanta, GA
David A. Garber, DMD, Atlanta, GA
Ronald E. Goldstein, DDS, FACD, FICD, Atlanta, GA
Steve D. Hoofard, CDT, AAACD, Hermiston, OR
Kenneth Hovden, DDS, AAACD, Daly City, CA
Nelson Y. Howard, DDS, AAACD, San Marcos, CA
Ronald D. Jackson, DDS, FAACD, Middleburg, VA
Sang K. Jun, CDT, Monterey, CA
Michael J. Koczarski, DDS, AAACD Woodinville, WA
John C. Kois, DMD, MSD, Seattle, WA
Gerard Kugel, DMD, MS, PhD, Boston, MA
Cobi J. Landsberg, DMD, Tel Aviv, Israel
Ryan Langer, AAACD, Eagle, ID
David A. Little, DDS, San Antonio, TX
Robert A. Lowe, DDS, Charlotte, NC
Robert C. Margeas, DDS, Des Moines, IA
Frank J. Milnar, DDS, AAACD, St. Paul, MN
Ricardo Mitrani, DDS, MSD, Mexico City, Mexico
Carlos A. Munoz, DDS, MSD, Buffalo, NY
Thomas W. Nabors lll, DDS, AAACD, Nashville, TN
W. Peter Nordland, DMD, MS, La Jolla, CA
Aikaterini G. Papathanasiou, DDS, Boston, MA
Gary M. Radz, DDS, Denver, CO
Christopher D. Ramsey, DMD, AAACD, Jupiter, FL
Nelson A. Rego, CDT, AAACD, Santa Fe Springs, CA
Dwight G. Rickert, CDT, AAACD, Indianapolis, IN
Robert G. Ritter, DMD, Jupiter, FL
Matthew R. Roberts, CDT, AAACD, Idaho Falls, ID
Henry Salama, DMD, Atlanta, GA
Maurice A. Salama, DMD, Atlanta GA
Michael R. Sesemann, DDS, FAACD, Omaha, NE
Michael Sonick, DMD, Fairfield, CT
Rhys D. Spoor, DDS, AAACD, Seattle, WA
Thomas T. Teel, DDS, Fort Wayne, IN
Thomas F. Trinkner, DDS, AAACD, Columbia, SC
Eric Van Dooren, DDS, Antwerp, Belgium
Marcos A. Vargas, DDS, Iowa City, IA
Nondas Vlachopoulos, CDT, Athens, Greece
Dennis J. Wells, DDS, AAACD, Brentwood, TN
Barbara Warner Wojdan, CDT, AAACD, Oldsmar, FL
Journal of Cosmetic Dentistryvol. 32 issue 1
A PEER-REVIEWED PUBLICATION OF THEAMERICAN ACADEMY OF COSMETIC DENTISTRY
EDITORIAL MISSIONThe mission of the Journal of Cosmetic Dentistry is to educate AACD members, as well as other professionals in the field, on the art and science of cosmetic dentistry. We will endeavor to do this by publishing well-researched, peer-reviewed articles accompanied by high-quality, comprehensive clinical imagery. The objective is to enhance readers’ knowledge and skills while showcasing the latest cosmetic techniques and procedures. The Journal of Cosmetic Dentistry will strive to help readers become better clinicians, so they can offer their patients the best—and most responsible—treatment possible.
Advertising: 800.543.9220 • 608.222.8583 or [email protected]
Editorial: 800.543.9220 • 608.222.8583 or [email protected]
EDITOR-IN-CHIEF Edward Lowe, DMD, AAACD Vancouver, BC, Canada, [email protected]
EXECUTIVE DIRECTOR Barbara J. Kachelski, MBA, CAE, [email protected]
MANAGING EDITOR Tracy Skenandore, [email protected]
EDITORIAL ASSISTANT Denise Sheriff, [email protected]
ART DIRECTOR/DESIGNER Lynnette Rogers, [email protected]
GRAPHIC DESIGNER Sherry Misener, [email protected]
EDITORIAL CONSULTANT Juliette Kurtz, [email protected]
MANUSCRIPT DEVELOPMENT LIAISON Allison DiMatteo, MPS, [email protected]
CHIEF MARKETING OFFICER Michael DiFrisco, [email protected]
CONTRIBUTING EDITORS Julie M. Gillis, DDS, AAACD, Grand Junction, CO
James H. Peyton, DDS, FAACD, Bakersfield, CA
J.A. Reynolds, DDS, AAACD, Franklin, TN
Gregory B. Wright, DDS, FAACD, Southlake, TX
AACD OFFICE
402 West Wilson Street, Madison, WI 53703
800.543.9220 • 608.222.8583
fax 608.222.9540 • [email protected] • www.aacd.com
High-quality reprints with possible customization are available for authors and advertisers. Please contact [email protected] and the jCD editorial staff will work with you to get the exact reprint you would like for your presentations, lectures, or patient literature.
Reprints
ADVERTISING POLICY
All advertising appearing in the Journal of Cosmetic Dentistry (jCD) is approved by the editorial team. Advertisements are not endorsed by the jCD or AACD.
4 Spring 2016 • Volume 32 • Number 1
Journal of Cosmetic Dentistry • Spring 2016 • Volume 32 • Number 1
A peer-reviewed publication and member benefit of the AACD
Column
8 Editor’s Message
In the Blink of an Eye... Edward Lowe, DMD, AAACD
Features
28 Clinical Cover Feature Masterful Maneuvers v Sean Park, MDC
Sebastian Ercus, DMD
Delfin Barquero, DDS
Johan Figueira, DDS
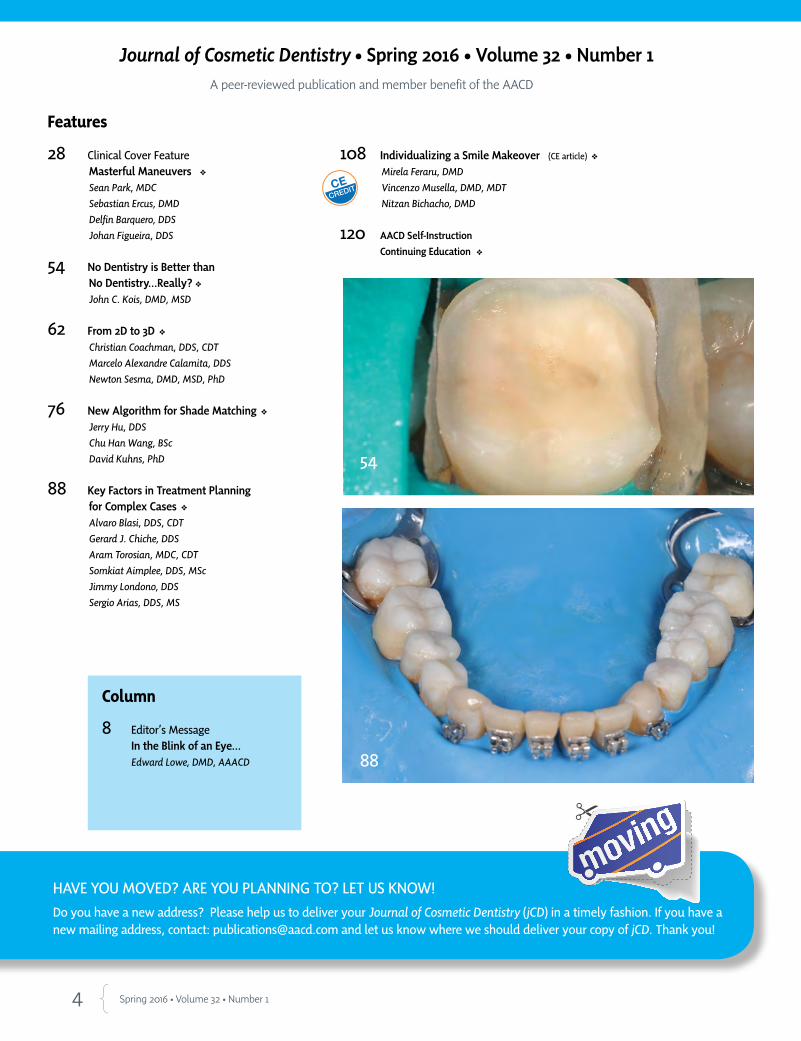
54 No Dentistry is Better than No Dentistry…Really? v John C. Kois, DMD, MSD
62 From 2D to 3D v Christian Coachman, DDS, CDT
Marcelo Alexandre Calamita, DDS
Newton Sesma, DMD, MSD, PhD
76 New Algorithm for Shade Matching v Jerry Hu, DDS
Chu Han Wang, BSc
David Kuhns, PhD
88 Key Factors in Treatment Planning for Complex Cases v Alvaro Blasi, DDS, CDT
Gerard J. Chiche, DDS
Aram Torosian, MDC, CDT
Somkiat Aimplee, DDS, MSc
Jimmy Londono, DDS
Sergio Arias, DDS, MS
CECREDIT
HAVE YOU MOVED? ARE YOU PLANNING TO? LET US KNOW!
Do you have a new address? Please help us to deliver your Journal of Cosmetic Dentistry (jCD) in a timely fashion. If you have a new mailing address, contact: [email protected] and let us know where we should deliver your copy of jCD. Thank you!
54
88
108 Individualizing a Smile Makeover (CE article) v Mirela Feraru, DMD
Vincenzo Musella, DMD, MDT
Nitzan Bichacho, DMD
120 AACD Self-Instruction
Continuing Education v
Isn’t it time your patient fi nancingmeasured up to your patient care?
“ When it comes to patient fi nancing, Lending Club Patient Solutions is my go-to partner. They’ve got great payment alternatives for cases of all sizes, from single implants to comprehensive smile makeovers.”
—Steve R., DMD
“ Since working with Lending Club Patient Solutions, our treatment plan acceptance jumped from around 45% to 75%.”
—Cameron E, Marketing Admin, Florida
Discover a new approach to patient fi nancing and see why we continue to get rave reviews. To learn how easy patient fi nancing can be:
Call (844) 766-7283 or visit lendingclub.com/providers.
©2016 Lending Club Patient Solutions products and services provided through Springstone Financial, LLC, a subsidiary of LendingClub Corporation. Payment plans made by issuing bank partners.
Formerly Springstone Patient Financing
Lending Club Patient SolutionsJournal of Cosmetic DentistryFull page ad with bleed
Bleed = 8.875” x 11.375”Live = Trim = 8.375” x 10.875”
6 Spring 2016 • Volume 32 • Number 1
Journal of Cosmetic Dentistry • Spring 2016 • Volume 32 • Number 1
A peer-reviewed publication and member benefit of the AACD
AACD Mission stAteMent
The American Academy of Cosmetic Dentistry is dedicated to advancing excellence in the art and science of
comprehensive cosmetic dentistry and encouraging the highest
standards of ethical conduct and responsible patient care.
The Journal of Cosmetic Dentistry (ISSN 1532-8910), USPS (10452), published quarterly. $200 per year (U.S.
& Canada) or $240 per year (All other countries), single issues available upon request, by the American
Academy of Cosmetic Dentistry®, 402 West Wilson Street, Madison, WI 53703. 800.543.9220 OR
608.222.8583. Periodicals postage paid in Madison, WI, and additional offices.
POSTMASTER: send address changes to: Journal of Cosmetic Dentistry American Academy of Cosmetic Dentistry 402 West Wilson Street Madison, WI 53703
Peer-reviewed articles are denoted with the following symbol: v
Statements of fact and opinion are the responsibility of the authors alone and do not imply an opinion
on the part of the officers of the AACD. Materials may not be reproduced without written permission.
Contents© 2016 American Academy of Cosmetic Dentistry®
The Journal of Cosmetic Dentistry maintains signed patient release forms for all articles featuring clinical
or other patient photography.
Departments
10 Behind the Cover Building with Control v Sean Park, MDC
12 Scientific Session—Toronto 2016 Thoughts on Reducing Risk and
Minimizing Failures (Interview) v John C. Kois, DMD, MSD
14 Scientific Session—Toronto 2016 Views on Managing Complex Cases (Interview) v Gerard J. Chiche, DDS
18 Accreditation Essentials
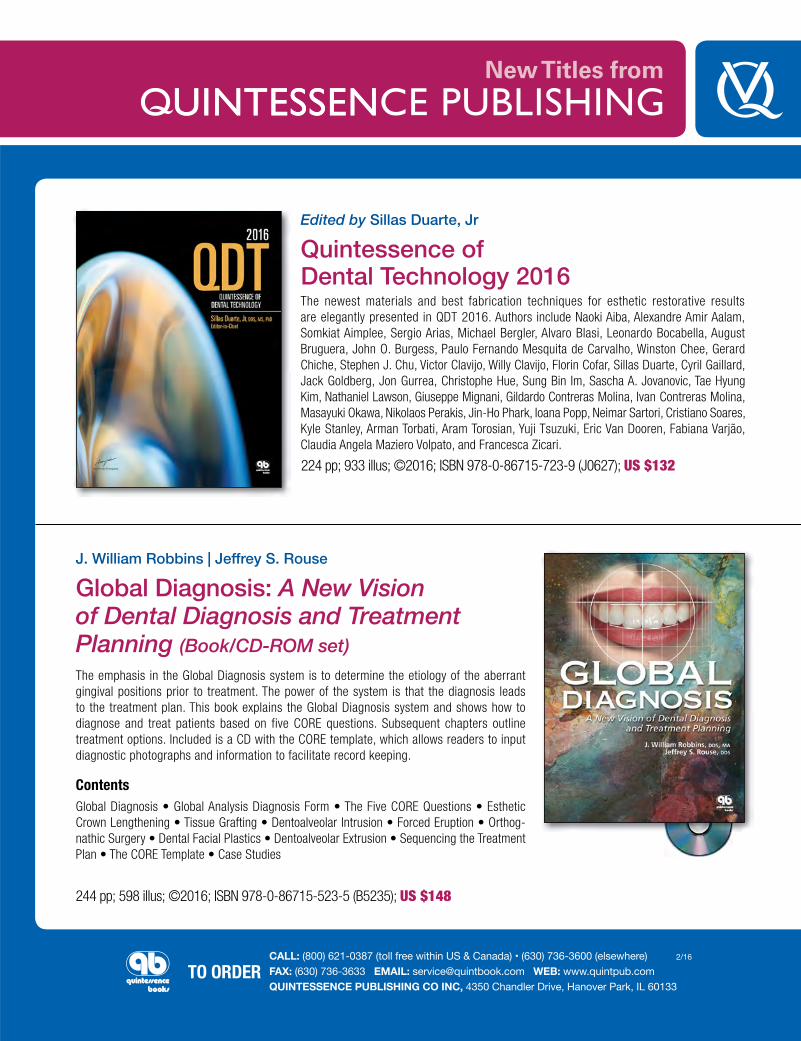
Revitalizing Discolored Anterior Restorations v Cecilia Eichenholz Omo, DDS
25 Examiners’ Commentary v The Paramount Details of Case Type IV James H. Peyton, DDS, FAACD
26 New Fellow Member
27 New Accredited Members
10
18
CALL: (800) 621-0387 (toll free within US & Canada) • (630) 736-3600 (elsewhere) 2/16
FAX: (630) 736-3633 EMAIL: [email protected] WEB: www.quintpub.comQUINTESSENCE PUBLISHING CO INC, 4350 Chandler Drive, Hanover Park, IL 60133
TO ORDER
New Titles from
Edited by Sillas Duarte, Jr
Quintessence of Dental Technology 2016The newest materials and best fabrication techniques for esthetic restorative results are elegantly presented in QDT 2016. Authors include Naoki Aiba, Alexandre Amir Aalam, Somkiat Aimplee, Sergio Arias, Michael Bergler, Alvaro Blasi, Leonardo Bocabella, August Bruguera, John O. Burgess, Paulo Fernando Mesquita de Carvalho, Winston Chee, Gerard Chiche, Stephen J. Chu, Victor Clavijo, Willy Clavijo, Florin Cofar, Sillas Duarte, Cyril Gaillard, Jack Goldberg, Jon Gurrea, Christophe Hue, Sung Bin Im, Sascha A. Jovanovic, Tae Hyung Kim, Nathaniel Lawson, Giuseppe Mignani, Gildardo Contreras Molina, Ivan Contreras Molina, Masayuki Okawa, Nikolaos Perakis, Jin-Ho Phark, Ioana Popp, Neimar Sartori, Cristiano Soares, Kyle Stanley, Arman Torbati, Aram Torosian, Yuji Tsuzuki, Eric Van Dooren, Fabiana Varjão, Claudia Angela Maziero Volpato, and Francesca Zicari.
J. William Robbins | Jeffrey S. Rouse
Global Diagnosis: A New Vision of Dental Diagnosis and Treatment Planning (Book/CD-ROM set)
The emphasis in the Global Diagnosis system is to determine the etiology of the aberrant gingival positions prior to treatment. The power of the system is that the diagnosis leads to the treatment plan. This book explains the Global Diagnosis system and shows how to diagnose and treat patients based on five CORE questions. Subsequent chapters outline treatment options. Included is a CD with the CORE template, which allows readers to input diagnostic photographs and information to facilitate record keeping.
ContentsGlobal Diagnosis • Global Analysis Diagnosis Form • The Five CORE Questions • Esthetic Crown Lengthening • Tissue Grafting • Dentoalveolar Intrusion • Forced Eruption • Orthog-nathic Surgery • Dental Facial Plastics • Dentoalveolar Extrusion • Sequencing the Treatment Plan • The CORE Template • Case Studies
224 pp; 933 illus; ©2016; ISBN 978-0-86715-723-9 (J0627); US $132
244 pp; 598 illus; ©2016; ISBN 978-0-86715-523-5 (B5235); US $148
JCD_Ad_QDT-RobbinsRouse_F.indd 1 2/8/16 10:30 AM

8 Spring 2016 • Volume 32 • Number 1
Sitting at a table on the exhibit floor at the Pacific Dental Conference in Vancouver, BC, I observe the traffic around me. “Freshman decade” dentists run from booth to booth, attempting to procure as many free samples as possible. Getting more education and enhancing hand skills top their agendas.
I cannot believe that I graduated from dental school 30 years ago. Back then, the preeminent restoration was the silver mercury amalgam lined with Dycal and Copalite varnish. Gold and porcelain metal crowns were the standard fixed prosthodontic restorations. Dental implants were evolving and had not yet gained mainstream acceptance. Education focused on form and function, with light emphasis on esthetics.
When I started lecturing, one of my favorite sayings was, “I do not own dentistry…I am simply borrowing it for another 30 years or so before passing it on to someone else.” Lately I find that the number of years I am “borrowing dentistry” has dwindled from 30 down to 10. As I enter the “senior decade” of my profession, I still feel I have much to learn.
Appreciating our past and understanding what we face in our present is all part of the learning interchange, and what we learn from each other at events like the AACD Scientific Session is awe-inspiring and advantageous for our future. That is why this issue highlights presentations of various AACD 2016 Toronto speakers.
As you attend this year’s meeting, I challenge Traditionalists and Baby Boomers to share your wisdom. Helping others excel and become better than you is the true mark of a teacher and mentor. Give unconditionally and generously of your time, knowledge, and experience. It is not for you to judge how parched for guidance the student protégé is, but simply to offer up all he or she can drink. How much is necessary to quench their thirst is ultimately their decision.
I also challenge Generation Xers and Millennials to heed the words of one of my favorite characters, ‘Red’ Reddington, from the television drama, “The Blacklist”:
“People say youth is wasted on the young. I disagree. I believe wisdom is wasted on the old. All you can do is part with it, but very few will take it, least of all the people closest to you. They want no part of it.”
Prove Reddington wrong by seeking out wisdom and modeling those who have endured the tests and paved the pathways for you to succeed.
A colleague asked me if I am going to retire in the next few years. No way. I spent 30 years mastering dentistry and professional communication so that now it has never been easier or more fun. This is a great time to be practicing, so why would I quit? I’m just getting started!
In the Blink of an Eye...
EDITOR’S MESSAGE
Helping others excel and become better than you is the true mark of a teacher and mentor.
Edward Lowe, DMD, AAACD Editor-in-Chief
ARTscience
Esthetic & functional harmony.
834 Falls Ave., Suite 2060, Twin Falls, ID 83301 208-733-0383 www.precision-dental-arts.com
BEHIND THE COVER
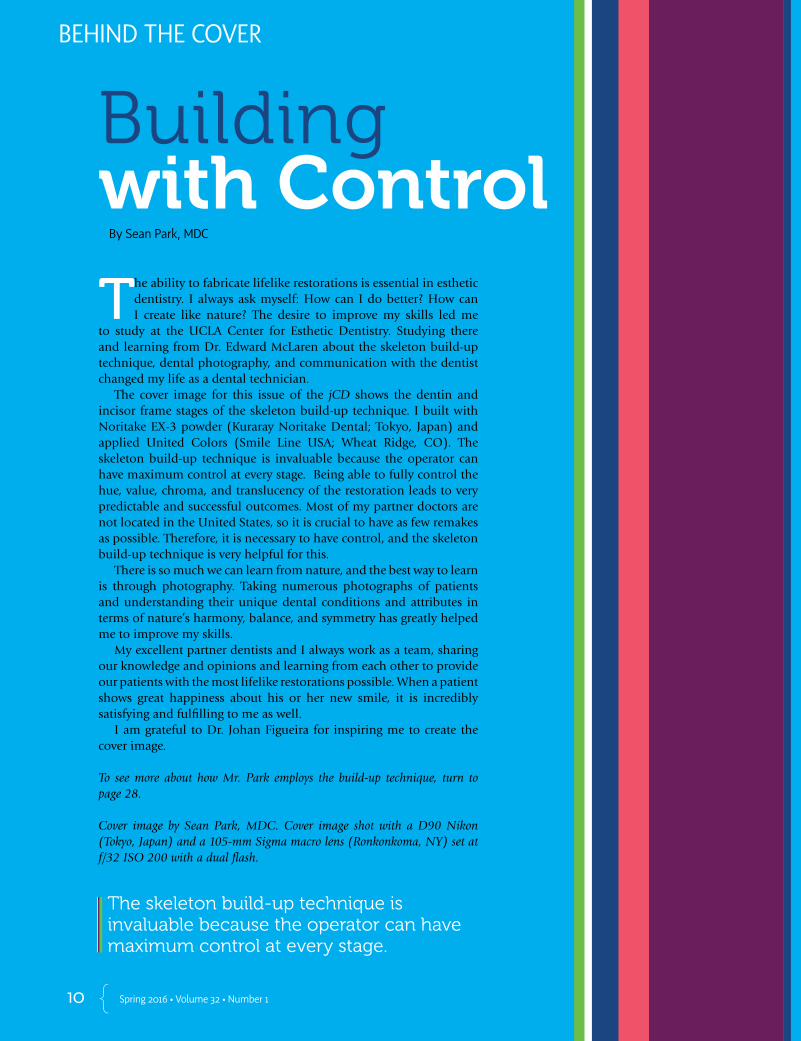
T he ability to fabricate lifelike restorations is essential in esthetic dentistry. I always ask myself: How can I do better? How can I create like nature? The desire to improve my skills led me
to study at the UCLA Center for Esthetic Dentistry. Studying there and learning from Dr. Edward McLaren about the skeleton build-up technique, dental photography, and communication with the dentist changed my life as a dental technician.
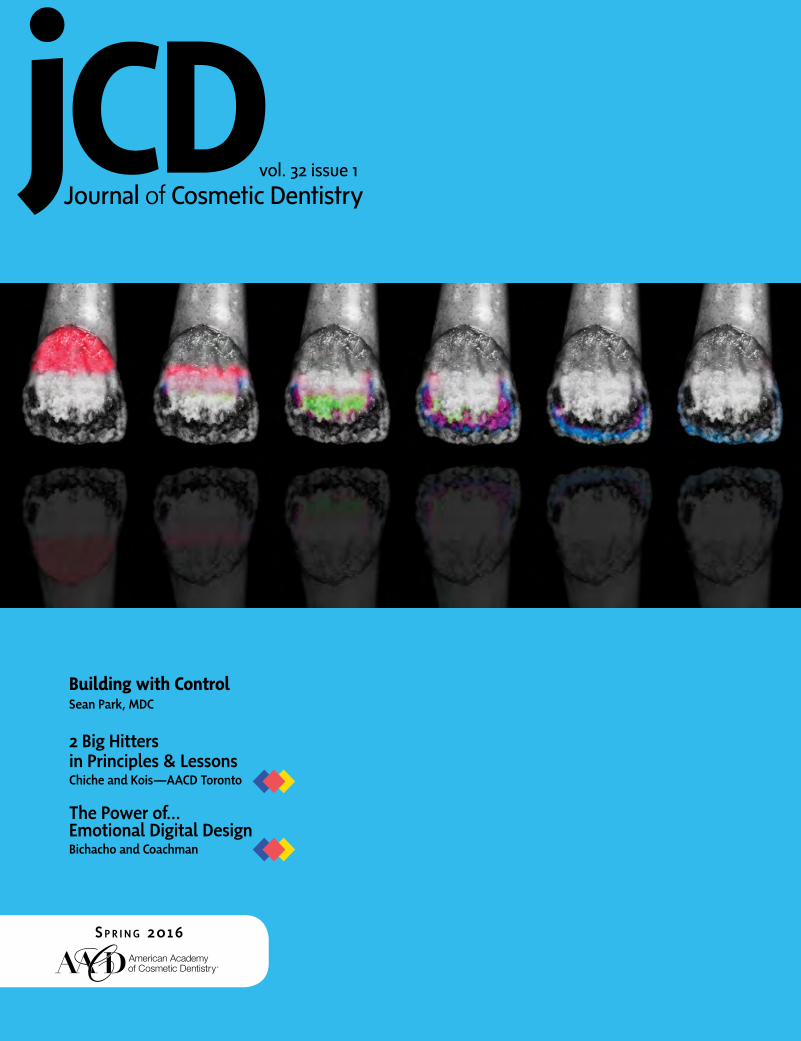
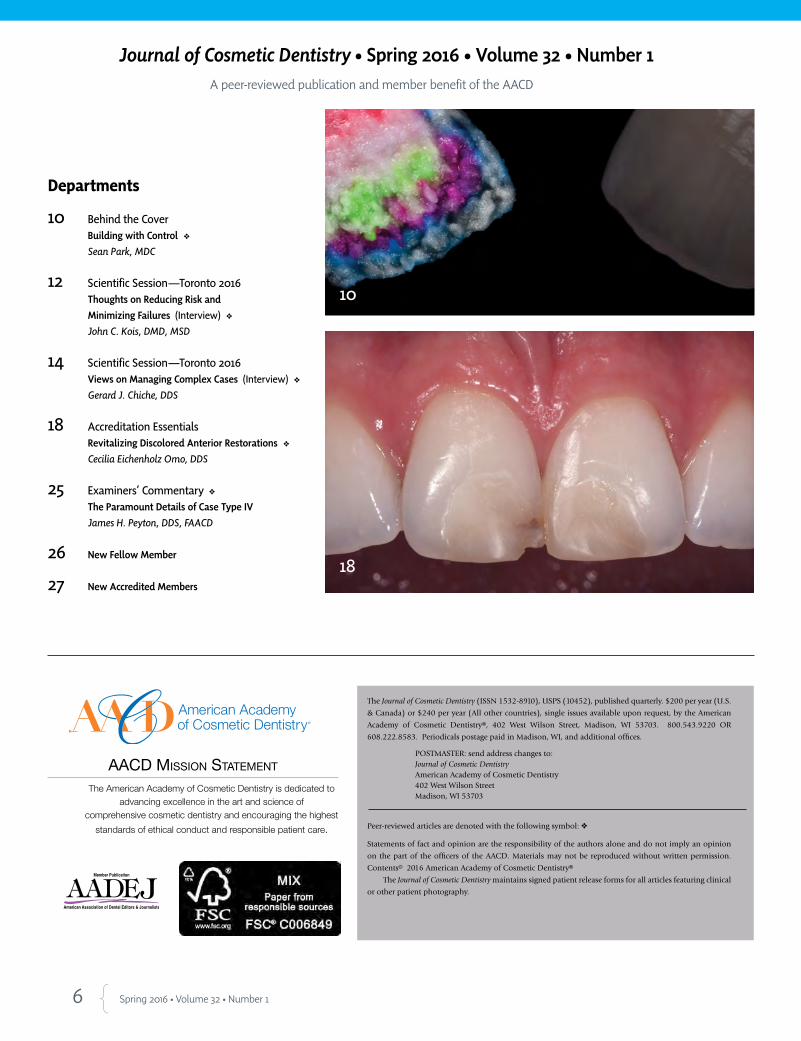
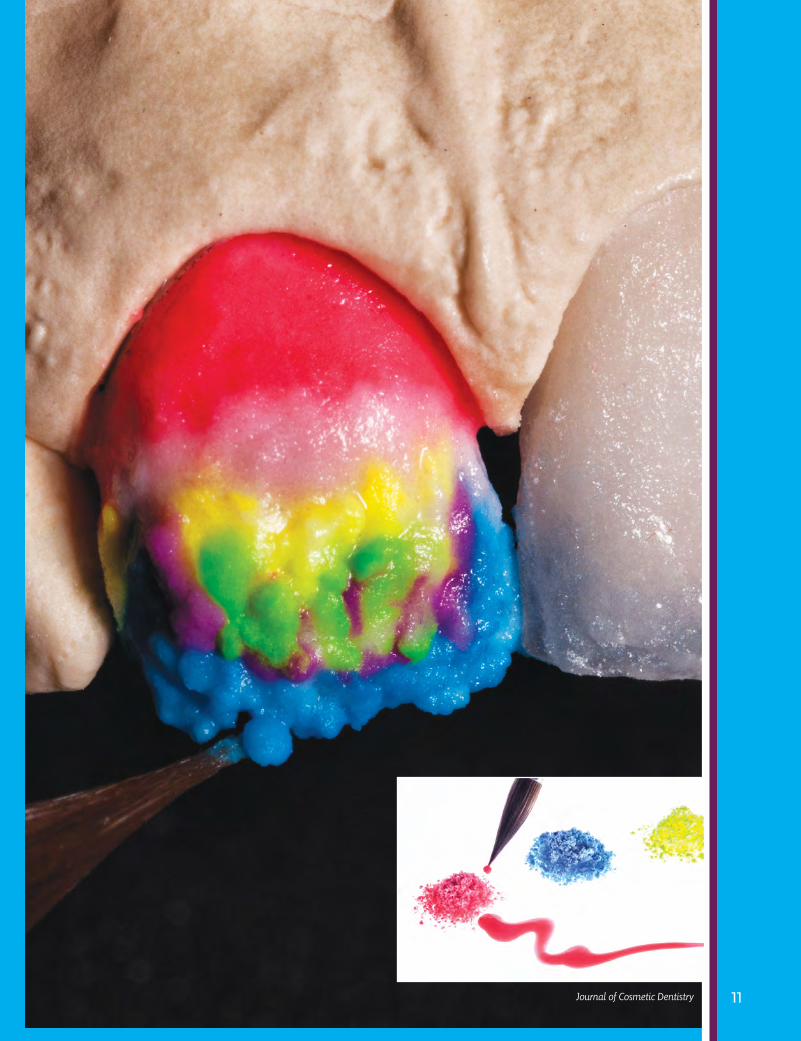
The cover image for this issue of the jCD shows the dentin and incisor frame stages of the skeleton build-up technique. I built with Noritake EX-3 powder (Kuraray Noritake Dental; Tokyo, Japan) and applied United Colors (Smile Line USA; Wheat Ridge, CO). The skeleton build-up technique is invaluable because the operator can have maximum control at every stage. Being able to fully control the hue, value, chroma, and translucency of the restoration leads to very predictable and successful outcomes. Most of my partner doctors are not located in the United States, so it is crucial to have as few remakes as possible. Therefore, it is necessary to have control, and the skeleton build-up technique is very helpful for this.
There is so much we can learn from nature, and the best way to learn is through photography. Taking numerous photographs of patients and understanding their unique dental conditions and attributes in terms of nature’s harmony, balance, and symmetry has greatly helped me to improve my skills.
My excellent partner dentists and I always work as a team, sharing our knowledge and opinions and learning from each other to provide our patients with the most lifelike restorations possible. When a patient shows great happiness about his or her new smile, it is incredibly satisfying and fulfilling to me as well.
I am grateful to Dr. Johan Figueira for inspiring me to create the cover image.
To see more about how Mr. Park employs the build-up technique, turn to page 28.
Cover image by Sean Park, MDC. Cover image shot with a D90 Nikon (Tokyo, Japan) and a 105-mm Sigma macro lens (Ronkonkoma, NY) set at f/32 ISO 200 with a dual flash.
Building with Control
By Sean Park, MDC
10 Spring 2016 • Volume 32 • Number 1
The skeleton build-up technique is invaluable because the operator can have maximum control at every stage.
11 Journal of Cosmetic Dentistry

12 Spring 2016 • Volume 32 • Number 1
SCIENTIFIC SESSION
T O R O N T O 2 0 1 6
Thoughts on Reducing Risk and Minimizing FailureAn Interview with Dr. John Kois
In this interview, Dr. Kois answers questions from registrants for his course, “Modes of Failure,” on Saturday, April 30, at AACD Toronto 2016. For additional information, please turn to page 54 to read Dr. Kois’ article on differentiating between tooth failure and restoration failure, and solutions to reduce risk.
13 Journal of Cosmetic Dentistry
Kois
Q: If eliminating risk factors/mini-mizing failure requires patient compliance (e.g., wearing a mouth guard), would you take the risk? Where do you draw the line?
A: We all recognize that our patients typically do not have compliance issues when our recommenda-tions make them feel better, look better (whether it is real or merely perceived), or provide something more convenient at a lower cost. Therefore, compliance issues be-come more of a problem when we do not have clear metrics to track the value of our treatment recom-mendations. It is also essential that the dentist make the correct diagnosis rather than a subjective presumption of what they think is happening based on signs and symptoms because the patient is not compliant. Then, it is critical that the dentist understand that what they expect their patient to be compliant with actually would minimize risk if they were compli-ant or recognize whether or not the treatment protocols need to be augmented. Therefore, our recom-mendations that require patient compliance must be a clear and compelling opportunity for patients to become advocates for their own dental health. I draw the line when the patient’s behavioral compliance issues compromise my ability to significantly reduce their risk.
Q: When you are reviewing treatment plans with your student col-leagues, what bigger picture issue do they commonly overlook?
A: My student colleagues most often are capable of understanding what is necessary for ideal treatment. However, without a risk-based understanding, they can tend to overlook what acceptable compro-mises can be achieved to sequence treatment or make it more afford-able for many patients. Therefore,
it is essential to also understand the minimum treatment neces-sary to achieve the objectives. This would help reduce their temptation to try and “sell” the patient what they thought the patient needed (Commodity Approach) versus explaining the patient’s problems (Diagnostic Approach) and provid-ing possible solutions critical to improving their prognosis. For example, if a patient presents with a large carious lesion on his lower first molar, my approach would be something like, “Mr. Jones, your lower molar has a large hole in it that has weakened the tooth. This is a result of the disease called car-ies. Without treatment, it will likely progress and infect the nerve in the tooth and you will need a root canal treatment. In addition, if not treated, it will continue to get larger and eventually destroy the tooth. If the tooth is treated now, you can reduce this risk. You have two choices: a) a direct filling material that can seal the tooth but not pro-tect it, or b) a crown that can seal the tooth and protect it to minimize the rest of the tooth cracking from biting force.”
Q: As a clinician, what failures are commonly referred to you that could be explained as an issue of biophysics, and how can we be more mindful of how to approach those cases?
A: Dentists are capable of restoring teeth very well, but many times are not cognizant of the modes of failure they are challenged by in a given patient. In other words, the restoration in a particular patient might not have the expected outcome, based on the patient’s risk factors. Failure modes based on the restoration would be attributed merely to the skill level of the dentist and the material character-istics. However, the failure modes
that may be more critical are based on the risk concerns of the indi-vidual patient (i.e., biofilm-based, environmentally-based or load-based), which must be managed properly for a predictable outcome. Remember, even gold crowns fail for reasons other than the material choice.
Q: Esthetic parameters should first be analyzed and accounted for in the treatment-planning process. Can we predict successful clinical outcomes when we change the occlusal environment to enhance esthetics?
A: This is an interesting question with many variables. The simple answer is “yes,” but it is not so simple merely by correcting morphologi-cal concerns. There are many Class I occlusions that appear attractive but are not functionally stable. Therefore, following the analysis of esthetic parameters, it is also criti-cal that the dentist be cognizant of managing the functional physiology (i.e., mastication, breathing, speak-ing, swallowing) to ensure func-tional predictability. In other words, just because an occlusion seems viable on an articulator does not necessarily mean it will function in the mouth. We try to optimize the esthetic outcome, but there may be functional limits imposed based on what the patient is willing to do for correction or the reasons the teeth have esthetic problems in the first place.
The Journal of Cosmetic Dentistry thanks those who submitted questions for this interview and Dr. Kois for tak-ing the time to answer them.

14 Spring 2016 • Volume 32 • Number 1
SCIENTIFIC SESSION
T O R O N T O 2 0 1 6
Views on Managing Complex CasesAn Interview with Dr. Gerard Chiche
In this interview, Dr. Chiche answers questions from AACD members about his course, “Esthetic Full-Mouth Rehabilitations,” on Saturday, April 30, at AACD Toronto 2016. For additional information, please turn to page 88 to read Dr. Chiche’s co-authored clinical case article addressing key factors in treatment planning complex cases.
15 Journal of Cosmetic Dentistry
Chiche
Q: What factors do you consider prior to performing a complete reha-bilitation? In what order do you address them, how, and why?
A The team at our Esthetics and Im-plants Center begins by examining (1) the face type (i.e., brachycephal-ic), (2) size of the masseter muscles, and (3) the mandibular plane angle. Then we examine the amount of attrition and erosion, and from there implement a problems list and diagnostic process. Since wear is a multifactorial process of which occlusion is not the only causative factor, we also assess other condi-tions. These include regurgitation, breathing disorders (with screening as necessary using a pulse oxim-eter), and finally, for severe cases, the possibility of Botox injections in the masseter muscles.
The point is this: proper occlusal design is necessary, but occlusion is only one of several factors that should be controlled prior to pre-paring teeth. We explain this to the patients we see at our center who present with very powerful and destructive risk factors.
Because the vast majority of reha-bilitation patients require alteration of the vertical dimension of occlu-sion (VDO), we put them on a splint to adjust the occlusion over time and achieve a stable and comfort-able restorative position. They will typically become accustomed to the change.
Then, during provisionalization, it is not so much the VDO that is being tested, but rather the pathways and their interference with mastication. In particular, it is how much canine guidance the patient can tolerate, or whether or not the patient would tolerate a more vertical chewing pattern. Many times the canine guidance needs to be quite shallow,
and group function is not unusual if the patient keeps a wide lateral chewing pattern.
Q: Ensuring the longevity of adhe-sively bonded mandibular veneers placed to restore worn anterior teeth is always a challenge. Can you discuss bonding, occlusion, and orthodontic factors that con-tribute to treatment success?A: This is an important topic. When dentists first placed veneers in the mid-1980s, we learned that preparing mandibular incisors for veneers could lead us very quickly into large areas of dentin. Addition-ally, with limited space in this area, color change was not that impres-sive unless the veneers were made more opaque. I also encountered numerous frustrated patients with mandibular veneers that came off, revealing small preparations that were mostly in dentin. I am not saying that bonding to dentin does not work, but I am cautious about large areas of dentin in a veneer preparation.Researchers will tell you that dentin bonds vary widely from one sample to the next; the dentin bond figure achieved in a research study is an average number. Given individual differences, dentin bonding for one patient may be perfectly successful for these veneers long term, with no leakage or debonding, yet not as successful for another patient who experiences microleakage. Therefore, to maximize bonding, the preparation surface area should have at least 50% enamel that is conditioned with dentin prepared very specifically; this has worked quite well over the years. However, if possible, the best strategy still remains bonding to 100% enamel.For mandibular veneers, this simply means opening the VDO slightly; or, according to case specifications, intruding the mandibular incisors or both maxillary and mandibular
incisors. However, practicality is important. If the patient requires a complete rehabilitation, a small VDO alteration will provide tremendous room for mandibular veneers with absolutely minimum tooth preparation. I prefer to call them “low-prep” as opposed to “no-prep,” because we always re-duce the facial line angles to some degree, and if there are undercuts with diastema and black holes, those areas require preparation to optimize the path of insertion.One final precaution to remember for mandibular veneers placed in combination with VDO increase or orthodontic intrusion is that, ultimately, the lower lip rules! The incisal edge length of the mandibu-lar incisors cannot exceed 3 mm beyond the lower lip at rest. Other-wise, mandibular esthetics compete with maxillary esthetics, and the final result is not pleasing at all.
Q: For medium- to high-risk patients, what role does wearing an occlusal splint or night guard post-treat-ment have as part of a preserva-tion strategy or in reducing risk factors?
A: This subject is quite controversial. I am only a “follower” in this area and certainly not an innovator. From my discussions at dental meetings and study groups, the consensus of the vast majority of professionals is that a carefully fab-ricated, classic hard occlusal splint (i.e., the horseshoe type) is neces-sary to protect all final ceramic restorations.I prefer a maxillary splint, since quite a few full-mouth rehabili-tation patients have had pre-restorative orthodontics. This type of splint also serves as a maxillary retainer, while the lower incisors are retained with bonded lingual wire.A number of practitioners typically mention in group discussions that
16 Spring 2016 • Volume 32 • Number 1
SCIENTIFIC SESSION
T O R O N T O 2 0 1 6
they have been very successful using a simple anterior appliance that keeps the posterior teeth out of occlusion. Others argue that it has not worked for them.It may surprise you that the major-ity of our rehabilitation patients who are wearing a CPAP are actu-ally quite pleased with it. However, although we must be cautious with tongue space, we still want to pro-tect our ceramic rehabilitation with a thin, horseshoe maxillary splint.
Q: What is the potential of today’s new translucent zirconia materials for complex veneer cases?
A: Our two master ceramists, Aram Torosian and Im Sung, graduated from Ed McLaren’s UCLA advanced technology program and came to our Esthetics and Implants Center with expertise using IPS e.max lithium disilicate. You could say they “grew up” with it, which provides us with a great foundation for the rehabilitations illustrated in the article on page 88.They have also explored monolith-ic zirconia in depth. We have typi-cally restored challenging patients with IPS e.max from canine to canine, and with monolithic zirco-nia on bicuspids and molars, using
minimal layering on the facial as-pect of bicuspid restorations for an esthetic transition with the canines. Their focus is also on “minimally layered” full-arch implant-support-ed zirconia restorations typically fabricated using Procera Implant Bridge technology.With equal levels of expertise in lithium disilicate and zirconia, our team decided six months ago to explore translucent zirconia in order to take advantage of the material’s superior strength yet achieve greater translucency. To achieve greater translucency in zir-conia, it is necessary to adjust the particle size to improve the internal refraction. Simultaneously, a small amount of cubic zirconia is incorpo-rated, which automatically reduces material strength compared to tra-ditional zirconia. Therefore, always understand the material you are using, and be careful with tooth reduction and thickness!Several products are available, but our experience is with the Noritake Katana System, which uses three different grades of translucency and strength. Although more data are needed, after we delivered a few cases it was evident that it is an attractive option when used
properly and safely. In particular, we have observed the following regarding translucent zirconia:
• Cemented translucent zirconia crowns, as opposed to bonded lithium disilicate, are very attrac-tive based on simplicity.
• Cementing translucent crowns, as opposed to bonding them, is also more realistic when patients have gingivitis and bleeding tissues on the day of delivery.
• A good indication for translucent zirconia crowns could be in the anterior region for a bruxer.
• Translucent zirconia creates a more translucent fixed partial denture (FPD) for the anterior region than traditional zirconia and maintains its strength with adequately de-signed connectors.
• Finally, it provides a pleasing esthetic transition when you need to blend, for example, four e.max crowns or veneers on the four max-illary incisors with a zirconia FPD starting on the canines.
The Journal of Cosmetic Dentistry thanks those who submitted questions for this interview and Dr. Chiche for taking the time to answer them.
18 Spring 2016 • Volume 32 • Number 1
ACCREDITATION ESSENTIALS
Restoring Class IV Fractures with New Composite Resin
Revitalizing Discolored Anterior Restorations
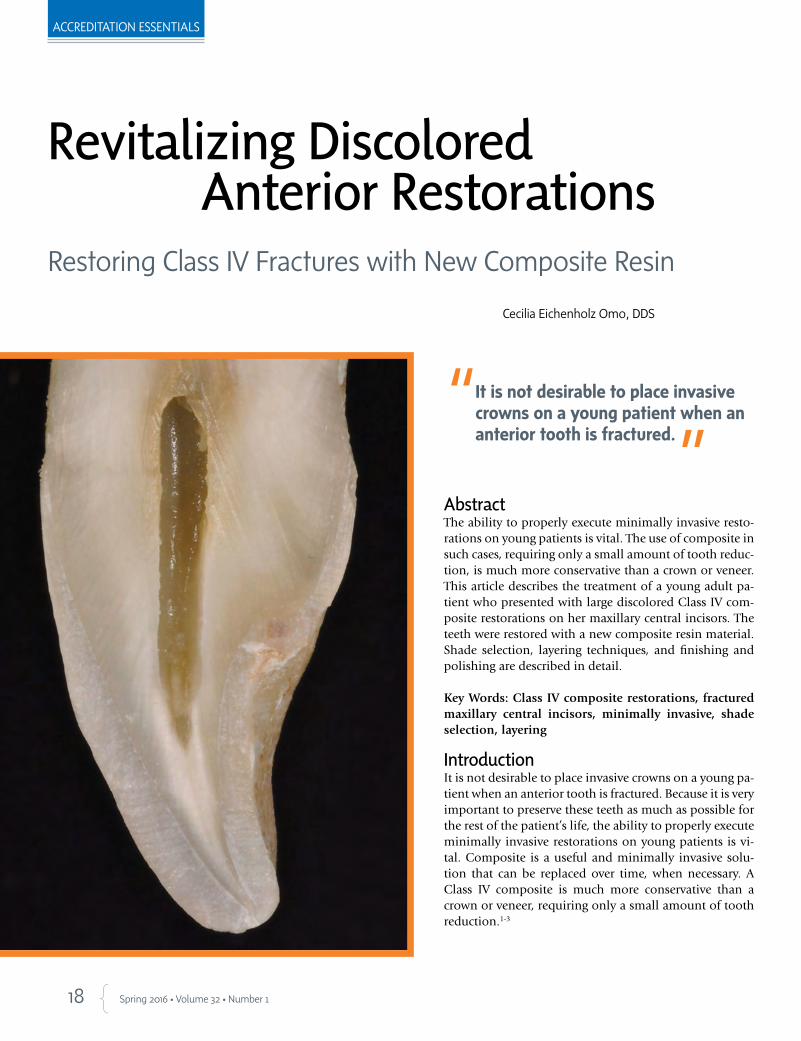
Abstract The ability to properly execute minimally invasive resto-rations on young patients is vital. The use of composite in such cases, requiring only a small amount of tooth reduc-tion, is much more conservative than a crown or veneer. This article describes the treatment of a young adult pa-tient who presented with large discolored Class IV com-posite restorations on her maxillary central incisors. The teeth were restored with a new composite resin material. Shade selection, layering techniques, and finishing and polishing are described in detail.
Key Words: Class IV composite restorations, fractured maxillary central incisors, minimally invasive, shade selection, layering
IntroductionIt is not desirable to place invasive crowns on a young pa-tient when an anterior tooth is fractured. Because it is very important to preserve these teeth as much as possible for the rest of the patient’s life, the ability to properly execute minimally invasive restorations on young patients is vi-tal. Composite is a useful and minimally invasive solu-tion that can be replaced over time, when necessary. A Class IV composite is much more conservative than a crown or veneer, requiring only a small amount of tooth reduction.1-3
It is not desirable to place invasive crowns on a young patient when an anterior tooth is fractured.
Cecilia Eichenholz Omo, DDS
19 Journal of Cosmetic Dentistry
Omo
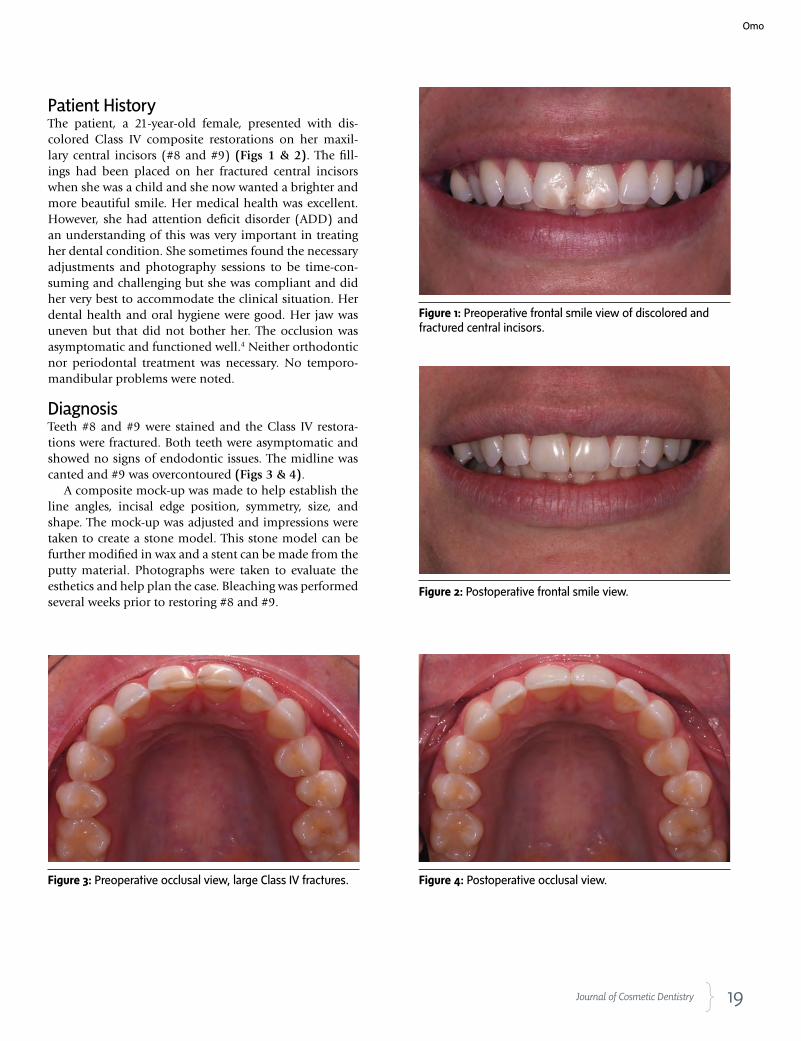
Patient HistoryThe patient, a 21-year-old female, presented with dis-colored Class IV composite restorations on her maxil-lary central incisors (#8 and #9) (Figs 1 & 2). The fill-ings had been placed on her fractured central incisors when she was a child and she now wanted a brighter and more beautiful smile. Her medical health was excellent. However, she had attention deficit disorder (ADD) and an understanding of this was very important in treating her dental condition. She sometimes found the necessary adjustments and photography sessions to be time-con-suming and challenging but she was compliant and did her very best to accommodate the clinical situation. Her dental health and oral hygiene were good. Her jaw was uneven but that did not bother her. The occlusion was asymptomatic and functioned well.4 Neither orthodontic nor periodontal treatment was necessary. No temporo-mandibular problems were noted.
DiagnosisTeeth #8 and #9 were stained and the Class IV restora-tions were fractured. Both teeth were asymptomatic and showed no signs of endodontic issues. The midline was canted and #9 was overcontoured (Figs 3 & 4).
A composite mock-up was made to help establish the line angles, incisal edge position, symmetry, size, and shape. The mock-up was adjusted and impressions were taken to create a stone model. This stone model can be further modified in wax and a stent can be made from the putty material. Photographs were taken to evaluate the esthetics and help plan the case. Bleaching was performed several weeks prior to restoring #8 and #9.
Figure 1: Preoperative frontal smile view of discolored and fractured central incisors.
Figure 2: Postoperative frontal smile view.
Figure 3: Preoperative occlusal view, large Class IV fractures. Figure 4: Postoperative occlusal view.
20 Spring 2016 • Volume 32 • Number 1
ACCREDITATION ESSENTIALS
Treatment
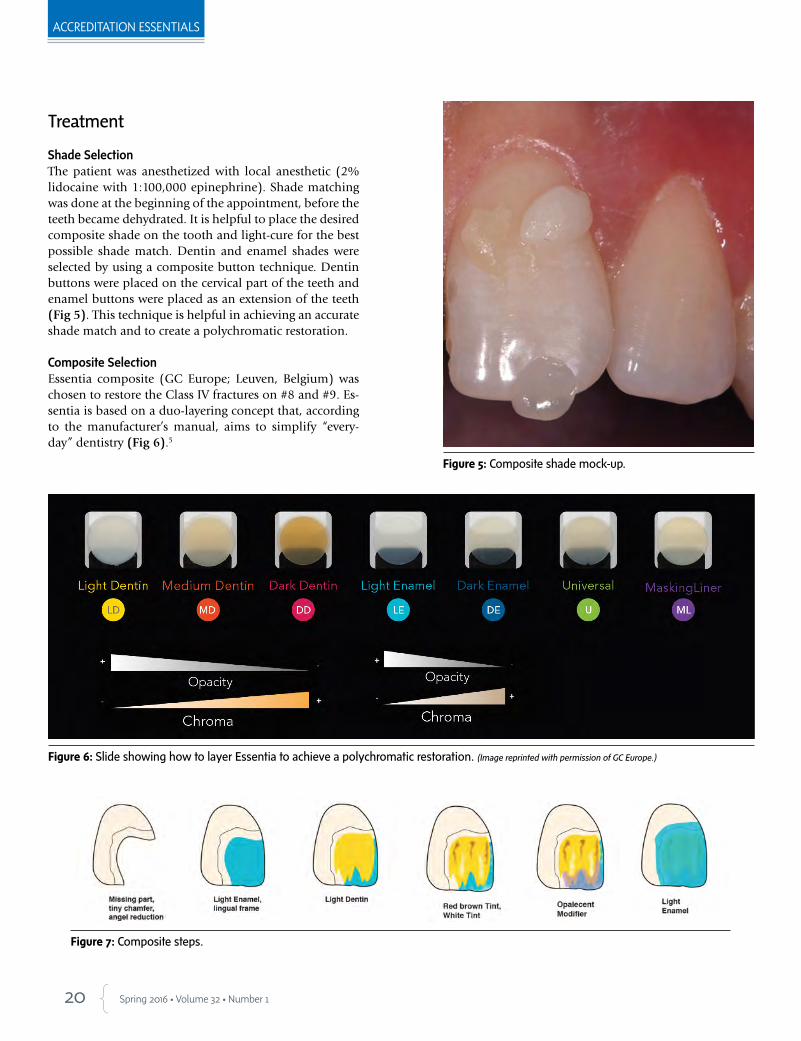
Shade SelectionThe patient was anesthetized with local anesthetic (2% lidocaine with 1:100,000 epinephrine). Shade matching was done at the beginning of the appointment, before the teeth became dehydrated. It is helpful to place the desired composite shade on the tooth and light-cure for the best possible shade match. Dentin and enamel shades were selected by using a composite button technique. Dentin buttons were placed on the cervical part of the teeth and enamel buttons were placed as an extension of the teeth (Fig 5). This technique is helpful in achieving an accurate shade match and to create a polychromatic restoration.
Composite SelectionEssentia composite (GC Europe; Leuven, Belgium) was chosen to restore the Class IV fractures on #8 and #9. Es-sentia is based on a duo-layering concept that, according to the manufacturer’s manual, aims to simplify “every-day” dentistry (Fig 6).5
Figure 5: Composite shade mock-up.
Figure 6: Slide showing how to layer Essentia to achieve a polychromatic restoration. (Image reprinted with permission of GC Europe.)
Figure 7: Composite steps.
21 Journal of Cosmetic Dentistry
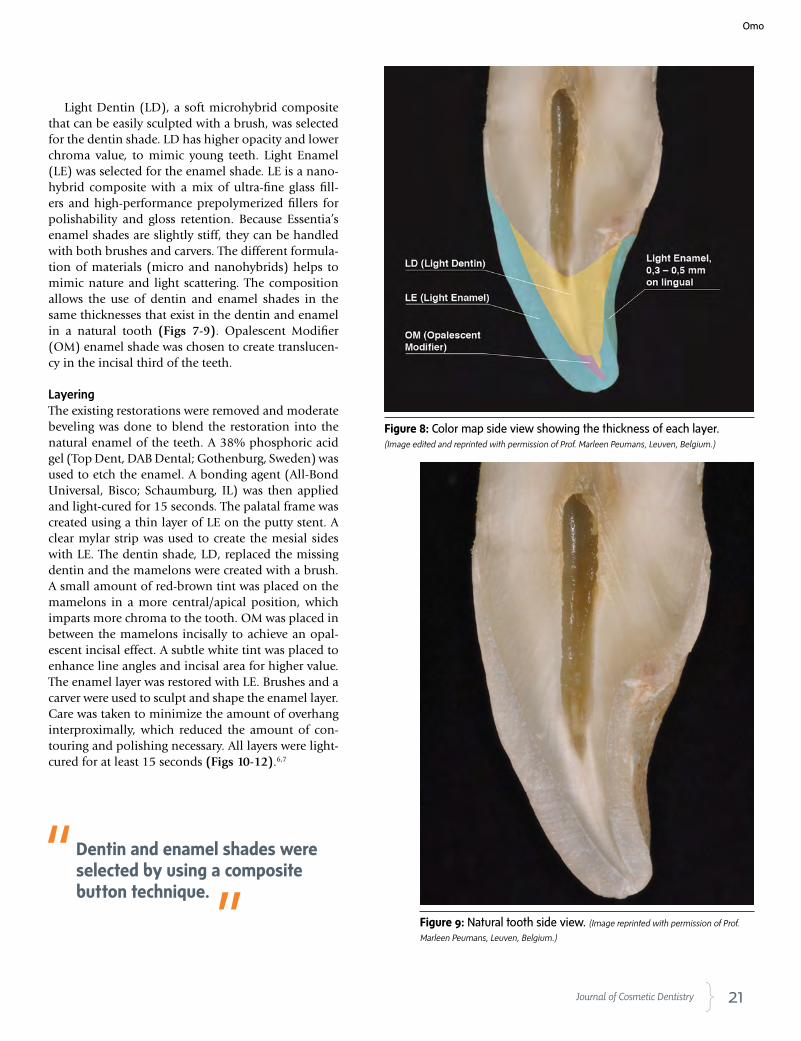
Light Dentin (LD), a soft microhybrid composite that can be easily sculpted with a brush, was selected for the dentin shade. LD has higher opacity and lower chroma value, to mimic young teeth. Light Enamel (LE) was selected for the enamel shade. LE is a nano-hybrid composite with a mix of ultra-fine glass fill-ers and high-performance prepolymerized fillers for polishability and gloss retention. Because Essentia’s enamel shades are slightly stiff, they can be handled with both brushes and carvers. The different formula-tion of materials (micro and nanohybrids) helps to mimic nature and light scattering. The composition allows the use of dentin and enamel shades in the same thicknesses that exist in the dentin and enamel in a natural tooth (Figs 7-9). Opalescent Modifier (OM) enamel shade was chosen to create translucen-cy in the incisal third of the teeth.
LayeringThe existing restorations were removed and moderate beveling was done to blend the restoration into the natural enamel of the teeth. A 38% phosphoric acid gel (Top Dent, DAB Dental; Gothenburg, Sweden) was used to etch the enamel. A bonding agent (All-Bond Universal, Bisco; Schaumburg, IL) was then applied and light-cured for 15 seconds. The palatal frame was created using a thin layer of LE on the putty stent. A clear mylar strip was used to create the mesial sides with LE. The dentin shade, LD, replaced the missing dentin and the mamelons were created with a brush. A small amount of red-brown tint was placed on the mamelons in a more central/apical position, which imparts more chroma to the tooth. OM was placed in between the mamelons incisally to achieve an opal-escent incisal effect. A subtle white tint was placed to enhance line angles and incisal area for higher value. The enamel layer was restored with LE. Brushes and a carver were used to sculpt and shape the enamel layer. Care was taken to minimize the amount of overhang interproximally, which reduced the amount of con-touring and polishing necessary. All layers were light-cured for at least 15 seconds (Figs 10-12).6,7
Figure 8: Color map side view showing the thickness of each layer. (Image edited and reprinted with permission of Prof. Marleen Peumans, Leuven, Belgium.)
Figure 9: Natural tooth side view. (Image reprinted with permission of Prof.
Marleen Peumans, Leuven, Belgium.)
Dentin and enamel shades were selected by using a composite button technique.
Omo
22 Spring 2016 • Volume 32 • Number 1
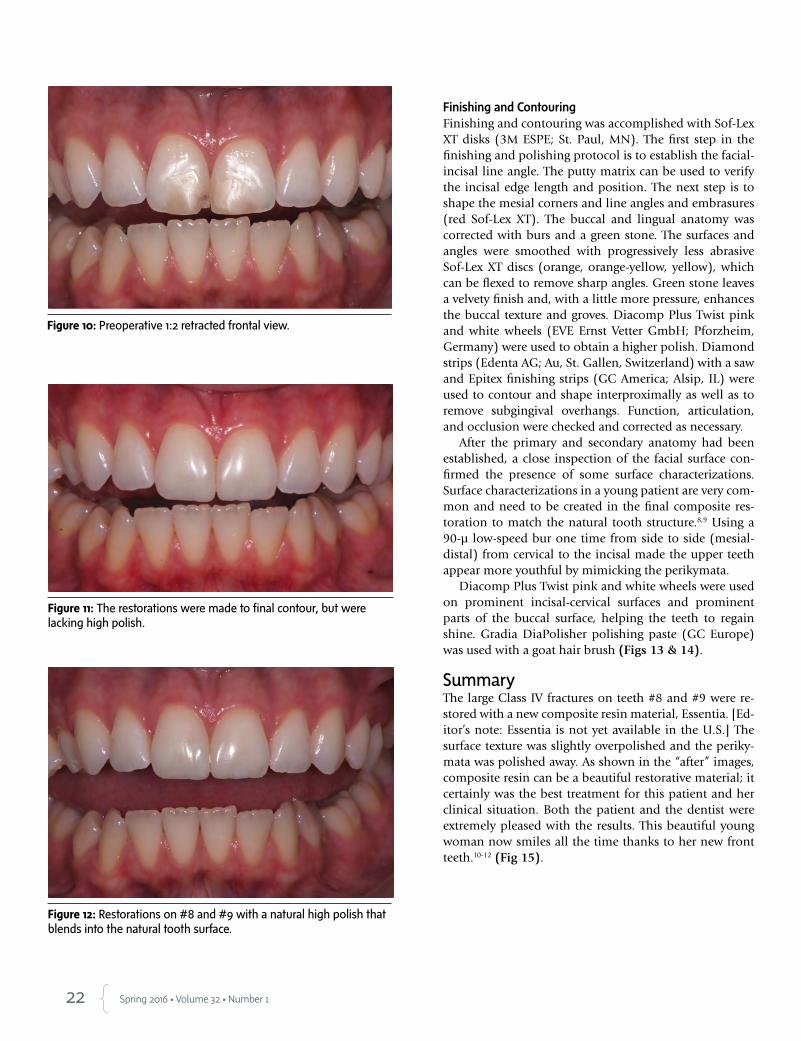
Figure 10: Preoperative 1:2 retracted frontal view.
Figure 11: The restorations were made to final contour, but were lacking high polish.
Figure 12: Restorations on #8 and #9 with a natural high polish that blends into the natural tooth surface.
Finishing and ContouringFinishing and contouring was accomplished with Sof-Lex XT disks (3M ESPE; St. Paul, MN). The first step in the finishing and polishing protocol is to establish the facial-incisal line angle. The putty matrix can be used to verify the incisal edge length and position. The next step is to shape the mesial corners and line angles and embrasures (red Sof-Lex XT). The buccal and lingual anatomy was corrected with burs and a green stone. The surfaces and angles were smoothed with progressively less abrasive Sof-Lex XT discs (orange, orange-yellow, yellow), which can be flexed to remove sharp angles. Green stone leaves a velvety finish and, with a little more pressure, enhances the buccal texture and groves. Diacomp Plus Twist pink and white wheels (EVE Ernst Vetter GmbH; Pforzheim, Germany) were used to obtain a higher polish. Diamond strips (Edenta AG; Au, St. Gallen, Switzerland) with a saw and Epitex finishing strips (GC America; Alsip, IL) were used to contour and shape interproximally as well as to remove subgingival overhangs. Function, articulation, and occlusion were checked and corrected as necessary.
After the primary and secondary anatomy had been established, a close inspection of the facial surface con-firmed the presence of some surface characterizations. Surface characterizations in a young patient are very com-mon and need to be created in the final composite res-toration to match the natural tooth structure.8,9 Using a 90-µ low-speed bur one time from side to side (mesial-distal) from cervical to the incisal made the upper teeth appear more youthful by mimicking the perikymata.
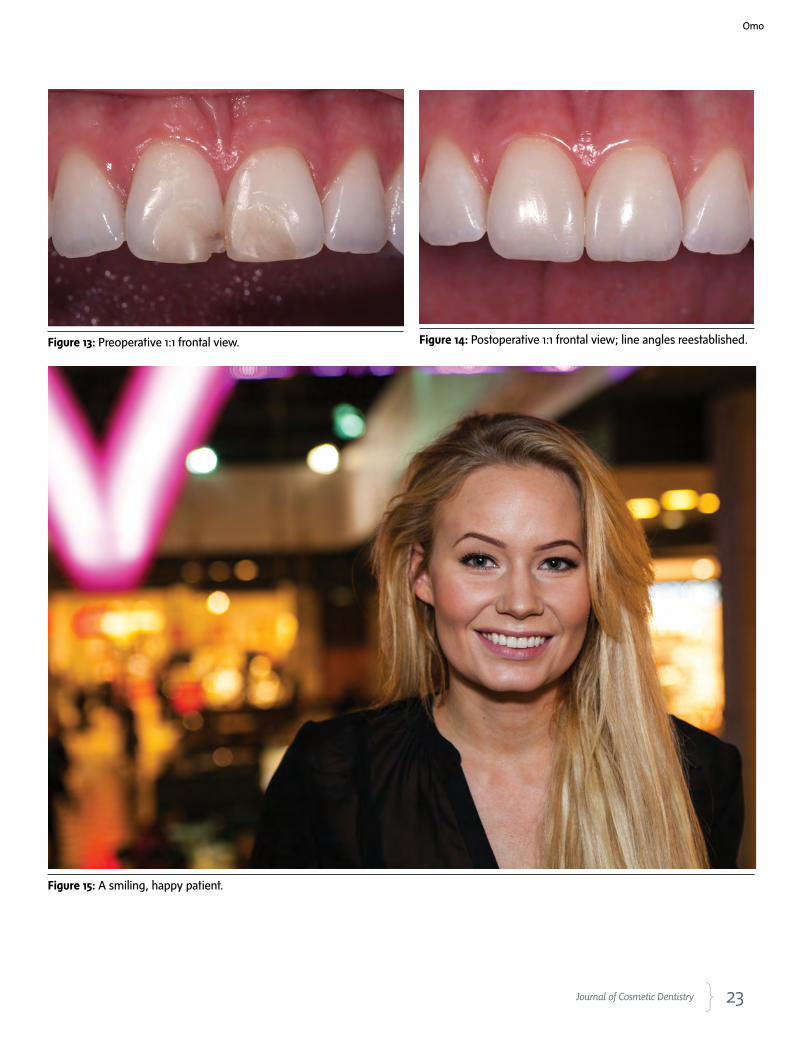
Diacomp Plus Twist pink and white wheels were used on prominent incisal-cervical surfaces and prominent parts of the buccal surface, helping the teeth to regain shine. Gradia DiaPolisher polishing paste (GC Europe) was used with a goat hair brush (Figs 13 & 14).
SummaryThe large Class IV fractures on teeth #8 and #9 were re-stored with a new composite resin material, Essentia. [Ed-itor’s note: Essentia is not yet available in the U.S.] The surface texture was slightly overpolished and the periky-mata was polished away. As shown in the “after” images, composite resin can be a beautiful restorative material; it certainly was the best treatment for this patient and her clinical situation. Both the patient and the dentist were extremely pleased with the results. This beautiful young woman now smiles all the time thanks to her new front teeth.10-12 (Fig 15).
23 Journal of Cosmetic Dentistry
Figure 15: A smiling, happy patient.
Figure 13: Preoperative 1:1 frontal view. Figure 14: Postoperative 1:1 frontal view; line angles reestablished.
Omo
24 Spring 2016 • Volume 32 • Number 1
References
1. Byoung SI. Principles of adhesion dentistry. A theoretical and
clinical guide for dentists. Newton (PA): AEGIS; 2013.
2. American Academy of Cosmetic Dentistry (AACD). A guide to
Accreditation criteria. Madison (WI): AACD; 2014.
3. American Academy of Cosmetic Dentistry (AACD). Photograph-
ic documentation and evaluation in cosmetic dentistry: a guide
to Accreditation photography. Madison (WI): AACD; 2015.
4. Dawson PE. Functional occlusion: from TMJ to smile design. St.
Louis: Mosby; 2006.
5. Peumans M, Guadix JT. Aesthetics brought back to the essentials.
Essentia from GC clinical guide. Available from: http://www.
gceurope.com/pid/184/manual/en_Manual.pdf
6. Fahl N Jr. A solution for everyday direct restorative challenges:
mastering composite artistry to create anterior masterpieces—
part 1. J Cosmetic Dent. 2010 Fall;26(3):56-67.
Dr. Omo owns a private practice in Stockholm, Sweden.
Disclosures: The author did not report any disclosures.
7. Fahl N Jr. Step-by-step approaches for anterior direct restorative challenges: mastering
composite artistry to create anterior masterpieces—part 2. J Cosmetic Dent. 2011 Win-
ter;26(4):42-55.
8. Peyton JH, Arnold JF. Six or more direct resin veneers case for Accreditation: hands-on
typodont exercise. J Cosmetic Dent. 2008 Fall;24(3):38-48.
9. Peyton, James. Finishing and polishing techniques: direct composite resin restorations.
Pract Proced Aesthet Dent. 2004 May;16(4):293-8.
10. Hatkar P. Preserving natural tooth structure with composite resin. J Cosmetic Dent. 2010
Fall;26(3):26-36.
11. Snyder TC. Conservative replication of nature with a Class IV direct composite. J Cos-
metic Dent. 2012 Spring;28(1):22-8.
12. Tirumalasetty PS. Layering and blending composite: conservative and esthetic restoration
of a Class IV fractured central incisor. J Cosmetic Dent. 2014 Fall;30(3):16-22. jCD
AACD Accreditation.The place where you can achieve
your full potential.
Visit AACD.com/firststep to get started on your Accreditation journey
R e s p o n s i b l e E s t h e t i c s
HIGH ACHIEVEMENT ALWAYS TAKES PLACE IN THE FRAMEWORK OF HIGH EXPECTATION
AACD_HALF_PAGE_JCD.indd 1 3/1/16 4:02 PM
25 Journal of Cosmetic Dentistry
Examiners’ Commentary
The Paramount Details of Case Type IVJames H. Peyton, DDS, FAACD
The examiners found the following faults:
Dr. Peyton is an AACD Accredited Fellow and has been an AACD Accreditation Examiner since 2000.
A part-time instructor at the UCLA School of Dentistry, he practices in Bakersfield, California.
Disclosure: The author did not report any disclosures.
• Criterion #44: Is the surface finish, polish, and luster appropriate? Several examiners stated that the restorations were underpolished.
• Criterion #53: Is the color (hue, value, chroma) selection appropriate/natural, not monochromatic? Several examiners stated that the restora-tions were lower in value than natural teeth.
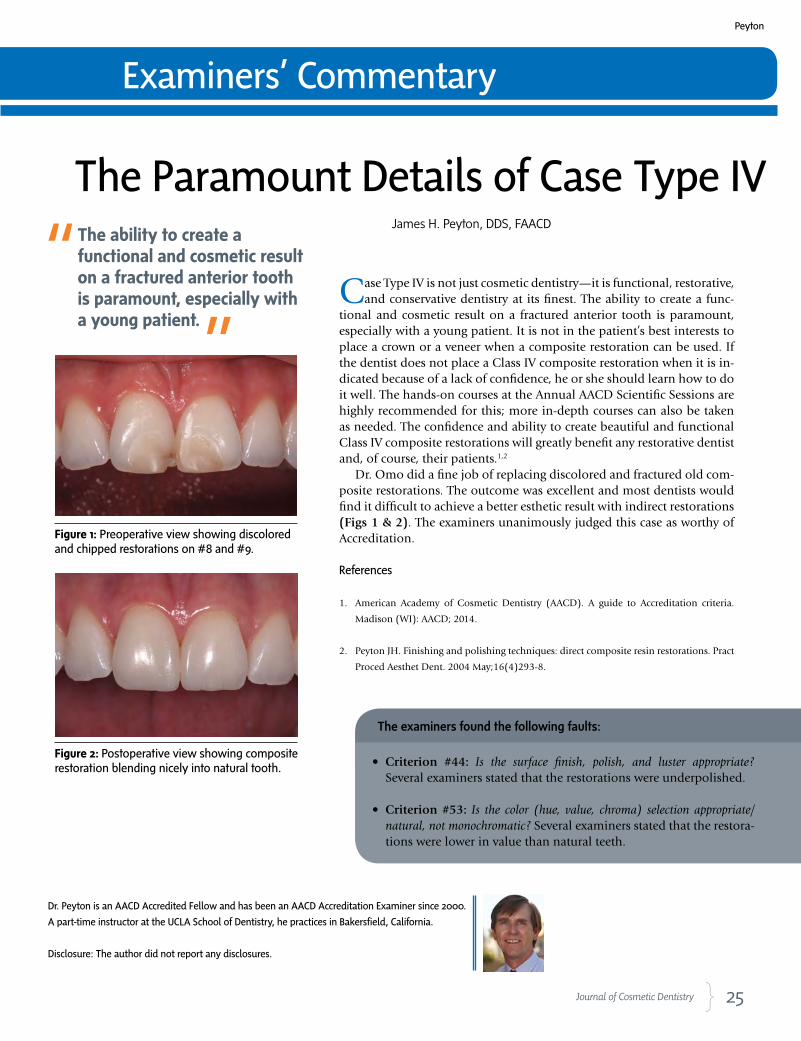
Case Type IV is not just cosmetic dentistry—it is functional, restorative, and conservative dentistry at its finest. The ability to create a func-
tional and cosmetic result on a fractured anterior tooth is paramount, especially with a young patient. It is not in the patient’s best interests to place a crown or a veneer when a composite restoration can be used. If the dentist does not place a Class IV composite restoration when it is in-dicated because of a lack of confidence, he or she should learn how to do it well. The hands-on courses at the Annual AACD Scientific Sessions are highly recommended for this; more in-depth courses can also be taken as needed. The confidence and ability to create beautiful and functional Class IV composite restorations will greatly benefit any restorative dentist and, of course, their patients.1,2
Dr. Omo did a fine job of replacing discolored and fractured old com-posite restorations. The outcome was excellent and most dentists would find it difficult to achieve a better esthetic result with indirect restorations (Figs 1 & 2). The examiners unanimously judged this case as worthy of Accreditation.
References
1. American Academy of Cosmetic Dentistry (AACD). A guide to Accreditation criteria.
Madison (WI): AACD; 2014.
2. Peyton JH. Finishing and polishing techniques: direct composite resin restorations. Pract
Proced Aesthet Dent. 2004 May;16(4)293-8.
Figure 1: Preoperative view showing discolored and chipped restorations on #8 and #9.
Figure 2: Postoperative view showing composite restoration blending nicely into natural tooth.
The ability to create a functional and cosmetic result on a fractured anterior tooth is paramount, especially with a young patient.
Peyton
26 Spring 2016 • Volume 32 • Number 1
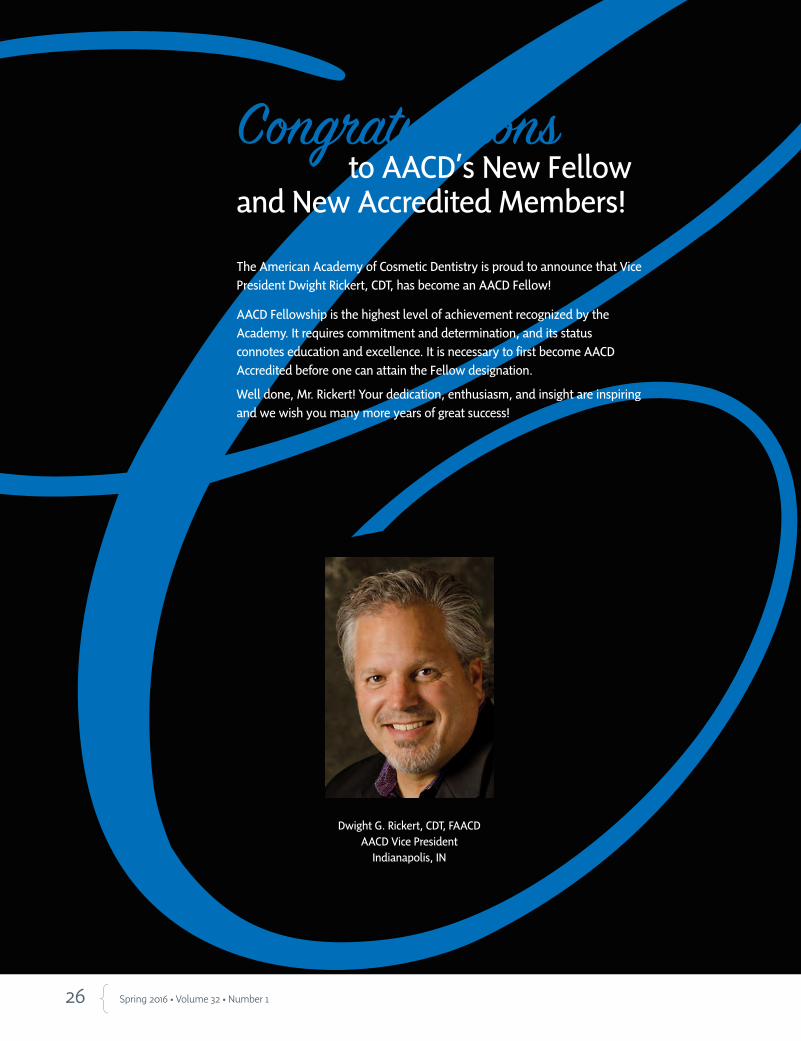
Dwight G. Rickert, CDT, FAACDAACD Vice President
Indianapolis, IN
Congratulations to AACD’s New Fellow and New Accredited Members!
The American Academy of Cosmetic Dentistry is proud to announce that Vice
President Dwight Rickert, CDT, has become an AACD Fellow!
AACD Fellowship is the highest level of achievement recognized by the
Academy. It requires commitment and determination, and its status
connotes education and excellence. It is necessary to first become AACD
Accredited before one can attain the Fellow designation.
Well done, Mr. Rickert! Your dedication, enthusiasm, and insight are inspiring
and we wish you many more years of great success!
27 Journal of Cosmetic Dentistry
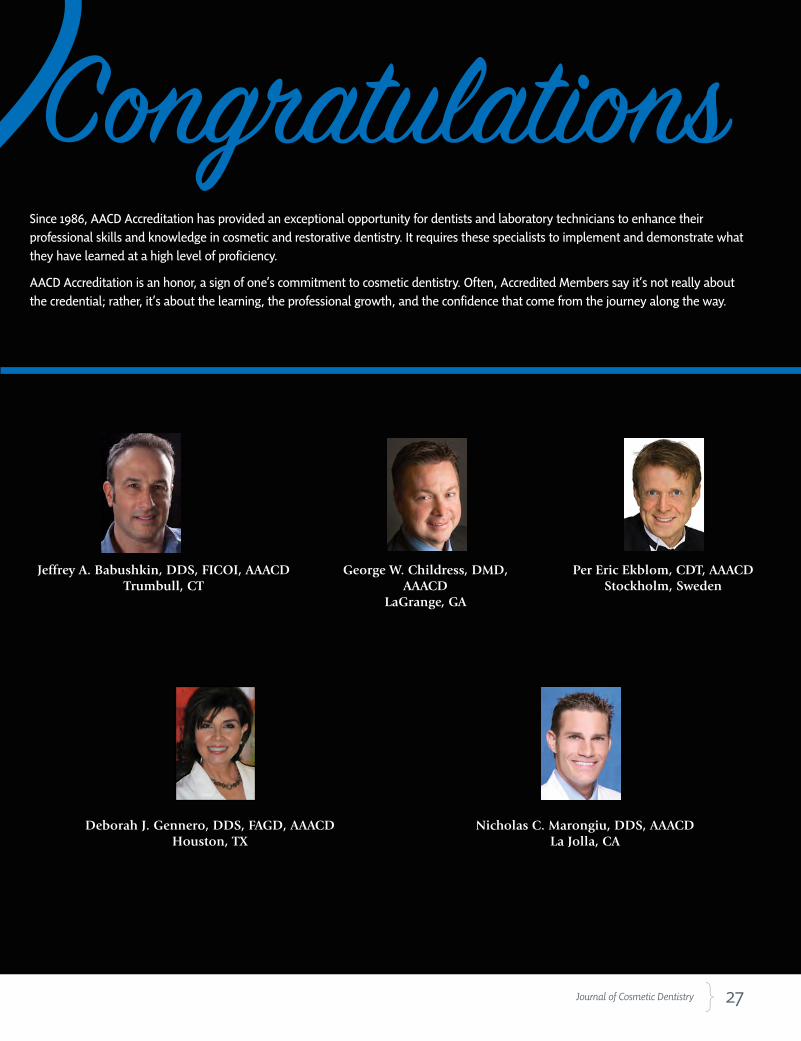
George W. Childress, DMD, AAACD
LaGrange, GA
Per Eric Ekblom, CDT, AAACDStockholm, Sweden
Deborah J. Gennero, DDS, FAGD, AAACDHouston, TX
Nicholas C. Marongiu, DDS, AAACDLa Jolla, CA
Since 1986, AACD Accreditation has provided an exceptional opportunity for dentists and laboratory technicians to enhance their
professional skills and knowledge in cosmetic and restorative dentistry. It requires these specialists to implement and demonstrate what
they have learned at a high level of proficiency.
AACD Accreditation is an honor, a sign of one’s commitment to cosmetic dentistry. Often, Accredited Members say it’s not really about
the credential; rather, it’s about the learning, the professional growth, and the confidence that come from the journey along the way.
Jeffrey A. Babushkin, DDS, FICOI, AAACDTrumbull, CT
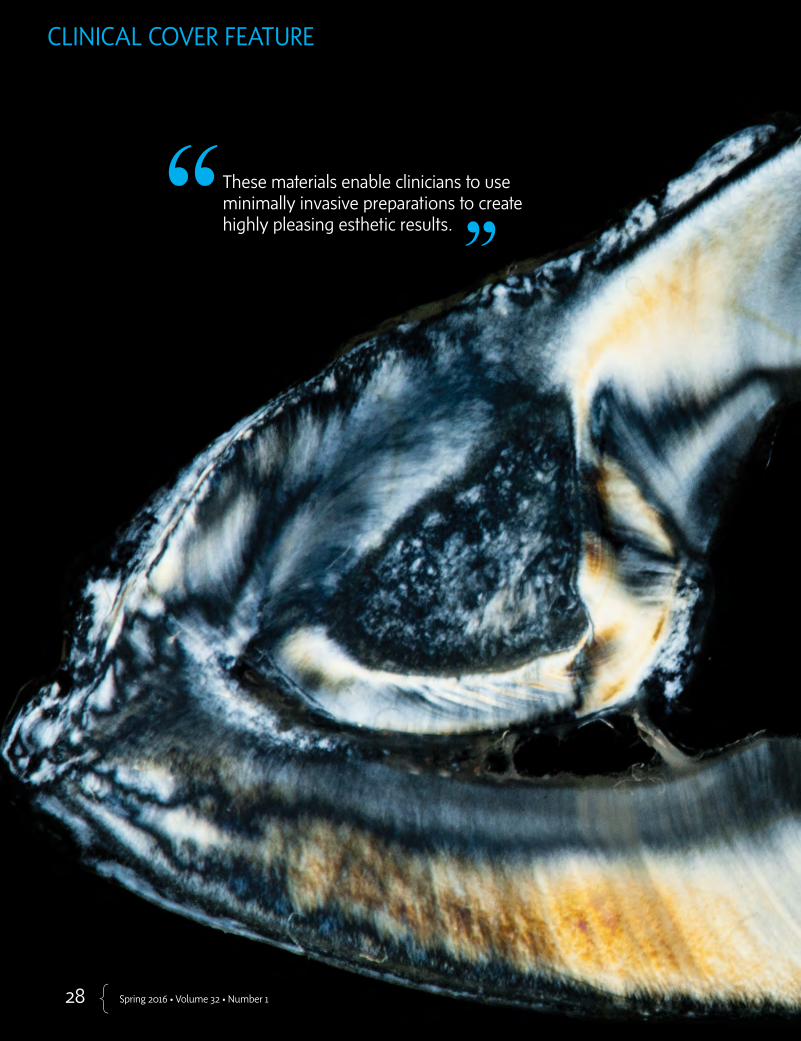
CLINICAL COVER FEATURE
These materials enable clinicians to use minimally invasive preparations to create highly pleasing esthetic results.
28 Spring 2016 • Volume 32 • Number 1

AbstractAll-ceramic materials can be a suitable choice for minimally invasive, esthetic restorations. Duplicating the unique characteristics of natural teeth requires the ceramist’s knowledge of the different all-ceramic systems available and the skill to reproduce the desired natural-looking results. Each case has its own key clinical requirements, making communication between the dentist and ceramist crucial to successful outcomes. This article discusses five cases using various all-ceramic materials to fabricate veneers and a crown. A build-up technique is also discussed.
Key Words: all-ceramic, skeleton build-up technique, veneers, color matching, photography, communication
Masterful ManeuversChallenges in Minimally Invasive Cases with All-Ceramic Materials
Sean Park, MDCSebastian Ercus, DMDDelfin Barquero, DDS Johan Figueira, DDS
Park/Ercus/Barquero/Figueira
29 Journal of Cosmetic Dentistry
30 Spring 2016 • Volume 32 • Number 1
CLINICAL COVER FEATURE
IntroductionAll-ceramics are a very popular choice of material in esthetic dentistry today, espe-cially for anterior restorations.1 These materials enable clinicians to use minimally invasive preparations to create highly pleasing esthetic results. Natural teeth have unique characteristics, translucency, and morphology. It is important to understand and reproduce these elements during porcelain fabrication. Capturing all the details of nature and transferring them to create minimally invasive restorations can be a great challenge, requiring a dental technician’s utmost technique and skill.2
Most all-ceramic materials are translucent, allowing technicians to craft more life-like restorations. However, because of this translucency, the stump shade can affect the final shade of the restoration. The stump shade therefore must be carefully evalu-ated when selecting the ceramic material during treatment planning.
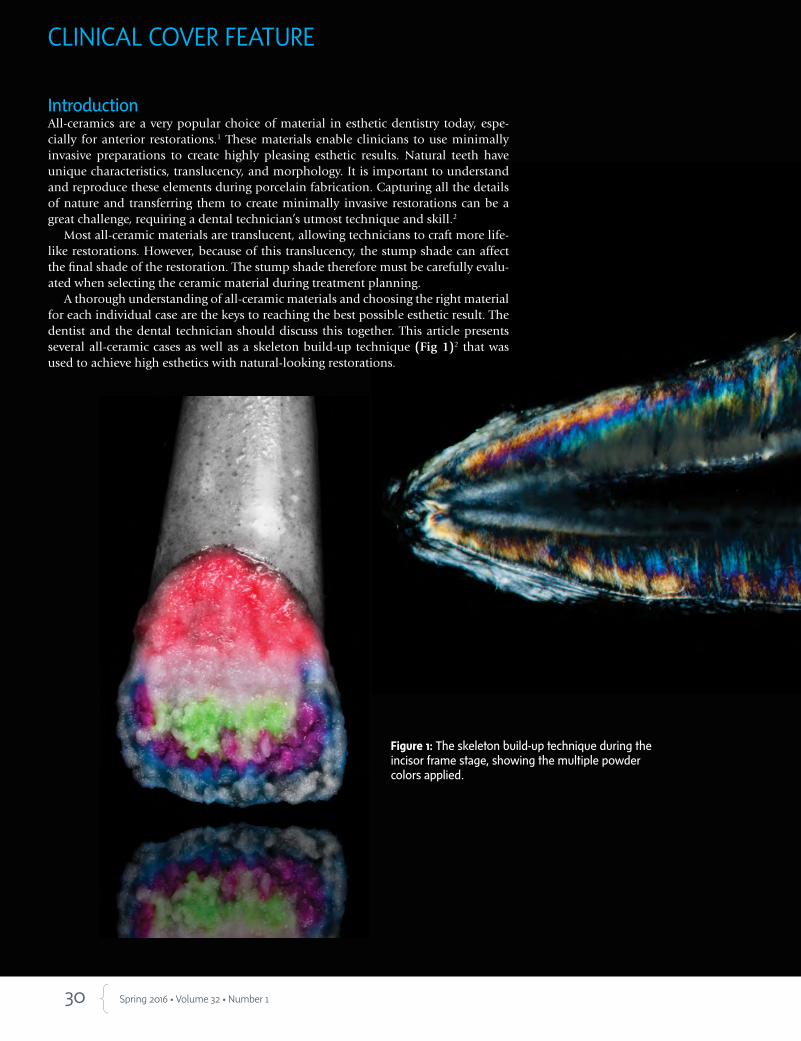
A thorough understanding of all-ceramic materials and choosing the right material for each individual case are the keys to reaching the best possible esthetic result. The dentist and the dental technician should discuss this together. This article presents several all-ceramic cases as well as a skeleton build-up technique (Fig 1)2 that was used to achieve high esthetics with natural-looking restorations.
Figure 1: The skeleton build-up technique during the incisor frame stage, showing the multiple powder colors applied.
31 Journal of Cosmetic Dentistry
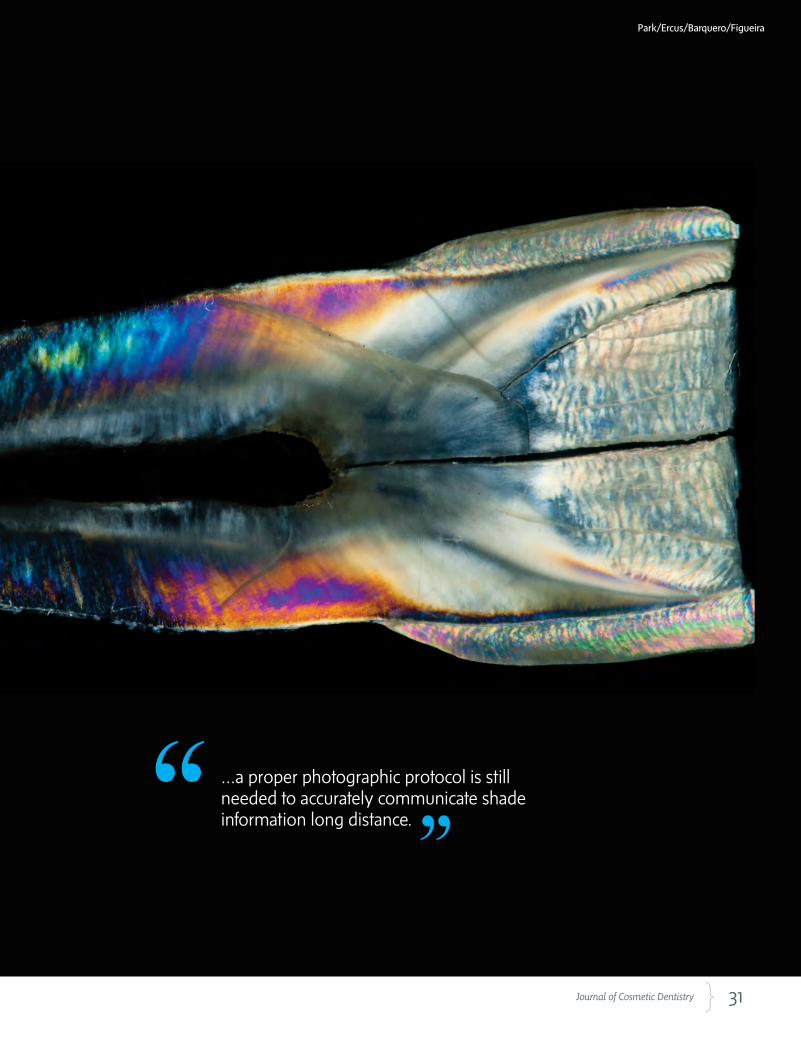
…a proper photographic protocol is still needed to accurately communicate shade information long distance.
Park/Ercus/Barquero/Figueira

32 Spring 2016 • Volume 32 • Number 1
CLINICAL COVER FEATURE
Case 1 Dentist: Sebastian Ercus, DMD (Brussels, Belgium)Patient: Female in her 20sTooth Restored: #9 (veneer with IPS e.max, Ivo-clar Vivadent; Amherst, NY)
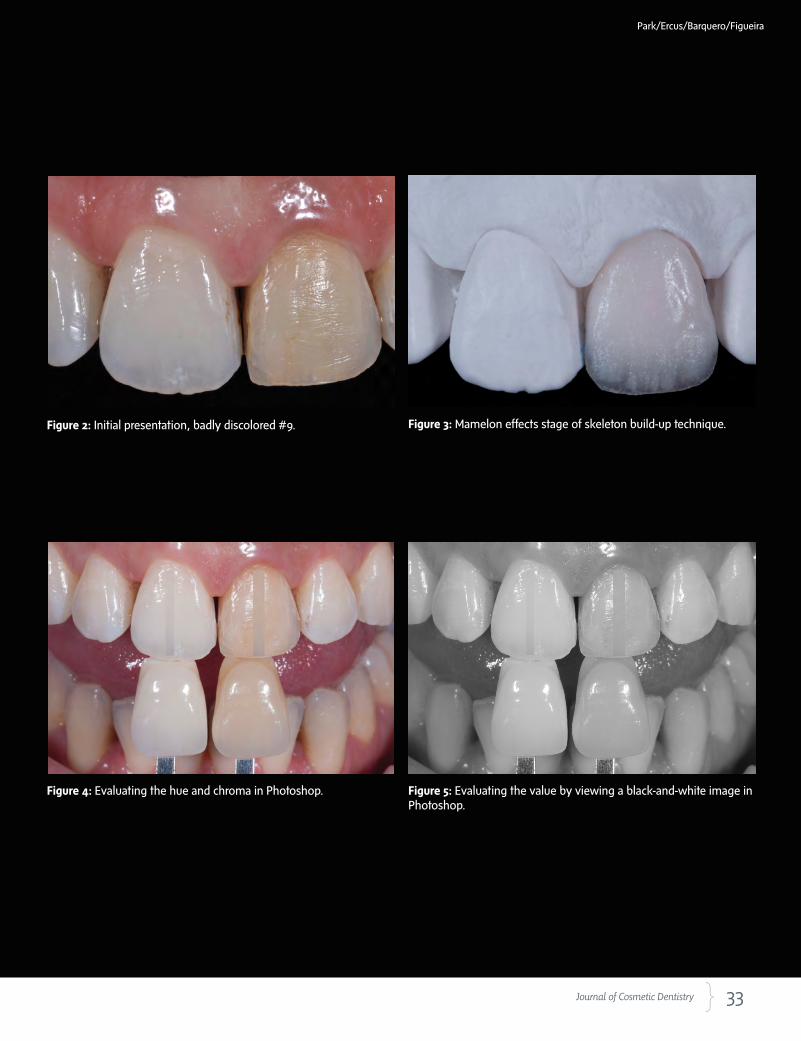
Case DescriptionThe patient wanted to replace her discolored #9 (Fig 2). This tooth had, in the past, been prepared by another dentist for a direct composite restoration. Af-ter the dentist removed the composite and cleaned the recurrent carious lesions present, the ultimate treat-ment goal was to reproduce and match the shape and shade of the adjacent #8.
Fabrication DetailsThe stump shade was very dark. A medium-opacity ingot (MO 0, IPS e.max Press) was used to block out and neutralize it. As a general rule, to correctly filter the light that reaches the stump, at least 0.6 mm of space is needed for ceramics2 and enough space to rec-reate the incisal effects and mamelons present on #8. An approximately 0.5-mm thick coping was waxed-up and pressed and IPS e.max Ceram porcelain was ap-plied using the skeleton build-up technique.2 For the mamelon effects stage of this technique, copy the in-ternal mamelon characteristics of the adjacent tooth as closely as possible. IPS e.max Ceram Mamelon Light, Mamelon Salmon, and A1 Dentin powders were ap-plied and fired (Fig 3).
The following quick Photoshop technique (Adobe Systems; San Jose, CA) was performed using a MAC (Apple Inc.; Cupertino, CA) to better evaluate the shade information:1. Select and copy the image of the shade tab and
paste it on top of the tooth image. 2. Merge all the image layers with Command + E. 3. After saving the image, reopen it, go to Image/Ad-
justments, and select “black and white” to assess the value of the case (Figs 4 & 5).
DiscussionPerhaps future software will be able to precisely evalu-ate all optical properties of the adjacent natural denti-tion without the need for a shade tab. Currently, how-ever, a proper photographic protocol is still needed to accurately communicate shade information long dis-tance.3 Isolating the value in image alteration software (e.g., Photoshop CS 5) can help to analyze the retract-ed images taken during the patient’s appointment. The pictures should be taken with a black background and with a polarizing filter to better analyze the trans-lucency in the incisal area, the characterizations, and the mamelon effects. Proper positioning of wireless flashes while taking the pictures is also very important to obtain these details and gather the best data.
The following are general recommendations for taking retracted close-up images:4,5
• Take images at the beginning of the dental appointment, before the tooth has started to dehydrate. A digital single-lens reflex camera (D90, Nikon USA; Melville, NY) was used here with a macro lens (105-mm F2.8 EX DG, Sigma; Ronkonkoma, NY). The camera was set at AP, range of f 22 to f32, ISO 200, 1/60, with a SB 200 wireless flash.
• The camera was positioned three inches away, two inches backward with a slight camera angulation of 5 to 10 degrees to avoid specular reflection.
• Photographs should be shot in RAW format and a web-based file transfer provider should be used to link the clinician to the dental laboratory.
• Shade analysis is the key aspect when working on single central match cases.6
• It is strongly recommended to take the shade RAW photos without any type of flash bouncers.7
Capturing the correct shade in photographs is im-perative to the success of each case. Even with correct interpretation of all the above information, it is still advisable to utilize the skills of a master ceramist who can choose the right materials and emulate nature in-traorally as closely as possible (Figs 6-8).
33 Journal of Cosmetic Dentistry
Figure 2: Initial presentation, badly discolored #9. Figure 3: Mamelon effects stage of skeleton build-up technique..
Figure 4: Evaluating the hue and chroma in Photoshop. Figure 5: Evaluating the value by viewing a black-and-white image in Photoshop.
Park/Ercus/Barquero/Figueira

34 Spring 2016 • Volume 32 • Number 1
Figure 6: One month after cementation.
Figure 7: Close-up intraoral photo of final restorations.
CLINICAL COVER FEATURE
35 Journal of Cosmetic Dentistry
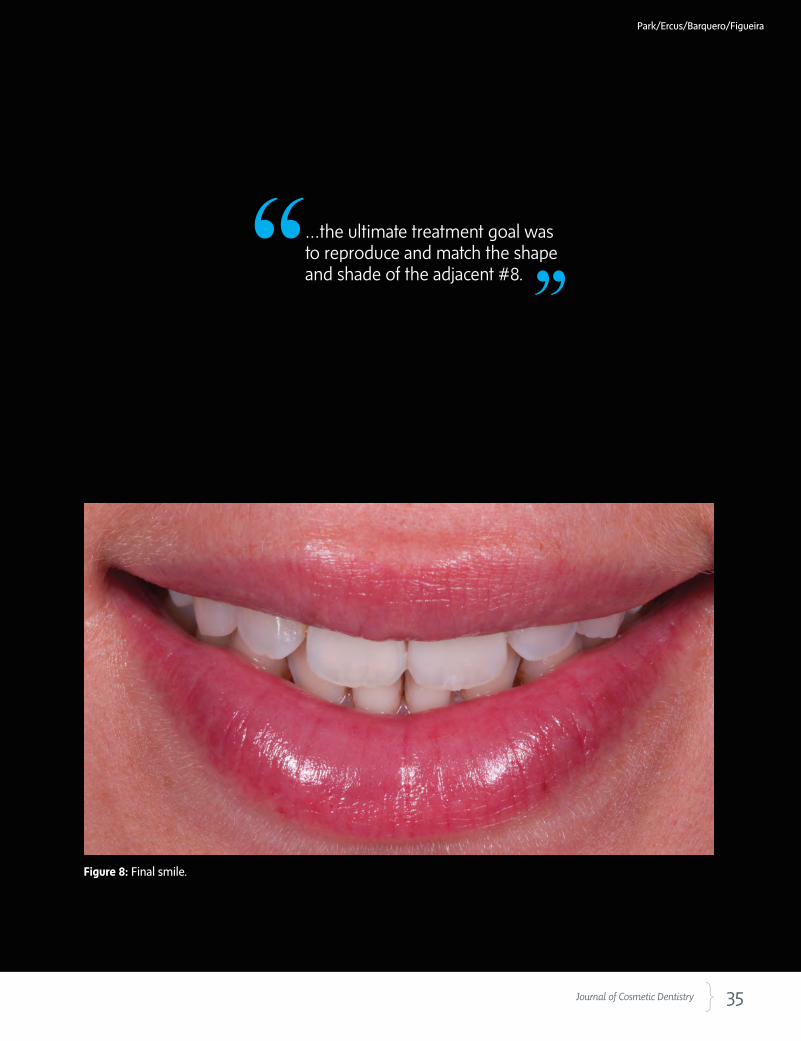
Figure 8: Final smile.
Park/Ercus/Barquero/Figueira
...the ultimate treatment goal was to reproduce and match the shape and shade of the adjacent #8.
36 Spring 2016 • Volume 32 • Number 1
CLINICAL COVER FEATURE
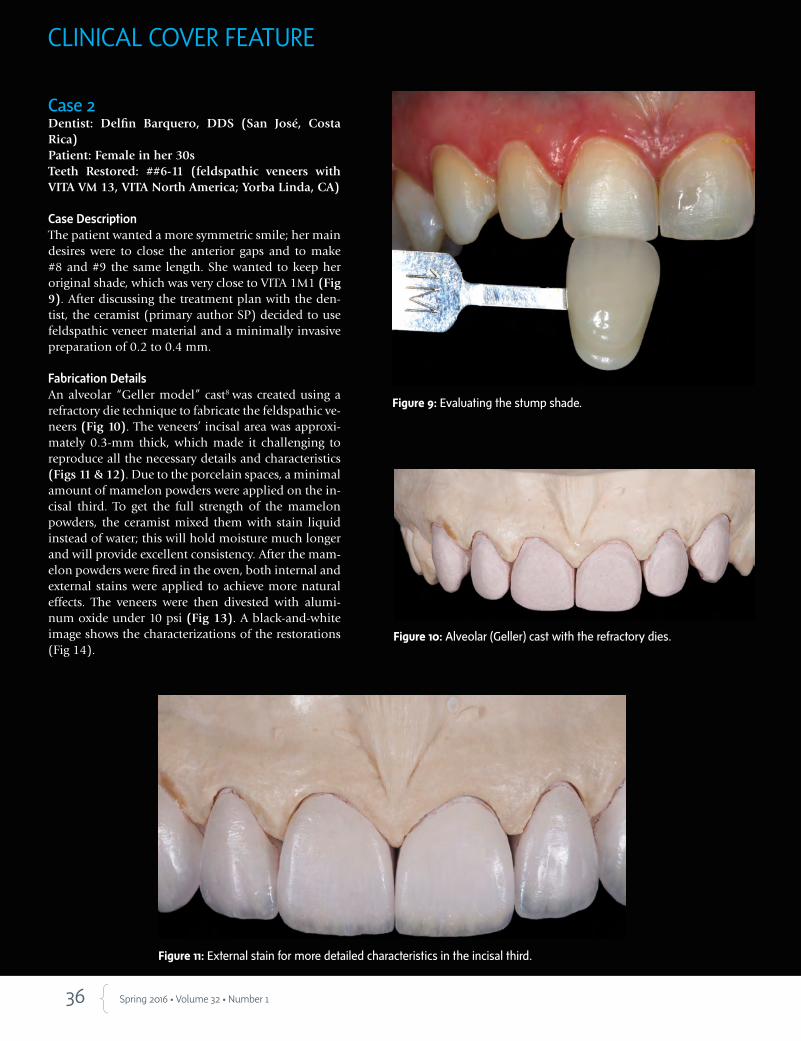
Case 2Dentist: Delfin Barquero, DDS (San José, Costa Rica)Patient: Female in her 30sTeeth Restored: ##6-11 (feldspathic veneers with VITA VM 13, VITA North America; Yorba Linda, CA)
Case DescriptionThe patient wanted a more symmetric smile; her main desires were to close the anterior gaps and to make #8 and #9 the same length. She wanted to keep her original shade, which was very close to VITA 1M1 (Fig 9). After discussing the treatment plan with the den-tist, the ceramist (primary author SP) decided to use feldspathic veneer material and a minimally invasive preparation of 0.2 to 0.4 mm.
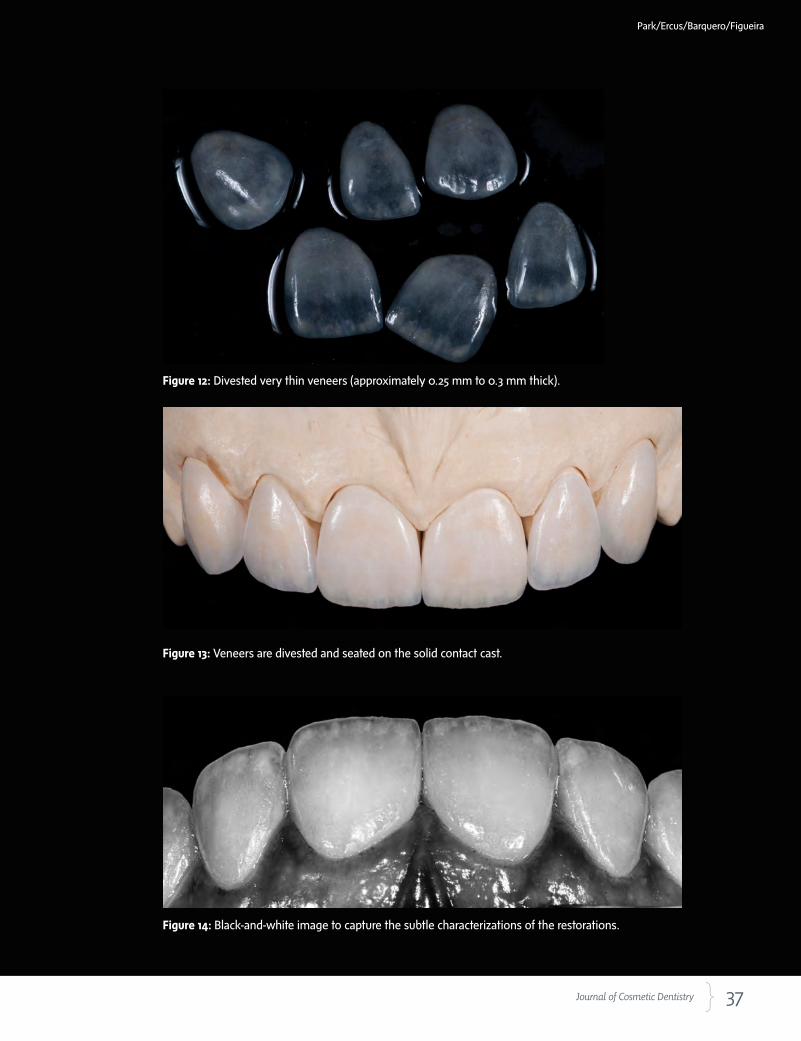
Fabrication DetailsAn alveolar “Geller model” cast8 was created using a refractory die technique to fabricate the feldspathic ve-neers (Fig 10). The veneers’ incisal area was approxi-mately 0.3-mm thick, which made it challenging to reproduce all the necessary details and characteristics (Figs 11 & 12). Due to the porcelain spaces, a minimal amount of mamelon powders were applied on the in-cisal third. To get the full strength of the mamelon powders, the ceramist mixed them with stain liquid instead of water; this will hold moisture much longer and will provide excellent consistency. After the mam-elon powders were fired in the oven, both internal and external stains were applied to achieve more natural effects. The veneers were then divested with alumi-num oxide under 10 psi (Fig 13). A black-and-white image shows the characterizations of the restorations (Fig 14).
Figure 9: Evaluating the stump shade.
Figure 10: Alveolar (Geller) cast with the refractory dies.
Figure 11: External stain for more detailed characteristics in the incisal third.
37 Journal of Cosmetic Dentistry
Figure 14: Black-and-white image to capture the subtle characterizations of the restorations.
Figure 13: Veneers are divested and seated on the solid contact cast.
Figure 12: Divested very thin veneers (approximately 0.25 mm to 0.3 mm thick).
Park/Ercus/Barquero/Figueira
38 Spring 2016 • Volume 32 • Number 1
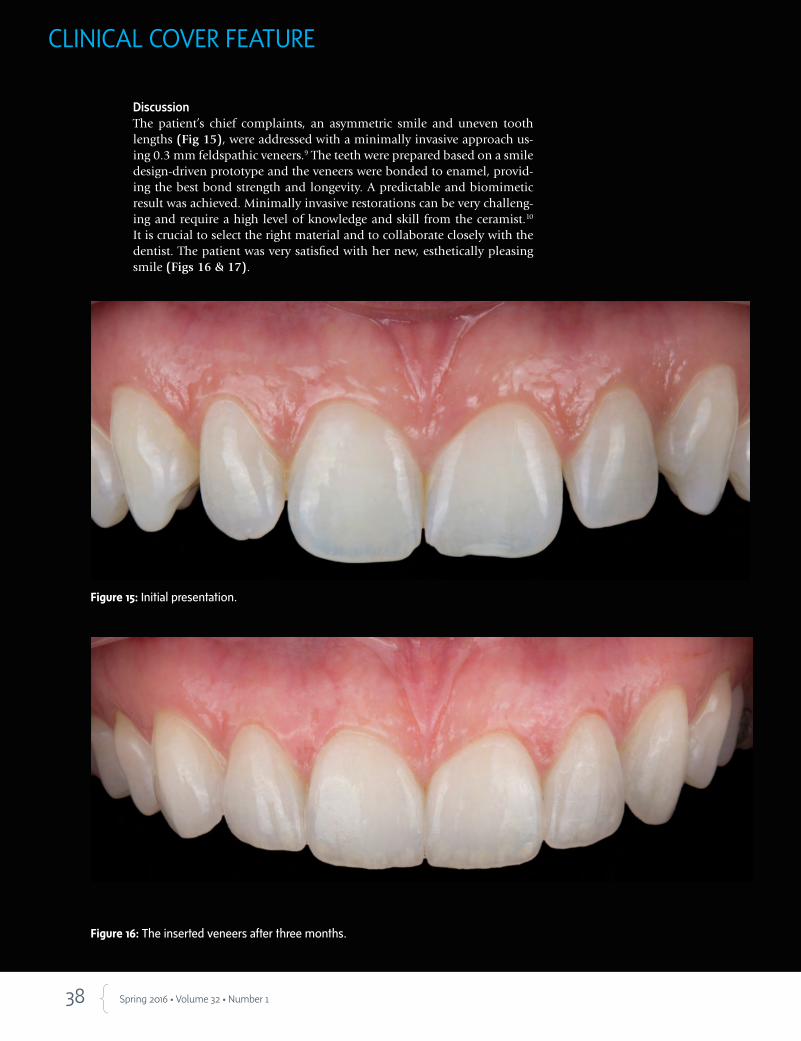
DiscussionThe patient’s chief complaints, an asymmetric smile and uneven tooth lengths (Fig 15), were addressed with a minimally invasive approach us-ing 0.3 mm feldspathic veneers.9 The teeth were prepared based on a smile design-driven prototype and the veneers were bonded to enamel, provid-ing the best bond strength and longevity. A predictable and biomimetic result was achieved. Minimally invasive restorations can be very challeng-ing and require a high level of knowledge and skill from the ceramist.10 It is crucial to select the right material and to collaborate closely with the dentist. The patient was very satisfied with her new, esthetically pleasing smile (Figs 16 & 17).
Figure 16: The inserted veneers after three months.
Figure 15: Initial presentation.
CLINICAL COVER FEATURE

39 Journal of Cosmetic Dentistry
The prototype proved to be a valuable way for us to communicate not only with each other but also with the patient.
Figure 17: Postoperative, the satisfied patient.
Park/Ercus/Barquero/Figueira
40 Spring 2016 • Volume 32 • Number 1
CLINICAL COVER FEATURE
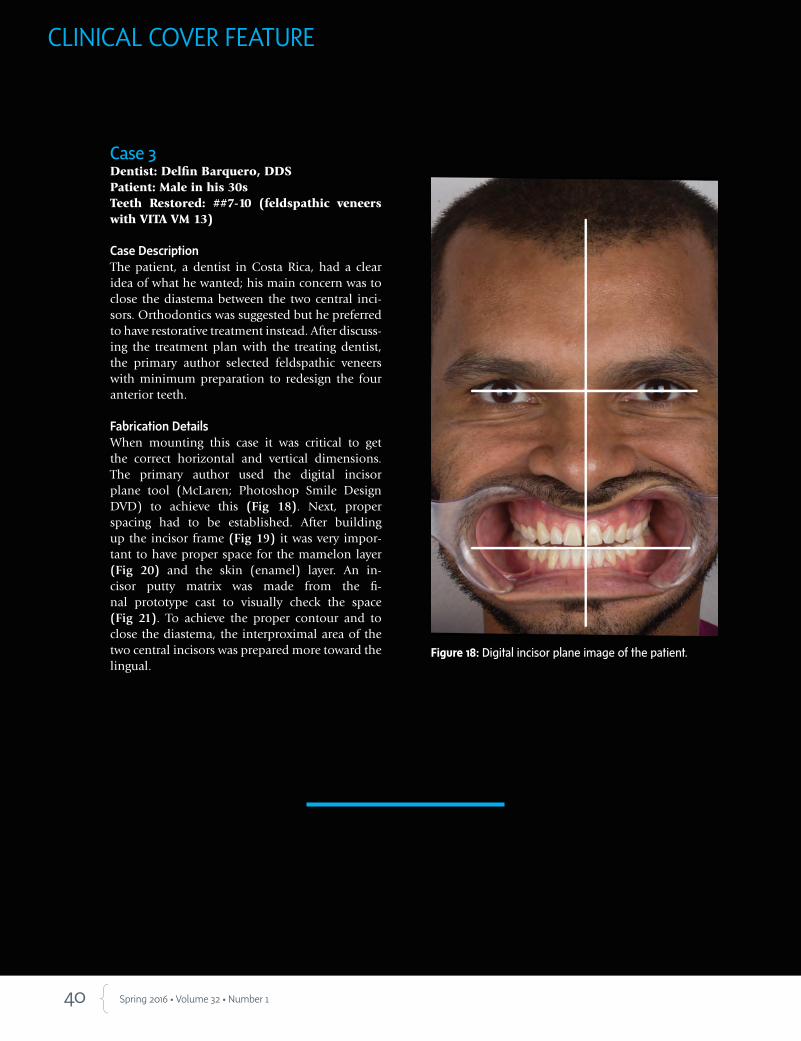
Figure 18: Digital incisor plane image of the patient.
Case 3Dentist: Delfin Barquero, DDS Patient: Male in his 30s Teeth Restored: ##7-10 (feldspathic veneers with VITA VM 13)
Case DescriptionThe patient, a dentist in Costa Rica, had a clear idea of what he wanted; his main concern was to close the diastema between the two central inci-sors. Orthodontics was suggested but he preferred to have restorative treatment instead. After discuss-ing the treatment plan with the treating dentist, the primary author selected feldspathic veneers with minimum preparation to redesign the four anterior teeth.
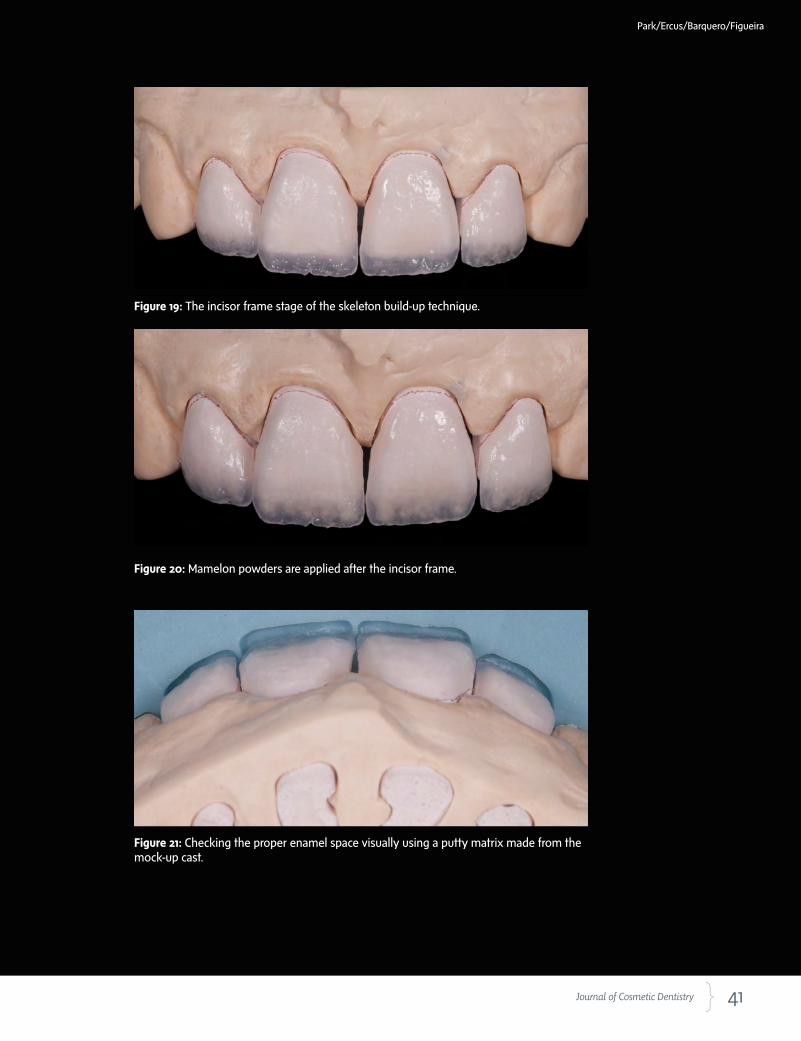
Fabrication DetailsWhen mounting this case it was critical to get the correct horizontal and vertical dimensions. The primary author used the digital incisor plane tool (McLaren; Photoshop Smile Design DVD) to achieve this (Fig 18). Next, proper spacing had to be established. After building up the incisor frame (Fig 19) it was very impor-tant to have proper space for the mamelon layer (Fig 20) and the skin (enamel) layer. An in-cisor putty matrix was made from the fi-nal prototype cast to visually check the space (Fig 21). To achieve the proper contour and to close the diastema, the interproximal area of the two central incisors was prepared more toward the lingual.
41 Journal of Cosmetic Dentistry
Figure 19: The incisor frame stage of the skeleton build-up technique.
Figure 20: Mamelon powders are applied after the incisor frame.
Figure 21: Checking the proper enamel space visually using a putty matrix made from the mock-up cast.
Park/Ercus/Barquero/Figueira
42 Spring 2016 • Volume 32 • Number 1
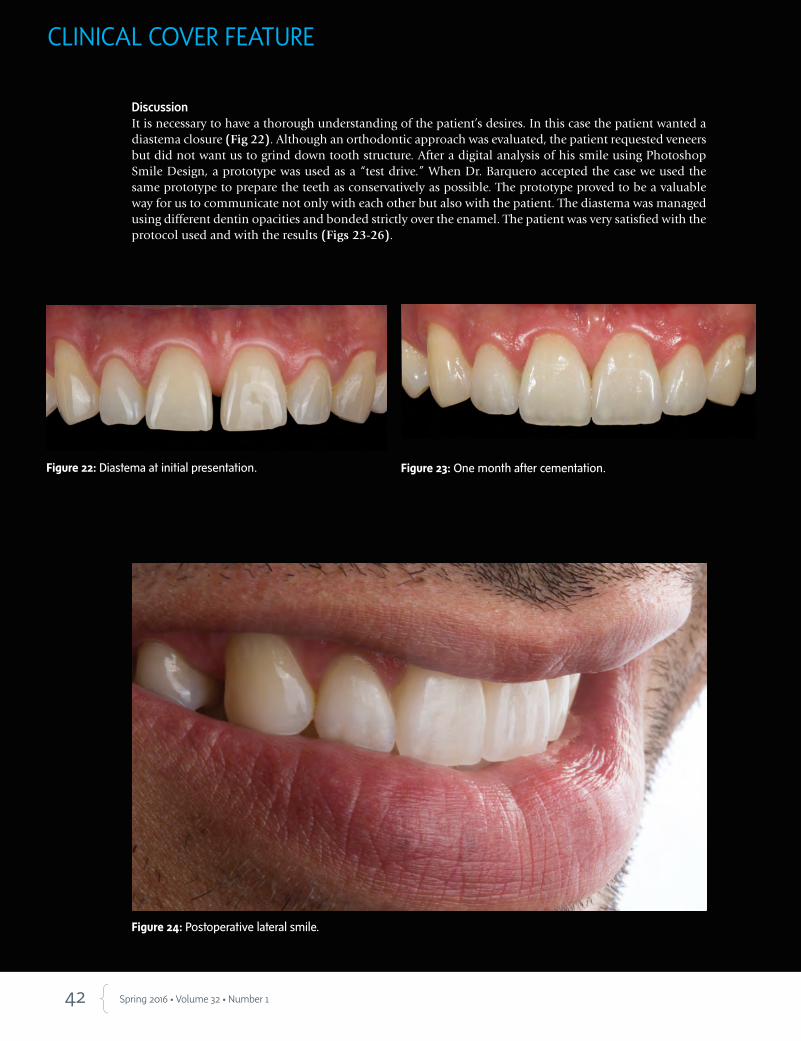
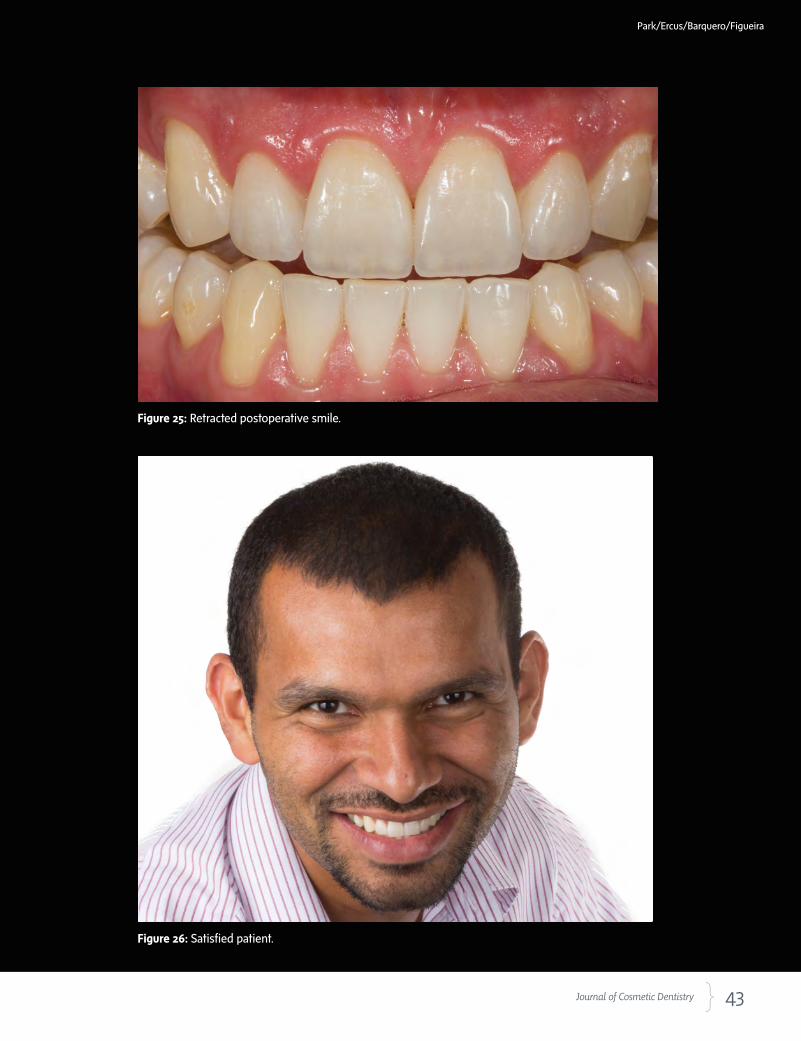
DiscussionIt is necessary to have a thorough understanding of the patient’s desires. In this case the patient wanted a diastema closure (Fig 22). Although an orthodontic approach was evaluated, the patient requested veneers but did not want us to grind down tooth structure. After a digital analysis of his smile using Photoshop Smile Design, a prototype was used as a “test drive.” When Dr. Barquero accepted the case we used the same prototype to prepare the teeth as conservatively as possible. The prototype proved to be a valuable way for us to communicate not only with each other but also with the patient. The diastema was managed using different dentin opacities and bonded strictly over the enamel. The patient was very satisfied with the protocol used and with the results (Figs 23-26).
Figure 22: Diastema at initial presentation. Figure 23: One month after cementation.
Figure 24: Postoperative lateral smile.
CLINICAL COVER FEATURE
43 Journal of Cosmetic Dentistry
Figure 25: Retracted postoperative smile.
Figure 26: Satisfied patient.
Park/Ercus/Barquero/Figueira
44 Spring 2016 • Volume 32 • Number 1
Case 4Dentist: Johan M. Figueira, DDS (Los Angeles, CA)Patient: Female in her 20s Teeth Restored: #7 and #10 (feldspathic veneers with Vita VM 13); #8 (ceramic fragment)
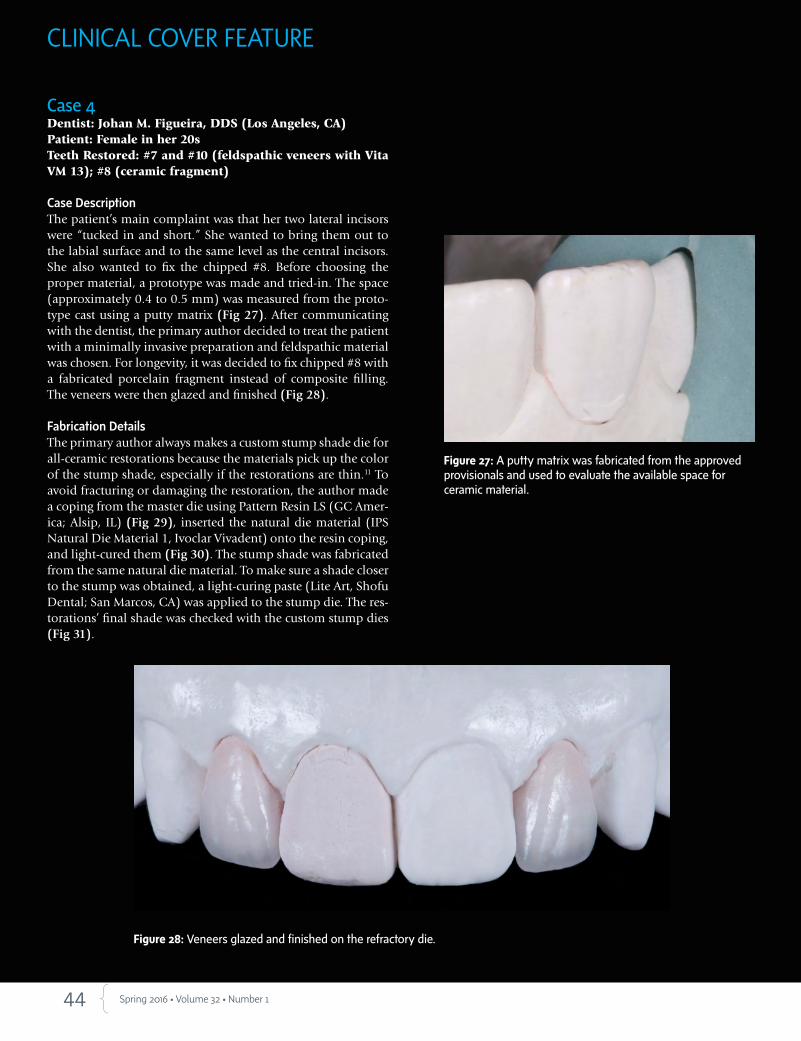
Case DescriptionThe patient’s main complaint was that her two lateral incisors were “tucked in and short.” She wanted to bring them out to the labial surface and to the same level as the central incisors. She also wanted to fix the chipped #8. Before choosing the proper material, a prototype was made and tried-in. The space (approximately 0.4 to 0.5 mm) was measured from the proto-type cast using a putty matrix (Fig 27). After communicating with the dentist, the primary author decided to treat the patient with a minimally invasive preparation and feldspathic material was chosen. For longevity, it was decided to fix chipped #8 with a fabricated porcelain fragment instead of composite filling. The veneers were then glazed and finished (Fig 28).
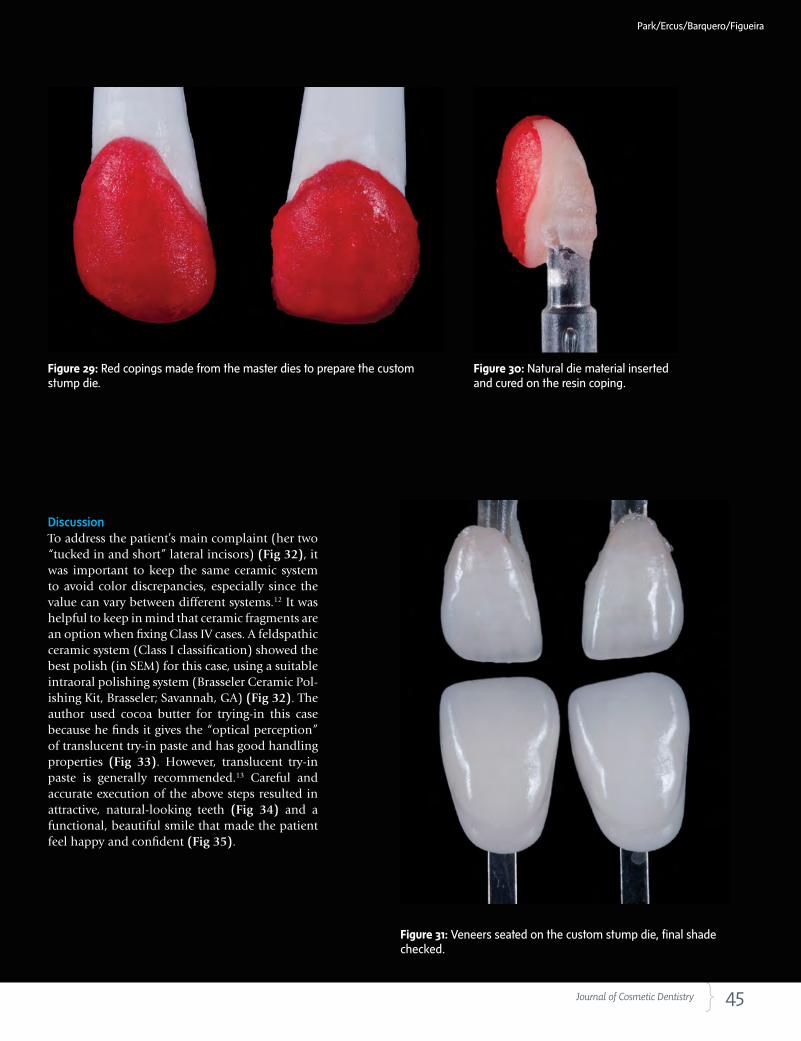
Fabrication DetailsThe primary author always makes a custom stump shade die for all-ceramic restorations because the materials pick up the color of the stump shade, especially if the restorations are thin.11 To avoid fracturing or damaging the restoration, the author made a coping from the master die using Pattern Resin LS (GC Amer-ica; Alsip, IL) (Fig 29), inserted the natural die material (IPS Natural Die Material 1, Ivoclar Vivadent) onto the resin coping, and light-cured them (Fig 30). The stump shade was fabricated from the same natural die material. To make sure a shade closer to the stump was obtained, a light-curing paste (Lite Art, Shofu Dental; San Marcos, CA) was applied to the stump die. The res-torations’ final shade was checked with the custom stump dies (Fig 31).
Figure 27: A putty matrix was fabricated from the approved provisionals and used to evaluate the available space for ceramic material.
Figure 28: Veneers glazed and finished on the refractory die.
CLINICAL COVER FEATURE
45 Journal of Cosmetic Dentistry
Figure 31: Veneers seated on the custom stump die, final shade checked.
Figure 29: Red copings made from the master dies to prepare the custom stump die.
Figure 30: Natural die material inserted and cured on the resin coping.
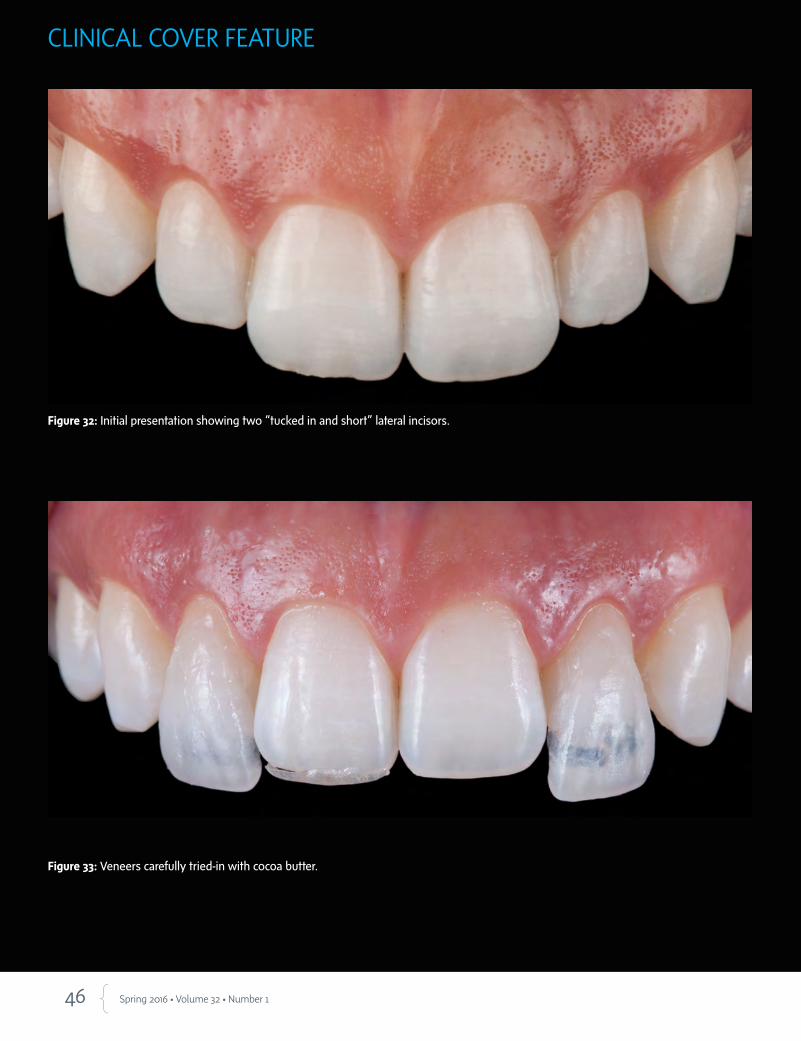
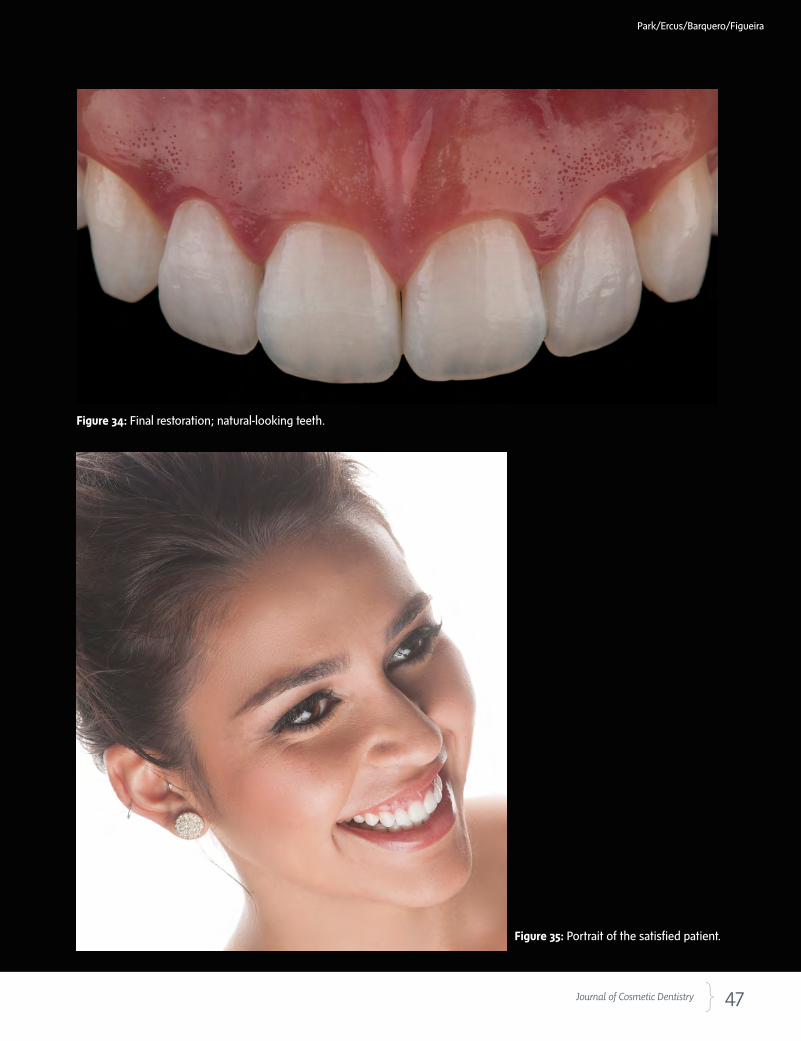
DiscussionTo address the patient’s main complaint (her two “tucked in and short” lateral incisors) (Fig 32), it was important to keep the same ceramic system to avoid color discrepancies, especially since the value can vary between different systems.12 It was helpful to keep in mind that ceramic fragments are an option when fixing Class IV cases. A feldspathic ceramic system (Class I classification) showed the best polish (in SEM) for this case, using a suitable intraoral polishing system (Brasseler Ceramic Pol-ishing Kit, Brasseler; Savannah, GA) (Fig 32). The author used cocoa butter for trying-in this case because he finds it gives the “optical perception” of translucent try-in paste and has good handling properties (Fig 33). However, translucent try-in paste is generally recommended.13 Careful and accurate execution of the above steps resulted in attractive, natural-looking teeth (Fig 34) and a functional, beautiful smile that made the patient feel happy and confident (Fig 35).
Park/Ercus/Barquero/Figueira
46 Spring 2016 • Volume 32 • Number 1
Figure 33: Veneers carefully tried-in with cocoa butter.
Figure 32: Initial presentation showing two “tucked in and short” lateral incisors.
CLINICAL COVER FEATURE
47 Journal of Cosmetic Dentistry
Park/Ercus/Barquero/Figueira
Figure 35: Portrait of the satisfied patient.
Figure 34: Final restoration; natural-looking teeth.
48 Spring 2016 • Volume 32 • Number 1
CLINICAL COVER FEATURE
Case 5Dentist: Delfin Barquero, DDSPatient: Female in her 20sTeeth Restored: #7, #8, #10 (feldspathic veneers with Noritake EX-3); #9 (all-ceramic crown with Noritake EX-3 Press)
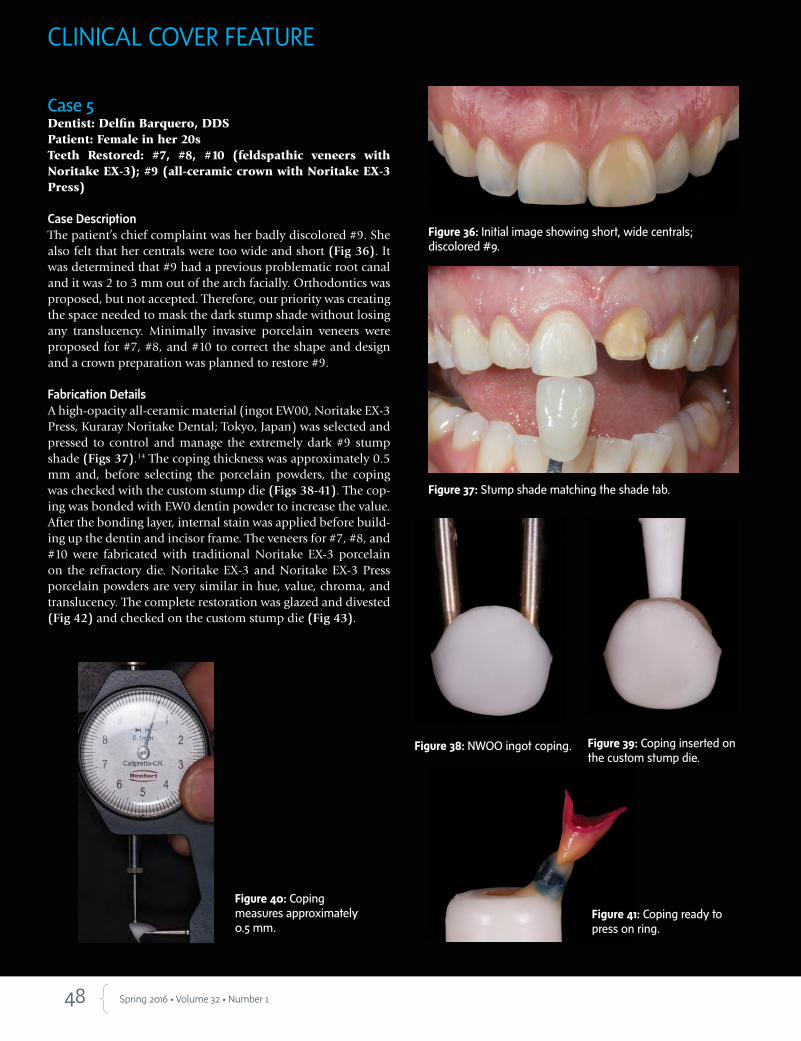
Case DescriptionThe patient’s chief complaint was her badly discolored #9. She also felt that her centrals were too wide and short (Fig 36). It was determined that #9 had a previous problematic root canal and it was 2 to 3 mm out of the arch facially. Orthodontics was proposed, but not accepted. Therefore, our priority was creating the space needed to mask the dark stump shade without losing any translucency. Minimally invasive porcelain veneers were proposed for #7, #8, and #10 to correct the shape and design and a crown preparation was planned to restore #9.
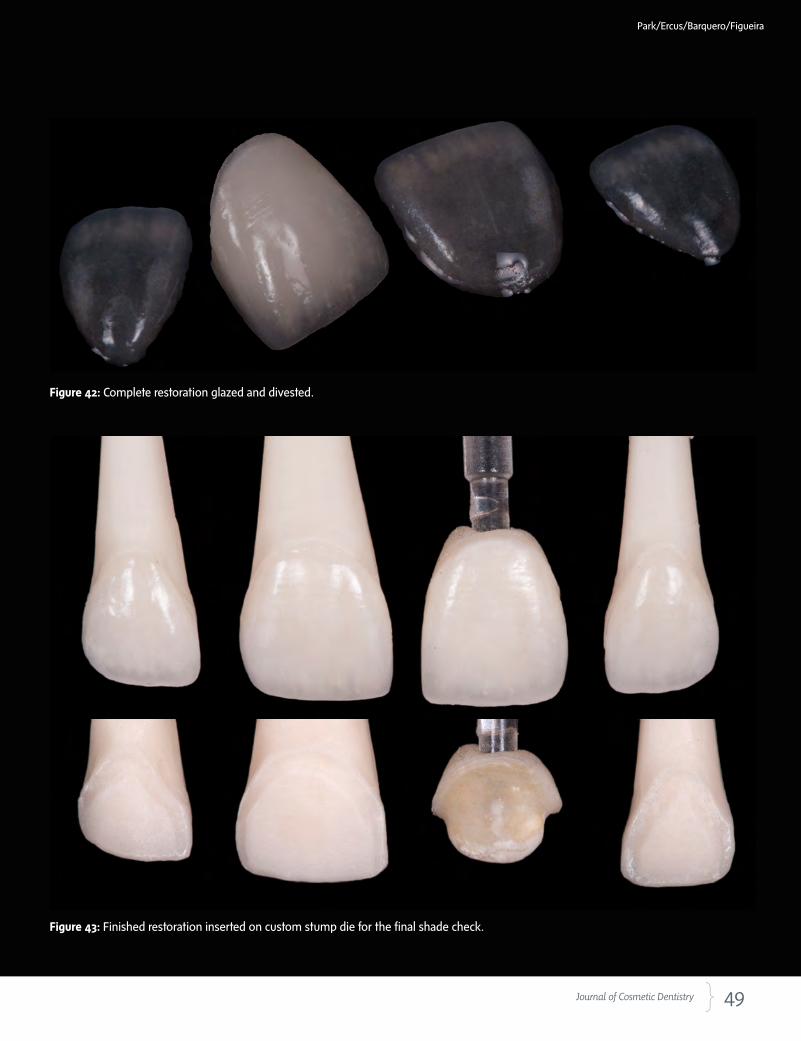
Fabrication DetailsA high-opacity all-ceramic material (ingot EW00, Noritake EX-3 Press, Kuraray Noritake Dental; Tokyo, Japan) was selected and pressed to control and manage the extremely dark #9 stump shade (Figs 37).14 The coping thickness was approximately 0.5 mm and, before selecting the porcelain powders, the coping was checked with the custom stump die (Figs 38-41). The cop-ing was bonded with EW0 dentin powder to increase the value. After the bonding layer, internal stain was applied before build-ing up the dentin and incisor frame. The veneers for #7, #8, and #10 were fabricated with traditional Noritake EX-3 porcelain on the refractory die. Noritake EX-3 and Noritake EX-3 Press porcelain powders are very similar in hue, value, chroma, and translucency. The complete restoration was glazed and divested (Fig 42) and checked on the custom stump die (Fig 43).
Figure 36: Initial image showing short, wide centrals; discolored #9.
Figure 37: Stump shade matching the shade tab.
Figure 41: Coping ready to press on ring.
Figure 38: NWOO ingot coping.
Figure 40: Coping measures approximately 0.5 mm.
Figure 39: Coping inserted on the custom stump die.
49 Journal of Cosmetic Dentistry
Park/Ercus/Barquero/Figueira
Figure 42: Complete restoration glazed and divested.
Figure 43: Finished restoration inserted on custom stump die for the final shade check.
50 Spring 2016 • Volume 32 • Number 1
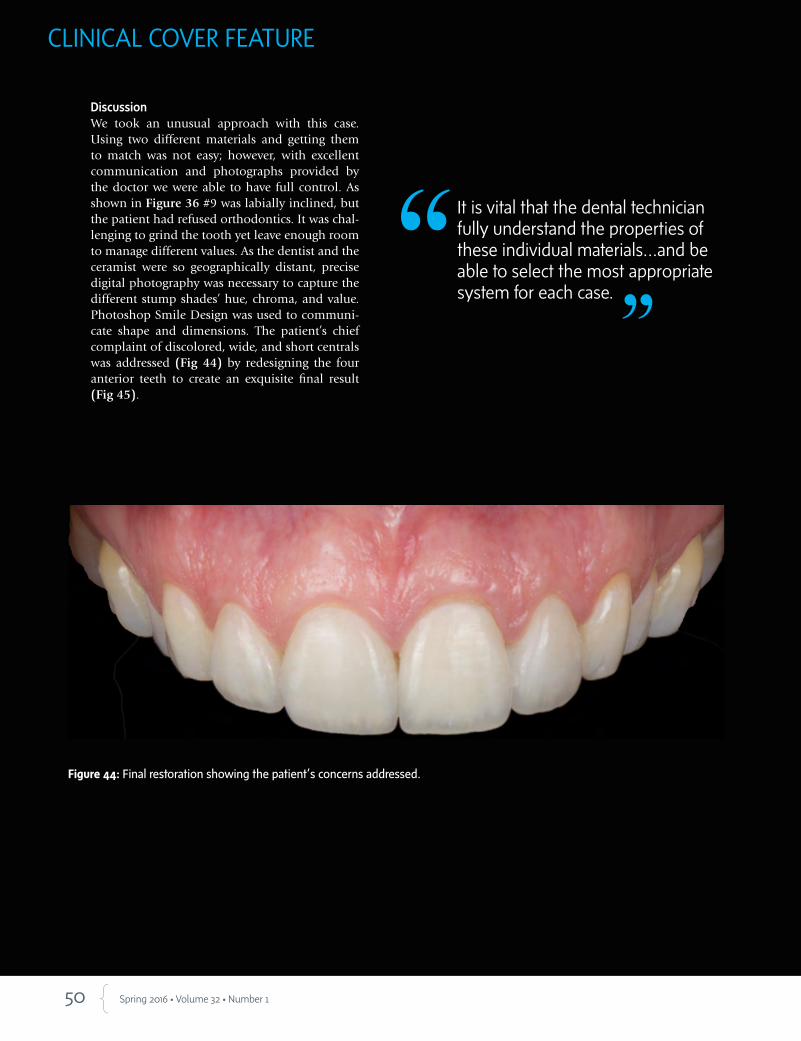
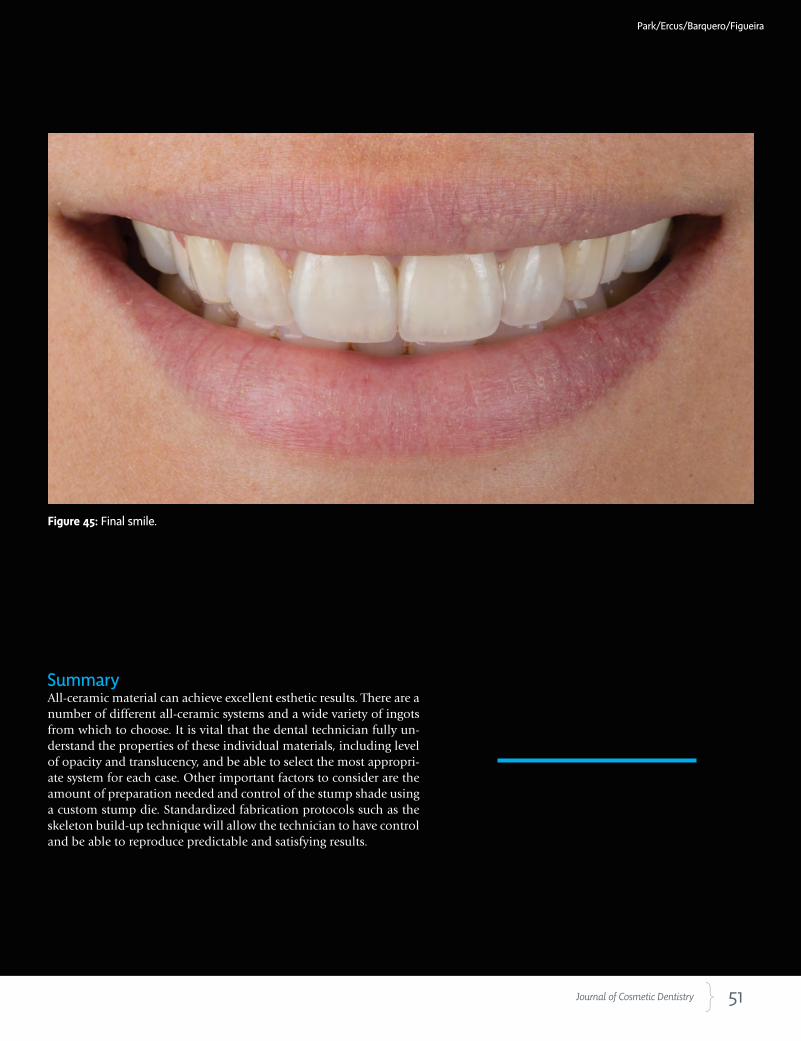
DiscussionWe took an unusual approach with this case. Using two different materials and getting them to match was not easy; however, with excellent communication and photographs provided by the doctor we were able to have full control. As shown in Figure 36 #9 was labially inclined, but the patient had refused orthodontics. It was chal-lenging to grind the tooth yet leave enough room to manage different values. As the dentist and the ceramist were so geographically distant, precise digital photography was necessary to capture the different stump shades’ hue, chroma, and value. Photoshop Smile Design was used to communi-cate shape and dimensions. The patient’s chief complaint of discolored, wide, and short centrals was addressed (Fig 44) by redesigning the four anterior teeth to create an exquisite final result (Fig 45).
Figure 44: Final restoration showing the patient’s concerns addressed.
It is vital that the dental technician fully understand the properties of these individual materials…and be able to select the most appropriate system for each case.
CLINICAL COVER FEATURE
51 Journal of Cosmetic Dentistry
Figure 45: Final smile.
Park/Ercus/Barquero/Figueira
SummaryAll-ceramic material can achieve excellent esthetic results. There are a number of different all-ceramic systems and a wide variety of ingots from which to choose. It is vital that the dental technician fully un-derstand the properties of these individual materials, including level of opacity and translucency, and be able to select the most appropri-ate system for each case. Other important factors to consider are the amount of preparation needed and control of the stump shade using a custom stump die. Standardized fabrication protocols such as the skeleton build-up technique will allow the technician to have control and be able to reproduce predictable and satisfying results.
52 Spring 2016 • Volume 32 • Number 1
References
1. Magne P, Hana J, Magne M. The case for moderate “guided
prep” indirect porcelain veneers in the anterior dentition.
The pendulum of porcelain veneer preparations: from almost
no-prep to over-prep to no-prep. Eur J Esthet Dent. 2013 Au-
tumn;8(3):376-88.
2. McLaren EA. The skeleton buildup technique: a systematic ap-
proach to the three-dimensional control of shade and shape.
Pract Periodontics Aesthet Dent. 1998 Jun-Jul;10(5):587-97;
quiz 598.
3. Tak On T. Critical communication with well-documented pho-
tography. J Cosmetic Dent. 2015 Winter;30(4):114-22.
4. McLaren EA, Schoenbaum T. (2010). Digital photography en-
hances diagnostics, communication, and documentation. Com-
pend Contin Educ Dent. 2011 Nov-Dec;32 Spec No 4:36-8.
5. McLaren EA, Schoenbaum T. Combine conventional and digital
methods to maximize shade matching. Compend Contin Educ
Dent. 2011 Nov-Dec;32 Spec No 4:30, 32-3.
6. Bazos P, Magne M. Getting it right the first time. J Cosmetic Dent.
2013 Summer; 29(2):36-41.
7. Bengel W. Mastering digital dental photography. Hanover Park
(IL): Quintessence Pub.; 2006.
8. Tric O. The carrot model. Spectrum Dialogue. 2010 Feb;9(2):20-
30.
9. McLaren EA. Porcelain veneer preparations: to prep or not to
prep. Inside Dent. 2006 May;2(4)76-9.
10. Lesage B. Revisiting the design of minimal and no-preparation
veneers: a step-by-step technique. J Calif Dent Assoc. 2010
Aug;38(8):561-9.
11. Chu S, Mieleszko A. Color matching strategies for non-vital discol-
ored teeth: part 1. J Esthet Restor Dent. 2014 Jul-Aug;26(4):240-6.
12. Gürel G. The science and art of porcelain laminate veneers. Ber-
lin: Quintessence Pub.; 2003.
Mr. Park owns and operates SP Dental Arts in Gardena, California.
Dr. Ercus is in private practice in Brussels, Belgium.
Dr. Barquero is an associate professor in the Esthetic Dentistry Department at University of El Salvador. He has a private prac-tice in San José, Costa Rica.
Dr. Figueira is an instructor at the UCLA Center for Esthetic Dentistry. He maintains private practices in Los Angeles and in Caracas, Venezuela.
Disclosures: The authors did not report any disclosures.
Standardized fabrication protocols such as the skeleton build-up technique will allow the technician to have control and be able to reproduce predictable and satisfying results.
CLINICAL COVER FEATURE
13. Chu SJ, Trushkowsky RD, Paravina RD. Dental color matching instruments and
systems. Review of clinical and research aspects. J Dent. 2010;38 Suppl 2:e2-e16.
14. Stover J. Today’s popular all-ceramic materials: tips for success. Inside Dental Assist-
ing [Internet]. 2014 Jul/Aug 11(4). Available from: https://www.dentalaegis.com/
ida/2014/08/todays-popular-all-ceramic-materials jCD

www.whatsinyourmouth.us | www.nadl.org
Transparency for both the dentist and dental patient is crucial forgood health and safety. Dental laboratories play an important role
in achieving transparency and the proper level of patient care.
Ask your dental laboratory about their quality systems and good manufacturing practices.
Transparency isimportant.
54 Spring 2016 • Volume 32 • Number 1
AbstractHistorically, the goal of ideal dentistry has been to preserve natural tooth structure with a conservative, restorative approach. However, this historical principle could not take into account the advent of newer restorative materi-als and techniques. When offering treatment choices, clinicians must exam-ine both the risk and prognosis each choice involves and understand that not all failures are equal; it is essential to understand the mode of failure and differentiate tooth failure from restoration failure. Clinicians can no longer assume that a treatment once considered more invasive will compromise tooth prognosis more than treatment that traditionally has been considered more conservative.
Key Words: comprehensive care, diagnosis and treatment, functional dentistry, minimally invasive dentistry
No Dentistry is Better than No Dentistry…Really? Understanding Modes of Tooth and Restoration Failure
John C. Kois, DMD, MSD
Dr. John Kois will present “Modes of Failure” on Saturday, April 30, at AACD 2016 Toronto. In this course, he will cover recommended strategies and outline important diagnostic and critical risk parameters to minimize failures, provide better treatment options, and maximize predictable outcomes as outlined in this article.
55 Journal of Cosmetic Dentistry
Kois
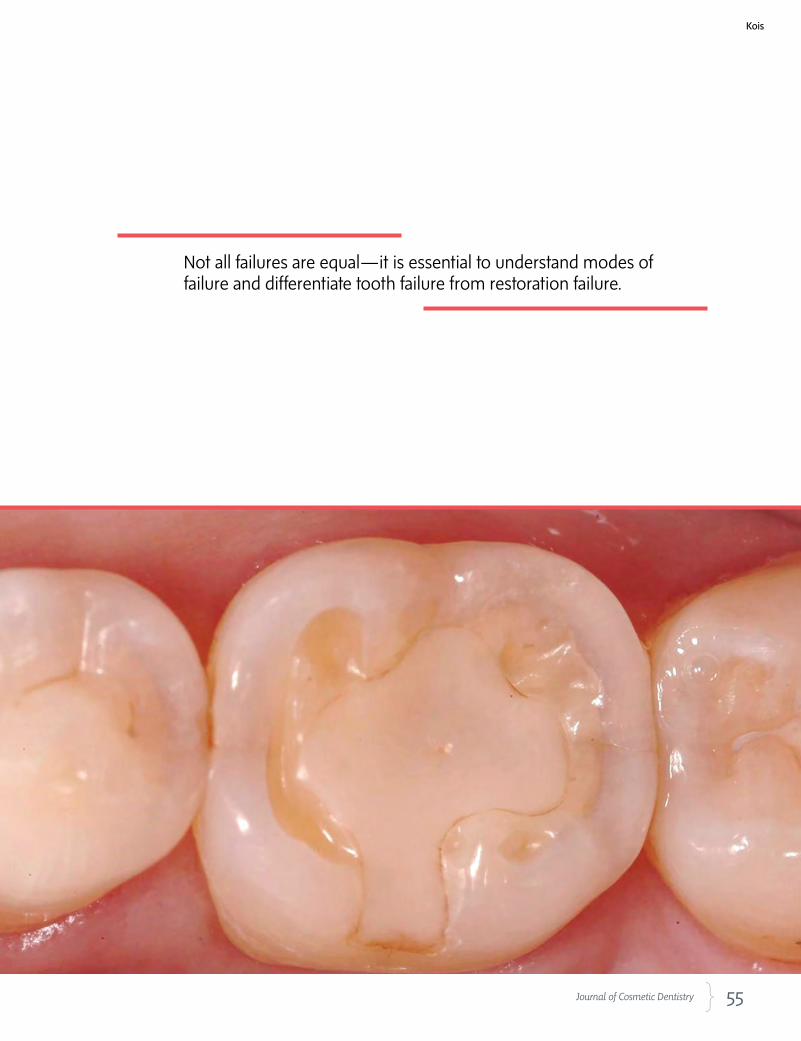
Not all failures are equal—it is essential to understand modes of failure and differentiate tooth failure from restoration failure.

56 Spring 2016 • Volume 32 • Number 1
Introduction
Outdated Outcomes DataHistorically, ideal dentistry has aimed to preserve natural tooth structure with a conservative, restorative approach. Developed over time, this approach employs the current standard of minimally invasive techniques once it has been determined that dental procedures are necessary. However, the oft-repeated corollary that all dentistry is a compromise may not be accurate. This belief is rooted in the findings of outdated outcomes data. While older studies may have revealed increased risk to a tooth after restoration, those studies preceded current and rapidly evolving science, materials, and technologies. In addi-tion, the outcomes data reflected the limited choices in restorative materials with the resultant dilemma that, many times, the tooth preparation was dictated by the needs of the material more than by the needs of the tooth. For example, cavity preparation would be ex-tended to provide retention and resistance form or the reduction requirements were dictated by the dimension needs of the material. Too often this necessitated sacri-ficing sound tooth structure, endangering the pulp, and impacting periodontal health (Fig 1).1-3
LimitationsThe limitations inherent in these outdated outcomes studies created a paradox of choice wherein, historically, a compromised tooth that was not treated at all might have had a better prognosis than the same tooth restored with conventional treatment. In this model, the restorative dentist unfortunately often faced a risk/reward ratio im-balance or an unfavorable risk option, which supported the belief that “No dentistry is better than no dentistry,” placing the dentist in a difficult position that skill level and training could not overcome. A crown for example, could never “strengthen” a natural tooth (no matter how well the procedure was performed), but it could improve the prognosis of a compromised natural tooth.
Assigning Risk and PrognosisThe ability to assign risk and prognosis to a proposed treatment option is further complicated because the sur-vival probability data often do not provide the reason why the restoration was needed in the first place. The clinician therefore cannot extrapolate a risk assessment for the failure: was it more influenced by the reason (i.e., diagnosis) for restoration placement, rather than by the restoration itself? The clinical dilemma in applying mini-mally invasive principles is that a more conservative res-toration may seal the tooth but inadequately protect it, so a catastrophic failure actually becomes more likely in the future. This would then require more invasive treat- Figure 2: Fractured endodontically treated #18 with an
occlusal composite now is nonrestorable.
Figure 1: A metal ceramic crown required adequate metal, opaquer, and porcelain thickness for desired optical effect, but this compromised remaining tooth structure.
ment and negate the purpose of “minimally invasive" dentistry (Fig 2). Clinicians must use the available science to offer better treat-ment choices that examine both the risk and prognosis each choice involves, while incorporating this information into informed con-sent for all patient decisions.
In the future, dentistry would benefit greatly if measures of clini-cally meaningful consequences of treatment were available. This information would support a careful weighing of options when de-ciding whether or not the protective benefit of a proposed treatment would outweigh the risks of other adverse side effects as a result of that treatment.
Understanding Modes of FailureTherefore, in order to assign risk and prognosis to treatment choices, the clinician must understand how survival analysis and probability are reported in the dental literature. Not all failures are equal—it is essential to understand modes of failure and differentiate tooth failure from restoration failure. It is also important to determine whether the tooth failed because of the restoration compromise rather than the initial compromise that led to the initial decision to restore the tooth. The following outline is intended to show the key differences between tooth failure modes and restoration failure modes.
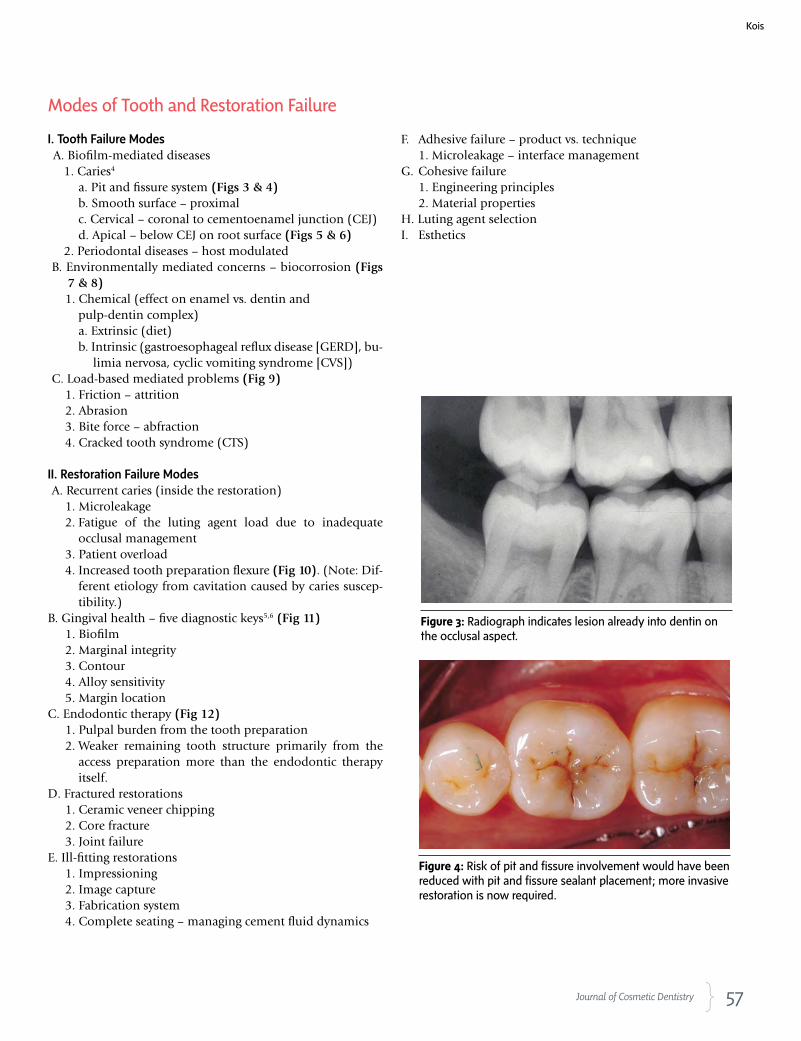
57 Journal of Cosmetic Dentistry
Kois
Figure 3: Radiograph indicates lesion already into dentin on the occlusal aspect.
Figure 4: Risk of pit and fissure involvement would have been reduced with pit and fissure sealant placement; more invasive restoration is now required.
I. Tooth Failure ModesA. Biofilm-mediated diseases
1. Caries4
a. Pit and fissure system (Figs 3 & 4)b. Smooth surface – proximalc. Cervical – coronal to cementoenamel junction (CEJ)d. Apical – below CEJ on root surface (Figs 5 & 6)
2. Periodontal diseases – host modulatedB. Environmentally mediated concerns – biocorrosion (Figs
7 & 8)1. Chemical (effect on enamel vs. dentin and
pulp-dentin complex)a. Extrinsic (diet)b. Intrinsic (gastroesophageal reflux disease [GERD], bu-
limia nervosa, cyclic vomiting syndrome [CVS])C. Load-based mediated problems (Fig 9)
1. Friction – attrition2. Abrasion3. Bite force – abfraction4. Cracked tooth syndrome (CTS)
II. Restoration Failure ModesA. Recurrent caries (inside the restoration)
1. Microleakage 2. Fatigue of the luting agent load due to inadequate
occlusal management 3. Patient overload 4. Increased tooth preparation flexure (Fig 10). (Note: Dif-
ferent etiology from cavitation caused by caries suscep-tibility.)
B. Gingival health – five diagnostic keys5,6 (Fig 11)1. Biofilm2. Marginal integrity3. Contour4. Alloy sensitivity5. Margin location
C. Endodontic therapy (Fig 12)1. Pulpal burden from the tooth preparation2. Weaker remaining tooth structure primarily from the
access preparation more than the endodontic therapy itself.
D. Fractured restorations1. Ceramic veneer chipping2. Core fracture3. Joint failure
E. Ill-fitting restorations1. Impressioning2. Image capture3. Fabrication system4. Complete seating – managing cement fluid dynamics
F. Adhesive failure – product vs. technique1. Microleakage – interface management
G. Cohesive failure1. Engineering principles2. Material properties
H. Luting agent selectionI. Esthetics
Modes of Tooth and Restoration Failure
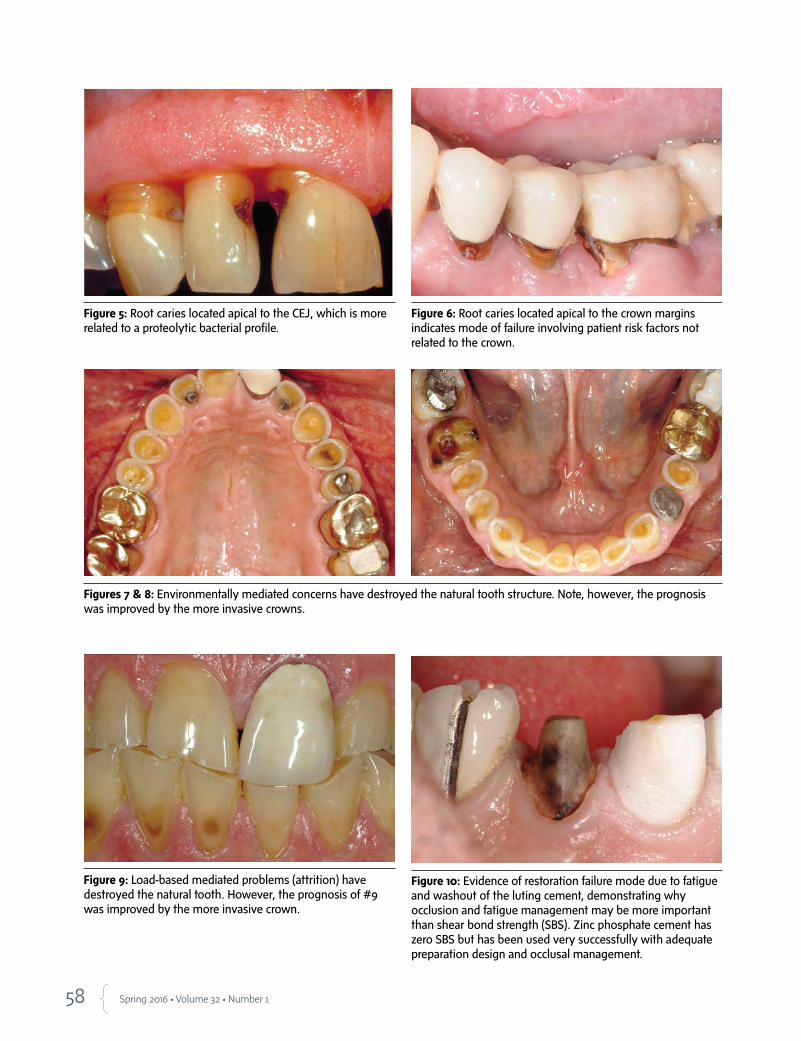
58 Spring 2016 • Volume 32 • Number 1
Figure 5: Root caries located apical to the CEJ, which is more related to a proteolytic bacterial profile.
Figure 6: Root caries located apical to the crown margins indicates mode of failure involving patient risk factors not related to the crown.
Figures 7 & 8: Environmentally mediated concerns have destroyed the natural tooth structure. Note, however, the prognosis was improved by the more invasive crowns.
Figure 9: Load-based mediated problems (attrition) have destroyed the natural tooth. However, the prognosis of #9 was improved by the more invasive crown.
Figure 10: Evidence of restoration failure mode due to fatigue and washout of the luting cement, demonstrating why occlusion and fatigue management may be more important than shear bond strength (SBS). Zinc phosphate cement has zero SBS but has been used very successfully with adequate preparation design and occlusal management.
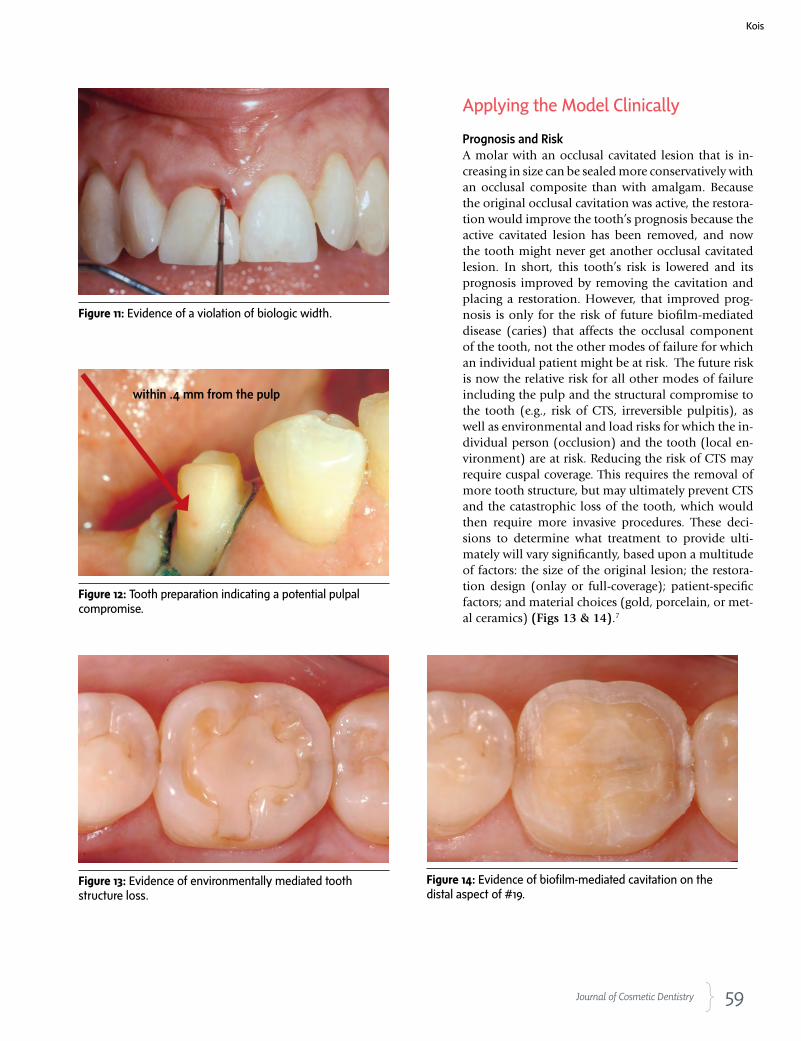
59 Journal of Cosmetic Dentistry
Kois
Applying the Model Clinically
Prognosis and RiskA molar with an occlusal cavitated lesion that is in-creasing in size can be sealed more conservatively with an occlusal composite than with amalgam. Because the original occlusal cavitation was active, the restora-tion would improve the tooth’s prognosis because the active cavitated lesion has been removed, and now the tooth might never get another occlusal cavitated lesion. In short, this tooth’s risk is lowered and its prognosis improved by removing the cavitation and placing a restoration. However, that improved prog-nosis is only for the risk of future biofilm-mediated disease (caries) that affects the occlusal component of the tooth, not the other modes of failure for which an individual patient might be at risk. The future risk is now the relative risk for all other modes of failure including the pulp and the structural compromise to the tooth (e.g., risk of CTS, irreversible pulpitis), as well as environmental and load risks for which the in-dividual person (occlusion) and the tooth (local en-vironment) are at risk. Reducing the risk of CTS may require cuspal coverage. This requires the removal of more tooth structure, but may ultimately prevent CTS and the catastrophic loss of the tooth, which would then require more invasive procedures. These deci-sions to determine what treatment to provide ulti-mately will vary significantly, based upon a multitude of factors: the size of the original lesion; the restora-tion design (onlay or full-coverage); patient-specific factors; and material choices (gold, porcelain, or met-al ceramics) (Figs 13 & 14).7
Figure 11: Evidence of a violation of biologic width.
Figure 12: Tooth preparation indicating a potential pulpal compromise.
Figure 13: Evidence of environmentally mediated tooth structure loss.
Figure 14: Evidence of biofilm-mediated cavitation on the distal aspect of #19.
within .4 mm from the pulp
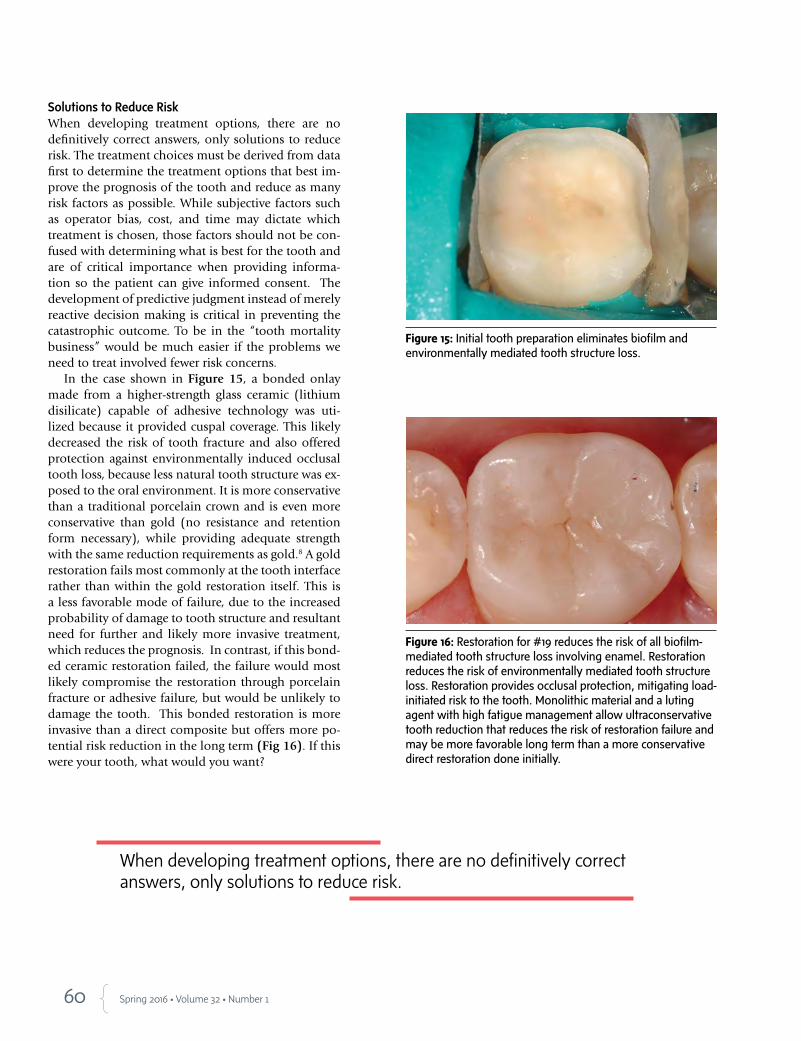
60 Spring 2016 • Volume 32 • Number 1
Solutions to Reduce RiskWhen developing treatment options, there are no definitively correct answers, only solutions to reduce risk. The treatment choices must be derived from data first to determine the treatment options that best im-prove the prognosis of the tooth and reduce as many risk factors as possible. While subjective factors such as operator bias, cost, and time may dictate which treatment is chosen, those factors should not be con-fused with determining what is best for the tooth and are of critical importance when providing informa-tion so the patient can give informed consent. The development of predictive judgment instead of merely reactive decision making is critical in preventing the catastrophic outcome. To be in the “tooth mortality business” would be much easier if the problems we need to treat involved fewer risk concerns.
In the case shown in Figure 15, a bonded onlay made from a higher-strength glass ceramic (lithium disilicate) capable of adhesive technology was uti-lized because it provided cuspal coverage. This likely decreased the risk of tooth fracture and also offered protection against environmentally induced occlusal tooth loss, because less natural tooth structure was ex-posed to the oral environment. It is more conservative than a traditional porcelain crown and is even more conservative than gold (no resistance and retention form necessary), while providing adequate strength with the same reduction requirements as gold.8 A gold restoration fails most commonly at the tooth interface rather than within the gold restoration itself. This is a less favorable mode of failure, due to the increased probability of damage to tooth structure and resultant need for further and likely more invasive treatment, which reduces the prognosis. In contrast, if this bond-ed ceramic restoration failed, the failure would most likely compromise the restoration through porcelain fracture or adhesive failure, but would be unlikely to damage the tooth. This bonded restoration is more invasive than a direct composite but offers more po-tential risk reduction in the long term (Fig 16). If this were your tooth, what would you want?
Figure 15: Initial tooth preparation eliminates biofilm and environmentally mediated tooth structure loss.
Figure 16: Restoration for #19 reduces the risk of all biofilm-mediated tooth structure loss involving enamel. Restoration reduces the risk of environmentally mediated tooth structure loss. Restoration provides occlusal protection, mitigating load-initiated risk to the tooth. Monolithic material and a luting agent with high fatigue management allow ultraconservative tooth reduction that reduces the risk of restoration failure and may be more favorable long term than a more conservative direct restoration done initially.
When developing treatment options, there are no definitively correct answers, only solutions to reduce risk.

61 Journal of Cosmetic Dentistry
SummaryIt is not always correct to assume that treatment once considered more invasive will compromise the ulti-mate tooth prognosis more than the treatment that was traditionally considered more conservative, espe-cially if the more conservative restoration has a lower survival probability and risks further compromise of tooth structure. Newer monolithic materials, lut-ing agents, improved protocols, and disruptive tech-nologies have blurred the previous concepts of what constitutes minimally invasive dentistry. The future of restorative dentistry will continue trending toward less invasive procedures as newer science is com-bined with traditional protocols. Minimally invasive dentistry will be ultraconservative (to preserve tooth structure and minimize pulpal risks), utilizing thin monolithic crowns (to reduce porcelain chipping and have adequate strength), and be adhesively retained to minimize microleakage and fatigue problems. In essence, the restoration could be more like a crown/veneer hybrid (“croneers”).
As dentistry moves beyond simple consideration of the outcomes reported in randomized clinical tri-als to include the evaluation of an individual patient’s risk factors for all the modes of failure (e.g., biofilm-mediated, environmentally mediated, and load-initi-ated) that are patient-specific or localized to the tooth, a different approach to minimally invasive dentistry is evolving. The next paradigm shift that is emerging in dentistry will result in a restoration that performs better than many natural teeth exposed to our mod-ern environment. Perhaps bionic teeth may be on the horizon?
References
1. Magne P, Versluis A, Douglas WH. Rationalization of incisor
shape: experimental- numerical analysis. J Prosthet Dent. 1999
Mar;81(3):345-55.
2. Magne P, Douglas WH. Cumulative effects of successive restor-
ative procedures on anterior crown flexure: intact versus veneered
incisors. Quintessence Int. 2000 Jan;31(1):5-18.
3. Magne P, Douglas WH. Rationalization of esthetics: restorative
dentistry based on biomimetics. J Esthet Dent. 1999;11(1):5-15.
4. Young DA, Novy BB, Zeller GG, Hale R, Hart TC, Truelove EL,
American Dental Association Council on Scientific Affairs.
The American Dental Association Caries Classification Sys-
tem for clinical practice: a report of the American Dental As-
sociation Council on Scientific Affairs. J Am Dent Assoc. 2015
Feb;146(2):79-86.
5. Kois JC. The restorative-periodontal interface: biological parameters. Periodontol 2000.
1996 Jun;11:29-38.
6. Kois JC. “The gingiva is red around my crowns”—a differential diagnosis. Dent Econ.
1993 Apr;83(4):101-2.
7. Magne P, Belser UC. Porcelain versus composite inlays/onlays: effects of mechanical
loads on stress distribution, adhesion, and crown flexure. Int J Periodontics Restorative
Dent. 2003 Dec;23(6):543-55.
8. Kois DE, Chaiyabutr Y, Kois JC. Comparison of load-fatigue performance of posterior
ceramic onlay restorations under different preparation designs. Compend Contin Educ
Dent. 2012 Jun;33 Spec No 2:2-9.
Kois
Dr. Kois is the director of the Kois Center, in Seattle, Washington. He also maintains a private practice in Seattle.
Disclosure: The author did not report any disclosures.
The future of restorative dentistry will continue trending toward less invasive procedures as newer science is combined with traditional protocols.
62 Spring 2016 • Volume 32 • Number 1
AbstractThe use of digital technology is becoming more common in clinical den-tistry. A general knowledge of the scope of these resources can help clini-cians to develop more precise treatment plans and achieve more predict-able clinical results. This article discusses novel ways to integrate patient data into a digital workflow in interdisciplinary dentistry. A complete dig-ital workflow that increases the predictability of the clinical procedures and relates the initial project to the final outcome is presented.
Key Words: esthetic dentistry, dynamic smile analysis, video docu-mentation, smile design, smile frame
From 2D toComplete Digital Workflow in Interdisciplinary Dentistry
Dr. Christian Coachman will present “The Virtual Lab and the Complete Digital Workflow” on Friday, April 29, at AACD 2016 Toronto. In this course, he will introduce the new generation of interdisciplinary software that allows clinicians to develop facial analysis to 3D smile design, interdisciplinary planning, and fab-rication of everything needed to restore a smile.
Christian Coachman, DDS, CDTMarcelo Alexandre Calamita, DDS, MSD, PhDNewton Sesma, DDS, MSD, PhD
63 Journal of Cosmetic Dentistry
Coachman/Calamita/Sesma
Virtual planning uses patient photographs and videos to digitally design a new smile to facilitate communication between the interdisciplinary team and the patient.
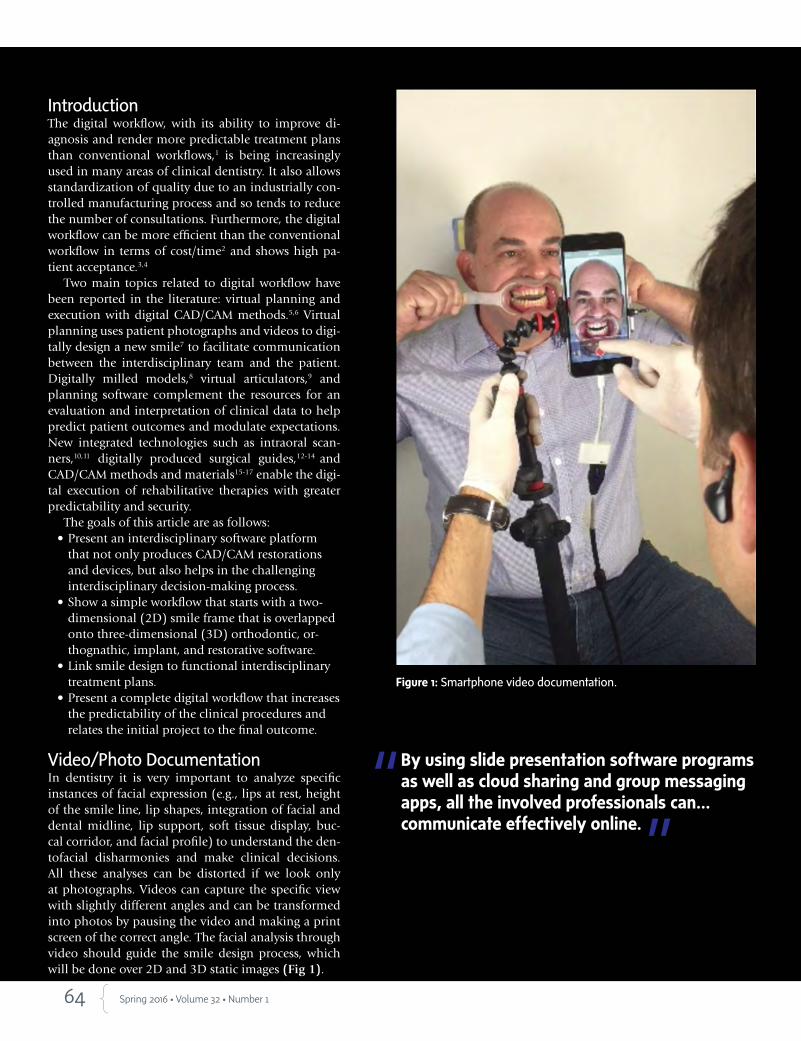
64 Spring 2016 • Volume 32 • Number 1
IntroductionThe digital workflow, with its ability to improve di-agnosis and render more predictable treatment plans than conventional workflows,1 is being increasingly used in many areas of clinical dentistry. It also allows standardization of quality due to an industrially con-trolled manufacturing process and so tends to reduce the number of consultations. Furthermore, the digital workflow can be more efficient than the conventional workflow in terms of cost/time2 and shows high pa-tient acceptance.3,4
Two main topics related to digital workflow have been reported in the literature: virtual planning and execution with digital CAD/CAM methods.5,6 Virtual planning uses patient photographs and videos to digi-tally design a new smile7 to facilitate communication between the interdisciplinary team and the patient. Digitally milled models,8 virtual articulators,9 and planning software complement the resources for an evaluation and interpretation of clinical data to help predict patient outcomes and modulate expectations. New integrated technologies such as intraoral scan-ners,10,11 digitally produced surgical guides,12-14 and CAD/CAM methods and materials15-17 enable the digi-tal execution of rehabilitative therapies with greater predictability and security.
The goals of this article are as follows: • Present an interdisciplinary software platform
that not only produces CAD/CAM restorations and devices, but also helps in the challenging interdisciplinary decision-making process.
• Show a simple workflow that starts with a two-dimensional (2D) smile frame that is overlapped onto three-dimensional (3D) orthodontic, or-thognathic, implant, and restorative software.
• Link smile design to functional interdisciplinary treatment plans.
• Present a complete digital workflow that increases the predictability of the clinical procedures and relates the initial project to the final outcome.
Video/Photo DocumentationIn dentistry it is very important to analyze specific instances of facial expression (e.g., lips at rest, height of the smile line, lip shapes, integration of facial and dental midline, lip support, soft tissue display, buc-cal corridor, and facial profile) to understand the den-tofacial disharmonies and make clinical decisions. All these analyses can be distorted if we look only at photographs. Videos can capture the specific view with slightly different angles and can be transformed into photos by pausing the video and making a print screen of the correct angle. The facial analysis through video should guide the smile design process, which will be done over 2D and 3D static images (Fig 1).
Figure 1: Smartphone video documentation.
By using slide presentation software programs as well as cloud sharing and group messaging apps, all the involved professionals can… communicate effectively online.

65 Journal of Cosmetic Dentistry
Integrative TechnologyThe main goal of the DSD technique (Digital Smile Design; São Paulo, Brazil) on the computer is to ad-just the photographs from the three main views (12 o’clock, frontal, and occlusal) (Fig 2) with each other, assisted by the digital ruler, and to add the lines and drawings that will create the smile frame, always based on the video analysis. This frame (Fig 3) is useful ex-tra information that, together with the conventional documentation of the patient (e.g., x-rays, models, medical history, clinical exam, perio chart), helps to facilitate a better decision-making process and inter-disciplinary interaction.
Team CommunicationSharing the patient’s video and smile frame slide pre-sentation with the specialists who will be involved with the case allows the whole team—even those team members who were not present at the first appoint-ment with the patient—to become familiar with the case. By using slide presentation software programs as well as cloud sharing and group messaging apps, all the involved professionals can have access to the information, each in his or her own time, and com-municate effectively online (online asynchronous communication) (Fig 4). With this protocol it is pos-sible to overcome two of the main challenges of in-terdisciplinary dentistry: difficulty in geographically distant team members being able to communicate at the same time and lack of common vision among the interdisciplinary team regarding the case’s final ideal outcome.
Figure 2: The 2D/3D digital workflow.
Figure 3: Smile frame on the three views of frontal, occlusal, and 12 o’clock.
Figure 4: Online asynchronous communication.
Coachman/Calamita/Sesma
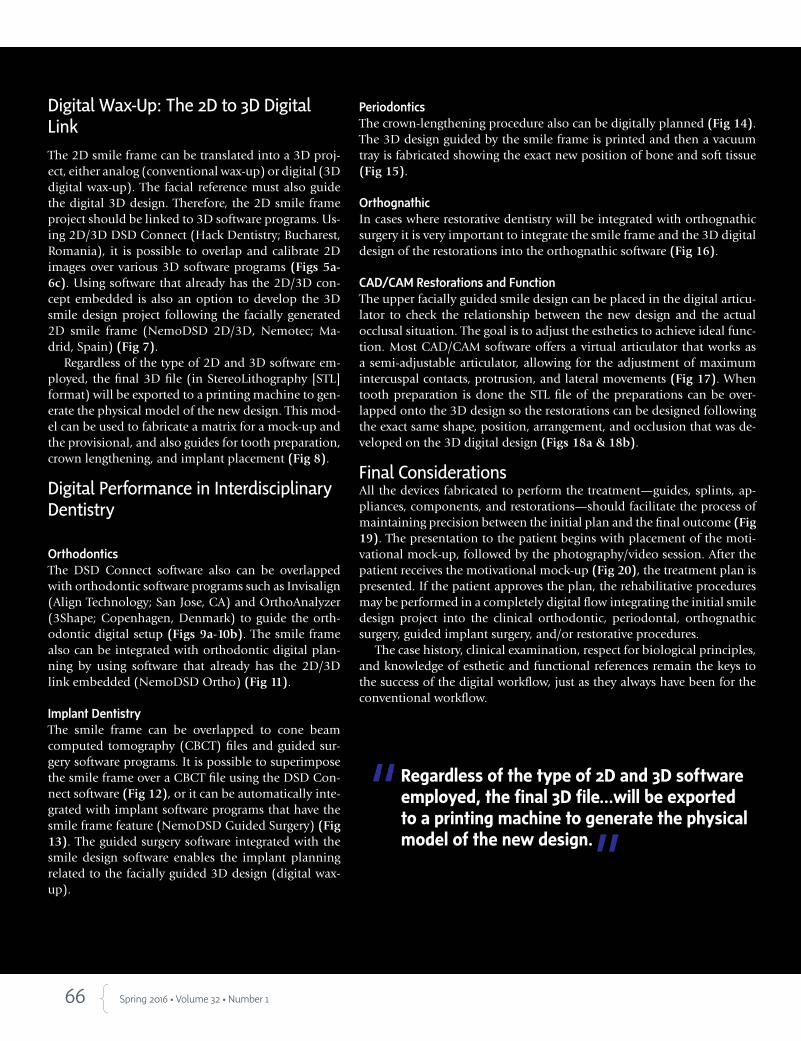
66 Spring 2016 • Volume 32 • Number 1
Digital Wax-Up: The 2D to 3D Digital Link
The 2D smile frame can be translated into a 3D proj-ect, either analog (conventional wax-up) or digital (3D digital wax-up). The facial reference must also guide the digital 3D design. Therefore, the 2D smile frame project should be linked to 3D software programs. Us-ing 2D/3D DSD Connect (Hack Dentistry; Bucharest, Romania), it is possible to overlap and calibrate 2D images over various 3D software programs (Figs 5a-6c). Using software that already has the 2D/3D con-cept embedded is also an option to develop the 3D smile design project following the facially generated 2D smile frame (NemoDSD 2D/3D, Nemotec; Ma-drid, Spain) (Fig 7).
Regardless of the type of 2D and 3D software em-ployed, the final 3D file (in StereoLithography [STL] format) will be exported to a printing machine to gen-erate the physical model of the new design. This mod-el can be used to fabricate a matrix for a mock-up and the provisional, and also guides for tooth preparation, crown lengthening, and implant placement (Fig 8).
Digital Performance in Interdisciplinary Dentistry
OrthodonticsThe DSD Connect software also can be overlapped with orthodontic software programs such as Invisalign (Align Technology; San Jose, CA) and OrthoAnalyzer (3Shape; Copenhagen, Denmark) to guide the orth-odontic digital setup (Figs 9a-10b). The smile frame also can be integrated with orthodontic digital plan-ning by using software that already has the 2D/3D link embedded (NemoDSD Ortho) (Fig 11).
Implant DentistryThe smile frame can be overlapped to cone beam computed tomography (CBCT) files and guided sur-gery software programs. It is possible to superimpose the smile frame over a CBCT file using the DSD Con-nect software (Fig 12), or it can be automatically inte-grated with implant software programs that have the smile frame feature (NemoDSD Guided Surgery) (Fig 13). The guided surgery software integrated with the smile design software enables the implant planning related to the facially guided 3D design (digital wax-up).
PeriodonticsThe crown-lengthening procedure also can be digitally planned (Fig 14). The 3D design guided by the smile frame is printed and then a vacuum tray is fabricated showing the exact new position of bone and soft tissue (Fig 15).
OrthognathicIn cases where restorative dentistry will be integrated with orthognathic surgery it is very important to integrate the smile frame and the 3D digital design of the restorations into the orthognathic software (Fig 16).
CAD/CAM Restorations and Function The upper facially guided smile design can be placed in the digital articu-lator to check the relationship between the new design and the actual occlusal situation. The goal is to adjust the esthetics to achieve ideal func-tion. Most CAD/CAM software offers a virtual articulator that works as a semi-adjustable articulator, allowing for the adjustment of maximum intercuspal contacts, protrusion, and lateral movements (Fig 17). When tooth preparation is done the STL file of the preparations can be over-lapped onto the 3D design so the restorations can be designed following the exact same shape, position, arrangement, and occlusion that was de-veloped on the 3D digital design (Figs 18a & 18b).
Final ConsiderationsAll the devices fabricated to perform the treatment—guides, splints, ap-pliances, components, and restorations—should facilitate the process of maintaining precision between the initial plan and the final outcome (Fig 19). The presentation to the patient begins with placement of the moti-vational mock-up, followed by the photography/video session. After the patient receives the motivational mock-up (Fig 20), the treatment plan is presented. If the patient approves the plan, the rehabilitative procedures may be performed in a completely digital flow integrating the initial smile design project into the clinical orthodontic, periodontal, orthognathic surgery, guided implant surgery, and/or restorative procedures.
The case history, clinical examination, respect for biological principles, and knowledge of esthetic and functional references remain the keys to the success of the digital workflow, just as they always have been for the conventional workflow.
Regardless of the type of 2D and 3D software employed, the final 3D file…will be exported to a printing machine to generate the physical model of the new design.
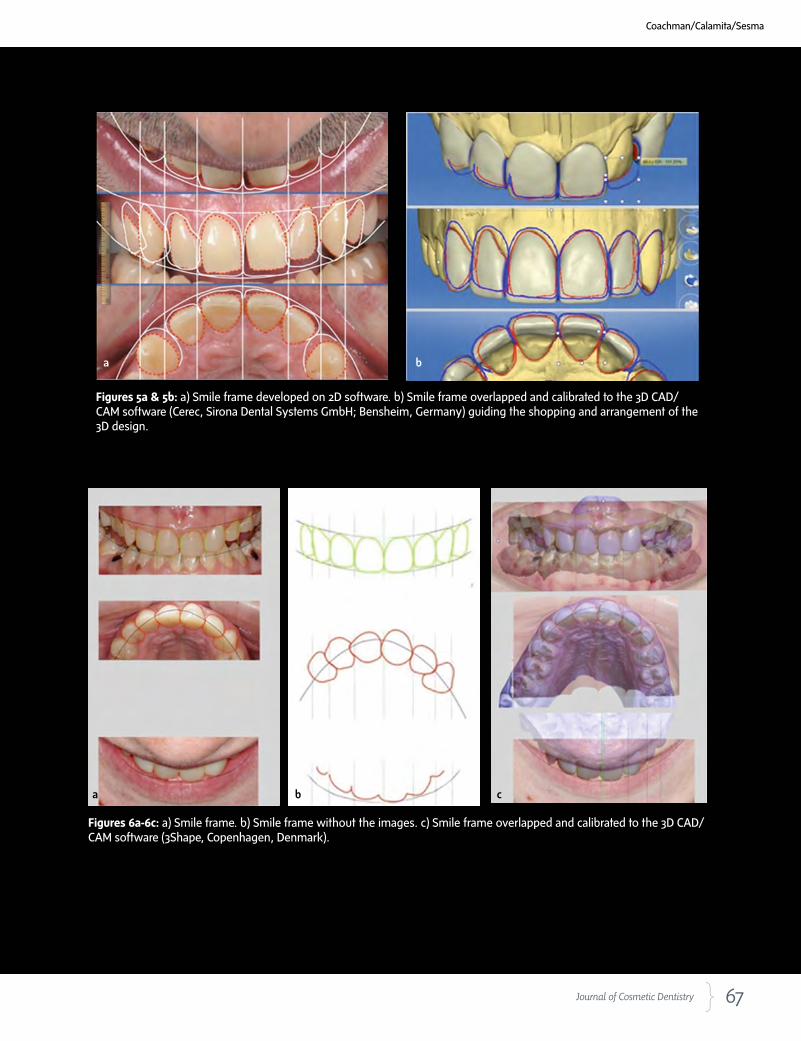
67 Journal of Cosmetic Dentistry
Figures 5a & 5b: a) Smile frame developed on 2D software. b) Smile frame overlapped and calibrated to the 3D CAD/CAM software (Cerec, Sirona Dental Systems GmbH; Bensheim, Germany) guiding the shopping and arrangement of the 3D design.
a b
Figures 6a-6c: a) Smile frame. b) Smile frame without the images. c) Smile frame overlapped and calibrated to the 3D CAD/CAM software (3Shape, Copenhagen, Denmark)..
a b c
Coachman/Calamita/Sesma

68 Spring 2016 • Volume 32 • Number 1
Figure 7: 3D smile design.Figure 8: Printed models and vacuum tray.
Figures 9a-9c: a) Occlusal smile frame with the drawings suggesting the orthodontic movements (yellow). b) Invisalign ClinCheck software overlapped by the smile frame. c) After the virtual orthodontic movement, matching the smile frame.
Figures 10a & 10b: a) Frontal smile frame suggesting orthodontic movements (yellow). b) 3D model calibrated to the smile frame ready to start the virtual setup procedure.
a b
c
a b

69 Journal of Cosmetic Dentistry
Figure 11: Digital Ortho software with the smile frame integrated.
Figure 12: CBCT file and smile frame superimposition using the Connect software program.
Coachman/Calamita/Sesma
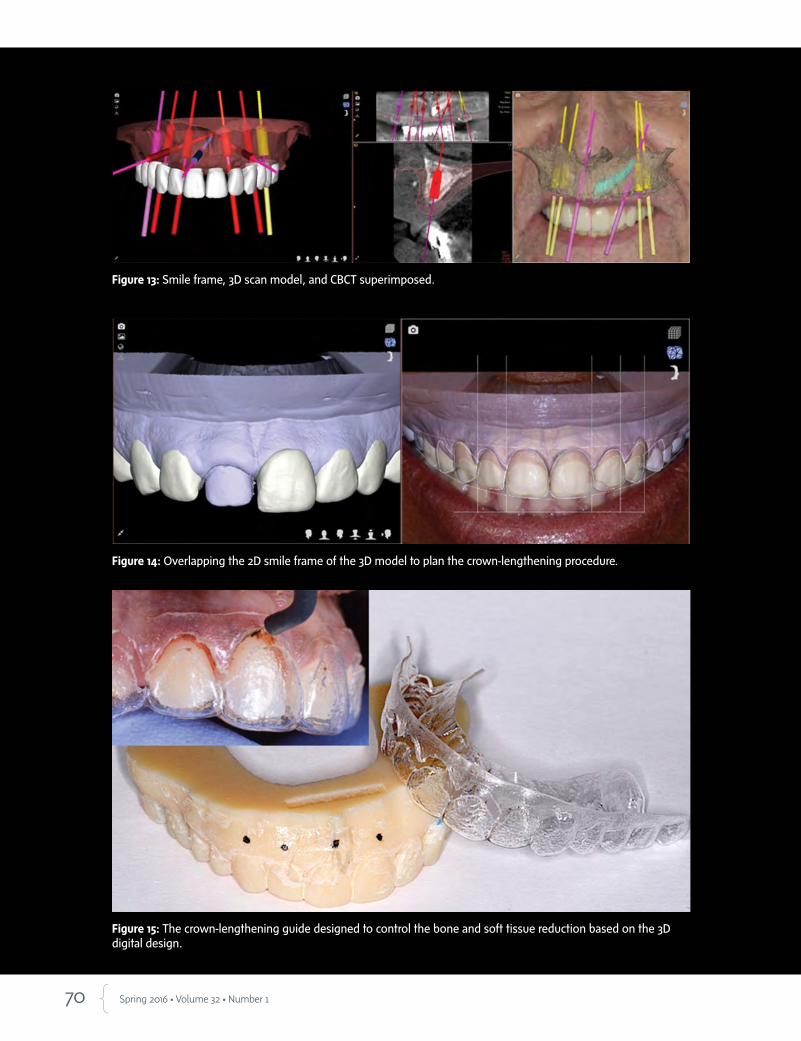
70 Spring 2016 • Volume 32 • Number 1
Figure 13: Smile frame, 3D scan model, and CBCT superimposed.
Figure 14: Overlapping the 2D smile frame of the 3D model to plan the crown-lengthening procedure.
Figure 15: The crown-lengthening guide designed to control the bone and soft tissue reduction based on the 3D digital design.

71 Journal of Cosmetic Dentistry
Figure 16: The Orthognathic NemoCeph software integrated to the smile design software.
Figure 17: Facially guided smile design checked in the digital articulator.
Coachman/Calamita/Sesma
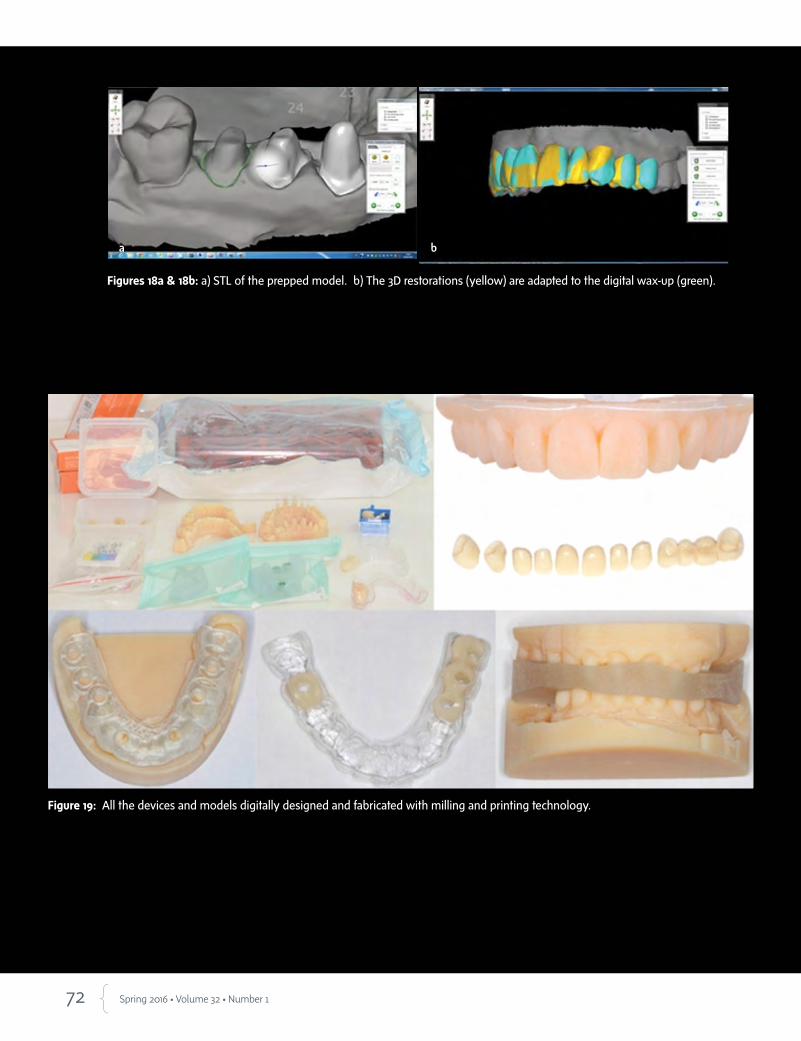
72 Spring 2016 • Volume 32 • Number 1
Figures 18a & 18b: a) STL of the prepped model. b) The 3D restorations (yellow) are adapted to the digital wax-up (green).
a b
Figure 19: All the devices and models digitally designed and fabricated with milling and printing technology.

73 Journal of Cosmetic Dentistry
Figure 20: Patient without and with the mock-up for the motivational presentation.
References
1. Hämmerle CH, Cordaro L, van Assche N, Benic GI, Bornstein M,
Gamper F, Gotfredsen K, Harris D, Hürzeler M, Jacobs R, Kapos
T, Kohal RJ, Patzelt SB, Sailer I, Tahmaseb A, Vercruyssen M, Wis-
meijer D. Digital technologies to support planning, treatment,
and fabrication processes and outcome assessments in implant
dentistry. Summary and consensus statements. The 4th EAO
consensus conference 2015. Clin Oral Implants Res. 2015 Sep;26
Suppl 11:97-101.
2. Joda T, Brägger U. Digital vs. conventional implant prosthetic
workflows: a cost/time analysis. Clin Oral Implants Res. 2015
Dec;26(12):1430-5.
3. Wismeijer D, Mans R, van Genuchten M, Reijers HA. Patients’
preferences when comparing analogue implant impressions us-
ing a polyether impression material versus digital impressions
(Intraoral Scan) of dental implants. Clin Oral Implants Res. 2014
Oct;25(10):1113–8.
All the devices fabricated to perform the treatment…should facilitate the process of maintaining precision between the initial plan and the final outcome.
Coachman/Calamita/Sesma

74 Spring 2016 • Volume 32 • Number 1
4. Joda T, Brägger U. Patient-centered outcomes comparing digital
and conventional implant impression procedures: a randomized
crossover trial. Clin Oral Implants Res. 2015 Apr 12. doi: 10.1111/
clr.12600. [Epub ahead of print].
5. Lanis A, Padial-Molina M, Gamil R, Alvarez del Canto O. Com-
puter-guided implant surgery and immediate loading with a
modifiable radiographic template in a patient with partial eden-
tulism: a clinical report. J Prosthet Dent. 2015 Sep;114(3):328-
34.
6. Lewis RC, Harris BT, Sarno R, Morton D, Llop DR, Lin WS. Max-
illary and mandibular immediately loaded implant-supported
interim complete fixed dental prostheses on immediately placed
implants with a digital approach: a clinical report. J Prosthet
Dent. 2015 Sep;114(3):315-22.
7. Coachman C, Calamita MA. Digital Smile Design: a tool for treat-
ment planning and communication in esthetic dentistry. QDT
2012. Hanover Park (IL): Quintessence Pub.; 2012. p. 103-11.
8. Lee SJ, Betensky RA, Gianneschi GE, Gallucci GO. Accuracy of
digital versus conventional implant impressions. Clin Oral Im-
plants Res. 2015 Jun;26(6):715-9.
9. Solaberrieta E, Minguez R, Etxaniz O, Barrenetxea L. Improving
the digital workflow: direct transfer from patient to virtual articu-
lator. Int J Comput Dent. 2013;16(4):285-92.
10. Lee SJ, Gallucci GO. Digital vs. conventional implant im-
pressions: efficiency outcomes. Clin Oral Implants Res. 2013
Jan;24(1):111–5.
11. Reich S, Kern T, Ritter L. Options in virtual 3D, optical-impres-
sion-based planning of dental implants. Int J Comput Dent.
2014;17(2):101-13.
12. Mandelaris GA, Vlk SD. Guided implant surgery with placement
of a presurgical CAD/CAM patient-specific abutment and provi-
sional in the esthetic zone. Compend Contin Educ Dent. 2014
Jul-Aug;35(7):494-504.
13. Gallucci GO, Finelle G, Papadimitriou DE, Lee SJ. Innovative ap-
proach to computer-guided surgery and fixed provisionalization
assisted by screw-retained transitional implants. Int J Oral Maxil-
lofac Implants. 2015 Mar-Apr;30(2):403-10.
14. Ganz SD. Three-dimensional imaging and guided surgery for
dental implants. Dent Clin North Am. 2015 Apr;59(2):265-90.
15. Kapos T, Evans C. CAD/CAM technology for implant abutments, crowns, and superstruc-
tures. Int J Oral Maxillofac Implants. 2014;29 Suppl:117-36.
16. Keerthi S, Proussaefs P, Lozada J. Clinical and laboratory steps for fabricating a com-
plete-arch fixed prosthesis using CAD/CAM. Int J Periodontics Restorative Dent. 2015
Jul-Aug;35(4):473-80.
17. Gracis S, Thompson VP, Ferencz JL, Silva NR, Bonfante EA. A new classification system
for all-ceramic and ceramic-like restorative materials. Int J Prosthodont. 2015 May-
Jun;28(3):227-35. jCD
Dr. Coachman has a private practice in São Paulo, Brazil.
Dr. Calamita has a private practice in São Paulo, Brazil.
Dr. Sesma is an assistant professor, Department of Prosthodontics, School of Dentistry, University of São Paulo, São Paulo, Brazil.
Disclosures: Dr. Coachman is a co-founder of DSD. Dr. Calamita is on the advisory board of DSD.Dr. Sesma is on the advisory board of and is an instructor for DSD.
The case history, clinical examination, respect for biological principles, and knowledge of esthetic and functional references remain the keys to the success of the digital workflow, just as they always have been for the conventional workflow.
Call us today to learn more! 1-800-4DENMAT (1-800-433-6628) www.denmat.com
Visit Booth #1716 or attend our new hands-on workshop and experience A.R.T. live!©2016 Den-Mat Holdings, LLC. All rights reserved. 801337100 02/16SN
Signature Service — Natural, by Brad Jones, FAACD:
Before
The natural choice for natural results.DenMat, the leader in minimally-invasive esthetic dental solutions, now has NEW offerings to share with our customers:
New Process A.R.T. is the new additive-reductive template designed to make complex cases simpler. Minimize chairtime and ensure predictable results with A.R.T.
New TeamBrad Jones, FAACD, Director of Esthetics, is taking Lumineers® to new heights.
New ServicesDenMat’s new Signature Service delivers world-class lab work with a personalized approach, directly supervised by Brad Jones, FAACD.
Please sign up for our advanced hands-on workshop (W170) at the AACD annual meeting, entitled, Making the complex simple and predictable – Introducing A.R.T. (Additive-Reductive Template): Minimally-invasive esthetic smile design prepping techniques and procedures on Thursday from 2:00 to 5:00 to personally learn about A.R.T. from Peter Harnois, DDS and Brad Jones, FAACD.
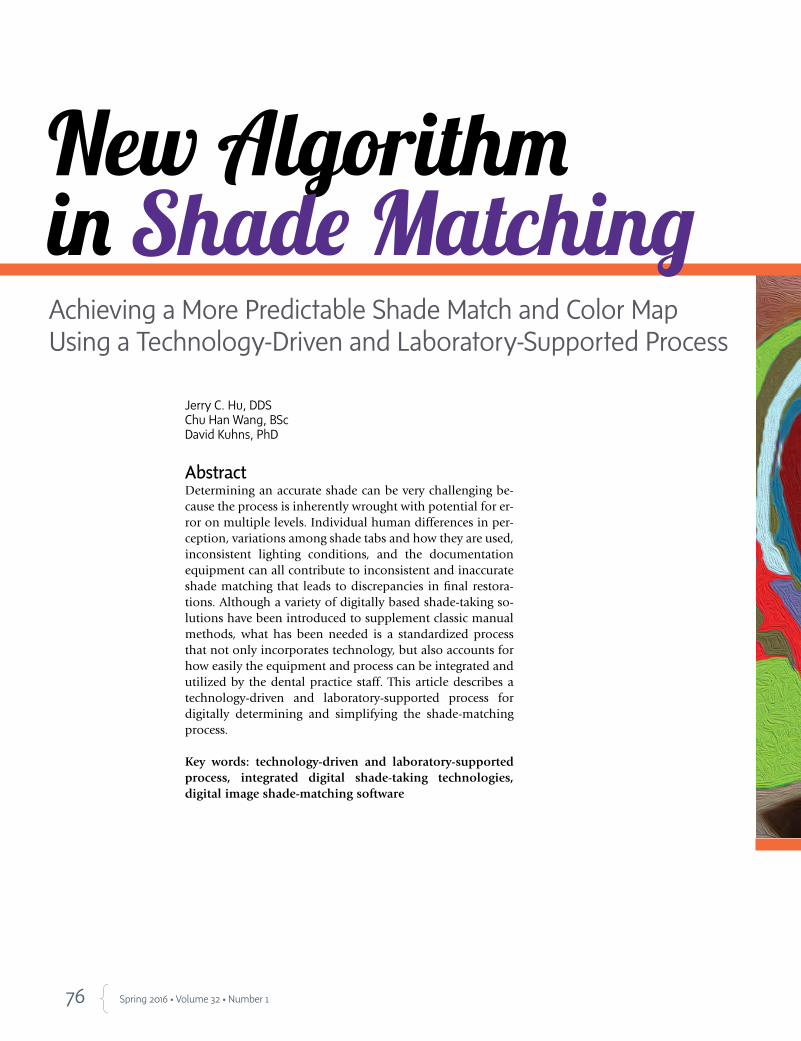
76 Spring 2016 • Volume 32 • Number 1
AbstractDetermining an accurate shade can be very challenging be-cause the process is inherently wrought with potential for er-ror on multiple levels. Individual human differences in per-ception, variations among shade tabs and how they are used, inconsistent lighting conditions, and the documentation equipment can all contribute to inconsistent and inaccurate shade matching that leads to discrepancies in final restora-tions. Although a variety of digitally based shade-taking so-lutions have been introduced to supplement classic manual methods, what has been needed is a standardized process that not only incorporates technology, but also accounts for how easily the equipment and process can be integrated and utilized by the dental practice staff. This article describes a technology-driven and laboratory-supported process for digitally determining and simplifying the shade-matching process.
Key words: technology-driven and laboratory-supported process, integrated digital shade-taking technologies, digital image shade-matching software
Achieving a More Predictable Shade Match and Color Map Using a Technology-Driven and Laboratory-Supported Process
Jerry C. Hu, DDSChu Han Wang, BScDavid Kuhns, PhD
New Algorithm in Shade Matching
77 Journal of Cosmetic Dentistry
Hu/Wang/Kuhns
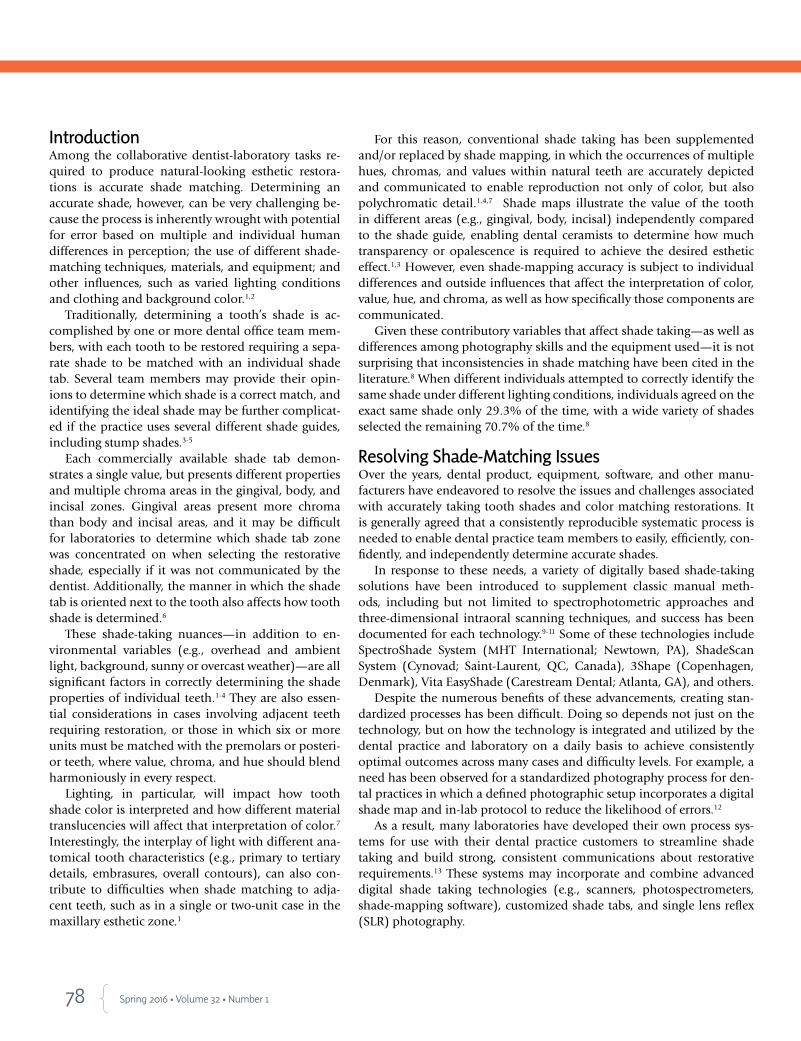
78 Spring 2016 • Volume 32 • Number 1
IntroductionAmong the collaborative dentist-laboratory tasks re-quired to produce natural-looking esthetic restora-tions is accurate shade matching. Determining an accurate shade, however, can be very challenging be-cause the process is inherently wrought with potential for error based on multiple and individual human differences in perception; the use of different shade-matching techniques, materials, and equipment; and other influences, such as varied lighting conditions and clothing and background color.1,2
Traditionally, determining a tooth’s shade is ac-complished by one or more dental office team mem-bers, with each tooth to be restored requiring a sepa-rate shade to be matched with an individual shade tab. Several team members may provide their opin-ions to determine which shade is a correct match, and identifying the ideal shade may be further complicat-ed if the practice uses several different shade guides, including stump shades.3-5
Each commercially available shade tab demon-strates a single value, but presents different properties and multiple chroma areas in the gingival, body, and incisal zones. Gingival areas present more chroma than body and incisal areas, and it may be difficult for laboratories to determine which shade tab zone was concentrated on when selecting the restorative shade, especially if it was not communicated by the dentist. Additionally, the manner in which the shade tab is oriented next to the tooth also affects how tooth shade is determined.6
These shade-taking nuances—in addition to en-vironmental variables (e.g., overhead and ambient light, background, sunny or overcast weather)—are all significant factors in correctly determining the shade properties of individual teeth.1-4 They are also essen-tial considerations in cases involving adjacent teeth requiring restoration, or those in which six or more units must be matched with the premolars or posteri-or teeth, where value, chroma, and hue should blend harmoniously in every respect.
Lighting, in particular, will impact how tooth shade color is interpreted and how different material translucencies will affect that interpretation of color.7 Interestingly, the interplay of light with different ana-tomical tooth characteristics (e.g., primary to tertiary details, embrasures, overall contours), can also con-tribute to difficulties when shade matching to adja-cent teeth, such as in a single or two-unit case in the maxillary esthetic zone.1
For this reason, conventional shade taking has been supplemented and/or replaced by shade mapping, in which the occurrences of multiple hues, chromas, and values within natural teeth are accurately depicted and communicated to enable reproduction not only of color, but also polychromatic detail.1,4,7 Shade maps illustrate the value of the tooth in different areas (e.g., gingival, body, incisal) independently compared to the shade guide, enabling dental ceramists to determine how much transparency or opalescence is required to achieve the desired esthetic effect.1,3 However, even shade-mapping accuracy is subject to individual differences and outside influences that affect the interpretation of color, value, hue, and chroma, as well as how specifically those components are communicated.
Given these contributory variables that affect shade taking—as well as differences among photography skills and the equipment used—it is not surprising that inconsistencies in shade matching have been cited in the literature.8 When different individuals attempted to correctly identify the same shade under different lighting conditions, individuals agreed on the exact same shade only 29.3% of the time, with a wide variety of shades selected the remaining 70.7% of the time.8
Resolving Shade-Matching IssuesOver the years, dental product, equipment, software, and other manu-facturers have endeavored to resolve the issues and challenges associated with accurately taking tooth shades and color matching restorations. It is generally agreed that a consistently reproducible systematic process is needed to enable dental practice team members to easily, efficiently, con-fidently, and independently determine accurate shades.
In response to these needs, a variety of digitally based shade-taking solutions have been introduced to supplement classic manual meth-ods, including but not limited to spectrophotometric approaches and three-dimensional intraoral scanning techniques, and success has been documented for each technology.9-11 Some of these technologies include SpectroShade System (MHT International; Newtown, PA), ShadeScan System (Cynovad; Saint-Laurent, QC, Canada), 3Shape (Copenhagen, Denmark), Vita EasyShade (Carestream Dental; Atlanta, GA), and others.
Despite the numerous benefits of these advancements, creating stan-dardized processes has been difficult. Doing so depends not just on the technology, but on how the technology is integrated and utilized by the dental practice and laboratory on a daily basis to achieve consistently optimal outcomes across many cases and difficulty levels. For example, a need has been observed for a standardized photography process for den-tal practices in which a defined photographic setup incorporates a digital shade map and in-lab protocol to reduce the likelihood of errors.12
As a result, many laboratories have developed their own process sys-tems for use with their dental practice customers to streamline shade taking and build strong, consistent communications about restorative requirements.13 These systems may incorporate and combine advanced digital shade taking technologies (e.g., scanners, photospectrometers, shade-mapping software), customized shade tabs, and single lens reflex (SLR) photography.
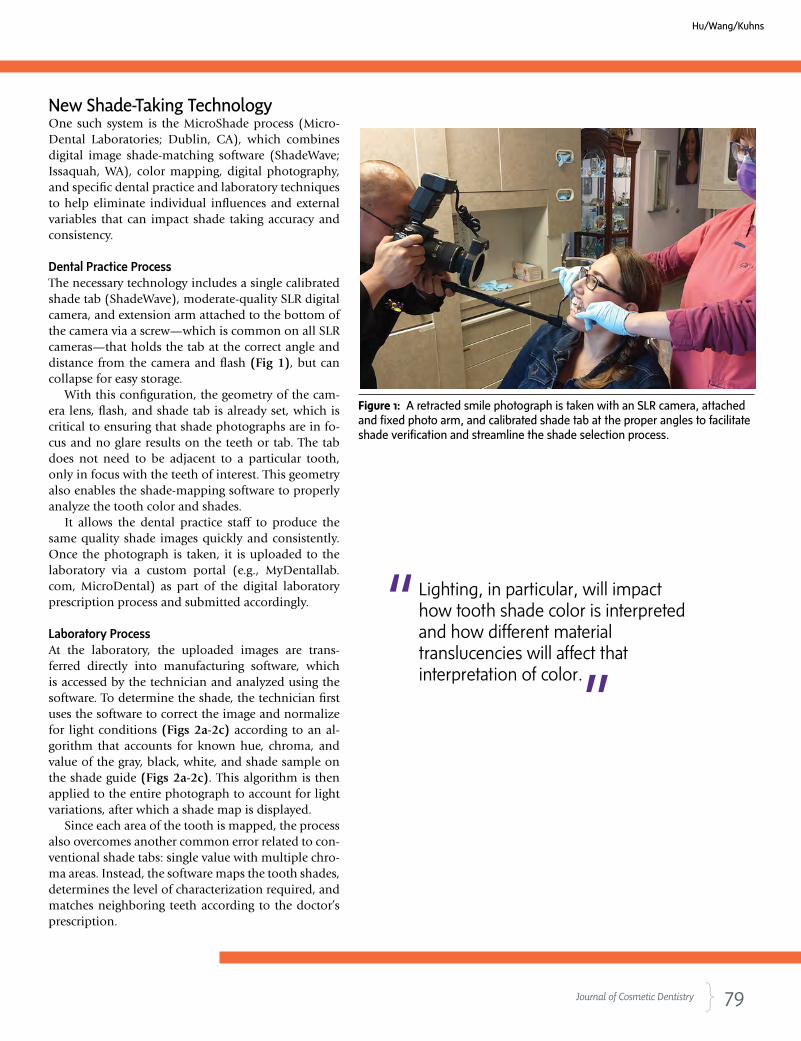
79 Journal of Cosmetic Dentistry
New Shade-Taking TechnologyOne such system is the MicroShade process (Micro-Dental Laboratories; Dublin, CA), which combines digital image shade-matching software (ShadeWave; Issaquah, WA), color mapping, digital photography, and specific dental practice and laboratory techniques to help eliminate individual influences and external variables that can impact shade taking accuracy and consistency.
Dental Practice ProcessThe necessary technology includes a single calibrated shade tab (ShadeWave), moderate-quality SLR digital camera, and extension arm attached to the bottom of the camera via a screw—which is common on all SLR cameras—that holds the tab at the correct angle and distance from the camera and flash (Fig 1), but can collapse for easy storage.
With this configuration, the geometry of the cam-era lens, flash, and shade tab is already set, which is critical to ensuring that shade photographs are in fo-cus and no glare results on the teeth or tab. The tab does not need to be adjacent to a particular tooth, only in focus with the teeth of interest. This geometry also enables the shade-mapping software to properly analyze the tooth color and shades.
It allows the dental practice staff to produce the same quality shade images quickly and consistently. Once the photograph is taken, it is uploaded to the laboratory via a custom portal (e.g., MyDentallab.com, MicroDental) as part of the digital laboratory prescription process and submitted accordingly.
Laboratory ProcessAt the laboratory, the uploaded images are trans-ferred directly into manufacturing software, which is accessed by the technician and analyzed using the software. To determine the shade, the technician first uses the software to correct the image and normalize for light conditions (Figs 2a-2c) according to an al-gorithm that accounts for known hue, chroma, and value of the gray, black, white, and shade sample on the shade guide (Figs 2a-2c). This algorithm is then applied to the entire photograph to account for light variations, after which a shade map is displayed.
Since each area of the tooth is mapped, the process also overcomes another common error related to con-ventional shade tabs: single value with multiple chro-ma areas. Instead, the software maps the tooth shades, determines the level of characterization required, and matches neighboring teeth according to the doctor’s prescription.
Figure 1: A retracted smile photograph is taken with an SLR camera, attached and fixed photo arm, and calibrated shade tab at the proper angles to facilitate shade verification and streamline the shade selection process.
Hu/Wang/Kuhns
Lighting, in particular, will impact how tooth shade color is interpreted and how different material translucencies will affect that interpretation of color.
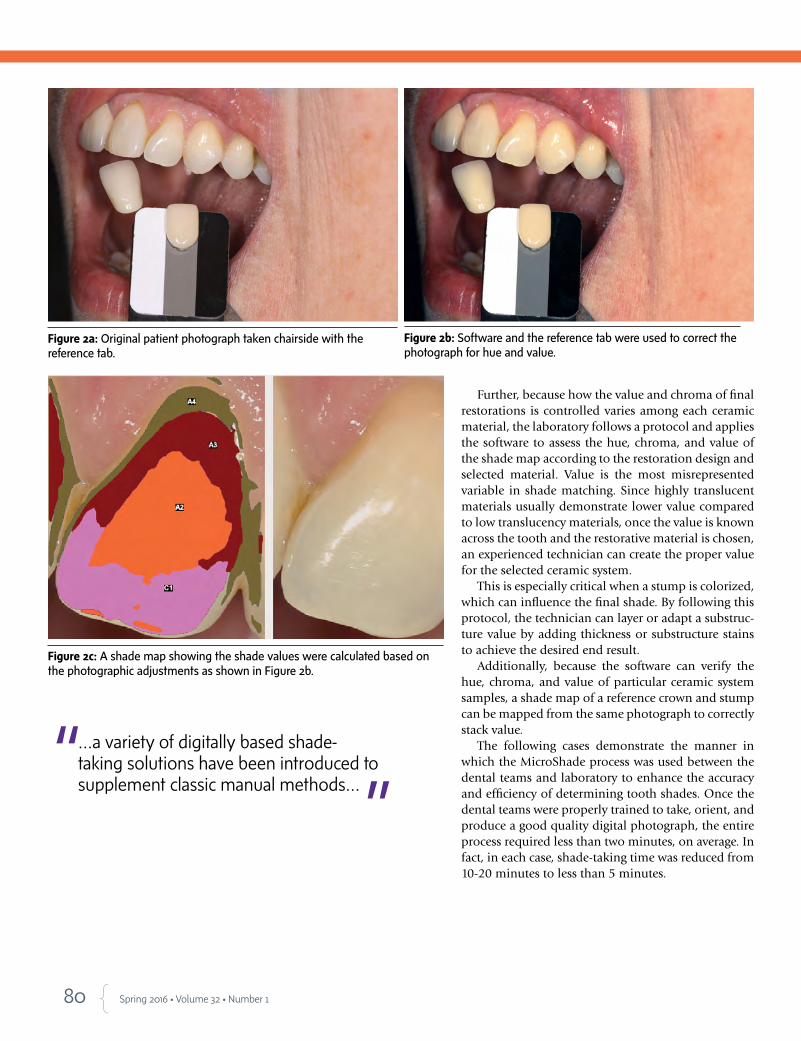
80 Spring 2016 • Volume 32 • Number 1
Further, because how the value and chroma of final restorations is controlled varies among each ceramic material, the laboratory follows a protocol and applies the software to assess the hue, chroma, and value of the shade map according to the restoration design and selected material. Value is the most misrepresented variable in shade matching. Since highly translucent materials usually demonstrate lower value compared to low translucency materials, once the value is known across the tooth and the restorative material is chosen, an experienced technician can create the proper value for the selected ceramic system.
This is especially critical when a stump is colorized, which can influence the final shade. By following this protocol, the technician can layer or adapt a substruc-ture value by adding thickness or substructure stains to achieve the desired end result.
Additionally, because the software can verify the hue, chroma, and value of particular ceramic system samples, a shade map of a reference crown and stump can be mapped from the same photograph to correctly stack value.
The following cases demonstrate the manner in which the MicroShade process was used between the dental teams and laboratory to enhance the accuracy and efficiency of determining tooth shades. Once the dental teams were properly trained to take, orient, and produce a good quality digital photograph, the entire process required less than two minutes, on average. In fact, in each case, shade-taking time was reduced from 10-20 minutes to less than 5 minutes.
Figure 2a: Original patient photograph taken chairside with the reference tab.
Figure 2b: Software and the reference tab were used to correct the photograph for hue and value.
Figure 2c: A shade map showing the shade values were calculated based on the photographic adjustments as shown in Figure 2b.
…a variety of digitally based shade-taking solutions have been introduced to supplement classic manual methods…
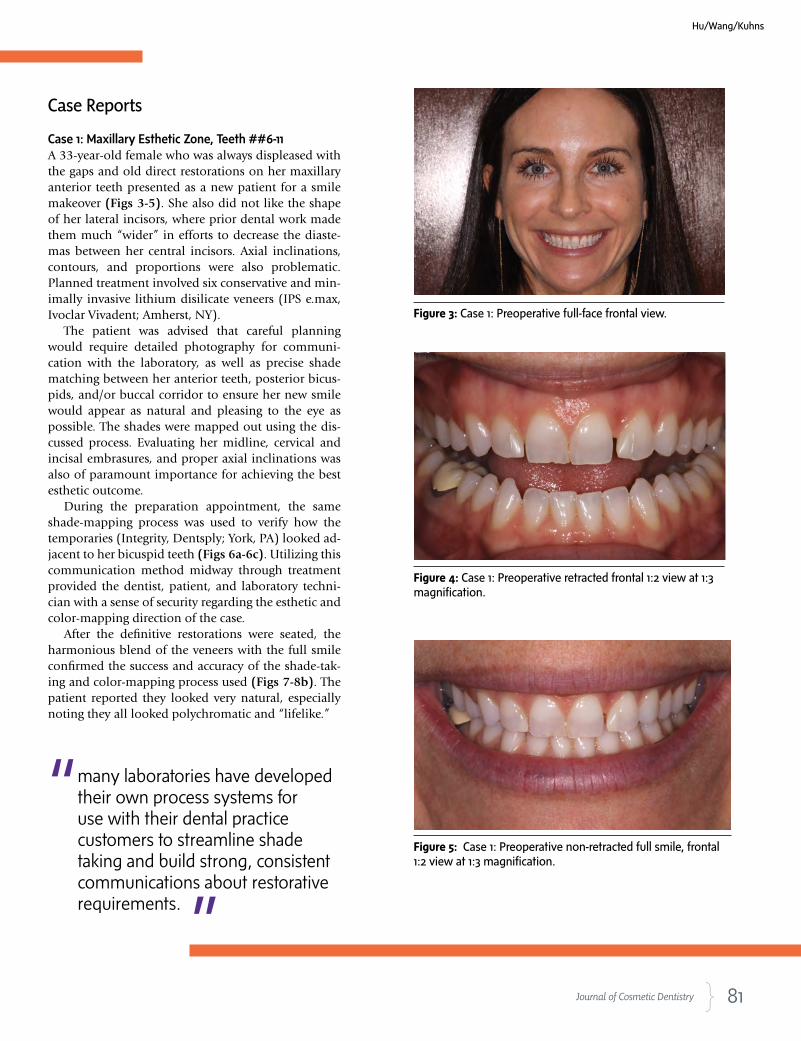
81 Journal of Cosmetic Dentistry
Case Reports
Case 1: Maxillary Esthetic Zone, Teeth ##6-11 A 33-year-old female who was always displeased with the gaps and old direct restorations on her maxillary anterior teeth presented as a new patient for a smile makeover (Figs 3-5). She also did not like the shape of her lateral incisors, where prior dental work made them much “wider” in efforts to decrease the diaste-mas between her central incisors. Axial inclinations, contours, and proportions were also problematic. Planned treatment involved six conservative and min-imally invasive lithium disilicate veneers (IPS e.max, Ivoclar Vivadent; Amherst, NY).
The patient was advised that careful planning would require detailed photography for communi-cation with the laboratory, as well as precise shade matching between her anterior teeth, posterior bicus-pids, and/or buccal corridor to ensure her new smile would appear as natural and pleasing to the eye as possible. The shades were mapped out using the dis-cussed process. Evaluating her midline, cervical and incisal embrasures, and proper axial inclinations was also of paramount importance for achieving the best esthetic outcome.
During the preparation appointment, the same shade-mapping process was used to verify how the temporaries (Integrity, Dentsply; York, PA) looked ad-jacent to her bicuspid teeth (Figs 6a-6c). Utilizing this communication method midway through treatment provided the dentist, patient, and laboratory techni-cian with a sense of security regarding the esthetic and color-mapping direction of the case.
After the definitive restorations were seated, the harmonious blend of the veneers with the full smile confirmed the success and accuracy of the shade-tak-ing and color-mapping process used (Figs 7-8b). The patient reported they looked very natural, especially noting they all looked polychromatic and “lifelike.”
Figure 3: Case 1: Preoperative full-face frontal view.
Figure 4: Case 1: Preoperative retracted frontal 1:2 view at 1:3 magnification.
Figure 5: Case 1: Preoperative non-retracted full smile, frontal 1:2 view at 1:3 magnification.
many laboratories have developed their own process systems for use with their dental practice customers to streamline shade taking and build strong, consistent communications about restorative requirements.
Hu/Wang/Kuhns
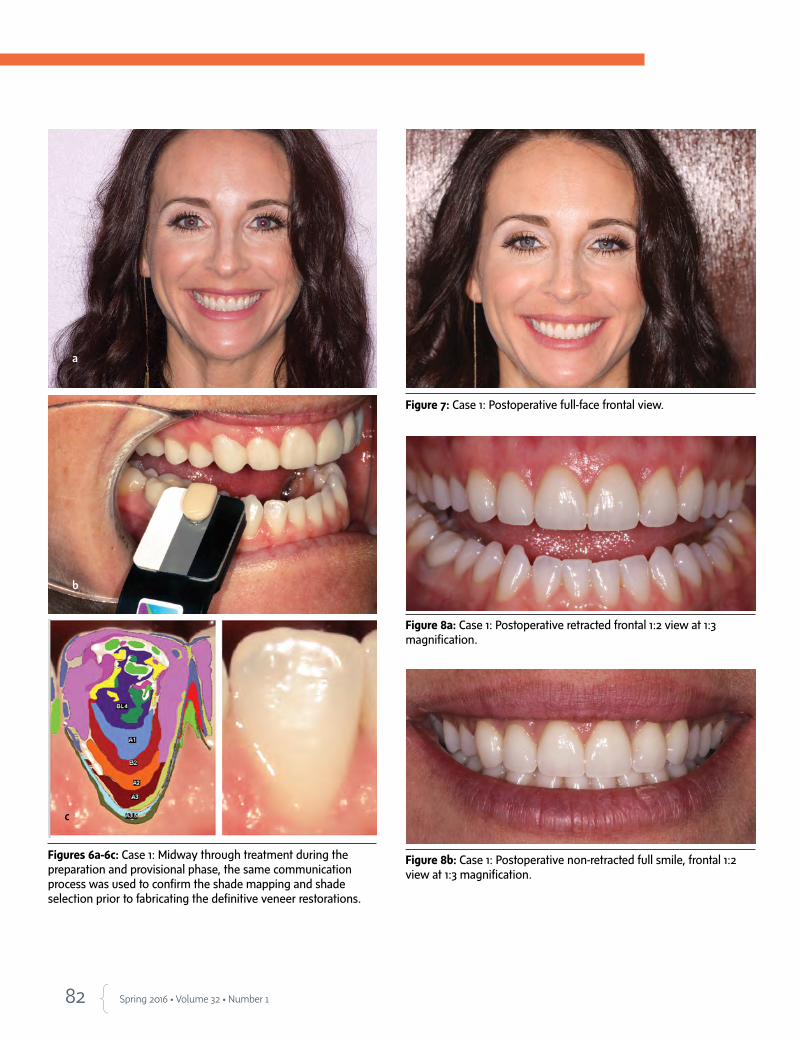
82 Spring 2016 • Volume 32 • Number 1
Figures 6a-6c: Case 1: Midway through treatment during the preparation and provisional phase, the same communication process was used to confirm the shade mapping and shade selection prior to fabricating the definitive veneer restorations.
Figure 8b: Case 1: Postoperative non-retracted full smile, frontal 1:2 view at 1:3 magnification.
Figure 7: Case 1: Postoperative full-face frontal view.
Figure 8a: Case 1: Postoperative retracted frontal 1:2 view at 1:3 magnification.
a
b
c

Exceptional Patient Care Starts in the Waiting Room
Health & Entertainment Television
Try For 30 Days — Risk Free!Sign up at www.DearDoctorTV.com or call 866-821-5458
LIMITED-TIME OFFER ON DEAR DOCTOR TV
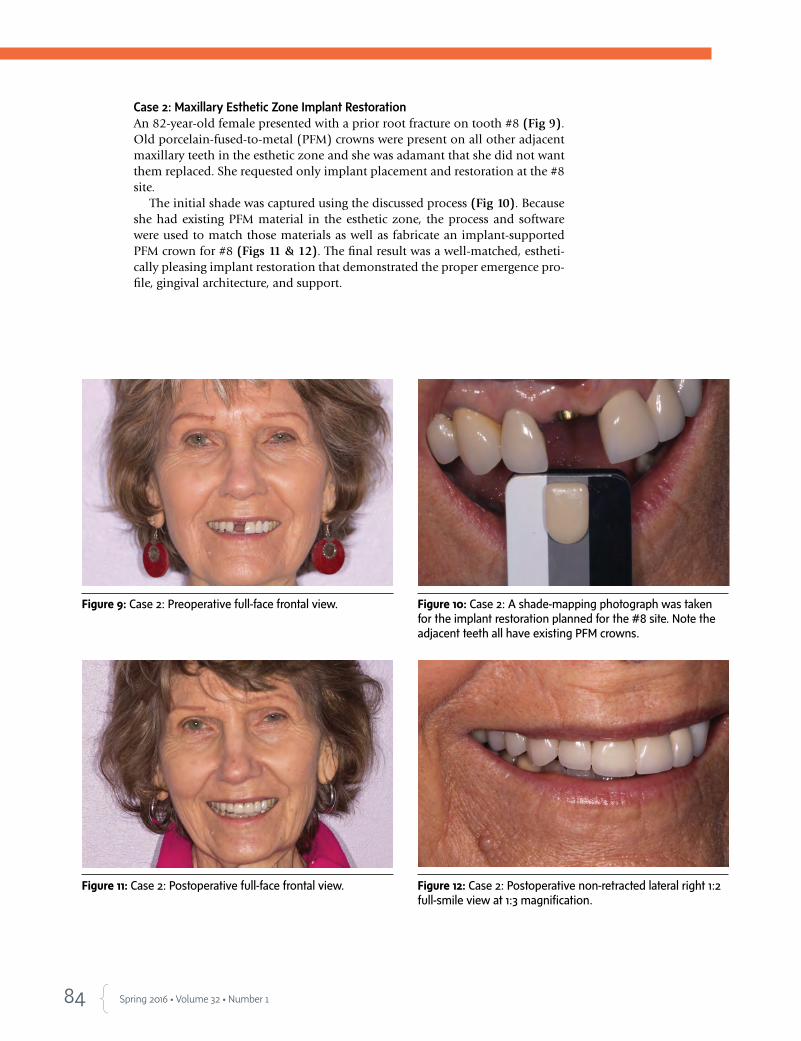
84 Spring 2016 • Volume 32 • Number 1
Case 2: Maxillary Esthetic Zone Implant RestorationAn 82-year-old female presented with a prior root fracture on tooth #8 (Fig 9). Old porcelain-fused-to-metal (PFM) crowns were present on all other adjacent maxillary teeth in the esthetic zone and she was adamant that she did not want them replaced. She requested only implant placement and restoration at the #8 site.
The initial shade was captured using the discussed process (Fig 10). Because she had existing PFM material in the esthetic zone, the process and software were used to match those materials as well as fabricate an implant-supported PFM crown for #8 (Figs 11 & 12). The final result was a well-matched, estheti-cally pleasing implant restoration that demonstrated the proper emergence pro-file, gingival architecture, and support.
Figure 9: Case 2: Preoperative full-face frontal view. Figure 10: Case 2: A shade-mapping photograph was taken for the implant restoration planned for the #8 site. Note the adjacent teeth all have existing PFM crowns.
Figure 11: Case 2: Postoperative full-face frontal view. Figure 12: Case 2: Postoperative non-retracted lateral right 1:2 full-smile view at 1:3 magnification.
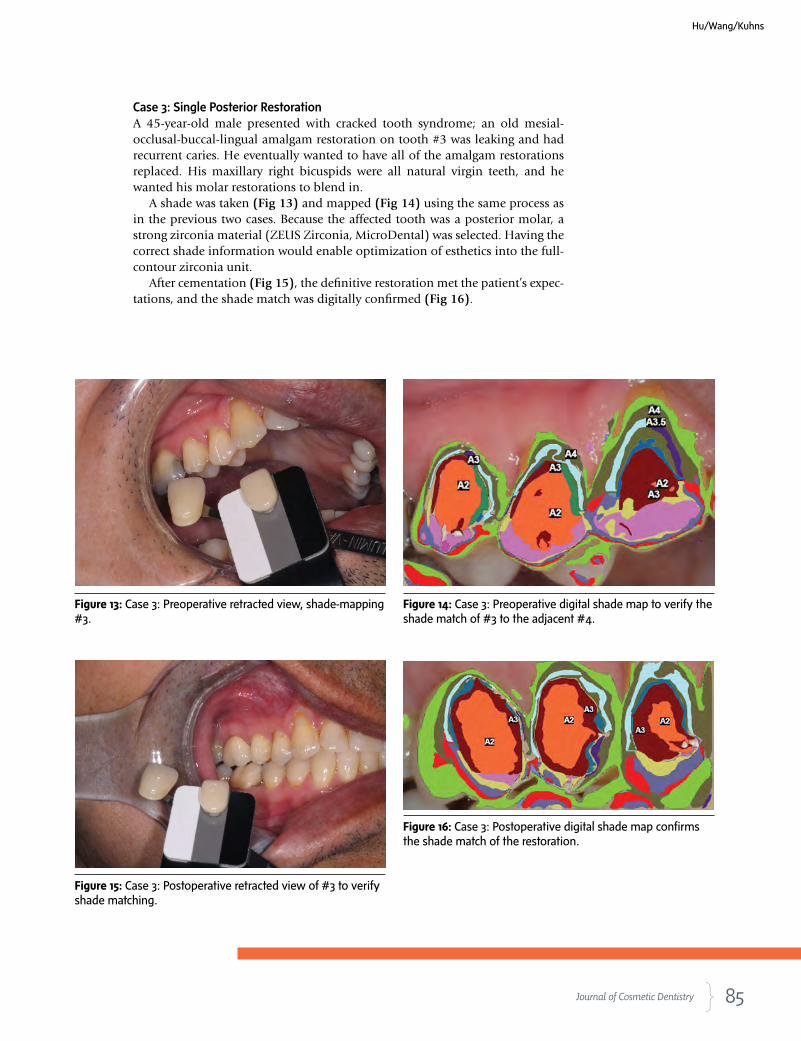
85 Journal of Cosmetic Dentistry
Case 3: Single Posterior Restoration A 45-year-old male presented with cracked tooth syndrome; an old mesial-occlusal-buccal-lingual amalgam restoration on tooth #3 was leaking and had recurrent caries. He eventually wanted to have all of the amalgam restorations replaced. His maxillary right bicuspids were all natural virgin teeth, and he wanted his molar restorations to blend in.
A shade was taken (Fig 13) and mapped (Fig 14) using the same process as in the previous two cases. Because the affected tooth was a posterior molar, a strong zirconia material (ZEUS Zirconia, MicroDental) was selected. Having the correct shade information would enable optimization of esthetics into the full-contour zirconia unit.
After cementation (Fig 15), the definitive restoration met the patient’s expec-tations, and the shade match was digitally confirmed (Fig 16).
Figure 15: Case 3: Postoperative retracted view of #3 to verify shade matching.
Figure 13: Case 3: Preoperative retracted view, shade-mapping #3.
Figure 14: Case 3: Preoperative digital shade map to verify the shade match of #3 to the adjacent #4.
Figure 16: Case 3: Postoperative digital shade map confirms the shade match of the restoration.
Hu/Wang/Kuhns
86 Spring 2016 • Volume 32 • Number 1
SummaryUsing a technology-driven and laboratory-supported process can help to simplify and streamline how den-tal practices obtain and match shades for esthetic res-torations. The systematic approach described in this article can help dental practice staff and the laboratory to determine an accurate shade by removing many of the inherent variables that can lead to errors. The pro-cess and protocol discussed can be easily integrated and represent a reproducible and controlled method for taking shades.
References
1. Volpato CA, Monteiro S Jr, de Andrada MC, Fredel MC, Petter
CO. Optical influence of the type of illuminant, substrates and
thickness of ceramic materials. Dent Mater. 2009 Jan; 25(1):87-
93. Epub 2008 Jul 7.
2. Mayekar SM. Shades of a color. Illusion or reality? Dent Clin
North Am. 2001 Jan;45(1):155-72, vii.
3. Ishikawa-Nagai S, Yoshida A, Sakai M, Kristiansen J, DaSilva JD.
Clinical evaluation of perceptibility of color differences between
natural teeth and all-ceramic crowns. J Dent. 2009; 37 Suppl
1:e57-63. Epub 2009 Apr 18.
4. Joiner A. Tooth colour: a review of the literature. J Dent. 2004;32
Suppl 1:3-12.
5. Haddad HJ, Jakstat HA, Arnetzl G, Borbely J, Vichi A, Dumfahrt
H, et al. Does gender and experience influence shade matching
quality? J Dent. 2009; 37 Suppl 1:e40-4. Epub 2009 May 22.
6. Sing TS. The difficult is beautiful. J Cosmetic Dent. 2015 Win-
ter;30(4):26-36.
7. Sikri VK. Color implications in dentistry. J Conserv Dent. 2010
Oct-Dec;13(4):249-55.
8. King AH. Shade guide lights: technical evaluation. USAF School
of Aerospace Medicine, USAFSAM-TP-88-14, AD-A206 513, p1-9,
December 1988.
9. Lammott LT. Going beyond the patient’s expectations. J Cosmetic
Dent. 2015 Winter;30(4):38-46.
10. Culic B, Prejmerean V, Gasparik C, Culic C, Dragos C, Dudea D.
In vitro evaluation of new dental software for shade matching.
Key Engineering Materials. 2014;587:360-5.
11. Odaira C, Itoh S, Ishibashi K. Clinical evaluation of a dental color analysis system:
the Crystaleye Spectrophotometer. J Prosthodont Res. 2011 Oct;55(4):199-205.
12. Devigus A. A picture is worth. J Cosmetic Dent. 2012 Spring;28(1):82-8.
13. Griffin JD. How to build a great relationship with the laboratory technician: sim-
plified and effective laboratory communications. Contemp Esthet. 2006:10(7):26-
34. jCD
Using a technology-driven and laboratory-supported process can help to simplify and streamline how dental practices obtain and match shades for esthetic restorations.
Dr. Hu maintains private practices in Anchorage and Soldotna, Alaska.
Ms. Wang is an intern at Dr. Hu’s practices.
Dr. Kuhns holds a PhD in analytical chemistry from the University of Washington.
Disclosure: Dr. Kuhns is the senior director of product development and technical sales at MicroDental Laboratories, where the MicroShade process was developed.
VISIT COSMEDENT.COM to watch a technique demonstration of our new All Ceramic Polishers.
Our revolutionary new product
ALL CERAMICPOLISHERS
It’s the system everyone has been looking for...
We can help you succeed
CALL US TODAY FOR MORE INFORMATION. (800) 621-6729 WWW.COSMEDENT.COM
Creates an incredible polish in seconds on all ceramics
1 kit will polish all your ceramics
Brings the translucence and color out of your ceramic, unlike the flat
finish of a glaze
Available in both Intra-oral and Extra-oral Kits
Includes grinders and polishers
Makes it easy to polish Zirconia and e.max
For use on Zirconia, e.max, and other lithium disilicates, feldpathics porcelain
and all milled CAD/CAM Ceramics
88 Spring 2016 • Volume 32 • Number 1
Abstract Dentition that is worn from attrition or erosion presents many chal-lenges. A comprehensive extraoral and intraoral examination should be performed to collect necessary data to create a treatment plan. This ar-ticle covers key intraoral parameters when dealing with these complex cases. The case discussed illustrates an interdisciplinary plan to serve the patient’s needs and expectations, and provide biological and functional support for the final restorations.
Key Words: worn dentition, orthodontics, crowns, veneers, onlays
Dr. Gerard Chiche will present “Esthetic Full-Mouth Rehabilitation” on Saturday, April 30, at AACD 2016 Toronto. In this course, he will outline the management of risk factors in a step-by-step method to maximize long-term success of complete rehabilitation, as was done for the complex case discussed in this article.
Key Factors in Treatment Planning for Complex CasesOrthodontics as a Tool to Manage Severely Worn Dentitions
Alvaro Blasi, DDS, CDTGerard J. Chiche, DDSAram Torosian, MDC, CDTSomkiat Aimplee, DDS, MScJimmy Londono, DDSSergio R. Arias, DDS, MS
The dental treatment of adult patients with high esthetic expectations can represent a challenge when they present with worn dentition from attritio
n or erosion.
89 Journal of Cosmetic Dentistry
Blasi/Chiche/Torosian/Aimplee/Londono/Arias
The dental treatment of adult patients with high esthetic expectations can represent a challenge when they present with worn dentition from attritio
n or erosion.
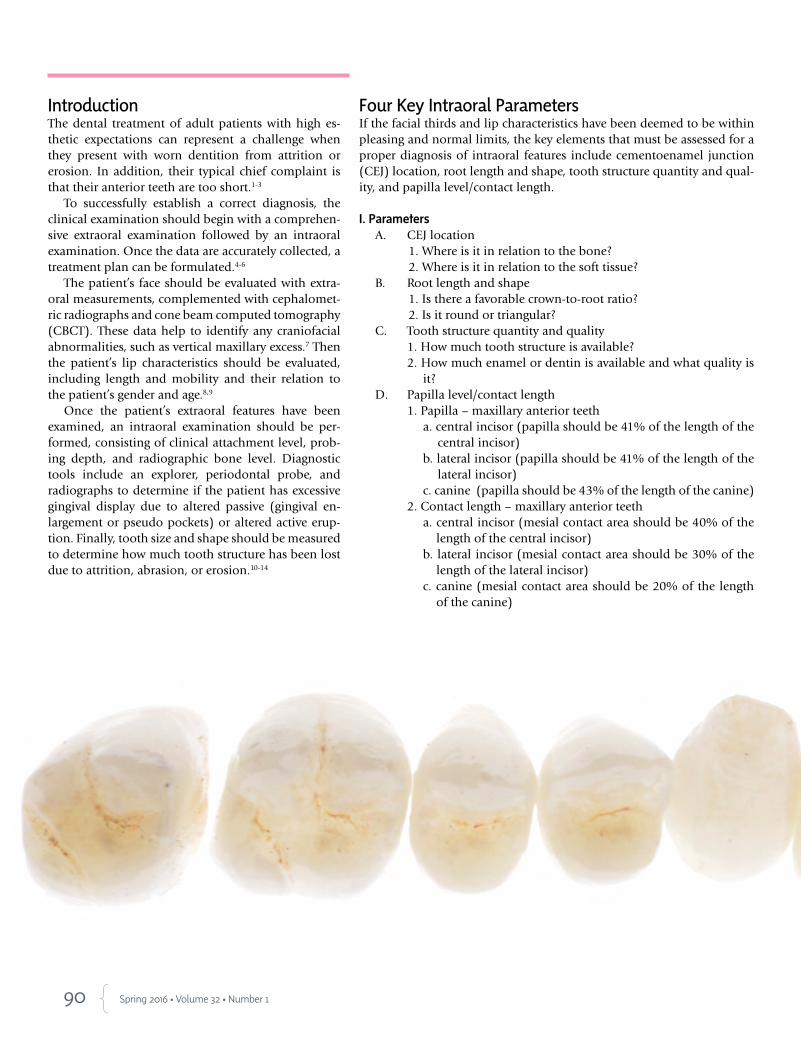
90 Spring 2016 • Volume 32 • Number 1
IntroductionThe dental treatment of adult patients with high es-thetic expectations can represent a challenge when they present with worn dentition from attrition or erosion. In addition, their typical chief complaint is that their anterior teeth are too short.1-3
To successfully establish a correct diagnosis, the clinical examination should begin with a comprehen-sive extraoral examination followed by an intraoral examination. Once the data are accurately collected, a treatment plan can be formulated.4-6
The patient’s face should be evaluated with extra-oral measurements, complemented with cephalomet-ric radiographs and cone beam computed tomography (CBCT). These data help to identify any craniofacial abnormalities, such as vertical maxillary excess.7 Then the patient’s lip characteristics should be evaluated, including length and mobility and their relation to the patient’s gender and age.8,9
Once the patient’s extraoral features have been examined, an intraoral examination should be per-formed, consisting of clinical attachment level, prob-ing depth, and radiographic bone level. Diagnostic tools include an explorer, periodontal probe, and radiographs to determine if the patient has excessive gingival display due to altered passive (gingival en-largement or pseudo pockets) or altered active erup-tion. Finally, tooth size and shape should be measured to determine how much tooth structure has been lost due to attrition, abrasion, or erosion.10-14
Four Key Intraoral ParametersIf the facial thirds and lip characteristics have been deemed to be within pleasing and normal limits, the key elements that must be assessed for a proper diagnosis of intraoral features include cementoenamel junction (CEJ) location, root length and shape, tooth structure quantity and qual-ity, and papilla level/contact length.
I. ParametersA. CEJ location
1. Where is it in relation to the bone?2. Where is it in relation to the soft tissue?
B. Root length and shape1. Is there a favorable crown-to-root ratio?2. Is it round or triangular?
C. Tooth structure quantity and quality1. How much tooth structure is available?2. How much enamel or dentin is available and what quality is
it?D. Papilla level/contact length
1. Papilla – maxillary anterior teeth a. central incisor (papilla should be 41% of the length of the
central incisor)b. lateral incisor (papilla should be 41% of the length of the
lateral incisor)c. canine (papilla should be 43% of the length of the canine)
2. Contact length – maxillary anterior teeth a. central incisor (mesial contact area should be 40% of the
length of the central incisor)b. lateral incisor (mesial contact area should be 30% of the
length of the lateral incisor)c. canine (mesial contact area should be 20% of the length
of the canine)
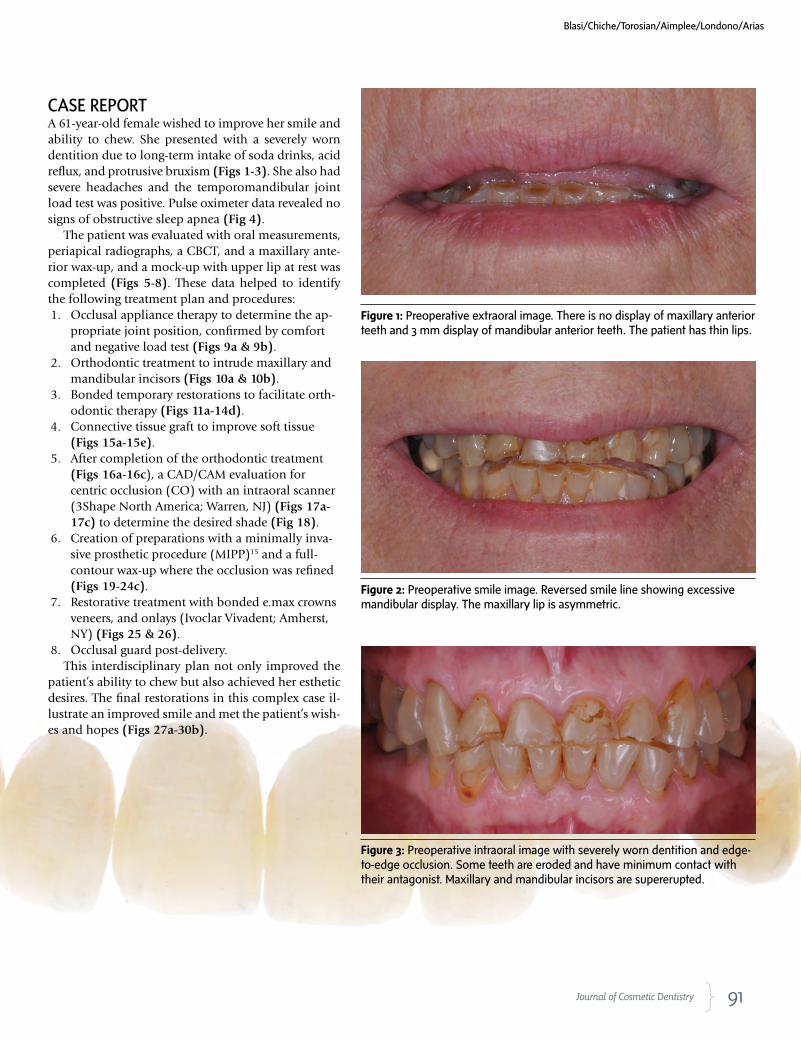
91 Journal of Cosmetic Dentistry
CASE REPORTA 61-year-old female wished to improve her smile and ability to chew. She presented with a severely worn dentition due to long-term intake of soda drinks, acid reflux, and protrusive bruxism (Figs 1-3). She also had severe headaches and the temporomandibular joint load test was positive. Pulse oximeter data revealed no signs of obstructive sleep apnea (Fig 4).
The patient was evaluated with oral measurements, periapical radiographs, a CBCT, and a maxillary ante-rior wax-up, and a mock-up with upper lip at rest was completed (Figs 5-8). These data helped to identify the following treatment plan and procedures:1. Occlusal appliance therapy to determine the ap-
propriate joint position, confirmed by comfort and negative load test (Figs 9a & 9b).
2. Orthodontic treatment to intrude maxillary and mandibular incisors (Figs 10a & 10b).
3. Bonded temporary restorations to facilitate orth-odontic therapy (Figs 11a-14d).
4. Connective tissue graft to improve soft tissue (Figs 15a-15e).
5. After completion of the orthodontic treatment (Figs 16a-16c), a CAD/CAM evaluation for centric occlusion (CO) with an intraoral scanner (3Shape North America; Warren, NJ) (Figs 17a-17c) to determine the desired shade (Fig 18).
6. Creation of preparations with a minimally inva-sive prosthetic procedure (MIPP)15 and a full-contour wax-up where the occlusion was refined (Figs 19-24c).
7. Restorative treatment with bonded e.max crowns veneers, and onlays (Ivoclar Vivadent; Amherst, NY) (Figs 25 & 26).
8. Occlusal guard post-delivery.This interdisciplinary plan not only improved the
patient’s ability to chew but also achieved her esthetic desires. The final restorations in this complex case il-lustrate an improved smile and met the patient’s wish-es and hopes (Figs 27a-30b).
Figure 1: Preoperative extraoral image. There is no display of maxillary anterior teeth and 3 mm display of mandibular anterior teeth. The patient has thin lips.
Figure 2: Preoperative smile image. Reversed smile line showing excessive mandibular display. The maxillary lip is asymmetric.
Figure 3: Preoperative intraoral image with severely worn dentition and edge-to-edge occlusion. Some teeth are eroded and have minimum contact with their antagonist. Maxillary and mandibular incisors are supererupted.
Blasi/Chiche/Torosian/Aimplee/Londono/Arias
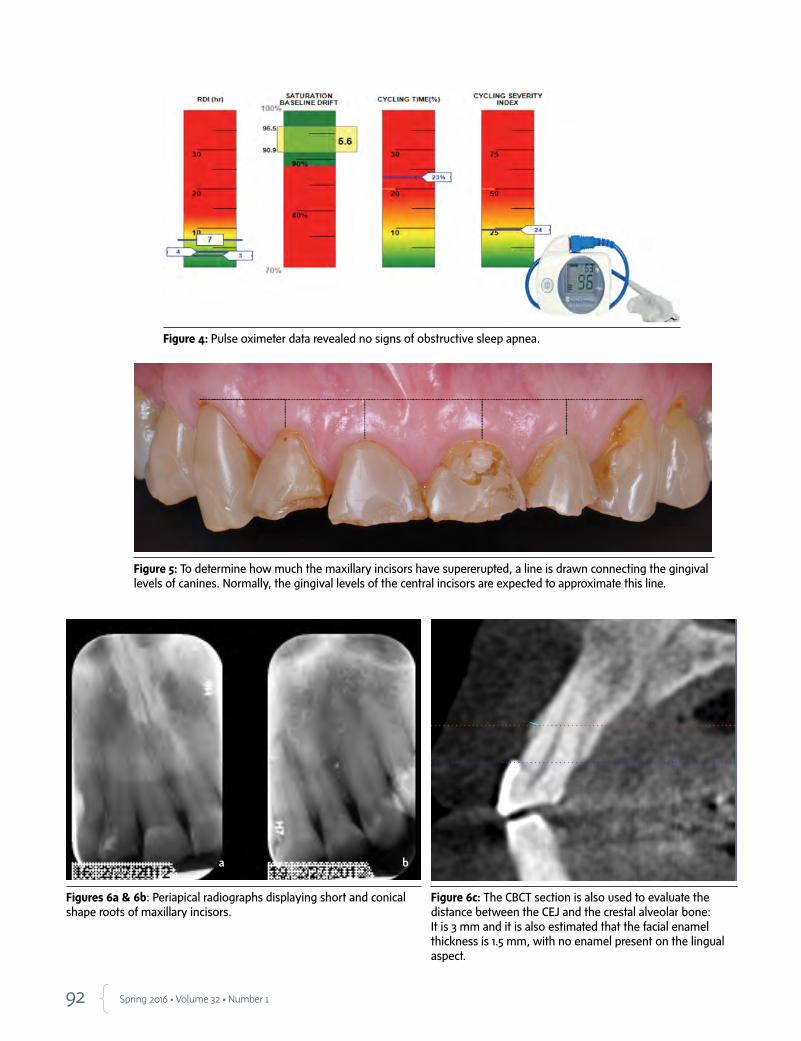
92 Spring 2016 • Volume 32 • Number 1
Figure 4: Pulse oximeter data revealed no signs of obstructive sleep apnea.
Figure 5: To determine how much the maxillary incisors have supererupted, a line is drawn connecting the gingival levels of canines. Normally, the gingival levels of the central incisors are expected to approximate this line.
Figures 6a & 6b: Periapical radiographs displaying short and conical shape roots of maxillary incisors.
Figure 6c: The CBCT section is also used to evaluate the distance between the CEJ and the crestal alveolar bone: It is 3 mm and it is also estimated that the facial enamel thickness is 1.5 mm, with no enamel present on the lingual aspect.
a b

93 Journal of Cosmetic Dentistry
Blasi/Chiche/Torosian/Aimplee/Londono/Arias
Figure 7: Maxillary anterior wax-up based on ideal tooth proportions and lingual ramp design; due to the severely worn dentition and its compensatory eruption, this lingual ramp design is critical for occlusal stability and prevention of orthodontic relapse.
Figure 8: Evaluation of mock-up with the upper lip at rest. During this mock-up stage, “F” and “V” sounds should be evaluated. The maxillary incisal edge is esthetically pleasing and the mandibular incisal edge level was deemed satisfactory. To avoid incisal tooth reduction, it was decided that the mandibular incisors would be intruded 1.5 mm.
Figures 9a & 9b: Occlusal device fabricated to determine the optimum joint position. Since the patient displayed a positive load test, the mandible was repositioned anteriorly to a comfortable position. The TMJs were evaluated at regular intervals for six months until a final pain-free position was determined for the final reconstruction.
The patient’s face should be evaluated with extraoral measurements, complemented with cephalometric radiographs and cone beam computed tomography.
a
b
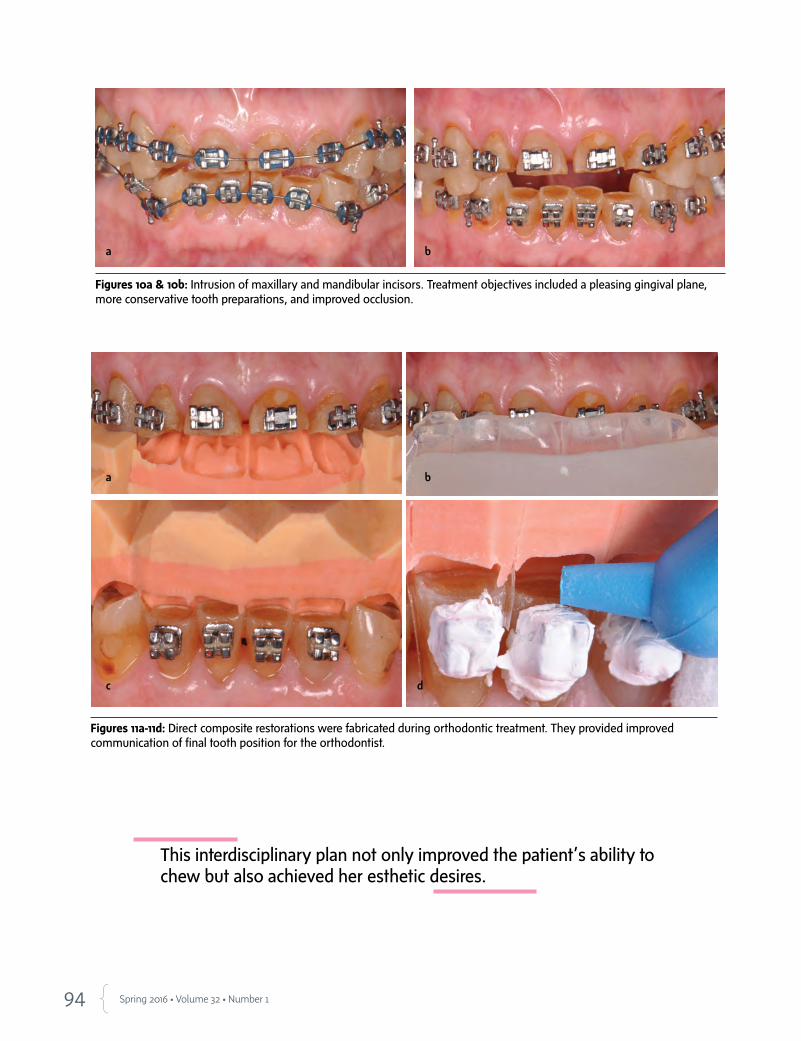
94 Spring 2016 • Volume 32 • Number 1
Figures 10a & 10b: Intrusion of maxillary and mandibular incisors. Treatment objectives included a pleasing gingival plane, more conservative tooth preparations, and improved occlusion.
Figures 11a-11d: Direct composite restorations were fabricated during orthodontic treatment. They provided improved communication of final tooth position for the orthodontist.
This interdisciplinary plan not only improved the patient’s ability to chew but also achieved her esthetic desires.
ba
a b
dc
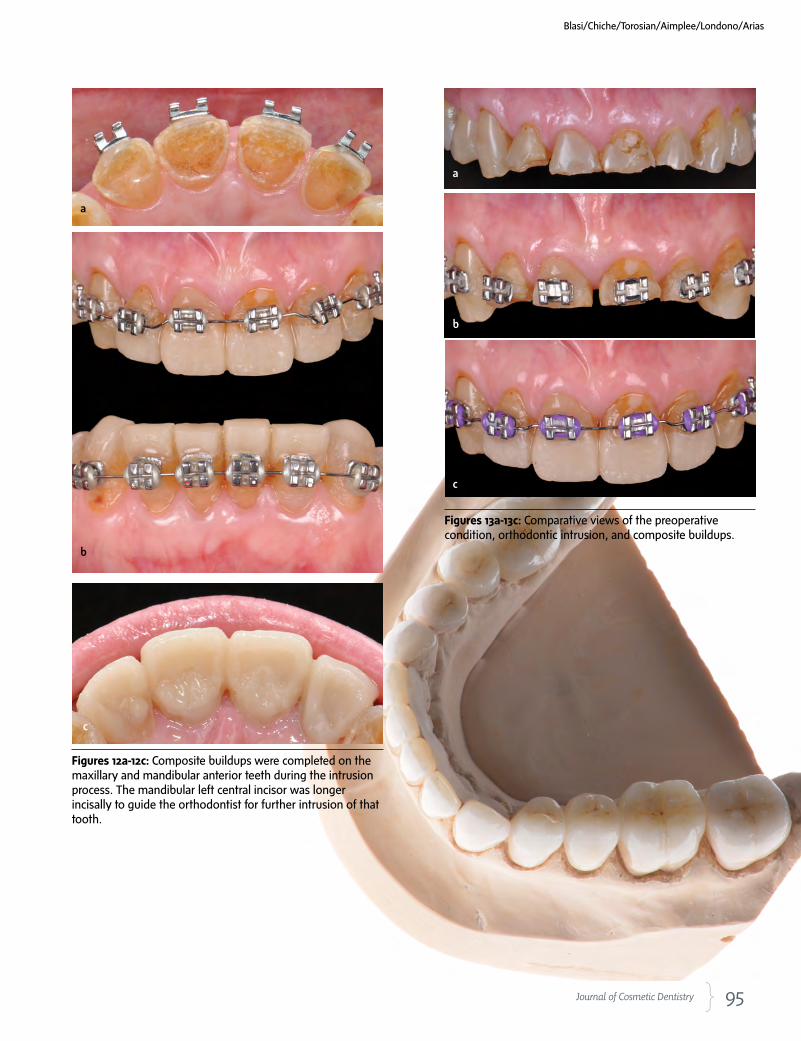
95 Journal of Cosmetic Dentistry
Figures 12a-12c: Composite buildups were completed on the maxillary and mandibular anterior teeth during the intrusion process. The mandibular left central incisor was longer incisally to guide the orthodontist for further intrusion of that tooth.
Figures 13a-13c: Comparative views of the preoperative condition, orthodontic intrusion, and composite buildups.
Blasi/Chiche/Torosian/Aimplee/Londono/Arias
c
b
a
a
b
c

96 Spring 2016 • Volume 32 • Number 1
Figures 14a-14d: Posterior indirect composites were bonded individually.
a
b
c d
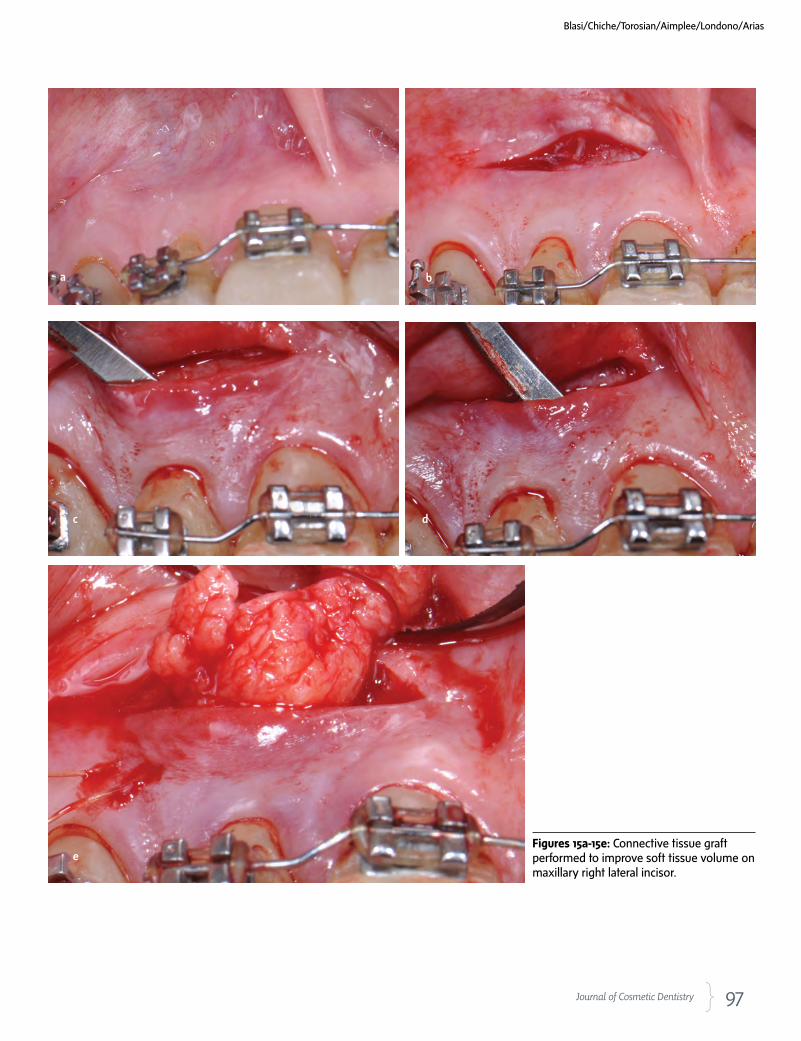
97 Journal of Cosmetic Dentistry
Figures 15a-15e: Connective tissue graft performed to improve soft tissue volume on maxillary right lateral incisor.
Blasi/Chiche/Torosian/Aimplee/Londono/Arias
a b
c d
e
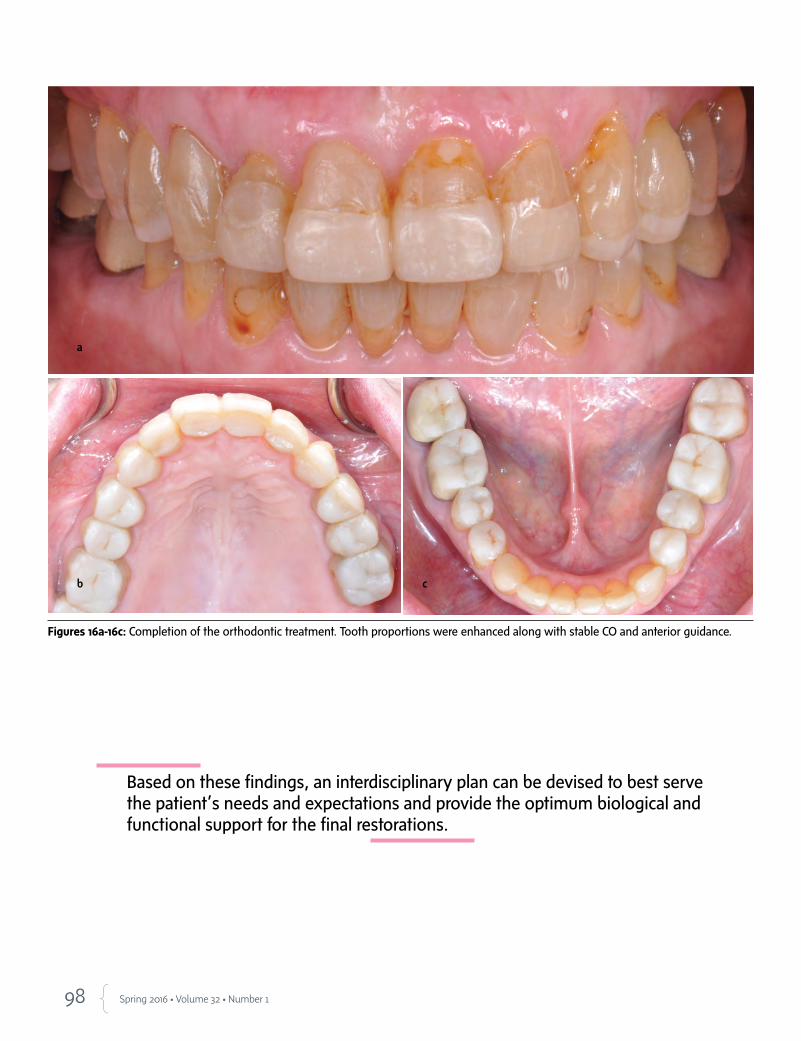
98 Spring 2016 • Volume 32 • Number 1
Figures 16a-16c: Completion of the orthodontic treatment. Tooth proportions were enhanced along with stable CO and anterior guidance.
Based on these findings, an interdisciplinary plan can be devised to best serve the patient’s needs and expectations and provide the optimum biological and functional support for the final restorations.
a
b c
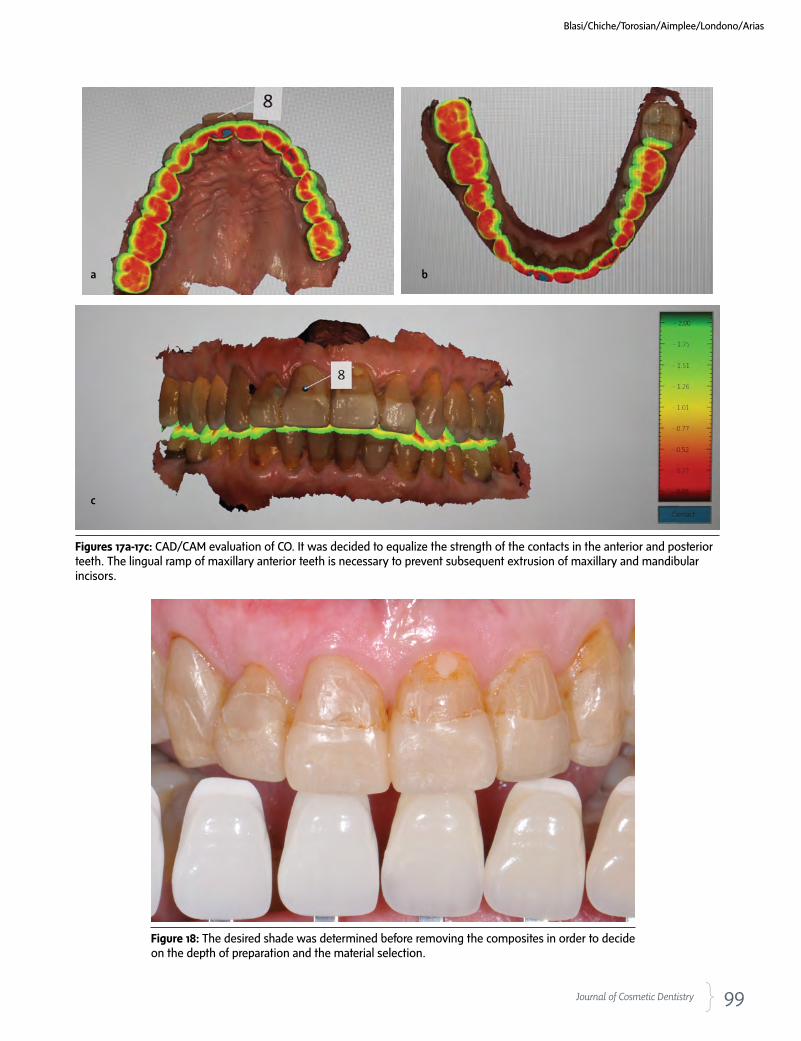
99 Journal of Cosmetic Dentistry
Figures 17a-17c: CAD/CAM evaluation of CO. It was decided to equalize the strength of the contacts in the anterior and posterior teeth. The lingual ramp of maxillary anterior teeth is necessary to prevent subsequent extrusion of maxillary and mandibular incisors.
Figure 18: The desired shade was determined before removing the composites in order to decide on the depth of preparation and the material selection.
Blasi/Chiche/Torosian/Aimplee/Londono/Arias
a b
c
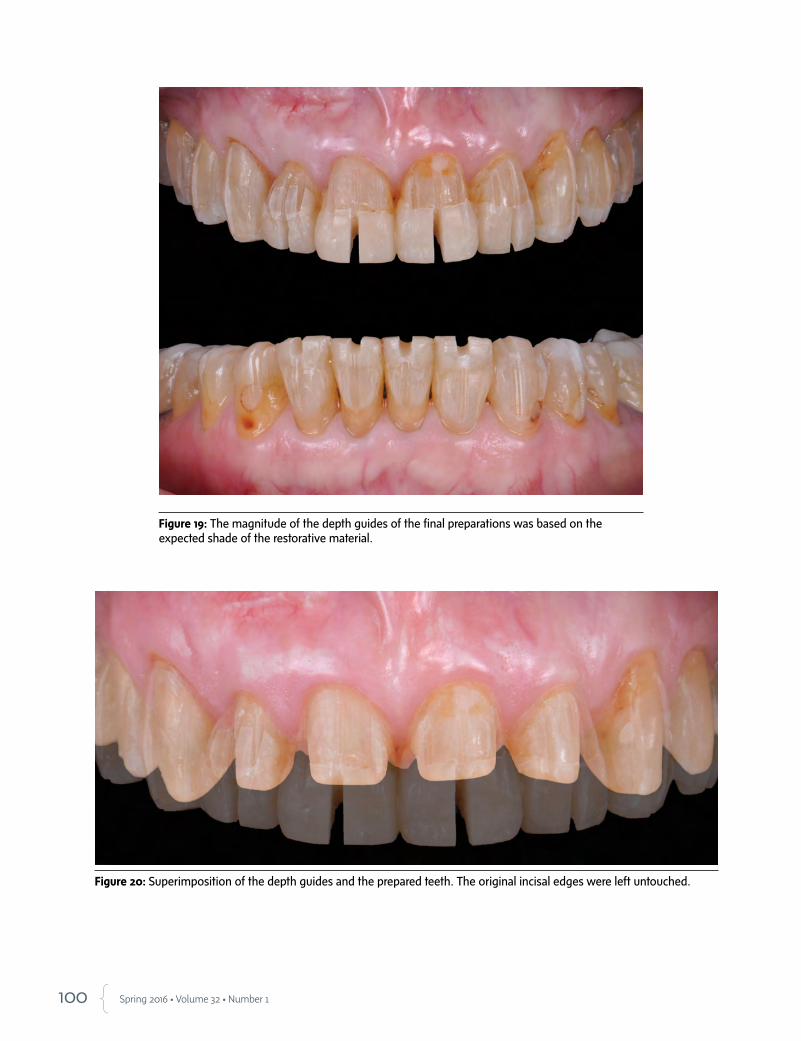
100 Spring 2016 • Volume 32 • Number 1
Figure 19: The magnitude of the depth guides of the final preparations was based on the expected shade of the restorative material.
Figure 20: Superimposition of the depth guides and the prepared teeth. The original incisal edges were left untouched.
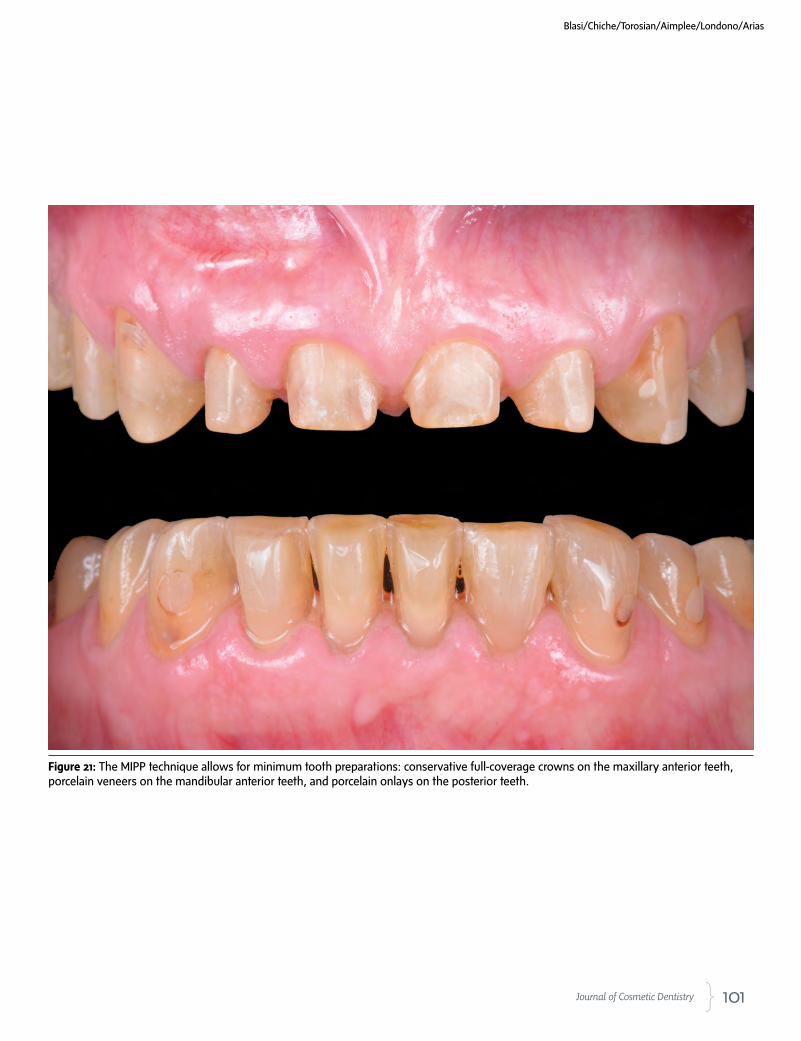
101 Journal of Cosmetic Dentistry
Figure 21: The MIPP technique allows for minimum tooth preparations: conservative full-coverage crowns on the maxillary anterior teeth, porcelain veneers on the mandibular anterior teeth, and porcelain onlays on the posterior teeth.
Blasi/Chiche/Torosian/Aimplee/Londono/Arias
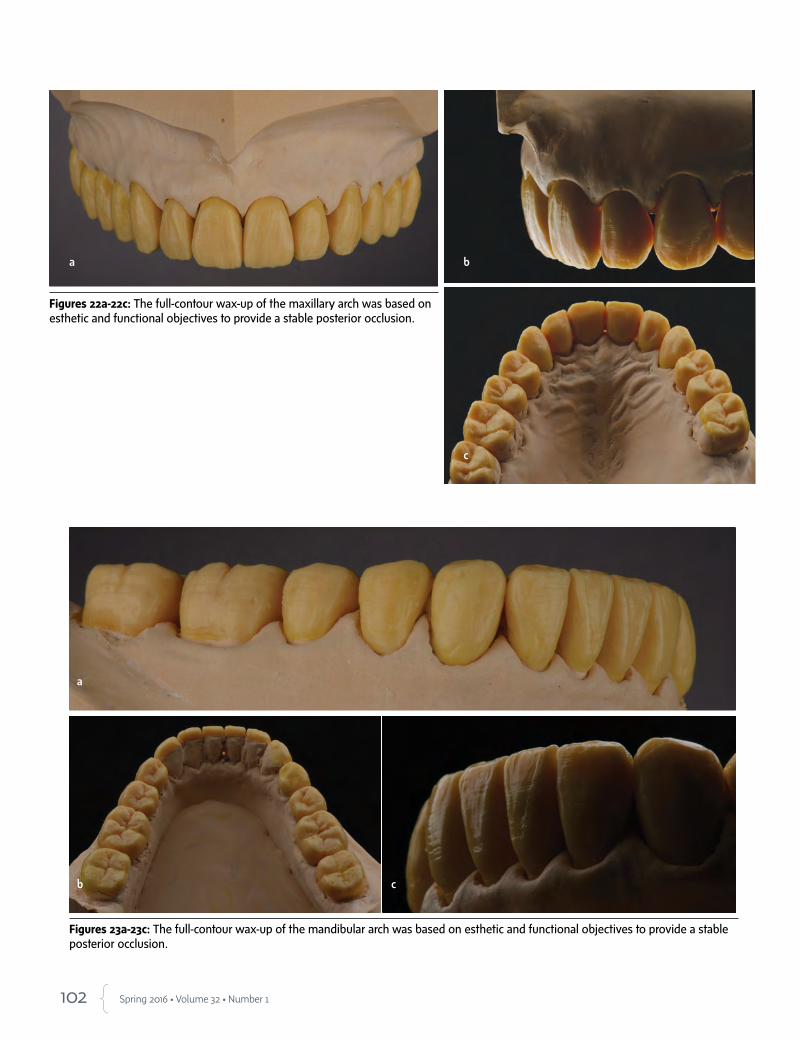
102 Spring 2016 • Volume 32 • Number 1
Figures 22a-22c: The full-contour wax-up of the maxillary arch was based on esthetic and functional objectives to provide a stable posterior occlusion.
Figures 23a-23c: The full-contour wax-up of the mandibular arch was based on esthetic and functional objectives to provide a stable posterior occlusion.
a b
c
a
b c

103 Journal of Cosmetic Dentistry
Figures 24a-24c: The occlusion was refined in the wax stage before processing the pressed restorations.
Figure 25: Posterior onlays allow for conservative tooth preparation.
Blasi/Chiche/Torosian/Aimplee/Londono/Arias
a b
c

104 Spring 2016 • Volume 32 • Number 1
Figure 26: Final intraoral image with lithium disilicate crowns pressed and stained. Shade A3 was selected by the patient to maximize a natural appearance.
Figures 27a & 27b: Preoperative and postoperative images of the challenging worn dentition case.
Figures 28a & 28b: Preoperative and postoperative evaluation of the restorative maxillary treatment addressing the patient's concerns.
a b
a b
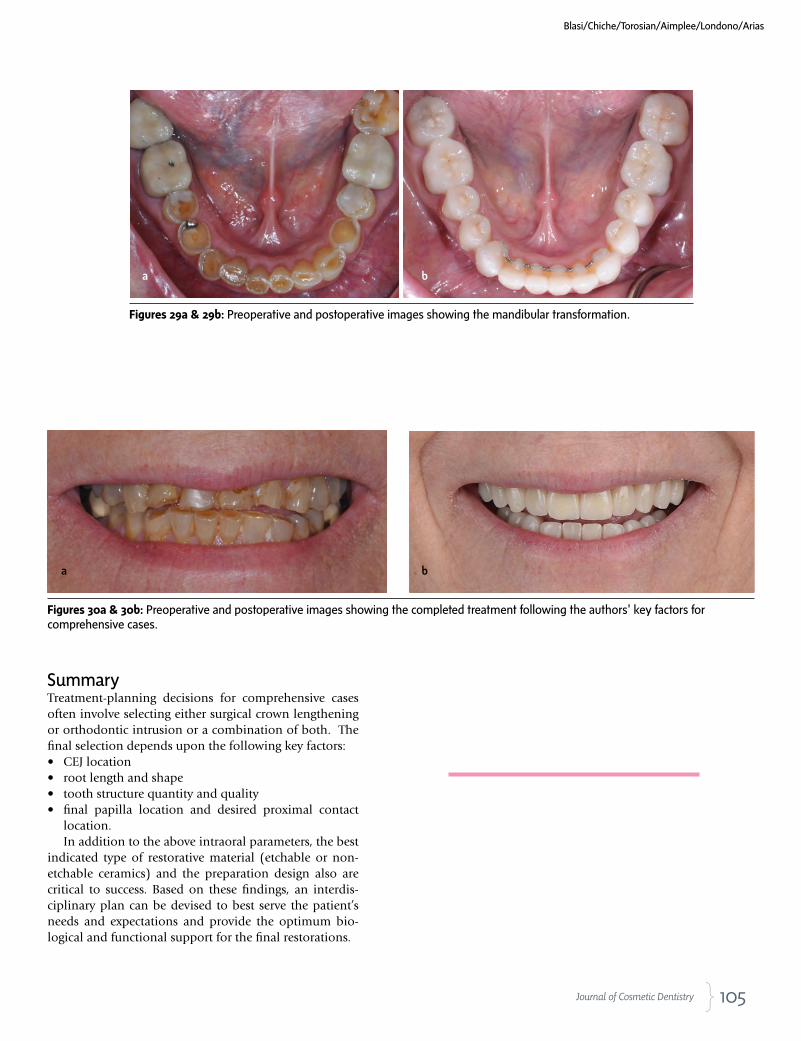
105 Journal of Cosmetic Dentistry
Figures 29a & 29b: Preoperative and postoperative images showing the mandibular transformation.
Figures 30a & 30b: Preoperative and postoperative images showing the completed treatment following the authors' key factors for comprehensive cases.
SummaryTreatment-planning decisions for comprehensive cases often involve selecting either surgical crown lengthening or orthodontic intrusion or a combination of both. The final selection depends upon the following key factors: • CEJ location• root length and shape• tooth structure quantity and quality• final papilla location and desired proximal contact
location.In addition to the above intraoral parameters, the best
indicated type of restorative material (etchable or non-etchable ceramics) and the preparation design also are critical to success. Based on these findings, an interdis-ciplinary plan can be devised to best serve the patient’s needs and expectations and provide the optimum bio-logical and functional support for the final restorations.
Blasi/Chiche/Torosian/Aimplee/Londono/Arias
a b
a b
106 Spring 2016 • Volume 32 • Number 1
Acknowledgements
The authors thank Dr. Eladio DeLeon (Augusta, GA) for the orthodon-tics treatment performed on the case discussed in this article, and Dr. Jae Seon Kim (Bellevue, WA), for his general guidance on this case.
References
1. Chiche GJ, Pinault A. Esthetics of anterior fixed prosthodontics. Quintessence
Pub.; 1994.
2. Aimplee S, Arias S, Kim JS, Torosian A, Blasi A, Chiche G. Pursuing conserva-
tive esthetics. An interdisciplinary treatment approach for minimally prepared
porcelain laminate veneers. J Cosmetic Dent. 2015 Fall;31(3):52-62.
3. Chu SJ, Karabin S, Mistry S. Short tooth syndrome: diagnosis, etiology and
treatment Management. J Calif Dent Assoc. 2004 Feb;32(2):143-52.
4. Kois DE, Kois JC. Comprehensive risk-based diagnostically driven treatment
planning: developing sequentially generated treatment. Dent Clin North Am.
2015 Jul;59(3):593-608.
5. Coslet JG, Vandarsall R, Weisgold A. Diagnosis and classification of delayed
passive eruption of the dentogingival junction in the adult. Alpha Omegan.
1977 Dec;70(3):24-8.
6. Spear FM, Kokich VG, Mathews DP. Interdisciplinary management of anterior
dental esthetics. J Am Dent Assoc. 2006 Feb;137(2):160-9.
7. Vanarsdall RL, Blasi I, Secchi AG. Periodontal-orthodontic interrelationships.
In: Graber TM, Vanarsdall RL, Vig KWL, Huang GJ, editors. Orthodontics: cur-
rent principles and techniques. 6th ed. St. Louis: Mosby. Forthcoming 2016.
8. Vig RG Brundo GC. The kinetics of anterior tooth display. J Prosthet Dent. 1978
May;39(5):502-4.
9. Tjan AH, Miller GD, The JG. Some esthetic factors in a smile. J Prosthet Dent.
1984 Jan;51(1):24-8.
10. Kois JC. Altering gingival levels: the restorative connection. Part I: biologic vari-
ables. J Esthet Dent. 1994 Jan;6(1):3-7.
11. Robbins JW. Tissue management in restorative dentistry. Functional Esthet Re-
storative Dent. 2007:1(3):2-5. Available from: http://www.redrocksoralsurgery.
com/files/2014/03/Tissue-Management-in-Restorative-Dentistry.pdf
12. Chu SJ. Range and mean distribution frequency of individual tooth width of the
maxillary anterior dentition. Pract Proced Aesthet Dent. 2007 May;19(4):209-
15.
13. Chu SJ, Tarnow DP, Tan JH, Stappert CF. Papilla proportions in the maxillary
anterior dentition. Int J Periodontics Restorative Dent. 2009 Aug;29(4):385-93.
14. Stappert CF, Tarnow DP, Tan JH, Chu SJ, Proximal contact areas of
the maxillary anterior dentition. Int J Periodontics Restorative Dent.
2010 Oct;30(5):471-7.
15. Fradeani M, Barducci G, Bacherini L, Brennan M. Esthetic rehabili-
tation of a severely worn dentition with minimally invasive pros-
thetic procedures (MIPP). Int J Periodontics Restorative Dent. 2012
Apr;32(2):135-47. jCD
Dr. Blasi is an assistant adjunct professor, Oral Reha-bilitation Department, at Augusta University Dental College of Georgia’s Goldstein Center for Esthetic and Implant Dentistry.
Dr. Chiche is the Thomas P. Hinman Endowed Chair in Restorative Dentistry and the director and a profes-sor at the Goldstein Center for Esthetic and Implant Dentistry.
Mr. Torosian is a master dental ceramist, laboratory supervisor, and instructor at the Goldstein Center for Esthetic and Implant Dentistry.
Dr. Aimplee is an assistant adjunct professor, Oral Re-habilitation Department, at Augusta University Dental College of Georgia. He is in private practice limited to prosthodontics and esthetic dentistry in Bangkok, Thailand.
Dr. Londono is an assistant professor, Removable and Fixed Prosthodontics Department and a prosthodontist on the Esthetics and Implant Faculty at Augusta Univer-sity Dental College of Georgia.
Dr. Arias is an assistant adjunct professor, Oral Reha-bilitation Department, at Augusta University Dental College of Georgia. He is in private practice limited to prosthodontics and esthetic dentistry in Fort Lauder-dale, Florida.
Disclosure: This work was supported by the Nobel Biocare Center for Implant and Esthetic Dentistry at Augusta University.
Build. Grow. Maintain.Leveraging the unequivocal authority of NewBeauty, this full service marketing platform can support your
practice e� ectively and e� ciently. By utilizing our services, you can add patients, strengthen retention
and improve conversion for your practice.
MARKETING SERVICES POWERED BY NEWBEAUTY.
and improve conversion for your practice.
Contact us today!866-779-9235newbeautypro.com
AACD_2015_ad_0513_tg.indd 1 5/14/15 11:02 AM
108 Spring 2016 • Volume 32 • Number 1
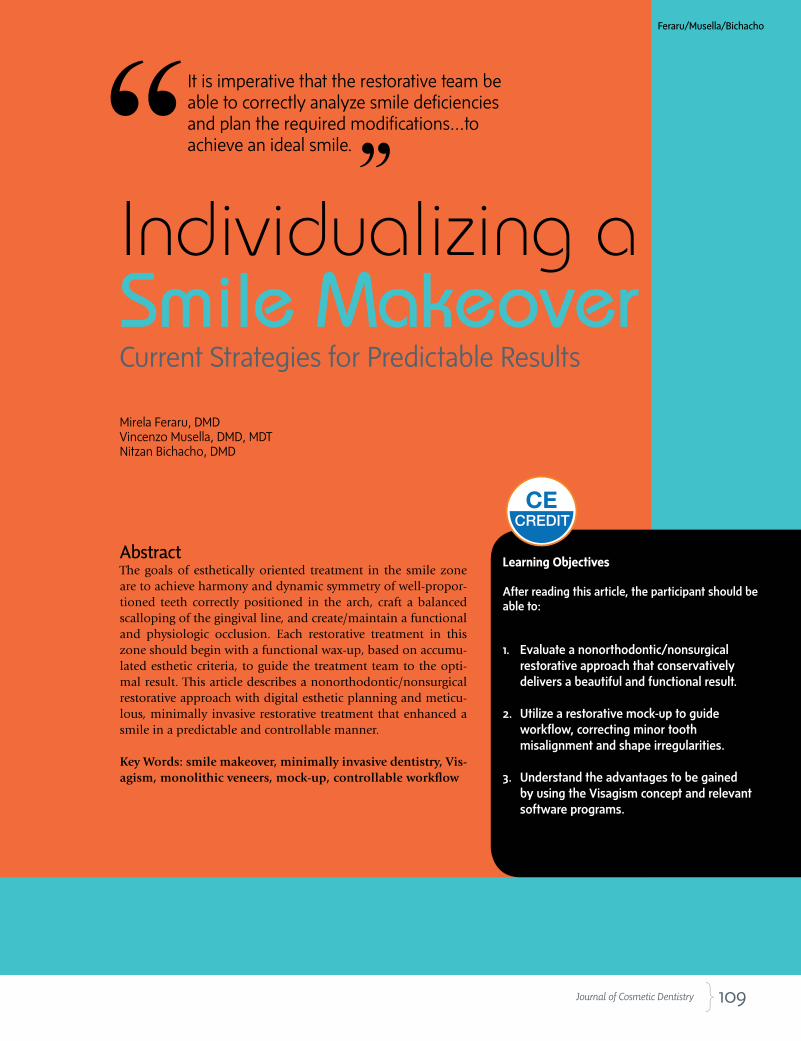
109 Journal of Cosmetic Dentistry
Learning Objectives
After reading this article, the participant should be able to:
1. Evaluate a nonorthodontic/nonsurgical restorative approach that conservatively delivers a beautiful and functional result.
2. Utilize a restorative mock-up to guide workflow, correcting minor tooth misalignment and shape irregularities.
3. Understand the advantages to be gained by using the Visagism concept and relevant software programs.
CECREDIT
AbstractThe goals of esthetically oriented treatment in the smile zone are to achieve harmony and dynamic symmetry of well-propor-tioned teeth correctly positioned in the arch, craft a balanced scalloping of the gingival line, and create/maintain a functional and physiologic occlusion. Each restorative treatment in this zone should begin with a functional wax-up, based on accumu-lated esthetic criteria, to guide the treatment team to the opti-mal result. This article describes a nonorthodontic/nonsurgical restorative approach with digital esthetic planning and meticu-lous, minimally invasive restorative treatment that enhanced a smile in a predictable and controllable manner.
Key Words: smile makeover, minimally invasive dentistry, Vis-agism, monolithic veneers, mock-up, controllable workflow
Individualizing a Smile MakeoverCurrent Strategies for Predictable Results
Mirela Feraru, DMDVincenzo Musella, DMD, MDTNitzan Bichacho, DMD
Feraru/Musella/Bichacho
It is imperative that the restorative team be able to correctly analyze smile deficiencies and plan the required modifications…to achieve an ideal smile.
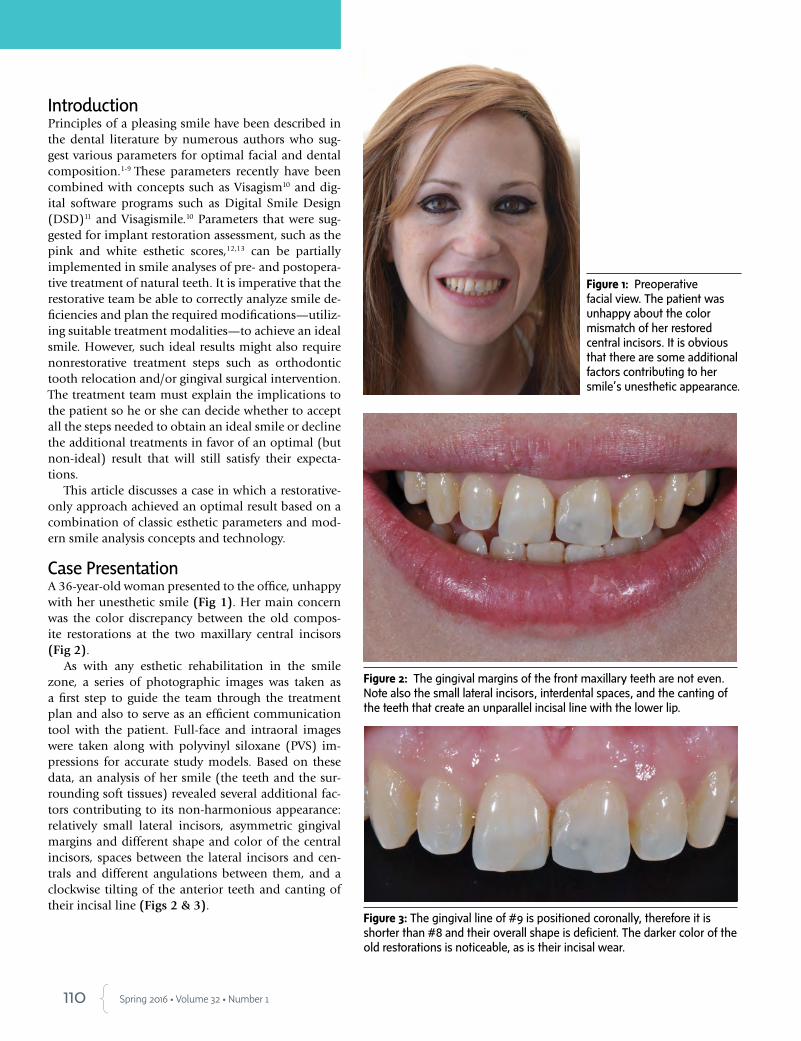
110 Spring 2016 • Volume 32 • Number 1
IntroductionPrinciples of a pleasing smile have been described in the dental literature by numerous authors who sug-gest various parameters for optimal facial and dental composition.1-9 These parameters recently have been combined with concepts such as Visagism10 and dig-ital software programs such as Digital Smile Design (DSD)11 and Visagismile.10 Parameters that were sug-gested for implant restoration assessment, such as the pink and white esthetic scores,12,13 can be partially implemented in smile analyses of pre- and postopera-tive treatment of natural teeth. It is imperative that the restorative team be able to correctly analyze smile de-ficiencies and plan the required modifications—utiliz-ing suitable treatment modalities—to achieve an ideal smile. However, such ideal results might also require nonrestorative treatment steps such as orthodontic tooth relocation and/or gingival surgical intervention. The treatment team must explain the implications to the patient so he or she can decide whether to accept all the steps needed to obtain an ideal smile or decline the additional treatments in favor of an optimal (but non-ideal) result that will still satisfy their expecta-tions.
This article discusses a case in which a restorative-only approach achieved an optimal result based on a combination of classic esthetic parameters and mod-ern smile analysis concepts and technology.
Case Presentation A 36-year-old woman presented to the office, unhappy with her unesthetic smile (Fig 1). Her main concern was the color discrepancy between the old compos-ite restorations at the two maxillary central incisors (Fig 2).
As with any esthetic rehabilitation in the smile zone, a series of photographic images was taken as a first step to guide the team through the treatment plan and also to serve as an efficient communication tool with the patient. Full-face and intraoral images were taken along with polyvinyl siloxane (PVS) im-pressions for accurate study models. Based on these data, an analysis of her smile (the teeth and the sur-rounding soft tissues) revealed several additional fac-tors contributing to its non-harmonious appearance: relatively small lateral incisors, asymmetric gingival margins and different shape and color of the central incisors, spaces between the lateral incisors and cen-trals and different angulations between them, and a clockwise tilting of the anterior teeth and canting of their incisal line (Figs 2 & 3).
Figure 1: Preoperative facial view. The patient was unhappy about the color mismatch of her restored central incisors. It is obvious that there are some additional factors contributing to her smile’s unesthetic appearance.
Figure 2: The gingival margins of the front maxillary teeth are not even. Note also the small lateral incisors, interdental spaces, and the canting of the teeth that create an unparallel incisal line with the lower lip.
Figure 3: The gingival line of #9 is positioned coronally, therefore it is shorter than #8 and their overall shape is deficient. The darker color of the old restorations is noticeable, as is their incisal wear.

111 Journal of Cosmetic Dentistry
Treatment ObjectivesThe objectives of the treatment—to achieve a natu-ral, pleasing smile by designing a balanced gingival outline and a proper shape and proportions for the anterior teeth—were set collaboratively with the pa-tient. The main esthetic challenge of such a case is to choose suitable shapes for the anterior teeth that will integrate with the patient’s facial esthetics as well as with his or her individual personality.10
VisagismNonverbal communication—harmony of the smile
with the facial esthetics—is the primary area of study in Visagism.10 Due to their prominent position, the maxillary central incisors are the most important ele-ment to be studied. The initial consultation involves an analysis of the face and completion of a question-naire to determine the patient’s dominant tempera-ments so the treatment team can formulate a treat-ment plan assisted by the Visagism concept.10
The four basic temperaments can be classified as:--choleric/strong--sanguine/dynamic--melancholic/sensitive--phlegmatic/calm (Fig 4).10 An in-depth clinical analysis and a patient inter-
view are crucial in determining which specific tooth forms most accurately reflect the patient’s personality.
Based on the patient questionnaire and interview, Visagismile software for personalized smile design (Visagismile Inc.; Sofia, Bulgaria) indicated that this patient showed more dynamic and delicate charac-teristics, which are expressed in triangular/oval tooth shapes (Figs 5-7). Relevant images were sent to the dental laboratory along with guidelines for the sug-gested design of the four anterior teeth.
The dental technician created a diagnostic additive wax-up that included the desired modifications: even the gingival outline by correcting the gingival margin of #9, enlarge the lateral incisors, correct the propor-tions of the four incisors, and close the spaces between the lateral and central incisors (Fig 8). The new design was in line with the Visagism guidelines.10 Blueprint-ing the wax-up, the dental technician provided a trans-parent silicone template (visio.sil ILT, Bredent Medical GmbH & Co. KG; Senden, Germany) prepared under pressure. It is important that the silicone template fit precisely to obtain a well-fitting, accurate mock-up.
Feraru/Musella/Bichacho
First Mock-Up as a Diagnostic and Motivational Tool The first intraoral additive mock-up was based on the diagnostic wax-up. A self-curing composite material (Luxatemp, DMG America; Englewood, NJ) was injected into the silicone key and inserted on the unprepared teeth, which were isolated with paraffin wax to facilitate easy removal (Fig 9). This first mock-up also serves as a motivational and communica-tion tool with the patient, showing and explaining all the changes that can be made, as well as the desired final outcome. New full-face and intra-oral photographic and video images were recorded in a sequence similar to the preoperative images. The desired changes were shown, explained, and discussed with the patient by comparing the relevant before-and-af-ter mock-up videos and images (Figs 10 & 11). The patient accepted the treatment and the following steps were planned:1. oral hygiene appointments until excellent oral hygiene was main-
tained2. replacement of the old composite restorations 3. home bleaching for a period of 3 weeks (1 hour/day 22% carbamide
peroxide) 4. mock-up-guided preparation, impression, and provisional restora-
tions5. bonding of the ceramic restorations 6. periodical recalls.
The patient declined a traditional surgical crown lengthening of #9 as the length difference between the central incisors was not visibly pro-nounced at function. However, she did accept a minimal adjustment of the tooth’s free gingival margin.
Following replacement of the old composite restorations (Figs 12a & 12b), home bleaching, and the return of soft tissue health through proper hygiene, the treatment could continue with preparation of the four anterior teeth for ceramic restorations.
The main esthetic challenge…is to choose suitable shapes for the anterior teeth that will integrate with the patient’s facial esthetics as well as with his or her individual personality.
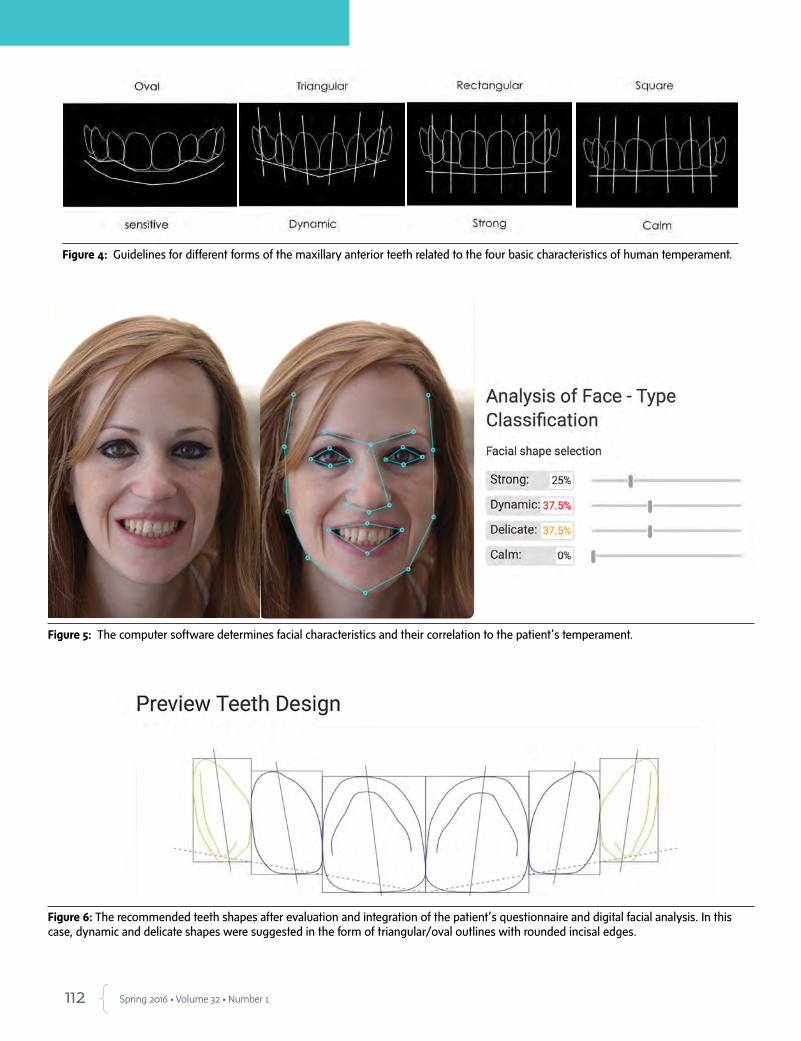
112 Spring 2016 • Volume 32 • Number 1
Figure 5: The computer software determines facial characteristics and their correlation to the patient’s temperament.
Figure 6: The recommended teeth shapes after evaluation and integration of the patient’s questionnaire and digital facial analysis. In this case, dynamic and delicate shapes were suggested in the form of triangular/oval outlines with rounded incisal edges.
Figure 4: Guidelines for different forms of the maxillary anterior teeth related to the four basic characteristics of human temperament.
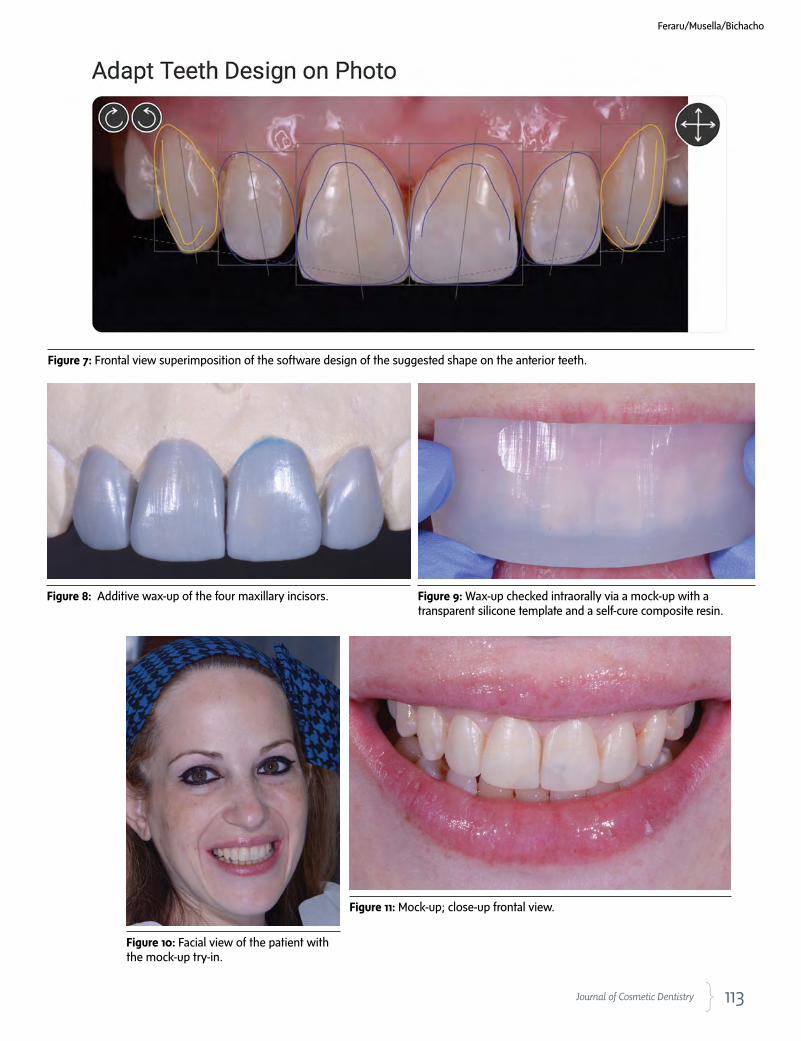
113 Journal of Cosmetic Dentistry
Figure 7: Frontal view superimposition of the software design of the suggested shape on the anterior teeth.
Figure 8: Additive wax-up of the four maxillary incisors. Figure 9: Wax-up checked intraorally via a mock-up with a transparent silicone template and a self-cure composite resin.
Feraru/Musella/Bichacho
Figure 10: Facial view of the patient with the mock-up try-in.
Figure 11: Mock-up; close-up frontal view.

114 Spring 2016 • Volume 32 • Number 1
Figure 12a: The defective composite resin restorations at #8 and #9 were replaced before preparation.
Figure 12b: Radiograph after replacement of the defective resin composite restorations and before the preparation phase. The new restorations will be included within the porcelain laminate veneer preparations.
Second Mock-Up as a Preparation GuideA second mock-up was placed to serve as a prosthetic and sur-gical preparation guide (Fig 13)14 in order to remove as little tooth structure as possible. The wax-up design allowed us to confine the preparations almost entirely within the enamel. Guiding burs (0.3 mm PR12, Strauss & Co.; Ra’anana, Israel) were used for the initial preparation (Fig 14), followed by overall light chamfer reduction.15 After the initial prepara-tion was completed, the soft tissue contours were addressed. A minor gingivectomy was performed on #9 with a diode laser (Opus 10, Lumenis; Yokneam, Israel) (Fig 15) to balance the gingival outline of the two central incisors. The more coronal position of the gingival margin on #9 (due to the anatomi-cal mesiobuccal groove) could be superficially addressed to create a confluence shape, although more coronally than the contralateral tooth. The preparation margin in the areas where spaces were to be closed (between the central and lateral inci-sor) was intracrevicular.16
Shallow chamfers (0.2 mm) were created supragingival to the facial aspect of the prepared teeth under 6x magnification. At the interproximal areas, the intrasulcular margins were de-fined beyond the contact point to create a proper emergence profile and enable support for the papilla at the future restora-tions (Figs 16-18). The use of high magnification (6x loupes and/or microscope) helps to achieve precision and control during the preparation phase as well as later on during the bonding procedure.
The preparations were finished with chamfer burs (Red-Line; Plymouth, MN) and silicone polishing points, both impregnated (Enhance, Dentsply; York, PA) and nonimpreg-nated (Opticlean, Kerr; Orange, CA). Due to the preparation margins’ superficial position, placement of a single cord for impression taking (Figs 19a & 19b) was sufficient to ensure
Figure 13: Mock-up as a prosthetic and surgical preparation guide for the four maxillary incisors.
Figure 14: The initial facial and incisal preparations ensure minimal tooth reduction and maximum enamel preservation.
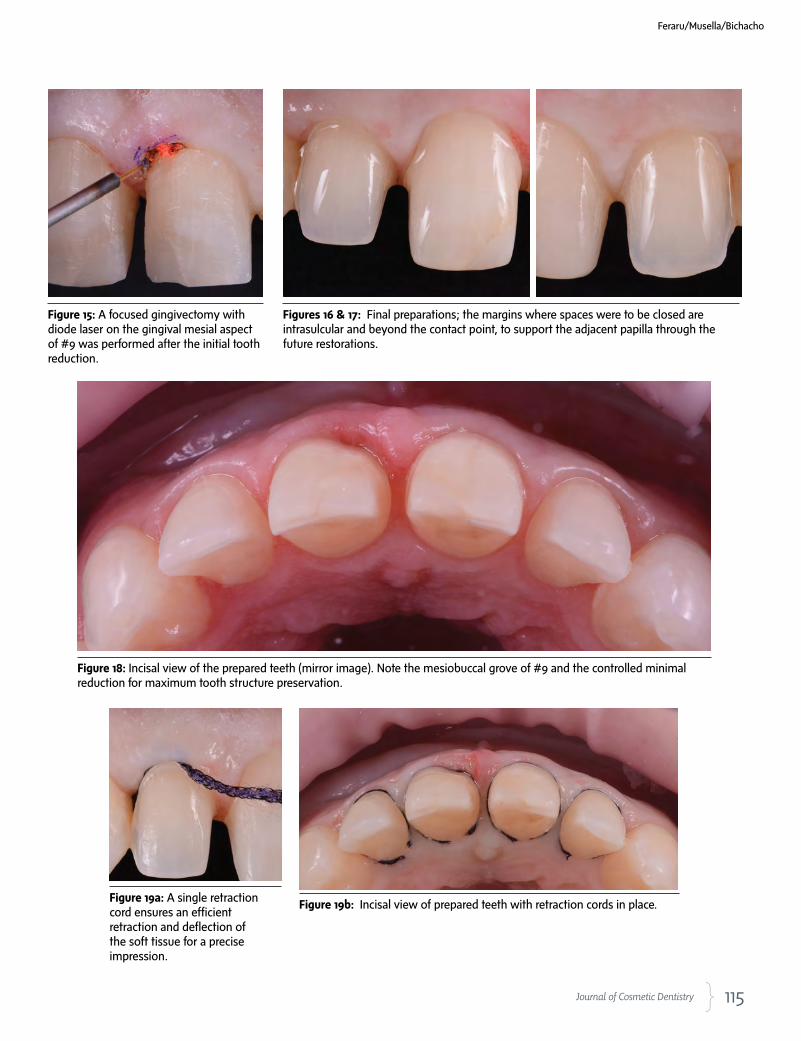
115 Journal of Cosmetic Dentistry
Figure 15: A focused gingivectomy with diode laser on the gingival mesial aspect of #9 was performed after the initial tooth reduction.
Figures 16 & 17: Final preparations; the margins where spaces were to be closed are intrasulcular and beyond the contact point, to support the adjacent papilla through the future restorations.
Figure 18: Incisal view of the prepared teeth (mirror image). Note the mesiobuccal grove of #9 and the controlled minimal reduction for maximum tooth structure preservation.
Figure 19a: A single retraction cord ensures an efficient retraction and deflection of the soft tissue for a precise impression.
Figure 19b: Incisal view of prepared teeth with retraction cords in place.
Feraru/Musella/Bichacho
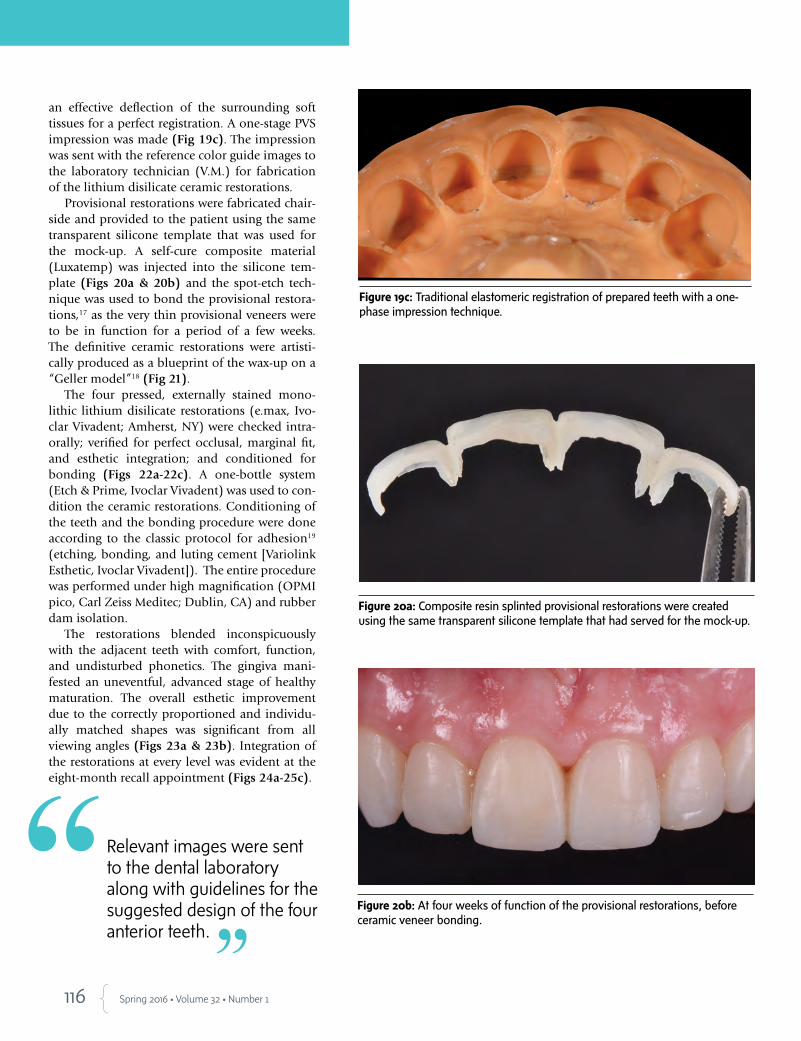
116 Spring 2016 • Volume 32 • Number 1
an effective deflection of the surrounding soft tissues for a perfect registration. A one-stage PVS impression was made (Fig 19c). The impression was sent with the reference color guide images to the laboratory technician (V.M.) for fabrication of the lithium disilicate ceramic restorations.
Provisional restorations were fabricated chair-side and provided to the patient using the same transparent silicone template that was used for the mock-up. A self-cure composite material (Luxatemp) was injected into the silicone tem-plate (Figs 20a & 20b) and the spot-etch tech-nique was used to bond the provisional restora-tions,17 as the very thin provisional veneers were to be in function for a period of a few weeks. The definitive ceramic restorations were artisti-cally produced as a blueprint of the wax-up on a “Geller model”18 (Fig 21).
The four pressed, externally stained mono-lithic lithium disilicate restorations (e.max, Ivo-clar Vivadent; Amherst, NY) were checked intra-orally; verified for perfect occlusal, marginal fit, and esthetic integration; and conditioned for bonding (Figs 22a-22c). A one-bottle system (Etch & Prime, Ivoclar Vivadent) was used to con-dition the ceramic restorations. Conditioning of the teeth and the bonding procedure were done according to the classic protocol for adhesion19 (etching, bonding, and luting cement [Variolink Esthetic, Ivoclar Vivadent]). The entire procedure was performed under high magnification (OPMI pico, Carl Zeiss Meditec; Dublin, CA) and rubber dam isolation.
The restorations blended inconspicuously with the adjacent teeth with comfort, function, and undisturbed phonetics. The gingiva mani-fested an uneventful, advanced stage of healthy maturation. The overall esthetic improvement due to the correctly proportioned and individu-ally matched shapes was significant from all viewing angles (Figs 23a & 23b). Integration of the restorations at every level was evident at the eight-month recall appointment (Figs 24a-25c).
Figure 19c: Traditional elastomeric registration of prepared teeth with a one-phase impression technique.
Figure 20a: Composite resin splinted provisional restorations were created using the same transparent silicone template that had served for the mock-up.
Figure 20b: At four weeks of function of the provisional restorations, before ceramic veneer bonding.
Relevant images were sent to the dental laboratory along with guidelines for the suggested design of the four anterior teeth.

117 Journal of Cosmetic Dentistry
Figure 21: The master “Geller model.” Note that the gingival margins at the plaster are apically dislocated due to the retraction cords.
Figure 22a: Four pressed, monolithic lithium disilicate restorations were created as a copy of the wax-up.
Figure 22b: The stained and glazed lithium disilicate restorations on the working model.
Figure 22c: A 0.2 to 0.3 mm average thickness of the restorations will restore the space between the minimally prepared teeth and the envelope of design.
Figures 23a & 23b: Semi-profile views of the patient when smiling with the definitive restorations, after bonding.
Feraru/Musella/Bichacho
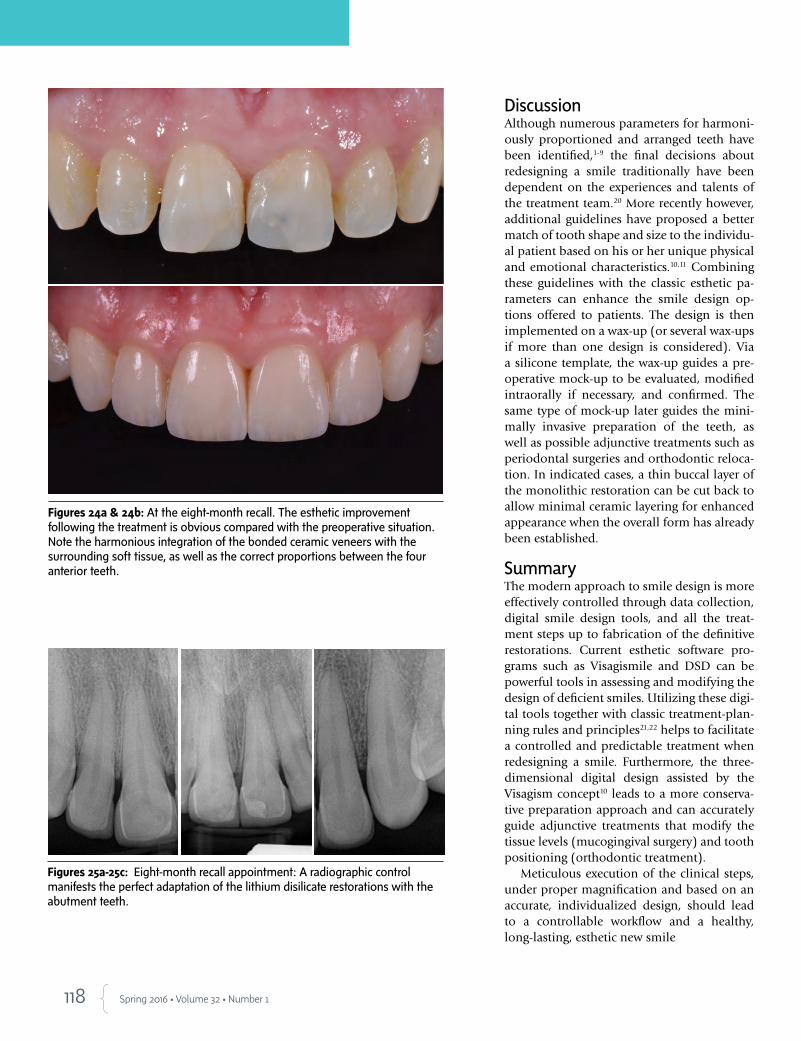
118 Spring 2016 • Volume 32 • Number 1
DiscussionAlthough numerous parameters for harmoni-ously proportioned and arranged teeth have been identified,1-9 the final decisions about redesigning a smile traditionally have been dependent on the experiences and talents of the treatment team.20 More recently however, additional guidelines have proposed a better match of tooth shape and size to the individu-al patient based on his or her unique physical and emotional characteristics.10,11 Combining these guidelines with the classic esthetic pa-rameters can enhance the smile design op-tions offered to patients. The design is then implemented on a wax-up (or several wax-ups if more than one design is considered). Via a silicone template, the wax-up guides a pre-operative mock-up to be evaluated, modified intraorally if necessary, and confirmed. The same type of mock-up later guides the mini-mally invasive preparation of the teeth, as well as possible adjunctive treatments such as periodontal surgeries and orthodontic reloca-tion. In indicated cases, a thin buccal layer of the monolithic restoration can be cut back to allow minimal ceramic layering for enhanced appearance when the overall form has already been established.
SummaryThe modern approach to smile design is more effectively controlled through data collection, digital smile design tools, and all the treat-ment steps up to fabrication of the definitive restorations. Current esthetic software pro-grams such as Visagismile and DSD can be powerful tools in assessing and modifying the design of deficient smiles. Utilizing these digi-tal tools together with classic treatment-plan-ning rules and principles21,22 helps to facilitate a controlled and predictable treatment when redesigning a smile. Furthermore, the three-dimensional digital design assisted by the Visagism concept10 leads to a more conserva-tive preparation approach and can accurately guide adjunctive treatments that modify the tissue levels (mucogingival surgery) and tooth positioning (orthodontic treatment).
Meticulous execution of the clinical steps, under proper magnification and based on an accurate, individualized design, should lead to a controllable workflow and a healthy, long-lasting, esthetic new smile
Figures 24a & 24b: At the eight-month recall. The esthetic improvement following the treatment is obvious compared with the preoperative situation. Note the harmonious integration of the bonded ceramic veneers with the surrounding soft tissue, as well as the correct proportions between the four anterior teeth.
Figures 25a-25c: Eight-month recall appointment: A radiographic control manifests the perfect adaptation of the lithium disilicate restorations with the abutment teeth.
119 Journal of Cosmetic Dentistry
References
1. Dawson PE. Functional occlusion: from TMJ to smile design. St.
Louis: Mosby; 2006.
2. Chiche G, Pinault A. Esthetics of anterior fixed prosthodontics.
1st ed. Hanover Park (IL): Quintessence Pub.; 1994.
3. Fradeani M. Esthetic rehabilitation in fixed prosthodontics, Vol-
ume 1. Esthetic analysis: a systematic approach to prosthetic
treatment. Hanover Park (IL): Quintessence Pub.; 2004.
4. Lombardi RE. The principles of visual perception and their
clinical application to denture esthetics. J Prosthet Dent. 1973
Apr;29(4):358-82.
5. Levin EI. Dental esthetics and the golden proportion. J Prosthet
Dent. 1978 Sep;40(3):244-52.
6. Rufenacht CR. Fundamentals of esthetics. Hanover Park (IL):
Quintessence Pub.; 1990.
7. Adolfi D. Natural esthetics. Hanover Park (IL): Quintessence
Pub.; 2002.
8. Ahmad I. A clinical guide to anterior dental aesthetics. London:
British Dental Association; 2005.
9. Calamia JR, Wolff MS, Simonsen RJ. Succesful esthetic and cos-
metic dentistry for the modern dental practice. Dent Clin North
Am. 2007;51(2):281-571.
10. Paolucci B, Calamita M, Coachman C, Gürel G, Shayder A,
Hallawell P. Visagism: the art of dental composition. QDT
2012;35:187-201.
11. Coachman C, Calamita M. Digital Smile Design: a tool for treat-
ment planning and communication in esthetic dentistry. QDT
2012. Hanover Park (IL): Quintessence Pub.; 2012. p.103-12.
12. Fürhauser R, Florescu D, Benesch T, Haas R, Mailath G, Watzek G.
Evaluation of soft tissue around single-tooth implant crowns: the
pink esthetic score. Clin Oral Implants Res. 2005 Dec;16(6):639-
44.
13. Belser UC, Grütter L, Vailati F, Bornstein MM, Weber HP, Buser
D. Outcome evaluation of early placed maxillary anterior single-
tooth implants using objective esthetic criteria: a cross-sectional,
retrospective study in 45 patients with a 2- to 4-year follow-
up using pink and white esthetic scores. J Periodontol. 2009
Jan;80(1):140-51.
14. Gürel G. Porcelain laminate veneers: minimal tooth preparation by design. Dent Clin
North Am. 2007 Apr;51(2):419-31.
15. Bichacho N. Porcelain laminate veneers. Part 1: preparation techniques. Israel J Dent
Technol. 1994;3:54-9.
16. Bichacho N. The frontal spaced dentition—different prosthetic treatment modalities. J
Israeli Orthod Soc. 1995;3:7-14.
17. Gürel G, Bichacho N. Permanent diagnostic provisional restorations for predictable re-
sults when redesigning the smile. Pract Proced Aesthet Dent. 2006 Jun;18(5):281-6.
18. McLaren EA, Chang YY. Creating physiologic contours using a modified Geller cast tech-
nique. Inside Dent. 2007 Oct;3(9):88-91.
19. Mangani F, Putignano A, Cerutti A. Guidelines for Adhesive dentistry: the key to success.
Hanover Park (IL): Quintessence Pub.; 2009
20. Bichacho N, Magne M. Controlled restorative treatment of compromised anterior denti-
tion. Pract Proced Aesthet Dent. 1998 Aug;10:723-6.
21. Gürel G. The science and art of porcelain laminate veneers. Hanover Park (IL): Quintes-
sence Pub.; 2003.
22. Bichacho N. Porcelain laminates: integrated concepts in treating diverse aesthetic defects.
Pract Proced Aesthet Dent. 1995 Apr:7(3):13-23. jCD
Dr. Feraru is a team member at the Bichacho Clinic in Tel Aviv, Israel, and an affiliate of the European Academy of Esthetic Dentistry.
Dr. Musella is a practicing dentist and technician. He is the founder of the Aesthetic Dental Full HD Annual Symposia in Modena, Italy.
Prof. Bichacho is head of the Ronald E. Goldstein Center for Esthetic Dentistry, Hadassah Medical Campus, Hebrew University, Jerusalem. He is a past president and life member of the European Academy of Estheric Dentistry and owns a private practice in Tel Aviv, Israel.
Disclosures: The authors did not report any disclosures.
Feraru/Musella/Bichacho
Current esthetic software programs…can be powerful tools in assessing and modifying the design of deficient smiles.

120 Spring 2016 • Volume 32 • Number 1
AACD Self-Instruction Continuing Education InformationGeneral InformationThis continuing education (CE) self-instruction pro-gram has been developed by the American Academy of Cosmetic Dentistry (AACD) and an advisory com-mittee of the Journal of Cosmetic Dentistry.
Eligibility and CostThe exam is free of charge and is intended for and available to AACD members only. It is the responsi-bility of each participant to contact his or her state board for its requirements regarding acceptance of CE credits. The AACD designates this activity for 3 continuing education credits.
Testing and CEThe self-instruction exam comprises 10 multiple-choice questions. To receive course credit, AACD members must complete and submit the exam and answer at least 70% of the questions correctly. Par-ticipants will receive tests results immediately after taking the examination online and can only take each exam once. The exam is scored automatically by the AACD’s online testing component. The deadline for completed exams is one calendar year from the publication date of the issue in which the exam ap-peared. The exam is available online at www.aacd.com. A current web browser is necessary to complete the exam; no special software is needed.
Note: Although the AACD grants these CE credits, it is up to the receiving governing body to determine the amount of CE credits they will accept and grant to participants.
Verification of Participation (VOP)VOP will be sent to AACD members via their My-AACD account upon pass completion. Log into www.aacd.com to sign into your MyAACD account.
For members of the Academy of General Dentistry (AGD): The AACD will send the AGD proof of your credits earned on a monthly basis. To do this, AACD must have your AGD member number on file. Be sure to update your AGD member number in your AACD member profile on MyAACD.com.
All participants are responsible for sending proof of earned CE credits to their state dental board or agency for licensure purposes.
DisclaimerAACD’s self-instruction exams may not provide enough comprehensive information for participants to implement into practice. It is recommended that participants seek additional information as required. The AACD Self-Instruction Program adheres to the guidelines set forth by the American Dental Asso-ciation Continuing Education Recognition Program (CERP), and the AGD Program Approval for Con-tinuing Education (PACE). Exams will be available for a maximum of 3 years from publication date.
Questions and FeedbackFor questions regarding a specific course, informa-tion regarding your CE credits, or to give feedback on a CE self-instruction exam, please contact the AACD Executive Office by e-mailing [email protected] or by calling 800.543.9220 or 608.222.8583.
ADA CERP is a service of the American Dental Association to assist dental professionals in identifying quality providers of continuing dental education. ADA CERP does not approve or endorse individual courses or instructors, nor does it imply acceptance of credit hours by boards of dentistry. AACD designates this activity for 3 continuing education credits. Concerns or complaints about a CE provider may be directed to the provider or to ADA CERP at www.ada.org/goto/cerp.
CECREDIT
3 Hours Credit
121 Journal of Cosmetic Dentistry
(CE) Exercise No. jCD24
Esthetics/Cosmetic Dentistry AGD Subject Code: 780
The 10 multiple-choice questions for this Continuing Education (CE) self-instruction exam are based on the article, “Individual-izing a Smile Makeover,” by Dr. Mirela Feraru, Dr. Vincenzo Musella, and Dr. Nitzan Bichacho. This article appears on pages 108-119.
The examination is free of charge and available to AACD members only, and will be available for 3 years after publication. AACD members must log onto www.aacd.com to take the exam. Note that only Questions 1 through 5 appear in the printed and digital versions of the jCD; they are for readers’ information only. The complete, official self-instruction exam is available online only—completed exams submitted any other way will not be accepted or processed. A current web browser is necessary to complete the exam; no special software is needed. The AACD is a recognized credit provider for the Academy of General Dentistry, American Dental Association, and National Association of Dental Laboratories. For any questions regarding this self-instruction exam, call the AACD at 800.543.9220 or 608.222.8583.
1. In the case presented, which of the following was completed prior to beginning restorative treatment?
a. periodontal treatment including deep scales and gingival curet-tage
b. a functional esthetic wax-up based on accumulated esthetic criteria to guide the treatment team
c. orthodontic treatment to improve alignment and minimize tooth preparation
d. TMJ therapy including the use of directive splints
2. What is the primary issue in the study of Visagism?
a. nonverbal communication – harmony of the smile with the facial esthetics
b. nonverbal communication – harmony of the teeth with the oral musculature
c. verbal communication – harmony between the patient’s per-sonality characteristics and the soft tissue display during smiling
d. verbal communication – harmony between the patient’s per-sonality and the dominance of the lateral incisors and canines
3. Parameters for implant restorations such as the pink and white esthetic scores
a. are not really applicable to the principles of a pleasing smile with natural teeth
b. are useful only before treatment of natural teethc. are useful only after treatment of natural teethd. can be partially implemented in smile analyses both before and
after treatment
4. In terms of smile design for the case presented, the most impor-tant esthetic principle to correct is which of the following?
a. the discrepancy in the gingival position in the area of the lateral incisors
b. the discrepancy in the gingival position in the area of the central incisors
c. the inappropriate cant, size, and shape of the upper incisorsd. the discrepancy in length of the lateral incisors
5. The purpose of the patient questionnaire discussed in this article was to
a. document the patient’s smile design goalsb. evaluate the patient’s health historyc. document the advantages of esthetic smile enhancementd. determine the patient’s dominant temperament characteristics
To see and take the complete exam, log onto www.aacd.com/jcdce
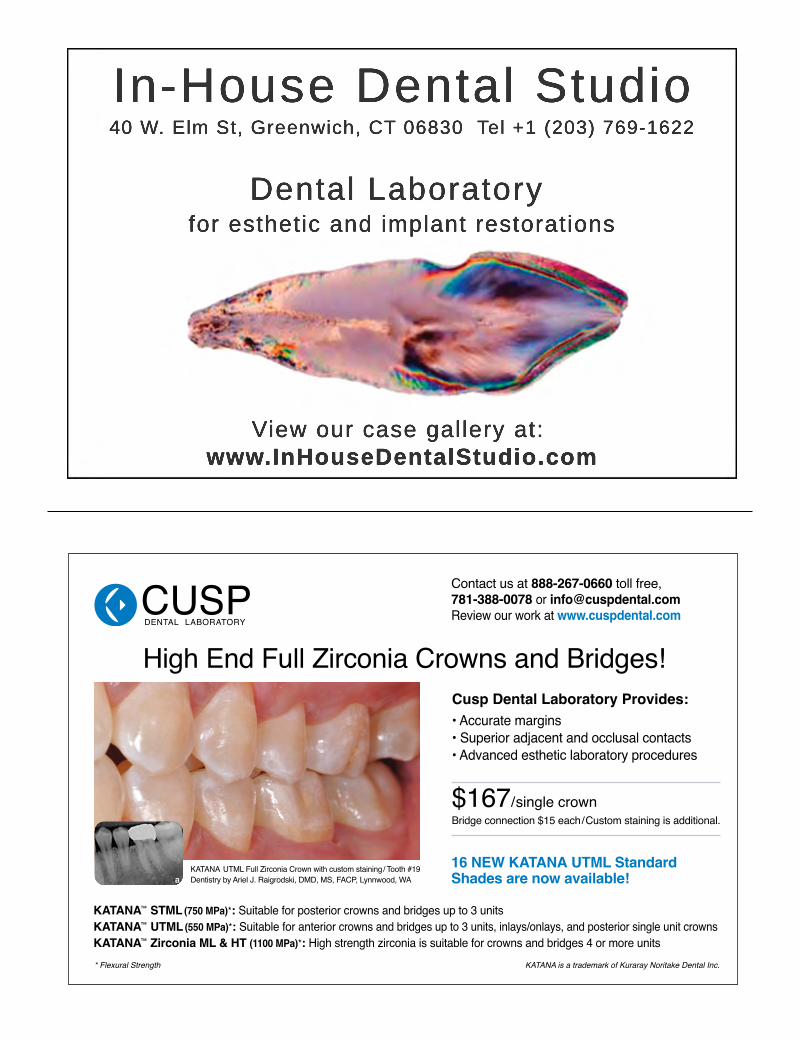
In-House Dental Studio40 W. Elm St, Greenwich, CT 06830 Tel +1 (203) 769-1622
Dental Laboratory for esthetic and implant restorations
View our case gallery at: www.InHouseDentalStudio.com
KATANA UTML Full Zirconia Crown with custom staining/ Tooth #19
Dentistry by Ariel J. Raigrodski, DMD, MS, FACP, Lynnwood, WA
High End Full Zirconia Crowns and Bridges!
Contact us at 888-267-0660 toll free,
781-388-0078 or [email protected]
Review our work at www.cuspdental.com
$167/single crown
Bridge connection $15 each/Custom staining is additional.
Cusp Dental Laboratory Provides:
• Accurate margins
• Superior adjacent and occlusal contacts
• Advanced esthetic laboratory procedures
KATANA™
STML (750 MPa)*: Suitable for posterior crowns and bridges up to 3 units
KATANA™
UTML (550 MPa)*: Suitable for anterior crowns and bridges up to 3 units, inlays/onlays, and posterior single unit crowns
KATANA™
Zirconia ML & HT (1100 MPa)*: High strength zirconia is suitable for crowns and bridges 4 or more units
16 NEW KATANA UTML Standard
Shades are now available!
* Flexural Strength KATANA is a trademark of Kuraray Noritake Dental Inc.
BB22185_JCD Ad_Spring 2016_Ad_JCD Ad 1/26/16 1:57 PM Page 1

*Ivoclar Vivadent global usage data Photo Courtesy of Bryan MillerFor more information, call us at 1-800-533-6825 in the U.S., 1-800-263-8182 in Canada.© 2015 Ivoclar Vivadent, Inc. Ivoclar Vivadent, IPS e.max is a registered trademark of Ivoclar Vivadent, Inc.
ivoclarvivadent.com
IPS
e.m
ax®
When Juan Rego‘s daughter Natalie wanted a new smile for her wedding day, he chose IPS e.max to make her perfect day even more beautiful.
Today, more dental professionals choose IPS e.max, the world‘s leading all-ceramic – for their families and for themselves. With over 100 million e.max restorations placed, it has become the unchallenged leader around the world for dentists who prefer to treat their patients like part of the family. Make it e.max, because every patient matters.
Make it e.max®
because it matters.
Share your story at
makeitemax.com/smile For a chance to be featured in an IPS e.max advertisement!
8739_ emax Rego_JCD.indd 1 1/26/16 3:30 PM
Related Documents