Jewish Lens Photo Teaching Guide This guide will introduce you to some key photographic concepts and visual elements to help you get started on your journey with photography. Some of the topics, such as shutter and aperture, address the core mechanical operations of the camera, while others, such as street photography and portraiture, address styles, genres, and conventions of photographing. Ultimately, these categories and tips should serve as a starting point for your own exploration. Pay attention to the photographs you see online, in books, or in magazines, and learn what types of images get you inspired. We encourage you to experiment with your camera and subjects to find a style of photography that feels unique to you! Contents: 1. Photographic elements a. Shutter b. Aperture c. Color versus black-and-white 2. Photographic approaches a. Posed versus candid b. Street photography and ‘the decisive moment’ c. Staged photography 3. Types of photographs a. Portraiture b. Landscape c. Still life and object 4. Visual principles and glossary a. Framing and the Rule of Thirds b. Contrast c. Scale and perception d. Balance

Welcome message from author
This document is posted to help you gain knowledge. Please leave a comment to let me know what you think about it! Share it to your friends and learn new things together.
Transcript

Jewish Lens Photo Teaching Guide
This guide will introduce you to some key photographic concepts and visual elements to help
you get started on your journey with photography. Some of the topics, such as shutter and
aperture, address the core mechanical operations of the camera, while others, such as street
photography and portraiture, address styles, genres, and conventions of photographing.
Ultimately, these categories and tips should serve as a starting point for your own exploration.
Pay attention to the photographs you see online, in books, or in magazines, and learn what
types of images get you inspired. We encourage you to experiment with your camera and
subjects to find a style of photography that feels unique to you!
Contents:
1. Photographic elements
a. Shutter
b. Aperture
c. Color versus black-and-white
2. Photographic approaches
a. Posed versus candid
b. Street photography and ‘the decisive moment’
c. Staged photography
3. Types of photographs
a. Portraiture
b. Landscape
c. Still life and object
4. Visual principles and glossary
a. Framing and the Rule of Thirds
b. Contrast
c. Scale and perception
d. Balance

1a. Shutter
The shutter controls how long the camera’s sensor or film is exposed to the subject in front of
the lens. In other words, the shutter controls how much light enters the camera. Shutter speeds
are described in fractions of a second (or in full seconds, for very long exposures).
Shutter also controls motion or blur. A shutter speed of 1/60 of a second is considered the
maximum shutter time you can use and still get a sharp image. A fast shutter, such as 1/1000 of
a second, can be useful on very sunny days or when you want to take a sharp picture of a fast-
moving object, such as a car. On the other hand, a slow shutter, such as 1/2 second, will allow
you to get a good exposure in a dark setting, but will create a blurry unless the camera is
mounted on a stable tripod and the subject is not moving.
In this image, the shutter was clicked while the basketball was shot at the basket. The
photographer used a fast shutter speed to create a sharp image of the moving players and the
basketball mid-air.
Hertzliya Day School, Cape Town, South Africa, 1998 © Zion Ozeri

1b. Aperture
The aperture is a fancy word used to describe the opening in the camera’s lens. The aperture is
another element that controls how much light reaches the camera’s sensor or film.
The aperture’s setting is described as its ‘F-stop’. When there is a big aperture, more light can
enter the camera, allowing you to use a quicker shutter speed. A small aperture constricts light,
so you will need to make up for this with a slower shutter speed. It is important to keep in mind
that smaller aperture numbers such as ‘F/2’ describe larger aperture openings, and larger
numbers such as ‘F/16’ describe smaller aperture openings.
Aperture also controls the “depth of field,” which is a term used to describe how much of the
picture is in focus. Depth of field can be described as shallow, meaning only part of the picture
is in focus, or deep, meaning all or most of the picture is in focus.
In the picture below, there is a shallow depth of field. The boy in the front part of the image is in
sharp focus. The boy behind him, because he is further away from the camera, is slightly blurry.
In the far distance, the landscape is almost totally blurry. Especially for portraits, photographers
often use a small aperture to get a shallow depth of field so that the subject is in focus, but their
surroundings are blurred.
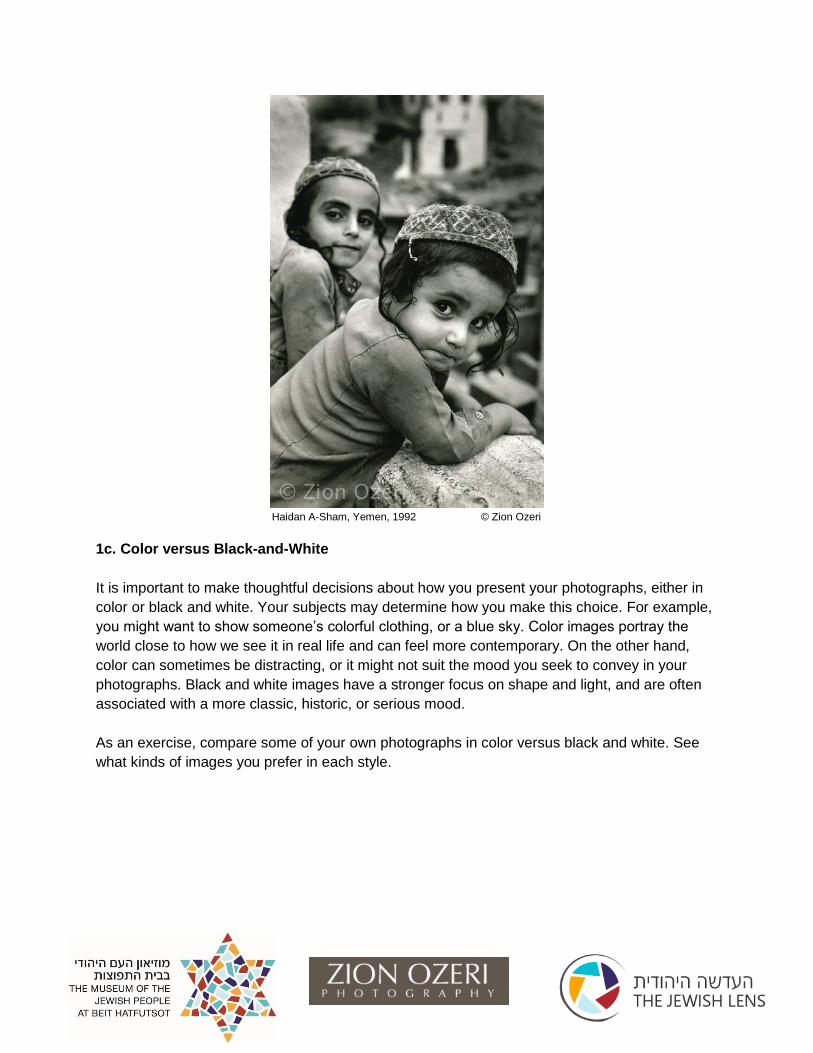
Haidan A-Sham, Yemen, 1992 © Zion Ozeri
1c. Color versus Black-and-White
It is important to make thoughtful decisions about how you present your photographs, either in
color or black and white. Your subjects may determine how you make this choice. For example,
you might want to show someone’s colorful clothing, or a blue sky. Color images portray the
world close to how we see it in real life and can feel more contemporary. On the other hand,
color can sometimes be distracting, or it might not suit the mood you seek to convey in your
photographs. Black and white images have a stronger focus on shape and light, and are often
associated with a more classic, historic, or serious mood.
As an exercise, compare some of your own photographs in color versus black and white. See
what kinds of images you prefer in each style.
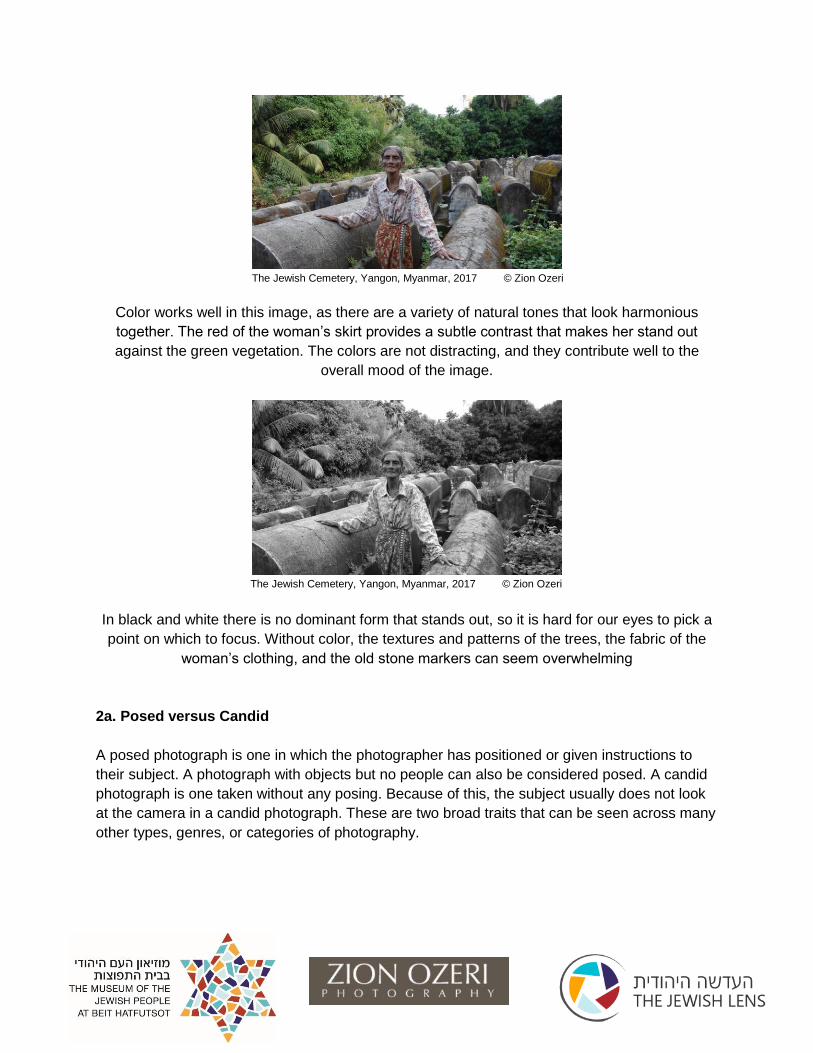
The Jewish Cemetery, Yangon, Myanmar, 2017 © Zion Ozeri
Color works well in this image, as there are a variety of natural tones that look harmonious
together. The red of the woman’s skirt provides a subtle contrast that makes her stand out
against the green vegetation. The colors are not distracting, and they contribute well to the
overall mood of the image.
The Jewish Cemetery, Yangon, Myanmar, 2017 © Zion Ozeri
In black and white there is no dominant form that stands out, so it is hard for our eyes to pick a
point on which to focus. Without color, the textures and patterns of the trees, the fabric of the
woman’s clothing, and the old stone markers can seem overwhelming
2a. Posed versus Candid
A posed photograph is one in which the photographer has positioned or given instructions to
their subject. A photograph with objects but no people can also be considered posed. A candid
photograph is one taken without any posing. Because of this, the subject usually does not look
at the camera in a candid photograph. These are two broad traits that can be seen across many
other types, genres, or categories of photography.

Farmers, Greenville, Mississippi, USA, 2008 © Zion Ozeri Morning Study, The Bronx, New York, USA, 1985 © Zion Ozeri
2b. Street photography and ‘the decisive moment’
Street photography is one of the major categories of photography. It describes an approach or
style of photographing in public spaces (such as the street) that is candid and often quick or
spontaneous. Street photography can be similar to or overlap with documentary photography
and photojournalism. Some famous street photographers include Robert Frank, Gary
Winogrand, Lee Friedlander, and Helen Levitt.

The ‘decisive moment’ is a term associated with street photography. It comes from the title of a
book published in 1952 by the French photographer Henri Cartier-Bresson. This term has come
to describe unplanned, well-composed images taken at just the right moment. The decisive
moment is an idea unique to photography, as it draws upon photography’s ability to freeze time
and capture a split second of a quick-moving, fleeting scene.
In Passing, Rosh Ha’ayin, Israel, 1984 © Zion Ozeri
In this moment, the photographer captured the contrast between the old way of life and the new.
The older man to the left looks at the camera, wearing traditional clothing and moving by foot.
The image captures the moment that another man, in modern clothing and on a motorbike, zips
by.
2c. Staged photography
Staged photography is a type of posed photography that includes constructed settings and
arranged figures. It can depict imagined or fictional events or capture artificially created
scenarios. There are many different styles of staged photography, and it encompasses various
types of fine art or fashion photography. Famous photographers who create staged images
include Gregory Crewdson, Laurie Simmons, Carrie Mae Weems, and Annie Liebovitz.
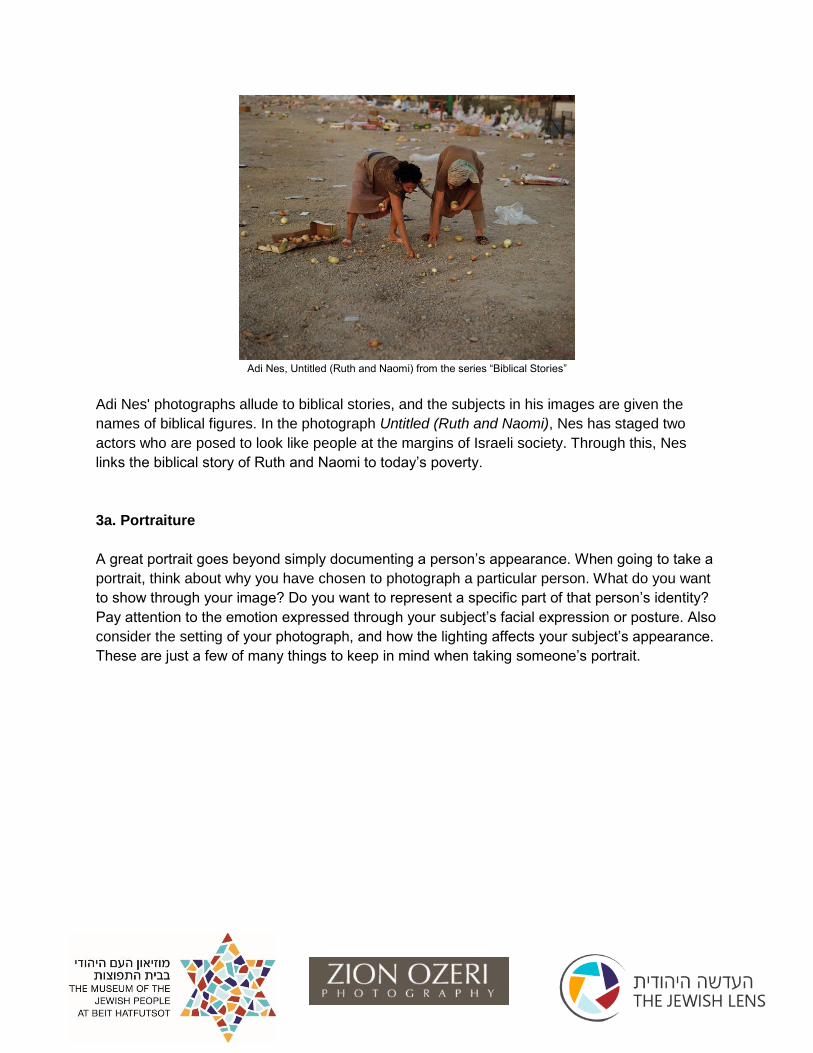
Adi Nes, Untitled (Ruth and Naomi) from the series “Biblical Stories”
Adi Nes' photographs allude to biblical stories, and the subjects in his images are given the
names of biblical figures. In the photograph Untitled (Ruth and Naomi), Nes has staged two
actors who are posed to look like people at the margins of Israeli society. Through this, Nes
links the biblical story of Ruth and Naomi to today’s poverty.
3a. Portraiture
A great portrait goes beyond simply documenting a person’s appearance. When going to take a
portrait, think about why you have chosen to photograph a particular person. What do you want
to show through your image? Do you want to represent a specific part of that person’s identity?
Pay attention to the emotion expressed through your subject’s facial expression or posture. Also
consider the setting of your photograph, and how the lighting affects your subject’s appearance.
These are just a few of many things to keep in mind when taking someone’s portrait.

Park Ranger, Acadia National Park, Maine, USA, 2005 © Zion Ozeri
In this photograph we see a man sitting at a high elevation overlooking a dramatic natural
landscape. He looks straight into the camera and seems at ease in his environment. From this
man’s badge and uniform, as well as from his setting, we can tell that he is a park ranger. This
image is a good example of environmental portraiture. An environmental portrait is a photograph
of a person set against a background in which he or she feels comfortable or can regularly be
found, such as at work, at school, at home, or partaking in a hobby.
Who do you think chose this setting- the photographer or the subject- and why? What can we
learn from this man’s facial expression and posture? What else might we be able to guess about
this man from what we see in the photograph?
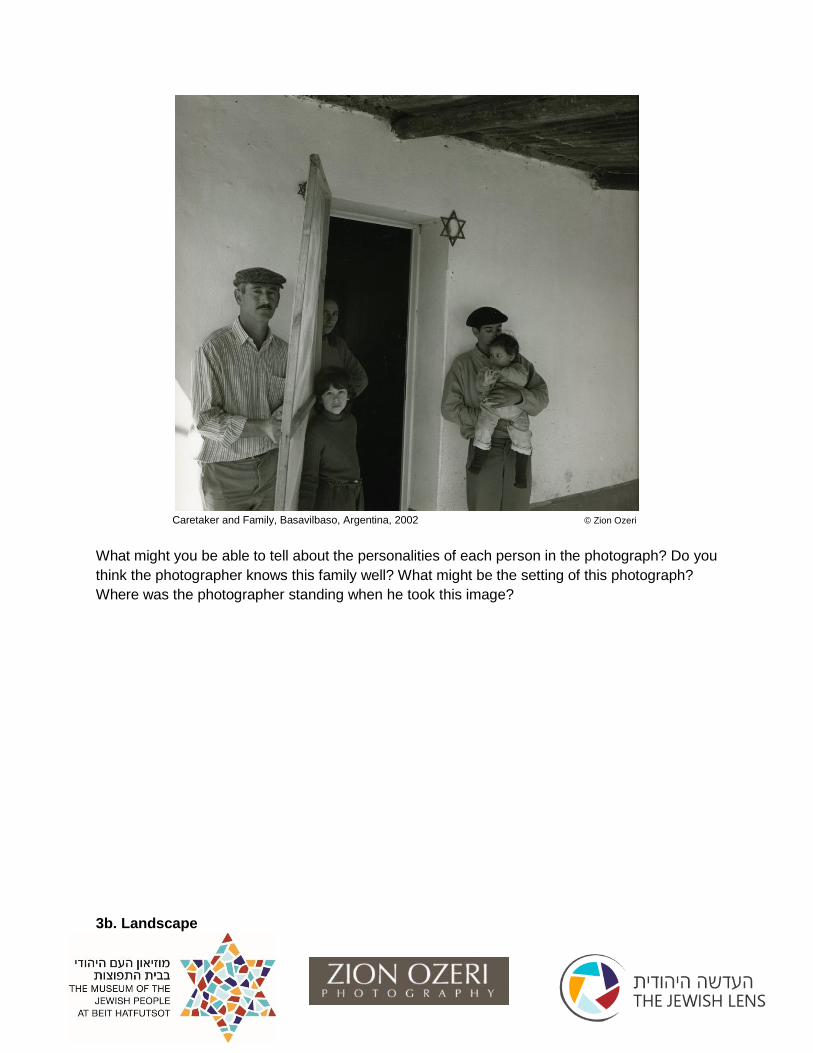
Caretaker and Family, Basavilbaso, Argentina, 2002 © Zion Ozeri
What might you be able to tell about the personalities of each person in the photograph? Do you
think the photographer knows this family well? What might be the setting of this photograph?
Where was the photographer standing when he took this image?
3b. Landscape

Think about your goals for photographing a landscape. What compels you to photograph a
particular scene? What are you trying to communicate? How would you like your viewers to feel
in response to seeing your photograph? How does including or excluding people change the
mood of a landscape? These are a few key stylistic considerations for landscape photographs:
- The vantage point from which the photograph is taken
- The location of the horizon line
- The contents that appear in the image’s foreground, middle ground, and background
- The lighting, time of day, and weather conditions in the scene
Buffalo, Yellowstone, Wyoming, USA, 1996 © Zion Ozeri
Five buffalo occupy the foreground of this image, drawing attention as the key subject matter.
They stand out as dark objects amongst a white, snowy scene. In the middle ground we see a
thin, meandering river and a singular tree. In this image, the river functions like the horizon line.
In the background we see a mountainside covered with thin, straight trees, however, it is largely
obscured by a heavy fog. In this photograph we feel as if we are given a special glimpse at the
buffalo quietly grazing in their natural habitat, which is made more dramatic by the harsh winter
conditions.
3c. Still Life and Object
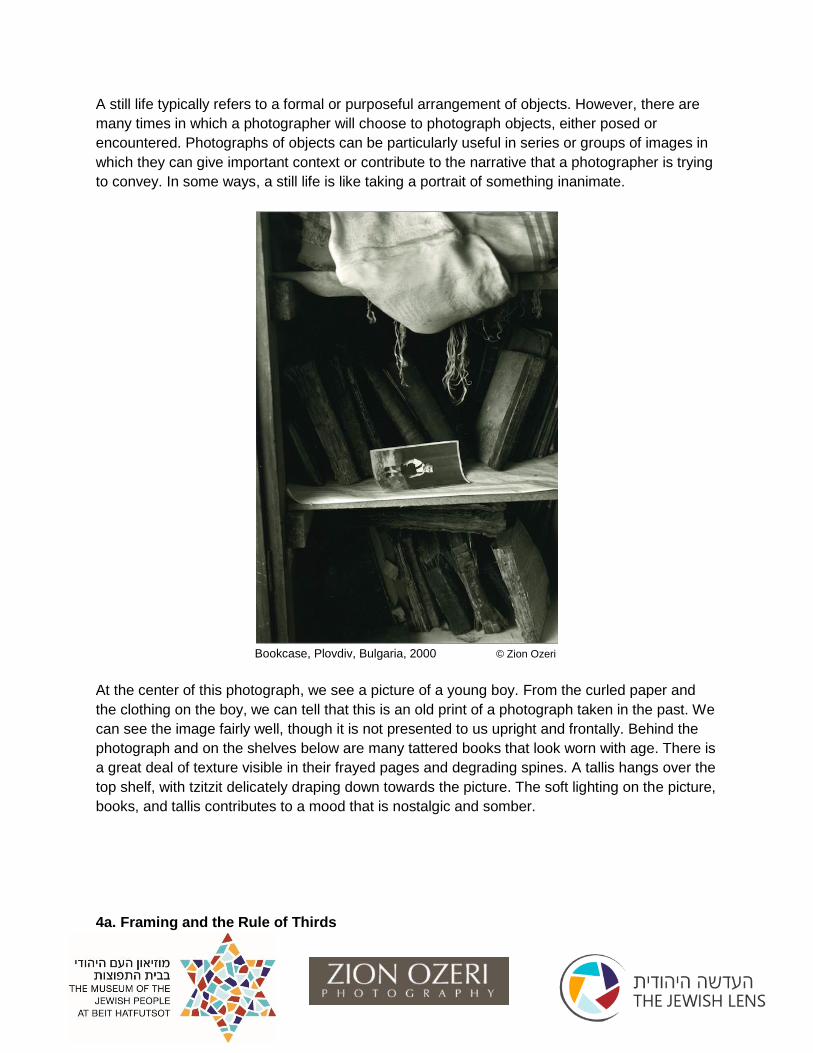
A still life typically refers to a formal or purposeful arrangement of objects. However, there are
many times in which a photographer will choose to photograph objects, either posed or
encountered. Photographs of objects can be particularly useful in series or groups of images in
which they can give important context or contribute to the narrative that a photographer is trying
to convey. In some ways, a still life is like taking a portrait of something inanimate.
Bookcase, Plovdiv, Bulgaria, 2000 © Zion Ozeri
At the center of this photograph, we see a picture of a young boy. From the curled paper and
the clothing on the boy, we can tell that this is an old print of a photograph taken in the past. We
can see the image fairly well, though it is not presented to us upright and frontally. Behind the
photograph and on the shelves below are many tattered books that look worn with age. There is
a great deal of texture visible in their frayed pages and degrading spines. A tallis hangs over the
top shelf, with tzitzit delicately draping down towards the picture. The soft lighting on the picture,
books, and tallis contributes to a mood that is nostalgic and somber.
4a. Framing and the Rule of Thirds

The Rule of Thirds is an idea used by photographers to help frame a composition. It is more of a
trick or a guide than a rule- how you frame your photographs is your choice!
The Rule of Thirds is a grid of 9 boxes that you can imagine over the picture plane. It looks
something like this:
Placing your subject or key focal point near a spot where two of the lines intersect is considered
a good way to frame your image. The idea is to avoid always placing your subject in the center
part of the grid, or to avoid placing a landscape’s horizon line at the exact center.
Sagin, Yemen, 1992 © Zion Ozeri

4b. Contrast
Scribe, Mumbai, India, 2001 © Zion Ozeri
This image utilizes a lighting technique to emphasize the main subjects of the image: the man
and the Torah. Natural light pours in from a window to the right, which is just out of the frame.
The Torah appears particularly bright, adding to its symbolic significance in the image. There is
a strong contrast between the foreground, which appears bright, and background, which
appears dark. This lighting strategy encourages the viewer to focus on the man and the Torah
without getting visually distracted by other elements in the room.

4c. Scale and perception
Consider the vantage point from which you take your photographs. Instead of simply taking the
picture from eye level where you stand, see if you can get a more interesting image from up
high (perhaps standing on a chair) or from below (perhaps lying on the floor), from far away, or
close up. Pay attention to how this affects your perception of people and objects. Consider how
much of your frame is occupied by different elements, as well as the spatial relationship
between these elements. Does something in your picture look unexpectedly small or big? How
might you change this or use it to your advantage? One of the most important tools a
photographer has is their feet! Try out new or unexpected angles by moving around what or who
you are photographing.
Institute for Southern Jewish Life, Jackson, Mississippi, USA, 2008 © Zion Ozeri
This photograph is taken from a low angle, so that the central figure looks tall and confident.
Despite this, the top of his head only comes to the halfway point in the frame. The rest of the
frame is occupied by a large tree, whose sturdy-looking trunk frames the man. The branches
also frame the other individuals in the photograph. Because these individuals are set further
back in the photograph, they appear smaller. This gives us the sense that the central man is a
leader amongst the group.

4d. Balance
Hallway, Brooklyn, New York, USA, 1996 © Zion Ozeri
In this image we see a man talking to two children. We can tell that the photographer bent
down, so that the image was taken at about the height of the little boys. The top of the man’s hat
is slightly cut off by the top of the frame, and the boy’s faces are at the midline. How does this
angle change your perception of the figures in the image?
The taller adult is seen in the middle with one boy on each side. This balance is further
emphasized by the square frame of the photograph. The boy to the right is slightly shorter,
though this is visually balanced by the man leaning towards his direction. What part of the
photograph do you look at first? Pay attention to how your eyes move around the picture. What
elements do you notice first, then second, and so on? What direction do your eyes move?
Consider any shapes or lines you see in the image. If you focus for a few moments, do you
notice anything about the photograph or its framing that you didn’t see at first?
Related Documents