¡Port thread types G, Rc, NPT, added. 10 mm stroke 10 mm stroke Compact 6.5 .5 mm mm JCQ Ø 20 JCQ Ø 20 JCQ Ø 20 Current product Ø 20 (CDQS series) Current product Ø 20 (CDQS series) Overall length shortened 6 mm mm Width shortened 4 mm mm Height shortened 150 ga82 g (Compared with the current CDQS series, Ø 25, 10 mm stroke) 45 % lighter Max. Weight RoHS CAT.EUS20-239C-UK JCQ Series Compact Cylinder Ø 12, Ø 16, Ø 20, Ø 25, Ø 32, Ø 40, Ø 50, Ø 63, Ø 80, Ø 100

Welcome message from author
This document is posted to help you gain knowledge. Please leave a comment to let me know what you think about it! Share it to your friends and learn new things together.
Transcript

¡Port thread types G, Rc, NPT, added.
10 mm stroke
10 mm stroke
Compact
6.5 .5 mmmmJCQ Ø 20 JCQ Ø 20
JCQ Ø 20Current product Ø 20(CDQS series)
Current product Ø 20(CDQS series)
Overall lengthshortened
6 mmmm
Width shortened
4 mmmm
Height shortened
150 ga82 g(Compared with the current CDQS series,Ø 25, 10 mm stroke)
45 %lighter
Max.
Weight
RoHS
CAT.EUS20-239C-UK
JCQ Series
Compact CylinderØ 12, Ø 16, Ø 20, Ø 25, Ø 32, Ø 40, Ø 50, Ø 63, Ø 80, Ø 100
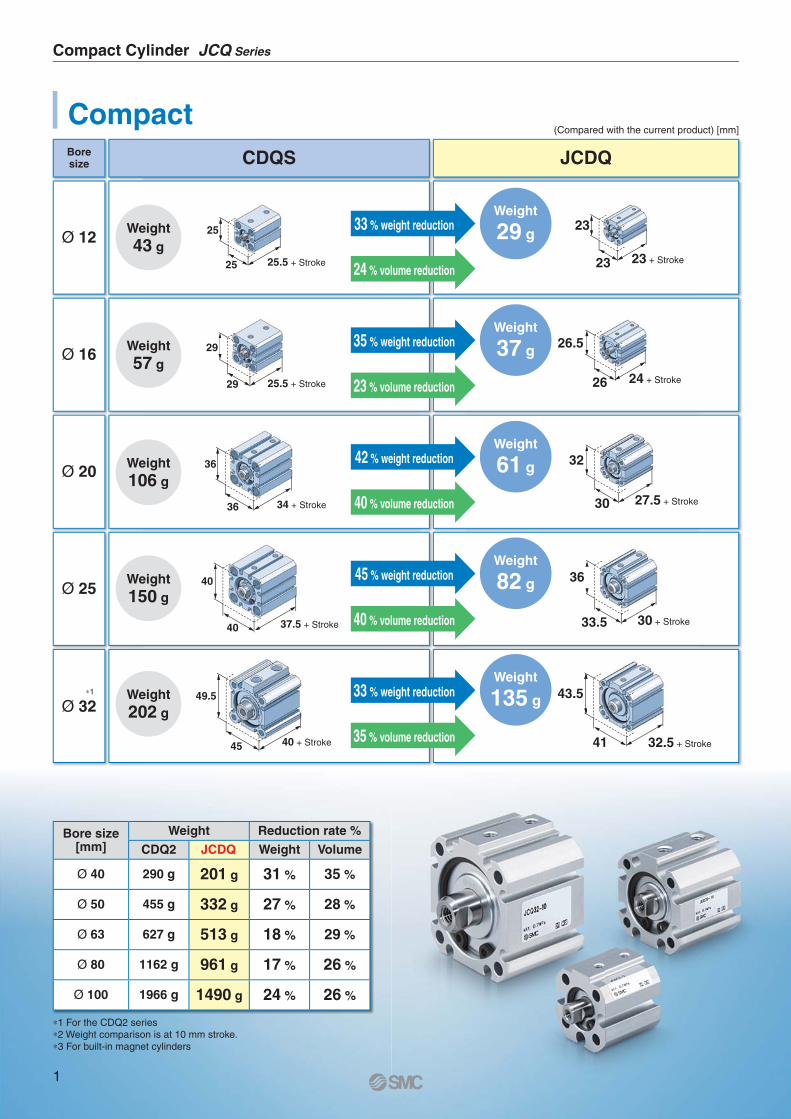
∗1 For the CDQ2 series∗2 Weight comparison is at 10 mm stroke.∗3 For built-in magnet cylinders
Bore size CDQS JCDQ
Ø 12
Ø 16
Ø 20
Ø 25
∗1
Ø 32
Compact Cylinder JCQ Series
Compact
Weight57 g
Weight106 g
Weight150 g
Weight202 g
Weight43 g
Weight
29 g
Weight
37 g
Weight
61 g
Weight
82 g
Weight
135 g
33 % weight reduction
24 % volume reduction
35 % weight reduction
23 % volume reduction
42 % weight reduction
40 % volume reduction
45 % weight reduction
40 % volume reduction
33 % weight reduction
35 % volume reduction 32.5 + Stroke
43.5
4140 + Stroke
49.5
45
(Compared with the current product) [mm]
23 + Stroke
23
23
24 + Stroke
26.5
26
30 27.5 + Stroke
32
30 + Stroke
36
33.5
25.5 + Stroke
25
25
25.5 + Stroke
29
29
34 + Stroke
36
36
37.5 + Stroke
40
40
Bore size[mm]
Weight Reduction rate %
CDQ2 JCDQ Weight Volume
Ø 40 290 g 201 g 31 % 35 %
Ø 50 455 g 332 g 27 % 28 %
Ø 63 627 g 513 g 18 % 29 %
Ø 80 1162 g 961 g 17 % 26 %
Ø 100 1966 g 1490 g 24 % 26 %
1

12 12 mm16 16 mm20 20 mm25 25 mm32 32 mm40 40 mm50 50 mm63 63 mm80 80 mm
100 100 mm
— 2S 1n n
— Without auto switch
Type Special function Electricalentry
Indica
tor lig
ht
Wiring(Output)
Load voltage Auto switch model Lead wire length [m]Pre-wiredconnector Applicable load
DC AC Perpendicular In-line 0.5(—)
1(M)
3(L)
5(Z)
None(N)
So
lid s
tate
au
to s
wit
ch —
Grommet Yes
3-wire (NPN)
24 V
5 V,12 V
—
M9NV M9N � � � � — � IC circuit
Relay,PLC
3-wire (PNP) M9PV M9P � � � � — �
2-wire 12 V M9BV M9B � � � � — � —
Diagnostic indication(2-colour indicator)
3-wire (NPN) 5 V,12 V
M9NWV M9NW � � � � — � IC circuit3-wire (PNP) M9PWV M9PW � � � � — �
2-wire 12 V M9BWV M9BW � � � � — � —
Water resistant(2-colour indicator)
3-wire (NPN) 5 V,12 V
M9NAV∗∗ M9NA∗∗ � � � � — � IC circuit3-wire (PNP) M9PAV∗∗ M9PA∗∗ � � � � — �
2-wire 12 V M9BAV∗∗ M9BA∗∗ � � � � — � —
—M thread Ø 12 to Ø 40
RcØ 50 to Ø 100TN NPT
TF G
Port thread type
Mounting— Through-hole (Standard)
A Both ends tapped
Compact CylinderDouble Acting, Single Rod
JCQ SeriesØ 12, Ø 16, Ø 20, Ø 25, Ø 32, Ø 40, Ø 50, Ø 63, Ø 80, Ø 100
∗ Lead wire length symbols: 0.5 m………… — (Example) M9NW 1 m………… M (Example) M9NWM 3 m………… L (Example) M9NWL 5 m………… Z (Example) M9NWZ
∗∗ Water resistant type auto switches can be mounted on the above models, but in such case SMC cannot guarantee water resistance.Please contact SMC regarding water resistant types with the above model numbers.
∗ Solid state auto switches marked with “�” are produced upon receipt of order.
∗ For details about auto switches with pre-wired connector, refer to the Auto Switch Guide.∗ Auto switches are shipped together, (but not assembled).
How to Order
3012
With magnet for auto switch
JCDQWith auto switch
Without auto switch
Auto switch
∗ For applicable auto switches, refer to the table below.
M9BW
Number of auto switches
3012JCQ
Applicable Auto Switches/Refer to the Auto Switch Guide for further information.
Cylinder stroke [mm]Refer to “Standard Strokes” on page 3.
Bore size
2
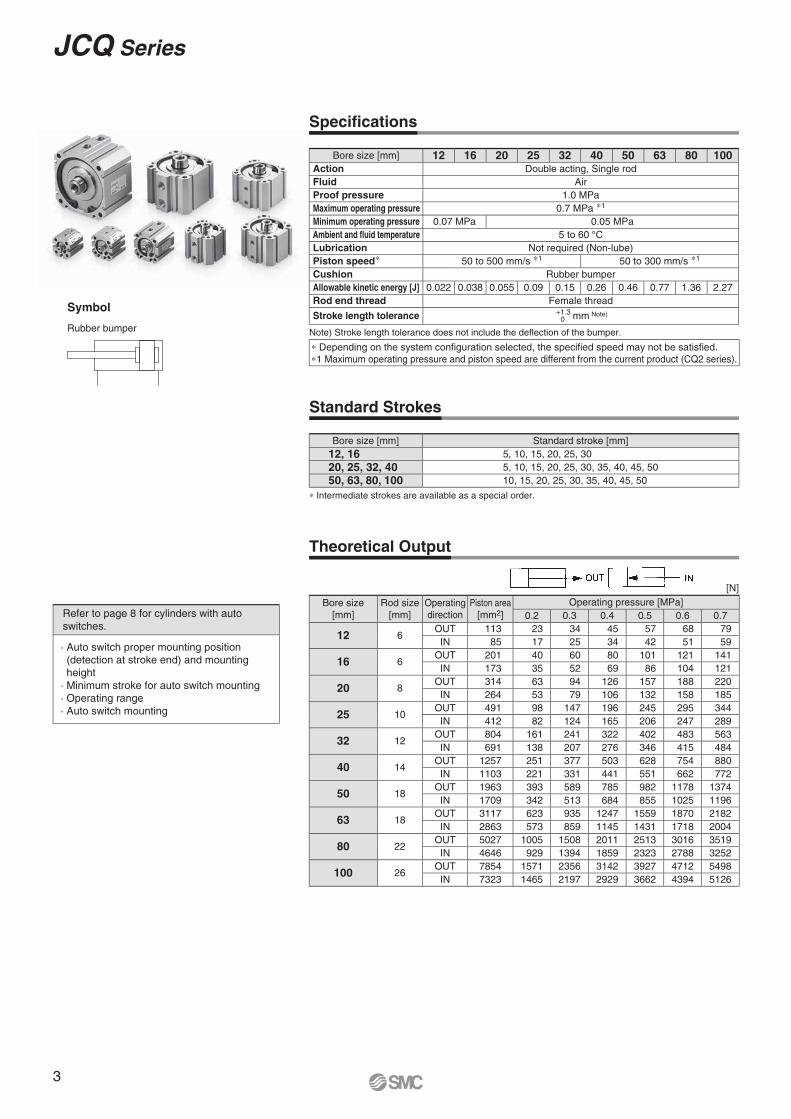
Bore size[mm]
Rod size[mm]
Operatingdirection
Piston area[mm2]
Operating pressure [MPa]0.2 0.3 0.4 0.5 0.6 0.7
12 6OUT 113 23 34 45 57 68 79IN 85 17 25 34 42 51 59
16 6OUT 201 40 60 80 101 121 141IN 173 35 52 69 86 104 121
20 8OUT 314 63 94 126 157 188 220IN 264 53 79 106 132 158 185
25 10OUT 491 98 147 196 245 295 344IN 412 82 124 165 206 247 289
32 12OUT 804 161 241 322 402 483 563IN 691 138 207 276 346 415 484
40 14OUT 1257 251 377 503 628 754 880IN 1103 221 331 441 551 662 772
50 18OUT 1963 393 589 785 982 1178 1374IN 1709 342 513 684 855 1025 1196
63 18OUT 3117 623 935 1247 1559 1870 2182IN 2863 573 859 1145 1431 1718 2004
80 22OUT 5027 1005 1508 2011 2513 3016 3519IN 4646 929 1394 1859 2323 2788 3252
100 26OUT 7854 1571 2356 3142 3927 4712 5498IN 7323 1465 2197 2929 3662 4394 5126
Refer to page 8 for cylinders with auto switches.
· Auto switch proper mounting position (detection at stroke end) and mounting height
· Minimum stroke for auto switch mounting· Operating range· Auto switch mounting
Bore size [mm] 12 16 20 25 32 40 50 63 80 100Action Double acting, Single rodFluid AirProof pressure 1.0 MPaMaximum operating pressure 0.7 MPa ∗1
Minimum operating pressure 0.07 MPa 0.05 MPaAmbient and fluid temperature 5 to 60 °CLubrication Not required (Non-lube)Piston speed∗ 50 to 500 mm/s ∗1 50 to 300 mm/s ∗1
Cushion Rubber bumperAllowable kinetic energy [J] 0.022 0.038 0.055 0.09 0.15 0.26 0.46 0.77 1.36 2.27Rod end thread Female thread
Stroke length tolerance +1.3 0 mm Note)
Bore size [mm] Standard stroke [mm]12, 16 5, 10, 15, 20, 25, 3020, 25, 32, 40 5, 10, 15, 20, 25, 30, 35, 40, 45, 5050, 63, 80, 100 10, 15, 20, 25, 30, 35, 40, 45, 50
Note) Stroke length tolerance does not include the defl ection of the bumper.
Standard Strokes
∗ Intermediate strokes are available as a special order.
Specifi cations
Symbol
Rubber bumper
[N]
Theoretical Output
∗ Depending on the system confi guration selected, the specifi ed speed may not be satisfi ed.∗1 Maximum operating pressure and piston speed are different from the current product (CQ2 series).
3
JCQ Series

Ø 80
Ø 63
Ø 50
Ø 40Ø 32
Ø 25
Ø 20Ø 16
Ø 12
Ø 100
0.4
1.0
10.0
100.0
0 10 20 30 40 50
Cylinder stroke [mm]
Allo
wab
le la
tera
l loa
d at
rod
end
[N]
Ø 80
Ø 63
Ø 50Ø 40Ø 32
Ø 25
Ø 20Ø 16
Ø 12
Ø 100
0.4
1.0
10.0
100.0
0 10 20 30 40 50
Allo
wab
le la
tera
l loa
d at
rod
end
[N]
Cylinder stroke [mm]
Mass of Cylinder Moving Parts:With Magnet for Auto Switch [g]
Bore size [mm]
Cylinder stroke [mm]
5 10 15 20 25 30 35 40 45 50
12 6 7 8 9 10 11 — — — —
16 7 8 9 10 11 12 — — — —
20 16 17 19 21 23 25 27 29 31 33
25 25 28 31 34 37 40 43 46 49 53
32 43 48 52 57 61 66 70 75 79 83
40 69 75 81 87 93 99 105 111 117 123
50 — 127 137 147 157 167 177 187 197 207
63 — 180 190 200 210 220 230 240 250 260
80 — 329 344 359 374 389 404 419 433 448
100 — 545 565 586 607 628 649 670 690 711
Mass of Cylinder Moving Parts:Without Magnet for Auto Switch [g]
Bore size [mm]
Cylinder stroke [mm]
5 10 15 20 25 30 35 40 45 50
12 5 6 7 8 9 10 — — — —
16 5 6 7 9 10 11 — — — —
20 9 11 13 15 17 19 21 23 25 27
25 15 18 21 24 27 30 33 37 40 43
32 27 32 36 41 45 50 54 59 63 67
40 42 48 54 60 66 73 79 85 91 97
50 — 91 101 111 121 131 141 151 161 171
63 — 130 140 150 159 169 179 189 199 209
80 — 240 255 270 285 300 315 329 344 359
100 — 426 446 467 488 509 530 551 572 592
Bore size [mm] 12 16 20 25 32 40 50 63Standard/Allowable kinetic energy: Ea
0.022 0.038 0.055 0.09 0.15 0.26 0.46 0.77 W (Mounting orientation: Horizontal)
Allowable Kinetic Energy
Load Mass and Piston Speed [J]
Kinetic energy E [J] =
m1: Mass of cylinder moving parts kgm2: Load mass kg
V: Piston speed m/s
(m1 + m2) V2
2
Allowable Lateral Load at Rod End
Without Magnet for Auto Switch
With Magnet for Auto Switch
[g]Without Magnet for Auto Switch
Weight
[g]With Magnet for Auto SwitchBore size
[mm]Cylinder stroke [mm]
5 10 15 20 25 30 35 40 45 50
12 21 25 30 35 39 44 — — — —
16 28 33 38 43 49 54 — — — —
20 40 47 55 62 69 77 84 91 99 106
25 55 64 73 83 92 101 110 119 128 138
32 94 108 121 135 148 162 175 189 202 215
40 145 161 177 194 210 226 243 259 275 292
50 — 284 309 334 359 384 410 435 460 485
63 — 452 483 514 545 576 606 637 668 699
80 — 850 899 948 997 1046 1095 1144 1193 1242
100 — 1348 1407 1465 1524 1582 1641 1700 1758 1817
Bore size[mm]
Cylinder stroke [mm]
5 10 15 20 25 30 35 40 45 50
12 25 29 34 38 43 48 — — — —
16 32 37 43 48 53 58 — — — —
20 53 61 68 75 83 90 98 105 112 120
25 73 82 91 100 109 119 128 137 146 155
32 122 135 149 162 176 189 203 216 230 243
40 184 201 217 233 250 266 282 299 315 331
50 — 332 357 383 408 433 458 483 508 533
63 — 513 544 575 606 637 667 698 729 760
80 — 961 1010 1059 1109 1158 1207 1256 1305 1354
100 — 1490 1549 1608 1666 1725 1783 1842 1901 1959
4
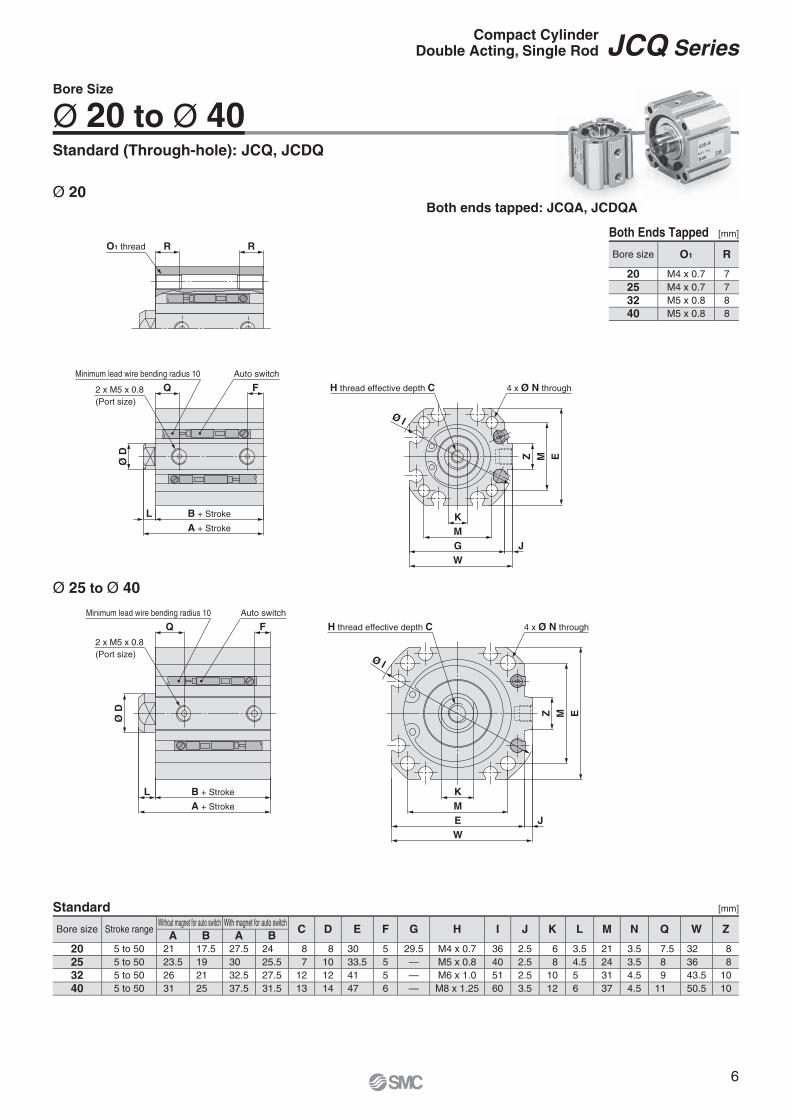
Compact CylinderDouble Acting, Single Rod JCQ Series

Minimum lead wire bending radius 10
H thread effective depth C
Auto switch
4 x Ø N through
EMZ
K
M
G J
W
Ø I
Minimum lead wire bending radius 10 Auto switch
4 x Ø N throughH thread effective depth C
EMZ
K
M
G
W
J
Q F
B + Stroke
A + Stroke
L
Ø D
2 x M3 x 0.5(Port size)
Q F
2 x M3 x 0.5(Port size)
Ø D
B + Stroke
A + Stroke
L
Ø I
RRO1 thread
Ø 12, Ø 16Standard (Through-hole): JCQ, JCDQ
Bore Size
Both ends tapped: JCQA, JCDQA
Both Ends Tapped [mm]
Bore size O1 R
12 M4 x 0.7 716 M4 x 0.7 7
Ø 12
Ø 16
Standard [mm]
Bore size Stroke rangeWithout magnet for auto switch With magnet for auto switch
C D E F G H I J K L M N Q W ZA B A B12 5 to 30 19.5 16 23 19.5 6 6 23 4 21.5 M3 x 0.5 26 1.5 5 3.5 14 3.5 7 23 816 5 to 30 20.5 17 24 20.5 6 6 26 4 25 M3 x 0.5 31 1.5 5 3.5 17 3.5 8 26.5 8
5
JCQ Series
WGMK
JEMZ
Ø I
FQ
Ø D
L
EMZ
Ø I
WEMK
J
L
Ø D
FQ
RR
H thread effective depth C 4 x Ø N through
H thread effective depth C 4 x Ø N through
2 x M5 x 0.8(Port size)
Minimum lead wire bending radius 10 Auto switch
2 x M5 x 0.8(Port size)
Minimum lead wire bending radius 10 Auto switch
O1 thread
A + Stroke
B + Stroke
A + Stroke
B + Stroke
Ø 20 to Ø 40Standard (Through-hole): JCQ, JCDQ
Ø 25 to Ø 40
Ø 20
Standard [mm]
Bore size Stroke rangeWithout magnet for auto switch With magnet for auto switch
C D E F G H I J K L M N Q W ZA B A B20 5 to 50 21 17.5 27.5 24 8 8 30 5 29.5 M4 x 0.7 36 2.5 6 3.5 21 3.5 7.5 32 825 5 to 50 23.5 19 30 25.5 7 10 33.5 5 — M5 x 0.8 40 2.5 8 4.5 24 3.5 8 36 832 5 to 50 26 21 32.5 27.5 12 12 41 5 — M6 x 1.0 51 2.5 10 5 31 4.5 9 43.5 1040 5 to 50 31 25 37.5 31.5 13 14 47 6 — M8 x 1.25 60 3.5 12 6 37 4.5 11 50.5 10
Bore Size
Both ends tapped: JCQA, JCDQA
Both Ends Tapped [mm]
Bore size O1 R
20 M4 x 0.7 725 M4 x 0.7 732 M5 x 0.8 840 M5 x 0.8 8
6
Compact CylinderDouble Acting, Single Rod JCQ Series
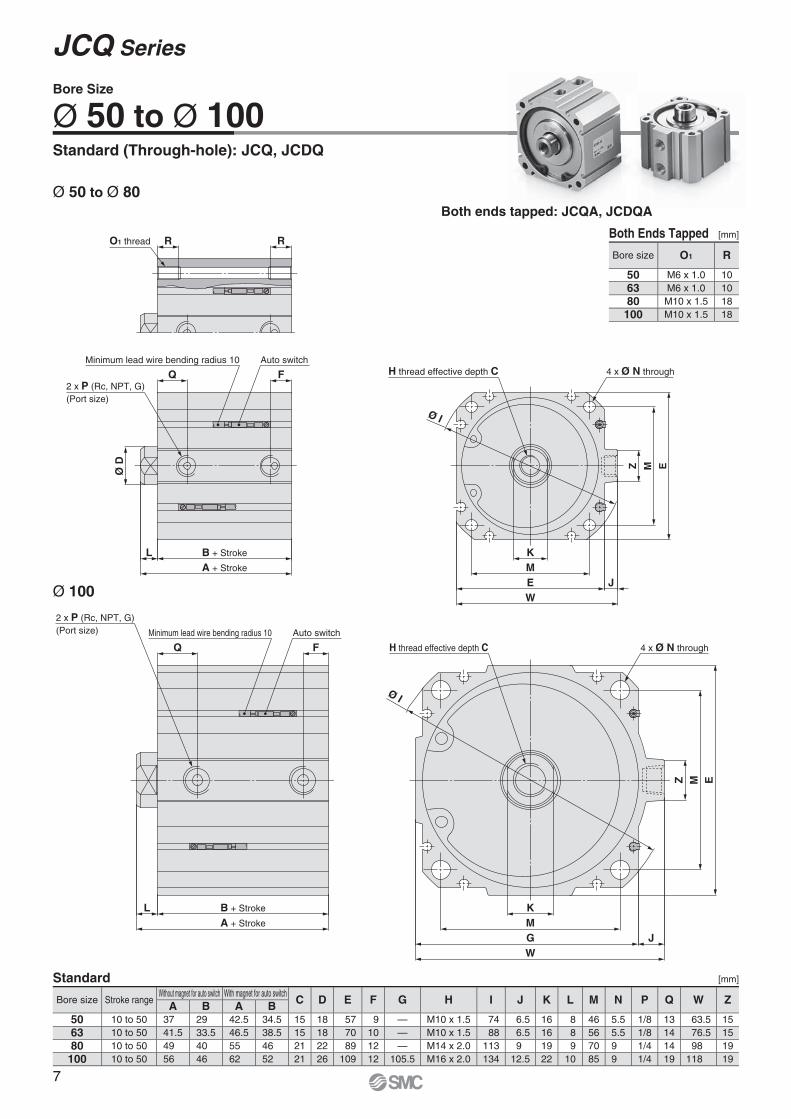
Ø 50 to Ø 80
Ø 100
RRO1 thread
Auto switchMinimum lead wire bending radius 10
FQ2 x P (Rc, NPT, G)(Port size)
Ø D
A + Stroke
B + StrokeL
WEMK
J
EMZ
4 x Ø N throughH thread effective depth C
Ø I
A + Stroke
B + StrokeL
FQAuto switchMinimum lead wire bending radius 10
2 x P (Rc, NPT, G)(Port size)
4 x Ø N through
EMZ
H thread effective depth C
Ø I
WGMK
J
Standard (Through-hole): JCQ, JCDQ
Ø 50 to Ø 100Bore Size
Both ends tapped: JCQA, JCDQA
Both Ends Tapped [mm]
Bore size O1 R
50 M6 x 1.0 1063 M6 x 1.0 1080 M10 x 1.5 18
100 M10 x 1.5 18
Standard [mm]
Bore size Stroke rangeWithout magnet for auto switch With magnet for auto switch
C D E F G H I J K L M N P Q W ZA B A B50 10 to 50 37 29 42.5 34.5 15 18 57 9 — M10 x 1.5 74 6.5 16 8 46 5.5 1/8 13 63.5 1563 10 to 50 41.5 33.5 46.5 38.5 15 18 70 10 — M10 x 1.5 88 6.5 16 8 56 5.5 1/8 14 76.5 1580 10 to 50 49 40 55 46 21 22 89 12 — M14 x 2.0 113 9 19 9 70 9 1/4 14 98 19100 10 to 50 56 46 62 52 21 26 109 12 105.5 M16 x 2.0 134 12.5 22 10 85 9 1/4 19 118 19
7
JCQ Series
≈UA B
Auto switch model
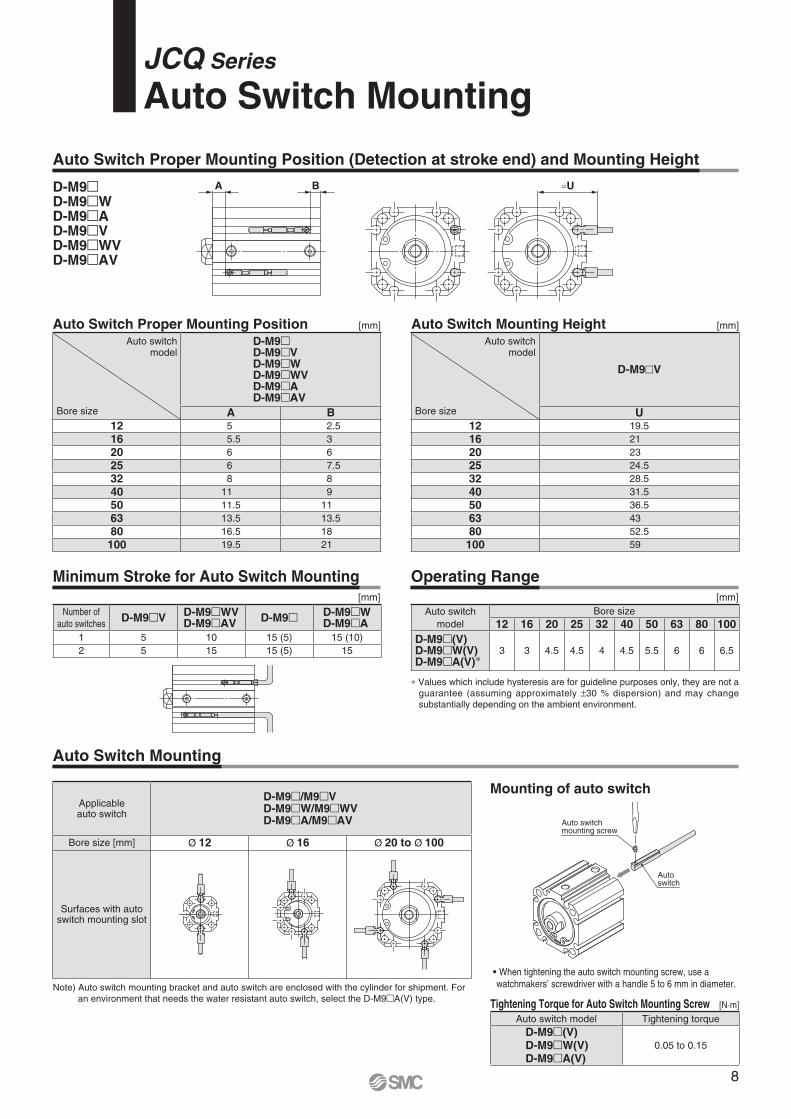
Bore size12 16 20 25 32 40 50 63 80 100
D-M9�(V)D-M9�W(V)D-M9�A(V)∗
3 3 4.5 4.5 4 4.5 5.5 6 6 6.5
Number ofauto switches D-M9�V D-M9�WV
D-M9�AV D-M9� D-M9�WD-M9�A
1 5 10 15 (5) 15 (10)2 5 15 15 (5) 15
Auto switchmodel
Bore size
D-M9�V
U12 19.516 2120 2325 24.532 28.540 31.550 36.563 4380 52.5
100 59
Auto switchmodel
Bore size
D-M9�D-M9�VD-M9�WD-M9�WVD-M9�AD-M9�AV
A B12 5 2.516 5.5 320 6 625 6 7.532 8 840 11 950 11.5 1163 13.5 13.580 16.5 18100 19.5 21
Applicableauto switch
D-M9�/M9�VD-M9�W/M9�WVD-M9�A/M9�AV
Bore size [mm] Ø 12 Ø 16 Ø 20 to Ø 100
Surfaces with auto switch mounting slot
Auto switchmounting screw
Autoswitch
Auto switch model Tightening torqueD-M9�(V)D-M9�W(V)D-M9�A(V)
0.05 to 0.15
D-M9�D-M9�WD-M9�AD-M9�VD-M9�WVD-M9�AV
Auto Switch Proper Mounting Position (Detection at stroke end) and Mounting Height
Minimum Stroke for Auto Switch Mounting Operating Range
[mm]Auto Switch Proper Mounting Position [mm]Auto Switch Mounting Height
[mm]
∗ Values which include hysteresis are for guideline purposes only, they are not a guarantee (assuming approximately ±30 % dispersion) and may change substantially depending on the ambient environment.
[mm]
JCQ Series
Auto Switch Mounting
Note) Auto switch mounting bracket and auto switch are enclosed with the cylinder for shipment. For an environment that needs the water resistant auto switch, select the D-M9�A(V) type.
Auto Switch Mounting
Tightening Torque for Auto Switch Mounting Screw [N·m]
• When tightening the auto switch mounting screw, use a watchmakers’ screwdriver with a handle 5 to 6 mm in diameter.
Mounting of auto switch
8

Relay
RelayLoad
Load
Load
Load Load
Load Load
Load
Blue
Black
Brown
Auto switch 2
Blue
Black
Brown
Auto switch 1
Blue
Black
Brown
Auto switch 2
Blue
Black
Brown
Auto switch 1
Blue
Black
Brown
Auto switch 2
Blue
Black
Brown
Auto switch 1
Blue
Black
Brown
Auto switch 2
Blue
Black
Brown
Auto switch 1
Blue
Brown
Auto switch 2
Blue
Brown
Auto switch 1
Blue
Black
Brown
Auto switch 2
Blue
Black
Brown
Auto switch 1
Blue
Brown
Auto switch 2
Blue
Brown
Auto switch 1
Blue
Black
Brown
Auto switch 2
Blue
Black
Brown
Auto switch 1
Input
COM
COMCOM
COM
InputInput
Input
Blue
Brown
Blue
Brown
Blue
Black
Brown
Blue
Black
Brown
Auto switch
Auto switch
Auto switch
Auto switch
∗ When using solid state auto switches, ensure the application is set up so the signals for the fi rst 50 ms are invalid.
Connect according to the applicable PLC input specifi cations, as the connection method will vary depending on the PLC input specifi cations.
Because there is no current leakage, the load voltage will not increase when turned OFF. However, depending on the number of auto switches in the ON state, the indicator lights may sometimes grow dim or not light up, due to the dispersion and reduction of the current fl owing to the auto switches.
When two auto switches are connected in parallel, malfunction may occur because the load voltage will increase when in the OFF state.Auto switches with load
vo l tage less than 20 V cannot be used.
When two auto switches are connected in series, a load may malfunction because the load voltage will decline when in the ON state.The indicator lights will light up when both of the auto switches are in the ON state.
(Reed)(Solid state)
Example: Load impedance is 3 kΩ.Leakage current from auto switch is 1 mA.
Load voltage at OFF = Leakage current x 2 pcs. x Load impedance
= 1 mA x 2 pcs. x 3 kΩ= 6 V
Example: Power supply is 24 V DCInternal voltage drop in auto switch is 4 V.
Load voltage at ON = Power supply voltage – Residual voltage x 2 pcs.
= 24 V − 4 V x 2 pcs.= 16 V
Prior to UseAuto Switch Connection and Example
3-wire, NPN
2-wire
3-wire, PNP
2-wire
(PLC internal circuit)
(PLC internal circuit)
(PLC internal circuit)
(PLC internal circuit)
3-wire AND connection for NPN output(Using relays) (Performed with auto switches only)
3-wire OR connection for NPN output
3-wire AND connection for PNP output(Using relays) (Performed with auto switches only)
3-wire OR connection for PNP output
2-wire AND connection 2-wire OR connection
Sink Input Specifi cations
Example of AND (Series) and OR (Parallel) Connection
Source Input Specifi cations
9
Mounting
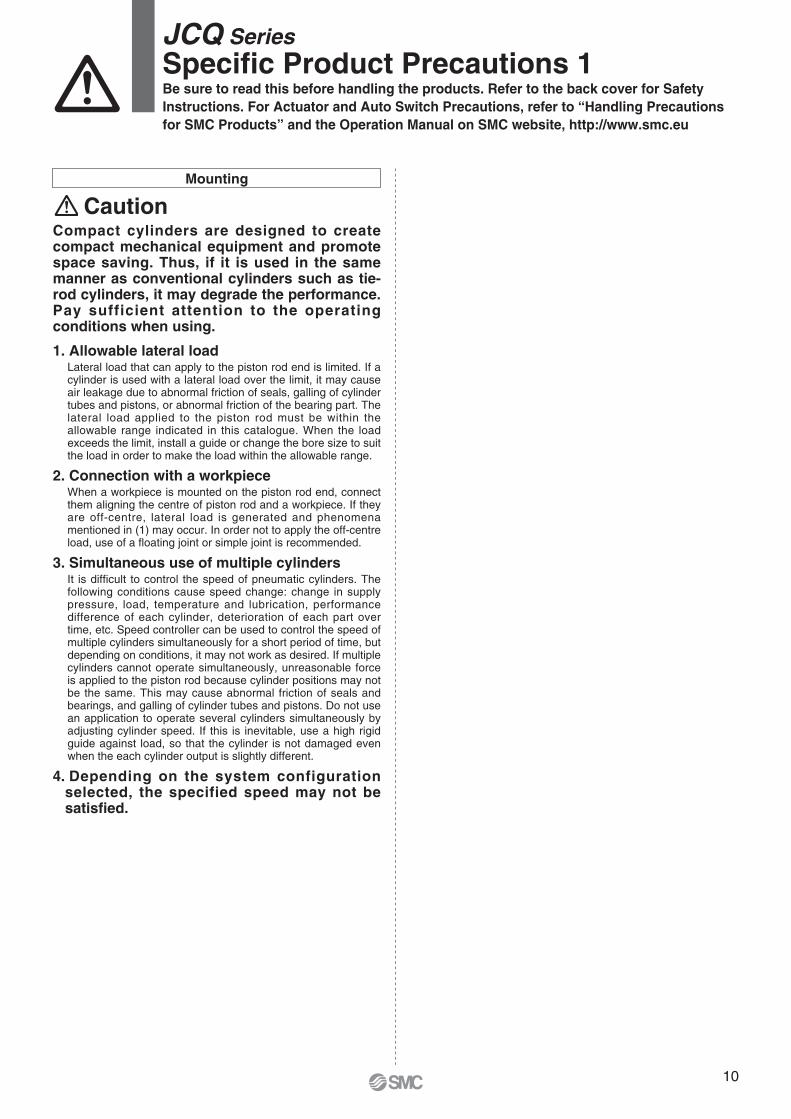
Compact cylinders are designed to create compact mechanical equipment and promote space saving. Thus, if it is used in the same manner as conventional cylinders such as tie-rod cylinders, it may degrade the performance. Pay sufficient attention to the operating conditions when using.
Caution
1. Allowable lateral loadLateral load that can apply to the piston rod end is limited. If a cylinder is used with a lateral load over the limit, it may cause air leakage due to abnormal friction of seals, galling of cylinder tubes and pistons, or abnormal friction of the bearing part. The lateral load applied to the piston rod must be within the allowable range indicated in this catalogue. When the load exceeds the limit, install a guide or change the bore size to suit the load in order to make the load within the allowable range.
2. Connection with a workpieceWhen a workpiece is mounted on the piston rod end, connect them aligning the centre of piston rod and a workpiece. If they are off-centre, lateral load is generated and phenomena mentioned in (1) may occur. In order not to apply the off-centre load, use of a fl oating joint or simple joint is recommended.
3. Simultaneous use of multiple cylindersIt is diffi cult to control the speed of pneumatic cylinders. The following conditions cause speed change: change in supply pressure, load, temperature and lubrication, performance difference of each cylinder, deterioration of each part over time, etc. Speed controller can be used to control the speed of multiple cylinders simultaneously for a short period of time, but depending on conditions, it may not work as desired. If multiple cylinders cannot operate simultaneously, unreasonable force is applied to the piston rod because cylinder positions may not be the same. This may cause abnormal friction of seals and bearings, and galling of cylinder tubes and pistons. Do not use an application to operate several cylinders simultaneously by adjusting cylinder speed. If this is inevitable, use a high rigid guide against load, so that the cylinder is not damaged even when the each cylinder output is slightly different.
4. Depending on the system configuration selected, the specified speed may not be satisfi ed.
Be sure to read this before handling the products. Refer to the back cover for Safety Instructions. For Actuator and Auto Switch Precautions, refer to “Handling Precautions for SMC Products” and the Operation Manual on SMC website, http://www.smc.eu
JCQ SeriesSpecifi c Product Precautions 1
10

With Magnet for Auto Switch
�: Applicable to mounting condition 1 and 2.
Bore size [mm] 12 16 20 25 32Port size M3 x 0.5 M5 x 0.8
Stroke [mm] 5 or more 5 or more 5 or more 5 or more 5 or more
Elbowtype
AS12�1F-M3-04 � � — — —AS12�1F-M5E-04A — — � � �
AS12�1F-M5E-06A — — � � �
Universaltype
AS13�1F-M3-04 � � — — —AS13�1F-M5E-04A — — � � �
AS13�1F-M5E-06A — — � � �
Without Magnet for Auto Switch
�: Applicable to mounting condition 1 and 2.
Bore size [mm] 12 16 20 25 32Port size M3 x 0.5 M5 x 0.8
Stroke [mm] 5 or more 5 or more 5 or more 5 or more 5 or more
Elbowtype
AS12�1F-M3-04 � � — — —AS12�1F-M5E-04A — — � � �
AS12�1F-M5E-06A — — � � �
Universaltype
AS13�1F-M3-04 � � — — —AS13�1F-M5E-04A — — � � �
AS13�1F-M5E-06A — — � � �
Mounting Fittings and Speed Controllers (for Ø 12 to Ø 32)
Use the series models listed below when connecting speed controllers and fittings directly to cylinders.
<One-touch Fittings> <Speed Controllers>With Magnet for Auto Switch
�: Applicable to mounting condition 1 and 2.�: Applicable to mounting condition 1.
Bore size [mm] 12 16 20 25 32Port size M3 x 0.5 M5 x 0.8
Stroke [mm] 5 or more 5 or more 5 or more 5 or more 5 or moreMale connector(with hexagonsocket head)
KQ2S04-M3G � � — — —KQ2S04-M5� — — � � �
KQ2S06-M5� — — � � �
Maleconnector
KQ2H04-M3G � � — — —KQ2H04-M5� — — � � �
KQ2H06-M5� — — � � �
Maleelbow
KQ2L04-M3G � � — — —KQ2L04-M5� — — � � �
KQ2L06-M5� — — � � �
∗ The above fi gures show the mounting conditions with the KQ2S One-touch fi ttings.
∗ The above fi gures show the mounting conditions with the AS12�1F-M5E-�A elbow type speed controllers.
Mounting condition 1 Mounting condition 1Mounting condition 2 Mounting condition 2
Without Magnet for Auto Switch
�: Applicable to mounting condition 1 and 2.�: Applicable to mounting condition 1.
Bore size [mm] 12 16 20 25 32Port size M3 x 0.5 M5 x 0.8
Stroke [mm] 5 or more 5 or more 5 10 or more 5 10 or more 5 or moreMale connector(with hexagonsocket head)
KQ2S04-M3G � � — — — — —KQ2S04-M5� — — � � � � �
KQ2S06-M5� — — � � � � �
Maleconnector
KQ2H04-M3G � � — — — — —KQ2H04-M5� — — � � � � �
KQ2H06-M5� — — — � — � �
Maleelbow
KQ2L04-M3G � � — — — — —KQ2L04-M5� — — � � � � �
KQ2L06-M5� — — � � � � �
Caution
1. After tightening the fi tting by hand, use a wrench to tighten the fi tting an additional approximately 1/4 turn for a port size of M3 x 0.5 or 1/6 turn for a port size of M5 x 0.8. For elbow type fi ttings, tighten an additional 1/2 turn for a port size of M3 x 0.5 or 1/3 turn for a port size of M5 x 0.8 if gaskets are mounted in two places. If screws are tightened excessively, air leakage may result due to broken threads or a deformed gasket. If screws are tightened insuffi ciently, looseness and accompanying air leakage are likely to occur.
Be sure to read this before handling the products. Refer to the back cover for Safety Instructions. For Actuator and Auto Switch Precautions, refer to “Handling Precautions for SMC Products” and the Operation Manual on SMC website, http://www.smc.eu
JCQ SeriesSpecifi c Product Precautions 2
11

Lithuania +370 5 2308118 www.smclt.lt [email protected] +31 (0)205318888 www.smcpneumatics.nl [email protected] +47 67129020 www.smc-norge.no [email protected] +48 222119600 www.smc.pl [email protected] +351 226166570 www.smc.eu [email protected] +40 213205111 www.smcromania.ro [email protected] +7 8127185445 www.smc-pneumatik.ru [email protected] +421 (0)413213212 www.smc.sk [email protected] +386 (0)73885412 www.smc.si [email protected] +34 902184100 www.smc.eu [email protected] +46 (0)86031200 www.smc.nu [email protected] +41 (0)523963131 www.smc.ch [email protected] +90 212 489 0 440 www.smcpnomatik.com.tr [email protected] UK +44 (0)845 121 5122 www.smcpneumatics.co.uk [email protected]
Specifications are subject to change without prior notice and any obligation on the part of the manufacturer.SMC CORPORATION Akihabara UDX 15F, 4-14-1, Sotokanda, Chiyoda-ku, Tokyo 101-0021, JAPAN Phone: 03-5207-8249 FAX: 03-5298-5362
1st printing TT printing TU 00 Printed in Spain
Austria +43 (0)2262622800 www.smc.at [email protected] +32 (0)33551464 www.smcpneumatics.be [email protected] +359 (0)2807670 www.smc.bg [email protected] Croatia +385 (0)13707288 www.smc.hr [email protected] Republic +420 541424611 www.smc.cz [email protected] Denmark +45 70252900 www.smcdk.com [email protected] Estonia +372 6510370 www.smcpneumatics.ee [email protected] +358 207513513 www.smc.fi [email protected] +33 (0)164761000 www.smc-france.fr [email protected] +49 (0)61034020 www.smc.de [email protected] +30 210 2717265 www.smchellas.gr [email protected] +36 23511390 www.smc.hu [email protected] +353 (0)14039000 www.smcpneumatics.ie [email protected] +39 0292711 www.smcitalia.it [email protected] +371 67817700 www.smclv.lv [email protected]
Safety Instructions Be sure to read “Handling Precautions for SMC Products” (M-E03-3) before using.
SMC Corporation (Europe)
1. The compatibility of the product is the responsibility of the person who designs the equipment or decides its specifications.
Since the product specified here is used under various operating conditions, its compatibility with specific equipment must be decided by the person who designs the equipment or decides its specifications based on necessary analysis and test results. The expected performance and safety assurance of the equipment will be the responsibility of the person who has determined its compatibility with the product. This person should also continuously review all specifications of the product referring to its latest catalogue information, with a view to giving due consideration to any possibility of equipment failure when configuring the equipment.
2. Only personnel with appropriate training should operate machinery and equipment.
The product specified here may become unsafe if handled incorrectly. The assembly, operation and maintenance of machines or equipment including our products must be performed by an operator who is appropriately trained and experienced.
3. . Do not service or attempt to remove product and machinery/equipment until safety is confirmed.1. The inspection and maintenance of machinery/equipment should only be performed
after measures to prevent falling or runaway of the driven objects have been confirmed.
2. When the product is to be removed, confirm that the safety measures as mentioned above are implemented and the power from any appropriate source is cut, and read and understand the specific product precautions of all relevant products carefully.
3. Before machinery/equipment is restarted, take measures to prevent unexpected operation and malfunction.
4. Contact SMC beforehand and take special consideration of safety measures if the product is to be used in any of the following conditions. 1. Conditions and environments outside of the given specifications, or use outdoors or in
a place exposed to direct sunlight.2. Installation on equipment in conjunction with atomic energy, railways, air navigation,
space, shipping, vehicles, military, medical treatment, combustion and recreation, or equipment in contact with food and beverages, emergency stop circuits, clutch and brake circuits in press applications, safety equipment or other applications unsuitable for the standard specifications described in the product catalogue.
3. An application which could have negative effects on people, property, or animals requiring special safety analysis.
4. Use in an interlock circuit, which requires the provision of double interlock for possible failure by using a mechanical protective function, and periodical checks to confirm proper operation.
Warning Limited warranty and Disclaimer/Compliance Requirements The product used is subject to the following “Limited warranty and Disclaimer” and “Compliance Requirements”.Read and accept them before using the product.
1. The product is provided for use in manufacturing industries.The product herein described is basically provided for peaceful use in manufacturing industries. If considering using the product in other industries, consult SMC beforehand and exchange specifications or a contract if necessary. If anything is unclear, contact your nearest sales branch.
CautionSMC products are not intended for use as instruments for legal metrology.Measurement instruments that SMC manufactures or sells have not been qualified by type approval tests relevant to the metrology (measurement) laws of each country.Therefore, SMC products cannot be used for business or certification ordained by the metrology (measurement) laws of each country.
Caution
Limited warranty and Disclaimer1. The warranty period of the product is 1 year in service or 1.5 years
after the product is delivered, wichever is first.∗2)
Also, the product may have specified durability, running distance or replacement parts. Please consult your nearest sales branch.
2. For any failure or damage reported within the warranty period which is clearly our responsibility, a replacement product or necessary parts will be provided. This limited warranty applies only to our product independently, and not to any other damage incurred due to the failure of the product.
3. Prior to using SMC products, please read and understand the warranty terms and disclaimers noted in the specified catalogue for the particular products.
∗2) Vacuum pads are excluded from this 1 year warranty.A vacuum pad is a consumable part, so it is warranted for a year after it is delivered. Also, even within the warranty period, the wear of a product due to the use of the vacuum pad or failure due to the deterioration of rubber material are not covered by the limited warranty.
Compliance Requirements1. The use of SMC products with production equipment for the manufacture of
weapons of mass destruction (WMD) or any other weapon is strictly prohibited.
2. The exports of SMC products or technology from one country to another are governed by the relevant security laws and regulations of the countries involved in the transaction. Prior to the shipment of a SMC product to another country, assure that all local rules governing that export are known and followed.
These safety instructions are intended to prevent hazardous situations and/or equipment damage. These instructions indicate the level of potential hazard with the labels of “Caution,” “Warning” or “Danger.” They are all important notes for safety and must be followed in addition to International Standards (ISO/IEC)∗1), and other safety regulations.
∗1) ISO 4414: Pneumatic fluid power – General rules relating to systems. ISO 4413: Hydraulic fluid power – General rules relating to systems. IEC 60204-1: Safety of machinery – Electrical equipment of machines. (Part 1: General requirements) ISO 10218-1: Manipulating industrial robots - Safety. etc.
Caution indicates a hazard with a low level of risk which, if not avoided, could result in minor or moderate injury.
Warning indicates a hazard with a medium level of risk which, if not avoided, could result in death or serious injury.
Caution:
Warning:
Danger : Danger indicates a hazard with a high level of risk which, if not avoided, will result in death or serious injury.
Safety Instructions
Related Documents