1 【Java 1.8.0_77 Installation Manual】 2016/12/13 Project IT Dept. / FETEC PMSSUPPORT This manual shall guide you on the installation of Java 1.8.0_77 to PC running on Windows 7 platform. ※Installation procedure for English PC is similar with Japanese procedure, though the screenshots provided are in Japanese. 0. Verify the installed Java version 1) Click [Start], then open Control Panel and click on [Programs and Features]. 2) Check if you have Version 8 Update 77 not installed.

Welcome message from author
This document is posted to help you gain knowledge. Please leave a comment to let me know what you think about it! Share it to your friends and learn new things together.
Transcript
1
【Java 1.8.0_77 Installation Manual】 2016/12/13
Project IT Dept. / FETEC PMSSUPPORT This manual shall guide you on the installation of Java 1.8.0_77 to PC running on Windows 7 platform. ※Installation procedure for English PC is similar with Japanese procedure, though the
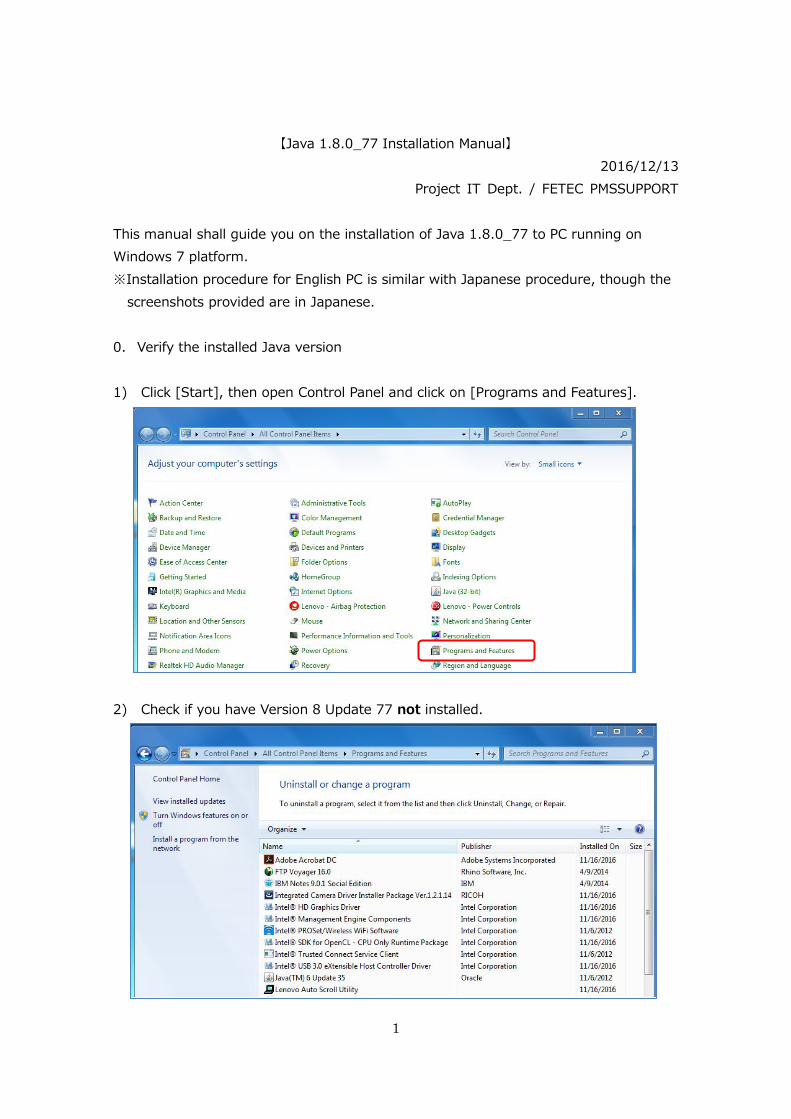
screenshots provided are in Japanese. 0. Verify the installed Java version 1) Click [Start], then open Control Panel and click on [Programs and Features].
2) Check if you have Version 8 Update 77 not installed.
2
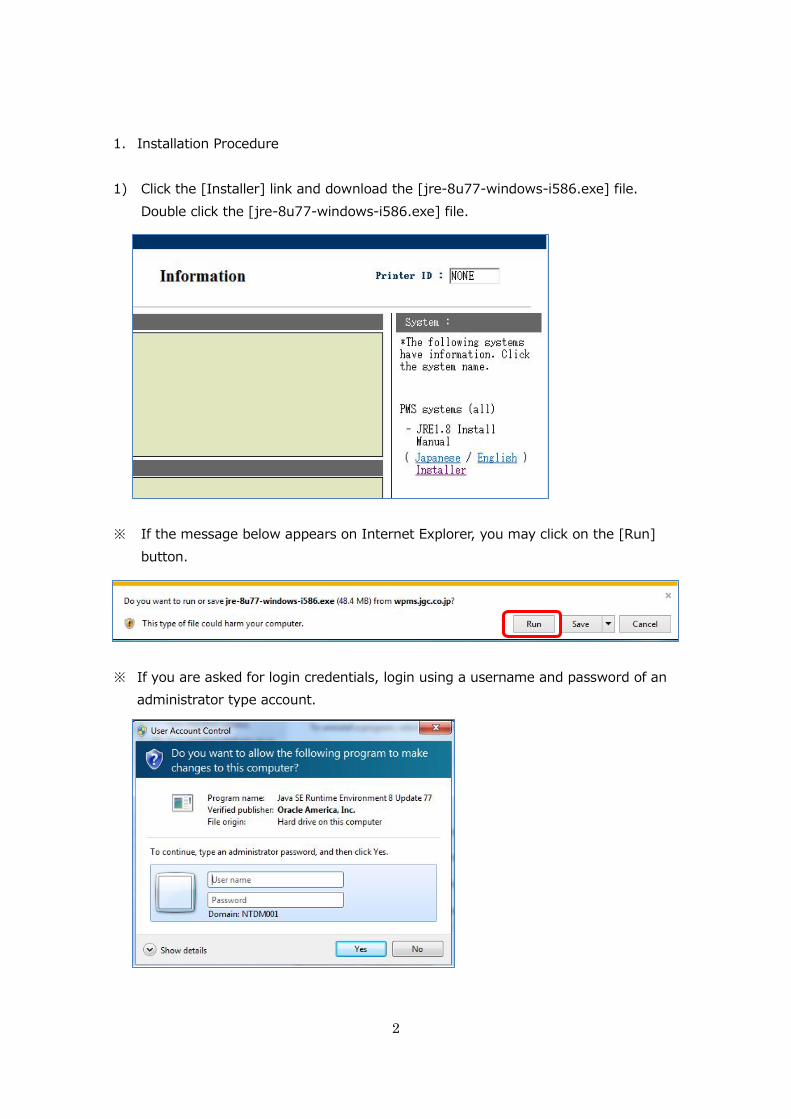
1. Installation Procedure 1) Click the [Installer] link and download the [jre-8u77-windows-i586.exe] file.
Double click the [jre-8u77-windows-i586.exe] file.
※ If the message below appears on Internet Explorer, you may click on the [Run]
button.
※ If you are asked for login credentials, login using a username and password of an
administrator type account.

3
2) Click the [Yes] button to begin installation. 3) Once the [Java Setup] screen appears, click the [Install] button. *If the [Uninstall Previous Version] screen appears, click the [Remind Me Later] button. *If the [Security Prompt] screen appears, click the [Next] button.

4
4) When installation is done, click the [Close] button. 5) After closing the previous screen, you will be directed to a Java website. Click [X] to
close this window.
5
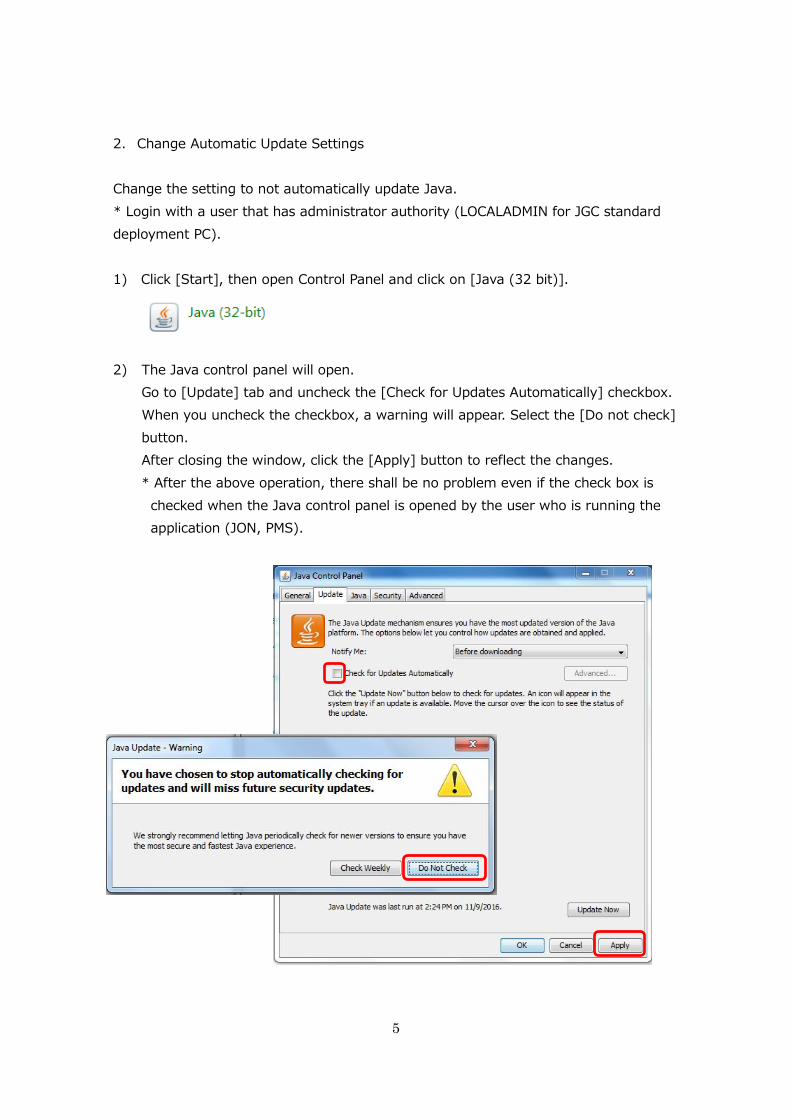
2. Change Automatic Update Settings Change the setting to not automatically update Java. * Login with a user that has administrator authority (LOCALADMIN for JGC standard deployment PC). 1) Click [Start], then open Control Panel and click on [Java (32 bit)].
2) The Java control panel will open.
Go to [Update] tab and uncheck the [Check for Updates Automatically] checkbox. When you uncheck the checkbox, a warning will appear. Select the [Do not check] button. After closing the window, click the [Apply] button to reflect the changes. * After the above operation, there shall be no problem even if the check box is
checked when the Java control panel is opened by the user who is running the application (JON, PMS).
6
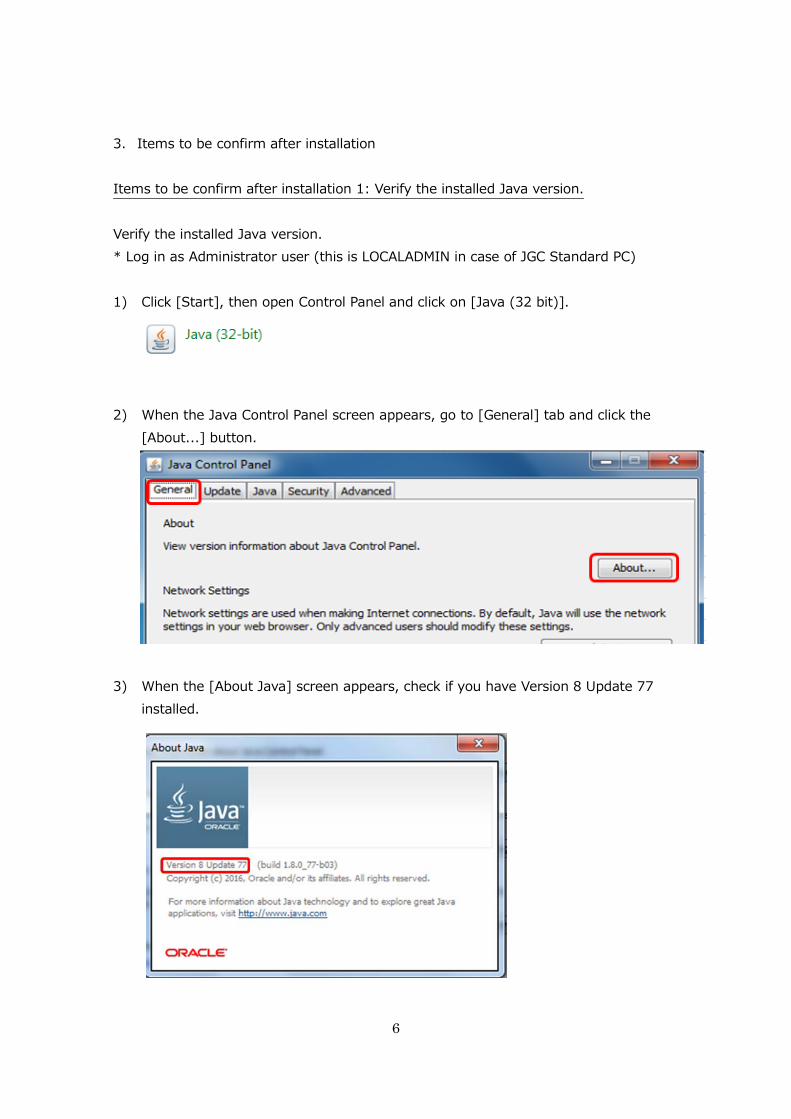
3. Items to be confirm after installation Items to be confirm after installation 1: Verify the installed Java version. Verify the installed Java version. * Log in as Administrator user (this is LOCALADMIN in case of JGC Standard PC) 1) Click [Start], then open Control Panel and click on [Java (32 bit)]. 2) When the Java Control Panel screen appears, go to [General] tab and click the
[About...] button. 3) When the [About Java] screen appears, check if you have Version 8 Update 77
installed.

7
If in case the version mention above was not displayed, do the following process. 1) Restart the PC
Once the PC was restarted, the version number will change. 2) Uninstall the old JRE
In the Control Panel, uninstall the JRE then restart the PC. After restarting, check the version again.
8
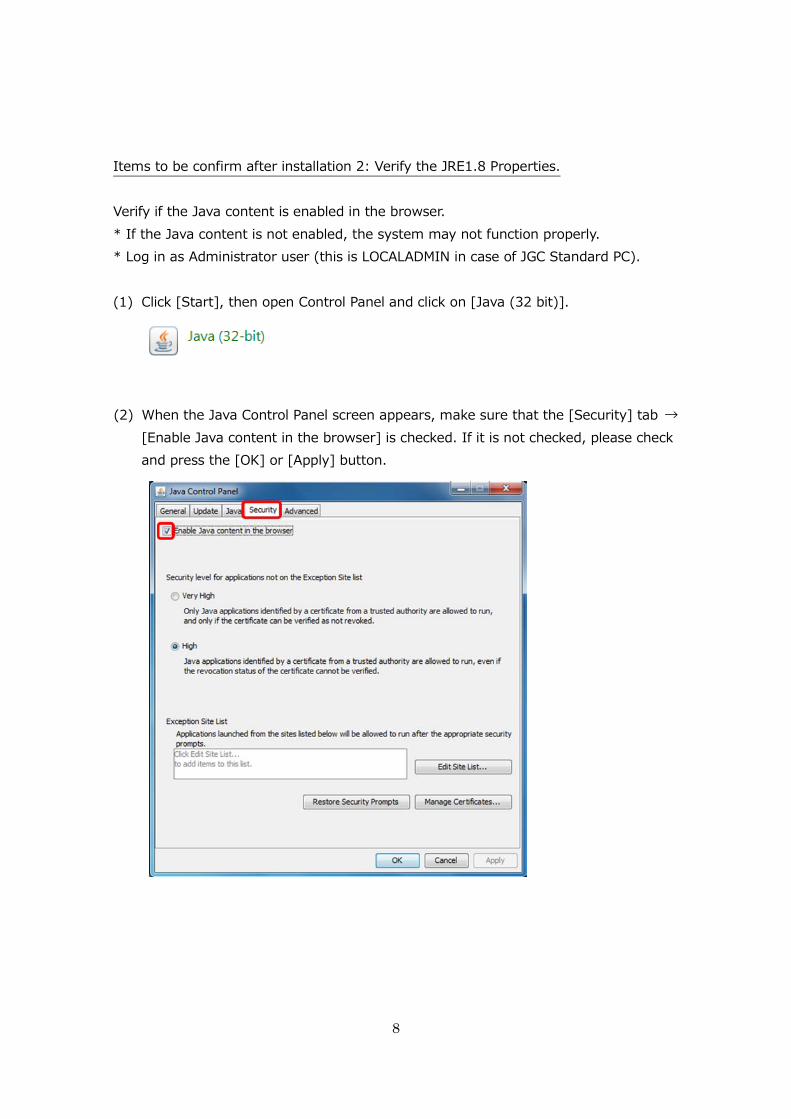
Items to be confirm after installation 2: Verify the JRE1.8 Properties. Verify if the Java content is enabled in the browser. * If the Java content is not enabled, the system may not function properly. * Log in as Administrator user (this is LOCALADMIN in case of JGC Standard PC). (1) Click [Start], then open Control Panel and click on [Java (32 bit)]. (2) When the Java Control Panel screen appears, make sure that the [Security] tab →
[Enable Java content in the browser] is checked. If it is not checked, please check and press the [OK] or [Apply] button.
9
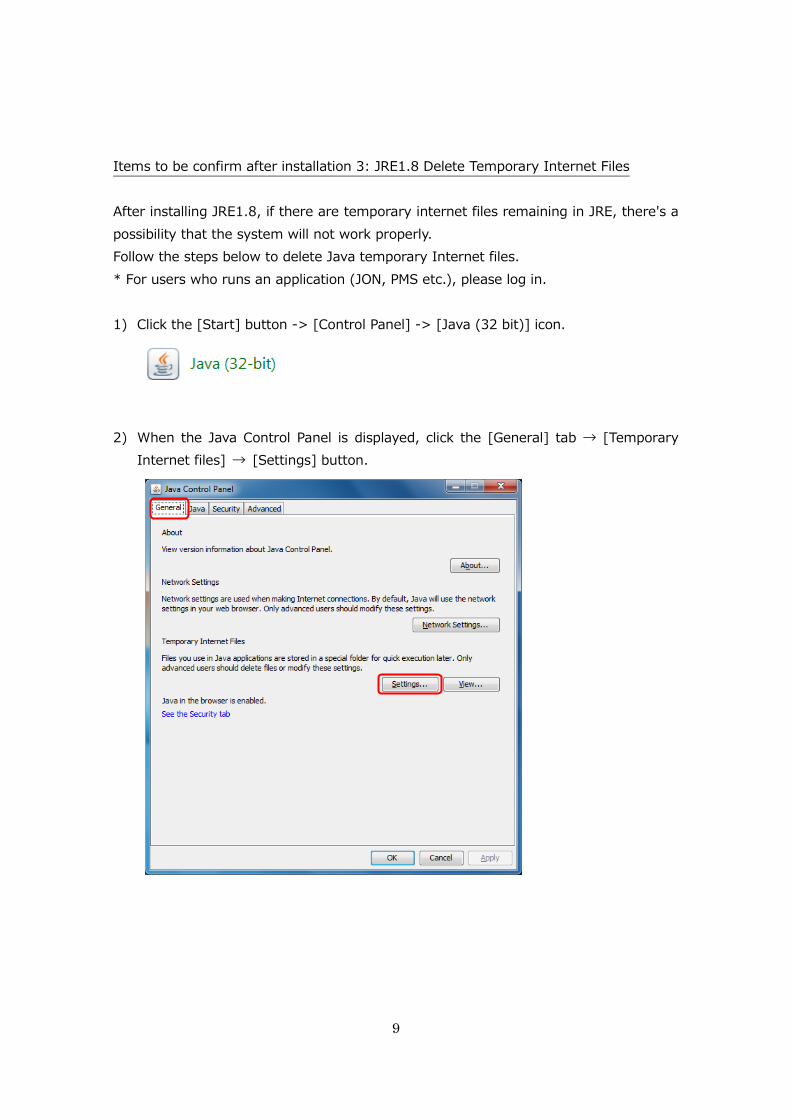
Items to be confirm after installation 3: JRE1.8 Delete Temporary Internet Files After installing JRE1.8, if there are temporary internet files remaining in JRE, there's a possibility that the system will not work properly. Follow the steps below to delete Java temporary Internet files. * For users who runs an application (JON, PMS etc.), please log in. 1) Click the [Start] button -> [Control Panel] -> [Java (32 bit)] icon. 2) When the Java Control Panel is displayed, click the [General] tab → [Temporary
Internet files] → [Settings] button.

10
3) Click the [Delete Files…] button. 4) Confirm if the [Trace and Log Files] and [Cached Applications and Applets] are
checked, and then click the OK button. After that, return to the [Java Control Panel] screen in the 2nd step and click [OK].
(5) Please restart your PC after completing work.

11
Items to be confirm after installation 4: Delete browsing history of Internet Explorer (IE) Follow the steps below to delete the browsing history of IE. * For users who runs an application (JON, PMS etc.), please log in. (1) Click the setting (gear icon) → [Internet option]. (2) Click [General] tab → (Browsing history) [Delete…] button.
12
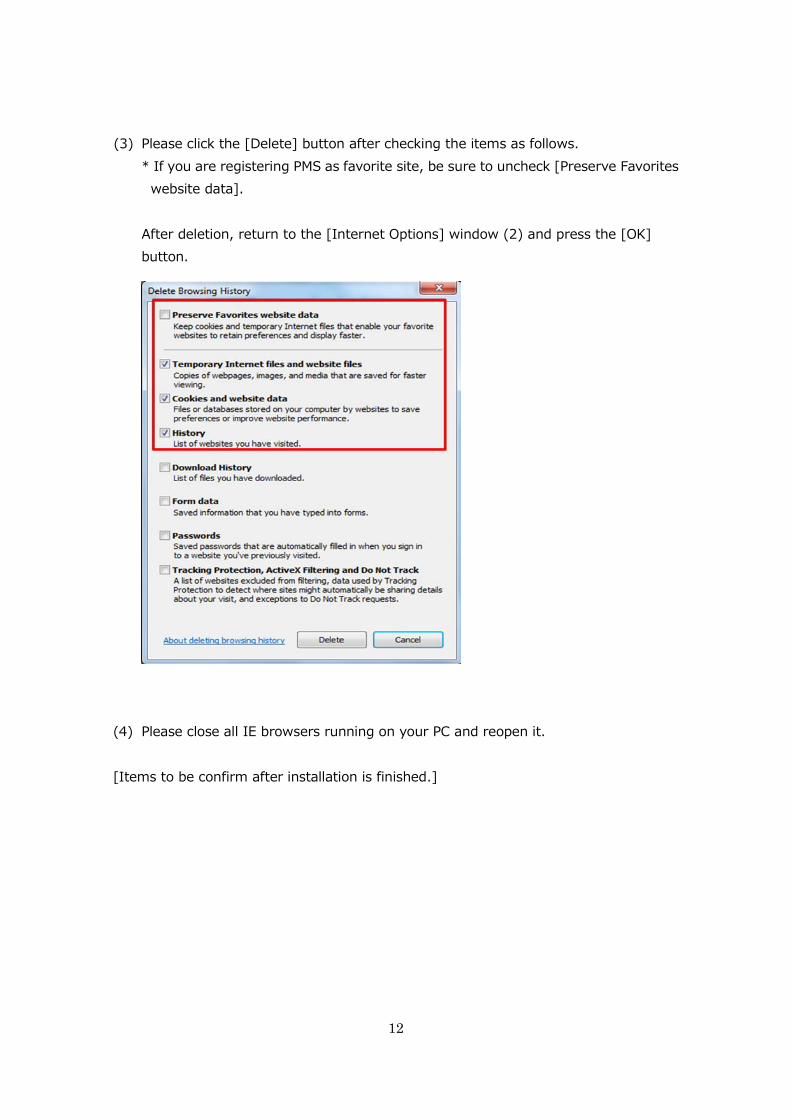
(3) Please click the [Delete] button after checking the items as follows. * If you are registering PMS as favorite site, be sure to uncheck [Preserve Favorites
website data]. After deletion, return to the [Internet Options] window (2) and press the [OK] button.
(4) Please close all IE browsers running on your PC and reopen it. [Items to be confirm after installation is finished.]

13
4. Trouble Shooting Trouble Shooting 1: Notes on Applet system startup When you start the Applet system (*1) on your PC where the above item has been installed, a confirmation screen will appear. (*1) ・PMS System CES, CMMS, CONT, DOCSTR, ETRS-Multi, JWMS, OSR, PADSG, PAL, PAY, PIRS, RFA ・Others JON, MACS, ProCash, CAPS Click [Run with the latest version] button if the confirmation screen was displayed. * After pressing this button, the confirmation screen will not be displayed again.

14
Trouble Shooting 2: PMS File Download/Upload Execution Dialog When executing Download/Upload File in PMS, there’s a possibility that the below dialog box will appear. If the dialog box appeared, check the [Do not show this again for apps from the publisher and location above] and click the [Run] button. Once this is done, this screen will not be shown again.
15
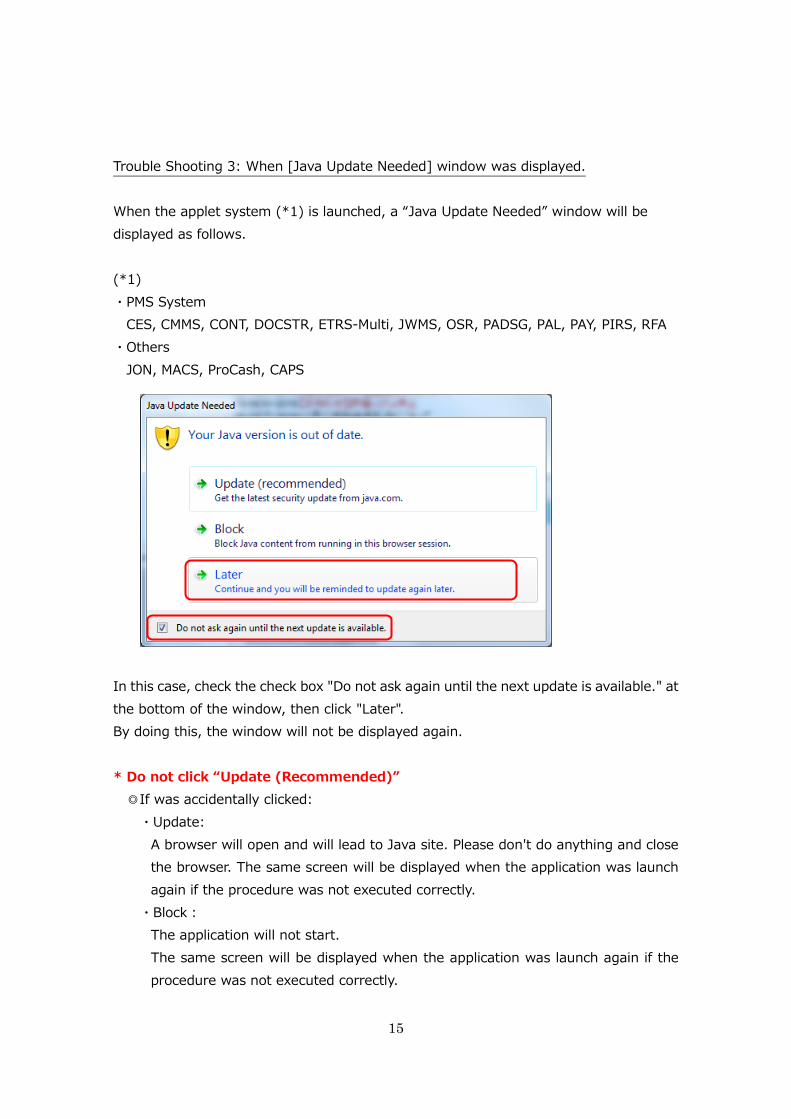
Trouble Shooting 3: When [Java Update Needed] window was displayed. When the applet system (*1) is launched, a “Java Update Needed” window will be displayed as follows. (*1) ・PMS System CES, CMMS, CONT, DOCSTR, ETRS-Multi, JWMS, OSR, PADSG, PAL, PAY, PIRS, RFA ・Others JON, MACS, ProCash, CAPS In this case, check the check box "Do not ask again until the next update is available." at the bottom of the window, then click "Later". By doing this, the window will not be displayed again. * Do not click “Update (Recommended)” ◎If was accidentally clicked:
・Update: A browser will open and will lead to Java site. Please don't do anything and close the browser. The same screen will be displayed when the application was launch again if the procedure was not executed correctly.
・Block: The application will not start. The same screen will be displayed when the application was launch again if the procedure was not executed correctly.
16
* Occasionally, this dialog may be redisplayed with Java version upgrade, however, by doing the same process, it will not be redisplayed.
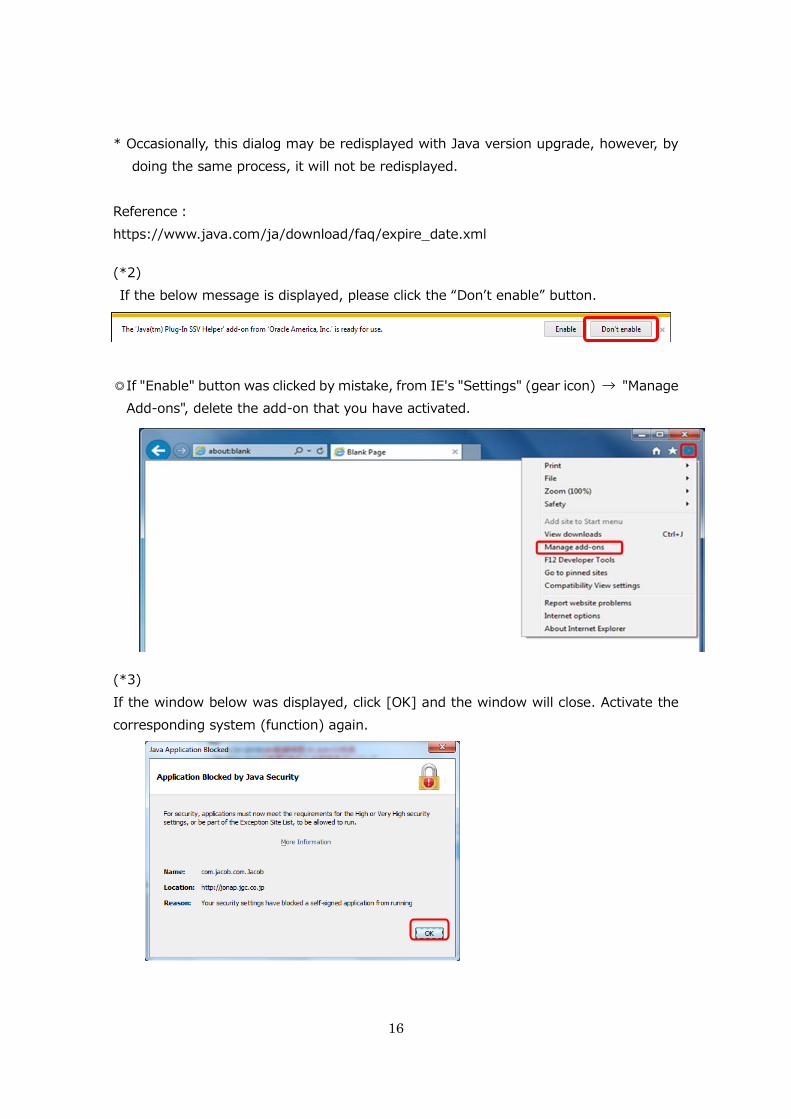
Reference: https://www.java.com/ja/download/faq/expire_date.xml (*2) If the below message is displayed, please click the “Don’t enable” button.
◎If "Enable" button was clicked by mistake, from IE's "Settings" (gear icon) → "Manage
Add-ons", delete the add-on that you have activated. (*3) If the window below was displayed, click [OK] and the window will close. Activate the corresponding system (function) again.

17
After selecting "Later", the security warning dialog appeared, refer to the following items. 1) Try uninstalling all the JRE
From the control panel, uninstall all JRE, then follow the manual again about the installation process.
* If the uninstall process didn't work, uninstall using the attached program deletion
tool provided by Microsoft. (Microsoft Program Install and Uninstall) Please access the URL below and click the "Download" button to obtain the tool.
https://support.microsoft.com/en-us/help/17588/fix-problems-that-block-programs-from-being-installed-or-removed
* When using the tool, login as administrator (LOCALADMIN) and connect to a
network cable. 2) Try installing as a different user
There is a possibility that a problem has occurred in the profile of the user who was trying to install JRE. Try to install using a different user which also has an administrator authority.

18
Trouble Shooting 4: Error window appeared. When the applet system (*1) is launched, a “Java Update Needed” window will be displayed as follows. (*1) ・PMS System CES, CMMS, CONT, DOCSTR, ETRS-Multi, JWMS, OSR, PADSG, PAL, PAY, PIRS, RFA ・Others JON, MACS, ProCash, CAPS When this window appeared, please refer to the following items below. - Items to be confirm after installation 2: Verify the JRE1.8 Properties. (P.6) - Items to be confirm after installation 3: JRE1.8 Delete Temporary Internet Files (P.8) - Items to be confirm after installation 4: Delete browsing history of Internet Explorer
(IE) (P.10) Confirm the above items. If the situation did not improve after the process, uninstall all software starting with JAVA (X) Update ... (*2) from the control panel and install JRE 1.8.0_77 again. (*2) In (X) of Java (X), place the numbers 6, 7, 8.
End of file
Related Documents