Introduction to PHP 750-PHP-1.0.2 Copyright © 2011 PB Tech Internet Training, all rights reserved. Reproduction in any form without the express written consent of PB Tech Internet Training is strictly prohibited.

Jan 2015
Apr 07, 2016
Hi this pdf for you all
Welcome message from author
This document is posted to help you gain knowledge. Please leave a comment to let me know what you think about it! Share it to your friends and learn new things together.
Transcript

Introduction to PHP
750-PHP-1.0.2
Copyright © 2011 PB Tech Internet Training, all rights reserved. Reproduction in any form without the express written consent of PB Tech Internet Training is strictly prohibited.

PB Tech Internet Training Introduction to PHP Page i
Table of Contents
Table of Contents ..................................................................................................... i Hypertext Preprocessor (PHP): A Web Server-Side Technology ....................... 1
Client-Side vs. Server-Side Web Technologies ....................................................................................................... 1 The Web's Client-Server Relationship ..................................................................................................................... 1 Which Web Servers Support PHP? .......................................................................................................................... 2
Writing PHP Pages .................................................................................................. 3 PHP Code In An HTML Context ............................................................................................................................. 3 PHP Statements ........................................................................................................................................................ 3 Enclosing Scripting Code within your PHP Pages................................................................................................... 3 Strings in PHP .......................................................................................................................................................... 4 Developing PHPs in This Class ............................................................................................................................... 4 An Example: “Hello World” .................................................................................................................................... 5 Conditional Constructs with “if”.............................................................................................................................. 8 Comparison Operators in PHP ............................................................................................................................... 10 The Logical AND (&&) and OR (||) ...................................................................................................................... 10 Exercise 1: Adding a Greeting and Date and Time Stamps to a Page ................................................................... 15 A Possible Solution to Exercise 1 .......................................................................................................................... 18
Processing Data from Online Forms ....................................................................21 The <FORM> Tag and Its Attributes ..................................................................................................................... 21 Scalar Variables in PHP ......................................................................................................................................... 22 Demonstration: Displaying a Customized Greeting............................................................................................... 24 Combining the Form and Its Processing Code In One PHP File ........................................................................... 30 The Ternary Operator ............................................................................................................................................ 32 Exercise 2: Personalizing the Homepage for WLDC ............................................................................................. 34 A Possible Solution to Exercise 2 .......................................................................................................................... 38
Working with Cookies ...........................................................................................41 Setting a Cookie ..................................................................................................................................................... 41 Retrieving a Cookie ............................................................................................................................................... 42 Example: Setting, Retrieving, and Expiring a Cookie ........................................................................................... 42 Exercise 3: Enhance the WLDC Home Page With Cookies .................................................................................. 47 A Possible Solution to Exercise 3 .......................................................................................................................... 50
Maintaining State with Sessions ..........................................................................53 Sessions .................................................................................................................................................................. 53 Storing and Retrieving Session Values .................................................................................................................. 54 Example: Using the Session Object to Track a Shopping Cart .............................................................................. 55 Exercise 4: Building a Shopping Cart for WLDC.................................................................................................. 60 A Possible Solution to Exercise 4 .......................................................................................................................... 65

PB Tech Internet Training Introduction to PHP Page ii
Email with PHP ......................................................................................................69 Sending E-mail PHP .............................................................................................................................................. 69 Exercise 5: Implementing PHP E-mail at WLDC .................................................................................................. 74 A Possible Solution to Exercise 5 .......................................................................................................................... 77
Reading and Writing Text Files............................................................................79 Example: Writing to a Tab-Delimited File ............................................................................................................ 79 Exercise 6a: Storing Registrations in a Tab-Delimited Text File........................................................................... 84 A Possible Solution to Exercise 6a ........................................................................................................................ 87
Loop Structures ......................................................................................................89 For Loops ............................................................................................................................................................... 89 Foreach Loops........................................................................................................................................................ 90 While Loops ........................................................................................................................................................... 91 Example: Reading from a tab-delimited text file ................................................................................................... 92 Exercise 6b: Displaying Registrations from a Tab-Delimited Text File ................................................................ 96 A Possible Solution to Exercise 6b ...................................................................................................................... 100
Database Integration with PHP ..........................................................................103 The Databases Used in this Class ........................................................................................................................ 103 Issuing Database Commands with SQL ............................................................................................................... 105 Example: Selecting and Viewing Data From guestbook.mdb ............................................................................. 107 Connecting and Issuing Commands to the Database ........................................................................................... 108 Displaying Database Results ................................................................................................................................ 109 Non-MySQL databases and PHP ......................................................................................................................... 110 Exercise 7: Building a Search Engine Interface ................................................................................................... 111 A Possible Solution to Exercise 7 ........................................................................................................................ 115
Working with Meta Information from a Database ..........................................117 Object-Oriented PHP ........................................................................................................................................... 117 Exercise 8: Enhancing the Search Form .............................................................................................................. 121 A Possible Solution to Exercise 8 ........................................................................................................................ 124 Exercise 9: Enhance the Registration Form to Insert a New Client ..................................................................... 127 A Possible Solution to Exercise 9 ........................................................................................................................ 131 Development Strategy Session: Building an Interface for Updating Client Records ........................................... 133 Exercise 10: Building an Interface for Updating Client Records ......................................................................... 134 A Possible Solution to Exercise 10 ...................................................................................................................... 140
User-Defined Functions in PHP ..........................................................................143 Functions .............................................................................................................................................................. 143
Form Validation ...................................................................................................149 Exercise 11: Using Functions to Validate Form Submissions ............................................................................. 155 A Possible Solution to Exercise 11 ...................................................................................................................... 160
Regular Expressions ............................................................................................163 Character Types and Ranges ................................................................................................................................ 163

PB Tech Internet Training Introduction to PHP Page iii
Quantity Indicators .............................................................................................................................................. 164 Location Indicators .............................................................................................................................................. 165 Regular Expressions in PHP ................................................................................................................................ 168 Exercise 12: Validating Form Data with Regular Expressions ............................................................................ 171 A Possible Solution to Exercise 12 ...................................................................................................................... 176
Drilling Down and the Query String ..................................................................181 Building the Query String into a Link ................................................................................................................. 183 Generating Drill Down Links Dynamically ......................................................................................................... 185 Exercise 13: Drilling Down Client Data .............................................................................................................. 187 A Possible Solution to Exercise 13 ...................................................................................................................... 191
Appendix A: Installing PHP ...............................................................................193
Appendix B: Installing MySQL ..........................................................................197

PB Tech Internet Training Introduction to PHP 1
Hypertext Preprocessor (PHP): A Web Server-Side Technology
Client-Side vs. Server-Side Web Technologies The basic Web server performs a simple task: it receives HTTP requests from client computers, generally from a browser like Netscape or Internet Explorer, it searches through its directory structure for the Web page requested, and it responds by serving up the page to the client. The Web page is streamed to the browser as simple text containing HTML markup and perhaps JavaScript. It is the browser itself that parses and interprets the code, rendering it into the attractive and functional content that is displayed on the screen. This page might also contain JavaScript code that causes buttons to light up or prompts to appear. HTML and JavaScript are parsed and processed on the client computer by the browser; they are client-side Web technologies.
The Web environment today requires more than static HTML pages. Today's Web sites must deliver dynamically generated, customized content to the browser. They greet the visiting user by name, collect information entered in online forms, compose and send customized e-mail, conduct searches based on keywords supplied by the client, and access and modify the contents of databases. The operations that provide this dynamic functionality are executed on the Web server; they are Web server-side applications.
In the early days of Web server-side programming, developers mostly wrote their Web server-side applications in CGI scripting languages like Perl. In 1996, Microsoft Corporation released Active Server Pages (ASP), a Web scripting technology. This led to a minor revolution in the way server-side scripting was performed. PHP has emerged as one of the most popular options.
The Web's Client-Server Relationship As you begin to develop Web server-side applications, remember that each HTTP request is a discrete and unique connection between the client and the Web server. The server remembers nothing about the client between page requests, and it regards every HTTP request as brand-new, coming from a brand-new client. Because the server forgets everything it knows about a client after it has served up a response, the Web environment is known as a stateless protocol. This lack of a persistence of state of connectivity between the client and the server presents a special set of challenges to the Web developer, whose Web applications must remember the contents of shopping carts, login information, or personal and technical information throughout the client's browsing “session.” Web server-side applications play an integral role in providing functionality, including cookies and sessions, which can make different kinds of information about the client persist between connections, helping to maintain state.

PB Tech Internet Training Introduction to PHP 2
Which Web Servers Support PHP? Just about all web servers on all platforms out there support PHP. Perhaps the most common configuration is to run PHP with Apache server software on a Linux Operating System. For Windows Servers, it is very common to run PHP with Microsoft’s IIS Server Software. You can consult http://www.php.net for more information on installing PHP.

PB Tech Internet Training Introduction to PHP 3
Writing PHP Pages
PHP Code In An HTML Context Most PHP pages will look familiar to the experienced HTML developer; they look a lot like HTML pages. Closer inspection, however, will reveal PHP code throughout the page, inserted within the HTML markup and content, and set off inside of special tags that look like this:
<?php your_PHP_code_here ?>
This provides an optimum development environment for the Web application development team: the HTML designers can create the front-end, static HTML content, and then turn the pages over to the server-side team to add in the PHP code that will create the dynamic content.
PHP Statements When you write programming code, you are writing a series of steps that you want the program to execute in sequential order. In PHP, each of these steps is referred to as a statement. Statements in PHP are writtenwith a semicolon character marking the end of a statement.
For example:
echo "<h1>Welcome to My Page</h1>"; echo "<p>I am delighted that you visited.</p>";
is the code for two statements which would be executed sequentially.
You can break a long statement into multiple lines, since PHP assumes you’re writing one statement until it sees a semicolon. For example, the two statements above could be written like this:
echo "<h1>Welcome to My Page</h1> <p>I am delighted that you visited</p>"
PHP treats the above code as one line, a single statement.
Enclosing Scripting Code within your PHP Pages As mentioned above, your PHPs will include a mix of HTML and PHP statements. The server will execute the PHP statements before the page is transmitted to the browser.
Each block of PHP statements is set off inside special scripting tags that look like this:

PB Tech Internet Training Introduction to PHP 4
<?php your_PHP_code_here ?>
Place as many PHP statements as necessary inside each set of scripting tags. In the example below, the statement echo will write output to the browser. date() is a PHP function that returns the date on the server’s clock, formatted however you specify:
<h2>The following is a demonstration of PHP:</h2> <ul> <?php echo "<li>The time is: "; echo date("g:i:s a"); echo “</li>”; echo "<li>The date is: "; echo date("n/d/Y"); echo “</li>”; ?> </ul>
In the example above, the text and HTML tags that are not enclosed between the <?php ... ?> are ordinary HTML, and will be sent to the browser just as they are. The PHP statements are grouped in a sequential block between the <?php ... ?> scripting tags.
Strings in PHP In PHP, strings of text are enclosed in “quotation marks.” These strings of text can be concatenated (joined) together with other strings, or with scripting code that resolves into strings, with periods. For example, the code below would give us the same results as the previous code:
<h2>The following is a demonstration of PHP:</h2> <ul> <?php echo "<li>The time is: " . date("g:i:s a") . “</li>”; echo "<li>The date is: " . date("n/d/Y") . “</li>”; ?> </ul>
Developing PHPs in This Class
Executing Your PHPs
As we create PHPs, we will want to run them so that the server will process the PHP code, execute the PHP statements, and return an HTML response to our browsers. The server will do this only if the page is requested through an HTTP request.
You will run your files by making HTTP requests to a file in a folder on the server. Your instructor will tell you the name of the server for this class, as well as the name and location of your student folder.

PB Tech Internet Training Introduction to PHP 5
For example, navigate in your browser to
http://servername/php/yourfolder
inserting the servername for today’s class, and the folder name assigned by your instructor, to see a list of links representing your student files and folders.
Clicking on any of the files will request your file by means of an HTTP request. You will notice some file names contain the word temp, while others contain the word done. You will work in the temp files. The done files contain possible answers to the exercises - use them at your discretion! You will also notice a folder named demos, which contains demonstration files.
Writing Your PHP Files
Because PHPs are simple text files, they can be written and edited in any text editor that supports simple text files, from expensive editors like Dreamweaver to shareware products to barebones text editors like Notepad.
An Example: “Hello World” Please examine the following code, found in demos/hello-world.php:
<!DOCTYPE html PUBLIC "-//W3C//DTD XHTML 1.0 Transitional//EN" "http://www.w3.org/TR/xhtml1/DTD/xhtml1-transitional.dtd"> <html xmlns="http://www.w3.org/1999/xhtml"> <head> <title>Hello World</title> <meta http-equiv="Content-Type" content="text/html; charset=iso-8859-1" /> </head> <body style="background-color:#DBFFBF"> <h2> Hello World!</h2> <h3>The time now is <?php echo date("g:i:s a");?> on <?php echo date("n/d/Y");?></h3> </body> </html>
When this code is executed, a page similar to the following is displayed:

PB Tech Internet Training Introduction to PHP 6
If you view the page source, by choosing View>Source in Internet Explorer, for example, you will see something like this:
Although PHP generated the time and date dynamically, the page source shows the result rather than the PHP statements that generated it. You see no PHP statements because, as the statements were executed on the server, they were removed and replaced with their output, and the response was sent to the browser as plain, albeit dynamically-generated, HTML.
To see some other ways to create the same effect, examine the code in demos/hello-world-repeat.php:
<!DOCTYPE html PUBLIC "-//W3C//DTD XHTML 1.0 Transitional//EN" "http://www.w3.org/TR/xhtml1/DTD/xhtml1-transitional.dtd"> <html xmlns="http://www.w3.org/1999/xhtml"> <head>

PB Tech Internet Training Introduction to PHP 7
<title>Hello World</title> <meta http-equiv="Content-Type" content="text/html; charset=iso-8859-1" /> <style type="text/css"> body {background:#DBFFBF;font-size: 1.6em; font-family: Georgia, Arial, sans-serif;} p {border-bottom: 2px solid black; margin-bottom: 1em;} </style> </head> <body> <p> <?php echo "Hello World! It is now " . date("g:i:s a") . " on " . date("n/d/Y"); ?>. </p> <p> Hello World! It is now <?php echo date("g:i:s a");?> on <?php echo date("n/d/Y");?>. </p> </body> </html>
Make an HTTP request to view the page in the browser, and the result will look something like this:
There is no inherent difference in speed, and no additional strain on server resources, in choosing one way of writing the code over another. Use the method that is most convenient to you considering the task at hand.
PHP Comments
Within PHP tags, you can specify comments (code that will be in the PHP source file, but which will not be executed by the server) in two ways.
// This comments out a single line of code.

PB Tech Internet Training Introduction to PHP 8
/* */ This allows you to comment out multiple lines of code <!--This is an HTML comment, and will be returned to the browser--> <p> <?php //This is a comment that works on a single line. echo "Hello World! It is now " . date("g:i:s a") . " on " . date("n/d/Y"); /* If I’ve got a lot of comments. They can all go here. This is a multiline comment. */ ?>. </p> <p> Hello World! It is now <?php echo date("g:i:s a");?> on <?php echo date("n/d/Y");?>. </p>
Conditional Constructs with “if” Conditional constructs are the classic programming structures that enable you to have one or more statements executed only in the event a certain condition is true. In PHP, we use the following syntax to build conditionals:
if (condition){ statement(s); } elseif (other condition) { statement(s); } elseif (other condition) { statement(s); } else { statement(s); }
These expressions take the following form, as shown in demos/conditionals.php: <!DOCTYPE html PUBLIC "-//W3C//DTD XHTML 1.0 Transitional//EN" "http://www.w3.org/TR/xhtml1/DTD/xhtml1-transitional.dtd"> <html xmlns="http://www.w3.org/1999/xhtml"> <head> <title>Conditional Structures</title> <meta http-equiv="Content-Type" content="text/html; charset=iso-8859-1" /> <style type="text/css"> </style> </head>

PB Tech Internet Training Introduction to PHP 9
<body> <h2>Hello World! Let me wish you a gracious <?php if (date("G") < 12) { echo "Good Morning!"; } elseif (date("G") < 18) { echo "Good Afternoon!"; } else { echo "Good Evening!"; } ?> </h2> <p>The time now is <?php echo date("g:i:s a");?> on <?php echo date("n/d/Y");?></p> </body> </html>
Requesting the page before noon returns a response similar to:
This PHP uses the date string to return an integer between 0 and 23 indicating the hour on the server.
<?php if (date("G") < 12) { echo "Good Morning!"; } elseif (date("G") < 18) { echo "Good Afternoon!"; } else { echo "Good Evening!"; } ?>
The else and elseif clauses are optional. You may have as many elseif clauses as you want.

PB Tech Internet Training Introduction to PHP 10
Alternative Syntax for Conditionals
Some people don’t like all the curly brackets. PHP provides a way out by using colons and the keyword end if:
if (weather == “sunny”): Statement; Statement; elseif (weather == “snowy”): Statement; Statement; else: Statement; Statement; endif;
Comparison Operators in PHP A comparison operator defines the nature of a comparison. VBScript uses the following comparison operators:
Operator Definition == Equals != Does not equal > Greater than >= Greater than or equal to < Less than <= Less than or equal to
The Logical AND (&&) and OR (||) The logical And (&&) and Or (||) operators can be used to join clauses in a conditional expression. When clauses are joined with &&, all of the joined clauses must evaluate to true for the entire expression to evaluate to true. When you join clauses with ||, if any one of the joined clauses evaluates to true, the entire expression is evaluated to true.
As an example, request demos/andorform.php, to display the following form.

PB Tech Internet Training Introduction to PHP 11
Submit the form several times, checking different combinations of checkboxes, or checking no checkboxes at all. The response will be dynamically customized depending on which combination of checkboxes has been sent to the server. For example, if you submit without checking any checkbox (you have never used WavaBeans), this will be returned:

PB Tech Internet Training Introduction to PHP 12
If you check only the first checkbox and submit, the message returned will be:
If you check only the second checkbox and submit, the message returned will be:
And if you check both checkboxes and submit, the message returned will be:

PB Tech Internet Training Introduction to PHP 13
The content of first paragraph of the response is determined by a conditional with several && clauses, while the content of the second paragraph, is determined by a conditional using an || clause.
The appropriate portion of andorform.php is shown below:
<form method="post" action="andor.php"> <table> <tr><td>Super-Duper 10-Pound Box</td><td><input type="checkbox" name="large" /></td></tr> <tr><td>Handy-Dandy 2-Pound Box</td><td><input type="checkbox" name="small" /></td></tr> </table> <div> <input type="submit" value="Submit the Survey" /> <input type="reset" value="Start Over" /> </div> </form>
The portion of andor.php that handles the response is shown below:
<?php if ( (isset($_POST["small"]) == false) && (isset($_POST["large"]) == false) ) {?> <p>You are missing out on a Laundry Day Miracle. Let us send you a coupon so you can discover the <strong>Wonder of WavaBeans</strong>!</p> <?php } elseif ( (isset($_POST["small"]) == true) && (isset($_POST["large"]) == false) ) {?> <p>We are sure you find the <strong>Handy-Dandy 2-Pound Box</strong> convenient for travel and school.</strong>!</p> <?php } elseif ( (isset($_POST["small"]) == false) && (isset($_POST["large"]) == true) ) {?> <p>We are sure you find the <strong>Super-Duper 10-Pound Box</strong> economical and long-lasting!</strong>!</p> <?php } elseif ( (isset($_POST["small"]) == true) && (isset($_POST["large"]) == true) ) {?> <p>Thank you for being a loyal customer who uses all the sizes of <strong>WavaBeans</strong>!</p> <?php } ?> <!--This if block with an Or condition returns its paragraph if any combination is checked--> <?php if ( (isset($_POST["small"]) == true) || (isset($_POST["large"]) == true) ) { ?> <p>And, to show our special thanks to you for using <strong>WavaBeans</strong>, we will be sending you an all-in-one <strong>Wava Soap Packet</strong>, or <strong>WSP</strong>, as a special gift!</p> <?php } ?>
One thing to notice here is a function called isset(). This function checks to see whether a variable exists. When a checkbox is not selected, no value for that form field is submitted to the server. The isset() function will return true or false. There is actually a shortcut for checking for true and false values, which can be seen in demos/andor-abbreviated.php:

PB Tech Internet Training Introduction to PHP 14
<?php if ( !isset($_POST["small"]) && !isset($_POST["large"]) ) {?> <p>You are missing out on a Laundry Day Miracle. Let us send you a coupon so you can discover the <strong>Wonder of WavaBeans</strong>!</p> <?php } elseif ( isset($_POST["small"]) && !isset($_POST["large"]) ) {?> <p>We are sure you find the <strong>Handy-Dandy 2-Pound Box</strong> convenient for travel and school.</strong>!</p> <?php } elseif ( !isset($_POST["small"]) && isset($_POST["large"]) ) {?> <p>We are sure you find the <strong>Super-Duper 10-Pound Box</strong> economical and long-lasting!</strong>!</p> <?php } elseif ( isset($_POST["small"]) && isset($_POST["large"]) ) {?> <p>Thank you for being a loyal customer who uses all the sizes of <strong>WavaBeans</strong>!</p> <?php } ?> <!--This if block with an Or condition returns its paragraph if any combination is checked--> <?php if ( isset($_POST["small"]) || isset($_POST["large"]) ) { ?> <p>And, to show our special thanks to you for using <strong>WavaBeans</strong>, we will be sending you an all-in-one <strong>Wava Soap Packet</strong>, or <strong>WSP</strong>, as a special gift!</p> <?php } ?>
The other new thing here is the variable: $_POST["small"]
This variable is a special one for reading values submitted with forms (specifically, forms with a method of GET). We’ll talk more about this in the next section. Suffice it to say that you just put the name of the form field in square brackets and parentheses after the $_POST, and you can get a form field’s value.

PB Tech Internet Training Introduction to PHP 15
Exercise 1: Adding a Greeting and Date and Time Stamps to a Page Throughout this class, you will be developing the PHP-driven Web application of the fictitious WestLake Laundry Detergent Company. WLDC sells two primary products: HotWava (a liquid detergent) and WavaBeans (a powdered detergent).
In this exercise, you will be modifying the file ex01-default-temp.php (the homepage for WLDC) to display the current date and time at the bottom of the page, and to greet the visitor with a greeting based on the time of day, as shown below:
To complete this exercise:
1. Open ex01-default-temp.php for editing.
2. Edit the code to display the italicized Good Morning, Good Afternoon or Good Evening, depending on the time of day. This phrase should fit neatly and grammatically into the first paragraph. Below is a reproduction of the file you will have to edit. <!DOCTYPE html PUBLIC "-//W3C//DTD XHTML 1.0 Transitional//EN" "http://www.w3.org/TR/xhtml1/DTD/xhtml1-transitional.dtd"> <html xmlns="http://www.w3.org/1999/xhtml"> <head>

PB Tech Internet Training Introduction to PHP 16
<title>The WestLake Laundry Detergent Company</title> <link href="washstyle.css" rel="stylesheet" /> <meta http-equiv="Content-Type" content="text/html; charset=iso-8859-1" /> </head> <body> <?php include("header.php"); ?> <p><em> <!-- Insert appropriate greeting, based on time of day, here --> </em> and welcome to WLDC, from the inventors of <strong>Wava<span style="vertical-align: super; font-size: .7em">®</span></strong> laundry detergent. Wava is the world's most powerful detergent and is compatible with all washing machines. No matter how badly your clothes are stained, you'll be able to <strong>wash once, wear anywhere</strong>!</p> <p>How did we do it? Unlike other detergents, which are designed to work with specific types of washing machines, <strong>Wava</strong> was designed to work with a <strong>Virtual Washing Machine</strong>. Just install the <strong>Wava White Clothes Interpreter</strong> on your machine, then use the <strong>Wava</strong> detergent. It's so easy, and fun too!</p> <h3 class="header" style="text-align:center"> WavaBeans! <img src="images/wavas.gif" width="160" height="176" alt="WavaBeans and Hot Wava!" style="vertical-align:middle" /> HotWava! </h3> <?php include("footer-temp.php"); ?> </body> </html>
3. Edit the code so that date and time stamps are automatically included in the footer as shown in the screen shot above. You will find this code in a file called footer-temp.php. The include() function causes the contents of a separate file to be included into the including page. The code for footer-temp.php, shown below, contains helpful hints, shown below in bold. You may need to consult the PHP documentation (http://www.php.net) to find the appropriate date formats. <div style="width:100%; text-align:center;"> <div class="footer"> <div>Copyright © <!-- Insert the Year Here --> <a href="http://www.westlake.com/">WestLake Internet Training</a>. </div> <div>Current Date: <!-- Insert the date here -->. Current Time: <!-- Insert the time here --></div>

PB Tech Internet Training Introduction to PHP 17
<div>WLDC is a proud member of the <a href="http://www.sdahq.org/">Soap and Detergent Association</a>.</div> </div> </div>
4. Save your work, then request ex01-default-temp.php in your browser.
5. If an error page is displayed, read the error message for clues, edit the file to resolve the error, save it, then request the page anew in the browser.
If you are done early...
• Give the page a different background color depending on the time of day.

PB Tech Internet Training Introduction to PHP 18
A Possible Solution to Exercise 1 As contained in ex01-default-done.php:
<!DOCTYPE html PUBLIC "-//W3C//DTD XHTML 1.0 Transitional//EN" "http://www.w3.org/TR/xhtml1/DTD/xhtml1-transitional.dtd"> <html xmlns="http://www.w3.org/1999/xhtml"> <head> <title>The WestLake Laundry Detergent Company</title> <link href="washstyle.css" rel="stylesheet" /> <style type="text/css"> <!-- strong {color: red} --> </style> <meta http-equiv="Content-Type" content="text/html; charset=iso-8859-1" /> </head> <body> <?php include("header.php"); ?> <p><em> <?php if (date("G") < 12 ) { echo "Good Morning, "; } elseif (date("G") < 18) { echo "Good Afternoon, "; } else { echo "Good Evening, "; } ?> </em> and welcome to WLDC, from the inventors of <strong>Wava<span style="vertical-align: super; font-size: .7em">®</span></strong> laundry detergent. Wava is the world's most powerful detergent and is compatible with all washing machines. No matter how badly your clothes are stained, you'll be able to <strong>wash once, wear anywhere</strong>!</p> <p>How did we do it? Unlike other detergents, which are designed to work with specific types of washing machines, <strong>Wava</strong> was designed to work with a <strong>Virtual Washing Machine</strong>. Just install the <strong>Wava White Clothes Interpreter</strong> on your machine, then use the <strong>Wava</strong> detergent. It's so easy, and fun too!</p> <h3 class="header" style="text-align:center"> WavaBeans! <img src="images/wavas.gif" width="160" height="176" alt="WavaBeans and Hot Wava!" style="vertical-align:middle" />

PB Tech Internet Training Introduction to PHP 19
HotWava! </h3> <?php include("footer.php"); ?> </body> </html>
As contained in footer.php: <div style="width:100%; text-align:center;"> <div class="footer"> <div>Copyright © <?php echo date("Y"); ?> <a href="http://www.westlake.com/">WestLake Internet Training</a>. </div> <div>Current Date: <?php echo date("n/d/Y"); ?>. Current Time: <?php echo date("g:i:s a"); ?></div> <div>WLDC is a proud member of the <a href="http://www.sdahq.org/">Soap and Detergent Association</a>.</div> </div>
</div>


PB Tech Internet Training Introduction to PHP 21
Processing Data from Online Forms A defining characteristic of Web server-side applications is their ability to retrieve and process data from online forms. Given the ubiquity of online forms on the Web today, and their importance to e-commerce (how else to collect shipping addresses and credit card numbers?), it makes sense that PHP includes functionality for retrieving and processing data from online forms. Before we look at how to program our PHP pages, let us review some of the basics of online HTML forms.
The <FORM> Tag and Its Attributes HTML online forms are built between <FORM>…</FORM> tags. A typical <FORM>, including the opening <FORM> tag, might look something like:
<form method=″post″ action=″responsepage.php″> Please enter your first name: <input type=″text″ name=″firstname″ /> <input type=″submit″ /> </form>
The user will complete the form and click the SUBMIT button, sending the data entered into the form to the server as variable name and value pairs. For example, if Melody entered her name in the form coded above and clicked submit, we could represent the variable name and value pair sent to the server as firstname=Melody, with firstname, the name taken from the input field’s name attribute, as the variable name, and the value entered in the field as the associated value.
The ACTION Attribute
The value assigned to the action attribute is the Web page being requested when the submit button is clicked. Most likely, this will be the page that contains the code that will receive and process the data being submitted. This submission is in the form of an HTTP request which will include the variable name and value pairs sent by the form, as well as the location and name of the page requested.
On occasion you may see a <form> tag without an action attribute. This <form> is requesting the current page, which is the default value of the action attribute. In other words, the page is requesting itself; it is a “self-referencing” page.

PB Tech Internet Training Introduction to PHP 22
The GET and POST Methods
The method attribute of the <form> tag determines the method by which the data entered into the form is encoded and sent to the server to be processed. The method tag has two possible values:
• method=”get”: The variable name and value pairs from the form will be concatenated onto the end of the URL as a Query String. A typical URL containing a Query String might look like:
http://www.westlake.com/responsepage.php?firstname=Melody&lastname=Bigwheel
Pro: The resulting response page can be bookmarked in the browser. Con: When the response page is displayed in the browser, the URL will be displayed in the address bar. Any sensitive information (i.e., credit card or social security numbers), will be displayed as well as saved in the browser’s history lists. Browsers also limit the number of characters that can be sent as a Query String.
• method=”post”: The variable name and value pairs are encoded and sent to the server transparently in the HTTP headers when the form is submitted. Pro: Sensitive information is not displayed or saved by the browser, and any number of variable name and value pairs may be included. Note: this does not mean the page is secure. Data is still being sent as plain, unencrypted text. Con: The resulting response page cannot be bookmarked.
The default method is get. A <form> tag without a method attribute will, by default, use method=”get”.
Scalar Variables in PHP Variables are used to store values in memory for later use. The two most common variable types in PHP are scalar variables (which store a single value) and array variables (which store a list of values). You can create variables, assign values to them, and then use those variables throughout your PHP page.
In the sample code below (demos/variables.php), you will notice that all variables start with a dollar sign ($). This tells PHP that this is a variable and not some built-in PHP function. The global keyword has been used to declare several variables. Subsequent statements assign values to the variables, and then retrieve those values to write them to the browser.
<?php global $firstname, $age; $firstname = "Mack"; $age = 30; echo $firstname . “ is “ . $age . “ years old.”; ?>
The string “Mack is 30 years old.” would be written to the browser.

PB Tech Internet Training Introduction to PHP 23
You do not need to declare your variables. Some people think it is good practice, but the only time it is really necessary is when you write code inside a user-defined function. Variables inside such functions will be local (i.e. only available to other code in the same function) unless you declare them as global. We will look at this topic in more depth later in the course.
Variable names can consist of letters, digits, and underscores, but the first character may not be a digit. In PHP, variable names are case-sensitive. Strings assigned to variables are enclosed in single or double quotation marks; numeric values are not enclosed in quotes. Boolean values are also assigned without quotation marks (demos/variables2.php):
<?php global $firstname, $age, $member; $firstname = "Mack"; $age = 30; $member = true; echo $firstname . " is " . $age . " years old. "; if ($member) echo "He is a member of the club"; else echo "He is not a member of the club"; ?>
Quotation Marks: Single or Double?
There is a slight difference between using single and double quotation marks. With single quotation marks, everything is considered plain text. With double quotation marks, variable names are expanded. This can be very useful, since we do not have to do as much concatenating.
The code for this page can be found in demos/variables-quotationmarks.php:

PB Tech Internet Training Introduction to PHP 24
<h3>With Concatenation (single or double quotation marks)</h3> <?php $firstname = 'Mack'; $age = 30; $member = true; echo $firstname . ' is ' . $age . ' years old. '; if ($member) echo 'He is a member of the club'; else echo 'He is not a member of the club'; ?> <h3>With double quotation marks and no concatenation</h3> <?php $firstname = 'Mack'; $age = 30; $member = true; echo "$firstname is $age years old. "; if ($member) echo 'He is a member of the club'; else echo 'He is not a member of the club'; ?> <h3>With single quotation marks and no concatenation</h3> <?php $firstname = 'Mack'; $age = 30; $member = true; echo '$firstname is $age years old. '; if ($member) echo 'He is a member of the club'; else echo 'He is not a member of the club'; ?>
Escape Character
What if you want to print out a special character (such as $ or “). This could be confusing to PHP:
echo "Joe said "sure"";
To fix this, we use an “escape” character, which in PHP is the backslash \. echo "Joe said \"sure\"";
Demonstration: Displaying a Customized Greeting Use your browser to request demos/nameform.html. Here is what the page would look like after the user enters “Bartholomew” in the input field:

PB Tech Internet Training Introduction to PHP 25
Clicking the SUBMIT button will return:
Because the source code for nameform.html contains only HTML and no PHP, it would have been inefficient to use the .php file extension, as that would have caused the page to be processed through the PHP interpreter even in the absence of PHP code. With the .html extension, the page is simply served up directly to the browser. The source code for nameform.html is:
<!DOCTYPE html PUBLIC "-//W3C//DTD XHTML 1.0 Transitional//EN" "http://www.w3.org/TR/xhtml1/DTD/xhtml1-transitional.dtd"> <html xmlns="http://www.w3.org/1999/xhtml"> <head> <title>Greeting a User by Name</title> <meta http-equiv="Content-Type" content="text/html; charset=iso-8859-1" /> </head> <body> <h2>Name Entry Form</h2>

PB Tech Internet Training Introduction to PHP 26
<form method="post" action="greetuser.php"> Please enter your first name: <input type="text" name="firstname" size="40" /> <input type="submit" value="Submit" /> </form> </body> </html>
Clicking the SUBMIT button requests greetuser.php. A special variable -- $_POST -- is sent along with the request. It contains the variable firstname and its associated value, which is the information typed into the field. The source code for greetuser.php is:
<!DOCTYPE html PUBLIC "-//W3C//DTD XHTML 1.0 Transitional//EN" "http://www.w3.org/TR/xhtml1/DTD/xhtml1-transitional.dtd"> <html xmlns="http://www.w3.org/1999/xhtml"> <head> <title>Greetings, <?php echo $_POST["firstname"] ?></title> <meta http-equiv="Content-Type" content="text/html; charset=iso-8859-1" /> </head> <body> <center> <h2>Greetings, <?php echo $_POST["firstname"] ?></h2> </center> <?php echo $_POST["firstname"] ?>, we are delighted that you came to visit. </body> </html>
At each place where the value of the firstname parameter was needed, we fetched its value with the statement:
<?php echo $_POST["firstname"] ?>
NOTE
Semicolons and PHP
The semicolon is optional if you have a single statement in a PHP block.

PB Tech Internet Training Introduction to PHP 27
The Same Demonstration Using A Declared Variable
Rather than typewrite this statement three times, we could have assigned its value to a variable, and repeated the variable throughout our page to retrieve the assigned value. Run demos/nameformvar.html, which contains the same code as nameform.html, but requests a file named greetuservar.php. The pages displayed in the browser will be the same as in the previous demonstration, but the code for greetuservar.php is as follows:
<?php $fname = $_POST["firstname"] ?> <!DOCTYPE html PUBLIC "-//W3C//DTD XHTML 1.0 Transitional//EN" "http://www.w3.org/TR/xhtml1/DTD/xhtml1-transitional.dtd"> <html xmlns="http://www.w3.org/1999/xhtml"> <head> <title>Greetings, <?php echo $fname ?></title> <meta http-equiv="Content-Type" content="text/html; charset=iso-8859-1" /> </head> <body> <center> <h2>Greetings, <?php echo $fname ?></h2> </center> <?php echo $fname ?>, we are delighted that you came to visit. </body> </html>
Notice how, in this page, the variable fname was declared and its value assigned by retrieving the firstname value from the global variable $_POST, all before the opening <html> tag.
The Same Demonstration Using method="get"
Now, look at demos/nameformget.html which is the same as nameform.html, except that it specifies method="get" and requests greetuserget.php. The result returned might look like this:

PB Tech Internet Training Introduction to PHP 28
The response looks familiar, but notice that the URL requested has a Query String appended. The code for greetuserget.php is:
<?php $fname = $_GET["firstname"] ?> <!DOCTYPE html PUBLIC "-//W3C//DTD XHTML 1.0 Transitional//EN" "http://www.w3.org/TR/xhtml1/DTD/xhtml1-transitional.dtd"> <html xmlns="http://www.w3.org/1999/xhtml"> <head> <title>Greetings, <?php echo $fname ?></title> <meta http-equiv="Content-Type" content="text/html; charset=iso-8859-1" /> </head> <body> <center> <h2>Greetings, <?php echo $fname ?></h2> </center> <?php echo $fname ?>, we are delighted that you came to visit. </body> </html>
Redirecting Users
What if a user bookmarks the result page and comes back tomorrow without having filled out the form? This is especially problematic with post forms. With error messages turned on, we get:

PB Tech Internet Training Introduction to PHP 29
We can fix this by checking to see if the variable exists. If it doesn’t we automatically send the user to the form page. The code looks like this (as found in demos/greetuser-valid.php):
<?php if (isset($_POST["firstname"])) $fname = $_POST["firstname"]; else header("Location: http://" . $_SERVER['HTTP_HOST']. dirname($_SERVER['PHP_SELF']) . "/nameform-valid.html"); ?> <!DOCTYPE html PUBLIC "-//W3C//DTD XHTML 1.0 Transitional//EN" "http://www.w3.org/TR/xhtml1/DTD/xhtml1-transitional.dtd"> <html xmlns="http://www.w3.org/1999/xhtml"> <head> <title>Greetings, <?php echo $fname ?></title> <meta http-equiv="Content-Type" content="text/html; charset=iso-8859-1" /> </head> <body> <center> <h2>Greetings, <?php echo $fname ?></h2> </center> <?php echo $fname ?>, we are delighted that you came to visit. </body> </html>
The header function allows us to set an HTTP header. In this case we’re setting the Location header. That is like filling in the location bar of your browser and hitting send. The next bit of code uses the global $_SERVER variable to get built in variables containing the current server’s name and the directory name of the current file, all concatenated together with the name of the form. You could have also hard-coded the url of the file. Some servers will accept virtual paths as well.

PB Tech Internet Training Introduction to PHP 30
Combining the Form and Its Processing Code In One PHP File In some cases, you will find it handy to combine, in one PHP file, the code for the form as well as the statements that process the data from the form. This can be practical if both the form and the response pages contain PHP statements for the server to execute.
One way to combine the form and response blocks of code in the same file is to use a conditional structure to test whether or not the form has been submitted.
As an example, request demos/allinone.php. This page displays a form that looks and works like the name form we saw in an earlier example. The source code is as follows:
<!DOCTYPE html PUBLIC "-//W3C//DTD XHTML 1.0 Transitional//EN" "http://www.w3.org/TR/xhtml1/DTD/xhtml1-transitional.dtd"> <html xmlns="http://www.w3.org/1999/xhtml"> <head> <title>Greeting a User by Name</title> <meta http-equiv="Content-Type" content="text/html; charset=iso-8859-1" /> </head> <body> <?php if (!isset($_POST["firstname"])) {?> <h2>Name Entry Form</h2> <form method="post"> Please enter your first name: <input type="text" name="firstname" size="40" /> <input type="submit" value="Submit" /> </form> <?php } else { $fname = $_POST["firstname"]; echo "<h2>Greetings, $fname</h2> $fname, we are delighted that you came to visit."; } ?> </body> </html>
The conditional structure tests whether the firstname field is set, which would only be true if the form has been submitted. If it has not been set, the form is returned. Otherwise, it sends the greeting. In the code for this file, note how the portions of the page returned for both the form and the greeting response are outside of the conditional structure.

PB Tech Internet Training Introduction to PHP 31
Self-Submission and the ACTION Attribute
The <FORM> tag in the above example is:
<form method=”post”>
It contains no ACTION attribute. When a <FORM> tag has no ACTION attribute, the default value of this attribute is assumed, and the page calls itself, just as if the <FORM> tag had been coded as follows:
<form method=”post” action=”allinone.php”>
Just to make our file a little fancier, let us look at demos/allinonefancy.php. At first glance it looks the same, but when you submit the form, the response returns a dynamically customized <title> in the title bar, as well as a personalized greeting. The code is as follows:
<?php $fname = (isset($_POST["firstname"])) ? $_POST["firstname"]: false; ?> <!DOCTYPE html PUBLIC "-//W3C//DTD XHTML 1.0 Transitional//EN" "http://www.w3.org/TR/xhtml1/DTD/xhtml1-transitional.dtd"> <html xmlns="http://www.w3.org/1999/xhtml"> <head> <?php if (!$fname) echo "<title>Greeting a User by Name</title>"; else echo "<title>Welcome, $fname</title>"; ?> <meta http-equiv="Content-Type" content="text/html; charset=iso-8859-1" /> </head> <body> <?php if (!$fname) {?> <h2>Name Entry Form</h2> <form method="post"> Please enter your first name: <input type="text" name="firstname" size="40" /> <input type="submit" value="Submit" /> </form> <?php } else { echo "<h2>Greetings, $fname</h2> $fname, we are delighted that you came to visit."; } ?> </body>

PB Tech Internet Training Introduction to PHP 32
</html>
The Ternary Operator Note that the following structure:
$var = (expression)? “value to return if true”: “value to return if false”;
is a shortcut for: if (expression) $var = “value to return if true”; else $var = “value to return if false”;

PB Tech Internet Training Introduction to PHP 33

PB Tech Internet Training Introduction to PHP 34
Exercise 2: Personalizing the Homepage for WLDC In this exercise, you will modify ex02-default-temp.php to include a form that asks visitors to enter their full name. When SUBMIT is clicked, the page will request itself to return a customized greeting.
At first, when ex02-default-temp.php is requested, it will return the form:
Entering “Sam Jones” in the form and clicking SUBMIT will return the following response:

PB Tech Internet Training Introduction to PHP 35
To complete this exercise:
1. Open ex02-default-temp.php for editing.
2. Complete the HTML form that will ask the visitor their name.
3. Upgrade the greeting portion of the file to include a personalized greeting when the SUBMIT button is clicked.
4. Nest the form and the greeting response in a conditional structure. The code for ex02-default-temp.php contains helpful hints, shown below in bold: <!DOCTYPE html PUBLIC "-//W3C//DTD XHTML 1.0 Transitional//EN" "http://www.w3.org/TR/xhtml1/DTD/xhtml1-transitional.dtd"> <html xmlns="http://www.w3.org/1999/xhtml"> <head> <title>The WestLake Laundry Detergent Company</title> <link href="washstyle.css" rel="stylesheet" /> <meta http-equiv="Content-Type" content="text/html; charset=iso-8859-1" /> </head> <body>

PB Tech Internet Training Introduction to PHP 36
<?php include("header.php"); /* Create a conditional to test if the fullname form variable has been set. If it hasn't been, show the user the form. */ ?> Thank you for visiting the WestLake Laundry Detergent Company (WLDC). So that we may better serve you during your visit, please provide us your name: <div style="width: 100%; text-align:center; margin-top: 1em;"> <!--Add appropriate form attributes to make a self-submitting POST form--> <form> <!--Add a fullname text field--> <input type="submit" value="Submit" /> </form> </div> <!--Below is the response if the form has been filled out.--> <p><em> <?php if (date("G") < 12 ) { echo "Good Morning, "; } elseif (date("G") < 18) { echo "Good Afternoon, "; } else { echo "Good Evening, "; } ?> </em> and welcome to WLDC, <strong><!--Write out the visitor's name--></strong>, from the inventors of <strong>Wava<span style="vertical-align: super; font-size: .7em">®</span></strong> laundry detergent. Wava is the world's most powerful detergent and is compatible with all washing machines. No matter how badly your clothes are stained, you'll be able to <strong>wash once, wear anywhere</strong>!</p> <p>How did we do it? Unlike other detergents, which are designed to work with specific types of washing machines, <strong>Wava</strong> was designed to work with a <strong>Virtual Washing Machine</strong>. Just install the <strong>Wava White Clothes Interpreter</strong> on your machine, then use the <strong>Wava</strong> detergent. It's so easy, and fun too!</p> <h3 class="header" style="text-align:center"> WavaBeans! <img src="images/wavas.gif" width="160" height="176" alt="WavaBeans and Hot Wava!" style="vertical-align:middle" />

PB Tech Internet Training Introduction to PHP 37
HotWava! </h3> <!-- don't forget to end your conditional!--> <?php include("footer.php"); ?> </body> </html>
5. Save ex02-default-temp.php. From your browser, request the file. If the form does not display correctly, reedit, save, and request again.
6. Enter a full name in the form field and submit. If the correct response is not returned, edit ex02-default-temp.php and try again.
If you are done early...
• Upgrade your form to include radio buttons named “gender” that will request whether the visitor is male or female. When the SUBMIT is clicked, include the appropriate polite salutation, as in Good Morning, Ms. Melody Bigwheel.

PB Tech Internet Training Introduction to PHP 38
A Possible Solution to Exercise 2 As contained in ex02-default-done.php:
<!DOCTYPE html PUBLIC "-//W3C//DTD XHTML 1.0 Transitional//EN" "http://www.w3.org/TR/xhtml1/DTD/xhtml1-transitional.dtd"> <html xmlns="http://www.w3.org/1999/xhtml"> <head> <title>The WestLake Laundry Detergent Company</title> <link href="washstyle.css" rel="stylesheet" /> <meta http-equiv="Content-Type" content="text/html; charset=iso-8859-1" /> </head> <body> <?php include("header.php"); if (!isset($_POST["fullname"])) { ?> Thank you for visiting the WestLake Laundry Detergent Company (WLDC). So that we may better serve you during your visit, please provide us your name: <div style="width: 100%; text-align:center; margin-top: 1em;"> <form method="post"> <input size="35" maxlength="35" name="fullname" /> <input type="submit" value="Submit" /> </form> </div> <?php } else { ?> <p><em> <?php if (date("G") < 12 ) { echo "Good Morning, "; } elseif (date("G") < 18) { echo "Good Afternoon, "; } else { echo "Good Evening, "; } ?> </em> and welcome to WLDC, <strong><?php echo $_POST["fullname"]; ?></strong>, from the inventors of <strong>Wava<span style="vertical-align: super; font-size: .7em">®</span></strong> laundry detergent. Wava is the world's most powerful detergent and is compatible with all washing machines. No matter how badly your clothes are stained, you'll be able to <strong>wash once, wear anywhere</strong>!</p>

PB Tech Internet Training Introduction to PHP 39
<p>How did we do it? Unlike other detergents, which are designed to work with specific types of washing machines, <strong>Wava</strong> was designed to work with a <strong>Virtual Washing Machine</strong>. Just install the <strong>Wava White Clothes Interpreter</strong> on your machine, then use the <strong>Wava</strong> detergent. It's so easy, and fun too!</p> <h3 class="header" style="text-align:center"> WavaBeans! <img src="images/wavas.gif" width="160" height="176" alt="WavaBeans and Hot Wava!" style="vertical-align:middle" /> HotWava! </h3> <?php } ?> <?php include("footer.php"); ?> </body> </html>


PB Tech Internet Training Introduction to PHP 41
Working with Cookies As we have mentioned, the Web is a stateless protocol. In other words, it forgets everything about the client and all information associated with it after every connection. Developers face the challenge of making values persist between connections. For example, in prior exercises, a user entered a name in a form, and PHP returned a personalized response. Perhaps you would like all of the pages the user requests from your Web site to return the same personalized greeting, even on future visits. Saving the user’s name between connections is an example of maintaining state.
Cookies enable your PHP pages to store one or more variable name and value pairs by writing them to small text files on the user’s computer. Your PHP pages can later retrieve these variable name and value pairs, even if the user has exited and restarted the browser in the interim. Cookies make it possible to share data across multiple page requests.
Cookies and Privacy
Because cookies are written as text to the user’s computer, there are questions about how secure this information may be. By default, a cookie that is set can be retrieved over the Web only by a page from the same domain as the page that set the cookie. As we will see, it is also possible to set values for cookies that further restrict how they can be retrieved, their longevity and expiration date, and whether they will be transmitted to the server in an encrypted format. Still, because cookies reside as text files on the local client computer, anyone could conceivably sit down at the client computer and, if they know where to look, snoop in someone’s cookies. Because of this, it is inadvisable to store confidential information, like credit card numbers or social security numbers, in cookies.
Setting a Cookie The setcookie function sets a cookie. If takes several arguments (the documentation below is from www.php.net:
bool setcookie ( string name [, string value [, int expire [, string path [, string domain [, bool secure]]]]])
Parameter Description Examples
name The name of the cookie. 'cookiename' is called as $_COOKIE['cookiename']
value The value of the cookie. This value is stored on the clients computer; do not store sensitive information.
Assuming the name is 'cookiename', this value is retrieved through $_COOKIE['cookiename']
expire
The time the cookie expires. This is a Unix timestamp so is in number of seconds since the epoch. In otherwords, you'll most likely set this with the time() function plus the
time()+60*60*24*30 will set the cookie to expire in 30 days. If not set, the cookie will expire at the end of the session (when the browser closes).

PB Tech Internet Training Introduction to PHP 42
Parameter Description Examples
number of seconds before you want it to expire. Or you might use mktime().
path The path on the server in which the cookie will be available on.
If set to '/', the cookie will be available within the entire domain. If set to '/foo/', the cookie will only be available within the /foo/ directory and all sub-directories such as /foo/bar/ of domain. The default value is the current directory that the cookie is being set in.
domain The domain that the cookie is available.
To make the cookie available on all subdomains of example.com then you'd set it to '.example.com'. The . is not required but makes it compatible with more browsers. Setting it to www.example.com will make the cookie only available in the www subdomain. Refer to tail matching in the spec for details.
secure
Indicates that the cookie should only be transmitted over a secure HTTPS connection. When set to TRUE, the cookie will only be set if a secure connection exists. The default is FALSE.
0 or 1
It is crucial to note that you must set cookies before any ouput is sent to the browser, including <!DOCTYPE> and other initial tags or whitespace. This is because cookies are part of the http headers. If you really do not want to do this, you can force your server to buffer output. This makes your server operate less efficiently, so do so with care. See http://us2.php.net/setcookie for details.
Retrieving a Cookie You can retrieve cookie values with the global $_COOKIE variable. A very simple demo is found in the files below.
Page 1 (demos/cookie-set.php): <?php setcookie(“name”,”Joe”,time()+60*60*24*7); ?>
Page 2 (demos/cookie-get.php): <?php echo “Welcome back “ . $_COOKIE[“name”]; ?>
Example: Setting, Retrieving, and Expiring a Cookie The following demo uses three files to demonstrate cookies: cookiedemo.php, makecookie.php, and killcookie.php. First, request demos/cookiedemo.php in your browser. The following screen is displayed:

PB Tech Internet Training Introduction to PHP 43
Completing and submitting the form requests makecookie.php, which contains the code that sets the name in a cookie named “firstname” on your local computer:
Following the link back to cookiedemo.php (or just clicking the back button and refreshing) will display this page:
The cookie will persist even if the browser is closed and relaunched. So, future requests for cookiedemo.php will continue to retrieve the cookie and return a personalized response.

PB Tech Internet Training Introduction to PHP 44
Click the “clear this cookie” link to request killcookie.php, the file that expires the cookie immediately:
Requesting cookiedemo.php in this case will return the form. The file cookiedemo.php, shown below, is a self-submitting file containing both a form and a response. Here, the conditional that nests the two blocks of code checks whether the cookie “firstname” exists on the local client computer. If it does, a customized greeting including information from the cookie is returned. If the cookie returns an empty string, the form is returned.
<!DOCTYPE html PUBLIC "-//W3C//DTD XHTML 1.0 Transitional//EN" "http://www.w3.org/TR/xhtml1/DTD/xhtml1-transitional.dtd"> <html xmlns="http://www.w3.org/1999/xhtml"> <head> <title>Cookie Demo</title> <meta http-equiv="Content-Type" content="text/html; charset=iso-8859-1" /> </head> <body> <?php if (isset($_COOKIE["firstname"])) { echo '<h1>Welcome back, ' . $_COOKIE["firstname"] . '!</h1> <p>If you\'d like, you may <a href="killcookie.php">clear this cookie</a>. </p>'; } else { ?> </p> <h1>Welcome to our site!</h1> <form action="makecookie.php" method="post"> <p>Please tell us your name: <input type="text" name="firstname" /> <input type="submit" /> </p> </form> <?php } ?>

PB Tech Internet Training Introduction to PHP 45
</body> </html>
When the form is submitted to makecookie.php, this page sets the cookie “firstname” with the value retrieved from the form, and it sets an expiration date 365 days from the current date. Notice that the cookie is set before the <HTML> is sent to the browser. A link sends the user back to cookiedemo.php. Here is the code for makecookie.php:
<?php setcookie("firstname",$_POST["firstname"],time()+60*60*24*365); ?> <!DOCTYPE html PUBLIC "-//W3C//DTD XHTML 1.0 Transitional//EN" "http://www.w3.org/TR/xhtml1/DTD/xhtml1-transitional.dtd"> <html xmlns="http://www.w3.org/1999/xhtml"> <head> <title>Create Cookie</title> <meta http-equiv="Content-Type" content="text/html; charset=iso-8859-1" /> </head> <body> <h1>Cookie has been set.</h1> <h2><a href="cookiedemo.php">Return to cookie demo</a>.</h2> </body> </html>
If the cookie has been set, the greeting portion of cookiedemo.php provides a link to killcookie.php, allowing the client to voluntarily kill the cookie! This is done by setting the value of the cookie to an empty string (“”). For good measure, we also set the expiration to a time in the past. Here is the code for killcookie.php:
<?php setcookie("firstname","",time()); ?> <!DOCTYPE html PUBLIC "-//W3C//DTD XHTML 1.0 Transitional//EN" "http://www.w3.org/TR/xhtml1/DTD/xhtml1-transitional.dtd"> <html xmlns="http://www.w3.org/1999/xhtml"> <head> <title>Delete Cookie</title> <meta http-equiv="Content-Type" content="text/html; charset=iso-8859-1" /> </head> <body> <h1>Cookie has been deleted.</h1> <h2><a href="cookiedemo.php">Return to test page</a>.</h2> </body>

PB Tech Internet Training Introduction to PHP 46
</html>

PB Tech Internet Training Introduction to PHP 47
Exercise 3: Enhance the WLDC Home Page With Cookies In this exercise, you will enhance your WLDC Home Page to “remember” the name and gender entered in the form by setting cookies on the user’s client computer.
To complete this exercise:
1. Open ex03-default-temp.php, which contains all of the code from the prior exercises.
2. If the form has been submitted, use the data sent to set two cookies on the user’s client computer, one named “fullname” and the other “gender.” Remember, this must be done before the HTML headers are written to the browser.
3. After you’ve set the cookies, you will probably want to reload the page, since the cookies won’t be available until the next http request. You can use the header function to request the current page: header("Location: http://" . $_SERVER['HTTP_HOST'] . $_SERVER['PHP_SELF']);
4. Modify your main conditional, the one that “decides” whether to respond with a greeting, or by sending the form,” to test for cookie existence (rather than form submission).
5. Look throughout your greeting statement block to find statements requesting form information. Modify them to request the information from the appropriate cookies instead.
6. Open ex03-deletecookie-temp.php. This should delete the two cookies and return the user back to the main page for this exercise.
7. The file ex03-default-temp.php has some helpful hints in it. <!-- Test for submission of form. If true, set gender and fullname cookies. Reload the page as well. --> <!DOCTYPE html PUBLIC "-//W3C//DTD XHTML 1.0 Transitional//EN" "http://www.w3.org/TR/xhtml1/DTD/xhtml1-transitional.dtd"> <html xmlns="http://www.w3.org/1999/xhtml"> <head> <title>The WestLake Laundry Detergent Company</title> <link href="washstyle.css" rel="stylesheet" /> <meta http-equiv="Content-Type" content="text/html; charset=iso-8859-1" /> </head> <body> <?php include("header.php"); /*Change this to test for the cookie rather than the form value*/ if (!isset($_POST["fullname"])) {

PB Tech Internet Training Introduction to PHP 48
?> Thank you for visiting the WestLake Laundry Detergent Company (WLDC). So that we may better serve you during your visit, please provide us your name: <div style="width: 100%; text-align:center; margin-top: 1em;"> <form method="post"> <input size="35" maxlength="35" name="fullname" /> Male: <input type="radio" name="gender" value="male" /> Female: <input type="radio" name="gender" value="female" /> <input type="submit" value="Submit" /> </form> </div> <?php } else { ?> <p><em> <?php if (date("G") < 12 ) { echo "Good Morning, "; } elseif (date("G") < 18) { echo "Good Afternoon, "; } else { echo "Good Evening, "; } ?> </em> and welcome to WLDC, <strong> <!-- Greet the user by name here, using the gender cookie to decide if the user should be addressed as Mr. or Ms.--> </strong>, from the inventors of <strong>Wava<span style="vertical-align: super; font-size: .7em">®</span></strong> laundry detergent. Wava is the world's most powerful detergent and is compatible with all washing machines. No matter how badly your clothes are stained, you'll be able to <strong>wash once, wear anywhere</strong>!</p> <p>How did we do it? Unlike other detergents, which are designed to work with specific types of washing machines, <strong>Wava</strong> was designed to work with a <strong>Virtual Washing Machine</strong>. Just install the <strong>Wava White Clothes Interpreter</strong> on your machine, then use the <strong>Wava</strong> detergent. It's so easy, and fun too!</p> <p>You may <a href="ex03-deletecookie-temp.php">delete</a> your cookie if you wish.</p> <h3 class="header" style="text-align:center"> WavaBeans! <img src="images/wavas.gif" width="160" height="176" alt="WavaBeans and Hot Wava!" style="vertical-align:middle" /> HotWava! </h3>

PB Tech Internet Training Introduction to PHP 49
<?php } ?> <?php include("footer.php"); ?> </body> </html>
If you are done early...
• Add some more cookies.
• Experiment with the other arguments of the setcookie() function.

PB Tech Internet Training Introduction to PHP 50
A Possible Solution to Exercise 3 As contained in ex03-default-done.php:
<?php if (isset($_POST["fullname"])) { setcookie("fullname",$_POST["fullname"],time() + 60*60*24*31); setcookie("gender",$_POST["gender"],time() + 60*60*24*31); header("Location: http://" . $_SERVER['HTTP_HOST'] . $_SERVER['PHP_SELF']); } ?> <!DOCTYPE html PUBLIC "-//W3C//DTD XHTML 1.0 Transitional//EN" "http://www.w3.org/TR/xhtml1/DTD/xhtml1-transitional.dtd"> <html xmlns="http://www.w3.org/1999/xhtml"> <head> <title>The WestLake Laundry Detergent Company</title> <link href="washstyle.css" rel="stylesheet" /> <meta http-equiv="Content-Type" content="text/html; charset=iso-8859-1" /> </head> <body> <?php include("header.php"); if (!isset($_COOKIE["fullname"])) { ?> Thank you for visiting the WestLake Laundry Detergent Company (WLDC). So that we may better serve you during your visit, please provide us your name: <div style="width: 100%; text-align:center; margin-top: 1em;"> <form method="post"> <input size="35" maxlength="35" name="fullname" /> Male: <input type="radio" name="gender" value="male" /> Female: <input type="radio" name="gender" value="female" /> <input type="submit" value="Submit" /> </form> </div> <?php } else { ?> <p><em> <?php if (date("G") < 12 ) { echo "Good Morning, "; } elseif (date("G") < 18) { echo "Good Afternoon, "; } else { echo "Good Evening, "; } ?>

PB Tech Internet Training Introduction to PHP 51
</em> and welcome to WLDC, <strong> <?php if ($_COOKIE["gender"] == "male") echo "Mr. " . $_COOKIE["fullname"]; else echo "Ms. " . $_COOKIE["fullname"]; ?></strong>, from the inventors of <strong>Wava<span style="vertical-align: super; font-size: .7em">®</span></strong> laundry detergent. Wava is the world's most powerful detergent and is compatible with all washing machines. No matter how badly your clothes are stained, you'll be able to <strong>wash once, wear anywhere</strong>!</p> <p>How did we do it? Unlike other detergents, which are designed to work with specific types of washing machines, <strong>Wava</strong> was designed to work with a <strong>Virtual Washing Machine</strong>. Just install the <strong>Wava White Clothes Interpreter</strong> on your machine, then use the <strong>Wava</strong> detergent. It's so easy, and fun too!</p> <p>You may <a href="ex03-deletecookie-done.php">delete</a> your cookie if you wish.</p> <h3 class="header" style="text-align:center"> WavaBeans! <img src="images/wavas.gif" width="160" height="176" alt="WavaBeans and Hot Wava!" style="vertical-align:middle" /> HotWava! </h3> <?php } ?> <?php include("footer.php"); ?> </body> </html>
As contained in ex03-deletecookie-done.php <?php setcookie("fullname","",time() - 1000); setcookie("gender","",time() - 1000); header("Location: http://" . $_SERVER['HTTP_HOST'] . dirname($_SERVER['PHP_SELF']) . "/ex03-default-done.php"); ?>

PB Tech Internet Training Introduction to PHP 53
Maintaining State with Sessions
As we have mentioned, Web servers treat every page request as brand-new. Even if you request page after page from the same Web site, the server remembers nothing about you between page requests. We have referred to this as a lack of persistence of state, and it makes for a fast and efficient Web server, as all it needs to do is serve up individual Web pages as quickly as possible.
However, e-commerce today demands that information be maintained, or be made to persist, from page request to page request to page request. If we can maintain state in this fashion, we can hold onto personalized information about each user, information about their computer and browser, shopping cart information, airline seat or hotel room preferences, and a host of other information that make advanced Web transactions possible. We would be able to treat all of an individual client’s related page requests to a Web application as a single session.
So far, we have seen the contribution that cookies make to maintaining state by storing information on the client computer. While cookies may be handy for storing small amounts of information, if we used cookies to store all of the information, let’s say, pertaining to a shopping transaction, this would amount to quite a bit of data that would have to be retrieved by the server with every page request made in the course of the transaction. This is quite a job for the server, especially if many users are shopping (each making multiple page requests) at the same time.
With Sessions, information can be stored in memory on the server. For each individual client, the server will spawn an individual Session object for each and every client currently making requests. Each Session object can store information pertaining to an individual client’s session of page requests. This Session object will recognize the client throughout the session, holding onto information for that client throughout the session.
Sessions When a client begins interacting with a Web application by requesting a page from within its directory structure, you can kick off a chain of events is automatically kicked off that will enable the user to begin a session. By default, PHP will assume that a particular http request has no need for a session. You can tell the server to deal with sessions by either setting the appropriate value in your php.ini configuration file (session.auto_start = On), or by calling the session_start() function. The latter is the preferred method.
1. The server checks to see if it has stored a Session ID cookie on the client computer (sessions can also be tracked in the URL bar if you enable the session.use_trans_sid option in your configuration file). If not, it knows to treat this page request as the start of a new session.

PB Tech Internet Training Introduction to PHP 54
2. For this new session, the server creates a Session object in memory on the server.
3. The server sets a special cookie on the client computer containing a unique session id. As long as the server is running, it will continue to generate a unique session id for each and every client making requests that contain the session_start() function call.
4. Just as it did when the client’s first page request was made, and the session began, the server will continue to check for the session id cookie each and every time this client makes a page request that contains the session_start() function, matching the user to the appropriate session information on the server.
5. During this client’s session of page requests, the server uses the session object to store and update information about the client's session as variable name and value pairs. PHP files can contain statements that modify, update, and retrieve these session values.
Ending a Session
This client’s Session object will remain in memory on the server, providing storage and access of information pertaining to this client’s session of page requests to this Web application, as long as the client continues to make requests, until:
• The Session times out. The server will automatically destroy the session data (deallocating it from server memory) after a period of client inactivity. This time period can be modified with the session.gc_maxlifetime option in your php.ini file. For example, let’s supposes you are making airline reservations online, and are called away to the phone. Upon your return, your next page request returns a
• The user closes the browser. Session information is not shared across different browsers (IE, Mozilla, Opera, etc.). Nor is it generally shared between different windows of the same browser, though there are exceptions to this.
• The Session is “destroyed” when the PHP session_destroy() function is executed.
Storing and Retrieving Session Values The easiest and best way to set a session variable is to use the $_SESSION superglobal. You simply assign it a value like any other variable.
$_SESSION["key"] = value;
As in:
$_SESSION["user"] = "Rachel";

PB Tech Internet Training Introduction to PHP 55
The statement above creates a Session variable called loggedin with the string value “Rachel”. This value could be retrieved, then, with a statement similar to the following:
<?php echo "Click here, " . $_SESSION["user"] . ", to submit your order."; ?>
Example: Using the Session Object to Track a Shopping Cart Session variables are often used to keep track of a user’s online “shopping cart” throughout that user’s session of page requests. As an example, request demos/sessiondemo.php to display a shopping page. Notice how the page also looks for the cookie set in a prior example, and uses it to greet the user by name:
If Ben Franklin increases his order of batteries by 15 and submits the form, setsession.php contains the statements that will increment his current order by modifying his $_SESSION["batteries"] variable, along with a link back to the Shopping Cart in sessiondemo.php.

PB Tech Internet Training Introduction to PHP 56
Ben can empty his shopping cart by clicking the link that leads to resetsession.php.
Examine the code for these three pages. First, sessiondemo.php:
<?php session_start(); if (!isset($_SESSION["batteries"])) $_SESSION["batteries"] = 0; if (!isset($_COOKIE["fullname"])) $fullname = "Guest"; else $fullname = $_COOKIE["fullname"]; ?> <!DOCTYPE html PUBLIC "-//W3C//DTD XHTML 1.0 Transitional//EN" "http://www.w3.org/TR/xhtml1/DTD/xhtml1-transitional.dtd"> <html xmlns="http://www.w3.org/1999/xhtml"> <head><title>Session Demo - A Shopping Cart</title> <meta http-equiv="Content-Type" content="text/html; charset=iso-8859-1" /> </head> <body> <h1>Hello, <?php echo $fullname ?>!<br /> Welcome To Your Shopping Cart!</h1> <p>You currently have <b><?php echo $_SESSION["batteries"] ?></b> batteries on order. If you'd like to change your order, please mark your changes below and submit the form.</p> <form method="post" action="setsession.php"> <p>Please <select name="updown"> <option value="increase">increase</option>

PB Tech Internet Training Introduction to PHP 57
<option value="decrease">decrease</option> </select> my order by <input type="text" name="howmany" /> batteries. </p> <p> <input type="submit" value="Shop!" /> <input type="reset" value="Reset" /> </p> </form> <p><a href="resetsession.php">Empty</a> your Shopping Cart.</p> </body> </html>
The code in setsession.php appropriately increments the value of $_SESSION["batteries"] , and provides a link back to the Shopping Cart. Notice the use of the one-step add and assign operators += and -=. The following pairs of statements are equivalent
$x = 4; $x += 2; $x = 4; $x = $x + 2;
And now the code:
<!DOCTYPE html PUBLIC "-//W3C//DTD XHTML 1.0 Transitional//EN" "http://www.w3.org/TR/xhtml1/DTD/xhtml1-transitional.dtd"> <?php session_start(); if ($_POST["updown"] == "increase") $_SESSION["batteries"] += $_POST["howmany"]; else $_SESSION["batteries"] -= $_POST["howmany"]; ?> <html xmlns="http://www.w3.org/1999/xhtml"> <head><title>Set Session Variable</title> <meta http-equiv="Content-Type" content="text/html; charset=iso-8859-1" /> </head> <body> <p>Your Shopping Cart has been adjusted. <a href="sessiondemo.php">Return to the Shopping Cart page</a> to shop some more!</p> </body> </html>
Finally, resetsession.php abandons the session:
<?php

PB Tech Internet Training Introduction to PHP 58
session_start(); session_destroy(); ?> <!DOCTYPE html PUBLIC "-//W3C//DTD XHTML 1.0 Transitional//EN" "http://www.w3.org/TR/xhtml1/DTD/xhtml1-transitional.dtd"> <html xmlns="http://www.w3.org/1999/xhtml"> <head><title>Reset Session Variables</title> <meta http-equiv="Content-Type" content="text/html; charset=iso-8859-1" /> </head> <body> <p>Your Session variables have been reset. <a href="sessiondemo.php">Return to the Shopping Cart page</a>.</p> </body> </html>
Even here, where we’re just wiping out all the session data, we still must call session_start(). In order to do anything with a session, you have to let PHP know that it’s dealing with a session (unless of course you set this as the default behavior – see above).

PB Tech Internet Training Introduction to PHP 59

PB Tech Internet Training Introduction to PHP 60
Exercise 4: Building a Shopping Cart for WLDC In this exercise, you will complete the code for a shopping-cart application that uses Session variables. By requesting ex04-cart-temp.php, users will be able to place multiple quantities of both WavaBeans and HotWava laundry products in a virtual shopping cart. The page will also display the current selected amounts of these products, and allow the user to withdraw products from the cart. Requesting ex04-cart-temp.php will display this page:
Submitting the completed form will request ex04-set-temp.php, which will contain statements that modify and store the appropriate Session variables.

PB Tech Internet Training Introduction to PHP 61
Clicking the “empty” link on the main Shopping Cart page will request ex4-resetcart-temp.php, which will contain the code that ends the Session.
To complete this exercise:
1. Open ex04-cart-temp.php in Notepad. Complete the sections indicated in bold in the code below: <!-- Activate session handling. Check for the existence of the session variables wavabeans and hotwava. If they do not exist, initialize them at 0 -->

PB Tech Internet Training Introduction to PHP 62
<!DOCTYPE html PUBLIC "-//W3C//DTD XHTML 1.0 Transitional//EN" "http://www.w3.org/TR/xhtml1/DTD/xhtml1-transitional.dtd"> <html xmlns="http://www.w3.org/1999/xhtml"> <head> <title>Shop For WavaBeans and HotWava Online</title> <link href="washstyle.css" rel="stylesheet" /> <meta http-equiv="Content-Type" content="text/html; charset=iso-8859-1" /> </head> <body> <?php include("header.php"); ?> <p><img src="images/wavas.gif" width="160" height="176" align="right" alt="Wava Laundry Products!" />Welcome to the <strong class="header">WLDC Shopping Center</strong>, where you can shop for <strong>WavaBeans</strong> and <strong>HotWava</strong> laundry products online! Your <strong class="header">Shopping Cart</strong> currently contains:</p> <p><strong><!-- Print out the wavabeans session variable here --></strong> boxes of <strong>WavaBeans</strong>.<br /> <strong><!-- Print out the hotwava session variable here --></strong> jugs of <strong>HotWava</strong>.</p> <p>If you would like to change your order, please make your changes below and submit the form. </p> <form method="post" action="ex04-set-temp.php"> <!-- Notice the names of the form fields below --> <p>Please <select name="wbchange"> <option value="increase">increase </option> <option value="decrease">decrease </option> </select> my order of <strong>WavaBeans</strong> by <input type="text" name="wbamount" /> boxes. </p> <p>Please <select name="hwchange"> <option value="increase">increase </option> <option value="decrease">decrease </option> </select> my order of <strong>HotWava</strong> by <input type="text" name="hwamount" /> jugs. </p> <p> <input type="submit" value="Shop!" /> <input type="reset" value="Reset" /> </p> </form>

PB Tech Internet Training Introduction to PHP 63
<p>Please <a href="ex04-resetcart-temp.php">empty</a> my shopping cart!</p> <?php include("footer.php"); ?> </body> </html>
2. Open ex04-set-temp.php for editing. Complete the parts indicated in bold below: <!-- Make sure the user has filled out the form by seeing if the wbamount and hwamount form fields are set. if either of them is not, redirect the user to the form. Activate session handling. Save the form fields into variables for easy use later: i.e. create a variable called wbchange that will contain the value of the wbchange form element. Do this for all four form fields. --> <!DOCTYPE html PUBLIC "-//W3C//DTD XHTML 1.0 Transitional//EN" "http://www.w3.org/TR/xhtml1/DTD/xhtml1-transitional.dtd"> <!-- Adjust the wavabeans and hotwava variables according to the value entered by the user. Make sure you add or subtract based on whether they want to increase or decrease their order --> <html xmlns="http://www.w3.org/1999/xhtml"> <head> <title>Shop For WavaBeans and HotWava Online</title> <link href="washstyle.css" rel="stylesheet" /> <meta http-equiv="Content-Type" content="text/html; charset=iso-8859-1" /> </head> <body> <?php include("header.php");?> <H2 CLASS="header"> Fill Your Shopping Cart!</H3> </CENTER> <p>WLDC has adjusted the contents of your Shopping Cart. Return to the <a href="ex04-cart-temp.php">Shopping Cart page</a> where more wonderful WLDC products await!</p> <?php include("footer.php");?> </body> </html>
3. Open ex04-resetcart-temp.php for editing. Complete the parts indicated in bold below: <!-- Activate session handling. Destroy the current session. --> <!DOCTYPE html PUBLIC "-//W3C//DTD XHTML 1.0 Transitional//EN" "http://www.w3.org/TR/xhtml1/DTD/xhtml1-transitional.dtd"> <html xmlns="http://www.w3.org/1999/xhtml"> <head>

PB Tech Internet Training Introduction to PHP 64
<title>Empty My Shopping Cart</title> <link href="washstyle.css" rel="stylesheet" /> <meta http-equiv="Content-Type" content="text/html; charset=iso-8859-1" /> </head> <body> <?php include("header.php") ?> <h3 class="header" style="width:100%;text-align:center;">Empty Your Shopping Cart</h3> <p>Your <strong class="header">Shopping Cart</strong> has been emptied.</p> <p>Click here to return to the <strong class="header"><a href="ex04-cart-done.php">Shopping Cart</a></strong> page.</p> </body> </html>
If you are done early...
• This Shopping Cart allows the user to select negative quantities of WavaBeans and HotWava. WLDC cannot allow this! Modify your code so that if the user tries to remove from the shopping cart more of either product than it currently contains, the quantity of that product will be automatically set to 0.

PB Tech Internet Training Introduction to PHP 65
A Possible Solution to Exercise 4 As contained in ex04-cart-done.php:
<?php session_start(); if (!isset($_SESSION["wavabeans"])) $_SESSION["wavabeans"] = 0; if (!isset($_SESSION["hotwava"])) $_SESSION["hotwava"] = 0; ?> <!DOCTYPE html PUBLIC "-//W3C//DTD XHTML 1.0 Transitional//EN" "http://www.w3.org/TR/xhtml1/DTD/xhtml1-transitional.dtd"> <html xmlns="http://www.w3.org/1999/xhtml"> <head> <title>Shop For WavaBeans and HotWava Online</title> <link href="washstyle.css" rel="stylesheet" /> <meta http-equiv="Content-Type" content="text/html; charset=iso-8859-1" /> </head> <body> <?php include("header.php"); ?> <p><img src="images/wavas.gif" width="160" height="176" align="right" alt="Wava Laundry Products!" />Welcome to the <strong class="header">WLDC Shopping Center</strong>, where you can shop for <strong>WavaBeans</strong> and <strong>HotWava</strong> laundry products online! Your <strong class="header">Shopping Cart</strong> currently contains:</p> <p><strong><?php echo $_SESSION["wavabeans"]; ?></strong> boxes of <strong>WavaBeans</strong>.<br /> <strong><?php echo $_SESSION["hotwava"]; ?></strong> jugs of <strong>HotWava</strong>.</p> <p>If you would like to change your order, please make your changes below and submit the form. </p> <form method="post" action="ex04-set-done.php"> <p>Please <select name="wbchange"> <option value="increase">increase </option> <option value="decrease">decrease </option> </select> my order of <strong>WavaBeans</strong> by <input type="text" name="wbamount" /> boxes. </p> <p>Please <select name="hwchange">

PB Tech Internet Training Introduction to PHP 66
<option value="increase">increase </option> <option value="decrease">decrease </option> </select> my order of <strong>HotWava</strong> by <input type="text" name="hwamount" /> jugs. </p> <p> <input type="submit" value="Shop!" /> <input type="reset" value="Reset" /> </p> </form> <p>Please <a href="ex04-resetcart-done.php">empty</a> my shopping cart!</p> <?php include("footer.php"); ?> </body> </html>
As contained in ex04-set-done.php
<?php if ( !isset($_POST["wbamount"]) || !isset($_POST["hwamount"]) ) header("Location: http://" . $_SERVER['HTTP_HOST'] . dirname($_SERVER['PHP_SELF']) . "/ex04-cart-done.php"); session_start(); $wbchange = $_POST["wbchange"]; $wbamount = $_POST["wbamount"]; $hwchange = $_POST["hwchange"]; $hwamount = $_POST["hwamount"]; ?> <!DOCTYPE html PUBLIC "-//W3C//DTD XHTML 1.0 Transitional//EN" "http://www.w3.org/TR/xhtml1/DTD/xhtml1-transitional.dtd"> <?php if ($wbchange == "increase") $_SESSION["wavabeans"] += $wbamount; else $_SESSION["wavabeans"] -= $wbamount; if ($wbchange == "increase") $_SESSION["hotwava"] += $hwamount; else $_SESSION["hotwava"] -= $hwamount; ?> <html xmlns="http://www.w3.org/1999/xhtml"> <head> <title>Shop For WavaBeans and HotWava Online</title> <link href="washstyle.css" rel="stylesheet" />

PB Tech Internet Training Introduction to PHP 67
<style> <!-- b {color: red} --> </style> <meta http-equiv="Content-Type" content="text/html; charset=iso-8859-1" /> </head> <body> <?php include("header.php");?> <H2 CLASS="header"> Fill Your Shopping Cart!</H3> </CENTER> <p>WLDC has adjusted the contents of your Shopping Cart. Return to the <a href="ex04-cart-done.php">Shopping Cart page</a> where more wonderful WLDC products await!</p> <?php include("footer.php");?> </body> </html>
As contained in ex04-resetcart-done.php:
<?php session_start(); session_destroy(); ?> <!DOCTYPE html PUBLIC "-//W3C//DTD XHTML 1.0 Transitional//EN" "http://www.w3.org/TR/xhtml1/DTD/xhtml1-transitional.dtd"> <html xmlns="http://www.w3.org/1999/xhtml"> <head> <title>Empty My Shopping Cart</title> <link href="washstyle.css" rel="stylesheet" /> <meta http-equiv="Content-Type" content="text/html; charset=iso-8859-1" /> </head> <body> <?php include("header.php") ?> <h3 class="header" style="width:100%;text-align:center;">Empty Your Shopping Cart</h3> <p>Your <strong class="header">Shopping Cart</strong> has been emptied.</p> <p>Click here to return to the <strong class="header"><a href="ex04-cart-done.php">Shopping Cart</a></strong> page.</p> </body> </html>


PB Tech Internet Training Introduction to PHP 69
Email with PHP
Sending E-mail PHP When you make a flight reservation online, you usually receive an email about it almost instantaneously. When you forget your password, the server seems to magically send it to you as an email. Having the server automatically generate emails is an extremely useful, and therefore common, strategy for server-side web development.
PHP makes automatically generating emails easy. Let’s take a look at a brief demonstration.
NOTE
Your server needs to be configured so that it can send SMTP messages. You may need to contact your server administrator to see if your server has been configured to send mail. If you are running the files for this class on your local Windows machine, you can adjust the SMTP settings from the Internet Information Services window.
In your browser, request demos/email-simple.php. A form will be displayed:

PB Tech Internet Training Introduction to PHP 70
When the form is submitted, the page requests itself, as it also contains the code that processes and sends the e-mail:
And voila! An email has been sent!
Take a look at the code for email-simple.php:
<!DOCTYPE html PUBLIC "-//W3C//DTD XHTML 1.0 Transitional//EN" "http://www.w3.org/TR/xhtml1/DTD/xhtml1-transitional.dtd"> <html xmlns="http://www.w3.org/1999/xhtml"> <head> <title>Mail Demo</title> <meta http-equiv="Content-Type" content="text/html; charset=iso-8859-1" /> </head> <body> <?php if (!isset($_POST["mailto"])) { ?> <form method="post"> <p>To: <input type="text" name="mailto" size="40" /> </p> <p>Message text: <textarea name="message" cols="50" rows="10"></textarea> </p> <p> <input type="submit" /> <input type="reset" /> </p> </form>

PB Tech Internet Training Introduction to PHP 71
<?php } else { echo "<P>About to send the message..."; $mailTo = $_POST["mailto"]; $message = $_POST["message"]; $subject = "Demonstrating PHP mail"; $mailresult = mail($mailTo,$subject,$message); if ($mailresult){ echo <<<THEEND OK. An email has been sent to $mailTo, with the following contents: <pre>$message</pre> THEEND; } else { echo "something went wrong!"; } } ?> </body> </html>
First you will see a conditional that checks to see if the form's mailto value was received. If not, the form is displayed. Note the names of the variables being sent by the form to the server. If the values from the form were received, we can see them being assigned to local string variables.
$mailTo = $_POST["mailto"]; $message = $_POST["message"]; $subject = "Demonstrating PHP mail";
We then send the mail with the following line of code:
$mailresult = mail($mailTo,$subject,$message);
The mail() function will send an email. It takes three required arguments:
1. To: comma-delimited list of email addresses to whom the message should be sent.
2. Subject: a string with the subject of the email.
3. Message: a string with the contents of the email.
You will also notice that the mail function returns a Boolean value (true/false), which we’ve saved into a variable called $mailresult. This will be true if the mail message was formatted correctly for delivery, and false otherwise. It does not check to see that delivery was successful. We check the value of it, and display a success or failure message accordingly.
What if you want to customize more of the message? There is an optional fourth parameter for adding any additional email headers. Check out demos/email-from.php, in which we have overridden the default from header:

PB Tech Internet Training Introduction to PHP 72
<!DOCTYPE html PUBLIC "-//W3C//DTD XHTML 1.0 Transitional//EN" "http://www.w3.org/TR/xhtml1/DTD/xhtml1-transitional.dtd"> <html xmlns="http://www.w3.org/1999/xhtml"> <head> <title>Mail Demo</title> <meta http-equiv="Content-Type" content="text/html; charset=iso-8859-1" /> </head> <body> <?php if (!isset($_POST["mailto"])) { ?> <form method="post"> <p>From: <input type="text" name="mailfrom" size="40" value="[email protected]" /> </p> <p>To: <input type="text" name="mailto" size="40" /> </p> <p>Message text: <textarea name="message" cols="50" rows="10"></textarea> </p> <p> <input type="submit" /> <input type="reset" /> </p> </form> <?php } else { echo "<P>About to send the message..."; $mailTo = $_POST["mailto"]; $mailFrom = $_POST["mailfrom"]; $message = $_POST["message"]; $subject = "Demonstrating PHP mail"; $mailresult = mail($mailTo,$subject,$message,"From: " . $mailFrom); if ($mailresult){ echo <<<THEEND OK. An email has been sent to $mailTo, with the following contents: <pre>$message</pre> THEEND; } else { echo "something went wrong!"; } } ?> </body> </html>

PB Tech Internet Training Introduction to PHP 73
You can set any headers you want, including CC, BCC, Reply-To, Importance, etc. One of the most useful headers is the content type, which allows you to send email that is formatted as HTML. Notice the extra headers in demos/email-fancy.php, and how we separate them with carriage returns/new lines.
<!DOCTYPE html PUBLIC "-//W3C//DTD XHTML 1.0 Transitional//EN" "http://www.w3.org/TR/xhtml1/DTD/xhtml1-transitional.dtd"> <html xmlns="http://www.w3.org/1999/xhtml"> <head> <title>Mail Demo</title> <meta http-equiv="Content-Type" content="text/html; charset=iso-8859-1" /> </head> <body> <?php if (!isset($_POST["mailto"])) { ?> <form method="post"> <p>From: <input type="text" name="mailfrom" size="40" /></p> <p>Subject: <input type="text" name="mailsubject" size="40" /></p> <p>To: <input type="text" name="mailto" size="40" /></p> <p>CC: <input type="text" name="mailcc" size="40" /></p> <p>BCC: <input type="text" name="mailbcc" size="40" /></p> <p>As HTML? <input type="checkbox" name="mailformat" /></p> <p>Message text: <textarea name="message" cols="50" rows="10"></textarea></p> <p><input type="submit" /><input type="reset" /></p> </form> <?php } else { echo "<P>About to send the message..."; $mailTo = $_POST["mailto"]; $mailFrom = $_POST["mailfrom"]; $mailCC = $_POST["mailcc"]; $mailBCC = $_POST["mailbcc"]; $message = $_POST["message"]; $subject = $_POST["mailsubject"]; $extras = "From: " . $mailFrom . "\r\n"; $extras .= "CC: " . $mailCC . "\r\n"; $extras .= "BCC: " . $mailBCC . "\r\n"; if (isset($_POST["mailformat"])) $extras .= "Content-type: text/html \r\n"; $mailresult = mail($mailTo,$subject,$message,$extras); if ($mailresult){ echo <<<THEEND OK. An email has been sent to $mailTo, with the following contents: <pre>$message</pre> THEEND; } else { echo "something went wrong!"; } } ?> </body> </html>

PB Tech Internet Training Introduction to PHP 74
Exercise 5: Implementing PHP E-mail at WLDC In this exercise, file ex05-email-temp.php contains code that will display a form that visitors to the site can use to register with WLDC. With form filled in, it might look like this:
When the form is submitted, another block of code in the page will format and e-mail the registration information, returning this confirmation page:

PB Tech Internet Training Introduction to PHP 75
To complete this exercise:
1. Open ex05-email-temp.php for editing. Complete the portions indicated below in bold: <!DOCTYPE html PUBLIC "-//W3C//DTD XHTML 1.0 Transitional//EN" "http://www.w3.org/TR/xhtml1/DTD/xhtml1-transitional.dtd"> <html xmlns="http://www.w3.org/1999/xhtml"> <head> <title>WLDC Customer Registration</title> <link href="washstyle.css" rel="stylesheet" /> <meta http-equiv="Content-Type" content="text/html; charset=iso-8859-1" /> </head> <body> <?php include("header.php"); if (!isset($_POST["firstname"])) { ?> <h1 class="header">WLDC Customer Registration</h1> <form method="post"> <pre> First Name <input name="firstname" size="57" maxlength="70" /> Last Name <input name="lastname" size="57" maxlength="70" /> State <input name="state" size="2" maxlength="2" /> Zip <input name="zip" size="25" maxlength="70" /> Email <input name="email" size="25" maxlength="70" /> <input type="submit" value="Submit" /> <input type="reset" /> </pre> </form> <?php } else { /* 1. Gather up the form fields into variables 2. Create a new variable called subject that says "Registration for Firstname Lastname" 3. Create a variable called message that will contain the registration information for this customer. This is what will be sent as body of the email. Remember that emails go out as plain text by default, so any tabs, spaces, or new lines will appear in the ultimate result. You may want to change the content type to HTML if you finish early. 4. Send the mail using the TO, SUBJECT, MESSAGE fields. Use your own email address for the To field. Also specify that the email is coming from the email address entered by the user. Save the success or failure of the message into a variable. 5. If the email was sent correctly, tell the user that it was sent and display the contents on the page. 6. If the email was not sent correctly, display an error message, and have them go back to the form. */ } ?> <?php include("footer.php"); ?>

PB Tech Internet Training Introduction to PHP 76
</body> </html>
If you are done early...
• Include the time and date that the person registered in the message.
• Format the message in HTML.
• Try out some of the other headers that can be added to the message.
• Add some validation, so that bad email addresses are rejected, and so that we’re sure all fields have been filled out.

PB Tech Internet Training Introduction to PHP 77
A Possible Solution to Exercise 5 As contained in ex05-email-done.php:
<!DOCTYPE html PUBLIC "-//W3C//DTD XHTML 1.0 Transitional//EN" "http://www.w3.org/TR/xhtml1/DTD/xhtml1-transitional.dtd"> <html xmlns="http://www.w3.org/1999/xhtml"> <head> <title>WLDC Customer Registration</title> <link href="washstyle.css" rel="stylesheet" /> <meta http-equiv="Content-Type" content="text/html; charset=iso-8859-1" /> </head> <body> <?php include("header.php"); if (!isset($_POST["firstname"])) { ?> <h1 class="header">WLDC Customer Registration</h1> <form method="post"> <pre> First Name <input name="firstname" size="57" maxlength="70" /> Last Name <input name="lastname" size="57" maxlength="70" /> State <input name="state" size="2" maxlength="2" /> Zip <input name="zip" size="25" maxlength="70" /> Email <input name="email" size="25" maxlength="70" /> <input type="submit" value="Submit" /> <input type="reset" /> </pre> </form> <?php } else { $firstname = $_POST["firstname"]; $lastname = $_POST["lastname"]; $state = $_POST["state"]; $zip = $_POST["zip"]; $email = $_POST["email"]; $subject = "Registration for $firstname $lastname"; $message = "Wava Customer Registration Firstname: $firstname Lastname: $lastname State: $state Zip: $zip E-Mail: $email";

PB Tech Internet Training Introduction to PHP 78
$mailresult = mail("[email protected]", $subject, $message, "From: " . $email); if ($mailresult){ echo "<h1 class=\"header\">Registration Received for $firstname $lastname </h1> <pre>$message</pre>"; } else { echo "<h2>Error! Please go <a href=\"javascript:history.back()\"back and fill in the form again.</h2>"; } } ?> <?php include("footer.php"); ?> </body> </html>

PB Tech Internet Training Introduction to PHP 79
Reading and Writing Text Files Text files are a simple, yet powerful and flexible way of storing and sharing information. For instance, tab-delimited text files (files that contain rows of information, with each row containing bits of data that are separated, or delimited, by tabs) are a universal exchange format supported by all major databases and spreadsheets. Even HTML files, and PHP files, are really just plain text files containing special markup tags. By having your PHP script write the information from forms to a text file, you can create a file that can be viewed as hypertext in a browser, or one that can be easily imported into the spreadsheet or database program of your choice.
Creating, opening, and writing to text files on the server requires that we write PHP pages that gain access to the file system of the server. PHP provides many different functions (approximately 75) for working with files on the server. They are referred to in the PHP documentation as Filesystem functions, and they allow you to create, delete, move and read files, as well as read and write meta information such as file sizes and permissions.
We don’t have enough time to look into all these functions, but we will look at a few of the most common functions.
Example: Writing to a Tab-Delimited File In your browser, request demos/commentform.html, which contains a form for submitting comments. The comments will be written to a tab-delimited log file on the server. Filled out, commentform.html might display a screen like this:

PB Tech Internet Training Introduction to PHP 80
When the form is submitted, it requests writecomment.php, which opens a text file named commentdb.txt, and writes the data from the form to it in tab-delimited format. After writing to the text file, the following report is returned to the browser:
Click the first link to display the contents of the commentdb.txt:
The code for the form is in commentform.html:
<!DOCTYPE html PUBLIC "-//W3C//DTD XHTML 1.0 Transitional//EN" "http://www.w3.org/TR/xhtml1/DTD/xhtml1-transitional.dtd"> <html xmlns="http://www.w3.org/1999/xhtml"> <head>

PB Tech Internet Training Introduction to PHP 81
<title>Customer Comments</title> <meta http-equiv="Content-Type" content="text/html; charset=iso-8859-1" /> </head> <body> <h1>Customer Comments</h1> <form method="post" action="writecomment.php"> <p>Please enter your full name: <input type="text" name="fullname" size="30" maxlength="70" /></p> <p>Please provide us with your comments:</p> <p><textarea name="comment" cols="50" rows="3"></textarea></p> <p><input type="submit" value="Submit Comments" /><input type="reset" value="Start Over" /></p> </form> </body> </html>
The code that writes to the text file is in writecomment.php. Notice the parts in bold, then look at how the code is explained:
<?php $file = fopen("commentdb.txt","a"); $entry = $_POST["fullname"] . "\t" . $_POST["comment"] . "\r\n"; $writeresult = fwrite($file,$entry); fclose($file); ?> <!DOCTYPE html PUBLIC "-//W3C//DTD XHTML 1.0 Transitional//EN" "http://www.w3.org/TR/xhtml1/DTD/xhtml1-transitional.dtd"> <html xmlns="http://www.w3.org/1999/xhtml"> <head><title>Comments Recorded</title> <meta http-equiv="Content-Type" content="text/html; charset=iso-8859-1" /> </head> <body> <?php if ($writeresult) {?> <h1>Comments Recorded</h1> <p>Thank you, your comments (<?php echo $writeresult ?> bytes of data) were recorded. Click <a href="commentdb.txt">here</a> to view the file.</p> <?php } else {?> <h2>Sorry! Something went wrong!</h2> <?php }?> </body> </html>
The first line opens a file in “appending” mode, so that we can add to the end of the file. We also save the opened file stream as a resource (that’s PHP-speak for a reference to a programming object you have created), so that later on we can access and work with that file:
$file = fopen("commentdb.txt","a");

PB Tech Internet Training Introduction to PHP 82
The next line concatenates the values into tab-delimited format using the \t and \r\n characters to specify that a should be inserted between the name and the comment, and that a newline character should be placed at the end of the file:
$entry = $_POST["fullname"] . "\t" . $_POST["comment"] . "\r\n";
Unix systems use \n for a new line, while Windows uses \r\n and Macs use \r.
Finally, we write our new $entry into the file using the fwrite() method, which takes a file resource and a string as arguments.
$writeresult = fwrite($file,$entry);
The fwrite() method returns either false if it was unable to write, or an integer specifying how many bytes of data were written to the file.
Finally, we close the file. Eventually, this will happen automatically. But keeping resources open longer than necessary is a great way to slow down your server. In other words, it’s bad practice and you should not do it. So close the file:
fclose($file);
If you’re interested in the different ways you can open up a file, here’s the official PHP documentation on the subject (as found at http://www.php.net):
mode Description
'r' Open for reading only; place the file pointer at the beginning of the file.
'r+' Open for reading and writing; place the file pointer at the beginning of the file.
'w' Open for writing only; place the file pointer at the beginning of the file and truncate the file to zero length. If the file does not exist, attempt to create it.
'w+' Open for reading and writing; place the file pointer at the beginning of the file and truncate the file to zero length. If the file does not exist, attempt to create it.
'a' Open for writing only; place the file pointer at the end of the file. If the file does not exist, attempt to create it.
'a+' Open for reading and writing; place the file pointer at the end of the file. If the file does not exist, attempt to create it.
'x'
Create and open for writing only; place the file pointer at the beginning of the file. If the file already exists, the fopen() call will fail by returning FALSE and generating an error of level E_WARNING. If the file does not exist, attempt to create it. This is equivalent to specifying O_EXCL|O_CREAT flags for the underlying open(2) system call. This option is supported in PHP 4.3.2 and later, and only works for local files.
'x+'
Create and open for reading and writing; place the file pointer at the beginning of the file. If the file already exists, the fopen() call will fail by returning FALSE and generating an error of level E_WARNING. If the file does not exist, attempt to create it. This is equivalent to specifying O_EXCL|O_CREAT flags for the underlying open(2) system call. This option is supported in PHP 4.3.2 and later, and only works for local files.

PB Tech Internet Training Introduction to PHP 83
Note that you have to tack on a “b” to these arguments if you want to read binary data on a windows system.

PB Tech Internet Training Introduction to PHP 84
Exercise 6a: Storing Registrations in a Tab-Delimited Text File In this exercise, you will work on a file named ex06a-write-temp.php which will collect client information from visitors and then write it in tab-delimited format to a text file clientdb.txt in the current directory. When the page is first requested, it displays a form, which, when filled out, will look something like this:
Submitting the form will request the same file to collect the data, format it as tab-delimited text, and append it to the text file clientdb.txt, which already exists in the current directory. This screen will be displayed:

PB Tech Internet Training Introduction to PHP 85
Clicking the link will display the contents of clientdb.txt in the browser (you may need to refresh the browser when it is displayed). You can also see we’ve read the contents into a table.
To complete this exercise:
2. Open ex06a-write-temp.php for editing. Complete the sections indicated below in bold: <!DOCTYPE html PUBLIC "-//W3C//DTD XHTML 1.0 Transitional//EN" "http://www.w3.org/TR/xhtml1/DTD/xhtml1-transitional.dtd"> <html xmlns="http://www.w3.org/1999/xhtml"> <head> <title>WLDC Customer Registration</title> <link href="washstyle.css" rel="stylesheet" type="text/css" /> <meta http-equiv="Content-Type" content="text/html; charset=iso-8859-1" /> </head> <body> <?php include("header.php");

PB Tech Internet Training Introduction to PHP 86
if ($_SERVER['REQUEST_METHOD'] != 'POST'){ ?> <h1 class="header" style="width:100%; text-align:center;">WLDC Customer Registration</h1> <form method="post"> <pre> First Name <input name="firstname" size="57" maxlength="70" /> Last Name <input name="lastname" size="57" maxlength="70" /> State <input name="state" size="2" maxlength="2" /> Zip <input name="zip" size="25" maxlength="70" /> <input type="submit" value="Submit" /> <input type="reset" /> </pre> </form> <?php } else { $firstname = $_POST["firstname"]; $lastname = $_POST["lastname"]; $state = $_POST["state"]; $zip = $_POST["zip"]; $clientinfo = "$firstname\t$lastname\t$state\t$zip\r\n"; //Save the name of your text file -- "clientdb.txt" -- into a text file; //Open the file in append mode. Be sure to assign the open file to a variable. //Write the client info (as saved in $clientinfo) into the file. //If the information was successfull, print the following content, making sure the user's first and last names get printed out correctly: /********************************************** <h1 class="header" style="width:100%;text-align:center;">Registration Recorded</h1> <p>Thank you, <strong>FIRSTNAME LASTNAME</strong>, for your registration.</p> <p>Click here to <a href="clientdb.txt">View Customer Data file</a>. You may also examine the contents below.</p> ************************************************/ //If things went wrong, display an error message } include("footer.php"); ?> </body> </html>
If you are done early…
• Write the current date at the end of the tab-delimited line.

PB Tech Internet Training Introduction to PHP 87
A Possible Solution to Exercise 6a As contained in ex06a-write-done.php:
<!DOCTYPE html PUBLIC "-//W3C//DTD XHTML 1.0 Transitional//EN" "http://www.w3.org/TR/xhtml1/DTD/xhtml1-transitional.dtd"> <html xmlns="http://www.w3.org/1999/xhtml"> <head> <title>WLDC Customer Registration</title> <link href="washstyle.css" rel="stylesheet" type="text/css" /> <meta http-equiv="Content-Type" content="text/html; charset=iso-8859-1" /> </head> <body> <?php include("header.php"); if ($_SERVER['REQUEST_METHOD'] != 'POST'){ ?> <h1 class="header" style="width:100%; text-align:center;">WLDC Customer Registration</h1> <form method="post"> <pre> First Name <input name="firstname" size="57" maxlength="70" /> Last Name <input name="lastname" size="57" maxlength="70" /> State <input name="state" size="2" maxlength="2" /> Zip <input name="zip" size="25" maxlength="70" /> <input type="submit" value="Submit" /> <input type="reset" /> </pre> </form> <?php } else { $firstname = $_POST["firstname"]; $lastname = $_POST["lastname"]; $state = $_POST["state"]; $zip = $_POST["zip"]; $clientinfo = "$firstname\t$lastname\t$state\t$zip\r\n"; $filename = "clientdb.txt"; $file = fopen($filename, "a+"); $writeresult = fwrite($file,$clientinfo); if ($writeresult){ echo "<h1 class=\"header\" style=\"width:100%;text-align:center;\">Registration Recorded</h1> <p>Thank you, <strong>$firstname $lastname</strong>, for your registration.</p> <p>Click here to <a href=\"clientdb.txt\">View Customer Data file</a>. You may also examine the contents below.</p>"; } else { echo "Woops! Something went wrong"; }

PB Tech Internet Training Introduction to PHP 88
} include("footer.php"); ?> </body> </html>

PB Tech Internet Training Introduction to PHP 89
Loop Structures Loops are the classic, compact programming structures that iterate, or repeat, one or more statements, as many times as necessary. PHP provides several types of loops.
Let’s look at how they’re done in PHP.
For Loops For loops take three arguments:
Initialized variable -- this tells the loop where to start.
Condition – this tells the loop when to end.
Increment – this changes the variable so that the loop does not continue forever. Here’s a prototypical example:
echo "<ul>"; for ($x = 1; $x <= 10;$x++) { echo "<li>$x</li>"; } echo "</ul>";
This loop will start at 1 and add one to $x every time it goes through the loop. It will continue as long as $x is less than or equal to 10. Therefore we should see 10 bulleted list items, with the numbers 1 – 10. Take a look at demos/loop-for.php to see some examples of “for” loops.
<?php /* standard syntax */ echo "<ul>"; for ($x = 1; $x <= 10;$x++) { echo "<li>$x</li>"; } echo "</ul>"; /* When you only want to execute one statement for each iteration of the loop, you may leave out the curly brackets. */ echo "<ul>"; for ($x = 1; $x <= 10;$x++) echo "<li>$x</li>"; echo "</ul>";

PB Tech Internet Training Introduction to PHP 90
/* Alternative syntax: you may use the colon and endfor rather than the curly brackets. */ echo "<ul>"; for ($x = 1; $x <= 10;$x++): echo "<li>$x</li>"; endfor; echo "</ul>"; $myarray = array("a","b","c"); $myarray[3] = "d"; $myarray[4] = "e"; echo "<ul>"; for ($counter = 0; $counter < count($myarray); $counter++) echo "<li>$myarray[$counter]</li>"; echo "</ul>"; ?>
Foreach Loops A foreach loop allows you to create a loop that will run once for every item in an array.
You use the keyword foreach, followed by a set of parentheses in which you put the name of the array, then the keyword as, and then a temporary variable name that you can use to access the value returned at each iteration of the loop. Note that the same syntax rules apply as in the for loop. So if you want to execute multiple statements for each iteration, you must enclose them in curly brackets. See demos/loop-foreach.php for working versions of the following code.
echo "<ul>"; foreach ($_POST as $fieldvalue) echo "<li>$fieldvalue</li>"; echo "</ul>";
If you are using an associative array (that is, an array where each item is identified by a string rather than an index number), you can also get the name of the array item:
echo "<ul>"; foreach ($_POST as $fieldname=>$fieldvalue) echo "<li>$fieldname: $fieldvalue</li>"; echo "</ul>";
Note that if you try to access the names of items in an indexed array, you will get the index numbers.

PB Tech Internet Training Introduction to PHP 91
While Loops While loops execute as long as some condition is true. If you’re not careful to make sure that it’s a condition that will be false at sometime, you’ll get an infinite loop, which will slow down your server. Here’s a simple while loop:
echo "<ul>"; $x = 1; while ($x < 10) { echo "<li>$x</li>"; $x++;//DON’T FORGET TO INCREMENT YOUR COUNTER!! } echo "<li>$x</li>"; echo "</ul>";
As you can see, this syntax is a bit longer than the for loop. So for simple numeric loops, we usually use for, though there are no performance differences.
However, when we want to loop through a PHP structure while can be a very good option.
For instance, let’s say we read a file’s contents into an array using the file() function. We can then call a while loop as long as there are more items in the array. The next() function checks to see if there are more items in an array, and if there are, returns the next item for us to work with. Also note that the current() function returns the current item in an array. Take a look at demos/loop-while.php:
$filename = "commentdb.txt"; $filearray = file($filename); echo "<ul>"; while (next($filearray)) { echo "<li>" . current($filearray) . "</li>"; } ; echo "</ul>";
You will notice however, that this doesn’t give us the first item in the array. That’s because we were at the first item of the array to begin with, and then we called next(), which took us to the second item.
To get around this we can use a do loop. A do loop runs once and THEN checks the condition. So it is guaranteed to always run once. That will fix this problem. So the following would work:
$filename = "commentdb.txt"; $filearray = file($filename); echo "<ul>"; do { echo "<li>" . current($filearray) . "</li>"; } while (next($filearray)); echo "</ul>";

PB Tech Internet Training Introduction to PHP 92
We know that a foreach loop probably would have been even easier here. But when we get to databases, you’ll see some examples of the while loop in action.
Example: Reading from a tab-delimited text file You may notice that if you load a .txt file directly in the browser, it doesn’t refresh correctly. It also doesn’t look very good. Asking PHP to read the contents will give us better results. If we look at another version of the demonstration from the previous section, we can see a better way to do things. Start with demos/commentform2.html:
This submits to a page (demos/writecomment2.php) that allows us to either see the results as plain text or in an HTML table:

PB Tech Internet Training Introduction to PHP 93
Here we have read the contents out of the file and put them in a nice HTML table. Let’s take a look:
PB Tech Internet Training Introduction to PHP 94
<?php $filename = "commentdb.txt"; $file = fopen($filename,"r"); $result = fread($file,filesize($filename)); fclose($file); ?> <!DOCTYPE html PUBLIC "-//W3C//DTD XHTML 1.0 Transitional//EN" "http://www.w3.org/TR/xhtml1/DTD/xhtml1-transitional.dtd"> <html xmlns="http://www.w3.org/1999/xhtml"> <head><title>Comments Recorded</title> <meta http-equiv="Content-Type" content="text/html; charset=iso-8859-1" /> </head> <body> <h2>Customer Comments</h2> <table border="1" style="border-collapse: collapse;"> <tr><th>Client</th><th>Comment</th></tr> <?php $rows = explode("\n",$result); foreach ($rows as $row){ echo "<tr>"; $columns = explode("\t",$row); foreach ($columns as $column){ echo "<td>$column</td>"; } echo "</tr>"; } ?> </table> <p>Back to <a href="commentform2.html">comment</a> form.</p> </body> </html>
The first bold section is pretty straightforward. We open a file for reading. $filename = "commentdb.txt"; $file = fopen($filename,"r");
We then read its contents with the fread() function. This function expects a string pointing to a file and the number of bytes to read. It returns a string, which we have saved as $result.
$result = fread($file,filesize($filename));
Finally, we close the open file. fclose($file);
The tricky part is actually reading our $result into a table. To do that we have to split the long string of text we have into bits. Each record is separated by a newline (\n) character. So we use the explode() function to split the whole string up at every new line.

PB Tech Internet Training Introduction to PHP 95
$rows = explode("\n",$result);
The explode function takes two arguments: where to split a string, and which string to split. It returns an array. We can then “loop” through the array with a foreach statement. The foreach statement allows you to look at every item in an array and do something with it. Its format is as follows:
foreach (arrayname as temporaryitemname){ statement(s) to be executed for each item in the array; }
So in our case, we loop through the $rows array, calling each row $row as we process it: foreach ($rows as $row){
We print out <tr> tags for each row. Then, we must split each row into its individual parts, which are delimited by tab characters (“\t”).
$columns = explode("\t",$row);
Now we have another array called columns. We can loop through that array and print out a table cell at each iteration:
foreach ($columns as $column){ echo "<td>$column</td>"; }

PB Tech Internet Training Introduction to PHP 96
Exercise 6b: Displaying Registrations from a Tab-Delimited Text File In this exercise, you will work on a file named ex06b-read-temp.php which will collect client information from visitors and then write it in tab-delimited format to a text file clientdb.txt in the current directory. When the page is first requested, it displays a form, which, when filled out, will look something like this:
Submitting the form will request the same file to collect the data, format it as tab-delimited text, and append it to the text file clientdb.txt, which already exists in the current directory. This screen will be displayed:

PB Tech Internet Training Introduction to PHP 97
Clicking the link will display the contents of clientdb.txt in the browser (you may need to refresh the browser when it is displayed). You can also see we’ve read the contents into a table.
To complete this exercise:
1. Open ex06b-read-temp.php for editing. Complete the sections indicated below in bold: <!DOCTYPE html PUBLIC "-//W3C//DTD XHTML 1.0 Transitional//EN" "http://www.w3.org/TR/xhtml1/DTD/xhtml1-transitional.dtd"> <html xmlns="http://www.w3.org/1999/xhtml"> <head> <title>WLDC Customer Registration</title> <link href="washstyle.css" rel="stylesheet" type="text/css" /> <meta http-equiv="Content-Type" content="text/html; charset=iso-8859-1" /> </head> <body> <?php include("header.php"); if ($_SERVER['REQUEST_METHOD'] != 'POST'){ ?> <h1 class="header" style="width:100%; text-align:center;">WLDC Customer Registration</h1>

PB Tech Internet Training Introduction to PHP 98
<form method="post"> <pre> First Name <input name="firstname" size="57" maxlength="70" /> Last Name <input name="lastname" size="57" maxlength="70" /> State <input name="state" size="2" maxlength="2" /> Zip <input name="zip" size="25" maxlength="70" /> <input type="submit" value="Submit" /> <input type="reset" /> </pre> </form> <?php } else { $firstname = $_POST["firstname"]; $lastname = $_POST["lastname"]; $state = $_POST["state"]; $zip = $_POST["zip"]; $clientinfo = "$firstname\t$lastname\t$state\t$zip\r\n"; $filename = "clientdb.txt"; $file = fopen($filename, "a+"); $writeresult = fwrite($file,$clientinfo); if ($writeresult){ echo "<h1 class=\"header\" style=\"width:100%;text-align:center;\">Registration Recorded</h1> <p>Thank you, <strong>$firstname $lastname</strong>, for your registration.</p> <p>Click here to <a href=\"clientdb.txt\">View Customer Data file</a>. You may also examine the contents below.</p>"; rewind($file); /* Print a table of the records from the file. We have used the rewind() function to send the pointer back to the beginning of the file. 1. Use fread to read the results of the file. Note that this will only be the original results, so you'll need to tack on the client just entered. 2. explode() the result into an array. 3. We have created the table headers for you. */ echo '<table border="1" style="border-collapse:collapse;"> <tr><th>First Name</th><th>Last Name</th><th>State</th><th>Zip</th></tr> '; /* 1. Loop through each record of the array you created above. 2. Create a table row for each record. 3. explode() each row into pieces at the tab character. 4. Loop through the pieces you've just created, building a table data cell for each one. */ echo '</table>';

PB Tech Internet Training Introduction to PHP 99
/* If the writing was unsuccessful, add an else clause here with an error message.*/ } include("footer.php"); ?> </body> </html>
If you are done early…
• What if the first row of the text file contained header information (i.e. firstname, lastname, etc.). Could we print that out?
• Format the table with alternating background colors.
• If you used the explode() function to break up the file, try using the file() function, which automatically reads a file into an array.

PB Tech Internet Training Introduction to PHP 100
A Possible Solution to Exercise 6b As contained in ex06b-read-done.php:
<!DOCTYPE html PUBLIC "-//W3C//DTD XHTML 1.0 Transitional//EN" "http://www.w3.org/TR/xhtml1/DTD/xhtml1-transitional.dtd"> <html xmlns="http://www.w3.org/1999/xhtml"> <head> <title>WLDC Customer Registration</title> <link href="washstyle.css" rel="stylesheet" type="text/css" /> <meta http-equiv="Content-Type" content="text/html; charset=iso-8859-1" /> </head> <body> <?php include("header.php"); if ($_SERVER['REQUEST_METHOD'] != 'POST'){ ?> <h1 class="header" style="width:100%; text-align:center;">WLDC Customer Registration</h1> <form method="post"> <pre> First Name <input name="firstname" size="57" maxlength="70" /> Last Name <input name="lastname" size="57" maxlength="70" /> State <input name="state" size="2" maxlength="2" /> Zip <input name="zip" size="25" maxlength="70" /> <input type="submit" value="Submit" /> <input type="reset" /> </pre> </form> <?php } else { $firstname = $_POST["firstname"]; $lastname = $_POST["lastname"]; $state = $_POST["state"]; $zip = $_POST["zip"]; $clientinfo = "$firstname\t$lastname\t$state\t$zip\r\n"; $filename = "clientdb.txt"; $file = fopen($filename, "a+"); $writeresult = fwrite($file,$clientinfo); if ($writeresult){ echo "<h1 class=\"header\" style=\"width:100%;text-align:center;\">Registration Recorded</h1> <p>Thank you, <strong>$firstname $lastname</strong>, for your registration.</p> <p>Click here to <a href=\"clientdb.txt\">View Customer Data file</a>. You may also examine the contents below.</p>"; rewind($file); $readresult = fread($file,filesize($filename)) . $clientinfo;

PB Tech Internet Training Introduction to PHP 101
$records = explode("\n",$readresult); echo '<table border="1" style="border-collapse:collapse;"> <tr><th>First Name</th><th>Last Name</th><th>State</th><th>Zip</th></tr> '; foreach ($records as $record){ echo '<tr>'; $fields = explode("\t",$record); foreach ($fields as $field){ echo "<td>$field</td>"; } echo '</tr>'; } echo '</table>'; } else { echo "Woops! Something went wrong"; } } include("footer.php"); ?> </body> </html>


PB Tech Internet Training Introduction to PHP 103
Database Integration with PHP How often do you enter one or more keywords into a form field and click a button labeled “Search?” Whether you are using the Web to shop, conduct research, or search for other Web pages, when you click that button, you are interacting with a database. Your keywords will, most likely, be issued as part of a command to a database, which will return a set of matches. The matches will then be formatted into beautiful HTML and returned to your browser.
Web-to-database integration is central to the Web today. Perhaps the main reason you’re interested in PHP is to be able to integrate your database and your web site. So let’s dive in.
The Databases Used in this Class We will using a mySQL database in this class. It is called wldc and it contains two tables: clients, and guestbook. Let’s take a quick look at the main table we will be using, the clients table:
The clients table consists of multiple rows of data. Each row is a record containing data pertaining to a single client. Each record contains multiple fields, which logically organize the

PB Tech Internet Training Introduction to PHP 104
data for each client. The fields organize into columns, with the field names shown at the top of each column.
The first column, id, contains an incrementing series of unique numbers. It has been marked AUTO_INCREMENT in the table definition, so that each new record would get a unique number. This allows each record to be uniquely identified by its id. This makes id, the field that uniquely identifies each record, the primary key for this table.
When a database table is designed, the fields in it are created according to type. Field typing can be quite complex, but we have kept the field types quite basic in this table: the fields firstname, lastname, state, and zip are text fields (technically VARCHAR and CHAR), id, as we have seen, is an Auto-Incrementing Numeric field, and age is a numeric field (TINYINT).
Here is a screenshot of the table’s fundamental structure:
We will also use the guestbook table for a demo or two, so here are its description and data:

PB Tech Internet Training Introduction to PHP 105
Issuing Database Commands with SQL While there are several types of commands we can issue to databases, we often issue commands using SQL (Structured Query Language). SQL is a standardized database interface language that has been in continuous evolution over the past several decades. In this class, we will be using several basic SQL commands that should differ little in their syntax from database to database. (Still, since each database vendor has developed its own dialect of SQL, you should always check the documentation for your database for the exact SQL syntax it supports.)
We will be issuing four basic types of commands:
Command Description SELECT Select one or more records from the database, usually to view. INSERT Insert a record into the database. UPDATE Change and update one or more records in the database. DELETE Delete one or more records in the database.

PB Tech Internet Training Introduction to PHP 106
Retrieving Information with SELECT
For the sample SQL statements below, we are selecting from a table clients, which has the fields clientid, firstname, lastname, state, zip, age
SELECT * FROM clients Selects all fields for all records from the clientlist table.
SELECT firstname, lastname, state FROM clients Selects only the firstname and lastname fields from the clients table.
SELECT * FROM clients WHERE state = 'NY' Selects all fields from clients in all records where state = 'NY'. Notice how the string 'NY' is in single quotes.
SELECT * FROM clients WHERE state = 'NY' AND age = 18 You can use the logical AND and OR to group clauses. Notice that while the string value is in single quotes, the numeric value is not.
SELECT * FROM clients WHERE lastname LIKE 'Sm%' AND lastname <> 'Smathers' % is the SQL wildcard; use it with the LIKE keyword. This statement selects all fields, but only records where lastname starts with Sm, except for the lastname may not equal Smathers.
SELECT * FROM clients ORDER BY lastname, firstname DESC Selects all fields from clients, sorts them by lastname then firstname descending. ASC, the default, sorts in ascending order.
SELECT DISTINCT state FROM clients Selects all of the states from the database, but returns a result containing only unique values (no repeating states).
Inserting a Row in the Table with INSERT
INSERT INTO clients VALUES (0,'Steve', 'Speckler', 'NY', '10016', 25) Inserts the values into the table in the exact order specified, so the order must conform to the exact order of the fields in the table. Once again, all strings are in single quotes, while numeric values are not quoted.
INSERT INTO clients (clientid, firstname, lastname, state, zip, age) VALUES (0,'Steve', 'Speckler', 'NY', '10016', 25) Inserts values into the table in the order in which the fields are specified in the statement, regardless of the order they are in the database. Use this type of INSERT statement when the table includes an automatically generated primary key, like a client id. In mySQL, you need to provide a dummy value for the auto_incrementing field. In this case, we’ve used 0, which will be overridden by the database at insertion time.

PB Tech Internet Training Introduction to PHP 107
Editing Records with UPDATE
UPDATE clients SET zip='06040', state='MA' WHERE firstname='Steve' AND lastname='Speckler' Updates the specified fields to the associated values for the record that matches the WHERE clause. Do not forget your WHERE clause!
Delete Records with DELETE
DELETE FROM clients WHERE phone LIKE '%202%' AND state = 'DC' Once again, do not forget your WHERE clause!!
Example: Selecting and Viewing Data From guestbook.mdb Let’s see how we can access this data by looking at demos/view.php:

PB Tech Internet Training Introduction to PHP 108
Take a look at the code for view.php. Afterward, each section will be explained:
<!DOCTYPE html PUBLIC "-//W3C//DTD XHTML 1.0 Transitional//EN" "http://www.w3.org/TR/xhtml1/DTD/xhtml1-transitional.dtd"> <?php $link = mysql_connect("localhost","root",""); mysql_select_db("wldc",$link); $sql = "SELECT * FROM guestbook"; $result = mysql_query($sql, $link); $resultcount = mysql_num_rows($result); ?> <html xmlns="http://www.w3.org/1999/xhtml"> <head><title>Guest Book</title> <meta http-equiv="Content-Type" content="text/html; charset=iso-8859-1" /> </head> <body> <p><?php echo $resultcount ?> people have signed the Guestbook.</p> <table border="1"> <tr> <th>No.</th> <th colspan="2">Name</th> <th>Phone</th> <th>Email</th> </tr> <?php while ($thisrow = mysql_fetch_array($result,MYSQL_ASSOC)){ echo " <tr> <td>{$thisrow['id']}</td> <td>{$thisrow['fname']}</td> <td>{$thisrow['lname']}</td> <td>{$thisrow['phone']}</td> <td>{$thisrow['email']}</td> </tr> "; } mysql_close($link); ?> </table></body></html>
Connecting and Issuing Commands to the Database To open a connection to a mySQL database, we must specify the name of the mySQL server, as well as a user name and password (if it is password protected). You will also want to save this database connection into a variable, in our case “$link”.
$link = mysql_connect("localhost","root","");
This server may have several databases, so you must tell it which database you are using with the mysql_select_db() function. The first argument is the name of the db you want. The second

PB Tech Internet Training Introduction to PHP 109
argument specifies which connection you mean. If you leave off the second argument, it will assume you mean the most recently opened db connection.
mysql_select_db("wldc",$link);
Next we issue a command to the database with the mysql_query() function. It takes a SQL statement as the first argument and an optional second argument of the link resource handler. For SQL queries that produce a result, it returns that result into a variable. In this case, we’ve also grabbed a count of the number of records with the mysql_num_rows() function.
$sql = "SELECT * FROM guestbook"; $result = mysql_query($sql, $link); $resultcount = mysql_num_rows($result);
Displaying Database Results Now that we’ve got our result, we need to display it. To do this, we can call one of several functions:
• mysql_fetch_row() – gets a row as an indexed array, where 0 is the first field, 1 is the second, etc.
• mysql_fetch_assoc() - gets a row as an associative array.
• mysql_fetch_array () – gets a row as an associative or indexed array or both.
The last of these three is the most flexible, without serious performance losses, so why not use it. They all take a mysql_query() result as an argument. The mysql_fetch_array function takes a second parameter where you specify what type of array you’d like. It expects one of three constants: MYSQL_ASSOC, MYSQL_NUM, or MYSQL_BOTH. All of these methods return an array, which you can then loop through with any loop that you like. Here’s how we did it:
<?php while ($thisrow = mysql_fetch_array($result,MYSQL_ASSOC)){ echo " <tr> <td>{$thisrow['id']}</td> <td>{$thisrow['fname']}</td> <td>{$thisrow['lname']}</td> <td>{$thisrow['phone']}</td> <td>{$thisrow['email']}</td> </tr> "; }
Notice that to get the complex variable name evaluated correctly inside of quotation marks, we have to surround it with curly brackets. If you look at demos/view-forloop.php and demos/view-foreachloop.php, you will see other possibilities for looping through the columns.

PB Tech Internet Training Introduction to PHP 110
Finally, of course, we close our connection to the database: mysql_close($link);
Non-MySQL databases and PHP If you take a look at demos/view-odbc.php, you will see how you connect and work with a non-MySQL database. For the most part this is done using a standard odbc driver. These tend to be slower than specialized database drivers, but many production websites have relied on them. Some database manufacturers, such as Oracle, provide extension to provide faster access to their databases via PHP. Note, for this example to work, you must create a dsn (we called it wldc) for the orders.mdb database included in the class files.
<!DOCTYPE html PUBLIC "-//W3C//DTD XHTML 1.0 Transitional//EN" "http://www.w3.org/TR/xhtml1/DTD/xhtml1-transitional.dtd"> <?php $link = odbc_connect("wldc","admin",""); $sql = "SELECT * FROM guestbook"; $result = odbc_exec($link,$sql); ?> <html xmlns="http://www.w3.org/1999/xhtml"> <head><title>Guest Book</title> <meta http-equiv="Content-Type" content="text/html; charset=iso-8859-1" /> </head> <body> <table border="1"> <tr> <th>No.</th> <th colspan="2">Name</th> <th>Phone</th> <th>Email</th> </tr> <?php $resultcount = 0; while ($thisrow = odbc_fetch_array($result)){ $resultcount++; echo " <tr> <td>{$thisrow['id']}</td> <td>{$thisrow['fname']}</td> <td>{$thisrow['lname']}</td> <td>{$thisrow['phone']}</td> <td>{$thisrow['email']}</td> </tr> "; } odbc_close($link); ?> <caption style="text-align:left"><?php echo $resultcount ?> people have signed the Guestbook.</caption> </table></body></html>

PB Tech Internet Training Introduction to PHP 111
Exercise 7: Building a Search Engine Interface In this exercise and the exercises for the remainder of the course, you will be writing PHP scripts that interact with the clients table. Here’s a review of the fields:
Column Name Column Type id AutoNumber firstname Text lastname Text state Text zip Text age Numeric
In this exercise, you will be building a search engine interface that will allow searches of the clients table based on any search criteria. On the initial request, the search interface will be returned:
The visitor can choose any field from the select list, enter a value in the input field, and submit, to return something like:

PB Tech Internet Training Introduction to PHP 112
To complete this exercise:
1. Open ex07-dbsearch-temp.php for editing. Complete the sections in bold below
2. Notice that in this file, the SQL statement is being dynamically generated from the variables the user enters. <!DOCTYPE html PUBLIC "-//W3C//DTD XHTML 1.0 Transitional//EN" "http://www.w3.org/TR/xhtml1/DTD/xhtml1-transitional.dtd"> <html xmlns="http://www.w3.org/1999/xhtml"> <head><title>The WestLake Laundry Detergent Company</title> <link href="washstyle.css" rel="stylesheet" /> <meta http-equiv="Content-Type" content="text/html; charset=iso-8859-1" /> </head> <body> <?php include("header.php");?> <div style="width:100%; text-align:center;"> <?php if (empty($_POST["searchtext"])): ?> <h1 class="header">WestLake Laundry Detergent Customer Search</h1> <form method="post"> <table border="1"> <tr> <td>Text to search for:<br /> <input name="searchtext" size="30" maxlength="64" /> </td> <td>Field to search: <select name="searchfield"> <option value="firstname">First Name </option> <option value="lastname">Last Name </option>
PB Tech Internet Training Introduction to PHP 113
<option value="state">State </option> <option value="zip">Zip Code </option> <option value="age">Age </option> </select> </td> </tr> <tr> <th colspan="2"><input type="submit" /> <input type="reset" /></th> </tr> </table> </form> <?php else: ?> <h1 class="header">WestLake Laundry Detergent Customer Search Results</h1> <?php $searchtext = $_POST["searchtext"]; $searchfield = $_POST["searchfield"]; /* Compose a sql statement to get all records matching the user's form submission. Be careful with your quotation marks: the age field is numeric whereas the other fields are textual. Connect to the db: ask your instructor for server login information. Select the "wldc" database. Issue a query and return it into a result. Get a count of how many rows our query matched. */ ?> <table border="1"> <caption><?php //print the record count here ?> records retrieved.</caption> <tr> <th>Client Id</th> <th>First Name</th> <th>Last Name</th> <th>State</th> <th>Zip Code</th> <th>Age</th> </tr> <?php /* Loop through the results, printing a row for each one. Print out each field in a table data cell. */ ?> </table> <?php endif; ?> </div> </body>

PB Tech Internet Training Introduction to PHP 114
</html>
If you are done early...
• Try some other looping techniques. Which one do you like best?
• If the user searches on data that is not present in the table (i.e., WLDC does not yet have clients living in Hawaii), naked table headers are currently returned. Add functionality to the page so that it apologizes if no records were found.

PB Tech Internet Training Introduction to PHP 115
A Possible Solution to Exercise 7 As contained in ex07-dbsearch-done.php:
<!DOCTYPE html PUBLIC "-//W3C//DTD XHTML 1.0 Transitional//EN" "http://www.w3.org/TR/xhtml1/DTD/xhtml1-transitional.dtd"> <html xmlns="http://www.w3.org/1999/xhtml"> <head><title>The WestLake Laundry Detergent Company</title> <link href="washstyle.css" rel="stylesheet" /> <meta http-equiv="Content-Type" content="text/html; charset=iso-8859-1" /> </head> <body> <?php include("header.php");?> <div style="width:100%; text-align:center;"> <?php if (empty($_POST["searchtext"])): ?> <h1 class="header">WestLake Laundry Detergent Customer Search</h1> <form method="post"> <table border="1"> <tr> <td>Text to search for:<br /> <input name="searchtext" size="30" maxlength="64" /> </td> <td>Field to search: <select name="searchfield"> <option value="firstname">First Name </option> <option value="lastname">Last Name </option> <option value="state">State </option> <option value="zip">Zip Code </option> <option value="age">Age </option> </select> </td> </tr> <tr> <th colspan="2"><input type="submit" /> <input type="reset" /></th> </tr> </table> </form> <?php else: ?> <h1 class="header">WestLake Laundry Detergent Customer Search Results</h1> <?php $searchtext = $_POST["searchtext"]; $searchfield = $_POST["searchfield"]; $apostrophe = ($searchfield == 'age')?"":"'";

PB Tech Internet Training Introduction to PHP 116
$sql = "SELECT * FROM clients WHERE $searchfield = $apostrophe$searchtext$apostrophe ORDER BY lastname"; $link = mysql_connect("localhost","root",""); mysql_select_db("wldc",$link); $result = mysql_query($sql, $link); $resultcount = mysql_num_rows($result); ?> <table border="1"> <caption><?php echo $resultcount ?> records retrieved.</caption> <tr> <th>Client Id</th> <th>First Name</th> <th>Last Name</th> <th>State</th> <th>Zip Code</th> <th>Age</th> </tr> <?php while ($row = mysql_fetch_array($result,MYSQL_ASSOC)){ echo "<tr> <td>{$row['id']}</td> <td>{$row['firstname']}</td> <td>{$row['lastname']}</td> <td>{$row['state']}</td> <td>{$row['zip']}</td> <td>{$row['age']}</td> </tr>"; } ?> </table> <?php endif; ?> </div> </body> </html>

PB Tech Internet Training Introduction to PHP 117
Working with Meta Information from a Database
You can get information about the database and your queries with PHP. Let’s take a look:
This looks almost exactly like the demo from the last exercise. The difference is that we have grabbed the field names from the database. Now, many field names are not very pretty, but it can be a good way to make exceptions in the way we process fields. In this example we’ve merely displayed one field in a different color than the other fields:
Object-Oriented PHP One of the biggest changes in computer programming over the past decade has been the spread of Object-Oriented languages. PHP started out as a non-OO language and still cannot be

PB Tech Internet Training Introduction to PHP 118
considered object-oriented. However, some of the benefits of OOP have been incorporated into PHP, and it is worthwhile seeing what an object looks like in PHP. Database fields are a perfect example of an object-oriented structure in PHP, and will give you a sense of what OOP looks like in the language. A fuller discussion goes beyond the scope of this course. Let’s take a look at the code for the demo above, with special attention to the part in bold:
<!DOCTYPE html PUBLIC "-//W3C//DTD XHTML 1.0 Transitional//EN" "http://www.w3.org/TR/xhtml1/DTD/xhtml1-transitional.dtd"> <?php $link = mysql_connect("localhost","root",""); mysql_select_db("wldc",$link); $sql = "SELECT * FROM guestbook"; $result = mysql_query($sql, $link); $resultcount = mysql_num_rows($result); ?> <html xmlns="http://www.w3.org/1999/xhtml"> <head><title>Guest Book</title> <meta http-equiv="Content-Type" content="text/html; charset=iso-8859-1" /> </head> <body> <p><?php echo $resultcount ?> people have signed the Guestbook.</p> <table border="1"> <tr> <?php while ($field = mysql_fetch_field($result)){ $name = $field->name; $bgcolor = ($name == 'id')?"yellow": "lime"; echo "<th style='background-color: $bgcolor;'>$name</th>"; } ?> </tr> <?php while ($thisrow = mysql_fetch_array($result,MYSQL_ASSOC)){ echo " <tr> <td>{$thisrow['id']}</td> <td>{$thisrow['fname']}</td> <td>{$thisrow['lname']}</td> <td>{$thisrow['phone']}</td> <td>{$thisrow['email']}</td> </tr> "; } mysql_close($link); ?> </table></body></html>
The mysql_fetch_field() function returns an object. We can then access the methods and properties of that object with hyphen-angle characters ( ->) . There are a number of different properties you can access, though the only one we have actually captured here is the name

PB Tech Internet Training Introduction to PHP 119
property. If the name of the field is id, we set the background color to yellow. Otherwise, we set it to lime.


PB Tech Internet Training Introduction to PHP 121
Exercise 8: Enhancing the Search Form In this exercise you will enhance your search form by dynamically drawing the field names from the database. You will also allow users to do a partial search on the data as well
For this exercise, complete the following:

PB Tech Internet Training Introduction to PHP 122
1. Open ex08-dbsearch-temp.php in a text editor. This is simply a copy of the solution to the previous exercise, so you may use the file you worked on if you want to retain any of your modifications.
2. Complete the sections in bold below: <!DOCTYPE html PUBLIC "-//W3C//DTD XHTML 1.0 Transitional//EN" "http://www.w3.org/TR/xhtml1/DTD/xhtml1-transitional.dtd"> <html xmlns="http://www.w3.org/1999/xhtml"> <head><title>The WestLake Laundry Detergent Company</title> <link href="washstyle.css" rel="stylesheet" /> <meta http-equiv="Content-Type" content="text/html; charset=iso-8859-1" /> </head> <body> <?php include("header.php");?> <div style="width:100%; text-align:center;"> <?php if (empty($_POST["searchtext"])): ?> <h1 class="header">WestLake Laundry Detergent Customer Search</h1> <form method="post"> <table border="1"> <tr> <td>Text to search for:<br /> <input name="searchtext" size="30" maxlength="64" /> </td> <td>Field to search: <select name="searchfield"> <option value="firstname">First Name </option> <option value="lastname">Last Name </option> <option value="state">State </option> <option value="zip">Zip Code </option> <option value="age">Age </option> </select> </td> </tr> <tr> <th colspan="2"><input type="submit" /> <input type="reset" /></th> </tr> </table> </form> <?php else: ?> <h1 class="header">WestLake Laundry Detergent Customer Search Results</h1> <?php $searchtext = $_POST["searchtext"]; $searchfield = $_POST["searchfield"]; $apostrophe = ($searchtext == 'age')?"":"'";

PB Tech Internet Training Introduction to PHP 123
$sql = "SELECT * FROM clients WHERE $searchfield = $apostrophe$searchtext$apostrophe ORDER BY lastname"; $link = mysql_connect("localhost","root",""); mysql_select_db("wldc",$link); $result = mysql_query($sql, $link); $resultcount = mysql_num_rows($result); ?> <table border="1"> <caption><?php echo $resultcount ?> records retrieved.</caption> <!-- Replace the hard-coded table headers here with automatically-generated headers based on the field names in the database. --> <tr> <th>Client Id</th> <th>First Name</th> <th>Last Name</th> <th>State</th> <th>Zip Code</th> <th>Age</th> </tr> <?php /* Give the rows of the table alternating background colors*/ while ($row = mysql_fetch_array($result,MYSQL_ASSOC)){ echo "<tr> <td>{$row['id']}</td> <td>{$row['firstname']}</td> <td>{$row['lastname']}</td> <td>{$row['state']}</td> <td>{$row['zip']}</td> <td>{$row['age']}</td> </tr>"; } ?> </table> <?php endif; ?> </div> </body> </html>
If you are done early...
• Capitalize the first letter of each field name, except for the id field which should be all in capital letters.

PB Tech Internet Training Introduction to PHP 124
A Possible Solution to Exercise 8 As contained in ex08-dbsearch-done.php:
<!DOCTYPE html PUBLIC "-//W3C//DTD XHTML 1.0 Transitional//EN" "http://www.w3.org/TR/xhtml1/DTD/xhtml1-transitional.dtd"> <html xmlns="http://www.w3.org/1999/xhtml"> <head><title>The WestLake Laundry Detergent Company</title> <link href="washstyle.css" rel="stylesheet" /> <meta http-equiv="Content-Type" content="text/html; charset=iso-8859-1" /> </head> <body> <?php include("header.php");?> <div style="width:100%; text-align:center;"> <?php if (empty($_POST["searchtext"])): ?> <h1 class="header">WestLake Laundry Detergent Customer Search</h1> <form method="post"> <table border="1"> <tr> <td>Text to search for:<br /> <input name="searchtext" size="30" maxlength="64" /> </td> <td>Field to search: <select name="searchfield"> <option value="firstname">First Name </option> <option value="lastname">Last Name </option> <option value="state">State </option> <option value="zip">Zip Code </option> <option value="age">Age </option> </select> </td> <td>Partial search?<br /> <input name="partial" type="checkbox" /> </td> </tr> <tr> <th colspan="3"><input type="submit" /> <input type="reset" /></th> </tr> </table> </form> <?php else: ?> <h1 class="header">WestLake Laundry Detergent Customer Search Results</h1> <?php $searchtext = $_POST["searchtext"];

PB Tech Internet Training Introduction to PHP 125
$searchfield = $_POST["searchfield"]; $partial = (empty($_POST["partial"]))?"":"%"; $apostrophe = ($searchtext == 'age')?"":"'"; $modifiera = $apostrophe . $partial; $modifierb = $partial . $apostrophe; $operator = (empty($_POST["partial"]))?" = ":" LIKE "; $sql = "SELECT * FROM clients WHERE $searchfield $operator $modifiera$searchtext$modifierb ORDER BY lastname"; $link = mysql_connect("localhost","root",""); mysql_select_db("wldc",$link); $result = mysql_query($sql, $link); $resultcount = mysql_num_rows($result); ?> <table border="1"> <caption><?php echo $resultcount ?> records retrieved.</caption> <tr> <?php while ($field = mysql_fetch_field($result)){ $name = $field->name; if ($name == 'id') $name = strtoupper($name); else $name = strtoupper(substr($name,0,1)) . strtolower(substr($name,1)); echo "<th>$name</th>"; } ?> </tr> <?php $bg = ''; $bg1 = '#eeffff'; $bg2 = '#eeffee'; while ($row = mysql_fetch_array($result,MYSQL_ASSOC)){ $bg = ($bg == $bg1)?$bg2:$bg1; echo "<tr style='background-color:$bg;'> <td>{$row['id']}</td> <td>{$row['firstname']}</td> <td>{$row['lastname']}</td> <td>{$row['state']}</td> <td>{$row['zip']}</td> <td>{$row['age']}</td> </tr>"; } ?> </table> <?php endif; ?> </div> </body> </html>

PB Tech Internet Training Introduction to PHP 126
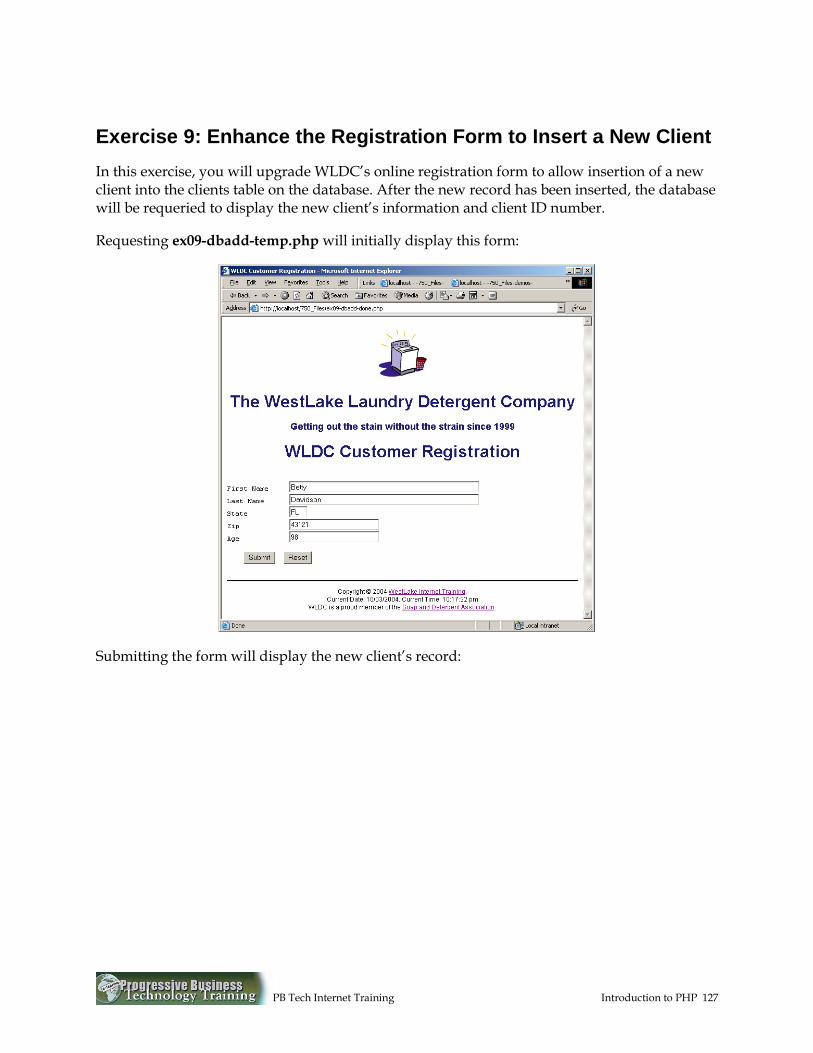
PB Tech Internet Training Introduction to PHP 127
Exercise 9: Enhance the Registration Form to Insert a New Client In this exercise, you will upgrade WLDC’s online registration form to allow insertion of a new client into the clients table on the database. After the new record has been inserted, the database will be requeried to display the new client’s information and client ID number.
Requesting ex09-dbadd-temp.php will initially display this form:
Submitting the form will display the new client’s record:

PB Tech Internet Training Introduction to PHP 128
To complete this exercise:
1. Open ex09-dbadd-temp.php for editing. This file contains two SQL strings: an INSERT statement to insert the new record, and a SELECT statement to query and display the new client’s registration information.
2. In the INSERT statement, remove the hard-coded values and concatenate in values retrieved from the form. Connect to the database and execute the statement with the mysql_query() statement.
3. Edit the SELECT statement to query the first and last names of the newly entered client. Since this may return multiple clients (if there are clients with the same name), add a clause to the SELECT statement to sort the returned data so the data for the client just entered is in the first row of the recordset.
4. Complete the sections show in bold below: <!DOCTYPE html PUBLIC "-//W3C//DTD XHTML 1.0 Transitional//EN" "http://www.w3.org/TR/xhtml1/DTD/xhtml1-transitional.dtd"> <html xmlns="http://www.w3.org/1999/xhtml"> <head><title>WLDC Customer Registration</title> <link href="washstyle.css" rel="stylesheet" type="text/css" /> <meta http-equiv="Content-Type" content="text/html; charset=iso-8859-1" /> </head>

PB Tech Internet Training Introduction to PHP 129
<body> <?php include("header.php"); ?> <div style="width:100%; text-align:center;"> <h1 class="header">WLDC Customer Registration</h1> </div> <?php if (empty($_POST["firstname"])): ?> <form method="post"> <pre> First Name <input name="firstname" size="57" maxlength="70" /> Last Name <input name="lastname" size="57" maxlength="70" /> State <input name="state" size="2" maxlength="2" /> Zip <input name="zip" size="25" maxlength="70" /> Age <input name="age" size="25" maxlength="70" /> <input type="submit" value="Submit" /> <input type="reset" /> </pre> </form> <?php else: $firstname = $_POST["firstname"]; $lastname = $_POST["lastname"]; $state = $_POST["state"]; $zip = $_POST["zip"]; $age = $_POST["age"]; /* Replace the hardcoded names below with names from the form. */ $sql = "INSERT INTO clients (firstname, lastname, state, zip, age) VALUES ('Joe', 'Smith','DC', '20010', 33)"; /* Connect to the db server. Select the wldc db. Insert the sql statement above. Save the result of the query into a variable. Using the variable returned above, print an error message if there was a problem inserting, otherwise display the message below. */ ?> <p>Thank you, <?php echo "$firstname $lastname" ?>. Your registration is confirmed below.</p> <?php /* Write a statment to requery the database for the user just entered. What if there are two people with the same information? How can you be sure you're showing the correct record? (Hint: there is a function called mysql_insert_id that will give you the id most recently added by a mysql_query). Execute the query and save it as $result. */

PB Tech Internet Training Introduction to PHP 130
?> <div style="width:100%; text-align:center;"> <table border="1"> <tr> <?php while ($field = mysql_fetch_field($result)){ echo "<th>{$field->name}</th>"; } ?> </tr> <tr> <?php $row = mysql_fetch_array($result,MYSQL_NUM); for ($counter = 0; $counter < mysql_num_fields($result); $counter++){ echo "<th>{$row[$counter]}</th>"; } ?> </tr> </table> </div> <?php endif; include("footer.php"); ?> </body> </html>
If you are done early...
• If the registrant tries to submit an incomplete form, an error will be thrown. Edit the file so that if the registrant submits an incomplete form, the entire form is returned, including the values entered so far.
• Prevent duplicate entries.

PB Tech Internet Training Introduction to PHP 131
A Possible Solution to Exercise 9 As contained in ex09-dbadd-done.php:
<!DOCTYPE html PUBLIC "-//W3C//DTD XHTML 1.0 Transitional//EN" "http://www.w3.org/TR/xhtml1/DTD/xhtml1-transitional.dtd"> <html xmlns="http://www.w3.org/1999/xhtml"> <head><title>WLDC Customer Registration</title> <link href="washstyle.css" rel="stylesheet" type="text/css" /> <meta http-equiv="Content-Type" content="text/html; charset=iso-8859-1" /> </head> <body> <?php include("header.php"); ?> <div style="width:100%; text-align:center;"> <h1 class="header">WLDC Customer Registration</h1> </div> <?php if (empty($_POST["firstname"])): ?> <form method="post"> <pre> First Name <input name="firstname" size="57" maxlength="70" /> Last Name <input name="lastname" size="57" maxlength="70" /> State <input name="state" size="2" maxlength="2" /> Zip <input name="zip" size="25" maxlength="70" /> Age <input name="age" size="25" maxlength="70" /> <input type="submit" value="Submit" /> <input type="reset" /> </pre> </form> <?php else: $firstname = $_POST["firstname"]; $lastname = $_POST["lastname"]; $state = $_POST["state"]; $zip = $_POST["zip"]; $age = $_POST["age"]; $sql = "INSERT INTO clients (firstname, lastname, state, zip, age) VALUES ('$firstname', '$lastname','$state', '$zip', $age)"; $link = mysql_connect("localhost","root",""); mysql_select_db("wldc",$link); $insertresult = mysql_query($sql,$link); if (!$insertresult): echo "<h2>ERROR</h2>"; else: ?>

PB Tech Internet Training Introduction to PHP 132
<p>Thank you, <?php echo "$firstname $lastname" ?>. Your registration is confirmed below.</p> <?php $requery = "SELECT * FROM clients WHERE firstname = '$firstname' AND lastname = '$lastname' ORDER BY id DESC"; $result = mysql_query($requery,$link) or die(mysql_error($link)); ?> <div style="width:100%; text-align:center;"> <table border="1"> <tr> <?php while ($field = mysql_fetch_field($result)){ echo "<th>{$field->name}</th>"; } ?> </tr> <tr> <?php $row = mysql_fetch_array($result,MYSQL_NUM); for ($counter = 0; $counter < mysql_num_fields($result); $counter++){ echo "<th>{$row[$counter]}</th>"; } ?> </tr> </table> </div> <?php endif; endif; include("footer.php"); ?> </body> </html>

PB Tech Internet Training Introduction to PHP 133
Development Strategy Session: Building an Interface for Updating Client Records The WLDC Web development team received a request from the WLDC CFO to build an interface that would let an administrator make changes to client information. The team listed the tasks involved:
• The administrator would have to query the client’s current information. Ideally, they might search by client ID number, but the client ID number might not be handy. So an interface would have to be provided that would allow a client search on any field.
• Since multiple records might be returned. The interface will have to allow a single client’s record to be chosen to update from among the returned list of records.
• To allow the client information to be edited, it will be displayed in a form. The form fields will display with the client’s current information pre-loaded. If the information for several clients is returned by the query, several forms will be displayed, with each form containing a single returned record of client information.
• The administrator will edit the information in the form fields, and then click Submit. When the form is submitted, a PHP script will retrieve the information and compose a SQL UPDATE statement. Because the UPDATE statement will have to include the id, it will have to be included in the data sent by the form. But we do not want the administrator to be able to edit the id. How can we include the id in the form, but not allow the administrator to modify it? The team realized they could create a HIDDEN field in each form that contained the id, as in;
<input type="hidden" name="id" value="36">
A HIDDEN field does not display, and the user cannot see or modify its contents. But the value of the HIDDEN field is sent to the server when the form is submitted, and it is retrieved from the form in exactly the same way as any other field.

PB Tech Internet Training Introduction to PHP 134
Exercise 10: Building an Interface for Updating Client Records In this exercise you will complete the coding to realize the solution devised by the development team. First, there is an HTML page, ex10-form-temp.php, that provides the search engine interface:
Here the administrator can search on any of the fields provided in the select list. When a search is submitted, ex10-update-temp.php queries the clients table and returns all of the matches, each in its own HTML form:

PB Tech Internet Training Introduction to PHP 135
Here, a search for clients living in New York returned five records, in five HTML forms. Remember, although there are five forms, only one can be submitted , as only on Submit button can be clicked.
Also, notice that the team decided to display the client ID numbers as a courtesy. But a value that is simply displayed will not be sent to the server when the form is submitted, so each HTML form also includes a HIDDEN field for the client ID number.
Bill Minton has moved to midtown, Manhattan, so his ZIP code is changed from 10514 to 10016. When the form is submitted, the entire client roster is returned, also by ex10-update-temp.php, allowing verification of the change:

PB Tech Internet Training Introduction to PHP 136
To complete this exercise:
1. The file ex10-form-temp.php is complete, but you may wish to open it to look at the names of the fields being returned to the server. Its code is below: <!DOCTYPE html PUBLIC "-//W3C//DTD XHTML 1.0 Transitional//EN" "http://www.w3.org/TR/xhtml1/DTD/xhtml1-transitional.dtd"> <html xmlns="http://www.w3.org/1999/xhtml"> <head><title>The WestLake Laundry Detergent Company</title> <link href="washstyle.css" rel="stylesheet" /> <meta http-equiv="Content-Type" content="text/html; charset=iso-8859-1" /> </head> <body style="width:100%; text-align:center;"> <?php include("header.php");?> <h1 class="header">WestLake Laundry Detergent Customer Search</h1> <p>Enter a value to search on, choose a search field, and submit.</p> <form method="post" action="ex10-update-temp.php"> <table border="0"> <tr style="vertical-align:bottom"> <td>Text to search for: <input name="searchtext" size="30" maxlength="64" /> </td> <td>Field to search: <select name="searchfield">

PB Tech Internet Training Introduction to PHP 137
<option value="firstname">First Name </option> <option value="lastname">Last Name </option> <option value="state">State </option> <option value="zip">Zip Code </option> <option value="age">Age </option> </select> </td> </tr> <tr> <th colspan="2"><input type="submit" /> <input type="reset" /></th> </tr> </table> </form> <?php include("footer.php"); ?> </body> </html>
2. Open ex10-update-temp.php for editing. Complete the sections shown in bold below. Check carefully as there some important snippets of code missing that might be easily overlooked. <!DOCTYPE html PUBLIC "-//W3C//DTD XHTML 1.0 Transitional//EN" "http://www.w3.org/TR/xhtml1/DTD/xhtml1-transitional.dtd"> <html xmlns="http://www.w3.org/1999/xhtml"> <head><title>The WestLake Laundry Detergent Company</title> <link href="washstyle.css" rel="stylesheet" /> <meta http-equiv="Content-Type" content="text/html; charset=iso-8859-1" /> </head> <body style="width:100%;text-align:center;"> <?php include("header.php"); $link = mysql_connect("localhost","root",""); mysql_select_db("wldc",$link); if (isset($_POST["searchfield"])){ $searchfield = $_POST["searchfield"]; $searchtext = $_POST["searchtext"]; $sql = "SELECT * FROM clients "; if ($searchfield == "age") $sql .= "WHERE age = $searchtext " ; else $sql .= "WHERE $searchfield = '$searchtext'"; $sql .= " ORDER BY lastname, firstname"; $result = mysql_query($sql,$link); ?>

PB Tech Internet Training Introduction to PHP 138
<h1 class="header">WestLake Laundry Detergent Customer Search Results</h1> <table border="1"> <tr> <th>ID</th> <th colspan="2">Name</th> <th>State</th> <th>Zip Code</th> <th>Age</th> </tr> <?php /* Build a row here for each result returned. The first cell (with the client's id) should display the id in a non-editable table data cell. The id should be added into hidden text field. The values of all other fields should be displayed in form fields. Name the form fields using the name of the field from the data base. */ ?> </table> <?php } else { $clientnum = $_POST["id"]; $firstname = $_POST["firstname"]; $lastname = $_POST["lastname"]; $state = $_POST["state"]; $zip = $_POST["zip"]; $age = $_POST["age"]; /* Using these variables, write a sql statement to update the client. Execute the sql statement */ ?> <h1 class="header">Client <?php echo $clientnum ?> Successfully Updated</h1> <p>Here is the revised client roster.</p> <?php $sql = "SELECT * FROM clients ORDER BY lastname, firstname"; $result = mysql_query($sql,$link); ?> <table border="1"> <tr> <th>ID</th> <th colspan="2">Name</th> <th>State</th> <th>Zip Code</th> <th>Age</th> </tr> <?php while ($row = mysql_fetch_array($result,$link)){ echo "<tr>"; foreach ($row as $field) echo "<td>$field</td>"; echo "</tr>";

PB Tech Internet Training Introduction to PHP 139
} ?> </table> <?php } include("footer.php"); ?> </body> </html>
If you are done early...
• It is indiscrete to show the entire client roster, along with each client’s personal information, to any client who updates their client information. Modify the application to display only the information of the client who just performed the update.
• Alternatively, highlight the client who was just updated in yellow so our administrator can quickly see that the changes were made successfully.

PB Tech Internet Training Introduction to PHP 140
A Possible Solution to Exercise 10 As contained in ex10-update-done.php:
<!DOCTYPE html PUBLIC "-//W3C//DTD XHTML 1.0 Transitional//EN" "http://www.w3.org/TR/xhtml1/DTD/xhtml1-transitional.dtd"> <html xmlns="http://www.w3.org/1999/xhtml"> <head><title>The WestLake Laundry Detergent Company</title> <link href="washstyle.css" rel="stylesheet" /> <meta http-equiv="Content-Type" content="text/html; charset=iso-8859-1" /> </head> <body style="width:100%;text-align:center;"> <?php include("header.php"); $link = mysql_connect("localhost","root",""); mysql_select_db("wldc",$link); if (isset($_POST["searchfield"])){ $searchfield = $_POST["searchfield"]; $searchtext = $_POST["searchtext"]; $sql = "SELECT * FROM clients "; if ($searchfield == "age") $sql .= "WHERE age = $searchtext " ; else $sql .= "WHERE $searchfield = '$searchtext'"; $sql .= " ORDER BY lastname, firstname"; $result = mysql_query($sql,$link); ?> <h1 class="header">WestLake Laundry Detergent Customer Search Results</h1> <table border="1"> <tr> <th>ID</th> <th colspan="2">Name</th> <th>State</th> <th>Zip Code</th> <th>Age</th> </tr> <?php while ($row = mysql_fetch_array($result,MYSQL_BOTH)){ echo " <tr> <form method='post'> <td>{$row['id']} <input type='hidden' name='id' value='{$row['id']}' /> </td>"; for ($counter = 0; $counter < mysql_num_fields($result); $counter++){ $thisfield = mysql_fetch_field($result,$counter); $thisfieldname = $thisfield->name; if ($thisfieldname != "id"){ echo "<td>

PB Tech Internet Training Introduction to PHP 141
<input name='$thisfieldname' size='9' value='$row[$counter]' /> </td>"; } } echo "<td><input type='submit' value='Submit Changes' /></td> </form> </tr>"; } ?> </table> <?php } else { $clientnum = $_POST["id"]; $firstname = $_POST["firstname"]; $lastname = $_POST["lastname"]; $state = $_POST["state"]; $zip = $_POST["zip"]; $age = $_POST["age"]; $sql = "UPDATE clients SET firstname='$firstname', lastname='$lastname', state='$state', zip='$zip', age=$age WHERE id= $clientnum"; mysql_query($sql,$link); ?> <h1 class="header">Client <?php echo $clientnum ?> Successfully Updated</h1> <p>Here is the revised client roster.</p> <?php $sql = "SELECT * FROM clients ORDER BY lastname, firstname"; $result = mysql_query($sql,$link); ?> <table border="1"> <tr> <th>ID</th> <th colspan="2">Name</th> <th>State</th> <th>Zip Code</th> <th>Age</th> </tr> <?php while ($row = mysql_fetch_array($result,$link)){ echo "<tr>"; foreach ($row as $field) echo "<td>$field</td>"; echo "</tr>"; } ?> </table> <?php }

PB Tech Internet Training Introduction to PHP 142
include("footer.php"); ?> </body> </html>

PB Tech Internet Training Introduction to PHP 143
User-Defined Functions in PHP Many PHP scripts use the same block of code more than once. PHP allows you to write a block of code as a sort of mini-routine that can be called by name as many times as necessary from within the main body of your code. These routines are called user-defined functions. They are also a great way to separate out business logic from the actual presentation details of your document.
Functions A function is written with the keyword function:
function dinner(){ echo “I host friends for dinner nearly every night!”; }
The function above will print out hello world whenever it is called (demos/functiondemo1.php):
<p>Did you know that <?php dinner(); ?>
Passing Arguments to a Function
You may write a subroutine to execute the same block of code over and over again, but each time the function is called, you would like the function’s statements to execute with different values. In this case, pass the specific values to the subroutine by listing them in parentheses when the function is called. The arguments will be passed to the function, which will receive them by assigning them to local variables.
For example, request demos/functiondemo2.php. The dinner function is called three times, passing different values to the function each time it is called, and displaying this response:

PB Tech Internet Training Introduction to PHP 144
In the code for functiondemo2.php, the dinner function is called three times, but each time, three different values are passed to it. The values to be passed are enclosed in parentheses, and separated by commas.
dinner("Sunday", 3, "Melody"); dinner("Wednesday", 5, "Clarence"); dinner("Friday", 4, "Clarissa");
Below, the function receives the values in three local variables, day, numpeople, and host. It then uses those local variables to execute the statements in the function:
function dinner($day, $numpeople, $host){ echo "<p>Every $day, $numpeople people will have have dinner at $host's house.</p>"; }
Variable Scoping and Functions
Occasionally you may assign values to a variable inside of a function, and then expect to reference that variable outside of the subroutine, perhaps in the main body of the PHP page. By default, any variables declared inside a function have local scope. This means the variable retains the value assigned to it only inside of the function. If you try to reference the variable outside of the function, it will not return the value assigned to it inside the function. For example, notice this code from demos/functiondemo3.php:
<!DOCTYPE html PUBLIC "-//W3C//DTD XHTML 1.0 Transitional//EN" "http://www.w3.org/TR/xhtml1/DTD/xhtml1-transitional.dtd"> <html xmlns="http://www.w3.org/1999/xhtml"> <head><title>Variable Scoping</title> <meta http-equiv="Content-Type" content="text/html; charset=iso-8859-1" /> </head> <body> <?php sumnums(2, 4, 6); ?> <p>The value of sum in the page is: <?php echo $sum ?></p> </body> </html> <?php function sumnums ($a, $b, $c){ //global $sum; //uncomment the previous line and notice the difference in the way the file works. $sum = $a + $b + $c; echo "<p>The value of sum in the function is: $sum </p>"; } ?>

PB Tech Internet Training Introduction to PHP 145
For demonstration purposes, the global declaration of the variable sum is commented out. When the function sumnums is called and passed the three integers as arguments, it will calculate the sum of the integers passed and assign it, inside the function, to the variable sum. When sum is referenced inside the function, it will print the resulting value. But where sum is referenced outside the function, it will print an error message, because the value assigned to it inside the function does not persist outside of the function. It has local scope. So functiondemo3.php should return the following response with its global statement commented out:
To give a function variable global scope, declare it with the global keyword. In the demo, uncomment the global statement to give the variable sum global scope, and request it again. This time, both the function and page references to sum return the calculated value. Declaring sum with global gave it global scope within the page, as shown below:
Returning a Value with a Function
One of the most useful things a function can do is to “return” a value. In other words, calling the function produces a result, which can then be used in any way you like. Compare the following two functions:

PB Tech Internet Training Introduction to PHP 146
<?php function sumnums ($a, $b, $c){ $sum = $a + $b + $c; echo "<p>The value of sum in the function is: $sum </p>"; } ?> <?php function sumnums ($a, $b, $c){ $sum = $a + $b + $c; return $sum; } ?>
Both functions add up some numbers. The first function prints them out. But what if you wanted to use the numbers in a further calculation? Or what if you wanted them written to a file or database? The first function wouldn’t do the trick and you’d have to write another function.
But the second function simply gives you the result with the return statement. This leaves you free to decide what to do with it. In this sense, the second function is more flexible (or “modular” as we usually say in programming jargon): the same function can be used in many different circumstances.
Note that a function can only return one value (though it could be a complex object such as an array). This means that once you issue the return statement, the rest of the function will not execute; the function exits once it returns a value.
Adding Apostrophe Protection to Your SQL Queries
Let’s look at a useful example of a function that returns a value.
In inserting or updating records in the database, you may have discovered that trying to submit a name that contains an apostrophe returns an error (there is a setting in PHP to avoid this problem, though it can sometimes lead to unwanted results). For example, consider the following SQL string:
$sql = "UPDATE clients SET lastname = 'O'Malley' WHERE clientid = 14
The nested apostrophe in O'Malley confuses the database, causing an error to be returned.
In mySQL, nested apostrophes (or single quotes), can be escaped in a SQL string with a backslash. For example, we can rework the sample SQL string above to submit correctly:
$sql = "UPDATE clients SET lastname = 'O\'Malley' WHERE clientid = 14
Because you may wish to make this correction for all string values being submitted in a SQL string, write a function that will add the extra apostrophe automatically. Our function, below,

PB Tech Internet Training Introduction to PHP 147
will use the built-in PHP replace() function. The replace() function takes the following three arguments:
replace(searchstring, replacementstring, string)
The replace() function will search for the searchstring within the larger string. Each time it finds a match, the searchstring is replaced with the replacementstring.
Using the replace() function to replace single apostrophes with backslashed apostrophes, we could write a function and pass it any string we would like to alter:
function FixApost($strText){ return replace("'", "\'", $strText); }
One by one, pass all of the string values you will be inserting or updating on the database through the FixApost() function before adding them to your SQL string, like this:
$DBLastname = FixApost($lastname);
Here, we could add $DBLastname to our SQL string, and any apostrophes in the name would be safely escaped.


PB Tech Internet Training Introduction to PHP 149
Form Validation Form validation is crucial to any website that relies on data gathered from users. It doesn’t so much require new functions we haven’t learned as it does skillful use of what we already know. Let’s jump into the fire with demos/validate.php.
If you forget to fill something out, you get a blank screen! <!DOCTYPE html PUBLIC "-//W3C//DTD XHTML 1.0 Transitional//EN" "http://www.w3.org/TR/xhtml1/DTD/xhtml1-transitional.dtd"> <html xmlns="http://www.w3.org/1999/xhtml"> <head><title>WLDC Customer Registration</title> <link href="../washstyle.css" rel="stylesheet" type="text/css" /> <meta http-equiv="Content-Type" content="text/html; charset=iso-8859-1" /> </head> <body> <?php if ( $_SERVER['REQUEST_METHOD'] == 'GET' ): ?> <form method="post"> First Name <input name="firstname" size="57" maxlength="70" value="" /><br /> Last Name <input name="lastname" size="57" maxlength="70" value="" /><br /> <input type="submit" value="Submit" /> <input type="reset" /> </form> <?php else: $firstname = trim($_POST["firstname"]);

PB Tech Internet Training Introduction to PHP 150
$lastname = trim($_POST["lastname"]); if ( ($firstname == '') || ($lastname == '')){ echo "ERROR"; } else { echo "Thank you, $firstname $lastname. Your form was filled in correctly!</p>"; } endif; ?> </body> </html>
Well that works. But it’s not very helpful. Let’s take another step in demos/validate2.php:
<!DOCTYPE html PUBLIC "-//W3C//DTD XHTML 1.0 Transitional//EN" "http://www.w3.org/TR/xhtml1/DTD/xhtml1-transitional.dtd">

PB Tech Internet Training Introduction to PHP 151
<html xmlns="http://www.w3.org/1999/xhtml"> <head><title>WLDC Customer Registration</title> <link href="../washstyle.css" rel="stylesheet" type="text/css" /> <meta http-equiv="Content-Type" content="text/html; charset=iso-8859-1" /> </head> <body> <?php if ( $_SERVER['REQUEST_METHOD'] == 'GET' ): ?> <?php if (isset($_GET["error"])) echo "<h3 style='color:red'>Error. Please fix the fields below</h3>"; ?> <form method="post"> First Name <input name="firstname" size="57" maxlength="70" /><br /> Last Name <input name="lastname" size="57" maxlength="70" /><br /> <input type="submit" value="Submit" /> <input type="reset" /> </form> <?php else: $firstname = trim($_POST["firstname"]); $lastname = trim($_POST["lastname"]); if ( ($firstname == '') || ($lastname == '')){ $redirect = "http://" . $_SERVER['HTTP_HOST'] . $_SERVER['PHP_SELF'] . "?error=true"; header("Location: " . $redirect); } ?> <p>Thank you, <?php echo "$firstname $lastname" ?>. Your form was filled in correctly!</p> <?php endif; ?> </body> </html>
And that’s nice in that we’re still on the form page. But the values we’ve filled in have disappeared. Let’s fix that in demos/validate3.php.
And the code: <?php

PB Tech Internet Training Introduction to PHP 152
function value($fieldname) { if (isset($_GET[$fieldname])) return $_GET[$fieldname]; else return ""; } ?> <!DOCTYPE html PUBLIC "-//W3C//DTD XHTML 1.0 Transitional//EN" "http://www.w3.org/TR/xhtml1/DTD/xhtml1-transitional.dtd"> <html xmlns="http://www.w3.org/1999/xhtml"> <head><title>WLDC Customer Registration</title> <link href="../washstyle.css" rel="stylesheet" type="text/css" /> <meta http-equiv="Content-Type" content="text/html; charset=iso-8859-1" /> </head> <body> <?php if ( $_SERVER['REQUEST_METHOD'] == 'GET' ): ?> <?php if (isset($_GET["error"])) echo "<h3 style='color:red'>Error. Please fix the fields below</h3>"; ?> <form method="post"> First Name <input name="firstname" size="57" maxlength="70" value="<?php echo value('firstname'); ?>" /><br /> Last Name <input name="lastname" size="57" maxlength="70" value="<?php echo value('lastname'); ?>" /><br /> <input type="submit" value="Submit" /> <input type="reset" /> </form> <?php else: $firstname = trim($_POST["firstname"]); $lastname = trim($_POST["lastname"]); if ( ($firstname == '') || ($lastname == '')){ $redirect = "http://" . $_SERVER['HTTP_HOST'] . $_SERVER['PHP_SELF'] . "?firstname=$firstname&lastname=$lastname&error=true"; header("Location: " . $redirect); } ?> <p>Thank you, <?php echo "$firstname $lastname" ?>. Your form was filled in correctly!</p> <?php endif; ?> </body> </html>
Here’s where the fun starts. If they make a mistake, we redirect them back to the form page. However, we also tack the values that they’ve entered so far onto the end of the query string:
$redirect = "http://" . $_SERVER['HTTP_HOST'] . $_SERVER['PHP_SELF'] . "?firstname=$firstname&lastname=$lastname&error=true";

PB Tech Internet Training Introduction to PHP 153
Then we create a function called value. This function accepts a fieldname as a parameter. It checks to see if the fieldname exists in the query string. If it does, the value is returned by the function, otherwise a blank string is returned. The returned value is then displayed in the form field. field yet. If they have, we prefill in the form so they don’t need to refill it in.

PB Tech Internet Training Introduction to PHP 154

PB Tech Internet Training Introduction to PHP 155
Exercise 11: Using Functions to Validate Form Submissions In this exercise, you will work on ex11-validate-temp.php. This file provides an interface for inserting new clients into the clients table of the database. However, if users fill out the form incorrectly, they will get a database error, since the database is expecting certain data types.
Your goal is to check the data before it goes into the database. If it has errors, you will alert the user to the problem and have them refill in the form. Otherwise, it will insert the information into the database and display the resulting record.

PB Tech Internet Training Introduction to PHP 156
Incorrectly Filled Out Correctly Filled Out
To complete this exercise:
1. Open ex11-validate-temp.php for editing. Complete the sections shown in bold below. <?php /* Write a function called asterisk. This function will decide whether to display an asterisk after a form field. 1) The function should accept two arguments: the name of a form field, and whether it should be validated as a string or a number. 2) If the query string does not contain an "error" variable, you know there are no errors, so this function should return an empty string. 3) If the query string does contain an "error" variable, you need to know if this form field had an error. Check to see if it is a blank string. If so, return a red asterisk. If it's a numeric field and the value is non numeric, it should also return a red asterisk.<br /> Otherwise, it should return an empty string. */ /* Write a function called value. It should accept a field name as an argument. It should check to see if that field exists in the query string (which will only be the case if the user has made a mistake in a form field). If it does, it should return the value of that field, otherwise it should return an empty string. */ ?> <!DOCTYPE html PUBLIC "-//W3C//DTD XHTML 1.0 Transitional//EN" "http://www.w3.org/TR/xhtml1/DTD/xhtml1-transitional.dtd">

PB Tech Internet Training Introduction to PHP 157
<html xmlns="http://www.w3.org/1999/xhtml"> <head><title>WLDC Customer Registration</title> <link href="washstyle.css" rel="stylesheet" type="text/css" /> <meta http-equiv="Content-Type" content="text/html; charset=iso-8859-1" /> </head> <body> <?php include("header.php"); ?> <div style="width:100%; text-align:center;"> <h1 class="header">WLDC Customer Registration</h1> </div> <?php if ( $_SERVER['REQUEST_METHOD'] == 'GET' ): ?> <?php /* Check to see if the error field in the query string is set. If it is, the user has made an error and should be alerted to that fact */ ?> <form method="post"> <table> <tr> <td>First Name </td> <td><input name="firstname" size="57" maxlength="70" value="<?php echo value('firstname'); ?>" /><?php echo asterisk('firstname','string') ?></td> </tr> <tr> <td>Last Name</td> <td><input name="lastname" size="57" maxlength="70" value="<?php echo value('lastname'); ?>" /><?php echo asterisk('lastname','string') ?></td> </tr> <tr> <td>State</td> <td><input name="state" size="2" maxlength="2" value="<?php echo value('state'); ?>" /><?php echo asterisk('state','string') ?></td> </tr> <tr> <td>Zip</td> <td><input name="zip" size="25" maxlength="70" value="<?php echo value('zip'); ?>" /><?php echo asterisk('zip','num') ?></td> </tr> <tr> <td>Age</td> <td> <input name="age" size="25" maxlength="70" value="<?php echo value('age'); ?>" /><?php echo asterisk('age','num') ?></td> </tr> <tr> <td colspan="2"><input type="submit" value="Submit" /> <input type="reset" /></td> </tr> </table> </form>

PB Tech Internet Training Introduction to PHP 158
<?php else: $firstname = trim($_POST["firstname"]); $lastname = trim($_POST["lastname"]); $state = trim($_POST["state"]); $zip = trim($_POST["zip"]); $age = trim($_POST["age"]); /* Complete the conditional statement below. It should test the values of the form fields gathered above. You should make sure that they are not empty. You should also make sure that the zip and age fields are numeric (HINT: use the is_numeric() function). If you find errors, redirect the user with the string $redirect, which has been composed for you below. Notice the error "flag" at the end of the string. */ if ( ) { $redirect = "http://" . $_SERVER['HTTP_HOST'] . $_SERVER['PHP_SELF'] . "?firstname=$firstname&lastname=$lastname&state=$state&zip=$zip&age=$age&error=true"; // Use the header function to redirect the user to the URL in $redirect } $sql = "INSERT INTO clients (firstname, lastname, state, zip, age) VALUES ('$firstname', '$lastname','$state', '$zip', $age)"; $link = mysql_connect("localhost","root",""); mysql_select_db("wldc",$link); $insertresult = mysql_query($sql,$link); if (!$insertresult): echo "<h3>ERROR: " . mysql_error() . "</h3>"; else: ?> <p>Thank you, <?php echo "$firstname $lastname" ?>. Your registration is confirmed below.</p> <?php $requery = "SELECT * FROM clients WHERE firstname = '$firstname' AND lastname = '$lastname' ORDER BY id DESC"; $result = mysql_query($requery,$link) or die(mysql_error($link)); ?> <div style="width:100%; text-align:center;"> <table border="1">

PB Tech Internet Training Introduction to PHP 159
<tr> <?php while ($field = mysql_fetch_field($result)){ echo "<th>{$field->name}</th>"; } ?> </tr> <tr> <?php $row = mysql_fetch_array($result,MYSQL_NUM); for ($counter = 0; $counter < mysql_num_fields($result); $counter++){ echo "<th>{$row[$counter]}</th>"; } ?> </tr> </table> </div> <?php endif; endif; include("footer.php"); ?> </body> </html>
2. To run your file, request ex11-valid-temp.html. Complete the form and submit.
If you are done early…
• Add a function to the file that will escape any apostrophes in the first or last name being submitted in the form.
• The code to create the form fields is pretty cumbersome. Write a function that creates a form field, given parameters of a name for the field, a size, and whether it is numeric.

PB Tech Internet Training Introduction to PHP 160
A Possible Solution to Exercise 11 As contained in ex11-validate-done.php:
<?php function asterisk($fieldname,$numeric){ if (empty($_GET["error"])) { return ""; } else { if ( (trim($_GET[$fieldname]) == '') || ( ($numeric == 'num') && !is_numeric(trim($_GET[$fieldname])) ) ) return "<span style='color:red'>*</span>"; else return ""; } } function value($fieldname){ if (isset($_REQUEST[$fieldname])) return $_REQUEST[$fieldname]; else return ""; } ?> <!DOCTYPE html PUBLIC "-//W3C//DTD XHTML 1.0 Transitional//EN" "http://www.w3.org/TR/xhtml1/DTD/xhtml1-transitional.dtd"> <html xmlns="http://www.w3.org/1999/xhtml"> <head><title>WLDC Customer Registration</title> <link href="washstyle.css" rel="stylesheet" type="text/css" /> <meta http-equiv="Content-Type" content="text/html; charset=iso-8859-1" /> </head> <body> <?php include("header.php"); ?> <div style="width:100%; text-align:center;"> <h1 class="header">WLDC Customer Registration</h1> </div> <?php if ( $_SERVER['REQUEST_METHOD'] == 'GET' ): ?> <?php if (isset($_GET["error"])) echo "<h3 style='color:red'>Error. Please fix the fields marked below</h3>"; ?> <form method="post"> <table> <tr> <td>First Name </td> <td><input name="firstname" size="57" maxlength="70" value="<?php echo value('firstname'); ?>" /><?php echo asterisk('firstname','string') ?></td> </tr> <tr>

PB Tech Internet Training Introduction to PHP 161
<td>Last Name</td> <td><input name="lastname" size="57" maxlength="70" value="<?php echo value('lastname'); ?>" /><?php echo asterisk('lastname','string') ?></td> </tr> <tr> <td>State</td> <td><input name="state" size="2" maxlength="2" value="<?php echo value('state'); ?>" /><?php echo asterisk('state','string') ?></td> </tr> <tr> <td>Zip</td> <td><input name="zip" size="25" maxlength="70" value="<?php echo value('zip'); ?>" /><?php echo asterisk('zip','num') ?></td> </tr> <tr> <td>Age</td> <td> <input name="age" size="25" maxlength="70" value="<?php echo value('age'); ?>" /><?php echo asterisk('age','num') ?></td> </tr> <tr> <td colspan="2"><input type="submit" value="Submit" /> <input type="reset" /></td> </tr> </table> </form> <?php else: $firstname = trim($_POST["firstname"]); $lastname = trim($_POST["lastname"]); $state = trim($_POST["state"]); $zip = trim($_POST["zip"]); $age = trim($_POST["age"]); if ( ($firstname == '') || ($lastname == '') || ($state == '') || ($zip == '') || !is_numeric($zip) || ($age == '') || !is_numeric($age) ) { $redirect = "http://" . $_SERVER['HTTP_HOST'] . $_SERVER['PHP_SELF'] . "?firstname=$firstname&lastname=$lastname&state=$state&zip=$zip&age=$age&error=true"; header("Location: " . $redirect); } $sql = "INSERT INTO clients (firstname, lastname, state, zip, age) VALUES ('$firstname', '$lastname','$state', '$zip', $age)"; $link = mysql_connect("localhost","root",""); mysql_select_db("wldc",$link);

PB Tech Internet Training Introduction to PHP 162
$insertresult = mysql_query($sql,$link); if (!$insertresult): echo "<h3>ERROR: " . mysql_error() . "</h3>"; else: ?> <p>Thank you, <?php echo "$firstname $lastname" ?>. Your registration is confirmed below.</p> <?php $requery = "SELECT * FROM clients WHERE firstname = '$firstname' AND lastname = '$lastname' ORDER BY id DESC"; $result = mysql_query($requery,$link) or die(mysql_error($link)); ?> <div style="width:100%; text-align:center;"> <table border="1"> <tr> <?php while ($field = mysql_fetch_field($result)){ echo "<th>{$field->name}</th>"; } ?> </tr> <tr> <?php $row = mysql_fetch_array($result,MYSQL_NUM); for ($counter = 0; $counter < mysql_num_fields($result); $counter++){ echo "<th>{$row[$counter]}</th>"; } ?> </tr> </table> </div> <?php endif; endif; include("footer.php"); ?> </body> </html>

PB Tech Internet Training Introduction to PHP 163
Regular Expressions The validation we did in the previous exercise was very basic. But what if we wanted to check for a valid social security number? Or telephone number?
To do robust validation, we need regular expressions. Regular expressions allow us to check strings against patterns. We could spend several hours on regular expressions. However, the point is to just get a feel for them and then take a look at how to use them with PHP.
Character Types and Ranges Several character range escape sequences are provided to make it easier to specify broad ranges of characters. Specifically:
Escape Sequence Description \d Any digit \D Any character other than a digit \s Whitespace (spaces or tabs) \S Anything other than whitespace \w Any word character (numbers,
letters, and underscores) \W Anything not a word character.
. Any character but a newline
Specifying Character Options and Ranges in Patterns
The [ ] Special Characters: The [ ] special characters enclose a series of alternatives in a pattern. For example,
/p[aeiou]t/
matches pat pet pit pot put
To specify that a pattern contains a character other than the ones enclosed in braces, type a ^ prior to the characters. For example,
/abc[^0123456789]def/

PB Tech Internet Training Introduction to PHP 164
matches the letters abc, followed by any non-numeric character, followed by the letters def.
Within a [] section, the dash character (-) is used to specify a range of letters or numbers within a pattern. For example:
/abc[0-9]def/ matches the letters abc, followed by any digit, followed by the letters def.
NOTE
The [0-9] Range
You will note that the [0-9] range, specifying any digit, is exactly equivalent to the \d indicator.
You can match several ranges of letters and numbers at once, per the following example:
/abc[a-zA-Z0-9]def/
In this example, a match is made if the string contains the letters abc, followed by any number or upper or lower case letter, followed by the letters def.
Quantity Indicators The + Special Character: The + character matches one or more occurrences of the preceding character. For example, the pattern /12+3/ matches all of the following:
1223 1222223 123
The * Special Character: The * character matches zero or more occurrences of the preceding character.
The ? Special Character: The ? character matches zero or one occurrences of the preceding character.
The {} Characters: The {} characters allow you to specify a specific number of matches of the preceding character. For example,
/\d{5}/
matches any 5-digit sequence.

PB Tech Internet Training Introduction to PHP 165
To specify a minimum and maximum number of matches, enclose two numbers in the {} characters, separated by a comma. For example,
/\d{3,8}/
matches any sequence of numbers from 3 to 8 characters long.
Finally, to specify only a minimum but not a maximum, simply leave off one of the bounding parameters:
/\d{4,}/
Matches a pattern of 4 or more digits.
Location Indicators Matching at the start of a string (^): The ^ character at the start of a pattern indicates that the pattern is to be matched only at the start of a string. For example,
/^xyz/
matches xyz123 xyzabcdefg xyz
but not wxyz 123xyz axyz12
Matching at the end of a string ($): The $ character at the end of a pattern indicates that the pattern is to be matched only at the end of a string. For example,
/xyz$/
matches 123xyz wxyz xyz
but not wxyza 12xyz34 xyz4

PB Tech Internet Training Introduction to PHP 166
The Word-Boundary Pattern Anchors: \b and \B
The word-boundary pattern anchors indicate whether the pattern to be matched falls on or inside the boundaries of a word. For these purposes, a word is assumed to contain only letters, digits, and underscore characters — nothing else.
The word-boundary (\b) pattern anchor: The \b anchor, when inserted in a pattern, indicates that a word boundary must occur at the position occupied by \b. For example,
/\bth/
indicates that the pattern to be matched consists of a word boundary, followed by the characters th (i.e., th is at the start of a word). As a result, the pattern matches
thanks thank you therefore
but does not match wrathful bubble bath math
The non-word-boundary pattern anchor (\B): The \B anchor, when inserted in a pattern, indicates that a word boundary must not occur at the position occupied by \B. For example,
/th\B/
indicates that the pattern to be matched consists of the characters th, followed by a character that is not a word boundary. Therefore, the pattern above matches
wrathful thankful baths
but does not match math bath? All were made humble by his wrath.

PB Tech Internet Training Introduction to PHP 167
NOTE
Escape Sequences for Special Characters
On occasion, you may need to search a pattern for reserved characters such as +, *, ?, [, or ]. To indicate that a special character should be treated as a normal character, place a \ (backslash) before the character. For example,
/\*cat/
matches any occurrences of *cat in the string.
Ignoring Case with the i Modifier
Adding this option means that the case of the letters will be ignored within a regular expression. For example,
/abc/i
matches ABCDEFGHI defAbC123 xyzabcxyz zABcDeF
Specifying Alternate Values
To specify a list of alternate values, separate each value with a pipe character (|). The match will be restricted to either the sub-expression on the left or the sub-expression on the right of the vertical bar. Furthermore, parentheses should be used to group the alternate values, isolating them from the rest of the pattern. For example,
/gr(a|e)y/
matches gray grey

PB Tech Internet Training Introduction to PHP 168
Regular Expressions in PHP There are several different ways to work with regular expressions in PHP. The best way (in our opinion) is to use the PERL-compatible syntax. This syntax is more widely used and generally speaking executes faster.
The main function you’ll want to use is the preg_match() function: preg_match(patterntosearchfor, stringtosearch, matcharray)
If a match is found, the function will return 1, otherwise it will return 0. If you want to see how many times a pattern is found in a string you can use preg_match_all(), which works in roughly the same way, except that it will find all occurrences of the matching pattern, whereas preg_match() stops after the first successful match.
Basic pattern matching
In demos/re.php (form to fill out is demos/re-form.html), you see that we can tell whether users have filled out their information correctly:
Here’s the code: <!DOCTYPE html PUBLIC "-//W3C//DTD XHTML 1.0 Transitional//EN" "http://www.w3.org/TR/xhtml1/DTD/xhtml1-transitional.dtd"> <html xmlns="http://www.w3.org/1999/xhtml"> <head> <title>Untitled Document</title> <meta http-equiv="Content-Type" content="text/html; charset=iso-8859-1" /> </head> <body> <?php $nameRE = '/^[A-Z][a-z]+\s[A-Z][a-z]+$/'; $ssnRE = '/^\d{3}[\s\-]?\d{2}[\s\-]?\d{4}$/'; $zipRE = '/^\d{5}(-\d{4})?$/';

PB Tech Internet Training Introduction to PHP 169
if (preg_match($nameRE,$_GET['name'])) echo "Name was correct<br />"; else echo "Name was incorrect<br />"; if (preg_match($ssnRE,$_GET['ssn'])) echo "ssn was correct<br />"; else echo "ssn was incorrect<br />"; if (preg_match($zipRE,$_GET['zip'])) echo "zip was correct<br />"; else echo "zip was incorrect<br />"; ?> </body> </html>
Matching Sub-Groups
The preg_match() function also allows you to extract parts of the match string. For instance, let’s say that you wanted to get people’s phone number into a database field. You could let them enter the data in any of several acceptable formats. You could then parse the data and transform it into the format your database expects by grabbing the area code and seven-digit number. The preg_match() function allows us to do this automatically. If you provide the name of a variable as the third argument, it will populate this as an array, where the first item (index 0) in the array is the entire matched string. The second argument (index 1) is the first parenthesized portion, the third argument (index 2) is the second parenthesized portion, etc. Fill in demos/re-form-groups.html to see it in action:
In this demo, you can see that not only have we validated the data, but we have also extracted various pieces from the data. Let’s have a look:
<!DOCTYPE html PUBLIC "-//W3C//DTD XHTML 1.0 Transitional//EN" "http://www.w3.org/TR/xhtml1/DTD/xhtml1-transitional.dtd"> <html xmlns="http://www.w3.org/1999/xhtml"> <head> <title>Untitled Document</title>

PB Tech Internet Training Introduction to PHP 170
<meta http-equiv="Content-Type" content="text/html; charset=iso-8859-1" /> <style type="text/css"> h3 {margin-top: 1em;margin-bottom: 0em;} </style> </head> <body> <?php $nameRE = '/^([A-Z][a-z]+)\s([A-Z][a-z]+)$/'; $ssnRE = '/^(\d{3})[\s\-\.]?(\d{2})[\s\-\.]?(\d{4})$/'; $phoneRE = '/^(\d{3})[\-\.\s](\d{3})[\-\.\s](\d{4})$/'; if (preg_match($nameRE,$_GET['name'],$namematches)) { echo "<h3>Name was correct</h3>"; echo "Full name: $namematches[0]<br />"; echo "First Name: $namematches[1] <br />"; echo "Last Name: $namematches[2]"; } else { echo "Name was incorrect"; } if (preg_match($ssnRE,$_GET['ssn'], $ssnmatches)) { echo "<h3>ssn was correct</h3>"; echo "ssn: $ssnmatches[0] <br />"; echo "formatted ssn: " . $ssnmatches[1] . "-" . $ssnmatches[2] . "-" . $ssnmatches[3]; } else { echo "ssn was incorrect<br />"; } if (preg_match($phoneRE,$_GET['phone'],$phonematches)) { echo "<h3>phone was correct</h3>"; echo "phone: $phonematches[0]<br />"; echo "formatted phone: ($phonematches[1]) $phonematches[2]-$phonematches[3]"; } else { echo "phone was incorrect"; } ?> </body> </html>

PB Tech Internet Training Introduction to PHP 171
Exercise 12: Validating Form Data with Regular Expressions In this exercise you will improve your form validation so that it uses regular expressions that will enforce more exacting requirements of the data clients enter.
For this exercise, complete the following:
1. Open ex12-validateRE-temp.php in a text editor.
2. Complete the sections in bold below: <?php function firstnamevalid($val){ $firstnameRE = "/^[A-Z][a-z]+$/"; return preg_match($firstnameRE,$val); }

PB Tech Internet Training Introduction to PHP 172
function lastnamevalid($val){ $lastnameRE = "/^[A-Z][a-z'][A-Za-z]?[a-z]*$/"; return preg_match($lastnameRE,$val); } /* Write the statevalid function. It should make sure that the state is two capital letters. If you have extra time, you could write a regular expression that only accepts the fifty official two-letter abbreviations. */ /* Write the zipvalid function. It should make sure that the zip is exactly five digits. If you have extra time, you could write a regular expression that will accept EITHER a five-digit zip OR a five digit zip plus a dash and four more digits. */ /* Write the age valid function. You can use regular expressions here to make sure that the age is a number consisting of between one and three digits. You may find that it's easier to do good validation here without regular expressions. Let’s assume that the maximum age we will accept is 119, with apologies to those older than that. */ function value($fieldname){ if (isset($_REQUEST[$fieldname])) return $_REQUEST[$fieldname]; else return ""; } function dbfix($val){ $temp = trim($val); $temp = str_replace("'","\'",$temp); return $temp; } ?> <!DOCTYPE html PUBLIC "-//W3C//DTD XHTML 1.0 Transitional//EN" "http://www.w3.org/TR/xhtml1/DTD/xhtml1-transitional.dtd"> <html xmlns="http://www.w3.org/1999/xhtml"> <head><title>WLDC Customer Registration</title> <link href="washstyle.css" rel="stylesheet" type="text/css" /> <meta http-equiv="Content-Type" content="text/html; charset=iso-8859-1" /> </head> <body> <?php include("header.php"); ?> <div style="width:100%; text-align:center;"> <h1 class="header">WLDC Customer Registration</h1> </div> <?php if ( $_SERVER['REQUEST_METHOD'] == 'GET' ):

PB Tech Internet Training Introduction to PHP 173
?> <?php if (isset($_GET["error"])) echo "<h3 style='color:red'>Error. Please fix the fields marked below</h3>"; ?> <form method="post"> <table cellpadding="2"> <tr> <td>First Name</td> <td><input name="firstname" size="57" maxlength="70" value="<?php echo value('firstname'); ?>" /> <?php if (isset($_GET['error']) && !firstnamevalid(value("firstname"))) echo "*"; ?> </td> </tr> <tr> <td>Last Name</td> <td><input name="lastname" size="57" maxlength="70" value="<?php echo value('lastname'); ?>" /> <?php if (isset($_GET['error']) && !lastnamevalid(value("lastname"))) echo "*"; ?> </td> </tr> <tr> <td>State</td> <td><input name="state" size="2" maxlength="2" value="<?php echo value('state'); ?>" /> <?php if (isset($_GET['error']) && !statevalid(value("state"))) echo "*"; ?> </td> </tr> <tr> <td>Zip</td> <td><input name="zip" size="8" maxlength="10" value="<?php echo value('zip'); ?>" /> <?php if (isset($_GET['error']) && !zipvalid(value("zip"))) echo "*"; ?> </td> </tr> <tr> <td>Age</td> <td><input name="age" size="2" maxlength="3" value="<?php echo value('age'); ?>" /> <?php if (isset($_GET['error']) && !agevalid(value("age"))) echo "*"; ?> </td> </tr> <tr> <td colspan="2"><input type="submit" value="Submit" /> <input type="reset" /></td> </tr> </table> </form> <?php else: $firstname = trim($_POST["firstname"]); $lastname = trim($_POST["lastname"]);

PB Tech Internet Training Introduction to PHP 174
$state = trim($_POST["state"]); $zip = trim($_POST["zip"]); $age = trim($_POST["age"]); /* Right now, this page only validates the first and last names. In the if statement below, add calls to the functions you've written above to check the validity of the state, zip, and age fields */ if ( (!firstnamevalid($firstname)) || (!lastnamevalid($lastname)) ) { $redirect = "http://" . $_SERVER['HTTP_HOST'] . $_SERVER['PHP_SELF'] . "?firstname=$firstname&lastname=$lastname&state=$state&zip=$zip&age=$age&error=true"; header("Location: " . $redirect); } $firstname = dbfix($_POST["firstname"]); $lastname = dbfix($_POST["lastname"]); $state = dbfix($_POST["state"]); $zip = dbfix($_POST["zip"]); $age = dbfix($_POST["age"]); $sql = "INSERT INTO clients (firstname, lastname, state, zip, age) VALUES ('$firstname', '$lastname','$state', '$zip', $age)"; $link = mysql_connect("localhost","root",""); mysql_select_db("wldc",$link); $insertresult = mysql_query($sql,$link); if (!$insertresult): echo "<h3>ERROR: " . mysql_error() . "</h3>"; else: ?> <p>Thank you, <?php echo "$firstname $lastname" ?>. Your registration is confirmed below.</p> <?php $requery = "SELECT * FROM clients WHERE firstname = '$firstname' AND lastname = '$lastname' ORDER BY id DESC"; $result = mysql_query($requery,$link) or die(mysql_error($link)); ?> <div style="width:100%; text-align:center;"> <table border="1"> <tr> <?php

PB Tech Internet Training Introduction to PHP 175
while ($field = mysql_fetch_field($result)){ echo "<th>{$field->name}</th>"; } ?> </tr> <tr> <?php $row = mysql_fetch_array($result,MYSQL_NUM); for ($counter = 0; $counter < mysql_num_fields($result); $counter++){ echo "<th>{$row[$counter]}</th>"; } ?> </tr> </table> </div> <?php endif; endif; include("footer.php"); ?> </body> </html>
If you are done early...
• If you did the age field with regular expressions, try it without using them. If you didn’t use regular expression, try writing a regular expression that would work for validating a number between 0 and 119.
• Add another field to validate such as a social security number. Keep in mind that our database isn’t set up to handle such a value, so you probably just want to test it rather than actually using it in your INSERT statement.

PB Tech Internet Training Introduction to PHP 176
A Possible Solution to Exercise 12 As contained in ex12-validateRE-done.php:
<?php function firstnamevalid($val){ $firstnameRE = "/^[A-Z][a-z]+$/"; return preg_match($firstnameRE,$val); } function lastnamevalid($val){ $lastnameRE = "/^[A-Z][a-z'][A-Za-z]?[a-z]*$/"; return preg_match($lastnameRE,$val); } function statevalid($val){ $stateRE = "/^[A-Z]{2}$/"; return preg_match($stateRE,$val); } function zipvalid($val){ $zipRE = "/^\d{5}(-\d{4})?$/"; return preg_match($zipRE,$val); } /* //This is a regular expression syntax that would make sure an age is between 0 and 119 inclusive. //The non-regular expression version that follows might be a bit easier in this case. function agevalid($val){ $ageRE = "/^(\d{2}|1[01][0-9])$/"; return preg_match($ageRE,$val); } */ function agevalid($val){ if (!is_numeric($val)) return false; elseif ($val < 0 || $val > 119) return false; else return true; } function value($fieldname){ if (isset($_REQUEST[$fieldname])) return $_REQUEST[$fieldname]; else return ""; } function dbfix($val){ $temp = trim($val); $temp = str_replace("'","\'",$temp); return $temp; }

PB Tech Internet Training Introduction to PHP 177
?> <!DOCTYPE html PUBLIC "-//W3C//DTD XHTML 1.0 Transitional//EN" "http://www.w3.org/TR/xhtml1/DTD/xhtml1-transitional.dtd"> <html xmlns="http://www.w3.org/1999/xhtml"> <head><title>WLDC Customer Registration</title> <link href="washstyle.css" rel="stylesheet" type="text/css" /> <meta http-equiv="Content-Type" content="text/html; charset=iso-8859-1" /> </head> <body> <?php include("header.php"); ?> <div style="width:100%; text-align:center;"> <h1 class="header">WLDC Customer Registration</h1> </div> <?php if ( $_SERVER['REQUEST_METHOD'] == 'GET' ): ?> <?php if (isset($_GET["error"])) echo "<h3 style='color:red'>Error. Please fix the fields marked below</h3>"; ?> <form method="post"> <table cellpadding="2"> <tr> <td>First Name</td> <td><input name="firstname" size="57" maxlength="70" value="<?php echo value('firstname'); ?>" /> <?php if (isset($_GET['error']) && !firstnamevalid(value("firstname"))) echo "*"; ?> </td> </tr> <tr> <td>Last Name</td> <td><input name="lastname" size="57" maxlength="70" value="<?php echo value('lastname'); ?>" /> <?php if (isset($_GET['error']) && !lastnamevalid(value("lastname"))) echo "*"; ?> </td> </tr> <tr> <td>State</td> <td><input name="state" size="2" maxlength="2" value="<?php echo value('state'); ?>" /> <?php if (isset($_GET['error']) && !statevalid(value("state"))) echo "*"; ?> </td> </tr> <tr> <td>Zip</td> <td><input name="zip" size="8" maxlength="10" value="<?php echo value('zip'); ?>" /> <?php if (isset($_GET['error']) && !zipvalid(value("zip"))) echo "*"; ?> </td> </tr> <tr>

PB Tech Internet Training Introduction to PHP 178
<td>Age</td> <td><input name="age" size="2" maxlength="3" value="<?php echo value('age'); ?>" /> <?php if (isset($_GET['error']) && !agevalid(value("age"))) echo "*"; ?> </td> </tr> <tr> <td colspan="2"><input type="submit" value="Submit" /> <input type="reset" /></td> </tr> </table> </form> <?php else: $firstname = trim($_POST["firstname"]); $lastname = trim($_POST["lastname"]); $state = trim($_POST["state"]); $zip = trim($_POST["zip"]); $age = trim($_POST["age"]); if ( (!firstnamevalid($firstname)) || (!lastnamevalid($lastname)) || (!statevalid($state)) || (!zipvalid($zip)) || (!agevalid($age)) ) { $redirect = "http://" . $_SERVER['HTTP_HOST'] . $_SERVER['PHP_SELF'] . "?firstname=$firstname&lastname=$lastname&state=$state&zip=$zip&age=$age&error=true"; header("Location: " . $redirect); } $firstname = dbfix($_POST["firstname"]); $lastname = dbfix($_POST["lastname"]); $state = dbfix($_POST["state"]); $zip = dbfix($_POST["zip"]); $age = dbfix($_POST["age"]); $sql = "INSERT INTO clients (firstname, lastname, state, zip, age) VALUES ('$firstname', '$lastname','$state', '$zip', $age)"; $link = mysql_connect("localhost","root",""); mysql_select_db("wldc",$link); $insertresult = mysql_query($sql,$link); if (!$insertresult): echo "<h3>ERROR: " . mysql_error() . "</h3>"; else: ?> <p>Thank you, <?php echo "$firstname $lastname" ?>. Your registration is confirmed below.</p> <?php

PB Tech Internet Training Introduction to PHP 179
$requery = "SELECT * FROM clients WHERE firstname = '$firstname' AND lastname = '$lastname' ORDER BY id DESC"; $result = mysql_query($requery,$link) or die(mysql_error($link)); ?> <div style="width:100%; text-align:center;"> <table border="1"> <tr> <?php while ($field = mysql_fetch_field($result)){ echo "<th>{$field->name}</th>"; } ?> </tr> <tr> <?php $row = mysql_fetch_array($result,MYSQL_NUM); for ($counter = 0; $counter < mysql_num_fields($result); $counter++){ echo "<th>{$row[$counter]}</th>"; } ?> </tr> </table> </div> <?php endif; endif; include("footer.php"); ?> </body> </html>

PB Tech Internet Training Introduction to PHP 180

PB Tech Internet Training Introduction to PHP 181
Drilling Down and the Query String A vast amount of information is available over the Web today, and finding just the thing you need can require many page requests. Even the Web site of an individual company, say, one selling products, can require multiple page requests before you zero in on the product you want to buy. Helping the user navigate through mountains of data requires a strategy.
According to a frequently-used strategy, the user’s first search casts a wide net, and returns a wide number of matches, most likely based on a query to the company’s database. The list of matches does not, however, include all of the information available in the database about each and every match. This would require excessive scrolling and would soon overwhelm the user. Rather, just a tidbit of information is provided about each match in the form of a hyperlink. The user clicks one of the hyperlinks, and the database is queried again, but this time for additional information about only the clicked item. Here, the user has drilled down further into the data store to return more detailed information about one item. This query may return another set of links, allowing the user to drill down to yet more detailed information.
With each click on a link, extra information is being passed to the server along with the URL. This extra information will be used to compose a database query. The URLs in these links are composed with built-in Query Strings appended to them. These are the same type of Query String that is passed to the server by a form using METHOD=”GET”.
Request demos/querystring_form.php, to display this GET form:
STORE LOCATIONS
AZ CA CT DC NY WA
STORES IN NY
1616 Broadway 3216 Lexington 185 Madison 143 Prince St. 45 John Street 132 Chambers
STORE DETAILS
185 Madison phone: (212) 555-0202 fax: (212) 555 0203 hours: M-F 9am-10pm
Store Locations
Products
Contact Us
DB DB DB

PB Tech Internet Training Introduction to PHP 182
When the Submit button is clicked, the selected value will be sent to the server with METHOD=”GET”. The portion of the code the generates the HTML form is:
<form method="get"> <p>Please choose your favorite American President: <select name="president"> <option value="George Washington">George Washington</option> <option value="Thomas Jefferson">Thomas Jefferson</option> <option value="Abraham Lincoln">Abraham Lincoln</option> <option value="Theodore Roosevelt">Theodore Roosevelt</option> <option value="Franklin Roosevelt">Franklin Roosevelt</option> </select> </p> <p> <input type="submit" /> </p> </form>
When the Submit is clicked, METHOD=”GET” causes the value to be passed to the server appended to the URL as a Query String, returning this response:
The Query String is visible in the address bar, appended to the name of the page requested as:
querystring-form.php?president=Thomas+Jefferson
In the complete code for querystring-form.php, note that the value sent in the query string is retrieved in the usual way, with the superglobal GET:
<!DOCTYPE html PUBLIC "-//W3C//DTD XHTML 1.0 Transitional//EN" "http://www.w3.org/TR/xhtml1/DTD/xhtml1-transitional.dtd"> <html xmlns="http://www.w3.org/1999/xhtml"> <head> <title>President Picker</title> <meta http-equiv="Content-Type" content="text/html; charset=iso-8859-1" /> </head> <body> <h1 style="text-align:center">Pick A President</h1>

PB Tech Internet Training Introduction to PHP 183
<?php if (empty($_GET["president"])) { ?> <form method="get"> <p>Please choose your favorite American President: <select name="president"> <option value="George Washington">George Washington</option> <option value="Thomas Jefferson">Thomas Jefferson</option> <option value="Abraham Lincoln">Abraham Lincoln</option> <option value="Theodore Roosevelt">Theodore Roosevelt</option> <option value="Franklin Roosevelt">Franklin Roosevelt</option> </select> </p> <p> <input type="submit" /> </p> </form> <? } else { $president = $_GET["president"]; ?> <p>What a coincidence! <b><?php echo $president ?></b> is also my favorite American President!</p> <?php } ?> </body> </html>
Building the Query String into a Link Request demos/querystring-links.php. Mouse over the links and look in the browser’s status line. The URL being requested by each link contains a built-in Query String.
Click the link to request the page and send the Query String:

PB Tech Internet Training Introduction to PHP 184
The code for querystring-links.php:
<!DOCTYPE html PUBLIC "-//W3C//DTD XHTML 1.0 Transitional//EN" "http://www.w3.org/TR/xhtml1/DTD/xhtml1-transitional.dtd"> <html xmlns="http://www.w3.org/1999/xhtml"> <head> <title>President Picker</title> <style type="text/css"> a {display:block;} </style> <meta http-equiv="Content-Type" content="text/html; charset=iso-8859-1" /> </head> <body> <h1 style="text-align:center">Pick A President</h1> <?php if (empty($_GET["president"])) { ?> <p>Please choose your favorite American President: <p> <a href="?president=George Washington">George Washington </a> <a href="?president=Thomas Jefferson">Thomas Jefferson </a> <a href="?president=Abraham Lincoln">Abraham Lincoln </a> <a href="?president=Theodore Roosevelt">Theodore Roosevelt </a> <a href="?president=Franklin Roosevelt">Franklin Roosevelt </a> </p> <? } else { $president = $_GET["president"]; ?> <p>What a coincidence! <b><?php echo $president ?></b> is also my favorite American President!</p> <?php } ?> </body> </html>
While the query strings have been built into the links, and there is no HTML form in this PHP file, we still use the GET superglobal to retrieve the value. PHP treats all variables in the query string the same, whether they are passed by a form, or coded into a link.

PB Tech Internet Training Introduction to PHP 185
Query Strings can pass multiple variable name and value pairs by delimiting them with ampersands, as in the following format:
filename.php?firstname=Melody&lastname=Bigwheel&city=New+York
Generating Drill Down Links Dynamically The drill-down links in the demo were hard-coded. But remember our scenario in which the links are generated based on a query to a database - these query strings may have to be generated dynamically based on data returned from a database query. For example, imagine building a loop to loop through the contents of a database query result referred to as clientresult. Inside the loop, you may find code like this: <a href="file.php?clientnum=<?php echo $row[“clientid”] ?>"><?php echo $row[“firstname”] ?></a>
In this code, the file being requested is
file.php?clientnum=<?php echo $row[“clientid”] ?>
while the clickable text is provided by
<?php echo $row[“firstname”] ?>
Bear this in mind as we move ahead to our next exercise.

PB Tech Internet Training Introduction to PHP 186

PB Tech Internet Training Introduction to PHP 187
Exercise 13: Drilling Down Client Data In this exercise, ex13-drill-temp.php will provide a drill-down interface allowing users to click a link to pick a state from among the states represented in the WLDC clients table, drill down to a list of zip codes from that state, as represented in the clients table, and then click a zip code to display client information for WLDC clients living in that zip code.
On the first request, ex13-drill-temp.php will display a distinct list of states queried from the clients table:
Clicking a link requests the same page, but this time the page drills down to a clickable list of the zip codes in the selected state:

PB Tech Internet Training Introduction to PHP 188
Clicking a zip code link will return client information for clients living in that zip code:
To complete this exercise:
1. Open ex13-drill-temp.php for editing. Complete the sections shown below in bold: <!DOCTYPE html PUBLIC "-//W3C//DTD XHTML 1.0 Transitional//EN" "http://www.w3.org/TR/xhtml1/DTD/xhtml1-transitional.dtd"> <html xmlns="http://www.w3.org/1999/xhtml"> <head><title>The WestLake Laundry Detergent Company</title>

PB Tech Internet Training Introduction to PHP 189
<link href="washstyle.css" rel="stylesheet" /> <meta http-equiv="Content-Type" content="text/html; charset=iso-8859-1" /> </head> <body> <?php include("header.php"); ?> <h3 class="header" style="text-align:center;">Drill Down Customer Information From State to Zip to Customer</h3> <?php $link = mysql_connect("localhost","root",""); mysql_select_db("wldc",$link); if (empty($_GET["mystate"]) && empty($_GET["myzip"])): ?> <p>Please choose a WLDC state:</p> <div style="float:left; width: 100px; "> <ul> <?php /* COMPLETE THE SQL STATEMENT TO SELECT AND SORT UNIQUE STATES, SORT THEM ALPHABETICALLY--> */ $sql = "SELECT DISTINCT [COMPLETE THE STATEMENT]"; $result = mysql_query($sql,$link); while ($row = mysql_fetch_array($result, MYSQL_ASSOC)){ /* BUILD YOUR LINKS BELOW. LINK BACK TO THIS FILE. APPEND A QUERYSTRING WITH VARIABLE mystate. REMEMBER TO INCLUDE THE CLICKABLE PART */ } ?> </ul> </div> <div style="float:left;"><img src="images/wavasusa.jpg" width="303" height="242" /></div> <?php elseif ( isset($_GET["mystate"]) ) : ?> <p>Please choose from among these <b><?php echo $_GET["mystate"]; ?></b> zip codes: </p> <ul> <?php $sql = "SELECT DISTINCT zip FROM clients WHERE state='" . $_GET["mystate"] . "' ORDER BY zip"; $result = mysql_query($sql,$link); while ($row = mysql_fetch_array($result, MYSQL_ASSOC)){ /* BUILD YOUR SECOND SET OF LINKS BELOW.

PB Tech Internet Training Introduction to PHP 190
LINK BACK TO THIS FILE. APPEND A QUERYSTRING WITH VARIABLE myzip. REMEMBER TO INCLUDE THE CLICKABLE PART */ } ?> </ul> <?php else: $sql = "SELECT * FROM clients WHERE zip = '" . $_GET["myzip"] . "'"; $result = mysql_query($sql,$link); ?> <div style="position:relative; left: 50%; width: 400px; margin-left: -200px;"> <table border="1" style="width:100%"> <tr> <th>ID</th> <th colspan="2">Name</th> <th>State</th> <th>Zip Code</th> <th>Age</th> </tr> <?php while ($row = mysql_fetch_array($result, MYSQL_ASSOC)){ echo "<tr>"; foreach ($row as $field) echo "<td>$field</td>"; echo "</tr>"; } ?> </table> </div> <?php endif; mysql_close($link); ?> </body> </html>

PB Tech Internet Training Introduction to PHP 191
A Possible Solution to Exercise 13 As contained in ex13-drill-done.php:
<!DOCTYPE html PUBLIC "-//W3C//DTD XHTML 1.0 Transitional//EN" "http://www.w3.org/TR/xhtml1/DTD/xhtml1-transitional.dtd"> <html xmlns="http://www.w3.org/1999/xhtml"> <head><title>The WestLake Laundry Detergent Company</title> <link href="washstyle.css" rel="stylesheet" /> <meta http-equiv="Content-Type" content="text/html; charset=iso-8859-1" /> </head> <body> <?php include("header.php"); ?> <h3 class="header" style="text-align:center;">Drill Down Customer Information From State to Zip to Customer</h3> <?php $link = mysql_connect("localhost","root",""); mysql_select_db("wldc",$link); if (empty($_GET["mystate"]) && empty($_GET["myzip"])): ?> <p>Please choose a WLDC state:</p> <div style="float:left; width: 100px; "> <ul> <?php $sql = "SELECT DISTINCT state FROM clients ORDER BY state"; $result = mysql_query($sql,$link); while ($row = mysql_fetch_array($result, MYSQL_ASSOC)){ echo "<li><a href='?mystate={$row['state']}'>{$row['state']}</a></li>"; } ?> </ul> </div> <div style="float:left;"><img src="images/wavasusa.jpg" width="303" height="242" /></div> <?php elseif ( isset($_GET["mystate"]) ) : ?> <p>Please choose from among these <b><?php echo $_GET["mystate"]; ?></b> zip codes: </p> <ul> <?php $sql = "SELECT DISTINCT zip FROM clients WHERE state='" . $_GET["mystate"] . "' ORDER BY zip"; $result = mysql_query($sql,$link); while ($row = mysql_fetch_array($result, MYSQL_ASSOC)){ echo "<li><a href='?myzip={$row['zip']}'>{$row['zip']}</a></li>";

PB Tech Internet Training Introduction to PHP 192
} ?> </ul> <?php else: $sql = "SELECT * FROM clients WHERE zip = '" . $_GET["myzip"] . "'"; $result = mysql_query($sql,$link); ?> <div style="position:relative; left: 50%; width: 400px; margin-left: -200px;"> <table border="1" style="width:100%"> <tr> <th>ID</th> <th colspan="2">Name</th> <th>State</th> <th>Zip Code</th> <th>Age</th> </tr> <?php while ($row = mysql_fetch_array($result, MYSQL_ASSOC)){ echo "<tr>"; foreach ($row as $field) echo "<td>$field</td>"; echo "</tr>"; } ?> </table> </div> <?php endif; mysql_close($link); ?> </body> </html>

PB Tech Internet Training Introduction to PHP 193
Appendix A: Installing PHP One of the great things about PHP is that it is an open-source technology. That means anyone can have it. People are even free to monkey around with it to customize it for themselves. It is also cross-platform and is available on the major operating systems and server platforms.
Installation documentation is available at www.php.net and is fairly straightforward. We won’t reproduce it here. However, we will go through how to install PHP5 on a windows machine running IIS, which is probably the most commonly available setup for people trying this out on their own. Apache and Linux is a more common arrangement for production web sites, but the point here is to get you up and running. Different versions of PHP require different setups, documentation for which is at php.net.
Install PHP
1. Download PHP from www.php.net.
• Choose the windows binaries (rather than complete source code).
• Download the zip package. Do not choose the installer. That is easier, but does not come with many of the features you need. It also installs PHP as a CGI, which is not the preferred way to run it.
2. Create a folder for your PHP installation. The standard location would be to put it in c:\php.
3. Extract the php files you downloaded in step 1 into your php folder.
Configure PHP
1. In the PHP folder, you will see a file called php.ini-recommended. Create a copy of it in the same folder and name it php.ini. When this step is complete you should have two identical files, one called php.ini, the other called php.ini-recommended.
• The reason we don’t recommend overwriting the original php.ini-recommended is that it’s nice to be able to revert to it if you make a mistake or want to start fresh later.
2. Now you need to modify php.ini. It’s just a plain text file with a bunch of options to set. Any line that starts with a semicolon is a comment, so it isn’t executed by PHP. If you remove the semicolon from a particular line, PHP will try to execute it. So be careful when you remove semicolons!! To work on the files in this course, make the following changes:
3. change extension_dir to the name of the folder where you want to put your extensions. Note that php 5 comes with a folder called ext. If you have extracted everything into a folder

PB Tech Internet Training Introduction to PHP 194
called php in the c directory, there should be a folder called ext. So you would want to see the following in your php.ini file:
extension_dir = c:\php\ext
4. set display_errors = On
• You only want this option set to on when you are testing out an application. So when you think things are ready to go live, change this to Off.
5. Change SMTP to a valid mail server.
• This will depend on your location and whether you have access to a mail server.
6. Uncomment sendmail_from and give it a valid email address.
7. Uncomment extension=php_mysql.dll
Configure Your Environment
1. You can set environment variables by right-clicking on my computer. Then choose the advanced tab, and click on environment variables. Alternatively, you can go to Control Panel > System. Go to the Advanced tab and choose Environment Variables
2. Edit your PATH environment variable by appending c:\php (or whatever the name of the folder you unzipped PHP to is).
3. Add a new environment variable. The name of the variable should be PHPRC and the value should be the directory where your php.ini file is (probably c:\php).
Configure IIS
1. Open the IIS Administration panel (Control Panel > Administrative Tools > Internet Information Services).
2. Expand your computer name in the right panel.
3. Right-click on Default Web Site and choose properties.
4. Choose the ISAPI Filters tab.
5. Add a new filter called PHP. The executable should be C:\php\php5isapi.dll (or wherever php5isapi.dll is located).
6. Go to the Home Directory tab.
7. Choose Configuration.

PB Tech Internet Training Introduction to PHP 195
8. Choose the App Mappings tab.
9. Add a new Application Mapping.
• Extension should be .php
• The executable should be the path to php5isapi.dll.
10. Now restart IIS by right-clicking on Default Web Site and choosing Stop. Then right-click it again and choose Start.
11. You may need to shut down the IIS service to get changes to be applied: Control Panel > Administrative Tools > Services. Then stop and start IIS Admin Service.
12. If it still does not work, you may need to reboot your computer.


PB Tech Internet Training Introduction to PHP 197
Appendix B: Installing MySQL MySQL is a robust, full-featured, open-source database. PHP is specially configured to work with it. If you’d like to install it on your local machine, here’s a simple way to do it. Note that these instructions apply to version 4.1.8 and are designed to get you up and running as easily as possible. For information on optimizing MySQL’s performance and security settings, please see the installation section of the MySQL documentation, available online or for download at dev.mysql.com. Also note that new versions come out regularly, so the following instructions may be slightly different if you download a more recent version.
Installing MySQL
1. Download mySQL from dev.mysql.com
• Choose the Windows version with installer.
2. Extract the downloaded file (called Setup.exe) to a temporary directory on your system.
3. Run Setup.exe
• choose typical setup.
• click install.
• Login: you may create a MySQL account or just skip it.
• Wizard Complete screen: check the “Configure MySQL Server now” box and continue.
4. Configure MySQL
• Choose Standard Configuration.
• Check install as Windows Service (there’s no reason to change the name of the service).
• Check “Include Bin directory in Windows PATH”.
• Check Modify Security Settings and enter a new password.
• Check “Root may only connect from localhost” if desired.
• Click Execute and then Finish
5. Test MySQL
• Open a command prompt

PB Tech Internet Training Introduction to PHP 198
• type: mysql –u root –p
• enter your password when prompted
• You should get the following message:
6. You may want to enter a command or two to get the feel of things. Try the following (in order and don’t forget the semi-colons. Hit the return key after each statement): show databases; use mysql; show tables;
7. That's it!
To set up your database for this class
1. Go to the email sent from: [email protected].
2. Click on the link to access the course training files.
3. Open training files folder.
4. Open the db folder
5. Copy the wldc folder into the c:\mysql\data directory (your mysql data directory might be somewhere else, such as c:\program files\mysql\mysql server x.x.x\data).
6. From the mysql prompt window (see above), type: show databases;
7. You should see wldc listed. To run sql queries on it, first type: use wldc;
8. Now type any sql query you want. You may break sql queries over multiple lines. MySQL will know you are done when you hit a semicolon (;) and then your enter key.

PB Tech Internet Training Introduction to PHP 199
20050207v1.0.2_mrosenshield
Related Documents