TIBCO iWay® Service Manager Copyright © 2022. TIBCO Software Inc. All Rights Reserved. iWay Integration Solution for EDI X12 User's Guide Version 8.0 and Higher January 2022 DN3502264.0121

Welcome message from author
This document is posted to help you gain knowledge. Please leave a comment to let me know what you think about it! Share it to your friends and learn new things together.
Transcript
TIBCO iWay® Service Manager
Copyright © 2022. TIBCO Software Inc. All Rights Reserved.
iWay Integration Solutionfor EDI X12 User's Guide
Version 8.0 and HigherJanuary 2022DN3502264.0121


Contents
Preface . . . . . . . . . . . . . . . . . . . . . . . . . . . . . . . . . . . . . . . . . . . . . . . . . . . . . . . . . . . . . . . . . . . . . . . . . 9
Documentation Conventions . . . . . . . . . . . . . . . . . . . . . . . . . . . . . . . . . . . . . . . . . . . . . . . . . . . . . . . . . . 11
Related Publications . . . . . . . . . . . . . . . . . . . . . . . . . . . . . . . . . . . . . . . . . . . . . . . . . . . . . . . . . . . . . . . . . 11
Customer Support . . . . . . . . . . . . . . . . . . . . . . . . . . . . . . . . . . . . . . . . . . . . . . . . . . . . . . . . . . . . . . . . . . . 11
Help Us to Serve You Better . . . . . . . . . . . . . . . . . . . . . . . . . . . . . . . . . . . . . . . . . . . . . . . . . . . . . . . . . . 12
User Feedback . . . . . . . . . . . . . . . . . . . . . . . . . . . . . . . . . . . . . . . . . . . . . . . . . . . . . . . . . . . . . . . . . . . . . . 15
Information Builders Consulting and Training . . . . . . . . . . . . . . . . . . . . . . . . . . . . . . . . . . . . . . . . . . . . 15
1. Introducing the iWay Integration Solution for EDI X12 . . . . . . . . . . . . . . . . . . . . . . . . . . 17
A Brief History of Electronic Data Interchange . . . . . . . . . . . . . . . . . . . . . . . . . . . . . . . . . . . . . . . . . . . .17
Early Standardization Efforts. . . . . . . . . . . . . . . . . . . . . . . . . . . . . . . . . . . . . . . . . . . . . . . . . . . . . .17
The ANSI X12 and UN/EDIFACT Standard . . . . . . . . . . . . . . . . . . . . . . . . . . . . . . . . . . . . . . . . . . 18
Features of the iWay Integration Solution for EDI X12 . . . . . . . . . . . . . . . . . . . . . . . . . . . . . . . . . . . . .18
EDI X12 Transmission Envelope Structure. . . . . . . . . . . . . . . . . . . . . . . . . . . . . . . . . . . . . . . . . . 20
2. Deployment Information for Your iWay Integration Solution . . . . . . . . . . . . . . . . . . . . 23
iWay Products and Components . . . . . . . . . . . . . . . . . . . . . . . . . . . . . . . . . . . . . . . . . . . . . . . . . . . . . . . 23
iWay Service Manager. . . . . . . . . . . . . . . . . . . . . . . . . . . . . . . . . . . . . . . . . . . . . . . . . . . . . . . . . . . 23
iWay Integration Tools Transformer. . . . . . . . . . . . . . . . . . . . . . . . . . . . . . . . . . . . . . . . . . . . . . . . 24
iWay Integration Tools Designer. . . . . . . . . . . . . . . . . . . . . . . . . . . . . . . . . . . . . . . . . . . . . . . . . . .24
iWay Correlation Facility. . . . . . . . . . . . . . . . . . . . . . . . . . . . . . . . . . . . . . . . . . . . . . . . . . . . . . . . . .24
Using a Channel to Construct a Message Flow . . . . . . . . . . . . . . . . . . . . . . . . . . . . . . . . . . . . . . . . . . .24
Components of a Channel. . . . . . . . . . . . . . . . . . . . . . . . . . . . . . . . . . . . . . . . . . . . . . . . . . . . . . . .26
Components of the iWay Integration Solution for EDI . . . . . . . . . . . . . . . . . . . . . . . . . . . . . . . . . . . . . 28
Ebix. . . . . . . . . . . . . . . . . . . . . . . . . . . . . . . . . . . . . . . . . . . . . . . . . . . . . . . . . . . . . . . . . . . . . . . . . . .28
Preparsers. . . . . . . . . . . . . . . . . . . . . . . . . . . . . . . . . . . . . . . . . . . . . . . . . . . . . . . . . . . . . . . . . . . . . 29
EDIX12SplitterPreParser. . . . . . . . . . . . . . . . . . . . . . . . . . . . . . . . . . . . . . . . . . . . . . . . . . . . 29
EDIBatchSplitter. . . . . . . . . . . . . . . . . . . . . . . . . . . . . . . . . . . . . . . . . . . . . . . . . . . . . . . . . . . 30
Acknowledgement Service. . . . . . . . . . . . . . . . . . . . . . . . . . . . . . . . . . . . . . . . . . . . . . . . . . . . . . . .30
Preemitter. . . . . . . . . . . . . . . . . . . . . . . . . . . . . . . . . . . . . . . . . . . . . . . . . . . . . . . . . . . . . . . . . . . . . 30
Data Segments and Data Elements. . . . . . . . . . . . . . . . . . . . . . . . . . . . . . . . . . . . . . . . . . . . . . . 31
3. Configuring the EDI Activity Driver . . . . . . . . . . . . . . . . . . . . . . . . . . . . . . . . . . . . . . . . . . . . 33
EDI Activity Driver Configuration Overview . . . . . . . . . . . . . . . . . . . . . . . . . . . . . . . . . . . . . . . . . . . . . . . 33
iWay Integration Solution for EDI X12 User's Guide 3
Configuring the EDI Data Provider Using iWay Service Manager . . . . . . . . . . . . . . . . . . . . . . . . . . . . .33
Configuring the EDI Activity Driver Using iWay Service Manager . . . . . . . . . . . . . . . . . . . . . . . . . . . . .36
4. Working With EDI X12 Inbound and Outbound Applications Using iWay
Integration Tools (iIT) . . . . . . . . . . . . . . . . . . . . . . . . . . . . . . . . . . . . . . . . . . . . . . . . . . . . . . . . .43
EDI X12 Inbound and Outbound Application Overview . . . . . . . . . . . . . . . . . . . . . . . . . . . . . . . . . . . . . 43
EDI X12 Inbound and Outbound Application Prerequisites . . . . . . . . . . . . . . . . . . . . . . . . . . . . . . . . . 44
Downloading and Extracting EDI X12 User Samples . . . . . . . . . . . . . . . . . . . . . . . . . . . . . . . . . . . . . . 44
Importing EDI X12 User Samples to iWay Integration Tools as a Workspace . . . . . . . . . . . . . . . . . 48
Publishing iWay Integration Applications to the iWay Service Manager Registry . . . . . . . . . . . . . . . 54
Deploying iWay Integration Applications to iWay Service Manager . . . . . . . . . . . . . . . . . . . . . . . . . . .57
Setting Registers in the iWay Service Manager Administration Console . . . . . . . . . . . . . . . . . . . . . .60
Stopping Inbound (EDI X12 to XML) and Outbound (XML to EDI X12) Processing . . . . . . . . . . . . . .64
Testing the Sample EDI X12 Applications . . . . . . . . . . . . . . . . . . . . . . . . . . . . . . . . . . . . . . . . . . . . . . . 65
5. Inbound Processing: EDI X12 to XML . . . . . . . . . . . . . . . . . . . . . . . . . . . . . . . . . . . . . . . . . . 71
EDI X12 Inbound Processing Overview . . . . . . . . . . . . . . . . . . . . . . . . . . . . . . . . . . . . . . . . . . . . . . . . . . 71
Sample Configuration for Inbound Processing: EDI to XML . . . . . . . . . . . . . . . . . . . . . . . . . . . . . . . . .73
Accessing the iWay Service Manager Administration Console. . . . . . . . . . . . . . . . . . . . . . . . . .73
Adding an Ebix to the Registry. . . . . . . . . . . . . . . . . . . . . . . . . . . . . . . . . . . . . . . . . . . . . . . . . . . . 74
Adding Special Register Sets. . . . . . . . . . . . . . . . . . . . . . . . . . . . . . . . . . . . . . . . . . . . . . . . . . . . . 77
Defining an Inlet. . . . . . . . . . . . . . . . . . . . . . . . . . . . . . . . . . . . . . . . . . . . . . . . . . . . . . . . . . . . . . . . 78
Defining a Route. . . . . . . . . . . . . . . . . . . . . . . . . . . . . . . . . . . . . . . . . . . . . . . . . . . . . . . . . . . . . . . . 87
Defining the Outlets. . . . . . . . . . . . . . . . . . . . . . . . . . . . . . . . . . . . . . . . . . . . . . . . . . . . . . . . . . . .126
Defining a Channel. . . . . . . . . . . . . . . . . . . . . . . . . . . . . . . . . . . . . . . . . . . . . . . . . . . . . . . . . . . . .128
Reusing Your Channel Configuration. . . . . . . . . . . . . . . . . . . . . . . . . . . . . . . . . . . . . . . . . . . . . .133
6. Outbound Processing: XML to EDI X12 . . . . . . . . . . . . . . . . . . . . . . . . . . . . . . . . . . . . . . . 135
EDI X12 Outbound Processing Overview . . . . . . . . . . . . . . . . . . . . . . . . . . . . . . . . . . . . . . . . . . . . . . . 135
Sample Configuration for Outbound Processing: XML to EDI . . . . . . . . . . . . . . . . . . . . . . . . . . . . . . 136
Accessing the iWay Service Manager Administration Console. . . . . . . . . . . . . . . . . . . . . . . . 136
Adding an Ebix to the Registry. . . . . . . . . . . . . . . . . . . . . . . . . . . . . . . . . . . . . . . . . . . . . . . . . . . 136
Adding Special Register Sets. . . . . . . . . . . . . . . . . . . . . . . . . . . . . . . . . . . . . . . . . . . . . . . . . . . . 139
Defining an Inlet. . . . . . . . . . . . . . . . . . . . . . . . . . . . . . . . . . . . . . . . . . . . . . . . . . . . . . . . . . . . . . . 140
Defining a Route. . . . . . . . . . . . . . . . . . . . . . . . . . . . . . . . . . . . . . . . . . . . . . . . . . . . . . . . . . . . . . .143
Contents
4
Defining an Outlet. . . . . . . . . . . . . . . . . . . . . . . . . . . . . . . . . . . . . . . . . . . . . . . . . . . . . . . . . . . . . 163
Defining a Channel. . . . . . . . . . . . . . . . . . . . . . . . . . . . . . . . . . . . . . . . . . . . . . . . . . . . . . . . . . . . .167
Reusing Your Channel Configuration. . . . . . . . . . . . . . . . . . . . . . . . . . . . . . . . . . . . . . . . . . . . . .171
7. Batching for Outbound Documents . . . . . . . . . . . . . . . . . . . . . . . . . . . . . . . . . . . . . . . . . . . 173
Overview . . . . . . . . . . . . . . . . . . . . . . . . . . . . . . . . . . . . . . . . . . . . . . . . . . . . . . . . . . . . . . . . . . . . . . . . . . 173
Packaging. . . . . . . . . . . . . . . . . . . . . . . . . . . . . . . . . . . . . . . . . . . . . . . . . . . . . . . . . . . . . . . . . . . . 174
Outbound Batching Process Flow . . . . . . . . . . . . . . . . . . . . . . . . . . . . . . . . . . . . . . . . . . . . . . . . . . . . . 174
Control Numbers . . . . . . . . . . . . . . . . . . . . . . . . . . . . . . . . . . . . . . . . . . . . . . . . . . . . . . . . . . . . . . . . . . . 175
Assembly Details: Order of Operations . . . . . . . . . . . . . . . . . . . . . . . . . . . . . . . . . . . . . . . . . . . . . . . . 175
Extracted Fields . . . . . . . . . . . . . . . . . . . . . . . . . . . . . . . . . . . . . . . . . . . . . . . . . . . . . . . . . . . . . . . . . . . . 176
Trading Partner Flags and Counters . . . . . . . . . . . . . . . . . . . . . . . . . . . . . . . . . . . . . . . . . . . . . . . . . . . 176
Data Collection . . . . . . . . . . . . . . . . . . . . . . . . . . . . . . . . . . . . . . . . . . . . . . . . . . . . . . . . . . . . . . . . . . . . 178
Database Sweep (Data Selection) for Batching . . . . . . . . . . . . . . . . . . . . . . . . . . . . . . . . . . . . . . . . . 178
Building Each Batch . . . . . . . . . . . . . . . . . . . . . . . . . . . . . . . . . . . . . . . . . . . . . . . . . . . . . . . . . . . . . . . . 179
Appendix A: Batch Agent Options . . . . . . . . . . . . . . . . . . . . . . . . . . . . . . . . . . . . . . . . . . . . . . . . . . . . . 180
Appendix B: New TPAVALUES Metadata Tags for ANSI X12 Documents . . . . . . . . . . . . . . . . . . . . 181
Appendix C: Sample EDI X12 Batched Document . . . . . . . . . . . . . . . . . . . . . . . . . . . . . . . . . . . . . . . 184
A. Ebix-Supported Transaction Sets . . . . . . . . . . . . . . . . . . . . . . . . . . . . . . . . . . . . . . . . . . . . .185
Transaction Set and Acknowledgement Support . . . . . . . . . . . . . . . . . . . . . . . . . . . . . . . . . . . . . . . . 185
B. Using iWay Integration Tools to Configure an Ebix for EDI X12 . . . . . . . . . . . . . . . . .189
Using iIT to Configure an Ebix File for EDI X12 Overview . . . . . . . . . . . . . . . . . . . . . . . . . . . . . . . . . .189
Using iIT to Configure an Ebix File for EDI X12 Prerequisites . . . . . . . . . . . . . . . . . . . . . . . . . . . . . . 189
Downloading and Extracting an Ebix File . . . . . . . . . . . . . . . . . . . . . . . . . . . . . . . . . . . . . . . . . . . . . . . 189
Working With iWay Integration Tools (iIT) . . . . . . . . . . . . . . . . . . . . . . . . . . . . . . . . . . . . . . . . . . . . . . .192
C. Using EDI X12 Separators and Terminators . . . . . . . . . . . . . . . . . . . . . . . . . . . . . . . . . . . 213
EDI X12 Separators and Terminators . . . . . . . . . . . . . . . . . . . . . . . . . . . . . . . . . . . . . . . . . . . . . . . . . .213
D. Using EDI X12 Special Register (SREG) Types . . . . . . . . . . . . . . . . . . . . . . . . . . . . . . . . .215
EDI X12 Special Register (SREG) Types . . . . . . . . . . . . . . . . . . . . . . . . . . . . . . . . . . . . . . . . . . . . . . . .215
E. Sample EDI X12 Files . . . . . . . . . . . . . . . . . . . . . . . . . . . . . . . . . . . . . . . . . . . . . . . . . . . . . . . .219
Sample EDI 4010 850 Purchase Order . . . . . . . . . . . . . . . . . . . . . . . . . . . . . . . . . . . . . . . . . . . . . . . . 219
Sample EDI 4010 810 Invoice . . . . . . . . . . . . . . . . . . . . . . . . . . . . . . . . . . . . . . . . . . . . . . . . . . . . . . . 220
Contents
iWay Integration Solution for EDI X12 User's Guide 5

Sample EDI 4010 856 Advanced Ship Notice . . . . . . . . . . . . . . . . . . . . . . . . . . . . . . . . . . . . . . . . . . 220
F. Tutorial: Mapping an IDOC to an Invoice Document (810) . . . . . . . . . . . . . . . . . . . . . . 221
EDI X12 Invoice Document Mapping Tutorial Overview . . . . . . . . . . . . . . . . . . . . . . . . . . . . . . . . . . . 221
Creating a New Transform Project . . . . . . . . . . . . . . . . . . . . . . . . . . . . . . . . . . . . . . . . . . . . . . . . . . . . .222
Understanding EDI Invoice Mapping . . . . . . . . . . . . . . . . . . . . . . . . . . . . . . . . . . . . . . . . . . . . . . . . . . . 232
Mapping the Control Segments . . . . . . . . . . . . . . . . . . . . . . . . . . . . . . . . . . . . . . . . . . . . . . . . . . . . . . .232
Mapping ISA and IEA. . . . . . . . . . . . . . . . . . . . . . . . . . . . . . . . . . . . . . . . . . . . . . . . . . . . . . . . . . . 236
Mapping GS and GE. . . . . . . . . . . . . . . . . . . . . . . . . . . . . . . . . . . . . . . . . . . . . . . . . . . . . . . . . . . .237
Mapping ST and SE. . . . . . . . . . . . . . . . . . . . . . . . . . . . . . . . . . . . . . . . . . . . . . . . . . . . . . . . . . . . 238
Mapping the Header Section . . . . . . . . . . . . . . . . . . . . . . . . . . . . . . . . . . . . . . . . . . . . . . . . . . . . . . . . . 240
Currency Segment (CUR). . . . . . . . . . . . . . . . . . . . . . . . . . . . . . . . . . . . . . . . . . . . . . . . . . . . . . . .245
Reference Information Segment (REF). . . . . . . . . . . . . . . . . . . . . . . . . . . . . . . . . . . . . . . . . . . . 246
Name Loops. . . . . . . . . . . . . . . . . . . . . . . . . . . . . . . . . . . . . . . . . . . . . . . . . . . . . . . . . . . . . . . . . . 248
Terms of Sale Segment (ITD). . . . . . . . . . . . . . . . . . . . . . . . . . . . . . . . . . . . . . . . . . . . . . . . . . . . 262
Date/Time Segment (DTM). . . . . . . . . . . . . . . . . . . . . . . . . . . . . . . . . . . . . . . . . . . . . . . . . . . . . .268
Mapping the ITEM Detail . . . . . . . . . . . . . . . . . . . . . . . . . . . . . . . . . . . . . . . . . . . . . . . . . . . . . . . . . . . . 271
Mapping the Invoice Summary Section . . . . . . . . . . . . . . . . . . . . . . . . . . . . . . . . . . . . . . . . . . . . . . . . 283
Testing the Transform Project . . . . . . . . . . . . . . . . . . . . . . . . . . . . . . . . . . . . . . . . . . . . . . . . . . . . . . . . 286
G. Tutorial: Mapping an IDOC to an Advanced Ship Notice (ASN) . . . . . . . . . . . . . . . . . . 289
EDI X12 ASN Mapping Tutorial Overview . . . . . . . . . . . . . . . . . . . . . . . . . . . . . . . . . . . . . . . . . . . . . . . 289
Creating a New Transform Project . . . . . . . . . . . . . . . . . . . . . . . . . . . . . . . . . . . . . . . . . . . . . . . . . . . . .295
Maintaining the HL Counters in a Transform Project . . . . . . . . . . . . . . . . . . . . . . . . . . . . . . . . . . . . . 307
Showing and Hiding Tags . . . . . . . . . . . . . . . . . . . . . . . . . . . . . . . . . . . . . . . . . . . . . . . . . . . . . . . . . . . . 310
Mapping the Control Segments . . . . . . . . . . . . . . . . . . . . . . . . . . . . . . . . . . . . . . . . . . . . . . . . . . . . . . .313
Initializing Constant Values . . . . . . . . . . . . . . . . . . . . . . . . . . . . . . . . . . . . . . . . . . . . . . . . . . . . . . . . . . 319
Mapping the Begin Ship Notice (BSN) Segments . . . . . . . . . . . . . . . . . . . . . . . . . . . . . . . . . . . . . . . .332
Configuring Shipment Level Segments . . . . . . . . . . . . . . . . . . . . . . . . . . . . . . . . . . . . . . . . . . . . . . . . .333
Configuring Order Level Segments . . . . . . . . . . . . . . . . . . . . . . . . . . . . . . . . . . . . . . . . . . . . . . . . . . . . 354
Configuring Pack Level Segments . . . . . . . . . . . . . . . . . . . . . . . . . . . . . . . . . . . . . . . . . . . . . . . . . . . . .372
Configuring Item Level Segments . . . . . . . . . . . . . . . . . . . . . . . . . . . . . . . . . . . . . . . . . . . . . . . . . . . . . 380
Configuring the Summary Level Segment . . . . . . . . . . . . . . . . . . . . . . . . . . . . . . . . . . . . . . . . . . . . . . 384
Publishing the Transform Project . . . . . . . . . . . . . . . . . . . . . . . . . . . . . . . . . . . . . . . . . . . . . . . . . . . . . 385
Contents
6
IDoc Structure . . . . . . . . . . . . . . . . . . . . . . . . . . . . . . . . . . . . . . . . . . . . . . . . . . . . . . . . . . . . . . . . . . . . . 388
ASN Workflow . . . . . . . . . . . . . . . . . . . . . . . . . . . . . . . . . . . . . . . . . . . . . . . . . . . . . . . . . . . . . . . . . . . . . .388
ASN Transformation . . . . . . . . . . . . . . . . . . . . . . . . . . . . . . . . . . . . . . . . . . . . . . . . . . . . . . . . . . . . . . . . 391
The X12 ADN Mapping Final Results . . . . . . . . . . . . . . . . . . . . . . . . . . . . . . . . . . . . . . . . . . . . . . . . . . 392
Flattening the Output Structure . . . . . . . . . . . . . . . . . . . . . . . . . . . . . . . . . . . . . . . . . . . . . . . . . . . . . . .394
H. Tutorial: Adding a Detail Line Counter to a Purchase Order Transform . . . . . . . . . . 399
Configuring the Required Variables . . . . . . . . . . . . . . . . . . . . . . . . . . . . . . . . . . . . . . . . . . . . . . . . . . . .399
Using the Graphical Mapping Builder . . . . . . . . . . . . . . . . . . . . . . . . . . . . . . . . . . . . . . . . . . . . . . . . . . 404
Contents
iWay Integration Solution for EDI X12 User's Guide 7

Contents
8
Preface
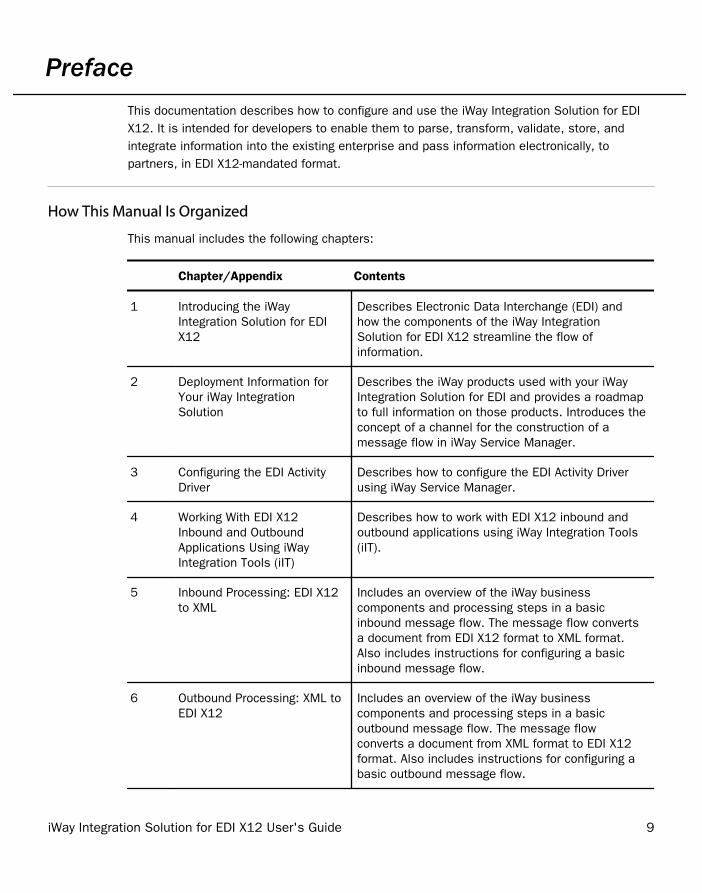
This documentation describes how to configure and use the iWay Integration Solution for EDIX12. It is intended for developers to enable them to parse, transform, validate, store, andintegrate information into the existing enterprise and pass information electronically, topartners, in EDI X12-mandated format.
How This Manual Is Organized
This manual includes the following chapters:
Chapter/Appendix Contents
1 Introducing the iWayIntegration Solution for EDIX12
Describes Electronic Data Interchange (EDI) andhow the components of the iWay IntegrationSolution for EDI X12 streamline the flow ofinformation.
2 Deployment Information forYour iWay IntegrationSolution
Describes the iWay products used with your iWayIntegration Solution for EDI and provides a roadmapto full information on those products. Introduces theconcept of a channel for the construction of amessage flow in iWay Service Manager.
3 Configuring the EDI ActivityDriver
Describes how to configure the EDI Activity Driverusing iWay Service Manager.
4 Working With EDI X12Inbound and OutboundApplications Using iWayIntegration Tools (iIT)
Describes how to work with EDI X12 inbound andoutbound applications using iWay Integration Tools(iIT).
5 Inbound Processing: EDI X12to XML
Includes an overview of the iWay businesscomponents and processing steps in a basicinbound message flow. The message flow convertsa document from EDI X12 format to XML format.Also includes instructions for configuring a basicinbound message flow.
6 Outbound Processing: XML toEDI X12
Includes an overview of the iWay businesscomponents and processing steps in a basicoutbound message flow. The message flowconverts a document from XML format to EDI X12format. Also includes instructions for configuring abasic outbound message flow.
iWay Integration Solution for EDI X12 User's Guide 9
Chapter/Appendix Contents
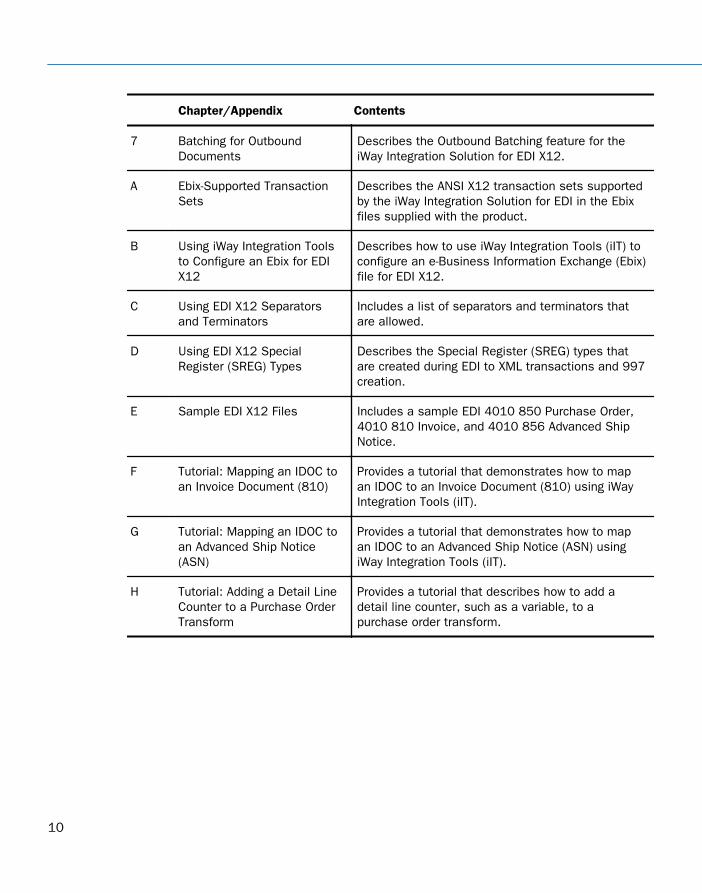
7 Batching for OutboundDocuments
Describes the Outbound Batching feature for theiWay Integration Solution for EDI X12.
A Ebix-Supported TransactionSets
Describes the ANSI X12 transaction sets supportedby the iWay Integration Solution for EDI in the Ebixfiles supplied with the product.
B Using iWay Integration Toolsto Configure an Ebix for EDIX12
Describes how to use iWay Integration Tools (iIT) toconfigure an e-Business Information Exchange (Ebix)file for EDI X12.
C Using EDI X12 Separatorsand Terminators
Includes a list of separators and terminators thatare allowed.
D Using EDI X12 SpecialRegister (SREG) Types
Describes the Special Register (SREG) types thatare created during EDI to XML transactions and 997creation.
E Sample EDI X12 Files Includes a sample EDI 4010 850 Purchase Order,4010 810 Invoice, and 4010 856 Advanced ShipNotice.
F Tutorial: Mapping an IDOC toan Invoice Document (810)
Provides a tutorial that demonstrates how to mapan IDOC to an Invoice Document (810) using iWayIntegration Tools (iIT).
G Tutorial: Mapping an IDOC toan Advanced Ship Notice(ASN)
Provides a tutorial that demonstrates how to mapan IDOC to an Advanced Ship Notice (ASN) usingiWay Integration Tools (iIT).
H Tutorial: Adding a Detail LineCounter to a Purchase OrderTransform
Provides a tutorial that describes how to add adetail line counter, such as a variable, to apurchase order transform.
10
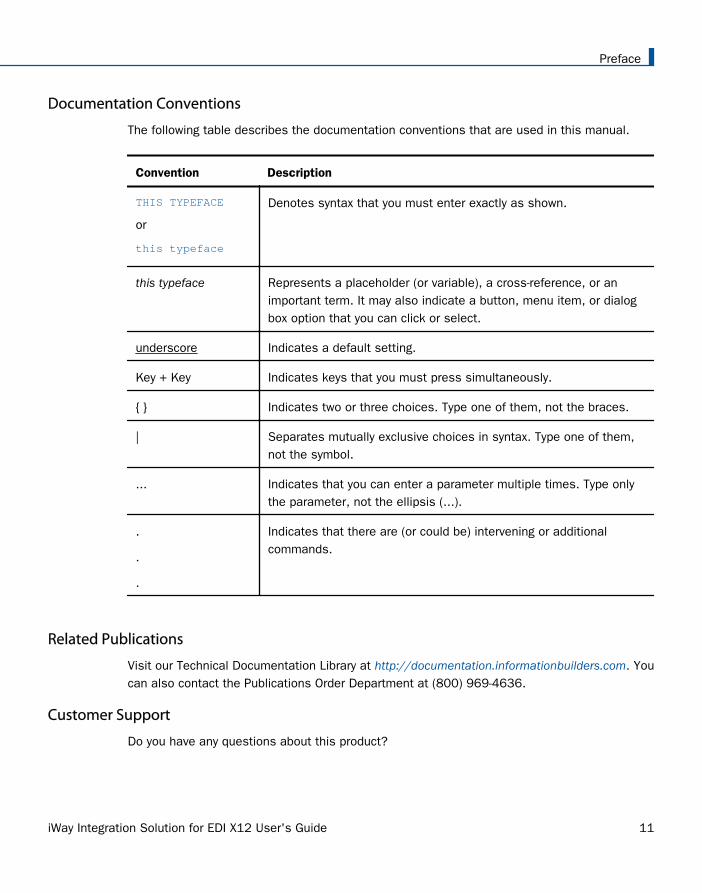
Documentation Conventions
The following table describes the documentation conventions that are used in this manual.
Convention Description
THIS TYPEFACE
or
this typeface
Denotes syntax that you must enter exactly as shown.
this typeface Represents a placeholder (or variable), a cross-reference, or animportant term. It may also indicate a button, menu item, or dialogbox option that you can click or select.
underscore Indicates a default setting.
Key + Key Indicates keys that you must press simultaneously.
{ } Indicates two or three choices. Type one of them, not the braces.
| Separates mutually exclusive choices in syntax. Type one of them,not the symbol.
... Indicates that you can enter a parameter multiple times. Type onlythe parameter, not the ellipsis (...).
.
.
.
Indicates that there are (or could be) intervening or additionalcommands.
Related Publications
Visit our Technical Documentation Library at http://documentation.informationbuilders.com. Youcan also contact the Publications Order Department at (800) 969-4636.
Customer Support
Do you have any questions about this product?
Preface
iWay Integration Solution for EDI X12 User's Guide 11
Join the Focal Point community. Focal Point is our online developer center and more than amessage board. It is an interactive network of more than 3,000 developers from almost everyprofession and industry, collaborating on solutions and sharing tips and techniques. AccessFocal Point at http://forums.informationbuilders.com/eve/forums.
You can also access support services electronically, 24 hours a day, with InfoResponseOnline. InfoResponse Online is accessible through our website, http://www.informationbuilders.com. It connects you to the tracking system and known-problemdatabase at the Information Builders support center. Registered users can open, update, andview the status of cases in the tracking system and read descriptions of reported softwareissues. New users can register immediately for this service. The technical support section of http://www.informationbuilders.com also provides usage techniques, diagnostic tips, andanswers to frequently asked questions.
Call Information Builders Customer Support Services (CSS) at (800) 736-6130 or (212)736-6130. Customer Support Consultants are available Monday through Friday between 8:00a.m. and 8:00 p.m. EST to address all your questions. Information Builders consultants canalso give you general guidance regarding product capabilities and documentation. Please beready to provide your six-digit site code number (xxxx.xx) when you call.
To learn about the full range of available support services, ask your Information Buildersrepresentative about InfoResponse Online, or call (800) 969-INFO.
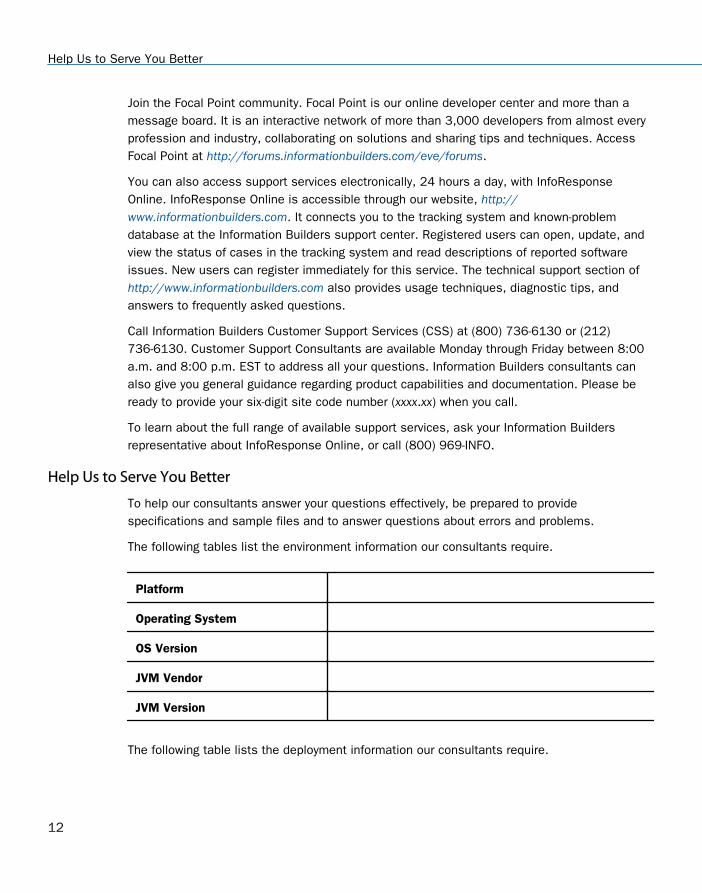
Help Us to Serve You Better
To help our consultants answer your questions effectively, be prepared to providespecifications and sample files and to answer questions about errors and problems.
The following tables list the environment information our consultants require.
Platform
Operating System
OS Version
JVM Vendor
JVM Version
The following table lists the deployment information our consultants require.
Help Us to Serve You Better
12
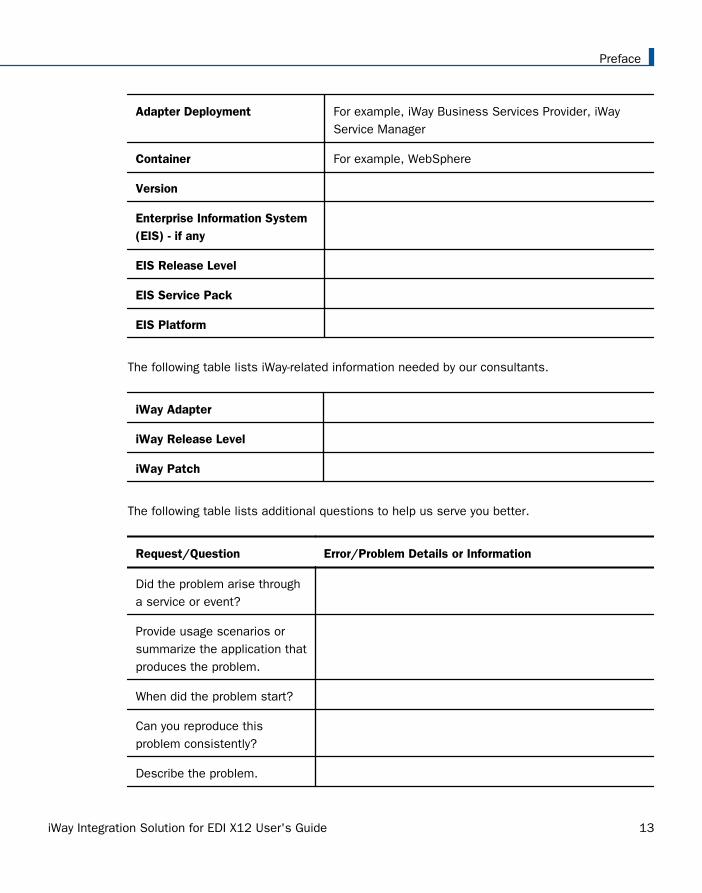
Adapter Deployment For example, iWay Business Services Provider, iWayService Manager
Container For example, WebSphere
Version
Enterprise Information System(EIS) - if any
EIS Release Level
EIS Service Pack
EIS Platform
The following table lists iWay-related information needed by our consultants.
iWay Adapter
iWay Release Level
iWay Patch
The following table lists additional questions to help us serve you better.
Request/Question Error/Problem Details or Information
Did the problem arise througha service or event?
Provide usage scenarios orsummarize the application thatproduces the problem.
When did the problem start?
Can you reproduce thisproblem consistently?
Describe the problem.
Preface
iWay Integration Solution for EDI X12 User's Guide 13
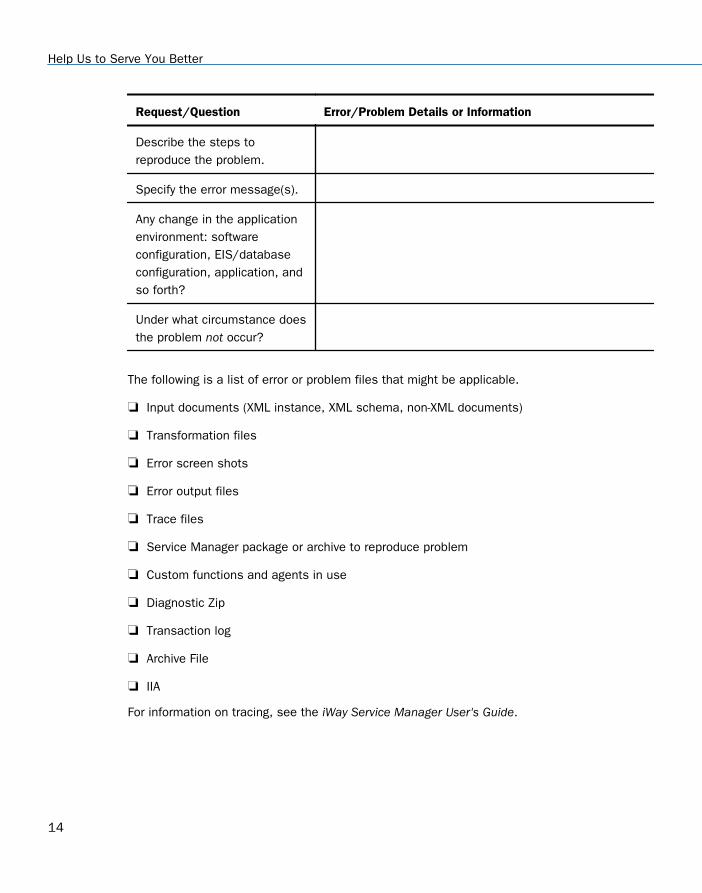
Request/Question Error/Problem Details or Information
Describe the steps toreproduce the problem.
Specify the error message(s).
Any change in the applicationenvironment: softwareconfiguration, EIS/databaseconfiguration, application, andso forth?
Under what circumstance doesthe problem not occur?
The following is a list of error or problem files that might be applicable.
Input documents (XML instance, XML schema, non-XML documents)
Transformation files
Error screen shots
Error output files
Trace files
Service Manager package or archive to reproduce problem
Custom functions and agents in use
Diagnostic Zip
Transaction log
Archive File
IIA
For information on tracing, see the iWay Service Manager User's Guide.
Help Us to Serve You Better
14

User Feedback
In an effort to produce effective documentation, the Technical Content Management staffwelcomes your opinions regarding this document. Please use the Reader Comments form atthe end of this document to communicate your feedback to us or to suggest changes that willsupport improvements to our documentation. You can also contact us through our website, http://documentation.informationbuilders.com/connections.asp.
Thank you, in advance, for your comments.
Information Builders Consulting and Training
Interested in training? Information Builders Education Department offers a wide variety oftraining courses for this and other Information Builders products.
For information on course descriptions, locations, and dates, or to register for classes, visitour website (http://education.informationbuilders.com) or call (800) 969-INFO to speak to anEducation Representative.
Preface
iWay Integration Solution for EDI X12 User's Guide 15

Information Builders Consulting and Training
16

Chapter1 Introducing the iWay Integration Solutionfor EDI X12
The iWay Integration Solution for EDI X12 transforms Electronic Data Interchange (EDI)documents into standard XML format, or transforms XML representations into EDIformat.
This section provides an overview of EDI and describes the features that are provided bythe iWay Integration Solution for EDI X12.
In this chapter:
A Brief History of Electronic Data Interchange
Features of the iWay Integration Solution for EDI X12
A Brief History of Electronic Data Interchange
Electronic Data Interchange (EDI) is a set of standards for formatting information that iselectronically exchanged between one business and another, or within a business. Thesestandards describe how documents for conducting certain aspects of business—such aspurchase orders and purchase order acknowledgements—are structured.
By specifying a standardized, computer-readable format for transferring data, EDI enables theautomation of commercial transactions around the world. It provides a common, uniformlanguage through which computers can communicate for fast and efficient transactionprocessing.
Early Standardization Efforts
Before the development of standards, many businesses used proprietary systems to exchangetrading information such as purchase orders and invoices. However, they recognized theeconomic need for a faster, less costly way to process information in order to stay competitivein the business world. Business sectors such as transportation, grocery supply, and bankingdrove the creation of standards for the communication of data.
In 1968, the United States Transportation Data Coordinating Committee (TDCC) was formed tooversee the design and development of format standards for transportation documents. In1975, the TDCC released its first standard, the Rail Transportation Industry Application.
iWay Integration Solution for EDI X12 User's Guide 17
The Rail Transportation Industry Application focused on the content of a message—rather thanthe means of transmission—through the use of transaction sets. A transaction set is abusiness document that consists of an arrangement of data segments. The data segmentsinclude data elements in an exact order. The concept of the transaction set is the basis of theEDI ANSI X12 standard created later and widely used today.
About the same time that the TDCC was formed, the United Kingdom started its own effort todevelop standard transaction documents for trans-Atlantic trade. The U.K. Department ofCustoms and Excise, with the help of the British Simplification of Trade Procedures Board(SITPRO), developed a competitive document standard for international trade, namedTRADACOMS.
The ANSI X12 and UN/EDIFACT Standard
Standards development progressed in 1979, when the American National Standards Institute(ANSI) chartered the Accredited Standards Committee (ASC) X12 to develop a uniformstandard for electronic, inter-industry business transactions. The United States Electronic DataInterchange (EDI) ANSI X12 standard, which resulted from the efforts of the committee,extended and ultimately replaced the standards created by the TDCC.
In 1988, the United Nations chartered UN/EDIFACT (United Nations Electronic DataInterchange for Administration, Commerce, and Transport) to develop a worldwide,internationally approved standard structure for exchanging information among partners. TheUN/EDIFACT standards are called United Nations Standard Messages (UNSM). They arecomparable to the ANSI ASC X12 transaction sets.
EDI is the standardized data format used for the majority of the world electronic businesstransactions. Many companies use either the ANSI X12 or UN/EDIFACT standard, or both.
With over 275 transaction sets, the ANSI X12 standard is used to perform nearly every aspectof business operation such as order placement and processing, shipping and receiving,invoicing and payment, pricing and sales, and inventory. It streamlines the communication ofdata to and from a broad range of entities, including financial and education institutions,insurance providers, food and pharmaceutical suppliers, retailers, automotive manufacturers,and federal and state government.
Features of the iWay Integration Solution for EDI X12
The standards-based iWay Integration Solution for EDI X12 reduces the amount of effort ittakes to integrate Electronic Data Interchange (EDI) documents with your internal enterpriseapplications and third-party trading partners. It includes conversion and validation ofdocuments from EDI to XML format, making it easy to include EDI documents in your XML-based integration projects.
Features of the iWay Integration Solution for EDI X12
18
Features of the iWay Integration Solution for EDI X12 include:
Integration with iWay Service Manager to provide bi-directional conversion of EDI formatsand XML.
Integration with iWay Trading Partner Manager to provide routing, custom transformation bydocument, and other value-added features.
Integration with more than 200 other information assets, including J2EE-based back-officesystems; data structures such as DB2, IMS, VSAM, and ADABAS; and front-office systemsbased on Sybase.
Integration with leading application servers, integration brokers, and developmentenvironments. Supported software platforms include BEA WebLogic, IBM WebSphere, SunJava Enterprise System, and Oracle Application Server.
Support for synchronous and asynchronous bi-directional interactions for EDI documentsbetween application servers, integration brokers, third-party software packages, andmessaging services.
Support for EDI ANSI X12 transaction sets. For details on the supported transaction sets,see Ebix-Supported Transaction Sets on page 185.
Reusable framework for parsing, transforming, and validating EDI documents without theneed to write custom code.
Data dictionary approach that facilitates EDI-to-XML transformations. The iWay IntegrationSolution for EDI X12 uses dictionaries to transform data from EDI format to any otherformat, or from any format to EDI format. It supports flat files, comma-delimited files,popular relational database formats, XML, and more.
Pre-built data dictionaries, XML schemas, transformation templates, and rule files forautomatic transformation and validation of input and output documents.
1. Introducing the iWay Integration Solution for EDI X12
iWay Integration Solution for EDI X12 User's Guide 19
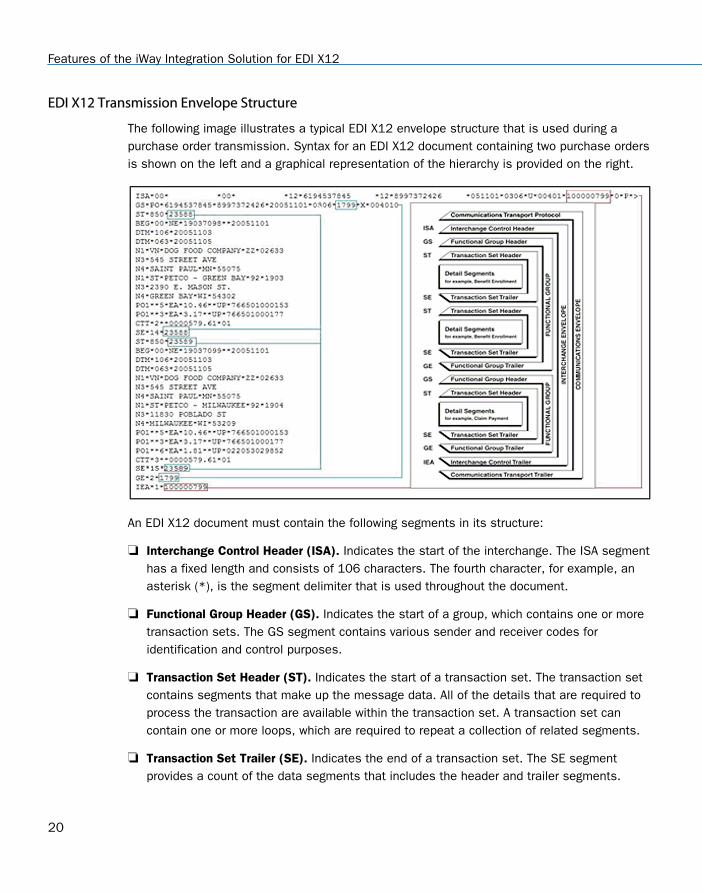
EDI X12 Transmission Envelope Structure
The following image illustrates a typical EDI X12 envelope structure that is used during apurchase order transmission. Syntax for an EDI X12 document containing two purchase ordersis shown on the left and a graphical representation of the hierarchy is provided on the right.
An EDI X12 document must contain the following segments in its structure:
Interchange Control Header (ISA). Indicates the start of the interchange. The ISA segmenthas a fixed length and consists of 106 characters. The fourth character, for example, anasterisk (*), is the segment delimiter that is used throughout the document.
Functional Group Header (GS). Indicates the start of a group, which contains one or moretransaction sets. The GS segment contains various sender and receiver codes foridentification and control purposes.
Transaction Set Header (ST). Indicates the start of a transaction set. The transaction setcontains segments that make up the message data. All of the details that are required toprocess the transaction are available within the transaction set. A transaction set cancontain one or more loops, which are required to repeat a collection of related segments.
Transaction Set Trailer (SE). Indicates the end of a transaction set. The SE segmentprovides a count of the data segments that includes the header and trailer segments.
Features of the iWay Integration Solution for EDI X12
20

Functional Group Trailer (GE). Indicates the end of the group. The GE segment contains anelement that indicates the number of transaction sets within the group.
Interchange Control Trailer (IEA). Indicates the end of the interchange. The IEA segmentcontains an element that indicates the number of groups within the interchange.
1. Introducing the iWay Integration Solution for EDI X12
iWay Integration Solution for EDI X12 User's Guide 21

Features of the iWay Integration Solution for EDI X12
22
Chapter2 Deployment Information for Your iWayIntegration Solution
This topic describes the iWay products used with your iWay Integration Solution for EDIand provides a roadmap to full information on those products.
It also introduces the concept of a channel for the construction of a message flow iniWay Service Manager.
In this chapter:
iWay Products and Components
Using a Channel to Construct a Message Flow
Components of the iWay Integration Solution for EDI
iWay Products and Components
Your iWay integration solution works in conjunction with one or more of the following productsand components:
iWay Service Manager
iWay Integration Tools Transformer
iWay Integration Tools Designer
iWay Correlation Facility
iWay Service Manager
iWay Service Manager is the heart of the Universal Integration Framework and is an opentransport service bus. Service Manager uses graphical tools to create sophisticated integrationservices without writing custom integration code by:
Using metadata from target applications
Transforming and mapping interfaces
Managing stateless processes
Its capability to manage complex integration interactions makes it ideally suited to be thefoundation of a service-oriented architecture.
iWay Integration Solution for EDI X12 User's Guide 23
For more information, see the IWay Service Manager User's Guide.
iWay Integration Tools Transformer
iWay Integration Tools (iIT) Transformer (previously known as iWay Transformer) is a GUI toolthat is delivered as a plugin with iIT. iIT Transformer is a rule based data transformation toolthat converts an input document of one data format to an output document of another dataformat or structure. The easy-to-use graphical user interface and function tool set facilitate thedesign of transform projects that are specific to your requirements.
For more information, see the iWay Integration Tools Transformer User's Guide.
iWay Integration Tools Designer
iWay Integration Tools (iIT) Designer (previously known as iWay Designer) is a GUI tool that isdelivered as a plugin with iIT.
The capability of graphically visualizing a business process is a powerful and necessarycomponent of any e-Business offering. iWay Integration Tools Designer, a Windows-baseddesign-time tool, provides a visual and user-friendly method of creating a business process,also called a process flow. Through a process flow, you control the sequence in which tasksare performed and the destination of the output from each task.
For more information, see the iWay Integration Tools Designer User's Guide.
iWay Correlation Facility
The iWay Correlation Facility (also known as the Correlation Manager) maintains records ofanticipated activities occurring in the system. Correlation actions take the correlation fromOPEN to CLOSED state, and allow history to be recorded. Agents are provided to implementCorrelation Facility interactions within process flows, however, it is possible to use this API toaccomplish this same purpose within your own exits.
For more information on using the iWay Correlation Facility, see the iWay Service ManagerUser's Guide and the iWay Service Manager Programmer's Guide.
Using a Channel to Construct a Message Flow
The use of iWay Service Manager is centered on a channel. A channel is a container for all theiWay business components used in an EDI message flow.
At a high level, a channel accepts input data through an inlet, processes the data using aroute, and outputs the resulting data through an outlet. Another component in the process isan e-Business Information Exchange (Ebix).
Using a Channel to Construct a Message Flow
24
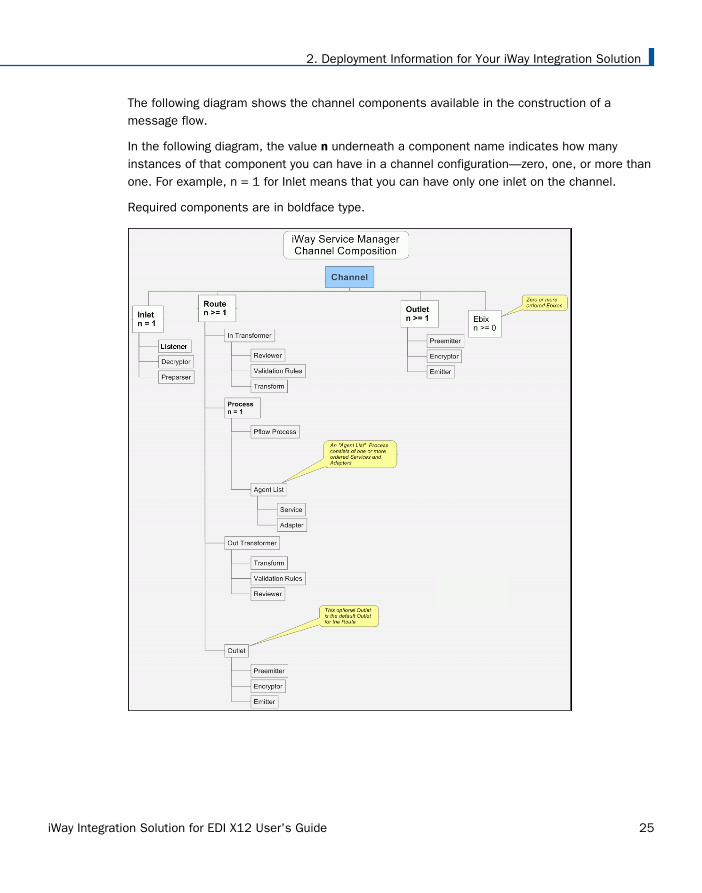
The following diagram shows the channel components available in the construction of amessage flow.
In the following diagram, the value n underneath a component name indicates how manyinstances of that component you can have in a channel configuration—zero, one, or more thanone. For example, n = 1 for Inlet means that you can have only one inlet on the channel.
Required components are in boldface type.
2. Deployment Information for Your iWay Integration Solution
iWay Integration Solution for EDI X12 User's Guide 25
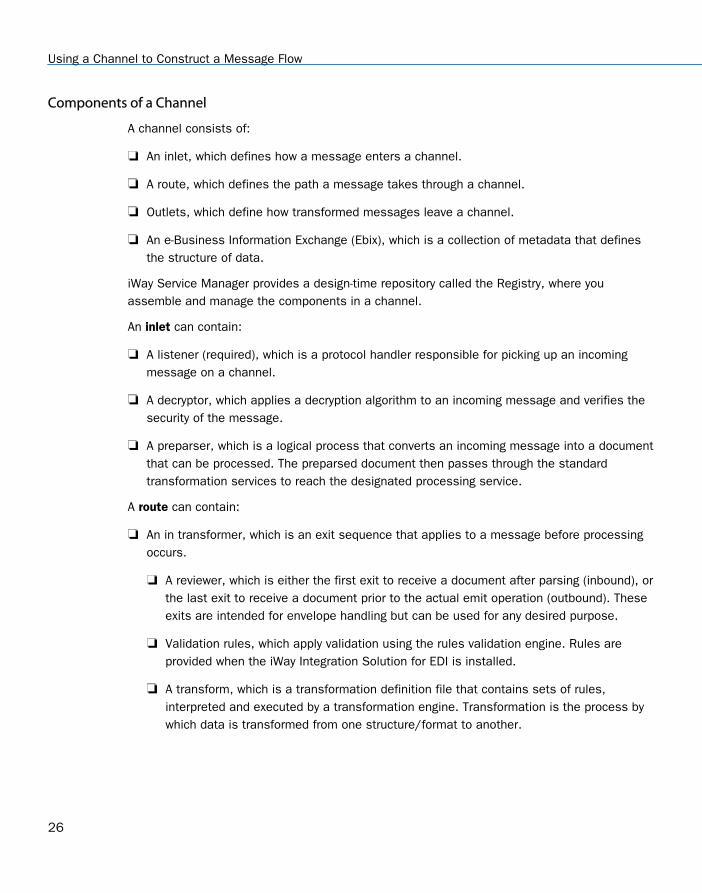
Components of a Channel
A channel consists of:
An inlet, which defines how a message enters a channel.
A route, which defines the path a message takes through a channel.
Outlets, which define how transformed messages leave a channel.
An e-Business Information Exchange (Ebix), which is a collection of metadata that definesthe structure of data.
iWay Service Manager provides a design-time repository called the Registry, where youassemble and manage the components in a channel.
An inlet can contain:
A listener (required), which is a protocol handler responsible for picking up an incomingmessage on a channel.
A decryptor, which applies a decryption algorithm to an incoming message and verifies thesecurity of the message.
A preparser, which is a logical process that converts an incoming message into a documentthat can be processed. The preparsed document then passes through the standardtransformation services to reach the designated processing service.
A route can contain:
An in transformer, which is an exit sequence that applies to a message before processingoccurs.
A reviewer, which is either the first exit to receive a document after parsing (inbound), orthe last exit to receive a document prior to the actual emit operation (outbound). Theseexits are intended for envelope handling but can be used for any desired purpose.
Validation rules, which apply validation using the rules validation engine. Rules areprovided when the iWay Integration Solution for EDI is installed.
A transform, which is a transformation definition file that contains sets of rules,interpreted and executed by a transformation engine. Transformation is the process bywhich data is transformed from one structure/format to another.
Using a Channel to Construct a Message Flow
26
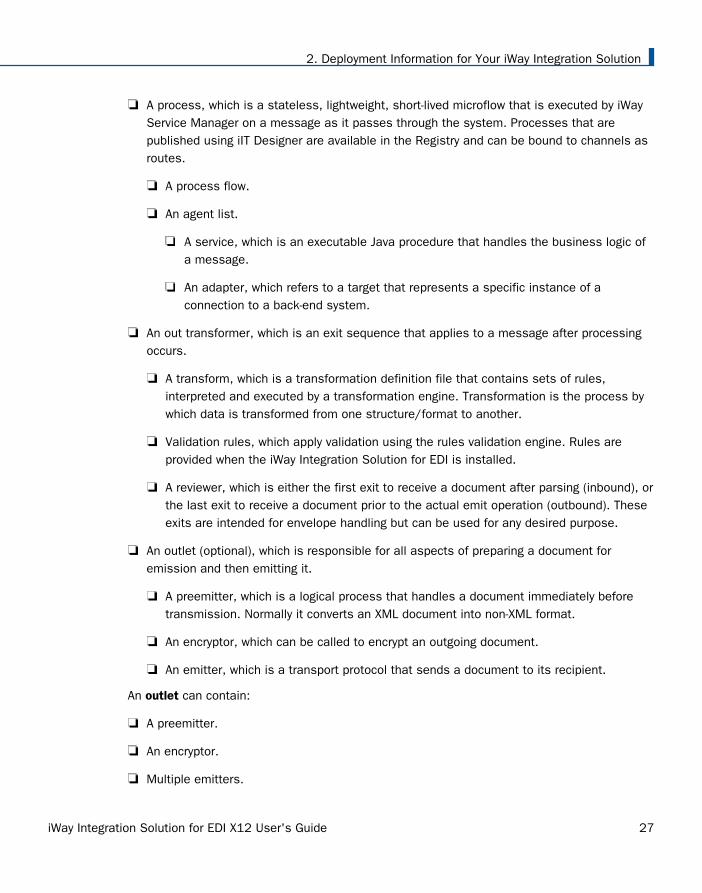
A process, which is a stateless, lightweight, short-lived microflow that is executed by iWayService Manager on a message as it passes through the system. Processes that arepublished using iIT Designer are available in the Registry and can be bound to channels asroutes.
A process flow.
An agent list.
A service, which is an executable Java procedure that handles the business logic ofa message.
An adapter, which refers to a target that represents a specific instance of aconnection to a back-end system.
An out transformer, which is an exit sequence that applies to a message after processingoccurs.
A transform, which is a transformation definition file that contains sets of rules,interpreted and executed by a transformation engine. Transformation is the process bywhich data is transformed from one structure/format to another.
Validation rules, which apply validation using the rules validation engine. Rules areprovided when the iWay Integration Solution for EDI is installed.
A reviewer, which is either the first exit to receive a document after parsing (inbound), orthe last exit to receive a document prior to the actual emit operation (outbound). Theseexits are intended for envelope handling but can be used for any desired purpose.
An outlet (optional), which is responsible for all aspects of preparing a document foremission and then emitting it.
A preemitter, which is a logical process that handles a document immediately beforetransmission. Normally it converts an XML document into non-XML format.
An encryptor, which can be called to encrypt an outgoing document.
An emitter, which is a transport protocol that sends a document to its recipient.
An outlet can contain:
A preemitter.
An encryptor.
Multiple emitters.
2. Deployment Information for Your iWay Integration Solution
iWay Integration Solution for EDI X12 User's Guide 27
For details on the preceding components, see the iWay Service Manager User's Guide.
Components of the iWay Integration Solution for EDI
iWay business components used in the construction of a message flow for EDI transactionsinclude:
An Ebix (e-Business Information Exchange)
A preparser
An acknowledgement service
A preemitter
Ebix
iWay Software provides various e-Business Information Exchange (Ebix) files used inconjunction with the iWay integration solutions. In iWay Service Manager, the iWay IntegrationSolution for EDI contains several Ebix files, one for each supported EDI ANSI X12 transactionset.
An Ebix file for EDI-X12 s named X12_transaction_set.ebx, where transaction_set is thetransaction set number. For example, the Ebix file for EDI X-12 transaction set 4050 is namedX12_4050.ebx.
For details on the supported EDI X-12 transaction sets, see Ebix-Supported Transaction Sets onpage 185.
An Ebix is a collection of metadata that defines the structure of data. The Ebix supplied withthe iWay Integration Solution for EDI defines the structure of supported EDI messages.
Each Ebix includes:
Pre-built data dictionaries. The structure of each EDI document is described by two datadictionaries:
Header dictionary, which describes the enveloping structure of the document.
Document dictionary, which describes the segments and elements that compose eachdocument.
The dictionaries from the Ebix are used to transform the structure of a document per EDIregulation.
Pre-built XML schemas that define the structure and content of XML messages in detail.
Components of the iWay Integration Solution for EDI
28
Pre-built EDI to XML transformation templates, and XML to EDI templates, for the supportedEDI ANSI X12 transaction sets.
Pre-built rule files for each message. The iWay Integration Solution for EDI uses these rulefiles to validate inbound and outbound documents.
Preparsers
A preparser is an iWay business component that converts incoming messages intoprocessable documents.
Typically a preparser converts a non-XML document into XML format. The preparser for theiWay Integration Solution for EDI converts an incoming EDI-X12 formatted document to XMLformat.
The EDIX12SplitterPreParser is provided by iWay Software for the iWay Integration Solution forEDI.
EDIX12SplitterPreParser
The EDIX12SplitterPreParser (com.ibi.preparsers.EDISplitPP) parses an EDI input file thatcontains one or more interchanges (ISA) and multiple documents, and creates multiple XMLoutput files. One XML output file is produced for each document.
For example, if the EDI input file contains three documents within one ISA, theEDIX12SplitterPreParser creates three XML output files, one per document.
Use the EDIX12SplitterPreParser for large files with multiple documents within one ISA; if thereis a specific business requirement to create separate XML output files; or if you receivemultiple documents within one ISA and want to separate each document for further businessprocessing. You can also use the EDIX12SplitterPreParser if there is only one document withinthe ISA.
You can also run the EDIX12SplitterPreParser in a splitter only mode based on configuration.The output files are in X12 format, one document per file with a wrapper consisting of theoriginal interchange. This option can be used to separate and route documents prior totransformation, in conjunction with several of the SREG values that are available. For example,you may receive text-based documents that you want to simply email rather than transform. Oryou may want to separate your documents by document type, which would allow you to processall purchase orders immediately and all sales reports overnight in a batch mode if required.
2. Deployment Information for Your iWay Integration Solution
iWay Integration Solution for EDI X12 User's Guide 29
EDIBatchSplitter
The EDIBatchSplitter (com.ibi.preparsers.XDEDIBatchSplitter) parses an EDI input file thatcontains one or more interchanges (ISA) and multiple documents. You must use this preparserwith the EDIX12PreParser (com.ibi.preparsers.XDEDIpreParser). The EDIBatchSplitter shouldnot be used as a standalone preparser. To successfully transform an inbound X12 input fileusing this preparser, you must also include the EDIX12PreParser in your channel Inlet.
One XML output file is produced for each document that is processed through this Inletdefinition. For example, if your EDI input contains three documents within an ISA, theEDIBatchSplitter/EDIX12Preparser will create three XML output files, one for each document.
Acknowledgement Service
An acknowledgement service is an iWay business component used in inbound processing tocreate a functional acknowledgement (997) for inbound messages.
An acknowledgement indicates that an inbound document was received and validated forstructure against the appropriate standard. An acknowledgement does not indicate that adocument was processed.
An acknowledgement is typically routed back to the originator of the inbound document or tothe next step in the integration process. It is a best business practice to send anacknowledgement to the originator of the inbound document.
The acknowledgement service for the iWay Integration Solution for EDI is calledEDIX12AckAgent (com.ibi.agents.XDX12AckAgent). The iWay Integration Solution for EDIcreates one acknowledgement for each interchange that is received.
Preemitter
A preemitter is a logical process that handles a document immediately before transmission.
Typically a preemitter is used to convert an XML document to non-XML format. The XMLdocument is created from EDI input data in inbound processing. The iWay Integration Solutionfor EDI uses a preemitter in outbound processing to convert the XML-formatted EDI documentto an EDI-X12 formatted document.
The XML structure must be compliant with the schema supplied in the Ebix.
The preemitter for the iWay Integration Solution for EDI is called EDIX12PreEmitter(com.ibi.preemit.XDX12PreEmitter).
Components of the iWay Integration Solution for EDI
30
Data Segments and Data Elements
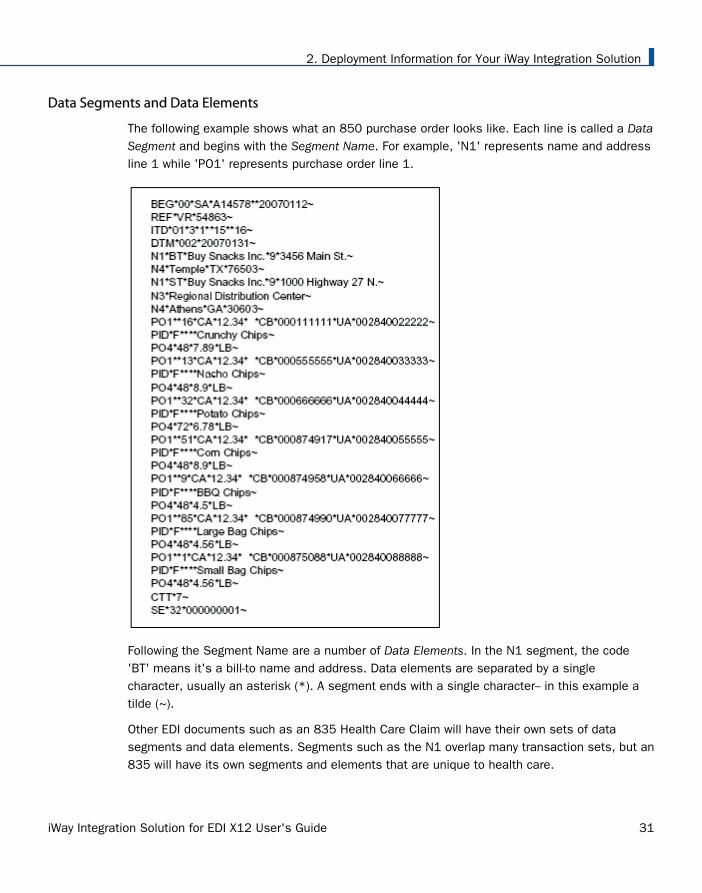
The following example shows what an 850 purchase order looks like. Each line is called a DataSegment and begins with the Segment Name. For example, 'N1' represents name and addressline 1 while 'PO1' represents purchase order line 1.
Following the Segment Name are a number of Data Elements. In the N1 segment, the code'BT' means it's a bill-to name and address. Data elements are separated by a singlecharacter, usually an asterisk (*). A segment ends with a single character-- in this example atilde (~).
Other EDI documents such as an 835 Health Care Claim will have their own sets of datasegments and data elements. Segments such as the N1 overlap many transaction sets, but an835 will have its own segments and elements that are unique to health care.
2. Deployment Information for Your iWay Integration Solution
iWay Integration Solution for EDI X12 User's Guide 31
Any number of data segments come together to form a transaction set. In this example, thereare 32, as shown in the control counter stored in the very last segment (SE). You will noticethat the PO1, PID and PO4 segments repeat multiple times, just as they would on a paper-based purchase order.
There is flexibility in how an industry or company uses the EDI standards. For example, apurchase order going from a retailer to its supplier will look very different from a purchaseorder going from a mining company to its supplier. The drawback is when one supplier receivespurchase orders from five different customers and they each structure their 850s differently.The supplier is burdened with the task of handling the five different 850 layouts.
Components of the iWay Integration Solution for EDI
32
Chapter3Configuring the EDI Activity Driver
This section describes how to configure the EDI Activity Driver using iWay ServiceManager.
In this chapter:
EDI Activity Driver Configuration Overview
Configuring the EDI Data Provider Using iWay Service Manager
Configuring the EDI Activity Driver Using iWay Service Manager
EDI Activity Driver Configuration Overview
The EDI Activity Driver is an extension of the Activity Facility in iWay Service Manager. It is usedto log events as messages are processed. Logging can occur when:
a message is acquired.
a message is emitted.
an error occurs.
a component such as an agent or process flow is called.
For more information about the Activity Facility, see the iWay Service Manager User's Guide.
Using iWay Service Manager, you must first configure the EDI data provider and then theActivity Facility handler.
Configuring the EDI Data Provider Using iWay Service Manager
This section describes how to configure the EDI data provider.
iWay Integration Solution for EDI X12 User's Guide 33
Procedure: How to Configure the EDI Data Provider
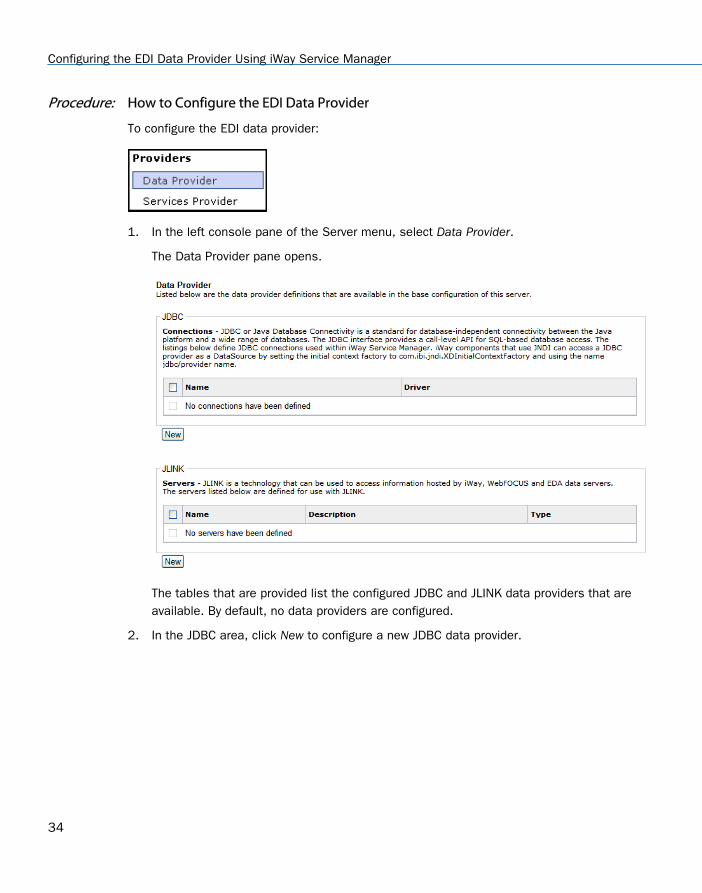
To configure the EDI data provider:
1. In the left console pane of the Server menu, select Data Provider.
The Data Provider pane opens.
The tables that are provided list the configured JDBC and JLINK data providers that areavailable. By default, no data providers are configured.
2. In the JDBC area, click New to configure a new JDBC data provider.
Configuring the EDI Data Provider Using iWay Service Manager
34
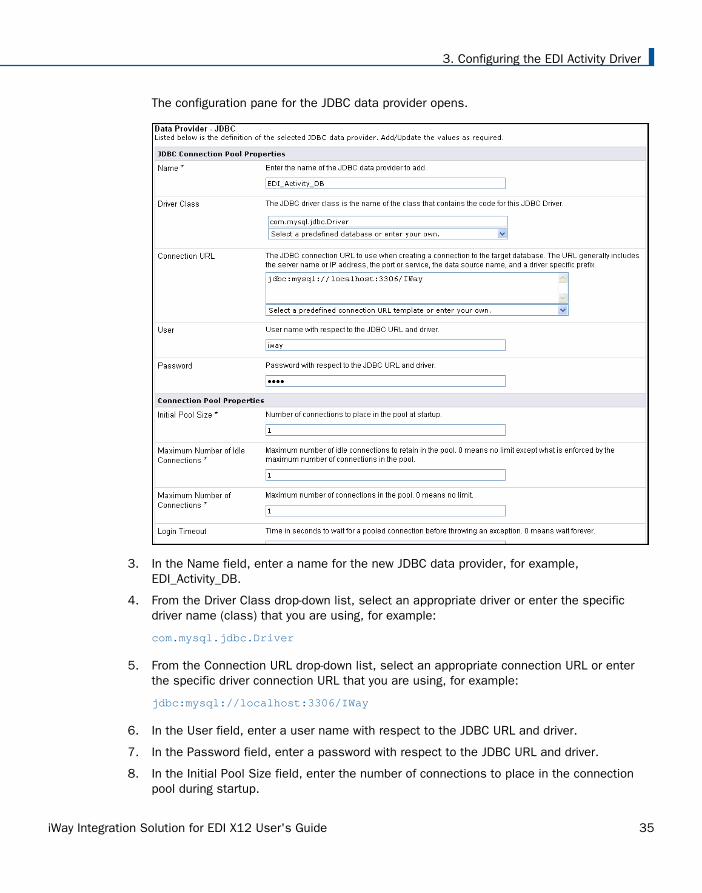
The configuration pane for the JDBC data provider opens.
3. In the Name field, enter a name for the new JDBC data provider, for example,EDI_Activity_DB.
4. From the Driver Class drop-down list, select an appropriate driver or enter the specificdriver name (class) that you are using, for example:
com.mysql.jdbc.Driver
5. From the Connection URL drop-down list, select an appropriate connection URL or enterthe specific driver connection URL that you are using, for example:
jdbc:mysql://localhost:3306/IWay
6. In the User field, enter a user name with respect to the JDBC URL and driver.
7. In the Password field, enter a password with respect to the JDBC URL and driver.
8. In the Initial Pool Size field, enter the number of connections to place in the connectionpool during startup.
3. Configuring the EDI Activity Driver
iWay Integration Solution for EDI X12 User's Guide 35
9. In the Maximum Number of Idle Connections field, enter the maximum number of idleconnections to retain in the connection pool.
A value of zero means that there is no limit, except what is enforced by the maximumnumber of connections in the connection pool.
10. In the Maximum Number of Connections field, enter the maximum number of connectionsin the connection pool.
A value of zero means that there is no limit.
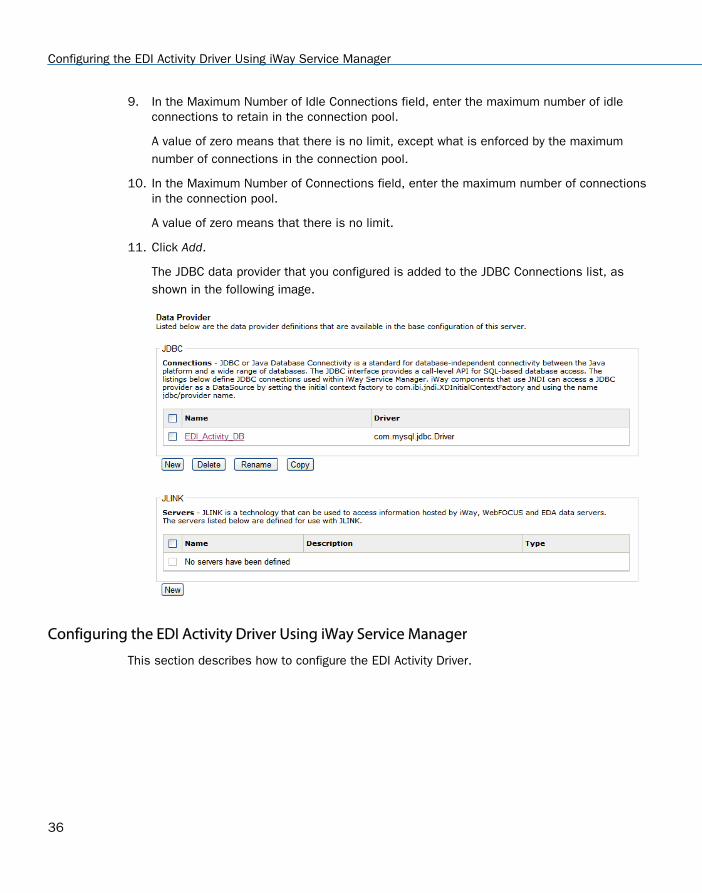
11. Click Add.
The JDBC data provider that you configured is added to the JDBC Connections list, asshown in the following image.
Configuring the EDI Activity Driver Using iWay Service Manager
This section describes how to configure the EDI Activity Driver.
Configuring the EDI Activity Driver Using iWay Service Manager
36
Procedure: How to Configure the EDI Activity Driver
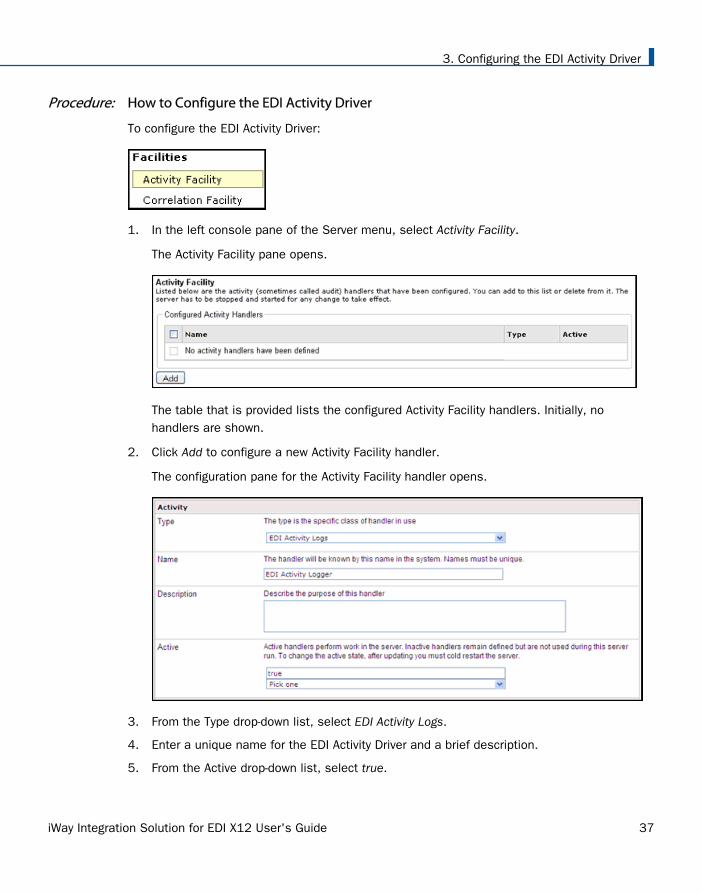
To configure the EDI Activity Driver:
1. In the left console pane of the Server menu, select Activity Facility.
The Activity Facility pane opens.
The table that is provided lists the configured Activity Facility handlers. Initially, nohandlers are shown.
2. Click Add to configure a new Activity Facility handler.
The configuration pane for the Activity Facility handler opens.
3. From the Type drop-down list, select EDI Activity Logs.
4. Enter a unique name for the EDI Activity Driver and a brief description.
5. From the Active drop-down list, select true.
3. Configuring the EDI Activity Driver
iWay Integration Solution for EDI X12 User's Guide 37
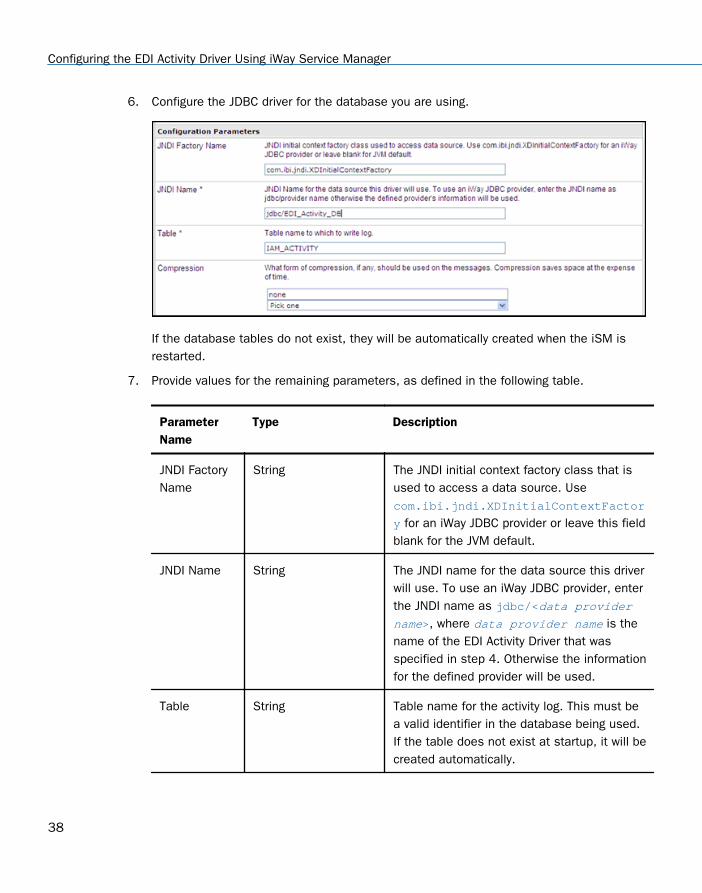
6. Configure the JDBC driver for the database you are using.
If the database tables do not exist, they will be automatically created when the iSM isrestarted.
7. Provide values for the remaining parameters, as defined in the following table.
ParameterName
Type Description
JNDI FactoryName
String The JNDI initial context factory class that isused to access a data source. Usecom.ibi.jndi.XDInitialContextFactor
y for an iWay JDBC provider or leave this fieldblank for the JVM default.
JNDI Name String The JNDI name for the data source this driverwill use. To use an iWay JDBC provider, enterthe JNDI name as jdbc/<data providername>, where data provider name is thename of the EDI Activity Driver that wasspecified in step 4. Otherwise the informationfor the defined provider will be used.
Table String Table name for the activity log. This must bea valid identifier in the database being used.If the table does not exist at startup, it will becreated automatically.
Configuring the EDI Activity Driver Using iWay Service Manager
38
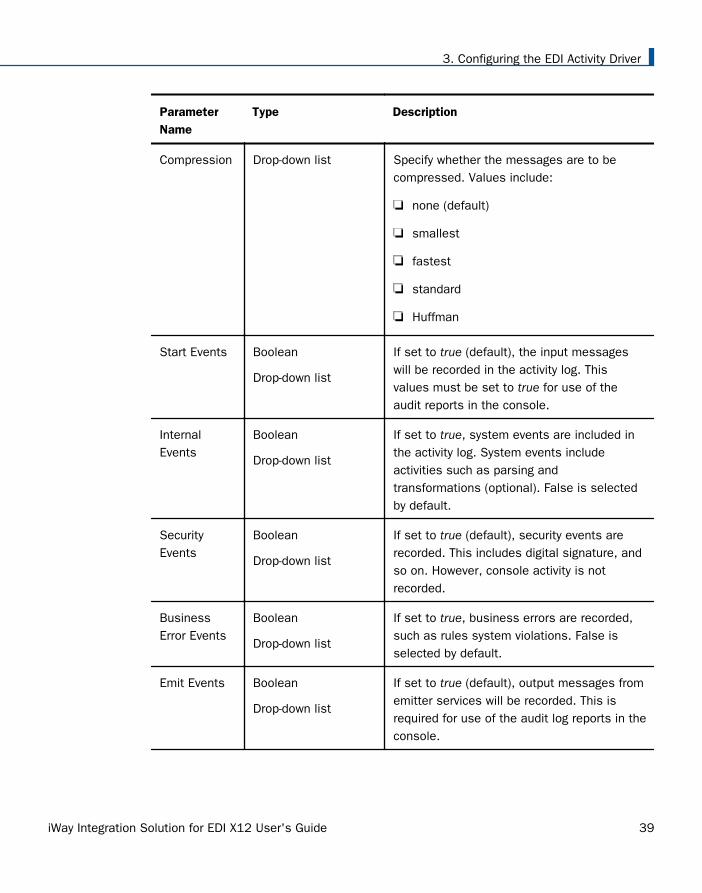
ParameterName
Type Description
Compression Drop-down list Specify whether the messages are to becompressed. Values include:
none (default)
smallest
fastest
standard
Huffman
Start Events Boolean
Drop-down list
If set to true (default), the input messageswill be recorded in the activity log. Thisvalues must be set to true for use of theaudit reports in the console.
InternalEvents
Boolean
Drop-down list
If set to true, system events are included inthe activity log. System events includeactivities such as parsing andtransformations (optional). False is selectedby default.
SecurityEvents
Boolean
Drop-down list
If set to true (default), security events arerecorded. This includes digital signature, andso on. However, console activity is notrecorded.
BusinessError Events
Boolean
Drop-down list
If set to true, business errors are recorded,such as rules system violations. False isselected by default.
Emit Events Boolean
Drop-down list
If set to true (default), output messages fromemitter services will be recorded. This isrequired for use of the audit log reports in theconsole.
3. Configuring the EDI Activity Driver
iWay Integration Solution for EDI X12 User's Guide 39
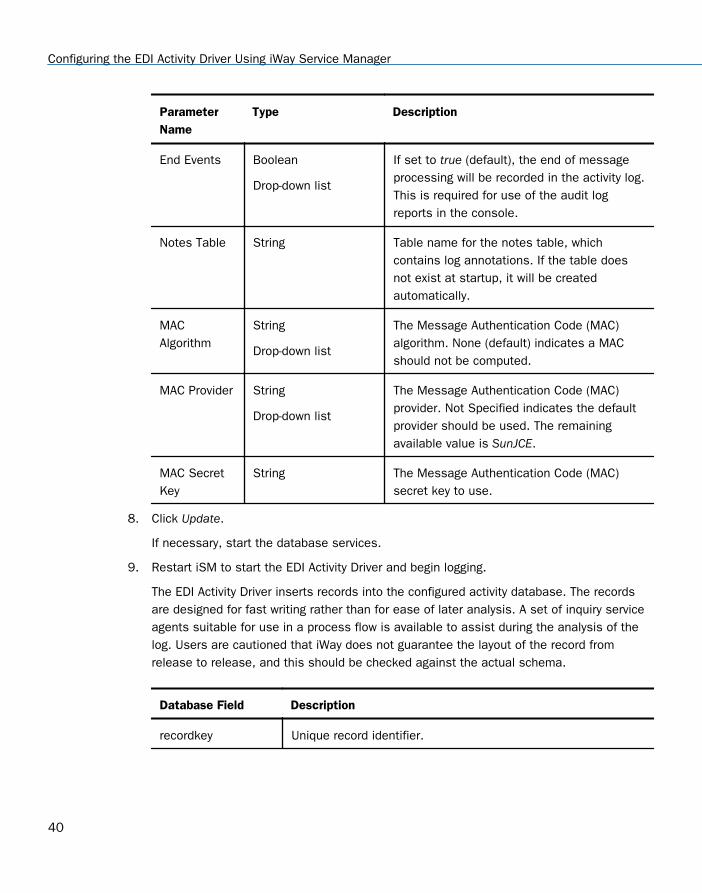
ParameterName
Type Description
End Events Boolean
Drop-down list
If set to true (default), the end of messageprocessing will be recorded in the activity log.This is required for use of the audit logreports in the console.
Notes Table String Table name for the notes table, whichcontains log annotations. If the table doesnot exist at startup, it will be createdautomatically.
MACAlgorithm
String
Drop-down list
The Message Authentication Code (MAC)algorithm. None (default) indicates a MACshould not be computed.
MAC Provider String
Drop-down list
The Message Authentication Code (MAC)provider. Not Specified indicates the defaultprovider should be used. The remainingavailable value is SunJCE.
MAC SecretKey
String The Message Authentication Code (MAC)secret key to use.
8. Click Update.
If necessary, start the database services.
9. Restart iSM to start the EDI Activity Driver and begin logging.
The EDI Activity Driver inserts records into the configured activity database. The recordsare designed for fast writing rather than for ease of later analysis. A set of inquiry serviceagents suitable for use in a process flow is available to assist during the analysis of thelog. Users are cautioned that iWay does not guarantee the layout of the record fromrelease to release, and this should be checked against the actual schema.
Database Field Description
recordkey Unique record identifier.
Configuring the EDI Activity Driver Using iWay Service Manager
40
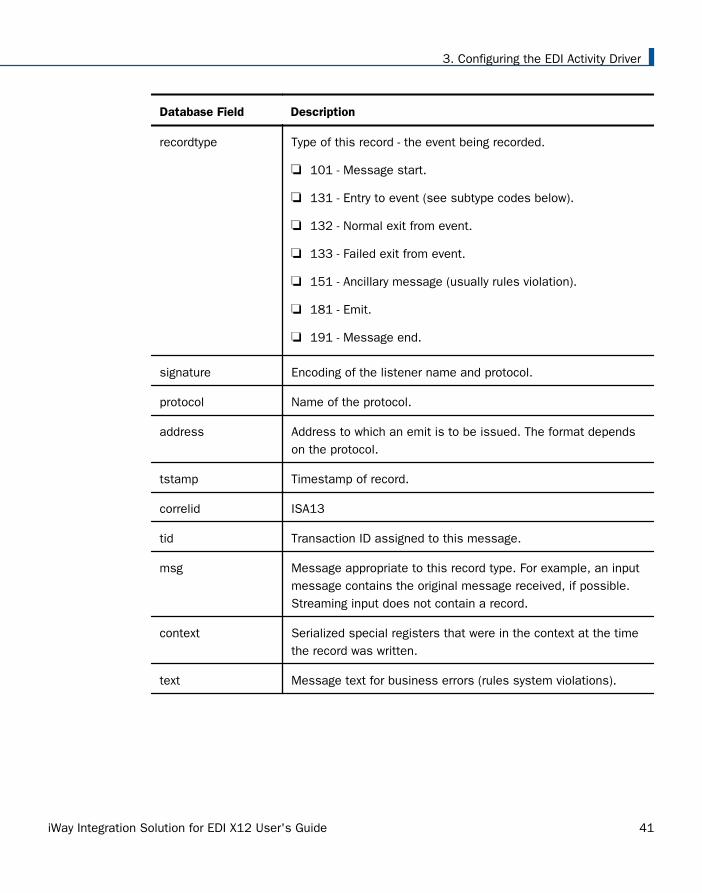
Database Field Description
recordtype Type of this record - the event being recorded.
101 - Message start.
131 - Entry to event (see subtype codes below).
132 - Normal exit from event.
133 - Failed exit from event.
151 - Ancillary message (usually rules violation).
181 - Emit.
191 - Message end.
signature Encoding of the listener name and protocol.
protocol Name of the protocol.
address Address to which an emit is to be issued. The format dependson the protocol.
tstamp Timestamp of record.
correlid ISA13
tid Transaction ID assigned to this message.
msg Message appropriate to this record type. For example, an inputmessage contains the original message received, if possible.Streaming input does not contain a record.
context Serialized special registers that were in the context at the timethe record was written.
text Message text for business errors (rules system violations).
3. Configuring the EDI Activity Driver
iWay Integration Solution for EDI X12 User's Guide 41
Database Field Description
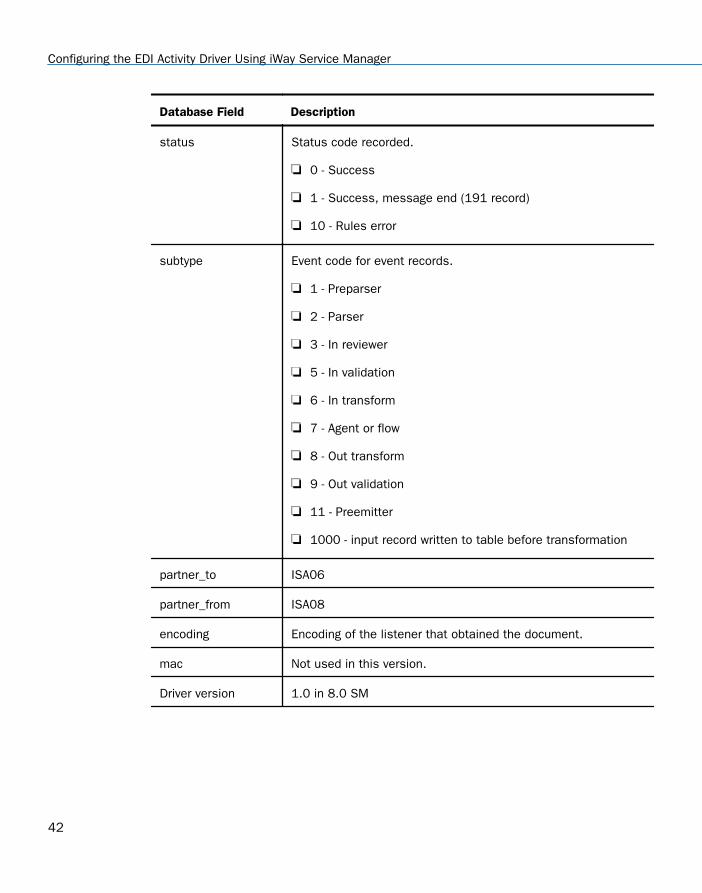
status Status code recorded.
0 - Success
1 - Success, message end (191 record)
10 - Rules error
subtype Event code for event records.
1 - Preparser
2 - Parser
3 - In reviewer
5 - In validation
6 - In transform
7 - Agent or flow
8 - Out transform
9 - Out validation
11 - Preemitter
1000 - input record written to table before transformation
partner_to ISA06
partner_from ISA08
encoding Encoding of the listener that obtained the document.
mac Not used in this version.
Driver version 1.0 in 8.0 SM
Configuring the EDI Activity Driver Using iWay Service Manager
42
Chapter4 Working With EDI X12 Inbound andOutbound Applications Using iWayIntegration Tools (iIT)
This chapter describes how to work with EDI X12 inbound and outbound applicationsusing iWay Integration Tools (iIT).
In this chapter:
EDI X12 Inbound and Outbound Application Overview
EDI X12 Inbound and Outbound Application Prerequisites
Downloading and Extracting EDI X12 User Samples
Importing EDI X12 User Samples to iWay Integration Tools as a Workspace
Publishing iWay Integration Applications to the iWay Service Manager Registry
Deploying iWay Integration Applications to iWay Service Manager
Setting Registers in the iWay Service Manager Administration Console
Stopping Inbound (EDI X12 to XML) and Outbound (XML to EDI X12) Processing
Testing the Sample EDI X12 Applications
EDI X12 Inbound and Outbound Application Overview
This chapter provides instructions to create, import, export, and work with EDI X12 inboundand outbound applications using iWay Integration Tools (iIT). In addition, you will learn how tocreate an iWay Integration Application (iIA) for deployment based on the sample data.
What will the Application do?
The iIAs will be used to transform EDI X12 to XML for inbound processing and XML to EDI X12for outbound processing.
The inbound application channel creates an XML representation of a EDI X12 (ANSI X12Nformatted) inbound message, a functional acknowledgement (997), and an XML-formattedvalidation report. The documents are routed to designated folders based on the success orfailure results of the transformation and EDI X12 validation.
iWay Integration Solution for EDI X12 User's Guide 43
The outbound application channel creates an ANSI X12N formatted EDI X12 message fromXML and a XML-formatted validation report. The documents are routed to designated foldersbased on success or failure of transformation and EDI X12 validation.
EDI X12 Inbound and Outbound Application Prerequisites
Before you continue, ensure that the following prerequisites are met:
You have a working knowledge of iWay Service Manager (iSM) and iWay Integration Tools(iIT).
iSM Version 8.0 or higher is installed.
iWay EDI X12 Adapter is installed.
iIT Version 8.0 or higher is installed.
System and channel Special Registers (SREGs) are updated to match your directorystructure, as shown in How to Download and Extract User Samples for EDI X12 on page44.
Downloading and Extracting EDI X12 User Samples
This section describes how to download and extract user samples for EDI X12.
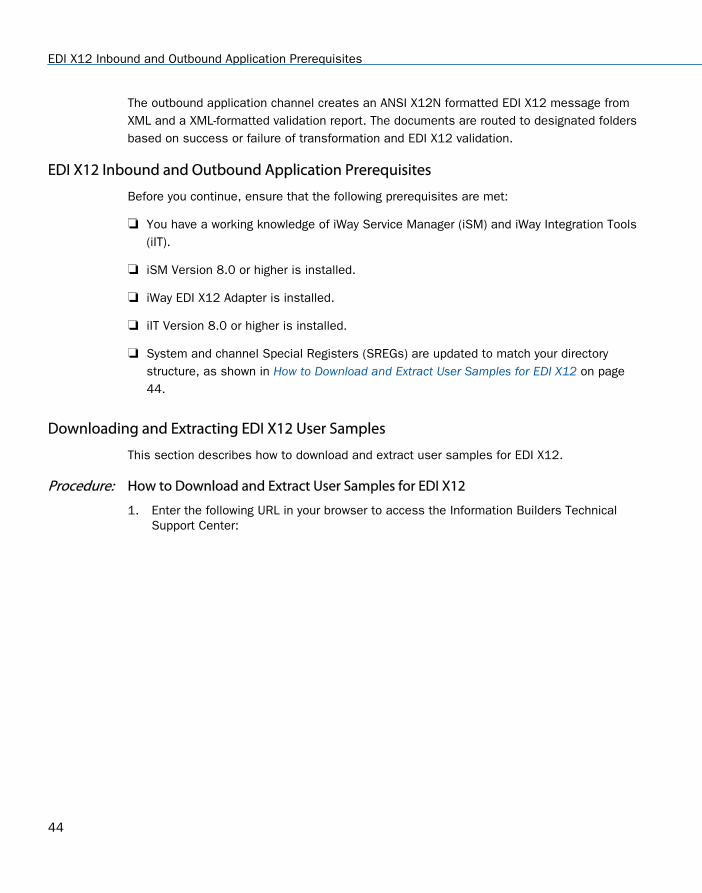
Procedure: How to Download and Extract User Samples for EDI X12
1. Enter the following URL in your browser to access the Information Builders TechnicalSupport Center:
EDI X12 Inbound and Outbound Application Prerequisites
44
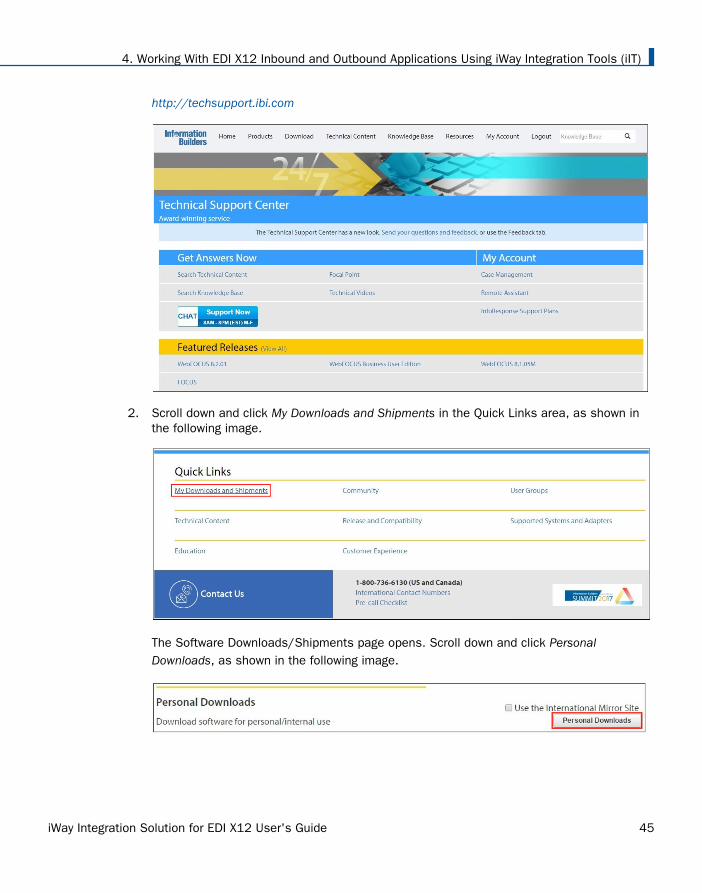
http://techsupport.ibi.com
2. Scroll down and click My Downloads and Shipments in the Quick Links area, as shown inthe following image.
The Software Downloads/Shipments page opens. Scroll down and click PersonalDownloads, as shown in the following image.
4. Working With EDI X12 Inbound and Outbound Applications Using iWay Integration Tools (iIT)
iWay Integration Solution for EDI X12 User's Guide 45
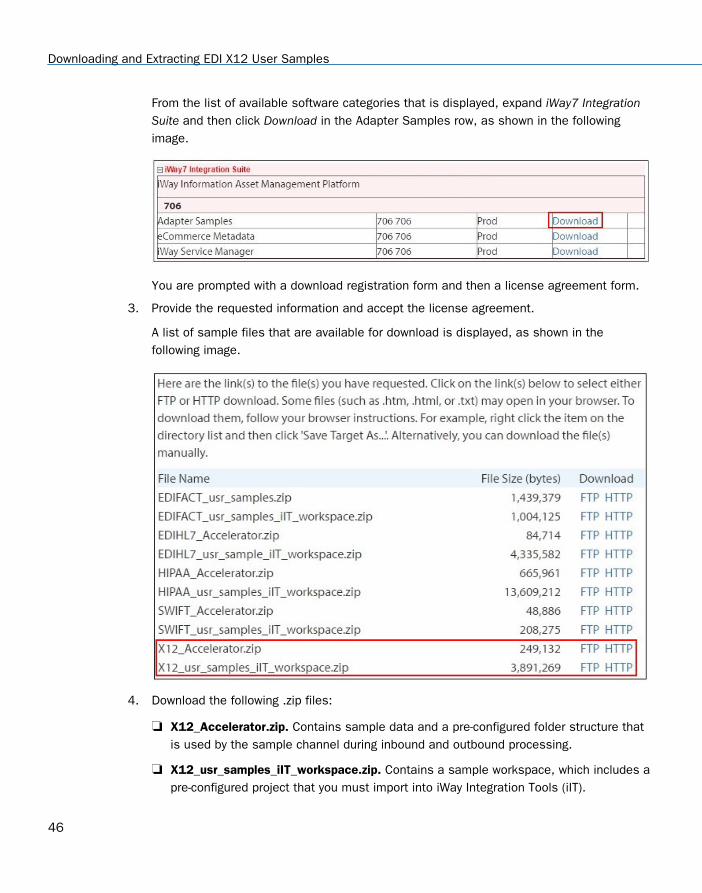
From the list of available software categories that is displayed, expand iWay7 IntegrationSuite and then click Download in the Adapter Samples row, as shown in the followingimage.
You are prompted with a download registration form and then a license agreement form.
3. Provide the requested information and accept the license agreement.
A list of sample files that are available for download is displayed, as shown in thefollowing image.
4. Download the following .zip files:
X12_Accelerator.zip. Contains sample data and a pre-configured folder structure thatis used by the sample channel during inbound and outbound processing.
X12_usr_samples_iIT_workspace.zip. Contains a sample workspace, which includes apre-configured project that you must import into iWay Integration Tools (iIT).
Downloading and Extracting EDI X12 User Samples
46
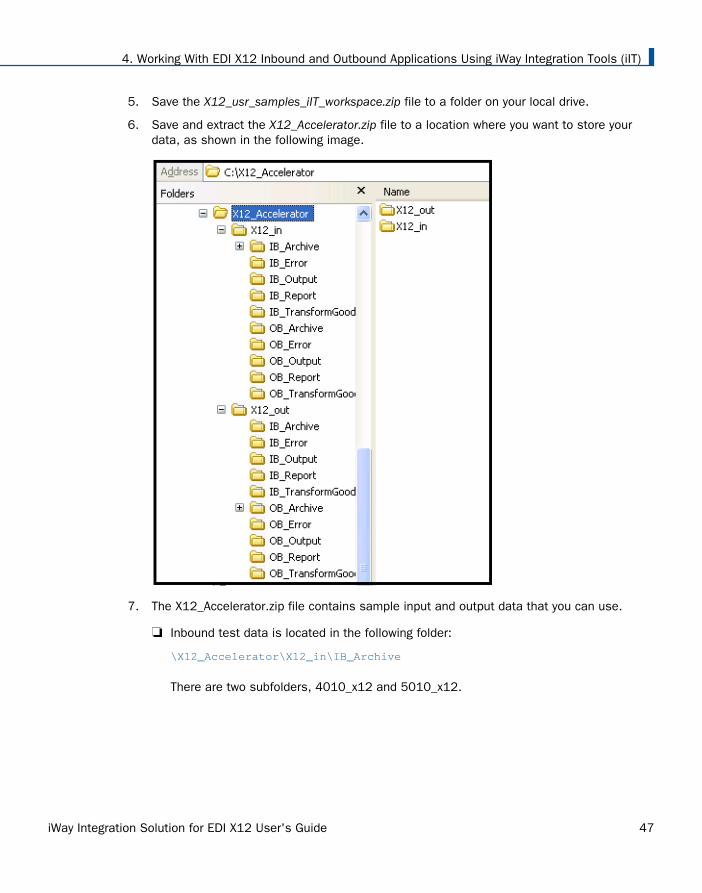
5. Save the X12_usr_samples_iIT_workspace.zip file to a folder on your local drive.
6. Save and extract the X12_Accelerator.zip file to a location where you want to store yourdata, as shown in the following image.
7. The X12_Accelerator.zip file contains sample input and output data that you can use.
Inbound test data is located in the following folder:
\X12_Accelerator\X12_in\IB_Archive
There are two subfolders, 4010_x12 and 5010_x12.
4. Working With EDI X12 Inbound and Outbound Applications Using iWay Integration Tools (iIT)
iWay Integration Solution for EDI X12 User's Guide 47
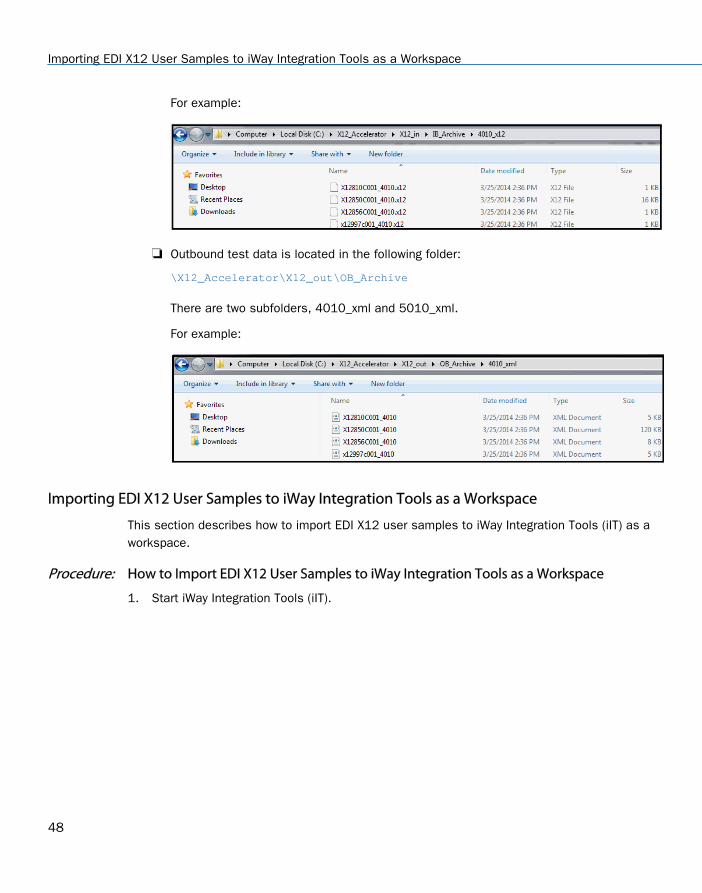
For example:
Outbound test data is located in the following folder:
\X12_Accelerator\X12_out\OB_Archive
There are two subfolders, 4010_xml and 5010_xml.
For example:
Importing EDI X12 User Samples to iWay Integration Tools as a Workspace
This section describes how to import EDI X12 user samples to iWay Integration Tools (iIT) as aworkspace.
Procedure: How to Import EDI X12 User Samples to iWay Integration Tools as a Workspace
1. Start iWay Integration Tools (iIT).
Importing EDI X12 User Samples to iWay Integration Tools as a Workspace
48
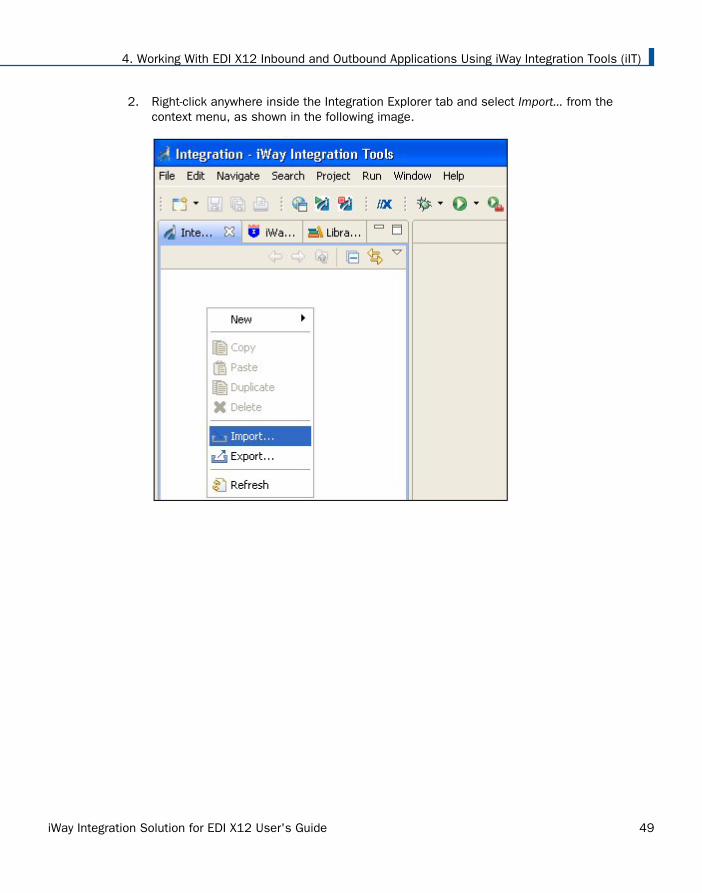
2. Right-click anywhere inside the Integration Explorer tab and select Import... from thecontext menu, as shown in the following image.
4. Working With EDI X12 Inbound and Outbound Applications Using iWay Integration Tools (iIT)
iWay Integration Solution for EDI X12 User's Guide 49
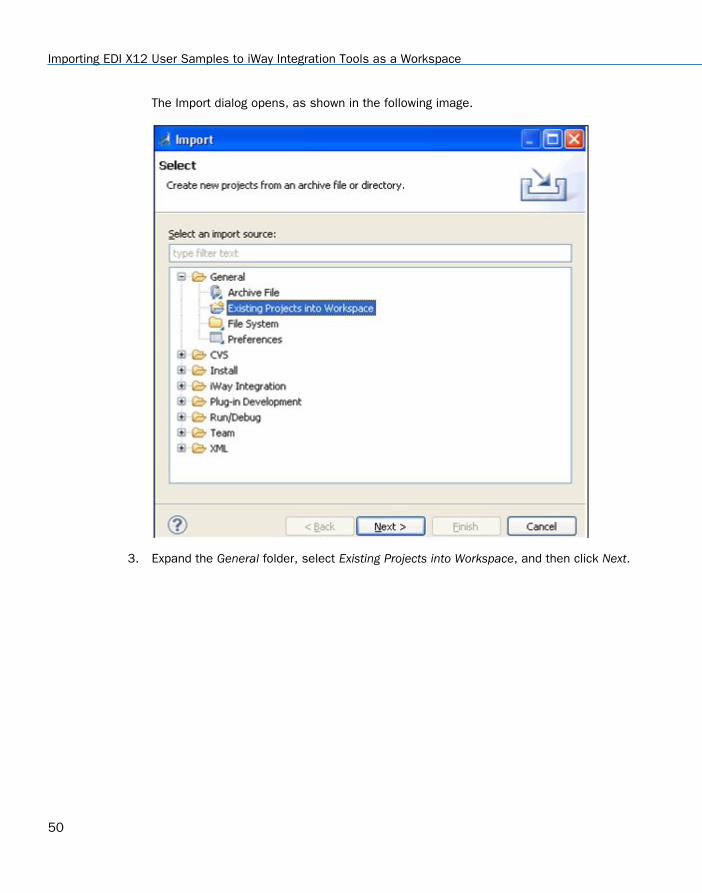
The Import dialog opens, as shown in the following image.
3. Expand the General folder, select Existing Projects into Workspace, and then click Next.
Importing EDI X12 User Samples to iWay Integration Tools as a Workspace
50
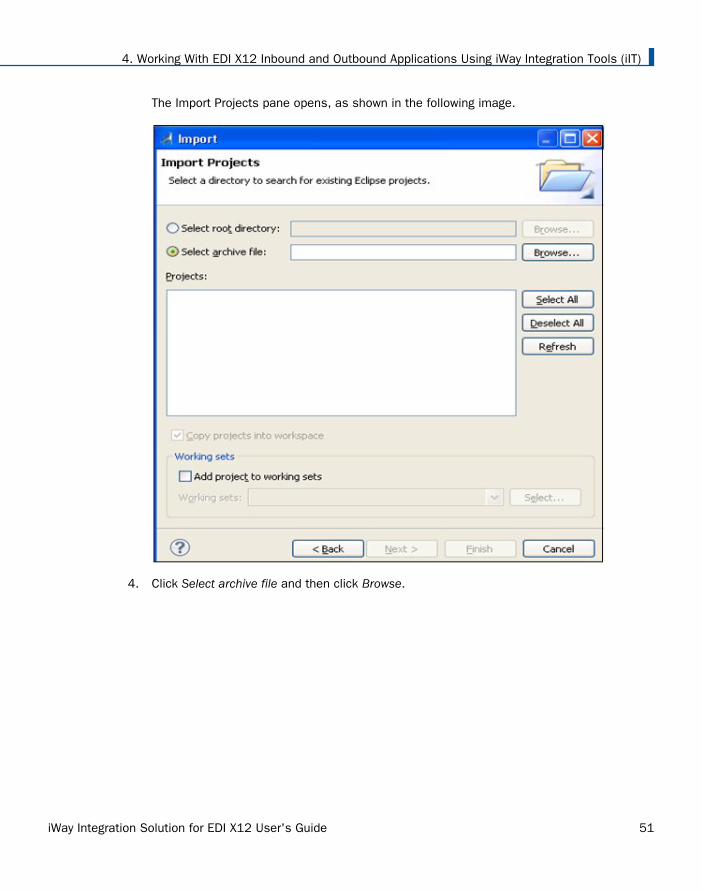
The Import Projects pane opens, as shown in the following image.
4. Click Select archive file and then click Browse.
4. Working With EDI X12 Inbound and Outbound Applications Using iWay Integration Tools (iIT)
iWay Integration Solution for EDI X12 User's Guide 51
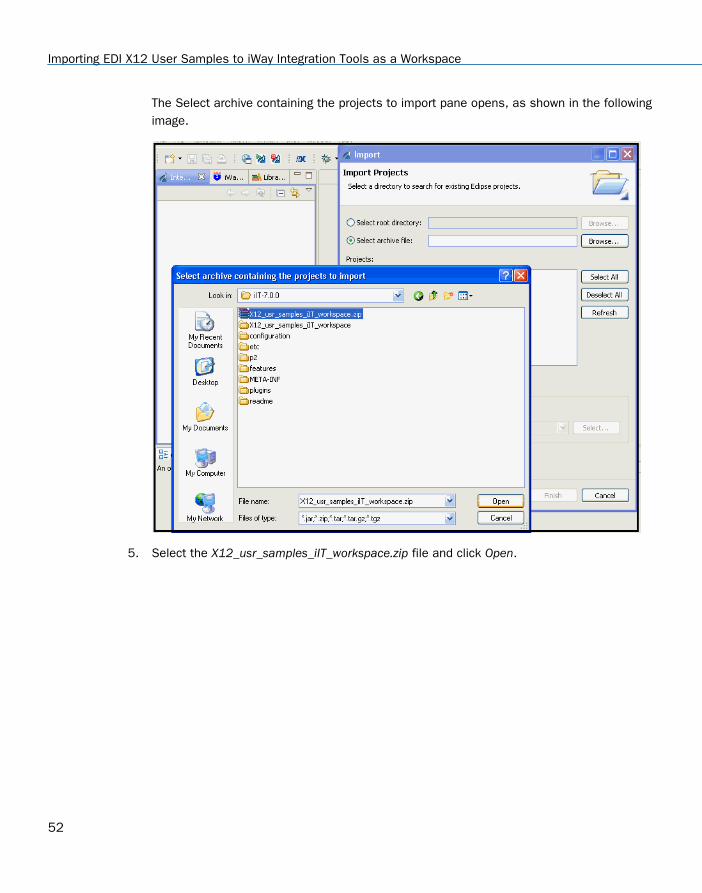
The Select archive containing the projects to import pane opens, as shown in the followingimage.
5. Select the X12_usr_samples_iIT_workspace.zip file and click Open.
Importing EDI X12 User Samples to iWay Integration Tools as a Workspace
52
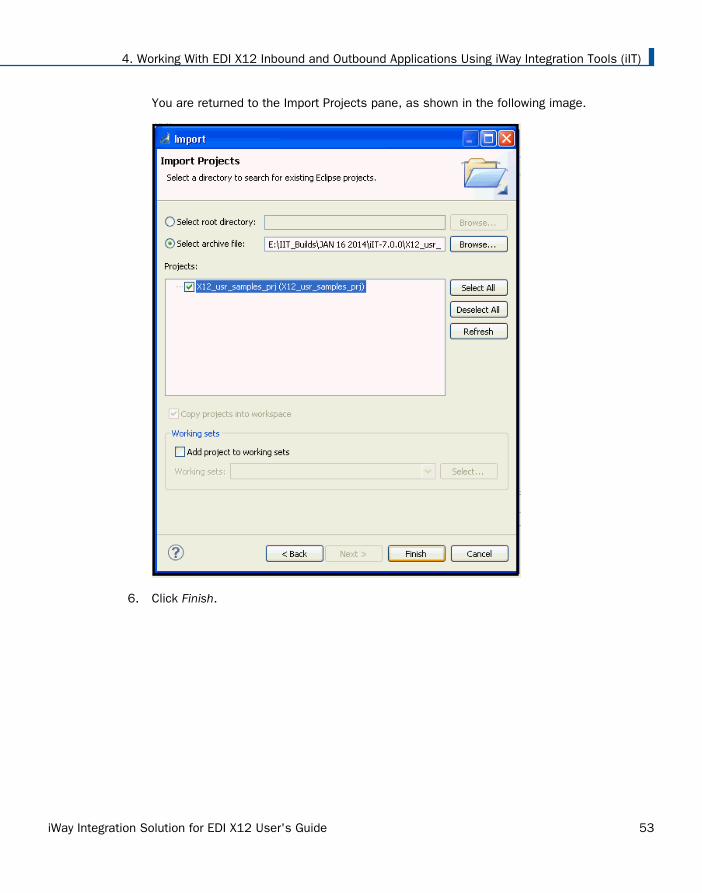
You are returned to the Import Projects pane, as shown in the following image.
6. Click Finish.
4. Working With EDI X12 Inbound and Outbound Applications Using iWay Integration Tools (iIT)
iWay Integration Solution for EDI X12 User's Guide 53
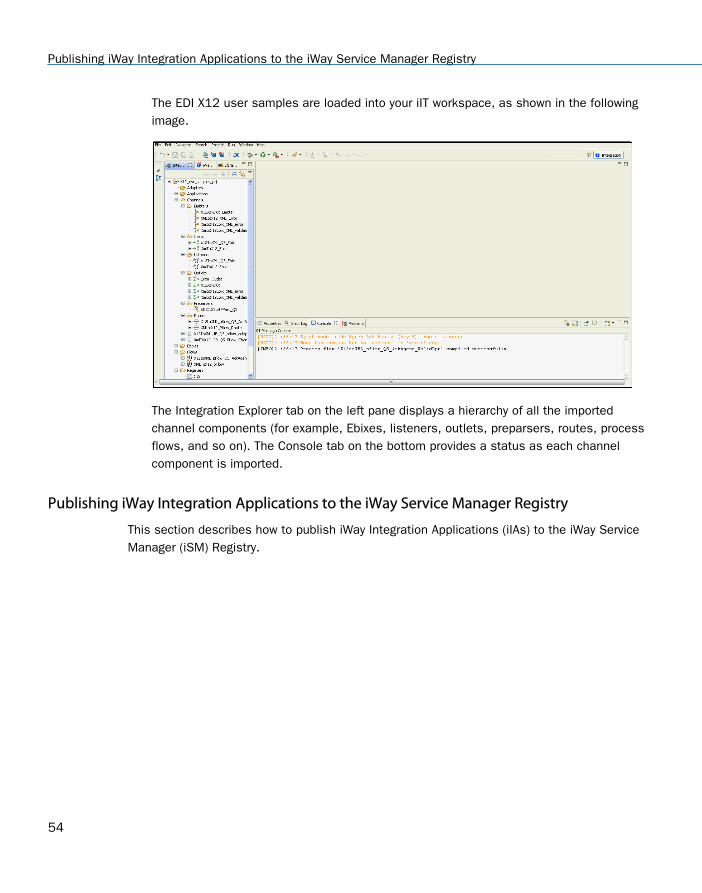
The EDI X12 user samples are loaded into your iIT workspace, as shown in the followingimage.
The Integration Explorer tab on the left pane displays a hierarchy of all the importedchannel components (for example, Ebixes, listeners, outlets, preparsers, routes, processflows, and so on). The Console tab on the bottom provides a status as each channelcomponent is imported.
Publishing iWay Integration Applications to the iWay Service Manager Registry
This section describes how to publish iWay Integration Applications (iIAs) to the iWay ServiceManager (iSM) Registry.
Publishing iWay Integration Applications to the iWay Service Manager Registry
54
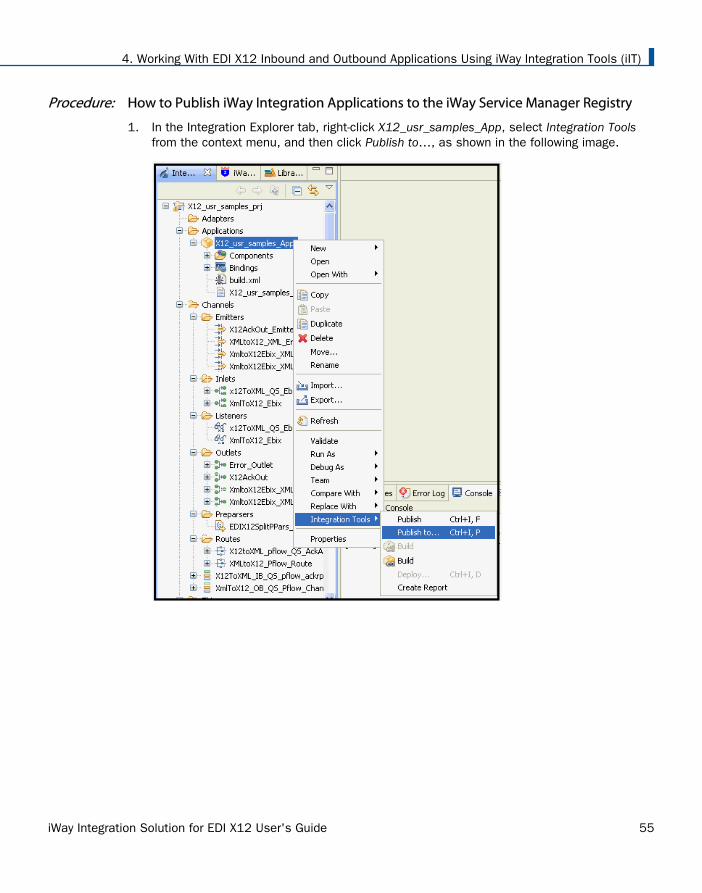
Procedure: How to Publish iWay Integration Applications to the iWay Service Manager Registry
1. In the Integration Explorer tab, right-click X12_usr_samples_App, select Integration Toolsfrom the context menu, and then click Publish to…, as shown in the following image.
4. Working With EDI X12 Inbound and Outbound Applications Using iWay Integration Tools (iIT)
iWay Integration Solution for EDI X12 User's Guide 55
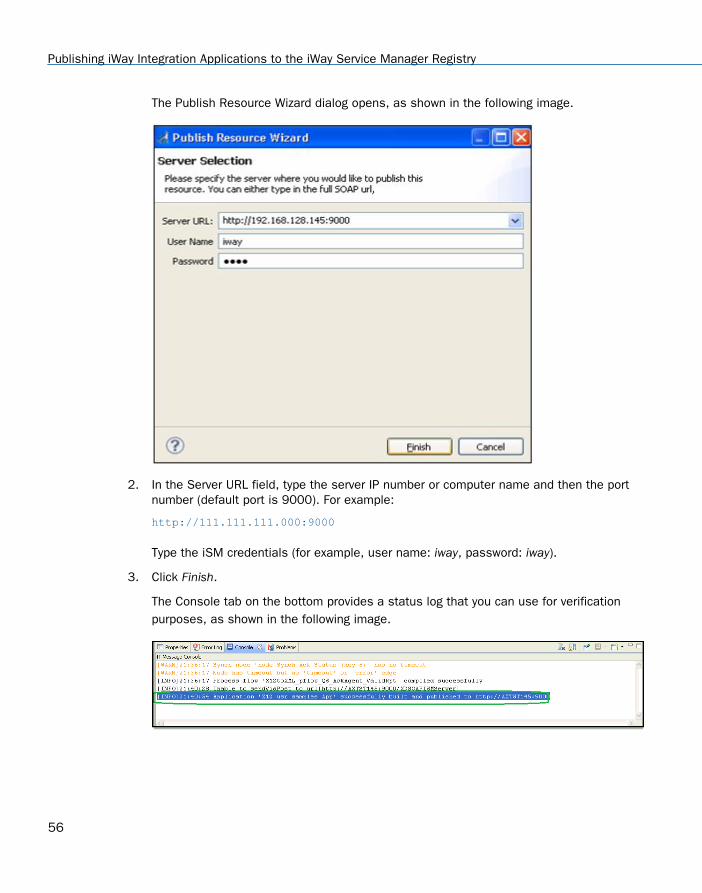
The Publish Resource Wizard dialog opens, as shown in the following image.
2. In the Server URL field, type the server IP number or computer name and then the portnumber (default port is 9000). For example:
http://111.111.111.000:9000
Type the iSM credentials (for example, user name: iway, password: iway).
3. Click Finish.
The Console tab on the bottom provides a status log that you can use for verificationpurposes, as shown in the following image.
Publishing iWay Integration Applications to the iWay Service Manager Registry
56
Deploying iWay Integration Applications to iWay Service Manager
This section describes how to deploy iWay Integration Applications (iIAs) to iWay ServiceManager (iSM).
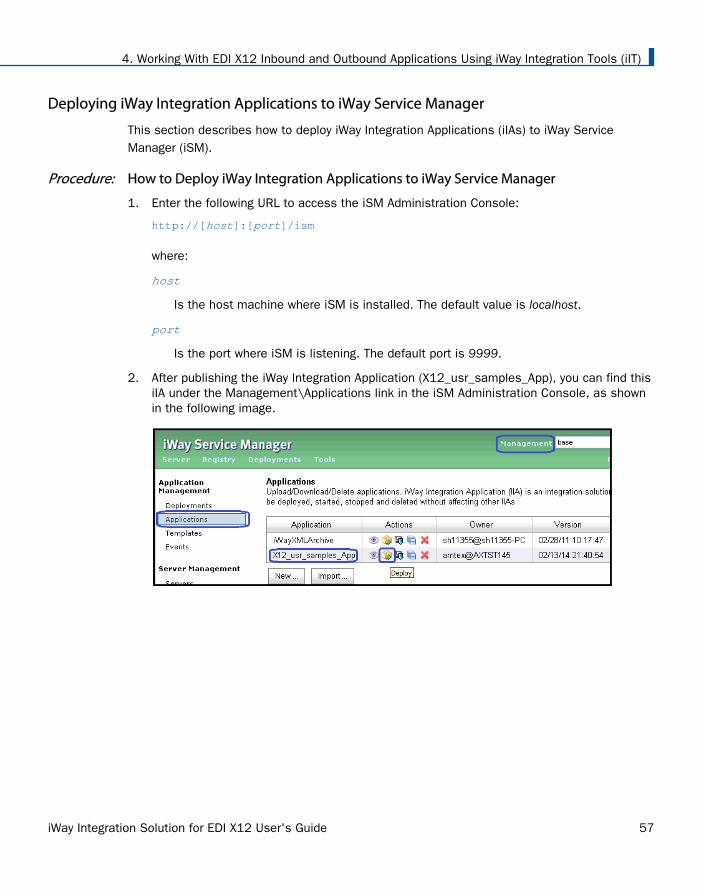
Procedure: How to Deploy iWay Integration Applications to iWay Service Manager
1. Enter the following URL to access the iSM Administration Console:
http://[host]:[port]/ism
where:
host
Is the host machine where iSM is installed. The default value is localhost.
port
Is the port where iSM is listening. The default port is 9999.
2. After publishing the iWay Integration Application (X12_usr_samples_App), you can find thisiIA under the Management\Applications link in the iSM Administration Console, as shownin the following image.
4. Working With EDI X12 Inbound and Outbound Applications Using iWay Integration Tools (iIT)
iWay Integration Solution for EDI X12 User's Guide 57
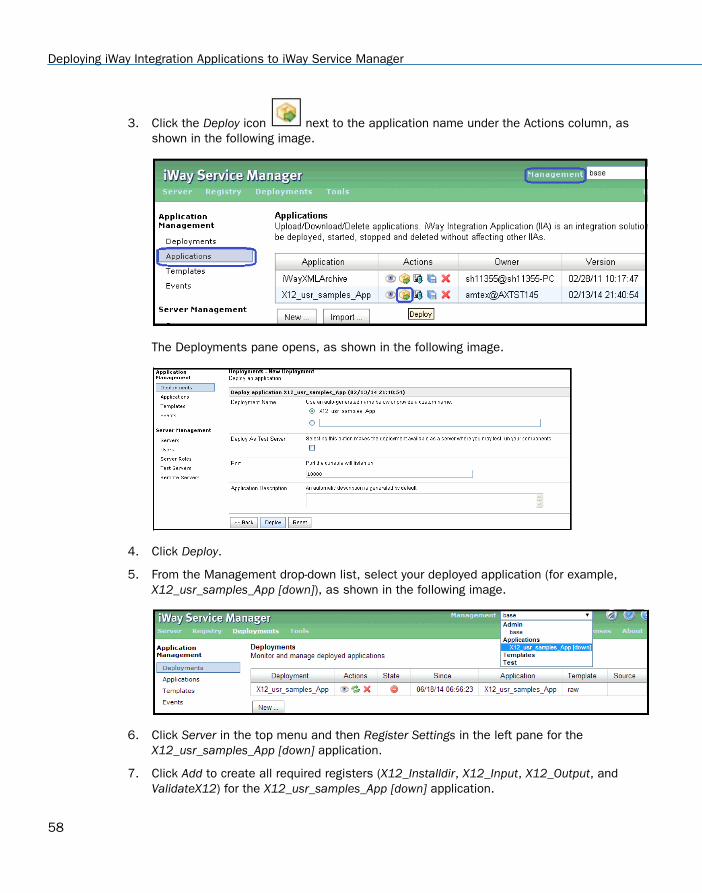
3. Click the Deploy icon next to the application name under the Actions column, asshown in the following image.
The Deployments pane opens, as shown in the following image.
4. Click Deploy.
5. From the Management drop-down list, select your deployed application (for example,X12_usr_samples_App [down]), as shown in the following image.
6. Click Server in the top menu and then Register Settings in the left pane for theX12_usr_samples_App [down] application.
7. Click Add to create all required registers (X12_Installdir, X12_Input, X12_Output, andValidateX12) for the X12_usr_samples_App [down] application.
Deploying iWay Integration Applications to iWay Service Manager
58
For more information, see Setting Registers in the iWay Service Manager AdministrationConsole on page 60.
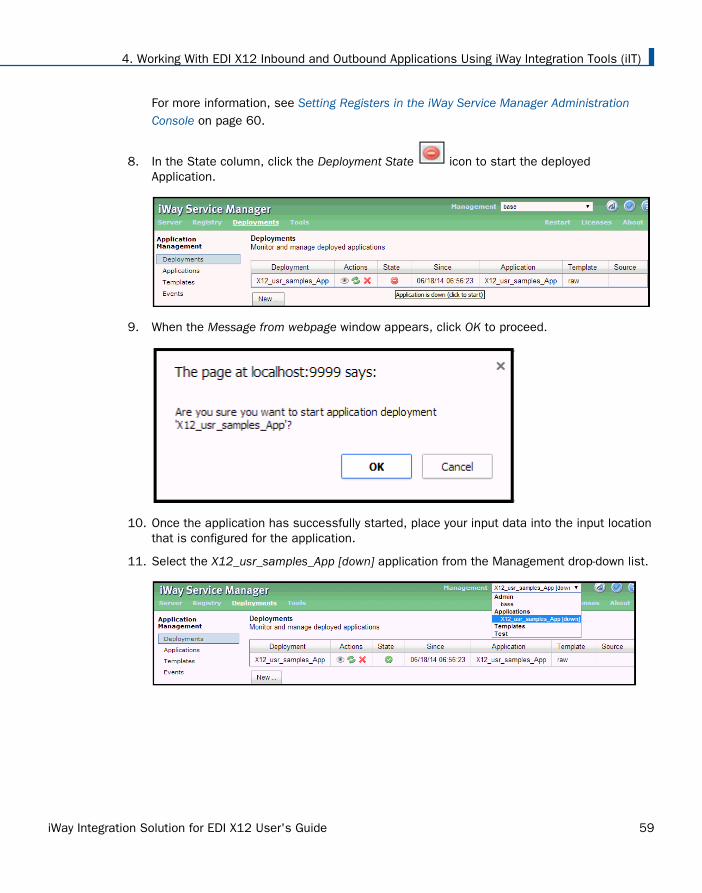
8. In the State column, click the Deployment State icon to start the deployedApplication.
9. When the Message from webpage window appears, click OK to proceed.
10. Once the application has successfully started, place your input data into the input locationthat is configured for the application.
11. Select the X12_usr_samples_App [down] application from the Management drop-down list.
4. Working With EDI X12 Inbound and Outbound Applications Using iWay Integration Tools (iIT)
iWay Integration Solution for EDI X12 User's Guide 59
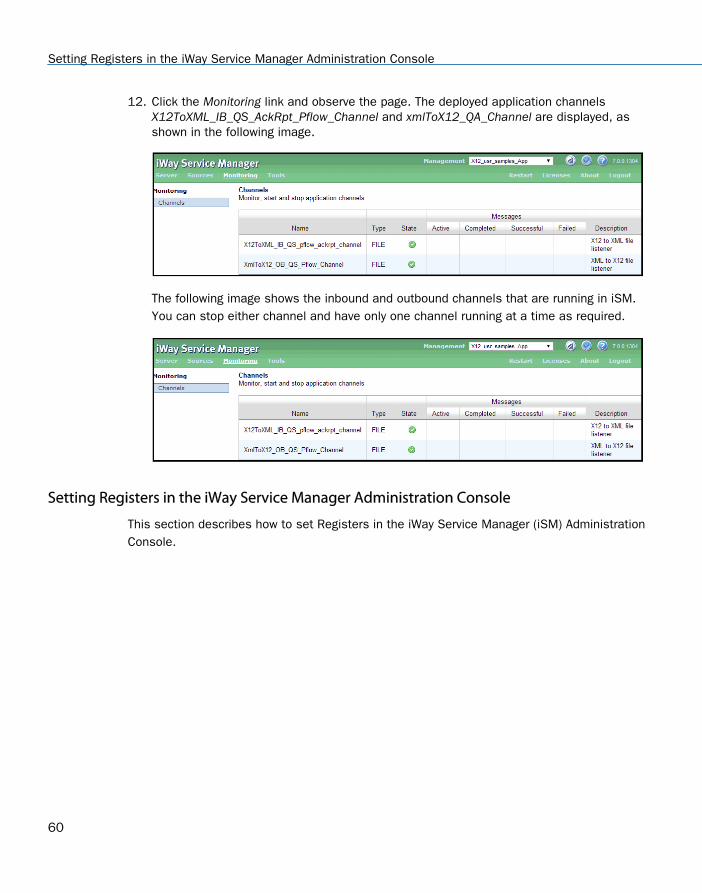
12. Click the Monitoring link and observe the page. The deployed application channelsX12ToXML_IB_QS_AckRpt_Pflow_Channel and xmlToX12_QA_Channel are displayed, asshown in the following image.
The following image shows the inbound and outbound channels that are running in iSM.You can stop either channel and have only one channel running at a time as required.
Setting Registers in the iWay Service Manager Administration Console
This section describes how to set Registers in the iWay Service Manager (iSM) AdministrationConsole.
Setting Registers in the iWay Service Manager Administration Console
60
Procedure: How to Set Registers in the iWay Service Manager Administration Console
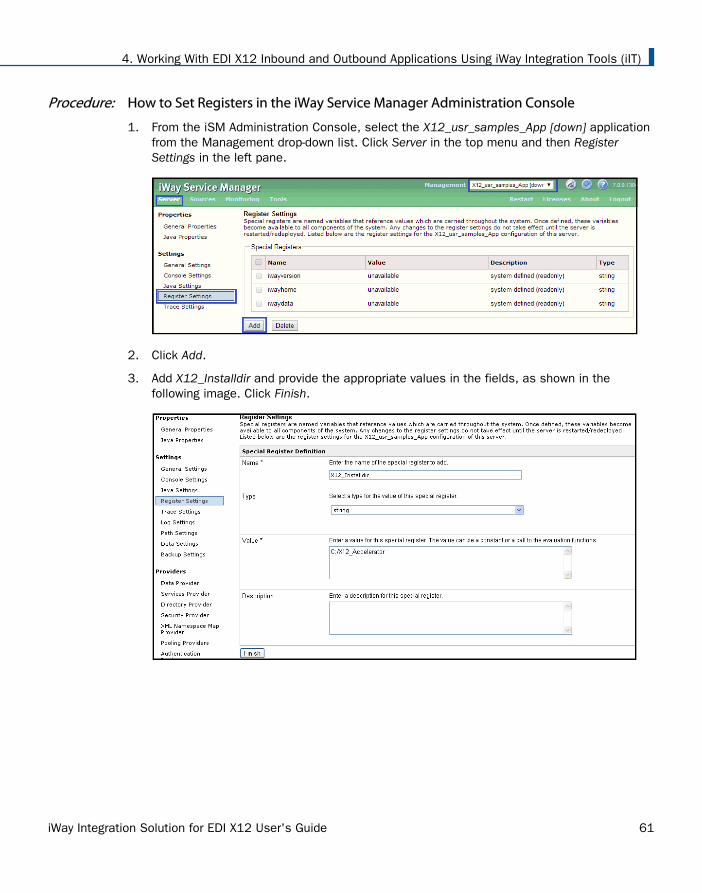
1. From the iSM Administration Console, select the X12_usr_samples_App [down] applicationfrom the Management drop-down list. Click Server in the top menu and then RegisterSettings in the left pane.
2. Click Add.
3. Add X12_Installdir and provide the appropriate values in the fields, as shown in thefollowing image. Click Finish.
4. Working With EDI X12 Inbound and Outbound Applications Using iWay Integration Tools (iIT)
iWay Integration Solution for EDI X12 User's Guide 61
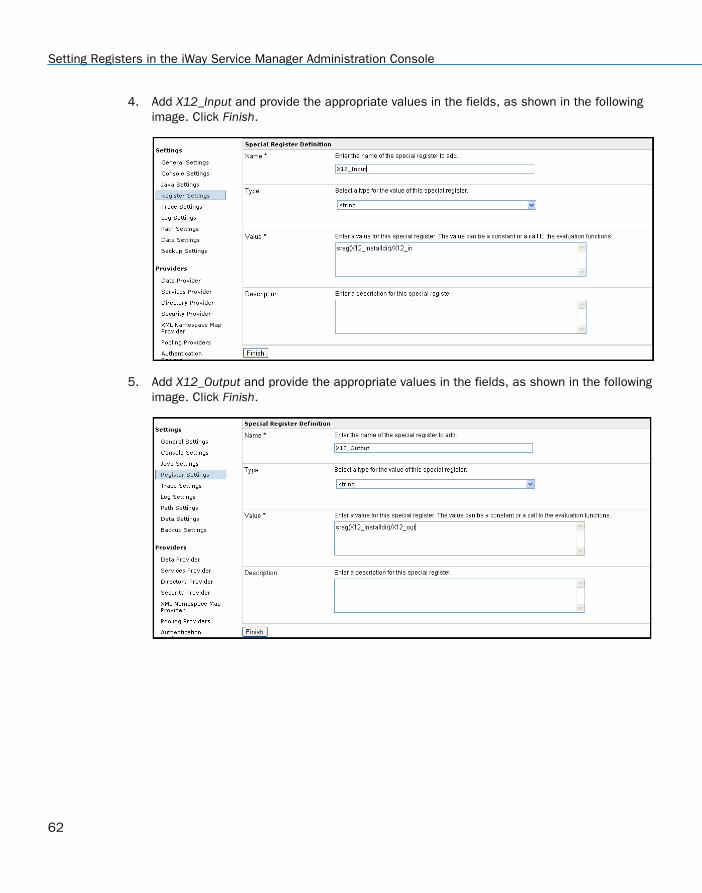
4. Add X12_Input and provide the appropriate values in the fields, as shown in the followingimage. Click Finish.
5. Add X12_Output and provide the appropriate values in the fields, as shown in the followingimage. Click Finish.
Setting Registers in the iWay Service Manager Administration Console
62
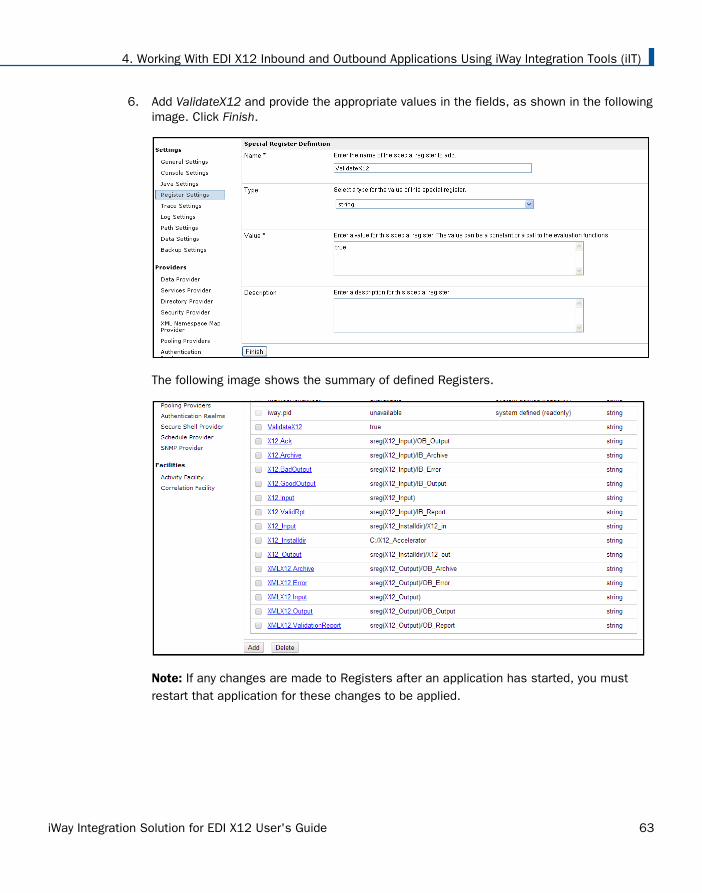
6. Add ValidateX12 and provide the appropriate values in the fields, as shown in the followingimage. Click Finish.
The following image shows the summary of defined Registers.
Note: If any changes are made to Registers after an application has started, you mustrestart that application for these changes to be applied.
4. Working With EDI X12 Inbound and Outbound Applications Using iWay Integration Tools (iIT)
iWay Integration Solution for EDI X12 User's Guide 63
Stopping Inbound (EDI X12 to XML) and Outbound (XML to EDI X12) Processing
This section describes how to stop inbound (EDI X12 to XML) and outbound (XML to EDI X12)processing.
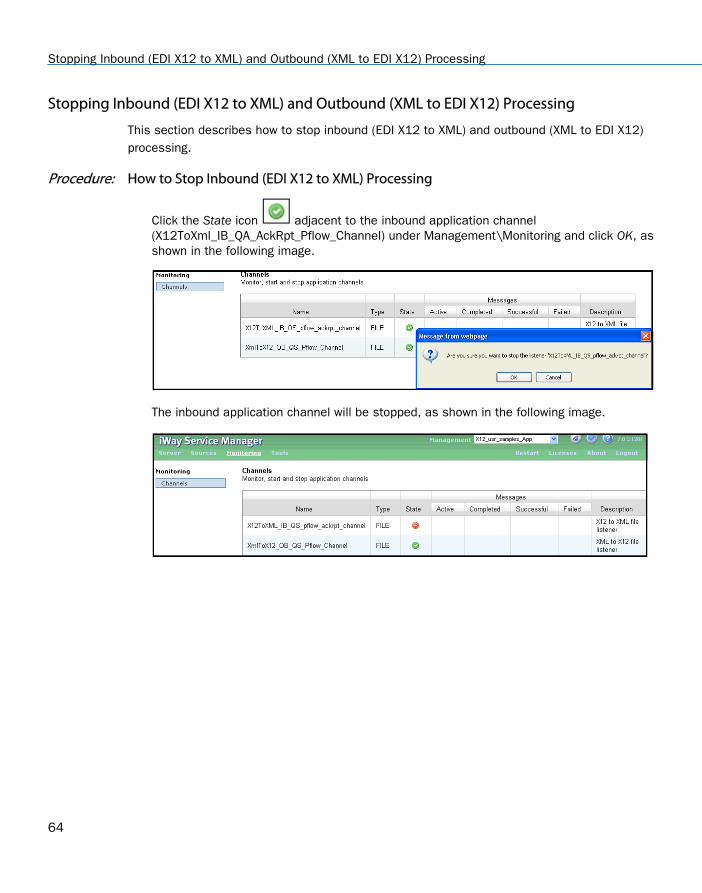
Procedure: How to Stop Inbound (EDI X12 to XML) Processing
Click the State icon adjacent to the inbound application channel(X12ToXml_IB_QA_AckRpt_Pflow_Channel) under Management\Monitoring and click OK, asshown in the following image.
The inbound application channel will be stopped, as shown in the following image.
Stopping Inbound (EDI X12 to XML) and Outbound (XML to EDI X12) Processing
64
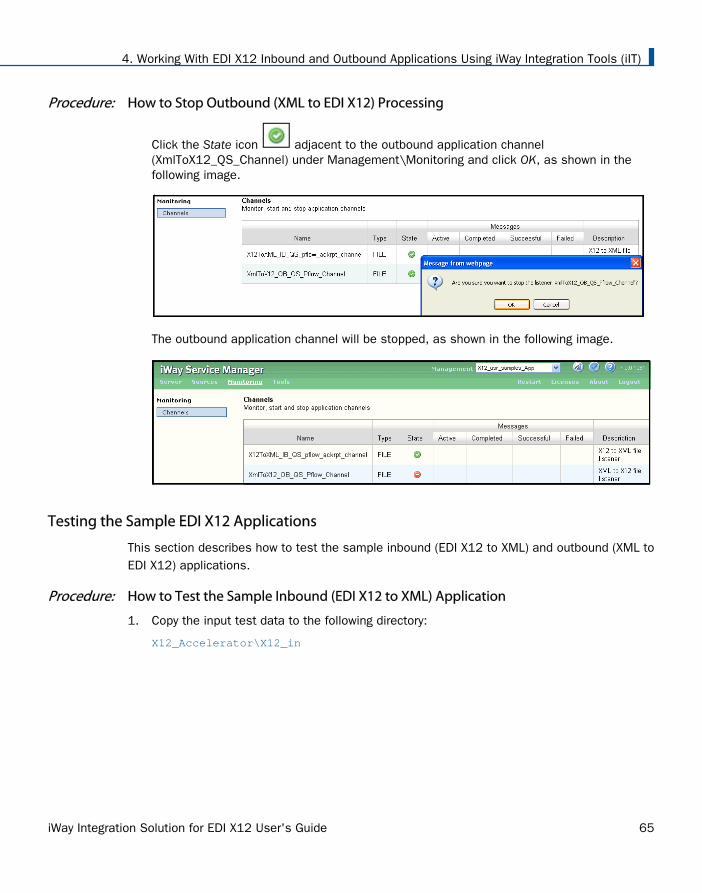
Procedure: How to Stop Outbound (XML to EDI X12) Processing
Click the State icon adjacent to the outbound application channel(XmlToX12_QS_Channel) under Management\Monitoring and click OK, as shown in thefollowing image.
The outbound application channel will be stopped, as shown in the following image.
Testing the Sample EDI X12 Applications
This section describes how to test the sample inbound (EDI X12 to XML) and outbound (XML toEDI X12) applications.
Procedure: How to Test the Sample Inbound (EDI X12 to XML) Application
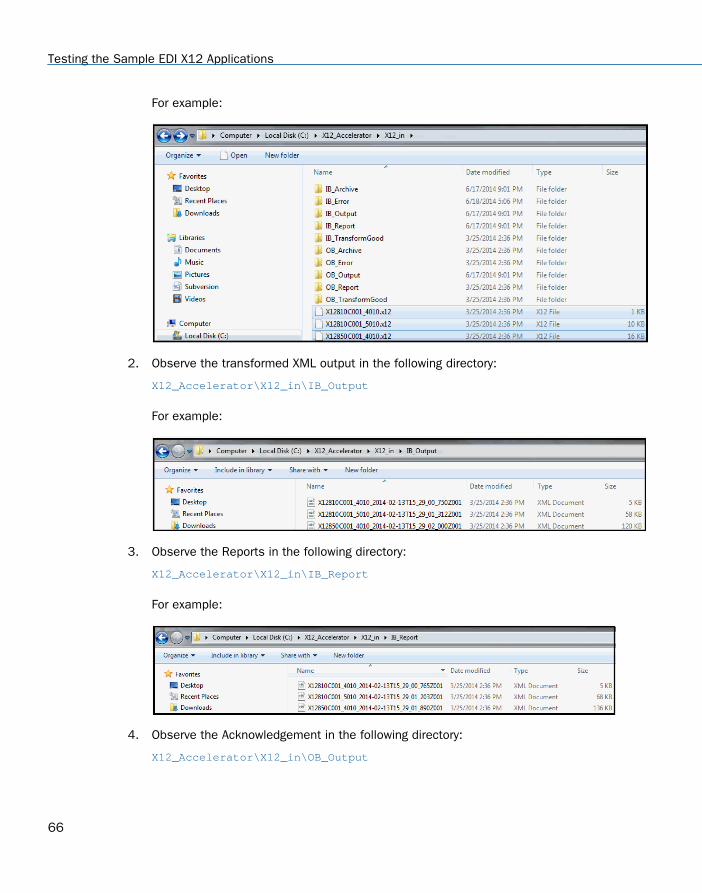
1. Copy the input test data to the following directory:
X12_Accelerator\X12_in
4. Working With EDI X12 Inbound and Outbound Applications Using iWay Integration Tools (iIT)
iWay Integration Solution for EDI X12 User's Guide 65
For example:
2. Observe the transformed XML output in the following directory:
X12_Accelerator\X12_in\IB_Output
For example:
3. Observe the Reports in the following directory:
X12_Accelerator\X12_in\IB_Report
For example:
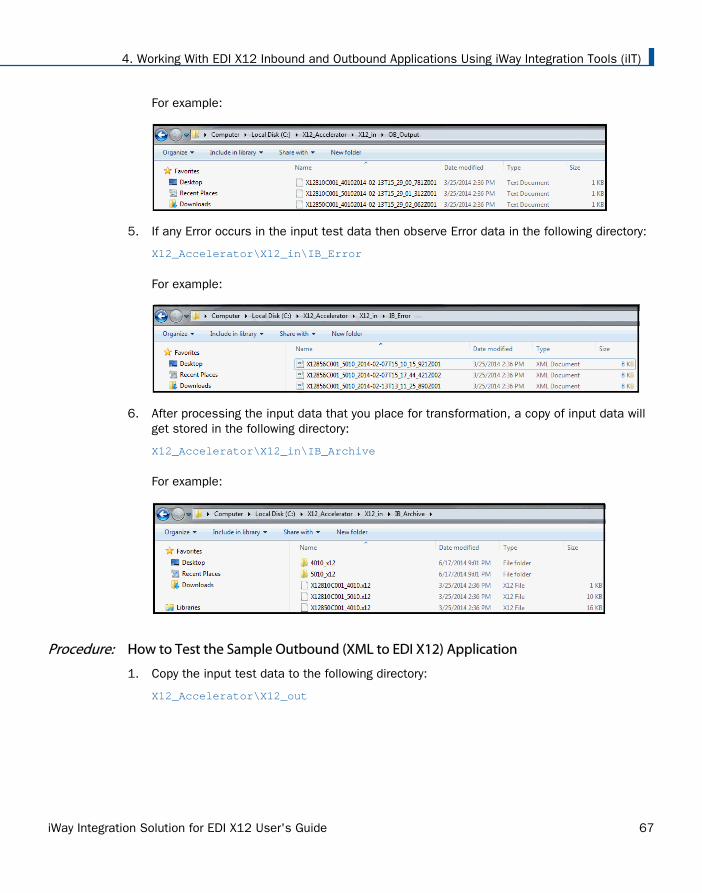
4. Observe the Acknowledgement in the following directory:
X12_Accelerator\X12_in\OB_Output
Testing the Sample EDI X12 Applications
66
For example:
5. If any Error occurs in the input test data then observe Error data in the following directory:
X12_Accelerator\X12_in\IB_Error
For example:
6. After processing the input data that you place for transformation, a copy of input data willget stored in the following directory:
X12_Accelerator\X12_in\IB_Archive
For example:
Procedure: How to Test the Sample Outbound (XML to EDI X12) Application
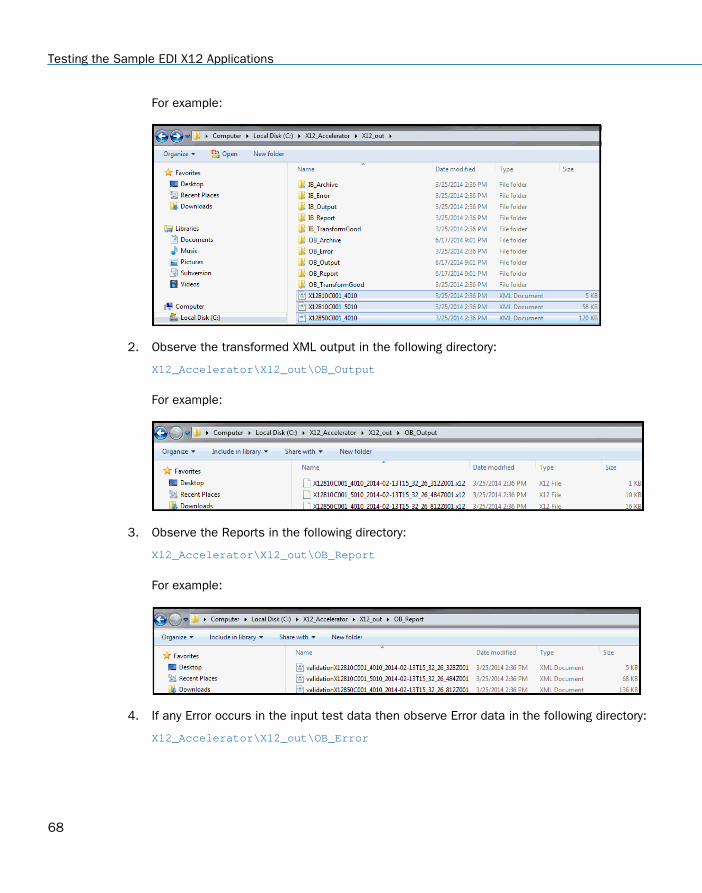
1. Copy the input test data to the following directory:
X12_Accelerator\X12_out
4. Working With EDI X12 Inbound and Outbound Applications Using iWay Integration Tools (iIT)
iWay Integration Solution for EDI X12 User's Guide 67
For example:
2. Observe the transformed XML output in the following directory:
X12_Accelerator\X12_out\OB_Output
For example:
3. Observe the Reports in the following directory:
X12_Accelerator\X12_out\OB_Report
For example:
4. If any Error occurs in the input test data then observe Error data in the following directory:
X12_Accelerator\X12_out\OB_Error
Testing the Sample EDI X12 Applications
68
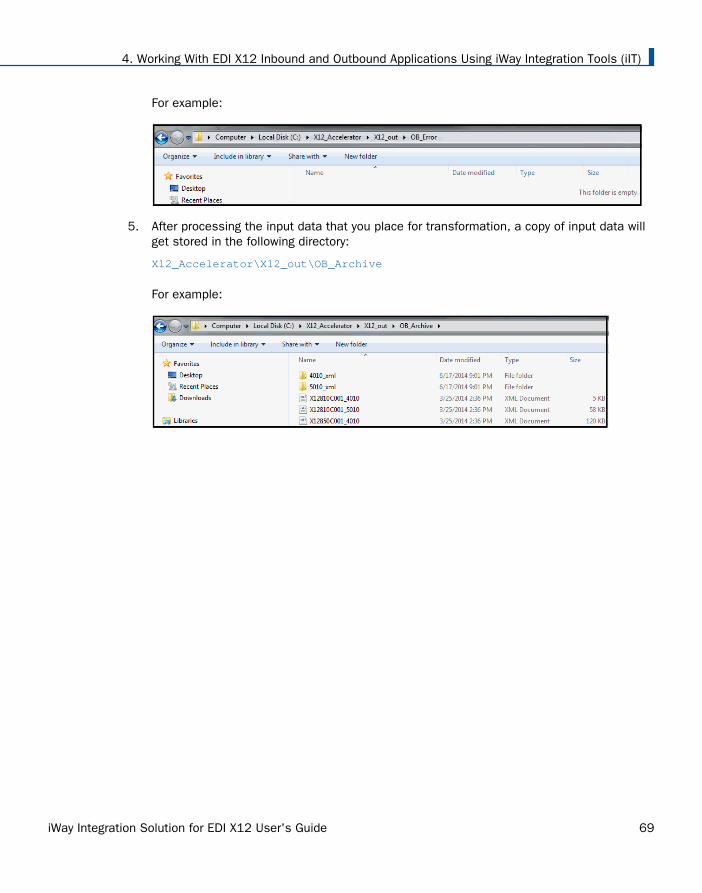
For example:
5. After processing the input data that you place for transformation, a copy of input data willget stored in the following directory:
X12_Accelerator\X12_out\OB_Archive
For example:
4. Working With EDI X12 Inbound and Outbound Applications Using iWay Integration Tools (iIT)
iWay Integration Solution for EDI X12 User's Guide 69

Testing the Sample EDI X12 Applications
70
Chapter5Inbound Processing: EDI X12 to XML
The iWay Integration Solution for EDI X12 includes iWay Service Manager. iWay ServiceManager converts a document from Electronic Data Interchange (EDI) X12 format to XMLformat, and validates it based on EDI published implementation guides.
This chapter provides the information you need to understand and implement a basicinbound message flow.
The inbound processing overview describes the iWay business components and theprocessing steps in the basic inbound message flow.
The sample configuration contains detailed instructions for configuring the basicinbound message flow. This topic guides you through each step of the configurationprocedure.
In this chapter:
EDI X12 Inbound Processing Overview
Sample Configuration for Inbound Processing: EDI to XML
EDI X12 Inbound Processing Overview
The inbound process converts an EDI X12 formatted document to an XML document.
In a basic message flow, inbound processing consists of the following components and steps.For an illustration of the components available in the construction of a message flow, see Using a Channel to Construct a Message Flow on page 24. You will define the components inthe configuration instructions in Sample Configuration for Inbound Processing: EDI to XML onpage 73.
Inlet
The listener picks up the incoming EDI document.
The preparser obtains the message type and version from the EDI document, in order toselect the appropriate transformation template name. The transformation templateconverts the original EDI document to an XML representation of that document.
The preparser ensures that the document is converted to a structurally correct EDI XMLdocument. The transformation templates that are provided in the Ebix are used totransform the structure of the document.
iWay Integration Solution for EDI X12 User's Guide 71
The iWay Integration Solution for EDI X12 supports one preparser(EDIX12SplitterPreParser), which is described in Preparsers on page 29.
Validation
The inbound EDI document is validated for structure and content. The published EDIstandards and user implementation guides define element types (for example, numeric,alpha, or date) and describe business rules to apply for validation.
For example, here is a typical date segment in an inbound EDI document:
DTM*001*20080701
The value in DTM01 ("001") is validated against an allowed code list. The value in DTM02("20080701") is validated as a properly formatted date.
In addition, the following business rule is applied: DTM02 is required if DTM01 is present(if there is a qualifier, there must be data).
Route
In our basic message flow example, the route will redirect the transformed document to adesignated folder that is dependent on rules validation. After validation, you can apply anyadditional business logic to the document. You can use a single service or multipleservices, passing the output of one service as the input of the next.
For details on available services, see the iWay Service Manager User's Guide.
The acknowledgement service creates a functional acknowledgement (997) for theinbound document. The acknowledgement indicates that the document was received andvalidated for structure.
The validation report service creates a validation report in XML format, which is routed to areports folder. This validation report indicates a success or failure result based on X12validation rules.
Outlets
Outlets define how messages leave a channel at the end of a process. In our basic example,two outlets are configured in the route and one outlet is configured in the channel.
The two outputs defined in the route will be XML documents. Documents will be placed intotheir appropriate folders dependent on the results of the EDI X12 rules validation.
The report outlet contains the validation report in XML format. This document contains theinbound data as well as the output transformed XML.
EDI X12 Inbound Processing Overview
72
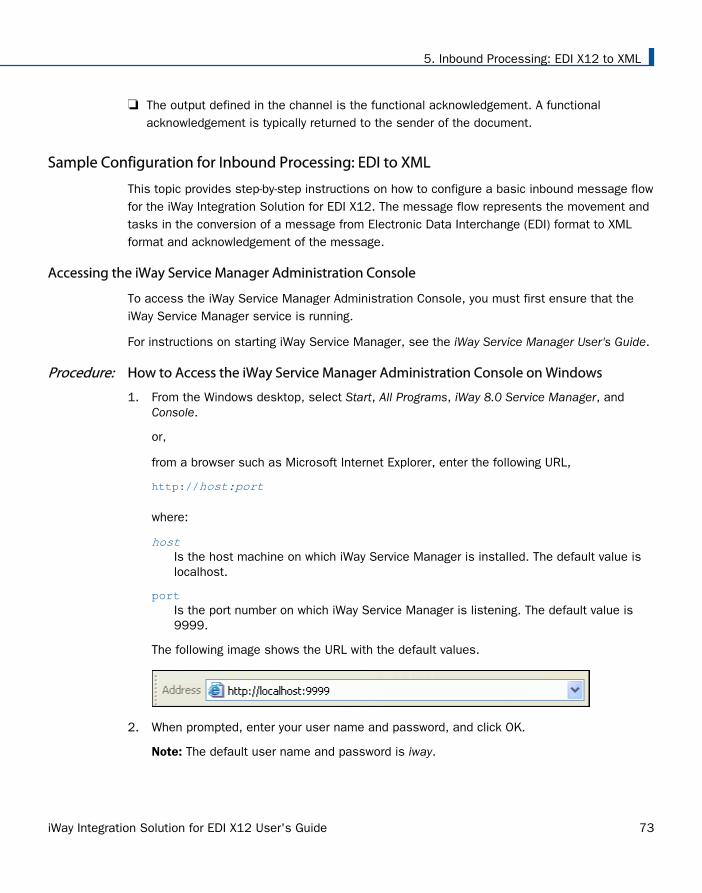
The output defined in the channel is the functional acknowledgement. A functionalacknowledgement is typically returned to the sender of the document.
Sample Configuration for Inbound Processing: EDI to XML
This topic provides step-by-step instructions on how to configure a basic inbound message flowfor the iWay Integration Solution for EDI X12. The message flow represents the movement andtasks in the conversion of a message from Electronic Data Interchange (EDI) format to XMLformat and acknowledgement of the message.
Accessing the iWay Service Manager Administration Console
To access the iWay Service Manager Administration Console, you must first ensure that theiWay Service Manager service is running.
For instructions on starting iWay Service Manager, see the iWay Service Manager User's Guide.
Procedure: How to Access the iWay Service Manager Administration Console on Windows
1. From the Windows desktop, select Start, All Programs, iWay 8.0 Service Manager, andConsole.
or,
from a browser such as Microsoft Internet Explorer, enter the following URL,
http://host:port
where:
host Is the host machine on which iWay Service Manager is installed. The default value islocalhost.
port Is the port number on which iWay Service Manager is listening. The default value is9999.
The following image shows the URL with the default values.
2. When prompted, enter your user name and password, and click OK.
Note: The default user name and password is iway.
5. Inbound Processing: EDI X12 to XML
iWay Integration Solution for EDI X12 User's Guide 73
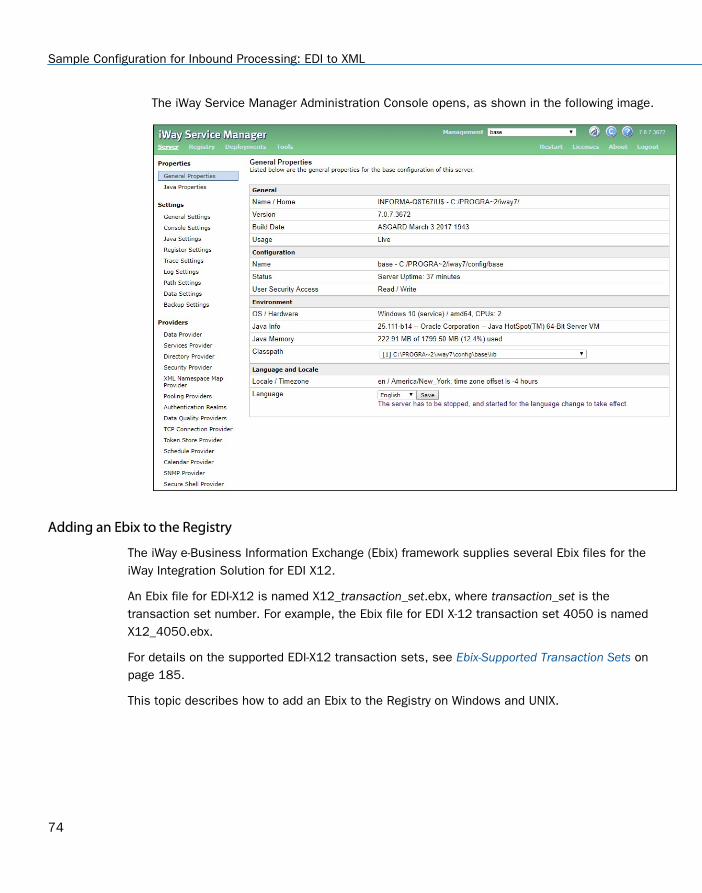
The iWay Service Manager Administration Console opens, as shown in the following image.
Adding an Ebix to the Registry
The iWay e-Business Information Exchange (Ebix) framework supplies several Ebix files for theiWay Integration Solution for EDI X12.
An Ebix file for EDI-X12 is named X12_transaction_set.ebx, where transaction_set is thetransaction set number. For example, the Ebix file for EDI X-12 transaction set 4050 is namedX12_4050.ebx.
For details on the supported EDI-X12 transaction sets, see Ebix-Supported Transaction Sets onpage 185.
This topic describes how to add an Ebix to the Registry on Windows and UNIX.
Sample Configuration for Inbound Processing: EDI to XML
74
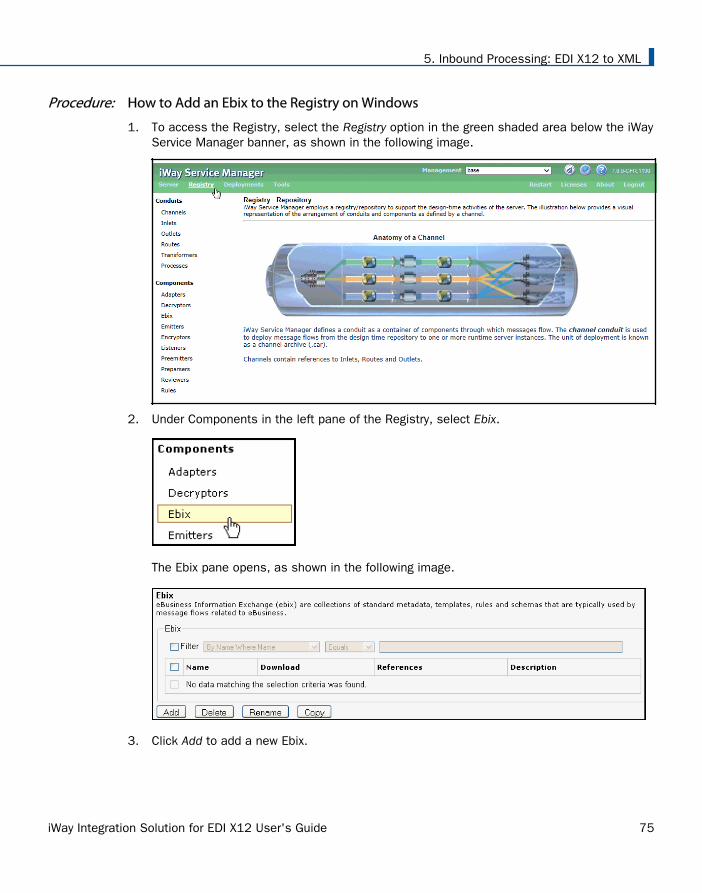
Procedure: How to Add an Ebix to the Registry on Windows
1. To access the Registry, select the Registry option in the green shaded area below the iWayService Manager banner, as shown in the following image.
2. Under Components in the left pane of the Registry, select Ebix.
The Ebix pane opens, as shown in the following image.
3. Click Add to add a new Ebix.
5. Inbound Processing: EDI X12 to XML
iWay Integration Solution for EDI X12 User's Guide 75
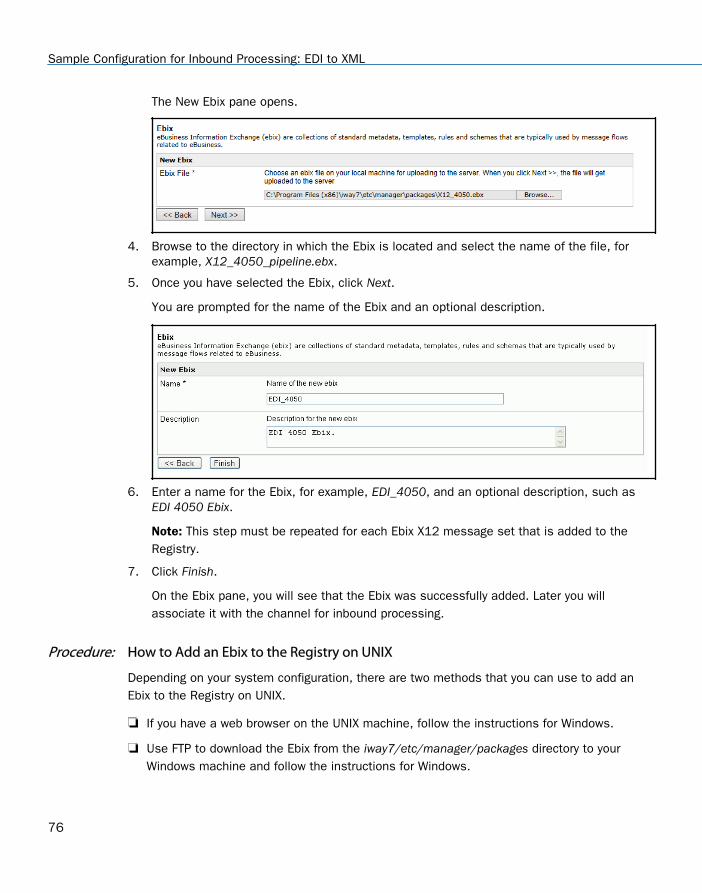
The New Ebix pane opens.
4. Browse to the directory in which the Ebix is located and select the name of the file, forexample, X12_4050_pipeline.ebx.
5. Once you have selected the Ebix, click Next.
You are prompted for the name of the Ebix and an optional description.
6. Enter a name for the Ebix, for example, EDI_4050, and an optional description, such asEDI 4050 Ebix.
Note: This step must be repeated for each Ebix X12 message set that is added to theRegistry.
7. Click Finish.
On the Ebix pane, you will see that the Ebix was successfully added. Later you willassociate it with the channel for inbound processing.
Procedure: How to Add an Ebix to the Registry on UNIX
Depending on your system configuration, there are two methods that you can use to add anEbix to the Registry on UNIX.
If you have a web browser on the UNIX machine, follow the instructions for Windows.
Use FTP to download the Ebix from the iway7/etc/manager/packages directory to yourWindows machine and follow the instructions for Windows.
Sample Configuration for Inbound Processing: EDI to XML
76
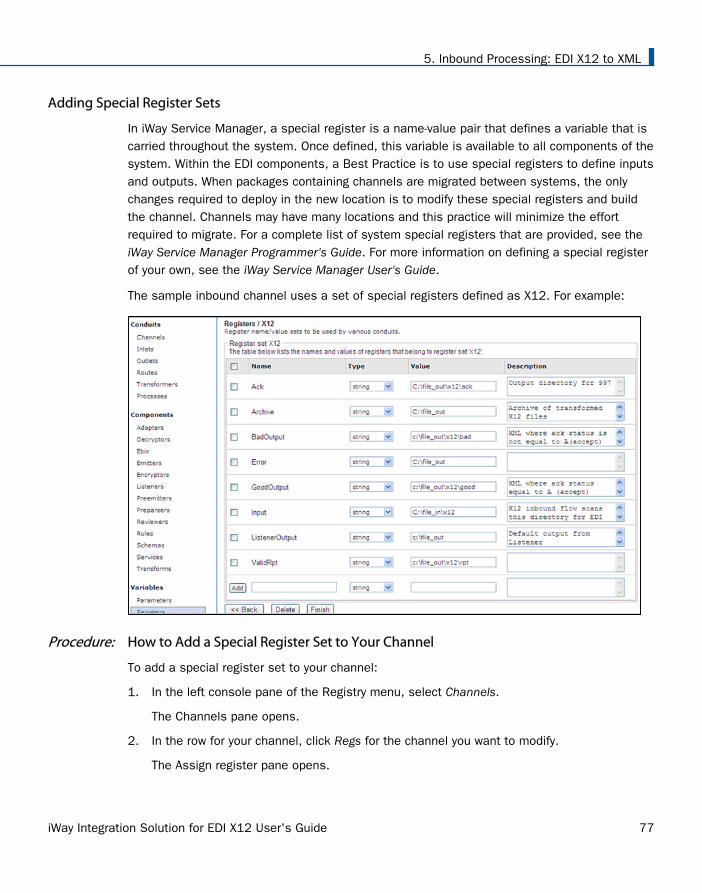
Adding Special Register Sets
In iWay Service Manager, a special register is a name-value pair that defines a variable that iscarried throughout the system. Once defined, this variable is available to all components of thesystem. Within the EDI components, a Best Practice is to use special registers to define inputsand outputs. When packages containing channels are migrated between systems, the onlychanges required to deploy in the new location is to modify these special registers and buildthe channel. Channels may have many locations and this practice will minimize the effortrequired to migrate. For a complete list of system special registers that are provided, see theiWay Service Manager Programmer's Guide. For more information on defining a special registerof your own, see the iWay Service Manager User's Guide.
The sample inbound channel uses a set of special registers defined as X12. For example:
Procedure: How to Add a Special Register Set to Your Channel
To add a special register set to your channel:
1. In the left console pane of the Registry menu, select Channels.
The Channels pane opens.
2. In the row for your channel, click Regs for the channel you want to modify.
The Assign register pane opens.
5. Inbound Processing: EDI X12 to XML
iWay Integration Solution for EDI X12 User's Guide 77
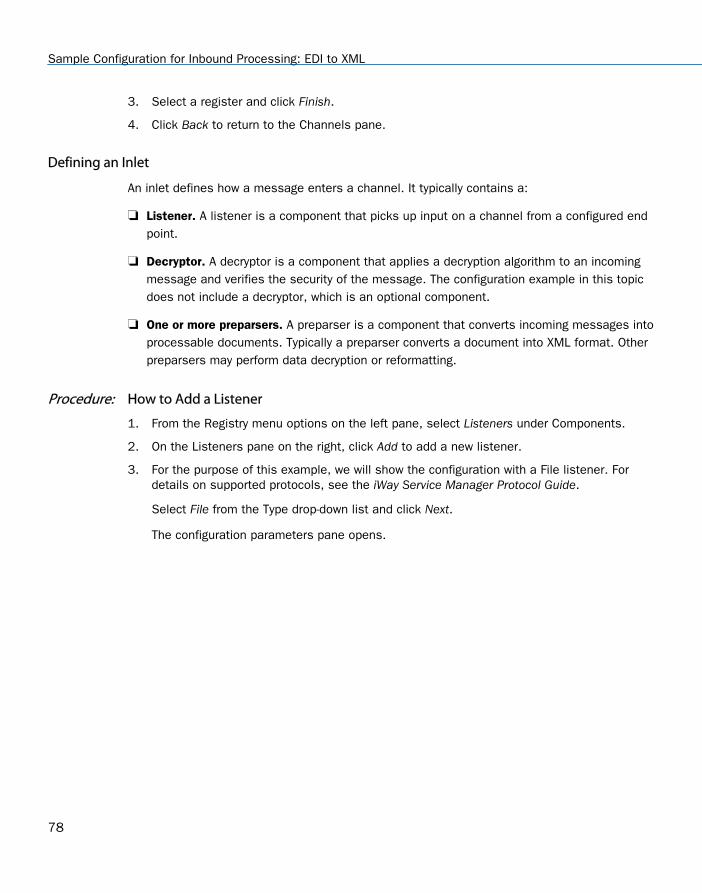
3. Select a register and click Finish.
4. Click Back to return to the Channels pane.
Defining an Inlet
An inlet defines how a message enters a channel. It typically contains a:
Listener. A listener is a component that picks up input on a channel from a configured endpoint.
Decryptor. A decryptor is a component that applies a decryption algorithm to an incomingmessage and verifies the security of the message. The configuration example in this topicdoes not include a decryptor, which is an optional component.
One or more preparsers. A preparser is a component that converts incoming messages intoprocessable documents. Typically a preparser converts a document into XML format. Otherpreparsers may perform data decryption or reformatting.
Procedure: How to Add a Listener
1. From the Registry menu options on the left pane, select Listeners under Components.
2. On the Listeners pane on the right, click Add to add a new listener.
3. For the purpose of this example, we will show the configuration with a File listener. Fordetails on supported protocols, see the iWay Service Manager Protocol Guide.
Select File from the Type drop-down list and click Next.
The configuration parameters pane opens.
Sample Configuration for Inbound Processing: EDI to XML
78
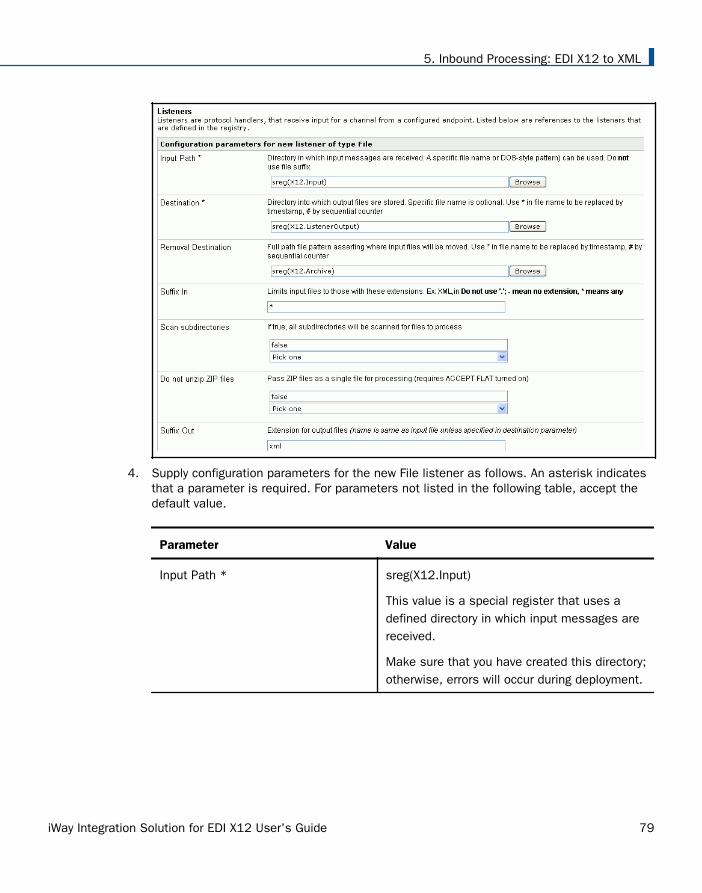
4. Supply configuration parameters for the new File listener as follows. An asterisk indicatesthat a parameter is required. For parameters not listed in the following table, accept thedefault value.
Parameter Value
Input Path * sreg(X12.Input)
This value is a special register that uses adefined directory in which input messages arereceived.
Make sure that you have created this directory;otherwise, errors will occur during deployment.
5. Inbound Processing: EDI X12 to XML
iWay Integration Solution for EDI X12 User's Guide 79
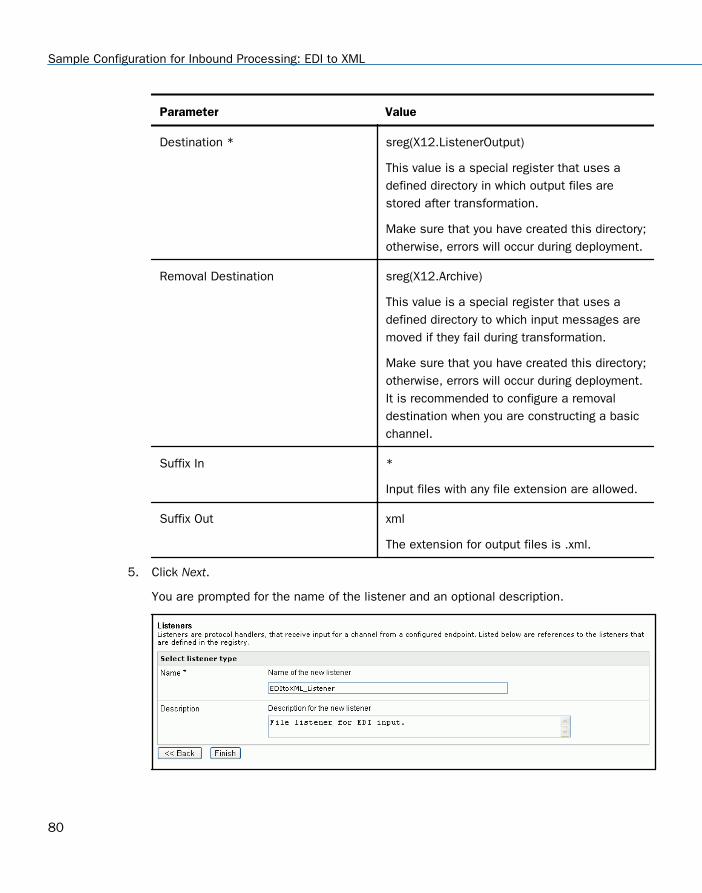
Parameter Value
Destination * sreg(X12.ListenerOutput)
This value is a special register that uses adefined directory in which output files arestored after transformation.
Make sure that you have created this directory;otherwise, errors will occur during deployment.
Removal Destination sreg(X12.Archive)
This value is a special register that uses adefined directory to which input messages aremoved if they fail during transformation.
Make sure that you have created this directory;otherwise, errors will occur during deployment.It is recommended to configure a removaldestination when you are constructing a basicchannel.
Suffix In *
Input files with any file extension are allowed.
Suffix Out xml
The extension for output files is .xml.
5. Click Next.
You are prompted for the name of the listener and an optional description.
Sample Configuration for Inbound Processing: EDI to XML
80

6. On the Listeners pane, enter the name of the new listener, EDItoXML_Listener, and anoptional description. Then click Finish to add the listener.In a later step, you will associate this listener with the inlet.
Procedure: How to Add a Preparser
1. From the Registry menu options, select Preparsers under Components.
2. On the Preparsers pane, click Add to add a new preparser.You are prompted for the type of preparser.
3. Select EDIX12SplitterPreParser (com.ibi.preparsers.EDISplitPP) from the Type drop-downlist.
The EDIX12SplitterPreParser parses an EDI input file with one or more ISAs and multipletransaction sets (STs), and creates multiple XML output files. One XML output file isproduced for each transaction set. You can also use the EDIX12SplitterPreParser if thereis only one transaction set in an ISA.
For details on the supported EDI-X12 transaction sets, see Ebix-Supported TransactionSets on page 185.
4. Click Next.
5. Inbound Processing: EDI X12 to XML
iWay Integration Solution for EDI X12 User's Guide 81
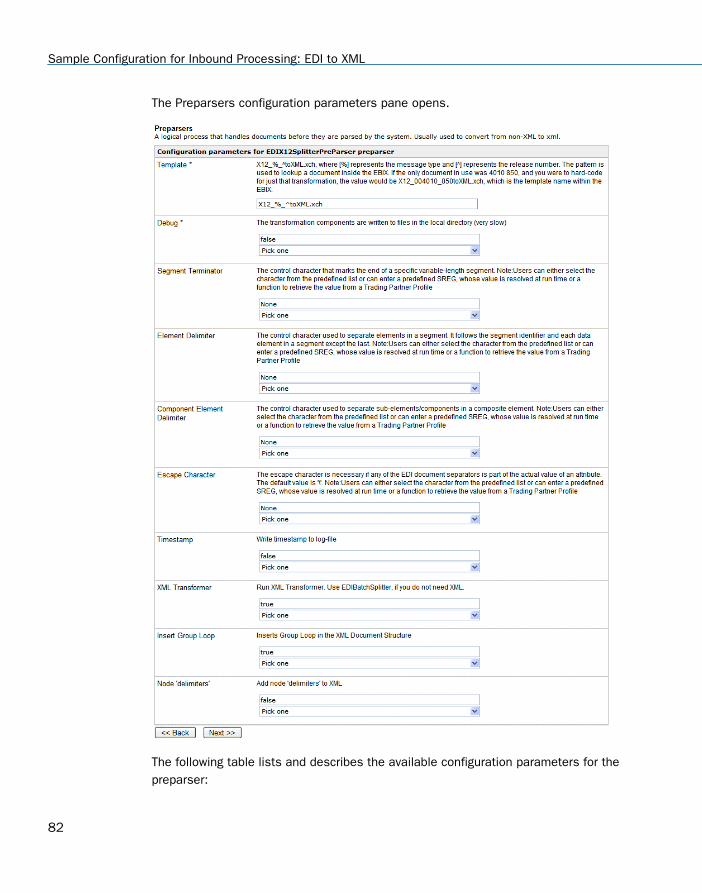
The Preparsers configuration parameters pane opens.
The following table lists and describes the available configuration parameters for thepreparser:
Sample Configuration for Inbound Processing: EDI to XML
82
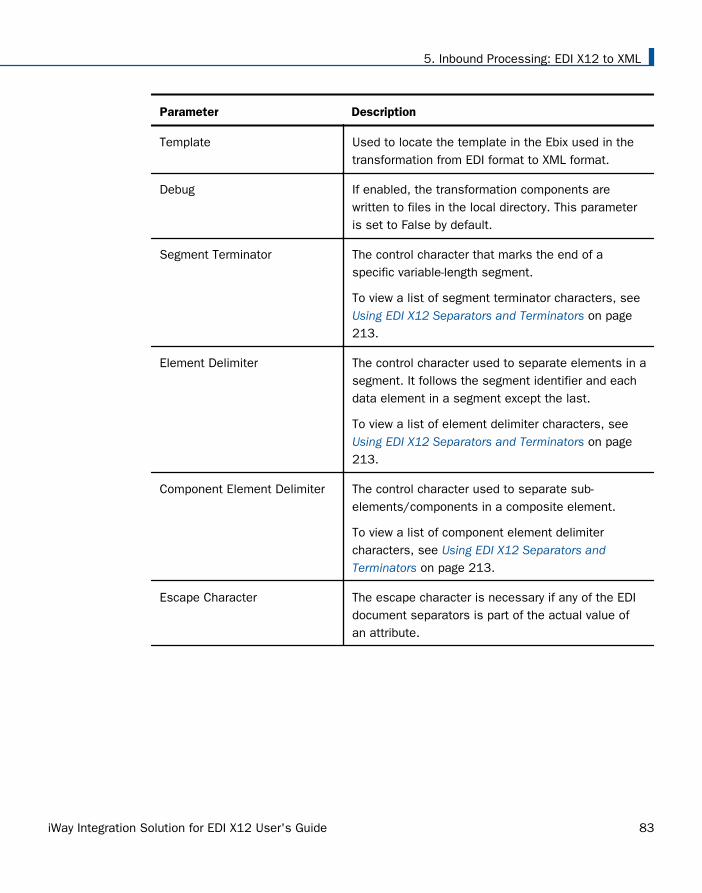
Parameter Description
Template Used to locate the template in the Ebix used in thetransformation from EDI format to XML format.
Debug If enabled, the transformation components arewritten to files in the local directory. This parameteris set to False by default.
Segment Terminator The control character that marks the end of aspecific variable-length segment.
To view a list of segment terminator characters, see Using EDI X12 Separators and Terminators on page213.
Element Delimiter The control character used to separate elements in asegment. It follows the segment identifier and eachdata element in a segment except the last.
To view a list of element delimiter characters, see Using EDI X12 Separators and Terminators on page213.
Component Element Delimiter The control character used to separate sub-elements/components in a composite element.
To view a list of component element delimitercharacters, see Using EDI X12 Separators andTerminators on page 213.
Escape Character The escape character is necessary if any of the EDIdocument separators is part of the actual value ofan attribute.
5. Inbound Processing: EDI X12 to XML
iWay Integration Solution for EDI X12 User's Guide 83
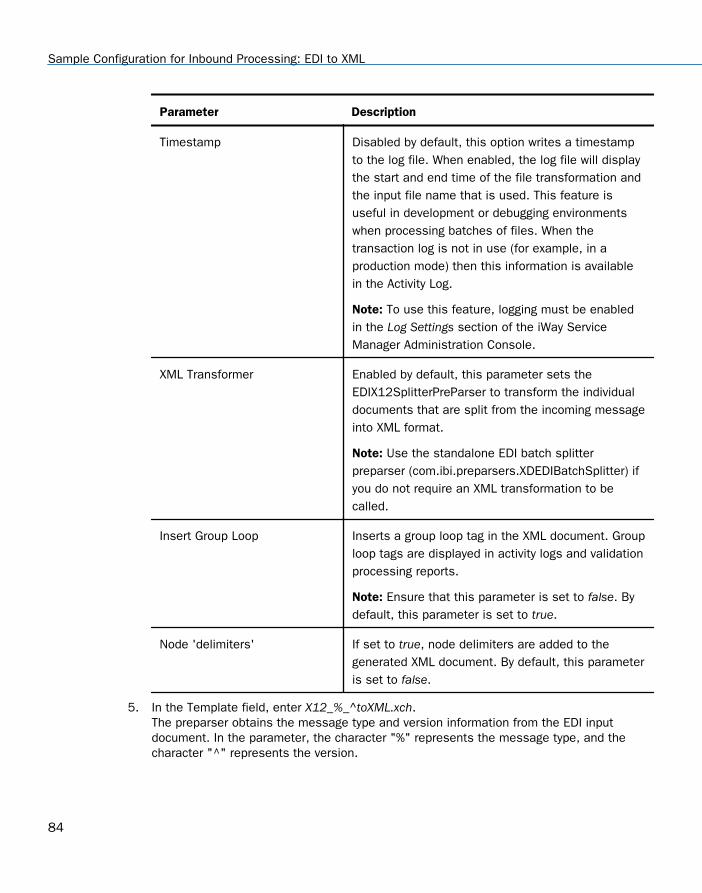
Parameter Description
Timestamp Disabled by default, this option writes a timestampto the log file. When enabled, the log file will displaythe start and end time of the file transformation andthe input file name that is used. This feature isuseful in development or debugging environmentswhen processing batches of files. When thetransaction log is not in use (for example, in aproduction mode) then this information is availablein the Activity Log.
Note: To use this feature, logging must be enabledin the Log Settings section of the iWay ServiceManager Administration Console.
XML Transformer Enabled by default, this parameter sets theEDIX12SplitterPreParser to transform the individualdocuments that are split from the incoming messageinto XML format.
Note: Use the standalone EDI batch splitterpreparser (com.ibi.preparsers.XDEDIBatchSplitter) ifyou do not require an XML transformation to becalled.
Insert Group Loop Inserts a group loop tag in the XML document. Grouploop tags are displayed in activity logs and validationprocessing reports.
Note: Ensure that this parameter is set to false. Bydefault, this parameter is set to true.
Node 'delimiters' If set to true, node delimiters are added to thegenerated XML document. By default, this parameteris set to false.
5. In the Template field, enter X12_%_^toXML.xch.The preparser obtains the message type and version information from the EDI inputdocument. In the parameter, the character "%" represents the message type, and thecharacter "^" represents the version.
Sample Configuration for Inbound Processing: EDI to XML
84
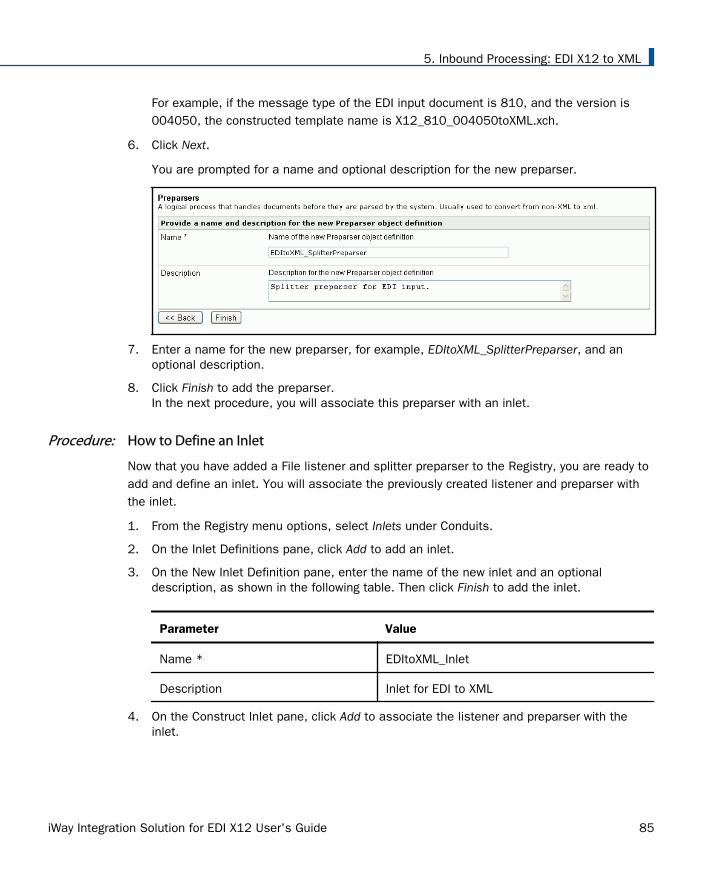
For example, if the message type of the EDI input document is 810, and the version is004050, the constructed template name is X12_810_004050toXML.xch.
6. Click Next.
You are prompted for a name and optional description for the new preparser.
7. Enter a name for the new preparser, for example, EDItoXML_SplitterPreparser, and anoptional description.
8. Click Finish to add the preparser.In the next procedure, you will associate this preparser with an inlet.
Procedure: How to Define an Inlet
Now that you have added a File listener and splitter preparser to the Registry, you are ready toadd and define an inlet. You will associate the previously created listener and preparser withthe inlet.
1. From the Registry menu options, select Inlets under Conduits.
2. On the Inlet Definitions pane, click Add to add an inlet.
3. On the New Inlet Definition pane, enter the name of the new inlet and an optionaldescription, as shown in the following table. Then click Finish to add the inlet.
Parameter Value
Name * EDItoXML_Inlet
Description Inlet for EDI to XML
4. On the Construct Inlet pane, click Add to associate the listener and preparser with theinlet.
5. Inbound Processing: EDI X12 to XML
iWay Integration Solution for EDI X12 User's Guide 85
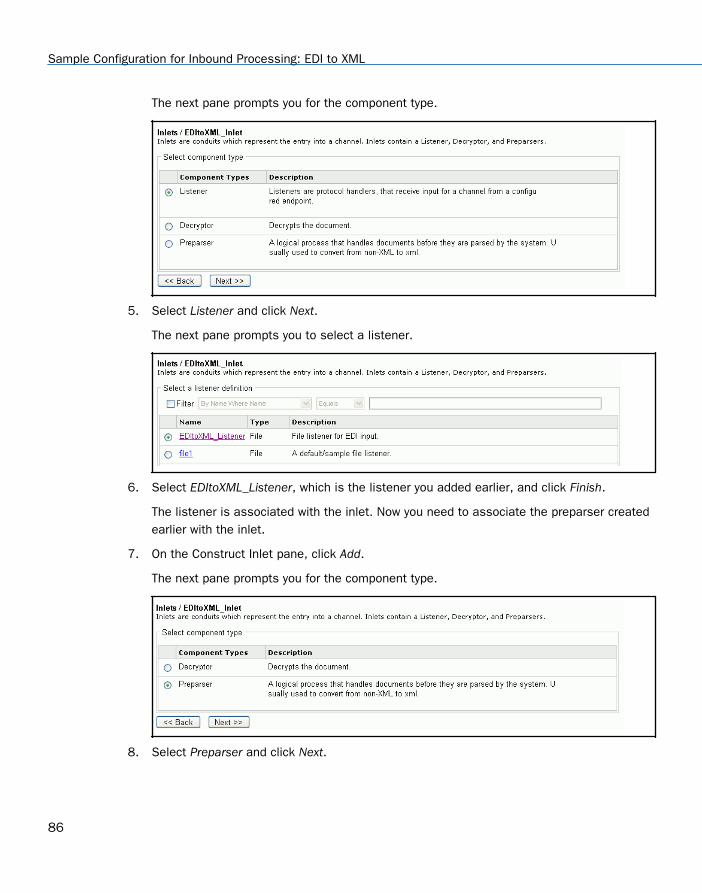
The next pane prompts you for the component type.
5. Select Listener and click Next.
The next pane prompts you to select a listener.
6. Select EDItoXML_Listener, which is the listener you added earlier, and click Finish.
The listener is associated with the inlet. Now you need to associate the preparser createdearlier with the inlet.
7. On the Construct Inlet pane, click Add.
The next pane prompts you for the component type.
8. Select Preparser and click Next.
Sample Configuration for Inbound Processing: EDI to XML
86
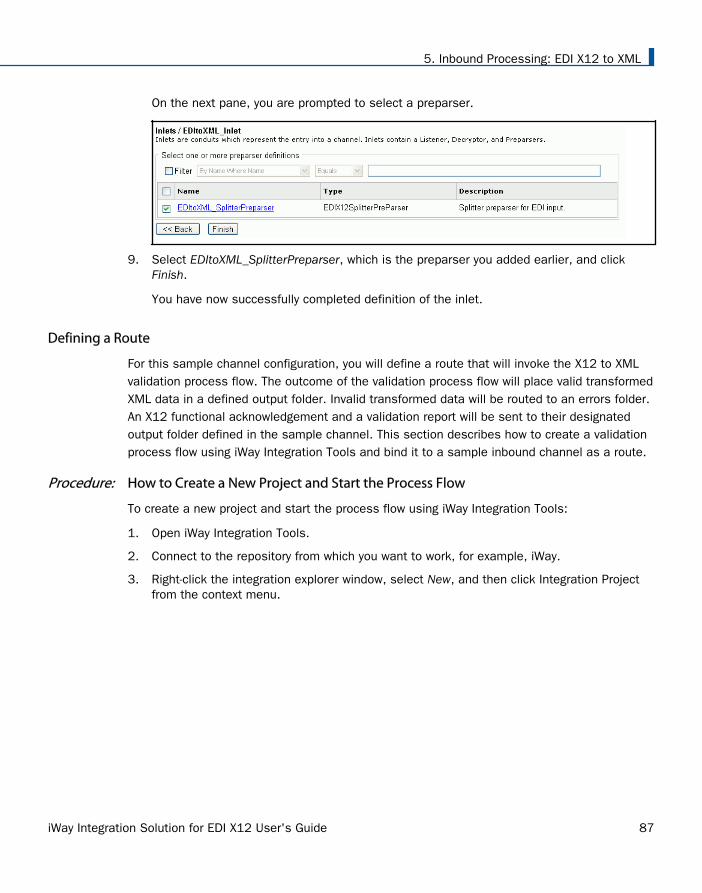
On the next pane, you are prompted to select a preparser.
9. Select EDItoXML_SplitterPreparser, which is the preparser you added earlier, and clickFinish.
You have now successfully completed definition of the inlet.
Defining a Route
For this sample channel configuration, you will define a route that will invoke the X12 to XMLvalidation process flow. The outcome of the validation process flow will place valid transformedXML data in a defined output folder. Invalid transformed data will be routed to an errors folder.An X12 functional acknowledgement and a validation report will be sent to their designatedoutput folder defined in the sample channel. This section describes how to create a validationprocess flow using iWay Integration Tools and bind it to a sample inbound channel as a route.
Procedure: How to Create a New Project and Start the Process Flow
To create a new project and start the process flow using iWay Integration Tools:
1. Open iWay Integration Tools.
2. Connect to the repository from which you want to work, for example, iWay.
3. Right-click the integration explorer window, select New, and then click Integration Projectfrom the context menu.
5. Inbound Processing: EDI X12 to XML
iWay Integration Solution for EDI X12 User's Guide 87
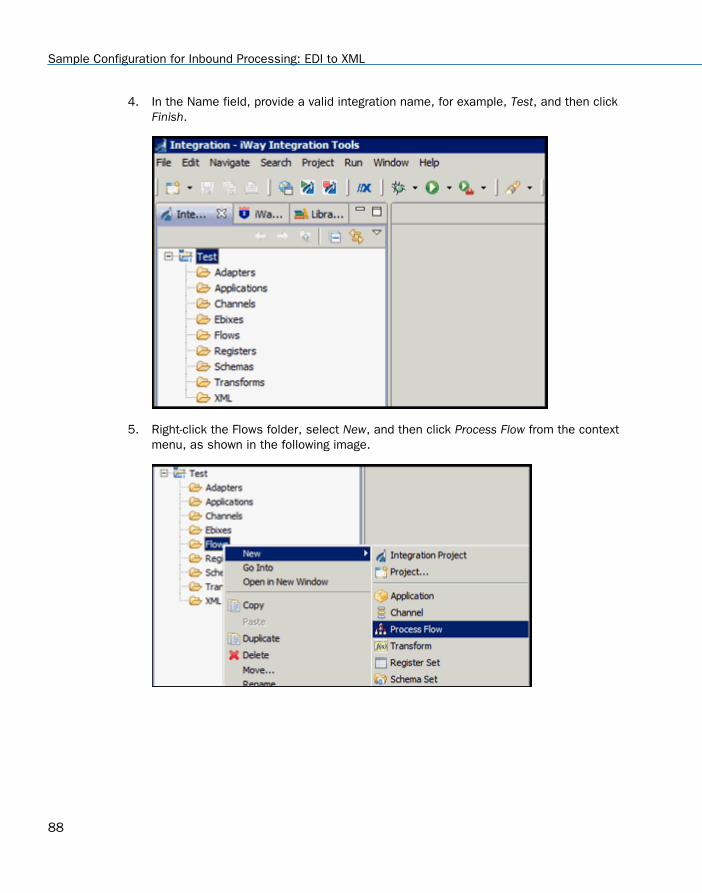
4. In the Name field, provide a valid integration name, for example, Test, and then clickFinish.
5. Right-click the Flows folder, select New, and then click Process Flow from the contextmenu, as shown in the following image.
Sample Configuration for Inbound Processing: EDI to XML
88
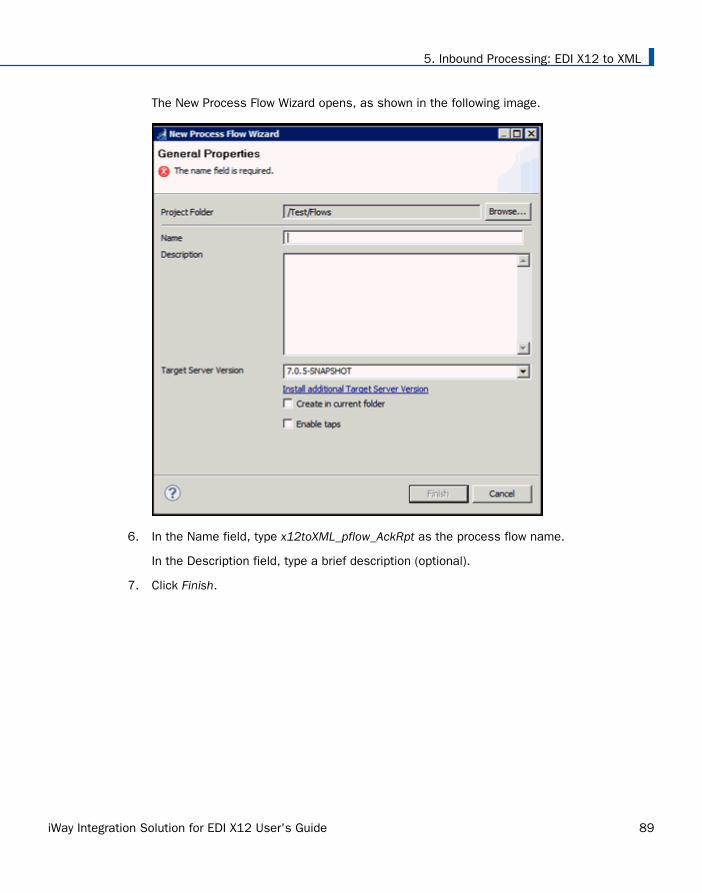
The New Process Flow Wizard opens, as shown in the following image.
6. In the Name field, type x12toXML_pflow_AckRpt as the process flow name.
In the Description field, type a brief description (optional).
7. Click Finish.
5. Inbound Processing: EDI X12 to XML
iWay Integration Solution for EDI X12 User's Guide 89

The new x12toXML_pflow_AckRpt node appears under the Flows folder, and the workspacedisplays a Start and End object with a relation established in between, as shown in thefollowing image.
You are ready to build the x12toXML_pflow_AckRpt validation process flow by configuringobjects to it and specifying their relationships.
Sample Configuration for Inbound Processing: EDI to XML
90
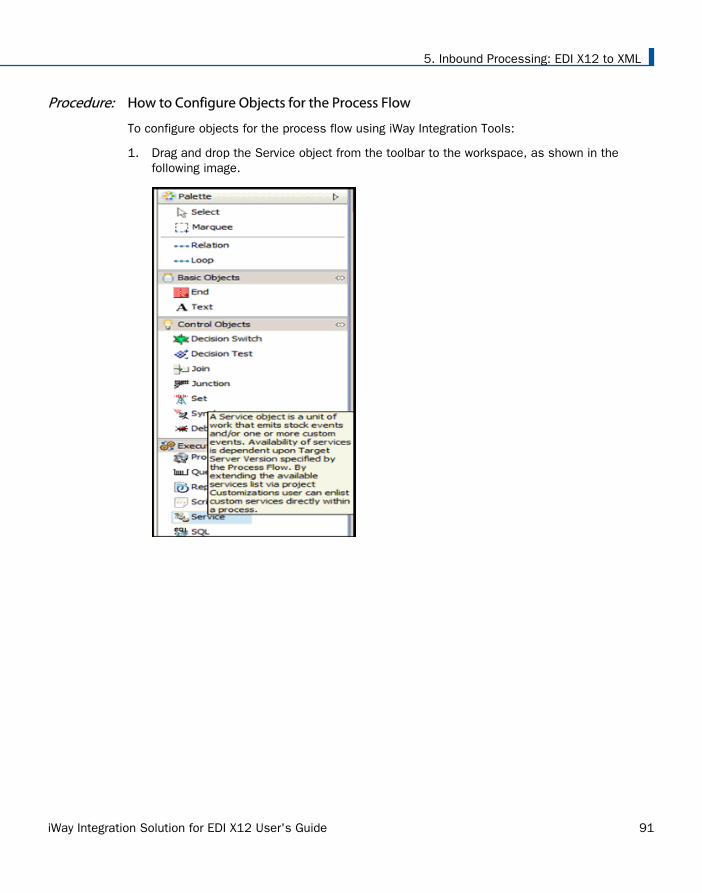
Procedure: How to Configure Objects for the Process Flow
To configure objects for the process flow using iWay Integration Tools:
1. Drag and drop the Service object from the toolbar to the workspace, as shown in thefollowing image.
5. Inbound Processing: EDI X12 to XML
iWay Integration Solution for EDI X12 User's Guide 91

The New Service Object dialog box opens.
2. In the Name field, type X12_Validation_Rpt, and a brief description (optional) in theDescription field and click Next.
The Service Object Type wizard opens.
Sample Configuration for Inbound Processing: EDI to XML
92

3. Select Class Name and enter com.ibi.agents.XDX12ValidationReportAgent and click Next, asshown in the following image.
4. Click Finish.
The new Service object (X12_Validation_Rpt) appears in the workspace.
5. Remove the relation (link) between the Start and End objects.
5. Inbound Processing: EDI X12 to XML
iWay Integration Solution for EDI X12 User's Guide 93
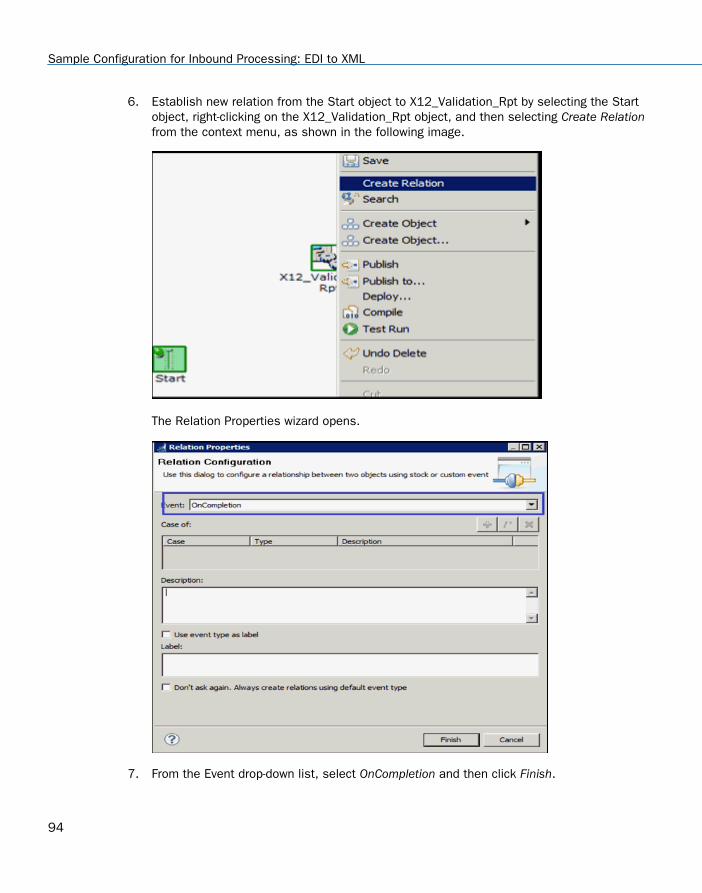
6. Establish new relation from the Start object to X12_Validation_Rpt by selecting the Startobject, right-clicking on the X12_Validation_Rpt object, and then selecting Create Relationfrom the context menu, as shown in the following image.
The Relation Properties wizard opens.
7. From the Event drop-down list, select OnCompletion and then click Finish.
Sample Configuration for Inbound Processing: EDI to XML
94
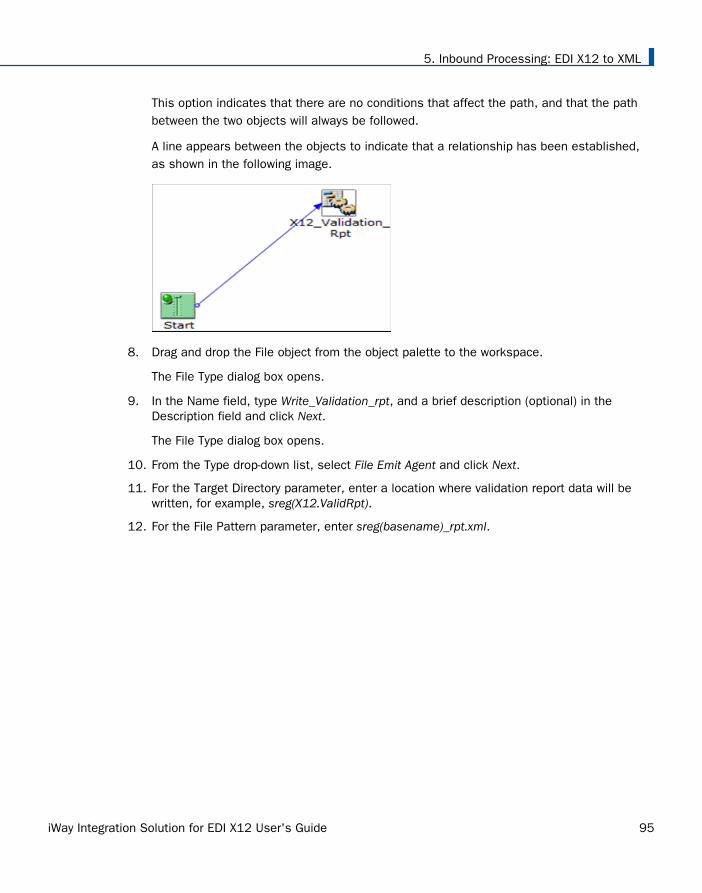
This option indicates that there are no conditions that affect the path, and that the pathbetween the two objects will always be followed.
A line appears between the objects to indicate that a relationship has been established,as shown in the following image.
8. Drag and drop the File object from the object palette to the workspace.
The File Type dialog box opens.
9. In the Name field, type Write_Validation_rpt, and a brief description (optional) in theDescription field and click Next.
The File Type dialog box opens.
10. From the Type drop-down list, select File Emit Agent and click Next.
11. For the Target Directory parameter, enter a location where validation report data will bewritten, for example, sreg(X12.ValidRpt).
12. For the File Pattern parameter, enter sreg(basename)_rpt.xml.
5. Inbound Processing: EDI X12 to XML
iWay Integration Solution for EDI X12 User's Guide 95
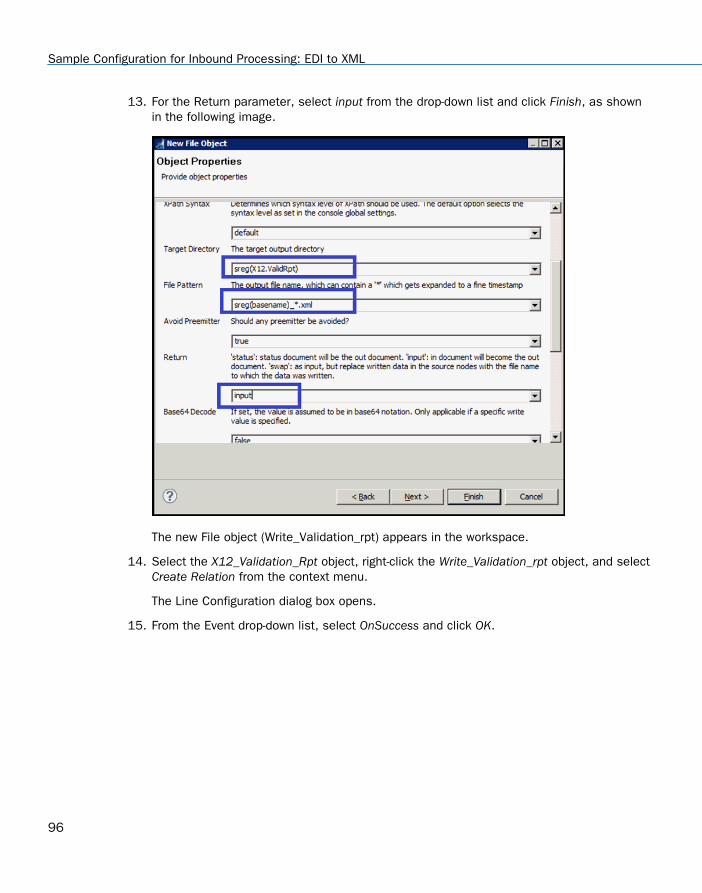
13. For the Return parameter, select input from the drop-down list and click Finish, as shownin the following image.
The new File object (Write_Validation_rpt) appears in the workspace.
14. Select the X12_Validation_Rpt object, right-click the Write_Validation_rpt object, and selectCreate Relation from the context menu.
The Line Configuration dialog box opens.
15. From the Event drop-down list, select OnSuccess and click OK.
Sample Configuration for Inbound Processing: EDI to XML
96
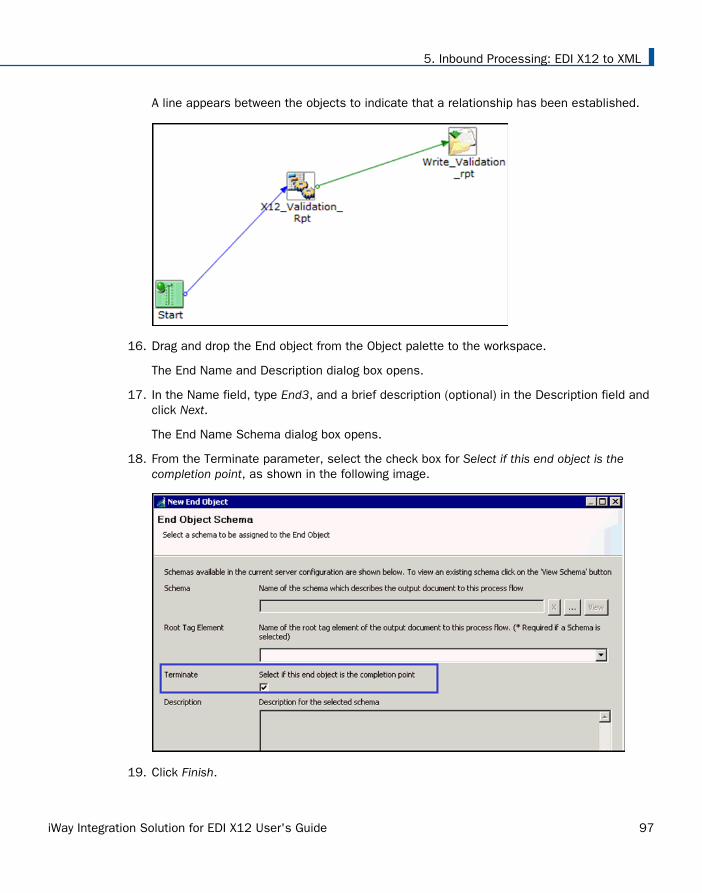
A line appears between the objects to indicate that a relationship has been established.
16. Drag and drop the End object from the Object palette to the workspace.
The End Name and Description dialog box opens.
17. In the Name field, type End3, and a brief description (optional) in the Description field andclick Next.
The End Name Schema dialog box opens.
18. From the Terminate parameter, select the check box for Select if this end object is thecompletion point, as shown in the following image.
19. Click Finish.
5. Inbound Processing: EDI X12 to XML
iWay Integration Solution for EDI X12 User's Guide 97
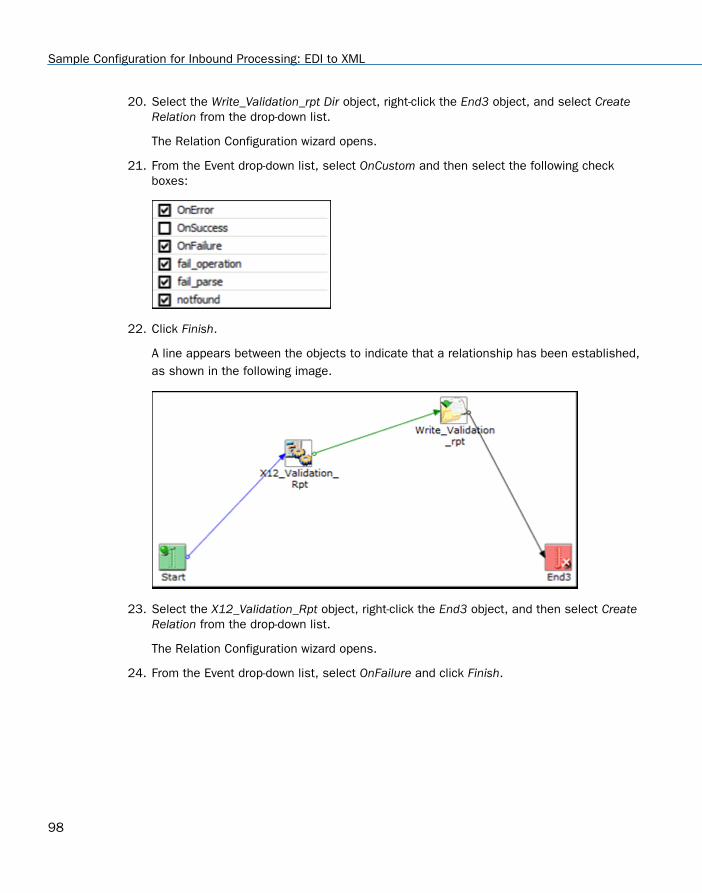
20. Select the Write_Validation_rpt Dir object, right-click the End3 object, and select CreateRelation from the drop-down list.
The Relation Configuration wizard opens.
21. From the Event drop-down list, select OnCustom and then select the following checkboxes:
22. Click Finish.
A line appears between the objects to indicate that a relationship has been established,as shown in the following image.
23. Select the X12_Validation_Rpt object, right-click the End3 object, and then select CreateRelation from the drop-down list.
The Relation Configuration wizard opens.
24. From the Event drop-down list, select OnFailure and click Finish.
Sample Configuration for Inbound Processing: EDI to XML
98
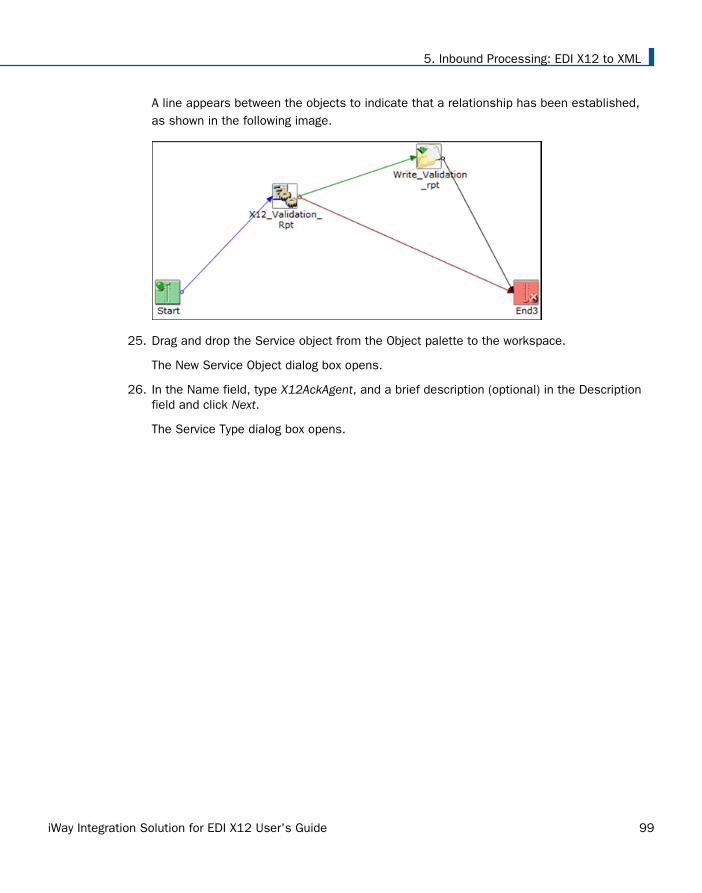
A line appears between the objects to indicate that a relationship has been established,as shown in the following image.
25. Drag and drop the Service object from the Object palette to the workspace.
The New Service Object dialog box opens.
26. In the Name field, type X12AckAgent, and a brief description (optional) in the Descriptionfield and click Next.
The Service Type dialog box opens.
5. Inbound Processing: EDI X12 to XML
iWay Integration Solution for EDI X12 User's Guide 99
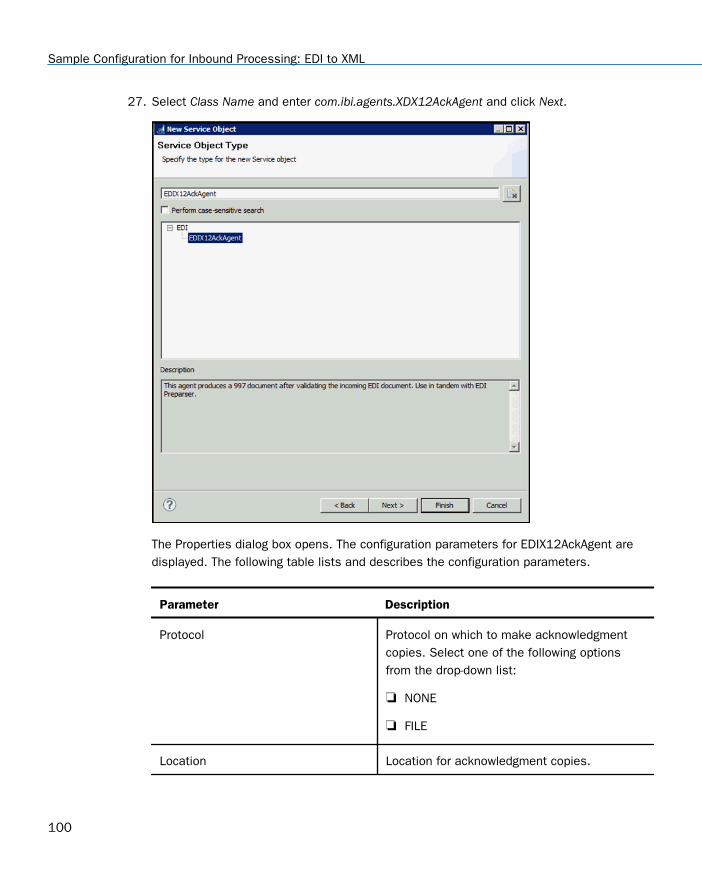
27. Select Class Name and enter com.ibi.agents.XDX12AckAgent and click Next.
The Properties dialog box opens. The configuration parameters for EDIX12AckAgent aredisplayed. The following table lists and describes the configuration parameters.
Parameter Description
Protocol Protocol on which to make acknowledgmentcopies. Select one of the following optionsfrom the drop-down list:
NONE
FILE
Location Location for acknowledgment copies.
Sample Configuration for Inbound Processing: EDI to XML
100
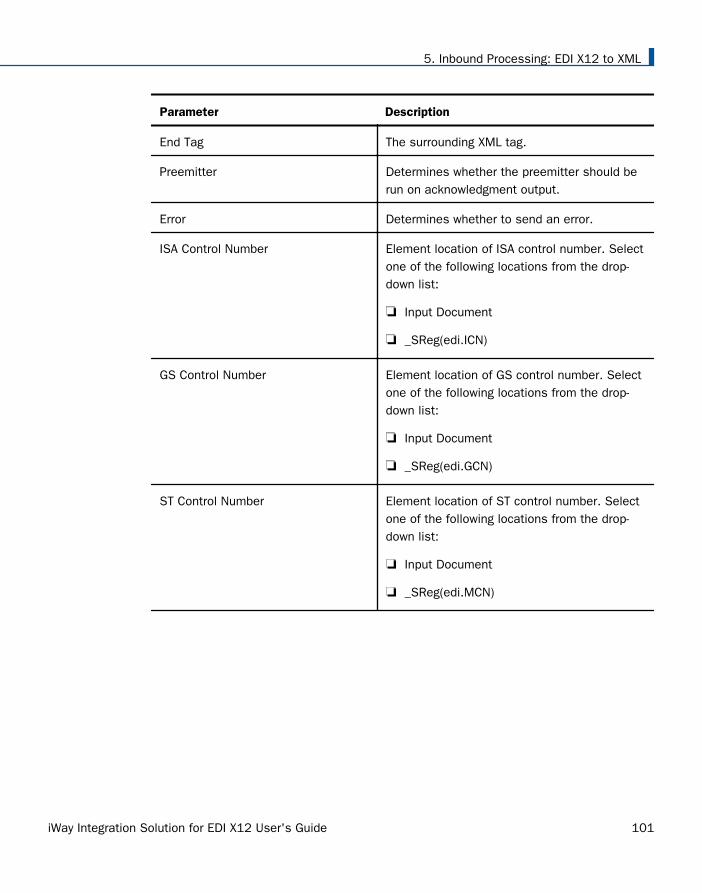
Parameter Description
End Tag The surrounding XML tag.
Preemitter Determines whether the preemitter should berun on acknowledgment output.
Error Determines whether to send an error.
ISA Control Number Element location of ISA control number. Selectone of the following locations from the drop-down list:
Input Document
_SReg(edi.ICN)
GS Control Number Element location of GS control number. Selectone of the following locations from the drop-down list:
Input Document
_SReg(edi.GCN)
ST Control Number Element location of ST control number. Selectone of the following locations from the drop-down list:
Input Document
_SReg(edi.MCN)
5. Inbound Processing: EDI X12 to XML
iWay Integration Solution for EDI X12 User's Guide 101
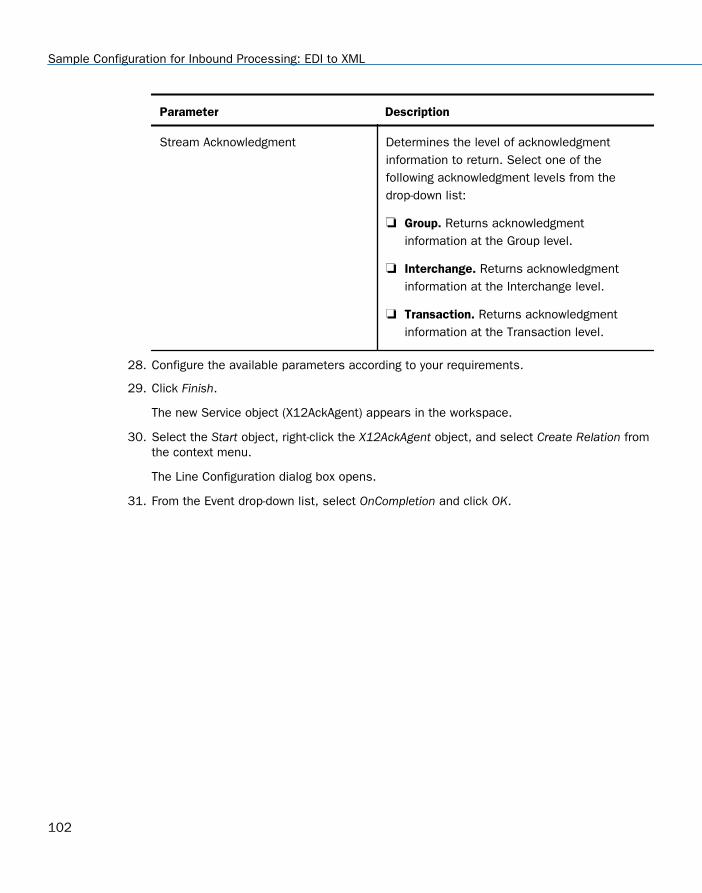
Parameter Description
Stream Acknowledgment Determines the level of acknowledgmentinformation to return. Select one of thefollowing acknowledgment levels from thedrop-down list:
Group. Returns acknowledgmentinformation at the Group level.
Interchange. Returns acknowledgmentinformation at the Interchange level.
Transaction. Returns acknowledgmentinformation at the Transaction level.
28. Configure the available parameters according to your requirements.
29. Click Finish.
The new Service object (X12AckAgent) appears in the workspace.
30. Select the Start object, right-click the X12AckAgent object, and select Create Relation fromthe context menu.
The Line Configuration dialog box opens.
31. From the Event drop-down list, select OnCompletion and click OK.
Sample Configuration for Inbound Processing: EDI to XML
102
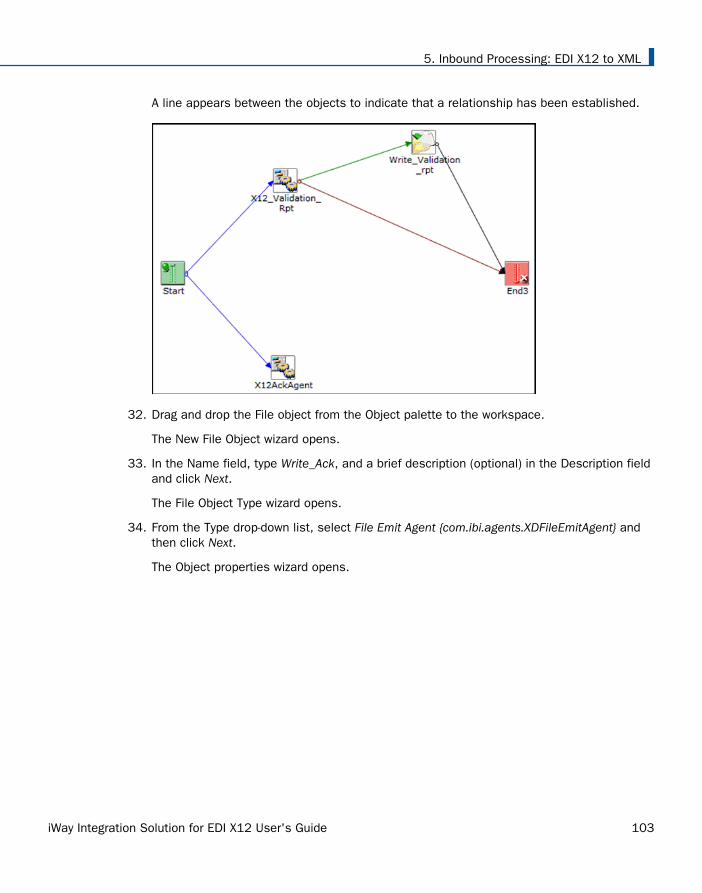
A line appears between the objects to indicate that a relationship has been established.
32. Drag and drop the File object from the Object palette to the workspace.
The New File Object wizard opens.
33. In the Name field, type Write_Ack, and a brief description (optional) in the Description fieldand click Next.
The File Object Type wizard opens.
34. From the Type drop-down list, select File Emit Agent {com.ibi.agents.XDFileEmitAgent} andthen click Next.
The Object properties wizard opens.
5. Inbound Processing: EDI X12 to XML
iWay Integration Solution for EDI X12 User's Guide 103
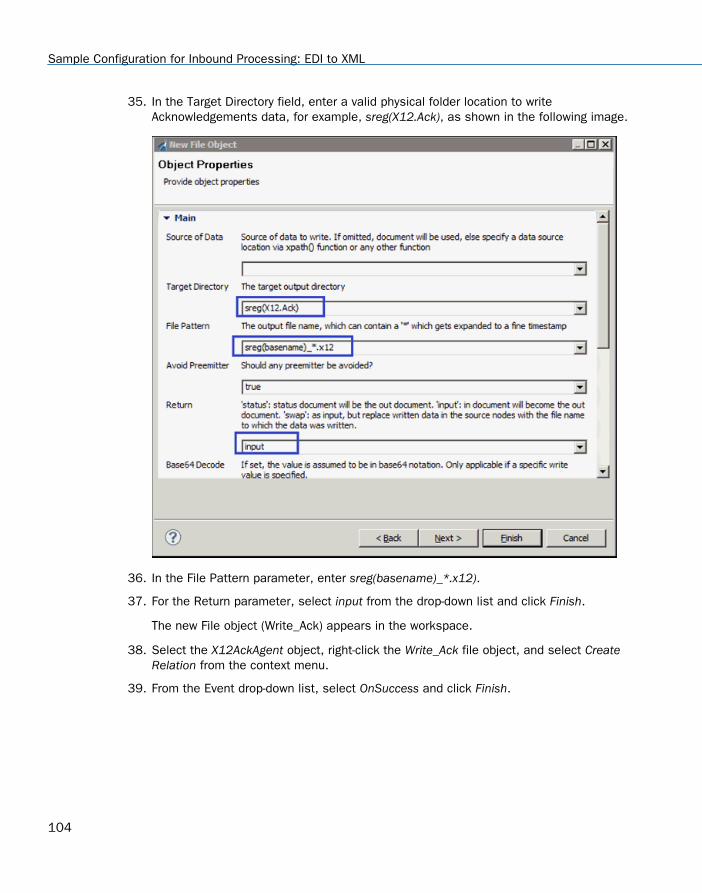
35. In the Target Directory field, enter a valid physical folder location to writeAcknowledgements data, for example, sreg(X12.Ack), as shown in the following image.
36. In the File Pattern parameter, enter sreg(basename)_*.x12).
37. For the Return parameter, select input from the drop-down list and click Finish.
The new File object (Write_Ack) appears in the workspace.
38. Select the X12AckAgent object, right-click the Write_Ack file object, and select CreateRelation from the context menu.
39. From the Event drop-down list, select OnSuccess and click Finish.
Sample Configuration for Inbound Processing: EDI to XML
104
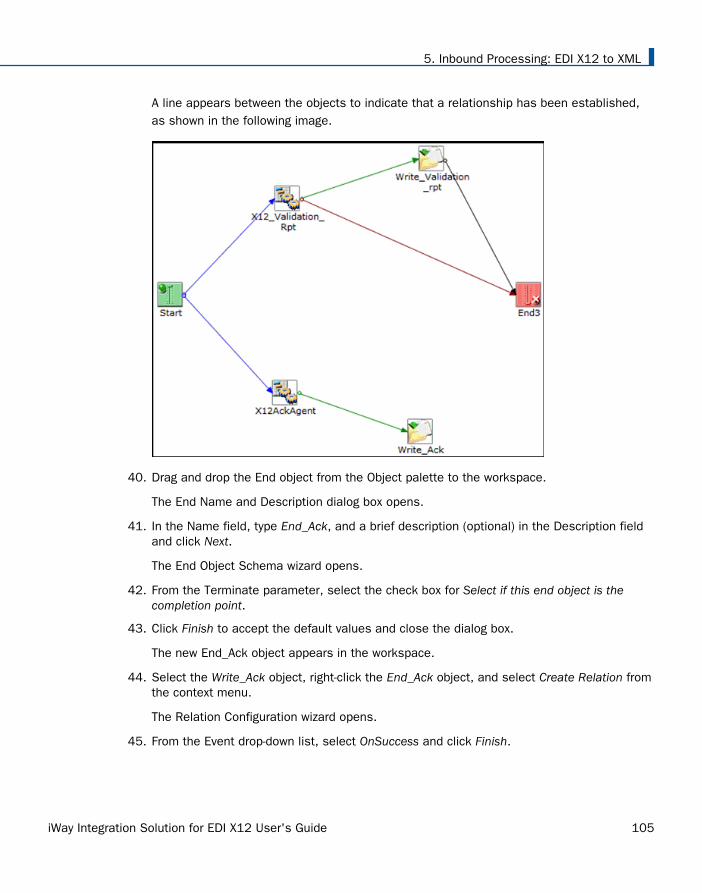
A line appears between the objects to indicate that a relationship has been established,as shown in the following image.
40. Drag and drop the End object from the Object palette to the workspace.
The End Name and Description dialog box opens.
41. In the Name field, type End_Ack, and a brief description (optional) in the Description fieldand click Next.
The End Object Schema wizard opens.
42. From the Terminate parameter, select the check box for Select if this end object is thecompletion point.
43. Click Finish to accept the default values and close the dialog box.
The new End_Ack object appears in the workspace.
44. Select the Write_Ack object, right-click the End_Ack object, and select Create Relation fromthe context menu.
The Relation Configuration wizard opens.
45. From the Event drop-down list, select OnSuccess and click Finish.
5. Inbound Processing: EDI X12 to XML
iWay Integration Solution for EDI X12 User's Guide 105
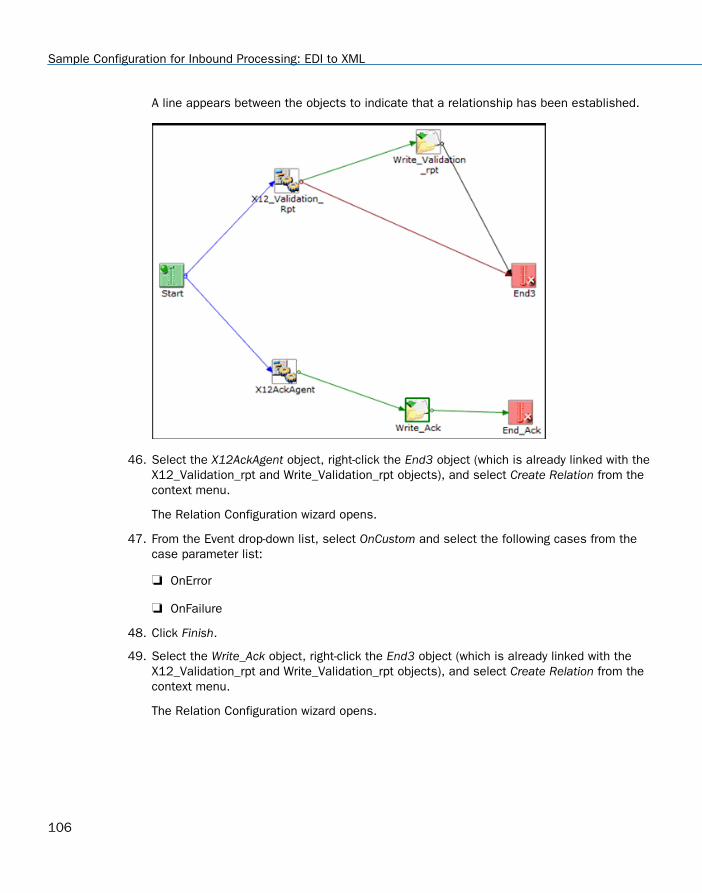
A line appears between the objects to indicate that a relationship has been established.
46. Select the X12AckAgent object, right-click the End3 object (which is already linked with theX12_Validation_rpt and Write_Validation_rpt objects), and select Create Relation from thecontext menu.
The Relation Configuration wizard opens.
47. From the Event drop-down list, select OnCustom and select the following cases from thecase parameter list:
OnError
OnFailure
48. Click Finish.
49. Select the Write_Ack object, right-click the End3 object (which is already linked with theX12_Validation_rpt and Write_Validation_rpt objects), and select Create Relation from thecontext menu.
The Relation Configuration wizard opens.
Sample Configuration for Inbound Processing: EDI to XML
106
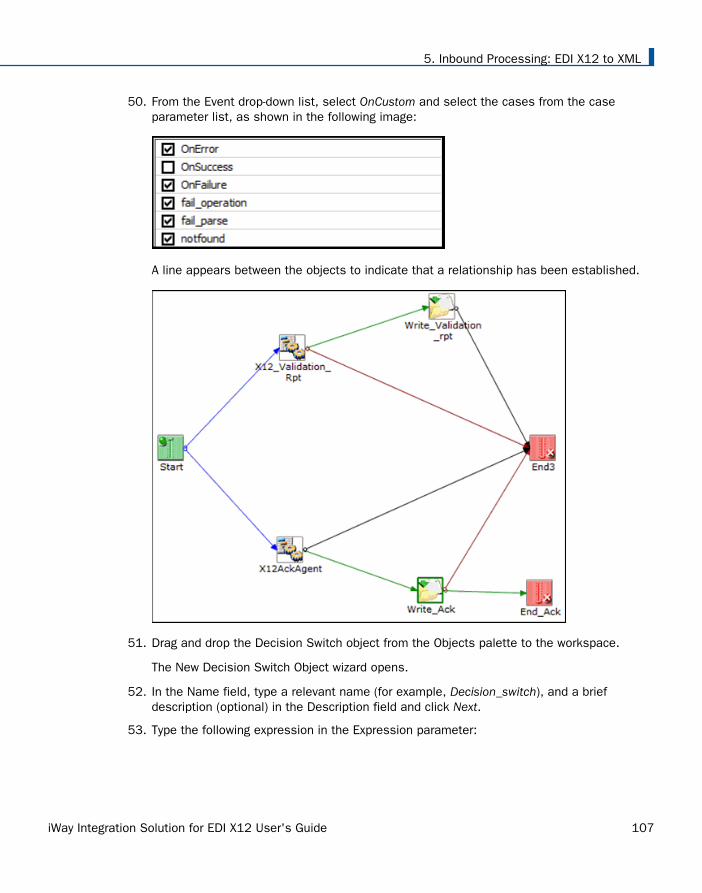
50. From the Event drop-down list, select OnCustom and select the cases from the caseparameter list, as shown in the following image:
A line appears between the objects to indicate that a relationship has been established.
51. Drag and drop the Decision Switch object from the Objects palette to the workspace.
The New Decision Switch Object wizard opens.
52. In the Name field, type a relevant name (for example, Decision_switch), and a briefdescription (optional) in the Description field and click Next.
53. Type the following expression in the Expression parameter:
5. Inbound Processing: EDI X12 to XML
iWay Integration Solution for EDI X12 User's Guide 107
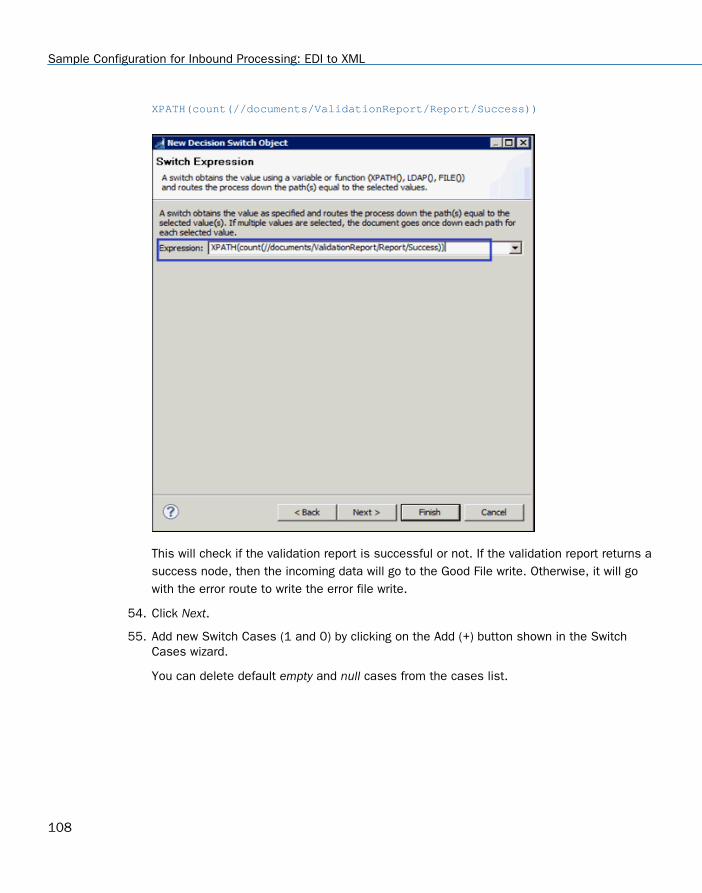
XPATH(count(//documents/ValidationReport/Report/Success))
This will check if the validation report is successful or not. If the validation report returns asuccess node, then the incoming data will go to the Good File write. Otherwise, it will gowith the error route to write the error file write.
54. Click Next.
55. Add new Switch Cases (1 and 0) by clicking on the Add (+) button shown in the SwitchCases wizard.
You can delete default empty and null cases from the cases list.
Sample Configuration for Inbound Processing: EDI to XML
108
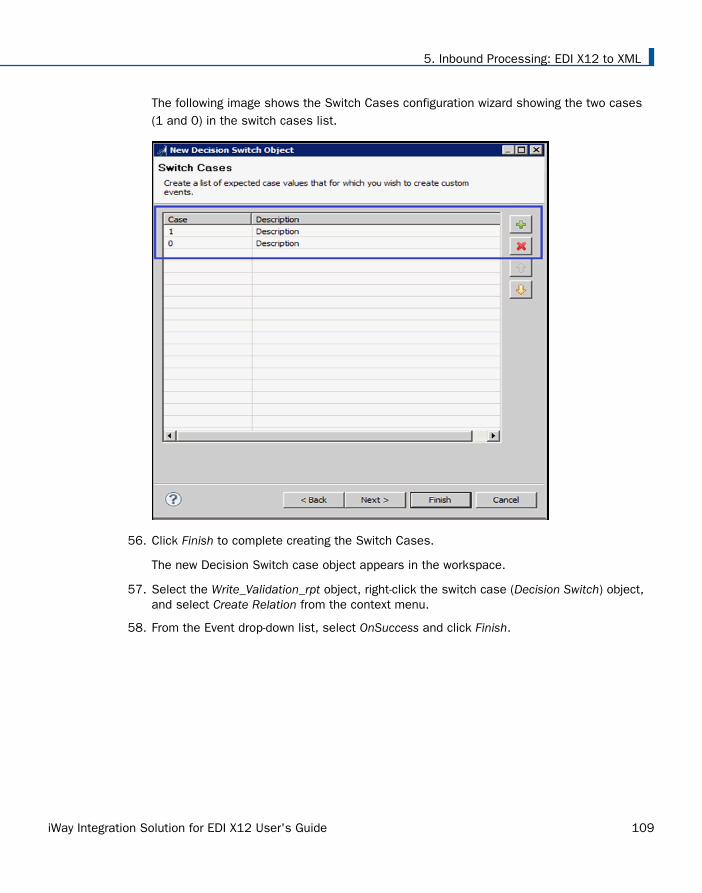
The following image shows the Switch Cases configuration wizard showing the two cases(1 and 0) in the switch cases list.
56. Click Finish to complete creating the Switch Cases.
The new Decision Switch case object appears in the workspace.
57. Select the Write_Validation_rpt object, right-click the switch case (Decision Switch) object,and select Create Relation from the context menu.
58. From the Event drop-down list, select OnSuccess and click Finish.
5. Inbound Processing: EDI X12 to XML
iWay Integration Solution for EDI X12 User's Guide 109
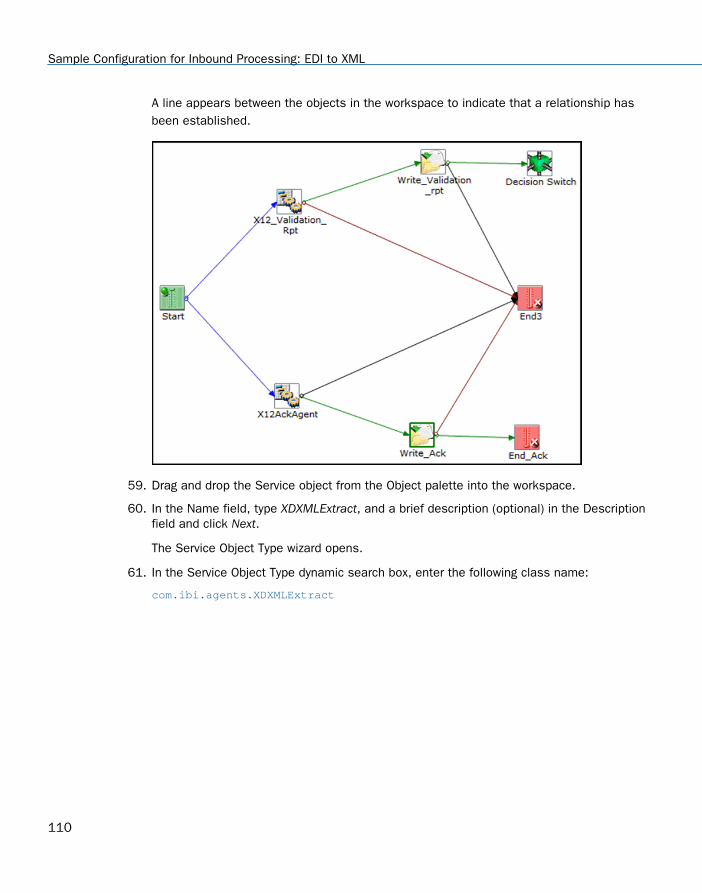
A line appears between the objects in the workspace to indicate that a relationship hasbeen established.
59. Drag and drop the Service object from the Object palette into the workspace.
60. In the Name field, type XDXMLExtract, and a brief description (optional) in the Descriptionfield and click Next.
The Service Object Type wizard opens.
61. In the Service Object Type dynamic search box, enter the following class name:
com.ibi.agents.XDXMLExtract
Sample Configuration for Inbound Processing: EDI to XML
110
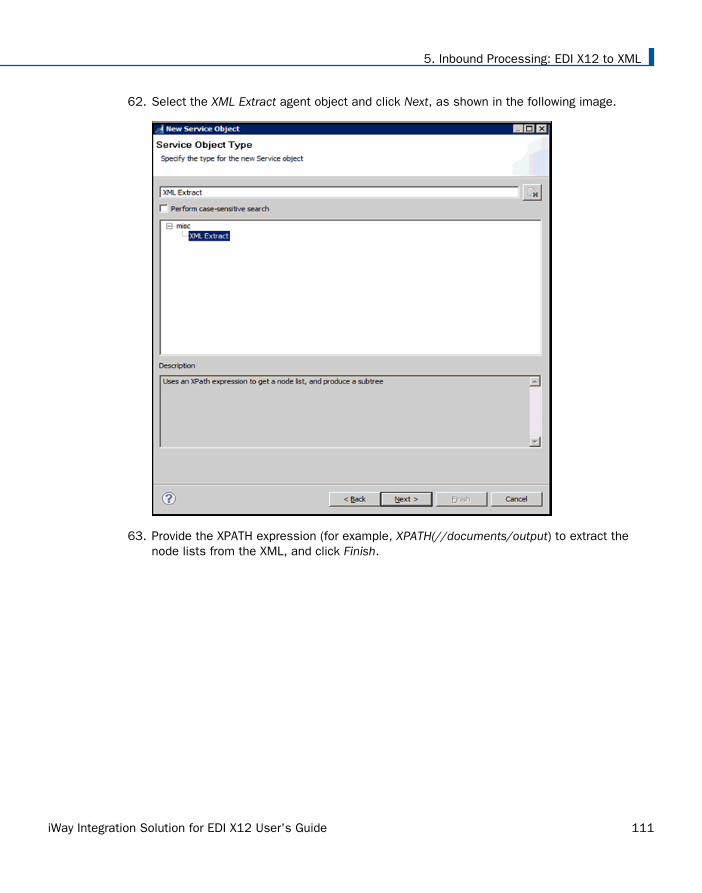
62. Select the XML Extract agent object and click Next, as shown in the following image.
63. Provide the XPATH expression (for example, XPATH(//documents/output) to extract thenode lists from the XML, and click Finish.
5. Inbound Processing: EDI X12 to XML
iWay Integration Solution for EDI X12 User's Guide 111
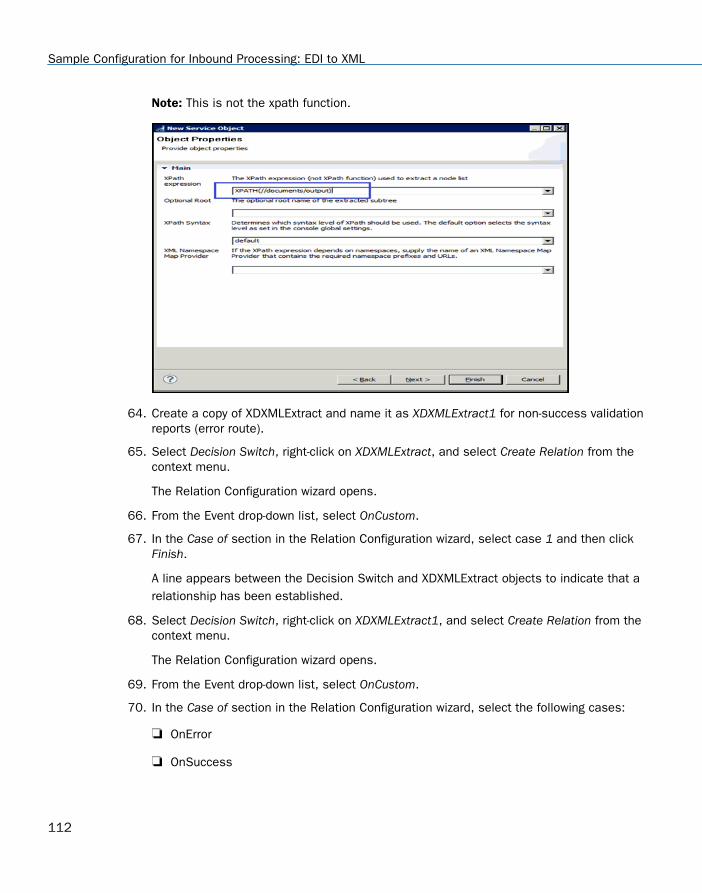
Note: This is not the xpath function.
64. Create a copy of XDXMLExtract and name it as XDXMLExtract1 for non-success validationreports (error route).
65. Select Decision Switch, right-click on XDXMLExtract, and select Create Relation from thecontext menu.
The Relation Configuration wizard opens.
66. From the Event drop-down list, select OnCustom.
67. In the Case of section in the Relation Configuration wizard, select case 1 and then clickFinish.
A line appears between the Decision Switch and XDXMLExtract objects to indicate that arelationship has been established.
68. Select Decision Switch, right-click on XDXMLExtract1, and select Create Relation from thecontext menu.
The Relation Configuration wizard opens.
69. From the Event drop-down list, select OnCustom.
70. In the Case of section in the Relation Configuration wizard, select the following cases:
OnError
OnSuccess
Sample Configuration for Inbound Processing: EDI to XML
112
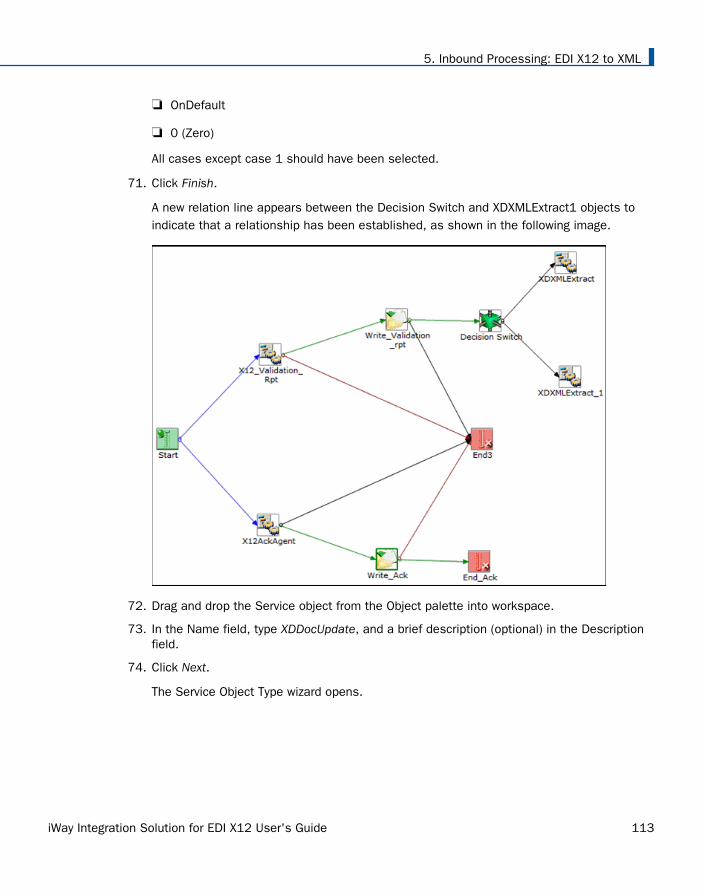
OnDefault
0 (Zero)
All cases except case 1 should have been selected.
71. Click Finish.
A new relation line appears between the Decision Switch and XDXMLExtract1 objects toindicate that a relationship has been established, as shown in the following image.
72. Drag and drop the Service object from the Object palette into workspace.
73. In the Name field, type XDDocUpdate, and a brief description (optional) in the Descriptionfield.
74. Click Next.
The Service Object Type wizard opens.
5. Inbound Processing: EDI X12 to XML
iWay Integration Solution for EDI X12 User's Guide 113
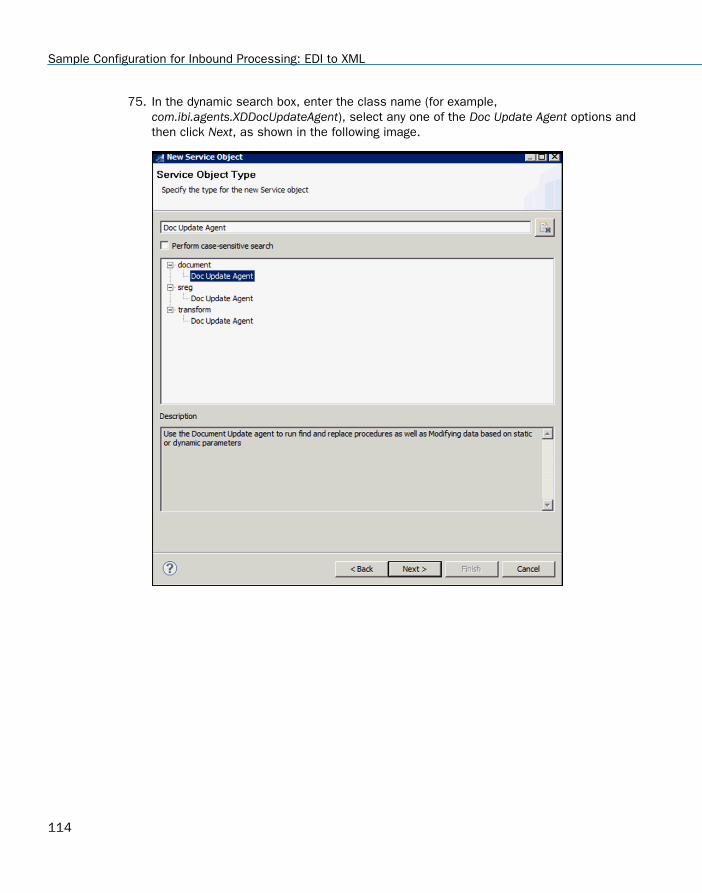
75. In the dynamic search box, enter the class name (for example,com.ibi.agents.XDDocUpdateAgent), select any one of the Doc Update Agent options andthen click Next, as shown in the following image.
Sample Configuration for Inbound Processing: EDI to XML
114
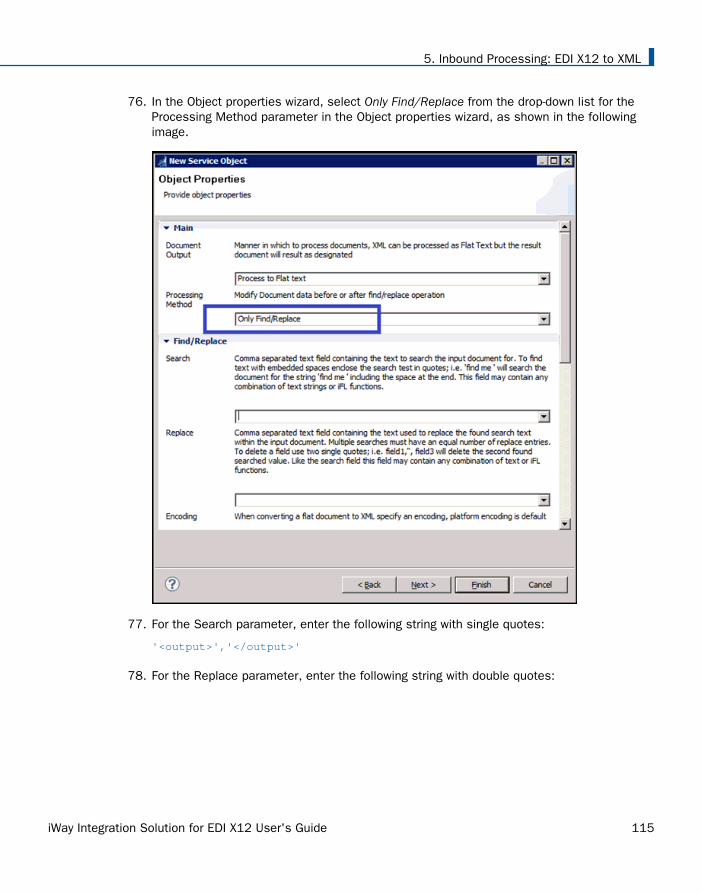
76. In the Object properties wizard, select Only Find/Replace from the drop-down list for theProcessing Method parameter in the Object properties wizard, as shown in the followingimage.
77. For the Search parameter, enter the following string with single quotes:
'<output>','</output>'
78. For the Replace parameter, enter the following string with double quotes:
5. Inbound Processing: EDI X12 to XML
iWay Integration Solution for EDI X12 User's Guide 115
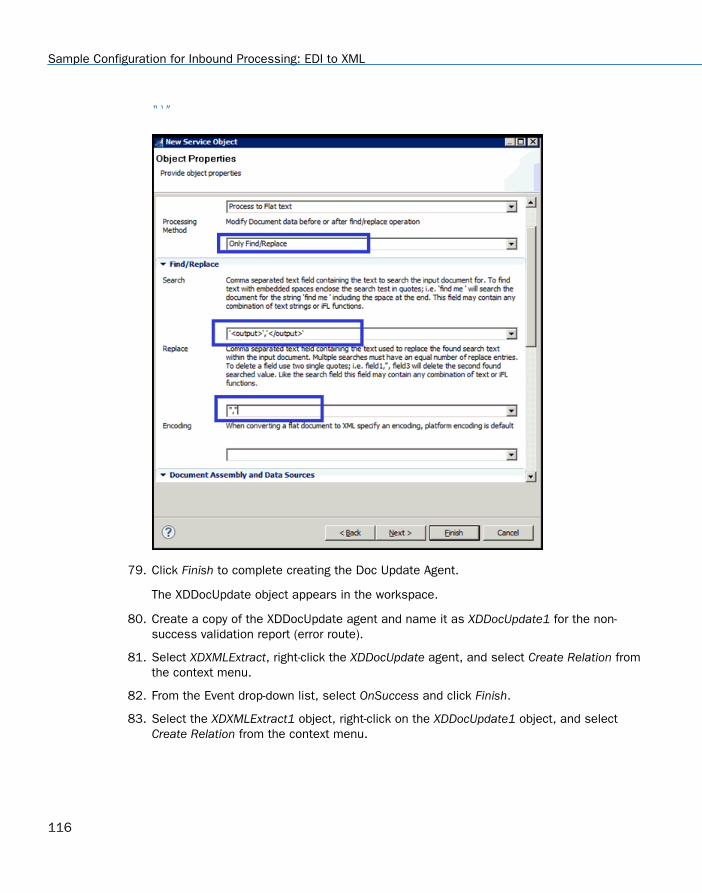
“‘”
79. Click Finish to complete creating the Doc Update Agent.
The XDDocUpdate object appears in the workspace.
80. Create a copy of the XDDocUpdate agent and name it as XDDocUpdate1 for the non-success validation report (error route).
81. Select XDXMLExtract, right-click the XDDocUpdate agent, and select Create Relation fromthe context menu.
82. From the Event drop-down list, select OnSuccess and click Finish.
83. Select the XDXMLExtract1 object, right-click on the XDDocUpdate1 object, and selectCreate Relation from the context menu.
Sample Configuration for Inbound Processing: EDI to XML
116
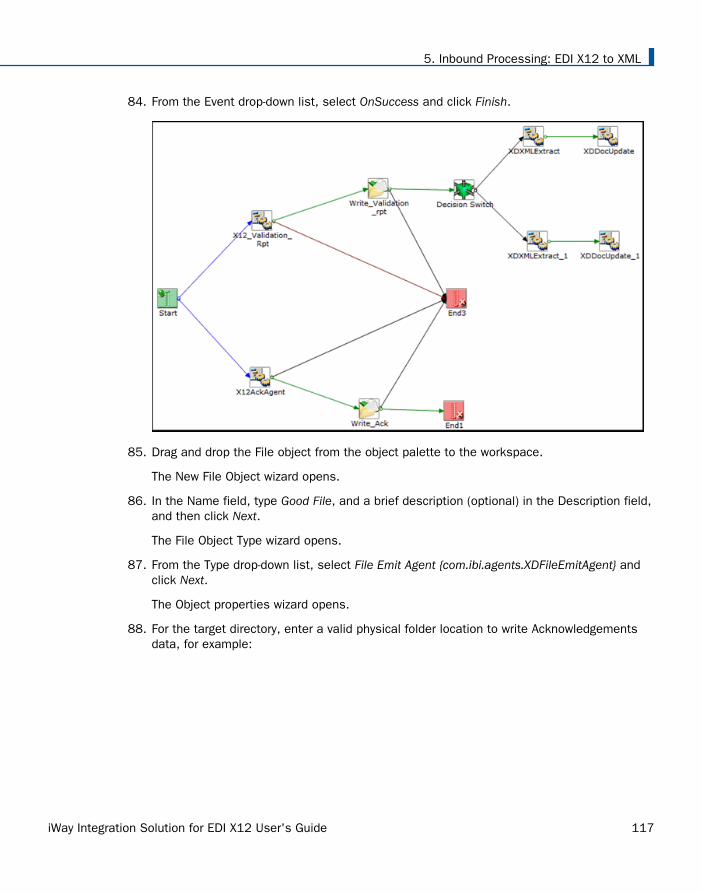
84. From the Event drop-down list, select OnSuccess and click Finish.
85. Drag and drop the File object from the object palette to the workspace.
The New File Object wizard opens.
86. In the Name field, type Good File, and a brief description (optional) in the Description field,and then click Next.
The File Object Type wizard opens.
87. From the Type drop-down list, select File Emit Agent {com.ibi.agents.XDFileEmitAgent} andclick Next.
The Object properties wizard opens.
88. For the target directory, enter a valid physical folder location to write Acknowledgementsdata, for example:
5. Inbound Processing: EDI X12 to XML
iWay Integration Solution for EDI X12 User's Guide 117
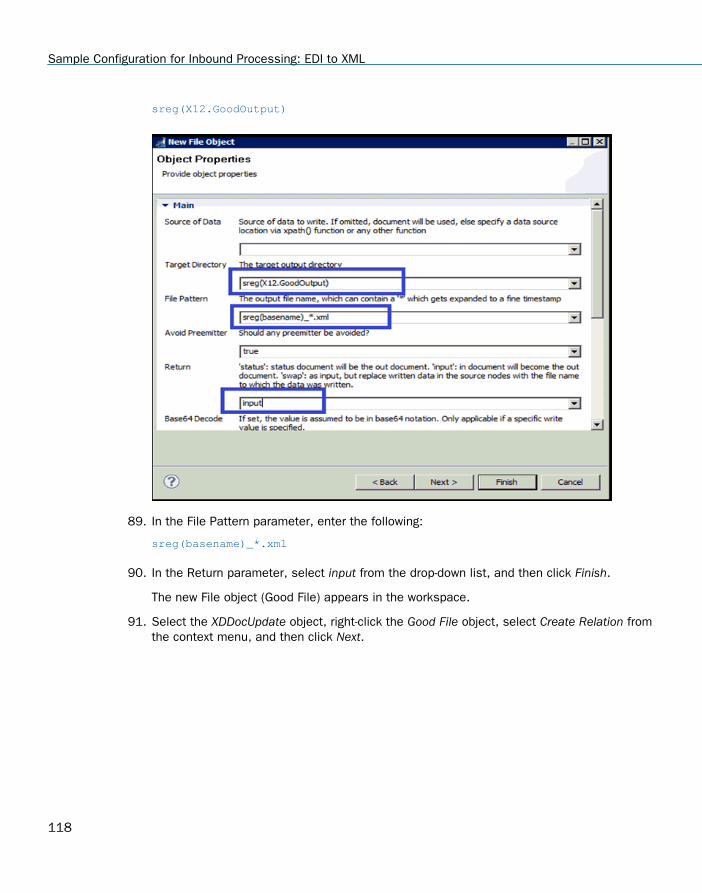
sreg(X12.GoodOutput)
89. In the File Pattern parameter, enter the following:
sreg(basename)_*.xml
90. In the Return parameter, select input from the drop-down list, and then click Finish.
The new File object (Good File) appears in the workspace.
91. Select the XDDocUpdate object, right-click the Good File object, select Create Relation fromthe context menu, and then click Next.
Sample Configuration for Inbound Processing: EDI to XML
118
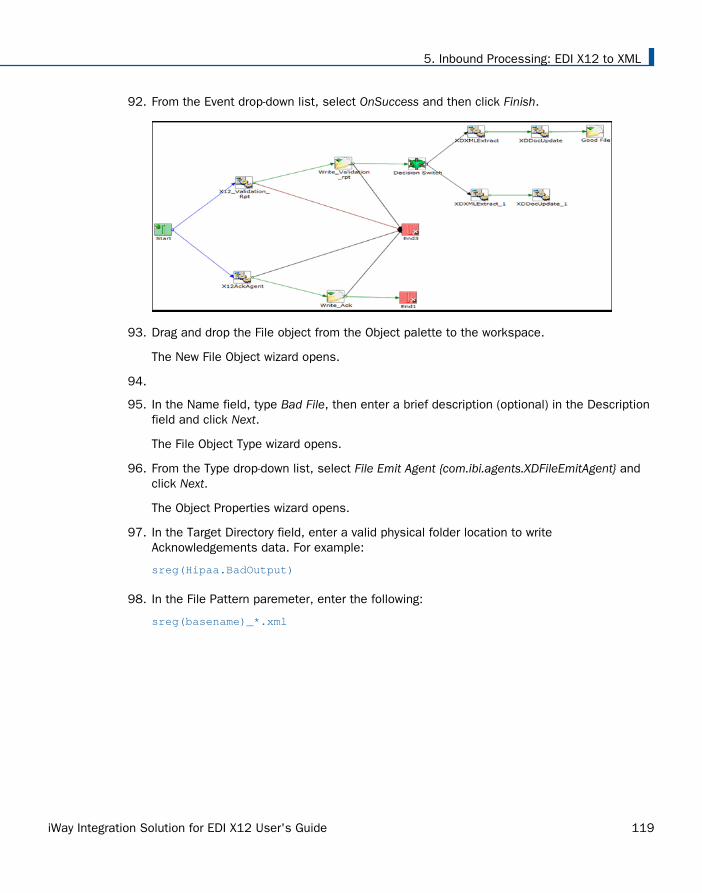
92. From the Event drop-down list, select OnSuccess and then click Finish.
93. Drag and drop the File object from the Object palette to the workspace.
The New File Object wizard opens.
94.
95. In the Name field, type Bad File, then enter a brief description (optional) in the Descriptionfield and click Next.
The File Object Type wizard opens.
96. From the Type drop-down list, select File Emit Agent {com.ibi.agents.XDFileEmitAgent} andclick Next.
The Object Properties wizard opens.
97. In the Target Directory field, enter a valid physical folder location to writeAcknowledgements data. For example:
sreg(Hipaa.BadOutput)
98. In the File Pattern paremeter, enter the following:
sreg(basename)_*.xml
5. Inbound Processing: EDI X12 to XML
iWay Integration Solution for EDI X12 User's Guide 119
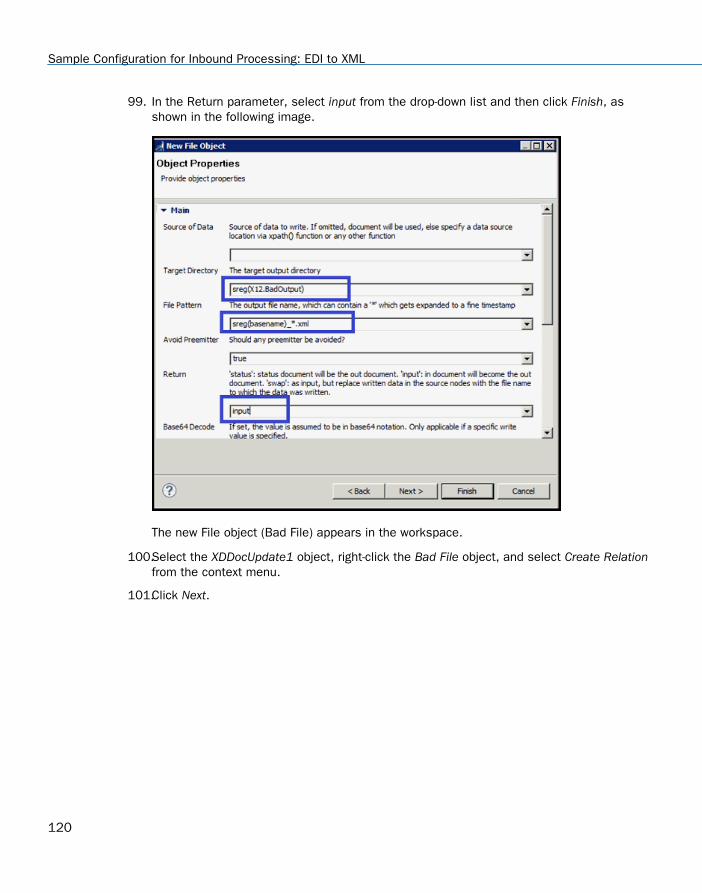
99. In the Return parameter, select input from the drop-down list and then click Finish, asshown in the following image.
The new File object (Bad File) appears in the workspace.
100.Select the XDDocUpdate1 object, right-click the Bad File object, and select Create Relationfrom the context menu.
101.Click Next.
Sample Configuration for Inbound Processing: EDI to XML
120
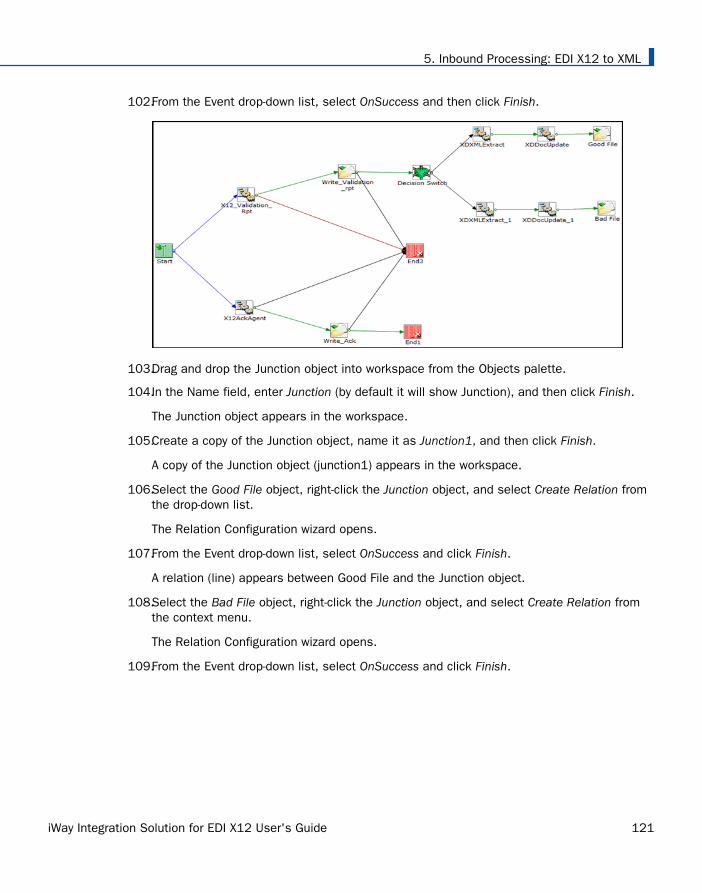
102.From the Event drop-down list, select OnSuccess and then click Finish.
103.Drag and drop the Junction object into workspace from the Objects palette.
104.In the Name field, enter Junction (by default it will show Junction), and then click Finish.
The Junction object appears in the workspace.
105.Create a copy of the Junction object, name it as Junction1, and then click Finish.
A copy of the Junction object (junction1) appears in the workspace.
106.Select the Good File object, right-click the Junction object, and select Create Relation fromthe drop-down list.
The Relation Configuration wizard opens.
107.From the Event drop-down list, select OnSuccess and click Finish.
A relation (line) appears between Good File and the Junction object.
108.Select the Bad File object, right-click the Junction object, and select Create Relation fromthe context menu.
The Relation Configuration wizard opens.
109.From the Event drop-down list, select OnSuccess and click Finish.
5. Inbound Processing: EDI X12 to XML
iWay Integration Solution for EDI X12 User's Guide 121
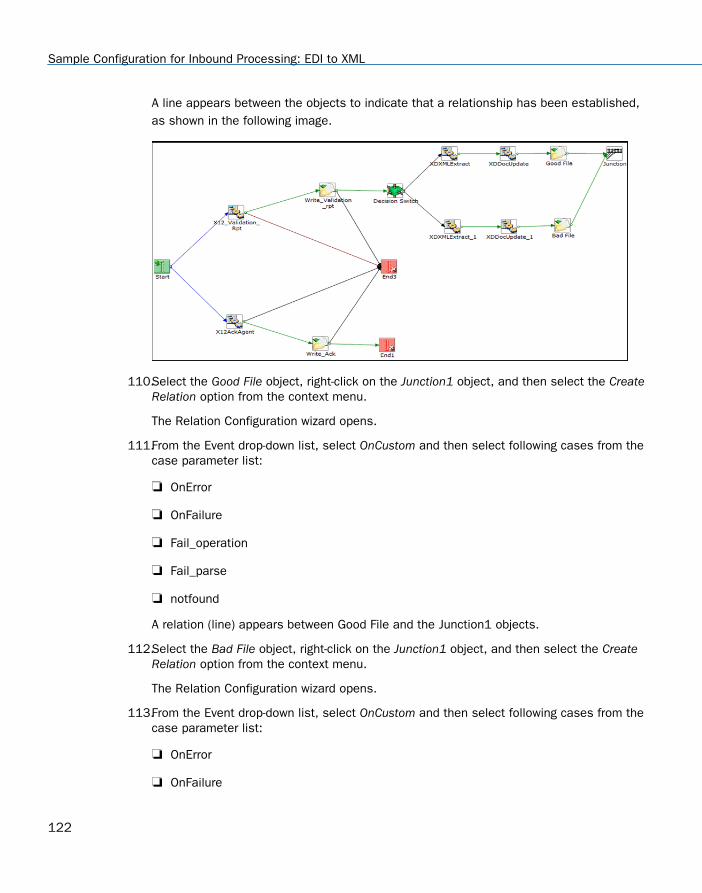
A line appears between the objects to indicate that a relationship has been established,as shown in the following image.
110.Select the Good File object, right-click on the Junction1 object, and then select the CreateRelation option from the context menu.
The Relation Configuration wizard opens.
111.From the Event drop-down list, select OnCustom and then select following cases from thecase parameter list:
OnError
OnFailure
Fail_operation
Fail_parse
notfound
A relation (line) appears between Good File and the Junction1 objects.
112.Select the Bad File object, right-click on the Junction1 object, and then select the CreateRelation option from the context menu.
The Relation Configuration wizard opens.
113.From the Event drop-down list, select OnCustom and then select following cases from thecase parameter list:
OnError
OnFailure
Sample Configuration for Inbound Processing: EDI to XML
122
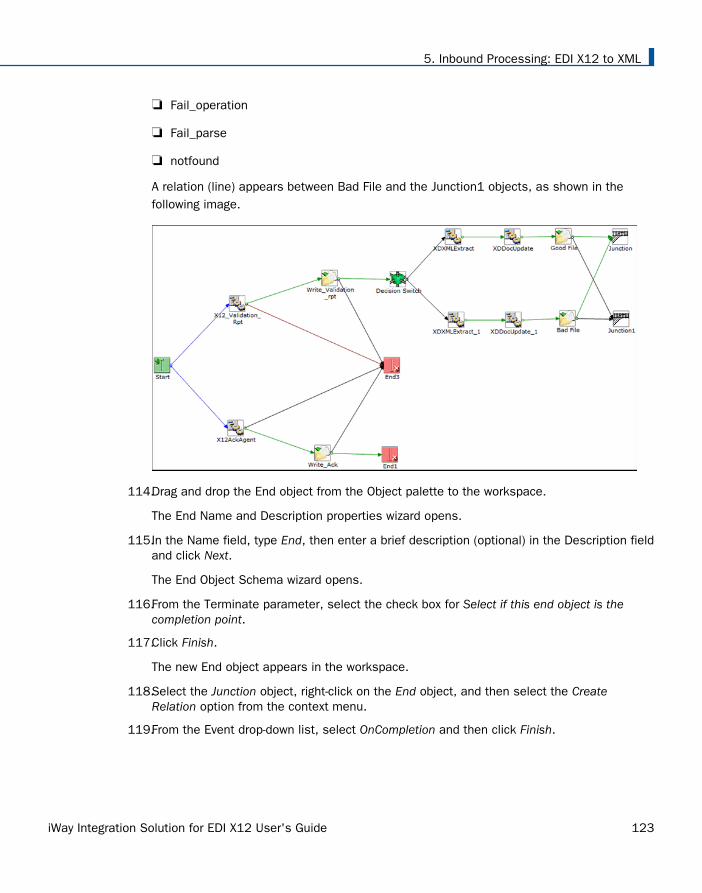
Fail_operation
Fail_parse
notfound
A relation (line) appears between Bad File and the Junction1 objects, as shown in thefollowing image.
114.Drag and drop the End object from the Object palette to the workspace.
The End Name and Description properties wizard opens.
115.In the Name field, type End, then enter a brief description (optional) in the Description fieldand click Next.
The End Object Schema wizard opens.
116.From the Terminate parameter, select the check box for Select if this end object is thecompletion point.
117.Click Finish.
The new End object appears in the workspace.
118.Select the Junction object, right-click on the End object, and then select the CreateRelation option from the context menu.
119.From the Event drop-down list, select OnCompletion and then click Finish.
5. Inbound Processing: EDI X12 to XML
iWay Integration Solution for EDI X12 User's Guide 123
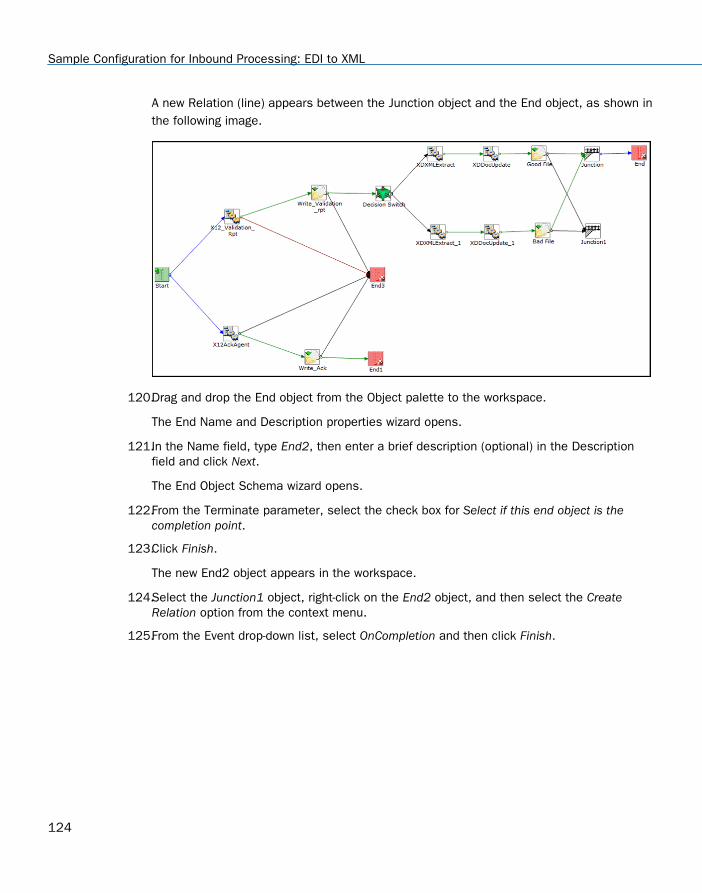
A new Relation (line) appears between the Junction object and the End object, as shown inthe following image.
120.Drag and drop the End object from the Object palette to the workspace.
The End Name and Description properties wizard opens.
121.In the Name field, type End2, then enter a brief description (optional) in the Descriptionfield and click Next.
The End Object Schema wizard opens.
122.From the Terminate parameter, select the check box for Select if this end object is thecompletion point.
123.Click Finish.
The new End2 object appears in the workspace.
124.Select the Junction1 object, right-click on the End2 object, and then select the CreateRelation option from the context menu.
125.From the Event drop-down list, select OnCompletion and then click Finish.
Sample Configuration for Inbound Processing: EDI to XML
124
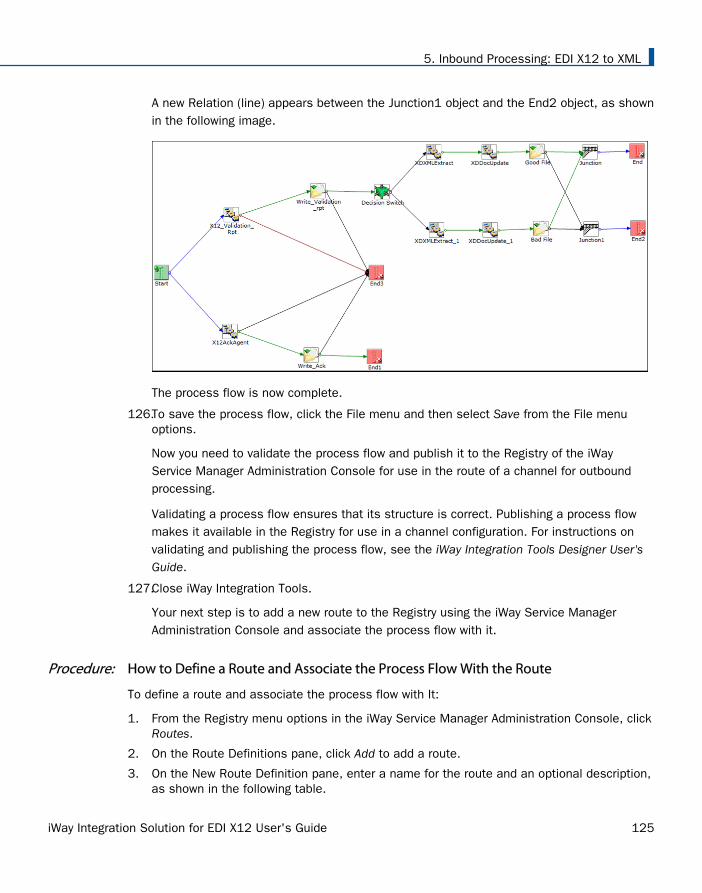
A new Relation (line) appears between the Junction1 object and the End2 object, as shownin the following image.
The process flow is now complete.
126.To save the process flow, click the File menu and then select Save from the File menuoptions.
Now you need to validate the process flow and publish it to the Registry of the iWayService Manager Administration Console for use in the route of a channel for outboundprocessing.
Validating a process flow ensures that its structure is correct. Publishing a process flowmakes it available in the Registry for use in a channel configuration. For instructions onvalidating and publishing the process flow, see the iWay Integration Tools Designer User'sGuide.
127.Close iWay Integration Tools.
Your next step is to add a new route to the Registry using the iWay Service ManagerAdministration Console and associate the process flow with it.
Procedure: How to Define a Route and Associate the Process Flow With the Route
To define a route and associate the process flow with It:
1. From the Registry menu options in the iWay Service Manager Administration Console, clickRoutes.
2. On the Route Definitions pane, click Add to add a route.
3. On the New Route Definition pane, enter a name for the route and an optional description,as shown in the following table.
5. Inbound Processing: EDI X12 to XML
iWay Integration Solution for EDI X12 User's Guide 125
Parameter Value
Name * EDItoXML_Route
Description This route will invoke the X12 to XMLvalidation process. The outcome of thisprocess will place valid X12 transformed datain your valid inbound folder. Invalid X12transformed data will be routed to itsappropriate folder. A validation report will alsobe generated and sent to its appropriatefolder.
4. Click Finish.
5. On the Construct Route pane, click Add.
You are prompted for the type of component to associate with the route.
6. Select Process and click Next.
7. The next pane prompts you to select a process. Select the process flow you createdearlier with iWay Integration Tools, x12toXML_pflow_AckRpt, and click Finish.
The route, with its associated process flow, has been successfully defined.
Defining the Outlets
An outlet defines how a message leaves a channel. An emitter is a transport protocol thatsends a document to its recipient. In the sample configuration, we will use a File emitter. Fordetails on supported protocols, see the iWay Service Manager Protocol Guide.
For the channel in this example, you will add one emitter to the Registry. Then you will defineone outlet and associate the emitter with this outlet.
When you associate the outlet with the channel in later steps, you will apply a condition todynamically direct the flow of the output document based on its content.
In the example, you will add an emitter for the acknowledgement data. In the example, thedata for the functional acknowledgement (transaction 997) is in EDI flat file (non-XML) format.When you add the acknowledgement outlet to the channel, you will set the condition _isFLAT().This condition tests the output data for flat file (non-XML) format. If the data is in flat file (non-XML) format, it is routed to the specified destination.
Sample Configuration for Inbound Processing: EDI to XML
126
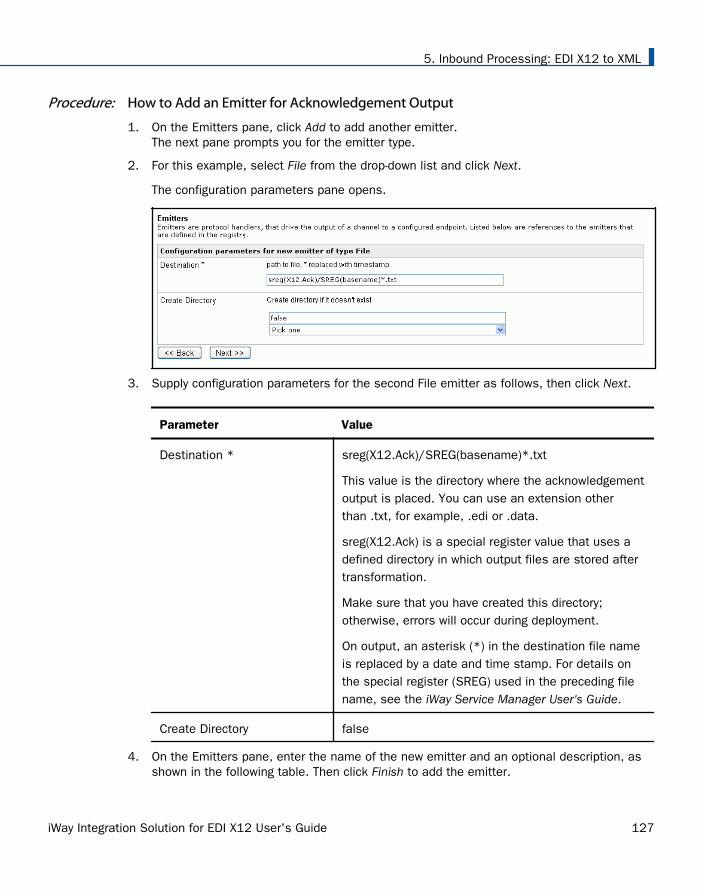
Procedure: How to Add an Emitter for Acknowledgement Output
1. On the Emitters pane, click Add to add another emitter.The next pane prompts you for the emitter type.
2. For this example, select File from the drop-down list and click Next.
The configuration parameters pane opens.
3. Supply configuration parameters for the second File emitter as follows, then click Next.
Parameter Value
Destination * sreg(X12.Ack)/SREG(basename)*.txt
This value is the directory where the acknowledgementoutput is placed. You can use an extension otherthan .txt, for example, .edi or .data.
sreg(X12.Ack) is a special register value that uses adefined directory in which output files are stored aftertransformation.
Make sure that you have created this directory;otherwise, errors will occur during deployment.
On output, an asterisk (*) in the destination file nameis replaced by a date and time stamp. For details onthe special register (SREG) used in the preceding filename, see the iWay Service Manager User's Guide.
Create Directory false
4. On the Emitters pane, enter the name of the new emitter and an optional description, asshown in the following table. Then click Finish to add the emitter.
5. Inbound Processing: EDI X12 to XML
iWay Integration Solution for EDI X12 User's Guide 127
Parameter Value
Name * Ack_Out_Emitter
Description Emitter for acknowledgement output for EDI.
Procedure: How to Define an Outlet for Acknowledgement Output
1. From the Registry menu options, select Outlets.
2. On the Outlet Definitions pane, click Add to add an outlet.
3. On the New Outlet Definition pane, enter the name of the new outlet and an optionaldescription, as shown in the following table. Then click Finish to add the outlet.
Parameter Value
Name * EDI_Ack_Outlet
Description Acknowledgement outlet for EDI.
4. On the Construct Outlet pane, click Add to associate the acknowledgement emitter withthe acknowledgement outlet.The next pane prompts you for the component type.
5. Select Emitter and click Next.
The next pane prompts you to select an emitter.
6. Select Ack_Out_Emitter, which is the acknowledgement emitter you added earlier, andclick Finish.
Now you have defined the two outlets.
Defining a Channel
Now that you have defined the inlet, route, and outlets for the channel, you are ready to addthe channel to the Registry and associate the conduits with it.
Procedure: How to Define a Channel
1. From the Registry menu options, select Channels under Conduits.
2. On the Channel Definitions pane, click Add to add a channel.
3. On the New Channel Definition pane, enter the name of the new channel and an optionaldescription, as shown in the following table. Then click Finish to add the channel.
Sample Configuration for Inbound Processing: EDI to XML
128

Parameter Value
Name * EDItoXML_Channel
Description Channel for EDI to XML inbound processing.
4. On the Construct Channel pane, click Add to associate the inlet, route, and outlets definedpreviously with the channel.
You are prompted to associate components with the channel.
5. Select Inlet and click Next.The next pane prompts you to select an inlet.
6. Select EDItoXML_Inlet, which is the inlet you defined earlier, and click Finish.
The inlet is added to the channel. Now you need to associate the route defined earlier withthe channel.
7. On the Construct Channel pane, click Add.
The next pane prompts you for the component type.
8. Select Route and click Next.
On the next pane, you are prompted to select a route.
9. Select EDItoXML_Route, which is the route created earlier, and click Finish.
10. On the Construct Channel pane, click the minus sign (-) under Conditions next to the nameof the route to set it as the default.
11. On the Construct Channel pane, click Add to add the outlets.
12. On the next pane, select Outlet and click Next.
13. Select the outlet defined earlier, EDI_Ack_Outlet and click Finish.
14. To set a condition for the EDI_Ack_Outlet, on the Construct Channel pane, click the plussign (+) under Conditions for the EDI_Ack_Outlet.
5. Inbound Processing: EDI X12 to XML
iWay Integration Solution for EDI X12 User's Guide 129
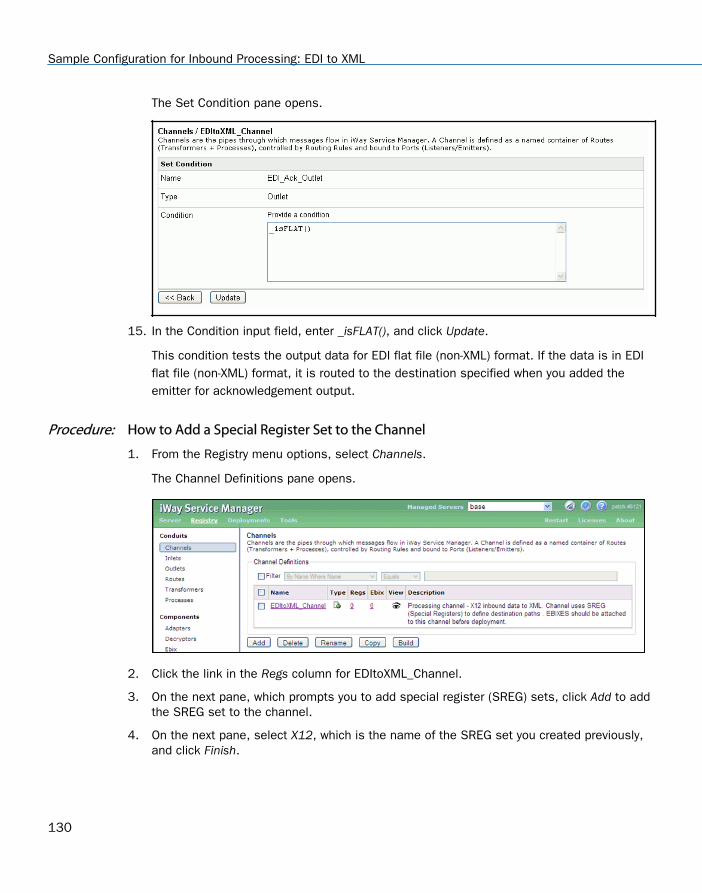
The Set Condition pane opens.
15. In the Condition input field, enter _isFLAT(), and click Update.
This condition tests the output data for EDI flat file (non-XML) format. If the data is in EDIflat file (non-XML) format, it is routed to the destination specified when you added theemitter for acknowledgement output.
Procedure: How to Add a Special Register Set to the Channel
1. From the Registry menu options, select Channels.
The Channel Definitions pane opens.
2. Click the link in the Regs column for EDItoXML_Channel.
3. On the next pane, which prompts you to add special register (SREG) sets, click Add to addthe SREG set to the channel.
4. On the next pane, select X12, which is the name of the SREG set you created previously,and click Finish.
Sample Configuration for Inbound Processing: EDI to XML
130
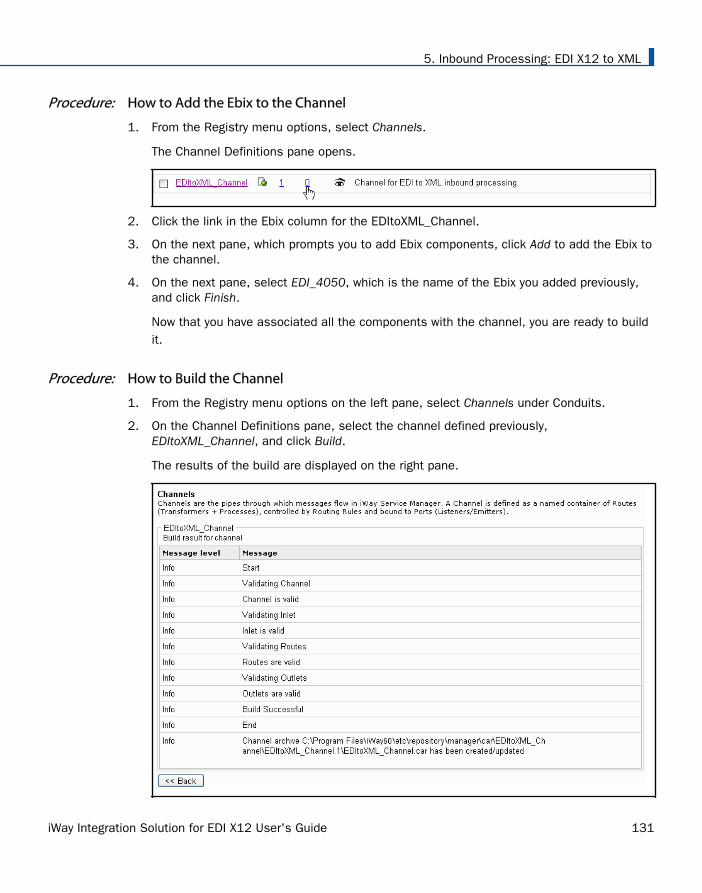
Procedure: How to Add the Ebix to the Channel
1. From the Registry menu options, select Channels.
The Channel Definitions pane opens.
2. Click the link in the Ebix column for the EDItoXML_Channel.
3. On the next pane, which prompts you to add Ebix components, click Add to add the Ebix tothe channel.
4. On the next pane, select EDI_4050, which is the name of the Ebix you added previously,and click Finish.
Now that you have associated all the components with the channel, you are ready to buildit.
Procedure: How to Build the Channel
1. From the Registry menu options on the left pane, select Channels under Conduits.
2. On the Channel Definitions pane, select the channel defined previously,EDItoXML_Channel, and click Build.
The results of the build are displayed on the right pane.
5. Inbound Processing: EDI X12 to XML
iWay Integration Solution for EDI X12 User's Guide 131
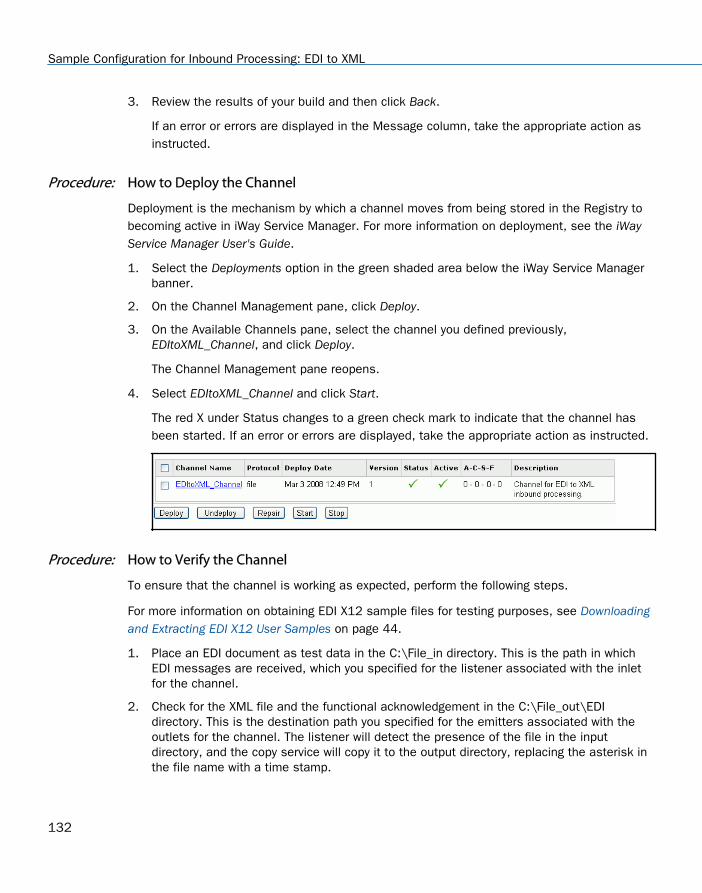
3. Review the results of your build and then click Back.
If an error or errors are displayed in the Message column, take the appropriate action asinstructed.
Procedure: How to Deploy the Channel
Deployment is the mechanism by which a channel moves from being stored in the Registry tobecoming active in iWay Service Manager. For more information on deployment, see the iWayService Manager User's Guide.
1. Select the Deployments option in the green shaded area below the iWay Service Managerbanner.
2. On the Channel Management pane, click Deploy.
3. On the Available Channels pane, select the channel you defined previously,EDItoXML_Channel, and click Deploy.
The Channel Management pane reopens.
4. Select EDItoXML_Channel and click Start.
The red X under Status changes to a green check mark to indicate that the channel hasbeen started. If an error or errors are displayed, take the appropriate action as instructed.
Procedure: How to Verify the Channel
To ensure that the channel is working as expected, perform the following steps.
For more information on obtaining EDI X12 sample files for testing purposes, see Downloadingand Extracting EDI X12 User Samples on page 44.
1. Place an EDI document as test data in the C:\File_in directory. This is the path in whichEDI messages are received, which you specified for the listener associated with the inletfor the channel.
2. Check for the XML file and the functional acknowledgement in the C:\File_out\EDIdirectory. This is the destination path you specified for the emitters associated with theoutlets for the channel. The listener will detect the presence of the file in the inputdirectory, and the copy service will copy it to the output directory, replacing the asterisk inthe file name with a time stamp.
Sample Configuration for Inbound Processing: EDI to XML
132
For example, if you specified the destination file name for the XML emitter as_SREG(basename)_*.xml per the configuration example, an EDI input file namedX12856C001_4050.x12 is named_X12856C001_4050_2008-03-03T19_33_26.684Z.xml on output.
Reusing Your Channel Configuration
Using the Archive Manager feature of iWay Service Manager, you can archive your channelconfiguration with its associated components and import them into another Registry. They willthen be available from that Registry for modification or reuse.
For details on this feature, see the iWay Service Manager User's Guide.
5. Inbound Processing: EDI X12 to XML
iWay Integration Solution for EDI X12 User's Guide 133

Sample Configuration for Inbound Processing: EDI to XML
134
Chapter6Outbound Processing: XML to EDI X12
The iWay Integration Solution for EDI X12 includes iWay Service Manager. iWay ServiceManager validates an XML document based on EDI X12 published implementationguides and converts it to a document in Electronic Data Interchange (EDI) X12 format.
This chapter provides the information you need to understand and implement a basicoutbound message flow.
The outbound processing overview describes the iWay business components and theprocessing steps in the basic outbound message flow.
The sample configuration contains detailed instructions for configuring the basicoutbound message flow. This topic guides you through each step of the configurationprocedure.
In this chapter:
EDI X12 Outbound Processing Overview
Sample Configuration for Outbound Processing: XML to EDI
EDI X12 Outbound Processing Overview
The standard outbound process converts an XML document to an EDI-formatted document.
The input document that is sent to the channel may not be in XML format. It can be any inputdocument that first will be processed by the channel and transformed to an EDI document.
In a basic message flow, outbound processing consists of the following components andsteps. For an illustration of the components available in the construction of a message flow,see Using a Channel to Construct a Message Flow on page 24. You will define the componentsin the configuration instructions in Sample Configuration for Outbound Processing: XML to EDIon page 136.
Inlet
The listener picks up the input document.
Route/Process Flow
A process flow guides the XML-formatted EDI document through the next stages of theprocess.
iWay Integration Solution for EDI X12 User's Guide 135
Rules processing runs against the XML-formatted EDI document to validate its structureand content. The published EDI standards and user implementation guides define elementtypes (for example, numeric, alpha, or date) and describe business rules to apply forvalidation.
The XMLToX12TransformationAgent obtains the message type and version from the XML-formatted EDI document. The appropriate transformation template is applied from the Ebix.The transformation converts the XML-formatted EDI document to EDI X12 format.
The XDX12ValidationReportAgent creates a report (an XML document) containing the XML-formatted EDI document and resulting EDI X12 formatted data, as well as the validationstatus.
If the EDI X12 document did not contain any errors during the rules processing stage, it isemitted and continues to its next destination. The validation report is always emitted. Inthe sample process flow that is described later in this chapter, good validation reports arewritten with a file name prefix of validation. All other validation reports are written with a filename prefix of error. Information in the error validation reports can be routed accordingly forrepair and reprocessing.
Outlet
The EDI document is passed to the next step in the integration process.
Sample Configuration for Outbound Processing: XML to EDI
This topic provides step-by-step instructions for configuring a basic outbound message flow forthe iWay Integration Solution for EDI X12. The message flow represents the movement andtasks in the conversion of a message from XML to EDI.
If you plan to modify the message flow presented here and would like more information on thesupported iWay business components that you can use in channel construction, see the iWayService Manager User's Guide.
Accessing the iWay Service Manager Administration Console
For instructions, see Accessing the iWay Service Manager Administration Console.
Adding an Ebix to the Registry
The iWay e-Business Information Exchange (Ebix) framework supplies several Ebix files for theiWay Integration Solution for EDI X12.
Sample Configuration for Outbound Processing: XML to EDI
136
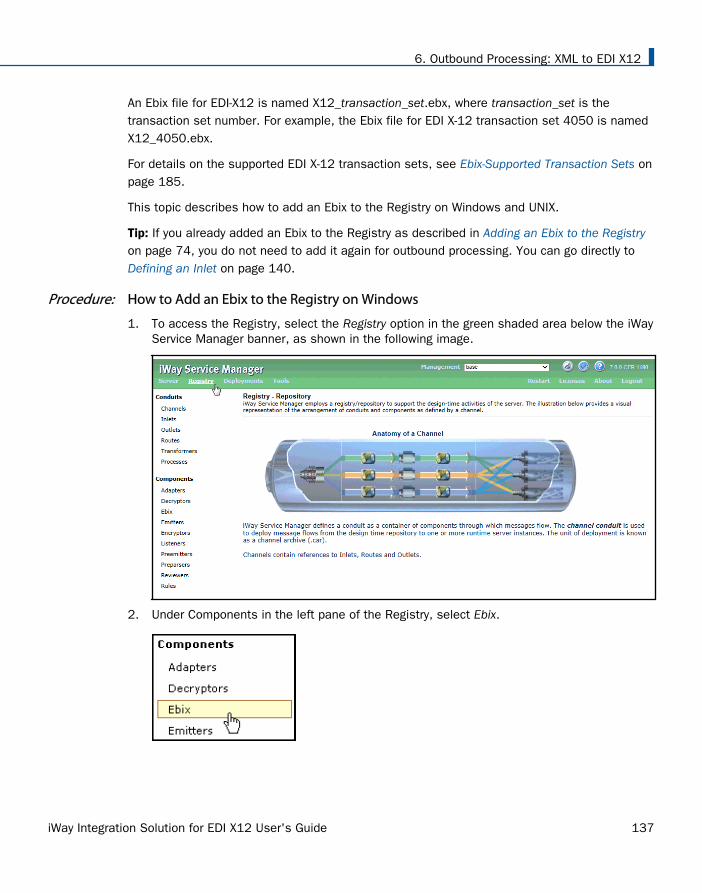
An Ebix file for EDI-X12 is named X12_transaction_set.ebx, where transaction_set is thetransaction set number. For example, the Ebix file for EDI X-12 transaction set 4050 is namedX12_4050.ebx.
For details on the supported EDI X-12 transaction sets, see Ebix-Supported Transaction Sets onpage 185.
This topic describes how to add an Ebix to the Registry on Windows and UNIX.
Tip: If you already added an Ebix to the Registry as described in Adding an Ebix to the Registryon page 74, you do not need to add it again for outbound processing. You can go directly to Defining an Inlet on page 140.
Procedure: How to Add an Ebix to the Registry on Windows
1. To access the Registry, select the Registry option in the green shaded area below the iWayService Manager banner, as shown in the following image.
2. Under Components in the left pane of the Registry, select Ebix.
6. Outbound Processing: XML to EDI X12
iWay Integration Solution for EDI X12 User's Guide 137
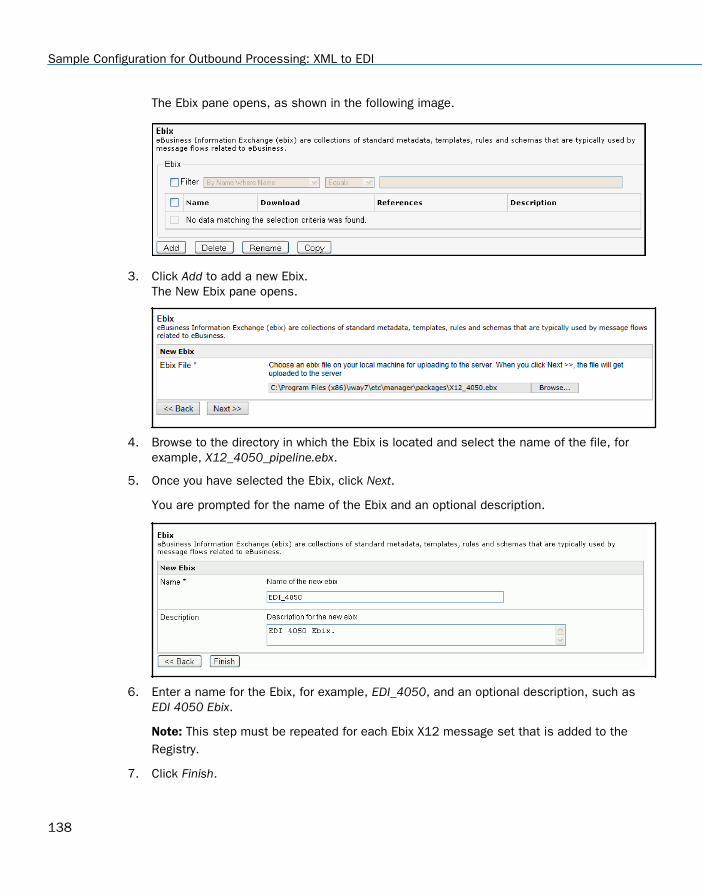
The Ebix pane opens, as shown in the following image.
3. Click Add to add a new Ebix.The New Ebix pane opens.
4. Browse to the directory in which the Ebix is located and select the name of the file, forexample, X12_4050_pipeline.ebx.
5. Once you have selected the Ebix, click Next.
You are prompted for the name of the Ebix and an optional description.
6. Enter a name for the Ebix, for example, EDI_4050, and an optional description, such asEDI 4050 Ebix.
Note: This step must be repeated for each Ebix X12 message set that is added to theRegistry.
7. Click Finish.
Sample Configuration for Outbound Processing: XML to EDI
138
On the Ebix pane, you will see that the Ebix was successfully added. Later you willassociate it with the channel for inbound processing.
Procedure: How to Add an Ebix to the Registry on UNIX
Depending on your system configuration, there are two methods that you can use to add anEbix to the Registry on UNIX.
If you have a web browser on the UNIX machine, follow the instructions for Windows.
Use FTP to download the Ebix from the iway7/etc/manager/packages directory to yourWindows machine and follow the instructions for Windows.
Adding Special Register Sets
In iWay Service Manager, a special register is a name-value pair that defines a variable that iscarried throughout the system. Once defined, this variable is available to all components of thesystem. Within the EDI components, a best practice is to use special registers to define inputsand outputs. When packages containing channels are migrated between systems, the onlychanges required to deploy in the new location is to modify these special registers and buildthe channel. Channels may have many locations and this practice will minimize the effortrequired to migrate. For a complete list of system special registers that are provided, see theiWay Service Manager Programmer's Guide. For more information on defining a special registerof your own, see the iWay Service Manager User's Guide.
6. Outbound Processing: XML to EDI X12
iWay Integration Solution for EDI X12 User's Guide 139
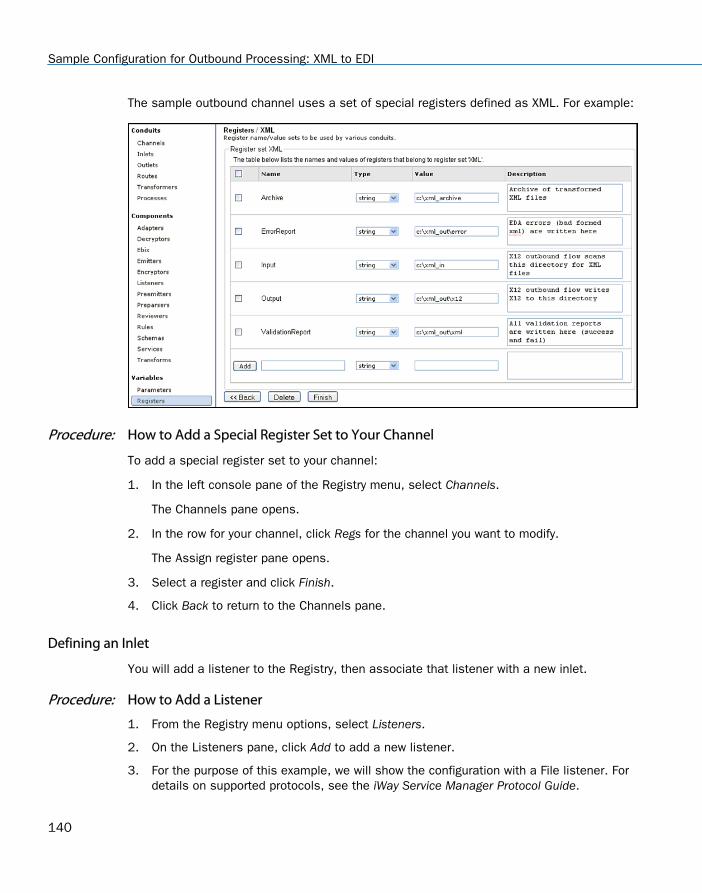
The sample outbound channel uses a set of special registers defined as XML. For example:
Procedure: How to Add a Special Register Set to Your Channel
To add a special register set to your channel:
1. In the left console pane of the Registry menu, select Channels.
The Channels pane opens.
2. In the row for your channel, click Regs for the channel you want to modify.
The Assign register pane opens.
3. Select a register and click Finish.
4. Click Back to return to the Channels pane.
Defining an Inlet
You will add a listener to the Registry, then associate that listener with a new inlet.
Procedure: How to Add a Listener
1. From the Registry menu options, select Listeners.
2. On the Listeners pane, click Add to add a new listener.
3. For the purpose of this example, we will show the configuration with a File listener. Fordetails on supported protocols, see the iWay Service Manager Protocol Guide.
Sample Configuration for Outbound Processing: XML to EDI
140
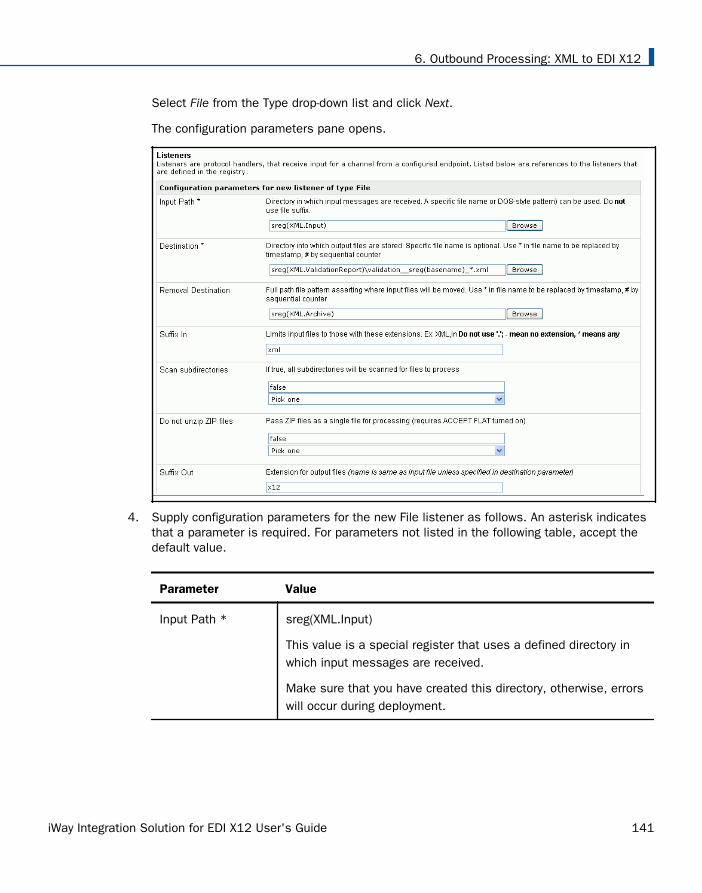
Select File from the Type drop-down list and click Next.
The configuration parameters pane opens.
4. Supply configuration parameters for the new File listener as follows. An asterisk indicatesthat a parameter is required. For parameters not listed in the following table, accept thedefault value.
Parameter Value
Input Path * sreg(XML.Input)
This value is a special register that uses a defined directory inwhich input messages are received.
Make sure that you have created this directory, otherwise, errorswill occur during deployment.
6. Outbound Processing: XML to EDI X12
iWay Integration Solution for EDI X12 User's Guide 141
Parameter Value
Destination * sreg(XML.ValidationReport)\validation__sreg(basename)_*.xml
This value is a special register that uses a defined directory inwhich output messages are received.
Note: The double underscore characters are used in thedestination to escape the underscore.
Make sure that you have created this directory, otherwise, errorswill occur during deployment.
RemovalDestination
sreg(XML.Archive)
This value is a special register that uses a defined directory towhich output messages are moved if they fail duringtransformation.
Make sure that you have created this directory, otherwise, errorswill occur during deployment. It is recommended to configure aremoval destination when you are constructing a basic channel.
Suffix In xml
Input files with the extension .xml are allowed.
Suffix Out x12
In this example, the extension for output files is .x12.
5. Click Next.
6. On the Listeners pane, enter the name of the new listener and a brief description, asshown in the following table.
Parameter Value
Name * XmlToX12_Ebix
Description XML to X12 file listener
7. Click Finish to add the listener.
Sample Configuration for Outbound Processing: XML to EDI
142
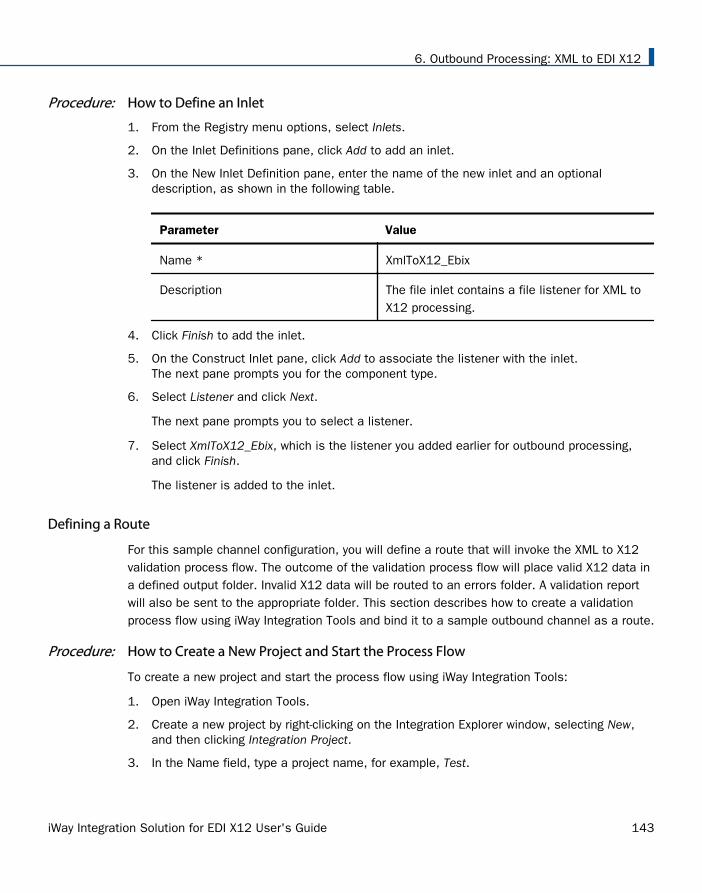
Procedure: How to Define an Inlet
1. From the Registry menu options, select Inlets.
2. On the Inlet Definitions pane, click Add to add an inlet.
3. On the New Inlet Definition pane, enter the name of the new inlet and an optionaldescription, as shown in the following table.
Parameter Value
Name * XmlToX12_Ebix
Description The file inlet contains a file listener for XML toX12 processing.
4. Click Finish to add the inlet.
5. On the Construct Inlet pane, click Add to associate the listener with the inlet.The next pane prompts you for the component type.
6. Select Listener and click Next.
The next pane prompts you to select a listener.
7. Select XmlToX12_Ebix, which is the listener you added earlier for outbound processing,and click Finish.
The listener is added to the inlet.
Defining a Route
For this sample channel configuration, you will define a route that will invoke the XML to X12validation process flow. The outcome of the validation process flow will place valid X12 data ina defined output folder. Invalid X12 data will be routed to an errors folder. A validation reportwill also be sent to the appropriate folder. This section describes how to create a validationprocess flow using iWay Integration Tools and bind it to a sample outbound channel as a route.
Procedure: How to Create a New Project and Start the Process Flow
To create a new project and start the process flow using iWay Integration Tools:
1. Open iWay Integration Tools.
2. Create a new project by right-clicking on the Integration Explorer window, selecting New,and then clicking Integration Project.
3. In the Name field, type a project name, for example, Test.
6. Outbound Processing: XML to EDI X12
iWay Integration Solution for EDI X12 User's Guide 143
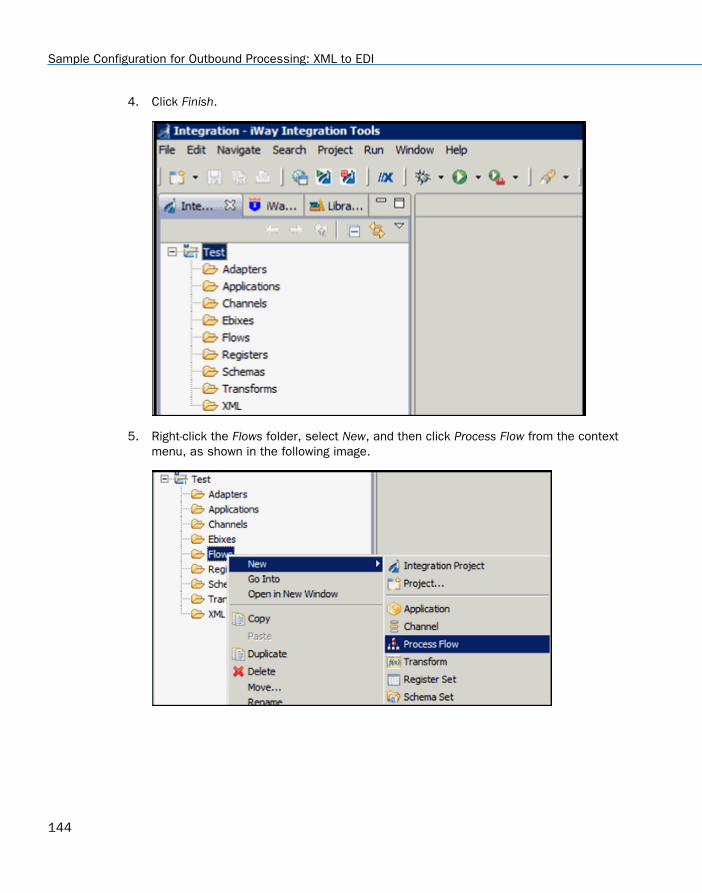
4. Click Finish.
5. Right-click the Flows folder, select New, and then click Process Flow from the contextmenu, as shown in the following image.
Sample Configuration for Outbound Processing: XML to EDI
144
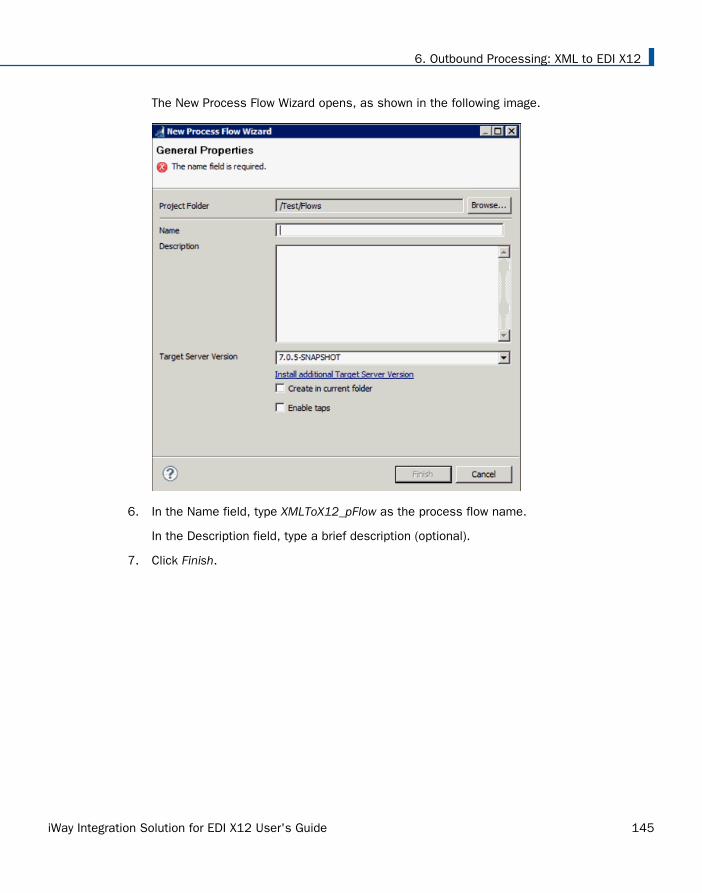
The New Process Flow Wizard opens, as shown in the following image.
6. In the Name field, type XMLToX12_pFlow as the process flow name.
In the Description field, type a brief description (optional).
7. Click Finish.
6. Outbound Processing: XML to EDI X12
iWay Integration Solution for EDI X12 User's Guide 145
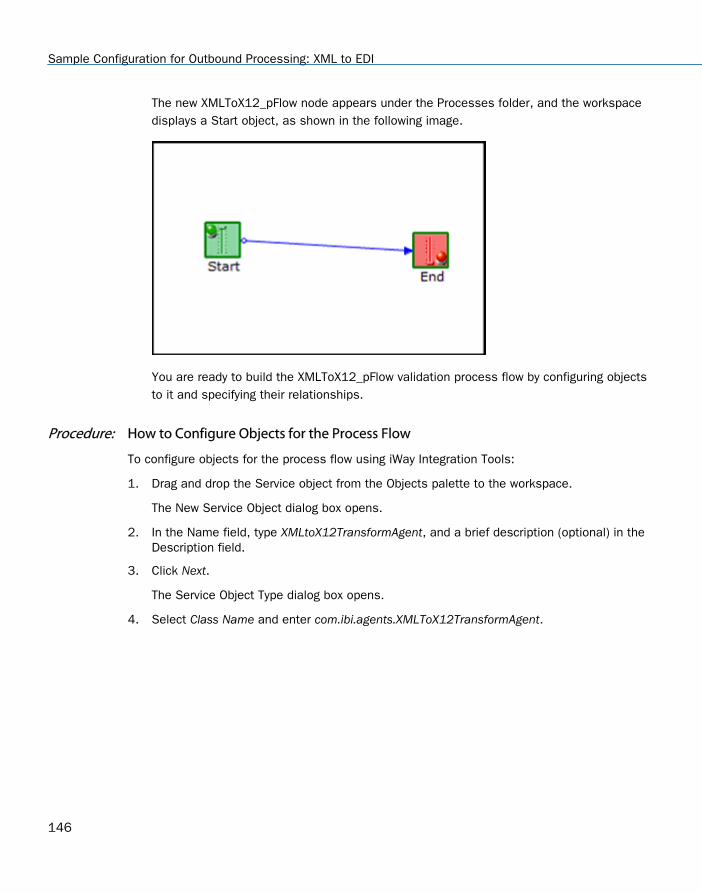
The new XMLToX12_pFlow node appears under the Processes folder, and the workspacedisplays a Start object, as shown in the following image.
You are ready to build the XMLToX12_pFlow validation process flow by configuring objectsto it and specifying their relationships.
Procedure: How to Configure Objects for the Process Flow
To configure objects for the process flow using iWay Integration Tools:
1. Drag and drop the Service object from the Objects palette to the workspace.
The New Service Object dialog box opens.
2. In the Name field, type XMLtoX12TransformAgent, and a brief description (optional) in theDescription field.
3. Click Next.
The Service Object Type dialog box opens.
4. Select Class Name and enter com.ibi.agents.XMLToX12TransformAgent.
Sample Configuration for Outbound Processing: XML to EDI
146
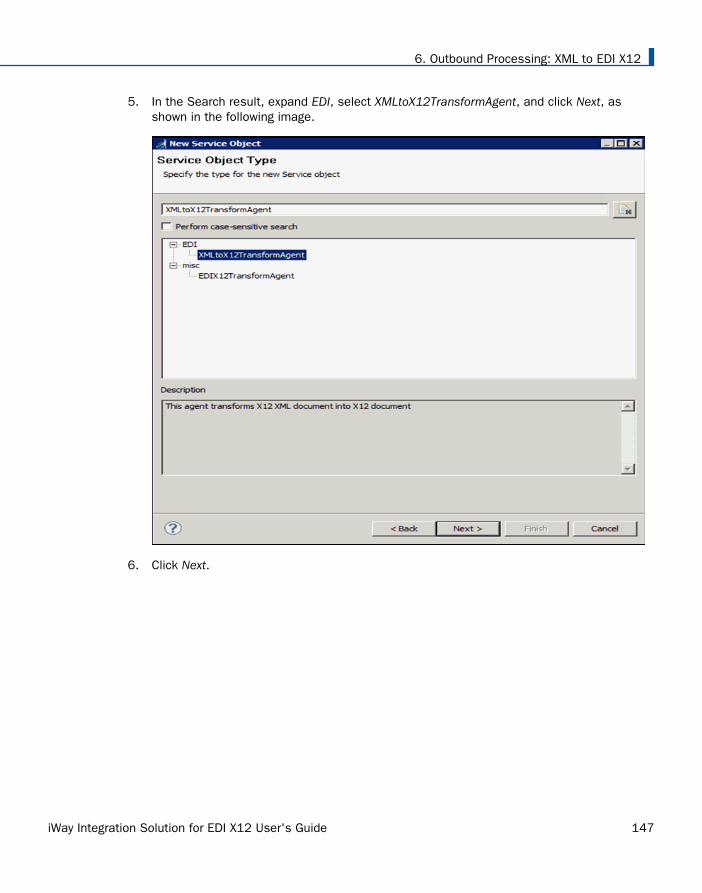
5. In the Search result, expand EDI, select XMLtoX12TransformAgent, and click Next, asshown in the following image.
6. Click Next.
6. Outbound Processing: XML to EDI X12
iWay Integration Solution for EDI X12 User's Guide 147
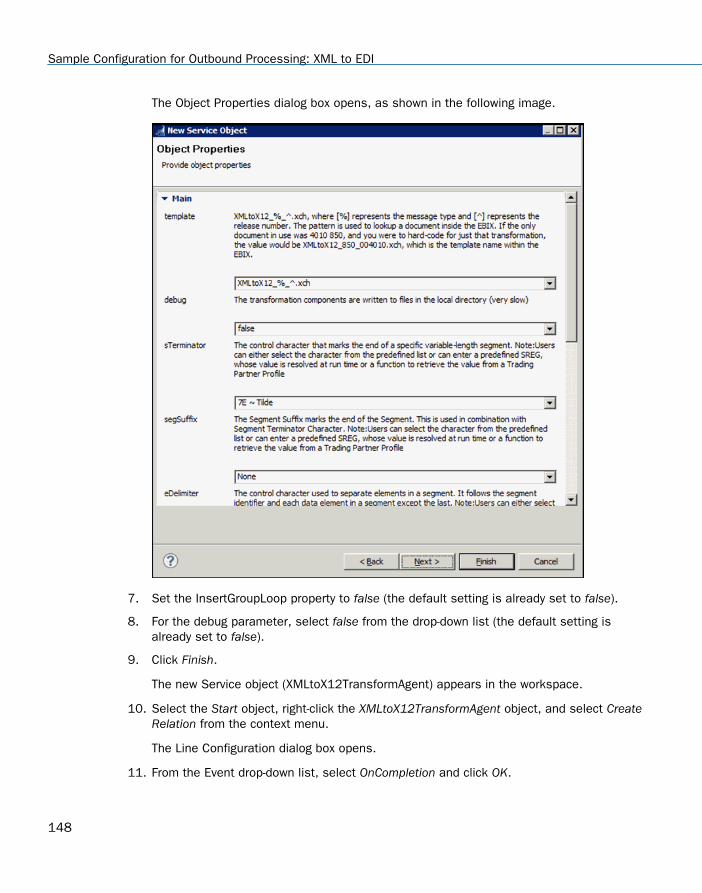
The Object Properties dialog box opens, as shown in the following image.
7. Set the InsertGroupLoop property to false (the default setting is already set to false).
8. For the debug parameter, select false from the drop-down list (the default setting isalready set to false).
9. Click Finish.
The new Service object (XMLtoX12TransformAgent) appears in the workspace.
10. Select the Start object, right-click the XMLtoX12TransformAgent object, and select CreateRelation from the context menu.
The Line Configuration dialog box opens.
11. From the Event drop-down list, select OnCompletion and click OK.
Sample Configuration for Outbound Processing: XML to EDI
148
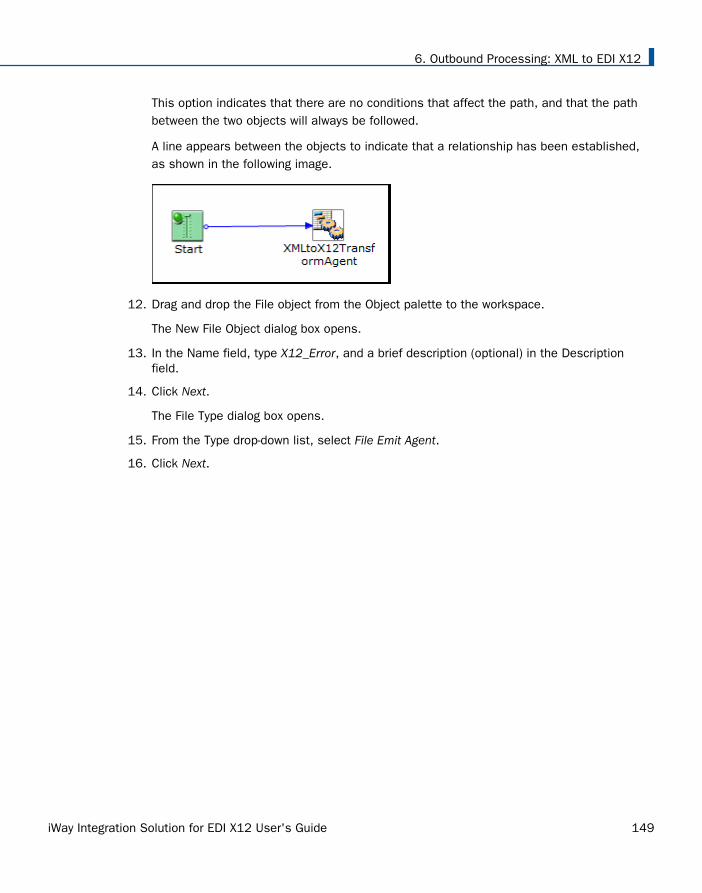
This option indicates that there are no conditions that affect the path, and that the pathbetween the two objects will always be followed.
A line appears between the objects to indicate that a relationship has been established,as shown in the following image.
12. Drag and drop the File object from the Object palette to the workspace.
The New File Object dialog box opens.
13. In the Name field, type X12_Error, and a brief description (optional) in the Descriptionfield.
14. Click Next.
The File Type dialog box opens.
15. From the Type drop-down list, select File Emit Agent.
16. Click Next.
6. Outbound Processing: XML to EDI X12
iWay Integration Solution for EDI X12 User's Guide 149
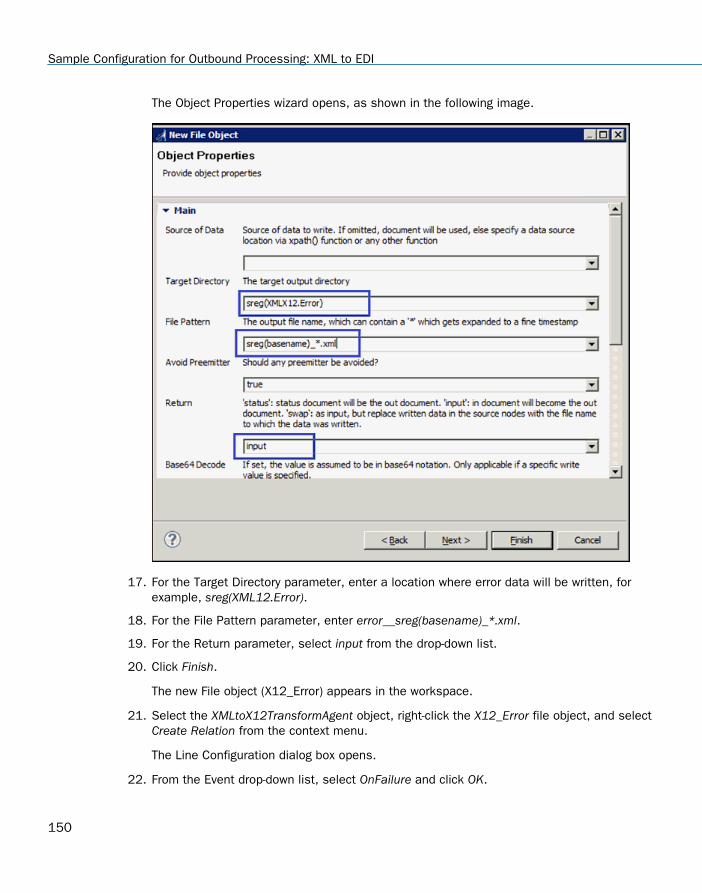
The Object Properties wizard opens, as shown in the following image.
17. For the Target Directory parameter, enter a location where error data will be written, forexample, sreg(XML12.Error).
18. For the File Pattern parameter, enter error__sreg(basename)_*.xml.
19. For the Return parameter, select input from the drop-down list.
20. Click Finish.
The new File object (X12_Error) appears in the workspace.
21. Select the XMLtoX12TransformAgent object, right-click the X12_Error file object, and selectCreate Relation from the context menu.
The Line Configuration dialog box opens.
22. From the Event drop-down list, select OnFailure and click OK.
Sample Configuration for Outbound Processing: XML to EDI
150
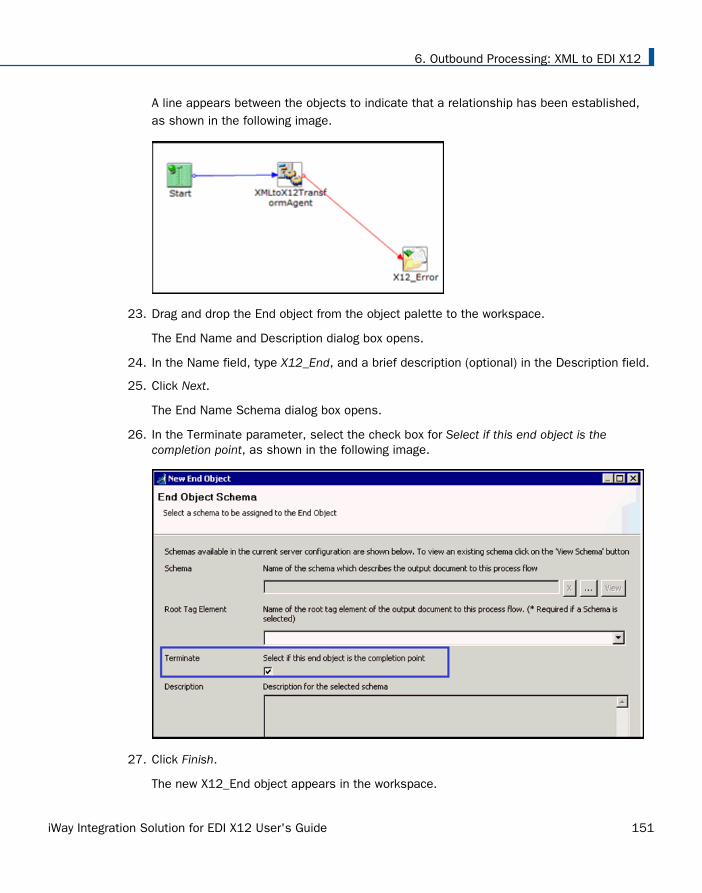
A line appears between the objects to indicate that a relationship has been established,as shown in the following image.
23. Drag and drop the End object from the object palette to the workspace.
The End Name and Description dialog box opens.
24. In the Name field, type X12_End, and a brief description (optional) in the Description field.
25. Click Next.
The End Name Schema dialog box opens.
26. In the Terminate parameter, select the check box for Select if this end object is thecompletion point, as shown in the following image.
27. Click Finish.
The new X12_End object appears in the workspace.
6. Outbound Processing: XML to EDI X12
iWay Integration Solution for EDI X12 User's Guide 151
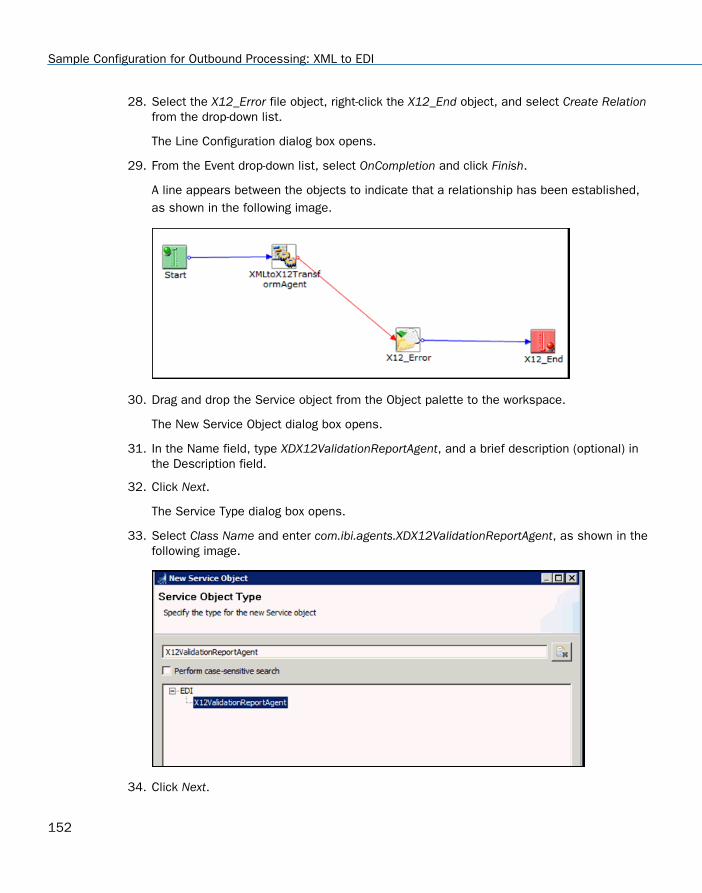
28. Select the X12_Error file object, right-click the X12_End object, and select Create Relationfrom the drop-down list.
The Line Configuration dialog box opens.
29. From the Event drop-down list, select OnCompletion and click Finish.
A line appears between the objects to indicate that a relationship has been established,as shown in the following image.
30. Drag and drop the Service object from the Object palette to the workspace.
The New Service Object dialog box opens.
31. In the Name field, type XDX12ValidationReportAgent, and a brief description (optional) inthe Description field.
32. Click Next.
The Service Type dialog box opens.
33. Select Class Name and enter com.ibi.agents.XDX12ValidationReportAgent, as shown in thefollowing image.
34. Click Next.
Sample Configuration for Outbound Processing: XML to EDI
152

The Properties dialog box opens.
35. Configure the available parameters according to your requirements.
36. Click Finish.
The new Service object (XDX12ValidationReportAgent) appears in the workspace.
37. Select the XMLtoX12TransformAgent object, right-click the XDX12ValidationReportAgentobject, and select Create Relation from the context menu.
The Line Configuration dialog box opens.
38. From the Event drop-down list, select OnSuccess and click OK.
A line appears between the objects to indicate that a relationship has been established,as shown in the following image.
39. Drag and drop the Decision Test object from the Object palette to the workspace.
The New Test Object dialog box opens.
40. In the Name field, type Decision Test, and a brief description (optional) in the Descriptionfield.
41. Click Next.
6. Outbound Processing: XML to EDI X12
iWay Integration Solution for EDI X12 User's Guide 153
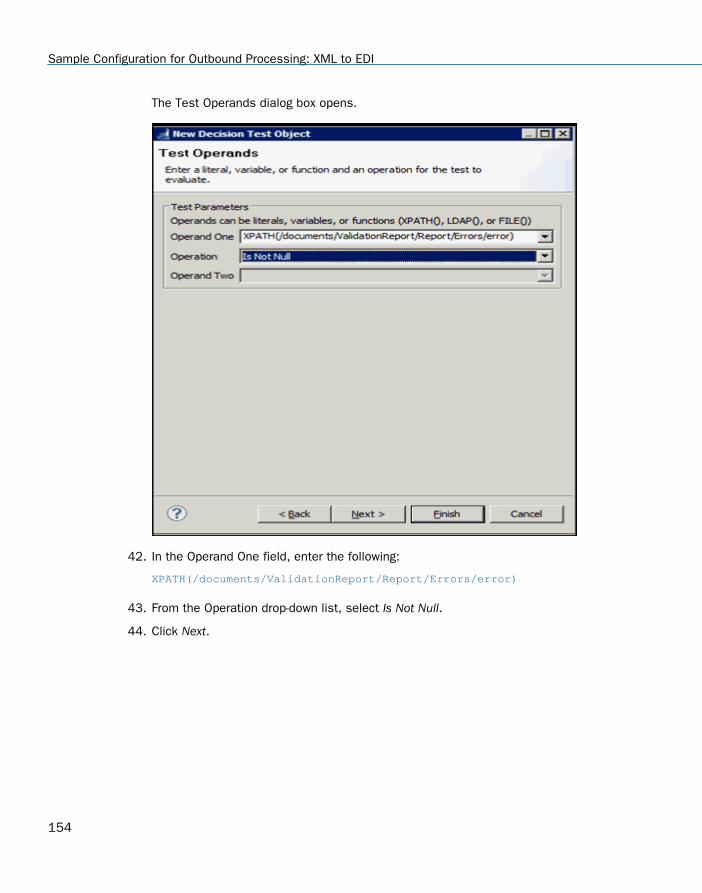
The Test Operands dialog box opens.
42. In the Operand One field, enter the following:
XPATH(/documents/ValidationReport/Report/Errors/error)
43. From the Operation drop-down list, select Is Not Null.
44. Click Next.
Sample Configuration for Outbound Processing: XML to EDI
154
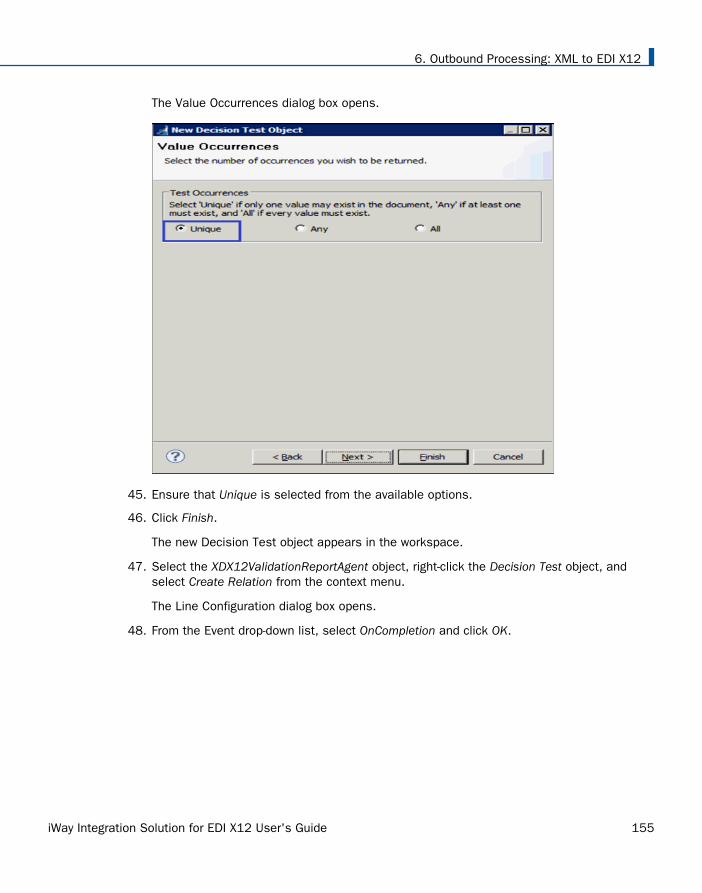
The Value Occurrences dialog box opens.
45. Ensure that Unique is selected from the available options.
46. Click Finish.
The new Decision Test object appears in the workspace.
47. Select the XDX12ValidationReportAgent object, right-click the Decision Test object, andselect Create Relation from the context menu.
The Line Configuration dialog box opens.
48. From the Event drop-down list, select OnCompletion and click OK.
6. Outbound Processing: XML to EDI X12
iWay Integration Solution for EDI X12 User's Guide 155
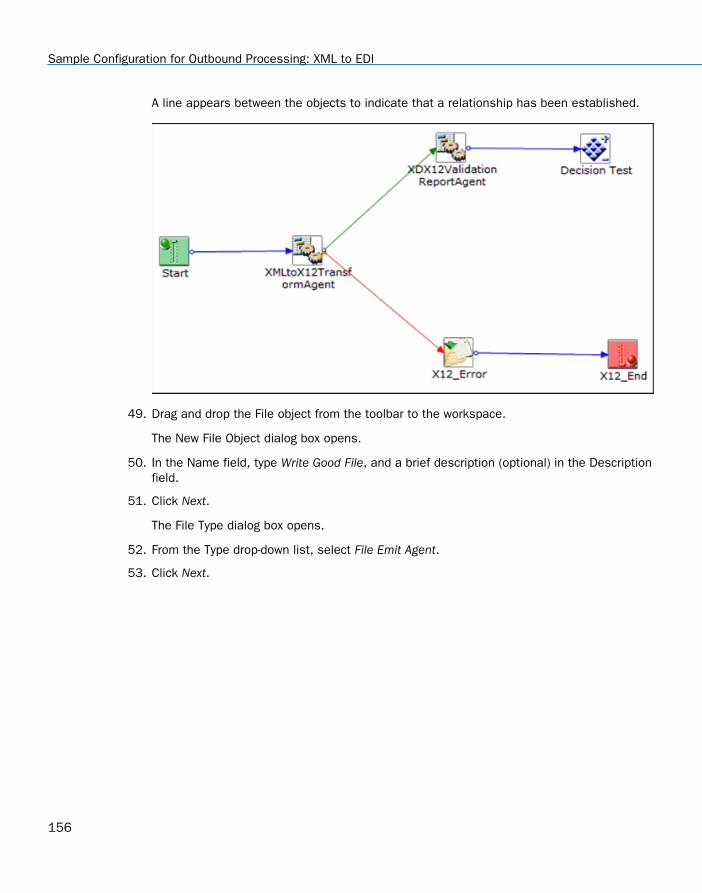
A line appears between the objects to indicate that a relationship has been established.
49. Drag and drop the File object from the toolbar to the workspace.
The New File Object dialog box opens.
50. In the Name field, type Write Good File, and a brief description (optional) in the Descriptionfield.
51. Click Next.
The File Type dialog box opens.
52. From the Type drop-down list, select File Emit Agent.
53. Click Next.
Sample Configuration for Outbound Processing: XML to EDI
156
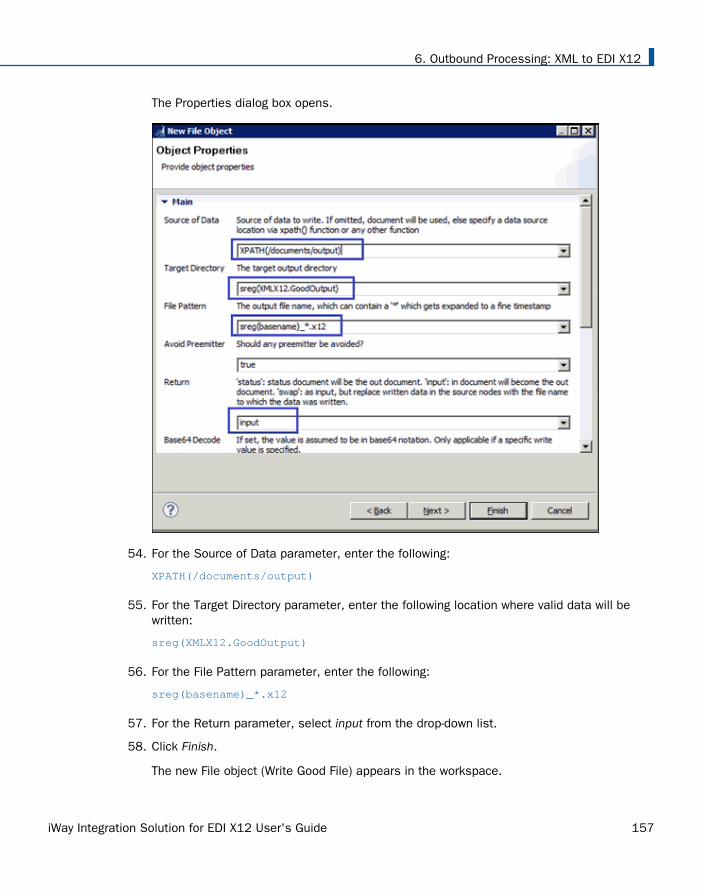
The Properties dialog box opens.
54. For the Source of Data parameter, enter the following:
XPATH(/documents/output)
55. For the Target Directory parameter, enter the following location where valid data will bewritten:
sreg(XMLX12.GoodOutput)
56. For the File Pattern parameter, enter the following:
sreg(basename)_*.x12
57. For the Return parameter, select input from the drop-down list.
58. Click Finish.
The new File object (Write Good File) appears in the workspace.
6. Outbound Processing: XML to EDI X12
iWay Integration Solution for EDI X12 User's Guide 157

59. Select the Decision Test object, right-click the Write Good File object, and select CreateRelation from the context menu.
The Line Configuration dialog box opens.
60. From the Event drop-down list, select OnCustom.
61. In the Case of section, select false.
62. Click Finish.
Sample Configuration for Outbound Processing: XML to EDI
158
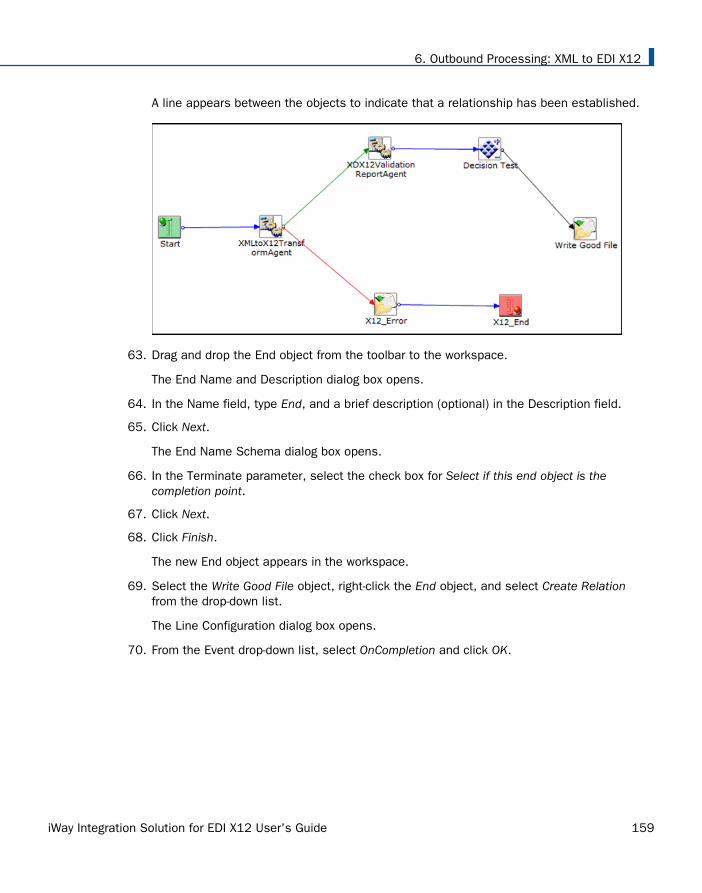
A line appears between the objects to indicate that a relationship has been established.
63. Drag and drop the End object from the toolbar to the workspace.
The End Name and Description dialog box opens.
64. In the Name field, type End, and a brief description (optional) in the Description field.
65. Click Next.
The End Name Schema dialog box opens.
66. In the Terminate parameter, select the check box for Select if this end object is thecompletion point.
67. Click Next.
68. Click Finish.
The new End object appears in the workspace.
69. Select the Write Good File object, right-click the End object, and select Create Relationfrom the drop-down list.
The Line Configuration dialog box opens.
70. From the Event drop-down list, select OnCompletion and click OK.
6. Outbound Processing: XML to EDI X12
iWay Integration Solution for EDI X12 User's Guide 159
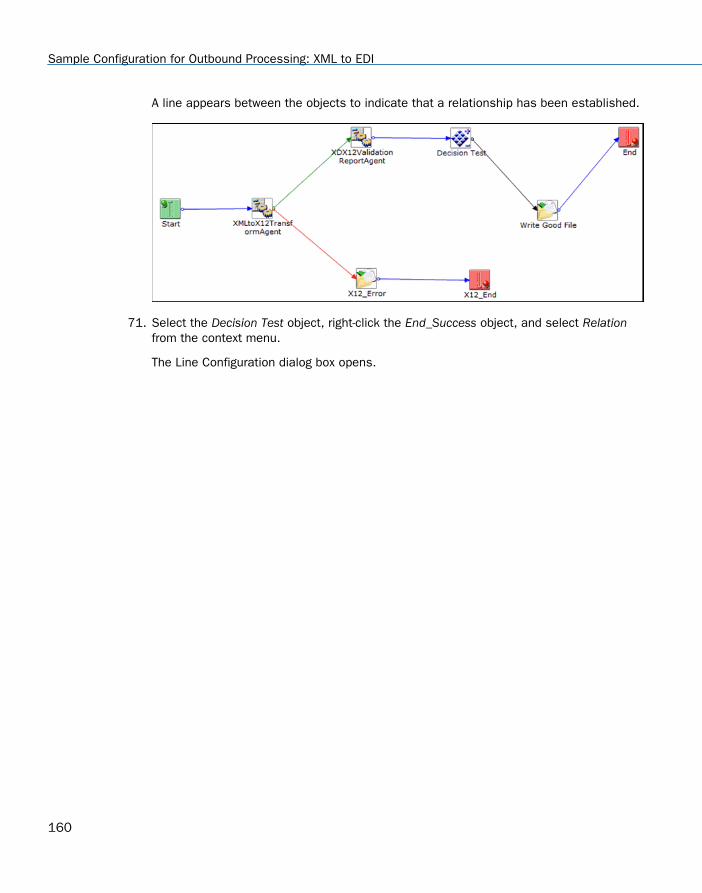
A line appears between the objects to indicate that a relationship has been established.
71. Select the Decision Test object, right-click the End_Success object, and select Relationfrom the context menu.
The Line Configuration dialog box opens.
Sample Configuration for Outbound Processing: XML to EDI
160
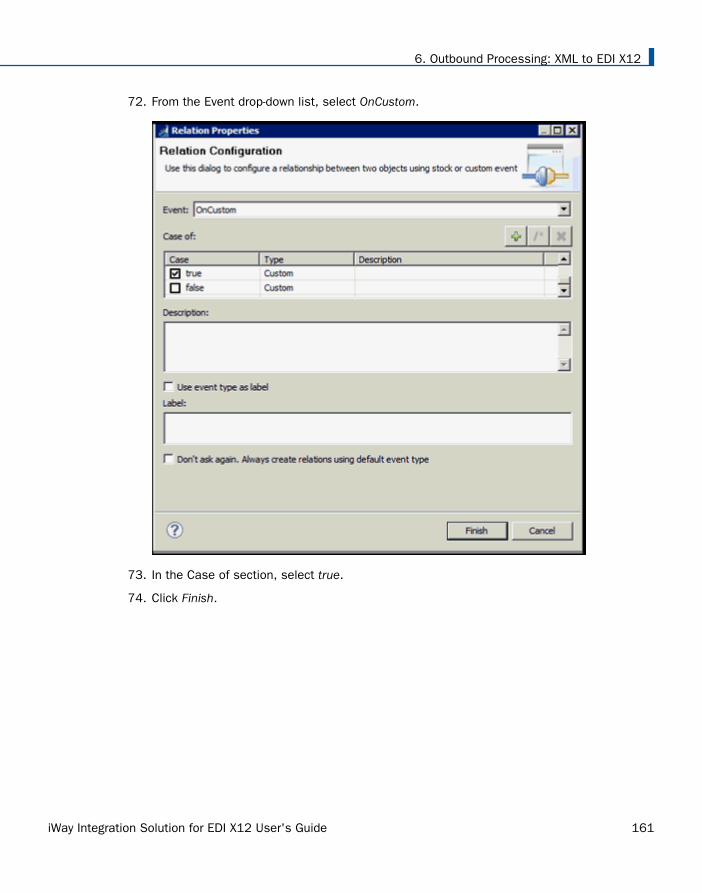
72. From the Event drop-down list, select OnCustom.
73. In the Case of section, select true.
74. Click Finish.
6. Outbound Processing: XML to EDI X12
iWay Integration Solution for EDI X12 User's Guide 161
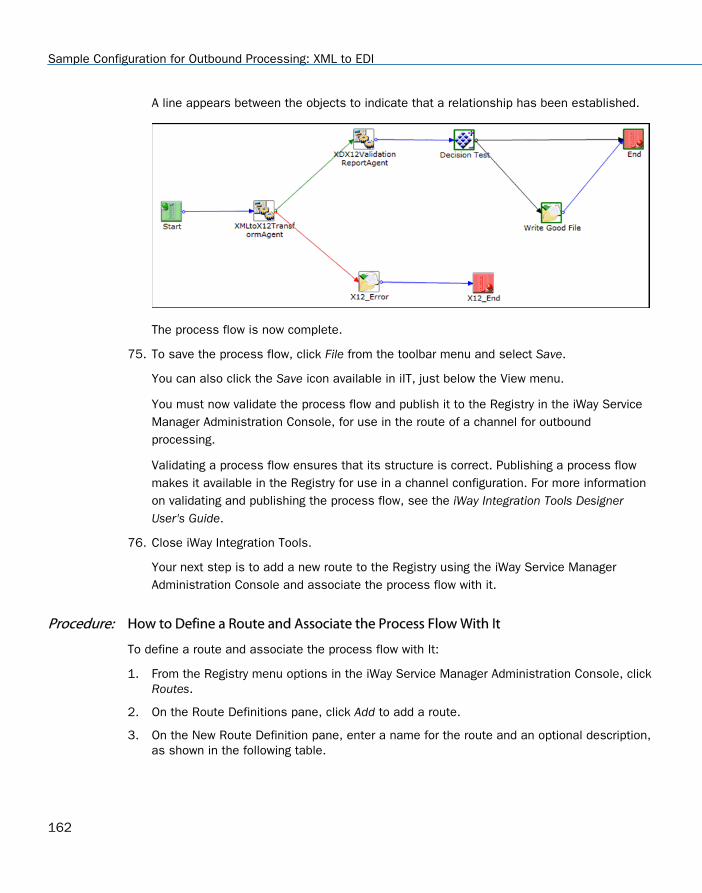
A line appears between the objects to indicate that a relationship has been established.
The process flow is now complete.
75. To save the process flow, click File from the toolbar menu and select Save.
You can also click the Save icon available in iIT, just below the View menu.
You must now validate the process flow and publish it to the Registry in the iWay ServiceManager Administration Console, for use in the route of a channel for outboundprocessing.
Validating a process flow ensures that its structure is correct. Publishing a process flowmakes it available in the Registry for use in a channel configuration. For more informationon validating and publishing the process flow, see the iWay Integration Tools DesignerUser's Guide.
76. Close iWay Integration Tools.
Your next step is to add a new route to the Registry using the iWay Service ManagerAdministration Console and associate the process flow with it.
Procedure: How to Define a Route and Associate the Process Flow With It
To define a route and associate the process flow with It:
1. From the Registry menu options in the iWay Service Manager Administration Console, clickRoutes.
2. On the Route Definitions pane, click Add to add a route.
3. On the New Route Definition pane, enter a name for the route and an optional description,as shown in the following table.
Sample Configuration for Outbound Processing: XML to EDI
162
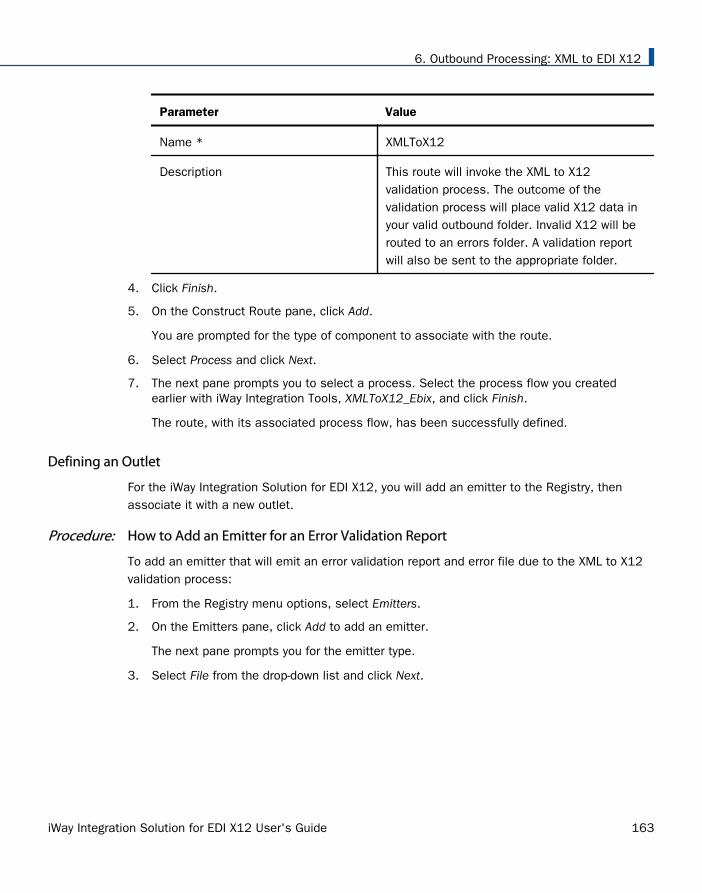
Parameter Value
Name * XMLToX12
Description This route will invoke the XML to X12validation process. The outcome of thevalidation process will place valid X12 data inyour valid outbound folder. Invalid X12 will berouted to an errors folder. A validation reportwill also be sent to the appropriate folder.
4. Click Finish.
5. On the Construct Route pane, click Add.
You are prompted for the type of component to associate with the route.
6. Select Process and click Next.
7. The next pane prompts you to select a process. Select the process flow you createdearlier with iWay Integration Tools, XMLToX12_Ebix, and click Finish.
The route, with its associated process flow, has been successfully defined.
Defining an Outlet
For the iWay Integration Solution for EDI X12, you will add an emitter to the Registry, thenassociate it with a new outlet.
Procedure: How to Add an Emitter for an Error Validation Report
To add an emitter that will emit an error validation report and error file due to the XML to X12validation process:
1. From the Registry menu options, select Emitters.
2. On the Emitters pane, click Add to add an emitter.
The next pane prompts you for the emitter type.
3. Select File from the drop-down list and click Next.
6. Outbound Processing: XML to EDI X12
iWay Integration Solution for EDI X12 User's Guide 163
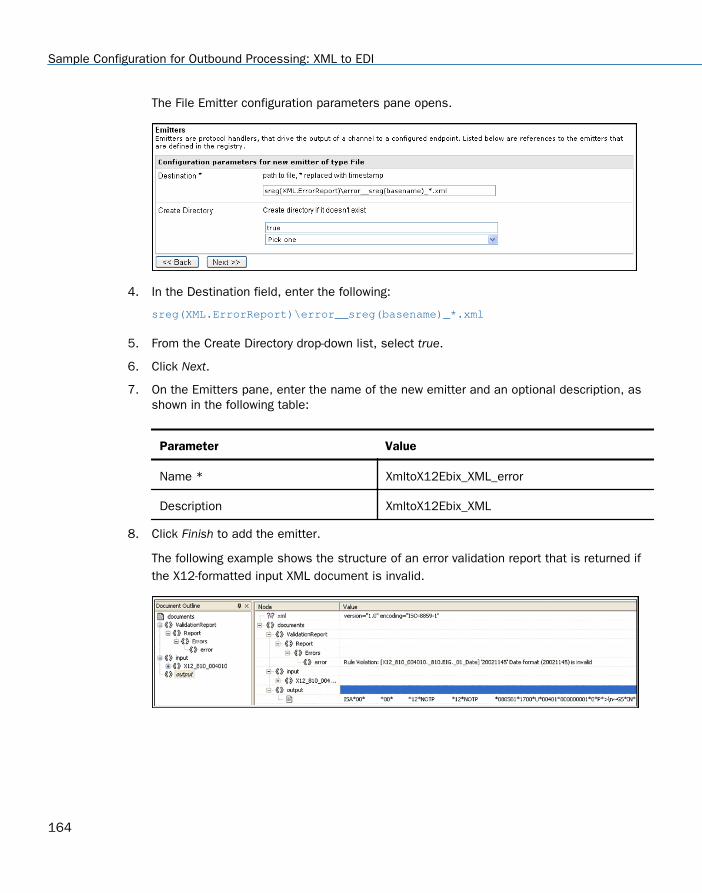
The File Emitter configuration parameters pane opens.
4. In the Destination field, enter the following:
sreg(XML.ErrorReport)\error__sreg(basename)_*.xml
5. From the Create Directory drop-down list, select true.
6. Click Next.
7. On the Emitters pane, enter the name of the new emitter and an optional description, asshown in the following table:
Parameter Value
Name * XmltoX12Ebix_XML_error
Description XmltoX12Ebix_XML
8. Click Finish to add the emitter.
The following example shows the structure of an error validation report that is returned ifthe X12-formatted input XML document is invalid.
Sample Configuration for Outbound Processing: XML to EDI
164

Procedure: How to Add an Emitter for a Valid Validation Report
To add an emitter that will emit a valid validation report due to the XML to X12 validationprocess:
1. From the Registry menu options, select Emitters.
2. On the Emitters pane, click Add to add an emitter.
The next pane prompts you for the emitter type.
3. Select File from the drop-down list and click Next.
The File Emitter configuration parameters pane opens.
4. In the Destination field, enter the following:
sreg(XML.ValidationReport)\validation_sreg(basename)_*.xml
5. From the Create Directory drop-down list, select true.
6. Click Next.
7. On the Emitters pane, enter the name of the new emitter and an optional description, asshown in the following table:
Parameter Value
Name * XmltoX12Ebix_XML_validation
Description XmltoX12Ebix_XML
8. Click Finish to add the emitter.
6. Outbound Processing: XML to EDI X12
iWay Integration Solution for EDI X12 User's Guide 165
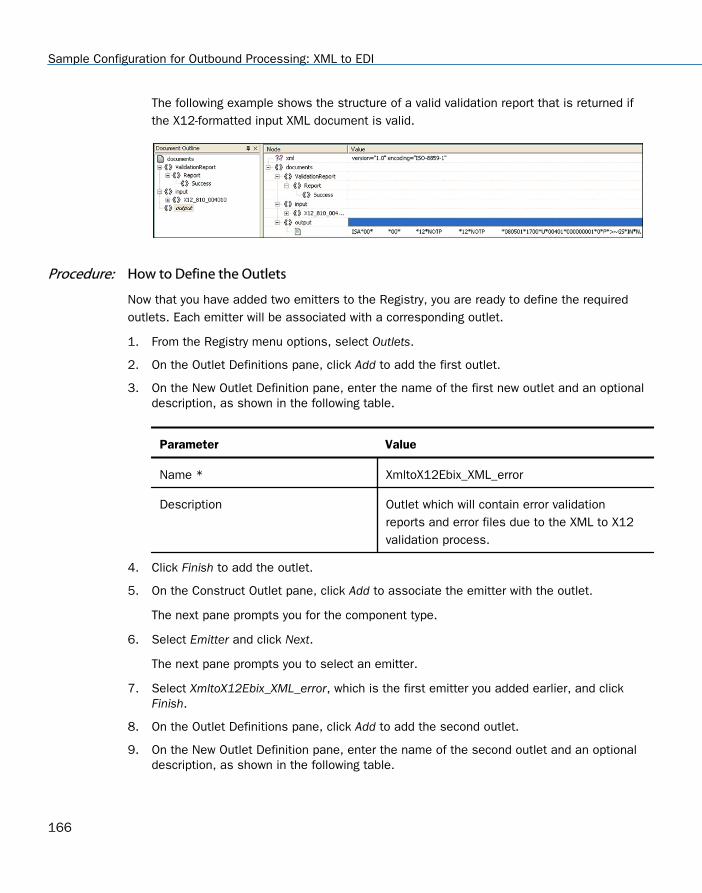
The following example shows the structure of a valid validation report that is returned ifthe X12-formatted input XML document is valid.
Procedure: How to Define the Outlets
Now that you have added two emitters to the Registry, you are ready to define the requiredoutlets. Each emitter will be associated with a corresponding outlet.
1. From the Registry menu options, select Outlets.
2. On the Outlet Definitions pane, click Add to add the first outlet.
3. On the New Outlet Definition pane, enter the name of the first new outlet and an optionaldescription, as shown in the following table.
Parameter Value
Name * XmltoX12Ebix_XML_error
Description Outlet which will contain error validationreports and error files due to the XML to X12validation process.
4. Click Finish to add the outlet.
5. On the Construct Outlet pane, click Add to associate the emitter with the outlet.
The next pane prompts you for the component type.
6. Select Emitter and click Next.
The next pane prompts you to select an emitter.
7. Select XmltoX12Ebix_XML_error, which is the first emitter you added earlier, and clickFinish.
8. On the Outlet Definitions pane, click Add to add the second outlet.
9. On the New Outlet Definition pane, enter the name of the second outlet and an optionaldescription, as shown in the following table.
Sample Configuration for Outbound Processing: XML to EDI
166
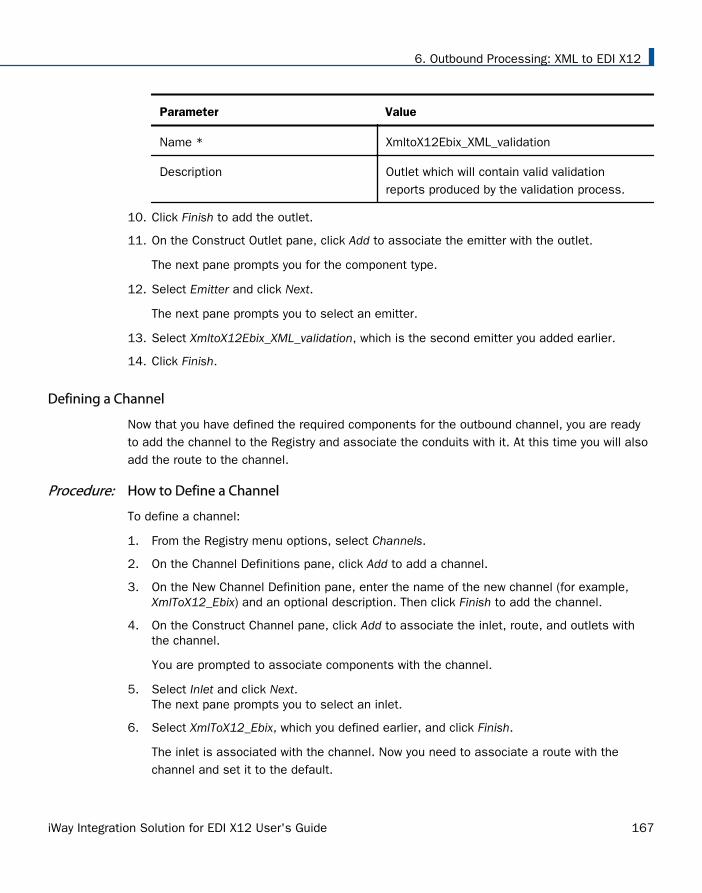
Parameter Value
Name * XmltoX12Ebix_XML_validation
Description Outlet which will contain valid validationreports produced by the validation process.
10. Click Finish to add the outlet.
11. On the Construct Outlet pane, click Add to associate the emitter with the outlet.
The next pane prompts you for the component type.
12. Select Emitter and click Next.
The next pane prompts you to select an emitter.
13. Select XmltoX12Ebix_XML_validation, which is the second emitter you added earlier.
14. Click Finish.
Defining a Channel
Now that you have defined the required components for the outbound channel, you are readyto add the channel to the Registry and associate the conduits with it. At this time you will alsoadd the route to the channel.
Procedure: How to Define a Channel
To define a channel:
1. From the Registry menu options, select Channels.
2. On the Channel Definitions pane, click Add to add a channel.
3. On the New Channel Definition pane, enter the name of the new channel (for example,XmlToX12_Ebix) and an optional description. Then click Finish to add the channel.
4. On the Construct Channel pane, click Add to associate the inlet, route, and outlets withthe channel.
You are prompted to associate components with the channel.
5. Select Inlet and click Next.The next pane prompts you to select an inlet.
6. Select XmlToX12_Ebix, which you defined earlier, and click Finish.
The inlet is associated with the channel. Now you need to associate a route with thechannel and set it to the default.
6. Outbound Processing: XML to EDI X12
iWay Integration Solution for EDI X12 User's Guide 167
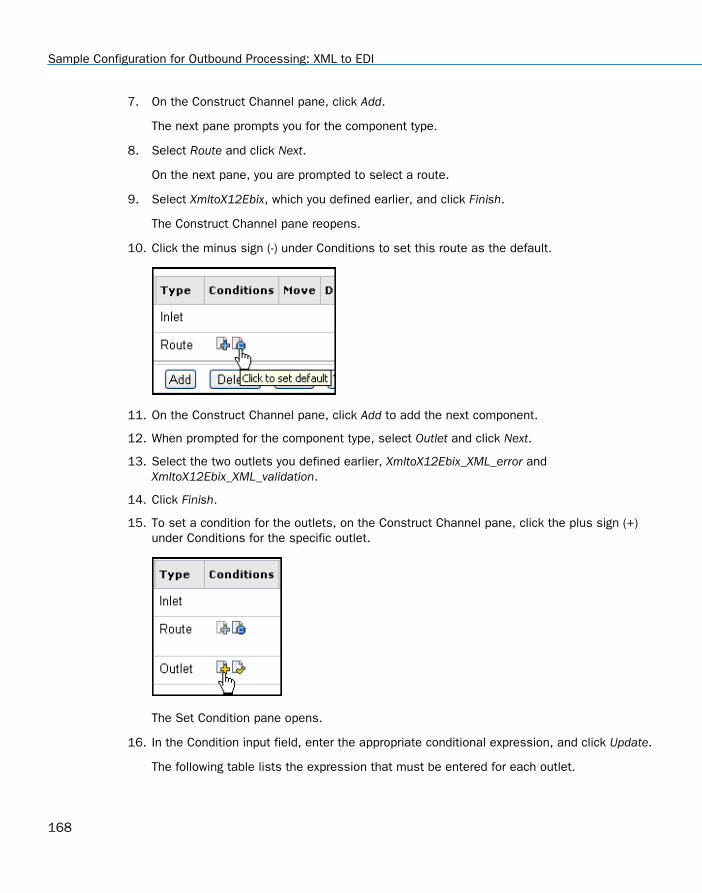
7. On the Construct Channel pane, click Add.
The next pane prompts you for the component type.
8. Select Route and click Next.
On the next pane, you are prompted to select a route.
9. Select XmltoX12Ebix, which you defined earlier, and click Finish.
The Construct Channel pane reopens.
10. Click the minus sign (-) under Conditions to set this route as the default.
11. On the Construct Channel pane, click Add to add the next component.
12. When prompted for the component type, select Outlet and click Next.
13. Select the two outlets you defined earlier, XmltoX12Ebix_XML_error andXmltoX12Ebix_XML_validation.
14. Click Finish.
15. To set a condition for the outlets, on the Construct Channel pane, click the plus sign (+)under Conditions for the specific outlet.
The Set Condition pane opens.
16. In the Condition input field, enter the appropriate conditional expression, and click Update.
The following table lists the expression that must be entered for each outlet.
Sample Configuration for Outbound Processing: XML to EDI
168
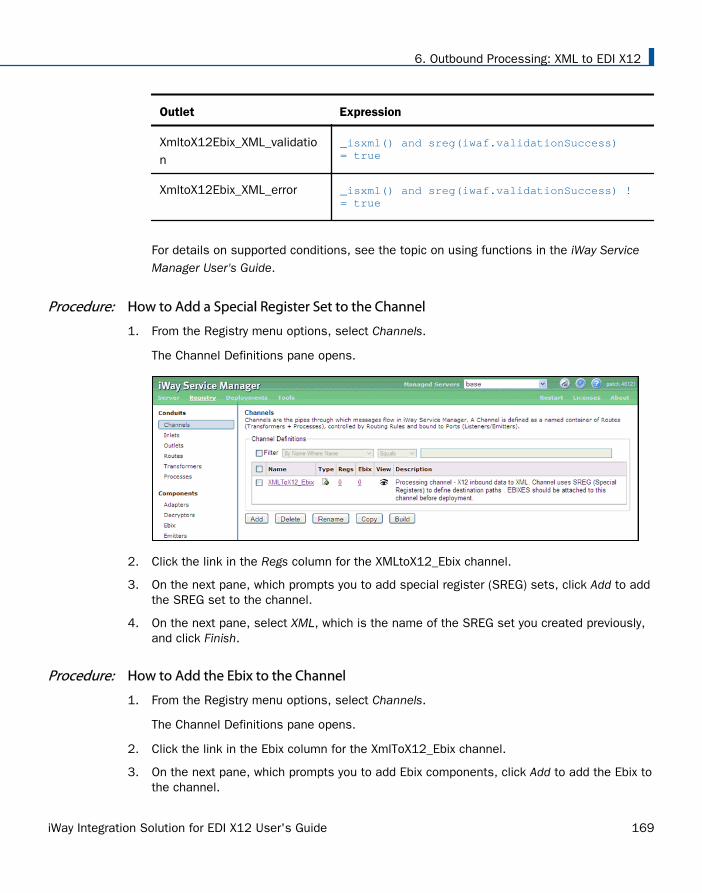
Outlet Expression
XmltoX12Ebix_XML_validation
_isxml() and sreg(iwaf.validationSuccess) = true
XmltoX12Ebix_XML_error _isxml() and sreg(iwaf.validationSuccess) != true
For details on supported conditions, see the topic on using functions in the iWay ServiceManager User's Guide.
Procedure: How to Add a Special Register Set to the Channel
1. From the Registry menu options, select Channels.
The Channel Definitions pane opens.
2. Click the link in the Regs column for the XMLtoX12_Ebix channel.
3. On the next pane, which prompts you to add special register (SREG) sets, click Add to addthe SREG set to the channel.
4. On the next pane, select XML, which is the name of the SREG set you created previously,and click Finish.
Procedure: How to Add the Ebix to the Channel
1. From the Registry menu options, select Channels.
The Channel Definitions pane opens.
2. Click the link in the Ebix column for the XmlToX12_Ebix channel.
3. On the next pane, which prompts you to add Ebix components, click Add to add the Ebix tothe channel.
6. Outbound Processing: XML to EDI X12
iWay Integration Solution for EDI X12 User's Guide 169

4. On the next pane, select EDI_4050, which is the name of the Ebix you added previously,and click Finish.
Procedure: How to Build the Channel
1. From the Registry menu options, select Channels.
2. On the Channel Definitions pane, select the channel for outbound processing definedpreviously, XmlToX12_Ebix, and click Build.
The results of the build are displayed on the right pane.
3. Review the results of your build and then click Back.
If an error or errors are displayed in the Message column, take the appropriate action asinstructed.
Procedure: How to Deploy the Channel
Deployment is the mechanism by which a channel moves from being stored in the Registry tobecoming active in iWay Service Manager. For more information on deployment, see the iWayService Manager User's Guide.
1. Select the Deployments option.
2. On the Channel Management pane, click Deploy.
3. On the Available Channels pane, select the channel you defined previously,XmlToX12_Ebix, and click Deploy.
The Channel Management pane reopens.
4. Select XmlToX12_Ebix and click Start.
The red X under Status changes to a green check mark to indicate that the channel hasbeen started. If an error or errors are displayed, take the appropriate action as instructed.
Procedure: How to Verify the Channel
To ensure that the channel is working as expected, perform the following steps.
For more information on obtaining EDI X12 sample files for testing purposes, see Downloadingand Extracting EDI X12 User Samples on page 44.
1. Place an XML file as test data into the input directory. This is the path in which XMLmessages are received, which you specified for the listener associated with the inlet forthe channel.
2. Check for the EDI output file in the output directory. This is the destination directory youspecified for the listener.
Sample Configuration for Outbound Processing: XML to EDI
170

3. Confirm that the output has been converted to EDI format.
Reusing Your Channel Configuration
Using the Archive Manager feature of iWay Service Manager, you can archive your channelconfiguration with its associated components and import them into another Registry. They willthen be available from that Registry for modification or reuse.
For details on this feature, see the iWay Service Manager User's Guide.
6. Outbound Processing: XML to EDI X12
iWay Integration Solution for EDI X12 User's Guide 171

Sample Configuration for Outbound Processing: XML to EDI
172
Chapter7Batching for Outbound Documents
This chapter describes the Outbound Batching feature for the iWay Integration Solutionfor EDI X12.
In this chapter:
Overview
Outbound Batching Process Flow
Control Numbers
Assembly Details: Order of Operations
Extracted Fields
Trading Partner Flags and Counters
Data Collection
Database Sweep (Data Selection) for Batching
Building Each Batch
Appendix A: Batch Agent Options
Appendix B: New TPAVALUES Metadata Tags for ANSI X12 Documents
Appendix C: Sample EDI X12 Batched Document
Overview
In previous releases, outbound EDI X12 documents were being sent as single units of work.Each document was wrapped in an interchange wrapper, a group wrapper, and a documentwrapper.
iWay Integration Solution for EDI X12 User's Guide 173

As of iWay version 8.0.4, the Outbound Batching feature is available for the iWay IntegrationSolution for EDI X12, which enables you to send batches of outbound documents. This featurerequires iWay Trading Partner Manager (TPM). New metadata tags were added to theTPAVALUES table, which are required by embedded TPA calls and extraction/concatenation.For example:
ISA13 (X12 Interchange Control Number)
GS06 (X12 Group Control Number)
ST02 (X12 Transaction Set Control Number)
As a best practice, document headers are being populated from the trading partner table(s).The transformed standard formatted data already contains the values from these fields. Thisprovides a user framework for creating documents rather than hard-coding within thetransforms.
Packaging
The Outbound Batching feature is packaged with the sample EDI X12 channel that you candownload from https://techsupport.informationbuilders.com/ and then import into iWayIntegration Tools (iIT).
Outbound Batching Process Flow
After you import the sample EDI X12 channel that you downloaded into iWay Integration Tools(iIT), expand the Flows subfolder, as shown in the following image.
Double-click X12Batching8x.
Outbound Batching Process Flow
174
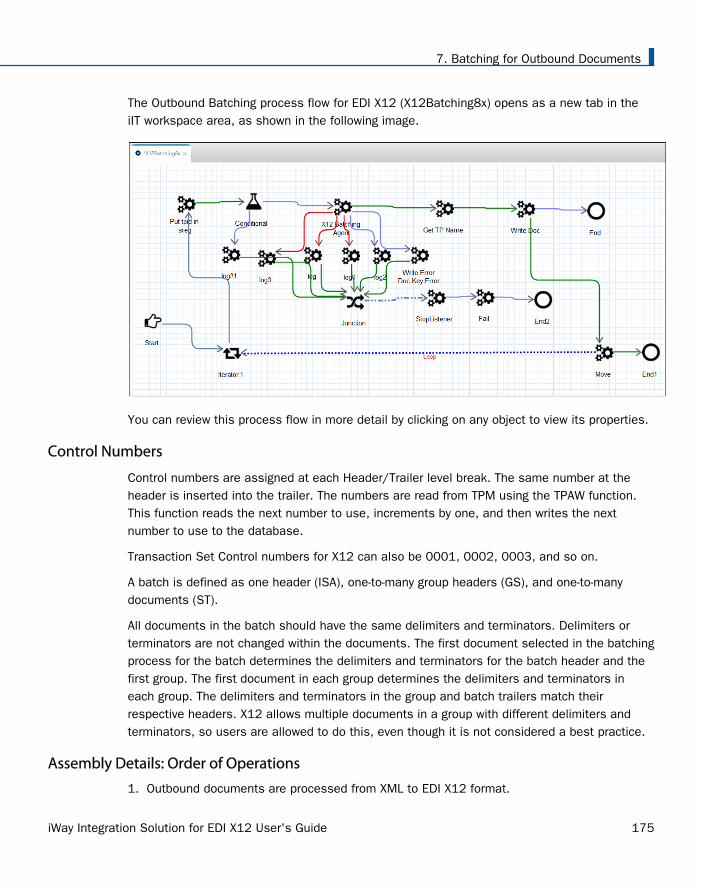
The Outbound Batching process flow for EDI X12 (X12Batching8x) opens as a new tab in theiIT workspace area, as shown in the following image.
You can review this process flow in more detail by clicking on any object to view its properties.
Control Numbers
Control numbers are assigned at each Header/Trailer level break. The same number at theheader is inserted into the trailer. The numbers are read from TPM using the TPAW function.This function reads the next number to use, increments by one, and then writes the nextnumber to use to the database.
Transaction Set Control numbers for X12 can also be 0001, 0002, 0003, and so on.
A batch is defined as one header (ISA), one-to-many group headers (GS), and one-to-manydocuments (ST).
All documents in the batch should have the same delimiters and terminators. Delimiters orterminators are not changed within the documents. The first document selected in the batchingprocess for the batch determines the delimiters and terminators for the batch header and thefirst group. The first document in each group determines the delimiters and terminators ineach group. The delimiters and terminators in the group and batch trailers match theirrespective headers. X12 allows multiple documents in a group with different delimiters andterminators, so users are allowed to do this, even though it is not considered a best practice.
Assembly Details: Order of Operations
1. Outbound documents are processed from XML to EDI X12 format.
7. Batching for Outbound Documents
iWay Integration Solution for EDI X12 User's Guide 175
2. Header fields and document (as a Binary Large OBject (BLOB)) are extracted and persistedto the database table.
3. Database table is periodically swept. Documents with like trading partner credentials areselected and flagged.
4. Group is built from the inside out as follows:
a. Each document header is constructed.
b. Each document is appended to the header.
c. Document trailer is constructed and appended to each document.
d. Batches of documents (steps a-b-c) are concatenated together for a single group.
e. Group header is constructed. Result of step d is appended to the header.
f. Group trailer is constructed and appended to the result of step e.
g. If there are more documents, then repeat steps a-b-c-d-e-f.
h. If there are no more documents, then the Interchange header is constructed. Result ofstep f is appended to the header.
i. Interchange trailer is constructed and appended to the output file.
Extracted Fields
Using XPATH, it is possible to define the header, group, and document elements to collect andpersist to the database from the validation report. Additional elements to persist include theelement and subelement delimiters and the segment terminator. These three fields must bepersisted as hex values. Note that three different formats of segment terminators are allowed,and these must be preserved in the disassembly and reassembly processes.
Trading Partner Flags and Counters
A trading partner is defined to represent a document going to an interchange sender andreceiver, group sender and receiver, version and document (six key lookup). For example, if youare sending invoices and advanced shipping notices to JCPenney, you will define two tradingpartners, as shown in the following example:
FROM_US*TO_JPC*SENT_FROM_US*TO_JCP_ACCT*4010*810 (invoice)FROM_US*TO_JPC*SENT_FROM_US*TO_JCP_RECEIVING*4010*856 (ASN)
A combination of Interchange sender and receiver usually resolved to the mailbox address.Sometimes the group sender and receiver IDs are the same as the interchange. Other times itwill resolve to the slot in the mailbox.
Extracted Fields
176
In order to use this feature:
A metadata tagged field is added to TPM. This indicates if the partner receives data in theold (unbatched) or new (batched) presentation. Absence of the flag will default to“unbatched.” The stock channels require a decision point to read this tag. Unbatcheddocuments continue to flow as they do now. Batched documents route to the new agentthat reads the data elements from each document and persists to a database table.
Metadata tags must exist to contain the next interchange, group and document numbers toassign. TPA function TPAW reads this number, increments, and writes the new “nextnumber to assign” to the table. If the document number is not present, then the defaultvalue of “0001” is assigned. The agent has three prompts to contain the name of themetadata tag for each of these. You can modify these via SREG or can insert the valuesthat match your database.
A metadata tag is added to assign the maximum number of documents to allow in a group.If this metadata tag and the corresponding agent tags are not present, then the batching,when run, will contain all available documents. If this metadata tag is present, then groupswill be created of this size and a remainder group will be created if necessary.
A metadata tag “Accumulation Threshold” is added to assign the minimum number ofdocuments to assign to a batch. If this metadata tag is not present or this tag is zero (“0”),then the batching, when run, will contain all available documents. If this metadata tag ispresent, then batches will be created if the minimum number of documents available tobatch exceeds this number.
A metadata tag is added to determine the “Frequency To Batch” for a partner. Valid valuesfor this tag can range from five minutes (“00:05”) up to an entire day (“23:59”). If the tagis missing, then the default is “23:59”. This ensures that the outbound documents aresent at least daily. In addition, the last date and time batched is written to a tag in thetable. This is the value that is inspected and used to determine if data is ready to batch ornot.
A metadata tag is added to determine the Age Threshold for a partner. Valid values for thistag can range from five minutes (“00:05”) up to an entire day (“23:59”). If the tag ismissing, then the default is “23:59”. This ensures that the outbound documents are notpresent on the table for more than one day. In addition, the last date and time batched arewritten to a tag in the table. This is the value that is inspected and used to determine ifdata is ready to batch or not. This value is optional and overrides the value set in thebatching agent.
7. Batching for Outbound Documents
iWay Integration Solution for EDI X12 User's Guide 177
A metadata tag is added to determine if multiple groups are allowed in an interchange. Thedefault or missing tag value is true (“1”). This allows the user to send interchanges withonly one group per interchange instead of multiple groups per interchange. This also allowsthe user to set a specific trading partner to batch with only one group per interchange.
Data Collection
Two new tables have been added to the TPM database for the iWay Integration Solution for EDIX12 in support of the Outbound Batching feature.
Header Table: X12_BATCHHEADER
Detail Table: X12_BATCHDETAIL
Each row in the X12_BATCHDETAIL table contains each individual document and its extractedmetadata elements. In addition, the document is extracted and stored as a Binary LargeOBject (BLOB). The datetimestamp that the row was persisted is recorded. When rows areselected for batching, a datetimestamp is also set and the active row count in theBATCHHEADER is updated. A cleanup SQL script is provided for this table, but does not deletedata in real time.
The X12_BATCHHEADER table is a summary by six key lookup. It contains the active row countand total row count for each unique six key lookup that the sweep process will inspect. Itcontains the last written datetimestamp and last batched datetimestamp. These are used bythe sweep process to determine if the partner has exceeded the age threshold, accumulationthreshold, or maximum batch size from TPAVALUES.
Database Sweep (Data Selection) for Batching
The iWay Integration Solution for EDI X12 has its own selection process for batching and runsin its own iWay Integration Application (iIA). This allows user with X12 and EDIFACT to batchconcurrently. Multithreading is not supported.
A standard SQL adapter is used to select headers with available details to batch. The adapteruses a stored procedure to allow users to modify the sort selection (for example, sort by dateor invoice number). The user is prompted for the name and file location of the storedprocedure to execute in this agent and TPAVALUES.
An option is provided to set the time to sleep between channel executions.
Data Collection
178
An option is provided to set the age threshold (maximum time) that a document can be on thework table. If the maximum time is exceeded, then that document must be selected andbatched, regardless of any options set in the TPM table. This ensures that documents do notget stuck in the batching process and never emitted. Typically this will be “23:59” sodocuments are batched daily.
An option is provided to allow multiple groups in an interchange. This option defaults to true.The optional flag trading partner level takes precedence.
The selected headers are validated against TPM by checking the accumulation threshold(minimum batch size), maximum batch size, and age threshold to batch. If the partner is validto batch, the header busy flag is set to “1”.
Building Each Batch
Follow the Assembly Details: Order of Operations as previously stated.
For each header:
Select all of the details for that header.
Save the current datetimestamp.
Update datetimestamp with the value that was saved.
Count the number of detail records batched.
Create an interchange control from the first selected detail record in each group break.Replace the date and time in the header.
Use TPAW to get and set the control number.
Note: The X12 ISA and IEA are fixed length.
For each group:
Create a group header from the first selected detail record in each group break.
Use the same date and time as the interchange header.
Use TPAW to get and set the control number.
Create and append the group trailer. The trailer control number is the same as thegroup header.
For each document:
Get the document BLOB.
7. Batching for Outbound Documents
iWay Integration Solution for EDI X12 User's Guide 179
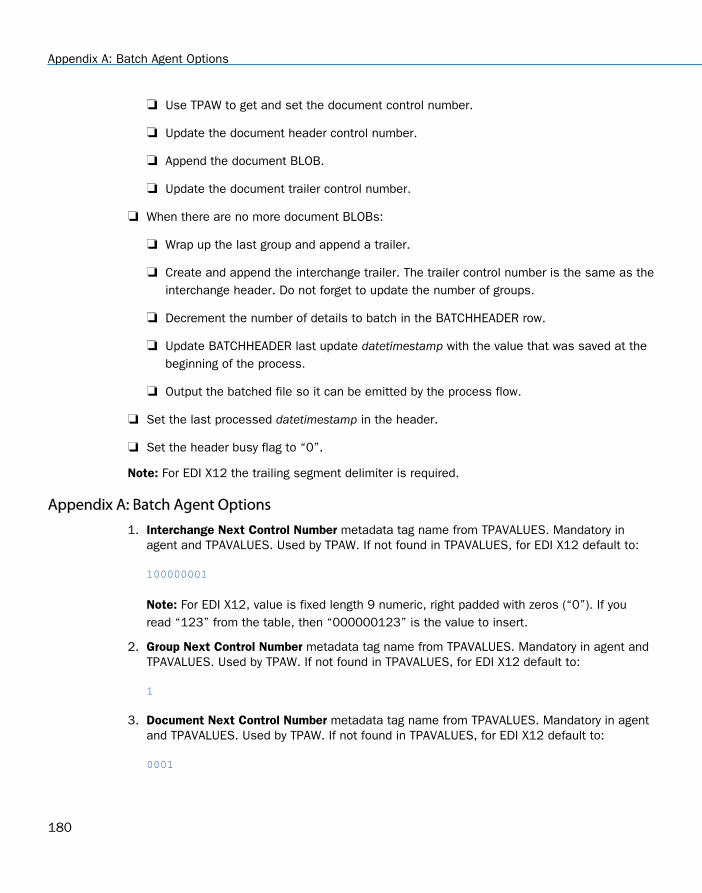
Use TPAW to get and set the document control number.
Update the document header control number.
Append the document BLOB.
Update the document trailer control number.
When there are no more document BLOBs:
Wrap up the last group and append a trailer.
Create and append the interchange trailer. The trailer control number is the same as theinterchange header. Do not forget to update the number of groups.
Decrement the number of details to batch in the BATCHHEADER row.
Update BATCHHEADER last update datetimestamp with the value that was saved at thebeginning of the process.
Output the batched file so it can be emitted by the process flow.
Set the last processed datetimestamp in the header.
Set the header busy flag to “0”.
Note: For EDI X12 the trailing segment delimiter is required.
Appendix A: Batch Agent Options
1. Interchange Next Control Number metadata tag name from TPAVALUES. Mandatory inagent and TPAVALUES. Used by TPAW. If not found in TPAVALUES, for EDI X12 default to:
100000001
Note: For EDI X12, value is fixed length 9 numeric, right padded with zeros (“0”). If youread “123” from the table, then “000000123” is the value to insert.
2. Group Next Control Number metadata tag name from TPAVALUES. Mandatory in agent andTPAVALUES. Used by TPAW. If not found in TPAVALUES, for EDI X12 default to:
1
3. Document Next Control Number metadata tag name from TPAVALUES. Mandatory in agentand TPAVALUES. Used by TPAW. If not found in TPAVALUES, for EDI X12 default to:
0001
Appendix A: Batch Agent Options
180
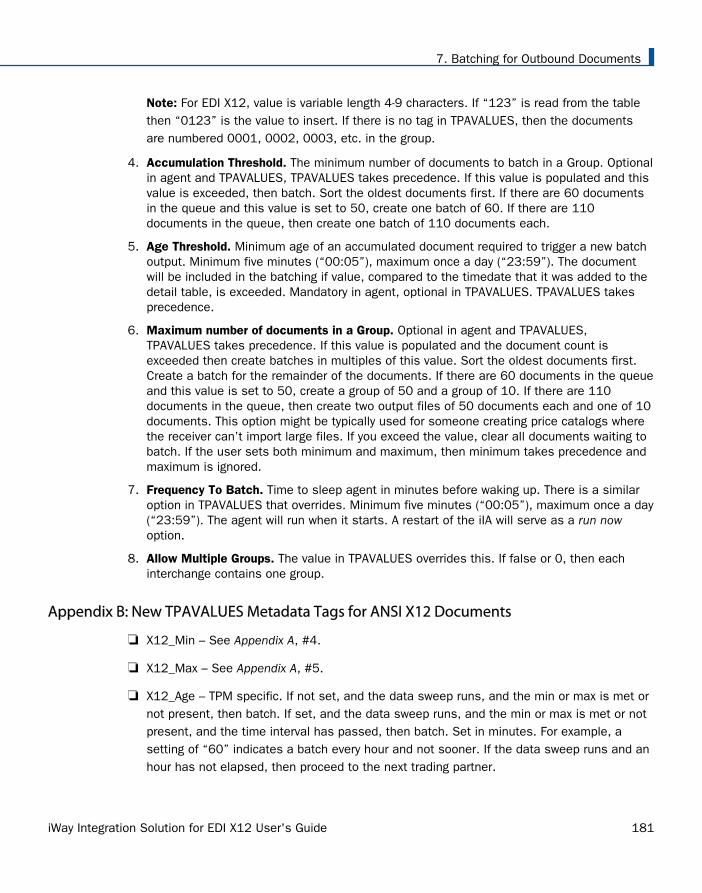
Note: For EDI X12, value is variable length 4-9 characters. If “123” is read from the tablethen “0123” is the value to insert. If there is no tag in TPAVALUES, then the documentsare numbered 0001, 0002, 0003, etc. in the group.
4. Accumulation Threshold. The minimum number of documents to batch in a Group. Optionalin agent and TPAVALUES, TPAVALUES takes precedence. If this value is populated and thisvalue is exceeded, then batch. Sort the oldest documents first. If there are 60 documentsin the queue and this value is set to 50, create one batch of 60. If there are 110documents in the queue, then create one batch of 110 documents each.
5. Age Threshold. Minimum age of an accumulated document required to trigger a new batchoutput. Minimum five minutes (“00:05”), maximum once a day (“23:59”). The documentwill be included in the batching if value, compared to the timedate that it was added to thedetail table, is exceeded. Mandatory in agent, optional in TPAVALUES. TPAVALUES takesprecedence.
6. Maximum number of documents in a Group. Optional in agent and TPAVALUES,TPAVALUES takes precedence. If this value is populated and the document count isexceeded then create batches in multiples of this value. Sort the oldest documents first.Create a batch for the remainder of the documents. If there are 60 documents in the queueand this value is set to 50, create a group of 50 and a group of 10. If there are 110documents in the queue, then create two output files of 50 documents each and one of 10documents. This option might be typically used for someone creating price catalogs wherethe receiver can’t import large files. If you exceed the value, clear all documents waiting tobatch. If the user sets both minimum and maximum, then minimum takes precedence andmaximum is ignored.
7. Frequency To Batch. Time to sleep agent in minutes before waking up. There is a similaroption in TPAVALUES that overrides. Minimum five minutes (“00:05”), maximum once a day(“23:59”). The agent will run when it starts. A restart of the iIA will serve as a run nowoption.
8. Allow Multiple Groups. The value in TPAVALUES overrides this. If false or 0, then eachinterchange contains one group.
Appendix B: New TPAVALUES Metadata Tags for ANSI X12 Documents
X12_Min – See Appendix A, #4.
X12_Max – See Appendix A, #5.
X12_Age – TPM specific. If not set, and the data sweep runs, and the min or max is met ornot present, then batch. If set, and the data sweep runs, and the min or max is met or notpresent, and the time interval has passed, then batch. Set in minutes. For example, asetting of “60” indicates a batch every hour and not sooner. If the data sweep runs and anhour has not elapsed, then proceed to the next trading partner.
7. Batching for Outbound Documents
iWay Integration Solution for EDI X12 User's Guide 181
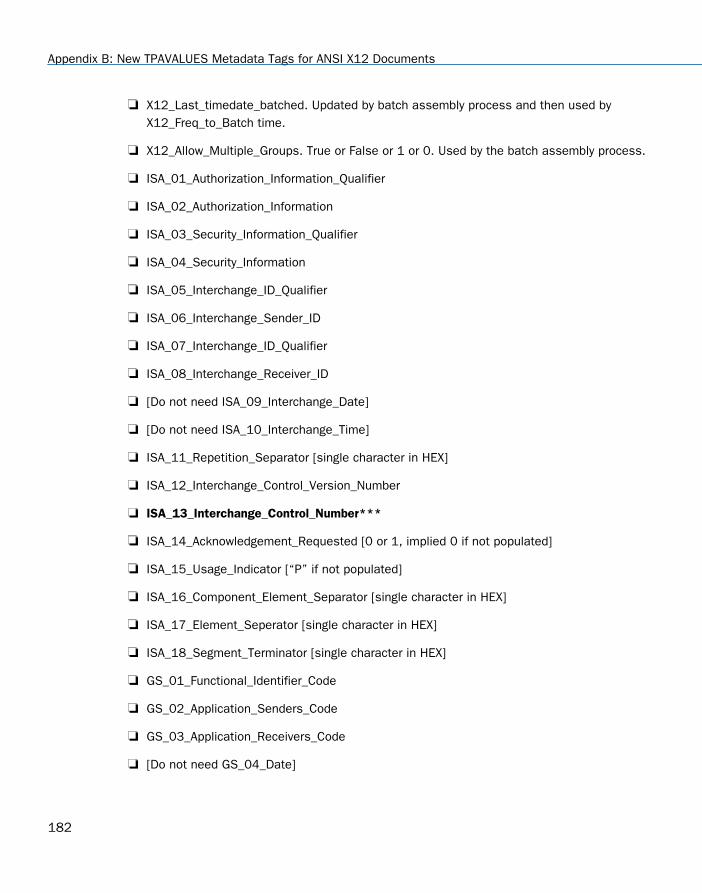
X12_Last_timedate_batched. Updated by batch assembly process and then used byX12_Freq_to_Batch time.
X12_Allow_Multiple_Groups. True or False or 1 or 0. Used by the batch assembly process.
ISA_01_Authorization_Information_Qualifier
ISA_02_Authorization_Information
ISA_03_Security_Information_Qualifier
ISA_04_Security_Information
ISA_05_Interchange_ID_Qualifier
ISA_06_Interchange_Sender_ID
ISA_07_Interchange_ID_Qualifier
ISA_08_Interchange_Receiver_ID
[Do not need ISA_09_Interchange_Date]
[Do not need ISA_10_Interchange_Time]
ISA_11_Repetition_Separator [single character in HEX]
ISA_12_Interchange_Control_Version_Number
ISA_13_Interchange_Control_Number***
ISA_14_Acknowledgement_Requested [0 or 1, implied 0 if not populated]
ISA_15_Usage_Indicator [“P” if not populated]
ISA_16_Component_Element_Separator [single character in HEX]
ISA_17_Element_Seperator [single character in HEX]
ISA_18_Segment_Terminator [single character in HEX]
GS_01_Functional_Identifier_Code
GS_02_Application_Senders_Code
GS_03_Application_Receivers_Code
[Do not need GS_04_Date]
Appendix B: New TPAVALUES Metadata Tags for ANSI X12 Documents
182
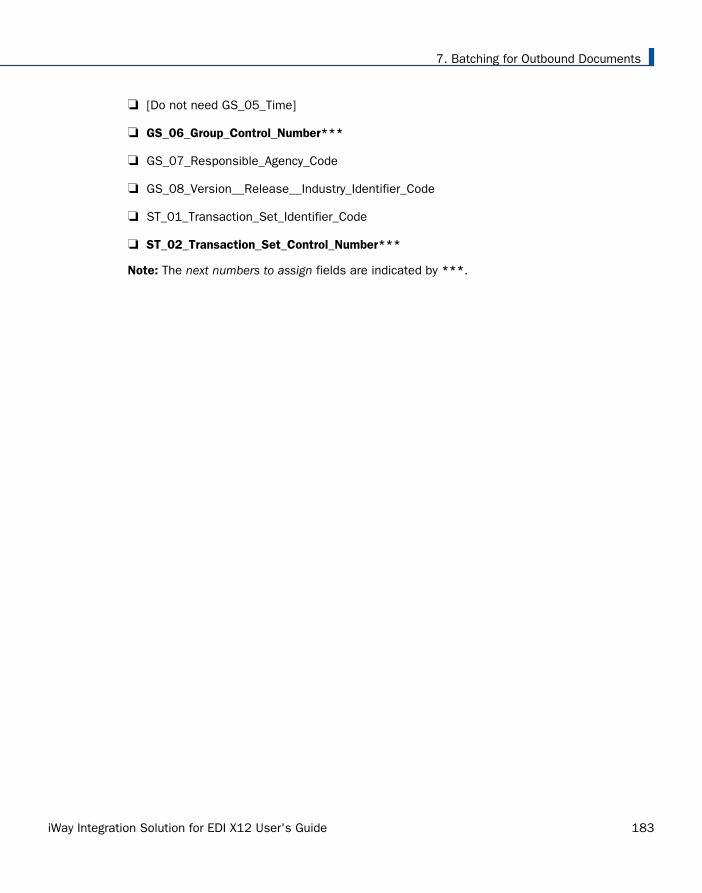
[Do not need GS_05_Time]
GS_06_Group_Control_Number***
GS_07_Responsible_Agency_Code
GS_08_Version__Release__Industry_Identifier_Code
ST_01_Transaction_Set_Identifier_Code
ST_02_Transaction_Set_Control_Number***
Note: The next numbers to assign fields are indicated by ***.
7. Batching for Outbound Documents
iWay Integration Solution for EDI X12 User's Guide 183
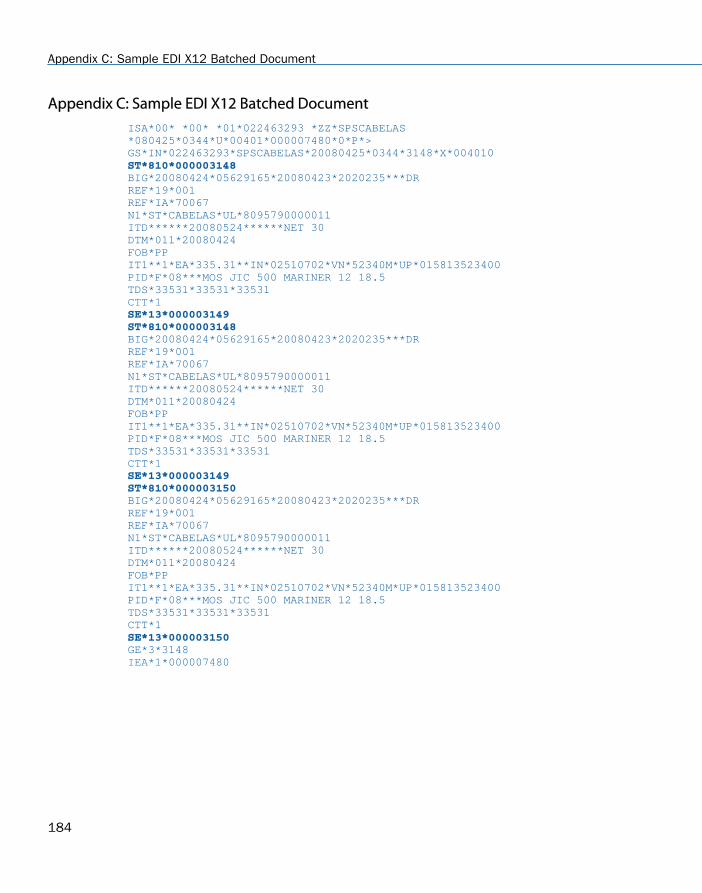
Appendix C: Sample EDI X12 Batched DocumentISA*00* *00* *01*022463293 *ZZ*SPSCABELAS *080425*0344*U*00401*000007480*0*P*>GS*IN*022463293*SPSCABELAS*20080425*0344*3148*X*004010 ST*810*000003148BIG*20080424*05629165*20080423*2020235***DRREF*19*001REF*IA*70067N1*ST*CABELAS*UL*8095790000011ITD******20080524******NET 30DTM*011*20080424FOB*PPIT1**1*EA*335.31**IN*02510702*VN*52340M*UP*015813523400PID*F*08***MOS JIC 500 MARINER 12 18.5TDS*33531*33531*33531CTT*1 SE*13*000003149 ST*810*000003148BIG*20080424*05629165*20080423*2020235***DRREF*19*001REF*IA*70067N1*ST*CABELAS*UL*8095790000011ITD******20080524******NET 30DTM*011*20080424FOB*PPIT1**1*EA*335.31**IN*02510702*VN*52340M*UP*015813523400PID*F*08***MOS JIC 500 MARINER 12 18.5TDS*33531*33531*33531CTT*1 SE*13*000003149 ST*810*000003150BIG*20080424*05629165*20080423*2020235***DRREF*19*001REF*IA*70067N1*ST*CABELAS*UL*8095790000011ITD******20080524******NET 30DTM*011*20080424FOB*PPIT1**1*EA*335.31**IN*02510702*VN*52340M*UP*015813523400PID*F*08***MOS JIC 500 MARINER 12 18.5TDS*33531*33531*33531CTT*1 SE*13*000003150GE*3*3148IEA*1*000007480
Appendix C: Sample EDI X12 Batched Document
184
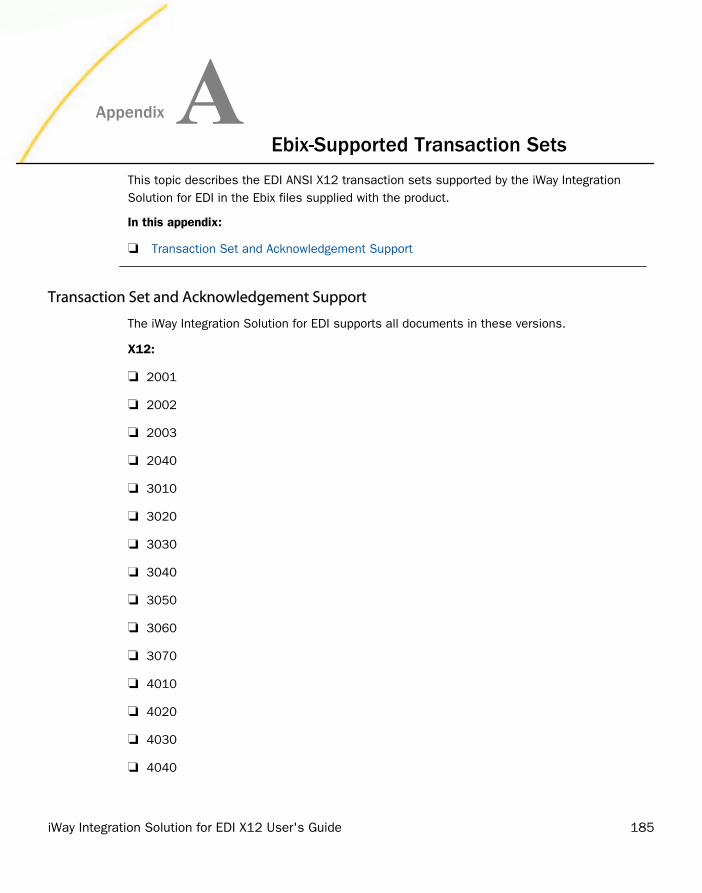
AppendixAEbix-Supported Transaction Sets
This topic describes the EDI ANSI X12 transaction sets supported by the iWay IntegrationSolution for EDI in the Ebix files supplied with the product.
In this appendix:
Transaction Set and Acknowledgement Support
Transaction Set and Acknowledgement Support
The iWay Integration Solution for EDI supports all documents in these versions.
X12:
2001
2002
2003
2040
3010
3020
3030
3040
3050
3060
3070
4010
4020
4030
4040
iWay Integration Solution for EDI X12 User's Guide 185
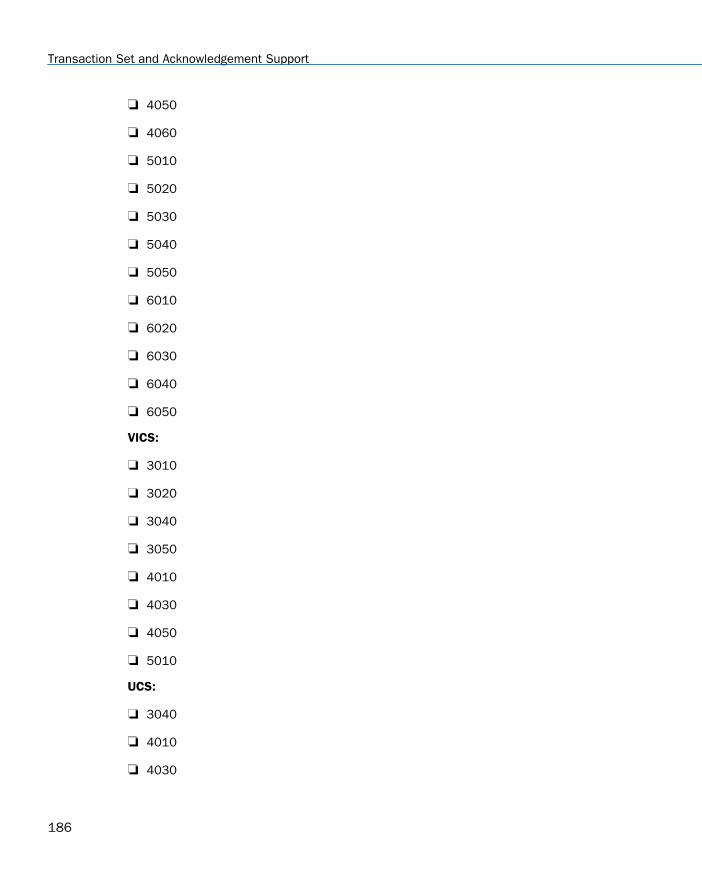
4050
4060
5010
5020
5030
5040
5050
6010
6020
6030
6040
6050
VICS:
3010
3020
3040
3050
4010
4030
4050
5010
UCS:
3040
4010
4030
Transaction Set and Acknowledgement Support
186
5010
A. Ebix-Supported Transaction Sets
iWay Integration Solution for EDI X12 User's Guide 187

Transaction Set and Acknowledgement Support
188
AppendixB Using iWay Integration Tools toConfigure an Ebix for EDI X12
This section describes how to use iWay Integration Tools (iIT) to configure an e-BusinessInformation Exchange (Ebix) file for EDI X12.
In this appendix:
Using iIT to Configure an Ebix File for EDI X12 Overview
Using iIT to Configure an Ebix File for EDI X12 Prerequisites
Downloading and Extracting an Ebix File
Working With iWay Integration Tools (iIT)
Using iIT to Configure an Ebix File for EDI X12 Overview
You can use iWay Integration Tools (iIT) to import, edit, export, and work with e-BusinessInformation Exchange (Ebix) files for EDI X12. The topics in this appendix describe how to:
Import an X12 005010 856 Ebix into iIT.
Add a qualifier at the 08 [Relationship Code] element under the SLN [Subline Item Detail]segment in the SG0 loop level, to the X12 005010 856 Ebix.
Export the edited Ebix to a physical location.
The edited Ebix can be returned and then tested with the appropriate X12 005010 856message.
Using iIT to Configure an Ebix File for EDI X12 Prerequisites
This section provides a list of prerequisites for using iWay Integration Tools (iIT) to configure anEbix for EDI X12:
Have a working knowledge of iIT and EDI X12.
Ensure the iWay EDI X12 adapter is installed.
Ensure iIT Version 8.0 or higher is installed.
Downloading and Extracting an Ebix File
This section describes how to download and extract an Ebix file for EDI X12.
iWay Integration Solution for EDI X12 User's Guide 189
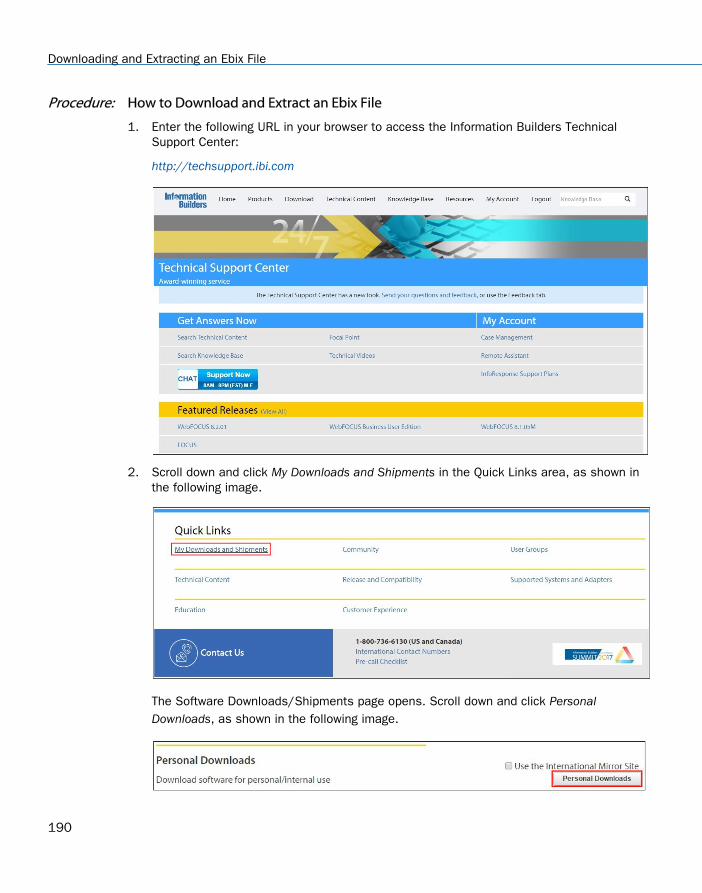
Procedure: How to Download and Extract an Ebix File
1. Enter the following URL in your browser to access the Information Builders TechnicalSupport Center:
http://techsupport.ibi.com
2. Scroll down and click My Downloads and Shipments in the Quick Links area, as shown inthe following image.
The Software Downloads/Shipments page opens. Scroll down and click PersonalDownloads, as shown in the following image.
Downloading and Extracting an Ebix File
190
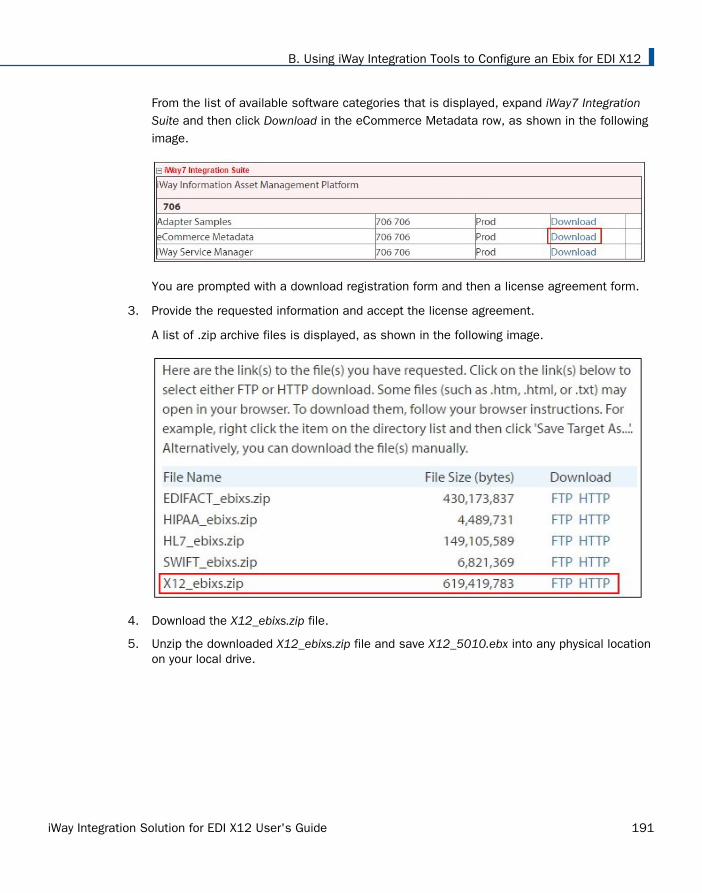
From the list of available software categories that is displayed, expand iWay7 IntegrationSuite and then click Download in the eCommerce Metadata row, as shown in the followingimage.
You are prompted with a download registration form and then a license agreement form.
3. Provide the requested information and accept the license agreement.
A list of .zip archive files is displayed, as shown in the following image.
4. Download the X12_ebixs.zip file.
5. Unzip the downloaded X12_ebixs.zip file and save X12_5010.ebx into any physical locationon your local drive.
B. Using iWay Integration Tools to Configure an Ebix for EDI X12
iWay Integration Solution for EDI X12 User's Guide 191
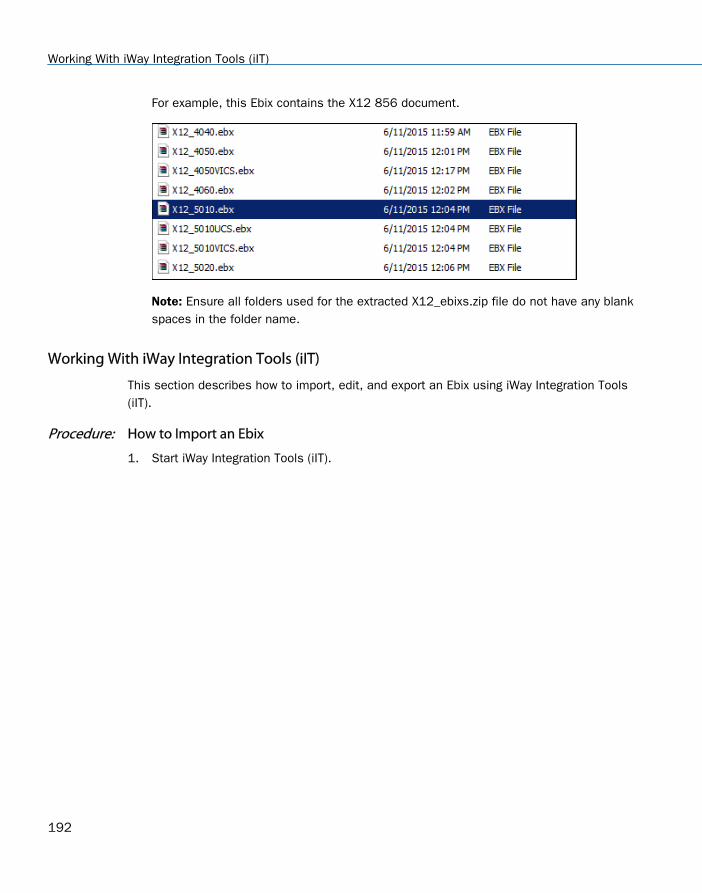
For example, this Ebix contains the X12 856 document.
Note: Ensure all folders used for the extracted X12_ebixs.zip file do not have any blankspaces in the folder name.
Working With iWay Integration Tools (iIT)
This section describes how to import, edit, and export an Ebix using iWay Integration Tools(iIT).
Procedure: How to Import an Ebix
1. Start iWay Integration Tools (iIT).
Working With iWay Integration Tools (iIT)
192
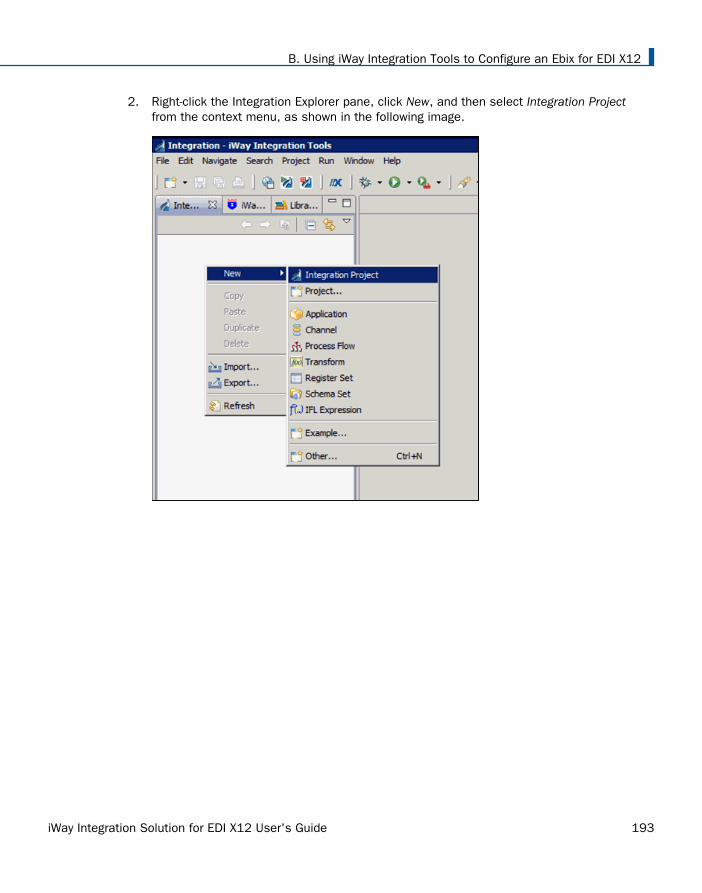
2. Right-click the Integration Explorer pane, click New, and then select Integration Projectfrom the context menu, as shown in the following image.
B. Using iWay Integration Tools to Configure an Ebix for EDI X12
iWay Integration Solution for EDI X12 User's Guide 193
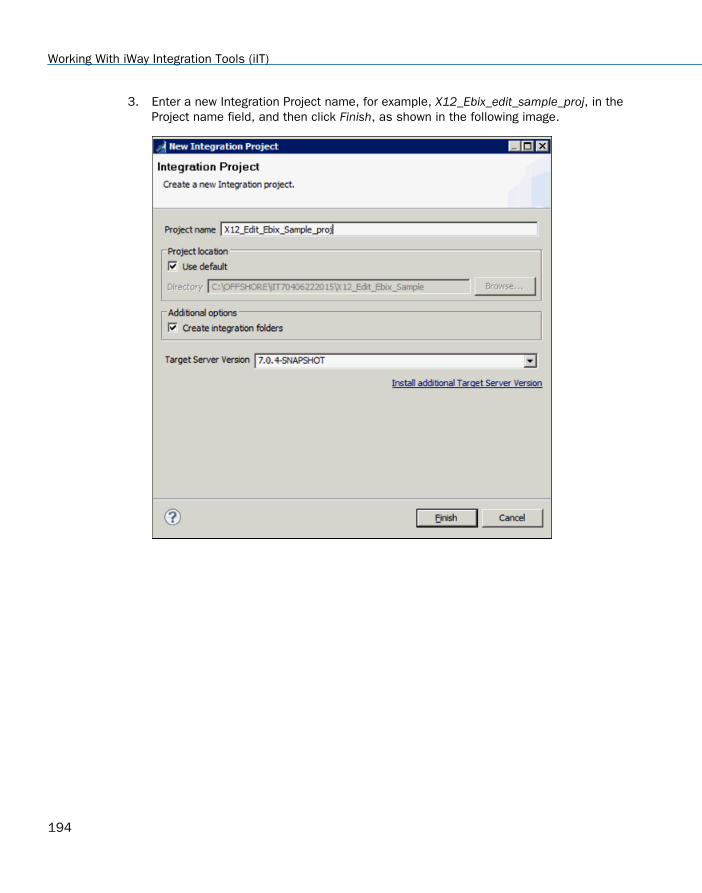
3. Enter a new Integration Project name, for example, X12_Ebix_edit_sample_proj, in theProject name field, and then click Finish, as shown in the following image.
Working With iWay Integration Tools (iIT)
194
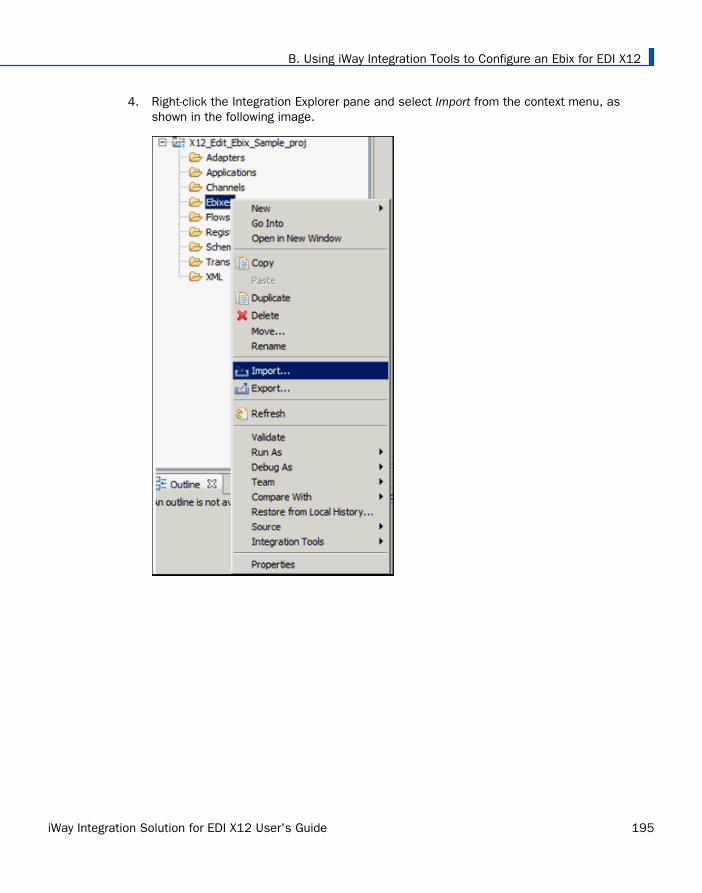
4. Right-click the Integration Explorer pane and select Import from the context menu, asshown in the following image.
B. Using iWay Integration Tools to Configure an Ebix for EDI X12
iWay Integration Solution for EDI X12 User's Guide 195
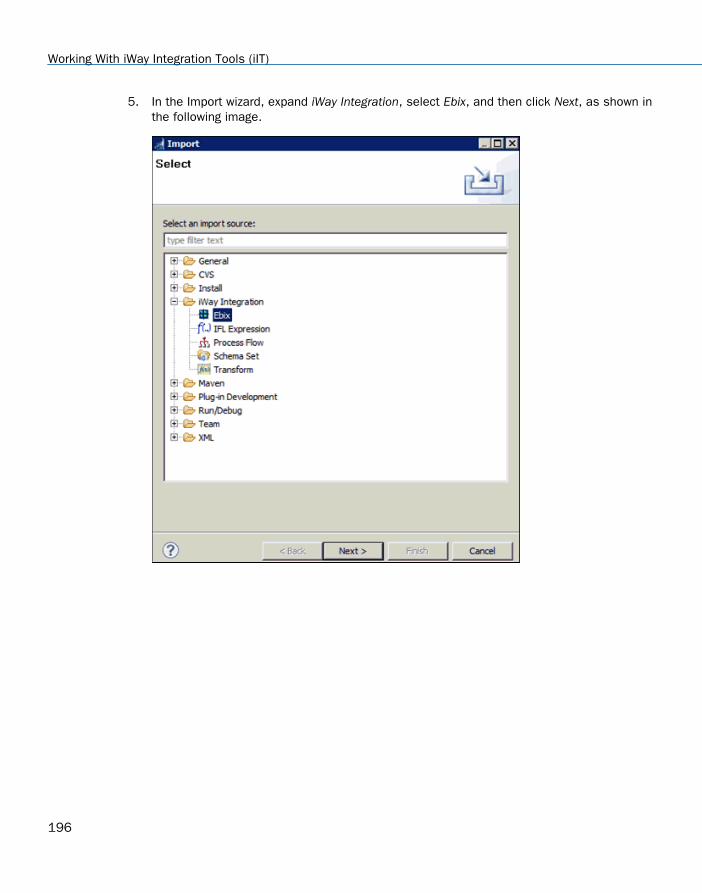
5. In the Import wizard, expand iWay Integration, select Ebix, and then click Next, as shown inthe following image.
Working With iWay Integration Tools (iIT)
196
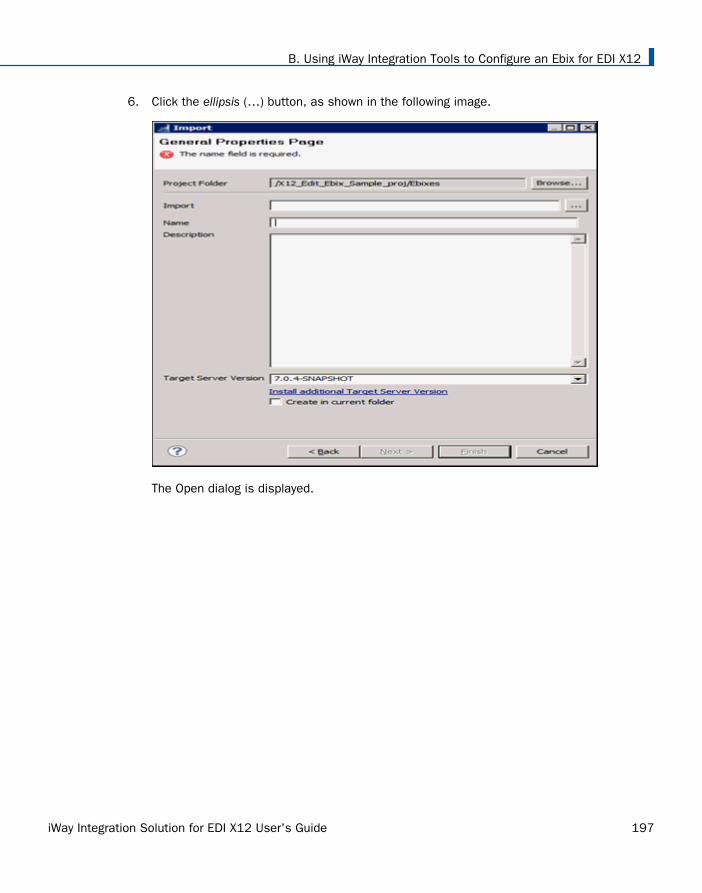
6. Click the ellipsis (…) button, as shown in the following image.
The Open dialog is displayed.
B. Using iWay Integration Tools to Configure an Ebix for EDI X12
iWay Integration Solution for EDI X12 User's Guide 197
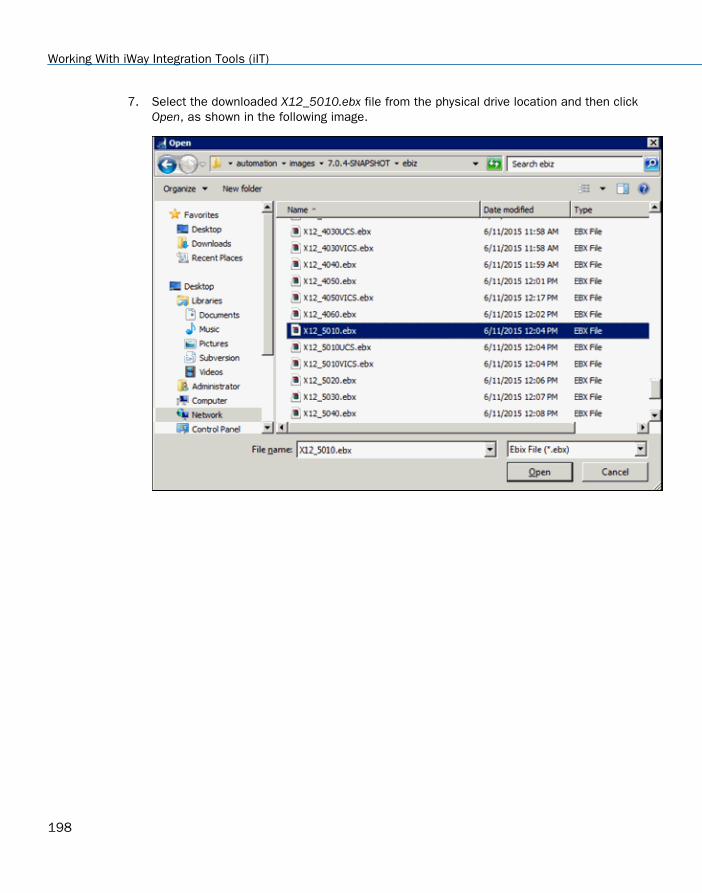
7. Select the downloaded X12_5010.ebx file from the physical drive location and then clickOpen, as shown in the following image.
Working With iWay Integration Tools (iIT)
198
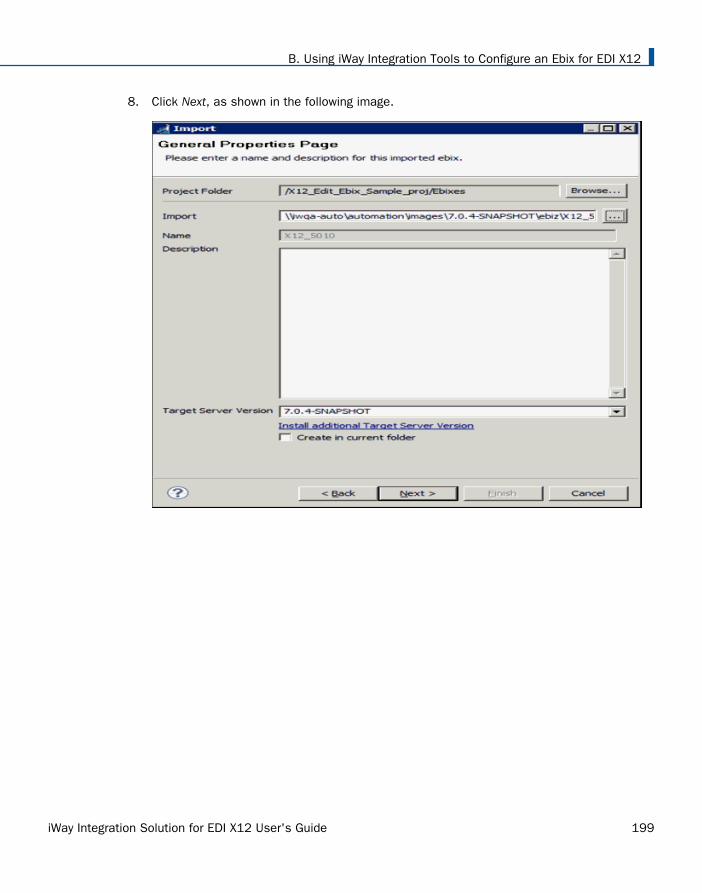
8. Click Next, as shown in the following image.
B. Using iWay Integration Tools to Configure an Ebix for EDI X12
iWay Integration Solution for EDI X12 User's Guide 199
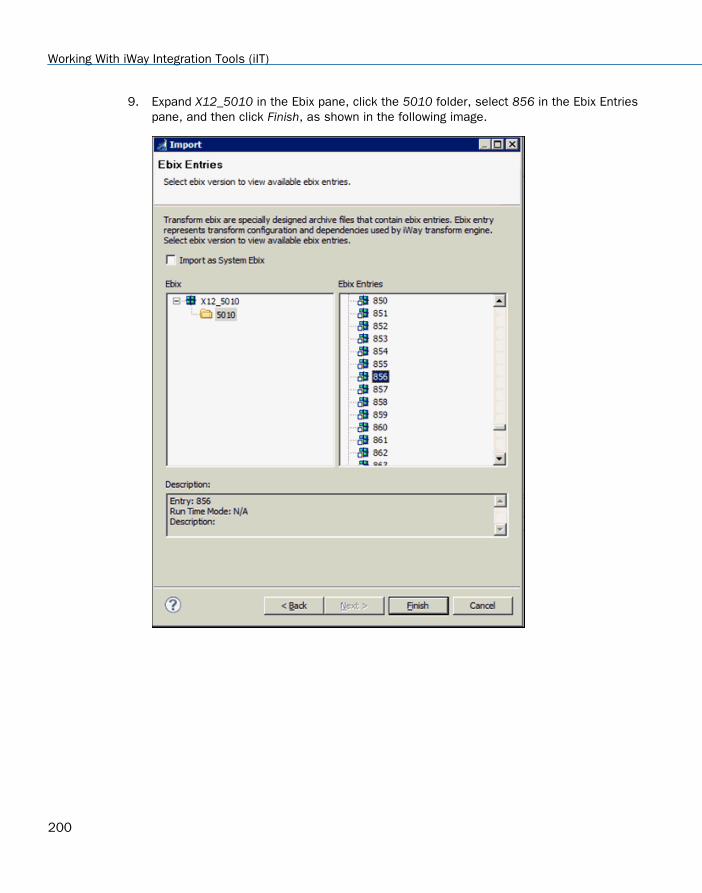
9. Expand X12_5010 in the Ebix pane, click the 5010 folder, select 856 in the Ebix Entriespane, and then click Finish, as shown in the following image.
Working With iWay Integration Tools (iIT)
200
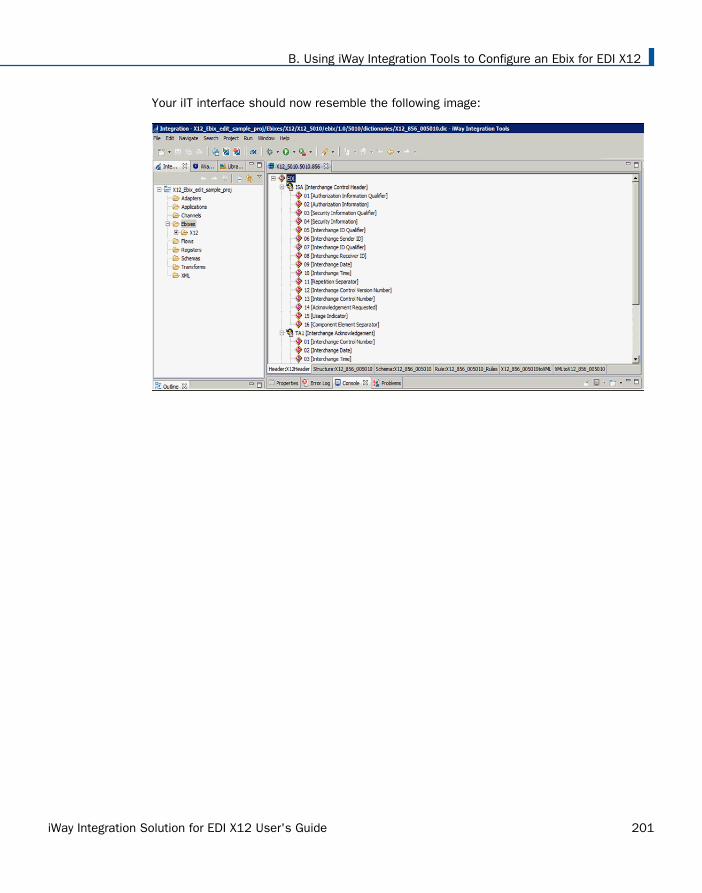
Your iIT interface should now resemble the following image:
B. Using iWay Integration Tools to Configure an Ebix for EDI X12
iWay Integration Solution for EDI X12 User's Guide 201
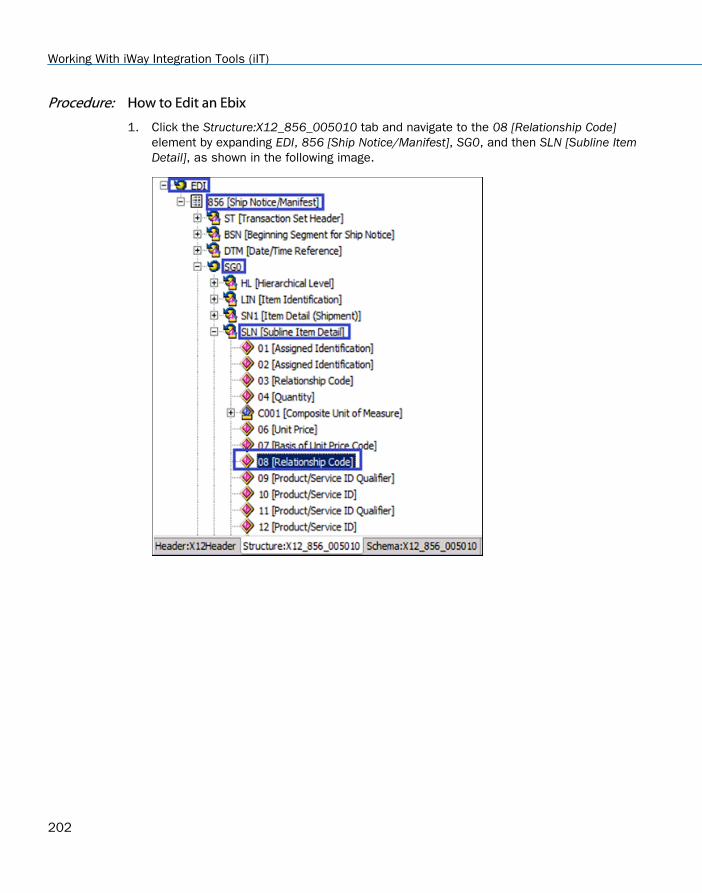
Procedure: How to Edit an Ebix
1. Click the Structure:X12_856_005010 tab and navigate to the 08 [Relationship Code]element by expanding EDI, 856 [Ship Notice/Manifest], SG0, and then SLN [Subline ItemDetail], as shown in the following image.
Working With iWay Integration Tools (iIT)
202
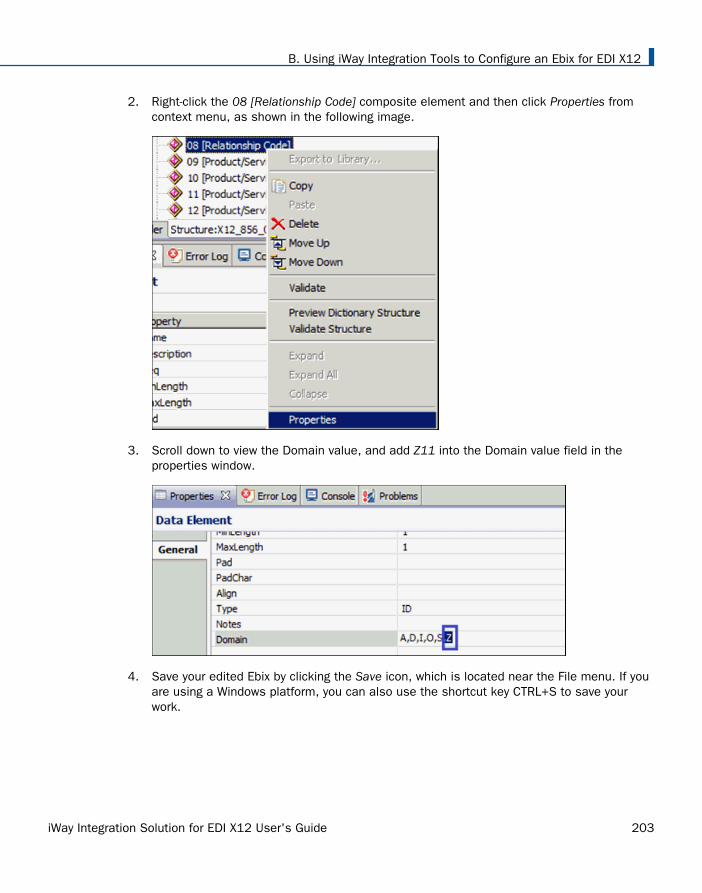
2. Right-click the 08 [Relationship Code] composite element and then click Properties fromcontext menu, as shown in the following image.
3. Scroll down to view the Domain value, and add Z11 into the Domain value field in theproperties window.
4. Save your edited Ebix by clicking the Save icon, which is located near the File menu. If youare using a Windows platform, you can also use the shortcut key CTRL+S to save yourwork.
B. Using iWay Integration Tools to Configure an Ebix for EDI X12
iWay Integration Solution for EDI X12 User's Guide 203
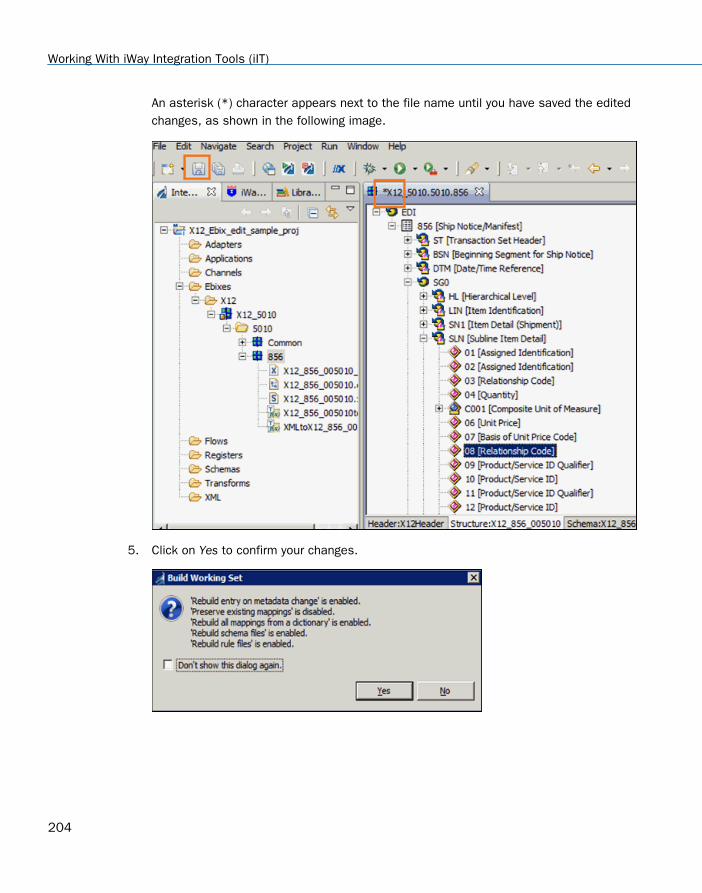
An asterisk (*) character appears next to the file name until you have saved the editedchanges, as shown in the following image.
5. Click on Yes to confirm your changes.
Working With iWay Integration Tools (iIT)
204
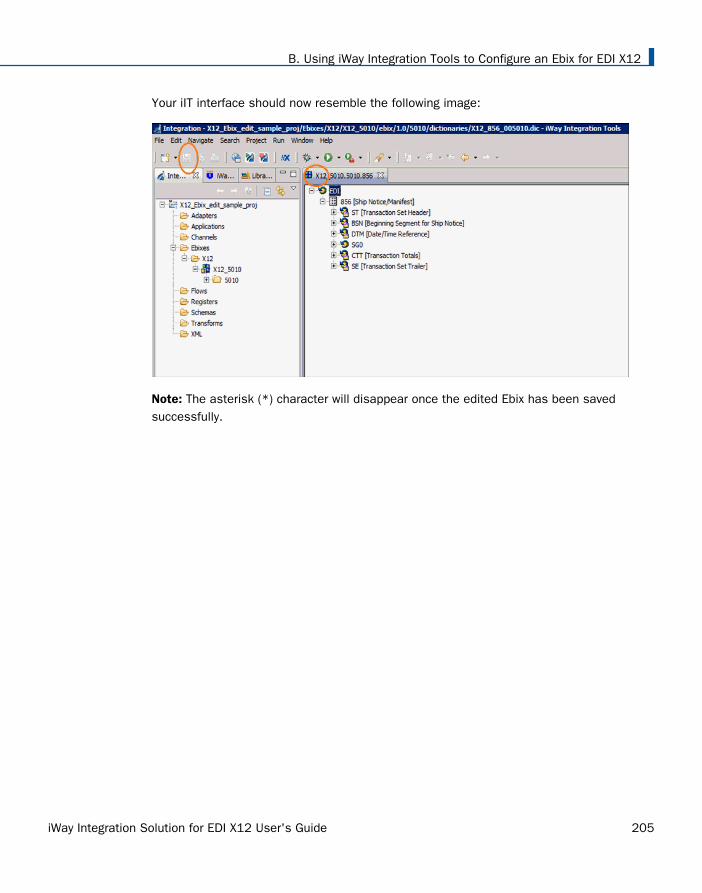
Your iIT interface should now resemble the following image:
Note: The asterisk (*) character will disappear once the edited Ebix has been savedsuccessfully.
B. Using iWay Integration Tools to Configure an Ebix for EDI X12
iWay Integration Solution for EDI X12 User's Guide 205
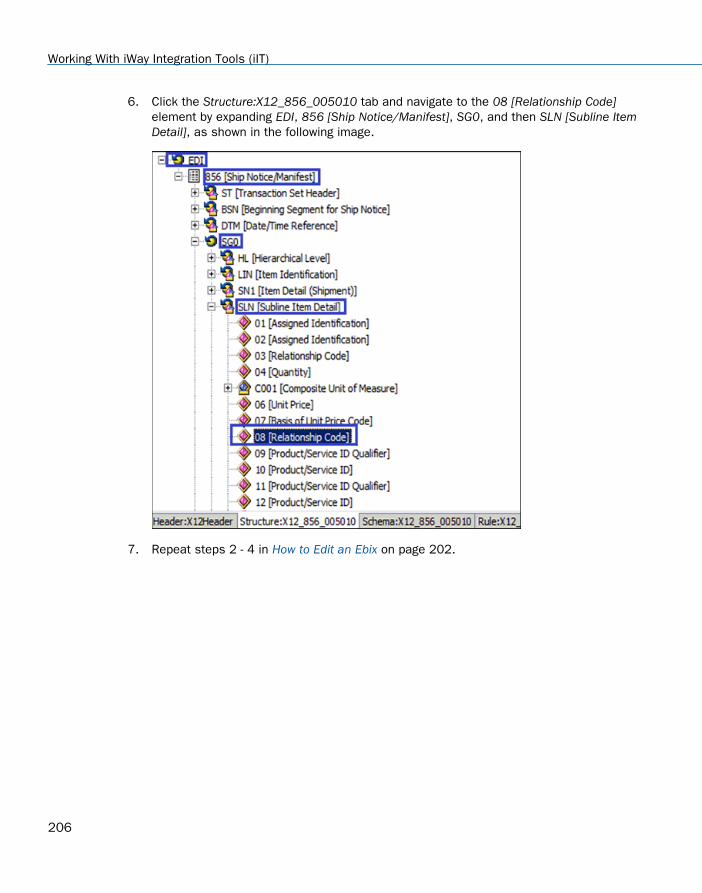
6. Click the Structure:X12_856_005010 tab and navigate to the 08 [Relationship Code]element by expanding EDI, 856 [Ship Notice/Manifest], SG0, and then SLN [Subline ItemDetail], as shown in the following image.
7. Repeat steps 2 - 4 in How to Edit an Ebix on page 202.
Working With iWay Integration Tools (iIT)
206
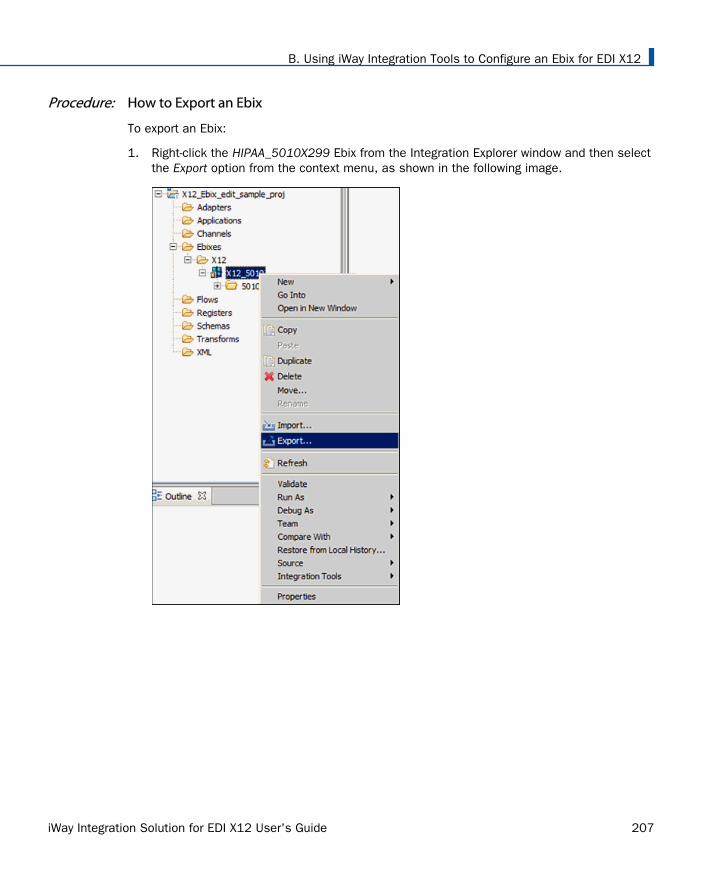
Procedure: How to Export an Ebix
To export an Ebix:
1. Right-click the HIPAA_5010X299 Ebix from the Integration Explorer window and then selectthe Export option from the context menu, as shown in the following image.
B. Using iWay Integration Tools to Configure an Ebix for EDI X12
iWay Integration Solution for EDI X12 User's Guide 207
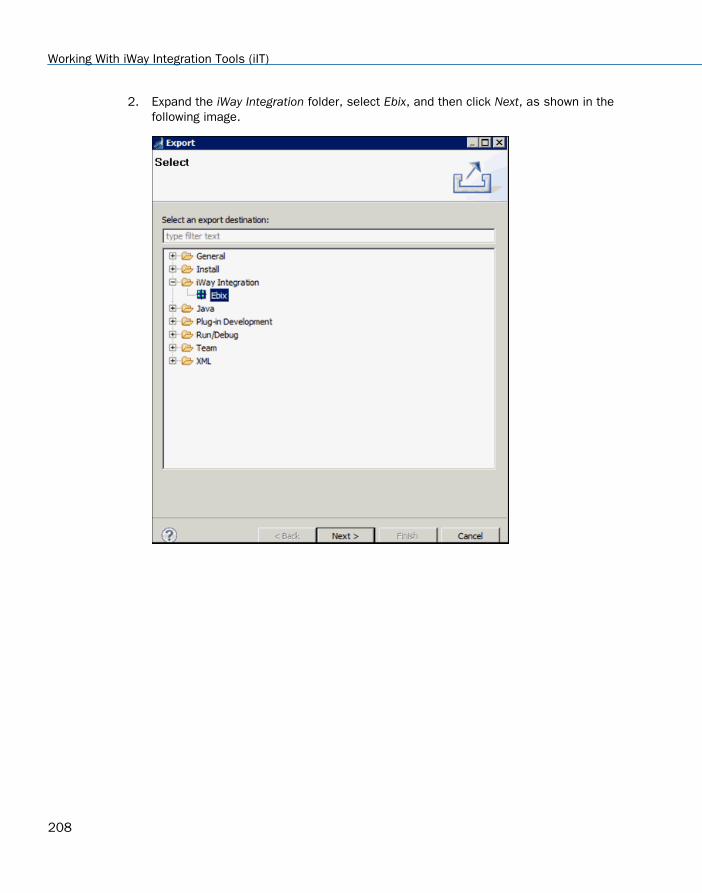
2. Expand the iWay Integration folder, select Ebix, and then click Next, as shown in thefollowing image.
Working With iWay Integration Tools (iIT)
208
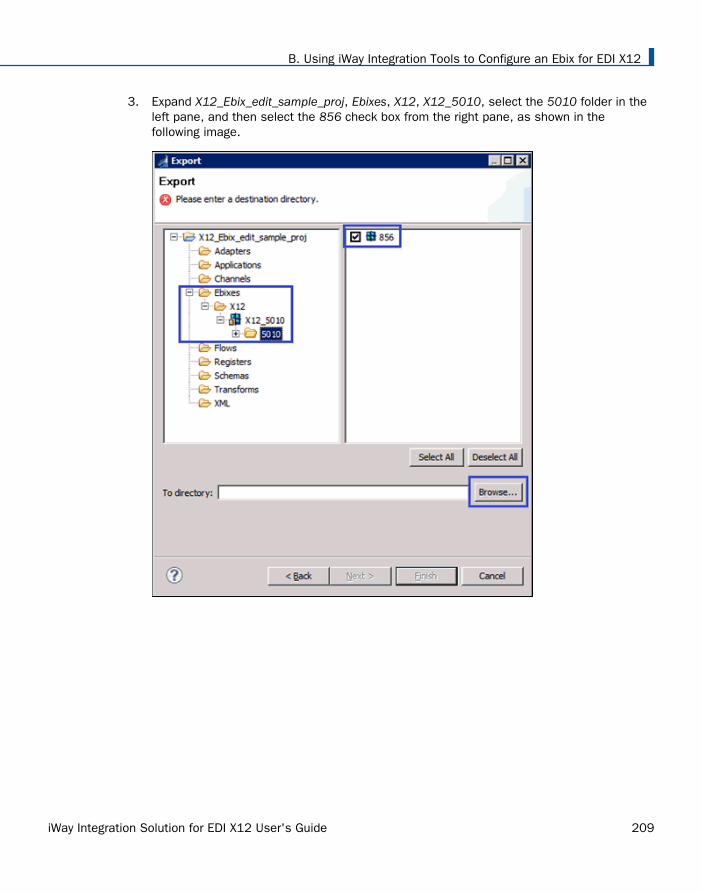
3. Expand X12_Ebix_edit_sample_proj, Ebixes, X12, X12_5010, select the 5010 folder in theleft pane, and then select the 856 check box from the right pane, as shown in thefollowing image.
B. Using iWay Integration Tools to Configure an Ebix for EDI X12
iWay Integration Solution for EDI X12 User's Guide 209
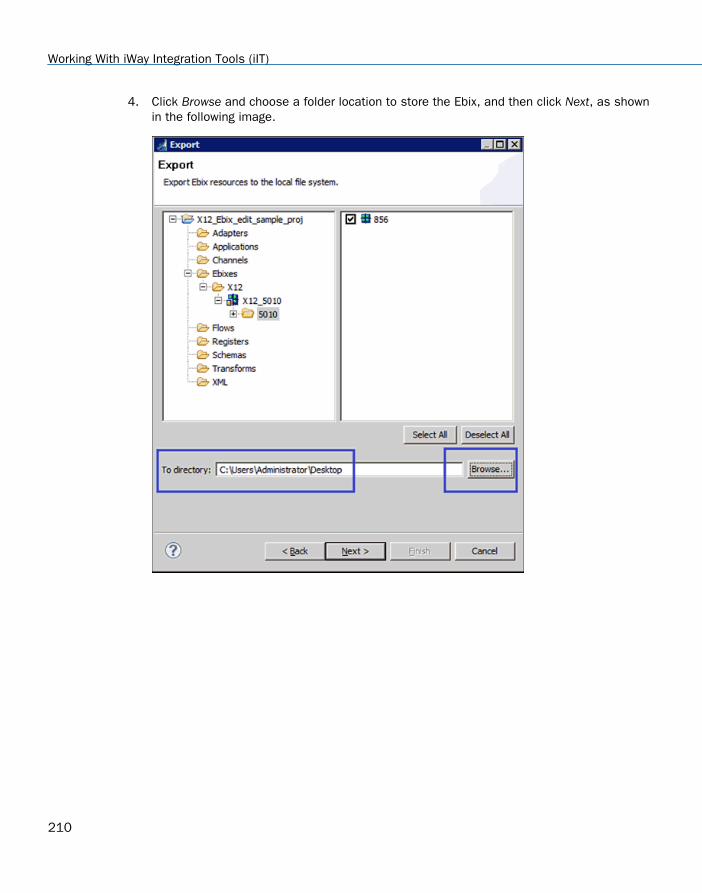
4. Click Browse and choose a folder location to store the Ebix, and then click Next, as shownin the following image.
Working With iWay Integration Tools (iIT)
210
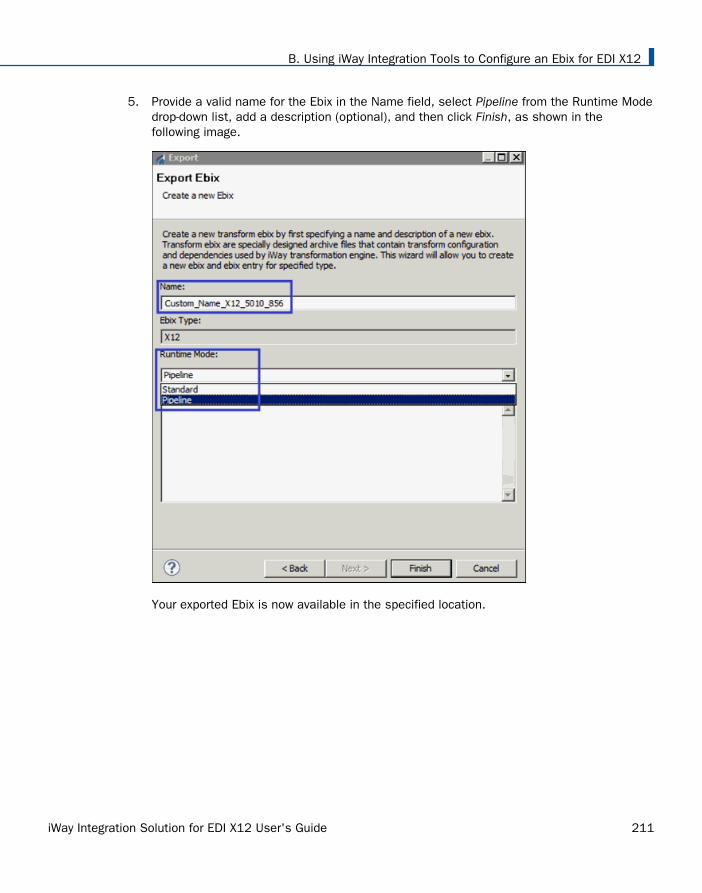
5. Provide a valid name for the Ebix in the Name field, select Pipeline from the Runtime Modedrop-down list, add a description (optional), and then click Finish, as shown in thefollowing image.
Your exported Ebix is now available in the specified location.
B. Using iWay Integration Tools to Configure an Ebix for EDI X12
iWay Integration Solution for EDI X12 User's Guide 211

Working With iWay Integration Tools (iIT)
212
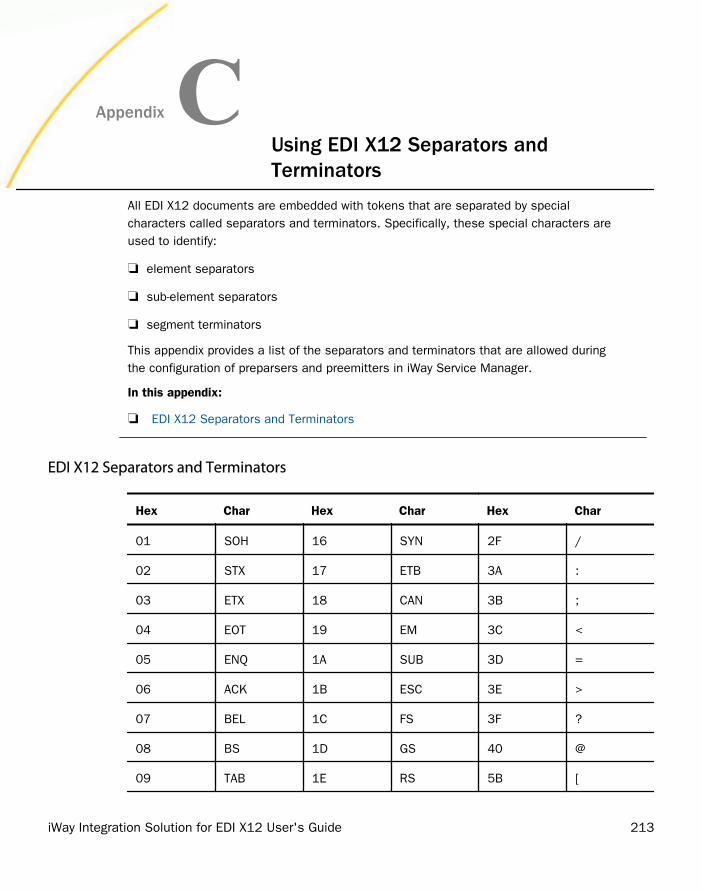
AppendixCUsing EDI X12 Separators andTerminators
All EDI X12 documents are embedded with tokens that are separated by specialcharacters called separators and terminators. Specifically, these special characters areused to identify:
element separators
sub-element separators
segment terminators
This appendix provides a list of the separators and terminators that are allowed duringthe configuration of preparsers and preemitters in iWay Service Manager.
In this appendix:
EDI X12 Separators and Terminators
EDI X12 Separators and Terminators
Hex Char Hex Char Hex Char
01 SOH 16 SYN 2F /
02 STX 17 ETB 3A :
03 ETX 18 CAN 3B ;
04 EOT 19 EM 3C <
05 ENQ 1A SUB 3D =
06 ACK 1B ESC 3E >
07 BEL 1C FS 3F ?
08 BS 1D GS 40 @
09 TAB 1E RS 5B [
iWay Integration Solution for EDI X12 User's Guide 213
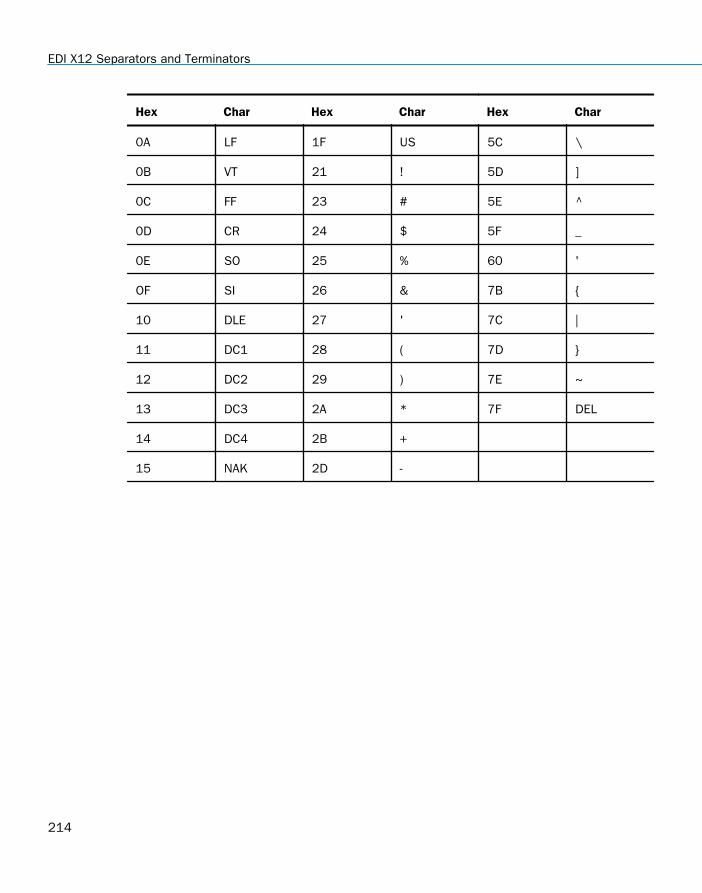
Hex Char Hex Char Hex Char
0A LF 1F US 5C \
0B VT 21 ! 5D ]
0C FF 23 # 5E ^
0D CR 24 $ 5F _
0E SO 25 % 60 '
OF SI 26 & 7B {
10 DLE 27 ' 7C |
11 DC1 28 ( 7D }
12 DC2 29 ) 7E ~
13 DC3 2A * 7F DEL
14 DC4 2B +
15 NAK 2D -
EDI X12 Separators and Terminators
214
AppendixDUsing EDI X12 Special Register (SREG)Types
This section describes the Special Register (SREG) types that are created during EDI toXML transactions and 997 creation.
In this appendix:
EDI X12 Special Register (SREG) Types
EDI X12 Special Register (SREG) Types
New Special Registers (SREGs) are available for EDI preparsers and EDI preemitters.
<variable type="USR" name="edi.transactionID" otype="0">823</variable><variable type="USR" name="edi.type" otype="0">X12</variable><variable type="USR" name="edi.version" otype="0">004010</variable>
These may be used to route your data by placing them in your process flow.
A new SREG (edi.ackstatus) is available for the acknowledgement agent. This SREG willcontain the AK501 status from the 997 that corresponds to each XML output file. This valuecan be used to route error data (for example, a failed 997) from standard processing.
During EDI to XML transactions and 997 creation, the following types of SREGs are created:
SYS (System) - These SREGs exist until you restart iWay Service Manager.
USR/DOC - These SREGs exist throughout the life of the document.
CFG - These SREGs are configuration related.
SEGMENT COUNT
1. <variable name="SEGCOUNT" type="USR">20</variable>2. <variable name="basename" type="DOC">stephan_850_bad</variable>3. <variable name="console-master-port" type="SYS">9999</variable>
CORRELATION ID
4. <variable name="correlid" type="USR">000001000</variable>5. <variable name="doclocation" type="SYS">config</variable>
END OF STREAM FLAG
iWay Integration Solution for EDI X12 User's Guide 215
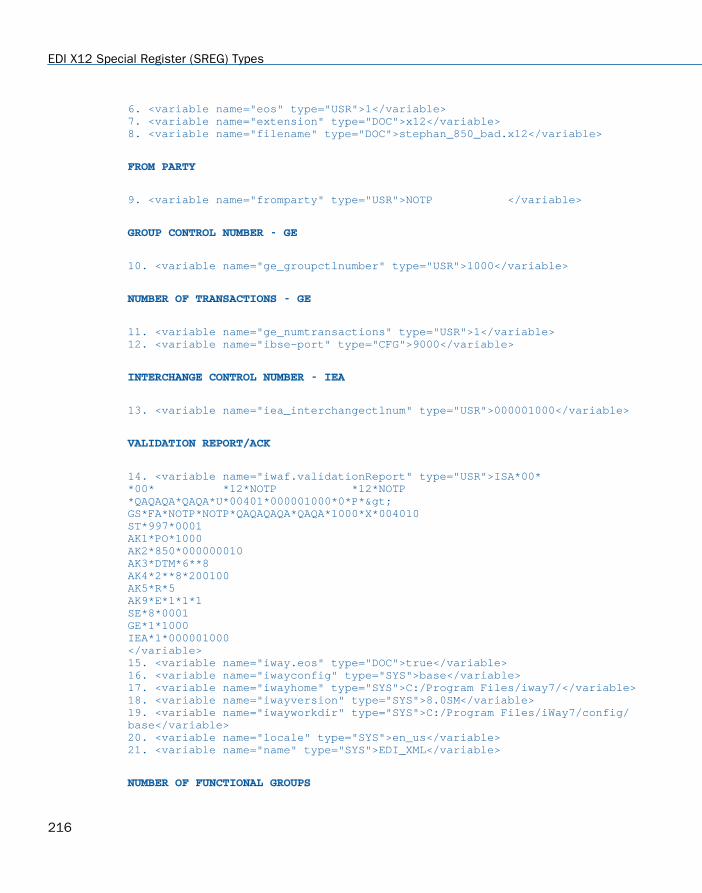
6. <variable name="eos" type="USR">1</variable> 7. <variable name="extension" type="DOC">x12</variable>8. <variable name="filename" type="DOC">stephan_850_bad.x12</variable>
FROM PARTY
9. <variable name="fromparty" type="USR">NOTP </variable>
GROUP CONTROL NUMBER - GE
10. <variable name="ge_groupctlnumber" type="USR">1000</variable>
NUMBER OF TRANSACTIONS - GE
11. <variable name="ge_numtransactions" type="USR">1</variable>12. <variable name="ibse-port" type="CFG">9000</variable>
INTERCHANGE CONTROL NUMBER - IEA
13. <variable name="iea_interchangectlnum" type="USR">000001000</variable>
VALIDATION REPORT/ACK
14. <variable name="iwaf.validationReport" type="USR">ISA*00* *00* *12*NOTP *12*NOTP *QAQAQA*QAQA*U*00401*000001000*0*P*>GS*FA*NOTP*NOTP*QAQAQAQA*QAQA*1000*X*004010ST*997*0001AK1*PO*1000AK2*850*000000010AK3*DTM*6**8AK4*2**8*200100AK5*R*5AK9*E*1*1*1SE*8*0001GE*1*1000IEA*1*000001000</variable>15. <variable name="iway.eos" type="DOC">true</variable>16. <variable name="iwayconfig" type="SYS">base</variable>17. <variable name="iwayhome" type="SYS">C:/Program Files/iway7/</variable>18. <variable name="iwayversion" type="SYS">8.0SM</variable>19. <variable name="iwayworkdir" type="SYS">C:/Program Files/iWay7/config/base</variable>20. <variable name="locale" type="SYS">en_us</variable>21. <variable name="name" type="SYS">EDI_XML</variable>
NUMBER OF FUNCTIONAL GROUPS
EDI X12 Special Register (SREG) Types
216
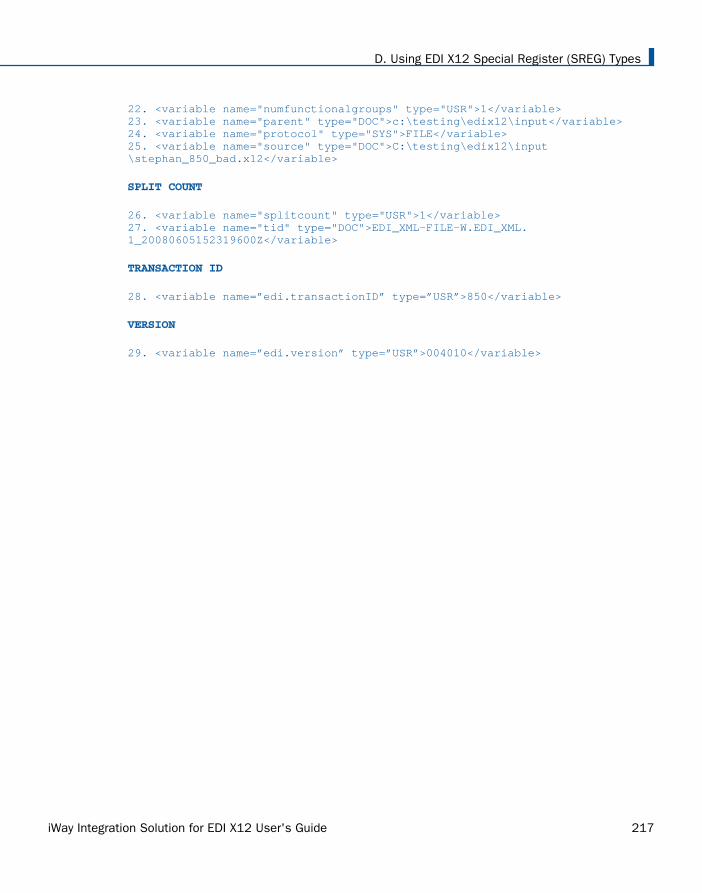
22. <variable name="numfunctionalgroups" type="USR">1</variable>23. <variable name="parent" type="DOC">c:\testing\edix12\input</variable>24. <variable name="protocol" type="SYS">FILE</variable>25. <variable name="source" type="DOC">C:\testing\edix12\input\stephan_850_bad.x12</variable>
SPLIT COUNT
26. <variable name="splitcount" type="USR">1</variable>27. <variable name="tid" type="DOC">EDI_XML-FILE-W.EDI_XML.1_20080605152319600Z</variable>
TRANSACTION ID
28. <variable name=”edi.transactionID” type=”USR”>850</variable>
VERSION
29. <variable name=”edi.version” type=”USR”>004010</variable>
D. Using EDI X12 Special Register (SREG) Types
iWay Integration Solution for EDI X12 User's Guide 217

EDI X12 Special Register (SREG) Types
218
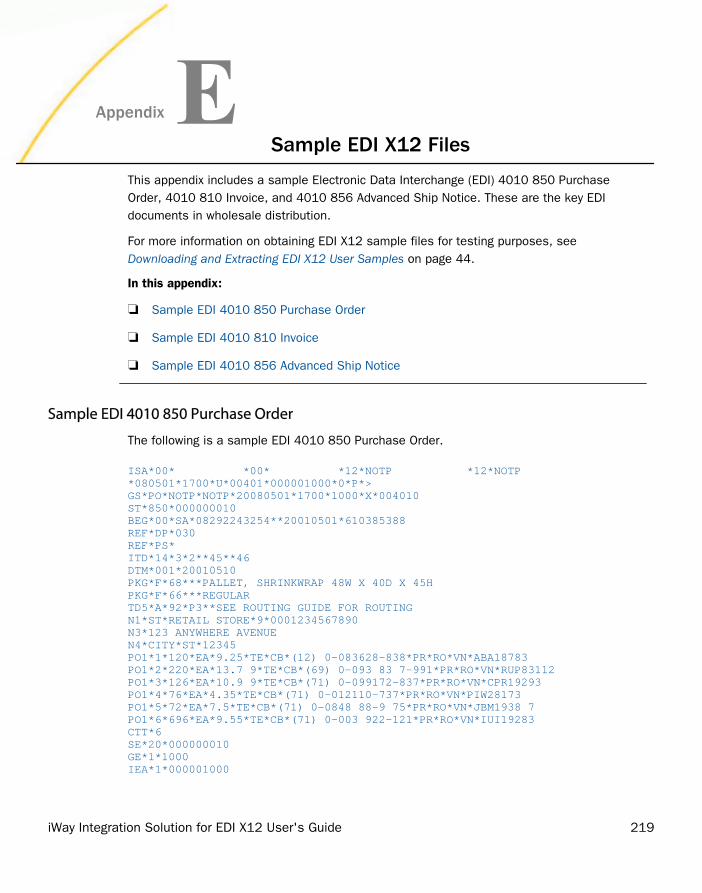
AppendixESample EDI X12 Files
This appendix includes a sample Electronic Data Interchange (EDI) 4010 850 PurchaseOrder, 4010 810 Invoice, and 4010 856 Advanced Ship Notice. These are the key EDIdocuments in wholesale distribution.
For more information on obtaining EDI X12 sample files for testing purposes, see Downloading and Extracting EDI X12 User Samples on page 44.
In this appendix:
Sample EDI 4010 850 Purchase Order
Sample EDI 4010 810 Invoice
Sample EDI 4010 856 Advanced Ship Notice
Sample EDI 4010 850 Purchase Order
The following is a sample EDI 4010 850 Purchase Order.
ISA*00* *00* *12*NOTP *12*NOTP *080501*1700*U*00401*000001000*0*P*>GS*PO*NOTP*NOTP*20080501*1700*1000*X*004010ST*850*000000010BEG*00*SA*08292243254**20010501*610385388REF*DP*030REF*PS*ITD*14*3*2**45**46DTM*001*20010510PKG*F*68***PALLET, SHRINKWRAP 48W X 40D X 45HPKG*F*66***REGULARTD5*A*92*P3**SEE ROUTING GUIDE FOR ROUTINGN1*ST*RETAIL STORE*9*0001234567890N3*123 ANYWHERE AVENUEN4*CITY*ST*12345PO1*1*120*EA*9.25*TE*CB*(12) 0-083628-838*PR*RO*VN*ABA18783PO1*2*220*EA*13.7 9*TE*CB*(69) 0-093 83 7-991*PR*RO*VN*RUP83112PO1*3*126*EA*10.9 9*TE*CB*(71) 0-099172-837*PR*RO*VN*CPR19293PO1*4*76*EA*4.35*TE*CB*(71) 0-012110-737*PR*RO*VN*PIW28173PO1*5*72*EA*7.5*TE*CB*(71) 0-0848 88-9 75*PR*RO*VN*JBM1938 7PO1*6*696*EA*9.55*TE*CB*(71) 0-003 922-121*PR*RO*VN*IUI19283CTT*6SE*20*000000010GE*1*1000IEA*1*000001000
iWay Integration Solution for EDI X12 User's Guide 219
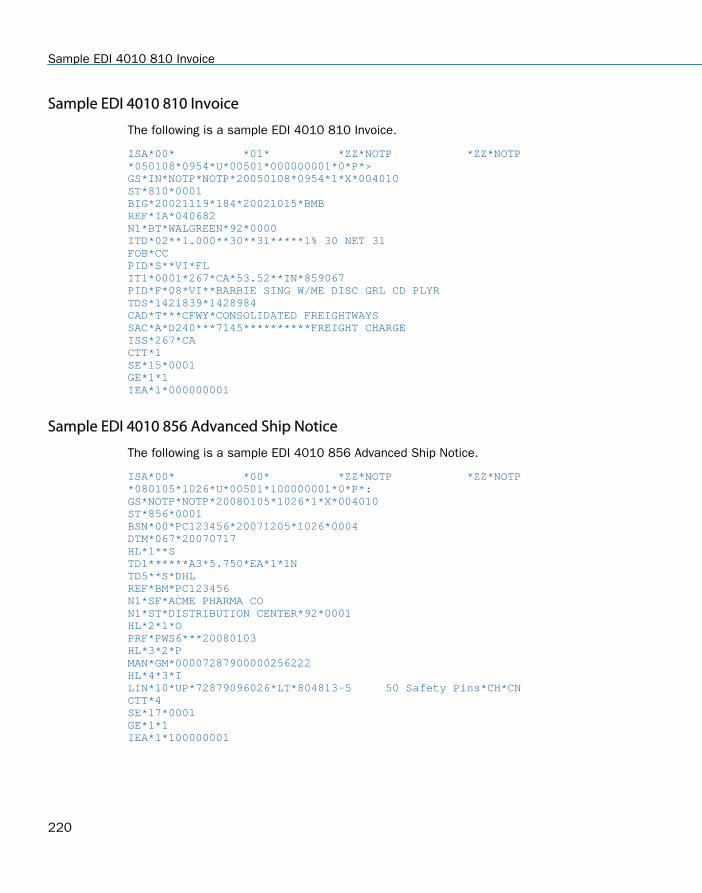
Sample EDI 4010 810 Invoice
The following is a sample EDI 4010 810 Invoice.
ISA*00* *01* *ZZ*NOTP *ZZ*NOTP *050108*0954*U*00501*000000001*0*P*>GS*IN*NOTP*NOTP*20050108*0954*1*X*004010ST*810*0001BIG*20021119*184*20021015*BMBREF*IA*040682N1*BT*WALGREEN*92*0000ITD*02**1.000**30**31*****1% 30 NET 31FOB*CCPID*S**VI*FLIT1*0001*267*CA*53.52**IN*859067PID*F*08*VI**BARBIE SING W/ME DISC GRL CD PLYRTDS*1421839*1428984CAD*T***CFWY*CONSOLIDATED FREIGHTWAYSSAC*A*D240***7145**********FREIGHT CHARGEISS*267*CACTT*1SE*15*0001GE*1*1IEA*1*000000001
Sample EDI 4010 856 Advanced Ship Notice
The following is a sample EDI 4010 856 Advanced Ship Notice.
ISA*00* *00* *ZZ*NOTP *ZZ*NOTP *080105*1026*U*00501*100000001*0*P*:GS*NOTP*NOTP*20080105*1026*1*X*004010ST*856*0001BSN*00*PC123456*20071205*1026*0004DTM*067*20070717HL*1**STD1******A3*5.750*EA*1*1NTD5**S*DHLREF*BM*PC123456N1*SF*ACME PHARMA CON1*ST*DISTRIBUTION CENTER*92*0001HL*2*1*OPRF*PWS6***20080103HL*3*2*PMAN*GM*00007287900000256222HL*4*3*ILIN*10*UP*72879096026*LT*804813-5 50 Safety Pins*CH*CNCTT*4SE*17*0001GE*1*1IEA*1*100000001
Sample EDI 4010 810 Invoice
220
AppendixF Tutorial: Mapping an IDOC to an InvoiceDocument (810)
This topic provides a tutorial that demonstrates how to map an IDOC to an InvoiceDocument (810) using iWay Integration Tools (iIT).
Note: For your convenience, the 5010_810.zip file is attached to this PDF, whichcontains sample files that can be used with this tutorial. For PDF-compatibility purposes,the file extension of the 5010_810.zip file is temporarily renamed to .zap. After savingthis file to your system, you must rename this extension back to .zip.
In this appendix:
EDI X12 Invoice Document Mapping Tutorial Overview
Creating a New Transform Project
Understanding EDI Invoice Mapping
Mapping the Control Segments
Mapping the Header Section
Mapping the ITEM Detail
Mapping the Invoice Summary Section
Testing the Transform Project
EDI X12 Invoice Document Mapping Tutorial Overview
The X12 transaction set contains the format and establishes the data contents of the Invoicedocument (810) for use within the context of an Electronic Data Interchange (EDI) environment.This transaction set can be used to provide for customary and established business andindustry practice relative to the billing for goods and services provided.
iWay Integration Tools (iIT) provides a rule-based data transformation tool that converts aninput document of one data format to an output document of another data format or structure.The easy-to use graphical user interface and function tool set facilitate the design of transformprojects that are specific to your requirements.
iWay Integration Solution for EDI X12 User's Guide 221
This tutorial guides you through the following steps that are required to map a sample IDoc inXML format to an XML schema document.
Creating a New Transform Project
Mapping the Control Segments
Mapping the Header Section
Mapping the ITEM Detail
Mapping the Invoice Summary Section
Testing the Transform Project
The XML output data that is returned by this transformation can be used as an input documentfor outbound processing (XML to EDI) in iWay Service Manager.
Creating a New Transform Project
This section describes how to create a new Transform project.
Procedure: How to Create a New Transform Project
To create a new Transform project:
1. Open iWay Integration Tools (iIT).
Creating a New Transform Project
222
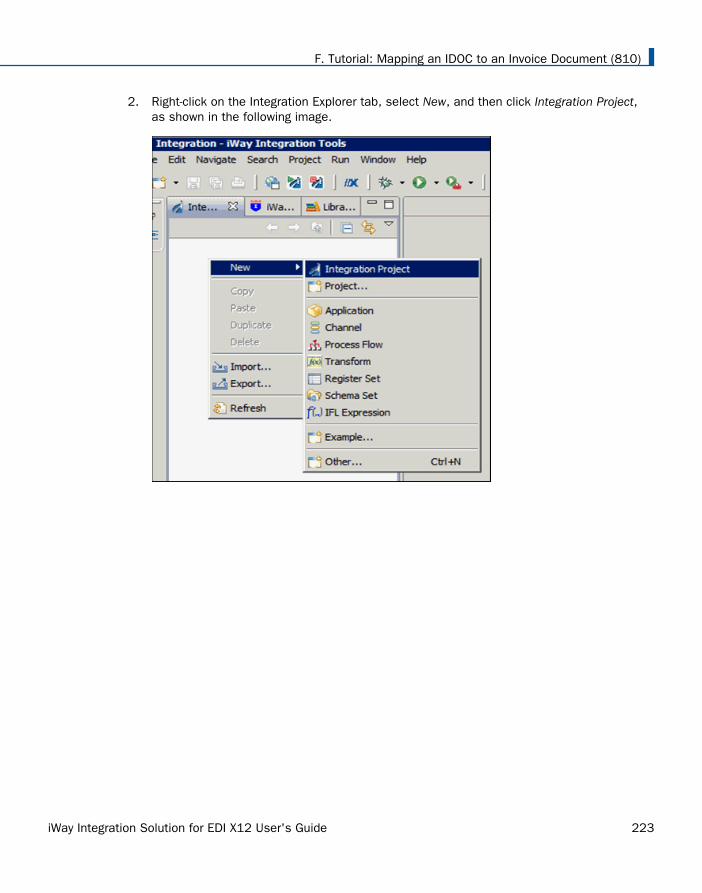
2. Right-click on the Integration Explorer tab, select New, and then click Integration Project,as shown in the following image.
F. Tutorial: Mapping an IDOC to an Invoice Document (810)
iWay Integration Solution for EDI X12 User's Guide 223
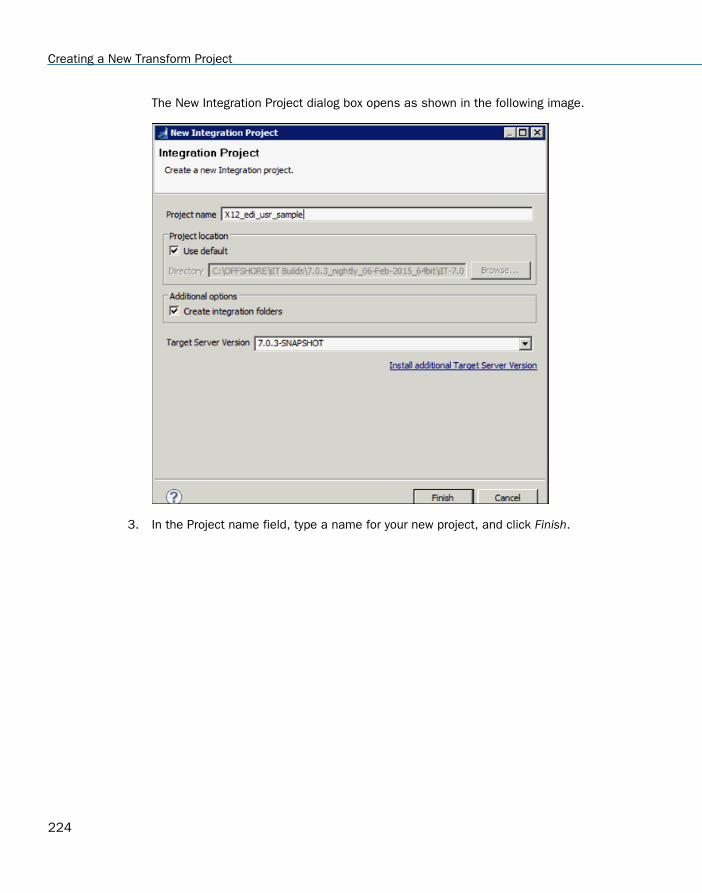
The New Integration Project dialog box opens as shown in the following image.
3. In the Project name field, type a name for your new project, and click Finish.
Creating a New Transform Project
224
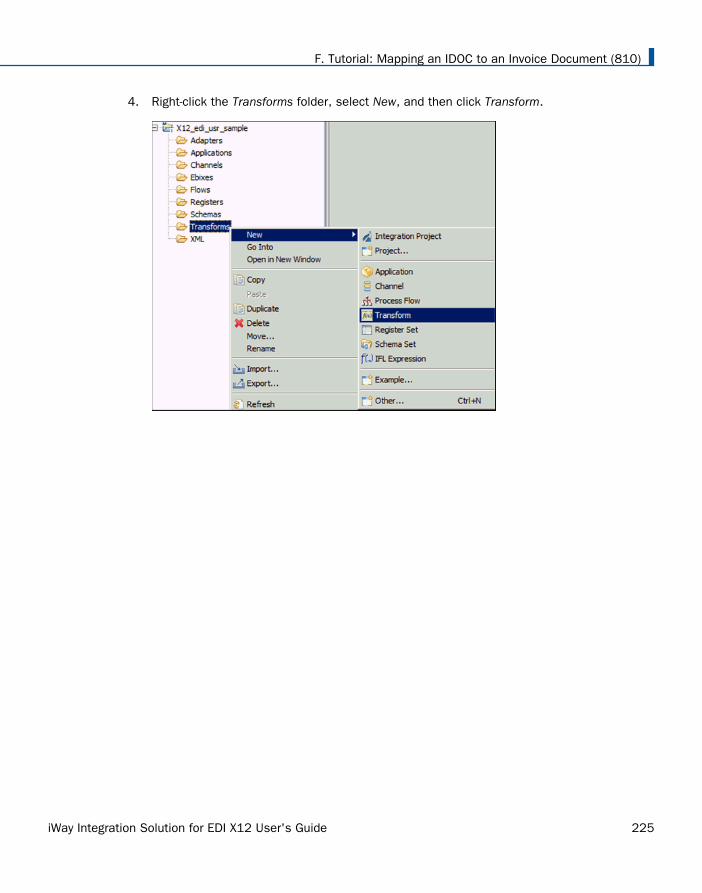
4. Right-click the Transforms folder, select New, and then click Transform.
F. Tutorial: Mapping an IDOC to an Invoice Document (810)
iWay Integration Solution for EDI X12 User's Guide 225
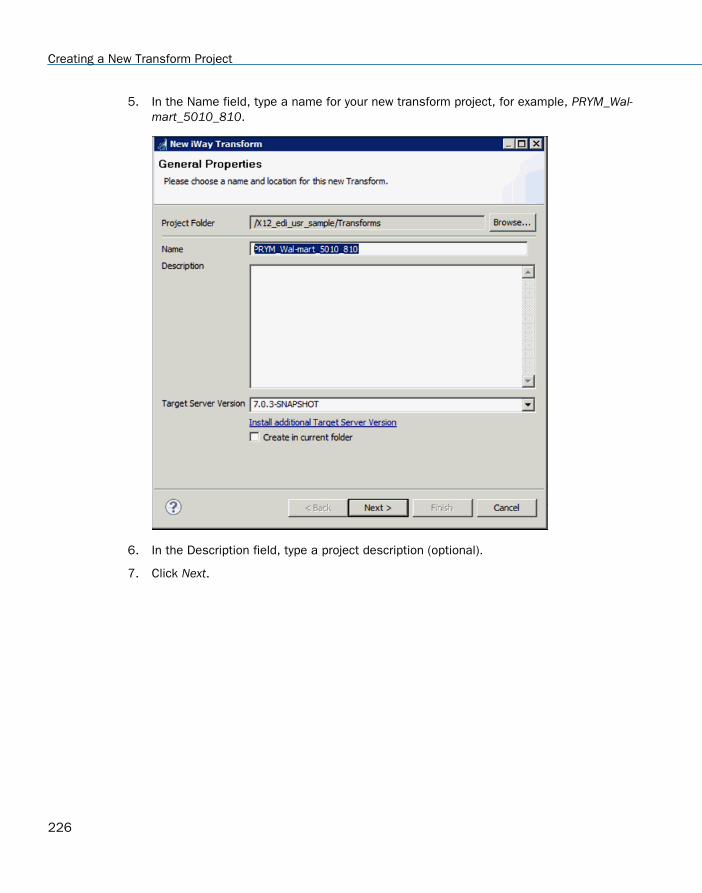
5. In the Name field, type a name for your new transform project, for example, PRYM_Wal-mart_5010_810.
6. In the Description field, type a project description (optional).
7. Click Next.
Creating a New Transform Project
226
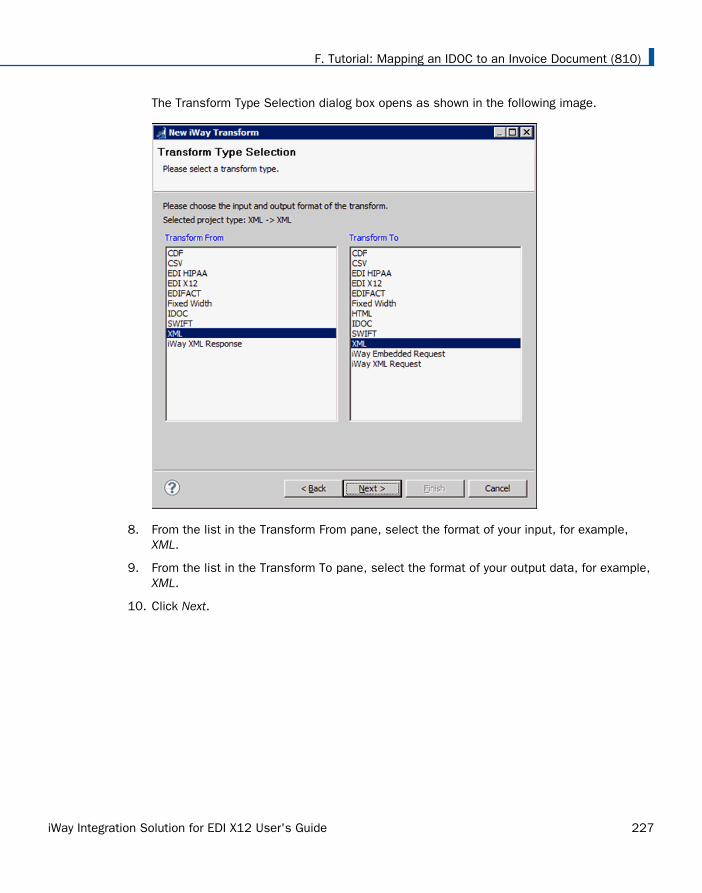
The Transform Type Selection dialog box opens as shown in the following image.
8. From the list in the Transform From pane, select the format of your input, for example,XML.
9. From the list in the Transform To pane, select the format of your output data, for example,XML.
10. Click Next.
F. Tutorial: Mapping an IDOC to an Invoice Document (810)
iWay Integration Solution for EDI X12 User's Guide 227
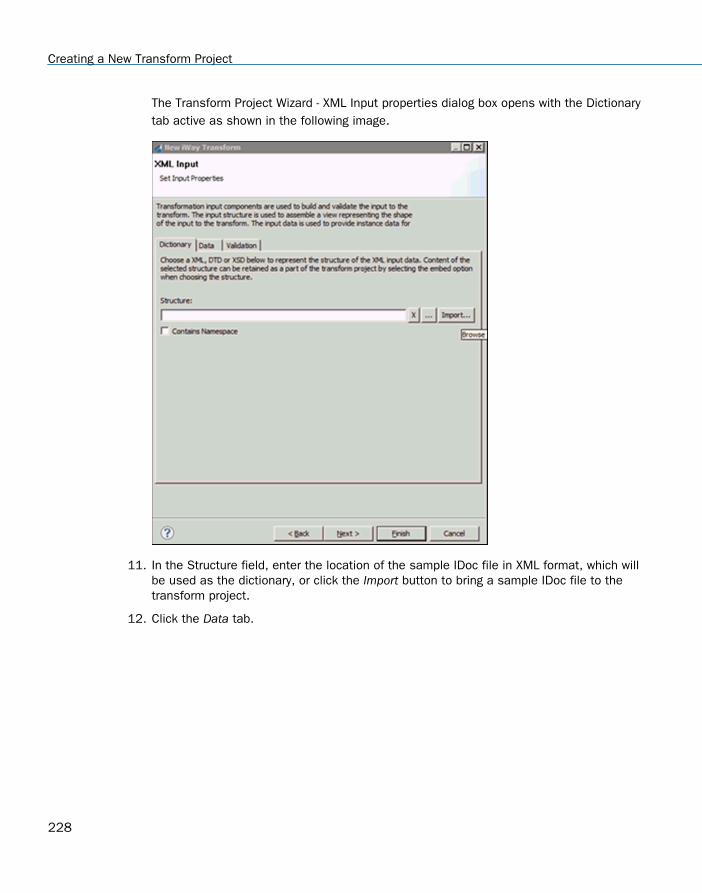
The Transform Project Wizard - XML Input properties dialog box opens with the Dictionarytab active as shown in the following image.
11. In the Structure field, enter the location of the sample IDoc file in XML format, which willbe used as the dictionary, or click the Import button to bring a sample IDoc file to thetransform project.
12. Click the Data tab.
Creating a New Transform Project
228
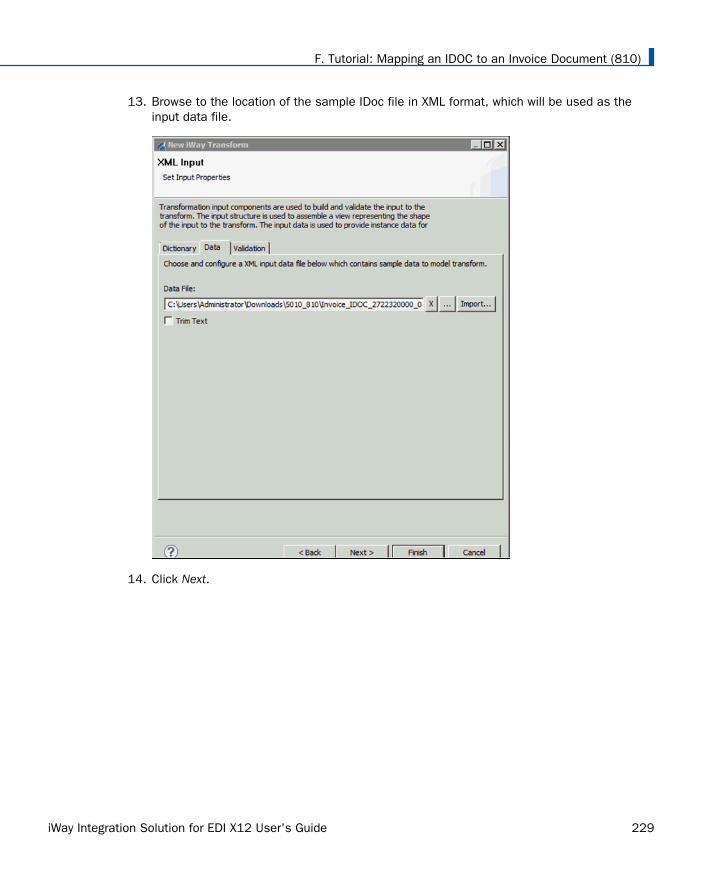
13. Browse to the location of the sample IDoc file in XML format, which will be used as theinput data file.
14. Click Next.
F. Tutorial: Mapping an IDOC to an Invoice Document (810)
iWay Integration Solution for EDI X12 User's Guide 229
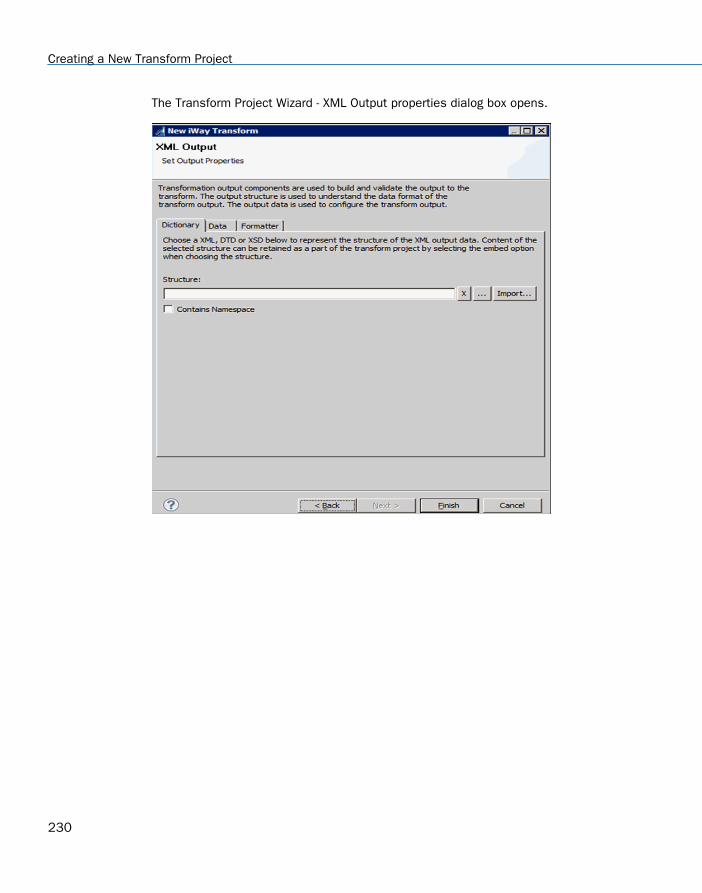
The Transform Project Wizard - XML Output properties dialog box opens.
Creating a New Transform Project
230
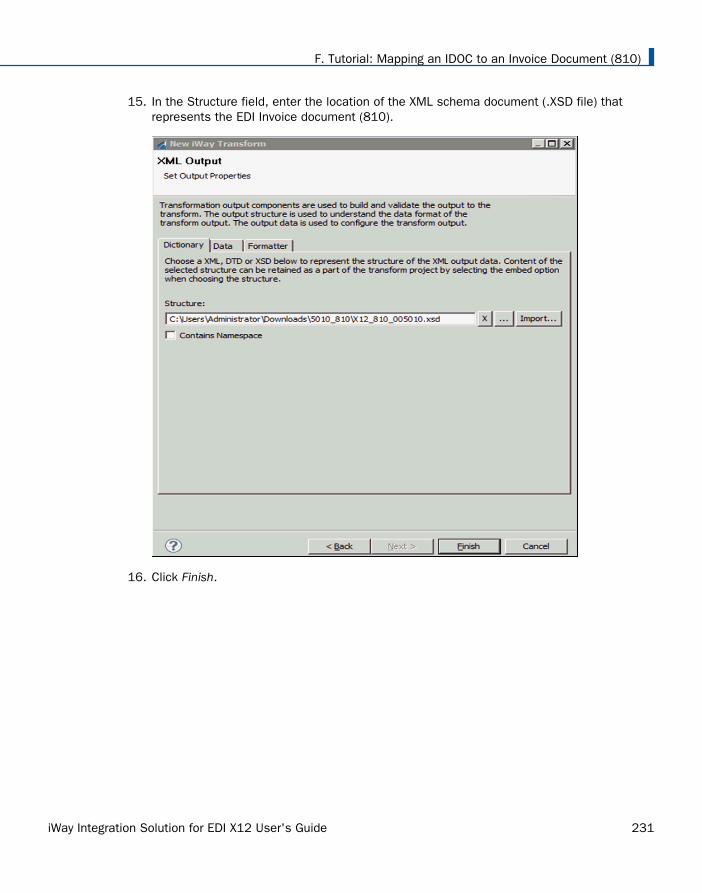
15. In the Structure field, enter the location of the XML schema document (.XSD file) thatrepresents the EDI Invoice document (810).
16. Click Finish.
F. Tutorial: Mapping an IDOC to an Invoice Document (810)
iWay Integration Solution for EDI X12 User's Guide 231
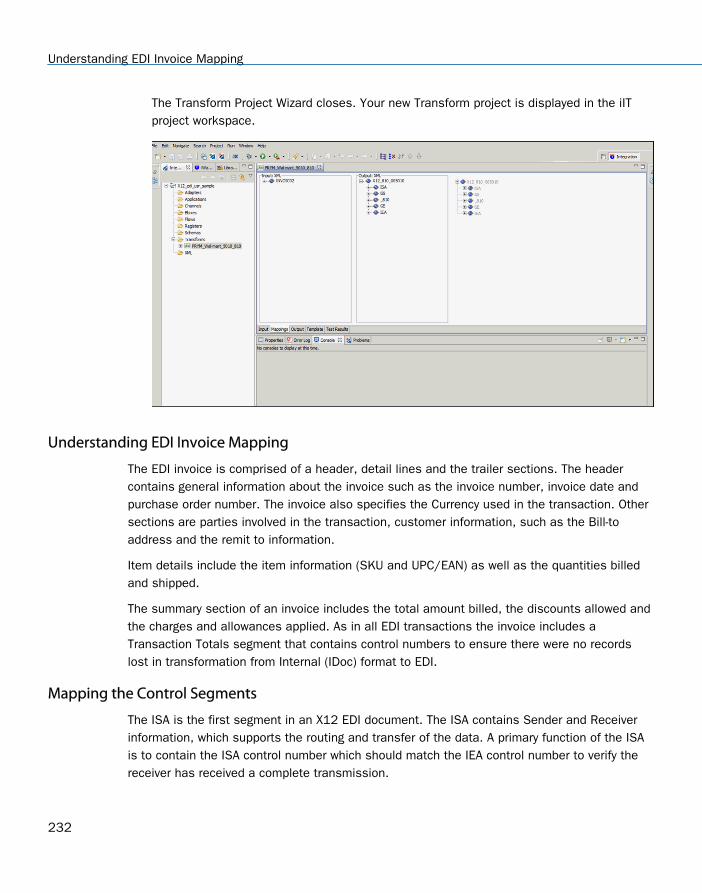
The Transform Project Wizard closes. Your new Transform project is displayed in the iITproject workspace.
Understanding EDI Invoice Mapping
The EDI invoice is comprised of a header, detail lines and the trailer sections. The headercontains general information about the invoice such as the invoice number, invoice date andpurchase order number. The invoice also specifies the Currency used in the transaction. Othersections are parties involved in the transaction, customer information, such as the Bill-toaddress and the remit to information.
Item details include the item information (SKU and UPC/EAN) as well as the quantities billedand shipped.
The summary section of an invoice includes the total amount billed, the discounts allowed andthe charges and allowances applied. As in all EDI transactions the invoice includes aTransaction Totals segment that contains control numbers to ensure there were no recordslost in transformation from Internal (IDoc) format to EDI.
Mapping the Control Segments
The ISA is the first segment in an X12 EDI document. The ISA contains Sender and Receiverinformation, which supports the routing and transfer of the data. A primary function of the ISAis to contain the ISA control number which should match the IEA control number to verify thereceiver has received a complete transmission.
Understanding EDI Invoice Mapping
232
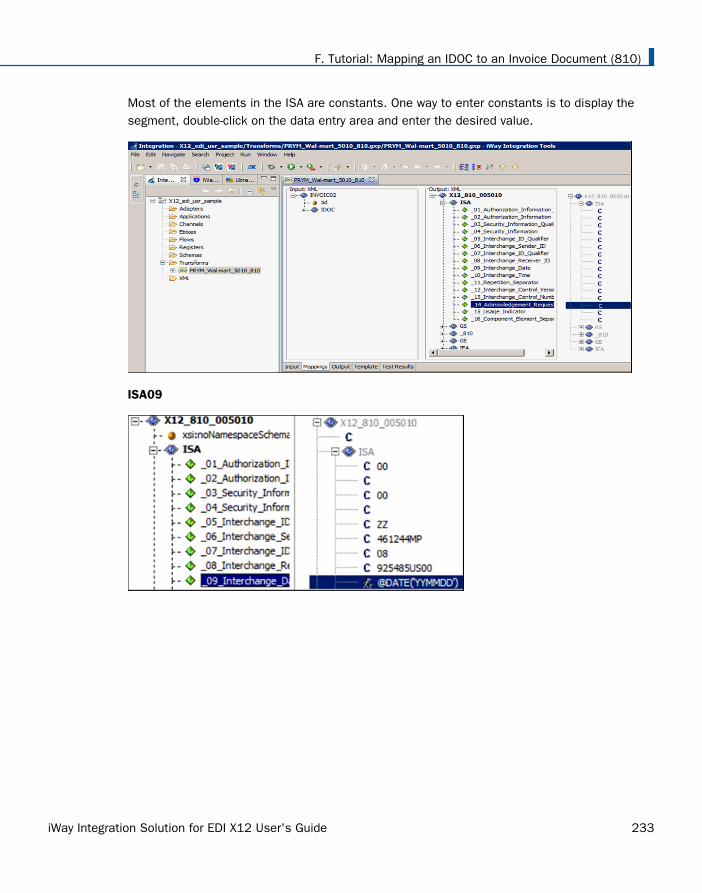
Most of the elements in the ISA are constants. One way to enter constants is to display thesegment, double-click on the data entry area and enter the desired value.
ISA09
F. Tutorial: Mapping an IDOC to an Invoice Document (810)
iWay Integration Solution for EDI X12 User's Guide 233
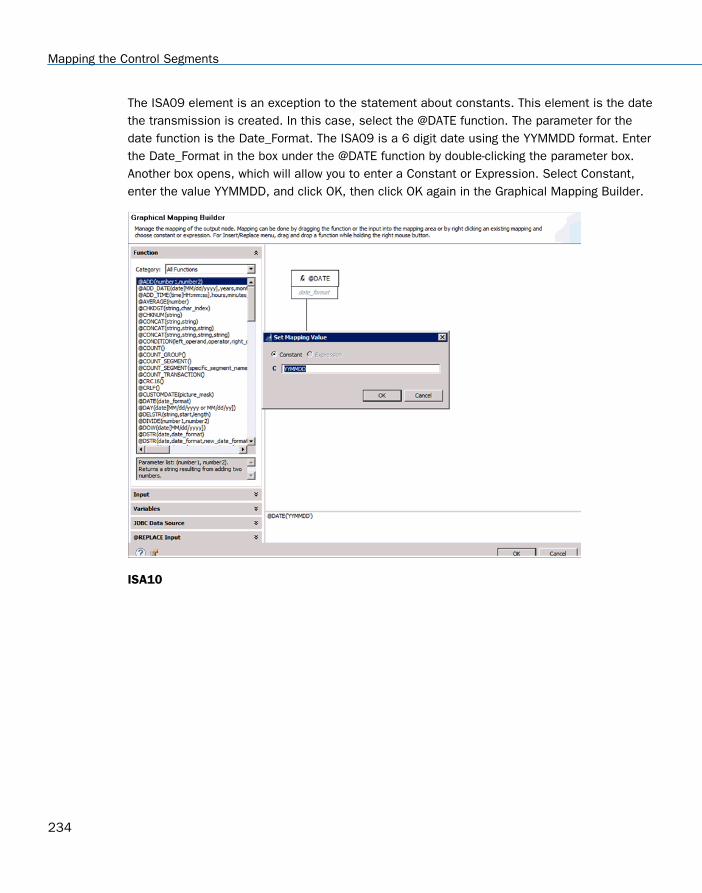
The ISA09 element is an exception to the statement about constants. This element is the datethe transmission is created. In this case, select the @DATE function. The parameter for thedate function is the Date_Format. The ISA09 is a 6 digit date using the YYMMDD format. Enterthe Date_Format in the box under the @DATE function by double-clicking the parameter box.Another box opens, which will allow you to enter a Constant or Expression. Select Constant,enter the value YYMMDD, and click OK, then click OK again in the Graphical Mapping Builder.
ISA10
Mapping the Control Segments
234
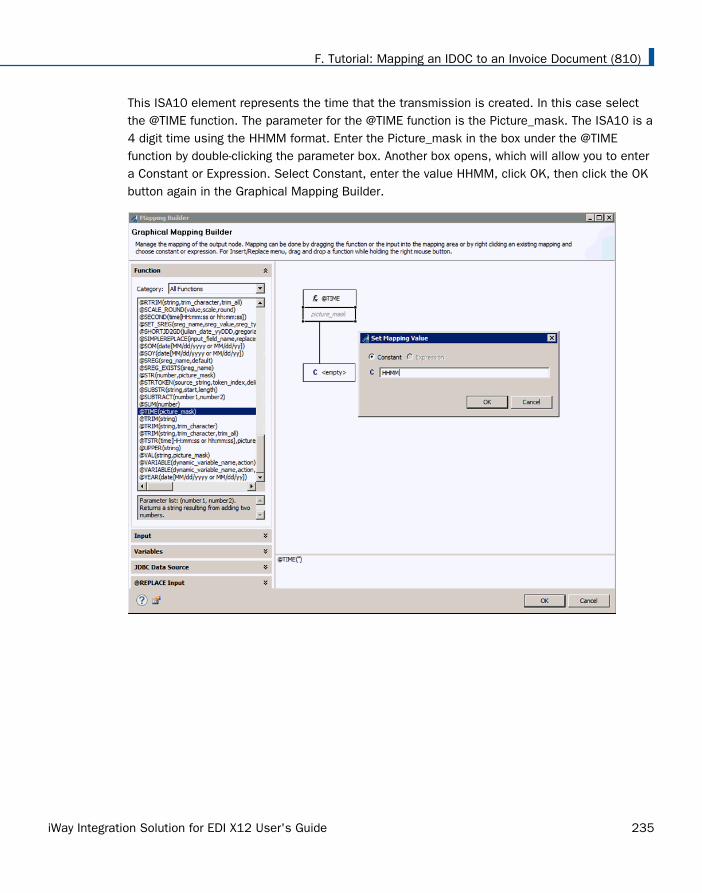
This ISA10 element represents the time that the transmission is created. In this case selectthe @TIME function. The parameter for the @TIME function is the Picture_mask. The ISA10 is a4 digit time using the HHMM format. Enter the Picture_mask in the box under the @TIMEfunction by double-clicking the parameter box. Another box opens, which will allow you to entera Constant or Expression. Select Constant, enter the value HHMM, click OK, then click the OKbutton again in the Graphical Mapping Builder.
F. Tutorial: Mapping an IDOC to an Invoice Document (810)
iWay Integration Solution for EDI X12 User's Guide 235
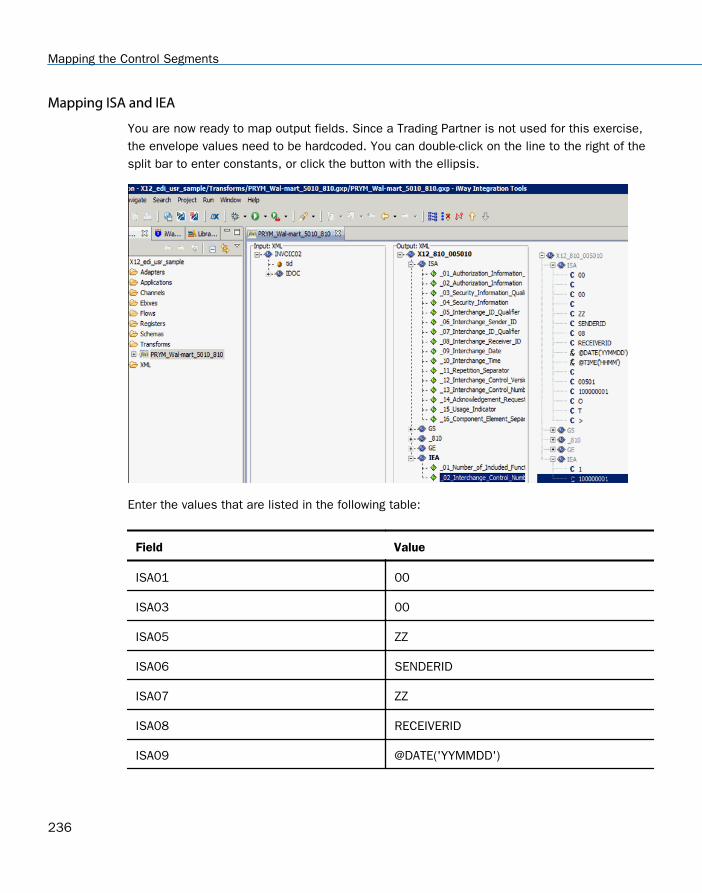
Mapping ISA and IEA
You are now ready to map output fields. Since a Trading Partner is not used for this exercise,the envelope values need to be hardcoded. You can double-click on the line to the right of thesplit bar to enter constants, or click the button with the ellipsis.
Enter the values that are listed in the following table:
Field Value
ISA01 00
ISA03 00
ISA05 ZZ
ISA06 SENDERID
ISA07 ZZ
ISA08 RECEIVERID
ISA09 @DATE('YYMMDD')
Mapping the Control Segments
236
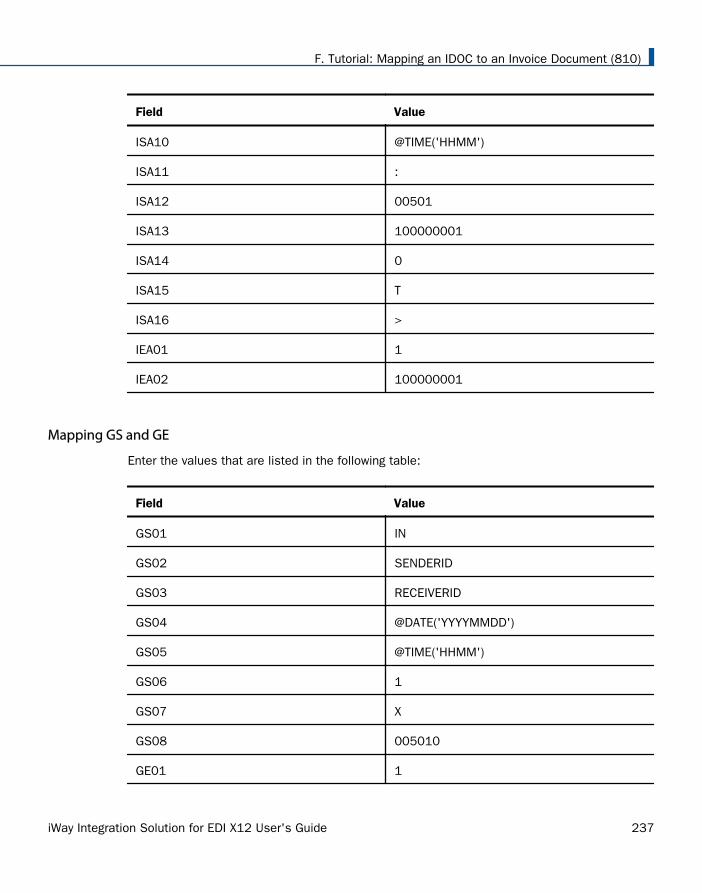
Field Value
ISA10 @TIME('HHMM')
ISA11 :
ISA12 00501
ISA13 100000001
ISA14 0
ISA15 T
ISA16 >
IEA01 1
IEA02 100000001
Mapping GS and GE
Enter the values that are listed in the following table:
Field Value
GS01 IN
GS02 SENDERID
GS03 RECEIVERID
GS04 @DATE('YYYYMMDD')
GS05 @TIME('HHMM')
GS06 1
GS07 X
GS08 005010
GE01 1
F. Tutorial: Mapping an IDOC to an Invoice Document (810)
iWay Integration Solution for EDI X12 User's Guide 237
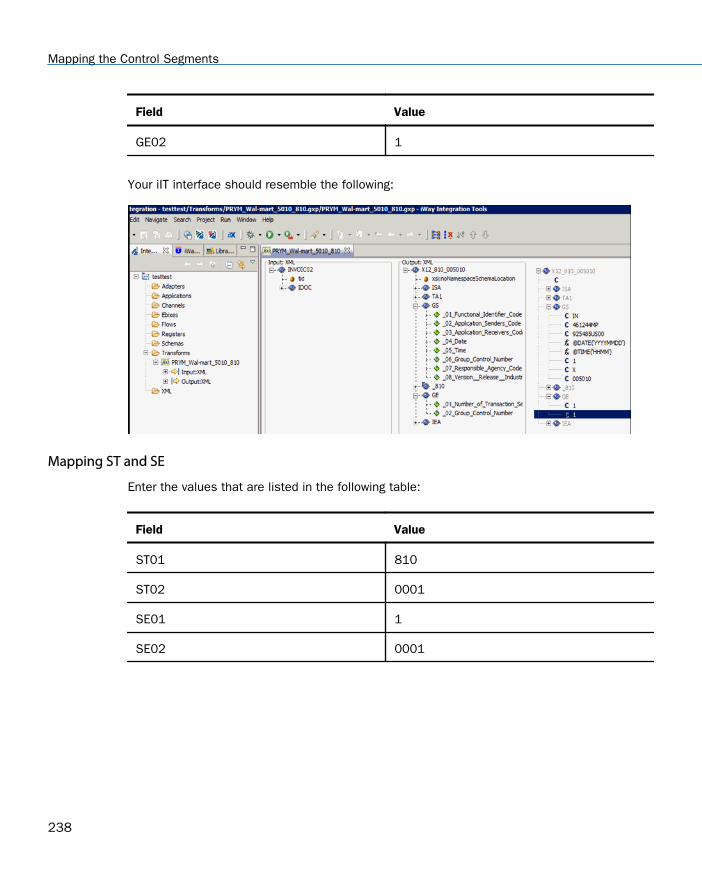
Field Value
GE02 1
Your iIT interface should resemble the following:
Mapping ST and SE
Enter the values that are listed in the following table:
Field Value
ST01 810
ST02 0001
SE01 1
SE02 0001
Mapping the Control Segments
238

Your iIT interface should resemble the following:
F. Tutorial: Mapping an IDOC to an Invoice Document (810)
iWay Integration Solution for EDI X12 User's Guide 239
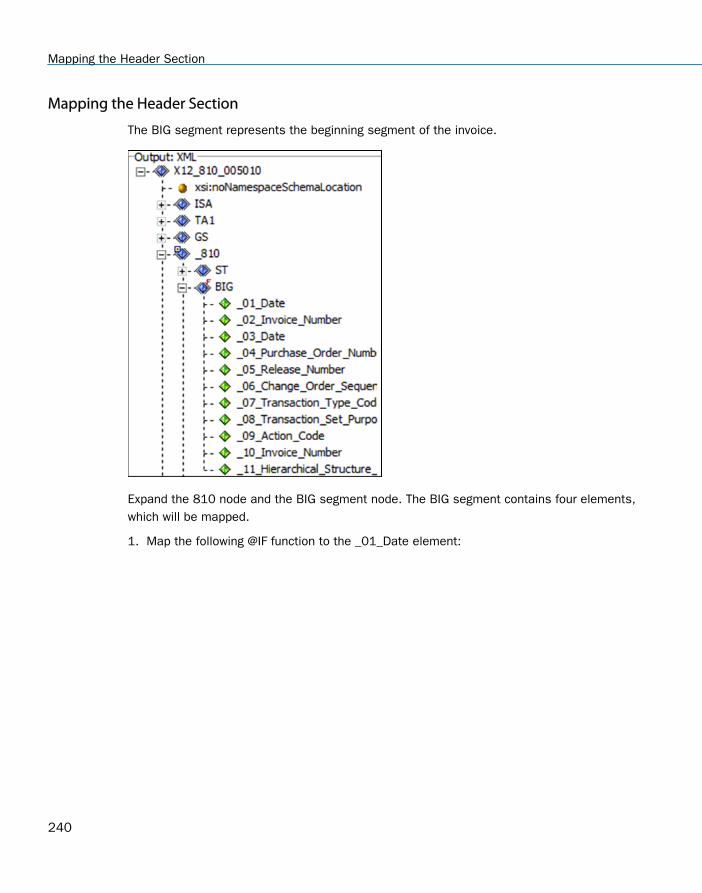
Mapping the Header Section
The BIG segment represents the beginning segment of the invoice.
Expand the 810 node and the BIG segment node. The BIG segment contains four elements,which will be mapped.
1. Map the following @IF function to the _01_Date element:
Mapping the Header Section
240
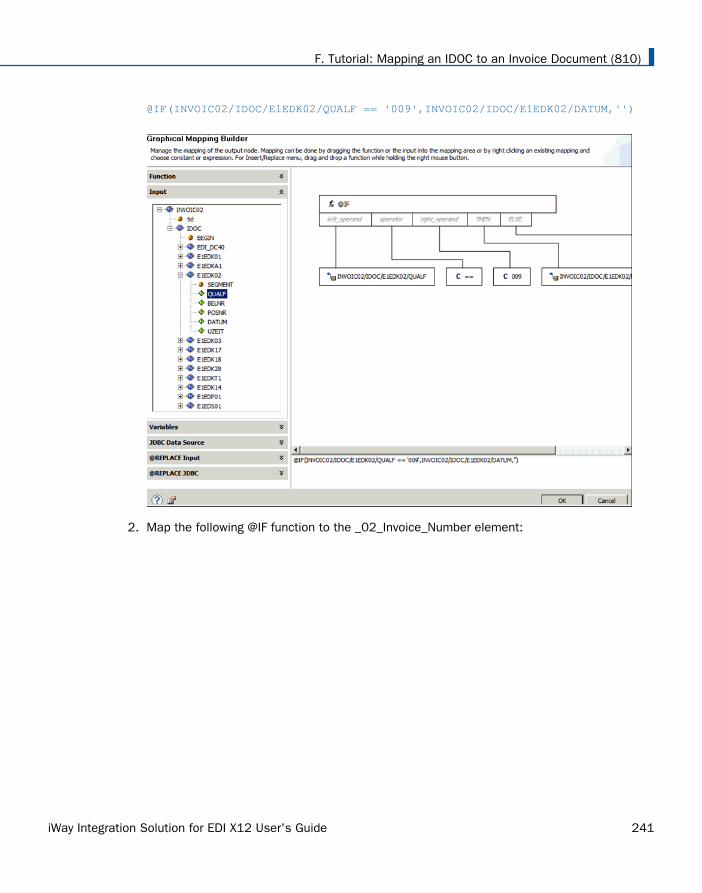
@IF(INVOIC02/IDOC/E1EDK02/QUALF == '009',INVOIC02/IDOC/E1EDK02/DATUM,'')
2. Map the following @IF function to the _02_Invoice_Number element:
F. Tutorial: Mapping an IDOC to an Invoice Document (810)
iWay Integration Solution for EDI X12 User's Guide 241
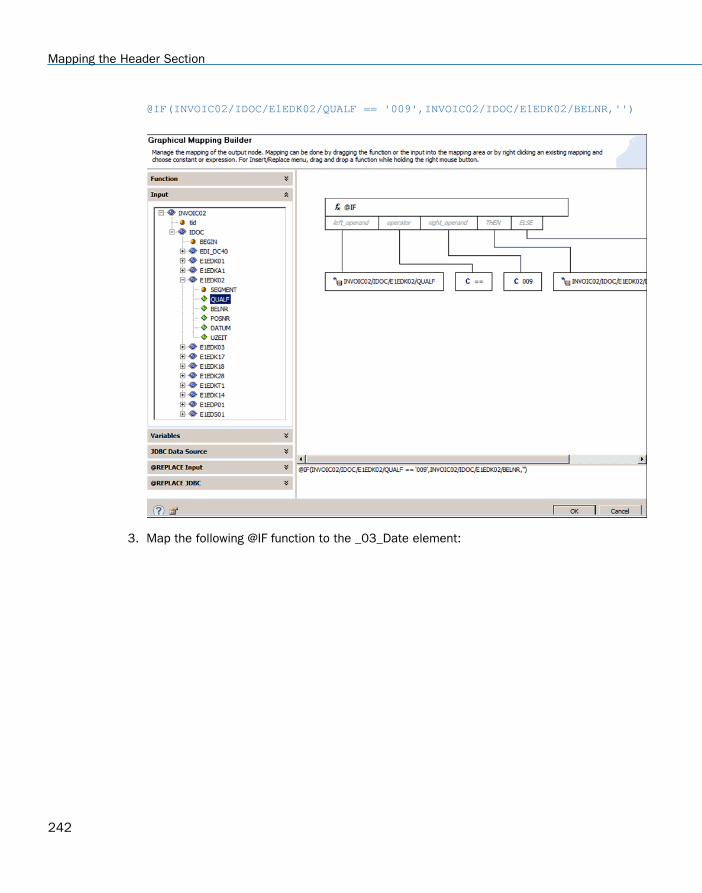
@IF(INVOIC02/IDOC/E1EDK02/QUALF == '009',INVOIC02/IDOC/E1EDK02/BELNR,'')
3. Map the following @IF function to the _03_Date element:
Mapping the Header Section
242
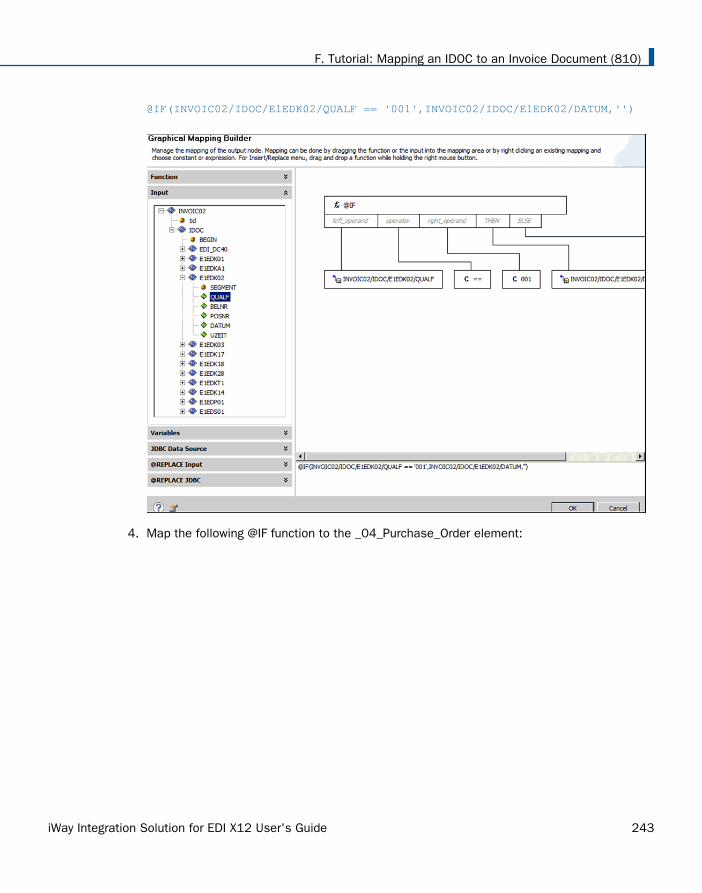
@IF(INVOIC02/IDOC/E1EDK02/QUALF == '001',INVOIC02/IDOC/E1EDK02/DATUM,'')
4. Map the following @IF function to the _04_Purchase_Order element:
F. Tutorial: Mapping an IDOC to an Invoice Document (810)
iWay Integration Solution for EDI X12 User's Guide 243
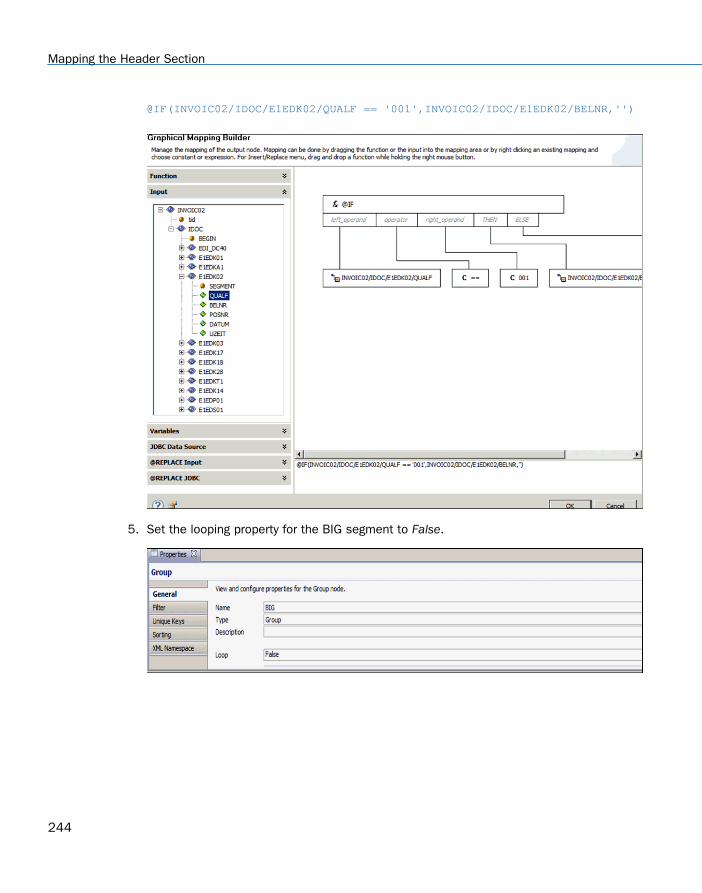
@IF(INVOIC02/IDOC/E1EDK02/QUALF == '001',INVOIC02/IDOC/E1EDK02/BELNR,'')
5. Set the looping property for the BIG segment to False.
Mapping the Header Section
244
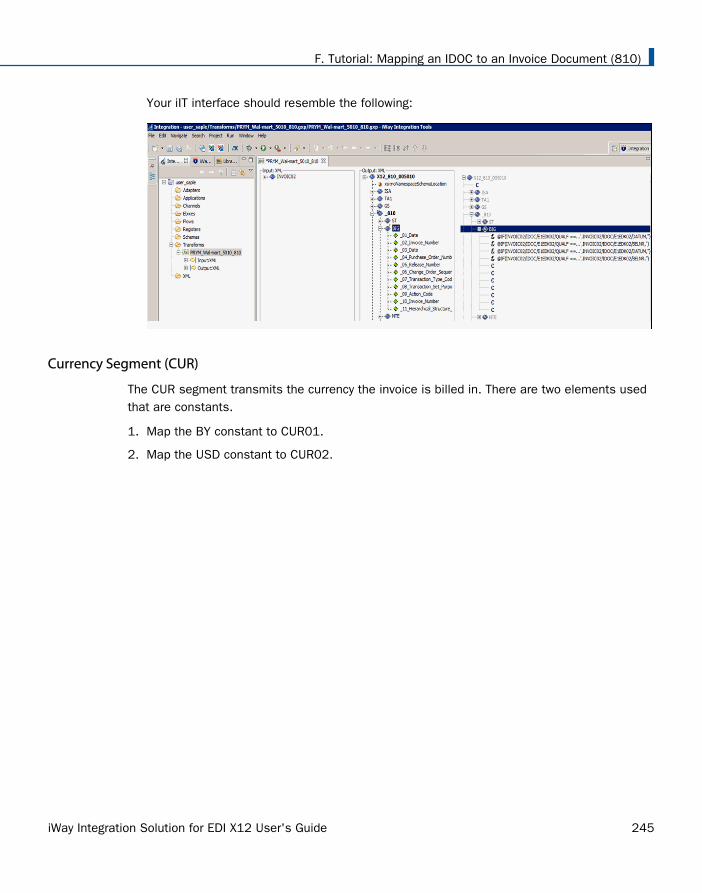
Your iIT interface should resemble the following:
Currency Segment (CUR)
The CUR segment transmits the currency the invoice is billed in. There are two elements usedthat are constants.
1. Map the BY constant to CUR01.
2. Map the USD constant to CUR02.
F. Tutorial: Mapping an IDOC to an Invoice Document (810)
iWay Integration Solution for EDI X12 User's Guide 245
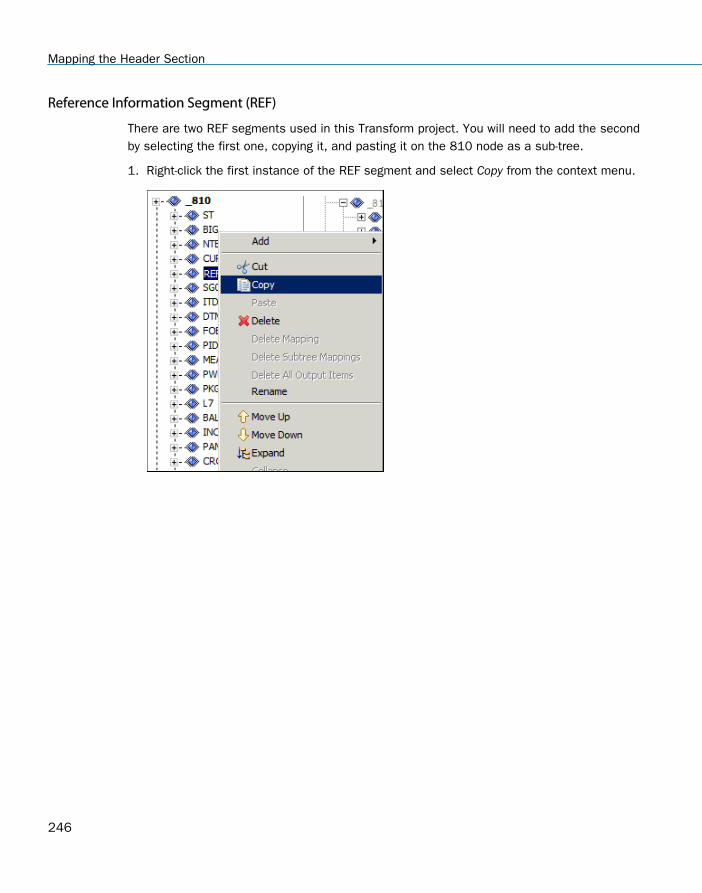
Reference Information Segment (REF)
There are two REF segments used in this Transform project. You will need to add the secondby selecting the first one, copying it, and pasting it on the 810 node as a sub-tree.
1. Right-click the first instance of the REF segment and select Copy from the context menu.
Mapping the Header Section
246
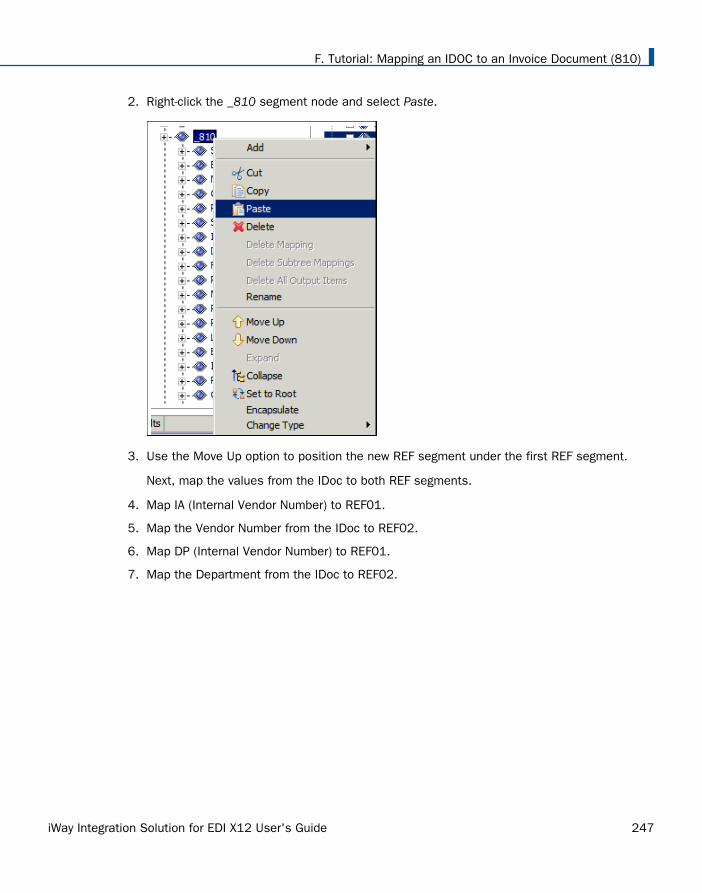
2. Right-click the _810 segment node and select Paste.
3. Use the Move Up option to position the new REF segment under the first REF segment.
Next, map the values from the IDoc to both REF segments.
4. Map IA (Internal Vendor Number) to REF01.
5. Map the Vendor Number from the IDoc to REF02.
6. Map DP (Internal Vendor Number) to REF01.
7. Map the Department from the IDoc to REF02.
F. Tutorial: Mapping an IDOC to an Invoice Document (810)
iWay Integration Solution for EDI X12 User's Guide 247
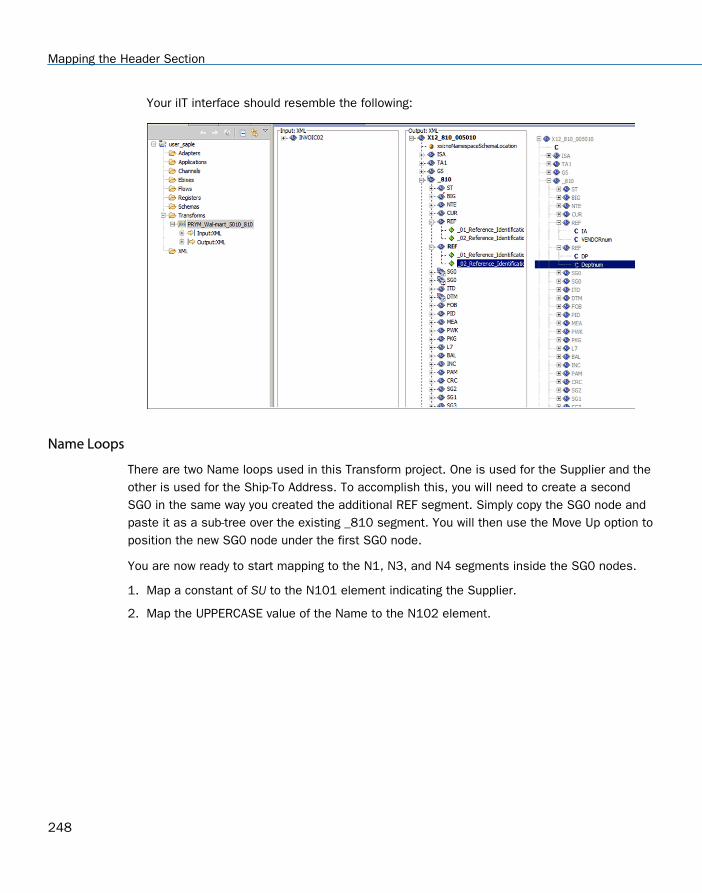
Your iIT interface should resemble the following:
Name Loops
There are two Name loops used in this Transform project. One is used for the Supplier and theother is used for the Ship-To Address. To accomplish this, you will need to create a secondSG0 in the same way you created the additional REF segment. Simply copy the SG0 node andpaste it as a sub-tree over the existing _810 segment. You will then use the Move Up option toposition the new SG0 node under the first SG0 node.
You are now ready to start mapping to the N1, N3, and N4 segments inside the SG0 nodes.
1. Map a constant of SU to the N101 element indicating the Supplier.
2. Map the UPPERCASE value of the Name to the N102 element.
Mapping the Header Section
248
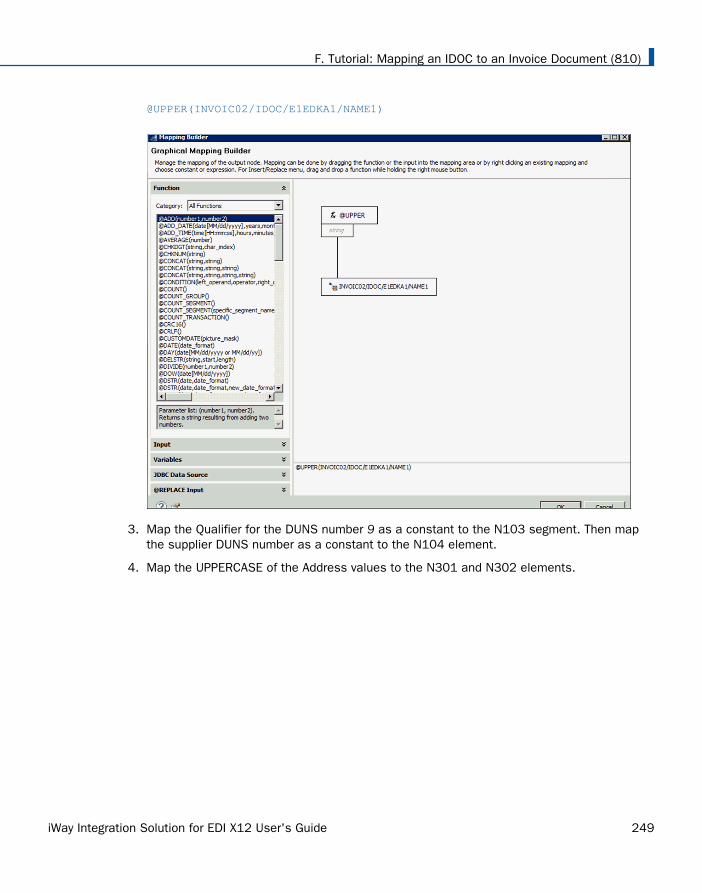
@UPPER(INVOIC02/IDOC/E1EDKA1/NAME1)
3. Map the Qualifier for the DUNS number 9 as a constant to the N103 segment. Then mapthe supplier DUNS number as a constant to the N104 element.
4. Map the UPPERCASE of the Address values to the N301 and N302 elements.
F. Tutorial: Mapping an IDOC to an Invoice Document (810)
iWay Integration Solution for EDI X12 User's Guide 249
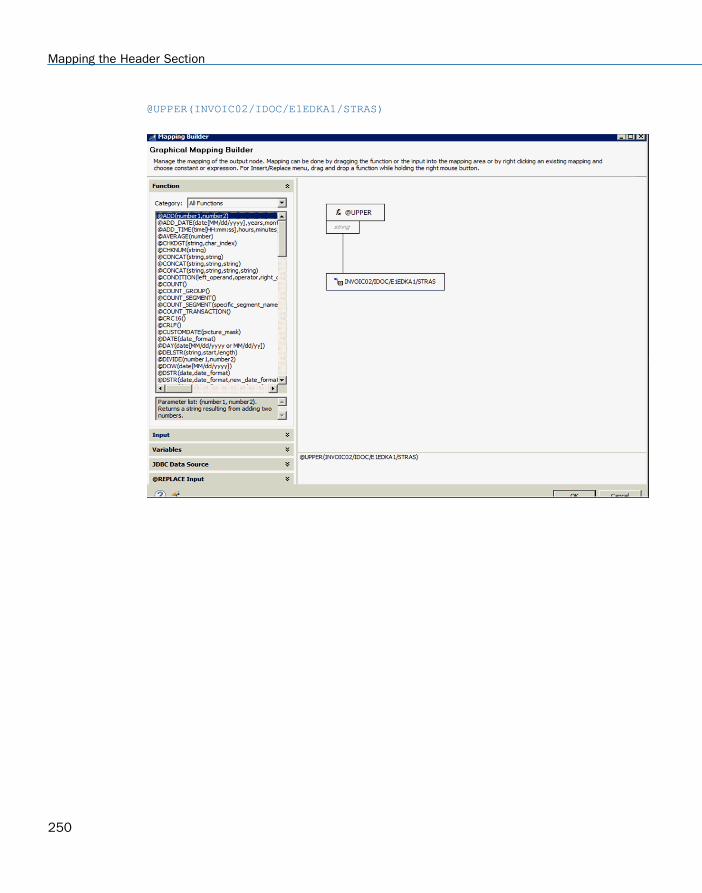
@UPPER(INVOIC02/IDOC/E1EDKA1/STRAS)
Mapping the Header Section
250
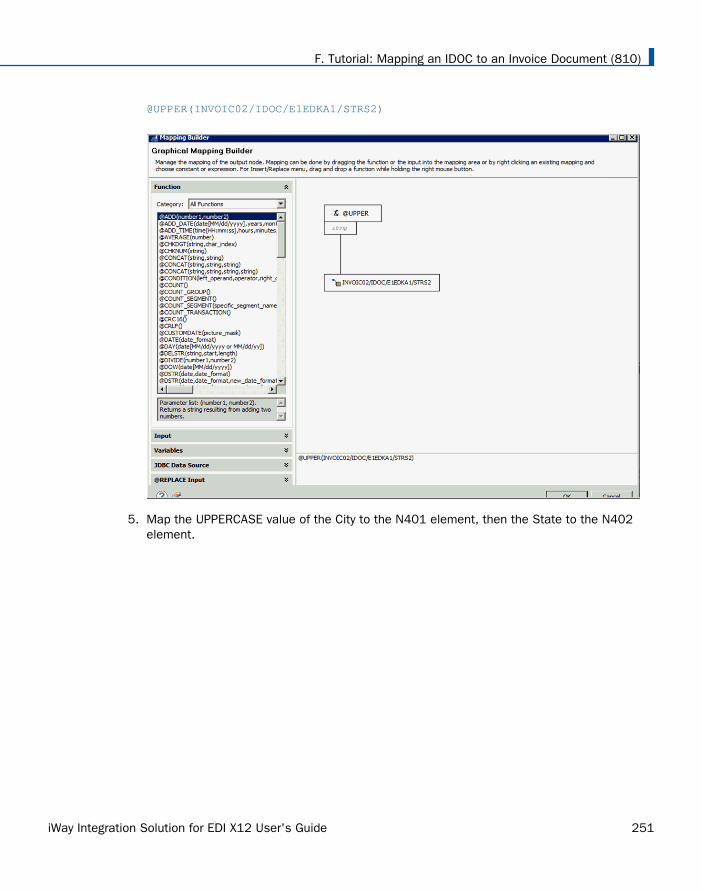
@UPPER(INVOIC02/IDOC/E1EDKA1/STRS2)
5. Map the UPPERCASE value of the City to the N401 element, then the State to the N402element.
F. Tutorial: Mapping an IDOC to an Invoice Document (810)
iWay Integration Solution for EDI X12 User's Guide 251
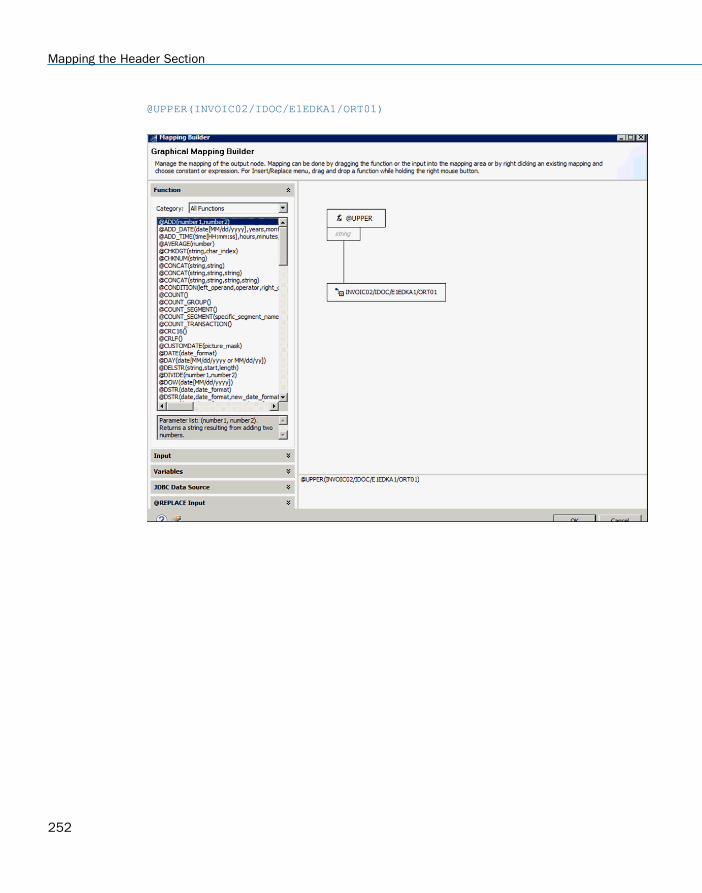
@UPPER(INVOIC02/IDOC/E1EDKA1/ORT01)
Mapping the Header Section
252
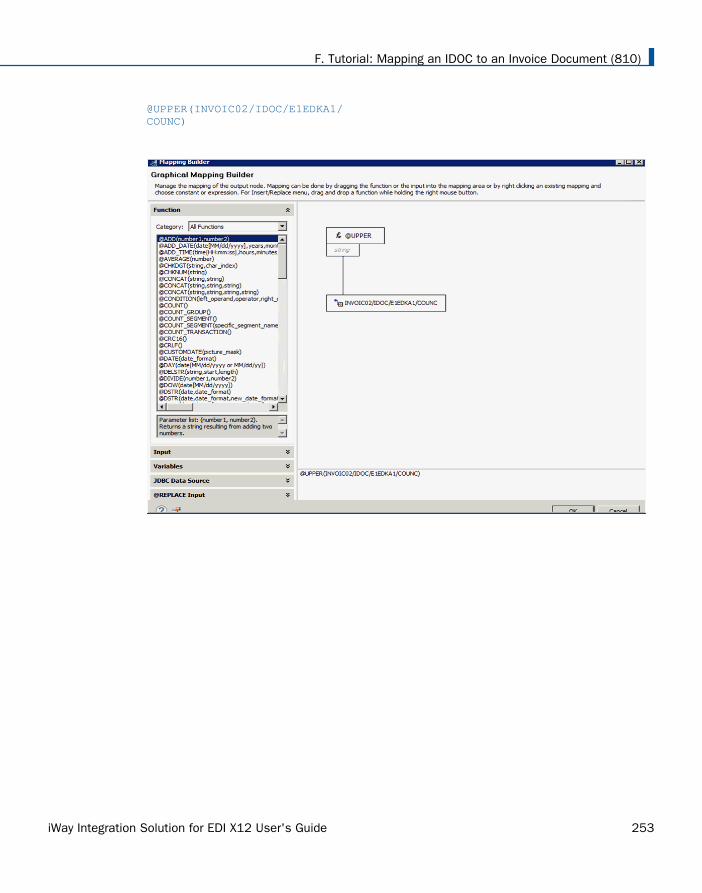
@UPPER(INVOIC02/IDOC/E1EDKA1/COUNC)
F. Tutorial: Mapping an IDOC to an Invoice Document (810)
iWay Integration Solution for EDI X12 User's Guide 253
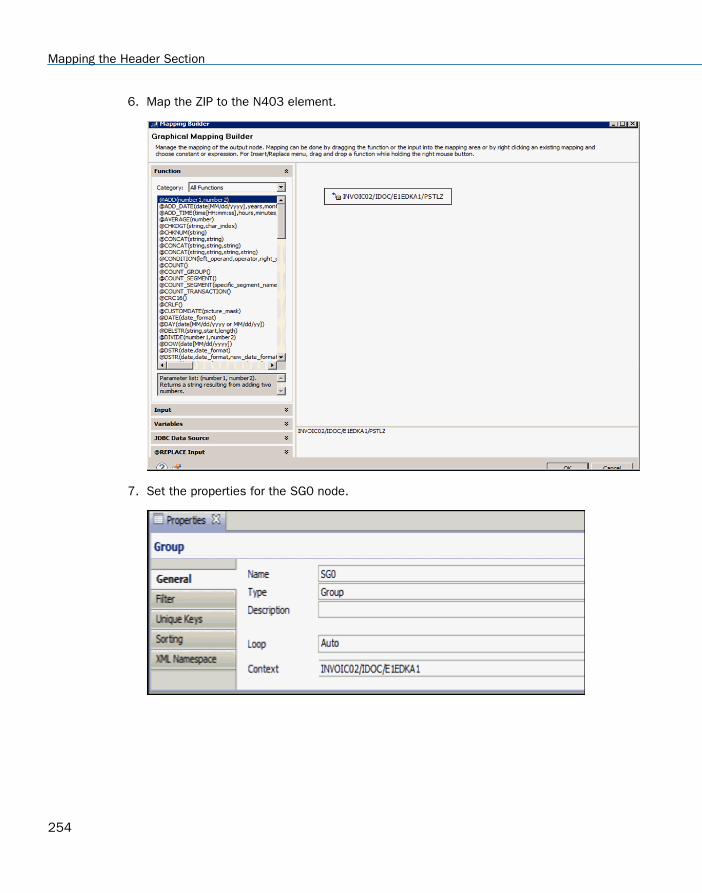
6. Map the ZIP to the N403 element.
7. Set the properties for the SG0 node.
Mapping the Header Section
254
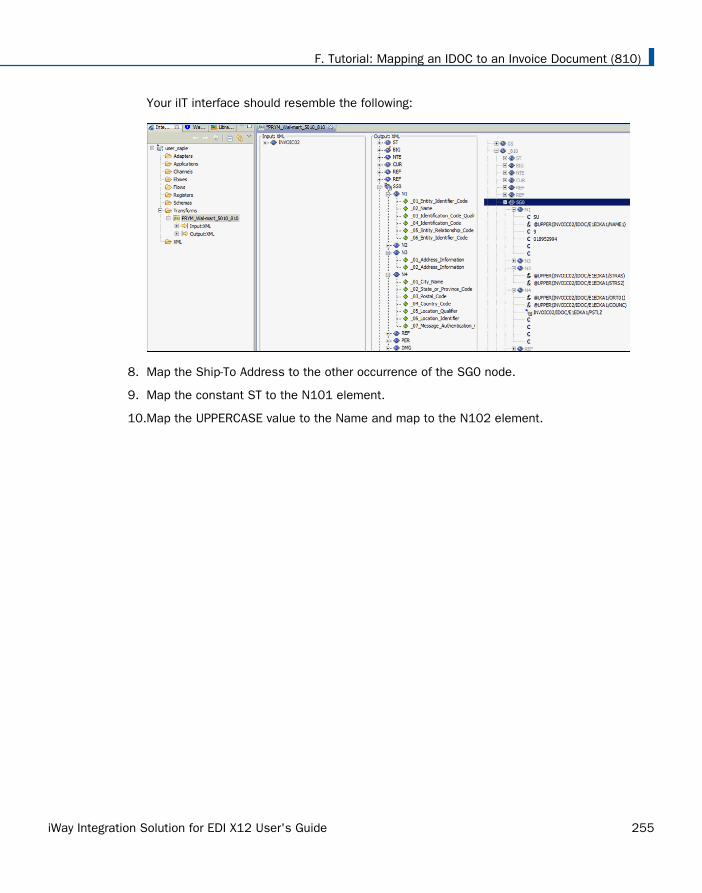
Your iIT interface should resemble the following:
8. Map the Ship-To Address to the other occurrence of the SG0 node.
9. Map the constant ST to the N101 element.
10.Map the UPPERCASE value to the Name and map to the N102 element.
F. Tutorial: Mapping an IDOC to an Invoice Document (810)
iWay Integration Solution for EDI X12 User's Guide 255
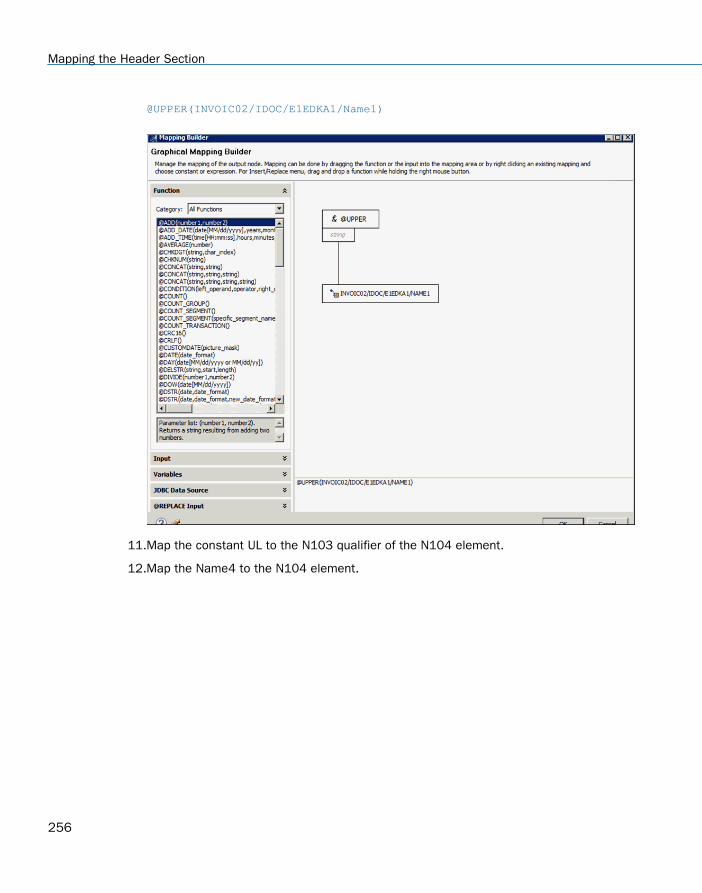
@UPPER(INVOIC02/IDOC/E1EDKA1/Name1)
11.Map the constant UL to the N103 qualifier of the N104 element.
12.Map the Name4 to the N104 element.
Mapping the Header Section
256
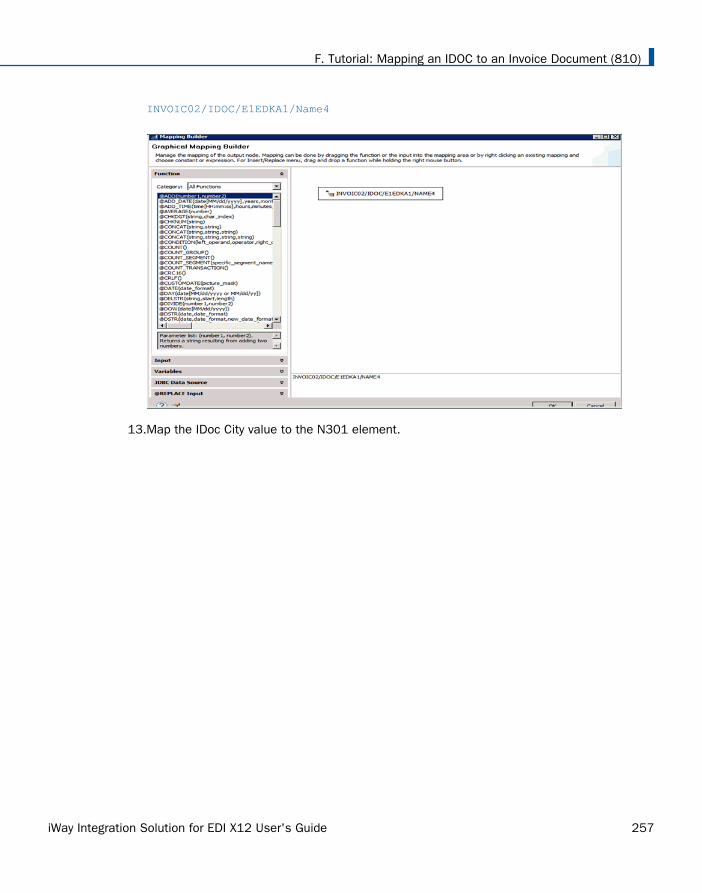
INVOIC02/IDOC/E1EDKA1/Name4
13.Map the IDoc City value to the N301 element.
F. Tutorial: Mapping an IDOC to an Invoice Document (810)
iWay Integration Solution for EDI X12 User's Guide 257
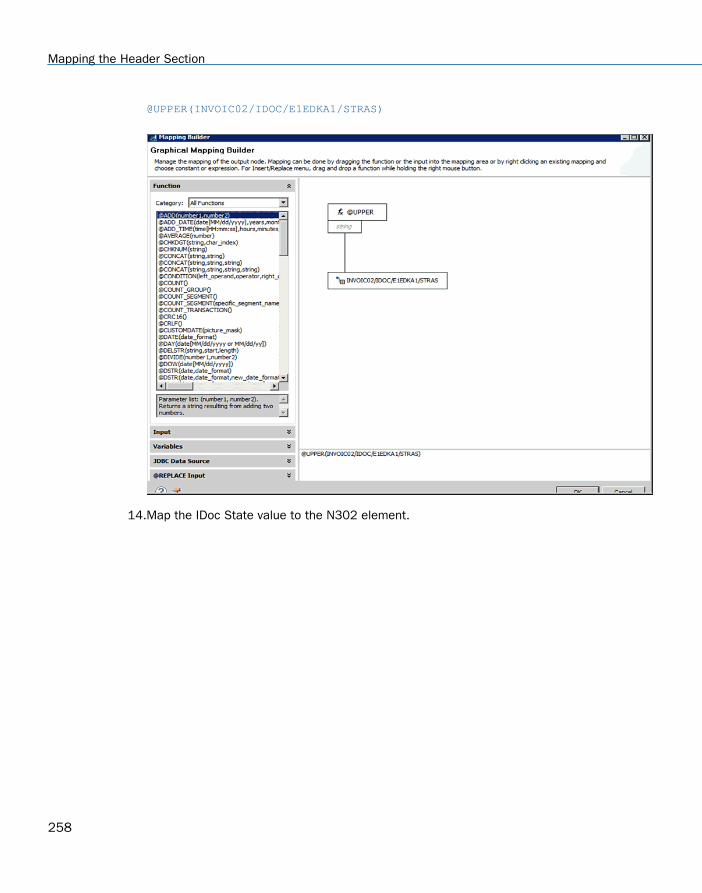
@UPPER(INVOIC02/IDOC/E1EDKA1/STRAS)
14.Map the IDoc State value to the N302 element.
Mapping the Header Section
258
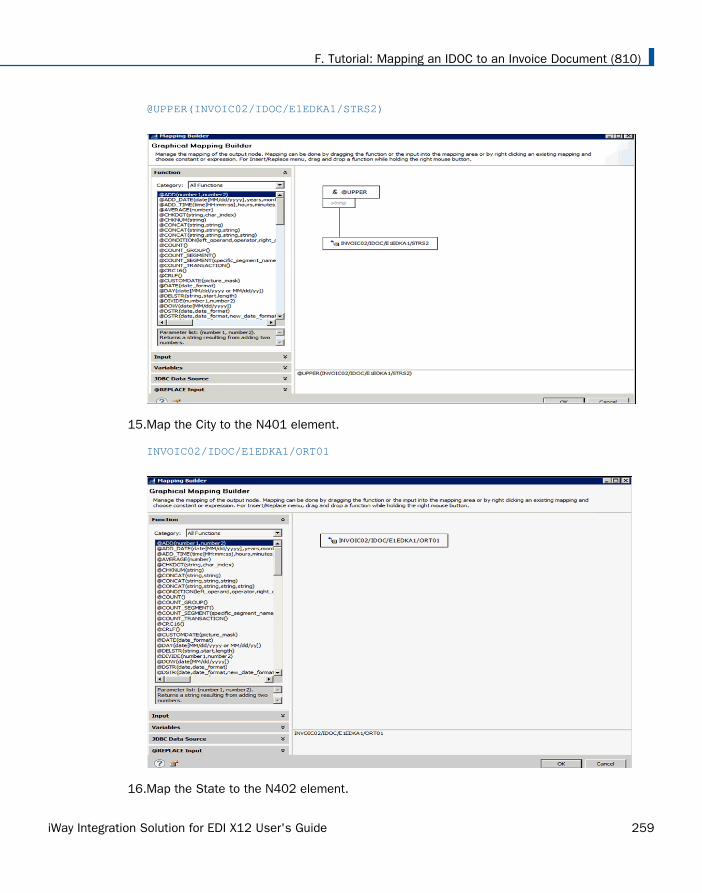
@UPPER(INVOIC02/IDOC/E1EDKA1/STRS2)
15.Map the City to the N401 element.
INVOIC02/IDOC/E1EDKA1/ORT01
16.Map the State to the N402 element.
F. Tutorial: Mapping an IDOC to an Invoice Document (810)
iWay Integration Solution for EDI X12 User's Guide 259
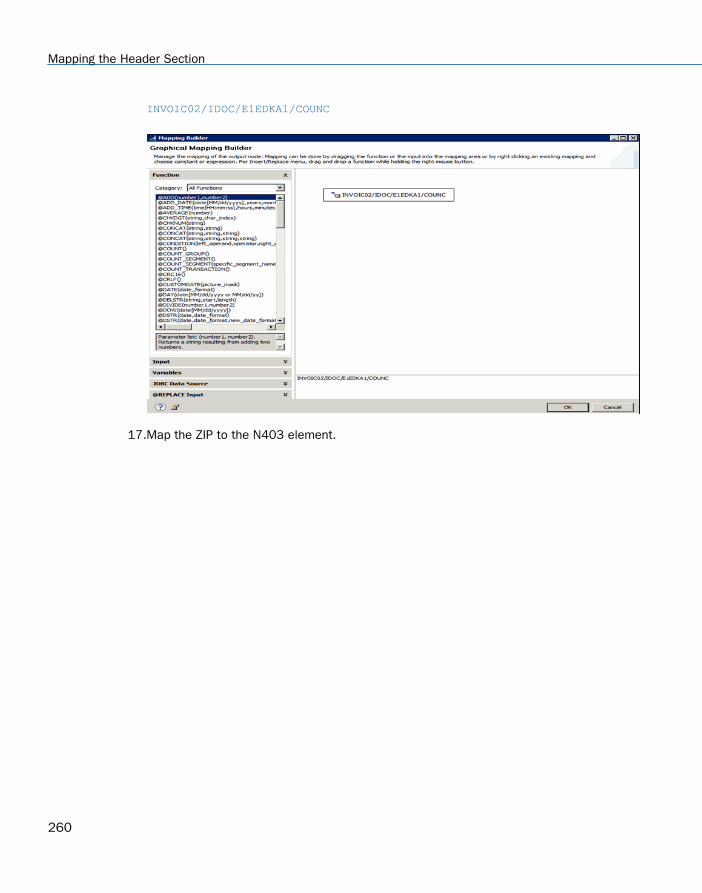
INVOIC02/IDOC/E1EDKA1/COUNC
17.Map the ZIP to the N403 element.
Mapping the Header Section
260
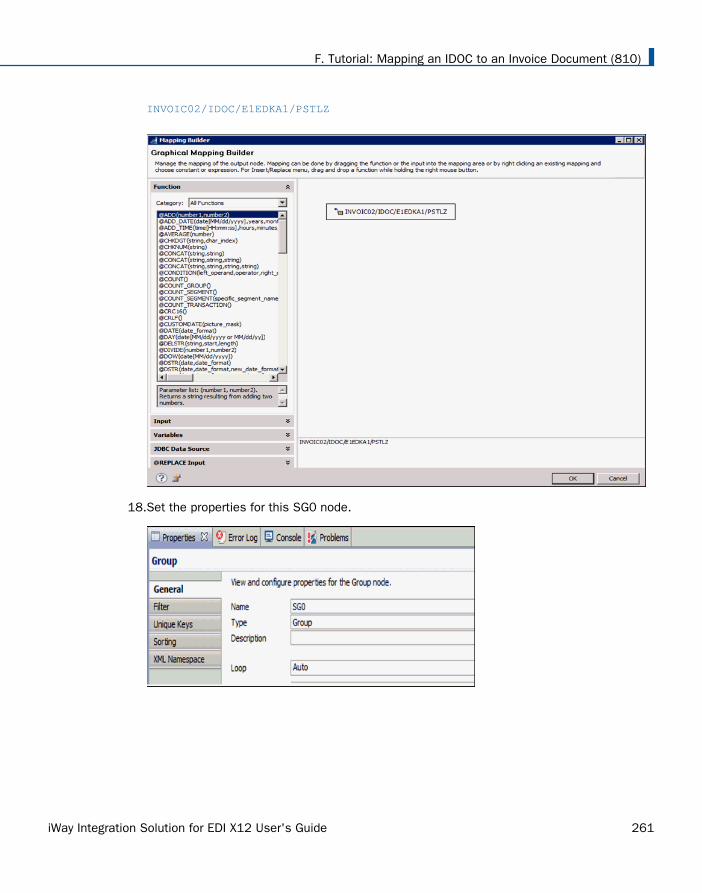
INVOIC02/IDOC/E1EDKA1/PSTLZ
18.Set the properties for this SG0 node.
F. Tutorial: Mapping an IDOC to an Invoice Document (810)
iWay Integration Solution for EDI X12 User's Guide 261
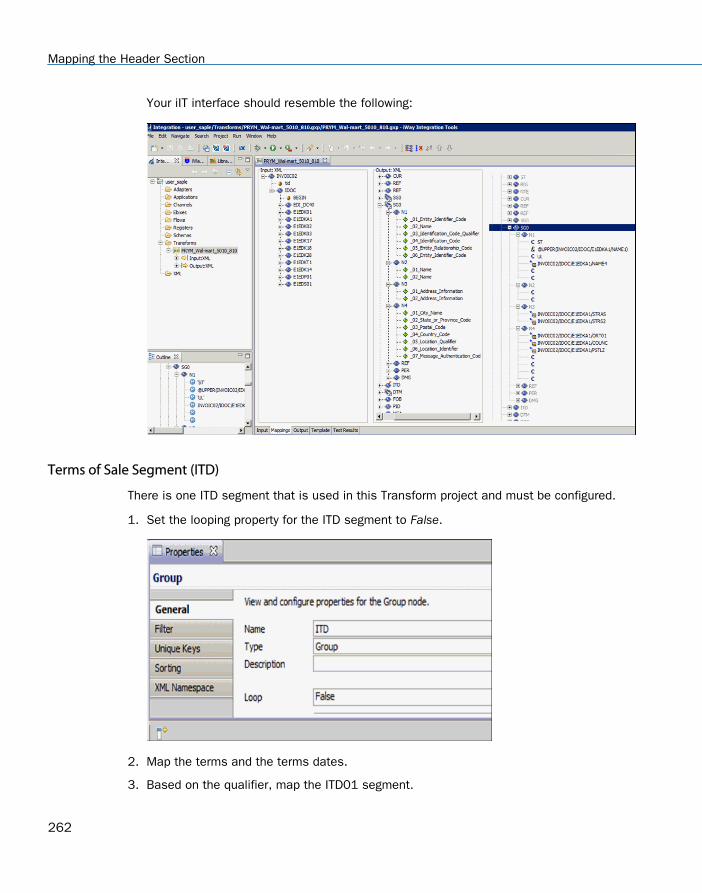
Your iIT interface should resemble the following:
Terms of Sale Segment (ITD)
There is one ITD segment that is used in this Transform project and must be configured.
1. Set the looping property for the ITD segment to False.
2. Map the terms and the terms dates.
3. Based on the qualifier, map the ITD01 segment.
Mapping the Header Section
262
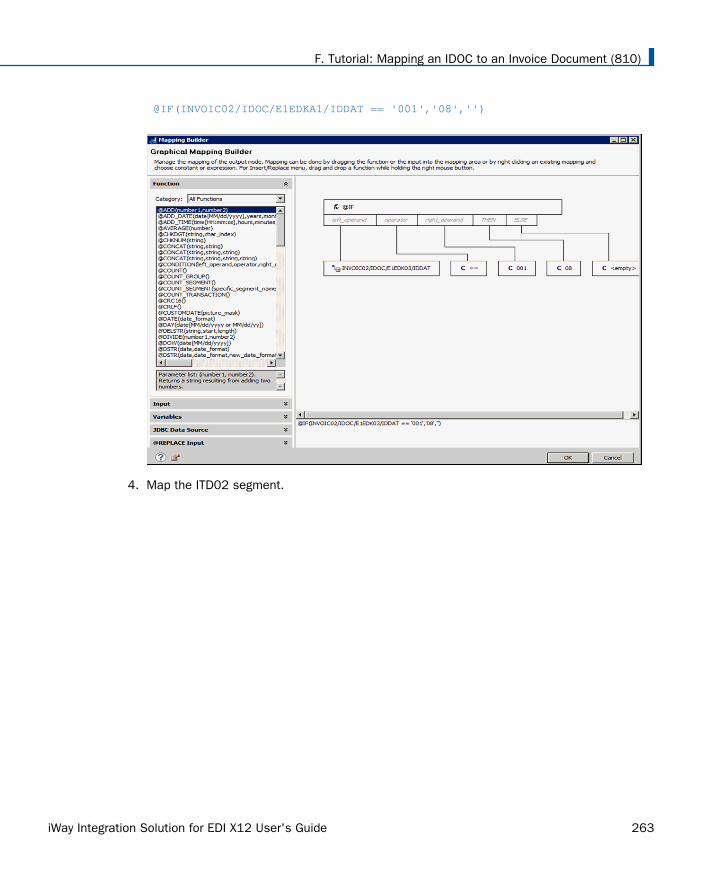
@IF(INVOIC02/IDOC/E1EDKA1/IDDAT == '001','08','')
4. Map the ITD02 segment.
F. Tutorial: Mapping an IDOC to an Invoice Document (810)
iWay Integration Solution for EDI X12 User's Guide 263
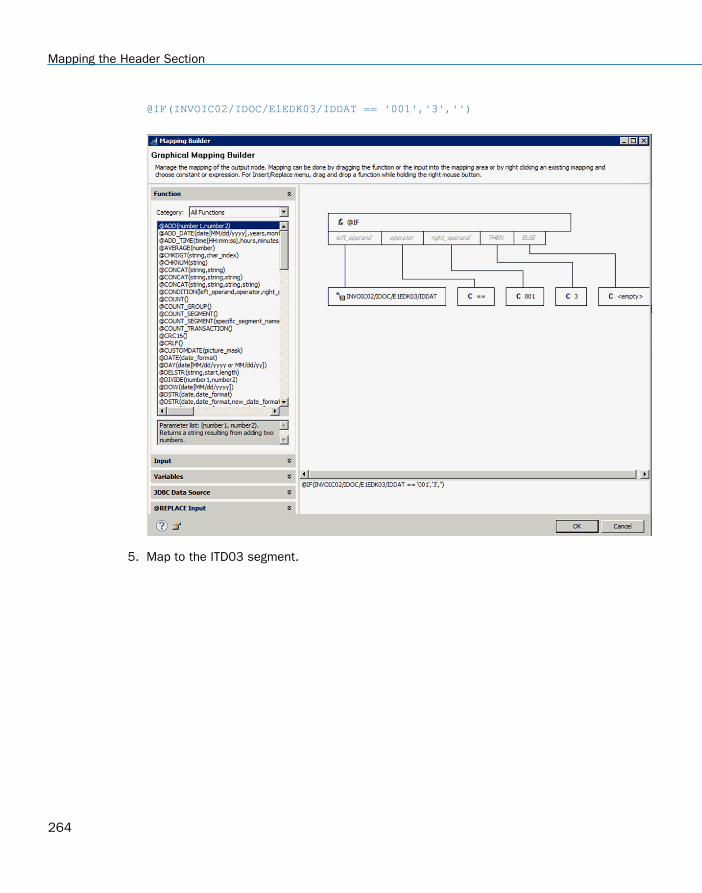
@IF(INVOIC02/IDOC/E1EDK03/IDDAT == '001','3','')
5. Map to the ITD03 segment.
Mapping the Header Section
264
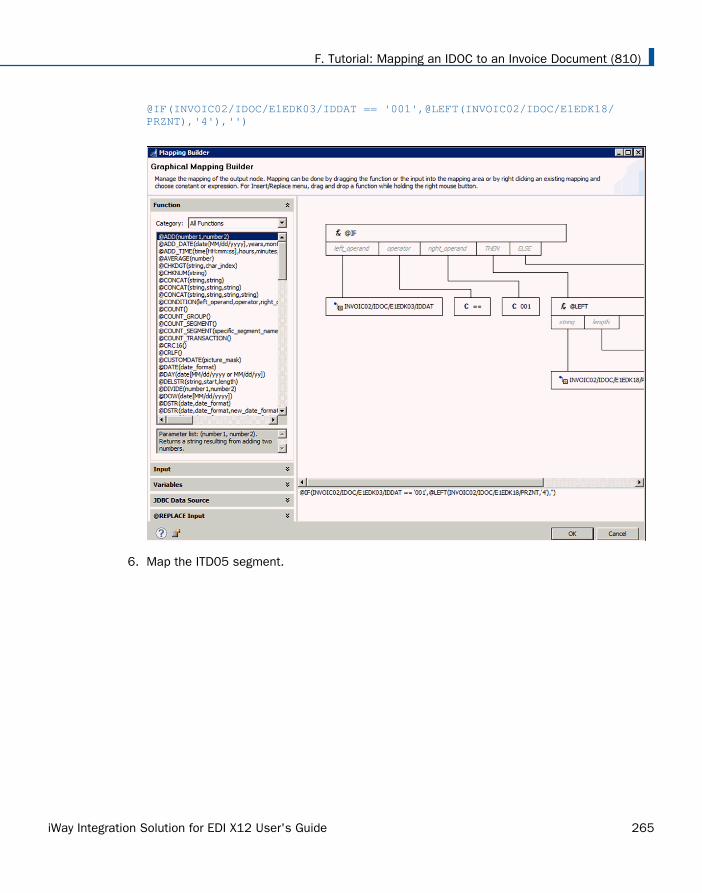
@IF(INVOIC02/IDOC/E1EDK03/IDDAT == '001',@LEFT(INVOIC02/IDOC/E1EDK18/PRZNT),'4'),'')
6. Map the ITD05 segment.
F. Tutorial: Mapping an IDOC to an Invoice Document (810)
iWay Integration Solution for EDI X12 User's Guide 265
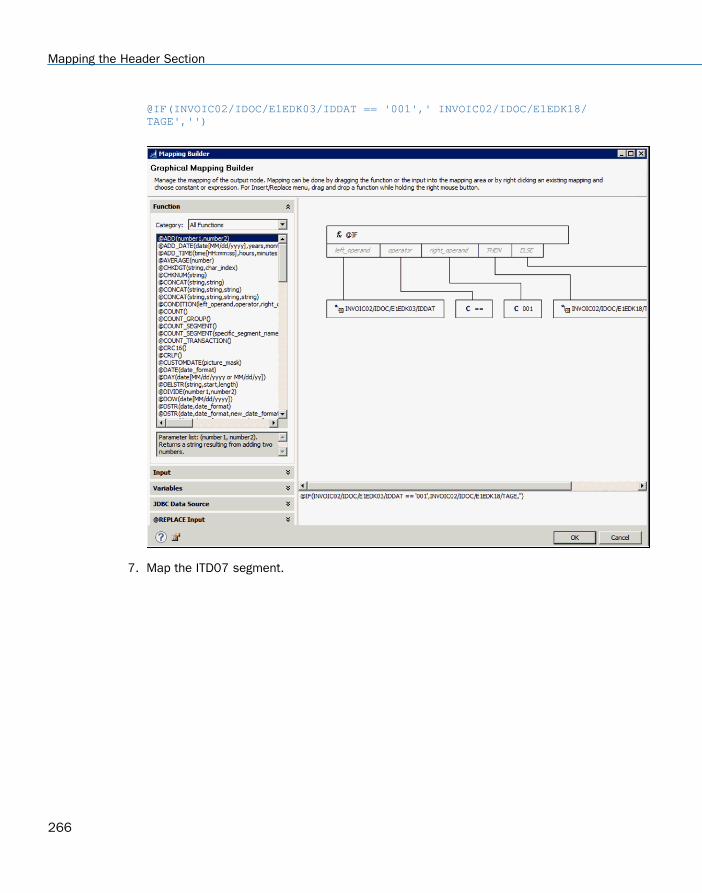
@IF(INVOIC02/IDOC/E1EDK03/IDDAT == '001',' INVOIC02/IDOC/E1EDK18/TAGE','')
7. Map the ITD07 segment.
Mapping the Header Section
266
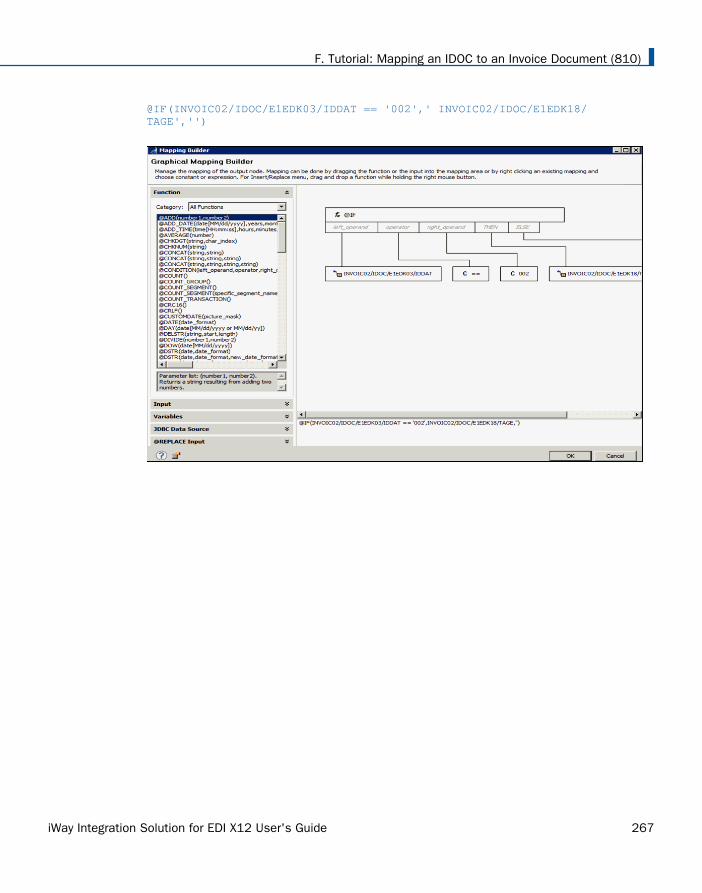
@IF(INVOIC02/IDOC/E1EDK03/IDDAT == '002',' INVOIC02/IDOC/E1EDK18/TAGE','')
F. Tutorial: Mapping an IDOC to an Invoice Document (810)
iWay Integration Solution for EDI X12 User's Guide 267
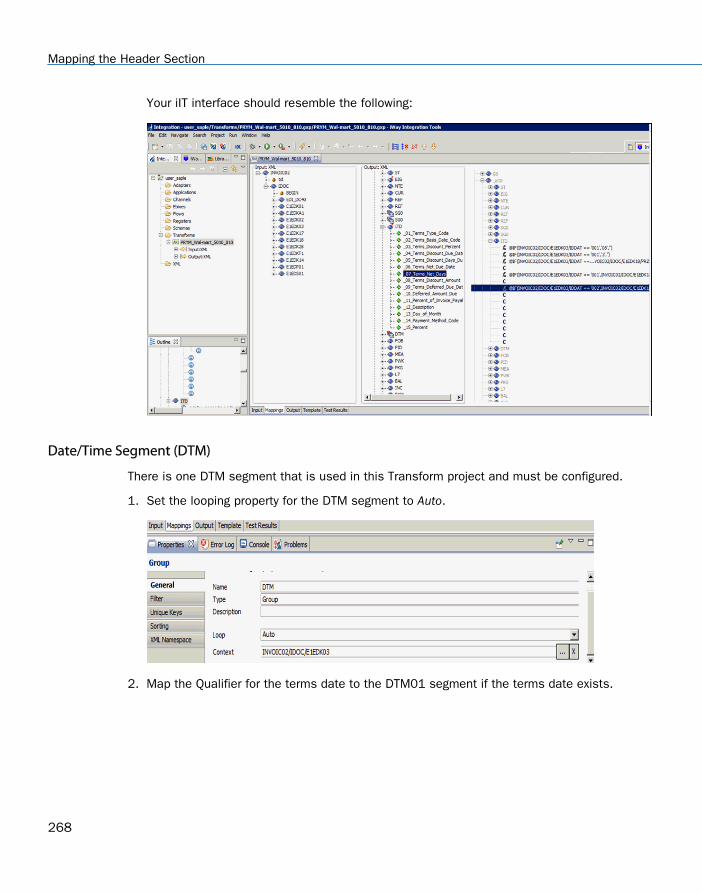
Your iIT interface should resemble the following:
Date/Time Segment (DTM)
There is one DTM segment that is used in this Transform project and must be configured.
1. Set the looping property for the DTM segment to Auto.
2. Map the Qualifier for the terms date to the DTM01 segment if the terms date exists.
Mapping the Header Section
268
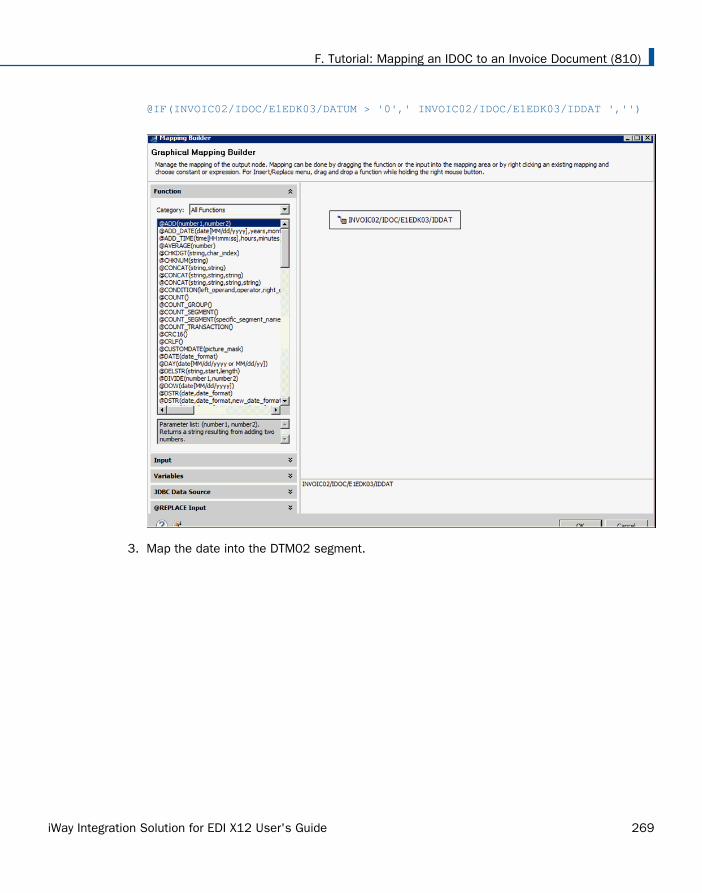
@IF(INVOIC02/IDOC/E1EDK03/DATUM > '0',' INVOIC02/IDOC/E1EDK03/IDDAT ','')
3. Map the date into the DTM02 segment.
F. Tutorial: Mapping an IDOC to an Invoice Document (810)
iWay Integration Solution for EDI X12 User's Guide 269
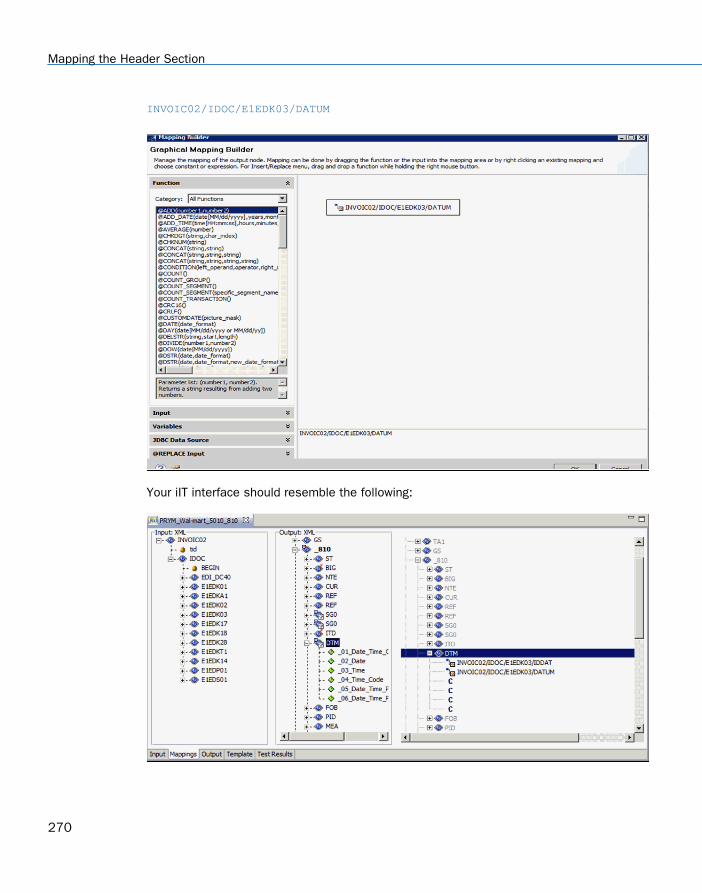
INVOIC02/IDOC/E1EDK03/DATUM
Your iIT interface should resemble the following:
Mapping the Header Section
270
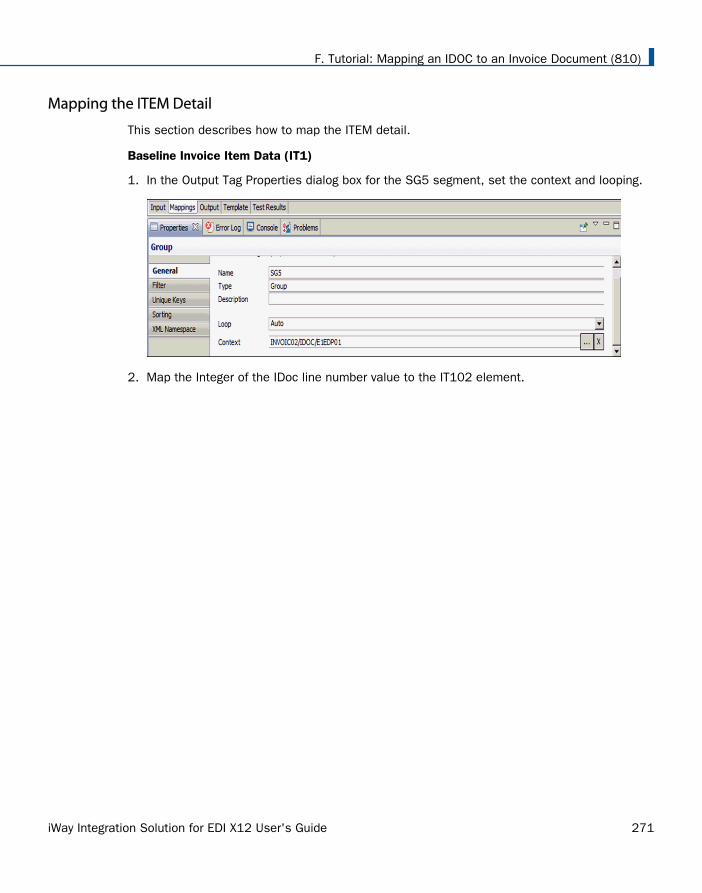
Mapping the ITEM Detail
This section describes how to map the ITEM detail.
Baseline Invoice Item Data (IT1)
1. In the Output Tag Properties dialog box for the SG5 segment, set the context and looping.
2. Map the Integer of the IDoc line number value to the IT102 element.
F. Tutorial: Mapping an IDOC to an Invoice Document (810)
iWay Integration Solution for EDI X12 User's Guide 271

@INT(INVOIC02/IDOC/E1EDP01/MENGE)
3. If the length of the Unit of Measure is greater than 0, map to the IT103 element, otherwise,map the constant EA.
Mapping the ITEM Detail
272
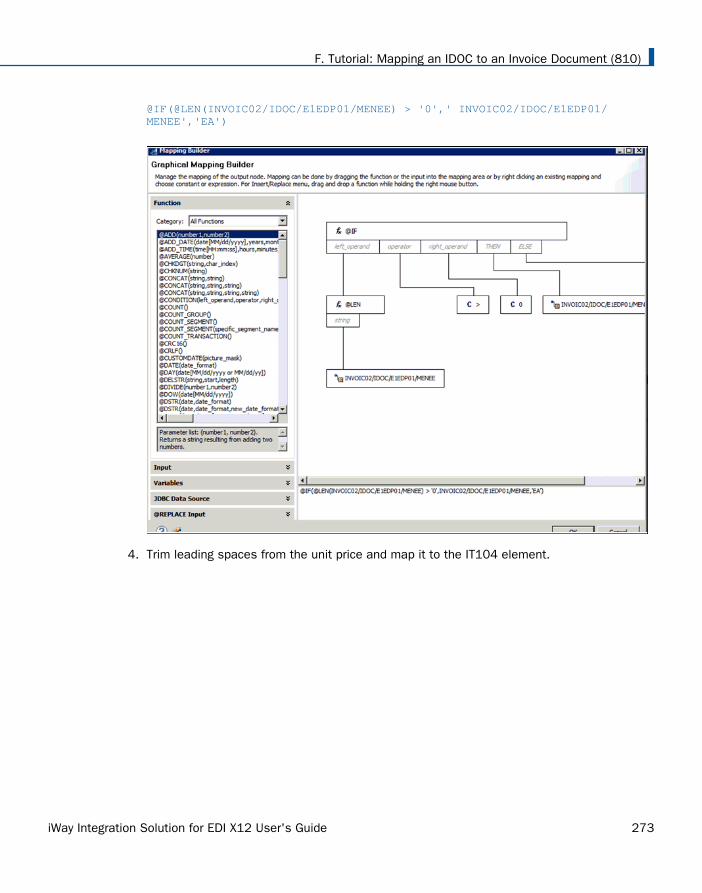
@IF(@LEN(INVOIC02/IDOC/E1EDP01/MENEE) > '0',' INVOIC02/IDOC/E1EDP01/MENEE','EA')
4. Trim leading spaces from the unit price and map it to the IT104 element.
F. Tutorial: Mapping an IDOC to an Invoice Document (810)
iWay Integration Solution for EDI X12 User's Guide 273
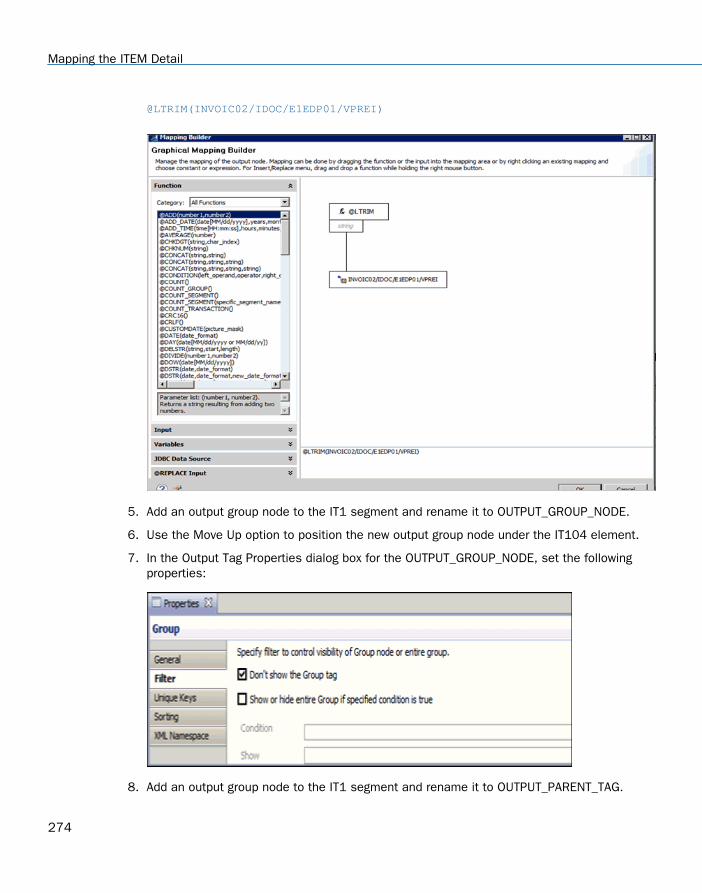
@LTRIM(INVOIC02/IDOC/E1EDP01/VPREI)
5. Add an output group node to the IT1 segment and rename it to OUTPUT_GROUP_NODE.
6. Use the Move Up option to position the new output group node under the IT104 element.
7. In the Output Tag Properties dialog box for the OUTPUT_GROUP_NODE, set the followingproperties:
8. Add an output group node to the IT1 segment and rename it to OUTPUT_PARENT_TAG.
Mapping the ITEM Detail
274
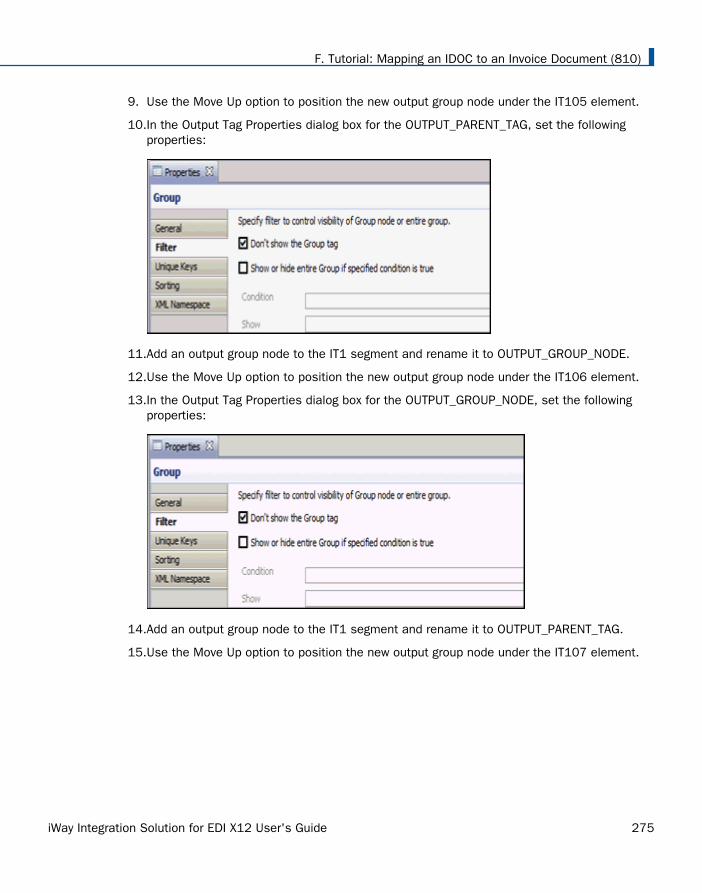
9. Use the Move Up option to position the new output group node under the IT105 element.
10.In the Output Tag Properties dialog box for the OUTPUT_PARENT_TAG, set the followingproperties:
11.Add an output group node to the IT1 segment and rename it to OUTPUT_GROUP_NODE.
12.Use the Move Up option to position the new output group node under the IT106 element.
13.In the Output Tag Properties dialog box for the OUTPUT_GROUP_NODE, set the followingproperties:
14.Add an output group node to the IT1 segment and rename it to OUTPUT_PARENT_TAG.
15.Use the Move Up option to position the new output group node under the IT107 element.
F. Tutorial: Mapping an IDOC to an Invoice Document (810)
iWay Integration Solution for EDI X12 User's Guide 275
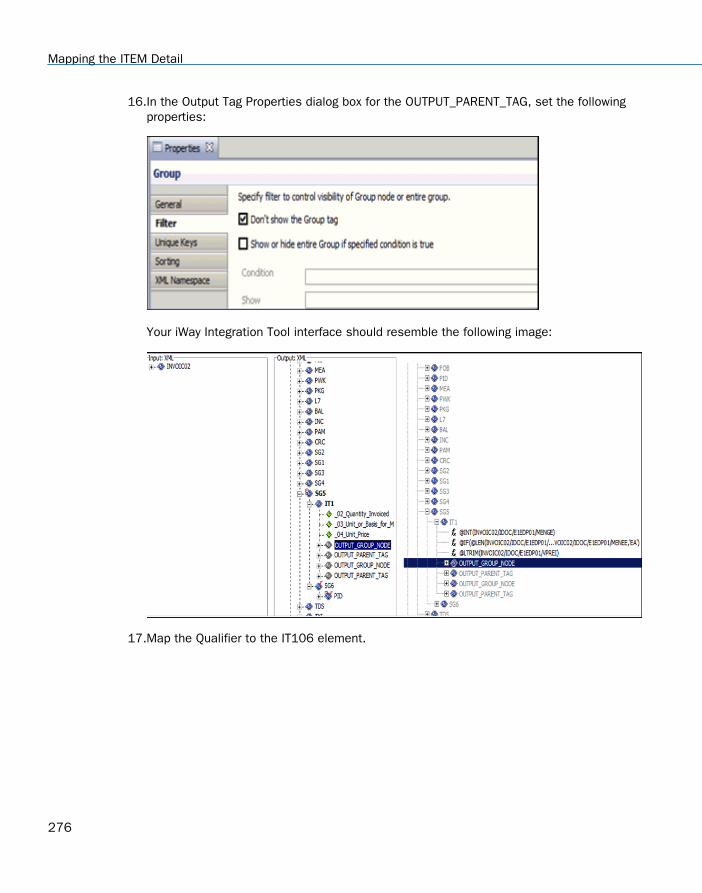
16.In the Output Tag Properties dialog box for the OUTPUT_PARENT_TAG, set the followingproperties:
Your iWay Integration Tool interface should resemble the following image:
17.Map the Qualifier to the IT106 element.
Mapping the ITEM Detail
276
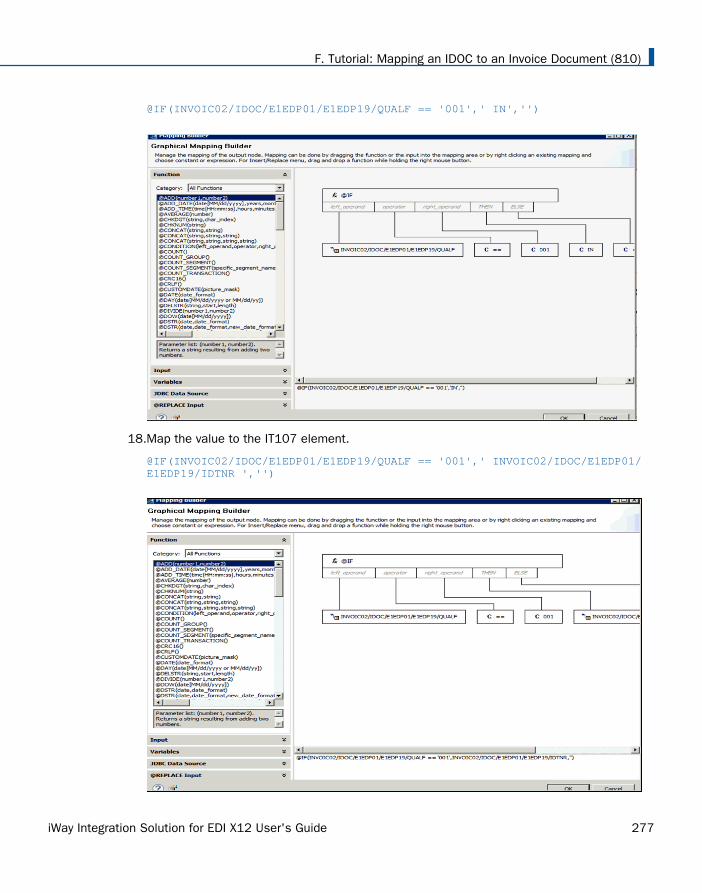
@IF(INVOIC02/IDOC/E1EDP01/E1EDP19/QUALF == '001',' IN','')
18.Map the value to the IT107 element.
@IF(INVOIC02/IDOC/E1EDP01/E1EDP19/QUALF == '001',' INVOIC02/IDOC/E1EDP01/E1EDP19/IDTNR ','')
F. Tutorial: Mapping an IDOC to an Invoice Document (810)
iWay Integration Solution for EDI X12 User's Guide 277
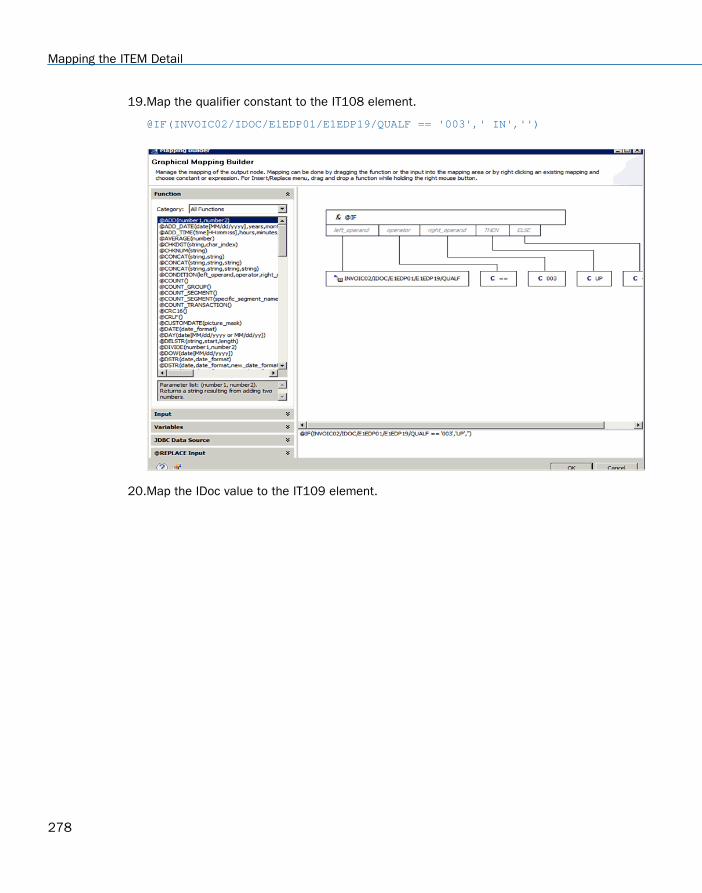
19.Map the qualifier constant to the IT108 element.
@IF(INVOIC02/IDOC/E1EDP01/E1EDP19/QUALF == '003',' IN','')
20.Map the IDoc value to the IT109 element.
Mapping the ITEM Detail
278
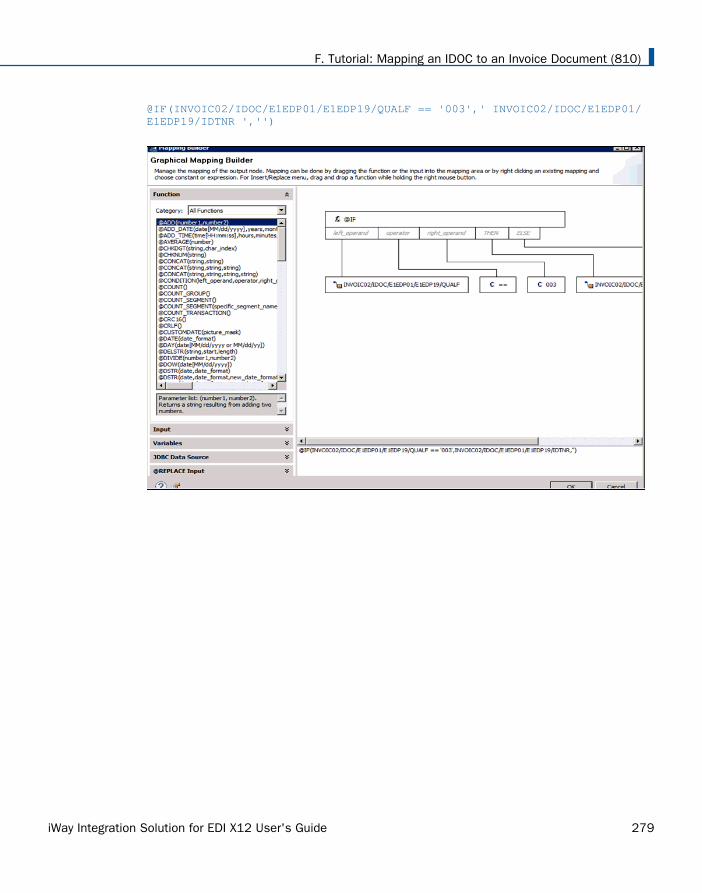
@IF(INVOIC02/IDOC/E1EDP01/E1EDP19/QUALF == '003',' INVOIC02/IDOC/E1EDP01/E1EDP19/IDTNR ','')
F. Tutorial: Mapping an IDOC to an Invoice Document (810)
iWay Integration Solution for EDI X12 User's Guide 279
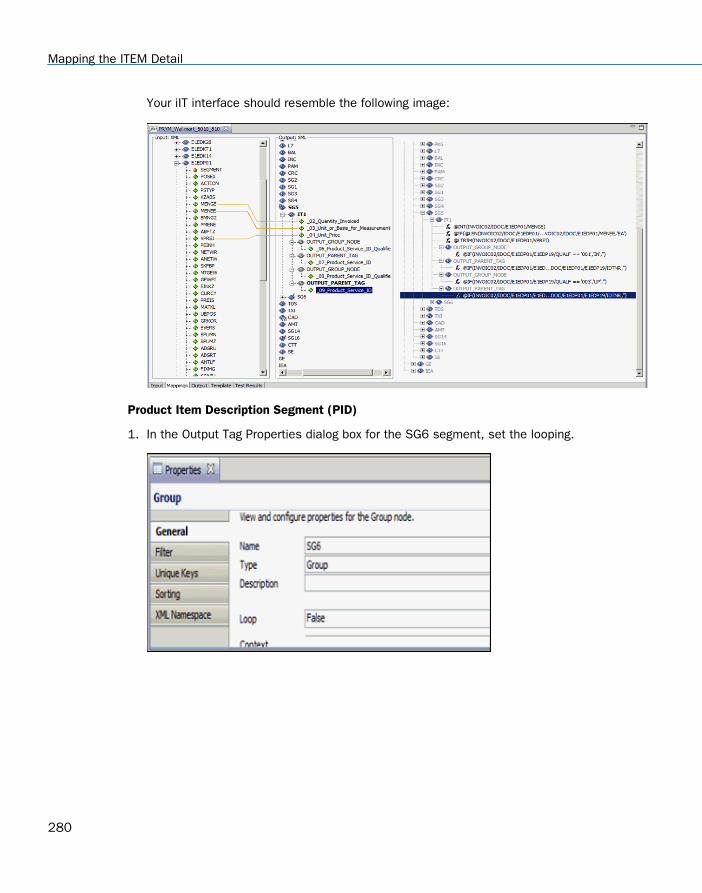
Your iIT interface should resemble the following image:
Product Item Description Segment (PID)
1. In the Output Tag Properties dialog box for the SG6 segment, set the looping.
Mapping the ITEM Detail
280

2. In the Output Tag Properties dialog box for the PID segment, set the following properties:
3. Add an output group node to the PID segment and rename it to OUTPUT_PARENT_TAG.
4. In the Output Tag Properties dialog box for the output group node, set the followingproperties:
5. Map a constant F to the PID01 element.
6. Map the following to the PID05 segment:
F. Tutorial: Mapping an IDOC to an Invoice Document (810)
iWay Integration Solution for EDI X12 User's Guide 281
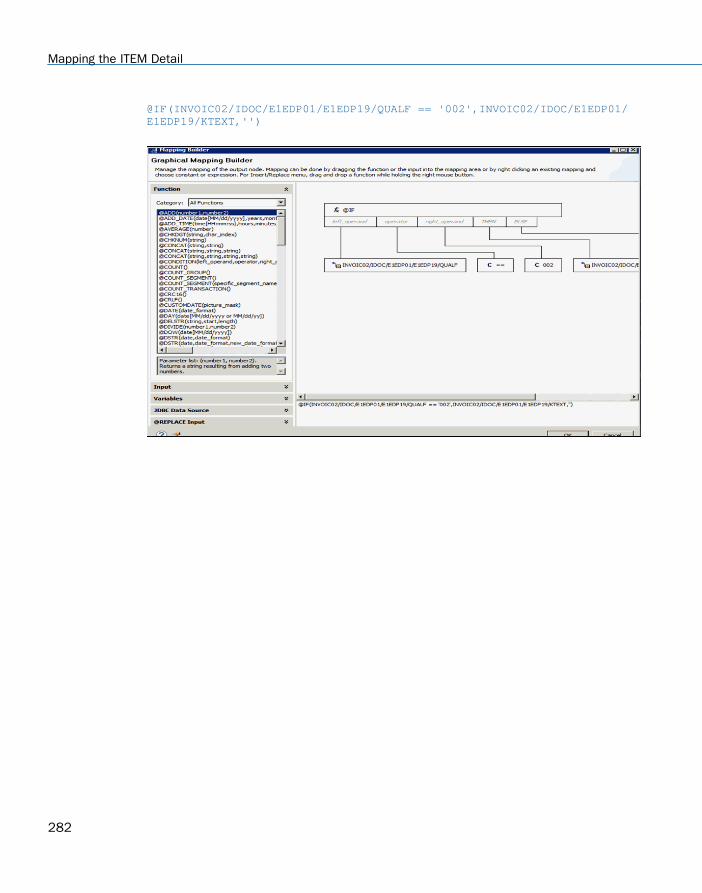
@IF(INVOIC02/IDOC/E1EDP01/E1EDP19/QUALF == '002',INVOIC02/IDOC/E1EDP01/E1EDP19/KTEXT,'')
Mapping the ITEM Detail
282
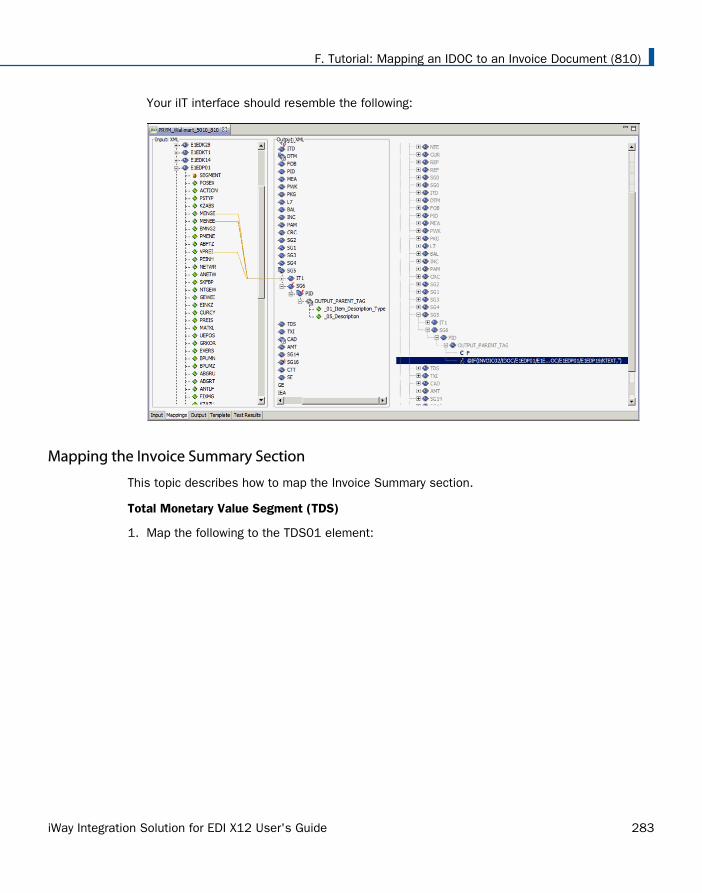
Your iIT interface should resemble the following:
Mapping the Invoice Summary Section
This topic describes how to map the Invoice Summary section.
Total Monetary Value Segment (TDS)
1. Map the following to the TDS01 element:
F. Tutorial: Mapping an IDOC to an Invoice Document (810)
iWay Integration Solution for EDI X12 User's Guide 283
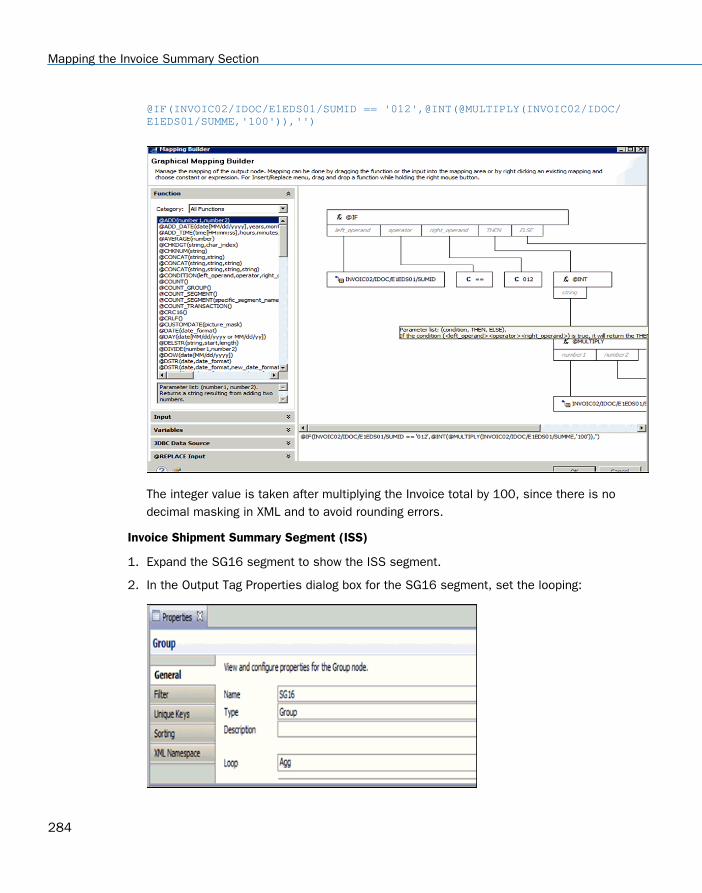
@IF(INVOIC02/IDOC/E1EDS01/SUMID == '012',@INT(@MULTIPLY(INVOIC02/IDOC/E1EDS01/SUMME,'100')),'')
The integer value is taken after multiplying the Invoice total by 100, since there is nodecimal masking in XML and to avoid rounding errors.
Invoice Shipment Summary Segment (ISS)
1. Expand the SG16 segment to show the ISS segment.
2. In the Output Tag Properties dialog box for the SG16 segment, set the looping:
Mapping the Invoice Summary Section
284
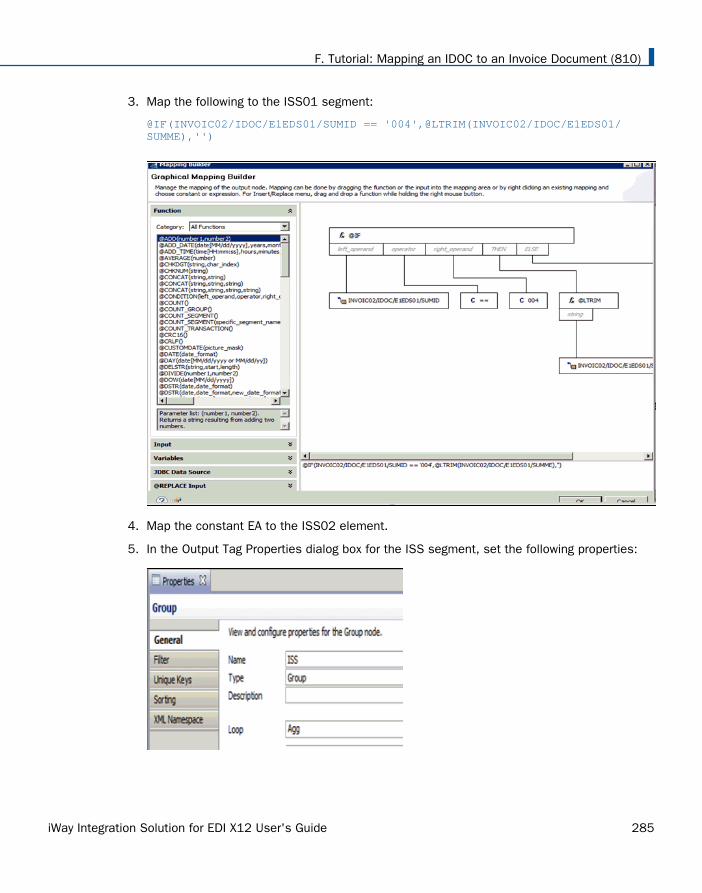
3. Map the following to the ISS01 segment:
@IF(INVOIC02/IDOC/E1EDS01/SUMID == '004',@LTRIM(INVOIC02/IDOC/E1EDS01/SUMME),'')
4. Map the constant EA to the ISS02 element.
5. In the Output Tag Properties dialog box for the ISS segment, set the following properties:
F. Tutorial: Mapping an IDOC to an Invoice Document (810)
iWay Integration Solution for EDI X12 User's Guide 285
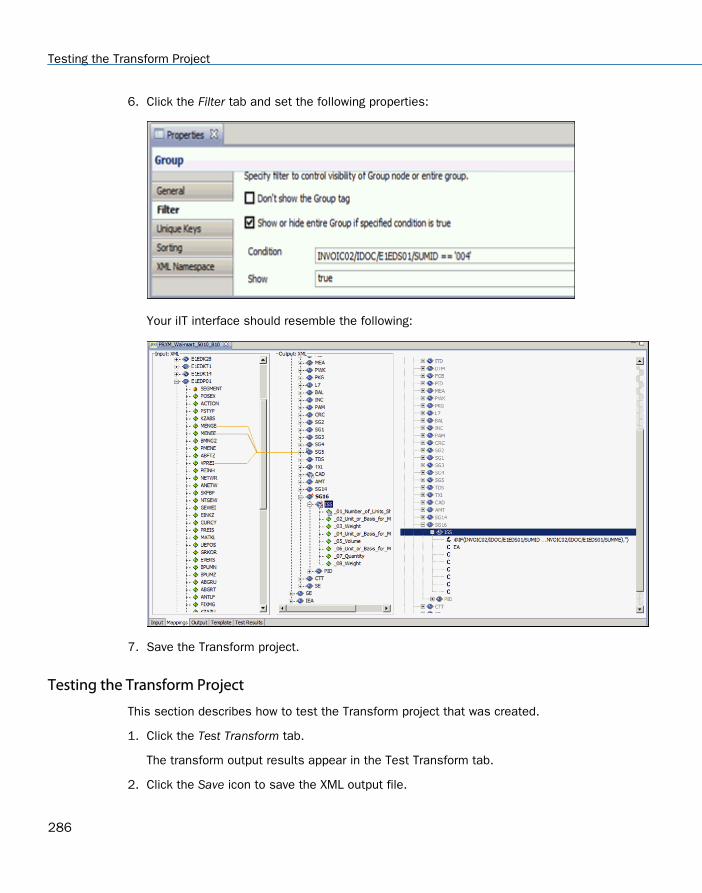
6. Click the Filter tab and set the following properties:
Your iIT interface should resemble the following:
7. Save the Transform project.
Testing the Transform Project
This section describes how to test the Transform project that was created.
1. Click the Test Transform tab.
The transform output results appear in the Test Transform tab.
2. Click the Save icon to save the XML output file.
Testing the Transform Project
286
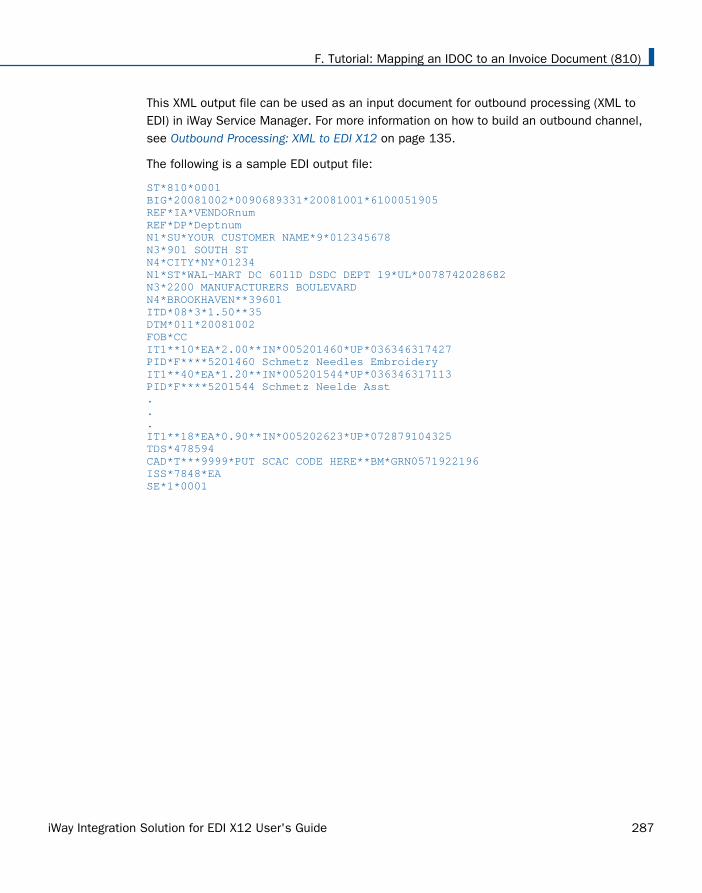
This XML output file can be used as an input document for outbound processing (XML toEDI) in iWay Service Manager. For more information on how to build an outbound channel,see Outbound Processing: XML to EDI X12 on page 135.
The following is a sample EDI output file:
ST*810*0001BIG*20081002*0090689331*20081001*6100051905REF*IA*VENDORnum REF*DP*DeptnumN1*SU*YOUR CUSTOMER NAME*9*012345678 N3*901 SOUTH STN4*CITY*NY*01234N1*ST*WAL-MART DC 6011D DSDC DEPT 19*UL*0078742028682 N3*2200 MANUFACTURERS BOULEVARDN4*BROOKHAVEN**39601ITD*08*3*1.50**35DTM*011*20081002 FOB*CCIT1**10*EA*2.00**IN*005201460*UP*036346317427PID*F****5201460 Schmetz Needles EmbroideryIT1**40*EA*1.20**IN*005201544*UP*036346317113PID*F****5201544 Schmetz Neelde Asst...IT1**18*EA*0.90**IN*005202623*UP*072879104325TDS*478594CAD*T***9999*PUT SCAC CODE HERE**BM*GRN0571922196 ISS*7848*EASE*1*0001
F. Tutorial: Mapping an IDOC to an Invoice Document (810)
iWay Integration Solution for EDI X12 User's Guide 287

Testing the Transform Project
288
AppendixG Tutorial: Mapping an IDOC to anAdvanced Ship Notice (ASN)
This topic provides a tutorial that demonstrates how to map an IDOC to an AdvancedShip Notice (ASN) using iWay Integration Tools (iIT).
Note: For your convenience, the ASN_With_Variables.zip file is attached to this PDF,which contains sample files that can be used with this tutorial. For PDF-compatibilitypurposes, the file extension of the ASN_With_Variables.zip file is temporarily renamedto .zap. After saving this file to your system, you must rename this extension backto .zip.
In this appendix:
EDI X12 ASN Mapping Tutorial Overview
Creating a New Transform Project
Maintaining the HL Counters in aTransform Project
Showing and Hiding Tags
Mapping the Control Segments
Initializing Constant Values
Mapping the Begin Ship Notice (BSN)Segments
Configuring Shipment Level Segments
Configuring Order Level Segments
Configuring Pack Level Segments
Configuring Item Level Segments
Configuring the Summary Level Segment
Publishing the Transform Project
IDoc Structure
ASN Workflow
ASN Transformation
The X12 ADN Mapping Final Results
Flattening the Output Structure
EDI X12 ASN Mapping Tutorial Overview
From the ANSI X12 Standards Board:
iWay Integration Solution for EDI X12 User's Guide 289
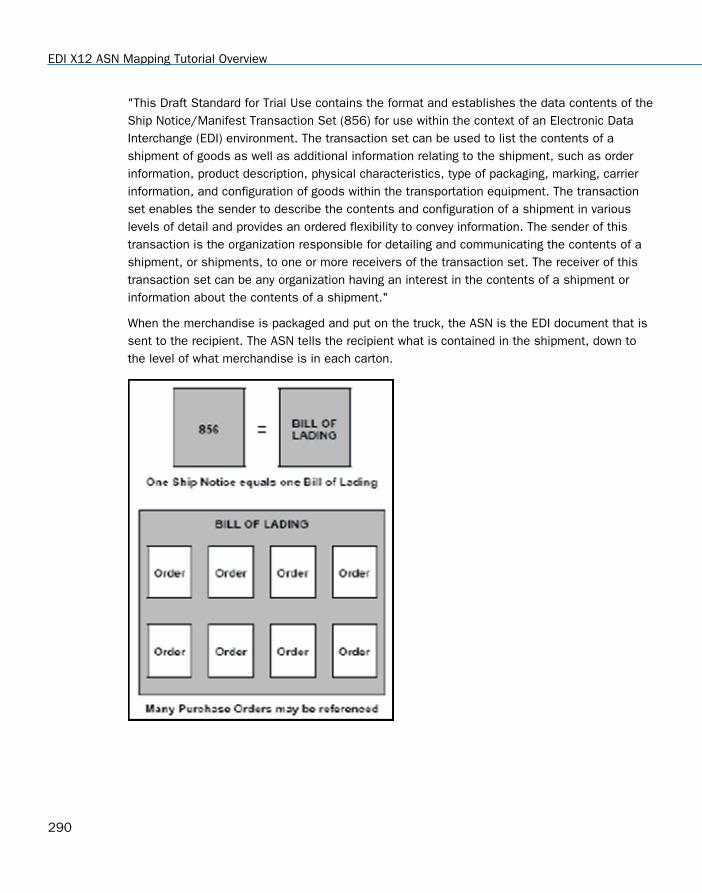
"This Draft Standard for Trial Use contains the format and establishes the data contents of theShip Notice/Manifest Transaction Set (856) for use within the context of an Electronic DataInterchange (EDI) environment. The transaction set can be used to list the contents of ashipment of goods as well as additional information relating to the shipment, such as orderinformation, product description, physical characteristics, type of packaging, marking, carrierinformation, and configuration of goods within the transportation equipment. The transactionset enables the sender to describe the contents and configuration of a shipment in variouslevels of detail and provides an ordered flexibility to convey information. The sender of thistransaction is the organization responsible for detailing and communicating the contents of ashipment, or shipments, to one or more receivers of the transaction set. The receiver of thistransaction set can be any organization having an interest in the contents of a shipment orinformation about the contents of a shipment."
When the merchandise is packaged and put on the truck, the ASN is the EDI document that issent to the recipient. The ASN tells the recipient what is contained in the shipment, down tothe level of what merchandise is in each carton.
EDI X12 ASN Mapping Tutorial Overview
290
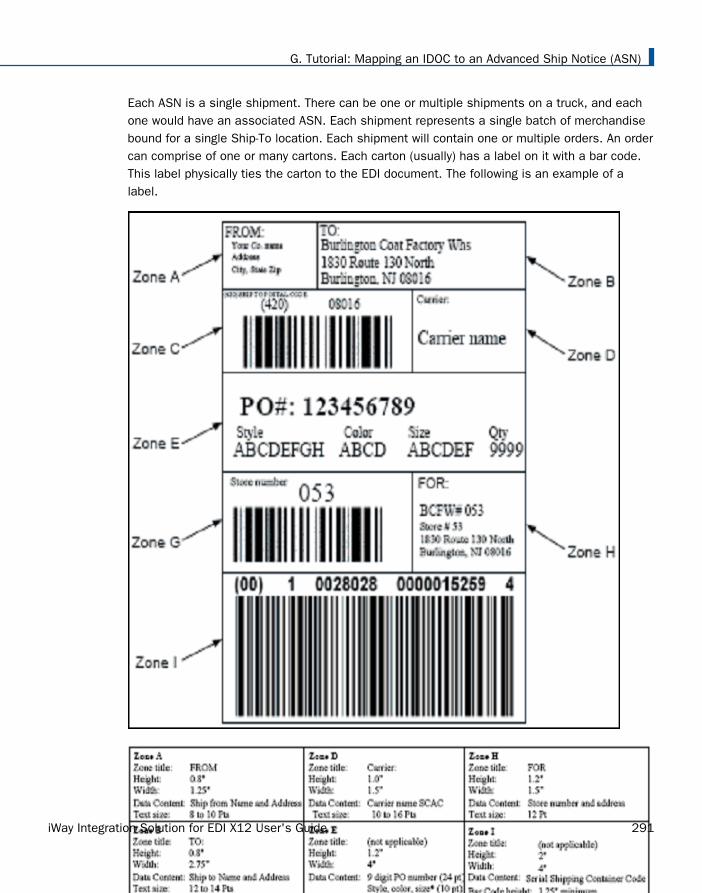
Each ASN is a single shipment. There can be one or multiple shipments on a truck, and eachone would have an associated ASN. Each shipment represents a single batch of merchandisebound for a single Ship-To location. Each shipment will contain one or multiple orders. An ordercan comprise of one or many cartons. Each carton (usually) has a label on it with a bar code.This label physically ties the carton to the EDI document. The following is an example of alabel.
G. Tutorial: Mapping an IDOC to an Advanced Ship Notice (ASN)
iWay Integration Solution for EDI X12 User's Guide 291
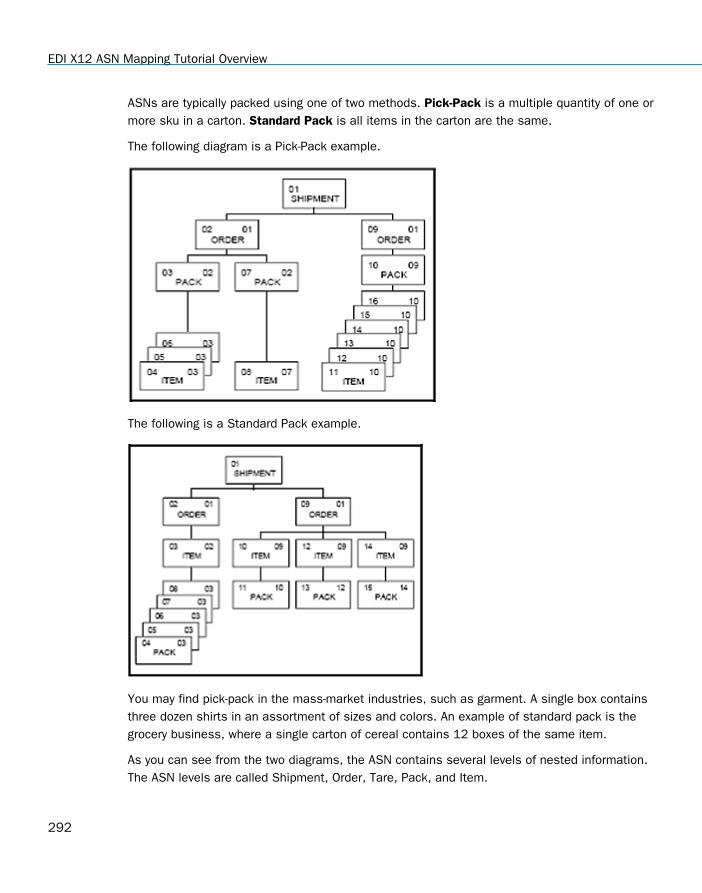
ASNs are typically packed using one of two methods. Pick-Pack is a multiple quantity of one ormore sku in a carton. Standard Pack is all items in the carton are the same.
The following diagram is a Pick-Pack example.
The following is a Standard Pack example.
You may find pick-pack in the mass-market industries, such as garment. A single box containsthree dozen shirts in an assortment of sizes and colors. An example of standard pack is thegrocery business, where a single carton of cereal contains 12 boxes of the same item.
As you can see from the two diagrams, the ASN contains several levels of nested information.The ASN levels are called Shipment, Order, Tare, Pack, and Item.
EDI X12 ASN Mapping Tutorial Overview
292
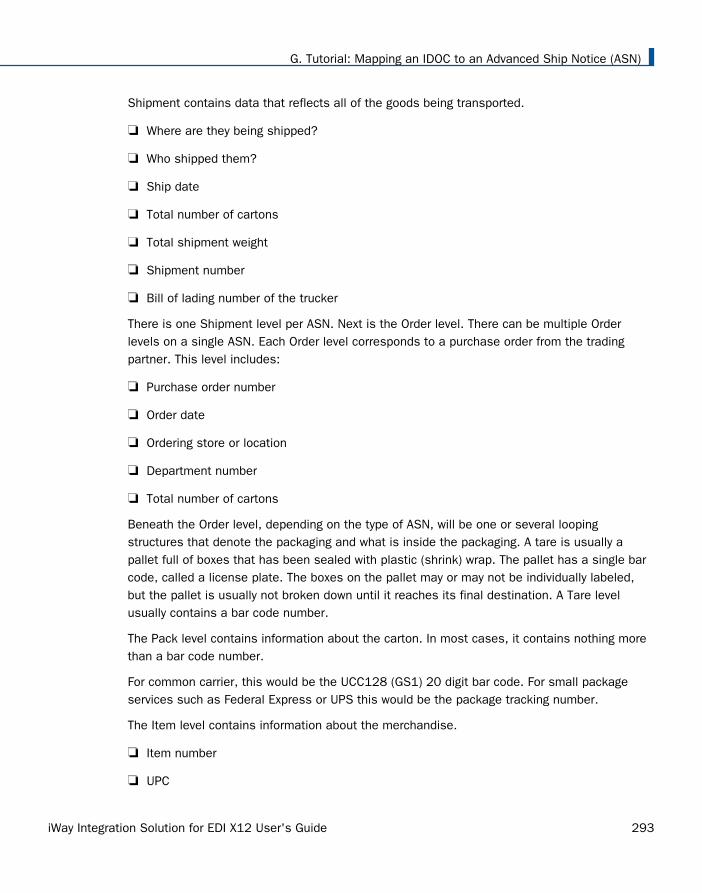
Shipment contains data that reflects all of the goods being transported.
Where are they being shipped?
Who shipped them?
Ship date
Total number of cartons
Total shipment weight
Shipment number
Bill of lading number of the trucker
There is one Shipment level per ASN. Next is the Order level. There can be multiple Orderlevels on a single ASN. Each Order level corresponds to a purchase order from the tradingpartner. This level includes:
Purchase order number
Order date
Ordering store or location
Department number
Total number of cartons
Beneath the Order level, depending on the type of ASN, will be one or several loopingstructures that denote the packaging and what is inside the packaging. A tare is usually apallet full of boxes that has been sealed with plastic (shrink) wrap. The pallet has a single barcode, called a license plate. The boxes on the pallet may or may not be individually labeled,but the pallet is usually not broken down until it reaches its final destination. A Tare levelusually contains a bar code number.
The Pack level contains information about the carton. In most cases, it contains nothing morethan a bar code number.
For common carrier, this would be the UCC128 (GS1) 20 digit bar code. For small packageservices such as Federal Express or UPS this would be the package tracking number.
The Item level contains information about the merchandise.
Item number
UPC
G. Tutorial: Mapping an IDOC to an Advanced Ship Notice (ASN)
iWay Integration Solution for EDI X12 User's Guide 293
Style
Color
Size
Item weight
Inner pack/outer pack
On an 857, unit price
A pick-pack style ASN is ordered SOPI (Ship, Order, Pack, Item). A standard pack ASN would beordered SOIP (Ship, Order, Item, Pack). Pick-pack has one or many items per carton, andstandard pack has one or many cartons per item.
At the beginning of each segment is the HL segment.
HL01 contains a counter. The shipment level is always 1. Each HL segment afterwardsincrements by 1. The CTT segment at the bottom of the document, after the last HL,contains the same counter as the last HL.
HL03 contains a constant that tells you the level (S,O,T,P, or I).
HL02 contains a pointer. The pointer is the location of the parent level to the current level.The shipment level has no parents, and contains nothing in this element. The ordersegments all point to the shipment segment, so they all contain "1" in this element. Thetare, pack and item levels all point to the higher level. In the diagrams on pages 8 and 9,each box (level) contains two numbers. The left number is the sequence number (HL01)and the right number is the pointer to the higher level (HL02).
Not all levels are required. It is perfectly fine to have SOI (no pack labels), although you wouldprobably show the items in summary rather than box-by-box details. You could also have SOT(tare with no item details). The contents and details are subject to agreement by the partners.
If you cannot figure out the type of looping, BSN05 usually contains a code that will tell you.
0001 – Ship, Order, Pack, Item (Pick-Pack)
0002 – Ship, Order, Item, Pack (Standard Pack)
0003 – Ship, Pack, Order, Item
0004 – Ship, Order, Item
Unfortunately BSN05 is not a mandatory element.
EDI X12 ASN Mapping Tutorial Overview
294
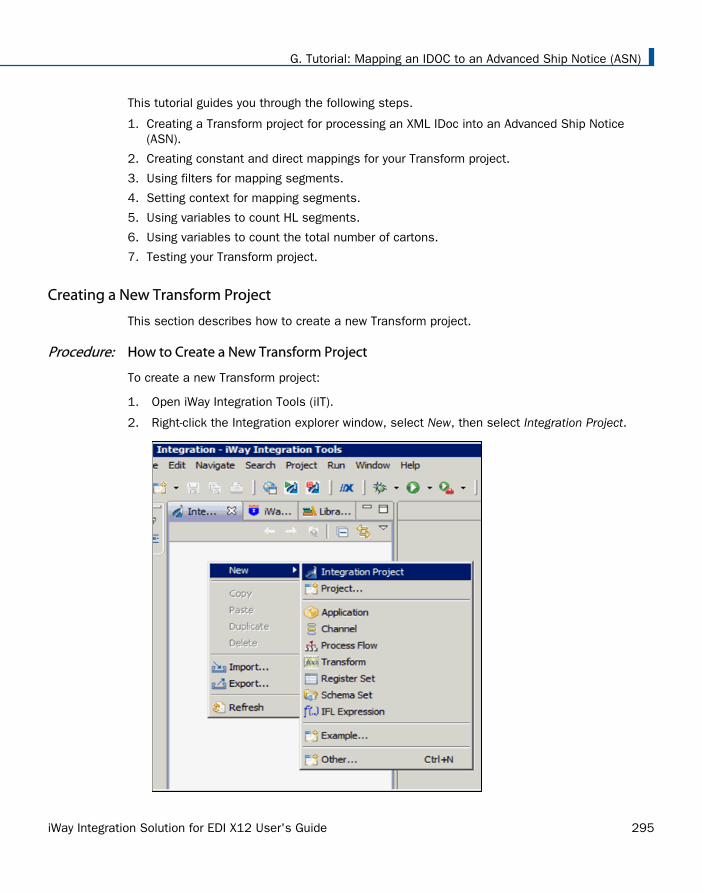
This tutorial guides you through the following steps.
1. Creating a Transform project for processing an XML IDoc into an Advanced Ship Notice(ASN).
2. Creating constant and direct mappings for your Transform project.
3. Using filters for mapping segments.
4. Setting context for mapping segments.
5. Using variables to count HL segments.
6. Using variables to count the total number of cartons.
7. Testing your Transform project.
Creating a New Transform Project
This section describes how to create a new Transform project.
Procedure: How to Create a New Transform Project
To create a new Transform project:
1. Open iWay Integration Tools (iIT).
2. Right-click the Integration explorer window, select New, then select Integration Project.
G. Tutorial: Mapping an IDOC to an Advanced Ship Notice (ASN)
iWay Integration Solution for EDI X12 User's Guide 295
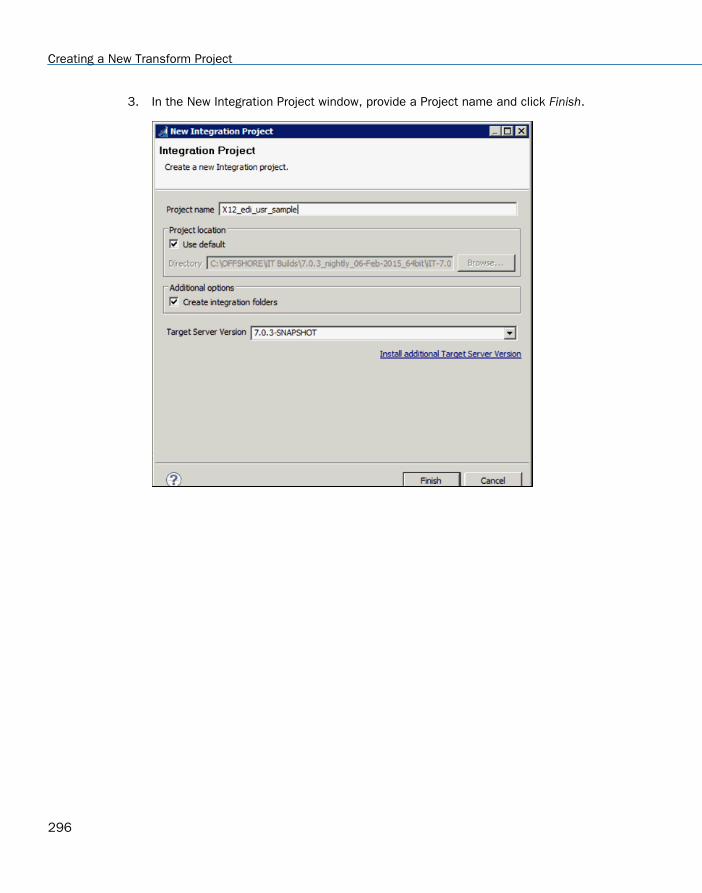
3. In the New Integration Project window, provide a Project name and click Finish.
Creating a New Transform Project
296
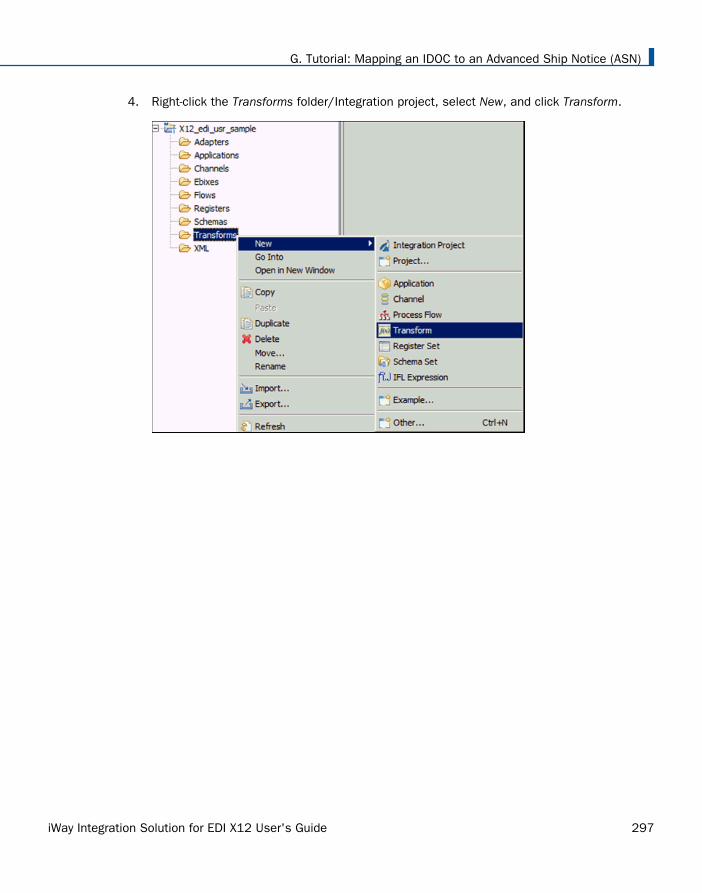
4. Right-click the Transforms folder/Integration project, select New, and click Transform.
G. Tutorial: Mapping an IDOC to an Advanced Ship Notice (ASN)
iWay Integration Solution for EDI X12 User's Guide 297
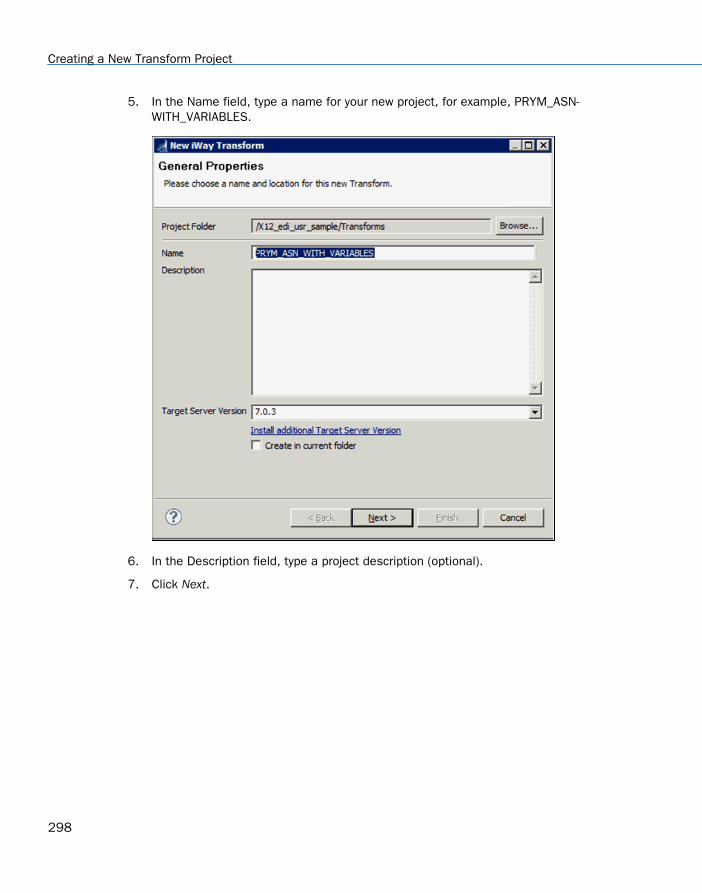
5. In the Name field, type a name for your new project, for example, PRYM_ASN-WITH_VARIABLES.
6. In the Description field, type a project description (optional).
7. Click Next.
Creating a New Transform Project
298
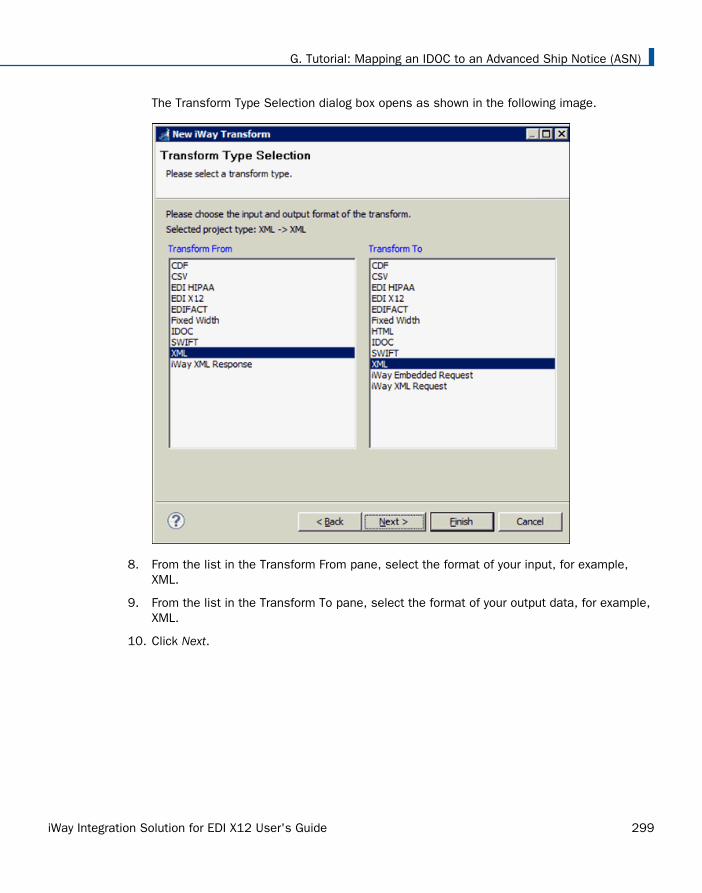
The Transform Type Selection dialog box opens as shown in the following image.
8. From the list in the Transform From pane, select the format of your input, for example,XML.
9. From the list in the Transform To pane, select the format of your output data, for example,XML.
10. Click Next.
G. Tutorial: Mapping an IDOC to an Advanced Ship Notice (ASN)
iWay Integration Solution for EDI X12 User's Guide 299
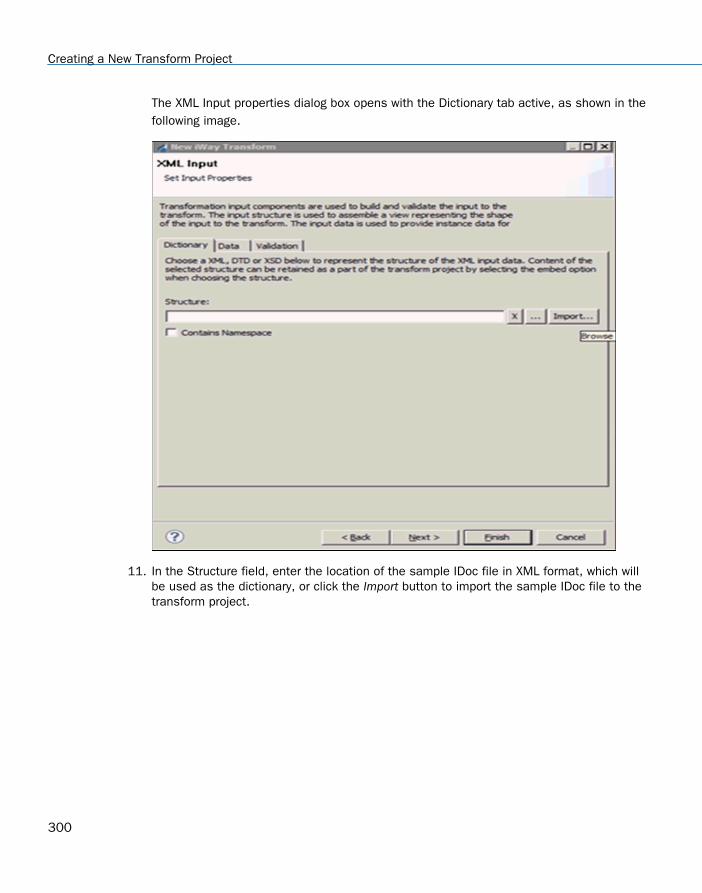
The XML Input properties dialog box opens with the Dictionary tab active, as shown in thefollowing image.
11. In the Structure field, enter the location of the sample IDoc file in XML format, which willbe used as the dictionary, or click the Import button to import the sample IDoc file to thetransform project.
Creating a New Transform Project
300
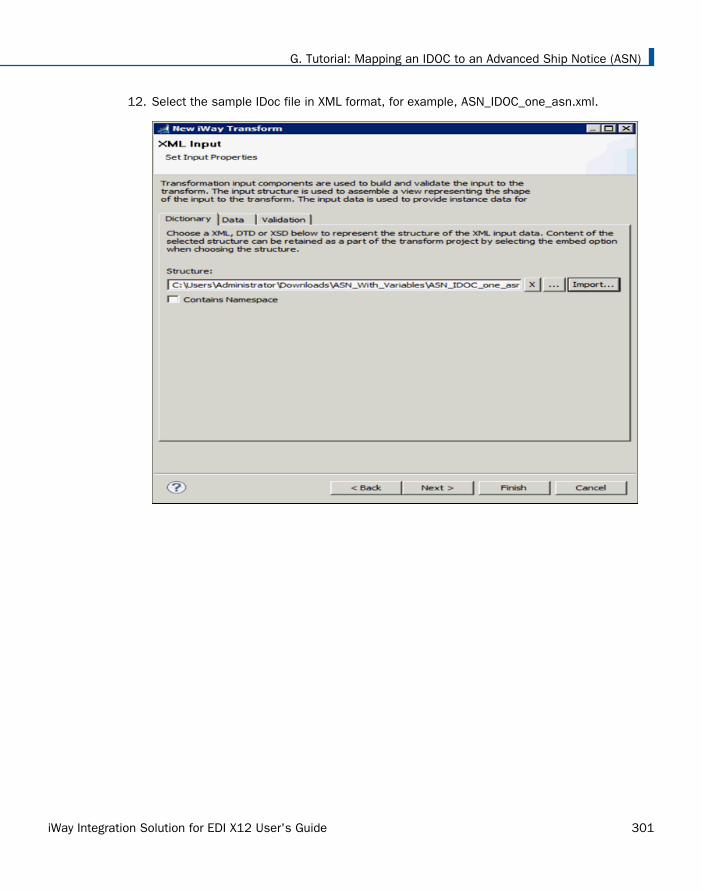
12. Select the sample IDoc file in XML format, for example, ASN_IDOC_one_asn.xml.
G. Tutorial: Mapping an IDOC to an Advanced Ship Notice (ASN)
iWay Integration Solution for EDI X12 User's Guide 301
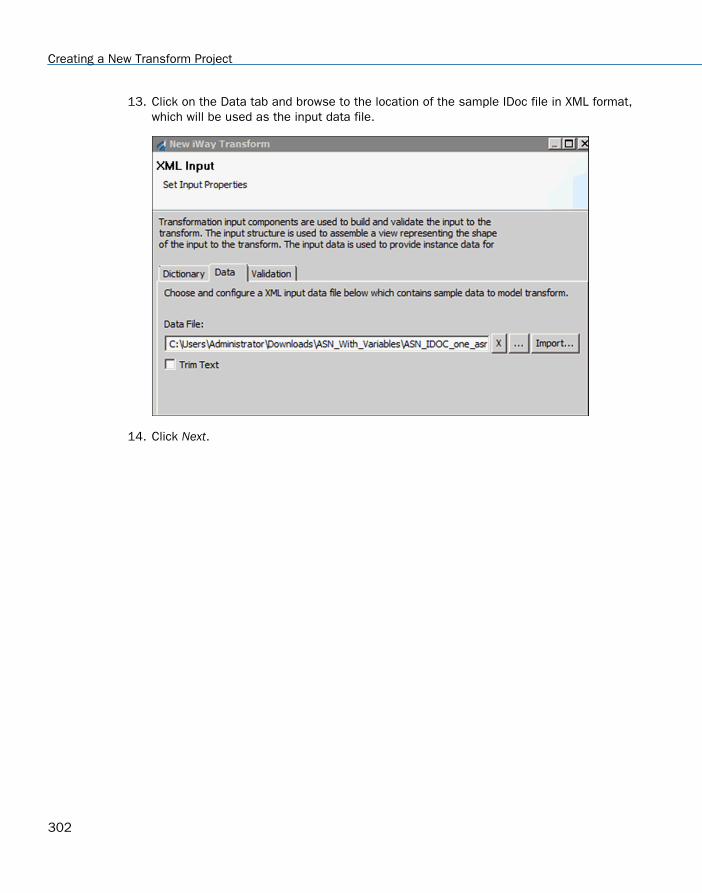
13. Click on the Data tab and browse to the location of the sample IDoc file in XML format,which will be used as the input data file.
14. Click Next.
Creating a New Transform Project
302
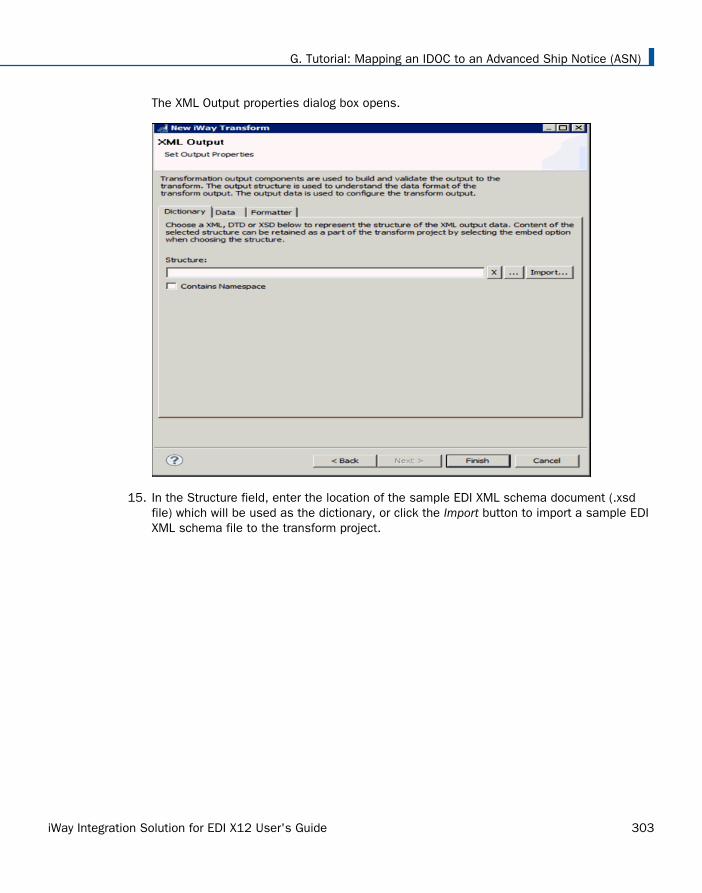
The XML Output properties dialog box opens.
15. In the Structure field, enter the location of the sample EDI XML schema document (.xsdfile) which will be used as the dictionary, or click the Import button to import a sample EDIXML schema file to the transform project.
G. Tutorial: Mapping an IDOC to an Advanced Ship Notice (ASN)
iWay Integration Solution for EDI X12 User's Guide 303
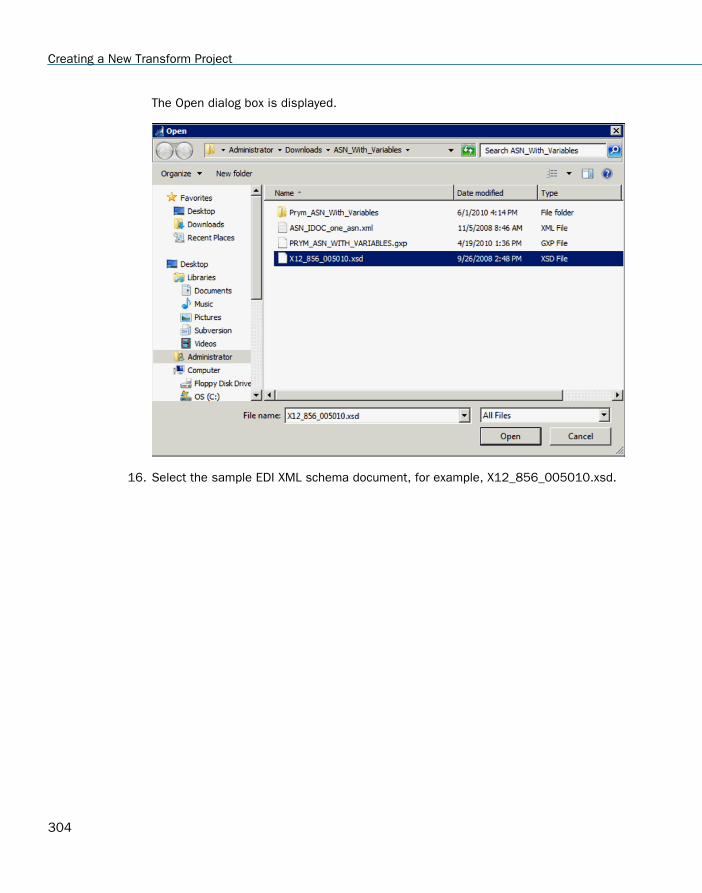
The Open dialog box is displayed.
16. Select the sample EDI XML schema document, for example, X12_856_005010.xsd.
Creating a New Transform Project
304
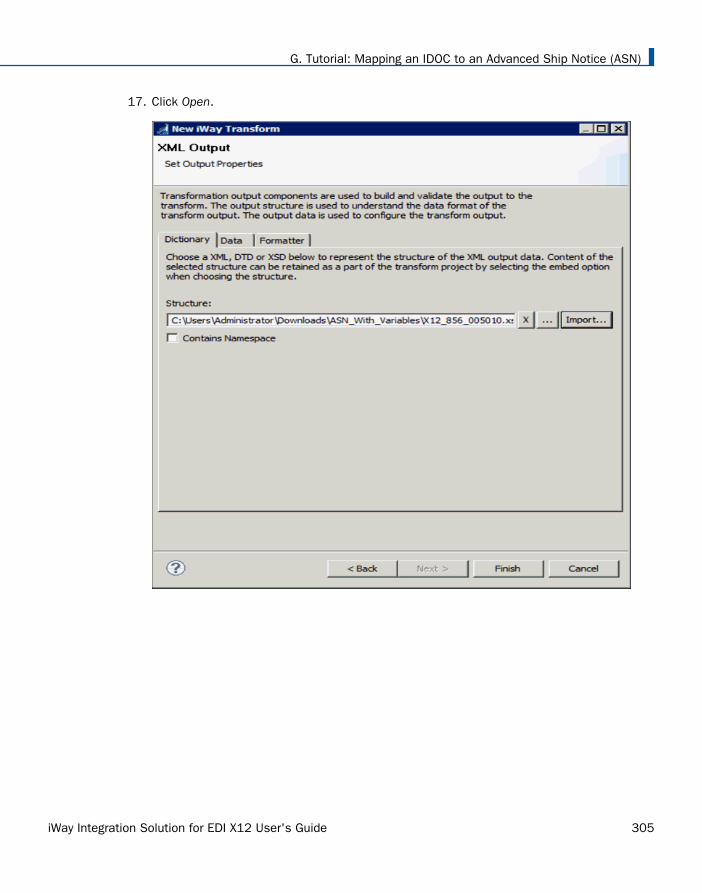
17. Click Open.
G. Tutorial: Mapping an IDOC to an Advanced Ship Notice (ASN)
iWay Integration Solution for EDI X12 User's Guide 305
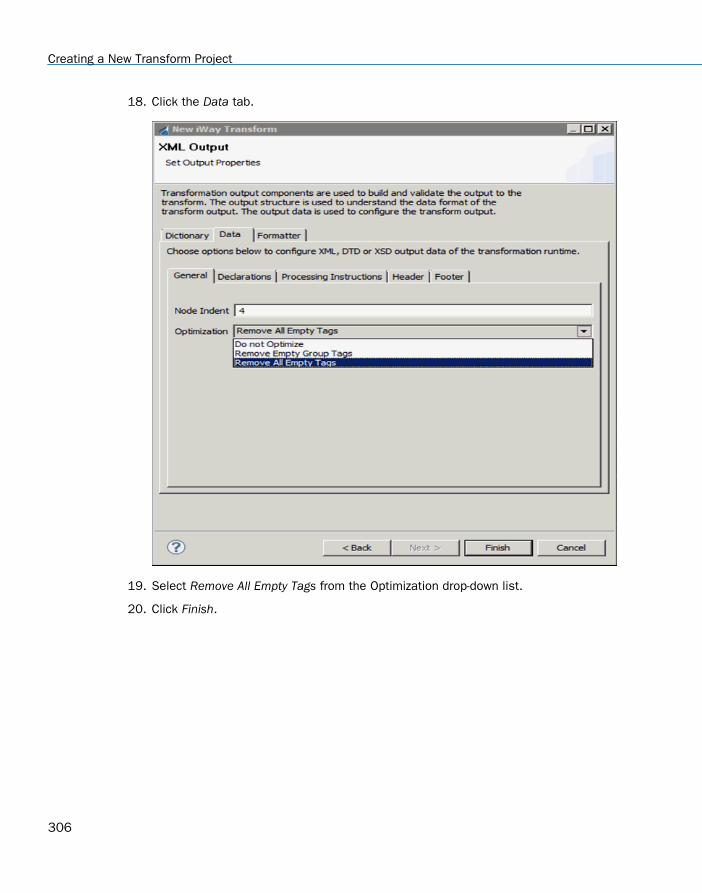
18. Click the Data tab.
19. Select Remove All Empty Tags from the Optimization drop-down list.
20. Click Finish.
Creating a New Transform Project
306
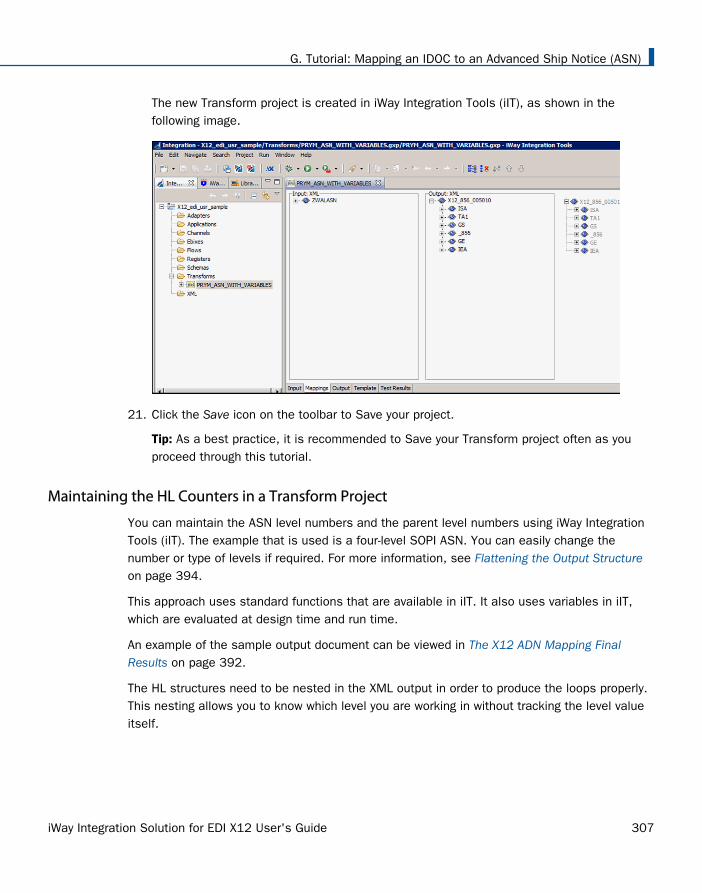
The new Transform project is created in iWay Integration Tools (iIT), as shown in thefollowing image.
21. Click the Save icon on the toolbar to Save your project.
Tip: As a best practice, it is recommended to Save your Transform project often as youproceed through this tutorial.
Maintaining the HL Counters in a Transform Project
You can maintain the ASN level numbers and the parent level numbers using iWay IntegrationTools (iIT). The example that is used is a four-level SOPI ASN. You can easily change thenumber or type of levels if required. For more information, see Flattening the Output Structureon page 394.
This approach uses standard functions that are available in iIT. It also uses variables in iIT,which are evaluated at design time and run time.
An example of the sample output document can be viewed in The X12 ADN Mapping FinalResults on page 392.
The HL structures need to be nested in the XML output in order to produce the loops properly.This nesting allows you to know which level you are working in without tracking the level valueitself.
G. Tutorial: Mapping an IDOC to an Advanced Ship Notice (ASN)
iWay Integration Solution for EDI X12 User's Guide 307
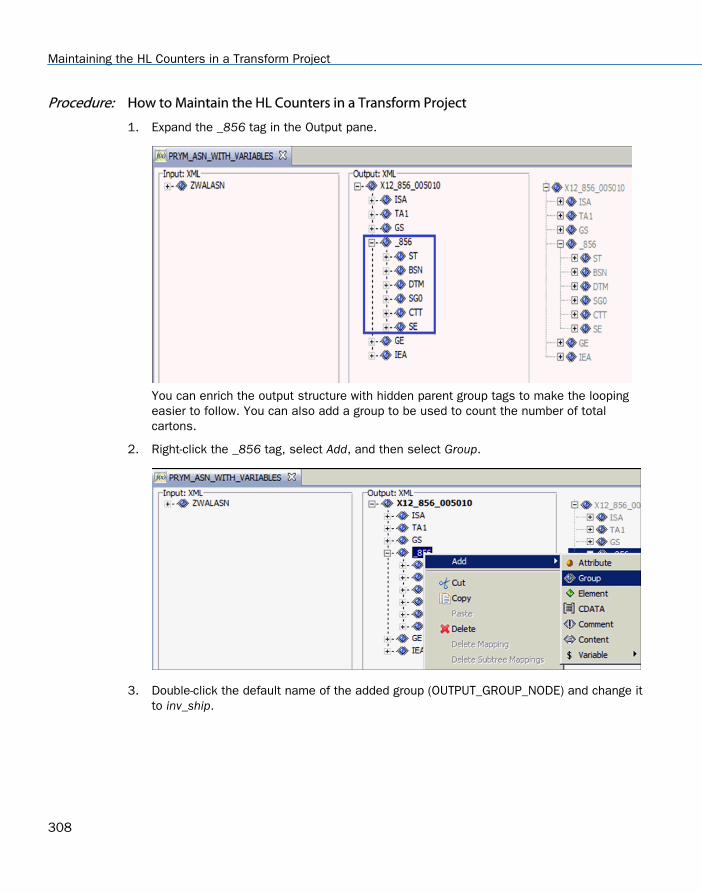
Procedure: How to Maintain the HL Counters in a Transform Project
1. Expand the _856 tag in the Output pane.
You can enrich the output structure with hidden parent group tags to make the loopingeasier to follow. You can also add a group to be used to count the number of totalcartons.
2. Right-click the _856 tag, select Add, and then select Group.
3. Double-click the default name of the added group (OUTPUT_GROUP_NODE) and change itto inv_ship.
Maintaining the HL Counters in a Transform Project
308
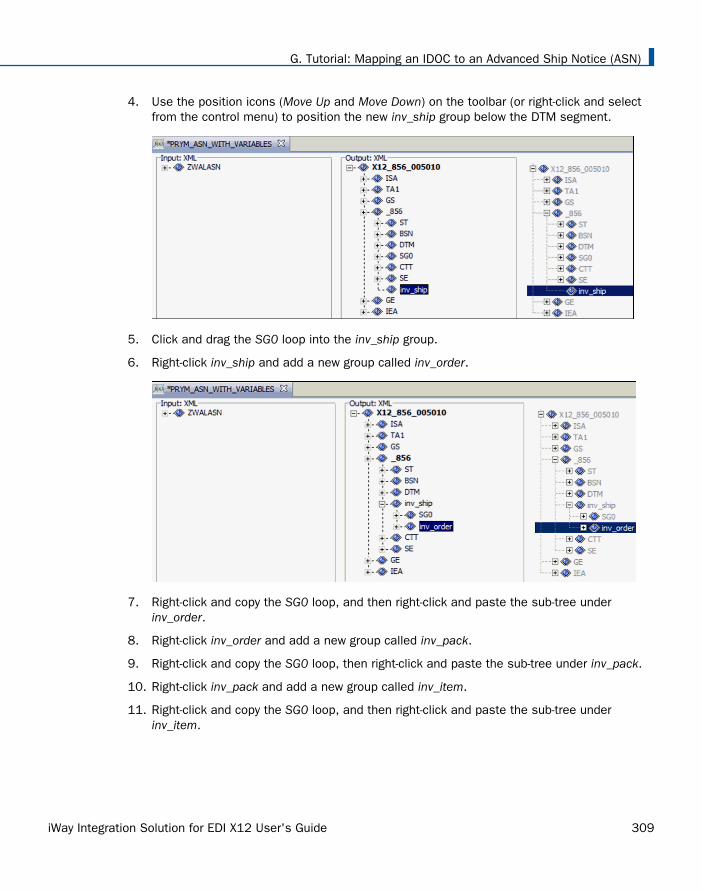
4. Use the position icons (Move Up and Move Down) on the toolbar (or right-click and selectfrom the control menu) to position the new inv_ship group below the DTM segment.
5. Click and drag the SG0 loop into the inv_ship group.
6. Right-click inv_ship and add a new group called inv_order.
7. Right-click and copy the SG0 loop, and then right-click and paste the sub-tree underinv_order.
8. Right-click inv_order and add a new group called inv_pack.
9. Right-click and copy the SG0 loop, then right-click and paste the sub-tree under inv_pack.
10. Right-click inv_pack and add a new group called inv_item.
11. Right-click and copy the SG0 loop, and then right-click and paste the sub-tree underinv_item.
G. Tutorial: Mapping an IDOC to an Advanced Ship Notice (ASN)
iWay Integration Solution for EDI X12 User's Guide 309
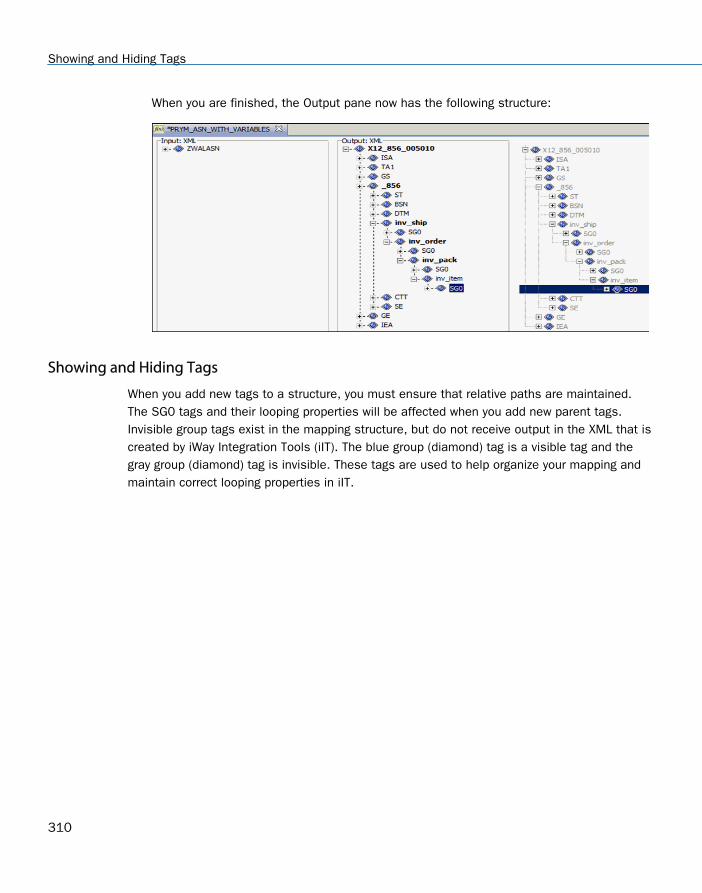
When you are finished, the Output pane now has the following structure:
Showing and Hiding Tags
When you add new tags to a structure, you must ensure that relative paths are maintained.The SG0 tags and their looping properties will be affected when you add new parent tags.Invisible group tags exist in the mapping structure, but do not receive output in the XML that iscreated by iWay Integration Tools (iIT). The blue group (diamond) tag is a visible tag and thegray group (diamond) tag is invisible. These tags are used to help organize your mapping andmaintain correct looping properties in iIT.
Showing and Hiding Tags
310

Procedure: How to Show and Hide Tags
To show and hide tags:
1. Right-click the inv_ship group in the Output pane and select Properties from the contextmenu.
G. Tutorial: Mapping an IDOC to an Advanced Ship Notice (ASN)
iWay Integration Solution for EDI X12 User's Guide 311
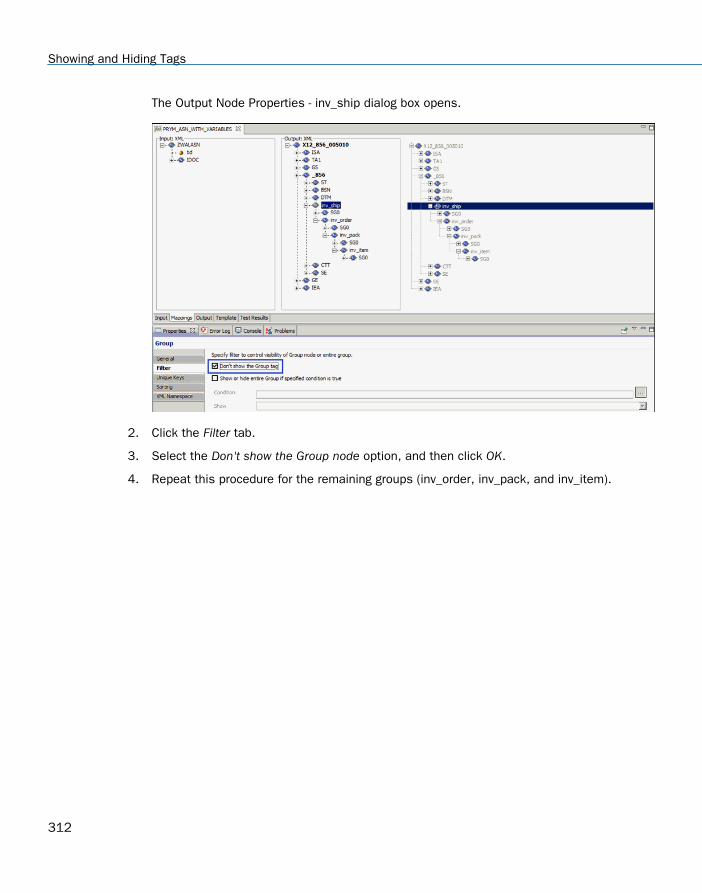
The Output Node Properties - inv_ship dialog box opens.
2. Click the Filter tab.
3. Select the Don't show the Group node option, and then click OK.
4. Repeat this procedure for the remaining groups (inv_order, inv_pack, and inv_item).
Showing and Hiding Tags
312
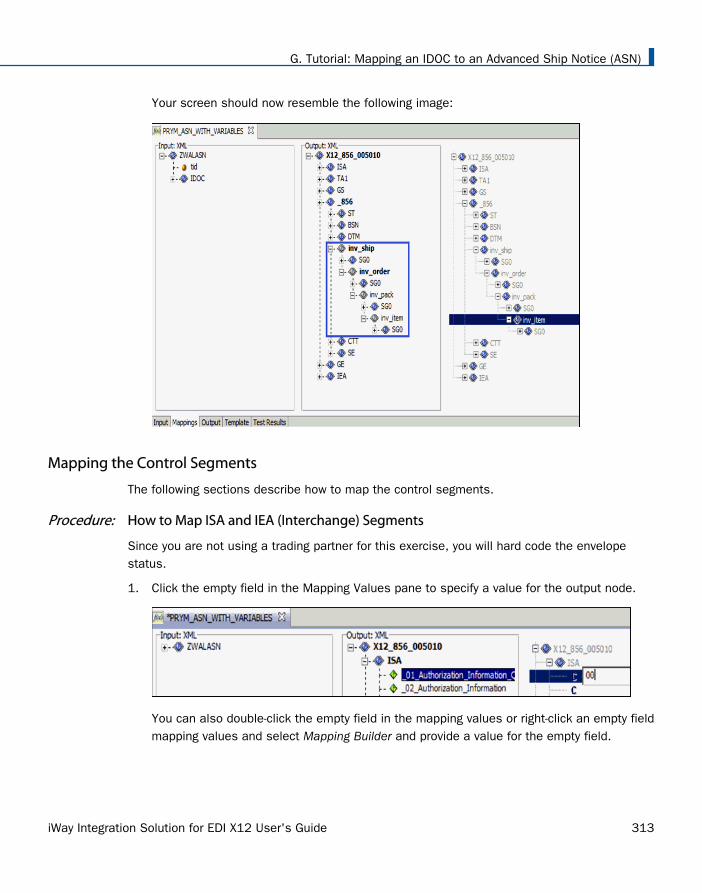
Your screen should now resemble the following image:
Mapping the Control Segments
The following sections describe how to map the control segments.
Procedure: How to Map ISA and IEA (Interchange) Segments
Since you are not using a trading partner for this exercise, you will hard code the envelopestatus.
1. Click the empty field in the Mapping Values pane to specify a value for the output node.
You can also double-click the empty field in the mapping values or right-click an empty fieldmapping values and select Mapping Builder and provide a value for the empty field.
G. Tutorial: Mapping an IDOC to an Advanced Ship Notice (ASN)
iWay Integration Solution for EDI X12 User's Guide 313
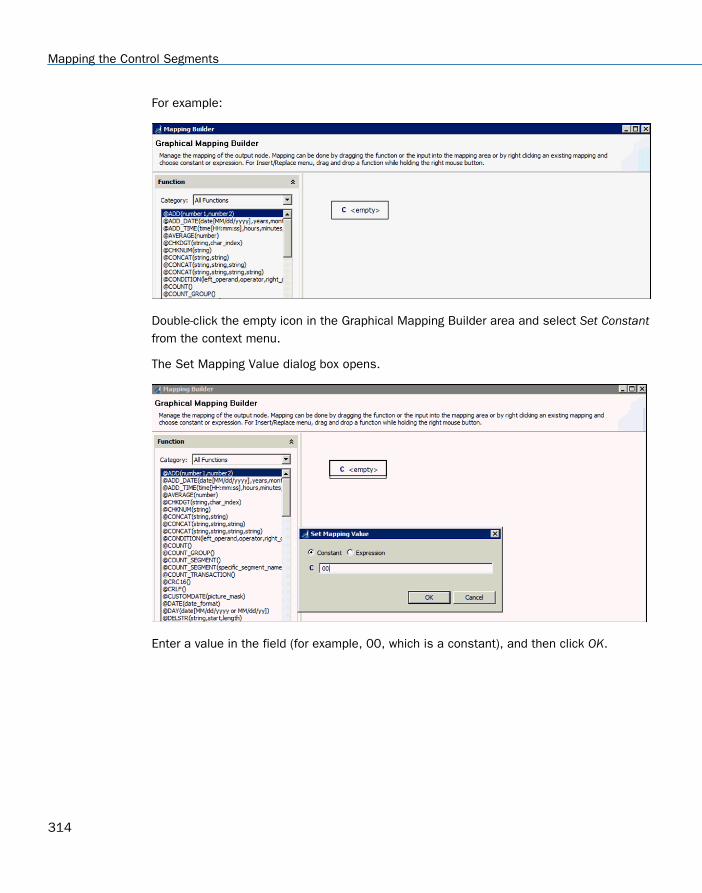
For example:
Double-click the empty icon in the Graphical Mapping Builder area and select Set Constantfrom the context menu.
The Set Mapping Value dialog box opens.
Enter a value in the field (for example, 00, which is a constant), and then click OK.
Mapping the Control Segments
314
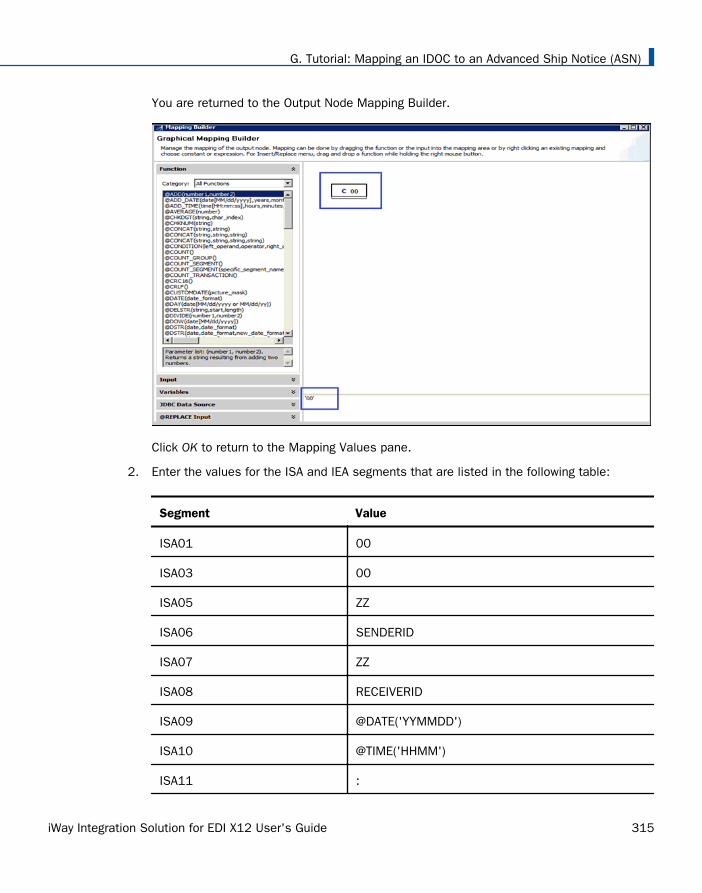
You are returned to the Output Node Mapping Builder.
Click OK to return to the Mapping Values pane.
2. Enter the values for the ISA and IEA segments that are listed in the following table:
Segment Value
ISA01 00
ISA03 00
ISA05 ZZ
ISA06 SENDERID
ISA07 ZZ
ISA08 RECEIVERID
ISA09 @DATE('YYMMDD')
ISA10 @TIME('HHMM')
ISA11 :
G. Tutorial: Mapping an IDOC to an Advanced Ship Notice (ASN)
iWay Integration Solution for EDI X12 User's Guide 315
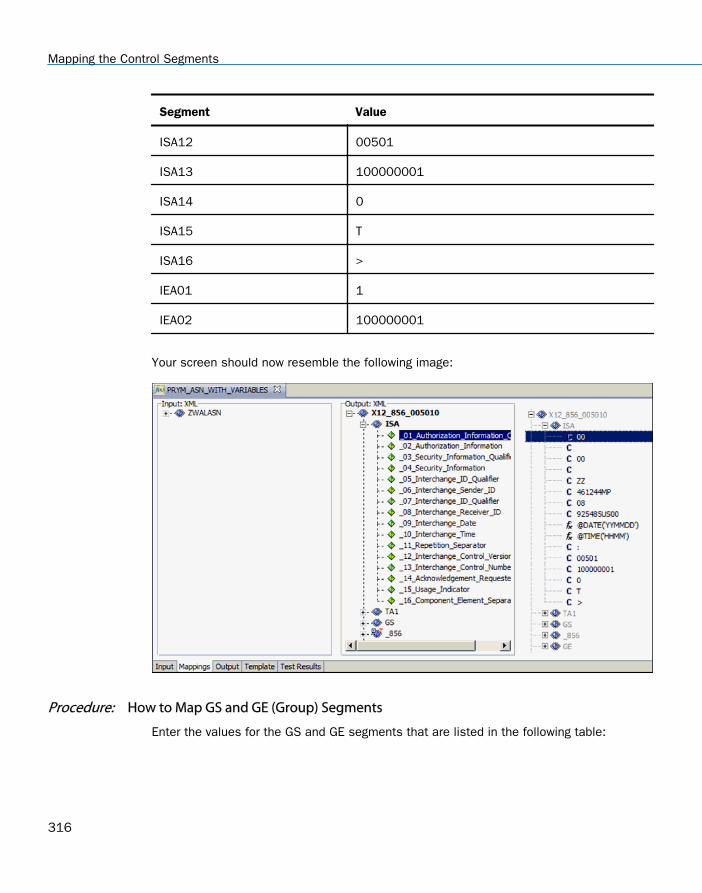
Segment Value
ISA12 00501
ISA13 100000001
ISA14 0
ISA15 T
ISA16 >
IEA01 1
IEA02 100000001
Your screen should now resemble the following image:
Procedure: How to Map GS and GE (Group) Segments
Enter the values for the GS and GE segments that are listed in the following table:
Mapping the Control Segments
316
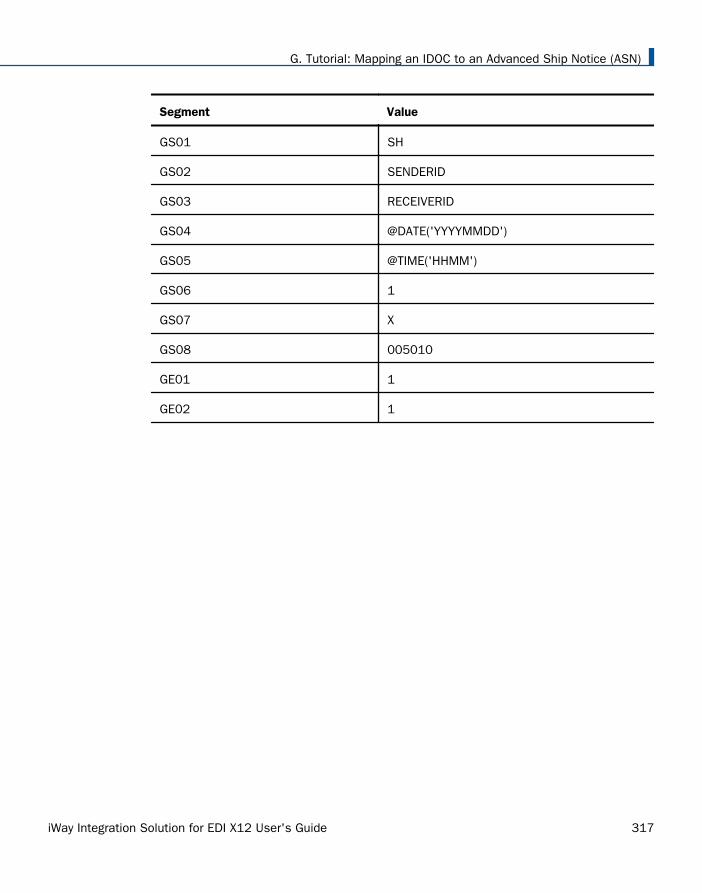
Segment Value
GS01 SH
GS02 SENDERID
GS03 RECEIVERID
GS04 @DATE('YYYYMMDD')
GS05 @TIME('HHMM')
GS06 1
GS07 X
GS08 005010
GE01 1
GE02 1
G. Tutorial: Mapping an IDOC to an Advanced Ship Notice (ASN)
iWay Integration Solution for EDI X12 User's Guide 317
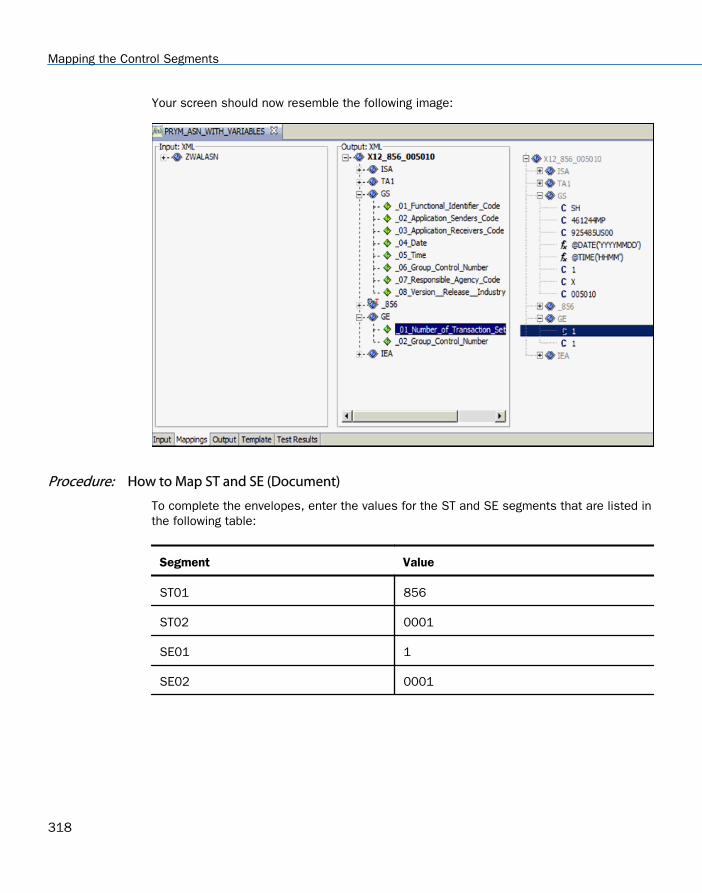
Your screen should now resemble the following image:
Procedure: How to Map ST and SE (Document)
To complete the envelopes, enter the values for the ST and SE segments that are listed inthe following table:
Segment Value
ST01 856
ST02 0001
SE01 1
SE02 0001
Mapping the Control Segments
318
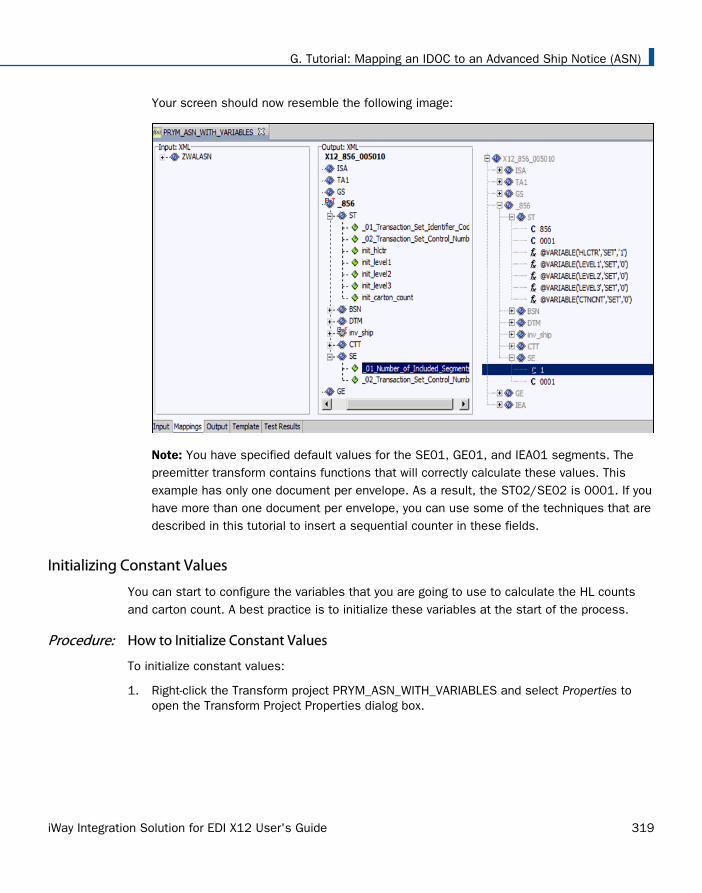
Your screen should now resemble the following image:
Note: You have specified default values for the SE01, GE01, and IEA01 segments. Thepreemitter transform contains functions that will correctly calculate these values. Thisexample has only one document per envelope. As a result, the ST02/SE02 is 0001. If youhave more than one document per envelope, you can use some of the techniques that aredescribed in this tutorial to insert a sequential counter in these fields.
Initializing Constant Values
You can start to configure the variables that you are going to use to calculate the HL countsand carton count. A best practice is to initialize these variables at the start of the process.
Procedure: How to Initialize Constant Values
To initialize constant values:
1. Right-click the Transform project PRYM_ASN_WITH_VARIABLES and select Properties toopen the Transform Project Properties dialog box.
G. Tutorial: Mapping an IDOC to an Advanced Ship Notice (ASN)
iWay Integration Solution for EDI X12 User's Guide 319
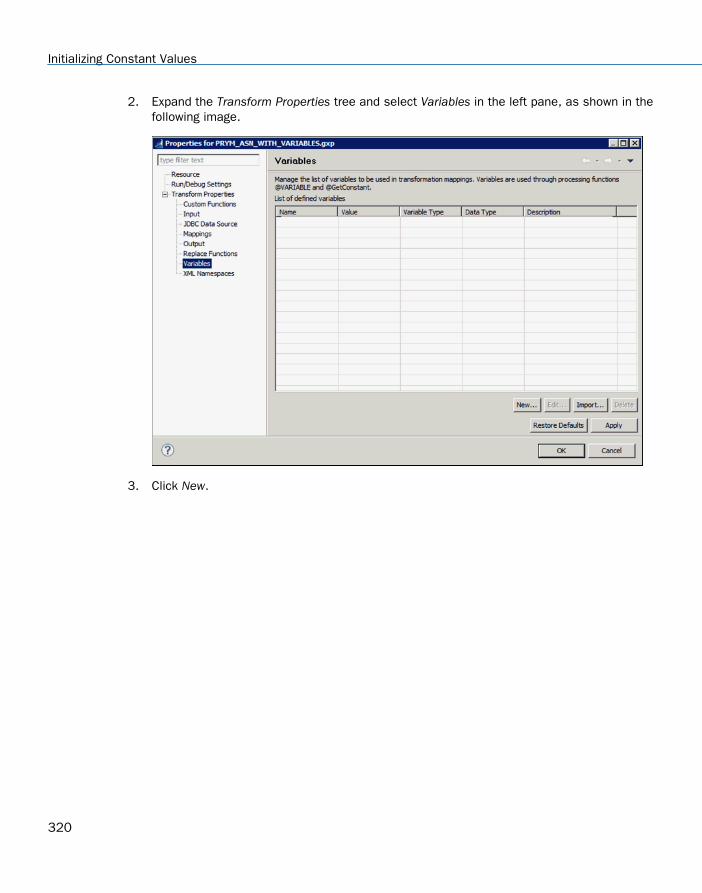
2. Expand the Transform Properties tree and select Variables in the left pane, as shown in thefollowing image.
3. Click New.
Initializing Constant Values
320
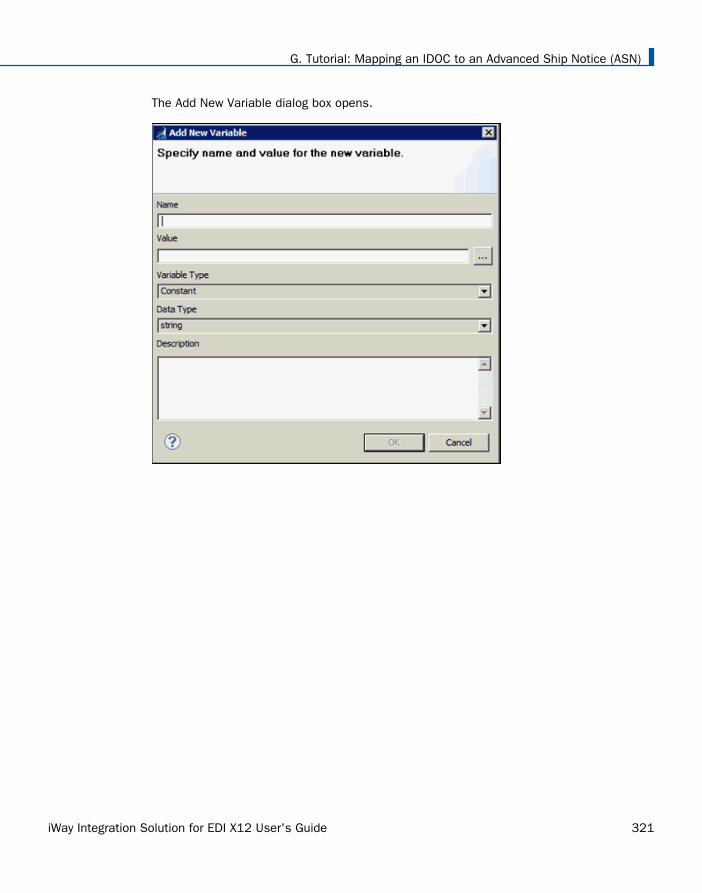
The Add New Variable dialog box opens.
G. Tutorial: Mapping an IDOC to an Advanced Ship Notice (ASN)
iWay Integration Solution for EDI X12 User's Guide 321
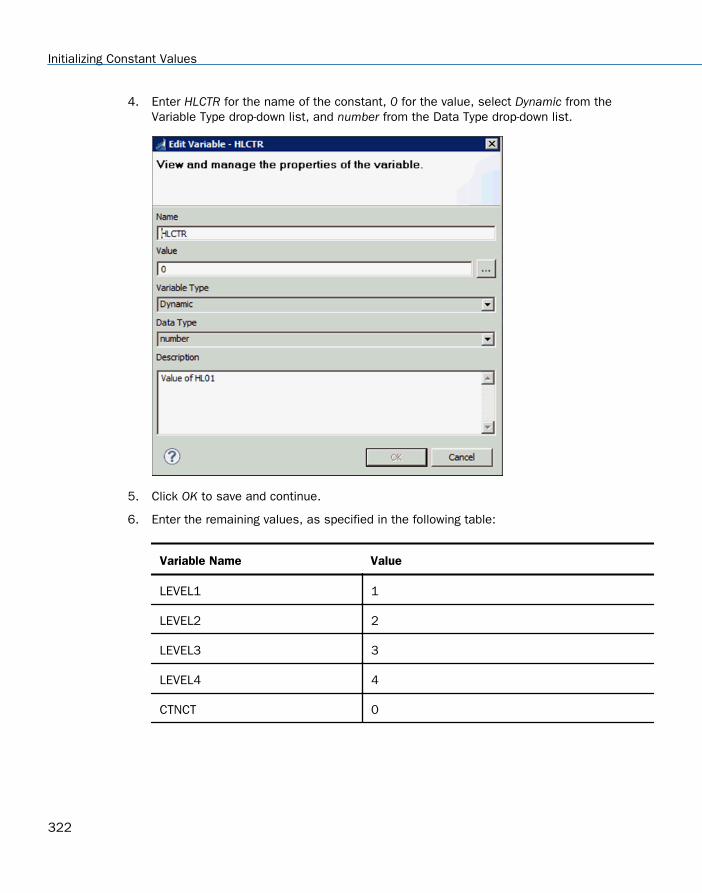
4. Enter HLCTR for the name of the constant, 0 for the value, select Dynamic from theVariable Type drop-down list, and number from the Data Type drop-down list.
5. Click OK to save and continue.
6. Enter the remaining values, as specified in the following table:
Variable Name Value
LEVEL1 1
LEVEL2 2
LEVEL3 3
LEVEL4 4
CTNCT 0
Initializing Constant Values
322

The Project Properties dialog box should now resemble the following image:
7. Click OK.
You also need to reset these variables in the Transform as it runs. The proper place to dothis is the ST segment. At each new ST segment you can reinitialize the counters. To dothis, you will add new element tags at the end of the ST segment. You do not have to hidethese elements because there are no corresponding elements in the XML to X12transform in the Ebix.
8. Right-click ST, select Add, and then click Element from the context menu.
9. Rename the new element to init_hlctr.
10. Add the following additional elements:
init_level1
init_level2
init_level3
init_carton_count
G. Tutorial: Mapping an IDOC to an Advanced Ship Notice (ASN)
iWay Integration Solution for EDI X12 User's Guide 323
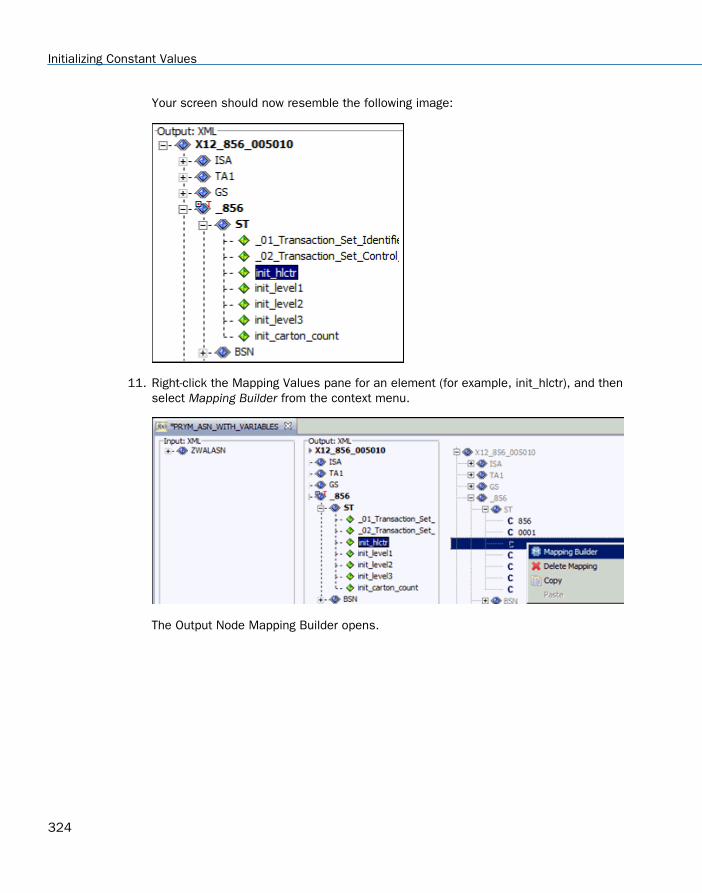
Your screen should now resemble the following image:
11. Right-click the Mapping Values pane for an element (for example, init_hlctr), and thenselect Mapping Builder from the context menu.
The Output Node Mapping Builder opens.
Initializing Constant Values
324
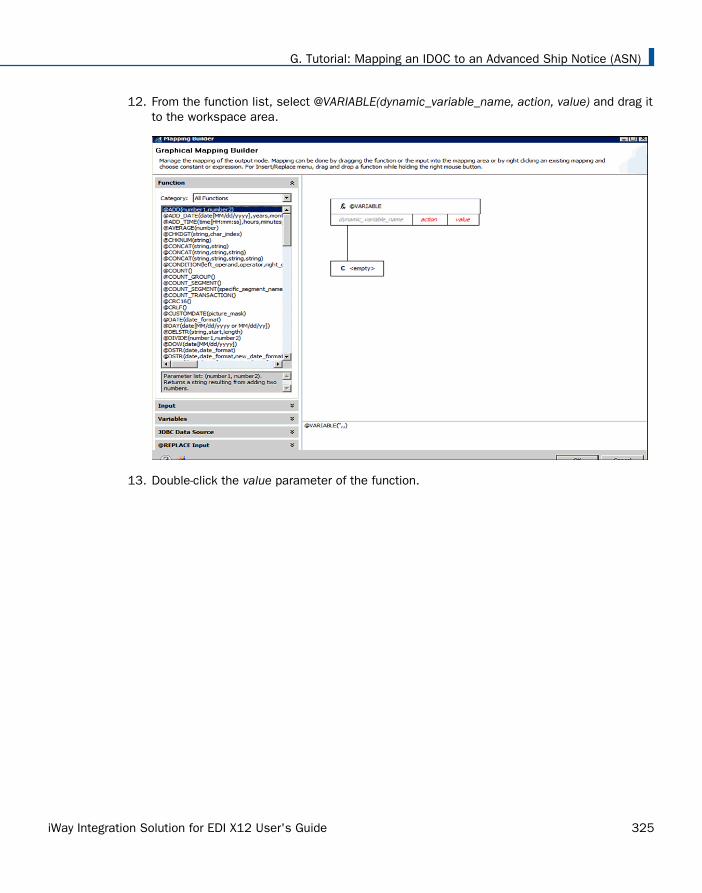
12. From the function list, select @VARIABLE(dynamic_variable_name, action, value) and drag itto the workspace area.
13. Double-click the value parameter of the function.
G. Tutorial: Mapping an IDOC to an Advanced Ship Notice (ASN)
iWay Integration Solution for EDI X12 User's Guide 325
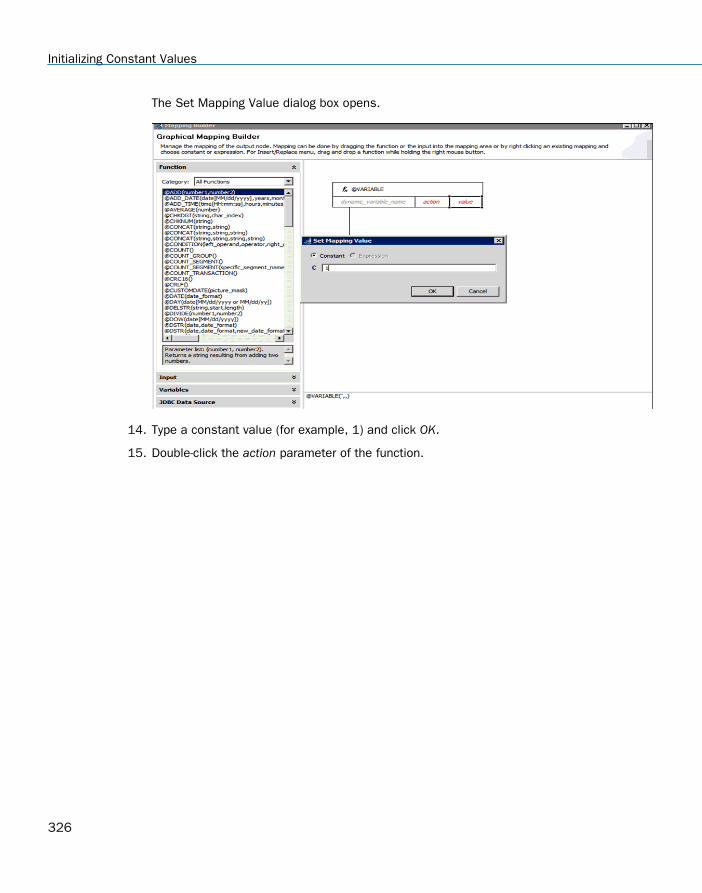
The Set Mapping Value dialog box opens.
14. Type a constant value (for example, 1) and click OK.
15. Double-click the action parameter of the function.
Initializing Constant Values
326
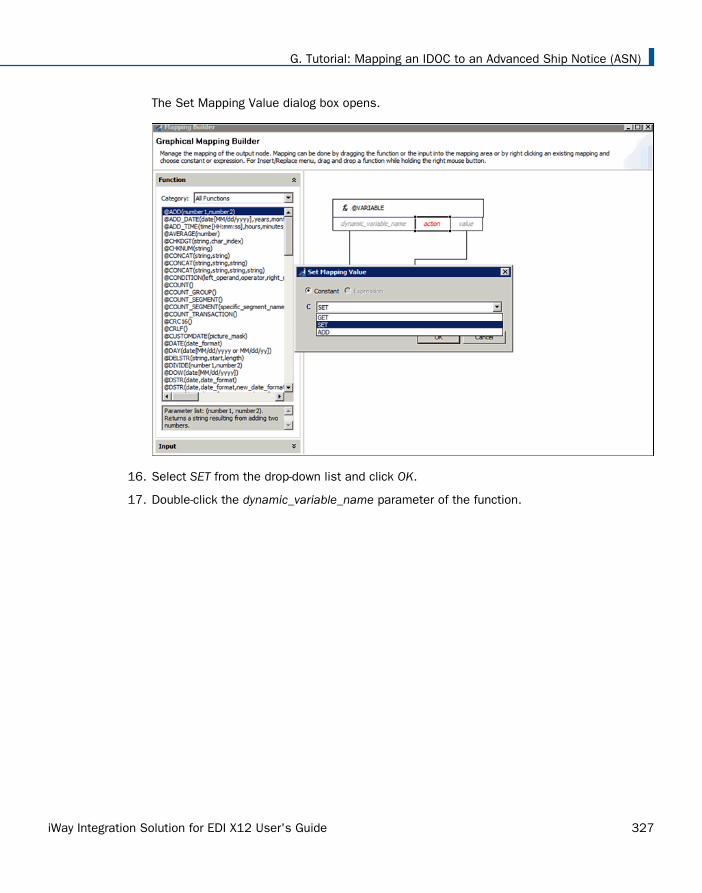
The Set Mapping Value dialog box opens.
16. Select SET from the drop-down list and click OK.
17. Double-click the dynamic_variable_name parameter of the function.
G. Tutorial: Mapping an IDOC to an Advanced Ship Notice (ASN)
iWay Integration Solution for EDI X12 User's Guide 327
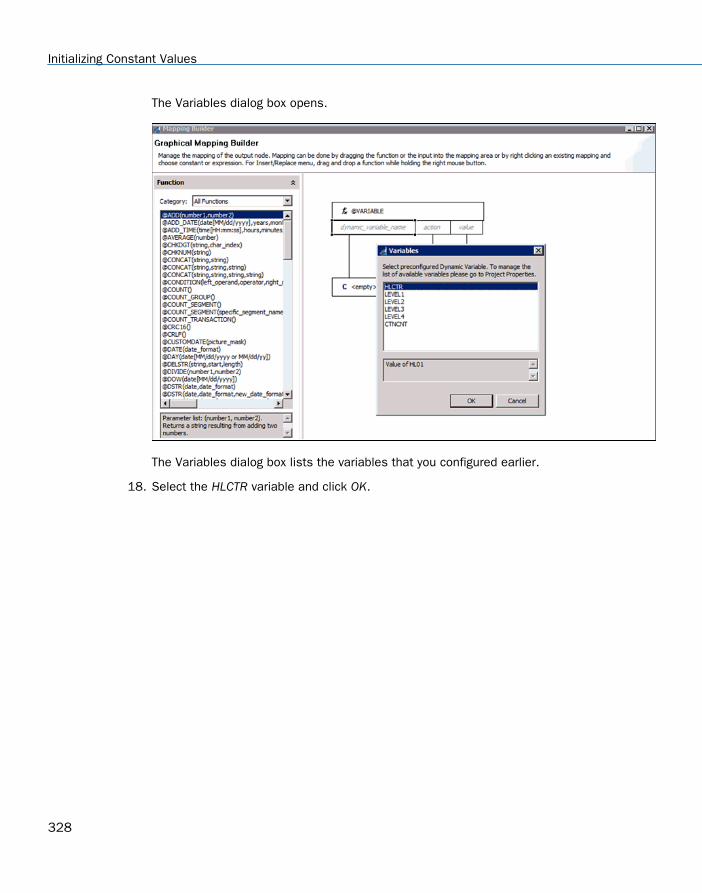
The Variables dialog box opens.
The Variables dialog box lists the variables that you configured earlier.
18. Select the HLCTR variable and click OK.
Initializing Constant Values
328
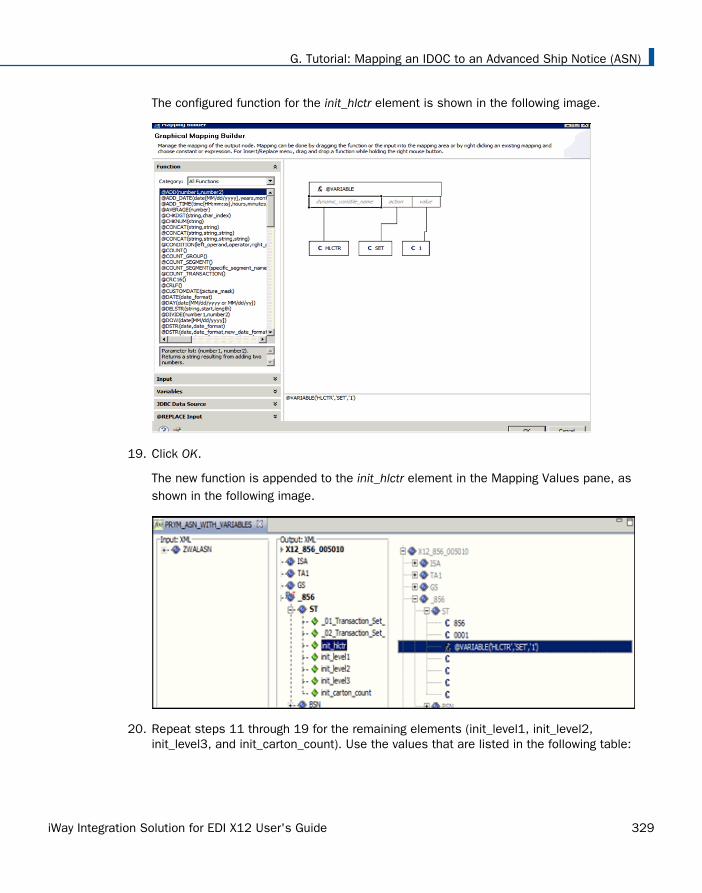
The configured function for the init_hlctr element is shown in the following image.
19. Click OK.
The new function is appended to the init_hlctr element in the Mapping Values pane, asshown in the following image.
20. Repeat steps 11 through 19 for the remaining elements (init_level1, init_level2,init_level3, and init_carton_count). Use the values that are listed in the following table:
G. Tutorial: Mapping an IDOC to an Advanced Ship Notice (ASN)
iWay Integration Solution for EDI X12 User's Guide 329
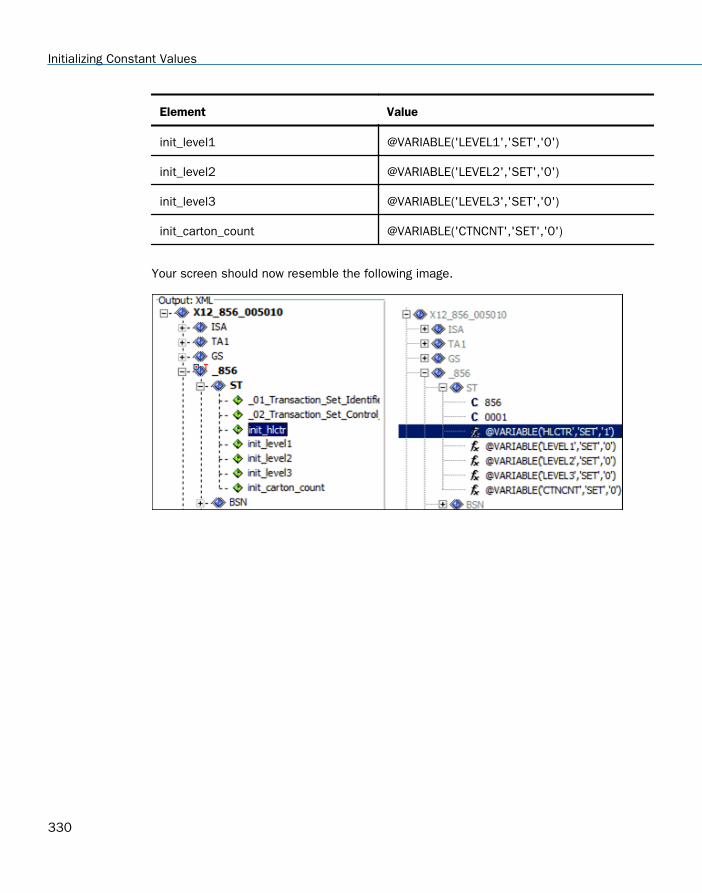
Element Value
init_level1 @VARIABLE('LEVEL1','SET','0')
init_level2 @VARIABLE('LEVEL2','SET','0')
init_level3 @VARIABLE('LEVEL3','SET','0')
init_carton_count @VARIABLE('CTNCNT','SET','0')
Your screen should now resemble the following image.
Initializing Constant Values
330
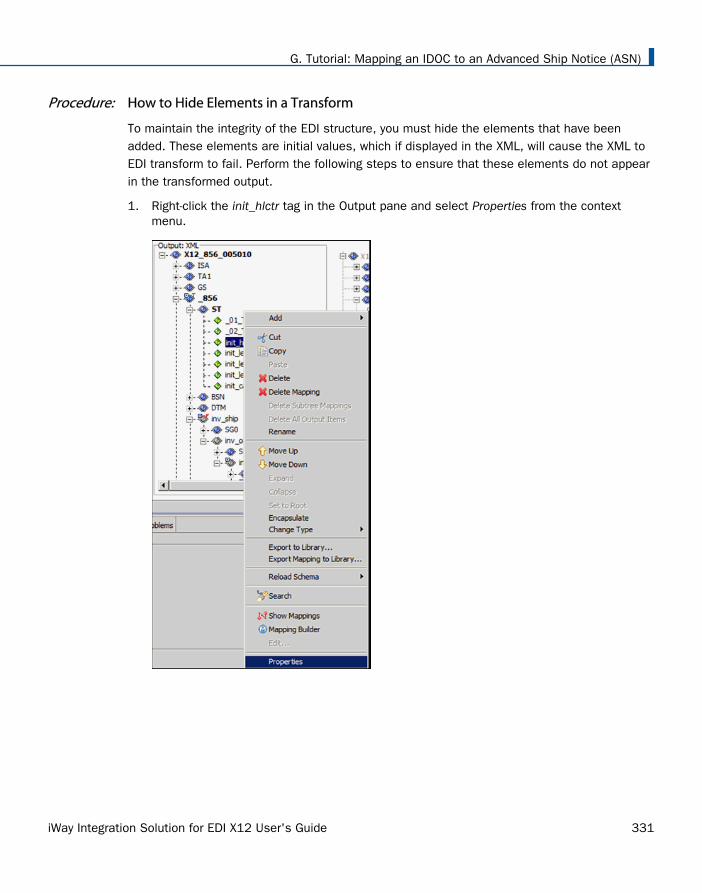
Procedure: How to Hide Elements in a Transform
To maintain the integrity of the EDI structure, you must hide the elements that have beenadded. These elements are initial values, which if displayed in the XML, will cause the XML toEDI transform to fail. Perform the following steps to ensure that these elements do not appearin the transformed output.
1. Right-click the init_hlctr tag in the Output pane and select Properties from the contextmenu.
G. Tutorial: Mapping an IDOC to an Advanced Ship Notice (ASN)
iWay Integration Solution for EDI X12 User's Guide 331
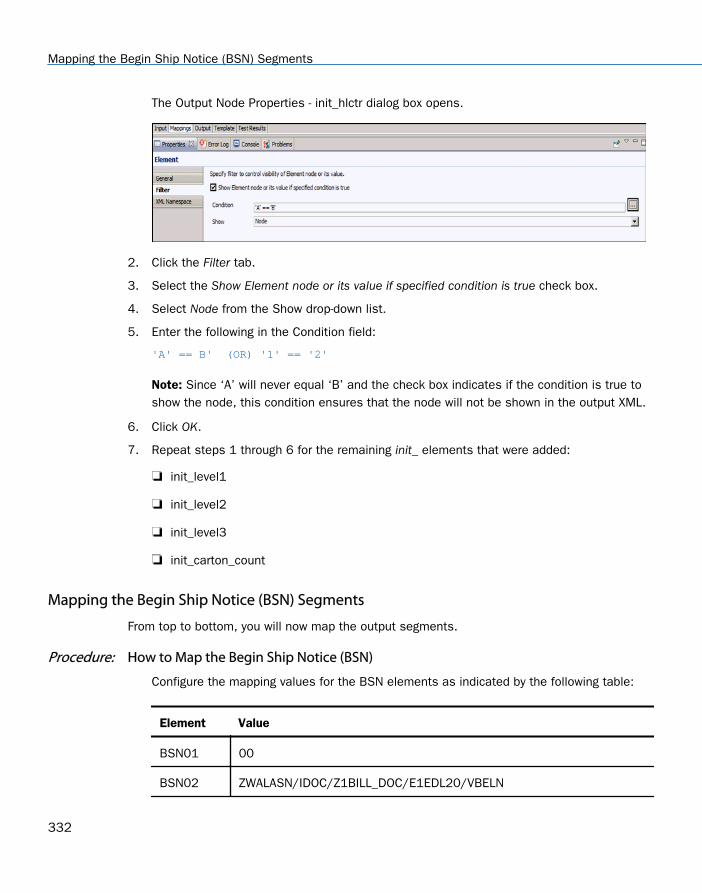
The Output Node Properties - init_hlctr dialog box opens.
2. Click the Filter tab.
3. Select the Show Element node or its value if specified condition is true check box.
4. Select Node from the Show drop-down list.
5. Enter the following in the Condition field:
'A' == B' (OR) '1' == '2'
Note: Since ‘A’ will never equal ‘B’ and the check box indicates if the condition is true toshow the node, this condition ensures that the node will not be shown in the output XML.
6. Click OK.
7. Repeat steps 1 through 6 for the remaining init_ elements that were added:
init_level1
init_level2
init_level3
init_carton_count
Mapping the Begin Ship Notice (BSN) Segments
From top to bottom, you will now map the output segments.
Procedure: How to Map the Begin Ship Notice (BSN)
Configure the mapping values for the BSN elements as indicated by the following table:
Element Value
BSN01 00
BSN02 ZWALASN/IDOC/Z1BILL_DOC/E1EDL20/VBELN
Mapping the Begin Ship Notice (BSN) Segments
332
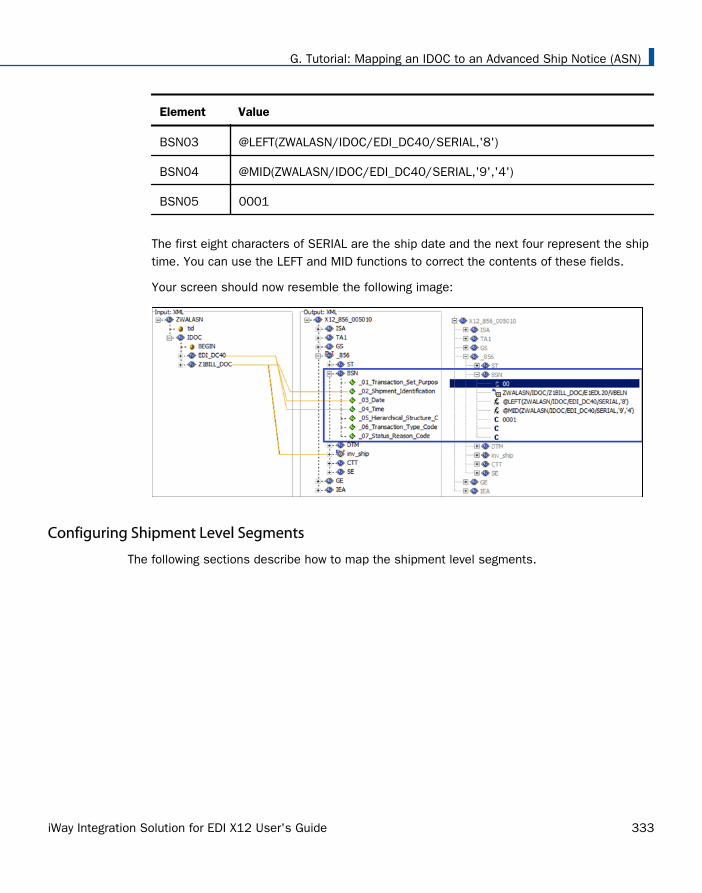
Element Value
BSN03 @LEFT(ZWALASN/IDOC/EDI_DC40/SERIAL,'8')
BSN04 @MID(ZWALASN/IDOC/EDI_DC40/SERIAL,'9','4')
BSN05 0001
The first eight characters of SERIAL are the ship date and the next four represent the shiptime. You can use the LEFT and MID functions to correct the contents of these fields.
Your screen should now resemble the following image:
Configuring Shipment Level Segments
The following sections describe how to map the shipment level segments.
G. Tutorial: Mapping an IDOC to an Advanced Ship Notice (ASN)
iWay Integration Solution for EDI X12 User's Guide 333

Procedure: How to Configure the HL (Hierarchy) Elements
1. Under the inv_ship tag, expand SG0, right-click the HL tag, select Add, and then clickElement.
Configuring Shipment Level Segments
334
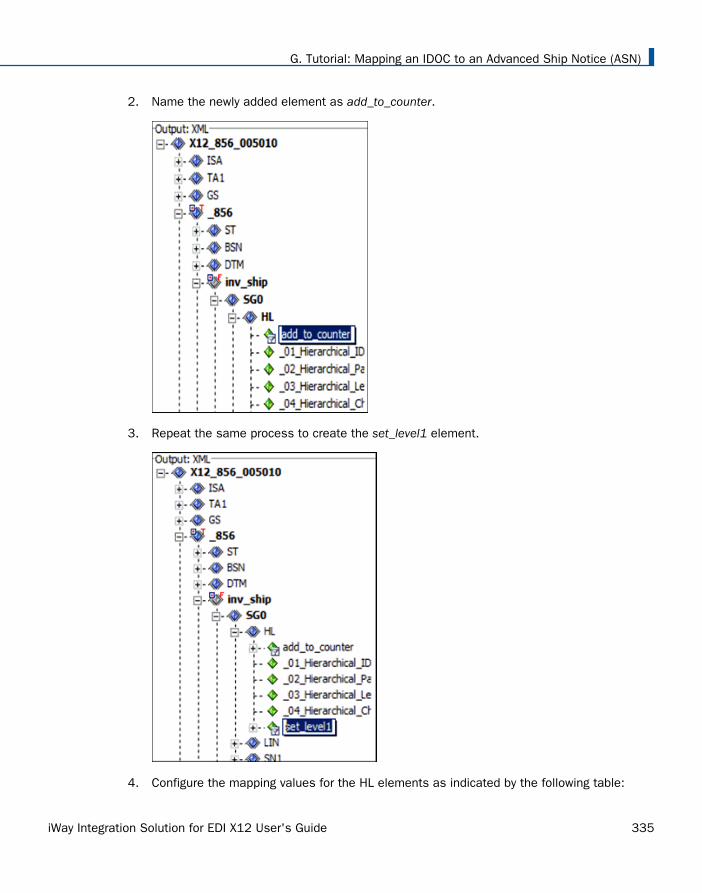
2. Name the newly added element as add_to_counter.
3. Repeat the same process to create the set_level1 element.
4. Configure the mapping values for the HL elements as indicated by the following table:
G. Tutorial: Mapping an IDOC to an Advanced Ship Notice (ASN)
iWay Integration Solution for EDI X12 User's Guide 335

Element Value
HL01 @VARIABLE('HLCTR','GET')
HL03 S
add_to_counter @VARIABLE('LEVEL1','ADD','1')
set_level1 @VARIABLE('LEVEL1','SET','1')
5. Map add_to_counter to the $LEVEL1 variable and the following:
action: ADD
value: 1
6. Map sel_level1 to the $LEVEL1 variable and the following:
action: SET
Configuring Shipment Level Segments
336
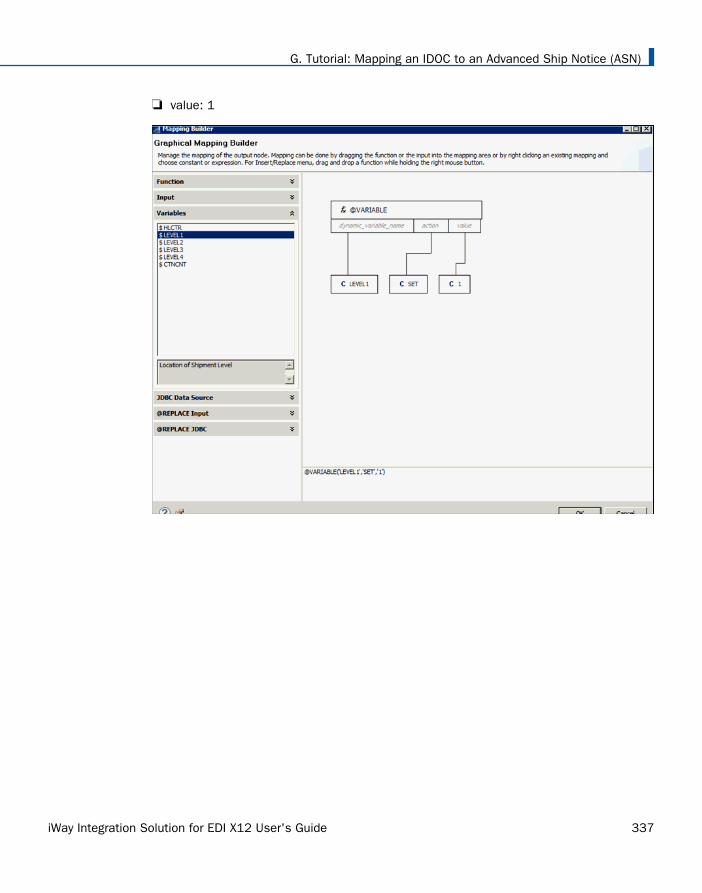
value: 1
G. Tutorial: Mapping an IDOC to an Advanced Ship Notice (ASN)
iWay Integration Solution for EDI X12 User's Guide 337
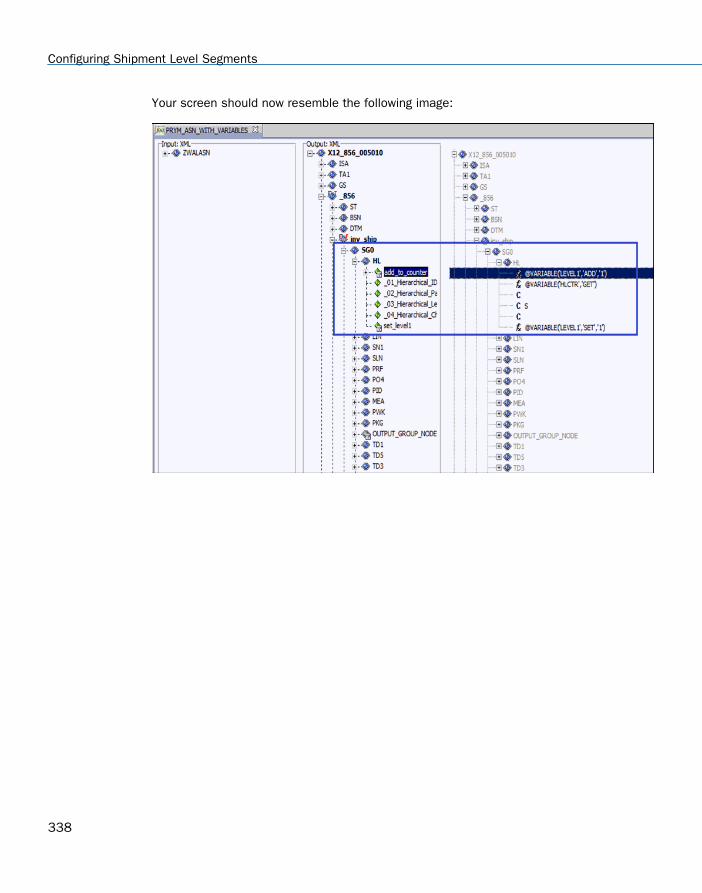
Your screen should now resemble the following image:
Configuring Shipment Level Segments
338
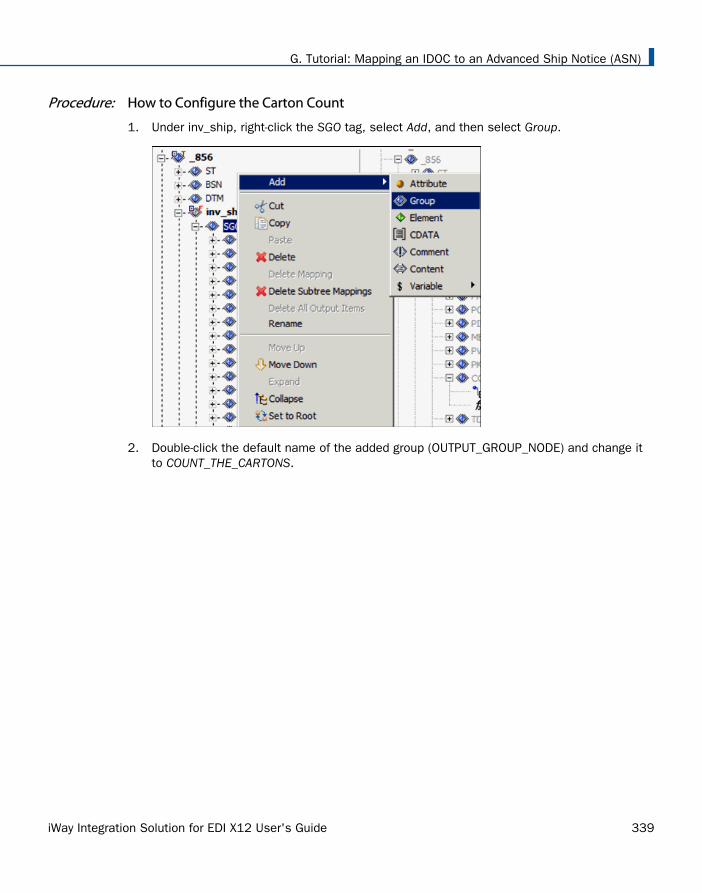
Procedure: How to Configure the Carton Count
1. Under inv_ship, right-click the SGO tag, select Add, and then select Group.
2. Double-click the default name of the added group (OUTPUT_GROUP_NODE) and change itto COUNT_THE_CARTONS.
G. Tutorial: Mapping an IDOC to an Advanced Ship Notice (ASN)
iWay Integration Solution for EDI X12 User's Guide 339
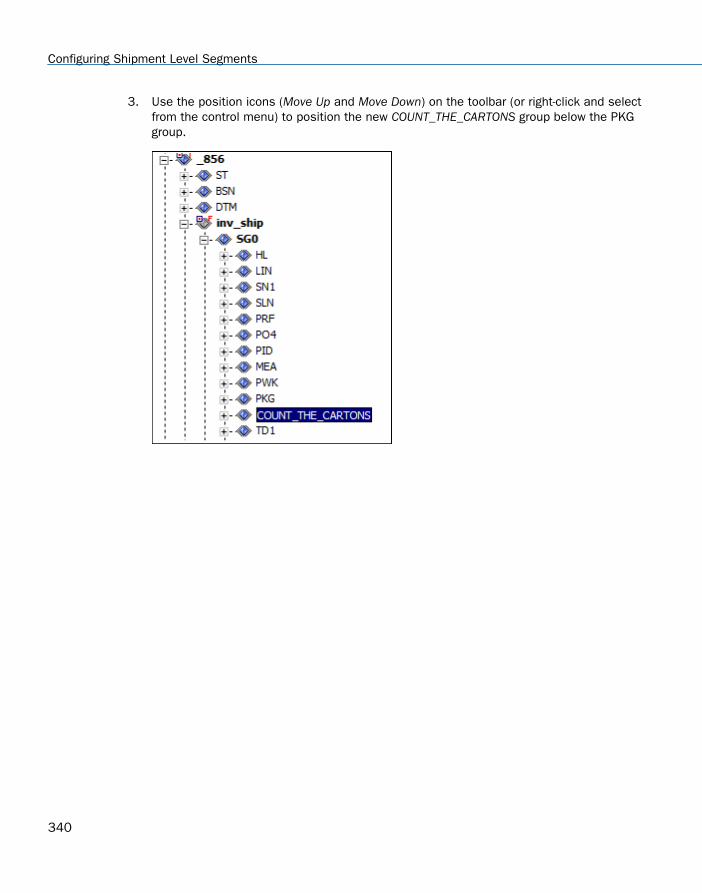
3. Use the position icons (Move Up and Move Down) on the toolbar (or right-click and selectfrom the control menu) to position the new COUNT_THE_CARTONS group below the PKGgroup.
Configuring Shipment Level Segments
340
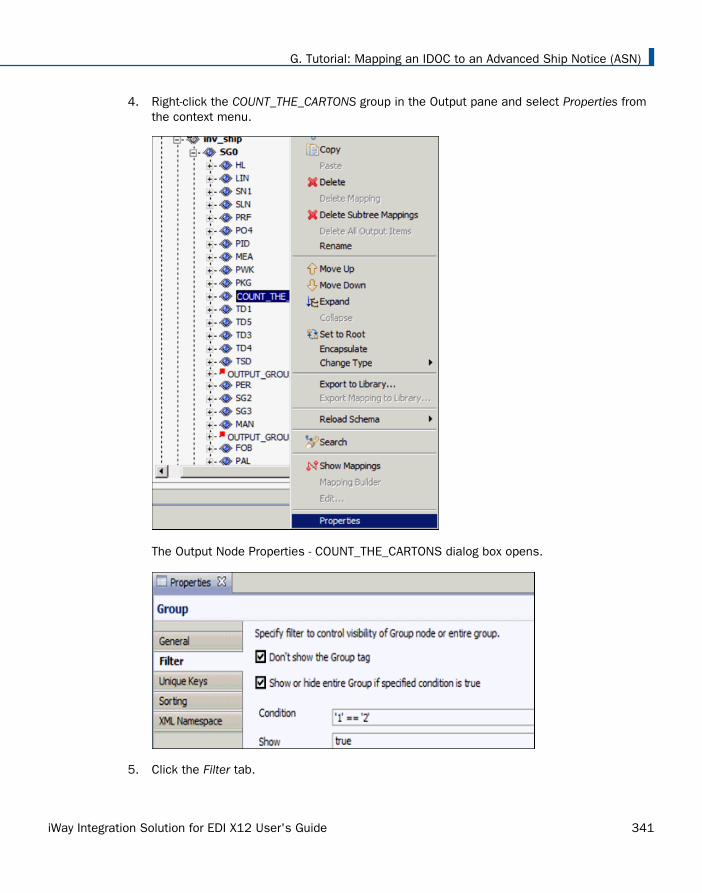
4. Right-click the COUNT_THE_CARTONS group in the Output pane and select Properties fromthe context menu.
The Output Node Properties - COUNT_THE_CARTONS dialog box opens.
5. Click the Filter tab.
G. Tutorial: Mapping an IDOC to an Advanced Ship Notice (ASN)
iWay Integration Solution for EDI X12 User's Guide 341
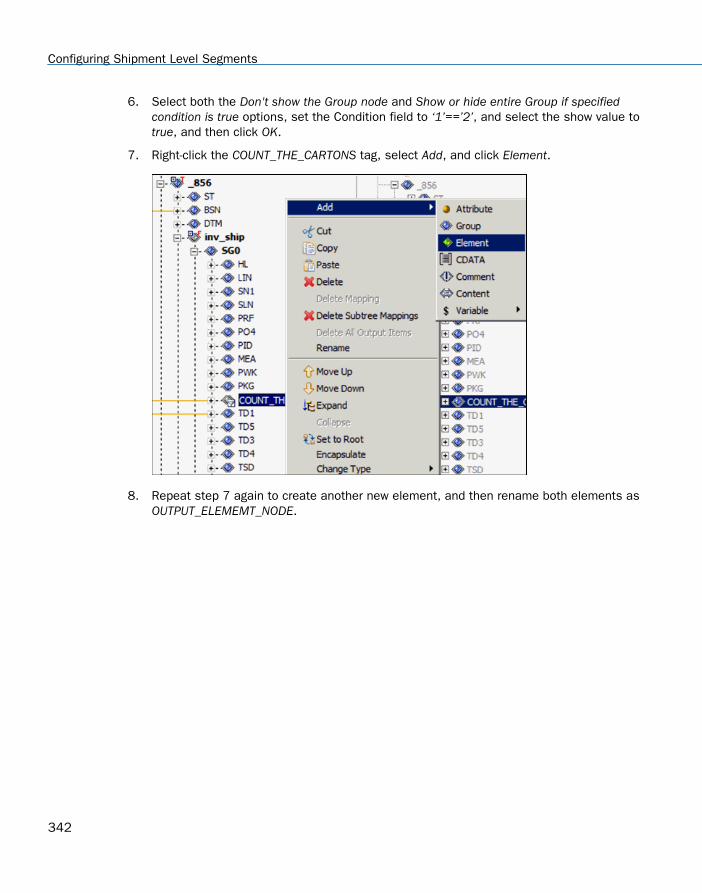
6. Select both the Don't show the Group node and Show or hide entire Group if specifiedcondition is true options, set the Condition field to ‘1’==’2’, and select the show value totrue, and then click OK.
7. Right-click the COUNT_THE_CARTONS tag, select Add, and click Element.
8. Repeat step 7 again to create another new element, and then rename both elements asOUTPUT_ELEMEMT_NODE.
Configuring Shipment Level Segments
342
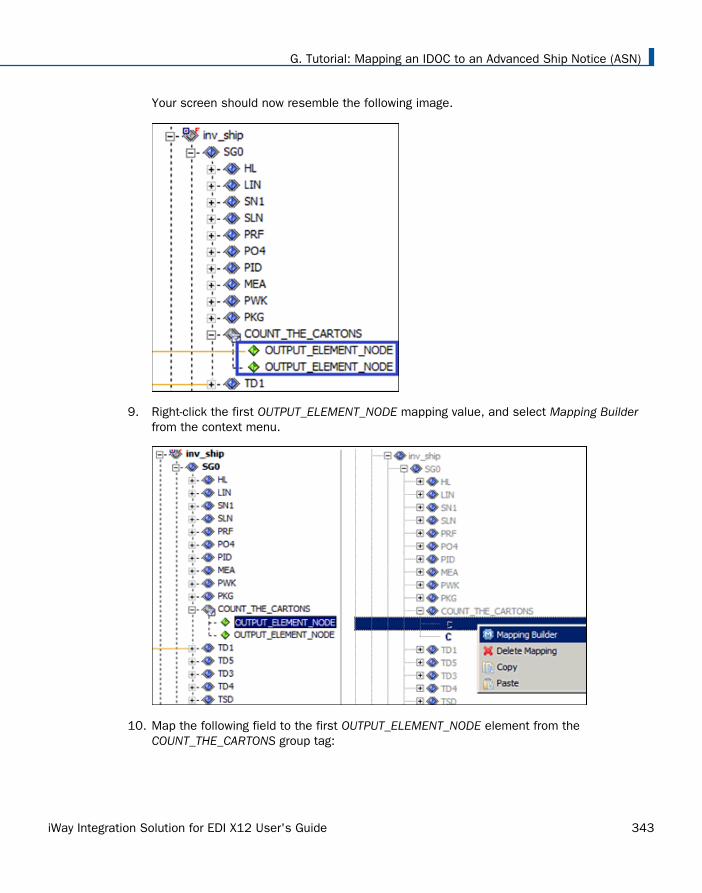
Your screen should now resemble the following image.
9. Right-click the first OUTPUT_ELEMENT_NODE mapping value, and select Mapping Builderfrom the context menu.
10. Map the following field to the first OUTPUT_ELEMENT_NODE element from theCOUNT_THE_CARTONS group tag:
G. Tutorial: Mapping an IDOC to an Advanced Ship Notice (ASN)
iWay Integration Solution for EDI X12 User's Guide 343
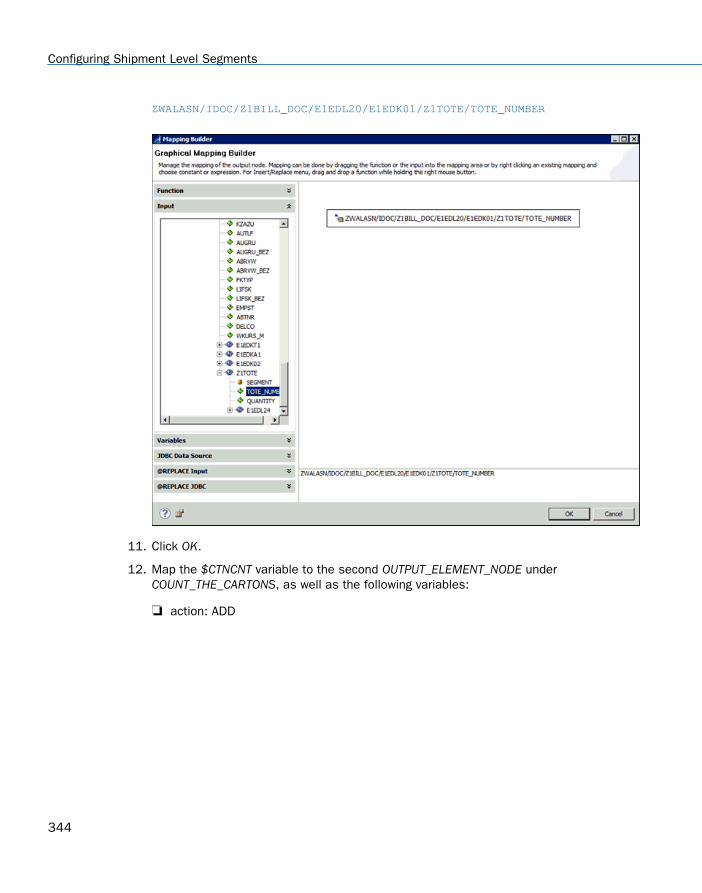
ZWALASN/IDOC/Z1BILL_DOC/E1EDL20/E1EDK01/Z1TOTE/TOTE_NUMBER
11. Click OK.
12. Map the $CTNCNT variable to the second OUTPUT_ELEMENT_NODE underCOUNT_THE_CARTONS, as well as the following variables:
action: ADD
Configuring Shipment Level Segments
344
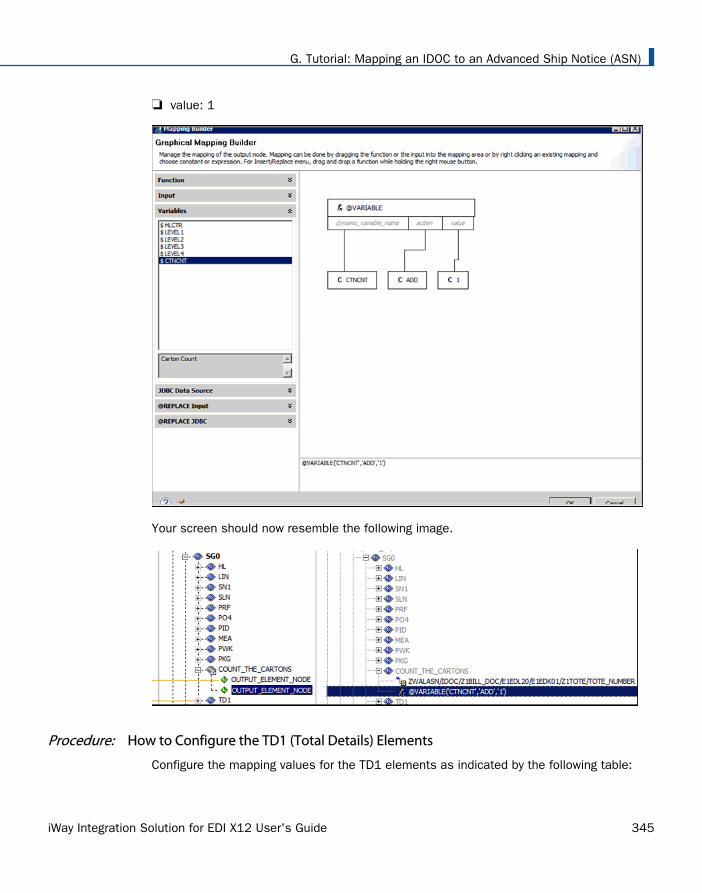
value: 1
Your screen should now resemble the following image.
Procedure: How to Configure the TD1 (Total Details) Elements
Configure the mapping values for the TD1 elements as indicated by the following table:
G. Tutorial: Mapping an IDOC to an Advanced Ship Notice (ASN)
iWay Integration Solution for EDI X12 User's Guide 345
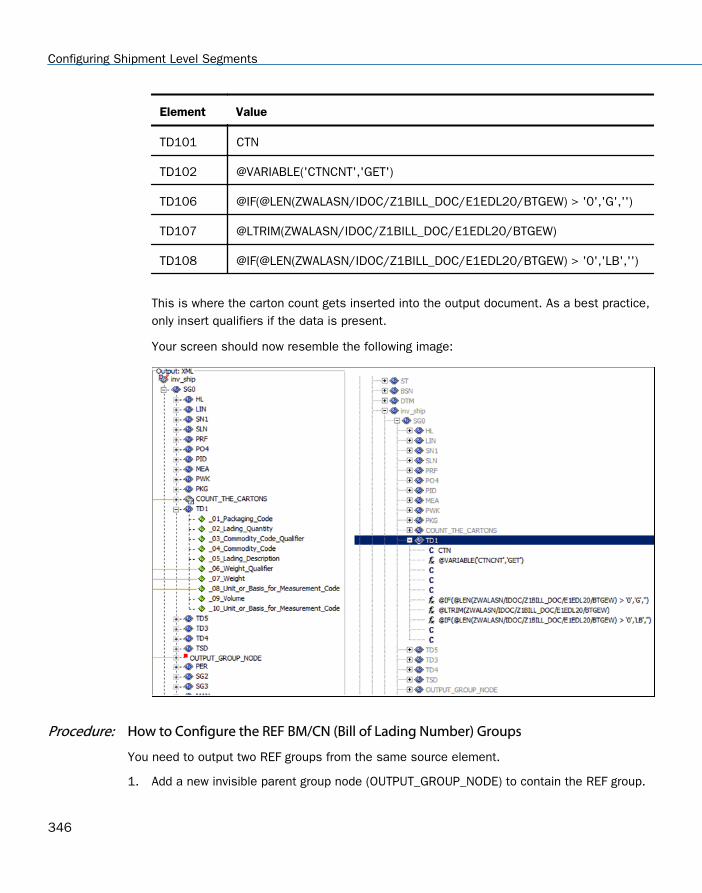
Element Value
TD101 CTN
TD102 @VARIABLE('CTNCNT','GET')
TD106 @IF(@LEN(ZWALASN/IDOC/Z1BILL_DOC/E1EDL20/BTGEW) > '0','G','')
TD107 @LTRIM(ZWALASN/IDOC/Z1BILL_DOC/E1EDL20/BTGEW)
TD108 @IF(@LEN(ZWALASN/IDOC/Z1BILL_DOC/E1EDL20/BTGEW) > '0','LB','')
This is where the carton count gets inserted into the output document. As a best practice,only insert qualifiers if the data is present.
Your screen should now resemble the following image:
Procedure: How to Configure the REF BM/CN (Bill of Lading Number) Groups
You need to output two REF groups from the same source element.
1. Add a new invisible parent group node (OUTPUT_GROUP_NODE) to contain the REF group.
Configuring Shipment Level Segments
346
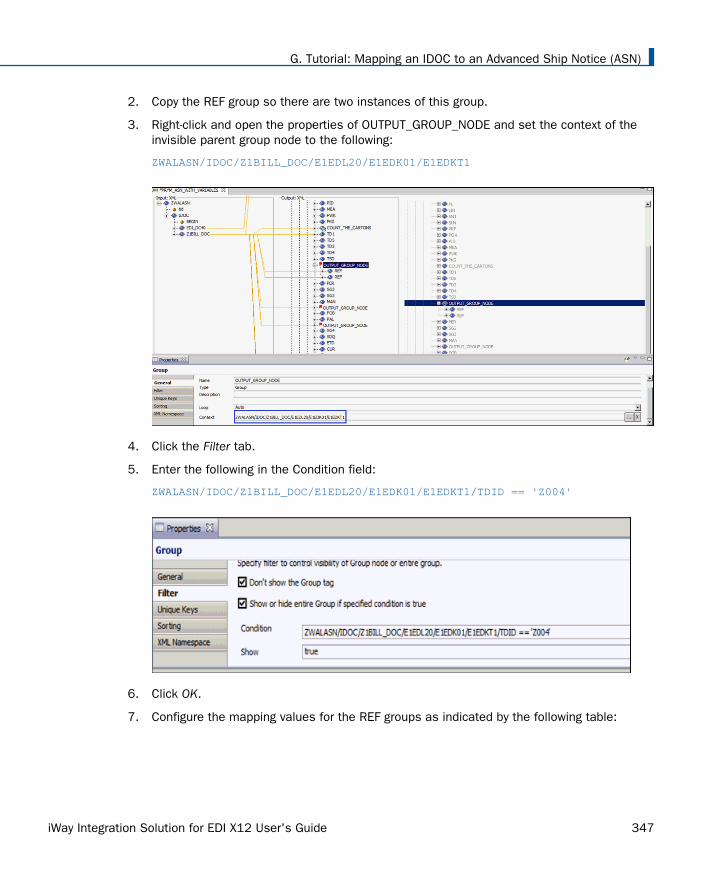
2. Copy the REF group so there are two instances of this group.
3. Right-click and open the properties of OUTPUT_GROUP_NODE and set the context of theinvisible parent group node to the following:
ZWALASN/IDOC/Z1BILL_DOC/E1EDL20/E1EDK01/E1EDKT1
4. Click the Filter tab.
5. Enter the following in the Condition field:
ZWALASN/IDOC/Z1BILL_DOC/E1EDL20/E1EDK01/E1EDKT1/TDID == 'Z004'
6. Click OK.
7. Configure the mapping values for the REF groups as indicated by the following table:
G. Tutorial: Mapping an IDOC to an Advanced Ship Notice (ASN)
iWay Integration Solution for EDI X12 User's Guide 347

Group Value
REF02 ZWALASN/IDOC/Z1BILL_DOC/E1EDL20/E1EDK01/E1EDKT1/E1EDKT2/TDLINE
REF02 ZWALASN/IDOC/Z1BILL_DOC/E1EDL20/E1EDK01/E1EDKT1/E1EDKT2/TDLINE
Your screen should now resemble the following image:
Procedure: How to Configure the DTM 011 (Shipment Date) Elements
1. Add a new group element (OUTPUT_GROUP_NODE) and align it below the DTM element inthe HL loop.
2. Drag and drop the DTM element into this new group.
3. Right-click and open the OUTPUT_GROUP_NODE properties and then set the context to thefollowing:
Configuring Shipment Level Segments
348
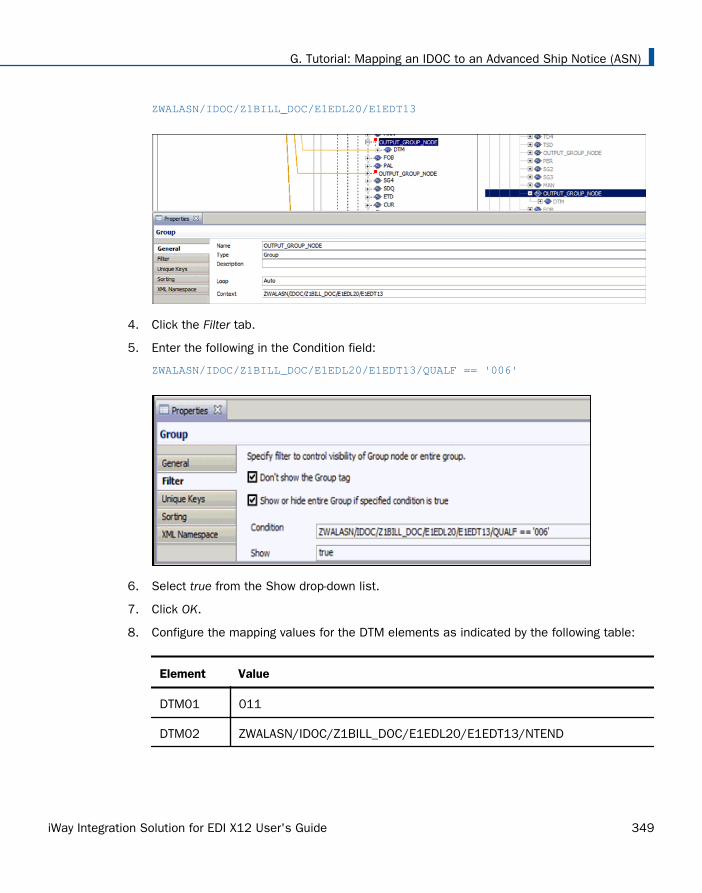
ZWALASN/IDOC/Z1BILL_DOC/E1EDL20/E1EDT13
4. Click the Filter tab.
5. Enter the following in the Condition field:
ZWALASN/IDOC/Z1BILL_DOC/E1EDL20/E1EDT13/QUALF == '006'
6. Select true from the Show drop-down list.
7. Click OK.
8. Configure the mapping values for the DTM elements as indicated by the following table:
Element Value
DTM01 011
DTM02 ZWALASN/IDOC/Z1BILL_DOC/E1EDL20/E1EDT13/NTEND
G. Tutorial: Mapping an IDOC to an Advanced Ship Notice (ASN)
iWay Integration Solution for EDI X12 User's Guide 349
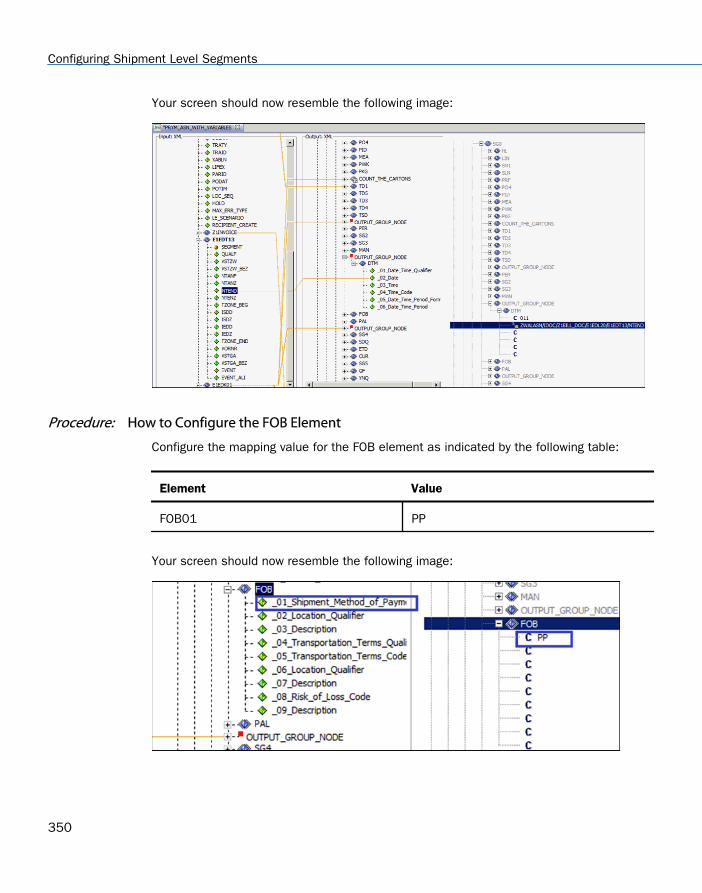
Your screen should now resemble the following image:
Procedure: How to Configure the FOB Element
Configure the mapping value for the FOB element as indicated by the following table:
Element Value
FOB01 PP
Your screen should now resemble the following image:
Configuring Shipment Level Segments
350
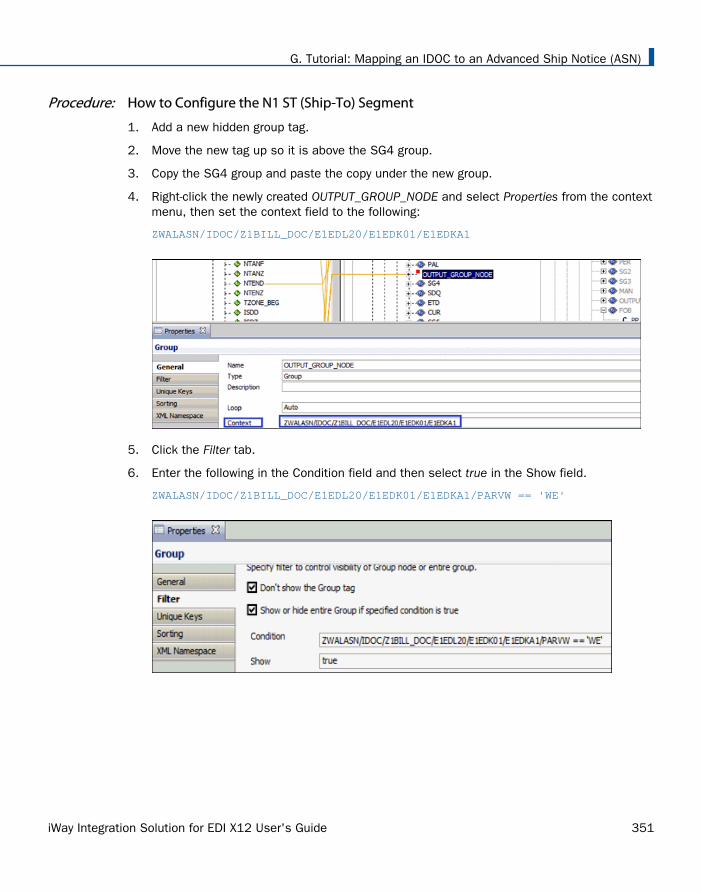
Procedure: How to Configure the N1 ST (Ship-To) Segment
1. Add a new hidden group tag.
2. Move the new tag up so it is above the SG4 group.
3. Copy the SG4 group and paste the copy under the new group.
4. Right-click the newly created OUTPUT_GROUP_NODE and select Properties from the contextmenu, then set the context field to the following:
ZWALASN/IDOC/Z1BILL_DOC/E1EDL20/E1EDK01/E1EDKA1
5. Click the Filter tab.
6. Enter the following in the Condition field and then select true in the Show field.
ZWALASN/IDOC/Z1BILL_DOC/E1EDL20/E1EDK01/E1EDKA1/PARVW == 'WE'
G. Tutorial: Mapping an IDOC to an Advanced Ship Notice (ASN)
iWay Integration Solution for EDI X12 User's Guide 351
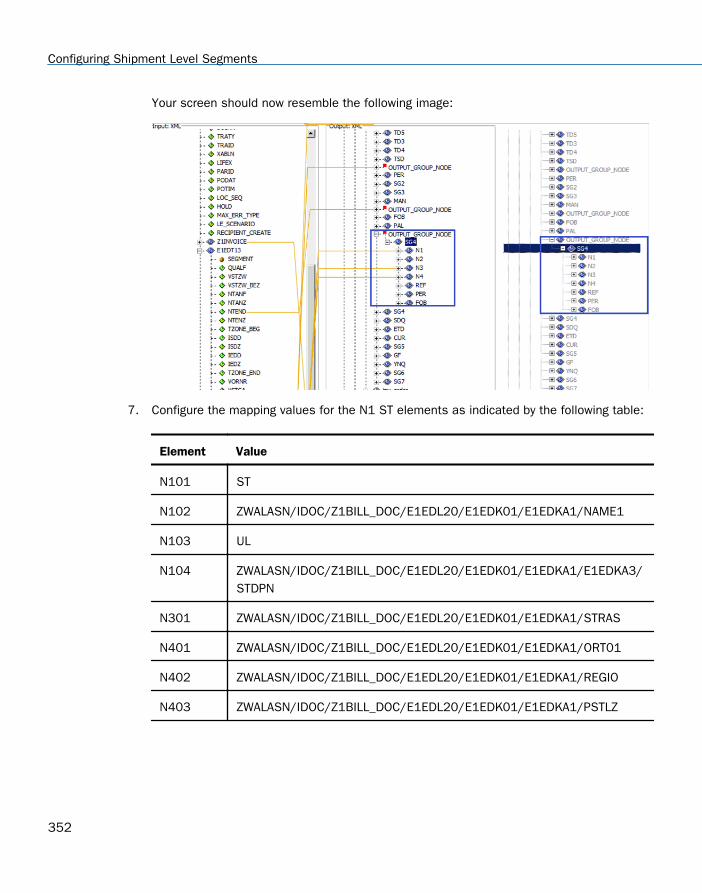
Your screen should now resemble the following image:
7. Configure the mapping values for the N1 ST elements as indicated by the following table:
Element Value
N101 ST
N102 ZWALASN/IDOC/Z1BILL_DOC/E1EDL20/E1EDK01/E1EDKA1/NAME1
N103 UL
N104 ZWALASN/IDOC/Z1BILL_DOC/E1EDL20/E1EDK01/E1EDKA1/E1EDKA3/STDPN
N301 ZWALASN/IDOC/Z1BILL_DOC/E1EDL20/E1EDK01/E1EDKA1/STRAS
N401 ZWALASN/IDOC/Z1BILL_DOC/E1EDL20/E1EDK01/E1EDKA1/ORT01
N402 ZWALASN/IDOC/Z1BILL_DOC/E1EDL20/E1EDK01/E1EDKA1/REGIO
N403 ZWALASN/IDOC/Z1BILL_DOC/E1EDL20/E1EDK01/E1EDKA1/PSTLZ
Configuring Shipment Level Segments
352
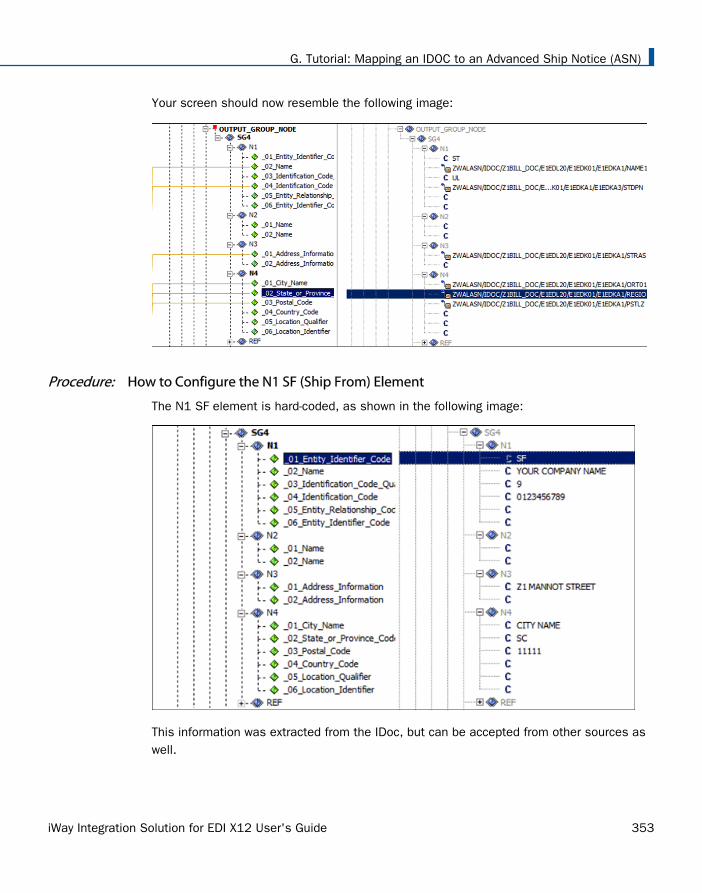
Your screen should now resemble the following image:
Procedure: How to Configure the N1 SF (Ship From) Element
The N1 SF element is hard-coded, as shown in the following image:
This information was extracted from the IDoc, but can be accepted from other sources aswell.
G. Tutorial: Mapping an IDOC to an Advanced Ship Notice (ASN)
iWay Integration Solution for EDI X12 User's Guide 353
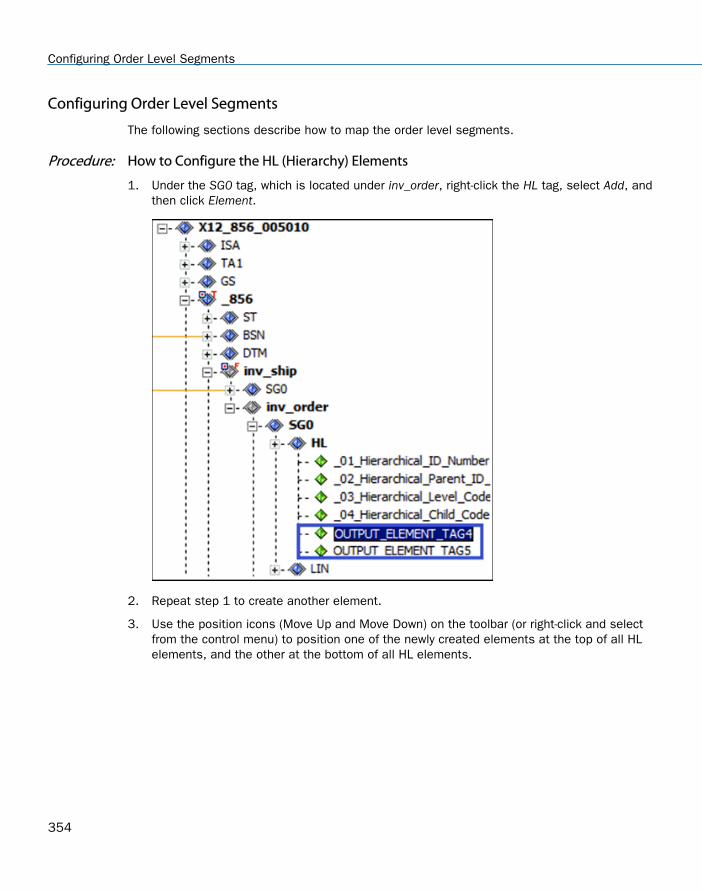
Configuring Order Level Segments
The following sections describe how to map the order level segments.
Procedure: How to Configure the HL (Hierarchy) Elements
1. Under the SG0 tag, which is located under inv_order, right-click the HL tag, select Add, andthen click Element.
2. Repeat step 1 to create another element.
3. Use the position icons (Move Up and Move Down) on the toolbar (or right-click and selectfrom the control menu) to position one of the newly created elements at the top of all HLelements, and the other at the bottom of all HL elements.
Configuring Order Level Segments
354

4. Rename the top HL element as incr_hlctr and the other element at the bottom,save_location_of_order, as shown in the following image.
5. Right-click the incr_hlctr element, select Properties in the context menu, click the ellipses(...) button under the General tab, and then map the HLCTR variable.
G. Tutorial: Mapping an IDOC to an Advanced Ship Notice (ASN)
iWay Integration Solution for EDI X12 User's Guide 355
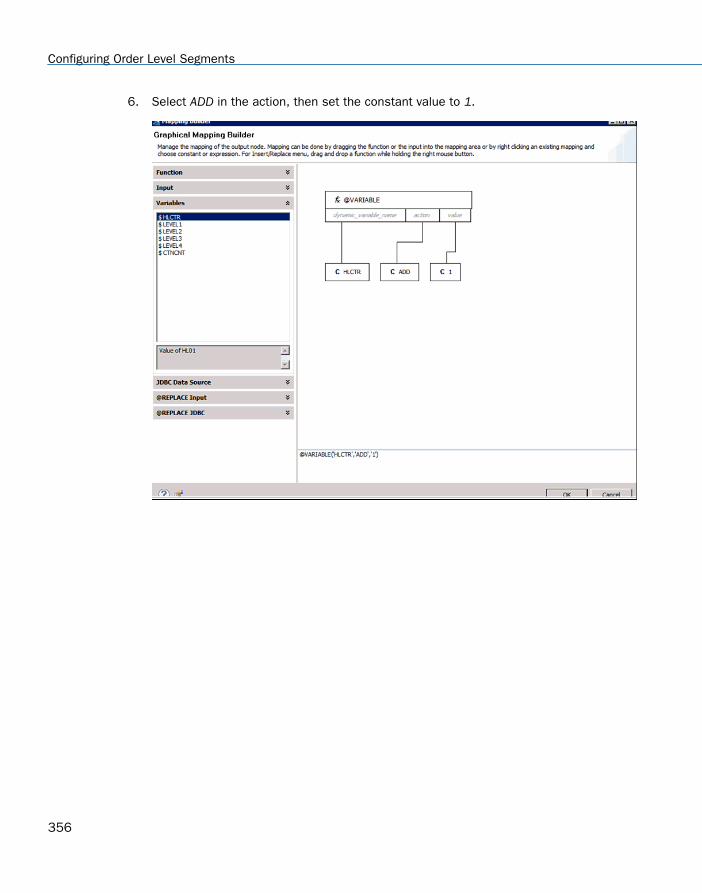
6. Select ADD in the action, then set the constant value to 1.
Configuring Order Level Segments
356
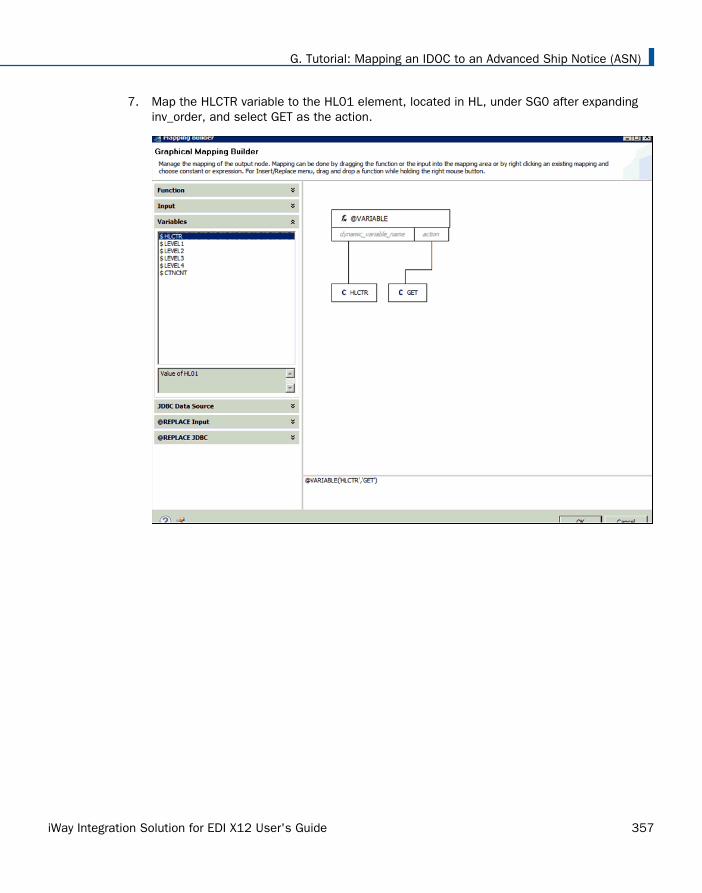
7. Map the HLCTR variable to the HL01 element, located in HL, under SG0 after expandinginv_order, and select GET as the action.
G. Tutorial: Mapping an IDOC to an Advanced Ship Notice (ASN)
iWay Integration Solution for EDI X12 User's Guide 357
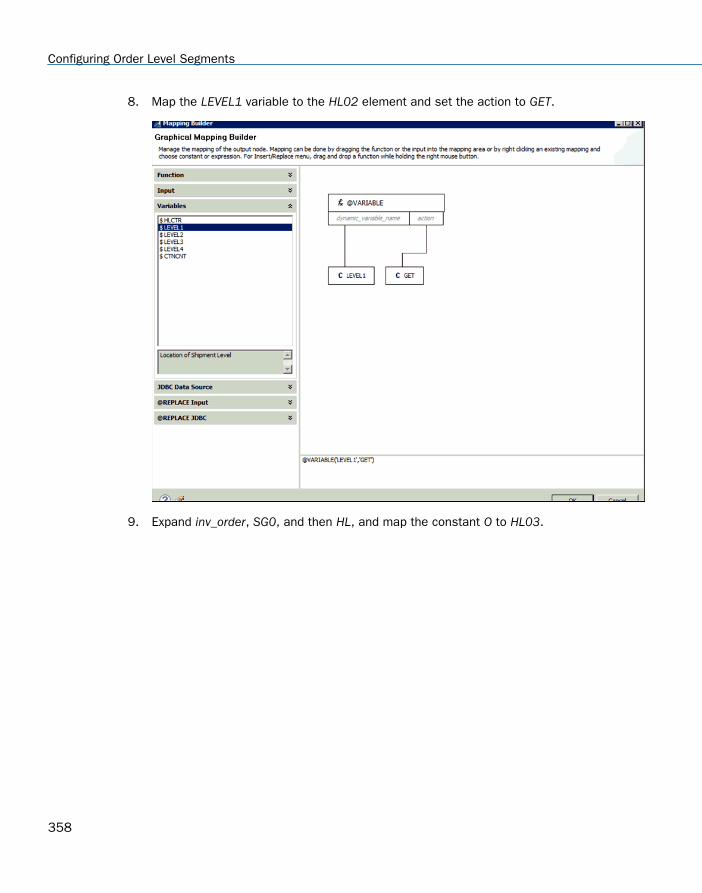
8. Map the LEVEL1 variable to the HL02 element and set the action to GET.
9. Expand inv_order, SG0, and then HL, and map the constant O to HL03.
Configuring Order Level Segments
358
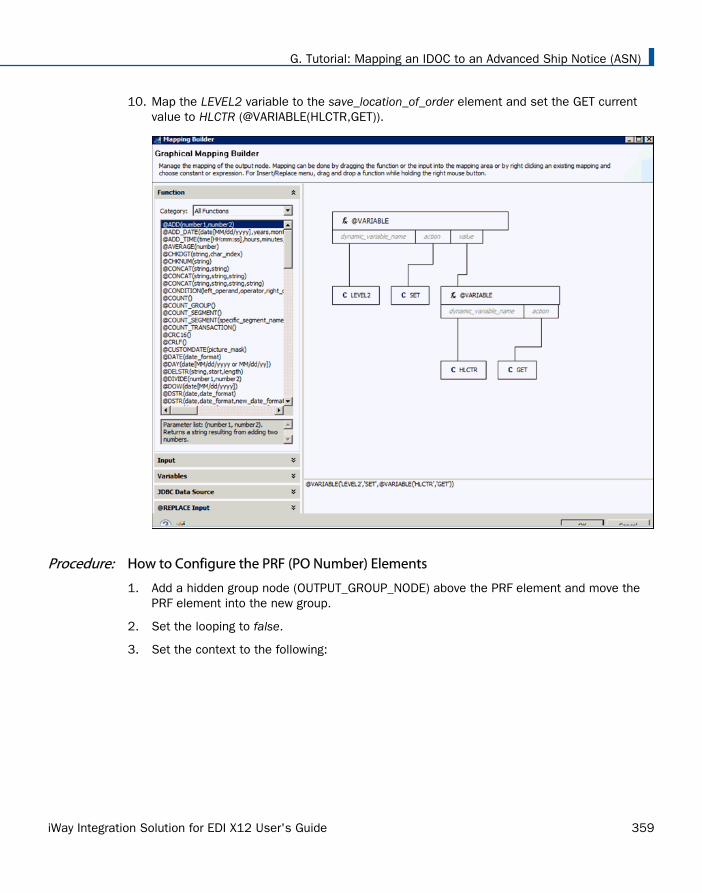
10. Map the LEVEL2 variable to the save_location_of_order element and set the GET currentvalue to HLCTR (@VARIABLE(HLCTR,GET)).
Procedure: How to Configure the PRF (PO Number) Elements
1. Add a hidden group node (OUTPUT_GROUP_NODE) above the PRF element and move thePRF element into the new group.
2. Set the looping to false.
3. Set the context to the following:
G. Tutorial: Mapping an IDOC to an Advanced Ship Notice (ASN)
iWay Integration Solution for EDI X12 User's Guide 359
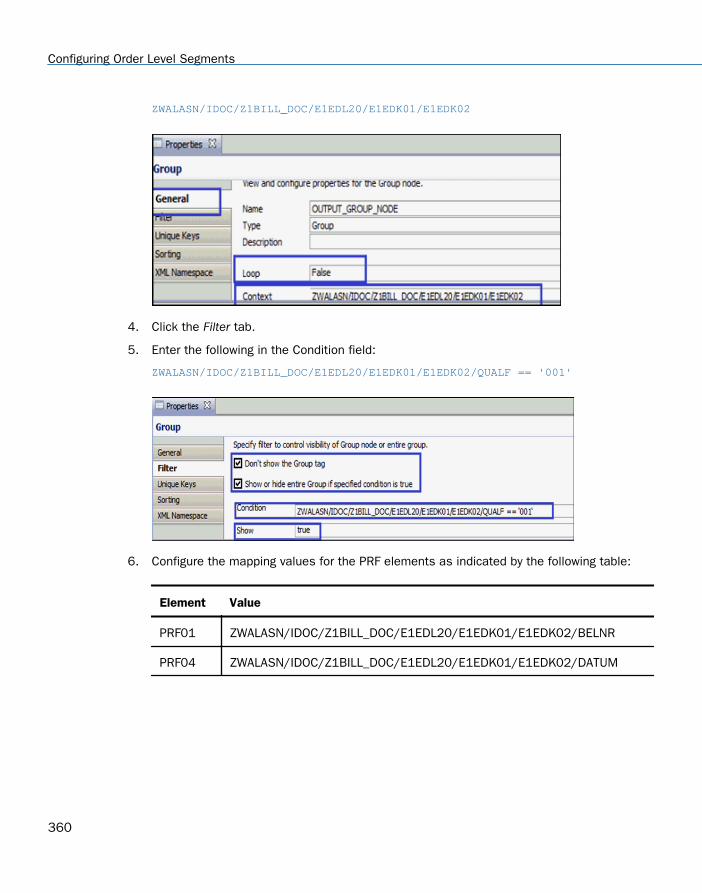
ZWALASN/IDOC/Z1BILL_DOC/E1EDL20/E1EDK01/E1EDK02
4. Click the Filter tab.
5. Enter the following in the Condition field:
ZWALASN/IDOC/Z1BILL_DOC/E1EDL20/E1EDK01/E1EDK02/QUALF == '001'
6. Configure the mapping values for the PRF elements as indicated by the following table:
Element Value
PRF01 ZWALASN/IDOC/Z1BILL_DOC/E1EDL20/E1EDK01/E1EDK02/BELNR
PRF04 ZWALASN/IDOC/Z1BILL_DOC/E1EDL20/E1EDK01/E1EDK02/DATUM
Configuring Order Level Segments
360
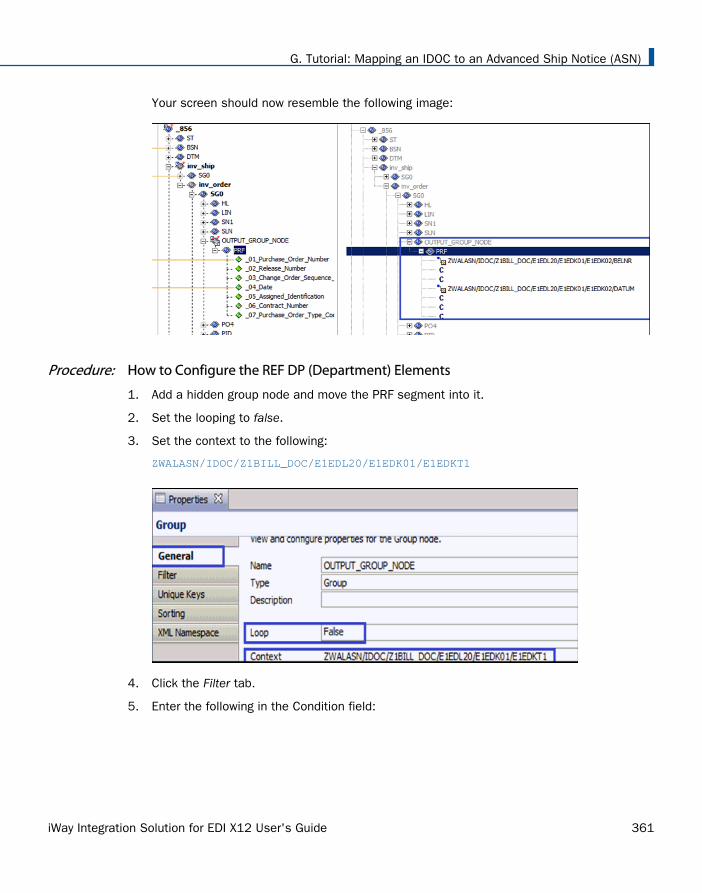
Your screen should now resemble the following image:
Procedure: How to Configure the REF DP (Department) Elements
1. Add a hidden group node and move the PRF segment into it.
2. Set the looping to false.
3. Set the context to the following:
ZWALASN/IDOC/Z1BILL_DOC/E1EDL20/E1EDK01/E1EDKT1
4. Click the Filter tab.
5. Enter the following in the Condition field:
G. Tutorial: Mapping an IDOC to an Advanced Ship Notice (ASN)
iWay Integration Solution for EDI X12 User's Guide 361
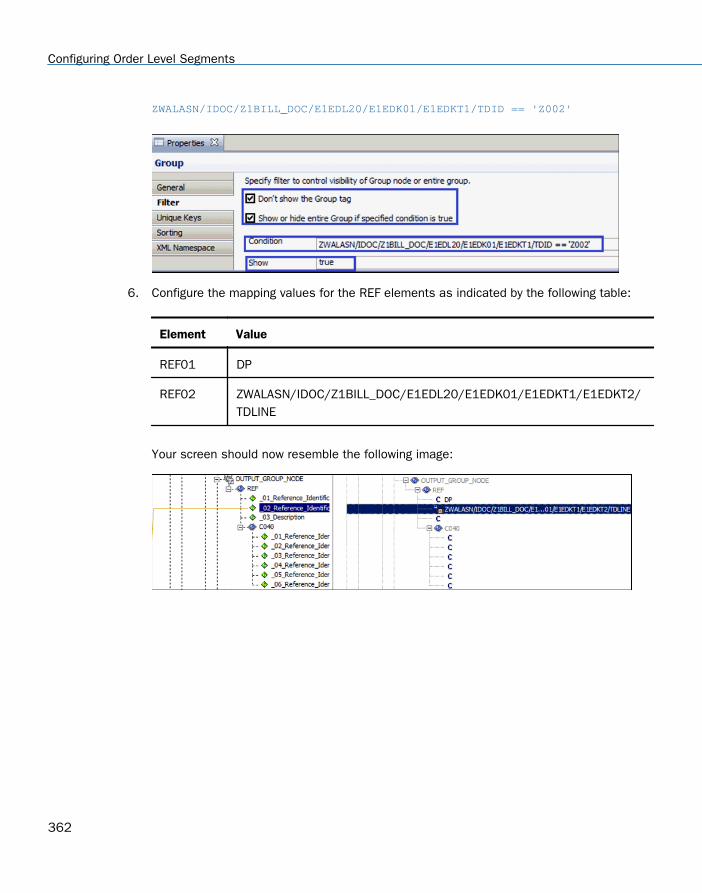
ZWALASN/IDOC/Z1BILL_DOC/E1EDL20/E1EDK01/E1EDKT1/TDID == 'Z002'
6. Configure the mapping values for the REF elements as indicated by the following table:
Element Value
REF01 DP
REF02 ZWALASN/IDOC/Z1BILL_DOC/E1EDL20/E1EDK01/E1EDKT1/E1EDKT2/TDLINE
Your screen should now resemble the following image:
Configuring Order Level Segments
362
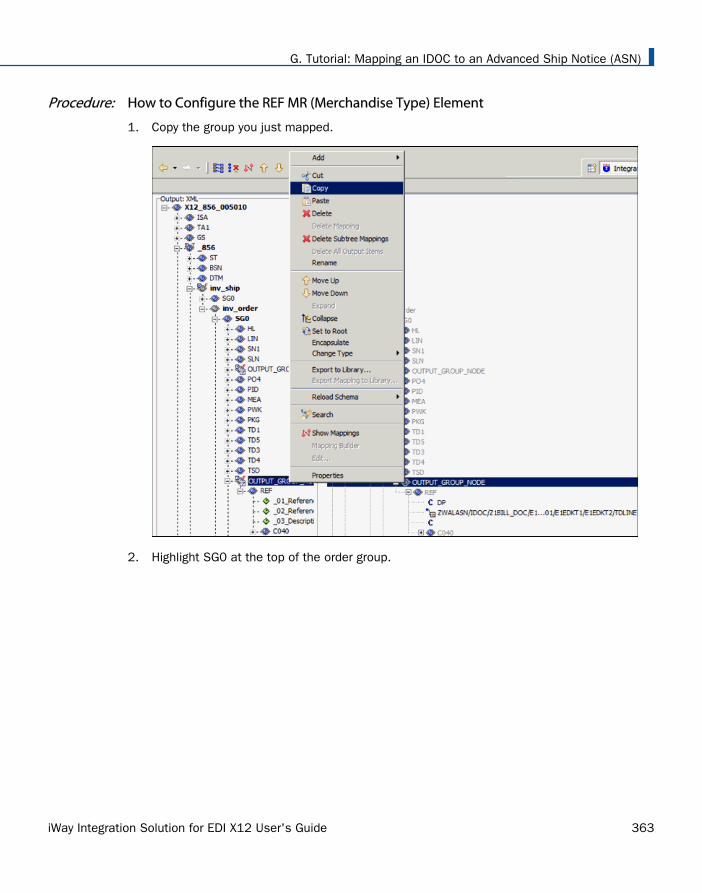
Procedure: How to Configure the REF MR (Merchandise Type) Element
1. Copy the group you just mapped.
2. Highlight SG0 at the top of the order group.
G. Tutorial: Mapping an IDOC to an Advanced Ship Notice (ASN)
iWay Integration Solution for EDI X12 User's Guide 363
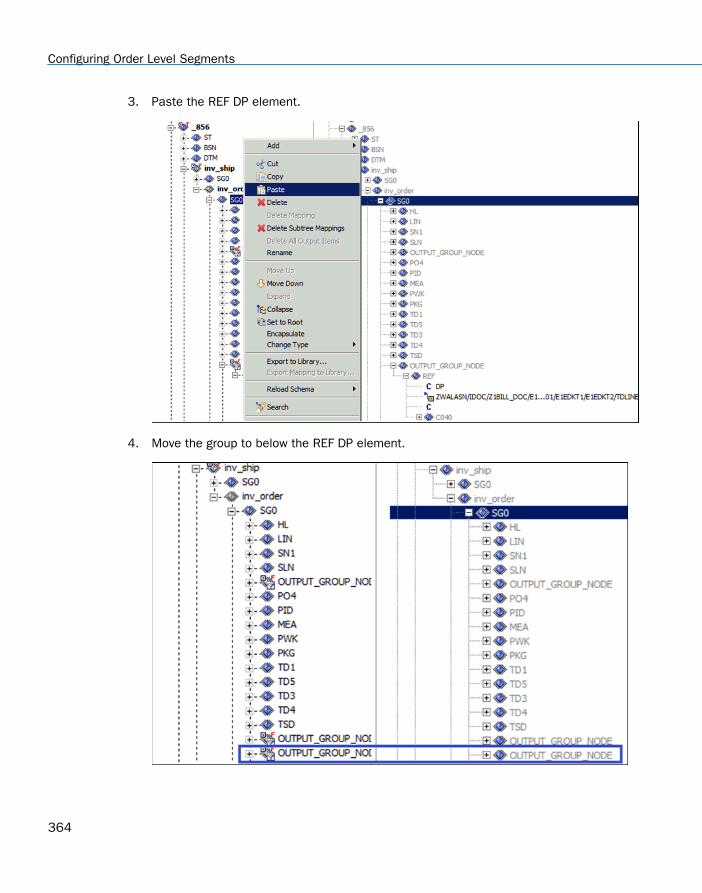
3. Paste the REF DP element.
4. Move the group to below the REF DP element.
Configuring Order Level Segments
364

5. Change the specified condition in the Filter tab from Z002 to Z003.
6. Change REF01 from DP to MR.Your screen should now resemble the following image:
G. Tutorial: Mapping an IDOC to an Advanced Ship Notice (ASN)
iWay Integration Solution for EDI X12 User's Guide 365
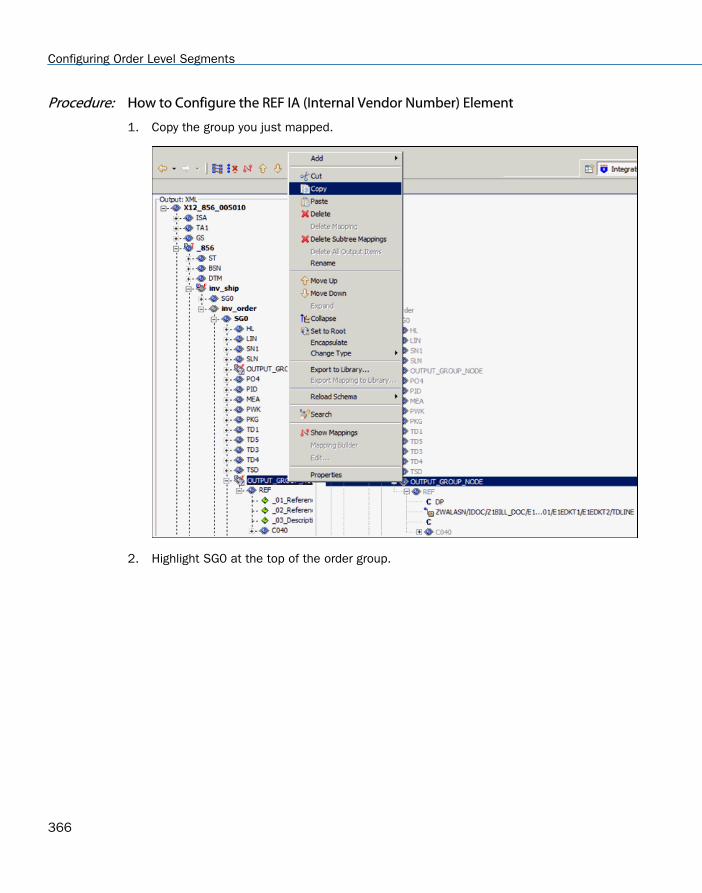
Procedure: How to Configure the REF IA (Internal Vendor Number) Element
1. Copy the group you just mapped.
2. Highlight SG0 at the top of the order group.
Configuring Order Level Segments
366
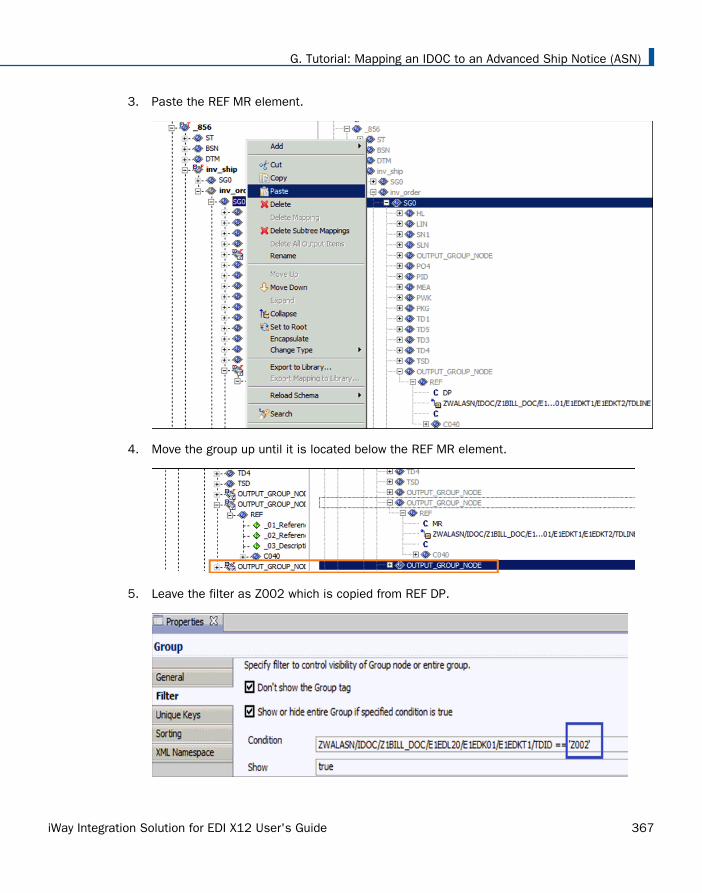
3. Paste the REF MR element.
4. Move the group up until it is located below the REF MR element.
5. Leave the filter as Z002 which is copied from REF DP.
G. Tutorial: Mapping an IDOC to an Advanced Ship Notice (ASN)
iWay Integration Solution for EDI X12 User's Guide 367
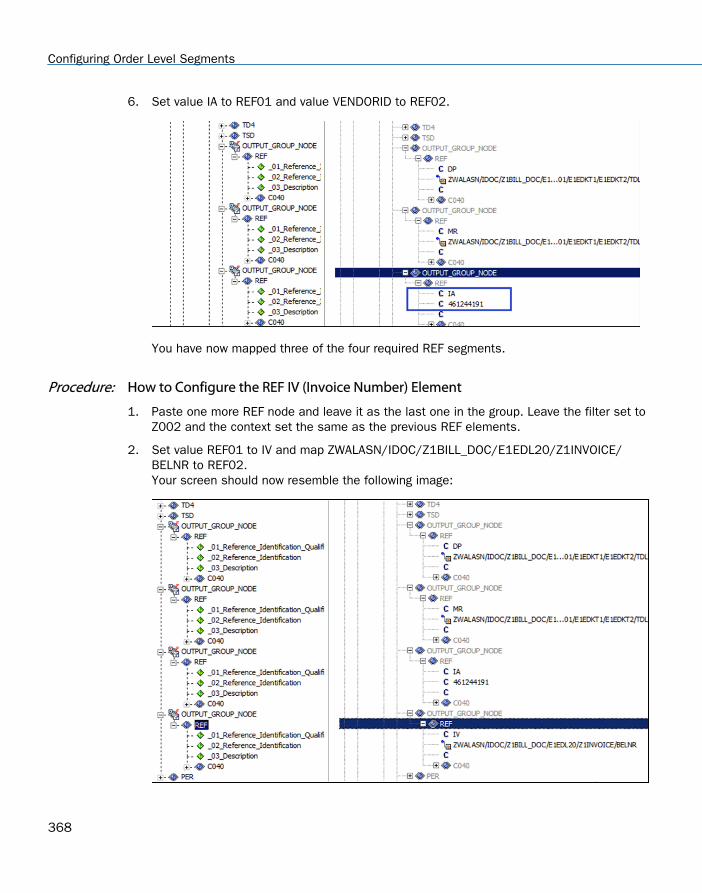
6. Set value IA to REF01 and value VENDORID to REF02.
You have now mapped three of the four required REF segments.
Procedure: How to Configure the REF IV (Invoice Number) Element
1. Paste one more REF node and leave it as the last one in the group. Leave the filter set toZ002 and the context set the same as the previous REF elements.
2. Set value REF01 to IV and map ZWALASN/IDOC/Z1BILL_DOC/E1EDL20/Z1INVOICE/BELNR to REF02.Your screen should now resemble the following image:
Configuring Order Level Segments
368
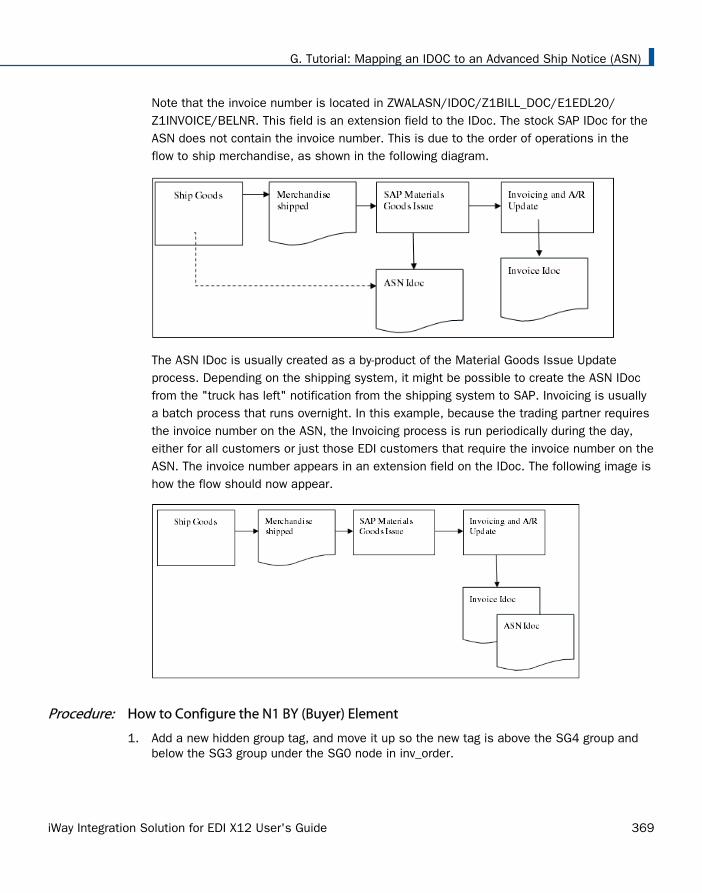
Note that the invoice number is located in ZWALASN/IDOC/Z1BILL_DOC/E1EDL20/Z1INVOICE/BELNR. This field is an extension field to the IDoc. The stock SAP IDoc for theASN does not contain the invoice number. This is due to the order of operations in theflow to ship merchandise, as shown in the following diagram.
The ASN IDoc is usually created as a by-product of the Material Goods Issue Updateprocess. Depending on the shipping system, it might be possible to create the ASN IDocfrom the "truck has left" notification from the shipping system to SAP. Invoicing is usuallya batch process that runs overnight. In this example, because the trading partner requiresthe invoice number on the ASN, the Invoicing process is run periodically during the day,either for all customers or just those EDI customers that require the invoice number on theASN. The invoice number appears in an extension field on the IDoc. The following image ishow the flow should now appear.
Procedure: How to Configure the N1 BY (Buyer) Element
1. Add a new hidden group tag, and move it up so the new tag is above the SG4 group andbelow the SG3 group under the SG0 node in inv_order.
G. Tutorial: Mapping an IDOC to an Advanced Ship Notice (ASN)
iWay Integration Solution for EDI X12 User's Guide 369
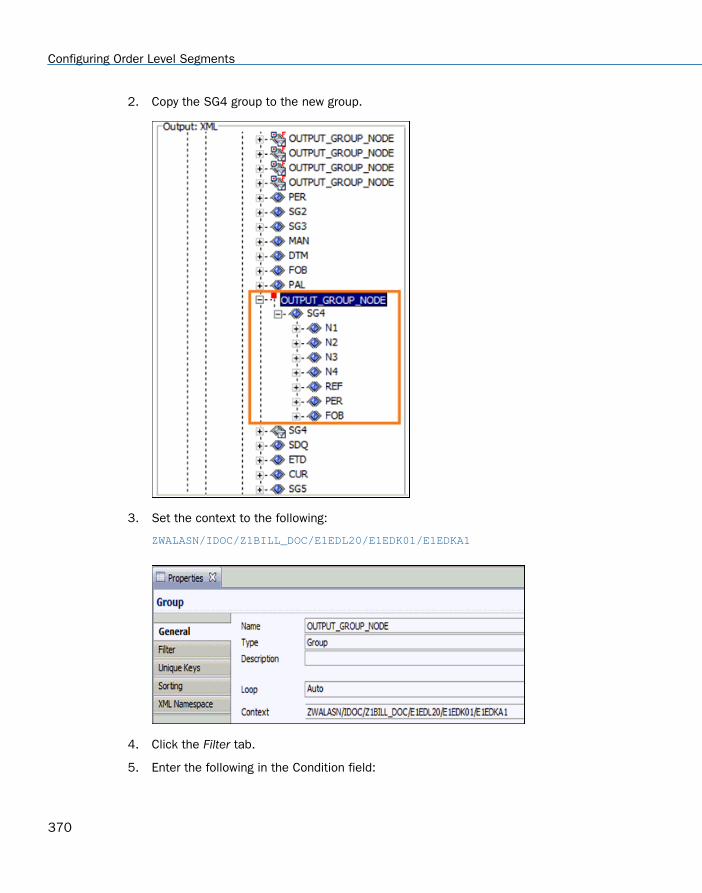
2. Copy the SG4 group to the new group.
3. Set the context to the following:
ZWALASN/IDOC/Z1BILL_DOC/E1EDL20/E1EDK01/E1EDKA1
4. Click the Filter tab.
5. Enter the following in the Condition field:
Configuring Order Level Segments
370
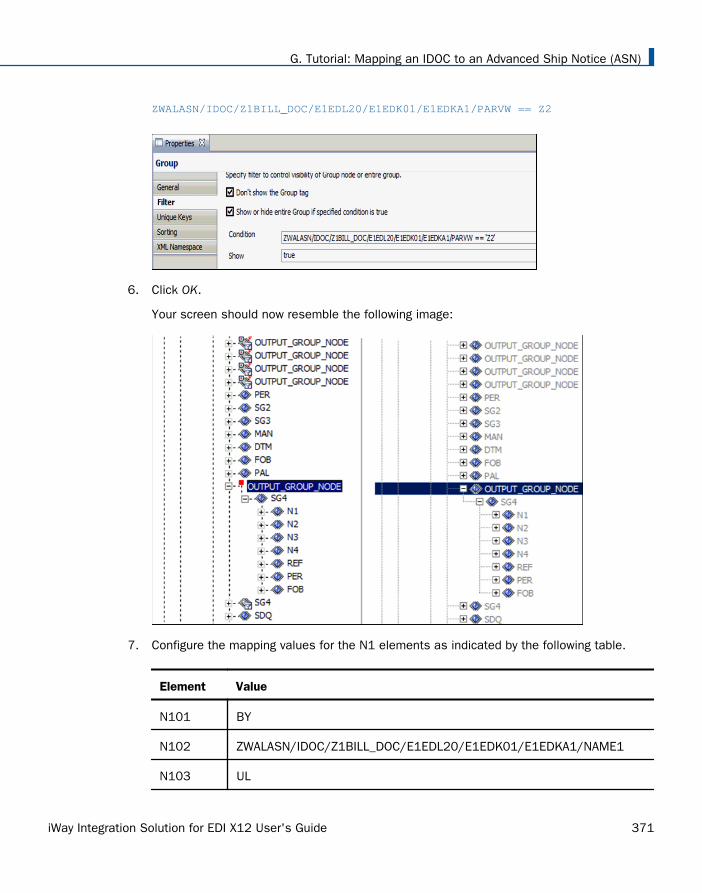
ZWALASN/IDOC/Z1BILL_DOC/E1EDL20/E1EDK01/E1EDKA1/PARVW == Z2
6. Click OK.
Your screen should now resemble the following image:
7. Configure the mapping values for the N1 elements as indicated by the following table.
Element Value
N101 BY
N102 ZWALASN/IDOC/Z1BILL_DOC/E1EDL20/E1EDK01/E1EDKA1/NAME1
N103 UL
G. Tutorial: Mapping an IDOC to an Advanced Ship Notice (ASN)
iWay Integration Solution for EDI X12 User's Guide 371
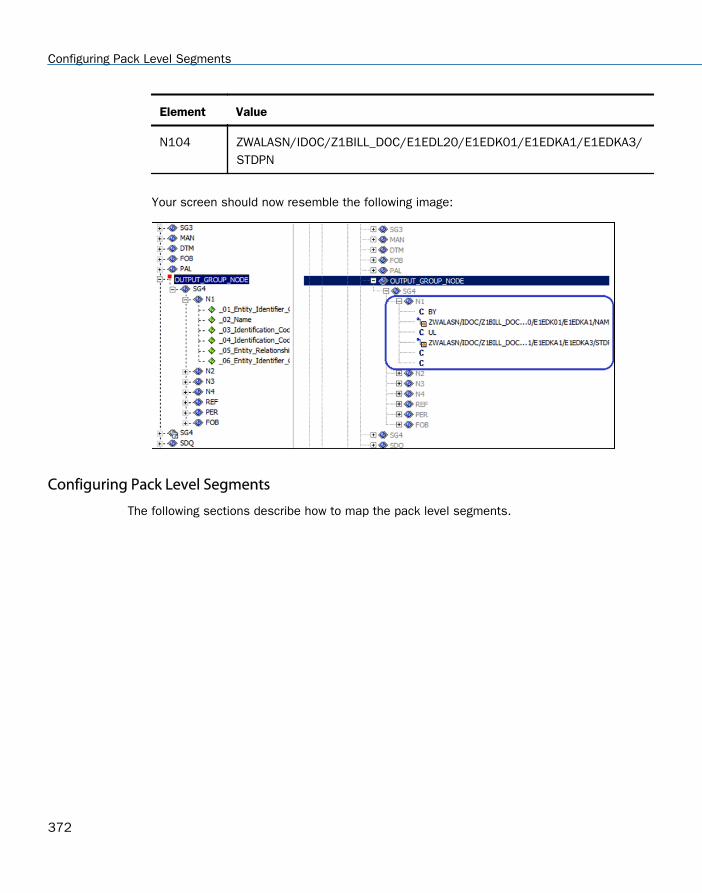
Element Value
N104 ZWALASN/IDOC/Z1BILL_DOC/E1EDL20/E1EDK01/E1EDKA1/E1EDKA3/STDPN
Your screen should now resemble the following image:
Configuring Pack Level Segments
The following sections describe how to map the pack level segments.
Configuring Pack Level Segments
372
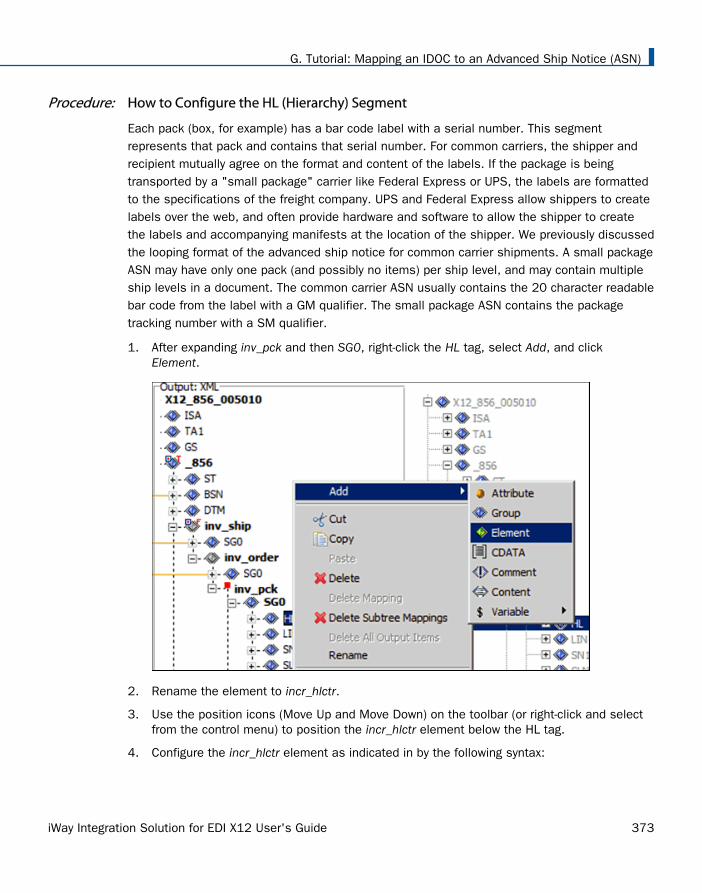
Procedure: How to Configure the HL (Hierarchy) Segment
Each pack (box, for example) has a bar code label with a serial number. This segmentrepresents that pack and contains that serial number. For common carriers, the shipper andrecipient mutually agree on the format and content of the labels. If the package is beingtransported by a "small package" carrier like Federal Express or UPS, the labels are formattedto the specifications of the freight company. UPS and Federal Express allow shippers to createlabels over the web, and often provide hardware and software to allow the shipper to createthe labels and accompanying manifests at the location of the shipper. We previously discussedthe looping format of the advanced ship notice for common carrier shipments. A small packageASN may have only one pack (and possibly no items) per ship level, and may contain multipleship levels in a document. The common carrier ASN usually contains the 20 character readablebar code from the label with a GM qualifier. The small package ASN contains the packagetracking number with a SM qualifier.
1. After expanding inv_pck and then SG0, right-click the HL tag, select Add, and clickElement.
2. Rename the element to incr_hlctr.
3. Use the position icons (Move Up and Move Down) on the toolbar (or right-click and selectfrom the control menu) to position the incr_hlctr element below the HL tag.
4. Configure the incr_hlctr element as indicated in by the following syntax:
G. Tutorial: Mapping an IDOC to an Advanced Ship Notice (ASN)
iWay Integration Solution for EDI X12 User's Guide 373
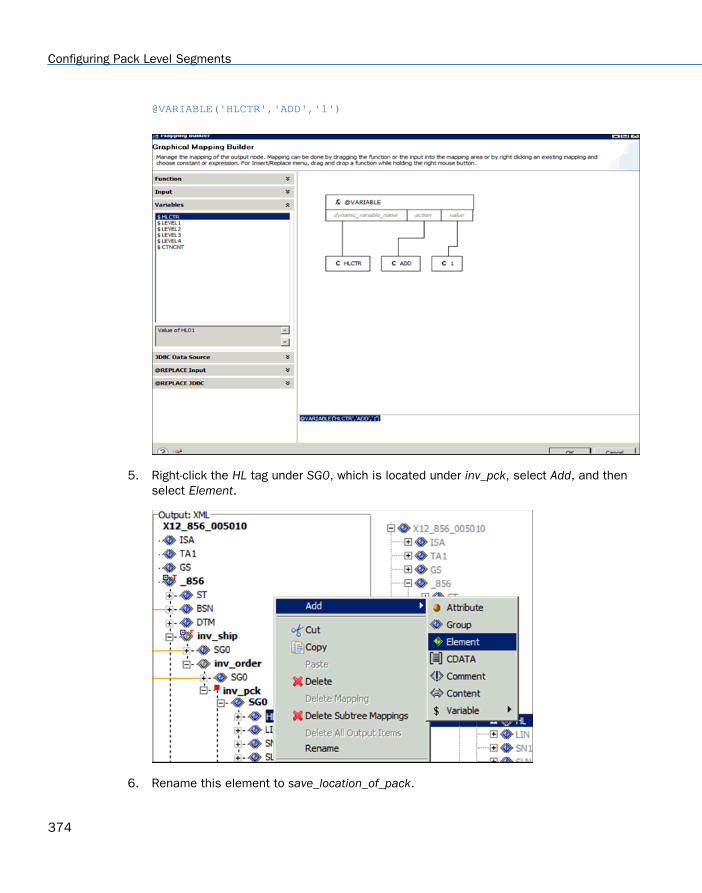
@VARIABLE('HLCTR','ADD','1')
5. Right-click the HL tag under SG0, which is located under inv_pck, select Add, and thenselect Element.
6. Rename this element to save_location_of_pack.
Configuring Pack Level Segments
374
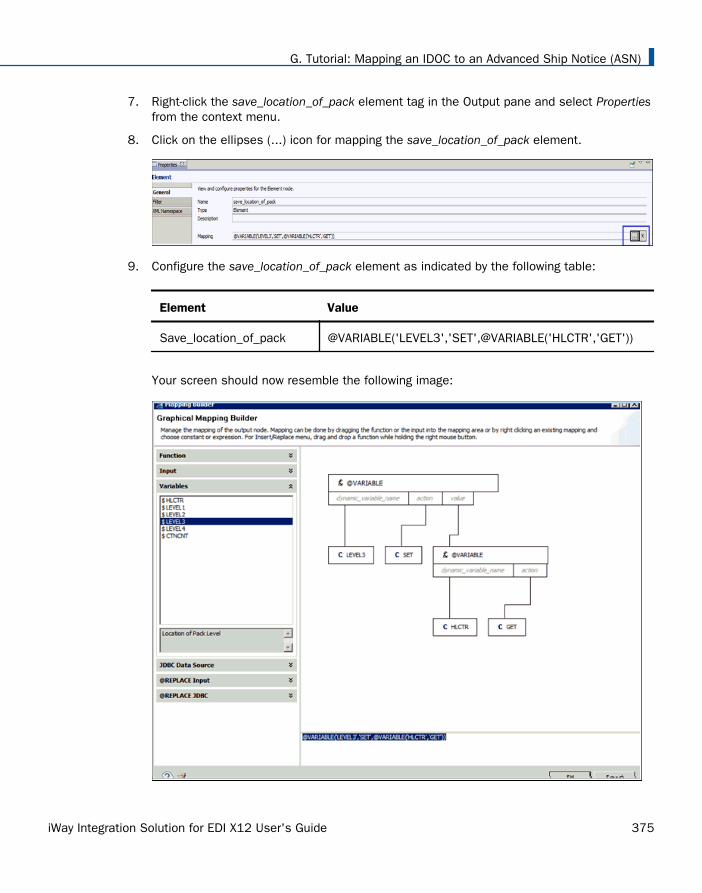
7. Right-click the save_location_of_pack element tag in the Output pane and select Propertiesfrom the context menu.
8. Click on the ellipses (...) icon for mapping the save_location_of_pack element.
9. Configure the save_location_of_pack element as indicated by the following table:
Element Value
Save_location_of_pack @VARIABLE('LEVEL3','SET',@VARIABLE('HLCTR','GET'))
Your screen should now resemble the following image:
G. Tutorial: Mapping an IDOC to an Advanced Ship Notice (ASN)
iWay Integration Solution for EDI X12 User's Guide 375
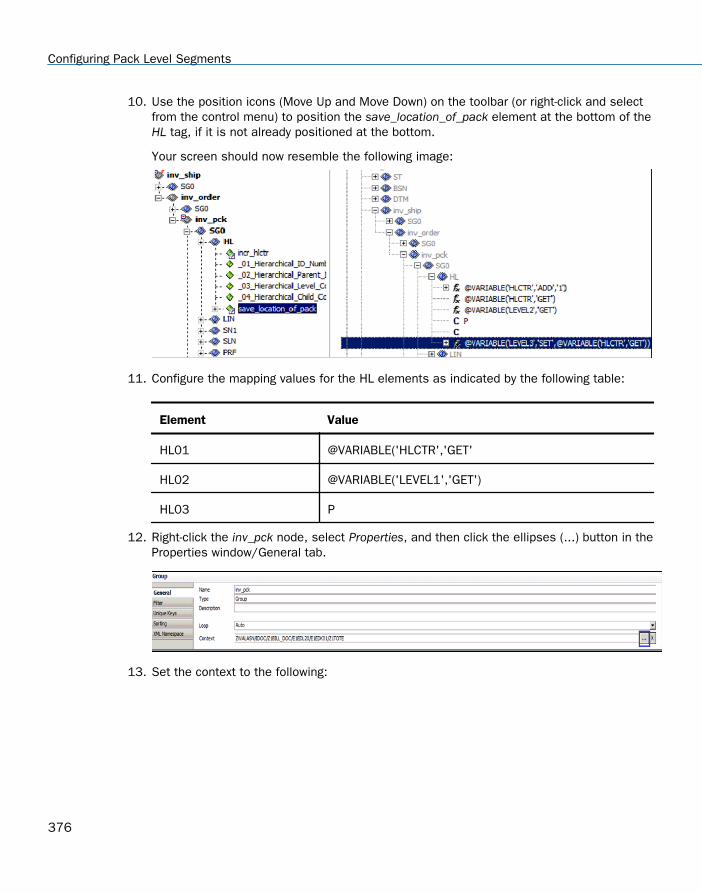
10. Use the position icons (Move Up and Move Down) on the toolbar (or right-click and selectfrom the control menu) to position the save_location_of_pack element at the bottom of theHL tag, if it is not already positioned at the bottom.
Your screen should now resemble the following image:
11. Configure the mapping values for the HL elements as indicated by the following table:
Element Value
HL01 @VARIABLE('HLCTR','GET'
HL02 @VARIABLE('LEVEL1','GET')
HL03 P
12. Right-click the inv_pck node, select Properties, and then click the ellipses (...) button in theProperties window/General tab.
13. Set the context to the following:
Configuring Pack Level Segments
376
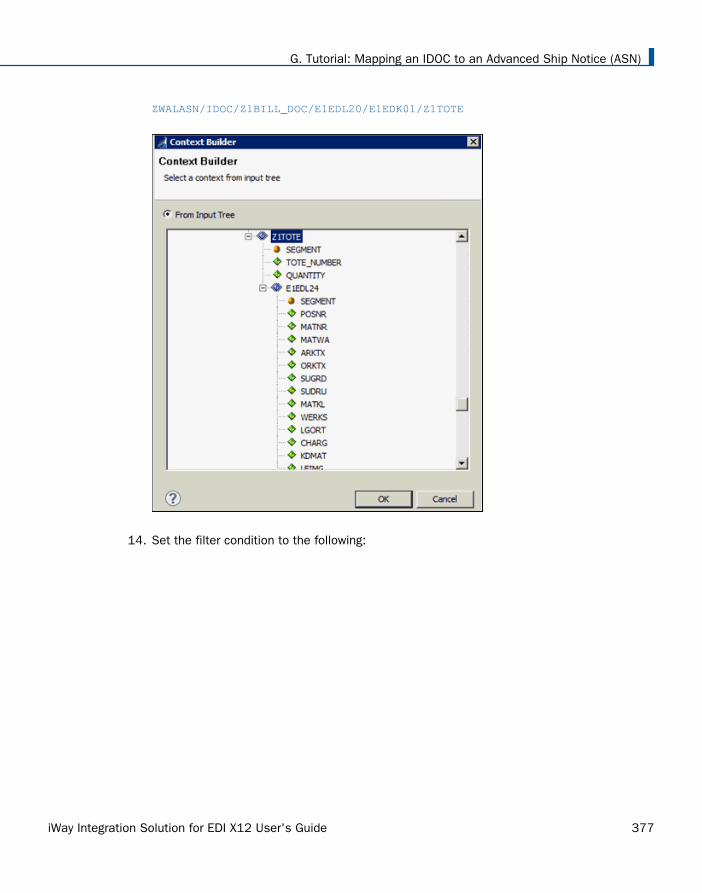
ZWALASN/IDOC/Z1BILL_DOC/E1EDL20/E1EDK01/Z1TOTE
14. Set the filter condition to the following:
G. Tutorial: Mapping an IDOC to an Advanced Ship Notice (ASN)
iWay Integration Solution for EDI X12 User's Guide 377
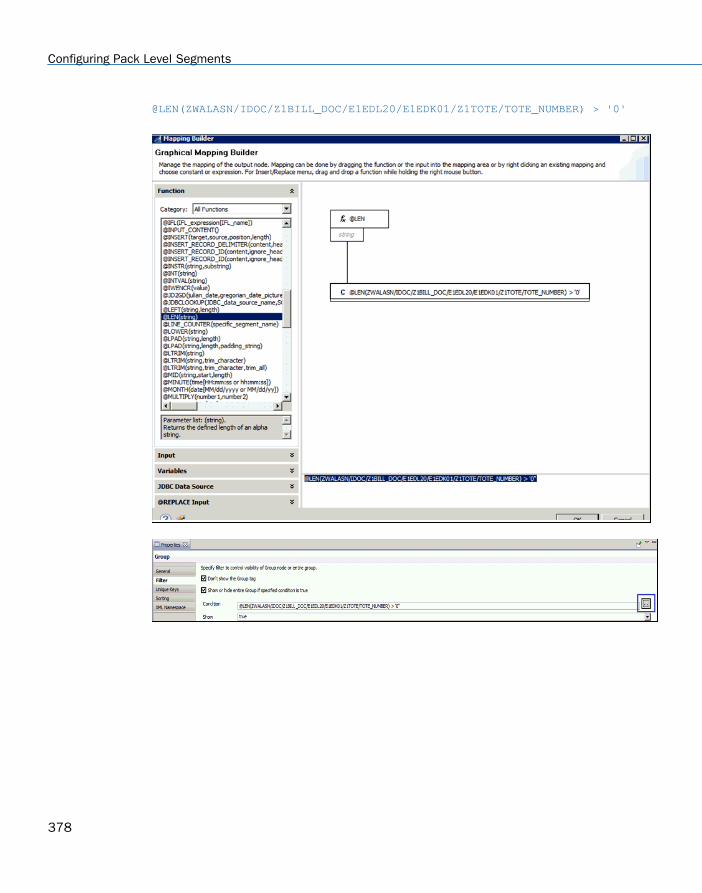
@LEN(ZWALASN/IDOC/Z1BILL_DOC/E1EDL20/E1EDK01/Z1TOTE/TOTE_NUMBER) > '0'
Configuring Pack Level Segments
378

Your screen should now resemble the following image:
Procedure: How to Configure the Man (Manifest) Element
1. Add a new hidden group tag (OUTPUT_GROUP_NODE). Move it up so the new tag is abovethe MAN segment.
2. Move the MAN segment to the new group.
3. Set the context to the following:
ZWALASN/IDOC/Z1BILL_DOC/E1EDL20/E1EDK01/Z1TOTE
4. Click the Filter tab.
5. Set the filter condition to the following:
G. Tutorial: Mapping an IDOC to an Advanced Ship Notice (ASN)
iWay Integration Solution for EDI X12 User's Guide 379
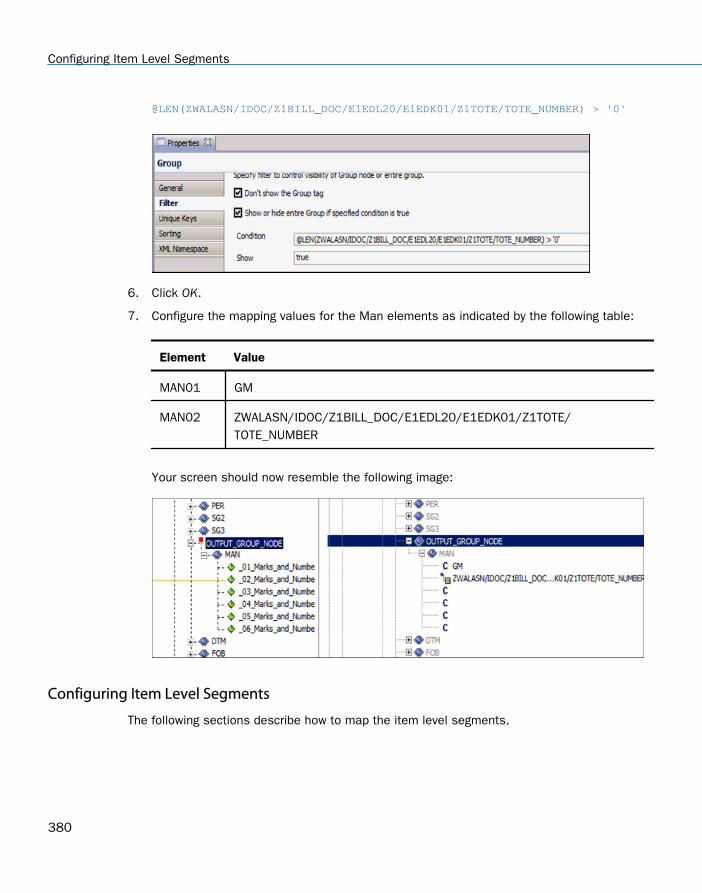
@LEN(ZWALASN/IDOC/Z1BILL_DOC/E1EDL20/E1EDK01/Z1TOTE/TOTE_NUMBER) > '0'
6. Click OK.
7. Configure the mapping values for the Man elements as indicated by the following table:
Element Value
MAN01 GM
MAN02 ZWALASN/IDOC/Z1BILL_DOC/E1EDL20/E1EDK01/Z1TOTE/TOTE_NUMBER
Your screen should now resemble the following image:
Configuring Item Level Segments
The following sections describe how to map the item level segments.
Configuring Item Level Segments
380
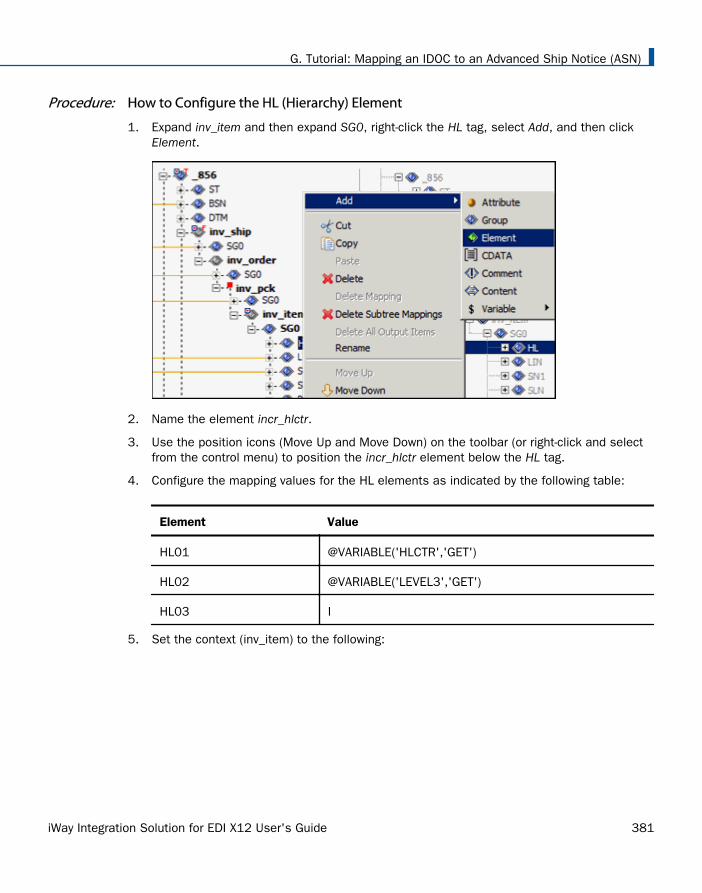
Procedure: How to Configure the HL (Hierarchy) Element
1. Expand inv_item and then expand SG0, right-click the HL tag, select Add, and then clickElement.
2. Name the element incr_hlctr.
3. Use the position icons (Move Up and Move Down) on the toolbar (or right-click and selectfrom the control menu) to position the incr_hlctr element below the HL tag.
4. Configure the mapping values for the HL elements as indicated by the following table:
Element Value
HL01 @VARIABLE('HLCTR','GET')
HL02 @VARIABLE('LEVEL3','GET')
HL03 I
5. Set the context (inv_item) to the following:
G. Tutorial: Mapping an IDOC to an Advanced Ship Notice (ASN)
iWay Integration Solution for EDI X12 User's Guide 381
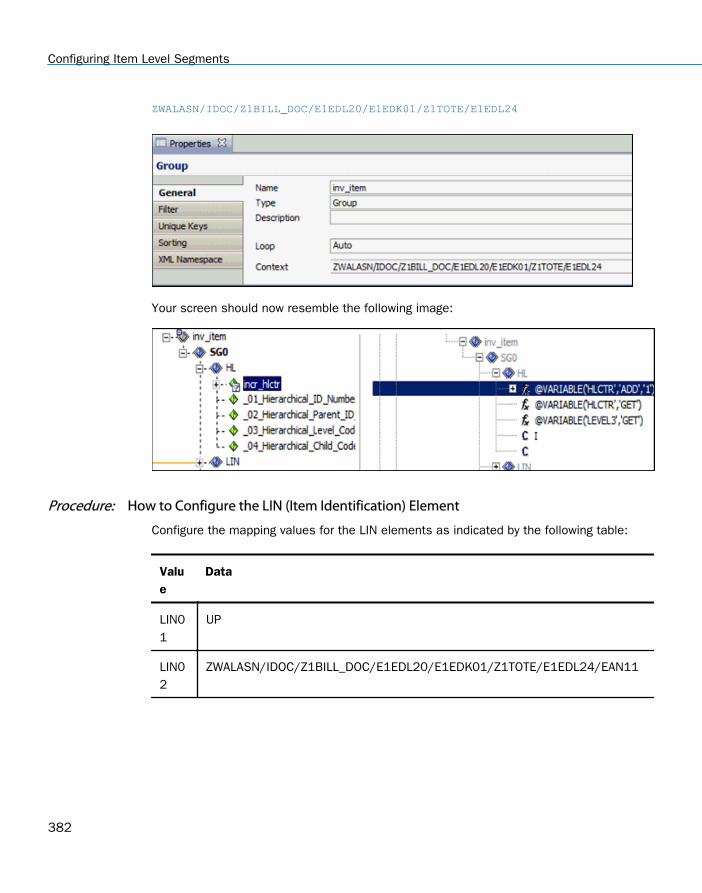
ZWALASN/IDOC/Z1BILL_DOC/E1EDL20/E1EDK01/Z1TOTE/E1EDL24
Your screen should now resemble the following image:
Procedure: How to Configure the LIN (Item Identification) Element
Configure the mapping values for the LIN elements as indicated by the following table:
Value
Data
LIN01
UP
LIN02
ZWALASN/IDOC/Z1BILL_DOC/E1EDL20/E1EDK01/Z1TOTE/E1EDL24/EAN11
Configuring Item Level Segments
382
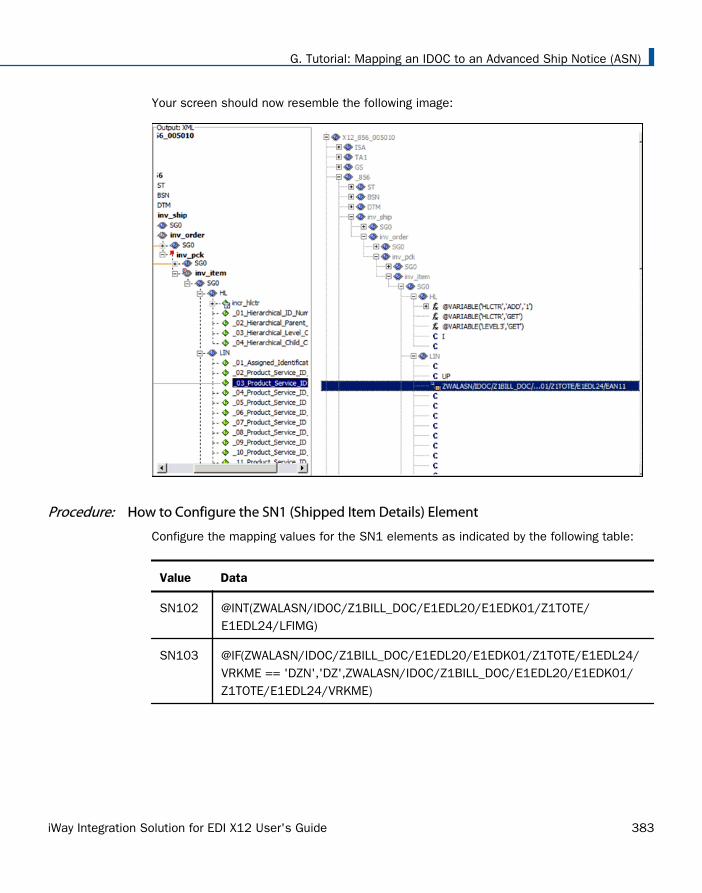
Your screen should now resemble the following image:
Procedure: How to Configure the SN1 (Shipped Item Details) Element
Configure the mapping values for the SN1 elements as indicated by the following table:
Value Data
SN102 @INT(ZWALASN/IDOC/Z1BILL_DOC/E1EDL20/E1EDK01/Z1TOTE/E1EDL24/LFIMG)
SN103 @IF(ZWALASN/IDOC/Z1BILL_DOC/E1EDL20/E1EDK01/Z1TOTE/E1EDL24/VRKME == 'DZN','DZ',ZWALASN/IDOC/Z1BILL_DOC/E1EDL20/E1EDK01/Z1TOTE/E1EDL24/VRKME)
G. Tutorial: Mapping an IDOC to an Advanced Ship Notice (ASN)
iWay Integration Solution for EDI X12 User's Guide 383
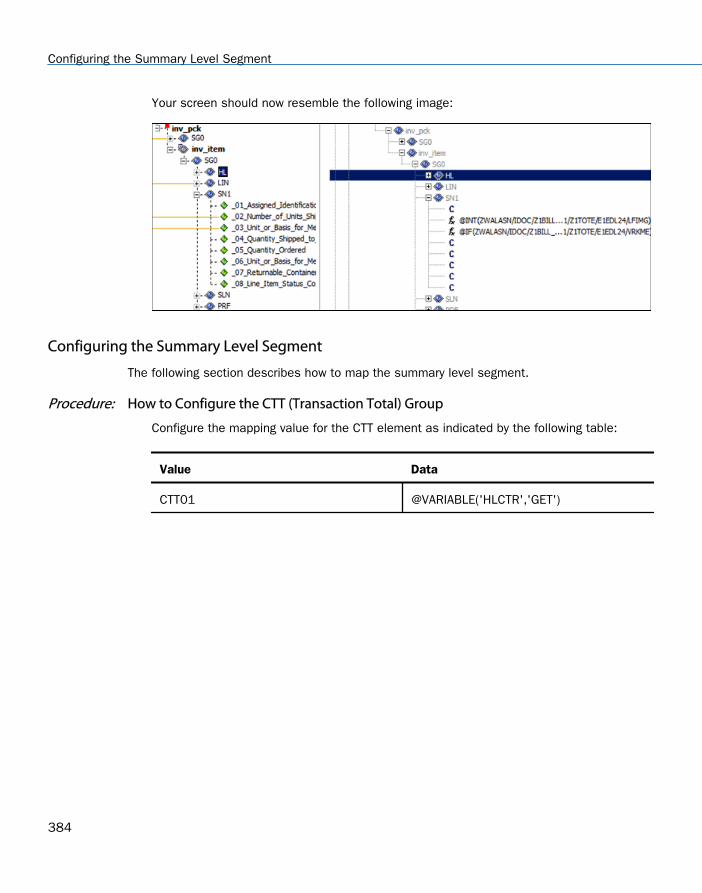
Your screen should now resemble the following image:
Configuring the Summary Level Segment
The following section describes how to map the summary level segment.
Procedure: How to Configure the CTT (Transaction Total) Group
Configure the mapping value for the CTT element as indicated by the following table:
Value Data
CTT01 @VARIABLE('HLCTR','GET')
Configuring the Summary Level Segment
384
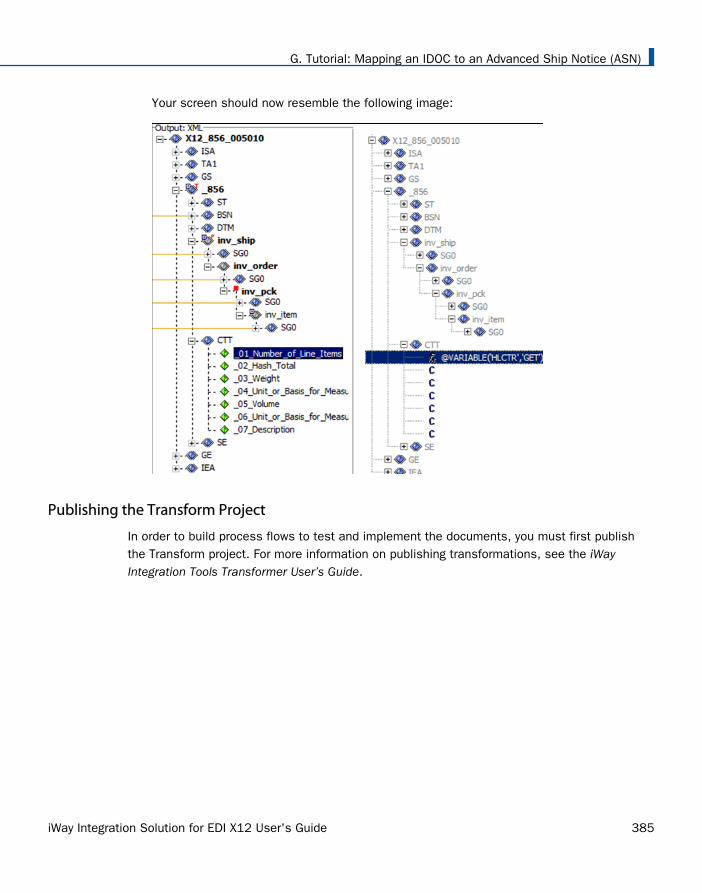
Your screen should now resemble the following image:
Publishing the Transform Project
In order to build process flows to test and implement the documents, you must first publishthe Transform project. For more information on publishing transformations, see the iWayIntegration Tools Transformer User’s Guide.
G. Tutorial: Mapping an IDOC to an Advanced Ship Notice (ASN)
iWay Integration Solution for EDI X12 User's Guide 385
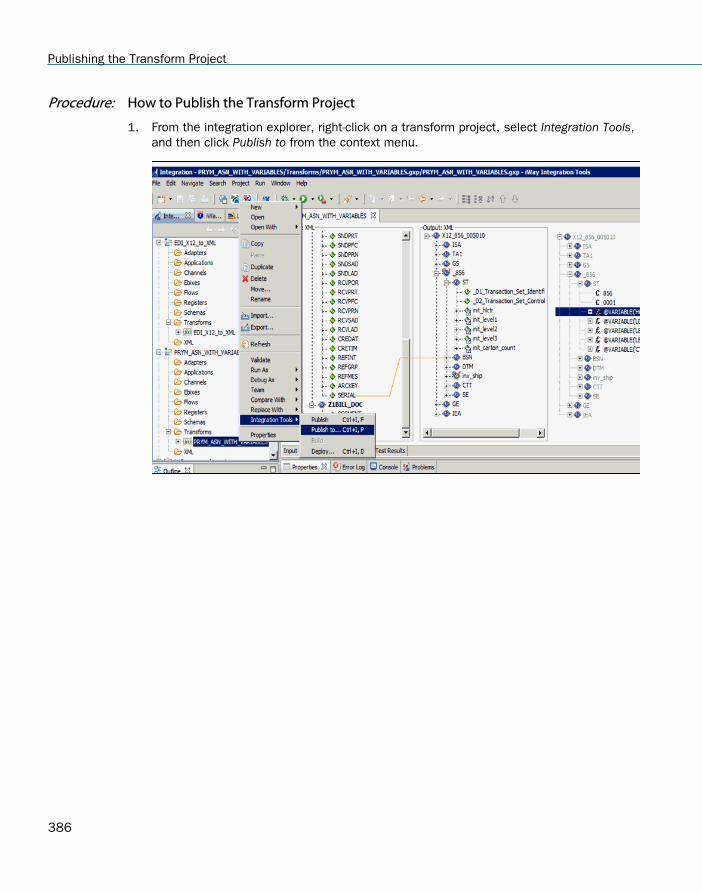
Procedure: How to Publish the Transform Project
1. From the integration explorer, right-click on a transform project, select Integration Tools,and then click Publish to from the context menu.
Publishing the Transform Project
386
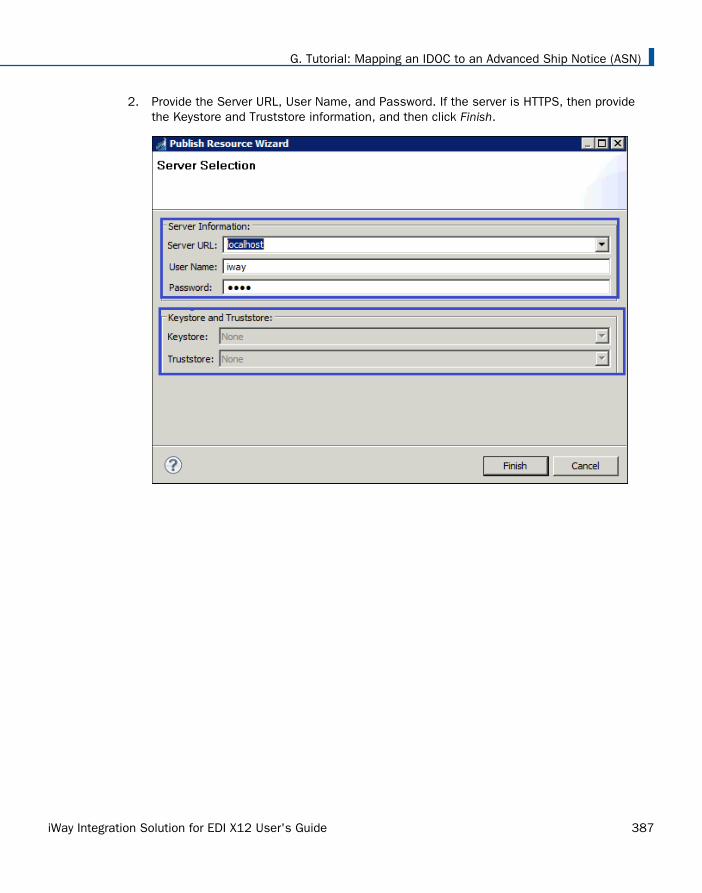
2. Provide the Server URL, User Name, and Password. If the server is HTTPS, then providethe Keystore and Truststore information, and then click Finish.
G. Tutorial: Mapping an IDOC to an Advanced Ship Notice (ASN)
iWay Integration Solution for EDI X12 User's Guide 387
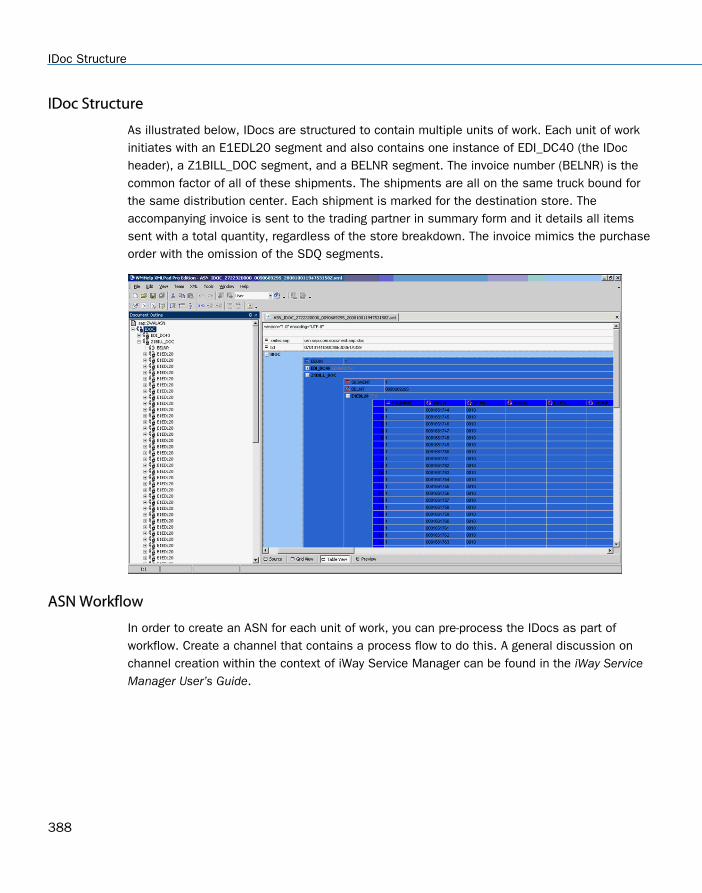
IDoc Structure
As illustrated below, IDocs are structured to contain multiple units of work. Each unit of workinitiates with an E1EDL20 segment and also contains one instance of EDI_DC40 (the IDocheader), a Z1BILL_DOC segment, and a BELNR segment. The invoice number (BELNR) is thecommon factor of all of these shipments. The shipments are all on the same truck bound forthe same distribution center. Each shipment is marked for the destination store. Theaccompanying invoice is sent to the trading partner in summary form and it details all itemssent with a total quantity, regardless of the store breakdown. The invoice mimics the purchaseorder with the omission of the SDQ segments.
ASN Workflow
In order to create an ASN for each unit of work, you can pre-process the IDocs as part ofworkflow. Create a channel that contains a process flow to do this. A general discussion onchannel creation within the context of iWay Service Manager can be found in the iWay ServiceManager User’s Guide.
IDoc Structure
388
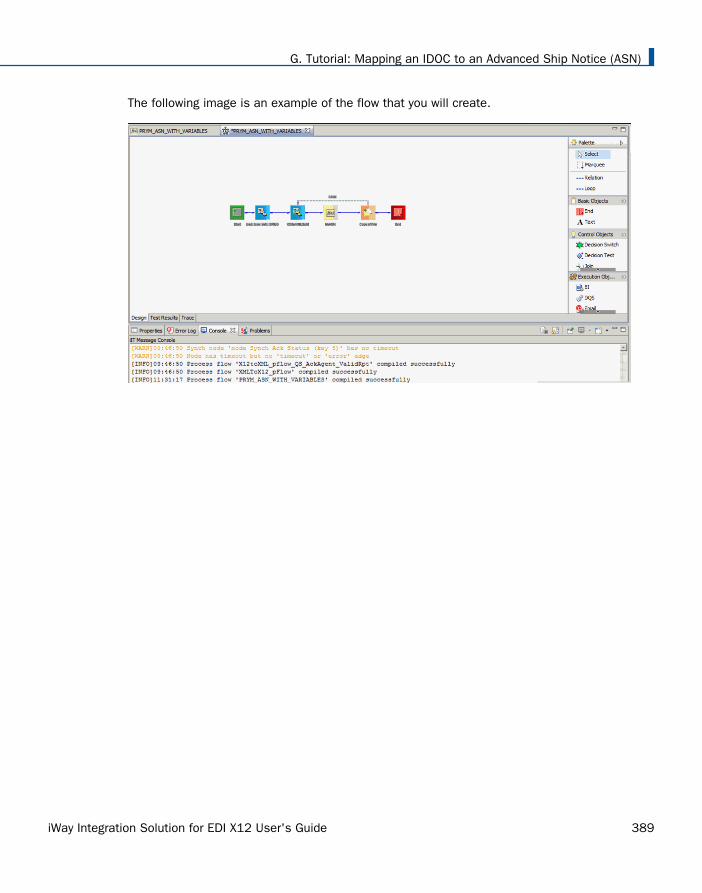
The following image is an example of the flow that you will create.
G. Tutorial: Mapping an IDOC to an Advanced Ship Notice (ASN)
iWay Integration Solution for EDI X12 User's Guide 389
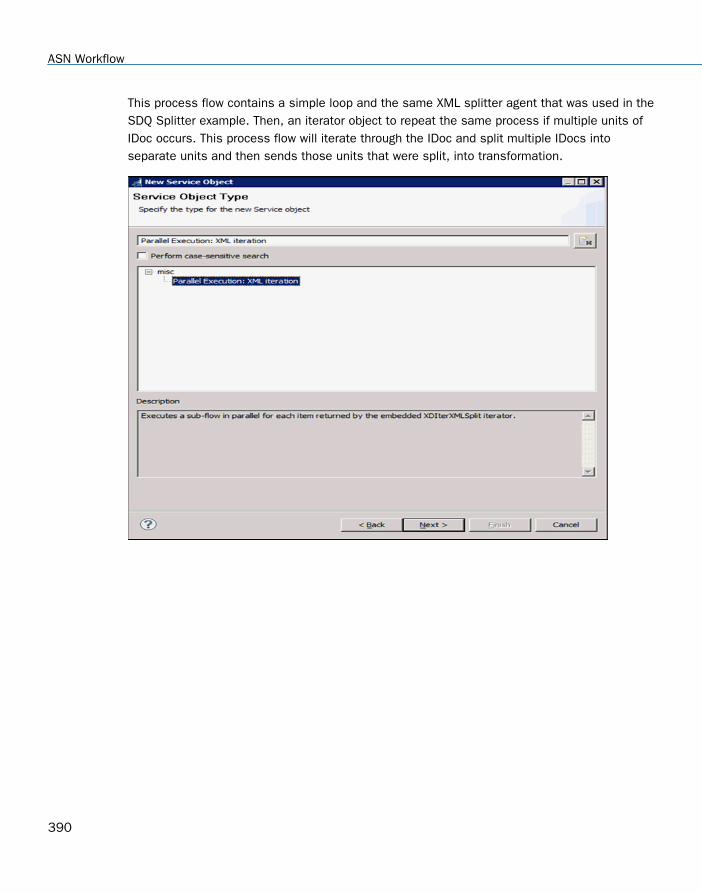
This process flow contains a simple loop and the same XML splitter agent that was used in theSDQ Splitter example. Then, an iterator object to repeat the same process if multiple units ofIDoc occurs. This process flow will iterate through the IDoc and split multiple IDocs intoseparate units and then sends those units that were split, into transformation.
ASN Workflow
390

Here are the splits.
When you are done creating your process flow, publish it to the registry under a meaningfulname.
ASN Transformation
There are two different styles to building the channels required for this transformation, a onechannel approach and a two channel approach. Both use the "standard EDI outbound channel"as documented in the EDI manual. Channel building is also covered in the iSM manual.
The One Channel Approach
G. Tutorial: Mapping an IDOC to an Advanced Ship Notice (ASN)
iWay Integration Solution for EDI X12 User's Guide 391
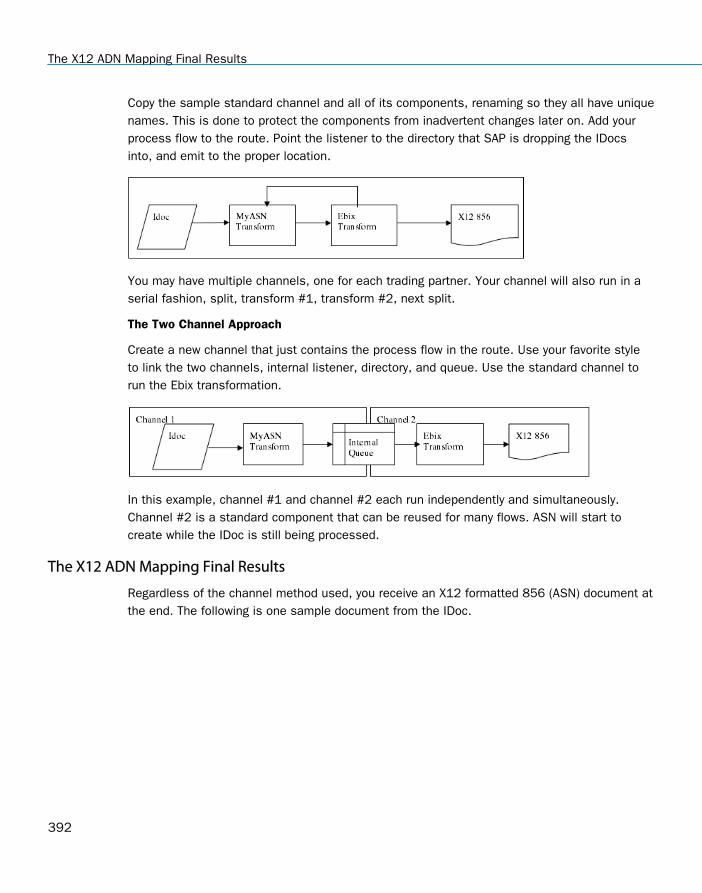
Copy the sample standard channel and all of its components, renaming so they all have uniquenames. This is done to protect the components from inadvertent changes later on. Add yourprocess flow to the route. Point the listener to the directory that SAP is dropping the IDocsinto, and emit to the proper location.
You may have multiple channels, one for each trading partner. Your channel will also run in aserial fashion, split, transform #1, transform #2, next split.
The Two Channel Approach
Create a new channel that just contains the process flow in the route. Use your favorite styleto link the two channels, internal listener, directory, and queue. Use the standard channel torun the Ebix transformation.
In this example, channel #1 and channel #2 each run independently and simultaneously.Channel #2 is a standard component that can be reused for many flows. ASN will start tocreate while the IDoc is still being processed.
The X12 ADN Mapping Final Results
Regardless of the channel method used, you receive an X12 formatted 856 (ASN) document atthe end. The following is one sample document from the IDoc.
The X12 ADN Mapping Final Results
392
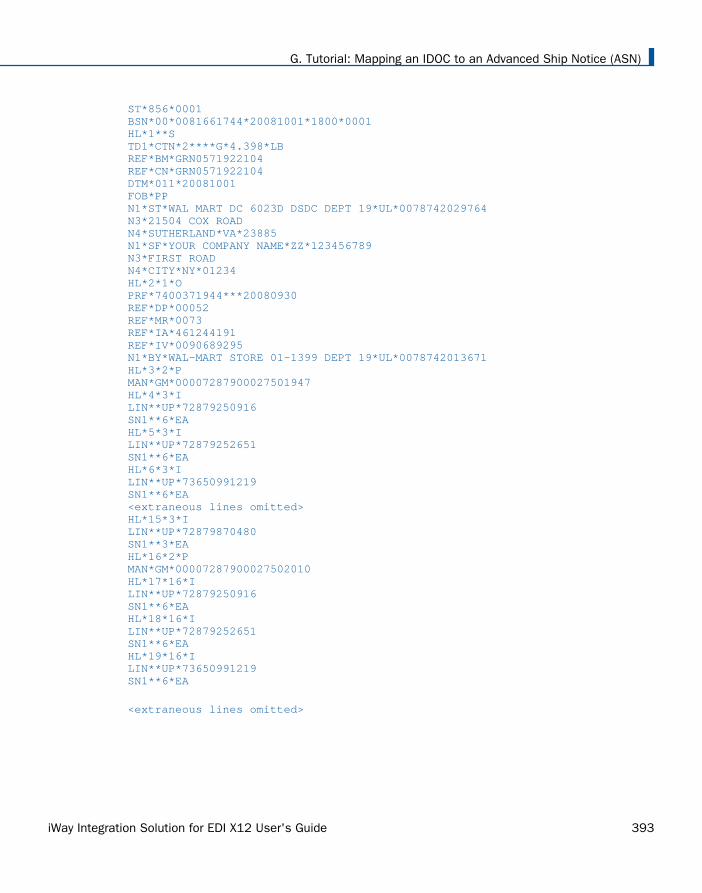
ST*856*0001BSN*00*0081661744*20081001*1800*0001HL*1**STD1*CTN*2****G*4.398*LBREF*BM*GRN0571922104REF*CN*GRN0571922104DTM*011*20081001FOB*PPN1*ST*WAL MART DC 6023D DSDC DEPT 19*UL*0078742029764N3*21504 COX ROADN4*SUTHERLAND*VA*23885N1*SF*YOUR COMPANY NAME*ZZ*123456789N3*FIRST ROADN4*CITY*NY*01234HL*2*1*OPRF*7400371944***20080930REF*DP*00052REF*MR*0073REF*IA*461244191REF*IV*0090689295N1*BY*WAL-MART STORE 01-1399 DEPT 19*UL*0078742013671HL*3*2*PMAN*GM*00007287900027501947HL*4*3*ILIN**UP*72879250916SN1**6*EAHL*5*3*ILIN**UP*72879252651SN1**6*EAHL*6*3*ILIN**UP*73650991219SN1**6*EA<extraneous lines omitted>HL*15*3*ILIN**UP*72879870480SN1**3*EAHL*16*2*PMAN*GM*00007287900027502010HL*17*16*ILIN**UP*72879250916SN1**6*EAHL*18*16*ILIN**UP*72879252651SN1**6*EAHL*19*16*ILIN**UP*73650991219SN1**6*EA
<extraneous lines omitted>
G. Tutorial: Mapping an IDOC to an Advanced Ship Notice (ASN)
iWay Integration Solution for EDI X12 User's Guide 393
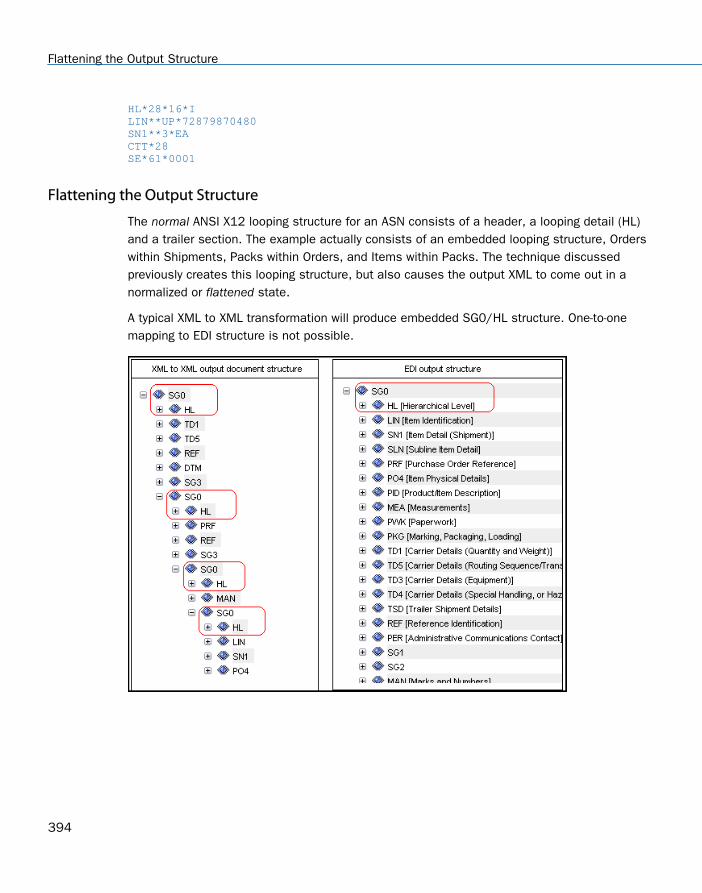
HL*28*16*ILIN**UP*72879870480SN1**3*EACTT*28SE*61*0001
Flattening the Output Structure
The normal ANSI X12 looping structure for an ASN consists of a header, a looping detail (HL)and a trailer section. The example actually consists of an embedded looping structure, Orderswithin Shipments, Packs within Orders, and Items within Packs. The technique discussedpreviously creates this looping structure, but also causes the output XML to come out in anormalized or flattened state.
A typical XML to XML transformation will produce embedded SG0/HL structure. One-to-onemapping to EDI structure is not possible.
Flattening the Output Structure
394
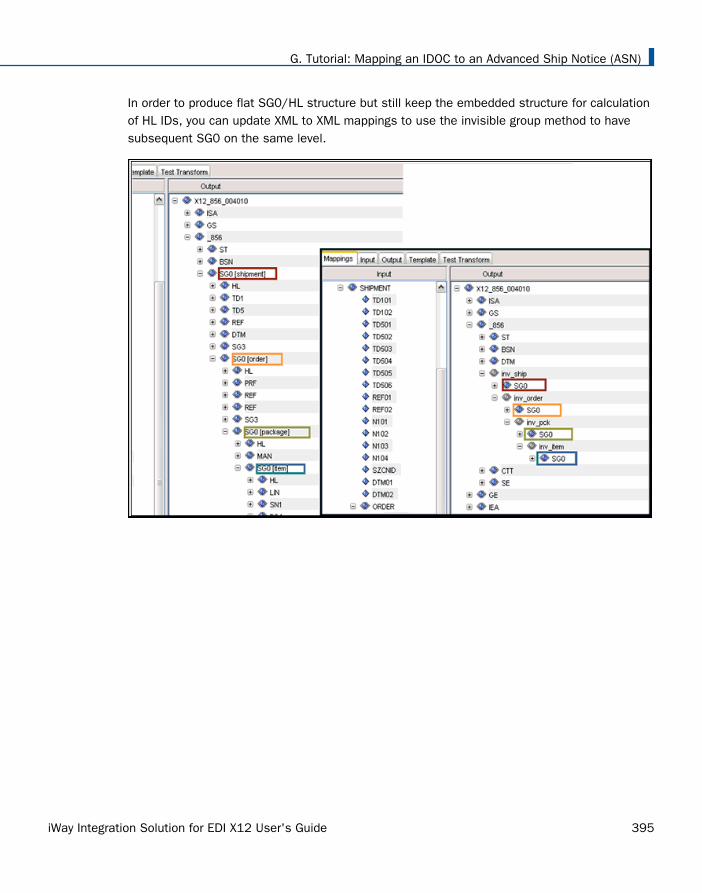
In order to produce flat SG0/HL structure but still keep the embedded structure for calculationof HL IDs, you can update XML to XML mappings to use the invisible group method to havesubsequent SG0 on the same level.
G. Tutorial: Mapping an IDOC to an Advanced Ship Notice (ASN)
iWay Integration Solution for EDI X12 User's Guide 395
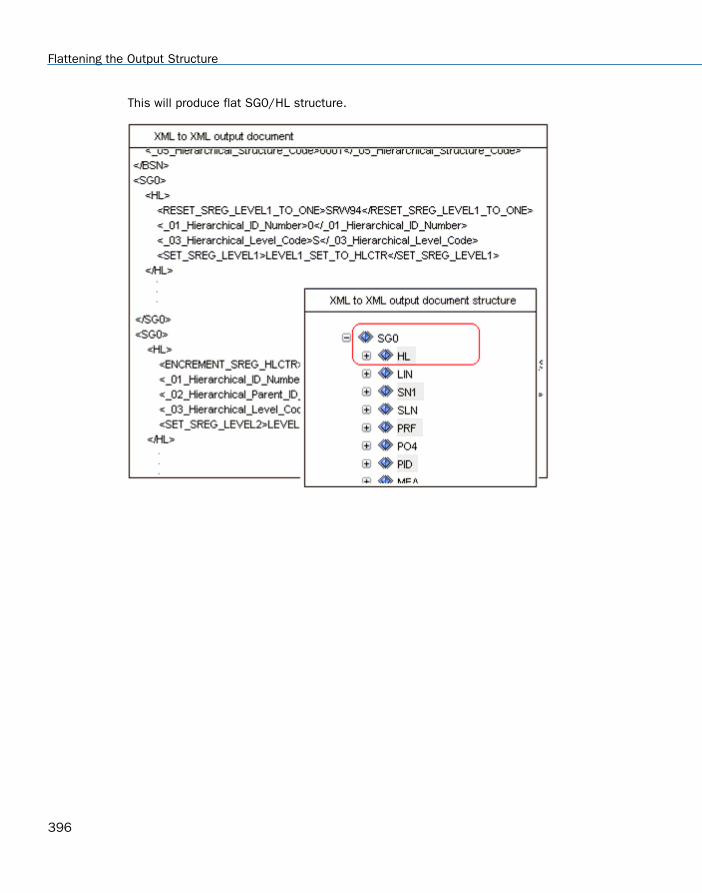
This will produce flat SG0/HL structure.
Flattening the Output Structure
396
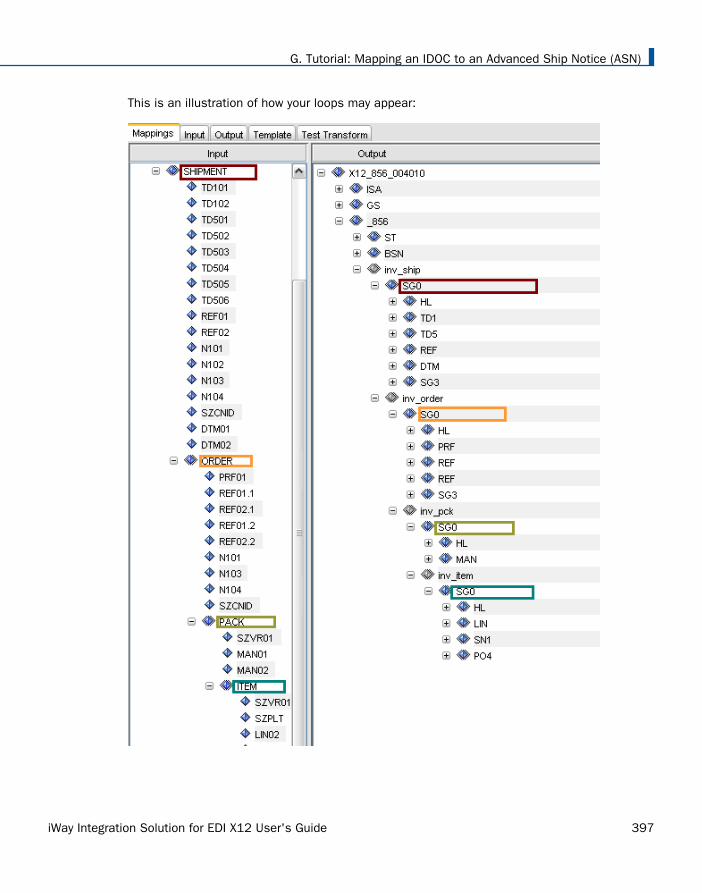
This is an illustration of how your loops may appear:
G. Tutorial: Mapping an IDOC to an Advanced Ship Notice (ASN)
iWay Integration Solution for EDI X12 User's Guide 397

Flattening the Output Structure
398
AppendixH Tutorial: Adding a Detail Line Counterto a Purchase Order Transform
This section provides a tutorial that describes how to add a detail line counter, such as avariable, to a purchase order transform. You will add a variable to the transform willcount the total number of detail lines and then insert that total into the document trailer.
In this appendix:
Configuring the Required Variables
Using the Graphical Mapping Builder
Configuring the Required Variables
This section describes how to configure a variable and then add this variable to a root node.
Procedure: How to Configure a Variable
To configure a variable:
1. In Integration explorer, right-click the transform name and select Properties.
2. Select the variables and then click New.
iWay Integration Solution for EDI X12 User's Guide 399
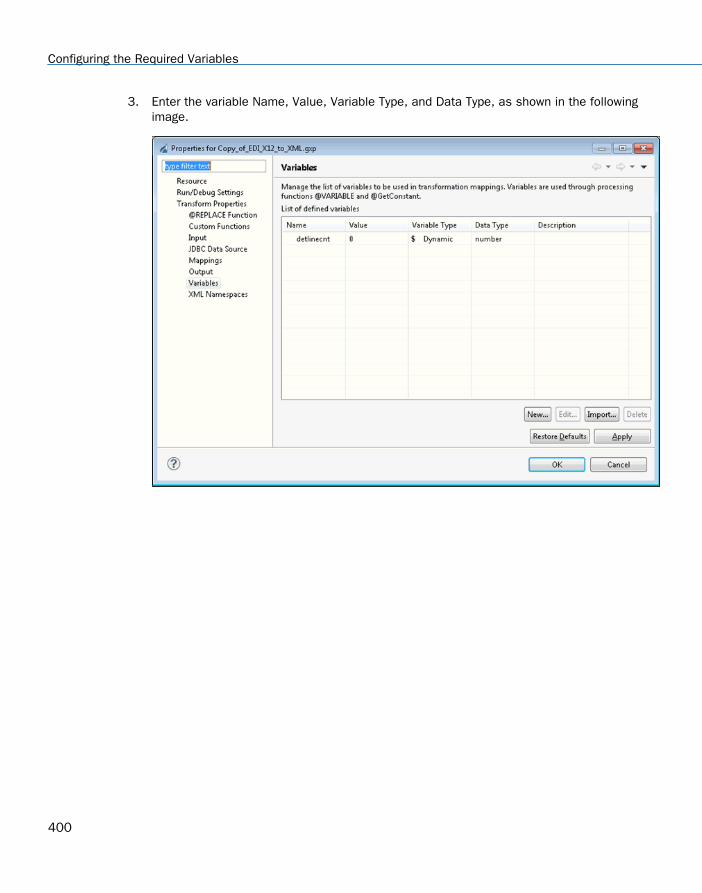
3. Enter the variable Name, Value, Variable Type, and Data Type, as shown in the followingimage.
Configuring the Required Variables
400
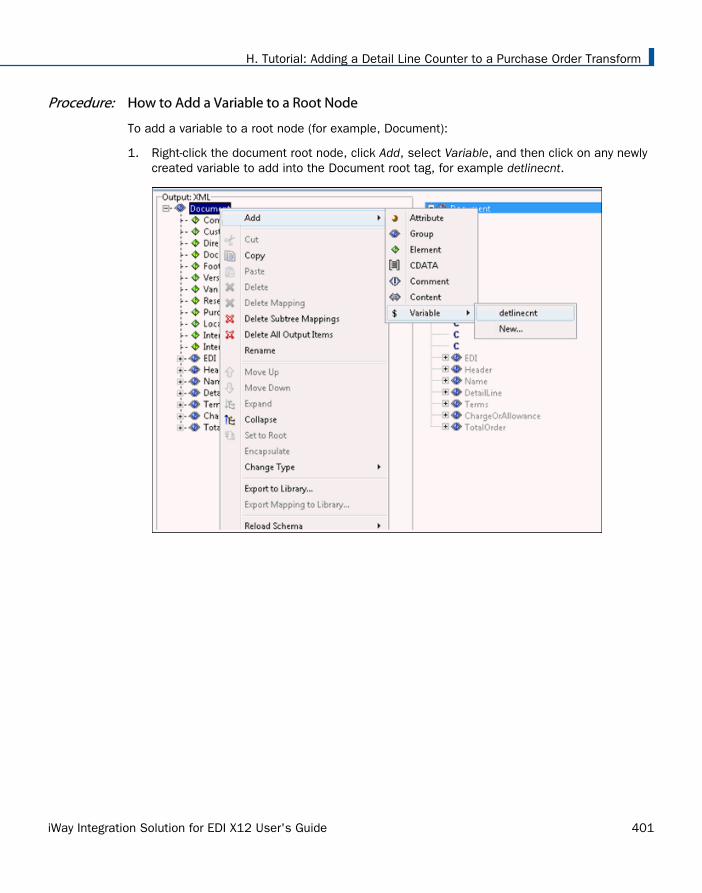
Procedure: How to Add a Variable to a Root Node
To add a variable to a root node (for example, Document):
1. Right-click the document root node, click Add, select Variable, and then click on any newlycreated variable to add into the Document root tag, for example detlinecnt.
H. Tutorial: Adding a Detail Line Counter to a Purchase Order Transform
iWay Integration Solution for EDI X12 User's Guide 401
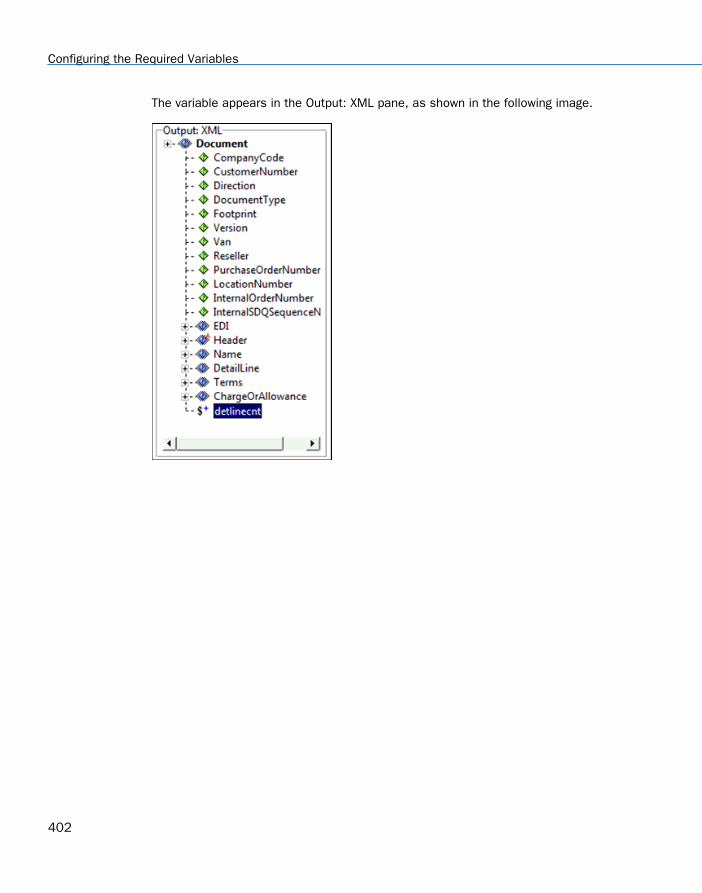
The variable appears in the Output: XML pane, as shown in the following image.
Configuring the Required Variables
402
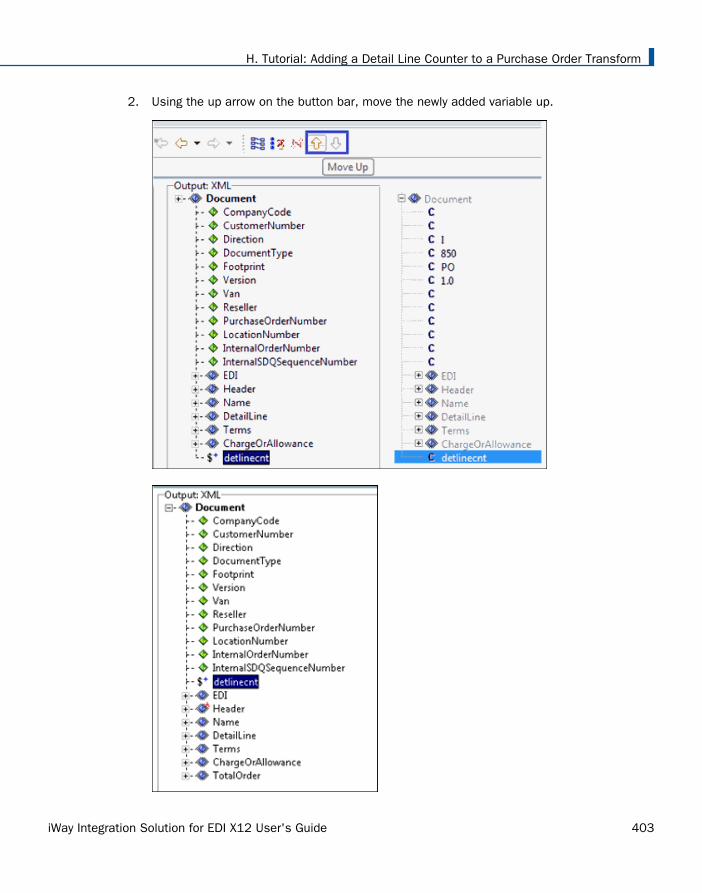
2. Using the up arrow on the button bar, move the newly added variable up.
H. Tutorial: Adding a Detail Line Counter to a Purchase Order Transform
iWay Integration Solution for EDI X12 User's Guide 403
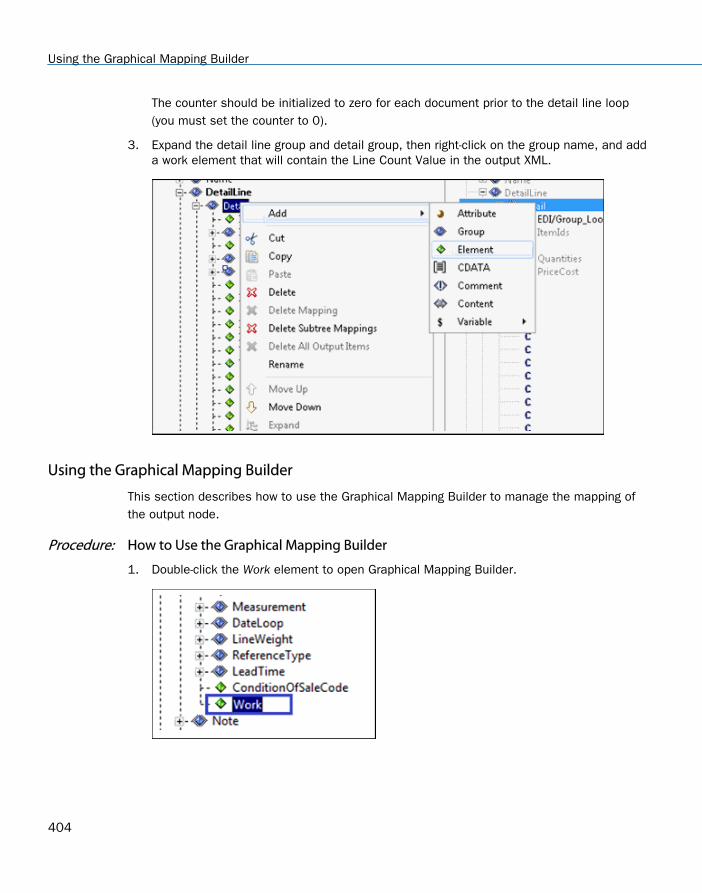
The counter should be initialized to zero for each document prior to the detail line loop(you must set the counter to 0).
3. Expand the detail line group and detail group, then right-click on the group name, and adda work element that will contain the Line Count Value in the output XML.
Using the Graphical Mapping Builder
This section describes how to use the Graphical Mapping Builder to manage the mapping ofthe output node.
Procedure: How to Use the Graphical Mapping Builder
1. Double-click the Work element to open Graphical Mapping Builder.
Using the Graphical Mapping Builder
404
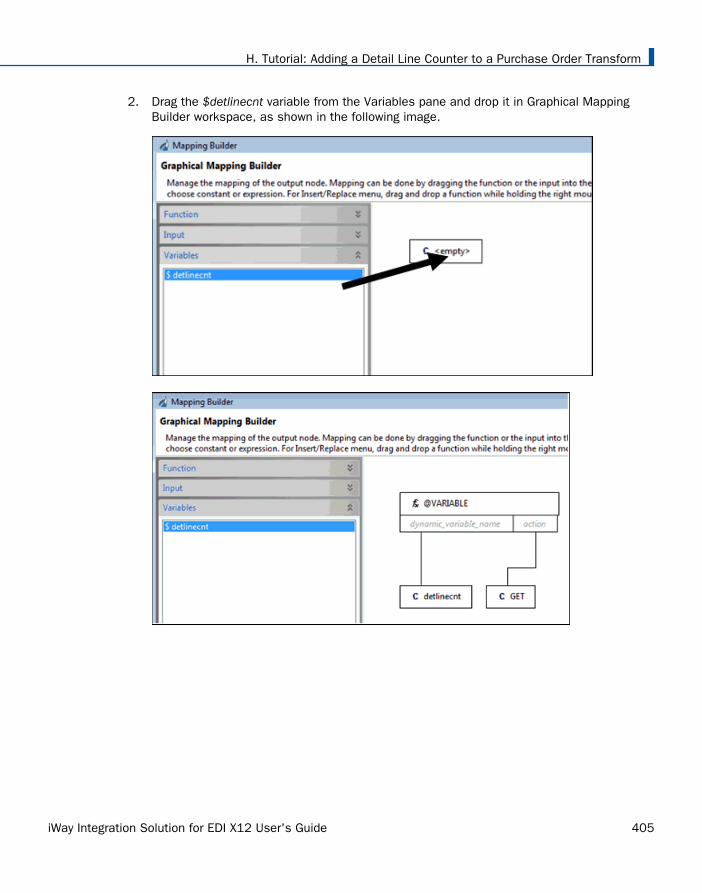
2. Drag the $detlinecnt variable from the Variables pane and drop it in Graphical MappingBuilder workspace, as shown in the following image.
H. Tutorial: Adding a Detail Line Counter to a Purchase Order Transform
iWay Integration Solution for EDI X12 User's Guide 405
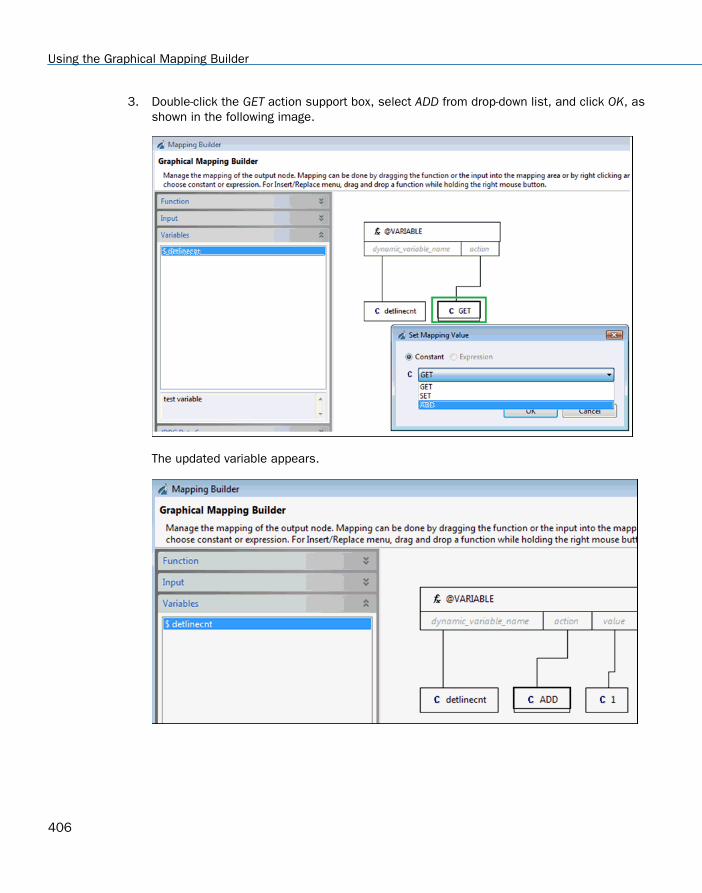
3. Double-click the GET action support box, select ADD from drop-down list, and click OK, asshown in the following image.
The updated variable appears.
Using the Graphical Mapping Builder
406
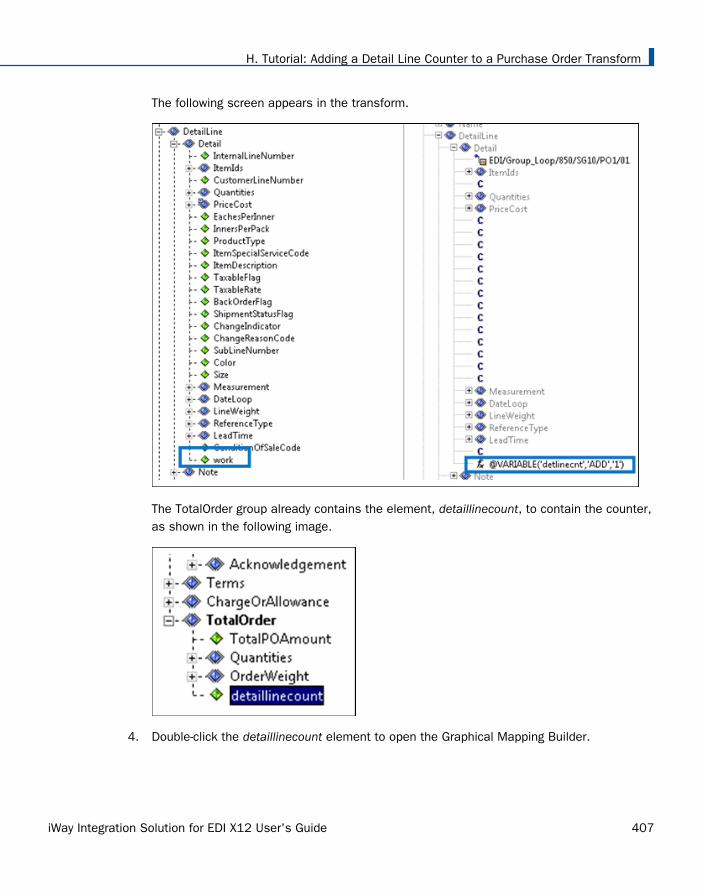
The following screen appears in the transform.
The TotalOrder group already contains the element, detaillinecount, to contain the counter,as shown in the following image.
4. Double-click the detaillinecount element to open the Graphical Mapping Builder.
H. Tutorial: Adding a Detail Line Counter to a Purchase Order Transform
iWay Integration Solution for EDI X12 User's Guide 407
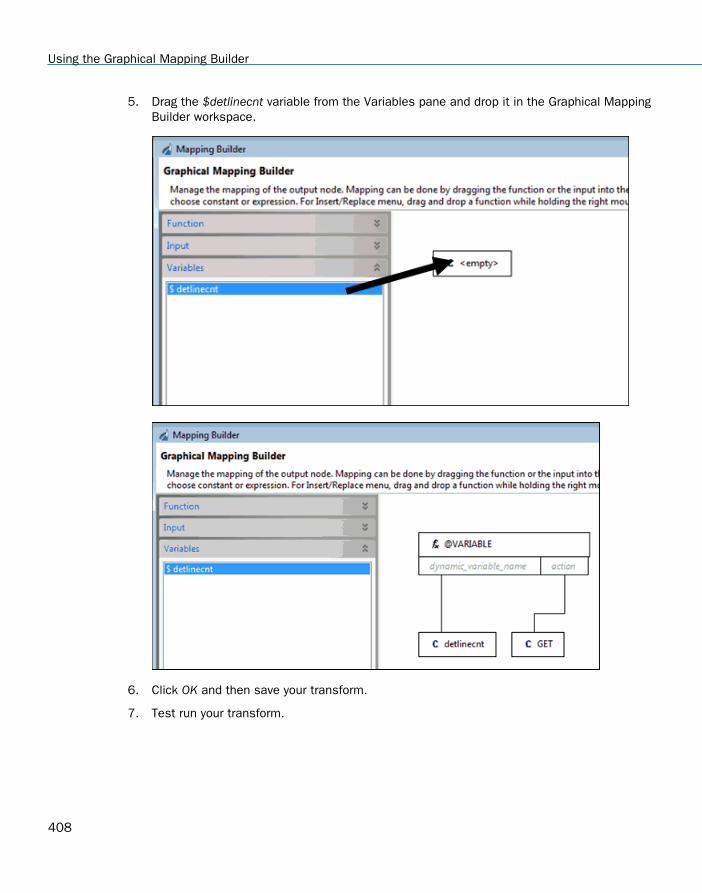
5. Drag the $detlinecnt variable from the Variables pane and drop it in the Graphical MappingBuilder workspace.
6. Click OK and then save your transform.
7. Test run your transform.
Using the Graphical Mapping Builder
408
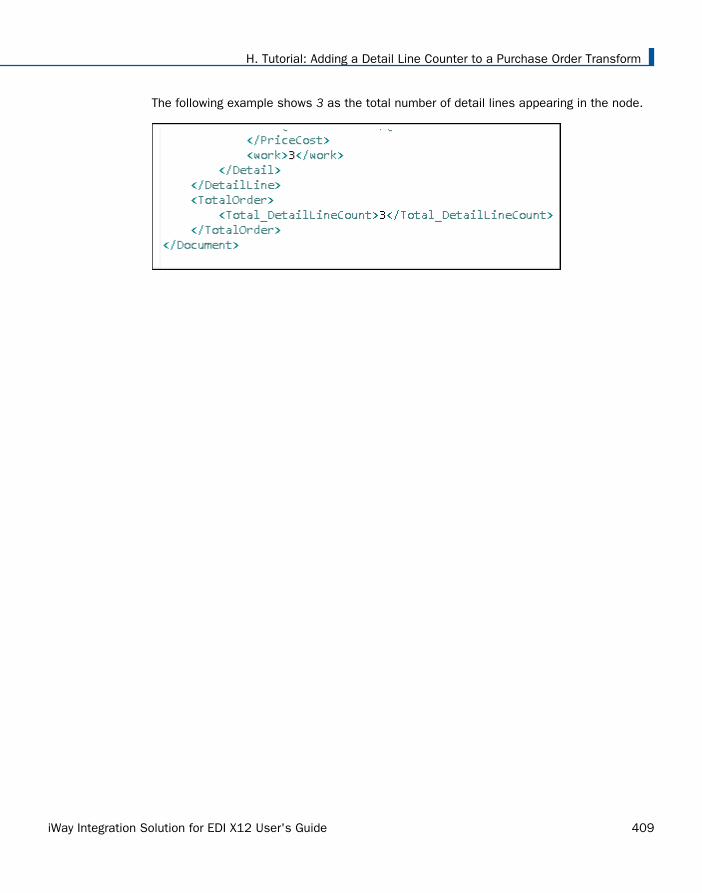
The following example shows 3 as the total number of detail lines appearing in the node.
H. Tutorial: Adding a Detail Line Counter to a Purchase Order Transform
iWay Integration Solution for EDI X12 User's Guide 409

Using the Graphical Mapping Builder
410
Related Documents