IVC Series Small PLC Programming Manual Version V1.0 Revision date Nov 26, 2011 Invt Auto-Control Technology provides customers with technical support. Users may contact the nearest Invt local sales office or service center. Copyright © 2011 by Invt Auto-Control Technology Co., Ltd. All rights reserved. The contents in this document are subject to change without notice. Invt Auto-Control Technology Co., Ltd. Address: 4# INVT Building, Gaofa Industrial Park, Longjing, Nanshan District, Shenzhen, China, 518055 Homepage: www.Invt.com.cn E-mail: [email protected]

Welcome message from author
This document is posted to help you gain knowledge. Please leave a comment to let me know what you think about it! Share it to your friends and learn new things together.
Transcript

IVC Series Small PLC
Programming Manual
Version V1.0
Revision date Nov 26, 2011
Invt Auto-Control Technology provides customers with technical support. Users may contact the nearest
Invt local sales office or service center.
Copyright © 2011 by Invt Auto-Control Technology Co., Ltd.
All rights reserved. The contents in this document are subject to change without notice.
Invt Auto-Control Technology Co., Ltd.
Address: 4# INVT Building, Gaofa Industrial Park, Longjing, Nanshan District, Shenzhen, China, 518055
Homepage: www.Invt.com.cn
E-mail: [email protected]

Prologue
Target reader
This book is suitable for the automation personnel who need to master the PLC programming, system design and
commissioning. This book can also serve as a reference for anyone who are interested in futhering their PLC
programming knowledge.
Content of this book
This book details the principles, hardware resources, programming languages and instructions of the IVC series
small PLC. A variety of application illustrations are used to help you understand the rich functions of the PLC.
Features of this book
The chapters in this book develops from general to details, each having its independent topic. You can either
read thoroughly to gain overall knowledge of the IVC series small PLC, or consult in some of the chapters for
technical reference.
Reading instructions
1. For readers unfamiliar with PLC
It is recommended to start with chapters 1~4 to learn the basic PLC knowledge, including PLC function
description, programming languages, elements & data, addressing modes, program annotating function,
main program and subprograms. Afterwards, you can read other chapters to cater for your needs.
2. For readers familiar with PLC
You can jump directly to Chapter 5 Basic Instructions and Chapter 6 Application Instructions, which
provide complete and detailed explanation for the instructions of Invt IVC series PLC. In addition, the
Appendix 9 Instruction Index and Appendix 10 Classified Instruction Index provide tools for locating the
instructions in the orders of alphabet and classification respectively.
Related documents
You can refer to the following books while reading this book:
� IVC1 Series PLC User Manual
� IVC2 Series PLC User Manual
� AutoStation Programming Software User Manual
Contents
Chapter 1 Product Overview ................................................................................................................................................ 1
Chapter 2 PLC Function Description ................................................................................................................................... 8
Chapter 3 Element And Data ............................................................................................................................................. 31
Chapter 4 Programming Concepts .................................................................................................................................... 44
Chapter 5 Basic Instructions .............................................................................................................................................. 54
Chapter 6 Application Instructions ..................................................................................................................................... 70
Chapter 7 SFC Tutor ....................................................................................................................................................... 205
Chapter 8 Using High Speed I/O ..................................................................................................................................... 226
Chapter 9 Using Interrupts............................................................................................................................................... 235
Chapter 10 Using Communication Function .................................................................................................................... 244
Appendix 1 Special Auxiliary Relay ................................................................................................................................. 263
Appendix 2 Special Data Register ................................................................................................................................... 270
Appendix 3 Reserved Elements ...................................................................................................................................... 276
Appendix 4 Modbus Communication Error Code ............................................................................................................. 277
Appendix 5 Inverter Instruction Error Code...................................................................................................................... 278
Appendix 6 System Error Code ....................................................................................................................................... 279
Appendix 7 Modbus Communication Protocol (IVC Series)............................................................................................. 281
Appendix 8 ASCII Code Table ......................................................................................................................................... 290
Appendix 9 Instruction Index ........................................................................................................................................... 291
Appendix 10 Classified Instruction Index ......................................................................................................................... 296

Chapter 1 Product Overview 1
IVC Series Small PLC Programming Manual
Chapter 1 Product Overview
This chapter presents the product makeup, plaftform of the programming software and network configuration of the
IVC series small PLC.
1.1 Product Introduction ...................................................................................................................................................... 2
1.1.1 Product Specification ......................................................................................................................................... 2
1.1.2 Outline Of IVC1 Series Basic Module ................................................................................................................ 4
1.1.3 Outline of IVC2 Series Basic Module ................................................................................................................. 4
1.2 AutoStation Programming Software .............................................................................................................................. 4
1.2.1 Basic Configuration ............................................................................................................................................ 4
1.2.2 AutoStation Installation ...................................................................................................................................... 5
1.2.3 AutoStation Operation Interface ......................................................................................................................... 5
1.2.4 Programming Cable ........................................................................................................................................... 5
1.3 Communication Function ............................................................................................................................................... 6
1.3.1 Modbus Protocol Network .................................................................................................................................. 6
1.3.2 N:N bus Protocol Network .................................................................................................................................. 6
1.3.3 Free Port Protocol Network ................................................................................................................................ 6
1.4 Makeup Of Document System Of IVC Series Small PLCs ............................................................................................ 7
1.4.1 Model Selection Instruction ................................................................................................................................ 7
1.4.2 Basic Module User Manual ................................................................................................................................ 7
1.4.3 Programming Manual ......................................................................................................................................... 7
1.4.4 Programming Software User Manual ................................................................................................................. 7
1.4.5 I/O Extension Module User Manual ................................................................................................................... 7
1.4.6 Special Module User Manual ............................................................................................................................. 7
2 Chapter 1 Product Overview
IVC Series Small PLC Programming Manual
1.1 Product Introduction
The IVC series small PLC, comprising the IVC1 mini-scale series and IVC2 small series, is a high performance
product suitable for modern industrial control.
The IVC series PLC products have integrated structure, built-in high performance microprocessor, operation control
system, integrated I/O and extension bus. The series also include I/O modules and special modules. The basic
module has 2 integrated communication ports, and the sytem can connect to the profibus network through a profibus
extension module. The basic module I/O is capable of high-speed counting and high-speed output that can be used for
exact locating. The powerful AutoStation programming software provides 3 standard programming languages and
commissioning & monitoring functions, and boasts complete user program protection mechanism.
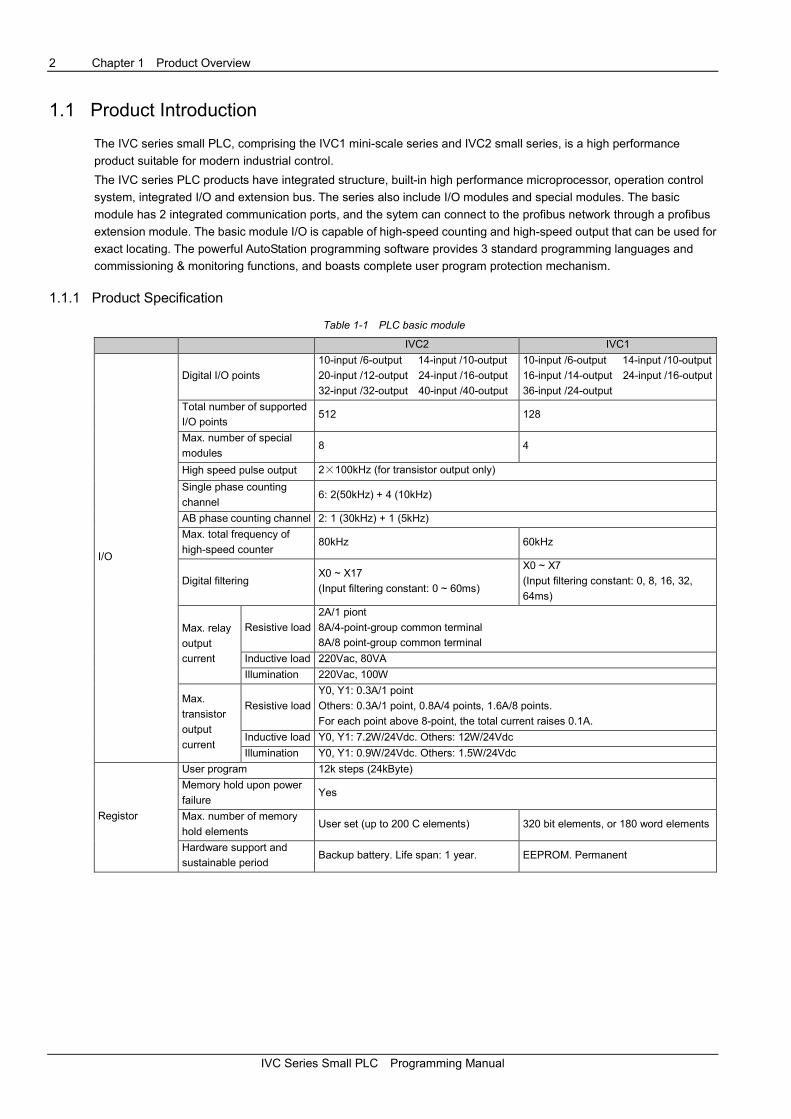
1.1.1 Product Specification
Table 1-1 PLC basic module
IVC2 IVC1
I/O
Digital I/O points
10-input /6-output 14-input /10-output
20-input /12-output 24-input /16-output
32-input /32-output 40-input /40-output
10-input /6-output 14-input /10-output
16-input /14-output 24-input /16-output
36-input /24-output
Total number of supported
I/O points 512 128
Max. number of special
modules 8 4
High speed pulse output 2×100kHz (for transistor output only)
Single phase counting
channel 6: 2(50kHz) + 4 (10kHz)
AB phase counting channel 2: 1 (30kHz) + 1 (5kHz)
Max. total frequency of
high-speed counter 80kHz 60kHz
Digital filtering X0 ~ X17
(Input filtering constant: 0 ~ 60ms)
X0 ~ X7
(Input filtering constant: 0, 8, 16, 32,
64ms)
Max. relay
output
current
Resistive load
2A/1 piont
8A/4-point-group common terminal
8A/8 point-group common terminal
Inductive load 220Vac, 80VA
Illumination 220Vac, 100W
Max.
transistor
output
current
Resistive load
Y0, Y1: 0.3A/1 point
Others: 0.3A/1 point, 0.8A/4 points, 1.6A/8 points.
For each point above 8-point, the total current raises 0.1A.
Inductive load Y0, Y1: 7.2W/24Vdc. Others: 12W/24Vdc
Illumination Y0, Y1: 0.9W/24Vdc. Others: 1.5W/24Vdc
Registor
User program 12k steps (24kByte)
Memory hold upon power
failure Yes
Max. number of memory
hold elements User set (up to 200 C elements) 320 bit elements, or 180 word elements
Hardware support and
sustainable period Backup battery. Life span: 1 year. EEPROM. Permanent
Chapter 1 Product Overview 3
IVC Series Small PLC Programming Manual
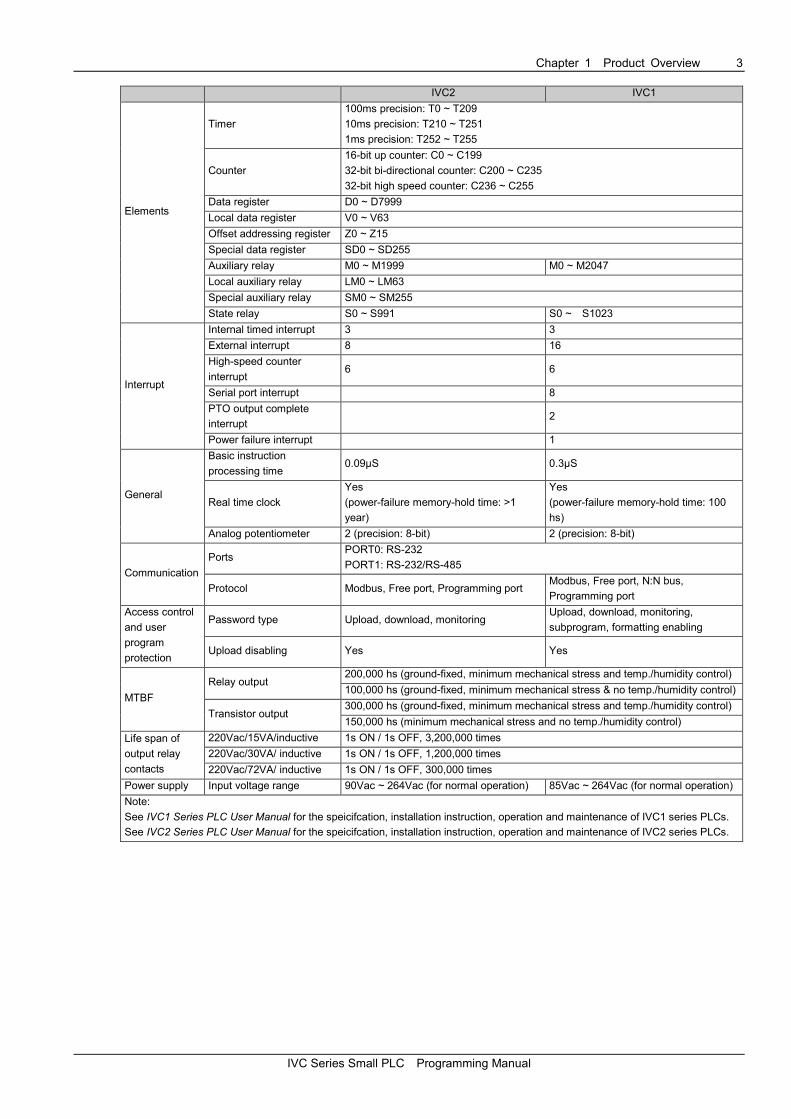
IVC2 IVC1
Elements
Timer
100ms precision: T0 ~ T209
10ms precision: T210 ~ T251
1ms precision: T252 ~ T255
Counter
16-bit up counter: C0 ~ C199
32-bit bi-directional counter: C200 ~ C235
32-bit high speed counter: C236 ~ C255
Data register D0 ~ D7999
Local data register V0 ~ V63
Offset addressing register Z0 ~ Z15
Special data register SD0 ~ SD255
Auxiliary relay M0 ~ M1999 M0 ~ M2047
Local auxiliary relay LM0 ~ LM63
Special auxiliary relay SM0 ~ SM255
State relay S0 ~ S991 S0 ~ S1023
Interrupt
Internal timed interrupt 3 3
External interrupt 8 16
High-speed counter
interrupt 6 6
Serial port interrupt 8
PTO output complete
interrupt 2
Power failure interrupt 1
General
Basic instruction
processing time 0.09µS 0.3µS
Real time clock
Yes
(power-failure memory-hold time: >1
year)
Yes
(power-failure memory-hold time: 100
hs)
Analog potentiometer 2 (precision: 8-bit) 2 (precision: 8-bit)
Communication
Ports PORT0: RS-232
PORT1: RS-232/RS-485
Protocol Modbus, Free port, Programming port Modbus, Free port, N:N bus,
Programming port
Access control
and user
program
protection
Password type Upload, download, monitoring Upload, download, monitoring,
subprogram, formatting enabling
Upload disabling Yes Yes
MTBF
Relay output 200,000 hs (ground-fixed, minimum mechanical stress and temp./humidity control)
100,000 hs (ground-fixed, minimum mechanical stress & no temp./humidity control)
Transistor output 300,000 hs (ground-fixed, minimum mechanical stress and temp./humidity control)
150,000 hs (minimum mechanical stress and no temp./humidity control)
Life span of
output relay
contacts
220Vac/15VA/inductive 1s ON / 1s OFF, 3,200,000 times
220Vac/30VA/ inductive 1s ON / 1s OFF, 1,200,000 times
220Vac/72VA/ inductive 1s ON / 1s OFF, 300,000 times
Power supply Input voltage range 90Vac ~ 264Vac (for normal operation) 85Vac ~ 264Vac (for normal operation)
Note:
See IVC1 Series PLC User Manual for the speicifcation, installation instruction, operation and maintenance of IVC1 series PLCs.
See IVC2 Series PLC User Manual for the speicifcation, installation instruction, operation and maintenance of IVC2 series PLCs.
4 Chapter 1 Product Overview
IVC Series Small PLC Programming Manual
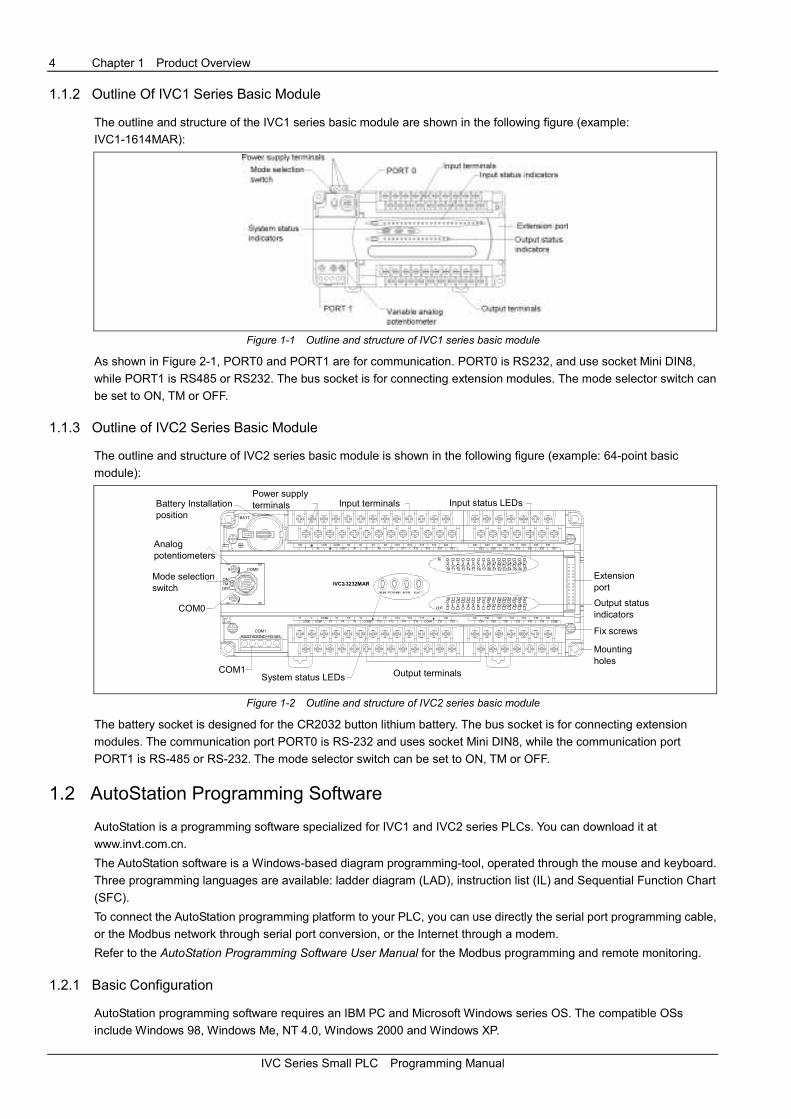
1.1.2 Outline Of IVC1 Series Basic Module
The outline and structure of the IVC1 series basic module are shown in the following figure (example:
IVC1-1614MAR):
Figure 1-1 Outline and structure of IVC1 series basic module
As shown in Figure 2-1, PORT0 and PORT1 are for communication. PORT0 is RS232, and use socket Mini DIN8,
while PORT1 is RS485 or RS232. The bus socket is for connecting extension modules. The mode selector switch can
be set to ON, TM or OFF.
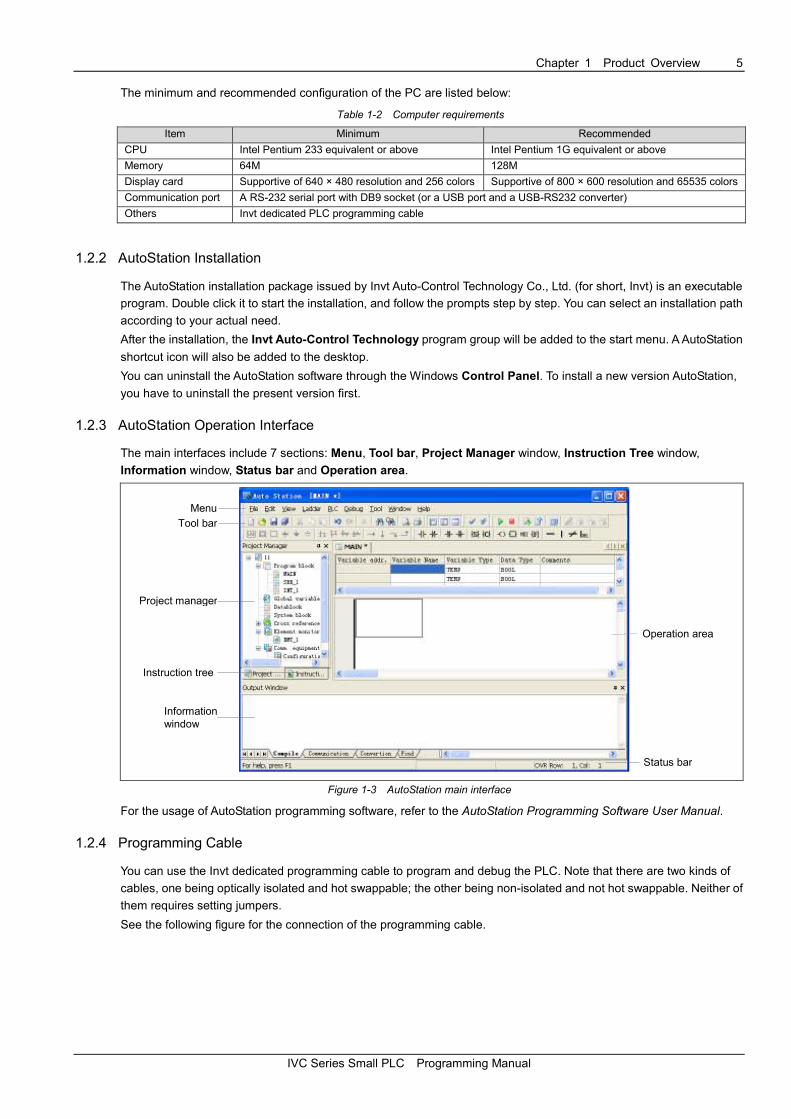
1.1.3 Outline of IVC2 Series Basic Module
The outline and structure of IVC2 series basic module is shown in the following figure (example: 64-point basic
module):
Figure 1-2 Outline and structure of IVC2 series basic module
The battery socket is designed for the CR2032 button lithium battery. The bus socket is for connecting extension
modules. The communication port PORT0 is RS-232 and uses socket Mini DIN8, while the communication port
PORT1 is RS-485 or RS-232. The mode selector switch can be set to ON, TM or OFF.
1.2 AutoStation Programming Software
AutoStation is a programming software specialized for IVC1 and IVC2 series PLCs. You can download it at
www.invt.com.cn.
The AutoStation software is a Windows-based diagram programming-tool, operated through the mouse and keyboard.
Three programming languages are available: ladder diagram (LAD), instruction list (IL) and Sequential Function Chart
(SFC).
To connect the AutoStation programming platform to your PLC, you can use directly the serial port programming cable,
or the Modbus network through serial port conversion, or the Internet through a modem.
Refer to the AutoStation Programming Software User Manual for the Modbus programming and remote monitoring.
1.2.1 Basic Configuration
AutoStation programming software requires an IBM PC and Microsoft Windows series OS. The compatible OSs
include Windows 98, Windows Me, NT 4.0, Windows 2000 and Windows XP.
Output terminalsSystem status LEDs
Battery Installationposition
+RS485- TXD COM1GNDRXD
X10+24V PG
L NCOM COM X4 X0
X1 X3 X2 X6 X5 X7 X21
X12X11 X13
X14X15
X16 X20X17
X22X23
X24X25
X26X37X33X31
X30X27
X32X35
X34 X36
Y13COM1COM0 Y0 Y1
Y2 COM2Y4 Y3
Y6 Y5 COM3 Y7 Y11
Y10 Y12 Y22COM4Y15
Y14 Y16Y17
Y20Y21 Y23
Y24Y25
Y26Y27
COM5Y34Y32Y30Y31 Y33
Y36Y35 Y37
3310 16131211 1415 3017 3132 34 35 3736
230 222176 54 2021 3 272624 25
230 21 3 4 5 2076 2122 2524 2726
3310 1615141211 13 32311730 373634 35
BATT.
COM0 0
ONTM OFF
1
Power supplyterminals Input terminals Input status LEDs
Extension port
Output statusindicators
Fix screws
Mountingholes
COM1
COM0
Mode selection switch
Analogpotentiometers
IVC2
-3232MAR
Chapter 1 Product Overview 5
IVC Series Small PLC Programming Manual
The minimum and recommended configuration of the PC are listed below:
Table 1-2 Computer requirements
Item Minimum Recommended
CPU Intel Pentium 233 equivalent or above Intel Pentium 1G equivalent or above
Memory 64M 128M
Display card Supportive of 640 × 480 resolution and 256 colors Supportive of 800 × 600 resolution and 65535 colors
Communication port A RS-232 serial port with DB9 socket (or a USB port and a USB-RS232 converter)
Others Invt dedicated PLC programming cable
1.2.2 AutoStation Installation
The AutoStation installation package issued by Invt Auto-Control Technology Co., Ltd. (for short, Invt) is an executable
program. Double click it to start the installation, and follow the prompts step by step. You can select an installation path
according to your actual need.
After the installation, the Invt Auto-Control Technology program group will be added to the start menu. A AutoStation
shortcut icon will also be added to the desktop.
You can uninstall the AutoStation software through the Windows Control Panel. To install a new version AutoStation,
you have to uninstall the present version first.
1.2.3 AutoStation Operation Interface
The main interfaces include 7 sections: Menu, Tool bar, Project Manager window, Instruction Tree window,
Information window, Status bar and Operation area.
Figure 1-3 AutoStation main interface
For the usage of AutoStation programming software, refer to the AutoStation Programming Software User Manual.
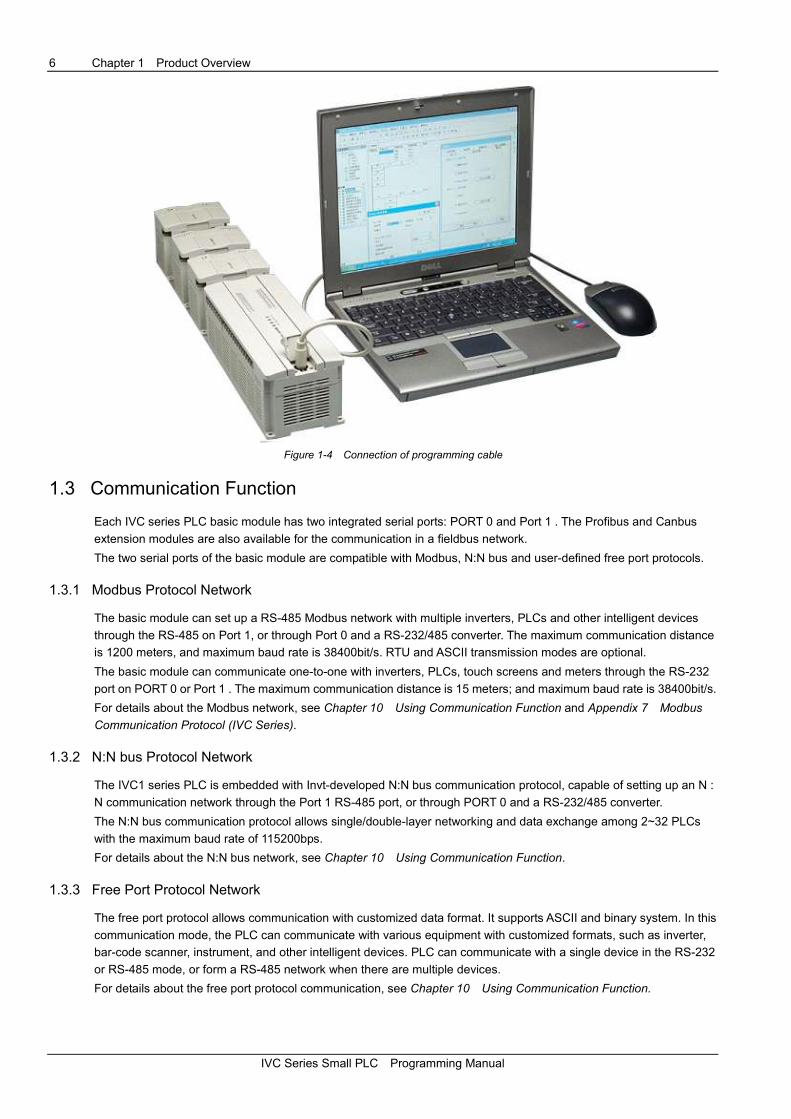
1.2.4 Programming Cable
You can use the Invt dedicated programming cable to program and debug the PLC. Note that there are two kinds of
cables, one being optically isolated and hot swappable; the other being non-isolated and not hot swappable. Neither of
them requires setting jumpers.
See the following figure for the connection of the programming cable.
Menu
Tool bar
Project manager
Instruction tree
Operation area
Informationwindow
Status bar
6 Chapter 1 Product Overview
IVC Series Small PLC Programming Manual
Figure 1-4 Connection of programming cable
1.3 Communication Function
Each IVC series PLC basic module has two integrated serial ports: PORT 0 and Port 1 . The Profibus and Canbus
extension modules are also available for the communication in a fieldbus network.
The two serial ports of the basic module are compatible with Modbus, N:N bus and user-defined free port protocols.
1.3.1 Modbus Protocol Network
The basic module can set up a RS-485 Modbus network with multiple inverters, PLCs and other intelligent devices
through the RS-485 on Port 1, or through Port 0 and a RS-232/485 converter. The maximum communication distance
is 1200 meters, and maximum baud rate is 38400bit/s. RTU and ASCII transmission modes are optional.
The basic module can communicate one-to-one with inverters, PLCs, touch screens and meters through the RS-232
port on PORT 0 or Port 1 . The maximum communication distance is 15 meters; and maximum baud rate is 38400bit/s.
For details about the Modbus network, see Chapter 10 Using Communication Function and Appendix 7 Modbus
Communication Protocol (IVC Series).
1.3.2 N:N bus Protocol Network
The IVC1 series PLC is embedded with Invt-developed N:N bus communication protocol, capable of setting up an N :
N communication network through the Port 1 RS-485 port, or through PORT 0 and a RS-232/485 converter.
The N:N bus communication protocol allows single/double-layer networking and data exchange among 2~32 PLCs
with the maximum baud rate of 115200bps.
For details about the N:N bus network, see Chapter 10 Using Communication Function.
1.3.3 Free Port Protocol Network
The free port protocol allows communication with customized data format. It supports ASCII and binary system. In this
communication mode, the PLC can communicate with various equipment with customized formats, such as inverter,
bar-code scanner, instrument, and other intelligent devices. PLC can communicate with a single device in the RS-232
or RS-485 mode, or form a RS-485 network when there are multiple devices.
For details about the free port protocol communication, see Chapter 10 Using Communication Function.

Chapter 1 Product Overview 7
IVC Series Small PLC Programming Manual
1.4 Makeup Of Document System Of IVC Series Small PLCs
You can download the documents of IVC series small PLC at www.invt.com.cn. If you need the paper copy of the
document, please contact your agent.
1.4.1 Model Selection Instruction
IVC1 Model Selection Manual
IVC2 Technical Manual
1.4.2 Basic Module User Manual
IVC1 series
IVC1 Series PLC Quick Start User Manual
IVC1 Series PLC User Manual
IVC2 series
IVC2 Basic Module Quick Start Manual
IVC2 Series PLC User Manual
1.4.3 Programming Manual
IVC Series Small PLC Programming Manual
1.4.4 Programming Software User Manual
AutoStation Programming Software User Manual
1.4.5 I/O Extension Module User Manual
IVC1 series
IVC1 Series PLC Passive I/O Extension Module User
Manual
IVC2 series
IVC2 Series PLC Passive I/O Extension Module User
Manual
IVC2 Series PLC Active I/O Extension Module User
Manual
1.4.6 Special Module User Manual
IVC1 series
IVC1-4AD Analog Input Module User Manual
IVC1-4DA Analog Output Module User Manual
IVC1-4PT RTD Module User Manual
IVC1-4TC Thermalcouple Module User Manual
IVC1-5AM Analog Input/Output Module User Manual
IVC2 series
IVC2-4AD Analog Signal Module User Manual
IVC2-4AM Analog Signal Input/Output Module User
Manual
IVC2-4DA Analog Signal Output Module User Manual
IVC2-4LC Temperature Control Module User Manual
IVC2-4PT RTD Module User Manual
IVC2-4TC Thermocouple Module User Manual
IVC2-8AD Analog Input Module User Manual
IVC2-8TC Thermocouple Module User Manual

8 Chapter 2 PLC Function Description
IVC Series Small PLC Programming Manual
Chapter 2 PLC Function Description
This chapter introduces the programming resources, theories and system configuration of IVC series PLC, as well as
how to set PLC running and operation modes. The system commissioning functions and commissioning software are
also introduced.
2.1 Programming Resources And Theories ........................................................................................................................ 9
2.1.1 Programming Resources ................................................................................................................................... 9
2.1.2 System Running Mechanism (Scan Cycle Model) ........................................................................................... 11
2.1.3 Watchdog Function For User Program Execution ............................................................................................ 11
2.1.4 Constant Scan Mode ....................................................................................................................................... 11
2.1.5 User File Download And Storage ..................................................................................................................... 12
2.1.6 Initialization Of Elements ................................................................................................................................. 12
2.1.7 Saving Data On Power Loss ............................................................................................................................ 12
2.1.8 Permanent Storage Of D Device Data ............................................................................................................. 13
2.1.9 Digital Filtering Of Input Terminals ................................................................................................................... 13
2.1.10 No Battery Mode ............................................................................................................................................ 13
2.1.11 User Program Protection ............................................................................................................................... 14
2.2 System Configuration .................................................................................................................................................. 14
2.2.1 System Block ................................................................................................................................................... 14
2.2.2 Datablock ......................................................................................................................................................... 21
2.2.3 Global Variable Table ...................................................................................................................................... 21
2.2.4 Setting BFM For IVC2 Serie Special Module ................................................................................................... 22
2.3 Running Mode And State Control ................................................................................................................................ 22
2.3.1 System RUN And System STOP States .......................................................................................................... 23
2.3.2 RUN & STOP State Change ............................................................................................................................ 23
2.3.3 Setting Output In STOP State .......................................................................................................................... 23
2.4 System Debugging ...................................................................................................................................................... 24
2.4.1 Uploading & Downloading Program ................................................................................................................. 24
2.4.2 Error Reporting Mechanism ............................................................................................................................. 24
2.4.3 Editing User Program Online ........................................................................................................................... 26
2.4.4 Clearing And Formatting .................................................................................................................................. 26
2.4.5 Checking PLC Information Online .................................................................................................................... 27
2.4.6 Write, Force And Element Monitoring Table .................................................................................................... 28
2.4.7 Generating Datablock From RAM .................................................................................................................... 29
Chapter 2 PLC Function Description 9
IVC Series Small PLC Programming Manual
2.1 Programming Resources And Theories
2.1.1 Programming Resources
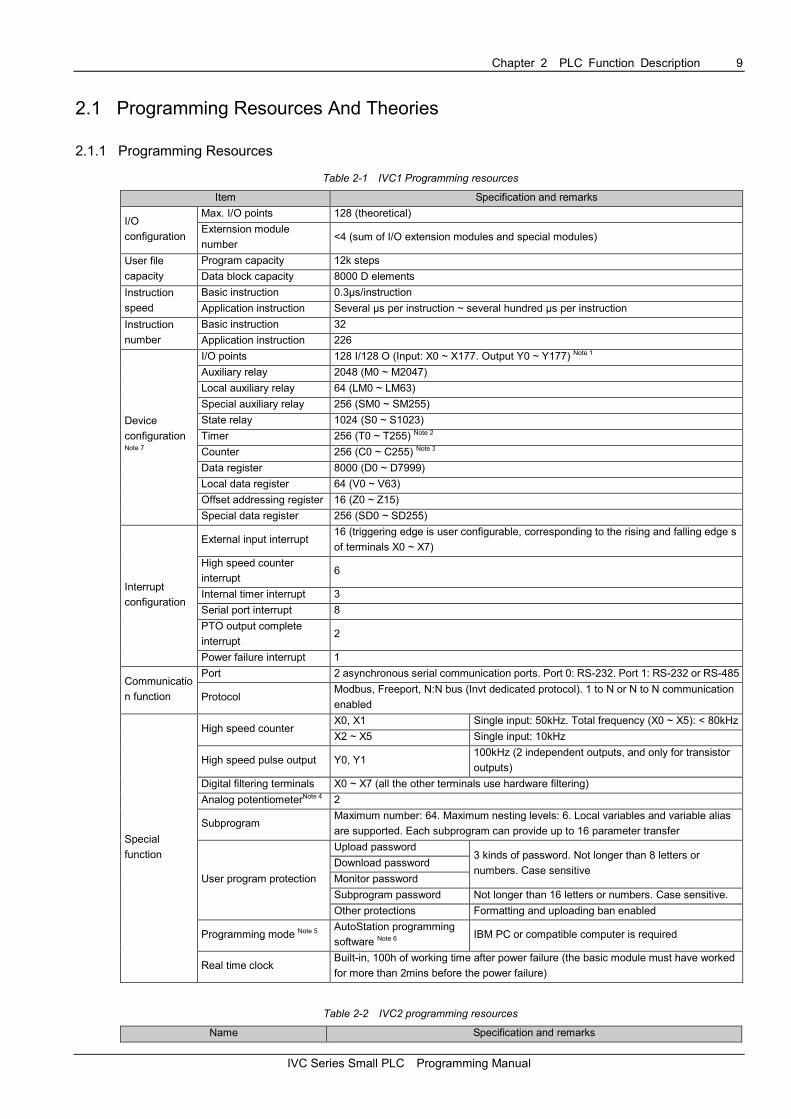
Table 2-1 IVC1 Programming resources
Item Specification and remarks
I/O
configuration
Max. I/O points 128 (theoretical)
Externsion module
number <4 (sum of I/O extension modules and special modules)
User file
capacity
Program capacity 12k steps
Data block capacity 8000 D elements
Instruction
speed
Basic instruction 0.3µs/instruction
Application instruction Several µs per instruction ~ several hundred µs per instruction
Instruction
number
Basic instruction 32
Application instruction 226
Device
configuration Note 7
I/O points 128 I/128 O (Input: X0 ~ X177. Output Y0 ~ Y177) Note 1
Auxiliary relay 2048 (M0 ~ M2047)
Local auxiliary relay 64 (LM0 ~ LM63)
Special auxiliary relay 256 (SM0 ~ SM255)
State relay 1024 (S0 ~ S1023)
Timer 256 (T0 ~ T255) Note 2
Counter 256 (C0 ~ C255) Note 3
Data register 8000 (D0 ~ D7999)
Local data register 64 (V0 ~ V63)
Offset addressing register 16 (Z0 ~ Z15)
Special data register 256 (SD0 ~ SD255)
Interrupt
configuration
External input interrupt 16 (triggering edge is user configurable, corresponding to the rising and falling edge s
of terminals X0 ~ X7)
High speed counter
interrupt 6
Internal timer interrupt 3
Serial port interrupt 8
PTO output complete
interrupt 2
Power failure interrupt 1
Communicatio
n function
Port 2 asynchronous serial communication ports. Port 0: RS-232. Port 1: RS-232 or RS-485
Protocol Modbus, Freeport, N:N bus (Invt dedicated protocol). 1 to N or N to N communication
enabled
Special
function
High speed counter X0, X1 Single input: 50kHz. Total frequency (X0 ~ X5): < 80kHz
X2 ~ X5 Single input: 10kHz
High speed pulse output Y0, Y1 100kHz (2 independent outputs, and only for transistor
outputs)
Digital filtering terminals X0 ~ X7 (all the other terminals use hardware filtering)
Analog potentiometerNote 4 2
Subprogram Maximum number: 64. Maximum nesting levels: 6. Local variables and variable alias
are supported. Each subprogram can provide up to 16 parameter transfer
User program protection
Upload password 3 kinds of password. Not longer than 8 letters or
numbers. Case sensitive Download password
Monitor password
Subprogram password Not longer than 16 letters or numbers. Case sensitive.
Other protections Formatting and uploading ban enabled
Programming mode Note 5 AutoStation programming
software Note 6 IBM PC or compatible computer is required
Real time clock Built-in, 100h of working time after power failure (the basic module must have worked
for more than 2mins before the power failure)
Table 2-2 IVC2 programming resources
Name Specification and remarks
10 Chapter 2 PLC Function Description
IVC Series Small PLC Programming Manual
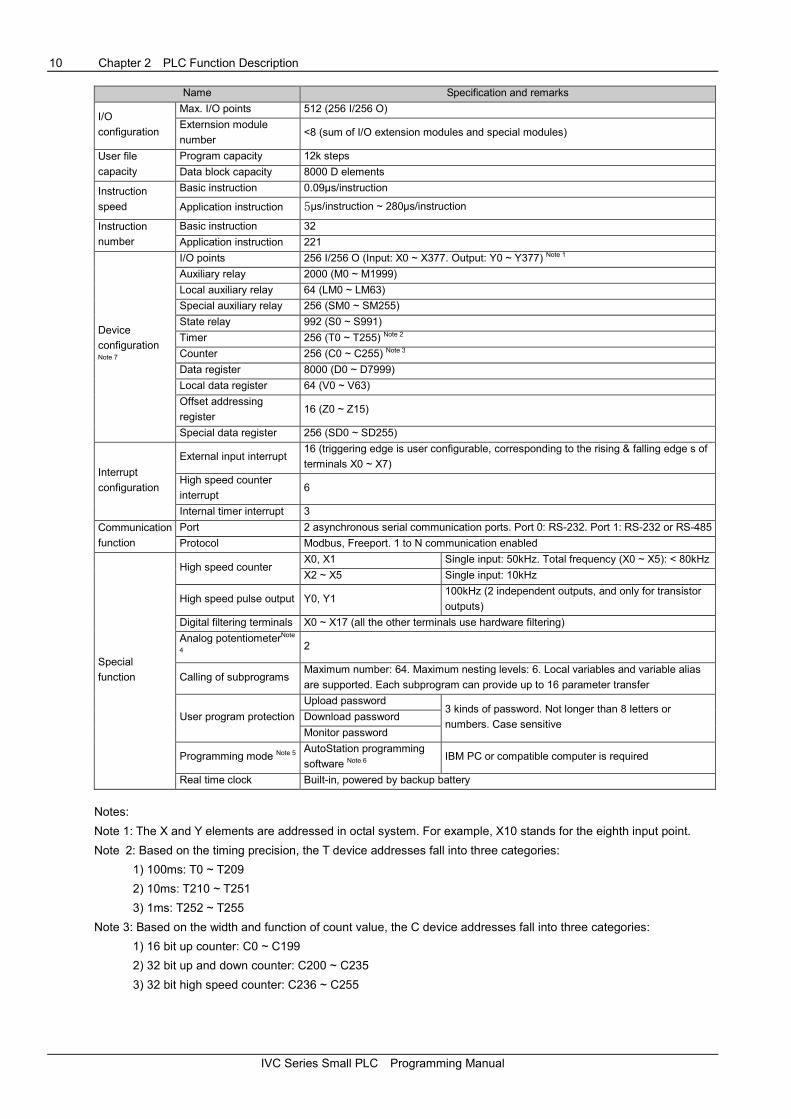
Name Specification and remarks
I/O
configuration
Max. I/O points 512 (256 I/256 O)
Externsion module
number <8 (sum of I/O extension modules and special modules)
User file
capacity
Program capacity 12k steps
Data block capacity 8000 D elements
Instruction
speed
Basic instruction 0.09µs/instruction
Application instruction 5µs/instruction ~ 280µs/instruction
Instruction
number
Basic instruction 32
Application instruction 221
Device
configuration Note 7
I/O points 256 I/256 O (Input: X0 ~ X377. Output: Y0 ~ Y377) Note 1
Auxiliary relay 2000 (M0 ~ M1999)
Local auxiliary relay 64 (LM0 ~ LM63)
Special auxiliary relay 256 (SM0 ~ SM255)
State relay 992 (S0 ~ S991)
Timer 256 (T0 ~ T255) Note 2
Counter 256 (C0 ~ C255) Note 3
Data register 8000 (D0 ~ D7999)
Local data register 64 (V0 ~ V63)
Offset addressing
register 16 (Z0 ~ Z15)
Special data register 256 (SD0 ~ SD255)
Interrupt
configuration
External input interrupt 16 (triggering edge is user configurable, corresponding to the rising & falling edge s of
terminals X0 ~ X7)
High speed counter
interrupt 6
Internal timer interrupt 3
Communication
function
Port 2 asynchronous serial communication ports. Port 0: RS-232. Port 1: RS-232 or RS-485
Protocol Modbus, Freeport. 1 to N communication enabled
Special
function
High speed counter X0, X1 Single input: 50kHz. Total frequency (X0 ~ X5): < 80kHz
X2 ~ X5 Single input: 10kHz
High speed pulse output Y0, Y1 100kHz (2 independent outputs, and only for transistor
outputs)
Digital filtering terminals X0 ~ X17 (all the other terminals use hardware filtering)
Analog potentiometerNote
4 2
Calling of subprograms Maximum number: 64. Maximum nesting levels: 6. Local variables and variable alias
are supported. Each subprogram can provide up to 16 parameter transfer
User program protection
Upload password 3 kinds of password. Not longer than 8 letters or
numbers. Case sensitive Download password
Monitor password
Programming mode Note 5 AutoStation programming
software Note 6 IBM PC or compatible computer is required
Real time clock Built-in, powered by backup battery
Notes:
Note 1: The X and Y elements are addressed in octal system. For example, X10 stands for the eighth input point.
Note 2: Based on the timing precision, the T device addresses fall into three categories:
1) 100ms: T0 ~ T209
2) 10ms: T210 ~ T251
3) 1ms: T252 ~ T255
Note 3: Based on the width and function of count value, the C device addresses fall into three categories:
1) 16 bit up counter: C0 ~ C199
2) 32 bit up and down counter: C200 ~ C235
3) 32 bit high speed counter: C236 ~ C255
Chapter 2 PLC Function Description 11
IVC Series Small PLC Programming Manual
Note 4: The analog potentiometer is an instrument that you can use to set the PLC device value.. You can use a
Philips screw driver to wind the potentiometer clockwise to the maximum angle of 270°, and the device value will be
set from 0 to 255. Note that the potentiometer could be damaged if you wind it clockwise more than 270°.
Note 5: The element values can be forcedly set to facilitate commissioning and analyzing user program and streamline
the commissioning. You can force up to 128 bit elements and 16 word elements at the same time.
Note 6: The user program can be modified online.
Note 7: Partial PLC elements are reserved. Avoid using those elements in the user program. For details, see Appendix
3 Reserved Elements .
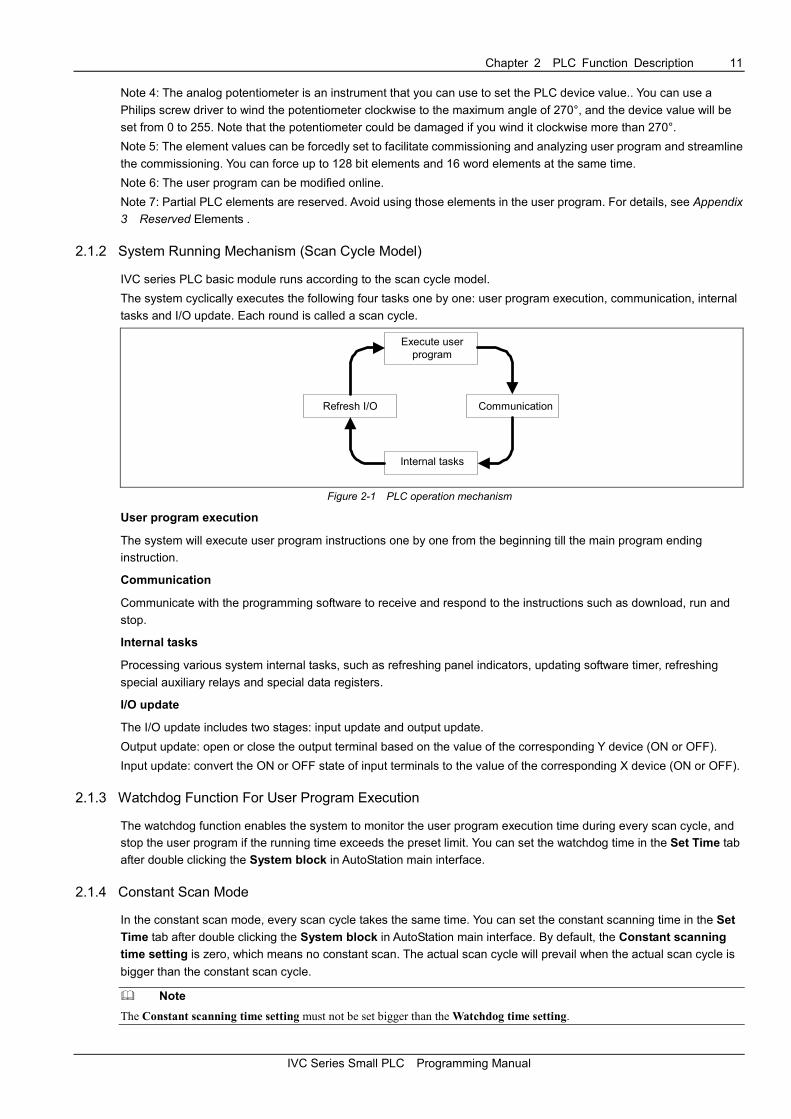
2.1.2 System Running Mechanism (Scan Cycle Model)
IVC series PLC basic module runs according to the scan cycle model.
The system cyclically executes the following four tasks one by one: user program execution, communication, internal
tasks and I/O update. Each round is called a scan cycle.
Execute userprogram
Internal tasks
Refresh I/O Communication
Figure 2-1 PLC operation mechanism
User program execution
The system will execute user program instructions one by one from the beginning till the main program ending
instruction.
Communication
Communicate with the programming software to receive and respond to the instructions such as download, run and
stop.
Internal tasks
Processing various system internal tasks, such as refreshing panel indicators, updating software timer, refreshing
special auxiliary relays and special data registers.
I/O update
The I/O update includes two stages: input update and output update.
Output update: open or close the output terminal based on the value of the corresponding Y device (ON or OFF).
Input update: convert the ON or OFF state of input terminals to the value of the corresponding X device (ON or OFF).
2.1.3 Watchdog Function For User Program Execution
The watchdog function enables the system to monitor the user program execution time during every scan cycle, and
stop the user program if the running time exceeds the preset limit. You can set the watchdog time in the Set Time tab
after double clicking the System block in AutoStation main interface.
2.1.4 Constant Scan Mode
In the constant scan mode, every scan cycle takes the same time. You can set the constant scanning time in the Set
Time tab after double clicking the System block in AutoStation main interface. By default, the Constant scanning
time setting is zero, which means no constant scan. The actual scan cycle will prevail when the actual scan cycle is
bigger than the constant scan cycle.
� Note
The Constant scanning time setting must not be set bigger than the Watchdog time setting.
12 Chapter 2 PLC Function Description
IVC Series Small PLC Programming Manual
2.1.5 User File Download And Storage
You can download a user file to the basic module to control the basic module.
The user file include user program, data block, system block and auxiliary user information. The auxiliary user
information include the user program variable list and the source file of user data.
You can select to download the user program, data block or system block. Whatever you select, the corresponding
auxiliary user information will always be downloaded.
For IVC2 series PLC, the downloaded user program, data block and system block will be stored permanently in the
basic module EEPROM area, while the downloaded auxiliary user information will be stored in the battery backed
RAM area.
For IVC1 series PLC, all user files will be stored permanently in the basic module FLASH area.
� Note
1. To embed the downloaded files into the basic module, the basic module power supply must be maintained for more than 30s
after the download.
2. If the backup battery fails in IVC2 series PLC, the auxiliary user information will be lost, the annotation for the user program
will not be uploaded, and system will report “User information file error”. But the user program will be executed after all.
2.1.6 Initialization Of Elements
When the PLC changes from STOP to RUN, it will initialize its elements according to battery backed data, EEPROM
data, data block and device value. The priorities of various data are listed in the following table.
Table 2-3 PLC data initialization priorities
Data type Power OFF → ON STOP → RUN
Battery backed data Highest Highest
EEPROM data High High
Data block (precondition: the Datablock enabled is checked in the
Advanced Settings tab of System block) Mid Mid
Device value (Precondition: the Element value retained is checked in
the Advanced Settings tab of System block) - Low
2.1.7 Saving Data On Power Loss
Preconditions
Upon power loss, the system will stop the user program and save the device in the specified saving range to the
battery backed files.
Device restoration after power on
If the battery backed files are correct, the PLC elements will restore their saved values after power on.
The elements outside of the saving range will be set to zero.
If the battery backed files are lost or incorrect, the system will set all elements to zero.
Setting saving range
You can set the device range in the Saving Range tab of System block. See Figure 2-2 and the following example.
IVC1 series PLC supports only one group of saving range.
IVC2 series PLC supports two saving groups that form a union.
Example (IVC2):
Set M100 ~ M200 as the saving range in Group 1.
Set M300 ~ M400 as the saving range in Group 2.
In effect, both M100 ~ M200 and M300 ~ M400 are set as the saving range.

Chapter 2 PLC Function Description 13
IVC Series Small PLC Programming Manual
Help
Figure 2-2 Setting saving range
� Note
The power loss data saving function in IVC2 series PLC relies on the support of the backup battery. If batteries fail, all the saved
elements will have uncertain values after power loss.
For IVC1 series PLC, the values of its saved elements are stored in the permanent memory.
2.1.8 Permanent Storage Of D Device Data
You can use the EROMWR instruction in the user program to write the D device values (D6000 ~ D6999) to the
permanent memory EEPROM in IVC1 series PLC. The EEPROM operation will make the scan cycle 2ms ~ 5ms
longer. The written data will overwrite the existing data in EEPROM.
� Note
The EEPROM can be over-written for a limited number of times (usually one million). Do not overwrite EEPROM unless it is
necessary, otherwise EEPROM could fail soon and lead to CPU fault.
2.1.9 Digital Filtering Of Input Terminals
The input terminals X0 ~ X17 of IVC2 series PLC and X0 ~ X7 of IVC1 series PLC use digital filtering to filter the noise
at the terminal. You can set the filter constant in the Input Filter tab of System block.
The filter constant setting ranges are:
IVC2: 0 ~ 60ms. Default: 10ms.
IVC1: 0, 8, 16, 32 and 64ms. Default: 8ms.
2.1.10 No Battery Mode
The IVC2 series basic module can work without battery. When you select the No battery mode in the Advanced
Settings tab of System block, the system will not report system errors caused by lack of battery (Battery-backed data
lost, Forced-table lost and User information file error).
See the notice for the No battery mode in the Advanced Settings tab of Data block.
� Note
IVC1 series PLC has no battery, therefore it does not support no battery mode.

14 Chapter 2 PLC Function Description
IVC Series Small PLC Programming Manual
2.1.11 User Program Protection
The IVC1 and IVC2 series PLCs provide mutiple levels of passwords and other protection measures.
Table 2-4 User program protection
Protection measures Description
Formatting ban
After downloading system block to the PLC and checking the Formatting is prohibited option in the
Advanced Settings tab in System block, the PLC internal user program, system block and data block are
protected against formatting.
To lift the formatting ban, you need to re-download the system block and uncheck the Formatting is
prohibited option
Download password Download limit
Upload ban
If you select to disable the upload function during downloading process, it will be prohibited to upload the
program from PLC to PC. To enable the upload function, you must re-download the program and check to
enable the upload function during the downloading process.
Upload password Upload limit
Monitor password Monitor limit
Program password
The programmer can set passwords to protect the program, subprogram and interrupt subprogram against
aunthrorized accessing and editing in AutoStation.
Password setting method: Right click the program and select Encrypt/Decrypt in the popped out shortcut
menu, insert the password and confirm it. To cancel the password, just go through the same process and
input the correct password.
� Note
If you fail to input the correct password for continuously ten times, you will be banned from inputting password for the next 5
minutes.
2.2 System Configuration
2.2.1 System Block
The PLC configuration information, or system block file, is configured through the system block and is an important
part of the PLC user file. Before using the PLC, you need to compile and download the system block file.
The system block configuration includes configuring the following items:
� Saving Range (element saving range)
� Communication Port (Communication port and protocol
setting)
� Input Filter
� Output Table
� Set Time (set watchdog time and constant scanning time)
� Input Point (Startup mode of the input point)
� Priority Level Of Interruption
� Special Module Configuration
� Advanced Settings (data block, element
value retain, no battery mode and formatting
ban)
After setting the system block, you can select PLC-> Compile All to compile the system block file and be ready for
download.
Saving Range
Upon power loss, the IVC1 and IVC2 series PLCs can save the data of elements in the preset saving range to SRAM,
so as to use them after the power on.
You can set the saving range in the Saving Range tab, as shown in Figure 2-3.

Chapter 2 PLC Function Description 15
IVC Series Small PLC Programming Manual
Help
Figure 2-3 Setting element saving range
� Note
The element range and group number of the saving range are different for different PLC models.
By default, the D, M, S, T and C elements in a certain range will be saved.
You can change the defaults as you need. By clicking the Clear button on the right will set the corresponding number
to zero.
For IVC2 series PLC, you can set two groups that form a union.
For IVC1 series PLC, you can set only one group.
� Note
The T elements cannot be set in the saving range for IVC1 series PLC.
System operation upon power loss: PLC will save the elements in the saving range to the battery backed files.
System operation upon power on: PLC will check the data in SRAM. If the data saved in SRAM is correct, it will remain
unchanged. If the data is incorrect, PLC will clear all the elements in SRAM.
Communication Port
You can set the two PLC communication ports in the Communication Port tab of the System block, as shown in
Figure 2-4. The items include protocol selection and setting the specific protocol parameters.

16 Chapter 2 PLC Function Description
IVC Series Small PLC Programming Manual
Help
Figure 2-4 Setting communication ports
By default, the communication port 0 uses program port protocol, while the communication port 1 uses no protocol.
You can set as you need.
1. Program port protocol
By default, the communication port 0 uses the program port protocol, the dedicated protocol for the communication of
IVC series PLC programming software. Under this protocol, you can set the communication baud rate between PC
and port 0 through the serial port configuration tool of AutoStation. In the TM state, port 0 can only be used for
programming communication.
2. Free port protocol
The free port protocol supports customized data file format, either ASCII or binary code. Only in the RUN state can a
PLC use the free port communication, which cannot be used to communicate with the programming device. In the
STOP state, port 0 can only be used for programming communication.
The configurable parameters include Baud rate, Data bit, Valid bit, Parity, Stop bit, Allow start character
detection, Allow end character detection, Intercharacter timeout and Interframe timeout.
3. Modbus protocol
The Modbus communication equipment include a master and a slave. The master can communicate with the slave
(including inverters) and send control frames to the slave, and the slave will respond to the master’s requests.
Communication port 0 can be set as a slave, while communication port 1 can be set as a slave or a master.
The configurable parameters include Baud rate, Data bit, Parity check, Stop bit, master/slave mode, Station no.,
Transmission mode, Timeout time of the main mode and Retry times.
4. N:N bus protocol
N:N bus is an Invt-developed communication protocol that supports N to N communication in a small PLC network.
The PLCs in a N:N bus network can automatically exchange part of their D and M elements.
Both port 0 and port 1 can use N:N bus protocol.
� Note
For the detailed information of communication protocols, see Chapter 10 Using Communication Function.
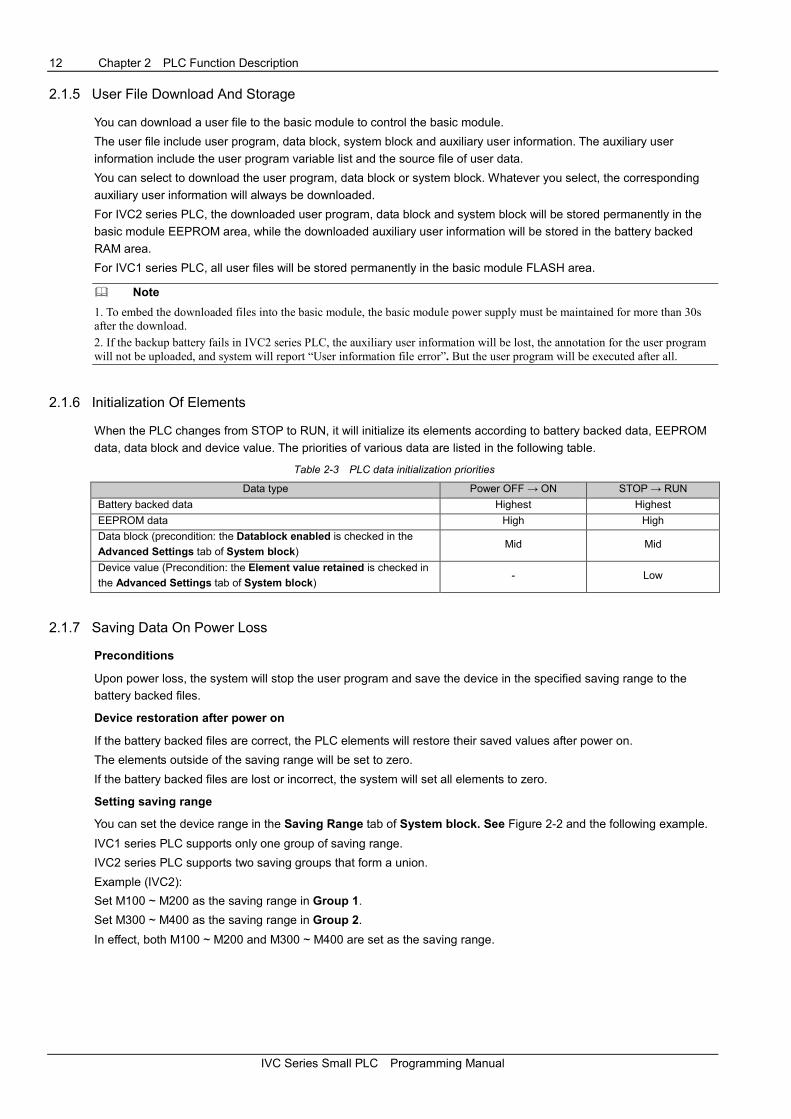
Input Filter
In the Input Filter tab, you can set the filter constant for a PLC input terminal. The digital filter can eliminate the noise at
the input terminal. Only input terminals X0 ~ X17 (for IVC1 series: X0 ~ X7) use digital filter, while other digital input
terminal use hardware filter. See Figure 2-5.
Chapter 2 PLC Function Description 17
IVC Series Small PLC Programming Manual
Help
Figure 2-5 Setting input filter
IVC2 setting range: 0ms ~ 60ms. Default: 10ms.
IVC1 setting range: 0ms, 8ms, 16ms, 32ms, 64ms. Default: 8ms.
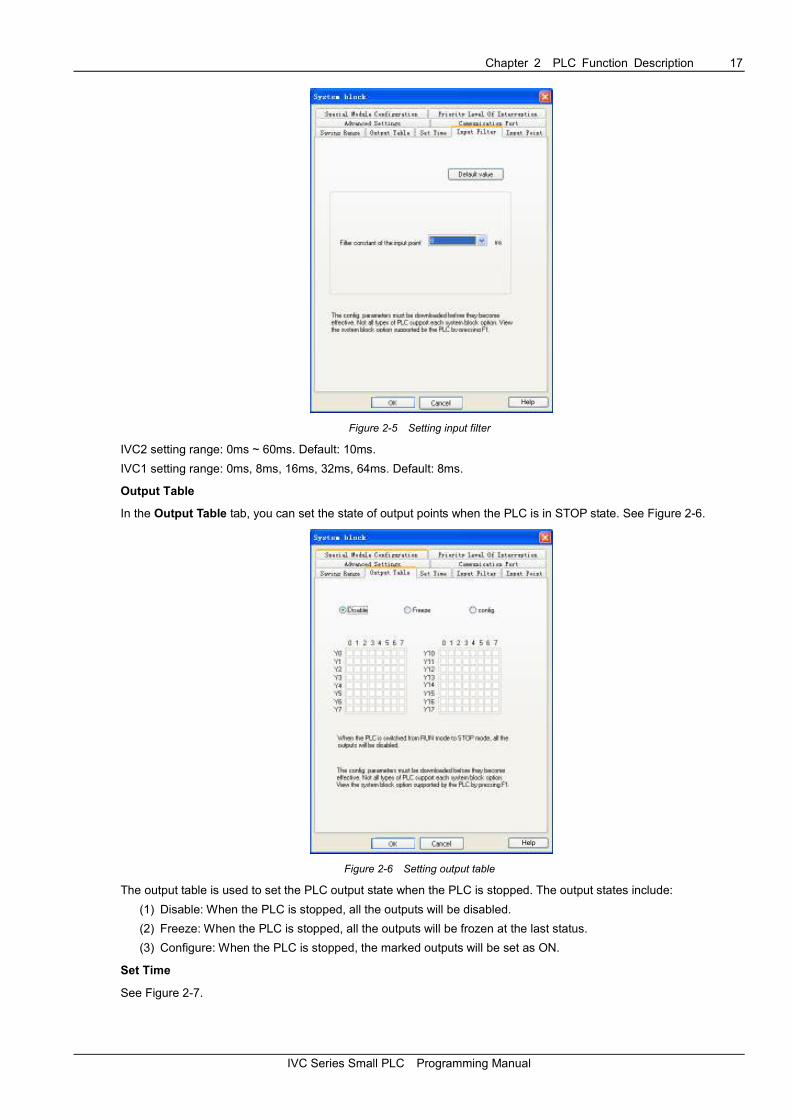
Output Table
In the Output Table tab, you can set the state of output points when the PLC is in STOP state. See Figure 2-6.
Help
Figure 2-6 Setting output table
The output table is used to set the PLC output state when the PLC is stopped. The output states include:
(1) Disable: When the PLC is stopped, all the outputs will be disabled.
(2) Freeze: When the PLC is stopped, all the outputs will be frozen at the last status.
(3) Configure: When the PLC is stopped, the marked outputs will be set as ON.
Set Time
See Figure 2-7.

18 Chapter 2 PLC Function Description
IVC Series Small PLC Programming Manual
Help
Figure 2-7 Setting time
1. Watchdog time setting
The watchdog time is the maximum user program execution time. When the actual program execution time exceeds
the watchdog time, PLC will stop the execution, the ERR indicator (red) will turn on, and the system will output
according to the system configuration. The watchdog time setting range is 0ms ~ 1000ms. Default: 200 ms.
2. Constant scanning time setting
With the constant scanning time set, system will scan the registers within a constant duration. Setting range: 0ms ~
1000ms. Default: 0ms.
3. Power loss detection time setting (for IVC2 only)
When the duration of power loss exceeds the power loss detection time, the PLC will change to STOP. The system will
save the values of elements in the Saving Range. Setting range: 0ms ~ 100ms. Default: 0ms
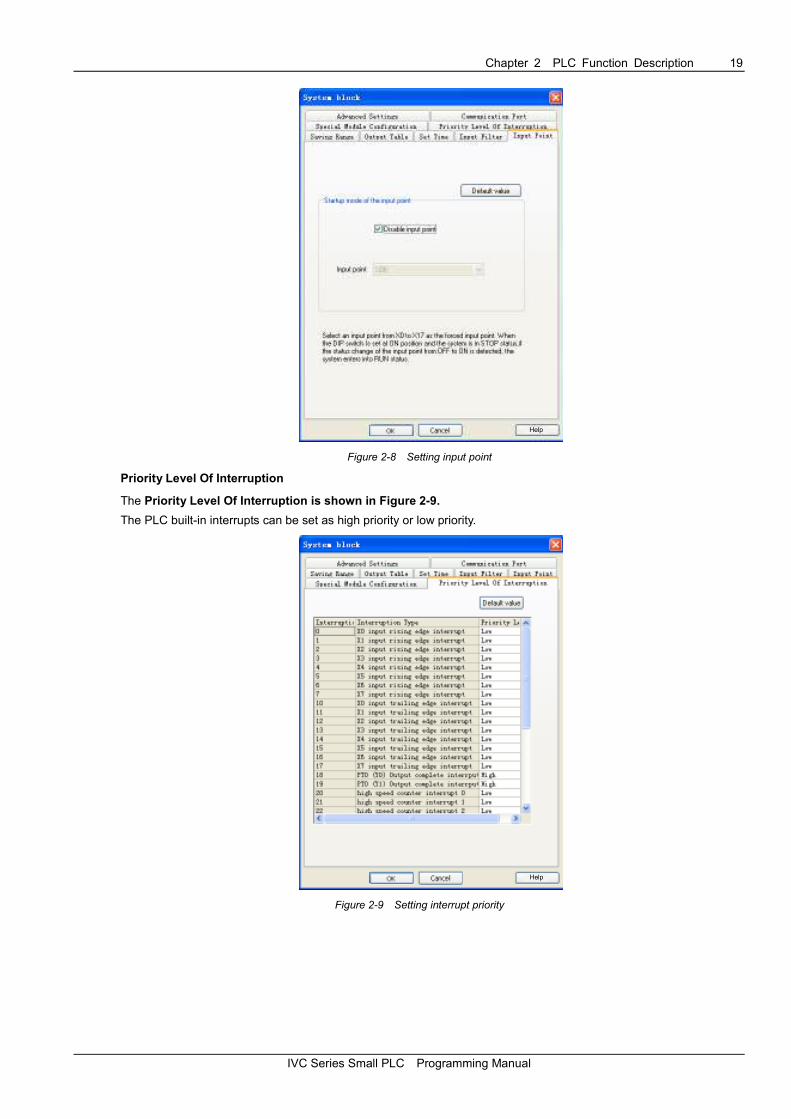
Input Point
The Input Point setting tab is shown in Figure 2-8.
In this tab, you can set the following parameters:
1. Disable input point
Check the Disable input point to disable the input point startup function.
2. Input point
When the Disable input point is not checked, you can designate an input terminal (among X0 ~ X17) as a means of
external RUN control. When the designated input terminal is ON, the PLC will be turned from STOP state to RUN
state.
Chapter 2 PLC Function Description 19
IVC Series Small PLC Programming Manual
Help
Figure 2-8 Setting input point
Priority Level Of Interruption
The Priority Level Of Interruption is shown in Figure 2-9.
The PLC built-in interrupts can be set as high priority or low priority.
Help
Figure 2-9 Setting interrupt priority

20 Chapter 2 PLC Function Description
IVC Series Small PLC Programming Manual
Special Module Configuration
You can set the Module Type and Module Property in the Special Module Configuration tab, as shown in Figure
2-10.
Help
Figure 2-10 Setting special module
1. Module Type
As shown in Figure 2-10, you can set the module type for No.0 ~ No.3 special modules.
Module Property
After selecting the Module Type, the corresponding Module Property will be activated. Open the dialogue box as
shown below.
Figure 2-11 Setting special module property
In the dialogue box as shown in Figure 2-11, you can configure the channel for the special module, including Mode
(signal features), Digital value at zero, Upper limit of digital value, and Average sampling value. Refer to the user
manual of the specific special module for the meanings and configuration methods of the various parameters.

Chapter 2 PLC Function Description 21
IVC Series Small PLC Programming Manual
Advanced Settings
The advanced settings include Datablock enabled, Element value retained, No battery mode and Formatting is
prohibited.
Help
Figure 2-12 Advanced settings
Datablock enabled
Check the Datablock enabled, and the datablock will be used to initialize the D elements when the PLC changes from
STOP to RUN.
Element value retained
Check the Element value retained, and the elements will not be initialized, but saved when the PLC changes from
STOP to RUN.
� Note
When the Datablock enabled and Element value retained are both checked, the Datablock enabled prevails. See 2.1.6
Initialization Of Elements.
No battery mode
Check this option, and the system will not report the battery backup data lost error and forced table lost error upon
battery failure.
2.2.2 Datablock
The datablock is used to set the defaults for D elements. If you download the compiled datablock settings to the PLC,
the PLC will use the datablock to initialize the related D elements upon PLC startup.
The datablock editor enables you to assign initial data to the D register (data memory). You can assign data to words
or double words, but not to bytes. You can also add comments by inputting “//” to the front of a character string.
See AutoStation Programming Software User Manual for detailed datablock instruction.
2.2.3 Global Variable Table
The global variables table enables you to give meaningful names for certain PLC addresses. The names are
accessible anywhere in the project, and using them is in effect using the corresponding device.
The global variable
The global variable table includes three columns: Variable Name, Variable addr. and Comments.

22 Chapter 2 PLC Function Description
IVC Series Small PLC Programming Manual
The variable name can be made up of letters (case insensitive), numbers, underline or their mixture, but no spaces.
The name cannot start with a number, nor be completely made up of numbers. Length: not longer than 8 bytes. The
format of “device type + number” is illegal. No keywords shall be used. The keywords include: basic data type,
instructions and the operators in the IL programming language.
The number of global variables shall not exceed 500. See Figure 2-13.
Figure 2-13 Global variable table
2.2.4 Setting BFM For IVC2 Serie Special Module
There is no need to set the addresses for IVC2 series special modules, for the basic module can detect and address
them automatically upon power on.
Among the special modules, the analog extension module includes the analog input module and analog output
module.
The parameters of these two special modules, such as the channel characteristics, zero point and maximum digital
signal are by default applicable directly. However, when necessary, you can change the parameters in order to cater
for your actual needs.
IVC2 analog input module
IVC2 analog input module exchanges information with its basic module through the BFM area.
When a user program runs on the basic module, the TO instruction will write data to the related registers in the BFM
area of IVC2 special module, and change the default settings. The configuration data that can be changed includes
zero digital signal, maximum digital signal, input channel signal characteristic, input channel ready flag, and so on.
The basic module uses the FROM instruction to read the data from the BFM area of IVC2 analog input module. The
data may include the analog-digital conversion result and other information.
IVC2 analog output module
IVC2 analog output module exchanges information with its basic module through the BFM area.
When a user program runs on the basic module, the TO instruction will write data to the related registers in the BFM
area of IVC2 special module, and change the default settings. The configuration data that can be changed includes
zero digital signal, maximum digital signal, output channel signal characteristic, output channel ready flag, and so on.
The basic module uses the FROM instruction to read the data from, and uses the TO instruction to write the digital
signal to be convertered to, the BFM area of IVC2 analog output module.
For details about the TO/FROM instruction, refer to Chapter 6 Application Instructions. As for the information about
various special modules, as well as their BFM areas, see the quick start manuals of the special module.
2.3 Running Mode And State Control
You can start or stop the PLC in any of the following three ways.
1. Using the mode selection switch
2. Feeding power to the designated input terminal (see Input Point in 2.2.1 System Block)
3. Programming software (by clicking PLC -> Stop in the main interface if the mode selection switch is set as TM or
ON)
Chapter 2 PLC Function Description 23
IVC Series Small PLC Programming Manual
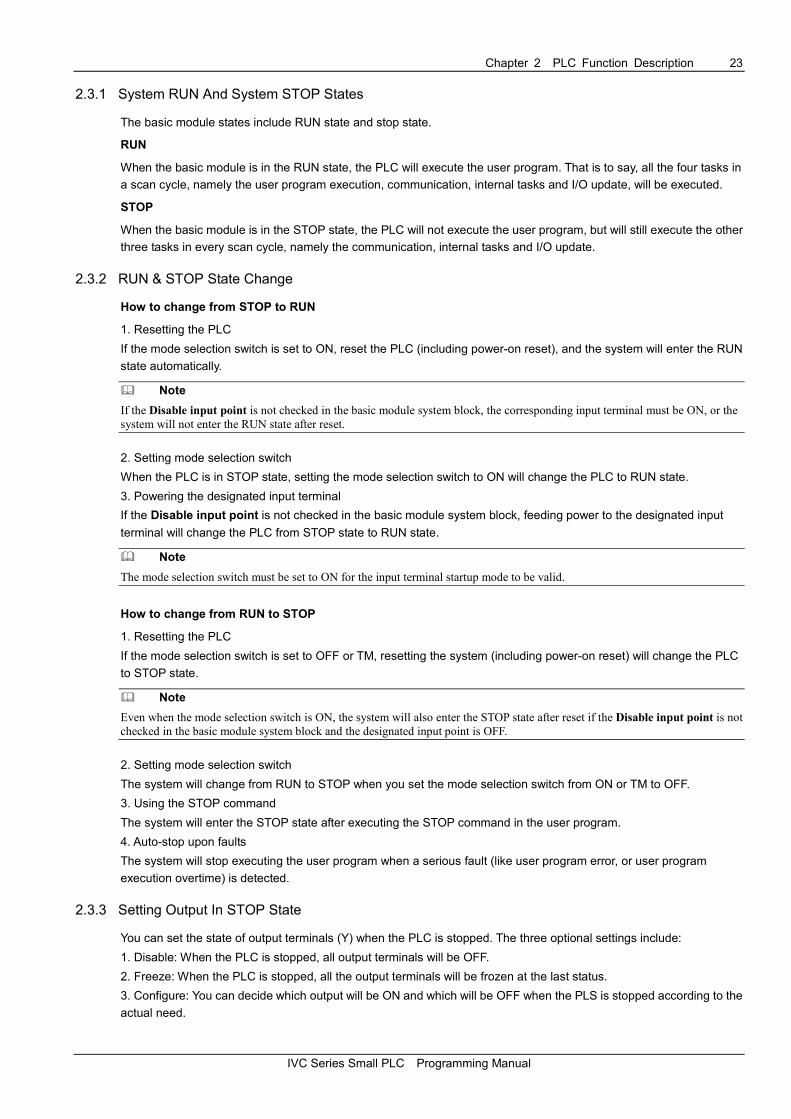
2.3.1 System RUN And System STOP States
The basic module states include RUN state and stop state.
RUN
When the basic module is in the RUN state, the PLC will execute the user program. That is to say, all the four tasks in
a scan cycle, namely the user program execution, communication, internal tasks and I/O update, will be executed.
STOP
When the basic module is in the STOP state, the PLC will not execute the user program, but will still execute the other
three tasks in every scan cycle, namely the communication, internal tasks and I/O update.
2.3.2 RUN & STOP State Change
How to change from STOP to RUN
1. Resetting the PLC
If the mode selection switch is set to ON, reset the PLC (including power-on reset), and the system will enter the RUN
state automatically.
� Note
If the Disable input point is not checked in the basic module system block, the corresponding input terminal must be ON, or the
system will not enter the RUN state after reset.
2. Setting mode selection switch
When the PLC is in STOP state, setting the mode selection switch to ON will change the PLC to RUN state.
3. Powering the designated input terminal
If the Disable input point is not checked in the basic module system block, feeding power to the designated input
terminal will change the PLC from STOP state to RUN state.
� Note
The mode selection switch must be set to ON for the input terminal startup mode to be valid.
How to change from RUN to STOP
1. Resetting the PLC
If the mode selection switch is set to OFF or TM, resetting the system (including power-on reset) will change the PLC
to STOP state.
� Note
Even when the mode selection switch is ON, the system will also enter the STOP state after reset if the Disable input point is not
checked in the basic module system block and the designated input point is OFF.
2. Setting mode selection switch
The system will change from RUN to STOP when you set the mode selection switch from ON or TM to OFF.
3. Using the STOP command
The system will enter the STOP state after executing the STOP command in the user program.
4. Auto-stop upon faults
The system will stop executing the user program when a serious fault (like user program error, or user program
execution overtime) is detected.
2.3.3 Setting Output In STOP State
You can set the state of output terminals (Y) when the PLC is stopped. The three optional settings include:
1. Disable: When the PLC is stopped, all output terminals will be OFF.
2. Freeze: When the PLC is stopped, all the output terminals will be frozen at the last status.
3. Configure: You can decide which output will be ON and which will be OFF when the PLS is stopped according to the
actual need.
24 Chapter 2 PLC Function Description
IVC Series Small PLC Programming Manual
You can find the above settings in the Output Table tab of the System block. See the Output Table in 2.2.1 System
Block.
2.4 System Debugging
2.4.1 Uploading & Downloading Program
Downloading
The system block, data block and user program edited in AutoStation can be downloaded to the PLC through a serial
port. Note that the PLC should be in the STOP state when downloading.
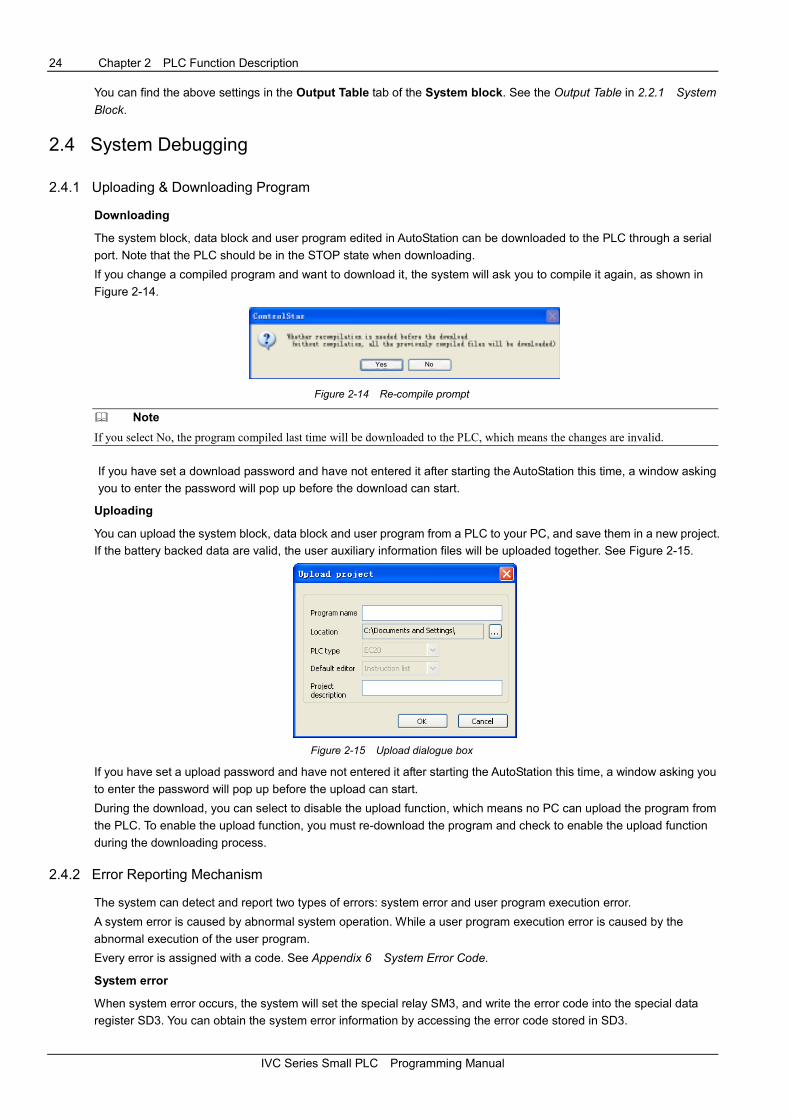
If you change a compiled program and want to download it, the system will ask you to compile it again, as shown in
Figure 2-14.
NoYes
Figure 2-14 Re-compile prompt
� Note
If you select No, the program compiled last time will be downloaded to the PLC, which means the changes are invalid.
If you have set a download password and have not entered it after starting the AutoStation this time, a window asking
you to enter the password will pop up before the download can start.
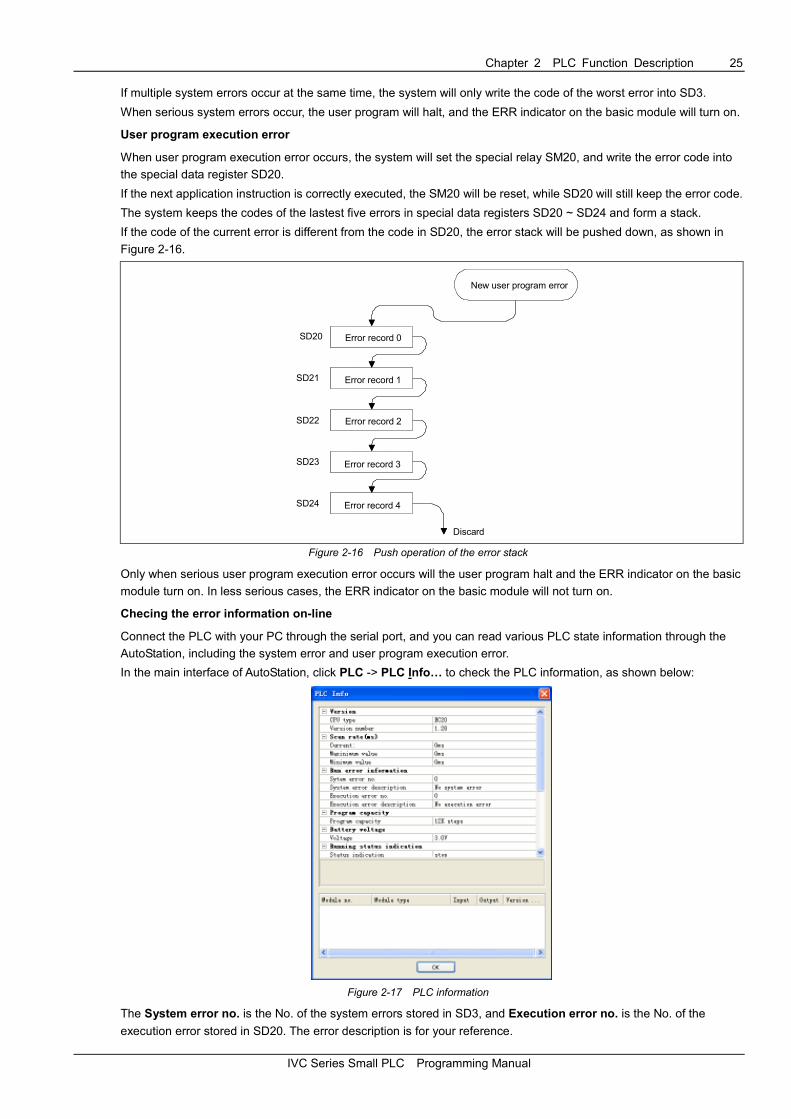
Uploading
You can upload the system block, data block and user program from a PLC to your PC, and save them in a new project.
If the battery backed data are valid, the user auxiliary information files will be uploaded together. See Figure 2-15.
Figure 2-15 Upload dialogue box
If you have set a upload password and have not entered it after starting the AutoStation this time, a window asking you
to enter the password will pop up before the upload can start.
During the download, you can select to disable the upload function, which means no PC can upload the program from
the PLC. To enable the upload function, you must re-download the program and check to enable the upload function
during the downloading process.
2.4.2 Error Reporting Mechanism
The system can detect and report two types of errors: system error and user program execution error.
A system error is caused by abnormal system operation. While a user program execution error is caused by the
abnormal execution of the user program.
Every error is assigned with a code. See Appendix 6 System Error Code.
System error
When system error occurs, the system will set the special relay SM3, and write the error code into the special data
register SD3. You can obtain the system error information by accessing the error code stored in SD3.
Chapter 2 PLC Function Description 25
IVC Series Small PLC Programming Manual
If multiple system errors occur at the same time, the system will only write the code of the worst error into SD3.
When serious system errors occur, the user program will halt, and the ERR indicator on the basic module will turn on.
User program execution error
When user program execution error occurs, the system will set the special relay SM20, and write the error code into
the special data register SD20.
If the next application instruction is correctly executed, the SM20 will be reset, while SD20 will still keep the error code.
The system keeps the codes of the lastest five errors in special data registers SD20 ~ SD24 and form a stack.
If the code of the current error is different from the code in SD20, the error stack will be pushed down, as shown in
Figure 2-16.
错误记录0
错误记录1
新发生的用户程序错误
错误记录2
错误记录3
错误记录4
SD20
SD21
SD22
SD23
New user program error
Error record 0
Error record 1
Error record 2
Error record 3
Error record 4
Discard
SD24
New user program error
Error record 0
Error record 1
Error record 2
Error record 3
Error record 4
Figure 2-16 Push operation of the error stack
Only when serious user program execution error occurs will the user program halt and the ERR indicator on the basic
module turn on. In less serious cases, the ERR indicator on the basic module will not turn on.
Checing the error information on-line
Connect the PLC with your PC through the serial port, and you can read various PLC state information through the
AutoStation, including the system error and user program execution error.
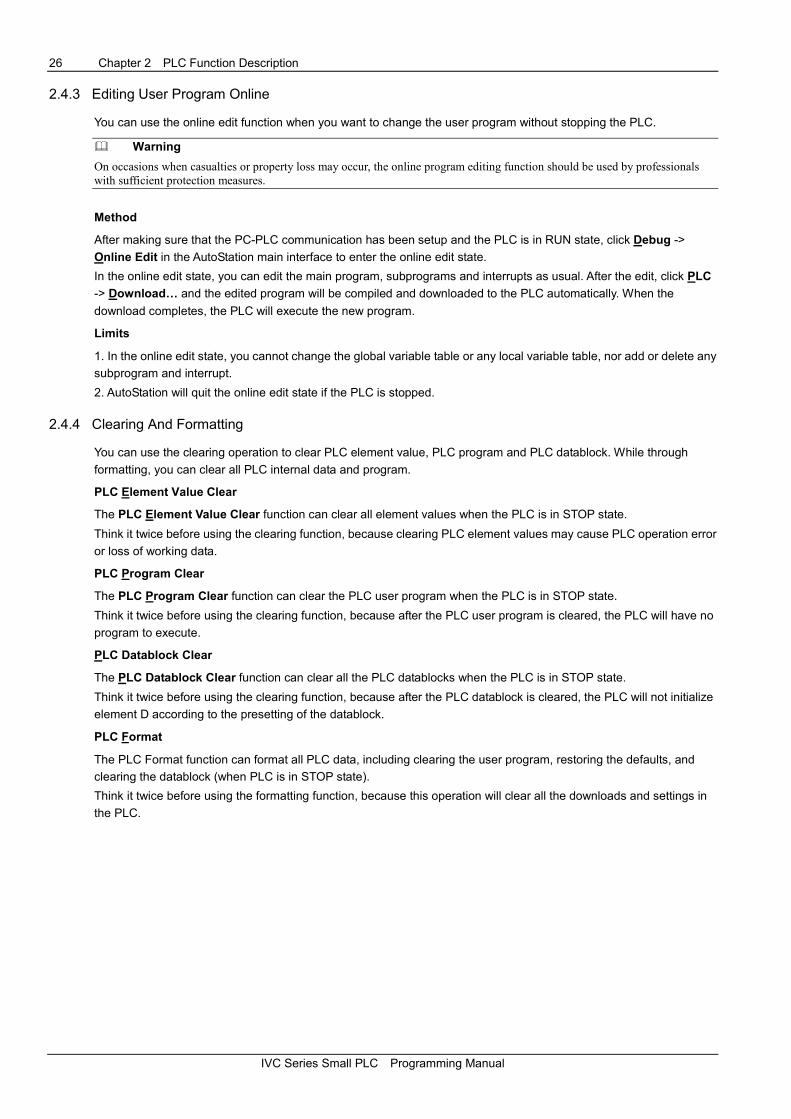
In the main interface of AutoStation, click PLC -> PLC Info… to check the PLC information, as shown below:
Figure 2-17 PLC information
The System error no. is the No. of the system errors stored in SD3, and Execution error no. is the No. of the
execution error stored in SD20. The error description is for your reference.
26 Chapter 2 PLC Function Description
IVC Series Small PLC Programming Manual
2.4.3 Editing User Program Online
You can use the online edit function when you want to change the user program without stopping the PLC.
� Warning
On occasions when casualties or property loss may occur, the online program editing function should be used by professionals
with sufficient protection measures.
Method
After making sure that the PC-PLC communication has been setup and the PLC is in RUN state, click Debug ->
Online Edit in the AutoStation main interface to enter the online edit state.
In the online edit state, you can edit the main program, subprograms and interrupts as usual. After the edit, click PLC
-> Download… and the edited program will be compiled and downloaded to the PLC automatically. When the
download completes, the PLC will execute the new program.
Limits
1. In the online edit state, you cannot change the global variable table or any local variable table, nor add or delete any
subprogram and interrupt.
2. AutoStation will quit the online edit state if the PLC is stopped.
2.4.4 Clearing And Formatting
You can use the clearing operation to clear PLC element value, PLC program and PLC datablock. While through
formatting, you can clear all PLC internal data and program.
PLC Element Value Clear
The PLC Element Value Clear function can clear all element values when the PLC is in STOP state.
Think it twice before using the clearing function, because clearing PLC element values may cause PLC operation error
or loss of working data.
PLC Program Clear
The PLC Program Clear function can clear the PLC user program when the PLC is in STOP state.
Think it twice before using the clearing function, because after the PLC user program is cleared, the PLC will have no
program to execute.
PLC Datablock Clear
The PLC Datablock Clear function can clear all the PLC datablocks when the PLC is in STOP state.
Think it twice before using the clearing function, because after the PLC datablock is cleared, the PLC will not initialize
element D according to the presetting of the datablock.
PLC Format
The PLC Format function can format all PLC data, including clearing the user program, restoring the defaults, and
clearing the datablock (when PLC is in STOP state).
Think it twice before using the formatting function, because this operation will clear all the downloads and settings in
the PLC.

Chapter 2 PLC Function Description 27
IVC Series Small PLC Programming Manual
2.4.5 Checking PLC Information Online
PLC Info…
The PLC Info… function can obtain and display various PLC running information, as shown in Figure 2-18.
Figure 2-18 PLC current operation information
PLC Clock
The PLC Clock function can be used to display and set PLC present time, as shown in Figure 2-19.
Figure 2-19 Setting PLC clock
Displayed in the PLC Clock window is the present date and time of PLC. You can adjust the time setting and click the
Set time button to validate it.
28 Chapter 2 PLC Function Description
IVC Series Small PLC Programming Manual
2.4.6 Write, Force And Element Monitoring Table
Write and force
During the debugging, some element values may need to be changed manually. You can use the write or force
function. Difference between write and force is that written element values are one-off and may change with the
program operation, but forced element values will be permanently recorded in the PLC hardware until being unforced.
To use the write or force function, just select the element that needs changing, right click and select Write Selected
Element or Force…. All the element addresses used by the selected element will be listed in the dialog box. Modify
the address value to be written or forced, click the OK button, and the value will be downloaded to the PLC. If these
values are effective in the hardware, you will see the change in later debugging process.
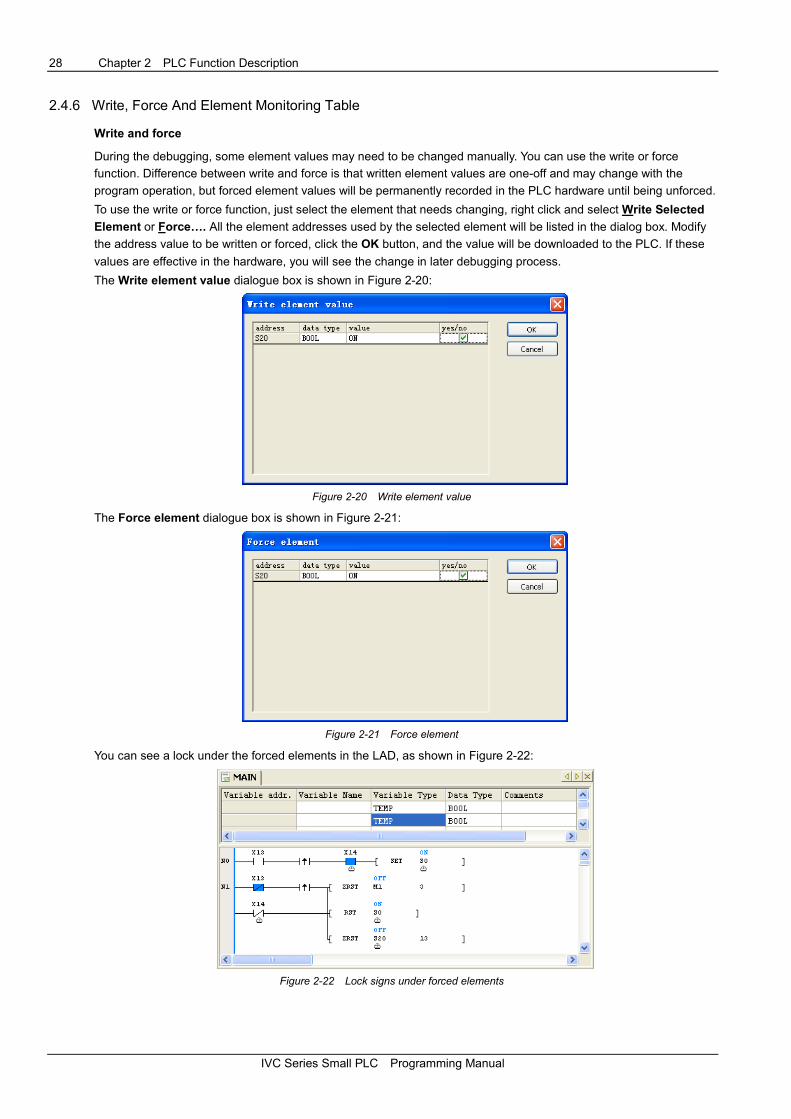
The Write element value dialogue box is shown in Figure 2-20:
Figure 2-20 Write element value
The Force element dialogue box is shown in Figure 2-21:
Figure 2-21 Force element
You can see a lock under the forced elements in the LAD, as shown in Figure 2-22:
Figure 2-22 Lock signs under forced elements
Chapter 2 PLC Function Description 29
IVC Series Small PLC Programming Manual
Unforce
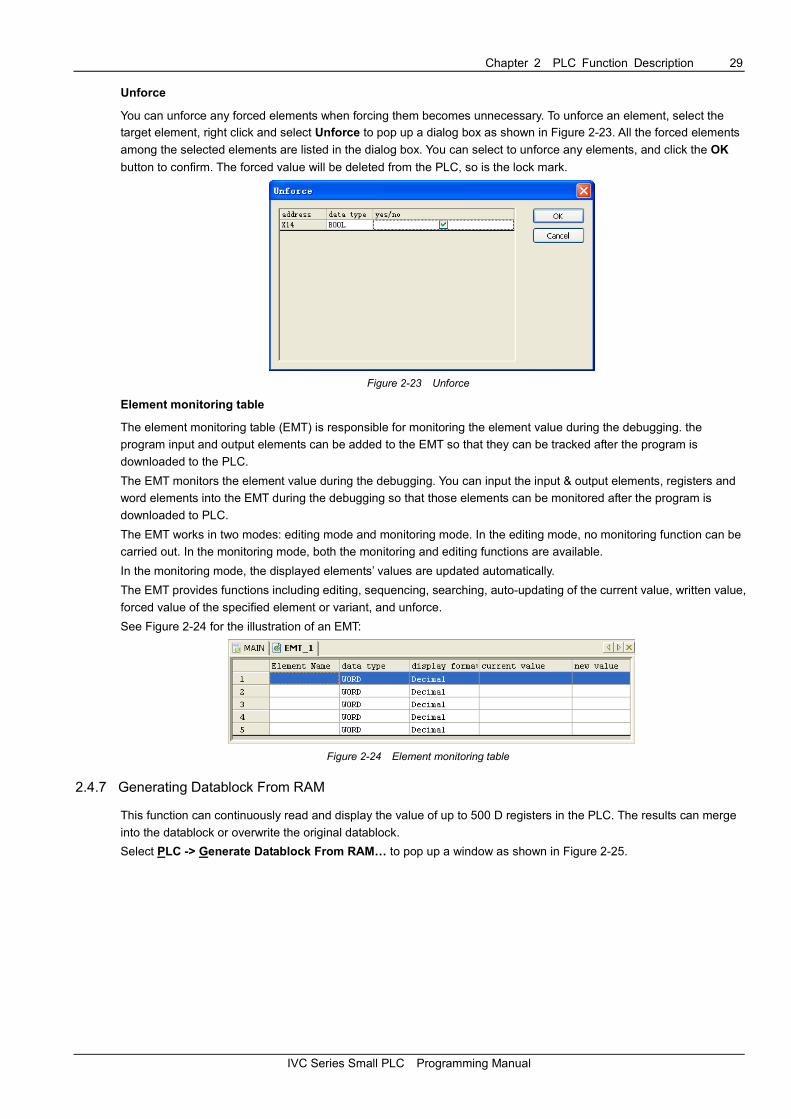
You can unforce any forced elements when forcing them becomes unnecessary. To unforce an element, select the target element, right click and select Unforce to pop up a dialog box as shown in Figure 2-23. All the forced elements
among the selected elements are listed in the dialog box. You can select to unforce any elements, and click the OK
button to confirm. The forced value will be deleted from the PLC, so is the lock mark.
Figure 2-23 Unforce
Element monitoring table
The element monitoring table (EMT) is responsible for monitoring the element value during the debugging. the
program input and output elements can be added to the EMT so that they can be tracked after the program is
downloaded to the PLC.
The EMT monitors the element value during the debugging. You can input the input & output elements, registers and
word elements into the EMT during the debugging so that those elements can be monitored after the program is
downloaded to PLC.
The EMT works in two modes: editing mode and monitoring mode. In the editing mode, no monitoring function can be
carried out. In the monitoring mode, both the monitoring and editing functions are available.
In the monitoring mode, the displayed elements’ values are updated automatically.
The EMT provides functions including editing, sequencing, searching, auto-updating of the current value, written value,
forced value of the specified element or variant, and unforce.
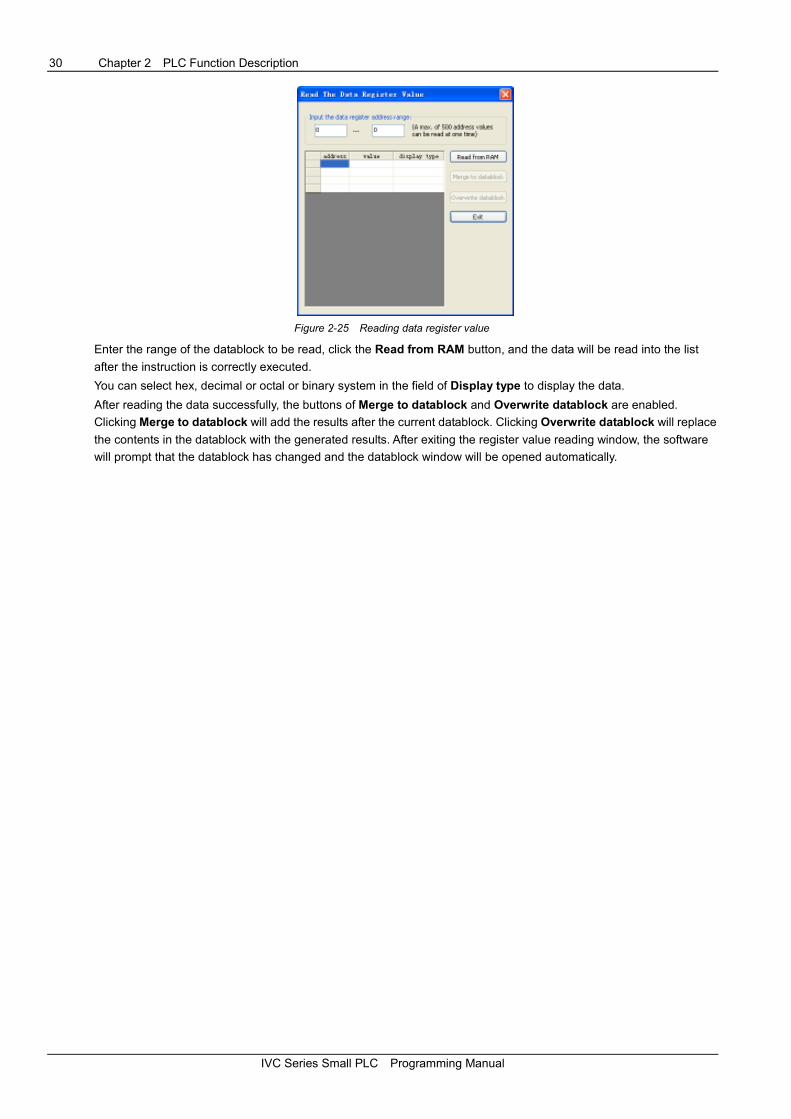
See Figure 2-24 for the illustration of an EMT:
Figure 2-24 Element monitoring table
2.4.7 Generating Datablock From RAM
This function can continuously read and display the value of up to 500 D registers in the PLC. The results can merge
into the datablock or overwrite the original datablock.
Select PLC -> Generate Datablock From RAM… to pop up a window as shown in Figure 2-25.
30 Chapter 2 PLC Function Description
IVC Series Small PLC Programming Manual
Figure 2-25 Reading data register value
Enter the range of the datablock to be read, click the Read from RAM button, and the data will be read into the list
after the instruction is correctly executed.
You can select hex, decimal or octal or binary system in the field of Display type to display the data.
After reading the data successfully, the buttons of Merge to datablock and Overwrite datablock are enabled.
Clicking Merge to datablock will add the results after the current datablock. Clicking Overwrite datablock will replace
the contents in the datablock with the generated results. After exiting the register value reading window, the software
will prompt that the datablock has changed and the datablock window will be opened automatically.

Chapter 3 Element And Data 31
IVC Series Small PLC Programming Manual
Chapter 3 Element And Data
This chapter details the description, classification and functions of the elements of IVC series small PLC.
3.1 Element Type And Function ........................................................................................................................................ 32
3.1.1 What Is A PLC Element ................................................................................................................................... 32
3.1.2 Element List ..................................................................................................................................................... 33
3.1.3 Input And Output Points ................................................................................................................................... 34
3.1.4 Auxiliary Relays ............................................................................................................................................... 35
3.1.5 State Relays ..................................................................................................................................................... 35
3.1.6 Timer ................................................................................................................................................................ 36
3.1.7 Counter ............................................................................................................................................................ 37
3.1.8 Data Register ................................................................................................................................................... 37
3.1.9 Special Auxiliary Relay .................................................................................................................................... 38
3.1.10 Special Data Register .................................................................................................................................... 38
3.1.11 Offset Addressing Register ............................................................................................................................ 39
3.1.12 Local Auxiliary Relay ...................................................................................................................................... 39
3.1.13 Local Data Register ....................................................................................................................................... 39
3.2 Elements Addressing Mode ........................................................................................................................................ 40
3.2.1 Kn Addressing Mode (Combined Bit-string Addressing Mode) ........................................................................ 40
3.2.2 Z Addressing Mode (Offset Addressing Mode) ................................................................................................ 40
3.2.3 Kn Addressing In Combination With Z Addressing .......................................................................................... 41
3.2.4 Storing & Addressing 32-Bit Data In D & V Elements ...................................................................................... 41
3.3 Data ............................................................................................................................................................................. 42
3.3.1 Data Type ........................................................................................................................................................ 42
3.3.2 Correlation Between Elements And Data Types .............................................................................................. 42
3.3.3 Constant........................................................................................................................................................... 43

32 Chapter 3 Element And Data
IVC Series Small PLC Programming Manual
3.1 Element Type And Function
3.1.1 What Is A PLC Element
The PLC elements are virtual elements configured in PLC system design in order to replace the actual relays in the
relay control circuits. PLC uses the elements to calculate and configure system function. Due to their virtual nature, the
elements can be used repeatedly in the program, their number is in theory unlimited (only related to program capacity),
and have no mechanical or electric problems like their actual counterparts. Such features make the PLC much more
reliable than relay control circuits. In addition, it is easier to program and modify the logic.
The types and functions of IVC series PLC elements are shown in the following figure.
User program
Buttons, contacts, etc.
X discrete input point hardwarecircuit
Input image registers
Input point X
Auxiliary relay M State relay S Data register D
Timer T Counter C
Local auxiliary relay LM Offset addressing register Z
Local data register V
Special auxiliary relay SM
Special data register SD
Output point Y
Output image registers
Y discrete output point hardwarecircuit
Executing & displaying devices
Elements
PLC
system functions, system
states, time square
wave, interrupts and com
munication, etc.
Figure 3-1 Types and functions of PLC elements
In this manual, the elements are named according to their types. For example:
� Input point X, or “X element” for short
� Output point Y, or “Y element” for short
� Auxiliary relay M, or “M element” for short
� Data register D, or “D element” for short
� State relay S, or “S element” for short

Chapter 3 Element And Data 33
IVC Series Small PLC Programming Manual
3.1.2 Element List
The elements of IVC series PLC are classified according to their functions, and are easily accessible.
The elements are listed in the following table.
Table 3-1 IVC series PLC elements
IVC1 series IVC2 series Numbered in
Element
resources Note 4
I/O 128I/128O (Input: X0 ~ X177.
Output: Y0 ~ Y177) Note 1
256I/256O (Input: X0 ~ X377.
Output: Y0 ~ Y377) Note 1 Octal
Auxiliary relay 2048 (M0 ~ M2047) 2000 (M0 ~ M1999) Decimal Local auxiliary relay Note 5 64 (LM0 ~ LM63) 64 (LM0 ~ LM63) Decimal Special auxiliary relay 256 (SM0 ~ SM255) 256 (SM0 ~ SM255) Decimal State relay 1024 (S0 ~ S1023) 992 (S0 ~ S991) Decimal Timer 256 (T0 ~ T255) Note2 256 (T0 ~ T255) Note 2 Decimal Counter 256 (C0 ~ C255) Note 3 256 (C0 ~ C255) Note 3 Decimal Data register 8000 (D0 ~ D7999) 8000 (D0 ~ D7999) Decimal Local data register Note 5 64 (V0 ~ V63) 64 (V0 ~ V63) Decimal Offset addressing register 16 (Z0 ~ Z15) 16 (Z0 ~ Z15) Decimal Special data register 256个 (SD0 ~ SD255) 256个 (SD0 ~ SD255) Decimal
Notes:
1: The X and Y elements are addressed in octal system, and X10 represents the 8th input point. The I/O point number here is the
system capacity, while the actual system I/O point number is determined by the actual system configuration (including extension
modules and power supply).
2: The T elements are addressed according to the timing precision:
� 100ms: T0 ~ T209
� 10ms: T210 ~ T251
� 1ms: T252 ~ T255
3: The C elements are addressed according to the counter types and functions:
� 16bit up counter: C0 ~ C199
� 32bit bi-directional counter: C200 ~ C235
� 32bit high speed counter: C236 ~ C255
4: Part of PLC elements are reserved for internal tasks. Avoid using those elements in the user program. See Appendix 3
Reserved Elements .
5: These two elements are local variants that cannot be defined in the global variant table. When the user program calls
subprograms or returns to the main program, they will be cleared, or be set through interface parameter transfer

34 Chapter 3 Element And Data
IVC Series Small PLC Programming Manual
3.1.3 Input And Output Points
Element mnemonic
� X (discrete input point)
� Y (discrete output point)
Function
The X and Y elements represent respectively the input
state of hardware X terminal and output state of
hardware Y terminal.
The state of X elements is obtained through the input
image register, while the state of Y elements is output
through the output circuit driven by the output image
register. The two operations are carried out in the I/O
Update stage of PLC scan cycle, as shown in Figure
3-2. For details, see 2.1.2 System Running
Mechanism (Scan Cycle Model) It is obvious that there
is a brief delay in PLC’s response to the I/O. The delay
is related to the input filter, communication, internal
tasks and scan cycle.
Execution of userprogram
Communication
Internal tasks
Update I/O
Input filtering
Buttons, contacts, etc.
Executing & displaying
devices
Output relay delay
Figure 3-2 Schematic diagram of I/O update
Classification
X0 ~ X17 have digital filters whose filtering time can be
set at the system block. Others use hardware filter. X0
~ X5 can be used as the counting input point for high
speed counters. Besides, X0 ~ X7 can also be used for
inputting external interrupts, pulse tracking and SPD
frequency detecting instruction.
Y0 and Y1 can be used for high speed output. Others
are ordinary output points.
Elements numbered in
Octal, starting with 0. The X and Y elements of both
the basic module and the I/O modules are numbered
continuously like 0 ~ 7, 10 ~ 17, 20 ~ 27, and so on.
Data type
Boolean (both X and Y)
Available forms
NO and NC contacts (dependent on which instruction
uses it)
The NO and NC contacts have opposite state values.
They are sometimes referred to as “a” contact and “b”
contact.
You can use NO and NC contacts of the Y element
during programming.
Value assignment
1. The X elements accepts only hardware input state
value and forced operation state value. In the user
program, they cannot be changed through output or
instructions, nor be set during system debugging.
2. You can assign values to Y elements with the OUT
instruction, or set the state value of Y elements, or
even force or write Y element values during system
debugging.
3. Through the system block, you can set the output
states of Y elements in the STOP state.
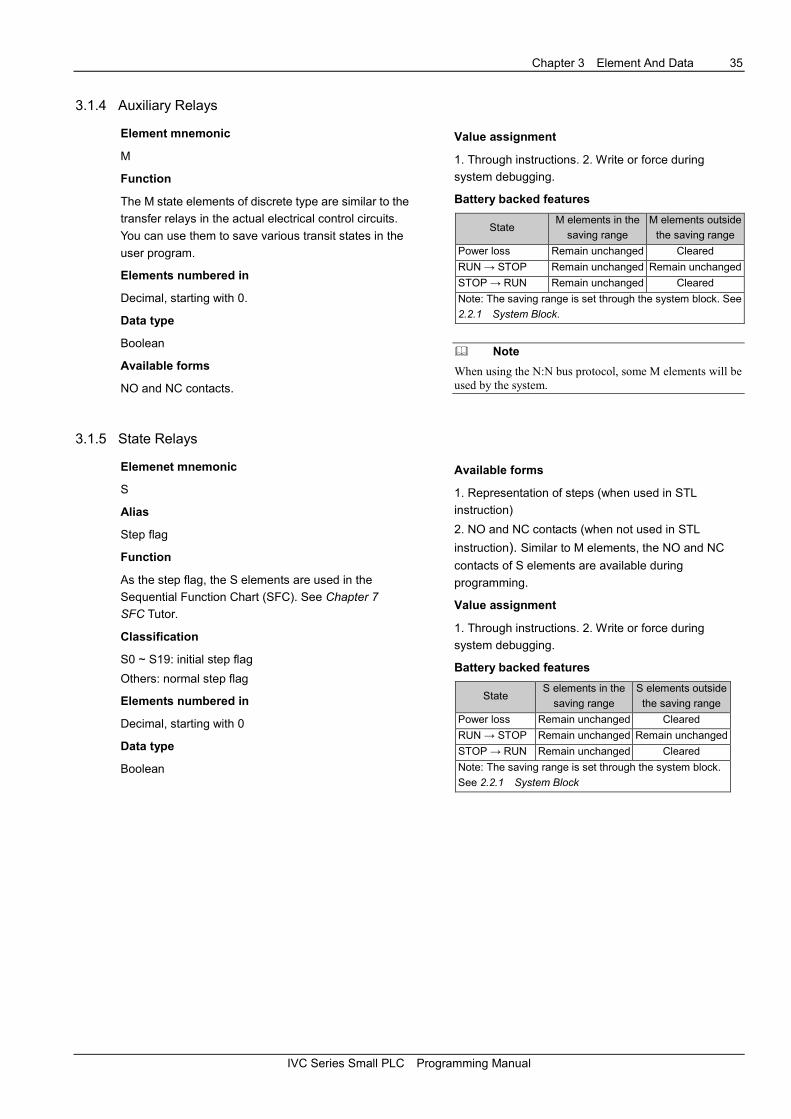
Chapter 3 Element And Data 35
IVC Series Small PLC Programming Manual
3.1.4 Auxiliary Relays
Element mnemonic
M
Function
The M state elements of discrete type are similar to the
transfer relays in the actual electrical control circuits.
You can use them to save various transit states in the
user program.
Elements numbered in
Decimal, starting with 0.
Data type
Boolean
Available forms
NO and NC contacts.
Value assignment
1. Through instructions. 2. Write or force during
system debugging.
Battery backed features
State M elements in the
saving range
M elements outside
the saving range
Power loss Remain unchanged Cleared
RUN → STOP Remain unchanged Remain unchanged
STOP → RUN Remain unchanged Cleared
Note: The saving range is set through the system block. See
2.2.1 System Block.
� Note
When using the N:N bus protocol, some M elements will be
used by the system.
3.1.5 State Relays
Elemenet mnemonic
S
Alias
Step flag
Function
As the step flag, the S elements are used in the
Sequential Function Chart (SFC). See Chapter 7
SFC Tutor.
Classification
S0 ~ S19: initial step flag
Others: normal step flag
Elements numbered in
Decimal, starting with 0
Data type
Boolean
Available forms
1. Representation of steps (when used in STL
instruction)
2. NO and NC contacts (when not used in STL
instruction). Similar to M elements, the NO and NC
contacts of S elements are available during
programming.
Value assignment
1. Through instructions. 2. Write or force during
system debugging.
Battery backed features
State S elements in the
saving range
S elements outside
the saving range
Power loss Remain unchanged Cleared
RUN → STOP Remain unchanged Remain unchanged
STOP → RUN Remain unchanged Cleared
Note: The saving range is set through the system block.
See 2.2.1 System Block
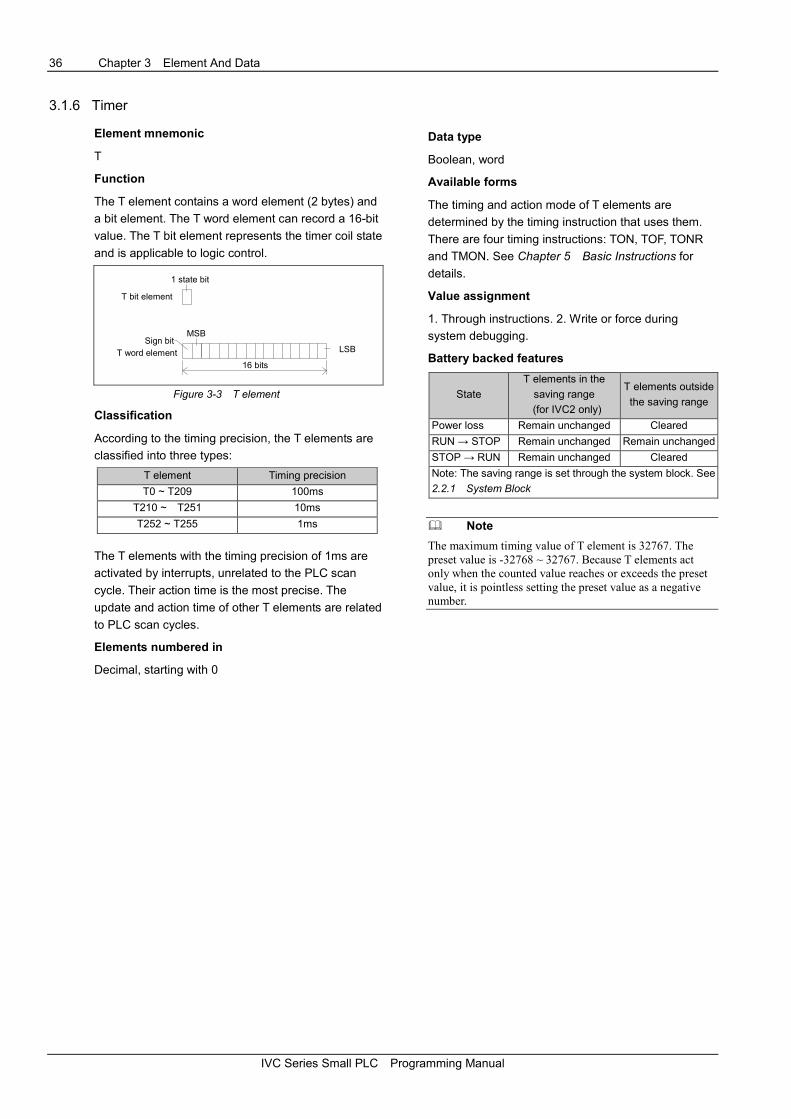
36 Chapter 3 Element And Data
IVC Series Small PLC Programming Manual
3.1.6 Timer
Element mnemonic
T
Function
The T element contains a word element (2 bytes) and
a bit element. The T word element can record a 16-bit
value. The T bit element represents the timer coil state
and is applicable to logic control.
T bit element
T word element
1 state bit
Sign bitMSB
16 bits
LSB
Figure 3-3 T element
Classification
According to the timing precision, the T elements are
classified into three types:
T element Timing precision
T0 ~ T209 100ms T210 ~ T251 10ms T252 ~ T255 1ms
The T elements with the timing precision of 1ms are
activated by interrupts, unrelated to the PLC scan
cycle. Their action time is the most precise. The
update and action time of other T elements are related
to PLC scan cycles.
Elements numbered in
Decimal, starting with 0
Data type
Boolean, word
Available forms
The timing and action mode of T elements are
determined by the timing instruction that uses them.
There are four timing instructions: TON, TOF, TONR
and TMON. See Chapter 5 Basic Instructions for
details.
Value assignment
1. Through instructions. 2. Write or force during
system debugging.
Battery backed features
State
T elements in the
saving range
(for IVC2 only)
T elements outside
the saving range
Power loss Remain unchanged Cleared
RUN → STOP Remain unchanged Remain unchanged
STOP → RUN Remain unchanged Cleared
Note: The saving range is set through the system block. See
2.2.1 System Block
� Note
The maximum timing value of T element is 32767. The
preset value is -32768 ~ 32767. Because T elements act
only when the counted value reaches or exceeds the preset
value, it is pointless setting the preset value as a negative
number.
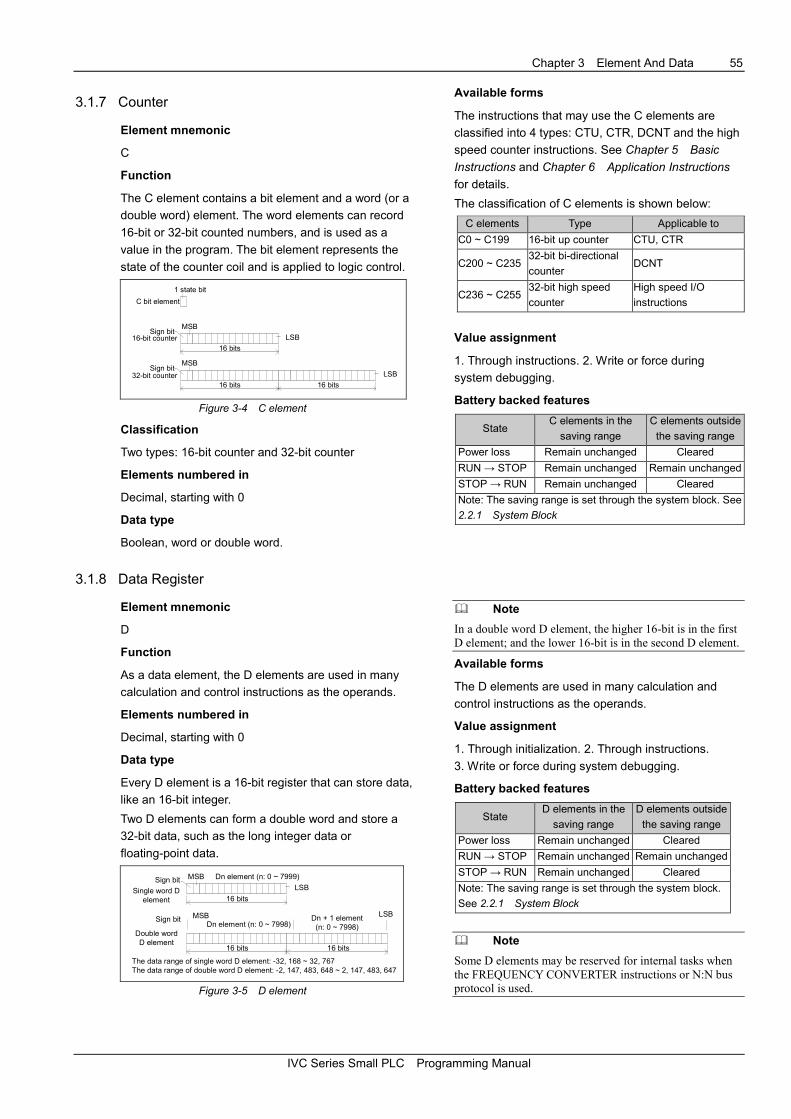
Chapter 3 Element And Data 55
IVC Series Small PLC Programming Manual
3.1.7 Counter
Element mnemonic
C
Function
The C element contains a bit element and a word (or a
double word) element. The word elements can record
16-bit or 32-bit counted numbers, and is used as a
value in the program. The bit element represents the
state of the counter coil and is applied to logic control.
C bit element
16-bit counter
1 state bit
Sign bitMSB
16 bits
LSB
32-bit counterSign bit
MSB
16 bits
LSB
16 bits
Figure 3-4 C element
Classification
Two types: 16-bit counter and 32-bit counter
Elements numbered in
Decimal, starting with 0
Data type
Boolean, word or double word.
Available forms
The instructions that may use the C elements are
classified into 4 types: CTU, CTR, DCNT and the high
speed counter instructions. See Chapter 5 Basic
Instructions and Chapter 6 Application Instructions
for details.
The classification of C elements is shown below:
C elements Type Applicable to C0 ~ C199 16-bit up counter CTU, CTR C200 ~ C235
32-bit bi-directional
counter DCNT
C236 ~ C255 32-bit high speed
counter High speed I/O
instructions
Value assignment
1. Through instructions. 2. Write or force during
system debugging.
Battery backed features
State C elements in the
saving range
C elements outside
the saving range
Power loss Remain unchanged Cleared
RUN → STOP Remain unchanged Remain unchanged
STOP → RUN Remain unchanged Cleared
Note: The saving range is set through the system block. See
2.2.1 System Block
3.1.8 Data Register
Element mnemonic
D
Function
As a data element, the D elements are used in many
calculation and control instructions as the operands.
Elements numbered in
Decimal, starting with 0
Data type
Every D element is a 16-bit register that can store data,
like an 16-bit integer.
Two D elements can form a double word and store a
32-bit data, such as the long integer data or
floating-point data.
Single word Delement
Sign bit MSB
16 bits
LSB
Double wordD element
Sign bit MSB
16 bits
LSB
16 bits
Dn element (n: 0 ~ 7999)
Dn element (n: 0 ~ 7998)Dn + 1 element(n: 0 ~ 7998)
The data range of single word D element: -32, 168 ~ 32, 767The data range of double word D element: -2, 147, 483, 648 ~ 2, 147, 483, 647
Figure 3-5 D element
� Note
In a double word D element, the higher 16-bit is in the first
D element; and the lower 16-bit is in the second D element.
Available forms
The D elements are used in many calculation and
control instructions as the operands.
Value assignment
1. Through initialization. 2. Through instructions.
3. Write or force during system debugging.
Battery backed features
State D elements in the
saving range
D elements outside
the saving range
Power loss Remain unchanged Cleared
RUN → STOP Remain unchanged Remain unchanged
STOP → RUN Remain unchanged Cleared
Note: The saving range is set through the system block.
See 2.2.1 System Block
� Note
Some D elements may be reserved for internal tasks when
the FREQUENCY CONVERTER instructions or N:N bus
protocol is used.

56 Chapter 3 Element And Data
IVC Series Small PLC Programming Manual
3.1.9 Special Auxiliary Relay
Element mnemonic
SM
Function
The SM elements are closely related to the PLC
system function. They reflect PLC system function and
system state. For details, see Appendix 1 Special
Auxiliary Relay.
Classification
The frequently used SM elements include:
� SM0: PLC operation monitor bit. It is ON when
the PLC is in RUN state.
� SM1: initial operation pulse bit. It is ON in the first
scan cycle of PLC operation.
� SM3: system error. It is ON if any system error is
detected after PLC is powered on or when PLC
changes from STOP to RUN.
� SM10 ~ SM12: respetively the clock square-wave
cycled at 10ms, 100ms and 1s (flipping-over
twice in a cycle).
In addition, you can use, control or change the PLC
system function by adjusting certain SM elements.
Such elements include:
SM40 ~ SM68: interrupt control flag bit. Setting these
SM elements will enable the corresponding interrupts.
SM80/81: Y0/Y1 high speed pulse output stop
instruction.
SM110 ~ SM114: monitor bit of free port 0
SM135/136: Modbus communication flag bit.
SM172 ~ SM178: integrated analog channel enabling
flag (valid only for IVC1-1614MAR1)
Elements numbered in
Decimal, starting with 0
Data type
Boolean
Available forms
NO and NC contacts
Value assignment
1. Through instructions. 2. Write or force during
system debugging.
3.1.10 Special Data Register
Element mnemonic
SD
Function
The SD elements are closely related to the PLC
system function. They reflect PLC system function
parameters, state code and instruction execution data.
See Appendix 2 Special Data Register for details.
Classification
� The frequently used SD elements include:
� SD3: system error code.
� SD50 ~ SD57: high speed pulse output monitor.
� SD100 ~ SD106: real time clock data.
In addition, you can change PLC system function
parameters by changing certain SD elements. Such
elements include:
SD66 ~ SD68: cycle of timed interrupt.
SD80 ~ SD89: locating instruction parameters.
SD100 ~ SD106: real time clock data.
Elements numbered in
Decimal, starting with 0
Data type
Word (integer)
Available forms
Storage and calculation of integers
Value assignment
1. Through instructions. 2. Write or force during
system debugging.
� Note
You cannot assign values to the read only SD elements.

Chapter 3 Element And Data 55
IVC Series Small PLC Programming Manual
3.1.11 Offset Addressing Register
Element mnemonic
Z
Function
The Z elements are 16-bit registers that can store
signed integers. For detailed offset addressing
information, see 3.2.2 Z Addressing Mode (Offset
Addressing Mode).
Elements numbered in
Decimal, starting with 0
Data type
Word
Available forms
The Z elements are used for offset addressing. You
need to write the addressing offset to the Z elements
before you can use them.
Value assignment
1. Through instructions. 2, Write or force during
system debugging.
3.1.12 Local Auxiliary Relay
Element mnemonic
LM
Function
The LM elements are local variants and can be used in
the main program and subprograms. But being local
variants, they are valid only in a certain program.
Different programs cannot share the same LM element
directly. When the system jumps from one program to
another, the system will redefine the LM element.
When the system returns to the main program or calls
a subprogram, the redefined LM element will be
cleared, or be set by the interface parameter transfer.
The LM elements can be used to define the interface
parameters of subprograms to realize interface
parameter transfer. For details, see 4.4 Subprogram.
Elements numbered in
Decimal, starting with 0
Data type
Boolean
Available forms
NO and NC contact
Value assignment
1. Through instructions. 2. Write or force during
system debugging.
3.1.13 Local Data Register
Element mnemonic
V
Function
The V elements are local variants and can be used in
the main program and subprograms. But being local
variants, they are valid only in a certain program.
Different programs cannot share the same V element
directly. When the system jumps from one program to
another, the system will redefine the V element. When
the system returns to the main program or calls a
subprogram, the redefined V element will be cleared,
or be set by the interface parameter transfer.
The V elements can be used to define the interface
parameters of subprograms to realize interface
parameter transfer. For details, see 4.4 Subprogram.
Elements numbered in
Decimal, starting with 0
Data type
Boolean
Available forms
Word, for numeric information
Value assignment
1. Through instructions. 2. Write or force during
system debugging
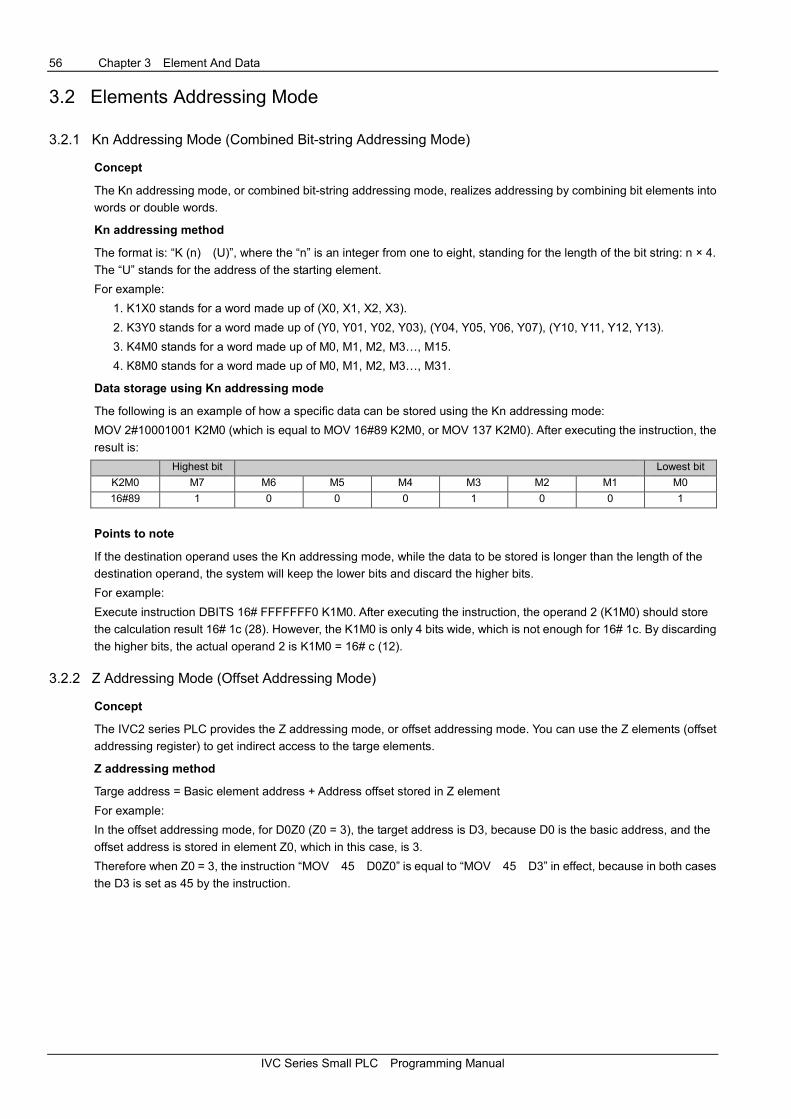
56 Chapter 3 Element And Data
IVC Series Small PLC Programming Manual
3.2 Elements Addressing Mode
3.2.1 Kn Addressing Mode (Combined Bit-string Addressing Mode)
Concept
The Kn addressing mode, or combined bit-string addressing mode, realizes addressing by combining bit elements into
words or double words.
Kn addressing method
The format is: “K (n) (U)”, where the “n” is an integer from one to eight, standing for the length of the bit string: n × 4.
The “U” stands for the address of the starting element.
For example:
1. K1X0 stands for a word made up of (X0, X1, X2, X3).
2. K3Y0 stands for a word made up of (Y0, Y01, Y02, Y03), (Y04, Y05, Y06, Y07), (Y10, Y11, Y12, Y13).
3. K4M0 stands for a word made up of M0, M1, M2, M3…, M15.
4. K8M0 stands for a word made up of M0, M1, M2, M3…, M31.
Data storage using Kn addressing mode
The following is an example of how a specific data can be stored using the Kn addressing mode:
MOV 2#10001001 K2M0 (which is equal to MOV 16#89 K2M0, or MOV 137 K2M0). After executing the instruction, the
result is:
Highest bit Lowest bit
K2M0 M7 M6 M5 M4 M3 M2 M1 M0
16#89 1 0 0 0 1 0 0 1
Points to note
If the destination operand uses the Kn addressing mode, while the data to be stored is longer than the length of the
destination operand, the system will keep the lower bits and discard the higher bits.
For example:
Execute instruction DBITS 16# FFFFFFF0 K1M0. After executing the instruction, the operand 2 (K1M0) should store
the calculation result 16# 1c (28). However, the K1M0 is only 4 bits wide, which is not enough for 16# 1c. By discarding
the higher bits, the actual operand 2 is K1M0 = 16# c (12).
3.2.2 Z Addressing Mode (Offset Addressing Mode)
Concept
The IVC2 series PLC provides the Z addressing mode, or offset addressing mode. You can use the Z elements (offset
addressing register) to get indirect access to the targe elements.
Z addressing method
Targe address = Basic element address + Address offset stored in Z element
For example:
In the offset addressing mode, for D0Z0 (Z0 = 3), the target address is D3, because D0 is the basic address, and the
offset address is stored in element Z0, which in this case, is 3.
Therefore when Z0 = 3, the instruction “MOV 45 D0Z0” is equal to “MOV 45 D3” in effect, because in both cases
the D3 is set as 45 by the instruction.

Chapter 3 Element And Data 55
IVC Series Small PLC Programming Manual
Offset addressing example
1. Bit element offset addressing example
LD M01
MOV 6 Z1
SFTR X0Z1 M0 8 2
The preceeding instructions are in effect equal to:
LD M0 1
SFTR X6 M0 8 2
The addressing process is as follows:
Z1=6
X0Z1 = X (0+Z1) = X6
2. Word element offset addressing example
LD M0 1
MOV 30 Z20
MOV D100Z20 D0
The preceeding instructions are in effect equal to:
LD M0 1
MOV D130 D0
The addressing process is as follows:
Z20=30
D100 Z20 = D (100+Z20) = D130
Points to note
1. The Z elements store the offset for the offset addressing. They support signed integers, which means minus offset is
supported.
For example:
MOV -30 Z20
MOV D100Z20 D0
The preceeding instructions are equal to the following one in effect:
MOV D70 D0
2. The SM elements and SD elements do not support the Z addressing mode.
3. Pay attention to the address range when using the Z addressing mode. For example, D7999Z0 (Z0 = 9) is outside
the address range of the D elements, which is not bigger than D7999.
3.2.3 Kn Addressing In Combination With Z Addressing
The Kn addressing mode can be used in combination with the Z addressing mode. For example: K1X0Z10.
In this mode, the starting element address is found throught the Z addressing mode, then the Kn addressing mode is
used to determine the length of the bit string.
For example:
LD M1
MOV 3 Z10
MOV K1X0Z10 D0
The preceeding instructions are in effect equal to:
LD M1
MOV K1X3 D0
The addressing process is as follows:
Z10 = 3
K1X0Z10=K1X (0+Z10) = K1X3
3.2.4 Storing & Addressing 32-Bit Data In D & V Elements
Storing 32-bit data in D and V elements
The DINT, DWORD and REAL data are all 32-bit, while the D and V elements are both 16-bit. Two consecutive D or V
elements are needed to store the 32-bit data.
The IVC2 series PLC stores the 32-bit data in the Big Endian mode, which means the elements with smaller addresses
are used to store the higher bits, while the elements with bigger addresses are used to store the lower bits.
For example, the signless integer “16# FEA8_67DA” is stored in the element (D0, D1). The actual storing format is:
D0 0xFEA8
D1 0x 67DA
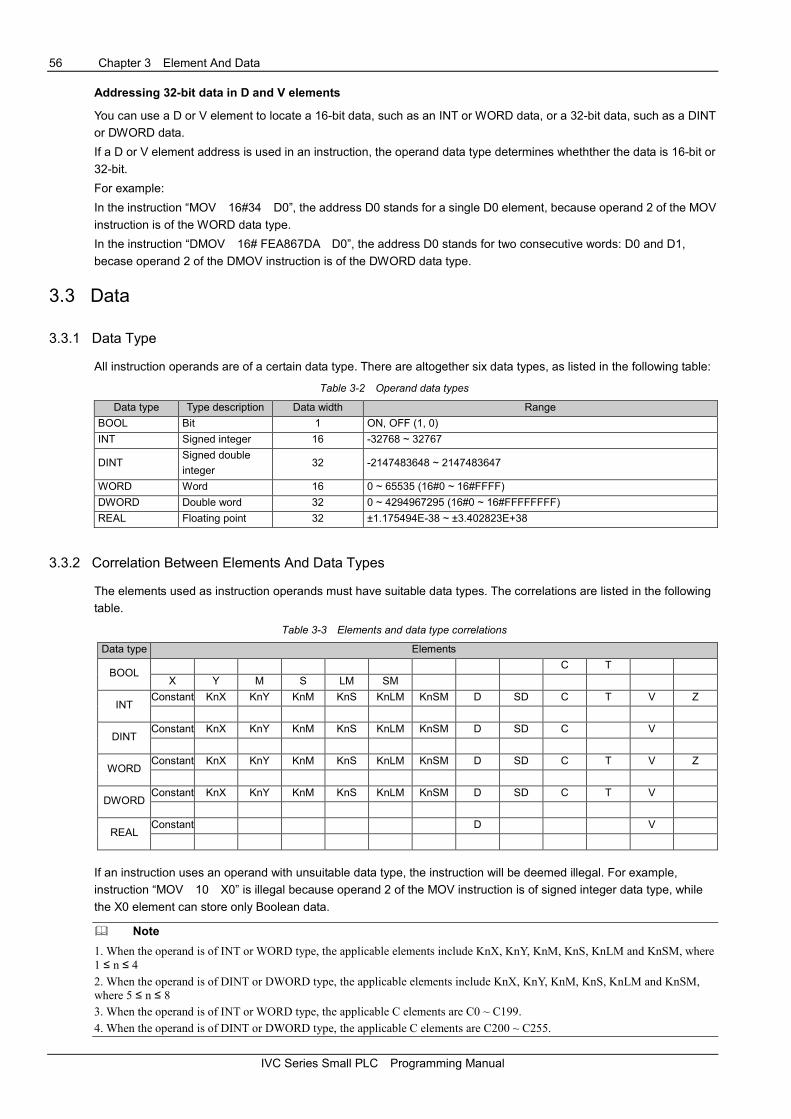
56 Chapter 3 Element And Data
IVC Series Small PLC Programming Manual
Addressing 32-bit data in D and V elements
You can use a D or V element to locate a 16-bit data, such as an INT or WORD data, or a 32-bit data, such as a DINT
or DWORD data.
If a D or V element address is used in an instruction, the operand data type determines whethther the data is 16-bit or
32-bit.
For example:
In the instruction “MOV 16#34 D0”, the address D0 stands for a single D0 element, because operand 2 of the MOV
instruction is of the WORD data type.
In the instruction “DMOV 16# FEA867DA D0”, the address D0 stands for two consecutive words: D0 and D1,
becase operand 2 of the DMOV instruction is of the DWORD data type.
3.3 Data
3.3.1 Data Type
All instruction operands are of a certain data type. There are altogether six data types, as listed in the following table:
Table 3-2 Operand data types
Data type Type description Data width Range
BOOL Bit 1 ON, OFF (1, 0)
INT Signed integer 16 -32768 ~ 32767
DINT Signed double
integer 32 -2147483648 ~ 2147483647
WORD Word 16 0 ~ 65535 (16#0 ~ 16#FFFF)
DWORD Double word 32 0 ~ 4294967295 (16#0 ~ 16#FFFFFFFF)
REAL Floating point 32 ±1.175494E-38 ~ ±3.402823E+38
3.3.2 Correlation Between Elements And Data Types
The elements used as instruction operands must have suitable data types. The correlations are listed in the following
table.
Table 3-3 Elements and data type correlations
Data type Elements
BOOL C T
X Y M S LM SM
INT Constant KnX KnY KnM KnS KnLM KnSM D SD C T V Z
DINT Constant KnX KnY KnM KnS KnLM KnSM D SD C V
WORD Constant KnX KnY KnM KnS KnLM KnSM D SD C T V Z
DWORD Constant KnX KnY KnM KnS KnLM KnSM D SD C T V
REAL Constant D V
If an instruction uses an operand with unsuitable data type, the instruction will be deemed illegal. For example,
instruction “MOV 10 X0” is illegal because operand 2 of the MOV instruction is of signed integer data type, while
the X0 element can store only Boolean data.
� Note
1. When the operand is of INT or WORD type, the applicable elements include KnX, KnY, KnM, KnS, KnLM and KnSM, where
1 ≤ n ≤ 4 2. When the operand is of DINT or DWORD type, the applicable elements include KnX, KnY, KnM, KnS, KnLM and KnSM,
where 5 ≤ n ≤ 8 3. When the operand is of INT or WORD type, the applicable C elements are C0 ~ C199.
4. When the operand is of DINT or DWORD type, the applicable C elements are C200 ~ C255.

Chapter 3 Element And Data 55
IVC Series Small PLC Programming Manual
3.3.3 Constant
You can use constants as the instruction operands. IVC2 series PLC supports input of multiple types of constants. The
usual constant types are listed in the following table:
Table 3-4 Constant types
Constant type Example Valid range Remarks
Decimal constant (16-bit signed
integer) -8949 -32768 ~ 32767
Decimal constant (16-bit unsigned
integer) 65326 0 ~ 65535
Decimal constant (32-bit signed
integer) -2147483646 -2147483648 ~ 2147483647
Decimal constant(32-bit unsigned
integer) 4294967295 0 ~ 4294967295
Hex constant (16-bit) 16#1FE9 16#0 ~ 16#FFFF The hex, octal or binary constants are
neither positive nor negative by
themselves. When used as operands, the
positive and negative nature of these
constants are determined by the data
type of the operand.
Hex constant (32-bit) 16#FD1EAFE9 16#0 ~ 16#FFFFFFFF
Octal constant (16-bit) 8#7173 8#0 ~ 8#177777
Octal constant (32-bit) 8#71732 8#0 ~ 8#37777777777
Binary constant (16-bit) 2#10111001 2#0 ~ 2#1111111111111111
Binary constant (32-bit) 2#1011100111
11
2#0 ~ 2#1111111111111111
1111111111111111
Single-precision floating point
-3.1415E-16
3.1415E+3
0.016
±1.175494E-38 ~ ±3.402823E+38
Compliant with IEEE-754.
The programming software can display
and input floating point constants with
7-bit of operational accuracy

56 Chapter 4 Programming Concepts
IVC Series Small PLC Programming Manual
Chapter 4 Programming Concepts
This chapter details the programming of IVC series small PLC, including the programming language, program
components, data type, addressing mode and annotating function. The programming and usage of subprograms are
also introduced, and finally, the general explanation of instructions.
4.1 Programming Language .............................................................................................................................................. 45
4.1.1 LAD .................................................................................................................................................................. 45
4.1.2 IL ...................................................................................................................................................................... 46
4.1.3 SFC.................................................................................................................................................................. 46
4.2 Program Components ................................................................................................................................................. 47
4.2.1 User Program .................................................................................................................................................. 47
4.2.2 System Block ................................................................................................................................................... 47
4.2.3 Data Block ....................................................................................................................................................... 47
4.3 Block Comment And Variable Comment ..................................................................................................................... 47
4.3.1 Block Comment ............................................................................................................................................... 47
4.3.2 Variable Comment ........................................................................................................................................... 48
4.4 Subprogram ................................................................................................................................................................ 50
4.4.1 Concept ........................................................................................................................................................... 50
4.4.2 Points To Note For Using SBRs ...................................................................................................................... 50
4.4.3 SBR Local Variable Table ................................................................................................................................ 50
4.4.4 SBR Parameter Transfer ................................................................................................................................. 51
4.4.5 Example ........................................................................................................................................................... 51
4.5 General Information Of Instructions ............................................................................................................................ 52
4.5.1 Instruction Operands........................................................................................................................................ 52
4.5.2 Flag Bit ............................................................................................................................................................. 52
4.5.3 Limits To Instruction Usage ............................................................................................................................. 53

Chapter 4 Programming Concepts 45
IVC Series Small PLC Programming Manual
4.1 Programming Language
Three programming languages are provided: ladder diagram (LAD), instruction list (IL) and Sequential Function Chart
(SFC).
4.1.1 LAD
Concepts
The LAD is a widely-used diagram programming-language, similar to the electric (relay) control diagram. It features:
1. Left bus, with right bus omitted.
2. All control output elements (coils) and functional blocks (application instructions) share the same power flow inlet.
The electric control diagram and LAD are equivalent to a certain degree, as shown in the following figure.
LS1 PB CRM
LS2 SS
Figure 4-1 The equivalence between electric control diagram and LAD
LAD basic programming components
According to the principles in electric control diagram, several basic programming components are abstracted for the
LAD:
1. Left bus: Corresponding to the control bus in electric control diagram, it provides power for the control circuit.
2. Connecting line ( ): Corresponding to the electric connection in electric control diagram, it connects different
components.
3. Contact ( ): Corresponding to the input contact in electric diagram, it controls the ON/OFF and direction of control
currents. The parallel and serial connection of contacts stands for the logic calculation of inputs, determining the
transfer of power flow.
4. Coil ( ): It corresponds to the relay output in electric control diagram.
5. Function block ( ): Or application instruction. Corresponding to the execution unit or functional device that
provides special functions in electric control diagram, it can accomplish specific control function or control calculation
function (like data transmission, data calculation, timer and counter).
Power flow
Being an important concept in LAD, the power flow is used to drive coils and application instructions, which is similar to
the control current output by the driving coil, and executed by the execution unit in electric control diagram.
In LAD, the coils or application instructions must be preceded with power flow, because the coils can output and
instructions can be executed only when the power flow is ON.
The following figure demonstrates the power flow in LAD and the how the power flow drives coils or function blocks.
Power flow No.1
Power flow No.1
Power flow No.2
Power flow No.3
Three power flows
Figure 4-2 Power flow and its driving function
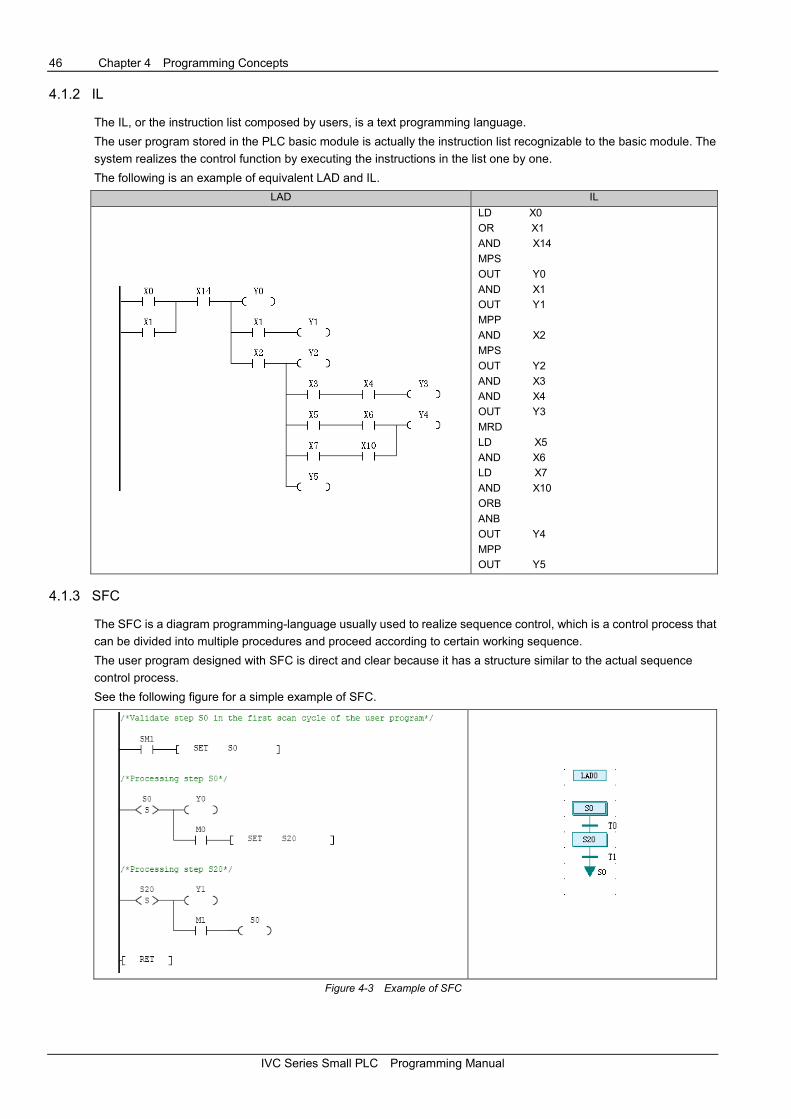
46 Chapter 4 Programming Concepts
IVC Series Small PLC Programming Manual
4.1.2 IL
The IL, or the instruction list composed by users, is a text programming language.
The user program stored in the PLC basic module is actually the instruction list recognizable to the basic module. The
system realizes the control function by executing the instructions in the list one by one.
The following is an example of equivalent LAD and IL.
LAD IL
LD X0
OR X1
AND X14
MPS
OUT Y0
AND X1
OUT Y1
MPP
AND X2
MPS
OUT Y2
AND X3
AND X4
OUT Y3
MRD
LD X5
AND X6
LD X7
AND X10
ORB
ANB
OUT Y4
MPP
OUT Y5
4.1.3 SFC
The SFC is a diagram programming-language usually used to realize sequence control, which is a control process that
can be divided into multiple procedures and proceed according to certain working sequence.
The user program designed with SFC is direct and clear because it has a structure similar to the actual sequence
control process.
See the following figure for a simple example of SFC.
Figure 4-3 Example of SFC

Chapter 4 Programming Concepts 47
IVC Series Small PLC Programming Manual
4.2 Program Components
The program components include user program, system block and data block. You can change these components by
programming.
4.2.1 User Program
A user program is the program code composed by users. It must be compiled into executable instruction list,
downloaded to the PLC and executed to realize the control function.
The user program comprises three Program Organization Units (POU): main program (MAIN), subprogram (SBR) and
interrupt (INT).
Main program
The main program is the main body and framework of the user program. When the system is in RUN state, the main
program will be executed cyclically.
One user program has only one main program.
Subprogram
A subprogram is a program independent in structure and function. It can be called by other POUs. Subprograms
generally have call operand interface and are executed only when being called.
A user program can have random number of subprograms, or no subprogram at all.
Interrupt
An interrupt is a program section handling a specific interrupt event. A specific interrupt event always corresponds to a
specific interrupt.
Upon the occurance of an interrupt event, a ordinary scan cycle will be interrupted. The system will run the
corresponding interrupt until the interrupt is finished, when the system will return to the ordinary scan cycle.
A user program can have random number of interrupts, or no interrupts at all.
4.2.2 System Block
The system block contains multiple system configuration parameters. You can modify, compile and download the
system block to configure the operation mode of the basic module.
For details, see 2.2.1 System Block or the related description in AutoStation Programming Software User Manual.
4.2.3 Data Block
The data block contains the values of D elements. By downloading the data block to the PLC, you can set a batch of
designated D elements.
If the Datablock enabled is checked in the Advanced Settings tab of System block, the D elements will be
initialized by the data block before the PLC executes the user program.
4.3 Block Comment And Variable Comment
4.3.1 Block Comment
You can add comments to the program. Occupying a whole row, each piece of comment can be used to explain the
function of the following program block.
In the program, right click and select Insert Row to insert a row above the current row. You can use a empty row to
separate two program sections.
To make a block comment, just select an empty row, right click and select Insert Block Comment.
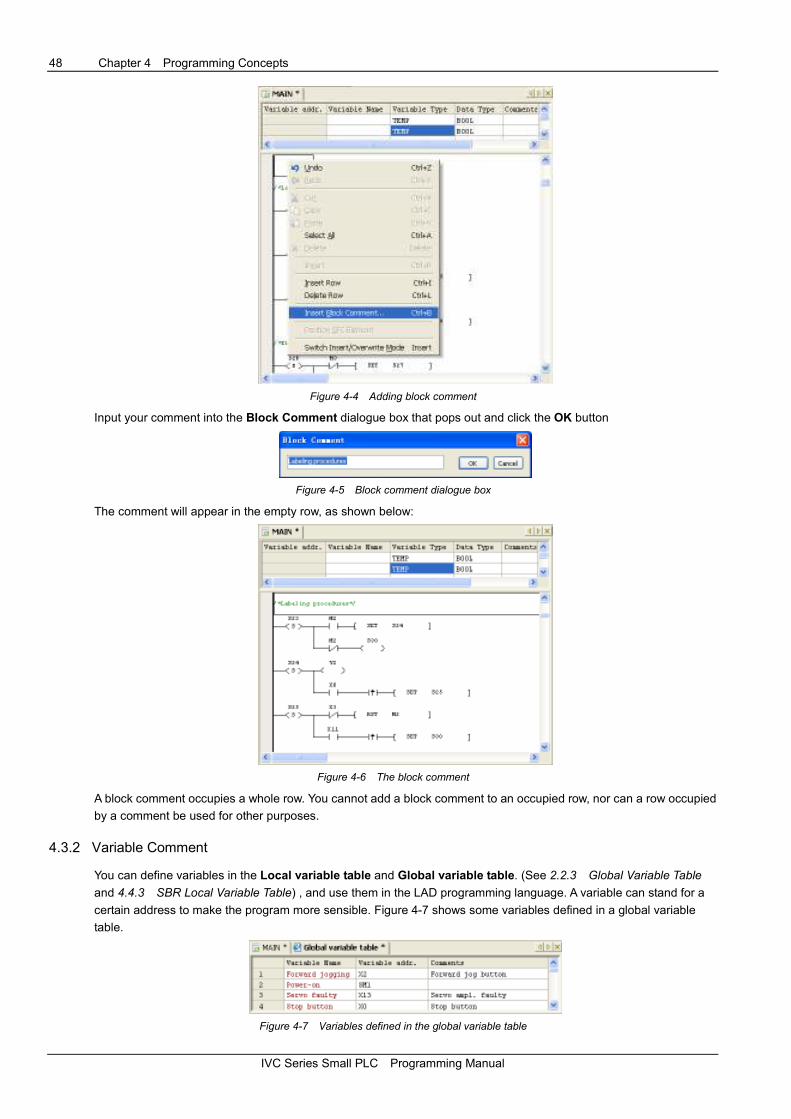
48 Chapter 4 Programming Concepts
IVC Series Small PLC Programming Manual
Figure 4-4 Adding block comment
Input your comment into the Block Comment dialogue box that pops out and click the OK button
Figure 4-5 Block comment dialogue box
The comment will appear in the empty row, as shown below:
Figure 4-6 The block comment
A block comment occupies a whole row. You cannot add a block comment to an occupied row, nor can a row occupied
by a comment be used for other purposes.
4.3.2 Variable Comment
You can define variables in the Local variable table and Global variable table. (See 2.2.3 Global Variable Table
and 4.4.3 SBR Local Variable Table) , and use them in the LAD programming language. A variable can stand for a
certain address to make the program more sensible. Figure 4-7 shows some variables defined in a global variable
table.
Figure 4-7 Variables defined in the global variable table
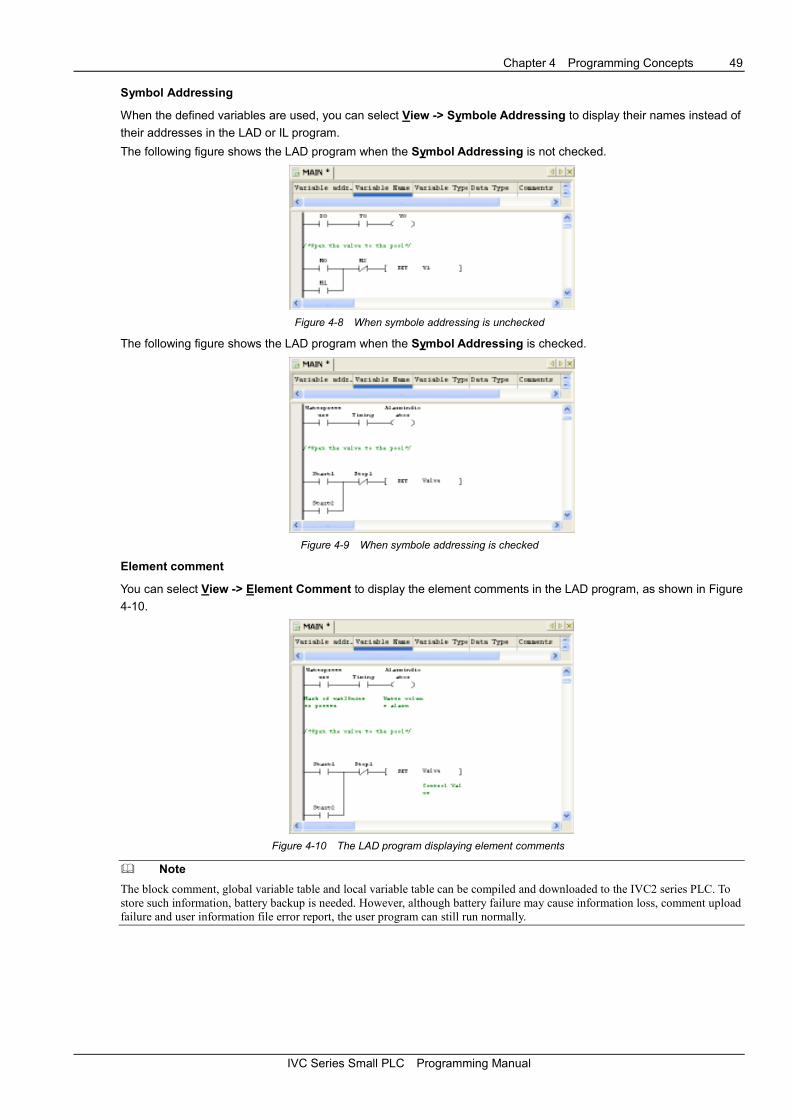
Chapter 4 Programming Concepts 49
IVC Series Small PLC Programming Manual
Symbol Addressing
When the defined variables are used, you can select View -> Symbole Addressing to display their names instead of
their addresses in the LAD or IL program.
The following figure shows the LAD program when the Symbol Addressing is not checked.
Figure 4-8 When symbole addressing is unchecked
The following figure shows the LAD program when the Symbol Addressing is checked.
Figure 4-9 When symbole addressing is checked
Element comment
You can select View -> Element Comment to display the element comments in the LAD program, as shown in Figure
4-10.
Figure 4-10 The LAD program displaying element comments
� Note
The block comment, global variable table and local variable table can be compiled and downloaded to the IVC2 series PLC. To
store such information, battery backup is needed. However, although battery failure may cause information loss, comment upload
failure and user information file error report, the user program can still run normally.
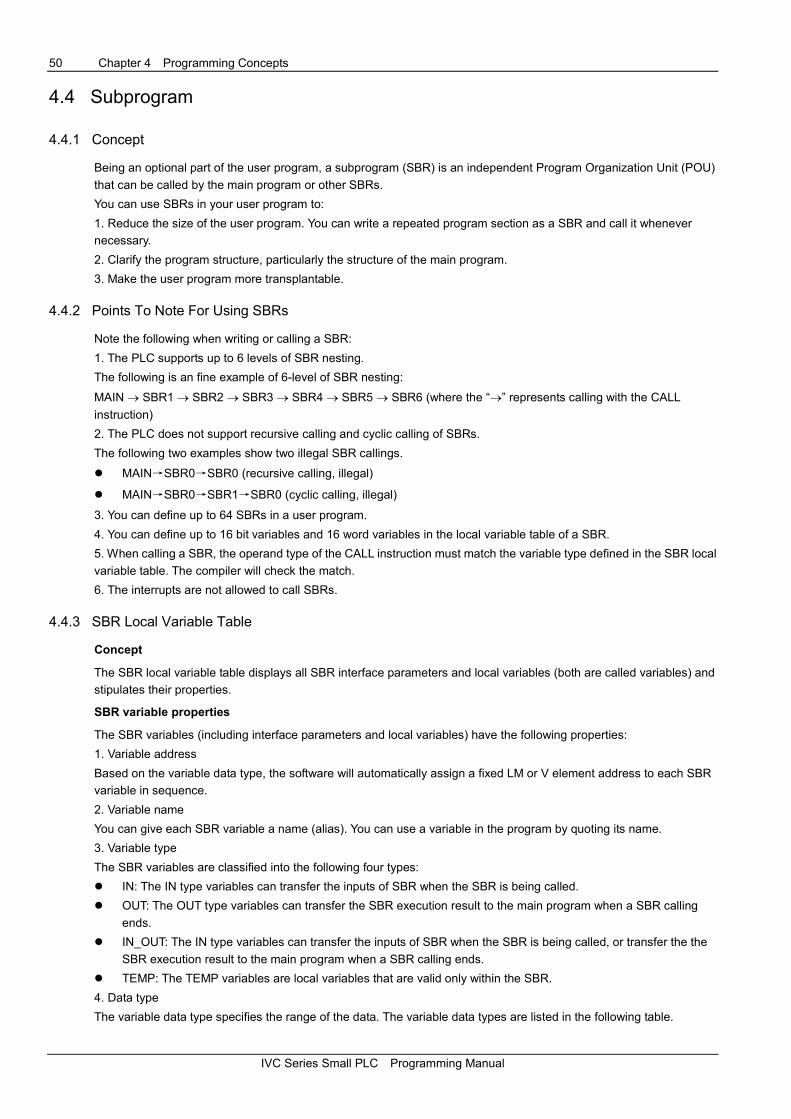
50 Chapter 4 Programming Concepts
IVC Series Small PLC Programming Manual
4.4 Subprogram
4.4.1 Concept
Being an optional part of the user program, a subprogram (SBR) is an independent Program Organization Unit (POU)
that can be called by the main program or other SBRs.
You can use SBRs in your user program to:
1. Reduce the size of the user program. You can write a repeated program section as a SBR and call it whenever
necessary.
2. Clarify the program structure, particularly the structure of the main program.
3. Make the user program more transplantable.
4.4.2 Points To Note For Using SBRs
Note the following when writing or calling a SBR:
1. The PLC supports up to 6 levels of SBR nesting.
The following is an fine example of 6-level of SBR nesting:
MAIN → SBR1 → SBR2 → SBR3 → SBR4 → SBR5 → SBR6 (where the “→” represents calling with the CALL
instruction)
2. The PLC does not support recursive calling and cyclic calling of SBRs.
The following two examples show two illegal SBR callings.
� MAIN→SBR0→SBR0 (recursive calling, illegal)
� MAIN→SBR0→SBR1→SBR0 (cyclic calling, illegal)
3. You can define up to 64 SBRs in a user program.
4. You can define up to 16 bit variables and 16 word variables in the local variable table of a SBR.
5. When calling a SBR, the operand type of the CALL instruction must match the variable type defined in the SBR local
variable table. The compiler will check the match.
6. The interrupts are not allowed to call SBRs.
4.4.3 SBR Local Variable Table
Concept
The SBR local variable table displays all SBR interface parameters and local variables (both are called variables) and
stipulates their properties.
SBR variable properties
The SBR variables (including interface parameters and local variables) have the following properties:
1. Variable address
Based on the variable data type, the software will automatically assign a fixed LM or V element address to each SBR
variable in sequence.
2. Variable name
You can give each SBR variable a name (alias). You can use a variable in the program by quoting its name.
3. Variable type
The SBR variables are classified into the following four types:
� IN: The IN type variables can transfer the inputs of SBR when the SBR is being called.
� OUT: The OUT type variables can transfer the SBR execution result to the main program when a SBR calling
ends.
� IN_OUT: The IN type variables can transfer the inputs of SBR when the SBR is being called, or transfer the the
SBR execution result to the main program when a SBR calling ends.
� TEMP: The TEMP variables are local variables that are valid only within the SBR.
4. Data type
The variable data type specifies the range of the data. The variable data types are listed in the following table.

Chapter 4 Programming Concepts 51
IVC Series Small PLC Programming Manual
Table 4-1 Variable data types
Data type Description Occupid LM/V element address
BOOL Bit type One LM element address
INT Signed integer type One V element address
DINT Signed double integer type Two consecutive V element addresses
WORD Word type One V element address
DWORD Double word type Two consecutive V element addresses
REAL Floating point type Two consecutive V element addresses
4.4.4 SBR Parameter Transfer
If local input or output variables are defined in a SBR, when the main program calls the SBR, you should input the
corresponding variable values, global variables or temporary variables into the SBR interface parameters. Note that
the global variable should be of the same data type with the local variable.
4.4.5 Example
What follows is an example of how to write and call a SBR.
Function of this example SBR
Call SBR_1 in the main program to complete a adding calculation of two integer constants 3 and 2, and assign the
result 5 to D0.
Operation procedures
Step 1: Insert a SBR into the project and name it as SBR_1.
Step 2: Write SBR_1.
1. Set the SBR calling interface through the SBR_1 variable table.
1) Variable 1: Name it as IN1 (variable type: IN). Set the data type as INT. The software will assign it with a V element
address of V0.
2) Variable 2: Name it as IN2 (variable type: IN). Set the data type as INT. The software will assign it with a V element
address of V1.
3) Variable 3: Name it as OUT1 (variable type: OUT). Set the data type as INT. The software will assign it with a V
element address of V2.
2. Write the SBR_1 as:
LD SM0
ADD #IN1 #IN2 #OUT1
The above program is shown in the following figure.
Figure 4-11 Writing SBR_1
Step 3: Write the main program and call the SBR
Use the CALL instruction in the main program to call SBR_1.
The corresponding main program is as shown below:
LD M0
CALL SBR_1 3 2 D0
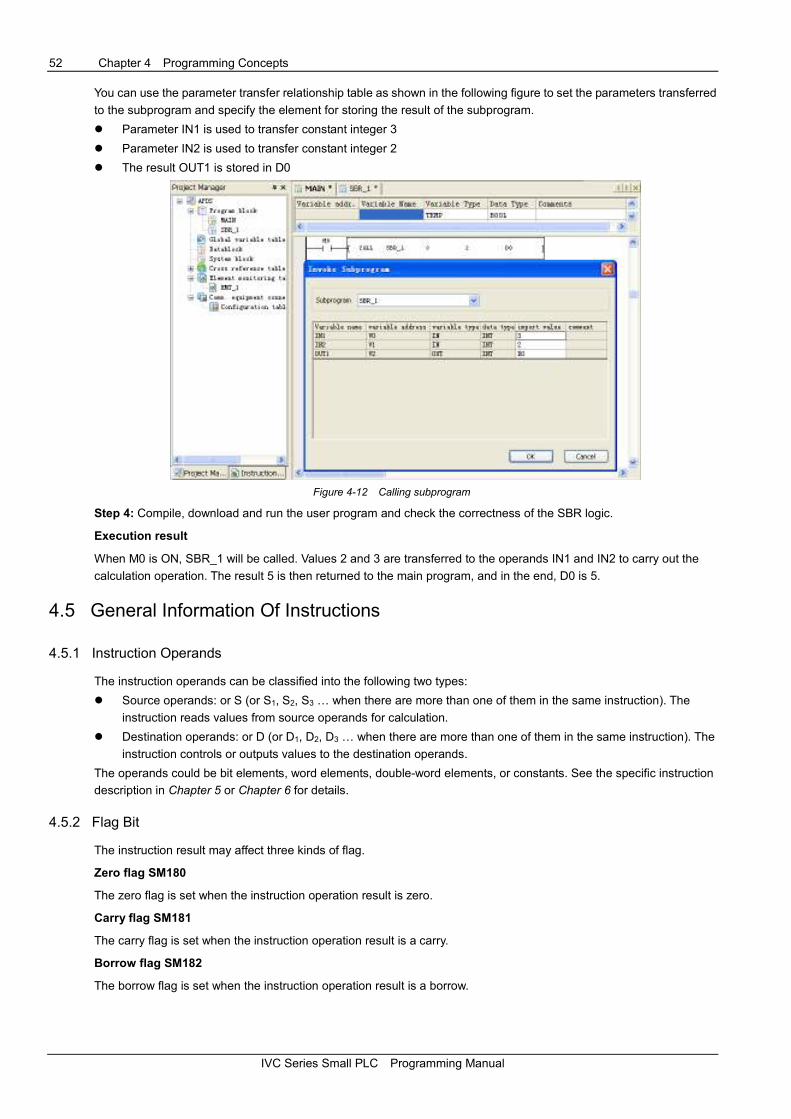
52 Chapter 4 Programming Concepts
IVC Series Small PLC Programming Manual
You can use the parameter transfer relationship table as shown in the following figure to set the parameters transferred
to the subprogram and specify the element for storing the result of the subprogram.
� Parameter IN1 is used to transfer constant integer 3
� Parameter IN2 is used to transfer constant integer 2
� The result OUT1 is stored in D0
Figure 4-12 Calling subprogram
Step 4: Compile, download and run the user program and check the correctness of the SBR logic.
Execution result
When M0 is ON, SBR_1 will be called. Values 2 and 3 are transferred to the operands IN1 and IN2 to carry out the
calculation operation. The result 5 is then returned to the main program, and in the end, D0 is 5.
4.5 General Information Of Instructions
4.5.1 Instruction Operands
The instruction operands can be classified into the following two types:
� Source operands: or S (or S1, S2, S3 … when there are more than one of them in the same instruction). The
instruction reads values from source operands for calculation.
� Destination operands: or D (or D1, D2, D3 … when there are more than one of them in the same instruction). The
instruction controls or outputs values to the destination operands.
The operands could be bit elements, word elements, double-word elements, or constants. See the specific instruction
description in Chapter 5 or Chapter 6 for details.
4.5.2 Flag Bit
The instruction result may affect three kinds of flag.
Zero flag SM180
The zero flag is set when the instruction operation result is zero.
Carry flag SM181
The carry flag is set when the instruction operation result is a carry.
Borrow flag SM182
The borrow flag is set when the instruction operation result is a borrow.
Chapter 4 Programming Concepts 53
IVC Series Small PLC Programming Manual
4.5.3 Limits To Instruction Usage
There are some limits to the usage of certain instructions. For details, see the description of the specific instruction.
Exclusive hardware resources
Some instructions requires hardware resources. When a specific hardware is being used by a certain instruction, the
access to the hardware will be denied to other instructions, because the occupation of the resource is exclusive.
Take the high speed I/O instructions and SPD instruction for example. Any of these instructions occupies a input point
among X0 ~ X7. The limited resources will make it impossible to exeucte these instructions at the same time.
Exclusive time
The execution of certain instructions may take some time. During such period, the system will be too busy to execute
other instructions.
Take the XMT instruction for example. Because of the time limit in communication, only one XMT instruction can be
executed once. In the same way, the free port can execute only one RCV instruction once. Everytime when a Modbus
instruction is being executed, the communication channel will be unavailable to other instructions for a while. The
same is true to other instructions such as high speed output instruction, locating instructions and FREQUENCY
CONVERTER instructions.
Application limit
Some instructions cannot be used in certain situations due to their limited application scope.
For example, instruction pair MC/MCR cannot be used in the steps of SFC.

54 Chapter 5 Basic Instructions
IVC Series Small PLC Programming Manual
Chapter 5 Basic Instructions
This chapter details the basic instruction of IVC1 and IVC 20, including the instruction format (form), operand,
influenced flag bit, function, example and sequence chart.
5.1 Contact Logic Instructions ........................................................................................................................................... 55
5.1.1 LD: NO Contact Power-Flow Loading .............................................................................................................. 55
5.1.2 LDI: NC Contact Power-Flow Loading ............................................................................................................. 55
5.1.3 AND: NO Contact Power-Flow And ................................................................................................................. 56
5.1.4 ANI: NC Contact Power-Flow And ................................................................................................................... 56
5.1.5 OR: NO Contact Power-Flow Or ...................................................................................................................... 57
5.1.6 ORI: NC Contact Power-Flow Or ..................................................................................................................... 57
5.1.7 OUT: Power-Flow Output ................................................................................................................................. 58
5.1.8 ANB: Power-Flow Block And ........................................................................................................................... 58
5.1.9 ORB: Power-Flow Block Or ............................................................................................................................. 59
5.1.10 MPS: Output Power-Flow Input Stack ............................................................................................................ 59
5.1.11 MRD: Read Output Power-Flow Stack Top Value ......................................................................................... 60
5.1.12 MPP: Output Power-Flow Stack Pop Off ....................................................................................................... 60
5.1.13 EU: Power flow Rising Edge Detection .......................................................................................................... 60
5.1.14 ED: Power flow Falling edge Detection .......................................................................................................... 61
5.1.15 INV: Power-Flow Block Inverse ..................................................................................................................... 61
5.1.16 SET: Set ........................................................................................................................................................ 62
5.1.17 RST: Reset .................................................................................................................................................... 62
5.1.18 NOP: No Operation ........................................................................................................................................ 62
5.2 Main Control Instruction .............................................................................................................................................. 62
5.2.1 MC: Main Contorl ............................................................................................................................................. 62
5.2.2 MCR: Main Control Remove ............................................................................................................................ 63
5.3 SFC Instructions .......................................................................................................................................................... 64
5.3.1 STL: SFC State Load Instruction ..................................................................................................................... 64
5.3.2 SET Sxx: SFC State Shift ................................................................................................................................ 64
5.3.3 OUT Sxx: SFC State Jump .............................................................................................................................. 64
5.3.4 RST Sxx: SFC State Reset .............................................................................................................................. 65
5.3.5 RET: SFC Program End .................................................................................................................................. 65
5.4 Timer Instruction ......................................................................................................................................................... 65
5.4.1 TON: On-Delay Timing Instruction ................................................................................................................... 65
5.4.2 TONR: On-Delay Remember Timing Instruction .............................................................................................. 66
5.4.3 TOF: Off-Delay Timing Instruction ................................................................................................................... 66
5.4.4 TMON: Monostable Timing Instruction ............................................................................................................. 67
5.5 Counter Instruction ...................................................................................................................................................... 67
5.5.1 CTU: 16-Bit Counter Counting Up Instruction .................................................................................................. 67
5.5.2 CTR: 16-Bit Counter Loop Cycle Counting Instruction ..................................................................................... 68
5.5.3 DCNT: 32-Bit Counting Instruction ................................................................................................................... 69

Chapter 5 Basic Instructions 55
IVC Series Small PLC Programming Manual
5.1 Contact Logic Instructions
5.1.1 LD: NO Contact Power-Flow Loading
LAD:
LD
Applicable to IVC2 IVC1
Influenced flag bit
IL: LD (S) Program steps 1
Operand Type Applicable elements Offset
addressing
S BOOL X Y M S LM SM C T
Operand description
S: Source operand
Function description
Connected to the left bus to connect
(status: ON) or disconnect (status:
OFF) the power flow.
Example
LD M0
OUT Y0
When M0 is ON, Y0 is ON.
Note:
For the contact logic instructions of IVC1 series, when the
operands are M1536 ~ M2047, the actual program steps will be
the instruction program steps plus 1.
5.1.2 LDI: NC Contact Power-Flow Loading
LAD:
LDI
Applicable to IVC2 IVC1
Influenced flag bit
IL: LDI (S) Program steps 1
Operand Type Applicable elements Offset
addressing
S BOOL X Y M S LM SM C T
Operand description
S: Source operand
Function description
Connected to the left bus to connect
(status: OFF) or disconnect (status:
ON) the power flow.
Example
LDI M0
OUT Y0
When M0 is OFF, Y0 is ON.
Note:
For the contact logic instructions of IVC1 series, when the
operands are M1536 ~ M2047, the actual program steps will be
the instruction program steps plus 1.

56 Chapter 5 Basic Instructions
IVC Series Small PLC Programming Manual
5.1.3 AND: NO Contact Power-Flow And
LAD:
AND
Applicable to IVC2 IVC1
Influenced flag bit
IL: AND (S) Program steps 1
Operand Type Applicable elements Offset
addressing
S BOOL X Y M S LM SM C T
Operand description
S: Source operand
Function description
After conducting the “and” operation on the
ON/OFF status of the designated contact (S) and
the current power flow, assign the value to the
current power flow.
Example
LD M0
AND M1
OUT Y0
When M0 is ON and M1 is ON, Y0 is ON.
5.1.4 ANI: NC Contact Power-Flow And
LAD:
ANI
Applicable to IVC2 IVC1
Influenced flag bit
IL: ANI (S) Program steps 1
Operand Type Applicable elements Offset
addressing
S BOOL X Y M S LM SM C T
Operand description
S: Source operand
Function description
After reversing the ON/OFF status of the
designated contact (S), conduct “and” operation
on the reversed result and the current power flow,
and then assign the value to the current power
flow.
Example
LD M0
ANI M1
OUT Y0
When M0 is ON and M1 is OFF, Y0 outputs ON.

Chapter 5 Basic Instructions 57
IVC Series Small PLC Programming Manual
5.1.5 OR: NO Contact Power-Flow Or
LAD:
OR
Applicable to IVC2 IVC1
Influenced flag bit
IL: OR (S) Program steps 1
Operand Type Applicable elements Offset
addressing
S BOOL X Y M S LM SM C T
Operand description
S: Source operand
Function description
After conducting “OR” operation on the ON/OFF
status of the designated contact (S) and the
current power flow, assign the value to the
current power flow.
Example
LD M0
OR M1
OUT Y0
When M0 or M1 is ON, Y0 is ON.
5.1.6 ORI: NC Contact Power-Flow Or
LAD:
ORI
Applicable to IVC2 IVC1
Influenced flag bit
IL: ORI (S) Program steps 1
Operand Type Applicable elements Offset
addressing
S BOOL X Y M S LM SM C T
Operand description
S: Source operand
Function description
After reversing the ON/OFF status of the
designated contact (S), conduct “OR” operation on
the reversed result and the current power flow, and
then assign the value to the current power flow.
Example
LD M0
ORI M2
OUT Y0
When M1 is ON or M2 is OFF, Y0 is ON.

58 Chapter 5 Basic Instructions
IVC Series Small PLC Programming Manual
5.1.7 OUT: Power-Flow Output
LAD:
OUT
Applicable to IVC2 IVC1
Influenced flag bit
IL: OUT (S) Program steps 1
Operand Type Applicable elements Offset
addressing
S BOOL X Y M S LM SM C T
Operand description
S: Source operand
Function description
Assign the value of the current power flow to the
designated coil (D)
Example
LD M1
OUT Y0
When M1 is ON, Y0 is ON.
5.1.8 ANB: Power-Flow Block And
LAD:
ANB
1 能流块 2Power flowblock 1
Power flowblock 2
Applicable to IVC2 IVC1
Influenced flag bit
IL: ANB (S) Program steps 1
Operand Type Applicable elements Offset
addressing
S BOOL X Y M S LM SM C T
Operand description
S: Source operand
Function description
Conduct “and”
operation on the power
flow values of two
power flow blocks, and
then assign the value to
the current power flow.
Example
LD M0
OR M1
LD M2
OR M3
ANB
OUT Y0
When M0 or M1 is on, and M2 or M3 is ON, Y0 is ON.
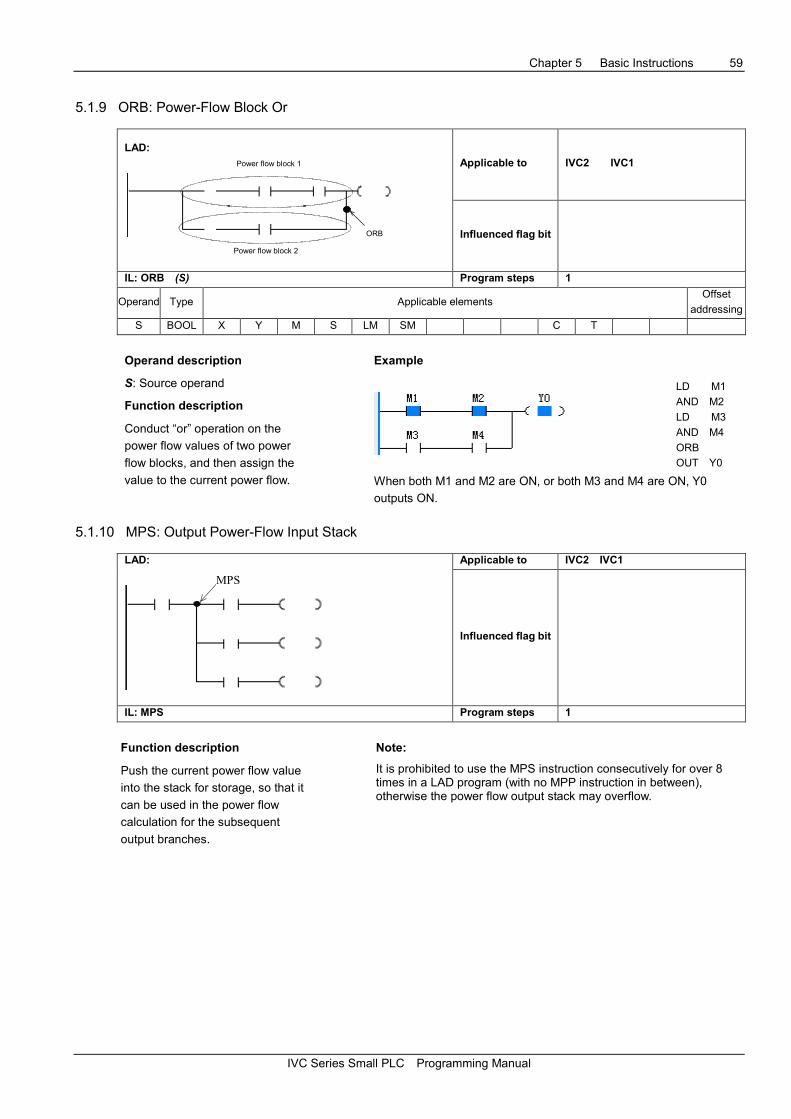
Chapter 5 Basic Instructions 59
IVC Series Small PLC Programming Manual
5.1.9 ORB: Power-Flow Block Or
LAD:
Power flow block 1
Power flow block 2
ORB
Applicable to IVC2 IVC1
Influenced flag bit
IL: ORB (S) Program steps 1
Operand Type Applicable elements Offset
addressing
S BOOL X Y M S LM SM C T
Operand description
S: Source operand
Function description
Conduct “or” operation on the
power flow values of two power
flow blocks, and then assign the
value to the current power flow.
Example
LD M1
AND M2
LD M3
AND M4
ORB
OUT Y0
When both M1 and M2 are ON, or both M3 and M4 are ON, Y0
outputs ON.
5.1.10 MPS: Output Power-Flow Input Stack
LAD:
MPS
Applicable to IVC2 IVC1
Influenced flag bit
IL: MPS Program steps 1
Function description
Push the current power flow value
into the stack for storage, so that it
can be used in the power flow
calculation for the subsequent
output branches.
Note:
It is prohibited to use the MPS instruction consecutively for over 8 times in a LAD program (with no MPP instruction in between), otherwise the power flow output stack may overflow.
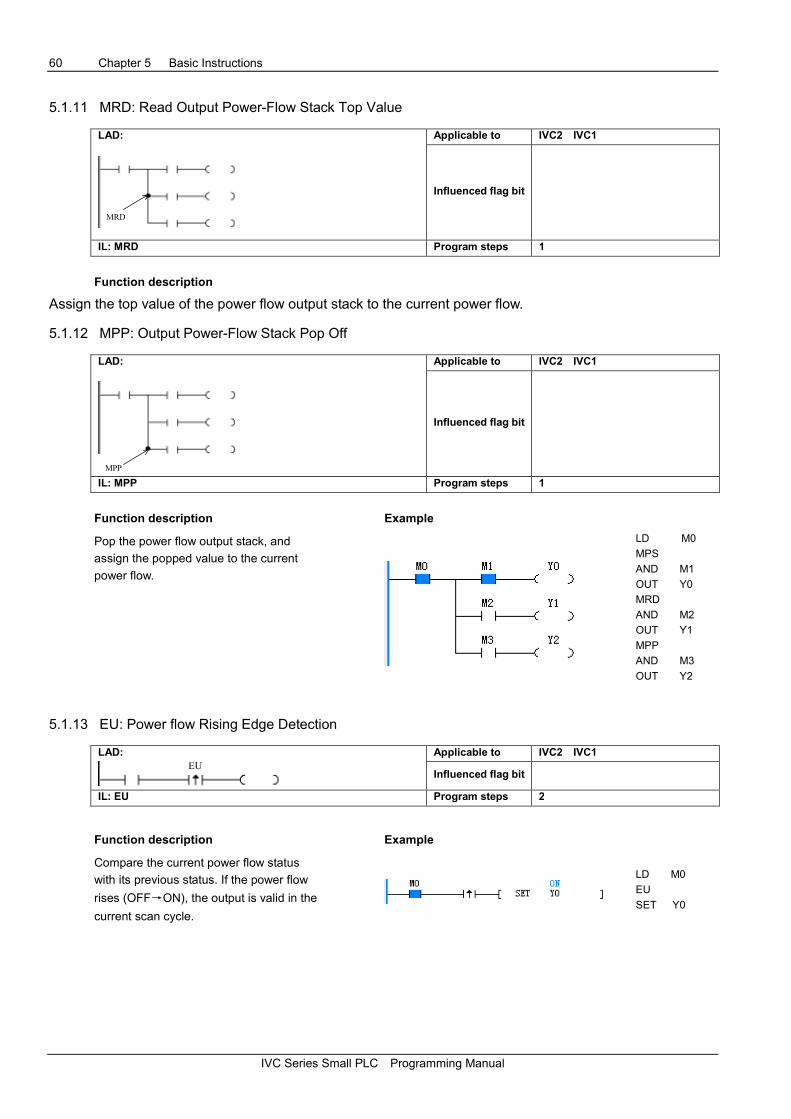
60 Chapter 5 Basic Instructions
IVC Series Small PLC Programming Manual
5.1.11 MRD: Read Output Power-Flow Stack Top Value
LAD:
MRD
Applicable to IVC2 IVC1
Influenced flag bit
IL: MRD Program steps 1
Function description
Assign the top value of the power flow output stack to the current power flow.
5.1.12 MPP: Output Power-Flow Stack Pop Off
LAD:
MPP
Applicable to IVC2 IVC1
Influenced flag bit
IL: MPP Program steps 1
Function description
Pop the power flow output stack, and
assign the popped value to the current
power flow.
Example
LD M0
MPS
AND M1
OUT Y0
MRD
AND M2
OUT Y1
MPP
AND M3
OUT Y2
5.1.13 EU: Power flow Rising Edge Detection
LAD: EU
Applicable to IVC2 IVC1
Influenced flag bit
IL: EU Program steps 2
Function description
Compare the current power flow status
with its previous status. If the power flow
rises (OFF→ON), the output is valid in the
current scan cycle.
Example
LD M0
EU
SET Y0

Chapter 5 Basic Instructions 61
IVC Series Small PLC Programming Manual
5.1.14 ED: Power flow Falling edge Detection
LAD:
ED
Applicable to IVC2 IVC1
Influenced flag bit
IL: ED Program steps 2
Function description
Compare the current power flow status
with its previous status. If the power flow
falls (OFF→ON), the output is valid in the
current scan cycle.
Sequence chart of example
Y3
Y2
M2
ON
OFF
OFF
ON
OFF
ON
Example
LD M2
MPS
EU
OUT Y2
MPP
ED
OUT Y3
Note
In LAD program, the rising edge contact or falling edge contact
instruction shall be used in series rather than in parallel
connection with other contact elements.
In LAD program, the rising edge contact and falling edge
contact instruction cannot directly connect to the left power
flow bus.
The examples of improper use of EU/ED instructions in LAD
program are shown as follows:
1. In two consecutive scan cycles, the
status of M2 contact is OFF and ON
respectively. When the EU instruction
detects a rising edge, Y2 will output ON
status with the width of a scan cycle.
2. In two consecutive scan cycles, the
status of M2 contact is ON and OFF
respectively, when the ED instruction
detects a trailing edge, Y3 will output ON
status with the width of a scan cycle.
X X
X
5.1.15 INV: Power-Flow Block Inverse
LAD:
INV
Applicable to IVC2 IVC1
Influenced flag bit
IL: INV Program steps 1
Function description
Reverse the current power flow value and then assign to the current power flow.
Note:
In LAD program, the INV instruction shall be used in series rather than in parallel connection with contacts.
INV cannot be used as the first instruction in the input parallel branch.
In LAD program, the INV instruction cannot directly connect to the left power flow bus.
The examples of improper use of INV instructions in LAD program are shown as follows:
X
X X
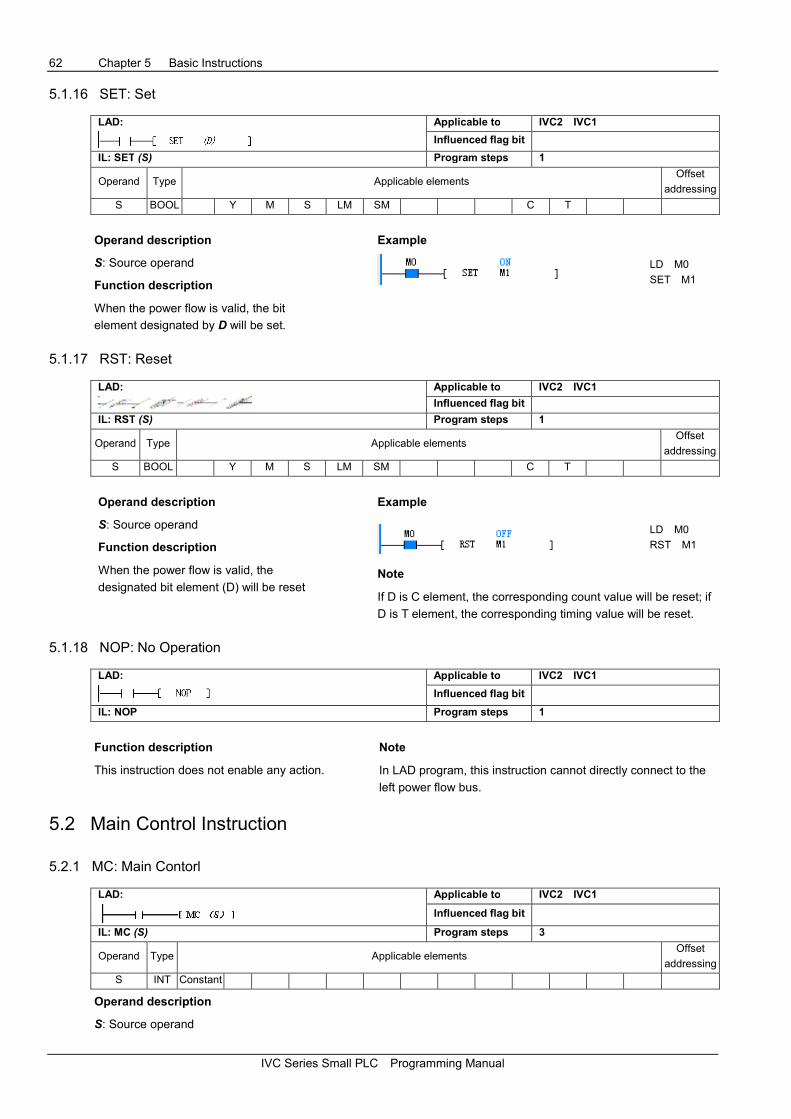
62 Chapter 5 Basic Instructions
IVC Series Small PLC Programming Manual
5.1.16 SET: Set
LAD:
Applicable to IVC2 IVC1
Influenced flag bit
IL: SET (S) Program steps 1
Operand Type Applicable elements Offset
addressing
S BOOL Y M S LM SM C T
Operand description
S: Source operand
Function description
When the power flow is valid, the bit
element designated by D will be set.
Example
LD M0
SET M1
5.1.17 RST: Reset
LAD:
Applicable to IVC2 IVC1
Influenced flag bit
IL: RST (S) Program steps 1
Operand Type Applicable elements Offset
addressing
S BOOL Y M S LM SM C T
Operand description
S: Source operand
Function description
When the power flow is valid, the
designated bit element (D) will be reset
Example
LD M0
RST M1
Note
If D is C element, the corresponding count value will be reset; if
D is T element, the corresponding timing value will be reset.
5.1.18 NOP: No Operation
LAD:
Applicable to IVC2 IVC1
Influenced flag bit
IL: NOP Program steps 1
Function description
This instruction does not enable any action.
Note
In LAD program, this instruction cannot directly connect to the
left power flow bus.
5.2 Main Control Instruction
5.2.1 MC: Main Contorl
LAD:
Applicable to IVC2 IVC1
Influenced flag bit
IL: MC (S) Program steps 3
Operand Type Applicable elements Offset
addressing
S INT Constant
Operand description
S: Source operand
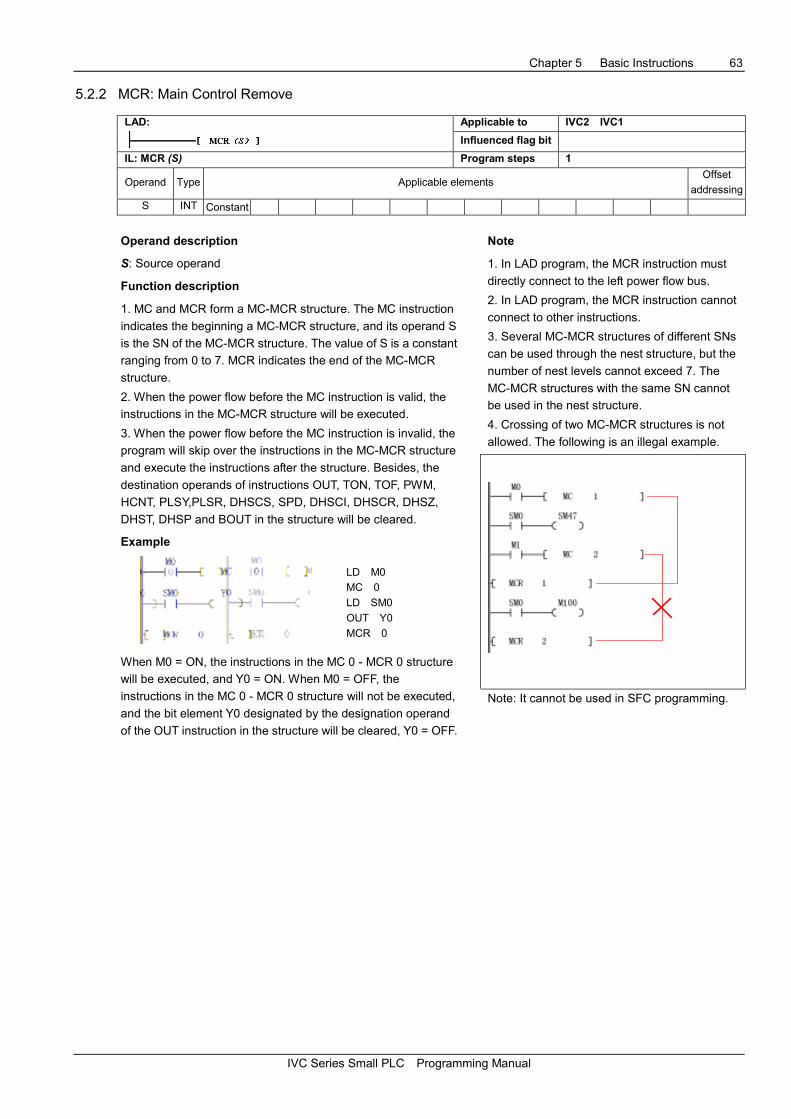
Chapter 5 Basic Instructions 63
IVC Series Small PLC Programming Manual
5.2.2 MCR: Main Control Remove
LAD:
Applicable to IVC2 IVC1
Influenced flag bit
IL: MCR (S) Program steps 1
Operand Type Applicable elements Offset
addressing
S INT Constant
Operand description
S: Source operand
Function description
1. MC and MCR form a MC-MCR structure. The MC instruction
indicates the beginning a MC-MCR structure, and its operand S
is the SN of the MC-MCR structure. The value of S is a constant
ranging from 0 to 7. MCR indicates the end of the MC-MCR
structure.
2. When the power flow before the MC instruction is valid, the
instructions in the MC-MCR structure will be executed.
3. When the power flow before the MC instruction is invalid, the
program will skip over the instructions in the MC-MCR structure
and execute the instructions after the structure. Besides, the
destination operands of instructions OUT, TON, TOF, PWM,
HCNT, PLSY,PLSR, DHSCS, SPD, DHSCI, DHSCR, DHSZ,
DHST, DHSP and BOUT in the structure will be cleared.
Example
Note
1. In LAD program, the MCR instruction must
directly connect to the left power flow bus.
2. In LAD program, the MCR instruction cannot
connect to other instructions.
3. Several MC-MCR structures of different SNs
can be used through the nest structure, but the
number of nest levels cannot exceed 7. The
MC-MCR structures with the same SN cannot
be used in the nest structure.
4. Crossing of two MC-MCR structures is not
allowed. The following is an illegal example.
LD M0
MC 0
LD SM0
OUT Y0
MCR 0
When M0 = ON, the instructions in the MC 0 - MCR 0 structure
will be executed, and Y0 = ON. When M0 = OFF, the
instructions in the MC 0 - MCR 0 structure will not be executed,
and the bit element Y0 designated by the designation operand
of the OUT instruction in the structure will be cleared, Y0 = OFF.
Note: It cannot be used in SFC programming.

64 Chapter 5 Basic Instructions
IVC Series Small PLC Programming Manual
5.3 SFC Instructions
5.3.1 STL: SFC State Load Instruction
LAD:
Applicable to IVC2 IVC1
Influenced flag bit
IL: STL (S) Program steps 3
Operand Type Applicable elements Offset
addressing
S BOOL S
Operand description
S : Source operand
Function description
1. It indicates the beginning of a step (S).
2. If a step is valid (ON), its embedded instructions
will be executed.
3. If a step changes from ON to OFF (trailing edge),
the embedded instructions will not be executed, and
the destination operands of the embedded
instructions such as OUT, TON, TOF, PWM, HCNT,
PLSY, PLSR, DHSCS, SPD, DHSCI, DHSCR,
DHSZ, DHST, DHSP and BOUT will be cleared.
4. If a step is invalid (OFF), the embedded
instructions will not be executed.
5. Consecutive STL instructions (serial connection
of S elements) define a parallel merge structure.
The STL instructions can be used up to 16 times in
a row (the maximum number of branches of a
parallel branch structure is 16).
5.3.2 SET Sxx: SFC State Shift
LAD:
Applicable to IVC2 IVC1
Influenced flag bit
IL: SET (D) Program steps 3
Operand Type Applicable elements Offset
addressing
D BOOL S
Operand description
D: Destination operand
Function description
When the power flow is valid, the designated step (D) will be set valid, and the current valid step will be set invalid, to complete the step transition.
5.3.3 OUT Sxx: SFC State Jump
LAD:
Applicable to IVC2 IVC1
Influenced flag bit
IL: OUT (D) Program steps 3
Operand Type Applicable elements Offset
addressing
D BOOL S
Operand description
D: Destination operand
Function description
When the power flow is valid, the designated step (D) will be set valid, and the current valid step will be set invalid, to complete the step jump.
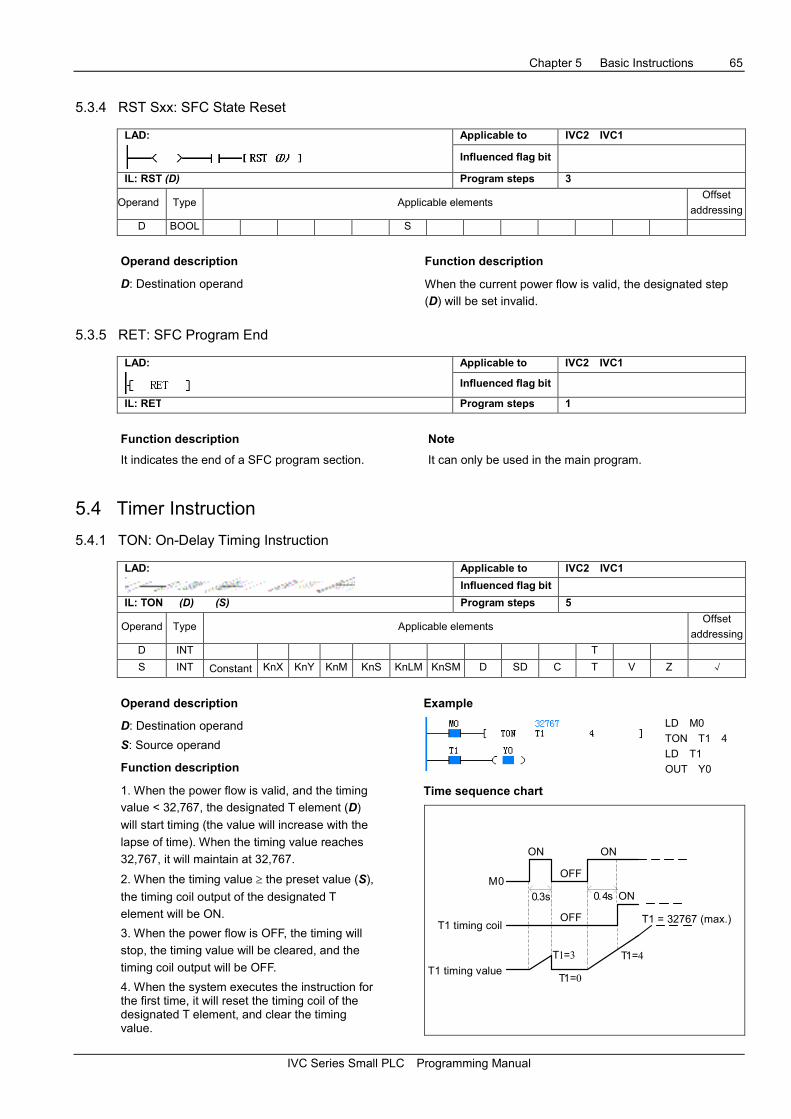
Chapter 5 Basic Instructions 65
IVC Series Small PLC Programming Manual
5.3.4 RST Sxx: SFC State Reset
LAD:
Applicable to IVC2 IVC1
Influenced flag bit
IL: RST (D) Program steps 3
Operand Type Applicable elements Offset
addressing
D BOOL S
Operand description
D: Destination operand
Function description
When the current power flow is valid, the designated step
(D) will be set invalid.
5.3.5 RET: SFC Program End
LAD:
Applicable to IVC2 IVC1
Influenced flag bit
IL: RET Program steps 1
Function description
It indicates the end of a SFC program section.
Note
It can only be used in the main program.
5.4 Timer Instruction
5.4.1 TON: On-Delay Timing Instruction
LAD:
Applicable to IVC2 IVC1
Influenced flag bit
IL: TON (D) (S) Program steps 5
Operand Type Applicable elements Offset
addressing
D INT T
S INT Constant KnX KnY KnM KnS KnLM KnSM D SD C T V Z √
Operand description
D: Destination operand
S: Source operand
Function description
1. When the power flow is valid, and the timing
value < 32,767, the designated T element (D)
will start timing (the value will increase with the
lapse of time). When the timing value reaches
32,767, it will maintain at 32,767.
2. When the timing value ≥ the preset value (S),
the timing coil output of the designated T
element will be ON.
3. When the power flow is OFF, the timing will
stop, the timing value will be cleared, and the
timing coil output will be OFF.
4. When the system executes the instruction for the first time, it will reset the timing coil of the designated T element, and clear the timing value.
Example
LD M0
TON T1 4
LD T1
OUT Y0
Time sequence chart
M0
T1 timing coil
ON
ON
ON
OFF
OFF
T1=3
T1=0
T1=4
0.3s 0.4s
T1 timing value
T1 = 32767 (max.)
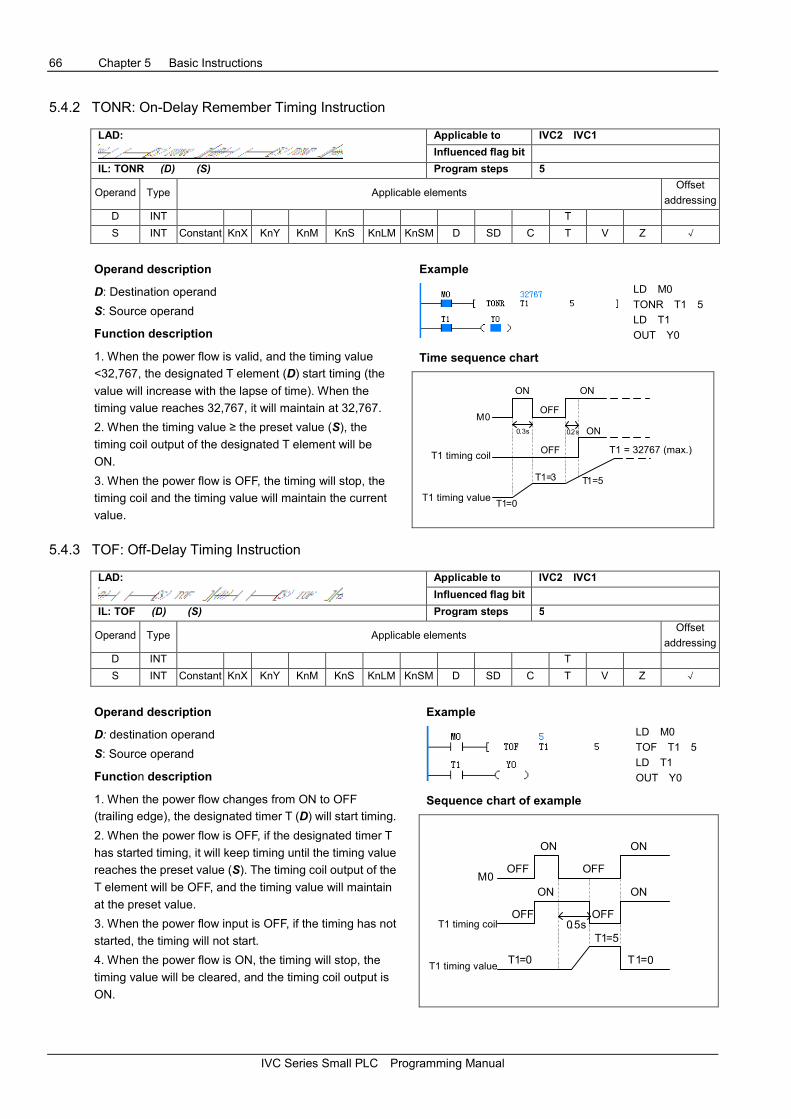
66 Chapter 5 Basic Instructions
IVC Series Small PLC Programming Manual
5.4.2 TONR: On-Delay Remember Timing Instruction
LAD:
Applicable to IVC2 IVC1
Influenced flag bit
IL: TONR (D) (S) Program steps 5
Operand Type Applicable elements Offset
addressing
D INT T
S INT Constant KnX KnY KnM KnS KnLM KnSM D SD C T V Z √
Operand description
D: Destination operand
S: Source operand
Function description
1. When the power flow is valid, and the timing value
<32,767, the designated T element (D) start timing (the
value will increase with the lapse of time). When the
timing value reaches 32,767, it will maintain at 32,767.
2. When the timing value ≥ the preset value (S), the
timing coil output of the designated T element will be
ON.
3. When the power flow is OFF, the timing will stop, the
timing coil and the timing value will maintain the current
value.
Example
LD M0
TONR T1 5
LD T1
OUT Y0
Time sequence chart
T1 = 32767 (max.)
M0
ON
ON
ON
OFF
OFF
T1=3
T1=0
T1=5
0.3s 0.2s
T1 timing coil
T1 timing value
5.4.3 TOF: Off-Delay Timing Instruction
LAD:
Applicable to IVC2 IVC1
Influenced flag bit
IL: TOF (D) (S) Program steps 5
Operand Type Applicable elements Offset
addressing
D INT T
S INT Constant KnX KnY KnM KnS KnLM KnSM D SD C T V Z √
Operand description
D: destination operand
S: Source operand
Function description
1. When the power flow changes from ON to OFF
(trailing edge), the designated timer T (D) will start timing.
2. When the power flow is OFF, if the designated timer T
has started timing, it will keep timing until the timing value
reaches the preset value (S). The timing coil output of the
T element will be OFF, and the timing value will maintain
at the preset value.
3. When the power flow input is OFF, if the timing has not
started, the timing will not start.
4. When the power flow is ON, the timing will stop, the
timing value will be cleared, and the timing coil output is
ON.
Example
LD M0
TOF T1 5
LD T1
OUT Y0
Sequence chart of example
OFF OFF
OFF OFF
ON ON
ONON
0.5s
T1=0 T1=0
T1=5
M0
T1 timing coil
T1 timing value

Chapter 5 Basic Instructions 67
IVC Series Small PLC Programming Manual
5.4.4 TMON: Monostable Timing Instruction
LAD:
Applicable to IVC2 IVC1
Influenced flag bit
IL: TMON (D) (S) Program steps 5
Operand Type Applicable elements Offset
addressing
D INT T
S INT Constant KnX KnY KnM KnS KnLM KnSM D SD C T V Z √
Operand description
D: Destination operand
S: Source operand
Function description
1. When the input power flow changes from OFF to ON
(rising edge), and the timing has not started, the
designated timer T (D) will start timing based on the current
value. In the timing status (whose length is determined by
S), the timing coil output will maintain ON.
2. In the timing status (whose length is determined by S),
no matter how the power flow changes, the timing will keep
going, and the timing coil output will keep ON.
3. When the timing value reaches the preset point, the
timing will stop, the timing value will be cleared, and the
timing coil output will be set OFF.
Example
LD M0
TMON T1 5
LD T1
OUT Y0
Sequence chart of example
M0
ON ON
OFF
OFF
T1=5
T1=0
T1=50.5s
OFF
ON
0.5s
T1=0
T1 timing coil
T1 timing value
5.5 Counter Instruction
5.5.1 CTU: 16-Bit Counter Counting Up Instruction
LAD:
Applicable to IVC2 IVC1
Influenced flag bit
IL: CTU (D) (S) Program steps 5
Operand Type Applicable elements Offset
addressing
D INT C
S INT Constant KnX KnY KnM KnS KnLM KnSM D SD C T V Z √
Operand description
D: destination operand
S: Source operand
Function description
1. When the power flow changes from OFF to ON (rising
edge), the 16-bit counter C (D) will count 1.
2. When the counting value reaches 32,767, it will maintain
that value.
3. When the counting value is larger than or equal to the
preset point (S), the counting coil will be set ON.
Note
The address range of the 16-bit counter C (D): C0 ~ C199.
Example
LD M0
CTU C0 3
LD C0
OUT Y0
Time sequence chart
C0 counting coil
C0 counting value
M0
ON ON
OFF
OFF
ON
C0=0C0=1 C0=2
C0=3
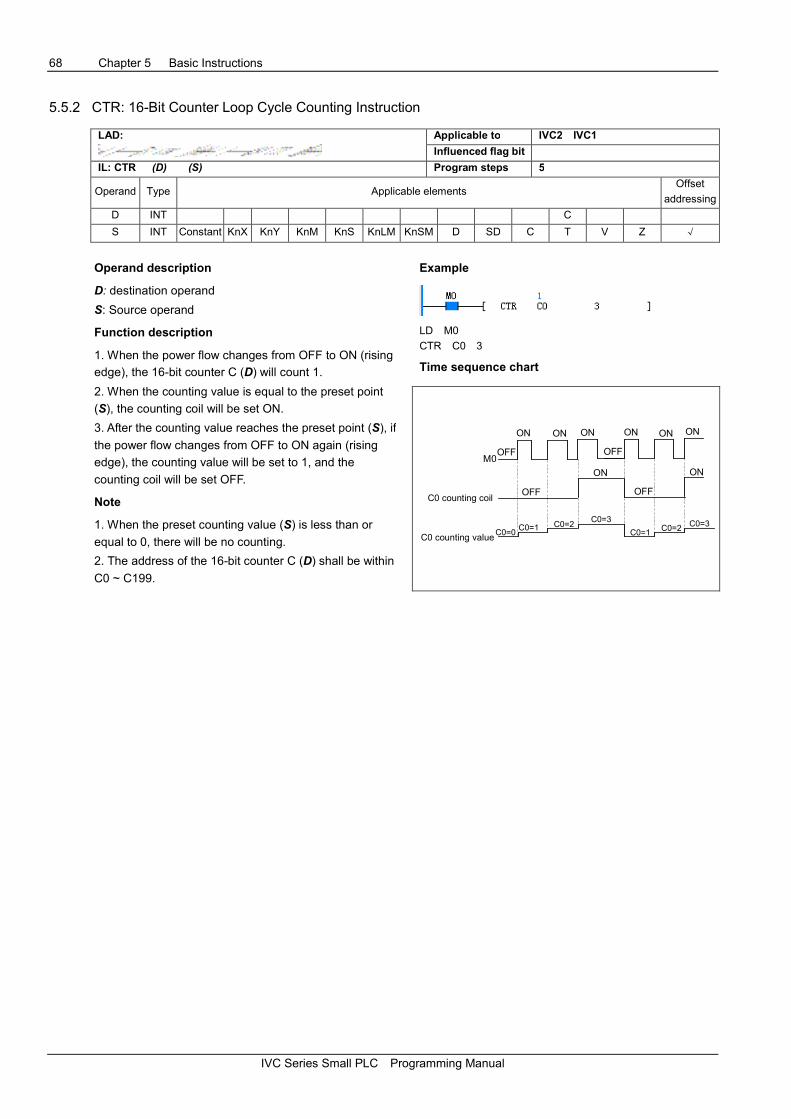
68 Chapter 5 Basic Instructions
IVC Series Small PLC Programming Manual
5.5.2 CTR: 16-Bit Counter Loop Cycle Counting Instruction
LAD:
Applicable to IVC2 IVC1
Influenced flag bit
IL: CTR (D) (S) Program steps 5
Operand Type Applicable elements Offset
addressing
D INT C
S INT Constant KnX KnY KnM KnS KnLM KnSM D SD C T V Z √
Operand description
D: destination operand
S: Source operand
Function description
1. When the power flow changes from OFF to ON (rising
edge), the 16-bit counter C (D) will count 1.
2. When the counting value is equal to the preset point
(S), the counting coil will be set ON.
3. After the counting value reaches the preset point (S), if
the power flow changes from OFF to ON again (rising
edge), the counting value will be set to 1, and the
counting coil will be set OFF.
Note
1. When the preset counting value (S) is less than or
equal to 0, there will be no counting.
2. The address of the 16-bit counter C (D) shall be within
C0 ~ C199.
Example
LD M0
CTR C0 3
Time sequence chart
M0
ON ON
OFF
OFF
ON
C0=0C0=1 C0=2
C0=3
ON ON
OFF
OFF
ON
C0=1 C0=2 C0=3
ON ON
C0 counting coil
C0 counting value
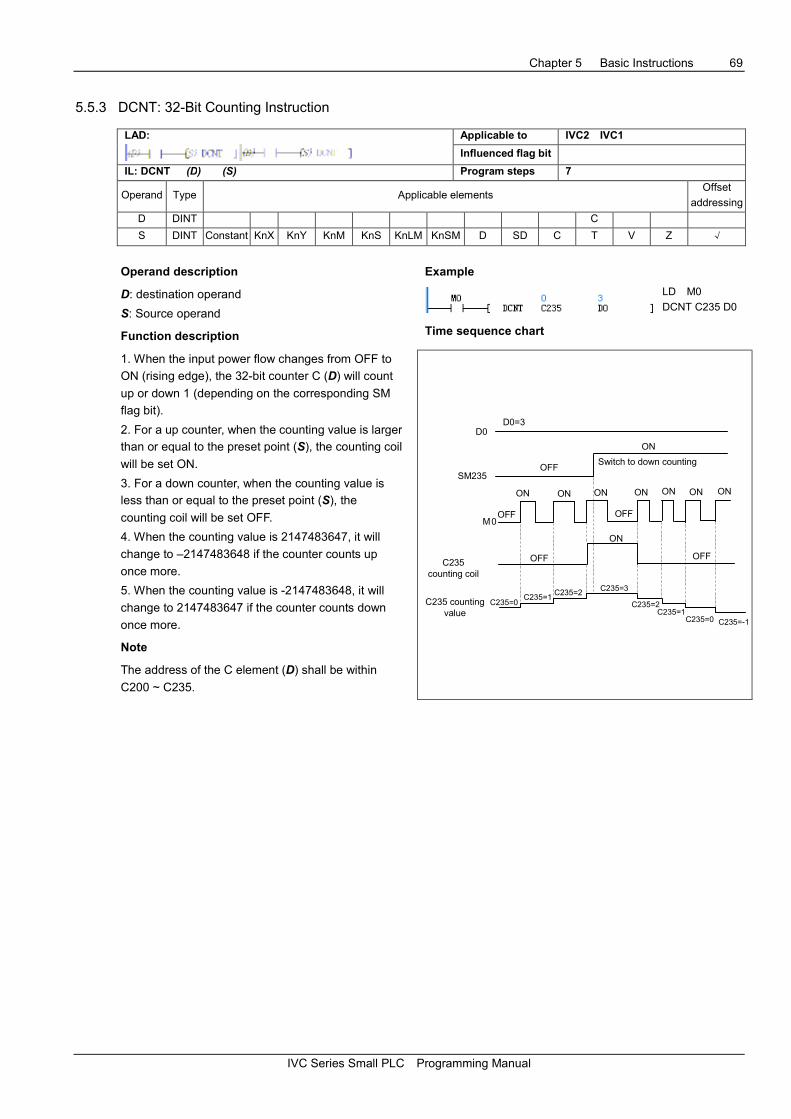
Chapter 5 Basic Instructions 69
IVC Series Small PLC Programming Manual
5.5.3 DCNT: 32-Bit Counting Instruction
LAD:
Applicable to IVC2 IVC1
Influenced flag bit
IL: DCNT (D) (S) Program steps 7
Operand Type Applicable elements Offset
addressing
D DINT C
S DINT Constant KnX KnY KnM KnS KnLM KnSM D SD C T V Z √
Operand description
D: destination operand
S: Source operand
Function description
1. When the input power flow changes from OFF to
ON (rising edge), the 32-bit counter C (D) will count
up or down 1 (depending on the corresponding SM
flag bit).
2. For a up counter, when the counting value is larger
than or equal to the preset point (S), the counting coil
will be set ON.
3. For a down counter, when the counting value is
less than or equal to the preset point (S), the
counting coil will be set OFF.
4. When the counting value is 2147483647, it will
change to –2147483648 if the counter counts up
once more.
5. When the counting value is -2147483648, it will
change to 2147483647 if the counter counts down
once more.
Note
The address of the C element (D) shall be within
C200 ~ C235.
Example
LD M0
DCNT C235 D0
Time sequence chart
M0
C235counting coil
C235 countingvalue
ON ON
OFF
OFF
ON
C235=0C235=1
C235=2 C235=3
ON ON
OFF
OFF
C235=2C235=1
C235=0
ON ON
SM235
D0
OFF
ON
D0=3
ON
C235=-1
Switch to down counting

70 Chapter 6 Application Instructions
IVC Series Small PLC Programming Manual
Chapter 6 Application Instructions
This chapter introduces the application instructions of IVC series small PLC, including the formats, operands,
influenced flag bit, functions, examples and time sequence charts of the instructions.
6.1 Program Flow Control Instruction ................................................................................................................................ 75
6.1.1 FOR: Cycle Instruction ..................................................................................................................................... 75
6.1.2 NEXT: Return From Cycle ............................................................................................................................... 75
6.1.3 LBL: Jump Label Definition .............................................................................................................................. 76
6.1.4 CJ: Conditional Jump ....................................................................................................................................... 77
6.1.5 CFEND: Conditional End From User Main Program ........................................................................................ 77
6.1.6 WDT: User Program Watchdog Reset ............................................................................................................. 78
6.1.7 EI: Enable Interrupt Instruction ........................................................................................................................ 78
6.1.8 DI: Disable Interrupt Instruction ....................................................................................................................... 78
6.1.9 CIRET: Conditional Return From User Interrupt Subprogram .......................................................................... 78
6.1.10 STOP: User Program Stop ............................................................................................................................ 78
6.1.11 CALL: Calling A Subprogram ......................................................................................................................... 79
6.1.12 CSRET: Conditional Return From User Subprogram..................................................................................... 79
6.2 Data Transmission Instruction ..................................................................................................................................... 80
6.2.1 MOV: Move Word Data Transmission Instruction ............................................................................................ 80
6.2.2 DMOV: Move Double Word Data Transmission Instruction ............................................................................. 80
6.2.3 RMOV: Move Floating Point Number Data Transmission ................................................................................ 81
6.2.4 BMOV: Move Data Block Transmission Instruction ......................................................................................... 81
6.2.5 FMOV: Fill Data Block Instruction .................................................................................................................... 82
6.2.6 DFMOV: Fill Data Block Double Word Instruction ............................................................................................ 82
6.2.7 SWAP: Swap Bytes ......................................................................................................................................... 83
6.2.8 XCH: Exchange Word ...................................................................................................................................... 83
6.2.9 DXCH: Exchange Double Word Instruction ..................................................................................................... 84
6.2.10 PUSH: Push Instruction ................................................................................................................................. 84
6.2.11 FIFO: First-In-First-Out Instruction ................................................................................................................. 85
6.2.12 LIFO: Last-In-First-Out Instruction ................................................................................................................. 86
6.2.13 WSFR: Shift Right Word Instruction ............................................................................................................... 87
6.2.14 WSFL: Shift Left Word Instruction .................................................................................................................. 88
6.3 Integer Math Instructions ............................................................................................................................................. 89
6.3.1 ADD: Add Integer Instruction ........................................................................................................................... 89
6.3.2 SUB: Subtract Integer Instruction .................................................................................................................... 89
6.3.3 MUL: Multiply Integer Instruction ..................................................................................................................... 90
6.3.4 DIV: Divide Integer Instruction ......................................................................................................................... 90
6.3.5 SQT: Square Root Integer Instructions ............................................................................................................ 91
6.3.6 INC: Increment Integer Instruction ................................................................................................................... 91
6.3.7 DEC: Decrement Integer Instruction ................................................................................................................ 92
6.3.8 VABS: Integer Absolute Value Instruction........................................................................................................ 92
6.3.9 NEG: Negative Integer Instruction ................................................................................................................... 93
6.3.10 DADD: Add Double Integer Instruction .......................................................................................................... 93
6.3.11 DSUB: Subtract Double Integer Instruction .................................................................................................... 94
6.3.12 DMUL: Multiply Double Integer Instruction ..................................................................................................... 94
6.3.13 DDIV: Divide Double Integer Instruction ........................................................................................................ 95
6.3.14 DSQT: Square Root Double Integer Instruction ............................................................................................. 95
6.3.15 DINC: Increment Double Integer Instruction .................................................................................................. 96
Chapter 6 Application Instructions 71
IVC Series Small PLC Programming Manual
6.3.16 DDEC: Decrement Double Integer Instruction ............................................................................................... 96
6.3.17 DVABS: Double Integer Absolute Value Instruction ....................................................................................... 97
6.3.18 DNEG: Negative Double Integer Instruction................................................................................................... 97
6.3.19 SUM: Sum Integer Instruction ........................................................................................................................ 98
6.3.20 DSUM: Sum Double Integer Instruction ......................................................................................................... 99
6.4 Floating-Point Number Math Instruction ...................................................................................................................... 99
6.4.1 RADD: Add Floating Point Number Instruction ................................................................................................ 99
6.4.2 RSUB: Subtract Floating Point Number Instruction ........................................................................................ 100
6.4.3 RMUL: Multiply Floating Point Number Instruction ......................................................................................... 100
6.4.4 RDIV: Divide Floating Point Number Instruction ............................................................................................ 101
6.4.5 RSQT: Square Root Floating Point Number Instruction ................................................................................. 101
6.4.6 RVABS: Floating Point Number Absolute Value Instruction ........................................................................... 102
6.4.7 RNEG: Negative Floating Point Number Instruction ...................................................................................... 102
6.4.8 SIN: Floating Point Number Sin Instruction .................................................................................................... 103
6.4.9 COS: Floating Point Number COS Instruction ............................................................................................... 103
6.4.10 TAN: Floating Point Number TAN Instruction ............................................................................................... 104
6.4.11 POWER: Floating Point Number Exponentiation Instruction ........................................................................ 104
6.4.12 LN: Floating Point Number LN Instruction .................................................................................................... 105
6.4.13 EXP: Floating Point Number EXP Instruction............................................................................................... 105
6.4.14 RSUM: Sum Floating Point Number Instruction ........................................................................................... 106
6.5 Data Converting Instruction ....................................................................................................................................... 106
6.5.1 DTI: Double Integer To Integer Instruction ..................................................................................................... 106
6.5.2 ITD: Integer To Double Integer Instruction ..................................................................................................... 107
6.5.3 FLT: Integer To Floating Point Number Instruction ........................................................................................ 107
6.5.4 DFLT: Double Integer To Floating Point Number Instruction ......................................................................... 107
6.5.5 INT: Floating Point Number To Integer Instruction ......................................................................................... 108
6.5.6 DINT: Floating Point Number To Double Integer Instruction .......................................................................... 108
6.5.7 BCD: Word To 16-Bit BCD Instruction ........................................................................................................... 109
6.5.8 DBCD: Double Word To 32-Bit BCD Instruction ............................................................................................ 109
6.5.9 BIN: 16-Bit BCD To Word Instruction ............................................................................................................. 110
6.5.10 DBIN: 32-Bit BCD To Double Word Instruction ............................................................................................ 110
6.5.11 GRY: Word To 16-bit Gray Code Instruction ................................................................................................ 111
6.5.12 DGRY: Double Word To 32-Bit Gray Code Instruction ................................................................................ 111
6.5.13 GBIN: 16-Bit Gray Code To Word Instruction .............................................................................................. 112
6.5.14 DGBIN: 32-Bit Gray Code To Double Word Instruction ............................................................................... 112
6.5.15 SEGl: Word To 7-Segment Encode ............................................................................................................. 113
6.5.16 ASC: ASCII Code Conversion Instruction .................................................................................................... 113
6.5.17 ITA: Hexadecimal Integer-ASCII Conversion Instruction ............................................................................. 114
6.5.18 ATI: ASCII-Hexadecimal Integer Conversion Instruction.............................................................................. 115
6.6 Word Logic Operation ............................................................................................................................................... 115
6.6.1 WAND: AND Word Instruction ....................................................................................................................... 115
6.6.2 WOR: OR Word Instruction ............................................................................................................................ 116
6.6.3 WXOR: Exclusive-OR Word Instruction ......................................................................................................... 116
6.6.4 WINV: NOT Word Instruction ......................................................................................................................... 117
6.6.5 DWAND: AND Double Word Instruction......................................................................................................... 117
6.6.6 DWOR: OR Double Word Instruction ............................................................................................................. 118
6.6.7 DWXOR: Exclusive-OR Double Word Instruction .......................................................................................... 118
6.6.8 DWINV: NOT Double Word Instruction .......................................................................................................... 119
6.7 Shift / Rotate Instruction ............................................................................................................................................ 119
6.7.1 ROR: 16-Bit Circular Shift Right Instruction ................................................................................................... 119
72 Chapter 6 Application Instructions
IVC Series Small PLC Programming Manual
6.7.2 ROL: 16-Bit Circular Shift Left Instruction ...................................................................................................... 120
6.7.3 RCR: 16-Bit Carry Circular Shift Right Instruction .......................................................................................... 121
6.7.4 RCL: 16-Bit Carry Circular Shift Left Instruction ............................................................................................. 122
6.7.5 DROR: 32-Bit Circular Shift Right Instruction ................................................................................................. 122
6.7.6 DROL: 32-Bit Circular Shift Left Instruction .................................................................................................... 123
6.7.7 DRCR: 32-Bit Carry Circular Shift Right Instruction ....................................................................................... 123
6.7.8 DRCL: 32-Bit Carry Circular Shift Left Instruction .......................................................................................... 124
6.7.9 SHR: 16-Bit Shift Right Word Instruction ....................................................................................................... 124
6.7.10 SHL: 16-Bit Shift Left Instruction .................................................................................................................. 125
6.7.11 DSHR: 32-Bit Shift Right Instruction ............................................................................................................ 125
6.7.12 DSHL: 32-Bit Shift Left Instruction ............................................................................................................... 126
6.7.13 SFTR: Shift Right Byte Instruction ............................................................................................................... 127
6.7.14 SFTL: Shift Left Byte Instruction .................................................................................................................. 128
6.8 External Equipment Instruction ................................................................................................................................. 129
6.8.1 FROM: Read Word Form Special Module Buffer Register Instruction ........................................................... 129
6.8.2 DFROM: Read Double Word Form Special Module Buffer Register Instruction ............................................ 130
6.8.3 TO: Write Word To Special Module Buffer Register Instruction ..................................................................... 131
6.8.4 DTO: Write Double Word To Special Module Buffer Register Instruction ...................................................... 132
6.8.5 VRRD: Read Analog Potentiometer Value Instruction ................................................................................... 132
6.8.6 REFF: Set Input Filtering Constant Instruction ............................................................................................... 133
6.8.7 REF: Instant Refresh I/O Instruction .............................................................................................................. 133
6.8.8 EROMWR: EEPROM Write Instruction .......................................................................................................... 134
6.9 Real-Time Clock Instruction ...................................................................................................................................... 135
6.9.1 TRD: Read Real-Time Clock Instruction ........................................................................................................ 135
6.9.2 TWR: Write Real-Time Clock Instruction ....................................................................................................... 136
6.9.3 TADD: Add Clock Instruction ......................................................................................................................... 137
6.9.4 TSUB: Subtract Clock Instruction................................................................................................................... 138
6.9.5 HOUR: Timing List Instruction ....................................................................................................................... 139
6.9.6 DCMP: Compare Date (=, <, >, <>, >=, <=) Instruction ................................................................................. 140
6.9.7 TCMP: Compare Time (=, <, >, <>, >=, <=) Instruction ................................................................................. 141
6.10 High-speed I/O Instruction....................................................................................................................................... 142
6.10.1 HCNT: High-speed Counter Drive Instruction .............................................................................................. 142
6.10.2 DHSCS: High-speed Counting Compare Set Instruction ............................................................................. 143
6.10.3 DHSCI: High-speed Counting Compare Interrupt Trigger Instruction .......................................................... 144
6.10.4 DHSCR: High-speed Counting Compare Reset Instruction ......................................................................... 145
6.10.5 DHSZ: High-speed Counting Zone Compare Instruction ............................................................................. 146
6.10.6 DHST: High-speed Counting Table Compare Instruction ............................................................................ 147
6.10.7 DHSP: High-speed Counting Table Compare Pulse Output Instruction....................................................... 149
6.10.8 SPD: Pulse Detection Instruction ................................................................................................................. 151
6.10.9 PLSY: Count Pulse Output Instruction ......................................................................................................... 152
6.10.10 PLSR: Count Pulse With Acceleration/Deceleration Output Instruction ..................................................... 153
6.10.11 PLS: Pulse Output Instruction of Envelope ................................................................................................ 155
6.10.12 PWM: Pulse Output Instruction .................................................................................................................. 156
6.11 Control Calculation Instruction ................................................................................................................................ 157
6.11.1 PID: PID Instruction ..................................................................................................................................... 157
6.11.2 RAMP: Ramp Wave Signal Output Instruction ............................................................................................. 160
6.11.3 HACKLE: Hackle Wave Signal Output Instruction ....................................................................................... 161
6.11.4 TRIANGLE: Triangle Wave Signal Output Instruction .................................................................................. 162
6.12 Communication Instruction ...................................................................................................................................... 164
6.12.1 Modbus: Modbus Master Station Communication Instruction ...................................................................... 164

Chapter 6 Application Instructions 73
IVC Series Small PLC Programming Manual
6.12.2 IVFWD: FREQUENCY CONVERTER Forward Rotation Instruction ............................................................ 165
6.12.3 IVREV: FREQUENCY CONVERTER Reverse Rotation Instruction ............................................................ 166
6.12.4 IVDFWD: FREQUENCY CONVERTER Touch Forward Rotation Instruction .............................................. 166
6.12.5 IVDREV: FREQUENCY CONVERTER Touch Reverse Rotation Instruction ............................................... 167
6.12.6 IVSTOP: FREQUENCY CONVERTER Stop Instruction .............................................................................. 167
6.12.7 IVFRQ: FREQUENCY CONVERTER Set Frequency Instruction ................................................................ 168
6.12.8 IVWRT: FREQUENCY CONVERTER Write Single Register Value Instruction ........................................... 169
6.12.9 IVRDST: FREQUENCY CONVERTER Read Status Instruction .................................................................. 170
6.12.10 IVRD: FREQUENCY CONVERTER Read Single Register Value Instruction ............................................ 171
6.12.11 XMT: Free-Port Sending (XMT) Instruction ................................................................................................ 172
6.12.12 RCV: Free-Port Receiving (RCV) Instruction ............................................................................................. 173
6.13 Data Check Instruction ............................................................................................................................................ 174
6.13.1 CCITT: Check Instruction ............................................................................................................................. 174
6.13.2 CRC16: Check Instruction ............................................................................................................................ 175
6.13.3 LRC: Check Instruction ................................................................................................................................ 176
6.14 Enhanced Bit Processing Instruction ....................................................................................................................... 177
6.14.1 ZRST: Batch Bit Reset Instruction ............................................................................................................... 177
6.14.2 ZSET: Set Batch Bit Instruction .................................................................................................................... 177
6.14.3 DECO: Decode Instruction ........................................................................................................................... 178
6.14.4 ENCO: Encode Instruction ........................................................................................................................... 178
6.14.5 BITS: Counting ON Bit In Word Instruction .................................................................................................. 179
6.14.6 DBITS: Counting ON Bit In Double Word Instruction ................................................................................... 179
6.15 Word Contactor Instruction ...................................................................................................................................... 180
6.15.1 BLD: Word Bit Contactor LD Instruction ....................................................................................................... 180
6.15.2 BLDI: Word Bit Contactor LDI Instruction ..................................................................................................... 180
6.15.3 BAND: Word Bit Contactor AND Instruction ................................................................................................. 181
6.15.4 BANI: Word Bit Contactor AND Instruction .................................................................................................. 181
6.15.5 BOR: Word Bit Contactor OR Instruction ..................................................................................................... 182
6.15.6 BORI: Word Bit Contactor ORI Instruction ................................................................................................... 182
6.15.7 BOUT: Word Bit Coil Output Instruction ....................................................................................................... 183
6.15.8 BSET: Word Bit Coil Set Instruction ............................................................................................................. 183
6.15.9 BRST: Word Bit Coil Reset Instruction ......................................................................................................... 183
6.16 Compare Contactor Instrucitons .............................................................................................................................. 184
6.16.1 Compare Integer LD (=, <, >, <>, >=, <=) Instrucitons ................................................................................. 184
6.16.2 Compare Integer AND (=, <, >, <>, >=, <=) Instruction ................................................................................ 185
6.16.3 Compare Integer OR (=, <, >, <>, >=, <=) Instruction .................................................................................. 186
6.16.4 Compare Double Integer LDD (=, <, >, <>, >=, <=) Instruction .................................................................... 187
6.16.5 Compare Double Integer ANDD (=, <, >, <>, >=, <=) Instruction ................................................................. 188
6.16.6 Compare Double Integer ORD (=, <, >, <>, >=, <=) Instruction ................................................................... 189
6.16.7 Compare Floating Point Number LDR Instruction ........................................................................................ 190
6.16.8 Compare Floating Point Number ANDR Instruction ..................................................................................... 191
6.16.9 Compare Floating Point Number ORR Instruction ....................................................................................... 192
6.17 Locating Instructions ............................................................................................................................................... 193
6.17.1 Setting Up An Absolute Position System ..................................................................................................... 193
6.17.2 Overview Of Locating Instructions For IVC Series PLC ............................................................................... 193
6.17.3 Mechanical Diagram Of Absolute Position System ...................................................................................... 194
6.17.4 Points To Note For Using Locating instructions ZRN, PLSV, DRVI And DRVA ........................................... 194
6.17.5 Notes On Servo Amplifiers ........................................................................................................................... 195
6.17.6 Special Elements Related To Locating instructions ..................................................................................... 195
6.17.7 ZRN: Regress To Origin Instruction ............................................................................................................. 196
74 Chapter 6 Application Instructions
IVC Series Small PLC Programming Manual
6.17.8 PLSV: Variable Speed Pulse Output Instruction .......................................................................................... 197
6.17.9 DRVI: Relative Position Control Instruction .................................................................................................. 198
6.17.10 DRVA: Control Absolute Position Instruction ............................................................................................. 199
6.17.11 ABS: Read Current Value Instruction......................................................................................................... 199
6.17.12 Application Examples ................................................................................................................................. 201

Chapter 6 Application Instructions 75
IVC Series Small PLC Programming Manual
6.1 Program Flow Control Instruction
6.1.1 FOR: Cycle Instruction
LAD:
Applicable to IVC2 IVC1
Influenced flag bit
IL: FOR (S) Program steps 3
Operand Type Applicable elements Offset
addressing
S INT Constant KnX KnY KnM KnS KnLM KnSM D SD C T V Z √
Operand description
S: Source operand
6.1.2 NEXT: Return From Cycle
LAD:
Applicable to IVC2 IVC1
Influenced flag bit
IL: NEXT Program steps 1
Function description
1. Instructions FOR and NEXT form a FOR-NEXT
structure.
2. When the power flow before FOR is valid, and the
cycle times (S) is larger than 0, the instructions in the
FOR-NEXT structure will be cyclically executed S
times. After that, the instructions after the FOR-NEXT
structure will be executed.
3. If the power flow before FOR is invalid, or the cycle
times (S) is less than or equal to 0, the program will
skip over the instructions in the FOR-NEXT structure
and execute the following instructions.
Example
LD SM1
MOV 0 D0
LD M2
EU
FOR 100
LD SM0
INC D100
NEXT
The initial conditions for the operation are: D0=0,
M2=OFF. When M2 changes from OFF to ON, the
instructions in the FOR-NEXT structure will be
consecutively executed for 100 times. D0 will increase
one for each cycle. When the cycle is over, D0 reaches
100.
Note
1. The FOR-NEXT instruction must be used in pairs in
a POU, or the program cannot pass the compiling.
2. Nesting of several FOR-NEXT structures is
supported. IVC2 series PLC supports up to 8 levels of
nesting. (The figure below shows a 3-level nesting of
FOR-NEXT structure)
3. You can use the Conditional Jump (CJ) instruction
to jump out of the structure and end the loop in
advance, as shown in the following ladder diagram:
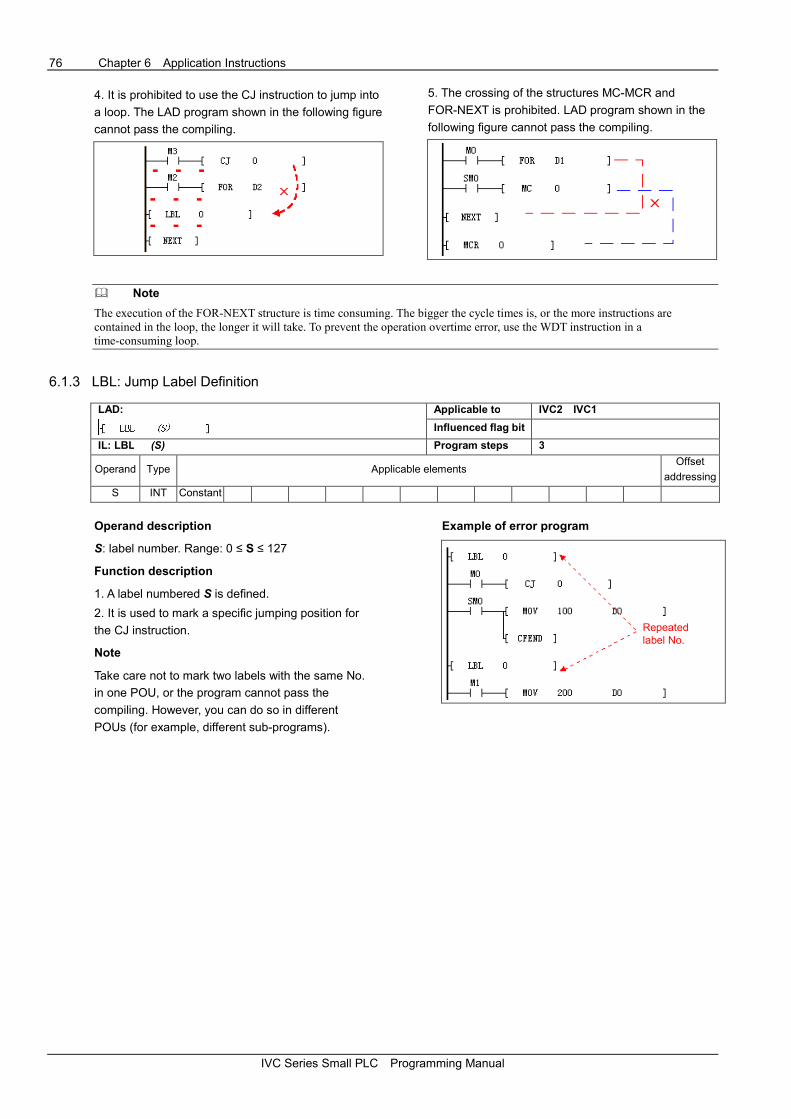
76 Chapter 6 Application Instructions
IVC Series Small PLC Programming Manual
4. It is prohibited to use the CJ instruction to jump into
a loop. The LAD program shown in the following figure
cannot pass the compiling.
5. The crossing of the structures MC-MCR and
FOR-NEXT is prohibited. LAD program shown in the
following figure cannot pass the compiling.
� Note
The execution of the FOR-NEXT structure is time consuming. The bigger the cycle times is, or the more instructions are
contained in the loop, the longer it will take. To prevent the operation overtime error, use the WDT instruction in a
time-consuming loop.
6.1.3 LBL: Jump Label Definition
LAD:
Applicable to IVC2 IVC1
Influenced flag bit
IL: LBL (S) Program steps 3
Operand Type Applicable elements Offset
addressing
S INT Constant
Operand description
S: label number. Range: 0 ≤ S ≤ 127
Function description
1. A label numbered S is defined.
2. It is used to mark a specific jumping position for
the CJ instruction.
Note
Take care not to mark two labels with the same No.
in one POU, or the program cannot pass the
compiling. However, you can do so in different
POUs (for example, different sub-programs).
Example of error program
Repeatedlabel No.

Chapter 6 Application Instructions 77
IVC Series Small PLC Programming Manual
6.1.4 CJ: Conditional Jump
LAD:
Applicable to IVC2 IVC1
Influenced flag bit
IL: CJ (S) Program steps 3
Operand Type Applicable elements Offset
addressing
S INT Constant
Operand description
S: label SN
Function description
1. When the power flow is valid, the program
will jump to execute the instruction numbered
S.
2. If the power flow is invalid, the program will
not jump, but execute the instruction following
CJ.
Note
1. The jumping label S (0 ≤ S ≤ 127) for the CJ
instruction shall be a legal and defined label.
Otherwise, the user program cannot pass the
compiling.
2. It is not allowed to use the CJ instruction to
jump into a FOR-NEXT structure.
3. It is allowable to use the CJ instruction to
jump out of or into the MC-MCR structure or
SFC status. However, such operation will
damage the logic of the MC-MCR structure or
SFC status and make the program complex. It
is not recommended to do this.
Example
Jump to LBL 0
LD M0
CJ 0
LD SM0
MOV 100 D0
CFEND
LBL 0
LD M1
MOV 200 D0
1. Initial conditions: M0=OFF, M1=ON. The CJ instruction is not
be executed, and D0 is 100. After executing CFEND, the current
cycle of the main program ends in advance, and the following LD
and MOV instructions are not executed.
2. When M0 is ON, M1=ON, the program will execute the CJ
instruction, skip over the “MOV 100 200” and CFEND
instructions, and jump to LBL 0 and execute “MOV 200 D0”
instruction. D0 is 200 then.
6.1.5 CFEND: Conditional End From User Main Program
LAD:
Applicable to IVC2 IVC1
Influenced flag bit
IL: CFEND Program steps 1
Function description
1. When the power flow of the instruction is
valid, the current scan cycle of the main
program ends immediately and the following
instructions in the main program will not be
executed.
2. When the power flow of the instruction is
invalid, the instruction enables no action, and
the instruction after it will be executed in order.
Note
The CFEND must be used in the main
program, or the program cannot pass the
compiling.
Example
The current scan cycle ends
LD M0
CFEND
LD SM12
OUT Y0
When the program is running, if M0=OFF, the CFEND instruction
will not enable any action. The following instructions LD and
OUT will be executed. When M0 is ON, the CFEND instruction
will be executed, the main program will end the current scan
cycle immediately, and the following instructions will not be
executed.

78 Chapter 6 Application Instructions
IVC Series Small PLC Programming Manual
6.1.6 WDT: User Program Watchdog Reset
LAD:
Applicable to IVC2 IVC1
Influenced flag bit
IL: WDT Program steps 1
Function description
When the power flow is valid, the instruction will clear the user program watchdog, and the watchdog will restart timing.
6.1.7 EI: Enable Interrupt Instruction
LAD:
Applicable to IVC2 IVC1
Influenced flag bit
IL: EI Program steps 1
Function description
1. When the power flow of the EI instruction is valid, the interrupts in the current scan cycle will be enabled.
2. When the EI instruction is valid, the interrupt requests will be allowed to join the interrupt request queue to wait for
system response.
6.1.8 DI: Disable Interrupt Instruction
LAD:
Applicable to IVC2 IVC1
Influenced flag bit
IL: DI Program steps 1
Function description
1. When the power flow is valid, the global interrupt enable flag is inactive, that is, the global interrupt will be off.
2. When the global interrupt enable flag is inactive, the interrupt events will not generate any interrupt request.
Note
When the DI instruction is valid, the system will still respond to the unprocessed interrupt requests in the request
queue, but new interrupt events cannot generate interrupt requests.
6.1.9 CIRET: Conditional Return From User Interrupt Subprogram
LAD:
Applicable to IVC2 IVC1
Influenced flag bit
IL: CIRET Program steps 1
Function description
When the power flow is valid, the system will quit the current interrupt program immediately.
6.1.10 STOP: User Program Stop
LAD:
Applicable to IVC2 IVC1
Influenced flag bit
IL: STOP Program steps 1
Function description
When the power flow is valid, the system will immediately stop the execution of the user program.
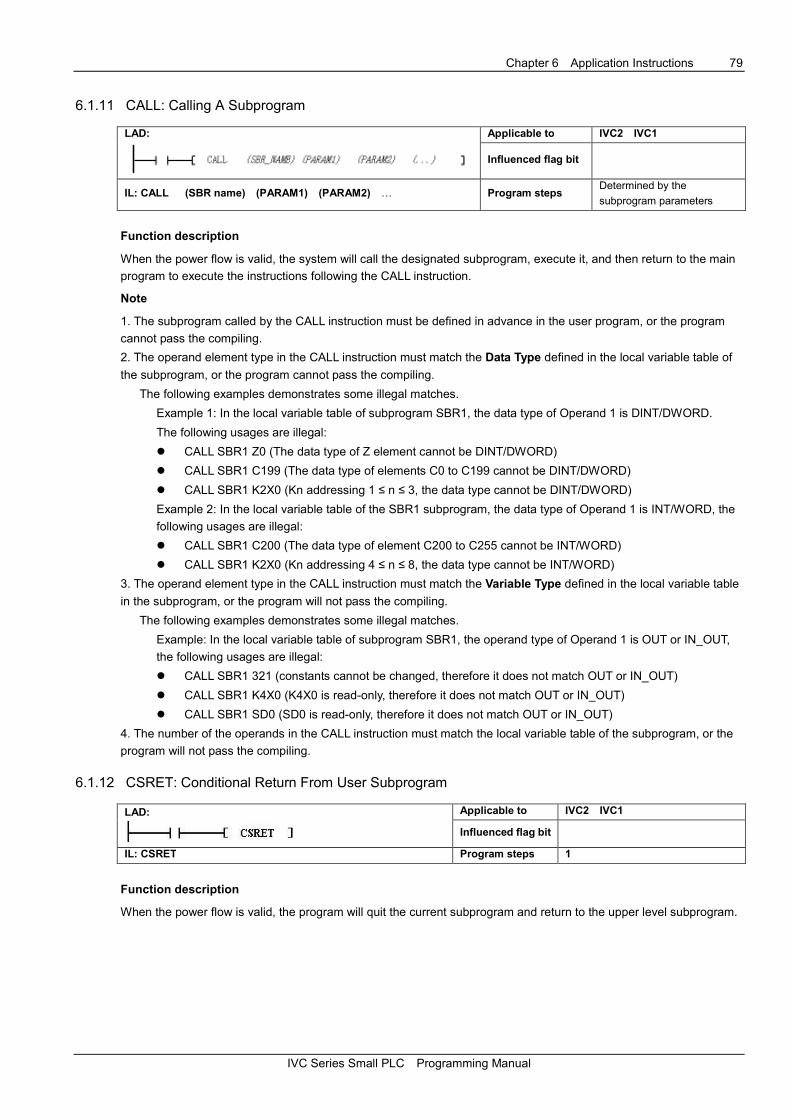
Chapter 6 Application Instructions 79
IVC Series Small PLC Programming Manual
6.1.11 CALL: Calling A Subprogram
LAD:
Applicable to IVC2 IVC1
Influenced flag bit
IL: CALL (SBR name) (PARAM1) (PARAM2) … Program steps Determined by the
subprogram parameters
Function description
When the power flow is valid, the system will call the designated subprogram, execute it, and then return to the main
program to execute the instructions following the CALL instruction.
Note
1. The subprogram called by the CALL instruction must be defined in advance in the user program, or the program
cannot pass the compiling.
2. The operand element type in the CALL instruction must match the Data Type defined in the local variable table of
the subprogram, or the program cannot pass the compiling.
The following examples demonstrates some illegal matches.
Example 1: In the local variable table of subprogram SBR1, the data type of Operand 1 is DINT/DWORD.
The following usages are illegal:
� CALL SBR1 Z0 (The data type of Z element cannot be DINT/DWORD)
� CALL SBR1 C199 (The data type of elements C0 to C199 cannot be DINT/DWORD)
� CALL SBR1 K2X0 (Kn addressing 1 ≤ n ≤ 3, the data type cannot be DINT/DWORD)
Example 2: In the local variable table of the SBR1 subprogram, the data type of Operand 1 is INT/WORD, the
following usages are illegal:
� CALL SBR1 C200 (The data type of element C200 to C255 cannot be INT/WORD)
� CALL SBR1 K2X0 (Kn addressing 4 ≤ n ≤ 8, the data type cannot be INT/WORD)
3. The operand element type in the CALL instruction must match the Variable Type defined in the local variable table
in the subprogram, or the program will not pass the compiling.
The following examples demonstrates some illegal matches.
Example: In the local variable table of subprogram SBR1, the operand type of Operand 1 is OUT or IN_OUT,
the following usages are illegal:
� CALL SBR1 321 (constants cannot be changed, therefore it does not match OUT or IN_OUT)
� CALL SBR1 K4X0 (K4X0 is read-only, therefore it does not match OUT or IN_OUT)
� CALL SBR1 SD0 (SD0 is read-only, therefore it does not match OUT or IN_OUT)
4. The number of the operands in the CALL instruction must match the local variable table of the subprogram, or the
program will not pass the compiling.
6.1.12 CSRET: Conditional Return From User Subprogram
LAD:
Applicable to IVC2 IVC1
Influenced flag bit
IL: CSRET Program steps 1
Function description
When the power flow is valid, the program will quit the current subprogram and return to the upper level subprogram.
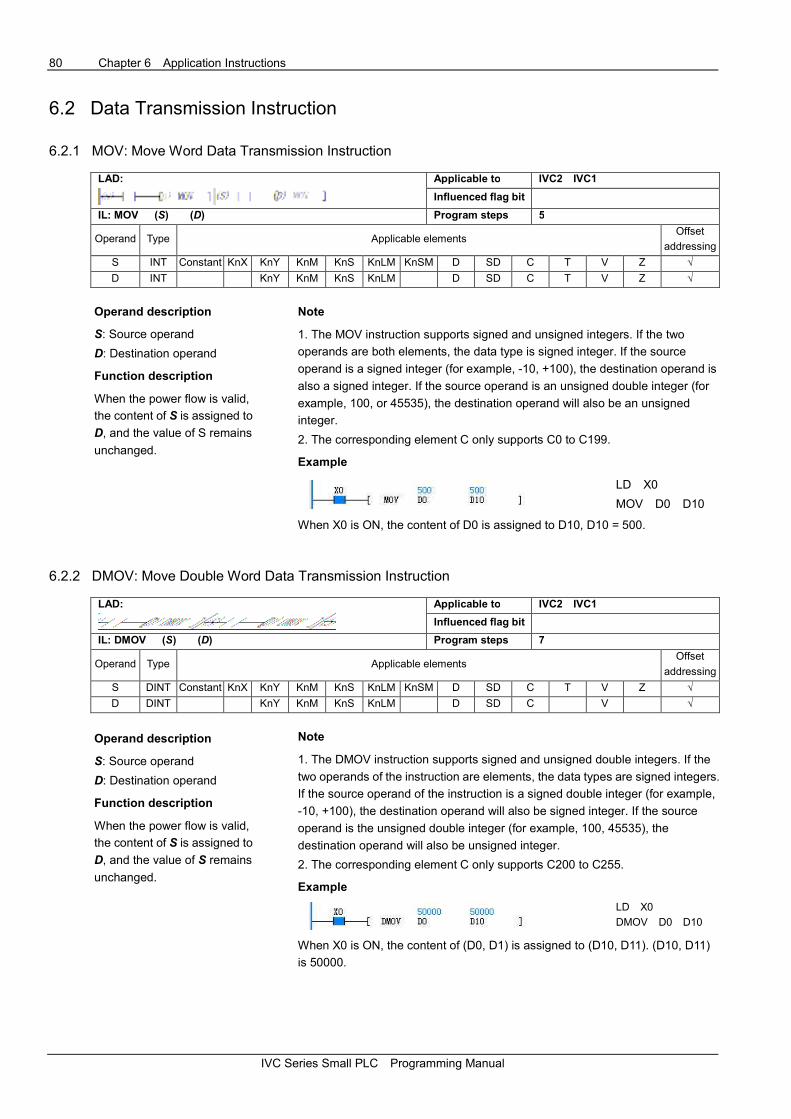
80 Chapter 6 Application Instructions
IVC Series Small PLC Programming Manual
6.2 Data Transmission Instruction
6.2.1 MOV: Move Word Data Transmission Instruction
LAD:
Applicable to IVC2 IVC1
Influenced flag bit
IL: MOV (S) (D) Program steps 5
Operand Type Applicable elements Offset
addressing
S INT Constant KnX KnY KnM KnS KnLM KnSM D SD C T V Z √
D INT KnY KnM KnS KnLM D SD C T V Z √
Operand description
S: Source operand
D: Destination operand
Function description
When the power flow is valid,
the content of S is assigned to
D, and the value of S remains
unchanged.
Note
1. The MOV instruction supports signed and unsigned integers. If the two
operands are both elements, the data type is signed integer. If the source
operand is a signed integer (for example, -10, +100), the destination operand is
also a signed integer. If the source operand is an unsigned double integer (for
example, 100, or 45535), the destination operand will also be an unsigned
integer.
2. The corresponding element C only supports C0 to C199.
Example
LD X0
MOV D0 D10
When X0 is ON, the content of D0 is assigned to D10, D10 = 500.
6.2.2 DMOV: Move Double Word Data Transmission Instruction
LAD:
Applicable to IVC2 IVC1
Influenced flag bit
IL: DMOV (S) (D) Program steps 7
Operand Type Applicable elements Offset
addressing
S DINT Constant KnX KnY KnM KnS KnLM KnSM D SD C T V Z √
D DINT KnY KnM KnS KnLM D SD C V √
Operand description
S: Source operand
D: Destination operand
Function description
When the power flow is valid,
the content of S is assigned to
D, and the value of S remains
unchanged.
Note
1. The DMOV instruction supports signed and unsigned double integers. If the
two operands of the instruction are elements, the data types are signed integers.
If the source operand of the instruction is a signed double integer (for example,
-10, +100), the destination operand will also be signed integer. If the source
operand is the unsigned double integer (for example, 100, 45535), the
destination operand will also be unsigned integer.
2. The corresponding element C only supports C200 to C255.
Example
LD X0
DMOV D0 D10
When X0 is ON, the content of (D0, D1) is assigned to (D10, D11). (D10, D11)
is 50000.
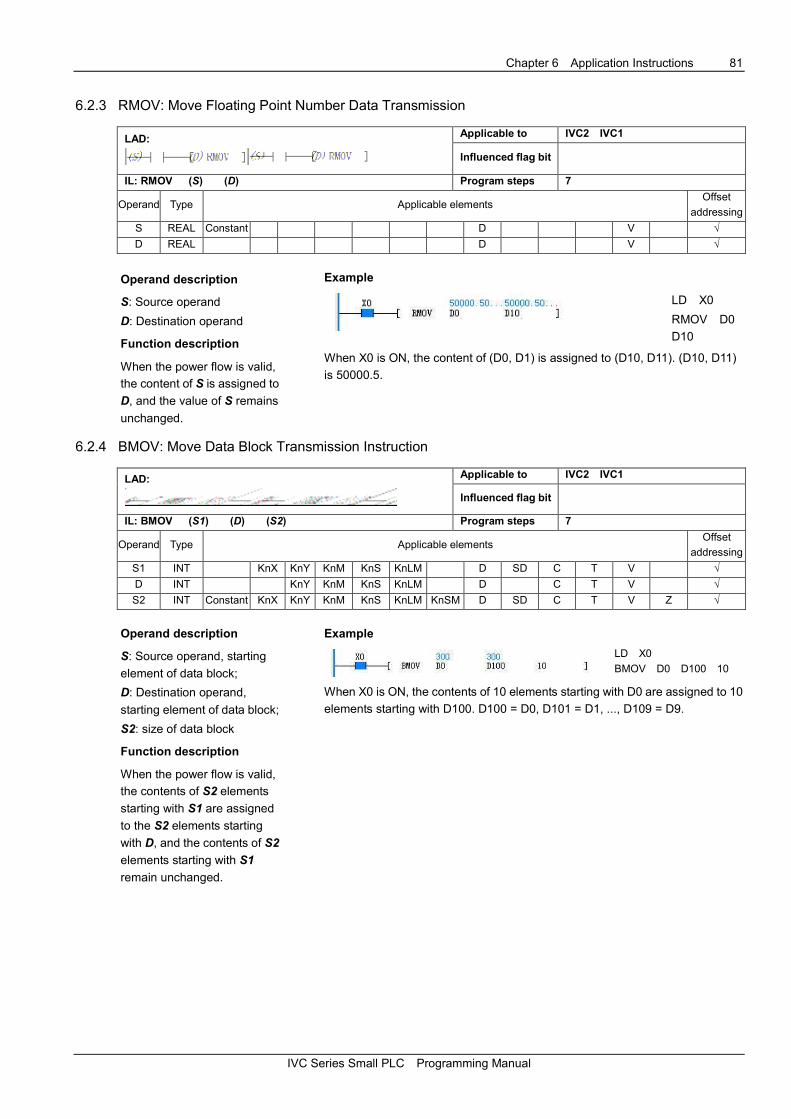
Chapter 6 Application Instructions 81
IVC Series Small PLC Programming Manual
6.2.3 RMOV: Move Floating Point Number Data Transmission
LAD:
Applicable to IVC2 IVC1
Influenced flag bit
IL: RMOV (S) (D) Program steps 7
Operand Type Applicable elements Offset
addressing
S REAL Constant D V √
D REAL D V √
Operand description
S: Source operand
D: Destination operand
Function description
When the power flow is valid,
the content of S is assigned to
D, and the value of S remains
unchanged.
Example
LD X0
RMOV D0
D10
When X0 is ON, the content of (D0, D1) is assigned to (D10, D11). (D10, D11)
is 50000.5.
6.2.4 BMOV: Move Data Block Transmission Instruction
LAD:
Applicable to IVC2 IVC1
Influenced flag bit
IL: BMOV (S1) (D) (S2) Program steps 7
Operand Type Applicable elements Offset
addressing
S1 INT KnX KnY KnM KnS KnLM D SD C T V √
D INT KnY KnM KnS KnLM D C T V √
S2 INT Constant KnX KnY KnM KnS KnLM KnSM D SD C T V Z √
Operand description
S: Source operand, starting
element of data block;
D: Destination operand,
starting element of data block;
S2: size of data block
Function description
When the power flow is valid,
the contents of S2 elements
starting with S1 are assigned
to the S2 elements starting
with D, and the contents of S2
elements starting with S1
remain unchanged.
Example
LD X0
BMOV D0 D100 10
When X0 is ON, the contents of 10 elements starting with D0 are assigned to 10
elements starting with D100. D100 = D0, D101 = D1, ..., D109 = D9.

82 Chapter 6 Application Instructions
IVC Series Small PLC Programming Manual
6.2.5 FMOV: Fill Data Block Instruction
LAD:
Applicable to IVC2 IVC1
Influenced flag bit
IL: FMOV (S1) (D) (S2) Program steps 7
Operand Type Applicable elements Offset
addressing
S1 INT Constant KnX KnY KnM KnS KnLM KnSM D SD C T V Z √
D INT KnY KnM KnS KnLM D C T V √
S2 INT Constant KnX KnY KnM KnS KnLM KnSM D SD C T V Z √
Operand description
S1: Source operand, starting
element of data block;
D: Destination operand,
starting element of data block;
S2: size of data block
Function description
When the power flow is valid,
the contents of S1 will be
filled into S2 elements starting
with D element, and the
content of S1 remains
unchanged.
Note
1. When S1, D and S2 use C element, the legal range is C0 to C199.
2. S2 is larger than or equal to 0.
3. When S1 and D both use Kn addressing, Kn shall be the same.
Example
LD X0
FMOV D0 D100 10
When X0 is ON, the content of D0 will be filled into 10 elements starting with
D100. D100 = D101 = ... = D109 = D0 = 500.
6.2.6 DFMOV: Fill Data Block Double Word Instruction
LAD:
Applicable to IVC2 IVC1
Influenced flag bit
IL: DFMOV (S1) (D) (S2) Program steps 9
Operand Type Applicable elements Offset
addressing
S1 DINT Constant KnX KnY KnM KnS KnLM KnSM D SD C V √
D DINT KnY KnM KnS KnLM D C V √
S2 INT Constant KnX KnY KnM KnS KnLM KnSM D SD C T V Z √
Operand description
S1: Source operand
D: Destination operand,
starting element of data block
S2: size of data block
Function description
When the power flow is valid,
the contents of S1 will be
filled into S2 elements starting
with D, and the content of S1
remains unchanged.
Note
1. When S1, D and S2 use C element, the legal range is C200 to C255.
2. S2 is larger than or equal to 0.
3. When S1 and D are both Kn addressing, Kn shall be the same.
Example
LD X0
DFMOV D0 D10 10
When X0 is ON, the content of (D0, D1) will be filled into 10 × 2 units starting
with D10. (D10, D11) = (D12, D13) =...= (D28, D29) = (D0, D1) = 100000.
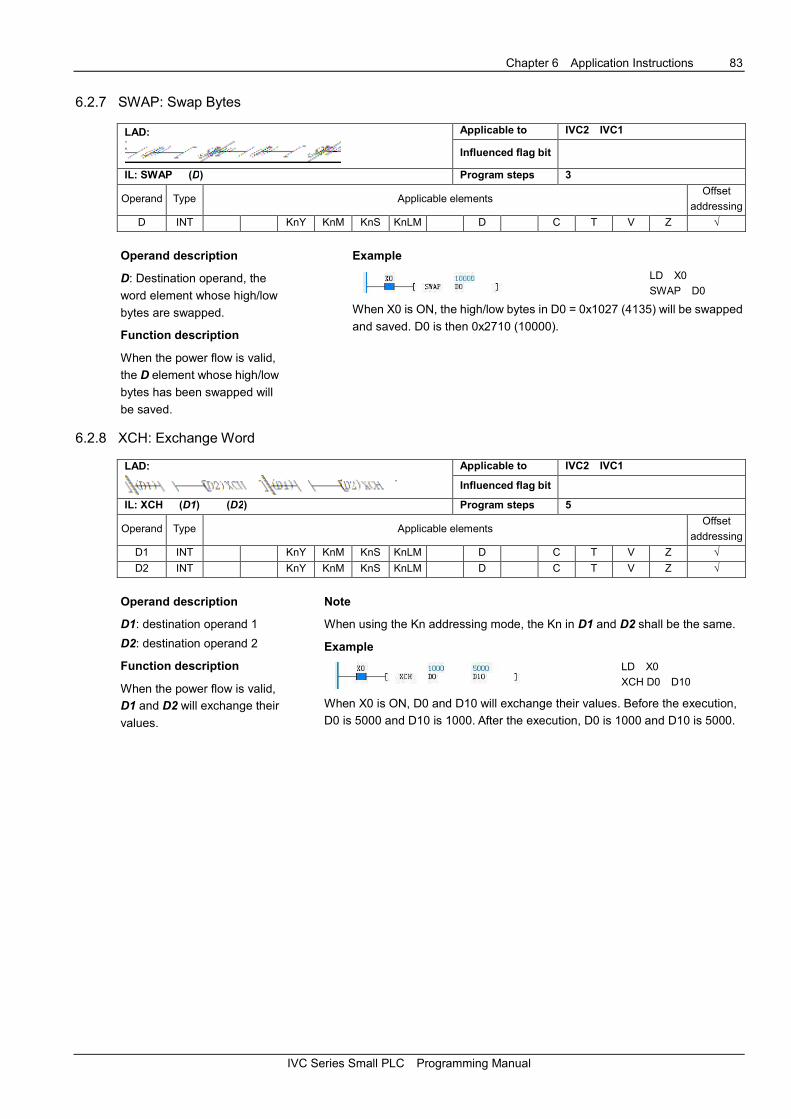
Chapter 6 Application Instructions 83
IVC Series Small PLC Programming Manual
6.2.7 SWAP: Swap Bytes
LAD:
Applicable to IVC2 IVC1
Influenced flag bit
IL: SWAP (D) Program steps 3
Operand Type Applicable elements Offset
addressing
D INT KnY KnM KnS KnLM D C T V Z √
Operand description
D: Destination operand, the
word element whose high/low
bytes are swapped.
Function description
When the power flow is valid,
the D element whose high/low
bytes has been swapped will
be saved.
Example
LD X0
SWAP D0
When X0 is ON, the high/low bytes in D0 = 0x1027 (4135) will be swapped
and saved. D0 is then 0x2710 (10000).
6.2.8 XCH: Exchange Word
LAD:
Applicable to IVC2 IVC1
Influenced flag bit
IL: XCH (D1) (D2) Program steps 5
Operand Type Applicable elements Offset
addressing
D1 INT KnY KnM KnS KnLM D C T V Z √
D2 INT KnY KnM KnS KnLM D C T V Z √
Operand description
D1: destination operand 1
D2: destination operand 2
Function description
When the power flow is valid,
D1 and D2 will exchange their
values.
Note
When using the Kn addressing mode, the Kn in D1 and D2 shall be the same.
Example
LD X0
XCH D0 D10
When X0 is ON, D0 and D10 will exchange their values. Before the execution,
D0 is 5000 and D10 is 1000. After the execution, D0 is 1000 and D10 is 5000.
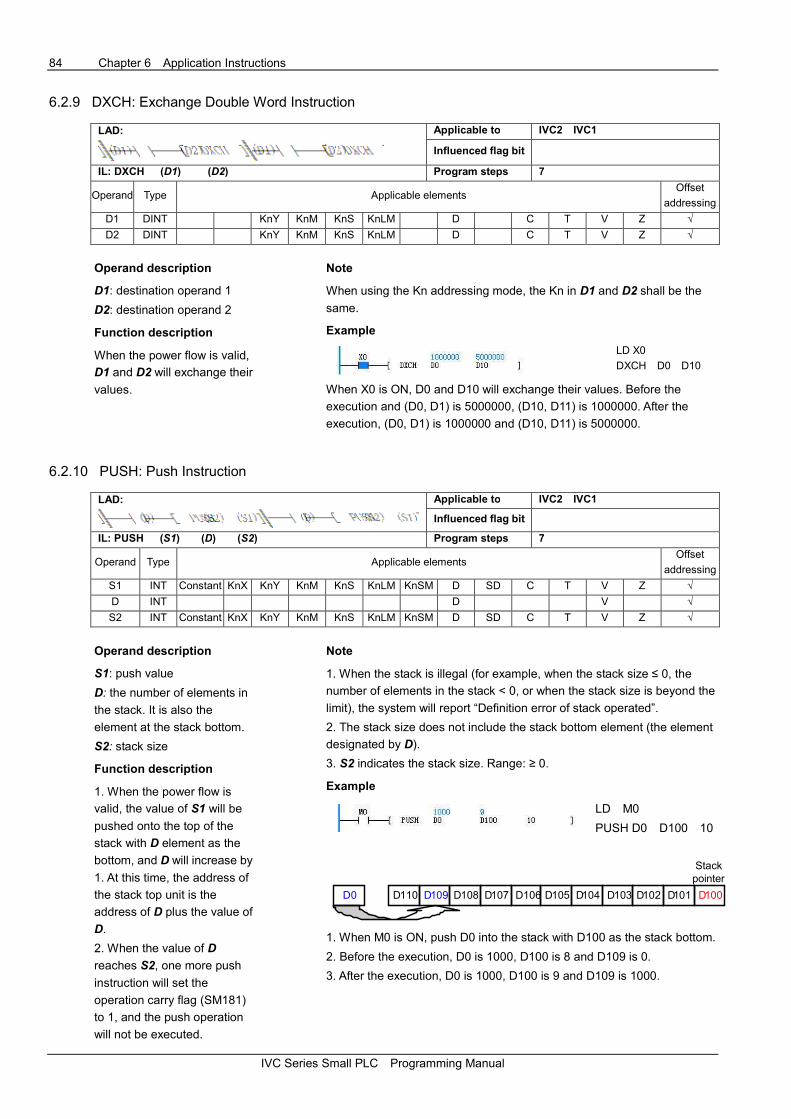
84 Chapter 6 Application Instructions
IVC Series Small PLC Programming Manual
6.2.9 DXCH: Exchange Double Word Instruction
LAD:
Applicable to IVC2 IVC1
Influenced flag bit
IL: DXCH (D1) (D2) Program steps 7
Operand Type Applicable elements Offset
addressing
D1 DINT KnY KnM KnS KnLM D C T V Z √
D2 DINT KnY KnM KnS KnLM D C T V Z √
Operand description
D1: destination operand 1
D2: destination operand 2
Function description
When the power flow is valid,
D1 and D2 will exchange their
values.
Note
When using the Kn addressing mode, the Kn in D1 and D2 shall be the
same.
Example
LD X0
DXCH D0 D10
When X0 is ON, D0 and D10 will exchange their values. Before the
execution and (D0, D1) is 5000000, (D10, D11) is 1000000. After the
execution, (D0, D1) is 1000000 and (D10, D11) is 5000000.
6.2.10 PUSH: Push Instruction
LAD:
Applicable to IVC2 IVC1
Influenced flag bit
IL: PUSH (S1) (D) (S2) Program steps 7
Operand Type Applicable elements Offset
addressing
S1 INT Constant KnX KnY KnM KnS KnLM KnSM D SD C T V Z √
D INT D V √
S2 INT Constant KnX KnY KnM KnS KnLM KnSM D SD C T V Z √
Operand description
S1: push value
D: the number of elements in
the stack. It is also the
element at the stack bottom.
S2: stack size
Function description
1. When the power flow is
valid, the value of S1 will be
pushed onto the top of the
stack with D element as the
bottom, and D will increase by
1. At this time, the address of
the stack top unit is the
address of D plus the value of
D.
2. When the value of D
reaches S2, one more push
instruction will set the
operation carry flag (SM181)
to 1, and the push operation
will not be executed.
Note
1. When the stack is illegal (for example, when the stack size ≤ 0, the
number of elements in the stack < 0, or when the stack size is beyond the
limit), the system will report “Definition error of stack operated”.
2. The stack size does not include the stack bottom element (the element
designated by D).
3. S2 indicates the stack size. Range: ≥ 0.
Example
LD M0
PUSH D0 D100 10
D0 D110 D109 D108 D107 D106 D105 D104 D103 D102 D101 D100
Stackpointer
1. When M0 is ON, push D0 into the stack with D100 as the stack bottom.
2. Before the execution, D0 is 1000, D100 is 8 and D109 is 0.
3. After the execution, D0 is 1000, D100 is 9 and D109 is 1000.

Chapter 6 Application Instructions 85
IVC Series Small PLC Programming Manual
6.2.11 FIFO: First-In-First-Out Instruction
LAD:
(D1)(D1)(D1)(D1)(D1)(D1)(D1)(D1)
(D2)(D2)(D2)(D2)(D2)(D2)(D2)(D2)
(S)(S)(S)(S)(S)(S)(S)(S)
FIFOFIFOFIFOFIFOFIFOFIFOFIFOFIFO
Applicable to IVC2 IVC1
Influenced flag bit
IL: FIFO (D1) (D2) (S) Program steps 7
Operand Type Applicable elements Offset
addressing
D1 INT D V √
D2 INT KnY KnM KnS KnLM D C T V Z √
S INT Constant KnX KnY KnM KnS KnLM KnSM D SD C T V Z √
Operand description
D1: the number of elements in the stack.
Its element address plus 1 is the address
of the stack head.
D2: storage register for popped value
S: queue size
Function description
1. When the power flow is valid, the value
of the stack head (the element
immediately following D1) with D1 as the
queue head is assigned to D2. At the
same time, the value of D1 subtracts 1,
the contents of the S units after D1 will
move forward, and the last unit is filled
with 0.
2. When D1 is 0, it indicates that the
stack is empty, the zero flag (SM180) will
be set 1.
Note
1. When the stack is illegal (for example,
when the stack size ≤ 0, the number of
elements in the stack < 0, or when the
stack size is beyond the limit), the system
will report “Definition error of stack
operated”.
2. The stack size does not include the
stack bottom element (the element
designated by D1)
3. S indicates the stack size. Range: ≥ 0.
Example
LD M0
FIFO D100 D0 10
0 D110 D109 D108 D107 D106 D105 D104 D103 D102 D101 D100 D0
Stackpointer
1. When M0 is ON, the content of D101 is filled into D0, and at the
same time the contents of D101 ~ D110 move forward, and the
D110 is filled with 0.
2. Before the execution: D0 = 0, D100 = 10, D101 = 1000, D102 =
2000, ..., D109 = 9000, D110 = 10000.
3. After the execution: D0 = 1000, D100 = 9, D101 = 2000, D102 =
3000,..., D109 = 10000, D110 = 0.
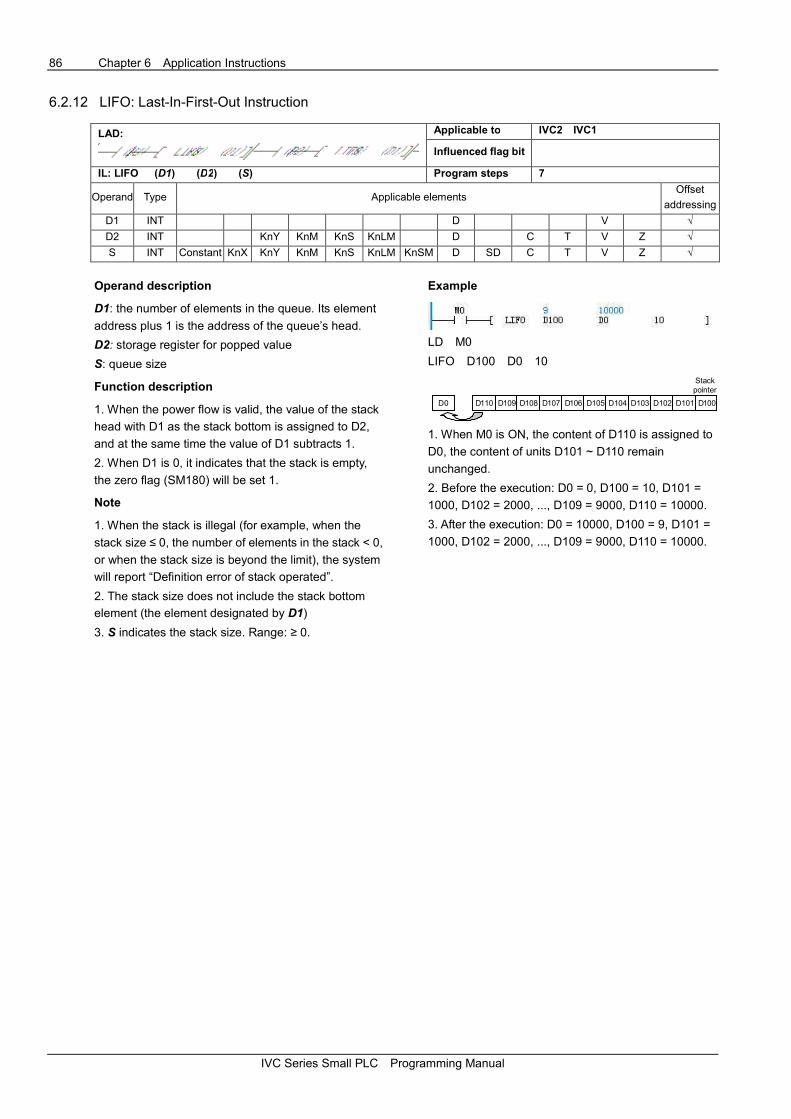
86 Chapter 6 Application Instructions
IVC Series Small PLC Programming Manual
6.2.12 LIFO: Last-In-First-Out Instruction
LAD:
Applicable to IVC2 IVC1
Influenced flag bit
IL: LIFO (D1) (D2) (S) Program steps 7
Operand Type Applicable elements Offset
addressing
D1 INT D V √
D2 INT KnY KnM KnS KnLM D C T V Z √
S INT Constant KnX KnY KnM KnS KnLM KnSM D SD C T V Z √
Operand description
D1: the number of elements in the queue. Its element
address plus 1 is the address of the queue’s head.
D2: storage register for popped value
S: queue size
Function description
1. When the power flow is valid, the value of the stack
head with D1 as the stack bottom is assigned to D2,
and at the same time the value of D1 subtracts 1.
2. When D1 is 0, it indicates that the stack is empty,
the zero flag (SM180) will be set 1.
Note
1. When the stack is illegal (for example, when the
stack size ≤ 0, the number of elements in the stack < 0,
or when the stack size is beyond the limit), the system
will report “Definition error of stack operated”.
2. The stack size does not include the stack bottom
element (the element designated by D1)
3. S indicates the stack size. Range: ≥ 0.
Example
LD M0
LIFO D100 D0 10
D0 D110 D109 D108 D107 D106 D105 D104 D103 D102 D101 D100
Stackpointer
1. When M0 is ON, the content of D110 is assigned to
D0, the content of units D101 ~ D110 remain
unchanged.
2. Before the execution: D0 = 0, D100 = 10, D101 =
1000, D102 = 2000, ..., D109 = 9000, D110 = 10000.
3. After the execution: D0 = 10000, D100 = 9, D101 =
1000, D102 = 2000, ..., D109 = 9000, D110 = 10000.
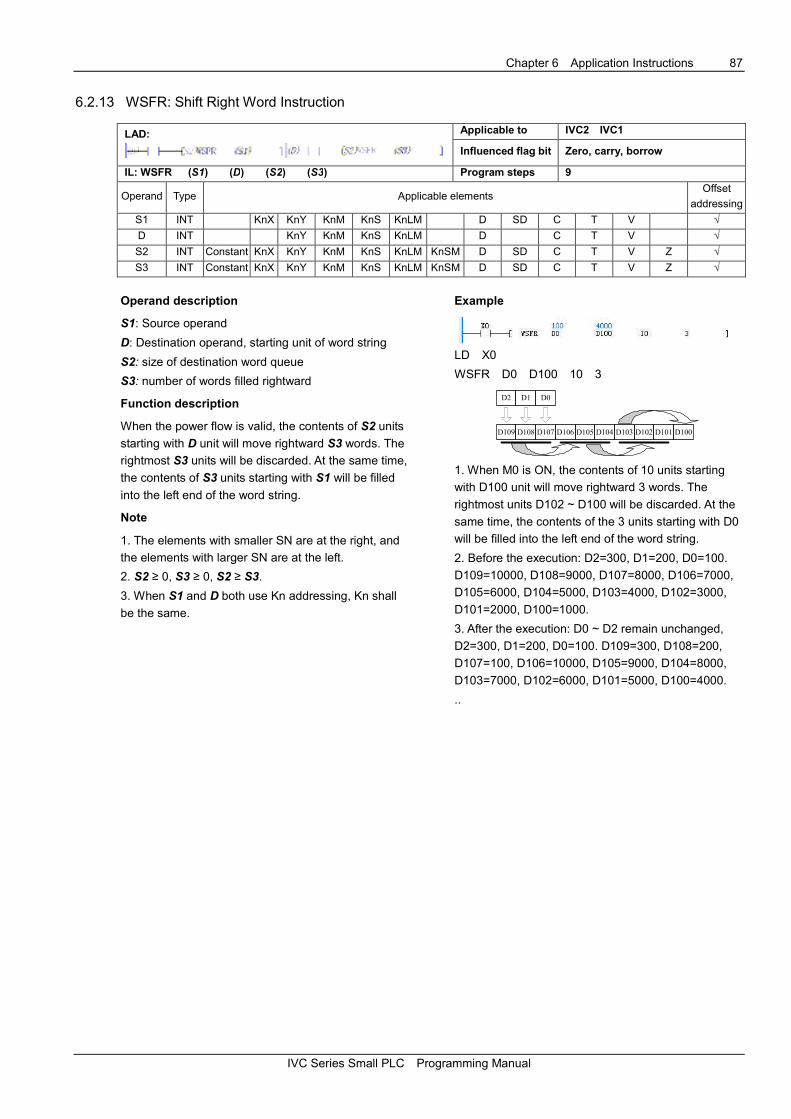
Chapter 6 Application Instructions 87
IVC Series Small PLC Programming Manual
6.2.13 WSFR: Shift Right Word Instruction
LAD:
Applicable to IVC2 IVC1
Influenced flag bit Zero, carry, borrow
IL: WSFR (S1) (D) (S2) (S3) Program steps 9
Operand Type Applicable elements Offset
addressing
S1 INT KnX KnY KnM KnS KnLM D SD C T V √
D INT KnY KnM KnS KnLM D C T V √
S2 INT Constant KnX KnY KnM KnS KnLM KnSM D SD C T V Z √
S3 INT Constant KnX KnY KnM KnS KnLM KnSM D SD C T V Z √
Operand description
S1: Source operand
D: Destination operand, starting unit of word string
S2: size of destination word queue
S3: number of words filled rightward
Function description
When the power flow is valid, the contents of S2 units
starting with D unit will move rightward S3 words. The
rightmost S3 units will be discarded. At the same time,
the contents of S3 units starting with S1 will be filled
into the left end of the word string.
Note
1. The elements with smaller SN are at the right, and
the elements with larger SN are at the left.
2. S2 ≥ 0, S3 ≥ 0, S2 ≥ S3.
3. When S1 and D both use Kn addressing, Kn shall
be the same.
Example
LD X0
WSFR D0 D100 10 3
D2 D1 D0
D109 D108 D107 D106 D105 D104 D103 D102 D101 D100
1. When M0 is ON, the contents of 10 units starting
with D100 unit will move rightward 3 words. The
rightmost units D102 ~ D100 will be discarded. At the
same time, the contents of the 3 units starting with D0
will be filled into the left end of the word string.
2. Before the execution: D2=300, D1=200, D0=100.
D109=10000, D108=9000, D107=8000, D106=7000,
D105=6000, D104=5000, D103=4000, D102=3000,
D101=2000, D100=1000.
3. After the execution: D0 ~ D2 remain unchanged,
D2=300, D1=200, D0=100. D109=300, D108=200,
D107=100, D106=10000, D105=9000, D104=8000,
D103=7000, D102=6000, D101=5000, D100=4000.
..
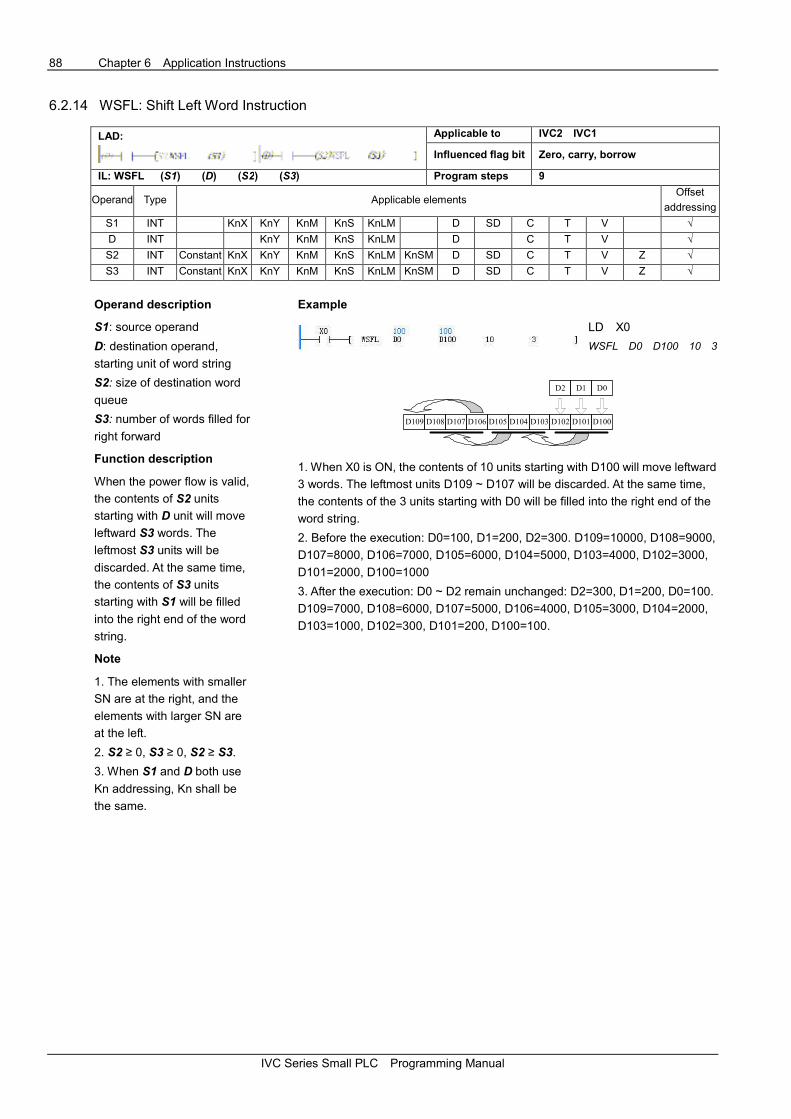
88 Chapter 6 Application Instructions
IVC Series Small PLC Programming Manual
6.2.14 WSFL: Shift Left Word Instruction
LAD:
Applicable to IVC2 IVC1
Influenced flag bit Zero, carry, borrow
IL: WSFL (S1) (D) (S2) (S3) Program steps 9
Operand Type Applicable elements Offset
addressing
S1 INT KnX KnY KnM KnS KnLM D SD C T V √
D INT KnY KnM KnS KnLM D C T V √
S2 INT Constant KnX KnY KnM KnS KnLM KnSM D SD C T V Z √
S3 INT Constant KnX KnY KnM KnS KnLM KnSM D SD C T V Z √
Operand description
S1: source operand
D: destination operand,
starting unit of word string
S2: size of destination word
queue
S3: number of words filled for
right forward
Function description
When the power flow is valid,
the contents of S2 units
starting with D unit will move
leftward S3 words. The
leftmost S3 units will be
discarded. At the same time,
the contents of S3 units
starting with S1 will be filled
into the right end of the word
string.
Note
1. The elements with smaller
SN are at the right, and the
elements with larger SN are
at the left.
2. S2 ≥ 0, S3 ≥ 0, S2 ≥ S3.
3. When S1 and D both use
Kn addressing, Kn shall be
the same.
Example
LD X0
WSFL D0 D100 10 3
D2 D1 D0
D109 D108 D107 D106 D105 D104 D103 D102 D101 D100
1. When X0 is ON, the contents of 10 units starting with D100 will move leftward
3 words. The leftmost units D109 ~ D107 will be discarded. At the same time,
the contents of the 3 units starting with D0 will be filled into the right end of the
word string.
2. Before the execution: D0=100, D1=200, D2=300. D109=10000, D108=9000,
D107=8000, D106=7000, D105=6000, D104=5000, D103=4000, D102=3000,
D101=2000, D100=1000
3. After the execution: D0 ~ D2 remain unchanged: D2=300, D1=200, D0=100.
D109=7000, D108=6000, D107=5000, D106=4000, D105=3000, D104=2000,
D103=1000, D102=300, D101=200, D100=100.
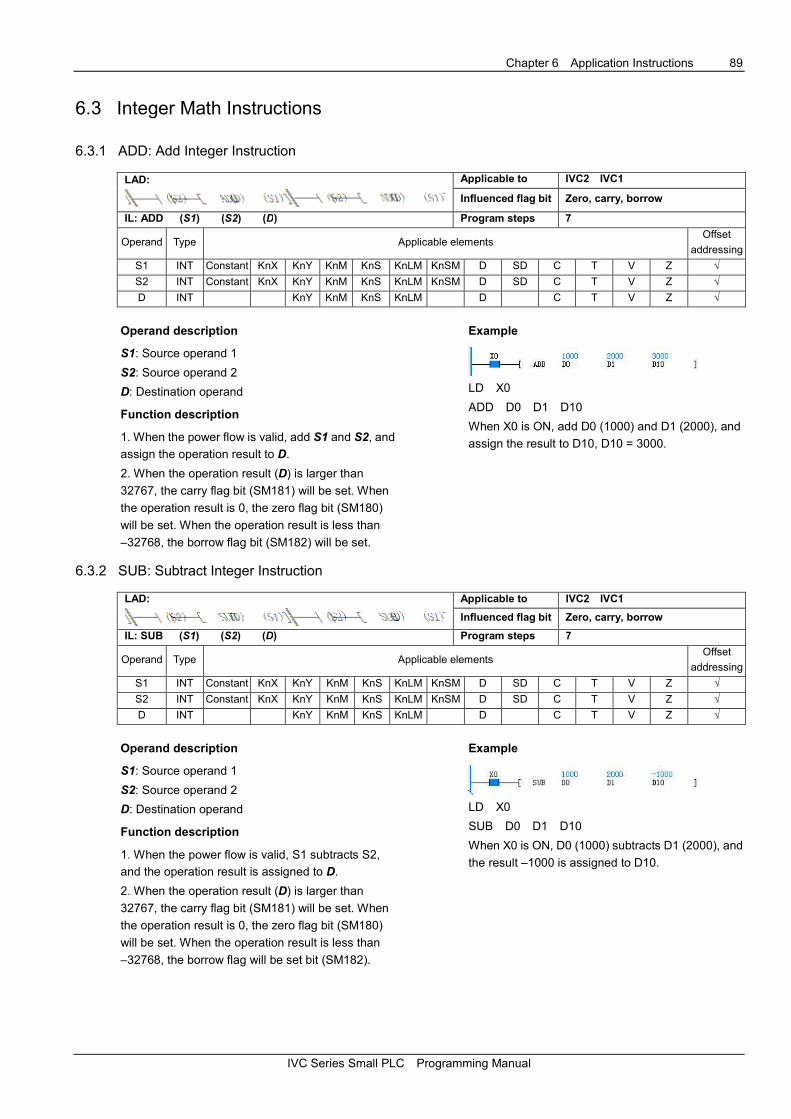
Chapter 6 Application Instructions 89
IVC Series Small PLC Programming Manual
6.3 Integer Math Instructions
6.3.1 ADD: Add Integer Instruction
LAD:
Applicable to IVC2 IVC1
Influenced flag bit Zero, carry, borrow
IL: ADD (S1) (S2) (D) Program steps 7
Operand Type Applicable elements Offset
addressing
S1 INT Constant KnX KnY KnM KnS KnLM KnSM D SD C T V Z √
S2 INT Constant KnX KnY KnM KnS KnLM KnSM D SD C T V Z √
D INT KnY KnM KnS KnLM D C T V Z √
Operand description
S1: Source operand 1
S2: Source operand 2
D: Destination operand
Function description
1. When the power flow is valid, add S1 and S2, and
assign the operation result to D.
2. When the operation result (D) is larger than
32767, the carry flag bit (SM181) will be set. When
the operation result is 0, the zero flag bit (SM180)
will be set. When the operation result is less than
–32768, the borrow flag bit (SM182) will be set.
Example
LD X0
ADD D0 D1 D10
When X0 is ON, add D0 (1000) and D1 (2000), and
assign the result to D10, D10 = 3000.
6.3.2 SUB: Subtract Integer Instruction
LAD:
Applicable to IVC2 IVC1
Influenced flag bit Zero, carry, borrow
IL: SUB (S1) (S2) (D) Program steps 7
Operand Type Applicable elements Offset
addressing
S1 INT Constant KnX KnY KnM KnS KnLM KnSM D SD C T V Z √
S2 INT Constant KnX KnY KnM KnS KnLM KnSM D SD C T V Z √
D INT KnY KnM KnS KnLM D C T V Z √
Operand description
S1: Source operand 1
S2: Source operand 2
D: Destination operand
Function description
1. When the power flow is valid, S1 subtracts S2,
and the operation result is assigned to D.
2. When the operation result (D) is larger than
32767, the carry flag bit (SM181) will be set. When
the operation result is 0, the zero flag bit (SM180)
will be set. When the operation result is less than
–32768, the borrow flag will be set bit (SM182).
Example
LD X0
SUB D0 D1 D10
When X0 is ON, D0 (1000) subtracts D1 (2000), and
the result –1000 is assigned to D10.
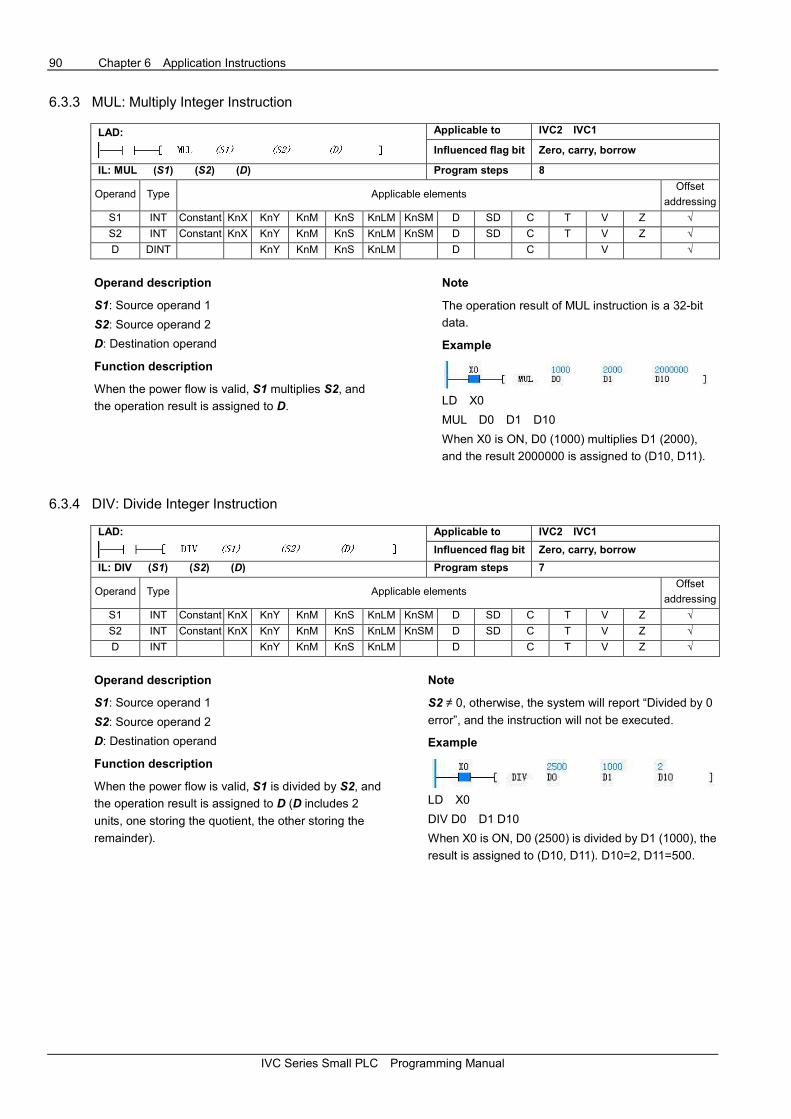
90 Chapter 6 Application Instructions
IVC Series Small PLC Programming Manual
6.3.3 MUL: Multiply Integer Instruction
LAD:
Applicable to IVC2 IVC1
Influenced flag bit Zero, carry, borrow
IL: MUL (S1) (S2) (D) Program steps 8
Operand Type Applicable elements Offset
addressing
S1 INT Constant KnX KnY KnM KnS KnLM KnSM D SD C T V Z √
S2 INT Constant KnX KnY KnM KnS KnLM KnSM D SD C T V Z √
D DINT KnY KnM KnS KnLM D C V √
Operand description
S1: Source operand 1
S2: Source operand 2
D: Destination operand
Function description
When the power flow is valid, S1 multiplies S2, and
the operation result is assigned to D.
Note
The operation result of MUL instruction is a 32-bit
data.
Example
LD X0
MUL D0 D1 D10
When X0 is ON, D0 (1000) multiplies D1 (2000),
and the result 2000000 is assigned to (D10, D11).
6.3.4 DIV: Divide Integer Instruction
LAD:
Applicable to IVC2 IVC1
Influenced flag bit Zero, carry, borrow
IL: DIV (S1) (S2) (D) Program steps 7
Operand Type Applicable elements Offset
addressing
S1 INT Constant KnX KnY KnM KnS KnLM KnSM D SD C T V Z √
S2 INT Constant KnX KnY KnM KnS KnLM KnSM D SD C T V Z √
D INT KnY KnM KnS KnLM D C T V Z √
Operand description
S1: Source operand 1
S2: Source operand 2
D: Destination operand
Function description
When the power flow is valid, S1 is divided by S2, and
the operation result is assigned to D (D includes 2
units, one storing the quotient, the other storing the
remainder).
Note
S2 ≠ 0, otherwise, the system will report “Divided by 0
error”, and the instruction will not be executed.
Example
LD X0
DIV D0 D1 D10
When X0 is ON, D0 (2500) is divided by D1 (1000), the
result is assigned to (D10, D11). D10=2, D11=500.

Chapter 6 Application Instructions 91
IVC Series Small PLC Programming Manual
6.3.5 SQT: Square Root Integer Instructions
LAD:
Applicable to IVC2 IVC1
Influenced flag bit Zero, carry, borrow
IL: SQT (S) (D) Program steps 5
Operand Type Applicable elements Offset
addressing
S INT Constant KnX KnY KnM KnS KnLM KnSM D SD C T V Z √
D INT KnY KnM KnS KnLM D C T V Z √
Operand description
S: Source operand
D: Destination operand
Function description
1. When the power flow is
valid, S is extracted, and the
operation result is assigned to
D.
2. When the operation result
(D) is 0, the zero flag bit
(SM180) will be set. When the
operation result rounds off the
decimal fraction, the borrow
flag bit (SM182) will be set.
Note
S ≥ 0, otherwise, the system will report operand error, and the instruction
will not be executed.
Example
LD X0
SQT D0 D10
When X0 is ON, extract D0 (1000), and assign the result to D10, D10=31.
6.3.6 INC: Increment Integer Instruction
LAD:
Applicable to IVC2 IVC1
Influenced flag bit Zero, carry, borrow
IL: INC (D) Program steps 3
Operand Type Applicable elements Offset
addressing
D INT KnY KnM KnS KnLM D C T V Z √
Operand description
D: Destination operand
Function description
When the power flow is valid,
D increases by 1.
Note
1. This instruction is a cyclic increase instruction. Range: –32768 ~ 32767.
2. The supported range of C element: C0 ~ C199.
Example
LD X0
INC D0
When X0 is ON, D0 (1000) is increased by 1. After the execution, D0 is
1001.

92 Chapter 6 Application Instructions
IVC Series Small PLC Programming Manual
6.3.7 DEC: Decrement Integer Instruction
LAD:
Applicable to IVC2 IVC1
Influenced flag bit Zero, carry, borrow
IL: DEC (D) Program steps 3
Operand Type Applicable elements Offset
addressing
D INT KnY KnM KnS KnLM D C T V Z √
Operand description
D: Destination operand
Function description
When the power flow is valid,
D decreases 1.
Note
This instruction is a cyclic
decrease instruction, with the
range of –32768 ~ 32767.
Example
LD X0
DEC D0
When X0 is ON, D0 (1000) decreases 1. After the execution, D0=999.
6.3.8 VABS: Integer Absolute Value Instruction
LAD:
Applicable to IVC2 IVC1
Influenced flag bit Zero, carry, borrow
IL: VABS (S) (D) Program steps 5
Operand Type Applicable elements Offset
addressing
S INT Constant KnX KnY KnM KnS KnLM KnSM D SD C T V Z √
D INT KnY KnM KnS KnLM D C T V Z √
Operand description
S: Source operand
D: Destination operand
Function description
When the power flow is valid,
get the absolute value of S
and assign it to D.
Note
The range of S shall be
-32767 ~ 32767. When S is
-32768, the system will report
operand error, and the
instruction will not be
executed.
Example
LD X0
VABS D0 D10
When X0 is ON, get the absolute value of D0 (-1000), and assign the result
to D10. D10=1000.
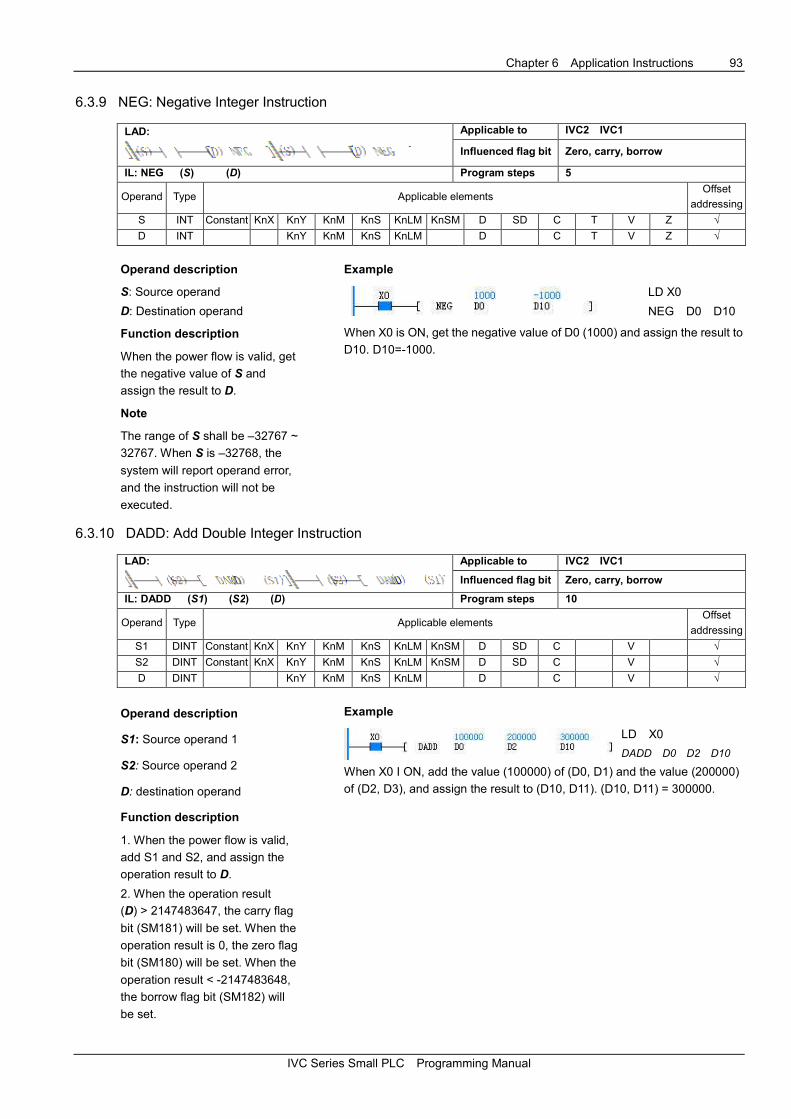
Chapter 6 Application Instructions 93
IVC Series Small PLC Programming Manual
6.3.9 NEG: Negative Integer Instruction
LAD:
Applicable to IVC2 IVC1
Influenced flag bit Zero, carry, borrow
IL: NEG (S) (D) Program steps 5
Operand Type Applicable elements Offset
addressing
S INT Constant KnX KnY KnM KnS KnLM KnSM D SD C T V Z √
D INT KnY KnM KnS KnLM D C T V Z √
Operand description
S: Source operand
D: Destination operand
Function description
When the power flow is valid, get
the negative value of S and
assign the result to D.
Note
The range of S shall be –32767 ~
32767. When S is –32768, the
system will report operand error,
and the instruction will not be
executed.
Example
LD X0
NEG D0 D10
When X0 is ON, get the negative value of D0 (1000) and assign the result to
D10. D10=-1000.
6.3.10 DADD: Add Double Integer Instruction
LAD:
Applicable to IVC2 IVC1
Influenced flag bit Zero, carry, borrow
IL: DADD (S1) (S2) (D) Program steps 10
Operand Type Applicable elements Offset
addressing
S1 DINT Constant KnX KnY KnM KnS KnLM KnSM D SD C V √
S2 DINT Constant KnX KnY KnM KnS KnLM KnSM D SD C V √
D DINT KnY KnM KnS KnLM D C V √
Operand description
S1: Source operand 1
S2: Source operand 2
D: destination operand
Function description
1. When the power flow is valid,
add S1 and S2, and assign the
operation result to D.
2. When the operation result
(D) > 2147483647, the carry flag
bit (SM181) will be set. When the
operation result is 0, the zero flag
bit (SM180) will be set. When the
operation result < -2147483648,
the borrow flag bit (SM182) will
be set.
Example
LD X0
DADD D0 D2 D10
When X0 I ON, add the value (100000) of (D0, D1) and the value (200000)
of (D2, D3), and assign the result to (D10, D11). (D10, D11) = 300000.

94 Chapter 6 Application Instructions
IVC Series Small PLC Programming Manual
6.3.11 DSUB: Subtract Double Integer Instruction
LAD:
Applicable to IVC2 IVC1
Influenced flag bit Zero, carry, borrow
IL: DSUB (S1) (S2) (D) Program steps 10
Operand Type Applicable elements Offset
addressing
S1 DINT Constant KnX KnY KnM KnS KnLM KnSM D SD C V √
S2 DINT Constant KnX KnY KnM KnS KnLM KnSM D SD C V √
D DINT KnY KnM KnS KnLM D C V √
Operand description
S1: Source operand 1
S2: Source operand 2
D: Destination operand
Function description
1. When the power flow is valid, S1 subtracts S2, and the operation result is assigned to D.
2. When the operation result (D) > 2147483647, the
carry flag bit (SM181) will be set. When the operation
result is 0, the zero flag bit (SM180) will be set. When
the operation result < -2147483648, the borrow flag bit
(SM182) will be set.
Example
LD X0
DSUB D0 D2 D10
When X0 is ON, the value (100000) of (D0, D1)
subtracts the value (200000) of (D2,D3), and the result
–100000 is assigned to (D10, D11).
6.3.12 DMUL: Multiply Double Integer Instruction
LAD:
Applicable to IVC2 IVC1
Influenced flag bit Zero, carry, borrow
IL: DMUL (S1) (S2) (D) Program steps 10
Operand Type Applicable elements Offset
addressing
S1 DINT Constant KnX KnY KnM KnS KnLM KnSM D SD C V √
S2 DINT Constant KnX KnY KnM KnS KnLM KnSM D SD C V √
D DINT KnY KnM KnS KnLM D C V √
Operand description
S1: Source operand 1
S2: Source operand 2
D: Destination operand
Function description
When the power flow is valid, S1 multiplies S2, and the
result is assigned to D.
Note
The result of the DMUL instruction is a 32-bit data, and
overflow may occur.
Example
LD X0
DMUL D0 D2 D10
When X0 is ON, the value (83000) of (D0, D1)
multiplies the value (2000) of (D2,D3), and the result
1660000000 is assigned to (D10, D11).

Chapter 6 Application Instructions 95
IVC Series Small PLC Programming Manual
6.3.13 DDIV: Divide Double Integer Instruction
LAD:
Applicable to IVC2 IVC1
Influenced flag bit Zero, carry, borrow
IL: DDIV (S1) (S2) (D) Program steps 10
Operand Type Applicable elements Offset
addressing
S1 DINT Constant KnX KnY KnM KnS KnLM KnSM D SD C V √
S2 DINT Constant KnX KnY KnM KnS KnLM KnSM D SD C V √
D DINT KnY KnM KnS KnLM D C V √
Operand description
S1: Source operand 1
S2: Source operand 2
D: Destination operand
Function description
When the power flow is valid, S1
is divided by S2, and the
operation result is assigned to D
(D includes 4 units, with the first
two storing the quotient, the
other two storing the remainder)
Note
S2 ≠ 0, otherwise, the system will report “Divided by 0 error”, and the
instruction will not be executed.
Example
LD X0
DDIV D0 D2 D10
When X0 is ON, the value (83000) of (D0, D1) is divided by the value (2000)
of (D2, D3), and the result is assigned to (D10, D11) and (D12,D13). (D10,
D11) = 41, (D12, D13) = 1000.
6.3.14 DSQT: Square Root Double Integer Instruction
LAD:
Applicable to IVC2 IVC1
Influenced flag bit Zero, carry, borrow
IL: DSQT (S) (D) Program steps 7
Operand Type Applicable elements Offset
addressing
S DINT Constant KnX KnY KnM KnS KnLM KnSM D SD C V √
D DINT KnY KnM KnS KnLM D C V √
Operand description
S: Source operand
D: Destination operand
Function description
1. When the power flow is
valid, S is extracted, and the
operation result is assigned to
D.
2. When the operation result
(D) is 0, the zero flag bit
(SM180) will be set. When the
operation result rounds off the
decimal fraction, the borrow
flag bit (SM182) will be set.
Note
S ≥ 0, otherwise, the system will report operand error, and the instruction
will not be executed.
Example
LD X0
DSQT D0 D10
When X0 is ON, extract the value (83000) of (D0, D1), and assign the
result to (D10, D11). (D10, D11) = 288.

96 Chapter 6 Application Instructions
IVC Series Small PLC Programming Manual
6.3.15 DINC: Increment Double Integer Instruction
LAD:
Applicable to IVC2 IVC1
Influenced flag bit Zero, carry, borrow
IL: DINC (D) Program steps 4
Operand Type Applicable elements Offset
addressing
D DINT KnY KnM KnS KnLM D C V √
Operand description
D: Destination operand
Function description
When the power flow is valid,
D increases 1.
Note
1. This instruction is a cyclic increase instruction. Range: -2147483648 ~
2147483647.
2. The supported range of C element: C200 ~ C255.
Example
LD X0
DINC D0
When X0 is ON, the value (100000) of (D0, D1) increases 1. After the
execution, (D0, D1) = 100001.
6.3.16 DDEC: Decrement Double Integer Instruction
LAD:
Applicable to IVC2 IVC1
Influenced flag bit Zero, carry, borrow
IL: DDEC (D) Program steps 4
Operand Type Applicable elements Offset
addressing
D DINT KnY KnM KnS KnLM D C V √
Operand description
D: Destination operand
Function description
When the power flow is valid,
D decreases 1.
Note
This instruction is a cyclic decrease instruction. Range: -2147483648 ~
2147483647
Example
LD X0
DDEC D0
When X0 is ON, the value (100000) of (D0, D1) decreases 1. After the
execution, (D0, D1) = 99999.
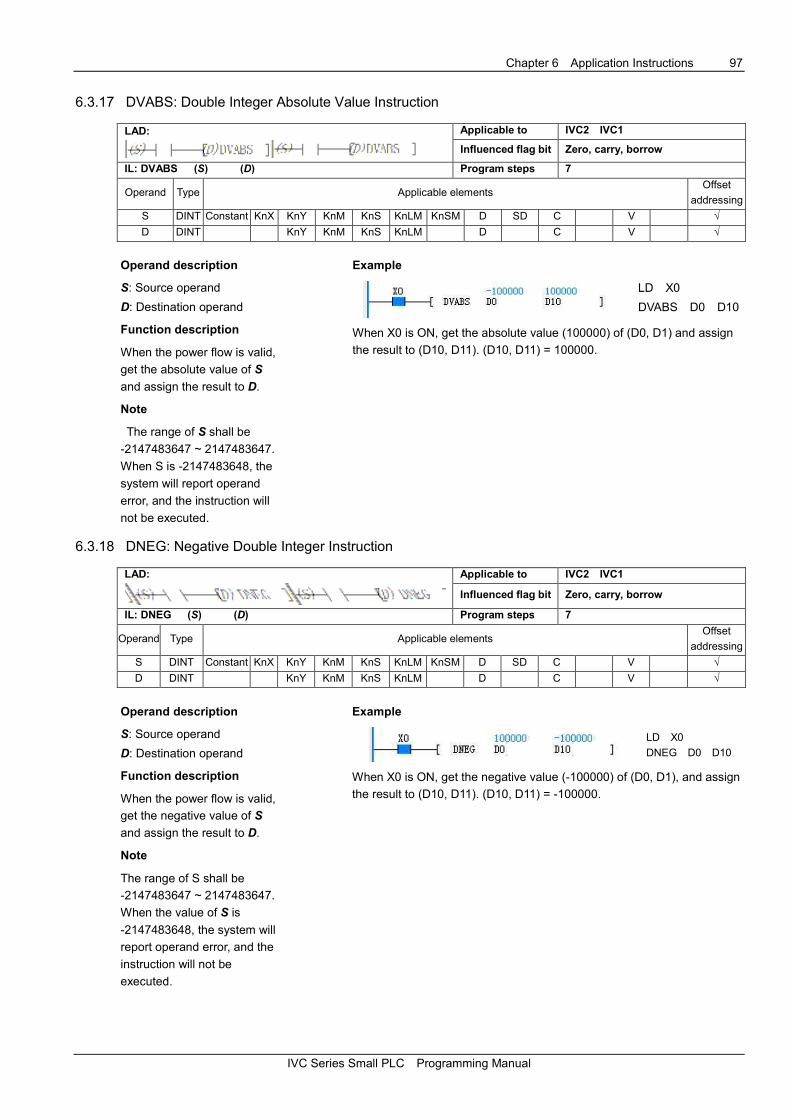
Chapter 6 Application Instructions 97
IVC Series Small PLC Programming Manual
6.3.17 DVABS: Double Integer Absolute Value Instruction
LAD:
Applicable to IVC2 IVC1
Influenced flag bit Zero, carry, borrow
IL: DVABS (S) (D) Program steps 7
Operand Type Applicable elements Offset
addressing
S DINT Constant KnX KnY KnM KnS KnLM KnSM D SD C V √
D DINT KnY KnM KnS KnLM D C V √
Operand description
S: Source operand
D: Destination operand
Function description
When the power flow is valid,
get the absolute value of S
and assign the result to D.
Note
The range of S shall be
-2147483647 ~ 2147483647.
When S is -2147483648, the
system will report operand
error, and the instruction will
not be executed.
Example
LD X0
DVABS D0 D10
When X0 is ON, get the absolute value (100000) of (D0, D1) and assign
the result to (D10, D11). (D10, D11) = 100000.
6.3.18 DNEG: Negative Double Integer Instruction
LAD:
Applicable to IVC2 IVC1
Influenced flag bit Zero, carry, borrow
IL: DNEG (S) (D) Program steps 7
Operand Type Applicable elements Offset
addressing
S DINT Constant KnX KnY KnM KnS KnLM KnSM D SD C V √
D DINT KnY KnM KnS KnLM D C V √
Operand description
S: Source operand
D: Destination operand
Function description
When the power flow is valid,
get the negative value of S
and assign the result to D.
Note
The range of S shall be
-2147483647 ~ 2147483647.
When the value of S is
-2147483648, the system will
report operand error, and the
instruction will not be
executed.
Example
LD X0
DNEG D0 D10
When X0 is ON, get the negative value (-100000) of (D0, D1), and assign
the result to (D10, D11). (D10, D11) = -100000.

98 Chapter 6 Application Instructions
IVC Series Small PLC Programming Manual
6.3.19 SUM: Sum Integer Instruction
LAD:
Applicable to IVC2 IVC1
Influenced flag bit Zero, carry, borrow
IL: SUM (S1) (S2) (D) Program steps 8
Operand Type Applicable elements Offset
addressing
S1 INT KnX KnY KnM KnS KnLM KnSM D SD C T V Z √
S2 INT Constant KnX KnY KnM KnS KnLM KnSM D SD C T V Z √
D DINT KnY KnM KnS KnLM D C V √
Operand description
S1: Source operand, starting
unit of summing
S2 : Source operand, number
of units to be summed up
D: Destination operand,
summing result
Function description
When the power flow is valid,
the contents of S2 units
starting with the starting unit
(S1) will be summed up, and
the summing result is
assigned to the D unit.
Note
1. The operation result of the
SUM instruction is a 32-bit
data.
2. 0 ≤ S2 ≤ 255, or system will
report operand error..
3. Since D is a 32-bit data, the
carry and borrow flags are
constantly 0, and the zero flag
is determined by the final
summing result.
Example
LD SM0
MOV 1000 D0
MOV 2000 D1
MOV 3000 D2
MOV 4000 D3
MOV 5000 D4
LD X0
SUM D0 5 D100
When X0 is ON, the integers of 5 elements starting form D0 will be
summed up, and the result is assigned to (D100, D101), (D100, D101) =
D0+...+D4 = 15000.

Chapter 6 Application Instructions 99
IVC Series Small PLC Programming Manual
6.3.20 DSUM: Sum Double Integer Instruction
LAD:
Applicable to IVC2 IVC1
Influenced flag bit Zero, carry, borrow
IL: DSUM (S1) (S2) (D) Program steps 9
Operand Type Applicable elements Offset
addressing
S1 DINT KnX KnY KnM KnS KnLM KnSM D SD C V √
S2 INT Constant KnX KnY KnM KnS KnLM KnSM D SD C T V Z √
D DINT KnY KnM KnS KnLM D C V √
Operand description
S1: Source operand, starting
unit of summing
S2: Source operand, number
of data to be summed up
D: destination operand,
summing result
Function description
When the power flow is valid,
the contents of S2 × 2 units
starting with the starting unit
(S1) will be summed up, and
the summing result is
assigned to the D unit.
Note
0 ≤ S2 ≤ 255, or the system will report operand error.
Example
LD SM0
DMOV 100000 D0
DMOV 200000 D2
DMOV 300000 D4
DMOV 400000 D6
DMOV 500000 D8
LD X0
DSUM D0 5 D100
When X0 is ON, the double integers of 5 × 2 units starting with D0 will be
summed up, and the result is assigned to (D100, D101).
6.4 Floating-Point Number Math Instruction
6.4.1 RADD: Add Floating Point Number Instruction
LAD:
Applicable to IVC2 IVC1
Influenced flag bit Zero, carry, borrow
IL: RADD (S1) (S2) (D) Program steps 10
Operand Type Applicable elements Offset
addressing
S1 REAL Constant D V √
S2 REAL Constant D V √
D REAL D V √
Operand description
S1: Source operand 1
S2: Source operand 2
D: Destination operand
Function description
1. When the power flow is
valid, add S1 and S2, and
assign the operation result to
D.
2. When the operation result
(D) is not within (-1.701412e
+ 038) ~ (1.701412e + 038), the carry flag bit (SM181) will be set. When
the operation result is 0, the zero flag bit (SM180) will be set.
Example
LD X0
RADD D0 D2 D10
When X0 is ON, add the value (-10000.2) of (D0, D1) and the value
(2000.5) of (D2, D3), and the result -7999.7 is assigned to (D10, D11).
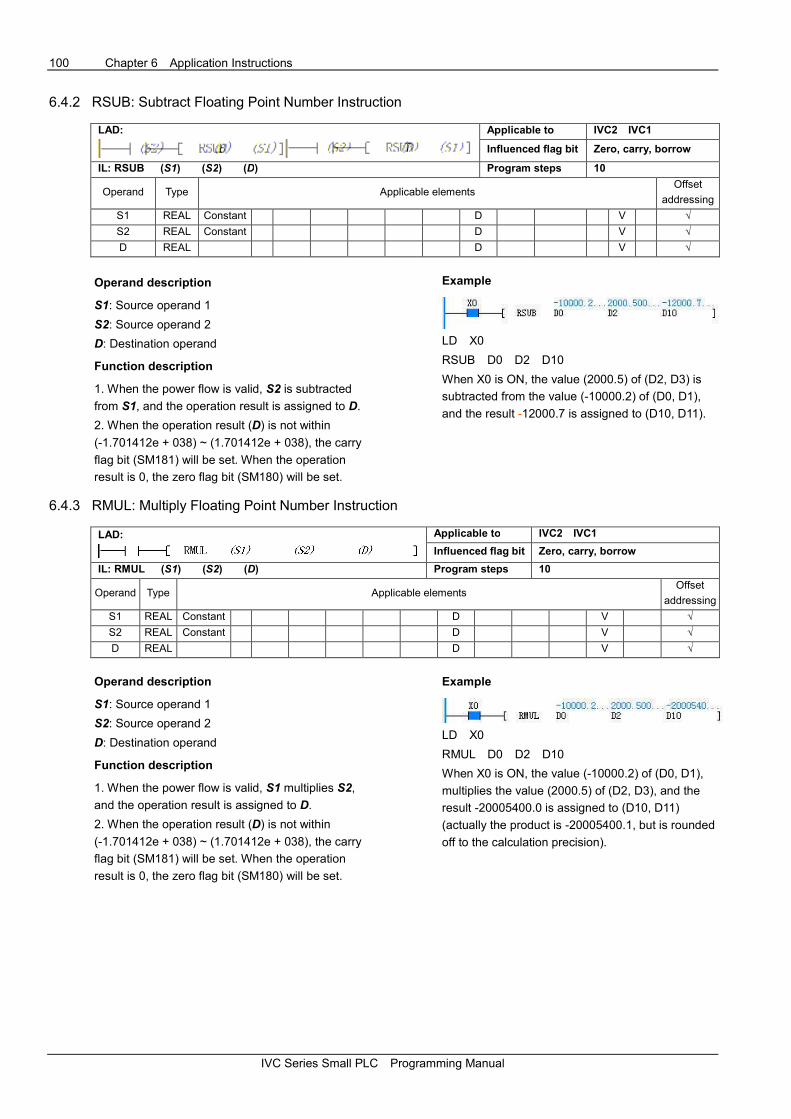
100 Chapter 6 Application Instructions
IVC Series Small PLC Programming Manual
6.4.2 RSUB: Subtract Floating Point Number Instruction
LAD:
Applicable to IVC2 IVC1
Influenced flag bit Zero, carry, borrow
IL: RSUB (S1) (S2) (D) Program steps 10
Operand Type Applicable elements Offset
addressing
S1 REAL Constant D V √
S2 REAL Constant D V √
D REAL D V √
Operand description
S1: Source operand 1
S2: Source operand 2
D: Destination operand
Function description
1. When the power flow is valid, S2 is subtracted
from S1, and the operation result is assigned to D.
2. When the operation result (D) is not within
(-1.701412e + 038) ~ (1.701412e + 038), the carry
flag bit (SM181) will be set. When the operation
result is 0, the zero flag bit (SM180) will be set.
Example
LD X0
RSUB D0 D2 D10
When X0 is ON, the value (2000.5) of (D2, D3) is
subtracted from the value (-10000.2) of (D0, D1),
and the result -12000.7 is assigned to (D10, D11).
6.4.3 RMUL: Multiply Floating Point Number Instruction
LAD:
Applicable to IVC2 IVC1
Influenced flag bit Zero, carry, borrow
IL: RMUL (S1) (S2) (D) Program steps 10
Operand Type Applicable elements Offset
addressing
S1 REAL Constant D V √
S2 REAL Constant D V √
D REAL D V √
Operand description
S1: Source operand 1
S2: Source operand 2
D: Destination operand
Function description
1. When the power flow is valid, S1 multiplies S2,
and the operation result is assigned to D.
2. When the operation result (D) is not within
(-1.701412e + 038) ~ (1.701412e + 038), the carry
flag bit (SM181) will be set. When the operation
result is 0, the zero flag bit (SM180) will be set.
Example
LD X0
RMUL D0 D2 D10
When X0 is ON, the value (-10000.2) of (D0, D1),
multiplies the value (2000.5) of (D2, D3), and the
result -20005400.0 is assigned to (D10, D11)
(actually the product is -20005400.1, but is rounded
off to the calculation precision).
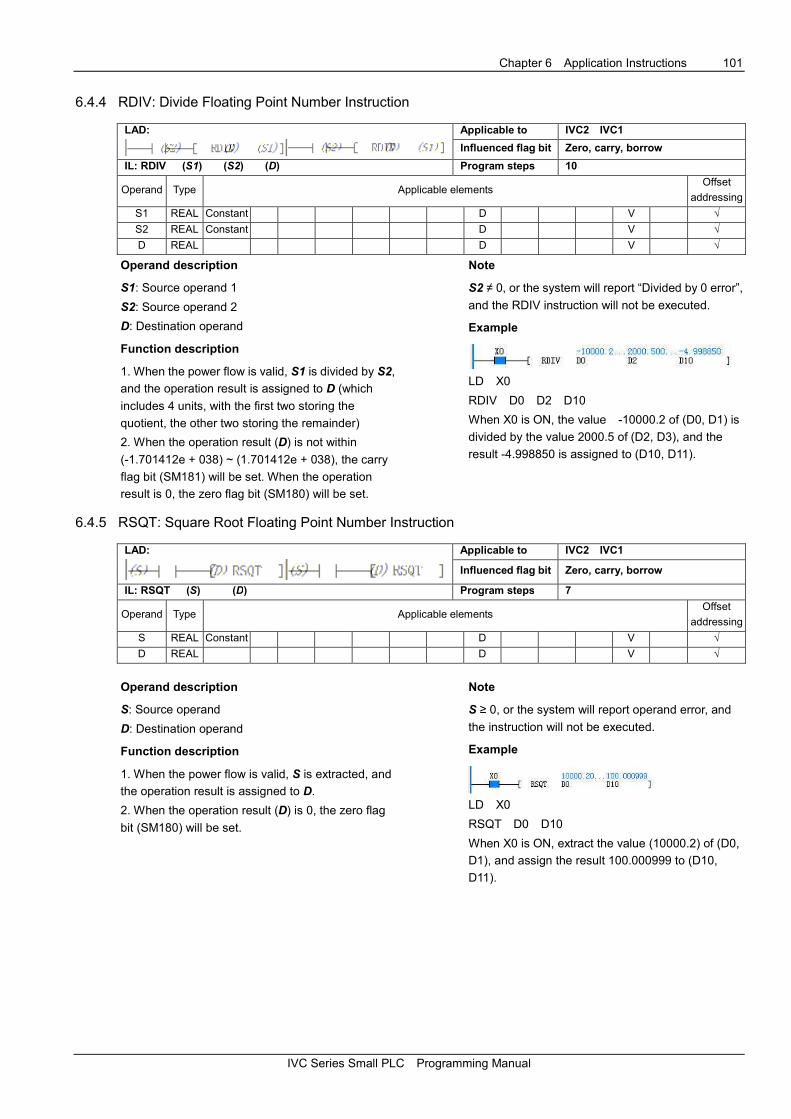
Chapter 6 Application Instructions 101
IVC Series Small PLC Programming Manual
6.4.4 RDIV: Divide Floating Point Number Instruction
LAD:
Applicable to IVC2 IVC1
Influenced flag bit Zero, carry, borrow
IL: RDIV (S1) (S2) (D) Program steps 10
Operand Type Applicable elements Offset
addressing
S1 REAL Constant D V √
S2 REAL Constant D V √
D REAL D V √
Operand description
S1: Source operand 1
S2: Source operand 2
D: Destination operand
Function description
1. When the power flow is valid, S1 is divided by S2,
and the operation result is assigned to D (which
includes 4 units, with the first two storing the
quotient, the other two storing the remainder)
2. When the operation result (D) is not within
(-1.701412e + 038) ~ (1.701412e + 038), the carry
flag bit (SM181) will be set. When the operation
result is 0, the zero flag bit (SM180) will be set.
Note
S2 ≠ 0, or the system will report “Divided by 0 error”,
and the RDIV instruction will not be executed.
Example
LD X0
RDIV D0 D2 D10
When X0 is ON, the value -10000.2 of (D0, D1) is
divided by the value 2000.5 of (D2, D3), and the
result -4.998850 is assigned to (D10, D11).
6.4.5 RSQT: Square Root Floating Point Number Instruction
LAD:
Applicable to IVC2 IVC1
Influenced flag bit Zero, carry, borrow
IL: RSQT (S) (D) Program steps 7
Operand Type Applicable elements Offset
addressing
S REAL Constant D V √
D REAL D V √
Operand description
S: Source operand
D: Destination operand
Function description
1. When the power flow is valid, S is extracted, and
the operation result is assigned to D.
2. When the operation result (D) is 0, the zero flag
bit (SM180) will be set.
Note
S ≥ 0, or the system will report operand error, and
the instruction will not be executed.
Example
LD X0
RSQT D0 D10
When X0 is ON, extract the value (10000.2) of (D0,
D1), and assign the result 100.000999 to (D10,
D11).
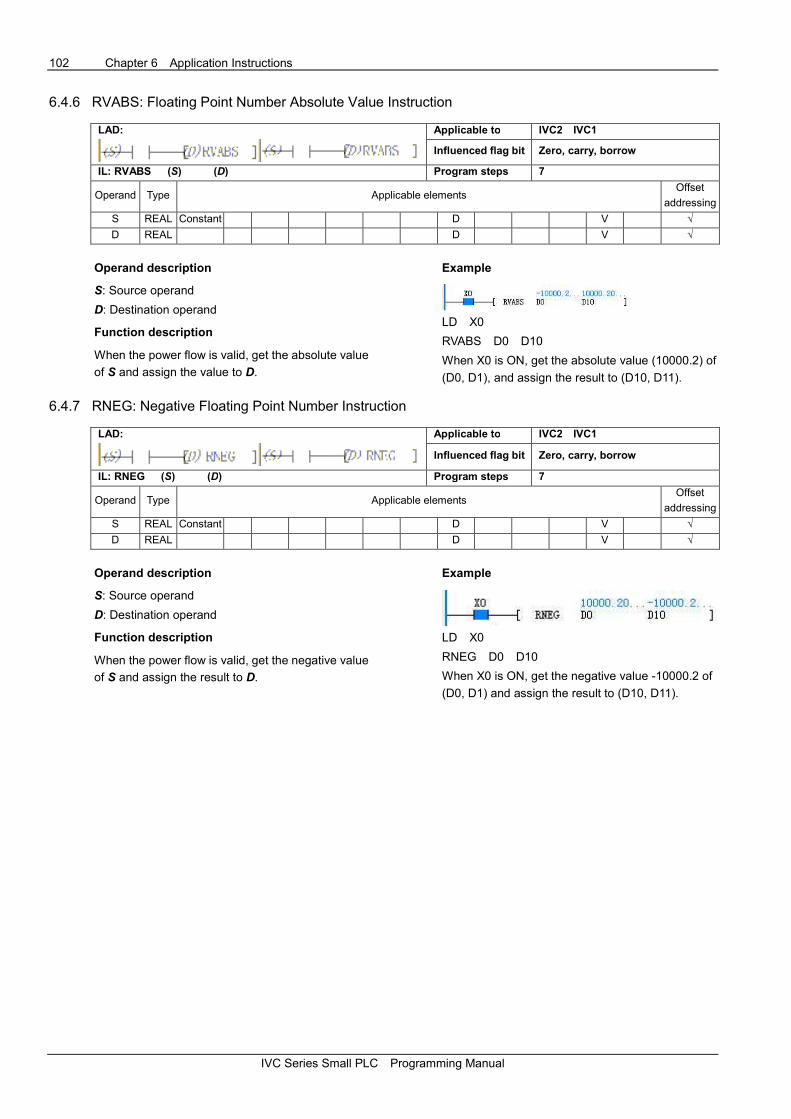
102 Chapter 6 Application Instructions
IVC Series Small PLC Programming Manual
6.4.6 RVABS: Floating Point Number Absolute Value Instruction
LAD:
Applicable to IVC2 IVC1
Influenced flag bit Zero, carry, borrow
IL: RVABS (S) (D) Program steps 7
Operand Type Applicable elements Offset
addressing
S REAL Constant D V √
D REAL D V √
Operand description
S: Source operand
D: Destination operand
Function description
When the power flow is valid, get the absolute value
of S and assign the value to D.
Example
LD X0
RVABS D0 D10
When X0 is ON, get the absolute value (10000.2) of
(D0, D1), and assign the result to (D10, D11).
6.4.7 RNEG: Negative Floating Point Number Instruction
LAD:
Applicable to IVC2 IVC1
Influenced flag bit Zero, carry, borrow
IL: RNEG (S) (D) Program steps 7
Operand Type Applicable elements Offset
addressing
S REAL Constant D V √
D REAL D V √
Operand description
S: Source operand
D: Destination operand
Function description
When the power flow is valid, get the negative value
of S and assign the result to D.
Example
LD X0
RNEG D0 D10
When X0 is ON, get the negative value -10000.2 of
(D0, D1) and assign the result to (D10, D11).
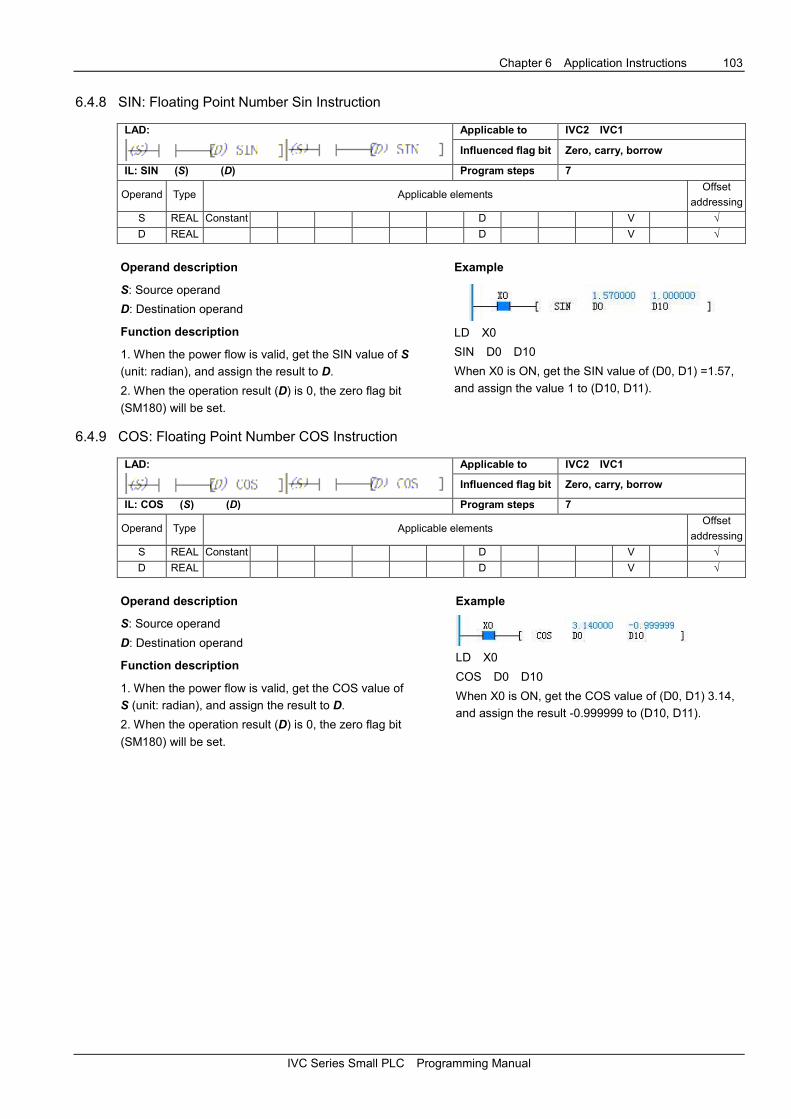
Chapter 6 Application Instructions 103
IVC Series Small PLC Programming Manual
6.4.8 SIN: Floating Point Number Sin Instruction
LAD:
Applicable to IVC2 IVC1
Influenced flag bit Zero, carry, borrow
IL: SIN (S) (D) Program steps 7
Operand Type Applicable elements Offset
addressing
S REAL Constant D V √
D REAL D V √
Operand description
S: Source operand
D: Destination operand
Function description
1. When the power flow is valid, get the SIN value of S
(unit: radian), and assign the result to D.
2. When the operation result (D) is 0, the zero flag bit
(SM180) will be set.
Example
LD X0
SIN D0 D10
When X0 is ON, get the SIN value of (D0, D1) =1.57,
and assign the value 1 to (D10, D11).
6.4.9 COS: Floating Point Number COS Instruction
LAD:
Applicable to IVC2 IVC1
Influenced flag bit Zero, carry, borrow
IL: COS (S) (D) Program steps 7
Operand Type Applicable elements Offset
addressing
S REAL Constant D V √
D REAL D V √
Operand description
S: Source operand
D: Destination operand
Function description
1. When the power flow is valid, get the COS value of
S (unit: radian), and assign the result to D.
2. When the operation result (D) is 0, the zero flag bit
(SM180) will be set.
Example
LD X0
COS D0 D10
When X0 is ON, get the COS value of (D0, D1) 3.14,
and assign the result -0.999999 to (D10, D11).

104 Chapter 6 Application Instructions
IVC Series Small PLC Programming Manual
6.4.10 TAN: Floating Point Number TAN Instruction
LAD:
Applicable to IVC2 IVC1
Influenced flag bit Zero, carry, borrow
IL: TAN (S) (D) Program steps 7
Operand Type Applicable elements Offset
addressing
S REAL Constant D V √
D REAL D V √
Operand description
S: Source operand
D: Destination operand
Function description
1. When the power flow is
valid, get the TAN value of S
(unit: radian), and assign the
result to D.
2. When the operation result
(D) is not within (-1.701412e
+ 038) ~ (1.701412e + 038),
the carry flag bit (SM181) will
be set. When the operation
result is 0, the zero flag bit
(SM180) will be set.
Example
LD X0
TAN D0 D10
When X0 is ON, get the TAN value of (D0, D1) 1.57, and assign the result
1255.848398 to (D10, D11).
6.4.11 POWER: Floating Point Number Exponentiation Instruction
LAD:
Applicable to IVC2 IVC1
Influenced flag bit Zero, carry, borrow
IL: POWER (S1) (S2) (D) Program steps 10
Operand Type Applicable elements Offset
addressing
S1 REAL Constant D V √
S2 REAL Constant D V √
D REAL D V √
Operand description
S1: Source operand 1
S2: Source operand 2
D: Destination operand
Function description
1. When the power flow is
valid, get the S2th power of
S1, and assign the result to D.
2. When the operation result
(D) is not within
(-1.701412e+038) ~
(1.701412e+038), the carry
flag bit (SM181) will be set.
3. When the operation result
is 0, the zero flag bit (SM180)
will be set.
Example
LD X0
POWER D0 D2 D10
When X0 is ON, get the (D2, D3)th power of (D0, D1) (i.e. 55.03.0), and
assign the result 166375.0 to (D10, D11).
Note
1. When S1 = 0 and S2 ≤ 0, the system will report operand error, and the
instruction will not be executed.
2. When S1 < 0 and the mantissa of S2 is not 0, the system will report
operand error, and the instruction will not be executed.
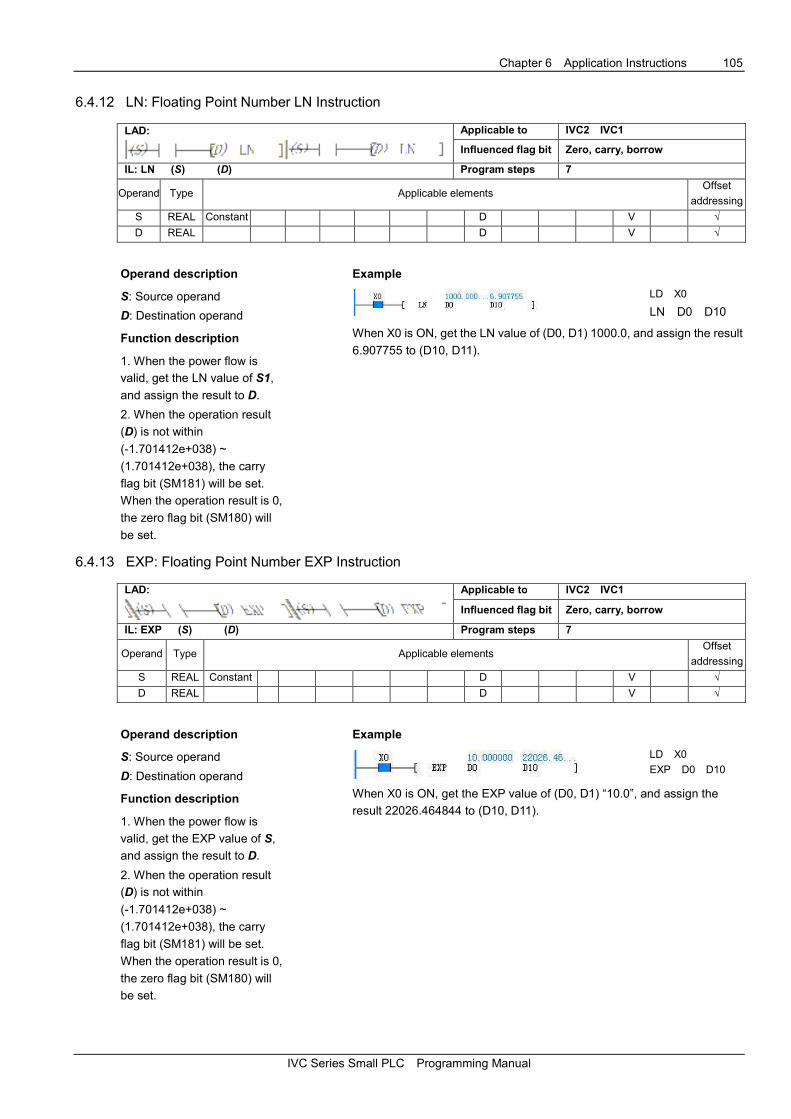
Chapter 6 Application Instructions 105
IVC Series Small PLC Programming Manual
6.4.12 LN: Floating Point Number LN Instruction
LAD:
Applicable to IVC2 IVC1
Influenced flag bit Zero, carry, borrow
IL: LN (S) (D) Program steps 7
Operand Type Applicable elements Offset
addressing
S REAL Constant D V √
D REAL D V √
Operand description
S: Source operand
D: Destination operand
Function description
1. When the power flow is
valid, get the LN value of S1,
and assign the result to D.
2. When the operation result
(D) is not within
(-1.701412e+038) ~
(1.701412e+038), the carry
flag bit (SM181) will be set.
When the operation result is 0,
the zero flag bit (SM180) will
be set.
Example
LD X0
LN D0 D10
When X0 is ON, get the LN value of (D0, D1) 1000.0, and assign the result
6.907755 to (D10, D11).
6.4.13 EXP: Floating Point Number EXP Instruction
LAD:
Applicable to IVC2 IVC1
Influenced flag bit Zero, carry, borrow
IL: EXP (S) (D) Program steps 7
Operand Type Applicable elements Offset
addressing
S REAL Constant D V √
D REAL D V √
Operand description
S: Source operand
D: Destination operand
Function description
1. When the power flow is
valid, get the EXP value of S,
and assign the result to D.
2. When the operation result
(D) is not within
(-1.701412e+038) ~
(1.701412e+038), the carry
flag bit (SM181) will be set.
When the operation result is 0,
the zero flag bit (SM180) will
be set.
Example
LD X0
EXP D0 D10
When X0 is ON, get the EXP value of (D0, D1) “10.0”, and assign the
result 22026.464844 to (D10, D11).
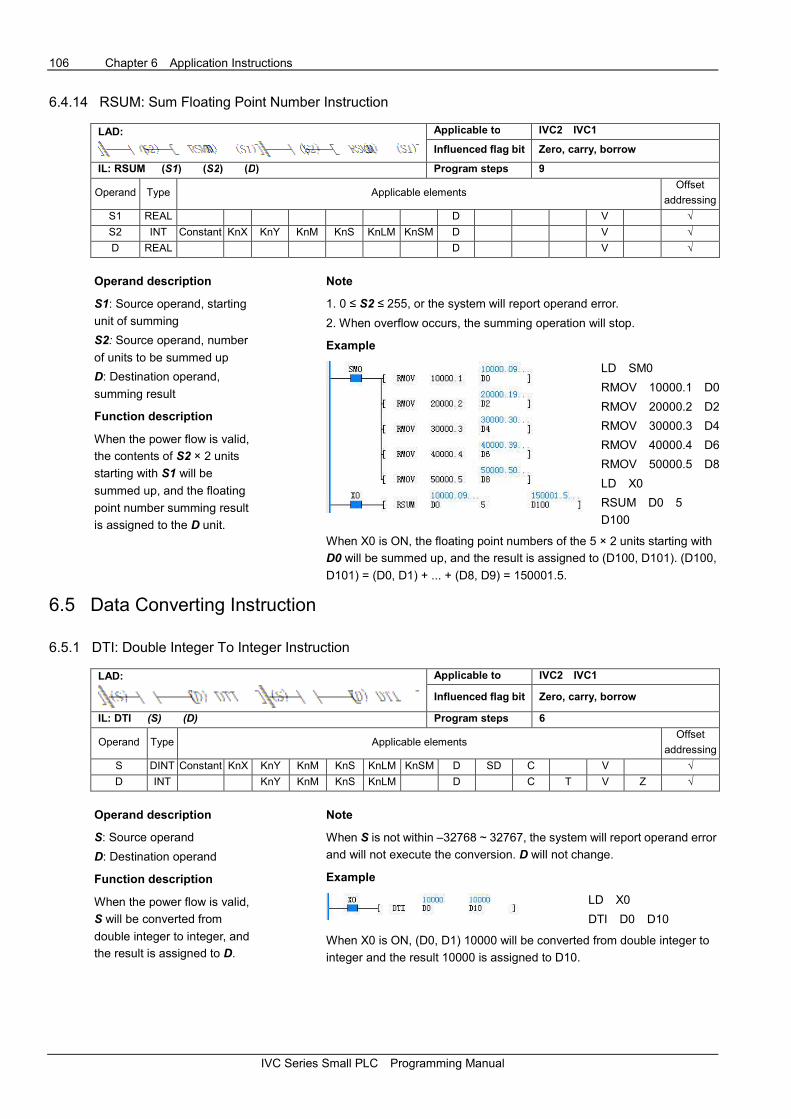
106 Chapter 6 Application Instructions
IVC Series Small PLC Programming Manual
6.4.14 RSUM: Sum Floating Point Number Instruction
LAD:
Applicable to IVC2 IVC1
Influenced flag bit Zero, carry, borrow
IL: RSUM (S1) (S2) (D) Program steps 9
Operand Type Applicable elements Offset
addressing
S1 REAL D V √
S2 INT Constant KnX KnY KnM KnS KnLM KnSM D V √
D REAL D V √
Operand description
S1: Source operand, starting
unit of summing
S2: Source operand, number
of units to be summed up
D: Destination operand,
summing result
Function description
When the power flow is valid,
the contents of S2 × 2 units
starting with S1 will be
summed up, and the floating
point number summing result
is assigned to the D unit.
Note
1. 0 ≤ S2 ≤ 255, or the system will report operand error.
2. When overflow occurs, the summing operation will stop.
Example
LD SM0
RMOV 10000.1 D0
RMOV 20000.2 D2
RMOV 30000.3 D4
RMOV 40000.4 D6
RMOV 50000.5 D8
LD X0
RSUM D0 5
D100
When X0 is ON, the floating point numbers of the 5 × 2 units starting with
D0 will be summed up, and the result is assigned to (D100, D101). (D100,
D101) = (D0, D1) + ... + (D8, D9) = 150001.5.
6.5 Data Converting Instruction
6.5.1 DTI: Double Integer To Integer Instruction
LAD:
Applicable to IVC2 IVC1
Influenced flag bit Zero, carry, borrow
IL: DTI (S) (D) Program steps 6
Operand Type Applicable elements Offset
addressing
S DINT Constant KnX KnY KnM KnS KnLM KnSM D SD C V √
D INT KnY KnM KnS KnLM D C T V Z √
Operand description
S: Source operand
D: Destination operand
Function description
When the power flow is valid,
S will be converted from
double integer to integer, and
the result is assigned to D.
Note
When S is not within –32768 ~ 32767, the system will report operand error
and will not execute the conversion. D will not change.
Example
LD X0
DTI D0 D10
When X0 is ON, (D0, D1) 10000 will be converted from double integer to
integer and the result 10000 is assigned to D10.

Chapter 6 Application Instructions 107
IVC Series Small PLC Programming Manual
6.5.2 ITD: Integer To Double Integer Instruction
LAD:
Applicable to IVC2 IVC1
Influenced flag bit Zero, carry, borrow
IL: ITD (S) (D) Program steps 6
Operand Type Applicable elements Offset
addressing
S INT Constant KnX KnY KnM KnS KnLM KnSM D SD C T V Z √
D DINT KnY KnM KnS KnLM D C V √
Operand description
S: Source operand
D: Destination operand
Function description
When the power flow is valid,
S will be converted from
integer to double integer, and the result is assigned to D.
Example
LD X0
ITD D0 D10
When X0 is ON, D0 (1000) will be converted from integer to double integer,
and the result 1000 is assigned to (D10, D11).
6.5.3 FLT: Integer To Floating Point Number Instruction
LAD:
Applicable to IVC2 IVC1
Influenced flag bit Zero, carry, borrow
IL: FLT (S) (D) Program steps 6
Operand Type Applicable elements Offset
addressing
S INT Constant KnX KnY KnM KnS KnLM KnSM D SD C T V Z √
D REAL D V √
Operand description
S: Source operand
D: Destination operand
Function description
When the power flow is valid,
S will be converted from
integer to floating point
number, and the result is
assigned to D.
Example
LD
X0
FLT
D0
D10
When X0 is ON, D0 (10005) will be converted from integer to floating point
number, and the result 10005.0 is assigned to (D10, D11).
6.5.4 DFLT: Double Integer To Floating Point Number Instruction
LAD:
Applicable to IVC2 IVC1
Influenced flag bit Zero, carry, borrow
IL: DFLT (S) (D) Program steps 7
Operand Type Applicable elements Offset
addressing
S DINT Constant KnX KnY KnM KnS KnLM KnSM D SD C V √
D REAL D V √
Operand description
S: Source operand
D: Destination operand
Function description
When the power flow is valid,
S will be converted from
double integer to floating point number, and the result is assigned to D.
Example
LD X0
DFLT D0 D10
When X0 is ON, (D0, D1) 100000 will be converted from integer to floating
point number, and the result 100000.0 is assigned to (D10, D11).

108 Chapter 6 Application Instructions
IVC Series Small PLC Programming Manual
6.5.5 INT: Floating Point Number To Integer Instruction
LAD:
Applicable to IVC2 IVC1
Influenced flag bit Zero, carry, borrow
IL: INT (S) (D) Program steps 6
Operand Type Applicable elements Offset
addressing
S REAL Constant D V √
D INT KnY KnM KnS KnLM D C T V Z √
Operand description
S: Source operand
D: Destination operand
Function description
1. When the power flow is
valid, S will be converted from
floating point number to
integer, and the result is
assigned to D.
2. This instruction affects the
zero flag and borrow flag.
When the conversion result is
0, the zero flag will be set.
When the result rounds off
the decimal fraction, the
borrow flag will be set. the
carry (overflow) flag will be
set.
Note
When S > 32767, D=32767. When S<-32768, D = -32768, and at the
same time the carry (overflow) flag bit will be set.
Example
LD X0
INT D0 D10
When X0 is ON, (D0, D1) 10000.5 will be converted from floating point
number to integer and the result 10000 is assigned to D10.
6.5.6 DINT: Floating Point Number To Double Integer Instruction
LAD:
Applicable to IVC2 IVC1
Influenced flag bit Zero, carry, borrow
IL: DINT (S) (D) Program steps 7
Operand Type Applicable elements Offset
addressing
S REAL Constant D V √
D DINT KnY KnM KnS KnLM D C V √
Operand description
S: Source operand
D: Destination operand
Function description
1. When the power flow is
valid, S will be converted from
floating point number to
double integer, and the result
is assigned to D.
2. When the conversion result
is 0, the zero flag will be set.
When the result rounds off
the decimal fraction, the
borrow flag will be set. When the result exceeds the range of the double
integer, the carry (overflow) flag will be set.
Note
When S > 2147483647, D = 2147483647. When S < -2147483648, D =
-2147483648, and at the same time the carry (overflow) flag will be set.
Example
LD X0
DINT D0 D10
When X0 is ON, (D0, D1) 100000.5 will be converted from floating point
number to double integer, and the result 100000 is assigned to (D10,
D11).
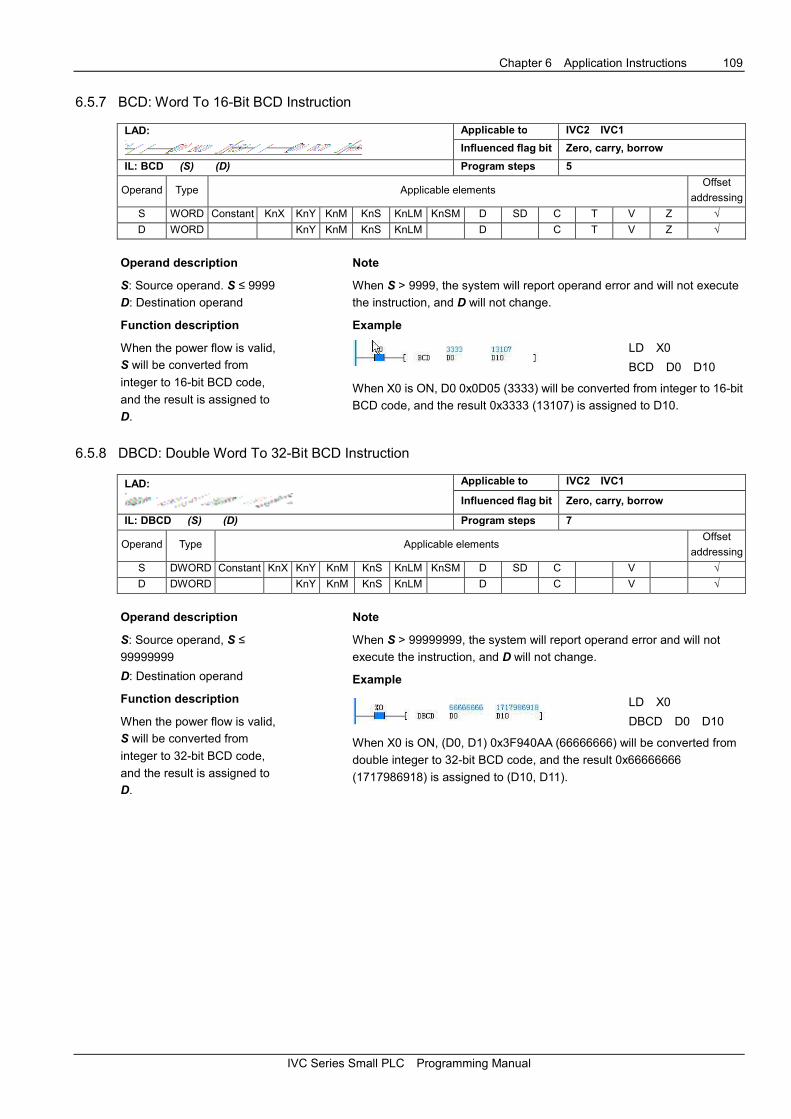
Chapter 6 Application Instructions 109
IVC Series Small PLC Programming Manual
6.5.7 BCD: Word To 16-Bit BCD Instruction
LAD:
Applicable to IVC2 IVC1
Influenced flag bit Zero, carry, borrow
IL: BCD (S) (D) Program steps 5
Operand Type Applicable elements Offset
addressing
S WORD Constant KnX KnY KnM KnS KnLM KnSM D SD C T V Z √
D WORD KnY KnM KnS KnLM D C T V Z √
Operand description
S: Source operand. S ≤ 9999
D: Destination operand
Function description
When the power flow is valid,
S will be converted from
integer to 16-bit BCD code,
and the result is assigned to
D.
Note
When S > 9999, the system will report operand error and will not execute
the instruction, and D will not change.
Example
LD X0
BCD D0 D10
When X0 is ON, D0 0x0D05 (3333) will be converted from integer to 16-bit
BCD code, and the result 0x3333 (13107) is assigned to D10.
6.5.8 DBCD: Double Word To 32-Bit BCD Instruction
LAD:
Applicable to IVC2 IVC1
Influenced flag bit Zero, carry, borrow
IL: DBCD (S) (D) Program steps 7
Operand Type Applicable elements Offset
addressing
S DWORD Constant KnX KnY KnM KnS KnLM KnSM D SD C V √
D DWORD KnY KnM KnS KnLM D C V √
Operand description
S: Source operand, S ≤
99999999
D: Destination operand
Function description
When the power flow is valid,
S will be converted from
integer to 32-bit BCD code,
and the result is assigned to
D.
Note
When S > 99999999, the system will report operand error and will not
execute the instruction, and D will not change.
Example
LD X0
DBCD D0 D10
When X0 is ON, (D0, D1) 0x3F940AA (66666666) will be converted from
double integer to 32-bit BCD code, and the result 0x66666666
(1717986918) is assigned to (D10, D11).

110 Chapter 6 Application Instructions
IVC Series Small PLC Programming Manual
6.5.9 BIN: 16-Bit BCD To Word Instruction
LAD:
Applicable to IVC2 IVC1
Influenced flag bit Zero, carry, borrow
IL: BIN (S) (D) Program steps 5
Operand Type Applicable elements Offset
addressing
S WORD Constant KnX KnY KnM KnS KnLM KnSM D SD C T V Z √
D WORD KnY KnM KnS KnLM D C T V Z √
Operand description
S: Source operand, the data
format of S must match the
BCD code format
D: Destination operand
Function description
When the power flow is valid,
S will be converted from
16-bit BCD code to integer,
and the result is assigned to
D.
Note
When the data format of S does not match the BCD code format, the
system will reports illegal operand and will not execute the instruction, and
D will not change.
Example
LD X0
BIN D0 D10
When X0 is ON, D0 0x5555 (21845) will be converted from 16-bit BCD
code to integer, and the result 0x15B3 (5555) is assigned to D10.
6.5.10 DBIN: 32-Bit BCD To Double Word Instruction
LAD:
Applicable to IVC2 IVC1
Influenced flag bit Zero, carry, borrow
IL: DBIN (S) (D) Program steps 7
Operand Type Applicable elements Offset
addressing
S DWORD Constant KnX KnY KnM KnS KnLM KnSM D SD C V √
D DWORD KnY KnM KnS KnLM D C V √
Operand description
S: Source operand
D: Destination operand
Function description
1. When the power flow is
valid, S will be converted from
16-bit BCD code to double
integer, and the result is
assigned to D.
2. The data format of S must
match the BCD code format.
Note
When the data format of S does not match the BCD code format, the
system will report operand error and will not execute the instruction, and D
will not change.
Example
LD X0
DBIN D0 D10
When X0 is ON, (D0, D1) 0x99999999 (2576980377) will be converted
from 32-bit BCD code to double integer, and the result 0x5F5E0FF
(99999999) is assigned to (D10, D11).
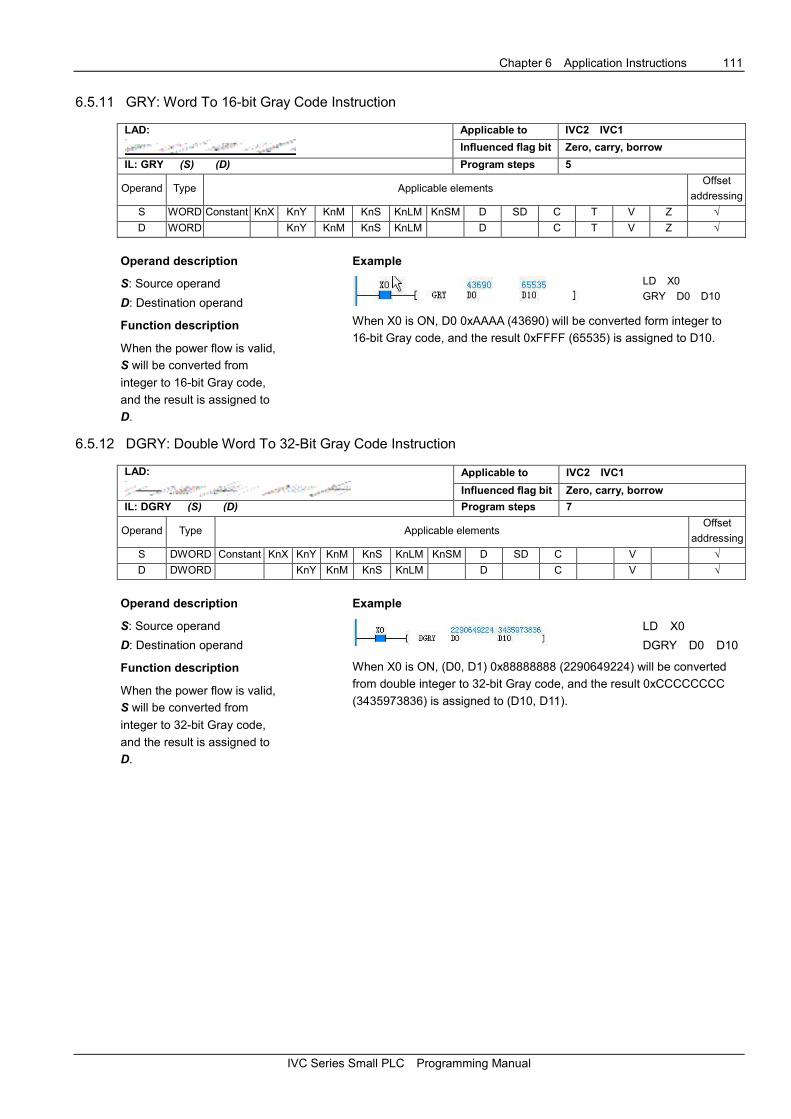
Chapter 6 Application Instructions 111
IVC Series Small PLC Programming Manual
6.5.11 GRY: Word To 16-bit Gray Code Instruction
LAD:
Applicable to IVC2 IVC1
Influenced flag bit Zero, carry, borrow
IL: GRY (S) (D) Program steps 5
Operand Type Applicable elements Offset
addressing
S WORD Constant KnX KnY KnM KnS KnLM KnSM D SD C T V Z √
D WORD KnY KnM KnS KnLM D C T V Z √
Operand description
S: Source operand
D: Destination operand
Function description
When the power flow is valid,
S will be converted from
integer to 16-bit Gray code,
and the result is assigned to
D.
Example
LD X0
GRY D0 D10
When X0 is ON, D0 0xAAAA (43690) will be converted form integer to
16-bit Gray code, and the result 0xFFFF (65535) is assigned to D10.
6.5.12 DGRY: Double Word To 32-Bit Gray Code Instruction
LAD:
Applicable to IVC2 IVC1
Influenced flag bit Zero, carry, borrow
IL: DGRY (S) (D) Program steps 7
Operand Type Applicable elements Offset
addressing
S DWORD Constant KnX KnY KnM KnS KnLM KnSM D SD C V √
D DWORD KnY KnM KnS KnLM D C V √
Operand description
S: Source operand
D: Destination operand
Function description
When the power flow is valid,
S will be converted from
integer to 32-bit Gray code,
and the result is assigned to
D.
Example
LD X0
DGRY D0 D10
When X0 is ON, (D0, D1) 0x88888888 (2290649224) will be converted
from double integer to 32-bit Gray code, and the result 0xCCCCCCCC
(3435973836) is assigned to (D10, D11).
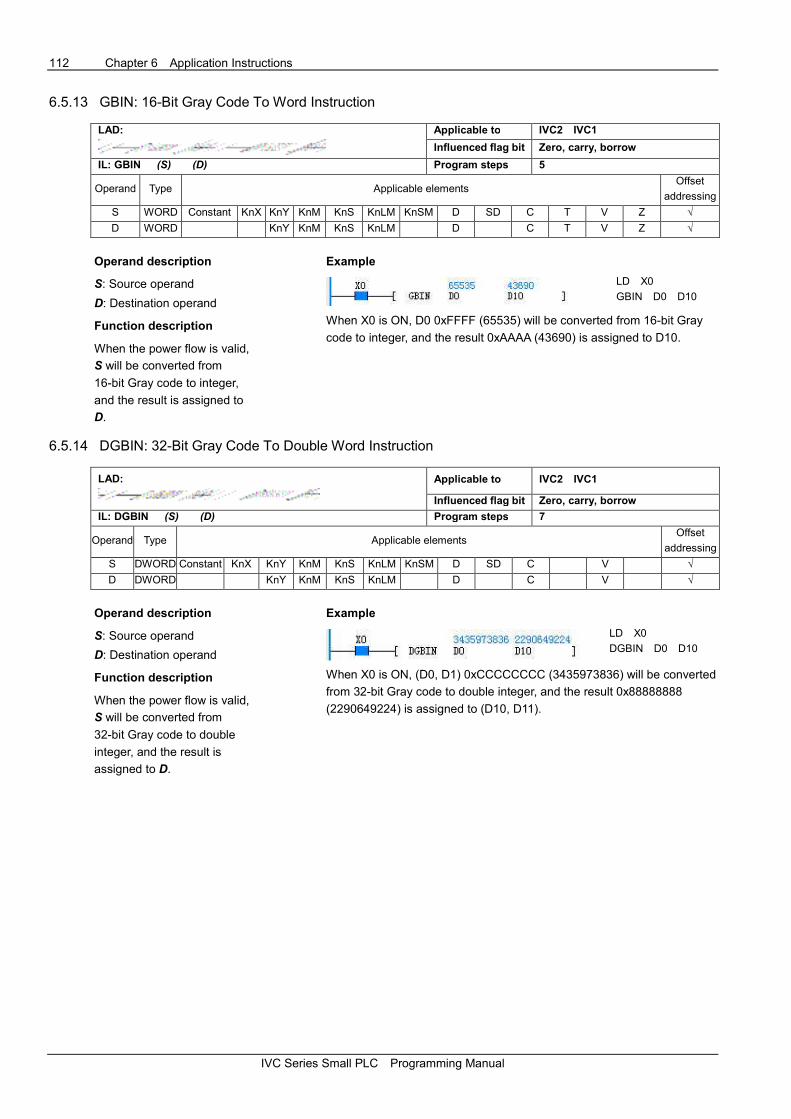
112 Chapter 6 Application Instructions
IVC Series Small PLC Programming Manual
6.5.13 GBIN: 16-Bit Gray Code To Word Instruction
LAD:
Applicable to IVC2 IVC1
Influenced flag bit Zero, carry, borrow
IL: GBIN (S) (D) Program steps 5
Operand Type Applicable elements Offset
addressing
S WORD Constant KnX KnY KnM KnS KnLM KnSM D SD C T V Z √
D WORD KnY KnM KnS KnLM D C T V Z √
Operand description
S: Source operand
D: Destination operand
Function description
When the power flow is valid,
S will be converted from
16-bit Gray code to integer,
and the result is assigned to
D.
Example
LD X0
GBIN D0 D10
When X0 is ON, D0 0xFFFF (65535) will be converted from 16-bit Gray
code to integer, and the result 0xAAAA (43690) is assigned to D10.
6.5.14 DGBIN: 32-Bit Gray Code To Double Word Instruction
LAD:
Applicable to IVC2 IVC1
Influenced flag bit Zero, carry, borrow
IL: DGBIN (S) (D) Program steps 7
Operand Type Applicable elements Offset
addressing
S DWORD Constant KnX KnY KnM KnS KnLM KnSM D SD C V √
D DWORD KnY KnM KnS KnLM D C V √
Operand description
S: Source operand
D: Destination operand
Function description
When the power flow is valid,
S will be converted from
32-bit Gray code to double
integer, and the result is
assigned to D.
Example
LD X0
DGBIN D0 D10
When X0 is ON, (D0, D1) 0xCCCCCCCC (3435973836) will be converted
from 32-bit Gray code to double integer, and the result 0x88888888
(2290649224) is assigned to (D10, D11).
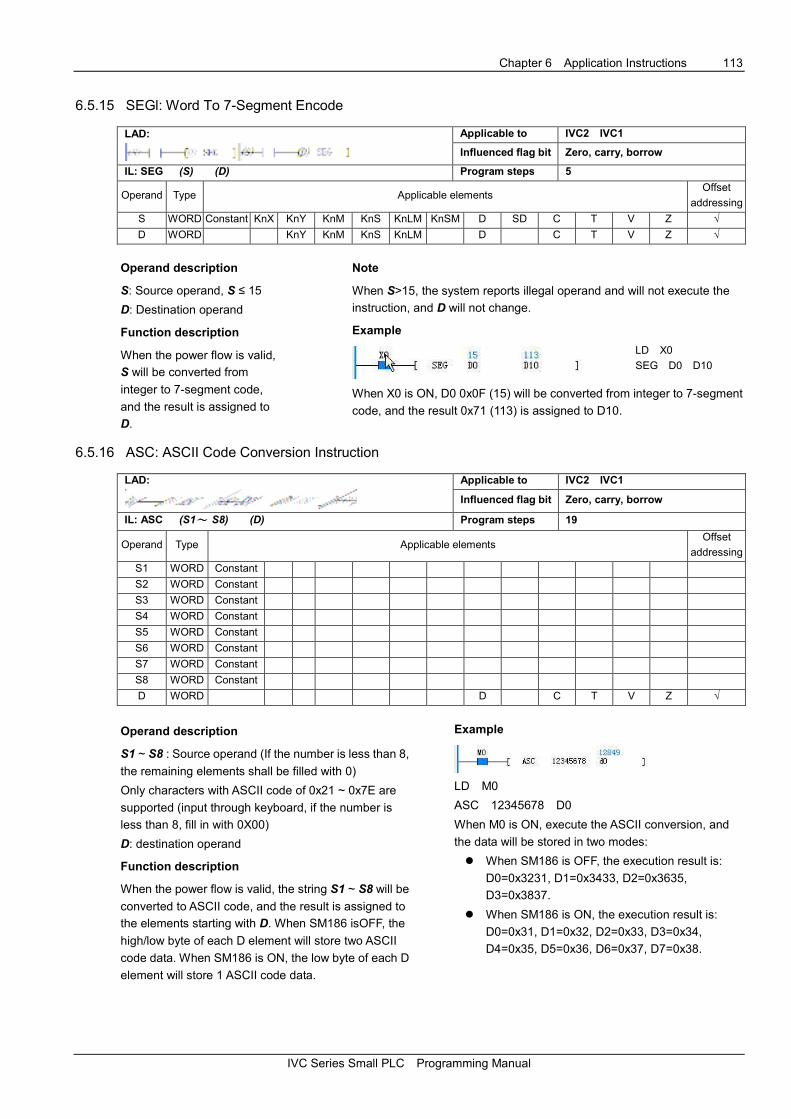
Chapter 6 Application Instructions 113
IVC Series Small PLC Programming Manual
6.5.15 SEGl: Word To 7-Segment Encode
LAD:
Applicable to IVC2 IVC1
Influenced flag bit Zero, carry, borrow
IL: SEG (S) (D) Program steps 5
Operand Type Applicable elements Offset
addressing
S WORD Constant KnX KnY KnM KnS KnLM KnSM D SD C T V Z √
D WORD KnY KnM KnS KnLM D C T V Z √
Operand description
S: Source operand, S ≤ 15
D: Destination operand
Function description
When the power flow is valid,
S will be converted from
integer to 7-segment code,
and the result is assigned to
D.
Note
When S>15, the system reports illegal operand and will not execute the
instruction, and D will not change.
Example
LD X0
SEG D0 D10
When X0 is ON, D0 0x0F (15) will be converted from integer to 7-segment
code, and the result 0x71 (113) is assigned to D10.
6.5.16 ASC: ASCII Code Conversion Instruction
LAD:
Applicable to IVC2 IVC1
Influenced flag bit Zero, carry, borrow
IL: ASC (S1~~~~ S8) (D) Program steps 19
Operand Type Applicable elements Offset
addressing
S1 WORD Constant
S2 WORD Constant
S3 WORD Constant
S4 WORD Constant
S5 WORD Constant
S6 WORD Constant
S7 WORD Constant
S8 WORD Constant
D WORD D C T V Z √
Operand description
S1 ~ S8 : Source operand (If the number is less than 8,
the remaining elements shall be filled with 0)
Only characters with ASCII code of 0x21 ~ 0x7E are
supported (input through keyboard, if the number is
less than 8, fill in with 0X00)
D: destination operand
Function description
When the power flow is valid, the string S1 ~ S8 will be
converted to ASCII code, and the result is assigned to
the elements starting with D. When SM186 isOFF, the
high/low byte of each D element will store two ASCII
code data. When SM186 is ON, the low byte of each D
element will store 1 ASCII code data.
Example
LD M0
ASC 12345678 D0
When M0 is ON, execute the ASCII conversion, and
the data will be stored in two modes:
� When SM186 is OFF, the execution result is:
D0=0x3231, D1=0x3433, D2=0x3635,
D3=0x3837.
� When SM186 is ON, the execution result is:
D0=0x31, D1=0x32, D2=0x33, D3=0x34,
D4=0x35, D5=0x36, D6=0x37, D7=0x38.
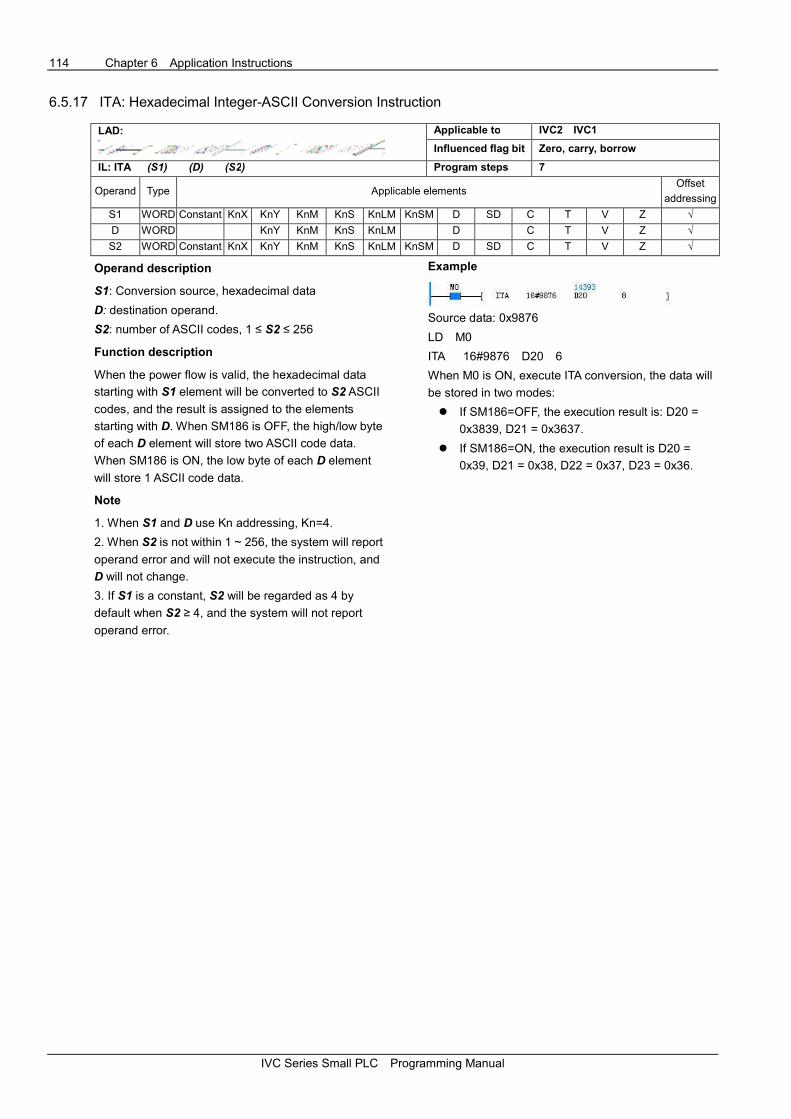
114 Chapter 6 Application Instructions
IVC Series Small PLC Programming Manual
6.5.17 ITA: Hexadecimal Integer-ASCII Conversion Instruction
LAD:
Applicable to IVC2 IVC1
Influenced flag bit Zero, carry, borrow
IL: ITA (S1) (D) (S2) Program steps 7
Operand Type Applicable elements Offset
addressing
S1 WORD Constant KnX KnY KnM KnS KnLM KnSM D SD C T V Z √
D WORD KnY KnM KnS KnLM D C T V Z √
S2 WORD Constant KnX KnY KnM KnS KnLM KnSM D SD C T V Z √
Operand description
S1: Conversion source, hexadecimal data
D: destination operand.
S2: number of ASCII codes, 1 ≤ S2 ≤ 256
Function description
When the power flow is valid, the hexadecimal data
starting with S1 element will be converted to S2 ASCII
codes, and the result is assigned to the elements
starting with D. When SM186 is OFF, the high/low byte
of each D element will store two ASCII code data.
When SM186 is ON, the low byte of each D element
will store 1 ASCII code data.
Note
1. When S1 and D use Kn addressing, Kn=4.
2. When S2 is not within 1 ~ 256, the system will report
operand error and will not execute the instruction, and
D will not change.
3. If S1 is a constant, S2 will be regarded as 4 by
default when S2 ≥ 4, and the system will not report
operand error.
Example
Source data: 0x9876
LD M0
ITA 16#9876 D20 6
When M0 is ON, execute ITA conversion, the data will
be stored in two modes:
� If SM186=OFF, the execution result is: D20 =
0x3839, D21 = 0x3637.
� If SM186=ON, the execution result is D20 =
0x39, D21 = 0x38, D22 = 0x37, D23 = 0x36.
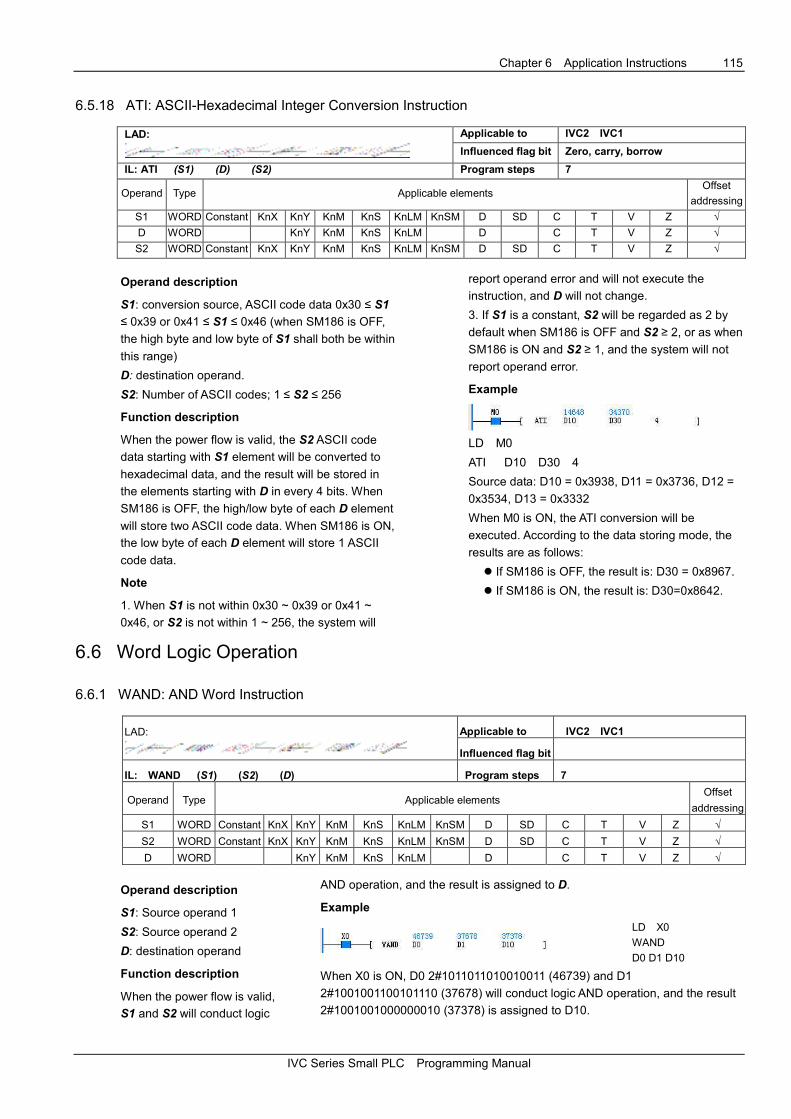
Chapter 6 Application Instructions 115
IVC Series Small PLC Programming Manual
6.5.18 ATI: ASCII-Hexadecimal Integer Conversion Instruction
LAD:
Applicable to IVC2 IVC1
Influenced flag bit Zero, carry, borrow
IL: ATI (S1) (D) (S2) Program steps 7
Operand Type Applicable elements Offset
addressing
S1 WORD Constant KnX KnY KnM KnS KnLM KnSM D SD C T V Z √
D WORD KnY KnM KnS KnLM D C T V Z √
S2 WORD Constant KnX KnY KnM KnS KnLM KnSM D SD C T V Z √
Operand description
S1: conversion source, ASCII code data 0x30 ≤ S1
≤ 0x39 or 0x41 ≤ S1 ≤ 0x46 (when SM186 is OFF,
the high byte and low byte of S1 shall both be within
this range)
D: destination operand.
S2: Number of ASCII codes; 1 ≤ S2 ≤ 256
Function description
When the power flow is valid, the S2 ASCII code
data starting with S1 element will be converted to
hexadecimal data, and the result will be stored in
the elements starting with D in every 4 bits. When
SM186 is OFF, the high/low byte of each D element
will store two ASCII code data. When SM186 is ON,
the low byte of each D element will store 1 ASCII
code data.
Note
1. When S1 is not within 0x30 ~ 0x39 or 0x41 ~
0x46, or S2 is not within 1 ~ 256, the system will
report operand error and will not execute the
instruction, and D will not change.
3. If S1 is a constant, S2 will be regarded as 2 by
default when SM186 is OFF and S2 ≥ 2, or as when
SM186 is ON and S2 ≥ 1, and the system will not
report operand error.
Example
LD M0
ATI D10 D30 4
Source data: D10 = 0x3938, D11 = 0x3736, D12 =
0x3534, D13 = 0x3332
When M0 is ON, the ATI conversion will be
executed. According to the data storing mode, the
results are as follows:
� If SM186 is OFF, the result is: D30 = 0x8967.
� If SM186 is ON, the result is: D30=0x8642.
6.6 Word Logic Operation
6.6.1 WAND: AND Word Instruction
LAD:
Applicable to IVC2 IVC1
Influenced flag bit
IL: WAND (S1) (S2) (D) Program steps 7
Operand Type Applicable elements Offset
addressing
S1 WORD Constant KnX KnY KnM KnS KnLM KnSM D SD C T V Z √
S2 WORD Constant KnX KnY KnM KnS KnLM KnSM D SD C T V Z √
D WORD KnY KnM KnS KnLM D C T V Z √
Operand description
S1: Source operand 1
S2: Source operand 2
D: destination operand
Function description
When the power flow is valid,
S1 and S2 will conduct logic
AND operation, and the result is assigned to D.
Example
LD X0
WAND
D0 D1 D10
When X0 is ON, D0 2#1011011010010011 (46739) and D1
2#1001001100101110 (37678) will conduct logic AND operation, and the result
2#1001001000000010 (37378) is assigned to D10.

116 Chapter 6 Application Instructions
IVC Series Small PLC Programming Manual
6.6.2 WOR: OR Word Instruction
LAD:
Applicable to IVC2 IVC1
Influenced flag bit
IL: WOR (S1) (S2) (D) Program steps 7
Operand Type Applicable elements Offset
addressing
S1 WORD Constant KnX KnY KnM KnS KnLM KnSM D SD C T V Z √
S2 WORD Constant KnX KnY KnM KnS KnLM KnSM D SD C T V Z √
D WORD KnY KnM KnS KnLM D C T V Z √
Operand description
S1: Source operand 1
S2: Source operand 2
D: destination operand
Function description
When the power flow is valid,
S1 and S2 will conduct logic
OR operation, and the result
is assigned to D.
Example
LD X0
WOR D0 D1
D10
When X0 is ON, D0 2#1011011010010011 (46739) and D1
2#1001001100101110 (37678) will conduct logic OR operation, and the result
2#1011011110111111 (47039) is assigned to D10.
.
6.6.3 WXOR: Exclusive-OR Word Instruction
LAD:
Applicable to IVC2 IVC1
Influenced flag bit
IL: WXOR (S1) (S2) (D) Program steps 7
Operand Type Applicable elements Offset
addressing
S1 WORD Constant KnX KnY KnM KnS KnLM KnSM D SD C T V Z √
S2 WORD Constant KnX KnY KnM KnS KnLM KnSM D SD C T V Z √
D WORD KnY KnM KnS KnLM D C T V Z √
Operand description
S1: Source operand 1
S2: Source operand 2
D: destination operand
Function description
When the power flow is valid,
S1 and S2 will conduct logic
exclusive OR operation, and
the result is assigned to D.
Example
LD X0
WXOR D0 D1 D10
When X0 is ON, D0 2#1011011010010011 (46739) and D1
2#1001001100101110 (37678) will conduct logic exclusive OR operation, and
the result 2#0010010110111101 (9661) is assigned to D10.

Chapter 6 Application Instructions 117
IVC Series Small PLC Programming Manual
6.6.4 WINV: NOT Word Instruction
LAD:
Applicable to IVC2 IVC1
Influenced flag bit
IL: WINV (S) (D) Program steps 5
Operand Type Applicable elements Offset
addressing
S WORD Constant KnX KnY KnM KnS KnLM KnSM D SD C T V Z √
D WORD KnY KnM KnS KnLM D C T V Z √
Operand description
S: Source operand
D: destination operand
Function description
When the power flow is valid,
conduct logic NOT operation
on S, and assign the result to
D.
Example
LD X0
WINV D0 D1 D10
When X0 is ON, conduct logic NOT operation on D0 (46739), and assign the
result 18796 to D10.
6.6.5 DWAND: AND Double Word Instruction
LAD:
Applicable to IVC2 IVC1
Influenced flag bit
IL: DWAND (S1) (S1) (D) Program steps 10
Operand Type Applicable elements Offset
addressing
S1 DWORD Constant KnX KnY KnM KnS KnLM KnSM D SD C V √
S2 DWORD Constant KnX KnY KnM KnS KnLM KnSM D SD C V √
D DWORD KnY KnM KnS KnLM D C V √
Operand description
S1: Source operand 1
S2: Source operand 2
D: destination operand
Function description
When the power flow is valid,
S1 and S2 will conduct logic
AND operation, and the
result is assigned to D.
Example
LD X0
DWAND D0 D2 D10
When X0 is ON, (D0, D1) 2#10110010101001101110011001010010
(2997282386) and (D2, D3) 2#00111010001110110011000100110011
(976957747) will conduct the logic AND operation, and the result
2#00110010001000100010000000010010 (841097234) is assigned to (D10,
D11).
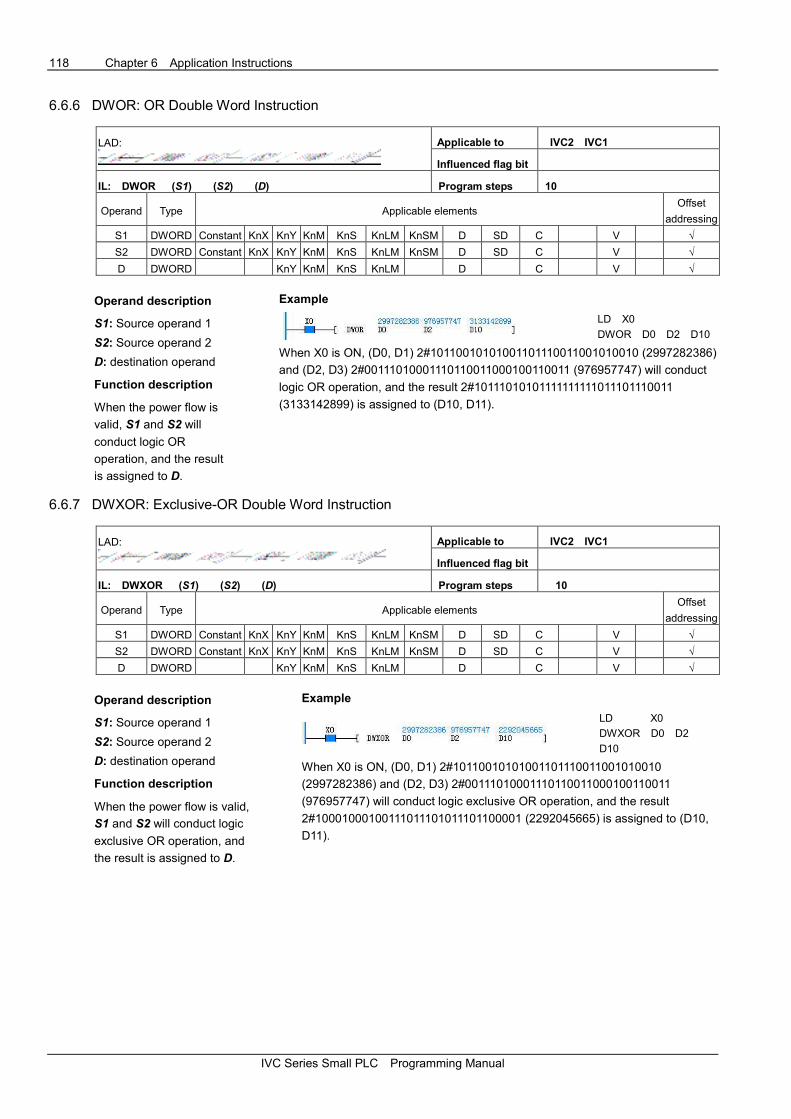
118 Chapter 6 Application Instructions
IVC Series Small PLC Programming Manual
6.6.6 DWOR: OR Double Word Instruction
LAD:
Applicable to IVC2 IVC1
Influenced flag bit
IL: DWOR (S1) (S2) (D) Program steps 10
Operand Type Applicable elements Offset
addressing
S1 DWORD Constant KnX KnY KnM KnS KnLM KnSM D SD C V √
S2 DWORD Constant KnX KnY KnM KnS KnLM KnSM D SD C V √
D DWORD KnY KnM KnS KnLM D C V √
Operand description
S1: Source operand 1
S2: Source operand 2
D: destination operand
Function description
When the power flow is
valid, S1 and S2 will
conduct logic OR
operation, and the result
is assigned to D.
Example
LD X0
DWOR D0 D2 D10
When X0 is ON, (D0, D1) 2#10110010101001101110011001010010 (2997282386)
and (D2, D3) 2#00111010001110110011000100110011 (976957747) will conduct
logic OR operation, and the result 2#10111010101111111111011101110011
(3133142899) is assigned to (D10, D11).
6.6.7 DWXOR: Exclusive-OR Double Word Instruction
LAD:
Applicable to IVC2 IVC1
Influenced flag bit
IL: DWXOR (S1) (S2) (D) Program steps 10
Operand Type Applicable elements Offset
addressing
S1 DWORD Constant KnX KnY KnM KnS KnLM KnSM D SD C V √
S2 DWORD Constant KnX KnY KnM KnS KnLM KnSM D SD C V √
D DWORD KnY KnM KnS KnLM D C V √
Operand description
S1: Source operand 1
S2: Source operand 2
D: destination operand
Function description
When the power flow is valid,
S1 and S2 will conduct logic
exclusive OR operation, and
the result is assigned to D.
Example
LD X0
DWXOR D0 D2
D10
When X0 is ON, (D0, D1) 2#10110010101001101110011001010010
(2997282386) and (D2, D3) 2#00111010001110110011000100110011
(976957747) will conduct logic exclusive OR operation, and the result
2#10001000100111011101011101100001 (2292045665) is assigned to (D10,
D11).

Chapter 6 Application Instructions 119
IVC Series Small PLC Programming Manual
6.6.8 DWINV: NOT Double Word Instruction
LAD:
Applicable to IVC2 IVC1
Influenced flag bit
IL: DWINV (S) (D) Program steps 7
Operand Type Applicable elements Offset
addressing
S DWORD Constant KnX KnY KnM KnS KnLM KnSM D SD C V √
D DWORD KnY KnM KnS KnLM D C V √
Operand description
S: Source operand
D: destination operand
Function description
When the power flow is valid,
logic NOT operation will be
conducted on S, and the
result is assigned to D.
Example
LD X0
DWINV D0 D10
When X0 is ON, logic NOT operation will be conducted on (D0, D1)
2#10110010101001101110011001010010 (2997282386), and the result
2#01001101010110010001100110101101 (1297684909) is assigned to (D10,
D11).
6.7 Shift / Rotate Instruction
6.7.1 ROR: 16-Bit Circular Shift Right Instruction
LAD:
Applicable to IVC2 IVC1
Influenced flag bit Carry flag SM181
IL: ROR (S1) (D) (S2) Program steps 7
Operand Type Applicable elements Offset
addressing
S1 WORD Constant KnX KnY KnM KnS KnLM KnSM D SD C T V Z √
D WORD KnY KnM KnS KnLM D C T V Z √
S2 INT Constant KnX KnY KnM KnS KnLM KnSM D SD C T V Z √
Operand description
S1: Source operand 1
D: destination operand
S2: Source operand 2
Function description
When the power flow is
valid, the data of S1 will
rotate rightward for S2 bits,
and the result is assigned
to D. At the same time the
highest bit of the S2 bits will
be stored into the carry flag
(SM181).
Note
1. S2 ≥ 0.
2. When S1 uses Kn
addressing, Kn must be
equal to 4.
Example
LD M0
ROR D0 D10 3
1 1 0 0 1 1 0 1 1 0 0 1 0 1 0 1
BeforeMSB LSB
1 0 1 0 1 1 0 1 0 01
AfterMSB LSB
1 1 0 1 0
SM181
SM181 1
Rotate rightward 3 bits
When M0 is ON, D0 2#1100110110010101 (52629) rotates rightward for 3 bits,
and the result 2#1011100110110010 (47538) is assigned to D10. The highest bit
of the 3 bits is stored into the carry flag. SM181 is ON.

120 Chapter 6 Application Instructions
IVC Series Small PLC Programming Manual
6.7.2 ROL: 16-Bit Circular Shift Left Instruction
LAD:
Applicable to IVC2 IVC1
Influenced flag bit Carry
IL: ROL (S1) (D) (S2) Program steps 7
Operand Type Applicable elements Offset
addressing
S1 WORD Constant KnX KnY KnM KnS KnLM KnSM D SD C T V Z √
D WORD KnY KnM KnS KnLM D C T V Z √
S2 INT Constant KnX KnY KnM KnS KnLM KnSM D SD C T V Z √
Operand description
S1: Source operand 1
D: destination operand
S2: Source operand 2
Function description
When the power flow is valid,
the data of S1 will rotate
leftward for S2 bits, and the
result is assigned to D. At the
same time the lowest bit of
the S2 bits will be stored into
the carry flag SM181.
Note
1. S2 ≥ 0.
2. When S1 uses Kn
addressing, Kn must be equal
to 4.
Example
LD M0
ROL D0 D10 15
1 1 0 0 1 1 0 1 1 0 0 1 0 1 0 1
1 1 0 0 1 1 0 1 1 0 0 1 0 1 01
BeforeMSB LSB
AfterMSB LSB
Rotate leftward 15 bits
SM181
0 SM181
When M0 is ON, D0 2#1100110110010101 (52629) rotates leftward for 15 bits,
and the result 2#1110011011001010 (59082) is assigned to D10. The final bit
will be stored in the carry flag bit. SM181 is OFF.

Chapter 6 Application Instructions 121
IVC Series Small PLC Programming Manual
6.7.3 RCR: 16-Bit Carry Circular Shift Right Instruction
LAD:
Applicable to IVC2 IVC1
Influenced flag bit Carry
IL: RCR (S1) (D) (S2) Program steps 7
Operand Type Applicable elements Offset
addressing
S1 WORD Constant KnX KnY KnM KnS KnLM KnSM D SD C T V Z √
D WORD KnY KnM KnS KnLM D C T V Z √
S2 INT Constant KnX KnY KnM KnS KnLM KnSM D SD C T V Z √
Operand description
S1: Source operand 1
D: destination operand
S2: Source operand 2
Function description
When the power flow is valid,
S1 data and the carry flag
(SM181) will together rotate
rightward for S2 bits, and the
result is assigned to D.
Note
1. S2 ≥0.
2. When S1 uses Kn
addressing, Kn must be equal
to 4.
Example
LD M0
RCR D0 D10 5
1 0 0 1 1 0 1 1 0 0 1 0 1 01 1
0 1 1 00 1 0 1 0 1 1 0 1 0 1 0
SM181 (0)
SM181 1
Rotate with the carryflag 5 bits leftward
BeforeMSB LSB
AfterMSB LSB
When M0 is ON, D0 2#1100110110010101 (52629) and the carry SM181 (OFF)
will rotate rightward for 5 bits, and the result 2#0101011001101100 (22124) is
assigned to D10. SM181 = ON.

122 Chapter 6 Application Instructions
IVC Series Small PLC Programming Manual
6.7.4 RCL: 16-Bit Carry Circular Shift Left Instruction
LAD:
Applicable to IVC2 IVC1
Influenced flag bit Carry
IL: RCL (S1) (D) (S2) Program steps 7
Operand Type Applicable elements Offset
addressing
S1 WORD Constant KnX KnY KnM KnS KnLM KnSM D SD C T V Z √
D WORD KnY KnM KnS KnLM D C T V Z √
S2 INT Constant KnX KnY KnM KnS KnLM KnSM D SD C T V Z √
Operand description
S1: Source operand 1
D: destination operand
S2: Source operand 2
Function description
When the power flow is valid,
S1 data and the carry (SM181)
will together rotate leftward
for S2 bits, and the result is
assigned to D.
Note
1. S2 ≥ 0.
2. When S1 uses Kn
addressing, Kn must be equal
to 4.
Example
LD M0
RCL D0 D10 16
1 1 0 0 1 1 0 1 1 0 0 1 0 1 0 1
1 1 0 0 1 1 0 1 1 0 0 1 0 1 01
BeforeMSB LSB
After
MSB LSB
Rotate with the carryflag leftward 16 bits
SM181 (1)
1 SM181
When M0 is ON, D0 2#1100110110010101 (52629) and the carry SM181 (ON)
will rotate leftward for 16-bits, and the result 2#1110011011001010 (59082) is
assigned to D10. SM181=ON.
6.7.5 DROR: 32-Bit Circular Shift Right Instruction
LAD:
Applicable to IVC2 IVC1
Influenced flag bit Carry
IL: DROR (S1) (D) (S2) Program steps 9
Operand Type Applicable elements Offset
addressing
S1 DWORD Constant KnX KnY KnM KnS KnLM KnSM D SD C V √
D DWORD KnY KnM KnS KnLM D C V √
S2 INT Constant KnX KnY KnM KnS KnLM KnSM D SD C T V Z √
Operand description
S1: Source operand 1
D: destination operand
S2: Source operand 2
Function description
When the power flow is valid,
the data of S1 will rotate
rightward for S2 bits, and the
result is assigned to D. At the
same time the highest bit of
the S2 bits will be stored into
the carry flag bit SM181.
Note
1. S2 ≥ 0.
2. When S1 uses Kn addressing, Kn must be equal to 8.
Example
LD M0
DROR D0 D10 7
1. When M0 is ON, D0 (D1) 2#10110011100110001001110010101100
(3013123244) will rotate rightward for 7 bits, and the result
2#01011001011001110011000100111001 (1499935033) is assigned to
(D10, D11). The final bit is stored into the carry flag bit. SM181 = OFF.
2. Please refer to the ROR instruction illustration.

Chapter 6 Application Instructions 123
IVC Series Small PLC Programming Manual
6.7.6 DROL: 32-Bit Circular Shift Left Instruction
LAD:
Applicable to IVC2 IVC1
Influenced flag bit Carry
IL: DROL (S1) (D) (S2) Program steps 9
Operand Type Applicable elements Offset
addressing
S1 DWORD Constant KnX KnY KnM KnS KnLM KnSM D SD C V √
D DWORD KnY KnM KnS KnLM D C V √
S2 INT Constant KnX KnY KnM KnS KnLM KnSM D SD C T V Z √
Operand description
S1: Source operand 1
D: destination operand
S2: Source operand 2
Function description
When the power flow is valid,
the data of S1 will rotate
leftward for S2 bits, and the
result is assigned to D. At the
same time the lowest bit of
the S2 bits will be stored into
the carry flag bit SM181.
Note
1. S2 ≥ 0.
2. When S1 uses Kn addressing, Kn must be equal to 8.
Example
LD M0
DROL D0 D10 30
1. When M0 is ON, (D0, D1) 2#10110011100110001001110010101100
(3013123244) will rotate leftward for 30 bits, and the result
2#00101100111001100010011100101011 (753280811) is assigned to (D10,
D11). The final bit is stored into the carry flag bit. SM181=ON.
2. Please refer to the ROL instruction illustration.
6.7.7 DRCR: 32-Bit Carry Circular Shift Right Instruction
LAD:
Applicable to IVC2 IVC1
Influenced flag bit Carry
IL: DRCR (S1) (D) (S2) Program steps 9
Operand Type Applicable elements Offset
addressing
S1 DWORD Constant KnX KnY KnM KnS KnLM KnSM D SD C V √
D DWORD KnY KnM KnS KnLM D C V √
S2 INT Constant KnX KnY KnM KnS KnLM KnSM D SD C T V Z √
Operand description
S1: Source operand 1
D: destination operand
S2: Source operand 2
Function description
When the power flow is valid,
S1 data and the carry SM181
will together rotate rightward
for S2 bits, and the result is
assigned to D.
Note
1. S2 ≥ 0.
2. When S1 uses Kn addressing, Kn must be equal to 8.
Example
LD M0
DRCR D0
D10 11
1. When M0 is ON, (D0, D1) 2#10110011100110001001110010101100
(3013123244) and the carry SM181 (OFF) will rotate rightward for 11 bits, and
the result 2#00101011000101100111001100010011 (722891539) is assigned
to (D10, D11). SM181=ON.
2. Please refer to the RCR instruction illustration.

124 Chapter 6 Application Instructions
IVC Series Small PLC Programming Manual
6.7.8 DRCL: 32-Bit Carry Circular Shift Left Instruction
LAD:
Applicable to IVC2 IVC1
Influenced flag bit Carry
IL: DRCL (S1) (D) (S2) Program steps 9
Operand Type Applicable elements Offset
addressing
S1 DWORD Constant KnX KnY KnM KnS KnLM KnSM D SD C V √
D DWORD KnY KnM KnS KnLM D C V √
S2 INT Constant KnX KnY KnM KnS KnLM KnSM D SD C T V Z √
Operand description
S1: Source operand 1
D: destination operand
S2: Source operand 2
Function description
When the power flow is valid,
the S1 data and the carry
SM181 will together rotate
leftward for S2 bits, and the
result is assigned to D.
Note
1. S2 ≥ 0.
2. When S1 uses Kn addressing, Kn must be equal to 8.
Example
LD M0
DRCL D0 D10 25
1. When M0 is ON, (D0, D1) 2#10110011100110001001110010101100
(3013123244) and the carry SM181 (OFF) will rotate leftward for 25 bits, and
the result 2#001011000101100111001100010011100 (1488165020) is
assigned to (D10, D11). SM181 = ON.
2. Please refer to the RCL instruction illustration.
6.7.9 SHR: 16-Bit Shift Right Word Instruction
LAD:
Applicable to IVC2 IVC1
Influenced flag bit
IL: SHR (S1) (D) (S2) Program steps 7
Operand Type Applicable elements Offset
addressing
S1 WORD Constant KnX KnY KnM KnS KnLM KnSM D SD C T V Z √
D WORD KnY KnM KnS KnLM D C T V Z √
S2 INT Constant KnX KnY KnM KnS KnLM KnSM D SD C T V Z √
Operand description
S1: Source operand 1
D: destination operand
S2: Source operand 2
Function description
When the power flow is valid,
the data of S1 will shift
rightward for S2 bits, and the
result is assigned to D.
Note
1. S2 ≥ 0.
2. When S1 uses Kn
addressing, Kn must be equal
to 4.
Example
LD M0
SHR D0 D10 5
0 1 1 1 1 0 1 0 1 1 0 1 1 1 0 0
0 0 0 0 0 1 1 1 1 0 1 0 1 1 00
BeforeMSB LSB
After
MSB LSB
Rotate rightward 5 bits
When M0 is ON, D0 2#0111101011011100 (31452) shifts rightward for 5
bits, and the result 2#0000001111010110 (982) is assigned to D10.

Chapter 6 Application Instructions 125
IVC Series Small PLC Programming Manual
6.7.10 SHL: 16-Bit Shift Left Instruction
LAD:
Applicable to IVC2 IVC1
Influenced flag bit
IL: SHL (S1) (D) (S2) Program steps 7
Operand Type Applicable elements Offset
addressing
S1 WORD Constant KnX KnY KnM KnS KnLM KnSM D SD C T V Z √
D WORD KnY KnM KnS KnLM D C T V Z √
S2 INT Constant KnX KnY KnM KnS KnLM KnSM D SD C T V Z √
Operand description
S1: Source operand 1
D: destination operand
S2: Source operand 2
Function description
When the power flow is valid,
the data of S1 will shift
leftward for S2 bits, and the
result is assigned to D.
Note
1. S2 ≥0.
2. When S1 uses Kn
addressing, Kn must be equal
to 4.
Example
LD M0
SHL D0 D10 7
0 1 1 1 1 0 1 0 1 1 0 1 1 1 0 0
1 1 0 1 1 1 0 0 0 0 0 0 0 0 00
BeforeMSB LSB
After
MSB LSB
Rotate leftward 7 bits
When M0 is ON, D0 2#0111101011011100 (31452) shifts leftward for 7 bits,
and the result 2#0110111000000000 (28160) is assigned to D10.
6.7.11 DSHR: 32-Bit Shift Right Instruction
LAD:
Applicable to IVC2 IVC1
Influenced flag bit
IL: DSHR (S1) (D) (S2) Program steps 9
Operand Type Applicable elements Offset
addressing
S1 DWORD Constant KnX KnY KnM KnS KnLM KnSM D SD C V √
D DWORD KnY KnM KnS KnLM D C V √
S2 INT Constant KnX KnY KnM KnS KnLM KnSM D SD C T V Z √
Operand description
S1: Source operand 1
D: destination operand
S2: Source operand 2
Function description
When the power flow is valid,
the data of S1 will shift
rightward for S2 bits, and the
result is assigned to D.
Note
1. S2 ≥0.
2. When S1 uses Kn addressing, Kn must be equal to 8.
Example
LD M0
DSHR D0 D10 10
1. When M0 is ON, (D0, D1) 2#01110011100110001001110010101100
(1939381420) shifts rightward for 10 bits, and the result
2#00000000000111001110011000100111 (1893927) is assigned to (D10,
D11).
2. Please refer to the SHR instruction illustration.

126 Chapter 6 Application Instructions
IVC Series Small PLC Programming Manual
6.7.12 DSHL: 32-Bit Shift Left Instruction
LAD:
Applicable to IVC2 IVC1
Influenced flag bit
IL: DSHL (S1) (D) (S2) Program steps 9
Operand Type Applicable elements Offset
addressing
S1 DWORD Constant KnX KnY KnM KnS KnLM KnSM D SD C V √
D DWORD KnY KnM KnS KnLM D C V √
S2 INT Constant KnX KnY KnM KnS KnLM KnSM D SD C T V Z √
Operand description
S1: Source operand 1
D: destination operand
S2: Source operand 2
Function description
When the power flow is valid,
the data of S1 will shift
leftward for S2 bits, and the
result is assigned to D.
Note
1. S2 ≥ 0.
2. When S1 uses Kn
addressing, Kn must be equal
to 8.
Example
LD M0
DSHL D0 D10 15
1. When M0 is ON, (D0, D1) 2#01110011100110001001110010101100
(1939381420) shifts leftward for 15 bits, and the result
2#01001110010101100000000000000000 (1314258944) is assigned to (D10,
D11).
2. Please refer to SHL instruction illustration.
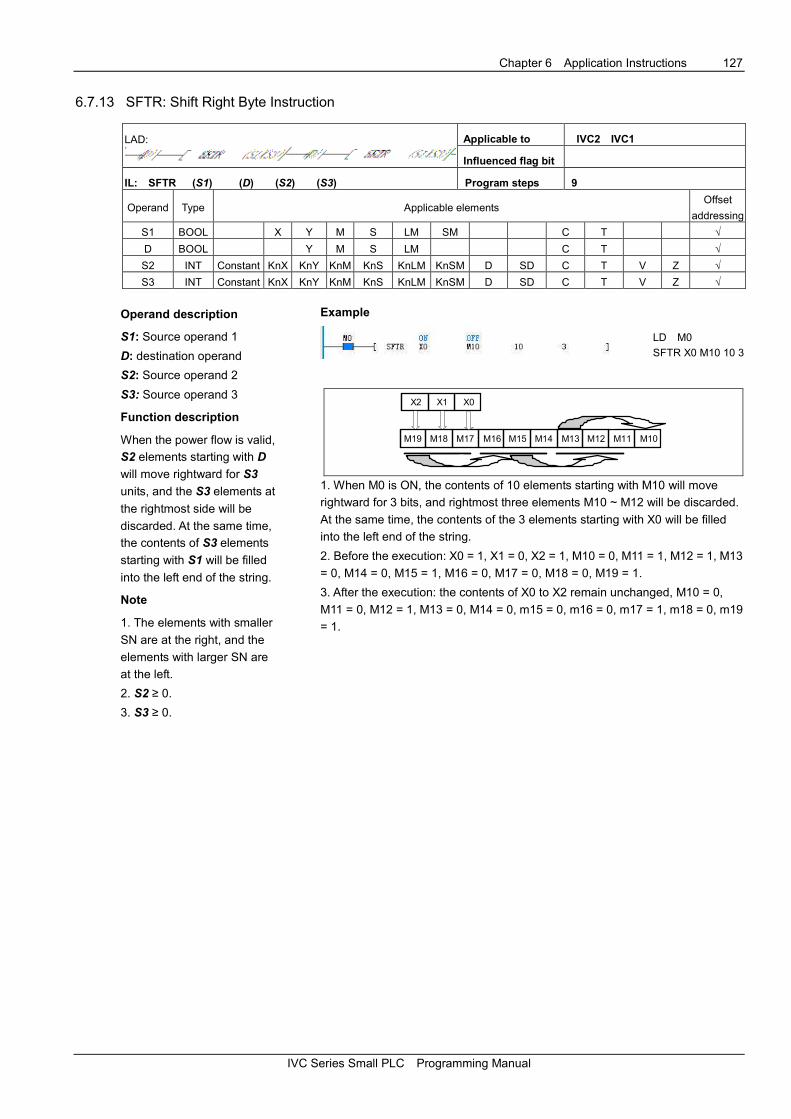
Chapter 6 Application Instructions 127
IVC Series Small PLC Programming Manual
6.7.13 SFTR: Shift Right Byte Instruction
LAD:
Applicable to IVC2 IVC1
Influenced flag bit
IL: SFTR (S1) (D) (S2) (S3) Program steps 9
Operand Type Applicable elements Offset
addressing
S1 BOOL X Y M S LM SM C T √
D BOOL Y M S LM C T √
S2 INT Constant KnX KnY KnM KnS KnLM KnSM D SD C T V Z √
S3 INT Constant KnX KnY KnM KnS KnLM KnSM D SD C T V Z √
Operand description
S1: Source operand 1
D: destination operand
S2: Source operand 2
S3: Source operand 3
Function description
When the power flow is valid,
S2 elements starting with D
will move rightward for S3
units, and the S3 elements at
the rightmost side will be
discarded. At the same time,
the contents of S3 elements
starting with S1 will be filled
into the left end of the string.
Note
1. The elements with smaller
SN are at the right, and the
elements with larger SN are
at the left.
2. S2 ≥ 0.
3. S3 ≥ 0.
Example
LD M0
SFTR X0 M10 10 3
M19 M18 M17 M16 M15 M14 M13 M12 M11 M10
X2 X1 X0
1. When M0 is ON, the contents of 10 elements starting with M10 will move
rightward for 3 bits, and rightmost three elements M10 ~ M12 will be discarded.
At the same time, the contents of the 3 elements starting with X0 will be filled
into the left end of the string.
2. Before the execution: X0 = 1, X1 = 0, X2 = 1, M10 = 0, M11 = 1, M12 = 1, M13
= 0, M14 = 0, M15 = 1, M16 = 0, M17 = 0, M18 = 0, M19 = 1.
3. After the execution: the contents of X0 to X2 remain unchanged, M10 = 0,
M11 = 0, M12 = 1, M13 = 0, M14 = 0, m15 = 0, m16 = 0, m17 = 1, m18 = 0, m19
= 1.

128 Chapter 6 Application Instructions
IVC Series Small PLC Programming Manual
6.7.14 SFTL: Shift Left Byte Instruction
LAD:
Applicable to IVC2 IVC1
Influenced flag bit
IL: SFTL (S1) (D) (S2) (S3) Program steps 9
Operand Type Applicable elements Offset
addressing
S1 BOOL X Y M S LM SM C T √
D BOOL Y M S LM C T √
S2 INT Constant KnX KnY KnM KnS KnLM KnSM D SD C T V Z √
S3 INT Constant KnX KnY KnM KnS KnLM KnSM D SD C T V Z √
Operand description
S1: Source operand 1
D: destination operand
S2: Source operand 2
S3: Source operand 3
Function description
When the power flow is valid,
S2 elements starting with D
will more leftward for S3 units,
and the S3 elements at the
leftmost side will be
discarded. At the same time,
the contents of S3 elements
starting with S1 will be filled
into the right end of the
string.
Note
1. The elements with smaller
SN are at the right, and the
elements with larger SN are
at the left.
2. S2 ≥ 0.
3. S3 ≥ 0.
Example
LD M0
SFTL X0 M10 10 3
M19 M18 M17 M16 M15 M14 M13 M12 M11 M10
X2 X1 X0
1. When M0 is ON, the contents of 10 elements starting with M10 will move
leftward for 3 bits, and the leftmost elements M17 ~ M19 will be discarded. At the
same time, the contents of the 3 elements starting with X0 will be filled into the
right end of the string.
2. Before the execution: X0 = 1, X1 = 0, X2 = 1, M10 = 0, M11 = 1, M12 = 1, M13
= 0, M14 = 0, M15 = 1, M16 = 0, M17 = 0, M18 = 0, M19 = 1.
3. After the execution: the contents of X0 ~ X2 remain unchanged, M10 = 1, M11
= 0, M12 = 1, M13 = 0, M14 = 1, M15 = 1, M16 = 0, M17 = 0, M18 = 1, M19 = 0.

Chapter 6 Application Instructions 129
IVC Series Small PLC Programming Manual
6.8 External Equipment Instruction
6.8.1 FROM: Read Word Form Special Module Buffer Register Instruction
LAD:
Applicable to IVC2
Influenced flag bit
IL: FROM (S1) (S2) (D) (S3) Program steps 9
Operand Type Applicable elements Offset
addressing
S1 INT Constant
S2 INT Constant
D INT D V √
S3 INT Constant
Operand description
S1: SN of the special module
to be read, or the target
module.
Range: 0 ~ 7. If the target
module does not exist, the
system will report target
module address invalid.
S2: The starting address in
the BFM of the target module.
Range: 0 ~ 32767. If the BFM
address is invalid, the system
will report “BFM unit of
accessed special module
exceeds range”.
D: The D element where the
data read from the target
module will be stored.
S3: The number of consecutive buffer registers (single word) to be read.
Range: 1 ~ 32767. If the target register does not exist, the system will report
“BFM unit of accessed special module exceeds range”.
Function description
Read consecutively S3 registers, starting with S2 register, in the BFM of the
target module (SN: S1) and put them into the S3 word elements starting with D.
Note
The execution time of the FROM instruction is relatively long, and closely
related to S3.
Example
LD M0
FROM 0 3 D100 2
When M0 is ON, read consecutively 2 registers, starting with register 3, in the
BFM of the target module number 0, and put them into the word elements D100
and D101.

130 Chapter 6 Application Instructions
IVC Series Small PLC Programming Manual
6.8.2 DFROM: Read Double Word Form Special Module Buffer Register Instruction
LAD:
Applicable to IVC2
Influenced flag bit
IL: DFROM (S1) (S2) (D) (S3) Program steps
10
Operand Type Applicable elements Offset
addressing
S1 INT Constant
S2 INT Constant
D DINT D V √
S3 INT Constant
Operand description
S1: SN of the special module
to be read, or the target
module.
Range: 0 ~ 7. If the target
module does not exist, the
system will report target
module address invalid.
S2: The starting address in
the BFM of the target
module.
Range: 0 ~ 32767. If the BFM
address is invalid, the system
will report “BFM unit of
accessed special module
exceeds range”.
D: The D element where the
data read from the target
module will be stored.
S3: The number of consecutive buffer registers (double word) to be read.
Range: 1 ~ 32767. If the target register does not exist, the system will report
“BFM unit of accessed special module exceeds range”
Function description
Read consecutively S3 registers, starting with S2 register, in the BFM of the
target module (SN: S1) and put them into the S3 double-word elements starting
with D.
Note
The execution time of the DFROM instruction is relatively long, and closely
related to S3.
Example
LD M0
DFROM 0 3 D200 1
When M0 is ON, read 1 double word from register 3, in the BFM of the target
module number 0, and put it into the double word element (D200, D201).
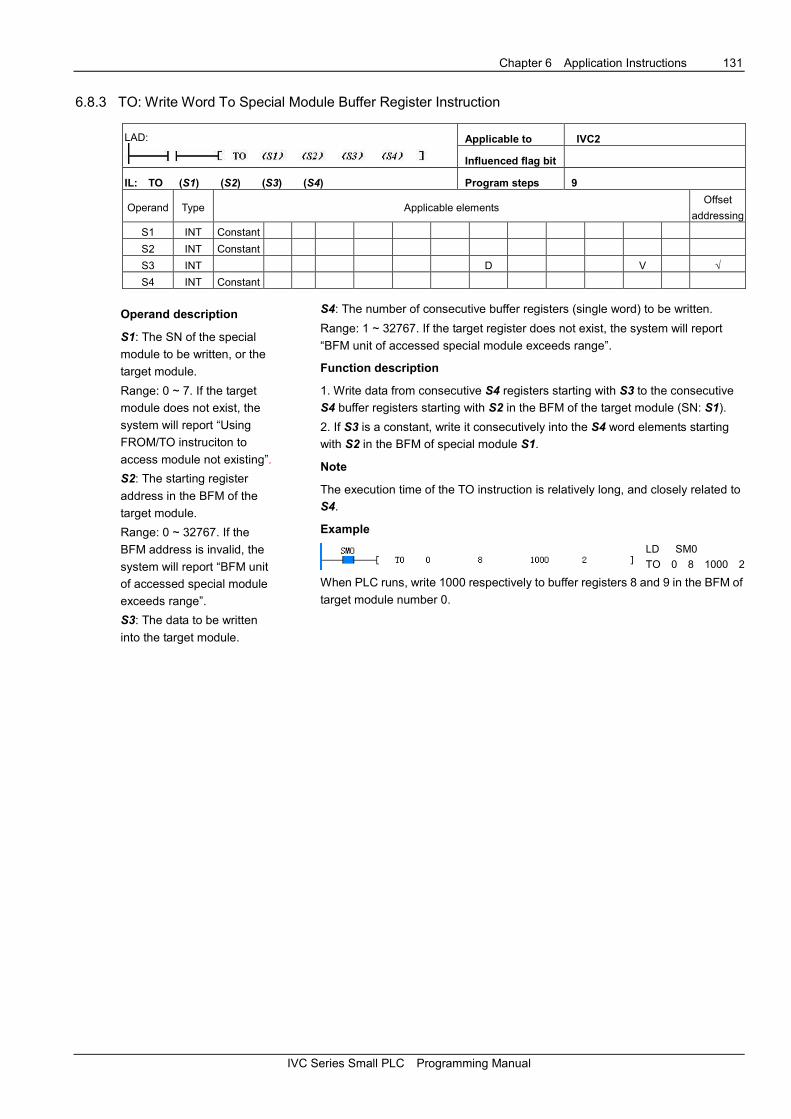
Chapter 6 Application Instructions 131
IVC Series Small PLC Programming Manual
6.8.3 TO: Write Word To Special Module Buffer Register Instruction
LAD:
Applicable to IVC2
Influenced flag bit
IL: TO (S1) (S2) (S3) (S4) Program steps 9
Operand Type Applicable elements Offset
addressing
S1 INT Constant
S2 INT Constant
S3 INT D V √
S4 INT Constant
Operand description
S1: The SN of the special
module to be written, or the
target module.
Range: 0 ~ 7. If the target
module does not exist, the
system will report “Using
FROM/TO instruciton to
access module not existing”.
S2: The starting register
address in the BFM of the
target module.
Range: 0 ~ 32767. If the
BFM address is invalid, the
system will report “BFM unit
of accessed special module
exceeds range”.
S3: The data to be written
into the target module.
S4: The number of consecutive buffer registers (single word) to be written.
Range: 1 ~ 32767. If the target register does not exist, the system will report
“BFM unit of accessed special module exceeds range”.
Function description
1. Write data from consecutive S4 registers starting with S3 to the consecutive
S4 buffer registers starting with S2 in the BFM of the target module (SN: S1).
2. If S3 is a constant, write it consecutively into the S4 word elements starting
with S2 in the BFM of special module S1.
Note
The execution time of the TO instruction is relatively long, and closely related to
S4.
Example
LD SM0
TO 0 8 1000 2
When PLC runs, write 1000 respectively to buffer registers 8 and 9 in the BFM of
target module number 0.

132 Chapter 6 Application Instructions
IVC Series Small PLC Programming Manual
6.8.4 DTO: Write Double Word To Special Module Buffer Register Instruction
LAD:
Applicable to IVC2
Influenced flag bit
IL: DTO (S1) (S2) (S3) (S4) Program steps 10
Operand Type Applicable elements Offset
addressing
S1 INT Constant
S2 INT Constant
S3 DINT D V √
S4 INT Constant
Operand description
S1: The SN of the special
module to be written, or the
target module.
Range: 0 ~ 7. If the target
module does not exist, the
system will report “Using
FROM/TO instruciton to access
module not existing”.
S2: The starting register
address in the BFM of the target
module.
Range: 0 ~ 32767. If the BFM
address is invalid, the system
will “BFM unit of accessed
special module exceeds range”.
S3: The data to be written into
the target module.
S4: The number of consecutive
buffer registers (double word) to
be written.
Range: 1 ~ 32767. If the target register does not exist, the system will report
“BFM unit of accessed special module exceeds range”.
Function description
1. Write data from consecutive S4 registers starting with S3 to the
consecutive S4 buffer registers starting with S2 in the BFM of the target
module (SN: S1).
2. If S3 is a constant, write it consecutively into the S4 double-word elements
starting with S2 in the BFM of special module S1.
Note
The execution time of the DTO instruction is relatively long, and closely
related to S4.
Example
LD SM0
DTO 0 8 16711935 1
When PLC runs, write a double word data 16711935 to buffer registers 8 and
9 (which forms a double-word element) in the BFM of target module number
0.
6.8.5 VRRD: Read Analog Potentiometer Value Instruction
LAD:
Applicable to IVC2 IVC1
Influenced flag bit
IL: VRRD ( S ) ( D ) Program steps 5
Operand Type Applicable elements Offset
addressing
S WORD Constant
D WORD D V √
Operand description
S: The specified potentiometer SN. Range: 0
~ 255. If S is set outside this range, the
system will report operand error.
D: The element where the read analog
potentiometer value will be stored. Range: 0 ~
255.
Function description
Read the value of the specified analog potentiometer and store
it into the specified element.
Example
LD M0
VRRD 0 D10
When M0 is ON, read the value of analog potentiometer 0 and
put the reading into D10.
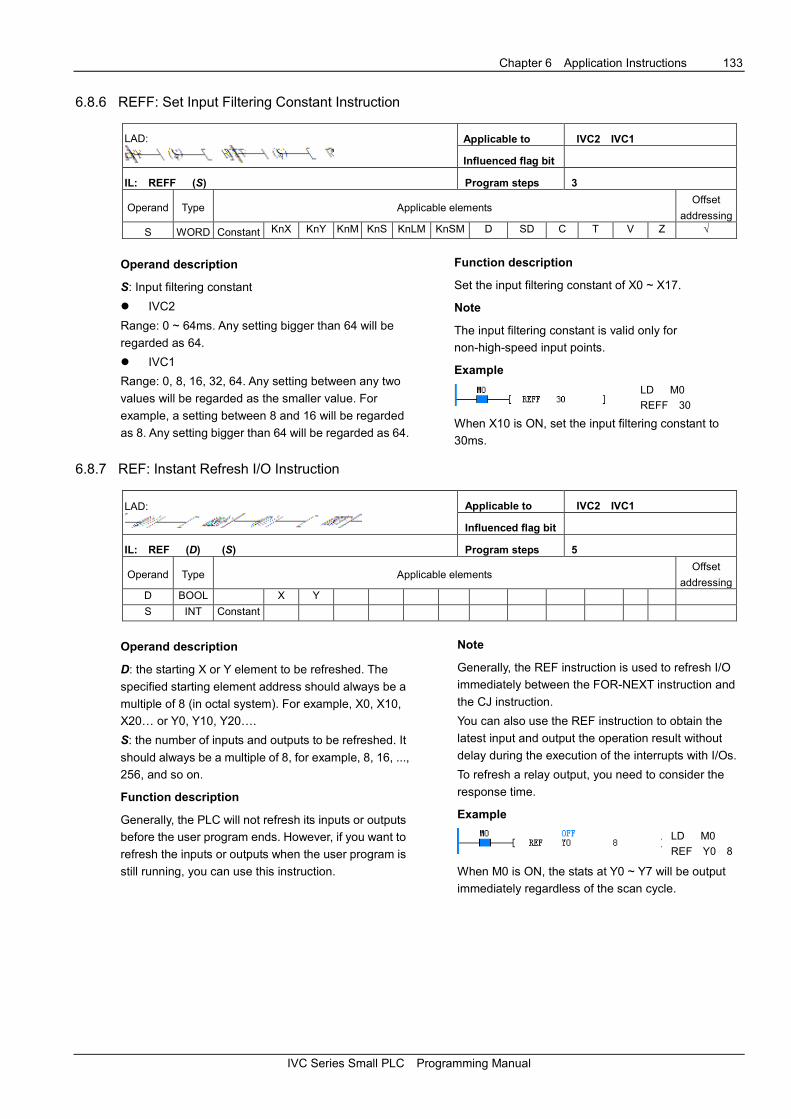
Chapter 6 Application Instructions 133
IVC Series Small PLC Programming Manual
6.8.6 REFF: Set Input Filtering Constant Instruction
LAD:
Applicable to IVC2 IVC1
Influenced flag bit
IL: REFF (S) Program steps 3
Operand Type Applicable elements Offset
addressing
S WORD Constant KnX KnY KnM KnS KnLM KnSM D SD C T V Z √
Operand description
S: Input filtering constant
� IVC2
Range: 0 ~ 64ms. Any setting bigger than 64 will be
regarded as 64.
� IVC1
Range: 0, 8, 16, 32, 64. Any setting between any two
values will be regarded as the smaller value. For
example, a setting between 8 and 16 will be regarded
as 8. Any setting bigger than 64 will be regarded as 64.
Function description
Set the input filtering constant of X0 ~ X17.
Note
The input filtering constant is valid only for
non-high-speed input points.
Example
LD M0
REFF 30
When X10 is ON, set the input filtering constant to
30ms.
6.8.7 REF: Instant Refresh I/O Instruction
LAD:
Applicable to IVC2 IVC1
Influenced flag bit
IL: REF (D) (S) Program steps 5
Operand Type Applicable elements Offset
addressing D BOOL X Y
S INT Constant
Operand description
D: the starting X or Y element to be refreshed. The
specified starting element address should always be a
multiple of 8 (in octal system). For example, X0, X10,
X20… or Y0, Y10, Y20….
S: the number of inputs and outputs to be refreshed. It
should always be a multiple of 8, for example, 8, 16, ...,
256, and so on.
Function description
Generally, the PLC will not refresh its inputs or outputs
before the user program ends. However, if you want to
refresh the inputs or outputs when the user program is
still running, you can use this instruction.
Note
Generally, the REF instruction is used to refresh I/O
immediately between the FOR-NEXT instruction and
the CJ instruction.
You can also use the REF instruction to obtain the
latest input and output the operation result without
delay during the execution of the interrupts with I/Os.
To refresh a relay output, you need to consider the
response time.
Example
LD M0
REF Y0 8
When M0 is ON, the stats at Y0 ~ Y7 will be output
immediately regardless of the scan cycle.

134 Chapter 6 Application Instructions
IVC Series Small PLC Programming Manual
6.8.8 EROMWR: EEPROM Write Instruction
LAD:
Applicable to IVC2 IVC1
Influenced flag bit
IL: EROMWR (S1) (S2) Program steps 6
Operand Type Applicable elements Offset
addressing S1 WORD D
S2 INT Constant KnX KnY KnM KnS KnLM KnSM D SD C T V Z √
Operand description
S1: starting address of the elements to be stored.
Range: D6000 ~ D6999
S2: number of the elements to be stored. S2<16
S1 + S2 < D7000
Function description
1. Partial PLC data are battery backed. However,
during the calculation, you can save the intermediate
data into EEPROM with the EROMWR instruction.
2. This instruction is executed upon the rising edge.
3. Two EROMWR instructions cannot be executed at
the same time. When SM196, the EEPROM write OK
flag, is ON, it indicates that EEPROM is okay for write
operation. When SM196 is OFF, it indicates that an
EROMWR instruction is being executed.
Note
An EROMWR instruction will make the scan cycle 2 ~
5ms longer. It is recommended to set the S1 to 6000
plus an integer multiple of 16, like D6000, D6016 and
D6032.
Example
LD M1
SET M1000
RST M1
MOV 16 D6016
MOV 32 D6032
LD SM1
SET M1
LD M1000
AND SM196
EROMWR D6016 2
RST M1000
SET M1001
LD M1001
AND SM196
EROMWR D6032 16
RST M1001
In the preceding example, two sets of D elements are
stored in the EEPROM:
1. SM1 and M1 makes M1000 generate a rising edge
during the second scan cycle and triggers the
execution of the first EROMWR instruction.
2. M1001 and SM196 makes the second rising edge,
triggering the execution of the second EROMWR
instruction.

Chapter 6 Application Instructions 135
IVC Series Small PLC Programming Manual
6.9 Real-Time Clock Instruction
6.9.1 TRD: Read Real-Time Clock Instruction
LAD:
Applicable to IVC2 IVC1
Influenced flag bit
IL: TRD (D) Program steps 3
Operand Type Applicable elements Offset
addressing D WORD D V √
Operand description
D: the starting storage element for the system time,
which occupies the 7 consecutive elements starting
with D
Function description
Read the system time and store the value in the
storage elements designated by D.
Note
The TRD instruction will fail upon system clock
setting error.
Example
LD M0
TRD D10
When M0 is ON, send the system time to the 7
elements starting with D10.
The execution result of the instruction is as follows:
Special data register
for real time clock
Element Item Clock data
— — — — — →
— — — — — →
— — — — — →
— — — — — →
— — — — — →
— — — — — →
— — — — — →
Element Item
SD100 Year 2000 to 2099 D10 Year
SD101 Month 1 to 12 D11 Month
SD102 Day 1 to 31 D12 Day
SD103 Hour 0 to 23 D13 Hour
SD104 Minute 0 to 59 D14 Minute
SD105 Second 0 to 59 D15 Second
SD106 Week 0 to 6 D16 Week
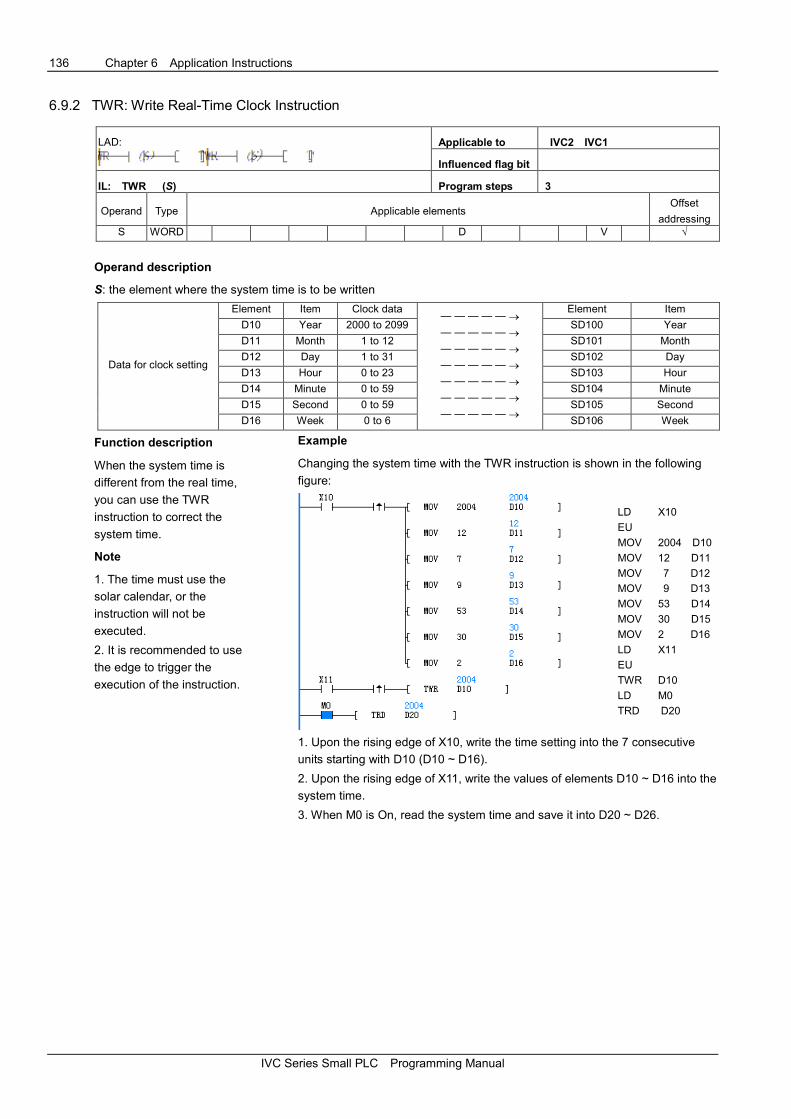
136 Chapter 6 Application Instructions
IVC Series Small PLC Programming Manual
6.9.2 TWR: Write Real-Time Clock Instruction
LAD:
Applicable to IVC2 IVC1
Influenced flag bit
IL: TWR (S) Program steps 3
Operand Type Applicable elements Offset
addressing S WORD D V √
Operand description
S: the element where the system time is to be written
Data for clock setting
Element Item Clock data — — — — — →
— — — — — →
— — — — — →
— — — — — →
— — — — — →
— — — — — →
— — — — — →
Element Item
D10 Year 2000 to 2099 SD100 Year
D11 Month 1 to 12 SD101 Month
D12 Day 1 to 31 SD102 Day
D13 Hour 0 to 23 SD103 Hour
D14 Minute 0 to 59 SD104 Minute
D15 Second 0 to 59 SD105 Second
D16 Week 0 to 6 SD106 Week
Function description
When the system time is
different from the real time,
you can use the TWR
instruction to correct the
system time.
Note
1. The time must use the
solar calendar, or the
instruction will not be
executed.
2. It is recommended to use
the edge to trigger the
execution of the instruction.
Example
Changing the system time with the TWR instruction is shown in the following
figure:
LD X10
EU
MOV 2004 D10
MOV 12 D11
MOV 7 D12
MOV 9 D13
MOV 53 D14
MOV 30 D15
MOV 2 D16
LD X11
EU
TWR D10
LD M0
TRD D20
1. Upon the rising edge of X10, write the time setting into the 7 consecutive
units starting with D10 (D10 ~ D16).
2. Upon the rising edge of X11, write the values of elements D10 ~ D16 into the
system time.
3. When M0 is On, read the system time and save it into D20 ~ D26.
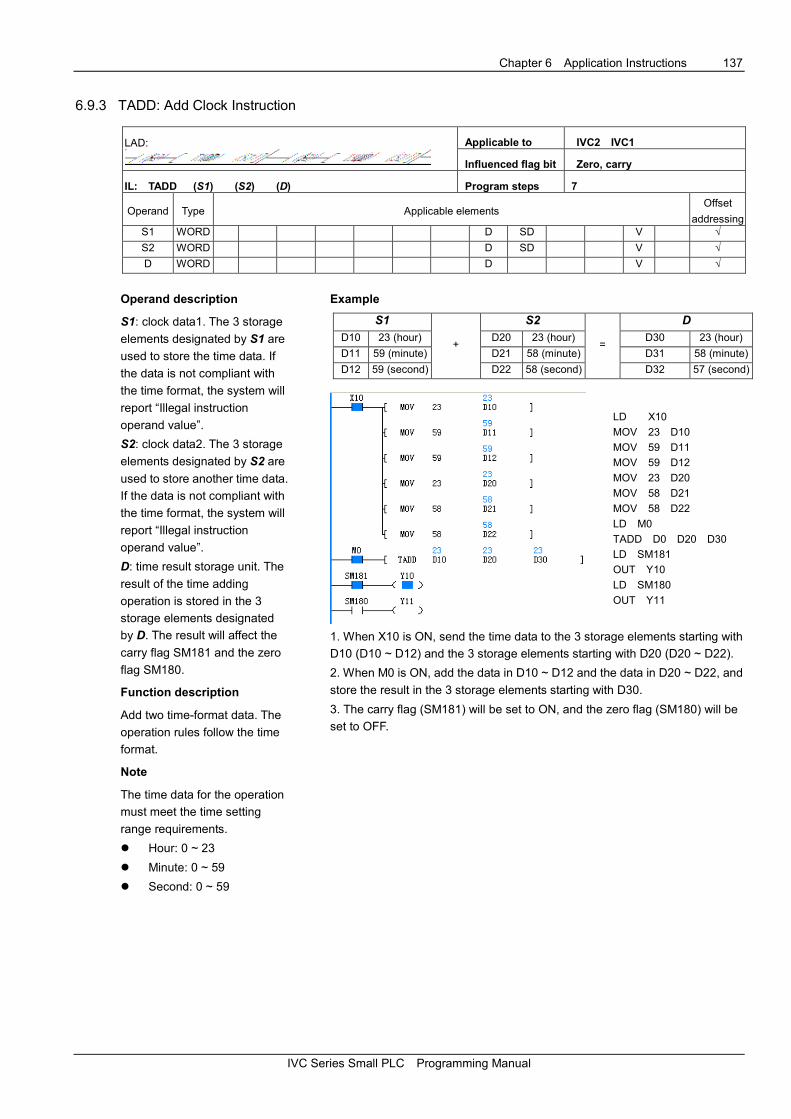
Chapter 6 Application Instructions 137
IVC Series Small PLC Programming Manual
6.9.3 TADD: Add Clock Instruction
LAD:
Applicable to IVC2 IVC1
Influenced flag bit Zero, carry
IL: TADD (S1) (S2) (D) Program steps 7
Operand Type Applicable elements Offset
addressing S1 WORD D SD V √
S2 WORD D SD V √
D WORD D V √
Operand description
S1: clock data1. The 3 storage
elements designated by S1 are
used to store the time data. If
the data is not compliant with
the time format, the system will
report “Illegal instruction
operand value”.
S2: clock data2. The 3 storage
elements designated by S2 are
used to store another time data.
If the data is not compliant with
the time format, the system will
report “Illegal instruction
operand value”.
D: time result storage unit. The
result of the time adding
operation is stored in the 3
storage elements designated
by D. The result will affect the
carry flag SM181 and the zero
flag SM180.
Function description
Add two time-format data. The
operation rules follow the time
format.
Note
The time data for the operation
must meet the time setting
range requirements.
� Hour: 0 ~ 23
� Minute: 0 ~ 59
� Second: 0 ~ 59
Example
S1
+
S2
=
D
D10 23 (hour) D20 23 (hour) D30 23 (hour)
D11 59 (minute) D21 58 (minute) D31 58 (minute)
D12 59 (second) D22 58 (second) D32 57 (second)
LD X10
MOV 23 D10
MOV 59 D11
MOV 59 D12
MOV 23 D20
MOV 58 D21
MOV 58 D22
LD M0
TADD D0 D20 D30
LD SM181
OUT Y10
LD SM180
OUT Y11
1. When X10 is ON, send the time data to the 3 storage elements starting with
D10 (D10 ~ D12) and the 3 storage elements starting with D20 (D20 ~ D22).
2. When M0 is ON, add the data in D10 ~ D12 and the data in D20 ~ D22, and
store the result in the 3 storage elements starting with D30.
3. The carry flag (SM181) will be set to ON, and the zero flag (SM180) will be
set to OFF.
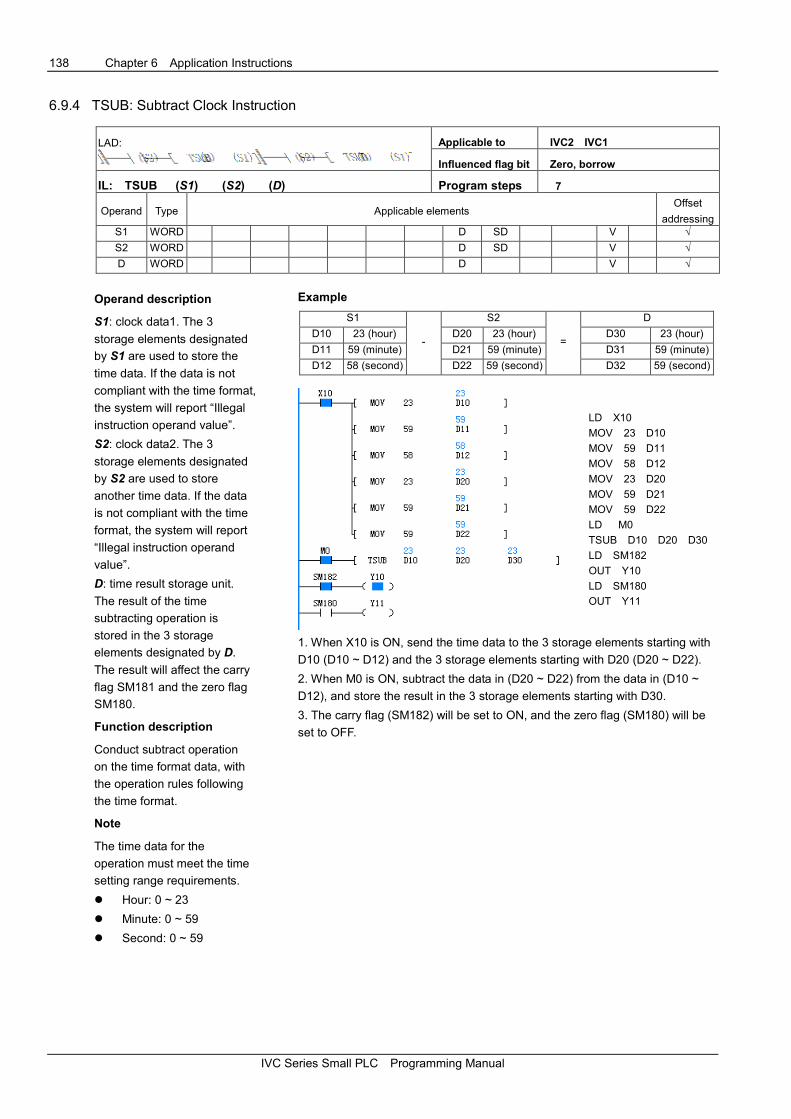
138 Chapter 6 Application Instructions
IVC Series Small PLC Programming Manual
6.9.4 TSUB: Subtract Clock Instruction
LAD:
Applicable to IVC2 IVC1
Influenced flag bit Zero, borrow
IL: TSUB (S1) (S2) (D) Program steps 7
Operand Type Applicable elements Offset
addressing S1 WORD D SD V √
S2 WORD D SD V √
D WORD D V √
Operand description
S1: clock data1. The 3
storage elements designated
by S1 are used to store the
time data. If the data is not
compliant with the time format,
the system will report “Illegal
instruction operand value”.
S2: clock data2. The 3
storage elements designated
by S2 are used to store
another time data. If the data
is not compliant with the time
format, the system will report
“Illegal instruction operand
value”.
D: time result storage unit.
The result of the time
subtracting operation is
stored in the 3 storage
elements designated by D.
The result will affect the carry
flag SM181 and the zero flag
SM180.
Function description
Conduct subtract operation
on the time format data, with
the operation rules following
the time format.
Note
The time data for the
operation must meet the time
setting range requirements.
� Hour: 0 ~ 23
� Minute: 0 ~ 59
� Second: 0 ~ 59
Example
S1
-
S2
=
D
D10 23 (hour) D20 23 (hour) D30 23 (hour)
D11 59 (minute) D21 59 (minute) D31 59 (minute)
D12 58 (second) D22 59 (second) D32 59 (second)
LD X10
MOV 23 D10
MOV 59 D11
MOV 58 D12
MOV 23 D20
MOV 59 D21
MOV 59 D22
LD M0
TSUB D10 D20 D30
LD SM182
OUT Y10
LD SM180
OUT Y11
1. When X10 is ON, send the time data to the 3 storage elements starting with
D10 (D10 ~ D12) and the 3 storage elements starting with D20 (D20 ~ D22).
2. When M0 is ON, subtract the data in (D20 ~ D22) from the data in (D10 ~
D12), and store the result in the 3 storage elements starting with D30.
3. The carry flag (SM182) will be set to ON, and the zero flag (SM180) will be
set to OFF.

Chapter 6 Application Instructions 139
IVC Series Small PLC Programming Manual
6.9.5 HOUR: Timing List Instruction
LAD:
Applicable to IVC2 IVC1
Influenced flag bit
IL: HOUR (S) (D1) (D2) Program steps 8
Operand Type Applicable elements Offset
addressing S INT Constant KnX KnY KnM KnS KnLM KnSM D SD C T V Z √
D1 INT D V √
D2 BOOL Y M S LM
Operand description
S: the hour comparison data.
Range: 0 ~ 32767.
D1: time storage starting
element. D1: hour. D1+1:
second.
D2: alarm output address.
When D1 ≥ S, the alarm point
changes to ON, and generates
output.
Function description
Make judgment on the time
when the input contact is ON
(unit: hour).
Note
1. To sustain the current data after power off, set D1 within the element Saving
Range (see 2.2.1 System Block). Otherwise, the current data will be cleared
upon PLC power off or when PLC changes from RUN to STOP.
2. The timing still continues even when the alarm output D2 is ON.
3. The hour data in this instruction is a 16-bit integer. It will restart from 0 after
32767.
Example
LD M0
MOV 1000 D100
LD M1
HOUR D100 D200 M10
LD M10
OUT Y10
1. When M0 is ON, set the comparison data of HOUR instruction.
2. When M1 is ON, accumulate the time for the input contact.
3. M10 will be ON when the accumulated time ≥ 1000.
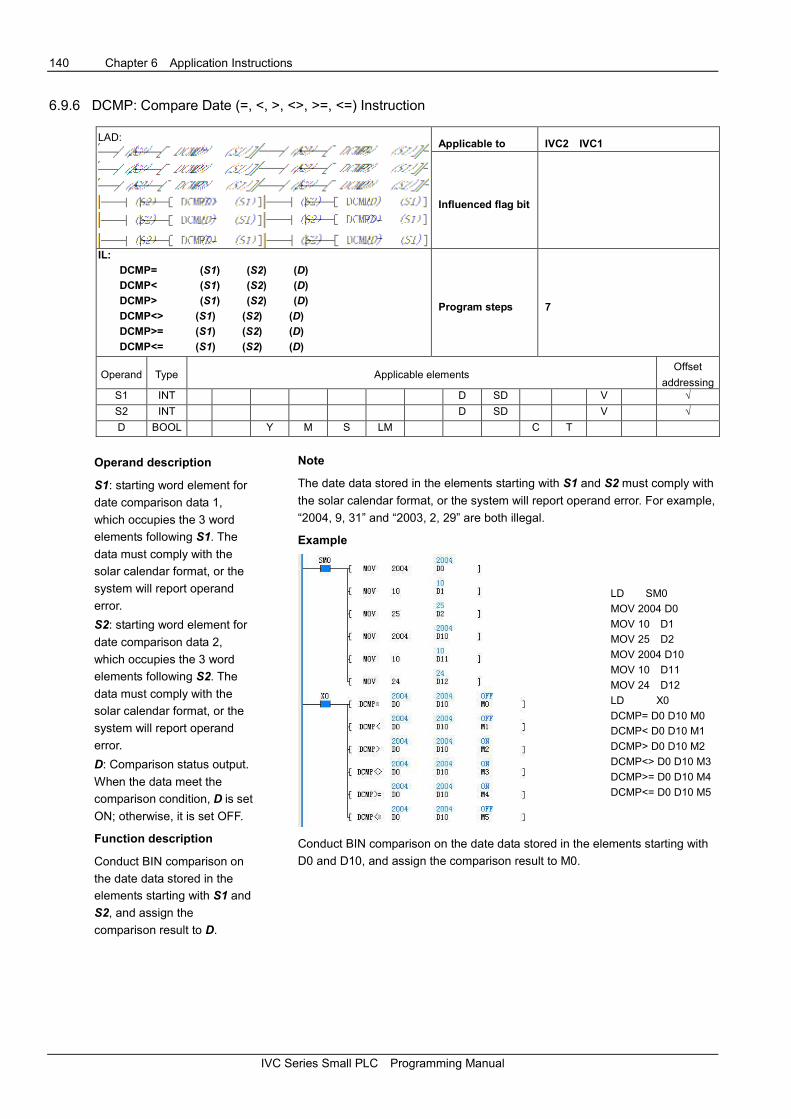
140 Chapter 6 Application Instructions
IVC Series Small PLC Programming Manual
6.9.6 DCMP: Compare Date (=, <, >, <>, >=, <=) Instruction
LAD:
Applicable to IVC2 IVC1
Influenced flag bit
IL:
DCMP= (S1) (S2) (D)
DCMP< (S1) (S2) (D)
DCMP> (S1) (S2) (D)
DCMP<> (S1) (S2) (D)
DCMP>= (S1) (S2) (D)
DCMP<= (S1) (S2) (D)
Program steps 7
Operand Type Applicable elements Offset
addressing S1 INT D SD V √
S2 INT D SD V √
D BOOL Y M S LM C T
Operand description
S1: starting word element for
date comparison data 1,
which occupies the 3 word
elements following S1. The
data must comply with the
solar calendar format, or the
system will report operand
error.
S2: starting word element for
date comparison data 2,
which occupies the 3 word
elements following S2. The
data must comply with the
solar calendar format, or the
system will report operand
error.
D: Comparison status output.
When the data meet the
comparison condition, D is set
ON; otherwise, it is set OFF.
Function description
Conduct BIN comparison on
the date data stored in the
elements starting with S1 and
S2, and assign the
comparison result to D.
Note
The date data stored in the elements starting with S1 and S2 must comply with
the solar calendar format, or the system will report operand error. For example,
“2004, 9, 31” and “2003, 2, 29” are both illegal.
Example
LD SM0
MOV 2004 D0
MOV 10 D1
MOV 25 D2
MOV 2004 D10
MOV 10 D11
MOV 24 D12
LD X0
DCMP= D0 D10 M0
DCMP< D0 D10 M1
DCMP> D0 D10 M2
DCMP<> D0 D10 M3
DCMP>= D0 D10 M4
DCMP<= D0 D10 M5
Conduct BIN comparison on the date data stored in the elements starting with
D0 and D10, and assign the comparison result to M0.
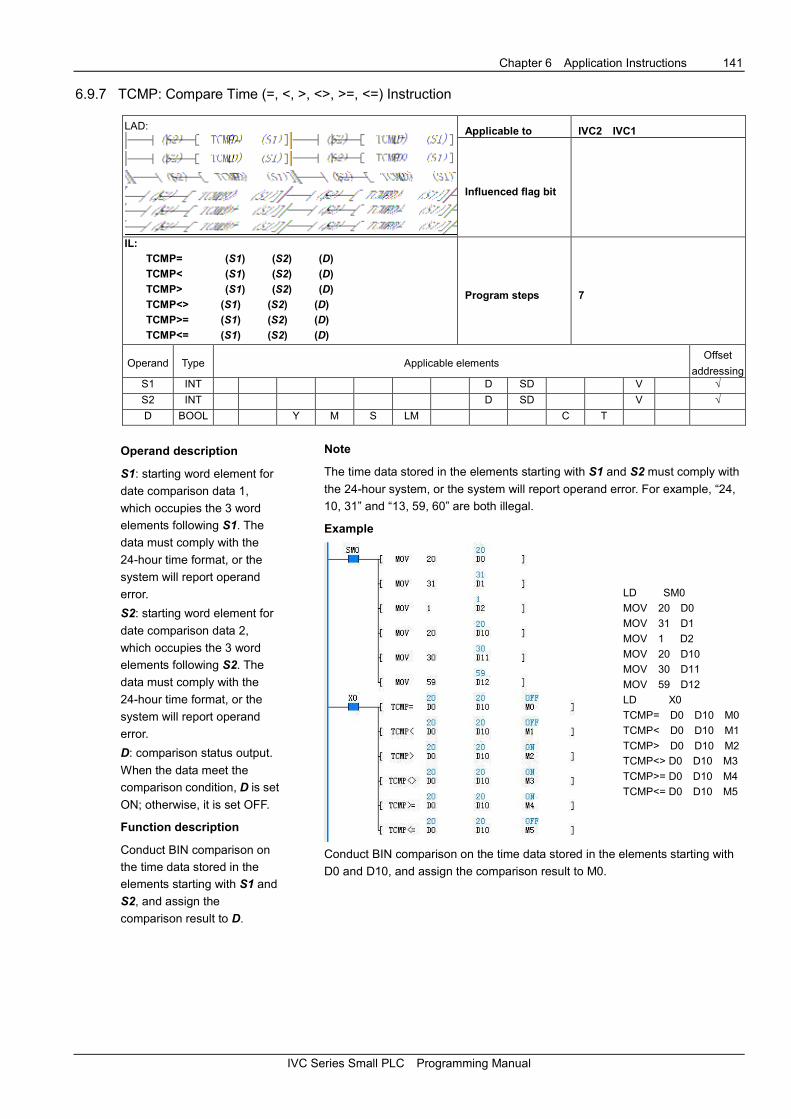
Chapter 6 Application Instructions 141
IVC Series Small PLC Programming Manual
6.9.7 TCMP: Compare Time (=, <, >, <>, >=, <=) Instruction
LAD:
Applicable to IVC2 IVC1
Influenced flag bit
IL:
TCMP= (S1) (S2) (D)
TCMP< (S1) (S2) (D)
TCMP> (S1) (S2) (D)
TCMP<> (S1) (S2) (D)
TCMP>= (S1) (S2) (D)
TCMP<= (S1) (S2) (D)
Program steps 7
Operand Type Applicable elements Offset
addressing S1 INT D SD V √
S2 INT D SD V √
D BOOL Y M S LM C T
Operand description
S1: starting word element for
date comparison data 1,
which occupies the 3 word
elements following S1. The
data must comply with the
24-hour time format, or the
system will report operand
error.
S2: starting word element for
date comparison data 2,
which occupies the 3 word
elements following S2. The
data must comply with the
24-hour time format, or the
system will report operand
error.
D: comparison status output.
When the data meet the
comparison condition, D is set
ON; otherwise, it is set OFF.
Function description
Conduct BIN comparison on
the time data stored in the
elements starting with S1 and
S2, and assign the
comparison result to D.
Note
The time data stored in the elements starting with S1 and S2 must comply with
the 24-hour system, or the system will report operand error. For example, “24,
10, 31” and “13, 59, 60” are both illegal.
Example
LD SM0
MOV 20 D0
MOV 31 D1
MOV 1 D2
MOV 20 D10
MOV 30 D11
MOV 59 D12
LD X0
TCMP= D0 D10 M0
TCMP< D0 D10 M1
TCMP> D0 D10 M2
TCMP<> D0 D10 M3
TCMP>= D0 D10 M4
TCMP<= D0 D10 M5
Conduct BIN comparison on the time data stored in the elements starting with
D0 and D10, and assign the comparison result to M0.
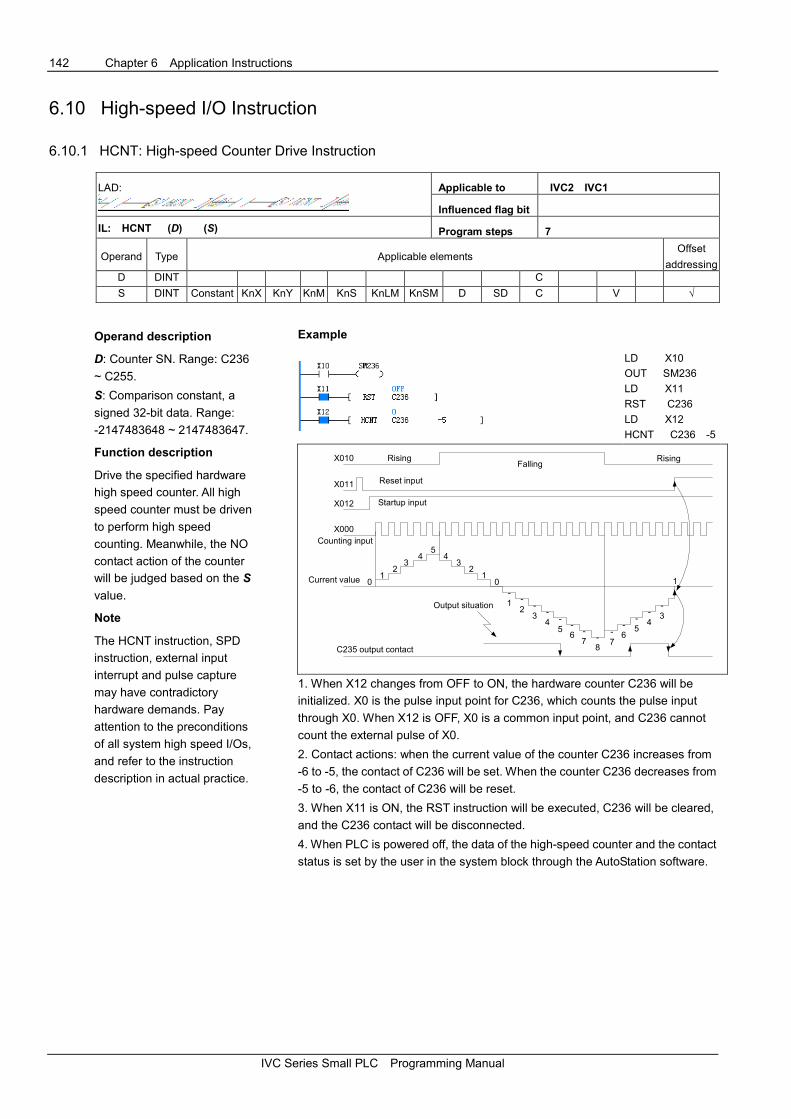
142 Chapter 6 Application Instructions
IVC Series Small PLC Programming Manual
6.10 High-speed I/O Instruction
6.10.1 HCNT: High-speed Counter Drive Instruction
LAD:
Applicable to IVC2 IVC1
Influenced flag bit
IL: HCNT (D) (S) Program steps 7
Operand Type Applicable elements Offset
addressing D DINT C
S DINT Constant KnX KnY KnM KnS KnLM KnSM D SD C V √
Operand description
D: Counter SN. Range: C236
~ C255.
S: Comparison constant, a
signed 32-bit data. Range:
-2147483648 ~ 2147483647.
Function description
Drive the specified hardware
high speed counter. All high
speed counter must be driven
to perform high speed
counting. Meanwhile, the NO
contact action of the counter
will be judged based on the S
value.
Note
The HCNT instruction, SPD
instruction, external input
interrupt and pulse capture
may have contradictory
hardware demands. Pay
attention to the preconditions
of all system high speed I/Os,
and refer to the instruction
description in actual practice.
Example
LD X10
OUT SM236
LD X11
RST C236
LD X12
HCNT C236 -5
X010
X011
X012
X000
01
23
45
43
21
0-1 -
2 -3 -
4 -5 -
6 -7 -
8
-7
-6
-5
-4
-3
Rising
1
Falling
Reset input
Startup input
Counting input
Current value
Output situation
C235 output contact
Rising
1. When X12 changes from OFF to ON, the hardware counter C236 will be
initialized. X0 is the pulse input point for C236, which counts the pulse input
through X0. When X12 is OFF, X0 is a common input point, and C236 cannot
count the external pulse of X0.
2. Contact actions: when the current value of the counter C236 increases from
-6 to -5, the contact of C236 will be set. When the counter C236 decreases from
-5 to -6, the contact of C236 will be reset.
3. When X11 is ON, the RST instruction will be executed, C236 will be cleared,
and the C236 contact will be disconnected.
4. When PLC is powered off, the data of the high-speed counter and the contact
status is set by the user in the system block through the AutoStation software.

Chapter 6 Application Instructions 143
IVC Series Small PLC Programming Manual
6.10.2 DHSCS: High-speed Counting Compare Set Instruction
LAD:
Applicable to IVC2 IVC1
Influenced flag bit
IL: DHSCS (S1) (S2 ) (D) Program steps 10
Operand Type Applicable elements Offset
addressing S1 DINT Constant KnX KnY KnM KnS KnLM KnSM D SD C V √
S2 DINT C
D BOOL Y M S
Operand description
S1: a 32-bit DINT data, the
one with which the high
speed counter will compare.
Range: -2147483648 ~
2147483647.
S2: high speed counter.
Range: C236 ~ C255.
D: target bit element,
including Y, M and S elements.
They will be set or output
immediately regardless of the
scan cycle.
Function description
1. A high-speed counter will
count in the interrupt mode
only when it is driven by the
HCNT instruction and the
counting input changes from
OFF to ON. When high-speed
counter counts to S1 in the
DHSCS instruction, the bit
element D will be set
immediately, or, in the case of
a Y element, the Y element
will output immediately.
2. This instruction can be
used when you want to set
(and output, for Y elements) a
certain bit element by
comparing the counter value
with a preset value.
Note
1. The DHSCS instruction must work together with the HCNT instruction,
because DHSCS is only applicable to the high speed counters that is driven by
HCNT.
2. The DHSCS instruction will be validated only by pulse input. You cannot
validate the instruction by changing the counter value with instructions such as
DMOV or MOV.
3. DHSCS (DHSCI, DHSCR, DHSZ, DHSP, DHST) can be used repeatedly.
However, at most the first six such instructions can be driven at the same time.
4. The maximum frequency supported by the PLC high speed counters will be
seriously affected by instructions like DHSCS, DHSCI, DHSCR, DHSZ, DHSP
and DHST. For details, see Chapter 8 Using High Speed I/O.
Example
LD M1
OUT SM236
LD M0
HCNT C236 1000
LD M2
DHSCS 2000 C236 Y10
LD C236
OUT Y11
1. When M1 is ON, C236 will count in the interrupt mode when X0 changes
from OFF to ON (see Chapter 8 Using High Speed I/O for the description of
the X0 input frequency). When C236 changes from 999 to 1000, the C236
contact will be set. When C236 changes from 1001 to 1000, the C236 contact
will be reset. When the C236 contact drives Y11, the execution of Y11 is
determined by the user program scan cycle.
2. When M2 is ON, and the DHSCS instruction meets the requirements stated
in the preceding “Note”, Y10 will output immediately if C236 reaches 2000,
regardless of the the scan cycle.
3. When M0 is ON, SM236 is driven, and the C236 counter counts down. When
M0 is OFF, SM236 is not driven, and the C236 counter counts up.
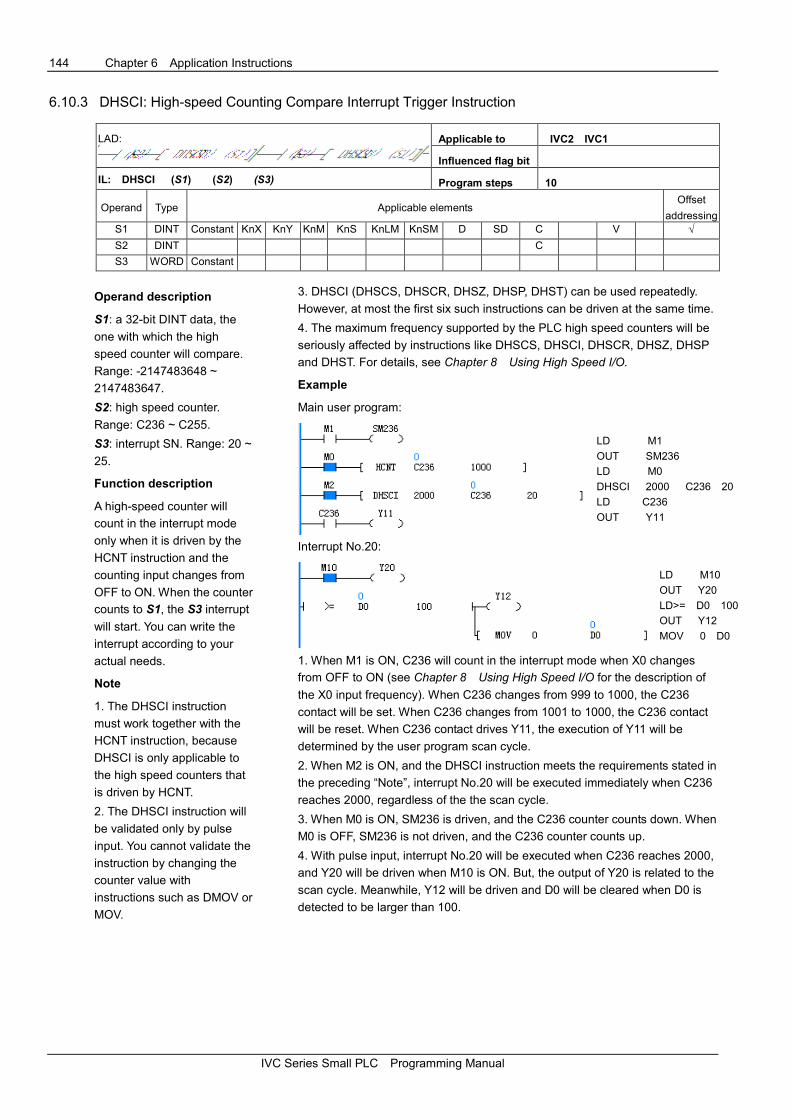
144 Chapter 6 Application Instructions
IVC Series Small PLC Programming Manual
6.10.3 DHSCI: High-speed Counting Compare Interrupt Trigger Instruction
LAD:
Applicable to IVC2 IVC1
Influenced flag bit
IL: DHSCI (S1) (S2) (S3) Program steps 10
Operand Type Applicable elements Offset
addressing S1 DINT Constant KnX KnY KnM KnS KnLM KnSM D SD C V √
S2 DINT C
S3 WORD Constant
Operand description
S1: a 32-bit DINT data, the
one with which the high
speed counter will compare.
Range: -2147483648 ~
2147483647.
S2: high speed counter.
Range: C236 ~ C255.
S3: interrupt SN. Range: 20 ~
25.
Function description
A high-speed counter will
count in the interrupt mode
only when it is driven by the
HCNT instruction and the
counting input changes from
OFF to ON. When the counter
counts to S1, the S3 interrupt
will start. You can write the
interrupt according to your
actual needs.
Note
1. The DHSCI instruction
must work together with the
HCNT instruction, because
DHSCI is only applicable to
the high speed counters that
is driven by HCNT.
2. The DHSCI instruction will
be validated only by pulse
input. You cannot validate the
instruction by changing the
counter value with
instructions such as DMOV or
MOV.
3. DHSCI (DHSCS, DHSCR, DHSZ, DHSP, DHST) can be used repeatedly.
However, at most the first six such instructions can be driven at the same time.
4. The maximum frequency supported by the PLC high speed counters will be
seriously affected by instructions like DHSCS, DHSCI, DHSCR, DHSZ, DHSP
and DHST. For details, see Chapter 8 Using High Speed I/O.
Example
Main user program:
LD M1
OUT SM236
LD M0
DHSCI 2000 C236 20
LD C236
OUT Y11
Interrupt No.20:
LD M10
OUT Y20
LD>= D0 100
OUT Y12
MOV 0 D0
1. When M1 is ON, C236 will count in the interrupt mode when X0 changes
from OFF to ON (see Chapter 8 Using High Speed I/O for the description of
the X0 input frequency). When C236 changes from 999 to 1000, the C236
contact will be set. When C236 changes from 1001 to 1000, the C236 contact
will be reset. When C236 contact drives Y11, the execution of Y11 will be
determined by the user program scan cycle.
2. When M2 is ON, and the DHSCI instruction meets the requirements stated in
the preceding “Note”, interrupt No.20 will be executed immediately when C236
reaches 2000, regardless of the the scan cycle.
3. When M0 is ON, SM236 is driven, and the C236 counter counts down. When
M0 is OFF, SM236 is not driven, and the C236 counter counts up.
4. With pulse input, interrupt No.20 will be executed when C236 reaches 2000,
and Y20 will be driven when M10 is ON. But, the output of Y20 is related to the
scan cycle. Meanwhile, Y12 will be driven and D0 will be cleared when D0 is
detected to be larger than 100.

Chapter 6 Application Instructions 145
IVC Series Small PLC Programming Manual
6.10.4 DHSCR: High-speed Counting Compare Reset Instruction
LAD:
Applicable to IVC2 IVC1
Influenced flag bit
IL: DHSCR (S1) (S2) (D) Program steps 10
Operand Type Applicable elements Offset
addressing S1 DINT Constant KnX KnY KnM KnS KnLM KnSM D SD C V √
S2 DINT C
D BOOL Y M S C
Operand description
S1: a 32-bit DINT data, the
one with which the high
speed counter will compare.
Range: -2147483648 ~
2147483647.
S2: high speed counter.
Range: C236 ~ C255.
D: target bit element. The
action on Y, M, S or C will be
valid immediately regardless
of the scan cycle. If D is a C
element, it must be S2.
Function description
A high-speed counter will
count in the interrupt mode
only when it is driven by the
HCNT instruction and the
counting input changes from
OFF to ON. When the counter
counts to S1, the D element
will be reset (and output, for Y
elements) immediately. You
can use this instruction when
you want to reset (and output,
for Y elements) a certain bit
element by comparing the
counter value with a preset
value.
Note
1. The DHSCR instruction
must work together with the
HCNT instruction, because
DHSCR is only applicable to
the high speed counters that is driven by HCNT.
2. The DHSCR instruction will be validated only by pulse input. You cannot
validate the instruction by changing the counter value with instructions such as
DMOV or MOV.
3. DHSCR (DHSCI, DHSCS, DHSZ, DHSP, DHST) can be used repeatedly.
However, at most the first six such instructions can be driven at the same time.
4. The maximum frequency supported by the PLC high speed counters will be
seriously affected by instructions like DHSCS, DHSCI, DHSCR, DHSZ, DHSP
and DHST. For details, see Chapter 8 Using High Speed I/O.
Example
LD SM255
OUT Y10
LD M1
HCNT C255 1000
LD C255
OUT Y20
LD M2
DHSCR 2000 C255 Y1
1. When M1 and X7 are both ON, C255 counts the phase difference of X3 and
X4 in the interrupt mode. When C255 changes from 999 to 1000, C255 contact
will be set, and reset when C255 changes from 1001 to 1000. When C255
contact drives Y20, the execution of Y20 will be determined by the user
program scan cycle.
2. When M2 is ON, and the DHSCR instruction meets the requirements stated
in the preceding “Note”, Y1 will be output immediately when C255 reaches
2000, regardless of the the scan cycle.
3. When the X3 pulse input is ahead of X4, SM255 is ON. When the X4 pulse
input is ahead of X3, SM255 is OFF.
4. When X7, the startup signal of C255, is OFF, C255 will not count.
5. When M1 and X7 are all ON, if X5 is ON, C255 will be cleared, and C255
auxiliary contact will be reset.
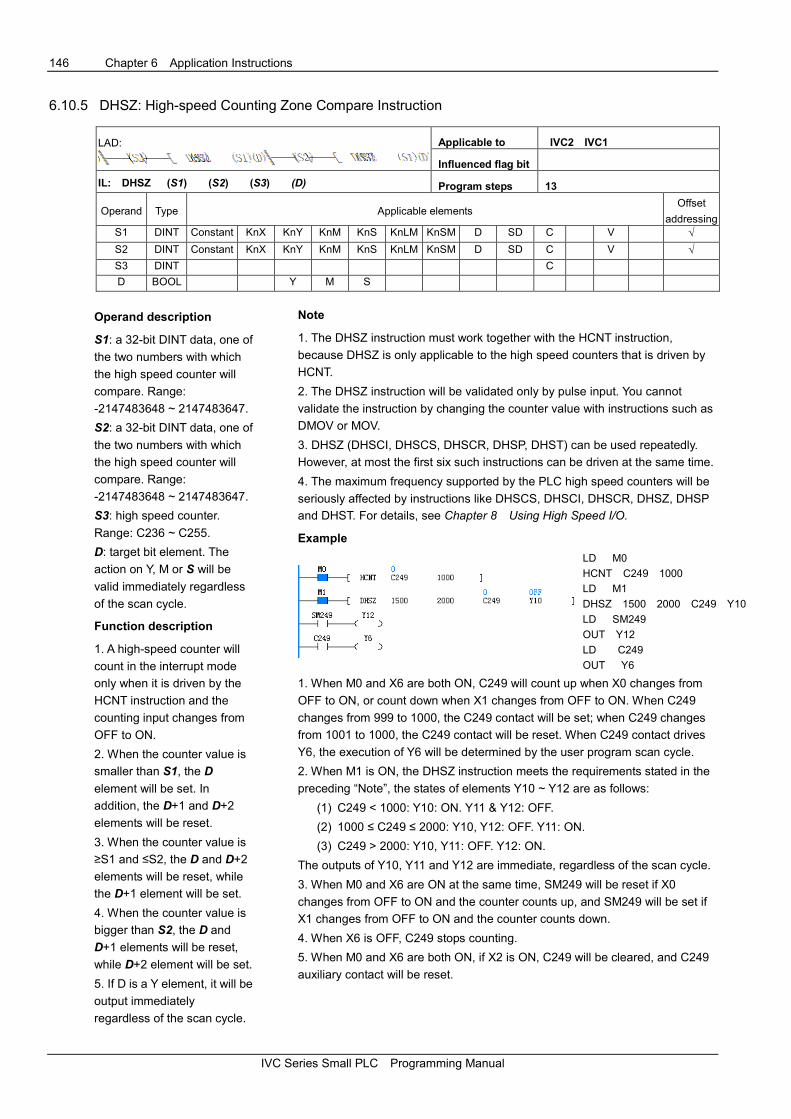
146 Chapter 6 Application Instructions
IVC Series Small PLC Programming Manual
6.10.5 DHSZ: High-speed Counting Zone Compare Instruction
LAD:
Applicable to IVC2 IVC1
Influenced flag bit
IL: DHSZ (S1) (S2) (S3) (D) Program steps 13
Operand Type Applicable elements Offset
addressing S1 DINT Constant KnX KnY KnM KnS KnLM KnSM D SD C V √
S2 DINT Constant KnX KnY KnM KnS KnLM KnSM D SD C V √
S3 DINT C
D BOOL Y M S
Operand description
S1: a 32-bit DINT data, one of
the two numbers with which
the high speed counter will
compare. Range:
-2147483648 ~ 2147483647.
S2: a 32-bit DINT data, one of
the two numbers with which
the high speed counter will
compare. Range:
-2147483648 ~ 2147483647.
S3: high speed counter.
Range: C236 ~ C255.
D: target bit element. The
action on Y, M or S will be
valid immediately regardless
of the scan cycle.
Function description
1. A high-speed counter will
count in the interrupt mode
only when it is driven by the
HCNT instruction and the
counting input changes from
OFF to ON.
2. When the counter value is
smaller than S1, the D
element will be set. In
addition, the D+1 and D+2
elements will be reset.
3. When the counter value is
≥S1 and ≤S2, the D and D+2
elements will be reset, while
the D+1 element will be set.
4. When the counter value is
bigger than S2, the D and
D+1 elements will be reset,
while D+2 element will be set.
5. If D is a Y element, it will be
output immediately
regardless of the scan cycle.
Note
1. The DHSZ instruction must work together with the HCNT instruction,
because DHSZ is only applicable to the high speed counters that is driven by
HCNT.
2. The DHSZ instruction will be validated only by pulse input. You cannot
validate the instruction by changing the counter value with instructions such as
DMOV or MOV.
3. DHSZ (DHSCI, DHSCS, DHSCR, DHSP, DHST) can be used repeatedly.
However, at most the first six such instructions can be driven at the same time.
4. The maximum frequency supported by the PLC high speed counters will be
seriously affected by instructions like DHSCS, DHSCI, DHSCR, DHSZ, DHSP
and DHST. For details, see Chapter 8 Using High Speed I/O.
Example
LD M0
HCNT C249 1000
LD M1
DHSZ 1500 2000 C249 Y10
LD SM249
OUT Y12
LD C249
OUT Y6
1. When M0 and X6 are both ON, C249 will count up when X0 changes from
OFF to ON, or count down when X1 changes from OFF to ON. When C249
changes from 999 to 1000, the C249 contact will be set; when C249 changes
from 1001 to 1000, the C249 contact will be reset. When C249 contact drives
Y6, the execution of Y6 will be determined by the user program scan cycle.
2. When M1 is ON, the DHSZ instruction meets the requirements stated in the
preceding “Note”, the states of elements Y10 ~ Y12 are as follows:
(1) C249 < 1000: Y10: ON. Y11 & Y12: OFF.
(2) 1000 ≤ C249 ≤ 2000: Y10, Y12: OFF. Y11: ON.
(3) C249 > 2000: Y10, Y11: OFF. Y12: ON.
The outputs of Y10, Y11 and Y12 are immediate, regardless of the scan cycle.
3. When M0 and X6 are ON at the same time, SM249 will be reset if X0
changes from OFF to ON and the counter counts up, and SM249 will be set if
X1 changes from OFF to ON and the counter counts down.
4. When X6 is OFF, C249 stops counting.
5. When M0 and X6 are both ON, if X2 is ON, C249 will be cleared, and C249
auxiliary contact will be reset.

Chapter 6 Application Instructions 147
IVC Series Small PLC Programming Manual
6.10.6 DHST: High-speed Counting Table Compare Instruction
LAD:
Applicable to IVC2 IVC1
Influenced flag bit
IL: DHST (S1) (S2) (S3) Program steps 10
Operand Type Applicable elements Offset
addressing S1 DINT D
S2 INT Constant
S3 DINT C
Operand description
S1: the starting D element for table comparison. The
following three D elements are the comparison data,
SN of Y element and the output state. These four D
elements form a record.
S2: the number of records for comparison. Range: 1
~ 128.
S3: high speed counter. Range: C236 ~ C255.
Function description
1. A high-speed counter will count in the interrupt
mode only when it is driven by the HCNT instruction
and the counting input changes from OFF to ON.
2. When the counter value equates the comparison
data of the present record, the corresponding Y
element will be output.
3. The Y element specified in the present record will
be output immediately, regardless of the scan cycle.
4. You can use the DHST instruction when you want
to immediately output, according to certain
comparison data, the Y elements specified in a
certain table.
Note
1. The DHST instruction must work together with
the HCNT instruction, because DHST is only
applicable to the high speed counters that is driven
by HCNT.
2. The DHST instruction will be validated only by
pulse input. You cannot validate the instruction by
changing the counter value with instructions such
as DMOV or MOV.
3. DHST (DHSCI, DHSCS, DHSCR, DHSP, DHSZ)
can be used repeatedly. However, at most six such
instructions can be driven at the same time.
4. In a user program, the DHSP and DHST
instructions cannot be valid at the same time. That
means a valid DHST (or DHSP) instruction will
make the following DHSP (or DHST) instructions
invalid.
5. The maximum frequency supported by the PLC
high speed counters will be seriously affected by
instructions like DHSCS, DHSCI, DHSCR, DHSZ,
DHSP and DHST. For details, see Chapter 8
Using High Speed I/O.

148 Chapter 6 Application Instructions
IVC Series Small PLC Programming Manual
Example
The table for comparison is shown below:
Comparison data Y element Set/Reset Operation flow
Most significant bit Least significant bit
D100=0 D101=100 D102=0 D103=1 1 ↓
D104=0 D105=200 D106=1 D107=0 2 ↓
D108=0 D109=300 D110=2 D111=1 3 ↓
D112=0 D113=300 D114=3 D115=1 4 ↓
Return to 1
The following is the user program:
LD SM1
DMOV 100 D100
MOV 0 D102
MOV 1 D103
DMOV 200 D104
MOV 1 D106
MOV 0 D107
DMOV 300 D108
MOV 2 D110
MOV 1 D111
DMOV 100 D112
MOV 3 D114
MOV 1 D115
LD M0
HCNT C244 1000
LD M1
DHST D100 4 C244
LD M2
OUT SM244
LD C244
OUT Y10
1. In the first user-program scan cycle, assign elements D100 ~ D115 with values to generate the table for comparison.
2. When M0 and X6 are both ON, the C244 will count when X0 changes from OFF to ON (for the input frequency, see
Chapter 8 Using High Speed I/O). When C244 changes from 999 to 1000, the C244 contact will be set; when C244
changes from 1001 to 1000, the C244 contact will be reset. When the C244 contact drives Y10, the execution of Y10
will be determined by the user program scan cycle.
3. When M1 is ON, and the DHST instruction meets the requirements in the preceding “Note”, the compare will start
with the first record. The compare with the second record will not start until the first compare is over and the
corresponding Y element has been output. After the compare with the last record is over, the compare with the first
record will start again, and SM185 will be set. SD184 is the SN of the present record, and SD182 & SD183 are the
present data for comparison. The corresponding output will be immediate, regardless of the scan cycle.
4. When M2 is ON, SM244 is ON, and C244 will count down. If M2 is OFF, SM244 is OFF, and C244 will count up.
5. When X6 is OFF, C244 is invalid.
6. When M0 and X6 are both ON, if X2 is ON, C244 will be cleared, and C244 auxiliary contact will be reset.

Chapter 6 Application Instructions 149
IVC Series Small PLC Programming Manual
6.10.7 DHSP: High-speed Counting Table Compare Pulse Output Instruction
LAD: Applicable to IVC2 IVC1
Influenced flag bit
IL: DHSP (S1) (S2) (S3) Program steps 10
Operand Type Applicable elements Offset
addressing S1 DINT D
S2 INT Constant
S3 DINT C
Operand description
S1: the starting D element for table comparison. The
following three D elements are the comparison data,
and the data to output to SD180 & SD181. These
four D elements form a record.
S2: the number of records to be compared. Range:
1 ~ 128.
S3: high speed counter. Range: C236 ~ C255.
Function description
1. A high-speed counter will count in the interrupt
mode only when it is driven by the HCNT instruction
and the counting input changes from OFF to ON.
2. When the counter value equates the comparison
data of the present record, the output data of the
present record will become the values of SD180 &
SD181.
3. You can use the DHSP instruction when you want
to control the high speed output or assign values to
certain parameters according to a table. For
example, you can set the SD180 & SD181 (double
word) as the output frequency of the PLSY
instruction, and the PLSY output frequency will be
adjusted by the table compare result.
Note
1. The DHSP instruction must be used together with
the HCNT instruction, because the DHST
instruction cannot be executed unless the related
high speed counter is driven by the HCNT
instruction.
2. When the DHSP instruction is used together with
the PLSY instruction, the values assigned to SD180
and SD181 must meet the frequency output
requirement of the PLSY instruction. For details,
see the description of the PLSY instruction.
3. To stop the comparison at the last record, set the
last output data of the table as 0. Under this
situation, other DHST and DHSP instructions will be
invalid. But at this time, the DHSP instruction is not
regarded as a high speed instruction when it comes
to the number limit of high-speed instructions.
4. The DHSP instruction will be validated only by
pulse input. You cannot validate the instruction by
changing the counter value with instructions such
as DMOV or MOV.
5. DHSP (DHSCI, DHSCS, DHSCR, DHST, DHSZ)
can be used repeatedly. However, at most the first
six such instructions can be driven at the same
time.
6. In a user program, the DHSP and DHST
instructions cannot be valid at the same time. That
means a valid DHSP (or DHST) instruction will
make the following DHST (or DHSP) instructions
invalid.
7. The maximum frequency supported by the PLC
high speed counters will be seriously affected by
instructions like DHSCS, DHSCI, DHSCR, DHSZ,
DHSP and DHST. For details, see Chapter 8
Using High Speed I/O.
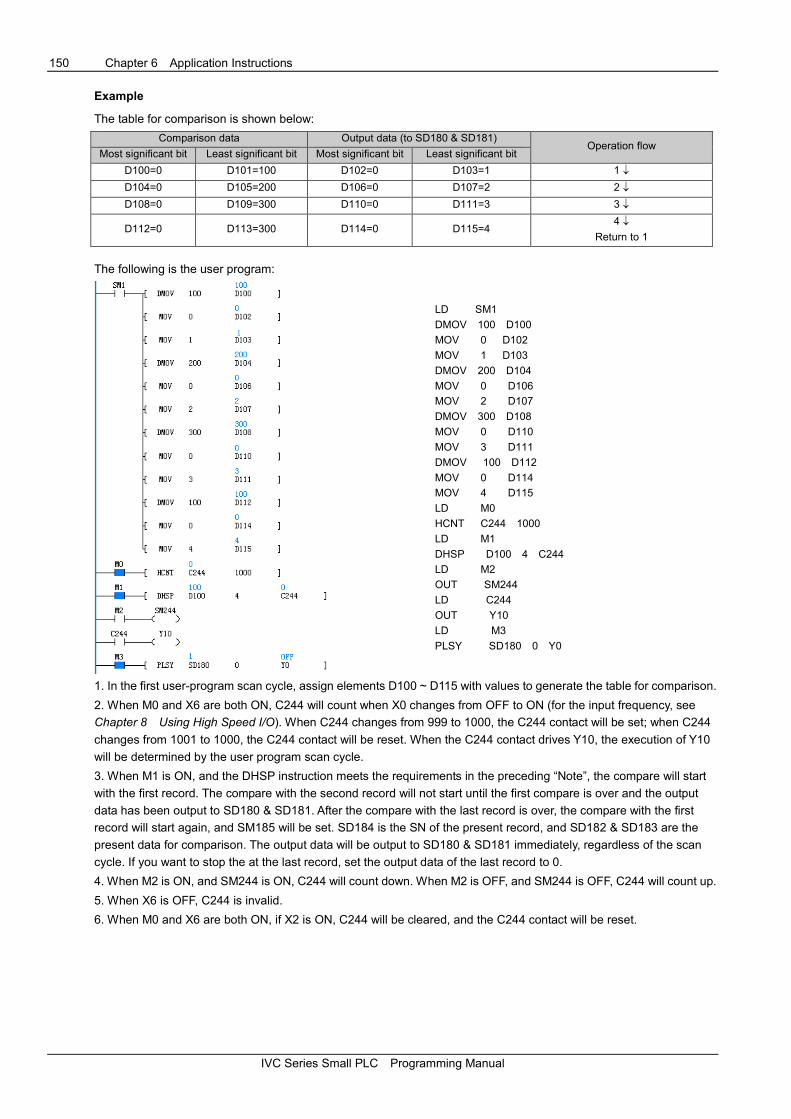
150 Chapter 6 Application Instructions
IVC Series Small PLC Programming Manual
Example
The table for comparison is shown below:
Comparison data Output data (to SD180 & SD181) Operation flow
Most significant bit Least significant bit Most significant bit Least significant bit
D100=0 D101=100 D102=0 D103=1 1 ↓
D104=0 D105=200 D106=0 D107=2 2 ↓
D108=0 D109=300 D110=0 D111=3 3 ↓
D112=0 D113=300 D114=0 D115=4 4 ↓
Return to 1
The following is the user program:
LD SM1
DMOV 100 D100
MOV 0 D102
MOV 1 D103
DMOV 200 D104
MOV 0 D106
MOV 2 D107
DMOV 300 D108
MOV 0 D110
MOV 3 D111
DMOV 100 D112
MOV 0 D114
MOV 4 D115
LD M0
HCNT C244 1000
LD M1
DHSP D100 4 C244
LD M2
OUT SM244
LD C244
OUT Y10
LD M3
PLSY SD180 0 Y0
1. In the first user-program scan cycle, assign elements D100 ~ D115 with values to generate the table for comparison.
2. When M0 and X6 are both ON, C244 will count when X0 changes from OFF to ON (for the input frequency, see
Chapter 8 Using High Speed I/O). When C244 changes from 999 to 1000, the C244 contact will be set; when C244
changes from 1001 to 1000, the C244 contact will be reset. When the C244 contact drives Y10, the execution of Y10
will be determined by the user program scan cycle.
3. When M1 is ON, and the DHSP instruction meets the requirements in the preceding “Note”, the compare will start
with the first record. The compare with the second record will not start until the first compare is over and the output
data has been output to SD180 & SD181. After the compare with the last record is over, the compare with the first
record will start again, and SM185 will be set. SD184 is the SN of the present record, and SD182 & SD183 are the
present data for comparison. The output data will be output to SD180 & SD181 immediately, regardless of the scan
cycle. If you want to stop the at the last record, set the output data of the last record to 0.
4. When M2 is ON, and SM244 is ON, C244 will count down. When M2 is OFF, and SM244 is OFF, C244 will count up.
5. When X6 is OFF, C244 is invalid.
6. When M0 and X6 are both ON, if X2 is ON, C244 will be cleared, and the C244 contact will be reset.

Chapter 6 Application Instructions 151
IVC Series Small PLC Programming Manual
6.10.8 SPD: Pulse Detection Instruction
LAD:
Applicable to IVC2 IVC1
Influenced flag bit
IL: SPD (S1) (S2) (D) Program steps 7
Operand Type Applicable elements Offset
addressing S1 BOOL X
S2 WORD Constant KnX KnY KnM KnS KnLM KnSM D SD C T V Z √
D WORD D V √
Operand description
S1: input point. Range: X0 ~ X5.
S2: time unit for input point detection. Unit: ms.
Operand S2 > 0.
D: the storage register for the counted pulse number,
which will cause overflow when bigger than 65535.
Function description
To detect the number of pulses input through X0 ~ X5
in the specified period of time (ms) and store the result
in the designated storage register.
Note
1. SPD and HCNT are contradictory in their occupation
of hardware. For details, see Chapter 8 Using High
Speed I/O.
2. The SPD instruction supports only input points X0 ~
X5.
3. Maximum pulse input frequency: 10kHz. Detection
may be faulty when frequency is higher than 10kHz.
4. The input frequency of SPD must be subject to the
limit of system total pulse frequency.
Example
LD SM0
PLSY 10000 0 Y0
LD M0
SPD X0 1000 D10
The time sequence chart of the example program is
shown below:
D11: currentvalue
1000ms 1000ms
D10: measuredvalue
X0
M0
1000
D12: elapsed time
Input X0
N(fpn)Proximity switchn pulse/round
1. When M0 is ON, count the pulses input through X0
within 1000ms, and store the counting result in D10.
D11 is the present counting value within the 1000ms,
while D12 is the elapsed time within the 1000ms.
2. D10 is in positive proportion to the rotary speed of
the plate in the preceding figure.
3. D10 counts whenever X0 changes from OFF to ON,
and the counting value within the last 1000ms will be
stored in D10.

152 Chapter 6 Application Instructions
IVC Series Small PLC Programming Manual
6.10.9 PLSY: Count Pulse Output Instruction
LAD:
Applicable to IVC2 IVC1
Influenced flag bit
IL: PLSY (S1) (S2) (D) Program steps 9
Operand Type Applicable elements Offset
addressing S1 DINT Constant KnX KnY KnM KnS KnLM KnSM D SD C V √
S2 DINT Constant KnX KnY KnM KnS KnLM KnSM D SD C V √
D BOOL Y
Operand description
S1: specified frequency (Hz). Range: 1 ~ 100,000 (Hz).
When S1 is outside this range, the system will report
instruction operand error, and no hardware resources
will be occupied.
Change S1 during the execution of the instruction will
change the output frequency in real time.
S2: output pulse number (PLS).
Range: 0 ~ 2147483647. When S2 is outside this range,
the system will report instruction operand error, output
no pulse, and no hardware resources will be occupied.
When S2 is 0, the pulse will output so long as the
instruction is valid. If you change S2 during the
execution of the instruction, the change will be take
effect in the next round.
D: high speed pulse output point. Range: Y0, Y1.
Function description
To output specified amount of high speed pulses at the
specified frequency. For that purpose, the load current
on the PLC output transistor should be big, but below
the rated load current.
Note
1. The PLC must use the transistor output mode.
2. When the PLC outputs high-frequency pulses, the
following load current for the PLC output transistor must
be used.
3. The output loop (transistor) for PLSY, PWM and
PLSR is shown as follows:
PLC
Load
resistance
Externalpower supply
100mA
4. With large load, the transistor off time is relatively
longer. The PWM, PLSY and PLSR instructions require
that the transistor output terminal be connected to their
corresponding loads. When the output waveform does
not conform to the instruction operand, increase the load
current of the transistor (the transistor load current
≤100mA).
5. During or after the execution of the high-speed
instruction, no other instructions can use the same
port, unless the high speed pulse output instruction is
invalid.
6. Using two PLSY instructions can output two
independent pulses at Y0 and Y1. You can also use
PLSY and the PWM (or PLSR) instructions to get
independent pulse outputs at different output ports
(Y0, Y1).
7. When multiple PWM, PLSY or PLSR instructions
work on the same output point, the first valid
instruction will control the state of the output point,
and others will not affect the output point state.
8. Just like other high speed instructions (DHSCS,
DHSCR, DHSZ, DHSP, DHST and HCNT), the PLSY
instruction must meet the system’s requests on high
speed I/O.
Example
LD M1
PLSY 1000 10000 Y1
PLSR 1000 10000 Y0
Y1
Y0
Pulses
Frequency (1000)
Pulses
Frequency (1000)
1. When M1 is ON, 10,000 pulses will output through
Y0 and Y1 at the frequency of 1000Hz. Then the
pulse output will stop until M0 changes from OFF to
ON when the next round of output will start. When
M0 is OFF, there will be no output.
2. The duty cycle of the pulses is 50%. The output is
handled in the interrupt mode, free from the scan
cycle. For high frequency output, the output duty
cycle at Y points is related to the load. The waveform
at output points (Y0 & Port 0, Y1 & Port 1) is related
to the load: so long as the current does not exceed
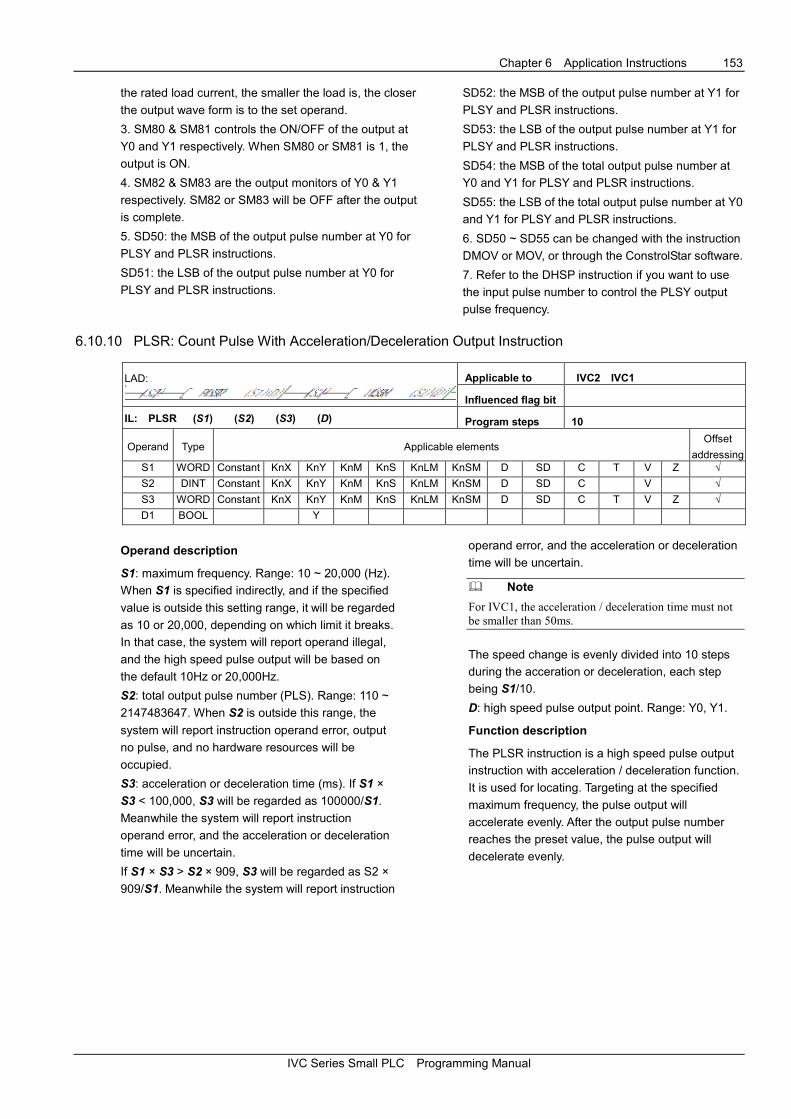
Chapter 6 Application Instructions 153
IVC Series Small PLC Programming Manual
the rated load current, the smaller the load is, the closer
the output wave form is to the set operand.
3. SM80 & SM81 controls the ON/OFF of the output at
Y0 and Y1 respectively. When SM80 or SM81 is 1, the
output is ON.
4. SM82 & SM83 are the output monitors of Y0 & Y1
respectively. SM82 or SM83 will be OFF after the output
is complete.
5. SD50: the MSB of the output pulse number at Y0 for
PLSY and PLSR instructions.
SD51: the LSB of the output pulse number at Y0 for
PLSY and PLSR instructions.
SD52: the MSB of the output pulse number at Y1 for
PLSY and PLSR instructions.
SD53: the LSB of the output pulse number at Y1 for
PLSY and PLSR instructions.
SD54: the MSB of the total output pulse number at
Y0 and Y1 for PLSY and PLSR instructions.
SD55: the LSB of the total output pulse number at Y0
and Y1 for PLSY and PLSR instructions.
6. SD50 ~ SD55 can be changed with the instruction
DMOV or MOV, or through the ConstrolStar software.
7. Refer to the DHSP instruction if you want to use
the input pulse number to control the PLSY output
pulse frequency.
6.10.10 PLSR: Count Pulse With Acceleration/Deceleration Output Instruction
LAD:
Applicable to IVC2 IVC1
Influenced flag bit
IL: PLSR (S1) (S2) (S3) (D) Program steps 10
Operand Type Applicable elements Offset
addressing S1 WORD Constant KnX KnY KnM KnS KnLM KnSM D SD C T V Z √
S2 DINT Constant KnX KnY KnM KnS KnLM KnSM D SD C V √
S3 WORD Constant KnX KnY KnM KnS KnLM KnSM D SD C T V Z √
D1 BOOL Y
Operand description
S1: maximum frequency. Range: 10 ~ 20,000 (Hz).
When S1 is specified indirectly, and if the specified
value is outside this setting range, it will be regarded
as 10 or 20,000, depending on which limit it breaks.
In that case, the system will report operand illegal,
and the high speed pulse output will be based on
the default 10Hz or 20,000Hz.
S2: total output pulse number (PLS). Range: 110 ~
2147483647. When S2 is outside this range, the
system will report instruction operand error, output
no pulse, and no hardware resources will be
occupied.
S3: acceleration or deceleration time (ms). If S1 ×
S3 < 100,000, S3 will be regarded as 100000/S1.
Meanwhile the system will report instruction
operand error, and the acceleration or deceleration
time will be uncertain.
If S1 × S3 > S2 × 909, S3 will be regarded as S2 ×
909/S1. Meanwhile the system will report instruction
operand error, and the acceleration or deceleration
time will be uncertain.
� Note
For IVC1, the acceleration / deceleration time must not
be smaller than 50ms.
The speed change is evenly divided into 10 steps
during the acceration or deceleration, each step
being S1/10.
D: high speed pulse output point. Range: Y0, Y1.
Function description
The PLSR instruction is a high speed pulse output
instruction with acceleration / deceleration function.
It is used for locating. Targeting at the specified
maximum frequency, the pulse output will
accelerate evenly. After the output pulse number
reaches the preset value, the pulse output will
decelerate evenly.
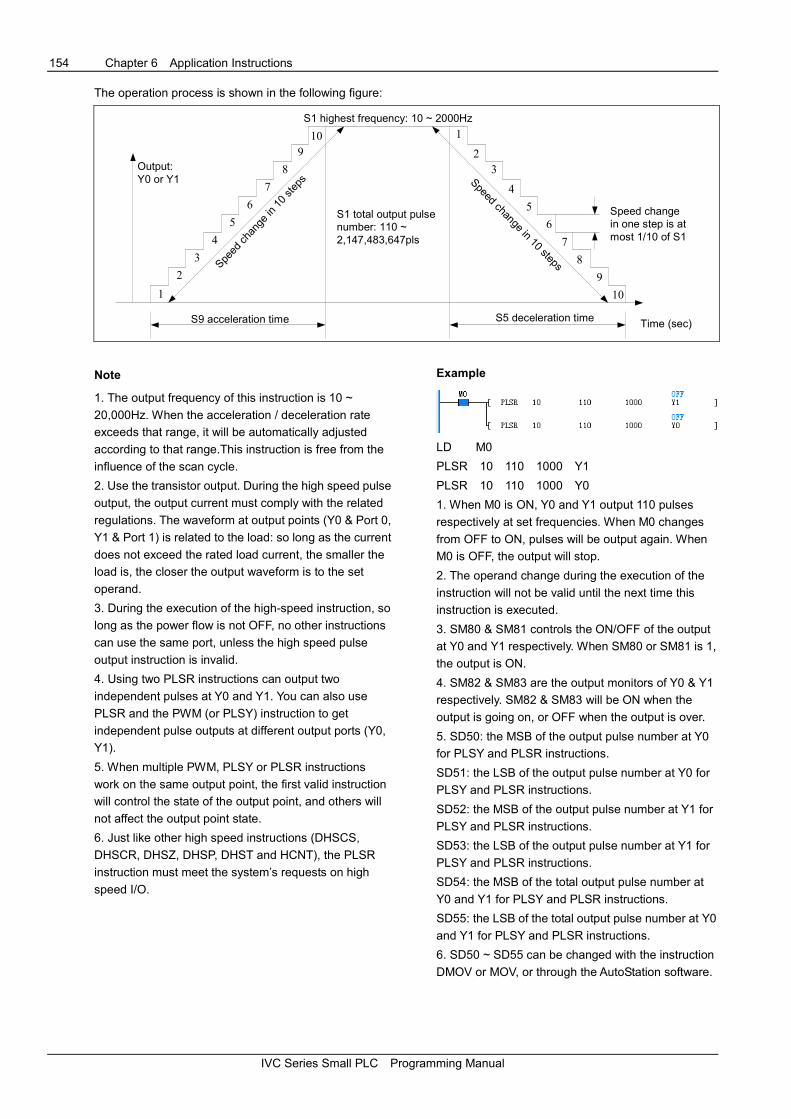
154 Chapter 6 Application Instructions
IVC Series Small PLC Programming Manual
The operation process is shown in the following figure:
1
2
3
4
5
6
7
8
9
10 1
2
3
4
5
6
7
8
9
10
Output:Y0 or Y1
S9 acceleration time
S1 highest frequency: 10 ~ 2000Hz
Speed change in 10 steps
S1 total output pulsenumber: 110 ~2,147,483,647pls
Speed change in 10 steps
S5 deceleration time Time (sec)
Speed changein one step is atmost 1/10 of S1
Note
1. The output frequency of this instruction is 10 ~
20,000Hz. When the acceleration / deceleration rate
exceeds that range, it will be automatically adjusted
according to that range.This instruction is free from the
influence of the scan cycle.
2. Use the transistor output. During the high speed pulse
output, the output current must comply with the related
regulations. The waveform at output points (Y0 & Port 0,
Y1 & Port 1) is related to the load: so long as the current
does not exceed the rated load current, the smaller the
load is, the closer the output waveform is to the set
operand.
3. During the execution of the high-speed instruction, so
long as the power flow is not OFF, no other instructions
can use the same port, unless the high speed pulse
output instruction is invalid.
4. Using two PLSR instructions can output two
independent pulses at Y0 and Y1. You can also use
PLSR and the PWM (or PLSY) instruction to get
independent pulse outputs at different output ports (Y0,
Y1).
5. When multiple PWM, PLSY or PLSR instructions
work on the same output point, the first valid instruction
will control the state of the output point, and others will
not affect the output point state.
6. Just like other high speed instructions (DHSCS,
DHSCR, DHSZ, DHSP, DHST and HCNT), the PLSR
instruction must meet the system’s requests on high
speed I/O.
Example
LD M0
PLSR 10 110 1000 Y1
PLSR 10 110 1000 Y0
1. When M0 is ON, Y0 and Y1 output 110 pulses
respectively at set frequencies. When M0 changes
from OFF to ON, pulses will be output again. When
M0 is OFF, the output will stop.
2. The operand change during the execution of the
instruction will not be valid until the next time this
instruction is executed.
3. SM80 & SM81 controls the ON/OFF of the output
at Y0 and Y1 respectively. When SM80 or SM81 is 1,
the output is ON.
4. SM82 & SM83 are the output monitors of Y0 & Y1
respectively. SM82 & SM83 will be ON when the
output is going on, or OFF when the output is over.
5. SD50: the MSB of the output pulse number at Y0
for PLSY and PLSR instructions.
SD51: the LSB of the output pulse number at Y0 for
PLSY and PLSR instructions.
SD52: the MSB of the output pulse number at Y1 for
PLSY and PLSR instructions.
SD53: the LSB of the output pulse number at Y1 for
PLSY and PLSR instructions.
SD54: the MSB of the total output pulse number at
Y0 and Y1 for PLSY and PLSR instructions.
SD55: the LSB of the total output pulse number at Y0
and Y1 for PLSY and PLSR instructions.
6. SD50 ~ SD55 can be changed with the instruction
DMOV or MOV, or through the AutoStation software.
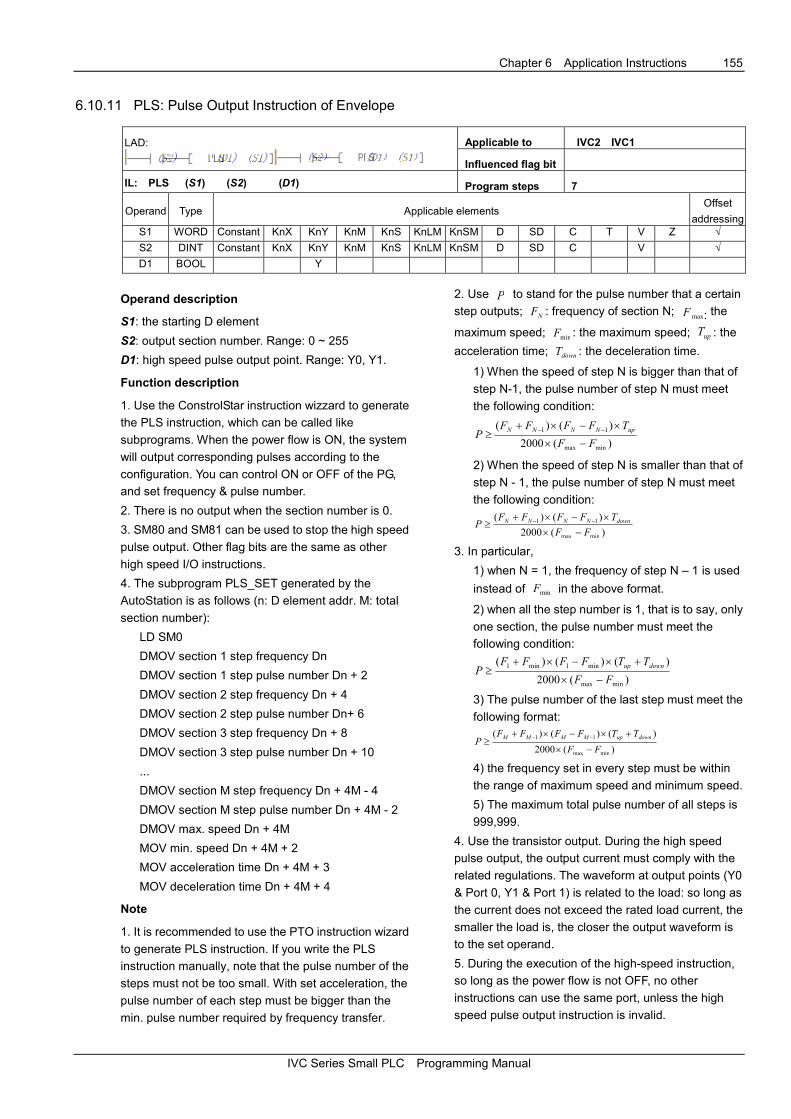
Chapter 6 Application Instructions 155
IVC Series Small PLC Programming Manual
6.10.11 PLS: Pulse Output Instruction of Envelope
LAD:
Applicable to IVC2 IVC1
Influenced flag bit
IL: PLS (S1) (S2) (D1) Program steps 7
Operand Type Applicable elements Offset
addressing S1 WORD Constant KnX KnY KnM KnS KnLM KnSM D SD C T V Z √
S2 DINT Constant KnX KnY KnM KnS KnLM KnSM D SD C V √
D1 BOOL Y
Operand description
S1: the starting D element
S2: output section number. Range: 0 ~ 255
D1: high speed pulse output point. Range: Y0, Y1.
Function description
1. Use the ConstrolStar instruction wizzard to generate
the PLS instruction, which can be called like
subprograms. When the power flow is ON, the system
will output corresponding pulses according to the
configuration. You can control ON or OFF of the PG,
and set frequency & pulse number.
2. There is no output when the section number is 0.
3. SM80 and SM81 can be used to stop the high speed
pulse output. Other flag bits are the same as other
high speed I/O instructions.
4. The subprogram PLS_SET generated by the
AutoStation is as follows (n: D element addr. M: total
section number):
LD SM0
DMOV section 1 step frequency Dn
DMOV section 1 step pulse number Dn + 2
DMOV section 2 step frequency Dn + 4
DMOV section 2 step pulse number Dn+ 6
DMOV section 3 step frequency Dn + 8
DMOV section 3 step pulse number Dn + 10
...
DMOV section M step frequency Dn + 4M - 4
DMOV section M step pulse number Dn + 4M - 2
DMOV max. speed Dn + 4M
MOV min. speed Dn + 4M + 2
MOV acceleration time Dn + 4M + 3
MOV deceleration time Dn + 4M + 4
Note
1. It is recommended to use the PTO instruction wizard
to generate PLS instruction. If you write the PLS
instruction manually, note that the pulse number of the
steps must not be too small. With set acceleration, the
pulse number of each step must be bigger than the
min. pulse number required by frequency transfer.
2. Use P to stand for the pulse number that a certain
step outputs; NF : frequency of section N; maxF : the
maximum speed; minF : the maximum speed; upT : the
acceleration time; downT : the deceleration time.
1) When the speed of step N is bigger than that of
step N-1, the pulse number of step N must meet
the following condition:
)(2000
)()(
minmax
11
FF
TFFFFP
upNNNN
−×
×−×+≥ −−
2) When the speed of step N is smaller than that of
step N - 1, the pulse number of step N must meet
the following condition:
)(2000
)()(
minmax
11
FF
TFFFFP downNNNN
−×
×−×+≥ −−
3. In particular,
1) when N = 1, the frequency of step N – 1 is used
instead of minF in the above format.
2) when all the step number is 1, that is to say, only
one section, the pulse number must meet the
following condition:
)(2000
)()()(
minmax
min1min1
FF
TTFFFFP
downup
−×
+×−×+≥
3) The pulse number of the last step must meet the
following format:
)(2000
)()()(
minmax
11
FF
TTFFFFP
downupMMMM
−×
+×−×+≥ −−
4) the frequency set in every step must be within
the range of maximum speed and minimum speed.
5) The maximum total pulse number of all steps is
999,999.
4. Use the transistor output. During the high speed
pulse output, the output current must comply with the
related regulations. The waveform at output points (Y0
& Port 0, Y1 & Port 1) is related to the load: so long as
the current does not exceed the rated load current, the
smaller the load is, the closer the output waveform is
to the set operand.
5. During the execution of the high-speed instruction,
so long as the power flow is not OFF, no other
instructions can use the same port, unless the high
speed pulse output instruction is invalid.
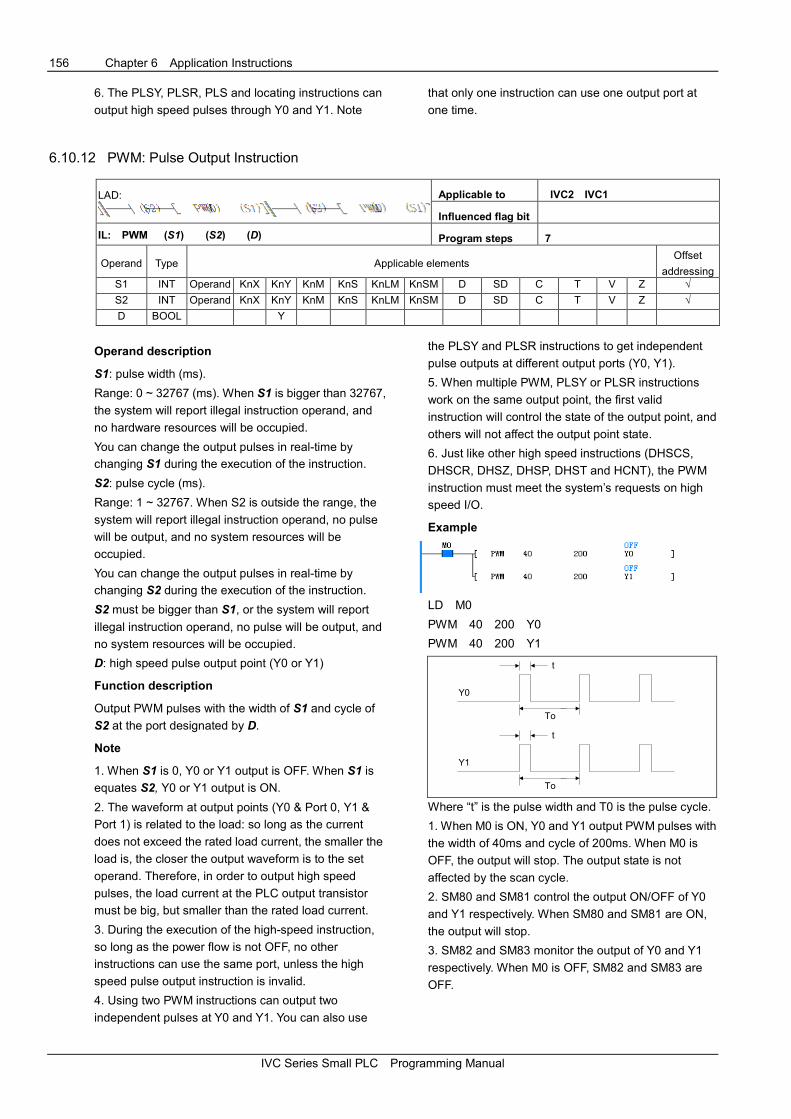
156 Chapter 6 Application Instructions
IVC Series Small PLC Programming Manual
6. The PLSY, PLSR, PLS and locating instructions can
output high speed pulses through Y0 and Y1. Note
that only one instruction can use one output port at
one time.
6.10.12 PWM: Pulse Output Instruction
LAD:
Applicable to IVC2 IVC1
Influenced flag bit
IL: PWM (S1) (S2) (D) Program steps 7
Operand Type Applicable elements Offset
addressing S1 INT Operand KnX KnY KnM KnS KnLM KnSM D SD C T V Z √
S2 INT Operand KnX KnY KnM KnS KnLM KnSM D SD C T V Z √
D BOOL Y
Operand description
S1: pulse width (ms).
Range: 0 ~ 32767 (ms). When S1 is bigger than 32767,
the system will report illegal instruction operand, and
no hardware resources will be occupied.
You can change the output pulses in real-time by
changing S1 during the execution of the instruction.
S2: pulse cycle (ms).
Range: 1 ~ 32767. When S2 is outside the range, the
system will report illegal instruction operand, no pulse
will be output, and no system resources will be
occupied.
You can change the output pulses in real-time by
changing S2 during the execution of the instruction.
S2 must be bigger than S1, or the system will report
illegal instruction operand, no pulse will be output, and
no system resources will be occupied.
D: high speed pulse output point (Y0 or Y1)
Function description
Output PWM pulses with the width of S1 and cycle of
S2 at the port designated by D.
Note
1. When S1 is 0, Y0 or Y1 output is OFF. When S1 is
equates S2, Y0 or Y1 output is ON.
2. The waveform at output points (Y0 & Port 0, Y1 &
Port 1) is related to the load: so long as the current
does not exceed the rated load current, the smaller the
load is, the closer the output waveform is to the set
operand. Therefore, in order to output high speed
pulses, the load current at the PLC output transistor
must be big, but smaller than the rated load current.
3. During the execution of the high-speed instruction,
so long as the power flow is not OFF, no other
instructions can use the same port, unless the high
speed pulse output instruction is invalid.
4. Using two PWM instructions can output two
independent pulses at Y0 and Y1. You can also use
the PLSY and PLSR instructions to get independent
pulse outputs at different output ports (Y0, Y1).
5. When multiple PWM, PLSY or PLSR instructions
work on the same output point, the first valid
instruction will control the state of the output point, and
others will not affect the output point state.
6. Just like other high speed instructions (DHSCS,
DHSCR, DHSZ, DHSP, DHST and HCNT), the PWM
instruction must meet the system’s requests on high
speed I/O.
Example
LD M0
PWM 40 200 Y0
PWM 40 200 Y1
t
To
Y0
t
To
Y1
Where “t” is the pulse width and T0 is the pulse cycle.
1. When M0 is ON, Y0 and Y1 output PWM pulses with
the width of 40ms and cycle of 200ms. When M0 is
OFF, the output will stop. The output state is not
affected by the scan cycle.
2. SM80 and SM81 control the output ON/OFF of Y0
and Y1 respectively. When SM80 and SM81 are ON,
the output will stop.
3. SM82 and SM83 monitor the output of Y0 and Y1
respectively. When M0 is OFF, SM82 and SM83 are
OFF.
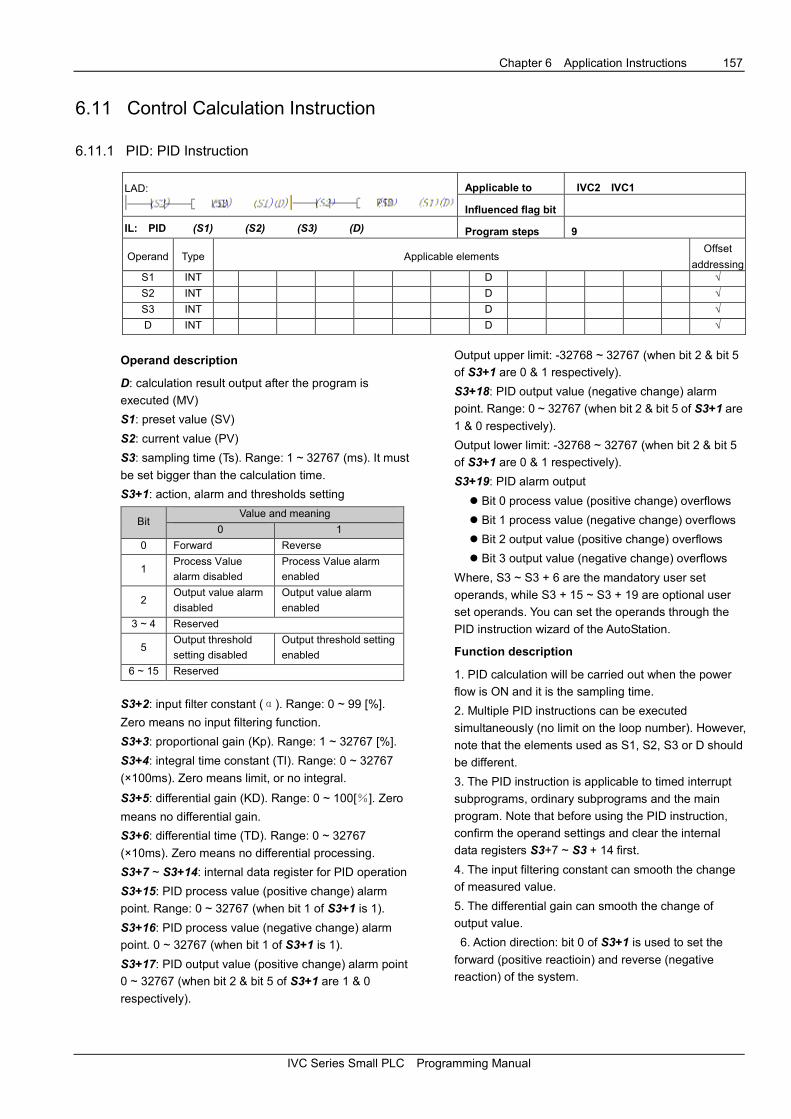
Chapter 6 Application Instructions 157
IVC Series Small PLC Programming Manual
6.11 Control Calculation Instruction
6.11.1 PID: PID Instruction
LAD:
Applicable to IVC2 IVC1
Influenced flag bit
IL: PID (S1) (S2) (S3) (D) Program steps 9
Operand Type Applicable elements Offset
addressing S1 INT D √
S2 INT D √
S3 INT D √
D INT D √
Operand description
D: calculation result output after the program is
executed (MV)
S1: preset value (SV)
S2: current value (PV)
S3: sampling time (Ts). Range: 1 ~ 32767 (ms). It must
be set bigger than the calculation time.
S3+1: action, alarm and thresholds setting
Bit Value and meaning
0 1
0 Forward Reverse
1 Process Value
alarm disabled
Process Value alarm
enabled
2 Output value alarm
disabled
Output value alarm
enabled
3 ~ 4 Reserved
5 Output threshold
setting disabled
Output threshold setting
enabled
6 ~ 15 Reserved
S3+2: input filter constant (α). Range: 0 ~ 99 [%].
Zero means no input filtering function.
S3+3: proportional gain (Kp). Range: 1 ~ 32767 [%].
S3+4: integral time constant (TI). Range: 0 ~ 32767
(×100ms). Zero means limit, or no integral.
S3+5: differential gain (KD). Range: 0 ~ 100[%]. Zero
means no differential gain.
S3+6: differential time (TD). Range: 0 ~ 32767
(×10ms). Zero means no differential processing.
S3+7 ~ S3+14: internal data register for PID operation
S3+15: PID process value (positive change) alarm
point. Range: 0 ~ 32767 (when bit 1 of S3+1 is 1).
S3+16: PID process value (negative change) alarm
point. 0 ~ 32767 (when bit 1 of S3+1 is 1).
S3+17: PID output value (positive change) alarm point
0 ~ 32767 (when bit 2 & bit 5 of S3+1 are 1 & 0
respectively).
Output upper limit: -32768 ~ 32767 (when bit 2 & bit 5
of S3+1 are 0 & 1 respectively).
S3+18: PID output value (negative change) alarm
point. Range: 0 ~ 32767 (when bit 2 & bit 5 of S3+1 are
1 & 0 respectively).
Output lower limit: -32768 ~ 32767 (when bit 2 & bit 5
of S3+1 are 0 & 1 respectively).
S3+19: PID alarm output
� Bit 0 process value (positive change) overflows
� Bit 1 process value (negative change) overflows
� Bit 2 output value (positive change) overflows
� Bit 3 output value (negative change) overflows
Where, S3 ~ S3 + 6 are the mandatory user set
operands, while S3 + 15 ~ S3 + 19 are optional user
set operands. You can set the operands through the
PID instruction wizard of the AutoStation.
Function description
1. PID calculation will be carried out when the power
flow is ON and it is the sampling time.
2. Multiple PID instructions can be executed
simultaneously (no limit on the loop number). However,
note that the elements used as S1, S2, S3 or D should
be different.
3. The PID instruction is applicable to timed interrupt
subprograms, ordinary subprograms and the main
program. Note that before using the PID instruction,
confirm the operand settings and clear the internal
data registers S3+7 ~ S3 + 14 first.
4. The input filtering constant can smooth the change
of measured value.
5. The differential gain can smooth the change of
output value.
6. Action direction: bit 0 of S3+1 is used to set the
forward (positive reactioin) and reverse (negative
reaction) of the system.
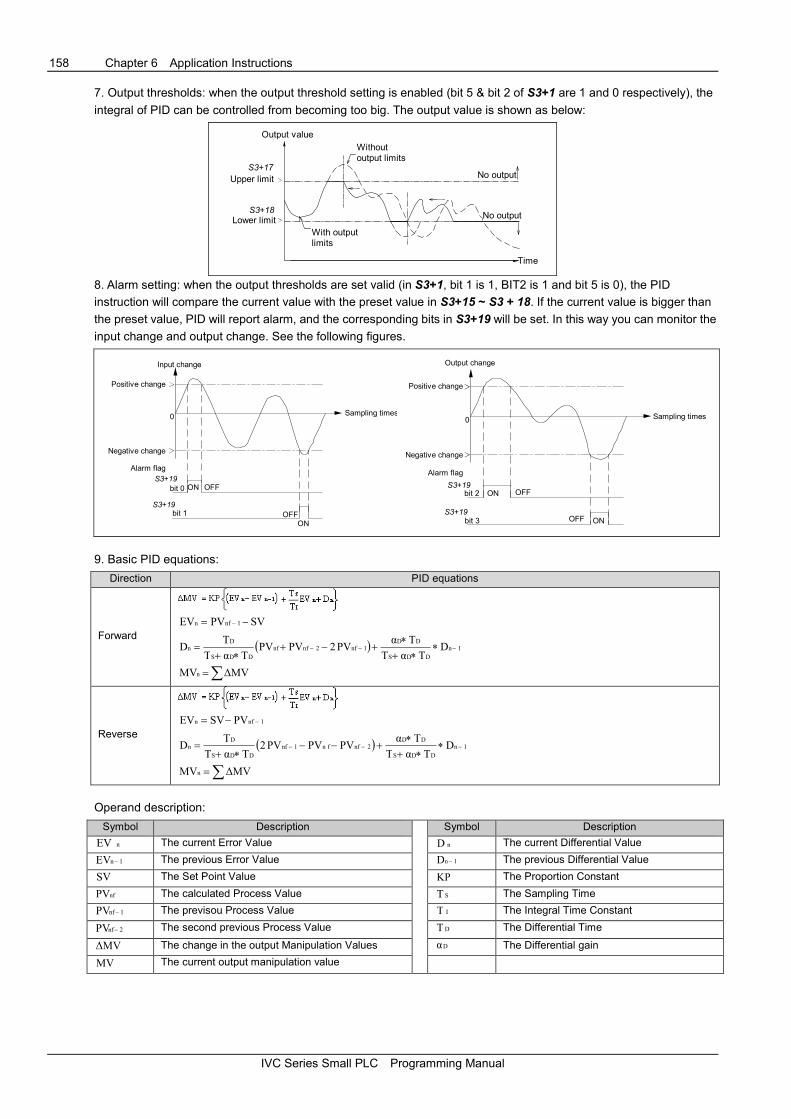
158 Chapter 6 Application Instructions
IVC Series Small PLC Programming Manual
7. Output thresholds: when the output threshold setting is enabled (bit 5 & bit 2 of S3+1 are 1 and 0 respectively), the
integral of PID can be controlled from becoming too big. The output value is shown as below:
Time
S3+18
S3+17
Upper limit
Output value
With outputlimits
Withoutoutput limits
Lower limit
No output
No output
8. Alarm setting: when the output thresholds are set valid (in S3+1, bit 1 is 1, BIT2 is 1 and bit 5 is 0), the PID
instruction will compare the current value with the preset value in S3+15 ~ S3 + 18. If the current value is bigger than
the preset value, PID will report alarm, and the corresponding bits in S3+19 will be set. In this way you can monitor the
input change and output change. See the following figures.
OFFON
OFFON
bit 1
bit 0S3+19
S3+19
0
Input change
Sampling times
Positive change
Negative change
Alarm flag
OFFS3+19
bit 2
S3+19bit 3
ON
OFF ON
0
Output change
Positive change
Negative change
Alarm flag
Sampling times
9. Basic PID equations:
Direction PID equations
Forward
SVPVEV 1nfn −= −
( ) 1n
DDS
DD1nf2nfnf
DDS
Dn D
TαT
TαPV2PVPV
TαT
TD −−− ∗
∗+
∗+−+
∗+=
∑= ∆MVMVn
Reverse
1nfn PVSVEV −−=
( ) 1n
DDS
DD2nffn1nf
DDS
Dn D
TαT
TαPVPVPV2
TαT
TD −−− ∗
∗+
∗+−−
∗+=
∑= ∆MVMVn
Operand description:
Symbol Description Symbol Description
nEV The current Error Value nD The current Differential Value
1nEV − The previous Error Value 1nD − The previous Differential Value
SV The Set Point Value KP The Proportion Constant
nfPV The calculated Process Value ST The Sampling Time
1nfPV − The previsou Process Value IT The Integral Time Constant
2nfPV − The second previous Process Value DT The Differential Time
∆MV The change in the output Manipulation Values Dα The Differential gain
MV The current output manipulation value

Chapter 6 Application Instructions 159
IVC Series Small PLC Programming Manual
Example
// PID initialization. If the control operands are the same, you can initialize the operands only once.
LD SM1 //Initialization, executed only once
MOV 1000 D500 //Setting target value
MOV 500 D510 //Sampling time (Ts) Range: 1 ~ 32767 (ms). It must be bigger than the
// calculation time
MOV 7 D511 //Action direction
MOV 70 D512 //Input filtering constant (α) Range: 0 ~ 99 [%]. Zero means no input filtering
MOV 100 D513 //Proportional gain (Kp) Range:1 ~ 32767 [%]
MOV 25 D514 //Integral time (TI) Range: 0 ~ 32767 (×100ms). Zero means limit, or no integral
MOV 0 D515 //Differential gain (KD) Range: 0 ~ 100[%]. Zero means no differential gain
MOV 63 D516 //Differential time (TD) Range: 0 ~ 32767 (×10ms). Zero means no differential
// processing
FMOV 0 D517 8 //Clearing the memory for the transit data of PID calculation
MOV 2000 D525 //Process value (positive change) alarm setting 0 ~ 32767
MOV 2000 D526 //Process value (negative change) alarm setting 0 ~ 32767
MOV 2000 D527 //Output value (positive change) alarm setting 0 ~ 32767
MOV 2000 D528 //Output value (negative change) alarm setting 0 ~ 32767
//PID instruction execution
LD M0 //User-controlled PID calculation program
FROM 0 5 D501 1 //Input current measured value (users can input measured values
// according to the actual situation)
PID D500 D501 D510 D502 //PID instruction: PID S1 S2 S3 D
TO 0 8 D502 1 //PID calculation result is fed back to the controlled system (users can
// handle the PID calculation result according to the actual situation)
The LAD of the above instructions is shown below:
The PLC will initialize the PID operands only in the first
scan cycle. When X2 is ON, the current measured
value will be read from external A/D module (the actual
situation could be different), assigned to the
corresponding elements, and the PID calculation will
be carried out. The calculation result will be converted
into analog signals through the external D/A module
(the actual situation could be different) and fed to the
controlled system.
Note
1. The operand D should be a register outside of the
Saving Range. Otherwise, it should be cleared (LD
SM0 MOV 0 D****) in the first operation.
2. The PID instructions occupies 20 consecutive
registers starting with S3.
3. The maximum error of sampling time (TS) is - (scan
cycle + 1ms) ~ + (scan cycle). When TS is small, the
PID effect will be affected. It is recommended to use
PID instruction in the timed interrupt.
4. When setting the PID output thresholds, if the upper
limit is smaller than the lower limit, the system will
report operand error, and no PID calculation will be
carried out.
5. When the process value alarm and output value
alarm are enabled, S3 + 15 ~ S3 + 18 cannot be set
negative, or the system will report operand error, and
no PID calculation will be carried out.

160 Chapter 6 Application Instructions
IVC Series Small PLC Programming Manual
6. Setting bit 2 and bit 5 of S3+1 ON at the same time
will be regarded as invalid (essentially the same as
setting bit 2 and bit 5 OFF), and there will be no limit,
nor output value alarm.
7. When the PID control operands (S3 ~ S3 + 6) are
set outside their ranges, the system will report operand
error, and no PID calculation will be carried out.
8. When the sampling time is smaller than the scan
cycle, if there is data overflow or result overflow during
the calculation, there will be no alarm, and the PID
calculation continues.
9. The PID operands must be initialized before the PID
instruction is executed the first time. If the operands
remain the same during the operation, and the related
operand elements will not be covered by other
programs, you can initialize the PID operands only
once. However, if the data in the transit data registers
are changed during the PID calculation, the calculation
result will be incorrect.
6.11.2 RAMP: Ramp Wave Signal Output Instruction
LAD:
Applicable to IVC2 IVC1
Influenced flag bit
IL: RAMP (S1) (S2) (D1) (S3) (D2) Program steps 12
Operand Type Applicable elements Offset
addressing S1 INT Constant KnX KnY KnM KnS KnLM KnSM D SD C T V Z √
S2 INT Constant KnX KnY KnM KnS KnLM KnSM D SD C T V Z √
D1 INT D V √
S3 INT Constant KnX KnY KnM KnS KnLM KnSM D SD C T V Z √
D2 BOOL Y M S LM C T
Operand description
S1: starting value
S2: end value
D1: output value
S3: step number. S3 >0, or system will report operand
error. and do not execute the calculation.
D2: output state 0
Function description
In each scan cycle, when the power flow is ON, this
instruction can determine the increment and current
output value D1 according to the ramp wave height
and step number. When the output value D1 reaches
S2, it will keep stable, and the output state D2 will be
set ON. If the power flow falls, the output state D2 will
be set OFF, but the output value D1 will not change,
until the power flow rises again, when D1 will be
initialized as S1, and continue to conduct the next
ramp calculation.
See the following figure:
pfpfpfpf
S1S1S1S1
S2S2S2S2
D2D2D2D2
D1D1D1D1
pf: state of the power flow
Analysis of the execution process of the ramp
instruction is shown in the following figure (S3=5):
D1D1D1D1
SM15SM15SM15SM15
D2D2D2D2
S3S3S3S3
Note
1. If the result is not divisible when calculating the
program steps, round off to the nearest whole number.
2. The instruction will generate one ramp data upon
every rising edge.
3. When S1 = S2, D1 = S2, D2 = ON.
4. The total number of RAMP, HACKLE and
TRIANGLE instructions in a program should not
exceed 100.
Example
//Initialize registers upon the first scan cycle after the
power-on
LD SM1
MOV 0 D0
MOV 2000 D1
//Execute RAMP instruction when X0 is ON

Chapter 6 Application Instructions 161
IVC Series Small PLC Programming Manual
LD X0
RAMP D0 D1 D10 1000 M0
//Output the ramp function result to external DA
module when X1 = ON to generate ramp wave form
LD X1
TO 0 6 D10 1
The LAD of the preceding instructions is shown below:
1. When X0 is ON, D10 (in the first cycle, D10 = D0 = 0)
will increase by 2 (2000/1000) in every scan cycle.
When D10 = D1 = 2000, D10 will increase no more,
and M0 will be ON. During the generation of the ramp
function, if the power flow falls, the output state D2 will
be OFF, the output value D1 will keep its current value
until the next rising edge, when D10 = D0 and a new
ramp starts.
2. You can use an external special module to convert
the data into analog waveform.
6.11.3 HACKLE: Hackle Wave Signal Output Instruction
LAD:
Applicable to IVC2 IVC1
Influenced flag bit
IL: HACKLE (S1) (S2) (D1) (S3) (D2) Program steps 12
Operand Type Applicable elements Offset
addressing S1 INT Constant KnX KnY KnM KnS KnLM KnSM D SD C T V Z √
S2 INT Constant KnX KnY KnM KnS KnLM KnSM D SD C T V Z √
D1 INT D V √
S3 INT Constant KnX KnY KnM KnS KnLM KnSM D SD C T V Z √
D2 BOOL Y M S LM C T
Operand description
S1: starting value
S2: end value
D1: output value
S3: step number. S3 > 0, or system will report
operand error. and do not execute the calculation
D2: output state
Function description
In each scan cycle, when the power flow is ON,
this instruction can determine the increment and
current output value D1 according to the hackle
wave height and step number. When the output
value reaches S2, it will be initialized as S1 and
the state output D2 will be set ON. If the power
flow in the next scan cycle is still ON, D2 will be
set OFF to produce the next hackle wave. If the
power flow falls, the output state D2 will be OFF,
and the output value D1 will keep its current value
until the next rising edge, when the output value
D1 will be initialized as S1, and the next hackle
wave will be created, as shown in the following
figure.
pfpfpfpf
S1S1S1S1
S2S2S2S2
D2D2D2D2
D1D1D1D1
pf: state of the power flow
The analysis of the hackle wave instruction is shown in
the following figure (S3=5):
D1D1D1D1
SM15SM15SM15SM15
D2D2D2D2
S3S3S3S3
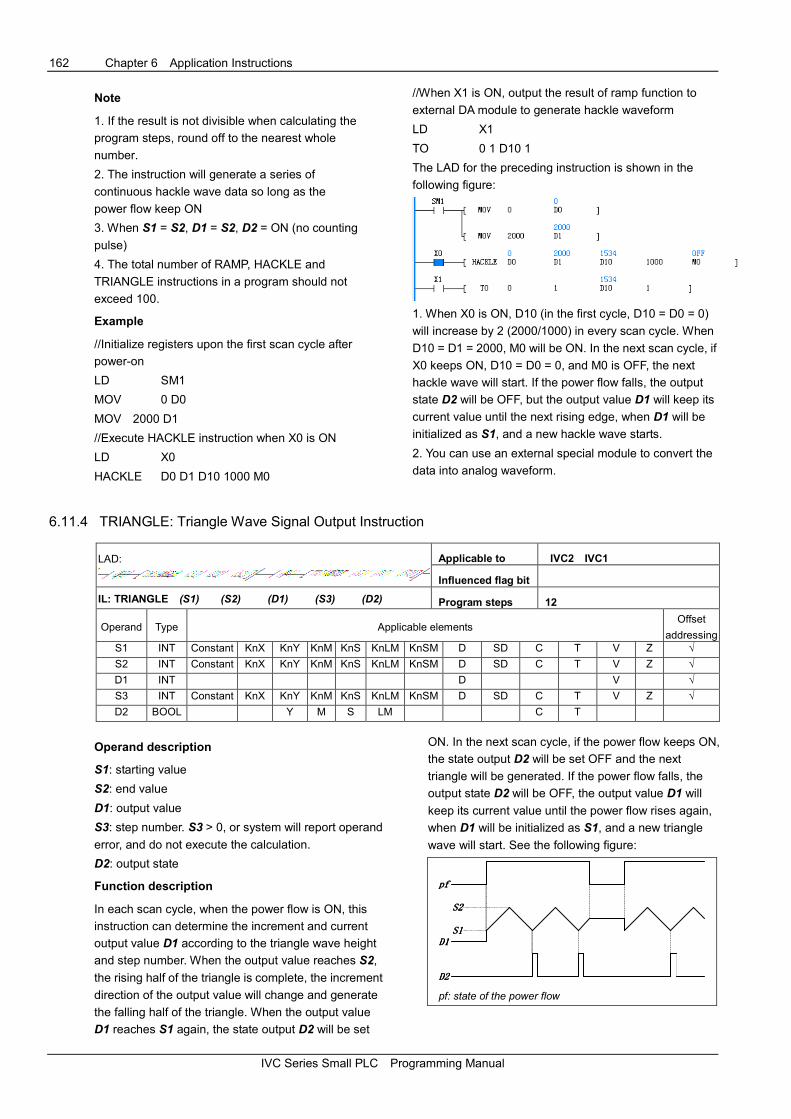
162 Chapter 6 Application Instructions
IVC Series Small PLC Programming Manual
Note
1. If the result is not divisible when calculating the
program steps, round off to the nearest whole
number.
2. The instruction will generate a series of
continuous hackle wave data so long as the
power flow keep ON
3. When S1 = S2, D1 = S2, D2 = ON (no counting
pulse)
4. The total number of RAMP, HACKLE and
TRIANGLE instructions in a program should not
exceed 100.
Example
//Initialize registers upon the first scan cycle after
power-on
LD SM1
MOV 0 D0
MOV 2000 D1
//Execute HACKLE instruction when X0 is ON
LD X0
HACKLE D0 D1 D10 1000 M0
//When X1 is ON, output the result of ramp function to
external DA module to generate hackle waveform
LD X1
TO 0 1 D10 1
The LAD for the preceding instruction is shown in the
following figure:
1. When X0 is ON, D10 (in the first cycle, D10 = D0 = 0)
will increase by 2 (2000/1000) in every scan cycle. When
D10 = D1 = 2000, M0 will be ON. In the next scan cycle, if
X0 keeps ON, D10 = D0 = 0, and M0 is OFF, the next
hackle wave will start. If the power flow falls, the output
state D2 will be OFF, but the output value D1 will keep its
current value until the next rising edge, when D1 will be
initialized as S1, and a new hackle wave starts.
2. You can use an external special module to convert the
data into analog waveform.
6.11.4 TRIANGLE: Triangle Wave Signal Output Instruction
LAD:
Applicable to IVC2 IVC1
Influenced flag bit
IL: TRIANGLE (S1) (S2) (D1) (S3) (D2) Program steps 12
Operand Type Applicable elements Offset
addressing S1 INT Constant KnX KnY KnM KnS KnLM KnSM D SD C T V Z √
S2 INT Constant KnX KnY KnM KnS KnLM KnSM D SD C T V Z √
D1 INT D V √
S3 INT Constant KnX KnY KnM KnS KnLM KnSM D SD C T V Z √
D2 BOOL Y M S LM C T
Operand description
S1: starting value
S2: end value
D1: output value
S3: step number. S3 > 0, or system will report operand
error, and do not execute the calculation.
D2: output state
Function description
In each scan cycle, when the power flow is ON, this
instruction can determine the increment and current
output value D1 according to the triangle wave height
and step number. When the output value reaches S2,
the rising half of the triangle is complete, the increment
direction of the output value will change and generate
the falling half of the triangle. When the output value
D1 reaches S1 again, the state output D2 will be set
ON. In the next scan cycle, if the power flow keeps ON,
the state output D2 will be set OFF and the next
triangle will be generated. If the power flow falls, the
output state D2 will be OFF, the output value D1 will
keep its current value until the power flow rises again,
when D1 will be initialized as S1, and a new triangle
wave will start. See the following figure:
pfpfpfpf
S1S1S1S1
S2S2S2S2
D2D2D2D2
D1D1D1D1
pf: state of the power flow

Chapter 6 Application Instructions 163
IVC Series Small PLC Programming Manual
The analysis of the execution of the triangle instruction
is shown in the following figure (S3 = 5):
D1D1D1D1
SM15SM15SM15SM15
D2D2D2D2
(S3 S3 S3 S3 -1)*2
Note
1. If the result is not divisible when calculating the
program steps, round off to the nearest whole number.
2. The instruction will generate a series of continuous
triangle wave data so long as the power flow keep ON
3. When S1 = S2, D1 = S2, D2 = ON (no counting
pulse), the cycle of the triangle wave is (S3 - 1) × 2.
4. The total number of RAMP, HACKLE and
TRIANGLE instructions in a program should not
exceed 100.
Example
// Initialize registers upon the first scan cycle after
power-on
LD SM1
MOV 0 D0
MOV 2000 D1
//Executie TRIANGLE instruction when X0 is ON
LD X0
TRIANGLE D0 D1 D10 1000 M0
// When X1 is ON, output the result of ramp function to
external DA module to generate triangle waveform
LD X1
TO 0 1 D10 1
The LAD of the preceding instruction is shown in the
following figure:
1. When X0 is ON, D10 (in the first cycle, D10 = D0 = 0)
will increase by 2 (2000/1000) in every scan cycle.
When D10 = D1 = 2000, the rising half of the triangle is
complete, and D10 will decrease by 2 in every scan
cycle that follows. When D10 = D0 = 0, a complete
triangle is complete, and M0 is ON. In the next scan
cycle, if X0 keeps ON, and M0 is OFF, the next triangle
wave will start. If the power flow falls, the output state
D2 will be OFF, but the output value D1 will keep its
current value until the next rising edge, when D1 will
be initialized as S1, and a new triangle wave starts.
2. You can use an external special module to convert
the data into analog waveform.
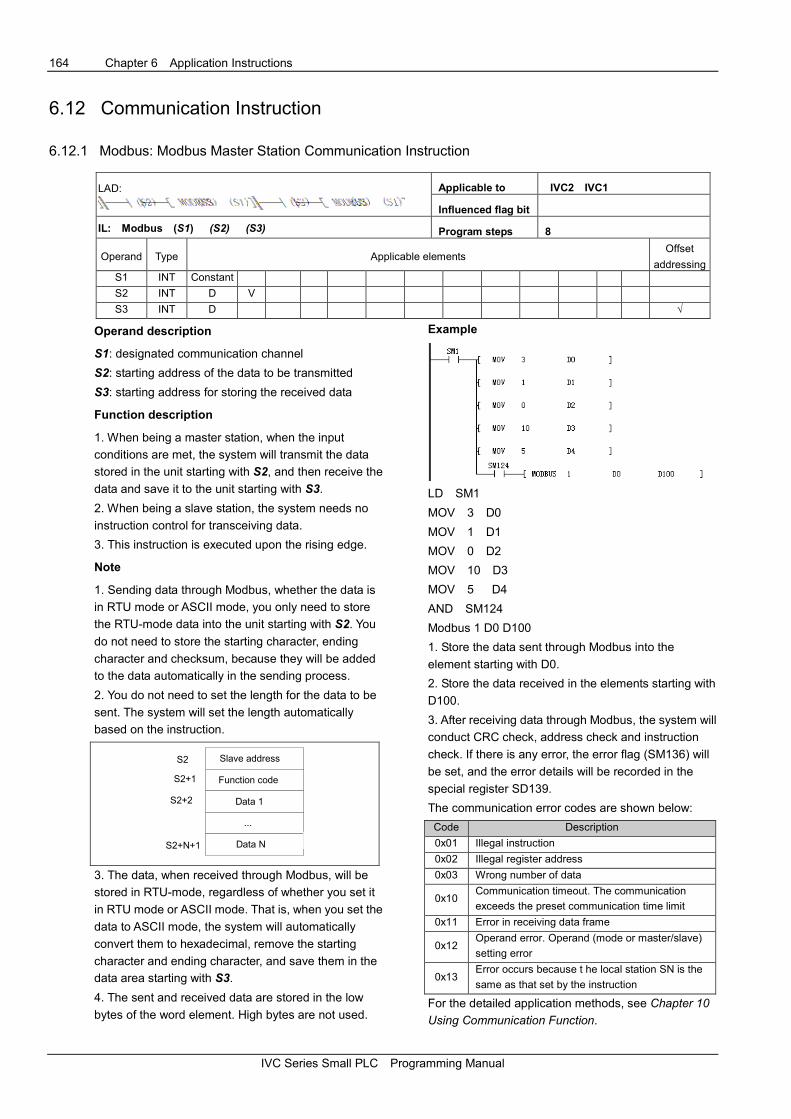
164 Chapter 6 Application Instructions
IVC Series Small PLC Programming Manual
6.12 Communication Instruction
6.12.1 Modbus: Modbus Master Station Communication Instruction
LAD:
Applicable to IVC2 IVC1
Influenced flag bit
IL: Modbus (S1) (S2) (S3) Program steps 8
Operand Type Applicable elements Offset
addressing S1 INT Constant
S2 INT D V
S3 INT D √
Operand description
S1: designated communication channel
S2: starting address of the data to be transmitted
S3: starting address for storing the received data
Function description
1. When being a master station, when the input
conditions are met, the system will transmit the data
stored in the unit starting with S2, and then receive the
data and save it to the unit starting with S3.
2. When being a slave station, the system needs no
instruction control for transceiving data.
3. This instruction is executed upon the rising edge.
Note
1. Sending data through Modbus, whether the data is
in RTU mode or ASCII mode, you only need to store
the RTU-mode data into the unit starting with S2. You
do not need to store the starting character, ending
character and checksum, because they will be added
to the data automatically in the sending process.
2. You do not need to set the length for the data to be
sent. The system will set the length automatically
based on the instruction.
S2 Slave address
Function code
...
S2+1
Data 1S2+2
Data NS2+N+1
3. The data, when received through Modbus, will be
stored in RTU-mode, regardless of whether you set it
in RTU mode or ASCII mode. That is, when you set the
data to ASCII mode, the system will automatically
convert them to hexadecimal, remove the starting
character and ending character, and save them in the
data area starting with S3.
4. The sent and received data are stored in the low
bytes of the word element. High bytes are not used.
Example
LD SM1
MOV 3 D0
MOV 1 D1
MOV 0 D2
MOV 10 D3
MOV 5 D4
AND SM124
Modbus 1 D0 D100
1. Store the data sent through Modbus into the
element starting with D0.
2. Store the data received in the elements starting with
D100.
3. After receiving data through Modbus, the system will
conduct CRC check, address check and instruction
check. If there is any error, the error flag (SM136) will
be set, and the error details will be recorded in the
special register SD139.
The communication error codes are shown below:
Code Description
0x01 Illegal instruction
0x02 Illegal register address
0x03 Wrong number of data
0x10 Communication timeout. The communication
exceeds the preset communication time limit
0x11 Error in receiving data frame
0x12 Operand error. Operand (mode or master/slave)
setting error
0x13 Error occurs because t he local station SN is the
same as that set by the instruction
For the detailed application methods, see Chapter 10
Using Communication Function.
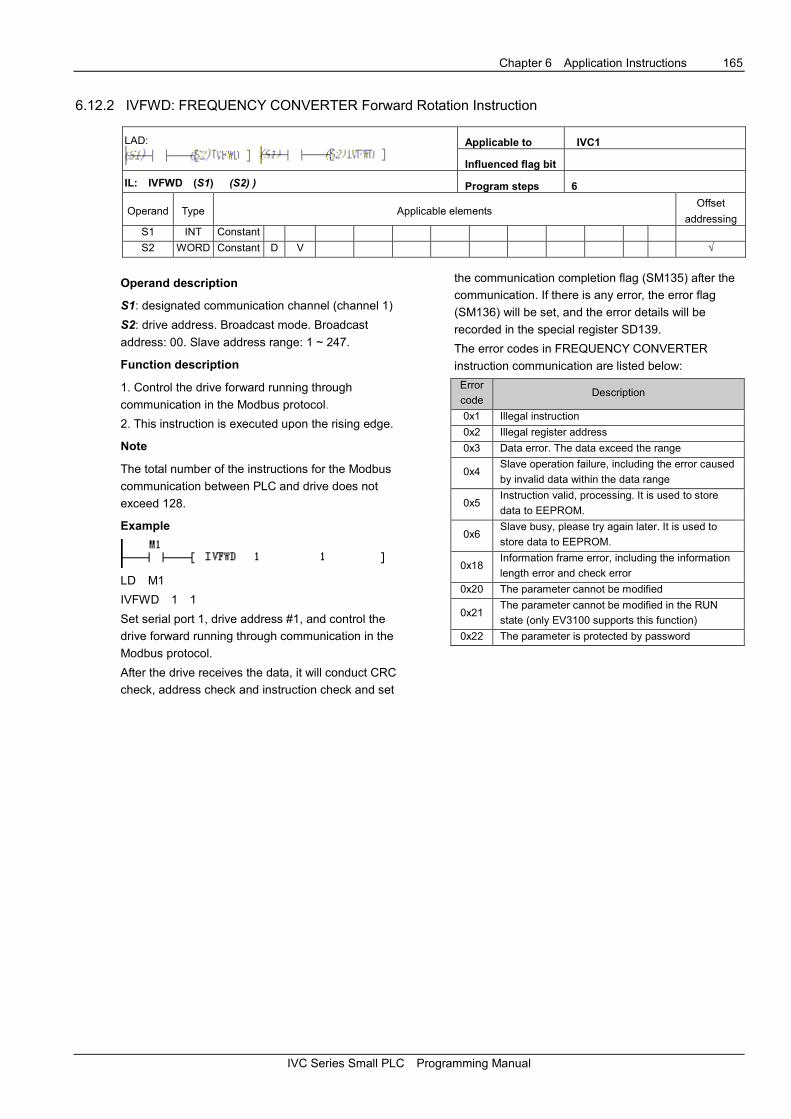
Chapter 6 Application Instructions 165
IVC Series Small PLC Programming Manual
6.12.2 IVFWD: FREQUENCY CONVERTER Forward Rotation Instruction
LAD:
Applicable to IVC1
Influenced flag bit
IL: IVFWD (S1) (S2) ) Program steps 6
Operand Type Applicable elements Offset
addressing S1 INT Constant
S2 WORD Constant D V √
Operand description
S1: designated communication channel (channel 1)
S2: drive address. Broadcast mode. Broadcast
address: 00. Slave address range: 1 ~ 247.
Function description
1. Control the drive forward running through
communication in the Modbus protocol.
2. This instruction is executed upon the rising edge.
Note
The total number of the instructions for the Modbus
communication between PLC and drive does not
exceed 128.
Example
LD M1
IVFWD 1 1
Set serial port 1, drive address #1, and control the
drive forward running through communication in the
Modbus protocol.
After the drive receives the data, it will conduct CRC
check, address check and instruction check and set
the communication completion flag (SM135) after the
communication. If there is any error, the error flag
(SM136) will be set, and the error details will be
recorded in the special register SD139.
The error codes in FREQUENCY CONVERTER
instruction communication are listed below:
Error
code Description
0x1 Illegal instruction
0x2 Illegal register address
0x3 Data error. The data exceed the range
0x4 Slave operation failure, including the error caused
by invalid data within the data range
0x5 Instruction valid, processing. It is used to store
data to EEPROM.
0x6 Slave busy, please try again later. It is used to
store data to EEPROM.
0x18 Information frame error, including the information
length error and check error
0x20 The parameter cannot be modified
0x21 The parameter cannot be modified in the RUN
state (only EV3100 supports this function)
0x22 The parameter is protected by password

166 Chapter 6 Application Instructions
IVC Series Small PLC Programming Manual
6.12.3 IVREV: FREQUENCY CONVERTER Reverse Rotation Instruction
LAD:
Applicable to IVC1
Influenced flag bit
IL: IVREV (S1) (S2) Program steps 6
Operand Type Applicable elements Offset
addressing S1 INT Constant
S2 WORD Constant D V √
Operand description
S1: designated communication channel (channel 1)
S2: drive address. Broadcast mode. Broadcast
address: 00. Slave address range: 1 ~ 247.
Function description
1. Control the drive reverse running through
communication in the Modbus protocol.
2. This instruction is executed upon the rising edge.
Example
LD M1
IVREV 1 1
1. Set the serial port 1, drive address #1, and control
the drive reverse running through communication in
the Modbus protocol.
2. After the drive receives the data, it will conduct CRC
check, address check and instruction check, and set
the communication completion flag (SM135) after the
communication. If there is any error, the error flag
(SM136) will be set, and the error details will be
recorded in the special register SD139.
6.12.4 IVDFWD: FREQUENCY CONVERTER Touch Forward Rotation Instruction
LAD:
Applicable to IVC1
Influenced flag bit
IL: IVDFWD (S1) (S2) Program steps 6
Operand Type Applicable elements Offset
addressing S1 INT Constant
S2 WORD Constant D V √
Operand description
S1: designated communication channel (channel 1)
S2: drive address. Broadcast mode. Broadcast
address: 00. Slave address range: 1 ~ 247.
Function description
Set the serial port and drive address, and control the
drive jog forward running through communication in
the Modbus protocol.
Example
LD M1
IVDFWD 1 1
Set the serial port 1 and drive address #1, and control
the drive jog forward running through communication
in the Modbus protocol.
2. After the drive receives the data, it will conduct CRC
check, address check and instruction check, and set
the communication completion flag (SM135) after the
communication. If there is any error, the error flag
(SM136) will be set, and the error details will be
recorded in the special register SD139.

Chapter 6 Application Instructions 167
IVC Series Small PLC Programming Manual
6.12.5 IVDREV: FREQUENCY CONVERTER Touch Reverse Rotation Instruction
LAD:
Applicable to IVC1
Influenced flag bit
IL: IVDREV (S1) (S2) Program steps 6
Operand Type Applicable elements Offset
addressing S1 INT Constant
S2 WORD Constant D V √
Operand description
S1: designated communication channel (channel 1)
S2: drive address. Broadcast mode. Broadcast
address: 00. Slave address range: 1 ~ 247.
Function description
1. Set the serial port and drive address, and control the
drive jog reverse running through communication in
the Modbus protocol.
2. This instruction is executed upon the rising edge.
Example
LD M1
IVDREV 1 1
1. Set the serial port 1 and drive address #1, and
control the drive jog reverse running through
communication in the Modbus protocol.
2. After the drive receives the data, it will conduct CRC
check, address check and instruction check, and set
the communication completion flag (SM135) after the
communication. If there is any error, the error flag
(SM136) will be set, and the error details will be
recorded in the special register SD139.
6.12.6 IVSTOP: FREQUENCY CONVERTER Stop Instruction
LAD:
Applicable to IVC1
Influenced flag bit
IL: IVSTOP (S1) (S2) (S3) Program steps 8
Operand Type Applicable elements Offset
addressing S1 INT Constant
S2 WORD Constant D V √
S3 WORD Constant D V √
Operand description
S1: designated communication channel (channel 1)
S2: drive address. Broadcast mode. Broadcast
address: 00. Slave address range: 1 ~ 247.
S3: drive stop mode.
There are three stop modes: stop mode 0 (stop), stop
mode 1 (free stop), stop mode 2 (JOG stop).
Function description
1. Set the serial port and drive address, and control the
drive jog reverse running through communication in
the Modbus protocol.
2. This instruction is executed upon the rising edge.
Example
LD M1
IVSTOP 1 1 0
1. Set the serial port 1, drive address #1, and the drive
stop mode 0 (stop according to the set deceleration
time), and control the drive stop through
communication in the Modbus protocol.
2. After the drive receives the data, it will conduct CRC
check, address check and instruction check, and set
the communication completion flag (SM135) after the
communication. If there is any error, the error flag
(SM136) will be set, and the error details will be
recorded in the special register SD139.

168 Chapter 6 Application Instructions
IVC Series Small PLC Programming Manual
6.12.7 IVFRQ: FREQUENCY CONVERTER Set Frequency Instruction
LAD:
Applicable to IVC1
Influenced flag bit
IL: IVFRQ (S1) (S2) (S3) Program steps 8
Operand Type Applicable elements Offset
addressing S1 INT Constant
S2 WORD Constant D V √
S3 WORD Constant D V √
Operand description
S1: designated communication channel (channel 1)
S2: drive address. Broadcast mode. Broadcast
address: 00. Slave address range: 1 ~ 247.
S3: frequency of the drive
Function description
1. Set the serial port and drive address, and control the
drive operation frequency through communication in
the Modbus protocol.
2. This instruction is executed upon the rising edge.
Example
LD M1
IVFRQ 1 1 50
1. Set the serial port 1 and drive address #1, and
control the drive operation frequency through
communication in the Modbus protocol.
2. After the drive receives the data, it will conduct CRC
check, address check and instruction check, and set
the communication completion flag (SM135) after the
communication. If there is any error, the error flag
(SM136) will be set, and the error details will be
recorded in the special register SD139.

Chapter 6 Application Instructions 169
IVC Series Small PLC Programming Manual
6.12.8 IVWRT: FREQUENCY CONVERTER Write Single Register Value Instruction
LAD:
Applicable to IVC1
Influenced flag bit
IL: IVWRT (S1) (S2) (S3) (S4) Program steps 10
Operand Type Applicable elements Offset
addressing S1 INT Constant
S2 WORD Constant D V √
S3 WORD Constant D V √
S4 WORD Constant D V √
Operand description
S1: designated communication channel (channel 1)
S2: drive address. Broadcast mode. Broadcast
address: 00. Slave address range: 1 ~ 247.
S3: register address
S4: register value
Function description
1. Set the serial port and drive address, input the
register address and register value, and the
corresponding register will be assigned with the set
value through communication in the Modbus protocol.
2. This instruction is executed upon the rising edge.
Example
LD M1
MOV 1 D0
IVWRT 1 1 D10 1
1. Set the serial port 1 and drive address #1, input the
register address 1 (digital frequency control) and
register value 1 (disable frequency saving upon
power-off), and write the value into the corresponding
register through communication in the Modbus mode.
2. After the drive receives the data, it will conduct CRC
check, address check and instruction check, and set
the communication completion flag (SM135) after the
communication. If there is any error, the error flag
(SM136) will be set, and the error details will be
recorded in the special register SD139.
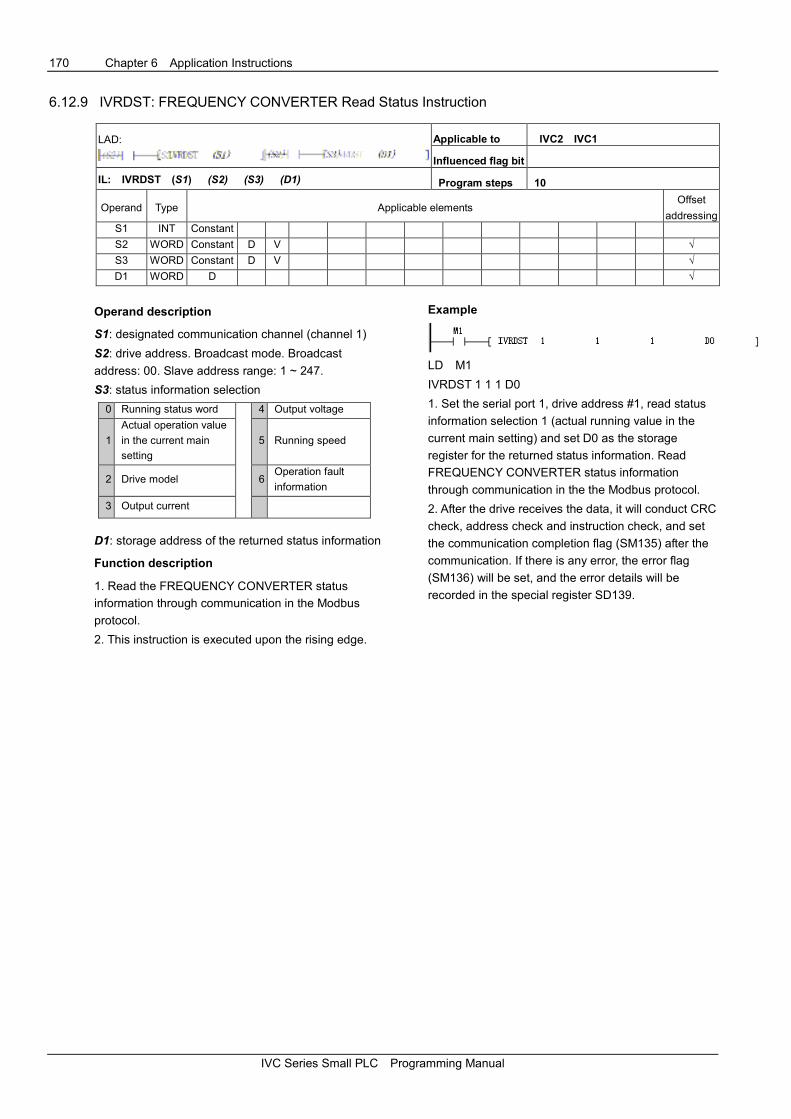
170 Chapter 6 Application Instructions
IVC Series Small PLC Programming Manual
6.12.9 IVRDST: FREQUENCY CONVERTER Read Status Instruction
LAD:
Applicable to IVC2 IVC1
Influenced flag bit
IL: IVRDST (S1) (S2) (S3) (D1) Program steps 10
Operand Type Applicable elements Offset
addressing S1 INT Constant
S2 WORD Constant D V √
S3 WORD Constant D V √
D1 WORD D √
Operand description
S1: designated communication channel (channel 1)
S2: drive address. Broadcast mode. Broadcast
address: 00. Slave address range: 1 ~ 247.
S3: status information selection
0 Running status word
4 Output voltage
1
Actual operation value
in the current main
setting
5 Running speed
2 Drive model 6 Operation fault
information
3 Output current
D1: storage address of the returned status information
Function description
1. Read the FREQUENCY CONVERTER status
information through communication in the Modbus
protocol.
2. This instruction is executed upon the rising edge.
Example
LD M1
IVRDST 1 1 1 D0
1. Set the serial port 1, drive address #1, read status
information selection 1 (actual running value in the
current main setting) and set D0 as the storage
register for the returned status information. Read
FREQUENCY CONVERTER status information
through communication in the the Modbus protocol.
2. After the drive receives the data, it will conduct CRC
check, address check and instruction check, and set
the communication completion flag (SM135) after the
communication. If there is any error, the error flag
(SM136) will be set, and the error details will be
recorded in the special register SD139.
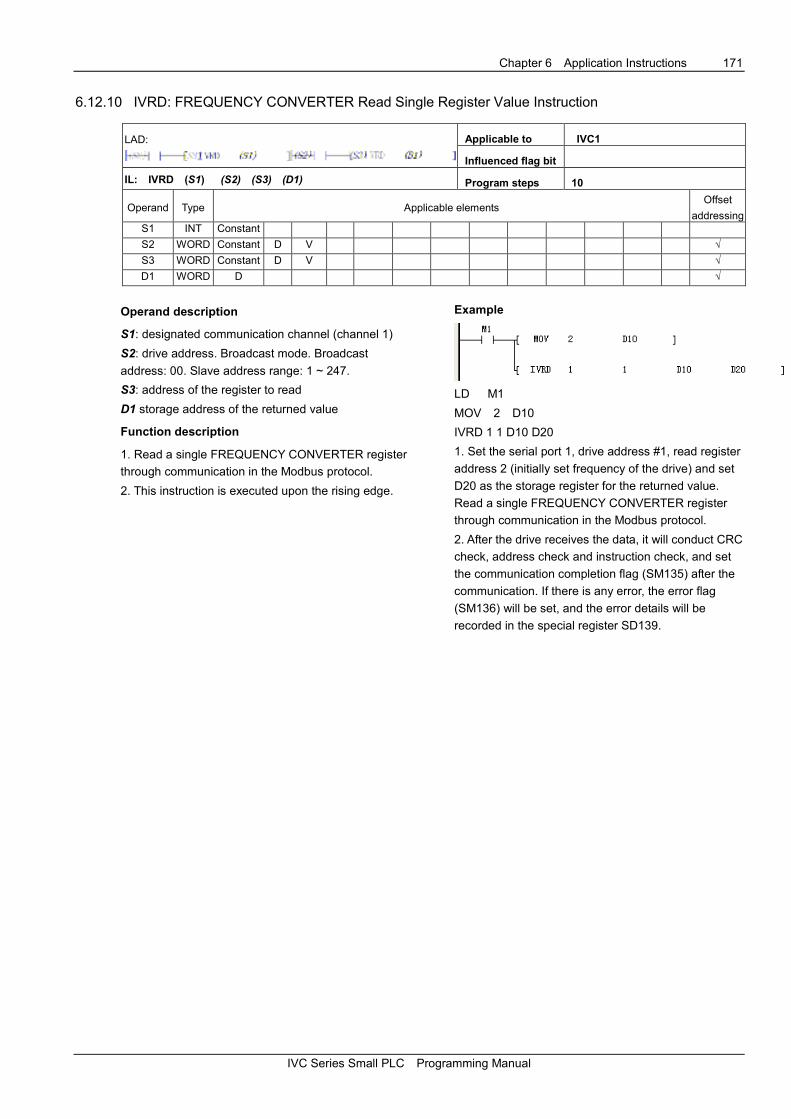
Chapter 6 Application Instructions 171
IVC Series Small PLC Programming Manual
6.12.10 IVRD: FREQUENCY CONVERTER Read Single Register Value Instruction
LAD:
Applicable to IVC1
Influenced flag bit
IL: IVRD (S1) (S2) (S3) (D1) Program steps 10
Operand Type Applicable elements Offset
addressing S1 INT Constant
S2 WORD Constant D V √
S3 WORD Constant D V √
D1 WORD D √
Operand description
S1: designated communication channel (channel 1)
S2: drive address. Broadcast mode. Broadcast
address: 00. Slave address range: 1 ~ 247.
S3: address of the register to read
D1 storage address of the returned value
Function description
1. Read a single FREQUENCY CONVERTER register
through communication in the Modbus protocol.
2. This instruction is executed upon the rising edge.
Example
LD M1
MOV 2 D10
IVRD 1 1 D10 D20
1. Set the serial port 1, drive address #1, read register
address 2 (initially set frequency of the drive) and set
D20 as the storage register for the returned value.
Read a single FREQUENCY CONVERTER register
through communication in the Modbus protocol.
2. After the drive receives the data, it will conduct CRC
check, address check and instruction check, and set
the communication completion flag (SM135) after the
communication. If there is any error, the error flag
(SM136) will be set, and the error details will be
recorded in the special register SD139.

172 Chapter 6 Application Instructions
IVC Series Small PLC Programming Manual
6.12.11 XMT: Free-Port Sending (XMT) Instruction
LAD:
Applicable to IVC2 IVC1
Influenced flag bit
IL: XMT (S1) (S2) (S3) Program steps 7
Operand Type Applicable elements Offset
addressing S1 INT Constant
S2 WORD D V
S3 INT Constant KnX KnY KnM KnS KnLM D SD C T V Z
Operand description
S1: designated communication channel. Range: 0, 1
S2: starting address of the data to be sent
S3: number of bytes to be sent
Function description
When the power flow is valid, and the communication
conditions are met, the designated data will be sent
through the designated channel.
Note
1. Size of communication frame: depending on the
element type (D or V) of the communication frame, the
ending character of the frame does not exceed D7999
or V63.
2. In case of shutdown, the sending will stop.
Special register
1. SM110/SM120: Sending enabled flag. It will be set
when the XMT instruction is used and cleared when
the sending is completed. When it is reset, the current
sending stops.
2. SM112/SM122: sending completed flag. When it is
judged that the sending is completed, the sending
completed flag will be set.
3. SM114/SM124: Idle flag. When the serial port has
no communication task, it will be set, and it can be
used as the checking bit for communication.
4. For detailed examples of the application, please
refer to Chapter 10 Communication Function Use
Instruction.
Example
LD SM0
TON T0 100
LD T0
RST T0
MOV 16# 1 D0
MOV 16#0 D1
MOV 16#1 D2
MOV 16#1 D3
MOV 16#2 D4
RST SM122
XMT 1 D0 5
LD SM122
INC D1OO
In this example, one data frame is sent in every 10s.
The following data will be sent through serial port 1.
01 00 01 01 02
1. Set port 1 in the system block as free port, and then
set the baud rate, parity check, data bit and stop bit.
2. Write the data to be sent into the transmission buffer
area. For IVC2, only the low bytes of the word element
will be sent.
3. Reset the sending completed flag (SM122) before
sending the data.
4. When the sending is completed, set the sending
completed flag (SM122).

Chapter 6 Application Instructions 173
IVC Series Small PLC Programming Manual
6.12.12 RCV: Free-Port Receiving (RCV) Instruction
LAD:
Applicable to IVC2 IVC1
Influenced flag bit
IL: RCV (S1) (D) (S2) Program steps 7
Operand Type Applicable elements Offset
addressing S1 INT Constant
D WORD D V
S2 INT Constant KnX KnY KnM KnS KnLM D SD C T V Z
Operand description
S1: designated communication channel. Range: 0, 1
D: starting address for storing the received data
S2: maximum number of received bytes
Function description
When the power flow is valid, and the communication
conditions are met, limited amount of data will be
received through the designated channel to the
designated registers.
Example
LD SM1
RCV 1 D20 5
LD SM123
INC D100
1. The instruction will be valid continuously as long as
the power flow is valid. If you want to receive data only
once, you can use a rising edge or special registers
that are effective only once, such as SM1, to trigger
the instruction.
2. For detailed application examples, refer to Chapter
10 Using Communication Function.
Note
Size of communication frame: depending on the
element type (D or V) of the communication frame, the
ending character of the frame does not exceed D7999
or V63.
The receiving stops upon shutdown.
The value range of S1: 0 and 1
Special register
SM111 (SM121): Receiving enabled flag. It will be set
when the RCV instruction is used and cleared when
the sending is completed. When it is reset, the current
receiving stops.
SM113 (SM123): receiving completed flag. When the
receiving is completed, the receiving completed flag
will be set.
SM114 (SM124): Idle flag. When the serial port has no
communication task, it will be set, and it can be used
as the checking bit for communication.
SD111 (SD121): Starting character, which can be set in
the system block
SD112 (SD122): Ending character, which can be set in
the system block
SD113 (SD123): Character time-out time, i.e. the
maximum receiving interval between the two
characters, which can be set in the system block
SD114 (SD124): Frame time-out time: the time starting
with the power flow and stops at the end of the
receiving, which can be set in the system block
SD115 (SD125): receiving completion code. The
definition of the data bit is shown as follows:
User
end
receiving
flag
Designated
ending
word
received
flag
Maxi.
number of
characters
received
flag
Inter-
character
time-out
flag
(Frame)
reception
time-out
flag
Parity
check
error
flag
Reserved
Bit 0 Bit 1 Bit 2 Bit 3 Bit 4 Bit 5 Bits 6 ~
15
SD116 (SD126): The characters currently received
SD117 (SD127): The character received previously

174 Chapter 6 Application Instructions
IVC Series Small PLC Programming Manual
6.13 Data Check Instruction
6.13.1 CCITT: Check Instruction
LAD:
Applicable to IVC2 IVC1
Influenced flag bit
IL: CCITT (S1) (S2) (D) Program steps 7
Operand Type Applicable elements Offset
addressing S1 WORD D V √
S2 INT Constant KnX KnY KnM KnS KnLM KnSM D SD C T V Z √
D WORD D V √
Operand description
S1: the starting element of the data to
be checked
S2: the number of the data to be
checked. S2 ≥ 0, or the system will
report operand error.
D: check result
Function description
1. Conduct CCITT check on the S2
data starting with S1, and assign the
result to D.
2. The expression for CCITT check
algorithm is: X^16+X^12+X^5+1
Note
1. For the system will bring value of D
into the operation each time the
instruction is executed, make sure to
clear D before executing the CCITT
instruction.
2. The data within the checking data
zone starting with S2 are stored in byte
mode by default. That is, the high bytes
are taken as 0, and the check result
has 16 bits.
Example
LD SM1
MOV 16#00 D0
MOV 16#11 D1
MOV 16#22 D2
MOV 16#33 D3
MOV 16#44 D4
MOV 16#55 D5
MOV 16#66 D6
MOV 16#77 D7
LD X0
MOV 0 D100
CCITT D0 8 D100
When X0 is ON, conduct CCITT check on the 8 data starting with
D0, and the result is assigned to D100.

Chapter 6 Application Instructions 175
IVC Series Small PLC Programming Manual
6.13.2 CRC16: Check Instruction
LAD:
Applicable to IVC2 IVC1
Influenced flag bit
IL: CRC16 (S1) (S2) (D) Program steps 7
Operand Type Applicable elements Offset
addressing S1 WORD D V √
S2 INT Constant KnX KnY KnM KnS KnLM KnSM D SD C T V Z √
D WORD D V √
Operand description
S1: the starting element of the
data to be checked
S2: the number of the data to
be checked; S2 ≥ 0, or the
system will report operand
error
D: check result
Function description
1. Conduct CRC16 check on
the S2 data starting with S1,
and assign the result to D
unit.
2. The expression for CRC16
check algorithm is:
X^16+X^15+X^2+1
Note
1. For the system will bring
value of D into the operation
each time the instruction is
executed, make sure to clear
D before executing the
CRC16 instruction.
2. The standard Modbus CRC
check requires that the D
element (checksum) be
initialized as 16#FFFF, and
the high/low byes (8 high, 8
low) shall be swapped.
3. The data within the
checking data zone starting
with S2 are stored in byte
mode by default. That is, the
high bytes will be taken as 0,
and the check result has 16
bits.
Example
LD SM1
MOV 16#00 D0
MOV 16#11 D1
MOV 16#22 D2
MOV 16#33 D3
MOV 16#44 D4
MOV 16#55 D5
MOV 16#66 D6
MOV 16#77 D7
LD X0
MOV 0 D100
CRC16 D0 8 D100
When X0 is ON, conduct CRC16 check on the 8 data starting with D0, and
the result is assigned to D100.
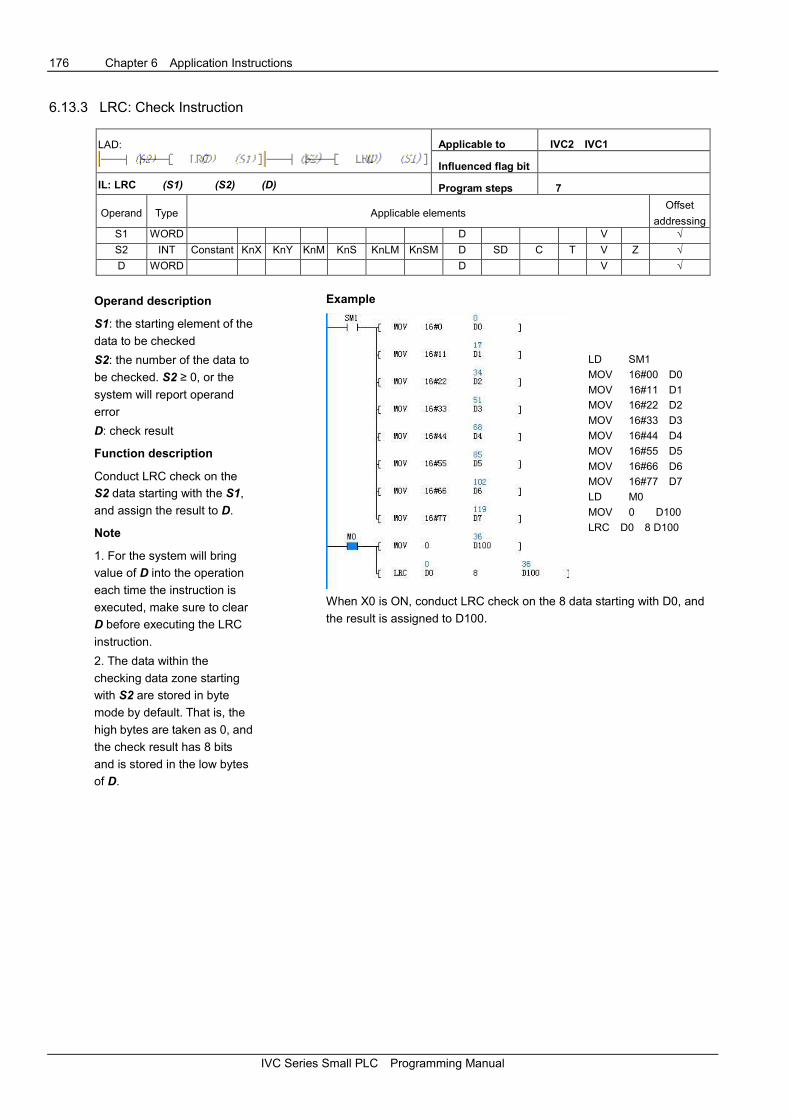
176 Chapter 6 Application Instructions
IVC Series Small PLC Programming Manual
6.13.3 LRC: Check Instruction
LAD:
Applicable to IVC2 IVC1
Influenced flag bit
IL: LRC (S1) (S2) (D) Program steps 7
Operand Type Applicable elements Offset
addressing S1 WORD D V √
S2 INT Constant KnX KnY KnM KnS KnLM KnSM D SD C T V Z √
D WORD D V √
Operand description
S1: the starting element of the
data to be checked
S2: the number of the data to
be checked. S2 ≥ 0, or the
system will report operand
error
D: check result
Function description
Conduct LRC check on the
S2 data starting with the S1,
and assign the result to D.
Note
1. For the system will bring
value of D into the operation
each time the instruction is
executed, make sure to clear
D before executing the LRC
instruction.
2. The data within the
checking data zone starting
with S2 are stored in byte
mode by default. That is, the
high bytes are taken as 0, and
the check result has 8 bits
and is stored in the low bytes
of D.
Example
LD SM1
MOV 16#00 D0
MOV 16#11 D1
MOV 16#22 D2
MOV 16#33 D3
MOV 16#44 D4
MOV 16#55 D5
MOV 16#66 D6
MOV 16#77 D7
LD M0
MOV 0 D100
LRC D0 8 D100
When X0 is ON, conduct LRC check on the 8 data starting with D0, and
the result is assigned to D100.

Chapter 6 Application Instructions 177
IVC Series Small PLC Programming Manual
6.14 Enhanced Bit Processing Instruction
6.14.1 ZRST: Batch Bit Reset Instruction
LAD:
Applicable to IVC2 IVC1
Influenced flag bit
IL: ZRST (D) (S) Program steps 5
Operand Type Applicable elements Offset
addressing D BOOL Y M S LM C T √
S INT Constant KnX KnY KnM KnS KnLM KnSM D SD C T V Z √
Operand description
D: destination operand
S: source operand
Function description
When the power flow is valid,
reset S bit-elements starting
with D.
Note
1. When a C element is reset, the counting value in it will also be cleared.
2. When a T element is reset, the timing value in it will also be cleared.
Example
LD SM0
ZRST M10 10
When SM0 is ON, the 10 elements M10, M10, M11, M12 ... M19 will be
completely cleared.
6.14.2 ZSET: Set Batch Bit Instruction
LAD:
Applicable to IVC2 IVC1
Influenced flag bit
IL: ZSET (D) (S) Program steps 5
Operand Type Applicable elements Offset
addressing D BOOL Y M S LM C T √
S INT Constant KnX KnY KnM KnS KnLM KnSM D SD C T V Z √
Operand description
D: destination operand
S: source operand
Function description
When the power flow is valid,
set S bit elements starting
with D.
Example
LD SM0
ZSET M10 10
When SM0 is ON, the 10 units M10, M10, M11, M12 … M19, will all be set
to 1.

178 Chapter 6 Application Instructions
IVC Series Small PLC Programming Manual
6.14.3 DECO: Decode Instruction
LAD:
Applicable to IVC2 IVC1
Influenced flag bit
IL: DECO (S) (D) Program steps 5
Operand Type Applicable elements Offset
addressing S WORD Constant KnX KnY KnM KnS KnLM KnSM D SD C T V Z √
D INT KnY KnM KnS KnLM KnSM D SD C T V Z √
Operand description
S: source operand
D: destination operand
Function description
When the power flow is valid,
set bit S in word element D to
1, and clear other bits.
Note
1. Range of S: 0 to 15.
2. If S is outside the range of 0 ~ 15, D will not be changed when the
power flow is valid. Instead, the system will report operand error.
Example
LD SM0
DECO 2 D9
When the power flow is valid, bit 2 in D9 will be set as 1, other bits will be
cleared.
6.14.4 ENCO: Encode Instruction
LAD:
Applicable to IVC2 IVC1
Influenced flag bit
IL: ENCO (S) (D) Program steps 5
Operand Type Applicable elements Offset
addressing S INT Constant KnX KnY KnM KnS KnLM KnSM D SD C T V Z √
D INT KnY KnM KnS KnLM D SD C T V Z √
Operand description
S: source operand
D: destination operand
Function description
When the power flow is valid,
assign the number of the bit
whose value is 1 in word
element S to D.
Note
When the value of multiple bits in S is 1, the smallest bit number will be written
into D, as shown in the following figure:
Example
LD M0
ENCO 2#0010 D0
When the power flow is valid, operand 1 is 2#0010, bit 1 is 1, hence 1 is written
into D0.

Chapter 6 Application Instructions 179
IVC Series Small PLC Programming Manual
6.14.5 BITS: Counting ON Bit In Word Instruction
LAD:
Applicable to IVC2 IVC1
Influenced flag bit
IL: BITS (S) (D) Program steps 5
Operand Type Applicable elements Offset
addressing S INT Constant KnX KnY KnM KnS KnLM KnSM D SD C T V Z √
D INT Constant KnX KnY KnM KnS KnLM KnSM D SD C T V Z √
Operand description
S: source operand
D: destination operand
Function description
When the power flow is valid,
count how many bits in operand S
is 1, and store the result into D.
Example
LD SM0
BITS 16#F0F0 D1
When the power flow is valid, it is counted that there are 8 bits whose value
is 1 (ON status) in constant 16#F0F0, so 8 is stored into D1.
6.14.6 DBITS: Counting ON Bit In Double Word Instruction
LAD:
Applicable to IVC2 IVC1
Influenced flag bit
IL: DBITS (S) (D) Program steps 6
Operand Type Applicable elements Offset
addressing S DWORD Constant KnX KnY KnM KnS KnLM KnSM D SD C V √
D INT KnY KnM KnS KnLM KnSM D SD C T V Z √
Operand description
S: source operand
D: destination operand
Function description
When the power flow is valid,
count how many bits in double
word S is 1, and store the result
into D.
Example
LD SM0
DBITS 16#FF0FF D10
When the power flow is valid, it is counted that there are 16 bits whose
value is 1 (ON status) in constant 16#FF0FF, so 16 is stored into D10.

180 Chapter 6 Application Instructions
IVC Series Small PLC Programming Manual
6.15 Word Contactor Instruction
6.15.1 BLD: Word Bit Contactor LD Instruction
LAD:
Applicable to IVC2 IVC1
Influenced flag bit
IL: BLD (S1) (S2) Program steps 5
Operand Type Applicable elements Offset
addressing S1 WORD KnX KnY KnM KnS KnLM KnSM D SD C T V Z √
S2 INT Constant KnX KnY KnM KnS KnLM KnSM D SD C T V Z √
Operand description
S1: source operand
S2: designated bit, 0 ≤ S2 ≤ 15, or system will report
operand error
Function description
Use the status of bit S2 in element S1 to drive the
following operation.
Example
BLD D0 5
OUT Y0
Use the status of BIT5 (ON) in D0 (1000:
2#0000001111101000) to determine the status of Y0 in
the following operation.
6.15.2 BLDI: Word Bit Contactor LDI Instruction
LAD: Applicable to IVC2 IVC1
Influenced flag bit
IL: BLDI (S1) (S2) Program steps 5
Operand Type Applicable elements Offset
addressing S1 WORD KnX KnY KnM KnS KnLM KnSM D SD C T V Z √
S2 INT Constant KnX KnY KnM KnS KnLM KnSM D SD C T V Z √
Operand description
S1: source operand
S2: designated bit. 0 ≤ S2 ≤ 15, or system will report
operand error..
Function description
Use the logic NOT of the status of bit S2 in element S1
to drive the following operation.
Example
BLDI D0 5
OUT Y0
Use the logic NOT of the status of BIT5 (ON) in D0
(1000: 2#0000001111101000), which is OFF, to
determine the status of Y0 in the following operation.
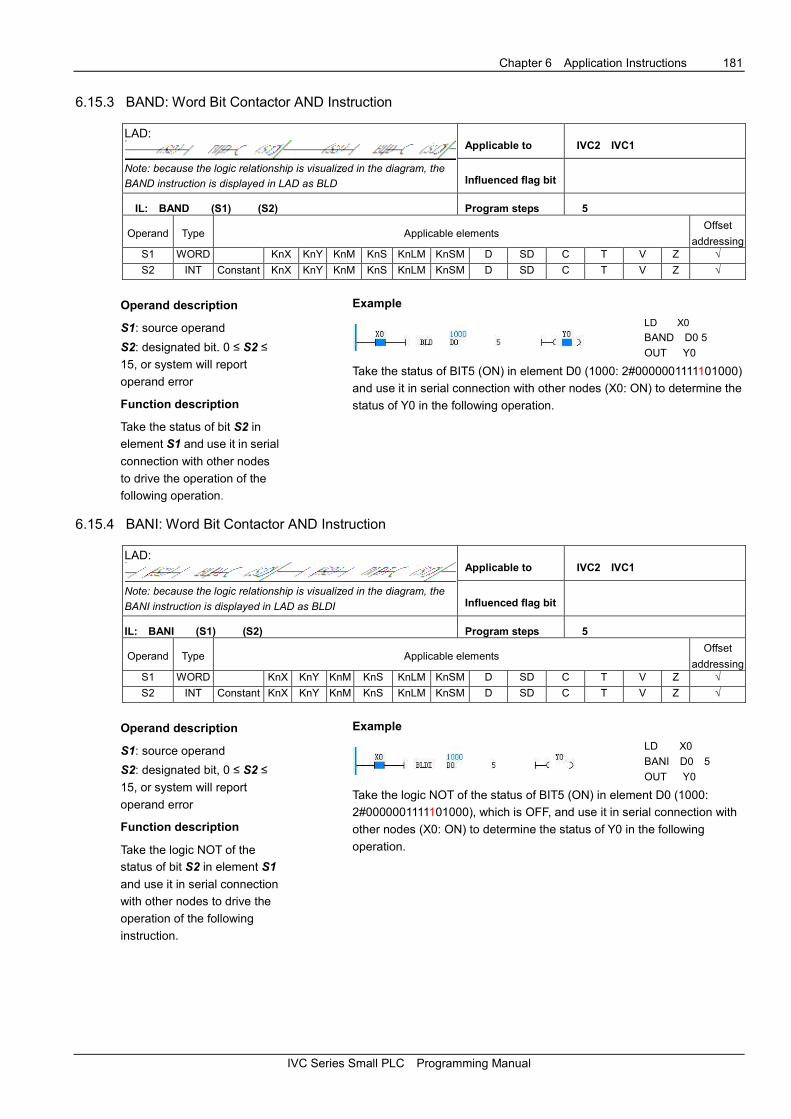
Chapter 6 Application Instructions 181
IVC Series Small PLC Programming Manual
6.15.3 BAND: Word Bit Contactor AND Instruction
LAD:
Note: because the logic relationship is visualized in the diagram, the
BAND instruction is displayed in LAD as BLD
Applicable to IVC2 IVC1
Influenced flag bit
IL: BAND (S1) (S2) Program steps 5
Operand Type Applicable elements Offset
addressing S1 WORD KnX KnY KnM KnS KnLM KnSM D SD C T V Z √
S2 INT Constant KnX KnY KnM KnS KnLM KnSM D SD C T V Z √
Operand description
S1: source operand
S2: designated bit. 0 ≤ S2 ≤
15, or system will report
operand error
Function description
Take the status of bit S2 in
element S1 and use it in serial
connection with other nodes
to drive the operation of the
following operation.
Example
LD X0
BAND D0 5
OUT Y0
Take the status of BIT5 (ON) in element D0 (1000: 2#0000001111101000)
and use it in serial connection with other nodes (X0: ON) to determine the
status of Y0 in the following operation.
6.15.4 BANI: Word Bit Contactor AND Instruction
LAD:
Note: because the logic relationship is visualized in the diagram, the
BANI instruction is displayed in LAD as BLDI
Applicable to IVC2 IVC1
Influenced flag bit
IL: BANI (S1) (S2) Program steps 5
Operand Type Applicable elements Offset
addressing S1 WORD KnX KnY KnM KnS KnLM KnSM D SD C T V Z √
S2 INT Constant KnX KnY KnM KnS KnLM KnSM D SD C T V Z √
Operand description
S1: source operand
S2: designated bit, 0 ≤ S2 ≤
15, or system will report
operand error
Function description
Take the logic NOT of the
status of bit S2 in element S1
and use it in serial connection
with other nodes to drive the
operation of the following
instruction.
Example
LD X0
BANI D0 5
OUT Y0
Take the logic NOT of the status of BIT5 (ON) in element D0 (1000:
2#0000001111101000), which is OFF, and use it in serial connection with
other nodes (X0: ON) to determine the status of Y0 in the following
operation.
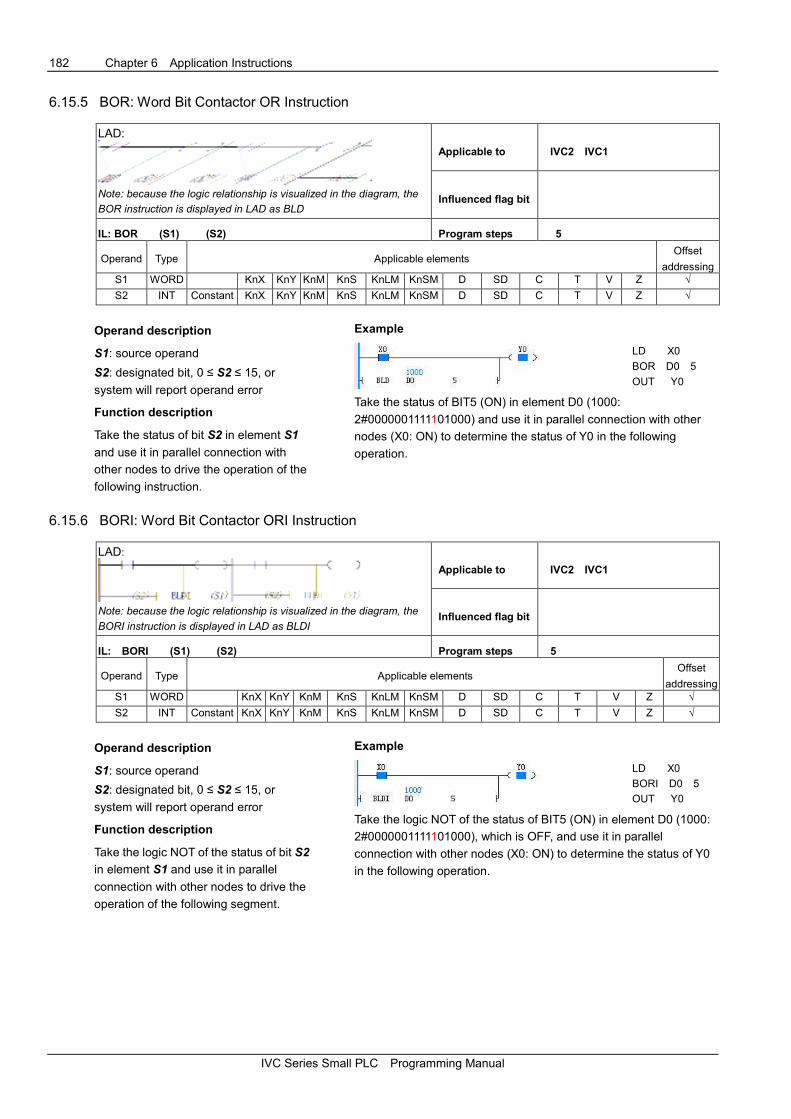
182 Chapter 6 Application Instructions
IVC Series Small PLC Programming Manual
6.15.5 BOR: Word Bit Contactor OR Instruction
LAD:
Note: because the logic relationship is visualized in the diagram, the
BOR instruction is displayed in LAD as BLD
Applicable to IVC2 IVC1
Influenced flag bit
IL: BOR (S1) (S2) Program steps 5
Operand Type Applicable elements Offset
addressing S1 WORD KnX KnY KnM KnS KnLM KnSM D SD C T V Z √
S2 INT Constant KnX KnY KnM KnS KnLM KnSM D SD C T V Z √
Operand description
S1: source operand
S2: designated bit, 0 ≤ S2 ≤ 15, or
system will report operand error
Function description
Take the status of bit S2 in element S1
and use it in parallel connection with
other nodes to drive the operation of the
following instruction.
Example
LD X0
BOR D0 5
OUT Y0
Take the status of BIT5 (ON) in element D0 (1000:
2#0000001111101000) and use it in parallel connection with other
nodes (X0: ON) to determine the status of Y0 in the following
operation.
6.15.6 BORI: Word Bit Contactor ORI Instruction
LAD:
Note: because the logic relationship is visualized in the diagram, the
BORI instruction is displayed in LAD as BLDI
Applicable to IVC2 IVC1
Influenced flag bit
IL: BORI (S1) (S2) Program steps 5
Operand Type Applicable elements Offset
addressing S1 WORD KnX KnY KnM KnS KnLM KnSM D SD C T V Z √
S2 INT Constant KnX KnY KnM KnS KnLM KnSM D SD C T V Z √
Operand description
S1: source operand
S2: designated bit, 0 ≤ S2 ≤ 15, or
system will report operand error
Function description
Take the logic NOT of the status of bit S2
in element S1 and use it in parallel
connection with other nodes to drive the
operation of the following segment.
Example
LD X0
BORI D0 5
OUT Y0
Take the logic NOT of the status of BIT5 (ON) in element D0 (1000:
2#0000001111101000), which is OFF, and use it in parallel
connection with other nodes (X0: ON) to determine the status of Y0
in the following operation.

Chapter 6 Application Instructions 183
IVC Series Small PLC Programming Manual
6.15.7 BOUT: Word Bit Coil Output Instruction
LAD:
Applicable to IVC2 IVC1
Influenced flag bit
IL: BOUT (D) (S) Program steps 5
Operand Type Applicable elements Offset
addressing D WORD KnY KnM KnS KnLM D C T V Z √
S INT Constant KnX KnY KnM KnS KnLM KnSM D SD C T V Z √
Operand description
S1: source operand
S2: designated bit. 0 ≤ S2 ≤ 15, or
system will report operand error.
Function description
Assign the current power flow status to
bit S of element D.
Example
LD X0
BOUT D0 4
Assign the current power flow status (X0: ON) to BIT4 ofelement
D0 (1000: 2#0000001111101000). After the execution, D0 = 1016
(2#0000001111111000).
6.15.8 BSET: Word Bit Coil Set Instruction
LAD:
Applicable to IVC2 IVC1
Influenced flag bit
IL: BSET (D) (S) Program steps 5
Operand Type Applicable elements Offset
addressing D WORD KnY KnM KnS KnLM D C T V Z
S INT Constant KnX KnY KnM KnS KnLM KnSM D SD C T V Z √
Operand description
D: destination operand
S2: designated bit. 0 ≤ S2 ≤ 15, or
system will report operand error.
Function description
Set bit S of element D.
Example
LD X0
BSET D0 8
When the power flow is valid, set BIT15 of element D0 (1000:
2#0000001111101000). After the execution, D0 = 33768
(2#1000001111101000).
6.15.9 BRST: Word Bit Coil Reset Instruction
LAD:
Applicable to IVC2 IVC1
Influenced flag bit
IL: BRST (D) (S) Program steps 5
Operand Type Applicable elements Offset
addressing D WORD KnY KnM KnS KnLM D C T V Z √
S INT Constant KnX KnY KnM KnS KnLM KnSM D SD C T V Z √
Operand description
D: destination operand
S2: designated bit. 0 ≤ S2 ≤ 15, or
system will report operand error.
Function description
Reset bit S of element D.
Example
LD X0
BRST D0 8
When the power flow is valid, reset BIT8 of element D0 (1000:
2#0000001111101000). After the execution, D0 = 744
(2#0000001011101000).

184 Chapter 6 Application Instructions
IVC Series Small PLC Programming Manual
6.16 Compare Contactor Instrucitons
6.16.1 Compare Integer LD (=,<,>,<>,>=,<=) Instrucitons
LAD:
Applicable to IVC2 IVC1
Influenced flag bit
IL: LD= (S1) (S2)
LD< (S1) (S2)
LD> (S1) (S2)
LD<> (S1) (S2)
LD>= (S1) (S2)
LD<= (S1) (S2)
Program steps 5
Operand Type Applicable elements Offset
addressing S1 INT Constant KnX KnY KnM KnS KnLM KnSM D SD C T V Z √
S2 INT Constant KnX KnY KnM KnS KnLM KnSM D SD C T V Z √
Operand description
S1: comparison parameter 1
S2: comparison parameter 2
Function description
Conduct BIN comparison on
elements S1 and S2, and use
the comparison result to drive
the following operation.
Example
LD= D0 D1
OUT Y0
LD< D0 D1
OUT Y1
LD> D0 D1
OUT 2
LD<> D0 D1
OUT Y3
LD>= D0 D1
OUT Y4
LD<= D0 D1
OUT Y5
Conduct BIN comparison on the data of D0 and D1, and the comparison
result is used to determine the output status of the following element.

Chapter 6 Application Instructions 185
IVC Series Small PLC Programming Manual
6.16.2 Compare Integer AND (=,<,>,<>,>=,<=) Instruction
LAD:
Applicable to IVC2 IVC1
Influenced flag bit
IL: AND= (S1) (S2)
AND< (S1) (S2)
AND> (S1) (S2)
AND<> (S1) (S2)
AND>= (S1) (S2)
AND<= (S1) (S2)
Program steps 5
Operand Type Applicable elements Offset
addressing S1 INT Constant KnX KnY KnM KnS KnLM KnSM D SD C T V Z √
S1 INT Constant KnX KnY KnM KnS KnLM KnSM D SD C T V Z √
Operand description
S1: comparison parameter 1
S2: comparison parameter 2
Function description
Conduct BIN comparison on
elements S1 and S2, and use
the comparison result in serial
connection with other nodes
to drive the following
operation.
Example
LD X0
AND= D0 D1
OUT Y0
LD X1
AND< D0 D1
OUT Y1
LD X2
AND> D0 D1
OUT Y2
LD X3
AND<> D0 D1
OUT Y3
LD X4
AND>= D0 D1
OUT Y4
LD X5
AND<= D0 D1
OUT Y5
Conduct BIN comparison on the data of D1 and D2, and use the comparison
result in serial connection with other nodes to determine the output status of the
following element.
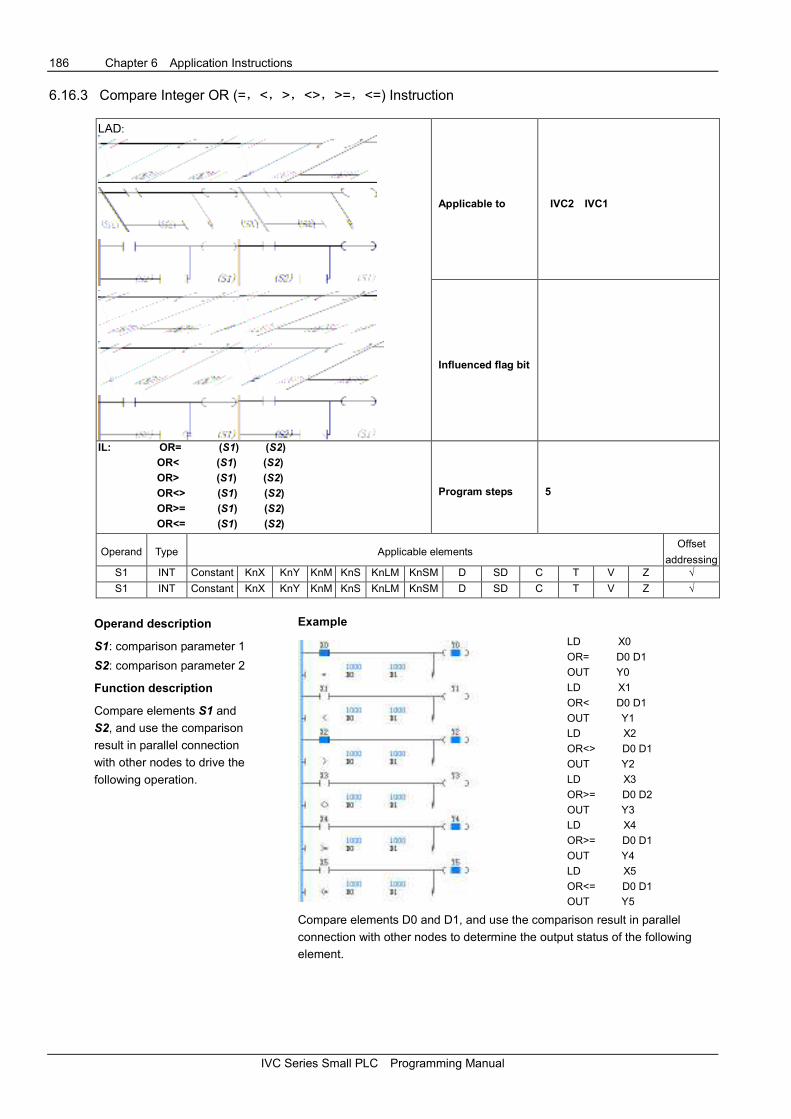
186 Chapter 6 Application Instructions
IVC Series Small PLC Programming Manual
6.16.3 Compare Integer OR (=,<,>,<>,>=,<=) Instruction
LAD:
Applicable to IVC2 IVC1
Influenced flag bit
IL: OR= (S1) (S2)
OR< (S1) (S2)
OR> (S1) (S2)
OR<> (S1) (S2)
OR>= (S1) (S2)
OR<= (S1) (S2)
Program steps 5
Operand Type Applicable elements Offset
addressing S1 INT Constant KnX KnY KnM KnS KnLM KnSM D SD C T V Z √
S1 INT Constant KnX KnY KnM KnS KnLM KnSM D SD C T V Z √
Operand description
S1: comparison parameter 1
S2: comparison parameter 2
Function description
Compare elements S1 and
S2, and use the comparison
result in parallel connection
with other nodes to drive the
following operation.
Example
LD X0
OR= D0 D1
OUT Y0
LD X1
OR< D0 D1
OUT Y1
LD X2
OR<> D0 D1
OUT Y2
LD X3
OR>= D0 D2
OUT Y3
LD X4
OR>= D0 D1
OUT Y4
LD X5
OR<= D0 D1
OUT Y5
Compare elements D0 and D1, and use the comparison result in parallel
connection with other nodes to determine the output status of the following
element.
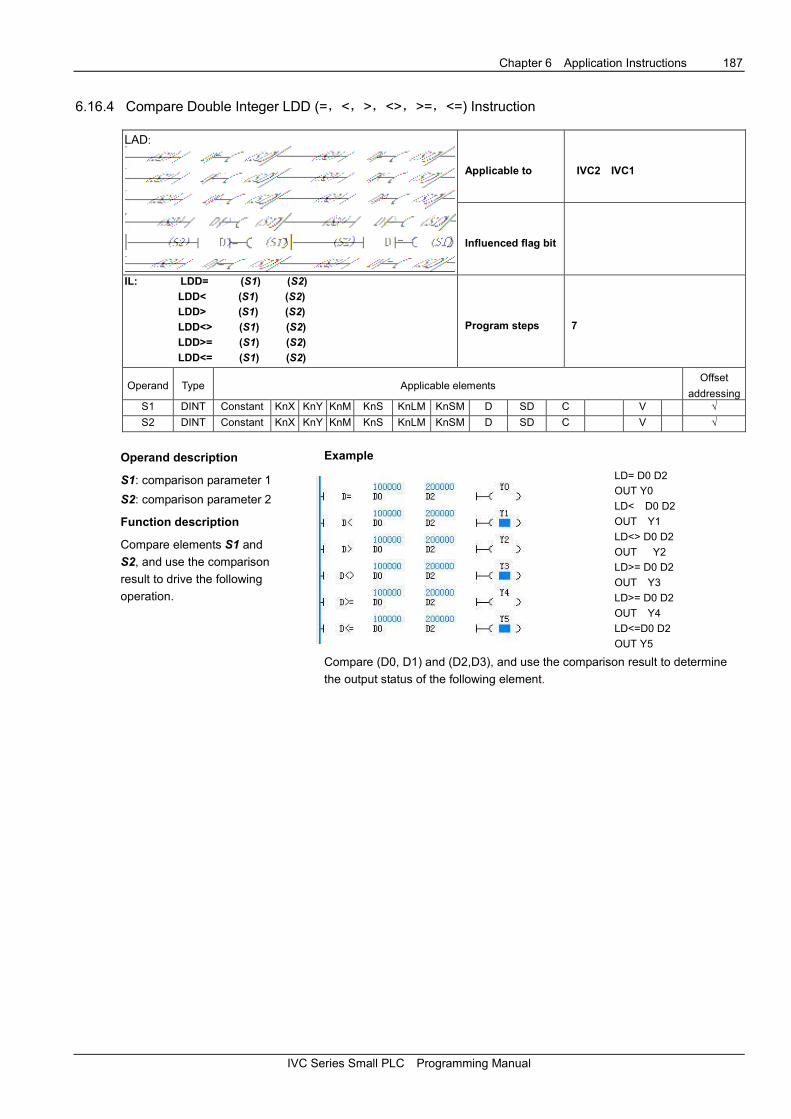
Chapter 6 Application Instructions 187
IVC Series Small PLC Programming Manual
6.16.4 Compare Double Integer LDD (=,<,>,<>,>=,<=) Instruction
LAD:
Applicable to IVC2 IVC1
Influenced flag bit
IL: LDD= (S1) (S2)
LDD< (S1) (S2)
LDD> (S1) (S2)
LDD<> (S1) (S2)
LDD>= (S1) (S2)
LDD<= (S1) (S2)
Program steps 7
Operand Type Applicable elements Offset
addressing S1 DINT Constant KnX KnY KnM KnS KnLM KnSM D SD C V √
S2 DINT Constant KnX KnY KnM KnS KnLM KnSM D SD C V √
Operand description
S1: comparison parameter 1
S2: comparison parameter 2
Function description
Compare elements S1 and
S2, and use the comparison
result to drive the following
operation.
Example
LD= D0 D2
OUT Y0
LD< D0 D2
OUT Y1
LD<> D0 D2
OUT Y2
LD>= D0 D2
OUT Y3
LD>= D0 D2
OUT Y4
LD<=D0 D2
OUT Y5
Compare (D0, D1) and (D2,D3), and use the comparison result to determine
the output status of the following element.

188 Chapter 6 Application Instructions
IVC Series Small PLC Programming Manual
6.16.5 Compare Double Integer ANDD (=,<,>,<>,>=,<=) Instruction
LAD:
Applicable to IVC2 IVC1
Influenced flag bit
IL: ANDD= (S1) (S2)
ANDD< (S1) (S2)
ANDD> (S1) (S2)
ANDD<> (S1) (S2)
ANDD>= (S1) (S2)
ANDD<= (S1) (S2)
Program steps 7
Operand Type Applicable elements Offset
addressing S1 DINT Constant KnX KnY KnM KnS KnLM KnSM D SD C V √
S2 DINT Constant KnX KnY KnM KnS KnLM KnSM D SD C V √
Operand description
S1: comparison parameter 1
S2: comparison parameter 2
Function description
Compare elements S1 and
S2, and use the comparison
result in serial connection with
other nodes to drive the
following operation.
Example
LD X0
LDD= D0 D2
OUT Y0
LD X1
LDD< D0 D2
OUT Y1
LD X2
LDD<> D0 D2
OUT Y2
LD X3
LDD<> D0 D2
OUT Y3
LD X4
LDD>= D0 D2
OUT Y4
LD X5
LDD<= D0 D2
OUT Y5
Compare (D0, D1) and (D2,D3), and use the comparison result in serial
connection with other nodes to determine the output status of the following
element.
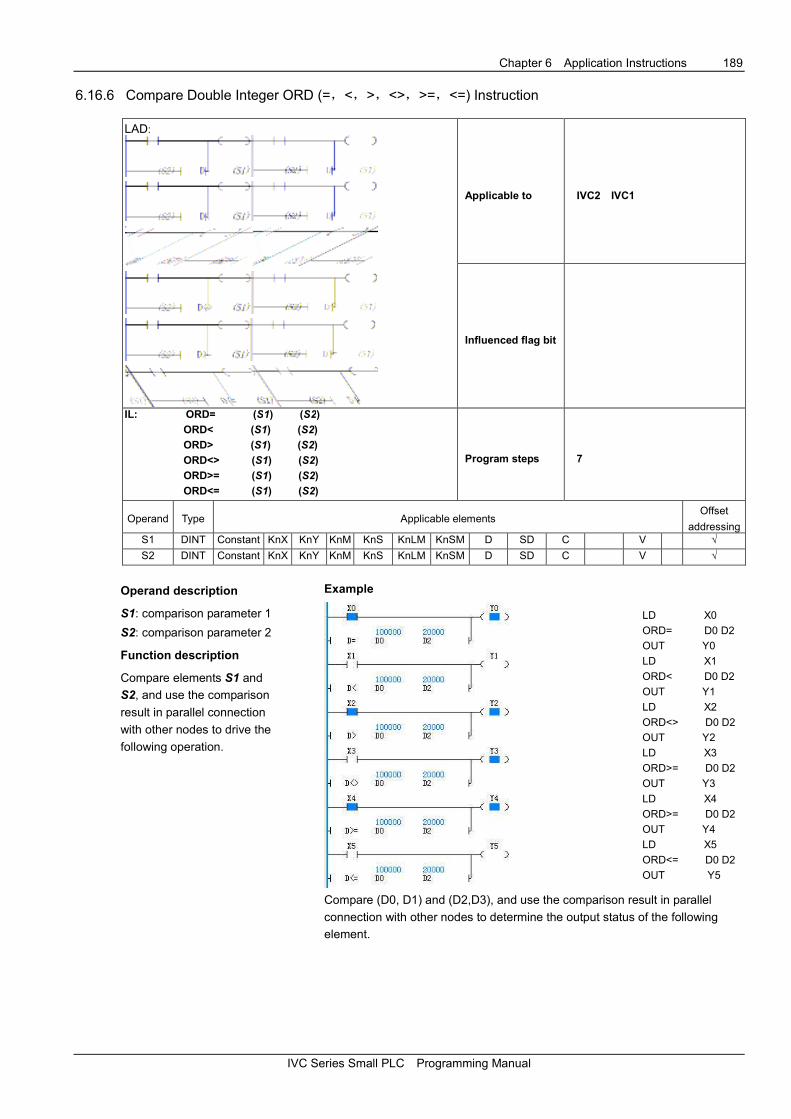
Chapter 6 Application Instructions 189
IVC Series Small PLC Programming Manual
6.16.6 Compare Double Integer ORD (=,<,>,<>,>=,<=) Instruction
LAD:
Applicable to IVC2 IVC1
Influenced flag bit
IL: ORD= (S1) (S2)
ORD< (S1) (S2)
ORD> (S1) (S2)
ORD<> (S1) (S2)
ORD>= (S1) (S2)
ORD<= (S1) (S2)
Program steps 7
Operand Type Applicable elements Offset
addressing S1 DINT Constant KnX KnY KnM KnS KnLM KnSM D SD C V √
S2 DINT Constant KnX KnY KnM KnS KnLM KnSM D SD C V √
Operand description
S1: comparison parameter 1
S2: comparison parameter 2
Function description
Compare elements S1 and
S2, and use the comparison
result in parallel connection
with other nodes to drive the
following operation.
Example
LD X0
ORD= D0 D2
OUT Y0
LD X1
ORD< D0 D2
OUT Y1
LD X2
ORD<> D0 D2
OUT Y2
LD X3
ORD>= D0 D2
OUT Y3
LD X4
ORD>= D0 D2
OUT Y4
LD X5
ORD<= D0 D2
OUT Y5
Compare (D0, D1) and (D2,D3), and use the comparison result in parallel
connection with other nodes to determine the output status of the following
element.
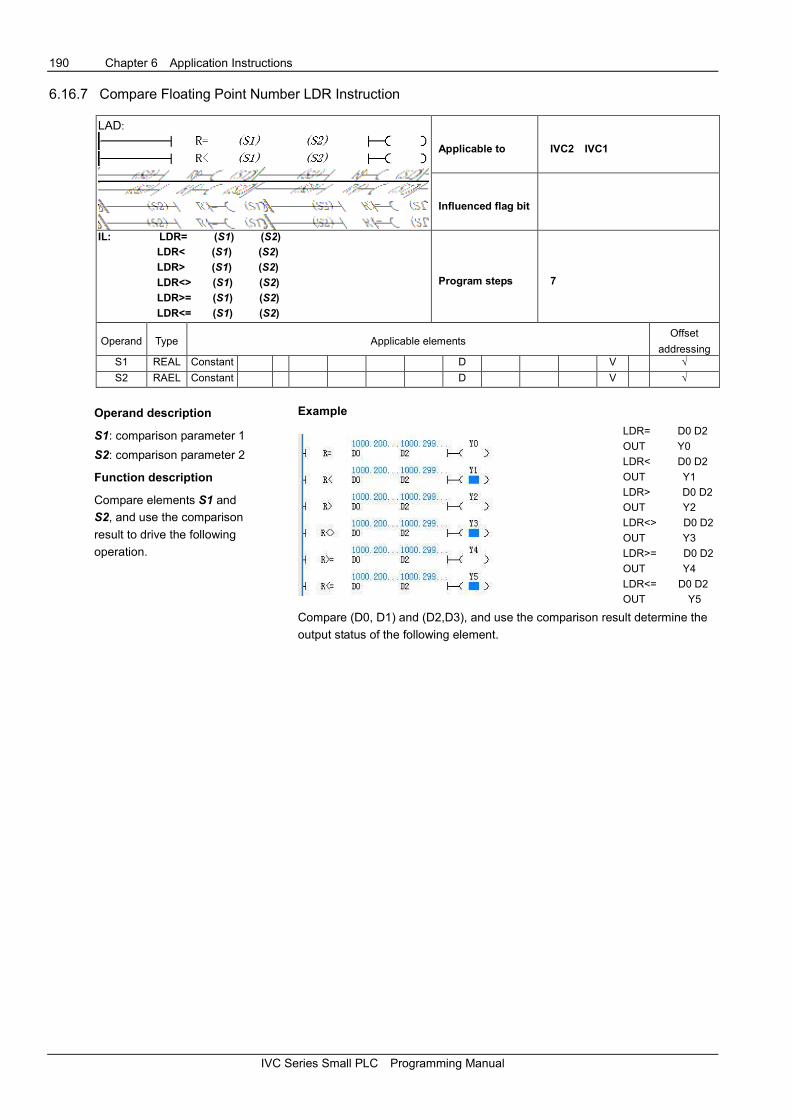
190 Chapter 6 Application Instructions
IVC Series Small PLC Programming Manual
6.16.7 Compare Floating Point Number LDR Instruction
LAD:
Applicable to IVC2 IVC1
Influenced flag bit
IL: LDR= (S1) (S2)
LDR< (S1) (S2)
LDR> (S1) (S2)
LDR<> (S1) (S2)
LDR>= (S1) (S2)
LDR<= (S1) (S2)
Program steps 7
Operand Type Applicable elements Offset
addressing S1 REAL Constant D V √
S2 RAEL Constant D V √
Operand description
S1: comparison parameter 1
S2: comparison parameter 2
Function description
Compare elements S1 and
S2, and use the comparison
result to drive the following
operation.
Example
LDR= D0 D2
OUT Y0
LDR< D0 D2
OUT Y1
LDR> D0 D2
OUT Y2
LDR<> D0 D2
OUT Y3
LDR>= D0 D2
OUT Y4
LDR<= D0 D2
OUT Y5
Compare (D0, D1) and (D2,D3), and use the comparison result determine the
output status of the following element.
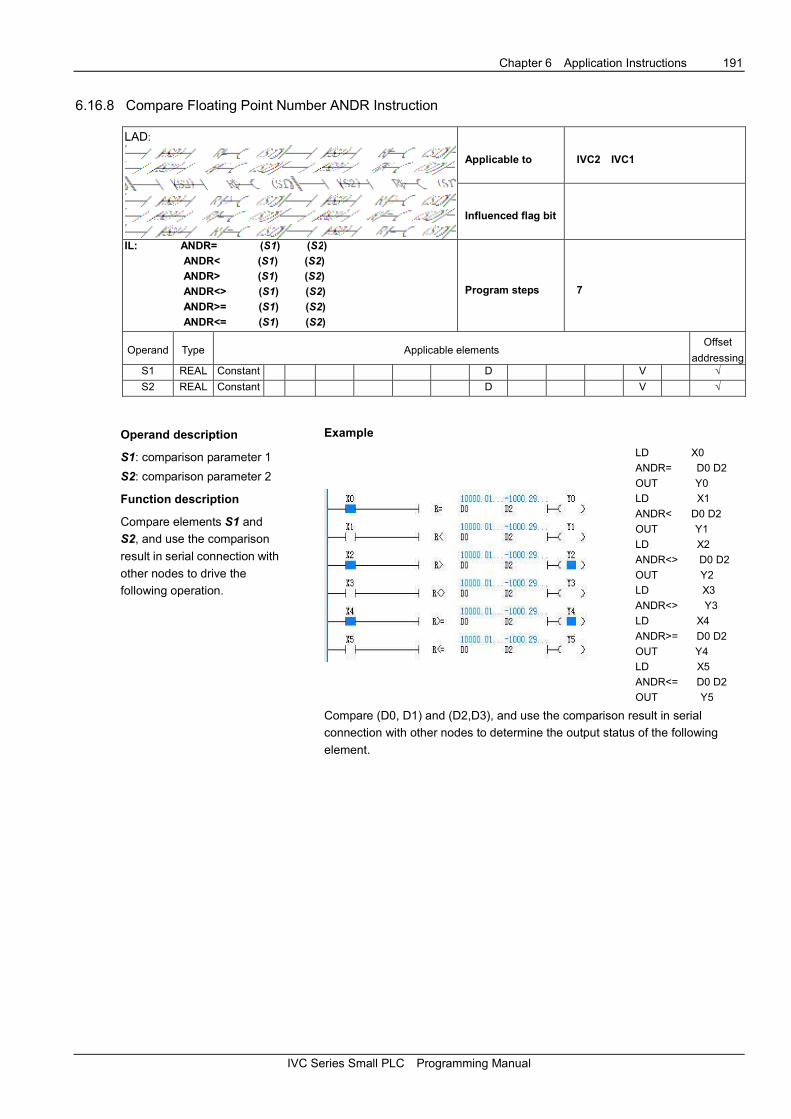
Chapter 6 Application Instructions 191
IVC Series Small PLC Programming Manual
6.16.8 Compare Floating Point Number ANDR Instruction
LAD:
Applicable to IVC2 IVC1
Influenced flag bit
IL: ANDR= (S1) (S2)
ANDR< (S1) (S2)
ANDR> (S1) (S2)
ANDR<> (S1) (S2)
ANDR>= (S1) (S2)
ANDR<= (S1) (S2)
Program steps 7
Operand Type Applicable elements Offset
addressing S1 REAL Constant D V √
S2 REAL Constant D V √
Operand description
S1: comparison parameter 1
S2: comparison parameter 2
Function description
Compare elements S1 and
S2, and use the comparison
result in serial connection with
other nodes to drive the
following operation.
Example
LD X0
ANDR= D0 D2
OUT Y0
LD X1
ANDR< D0 D2
OUT Y1
LD X2
ANDR<> D0 D2
OUT Y2
LD X3
ANDR<> Y3
LD X4
ANDR>= D0 D2
OUT Y4
LD X5
ANDR<= D0 D2
OUT Y5
Compare (D0, D1) and (D2,D3), and use the comparison result in serial
connection with other nodes to determine the output status of the following
element.

192 Chapter 6 Application Instructions
IVC Series Small PLC Programming Manual
6.16.9 Compare Floating Point Number ORR Instruction
LAD:
Applicable to IVC2 IVC1
Influenced flag bit
IL: ORR= (S1) (S2)
ORR< (S1) (S2)
ORR> (S1) (S2)
ORR<> (S1) (S2)
ORR>= (S1) (S2)
ORR<= (S1) (S2)
Program steps 7
Operand Type Applicable elements Offset
addressing S1 REAL Constant D V √
S2 REAL Constant D V √
Operand description
S1: comparison parameter 1
S2: comparison parameter 2
Function description
Compare elements S1 and
S2, and use the comparison
result in parallel connection
with other nodes to drive the
following operation.
Example
LD X0
ORR= D0 D2
OUT Y0
LD X1
ORR< D0 D2
OUT Y1
LD X2
ORR> D0 D2
OUT Y2
LD X3
ORR<> D0 D2
OUT Y3
LD X4
ORR>= D0 D2
OUT Y4
LD X5
ORR<= D0 D2
OUT Y5
Compare (D0, D1) and (D2, D3), and use the comparison result in parallel
connection with other nodes to determine the output status of the following
element.

Chapter 6 Application Instructions 193
IVC Series Small PLC Programming Manual
6.17 Locating Instructions
6.17.1 Setting Up An Absolute Position System
The absolute position system obtains the absolute position data of the servo motor by detecting the the current
position and the total cycle number of the motor PG. In this way, we can set up an absolute coordinates system of the
mechanical position. The following figure is a schematic diagram of an absolute position system:
- +
Other I/O
PLC
AC
Programscan
Storing absoluteposition data
Instruction pulse output
Instruction direction output
Clearing pulse output
Absolute positioncommunication
Servo amplifier
AC powersupply
Servo m
otor con
trol
Zero point data
Backup batteryAbsolute position
detection
Powersupply
Sustain
PG
Position data& total cyclenumber
Servo motor
Figure 6-1 Absolute position system
As shown in the figure, the PG of an absolute position system is special because it is battery backed, which protects its
position data and total cycle number upon power failure. That means even after a power failure, the servo amplifier can
obtain the current absolute position data after power on.
After power on, the PLC can obtain absolute position data from the servo amplifier through communication. PLC can
then use its locating instructions to control the servo amplifier and motor to realize precision positioning over
mechanical parts, and automatically refreshes its absolute position data. In this way, a positioning system based on
absolute position coordinates can be set up.
6.17.2 Overview Of Locating Instructions For IVC Series PLC
The IVC series small PLC provides locating instructions, including ZRN, PLSV, DRVI, DRVA and ABS, to control
various servo amplifiers and servo motors in the absolute position system. The absolute locating data is available
through the corresponding servo amplifier.

194 Chapter 6 Application Instructions
IVC Series Small PLC Programming Manual
6.17.3 Mechanical Diagram Of Absolute Position System
The mechanical diagram of the absolute position system that is based on the locating instructions of IVC series small
PLC is shown in the following figure.
OFFOFF
ON ON
SpeedZero return speed
Crawling speed
Reverse direction
Return start pointPosition
Return limit
Proximity detection (front)
Zero point (back)
Return limit switch
Servo motor
Proximity signaldetection device
Workbench
Front Back
Forward limitForward direction
Forward limit switch
Screw rod
Workbench position
Proximity signal state
Figure 6-2 Absolute position system based on locating instructions of IVC series small PLC
In this system, the servo motor drives the screw rod, which in turn drives the workbench. The location of the
workbench in the stroke is detected by an absolute PG. During the zero return, the servo motor will decelerate to the
crowling speed when the proximity sensor detects the fore-end of the workbench. When the proximity sensor detects the rear-end of the workbench, it sends the zero returned signal to the PLC to stop high speed pulse output.
Note that the forward limit switch and backward limit switch are a must. Because the zero return instruction (ZRN) is
incapable of auto-searching the proximity signal, the zero return operation must start earlier than where the proximity
sensor is located. You can jog-adjust the position of the workbench through designing and programming.
6.17.4 Points To Note For Using Locating instructions ZRN, PLSV, DRVI And DRVA
Transistor output
IVC series small PLC with transistor output must be used.
Requirements of locating instructions during programming
The locating instructions can be used repeatedly in the program. However, note that:
1. One high speed pulse output point (Y0 or Y1) can be driven only by one locating instruction (or high speed
instruction) at any time.
2. After the power flow of one locating instruction turns OFF, it cannot turn ON before the next PLC scan cycle.
Notes on using instructions PLSY, PLSR and PLS at the same time
From the functional perspective, it is recommended to use DRVI in stead of high speed pulse output instructions PLSY,
PLSR and PLS, because the DRVI instruction can update the absolute position registers SD80 ~ SD83 automatically.
The registers SD80 ~ SD83 can be used to store the present absolute position after the locating instruction is used.
Their values are based on the change of registers SD50 ~ SD53 and the control signal direction when the locating
instruction is executed. In this way, SD80 ~ SD83 and SD50 ~ SD53 are inter-related. Do not write SD50 ~ SD53 when
locating instructions are being executed, or SD80 ~ SD83 will be messed up.
If it is necessary to use locating instructions and high speed pulse output instructions PLSY, PLSR or PLS at the same
time, do write a PLC program so that registers SD80 ~ SD83 can be updated correctly.
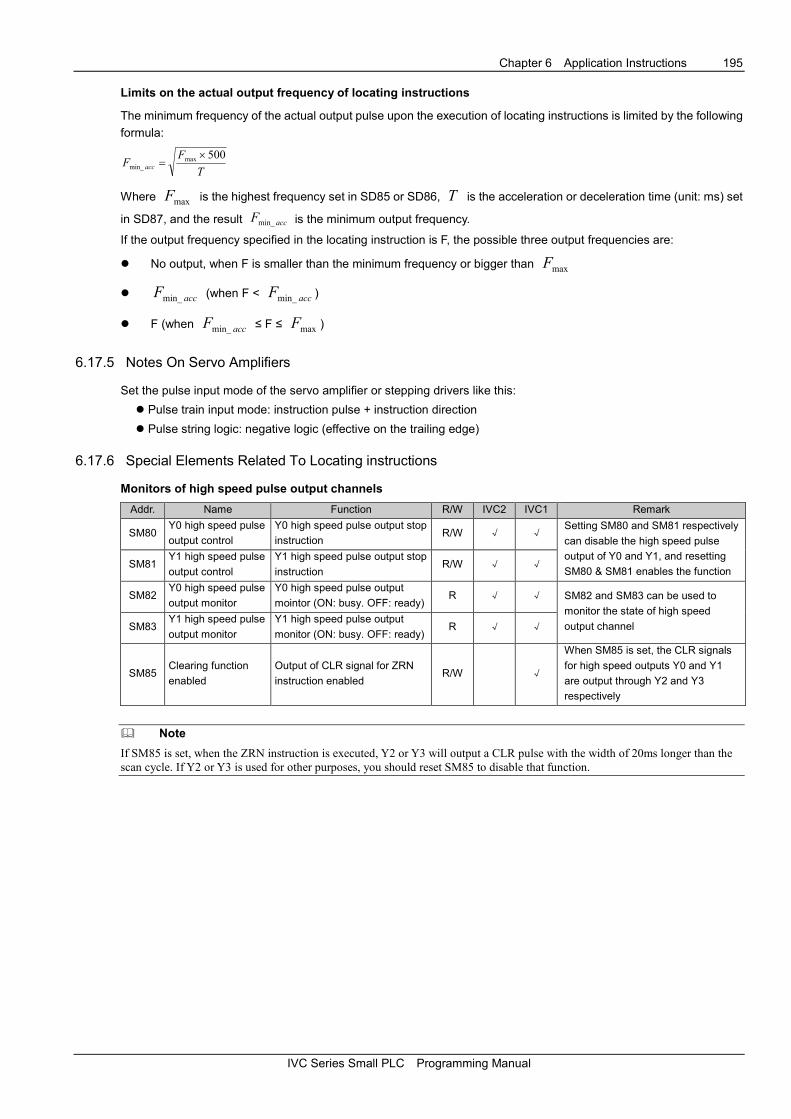
Chapter 6 Application Instructions 195
IVC Series Small PLC Programming Manual
Limits on the actual output frequency of locating instructions
The minimum frequency of the actual output pulse upon the execution of locating instructions is limited by the following
formula:
T
FF acc
500maxmin_
×=
Where maxF is the highest frequency set in SD85 or SD86, T is the acceleration or deceleration time (unit: ms) set
in SD87, and the result accFmin_ is the minimum output frequency.
If the output frequency specified in the locating instruction is F, the possible three output frequencies are:
� No output, when F is smaller than the minimum frequency or bigger than maxF
� accFmin_ (when F < accFmin_ )
� F (when accFmin_ ≤ F ≤ maxF )
6.17.5 Notes On Servo Amplifiers
Set the pulse input mode of the servo amplifier or stepping drivers like this:
� Pulse train input mode: instruction pulse + instruction direction
� Pulse string logic: negative logic (effective on the trailing edge)
6.17.6 Special Elements Related To Locating instructions
Monitors of high speed pulse output channels
Addr. Name Function R/W IVC2 IVC1 Remark
SM80 Y0 high speed pulse
output control
Y0 high speed pulse output stop
instruction R/W √ √
Setting SM80 and SM81 respectively
can disable the high speed pulse
output of Y0 and Y1, and resetting
SM80 & SM81 enables the function SM81
Y1 high speed pulse
output control
Y1 high speed pulse output stop
instruction R/W √ √
SM82 Y0 high speed pulse
output monitor
Y0 high speed pulse output
mointor (ON: busy. OFF: ready) R √ √ SM82 and SM83 can be used to
monitor the state of high speed
output channel SM83 Y1 high speed pulse
output monitor
Y1 high speed pulse output
monitor (ON: busy. OFF: ready) R √ √
SM85 Clearing function
enabled
Output of CLR signal for ZRN
instruction enabled R/W √
When SM85 is set, the CLR signals
for high speed outputs Y0 and Y1
are output through Y2 and Y3
respectively
� Note
If SM85 is set, when the ZRN instruction is executed, Y2 or Y3 will output a CLR pulse with the width of 20ms longer than the
scan cycle. If Y2 or Y3 is used for other purposes, you should reset SM85 to disable that function.
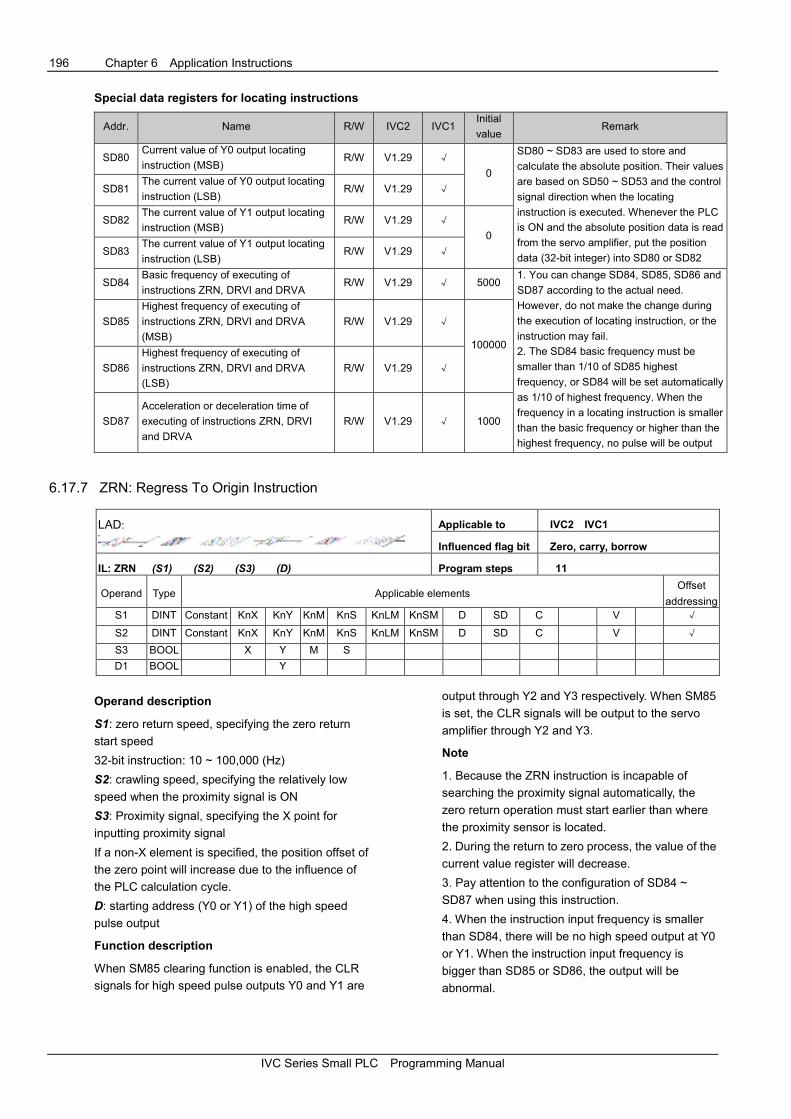
196 Chapter 6 Application Instructions
IVC Series Small PLC Programming Manual
Special data registers for locating instructions
Addr. Name R/W IVC2 IVC1 Initial
value Remark
SD80 Current value of Y0 output locating
instruction (MSB) R/W V1.29 √
0
SD80 ~ SD83 are used to store and
calculate the absolute position. Their values
are based on SD50 ~ SD53 and the control
signal direction when the locating
instruction is executed. Whenever the PLC
is ON and the absolute position data is read
from the servo amplifier, put the position
data (32-bit integer) into SD80 or SD82
SD81 The current value of Y0 output locating
instruction (LSB) R/W V1.29 √
SD82 The current value of Y1 output locating
instruction (MSB) R/W V1.29 √
0
SD83 The current value of Y1 output locating
instruction (LSB) R/W V1.29 √
SD84 Basic frequency of executing of
instructions ZRN, DRVI and DRVA R/W V1.29 √ 5000
1. You can change SD84, SD85, SD86 and
SD87 according to the actual need.
However, do not make the change during
the execution of locating instruction, or the
instruction may fail.
2. The SD84 basic frequency must be
smaller than 1/10 of SD85 highest
frequency, or SD84 will be set automatically
as 1/10 of highest frequency. When the
frequency in a locating instruction is smaller
than the basic frequency or higher than the
highest frequency, no pulse will be output
SD85
Highest frequency of executing of
instructions ZRN, DRVI and DRVA
(MSB)
R/W V1.29 √
100000
SD86
Highest frequency of executing of
instructions ZRN, DRVI and DRVA
(LSB)
R/W V1.29 √
SD87
Acceleration or deceleration time of
executing of instructions ZRN, DRVI
and DRVA
R/W V1.29 √ 1000
6.17.7 ZRN: Regress To Origin Instruction
LAD:
Applicable to IVC2 IVC1
Influenced flag bit Zero, carry, borrow
IL: ZRN (S1) (S2) (S3) (D) Program steps 11
Operand Type Applicable elements Offset
addressing S1 DINT Constant KnX KnY KnM KnS KnLM KnSM D SD C V √
S2 DINT Constant KnX KnY KnM KnS KnLM KnSM D SD C V √
S3 BOOL X Y M S
D1 BOOL Y
Operand description
S1: zero return speed, specifying the zero return
start speed
32-bit instruction: 10 ~ 100,000 (Hz)
S2: crawling speed, specifying the relatively low
speed when the proximity signal is ON
S3: Proximity signal, specifying the X point for
inputting proximity signal
If a non-X element is specified, the position offset of
the zero point will increase due to the influence of
the PLC calculation cycle.
D: starting address (Y0 or Y1) of the high speed
pulse output
Function description
When SM85 clearing function is enabled, the CLR
signals for high speed pulse outputs Y0 and Y1 are
output through Y2 and Y3 respectively. When SM85
is set, the CLR signals will be output to the servo
amplifier through Y2 and Y3.
Note
1. Because the ZRN instruction is incapable of
searching the proximity signal automatically, the
zero return operation must start earlier than where
the proximity sensor is located.
2. During the return to zero process, the value of the
current value register will decrease.
3. Pay attention to the configuration of SD84 ~
SD87 when using this instruction.
4. When the instruction input frequency is smaller
than SD84, there will be no high speed output at Y0
or Y1. When the instruction input frequency is
bigger than SD85 or SD86, the output will be
abnormal.
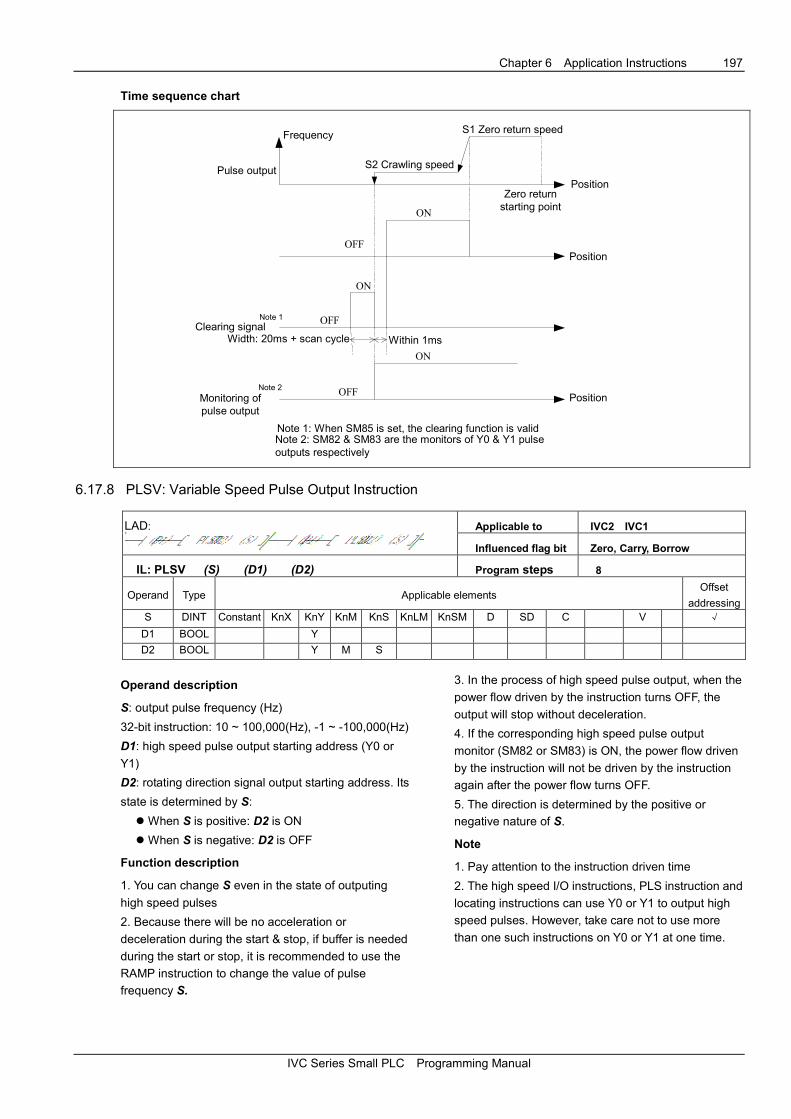
Chapter 6 Application Instructions 197
IVC Series Small PLC Programming Manual
Time sequence chart
Note 1
OFF
ON
OFF
ON
OFF
ON
Frequency
Pulse output
Clearing signal
Monitoring ofpulse output
Note 2
S2 Crawling speed
S1 Zero return speed
Width: 20ms + scan cycle Within 1ms
Zero returnstarting point
Position
Position
Position
Note 1: When SM85 is set, the clearing function is validNote 2: SM82 & SM83 are the monitors of Y0 & Y1 pulseoutputs respectively
6.17.8 PLSV: Variable Speed Pulse Output Instruction
LAD:
Applicable to IVC2 IVC1
Influenced flag bit Zero, Carry, Borrow
IL: PLSV (S) (D1) (D2) Program steps 8
Operand Type Applicable elements Offset
addressing S DINT Constant KnX KnY KnM KnS KnLM KnSM D SD C V √
D1 BOOL Y
D2 BOOL Y M S
Operand description
S: output pulse frequency (Hz)
32-bit instruction: 10 ~ 100,000(Hz), -1 ~ -100,000(Hz)
D1: high speed pulse output starting address (Y0 or
Y1)
D2: rotating direction signal output starting address. Its
state is determined by S:
� When S is positive: D2 is ON
� When S is negative: D2 is OFF
Function description
1. You can change S even in the state of outputing
high speed pulses
2. Because there will be no acceleration or
deceleration during the start & stop, if buffer is needed
during the start or stop, it is recommended to use the
RAMP instruction to change the value of pulse
frequency S.
3. In the process of high speed pulse output, when the
power flow driven by the instruction turns OFF, the
output will stop without deceleration.
4. If the corresponding high speed pulse output
monitor (SM82 or SM83) is ON, the power flow driven
by the instruction will not be driven by the instruction
again after the power flow turns OFF.
5. The direction is determined by the positive or
negative nature of S.
Note
1. Pay attention to the instruction driven time
2. The high speed I/O instructions, PLS instruction and
locating instructions can use Y0 or Y1 to output high
speed pulses. However, take care not to use more
than one such instructions on Y0 or Y1 at one time.

198 Chapter 6 Application Instructions
IVC Series Small PLC Programming Manual
6.17.9 DRVI: Relative Position Control Instruction
LAD:
Applicable to IVC2 IVC1
Influenced flag bit Zero, Carry, Borrow
IL: DRVI (S1) (S2) (D1) (D2) Program steps 11
Operand Type Applicable elements Offset
addressing S1 DINT Constant KnX KnY KnM KnS KnLM KnSM D SD C V √
S2 DINT Constant KnX KnY KnM KnS KnLM KnSM D SD C V √
D1 BOOL Y
D2 BOOL Y M S
Operand description
S1: output pulse number (relatively specified)
32-bit instruction: -999999 ~ +999999
S2: output pulse frequency (Hz)
32-bit instruction: 10 ~ 100000 (Hz)
D1: high speed pulse output starting address (Y0 or
Y1)
D2: rotating direction signal output starting address. Its
state is determined by S1:
� When S1 is positive: D2 is ON
� When S1 is negative: D2 is OFF
Function description
1. S1 is stored in the following current registers:
� Y0 output: SD80, SD81 (32-bit)
� Y1 output: SD82, SD83 (32-bit)
2. When D2 is OFF, the value of the current value
register will decrease.
3. The rotating direction is determined by the positive
or negative nature of S1.
4. Changing the operands during the execution of the
instruction will not take effect until the next cycle when
the instruction is executed again.
5. During the execution of the instruction, the output
will decelerate to stop when the driven contact turns
OFF. The exection completion flag SM will not act
then.
6. If the corresponding high speed pulse output control
(SM80 or SM81) is ON, the contact driven by the
instruction will not be driven by the instruction again
after the contact turns OFF.
Note
1. Pay attention to the configuration of SD84 ~ SD87
when using this instruction
2. When the instruction input frequency is smaller than
SD84, there will be no high speed output at Y0 or Y1.
When the instruction input frequency is bigger than
SD85 or SD86, the output will be abnormal.

Chapter 6 Application Instructions 199
IVC Series Small PLC Programming Manual
6.17.10 DRVA: Control Absolute Position Instruction
LAD:
Applicable to IVC2 IVC1
Influenced flag bit Zero, carry, borrow
IL: DRVA (S1) (S2) (D1) (D2) Program steps 11
Operand Type Applicable elements Offset
addressing S1 DINT Constant KnX KnY KnM KnS KnLM KnSM D SD C V √
S2 DINT Constant KnX KnY KnM KnS KnLM KnSM D SD C V √
D1 BOOL Y
D2 BOOL Y M S
Operand description
S1: targe position (absolutely specified)
32-bit instruction: -999999 ~ +999999
S2: output pulse frequency (Hz)
32-bit instruction: 10 ~ 100000 (Hz)
D1: high speed pulse output starting address (Y0 or
Y1). The PLC output must be transistor output
D2: rotating direction signal output starting address.
Its state is determined by S1:
� When S1 is positive: D2 is ON
� When S1 is negative: D2 is OFF
Function description
1. S1 is stored in the following registers:
� Y0 output: SD80, SD81 (32-bit)
� Y1 output: SD82, SD83 (32-bit)
2. When D2 is OFF, the value of the current value
register will decrease.
3. The rotating direction is determined by the positive
or negative nature of S1.
4. Changing the operands during the execution of the
instruction will not take effect until the next cycle when
the instruction is executed again.
5. During the execution of the instruction, the output
will decelerate to stop when the driven contact turns
OFF. The exection completion flag SM will not act
then.
6. If the corresponding high speed pulse output control
(SM80 or SM81) is ON, the contact driven by the
instruction will not be driven by the instruction again
after the contact turns OFF.
Note
1. Pay attention to the configuration of SD84 ~ SD87
when using this instruction
2. When the instruction input frequency is smaller than
SD84, there will be no high speed output at Y0 or Y1.
When the instruction input frequency is higher than
SD85 or SD86, the output will be abnormal.
6.17.11 ABS: Read Current Value Instruction
LAD:
Applicable to IVC2 IVC1
Influenced flag bit Zero, carry, borrow
IL: ABS (S) (D1) (D2) Program steps 8
Operand Type Applicable elements Offset
addressing
S BOOL X Y M S
D1 BOOL Y M S
D2 DINT KnY KnM KnS D SD C √
Operand description
S: the input point from servo.
The input points occupies three consecutive Xs (S, S + 1 and S + 2) or other bit elements.
D1: output points to servo.
The output points occupies three consecutive Ys (D1, D1 + 1 and D1 + 2) or other bit elements
D2: the current value (32-bit) read from servo.
The current value occupies two word elements: D2 (MSB) and D2 + 1 (LSB). Because the read current value must be
written into SD80 or SD82 (32-bit signed interger), you can directly specify SD80 or SD82 as D2.

200 Chapter 6 Application Instructions
IVC Series Small PLC Programming Manual
Function description
1. You should power on the PLC and servo amplifier at the same time, or power on the servo amplifier first, in order to
make sure that the servo amplifier is ON before the PLC enters the RUN state.
2. The read current value D2 can be stored in any word element, but the current value must be eventually stored in
SD80 or SD82.
3. The power flow of the ABS instruction should be ON after the current value is read, otherwise the servo amplifier will
turn OFF.
4. SM82 and SM83 are the output monitors of Y0 and Y1. The monitors will turn OFF after the output is complete.
5. When the power flow is valid and the servo is ON, the ABS instruction will send the transmission mode signal.
6. When the data transmission ready signal and the ABS request signal coincide with each other, the (32 + 6)bit data
communication will start.
7. The data are tranmitted through the ABS 2-bit (bit0 & bit1) loop.
8. The system error code for ABS Data Read Timeout is 79; for ABS Data Read and Check Error, 80.
9. The wire connection for the I/O signals of the ABS instruction is as shown in the following figure.
X 0
COM2Y 6Y 5
Y 4
COM
X 2
X 1
PF 24
ZSP 23
TLC 25
SG 16
SON 12
D13 44D14 45
MR-H -APLC Servo amplifier
ABS ( bit 0)
ABS ( bit 1)
ABS transmissionmode
ABS request
Data transmissionready
Servo ON
EC10 - 1614BRA
D01 4
ZSP 19
TLC 6
SG 10
SON 5
ABSM 8
ABSR 9
Servo amplifier
X 0
COM2Y 6Y 5
Y 4
COM
X 2
X 1
PLC
ABS (bit 0)
ABS (bit 1)
Servo ON
ABS transmissionmode
ABS request
EC10-1614BRA MR-J2-A
Data transmissionready
Time sequence chart
ON
OFF
ON
OFF
ON
OFF
ON
OFF
ON
OFF
ON
OFF
Power supply
Servo ON signal(SON)Note 1
ABS transmissionmode (ABSM).
Note 1
ABS transmissionrequest (ABSR)
Note 1
Data transmissionready (TLC). Note 2
Send ABS data
DO1/ZSPmain circuit
Ready. Note 2RD
Note 5
Note 5
80ms 80ms
Ready forperation.Note 3
Ready foroperation.Note 3
Note 4
Note 1: the signal PLC sends to servo amplifierNote 2: the signal servo amplifier sendsNote 3: system data transmission over, ready for normal operation. After RD is set, ABSM signal will not be acceptedNote 4: Here the SON signal is set before ABSM signal. Despite that, the main circuit will not be ON until ABSM is set ON. Iftransmission mode is interrupted with ABSM being set OFF during the ABS trasmission, the servo amplifier will report overtime alarm(AL.E5).Note 5: These signal pins' definitions will change upon ABSM set/reset. See the related Mitsubishi product information.
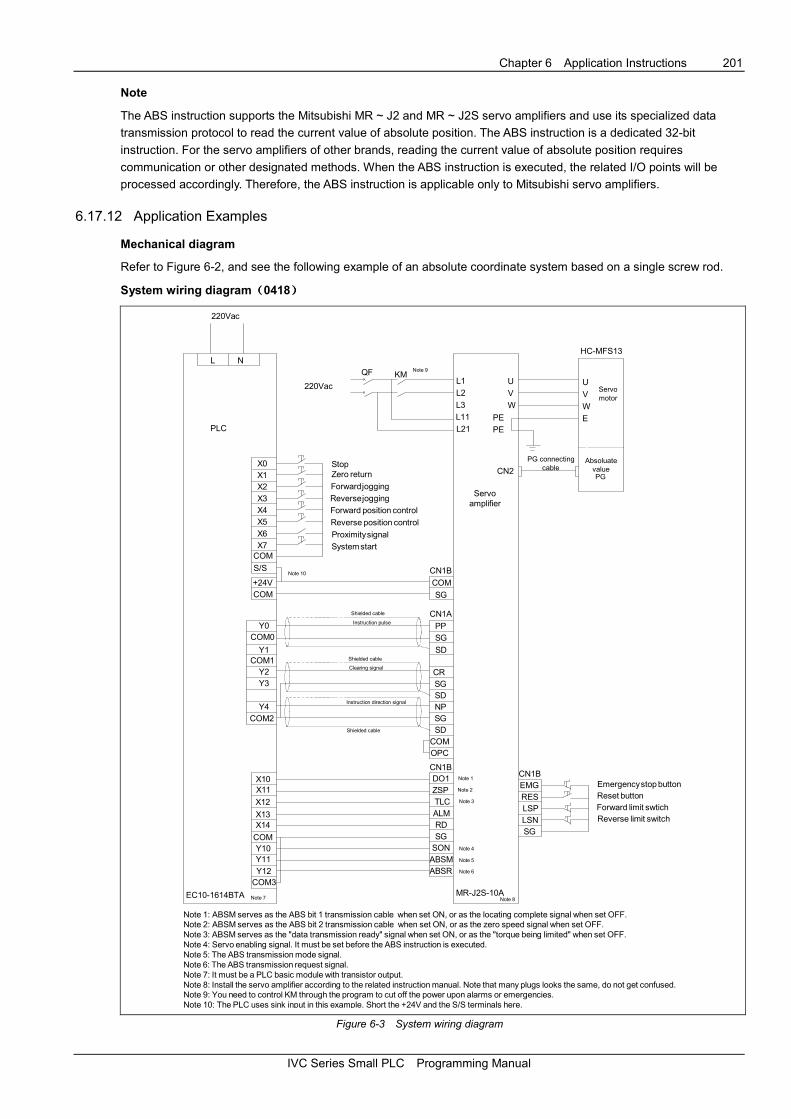
Chapter 6 Application Instructions 201
IVC Series Small PLC Programming Manual
Note
The ABS instruction supports the Mitsubishi MR ~ J2 and MR ~ J2S servo amplifiers and use its specialized data
transmission protocol to read the current value of absolute position. The ABS instruction is a dedicated 32-bit
instruction. For the servo amplifiers of other brands, reading the current value of absolute position requires
communication or other designated methods. When the ABS instruction is executed, the related I/O points will be
processed accordingly. Therefore, the ABS instruction is applicable only to Mitsubishi servo amplifiers.
6.17.12 Application Examples
Mechanical diagram
Refer to Figure 6-2, and see the following example of an absolute coordinate system based on a single screw rod.
System wiring diagram((((0418))))
220Vac
X0
PLC
L N
220Vac
QF KMNote 9
StopZero return
Forward jogging
Reverse jogging
Forward position control
Reverse position control
Proximity signal
System start
Note 10
Shielded cable
Instruction pulse
Clearing signal
Instruction direction signal
X1X2X3X4X5X6X7COM
S/S
+24VCOM
COM0Y0
Y1
Y2Y3
Y4
COM1
COM2
X10X11
X12
X13X14
COMY10Y11Y12COM3
Note 7
L1
L2
L3
L11
L21
U
V
W
PE
PE
U
V
W
E
Servoamplifier
CN2
PG connectingcable
AbsoluatevaluePG
Servomotor
HC-MFS13
CN1B
COM
SG
CN1A
PPSG
SD
CRSGSDNPSGSD
COMOPC
CN1BDO1ZSPTLCALMRDSGSONABSMABSR
MR-J2S-10A
Note 1
Note 2
Note 3
Note 4
Note 5
Note 6
Note 8
CN1BEMGRESLSPLSNSG
Emergency stop buttonReset buttonForward limit swtichReverse limit switch
EC10-1614BTA
Shielded cable
Shielded cable
Note 1: ABSM serves as the ABS bit 1 transmission cable when set ON, or as the locating complete signal when set OFF.Note 2: ABSM serves as the ABS bit 2 transmission cable when set ON, or as the zero speed signal when set OFF.Note 3: ABSM serves as the "data transmission ready" signal when set ON, or as the "torque being limited" when set OFF.Note 4: Servo enabling signal. It must be set before the ABS instruction is executed.Note 5: The ABS transmission mode signal.Note 6: The ABS transmission request signal.Note 7: It must be a PLC basic module with transistor output.Note 8: Install the servo amplifier according to the related instruction manual. Note that many plugs looks the same, do not get confused.Note 9: You need to control KM through the program to cut off the power upon alarms or emergencies.Note 10: The PLC uses sink input in this example. Short the +24V and the S/S terminals here.
Figure 6-3 System wiring diagram
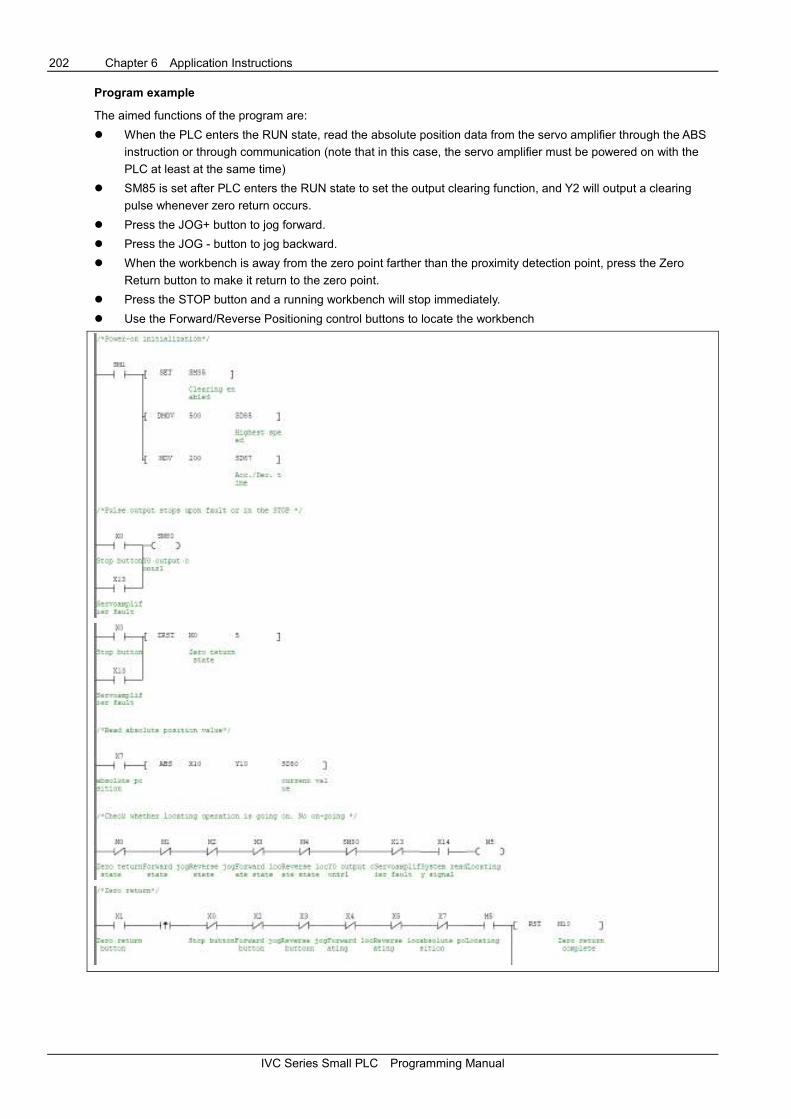
202 Chapter 6 Application Instructions
IVC Series Small PLC Programming Manual
Program example
The aimed functions of the program are:
� When the PLC enters the RUN state, read the absolute position data from the servo amplifier through the ABS
instruction or through communication (note that in this case, the servo amplifier must be powered on with the
PLC at least at the same time)
� SM85 is set after PLC enters the RUN state to set the output clearing function, and Y2 will output a clearing
pulse whenever zero return occurs.
� Press the JOG+ button to jog forward.
� Press the JOG - button to jog backward.
� When the workbench is away from the zero point farther than the proximity detection point, press the Zero
Return button to make it return to the zero point.
� Press the STOP button and a running workbench will stop immediately.
� Use the Forward/Reverse Positioning control buttons to locate the workbench

Chapter 6 Application Instructions 203
IVC Series Small PLC Programming Manual
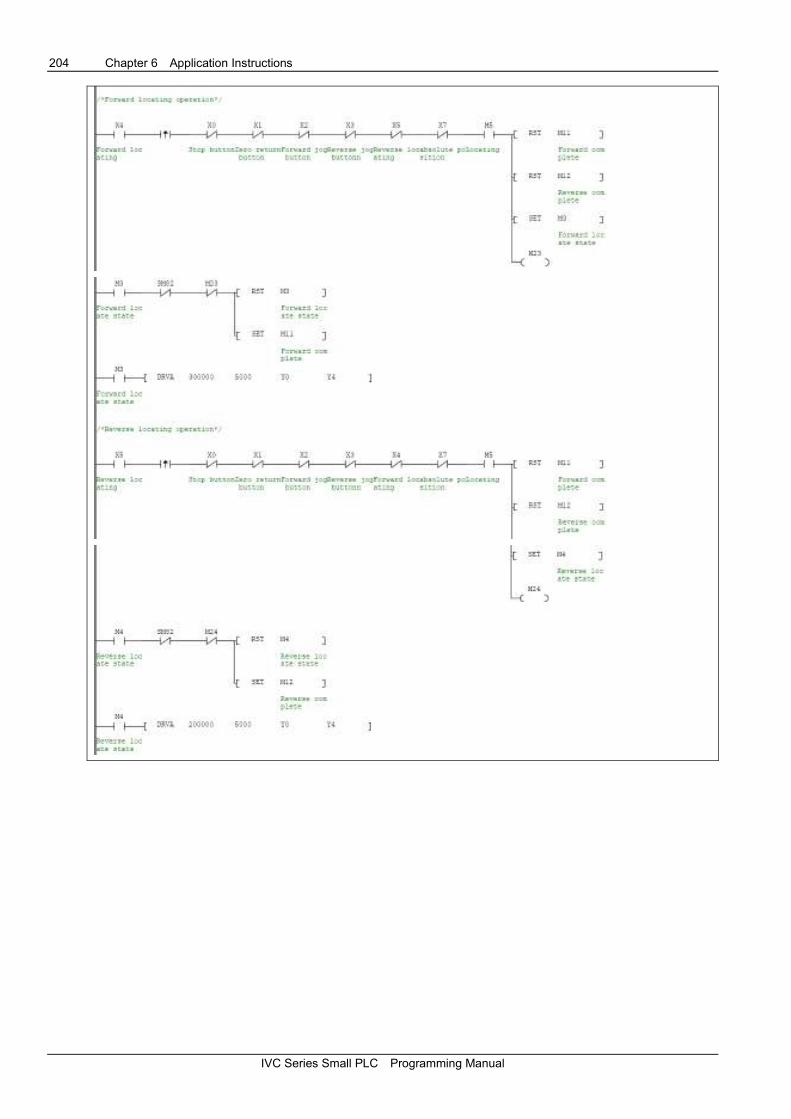
204 Chapter 6 Application Instructions
IVC Series Small PLC Programming Manual
Chapter 7 SFC Tutor 205
IVC Series Small PLC Programming Manual
Chapter 7 SFC Tutor
This chapter introduces the basic concepts and programming methods of Sequential Function Chart (SFC). In addition,
the points to note during the programming is also introduced.
7.1 Introduction To SFC .................................................................................................................................................. 206
7.1.1 What Is SFC ................................................................................................................................................... 206
7.1.2 What Is SFC Of IVC Series PLC .................................................................................................................... 206
7.1.3 Basic Concepts Of SFC ................................................................................................................................. 206
7.1.4 Programming Symbols And Their Usage ....................................................................................................... 206
7.1.5 SFC Program Structure.................................................................................................................................. 207
7.1.6 Execution Of SFC Program ............................................................................................................................ 211
7.2 Relationship Between SFC Program And LAD Program ........................................................................................... 211
7.2.1 STL Instruction And Steps ............................................................................................................................. 211
7.2.2 SET Instruction .............................................................................................................................................. 212
7.2.3 RET Instruction And SFC Program Section ................................................................................................... 212
7.2.4 OUT Instruction And RST Instruction ............................................................................................................. 212
7.2.5 SFC Selection Branch, Parallel Branch And Merge ....................................................................................... 212
7.3 How To Program With SFC ....................................................................................................................................... 212
7.4 Points To Note In SFC Programming ........................................................................................................................ 213
7.4.1 Common Programming Errors ....................................................................................................................... 213
7.4.2 Programming Tricks ....................................................................................................................................... 215
7.5 Examples Of SFC Programming ............................................................................................................................... 217
7.5.1 Simple Sequential Structure ........................................................................................................................... 217
7.5.2 Selection Branch Structure ............................................................................................................................ 219
7.5.3 Parallel Branch Structure ............................................................................................................................... 222
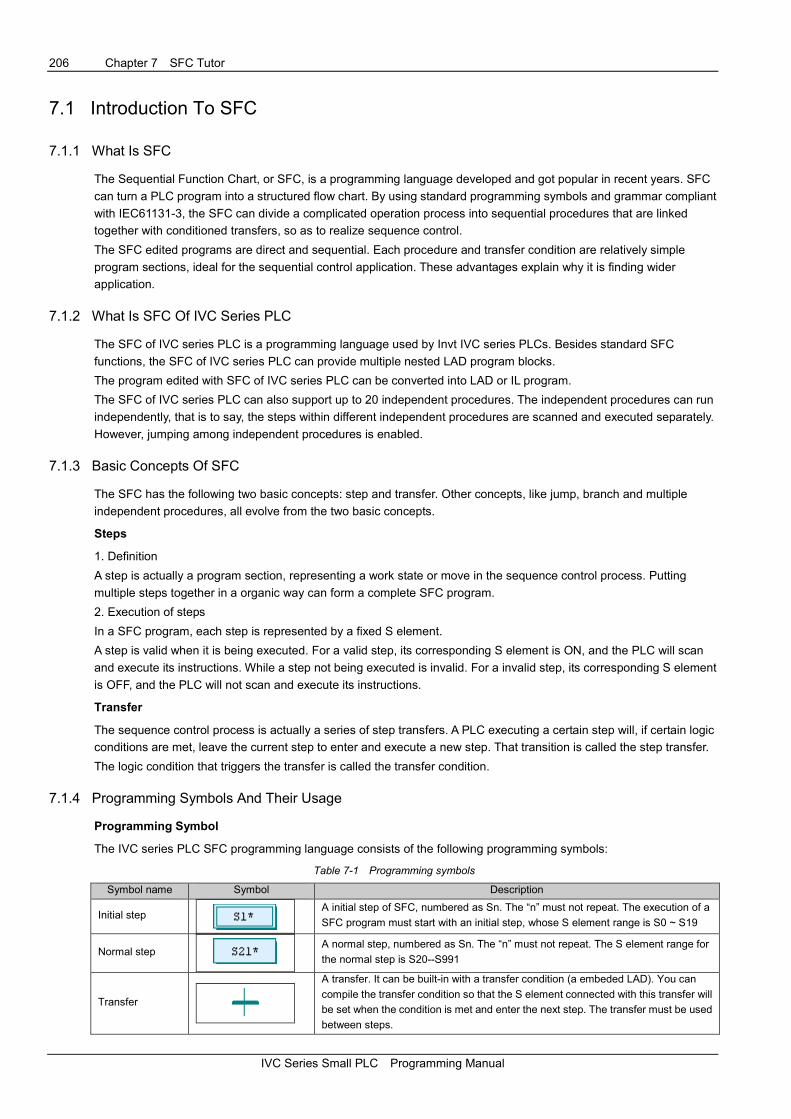
206 Chapter 7 SFC Tutor
IVC Series Small PLC Programming Manual
7.1 Introduction To SFC
7.1.1 What Is SFC
The Sequential Function Chart, or SFC, is a programming language developed and got popular in recent years. SFC
can turn a PLC program into a structured flow chart. By using standard programming symbols and grammar compliant
with IEC61131-3, the SFC can divide a complicated operation process into sequential procedures that are linked
together with conditioned transfers, so as to realize sequence control.
The SFC edited programs are direct and sequential. Each procedure and transfer condition are relatively simple
program sections, ideal for the sequential control application. These advantages explain why it is finding wider
application.
7.1.2 What Is SFC Of IVC Series PLC
The SFC of IVC series PLC is a programming language used by Invt IVC series PLCs. Besides standard SFC
functions, the SFC of IVC series PLC can provide multiple nested LAD program blocks.
The program edited with SFC of IVC series PLC can be converted into LAD or IL program.
The SFC of IVC series PLC can also support up to 20 independent procedures. The independent procedures can run
independently, that is to say, the steps within different independent procedures are scanned and executed separately.
However, jumping among independent procedures is enabled.
7.1.3 Basic Concepts Of SFC
The SFC has the following two basic concepts: step and transfer. Other concepts, like jump, branch and multiple
independent procedures, all evolve from the two basic concepts.
Steps
1. Definition
A step is actually a program section, representing a work state or move in the sequence control process. Putting
multiple steps together in a organic way can form a complete SFC program.
2. Execution of steps
In a SFC program, each step is represented by a fixed S element.
A step is valid when it is being executed. For a valid step, its corresponding S element is ON, and the PLC will scan
and execute its instructions. While a step not being executed is invalid. For a invalid step, its corresponding S element
is OFF, and the PLC will not scan and execute its instructions.
Transfer
The sequence control process is actually a series of step transfers. A PLC executing a certain step will, if certain logic
conditions are met, leave the current step to enter and execute a new step. That transition is called the step transfer.
The logic condition that triggers the transfer is called the transfer condition.
7.1.4 Programming Symbols And Their Usage
Programming Symbol
The IVC series PLC SFC programming language consists of the following programming symbols:
Table 7-1 Programming symbols
Symbol name Symbol Description
Initial step
A initial step of SFC, numbered as Sn. The “n” must not repeat. The execution of a
SFC program must start with an initial step, whose S element range is S0 ~ S19
Normal step
A normal step, numbered as Sn. The “n” must not repeat. The S element range for
the normal step is S20--S991
Transfer
A transfer. It can be built-in with a transfer condition (a embeded LAD). You can
compile the transfer condition so that the S element connected with this transfer will
be set when the condition is met and enter the next step. The transfer must be used
between steps.
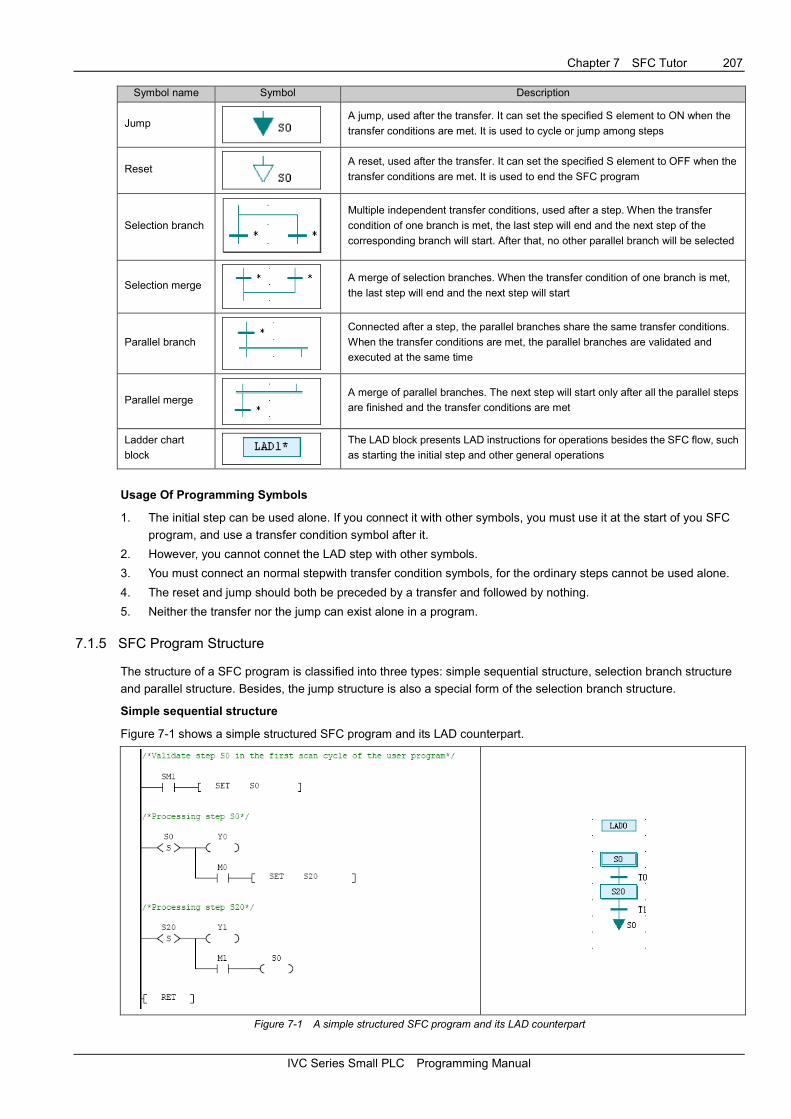
Chapter 7 SFC Tutor 207
IVC Series Small PLC Programming Manual
Symbol name Symbol Description
Jump
A jump, used after the transfer. It can set the specified S element to ON when the
transfer conditions are met. It is used to cycle or jump among steps
Reset
A reset, used after the transfer. It can set the specified S element to OFF when the
transfer conditions are met. It is used to end the SFC program
Selection branch
Multiple independent transfer conditions, used after a step. When the transfer
condition of one branch is met, the last step will end and the next step of the
corresponding branch will start. After that, no other parallel branch will be selected
Selection merge
A merge of selection branches. When the transfer condition of one branch is met,
the last step will end and the next step will start
Parallel branch
Connected after a step, the parallel branches share the same transfer conditions.
When the transfer conditions are met, the parallel branches are validated and
executed at the same time
Parallel merge
A merge of parallel branches. The next step will start only after all the parallel steps
are finished and the transfer conditions are met
Ladder chart
block
The LAD block presents LAD instructions for operations besides the SFC flow, such
as starting the initial step and other general operations
Usage Of Programming Symbols
1. The initial step can be used alone. If you connect it with other symbols, you must use it at the start of you SFC
program, and use a transfer condition symbol after it.
2. However, you cannot connet the LAD step with other symbols.
3. You must connect an normal stepwith transfer condition symbols, for the ordinary steps cannot be used alone.
4. The reset and jump should both be preceded by a transfer and followed by nothing.
5. Neither the transfer nor the jump can exist alone in a program.
7.1.5 SFC Program Structure
The structure of a SFC program is classified into three types: simple sequential structure, selection branch structure
and parallel structure. Besides, the jump structure is also a special form of the selection branch structure.
Simple sequential structure
Figure 7-1 shows a simple structured SFC program and its LAD counterpart.
Figure 7-1 A simple structured SFC program and its LAD counterpart
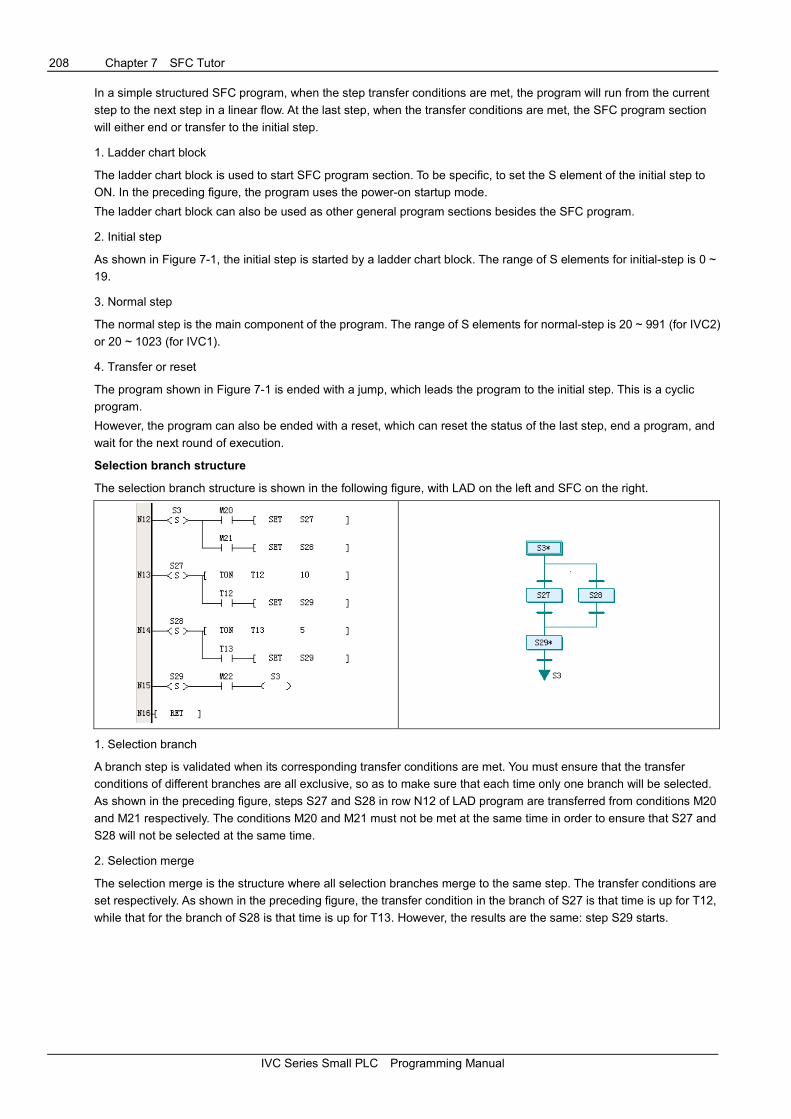
208 Chapter 7 SFC Tutor
IVC Series Small PLC Programming Manual
In a simple structured SFC program, when the step transfer conditions are met, the program will run from the current
step to the next step in a linear flow. At the last step, when the transfer conditions are met, the SFC program section
will either end or transfer to the initial step.
1. Ladder chart block
The ladder chart block is used to start SFC program section. To be specific, to set the S element of the initial step to
ON. In the preceding figure, the program uses the power-on startup mode.
The ladder chart block can also be used as other general program sections besides the SFC program.
2. Initial step
As shown in Figure 7-1, the initial step is started by a ladder chart block. The range of S elements for initial-step is 0 ~
19.
3. Normal step
The normal step is the main component of the program. The range of S elements for normal-step is 20 ~ 991 (for IVC2)
or 20 ~ 1023 (for IVC1).
4. Transfer or reset
The program shown in Figure 7-1 is ended with a jump, which leads the program to the initial step. This is a cyclic
program.
However, the program can also be ended with a reset, which can reset the status of the last step, end a program, and
wait for the next round of execution.
Selection branch structure
The selection branch structure is shown in the following figure, with LAD on the left and SFC on the right.
1. Selection branch
A branch step is validated when its corresponding transfer conditions are met. You must ensure that the transfer
conditions of different branches are all exclusive, so as to make sure that each time only one branch will be selected.
As shown in the preceding figure, steps S27 and S28 in row N12 of LAD program are transferred from conditions M20
and M21 respectively. The conditions M20 and M21 must not be met at the same time in order to ensure that S27 and
S28 will not be selected at the same time.
2. Selection merge
The selection merge is the structure where all selection branches merge to the same step. The transfer conditions are
set respectively. As shown in the preceding figure, the transfer condition in the branch of S27 is that time is up for T12,
while that for the branch of S28 is that time is up for T13. However, the results are the same: step S29 starts.

Chapter 7 SFC Tutor 209
IVC Series Small PLC Programming Manual
Parallel branch structure
The parallel branch structure is shown in the following figure, with LAD on the left and SFC on the right.
1. Parallel branch
When the transfer conditions are met for the parallel branches, all branch steps will be validated at the same time. This
enables the PLC to process multiple procedures at the same time, a quite usual sequential control process. As shown
in the preceding figure, in program row N5, the steps S30 and S31 will be validated at the same time when condition
M30 is met.
2. Parallel merge
The parallel merge is the structure where all parallel branches merge to the same step by invalidating all branch steps
at the same time. As shown in the preceding figure, in program row N6, when the program is running both S30 and
S31 at the same time, if condition M31 is met, the program will start S32 and end S30 & S31.
The sequential control behind the parallel merge structure is that no next step can be executed unless all the parallel
steps are finished.
Jump structure
The applications of jumps include: to omit certain steps, to recycle by returning to the initial step or a normal step, and
to jump to another independent procedure.
1. Omitting certain steps
In a procedure, when certain steps are unnecessary under certain conditions, the program can jump directly to the
needed step and omit the unnecessary steps, as shown in the following figure, with LAD on and left and SFC on the
right.
In the SFC program shown in the preceding figure, S21 is used as the jump, while step S20 is omitted. The jump is
actually a selection branch.
While in the LAD counterpart, the second branch in row N0 is the jump instruction, which uses the OUT coil instead of
the SET instruction in the transfer. When step S0 is valid, and if M1 is ON, the program will jump to step S21.
2. Recycling
In a procedure, when it is necessary to recycle a part or all of the steps under certain conditions, you can use the jump
function. you can recycle a part of the steps if you jump to a previous normal step, or all the step if you jump to the
initial step.
Shown in the following figure is a program that can realize the above two recycles, with LAD on the left and SFC on the
right.
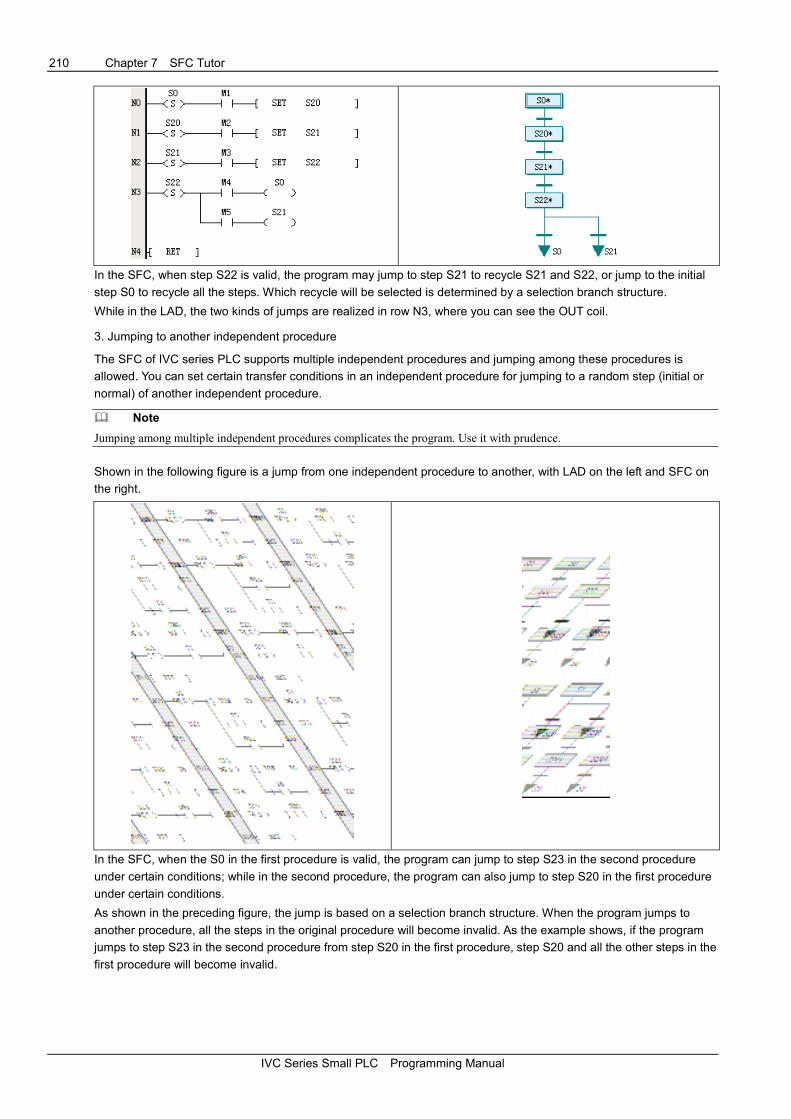
210 Chapter 7 SFC Tutor
IVC Series Small PLC Programming Manual
In the SFC, when step S22 is valid, the program may jump to step S21 to recycle S21 and S22, or jump to the initial
step S0 to recycle all the steps. Which recycle will be selected is determined by a selection branch structure.
While in the LAD, the two kinds of jumps are realized in row N3, where you can see the OUT coil.
3. Jumping to another independent procedure
The SFC of IVC series PLC supports multiple independent procedures and jumping among these procedures is
allowed. You can set certain transfer conditions in an independent procedure for jumping to a random step (initial or
normal) of another independent procedure.
� Note
Jumping among multiple independent procedures complicates the program. Use it with prudence.
Shown in the following figure is a jump from one independent procedure to another, with LAD on the left and SFC on
the right.
In the SFC, when the S0 in the first procedure is valid, the program can jump to step S23 in the second procedure
under certain conditions; while in the second procedure, the program can also jump to step S20 in the first procedure
under certain conditions.
As shown in the preceding figure, the jump is based on a selection branch structure. When the program jumps to
another procedure, all the steps in the original procedure will become invalid. As the example shows, if the program
jumps to step S23 in the second procedure from step S20 in the first procedure, step S20 and all the other steps in the
first procedure will become invalid.

Chapter 7 SFC Tutor 211
IVC Series Small PLC Programming Manual
7.1.6 Execution Of SFC Program
The similarity between the execution of a SFC program and that of a LAD program is that they both carry out cyclic
scanning from up to down and from left to right.
On the other hand, their difference lies in that in a SFC program, the steps’ validity will change according to certain
conditions, and only valid steps can be executed. While in a LAD main program, the whole program will be scanned
and executed in each scan cycle.
As shown in the following figure, the program on the right is the LAD counterpart of the SFC program on the left. When
step S20 is valid, the T2 timer will be scanned and start timing. Steps S21 and S22 will not be executed before T2
counter reaches the preset value, and S23 will not be executed when M13 is OFF.
The S elements state will switch between ON and OFF according to the transfer conditions, thus making the program
transfer from one step to another. When a S element changes from ON to OFF, the output elements of the
corresponding step will be cleared or reset. For details, see 5.3.1 STL: SFC State Load Instruction.
� Note
1. The SFC program of IVC series PLC usually contains LAD program blocks that are used to handle operations besides the flow, including starting the SFC. The LAD program blocks are not controlled by the S elements and will be executed in every
scan cycle.
2. Because the state change of the S element will affect the embedded instructions of the corresponding step, and the switch-over between two steps takes some time, it is necessary to observe certain rules during the SFC programming. For details,
see 7.4 Points To Note In SFC Programming.
7.2 Relationship Between SFC Program And LAD Program
A SFC program can take the form of a LAD program, which can help understanding the SFC program structure.
In the LAD program, the SFC symbols are replaced with various SFC instructions, while the procedures are
represented by various structures.
7.2.1 STL Instruction And Steps
All SFC steps are represented by S elements. In a LAD program, a step is started by a STL instruction.
Shown in the following left figure is the LAD program of a simple sequential structure, and the right figure is its
corresponding SFC program.
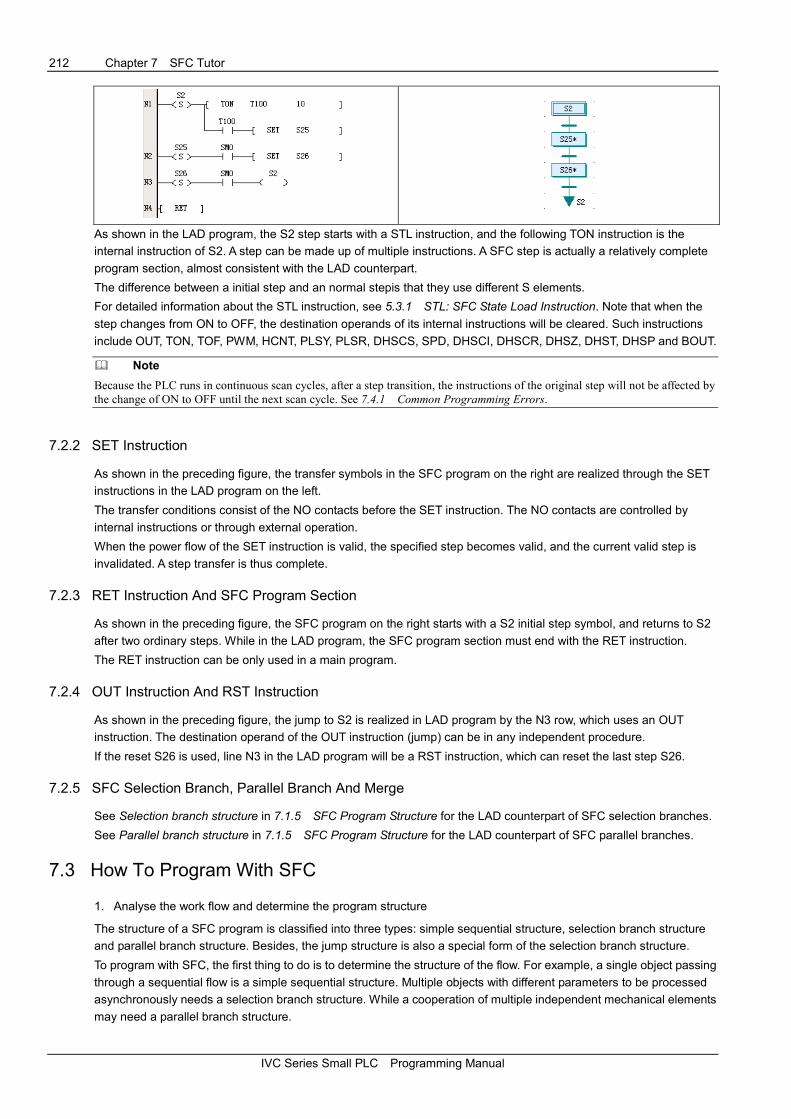
212 Chapter 7 SFC Tutor
IVC Series Small PLC Programming Manual
As shown in the LAD program, the S2 step starts with a STL instruction, and the following TON instruction is the
internal instruction of S2. A step can be made up of multiple instructions. A SFC step is actually a relatively complete
program section, almost consistent with the LAD counterpart.
The difference between a initial step and an normal stepis that they use different S elements.
For detailed information about the STL instruction, see 5.3.1 STL: SFC State Load Instruction. Note that when the
step changes from ON to OFF, the destination operands of its internal instructions will be cleared. Such instructions
include OUT, TON, TOF, PWM, HCNT, PLSY, PLSR, DHSCS, SPD, DHSCI, DHSCR, DHSZ, DHST, DHSP and BOUT.
� Note
Because the PLC runs in continuous scan cycles, after a step transition, the instructions of the original step will not be affected by
the change of ON to OFF until the next scan cycle. See 7.4.1 Common Programming Errors.
7.2.2 SET Instruction
As shown in the preceding figure, the transfer symbols in the SFC program on the right are realized through the SET
instructions in the LAD program on the left.
The transfer conditions consist of the NO contacts before the SET instruction. The NO contacts are controlled by
internal instructions or through external operation.
When the power flow of the SET instruction is valid, the specified step becomes valid, and the current valid step is
invalidated. A step transfer is thus complete.
7.2.3 RET Instruction And SFC Program Section
As shown in the preceding figure, the SFC program on the right starts with a S2 initial step symbol, and returns to S2
after two ordinary steps. While in the LAD program, the SFC program section must end with the RET instruction.
The RET instruction can be only used in a main program.
7.2.4 OUT Instruction And RST Instruction
As shown in the preceding figure, the jump to S2 is realized in LAD program by the N3 row, which uses an OUT
instruction. The destination operand of the OUT instruction (jump) can be in any independent procedure.
If the reset S26 is used, line N3 in the LAD program will be a RST instruction, which can reset the last step S26.
7.2.5 SFC Selection Branch, Parallel Branch And Merge
See Selection branch structure in 7.1.5 SFC Program Structure for the LAD counterpart of SFC selection branches.
See Parallel branch structure in 7.1.5 SFC Program Structure for the LAD counterpart of SFC parallel branches.
7.3 How To Program With SFC
1. Analyse the work flow and determine the program structure
The structure of a SFC program is classified into three types: simple sequential structure, selection branch structure
and parallel branch structure. Besides, the jump structure is also a special form of the selection branch structure.
To program with SFC, the first thing to do is to determine the structure of the flow. For example, a single object passing
through a sequential flow is a simple sequential structure. Multiple objects with different parameters to be processed
asynchronously needs a selection branch structure. While a cooperation of multiple independent mechanical elements
may need a parallel branch structure.

Chapter 7 SFC Tutor 213
IVC Series Small PLC Programming Manual
2. Determine the major procedures and transfer conditions to draw a draft flow chart
After determining the strucuture, you need to figure out the major procedures and transfer conditions. By deviding the
work flow into smaller operation stages, you can get the procedures. End each procedure with a transfer condition,
and you can get the draft of the work flow.
3. Make a SFC program according to the draft flow chart
Use the SFC programming language in AutoStation to make a SFC program out of the draft flow chart. By now you
have got an executable PLC program, but you still need to refine it.
4. Make a list of input and output points, and determine the objects of each procedure and the transfer conditions
Generally, the input points are transfer conditions, while the output points are the operation objects. In addition, with
the list, you can further modify the SFC.
5. Input the steps and transfer conditions
In the SFC program you just made, right click a SFC symbol and select Embedded Ladder Chart in the shortcut
menu. You are then able to edit the step or transfer condition through the LAD programming language.
6. Add functional program sections to the program
Do remember to add program sections that provide general functions, such as start, stop and alarm functions. Such
program sections should all be put in LAD blocks.
� Note
The start and stop operations are crucial for personal and equipment safety. Considering the special features of SFC program,
make sure that all outputs that should be stopped are shut down when the PLC is stopped.
7.4 Points To Note In SFC Programming
The STL instruction has some special characteristics, and the PLC scans instructions cyclically by their display order.
Because of these reasons, there are some points to note during SFC programming.
7.4.1 Common Programming Errors
1. Reusing steps
In the same PLC program, each step corresponds to a unique S element and cannot be reused.
Note this when editing a SFC program using the LAD editor.
2. Setting branches after a transfer condition
Setting conditioned branches after a transfer condition is prohibited in SFC programming, as shown in the left figure
below. Instead, you should change it into the right figure below.
3. Connecting output coils to internal bus after a NC or NO contact instruction
Connecting output coils to the internal bus after a NO or NC contact instruction in a branch is prohibited, as shown in
the left figure below. In stead, you should change it into the right figure below.
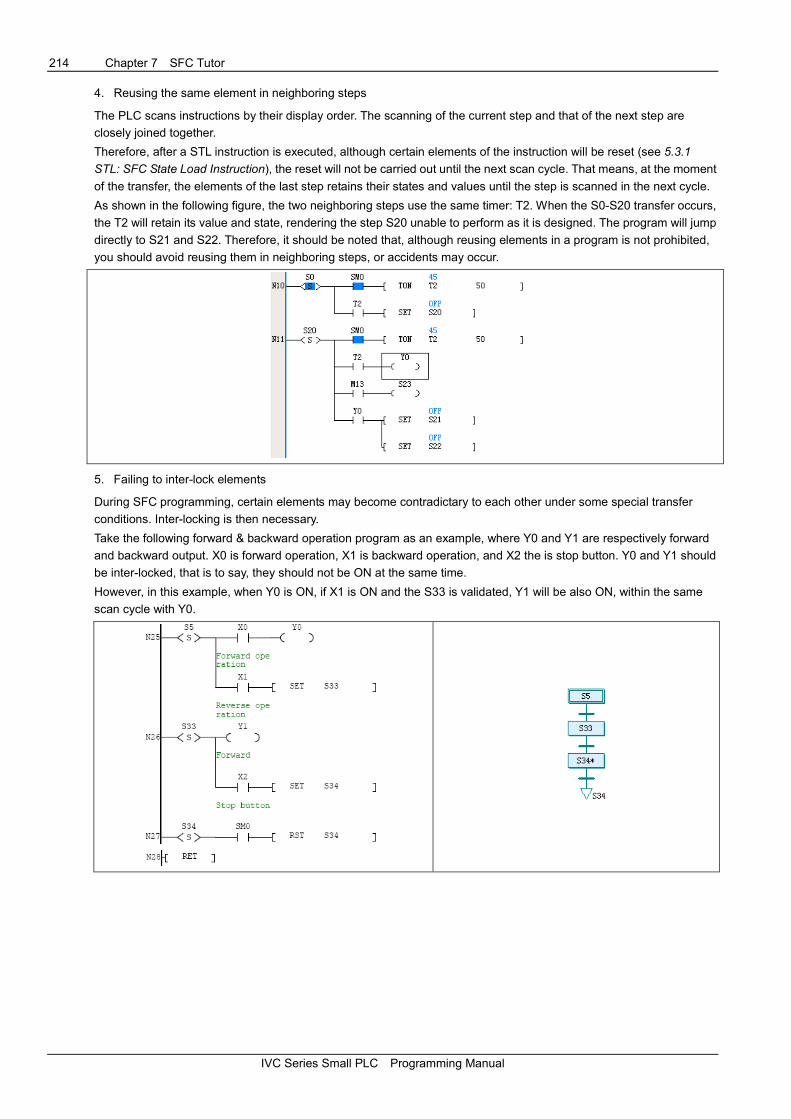
214 Chapter 7 SFC Tutor
IVC Series Small PLC Programming Manual
4. Reusing the same element in neighboring steps
The PLC scans instructions by their display order. The scanning of the current step and that of the next step are
closely joined together.
Therefore, after a STL instruction is executed, although certain elements of the instruction will be reset (see 5.3.1
STL: SFC State Load Instruction), the reset will not be carried out until the next scan cycle. That means, at the moment
of the transfer, the elements of the last step retains their states and values until the step is scanned in the next cycle.
As shown in the following figure, the two neighboring steps use the same timer: T2. When the S0-S20 transfer occurs,
the T2 will retain its value and state, rendering the step S20 unable to perform as it is designed. The program will jump
directly to S21 and S22. Therefore, it should be noted that, although reusing elements in a program is not prohibited,
you should avoid reusing them in neighboring steps, or accidents may occur.
5. Failing to inter-lock elements
During SFC programming, certain elements may become contradictary to each other under some special transfer
conditions. Inter-locking is then necessary.
Take the following forward & backward operation program as an example, where Y0 and Y1 are respectively forward
and backward output. X0 is forward operation, X1 is backward operation, and X2 the is stop button. Y0 and Y1 should
be inter-locked, that is to say, they should not be ON at the same time.
However, in this example, when Y0 is ON, if X1 is ON and the S33 is validated, Y1 will be also ON, within the same
scan cycle with Y0.

Chapter 7 SFC Tutor 215
IVC Series Small PLC Programming Manual
Therefore, you need to add an interlock to the program by adding a Y0 NC contact before the Y1 output coil, as shown
in the following figure.
6. Confusing jumps with transfers
Jumps are used between different procedures or non-neighboring steps, while transfers are used between
neighboring steps. It is prohibited to change an output coil into a SET instruction where a jump should be used, or
change a output coil into a SET instruction where a transfer should be used.
7. Using parllel merge for selection branches
In a selection branch structure, only one selection is valid. However, when it is mixed with a parallel branch structure,
the selection branch structure may never end. As shown in the following figure. In the left part, when flow 1 runs to step
S41, it meets the transfer condition of a parallel merge. But the system will never run flow 2. Therefore the transfer will
never occur, making flow 1 unable to end.
Flow 1 Flow 2
Flow 1 cannot end due to theparallel structure.
Modify
The same operation
Empty step
As shown in the right part, to correct it, you need to add a step S42 whose function is the same as S41. Then add an
empty step S43 that serves as a structural block without actual function. Design the transfer conditions for S38, S41
and S43 according to the actual situation.
7.4.2 Programming Tricks
1. Making use of empty steps
You may need empty steps to deal with the branches with grammatical problems. The empty steps do not provide
actual operation, but a necessary node in structure before the next transfer. See the following example.
In the left figure below, the selection merge is connected immediately with another selection branch structure. That is
prohibited. You can change it as the right figure shows: add an empty step.
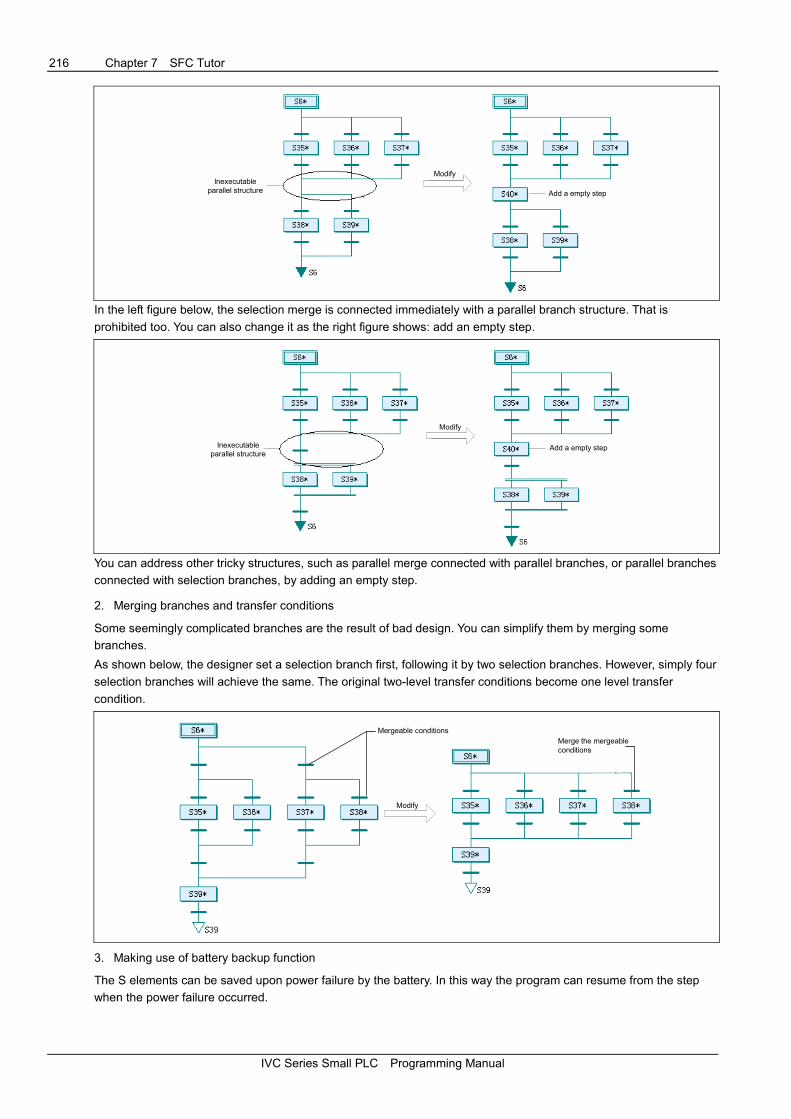
216 Chapter 7 SFC Tutor
IVC Series Small PLC Programming Manual
Inexecutableparallel structure
Modify
Add a empty step
In the left figure below, the selection merge is connected immediately with a parallel branch structure. That is
prohibited too. You can also change it as the right figure shows: add an empty step.
Inexecutableparallel structure
Modify
Add a empty step
You can address other tricky structures, such as parallel merge connected with parallel branches, or parallel branches
connected with selection branches, by adding an empty step.
2. Merging branches and transfer conditions
Some seemingly complicated branches are the result of bad design. You can simplify them by merging some
branches.
As shown below, the designer set a selection branch first, following it by two selection branches. However, simply four
selection branches will achieve the same. The original two-level transfer conditions become one level transfer
condition.
Mergeable conditions
Modify
Merge the mergeableconditions
3. Making use of battery backup function
The S elements can be saved upon power failure by the battery. In this way the program can resume from the step
when the power failure occurred.

Chapter 7 SFC Tutor 217
IVC Series Small PLC Programming Manual
7.5 Examples Of SFC Programming
The examples in this section are just illustrations of SFC programming, with simplified operations and conditions. The
equipment configuration is conceptual and for study only. Do not apply the example programs to actual use.
7.5.1 Simple Sequential Structure
The following example is an object lifting and conveying machine. This machine uses cylinder lifting devices and
rollers to convey the object tray from one conveying belt to another. The following figure is a top view of the machine.
Conveyingbelt
Baffle plateTray in
In lift 1
Height OK
Left-side lift cylinder
Lift RollersRight-side lift cylinder
Lift
In lift 2
Conveyingbelt
Convey complete
Limit switch
Cylinder/solenoid valve
After the machine is started, the object tray will be conveyed to the entrance of the machine at the left side and trigger
the “Tray in” limit switch. If no other tray is occupying the machine, the “Baffle plate” will lower down to let the object
tray enter the machine. When the tray is completely into the lift when it triggers the “In lift 1” limit switch, the lift will raise
the tray until the “Height OK” limit switch is triggered. The rollers will then act to convey the tray to the lift on the right
side until the “In lift 2” limit switch is triggered. The lift will then lower to put the tray to the conveying belt on the right.
When the “Convey complete” limit switch is reset, a complete lift and convey process is over and the machine is ready
for the next round.
The input and output points are listed in the following table.
SN Address Monitored object SN Address Monitored object
1 X0 Tray in limit switch 8 Y0 Cylinder solenoid valve for the baffle plate
2 X1 In lift 1 limit switch 9 Y1 Cylinder solenoid valve for the left lift
3 X2 Height OK limit switch 10 Y2 Cylinder solenoid valve for the right lift
4 X3 In lift 2 limit switch 11 Y3 Roller motor contactor
5 X4 Convey complete 12 Y4 Motor contactor for the left conveying belt
6 X5 Start switch 13 Y5 Motor contactor for the right conveying belt
7 X6 Auxiliary signal of emergency switch
This is a simple sequential flow. The procedures are linear, without any selection or parallel procedures. Writing the
program with SFC would be faster and clearer than the conventional logic design method.
See the following figure for the SFC program and its LAD counterpart.
Start & stop control program section
Use X0 as the transfer condition, and S20~S23 as the limit to prevent the next tray from entering beforethe current operation ends
Initial empty step
Lower the baffle plate to let the tray in lift 1. Delay: 1s
Delay (1s) time is up and start the next step
Lifting cylinders (Y1, Y2) act till Hight OK switch (X2) acts. Delay: 0.8s.
Delay (0.8s) time is up and start the next step
Start roller motor (Y3)
In lift 2 limit switch (X3) acts to enter the next step
The left & right lifts lower and the roller stops
X4 is reset to start a new round

218 Chapter 7 SFC Tutor
IVC Series Small PLC Programming Manual
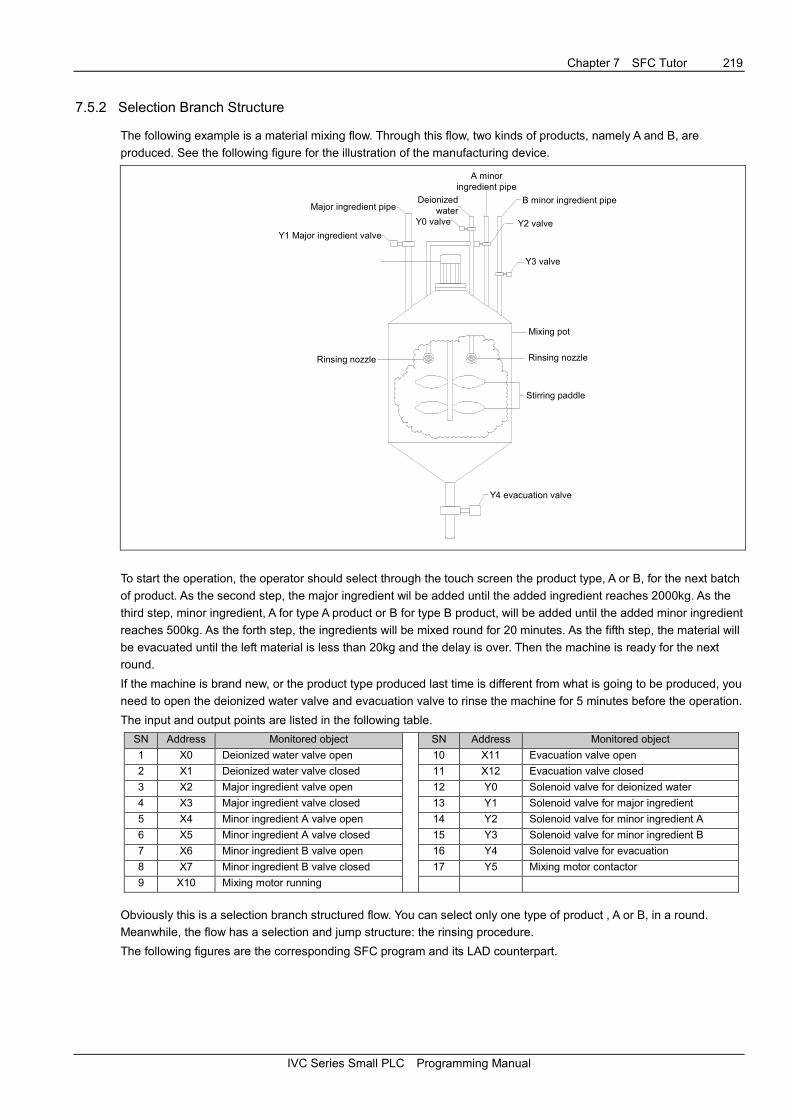
Chapter 7 SFC Tutor 219
IVC Series Small PLC Programming Manual
7.5.2 Selection Branch Structure
The following example is a material mixing flow. Through this flow, two kinds of products, namely A and B, are
produced. See the following figure for the illustration of the manufacturing device.
Major ingredient pipe
A minoringredient pipe
B minor ingredient pipe
Y2 valve
Deionizedwater
Y0 valve
Y3 valve
Y1 Major ingredient valve
Rinsing nozzle Rinsing nozzle
Mixing pot
Stirring paddle
Y4 evacuation valve
To start the operation, the operator should select through the touch screen the product type, A or B, for the next batch
of product. As the second step, the major ingredient wil be added until the added ingredient reaches 2000kg. As the
third step, minor ingredient, A for type A product or B for type B product, will be added until the added minor ingredient
reaches 500kg. As the forth step, the ingredients will be mixed round for 20 minutes. As the fifth step, the material will
be evacuated until the left material is less than 20kg and the delay is over. Then the machine is ready for the next
round.
If the machine is brand new, or the product type produced last time is different from what is going to be produced, you
need to open the deionized water valve and evacuation valve to rinse the machine for 5 minutes before the operation.
The input and output points are listed in the following table.
SN Address Monitored object SN Address Monitored object
1 X0 Deionized water valve open 10 X11 Evacuation valve open
2 X1 Deionized water valve closed 11 X12 Evacuation valve closed
3 X2 Major ingredient valve open 12 Y0 Solenoid valve for deionized water
4 X3 Major ingredient valve closed 13 Y1 Solenoid valve for major ingredient
5 X4 Minor ingredient A valve open 14 Y2 Solenoid valve for minor ingredient A
6 X5 Minor ingredient A valve closed 15 Y3 Solenoid valve for minor ingredient B
7 X6 Minor ingredient B valve open 16 Y4 Solenoid valve for evacuation
8 X7 Minor ingredient B valve closed 17 Y5 Mixing motor contactor
9 X10 Mixing motor running
Obviously this is a selection branch structured flow. You can select only one type of product , A or B, in a round.
Meanwhile, the flow has a selection and jump structure: the rinsing procedure.
The following figures are the corresponding SFC program and its LAD counterpart.
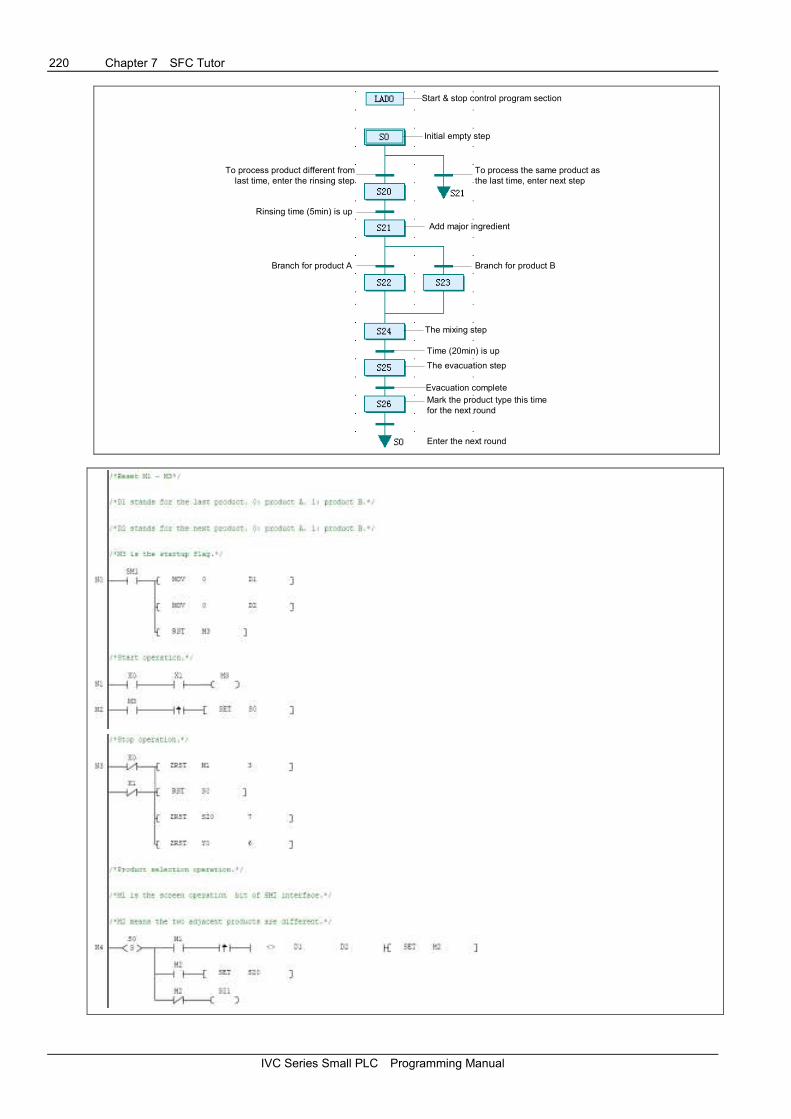
220 Chapter 7 SFC Tutor
IVC Series Small PLC Programming Manual
Start & stop control program section
Initial empty step
To process the same product asthe last time, enter next step
To process product different fromlast time, enter the rinsing step
Rinsing time (5min) is up
Add major ingredient
Branch for product A Branch for product B
The mixing step
Time (20min) is up
The evacuation step
Evacuation completeMark the product type this timefor the next round
Enter the next round
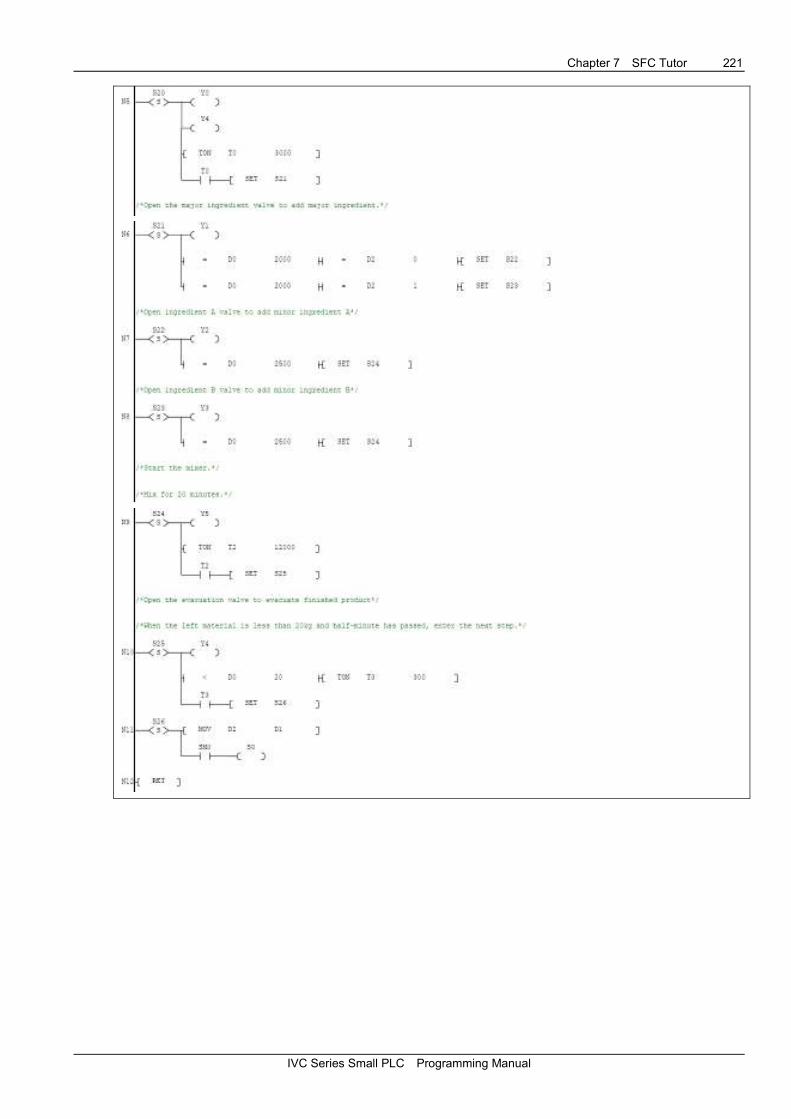
Chapter 7 SFC Tutor 221
IVC Series Small PLC Programming Manual
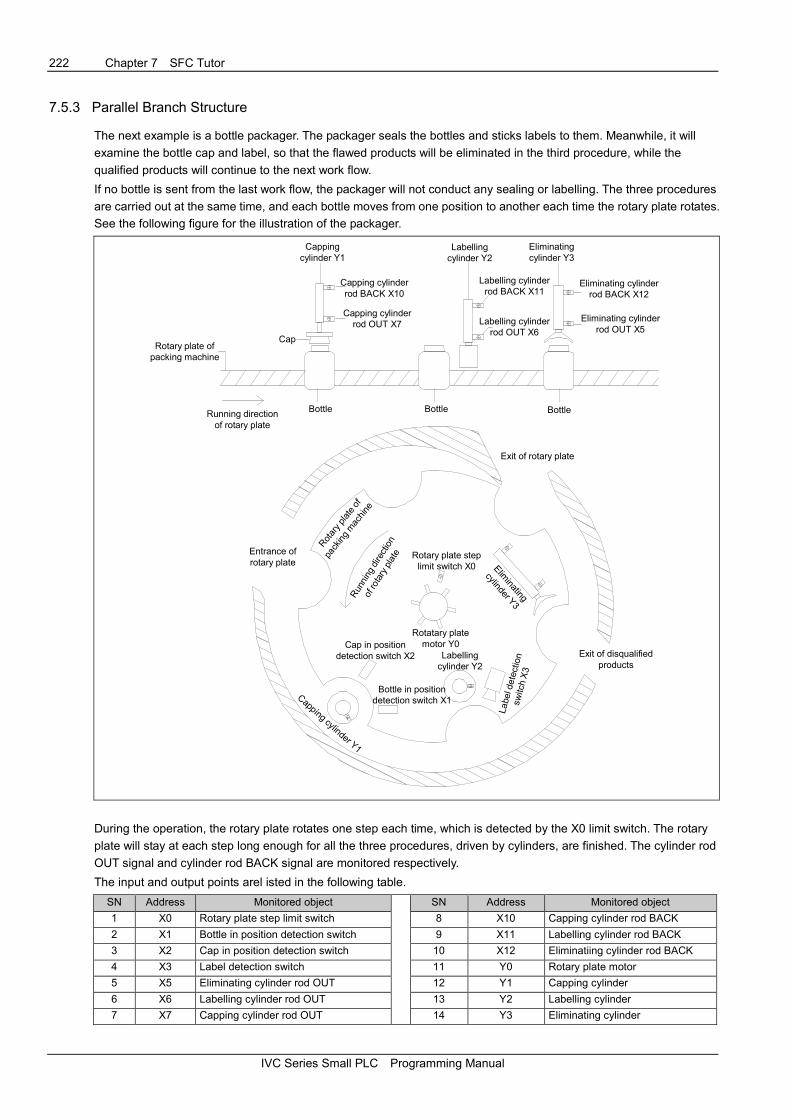
222 Chapter 7 SFC Tutor
IVC Series Small PLC Programming Manual
7.5.3 Parallel Branch Structure
The next example is a bottle packager. The packager seals the bottles and sticks labels to them. Meanwhile, it will
examine the bottle cap and label, so that the flawed products will be eliminated in the third procedure, while the
qualified products will continue to the next work flow.
If no bottle is sent from the last work flow, the packager will not conduct any sealing or labelling. The three procedures
are carried out at the same time, and each bottle moves from one position to another each time the rotary plate rotates.
See the following figure for the illustration of the packager.
Rotary plate ofpacking machine
Capping cylinder Y1
Entrance ofrotary plate
Exit of rotary plate
Cappingcylinder Y1
Cap
Capping cylinderrod BACK X10
Capping cylinderrod OUT X7
Labellingcylinder Y2
Running directionof rotary plate
Bottle Bottle Bottle
Eliminatingcylinder Y3
Labelling cylinderrod BACK X11
Labelling cylinderrod OUT X6
Eliminating cylinderrod BACK X12
Eliminating cylinderrod OUT X5
Exit of disqualifiedproducts
Running direction
of rotary plate
Rotary plate of
packing machine
Cap in positiondetection switch X2
Bottle in positiondetection switch X1
Labellingcylinder Y2
Rotatary platemotor Y0
Rotary plate steplimit switch X0 Elim
inating
cylinder Y3
Label detection
switch X3
During the operation, the rotary plate rotates one step each time, which is detected by the X0 limit switch. The rotary
plate will stay at each step long enough for all the three procedures, driven by cylinders, are finished. The cylinder rod
OUT signal and cylinder rod BACK signal are monitored respectively.
The input and output points arel isted in the following table.
SN Address Monitored object SN Address Monitored object
1 X0 Rotary plate step limit switch 8 X10 Capping cylinder rod BACK
2 X1 Bottle in position detection switch 9 X11 Labelling cylinder rod BACK
3 X2 Cap in position detection switch 10 X12 Eliminatiing cylinder rod BACK
4 X3 Label detection switch 11 Y0 Rotary plate motor
5 X5 Eliminating cylinder rod OUT 12 Y1 Capping cylinder
6 X6 Labelling cylinder rod OUT 13 Y2 Labelling cylinder
7 X7 Capping cylinder rod OUT 14 Y3 Eliminating cylinder

Chapter 7 SFC Tutor 223
IVC Series Small PLC Programming Manual
It is obvious that this is a parallel branch structured flow. With every step that the rotary plate makes, all the tree
procedures are carried out at the same time. Then, when the three procedures are finished, the rotary plate will rotate
one step again. See the following figure for the corresponding SFC program and its LAD counterpart.
In the program, M1 ~ M3 are the qualification flags for the procedures of capping, labeling and eliminating respectively.
When the capping procedure runs to S22, X2 will check whether the capping is qualified or not. If yes, the
corresponding qualification flag M1 will be set. When the labelling procedure runs to S25, X3 will check whether the
labelling is qualified or not. If not, M2 will be reset. After all the procedures are complete, at step S29, the M2 state will
be transferred to M3, and M1 state will be transferred to M2.
The capping procedure will act according to X1 state. If X1 indicates no bottle is in position, the capping will not
proceed. The labelling procedure will act according to M2 state. If M2 is OFF, it indicates that the bottle in position is
disqualified, and the labelling will not proceed. The eliminating procedure will act according to M3. The elimination will
not be conducted when M3 is ON, which indicates that the bottle is qualified, or the elimination will be conducted
otherwise. In both cases, M3 will be reset in S32 to prepare for the next procedure.
Start & stop control program section
Initial empty step
When a X0 rising edge is detected
The capping procedures
Transfer conditions
Capping operation
Mark the qualifiedproduct (M1 )
The labelling procedures
Jump whenno bottle isin position
M2 qualificationflag
Jump upondisqualified
product
Labeling operation
Mark the qualifiedproduct (M2 )
The eliminating procedures
M3 qualificationflag
Jump uponqualifiedproduct
Elimination operation
Reset the M3disqualification flag
Parallel merge
Transfer thequalification flagstates from M1 to M2and from M2 to M3
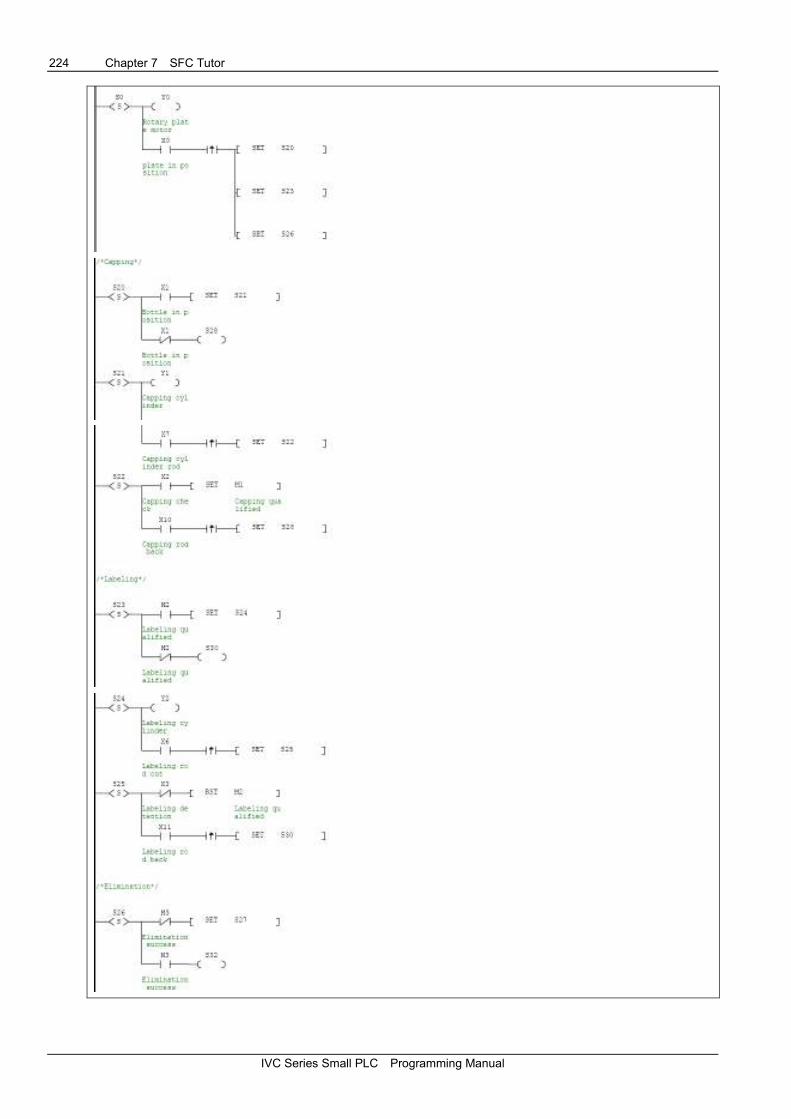
224 Chapter 7 SFC Tutor
IVC Series Small PLC Programming Manual

Chapter 7 SFC Tutor 225
IVC Series Small PLC Programming Manual
226 Chapter 8 Using High Speed I/O
IVC Series Small PLC Programming Manual
Chapter 8 Using High Speed I/O
This chapter presents the usage and notes about the high speed counters, external pulse and PLS envelope.
8.1 High Speed Counter .................................................................................................................................................. 227
8.1.1 Configuration ................................................................................................................................................. 227
8.1.2 High Speed Counter And SM Auxiliary Relay Relationship ........................................................................... 228
8.1.3 Usage Of High Speed Counter ...................................................................................................................... 228
8.1.4 Points To Note About High Speed Counters .................................................................................................. 230
8.2 External Pulse Capture Function ............................................................................................................................... 231
8.3 High Speed Pulse Output .......................................................................................................................................... 231
8.3.1 High Speed Pulse Output Function ................................................................................................................ 231
8.3.2 Points To Note About High Speed Pulse Output ........................................................................................... 231
8.4 Configuring PLS Envelope Instruction ....................................................................................................................... 232
8.5 Notes On High Speed I/O Application ....................................................................................................................... 234
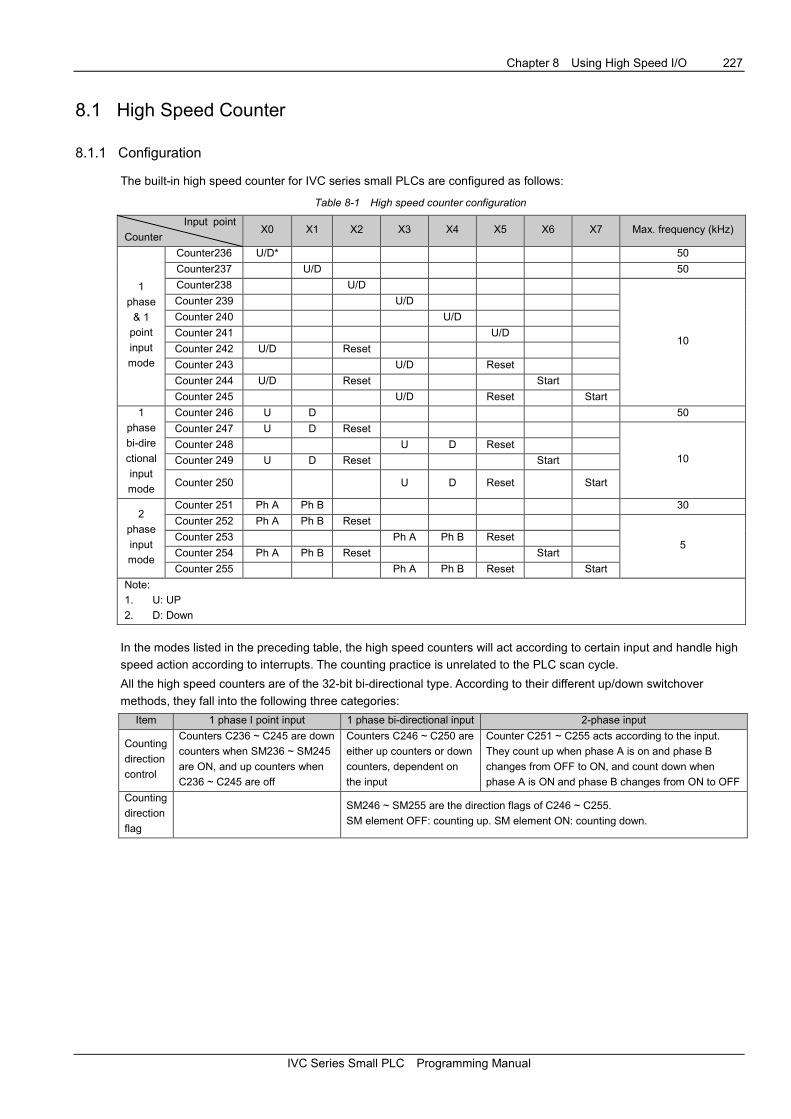
Chapter 8 Using High Speed I/O 227
IVC Series Small PLC Programming Manual
8.1 High Speed Counter
8.1.1 Configuration
The built-in high speed counter for IVC series small PLCs are configured as follows:
Table 8-1 High speed counter configuration
Input point
Counter X0 X1 X2 X3 X4 X5 X6 X7 Max. frequency (kHz)
1
phase
& 1
point
input
mode
Counter236 U/D* 50
Counter237 U/D 50
Counter238 U/D
10
Counter 239 U/D
Counter 240 U/D
Counter 241 U/D
Counter 242 U/D Reset
Counter 243 U/D Reset
Counter 244 U/D Reset Start
Counter 245 U/D Reset Start
1
phase
bi-dire
ctional
input
mode
Counter 246 U D 50
Counter 247 U D Reset
10 Counter 248 U D Reset
Counter 249 U D Reset Start
Counter 250 U D Reset Start
2
phase
input
mode
Counter 251 Ph A Ph B 30
Counter 252 Ph A Ph B Reset
5 Counter 253 Ph A Ph B Reset
Counter 254 Ph A Ph B Reset Start
Counter 255 Ph A Ph B Reset Start
Note:
1. U: UP
2. D: Down
In the modes listed in the preceding table, the high speed counters will act according to certain input and handle high
speed action according to interrupts. The counting practice is unrelated to the PLC scan cycle.
All the high speed counters are of the 32-bit bi-directional type. According to their different up/down switchover
methods, they fall into the following three categories:
Item 1 phase I point input 1 phase bi-directional input 2-phase input
Counting
direction
control
Counters C236 ~ C245 are down
counters when SM236 ~ SM245
are ON, and up counters when
C236 ~ C245 are off
Counters C246 ~ C250 are
either up counters or down
counters, dependent on
the input
Counter C251 ~ C255 acts according to the input.
They count up when phase A is on and phase B
changes from OFF to ON, and count down when
phase A is ON and phase B changes from ON to OFF
Counting
direction
flag
SM246 ~ SM255 are the direction flags of C246 ~ C255.
SM element OFF: counting up. SM element ON: counting down.
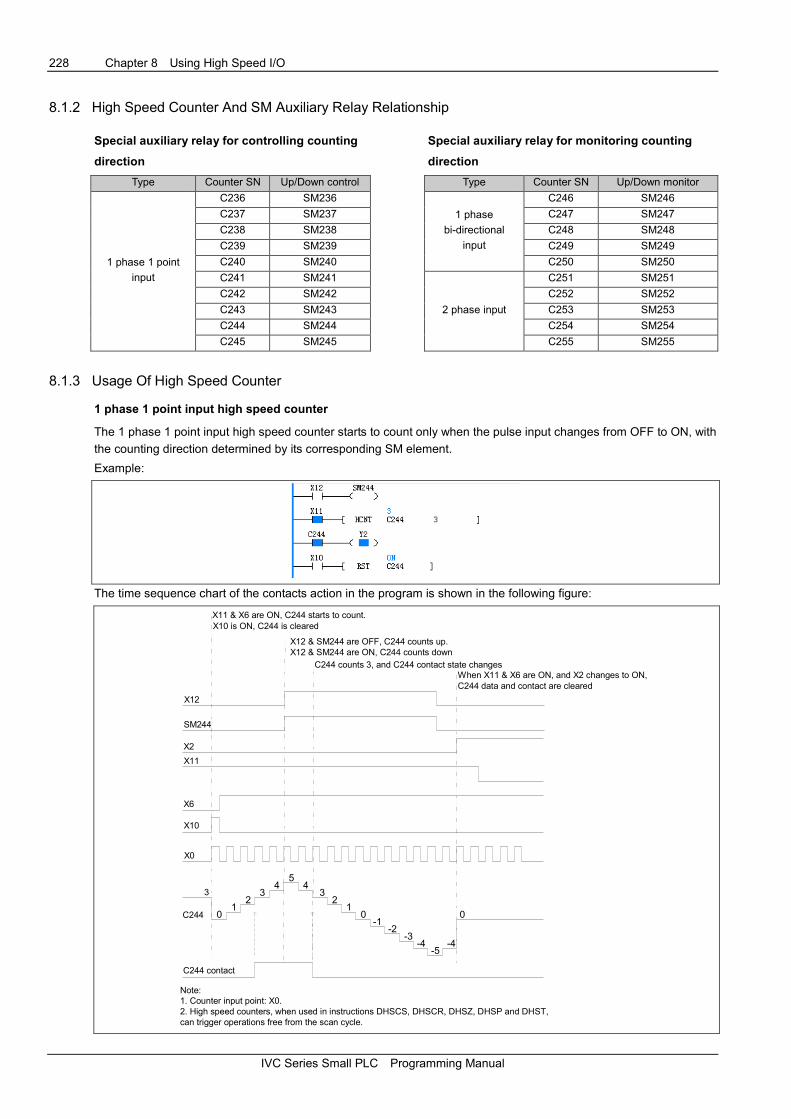
228 Chapter 8 Using High Speed I/O
IVC Series Small PLC Programming Manual
8.1.2 High Speed Counter And SM Auxiliary Relay Relationship
Special auxiliary relay for controlling counting
direction
Type Counter SN Up/Down control
1 phase 1 point
input
C236 SM236
C237 SM237
C238 SM238
C239 SM239
C240 SM240
C241 SM241
C242 SM242
C243 SM243
C244 SM244
C245 SM245
Special auxiliary relay for monitoring counting
direction
Type Counter SN Up/Down monitor
1 phase
bi-directional
input
C246 SM246
C247 SM247
C248 SM248
C249 SM249
C250 SM250
2 phase input
C251 SM251
C252 SM252
C253 SM253
C254 SM254
C255 SM255
8.1.3 Usage Of High Speed Counter
1 phase 1 point input high speed counter
The 1 phase 1 point input high speed counter starts to count only when the pulse input changes from OFF to ON, with
the counting direction determined by its corresponding SM element.
Example:
The time sequence chart of the contacts action in the program is shown in the following figure:
X0
X10
X6
X11
X2
0
3
12
34
54
32
10
-1-2
-3-4
-5-4
0C244
C244 contact
SM244
X12
X11 & X6 are ON, C244 starts to count.X10 is ON, C244 is cleared
X12 & SM244 are OFF, C244 counts up.X12 & SM244 are ON, C244 counts down
C244 counts 3, and C244 contact state changesWhen X11 & X6 are ON, and X2 changes to ON,C244 data and contact are cleared
Note:1. Counter input point: X0.2. High speed counters, when used in instructions DHSCS, DHSCR, DHSZ, DHSP and DHST,can trigger operations free from the scan cycle.

Chapter 8 Using High Speed I/O 229
IVC Series Small PLC Programming Manual
1 phase bi-directional input high speed counter
The 1 phase bi-directional input high speed counter starts to count only when the pulse input changes from OFF to ON.
The two input points determines its counting direction, which is monitored by its corresponding SM element.
Example:
The time sequence chart of the contacts action in the program is shown in the following figure:
X3
X10
X7
X11
X5
0
3
12
34
54
32
10
-1-2
-3-4
-5-4
0C250
C250 contact
SM250
X4
X10 is ON, C250 is cleared regardless of X11 and X7
X11 & X7: ON, C250 starts to count. X3 changes from OFF to ONC250 counts up. SM250 is not being driven
C250 value reaches 3, C250 contact changes
X4 changes from OFF to ON, C250counts down. SM250 is being driven
X11 & X7: ON. If X5 is ON, C250 iscleared, and the contact is reset
Note:1. Counter input points: X3 & X4.2. High speed counters, when used in instructions DHSCS, DHSCR, DHSZ, DHSP and DHST,can trigger operations free from the scan cycle.
2 phase input high speed counter
The 2 phase input high speed counter starts to count only when the pulse input changes from OFF to ON. The phase
difference of the two pulse inputs determines the counting direction, which is monitored by the corresponding SM
element.
Example:

230 Chapter 8 Using High Speed I/O
IVC Series Small PLC Programming Manual
The time sequence chart of the contacts action in the program is shown in the following figure:
X0
X10
X6
X11
X2
0
3
12
34
54
32
10
-1-2
-3-4
-5-4
0C254
C254 contact
SM254
X1
X10 is ON,C254 is cleared regardless of X11 & X6
X11: ON. If X6 is ON, C254 starts to count. X0 is ON, and X11changes from OFF to ON, X254 counts up. SM254 is not beingdriven.
C254 values reaches 3, C254 contact changesX0: ON. X1 changes from ON to OFF,C254 counts down. SM254 is being driven
X11 & X6: ON, X2 changes ON, C254is cleared, and the contact is reset
Note:1. Counter input points: X0 & X1.2. High speed counters, when used in instructions DHSCS, DHSCR, DHSZ, DHSP and DHST,can trigger operations free from the scan cycle.
8.1.4 Points To Note About High Speed Counters
Classification of high speed counters
C236, C237, C246 and C251 can be used as both hardware counters and software counters, depending on the modes
in which they are used. All the other high speed counters are software counters.
Maximum combined frequency
1. The maximum combined frequency, or the sum of frequencies of all signals input at any time, should not exceed
80kHz on the following two occasions:
� When multiple high speed counters (hardware counting mode) are used simultaneously.
� When the high speed counters (hardware counting mode) and the SPD instruction are used at the same time.
2. The maximum combined frequency when multiple software high speed counters, or when high speed counters and
the SPD instruction, are used at the same time, is shown in the following table:
Scenario Maximum combined frequency
Instructions DHSCS, DHSCR, DHSCI, DHSZ, DHSP and DHST are not used 80kHz
Instructions DHSCS, DHSCR, DHSCI, DHSP or DHST are used 30kHz
Instruction DHSZ is used 20kHz
Maximum frequency of hardware counter
Counters C236, C237, C246 and C251 are the only four potential hardware counters. Among which:
� C236, C237 and C246 are 1 phase counters. Their maximum counting frequency is 50kHz.
� C251 is a 2-phase counter. Its maximum counting frequency is 30kHz.
Maximum frequency of software counters
The high speed counters used in instructions DHSCS, DHSCR, DHSCI, DHSP or DHST are all in software counting
mode. The maximum input frequency for the 1-phase counters is 10kHz; for 2-phase counters: 5kHz.

Chapter 8 Using High Speed I/O 231
IVC Series Small PLC Programming Manual
When used in the DHSZ instruction, the maximum frequency for the 1-phase counters is 5kHz; for 2-phase counters:
4kHz.
8.2 External Pulse Capture Function
The input points that provides the external pulse capture function are X0 ~ X7. The corresponding SM elements are
listed below:
Input point Corresponding SM element
X0 SM90
X1 SM91
X2 SM92
X3 SM93
X4 SM94
X5 SM95
X6 SM96
X7 SM97
� Note
1. When the output input point changes from OFF to ON, the SM element of the corresponding terminal will be set to ON.
2. SM90 ~ SM97 will be cleared when the user program starts.
3. The total pulse frequency input through X0 ~ X7 should be smaller than 80kHz.
4. If high speed counters or SPD instructions are used on the same input point, the pulse capture function will become invalid
after the first scan cycle, regardless of the validity of the instructions.
8.3 High Speed Pulse Output
8.3.1 High Speed Pulse Output Function
The high speed pulse output is the pulse controllable with instructions PLSY, PLSR, PLS and PWM, and output
through Y0 or Y1. See 6.10 High-speed I/O Instruction for the usage of such instructions.
The pulse output is unrelated to the scan cycle.
Using two PLSY, PWM or PLSR instructions at the same time can output two independent high speed pulses at Y0
and Y1.
8.3.2 Points To Note About High Speed Pulse Output
During the execution of the high-speed instruction, so long as the power flow is not OFF, no other instructions can use
the same port, unless the high speed pulse output instruction is invalid.
If multiple PWM, PLSY or PLSR instructions uses the same output point, the output point will be available only to the
first valid instruction.

232 Chapter 8 Using High Speed I/O
IVC Series Small PLC Programming Manual
8.4 Configuring PLS Envelope Instruction
You can use the PTO instruction wizard to generate a PLS envelope instruction. In the AutoStation main interface,
select Tool -> Instruction Wizard … to open the dialogue box as shown in the following figure.
Select PTO, and click the Next button to enter the Output Wizard of Envelop, as shown in the following figure.
All the sections of the envelope have the same acceleration and deceleration. For example, according to the
configuration shown in the preceding figure, the time it takes for the motor to accelerate from 20000Hz to 50000Hz is:
1000 × (50000 - 20000) ÷ (100000 - 5000) = 316 (ms) = 0.316 (s)
During the acceleration, the total pulse number can be figured out with the trapezoid area calculation method:
(20000+50000) ×0.316÷2 = 11060 (pulse number)
Therefore, if a certain accerleration/deceleration time or pulse number is required, you should do the math before
setting the maximum speed, minimum speed and acc./dec. time.
Click the Next Step button in the preceding figure to enter the Motion Outline Define window as shown in the
following figure.

Chapter 8 Using High Speed I/O 233
IVC Series Small PLC Programming Manual
Input the Target Speed and moving distance of the first step, and click the New Step button. Then input the Target
Speed and moving distance again and click the New Step button again. Repeat this operation until no more steps
are needed. Then you can click the OK button to enter the Output Wizard of Envelop, as shown in the following
figure, where you can save the configuration into D elements.
The wizard will generate two subprograms, one for setting the parameters, the other for executing the PLS instruction,
as shown in the following figure. During the programming, do not call the execution subprogram before the parameter
setting subprogram has been called and executed (to assigned values to D elements).
After naming the subprograms, click the Next Step button to enter the window as shown in the following figure:
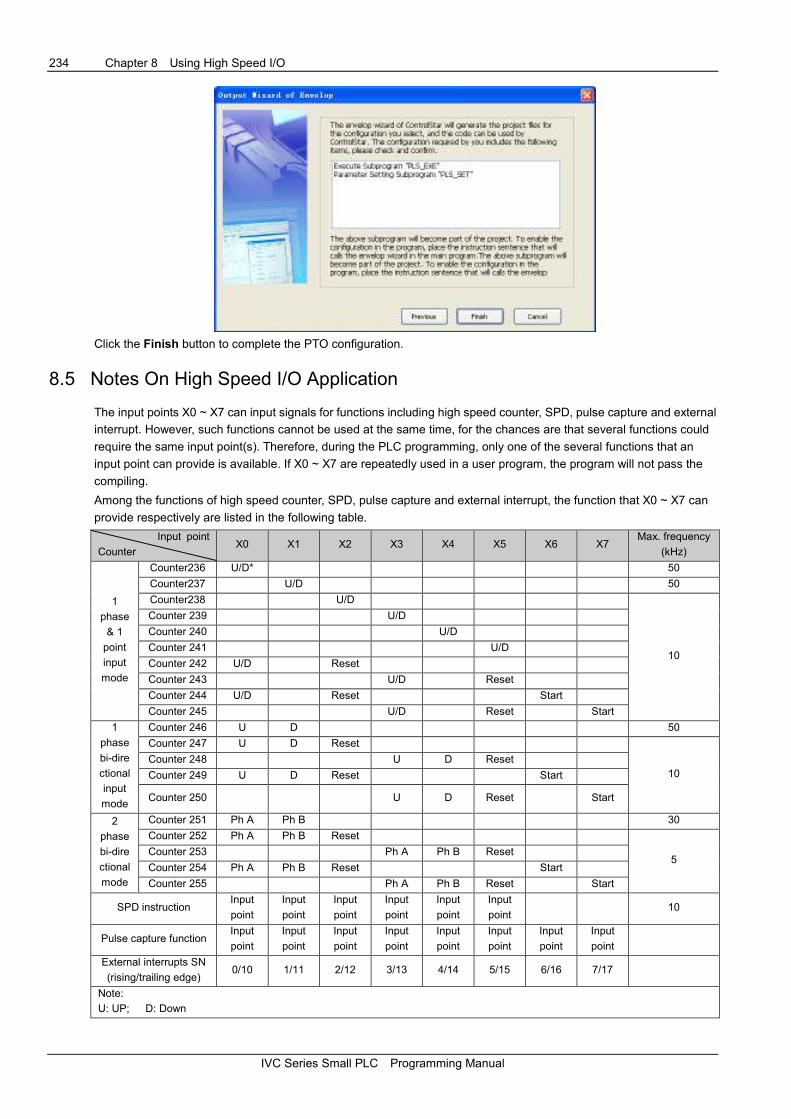
234 Chapter 8 Using High Speed I/O
IVC Series Small PLC Programming Manual
Click the Finish button to complete the PTO configuration.
8.5 Notes On High Speed I/O Application
The input points X0 ~ X7 can input signals for functions including high speed counter, SPD, pulse capture and external
interrupt. However, such functions cannot be used at the same time, for the chances are that several functions could
require the same input point(s). Therefore, during the PLC programming, only one of the several functions that an
input point can provide is available. If X0 ~ X7 are repeatedly used in a user program, the program will not pass the
compiling.
Among the functions of high speed counter, SPD, pulse capture and external interrupt, the function that X0 ~ X7 can
provide respectively are listed in the following table.
Input point
Counter X0 X1 X2 X3 X4 X5 X6 X7
Max. frequency
(kHz)
1
phase
& 1
point
input
mode
Counter236 U/D* 50
Counter237 U/D 50
Counter238 U/D
10
Counter 239 U/D
Counter 240 U/D
Counter 241 U/D
Counter 242 U/D Reset
Counter 243 U/D Reset
Counter 244 U/D Reset Start
Counter 245 U/D Reset Start
1
phase
bi-dire
ctional
input
mode
Counter 246 U D 50
Counter 247 U D Reset
10 Counter 248 U D Reset
Counter 249 U D Reset Start
Counter 250 U D Reset Start
2
phase
bi-dire
ctional
mode
Counter 251 Ph A Ph B 30
Counter 252 Ph A Ph B Reset
5 Counter 253 Ph A Ph B Reset
Counter 254 Ph A Ph B Reset Start
Counter 255 Ph A Ph B Reset Start
SPD instruction Input
point
Input
point
Input
point
Input
point
Input
point
Input
point 10
Pulse capture function Input
point
Input
point
Input
point
Input
point
Input
point
Input
point
Input
point
Input
point
External interrupts SN
(rising/trailing edge) 0/10 1/11 2/12 3/13 4/14 5/15 6/16 7/17
Note:
U: UP; D: Down

Chapter 9 Using Interrupts 235
IVC Series Small PLC Programming Manual
Chapter 9 Using Interrupts
This chapter details the mechanism, processing procedures and usage of various interrupts.
9.1 Interrupt Program ...................................................................................................................................................... 236
9.2 Processing Interrupt Event ........................................................................................................................................ 236
9.3 Timed Interrupt .......................................................................................................................................................... 237
9.4 External Interrupt ....................................................................................................................................................... 238
9.5 High-speed Counter Interrupt .................................................................................................................................... 240
9.6 PTO Output Completion Interrupt .............................................................................................................................. 241
9.7 Power Failure Interrupt .............................................................................................................................................. 242
9.8 Serial Port Interrupt ................................................................................................................................................... 242

236 Chapter 9 Using Interrupts
IVC Series Small PLC Programming Manual
9.1 Interrupt Program
When an interrupt event occurs, the normal scan cycle will be interrupted and the interrupt program will be executed,
which is called the interrupt mechanism. For the event-triggered control tasks that requires priority, you often need to
use this special mechanism.
The system provides many kinds of programmable interrupt resources. Each kind of interrupt resource can trigger a
type of interrupt events, and each type of interrupt event are independently numbered.
In order to deal with a certain interrupt event, you must compile a processing program, that is, an interrupt program,
which is an independent POU in the user program.
An event number must be designated for each interrupt program in order to link the interrupt program with the interrupt
event designated with the event SN. When responding to the interrupt request of the interrupt event, the system will
call the corresponding interrupt program based on the interrupt event number.
The following are the interrupt resources provided by IVC series small PLC:
Event
number Interrupt event
Enabling
SM
Event
number Interrupt event
Enabling
SM
0 X0 input rising edge interrupt SM40 20 High-speed counter interrupt 0 SM65
1 X1input rising edge interrupt SM41 21 High-speed counter interrupt 1 SM65
2 X2 input rising edge interrupt SM42 22 High-speed counter interrupt 2 SM65
3 X3 input rising edge interrupt SM43 23 High-speed counter interrupt 3 SM65
4 X4 input rising edge interrupt SM44 24 High-speed counter interrupt 4 SM65
5 X5 input rising edge interrupt SM45 25 High-speed counter interrupt 5 SM65
6 X6 input rising edge interrupt SM46 26 Timed interrupt 0
Setting:
SD66
Enabling:
SM66
7 X7 input rising edge interrupt SM47 27 Timed interrupt 1
Setting:
SD67
Enablin:
SM67
10 X0 input falling edge interrupt SM40 28 Timed interrupt 2
Setting:
SD68
Enabling:
SM68
11 X1 input falling edge interrupt SM41 29 Power failure interrupt SM56
12 X2 input falling edge interrupt SM42 30 Character sending interrupt of
communication port 0 SM48
13 X3 input falling edge interrupt SM43 31 Character receiving interrupt of
communication port 0 SM49
14 X4 input falling edge interrupt SM44 32 Frame sending interrupt of
communication port 0 SM50
15 X5 input falling edge interrupt SM45 33 Frame receiving interrupt of
communication port 0 SM51
16 X6 input falling edge interrupt SM46 34 Character sending interrupt of
communication port 1 SM52
17 X7 input falling edge interrupt SM47 35 Character receiving interrupt of
communication port 1 SM53
18 PTO (Y0) output completion interrupt SM63 36 Frame sending interrupt of
communication port 1 SM54
19 PTO (Y1) output completion interrupt SM64 37 Frame receiving interrupt of
communication port 1 SM55
9.2 Processing Interrupt Event
1. When a certain interrupt event occurs, if it is enabled, its corresponding event number will be added to the interrupt
request queue, which is 8-record long and FIFO.
2. Processing of the interrupt request by system:
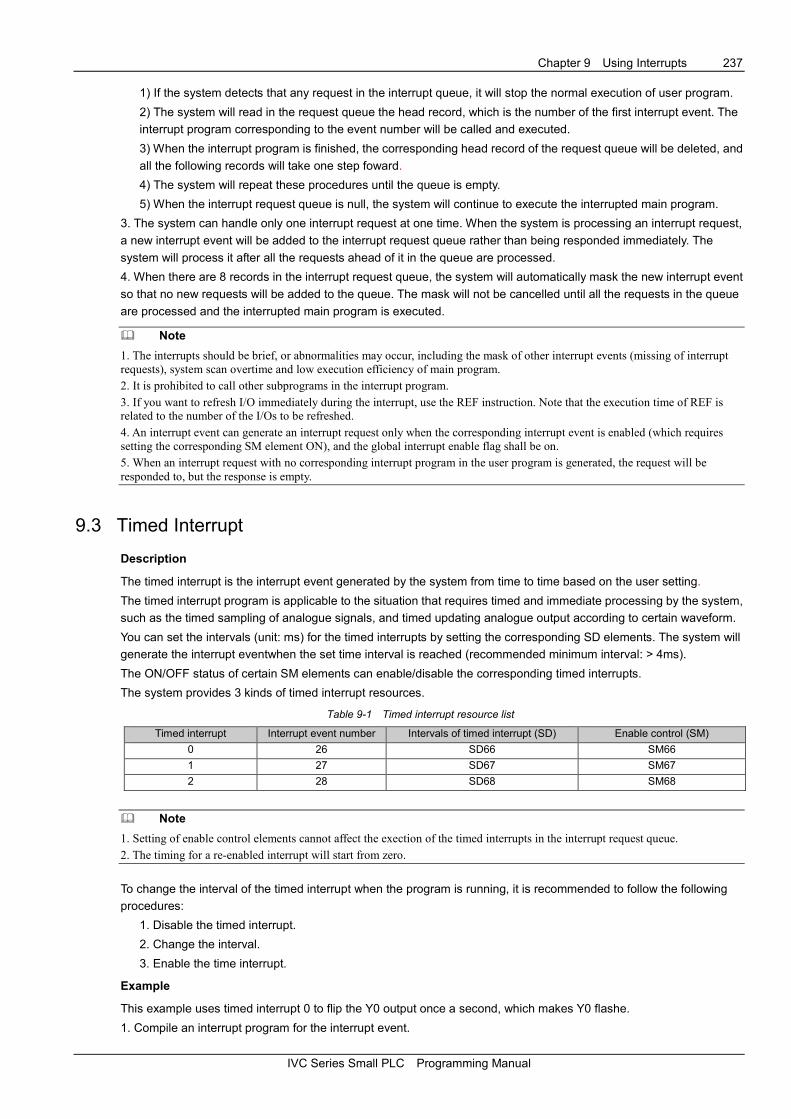
Chapter 9 Using Interrupts 237
IVC Series Small PLC Programming Manual
1) If the system detects that any request in the interrupt queue, it will stop the normal execution of user program.
2) The system will read in the request queue the head record, which is the number of the first interrupt event. The
interrupt program corresponding to the event number will be called and executed.
3) When the interrupt program is finished, the corresponding head record of the request queue will be deleted, and
all the following records will take one step foward.
4) The system will repeat these procedures until the queue is empty.
5) When the interrupt request queue is null, the system will continue to execute the interrupted main program.
3. The system can handle only one interrupt request at one time. When the system is processing an interrupt request,
a new interrupt event will be added to the interrupt request queue rather than being responded immediately. The
system will process it after all the requests ahead of it in the queue are processed.
4. When there are 8 records in the interrupt request queue, the system will automatically mask the new interrupt event
so that no new requests will be added to the queue. The mask will not be cancelled until all the requests in the queue
are processed and the interrupted main program is executed.
� Note
1. The interrupts should be brief, or abnormalities may occur, including the mask of other interrupt events (missing of interrupt
requests), system scan overtime and low execution efficiency of main program.
2. It is prohibited to call other subprograms in the interrupt program.
3. If you want to refresh I/O immediately during the interrupt, use the REF instruction. Note that the execution time of REF is related to the number of the I/Os to be refreshed.
4. An interrupt event can generate an interrupt request only when the corresponding interrupt event is enabled (which requires
setting the corresponding SM element ON), and the global interrupt enable flag shall be on.
5. When an interrupt request with no corresponding interrupt program in the user program is generated, the request will be
responded to, but the response is empty.
9.3 Timed Interrupt
Description
The timed interrupt is the interrupt event generated by the system from time to time based on the user setting.
The timed interrupt program is applicable to the situation that requires timed and immediate processing by the system,
such as the timed sampling of analogue signals, and timed updating analogue output according to certain waveform.
You can set the intervals (unit: ms) for the timed interrupts by setting the corresponding SD elements. The system will
generate the interrupt eventwhen the set time interval is reached (recommended minimum interval: > 4ms).
The ON/OFF status of certain SM elements can enable/disable the corresponding timed interrupts.
The system provides 3 kinds of timed interrupt resources.
Table 9-1 Timed interrupt resource list
Timed interrupt Interrupt event number Intervals of timed interrupt (SD) Enable control (SM)
0 26 SD66 SM66
1 27 SD67 SM67
2 28 SD68 SM68
� Note
1. Setting of enable control elements cannot affect the exection of the timed interrupts in the interrupt request queue.
2. The timing for a re-enabled interrupt will start from zero.
To change the interval of the timed interrupt when the program is running, it is recommended to follow the following
procedures:
1. Disable the timed interrupt.
2. Change the interval.
3. Enable the time interrupt.
Example
This example uses timed interrupt 0 to flip the Y0 output once a second, which makes Y0 flashe.
1. Compile an interrupt program for the interrupt event.
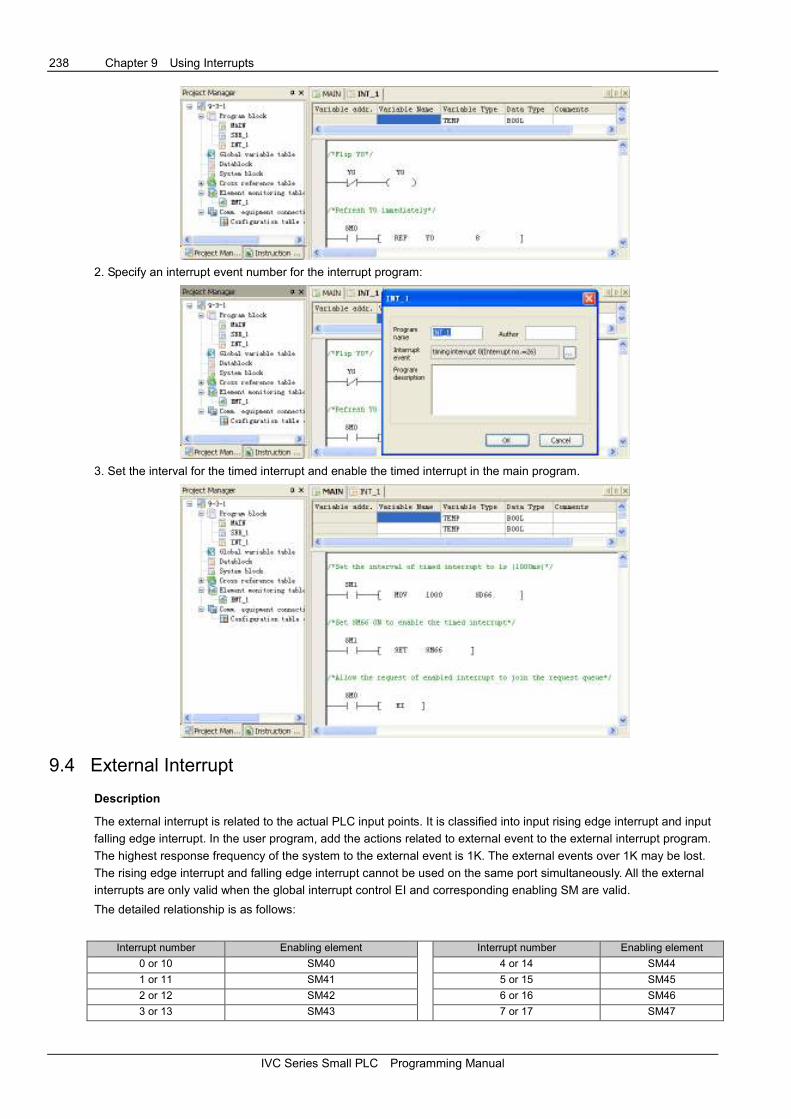
238 Chapter 9 Using Interrupts
IVC Series Small PLC Programming Manual
2. Specify an interrupt event number for the interrupt program:
3. Set the interval for the timed interrupt and enable the timed interrupt in the main program.
9.4 External Interrupt
Description
The external interrupt is related to the actual PLC input points. It is classified into input rising edge interrupt and input
falling edge interrupt. In the user program, add the actions related to external event to the external interrupt program.
The highest response frequency of the system to the external event is 1K. The external events over 1K may be lost.
The rising edge interrupt and falling edge interrupt cannot be used on the same port simultaneously. All the external
interrupts are only valid when the global interrupt control EI and corresponding enabling SM are valid.
The detailed relationship is as follows:
Interrupt number Enabling element Interrupt number Enabling element
0 or 10 SM40 4 or 14 SM44
1 or 11 SM41 5 or 15 SM45
2 or 12 SM42 6 or 16 SM46
3 or 13 SM43 7 or 17 SM47
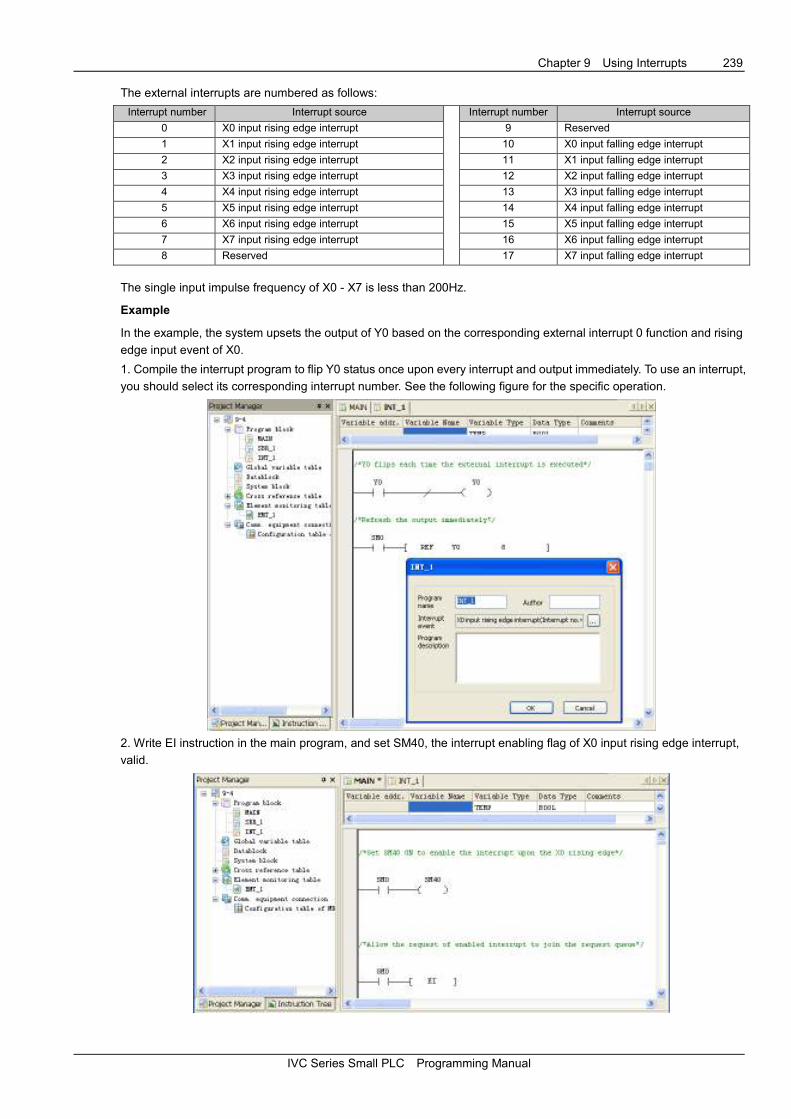
Chapter 9 Using Interrupts 239
IVC Series Small PLC Programming Manual
The external interrupts are numbered as follows:
Interrupt number Interrupt source Interrupt number Interrupt source
0 X0 input rising edge interrupt 9 Reserved
1 X1 input rising edge interrupt 10 X0 input falling edge interrupt
2 X2 input rising edge interrupt 11 X1 input falling edge interrupt
3 X3 input rising edge interrupt 12 X2 input falling edge interrupt
4 X4 input rising edge interrupt 13 X3 input falling edge interrupt
5 X5 input rising edge interrupt 14 X4 input falling edge interrupt
6 X6 input rising edge interrupt 15 X5 input falling edge interrupt
7 X7 input rising edge interrupt 16 X6 input falling edge interrupt
8 Reserved 17 X7 input falling edge interrupt
The single input impulse frequency of X0 - X7 is less than 200Hz.
Example
In the example, the system upsets the output of Y0 based on the corresponding external interrupt 0 function and rising
edge input event of X0.
1. Compile the interrupt program to flip Y0 status once upon every interrupt and output immediately. To use an interrupt,
you should select its corresponding interrupt number. See the following figure for the specific operation.
2. Write EI instruction in the main program, and set SM40, the interrupt enabling flag of X0 input rising edge interrupt,
valid.

240 Chapter 9 Using Interrupts
IVC Series Small PLC Programming Manual
9.5 High-speed Counter Interrupt
Description
The high-speed counter interrupt must be used together with the HCNT instruction or DHSCI instruction, and
generates high-speed counter interrupt based on the value of the high-speed counter. You can compile programs
related to external pulse input in the high-speed interrupt program. The high-speed counter interrupts (20 ~ 25) are
valid only when the EI instruction and corresponding interrupt enable flag are valid.
Example
This example uses the high speed counter function of X0 to call the interrupt program (number 20) when the external
counter C236 reaches the value specified through the DHSCI instruction.
1. Compile interrupt program, choose an interrupt number for each interrupt subprogram. See the following figure for
the specific operation.
2. Write EI instruction in the main program, and set SM65, the interrupt enabling flag of high speed counter interrupt,
valid. Drive the high-speed counter C236 and high-speed counter interrupt instruction.

Chapter 9 Using Interrupts 241
IVC Series Small PLC Programming Manual
9.6 PTO Output Completion Interrupt
Description
The PTO output completion interrupt is triggered when enable flag (SM63 or SM64) is set and the high-speed pulse
output at Y0 or Y1 is finished. You can carry out the relevant processing in the interrupt sub-program. This function is
applicable only to IVC1 series PLC.
Example
This example uses the high-speed pulse output of Y0 to call the interrupt program (number 18) after Y0 high-speed
pulse output is finished.
1. Code function in interrupt program (INT_1): Compile program for the interrupt code to realize the control. Choose
the corresponding interrupt number for each interrupt. See INT_1 for the specific operation.
2. Code function in main program: Enable the global interrupt of the system and the enable flag SM63 of PTO output
interrupt. Use PLS instruction.
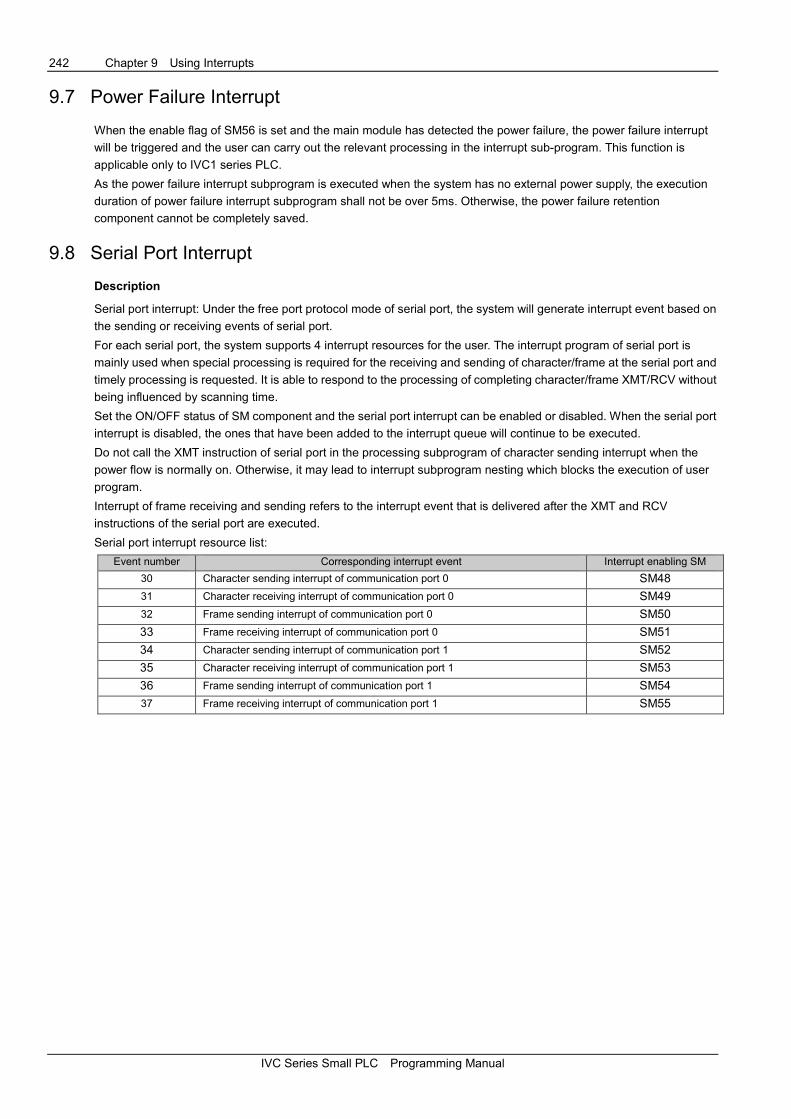
242 Chapter 9 Using Interrupts
IVC Series Small PLC Programming Manual
9.7 Power Failure Interrupt
When the enable flag of SM56 is set and the main module has detected the power failure, the power failure interrupt
will be triggered and the user can carry out the relevant processing in the interrupt sub-program. This function is
applicable only to IVC1 series PLC.
As the power failure interrupt subprogram is executed when the system has no external power supply, the execution
duration of power failure interrupt subprogram shall not be over 5ms. Otherwise, the power failure retention
component cannot be completely saved.
9.8 Serial Port Interrupt
Description
Serial port interrupt: Under the free port protocol mode of serial port, the system will generate interrupt event based on
the sending or receiving events of serial port.
For each serial port, the system supports 4 interrupt resources for the user. The interrupt program of serial port is
mainly used when special processing is required for the receiving and sending of character/frame at the serial port and
timely processing is requested. It is able to respond to the processing of completing character/frame XMT/RCV without
being influenced by scanning time.
Set the ON/OFF status of SM component and the serial port interrupt can be enabled or disabled. When the serial port
interrupt is disabled, the ones that have been added to the interrupt queue will continue to be executed.
Do not call the XMT instruction of serial port in the processing subprogram of character sending interrupt when the
power flow is normally on. Otherwise, it may lead to interrupt subprogram nesting which blocks the execution of user
program.
Interrupt of frame receiving and sending refers to the interrupt event that is delivered after the XMT and RCV
instructions of the serial port are executed.
Serial port interrupt resource list:
Event number Corresponding interrupt event Interrupt enabling SM
30 Character sending interrupt of communication port 0 SM48
31 Character receiving interrupt of communication port 0 SM49
32 Frame sending interrupt of communication port 0 SM50
33 Frame receiving interrupt of communication port 0 SM51
34 Character sending interrupt of communication port 1 SM52
35 Character receiving interrupt of communication port 1 SM53
36 Frame sending interrupt of communication port 1 SM54
37 Frame receiving interrupt of communication port 1 SM55
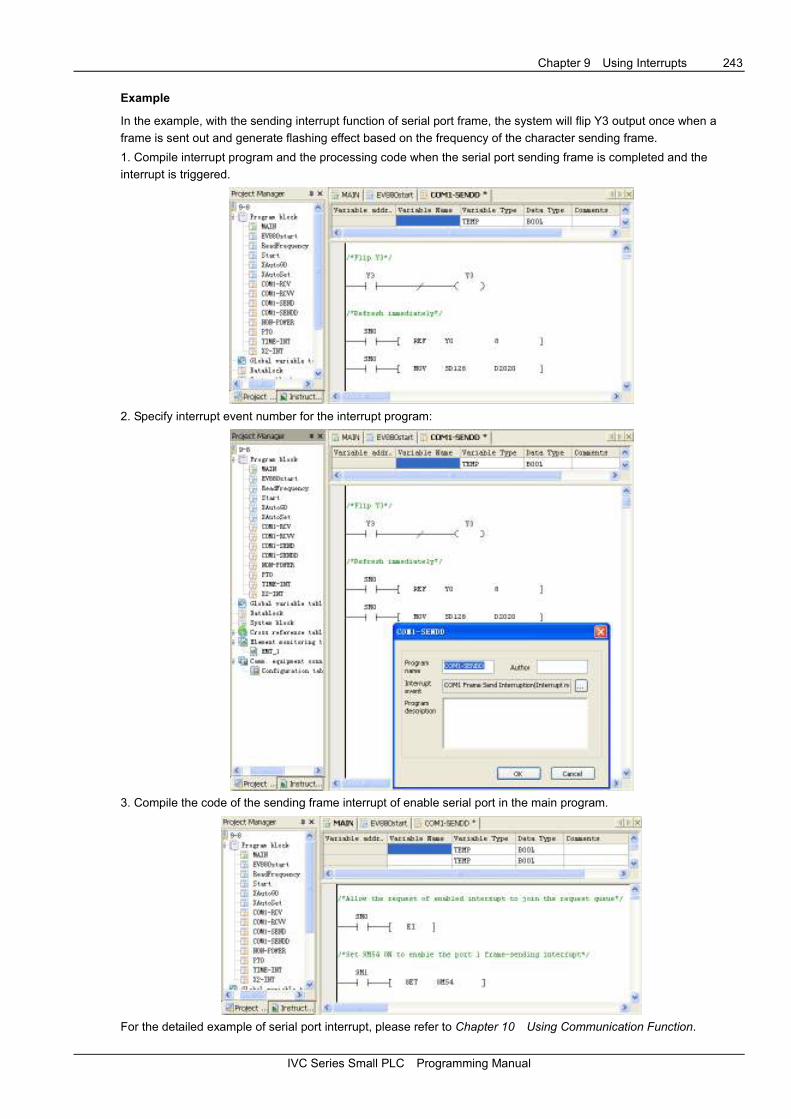
Chapter 9 Using Interrupts 243
IVC Series Small PLC Programming Manual
Example
In the example, with the sending interrupt function of serial port frame, the system will flip Y3 output once when a
frame is sent out and generate flashing effect based on the frequency of the character sending frame.
1. Compile interrupt program and the processing code when the serial port sending frame is completed and the
interrupt is triggered.
2. Specify interrupt event number for the interrupt program:
3. Compile the code of the sending frame interrupt of enable serial port in the main program.
For the detailed example of serial port interrupt, please refer to Chapter 10 Using Communication Function.
244 Chapter 10 Using Communication Function
IVC Series Small PLC Programming Manual
Chapter 10 Using Communication Function
This chapter introduces the communication function of IVC series small PLC, including the communication resources
and communication protocols, and uses examples to illustrate.
10.1 Communication Resource ....................................................................................................................................... 245
10.2 Programming Port Protocol ..................................................................................................................................... 245
10.3 Free Port Communication Protocol ......................................................................................................................... 245
10.3.1 Introduction .................................................................................................................................................. 245
10.3.2 Parameter Setting of Free Port .................................................................................................................... 245
10.3.3 Free Port Instruction .................................................................................................................................... 246
10.4 Modbus Communication Protocol ........................................................................................................................... 248
10.4.1 Introduction .................................................................................................................................................. 248
10.4.2 Characteristics Of Links ............................................................................................................................... 248
10.4.3 RTU Transfer Mode ..................................................................................................................................... 248
10.4.4 ASCII Transfer Mode ................................................................................................................................... 248
10.4.5 Supported Modbus Function Code .............................................................................................................. 248
10.4.6 Addressing Mode Of PLC Element .............................................................................................................. 249
10.4.7 Modbus Slave .............................................................................................................................................. 249
10.4.8 Reading & Writing Elements ........................................................................................................................ 250
10.4.9 Handle Of Double Word ............................................................................................................................... 250
10.4.10 Handle Of LONG INT ................................................................................................................................. 251
10.4.11 Diagnostic Function Code .......................................................................................................................... 251
10.4.12 Error Code ................................................................................................................................................. 251
10.4.13 Modbus Parameter Setting ........................................................................................................................ 252
10.4.14 Modbus Instruction..................................................................................................................................... 252
10.5 N:N bus Communication Protocol ........................................................................................................................... 255
10.5.1 Introduction .................................................................................................................................................. 255
10.5.2 N:N bus Network Structure .......................................................................................................................... 256
10.5.3 N:N bus Refresh Mode ................................................................................................................................ 256
10.5.4 N:N bus Parameter Setting .......................................................................................................................... 261
10.5.5 Example ....................................................................................................................................................... 262
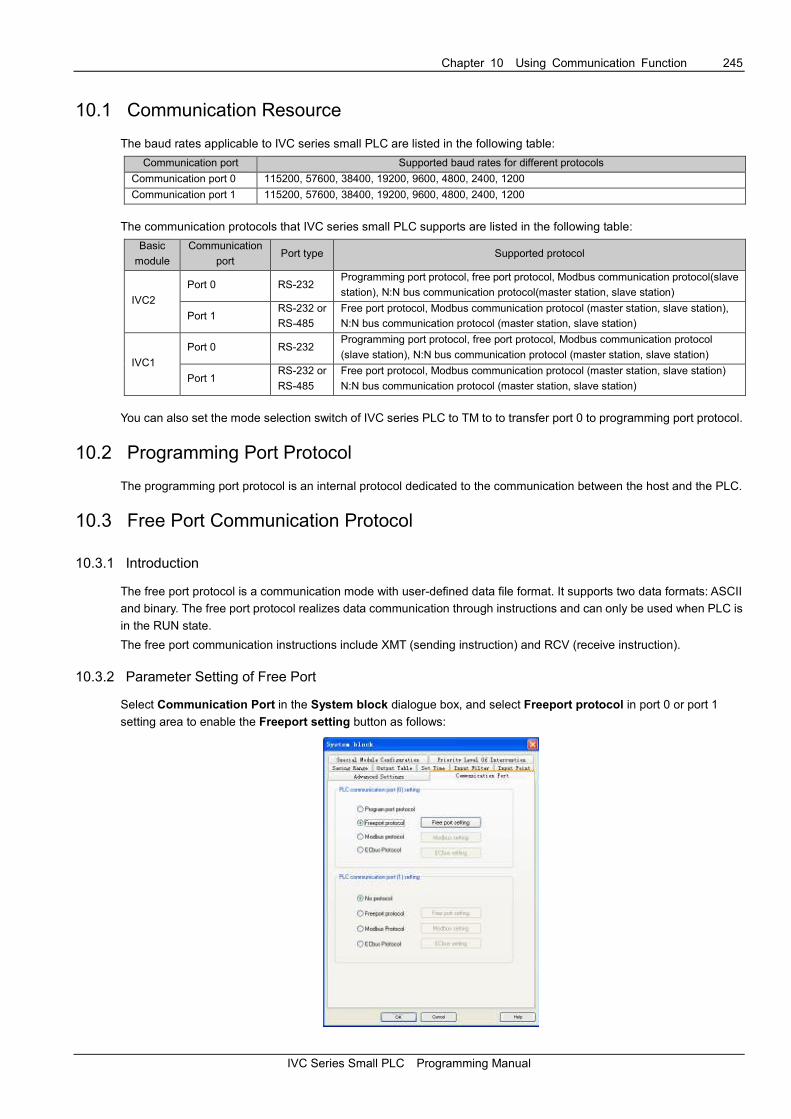
Chapter 10 Using Communication Function 245
IVC Series Small PLC Programming Manual
10.1 Communication Resource
The baud rates applicable to IVC series small PLC are listed in the following table:
Communication port Supported baud rates for different protocols
Communication port 0 115200, 57600, 38400, 19200, 9600, 4800, 2400, 1200
Communication port 1 115200, 57600, 38400, 19200, 9600, 4800, 2400, 1200
The communication protocols that IVC series small PLC supports are listed in the following table:
Basic
module
Communication
port Port type Supported protocol
IVC2
Port 0 RS-232 Programming port protocol, free port protocol, Modbus communication protocol(slave
station), N:N bus communication protocol(master station, slave station)
Port 1 RS-232 or
RS-485
Free port protocol, Modbus communication protocol (master station, slave station),
N:N bus communication protocol (master station, slave station)
IVC1
Port 0 RS-232 Programming port protocol, free port protocol, Modbus communication protocol
(slave station), N:N bus communication protocol (master station, slave station)
Port 1 RS-232 or
RS-485
Free port protocol, Modbus communication protocol (master station, slave station)
N:N bus communication protocol (master station, slave station)
You can also set the mode selection switch of IVC series PLC to TM to to transfer port 0 to programming port protocol.
10.2 Programming Port Protocol
The programming port protocol is an internal protocol dedicated to the communication between the host and the PLC.
10.3 Free Port Communication Protocol
10.3.1 Introduction
The free port protocol is a communication mode with user-defined data file format. It supports two data formats: ASCII
and binary. The free port protocol realizes data communication through instructions and can only be used when PLC is
in the RUN state.
The free port communication instructions include XMT (sending instruction) and RCV (receive instruction).
10.3.2 Parameter Setting of Free Port
Select Communication Port in the System block dialogue box, and select Freeport protocol in port 0 or port 1
setting area to enable the Freeport setting button as follows:
OK Cancel Help
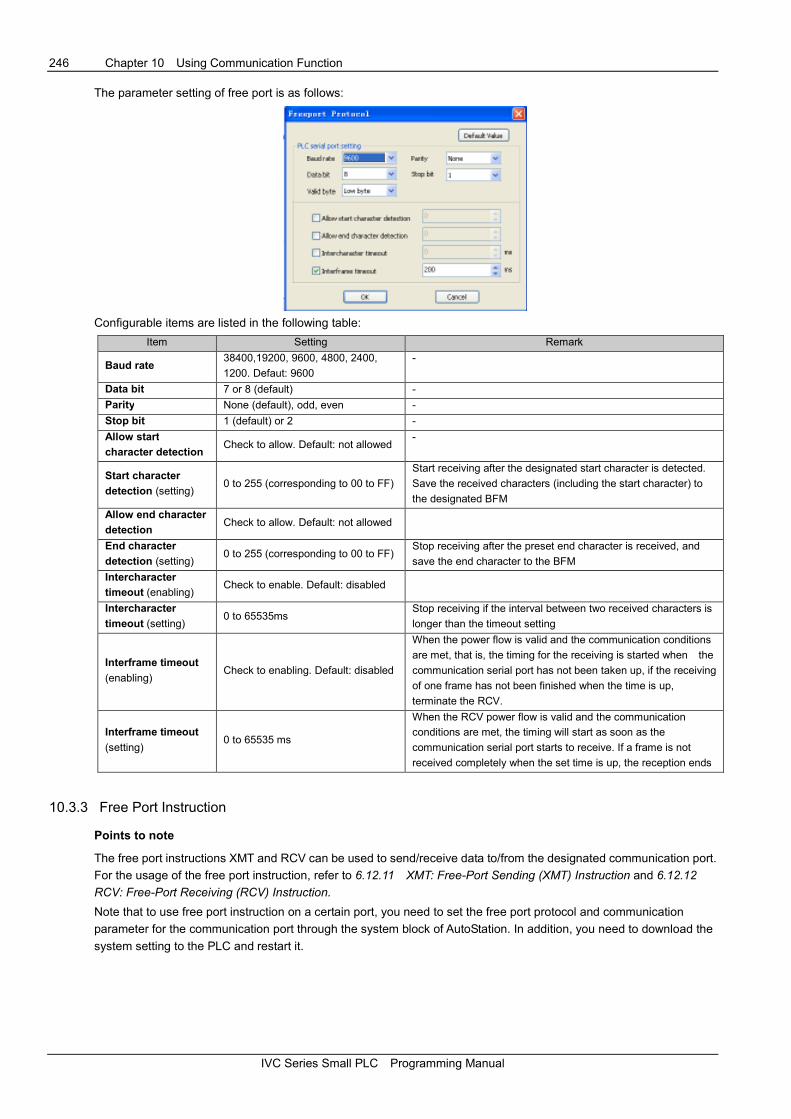
246 Chapter 10 Using Communication Function
IVC Series Small PLC Programming Manual
The parameter setting of free port is as follows:
Configurable items are listed in the following table:
Item Setting Remark
Baud rate 38400,19200, 9600, 4800, 2400,
1200. Defaut: 9600
-
Data bit 7 or 8 (default) -
Parity None (default), odd, even -
Stop bit 1 (default) or 2 -
Allow start
character detection Check to allow. Default: not allowed
-
Start character
detection (setting) 0 to 255 (corresponding to 00 to FF)
Start receiving after the designated start character is detected.
Save the received characters (including the start character) to
the designated BFM
Allow end character
detection Check to allow. Default: not allowed
End character
detection (setting) 0 to 255 (corresponding to 00 to FF)
Stop receiving after the preset end character is received, and
save the end character to the BFM
Intercharacter
timeout (enabling) Check to enable. Default: disabled
Intercharacter
timeout (setting) 0 to 65535ms
Stop receiving if the interval between two received characters is
longer than the timeout setting
Interframe timeout
(enabling) Check to enabling. Default: disabled
When the power flow is valid and the communication conditions
are met, that is, the timing for the receiving is started when the
communication serial port has not been taken up, if the receiving
of one frame has not been finished when the time is up,
terminate the RCV.
Interframe timeout
(setting) 0 to 65535 ms
When the RCV power flow is valid and the communication
conditions are met, the timing will start as soon as the
communication serial port starts to receive. If a frame is not
received completely when the set time is up, the reception ends
10.3.3 Free Port Instruction
Points to note
The free port instructions XMT and RCV can be used to send/receive data to/from the designated communication port.
For the usage of the free port instruction, refer to 6.12.11 XMT: Free-Port Sending (XMT) Instruction and 6.12.12
RCV: Free-Port Receiving (RCV) Instruction.
Note that to use free port instruction on a certain port, you need to set the free port protocol and communication
parameter for the communication port through the system block of AutoStation. In addition, you need to download the
system setting to the PLC and restart it.
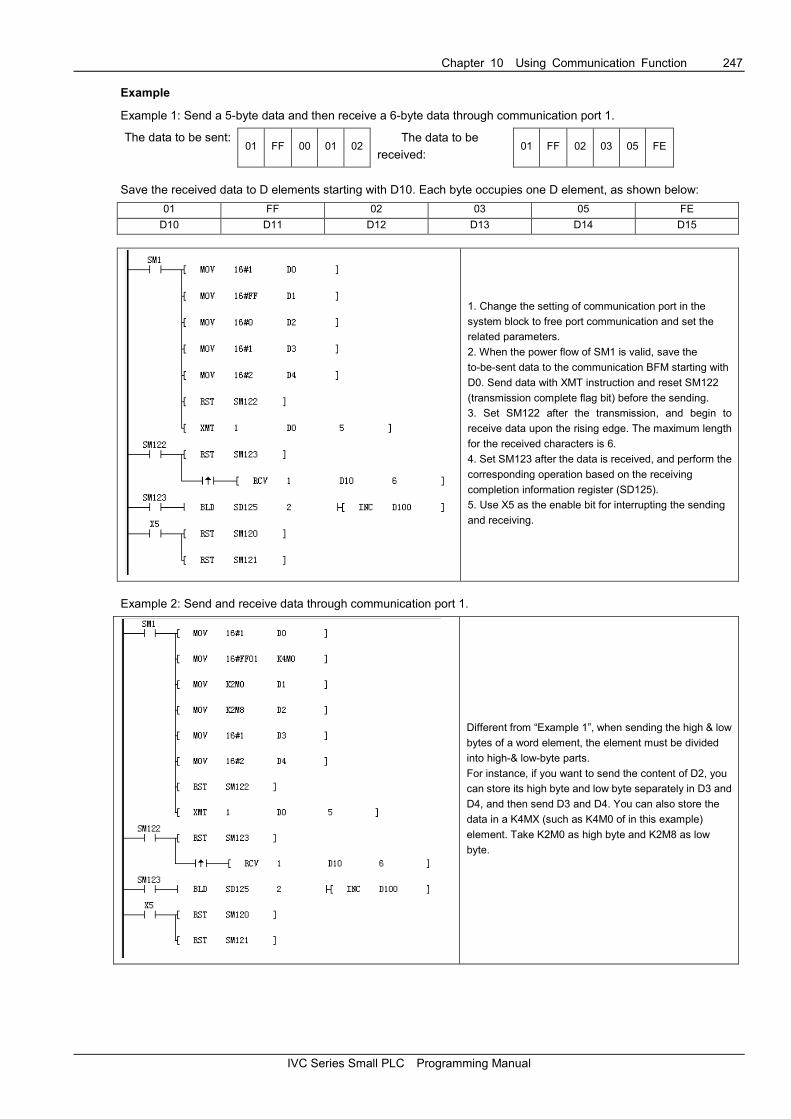
Chapter 10 Using Communication Function 247
IVC Series Small PLC Programming Manual
Example
Example 1: Send a 5-byte data and then receive a 6-byte data through communication port 1.
The data to be sent: 01 FF 00 01 02
The data to be
received: 01 FF 02 03 05 FE
Save the received data to D elements starting with D10. Each byte occupies one D element, as shown below:
01 FF 02 03 05 FE
D10 D11 D12 D13 D14 D15
1. Change the setting of communication port in the
system block to free port communication and set the
related parameters.
2. When the power flow of SM1 is valid, save the
to-be-sent data to the communication BFM starting with
D0. Send data with XMT instruction and reset SM122
(transmission complete flag bit) before the sending.
3. Set SM122 after the transmission, and begin to
receive data upon the rising edge. The maximum length
for the received characters is 6.
4. Set SM123 after the data is received, and perform the
corresponding operation based on the receiving
completion information register (SD125).
5. Use X5 as the enable bit for interrupting the sending
and receiving.
Example 2: Send and receive data through communication port 1.
Different from “Example 1”, when sending the high & low
bytes of a word element, the element must be divided
into high-& low-byte parts.
For instance, if you want to send the content of D2, you
can store its high byte and low byte separately in D3 and
D4, and then send D3 and D4. You can also store the
data in a K4MX (such as K4M0 of in this example)
element. Take K2M0 as high byte and K2M8 as low
byte.
248 Chapter 10 Using Communication Function
IVC Series Small PLC Programming Manual
10.4 Modbus Communication Protocol
10.4.1 Introduction
For the serial port communication of IVC series small PLC, Modbus communication protocol is available. Two
communication modes: ASCII and RTU (IVC1 only supports RTU mode) are supported. The PLC can be set as the
master or slave station.
10.4.2 Characteristics Of Links
1. Physical layer: RS-232, RS-485
2. Link layer: asynchronous transfer mode
1) Data bit: 7 bits (ASCII) or 8 bits (RTU)
2) Transfer rate: 1200, 2400, 4800, 9600, 19200, 38400
3) Check method: even check, odd check or no check
4) Stop bit: 1 or 2 stop bits
3. Networking configuration: up to 31 sets of equipment. Address range: 1 to 31. Broadcast is supported.
10.4.3 RTU Transfer Mode
1. Hexadecimal data.
2. The interval between two characters shall not be less than the time of 1.5 characters.
3. There is no frame head or tail, and the interval between two frames is at least the time of 3.5 characters.
4. Use CRC16 check.
5. The maximum length of RTU frame is 256 bytes and the frame structure is as follows:
Structure of frame Address Function code Data CRC
Nubmer of Bytes 1 1 0 to 252 2
6. Calculation of interval among characters:
If the communication baud rate is 19200, the interval of 1.5 characters is 1/19200×11×1.5×1000 = 0.86ms.
The interval of 3.5 characters is 1/19200×11×3.5×1000 = 2ms.
10.4.4 ASCII Transfer Mode
1. Use ASCII data communication.
2. The frame takes “: (3A)”as the head, and CRLF (0D 0A) as the tail.
3. The allowed interval among characters is 1s.
4. Use LRC check.
5. The frame of ASCII is longer than that of RTU. It is required two character codes for transferring one byte (HEX) in
ASCII mode. The maximum length for data field (2×252) of ASCII is twice of RTU data field (252). The maximum
length of ASCII frame is 513 characters and the structure of frame is as follows:
Structure of frame head Address Function code Data LRC Tail
Byte 1 2 2 0 to 2*252 2 2
10.4.5 Supported Modbus Function Code
Supported modbus function codes include 01, 02, 03, 05, 06, 08, 15 and 16.
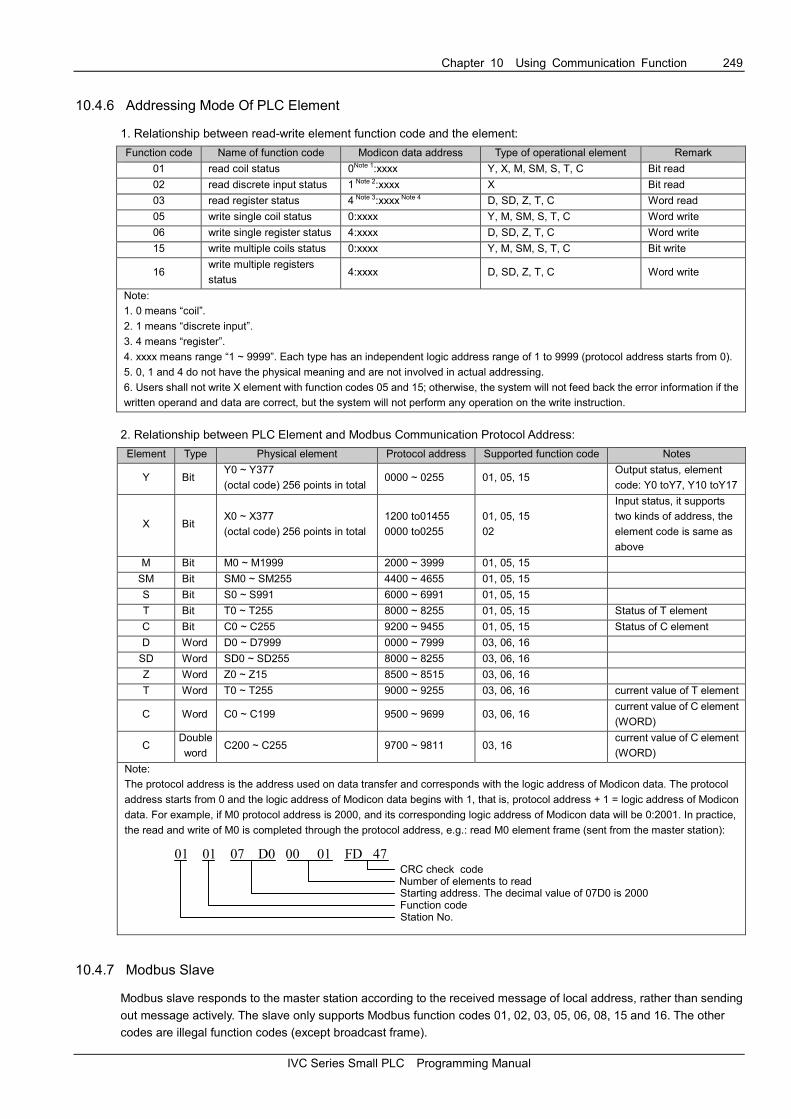
Chapter 10 Using Communication Function 249
IVC Series Small PLC Programming Manual
10.4.6 Addressing Mode Of PLC Element
1. Relationship between read-write element function code and the element:
Function code Name of function code Modicon data address Type of operational element Remark
01 read coil status 0Note 1:xxxx Y, X, M, SM, S, T, C Bit read
02 read discrete input status 1 Note 2:xxxx X Bit read
03 read register status 4 Note 3:xxxx Note 4 D, SD, Z, T, C Word read
05 write single coil status 0:xxxx Y, M, SM, S, T, C Word write
06 write single register status 4:xxxx D, SD, Z, T, C Word write
15 write multiple coils status 0:xxxx Y, M, SM, S, T, C Bit write
16 write multiple registers
status 4:xxxx D, SD, Z, T, C Word write
Note:
1. 0 means “coil”.
2. 1 means “discrete input”.
3. 4 means “register”.
4. xxxx means range “1 ~ 9999”. Each type has an independent logic address range of 1 to 9999 (protocol address starts from 0).
5. 0, 1 and 4 do not have the physical meaning and are not involved in actual addressing.
6. Users shall not write X element with function codes 05 and 15; otherwise, the system will not feed back the error information if the
written operand and data are correct, but the system will not perform any operation on the write instruction.
2. Relationship between PLC Element and Modbus Communication Protocol Address:
Element Type Physical element Protocol address Supported function code Notes
Y Bit Y0 ~ Y377
(octal code) 256 points in total 0000 ~ 0255 01, 05, 15
Output status, element
code: Y0 toY7, Y10 toY17
X Bit X0 ~ X377
(octal code) 256 points in total
1200 to01455
0000 to0255
01, 05, 15
02
Input status, it supports
two kinds of address, the
element code is same as
above
M Bit M0 ~ M1999 2000 ~ 3999 01, 05, 15
SM Bit SM0 ~ SM255 4400 ~ 4655 01, 05, 15
S Bit S0 ~ S991 6000 ~ 6991 01, 05, 15
T Bit T0 ~ T255 8000 ~ 8255 01, 05, 15 Status of T element
C Bit C0 ~ C255 9200 ~ 9455 01, 05, 15 Status of C element
D Word D0 ~ D7999 0000 ~ 7999 03, 06, 16
SD Word SD0 ~ SD255 8000 ~ 8255 03, 06, 16
Z Word Z0 ~ Z15 8500 ~ 8515 03, 06, 16
T Word T0 ~ T255 9000 ~ 9255 03, 06, 16 current value of T element
C Word C0 ~ C199 9500 ~ 9699 03, 06, 16 current value of C element
(WORD)
C Double
word C200 ~ C255 9700 ~ 9811 03, 16
current value of C element
(WORD)
Note:
The protocol address is the address used on data transfer and corresponds with the logic address of Modicon data. The protocol
address starts from 0 and the logic address of Modicon data begins with 1, that is, protocol address + 1 = logic address of Modicon
data. For example, if M0 protocol address is 2000, and its corresponding logic address of Modicon data will be 0:2001. In practice,
the read and write of M0 is completed through the protocol address, e.g.: read M0 element frame (sent from the master station):
01 01 07 D0 00 01 FD 47
Station No.Function codeStarting address. The decimal value of 07D0 is 2000Number of elements to readCRC check code
10.4.7 Modbus Slave
Modbus slave responds to the master station according to the received message of local address, rather than sending
out message actively. The slave only supports Modbus function codes 01, 02, 03, 05, 06, 08, 15 and 16. The other
codes are illegal function codes (except broadcast frame).
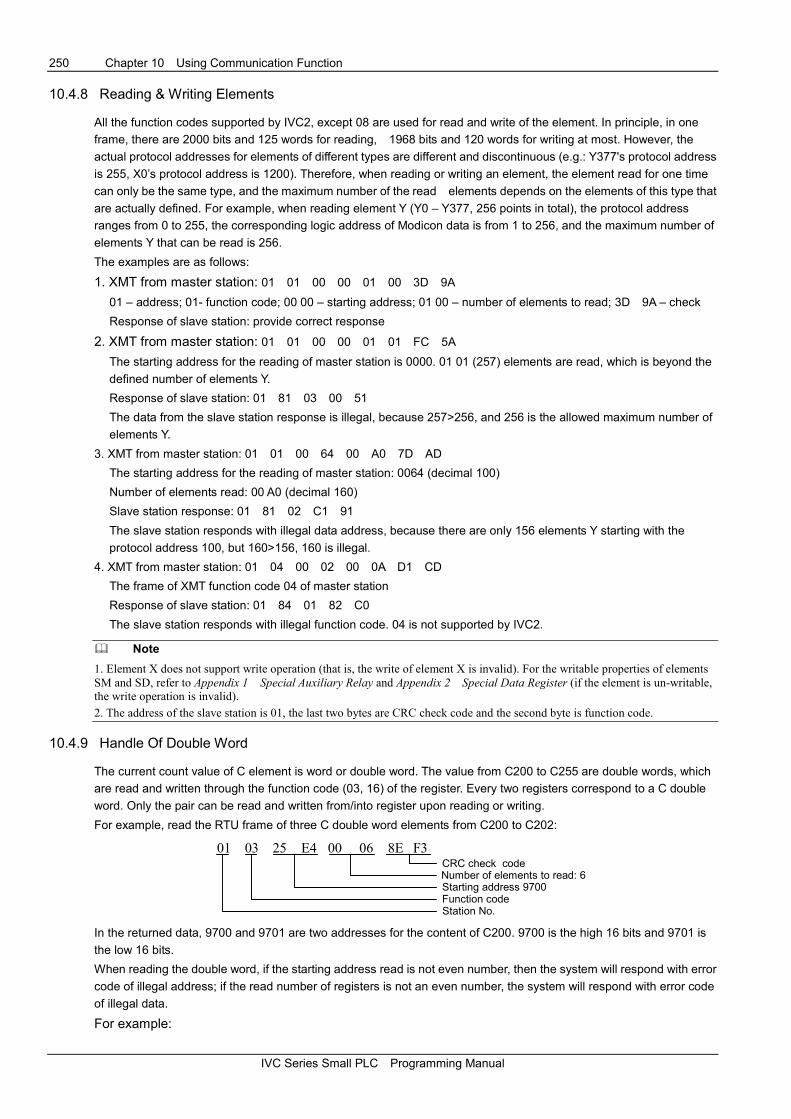
250 Chapter 10 Using Communication Function
IVC Series Small PLC Programming Manual
10.4.8 Reading & Writing Elements
All the function codes supported by IVC2, except 08 are used for read and write of the element. In principle, in one
frame, there are 2000 bits and 125 words for reading, 1968 bits and 120 words for writing at most. However, the
actual protocol addresses for elements of different types are different and discontinuous (e.g.: Y377's protocol address
is 255, X0’s protocol address is 1200). Therefore, when reading or writing an element, the element read for one time
can only be the same type, and the maximum number of the read elements depends on the elements of this type that
are actually defined. For example, when reading element Y (Y0 – Y377, 256 points in total), the protocol address
ranges from 0 to 255, the corresponding logic address of Modicon data is from 1 to 256, and the maximum number of
elements Y that can be read is 256.
The examples are as follows:
1. XMT from master station: 01 01 00 00 01 00 3D 9A
01 – address; 01- function code; 00 00 – starting address; 01 00 – number of elements to read; 3D 9A – check
Response of slave station: provide correct response
2. XMT from master station: 01 01 00 00 01 01 FC 5A
The starting address for the reading of master station is 0000. 01 01 (257) elements are read, which is beyond the
defined number of elements Y.
Response of slave station: 01 81 03 00 51
The data from the slave station response is illegal, because 257>256, and 256 is the allowed maximum number of
elements Y.
3. XMT from master station: 01 01 00 64 00 A0 7D AD
The starting address for the reading of master station: 0064 (decimal 100)
Number of elements read: 00 A0 (decimal 160)
Slave station response: 01 81 02 C1 91
The slave station responds with illegal data address, because there are only 156 elements Y starting with the
protocol address 100, but 160>156, 160 is illegal.
4. XMT from master station: 01 04 00 02 00 0A D1 CD
The frame of XMT function code 04 of master station
Response of slave station: 01 84 01 82 C0
The slave station responds with illegal function code. 04 is not supported by IVC2.
� Note
1. Element X does not support write operation (that is, the write of element X is invalid). For the writable properties of elements
SM and SD, refer to Appendix 1 Special Auxiliary Relay and Appendix 2 Special Data Register (if the element is un-writable, the write operation is invalid).
2. The address of the slave station is 01, the last two bytes are CRC check code and the second byte is function code.
10.4.9 Handle Of Double Word
The current count value of C element is word or double word. The value from C200 to C255 are double words, which
are read and written through the function code (03, 16) of the register. Every two registers correspond to a C double
word. Only the pair can be read and written from/into register upon reading or writing.
For example, read the RTU frame of three C double word elements from C200 to C202:
01 03 25 E4 00 06 8E F3
Station No.Function codeStarting address 9700Number of elements to read: 6CRC check code
In the returned data, 9700 and 9701 are two addresses for the content of C200. 9700 is the high 16 bits and 9701 is
the low 16 bits.
When reading the double word, if the starting address read is not even number, then the system will respond with error
code of illegal address; if the read number of registers is not an even number, the system will respond with error code
of illegal data.
For example:

Chapter 10 Using Communication Function 251
IVC Series Small PLC Programming Manual
XTM from master station: 01 03 25 E5 00 04 5E F2
The starting address for the reading of master station : 4 word elements of 25 E5 (decimal 9701,)
Response of slave station: 01 83 02 C0 F1
Response of slave station: illegal data address
XTM from slave station: 01 03 25 E4 00 05 CE F2
The starting address for master station read: 5 word elements of 25 E5
Response of slave station: 01 83 03 01 31
The data sent back from slave station is illegal.
10.4.10 Handle Of LONG INT
A LONG INT data can be saved in two D elements. For example, if a LONG INT data is saved in D3 and D4 of IVC
series PLC, the high 16 bits will be stored in D3 and the low 16 bits will be stored in D4. This is also true when the
master station reads LONG INT data through Modbus and reorganize the data into 32 bits.
The storage principle for FLOAT is the same as the storage principle for LONG INT data.
10.4.11 Diagnostic Function Code
Diagnostic function code is used for test the communication between the master station and slave station, or the
internal error of the slave station. The supported diagnostic sub-function codes are as follows:
Function
code
Sub-function
code Name of sub-function code Function
code
Sub-function
code Name of sub-function code
08 00 Return query data 08 12 Return bus communication error
count
08 01 Restart communication option 08 13 Return bus exceptional error count
08 04 Forced listen only mode 08 14 Return slave message count
08 10 Clear the counter 08 15 Return salve no response count
08 11 Return bus message count 08 18 Return bus character overrun count
10.4.12 Error Code
For the XMT of master station, the slave station returns data or statistic value in the data field under the normal
response status. But in the abnormal response status, the server will return error code in the data field. Refer to the
following table for error codes:
Error code Meaning of error code
0x01 illegal function code
0x02 illegal register address
0x03 illegal data
In addition, if the slave station receives data under the following situations, no message will be returned:
1) Error in broadcast frame, e.g. data error, address error;
2) Characters overrun, e.g. RTU frame over 256 bytes;
3) Under RTU transfer mode, interval between two characters time out, which is the same as receiving error frame,
and no message will be returned;
4) Listen-only mode of slave station;
5) The slave station received ASCII error frame, including frame tail error, character range error.
� Note
Read station is equipped with compulsory element. What is read is the value run by the program, which may be inconsistent with
the compulsory value.

252 Chapter 10 Using Communication Function
IVC Series Small PLC Programming Manual
10.4.13 Modbus Parameter Setting
Set communication port in system block
There are two serial ports (serial port 0 and 1) on the communication port interface. Communication port 0 only
supports Modbus slave station, while communication port 1 supports both master and slave stations.
Set Modbus communication parameters
There is a button of default value on Modbus operand interface. The default value is the communication setting
recommended by Modbus communication protocol. For the parameter setting items, refer to Table XX.
Item Setting
Station No. 0 to 31
Baud rate 38400, 19200, 9600, 4800, 2400, 1200
Data bit set to 7 or 8 bits; 7 for ASCII mode, 8 for RTU mode
Parity check bit set to no check, odd check and even check
Stop bit set to 1 or 2; set to 1 for odd or even check; set to 2 for no check status
Modbus master/slave It can be set to master or slave station; communication port 1 can be set to master/slave station,
communiation port 0 can only be set to slave station
transfer mode Select RTU mode or ASCII mode
main mode timeout The time for waiting the slave response by master is over the set value.
Note: After the operand is set and downloaded in the system block, it will be valid only after one operation.
10.4.14 Modbus Instruction
When PLC is used as Modbus master station, the Modbus data frame can be sent/received through Modbus
instruction provided by system. For the detailed use of Modbus instruction, refer to 6.12.1 Modbus: Modbus Master
Station Communication Instruction.
If PLC is set to master station, there is a timeout item in main mode when setting Modbus parameter in the system
block. To ensure the correctness of the received data, the timeout period shall be longer than a scan cycle of Modbus
slave station and with reasonable margin. For example, if IVC2 is the slave station and a scan cycle of IVC2 is 300ms,
the main mode timeout of the master station shall be over 300ms. It is proper to set the timeout to 350ms.
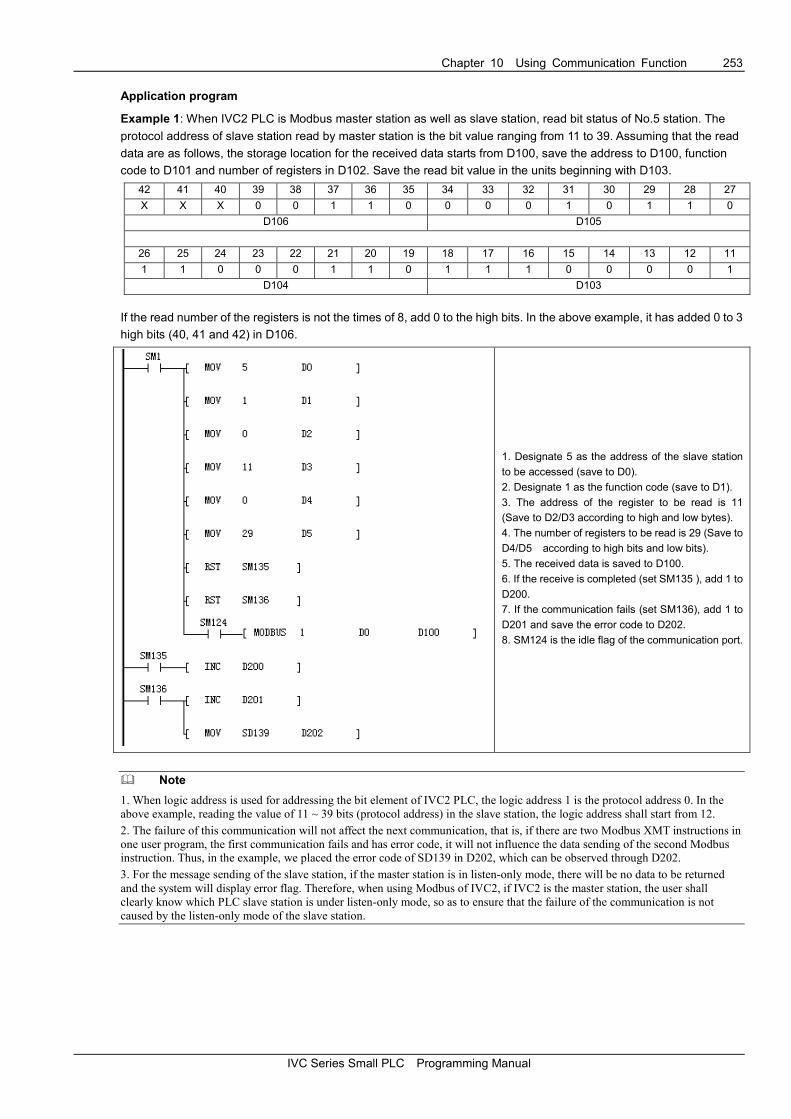
Chapter 10 Using Communication Function 253
IVC Series Small PLC Programming Manual
Application program
Example 1: When IVC2 PLC is Modbus master station as well as slave station, read bit status of No.5 station. The
protocol address of slave station read by master station is the bit value ranging from 11 to 39. Assuming that the read
data are as follows, the storage location for the received data starts from D100, save the address to D100, function
code to D101 and number of registers in D102. Save the read bit value in the units beginning with D103.
42 41 40 39 38 37 36 35 34 33 32 31 30 29 28 27
X X X 0 0 1 1 0 0 0 0 1 0 1 1 0
D106 D105
26 25 24 23 22 21 20 19 18 17 16 15 14 13 12 11
1 1 0 0 0 1 1 0 1 1 1 0 0 0 0 1
D104 D103
If the read number of the registers is not the times of 8, add 0 to the high bits. In the above example, it has added 0 to 3
high bits (40, 41 and 42) in D106.
1. Designate 5 as the address of the slave station
to be accessed (save to D0).
2. Designate 1 as the function code (save to D1).
3. The address of the register to be read is 11
(Save to D2/D3 according to high and low bytes).
4. The number of registers to be read is 29 (Save to
D4/D5 according to high bits and low bits).
5. The received data is saved to D100.
6. If the receive is completed (set SM135 ), add 1 to
D200.
7. If the communication fails (set SM136), add 1 to
D201 and save the error code to D202.
8. SM124 is the idle flag of the communication port.
� Note
1. When logic address is used for addressing the bit element of IVC2 PLC, the logic address 1 is the protocol address 0. In the
above example, reading the value of 11 ~ 39 bits (protocol address) in the slave station, the logic address shall start from 12.
2. The failure of this communication will not affect the next communication, that is, if there are two Modbus XMT instructions in
one user program, the first communication fails and has error code, it will not influence the data sending of the second Modbus instruction. Thus, in the example, we placed the error code of SD139 in D202, which can be observed through D202.
3. For the message sending of the slave station, if the master station is in listen-only mode, there will be no data to be returned
and the system will display error flag. Therefore, when using Modbus of IVC2, if IVC2 is the master station, the user shall
clearly know which PLC slave station is under listen-only mode, so as to ensure that the failure of the communication is not
caused by the listen-only mode of the slave station.

254 Chapter 10 Using Communication Function
IVC Series Small PLC Programming Manual
Example 2: IVC2 is the Modbus master station, the slave station is also an IVC2 basic module. Read the status of bit
elements (protocol address: 2000 ~ 2017) in No.5 station.
The read data are as follows:
� The received frame starts from D100.
� D100 is for saving address
� D101 is for saving function code
� D102 is for saving the number of registers
� Units beginning with D103 are for saving the read value of bit element
1. The program has designated 5 as the address
of the slave station to be accessed (save to D0).
2. The program has designated 1 as function
code (save to D1).
3. The starting address of the register to be
read is 07D0 (hexadecimal, save to D2/D3
according to high bits and low bits).
4. The number of registers to be read is 18 (Save
to D4/D5 according to high bits and low bits).
5. The received data is saved to D100.
6. If the receive is completed (set SM135), add 1
to D200.
7. If the communication fails (set SM136), add 1
to D201 and save the error code to D202.
8. SM124 is the idle flag of the communication
port.

Chapter 10 Using Communication Function 255
IVC Series Small PLC Programming Manual
Example 3: IVC2 is the Modbus master station as well as the slave station. Read the status of the bit element with the
protocol address ranging from 40 to 43 of No.5 station.
The read data are as follows:
The received frame starts from D100.
D100 is for saving address
D101 is for saving function code
D102 is for saving the number of registers
Units beginning with D103 are for saving the read value of bit element
40 element
high bits
40 element
low bits
41 element
high bits
41 element
low bits
42 element
high bits
42 element
low bits
43 element
high bits
43 element
LSB
D103 D104 D105 D106 D107 D108 D109 D110
1. The program has designated 5 as the address of
the slave station to be accessed (save to D0).
2. The program has designated 3 as function code
(save to D1).
3. The starting address of the register to be read is 40
(save to D2/D3 according to high bits and low bits).
4. The number of registers to be read is 4 (Save to
D4/D5 according to high bits and low bits).
5. The received data is saved to D100.
6. If the receiving is completed (set SM135 ), add 1 to
D200.
7. If the communication fails (set SM136), add 1 to
D201 and save the error code to D202.
8. SM124 is the idle flag of the communication port.
10.5 N:N bus Communication Protocol
10.5.1 Introduction
N:N bus is a small PLC network developed by Invt Auto-Control Technology Co., Ltd. The physical layer of N:N bus
uses RS-485, so the PLC can be directly connected through communication port 1 or connected through
communication port 0 by RS-232/RS-485 converter. The connected PLC of N:N bus can automatically exchange the
values between D elements and M elements , which makes the access to the other PLC elements on the network as
convenient as accessing its own element. In N:N bus, the data access between PLCs is completely equivalent (N:N
communication network).
It is convenient to configure N:N bus. Most parameters of N:N bus only need to be configured on No.0 PLC. In addition,
N:N bus supports online modification of the network parameters, and is able to detect the newly added PLC
automatically. If any PLC is disconnected from the network, the other PLCs will continue to exchange the data. It is
also able to monitor the communication status of the whole network through the relevant SM element of any PLC in
N:N bus.
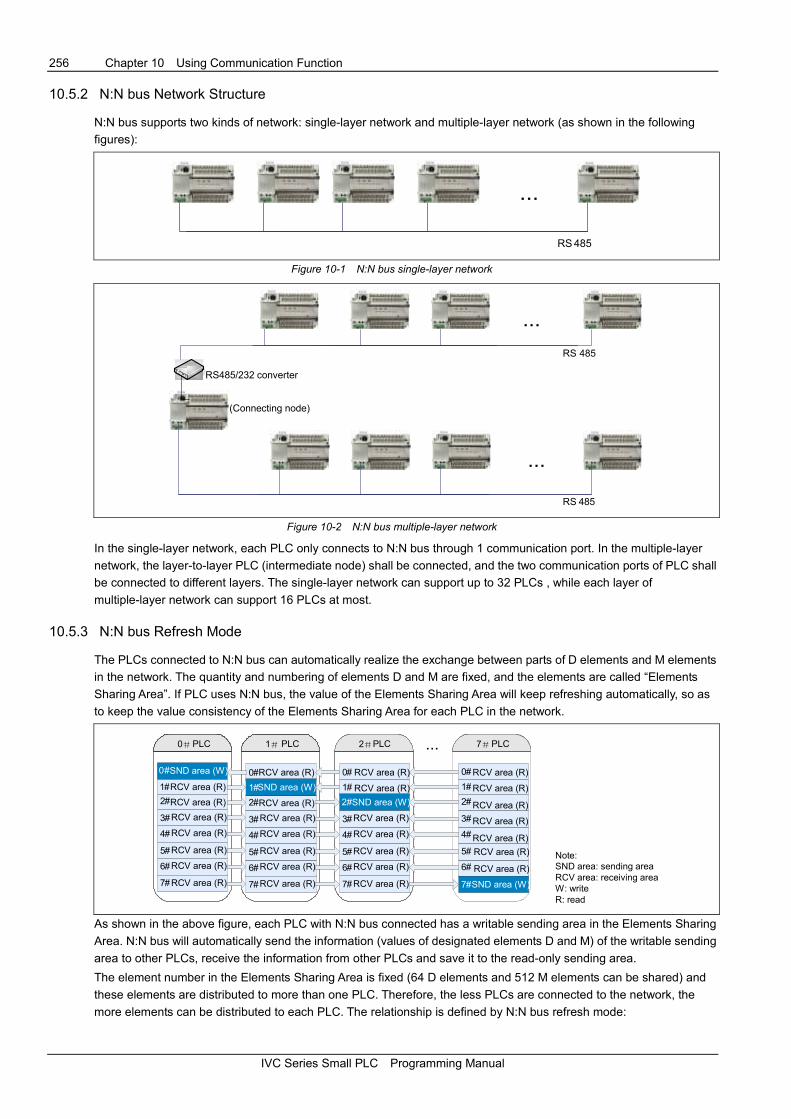
256 Chapter 10 Using Communication Function
IVC Series Small PLC Programming Manual
10.5.2 N:N bus Network Structure
N:N bus supports two kinds of network: single-layer network and multiple-layer network (as shown in the following
figures):
...
RS485
Figure 10-1 N:N bus single-layer network
RS485/232 converter
...
...
RS 485
RS 485
(Connecting node)
Figure 10-2 N:N bus multiple-layer network
In the single-layer network, each PLC only connects to N:N bus through 1 communication port. In the multiple-layer
network, the layer-to-layer PLC (intermediate node) shall be connected, and the two communication ports of PLC shall
be connected to different layers. The single-layer network can support up to 32 PLCs , while each layer of
multiple-layer network can support 16 PLCs at most.
10.5.3 N:N bus Refresh Mode
The PLCs connected to N:N bus can automatically realize the exchange between parts of D elements and M elements
in the network. The quantity and numbering of elements D and M are fixed, and the elements are called “Elements
Sharing Area”. If PLC uses N:N bus, the value of the Elements Sharing Area will keep refreshing automatically, so as
to keep the value consistency of the Elements Sharing Area for each PLC in the network.
0#SND area (W)
1#RCV area (R)
2#
4#
3#
7#
6#
5#
0#
1#
2#
4#
3#
7#
6#
5#
0#
1#
2#
4#
3#
7#
6#
5#
0#
1#
2#
4#
3#
7#
6#
5#
0#PLC 1# PLC 2#PLC 7#PLC...
RCV area (R)
RCV area (R)
RCV area (R)
RCV area (R)
RCV area (R)
RCV area (R)
RCV area (R)
RCV area (R)
RCV area (R)
RCV area (R)
RCV area (R)
RCV area (R)
RCV area (R)
SND area (W)
RCV area (R)
RCV area (R)
RCV area (R)
RCV area (R)
RCV area (R)
RCV area (R)
RCV area (R)
SND area (W)
RCV area (R)
RCV area (R)
RCV area (R)
RCV area (R)
RCV area (R)
RCV area (R)
RCV area (R)
SND area (W)
Note:SND area: sending areaRCV area: receiving areaW: writeR: read
As shown in the above figure, each PLC with N:N bus connected has a writable sending area in the Elements Sharing
Area. N:N bus will automatically send the information (values of designated elements D and M) of the writable sending
area to other PLCs, receive the information from other PLCs and save it to the read-only sending area.
The element number in the Elements Sharing Area is fixed (64 D elements and 512 M elements can be shared) and
these elements are distributed to more than one PLC. Therefore, the less PLCs are connected to the network, the
more elements can be distributed to each PLC. The relationship is defined by N:N bus refresh mode:

Chapter 10 Using Communication Function 257
IVC Series Small PLC Programming Manual
Distribution of D element on N:N bus single-layer network:
Distribution of D element
in sending area Mode 1 Mode 2 Mode 3 Mode 4 Mode 5
D7700 to D7701 #0 #0
#0
#0
#0
D7702 to D7703 #1
D7704 to D7705 #2 #1
D7706 to D7707 #3
D7708 to D7709 #4 #2
#1 D7710 to D7711 #5
D7712 to D7713 #6 #3
D7714 to D7715 #7
D7716 to D7717 #8 #4
#2
#1
D7718 to D7719 #9
D7720 to D7721 #10 #5
D7722 to D7723 #11
D7724 to D7725 #12 #6
#3 D7726 to D7727 #13
D7728 to D7729 #14 #7
D7730 to D7731 #15
D7732 to D7733 #16 #8
#4
#2
#1
D7734 to D7735 #17
D7736 to D7737 #18 #9
D7738 to D7739 #19
D7740 to D7741 #20 #10
#5 D7742 to D7743 #21
D7744 to D7745 #22 #11
D7746 to D7747 #23
D7748 to D7749 #24 #12
#6
#3
D7750 to D7751 #25
D7752 to D7753 #26 #13
D7754 to D7755 #27
D7756 to D7757 #28 #14
#7 D7758 to D7759 #29
D7760 to D7761 #30 #15
D7762 to D7763 #31
Explanation:
1) In mode 1, the D elements distributed to the sending area by 0# station are D7700 and D7701. D7700 and
D7701 can be written by the PLC of 0# station, and directly read by other stations (1#--31#).
2) In mode 2, the D elements distributed to the sending area by 0# station are D7700, D7701, D7701 and D7703.
The elements can be written by the PLC of 0# station and directly read by other stations (1#--15#).

258 Chapter 10 Using Communication Function
IVC Series Small PLC Programming Manual
Distribution of M element on N:N bus single-layer network:
Distribution of M element
in sending area Mode 1 Mode 2 Mode 3 Mode 4 Mode 5
M1400 to M1415 #0 #0
#0
#0
#0
M1416 to M1431 #1
M1432 to M1447 #2 #1
M1448 to M1463 #3
M1464 to M1479 #4 #2
#1 M1480 to M1495 #5
M1496 to M1511 #6 #3
M1512 to M1527 #7
M1528 to M1543 #8 #4
#2
#1
M1544 to M1559 #9
M1560 to M1575 #10 #5
M1576 to M1591 #11
M1592 to M1607 #12 #6
#3 #0 M1608 to M1623 #13
M1624 to M1639 #14 #7
M1640 to M1655 #15
M1656 to M1671 #16 #8
#4
#2
#1
M1672 to M1687 #17
M1688 to M1703 #18 #9
M1704 to M1719 #19
M1720 to M1735 #20 #10
#5 M1736 to M1751 #21
M1752 to M1767 #22 #11
M1768 to M1783 #23
M1784 to M1799 #24 #12
#6
#3
M1800 to M1815 #25
M1816 to M1831 #26 #13
M1832 to M1847 #27
M1848 to M1863 #28 #14
#7 M1864 to M1879 #29
M1880 to M1895 #30 #15
M1896 to M1911 #31
Explanation:
1) In mode 1, the M elements distributed to the sending area by 0# station range from M1400 to M1415. The
elements can be written by the PLC of 0# station and directly read by other stations (1#--31#).
2) In mode 2, the M elements distributed to the sending area by 0# station range from M1400 to M1431. The
elements can be written by the PLC of 0# station and directly read by other stations (1#--31#).

Chapter 10 Using Communication Function 259
IVC Series Small PLC Programming Manual
Distribution of D element on N:N bus multiple-layer network (layer 0):
Distribution of D element in
sending area Mode 6 Mode 7 Mode 8 Mode 9
D7700 to D7701 #0 #0
#0
#0
D7702 to D7703 #1
D7704 to D7705 #2 #1
D7706 to D7707 #3
D7708 to D7709 #4 #2
#1 D7710 to D7711 #5
D7712 to D7713 #6 #3
D7714 to D7715 #7
D7716 to D7717 #8 #4
#2
#1
D7718 to D7719 #9
D7720 to D7721 #10 #5
D7722 to D7723 #11
D7724 to D7725 #12 #6
#3 D7726 to D7727 #13
D7728 to D7729 #14 #7
D7730 to D7731 #15
Explanation:
In mode 6, D7700 and D7701 are distributed to the sending area by 0# station (layer 0). They can be written by the
PLC of 0# station and directly read by the other stations (1#--15#).
Distribution of D element on N:N bus multiple-layer network (layer 1):
Distribution of D element in
sending area Mode 10 Mode 11 Mode 12 Mode 13
D7732 to D7733 #0 #0
#0
#0
D7734 to D7735 #1
D7736 to D7737 #2 #1
D7738 to D7739 #3
D7740 to D7741 #4 #2
#1 D7742 to D7743 #5
D7744 to D7745 #6 #3
D7746 to D7747 #7
D7748 to D7749 #8 #4
#2
#1
D7750 to D7751 #9
D7752 to D7753 #10 #5
D7754 to D7755 #11
D7756 to D7757 #12 #6
#3 D7758 to D7759 #13
D7760 to D7761 #14 #7
D7762 to D7763 #15
Explanation:
In mode 10, D7732 and D7733 are distributed to the sending area by 0# station (layer 0). They can be written by
the PLC of 0# station and directly read by the other stations (1#--15#).
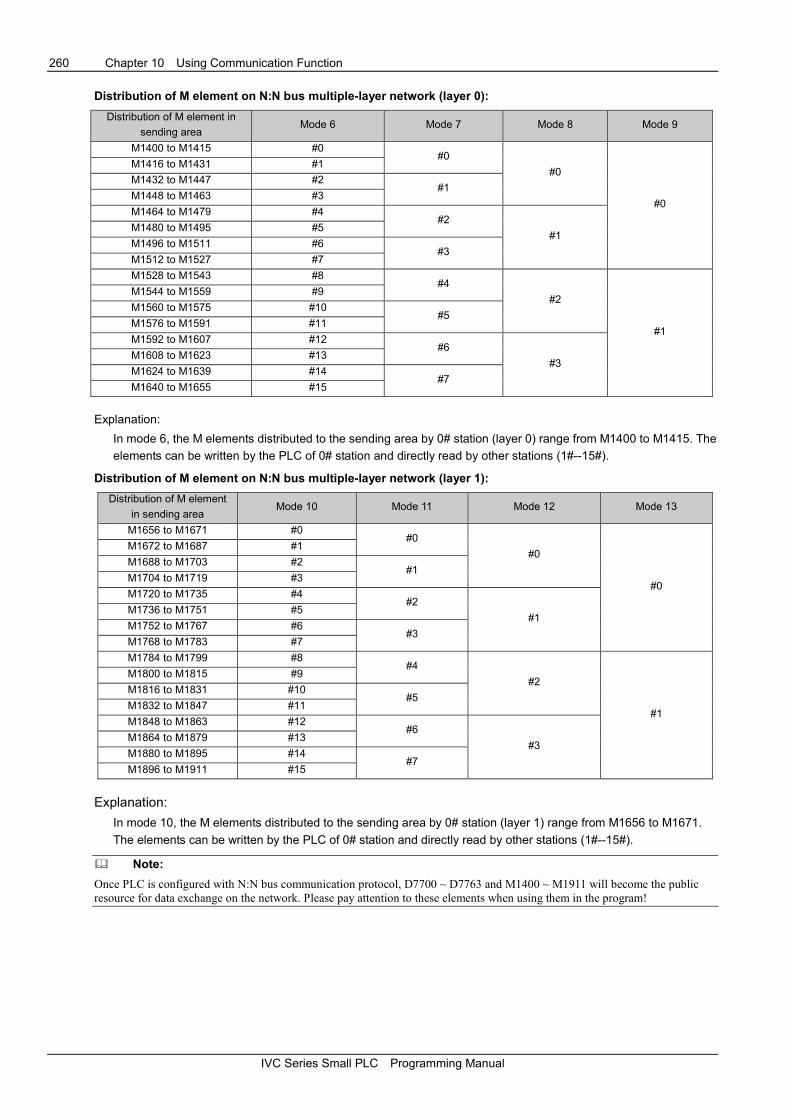
260 Chapter 10 Using Communication Function
IVC Series Small PLC Programming Manual
Distribution of M element on N:N bus multiple-layer network (layer 0):
Distribution of M element in
sending area Mode 6 Mode 7 Mode 8 Mode 9
M1400 to M1415 #0 #0
#0
#0
M1416 to M1431 #1
M1432 to M1447 #2 #1
M1448 to M1463 #3
M1464 to M1479 #4 #2
#1 M1480 to M1495 #5
M1496 to M1511 #6 #3
M1512 to M1527 #7
M1528 to M1543 #8 #4
#2
#1
M1544 to M1559 #9
M1560 to M1575 #10 #5
M1576 to M1591 #11
M1592 to M1607 #12 #6
#3 M1608 to M1623 #13
M1624 to M1639 #14 #7
M1640 to M1655 #15
Explanation:
In mode 6, the M elements distributed to the sending area by 0# station (layer 0) range from M1400 to M1415. The
elements can be written by the PLC of 0# station and directly read by other stations (1#--15#).
Distribution of M element on N:N bus multiple-layer network (layer 1):
Distribution of M element
in sending area Mode 10 Mode 11 Mode 12 Mode 13
M1656 to M1671 #0 #0
#0
#0
M1672 to M1687 #1
M1688 to M1703 #2 #1
M1704 to M1719 #3
M1720 to M1735 #4 #2
#1 M1736 to M1751 #5
M1752 to M1767 #6 #3
M1768 to M1783 #7
M1784 to M1799 #8 #4
#2
#1
M1800 to M1815 #9
M1816 to M1831 #10 #5
M1832 to M1847 #11
M1848 to M1863 #12 #6
#3 M1864 to M1879 #13
M1880 to M1895 #14 #7
M1896 to M1911 #15
Explanation:
In mode 10, the M elements distributed to the sending area by 0# station (layer 1) range from M1656 to M1671.
The elements can be written by the PLC of 0# station and directly read by other stations (1#--15#).
� Note:
Once PLC is configured with N:N bus communication protocol, D7700 ~ D7763 and M1400 ~ M1911 will become the public
resource for data exchange on the network. Please pay attention to these elements when using them in the program!

Chapter 10 Using Communication Function 261
IVC Series Small PLC Programming Manual
10.5.4 N:N bus Parameter Setting
Select Communication Port in the System block dialogue box, and select N:N bus protocol in the port 0 or port 1
setting area to enable the N:N bus setting button as follows:
OK Cancel Help
Click the N:N bus setting button to enter the N:N bus protocol setting dialogue box as shown below:
As shown in the preceding figure, the N:N bus parameters are set through the system block. The Station no. shall
begin with 0#. Several PLCs cannot share the same station number. 0# station is used for starting and setting the
whole network. The setting of Max number of sites, Additional delay time, Retry times and Mode can be realized
through 0# station. For the stations with other station numbers, except that the Baud rate and Parity check shall be
consistent with those of 0# station, they only need to set their own Station no., as shown in the following figure:
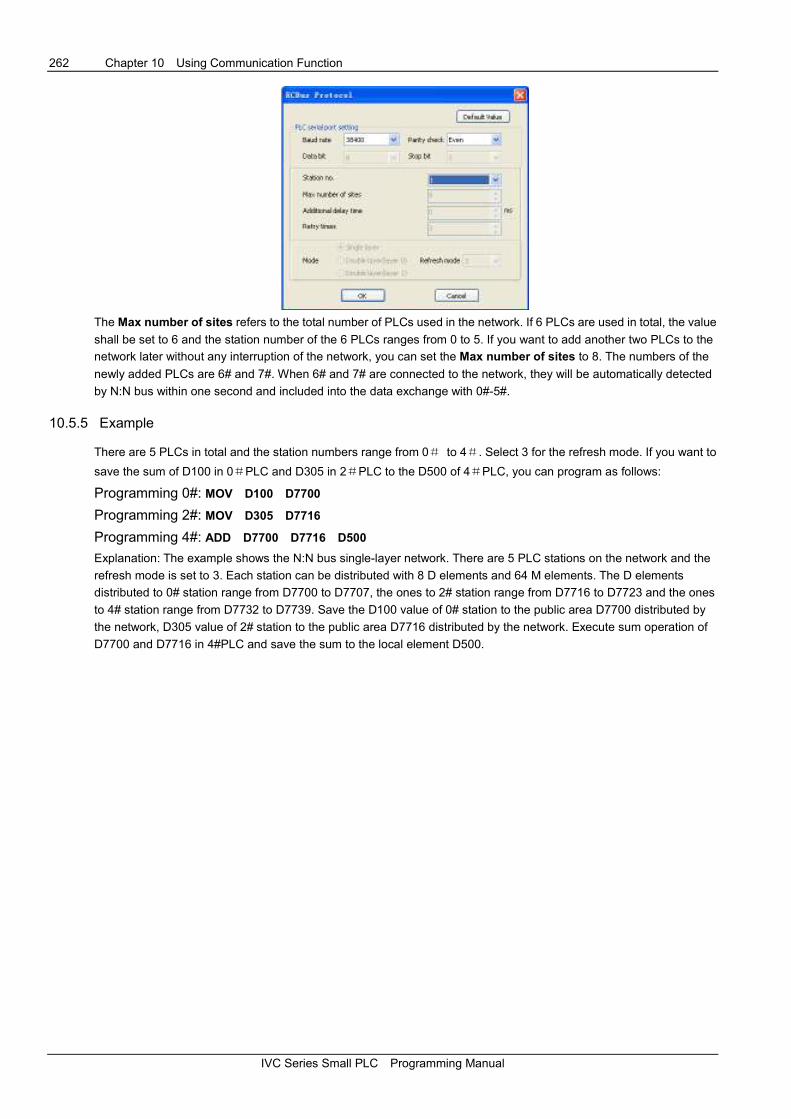
262 Chapter 10 Using Communication Function
IVC Series Small PLC Programming Manual
The Max number of sites refers to the total number of PLCs used in the network. If 6 PLCs are used in total, the value
shall be set to 6 and the station number of the 6 PLCs ranges from 0 to 5. If you want to add another two PLCs to the
network later without any interruption of the network, you can set the Max number of sites to 8. The numbers of the
newly added PLCs are 6# and 7#. When 6# and 7# are connected to the network, they will be automatically detected
by N:N bus within one second and included into the data exchange with 0#-5#.
10.5.5 Example
There are 5 PLCs in total and the station numbers range from 0# to 4#. Select 3 for the refresh mode. If you want to
save the sum of D100 in 0#PLC and D305 in 2#PLC to the D500 of 4#PLC, you can program as follows:
Programming 0#: MOV D100 D7700
Programming 2#: MOV D305 D7716
Programming 4#: ADD D7700 D7716 D500
Explanation: The example shows the N:N bus single-layer network. There are 5 PLC stations on the network and the
refresh mode is set to 3. Each station can be distributed with 8 D elements and 64 M elements. The D elements
distributed to 0# station range from D7700 to D7707, the ones to 2# station range from D7716 to D7723 and the ones
to 4# station range from D7732 to D7739. Save the D100 value of 0# station to the public area D7700 distributed by
the network, D305 value of 2# station to the public area D7716 distributed by the network. Execute sum operation of
D7700 and D7716 in 4#PLC and save the sum to the local element D500.

Appendix 1 Special Auxiliary Relay 263
IVC Series Small PLC Programming Manual
Appendix 1 Special Auxiliary Relay
All the special auxiliary relays are initialized when the PLC changes from STOP to RUN. Those that have been set in
system setting will be set to the preset value after that initialization.
� Note
The reserved SD and SM elements are not listed in the table. The reserved SM elements are by default read only (R).
1. PLC Work State Flag
Addr. Name Action and function R/W IVC2 IVC1
SM0 Monitoring run bit This bit is high in the RUN state, and low in the STOP state R √ √
SM1 Initial run pulse bit This bit is set high when PLC changes form STOP to RUN, and set low after a
scan cycle R √ √
SM2 Power on flag bit This bit is set high after system power-on, and set low after a scan cycle R √ √
SM3 System error This bit is set when system error occurs after power-on or after PLC changes from
STOP to RUN, or reset if no system error occurs R √ √
SM4 Battery voltage
low
This bit is set when the battery voltage is too low, or reset if the battery voltage is
detected higher than 2.4V R √
SM5 AC power failure
detection bit
This bit is set when PLC detects AC power off (detecting time 40ms). If the power
is on after the delay of power off detecting time (set in SD05), the bit will be reset R √ √
SM6 24Vdc power
failure
This bit is set when PLC detects the 24Vdc power failure (detecting time 50ms). If
within the following 50ms the power is detected to be back, this bit will be reset R √ √
SM7 No battery work
mode
If this bit is set as 1 (configurable only through system block), the Battery-backed
data lost error (code: 43) and the Forced-table lost error (code: 44) will not be
reported upon system battery failure
R √
SM8 Constant scan
mode
Set this bit, and the scan time will be constant (configurable only through system
block) R √ √
SM9 Input point startup
mode
Set this bit, and the PLC can change from STOP to ON when the designated X
input point is ON (configurable only through system block) R √ √
2. Clock Running Bit
Addr. Name Action and function R/W IVC2 IVC1
SM10 10ms clock Crystal oscillation (period: 10ms). Reverse every half period. The first half period is
0 when the user program starts R √ √
SM11 100ms clock Crystal oscillation (period: 100ms). Reverse every half period. The first half period
is 0 when the user program starts R √ √
SM12 1s clock Crystal oscillation (period: 1s). Reverse every half period. The first half period is 0
when the user program starts R √ √
SM13 1min clock Crystal oscillation (period: 1min). Reverse every half period. The first half period is 0
when the user program starts R √ √
SM14 1hour clock Crystal oscillation (period: 1 hour). Reverse every half period. The first half period is
0 when the user program starts R √ √
SM15 Scan cycle
oscillation bit
This bit reverses once every scan cycle (The first period is 0 when the user program
starts) R √ √
3. User Program Execution Error
Addr. Name Action and function R/W IVC2 IVC1
SM20 Instruction execution
error
This bit is set upon instruction execution error. Ths corresponding error type
code is written into SD20. This bit is cleared after the execution succeeds R √ √
SM21
Instruction register
number subscript
overflow
This bit is set upon instruction execution error. The corresponding error type
code is written into SD20 R √ √
SM22 Instruction parameter
illegal
This bit is set upon instruction execution error. The corresponding error type
code is written into SD20. This bit is cleared after the execution succeeds R √ √

264 Appendix 1 Special Auxiliary Relay
IVC Series Small PLC Programming Manual
4. Interrupt Control
Addr. Name Action and function R/W IVC2 IVC1
SM40 X0 input rising/falling edge interrupt enabling flag bit Enable when set as 1 R/W √ √
SM41 X1 input rising/falling edge interrupt enabling flag bit Enable when set as 1 R/W √ √
SM42 X2 input rising/falling edge interrupt enabling flag bit Enable when set as 1 R/W √ √
SM43 X3 input rising/falling edge interrupt enabling flag bit Enable when set as 1 R/W √ √
SM44 X4 input rising/falling edge interrupt enabling flag bit Enable when set as 1 R/W √ √
SM45 X5 input rising/falling edge interrupt enabling flag bit Enable when set as 1 R/W √ √
SM46 X6 input rising/falling edge interrupt enabling flag bit Enable when set as 1 R/W √ √
SM47 X7 input rising/falling edge interrupt enabling flag bit Enable when set as 1 R/W √ √
SM48 COM 0 character transmission interrupt enabling flag bit Enable when set as 1 R/W √
SM49 COM 0 character reception interrupt enabling flag bit Enable when set as 1 R/W √
SM50 COM 0 frame transmission interrupt enabling flag bit Enable when set as 1 R/W √
SM51 COM 0 frame reception interrupt enabling flag bit Enable when set as 1 R/W √
SM52 COM 1 character transmission interrupt enabling flag bit Enable when set as 1 R/W √
SM53 COM 1 character reception interrupt enabling flag bit Enable when set as 1 R/W √
SM54 COM 1 frame transmission interrupt enabling flag bit Enable when set as 1 R/W √
SM55 COM 1 frame reception interrupt enabling flag bit Enable when set as 1 R/W √
SM56 Power failure interrupt Enable when set as 1 R/W √
SM63 PTO (Y0) output finish interrupt enable flag bit Enable when set as 1 R/W √
SM64 PTO (Y1) output finish interrupt enable flag bit Enable when set as 1 R/W √
SM65 High speed counter interrupt enabling flag bit Enable when set as 1 R/W √ √
SM66 Timed interrupt 0 enabling flag bit Enable when set as 1 R/W √ √
SM67 Timed interrupt 1 enabling flag bit Enable when set as 1 R/W √ √
SM68 Timed interrupt 2 enabling flag bit Enable when set as 1 R/W √ √
5. High Speed Pulse Output Control
Addr. Name Function R/W IVC2 IVC1
SM80 Y0 high speed pulse output control Y0 high speed pulse output stop instruction R/W √ √
SM81 Y1 high speed pulse output control Y1 high speed pulse output stop instruction R/W √ √
SM82 Y0 high speed pulse output monitor Y0 high speed pulse output mointor (ON: busy. OFF: ready) R √ √
SM83 Y1 high speed pulse output monitor Y1 high speed pulse output mointor (ON: busy. OFF: ready) R √ √
SM85 Reset function valid Output of CLR signal for ZRN instruction enabled R/W √
6. Pulse Capture Monitoring Bit
Addr. Name Function R/W IVC2 IVC1
SM90 Input X0 pulse capture monitoring bit Capture rising edge pulse at input X0 R/W √ √
SM91 Input X1 pulse capture monitoring bit Capture rising edge pulse at input X1 R/W √ √
SM92 Input X2 pulse capture monitoring bit Capture rising edge pulse at input X2 R/W √ √
SM93 Input X3 pulse capture monitoring bit Capture rising edge pulse at input X3 R/W √ √
SM94 Input X4 pulse capture monitoring bit Capture rising edge pulse at input X4 R/W √ √
SM95 Input X5 pulse capture monitoring bit Capture rising edge pulse at input X5 R/W √ √
SM96 Input X6 pulse capture monitoring bit Capture rising edge pulse at input X6 R/W √ √
SM97 Input X7 pulse capture monitoring bit Capture rising edge pulse at input X7 R/W √ √
Note:
1. All the elements in this table are cleared when the PLC changes from STOP to RUN. The pulse capture will fail when the HSNT or
SPD instruction is being executed at the same input point. For details, see 6.10.8 SPD: Pulse Detection Instruction and 6.10.1
HCNT: High-speed Counter Drive Instruction.
2. For hardware counters, the total pulse frequency input through X0 ~ X7 (using pulse capture, SPD instruction or HCNT
instructions, but not high speed compare instructions) is ≤80k. For software counters, that frequency (using instructions DHSCS,
DHSCI, DHSZ, DHSP or DHST for driven high speed counters) is ≤30k.
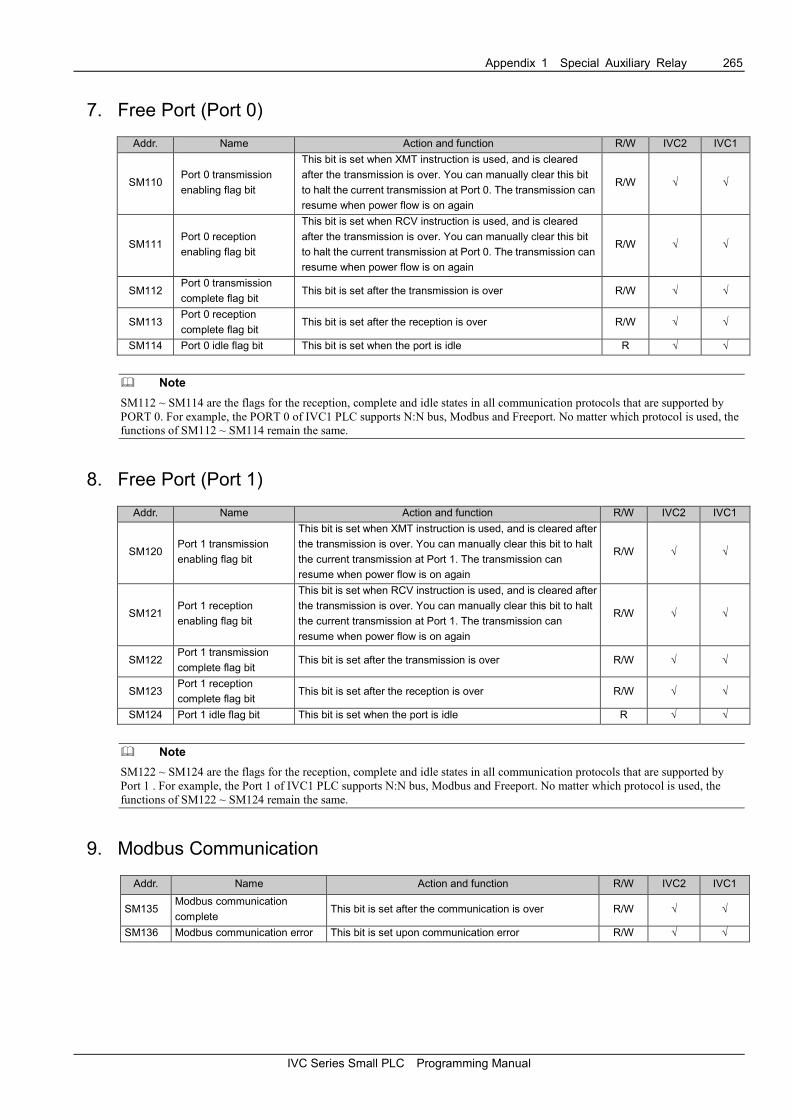
Appendix 1 Special Auxiliary Relay 265
IVC Series Small PLC Programming Manual
7. Free Port (Port 0)
Addr. Name Action and function R/W IVC2 IVC1
SM110 Port 0 transmission
enabling flag bit
This bit is set when XMT instruction is used, and is cleared
after the transmission is over. You can manually clear this bit
to halt the current transmission at Port 0. The transmission can
resume when power flow is on again
R/W √ √
SM111 Port 0 reception
enabling flag bit
This bit is set when RCV instruction is used, and is cleared
after the transmission is over. You can manually clear this bit
to halt the current transmission at Port 0. The transmission can
resume when power flow is on again
R/W √ √
SM112 Port 0 transmission
complete flag bit This bit is set after the transmission is over R/W √ √
SM113 Port 0 reception
complete flag bit This bit is set after the reception is over R/W √ √
SM114 Port 0 idle flag bit This bit is set when the port is idle R √ √
� Note
SM112 ~ SM114 are the flags for the reception, complete and idle states in all communication protocols that are supported by
PORT 0. For example, the PORT 0 of IVC1 PLC supports N:N bus, Modbus and Freeport. No matter which protocol is used, the
functions of SM112 ~ SM114 remain the same.
8. Free Port (Port 1)
Addr. Name Action and function R/W IVC2 IVC1
SM120 Port 1 transmission
enabling flag bit
This bit is set when XMT instruction is used, and is cleared after
the transmission is over. You can manually clear this bit to halt
the current transmission at Port 1. The transmission can
resume when power flow is on again
R/W √ √
SM121 Port 1 reception
enabling flag bit
This bit is set when RCV instruction is used, and is cleared after
the transmission is over. You can manually clear this bit to halt
the current transmission at Port 1. The transmission can
resume when power flow is on again
R/W √ √
SM122 Port 1 transmission
complete flag bit This bit is set after the transmission is over R/W √ √
SM123 Port 1 reception
complete flag bit This bit is set after the reception is over R/W √ √
SM124 Port 1 idle flag bit This bit is set when the port is idle R √ √
� Note
SM122 ~ SM124 are the flags for the reception, complete and idle states in all communication protocols that are supported by
Port 1 . For example, the Port 1 of IVC1 PLC supports N:N bus, Modbus and Freeport. No matter which protocol is used, the
functions of SM122 ~ SM124 remain the same.
9. Modbus Communication
Addr. Name Action and function R/W IVC2 IVC1
SM135 Modbus communication
complete This bit is set after the communication is over R/W √ √
SM136 Modbus communication error This bit is set upon communication error R/W √ √
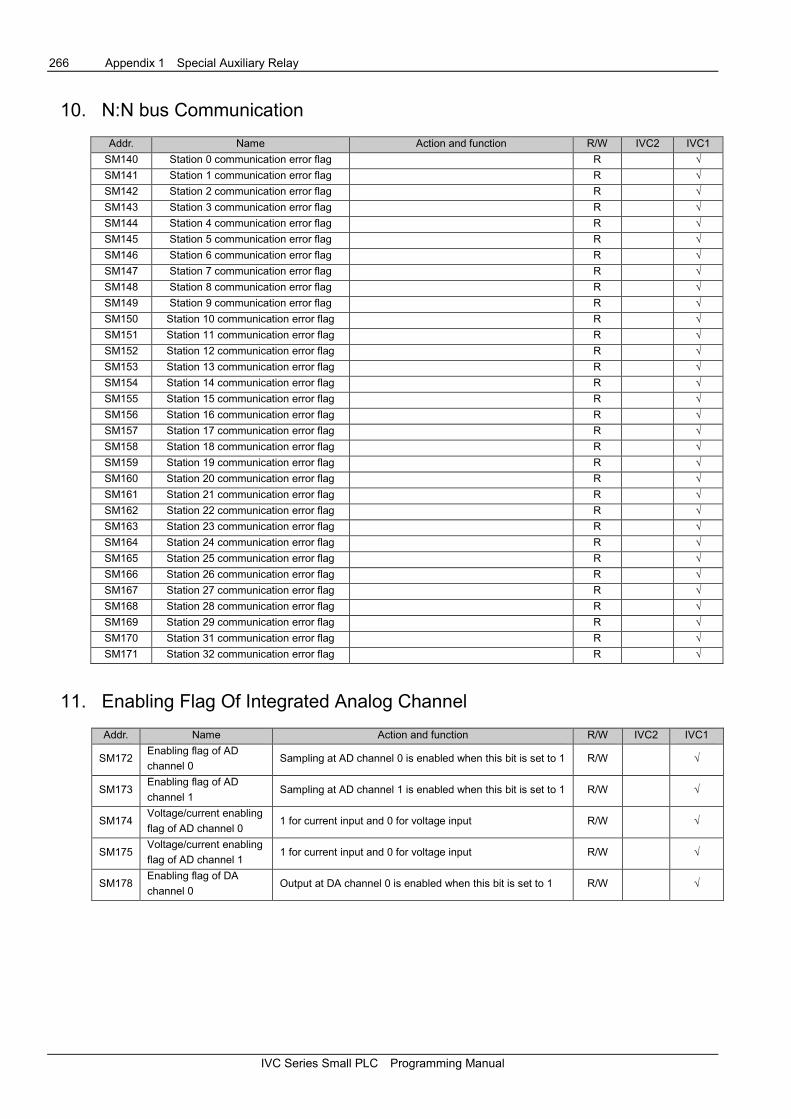
266 Appendix 1 Special Auxiliary Relay
IVC Series Small PLC Programming Manual
10. N:N bus Communication
Addr. Name Action and function R/W IVC2 IVC1
SM140 Station 0 communication error flag R √ SM141 Station 1 communication error flag R √
SM142 Station 2 communication error flag R √
SM143 Station 3 communication error flag R √
SM144 Station 4 communication error flag R √
SM145 Station 5 communication error flag R √
SM146 Station 6 communication error flag R √
SM147 Station 7 communication error flag R √
SM148 Station 8 communication error flag R √
SM149 Station 9 communication error flag R √
SM150 Station 10 communication error flag R √
SM151 Station 11 communication error flag R √
SM152 Station 12 communication error flag R √
SM153 Station 13 communication error flag R √
SM154 Station 14 communication error flag R √
SM155 Station 15 communication error flag R √
SM156 Station 16 communication error flag R √
SM157 Station 17 communication error flag R √
SM158 Station 18 communication error flag R √
SM159 Station 19 communication error flag R √
SM160 Station 20 communication error flag R √
SM161 Station 21 communication error flag R √
SM162 Station 22 communication error flag R √
SM163 Station 23 communication error flag R √
SM164 Station 24 communication error flag R √
SM165 Station 25 communication error flag R √
SM166 Station 26 communication error flag R √
SM167 Station 27 communication error flag R √
SM168 Station 28 communication error flag R √
SM169 Station 29 communication error flag R √
SM170 Station 31 communication error flag R √
SM171 Station 32 communication error flag R √
11. Enabling Flag Of Integrated Analog Channel
Addr. Name Action and function R/W IVC2 IVC1
SM172 Enabling flag of AD
channel 0 Sampling at AD channel 0 is enabled when this bit is set to 1 R/W √
SM173 Enabling flag of AD
channel 1 Sampling at AD channel 1 is enabled when this bit is set to 1 R/W √
SM174 Voltage/current enabling
flag of AD channel 0 1 for current input and 0 for voltage input R/W √
SM175 Voltage/current enabling
flag of AD channel 1 1 for current input and 0 for voltage input R/W √
SM178 Enabling flag of DA
channel 0 Output at DA channel 0 is enabled when this bit is set to 1 R/W √

Appendix 1 Special Auxiliary Relay 267
IVC Series Small PLC Programming Manual
12. Operation Flag Bit
Addr. Name Action and function R/W IVC2 IVC1
SM180 Zero flag bit This bit is set when the related calculation result is zero. You
can clear or set this bit manually R/W √ √
SM181 Carry/overflow flag bit This bit is set when the result of the related calculation is a
carry. You can clear or set this bit manually R/W √ √
SM182 borrow flag bit This bit is set when the result of the related calculation is a
borrow. You can clear or set this bit manually R/W √ √
SM185 Table comparison flag This bit is set when the whole table is completed R/W √ √
13. ASCII Code Conversion Instruction Flag
Addr. Name Action and function R/W IVC2 IVC1
SM186 ASC instruction
storing mode flag
0: the most and least significant bytes of every word are stored with one
ASCII code
1: the least significant byte of every word is stored with one ASCII code
R/W √
14. System Bus Error Flag
Addr. Name Action and function R/W IVC2 IVC1
SM190 Basic module
bus error flag bit
The bit, when set 1, would stop the system. You can reset this bit by:
1. Powering-on the PLC again
2. Changing PLC status from STOP to RUN
3. Downloading a new program
R √ √
SM191 General module
bus error flag bit
1. This bit is set and the system raises an alarm when a general
module bus operation error occurs
2. This bit is reset automatically when the system error is removed
R √ √
SM192 Special module
bus error flag bit
1. This bit is set and the system raises an alarm when a special
module bus operation error occurs
2. This bit is reset automatically when the system error is removed
R √ √
15. Real-Time Clock Error Flag
Addr. Name Action and function R/W IVC2 IVC1
SM193 R/W of real time clock error
This bit is set upon real-time clock error
This bit is automatically cleared if system fault is
removed
R √ √
16. EEPROM Flag
Addr. Name Action and function R/W IVC2 IVC1
SM196 EEPROM write OK flag This bit is set when EEPROM is not being written R √
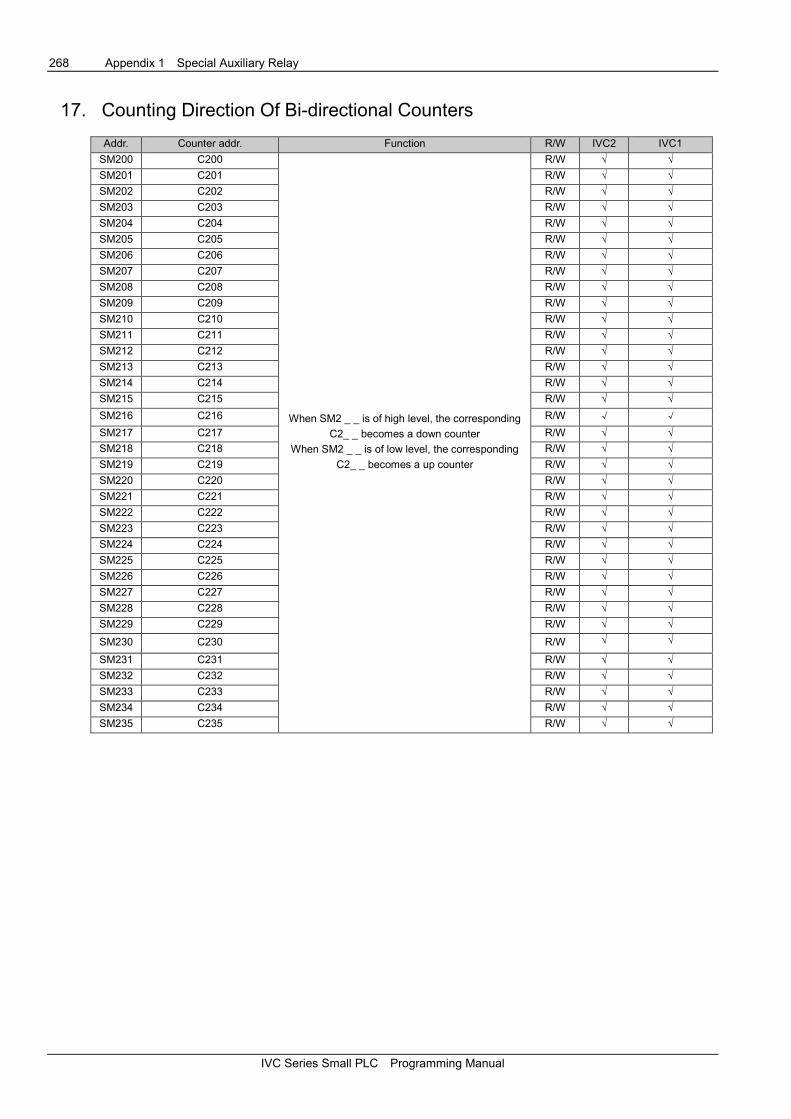
268 Appendix 1 Special Auxiliary Relay
IVC Series Small PLC Programming Manual
17. Counting Direction Of Bi-directional Counters
Addr. Counter addr. Function R/W IVC2 IVC1
SM200 C200
When SM2 _ _ is of high level, the corresponding
C2_ _ becomes a down counter
When SM2 _ _ is of low level, the corresponding
C2_ _ becomes a up counter
R/W √ √
SM201 C201 R/W √ √
SM202 C202 R/W √ √
SM203 C203 R/W √ √
SM204 C204 R/W √ √
SM205 C205 R/W √ √
SM206 C206 R/W √ √
SM207 C207 R/W √ √
SM208 C208 R/W √ √
SM209 C209 R/W √ √
SM210 C210 R/W √ √
SM211 C211 R/W √ √
SM212 C212 R/W √ √
SM213 C213 R/W √ √
SM214 C214 R/W √ √
SM215 C215 R/W √ √
SM216 C216 R/W √ √
SM217 C217 R/W √ √
SM218 C218 R/W √ √
SM219 C219 R/W √ √
SM220 C220 R/W √ √
SM221 C221 R/W √ √
SM222 C222 R/W √ √
SM223 C223 R/W √ √
SM224 C224 R/W √ √
SM225 C225 R/W √ √
SM226 C226 R/W √ √
SM227 C227 R/W √ √
SM228 C228 R/W √ √
SM229 C229 R/W √ √
SM230 C230 R/W √ √
SM231 C231 R/W √ √
SM232 C232 R/W √ √
SM233 C233 R/W √ √
SM234 C234 R/W √ √
SM235 C235 R/W √ √

Appendix 1 Special Auxiliary Relay 269
IVC Series Small PLC Programming Manual
18. Counting Direction And Monitoring Of High Speed Counter
Type Addr. Name Register content R/W IVC2 IVC1
Single
phase
single
point
counting
input
SM236 C236
The high & low level of SM2 _ _ corresponds to the
counting down & up of the counter respectively
R/W √ √
SM237 C237 R/W √ √
SM238 C238 R/W √ √
SM239 C239 R/W √ √
SM240 C240 R/W √ √
SM241 C241 R/W √ √
SM242 C242 R/W √ √
SM243 C243 R/W √ √
SM244 C244 R/W √ √
Single
phase
bidirect-
ional
counting
input
SM245 C245
When the single phase bi-directional counter and
2-phase counter C2 _ _ is in the down counting
mode, the corresponding SM2 _ _ becomes high
level; when in up counting mode, the corresponding
SM2 _ _ becomes low level
R/W √ √
SM246 C246 R/W √ √
SM247 C247 R/W √ √
SM248 C248 R/W √ √
SM249 C249 R/W √ √
AB
phase
counting
input
SM250 C250 R/W √ √
SM251 C251 R/W √ √
SM252 C252 R/W √ √
SM253 C253 R/W √ √
SM254 C254 R/W √ √
SM255 C255 R/W √ √
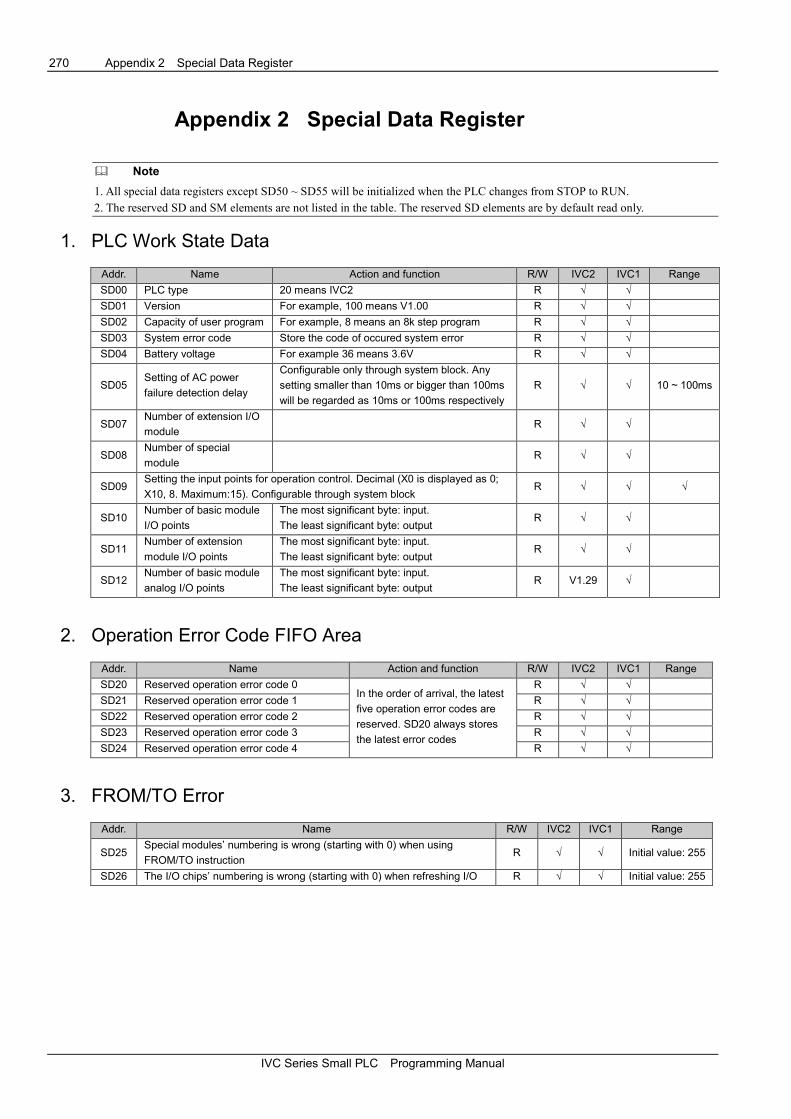
270 Appendix 2 Special Data Register
IVC Series Small PLC Programming Manual
Appendix 2 Special Data Register
� Note
1. All special data registers except SD50 ~ SD55 will be initialized when the PLC changes from STOP to RUN.
2. The reserved SD and SM elements are not listed in the table. The reserved SD elements are by default read only.
1. PLC Work State Data
Addr. Name Action and function R/W IVC2 IVC1 Range
SD00 PLC type 20 means IVC2 R √ √
SD01 Version For example, 100 means V1.00 R √ √
SD02 Capacity of user program For example, 8 means an 8k step program R √ √
SD03 System error code Store the code of occured system error R √ √
SD04 Battery voltage For example 36 means 3.6V R √ √
SD05 Setting of AC power
failure detection delay
Configurable only through system block. Any
setting smaller than 10ms or bigger than 100ms
will be regarded as 10ms or 100ms respectively
R √ √ 10 ~ 100ms
SD07 Number of extension I/O
module R √ √
SD08 Number of special
module R √ √
SD09 Setting the input points for operation control. Decimal (X0 is displayed as 0;
X10, 8. Maximum:15). Configurable through system block R √ √ √
SD10 Number of basic module
I/O points
The most significant byte: input.
The least significant byte: output R √ √
SD11 Number of extension
module I/O points
The most significant byte: input.
The least significant byte: output R √ √
SD12 Number of basic module
analog I/O points
The most significant byte: input.
The least significant byte: output R V1.29 √
2. Operation Error Code FIFO Area
Addr. Name Action and function R/W IVC2 IVC1 Range
SD20 Reserved operation error code 0 In the order of arrival, the latest
five operation error codes are
reserved. SD20 always stores
the latest error codes
R √ √
SD21 Reserved operation error code 1 R √ √
SD22 Reserved operation error code 2 R √ √
SD23 Reserved operation error code 3 R √ √
SD24 Reserved operation error code 4 R √ √
3. FROM/TO Error
Addr. Name R/W IVC2 IVC1 Range
SD25 Special modules’ numbering is wrong (starting with 0) when using
FROM/TO instruction R √ √ Initial value: 255
SD26 The I/O chips’ numbering is wrong (starting with 0) when refreshing I/O R √ √ Initial value: 255

Appendix 2 Special Data Register 271
IVC Series Small PLC Programming Manual
4. Scan Time
Addr. Name Action and function R/W IVC2 IVC1 Range
SD30 Current scan value Current scan time (unit: ms) R √ √
SD31 Min. scan time Min. scan time (uint: ms) R √ √
SD32 Max. scan time Max. scan time (unit: ms) R √ √
SD33 Constant scan time
Default: 0ms. Unit: 1ms. When the constant scan time
is longer than the user monitoring overtime setting,
user program overtime alarm will be raised. When a
scan cycle of user program is longer than the constant
scan time, the cycle constant scan mode is invalid
automatically and no alarm will be raised.
SD33 is regarded as 1000ms when it is set bigger than
1000ms (configurable only through the system block)
R √ √ 0 ~
1000ms
SD34 User program
overtime
Default: 100ms. Unit: 1ms. Any setting smaller than
100 or bigger than 1000 will be regarded as 100 or
1000 respectively. Configurable only through system
block
R √ √ 100 ~
1000ms
� Note
1. The error tolerance of SD30, SD31 and SD32 is 1ms.
2. It is recommended to set the user program overtime (SD34) at least 5ms bigger than the constant scan time (SD33). Otherwise,
due to the influence of system operation and user program, the system is apt to report user program overtime error.
5. Input Filtering Constant Setting
Addr. Name Action and function R/W IVC2 IVC1 Range
SD35 Input filtering constant Configurable only through system block R √ √ 0 ~ 60
6. High-speed Pulse Output Monitoring
5. SD50:.
SD54: the MSB of the total output pulse number at Y0 and Y1 for PLSY and PLSR instructions.
SD55: the LSB of the total output pulse number at Y0 and Y1 for PLSY and PLSR instructions.
Addr. Name R/W IVC2 IVC1 Range
SD50 Output pulse number at Y0 for PLSY and PLSR instructions (MSB) R/W √ √
SD51 Output pulse number at Y0 for PLSY and PLSR instructions (LSB) R/W √ √
SD52 Output pulse number at Y1 for PLSY and PLSR instructions (MSB) R/W √ √
SD53 Output pulse number at Y1 for PLSY and PLSR instructions (LSB) R/W √ √
SD54 Total output pulse number at Y0 and Y1 for PLSY and PLSR instructions (MSB) R/W √ √
SD55 Total output pulse number at Y0 and Y1 for PLSY and PLSR instructions (LSB) R/W √ √
SD56 Current section of the PLS instruction that outputs Y0 R √
SD57 Current section of the PLS instruction that outputs Y1 R √
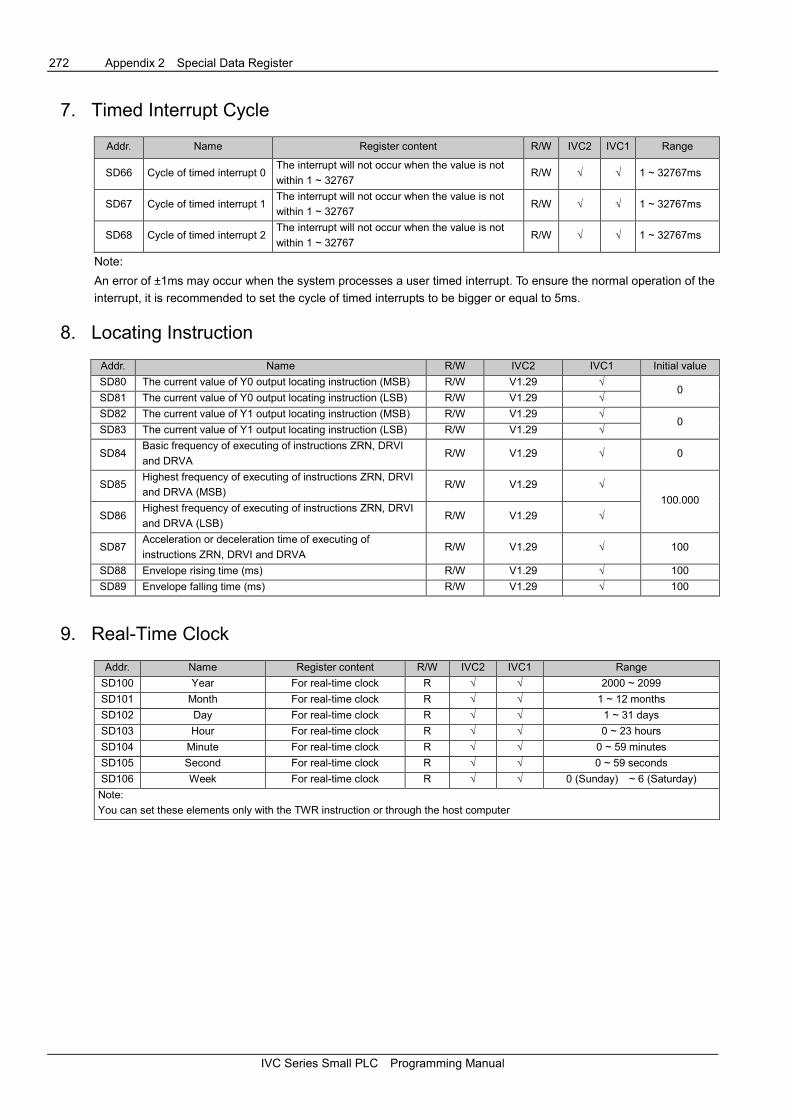
272 Appendix 2 Special Data Register
IVC Series Small PLC Programming Manual
7. Timed Interrupt Cycle
Addr. Name Register content R/W IVC2 IVC1 Range
SD66 Cycle of timed interrupt 0 The interrupt will not occur when the value is not
within 1 ~ 32767 R/W √ √ 1 ~ 32767ms
SD67 Cycle of timed interrupt 1 The interrupt will not occur when the value is not
within 1 ~ 32767 R/W √ √ 1 ~ 32767ms
SD68 Cycle of timed interrupt 2 The interrupt will not occur when the value is not
within 1 ~ 32767 R/W √ √ 1 ~ 32767ms
Note:
An error of ±1ms may occur when the system processes a user timed interrupt. To ensure the normal operation of the
interrupt, it is recommended to set the cycle of timed interrupts to be bigger or equal to 5ms.
8. Locating Instruction
Addr. Name R/W IVC2 IVC1 Initial value
SD80 The current value of Y0 output locating instruction (MSB) R/W V1.29 √ 0
SD81 The current value of Y0 output locating instruction (LSB) R/W V1.29 √
SD82 The current value of Y1 output locating instruction (MSB) R/W V1.29 √ 0
SD83 The current value of Y1 output locating instruction (LSB) R/W V1.29 √
SD84 Basic frequency of executing of instructions ZRN, DRVI
and DRVA R/W V1.29 √ 0
SD85 Highest frequency of executing of instructions ZRN, DRVI
and DRVA (MSB) R/W V1.29 √
100.000
SD86 Highest frequency of executing of instructions ZRN, DRVI
and DRVA (LSB) R/W V1.29 √
SD87 Acceleration or deceleration time of executing of
instructions ZRN, DRVI and DRVA R/W V1.29 √ 100
SD88 Envelope rising time (ms) R/W V1.29 √ 100
SD89 Envelope falling time (ms) R/W V1.29 √ 100
9. Real-Time Clock
Addr. Name Register content R/W IVC2 IVC1 Range
SD100 Year For real-time clock R √ √ 2000 ~ 2099
SD101 Month For real-time clock R √ √ 1 ~ 12 months
SD102 Day For real-time clock R √ √ 1 ~ 31 days
SD103 Hour For real-time clock R √ √ 0 ~ 23 hours
SD104 Minute For real-time clock R √ √ 0 ~ 59 minutes
SD105 Second For real-time clock R √ √ 0 ~ 59 seconds
SD106 Week For real-time clock R √ √ 0 (Sunday) ~ 6 (Saturday)
Note:
You can set these elements only with the TWR instruction or through the host computer
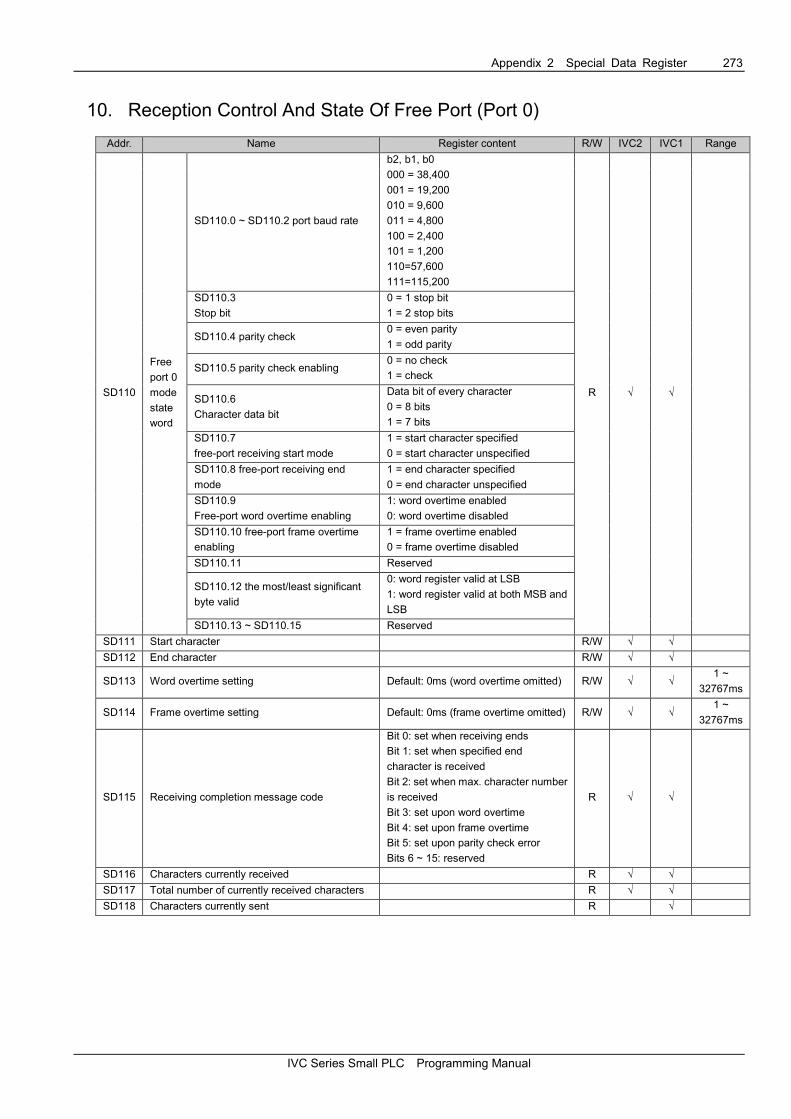
Appendix 2 Special Data Register 273
IVC Series Small PLC Programming Manual
10. Reception Control And State Of Free Port (Port 0)
Addr. Name Register content R/W IVC2 IVC1 Range
SD110
Free
port 0
mode
state
word
SD110.0 ~ SD110.2 port baud rate
b2, b1, b0
000 = 38,400
001 = 19,200
010 = 9,600
011 = 4,800
100 = 2,400
101 = 1,200
110=57,600
111=115,200
R √ √
SD110.3
Stop bit
0 = 1 stop bit
1 = 2 stop bits
SD110.4 parity check 0 = even parity
1 = odd parity
SD110.5 parity check enabling 0 = no check
1 = check
SD110.6
Character data bit
Data bit of every character
0 = 8 bits
1 = 7 bits
SD110.7
free-port receiving start mode
1 = start character specified
0 = start character unspecified
SD110.8 free-port receiving end
mode
1 = end character specified
0 = end character unspecified
SD110.9
Free-port word overtime enabling
1: word overtime enabled
0: word overtime disabled
SD110.10 free-port frame overtime
enabling
1 = frame overtime enabled
0 = frame overtime disabled
SD110.11 Reserved
SD110.12 the most/least significant
byte valid
0: word register valid at LSB
1: word register valid at both MSB and
LSB
SD110.13 ~ SD110.15 Reserved
SD111 Start character R/W √ √
SD112 End character R/W √ √
SD113 Word overtime setting Default: 0ms (word overtime omitted) R/W √ √ 1 ~
32767ms
SD114 Frame overtime setting Default: 0ms (frame overtime omitted) R/W √ √ 1 ~
32767ms
SD115 Receiving completion message code
Bit 0: set when receiving ends
Bit 1: set when specified end
character is received
Bit 2: set when max. character number
is received
Bit 3: set upon word overtime
Bit 4: set upon frame overtime
Bit 5: set upon parity check error
Bits 6 ~ 15: reserved
R √ √
SD116 Characters currently received R √ √
SD117 Total number of currently received characters R √ √
SD118 Characters currently sent R √

274 Appendix 2 Special Data Register
IVC Series Small PLC Programming Manual
11. Freeport Reception Control And State (Port 1)
Addr. Name Register content R/W IVC2 IVC1 Range
SD120
Free
port 1
mode
state
word
SD120.0 ~ SD120.2
Port baud rate
b2, b1, b0
000 = 38,400
001 = 19,200
010 = 9,600
011 = 4,800
100 = 2,400
101 = 1,200
110=57,600
111=115,200
R √ √
SD120.3 stop bit 0 = 1 stop bit
1 = 2 stop bits
SD120.4 parity check 0 = even parity
1 = odd parity
SD120.5 parity check
enabling
0 = disabled
1 = enabled
SD120.6 data bit of every
character
Data bit of every character
0: 8-bit character
1: 7-bit character
SD120.7 free-port
receiving start-character
mode
1: start-character specified
0: start-character unspecified
SD120.8 free-port
receiving end-character
mode
1: end-character specified
0: end-character unspecified
SD120.9 free port word
overtime enabling
1: word overtime enabled
0: word overtime disabled
SD120. 10 free port frame
overtime enabling
1: frame overtime enabled
0: frame overtime disabled
SD120.11 Reserved
SD120.12 the most/least
significant byte valid
0: word register valid at LSB
1: word register valid at both the
most and LSBs
SD120.13 ~ SD120.15 Reserved
SD121 Start character R/W √ √
SD122 End character R/W √ √
SD123 Word overtime setting Default: 0ms (word overtime
omitted) R/W √ √
0 ~
32767ms
SD124 Frame overtime setting Default: 0ms (frame overtime
omitted) R/W √ √
0 ~
32767ms
SD125 Receiving completion message code
Bit 0: set when receiving ends
Bit 1: set when specified end
character is received
Bit 2: set when max. character
number is received
Bit 3: set upon word overtime
Bit 4: set upon frame overtime
Bit 5: set upon parity check error
Bits 6 ~ 15: reserved
R √ √
SD126 Characters currently recived R √ √
SD127 Total number of currently received
characters R √ √
SD128 Characters currently sent R V1.29 √

Appendix 2 Special Data Register 275
IVC Series Small PLC Programming Manual
12. Modbus/N:N bus Setting
Addr. Name R/W IVC2 IVC1 Range
SD130 Local station No. (PORT 0) R/W √ √ MOD (1 ~ 32) ,
EMR (0 ~ 31)
SD131 Max. timeout time of PORT 0 (post-sending and
pre-receiving) / N:N bus extra delay R/W √
SD132 PORT 0 retry times R/W √
SD133 N:N bus network update mode (PORT 0) R/W √ 1 ~ 13
SD135 Local station No. (Port 1 ) R/W √ √ MOD (1 ~ 32),
EMR (0 ~ 31)
SD136 Max. timeout time of Port 1 (post-sending and pre-receiving)
/N:N bus extra delay R/W √ √
SD137 Port 1 retry times R/W √ √ 0 ~ 100
SD138 N:N bus network update mode (Port 1 ) R/W √ √ 1 ~ 13
SD139 Error code of Modbus master (Port 1 ) R √ √
13. Setting & Reading Of Integrated Analog Signal Channel
Addr. Name R/W IVC2 IVC1 Range
SD172 Average sample value of AD CH0 R √
SD173 Sampling times of AD CH0 R/W √ 0 ~ 1000
SD174 Average sample value of AD CH1 R √
SD175 Sampling times of AD CH1 R/W √ 0 ~ 1000
SD178 Output value of DA CH0 R/W √
14. Usage Of DHSP And DHST Instructions
Addr. Name R/W IVC2 IVC1 Range
SD180 MSB of DHSP table comparison output data R/W √ √
SD181 LSB of DHSP table comparison output data R/W √ √
SD182 MSB of DHST or DHSP table comparison data R/W √ √
SD183 LSB of DHST or DHSP table comparison data R/W √ √
SD184 Record No. of the table being executed R/W √ √
15. Error Flag
Addr. Name Action and function R/W IVC2 IVC1
SD191 No. of the module where bus
error occured
No. of the module where bus operation error
occurred R √
SD192 No. of the special module
where bus error occured
No. of the special module where bus
operation error occured R √
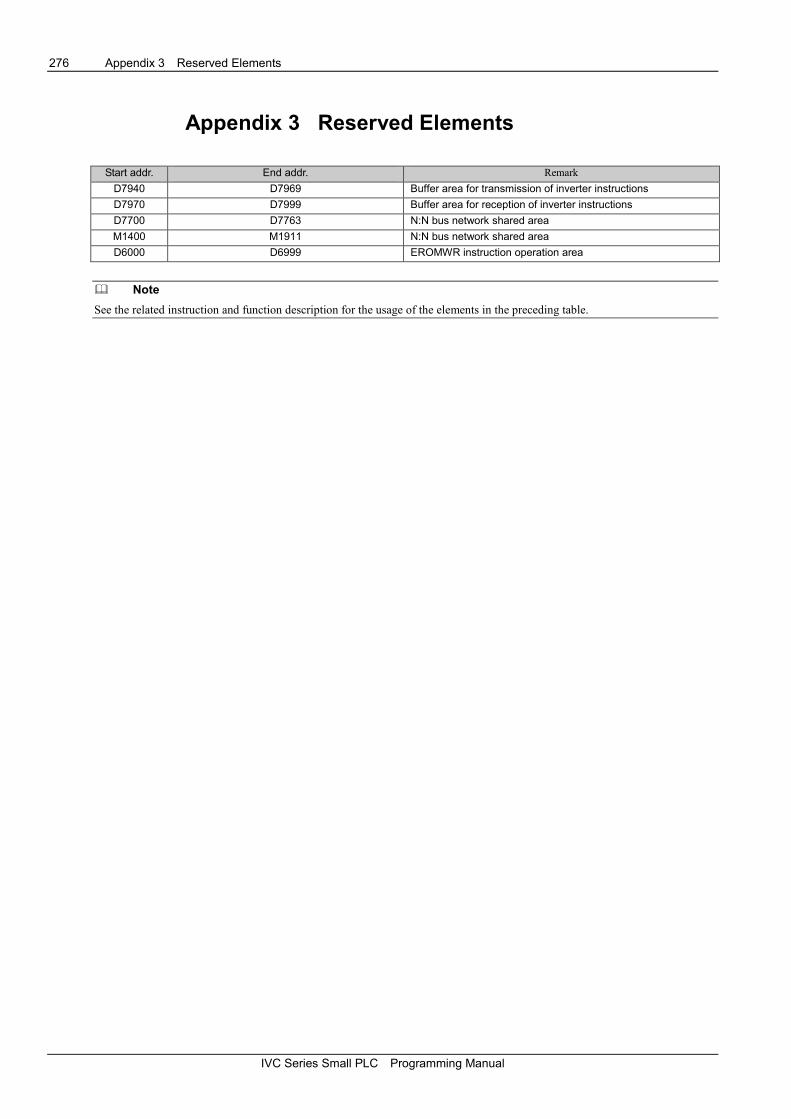
276 Appendix 3 Reserved Elements
IVC Series Small PLC Programming Manual
Appendix 3 Reserved Elements
Start addr. End addr. Remark
D7940 D7969 Buffer area for transmission of inverter instructions
D7970 D7999 Buffer area for reception of inverter instructions
D7700 D7763 N:N bus network shared area
M1400 M1911 N:N bus network shared area
D6000 D6999 EROMWR instruction operation area
� Note
See the related instruction and function description for the usage of the elements in the preceding table.
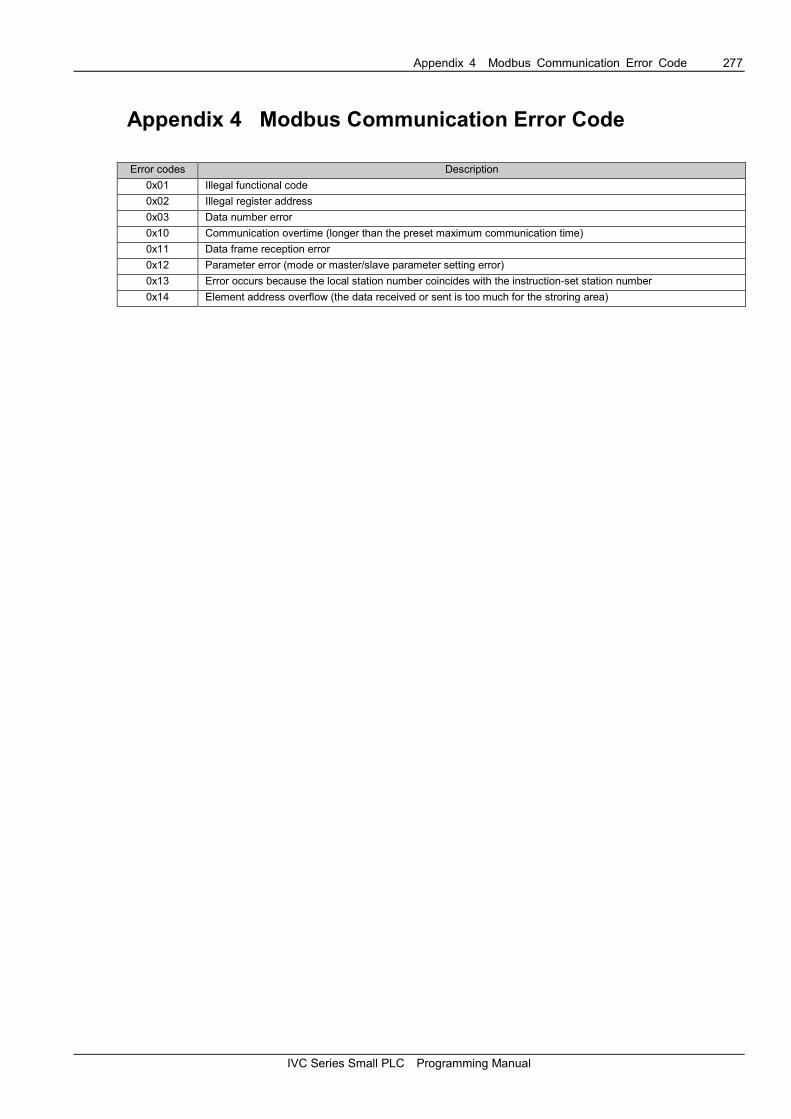
Appendix 4 Modbus Communication Error Code 277
IVC Series Small PLC Programming Manual
Appendix 4 Modbus Communication Error Code
Error codes Description
0x01 Illegal functional code
0x02 Illegal register address
0x03 Data number error
0x10 Communication overtime (longer than the preset maximum communication time)
0x11 Data frame reception error
0x12 Parameter error (mode or master/slave parameter setting error)
0x13 Error occurs because the local station number coincides with the instruction-set station number
0x14 Element address overflow (the data received or sent is too much for the stroring area)

278 Appendix 5 Inverter Instruction Error Code
IVC Series Small PLC Programming Manual
Appendix 5 Inverter Instruction Error Code
Error code Description
0x1 Illegal functional code
0x2 Illegal register address
0x3 Data error (data outside the range)
0x4 Slave operation failure (including the error due to invalid data, although the data is in the range)
0x5 Valid instruction. Processing. Mainly used to save data to EEPROM
0x6 Slave busy. Please try again later. Mainly used to save data to EEPROM
0x18 Information fram error, including information length error and parity check error
0x20 Parameter unchangeable
0x21 Parameter unchangeable during operation (applicable to only EV3100)
0x22 Password protected

Appendix 6 System Error Code 279
IVC Series Small PLC Programming Manual
Appendix 6 System Error Code
Error code Description Error type Description IVC1 IVC2
0 No error √ √
1 ~ 9 Reserved √ √
System hardware error
10 SRAM error System error
User program stops, and ERR indicator turns on.
To remove this fault, power off the PLC and
check the hardware
√
11 FLASH error System error
User program stops, and ERR indicator turns on.
To remove this fault, power off the PLC and
check the hardware
√
12 Communication port error System error
User program stops, and ERR indicator turns on.
To remove this fault, power off the PLC and
check the hardware
√
13 Real-time clock error System error
User program stops, and ERR indicator turns on.
To remove this fault, power off the PLC and
check the hardware
√
14 I2C error System error
User program stops, and ERR indicator turns on.
To remove this fault, power off the PLC and
check the hardware
√
External setting error (20 ~ 23)
20 Serious local I/O error System error
User program stops, and ERR indicator turns on.
To remove this fault, power off the PLC and
check the hardware
√
21 Serious extension I/O error System error ERR indicator blinks. This alarm is cleared
automatically upon the removal of the fault √
22 Serious special module error System error ERR indicator blinks. This alarm is cleared
automatically upon the removal of the fault √
23
Update error of real-time clock
(incorrect time is read during system
update)
System error ERR indicator blinks. This alarm is cleared
automatically upon the removal of the fault √
24 EEPROM write / read operation error System error ERR indicator blinks. This alarm is cleared
automatically upon the removal of the fault √
25 Local analog signal error System error ERR indicator blinks. This alarm is cleared
automatically upon the removal of the fault √
26 System special module configuration
error System error
ERR indicator blinks. This alarm is cleared
automatically upon the removal of the fault √
Storage error (40 ~ 45)
40 User program file error System error
User program stops, and ERR indicator turns on.
To remove this fault, download new program or
format the disk
√ √
41 System configuration file error System error
User program stops, and ERR indicator turns on.
To remove this fault, download new system
configuration files or format the disk
√ √
42 Data block file error System error
User program stops, and ERR indicator turns on.
To remove this fault, download new data block
file or format the disk
√ √
43 Battery-backed data lost System error
User program keeps running ERR indicator
blinks. To remove this fault, clear the register, or
format the disk, or reset
√ √
44 Forced-table lost System error
User program keeps running. ERR indicator
blinks. To remove this fault, clear the register, or
force, or format the disk, or reset
√ √
45 User information file error System error
User program keeps running ERR indicator is
off. To remove this fault, download new program
and data block files, or format the disk
√ √
46 ~ 59 Reserved

280 Appendix 6 System Error Code
IVC Series Small PLC Programming Manual
Error code Description Error type Description IVC1 IVC2
Instruction execution error (60~75)
60 User program compilation error Execution error User program stops, and ERR indicator turns on. √ √
61 User program operation overtime error Execution error User program stops, and ERR indicator turns on. √ √
62 illegal user program instruction execution
error Execution error User program stops, and ERR indicator turns on. √ √
63 Illegal element type of instruciton
operand Execution error User program stops, and ERR indicator turns on. √ √
64 Illegal instruction operand value Execution error
User program keeps running, ERR indicator
keeps off. The corresponding error code will be
prompted in SD20
√ √
65 Outside instruction element range Execution error √ √
66 Subprogram stack overflow Execution error √ √
67 User interrupt request queue overflow Execution error √ √
68 Illegal label jump or subprogram call Execution error √ √
69 Divided by 0 error Execution error √ √
70 Definition error of stack operated Execution error
When stack size, or stack elements are smaller
than zero, or stack element number exceeds the
limit of stack size
√ √
71 Reserved
√ √
72 Undefined user subprogram or interrupt
subprogram Execution error √ √
73 Using FROM/TO instruciton to access
module not existing Execution error √
74 I/O error when using FROM/TO
instruction Execution error √
75 I/O error when using REF instruction Execution error √ √
76 Cannot set real time clock time using
TWR Execution error √ √
77 Parameter 3 of PLSR instruction
inappropriate under constant scan Execution error √ √
78 BFM unit of accessed special module
exceeds range Execution error √
79 ABS Data Read Timeout Execution error √
80 ABS Data Read and Check Error Execution error √

Appendix 7 Modbus Communication Protocol (IVC Series) 281
IVC Series Small PLC Programming Manual
Appendix 7 Modbus Communication Protocol (IVC Series)
1. Modbus Communication Protocol Overview
IVC series small PLC has two communication ports: PORT 0 (also the programming port), which supports Modbus
slave station, and Port 1 , which supports Modbus master station and slave station (configurable through ConstrolStar).
Their features include:
1. Using RS485 or RS232 port, with RS-232 3-line system as the physical interface.
2. Supportive of RTU mode and ASCII mode, but not of the change of the ASCII ending character.
3. Being the Modbus slave station, the addresses range from 1 to 31.
4. Supportive of broadcast mode. The broadcast is effective for write and sub-function codes of diagnosis.
5. Suppoting baud rates including 38,400 bps, 19,200 bps, 9,600 bps, 4,800 bps, 2,400 bps and 1,200 bps.
(Default: 19200, 8 bits, 1 stop bit, even check)
6.Supportive of data field 2 × 252 bytes (ASII mode) or 252 bytes (RTU mode).
2. Supported Modbus Function Code and Element Addressing
The slave station supports function codes 01, 02, 03, 05, 06, 08, 15, 16 (decimal).
Pay attention to the following points during the reading:
Relationship between read-write element function code and the element
Function code Name of function code Modicon data address Type of operational element Remark
01 read coil status 0Note 1:xxxx Y, X, M, SM, S, T, C Bit read
02 read discrete input status 1 Note 2:xxxx X Bit read
03 read register status 4 Note 3:xxxx Note 4 D, SD, Z, T, C Word read
05 write single coil status 0:xxxx Y, M, SM, S, T, C Word write
06 write single register status 4:xxxx D, SD, Z, T, C Word write
15 write multiple coils status 0:xxxx Y, M, SM, S, T, C Bit write
16 write multiple registers status 4:xxxx D, SD, Z, T, C Word write
Note:
1. 0 means “coil”.
2. 1 means “discrete input”.
3. 4 means “register”.
4. xxxx means range “1 ~ 9999”. Each type has an independent logic address range of 1 to 9999 (protocol address starts from 0).
5. 0, 1 and 4 do not have the physical meaning and are not involved in actual addressing.
6. Users shall not write X element with function codes 05 and 15; otherwise, the system will not feed back the error information if the
written operand and data are correct, but the system will not perform any operation on the write instruction.
Relationship between PLC Element and Modbus Communication Protocol Address
Element Type Physical element Protocol
address
Supported
function code Notes
Y bit Y0 to Y377
(octal code) 256 points in total 0000 ~ 0255 01, 05, 15
output status, element
code: Y0 ~ Y7, Y10 ~ Y17
X bit X0 to X377
(octal code) 256 points in total
1200 ~ 01455
0000 ~ 0255
01, 05, 15
02
input status, it supports two
kinds of address, the
element code is same as
above
M bit M0 to M1999 2000 ~ 3999 01, 05, 15
SM bit SM0 to SM255 4400 ~4655 01, 05, 15
S bit S0 ~ S991 6000 ~ 6991 01, 05, 15
T bit T0 ~ T255 8000 ~ 8255 01, 05, 15 status of T element
C bit C0 ~ C255 9200 ~ 9455 01, 05, 15 status of C element
D word D0 ~ D7999 0000 ~ 7999 03, 06, 16
SD word SD0 ~ SD255 8000 ~ 8255 03, 06, 16
Z word Z0 ~ Z15 8500 ~ 8515 03, 06, 16

282 Appendix 7 Modbus Communication Protocol (IVC series)
IVC Series Small PLC Programming Manual
Element Type Physical element Protocol
address
Supported
function code Notes
T word T0 ~ T255 9000 ~ 9255 03, 06, 16 current value of T element
C word C0 ~ C199 9500 ~ 9699 03, 06, 16 current value of C element
(WORD)
C Double word C200 ~ C255 9700 ~ 9811 03, 16 current value of C element
(WORD)
Note:
The protocol address is the address used on data transfer and corresponds with the logic address of Modicon data. The protocol
address starts from 0 and the logic address of Modicon data begins with 1, that is, protocol address + 1 = logic address of Modicon
data. For example, if M0 protocol address is 2000, and its corresponding logic address of Modicon data will be 0:2001. In practice,
the read and write of M0 is completed through the protocol address, for example: read M0 element frame (sent from the master):
01 01 07 D0 00 01 FD 47
Station No.Function codeStarting address. The decimal value of 07D0 is 2000Number of elements to readCRC check code
Abnormal response description:
Abnormal code Definition
0x01 Illegal function code
0x02 Illegal register address
0x03 Illegal data
Note the following:
1. Elements X and Y use octal system. There are 256 points in total from X0 to X377, 256 points from Y0 to Y377, with
the combinations of Y0 ~ Y7, Y10 ~ Y17 and Y20 ~ Y27. etc.
2. Two addressing methods are available for Element X. One is the protocol address of 1200-1455 with corresponding
function codes of 01, 05 and 15; the other is the protocol address of 0-255 with function code 02.
3. Processing of double-word element: C element is a counter. It has status and current value. C200 ~ C255 are 32-bit
elements, but each C element in the range will get two protocol addresses during the protocol address compiling. For
example: The protocol address of C200 is 9700 ~ 9701. When reading the elements though Modbus, both the starting
protocol address and the number of the read elements shall be even number.
4. For most SM, SD elements, the real value cannot be written through Modbus, but PLC salve station will still return
“OK“ to indicate the completion of write operation, which is allowable.
5. In addition, the Modbus communication protocol of IVC2 supports the read and write of double word element, LONG
INT variable and floating point number. In the PLC of IVC2, 32-bit data are stored with high bits at high address. For
example, a 32-bit data is stored in two D elements (D3 and D4), with 16 high bits in D3 and 16 low bits in D4, as shown
in the following figure: (Refer to the description for the specific example)
32-bit data
D3
D4
High16-bit
Low16-bit Low
16-bit
High16-bit
3. Modbus Function Code Description
3.1 Read coil status (0x01)
Up to 256 bit-element can be read in IVC series PLC.
1. Request frame
Address Function code (01H) Initial address Number of elements Check code
(CRC or LRC) H L H L
2. Response frame
If the read address is not the times of 8, the remaining bits will be filled with 0 (starting with the high bits).

Appendix 7 Modbus Communication Protocol (IVC Series) 283
IVC Series Small PLC Programming Manual
AddressFunction code
(01H)
Number of bytes read
(n)Read data
No.1...... Read data
No.n
Check code
(CRC or LRC
B7 B6 B5 B4 B3 B2 B1 B0
3.2 Read discrete input status (0x02)
In the PLC of GCM series, it specially refers to X element. The function code only supports the read function of X
element with the maximum read number of 256.
1. Request frame
Address Function code (02H) starting address Number of elements Check code
(CRC or LRC) H L H L
2. Response frame
If the read address is not the times of 8, the remaining bits will be filled with 0 (starting with the high bits).
AddressFunction code
(02H)
Number of bytes read
(n)Read data
No.1...
Read dataNo.n
Check code
(CRC or LRC
B7 B6 B5 B4 B3 B2 B1 B0
3.3 Read Holding Registers (0x03)
It refers to reading the value of data (word) register at the slave station, with the maximum number of registers of 125
read each time. It does not support broadcast.
1. Request frame
Address Function Code (03H) Starting address Number of elements Check code
(CRC or LRC) H L H L
2. Response frame
Address Function code (03H) Number of bytes read (n) Read data No.1
... Read data No.n Check code
(CRC or LRC) H L H L
3.4 Force (Write) Single Coil (0x05)
Force (Write) single coil writes bit element value to the slave station and supports broadcast, i.e. writing the same
element to all slave stations. It supports 1 bit element at most.
1. Request frame
Address Function Code (05H) Starting address Written element value Check code
(CRC or LRC) H L H L
Note: The written value of the element is 0xFF00 (ON, 1) or 0x0000 (OFF, 0).
2. Response frame
Response frame is the repeat of request frame.
Address Function code (05H) Starting address Written element value Check code
(CRC or LRC) H L H L

284 Appendix 7 Modbus Communication Protocol (IVC series)
IVC Series Small PLC Programming Manual
3.5 Preset (write) Single Register (0x06)
Preset (Write) single register writes word element value to the slave station and supports broadcast, i.e. writing the
same element to all slave stations. It supports 1 bit element at most.
1. Request frame
Address Function code (06H) Starting address Written element value Check code
(CRC or LRC) H L H L
2. Response frame
Response frame is the repeat of Request frame.
Address Function code (06H) Starting address Written element value Check code
(CRC or LRC) H L H L
3.6 Return Diagnostic Check (0 x 08)
Diagnostic register and communication error information can be obtained through returning diagnostic check.
Diagnostic code Description
0x00 Return Request frame
0x 01 Restart Comm Option
0x 04 Listen Only Mode of Slave Station
0x0a Clear Ctrs and Diagnostic Reg
0x0b Return Bus Message Count
0x0c Return Bus CRC Error Count
0x0d Return Bus Exception Error Cnt
0x0e Return Slave Message Count
0x0f Return Slave No Response Cnt
0x12 Return Bus Char. Overrun Cnt
The frame description of sub-function code is as follows.
Return request frame (0x00):
1. Request frame
Address Function code (0x08H) Function word Any character Check code
(CRC or LRC) (0x00H) (0x00H) H L
2. Response frame
Return request frame intact.
Address Function code (0x08H) Function word Any character Check code
(CRC or LRC) (0x00H) (0x00H) H L
Restart communication option (0x01):
After receiving the frame, PLC will exit from Listen Only mode (Broadcast frame is supported).
1. Request frame
The normal Data field is 0x00 00 or 0xff 00.
Address Function code (0x08H) Function word Data field Check code
(CRC or LRC) 0x00H 0x01H H L
2. Response frame
Address Function code (0x08H) Function word Data field Check code
(CRC or LRC) 0x00H 0x01H H L
Listen only mode of slave station (0x04):
Slave station enters Listen Only mode. None of the instructions will be executed or responded. The slave station can
only recognize the restart communication option instruction and enters the online mode after receiving the instruction
(Broadcast frame is supported).

Appendix 7 Modbus Communication Protocol (IVC Series) 285
IVC Series Small PLC Programming Manual
1. Request frame
Address Function code (0x08H) Function word Data field Check code
(CRC or LRC) (0x00H) (0x04H) 0x00H 0x00H
2. Response frame
No return
Clear counter and diagnostic register (0x0A):
Clear all counters (Broadcast frame is supported).
1. Request frame
Address Function code (0x08H) Function word Data field Check code
(CRC or LRC) (0x00H) (0x0AH) 0x00H 0x00H
2. Response frame
Address Function
code (0x08H)
Function word Data field Check code
(CRC or LRC) (0x00H) (0x0AH) 0x00H 0x00H
Return bus message count (0x0B):
Record the total number of the messages to all master stations from the slave stations since the last starting, clearing
and power-on of counter, which excludes the message of CRC error.
1. Request frame
Address Function code (0x08H) Function word Data field Check code
(CRC or LRC) (0x00H) (0x0BH) 0x00H 0x00H
2. Response frame
Address Function code (0x08H) Function word Data field Check code
(CRC or LRC) (0x00H) (0x0BH) H L
CRC error count (0x0C):
Record the number of CRC errors received by slave station since the last starting, clearing and power-on of counter.
1. Request frame
Address Function code (0x08H) Function word Data field Check code
(CRC or LRC) (0x00H) (0x0CH) 0x00H 0x00H
2. Response frame
Address Function code (0x08H) Function word Data field Check code
(CRC or LRC) (0x00H) (0x0CH) H L
Return Slave Exception Error Count (0x0D):
Record the number of the exception error that detected by slave station since the last starting, clearing and power-on
of counter, which includes the error detected in the broadcast message.
1. Request frame
Address Function code (0x08H) Function word Data field Check code
(CRC or LRC) (0x00H) (0x0DH) 0x00H 0x00H
2. Response frame
Address Function code (0x08H) Function word Data field Check code
(CRC or LRC) (0x00H) (0x0DH) H L
Return Slave Message Count (0x0E)
Record the number of the addressing messages received by the slave station since the last starting, clearing and
power-on of counter.
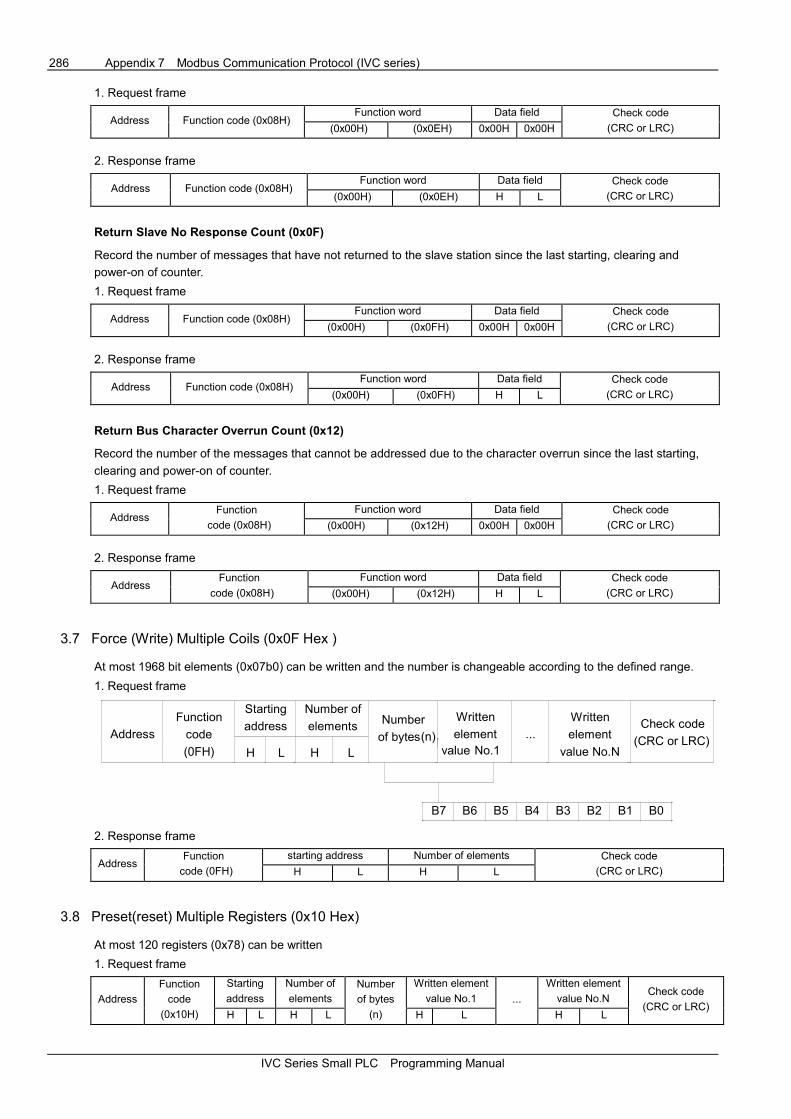
286 Appendix 7 Modbus Communication Protocol (IVC series)
IVC Series Small PLC Programming Manual
1. Request frame
Address Function code (0x08H) Function word Data field Check code
(CRC or LRC) (0x00H) (0x0EH) 0x00H 0x00H
2. Response frame
Address Function code (0x08H) Function word Data field Check code
(CRC or LRC) (0x00H) (0x0EH) H L
Return Slave No Response Count (0x0F)
Record the number of messages that have not returned to the slave station since the last starting, clearing and
power-on of counter.
1. Request frame
Address Function code (0x08H) Function word Data field Check code
(CRC or LRC) (0x00H) (0x0FH) 0x00H 0x00H
2. Response frame
Address Function code (0x08H) Function word Data field Check code
(CRC or LRC) (0x00H) (0x0FH) H L
Return Bus Character Overrun Count (0x12)
Record the number of the messages that cannot be addressed due to the character overrun since the last starting,
clearing and power-on of counter.
1. Request frame
Address Function
code (0x08H)
Function word Data field Check code
(CRC or LRC) (0x00H) (0x12H) 0x00H 0x00H
2. Response frame
Address Function
code (0x08H)
Function word Data field Check code
(CRC or LRC) (0x00H) (0x12H) H L
3.7 Force (Write) Multiple Coils (0x0F Hex )
At most 1968 bit elements (0x07b0) can be written and the number is changeable according to the defined range.
1. Request frame
Starting
address
Number of
elementsAddress
Function
code
(0FH) H L H L
Number
of bytes(n)
Written
elementvalue No.1
...
Written
element
value No.N
Check code
(CRC or LRC)
B7 B6 B5 B4 B3 B2 B1 B0
2. Response frame
Address Function
code (0FH)
starting address Number of elements Check code
(CRC or LRC) H L H L
3.8 Preset(reset) Multiple Registers (0x10 Hex)
At most 120 registers (0x78) can be written
1. Request frame
Address
Function
code
(0x10H)
Starting
address
Number of
elements Number
of bytes
(n)
Written element
value No.1 ...
Written element
value No.N Check code
(CRC or LRC) H L H L H L H L

Appendix 7 Modbus Communication Protocol (IVC Series) 287
IVC Series Small PLC Programming Manual
2. Response frame
Address Function code (0x10H)
Starting
address Number of elements Check code
(CRC or LRC) H L H L
3.9 Faulty Response Frame (0x80+function code)
Response Frame:
Address Function code Error code (see above) Check code
(CRC or LRC)
Function code refers to the function code of the captured request frame + 0x80
3.10 Points To Note
1. Refer to the address classification of elements, the elements read each time shall be of the same type. For example,
elements X and Y cannot be read in one frame.
2. The address and data range of the element shall be within the range specified by the protocol. For example:
For Y element, the protocol address range is 0000 ~ 0255 (Y0-Y377):
� If the read starting address is 1 and 256 elements are read, address error will be returned (error code 02),
because there are only 255 Y elements that start with 1.
� If the read starting address is 0 and 257 elements are read, data error will be returned (error code 03), because
the actual defined number of Y elements is only 256.
� If the read starting address is 0 and 256 elements are read, the status of 256 elements will be returned.
In other words, the read number of the elements must be within the actually defined range. It is true for read/write of
bit/word elements.
4. Example Of Modbus Communication Control
Rather than transmitting any message actively, the Modbus slave station only decides whether to respond to the
message from the master station based on the specific situation after receiving the message for the local station. The
slave station only supports Modbus function codes 01, 02, 03, 05, 06, 08, 15 and 16. The rest will be responded with
illegal function code (except broadcast frame).
Read and write of element:
Except function code 08, the other supported function codes can read and write element. In principle, one frame can
read up to 2000 bit elements 125 word elements, and write 1968 bit elements and 120 word elements at most.
However, the real protocol addresses are separate and discontinuous for different elements, therefore, when reading
or writing an element, the elements read at one time can only be the same type and the maximum number of the read
or written elements is related to the actually defined number of the elements. For example, when reading Y element
(Y0-Y377), the protocol address ranges from 0 to 255, the logic address of the corresponding Modicon data is 1-256
and the maximum number of elements can be read is 256. See the following examples:
Note: The address of the slave station is 01, the last two bytes are CRC check code and the second byte is function
code.
1. XMT from master station: 01 01 00 00 01 00 3D 9A
01 address; 01 function code; 00 00 starting address; 01 00 number of read elements; 3D 9A check
Slave station response: return correct response
2. XMT from master station: 01 01 00 00 01 01 FC 5A
The master station reads 01 01 elements (257), which is over the defined range of Y elements.
Slave station response: 01 81 03 00 51
The response of the slave station is illegal data, because 257>256, 256 is the allowed maximum number of Y
elements.
3. XMT from master station: 01 01 00 64 00 A0 7D AD
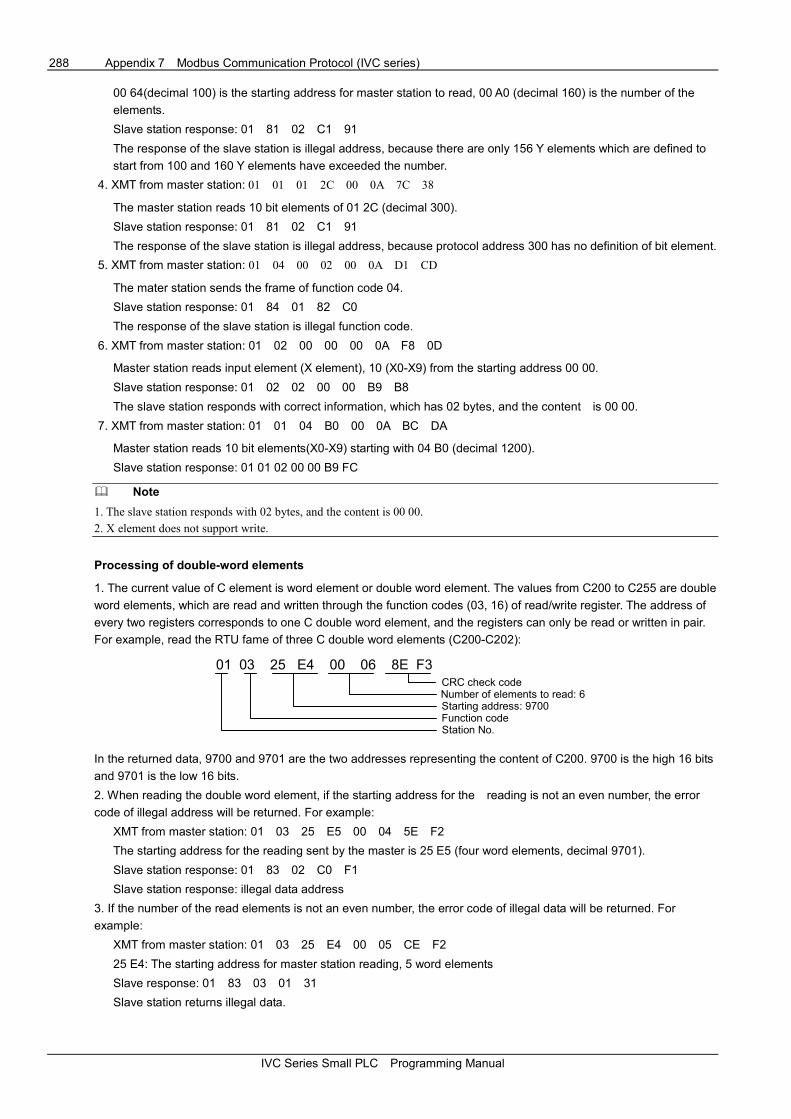
288 Appendix 7 Modbus Communication Protocol (IVC series)
IVC Series Small PLC Programming Manual
00 64(decimal 100) is the starting address for master station to read, 00 A0 (decimal 160) is the number of the
elements.
Slave station response: 01 81 02 C1 91
The response of the slave station is illegal address, because there are only 156 Y elements which are defined to
start from 100 and 160 Y elements have exceeded the number.
4. XMT from master station: 01 01 01 2C 00 0A 7C 38
The master station reads 10 bit elements of 01 2C (decimal 300).
Slave station response: 01 81 02 C1 91
The response of the slave station is illegal address, because protocol address 300 has no definition of bit element.
5. XMT from master station: 01 04 00 02 00 0A D1 CD
The mater station sends the frame of function code 04.
Slave station response: 01 84 01 82 C0
The response of the slave station is illegal function code.
6. XMT from master station: 01 02 00 00 00 0A F8 0D
Master station reads input element (X element), 10 (X0-X9) from the starting address 00 00.
Slave station response: 01 02 02 00 00 B9 B8
The slave station responds with correct information, which has 02 bytes, and the content is 00 00.
7. XMT from master station: 01 01 04 B0 00 0A BC DA
Master station reads 10 bit elements(X0-X9) starting with 04 B0 (decimal 1200).
Slave station response: 01 01 02 00 00 B9 FC
� Note
1. The slave station responds with 02 bytes, and the content is 00 00.
2. X element does not support write.
Processing of double-word elements
1. The current value of C element is word element or double word element. The values from C200 to C255 are double
word elements, which are read and written through the function codes (03, 16) of read/write register. The address of
every two registers corresponds to one C double word element, and the registers can only be read or written in pair.
For example, read the RTU fame of three C double word elements (C200-C202):
01 03 25 E4 00 06 8E F3
Station No.Function codeStarting address: 9700Number of elements to read: 6CRC check code
In the returned data, 9700 and 9701 are the two addresses representing the content of C200. 9700 is the high 16 bits
and 9701 is the low 16 bits.
2. When reading the double word element, if the starting address for the reading is not an even number, the error
code of illegal address will be returned. For example:
XMT from master station: 01 03 25 E5 00 04 5E F2
The starting address for the reading sent by the master is 25 E5 (four word elements, decimal 9701).
Slave station response: 01 83 02 C0 F1
Slave station response: illegal data address
3. If the number of the read elements is not an even number, the error code of illegal data will be returned. For
example:
XMT from master station: 01 03 25 E4 00 05 CE F2
25 E4: The starting address for master station reading, 5 word elements
Slave response: 01 83 03 01 31
Slave station returns illegal data.

Appendix 7 Modbus Communication Protocol (IVC Series) 289
IVC Series Small PLC Programming Manual
Processing of LONG INT data:
Based on the storage method of PLC in GCM, one LONG INT data can be saved in two D elements. For example:
Store one LONG INT data in D3 and D4, D3 is used for storing high 16 bits, D4 is used for storing low 16 bits in Invt
PLC. If master station reads LONG INT data through Modbus, the 32-bit data shall be regrouped based on the LONG
INT storage principle of INVT PLC after reading the data.
Storage principle of FLOAT is the same as the storage principle of LONG INT.
5. Description Of Broadcast
The slave station supports broadcast but not all the function codes. The slave station supports function codes 01, 02,
03, 05, 06, 08, 15 and 16 (decimal). Wherein, 01, 02 and 03 can read element but do not support broadcast, no
response will be gotten after sending out the broadcast; 05, 06, 15 and 16 can write element and support broadcast,
no response will be gotten after sending out the broadcast, but slave station will process the received data; 08 is the
diagnostic function code, it does not support the broadcast except its sub-function codes 0x01, 0x04 and 0x0A
(Hexadecimal).

290 Appendix 8 ASCII Code Table
IVC Series Small PLC Programming Manual
Appendix 8 ASCII Code Table
ASCII HEX High 3-bit
0 1 2 3 4 5 6 7
Low 4-bit
0 NUL DLE SPACE 0 @ P ` (pause
mark) p
1 SOH DC1 ! 1 A Q a q 2 STX DC2 " 2 B R b r 3 ETX DC3 # 3 C S c s 4 EOT DC4 $ 4 D T d t 5 ENQ NAK % 5 E U e u 6 ACK SYN & 6 F V f v 7 BEL ETB
, (single
quotation marks) 7 G W g w
8 BS CAN ( 8 H X h x 9 HT EM ) 9 I Y i y A LF SUB * : J Z j z B VT ESC + ; K [ k { C FF FS , (comma) < L l
I (vertical
slash) D CR GS
- (subtraction
sign) = M ] m }
E SO RS . > N ^ n ~ F SI US / ? O
-
(Underline) o DEL

Appendix 9 Instruction Index 291
IVC Series Small PLC Programming Manual
Appendix 9 Instruction Index
Instruction Instruction function Program steps Influenced flag bit IVC2 IVC1 Page
A
ABS Read current value instruction 8 √ 199
ADD Integer math instructions 7 Zero, Carry,
Borrow √ √ 89
ANB Power-flow block and 1 √ √ 58
AND NO contact power-flow and 1 √ √ 56
AND< Compare integer AND< instruction 5 √ √ 185
AND<= Compare integer AND<= instruction 5 √ √ 185
AND<> Compare integer AND <> instruction 5 √ √ 185
AND= Compare integer AND= instruction 5 √ √ 185
AND> Compare integer AND > instruction 5 √ √ 185
AND>= Compare integer AND > =instruction 5 √ √ 185
ANDD< Compare double integer ANDD< instruction 7 √ √ 188
ANDD<= Compare double integer ANDD<= instruction 7 √ √ 188
ANDD<> Compare double integer ANDD<> instruction 7 √ √ 188
ANDD= Compare double integer ANDD= instruction 7 √ √ 188
ANDD> Compare double integer ANDD> instruction 7 √ √ 188
ANDD>= Compare double integer ANDD>= instruction 7 √ √ 188
ANDR< Compare floating point number ANDR< instruction 7 √ √ 191
ANDR<= Compare floating point number ANDR<= instruction 7 √ √ 191
ANDR<> Compare floating point number ANDR<> instruction 7 √ √ 191
ANDR= Compare floating point number ANDR= instruction 7 √ √ 191
ANDR> Compare floating point number ANDR> instruction 7 √ √ 191
ANDR>= Compare floating point number ANDR>= instruction 7 √ √ 191
ANI NC contact power-flow and 1 √ √ 56
ASC ASCII Code conversion instruction 19 √ 113
ATI ASCII-hexadecimal integer conversion instruction 7 √ 115
B
BAND Word bit contactor AND instruction 5 √ √ 181
BANI Word bit contactor ANI instruction 5 √ √ 181
BCD Word to 16-bit BCD instruction 5 √ √ 109
BIN 16-bit BCD to word instruction 5 √ √ 110
BITS Counting ON bit in word instruction 5 √ √ 179
BLD Word bit contactor LD instruction 5 √ √ 180
BLDI Word bit contactor LDI instruction 5 √ √ 180
BMOV Move data block transmission instruction 7 √ √ 81
BOR Word bit contactor OR instruction 5 √ √ 182
BORI Word bit contactor ORI instruction 5 √ √ 182
BOUT Word bit coil output instruction 5 √ √ 183
BRST Word bit coil reset instruction 5 √ √ 183
BSET Word bit coil set instruction 5 √ √ 183
C
CALL Calling a subprogram
Dependent on
the parameter
of the
subprogram
√ √ 79
CCITT CCITT check instruction 7 √ √ 174
CFEND Conditional end from user main program 1 √ √ 77
CIRET Conditional return from user interrupt subprogram 1 √ √ 78
CJ Conditional jump 3 √ √ 77
COS Floating point number COS instruction 7 Zero √ √ 103
CRC16 CRC16 check instruction 7 √ √ 175
CSRET Conditional return from user subprogram 1 √ √ 79
CTR 16-bit counter loop cycle counting instruction 5 √ √ 68
CTU 16-bit counter counting up instruction 5 √ √ 67

292 Appendix 9 Instruction Index
IVC Series Small PLC Programming Manual
Instruction Instruction function Program steps Influenced flag bit IVC2 IVC1 Page
D
DADD Add double integer instruction 10 Zero, Carry,
Borrow √ √ 93
DBCD Double word to 32-bit BCD instruction 7 √ √ 109
DBIN 32-bit BCD to double word instruction 7 √ √ 110
DBITS Counting ON bit in double word instruction 6 √ √ 179
DCMP< Compare date< instruction 7 √ √ 140
DCMP<= Compare date<= instruction 7 √ √ 140
DCMP<> Compare date<> instruction 7 √ √ 140
DCMP= Compare date= instruction 7 √ √ 140
DCMP> Compare date> instruction 7 √ √ 140
DCMP>= Compare date>= instruction 7 √ √ 140
DCNT 32-bit counting instruction 7 √ √ 69
DDEC Decrement double integer instruction 4 √ √ 96
DDIV Divide double integer instruction 10 √ √ 95
DEC Decrement integer instruction 3 √ √ 92
DECO Decode instruction 5 √ √ 178
DFLT Double integer to floating point number instruction 7 √ √ 107
DFMOV Fill data block double word instruction 9 √ √ 82
DFROM Read double word from special module buffer
register instruction 10 √ √ 130
DGBIN 32-bit gray code to double word instruction 7 √ √ 112
DGRY Double word to 32-bit gray code instruction 7 √ √ 111
DHSCI High-speed counting compare interrupt trigger
instruction 10 √ √ 144
DHSCR High-speed counting compare reset instruction 10 √ √ 145
DHSCS High-speed counting compare set instruction 10 √ √ 143
DHSP High-speed counting table compare pulse output
instruction 10 √ √ 149
DHST High-speed counting table compare instruction 10 √ √ 147
DHSZ High-speed counting zone compare instruction 13 √ √ 146
DI Disable interrupt instruction 1 √ √ 78
DINC Increment double integer instruction 4 √ √ 96
DINT Floating point number to double integer instruction 7 Zero, Carry,
Borrow √ √ 108
DIV Divide integer instruction 7 √ √ 90
DMOV Move double word data transmission instruction 7 √ √ 80
DMUL Multiply double integer instruction 10 √ √ 94
DNEG Negative double integer instruction 7 √ √ 97
DRCL 32-bit carry circular shift left instruction 9 Carry √ √ 124
DRCR 32-bit carry circular shift right instruction 9 Carry √ √ 123
DROL 32-bit circular shift left instruction 9 Carry √ √ 123
DROR 32-bit circular shift right instruction 9 Carry √ √ 122
DRVA Control absolute position instruction 11 √ 199
DRVI Control relative position instruction 11 √ 198
DSHL 32-bit shift left instruction 9 √ √ 126
DSHR 32-bit shift right instruction 9 √ √ 125
DSQT Square root double integer instruction 7 √ √ 95
DSUB Subtract double integer instruction 10 Zero, Carry,
Borrow √ √ 94
DSUM Sum double integer instruction 9 Zero √ √ 99
DTI Double integer to integer instruction 6 √ √ 106
DTO Read double word from special module buffer
register instruction 10 √ √ 132
DVABS Double integer absolute value instruction 7 √ √ 97
DWAND AND double word instruction 10 √ √ 117
DWINV NOT double word Instruction 10 √ √ 119
DWOR OR double word instruction 10 √ √ 118
DWXOR Exclusive-OR double word instruction 10 √ √ 118
DXCH Exchange double word instruction 7 √ √ 84
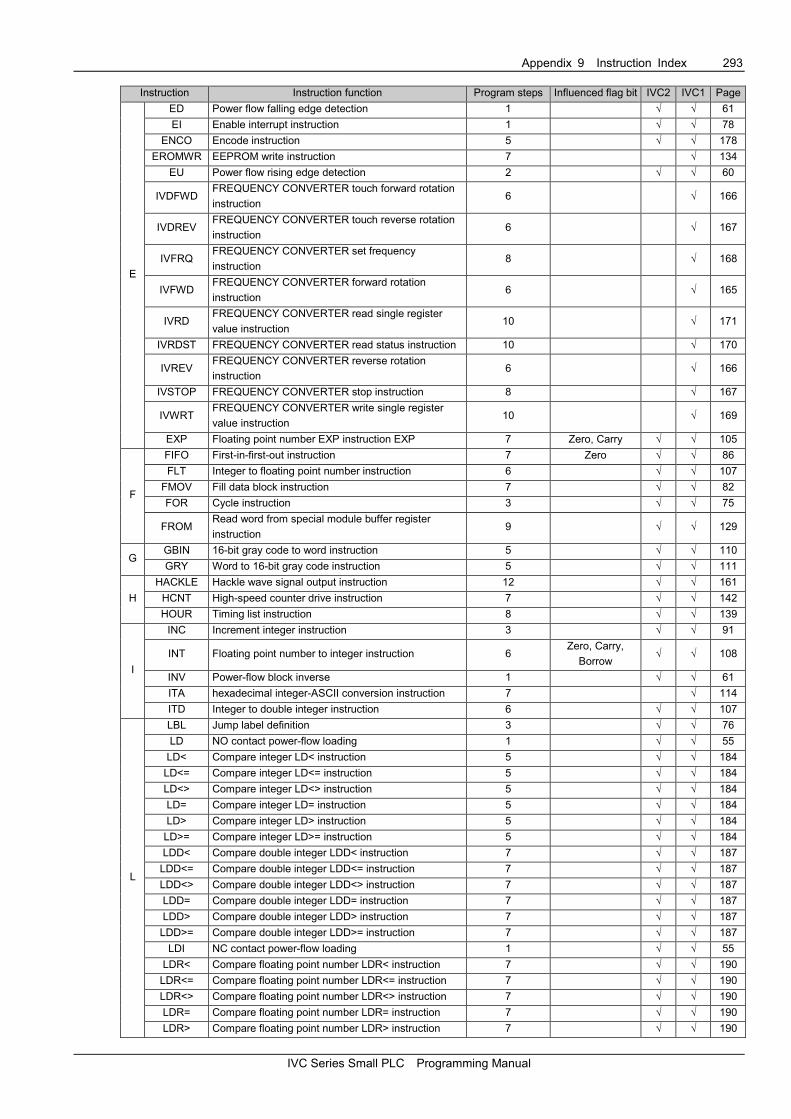
Appendix 9 Instruction Index 293
IVC Series Small PLC Programming Manual
Instruction Instruction function Program steps Influenced flag bit IVC2 IVC1 Page
E
ED Power flow falling edge detection 1 √ √ 61
EI Enable interrupt instruction 1 √ √ 78
ENCO Encode instruction 5 √ √ 178
EROMWR EEPROM write instruction 7 √ 134
EU Power flow rising edge detection 2 √ √ 60
IVDFWD FREQUENCY CONVERTER touch forward rotation
instruction 6 √ 166
IVDREV FREQUENCY CONVERTER touch reverse rotation
instruction 6 √ 167
IVFRQ FREQUENCY CONVERTER set frequency
instruction 8 √ 168
IVFWD FREQUENCY CONVERTER forward rotation
instruction 6 √ 165
IVRD FREQUENCY CONVERTER read single register
value instruction 10 √ 171
IVRDST FREQUENCY CONVERTER read status instruction 10 √ 170
IVREV FREQUENCY CONVERTER reverse rotation
instruction 6 √ 166
IVSTOP FREQUENCY CONVERTER stop instruction 8 √ 167
IVWRT FREQUENCY CONVERTER write single register
value instruction 10 √ 169
EXP Floating point number EXP instruction EXP 7 Zero, Carry √ √ 105
F
FIFO First-in-first-out instruction 7 Zero √ √ 86
FLT Integer to floating point number instruction 6 √ √ 107
FMOV Fill data block instruction 7 √ √ 82
FOR Cycle instruction 3 √ √ 75
FROM Read word from special module buffer register
instruction 9 √ √ 129
G GBIN 16-bit gray code to word instruction 5 √ √ 110
GRY Word to 16-bit gray code instruction 5 √ √ 111
H HACKLE Hackle wave signal output instruction 12 √ √ 161
HCNT High-speed counter drive instruction 7 √ √ 142
HOUR Timing list instruction 8 √ √ 139
I
INC Increment integer instruction 3 √ √ 91
INT Floating point number to integer instruction 6 Zero, Carry,
Borrow √ √ 108
INV Power-flow block inverse 1 √ √ 61
ITA hexadecimal integer-ASCII conversion instruction 7 √ 114
ITD Integer to double integer instruction 6 √ √ 107
L
LBL Jump label definition 3 √ √ 76
LD NO contact power-flow loading 1 √ √ 55
LD< Compare integer LD< instruction 5 √ √ 184
LD<= Compare integer LD<= instruction 5 √ √ 184
LD<> Compare integer LD<> instruction 5 √ √ 184
LD= Compare integer LD= instruction 5 √ √ 184
LD> Compare integer LD> instruction 5 √ √ 184
LD>= Compare integer LD>= instruction 5 √ √ 184
LDD< Compare double integer LDD< instruction 7 √ √ 187
LDD<= Compare double integer LDD<= instruction 7 √ √ 187
LDD<> Compare double integer LDD<> instruction 7 √ √ 187
LDD= Compare double integer LDD= instruction 7 √ √ 187
LDD> Compare double integer LDD> instruction 7 √ √ 187
LDD>= Compare double integer LDD>= instruction 7 √ √ 187
LDI NC contact power-flow loading 1 √ √ 55
LDR< Compare floating point number LDR< instruction 7 √ √ 190
LDR<= Compare floating point number LDR<= instruction 7 √ √ 190
LDR<> Compare floating point number LDR<> instruction 7 √ √ 190
LDR= Compare floating point number LDR= instruction 7 √ √ 190
LDR> Compare floating point number LDR> instruction 7 √ √ 190

294 Appendix 9 Instruction Index
IVC Series Small PLC Programming Manual
Instruction Instruction function Program steps Influenced flag bit IVC2 IVC1 Page LDR>= Compare floating point number LDR>= instruction 7 √ √ 190
LIFO Last-in-first-output instruction 7 Zero √ √ 86
LN Floating point number LN instruction 7 Zero, Carry √ √ 105
LRC LRC check instruction 7 √ √ 176
M
MC Main control 3 √ √ 62
MCR Main control remove 1 √ √ 63
Modbus Modbus master station communication instruction 8 √ √ 164
MOV Move word data transmission instruction 5 √ √ 80
MPP Output power-flow stack pop off 1 √ √ 60
MPS Output power-flow input stack 1 √ √ 59
MRD Read output power-flow stack top value 1 √ √ 60
MUL Multiply integer instruction 8 √ √ 90
N NEG Negative integer instruction 5 √ √ 93
NEXT Return from cycle 1 √ √ 75
NOP No operation 1 √ √ 62
O
OR NO contact power-flow or 1 √ √ 57
OR< Compare integer OR< instruction 5 √ √ 186
OR<= Compare integer OR<= instruction 5 √ √ 186
OR<> Compare integer OR<> instruction 5 √ √ 186
OR= Compare integer OR= instruction 5 √ √ 186
OR> Compare integer OR> instruction 5 √ √ 186
OR>= Compare integer OR>= instruction 5 √ √ 186
ORB Power-flow block or 1 √ √ 59
ORD< Compare double integer ORD< instruction 7 √ √ 189
ORD<= Compare double integer ORD<= instruction 7 √ √ 189
ORD<> Compare double integer ORD<> instruction 7 √ √ 189
ORD= Compare double integer ORD= instruction 7 √ √ 189
ORD> Compare double integer ORD> instruction 7 √ √ 189
ORD>= Compare double integer ORD>= instruction 7 √ √ 189
ORI NC contact power-flow or 1 √ √ 57
ORR< Compare floating point number ORR< instruction 7 √ √ 192
ORR<= Compare floating point number ORR<= instruction 7 √ √ 192
ORR<> Compare floating point number ORR<> instruction 7 √ √ 192
ORR= Compare floating point number ORR= instruction 7 √ √ 192
ORR> Compare floating point number ORR> instruction 7 √ √ 192
ORR>= Compare floating point number ORR>= instruction 7 √ √ 192
OUT Power-flow output 1 √ √ 58
OUT Sxx SFC state jumb 3 √ √ 64
P
PID PID instruction 9 √ √ 157
PLS Pulse Output Instruction of Envelop 7 √ 155
PLSR Count pulse with acceleration/deceleration output
instruction 10 √ √ 153
PLSV Variable speed pulse output instruction 8 √ 197
PLSY Count pulse output instruction 9 √ √ 152
POWER Floating point number exponentiation instruction 10 Zero, Carry √ √ 104
PUSH Push instruction 7 Carry √ √ 84
PWM PWM pulse output instruction 7 √ √ 156
R
RADD Add floating point number instruction 10 Zero, Carry √ √ 99
RAMP Ramp wave signal output instruction 12 √ √ 160
RCL 16-bit carry circular shift left instruction 7 Carry √ √ 122
RCR 16-bit carry circular shift right instruction 7 Carry √ √ 121
RCV Free-port receiving (RCV) instruction 7 √ √ 173
RDIV Divide floating point number instruction 10 Zero, Carry √ √ 101
REF Set input filtering constant instruction 5 √ √ 133
REFF Set input filtering constant instruction 3 √ √ 133
RET SFC program end 1 √ √ 65
RMOV Move floating point number data transmission
instruction 7 √ √ 81

Appendix 9 Instruction Index 295
IVC Series Small PLC Programming Manual
Instruction Instruction function Program steps Influenced flag bit IVC2 IVC1 Page RMUL Multiply floating point number instruction 10 Zero, Carry √ √ 100
RNEG Negative floating point number instruction 7 √ √ 102
ROL 16-bit circular shift left instruction 7 Carry √ √ 120
R
ROR 16-bit circular shift right instruction 7 Carry √ √ 119
RSQT Square root floating point number instruction 7 Zero √ √ 101
RST Reset 1 √ √ 62
RST Sxx SFC state delete 3 √ √ 65
RSUB Subtract floating point number instruction 10 Zero, Carry √ √ 100
RSUM Sum floating point number instruction 9 √ √ 106
RVABS Floating point number absolute value instruction 7 √ √ 102
S
SEG Word to 7-segment encode 5 √ √ 113
SET Set 1 √ √ 62
SET Sxx SFC state shift 3 √ √ 64
SFTL Shift left byte instruction 9 √ √ 128
SFTR Shift right byte instruction 9 √ √ 127
SHL 16-bit shift left instruction 7 √ √ 125
SHR 16-bit shift right word instruction 7 √ √ 124
SIN Floating point number SIN instruction 7 Zero √ √ 103
SPD Pulse detection instruction 7 √ √ 151
SQT Square root integer instructions 5 √ √ 91
STL SFC state load instruction 3 √ √ 64
STOP User program stop 1 √ √ 78
SUB Subtract integer instruction 7 Zero, Carry,
Borrow √ √ 89
SUM Sum integer instruction 8 Zero √ √ 98
SWAP Swap bytes 3 √ √ 83
T
TADD Add clock instruction 7 Zero, Carry √ √ 137
TAN Floating point number TAN instruction 7 Zero, Carry √ √ 104
TCMP< Compare time< instruction 7 √ √ 141
TCMP<= Compare time>= instruction 7 √ √ 141
TCMP<> Compare time<> instruction 7 √ √ 141
TCMP= Compare time= instruction 7 √ √ 141
TCMP> Compare time> instruction 7 √ √ 141
TCMP>= Compare time>= instruction 7 √ √ 141
TMON Monostable timing instruction 5 √ √ 67
TO Read word from special module buffer register
instruction 9 √ √ 131
TOF Off-delay timing instruction 5 √ √ 66
TON On-delay timing instruction 5 √ √ 65
TONR On-delay remember timing instruction 5 √ √ 66
TRD Read real-time clock instruction 3 √ √ 135
TRIANGLE Triangle wave signal output instruction 12 √ √ 162
TSUB Subtract clock instruction 7 Zero, Borrow √ √ 138
TWR Write real-time clock instruction 3 √ √ 136
V VABS Integer absolute value instruction 5 √ √ 92
VRRD Read analog potentiometer value instruction 5 √ √ 132
W
WAND AND word instruction 7 √ √ 115
WDT User program watchdog reset 1 √ √ 77
WINV NOT word instruction 5 √ √ 117
WOR OR word instruction 7 √ √ 116
WSFL Shift left word instruction 9 √ √ 88
WSFR Shift right word instruction 9 √ √ 87
WXOR Exclusive-OR word instruction 7 √ √ 116
X XCH Exchange word instruction 5 √ √ 83
XMT Free-port sending (XMT) instruction 7 √ √ 172
Z ZRN Regress to origin instruction 11 √ 196
ZRST Batch bit reset instruction 5 √ √ 177
ZSET Set batch bit instruction 5 √ √ 177
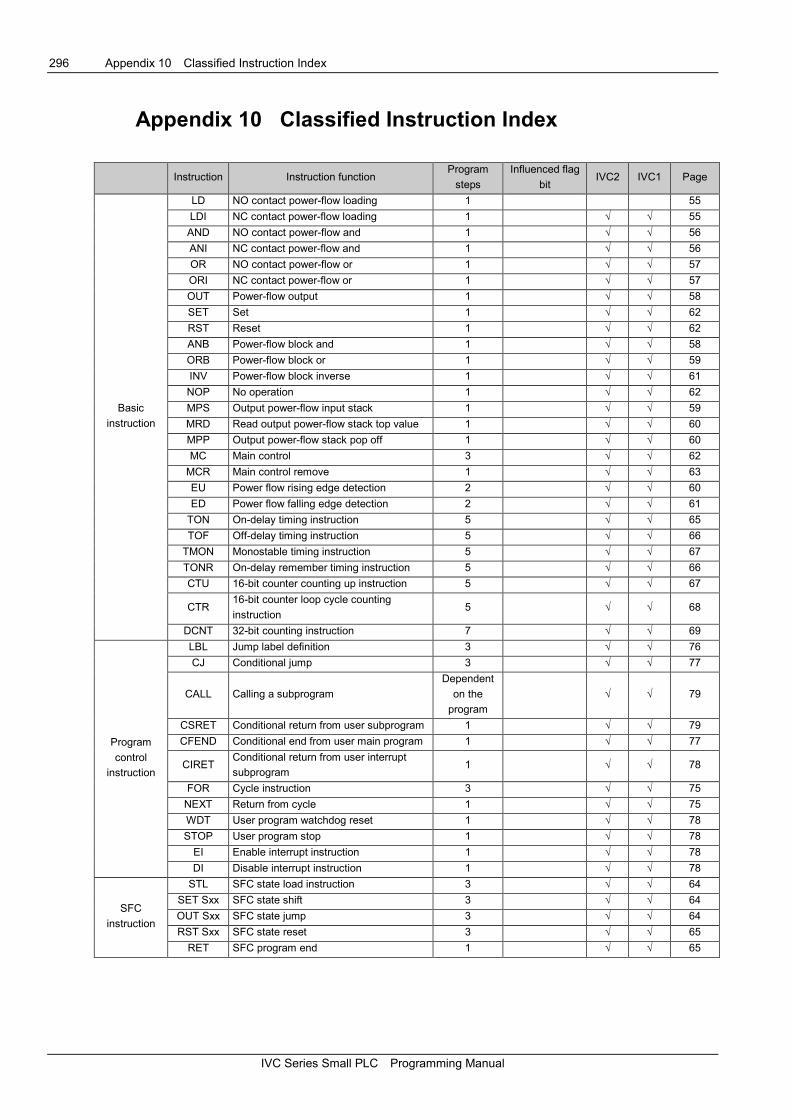
296 Appendix 10 Classified Instruction Index
IVC Series Small PLC Programming Manual
Appendix 10 Classified Instruction Index
Instruction Instruction function Program
steps Influenced flag
bit IVC2 IVC1 Page
Basic
instruction
LD NO contact power-flow loading 1 55
LDI NC contact power-flow loading 1 √ √ 55
AND NO contact power-flow and 1 √ √ 56
ANI NC contact power-flow and 1 √ √ 56
OR NO contact power-flow or 1 √ √ 57
ORI NC contact power-flow or 1 √ √ 57
OUT Power-flow output 1 √ √ 58
SET Set 1 √ √ 62
RST Reset 1 √ √ 62
ANB Power-flow block and 1 √ √ 58
ORB Power-flow block or 1 √ √ 59
INV Power-flow block inverse 1 √ √ 61
NOP No operation 1 √ √ 62
MPS Output power-flow input stack 1 √ √ 59
MRD Read output power-flow stack top value 1 √ √ 60
MPP Output power-flow stack pop off 1 √ √ 60
MC Main control 3 √ √ 62
MCR Main control remove 1 √ √ 63
EU Power flow rising edge detection 2 √ √ 60
ED Power flow falling edge detection 2 √ √ 61
TON On-delay timing instruction 5 √ √ 65
TOF Off-delay timing instruction 5 √ √ 66
TMON Monostable timing instruction 5 √ √ 67
TONR On-delay remember timing instruction 5 √ √ 66
CTU 16-bit counter counting up instruction 5 √ √ 67
CTR 16-bit counter loop cycle counting
instruction 5 √ √ 68
DCNT 32-bit counting instruction 7 √ √ 69
Program
control
instruction
LBL Jump label definition 3 √ √ 76
CJ Conditional jump 3 √ √ 77
CALL Calling a subprogram
Dependent
on the
program
√ √ 79
CSRET Conditional return from user subprogram 1 √ √ 79
CFEND Conditional end from user main program 1 √ √ 77
CIRET Conditional return from user interrupt
subprogram 1 √ √ 78
FOR Cycle instruction 3 √ √ 75
NEXT Return from cycle 1 √ √ 75
WDT User program watchdog reset 1 √ √ 78
STOP User program stop 1 √ √ 78
EI Enable interrupt instruction 1 √ √ 78
DI Disable interrupt instruction 1 √ √ 78
SFC
instruction
STL SFC state load instruction 3 √ √ 64
SET Sxx SFC state shift 3 √ √ 64
OUT Sxx SFC state jump 3 √ √ 64
RST Sxx SFC state reset 3 √ √ 65
RET SFC program end 1 √ √ 65

Appendix 10 Classified Instruction Index 297
IVC Series Small PLC Programming Manual
Instruction Instruction function Program
steps Influenced flag
bit IVC2 IVC1 Page
Data
transmission
instruction
MOV Move word data transmission instruction 5 √ √ 80
DMOV Move double word data transmission
instruction 7 √ √ 80
RMOV Move floating point number data
transmission instruction 7 √ √ 81
BMOV Move data block transmission instruction 7 √ √ 81
SWAP Swap bytes 3 √ √ 83
Data flow
instruction
XCH Exchange word instruction 5 √ √ 83
DXCH Exchange double word instruction 7 √ √ 84
FMOV Fill data block instruction 7 √ √ 82
DFMOV Fill data block double word instruction 9 √ √ 82
WSFR Shift right word instruction 9 √ √ 87
WSFL Shift left word instruction 9 √ √ 88
PUSH Push instruction 7 Carry √ √ 84
FIFO First-in-first-out instruction 7 Zero √ √ 86
LIFO Last-in-first-output instruction 7 Zero √ √ 86
Integer /
double
integer math
instruction
ADD Add integer instructions 7 Zero, Carry,
Borrow √ √ 89
DADD Add double integer instruction 10 Zero, Carry,
Borrow √ √ 93
SUB Subtract integer instruction 7 Zero, Carry,
Borrow √ √ 89
DSUB Subtract double integer instruction 10 Zero, Carry,
Borrow √ √ 94
INC Increment integer instruction 3 √ √ 91
DINC Increment double integer instruction 4 √ √ 96
DEC Decrement integer instruction 3 √ √ 92
DDEC Decrement double integer instruction 4 √ √ 96
MUL Multiply integer instruction 8 √ √ 90
DMUL Multiply double integer instruction 10 √ √ 94
DIV Divide integer instruction 7 √ √ 90
DDIV Divide double integer instruction 10 √ √ 95
VABS Integer absolute value instruction 5 √ √ 92
DVABS Double integer absolute value instruction 7 √ √ 97
NEG Negative integer instruction 5 √ √ 93
DNEG Negative double integer instruction 7 √ √ 97
SQT Square root integer instructions 5 √ √ 91
DSQT Square root double integer instruction 7 √ √ 95
SUM Sum integer instruction 8 Zero √ √ 98
DSUM Sum double integer instruction 9 Zero √ √ 99
Floating point
number math
instruction
RADD Add floating point number instruction 10 Zero, Carry √ √ 99
RSUB Subtract floating point number instruction 10 Zero, Carry √ √ 100
RMUL Multiply floating point number instruction 10 Zero, Carry √ √ 100
RDIV Divide floating point number instruction 10 Zero, Carry √ √ 101
RVABS Floating point number absolute value
instruction 7 √ √ 102
RNEG Floating point number absolute value
instruction 7 √ √ 102
RSQT Square root floating point number
instruction 7 Zero √ √ 101
SIN Floating point number SIN instruction 7 Zero √ √ 103
COS Floating point number COS instruction 7 Zero √ √ 103
TAN Floating point number TAN instruction 7 Zero, Carry √ √ 104
LN Floating point number LN instruction 7 Zero, Carry √ √ 105
EXP Floating point number EXP instruction 7 Zero, Carry √ √ 105
POWER Floating point number exponentiation
instruction 10 Zero, Carry √ √ 104
RSUM Sum floating point number instruction 9 √ √ 106

298 Appendix 10 Classified Instruction Index
IVC Series Small PLC Programming Manual
Instruction Instruction function Program
steps Influenced flag
bit IVC2 IVC1 Page
Word/double
word logic
instruction
WAND AND word instruction 7 √ √ 115
DWAND AND double word instruction 10 √ √ 117
WOR OR word instruction 7 √ √ 116
DWOR OR double word instruction 10 √ √ 118
WXOR Exclusive-OR word instruction 7 √ √ 116
DWXOR Exclusive-OR double word instruction 10 √ √ 118
WINV NOT word instruction 5 √ √ 117
DWINV NOT double word Instruction 7 √ √ 119
Shift / rotate
instruction
ROR 16-bit circular shift right instruction 7 Carry √ √ 119
DROR 32-bit circular shift right instruction 9 Carry √ √ 122
ROL 16-bit circular shift left instruction 7 Carry √ √ 120
DROL 32-bit circular shift left instruction 9 Carry √ √ 123
RCR 16-bit carry circular shift right instruction 7 Carry √ √ 121
DRCR 32-bit carry circular shift right instruction 9 Carry √ √ 123
RCL 16-bit carry circular shift left instruction 7 Carry √ √ 122
DRCL 32-bit carry circular shift left instruction 9 Carry √ √ 124
SHR 16-bit shift right word instruction 7 √ √ 124
DSHR 32-bit shift right instruction 9 √ √ 125
SHL 16-bit shift left instruction 7 √ √ 125
DSHL 32-bit shift left instruction 9 √ √ 126
SFTL Shift left byte instruction 9 √ √ 128
SFTR Shift right byte instruction 9 √ √ 127
Enhanced bit
logic
instruction
DECO Decode instruction 5 √ √ 178
ENCO Encode instruction 5 √ √ 178
BITS Counting ON bit in word instruction 5 √ √ 179
DBITS Counting ON bit in double word
instruction 6 √ √ 179
ZRST Batch bit reset instruction 5 √ √ 177
ZSET Set batch bit instruction 5 √ √ 177
High speed
I/O instruction
HCNT High-speed counter drive instruction 7 √ √ 142
DHSCS High-speed counting compare set
instruction 10 √ √ 143
DHSCR High-speed counting compare reset
instruction 10 √ √ 145
DHSCI High-speed counting compare interrupt
trigger instruction 10 √ √ 144
DHSZ High-speed counting zone compare
instruction 13 √ √ 146
DHST High-speed counting table compare
instruction 10 √ √ 147
DHSP High-speed counting table compare pulse
output instruction 10 √ √ 149
SPD Pulse detection instruction 7 √ √ 151
PLSY Count pulse output instruction 9 √ √ 152
PLSR
Count pulse with
acceleration/deceleration output
instruction
10 √ √ 153
PWM PWM pulse output instruction 7 √ √ 156
PLS Pulse Output Instruction of Envelop 7 √ 155
Control
calculation
instruction
PID PID instruction 9 √ √ 157
RAMP Ramp wave signal output instruction 12 √ √ 160
TRIANGLE Triangle wave signal output instruction 12 √ √ 162
HACKLE Hackle wave signal output instruction 12 √ √ 161
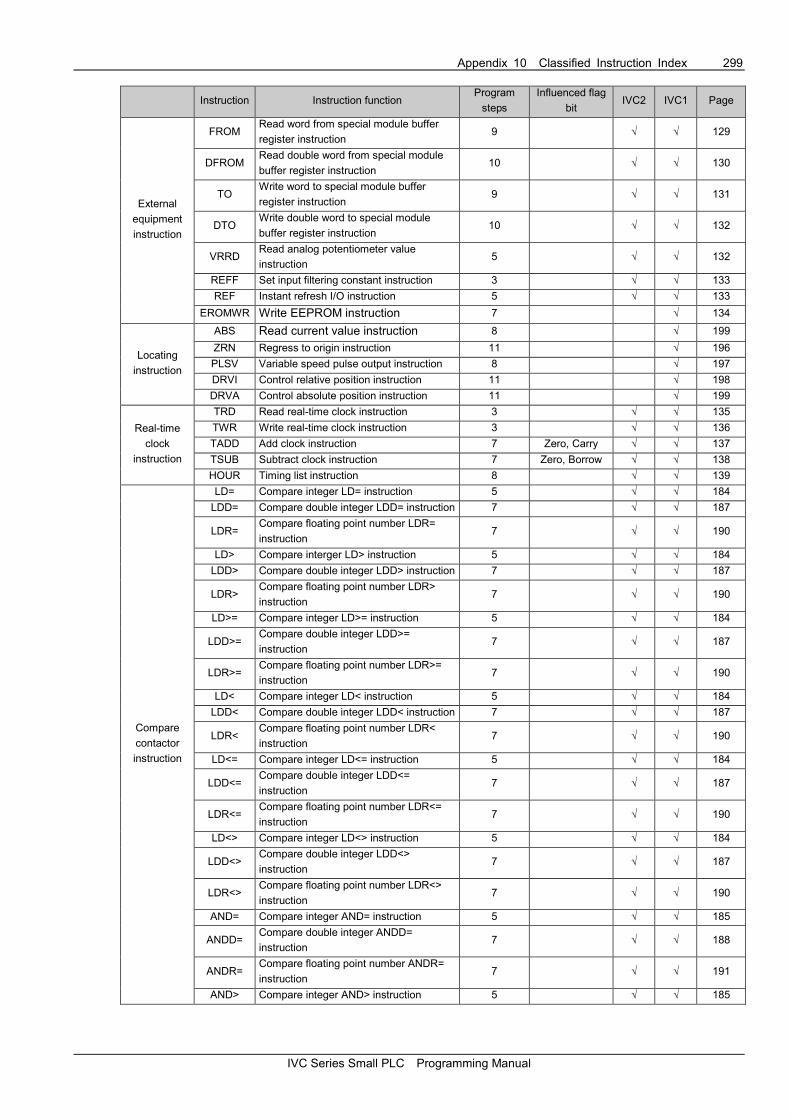
Appendix 10 Classified Instruction Index 299
IVC Series Small PLC Programming Manual
Instruction Instruction function Program
steps Influenced flag
bit IVC2 IVC1 Page
External
equipment
instruction
FROM Read word from special module buffer
register instruction 9 √ √ 129
DFROM Read double word from special module
buffer register instruction 10 √ √ 130
TO Write word to special module buffer
register instruction 9 √ √ 131
DTO Write double word to special module
buffer register instruction 10 √ √ 132
VRRD Read analog potentiometer value
instruction 5 √ √ 132
REFF Set input filtering constant instruction 3 √ √ 133
REF Instant refresh I/O instruction 5 √ √ 133
EROMWR Write EEPROM instruction 7 √ 134
Locating
instruction
ABS Read current value instruction 8 √ 199
ZRN Regress to origin instruction 11 √ 196
PLSV Variable speed pulse output instruction 8 √ 197
DRVI Control relative position instruction 11 √ 198
DRVA Control absolute position instruction 11 √ 199
Real-time
clock
instruction
TRD Read real-time clock instruction 3 √ √ 135
TWR Write real-time clock instruction 3 √ √ 136
TADD Add clock instruction 7 Zero, Carry √ √ 137
TSUB Subtract clock instruction 7 Zero, Borrow √ √ 138
HOUR Timing list instruction 8 √ √ 139
Compare
contactor
instruction
LD= Compare integer LD= instruction 5 √ √ 184
LDD= Compare double integer LDD= instruction 7 √ √ 187
LDR= Compare floating point number LDR=
instruction 7 √ √ 190
LD> Compare interger LD> instruction 5 √ √ 184
LDD> Compare double integer LDD> instruction 7 √ √ 187
LDR> Compare floating point number LDR>
instruction 7 √ √ 190
LD>= Compare integer LD>= instruction 5 √ √ 184
LDD>= Compare double integer LDD>=
instruction 7 √ √ 187
LDR>= Compare floating point number LDR>=
instruction 7 √ √ 190
LD< Compare integer LD< instruction 5 √ √ 184
LDD< Compare double integer LDD< instruction 7 √ √ 187
LDR< Compare floating point number LDR<
instruction 7 √ √ 190
LD<= Compare integer LD<= instruction 5 √ √ 184
LDD<= Compare double integer LDD<=
instruction 7 √ √ 187
LDR<= Compare floating point number LDR<=
instruction 7 √ √ 190
LD<> Compare integer LD<> instruction 5 √ √ 184
LDD<> Compare double integer LDD<>
instruction 7 √ √ 187
LDR<> Compare floating point number LDR<>
instruction 7 √ √ 190
AND= Compare integer AND= instruction 5 √ √ 185
ANDD= Compare double integer ANDD=
instruction 7 √ √ 188
ANDR= Compare floating point number ANDR=
instruction 7 √ √ 191
AND> Compare integer AND> instruction 5 √ √ 185
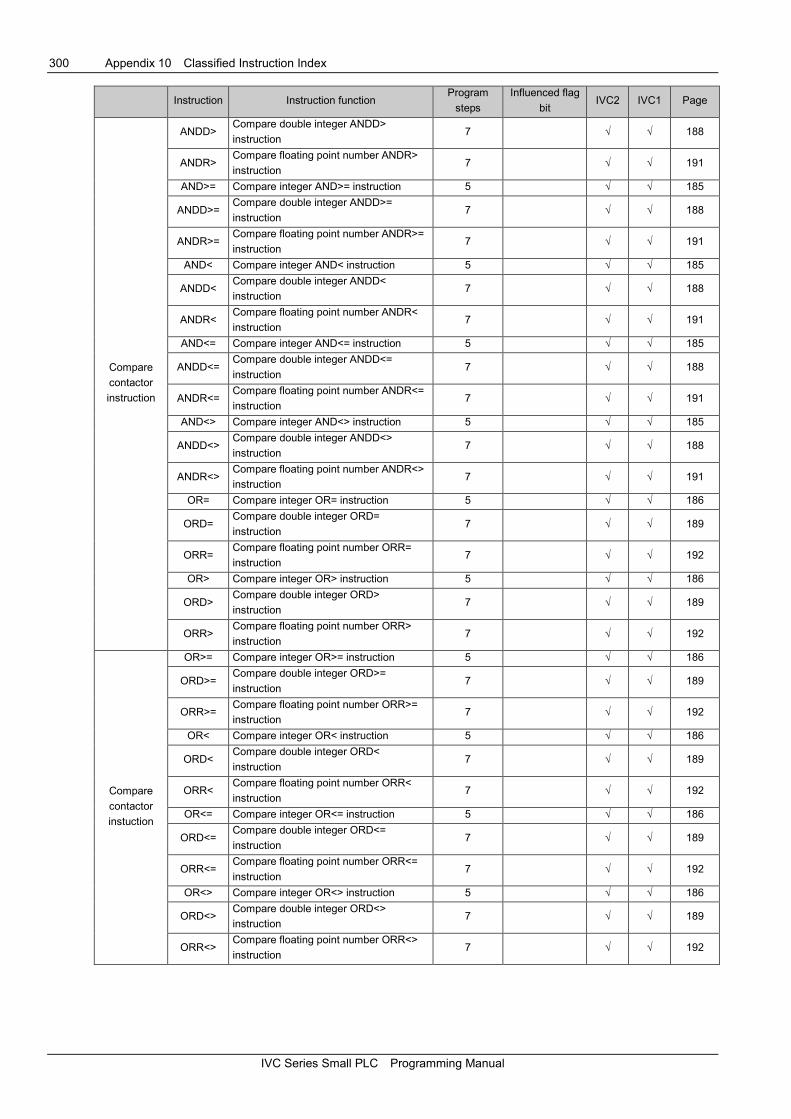
300 Appendix 10 Classified Instruction Index
IVC Series Small PLC Programming Manual
Instruction Instruction function Program
steps Influenced flag
bit IVC2 IVC1 Page
Compare
contactor
instruction
ANDD> Compare double integer ANDD>
instruction 7 √ √ 188
ANDR> Compare floating point number ANDR>
instruction 7 √ √ 191
AND>= Compare integer AND>= instruction 5 √ √ 185
ANDD>= Compare double integer ANDD>=
instruction 7 √ √ 188
ANDR>= Compare floating point number ANDR>=
instruction 7 √ √ 191
AND< Compare integer AND< instruction 5 √ √ 185
ANDD< Compare double integer ANDD<
instruction 7 √ √ 188
ANDR< Compare floating point number ANDR<
instruction 7 √ √ 191
AND<= Compare integer AND<= instruction 5 √ √ 185
ANDD<= Compare double integer ANDD<=
instruction 7 √ √ 188
ANDR<= Compare floating point number ANDR<=
instruction 7 √ √ 191
AND<> Compare integer AND<> instruction 5 √ √ 185
ANDD<> Compare double integer ANDD<>
instruction 7 √ √ 188
ANDR<> Compare floating point number ANDR<>
instruction 7 √ √ 191
OR= Compare integer OR= instruction 5 √ √ 186
ORD= Compare double integer ORD=
instruction 7 √ √ 189
ORR= Compare floating point number ORR=
instruction 7 √ √ 192
OR> Compare integer OR> instruction 5 √ √ 186
ORD> Compare double integer ORD>
instruction 7 √ √ 189
ORR> Compare floating point number ORR>
instruction 7 √ √ 192
Compare
contactor
instuction
OR>= Compare integer OR>= instruction 5 √ √ 186
ORD>= Compare double integer ORD>=
instruction 7 √ √ 189
ORR>= Compare floating point number ORR>=
instruction 7 √ √ 192
OR< Compare integer OR< instruction 5 √ √ 186
ORD< Compare double integer ORD<
instruction 7 √ √ 189
ORR< Compare floating point number ORR<
instruction 7 √ √ 192
OR<= Compare integer OR<= instruction 5 √ √ 186
ORD<= Compare double integer ORD<=
instruction 7 √ √ 189
ORR<= Compare floating point number ORR<=
instruction 7 √ √ 192
OR<> Compare integer OR<> instruction 5 √ √ 186
ORD<> Compare double integer ORD<>
instruction 7 √ √ 189
ORR<> Compare floating point number ORR<>
instruction 7 √ √ 192

Appendix 10 Classified Instruction Index 301
IVC Series Small PLC Programming Manual
Instruction Instruction function Program
steps Influenced flag
bit IVC2 IVC1 Page
Data
converting
instruction
ITD Integer to double integer instruction 6 √ √ 107
DTI Double integer to integer instruction 6 √ √ 106
FLT Integer to floating point number
instruction 6 √ √ 107
DFLT Double integer to floating point number
instruction 7 √ √ 107
INT Floating point number to integer
instruction 6
Zero, Carry,
Borrow √ √ 108
DINT Floating point number to double integer
instruction 7
Zero, Carry,
Borrow √ √ 108
BCD Word to 16-bit BCD instruction 5 √ √ 109
DBCD Double word to 32-bit BCD instruction 7 √ √ 109
BIN 16-bit BCD to word instruction 5 √ √ 110
DBIN 32-bit BCD to double word instruction 7 √ √ 110
GRY Word to 16-bit gray code instruction 5 √ √ 111
DGRY Double word to 32-bit gray code
instruction 7 √ √ 111
GBIN 16-bit gray code to word instruction 5 √ √ 112
DGBIN 32-bit gray code to double word
instruction 7 √ √ 112
SEGI Word to 7-segment encode 5 √ √ 113
ASC ASCII Code conversion instruction 19 √ 113
ITA hexadecimal integer-ASCII conversion
instruction 7 √ 114
ATI ASCII-hexadecimal integer conversion
instruction 7 √ 115
Word
contactor
instruction
BLD Word bit contactor LD instruction 5 √ √ 180
BLDI Word bit contactor LDI instruction 5 √ √ 180
BAND Word bit contactor AND instruction 5 √ √ 181
BANI Word bit contactor ANI instruction 5 √ √ 181
BOR Word bit contactor OR instruction 5 √ √ 182
BORI Word bit contactor ORI instruction 5 √ √ 182
BSET Word bit coil set instruction 5 √ √ 183
BRST Word bit coil reset instruction 5 √ √ 183
BOUT Word bit coil output instruction 5 √ √ 183
Communicati
on instruction
Modbus Modbus master station communication
instruction 8 √ √ 164
XMT Free-port sending (XMT) instruction 7 √ √ 172
RCV Free-port receiving (RCV) instruction 7 √ √ 173
IVFWD FREQUENCY CONVERTER forward
rotation instruction 6 √ 165
IVREV FREQUENCY CONVERTER reverse
rotation instruction 6 √ 166
IVDFWD FREQUENCY CONVERTER touch
forward rotation instruction 6 √ 166
IVDREV FREQUENCY CONVERTER touch
reverse rotation instruction 6 √ 167
IVSTOP FREQUENCY CONVERTER stop
instruction 8 √ 167
IVFRQ FREQUENCY CONVERTER set
frequency instruction 8 √ 168
IVWRT FREQUENCY CONVERTER write single
register value instruction 10 √ 169
IVRDST FREQUENCY CONVERTER read status
instruction 10 √ 170
IVRD FREQUENCY CONVERTER read single
register value instruction 10 √ 171
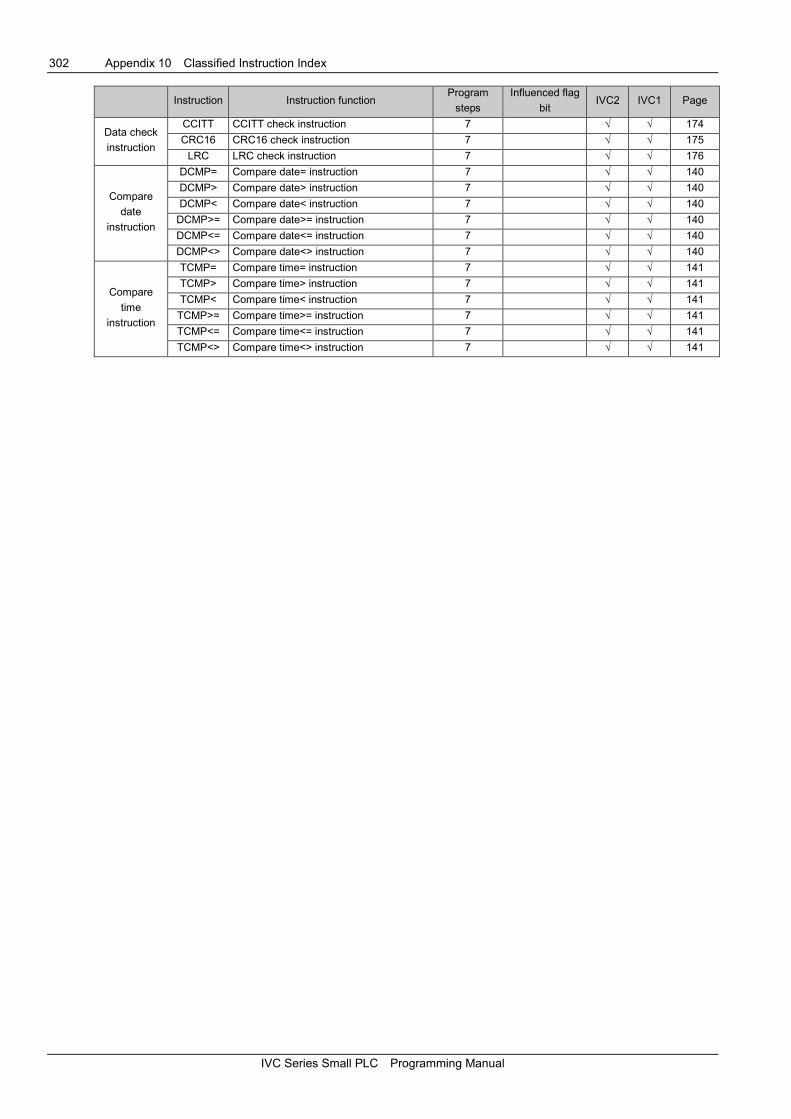
302 Appendix 10 Classified Instruction Index
IVC Series Small PLC Programming Manual
Instruction Instruction function Program
steps Influenced flag
bit IVC2 IVC1 Page
Data check
instruction
CCITT CCITT check instruction 7 √ √ 174
CRC16 CRC16 check instruction 7 √ √ 175
LRC LRC check instruction 7 √ √ 176
Compare
date
instruction
DCMP= Compare date= instruction 7 √ √ 140
DCMP> Compare date> instruction 7 √ √ 140
DCMP< Compare date< instruction 7 √ √ 140
DCMP>= Compare date>= instruction 7 √ √ 140
DCMP<= Compare date<= instruction 7 √ √ 140
DCMP<> Compare date<> instruction 7 √ √ 140
Compare
time
instruction
TCMP= Compare time= instruction 7 √ √ 141
TCMP> Compare time> instruction 7 √ √ 141
TCMP< Compare time< instruction 7 √ √ 141
TCMP>= Compare time>= instruction 7 √ √ 141
TCMP<= Compare time<= instruction 7 √ √ 141
TCMP<> Compare time<> instruction 7 √ √ 141
Related Documents