IP Camera Product Manual nolimits. March 2008, Version 6.0.0.5

Welcome message from author
This document is posted to help you gain knowledge. Please leave a comment to let me know what you think about it! Share it to your friends and learn new things together.
Transcript

IP CameraProduct Manual
nolimits.March 2008, Version 6.0.0.5

IP Camera User Manual
2 /30
The HH9000 Series of video cameras are intended for network video surveillance applications. The H.264 video compression algorithm assures clearer and more fluent image transmission. It uses the latest single chip SOC with a powerful Linux OS that ensures high performance. The built-in web server allows users to conveniently program and control the camera via a web browser. In addition, management software can be used to integrate surveillance and management of multiple network cameras, which allows you to build a large video surveillance system. Package contents:
1. IP Camera 2. DC12V Power Adapter 3. AC24V Power Adapter 4. Junction Box 5. User Manual 6. CD 7. Warranty Card
NOTE Changes to this manual may occur and Wireless Interactive reserves the right to make changes without notice.

IP Camera User Manual
3 /30
Table of Contents 1. Product Overview................................................................................................................................................................ 4
1.1 Product Features ........................................................................................................................................ 4
1.2 Specifications .............................................................................................................................................. 4
1.3 High Speed Dome Features ................................................................................................................... 5
1.4 System Requirements............................................................................................................................... 5
2. Overview and Installation ........................................................................................................................................... 6
2.1 Wired and Wi-Fi cameras ......................................................................................................................... 6
2.2 IR Dome and IR Waterproof IP camera ................................................................................................ 6
2.3 Connecting the High Speed Dome...................................................................................................... 7
2.4 Hardware Installation ............................................................................................................................... 8
3. Searching Device and ActiveX Download to Installation ............................................................................... 10
3.1 Searching Device and Modify Network Parameter ...................................................................... 10
3.2 Check Connection ................................................................................................................................... 11
3.3 Installing the ActiveX Control and Logging In ............................................................................... 12
4. Software Configurations ........................................................................................................................................... 13
4.1 IP Camera Live view ................................................................................................................................ 13
4.2 IP Camera Video Playback ..................................................................................................................... 14
4.3 IP Camera System Settings ................................................................................................................... 15
4.4 IP Camera Video Settings ...................................................................................................................... 16
4.5 IP Camera Motion Alarm Settings ...................................................................................................... 18
4.6 IP Camera Sensor Alarm Settings ....................................................................................................... 19
4.7 IP Camera Network Settings ................................................................................................................ 20
4.8 IP Camera Advanced Parameters ........................................................................................................ 21
4.9 IP Camera User Management .............................................................................................................. 22
4.10 IP Camera Terminal Settings ................................................................................................................ 22
4.11 IP Camera Storage Equipment ............................................................................................................ 23
Appendix 1. Network Interface for IP Camera .......................................................................................................... 24
Appendix 2. Network Parameter Defaults ................................................................................................................. 24
Appendix 3. IP Cameras in different network environments .............................................................................. 24

IP Camera User Manual
4 /30
1. Product Overview
1.1 Product Features
High-density and programmable communication media processor, SOC single chip solution, equipped with two processors, ARM9 and DSP
Supports both high sensitivity CCD and other CMOS sensors Supports day and night applications with infrared. (Refer to model) Supports Optical Zoom and auto-focus functions. (Refer to model) H.264 baseline profile@ Level 2.2, realizes transmission of High Definition video over low network
bandwidth
Supports SD Card Storage up to 32G. (Refer to model) Supports UPNP and DDNS Built-in Web server enables the use of a standard Web browser for viewing and management
Supports IEEE802.11b/g
Supports CDMA1X and GPRS mobile network and surveillance via mobile phone
Supports dynamic IP address, LAN, Internet (ADSL and Cable Modem) Supports Network protocols:HTTP, TCP/IP, UDP, SMTP, DDNS, DNS, SNTP,BOOTP, DHCP, FTP,SNMP Supports Bi-directional real- time transmission of audio talk-back &broadcast
Network self-adapting technology that will adjust video frame rate dynamically based on available network bandwidth
Provides motion detection (Area &Sensitivity can be set) and E-mail alarm functionality
Provides RS485/RS232 serial port with several built-in high-speed domes and decoder protocols that support transparent protocols
Auto-recovery function
1.2 Specifications
Image Sensor CCD Support Sony/Sharp interlace CCD sensor
CMOS Line-Scanning CMOS sensor
Video Compression H.264 baseline profile@Level 2.2
Video Resolution CCD(tiptop) D1(704x576 PAL,704x480 NTSC)
CMOS (tiptop) VGA(640x480) ,Line-Scanning.
Adjustment of Video Parameter Brightness, Contrast, Saturation, Hue and Image Quality.
Streaming Format Pure Video Streaming or Audio Composite Streaming
Video Frame Rate CCD:1 – 25 frames/second(PAL)/ 1 – 30 frames/second(NTSC)
CMOS: 1 – 25 frames/second (Set optional)
Video Compression Bit Rate 10Kbit/S~4Mbit/S
Audio Input 1 Channel Linearity Input or no original MIC input, MIC Resistance: 2.2KΩ.
Audio Compression G.726
Audio output 1 Channel Linearity output
System Interface 10Base-T/100Base-TX Ethernet Network Interface RS485 Interface (control the pan decoding) SD Card Interface
Wi-Fi 802.11b/g

IP Camera User Manual
IR Distance Refer to model: Respectively 10M,20M,30M,50M
Lens Parameter Refer to model: support Optical Zoom and Auto-Focus function
Power Input DC 12V 1A
Maximum Power CCD: Less than 4.5W; CMOS: less than 3W
Operating Temperature -10℃ ~ +55℃
Operating Humidity 10% ~ 85%
Storage Temperature -20℃ ~ +70℃
1.3 High Speed Dome Features
All alloy outer cover: 5.9 inch transparent dome. Preset positions: 128. Precision error: less than 0.1 0 Built-in function menu.
Change speed proportionally--Pan/tilt speed and the depth of zoom lens decline proportionally
Auto- scan speed Level rotation: 360°continuous rotation.
Vertical rotation:+2° ~92°expedite rotation.
Pan control speed manually: 0.1°~100°/s.
Preset target speed: Level 250°/s;Vertical 100°/s. Automatic Scanning: programable go-switch
Preset tour positions: 8(set the preset positions)
Automatical rotation: Level rotates 180° when it is to the bottom of the vertical. Adopts low-temperature and low-power for delaying the lifetime. Can control multi-brand IP camera.
1.4 System Requirements
Minimum hardware required
◆CPU: Pentium 2.0 GHz
◆Memory: 256MB
◆Graphics Card: TNT2
◆Hard Drive: No less than 40G
Recommended hardware
◆CPU: Pentium 2.6GMhz or higher
◆Memory: 512MB
◆Graphics Card: nVidia GeForce FX5200 or ATI RADEON 7000(9000) series 128M video memory
Operation System
◆Windows 2000 / Windows XP / Windows Vista.
5 /30

IP Camera User Manual
Software
◆IE 6.0 or greater
◆DirectX8.0 or greater
◆TCP/IP protocol
2. Overview and Installation
2.1 Wired and Wi-Fi cameras
Figure 1. Wired IP camera (rear view) Figure 2. WiFi IP Camera(rear view)
Interfaces:
LAN: Ethernet Port RST: Reset Button DC12V: Power Supply, DC 12V/1A A out: Audio Output A in: Audio Input SD Card: SD Card slot AUTO IRIS: Auto Iris port, support DC Lens ANT: Wi-Fi interface ALM out: 1 Alarm output ALM in: 1 Alarm Input GND: Signal ground, alarm ground, RS485 ground RS485: 485 Control interface, connect to Pan Decoder, supports multiple pan protocols
2.2 IR Dome and IR Waterproof IP camera
Dome IP Camera IR Waterproof IP Camera
6 /30

IP Camera User Manual
Junction Box Junction Box (rear view) Interfaces: PWR: WiFi interface RESET: Reset Button CAMERAPORT: DB15 pin port connecting IP Camera. DC 12V: Power Supply, DC 12V/1A LAN: Ethernet Port AUDIO: Audio Input ALM in: 1 Alarm Input GND: Signal ground, Alarm ground, RS485ground RS485: 485 Control Port, connect to Pan/tilt or encoder, support many Pan/tilt protocols
2.3 Connecting the High Speed Dome
High Speed Dome Junction Box
Dome Wiring Connection line explanations: Orange: Connects to RS485 positive Yellow: Connects to RS485 negative Grey: Video output Red: Power supply input AC24V Black: Power supply input AC24V
7 /30

IP Camera User Manual
2.4 Hardware Installation
2.4.1 Connecting the IP camera into a Router/Switch/Hub
Router/Network Switch/Hub
Step 1: Connect the DB15 pin port from IP camera into junction box.
8 /30

Step 2: Connect Cat5e cable to RJ45 port on the junction box.
Step 3: Connect power supply (DC 12V or 24V for Dome Camera).
Step 4: Connect the other end of the Cat5e cable to your switch.
9/ 30
2.4.2 Connect IP Camera to PC
Connect the IP Camera directly to a PC with a Cat5e cable
The Network Connection Light will turn orange within 5 seconds. It indicates that you have finished the physical connection of IP Camera successfully.
3. Searching Device and ActiveX Download to Installation
3.1 Searching Device and Modify Network Parameter
Use Search NVS software to search and modify network parameters (Such as IP address, subnet mask, gateway, etc.). Use Search NVS software to search and modify network parameters (Such as IP address, subnet mask, gateway, etc.). The Search NVS running path is as following: The Search NVS running path is as following:
A: Locate the Search NVS in 【tool software】 directory from the CD and copy it to your PC. A: Locate the Search NVS in 【tool software】 directory from the CD and copy it to your PC. B: Install the Central Management software and follow the below path to locate SearchNVS:
【Start】---【all programs】--- 【NVS Center500】---【Search NVS】. B: Install the Central Management software and follow the below path to locate SearchNVS:
【Start】---【all programs】--- 【NVS Center500】---【Search NVS】. Note: Note:
The factory default settings on the IP Camera is as follows: IP: 192.168.55.160; Subnet mask: 255.255.255.0.
(Administrator)User name: admin; Password: admin Run the Search NVS software to search and modify the IP Camera network parameters. It is a
multicast protocol and the firewall will not allow multicast data packets. So closing your firewall may be required.
1. Click 【Search】button to run SearchNVS software:
In the above Search NVS software interface, it will display all IP Cameras in your LAN. If there are several IP cameras in your LAN, you will know which camera is yours by the Device Name based on the exclusive device ID number. The default Device Name was named is “DVS+ID number”. 【Connect NVS Local IP 】Display the local IP of your device. 2. Set camera’s IP address.
Your computers local gateway must be the same as the IP camera. So you need to reset the IP address on the IP camera before using. Getting the IP configuration information: On Windows, click “start”, choose “run”, then input “command” or “cmd”(Windows 2000/XP system).click “confirm”, then input “ ipconfig” and press the “enter” button. You will get following information about your computer:
10/ 30

Write down the IP Address, Subnet Mask, Default Gateway, then setup the IP Camera address according to your computer’s IP address. For example: 192.168.1.100. Make sure the Default Gateway and Subnet Mask are the same.
Click 【Set Parameters】as follows:
Modify any relative parameters; click “OK”, and then the IP camera will restart.
3.2 Check Connection
To test the IP camera connection: “Start”→ “Run”→ “command”, get following interface, input: ping 192.168.1.100. Click “Enter” button.
If your packets are received, it means the IP Camera is working normally and is connected to network accordingly. If you do not get a reply then confirm the IP address settings on your computer as well as network cables. Then use the Search NVS software to search and modify network parameters (such as IP address, subnet mask, gateway and so on).
11/ 30

3.3 Installing the ActiveX Control and Logging In You need to install the camera’s ActiveX Control when you access the IP Camera for the first time. In
most cases, ActiveX is already installed but needs to be activated when accessing the IP camera.
To install ActiveX: Download ActiveX from Internet Explorer:Input the IP address of the IP camera into Internet Explore address bar; Login as follows:
Click【File】 to download the ActiveX: Download
ActiveX
12/ 30
What will appear is a new dialog box. Click 【Run】 or 【Save】 to download the ActiveX control. After it is downloaded double-click the downloaded file “xdview.exe” and install it as follows:
Close Internet Explorer, click “Install” button, and it will install the ActiveX and display “Install OK”. Open Internet Explorer, and input the camera’s IP address. You should then see the login screen.
Input the default user name (admin) and password (admin), and click Login.
Image display
Pan control Device control Motion on Left, Right Up, Down, Level, Vertical
Video parameters
Parameter Settings
LiveView

4. Software Configurations
4.1 IP Camera Live view
Live view as follows:
In the Live view interface, User can photo Snap, Record, Replay, Speaker, Call, Cancel Alarm and adjust Video Parameters Settings. 【Speaker】Audio Switch on/off: 【Snap】Click【Snap】, snapshot is saved in JPG format. 【Record】Manually record the video and is saved in .MP6 format. 【Replay】This is replay the video recording you created.
【Call】Audio Switch, If user connects a microphone to the IP camera, sound is recorded. 【Alarm】Click【Alarm】to cancel the alarm manually. 【Pan control】Camera positioning control, when applicable. 【Video Parameters】 CCD IP Camera: brightness, contrast, color, saturation adjustments:
CMOS IP Camera: brightness and contrast adjustments:
【Lens Control】Zoom, Focus, Aperture, Light, Clip, Preset, and Pan operation:
13/ 30
4.2 IP Camera Video Playback
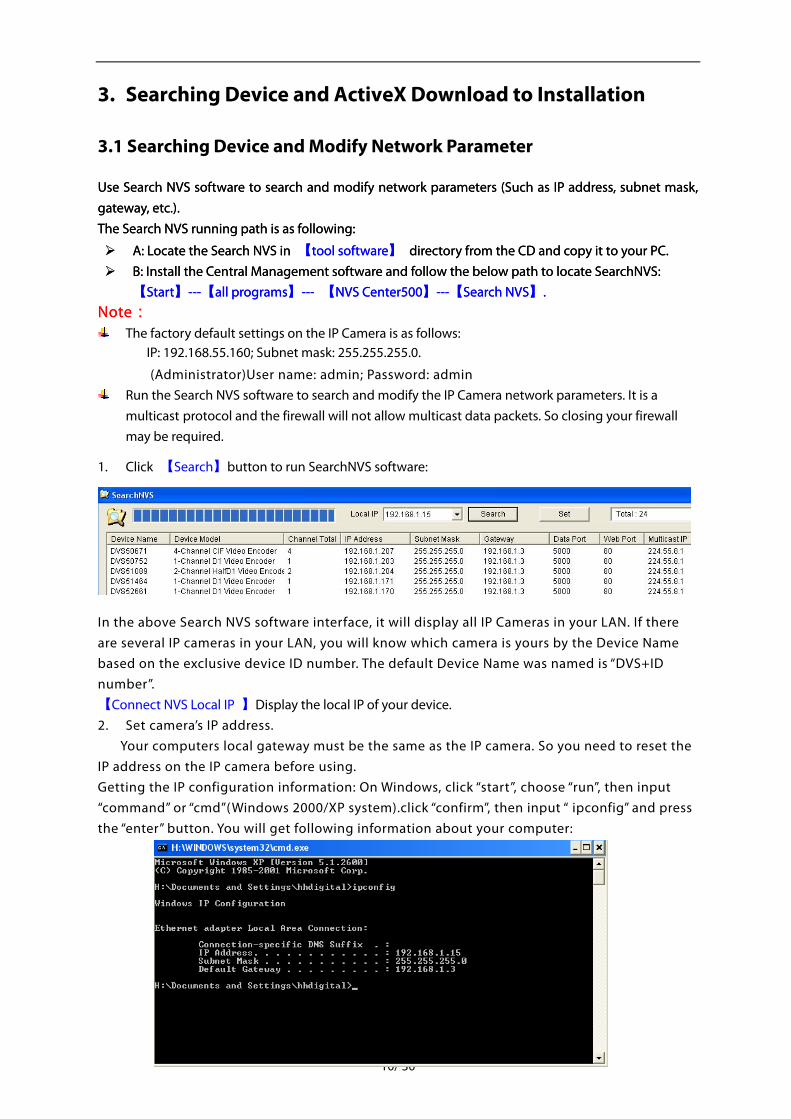
Click【Playback】and you will be directed to the following screen:
The user can search for recorded image files or snapped photos on the local PC or storage device filed by date. 【Date】Allows the user to check the recorded image files or snapped pictures by date:
【Local】Check the recorded image files or snapped pictures within your local PC by date.
【Device】Check the recorded image files or snapped pictures in the storage device used, by date.
【List】Displays the current recorded image files or snapped pictures in the list.
Check the current recorded image files or snapped pictures in the list as follows:
14/ 30

Note: The yellow icon means the current time, the blue icon means current optional time. The first row defines the hour unit of the recorded image; the second row defines minute units for the recorded image; the third row defines the hour unit for snapped pictures; the fourth row defines the minute unit for snapped pictures. 【Play】Choose the recorded image or snapped picture in the play list, then click the “play” button.
15/ 30
【Download】Search the recorded image file or snapped pictures which are downloaded from the SD card within the Play list, click the Download button to download to your local PC. 【Download information】Displayed information when “Download” is clicked:
Click【Pause】to pause download manually. Click【Start】to continue to download the unfinished file,click【Delete】to delete the downloaded file,click【Close】to close the download interface.
4.3 IP Camera System Settings
Time table
From left to right: File, Play, Pause, Stop, Reverse, Fast Forward, Frame Advance, Audio, Repeat
System Clock: Clicking TIME SYNC will synchronize the camera’s time with the current computer time.
【NTP Parameter】:Input the correct NTP server address and select the correct time zone. After saving, switch to 【Real-time Image】 . The NTP sever will show the correct system time. 【System Information】Displays device name, device number and user-defined device name. Note:Renaming the device name and saving it, will restart the device. 【Upgrade】Click 【Browse】button, and then select the correct file for upgrading. Click 【Upgrade】 to upgrade. After completion, the IP camera will reboot automatically.
Example Only:The current version of the IP Camera is V6.0.0.1; The new version of the IP Camera from the factory is V6.0.0.5(file: hh5200.ccd.6005.uke) . Click the【Browse】button,select file:hh5200.ccd.6005.uke,and click【Upgrade】button. When the upgrade is complete, it will display “upgrade successful”, and the IP camera will restart. Login and verify the new version firmware.
Note: Always upgrade firmware in sequence Allow firmware to upgrade completely. Do not recycle power or interrupt network.
【 Image Storage Path Setting】Setting storage path for image file and captured image file. Default path: C:\XDNVS
【Restore default】Will restore all parameters to factory default.
【Reboot】The IP Camera will restart after 5 seconds.
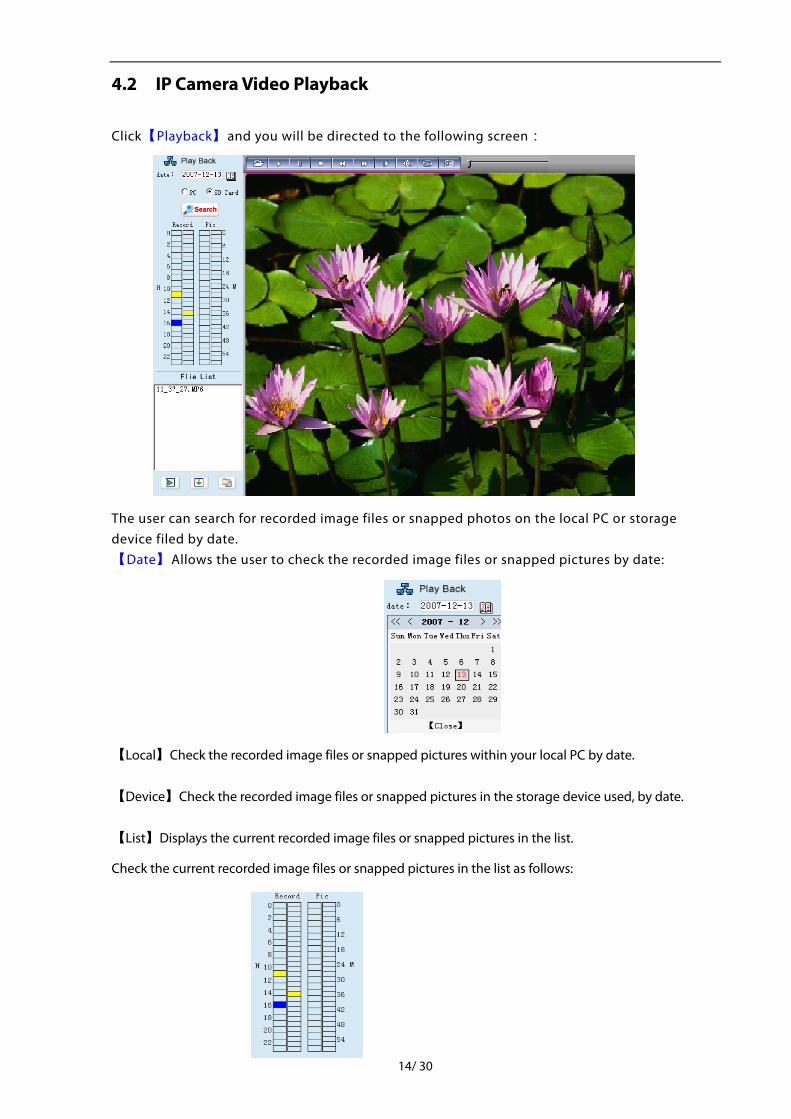
4.4 IP Camera Video Settings
IP Camera video settings as follows:
CCD Interface
【Image Resolution】: Set image resolution, CCD Camera supports PAL system D1 (704*576)/
HD1 (704*288) /CIF (352*288)/QCIF (176*144); NTSC system D1 (704*480)/HD1 (704*240)/CIF(352*240)/QCIF (176*120)
【Image Quality】: Options for Best, Good, Normal, and advanced image settings.
16/ 30
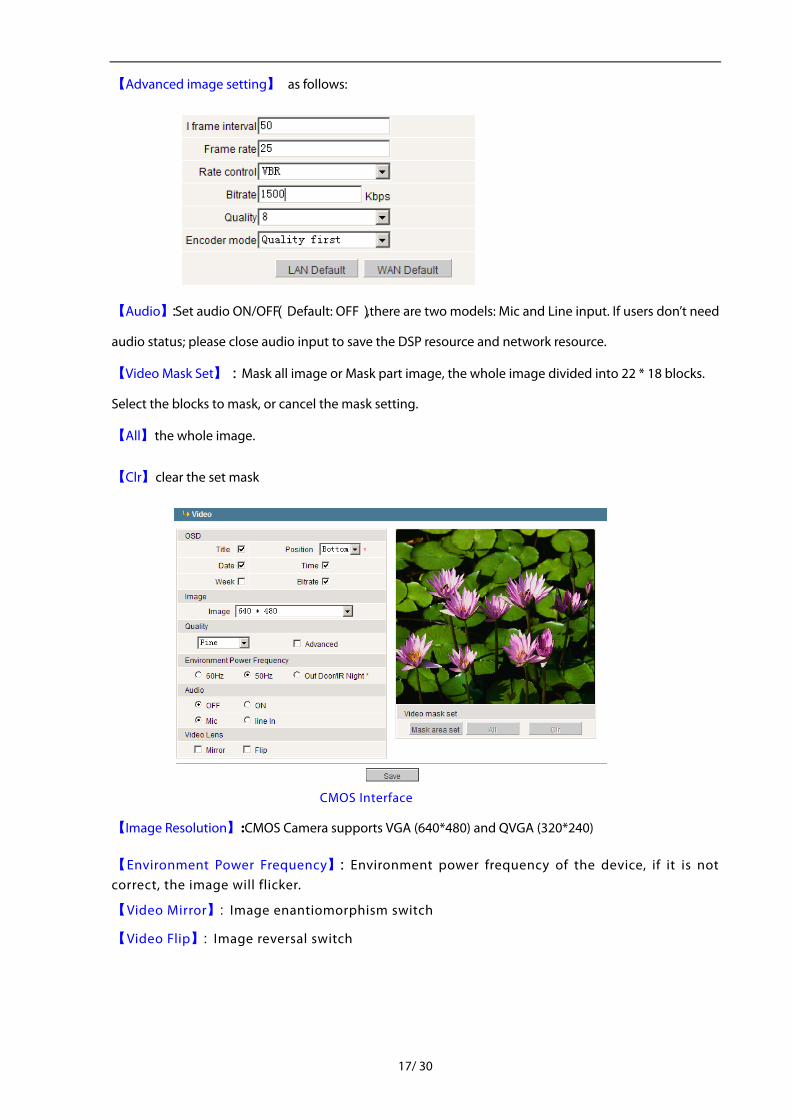
【Advanced image setting】 as follows:
【Audio】:Set audio ON/OFF(Default: OFF),there are two models: Mic and Line input. If users don’t need
audio status; please close audio input to save the DSP resource and network resource.
【Video Mask Set】:Mask all image or Mask part image, the whole image divided into 22 * 18 blocks.
Select the blocks to mask, or cancel the mask setting.
【All】the whole image.
【Clr】clear the set mask
CMOS Interface
【Image Resolution】:CMOS Camera supports VGA (640*480) and QVGA (320*240)
【Environment Power Frequency】:Environment power frequency of the device, if it is not correct, the image will flicker.
【Video Mirror】: Image enantiomorphism switch
【Video Flip】: Image reversal switch
17/ 30

4.5 IP Camera Motion Alarm Settings
Setting motion alarm parameters: include the scheduled time, sensitivity, alarm output, alarm delay, and trigger image captures to your PC or the SD card (if one is present).
【Schedule time setting】Set the time of motion alarm detection.
【Alarm output】Alarming, alarm signal output.
【Alarm delay】Alarming, clear the alarm time(the time of alarm signal output) automatically ,set the time from 0~86400 seconds.
【Alarm record in PC】Automatically recording image and stored in PC when alarming.
【Alarm capture in SD Card】Automatically captures the image to the internal SD card (if one is present). If there are continuous alarms, the interval between frames will be equal to the alarm delay set. For example, if the alarm delay is 10 seconds; it will capture an image to the SD card every 10 seconds. The image in the SD card can be downloaded to your PC. And when the SD is full, the files will be replaced automatically.
【Set motive block】Press the left button of mouse and drag to the test block.
【All】set whole area as motive test area
【Clr】clear all motive test area.
After setting, click the 【save】button.
18/ 30

4.6 IP Camera Sensor Alarm Settings
Setting sensor alarm parameters: included the schedule time, switch of the alarm, sensor type, alarm output, alarm delay, alarm record on PC or alarm capture on SD card when alarming.
【Schedule time setting】Set the time of sensor alarm detection.
【Alarm output】Alarming, alarm signal output.
【Alarm delay】Alarming, clear the alarm time(the time of alarm signal output) automatically ,set the time from 0~86400 seconds.
【Alarm record on PC】Automatically recording image and stored in PC when alarming.
【Alarm capture on SD Card】Automatically capturing image and stored in SD when alarming. If there are continuous alarms, the interval time of capturing is the delay time. For example, the alarm delay is 10 seconds; it will capture an image stored in SD card every 10 seconds. The image in SD card can be downloaded to PC when replay. And when the SD is full, the file will be replaced automatically.
After setting, click the 【save】button.
19/ 30

4.7 IP Camera Network Settings
The device will restart after setting any basic parameters. If the IP camera is connected to your LAN, make sure its IP address does not conflict with any other devices on the network.
【IP address】The camera’s own address on the network.
【Gateway】Wireless network gateway (wireless router/AP), for example: 192.168.1.1 【SSID number】It is the user name of certificate for wireless network. User can login on wireless network after checking the validation. This SSID number must be same as the SSID number of the wireless network (wireless router/AP).Save the parameters after setting. Then Pull out the cable, visit IP camera through wireless IP, for example 192.168.1.160. DDNS Setting: Setting Dynamic Domain Name Server to bind a fixed Domain Name, the server will find the device by the Domain Name even if the IP address has changed.
【DDNS User Name】User registered in DDNS server.
【DDNS Password】User Password in DDNS server.
【DDNS Domain Name】The Domain Name set for long-distance controlling after user logon in DDNS
server.
【DDNS Address】When the DDNS address is the domain Name, please set the DNS address correctly.
【Data Port Mapping】When the device mapped to TCP/IP through network server, fill in the TCP/IP data
port mapping number.
【HTTP Port Map No】 When the device mapped to TCP/IP through network server, fill in the TCP/IP
HTTP port mapping number.
20/ 30

4.8 IP Camera Advanced Parameters
Mail Setting:When a motion alarm is triggered, the device will send an alert to the provided email
address. 【SMTP Server】Email server address.
【Mail From】The FROM portion of the email header.
【Mail To】 The receiving email address.
【SMTP User Name】The user name required to access the SMTP mail server.
【SMTP Password】The password required to access the SMTP mail server.
【Mail Title】This will be used as the email’s subject line. 【Alarm send mail】Enable or disable the sending of the alert emails. 【Sensor alarm】Select this option, mail function success. When there is a sensor alarm, the device will
send the alarm mail to the designated email box automatically. 【Snap picture】Enabling this box will snap a photo when an alarm is triggered. UPNP Settings: When UPnP over LAN is supported, these settings will allow the device to be
discoverable by other UPnP devices on the network.
【UPNP Network Card】The model of network card in UPNP server.
【UPNP mode】There are designate and automate modes:
The designate mode is that the data port mapping No and web port mapping No were designated to Server. The automate mode is that the server sets the data port mapping No and web port mapping No.
【UPNP server】Gateway address of network server with UPNP function.
21/ 30
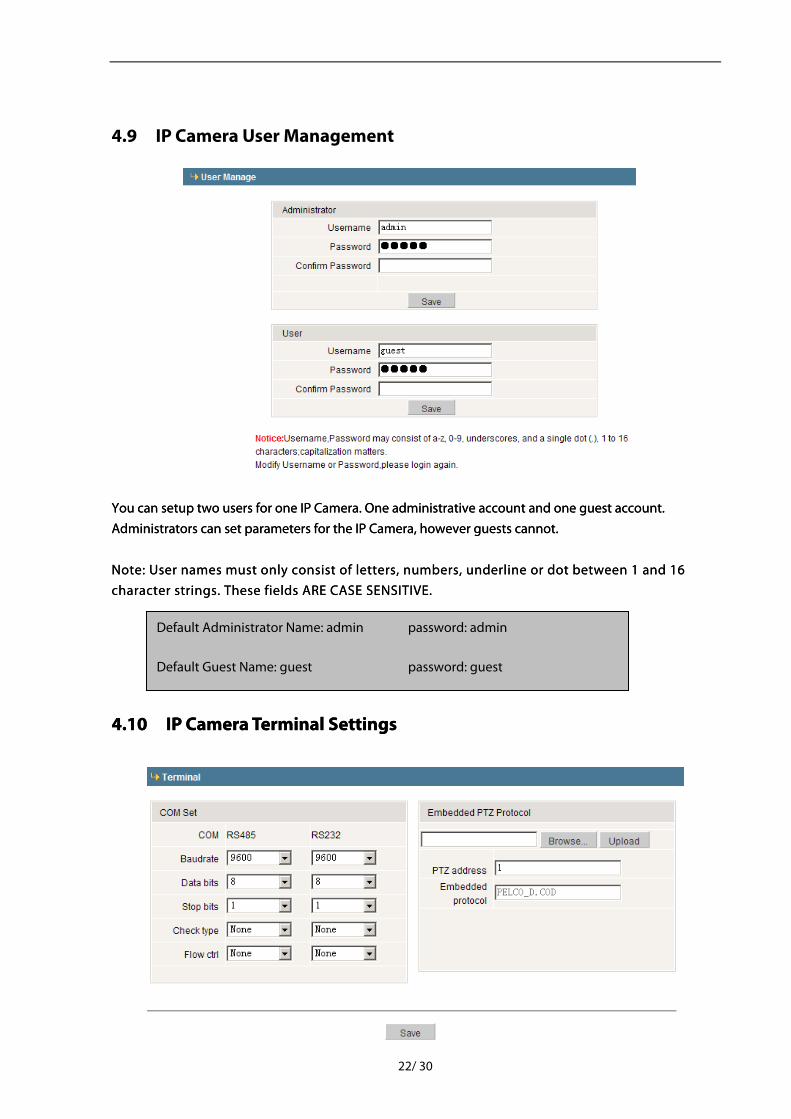
4.9 IP Camera User Management
You can setup two users for one IP Camera. One administrative account and one guest account. Administrators can set parameters for the IP Camera, however guests cannot. You can setup two users for one IP Camera. One administrative account and one guest account. Administrators can set parameters for the IP Camera, however guests cannot. Note: User names must only consist of letters, numbers, underline or dot between 1 and 16 character strings. These fields ARE CASE SENSITIVE. Note: User names must only consist of letters, numbers, underline or dot between 1 and 16 character strings. These fields ARE CASE SENSITIVE.
Default Administrator Name: admin password: admin
Default Guest Name: guest password: guest
4.10 IP Camera Terminal Settings 4.10 IP Camera Terminal Settings
22/ 30

Dome and Pan Decoder connect with RS485 port. When there is control device to connect with IP Camera, RS485 parameters need to be set according to the settings of the control device (Address, Protocol, Bit rate), and download the corresponding protocol.
4.11 IP Camera Storage Equipment
23/ 30

Appendix 1. Network Interface for IP Camera
Network ports for the IP Camera: TCP 80(Web port) 5000(Communication port, Audio/Video data
transmitting Port, Talk data transmitting Port)
UDP 5000(Audio/Video data transmitting Port)
Multiple port
Multiple original port + Channel Number
Appendix 2. Network Parameter Defaults
Network parameter defaults
Gateway: 192.168.1.1 Mode: Auto
Subnet Mask: 255.255.255.0
Wireless network parameter default:
IP Address:192.168.1.160 Frequency: Auto
Wired network parameters default:
IP Address: 192.168.55.160 Data port: 5000 Subnet Mask: 255.255.255.0 Web port: 80 Gateway: 192.168.55.1 DHCP: OFF
Appendix 3. IP Cameras in different network environments
You can use your notebook or tablet PC to connect to the IP camera through a LAN or Internet. The following will tell you how to use IP camera under the different configurations.
1. LAN The camera can be configured for Static or Dynamic IP addresses.
Static IP Address A static IP address means that your camera’s IP address was assigned manually by the administrator.
24/ 30

1. Login to the camera using Internet Explorer and select [ network setting ]; 2. Fill in the desired local IP address for your camera. 3. Enter a subnet mask. 4. Enter the gateway address.
If you’d also like to use the camera in a wireless environment, make sure the Wi-Fi Parameters are configured as well.
Dynamic IP Address
When your camera is configured dynamically, it will receive its IP address from a DHCP server.
25/ 30

Simply check Enable DHCP.
2. Internet You can connect the IP camera to the internet in three ways: Fixed IP mode, ADSL, and ADSL and IP camera’s PPPoE accesses the internet mode. After IP camera connects the Internet, the long-distance Internet user can visit the camera in the network via domain name or the IP address form directly.
Fixed IP Mode
The lining drawing as the following:
The network setting please check the following:
Step: One: Lands IP camera via IE browser, and changes to【network】; Two: Fills in the IP address which applies from the network server,
for example:218.84.31.168; Three: Fills in the correct subnet mask,for example:255.255.255.192; Four: Fills in the correct gateway address,for example:218.84.31.131; After setting, clicks on [ Save ] to restart then becomes effective.
ADSL and so on and router sharing accesses the internet mode(dynamic gains outside net IP address mode)
26/ 30

The lining drawing as the following:
Fills the username and password which applies in the DDNS server on the DDNS setting item, makes the port mapping on the router, the router judges basis different port and changes to the IP camera which must be visited, the long-distance Internet user can visit the camera in the network via domain name
form directly. The network setting please check the following:
Step:
1. Loads DDNS server( i.e.http://www.mvddns.net),Register username and password.(The
operation please check Appendix 3)
2. Clicks to open DDNS;
3. Enter your DDNS server. 4. Enter your DDNS registration name. 5. Enter your DDNS password. 6. Enter the DDNS server URL. 7. Enter the DDNS server’s port number. 8. Fill in the public data port No. which assign via port mapping. 9. Fill in the public WEB port No. which assign via port mapping.
Remark:
1. The detailed port mapping setting can visit http://88ip.net/Info/product-support.asp
2. Admin Web port mapping:80、Data port mapping:5000
3. DDNS domain name format: Application domain name + DDNS server name, For example test.mvddns.net
27/ 30

ADSL and IP camera’s PPPoE accesses the internet mode
Fills the username and password which applies in the DDNS server on the DDNS setting item, then fills the PPPoE username and password which applies in the network servicer on the PPPoE setting item,
clicks 【Save】finished ADSL Modem connect with IP camera.The long-distance Internet user can visit the camera in the network via domain name form directly.
The DDNS parameter detailed setting same with above, the PPPoE setting must fills the correct PPPoE username and password which applies from the network servicer.
Appendix 5. FAQ
1. How do I login to the camera if I’ve forgotten the passwords? Solution: Press the reset button on the back of the camera to reset the camera to factory defaults.
Note:please don't press 【RESET】if you are not professional.
2. My IP camera will not restart. What should I do? Solution: Unplug the camera’s power source. Then, depress the RESET button on the camera’s back panel. While holding RESET, plug the camera’s power source back in. After several seconds, the internal operating system will run a system restore. After a few minutes, the IP camera will start normally.
3. I don’t see an image in the browser window. Reason: ActiveX may be disabled. Solution: You need to install the ActiveX Control when you visit IP Camera for the first time.
28/ 30
29/ 30
You can install the ActiveX Control in two ways:
(1) Auto-Installation You need to lower the security level of the IE temporarily in order to install ActiveX Control into your PC as follows:
Choose Internet Options: TOOLS > INTERNET OPTIONS Click SECURITY and your current security setting is displayed. Set the security level to LOW and click APPLY Enter your camera’s address in the URL address bar. If you see a asking permission to install an
ActiveX Control, click YES. (2) Manual Installation Download and manually install the ActiveX Control package from the IP camera’s login screen. Then close Internet Explorer and run the installation program.
4. I’m having difficulty logging in to the IP camera’s web interface. Solution: Clear your browser’s cache and retry the login process.
5. I am experiencing video stuttering. Reason: The video frame rate is low Solution: Improve the video frame rate.
Reason: Too many users are viewing the video feed. Solution: Close some clients or reduce the video frame rate.
Reason: The bandwidth is low. Solution: Reduce the video frame rate or video compression bit rate 6. I’m not able to get to the camera’s login screen via my web browser. Reason: The IP address may be conflicting with another device on the network. Solution: Try connecting directly to the camera via a network cable and adjusting the IP address.
Reason: The IP address lies in another subnet. Solution: Check the IP and subnet mask, test the settings of gateway.
Reason: The physical address of network conflict with IP camera. Solution: please modify the physical address of IP camera. If none of the above solutions work, try restoring the IP camera to its default state, and connecting again. (System default IP address: 192.168.55.160, mask address: 255.255.255.0).
7. The image color is inaccurate. Solution: Some video cards may not be compatible with the H.264 video codec that this camera uses.
These issues are rare, but may result in color distortion or other image anomalies.
8. I am not receiving any audio from the camera. Solution: Check your audio output connection for loose cables. Also ensure that you enabled audio
output in the camera’s control panel.

9. The audio quality is poor or unclear. Reason: When there are many noises for the Audio and the distortion is very serious, please check the
input signal level, if it is not lineate input, the signal level is not matching with the signal level of IP Camera. And it results in the saturation distortion.
Solution: please adopt the properate lineate input accord with the IP Camera.
10. How do I fix image distortion issues?
Solution: Some graphics cards may not support the H.264 codec used by this IP camera. You may try adjusting your DirectX Acceleration settings by using START > RUN > “dxdiag”
Ensure that DirectDraw, Direct3D, and AGP Texture Acceleration are ENABLED. If they are not and cannot be started, your graphics card may not support the advanced video decoding.
30/ 30
Related Documents