IO2 - MANUAL FOR THE ADAPTIVE TRAINING IO3 - VIDEO RESOURCES

Welcome message from author
This document is posted to help you gain knowledge. Please leave a comment to let me know what you think about it! Share it to your friends and learn new things together.
Transcript
IO2 - MANUAL FOR THEADAPTIVE TRAINING
IO3 - VIDEO RESOURCES
Inclusive Karate: a new perspective to decrease
sedentary l ifestyle and increase self-confidence
in Down Syndrome
THESE OUTPUTS HAVE BEEN REALISED WITH THE
CONTRIBUTION OF ALL THE PROJECT PARTNERS
Edited by:
Partners involved:
The European Commission's support for the production of this publication does not constitute an endorsement of the contents, which reflect the views only of the authors, and the Commission cannot be held responsible for any use
which may be made of the information contained therein.
GA 2018-2512
2
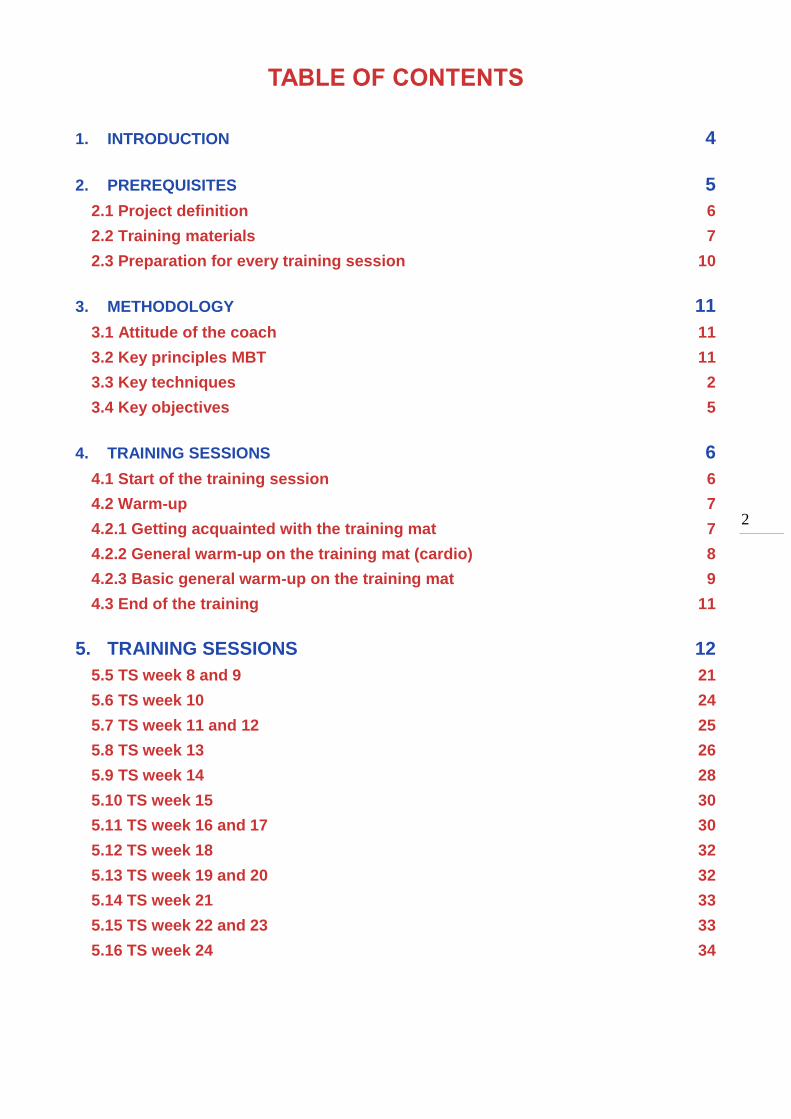
TABLE OF CONTENTS
1. INTRODUCTION 4
2. PREREQUISITES 5
2.1 Project definition 6
2.2 Training materials 7
2.3 Preparation for every training session 10
3. METHODOLOGY 11
3.1 Attitude of the coach 11
3.2 Key principles MBT 11
3.3 Key techniques 2
3.4 Key objectives 5
4. TRAINING SESSIONS 6
4.1 Start of the training session 6
4.2 Warm-up 7
4.2.1 Getting acquainted with the training mat 7
4.2.2 General warm-up on the training mat (cardio) 8
4.2.3 Basic general warm-up on the training mat 9
4.3 End of the training 11
5. TRAINING SESSIONS 12
5.5 TS week 8 and 9 21
5.6 TS week 10 24
5.7 TS week 11 and 12 25
5.8 TS week 13 26
5.9 TS week 14 28
5.10 TS week 15 30
5.11 TS week 16 and 17 30
5.12 TS week 18 32
5.13 TS week 19 and 20 32
5.14 TS week 21 33
5.15 TS week 22 and 23 33
5.16 TS week 24 34
3
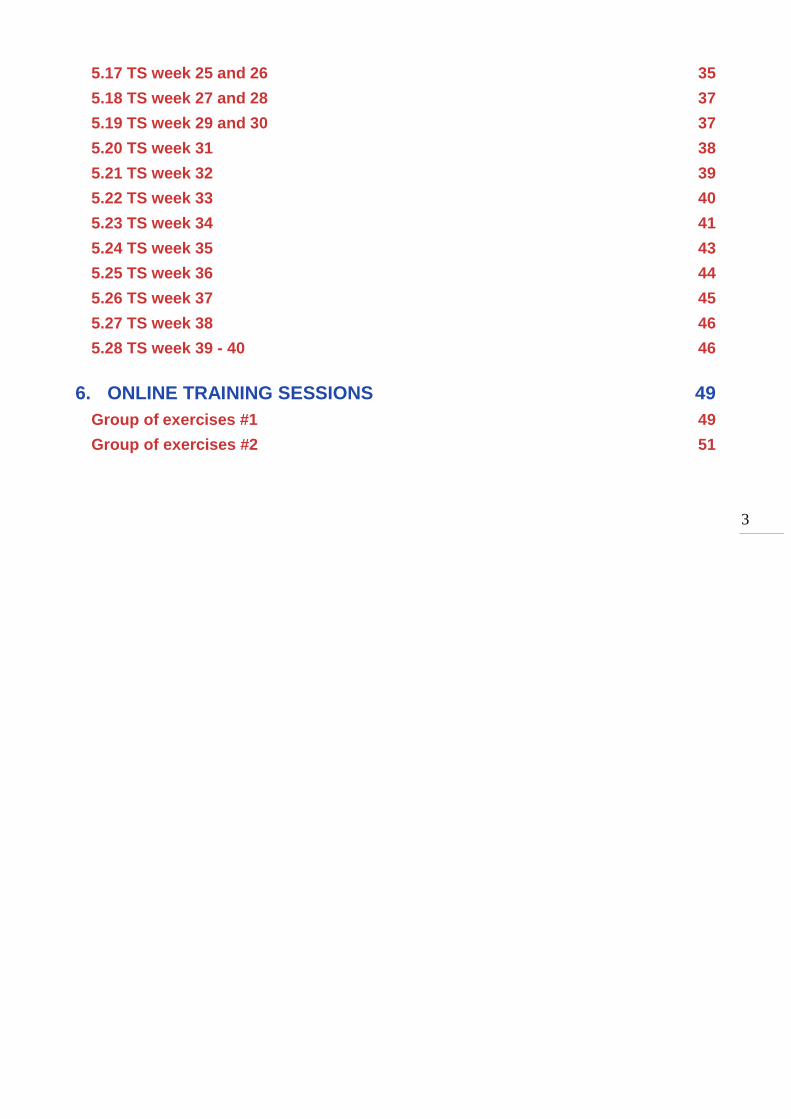
5.17 TS week 25 and 26 35
5.18 TS week 27 and 28 37
5.19 TS week 29 and 30 37
5.20 TS week 31 38
5.21 TS week 32 39
5.22 TS week 33 40
5.23 TS week 34 41
5.24 TS week 35 43
5.25 TS week 36 44
5.26 TS week 37 45
5.27 TS week 38 46
5.28 TS week 39 - 40 46
6. ONLINE TRAINING SESSIONS 49
Group of exercises #1 49
Group of exercises #2 51
4
IKONS project, funded by the ERASMUS+ SPORT programme of the European Unions,
aims to decrease the sedentary lifestyle and to increase the self confidence of people with
Down Syndrome.
This document describes the methodology and the course that will be used to provide
scientifically evidence of the benefits and a reference guide to all the karate coaches
involved in the project topics and who want to replicate the project training sessions with
their students.
The methodology described in the manual – developed by Inclusive Karate Federation
(IKF) from Belgium – is to be applied only for an intellectual impairment like Down
Syndrome. However, the guidelines contained in this manual might be usefuls also in other
contexts.
1. INTRODUCTION
2.
5
IKONS started its activities on 1 January 2019 and will last 36 months.
The project represents a solid partnership of 5 European Member States: Austria,
Belgium, Hungary, Romania and Italy.
https://ec.europa.eu/programmes/erasmus-plus/projects/eplus-project-
details/#project/602929-EPP-1-2018-1-IT-SPO-SCP
From an epidemiological point of view, DS is the most frequent of chromosomal disorders
in the world. It occurs in all countries, all races, and both genders.
Children and adolescents with DS have a range of physical problems and impairments that
may affect their motor developmen. Due to the genetic defect they show, DS individuals
are in fact characterized by a marked decrease in general coordination, reduced motor
skills and a general impairment of the cognitive functions. As a result, their inclusion in the
activities of daily living and, most of all, in leisure activities or in sport practice, are
markedly impaired.
Sport participation has demonstrated measurable physiologic and psychologic benefits in
this population. It has been showed that training a group of individuals with DS increased
their exercise self-efficacy, their positive expectation on the outcomes, decreased their
2. PREREQUISITES 3.
The project objectives are:
to promote and improve social inclusion of DS individuals through karate practice
using a new approach proposed by IKFI;
to improve physical conditions (motor skills, coordination, cognitive function), and
satisfaction in activities of daily life in DS individuals through inclusive karate
courses;
to train karate coaches in the participating countries providing them with specific
skills concerning the approach to be used in order to standardize the project
approach and make it transferable and replicable also in other contexts and
countries. The training will be organized using a “train the trainers” methodology in
order to trigger a cascade effect and involve more operators in the sector;
to organize multiplier sport events open to the public to inform them about the
content of the project and of other topics as the importance of physical activity for
the maintenance of health status; the benefits of exercise to a Down Syndrome
population.
6
cognitive–emotional barriers, improved life satisfaction, and marginally lower depression
compared to a control sedentary group.
Our project intends to exploit the special role that sport can play for people with DS as an
important contribution towards social cohesion and more integrated societies, supporting
the ‘sport for all’ principle by increasing people with DS participation in sport at non
competitive level and paying special attention to social inclusion in sports of disadvantaged
groups.
IKONS wants to involve people with DS in martial arts and in particular, karate. At present,
karate is not widely participated in people with DS, whereas this discipline in this
population could be helpful. Karate, for its nature, is a discipline capable to largely improve
coordination, motor skills and also cognitive functions.
However, there are structural prerequisites that have be met before applying and using
this method. These prerequisites, not covered in this manual but shown in this list, can be
acquired with special training courses:
Disability (definition and nomenclature).
Understanding of disability, meanings of the terms.
Classification of disabilities (How the disabled person is classified in the sports field
according to the disability and its severity).
Disability of possible interest for sports participation: Trisomy, Paraplegia, Delay,
Autism, Blindness, Deafness, Post trauma/pathology, etc. (Monothematic analysis
of some of the most frequent disabilities present and potentially interested in a
motor playful environment as a recovery and inclusion system).
Federations reports (Regulation, membership, protocol of agreement with the
national federation, insurance coverage and membership of the club/school).
Role of the coach (Analysis of how the coach modifies the psychophysical structure
of the subject entrusted to him both from a physical and social point of view).
2.1 Project definition
This manual and the methodology described therein were developed by I-Karate Global
(Belgium, project partner) over the course of 20 years of experience. The program
includes two training sessions per week for a period of 40 weeks (10 months).
A low coach/student ratio improves learning. It is, therefore, recommended that some
assistants participate in the training sessions who can, especially in the first phase
sessions, increase the feedback and support students in the learning process.
The methodology described in this manual refers specifically to the training program
applicable specifically to the selected population (Down Syndrome) and in accordance with
the objectives pursued by the project.
Naturally, hoping that this methodology might also be applied to other special populations
and in other contexts, it should be emphasized that the number of the sample to which the
7
protocol can be administered may be susceptible to variations in numerical terms,
according to the populations and conditions of the case.
2.2 Training materials
The following materials need to be used in the training sessions.
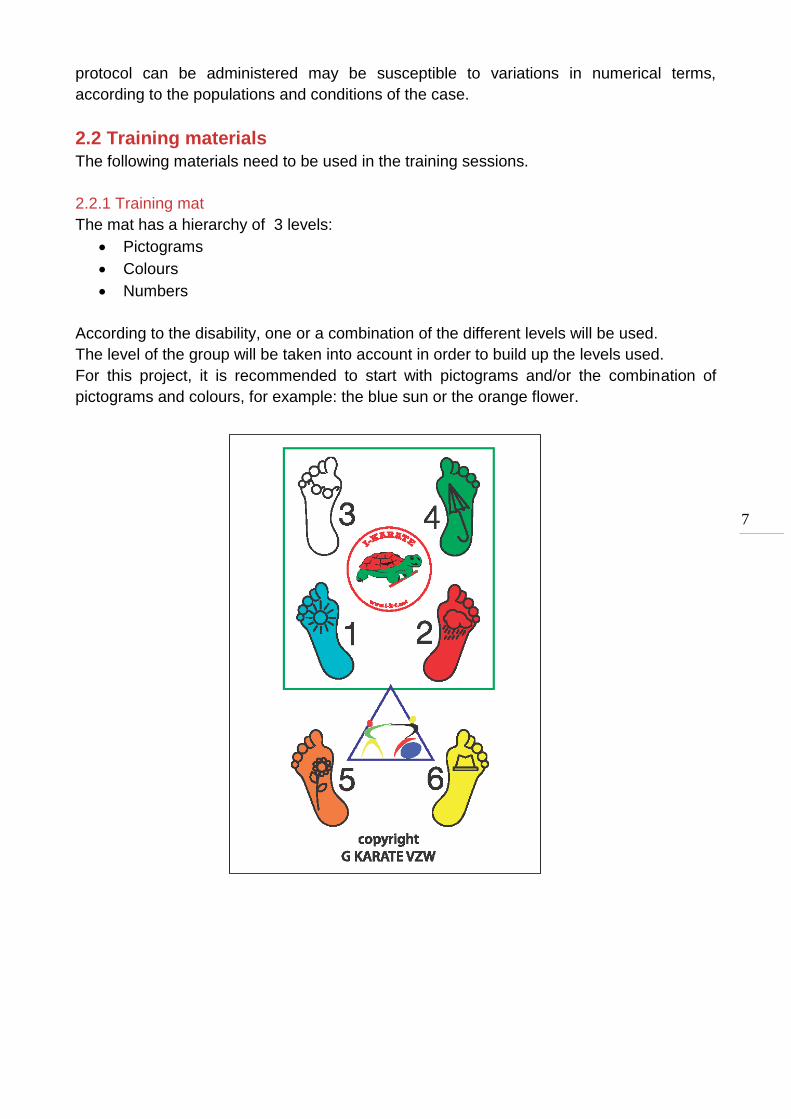
2.2.1 Training mat
The mat has a hierarchy of 3 levels:
Pictograms
Colours
Numbers
According to the disability, one or a combination of the different levels will be used.
The level of the group will be taken into account in order to build up the levels used.
For this project, it is recommended to start with pictograms and/or the combination of
pictograms and colours, for example: the blue sun or the orange flower.
8
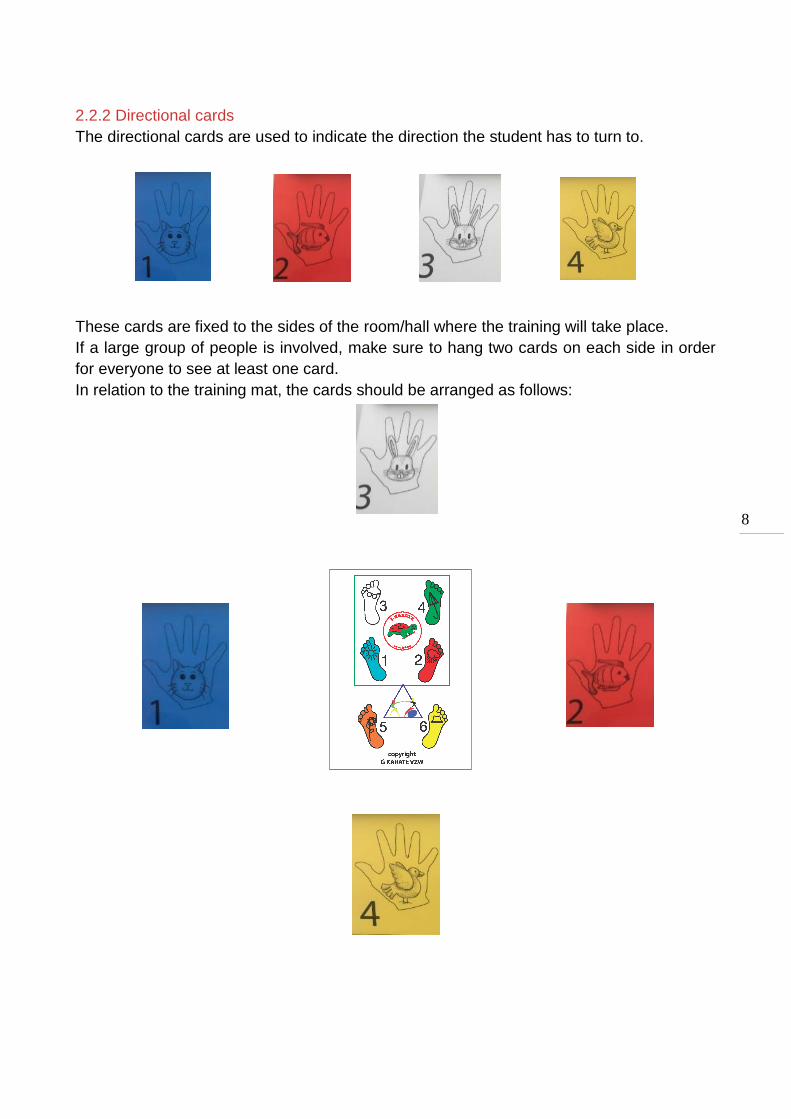
2.2.2 Directional cards
The directional cards are used to indicate the direction the student has to turn to.
These cards are fixed to the sides of the room/hall where the training will take place.
If a large group of people is involved, make sure to hang two cards on each side in order
for everyone to see at least one card.
In relation to the training mat, the cards should be arranged as follows:
9
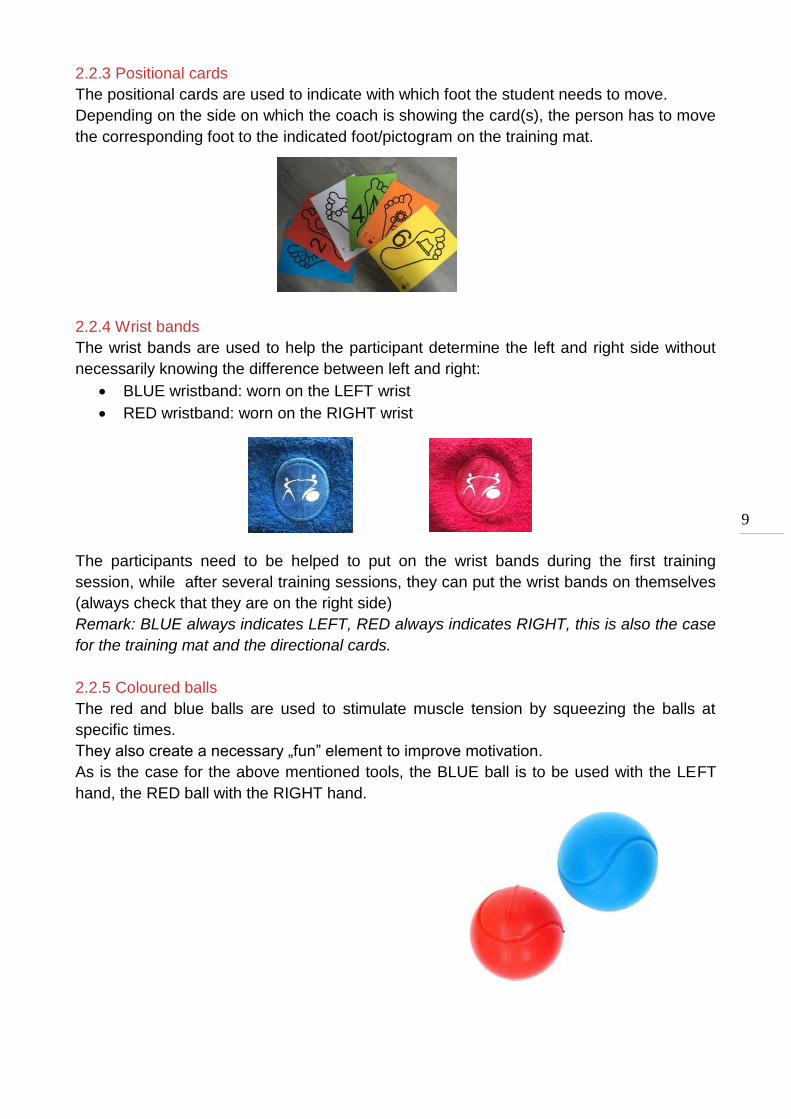
2.2.3 Positional cards
The positional cards are used to indicate with which foot the student needs to move.
Depending on the side on which the coach is showing the card(s), the person has to move
the corresponding foot to the indicated foot/pictogram on the training mat.
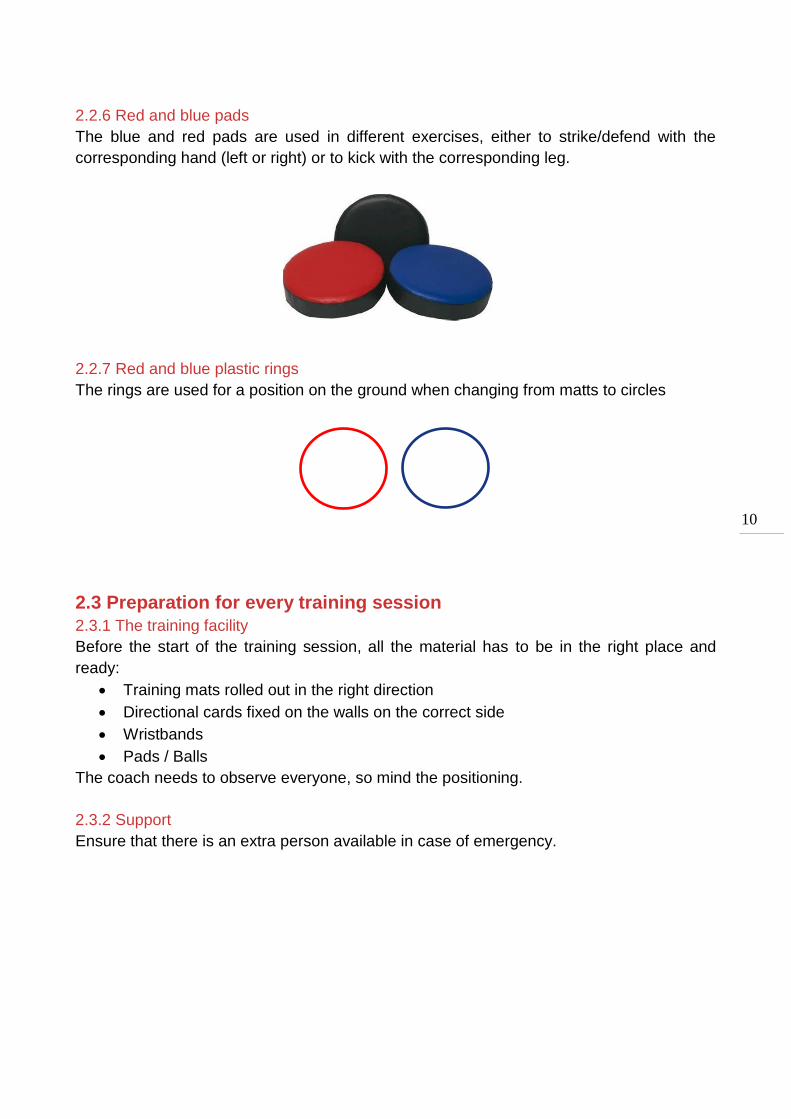
2.2.4 Wrist bands
The wrist bands are used to help the participant determine the left and right side without
necessarily knowing the difference between left and right:
BLUE wristband: worn on the LEFT wrist
RED wristband: worn on the RIGHT wrist
The participants need to be helped to put on the wrist bands during the first training
session, while after several training sessions, they can put the wrist bands on themselves
(always check that they are on the right side)
Remark: BLUE always indicates LEFT, RED always indicates RIGHT, this is also the case
for the training mat and the directional cards.
2.2.5 Coloured balls
The red and blue balls are used to stimulate muscle tension by squeezing the balls at
specific times.
They also create a necessary „fun” element to improve motivation.
As is the case for the above mentioned tools, the BLUE ball is to be used with the LEFT
hand, the RED ball with the RIGHT hand.
10
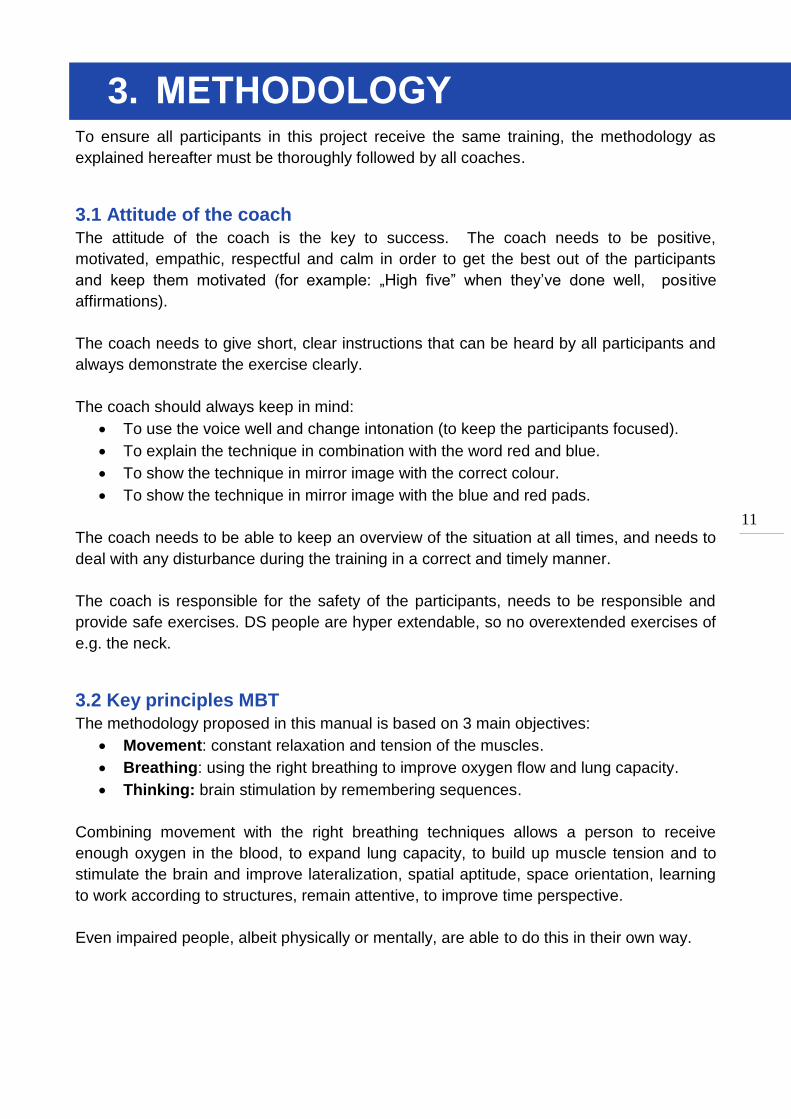
2.2.6 Red and blue pads
The blue and red pads are used in different exercises, either to strike/defend with the
corresponding hand (left or right) or to kick with the corresponding leg.
2.2.7 Red and blue plastic rings
The rings are used for a position on the ground when changing from matts to circles
2.3 Preparation for every training session
2.3.1 The training facility
Before the start of the training session, all the material has to be in the right place and
ready:
Training mats rolled out in the right direction
Directional cards fixed on the walls on the correct side
Wristbands
Pads / Balls
The coach needs to observe everyone, so mind the positioning.
2.3.2 Support
Ensure that there is an extra person available in case of emergency.
11
To ensure all participants in this project receive the same training, the methodology as
explained hereafter must be thoroughly followed by all coaches.
3.1 Attitude of the coach
The attitude of the coach is the key to success. The coach needs to be positive,
motivated, empathic, respectful and calm in order to get the best out of the participants
and keep them motivated (for example: „High five” when they’ve done well, positive
affirmations).
The coach needs to give short, clear instructions that can be heard by all participants and
always demonstrate the exercise clearly.
The coach should always keep in mind:
To use the voice well and change intonation (to keep the participants focused).
To explain the technique in combination with the word red and blue.
To show the technique in mirror image with the correct colour.
To show the technique in mirror image with the blue and red pads.
The coach needs to be able to keep an overview of the situation at all times, and needs to
deal with any disturbance during the training in a correct and timely manner.
The coach is responsible for the safety of the participants, needs to be responsible and
provide safe exercises. DS people are hyper extendable, so no overextended exercises of
e.g. the neck.
3.2 Key principles MBT
The methodology proposed in this manual is based on 3 main objectives:
Movement: constant relaxation and tension of the muscles.
Breathing: using the right breathing to improve oxygen flow and lung capacity.
Thinking: brain stimulation by remembering sequences.
Combining movement with the right breathing techniques allows a person to receive
enough oxygen in the blood, to expand lung capacity, to build up muscle tension and to
stimulate the brain and improve lateralization, spatial aptitude, space orientation, learning
to work according to structures, remain attentive, to improve time perspective.
Even impaired people, albeit physically or mentally, are able to do this in their own way.
3. METHODOLOGY 4.
12
The heart can be stimulated by a combination of relaxation and tension, allowing the body
to receive a thorough blood flow.
In order to make sure that every participant breaths correctly, we suggest to pronounce the
word „HET” (pronunciation: „hut”, the Dutch word for „the”). This way participants can
combine breathing and movement directly in an easy and understandable way.
In regular karate exercises, the abdominal muscles are tensed after each
technique to secure the technique. It also allows for an increase of muscle tension.
When the tongue is pushed against the palate without opening the mouth too much, a
person can exhale more powerfully.
The same effect is achieved by saying the word „HET”, because it has to sound like this.
It’s called a closed energy-circle in Tai Chi.
Using the word „HET” also provides the participant an outlet, because „HET” may also be
shouted.
Using “HET” as well as the contraction of the body may be the “key switcher” tomotivate
more the participants to keep practicing.
Teaching exercises to build up muscle tension in combination with the word “HET” can be
done in a rather simple way.
For example: squeezing a soft ball and simultaneously saying the word “HET”.
According to a person’s ability, this can range from tensing the arm along with the breast
muscle and side back muscle to only tensing the lower arm or even just closing the hand.
Brain stimulation is achieved by a methodology that triggers the brain:
Using and memorising pictograms, colours and numbers.
Lateral and directional movements by using the mat and the directional cards.
Crossed movement.
Replacing left and right by red and blue.
Teaching (easier) variations of the exercise that needs be performed at the
moment.
Learning to use technical exercises.
Keeping focus.
All of the above techniques are used throughout every element of a training session.
2
Coaches should not combine all of the techniques at once, but they have to add one
technique at a time:
Starting with exercises on the spot.
Adding the breathing technique by making the person say “HET”.
Finally, adding the movement (lateral and/or directional).
The key is to slowly build up exercises and perform many repetitions of the same exercise.
Positive reinforcement and enthusiasm are very important to increase the motivation and
self-confidence of the participants in the training.
3.3 Key techniques
The key techniques used in the training sessions are:
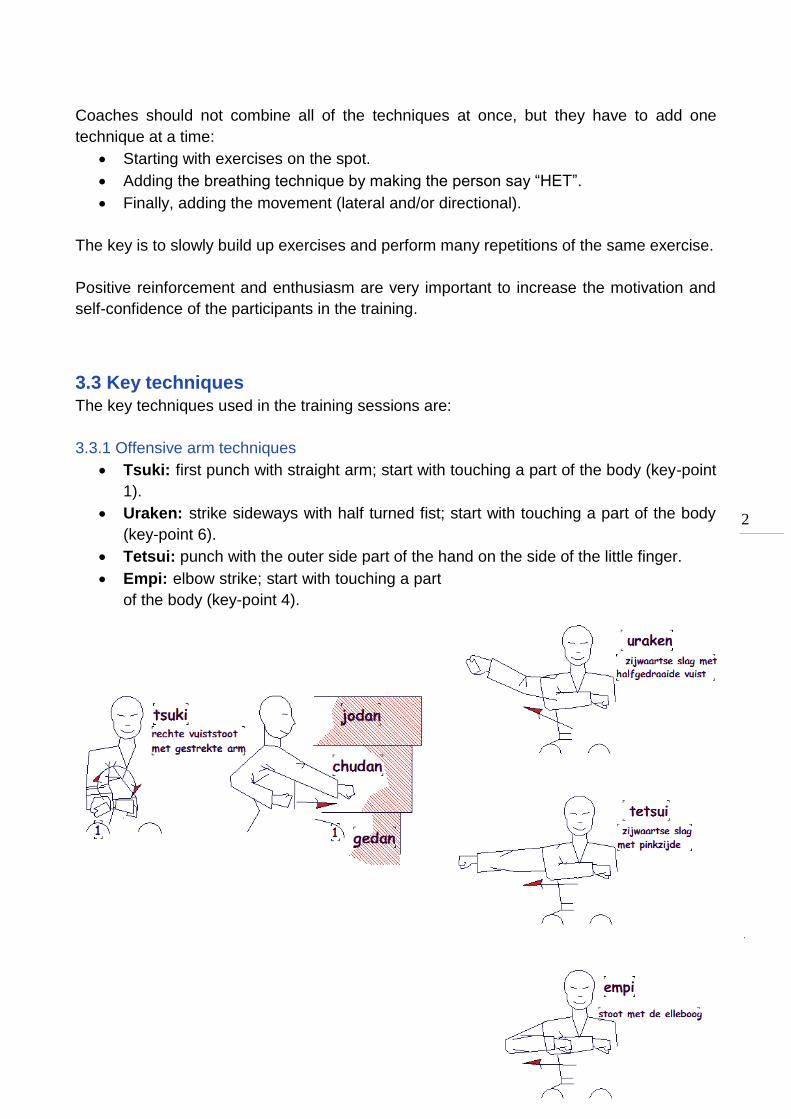
3.3.1 Offensive arm techniques
Tsuki: first punch with straight arm; start with touching a part of the body (key-point
1).
Uraken: strike sideways with half turned fist; start with touching a part of the body
(key-point 6).
Tetsui: punch with the outer side part of the hand on the side of the little finger.
Empi: elbow strike; start with touching a part
of the body (key-point 4).
3
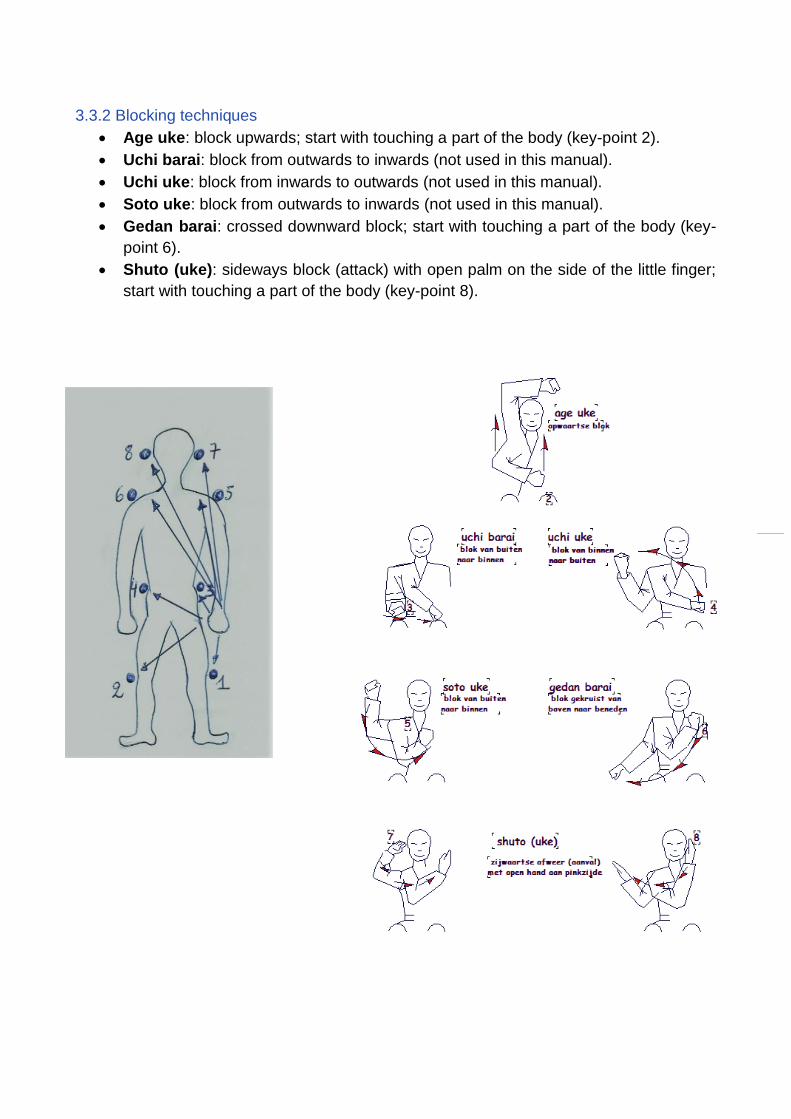
3.3.2 Blocking techniques
Age uke: block upwards; start with touching a part of the body (key-point 2).
Uchi barai: block from outwards to inwards (not used in this manual).
Uchi uke: block from inwards to outwards (not used in this manual).
Soto uke: block from outwards to inwards (not used in this manual).
Gedan barai: crossed downward block; start with touching a part of the body (key-
point 6).
Shuto (uke): sideways block (attack) with open palm on the side of the little finger;
start with touching a part of the body (key-point 8).

4
3.3.3 Foot techniques
Mae geri: front kick
3.3.4 Kihon-Kumite
Coaches should use the method:
- open hands at the hips and closed during thrust. Coordination will be stimulated.
- close the hands at the last moment (Kime) so the contraction of muscles is more focused
at the last moment (Kime)
say the word “HET” at the end of the movement;
the coach presents the pads to everyone;
if there are enough coaches, they can train with 2 or 3 students;
the coach will change partner after each exercise.
Important remark: colours are used in the description, but pictograms need to be used instead
(in combination with the colours).

5
3.4 Key objectives
The key objectives of the training sessions are for the participants to be able to perform:
Kihon: Exercise without partner
Kumite: Exercise with partner
Kata: Imaginary opponent
Participation of trained people with this methoid in an I-Karate Global IFK competition
might be considered as an achievement of the project in future perspective
3.4.1 Kihon
Building up structures with the mat as guidance. Both offense and defence are demonstrated in
the video you will find in the training sessions.
3.4.1 Kumite
Practice the structures with a coach or a partner. Building up the complete set of movements
(both offense and defence) required for the kumite are demonstrated you will find them in the
training sessions.
3.4.2 Kata
Building up the complete set of movements required for the kata are demonstrated in the video
you will find in the training sessions.
It is clear that teaching both kumite and kata requires a predefined development of the exercises
in order to achieve the end result. Coaches should keep in mind that the technique is only
secondary in this project, the main objective is the MBT-principle!
The methodology to build up the exercises week after week in the training sessions will be
described extensively for every training session in the following chapters.

6
Every training session needs to take place in the same way, based on a general outline, the
methodology and specific instructions for each session.
The general outline of each session is as follows:
Start of the training
Warm-up
Kihon
Kumite
Kata
End of the training
For every element of the training, the described methodology needs to be followed.
It is always allowed to combine training from previous weeks.
4.1 Start of the training session
The coach should prepare the participants by:
Putting on the wristbands
Standing on the training mat on the turtle (socks may be kept on, but no shoes on the
mats)
Once everyone is ready, the coach will stand in front of the participants.
The coach bows and says “REI” and the participants bow and say “OSS”.
4. TRAINING SESSIONS 5.
7
4.2 Warm-up
It is imperative coaches explain everything to the participants, by first naming the colour (blue or
red) and then saying the exercise, for example: blue crossed on the shoulder, red on the hip, ...
Exercises should be kept simple!
Coaches should pay attention to the following during the warm-up:
hands, arms, shoulders, head, torso;
bowing of the torso, sit down if necessary;
apply exercises crosswise, tap, rotate;
exercises by means of mats, pads, balls, rings;
balance on 1 leg;
exercise with tension and relaxation in combination with “HET”.
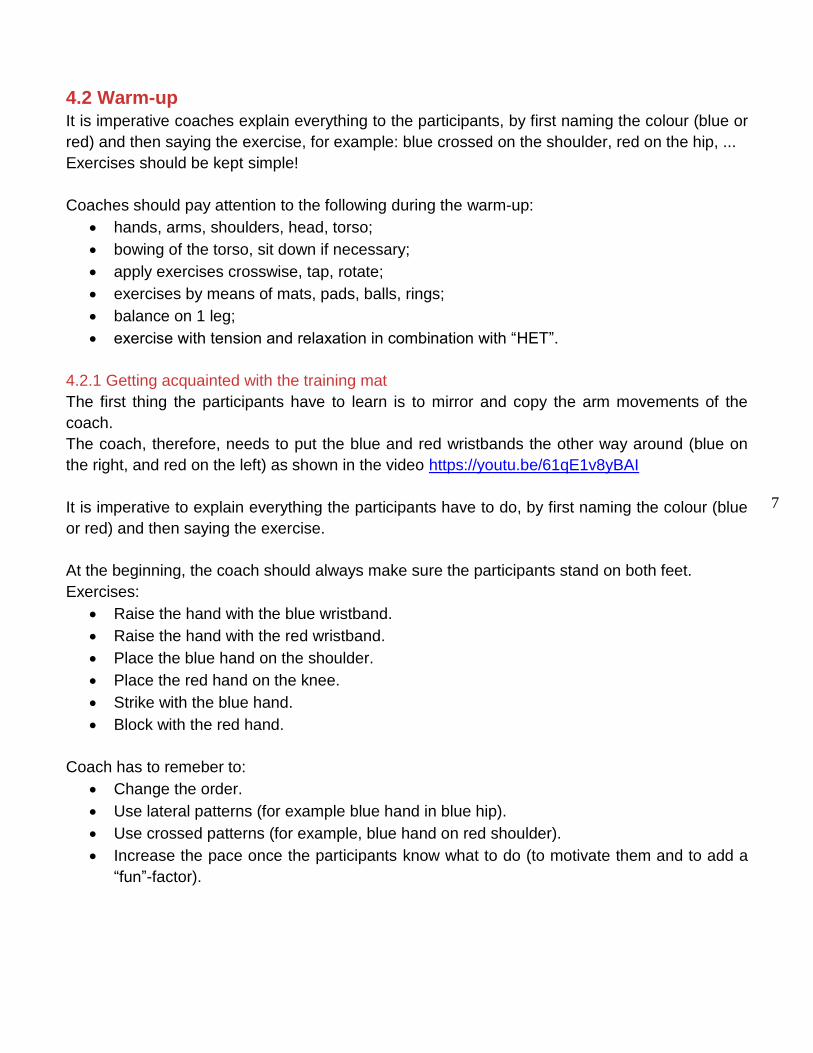
4.2.1 Getting acquainted with the training mat
The first thing the participants have to learn is to mirror and copy the arm movements of the
coach.
The coach, therefore, needs to put the blue and red wristbands the other way around (blue on
the right, and red on the left) as shown in the video https://youtu.be/61qE1v8yBAI
It is imperative to explain everything the participants have to do, by first naming the colour (blue
or red) and then saying the exercise.
At the beginning, the coach should always make sure the participants stand on both feet.
Exercises:
Raise the hand with the blue wristband.
Raise the hand with the red wristband.
Place the blue hand on the shoulder.
Place the red hand on the knee.
Strike with the blue hand.
Block with the red hand.
Coach has to remeber to:
Change the order.
Use lateral patterns (for example blue hand in blue hip).
Use crossed patterns (for example, blue hand on red shoulder).
Increase the pace once the participants know what to do (to motivate them and to add a
“fun”-factor).
8
Next, the participants have to learn the pictograms for the feet on the mat.
Coaches have to work with them 1 to 1 and ask them where the pictograms on the mat are
situated. The turtle cannot be missed!
Next, coaches can use the positional cards (see 2.2.3).
Exercises:
The coach shows each card and the participants stand (with 2 feet) on the corresponding
picture on the training mat as shown in the video https://youtu.be/2xV1NKu2yts
The coach splits up laterally showing 2 cards at the time as shown in the video
https://youtu.be/buSx1Wxwiw8
The coach splits up crossed showing 2 cards at the time (1 foot forwards or backwards)
as shown in the video https://youtu.be/-dGmjIGOB5Q
The participants stand on the blue (sun) and red (cloud) foot on the mat, the coach shows
1 card and they move 1 foot
The coach uses 4 cards (front and back cards) to make the participants switch feet
positioning
The coach moves the left (blue) foot to the white glasses
The coach moves the right (red) foot to the yellow hat
Repeatedly to this, the coach has to change the order and increase the pace
After a few lessons, the coach can introduce the blue and red balls to the exercises.
Coaches have to make sure the participants hold the balls correctly (blue ball in the hand with
the blue wristband, …).
Exercises:
The coach touches the pictogram with the coloured ball requested and shows the
pictogram with the coloured wristband they want to be used by the participants as shown
in the video https://youtu.be/VMiBktNhA-I
The coach can add a bit of creativity. They can ask the participants to put their feet on the
2 pictograms showed. They remain on these pictograms and need to touch the pictogram
showed them by the coach, with the coloured wristband…as shown in the video
https://youtu.be/yEsKTCo3qSU
4.2.2 General warm-up on the training mat (cardio)
The coach either places the mats one after the other or lets everyone stand behind his/her own
mat. The coach shows the exercise first and explain to the participants that they can either jump
or step!
Every exercise has to be repeated at least 3 times!
The coach has to tell the participants which hand or foot they have to move! (for example: move
your hand from the white glasses to the blue sun…)

9
Start standing behind the mat as shown in the video https://youtu.be/JxGboDmLqYQ
The coach says a pictogram, number or colour and participants have to:
o Run around the mat arriving at the correct side.
o Run at the correct side of the mat and tap the pictogram with a foot or a hand and continue
running around the mat until the starting point.
o Run at the correct side of the mat, 1 foot on each foot on the mat back until the starting
point.
o Run at the correct side of the mat, both feet on each foot of the matt on and off.
o Choose the correct side and hop on the 6 feet of the mat.
o Use one of the exercises above and run at the correct side of the mat, but first clap the
hands or tap knees... and then perform the exercise the coach explains.
The coach places the participants behind the mat laid one after the other (slowly and all at
their own pace) as shown in the video https://youtu.be/seTAHWUObic and they have to:
o Walk over on all feet and return (…repeat).
o Jump or place 2 feet on every pictogram.
o Jump on the first 2 feet, then to the next feet and start again.
o Jump on the first 2 feet, then feet off the mat and back to the next.
o Hop on every foot with the correct colour red or blue or balance on the foot we ask you to
stay on with the correct side.
o Jump on the first 2 feet then one foot on the circle, back to feet together and then one foot
on the triangle.
o Jump on the first 2 feet, then feet next to the mat at one side and back on the next feet.
o Jump on the mats with hands on the hips, stretch the arms at then jump.
o Jump on the first 2 feet and turn 180° on the same foot than next 2 feet and turn again
180°.
All these exercises can be done with turning on the last 2 feet and doing the exercise back to the
starting point.
The coach places the participants behind the mat on the knees (slowly and everybody
at his/her own pace):
o 2 hands on every pictogram and move to the next, the coach tells them the pictograms.
o Same but the knees cannot touch the ground.
4.2.3 Basic general warm-up on the training mat
At the beginning, the coach has always to make sure the participants stand on the blue (sun)
and red (cloud) foot on the mat.
The words BLUE and RED have to ne used not left or right.
It has to be clear to the participants to mirror and copy the arm movements of the coach.
The coach has to test the participants every time by raising the arm with the red (or blue)
wristband.
10
This way he/she can check who understands and if the participants have placed the wristbands
on the right arm.
The coach introduces the word “HET” while closing both hands and saying “HET” at the same
time.
Next: the participants close the hand of the colour the coach shows and say “HET”.
1. Several possibilities copying the coach (coach can use the pads it is more visual):
starting with the hands open placed on the hips and stretch 1 arm as shown in the
video https://youtu.be/Oj2YGjXJs58
to the front, back, side or upwards, crossing shoulder, knee, hip;
stretch both arms in different directions and place them back on the hips;
next don’t go back to the hips and move the arms from your previous position as
shown in the video https://youtu.be/S3wJz-eTS5Y
The coach calls whatever participants are going to do with red and blue starting from the hips.
For example: blue crossed on the knee, red not crossed on the shoulder; blue to the back red
crossed at the ear … use the 8 points see design.
2. More exercises (coaches are free to use their creativity):
fingertips on the shoulders, open and close the elbows;
fingertips on the shoulders and place your ear close to your red or blue wristband;
hands on the hips look at the red (fish) card and at the blue (cat) card, the yellow
(bird) card;
combination of hands on the shoulders, stretch, side and back to the shoulders (the
coach should call it);
open and close hands, tap fingers separately.
3. Working with crossed patterns is important. These exercises are also possible with one or
two coloured balls:
Starting position: arms opened: From this position, cross your hands on your
shoulders.
Starting position: arms opened: from this position, cross, cross your hands on your
knees, and then combine this exercise with the previous one.
single tap with blue on the knee, the knees crossed and then the shoulder crossed
and stretch then single tap with red on the knee…
clap your hands and then cross your hands on the shoulders and repeat…
clap two hands on the knees, a first time without crossing them, a second time
crossing them., repeat…
red open at the ear with tapping or clapping crossed and back …
place feet next to red and blue, next to the mat, bend your knees and hands on the
tortoise and stretch back.
11
4. The coach takes the wristband off or takes a red and blue ball:
squeeze the ball while stretching the arm and use the word “HET” as shown in the
video https://youtu.be/qEa3YYvBqZY
showing ball or wristband, the participants have to grasp the ball/wristband with the
same colour than their wristband;
now they have to do an in-between exercise like clap the hand, or tap knees
crossed…
than they can grasp the ball as shown in the video https://youtu.be/RFw33rwKSfk
the coach shows both balls and the participant can choose, the coach can close the
hand at the last moment;
the coach makes horizontal, vertical or round movement with the ball at a pace the
participant can grasp the colour of ball/wristband the coach will announce.
5. Double basic (starting with open hands on the hips) “HET” :
do the defend double and then combine the following actions: stretch, high up, elbows
against each other, crossed shoulder and down, hips crossed and look in your wrist,
crossed open at your ears and high five twice as shown in the video
https://youtu.be/vS3rhNAUH-8
do attacks double and then combine the following actions: crossed shoulder elbow
side hands closed, thrust forward hands open in the hips, hands crossed the shoulder
arms open hands closed “like opening a newspaper” as shown in the video
https://youtu.be/GVz9PSmrU1E
4.3 End of the training
At the end of the training (in case of different belts), the participants stand on one line according
to belt or stand on the turtle. The coach bows and says “REI” and the participants bow and say
“OSS”. The coach congratulates everyone after the training and applauds.
Organising and teaching each training session (TS) the same way is paramount to ensure
reliable results in this programme.
Each TS will be described in detail in the following pages.
In order to maximise this method’s results, it is recommended to
organise 2 training sessions per week.

12
The following training method is, thus, developed over a period of 40 weeks and then, it should
be adapted in case coaches might want to organise fewer sessions.
5.1 TS week 1 and 2
5.1.1 Warm-up
Getting acquainted with the mat and general warm up as described in 4.2.1 – 4.2.2.
5.1.2 Kihon on the training mat (with pads)
Watch the video https://youtu.be/suVfD4KsSb4
Start from ORANGE-YELLOW (coach uses pads red and blue in mirror vision).
The coach open both hands and stretch them out. The coach says the colour and the
student closes that same hand.
The coach says the colour on the spot and shows that colour (the coach stretches that
arm with correct colour pad “tsuki”).
Shifting on the colour (the coach calls the colour or symbol of the foot and shows the
correct colour of the pad) and stretching the right colour out and the right foot (the coach
can slightly rest his foot on that of the participant if he/she doesn’t let his foot rest).
The coach calls the colour on the spot and shows that colour (coach bend that arm with
red pad “age uke”).
Shifting on the colour (the coach calls the colour or symbol of the foot and shows the
correct colour of the pad) and flex the arm of the right colour and the right foot.
Now combine the 2 movement forwards while showing with the pads the arm as a “tsuki”
or as a “age uke”
5. TRAINING SESSIONS 6.
Student
13
In between task: the student performs the exercise, but now the coach has to suggest another
movement that the student has to perform before doing the above exercise, but with hands, with
the following steps:clapping the hands 1 time then step forwards
o touching both knees or cross the hand on the knees then step forward.
o turning 360° to the coloured side the coach is showing then step forward.
o combine one of the exercises before stepping forwards.
Repeat the above starting on BLUE-RED (instead of orange-yellow).
Repeat the above starting on WHITE-GREEN (instead of orange-yellow).
5.1.3 Kumite on the training mat (with pads)
Watch the video https://youtu.be/yrBbRe6SsmM
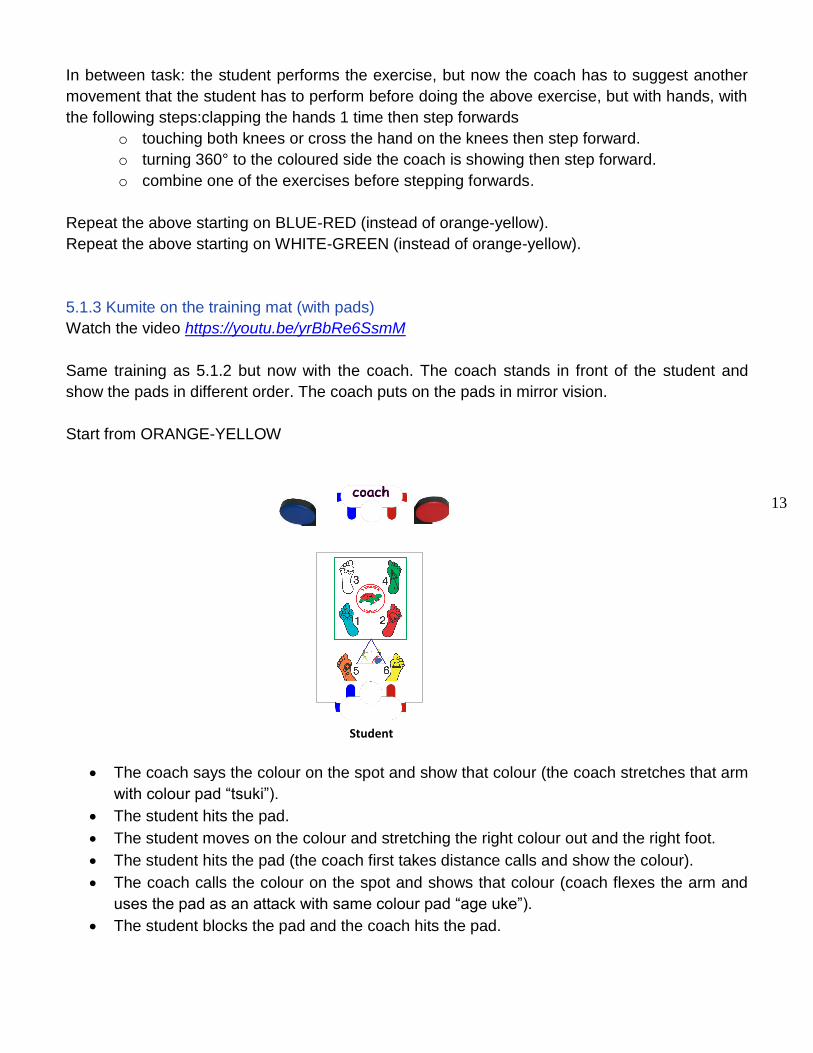
Same training as 5.1.2 but now with the coach. The coach stands in front of the student and
show the pads in different order. The coach puts on the pads in mirror vision.
Start from ORANGE-YELLOW
The coach says the colour on the spot and show that colour (the coach stretches that arm
with colour pad “tsuki”).
The student hits the pad.
The student moves on the colour and stretching the right colour out and the right foot.
The student hits the pad (the coach first takes distance calls and show the colour).
The coach calls the colour on the spot and shows that colour (coach flexes the arm and
uses the pad as an attack with same colour pad “age uke”).
The student blocks the pad and the coach hits the pad.
Student
14
The student moves on the colour (the coach calls the colour or symbol of the foot and
shows the correct colour of the pad) and flexes the arm of the right colour out and the
right foot; the student blocks the attack.
Now combine the 2 movement forwards while showing with the pads the arm as a “tsuki”
or as a “age uke” attacking between task: the student performs the exercise, but now the
coach has to suggest another movement that the student has to perform before doing the
above exercise, but with hands with the following steps:
o clapping the hands 1 time then “tsuki” on the spot then step forwards;
o clapping the hands 1 time then “age uke” on the spot then step forwards;
o touching both knees then “tsuki” forwards with correct colour;
o touching both knees crossed then “age uke” forwards with correct colour;
o touching only 1 knee: same knee is “tsuki” crossed knee is “age uke” step forwards;
o turning 360° towards the coloured side the coach is showing then step forward;
o combine one of the exercises before stepping forwards (clapping, tapping, turning).
Repeat the above starting on BLUE-RED (instead of ORANGE-YELLOW)
Repeat the above starting on WHITE-GREEN (instead of ORANGE-YELLOW)
5.2 TS week 3 and 4
5.2.1 Warm-up
Getting acquainted with the mat and general warm up as described in 4.2.1 – 4.2.2.
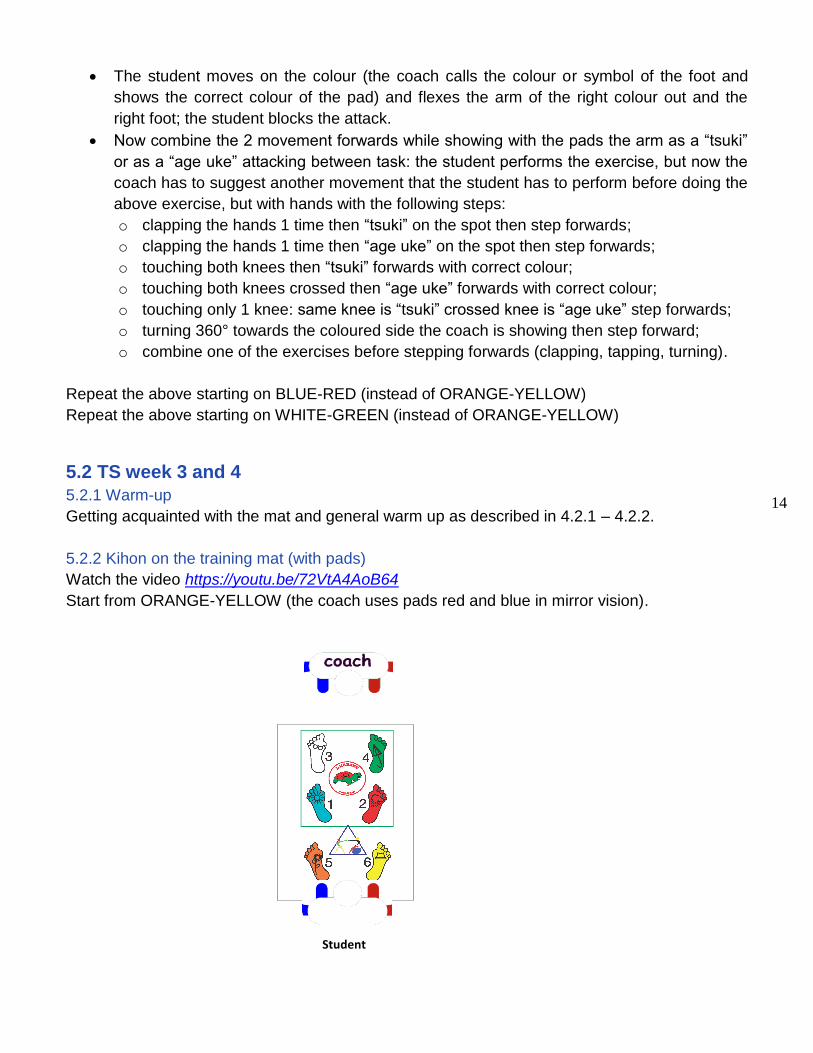
5.2.2 Kihon on the training mat (with pads)
Watch the video https://youtu.be/72VtA4AoB64
Start from ORANGE-YELLOW (the coach uses pads red and blue in mirror vision).
Student
15
The coach calls the colour on the spot and shows that colour while holding up the knee
(the coach holds the knee up with correct colour pad); the student rise the flexed knee,
stretches the leg and flexes it again before putting the foot down on the spot.
On the spot, the coach kicks bend-stretch-bend “mae geri”; the student “copies” the
exercise.
Shifting on the colour (the coach says the colour or symbol of the foot and shows the
correct colour of the pad) kicking and putting down the right foot.
The coach calls the colour of the pad and shows the colour and then, touches the
contralateral shoulder and waits for the student to do the same with the correct colour.
The coach stretches his arm down and waits for the student to perform exactly the
exercise.
On the spot, the coach crosses the colour and stretches out down. The student copies.
On the spot, the coach shows the pad down in an angle and the student has to cross first
and then move the arm downwards shifting on the colour (the coach says the colour or
symbol of the foot and shows the correct colour of the pad) and stretching the right colour
down with the right foot.
The coach combines the 4 movements forwards while showing with the pads the arm as
a “tsuki” or as “mae geri” as “age uke” or as a “gedan barai”
In between task: the student has to do the exercise, but the coach indicates another movement
he has to do before performing the exercise described above following the steps reported below:
o clap the hands 1 time then step forwards;
o touch both knees or cross the hands on the knees then step forward;
o touch 1 knee same side or opposite side and step forwards;
o turn 360° to the coloured side the coach is showing then step forward;
o combine one of the exercises before stepping forwards.
Repeat the above starting on BLUE-RED (instead of orange-yellow).
Repeat the above starting on WHITE-GREEN (instead of orange-yellow).
5.2.3 Kumite on the mat (with pads)
Same training as 5.2.2 but now with the coach.
The coach stands in front of the participant and shows the pads in different order.
The coach puts on the pads in mirror vision.
Start from ORANGE-YELLOW.
The coach calls out the colour on the spot and shows that colour, the coach stretches that
arm down with the colour pad the participant hits the pad side wards down.
Shifting on the colour and stretching the right colour out and the right foot.
The student hits the pad (the coach first takes distance calls and shows the colour).
Now the coach can combine the 3 movement forwards while showing with the pads the
arm as a “tsuki” or as a “age uke” or as a “gedan barai”.
16
Stand on orange and yellow colour; the student steps forward and does “tsuki”
Stand on blue and red colour; the student steps forward and blocks “age uke”
Stand on white and green the student steps forward and blocks “gedan barai”
In between task: the student has to perform the exercise, but now the coach has to suggest
another movement that the student has to perform before doing the exercise described above
following the sequence reported below.
In between task: the student has to perform the exercise now but ask them to perform another
movement before doing the above exercise with stepping;
o clapping the hands 1 time then step forwards;
o touching both knees or cross the hand on the knees then step forward;
o touching 1 knee same side or crossed and step forwards;
o turning 360° to the coloured side the coach is showing then step forward;
o combine one of the exercises before stepping forwards.
Repeat the above starting on BLUE-RED (instead of orange-yellow).
Repeat the above starting on WHITE-GREEN (instead of orange-yellow).
5.3 TS week 5 and 6
5.3.1 Warming-up
Getting acquainted with the mat and general warm up as described in 4.2.1 – 4.2.2.
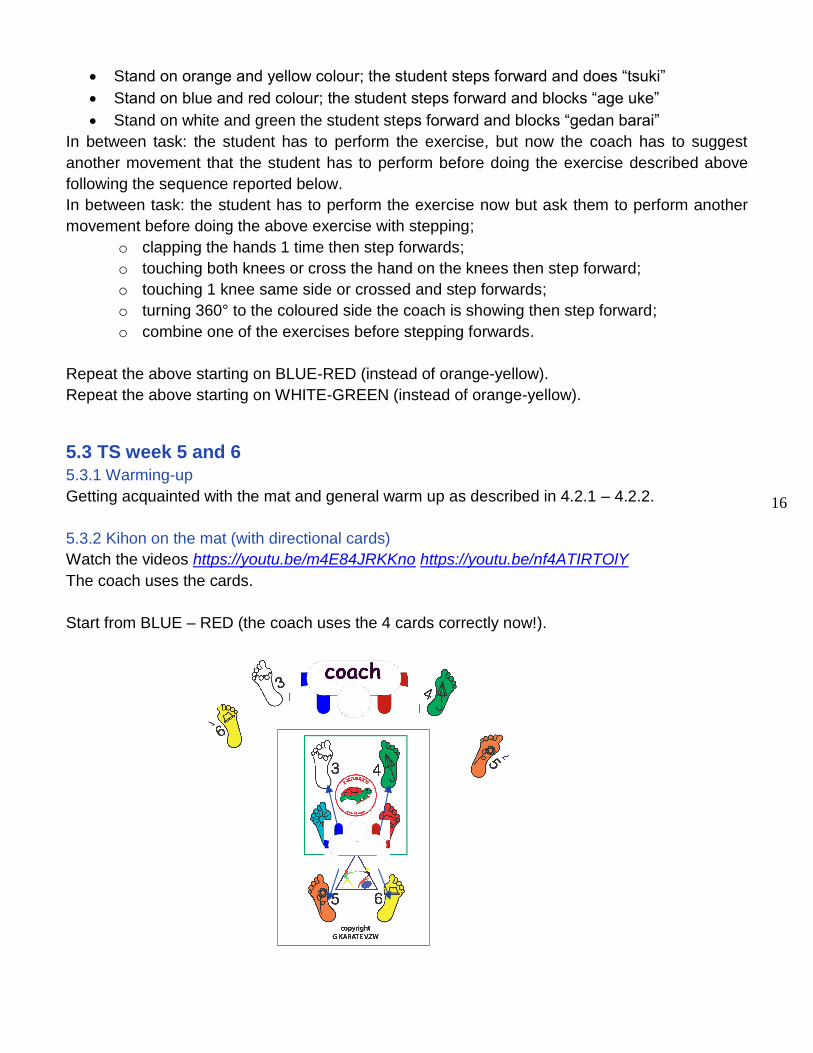
5.3.2 Kihon on the mat (with directional cards)
Watch the videos https://youtu.be/m4E84JRKKno https://youtu.be/nf4ATIRTOlY
The coach uses the cards.
Start from BLUE – RED (the coach uses the 4 cards correctly now!).

17
Shifting on the colour (the coach shows in mirror the pictogram white and green of the
foot and shows the right card), the student moves to the front stretches the correct arm
and steps back to basic position.
The coach can step first in the opposite way.
The coach then uses the orange and yellow cards (remembering to flex his arm cross-
cutting "age uke", take he has to step back). The coach has to take the yellow card and
orange controlaterally to make sure the gesture is run correctly.
Tthe coach needs to take the yellow and orange card crosswise.
The coach can use the 4 cards free of choice now if everything goes smoothly.
The coach shows the pads now as he/she stretches the participant’s moves to the front.
Training 6 with tapping the same knee for “tsuki”.
With tapping crossed knee for “age uke”.
5.3.3 Kumite on the mat (with pads)
Watch the video https://youtu.be/zTDSrtCfjLo
The coach uses the red and blue pads.
Showing the pads as the coach stretches, the participant moves to the front and hits the
pad.
Showing the pad as an attack, the participant moves backwards and blocks, the coach
hits with the correct pad on the elbow.
If the participant moves the wrong foot backwards, the coach has to tell the pictogram first
before hitting with the pad.
Training 6 with tapping the same knee for “tsuki”.
With tapping crossed knee for “age uke”.
18
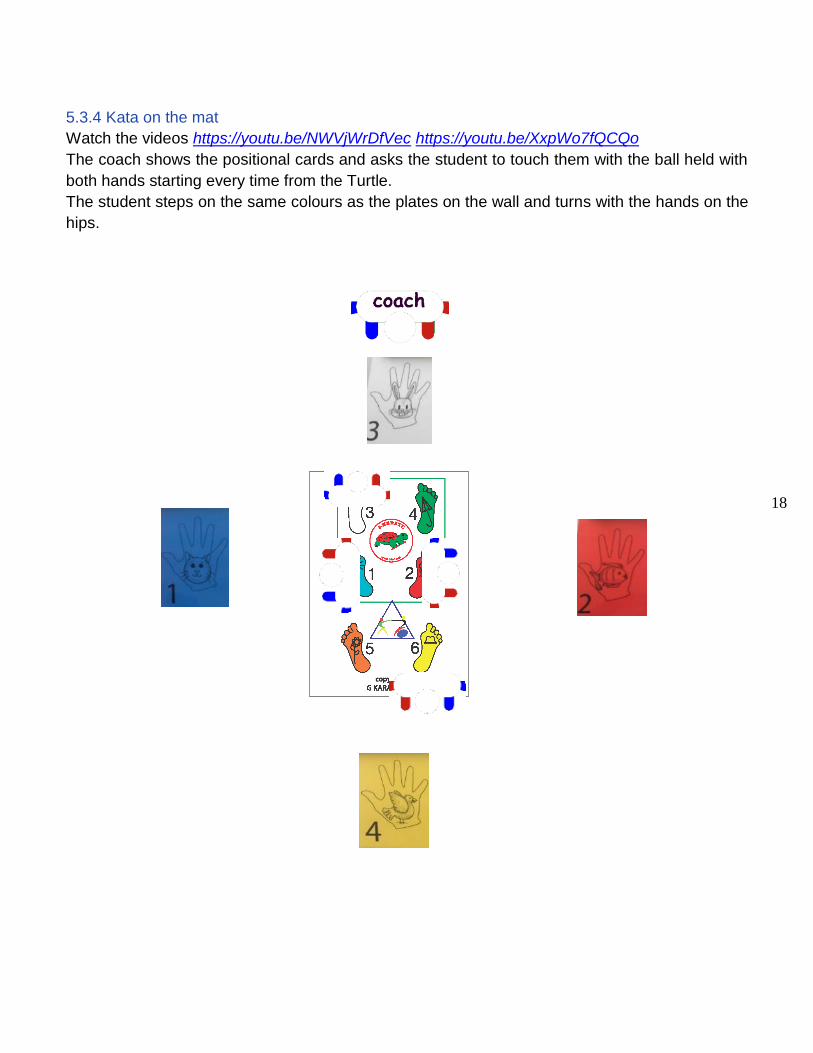
5.3.4 Kata on the mat
Watch the videos https://youtu.be/NWVjWrDfVec https://youtu.be/XxpWo7fQCQo
The coach shows the positional cards and asks the student to touch them with the ball held with
both hands starting every time from the Turtle.
The student steps on the same colours as the plates on the wall and turns with the hands on the
hips.
19
5.4 TS week 7
5.4.1 Warm-up
Getting acquainted with the mat and general warm up as described in 4.2.1 – 4.2.2.
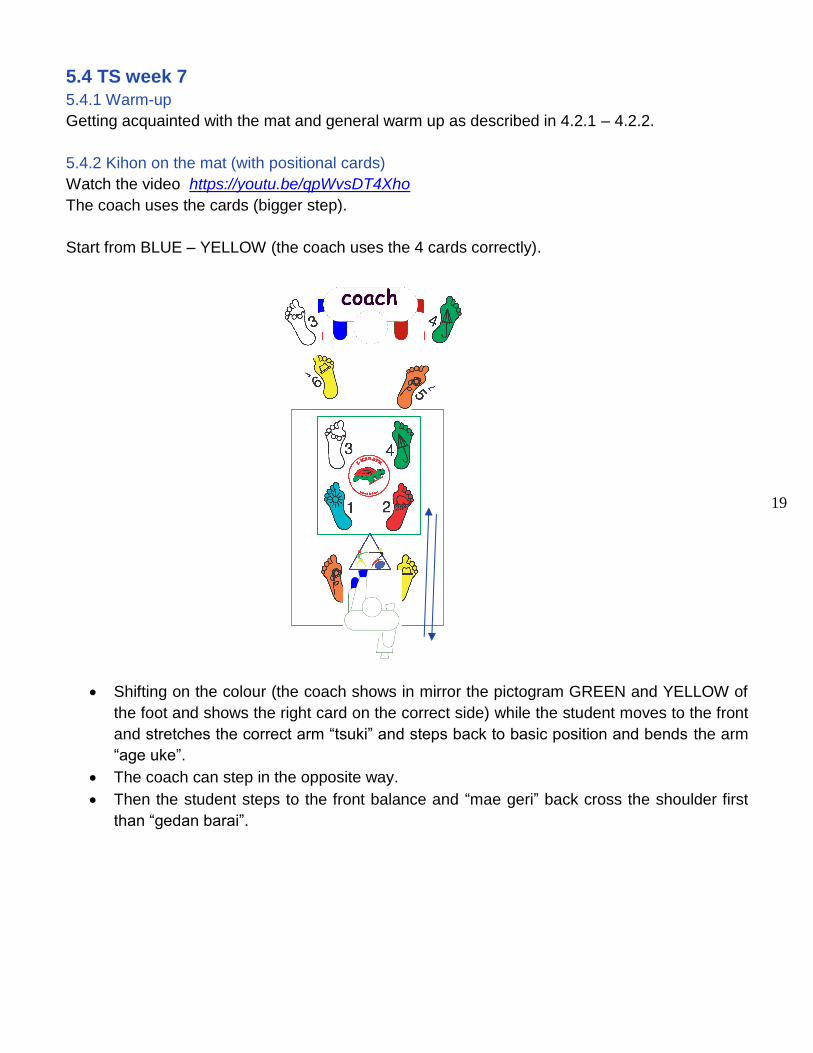
5.4.2 Kihon on the mat (with positional cards)
Watch the video https://youtu.be/qpWvsDT4Xho
The coach uses the cards (bigger step).
Start from BLUE – YELLOW (the coach uses the 4 cards correctly).
Shifting on the colour (the coach shows in mirror the pictogram GREEN and YELLOW of
the foot and shows the right card on the correct side) while the student moves to the front
and stretches the correct arm “tsuki” and steps back to basic position and bends the arm
“age uke”.
The coach can step in the opposite way.
Then the student steps to the front balance and “mae geri” back cross the shoulder first
than “gedan barai”.
20
Start from RED – ORANGE
Then the coach uses the WHITE and ORANGE.
The coach can change the student’s position now while showing RED-ORANGE or
BLUE-YELLOW cards.
Then it is possible to include tapping on the knee.
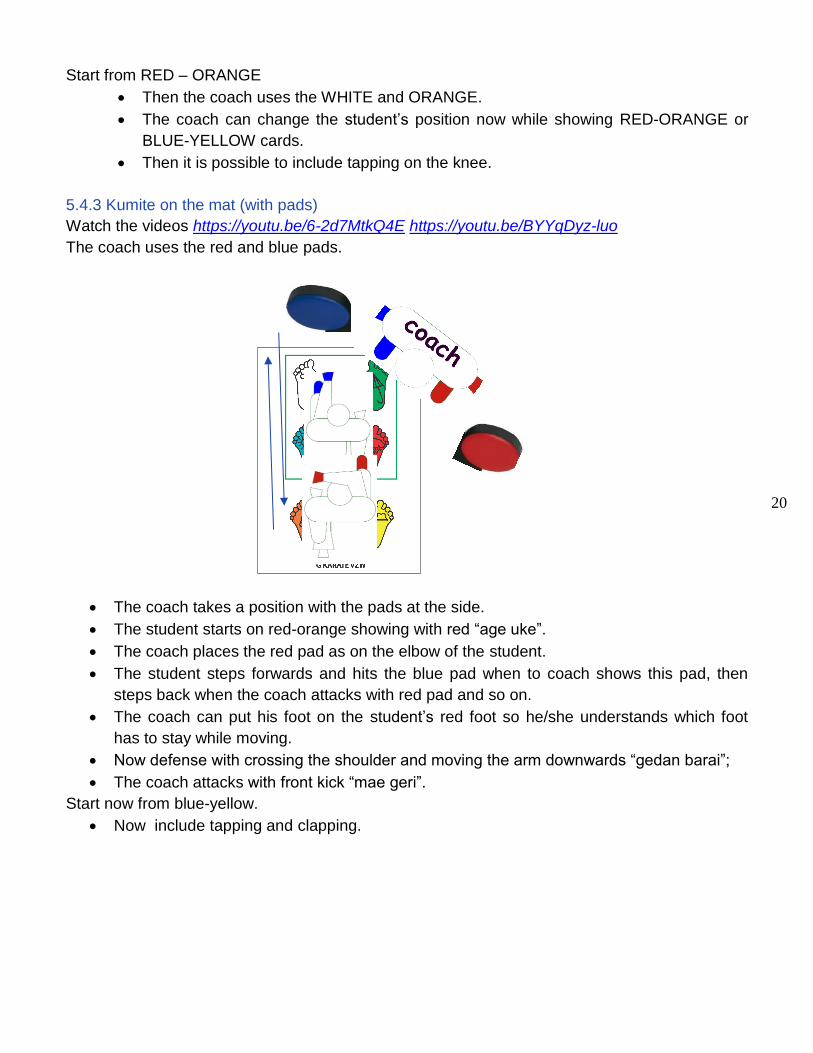
5.4.3 Kumite on the mat (with pads)
Watch the videos https://youtu.be/6-2d7MtkQ4E https://youtu.be/BYYqDyz-luo
The coach uses the red and blue pads.
The coach takes a position with the pads at the side.
The student starts on red-orange showing with red “age uke”.
The coach places the red pad as on the elbow of the student.
The student steps forwards and hits the blue pad when to coach shows this pad, then
steps back when the coach attacks with red pad and so on.
The coach can put his foot on the student’s red foot so he/she understands which foot
has to stay while moving.
Now defense with crossing the shoulder and moving the arm downwards “gedan barai”;
The coach attacks with front kick “mae geri”.
Start now from blue-yellow.
Now include tapping and clapping.
21
5.4.4 Kata on the mat
Watch the video https://youtu.be/PCZKBrftRfQ
Exercises for the 4 sides e.g.
The coach calls the animal animal on the cards, turns and performs the exercise
Double tsuki
Double age uke
Double gedan barai
Double shuto
Double mae geri
Then, for each side 1 exercise like “cat is tsuki”,”fish is gedan barai”.
5.5 TS week 8 and 9
5.5.1 Warm-up
Getting acquainted with the mat and general warm up as described in 4.2.1 – 4.2.2.
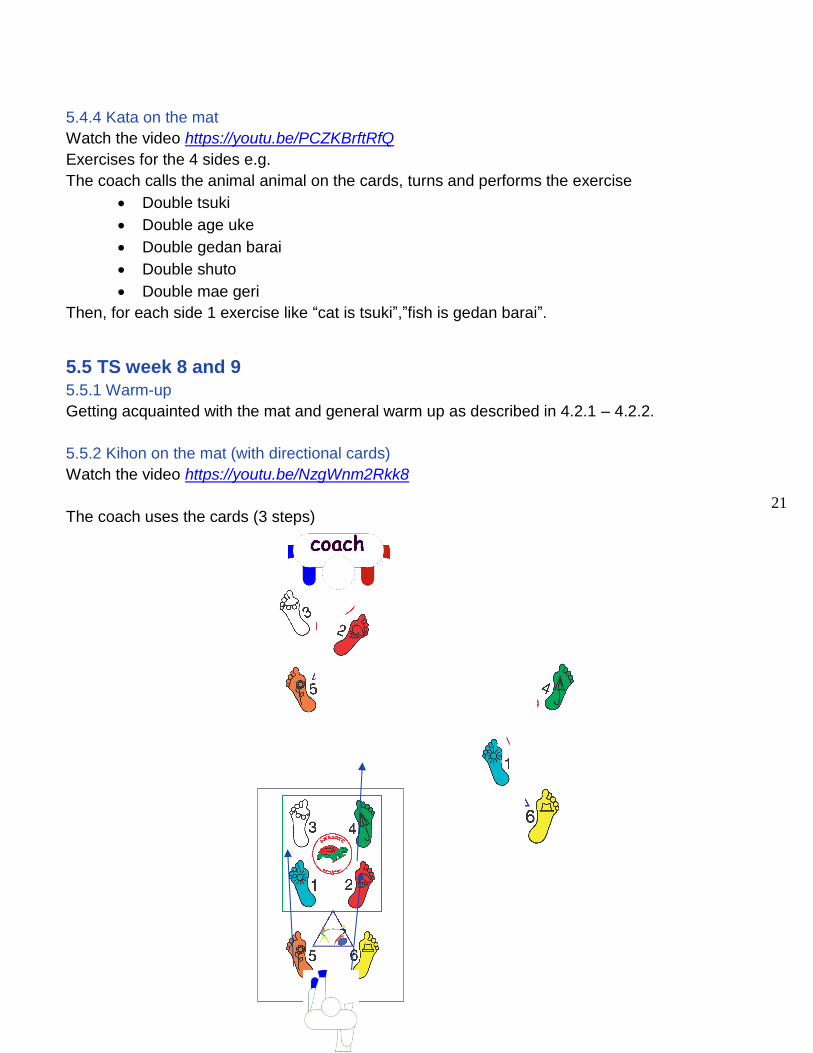
5.5.2 Kihon on the mat (with directional cards)
Watch the video https://youtu.be/NzgWnm2Rkk8
The coach uses the cards (3 steps)
22
Start from ORANGE behind the mat (coach uses the 3 cards correctly).
Shifting on the colour (the coach shows in mirror the pictograms ORANGE - RED -
WHITE) of the foot and shows the right card on the correct side RED – WHITE, the
student moves forwards and stretches the correct arm “tsuki” 3 times until he/she
steps over the mat. The 3rd time the student says “KIAI”.
Then, the student steps backwards bending the arm “age uke”.
The coach shows the colours RED – ORANGE, 3 times until he/she steps behind the
mat. The 3rd time the student says “KIAI”.
Shifting on the colour (the coach shows in mirror the pictograms ORANGE - RED -
WHITE) of the foot and shows the right card on the correct side RED – WHITE, the
student moves forwards with “mae geri” 3 times until he/she steps over the mat. The
3rd time the student says “KIAI”.
Now the same on the other side: backwards BLUE crossed shoulder and “gedan
barai” , RED crossed the shoulder and “gedan barai”.
Changing side YELLOW - BLUE - GREEN.
Now it is possible to include the tapping on the knee and the clapping.
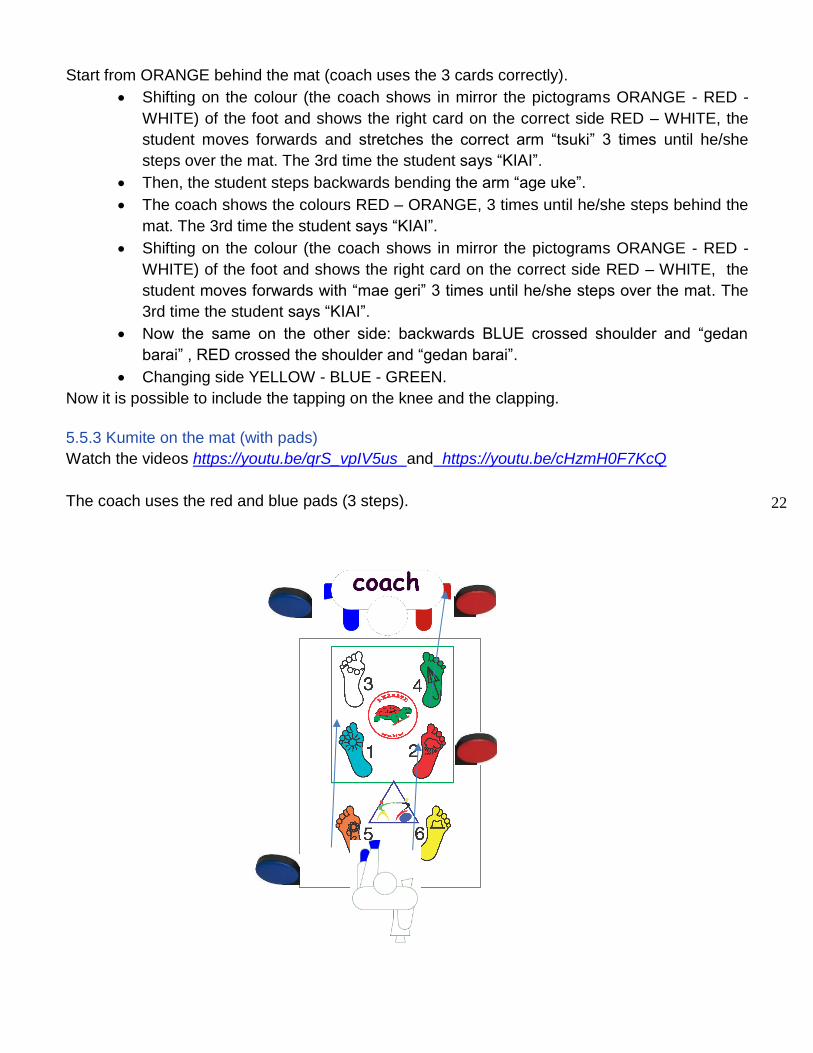
5.5.3 Kumite on the mat (with pads)
Watch the videos https://youtu.be/qrS_vpIV5us and https://youtu.be/cHzmH0F7KcQ
The coach uses the red and blue pads (3 steps).
23
The coach and participant start like 5.2.2 - fist against the pad.
Before starting, the coach moves backwards while changing the pad and or saying
the pictogram, the student has to move and hit the pad while saying “HET” and the
3rd time says “KIAI.
Then, the student steps backwards while blocking “age uke” while the coach attacks
with the correct pad.
If this exercises is performed correctly, the student can now kick “mae geri” against
the correct pad.
The participant at this point will be on orange and yellow and has to kick on the spot.
After this exercise, the student puts the kicking leg to the front and step back.
Now the student is ready to take the starting position orange behind the mat.
After each kick, the student has to put the leg forwards and the 3rd time has to say
“KIAI”.
Then, the student steps back crossing BLUE on the shoulder and hitting the pad
“gedan barai” then repeat with RED. Then, cross the shoulder and “gedan barai” on
the side.
Change position YELLOW - BLUE - GREEN.
Now it is possible to include the tapping on the knee and the clapping.
5.5.4 Kata on the mat
Exercises for the 4 sides like
Week 8: the coach calls the animal, turns and perform the exercise.
Double tsuki
Double age uke
Double gedan barai
Double shuto
Double mae geri
Week 9: now for each side 1 exercise like “cat is tsuki”, “fish is gedan barai” as shown in the
video https://youtu.be/1lDUW5iCrnM
24
5.6 TS week 10
5.6.1 Warm-up
General warm-up on the training mat as described in 4.2.2-4.2.3.
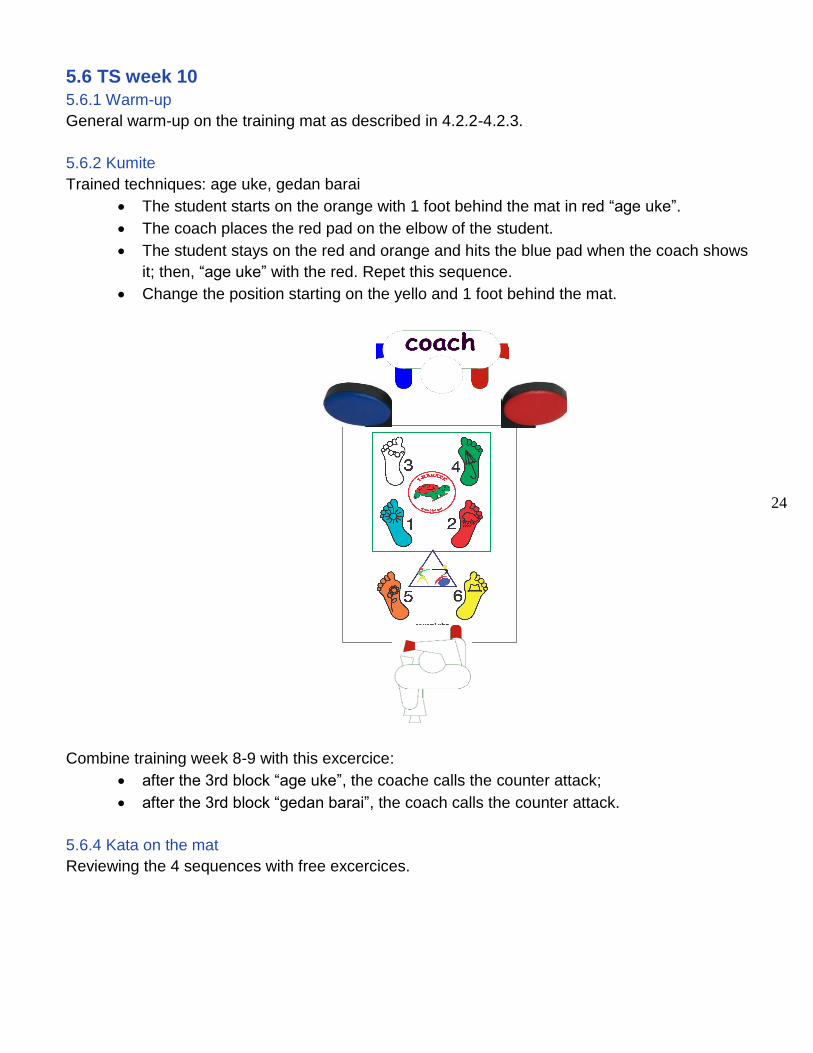
5.6.2 Kumite
Trained techniques: age uke, gedan barai
The student starts on the orange with 1 foot behind the mat in red “age uke”.
The coach places the red pad on the elbow of the student.
The student stays on the red and orange and hits the blue pad when the coach shows
it; then, “age uke” with the red. Repet this sequence.
Change the position starting on the yello and 1 foot behind the mat.
Combine training week 8-9 with this excercice:
after the 3rd block “age uke”, the coache calls the counter attack;
after the 3rd block “gedan barai”, the coach calls the counter attack.
5.6.4 Kata on the mat
Reviewing the 4 sequences with free excercices.
25
5.7 TS week 11 and 12
5.7.1 Warm-up
General warm-up on the training mat as described in 4.2.2-4.2.3.
5.7.2 Kihon
Trained techniques: “enpi” “uraken” and “tsuki”.
The coach and the participant start on RED and BLUE with “tsuki”.
Cross hands on shoulders “enpi”.
Cross hands on shoulders “uraken”.
Combine now with movement.
ORANGE - YELLOW “tsuki” forwards.
RED - BLUE “enpi” sidewards.
WHITE - GREEN turn backwards and foot next to the mat.
Try out with:
ORANGE - YELLOW “mae geri” forwards.
RED - BLUE “age uke” backwards.
WHITE - GREEN “gedan barai” on the side.
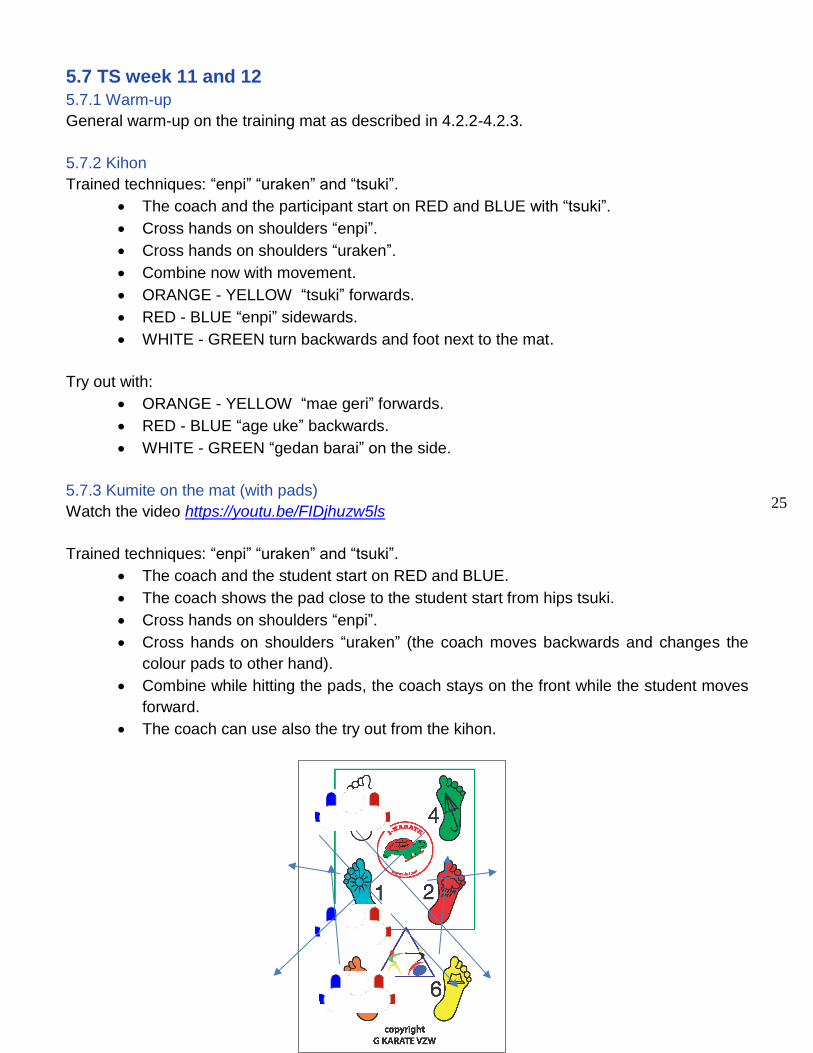
5.7.3 Kumite on the mat (with pads)
Watch the video https://youtu.be/FIDjhuzw5ls
Trained techniques: “enpi” “uraken” and “tsuki”.
The coach and the student start on RED and BLUE.
The coach shows the pad close to the student start from hips tsuki.
Cross hands on shoulders “enpi”.
Cross hands on shoulders “uraken” (the coach moves backwards and changes the
colour pads to other hand).
Combine while hitting the pads, the coach stays on the front while the student moves
forward.
The coach can use also the try out from the kihon.
26
5.7.4 Kata on the mat
Watch the video https://youtu.be/nDBuOif6v9I
Only stretching the blue except for the “fish red” and use the pads.
Weeks 13-14-15 will be with the student coupling with another. It is advisable to put a more
advanced student working with a less advanced one. The advanced student is positioned on the
side of the mat with the feet on white and green.
The coach should focus on touching with the wristbands, not on the actual combat.
5.8 TS week 13
5.8.1 Warm-up
Basic general warm-up on the training mat as described in 4.2.2-4.2.3.
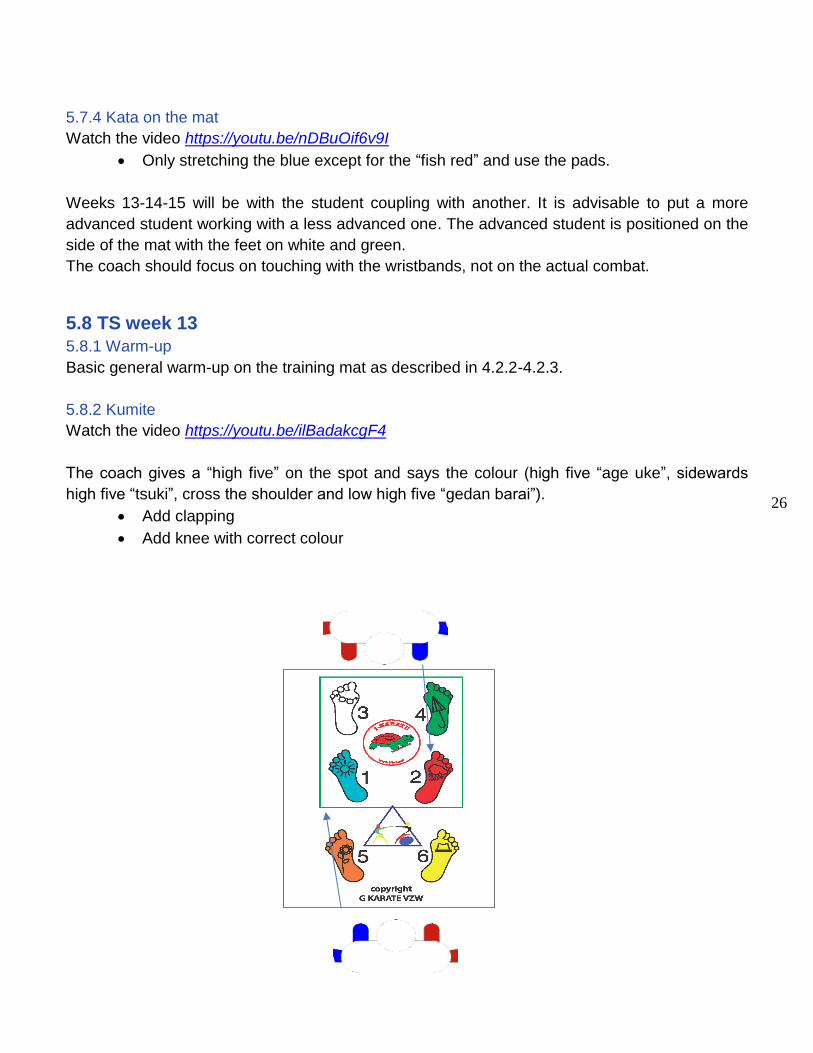
5.8.2 Kumite
Watch the video https://youtu.be/ilBadakcgF4
The coach gives a “high five” on the spot and says the colour (high five “age uke”, sidewards
high five “tsuki”, cross the shoulder and low high five “gedan barai”).
Add clapping
Add knee with correct colour
27
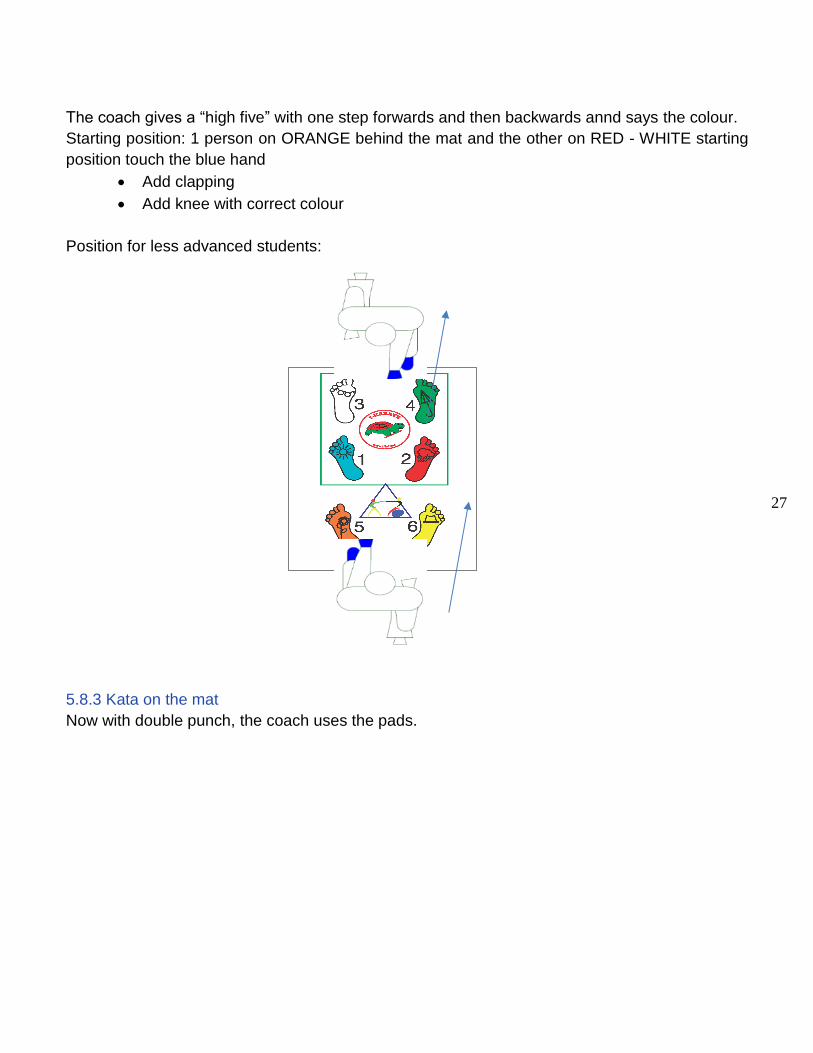
The coach gives a “high five” with one step forwards and then backwards annd says the colour.
Starting position: 1 person on ORANGE behind the mat and the other on RED - WHITE starting
position touch the blue hand
Add clapping
Add knee with correct colour
Position for less advanced students:
5.8.3 Kata on the mat
Now with double punch, the coach uses the pads.
28
5.9 TS week 14
5.9.1 Warm-up
General warm-up on the training mat as described in 4.2.2-4.2.3.
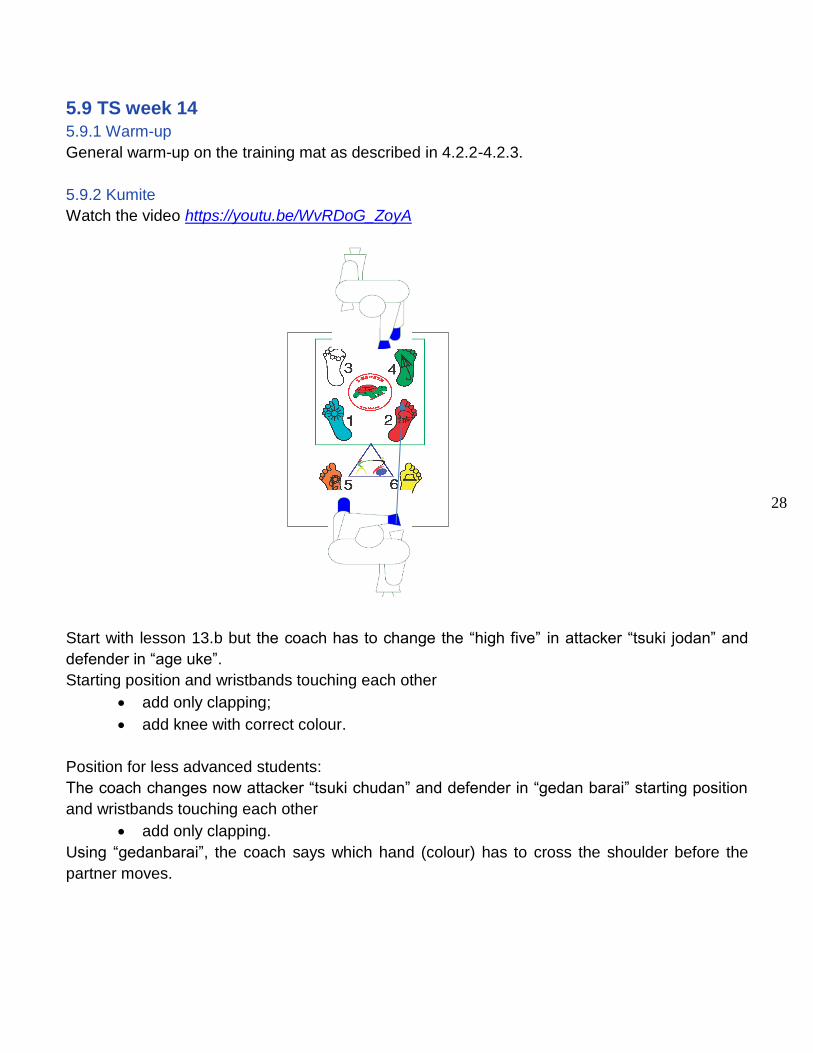
5.9.2 Kumite
Watch the video https://youtu.be/WvRDoG_ZoyA
Start with lesson 13.b but the coach has to change the “high five” in attacker “tsuki jodan” and
defender in “age uke”.
Starting position and wristbands touching each other
add only clapping;
add knee with correct colour.
Position for less advanced students:
The coach changes now attacker “tsuki chudan” and defender in “gedan barai” starting position
and wristbands touching each other
add only clapping.
Using “gedanbarai”, the coach says which hand (colour) has to cross the shoulder before the
partner moves.
29
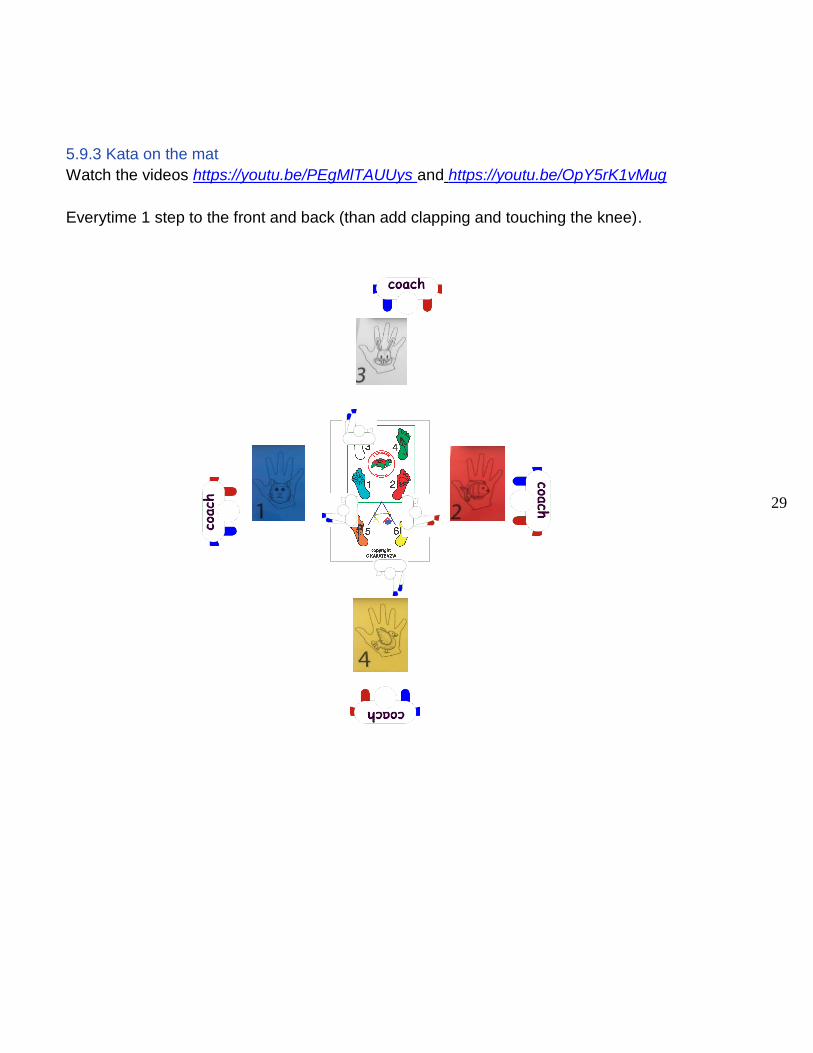
5.9.3 Kata on the mat
Watch the videos https://youtu.be/PEgMlTAUUys and https://youtu.be/OpY5rK1vMug
Everytime 1 step to the front and back (than add clapping and touching the knee).
30
5.10 TS week 15
5.10.1 Warm-up
Basic general warm-up on the training mat as described in 4.2.2-4.2.3.
5.10.2 Kumite
Watch the video https://youtu.be/2jjRVuHoKYI
The coach can start like lesson 14a but does 3 steps:
3 times “jodan” “age uke”. The 3rd time the student says “KIAI”.
3 times “chudan” “gedan barai”. The 3rd time the student says “KIAI”.
5.10.3 Kata on the mat
Now with clapping on the knee and cross the knee 1step and back
5.11 TS week 16 and 17
5.11.1 Warm-up
General warm-up on the training mat as described in 4.2.2-4.2.3.
5.11.2 Kihon on the mat (with balls and pads)
The student trains with a red and a blue ball.
He/she squeezes the ball and says “HET”, the coach calls the colour or shows the ball:
On the spot.
Moving 1 leg to the front with the ball and “tsuki”.
Touching the knee with the ball and “tsuki”.
Touching crossed knee with the correct ball and “age uke”.
Touching crossed shoulder with ball and “gedan barai”.
5.11.3 Kumite on the mat (with balls and pads)
Students in front of each other and touching the ball:
See kihon 11.2
5.11.4 Kata on the mat
Watch the video https://youtu.be/cI1K0_HZU14
Now 2 exercise direction 1-2 ; 4 exercises direction 3-4 with “KIAI” using the pads.
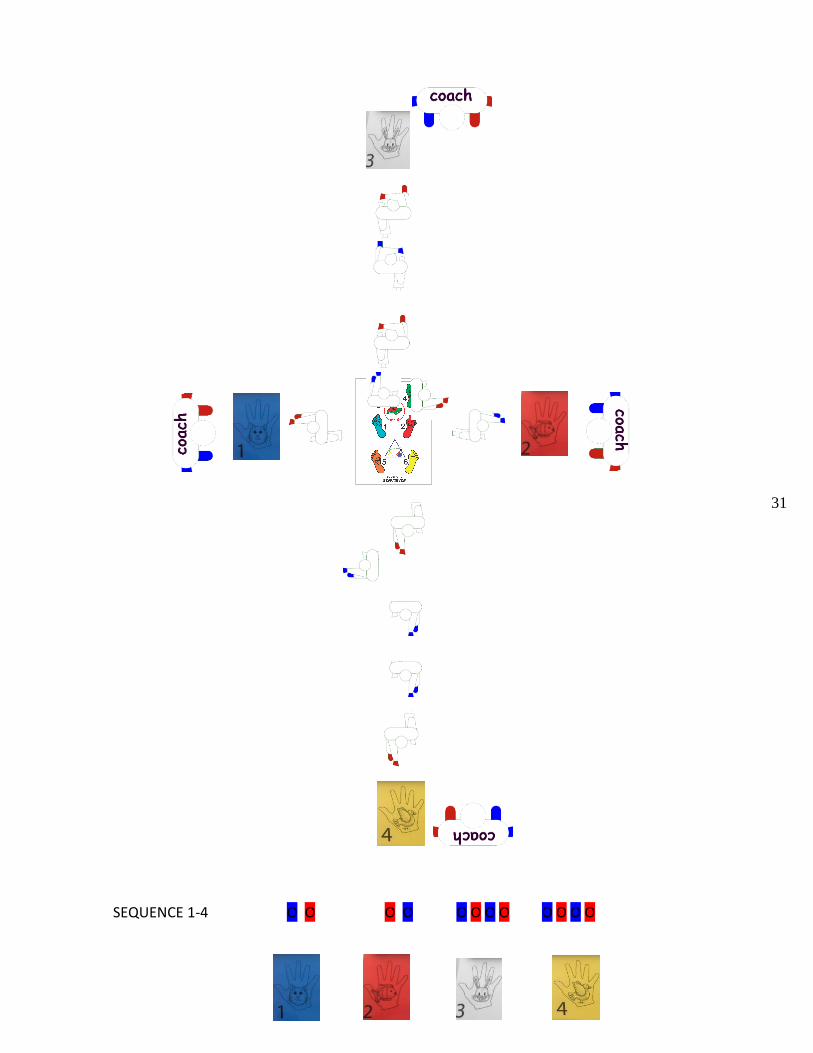
31
SEQUENCE 1-4 O O O O O O O O O O O O
32
5.12 TS week 18
5.12.1 Warm-up
Basic general warm-up on the training mat as described in 4.2.2-4.2.3.
5.12.2 Kihon on the mat (with balls and pads)
The coach combines “ tsuki age uke gedan barai” moving 1 leg to the front.
The coach shows what the student has to do with the ball.
First touch together with them.
Second the coach shows only the end of the movement and the student has to touch
the correct knee, shoulder.
5.12.3 Kumite on the mat (with balls and pads)
The coach makes a curve with the hand in the right direction and the student has to
put the ball in the curved hand.
The student with the coach touches the ball together moving 1 leg to the front.
See kihon 12.2.
5.12.4 Kata on the mat
As in 5.11.4.
5.13 TS week 19 and 20
5.13.1 Warm-up
General warm-up on the training mat as described in 4.2.2-4.2.3.
5.13.2 Kihon on the mat (with balls and pads)
Watch the videos https://youtu.be/Ho7WmuqIOt8 https://youtu.be/CoiTkPxEsm4
The student steps forward and backwards and changes hands holding the ball.
Forwards “tsuki”.
Backwards “age uke”.
Now touching the ball with the knee.
Forwards “tsuki”.
Backwards “gedan barai”.
Now touching the ball on the knee and shoulder.
Throwing the b.all up with 2 hands catch and than putting the correct coloured ball to
the front
33
5.13.3 Kumite on the mat (with balls and pads)
Students in front of each other and touching the ball and changing the ball every time
See kihon 13.2
Now touching the ball on the knee
5.13.4 Kata on the mat
Watch the video https://youtu.be/9D7dDPztIlY
1st exercise always “gedan barai” (cross the shoulder first).
5.14 TS week 21
5.14.1 Warm-up
General warm-up on the training mat as described in 4.2.2-4.2.3.
5.14.2 Kihon on the mat (with balls and pads)
Combination of “tsuki”, “age uke” and “gedan barai” stepping 2 times while changing the ball.
The coach should try the excercice also while throwing the ball up with 2 hands.
5.14.3 Kumite on the mat (with balls and pads)
Watch the video https://youtu.be/At_Jl_Hu9mk
With the coach or the student:
Combination of “tsuki”, “age uke” and “gedan barai” stepping 2 times while changing the ball and
touching.
5.14.4 Kata on the mat
Watch the videos https://youtu.be/2VGxy_yuZGE https://youtu.be/q-c8VENcaAs
Now with clapping and tapping
5.15 TS week 22 and 23
5.15.1 Warm-up
Basic general warm-up on the training mat as described in 4.2.2-4.2.3.
5.15.2 Kihon on the mat (with balls and pads)
Combination of “tsuki”, “age uke” and “gedan barai” stepping 3 times while changing the ball.
The 3rd time counter attack with the ball.
34
5.15.3 Kumite on the mat (with balls and pads)
With the coach or the student:
Combination of “tsuki”, “age uke” and “gedan barai” stepping 3 times while changing the ball and
touching.
The 3rd time counter attack with the ball.
5.15.4 Kata on the mat
Watch the video https://youtu.be/eMBqyyvv54c
Week 22: 2 feet on the blue foot and shuto. 2 feet on the red foot and shuto.
Week 23: Step on the blu foot and shuto. Step on the red foot and shuto.
5.16 TS week 24
5.16.1 Warm-up
General warm-up on the training mat as described in 4.2.2-4.2.3.
5.16.2 Kihon on the mat (with balls and pads)
With the the coach or the student:
Combination of “tsuki”, “age uke” and “gedan barai” stepping 3 times while changing the ball.
5.16.3 Kumite on the mat (with balls and pads)
With the coach or the student:
Combination of “tsuki”, “age uke” and “gedan barai” stepping 3 times while changing the ball.
5.16.4 Kata on the mat
Watch the video https://youtu.be/NoEl4SGzSYQ
Extra sides number 4-5 included in weeks 24-25-26

35
5.17 TS week 25 and 26
5.17.1 Warm-up
General warm-up on the training mat as described in 4.2.2-4.2.3.
5.17.2 Kihon on the mat (with balls and pads)
Combination of “tsuki”, “age uke” and “gedan barai” stepping 3 times while changing the ball.
3rd time counter attack with the ball
5.17.3 Kumite on the mat (with balls and pads)
With the coach or the participant:
Combine “ tsuki age uke gedan barai” stepping 3 times while changing the ball (202)
The 3rd time counter attack with the ball.
5.17.4 Kata on the mat
Extra sides number 4-5 included for weeks 24-25-26.
36
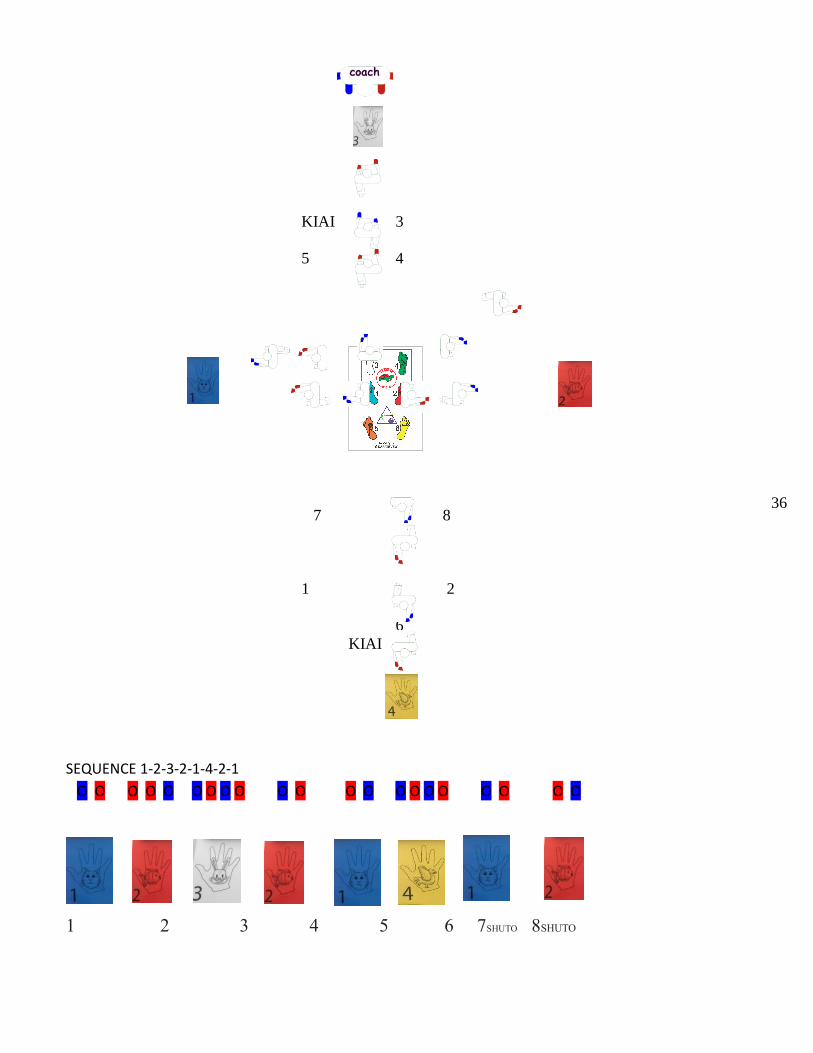
KIAI 3
5 4
7 8
1 2
6
KIAI
SEQUENCE 1-2-3-2-1-4-2-1
O O O O O O O O O O O O O O O O O O O O O
1 2 3 4 5 6 7SHUTO 8SHUTO
37
5.18 TS week 27 and 28
5.18.1 Warm-up
General warm-up on the training mat as described in 4.2.2-4.2.3.
5.18.2 Kihon on the mat (with balls and pads)
Start from RED and BLUE.
The coach shows the 6 cards.
Exercise: training 11-12 with the cards and the pads.
The student changes the ball all the time and performs the correct technique:
“Enpi” red and blue card.
“Tsuki” white and green card.
“Uraken” yellow and orange card.
5.18.3 Kumite on the mat (with balls and pads)
Start from RED and BLUE.
The coach shows the pads, the student hits the pad with the ball while changing.
Exercise: training 11-12 with the cards and the pads.
The student changes the ball all the time and performs the correct technique:
“Enpi” red and blue card.
“Tsuki” white and green card.
“Uraken” yellow and orange card.
5.18.4 Kata on the mat
Watch the video https://youtu.be/hfmJQkjkg0A
Extra sides number 7-8 included for weeks 27-28-29-30.
5.19 TS week 29 and 30
5.19.1 Warm-up
Basic general warm-up on the training mat as described in 4.2.2-4.2.3.
5.19.2 Kihon on the mat (with balls and pads)
Start from RED and BLUE.
The coach shows the 6 cards.
Exercise: training 11-12 with the cards and the pads.
The student changes the ball all the time and performs the correct technique:
“Enpi” red and blue card.
“Tsuki” white and green card.
“Uraken” yellow and orange card.
Now the coach says the cards randomly.
Now the student uses 1 ball and then, changes it.

38
5.19.3 Kumite on the mat (with balls and pads)
Start from RED and BLUE.
The coach shows the pads, the student hits the pad with the ball.
Exercise: training 11-12 with the cards and the pads.
The student changes the ball all the time and performs the correct technique:
“Enpi” red and blue card.
“Tsuki” white and green card.
“Uraken” yellow and orange card.
Now the coach shows the pads randomly.
Now the student uses 1 ball and then, changes it.
5.19.4 Kata on the mat
Extra sides number 7-8 included for weeks 27-28-29-30.
5.20 TS week 31
From this TS, the students should have acquired the knowledge on the methodology.
The methodology can thus be implemented while using: paper or taped line (3 lessons).
It is possible to mark a paper tape line with red and blue but it is not necessary.
5.20.1 Warm-up
General warm-up on the training using the line as warm up! No ball!
Feet behind the line, on the line, over the line.
Start with 2 feet on the line, 1 foot over, 1 foot behind and then change.
Turn while jumping over the line or turn when jumped over the line…
Touch the line with red or blue hand…
5.20.2 Kihon without the mat
TAPE IN FRONT LIKE WHITE AND GREEN
TAPE MIDDLE LIKE RED AND BLUE FEET
TAPE LIKE YELLOW AND ORANGE
39
5.20.3 Kumite without the mat
The coach has to use his/her expierience at this point.
The coach or the student with red and blue pads using the lines as in kihon 5.19.2.
5.20.4 Kata without the mat
Watch the video https://youtu.be/OWt720TrC1M
The coach puts 1 pad on the floor. The student has to stay behind the pad while stepping over
the pad and uses all the directions.
5.21 TS week 32
5.21.1 Warm-up
General warm-up on the training using the line as warm up! With balls!
Feet behind the line, on the line, over the line.
Start with 2 feet on the line, 1 foot over, 1 foot behind and change.
Turn while jumping over the line or turn when the participant already jumped over the line…
Touching the line with the red or blue ball…
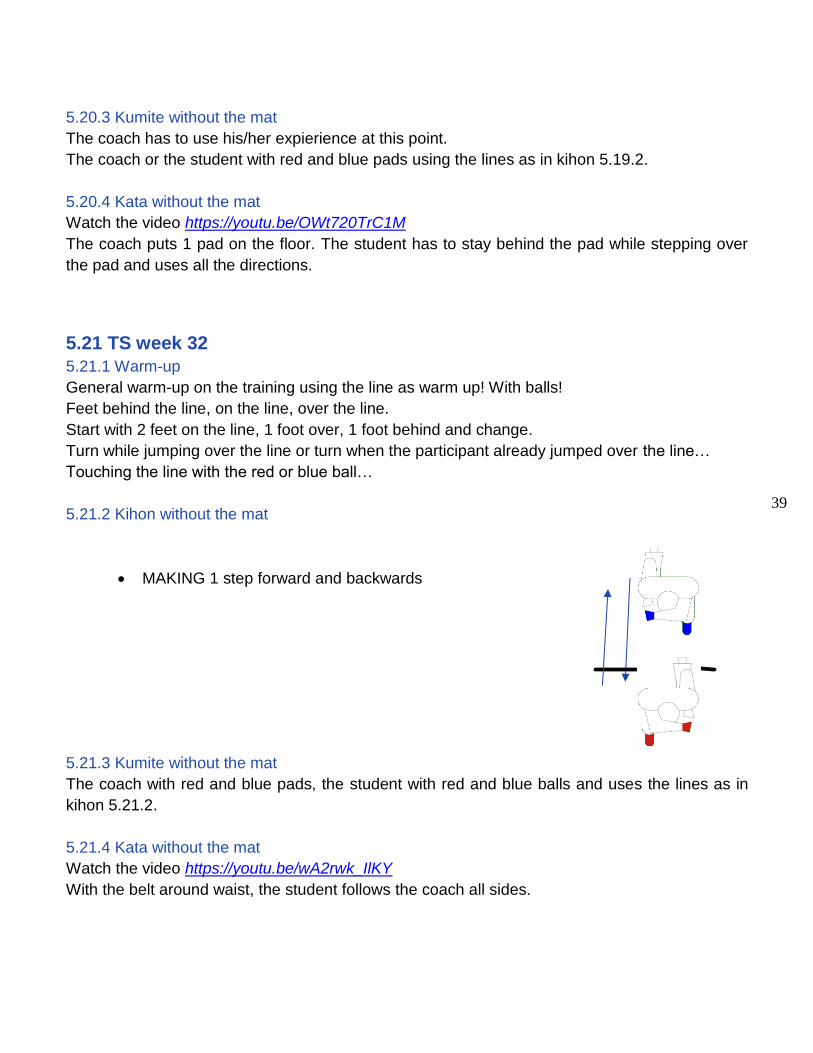
5.21.2 Kihon without the mat
MAKING 1 step forward and backwards
5.21.3 Kumite without the mat
The coach with red and blue pads, the student with red and blue balls and uses the lines as in
kihon 5.21.2.
5.21.4 Kata without the mat
Watch the video https://youtu.be/wA2rwk_IlKY
With the belt around waist, the student follows the coach all sides.
40
5.22 TS week 33
5.22.1 Warm-up
General warm-up on the training using the line as warm up! With balls!
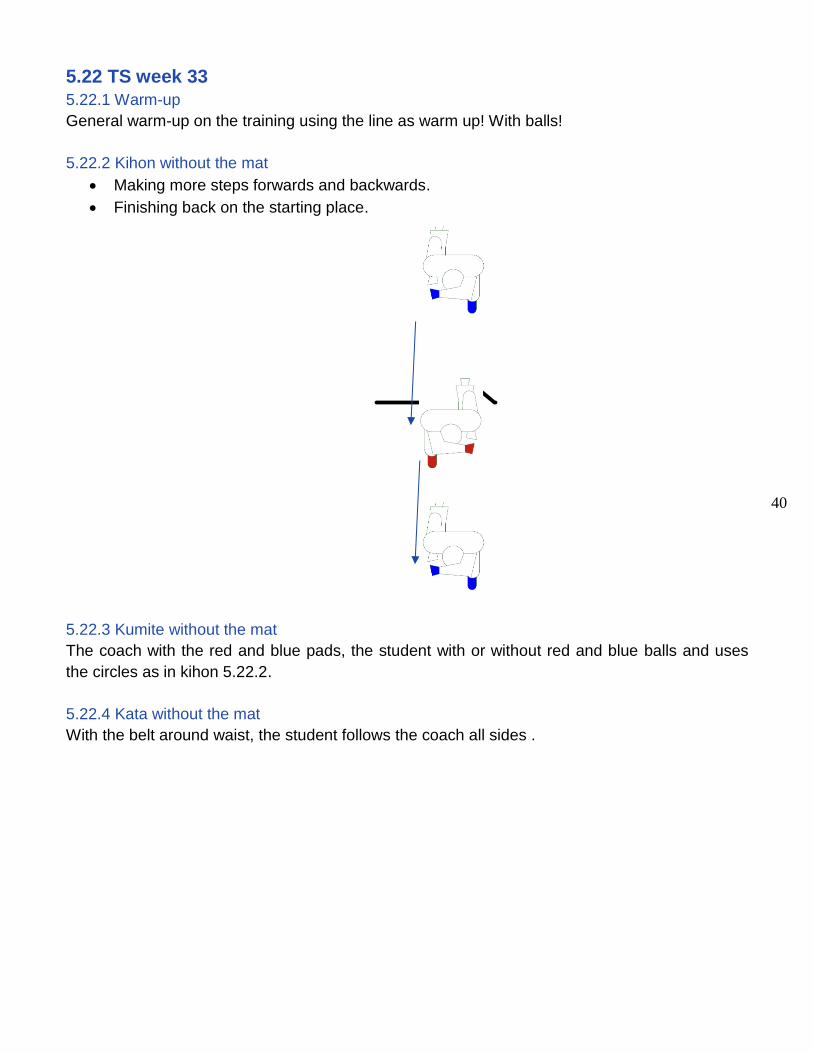
5.22.2 Kihon without the mat
Making more steps forwards and backwards.
Finishing back on the starting place.
5.22.3 Kumite without the mat
The coach with the red and blue pads, the student with or without red and blue balls and uses
the circles as in kihon 5.22.2.
5.22.4 Kata without the mat
With the belt around waist, the student follows the coach all sides .
41
5.23 TS week 34
With red and blue circles (3 lessons).
Kihon and kumite exercices can now be done with the blue and red circles rather than using the
red and blue foot.
5.23.1 Warm-up
General warm-up on the training using 1 circle in the hand.
Both feet in the circle, stepping out, front, side, backwards.
1 foot out and touching the circle with red or blue.
Taking the circle in the hand and changing the hand.
Putting 1 leg in the circle and then out… (finding the balance).
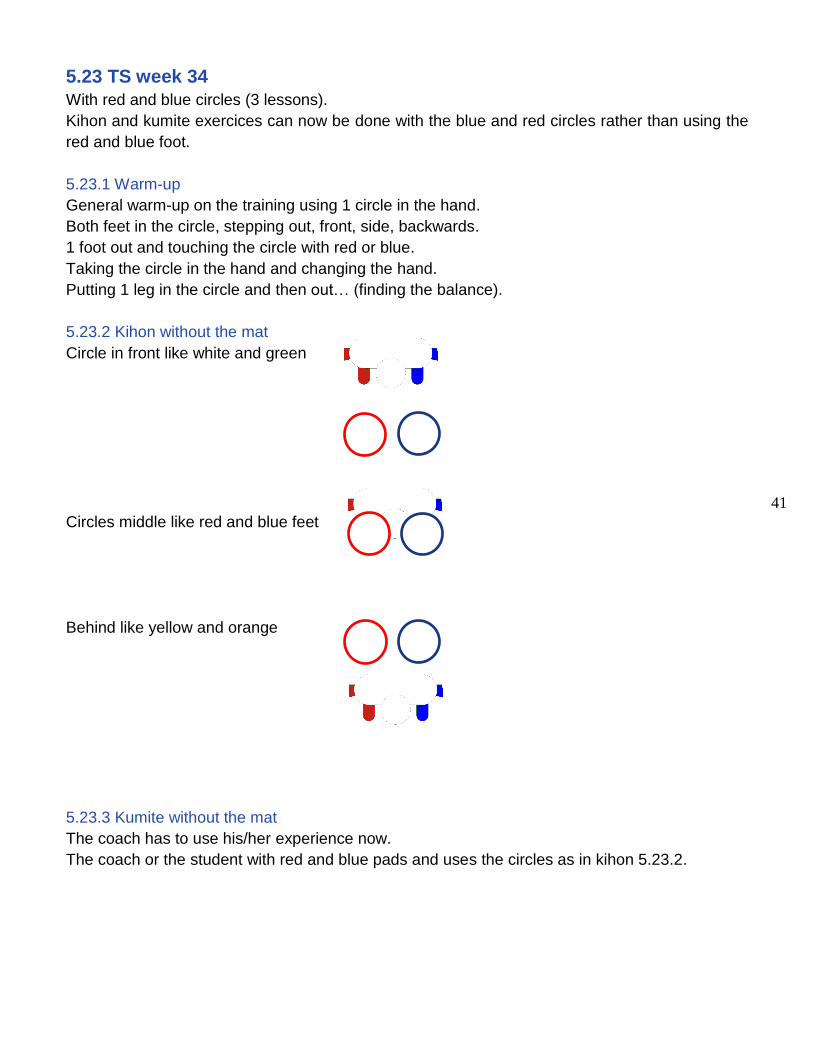
5.23.2 Kihon without the mat
Circle in front like white and green
Circles middle like red and blue feet
Behind like yellow and orange
5.23.3 Kumite without the mat
The coach has to use his/her experience now.
The coach or the student with red and blue pads and uses the circles as in kihon 5.23.2.
42
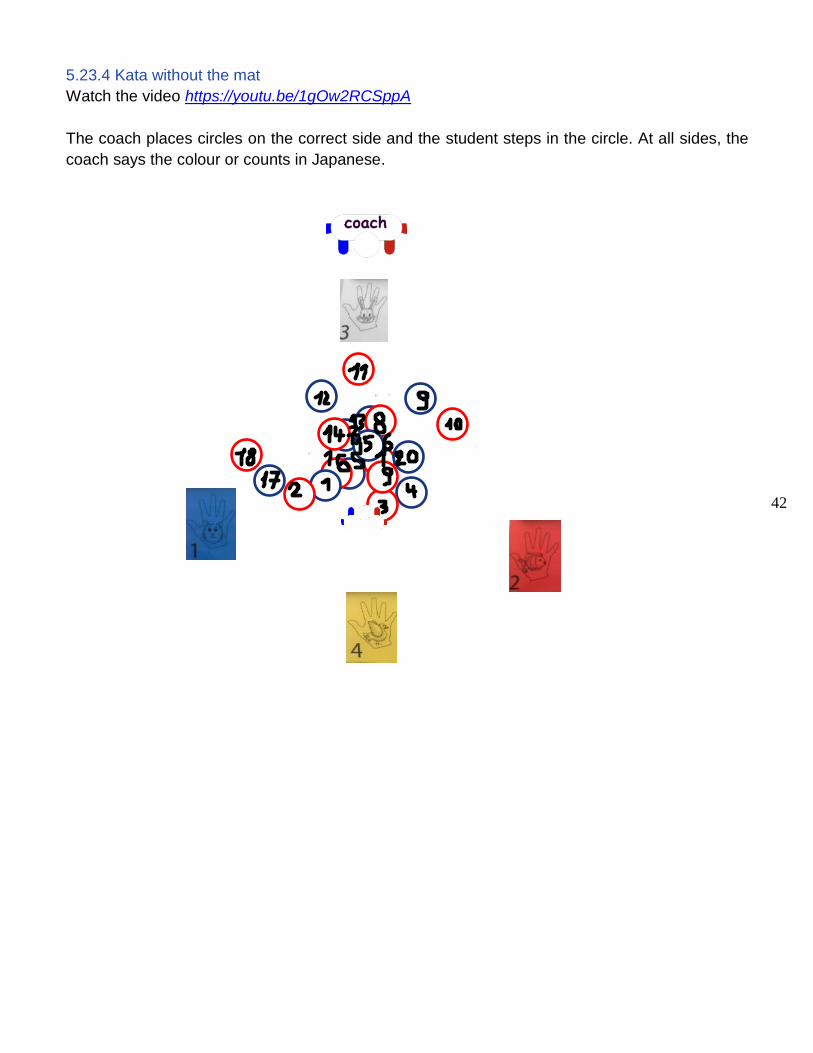
5.23.4 Kata without the mat
Watch the video https://youtu.be/1gOw2RCSppA
The coach places circles on the correct side and the student steps in the circle. At all sides, the
coach says the colour or counts in Japanese.
43
5.24 TS week 35
5.24.1 Warm-up
General warm-up on the training using 1 circle in the hand.
Both feet in the circle, stepping out, front, side, backwards.
1 foot out and touching the circle with red or blue.
Taking the circle in the hand and changing the hand.
Putting 1 foot in the circle and out…
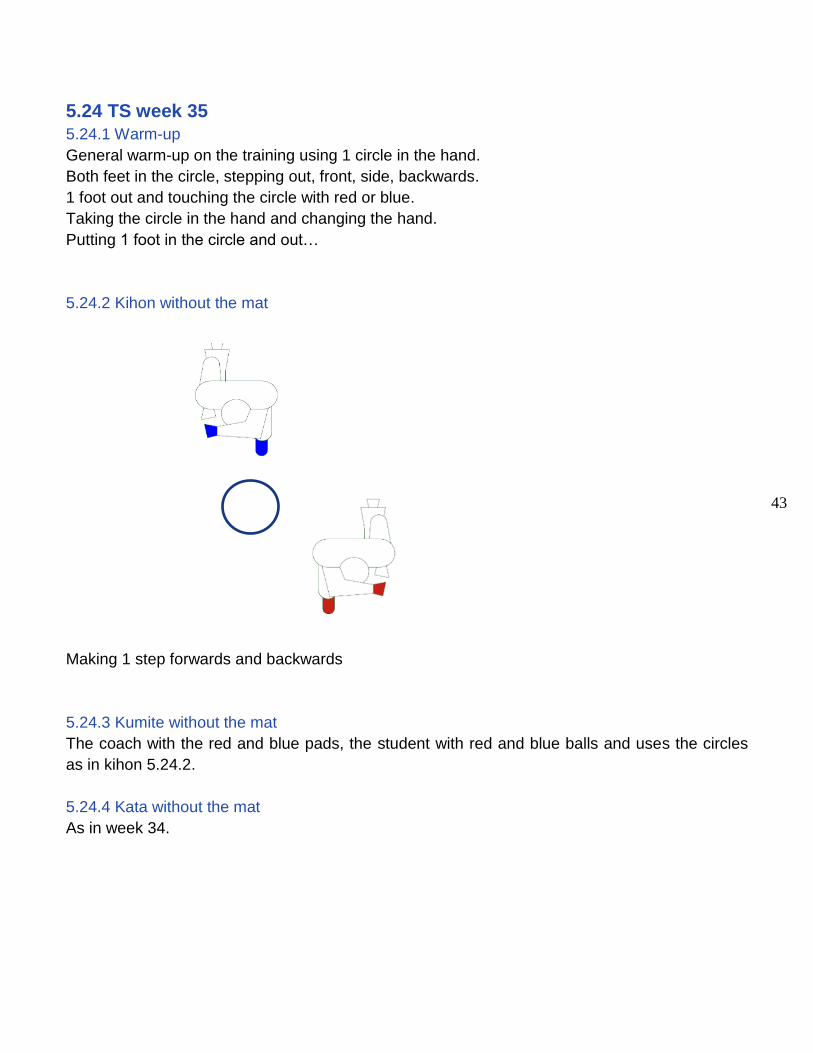
5.24.2 Kihon without the mat
Making 1 step forwards and backwards
5.24.3 Kumite without the mat
The coach with the red and blue pads, the student with red and blue balls and uses the circles
as in kihon 5.24.2.
5.24.4 Kata without the mat
As in week 34.
44
5.25 TS week 36
5.25.1 Warm-up
General warm-up on the training using 1 circle in the hand.
Both feet in the circle, stepping out, front, side, backwards.
1 foot out and touching the circle with red or blue.
Taking the circle in the hand and changing the hand.
Putting 1 foot in the circle and out…
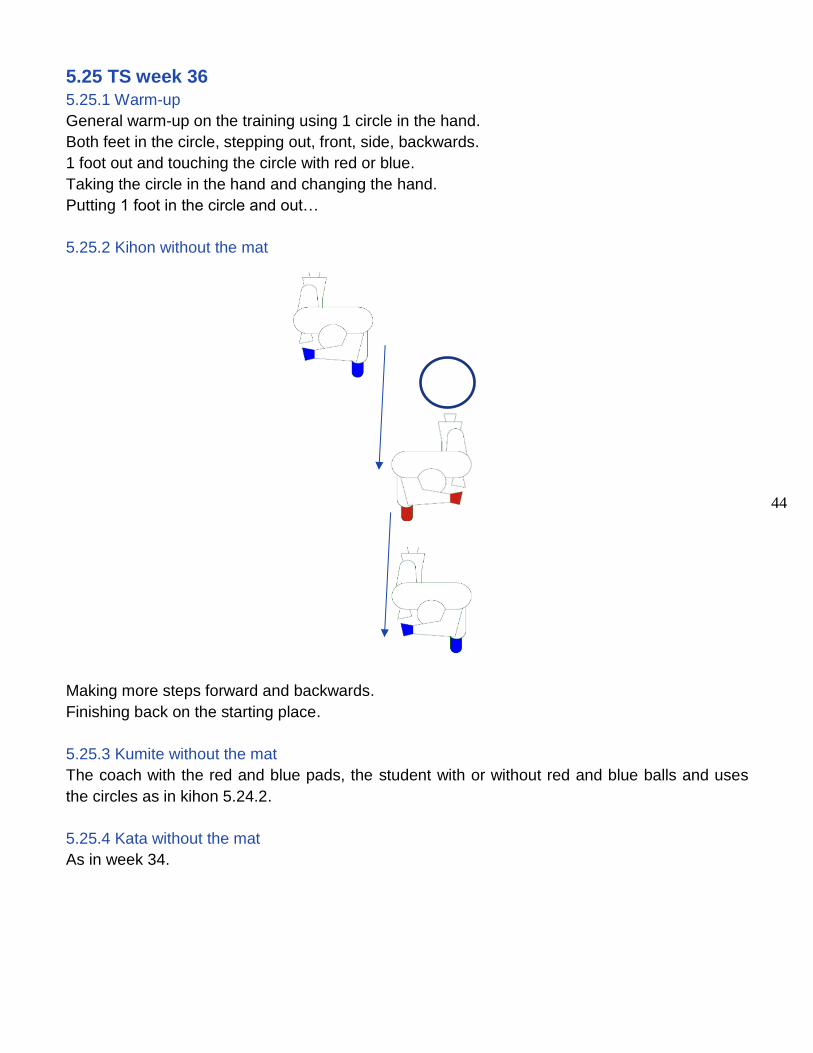
5.25.2 Kihon without the mat
Making more steps forward and backwards.
Finishing back on the starting place.
5.25.3 Kumite without the mat
The coach with the red and blue pads, the student with or without red and blue balls and uses
the circles as in kihon 5.24.2.
5.25.4 Kata without the mat
As in week 34.
45
5.26 TS week 37
Crayon (2lessons).
Kihon and kumite exercices can now be used with the crayon.
Using markes like: X and arrows.
5.26.1 Warm-up
General warm-up free of choice: line, pad, mat, circle….
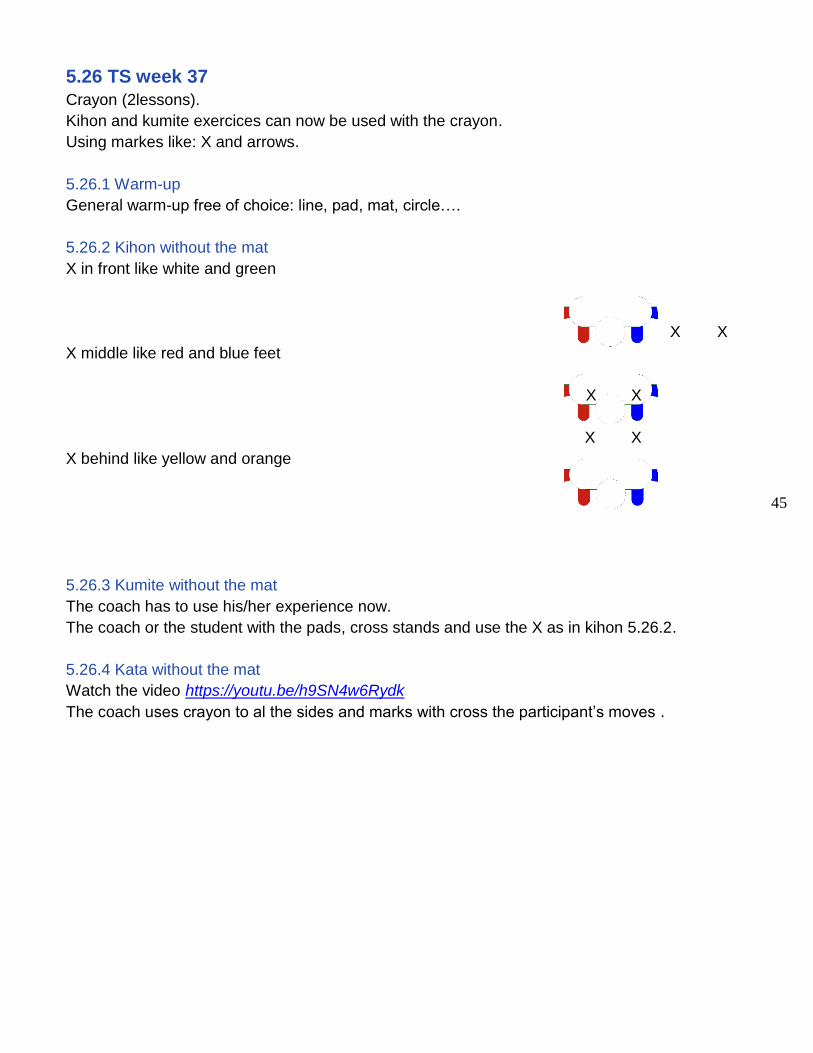
5.26.2 Kihon without the mat
X in front like white and green
X X
X middle like red and blue feet
X X
X X
X behind like yellow and orange
5.26.3 Kumite without the mat
The coach has to use his/her experience now.
The coach or the student with the pads, cross stands and use the X as in kihon 5.26.2.
5.26.4 Kata without the mat
Watch the video https://youtu.be/h9SN4w6Rydk
The coach uses crayon to al the sides and marks with cross the participant’s moves .
46
5.27 TS week 38
5.27.1 Warm-up
General warm-up free of choice: line, pad, mat, circle….
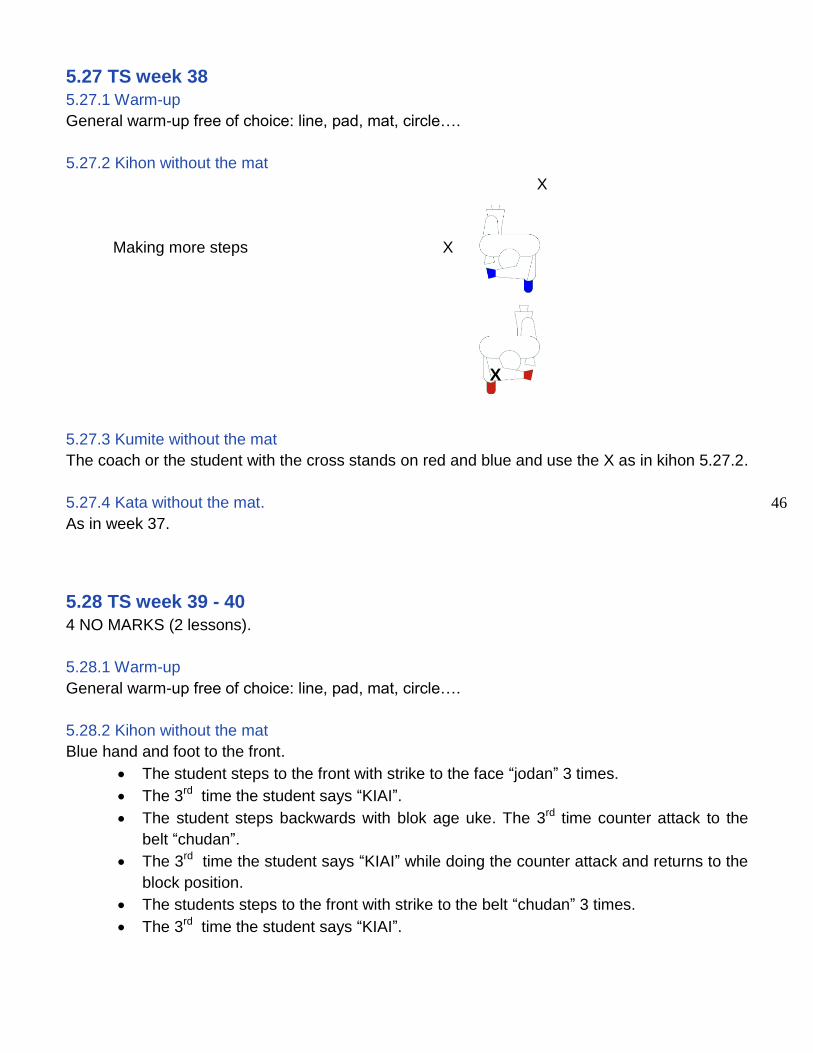
5.27.2 Kihon without the mat
X
Making more steps X
X
5.27.3 Kumite without the mat
The coach or the student with the cross stands on red and blue and use the X as in kihon 5.27.2.
5.27.4 Kata without the mat.
As in week 37.
5.28 TS week 39 - 40
4 NO MARKS (2 lessons).
5.28.1 Warm-up
General warm-up free of choice: line, pad, mat, circle….
5.28.2 Kihon without the mat
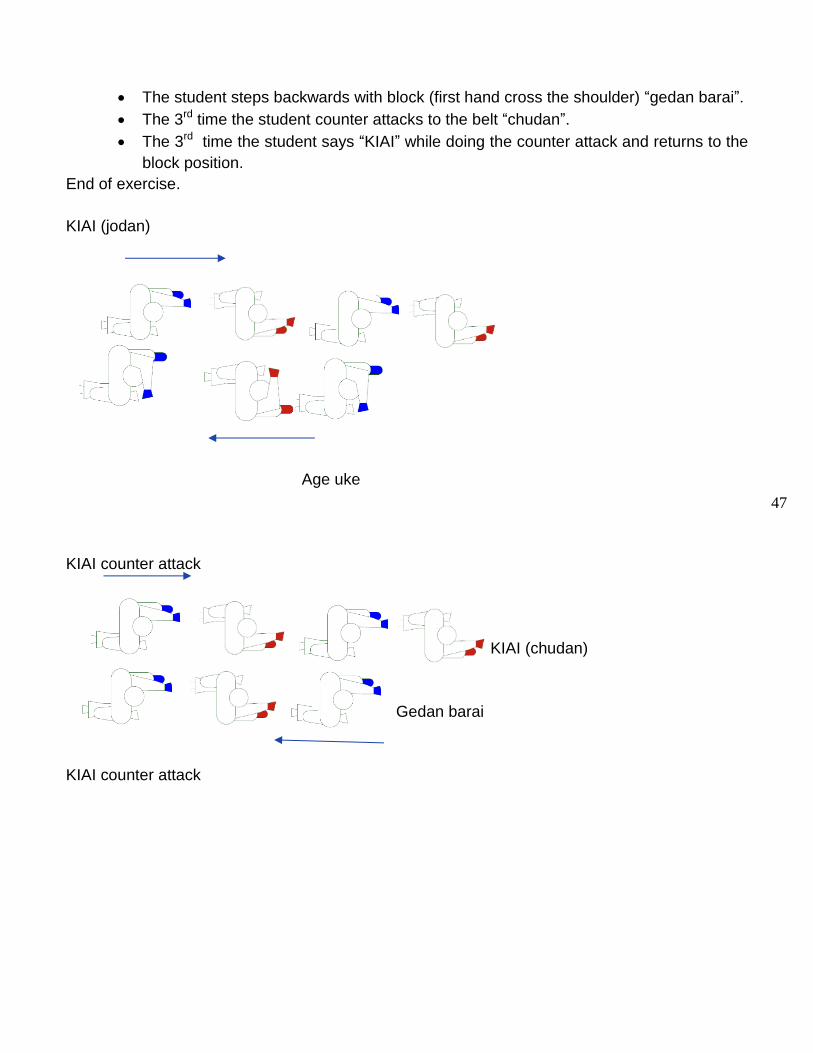
Blue hand and foot to the front.
The student steps to the front with strike to the face “jodan” 3 times.
The 3rd time the student says “KIAI”.
The student steps backwards with blok age uke. The 3rd time counter attack to the
belt “chudan”.
The 3rd time the student says “KIAI” while doing the counter attack and returns to the
block position.
The students steps to the front with strike to the belt “chudan” 3 times.
The 3rd time the student says “KIAI”.
47
The student steps backwards with block (first hand cross the shoulder) “gedan barai”.
The 3rd time the student counter attacks to the belt “chudan”.
The 3rd time the student says “KIAI” while doing the counter attack and returns to the
block position.
End of exercise.
KIAI (jodan)
Age uke
KIAI counter attack
KIAI (chudan)
Gedan barai
KIAI counter attack
48
5.28.3 Kumite without the mat
Watch the video https://youtu.be/eD5TxInchFE
Kumite drill - 3 steps 202 with participant or coach.
Starting position.
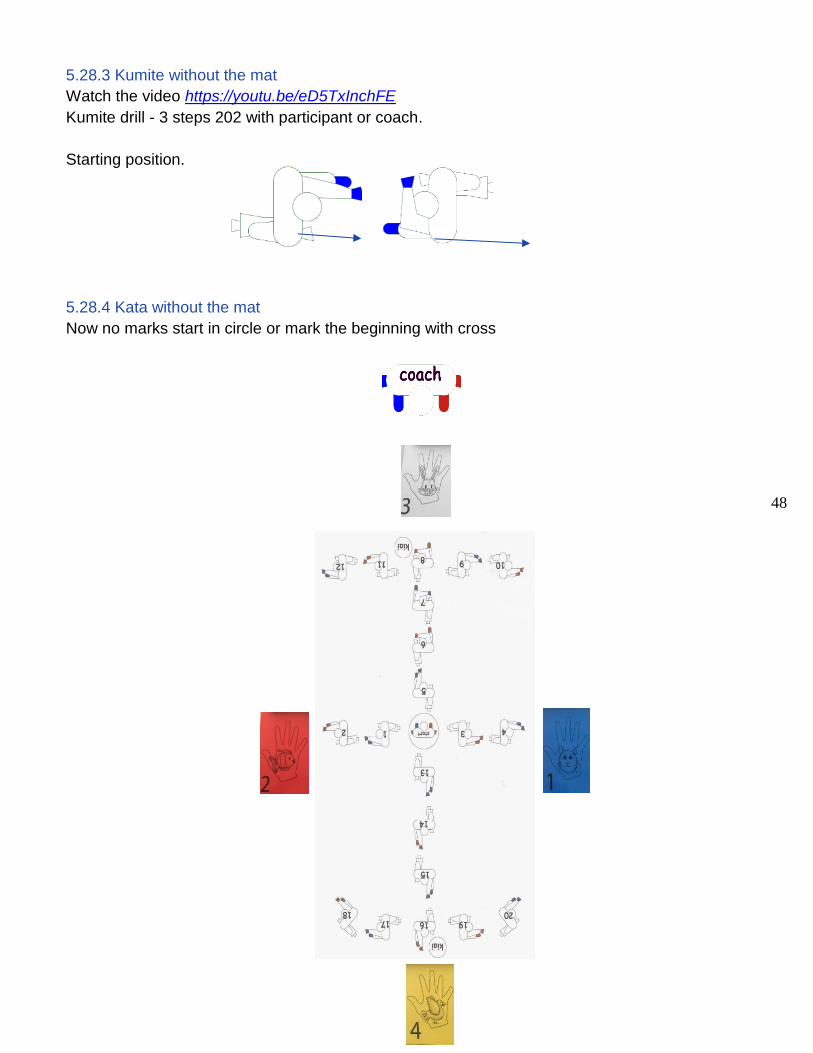
5.28.4 Kata without the mat
Now no marks start in circle or mark the beginning with cross
49
During 2020 COVID19 pandemic and consequent global lockdown, IKONS partners, guided by
IKFI, decided not to stop with the training and organized online classes for DS people who
wanted to and could continue the training on line.
Below, a list of exercises (also demonstrated in the linked videos) that karate coaches can do
online with DS people independently from the week of training of IKONS programme reached.
Group of exercises #1
Watch the video to follow the instructions https://youtu.be/XXMyGeB42rQ
Warm-up on the cp mat
Crossing the hands on the shoulders starting from the hips.
Crossing the hands on the knees starting from the hips.
Crossing the hands on the shoulders and knees combined.
Hands crossed on the shoulders and on the knees combined with the previous exercise.
The exercise is performed without the trainer
Starting position behind the mat. The student moves to the first 2 coloured feet; then,
brings the feet out of the mat bending the knees and tapping with both hands the
coloured feet. Then, he/she brings back the feet on the coloured feet and gets back to the
starting position.
The exercise is performed without the trainer
Starting position next to the cp mat. The student places the foot on the blue pictogram
and then, moves the hand towards the blue symbol. Then, he/she moves to the other side
of the cp mat and repeats using the other side of the body reaching the red pictogram.
The exercise is performed without the trainer
Starting position next to the cp mat. The student puts 1 foot on the blue pictogram and at
the same time the arms in “tsuki” position on the blue side of the mat. Repeat the exercise
starting from the other side of the mat using the red pictogram.
The exercise is performed without the trainer
6. ONLINE TRAINING SESSIONS
50
Kihon with the cp mat
The coach shows the positional cards starting behind the mat. The student puts 1 foot on
the coloured foot showed by the coach.
The exercise is performed without the trainer
Change side of the mat. The coach shows the positional cards starting behind the mat.
The student puts 1 foot on the coloured foot showed by the coach.
The exercise is performed without the trainer
Starting position behind the mat with hands on the hips (without positional cards). The
students puts 1 foot on the yellow foot on the mat and stretches the same side arm in
“tsuki”. The student moves 3 times, at the 3rd time says “KIAI”. Then, he/she tries starting
from both sides of the mat.
The exercise is performed without the trainer
Repeat the exercise. At the 3rd step, the student says “KIAI” and then, steps backwards
with the arm flexed at the same side in “age uke” and the 3rd step says “KIAI”
The coach can combine stepping forwards “tsuki” and step backwards “age uke” and at
every 3rd step always say “KIAI”
Starting position: with the cards, the coach calls the colours. Example: the student puts 1
foot on the yellow pictogram tapping the knee.
Starting position: with the cards, the coach calls the colours. Example: the students puts
1 foot on the yellow pictogram tapping the knee and then, steps forwards.
Starting position: with the cards, the coach calls the colours. Example: the student puts 1
foot on the yellow pictogram tapping the knee, steps forward and stretches the arm on the
same side “tsuki”.
51
Group of exercises #2
Watch the video to follow the instructions https://youtu.be/NI3O5pDSZ08
Warm-up on the cp mat
Starting position behind the cp mat, the student walks over the 6 coloured feet.
The coach now walks on the mat and the students has to follow and puts 1 knee up.
Starting position next to the cp mat, the student steps step sideways on the yellow foot,
then on the red and then on the green and follows with double “tsuki”; then, he/she moves
to the other side of the cp mat.
Starting position next to the cp mat, the student steps sideways straight to 3rd position
next to the mat and follows with single “tsuki” with the blue arm. Then, he/she moves to
the other side of the cp mat, 3rd position next to the mat and follows with single “tsuki” with
the red arm.
Kihon with the cp mat
Starting position behind the cp mat. The student puts 1 foot on the yellow pictogram and
stretches the red arm “tsuki”. Then, he/she steps forward to the blue foot and stretches
the blue arm “tsuki”. Then, he/she steps forward to the green foot and stretches the red
arm “tsuki”. Finally, he/she steps step over the mat and stretches the blue arm “tsuki”.
Then, the student steps backwards to the blue foot and bend the arm “age uke” ; then,
steps to the yellow foot and bend the arm “age uke” and finally, steps behind the mat and
bend the arm “age uke”. Switching both feet with a jump and performing the same
exercise starting from foot position yellow.
Starting position behind the cp mat. The student puts 1 foot on the yellow pictogram and
stretches both arms. Then, he/she steps forward to the blue foot and kicks, blue side
“mae geri”, than green side and “mae geri” then, steps over the mat and “mae geri”.
Then, the student steps backwards. First cross he/she crosses the shoulder with the red
arm then steps to the blue foot and stretches the arm down in “gedan barai” then, steps to
the yellow foot and “gedan barai” then, steps behind the mat and “gedan barai” .
Switching both feet with a jump and performing the same exercise starting from foot
position yellow.
Combine both exercises
Performing the same exercises but with the key-points:
for “tsuki” tapping on the same side of the leg;
for “age uke” tapping on the opposite leg;
for “mae geri” performing clapping first;
for “gedan barai” tapping on the opposite shoulder.
52
Starting position on the yellow and orange feet. The student kicks “mae geri”; after the
kick, goes back to the starting position. The coach shows the coloured cards.
Starting position on the blue and red feet. The student kicks “yoko geri”; after the kick,
goes back to the starting position. The coach shows the coloured cards.
Starting position on the white and green feet. The student kicks “ushiro geri”; after the kick,
goes back to the starting position. The coach shows the coloured cards.
Combine the 3 kicking techniques each time with the red and blue side.
This sequence is performed without the coach
Performing the same exercises and change the foot position:
for “mae geri”, the exercise ends with 1 step to the front;
for “yoko geri”, the exercise ends with 1 step sideways next to the mat;
for “ushiro geri”, the exercise ends with 1 step backwards.
Related Documents


