COMPATIBILITY REPORT SICK WTB2SC-2P3244 Proximity Sensor PLC DCS/HMI/SCADA IO-LINK SENSORS/ACTUATORS

Welcome message from author
This document is posted to help you gain knowledge. Please leave a comment to let me know what you think about it! Share it to your friends and learn new things together.
Transcript
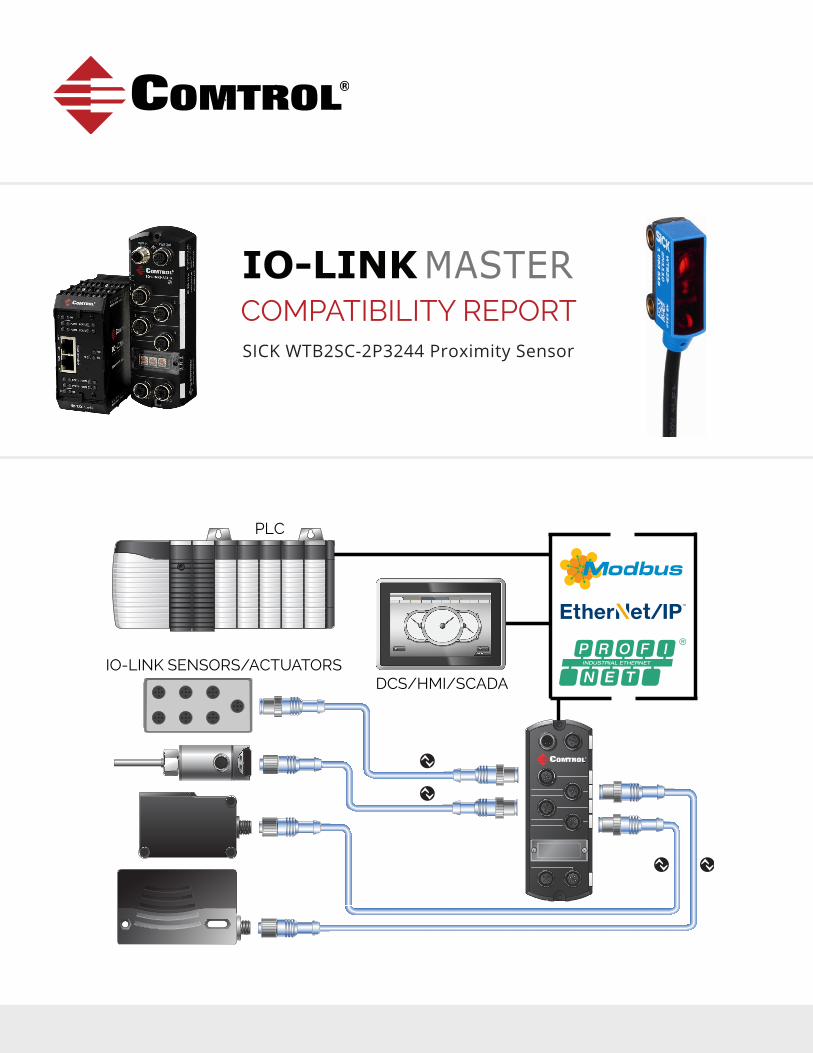
COMPATIBILITY REPORT
SICK WTB2SC-2P3244 Proximity Sensor
PLC
DCS/HMI/SCADA
IO-LINK SENSORS/ACTUATORS
5/21/2015 SICK WTB2SC-2P3244 Proximity Sensor 2
Table of Contents
Table of Contents .................................................................................................................................................................... 2
Test Report Overview ............................................................................................................................................................. 3
IO-Link Master – IO-Link Diagnostics Page ............................................................................................................................ 3
Configuring IO-Link Settings Settings ..................................................................................................................................... 4
After Configuring Friendly Port Names ................................................................................................................................ 5
Setting Up Passwords ............................................................................................................................................................. 6
IO-Link Device Configuration .................................................................................................................................................. 7
Loading the IODD Files ....................................................................................................................................................... 7
Verifying that the Correct IODD Files Loaded ................................................................................................................... 10
Changing Parameters in the Proximity Sensors with the GUI ........................................................................................... 11
Changing Parameters Using the ISDU Interface............................................................................................................... 14
Using the Device Validation Feature ..................................................................................................................................... 16
Incompatible Device Attached to Port ............................................................................................................................... 16
Compatible Device Attached to Port ................................................................................................................................. 18
Identical Device Validation ................................................................................................................................................ 19
Configuring Data Validation .................................................................................................................................................. 21

5/21/2015 SICK WTB2SC-2P3244 Proximity Sensor 3
Test Report Overview
The SICK WTB2SC-2P2344 Proximity sensor operates properly with the Comtrol IO-Link Master. This report contains the following topics:
• IO-Link Master – IO-Link Diagnostics page
• Configuring IO-Link settings
• Setting up passwords
• IO-Link device configuration
• Using the device and data validation features
This report is based on Application Base v1.3.14 on the IO-Link Master DR-8-EIP (DIN rail, IP20). This report does not illustrate all Comtrol IO-Link Master features, such as: EtherNet/IP and Modbus/TCP configuration, uploading the latest software, or network configuration. Nor does this report discuss data storage since this is a v1.0 IO-Link device and data storage was introduced at v1.1.
IO-Link Master – IO-Link Diagnostics Page
Five SICK IO-Link devices were connected to the Comtrol IO-Link Master and upon connection, the IO-Link Diagnostics page immediately displays the SICK IO-Link devices without any configuration.
Note: This screen shot does not display the complete IO-Link Diagnostics page.
5/21/2015 SICK WTB2SC-2P3244 Proximity Sensor 4
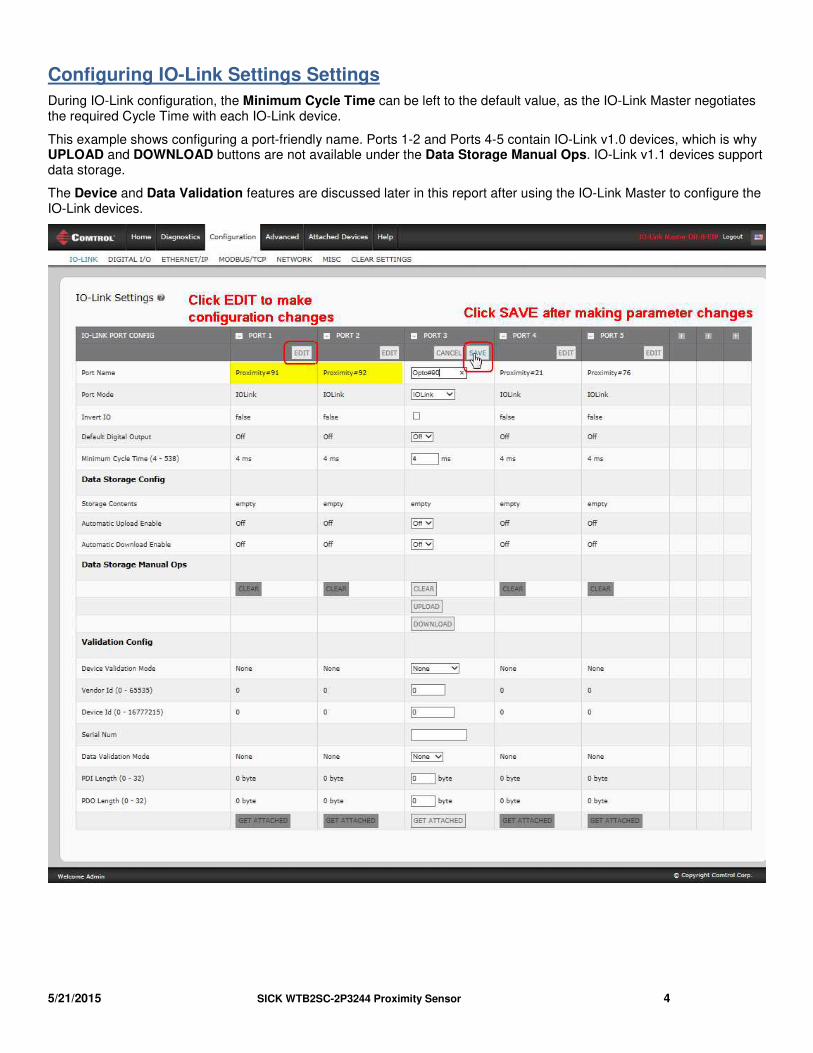
Configuring IO-Link Settings Settings
During IO-Link configuration, the Minimum Cycle Time can be left to the default value, as the IO-Link Master negotiates the required Cycle Time with each IO-Link device.
This example shows configuring a port-friendly name. Ports 1-2 and Ports 4-5 contain IO-Link v1.0 devices, which is why UPLOAD and DOWNLOAD buttons are not available under the Data Storage Manual Ops. IO-Link v1.1 devices support data storage.
The Device and Data Validation features are discussed later in this report after using the IO-Link Master to configure the IO-Link devices.

5/21/2015 SICK WTB2SC-2P3244 Proximity Sensor 5
After Configuring Friendly Port Names
You can use the IO-Link Configuration page to customize the Port Name. The IO-Link Diagnostics page now displays friendly port names.
5/21/2015 SICK WTB2SC-2P3244 Proximity Sensor 6
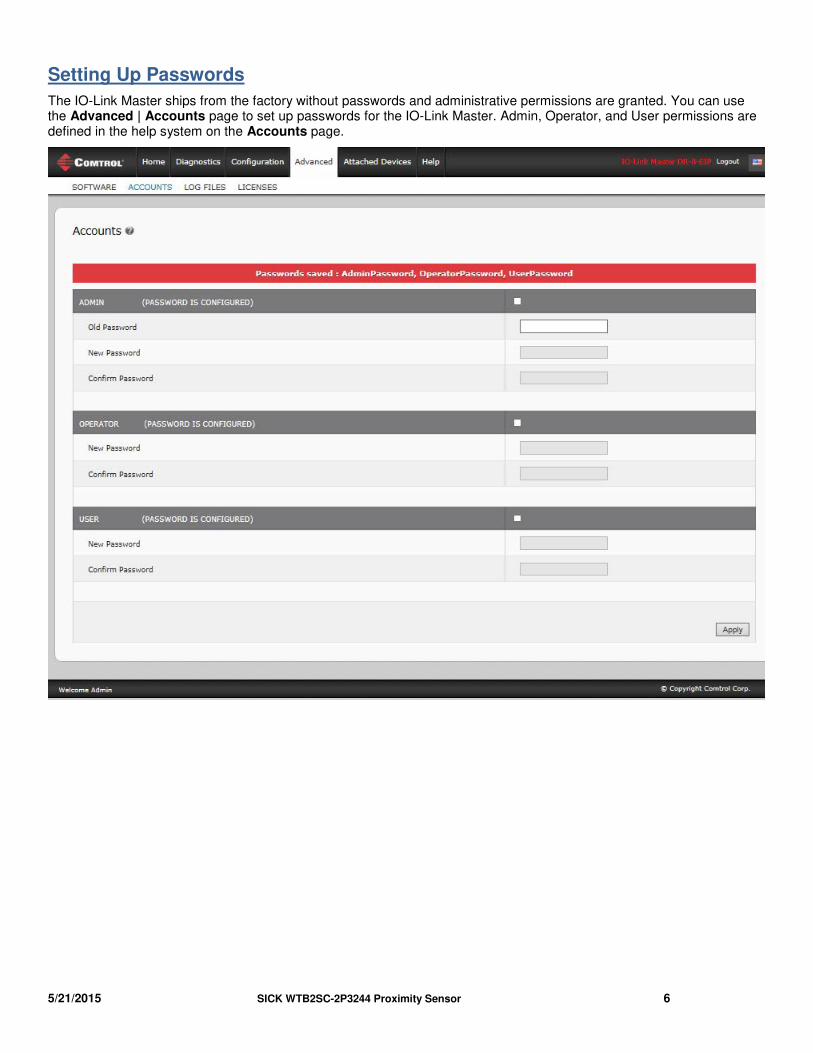
Setting Up Passwords
The IO-Link Master ships from the factory without passwords and administrative permissions are granted. You can use the Advanced | Accounts page to set up passwords for the IO-Link Master. Admin, Operator, and User permissions are defined in the help system on the Accounts page.
5/21/2015 SICK WTB2SC-2P3244 Proximity Sensor 7
IO-Link Device Configuration
You can use the Comtrol IO-Link Master to configure the IO-Link device.
• If an IODD file is loaded, you may want to use the IO-Link Device – Port table (GUI) to change parameter settings.
• If an IODD file is not loaded, you can use the IO-Link Device ISDU Interface on the bottom of the IO-Link Device – Port page along with the Operators Manual for the IO-Link device.
This section discusses the following topics:
• Loading IODD files
• Verifying that the correct IODD file is loaded
• Changing IO-Link device parameters using the GUI
• Resetting to the IO-Link device to factory defaults
• Changing IO-Link device parameters using the ISDU Interface
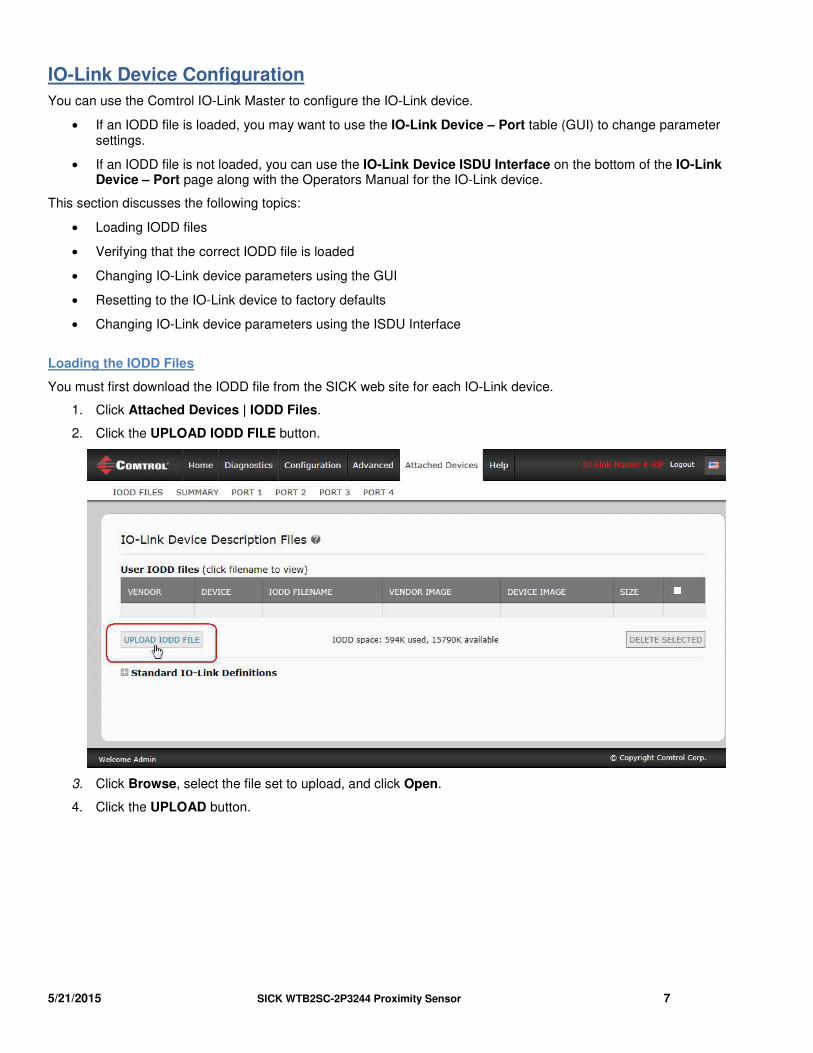
Loading the IODD Files
You must first download the IODD file from the SICK web site for each IO-Link device.
1. Click Attached Devices | IODD Files.
2. Click the UPLOAD IODD FILE button.
3. Click Browse, select the file set to upload, and click Open.
4. Click the UPLOAD button.

5/21/2015 SICK WTB2SC-2P3244 Proximity Sensor 8
The IO-Link Master loads only the files required and may issue a message like this:
5. This is the IODD file loaded for this IO-Link device.

5/21/2015 SICK WTB2SC-2P3244 Proximity Sensor 9
6. Click the the IODD FILENAME to view the .xml file.
7. If desired, review the IODD file.
5/21/2015 SICK WTB2SC-2P3244 Proximity Sensor 10
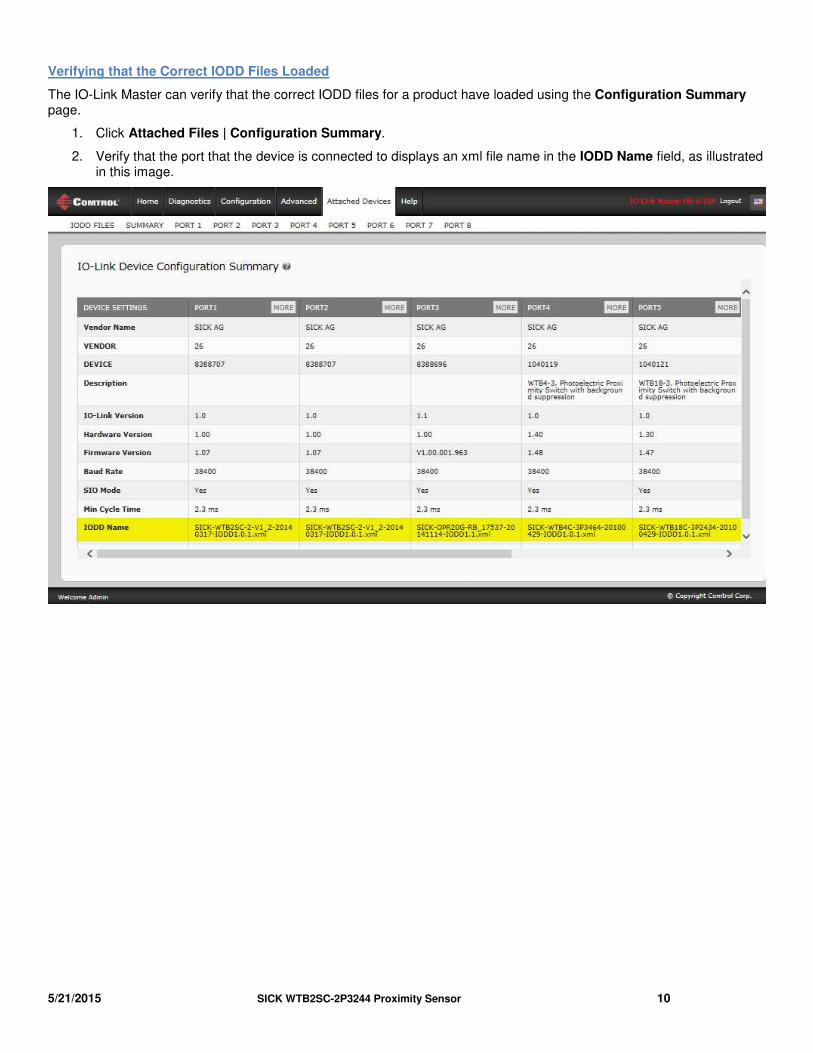
Verifying that the Correct IODD Files Loaded
The IO-Link Master can verify that the correct IODD files for a product have loaded using the Configuration Summary page.
1. Click Attached Files | Configuration Summary.
2. Verify that the port that the device is connected to displays an xml file name in the IODD Name field, as illustrated in this image.

5/21/2015 SICK WTB2SC-2P3244 Proximity Sensor 11
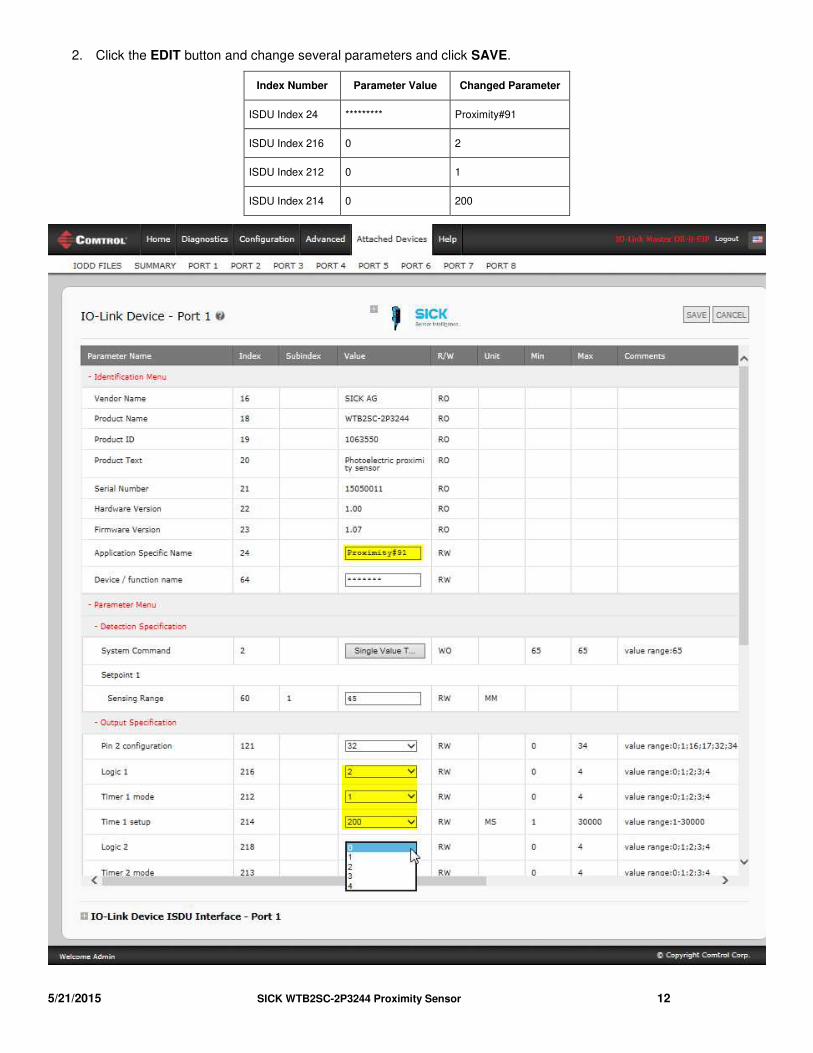
Changing Parameters in the Proximity Sensors with the GUI
Use the EDIT button to easily configure the sensor using the user interface or expand the IO-Link Device ISDU Interface.
1. Click Attached Devices | Port 1 (in this example). The IO-Link device displays as expected in the PORT page.
5/21/2015 SICK WTB2SC-2P3244 Proximity Sensor 12
2. Click the EDIT button and change several parameters and click SAVE.
Index Number Parameter Value Changed Parameter
ISDU Index 24 ********* Proximity#91
ISDU Index 216 0 2
ISDU Index 212 0 1
ISDU Index 214 0 200

5/21/2015 SICK WTB2SC-2P3244 Proximity Sensor 13
3. If necessary, click the REFRESH button to verify the changes have occurred.

5/21/2015 SICK WTB2SC-2P3244 Proximity Sensor 14
Changing Parameters Using the ISDU Interface
This shows using the IO-Link ISDU Interface to change configuration parameters.
Please note:
• You must enter the decimal value for the ISDU Block Index and ISDU Sub-index.
• The following images do not display the complete web page.
• The following screenshots do not illustrate the system responses. The IO-Link Master responds with a command executed notification.
The following shows how to use the IO-Link ISDU Interface to change IO-Link device configuration parameters.
1. Expand the IO-Link Device ISDU Interface.
2. Optionally, verify that the sensor responds to queries.
5/21/2015 SICK WTB2SC-2P3244 Proximity Sensor 15
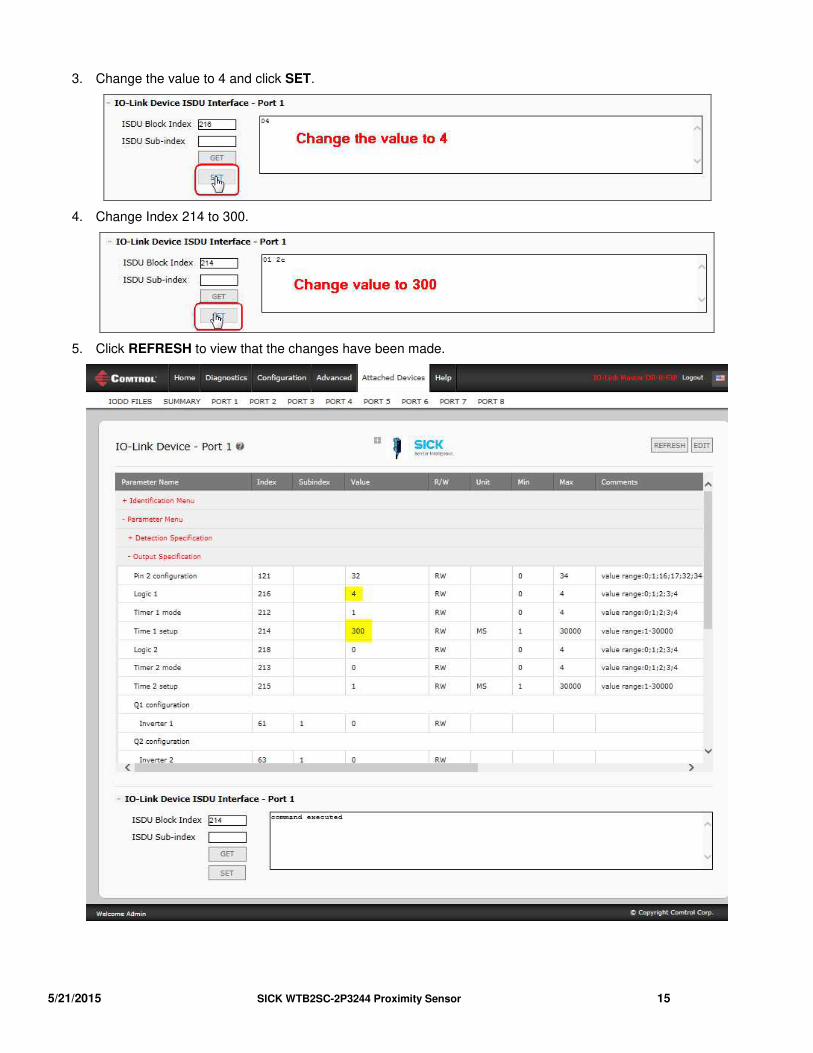
3. Change the value to 4 and click SET.
4. Change Index 214 to 300.
5. Click REFRESH to view that the changes have been made.
5/21/2015 SICK WTB2SC-2P3244 Proximity Sensor 16
Using the Device Validation Feature
The WTB2SC-2P3244 sensor supports Device Validation, Compatible or Identical.
Incompatible Device Attached to Port
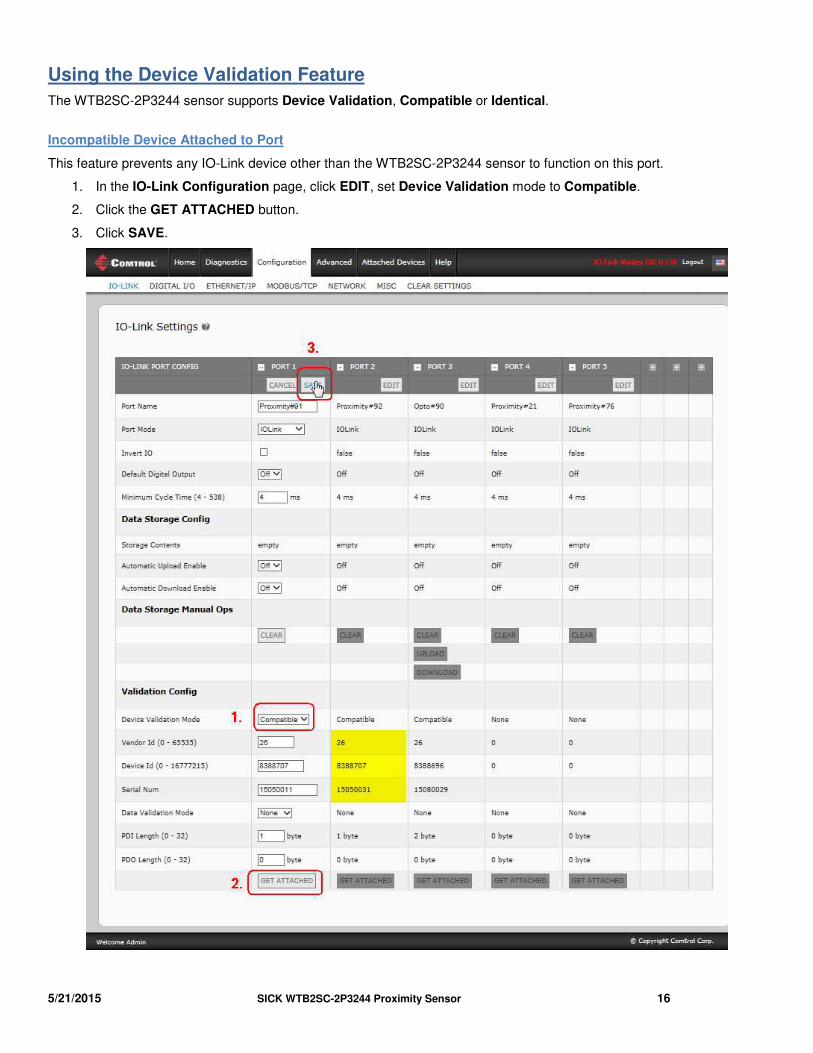
This feature prevents any IO-Link device other than the WTB2SC-2P3244 sensor to function on this port.
1. In the IO-Link Configuration page, click EDIT, set Device Validation mode to Compatible.
2. Click the GET ATTACHED button.
3. Click SAVE.

5/21/2015 SICK WTB2SC-2P3244 Proximity Sensor 17
4. Remove the sensor from the port and connect another IO-Link device (not a WTB2SC-2P3244).
5. The IO-Link LED on the IO-Link Master is now flashing red to indicate that an incompatible device is connected to the port.
In addition, the IO-Link Diagnostics page displays that an incompatible device (wrong sensor) is attached to the port.
This condition is also reported in Last Events on the Diagnostics page.

5/21/2015 SICK WTB2SC-2P3244 Proximity Sensor 18
Compatible Device Attached to Port
Remove the IO-Link device from the IO-Link Master and replace it with the other WTB2SC-2P3244, which immediately returns to an active state as displayed in the IO-Link Diagnostics page.
5/21/2015 SICK WTB2SC-2P3244 Proximity Sensor 19
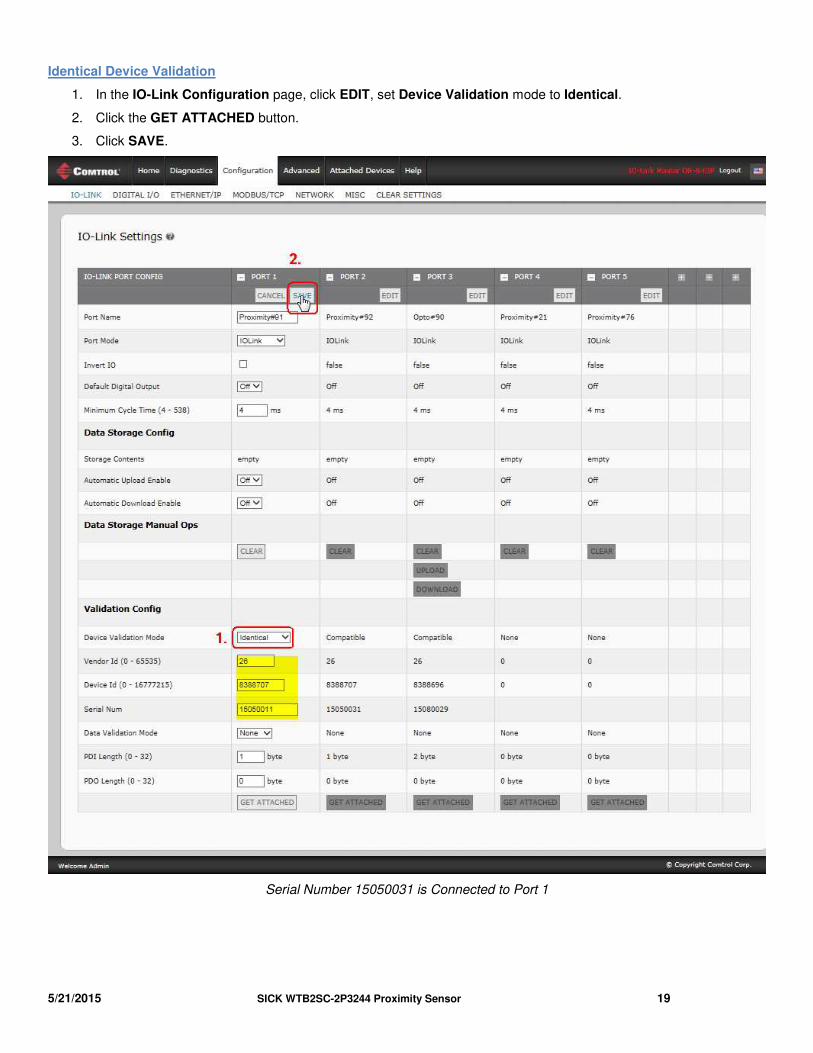
Identical Device Validation
1. In the IO-Link Configuration page, click EDIT, set Device Validation mode to Identical.
2. Click the GET ATTACHED button.
3. Click SAVE.
Serial Number 15050031 is Connected to Port 1
5/21/2015 SICK WTB2SC-2P3244 Proximity Sensor 20
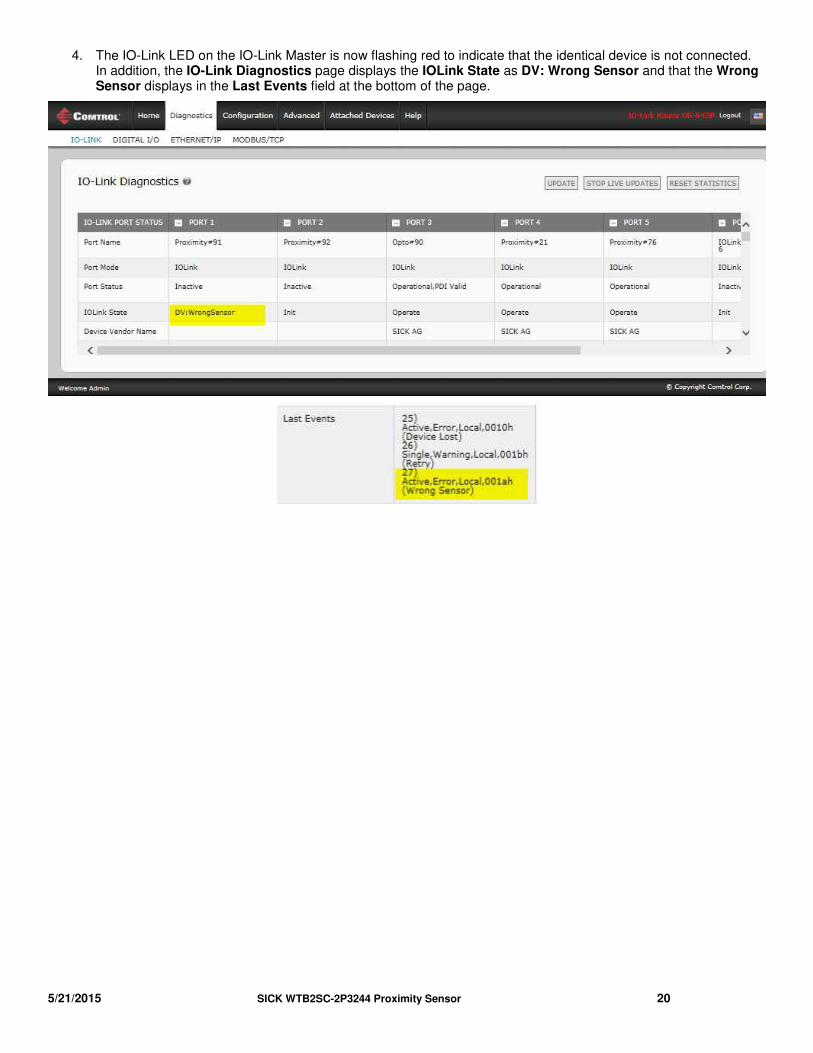
4. The IO-Link LED on the IO-Link Master is now flashing red to indicate that the identical device is not connected. In addition, the IO-Link Diagnostics page displays the IOLink State as DV: Wrong Sensor and that the Wrong Sensor displays in the Last Events field at the bottom of the page.

5/21/2015 SICK WTB2SC-2P3244 Proximity Sensor 21
Configuring Data Validation
Use the following steps to configure the Data Validation feature.
1. In the IO-Link Configuration page, click EDIT, set Data Validation mode to Strict or Loose.
2. Click the GET ATTACHED button.
3. Click SAVE.
Related Documents