Introduction to TAMS Analyser for Mac OSX Tabitha Hart Center for Social Science Computation and Research 110 Savery Hall University of Washington Seattle, WA 98195 USA (206) 543-8110 June 2011 http://julius.csscr.washington.edu/pdf/TAMS.pdf

Welcome message from author
This document is posted to help you gain knowledge. Please leave a comment to let me know what you think about it! Share it to your friends and learn new things together.
Transcript

Introduction to TAMS Analyser for Mac OSX
Tabitha Hart
Center for Social Science Computation and Research 110 Savery Hall
University of Washington Seattle, WA 98195 USA
(206) 543-8110
June 2011
http://julius.csscr.washington.edu/pdf/TAMS.pdf

TAMS Analyzer CSSCR th june 2011 Page 1 of 48
Introduction to TAMS Analyzer
TAMS Analyzer is a free qualitative data analysis software tool for use on Mac OSX. TAMS was created by Dr. Matthew Weinstein, a Professor at UW Tacoma, who continues to develop and improve it. TAMS can be used for:
• coding data • sorting through and selecting coded data • recoding data • running and refining searches • generating reports on coded data.
TAMS does not code data for you. However, having a tool like TAMS to help you organize and make sense of your data can make the coding and analysis process easier and more rewarding.
Downloading TAMSAnalyzer To download TAMS visit the website http://tamsys.sourceforge.net/ and click on the “Download” link. Select “Single user application and basic documentation.” This will download a set of TAMS files to your computer. To install, simply drag the TAMS Analyzer and graphviz folders to your Applications folder.
If you followed the steps above, the TAMS application should now be located in your application folder. TAMS comes bundled with a variety of files, some of which are instruction manuals and other helpful documentation. Do have a look at these – they are filled with useful information. The application itself is the file called TAMSAnalyzer, and it has this icon:
TAMS Analyzer CSSCR th june 2011 Page 2 of 48
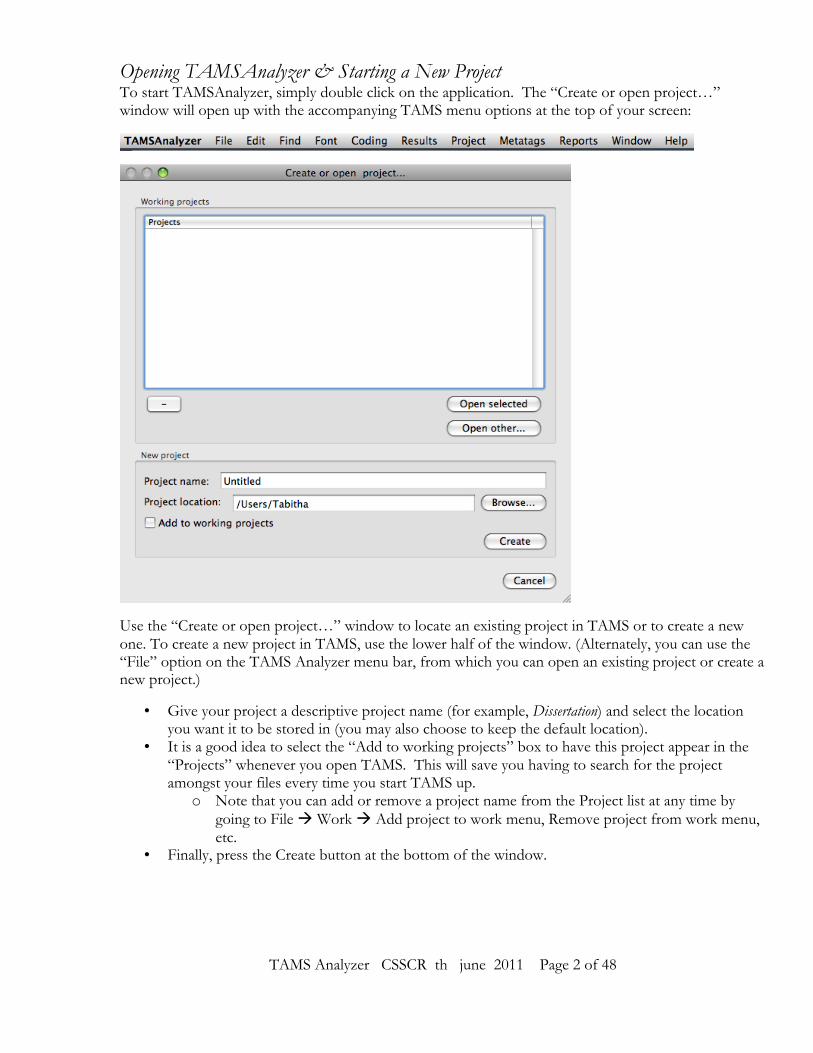
Opening TAMSAnalyzer & Starting a New Project To start TAMSAnalyzer, simply double click on the application. The “Create or open project…” window will open up with the accompanying TAMS menu options at the top of your screen:
Use the “Create or open project…” window to locate an existing project in TAMS or to create a new one. To create a new project in TAMS, use the lower half of the window. (Alternately, you can use the “File” option on the TAMS Analyzer menu bar, from which you can open an existing project or create a new project.)
• Give your project a descriptive project name (for example, Dissertation) and select the location you want it to be stored in (you may also choose to keep the default location).
• It is a good idea to select the “Add to working projects” box to have this project appear in the “Projects” whenever you open TAMS. This will save you having to search for the project amongst your files every time you start TAMS up.
o Note that you can add or remove a project name from the Project list at any time by going to File Work Add project to work menu, Remove project from work menu, etc.
• Finally, press the Create button at the bottom of the window.

TAMS Analyzer CSSCR th june 2011 Page 3 of 48
With the successful creation of a new project, a new project window should now open on your desktop (pictured below). Note that this project window will have the name that you assigned to it, and will end in .xtprj, which is the TAMS file type. You should never attempt to open .xtprj files except from within the TAMS application, since doing so can corrupt the file and make it unusable.
Note that on the project window there are different tabs: Info, Files, Search, Define codes, Tags & Sets.
For now, click on the “Files” tab.
TAMS Analyzer CSSCR th june 2011 Page 4 of 48
Importing Your Data into TAMS
The newest version of TAMS works with rtf, pdf, jpeg, and audio/video files.
Word documents – you must convert Word documents to rtf or pdf before importing them into TAMS. My preferred format is rtf because rtf files can be edited from inside TAMS, whereas pdf files cannot.
Audio/video – You can now link audio/video data with TAMS files. The idea behind this is to use TAMS as a platform for transcribing. TAMS has a small video/audio playback screen coupled with play, pause, rewind, and fast-forward buttons. The benefit of this is that you now have playback and word processing functionalities together on one platform, which can potentially make the process of transcribing a bit easier. When you are coding, however, you code the transcriptions, i.e. the text, and not the audio file itself. Unlike other qualitative data analysis programs, TAMS does not yet have the capabilities to code or mark the audio/video material itself.
pdf & jpeg – You can now link pdf and jpeg files with TAMS files. With pdf and jpeg files, the codes and other information you associate with the file are not embedded into the file. Rather, they are saved in a native TAMS file associated with the document.
Very important: The files that you import into TAMS are earmarked for TAMS. That is, from now on they will be associated with TAMS, and you should not ever open or use them except from within TAMS. For this reason, I don’t recommend that you ever import your original documents (or your only set of documents) into TAMS. Rather, make copies of your original files, and import those copies into TAMS. Keep your original files elsewhere in a safe location.
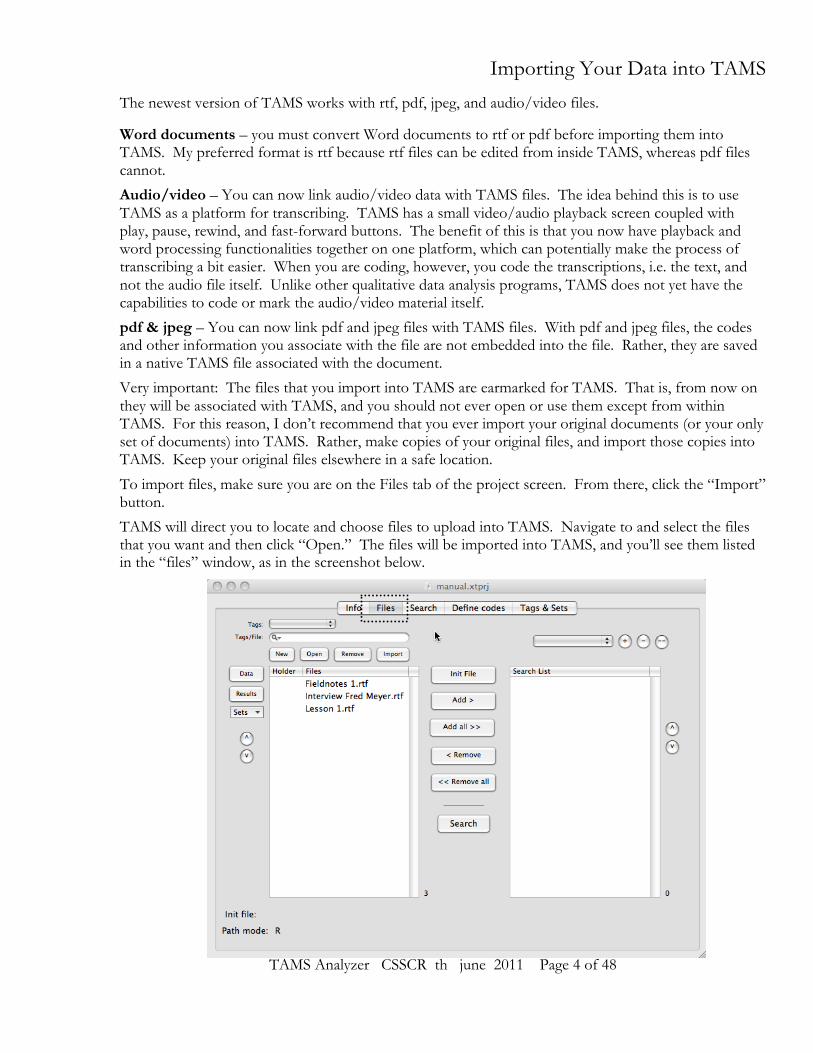
To import files, make sure you are on the Files tab of the project screen. From there, click the “Import” button.
TAMS will direct you to locate and choose files to upload into TAMS. Navigate to and select the files that you want and then click “Open.” The files will be imported into TAMS, and you’ll see them listed in the “files” window, as in the screenshot below.

TAMS Analyzer CSSCR th june 2011 Page 5 of 48
If you wish to work with a pdf file or an image file, take the following steps:
1. Start from the “Files” tab of the project window (pictured above). Press the “New” button to create a new file.
2. When prompted, give the new file a name. You’ll see a drop-down menu for file type. Press the up/down arrow to see the options. Select pdf or image, as appropriate.
3. Click OK.
4. A new window will open for the file you’ve just created. It’s a special “wrapper” for the file. (Note that the wrappers for pdfs and image files look slightly different but have similar functionalities.) At this point, you need to select one of your existing data files (pdf or image, as appropriate) to attach. Press the + key located near the “Apply Code” button. You’ll be prompted to locate the pdf /image file you want. When you have selected it, press OK.
5. You’ll now see the pdf/image you selected embedded in the “wrapper,” as in the screenshot below. From this point on you can begin coding, as I’ll describe in the next section.

TAMS Analyzer CSSCR th june 2011 Page 6 of 48
To remove a file from TAMS, highlight the name of the file in the “Files” list, then click the “Remove” button (located directly above the Files list).
Note that imported files should NEVER be opened except through TAMS. Opening files that are earmarked for TAMS can corrupt them, making the data unreadable.

TAMS Analyzer CSSCR th june 2011 Page 7 of 48
BASIC (FIRST LEVEL) CODING Once you have imported your documents, you are ready to begin coding in TAMS. To begin coding a document, simply open the data file that you want to code. Do this by double-clicking the name of the document listed in the files section of the project window. This will open the document in a new window.
In the screenshot below I have double-clicked one of my files (sbFN091604ERP), which has opened up in its own window on the left. My project window remains open on the right.

TAMS Analyzer CSSCR th june 2011 Page 8 of 48
Below is a close up image of the file window. Note the audio/video playback window in the top left corner.
If you’d like to attach an audio file to this document, simply press the + button beneath the playback screen. You will be prompted to locate and upload the audio file. Once it’s attached, you can use the controls in the audio/video window to play it back. The v button inserts time codes into the document window, making it easy for you to insert the exact times on the audio file that you want to keep track of.
You can hide the audio/video screen if you want to. Simply place your cursor over the small grey dot located above the “Apply Code” button. Your cursor will display as an up/down arrow, which you use to “close up” the screen.

TAMS Analyzer CSSCR th june 2011 Page 9 of 48
To code a passage, you’ll need to highlight it first.
In the example below, I’ve highlighted the passage starting with “It is a smallish location....”
To give this highlighted passage a new code name, enter the name in the empty field located in between the “Apply code” button and the “codes” box. Code names can have letters, numbers, underscore and the > character. They cannot have spaces.
After entering the name of your new code, click the “Apply code” button. (Do not press the return/enter key.)

TAMS Analyzer CSSCR th june 2011 Page 10 of 48
A new window will open, prompting you to describe this new code. Although you don’t have to enter a description, it’s a good idea to do so. By entering descriptions here you will have a record of what the code means to you.
You can also choose the color that you would like the code to appear in. The default color is black. To change the color, just click on the color box. In the example below, I’ve chosen to have this code (which I’ve named “layout”) display in red.
When you are finished, click OK.
You have successfully coded your passage with the new code, and you will now be taken back to the document that you were working on.

TAMS Analyzer CSSCR th june 2011 Page 11 of 48
You can tell that the passage is coded because it has squiggly brackets containing the code name around it. Note that the “layout” code is displayed in the red color that I selected for this particular code.

TAMS Analyzer CSSCR th june 2011 Page 12 of 48
As you’ll notice from the picture above, TAMS uses squiggly brackets { } to denote coded data. These code brackets appear on either side of the coded passage. If they don’t then the data is improperly coded and will cause trouble.
The start code is the code name inside the brackets, and the end code is the code name inside the brackets preceded by a slash, so it looks like this:
{code_X}piece of text here{/code_X}
or, as in the passage I’ve been working on:
{layout}It is a smallish location and, best of all, it has two long tables right next to the register. One of these directly faces the counter, and all of its four seats are positioned to give the customers seated there a clear view of the service counter, the menu, and the pick-up counter. The other one is perpendicular to the service/pick-up counter, with its edge pressed right up against it.{/layout}
Once you’ve created a code, it will appear in the “Codes” list. You’ll see it there whenever you open up a file in this particular project.
Codes are listed alphabetically in the “Codes” list. As far as I know there is no limit to the number of codes that you can create.
TAMS Analyzer CSSCR th june 2011 Page 13 of 48
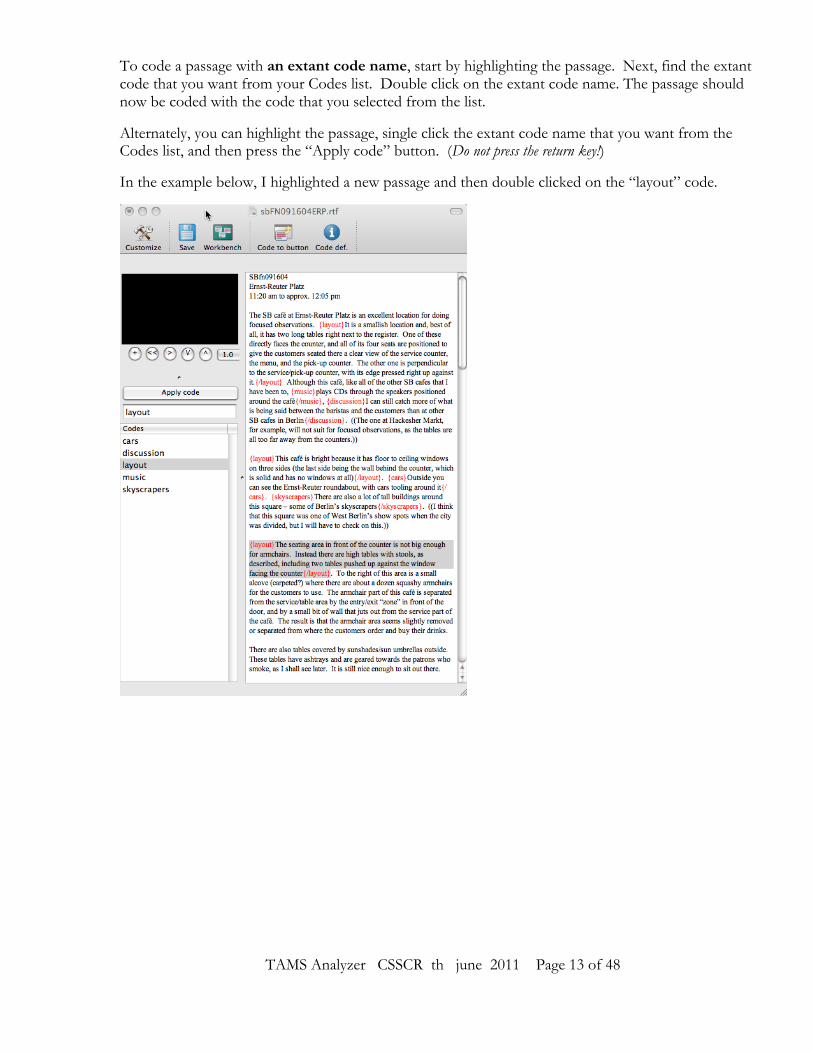
To code a passage with an extant code name, start by highlighting the passage. Next, find the extant code that you want from your Codes list. Double click on the extant code name. The passage should now be coded with the code that you selected from the list.
Alternately, you can highlight the passage, single click the extant code name that you want from the Codes list, and then press the “Apply code” button. (Do not press the return key!)
In the example below, I highlighted a new passage and then double clicked on the “layout” code.
TAMS Analyzer CSSCR th june 2011 Page 14 of 48
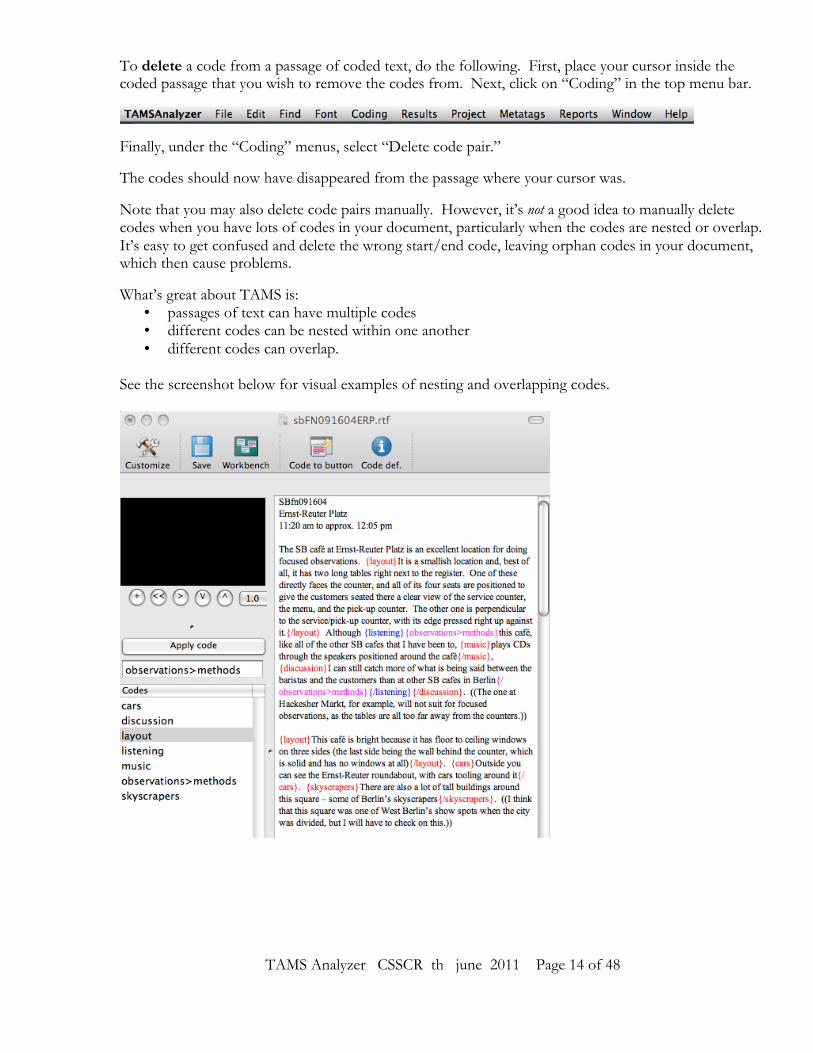
To delete a code from a passage of coded text, do the following. First, place your cursor inside the coded passage that you wish to remove the codes from. Next, click on “Coding” in the top menu bar.
Finally, under the “Coding” menus, select “Delete code pair.”
The codes should now have disappeared from the passage where your cursor was.
Note that you may also delete code pairs manually. However, it’s not a good idea to manually delete codes when you have lots of codes in your document, particularly when the codes are nested or overlap. It’s easy to get confused and delete the wrong start/end code, leaving orphan codes in your document, which then cause problems.
What’s great about TAMS is: • passages of text can have multiple codes • different codes can be nested within one another • different codes can overlap.
See the screenshot below for visual examples of nesting and overlapping codes.

TAMS Analyzer CSSCR th june 2011 Page 15 of 48
To remind yourself of the definition of a code, single click the code name in the “codes” box, and then click the code definition button (“Code def.”). The definition that you entered when you created the code will pop up in a separate box, as in the image below.
Alternately, you can press the “Define Codes” tab on the workbench. From here you can check or change the definition and/or color of any given code.

TAMS Analyzer CSSCR th june 2011 Page 16 of 48
In the screenshot below I’m checking the definition of the code “goal>culture.”
• You may enter extant codes manually if you wish, simply by typing them in, complete with
squiggly brackets and the slash in the end code. • When choosing code names, you might want to use this naming protocol to denote what you
feel are related codes: o rule>politeness o rule>professionalism o rule>politeness>smiling o rule>politeness>names

TAMS Analyzer CSSCR th june 2011 Page 17 of 48
Context Codes & the Init File In many data sets you will have contextual information that you want to have associated with your coded passages. For example, where did this piece of data come from? Was it from your field notes, an interview, or an interaction between research participants? Who said this? Was it Interviewee A, B, or C? On what date was this particular piece of data generated?
For example, in a multi-sited ethnography project that I did, I wanted to know what location each coded passage was associated with; i.e. the classroom, the playground, or the principal’s office. I also wanted to know what type of person each coded passage was associated with; i.e. a teacher, a student, or an administrator. Finally, I wanted to know what type of data each coded passage was associated with: my field notes, an interview, or a self-report.
You can code this kind of contextual information into your data using context codes1. Context codes are extremely useful when it comes time to sort through and analyze your coded data and/or create reports. In TAMS context codes appear as separate columns and thus show you at a glance what contexts your coded passages are associated with. They help you organize and make sense of your coded data.
The screenshot below shows an example search done on a data set in which I used context codes. I’ve done a search for all passages that I coded as “goal”. In the results window, I can see the data type (in this case ST interview, or Student interview), role (student) and speaker (various) associated with each coded passage.
1 For more information on context codes, see Matthew Weinstein’s ‘zine titled “Context Codes.” This can be downloaded from the TAMS website as part of a bundle of documentation that Matthew has created for TAMS users.

TAMS Analyzer CSSCR th june 2011 Page 18 of 48
If I didn’t have any context codes, I’d see something like this, which would be far less useful, because the coded passages would have no contextual information:
For this reason, it’s a great idea to use context codes in your project.
Some typical context codes might be:
• Informant (name of interviewee, participant, speaker, etc.) • Location or Site (where the data was collected) • Date (when the data was collected) • Data Type (interview, field notes, interaction, forum, team meeting, article) • Gender (male, female, unknown)
SETTING UP YOUR CONTEXT CODES IN THE INIT FILE TAMS can only recognize context codes through an “Init file,” which you’ll need to create. You can think of the Init file as an instruction sheet that you create to tell TAMS how to treat certain codes, which you will specify, as context codes. Without an init file, TAMS will simply treat all codes as regular data codes by default.
Ideally, you should set up your Init file at the beginning of your project, before you start coding anything. (Note that you may set up the Init file later on in the project, too, but then you’ll need to go back into every document that you want the context codes to apply to, and code them with the context codes.)
To create the init file, go to the “Files” tab of the project window and click the “new” button. Make sure that rtf is selected as the file type. Give the file a name. It’s a good idea to have “init” in the name as an additional reminder that this is your Init file.
In the example below, I’m calling it “myproject init”. You could also simply call it “Init file” if you wanted to.

TAMS Analyzer CSSCR th june 2011 Page 19 of 48
When you are ready, click OK.
The next step is to open the init file and declare what your context variables will be. If you’ve followed the instructions above, the Init file that you created should have opened. If not, simply double click on the init file to open it up.
Inside the init file you declare your context codes by typing them out in the required format, which I’ll describe in more detail below.
There are two different types of context codes, both of which must be set up in the Init File. The two types are (1) universal context codes and (2) regular context codes.
Universal Context Codes The first type of context code applies to an entire document and is therefore called a universal context code.
Universal context codes look like this:
{!universal somekindofname=""}
In my project, for example, each document I imported into TAMS was one type of data: either an interview report, a set of field notes, a transcription of a teacher-student interaction, or a forum post. For me it was important to have a universal context code denoting data type, so that when I looked at my codes I could see what type of data (an interview, field notes, transcription, forum post, etc.) they were associated with.
In my Init File I therefore created this universal context code:
{!universal datatype=""}
TAMS Analyzer CSSCR th june 2011 Page 20 of 48
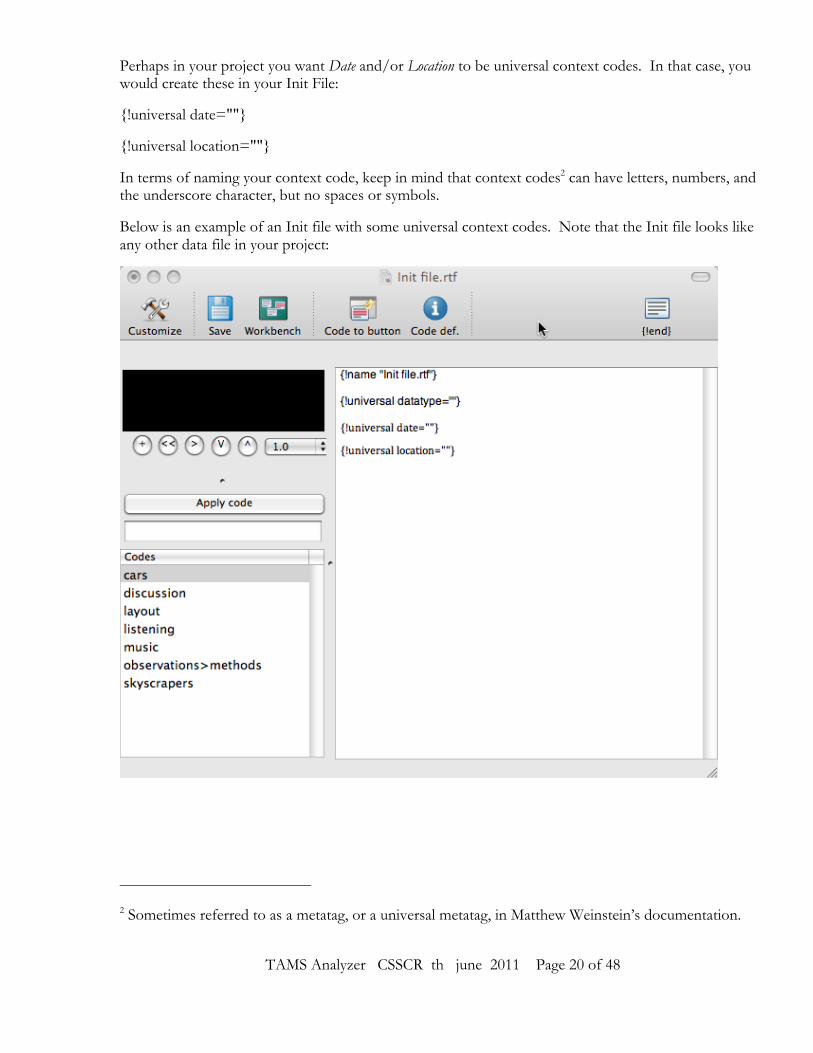
Perhaps in your project you want Date and/or Location to be universal context codes. In that case, you would create these in your Init File:
{!universal date=""}
{!universal location=""}
In terms of naming your context code, keep in mind that context codes2 can have letters, numbers, and the underscore character, but no spaces or symbols.
Below is an example of an Init file with some universal context codes. Note that the Init file looks like any other data file in your project:
2 Sometimes referred to as a metatag, or a universal metatag, in Matthew Weinstein’s documentation.

TAMS Analyzer CSSCR th june 2011 Page 21 of 48
(Regular) Context Codes The second type of context code applies only to selected passages of data. I’m referring to this code as a “regular context code.” When you set up the Init File, you format regular context codes in this way:
{!context somekindofname}
In my project, for example, I wanted context variables to denote both the role (teacher, student administrator) and the individual speaker (Jane, Bob, Sally, Fred) associated with my coded passages. I also wanted a context code for the date that the data was collected.
In my Init File I therefore set up the following context codes:
{!context role}
{!context speaker}
{!context topic}
Here’s an example of my Init file with the regular context codes listed beneath my universal context codes. Note that rather than list them one by one I’ve simply bundled them together like this:
{!context role, speaker, topic, date}

TAMS Analyzer CSSCR th june 2011 Page 22 of 48
Important side note on creating regular context codes: TAMS won’t recognize the context codes until the names – in this case, speaker and role – have been registered as codes in your project. You do this in the same way you register any new code, as described in above in the “Creating a new code” section of this documentation.
Creating Buttons in the Init File Like any code, the universal and regular context codes can be entered manually when you are coding your documents. However, if you’re going to be using certain context codes frequently it’s nice to have time-saving buttons which can used to enter the codes with one click. Buttons are set up in the Init File. To create a button, use this format:
{!button somekindofname}
In my project, I created buttons for my context codes speaker and role. I also created a button for {!end} because I used it so much. The button commands in my Init File looked like this:
{!button speaker}
{!button role}
{!button "{!end}"}3
Here’s a picture of my Init File with the button commands in it:
3 More on this later.

TAMS Analyzer CSSCR th june 2011 Page 23 of 48
Important note on buttons: TAMS won’t produce the buttons for the context codes until the names – in this case, speaker and role – have been registered as codes in your project. You do this in the same way you register any new code, as described in above in the “Creating a new code” section of this documentation.
You do not need to do anything else to get the code {!end} registered.
Once they have been completely set up, the buttons appear on the window for each document you open in the TAMS project with this Init File.
Below is an example of the buttons from my project window. Note that I have already registered speaker and role as codes (they are listed in the codes column):

TAMS Analyzer CSSCR th june 2011 Page 24 of 48
More notes on buttons: You could create a button for a universal context code if you wanted to. In my project, for example, I was actively using several universal context codes, so I tried using this generic button, which I set up in my Init File:
{!button "{!universal =""}"}
In each document I coded I used the generic button to get this on my document: {!universal =""}
Then I simply filled in the rest manually, directly onto my document:
{!universal datatype="Fieldnotes"} {!universal date="04/28/2009"} {!universal topic="mathematics"} {!universal location="playground"}
TAMS Analyzer CSSCR th june 2011 Page 25 of 48
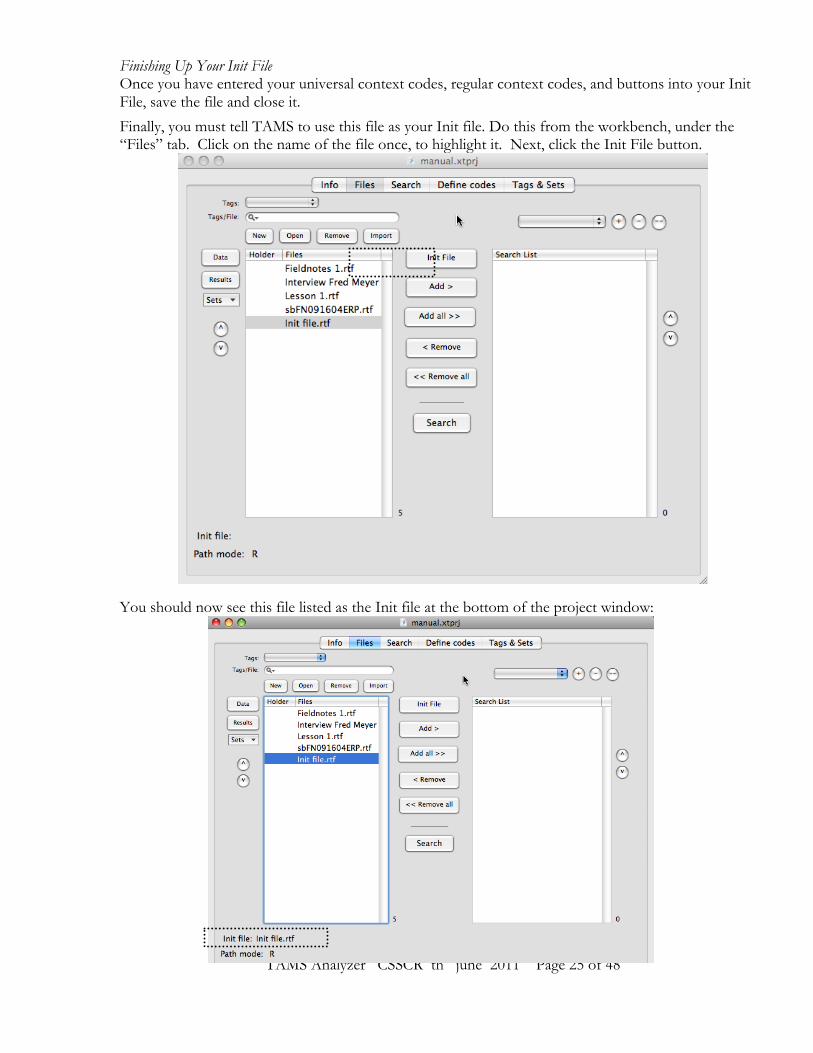
Finishing Up Your Init File Once you have entered your universal context codes, regular context codes, and buttons into your Init File, save the file and close it.
Finally, you must tell TAMS to use this file as your Init file. Do this from the workbench, under the “Files” tab. Click on the name of the file once, to highlight it. Next, click the Init File button.
You should now see this file listed as the Init file at the bottom of the project window:

TAMS Analyzer CSSCR th june 2011 Page 26 of 48
How To Use The Context Codes When You Are Coding Your Data Setting up the context codes in the Init file is only the first step. Once you start coding your data you’ll use these context codes in your data files. Here’s how you do it.
Remember, you may enter your context codes manually, or you can use buttons (which you create in the Init file, as described above) or you can do a combination of both.
USING UNIVERSAL CONTEXT CODES Here’s how you use universal context codes in a file that you are coding. You’ll use the universal code as you established it in the Init file but with the particulars (date, topic, name, etc.) included in between the quotation marks (“”).
For example, in the Init file you may have set up universal context codes for data type, date, topic, location, etc. Here’s how they look in the Init file:
{!universal datatype=" "} {!universal date=""} {!universal topic=""} {!universal location=""}
In the data file that you are coding, you use whatever universal context code you need, but with the file-specific information filled in. For example:
{!universal datatype="Fieldnotes"} {!universal date="04/28/2009"} {!universal topic="mathematics"} {!universal location="playground"}
You can just type these in at the top of the data file. Note that these universal context codes do not wrap around text. They are simply inserted at the top of a document.
Here’s an example of a coded file of mine with a universal context code inserted at the top:

TAMS Analyzer CSSCR th june 2011 Page 27 of 48
USING REGULAR CONTEXT CODES Regular context codes work differently. To use the regular context codes that you set up in the Init file, you must also establish them as codes in your project. You do this in the same way you register any new code, as described above in the “Creating a new code” section of this documentation. I suggest that you do this immediately after creating your Init file.
Once you have done this, you can use the regular context codes just as you would any other code. That is, you can highlight a piece of text, select the relevant code, and press the “Apply code” button.
Note that regular context codes do wrap around text, just like regular codes, and they use the same format as regular codes. For example:
{speaker}Ralph{/speaker} told me that he always tried to get to school early.
Ms. Fisher {role}teacher{/role} looked at the students’ assignments before calling them in from lunch.
Remember, it’s the information in the Init File -- {!context role} and {!context speaker} – that tells TAMS to treat this information as contextual information.
Here’s an example of a data file that I have coded with the context codes “role” and “speaker”. Note that both “role” and “speaker” appear in the Codes list (the pane in the bottom left corner of the window.

TAMS Analyzer CSSCR th june 2011 Page 28 of 48
Important note: Once a regular context code is inserted within a file, it will stay “switched on” until the end of that document unless you tell it otherwise.
For example, in the following passage, only Ralph will be recognized as the speaker:
{speaker}Ralph{/speaker} told me that he always tried to get to school early.
Ms. Fisher said she looked at the students’ assignments before calling them in from lunch.
Once I “switch on” the “speaker code around Ralph’s name, TAMS will assume that Ralph is the speaker of all the data that I code.
The same is true in this next example:
{speaker}Ralph{/speaker} told me that he always tried to get to school early.
{speaker}Ms. Fisher{/speaker} said she looked at the students’ assignments before calling them in from lunch.
In the passage above, the “speaker” code gets “switched on” around Ralph’s name. Even though I’ve inserted “speaker” around Ms. Fisher, TAMS won’t see it. All of the data will be associated with Ralph.
You have to tell TAMS when the speaker code – or any regular context code – ends, otherwise TAMS will just stick with it and keep it “on” until the end of the document. In other words, when you want to use the same regular context code multiple times within a document to denote multiple roles/speakers/etc. then you need to switch off the context code to indicate the end of a particular speaker’s turn, or a change in topic, etc.
Here’s how you do it:
To switch a context code off, you simply enter the code {!end}.
In my project, for example, I’m using the context code {speaker}{/speaker} because it’s important to me to be able to link statements and utterances with the people who make them. When I’m coding, I use the {speaker}{/speaker} code each time somebody takes a turn. When that person’s turn of speech ends, I alert TAMS to this by inserting the code {!end}. A passage of coded data would therefore look like this:
{speaker}Barry{/speaker} When are you going to turn in that assignment? {!end} {speaker}Ralph{/speaker} I’m not sure. Probably next week. {!end}
Here’s another example with the context code {role}{/role}:
{role}Teacher{/role}: Please open your books to page three. {!end}
{role}Student{/role} What did she say? Gosh I’m hungry. {!end}
{role}Teacher{/role}: Open your books please. {!end}
Important note: the {!end} code applies only to regular context codes. It does not “switch off” normal codes nor does it “switch off” universal codes.

TAMS Analyzer CSSCR th june 2011 Page 29 of 48
Because I use the code {!end} so frequently, I decided to make a button for it. To do this, I inserted the following command into the Init file:
{!button "{!end}"}
Now I have an end button on each data file that I open, as in the screenshot below:
To use the end button, simply place the cursor where you want the {!end} code to be inserted, and then click the end button. Remember, the {!end} code only affects regular context codes (which must be set up in the Init File). It has no impact on your normal codes or your universal context codes.
If you are coding speaker names, be very careful and consistent about coding all of them, otherwise you may end up attributing utterances to the wrong people. Likewise, be careful to put in {!end} whenever the value of a context code (like speaker) changes, or you will be misled as to who/what that context code applies to.

TAMS Analyzer CSSCR th june 2011 Page 30 of 48
Running Searches and Generating Reports on Your Codes Before you can run any search or report on any coded files, you’ll need to move those files over to the search list. This is because whenever you do a search, run a query, or generate a report, TAMS draws only from those coded files included in the search list.
To move files to the search list, go to the “Files” tab on the workbench. Select the documents that you want included by highlighting them. (Use Command + click to select multiple documents.) Once you are ready, click the “Add >” button to move them over to the search list. (You’ll notice that these documents still appear in the original “Files” list, which is normal.)
In the screenshot below you can see that I’ve copied all my files (except the Init file) into the Search List.
Now you’re ready to do searches and start running reports.

TAMS Analyzer CSSCR th june 2011 Page 31 of 48
SEARCH FOR ALL INSTANCES OF A PARTICULAR CODE To search for all instances of a particular code, make sure all of the files you want to be searched through are in the Search List (described above). Next, go to the Search tab on the workbench. Double click on the code that you want to search for. It will appear in the Search: field. Alternately, you can type the code into the field manually.
In the screenshot below, I’m doing a search for all instances of the code “layout”.
Note: if you want the codes in their squiggly brackets to appear in the results pane, then check “Raw.” If you want them to be removed, deselect it.
Next, press the Search button.

TAMS Analyzer CSSCR th june 2011 Page 32 of 48
The default mode for searches is that the results files are discarded. With most early searches you discard the results because the work is still in progress. Also, as you change, edit, code, and recode your files, the search results will change. However, if you want to name and save the results from a search, you are given the option to do so. When you go this route you should deselect the “Temporary” checkbox and name the result file, as in the screenshot below:
In either case, click OK when you are ready.
You are now presented with the search results, which appear in a new window, like this:
TAMS Analyzer CSSCR th june 2011 Page 33 of 48
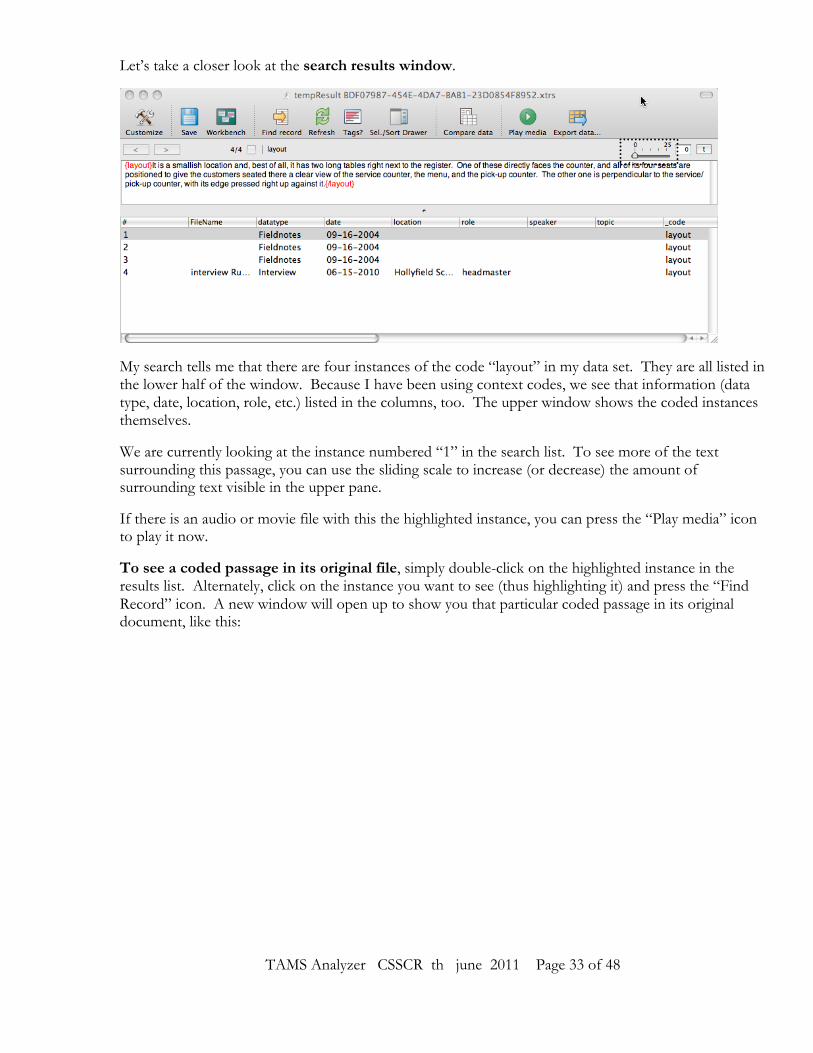
Let’s take a closer look at the search results window.
My search tells me that there are four instances of the code “layout” in my data set. They are all listed in the lower half of the window. Because I have been using context codes, we see that information (data type, date, location, role, etc.) listed in the columns, too. The upper window shows the coded instances themselves.
We are currently looking at the instance numbered “1” in the search list. To see more of the text surrounding this passage, you can use the sliding scale to increase (or decrease) the amount of surrounding text visible in the upper pane.
If there is an audio or movie file with this the highlighted instance, you can press the “Play media” icon to play it now.
To see a coded passage in its original file, simply double-click on the highlighted instance in the results list. Alternately, click on the instance you want to see (thus highlighting it) and press the “Find Record” icon. A new window will open up to show you that particular coded passage in its original document, like this:

TAMS Analyzer CSSCR th june 2011 Page 34 of 48
You can group your search results for easier viewing. Select the column that you would like to have the data grouped by. Go to “Results” in the main menu. Select “Group Column”. The results will now be grouped. In the example below, I’ve grouped my search results by location:
Click on the arrows to the left of the numbers to reveal/hide the results in that group. To “ungroup” the data, or to toggle between grouped and ungrouped data, click on the “o” button to the right of the slider.
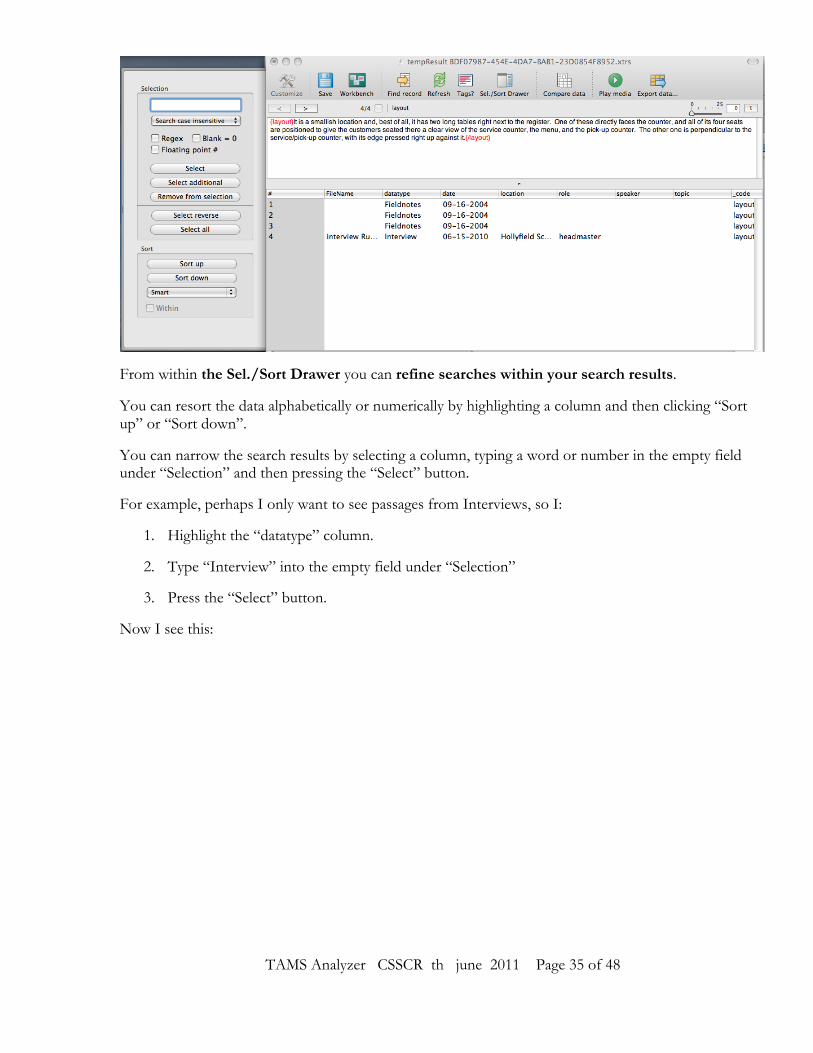
The Select & Sort Drawer is useful for doing searches inside search results. To open it, click on the Sel./Sort Drawer icon. A new window will pop out, which is attached to the search results, like this:
TAMS Analyzer CSSCR th june 2011 Page 35 of 48
From within the Sel./Sort Drawer you can refine searches within your search results.
You can resort the data alphabetically or numerically by highlighting a column and then clicking “Sort up” or “Sort down”.
You can narrow the search results by selecting a column, typing a word or number in the empty field under “Selection” and then pressing the “Select” button.
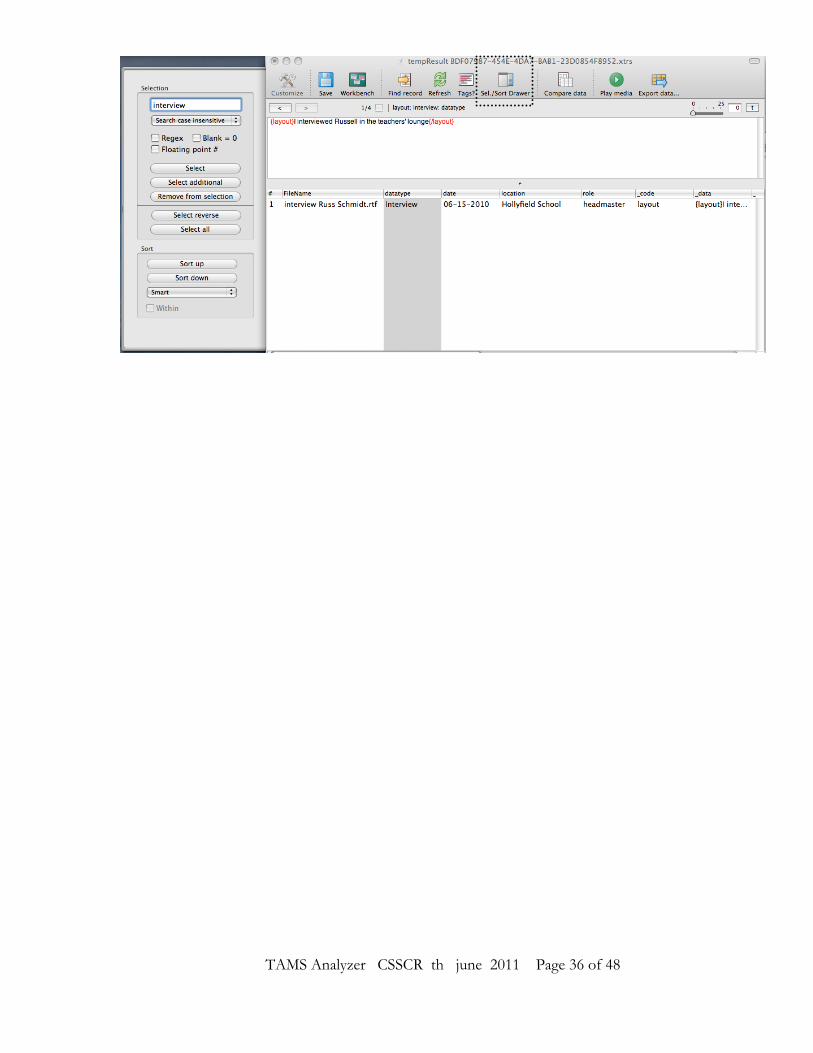
For example, perhaps I only want to see passages from Interviews, so I:
1. Highlight the “datatype” column.
2. Type “Interview” into the empty field under “Selection”
3. Press the “Select” button.
Now I see this:
TAMS Analyzer CSSCR th june 2011 Page 36 of 48

TAMS Analyzer CSSCR th june 2011 Page 37 of 48
Perhaps I want to search for coded passages in which the word “table” occurred, so I:
1. Highlight the “_data” column.
2. Type “table” into the empty field under “Selection”
3. Press the “Select” button.
Now I see this:
And so on.
Note that there is a useful “breadcrumbs trail” located under the “Find record” icon. This gives you a visual prompt as to what criteria have been used to produce the search results that you are currently looking at. To go back and forth between search results, press the back button (<) and/or forward (>) buttons under the “Customize” icon.

TAMS Analyzer CSSCR th june 2011 Page 38 of 48
Note that any permanently saved search files that you generate will be listed under the Files tab of the project window. Simply press the Results button to see them listed. In the screenshot below you can see that I’ve saved the search results from the “layout” search above:
Another useful feature connected with the search results window is the Compare Data function. You can use this to generate tables in which you compare variables from your search results. From the search results window, click the Compare Data icon. In the screenshot below, I am going to compare data generated from my search on the “layout” code:

TAMS Analyzer CSSCR th june 2011 Page 39 of 48
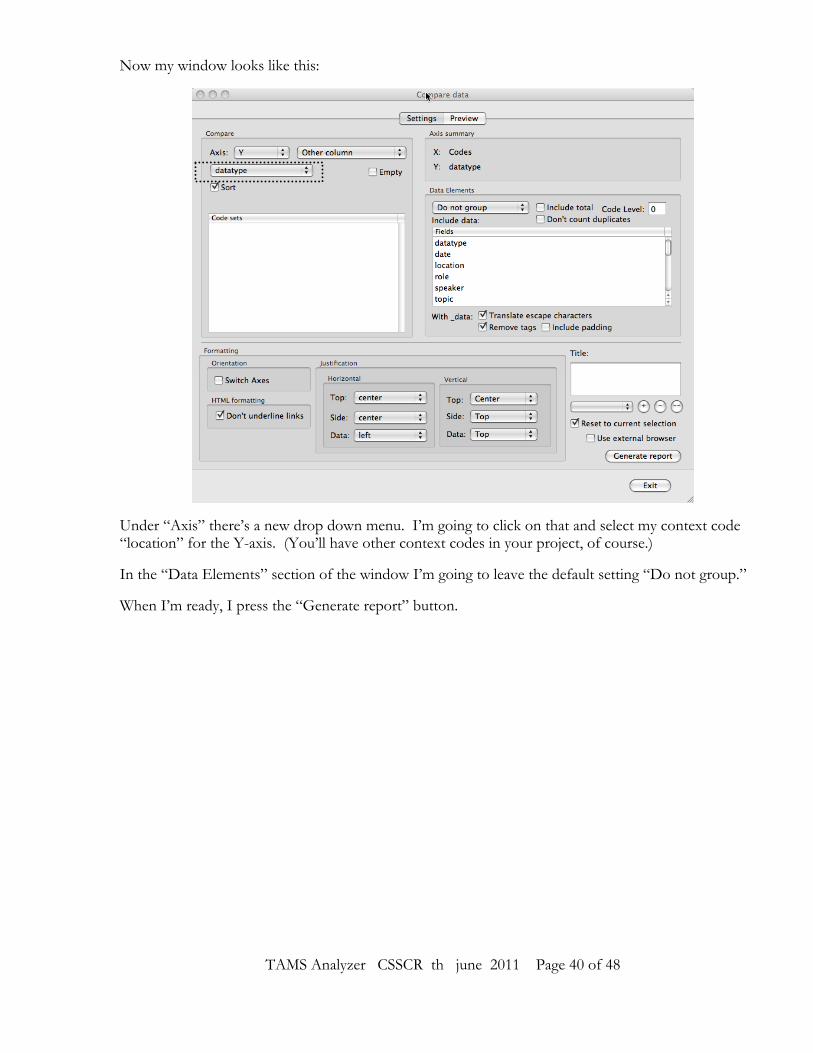
A new window pops up after you press the Compare data icon:
You will use this window to set up the comparison table that you wish to generate. The default setting for the X-axis is “Codes”, i.e. the codes that you have just run a search on. (In my case, this is the “layout” code. Now let’s set up the Y column. Click on the up/down arrows next to X and select Y. For my Y-axis I want another variable, so in my case I click on the up/down arrows next to “Codes” and select “other column.”
TAMS Analyzer CSSCR th june 2011 Page 40 of 48
Now my window looks like this:
Under “Axis” there’s a new drop down menu. I’m going to click on that and select my context code “location” for the Y-axis. (You’ll have other context codes in your project, of course.)
In the “Data Elements” section of the window I’m going to leave the default setting “Do not group.”
When I’m ready, I press the “Generate report” button.

TAMS Analyzer CSSCR th june 2011 Page 41 of 48
The window switches from the “Settings” tab to the “Preview” tab, and I see this:
What I have here is a simple but effective table that lets me see the results of my search for the “layout” code as it relates to the various locations I’ve coded for. For example, I can quickly and easily see the three coded instances of “layout” associated with ER Platz, the one instance associated with Hollyfield School, the two associated with campus, etc.

TAMS Analyzer CSSCR th june 2011 Page 42 of 48
To create a different data comparison table, go back to the Settings options by clicking on the Settings tab.
In the “Data Elements” section of the window I’m going select “Count only.”
Now when I press the “Generate report” button I see this:
TAMS Analyzer CSSCR th june 2011 Page 43 of 48
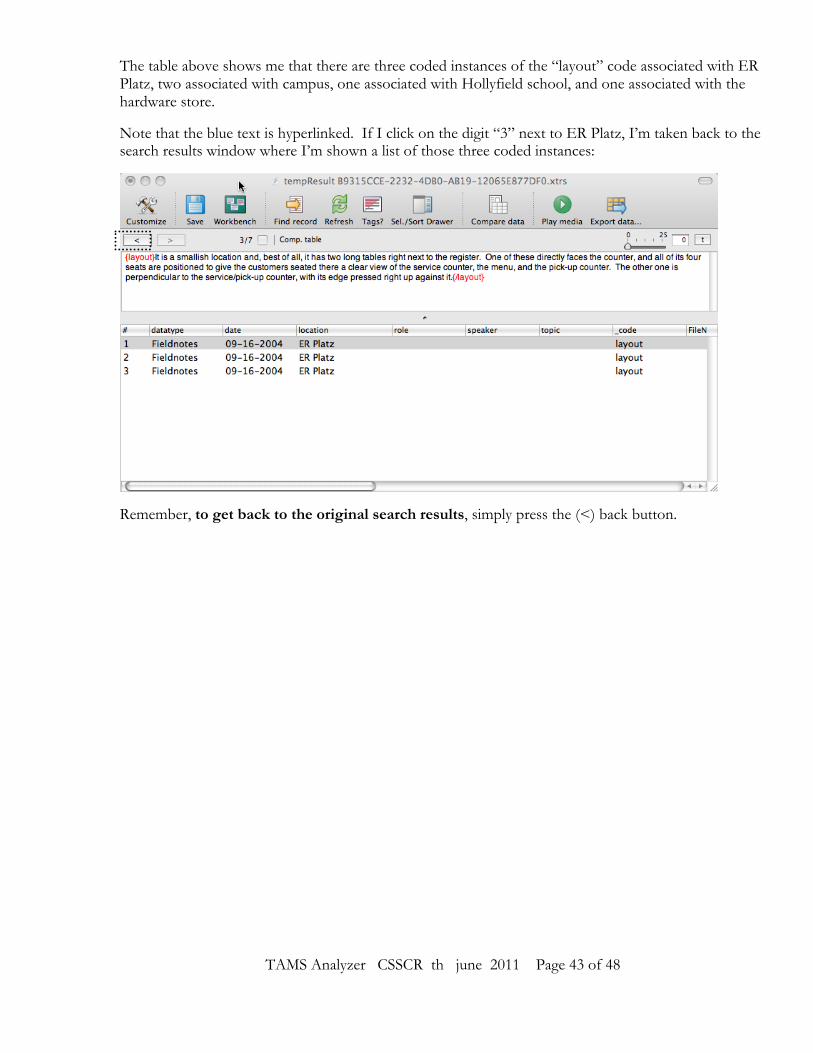
The table above shows me that there are three coded instances of the “layout” code associated with ER Platz, two associated with campus, one associated with Hollyfield school, and one associated with the hardware store.
Note that the blue text is hyperlinked. If I click on the digit “3” next to ER Platz, I’m taken back to the search results window where I’m shown a list of those three coded instances:
Remember, to get back to the original search results, simply press the (<) back button.

TAMS Analyzer CSSCR th june 2011 Page 44 of 48
REPORTS
Code Counts – To generate a simple list of the codes in your data set, and the frequency with which they appear, go to the main menu bar and click “Reports”. Next, click on “Code count.” You will be given the option to sort either alphabetically or by frequency. The end report will look something like this:
Note that under the “Reports” menu there is also the option of “Code count by file.” As its name suggests, this produces a report that give you counts of each code per file, like this:

TAMS Analyzer CSSCR th june 2011 Page 45 of 48
Exporting data from TAMS is simple. From the search results window, press the “Export Data” button. You’ll be prompted to select which of the columns you wish to export, as in the screenshot below. Highlight the column names that you want, using Command + click to select multiple columns as needed. You can select and drag column names to move them around into different orders, too. The default settings of “Export to clipboard” and Export format = “Tab separated” are amenable to Excel, and clicking the “Export” button with these settings has the effect of copying the selected data.
Now you can open an Excel spreadsheet and paste the data in by hitting Command + V (paste) on your keyboard.

TAMS Analyzer CSSCR th june 2011 Page 46 of 48
An alternate way of getting search results into an Excel file is to do the following. After generating a search results window, click File on the main TAMS menu.
Next click “Save To….” Give the file a name and choose where you’d like to save it. Be sure to save the file format as Text. Next, open up Excel and import the text file by clicking on File and then Import… in the Excel menu.
SECOND LEVEL CODING: GIVING EXTANT CODES A NEW NAME
Imagine you wish to change all instances of one code to a new code name (NOT an extant code name, which is NOT recommend). Let’s say, for example, that you want to change the code name “friendliness” to “politeness”. First locate the instances of the code you want to change. Do this by using the search function described above. In this case, be sure to check the “exact” box because you’re looking for that exact wording/code. In the results window you’ll see every instance of this code. Select the instances that you want to change. You can go to Results -> Marked Records -> Mark All to select ALL of the records, OR you can select records one-by-one by clicking Results -> Marked Records -> Mark for each instance OR you can use Command+Shift+M to mark individual records. Next, to change the code name of the marked records, click on Results->Recode->Recode… Fill in the new code name and definition and click OK.
CREATING MEMOS AND LINKING FILES
The way to approach memoing in TAMS is to simply create new files and name them memos. Let’s say you are coding and you have some sudden insight about what is happening in your data set, and you wish to create a memo about it. Simply do the following:
1. From the “Files” tab of the workbench, press the “New” button to create a new file.
2. When prompted, give the file a name, such as Memo about…. Keep the default file type setting of rtf.
3. A new document window will open up. Type in your memo.
4. You can code your memo, just as you code your regular data files.
5. When you are finished, save the file and close it.
6. This memo file will appear in your file list along with all your other data files. You can push it over to the Search list to include it in searches.

TAMS Analyzer CSSCR th june 2011 Page 47 of 48
In TAMS, you can also link files. This is especially useful with memos, which are often prompted by, or refer to, a particular piece of data.
Let’s imagine we have a memo file, which I’ll call Memo A, and a data file, which I’ll call Interview A. To link the two files, simply do the following:
1. Open Interview A (or whichever file it is that you want to link to your memo). Click once anywhere in or around the piece of text you are interested in so that the cursor is placed there.
2. From the main TAMS menu, select CodingBookmarks{!bookmark X}
3. You’ll now see the code {!bookmark X} placed in your file where your cursor was. The “X” will be highlighted. Replace the X with a descriptive name.
4. Save the file.
5. Now, make sure that the cursor is placed somewhere within the text of this new bookmark code. From the main TAMS menu, select CodingReferencesRemember reference.
6. Open Memo A (or whichever memo it is that you want to linked to the file that has just been bookmarked). Click once inside the text of your memo wherever you want the link to go, so that the cursor is placed there.
7. From the main TAMS menu, select CodingReferencesInsert reference link.
8. You’ll now see some {!goto} code in the memo.
9. Save the file.
10. To use the {!goto} code, place your cursor somewhere within it, then from the main TAMS menu, select CodingReferencesGo to reference. The linked file will open up beside the memo file. Easy and useful!
If you want to see if there are any memos or other files linked to a given document, just do the following:
1. Open the document. Click somewhere inside it so that the cursor is placed within it (but not inside a bookmark code).
2. From the main TAMS menu, select CodingReferencesFind citation.
3. This will open a new window with a list of all the files that are linked to this document. You can double click on any of the listed files to open them.

TAMS Analyzer CSSCR th june 2011 Page 48 of 48
Final Notes
This concludes the introductory documentation for TAMS. Don’t forget that there is a wealth of TAMS documentation created by Matthew Weinstein. Much of this gets downloaded along with the program, so check your files for the manuals. At this stage you’re ready to do all the basics.
If you have feedback on this documentation, please contact me at [email protected].
Happy Coding!
Other Helpful Resources
• See Matthew Weinstein’s Quick Reference Guide, which comes in the bundle of documentation that you can download from the TAMS website.
• See Matthew Weinstein’s video tutorials here: http://www.youtube.com/user/Allemand3Left?feature=mhsn#p/a
• See Matthew Weinstein’s documentation on importing and using audio files here: http://www.soc.ucsb.edu/faculty/mohr/classes/soc4/summer_08/pages/Projects/Blogs/TAMS/How%20Tos/Audio-Visual_How%20To.pdf
Related Documents