CIS 4000 Introduction to Computer Forensics Steganography and Its Detection with JP Hide and Seek, StegDetect, and StegBreak Purpose: Ensure every student understands the hiding of data within images, and is able to make simple image steganographic encodings. Students will also develop first-hand knowledge in techniques for detecting and cracking steganography. Materials required: (all downloadable files) images_cis4000.zip, jphs05_cis4000.zip, stegdetect04_cis4000.zip Preparation 1 Go to the Dayspace directory (or any directory you wish on a home computer 3. Make a directory in Dayspace named “stego” 2. Onto your desktop, download the three hyperlinked zip files above. These may be found under “Lab Materials” for the CIS 4000 course site (NOT your class section site). . Part One: Hiding data in a JPEG image using JP Hide and Seek 1. Unzip the contents of JP Hide and Seek (jphs05_cis4000.zip) into this directory. 2. From Windows Explorer, examine the photo downloaded with the zip file by double-clicking on the photo (Lake_Moraine.jpg) to bring it up in the Windows Picture Viewer. This is a clean (no hidden data) photo of a glacier lake taken in Canada and should look like the image to right. 3. Close the photo viewer. 4. From Windows Explorer, right click on the photo and choose “Properties” from the context menu. a. What is the exact size of the file containing this image?

Welcome message from author
This document is posted to help you gain knowledge. Please leave a comment to let me know what you think about it! Share it to your friends and learn new things together.
Transcript

CIS 4000
Introduction to Computer Forensics
Steganography and Its Detection with JP Hide and Seek, StegDetect, and StegBreak
Purpose: Ensure every student understands the hiding of data within images, and is able to make
simple image steganographic encodings. Students will also develop first-hand knowledge in
techniques for detecting and cracking steganography.
Materials required: (all downloadable files) images_cis4000.zip, jphs05_cis4000.zip, stegdetect04_cis4000.zip
Preparation
1 Go to the Dayspace directory (or any directory you wish on a home computer
3. Make a directory in Dayspace named “stego”
2. Onto your desktop, download the three hyperlinked zip files above. These may be found under “Lab
Materials” for the CIS 4000 course site (NOT your class section site).
.
Part One: Hiding data in a JPEG image using JP Hide and Seek
1. Unzip the contents of JP Hide and Seek (jphs05_cis4000.zip) into this directory.
2. From Windows Explorer, examine the photo downloaded with the
zip file by double-clicking on the photo (Lake_Moraine.jpg) to bring it
up in the Windows Picture Viewer. This is a clean (no hidden data)
photo of a glacier lake taken in Canada and should look like the image to
right.
3. Close the photo viewer.
4. From Windows Explorer, right click on the photo and choose
“Properties” from the context menu. a. What is the exact size of the file containing this image?

5. Examine the PTAC.pdf file that was downloaded with the zip file by double-clicking on the file. This file contains the secret information about the PTA Club members that we plan to hide in the image.
6. Run “Jphswin.exe” by double-clicking on the icon. After accepting the license terms, you
should see the following screen:
7. Choose “Open jpeg” from the menu and open the JPEG image that was downloaded with the
zip file.
8. JPHS will populate the “input jpeg file” information from the selected file. Notice that it will
specify a maximum file size that can be hidden within this image and recommend a limit that will make it less likely that the corruption of the image will be visually detectable. The screen
should appear as follows

9. Check to see that your data matches the expected values:
a. What is the recommended limit to the data file size that can be hidden in this image?
b. What is the maximum size for a data file that can be hidden in this image?
10. From Windows Explorer, right click on the secret file, PTAC.pdf, and choose “Properties”.
a. What is the exact file size of our secret file, PTAC?
b. Will this image be suitable, in terms of size, for hiding this data?
11. Choose “hide” from the menu. You are prompted for a passphrase. This is the passphrase
that will be needed to extract the hidden data. Let’s choose the work “sentence” as our
passphrase. Enter and confirm the passphrase is “sentence”. Click “OK”.

12. You will be prompted to select the file containing the information to hide. Choose the file PTAC.pdf that we examined earlier:
13. JPHS will report the details of the file to be hidden. Notice that the values reported in JPHS
are approximate.
a. What is the JPHS reported size of the hidden file PTAC.pdf
b. According to JPHS, will this image be suitable, in terms of size, for hiding this data?
14. Click on “Save jpeg as”. Save the file under the filename “My_Lake_Moraine.jpg.”

15. The JPHS screen will display the details of the three files approximately as below:
16. Note the difference in the input and saved JPEG files. From Windows Explorer, right click on
the newly created image file and choose “Properties” from the context menu.
a. What is the exact size of the file containing this image?
b. Is the saved image file larger or smaller than the input image file?
c. Does the size of the hidden file determine the size difference between the input and
saved image files?
d. Why?
17. From Windows Explorer, double click on one of the two images to view it is the Windows Picture Viewer. Switch between the two images using the blue arrow keys and study the visual differences between the two images. Alternately, you may open each photo in the Photo Editor and copy/paste each side-by-side in MS Word.:

a. What differences in these two images are detectable visually?
18. Close the viewer. Choose “Exit” from the JPHS menu to close JPHS.
Part Two: Recovering hidden data in a JPEG image using JP Hide and Seek
1. As before, run “Jphswin.exe” by double-clicking on the icon and accepting the license terms.
2. Choose “Open jpeg” from the menu. Select the file “My_Moraine_Lake.jpg” (this file
contains the hidden data).
3. Choose “Seek” from the menu. A passphrase dialog box will open. Enter our passphrase
“sentence” into the dialog box passphrase and confirmation text boxes. Click “OK”.
4. A dialog box will open to allow you to choose a file name and location in which to deposit the
recovered information. Enter the file name “my_PTAC.pdf”:

5. Open my_PTAC.pdf and check that the data contents are the same as the original file. Check
the file sizes of the original hidden data file (PTAC.pdf) and the recovered data file
(my_PTAC.pdf).
a. What is the exact file size of PTAC.pdf?
b. What is the exact file size of my_PTAC.pdf?
c. Has the steganography changed the hidden data?
Part Three: Detecting hidden data in a JPEG image using StegDetect
1. Unzip images_cis4000.zip into the stego directory. This file contains a number of JPEG images and one text file.
2. Unzip stegdetect04_cis4000.zip into the stego directory. StegDetect is a steganography
detection and cracking tool that is mainly aimed at unix-based computers, however these files
contain a version that runs on windows computers.
3. Run the x-windows version of StegDetect by double clicking on xsteg.exe:

4. Choose “File” and “Open” from the menu. The “Select File” dialog box will open:
5. Click “OK” to instruct StegDetect to search all files. The program will display its analysis
results for all files. Non-image files in the directory will likely result in error messages:

a. List below any files that StegDetect suspects of containing hidden data with JP Hide
and Seek:
6. Choose “File” and “Exit” from StegDetect.
7. While there are steganography breaking tools, these often work by brute force or dictionary
password attacks. Sometimes it is easy to discover or guess passwords, once the presence of hidden data is known and the method of encoding it is also known. Can you recover the
hidden data in the files discovered in (5) above?
a. What are the contents of the hidden data in the images files in this directory? Which
file(s) contained this hidden data?

Part IV – Cracking stenographic passwords
1. From StegDetect, three files were shown to have hidden messages: 1)My_Lake_Moraine.jpg; 2)
zebras2.jpg; and lastly, 3) space_images.jpg. The latter two were in the Pictures folder. Move
these two .jpg files into the same directory as My_Lake_Moraine.jpg. “Stegbreak.exe,” the
program we’ll use to crack the passwords is a DOS-based program. It will be easier to run if the
files with contained messages are in the same folder
2. Open the usr.zip file and paste the contents (a folder named “usr”) onto the Local Disk (C:) under
My Computer.
3. Go to a DOS window by using “CMD” in RUN under the Start menu. Navigate to the directory
in which you placed the zip file contents. An example of changing to the dayspace/stego
directory is shown below:
3. The command syntax for the stegbreak.exe application can be found in “Stegbreak.pdf” file.
4. Using brute-force password cracking with stegbreak is the simplest to execute. While in the DOS
directory with stegbreak and the file you wish to discover a password, use the following syntax. This
example shows the zebras2.jpg file as the target.

5. Notice the “Loading 1 files…” comment. The program is actually running, but just like Cain and
Abel, the brute force approach can take a very long time to finish. Use a CTRL-C multiple times to
see the progress to that point in time. After the last value is returned, the CTRL-C will terminate
stegbreak.exe.
6. An alternate, but much quicker alternative is to do a dictionary attack. For this, you must make sure
the dictionary used and the rules.ini file are in the same directory as stegbreak.exe. The syntax to run
a dictionary attack is: “c:\dayspace\stego\stegbreak –r rules.ini –f meddict.dic –t p zebras2.jpg”
a) the name following the –r parameter is the “rules.ini” file. It comes with the program but
must be in the same directory as stegbreak.
b) the name following the –f parameter is for the name of the dictionary to use. In this case, the
dictionary’s name is: “MedDict.Dic”…which is found in this same DOS directory as the other
files.
c) the –t p command parameter tells stegbreak to crack a file that was encrypted with the jphide
program.. See the stegbreak.pdf file to see what other encryption programs can be cracked with
stegbreak.
d) The figure below shows the results of breaking the zebras2.jpg file.
7) Although this starts the same way as a brute-force attack, in less than a minute, if the stegbreak
program will return a best-choice password. Note: in the example above, “together” is the password
for the zebras2.jpg file.
8) Return to Windows and restart the Jphswin program. Use the “Open jpg” menu command to
load the zebras2.jpg file.
9) Click on the Seek menu choice and enter the password you just discovered (together).
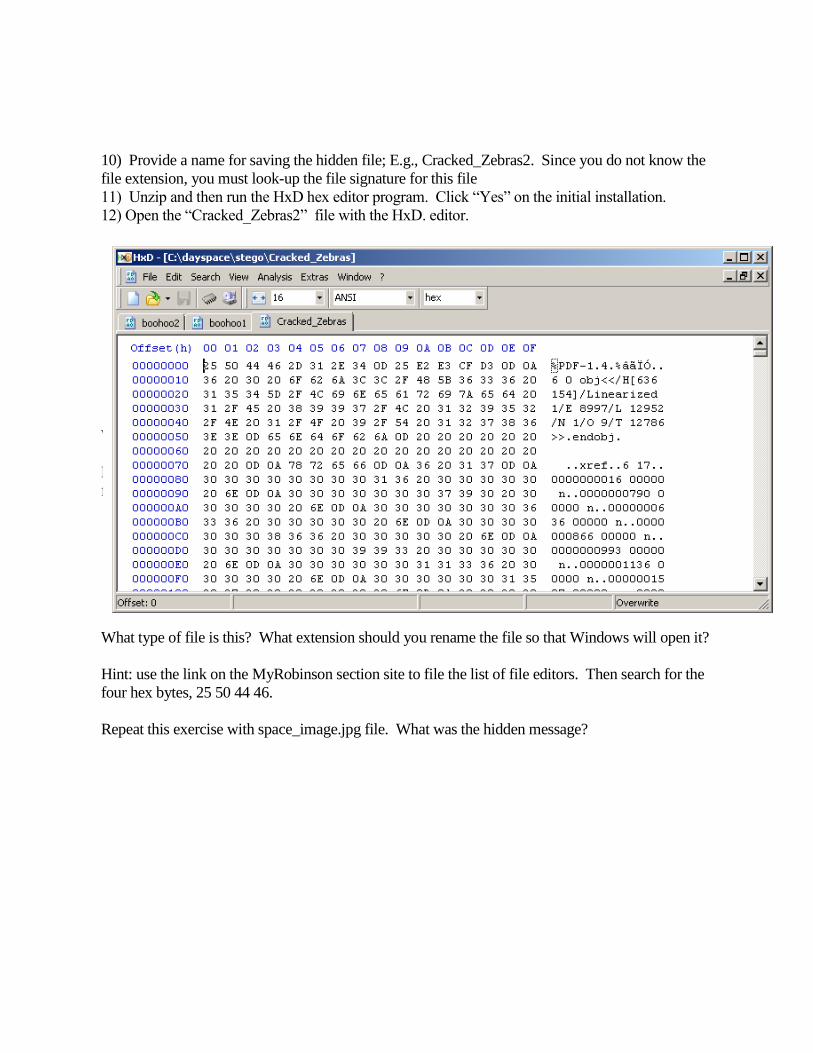
10) Provide a name for saving the hidden file; E.g., Cracked_Zebras2. Since you do not know the
file extension, you must look-up the file signature for this file
11) Unzip and then run the HxD hex editor program. Click “Yes” on the initial installation.
12) Open the “Cracked_Zebras2” file with the HxD. editor.
What type of file is this? What extension should you rename the file so that Windows will open it?
Hint: use the link on the MyRobinson section site to file the list of file editors. Then search for the
four hex bytes, 25 50 44 46.
What type of file is this? What extension should you rename the file so that Windows will open it?
Hint: use the link on the MyRobinson section site to file the list of file editors. Then search for the
four hex bytes, 25 50 44 46.
Repeat this exercise with space_image.jpg file. What was the hidden message?
Related Documents