Introduction to Arduino and Raspberry Pi Presented by SEAS Computing Facility April 14, 2018

Welcome message from author
This document is posted to help you gain knowledge. Please leave a comment to let me know what you think about it! Share it to your friends and learn new things together.
Transcript

Introduction to Arduino and Raspberry Pi
Presented by SEAS Computing Facility April 14, 2018

Materials Used in Presentation
Raspberry Pi Raspberry Pi power supply Keyboard Mouse Monitor Monitor power supply HDMI–HDMI or HDMI–DVI cable
Breadboard Ribbon cable and breakout board Two jumper cables LED 220 Ω resistor Arduino Arduino USB cable


Components
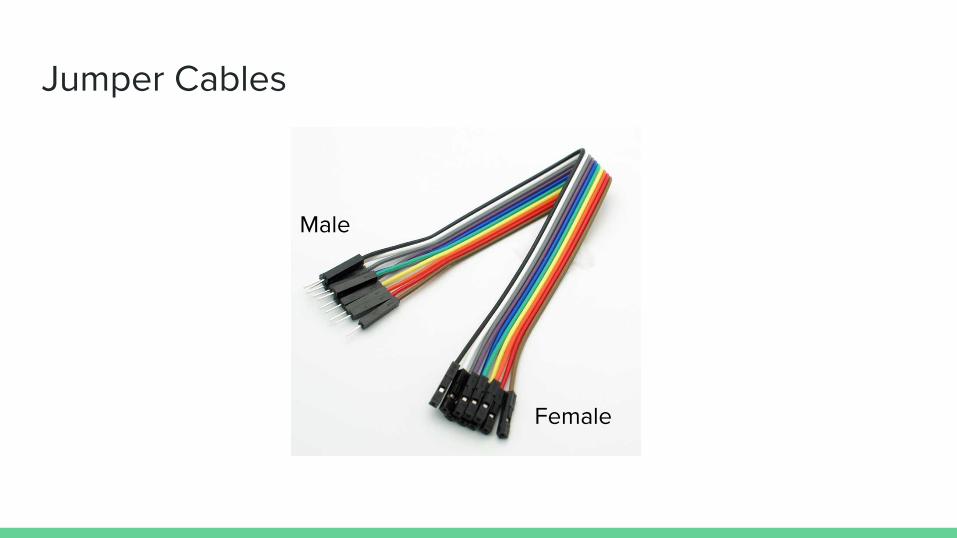
Jumper Cables
Female
Male


Push Button
All four pins are connected when pressed on If off, the left and right are separated

Light Emitting Diode
A diode is a component that only allows flow of current in one direction
A light emitting diode (LED) emits light when current passes in the correct direction

Circuit Basics
Ohm’s Law: V = IR V: Voltage (volts) I: Current (amperes) R: Resistance (ohms)
LEDs have a maximum current Ohm’s Law (rewritten): I = V / R
To keep current (I) low, resistance (R) must be high enough
Raspberry Pi
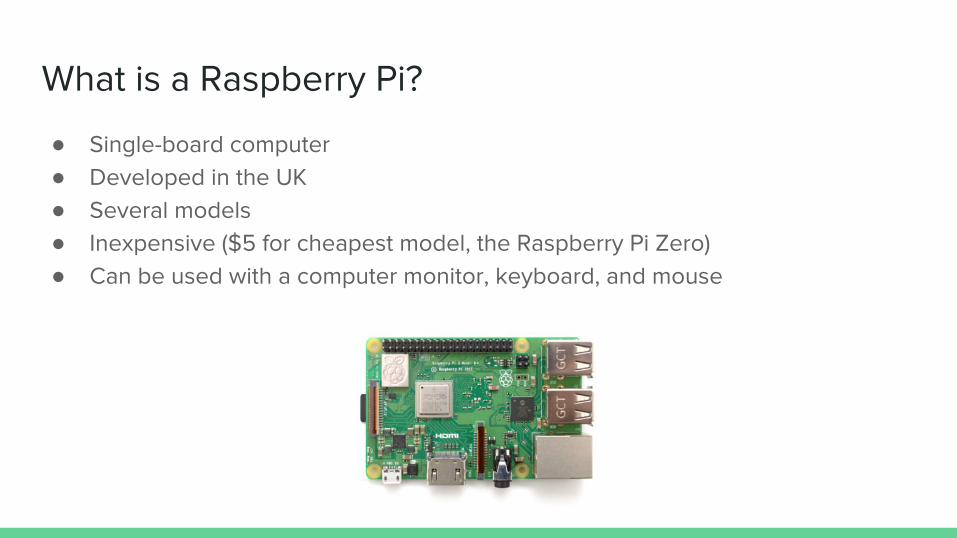
What is a Raspberry Pi?
Single-board computer Developed in the UK Several models Inexpensive ($5 for cheapest model, the Raspberry Pi Zero) Can be used with a computer monitor, keyboard, and mouse

What is Raspbian?
Operating system optimized for the Raspberry Pi Based on the Linux kernel Can be used like a desktop computer or through the terminal
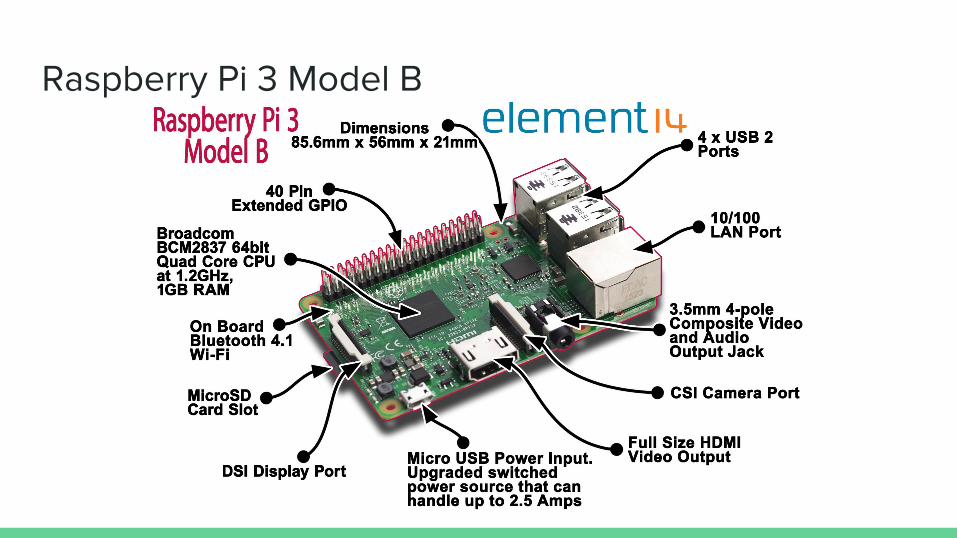
Raspberry Pi 3 Model B
Connecting to the Internet
Wired Connection: The SEASCF Raspberry Pis can instantly connect to the GW network from the SEH Studio Labs using an ethernet cable. This is the easiest and fastest option.
GWireless: Raspberry Pis cannot connect to GWireless. eduroam: Raspberry Pis can be connected to eduroam by modifying two
configuration files and running commands. Instructions: seascf.seas.gwu.edu/eduroam-connection
It may be necessary to run /etc/init.d/networking stop before running /etc/init.d/networking start
Keyboard Check
Open the web browser and type # and “ in the address bar
If the symbols do not appear as expected, follow these steps:
1. Click the Raspberry Pi icon in the upper-left corner, click Preferences, and click Raspberry Pi Configuration
2. Click Localisation, Click Set Keyboard, choose United States as country, select English (US) for variant, and click OK
Creating a Basic Python Program
1. Open Terminal2. Type nano helloworld.py and press ENTER to open a new file in the nano
text editor3. Type print(“Hello, World!”)4. Use CTRL + O and ENTER to save5. Exit with CTRL + X6. Type python helloworld.py and press ENTER to run the program7. Hello, World! should appear

Connecting to a Breadboard
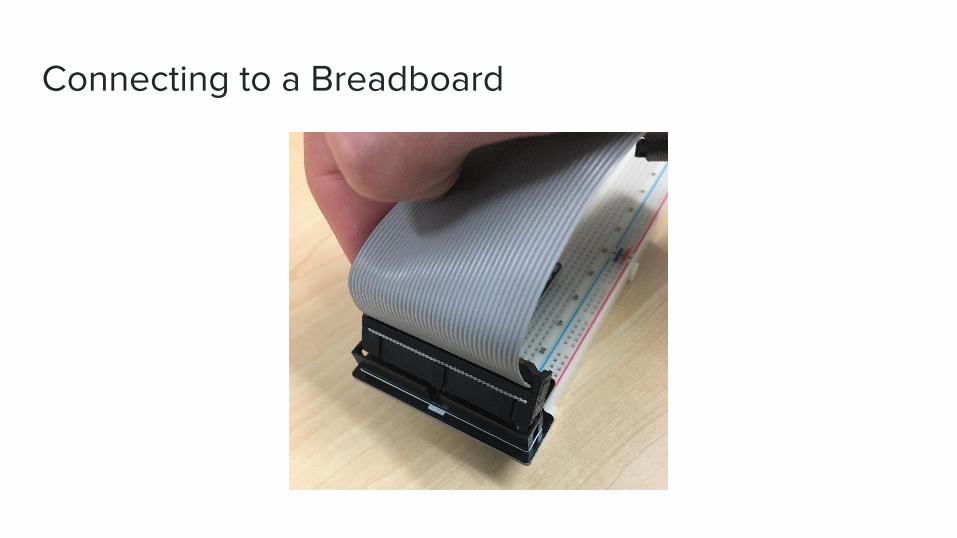
Connecting to a Breadboard

Connecting to a Breadboard
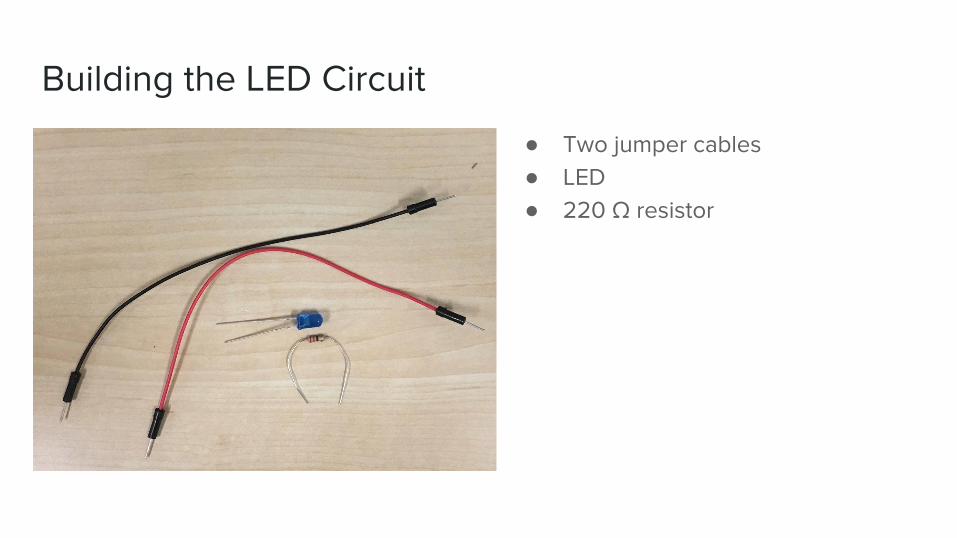
Building the LED Circuit
Two jumper cables LED 220 Ω resistor

Building the LED Circuit
Add a resistor to the breadboard Connect a wire from the red
power rail to one end of a resistor

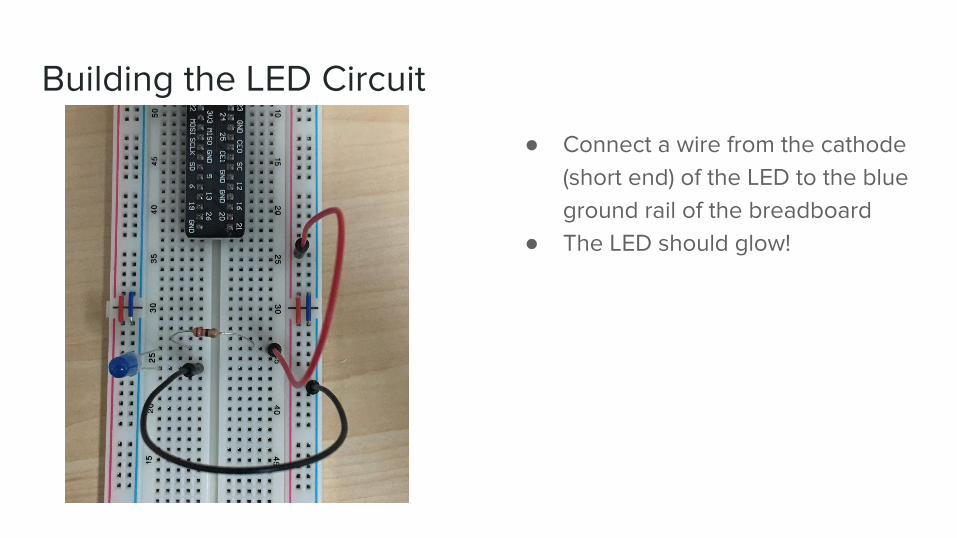
Building the LED Circuit
Connect the anode (long end) of the LED to the resistor
Building the LED Circuit
Connect a wire from the cathode (short end) of the LED to the blue ground rail of the breadboard
The LED should glow!
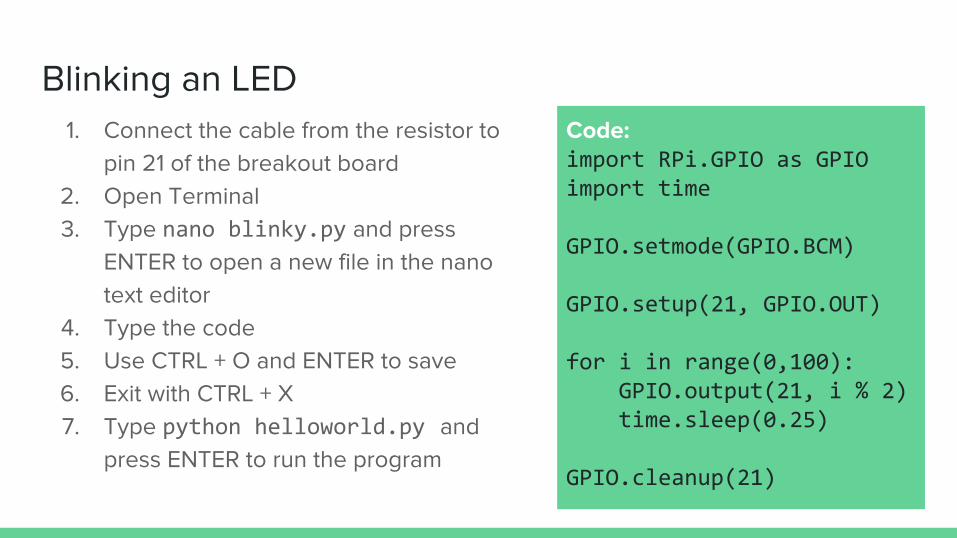
Blinking an LEDCode:import RPi.GPIO as GPIOimport time
GPIO.setmode(GPIO.BCM)
GPIO.setup(21, GPIO.OUT)
for i in range(0,100): GPIO.output(21, i % 2) time.sleep(0.25) GPIO.cleanup(21)
1. Connect the cable from the resistor to pin 21 of the breakout board
2. Open Terminal3. Type nano blinky.py and press
ENTER to open a new file in the nano text editor
4. Type the code5. Use CTRL + O and ENTER to save6. Exit with CTRL + X7. Type python helloworld.py and
press ENTER to run the program

Arduino

What is an Arduino?
Single-board microcontroller Originated in Italy Many variations from different makers Cannot be directly connected to a monitor, keyboard, mouse, etc. Does not normally have an operating system
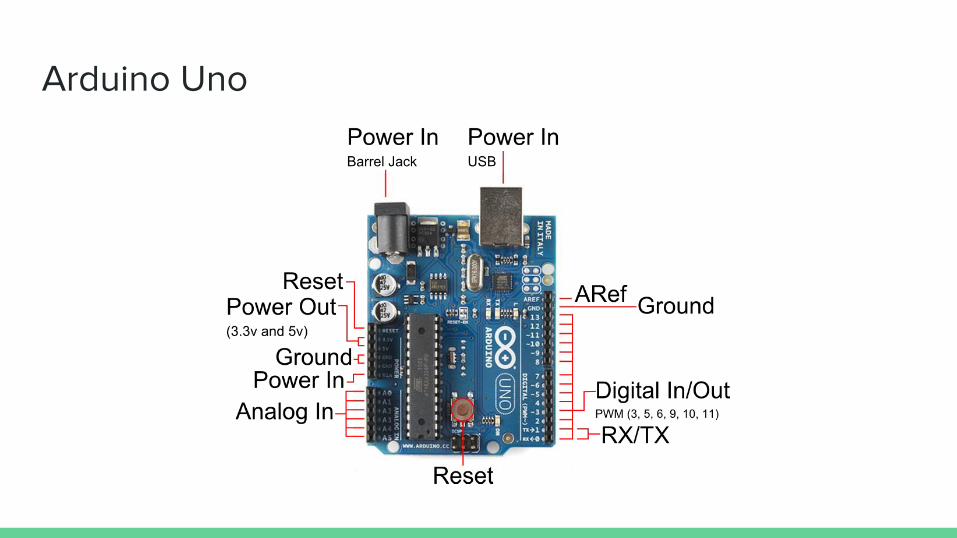
Arduino Uno

Running a Basic Arduino Program
1. Open the Arduino Desktop IDE (install required)a. There is also an Arduino Web IDE (account required)
2. Connect the Arduino to the computer using a USB cable3. Open example sketch from File > Examples > 01.Basics > Blink4. Select the board type from Tools > Board5. Select the port with the Arduino from Tools > Port6. Click the upload button7. The built-in LED near pin 13 should start to blink
Programs will stay on the Arduino until overridden by another program.
Programs start whenever the Arduino is powered on or reset.
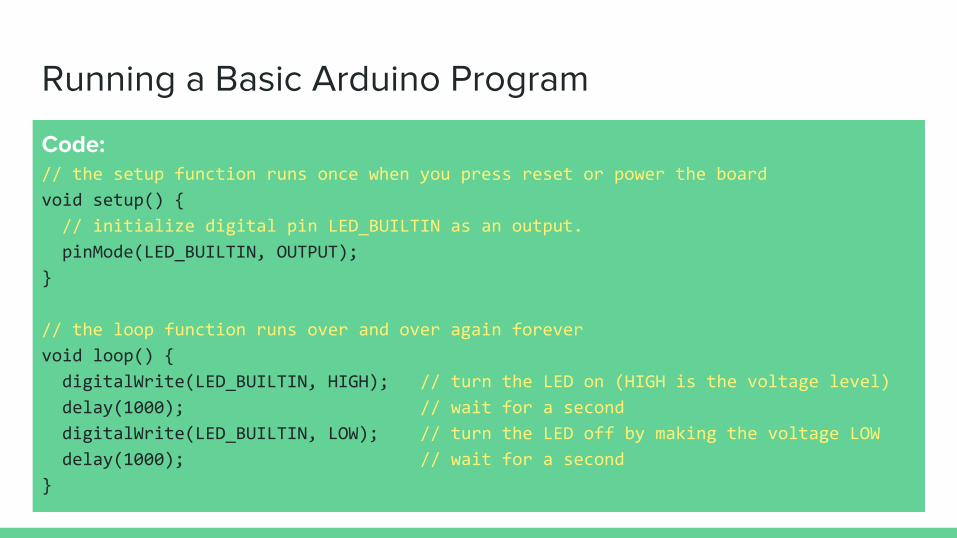
Running a Basic Arduino Program
Code:// the setup function runs once when you press reset or power the board
void setup()
// initialize digital pin LED_BUILTIN as an output.
pinMode(LED_BUILTIN, OUTPUT);
// the loop function runs over and over again forever
void loop()
digitalWrite(LED_BUILTIN, HIGH); // turn the LED on (HIGH is the voltage level)
delay(1000); // wait for a second
digitalWrite(LED_BUILTIN, LOW); // turn the LED off by making the voltage LOW
delay(1000); // wait for a second
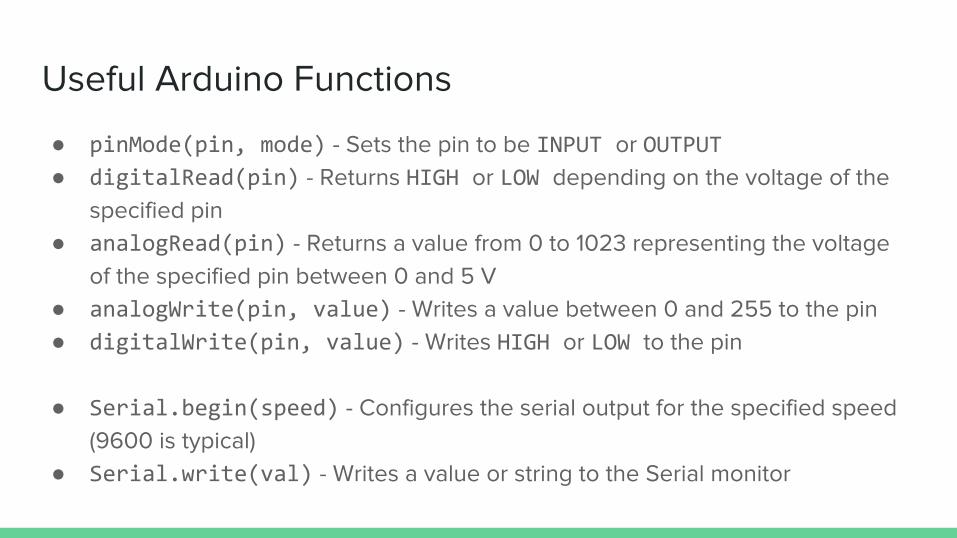
Useful Arduino Functions
pinMode(pin, mode) - Sets the pin to be INPUT or OUTPUT digitalRead(pin) - Returns HIGH or LOW depending on the voltage of the
specified pin analogRead(pin) - Returns a value from 0 to 1023 representing the voltage
of the specified pin between 0 and 5 V analogWrite(pin, value) - Writes a value between 0 and 255 to the pin digitalWrite(pin, value) - Writes HIGH or LOW to the pin
Serial.begin(speed) - Configures the serial output for the specified speed (9600 is typical)
Serial.write(val) - Writes a value or string to the Serial monitor

More Components

Raspberry Pi Camera Module V2
1080p HD video at 30 frames/second 720p HD video at 60 frames/second 8 Megapixels for still photos (3280 x 2464) Fixed Focus Lens Connected to Raspberry Pi with 15-pin ribbon cable
https://www.amazon.com/Raspberry-Pi-Camera-Module-Megapixel/dp/B01ER2SKFS

PIR Motion Sensor Detector Module
PIR: Passive Infrared Senses infrared radiation from objects
Range is adjustable up to 7 meters Viewing area is approximately a 120° cone
https://www.amazon.com/J-deal-Pyroelectric-Infrared-Detector-Hc-sr501/dp/B013LA6MW0/ref=sr_1_3?ie=UTF8&qid=1484274011&sr=8-3&keywords=pir+sensor
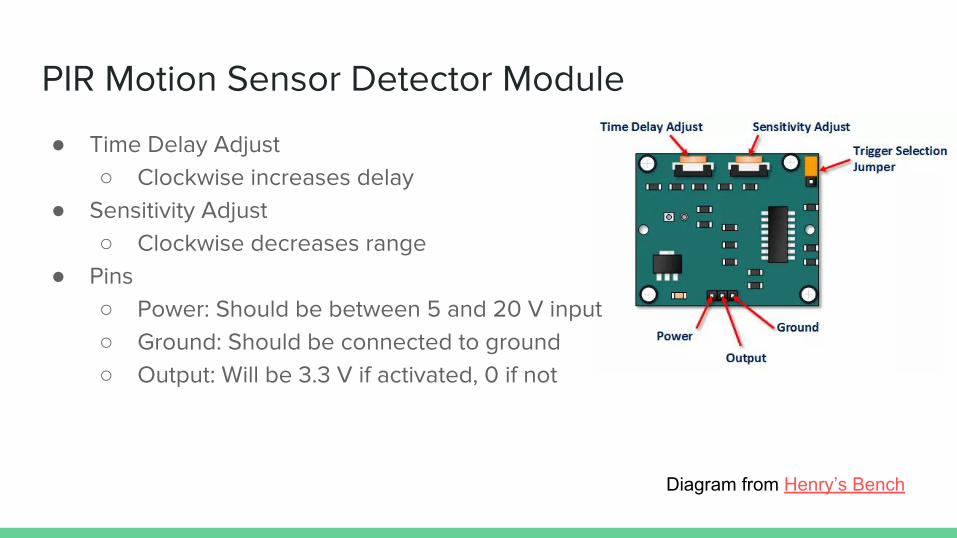
PIR Motion Sensor Detector Module
Time Delay Adjust Clockwise increases delay
Sensitivity Adjust Clockwise decreases range
Pins Power: Should be between 5 and 20 V input Ground: Should be connected to ground Output: Will be 3.3 V if activated, 0 if not
Diagram from Henry’s Bench
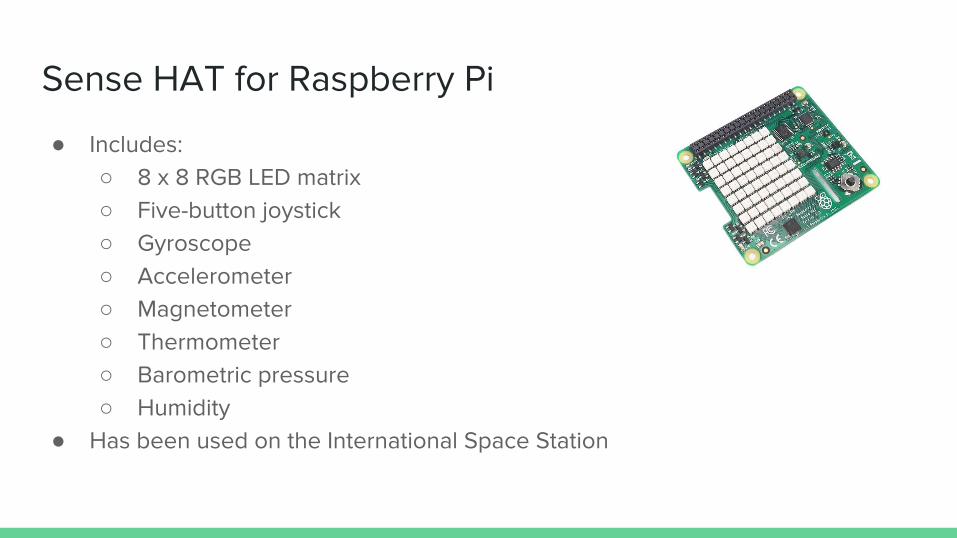
Sense HAT for Raspberry Pi
Includes: 8 x 8 RGB LED matrix Five-button joystick Gyroscope Accelerometer Magnetometer Thermometer Barometric pressure Humidity
Has been used on the International Space Station
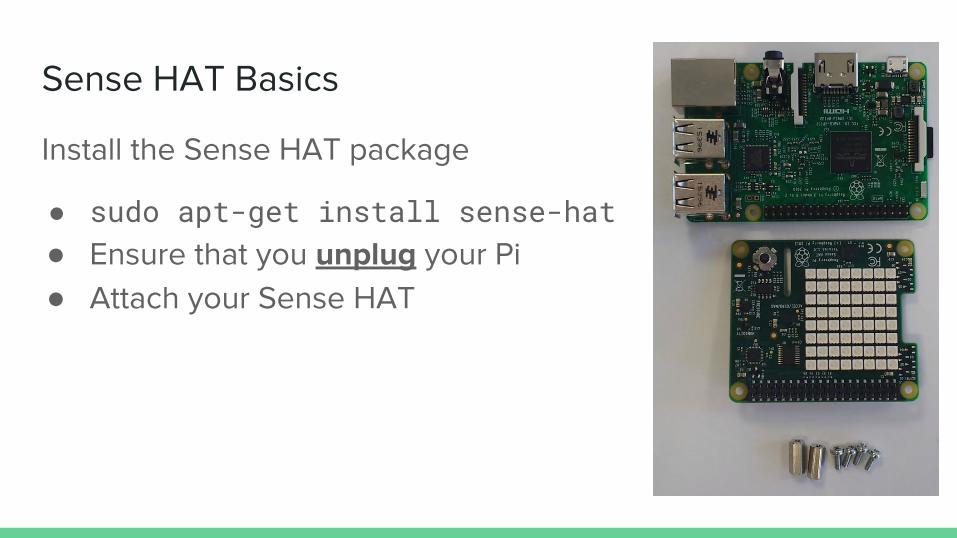
Sense HAT Basics
Install the Sense HAT package
sudo apt-get install sense-hat Ensure that you unplug your Pi Attach your Sense HAT
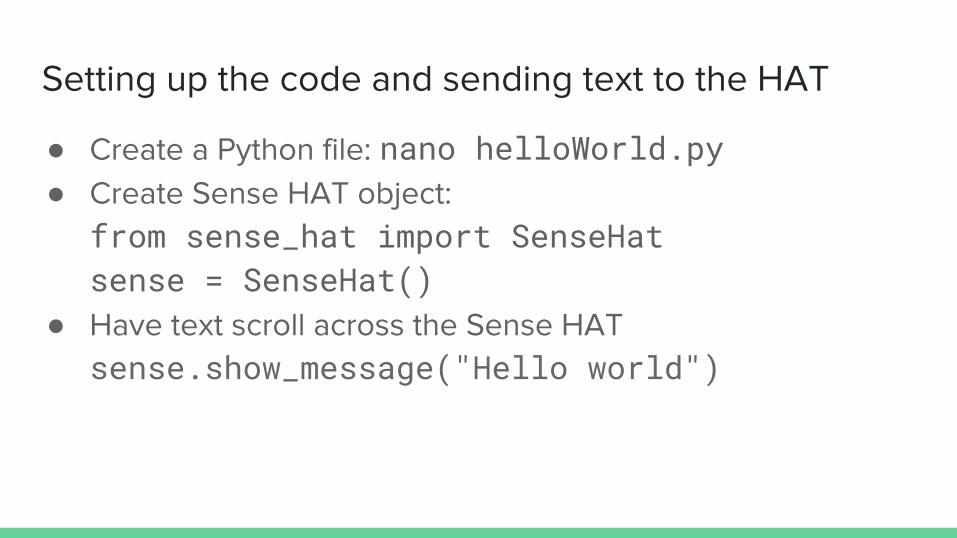
Setting up the code and sending text to the HAT
Create a Python file: nano helloWorld.py Create Sense HAT object:
from sense_hat import SenseHatsense = SenseHat()
Have text scroll across the Sense HAT sense.show_message("Hello world")
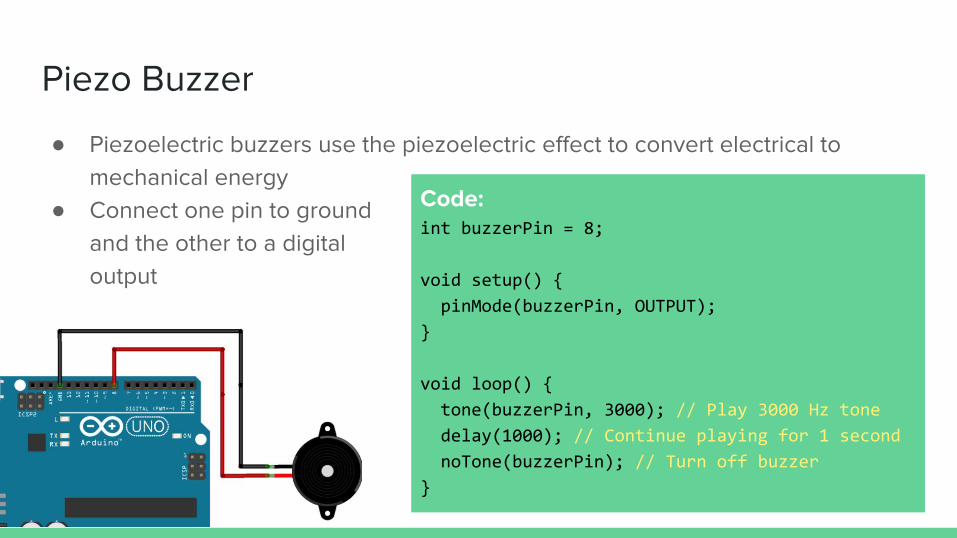
Piezo Buzzer
Piezoelectric buzzers use the piezoelectric effect to convert electrical to mechanical energy
Connect one pin to ground and the other to a digital output
Code:int buzzerPin = 8;
void setup()
pinMode(buzzerPin, OUTPUT);
void loop()
tone(buzzerPin, 3000); // Play 3000 Hz tone
delay(1000); // Continue playing for 1 second
noTone(buzzerPin); // Turn off buzzer

Motor
Motor draws more current than digital output can supply Transistor can be used as a switch to enable power to motor Switch wires on motor to change direction
Code:int motorPin = 3;
void setup()
pinMode(motorPin, OUTPUT);
void loop()
analogWrite(motorPin, 255); // Run motor at max speed

Other Sensors
Ultrasonic Sensor Water Sensor Sound Sensor

Further Information

Raspberry Pi vs. Arduino
Raspberry Pi
Allows graphical user interface Can be directly connected to
Internet More powerful and more memory Can be used with more
programming languages
Arduino
Low power consumption Can directly read analog inputs Requires less hardware (monitor,
mouse, etc.) to get started No operating system needs to be
installed


Activity Options
Button-activated LEDs Sense HAT Pong Game (Raspberry Pi only) Camera Module (Raspberry Pi only) Motion-Activated Camera (Raspberry Pi only) Clap-Activated Fan Flood Alarm Motion Detector

Link to These Slides
seascf.seas.gwu.edu/workshops
Link to Surveygo.gwu.edu/421survey
Related Documents


![[RASPBERRY PI & ARDUINO] - Telenetusers.telenet.be/pieterjan.degroof/Eindwerk_RaspberryPI_Arduino.pdf · Raspberry Pi & Arduino Pagina 3 van 22 Pieter-Jan De Groof 10 juni 2016 RASPBERRY](https://static.cupdf.com/doc/110x72/5e9dceb13caf8b222e0cfa99/raspberry-pi-arduino-raspberry-pi-arduino-pagina-3-van-22-pieter-jan.jpg)