2/22/2018 ELET114A Bluetooth Module - Wiki http://wiki.sunfounder.cc/index.php?title=ELET114A_Bluetooth_Module 1/11 Introduction The ELET114A Bluetooth module follows the BT2.1+EDR/3.0/4.0 Bluetooth profile and supports SPP, HID and so on. This module integrates the MCU and Bluetooth chip, thus boasts being high integrated, low consumption, and excellent Bluetooth radio frequency. Features Bluetooth Specification: V2.1+ EDR, BT3.0, BT4.0 (BLE) Operating Frequency Band: 2.4 -2.48GHz unlicensed ISM band Main Digital Interface: UART RX Sensitivity: -88dBm Operating Voltage: +5V 20mA Operating Temperature: -30 ~ +85 ℃ Dimensions: 50 x 24 x 2mm Pin Descriptions VCC: Positive pole of the power source GND: Ground TXD: Serial interface, transmitting terminal RXD: Serial interface, receiving terminal Using SunFounder Uno Step 1: Compile and upload the code before building the circuit. /****************************************/ #include <SoftwareSerial.h> SoftwareSerial mySerial(7, 8); // RX, TX // Connect HM10 Arduino Uno // TXD Pin 8 // RXD Pin 7 void setup() { Serial.begin(115200); // If the baudrate of the HM-10 module has been updated, // you may need to change 9600 by another value // Once you have found the correct baudrate, // you can update it using AT+BAUDx command

Welcome message from author
This document is posted to help you gain knowledge. Please leave a comment to let me know what you think about it! Share it to your friends and learn new things together.
Transcript

2/22/2018 ELET114A Bluetooth Module - Wiki
http://wiki.sunfounder.cc/index.php?title=ELET114A_Bluetooth_Module 1/11
Introduction
The ELET114A Bluetooth module follows the BT2.1+EDR/3.0/4.0 Bluetooth profile and supports SPP, HID and so on. This moduleintegrates the MCU and Bluetooth chip, thus boasts being high integrated, low consumption, and excellent Bluetooth radio frequency.
FeaturesBluetooth Specification: V2.1+ EDR, BT3.0, BT4.0 (BLE)
Operating Frequency Band: 2.4 -2.48GHz unlicensed ISM band Main Digital Interface: UART
RX Sensitivity: -88dBm Operating Voltage: +5V 20mA
Operating Temperature: -30 ~ +85 ℃ Dimensions: 50 x 24 x 2mm
Pin DescriptionsVCC: Positive pole of the power source
GND: Ground TXD: Serial interface, transmitting terminal
RXD: Serial interface, receiving terminal
Using SunFounder UnoStep 1: Compile and upload the code before building the circuit.
/****************************************/ #include <SoftwareSerial.h>
SoftwareSerial mySerial(7, 8); // RX, TX // Connect HM10 Arduino Uno // TXD Pin 8 // RXD Pin 7
void setup() { Serial.begin(115200); // If the baudrate of the HM-10 module has been updated, // you may need to change 9600 by another value // Once you have found the correct baudrate, // you can update it using AT+BAUDx command

2/22/2018 ELET114A Bluetooth Module - Wiki
http://wiki.sunfounder.cc/index.php?title=ELET114A_Bluetooth_Module 2/11
// e.g. AT+BAUD0 for 9600 bauds mySerial.begin(115200); }
void loop() { char c; if (Serial.available()) { c = Serial.read(); mySerial.print(c); } if (mySerial.available()) { c = mySerial.read(); Serial.print(c); } } /****************************************/
Step 2: Connect the circuit.
Bluetooth 4.0 Uno BoardVCC 5VGND GNDTXD Pin 8RXD Pin 7

2/22/2018 ELET114A Bluetooth Module - Wiki
http://wiki.sunfounder.cc/index.php?title=ELET114A_Bluetooth_Module 3/11
Using AndroidIf you are using an Android phone, please follow the steps below:
Step 3: You need to download a Bluetooth 4.0 debugging assistant onto the mobile phone to connect it with the Bluetooth 4.0module. We've provided the tool in Android. Just download BlueTooth.zip on your smart phone and decompress. Then you can see afile BlueTooth. Enable Bluetooth on your phone and install it.
Step 4: Open the installed app. It will directly go to the Bluetooth pairing interface. So first pair your phone and the module.

2/22/2018 ELET114A Bluetooth Module - Wiki
http://wiki.sunfounder.cc/index.php?title=ELET114A_Bluetooth_Module 4/11
Step 5: After the pairing is done successfully, you'll be redirected back to the app homepage (Fig 1). Then tap Select Device at thetop right corner. On the page, find the Bluetooth and hit it (Fig 2). Tap Connect. When Connect changes to Connected, it indicatesthat the pairing is good. At the same time the LED indicator on the module will change from blinking to constant lighting.

2/22/2018 ELET114A Bluetooth Module - Wiki
http://wiki.sunfounder.cc/index.php?title=ELET114A_Bluetooth_Module 5/11
Step 6: Tap serial monitor in Arduino IDE, and type in “Hello!”, then you will receive it in the mobile phone. Similarly, SunFoundersend by the phone will appear in the serial monitor.
Use iOS
2/22/2018 ELET114A Bluetooth Module - Wiki
http://wiki.sunfounder.cc/index.php?title=ELET114A_Bluetooth_Module 6/11
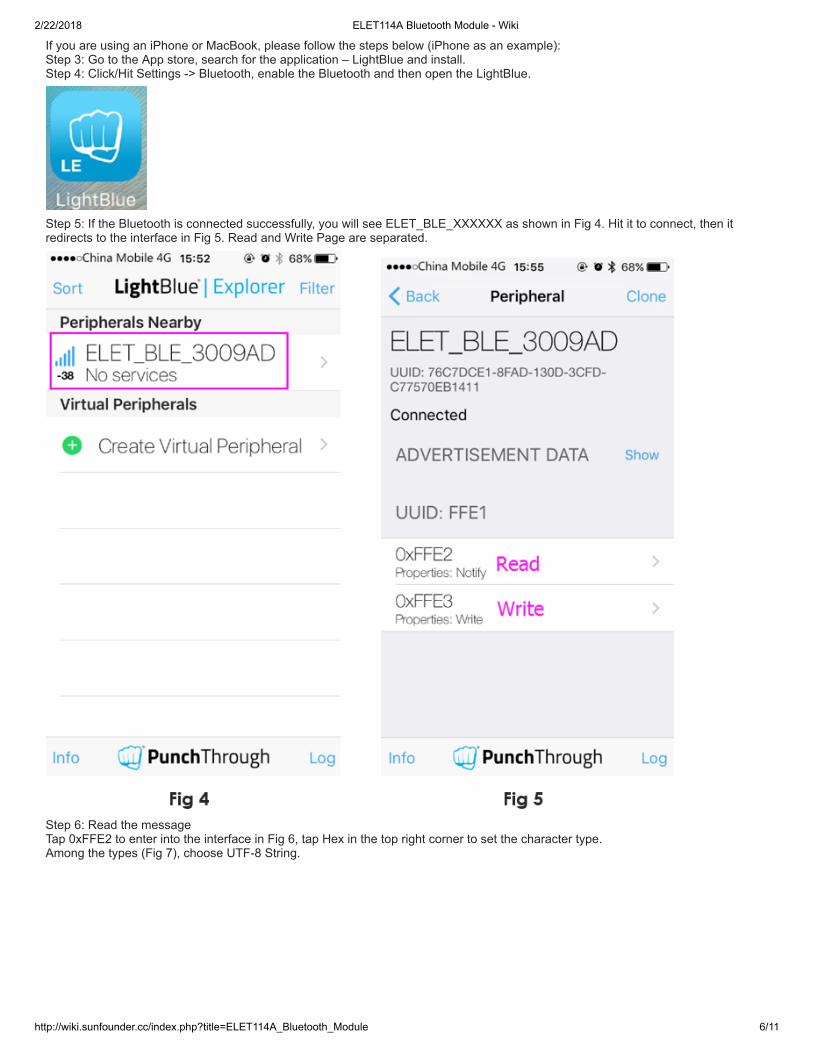
If you are using an iPhone or MacBook, please follow the steps below (iPhone as an example): Step 3: Go to the App store, search for the application – LightBlue and install.
Step 4: Click/Hit Settings -> Bluetooth, enable the Bluetooth and then open the LightBlue.
Step 5: If the Bluetooth is connected successfully, you will see ELET_BLE_XXXXXX as shown in Fig 4. Hit it to connect, then itredirects to the interface in Fig 5. Read and Write Page are separated.
Step 6: Read the message Tap 0xFFE2 to enter into the interface in Fig 6, tap Hex in the top right corner to set the character type.
Among the types (Fig 7), choose UTF-8 String.

2/22/2018 ELET114A Bluetooth Module - Wiki
http://wiki.sunfounder.cc/index.php?title=ELET114A_Bluetooth_Module 7/11
Hit Listen for notifications to read the value. Open Serial Monitor, select baud rate 115200, and send “Hello!”, then you will receive itin your iphone.

2/22/2018 ELET114A Bluetooth Module - Wiki
http://wiki.sunfounder.cc/index.php?title=ELET114A_Bluetooth_Module 8/11
Step 7:Write the message Tap 0xFFE3, and then tap Hex in the top right corner to set the character type.
Among the types (Fig 9), choose UTF-8 String. Hit Write New Value to write a message.
Then you can see the message sent from the phone in Serial Monitor.
Testing by AT CommandStep 1. Build the circuit.

2/22/2018 ELET114A Bluetooth Module - Wiki
http://wiki.sunfounder.cc/index.php?title=ELET114A_Bluetooth_Module 9/11
Bluetooth Module FTDIVCC VCCGND GNDTXD TXDRXD RXD
Step 2. Set parameters. Run the serial debugging tool sscom32. Set the parameters first.
1) Run Open Com to check the COM port. Select the corresponding COM port as shown below.

2/22/2018 ELET114A Bluetooth Module - Wiki
http://wiki.sunfounder.cc/index.php?title=ELET114A_Bluetooth_Module 10/11
2) Select the correct baud rate. Here we select 115200bps as shown below.
3) Before sending the command, tick the SendNew checkbox, then input “AT+MAC?” below Data input. If the Bluetooth moduleworks normally, it will return the module’s address as shown below.

2/22/2018 ELET114A Bluetooth Module - Wiki
http://wiki.sunfounder.cc/index.php?title=ELET114A_Bluetooth_Module 11/11
4) For more directives, please check the Datasheet of ELET114A.
Related Documents