Event Link User’s Manual

Welcome message from author
This document is posted to help you gain knowledge. Please leave a comment to let me know what you think about it! Share it to your friends and learn new things together.
Transcript
Event Link
User’s Manual

Event Link User’s Manual Last Updated: 5/9/2023
Created by Interactions 2
Event Link User’s Manual Last Updated: 5/9/2023
Table of ContentsIntroduction_____________________________________________________________________________8
Accessing Event Link_____________________________________________________________________________8
Scheduling_______________________________________________________________________________9
Vendors_______________________________________________________________________________________9Adding a New Vendor____________________________________________________________________________________9Finding a Vendor_______________________________________________________________________________________10Editing a Vendor_______________________________________________________________________________________10Adding a Division to a Vendor’s Account____________________________________________________________________11Changing a Vendor’s Contact or Adding Multiple Contacts______________________________________________________11
Accessing the Online Aging Report from the View Vendor Page_________________________________________12Accessing the Vendor Name and View Online Aging Report Links_________________________________________________12Printing and Emailing Delinquent Letters____________________________________________________________________12Viewing a Vendor’s Invoice from the Online Aging Page________________________________________________________13
Items________________________________________________________________________________________14Adding a New Item_____________________________________________________________________________________14Finding and Viewing an Item______________________________________________________________________________16Printing a DPIS from the View Item Page____________________________________________________________________16Editing an Item________________________________________________________________________________________17Adding an Item Commitment_____________________________________________________________________________17
Stores________________________________________________________________________________________18Adding a New Store_____________________________________________________________________________________18Finding a Store________________________________________________________________________________________19Viewing All Stores in a Selected Division____________________________________________________________________19Viewing All Stores in All Divisions__________________________________________________________________________19Editing a Store_________________________________________________________________________________________20Changing a Store’s Contact_______________________________________________________________________________20
Contacts______________________________________________________________________________________21Adding a New Contact___________________________________________________________________________________21Finding and Viewing Contacts_____________________________________________________________________________22Editing a Contact_______________________________________________________________________________________22
Work Orders__________________________________________________________________________________24Entering a Work Order__________________________________________________________________________________24Entering a Work Order by Date____________________________________________________________________________25Finding Work Orders____________________________________________________________________________________26Changing and Canceling Existing Work Orders________________________________________________________________27
Campaigns (CDS US Only)________________________________________________________________________29Creating a Campaign____________________________________________________________________________________29Finding Campaigns_____________________________________________________________________________________31Campaign List_________________________________________________________________________________________32
Approving Vendor Information Added by Vendors______________________________________________33
Approving a Vendor’s Profile after they have completed the New Vendor Registration______________________33
Approving an Existing Vendor’s Profile Change Request________________________________________________34
Reviewing a Vendor’s Contact Additions____________________________________________________________35
Changing Permissions for a Vendor’s Contacts_______________________________________________________35
Approving a Vendor’s Pending Event Request (Work Order)____________________________________________35
Created by Interactions 3
Event Link User’s Manual Last Updated: 5/9/2023
Linking Vendors for Split Events___________________________________________________________________37
Linking Vendor’s Items for Split Events_____________________________________________________________37
Adding Store Ranking___________________________________________________________________________38
Staffing Module & Sales Advisor Scheduling___________________________________________________39
Employees____________________________________________________________________________________39Adding a New Employee_________________________________________________________________________________39Finding and Viewing Employee Information__________________________________________________________________39
How to Schedule a Sales Advisor for an Event________________________________________________________40Employee Page - View Employee__________________________________________________________________________40Adding Employee Locations______________________________________________________________________________40Adding Employee Availability_____________________________________________________________________________40Manually Assigning Employees to Events____________________________________________________________________41Scheduling Events to Automatically Assign Sales Advisors to Work (disabled for all companies)_________________________41
Sales Advisor Scheduling Email Rules_______________________________________________________________42
Sales Advisor Login_____________________________________________________________________________44
Billing_________________________________________________________________________________46
Pending Recaps (Retail Only)_____________________________________________________________________46
Event Processing Billing__________________________________________________________________________48
Invoicing______________________________________________________________________________________51Generating Regular Invoices______________________________________________________________________________51Generating Invoices by PO (Special Event Billing) – CDS US Only__________________________________________________52Resend Invoices________________________________________________________________________________________53
Dates Not Keyed Report_________________________________________________________________________53
Auditing________________________________________________________________________________54
Daily Expense Report Processing__________________________________________________________________54Entering a DER_________________________________________________________________________________________54Finding and Viewing a DER_______________________________________________________________________________55
Posting Daily Expense Reports____________________________________________________________________56
Payment Recon________________________________________________________________________________56Reconciling Payments___________________________________________________________________________________56
Missing Dates__________________________________________________________________________________57Finding and Viewing Missing Dates________________________________________________________________________57
Accounts Payable________________________________________________________________________58
Weekly Expense Report Processing________________________________________________________________58Entering a WER________________________________________________________________________________________58Finding and Viewing a WER_______________________________________________________________________________59Editing a WER_________________________________________________________________________________________59
Posting WER Records____________________________________________________________________________59
Direct Bills____________________________________________________________________________________60Entering a Direct Bill____________________________________________________________________________________60Finding and Viewing a Direct Bill___________________________________________________________________________61Editing a Direct Bill_____________________________________________________________________________________61
AP Vendor Payables____________________________________________________________________________62
Created by Interactions 4
Event Link User’s Manual Last Updated: 5/9/2023
Adding a New AP Vendor________________________________________________________________________________62Finding and Viewing AP Vendors__________________________________________________________________________63Editing an AP Vendor___________________________________________________________________________________63
Uploading Direct Bill Data________________________________________________________________________64Uploading Data________________________________________________________________________________________64Direct Bill Upload Sample________________________________________________________________________________64
Accounts Receivable______________________________________________________________________65
Applying Payments_____________________________________________________________________________65Adding All Credit/Debit Memo Types from the Apply Payments Page_____________________________________________66Adding Debit/Credit Memos and NSF Checks from the Main Page________________________________________________67
Adding a PrePayment___________________________________________________________________________67
Operations_____________________________________________________________________________68
Issues________________________________________________________________________________________68Adding a New Issue (Office Staff):__________________________________________________________________________68Finding Issues for my Stores (Area Managers)________________________________________________________________68Resolving Completed Issues (Office Staff):___________________________________________________________________70
Sales Goals____________________________________________________________________________________71Entering Daily Sales_____________________________________________________________________________________71Finding and Editing Daily Sales Goals Records________________________________________________________________71Daily Sales Goals Point Rules_____________________________________________________________________________72
CDS Mobile and eDDR Knowledge Base_____________________________________________________________72
Reports________________________________________________________________________________73
Event Confirmation, Change & Cancellation Emails___________________________________________________73Sample Reports________________________________________________________________________________________73
Main Reports Page_____________________________________________________________________________73
Scheduling Reports_____________________________________________________________________________751. Division Schedule Report______________________________________________________________________________753. Daily Demo Report___________________________________________________________________________________775. Store Schedule Report________________________________________________________________________________806. Vendor Scheduled and Billed Report_____________________________________________________________________817. Vendor Report_______________________________________________________________________________________828. Item Report_________________________________________________________________________________________829. DPIS – Daily Report___________________________________________________________________________________8310. Department Schedule Report__________________________________________________________________________8411. Vendor Billed Report_________________________________________________________________________________8512. Forced Distribution Import (OTO Only)__________________________________________________________________8613. Event History Report (Work Order History)_______________________________________________________________8714. Event Classification Report____________________________________________________________________________88
Staffing Reports________________________________________________________________________________89Event Order Report_____________________________________________________________________________________89Schedule Employees Report______________________________________________________________________________90Exporting a Work Schedule_______________________________________________________________________________90Sales Advisor Calendar Report____________________________________________________________________________92
Billing Reports_________________________________________________________________________________931. Commitment Report__________________________________________________________________________________932. Event Billing Report___________________________________________________________________________________943. Employee Report_____________________________________________________________________________________954. Employee Hours Report_______________________________________________________________________________96
Created by Interactions 5
Event Link User’s Manual Last Updated: 5/9/2023
5. Payroll Report_______________________________________________________________________________________976. Payroll Report (Posting)_______________________________________________________________________________987. Sales Tax Due Report________________________________________________________________________________1008. Reprint Sales Tax Due Report__________________________________________________________________________1009. Unbilled Event Report________________________________________________________________________________10110. Demos Not Performed Report________________________________________________________________________10211. Invoice Audit Report________________________________________________________________________________10312. Reprint Invoice____________________________________________________________________________________10413. Special Events to be Invoiced Report___________________________________________________________________10514. Recap Status Report________________________________________________________________________________106
Auditing Reports______________________________________________________________________________1071. Billed Reconciliation Report___________________________________________________________________________1072. Billed Reconciliation Report by Variance_________________________________________________________________1083. Reprint DER Posting Report___________________________________________________________________________1094. DER Remits to Employees_____________________________________________________________________________1105. DER Detail Report___________________________________________________________________________________111
A/P Reports__________________________________________________________________________________1121. Invoices Submitted For Payment_______________________________________________________________________1122. Matching Payment Reconciliation Report________________________________________________________________1133. Reprint Matching Payment Reconciliation Report__________________________________________________________1144. Reprint WER Posting Report___________________________________________________________________________1165. WER Export – Detail and Summary______________________________________________________________________1176. JE Expensed to Others - Direct Bill______________________________________________________________________1187. JE Expensed to Others - WER Report____________________________________________________________________1198. Direct Bill Export Report______________________________________________________________________________120
Operations Reports____________________________________________________________________________1211. Hours Analysis Report________________________________________________________________________________1212. Issues and Unbilled Report____________________________________________________________________________1223a. Store Analysis Report – Crystal Report__________________________________________________________________1233b. Store Analysis Report – Detail and Summary_____________________________________________________________1244. Completion Analysis Report___________________________________________________________________________1255. Completion Analysis Report - Detail and Summary_________________________________________________________1266. Weekly Score Card Report____________________________________________________________________________1277. CDS Warehouse Sales Report__________________________________________________________________________1288. Costco Warehouse Report____________________________________________________________________________1299. Sales Goals/Results Not Entered________________________________________________________________________13010. Item Sales Report__________________________________________________________________________________13111. Department Sales Report____________________________________________________________________________132
A/R Reports__________________________________________________________________________________1331. Applied Payments Report_____________________________________________________________________________1332. Delinquent Vendor Report and Delinquency Letters________________________________________________________1343. Detail Aging Report__________________________________________________________________________________1354. Past Due Followup Report____________________________________________________________________________1365. Summary Aging Report_______________________________________________________________________________1376. Vendor Credit Exceptions Report_______________________________________________________________________1387. Invoice Followup Email Report_________________________________________________________________________1398. Credit/Debit Memo Report____________________________________________________________________________1409. Revenue Report_____________________________________________________________________________________141
Printing Reports________________________________________________________________________142
Exporting Reports and Searching for Data in Reports__________________________________________142
Exporting Reports_____________________________________________________________________________142Exporting a Report____________________________________________________________________________________142
Created by Interactions 6
Event Link User’s Manual Last Updated: 5/9/2023
Searching For Words and Numbers in the Report Viewer______________________________________________143
Created by Interactions 7
Event System User’s Manual Last Updated: 5/9/2023
Introduction
The purpose of this manual is to provide you with a basic overview of Event Link. The manual details all 7 modules within Event Link and gives you step-by-step instructions on how to add, edit and view information. Your ability to add or edit information is determined by the permissions you currently have. You should have viewing rights to most of the system. If you do not have the proper permissions, notify your Area or Operations Manager and they in turn should notify support. Support cannot grant you permissions without your Area or Operations manager’s approval.
If at any time you have questions concerning Event Link you may call or email support with your questions. Support will be more than willing to walk you through features you do not understand or help you navigate to features you cannot find. You cannot do any damage by viewing reports or looking for information. It is in your best interest to make yourself familiar with Event Link.
Event System Support Staff
DI Global Tech [email protected]
Accessing Event Link1. Open Internet Explorer
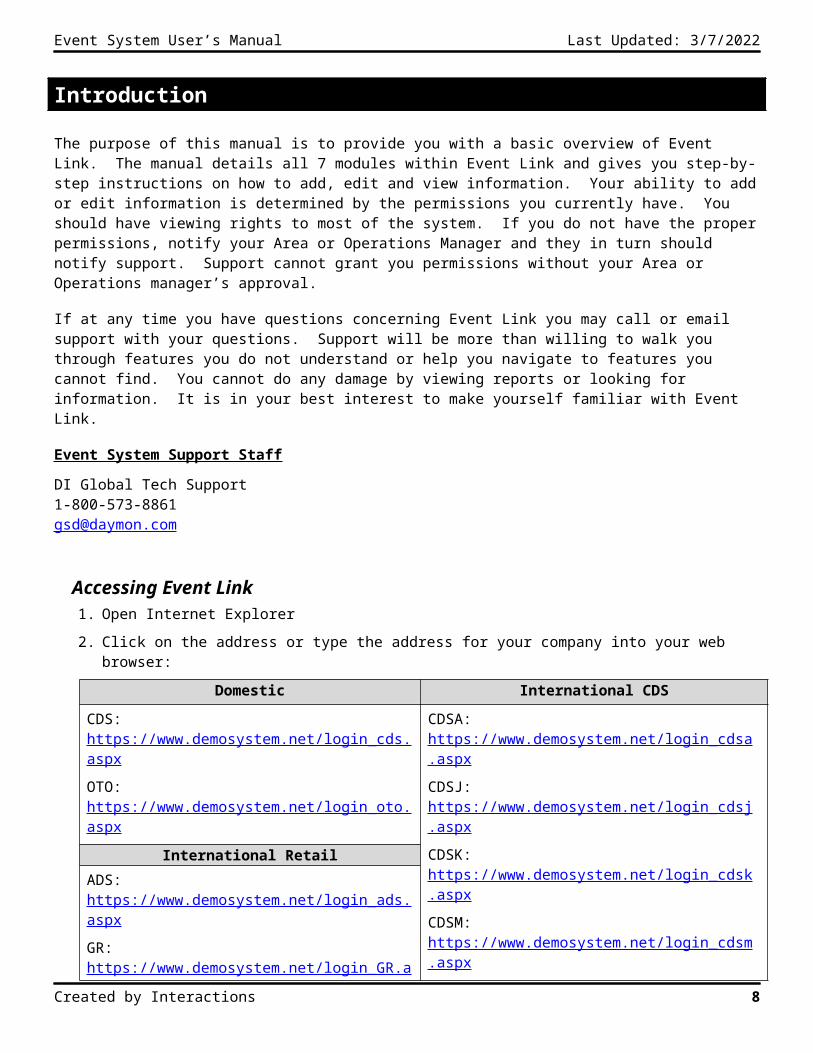
2. Click on the address or type the address for your company into your web browser:
Domestic International CDS
CDS: https://www.demosystem.net/login_cds.aspx
OTO: https://www.demosystem.net/login_oto.aspx
CDSA: https://www.demosystem.net/login_cdsa.aspx
CDSJ: https://www.demosystem.net/login_cdsj.aspx
CDSK: https://www.demosystem.net/login_cdsk.aspx
CDSM: https://www.demosystem.net/login_cdsm.aspx
CDST: https://www.demosystem.net/login_cdst.aspx
CDSS: https://www.demosystem.net/login_cdss.aspx
International RetailADS: https://www.demosystem.net/login_ads.aspx
GR: https://www.demosystem.net/login_GR.aspx
PD: https://www.demosystem.net/login_PD.aspx
PnP: https://www.demosystem.net/login_pnp.aspx
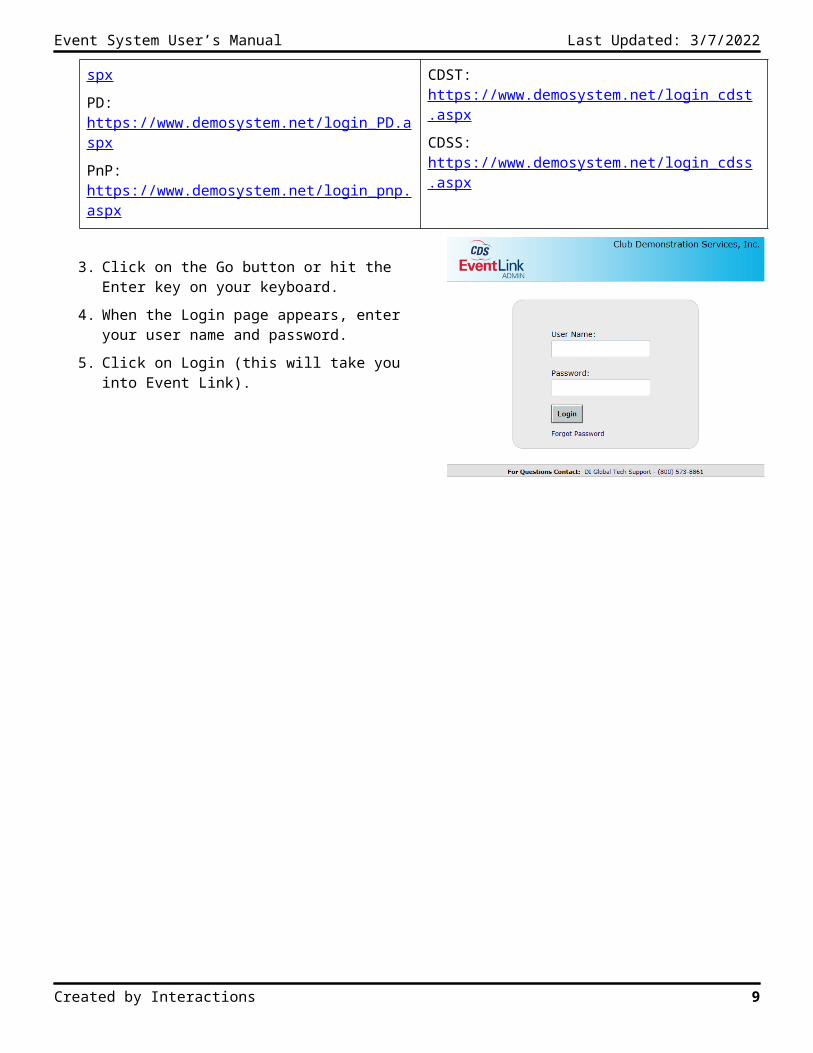
3. Click on the Go button or hit the Enter key on your keyboard.
4. When the Login page appears, enter your user name and password.
5. Click on Login (this will take you into Event Link).
Created by Interactions 8
Event System User’s Manual Last Updated: 5/9/2023
SchedulingVendors
The new vendor feature allows you to enter a new vendor record. This information is used when scheduling and billing events.
Adding a New Vendor
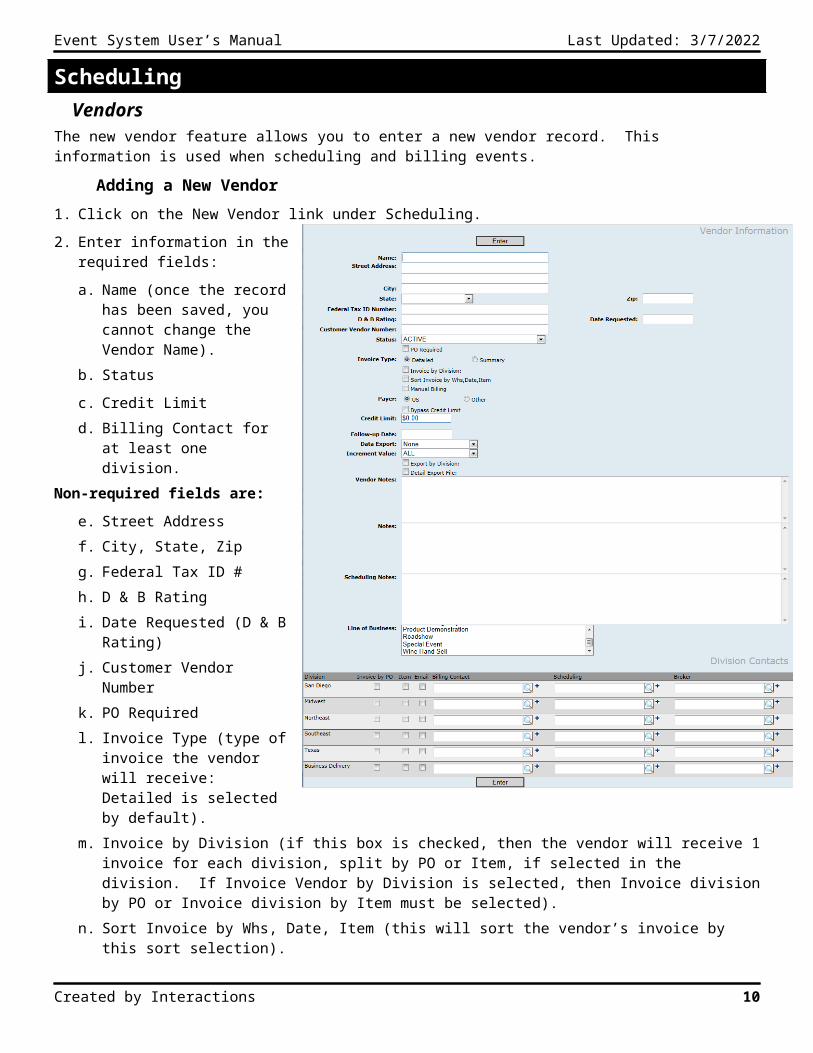
1. Click on the New Vendor link under Scheduling.
2. Enter information in the required fields:
a. Name (once the record has been saved, you cannot change the Vendor Name).
b. Status
c. Credit Limitd. Billing Contact for at least one
division.Non-required fields are:
e. Street Addressf. City, State, Zip
g. Federal Tax ID #h. D & B Rating
i. Date Requested (D & B Rating)j. Customer Vendor Number
k. PO Requiredl. Invoice Type (type of invoice
the vendor will receive: Detailed is selected by default).
m. Invoice by Division (if this box is checked, then the vendor will receive 1 invoice for each division, split by PO or Item, if selected in the division. If Invoice Vendor by Division is selected, then Invoice division by PO or Invoice division by Item must be selected).
n. Sort Invoice by Whs, Date, Item (this will sort the vendor’s invoice by this sort selection).o. Manual Billing (CDS ONLY - by checking this checkbox, it indicates the vendor will be invoiced separately from
other vendors and by PO number only).p. Payer (determines if the vendor will pay in US dollars or local currency)q. Follow-up Date (this date cannot be greater than 14 days from the current date).r. Data Export (export file type to accompany invoice file sent to vendor)s. Increment Value (dollar increment amount the vendor would like on each export. The most common
selection is ALL)
Created by Interactions 9
Event System User’s Manual Last Updated: 5/9/2023
t. Export by Division (will send the invoice data exports by division).u. Detail Export File (this will add all the billing data to the invoice export file sent with the regular invoice).v. Vendor Notes (notes only added by the vendor through the vendor portal).w. Notes (internal AR and Scheduling notes. These notes cannot be viewed by the vendor).x. Scheduling Notesy. Line of Business (the lines of business where the vendors perform events).z. Invoice by PO (If Invoice Vendor by Division is selected, then Invoice division by PO or Invoice division by Item
must be selected).aa. Invoice by Itembb. Email Invoice (You are not allowed to select "invoice by email" for one division without invoice by division
being selected).cc. Billing Contactdd. Scheduling Contact ee. Broker Contact
Note: to add a billing, scheduling or broker contact click on the magnifying glass icon, enter the Last or First Name, click on the Find button and select the correct name from the list.
3. Click on the Enter button.
Finding a Vendor
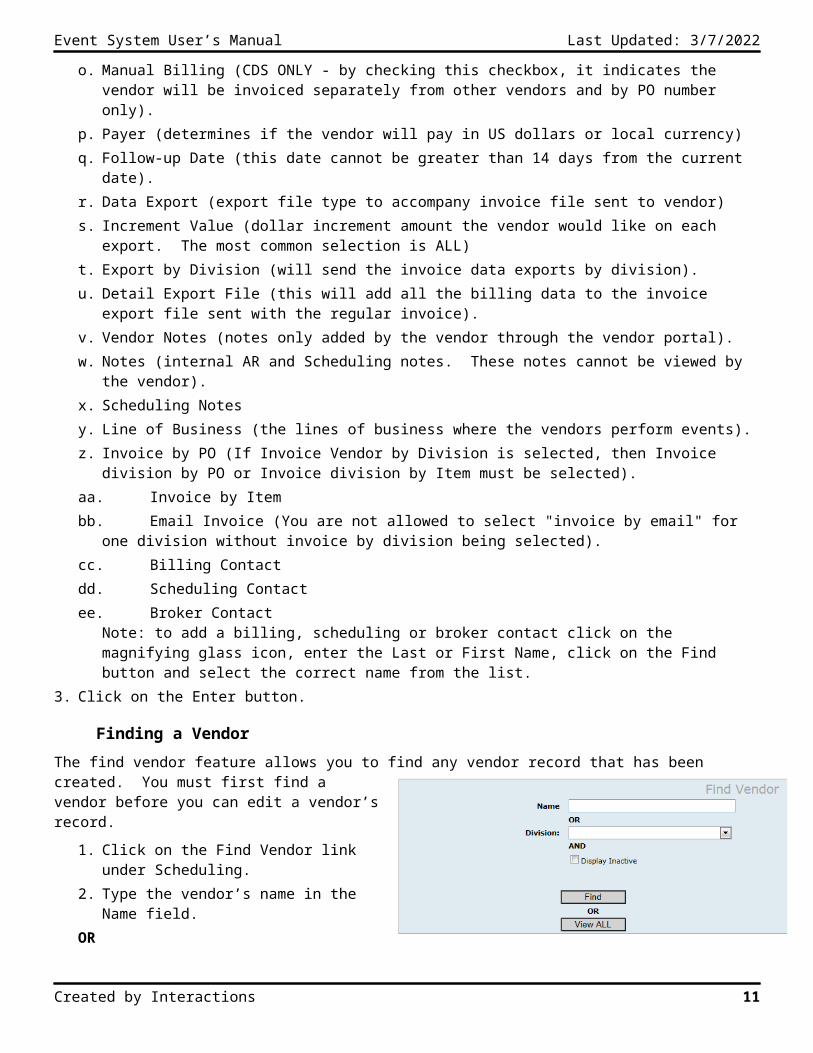
The find vendor feature allows you to find any vendor record that has been created. You must first find a vendor before you can edit a vendor’s record.
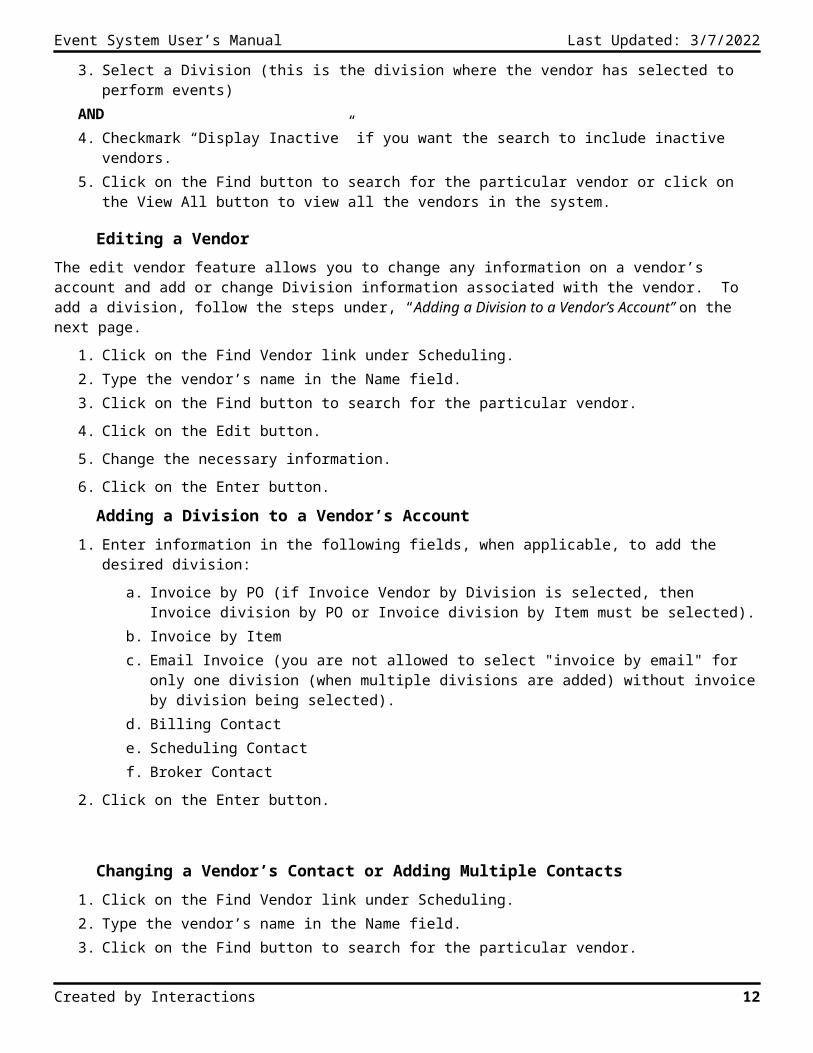
1. Click on the Find Vendor link under Scheduling.2. Type the vendor’s name in the Name field.OR3. Select a Division (this is the division where the
vendor has selected to perform events)AND4. Checkmark “Display Inactive” if you want the
search to include inactive vendors.5. Click on the Find button to search for the particular vendor or click on the View All button to view all the
vendors in the system.
Editing a Vendor
The edit vendor feature allows you to change any information on a vendor’s account and add or change Division information associated with the vendor. To add a division, follow the steps under, “Adding a Division to a Vendor’s Account” on the next page.
1. Click on the Find Vendor link under Scheduling.2. Type the vendor’s name in the Name field.3. Click on the Find button to search for the particular vendor.
4. Click on the Edit button.
5. Change the necessary information.
6. Click on the Enter button.
Created by Interactions 10
Event System User’s Manual Last Updated: 5/9/2023
Adding a Division to a Vendor’s Account
1. Enter information in the following fields, when applicable, to add the desired division:
a. Invoice by PO (if Invoice Vendor by Division is selected, then Invoice division by PO or Invoice division by Item must be selected).
b. Invoice by Itemc. Email Invoice (you are not allowed to select "invoice by email" for only one division (when multiple
divisions are added) without invoice by division being selected).d. Billing Contacte. Scheduling Contactf. Broker Contact
2. Click on the Enter button.
Changing a Vendor’s Contact or Adding Multiple Contacts
1. Click on the Find Vendor link under Scheduling.2. Type the vendor’s name in the Name field.3. Click on the Find button to search for the particular vendor.
4. Click on the Edit button.
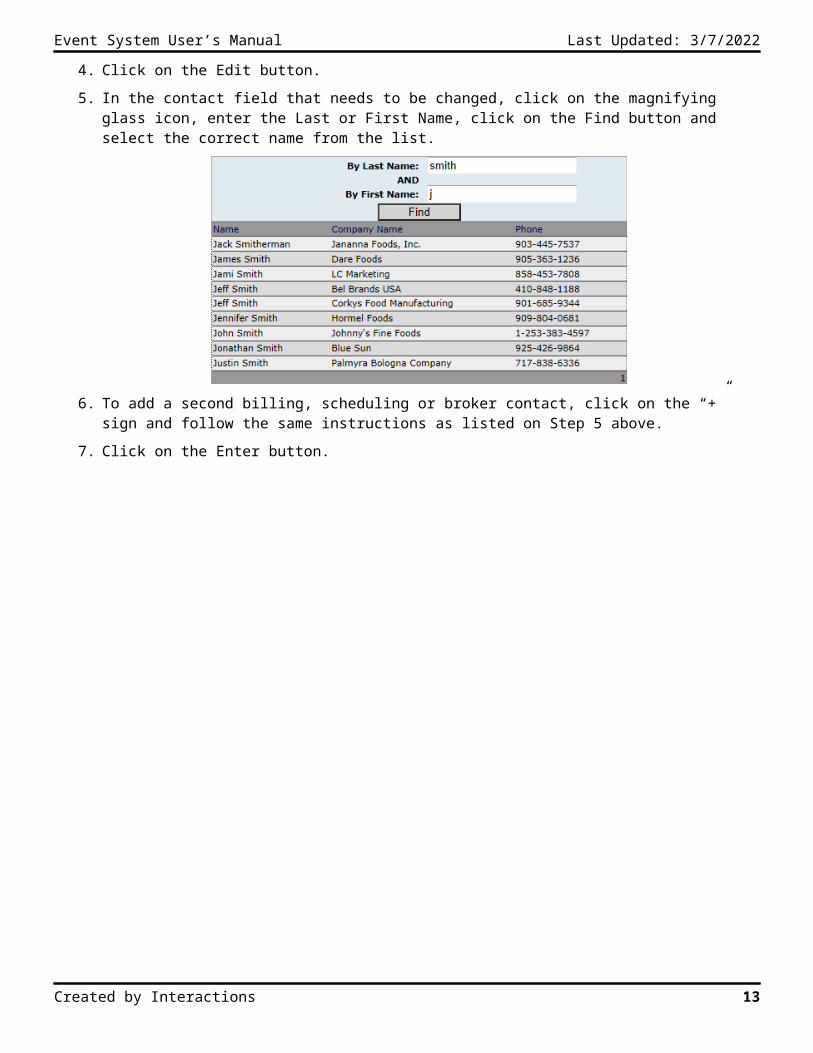
5. In the contact field that needs to be changed, click on the magnifying glass icon, enter the Last or First Name, click on the Find button and select the correct name from the list.
6. To add a second billing, scheduling or broker contact, click on the “+” sign and follow the same instructions as listed on Step 5 above.
7. Click on the Enter button.
Created by Interactions 11
Event System User’s Manual Last Updated: 5/9/2023
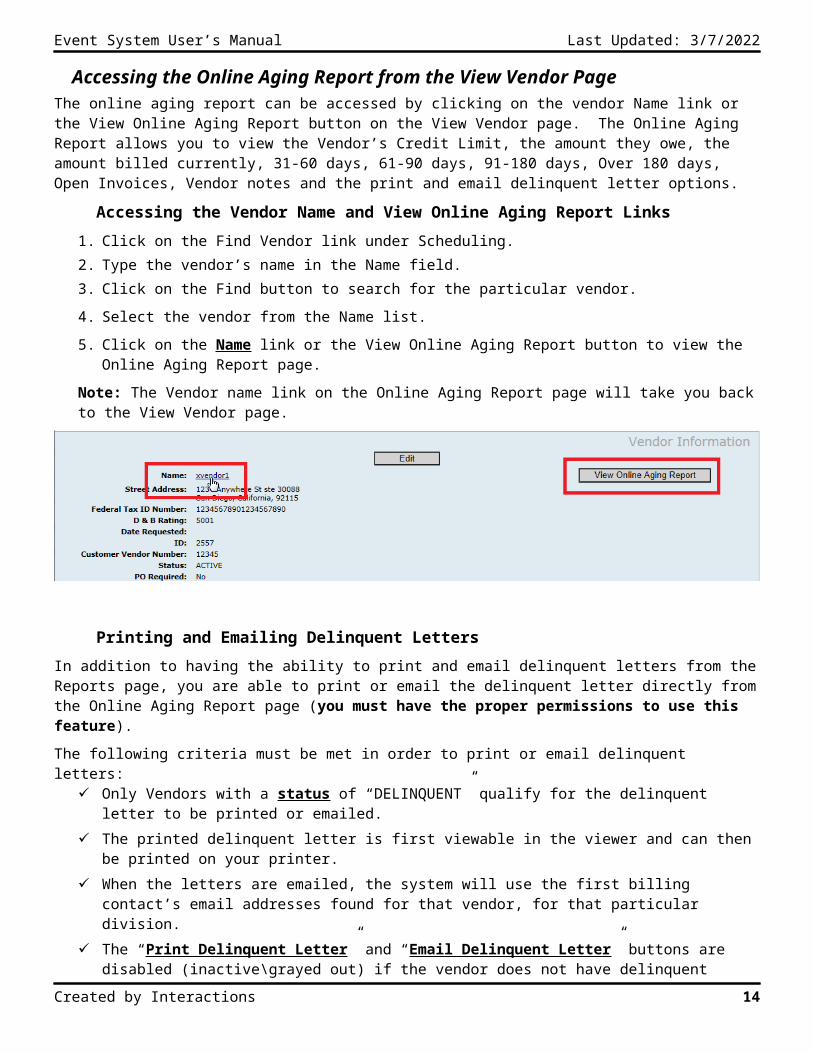
Accessing the Online Aging Report from the View Vendor PageThe online aging report can be accessed by clicking on the vendor Name link or the View Online Aging Report button on the View Vendor page. The Online Aging Report allows you to view the Vendor’s Credit Limit, the amount they owe, the amount billed currently, 31-60 days, 61-90 days, 91-180 days, Over 180 days, Open Invoices, Vendor notes and the print and email delinquent letter options.
Accessing the Vendor Name and View Online Aging Report Links
1. Click on the Find Vendor link under Scheduling.2. Type the vendor’s name in the Name field.3. Click on the Find button to search for the particular vendor.
4. Select the vendor from the Name list.
5. Click on the Name link or the View Online Aging Report button to view the Online Aging Report page.
Note: The Vendor name link on the Online Aging Report page will take you back to the View Vendor page.
Printing and Emailing Delinquent Letters
In addition to having the ability to print and email delinquent letters from the Reports page, you are able to print or email the delinquent letter directly from the Online Aging Report page (you must have the proper permissions to use this feature).
The following criteria must be met in order to print or email delinquent letters: Only Vendors with a status of “DELINQUENT” qualify for the delinquent letter to be printed or emailed.
The printed delinquent letter is first viewable in the viewer and can then be printed on your printer. When the letters are emailed, the system will use the first billing contact’s email addresses found for that
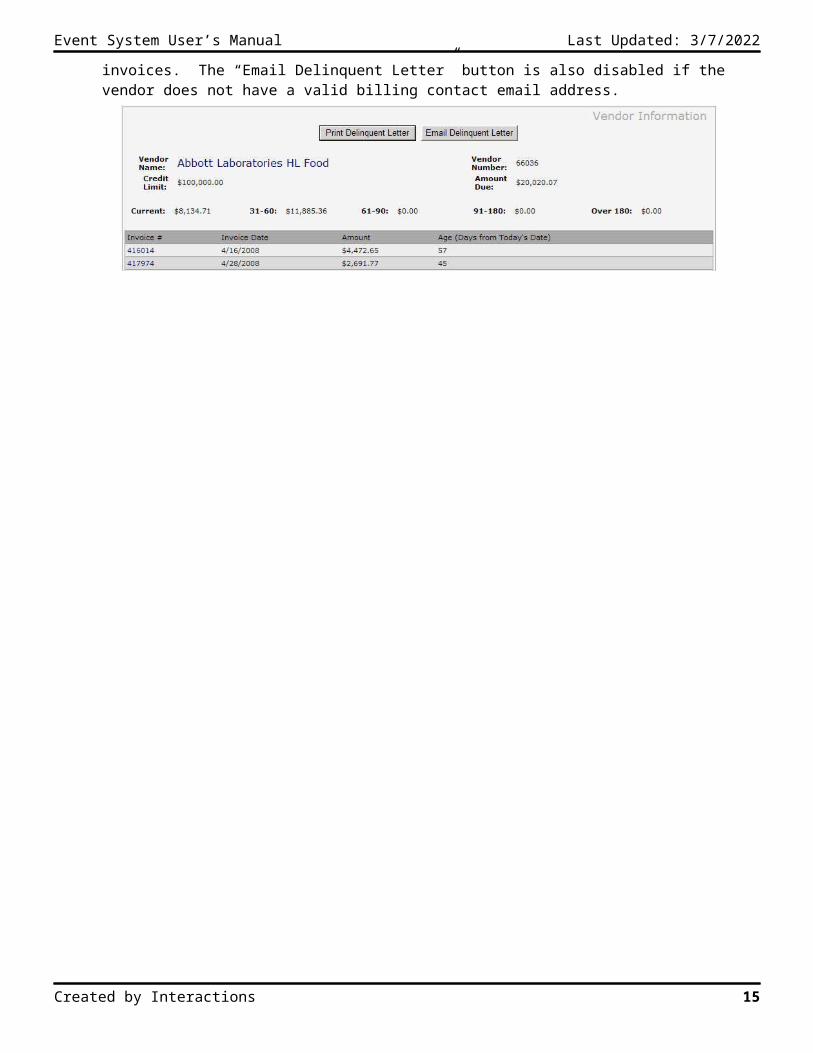
vendor, for that particular division. The “Print Delinquent Letter” and “Email Delinquent Letter” buttons are disabled (inactive\grayed out) if the
vendor does not have delinquent invoices. The “Email Delinquent Letter” button is also disabled if the vendor does not have a valid billing contact email address.
Created by Interactions 12
Event System User’s Manual Last Updated: 5/9/2023
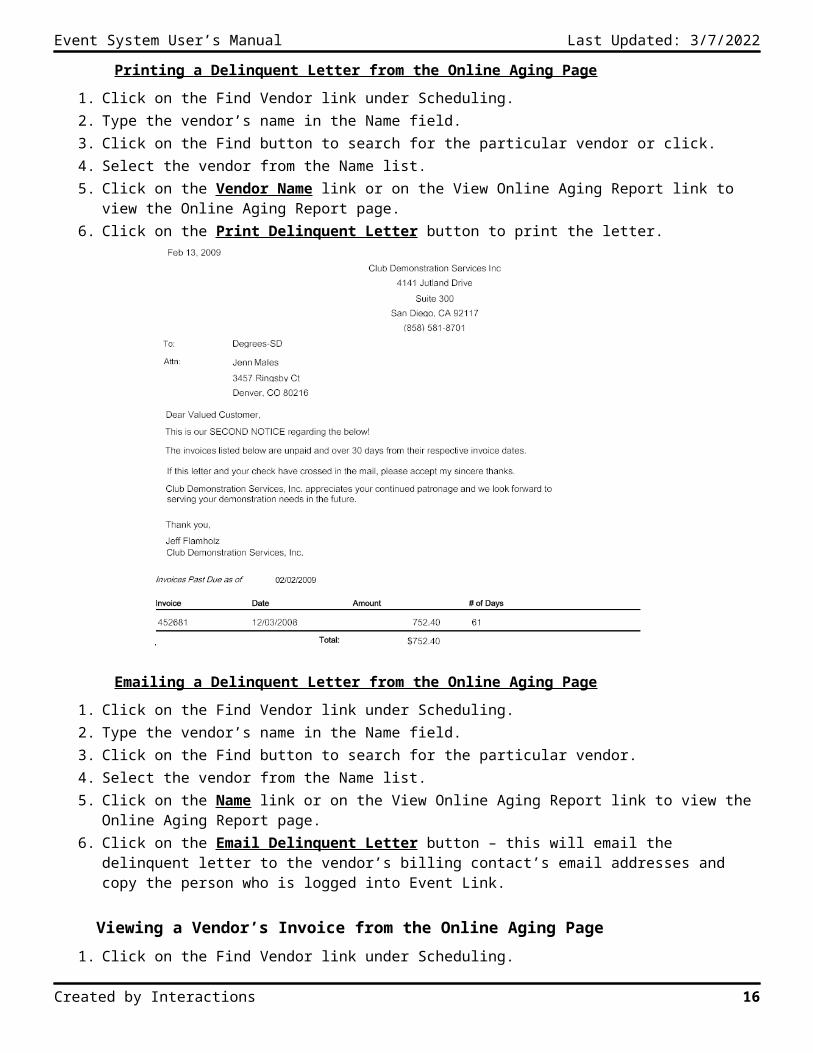
Printing a Delinquent Letter from the Online Aging Page
1. Click on the Find Vendor link under Scheduling.2. Type the vendor’s name in the Name field.3. Click on the Find button to search for the particular vendor or click.4. Select the vendor from the Name list.5. Click on the Vendor Name link or on the View Online Aging Report link to view the Online Aging Report page.6. Click on the Print Delinquent Letter button to print the letter.
Emailing a Delinquent Letter from the Online Aging Page
1. Click on the Find Vendor link under Scheduling.2. Type the vendor’s name in the Name field.3. Click on the Find button to search for the particular vendor.4. Select the vendor from the Name list.5. Click on the Name link or on the View Online Aging Report link to view the Online Aging Report page.6. Click on the Email Delinquent Letter button – this will email the delinquent letter to the vendor’s billing
contact’s email addresses and copy the person who is logged into Event Link.
Viewing a Vendor’s Invoice from the Online Aging Page
1. Click on the Find Vendor link under Scheduling.2. Type the vendor’s name in the Name field.3. Click on the Find button to search for the particular vendor.4. Select the vendor from the Name list.5. Click on the Name link or on the View Online Aging Report link to view the Online Aging Report page.6. Click on the Invoice Number link – once the invoice opens, you can print it.
Created by Interactions 13
Event System User’s Manual Last Updated: 5/9/2023
ItemsThe new item feature allows you to enter a new item, for a vendor, to be used when scheduling events.
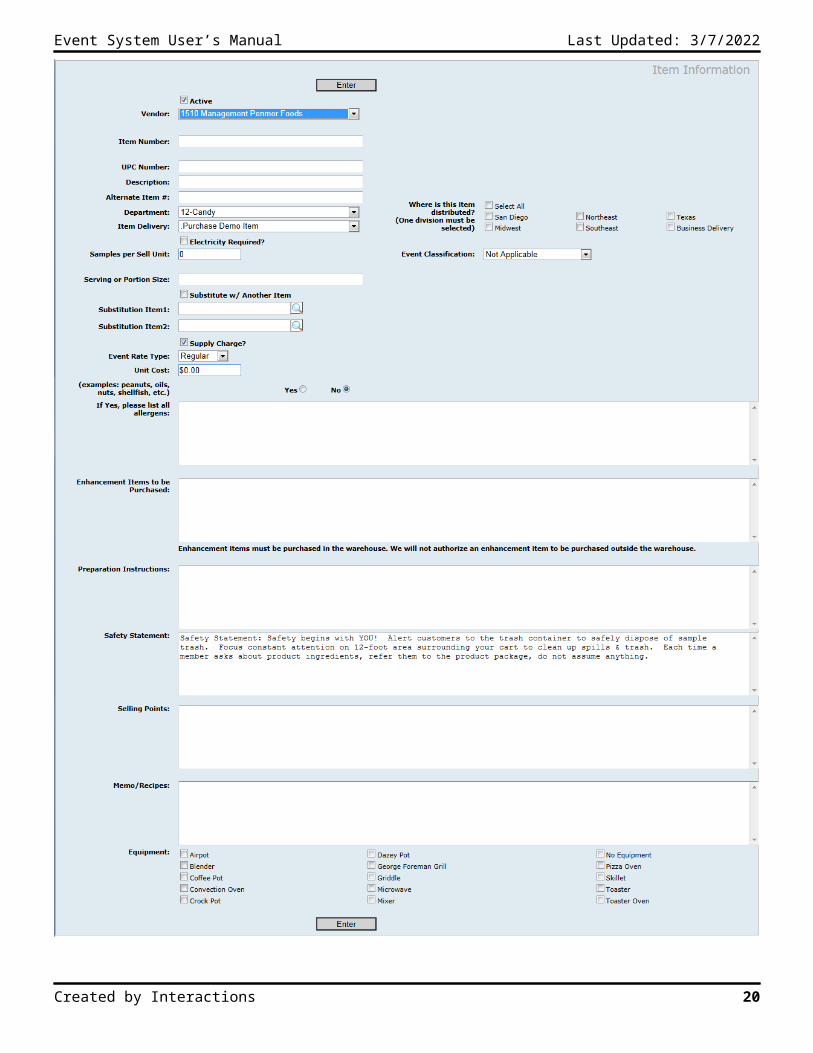
Adding a New Item
1. Click on the New Item link under Scheduling.
2. Enter information in the required fields:
a. Active (checked by default)
b. Vendor
c. Item Number
d. Description
e. Department
f. Item Delivery
g. Where Item is Distributed
h. Samples per Sell Unit
i. Serving or Portion Size
j. Allergens
k. Preparation Instructions
l. Selling Points
m. Memo/Recipes
n. Equipment
o. Other Equipment (optional setting per company)
Non-required fields are:
a. UPC Number
b. Alternate Item Number
c. Electricity Required
d. Event Classification
e. Substitution with Another Item checkbox
f. Substitution Item 1
g. Substitution Item 2
h. Supply Charge
i. Event Rate Type (Regular, In-House, Marketing or Other)
j. Other Event Rates (this only appears if “Other” is selected)
k. Unit Cost
l. Enhancement Items to be Purchased
m. Safety Statement
3. Click on the Enter button.
Created by Interactions 14
Event System User’s Manual Last Updated: 5/9/2023
Created by Interactions 15
Event System User’s Manual Last Updated: 5/9/2023
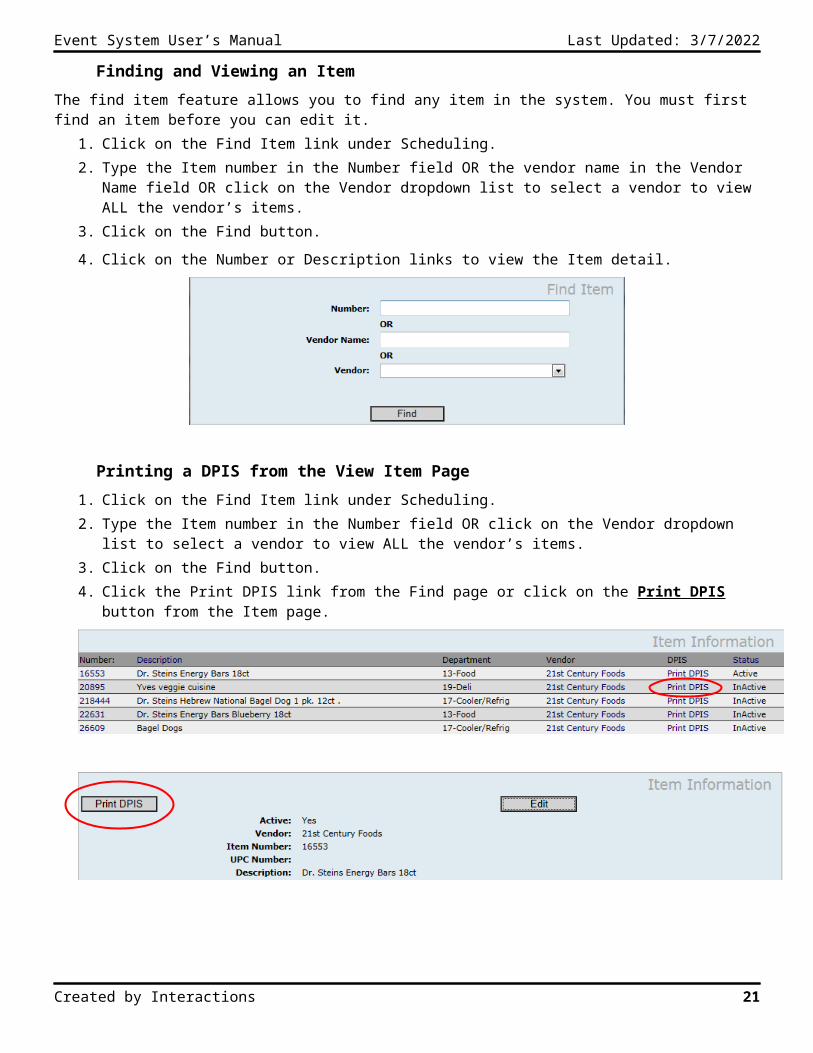
Finding and Viewing an Item
The find item feature allows you to find any item in the system. You must first find an item before you can edit it .1. Click on the Find Item link under Scheduling.2. Type the Item number in the Number field OR the vendor name in the Vendor Name field OR click on the
Vendor dropdown list to select a vendor to view ALL the vendor’s items.3. Click on the Find button.
4. Click on the Number or Description links to view the Item detail.
Printing a DPIS from the View Item Page
1. Click on the Find Item link under Scheduling.2. Type the Item number in the Number field OR click on the Vendor dropdown list to select a vendor to view ALL
the vendor’s items.3. Click on the Find button.4. Click the Print DPIS link from the Find page or click on the Print DPIS button from the Item page.
Created by Interactions 16
Event System User’s Manual Last Updated: 5/9/2023
Editing an Item
The edit item feature allows you to change any information about an item.
1. Click on the Find Item link under Scheduling.
2. Type the Item number in the Number field OR the vendor name in the Vendor Name field OR click on the Vendor dropdown list to select a vendor to view ALL the vendor’s items.
3. Click on the Find button.
4. Click on the Number or Description links to view the Item detail.
5. Click on the Edit button.
6. Change the necessary information.
7. Click on the Enter button
Adding an Item Commitment
1. Click on the Find Item link under Scheduling.2. Type the Item number in the Number field OR click on the Vendor dropdown list to select a vendor to view
ALL the vendor’s items.3. Click on the Find button.4. Click on the Number or Description links to view the Item detail.5. Click on the Edit button.6. Enter information in the Number, Amount, Effective, Expires and Notes fields for any division you need to a
commitment for.7. Click on the Enter button.
Created by Interactions 17
Event System User’s Manual Last Updated: 5/9/2023
StoresThe new store feature allows you to enter a new store. This information is used when scheduling and billing events.
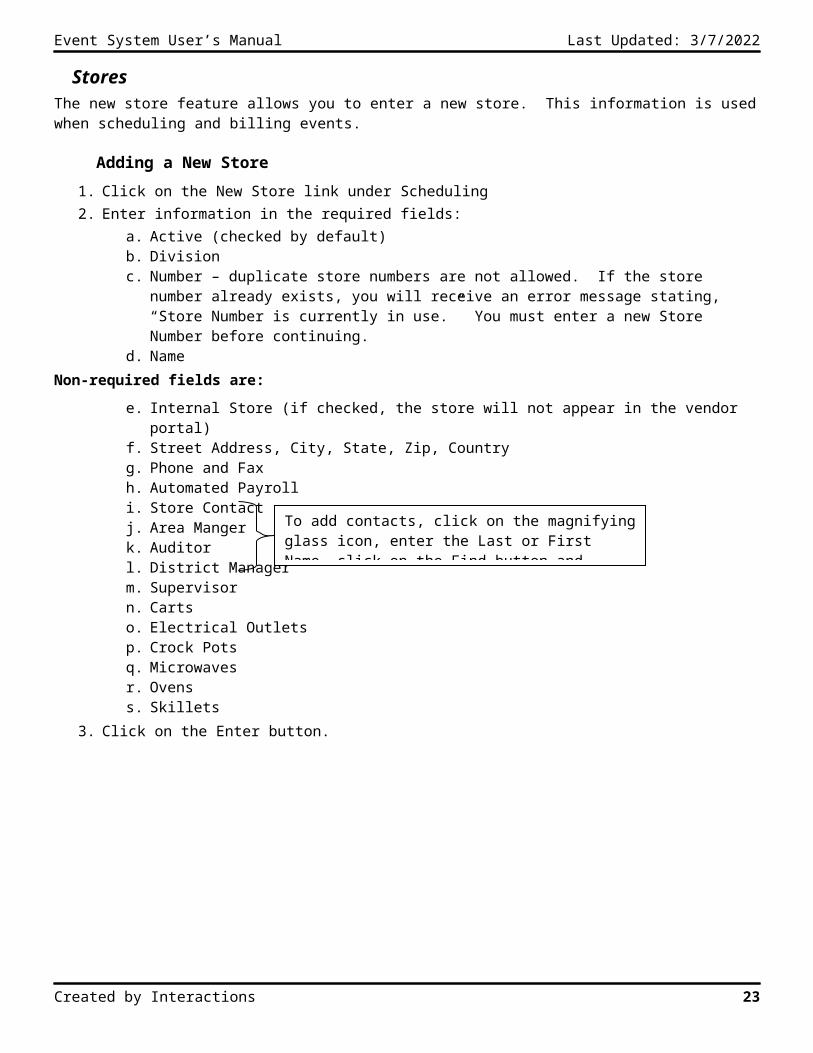
Adding a New Store
1. Click on the New Store link under Scheduling2. Enter information in the required fields:
a. Active (checked by default)b. Divisionc. Number – duplicate store numbers are not allowed. If the store number already exists, you will
receive an error message stating, “Store Number is currently in use.” You must enter a new Store Number before continuing.
d. NameNon-required fields are:
e. Internal Store (if checked, the store will not appear in the vendor portal)f. Street Address, City, State, Zip, Countryg. Phone and Faxh. Automated Payrolli. Store Contactj. Area Mangerk. Auditorl. District Managerm. Supervisorn. Cartso. Electrical Outletsp. Crock Potsq. Microwavesr. Ovenss. Skillets
3. Click on the Enter button.
Created by Interactions 18
To add contacts, click on the magnifying glass icon, enter the Last or First Name, click on the Find button and select the correct name from the list.
Event System User’s Manual Last Updated: 5/9/2023
Finding a Store
The find store feature allows you to find any store that has been created. You can search by one or All Divisions.
Viewing All Stores in a Selected Division
1. Click on the Find Store link under Scheduling.2. Select a Division from the Division dropdown.3. Select Active, Inactive or All status4. Click on the Find button to find stores for the selected division.
Viewing All Stores in All Divisions
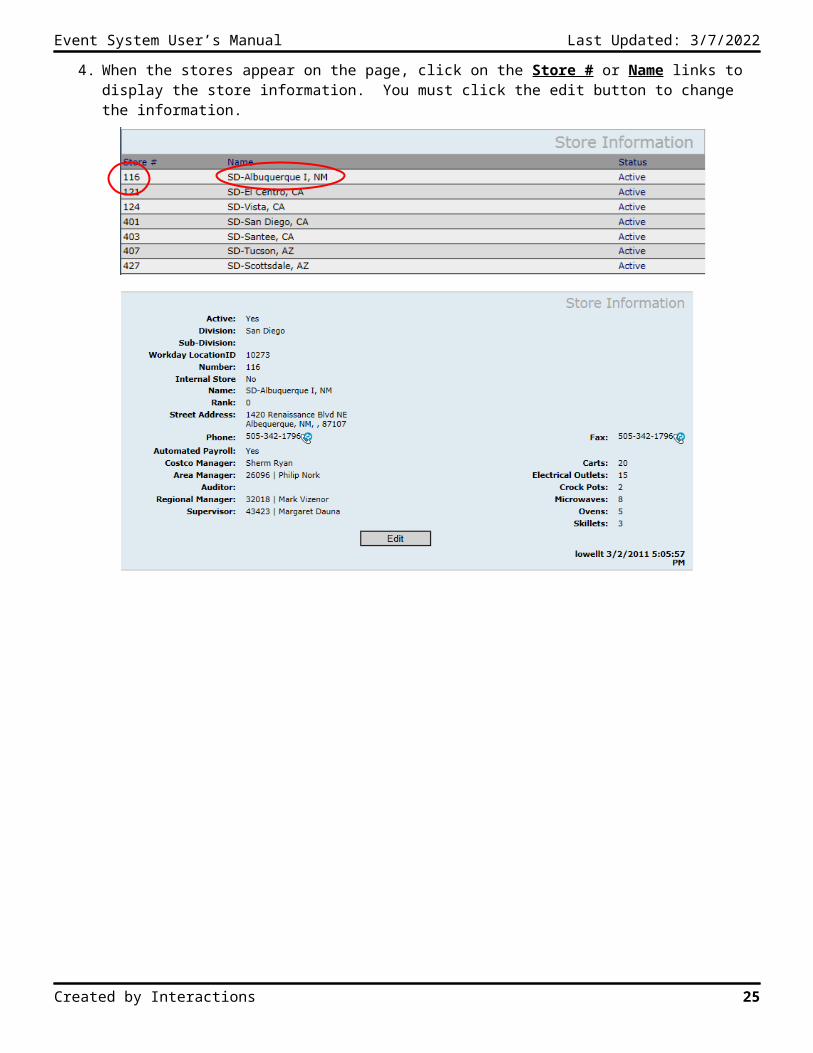
The view all stores in all divisions allows you to view a list of all active stores in the system.1. Click on the Find Store link under Scheduling.2. Select Active, Inactive or All status3. Click on the View All button.4. When the stores appear on the page, click on the Store # or Name links to display the store information. You
must click the edit button to change the information.
Created by Interactions 19
Event System User’s Manual Last Updated: 5/9/2023
Editing a Store
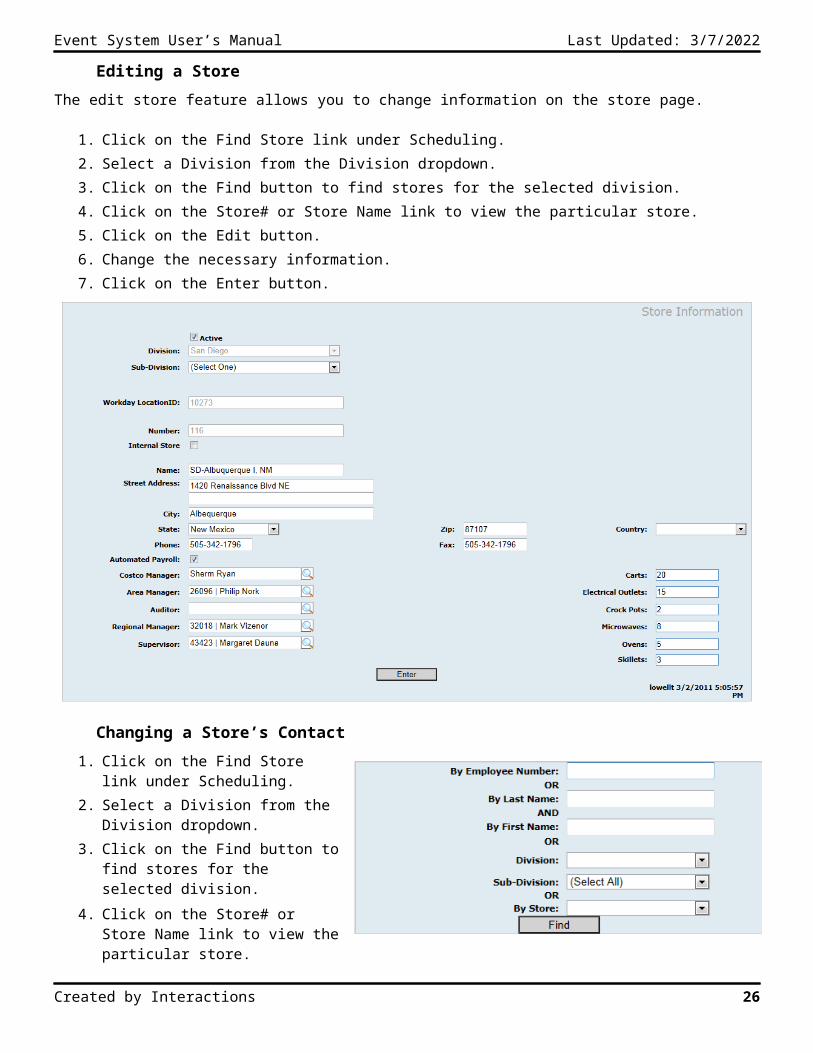
The edit store feature allows you to change information on the store page.
1. Click on the Find Store link under Scheduling.2. Select a Division from the Division dropdown.3. Click on the Find button to find stores for the selected division.4. Click on the Store# or Store Name link to view the particular store.5. Click on the Edit button.6. Change the necessary information.7. Click on the Enter button.
Changing a Store’s Contact
1. Click on the Find Store link under Scheduling.
2. Select a Division from the Division dropdown.
3. Click on the Find button to find stores for the selected division.
4. Click on the Store# or Store Name link to view the particular store.
5. Click on the Edit button.
6. In the contact field that needs to be changed, click on the magnifying glass icon, enter the Last or First Name, click on the Find button and select the correct name from the list.
Created by Interactions 20
Event System User’s Manual Last Updated: 5/9/2023
7. Click on the Enter button.
Created by Interactions 21

Event System User’s Manual Last Updated: 5/9/2023
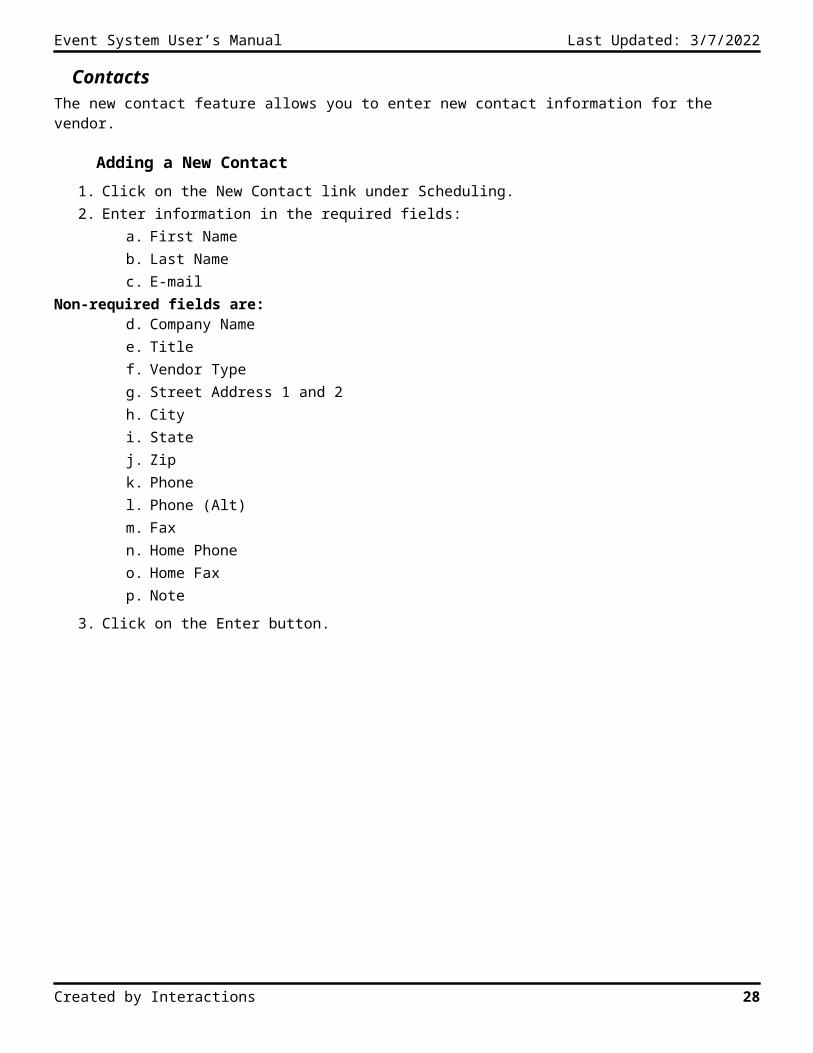
ContactsThe new contact feature allows you to enter new contact information for the vendor.
Adding a New Contact
1. Click on the New Contact link under Scheduling.2. Enter information in the required fields:
a. First Nameb. Last Namec. E-mail
Non-required fields are:d. Company Namee. Titlef. Vendor Typeg. Street Address 1 and 2h. Cityi. Statej. Zipk. Phonel. Phone (Alt)m. Faxn. Home Phoneo. Home Faxp. Note
3. Click on the Enter button.
Created by Interactions 22
Event System User’s Manual Last Updated: 5/9/2023
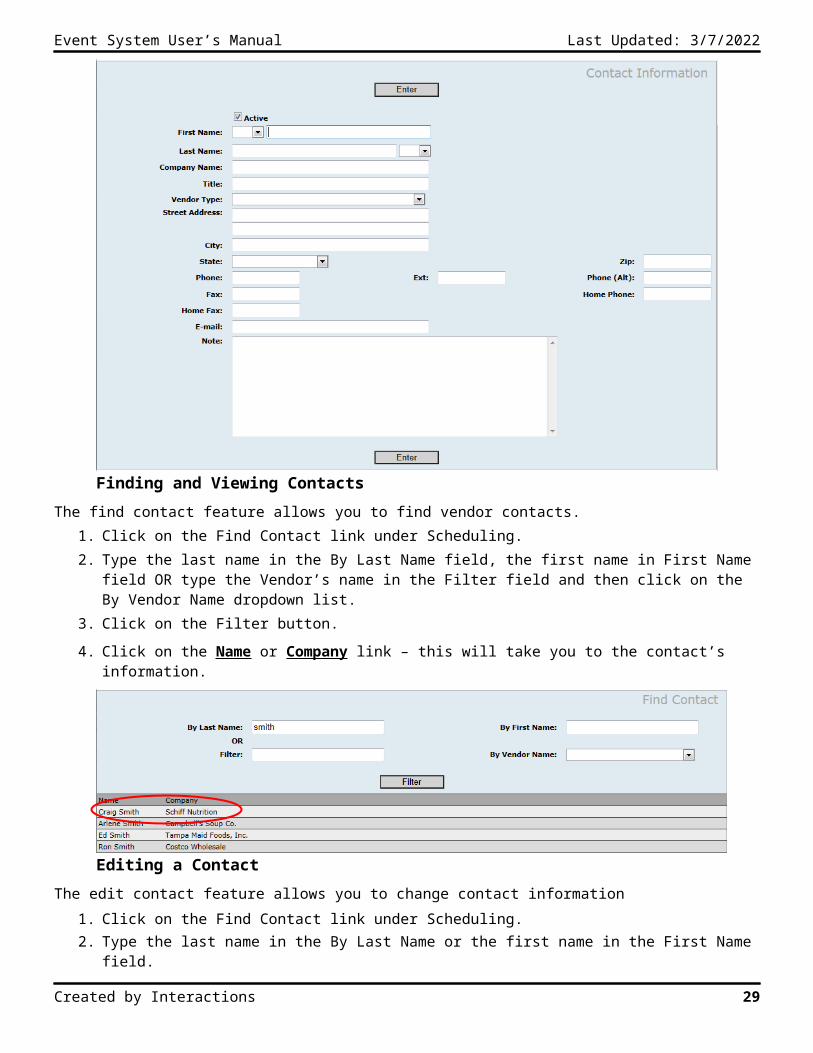
Finding and Viewing Contacts
The find contact feature allows you to find vendor contacts.1. Click on the Find Contact link under Scheduling.2. Type the last name in the By Last Name field, the first name in First Name field OR type the Vendor’s name in
the Filter field and then click on the By Vendor Name dropdown list.3. Click on the Filter button.
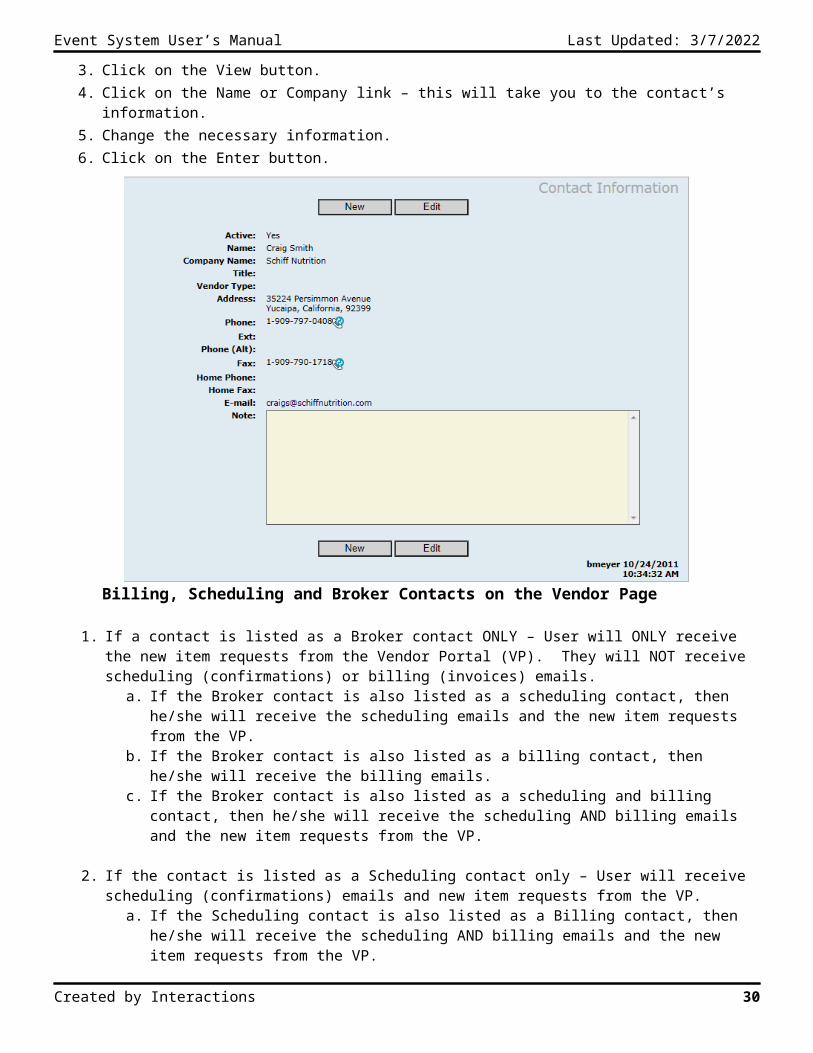
4. Click on the Name or Company link – this will take you to the contact’s information.
Editing a Contact
The edit contact feature allows you to change contact information1. Click on the Find Contact link under Scheduling.2. Type the last name in the By Last Name or the first name in the First Name field.3. Click on the View button.4. Click on the Name or Company link – this will take you to the contact’s information.5. Change the necessary information.6. Click on the Enter button.
Created by Interactions 23

Event System User’s Manual Last Updated: 5/9/2023
Billing, Scheduling and Broker Contacts on the Vendor Page
1. If a contact is listed as a Broker contact ONLY – User will ONLY receive the new item requests from the Vendor Portal (VP). They will NOT receive scheduling (confirmations) or billing (invoices) emails.
a. If the Broker contact is also listed as a scheduling contact, then he/she will receive the scheduling emails and the new item requests from the VP.
b. If the Broker contact is also listed as a billing contact, then he/she will receive the billing emails.c. If the Broker contact is also listed as a scheduling and billing contact, then he/she will receive the
scheduling AND billing emails and the new item requests from the VP.
2. If the contact is listed as a Scheduling contact only – User will receive scheduling (confirmations) emails and new item requests from the VP.
a. If the Scheduling contact is also listed as a Billing contact, then he/she will receive the scheduling AND billing emails and the new item requests from the VP.
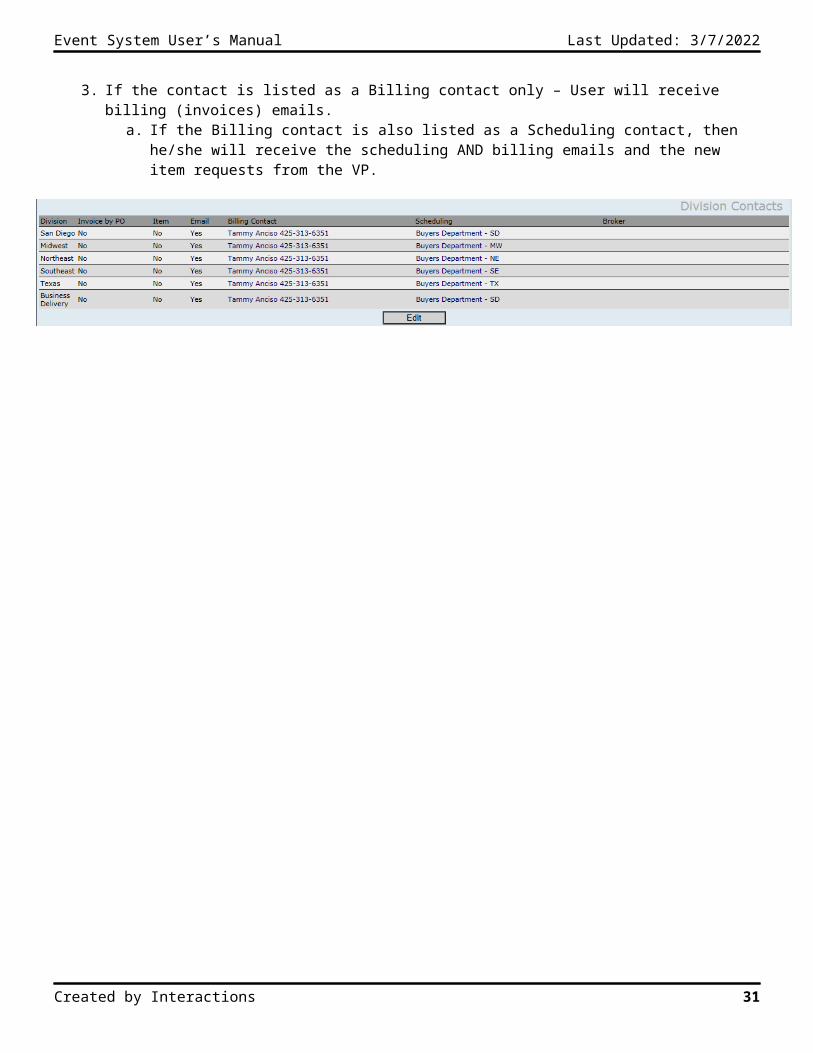
3. If the contact is listed as a Billing contact only – User will receive billing (invoices) emails.a. If the Billing contact is also listed as a Scheduling contact, then he/she will receive the scheduling AND
billing emails and the new item requests from the VP.
Created by Interactions 24
Event System User’s Manual Last Updated: 5/9/2023
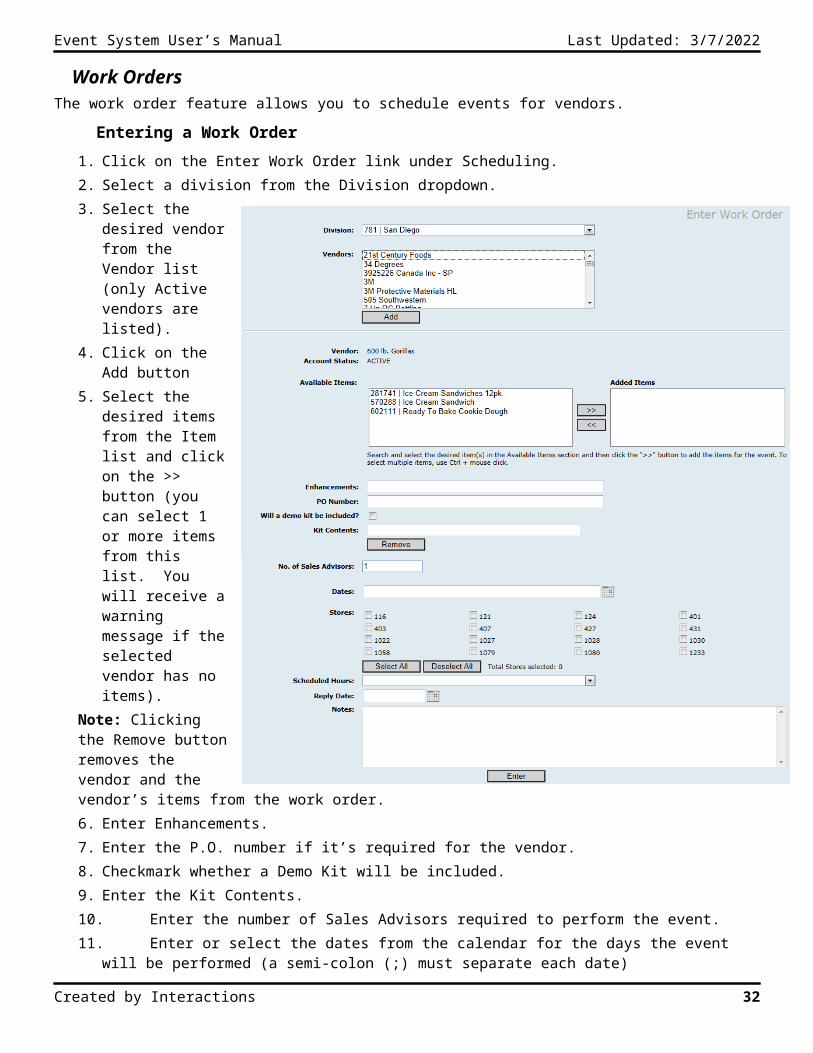
Work OrdersThe work order feature allows you to schedule events for vendors.
Entering a Work Order
1. Click on the Enter Work Order link under Scheduling.2. Select a division from the Division dropdown.3. Select the desired
vendor from the Vendor list (only Active vendors are listed).
4. Click on the Add button
5. Select the desired items from the Item list and click on the >> button (you can select 1 or more items from this list. You will receive a warning message if the selected vendor has no items).
Note: Clicking the Remove button removes the vendor and the vendor’s items from the work order.6. Enter Enhancements.7. Enter the P.O.
number if it’s required for the vendor.
8. Checkmark whether a Demo Kit will be included.
9. Enter the Kit Contents.
10. Enter the number of Sales Advisors required to perform the event.11. Enter or select the dates from the calendar for the days the event will be performed (a semi-colon (;) must
separate each date)12. Checkmark the stores where the events will be performed (you can select 1 or more stores. Only Active stores
are listed) or click on the Select All button to check mark all stores.13. Select the approximate hours, for the event, from the Scheduled Hours dropdown.14. Enter notes in the Notes field with event or billing specific information.15. Click on the Enter button.
Created by Interactions 25
Event System User’s Manual Last Updated: 5/9/2023
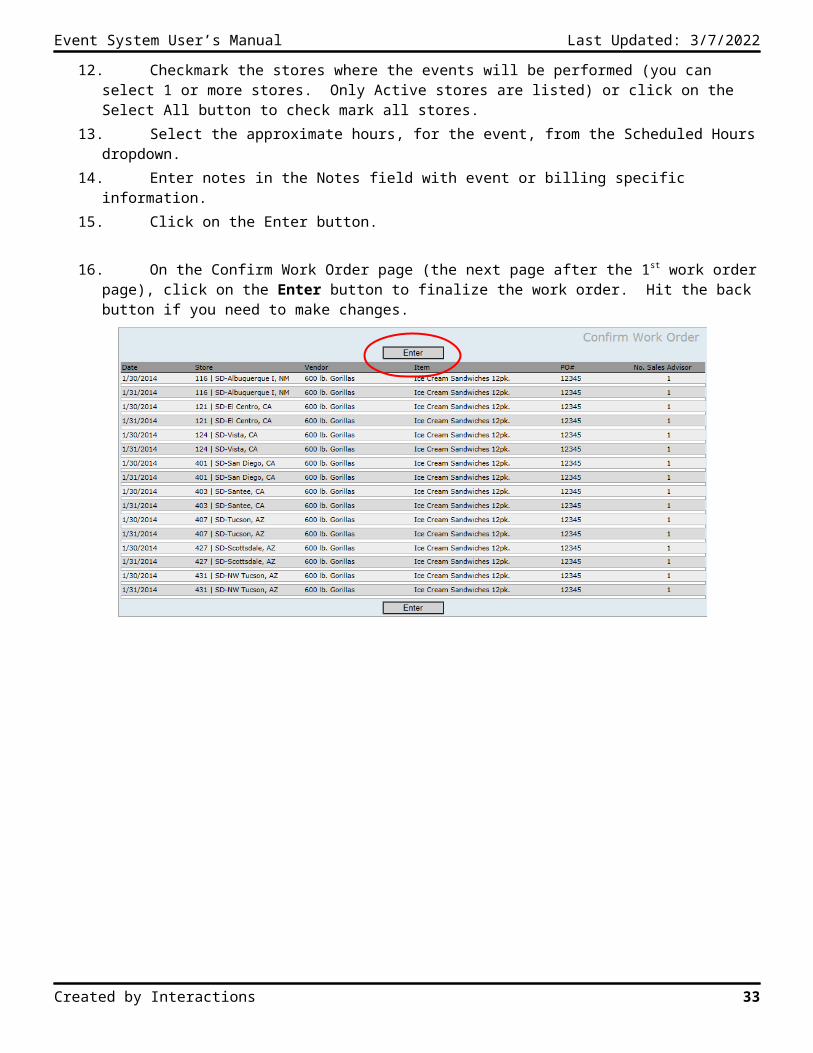
16. On the Confirm Work Order page (the next page after the 1st work order page), click on the Enter button to finalize the work order. Hit the back button if you need to make changes.
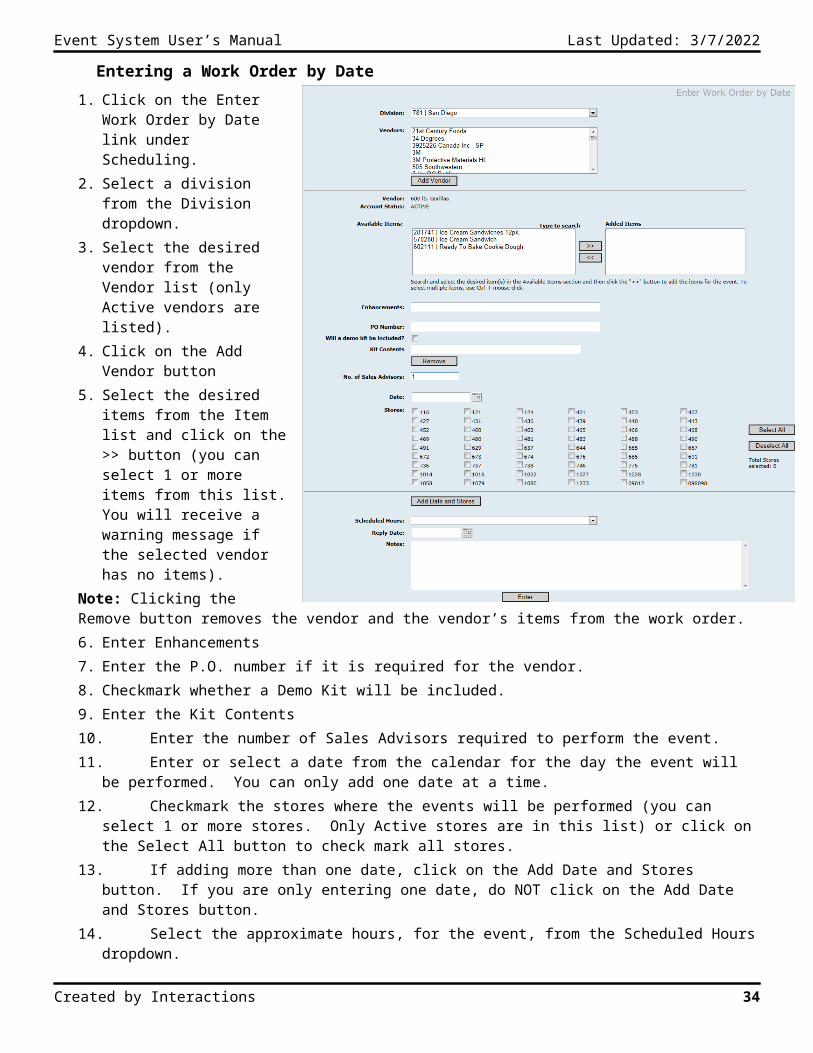
Entering a Work Order by Date
1. Click on the Enter Work Order by Date link under Scheduling.
2. Select a division from the Division dropdown.
3. Select the desired vendor from the Vendor list (only Active vendors are listed).
4. Click on the Add Vendor button5. Select the desired items from
the Item list and click on the >> button (you can select 1 or more items from this list. You will receive a warning message if the selected vendor has no items).
Note: Clicking the Remove button removes the vendor and the vendor’s items from the work order.6. Enter Enhancements7. Enter the P.O. number if it is
required for the vendor.8. Checkmark whether a Demo Kit
will be included.9. Enter the Kit Contents
Created by Interactions 26
Event System User’s Manual Last Updated: 5/9/2023
10. Enter the number of Sales Advisors required to perform the event.11. Enter or select a date from the calendar for the day the event will be performed. You can only add one date at
a time.12. Checkmark the stores where the events will be performed (you can select 1 or more stores. Only Active stores
are in this list) or click on the Select All button to check mark all stores.13. If adding more than one date, click on the Add Date and Stores button. If you are only entering one date, do
NOT click on the Add Date and Stores button.14. Select the approximate hours, for the event, from the Scheduled Hours dropdown.15. Enter notes in the Notes field if necessary.16. Click on the Enter button.
Work Order Warning Messages and Maximum Number of Items Scheduled
All errors or warnings will be displayed underneath the conflicting event on the Work Orders Scheduled page. The following errors will appear when the system finds a conflict:
A warning message appears if the system finds a event already scheduled in the system with the same item, store and date. You can still schedule this “possible duplicate” event.
A warning message appears if the Vendor being scheduled is over their credit limit. The system checks existing scheduled events and billed/unpaid events for the vendor. When the cost is below the credit limit, no warning message is displayed. The following warning messages are displayed when the cost exceeds the credit limit:
The cost is equal to or exceeds 100% of the credit limit - Vendor has exceeded their Credit Limit. The cost exceeds 125% of the credit limit - Vendor has exceeded 125% of their credit limit. The cost exceeds 150% of the credit limit - Vendor has exceeded 150% of their credit limit.
The system checks each store to make sure it has the capacity (outlets and equipment) on the dates for the events. An error message appears if the necessary equipment is being used by another event, on the same day and store. This checks all five pieces of equipment defined for the Store (Electrical Outlets, Skillets, Microwaves, Ovens and Dazey Pots).
If you have Read/Write permissions to the Scheduling Module, and you’ve added more than 5 items, you are provided with an error message stating, “The maximum number of Items has been exceeded. Please change your current Work Order to include 5 Items or less.” You are not allowed to continue until the Work Order has 5 items or less. If you have Admin permission to the Scheduling Module, you may schedule as many items as you want.
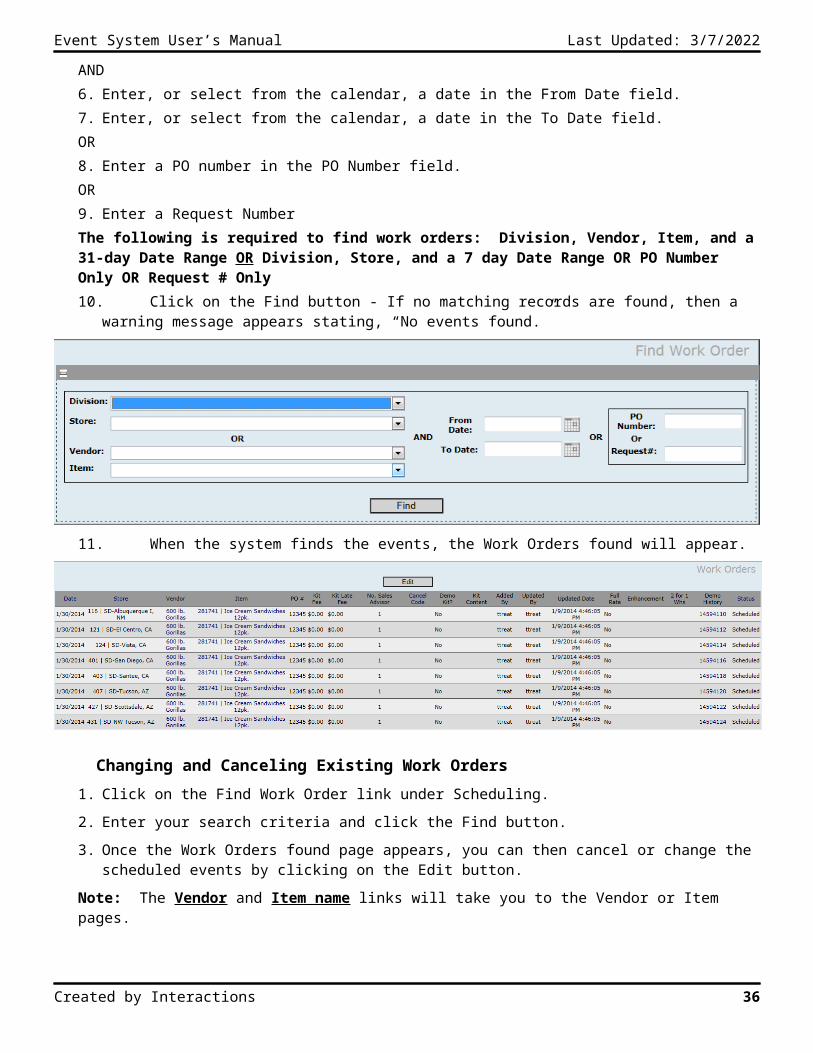
Finding Work Orders
The find work order feature allows you to find existing work orders based upon the criteria selected. You have the option to change or cancel any work order found unless it has been billed or invoiced.
1. Click on the Find Work Order link under Scheduling.2. Select a division from the Division dropdown.3. Select a vendor from the Vendor dropdown.4. Select an item from the Item dropdown.OR5. Select a store from the Store dropdown.AND6. Enter, or select from the calendar, a date in the From Date field.7. Enter, or select from the calendar, a date in the To Date field.OR8. Enter a PO number in the PO Number field.
Created by Interactions 27
Event System User’s Manual Last Updated: 5/9/2023
OR9. Enter a Request NumberThe following is required to find work orders: Division, Vendor, Item, and a 31-day Date Range OR Division, Store, and a 7 day Date Range OR PO Number Only OR Request # Only10. Click on the Find button - If no matching records are found, then a warning message appears stating, “No
events found.”
11. When the system finds the events, the Work Orders found will appear.
Changing and Canceling Existing Work Orders
1. Click on the Find Work Order link under Scheduling.
2. Enter your search criteria and click the Find button.
3. Once the Work Orders found page appears, you can then cancel or change the scheduled events by clicking on the Edit button.
Note: The Vendor and Item name links will take you to the Vendor or Item pages.
4. Canceling an Event:
Created by Interactions 28
Event System User’s Manual Last Updated: 5/9/2023
a. When the Edit Work Orders page appears, select the cancel code for the individual event or checkmark the Cancel All checkbox to select a cancel code for ALL the listed events.
b. Click on the Enter button.5. Changing an Event:
a. You can change the date, notes, PO Number, or kit fees for an individual event or for ALL the events. To change information for ALL events, select the desired checkbox for the information you want to change and then select the desired change from the list
b. Click on the Enter button.
Additional Notes
The Cancel and Change check boxes cannot be selected at the same time. Change All Dates Checkbox - Checking this box allows you to change the date for all events listed on this page.
This date change is restricted to only allow the changing of a single date. Whenever an event is created, changed or cancelled, the Event Confirmation, Change or Cancellation report is
emailed to each Vendor if the event date is greater than the current date. Any events scheduled in the past do not generate these emails.
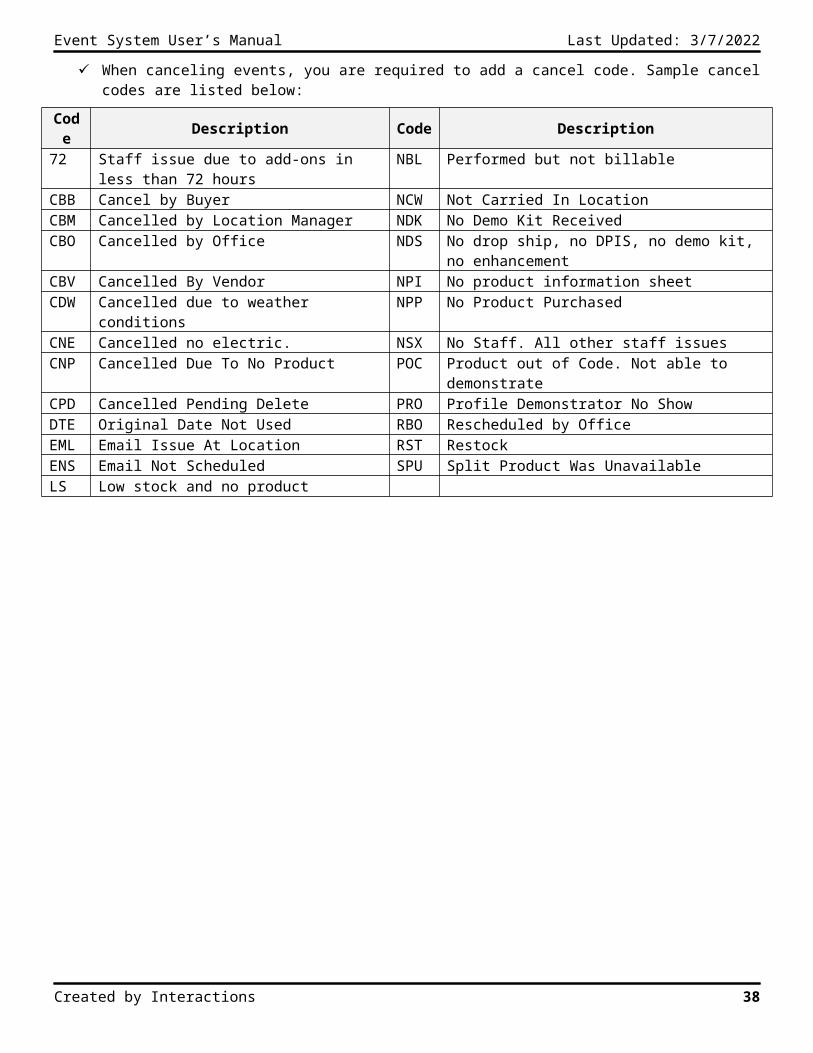
When canceling events, you are required to add a cancel code. Sample cancel codes are listed below:
Code Description Code Description72 Staff issue due to add-ons in less than 72 hours NBL Performed but not billableCBB Cancel by Buyer NCW Not Carried In LocationCBM Cancelled by Location Manager NDK No Demo Kit ReceivedCBO Cancelled by Office NDS No drop ship, no DPIS, no demo kit, no enhancementCBV Cancelled By Vendor NPI No product information sheetCDW Cancelled due to weather conditions NPP No Product PurchasedCNE Cancelled no electric. NSX No Staff. All other staff issuesCNP Cancelled Due To No Product POC Product out of Code. Not able to demonstrateCPD Cancelled Pending Delete PRO Profile Demonstrator No ShowDTE Original Date Not Used RBO Rescheduled by OfficeEML Email Issue At Location RST RestockENS Email Not Scheduled SPU Split Product Was UnavailableLS Low stock and no product
Created by Interactions 29
Event System User’s Manual Last Updated: 5/9/2023
Campaigns (CDS US Only)The Campaign feature allows you to create, find, edit and cancel campaign events. A campaign is a set of events, scheduled by Line of Business (LOB), within a specified date range or set of dates. This allows users to schedule products and services.
Creating a Campaign
1. Click on the Create Campaign link under Scheduling.
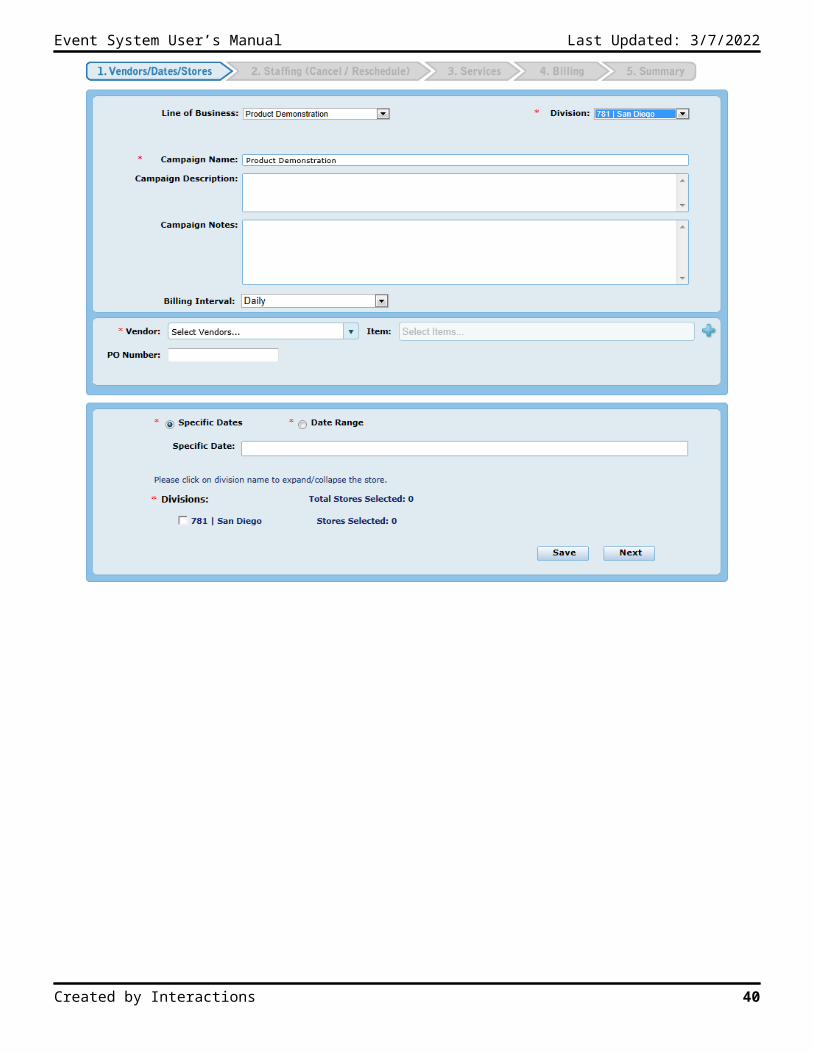
Step 1 – Vendor\Dates\Stores
2. Select the Line of Business.3. Select Division4. Add a Campaign Name. 5. Add Campaign Description (general description of the campaign. Can be the same as Campaign Name).6. Add Campaign Notes (these notes will appear on the field reports and billing pages)7. Select a vendor from the Vendor dropdown, Item(s) from the Item list, enter a PO Number if required (only
Active vendors are listed).8. Click on the Add button9. Add Dates or Date Range10. Select stores11. Click on the Next button (at any time you may click on the Save button to save your work).
Created by Interactions 30
Event System User’s Manual Last Updated: 5/9/2023
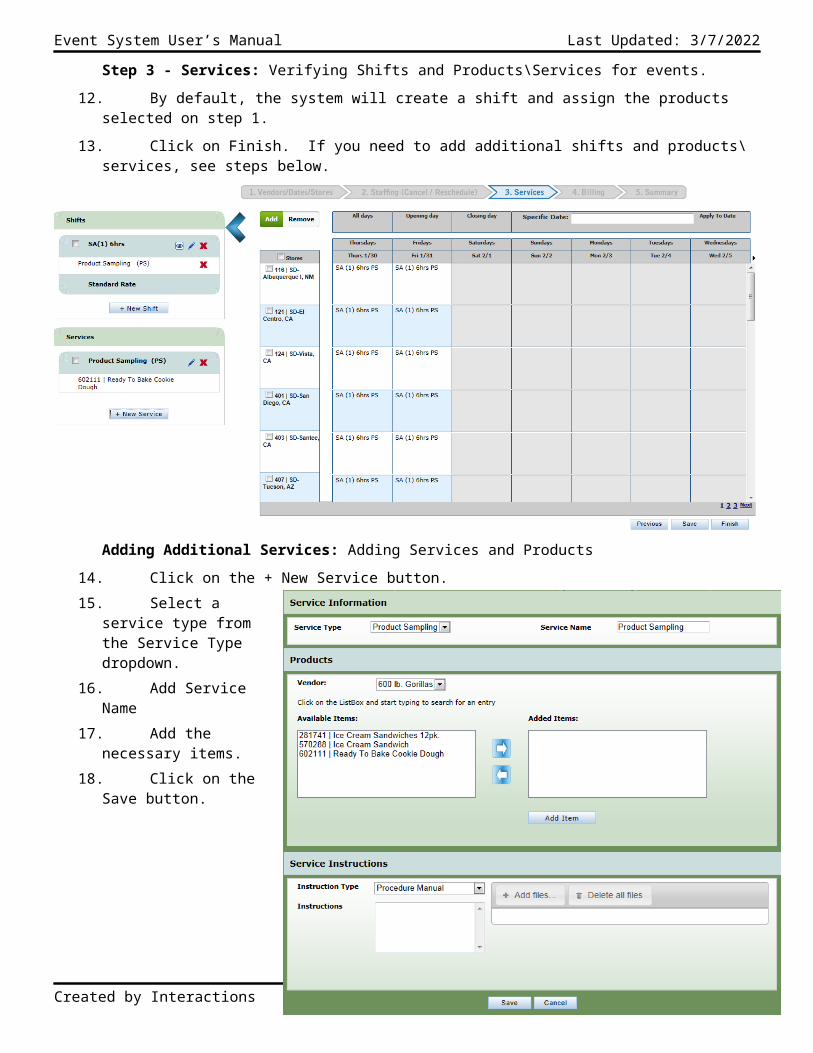
Step 3 - Services: Verifying Shifts and Products\Services for events.
12. By default, the system will create a shift and assign the products selected on step 1.
13. Click on Finish. If you need to add additional shifts and products\services, see steps below.
Adding Additional Services: Adding Services and Products
14. Click on the + New Service button.15. Select a service type from
the Service Type dropdown.16. Add Service Name
17. Add the necessary items.18. Click on the Save button.
Created by Interactions 31
Event System User’s Manual Last Updated: 5/9/2023
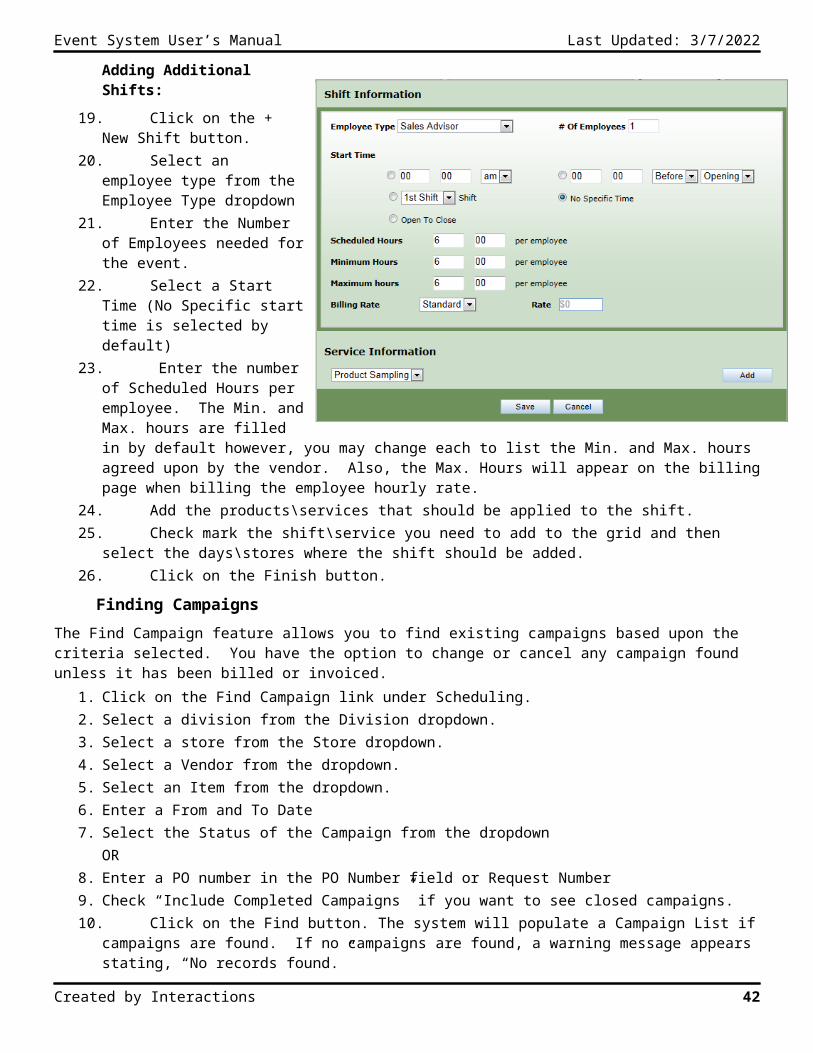
Adding Additional Shifts:
19. Click on the + New Shift button.20. Select an employee type from the
Employee Type dropdown21. Enter the Number of Employees
needed for the event.22. Select a Start Time (No Specific
start time is selected by default)23. Enter the number of Scheduled
Hours per employee. The Min. and Max. hours are filled in by default however, you may change each to list the Min. and Max. hours agreed upon by the vendor. Also, the Max. Hours will appear on the billing page when billing the employee hourly rate.
24. Add the products\services that should be applied to the shift.
25. Check mark the shift\service you need to add to the grid and then select the days\stores where the shift should be added.
26. Click on the Finish button.
Finding Campaigns
The Find Campaign feature allows you to find existing campaigns based upon the criteria selected. You have the option to change or cancel any campaign found unless it has been billed or invoiced.
1. Click on the Find Campaign link under Scheduling.2. Select a division from the Division dropdown.3. Select a store from the Store dropdown.4. Select a Vendor from the dropdown.5. Select an Item from the dropdown.6. Enter a From and To Date7. Select the Status of the Campaign from the dropdown
OR8. Enter a PO number in the PO Number field or Request Number9. Check “Include Completed Campaigns” if you want to see closed campaigns.10. Click on the Find button. The system will populate a Campaign List if campaigns are found. If no campaigns are
found, a warning message appears stating, “No records found.”
Created by Interactions 32
Event System User’s Manual Last Updated: 5/9/2023
Campaign List
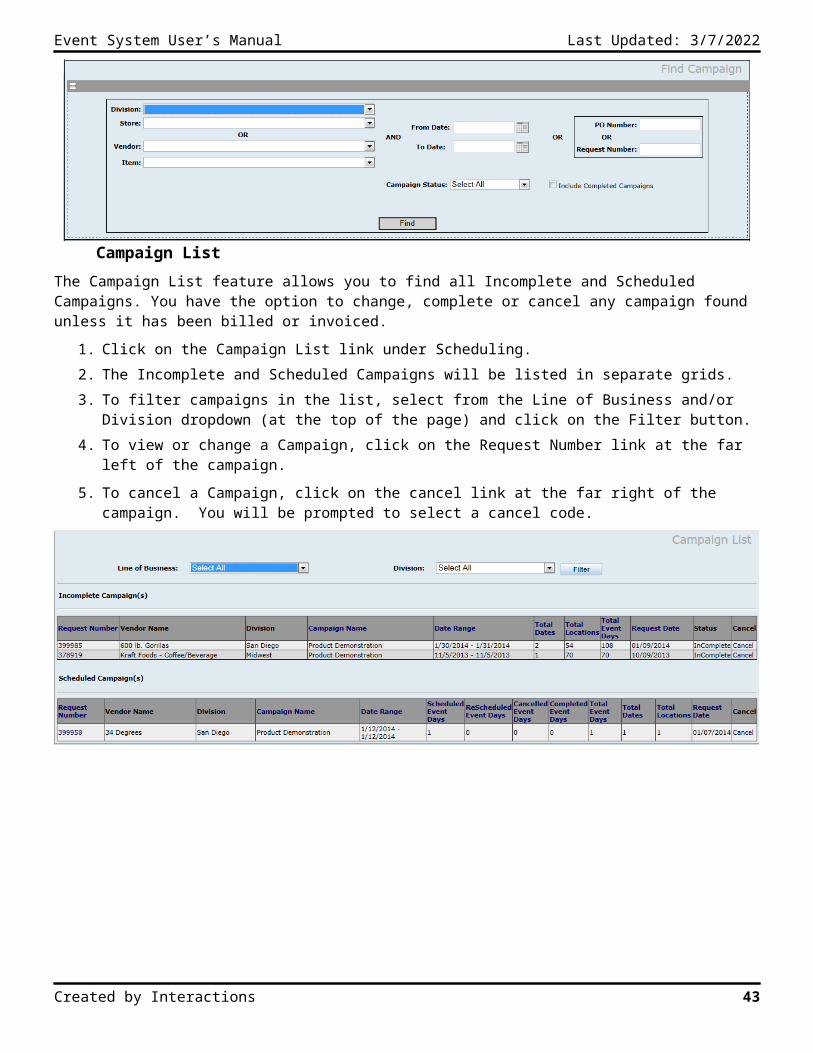
The Campaign List feature allows you to find all Incomplete and Scheduled Campaigns. You have the option to change, complete or cancel any campaign found unless it has been billed or invoiced.
1. Click on the Campaign List link under Scheduling.2. The Incomplete and Scheduled Campaigns will be listed in separate grids.
3. To filter campaigns in the list, select from the Line of Business and/or Division dropdown (at the top of the page) and click on the Filter button.
4. To view or change a Campaign, click on the Request Number link at the far left of the campaign.
5. To cancel a Campaign, click on the cancel link at the far right of the campaign. You will be prompted to select a cancel code.
Created by Interactions 33
Event System User’s Manual Last Updated: 5/9/2023
Approving Vendor Information Added by VendorsApproving a Vendor’s Profile after they have completed the New Vendor Registration
After a vendor has submitted their information through the New Vendor Registration process, an email is sent to the Accounts Receivable (AR) department. This email notifies the AR staff that a new vendor’s information is available for review. The following describes the process AR will take in approving, denying or requesting more information about the vendor account.
1. Log into Event Link2. Click on the Pending Profiles link in the Scheduling module.3. Locate the vendor with the “New Vendor” status (click on the Vendor Name to view the specific vendor
information).4. Check the checkbox to the left of the vendor’s name.5. Click on Approve, Denied or Request More Info depending on the status decided for the vendor.
a. Approve Button: By clicking on the “Approve” button the system will send an email to the vendor with his/her username (email address) and password. This will allow the vendor to log into the vendor portal to start printing the new vendor paperwork and upload the signed/scanned copy.
b. Denied Button: By clicking on the “Denied” button, the system will send the vendor an email notifying the vendor their account has been denied with the denial reason. If denied, the vendor’s account will not be setup and a username and password will not be created. An “Approver Note” is required.
c. Request More Info Button: by clicking on the “Request More Info” button the system will send an email to the vendor specifying the information needed. It gives the vendor the opportunity to add or change the necessary information in order to be approved. An “Approver Note” is required.
Created by Interactions 34
Event System User’s Manual Last Updated: 5/9/2023
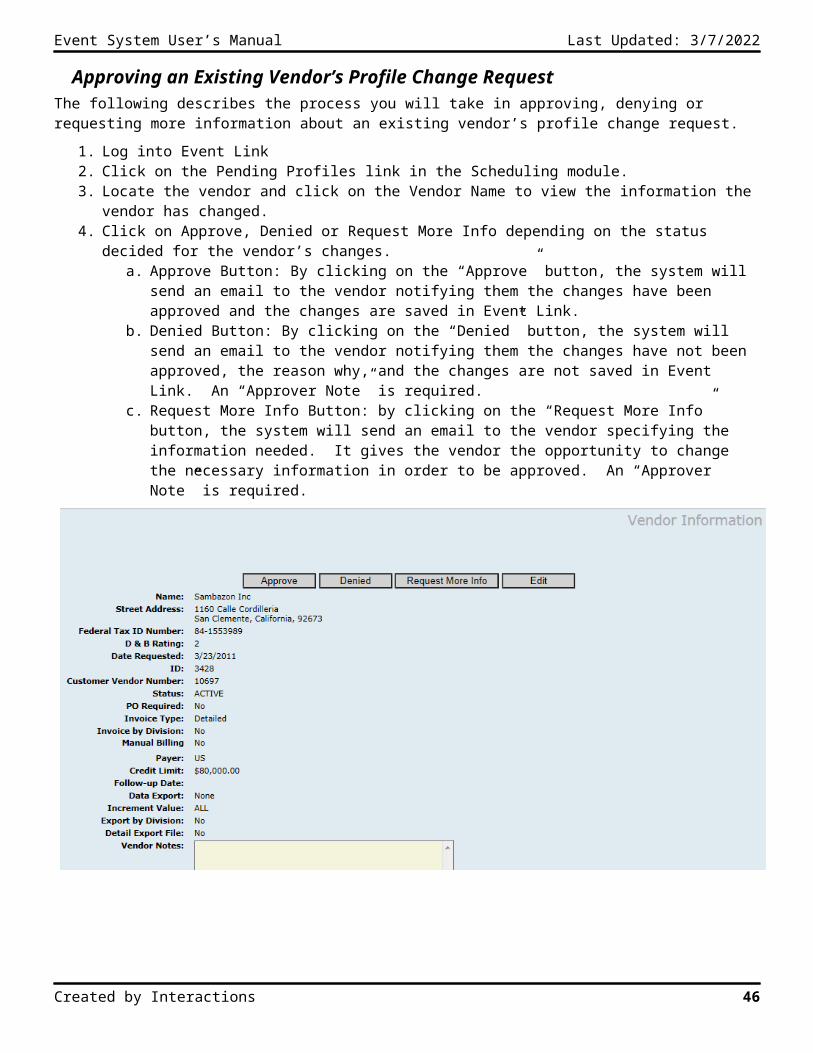
Approving an Existing Vendor’s Profile Change RequestThe following describes the process you will take in approving, denying or requesting more information about an existing vendor’s profile change request.
1. Log into Event Link2. Click on the Pending Profiles link in the Scheduling module.3. Locate the vendor and click on the Vendor Name to view the information the vendor has changed.4. Click on Approve, Denied or Request More Info depending on the status decided for the vendor’s changes.
a. Approve Button: By clicking on the “Approve” button, the system will send an email to the vendor notifying them the changes have been approved and the changes are saved in Event Link.
b. Denied Button: By clicking on the “Denied” button, the system will send an email to the vendor notifying them the changes have not been approved, the reason why, and the changes are not saved in Event Link. An “Approver Note” is required.
c. Request More Info Button: by clicking on the “Request More Info” button, the system will send an email to the vendor specifying the information needed. It gives the vendor the opportunity to change the necessary information in order to be approved. An “Approver Note” is required.
Created by Interactions 35
Event System User’s Manual Last Updated: 5/9/2023
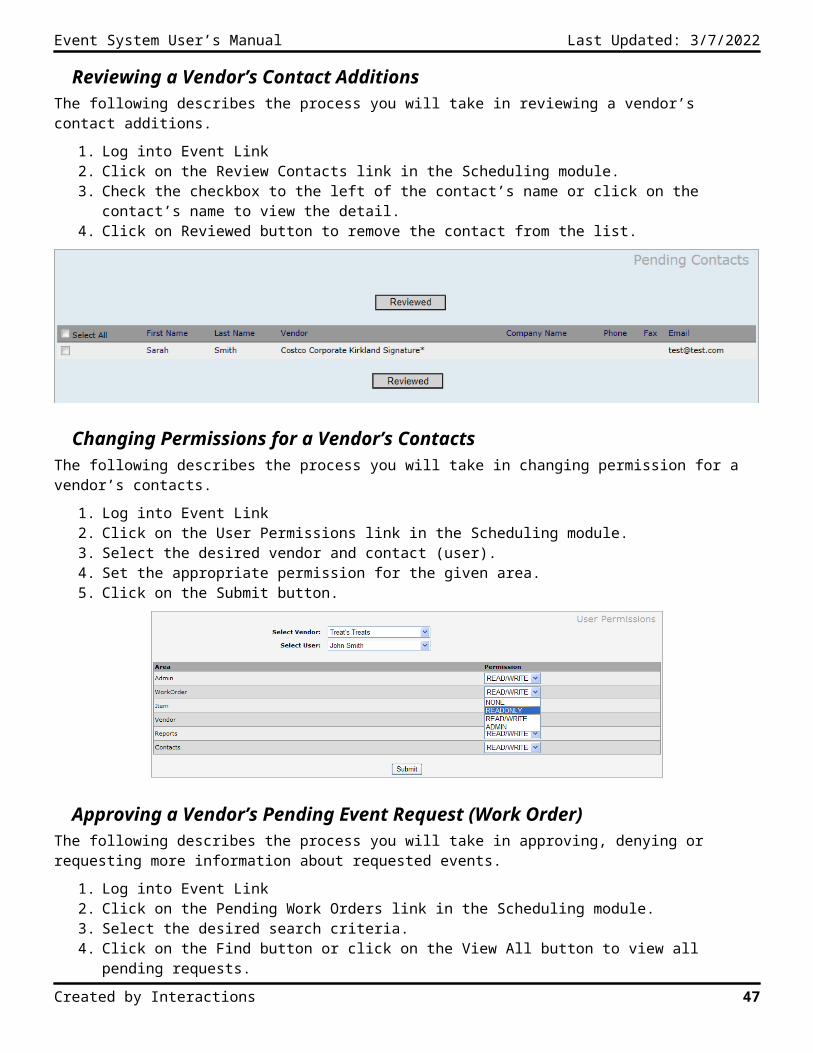
Reviewing a Vendor’s Contact AdditionsThe following describes the process you will take in reviewing a vendor’s contact additions.
1. Log into Event Link2. Click on the Review Contacts link in the Scheduling module.3. Check the checkbox to the left of the contact’s name or click on the contact’s name to view the detail.4. Click on Reviewed button to remove the contact from the list.
Changing Permissions for a Vendor’s ContactsThe following describes the process you will take in changing permission for a vendor’s contacts.
1. Log into Event Link2. Click on the User Permissions link in the Scheduling module.3. Select the desired vendor and contact (user).4. Set the appropriate permission for the given area.5. Click on the Submit button.
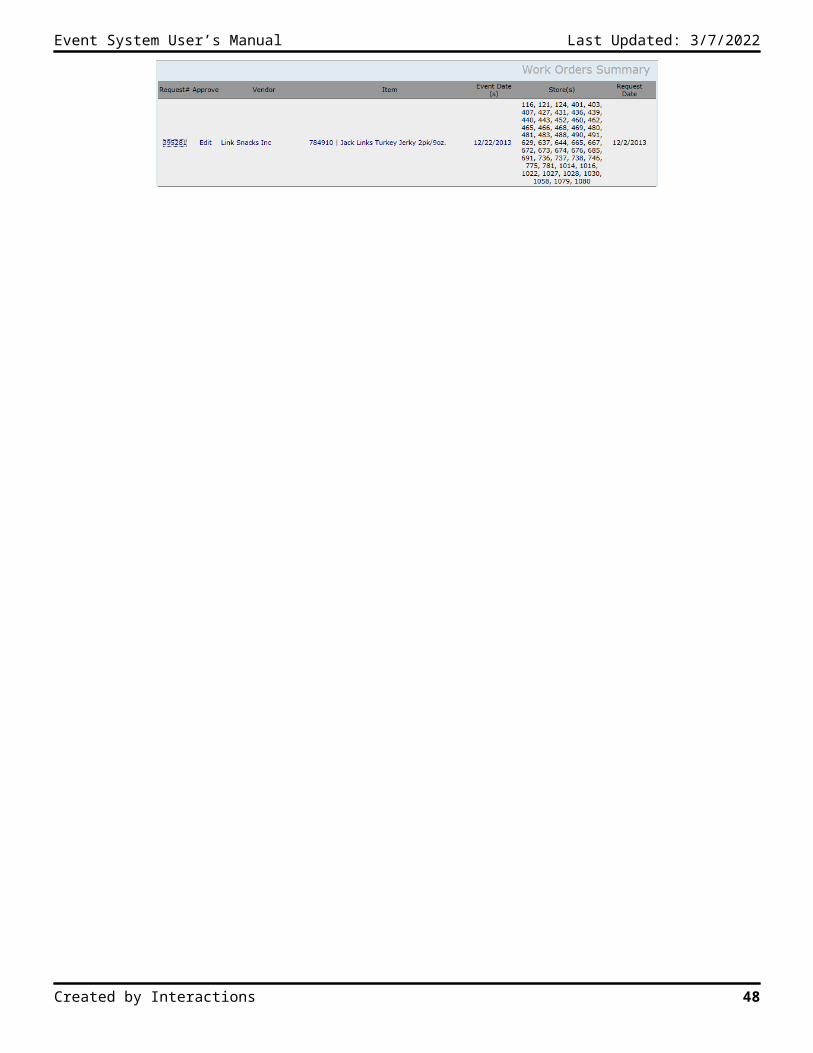
Approving a Vendor’s Pending Event Request (Work Order)The following describes the process you will take in approving, denying or requesting more information about requested events.
1. Log into Event Link2. Click on the Pending Work Orders link in the Scheduling module.3. Select the desired search criteria.4. Click on the Find button or click on the View All button to view all pending requests.
Created by Interactions 36

Event System User’s Manual Last Updated: 5/9/2023
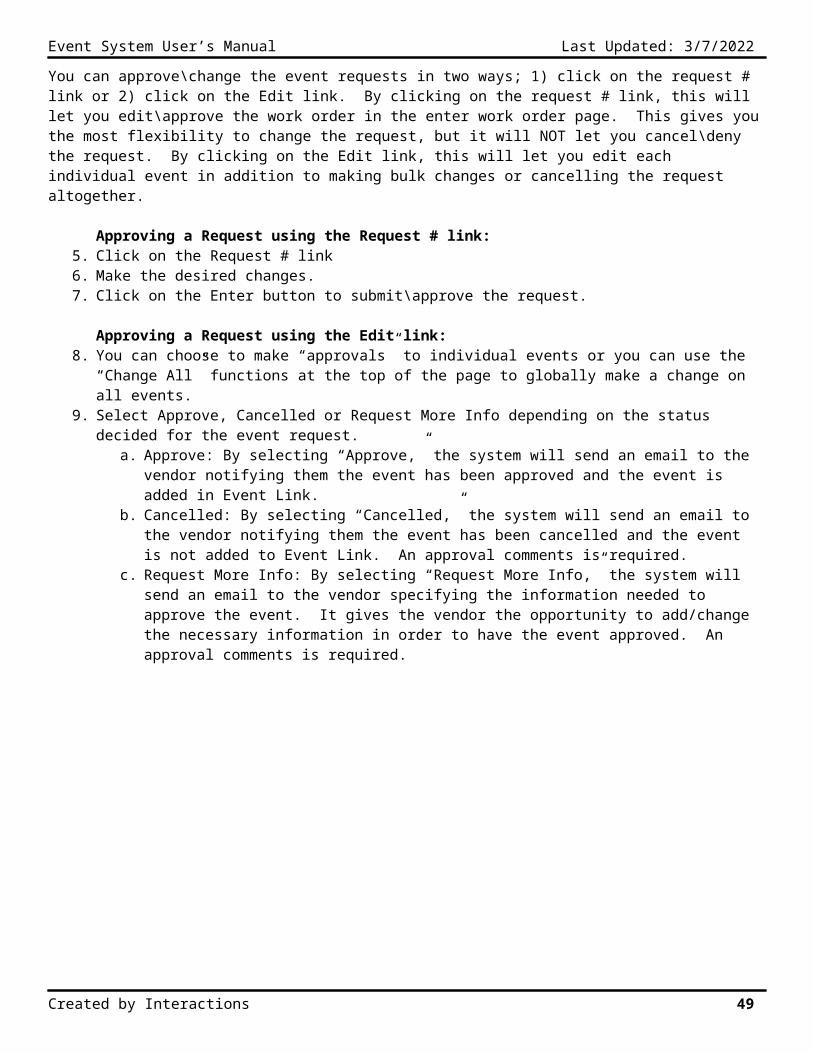
You can approve\change the event requests in two ways; 1) click on the request # link or 2) click on the Edit link. By clicking on the request # link, this will let you edit\approve the work order in the enter work order page. This gives you the most flexibility to change the request, but it will NOT let you cancel\deny the request. By clicking on the Edit link, this will let you edit each individual event in addition to making bulk changes or cancelling the request altogether.
Approving a Request using the Request # link:5. Click on the Request # link6. Make the desired changes.7. Click on the Enter button to submit\approve the request.
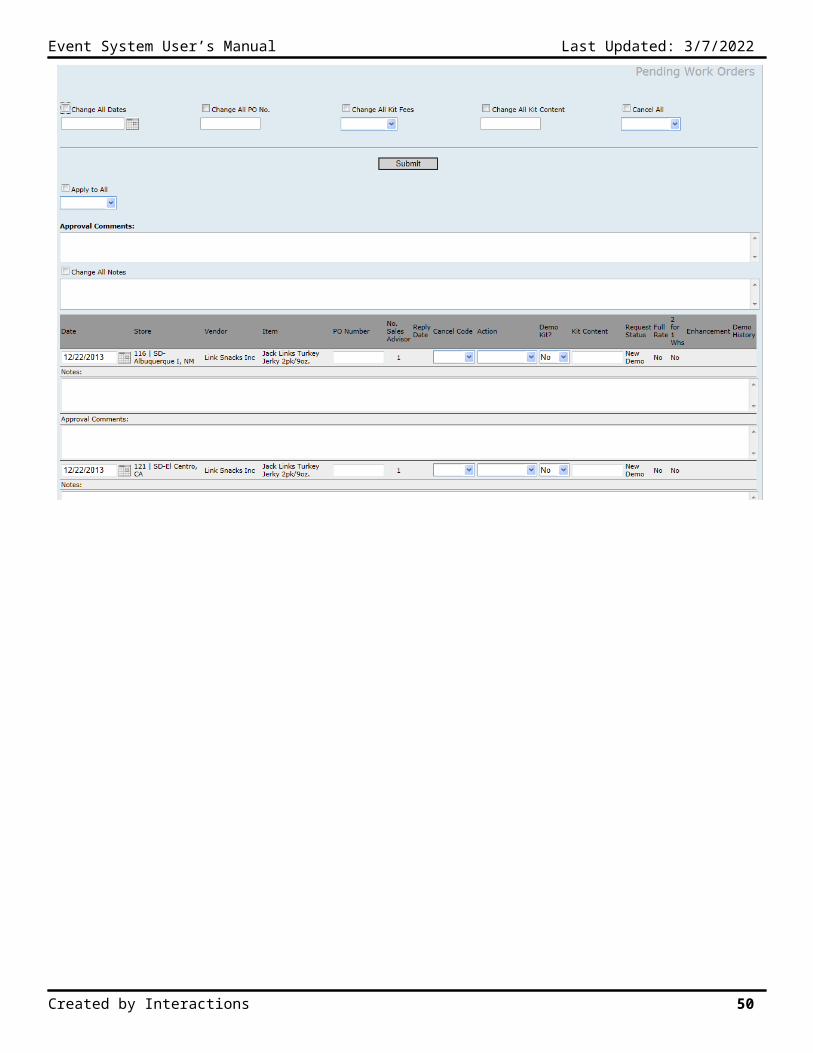
Approving a Request using the Edit link:8. You can choose to make “approvals” to individual events or you can use the “Change All” functions at the top of
the page to globally make a change on all events.9. Select Approve, Cancelled or Request More Info depending on the status decided for the event request.
a. Approve: By selecting “Approve,” the system will send an email to the vendor notifying them the event has been approved and the event is added in Event Link.
b. Cancelled: By selecting “Cancelled,” the system will send an email to the vendor notifying them the event has been cancelled and the event is not added to Event Link. An approval comments is required.
c. Request More Info: By selecting “Request More Info,” the system will send an email to the vendor specifying the information needed to approve the event. It gives the vendor the opportunity to add/change the necessary information in order to have the event approved. An approval comments is required.
Created by Interactions 37
Event System User’s Manual Last Updated: 5/9/2023
Linking Vendors for Split EventsThe following describes the process you will take in linking vendors who have previously agreed to perform split events together. You must first link the vendors and then link the vendor’s items.
1. Log into Event Link2. Click on the Link Vendors link in the Scheduling module.3. Select a Division and Vendor.4. Select a “Vendor to Link” and click on the Add button. To Add All or Remove All vendors, click on the Add All or
Remove All buttons. To remove one vendor, select the vendor on the right hand side and then click on the Remove button.
5. Click on the Enter button to save the changes.
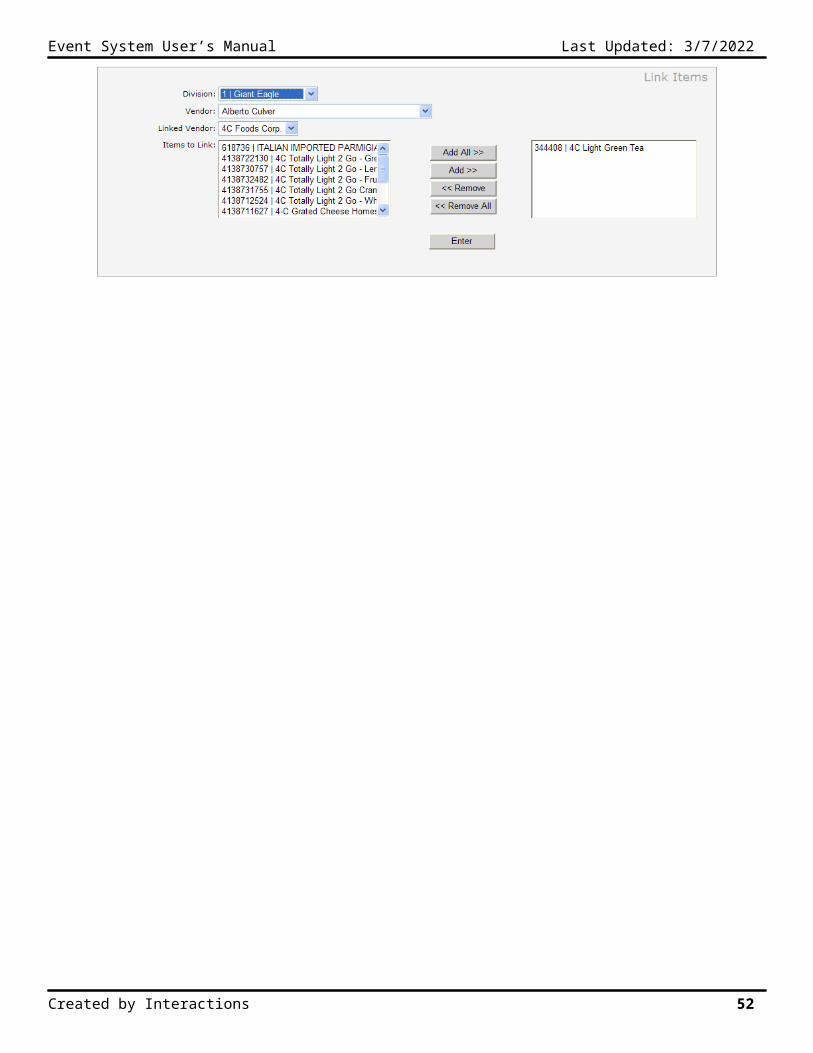
Linking Vendor’s Items for Split EventsThe following describes the process you will take in linking vendor’s items. You must first link the vendors and then link the vendor’s items.
1. Log into Event Link2. Click on the Link Items link in the Scheduling module.3. Select a Division, Vendor and Linked Vendor.4. Select an item in the “Items to Link” and click on the Add button. To Add All or Remove All items, click on the
Add All or Remove All buttons. To remove one item, select the item on the right hand side and then click on the Remove button.
5. Click on the Enter button to save the changes.
Once both vendors AND items have been linked, both vendors will be able to scheduled split events within the vendor portal. It will be important for the vendors to be in good communication about their split events so they don’t schedule duplicate events with each other.
Created by Interactions 38
Event System User’s Manual Last Updated: 5/9/2023
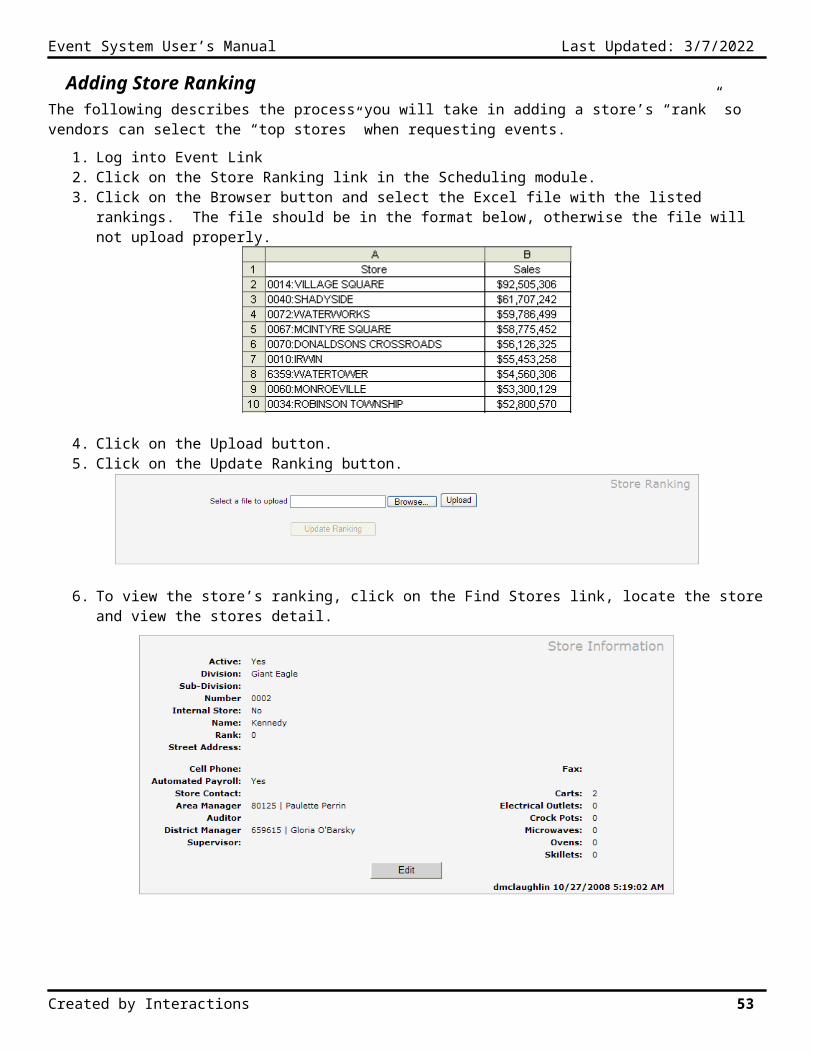
Adding Store RankingThe following describes the process you will take in adding a store’s “rank” so vendors can select the “top stores” when requesting events.
1. Log into Event Link2. Click on the Store Ranking link in the Scheduling module.3. Click on the Browser button and select the Excel file with the listed rankings. The file should be in the format
below, otherwise the file will not upload properly.
4. Click on the Upload button.5. Click on the Update Ranking button.
6. To view the store’s ranking, click on the Find Stores link, locate the store and view the stores detail.
Created by Interactions 39
Event System User’s Manual Last Updated: 5/9/2023
Staffing Module & Sales Advisor SchedulingEmployees
The new employee feature is under the staffing module for companies who use mobile devices and under the billing module for those who don’t. This page allows you to enter a new employee record. This information is used in the Billing, Auditing and AP modules.
Adding a New Employee
1. Click on the New Employee link under Staffing or Billing.2. Enter information in the required fields:3. Click on the Enter button.
Finding and Viewing Employee Information
The find employee feature allows you to find employees.
1. Click on the Find Employee link under Staffing or Billing.
2. Type the employee number in the Employee Number field OR last name in the By Last Name or the first name in the First Name field or select a store from the By Stores dropdown.
3. Click on the Filter button.4. When the Employees(s) appear, click on the
employee’s Name or Number link to view the employee’s information.
Created by Interactions 40
Event System User’s Manual Last Updated: 5/9/2023
How to Schedule a Sales Advisor for an Event1. Click on the Find Employee link under Staffing or Billing.
2. The manager must update the employee's information with locations, availability and specific days the employee can work. Once this has been completed, an account will be created for the sales advisor so he/she may log in to update their availability.
Employee Page - View Employee
Adding Employee Locationsa. The Add Locations link allows managers to add additional locations where they SA is able to work. Once
you have added the desired locations, you must click on the Close and Save button and then click on the Enter button to save all changes.
Adding Employee Availability
Created by Interactions 41
Location – primary location where
employee works
Link to choose employee’s
availability for two month period.
Available Days: the general days an
employee can work.
Event System User’s Manual Last Updated: 5/9/2023
b. The View Calendar link allows managers to select dates the SA is able to work in a calendar month format. This will drive the information that appears on the Sales Advisor Calendar Report and the Schedule Employees Report. The dropdown list, under the desired date, allows you to select the employee’s availability for the selected date. If you select the option of “No” you can add a short comment, to note to why the employee cannot work, so they are not accidentally scheduled for the given date. Check mark the “Available for Entire Month” checkbox to flag the entire month as “yes” available.
Manually Assigning Employees to Events
3. To assign employees to specific events, Event Link user must do the following (for more detail, see the Staffing Division Schedule Report information in the Reports section).
a. Go to Reports and select 2. Schedule Employees Reportb. Select the specific day's schedule for the given location.c. Employees are listed by rank and priority, top ranking/prioritized employees at the top. Click on the
"Assign" link to add the employee to one of the events.d. Select "Confirmed" or "Pending" on the event where the employee should work. Confirmed is a
permanent placement and will email the employee with a confirmation email. Pending is a "placeholder" until the employee confirms he/she can work. An email is sent to the employee where they can automatically "Accept" or "Deny" the work.
e. To add Temp Notes or change and employee's data, user can click on the Temp Note link.f. Once assigned, the employee will appear in the upper grid.
Scheduling Events to Automatically Assign Sales Advisors to Work (disabled for all companies)4. When events are scheduled, the system will auto assign available employees to those events.
a. If you need to schedule sales advisors for a vendor’s event, but the vendor has not committed to a specific item, schedule an event with a place holder item named “Item Hold 1 or 2”.
b. If an event requires more than one sales advisor, enter the appropriate number of SA’s needed in the, “No. Sales Advisors” field. The system automatically schedules the # of needed SA’s for events.
c. When a work order is created, the system will auto-assign employees to the event, IF he/she is assigned to the store and is available (marked available in his/her calendar and not scheduled to any other event on this date). This information will display on the Sales Advisor Calendar report and the Schedule Employee report.
Created by Interactions 42
Event System User’s Manual Last Updated: 5/9/2023
Sales Advisor Scheduling Email Rules
o Sales Advisor Account Created: When a new employee has been added to the system with an email address, the system will notify the sales advisor of their account and the ability to log into the employee portal.
o Available Dates for Event Work: Once an employee is flagged as “pending” for an event assignment, an email will be sent to the employee to inform them of the date of the event (does not include store information). This indicates the job has been offered and has a status of “pending.” The employee must Accept or Deny the job (these links are included in the email). When they click on the Accept or Deny links it will automatically assign the SA as confirmed (accept) or remove (deny) the SA from the event.
o Confirmed Event Assignment: Once an employee’s status has been selected as confirmed or has been changed from Pending to Confirmed in the SA Calendar Report or the Staffing Division Schedule Report, this email will display the location and date where the employee will be performing the event.
o Email reminder sent every 2 days: The Available Dates for Event Work email will be sent every two days until the employee accepts or denies the job.
Created by Interactions 43
Event System User’s Manual Last Updated: 5/9/2023
o 14 Days before event date: This email is sent to the employee 14 days before the event date to remind them of their confirmed assignment.
o 5 Days before event date: This email is sent to the employee 5 days before the event date to remind them of their confirmed assignment.
o Monthly Schedule Reminder for Employees: This is a reminder email, sent on the 11th of every month, to remind the employees to call or email their schedule to the scheduling coordinator.
o Event Date Change, Vendor Change, Store Change or Cancelled Event: In the event any of the event details change or if the SA has been removed from the event, the event change email will be sent to the SA.
Created by Interactions 44

Event System User’s Manual Last Updated: 5/9/2023
Scheduled Demo Report – Scheduled and Cancelled
This report displays all scheduled and cancelled events for a particular vendor and the number of available Sales Advisors in each store for each day. The Employee’s listed on the report are those who are assigned to the specific event.
The Available SA’s link will open the Available Sales Advisors pop-up window so the user knows which sales advisors can work.
Sales Advisor LoginOnce a new employee has been added to the event system with an email address, or updated an existing employee by adding an email address, the system will automatically create an account for the employee. The sales advisor is then able to log into Event Link to view their availability in the provided calendar. Once they have set their schedule, the system will make them available to be scheduled for events,
Created by Interactions 45
Event System User’s Manual Last Updated: 5/9/2023
Created by Interactions 46
Event System User’s Manual Last Updated: 5/9/2023
BillingPending Recaps (Retail Only)
For companies using mobile devices and the Field Link mobile app, the information submitted from the mobile app appears in Pending Recaps. The pending recaps page looks and feels exactly like the event processing page, but it is pre-populated with the information you need to bill the recap.
1. Click on the Pending Recaps link in the Billing module.2. Enter a store in the store field. This will populate the grid with any pending recaps that need to be billed.
Billing a Recap3. Click on the Event Type link to view the detail of the recap.4. Review the employee name and hours, survey questions, non-event time and tablet notes.
Created by Interactions 47
Event System User’s Manual Last Updated: 5/9/2023
5. Verify the products and enhancements purchased against the receipt image attached on the recap. Modify anything that does not match up with the receipt.
6. Add any notes you want the vendor to see on the invoice, review receipt images and review the event images.
7. Click on the Enter button to complete the billing of the recap and make it available for invoicing.
Billing an Unassigned Employee Recap8. Click on the Unassigned link to view the employee information for an employee who checked in, but wasn’t
assigned to an event9. If the employee worked a specific event, select that event from the list and click on Save to move that
employee’s information to that event.10. If the employee’s hours are Non-event time, select Non-Event time and click on Save to move the employee’s
hours to the non-event time section on the event processing page.11. If the employee’s hours are not valid or are a duplicate of hours that already exist, select Delete to remove the
employee’s hours.
Created by Interactions 48
Event System User’s Manual Last Updated: 5/9/2023
Note: Once you have billed any recap, the information can be changed on the event processing page.
Event Processing BillingThe event processing page allows you to bill events for companies who don’t use the Field Link mobile app or for recaps not submitted by the mobile app users. You can also change information on recaps you have previously billed.
1. Click on the Event Processing link under Billing.
2. Enter a store number in the Store field (if the store number exists in the system, the Store Name is displayed to the right of the number. If the store number does not exist, the store number will disappear when you tab off the field).
3. Enter, or select a date from the calendar in the Event Date field.
4. Click on the View button.
Created by Interactions 49
Event System User’s Manual Last Updated: 5/9/2023
Billing Summary – The billing summary page is a top-level view of all of the events scheduled for the selected store and date.
5. Select a weather type from the Weather dropdown if it’s not already selected.
6. Enter any non-event hours by clicking on the Add Non-Event Hours button on the right hand side.7. Click on a Type link (Regular, Combo or Split) for the event you need to bill.
Note: The Vendor and Item names are links to the respective Vendor and Item information pages.
Additional Information
The Type, Count, and Status headers can be clicked to change the sort order of each column. The Find and New Issues links will allow you to add an issue or find issues. If the billing record’s invoice has been paid, it cannot be modified unless you have Admin permission. The system automatically assigns the status of ‘billed’ when you click Enter from the Billing Detail page. The Billing Summary page does not list cancelled events. It only shows those events that have a status of
Scheduled, Billed, Invoiced or Paid. Event Type Logic - The following is the functionality to determine event type.
a. Regular – 1 vendor, 1 itemb. Combo – 1 vendor, 2+ itemsc. Split – 2+ vendors, x items (this includes at least 2 vendors - each vendor must have at least 1 item).
Billing Detail – The billing detail page allows you to enter information from the Daily Demo Report (DDR) or the Daily Demo Expense Report (DDER) if the company is not using the Field Link mobile app. In order to display this page, you must click on the event Type link on the billing summary page.
8. If the original event date needs to be changed, you can change the Executed Event Date for the event.9. Enter the employee number in the Employee field or click on the magnifying glass to find an employee. A
warning message appears if the following occurs. These warnings do not prevent you from continuing.a. The employee is not assigned to the store to the store where you’re billing.b. The same employee has been assigned to multiple events in the same store or different stores on that
day. 10. Enter the employee’s hours in the Hours field (a warning message appears if greater than 8 hours).11. Enter the Absence Reason for an employee if they were not available to work.
Created by Interactions 50

Event System User’s Manual Last Updated: 5/9/2023
12. Click on the Add Event Hours button if more employees need to be added.
13. Enter Base Units, Base $, Sales Results Units and Sales $. This information is used for the Daily Sales Goals and the Sales Incentives employees receive (CDS Only).
14. Enter the number of units (product) used in the # of Units field.15. Enter the unit cost of each unit in the Unit Cost field.16. Enter the tax amount in the Tax field.17. Enter information for enhancements if applicable. If more than one enhancement was used, click on the Add
Enhancement button to add additional rows.18. If the Labor and Supply Charges don’t automatically appear, you can enter these amounts manually.19. Enter the Additional Sales Tax, if applicable.20. Total Charge = Total Item Cost + Total Enhancement Cost + Total Labor Charge + Total Supply Charge + Total
Additional Sales Tax.
Created by Interactions 51
Event System User’s Manual Last Updated: 5/9/2023
21. Enter any notes for the event in the Notes for Vendors field. These notes will appear on the invoice for the vendor.
22. Upload additional receipt images if necessary.23. Click on the Enter button.
InvoicingInvoicing allows you to invoice all records that have not yet been invoiced. The invoicing method is based on the Vendor’s preferences.
Generating Regular Invoices
1. Click on the Generate Invoices link under Billing.2. Select a date in the By Date (To) field.3. Click on the Run button.
Additional Information
A. Invoicing Logic - The vendors are invoiced based upon how they are setup in the system (on the Vendor page). All billed, un-invoiced records are invoiced (there is no date range). You must have Administrative permissions in order to run invoices. If you do not have Administrative permissions, then an error message is displayed.
Note: Invoice by Item and Invoice by PO are setup separately by division.
1. Invoice vendor by division is turned OFF, invoice by item is turned OFF, and invoice by PO is turned OFF.This vendor receives 1 invoice for all billed items, regardless of division.
2. Invoice vendor by division is turned OFF, invoice by item is turned ON, and invoice by PO is turned OFF.This vendor receives 1 invoice for each unique item that was billed, regardless of division. For example, if item
#1 appeared in 2 events in division #1, and item #2 appeared in 3 events in division #2, and item #1 appeared in 2 events in division #3, then the vendor gets 2 invoices. 1 invoice for item #1 and 1 invoice for item #2.
3. Invoice vendor by division is turned OFF, invoice by item is turned OFF, and invoice by PO is turned ON.This vendor receives 1 invoice for each unique PO that was billed, regardless of division. For example, if item #1
has PO 123 in division #1, and item #2 has PO 123 in division #2, then the vendor gets 1 invoice.4. Invoice vendor by division is turned OFF, invoice by item is turned ON, and invoice by PO is turned ON.
Created by Interactions 52
Event System User’s Manual Last Updated: 5/9/2023
See #3 – The PO overrides the item. This vendor receives 1 invoice for each unique PO that was billed, regardless of division.
5. Invoice vendor by division is turned ON, invoice by item is turned OFF, and invoice by PO is turned OFF.
This vendor receives 1 invoice (for all items / PO’s) for each division that was billed.6. Invoice vendor by division is turned ON, invoice by item is turned ON, and invoice by PO is turned OFF.
This vendor receives 1 invoice for each unique item for each different division. For example, if item #1 appeared in 2 events in division #1, and item #1 appeared in 2 events in division #2, and item #2 appeared in 1 event in division #1, then the vendor gets 3 invoices. 1 invoice for item #1 in division #1, 1 invoice for item #1 in division #2 and 1 invoice for item #2 in division #1.
7. Invoice vendor by division is turned ON, invoice by item is turned OFF, and invoice by PO is turned ON.This vendor receives 1 invoice for each unique PO for each different division. For example, if item #1 has PO 123
in division #1, and item #1 has PO 123 in division #2, and item #2 has PO 456 in division #1 then the vendor receives 3 invoices. 1 invoice for PO 123 in division #1, 1 invoice for PO 123 in division #2 and 1 invoice for PO 456 in division #1.
8. Invoice vendor by division is turned ON, invoice by item is turned ON, and invoice by PO is turned ON.
See #5. The PO overrides the item. This vendor receives 1 invoice (for all items / PO’s) for each division that was billed.
B. Emailing Invoices - At the time Invoices are posted, a separate process is started to Email the invoices. The Invoice is emailed to the Vendor’s Billing Contact (If the Vendor is NOT invoiced by Division, then the FIRST division’s Billing Contact’s Email address is used when emailing the invoices). For those vendor’s who have selected to have the invoice mailed and printed, you can print these invoices by running the Reprint Invoice Report.
Generating Invoices by PO (Special Event Billing) – CDS US Only
In order to invoice a vendor by a PO number, the vendor and item accounts must be setup with the following:1. Set up the vendor account by checking, “Manual Billing” and setting each region to “Invoice by PO.”2. Set up the item by selecting “Special Event” as the Event Classification, selecting “Other” as the Event Rate Type
and then entering a Flat Rate OR an Hourly Rate with the Minimum and Maximum hours charged to the vendor. The Max. Hours number will appear in the billing page with the hourly rate and automatically calculate the rate.
Once the vendor and items have been set up, you are ready to invoice the vendor by PO #. This process will only invoice one vendor with one PO. No other vendors will be invoiced
1. Click on the Generate Invoices by PO link under Billing.
2. Enter the PO Number3. Select the Vendor name4. Enter the Start and End dates5. Select the Posting Method (Preliminary
with allow you to view the invoice before it is finalized, Final invoice the vendor and finalize the information in the system).
6. Click on the Run button.
Created by Interactions 53
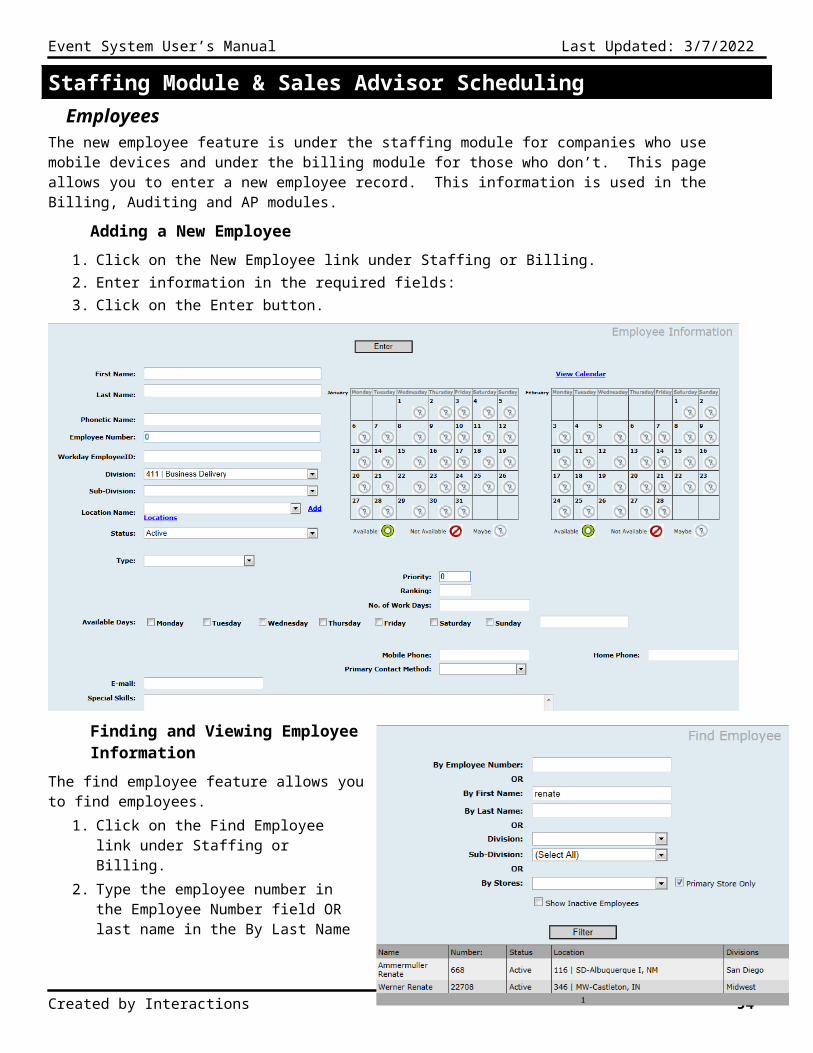
Event System User’s Manual Last Updated: 5/9/2023
Resend Invoices
The Resend Invoice function allows you to resend ALL invoices for a particular invoice date. This was designed to resend invoices in the event there are problems with the email server. This function will send the invoices as they were originally setup when running the invoice process the first time.
Dates Not Keyed ReportThe Dates Not Keyed report allows you to view all the dates where events have not been billed.
1. Click on the Dates Not Keyed link under Billing.
2. Enter the From Date3. Enter the To Date
4. Click on the Find button5. To Export the report, click on the Export button.
Created by Interactions 54
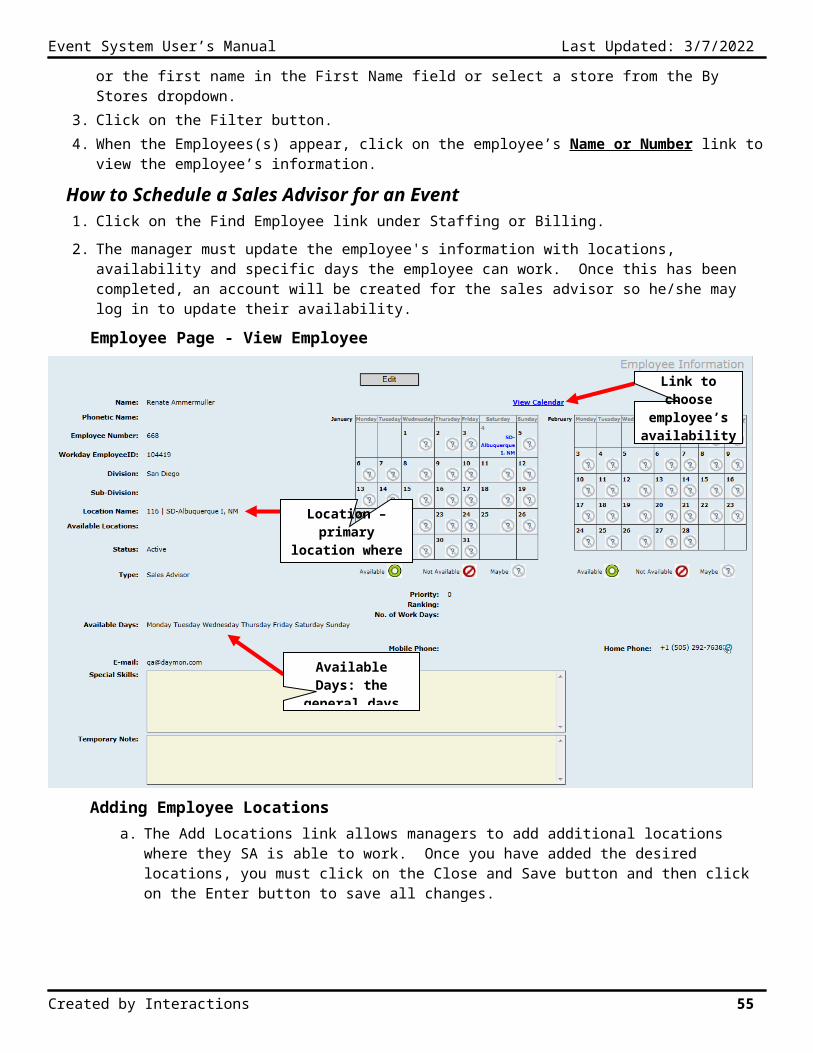
Event System User’s Manual Last Updated: 5/9/2023
Auditing
Daily Expense Report ProcessingDaily Expense Report processing is where you enter all of the information for Daily Expenses.
Entering a DER
1. Click on the Enter DER link under Auditing.2. Enter a store number in the Locations field.3. Enter a Event Date (the event date
must be less than or equal to tomorrow’s date).
4. Click on the Filter button.5. Enter the number of Reported
Events (the number of events reported on the Daily Expense Report).
6. Enter an employee’s number in the Prepared By field (a warning message appears if the employee does not belong to the store).
7. Enter an employee’s number in the Paid To field (a warning message appears if the employee does not belong to the store). This is for Reimbursements.
8. Enter the Regular Hours field.9. Enter the Meeting Hours: (if any) report meeting hours only if they appear on the All Purpose Sign In sheet. If
meeting hours have been reported on the DDR they must be counted as Regular Hours.10. Enter the Temp Hours11. Total Hours will calculate automatically based on all hours entered.12. Enter the Comments (example: Reason the DER/DDR is out of balance; Equipment Description Purchase, etc…).13. Enter the Receipt Date.14. Click on the Add Payment Details button.15. Select AMEX as the
Payment Type.16. Enter the Employee
Number (person whose name is on the Amex card) in the Tran # / Employee Name field.
17. Enter the amount in the Tran Amount field (a warning message appears if this value is greater than $1000.00).
18. Click on the Add Payment button if you have more payments to add.19. Click on the Ok button.20. Enter the Event Samples; Equipment; or Supply amounts that match the transactions keyed in the Payment
window. This correlates with what the receipt/return was for. 21. Enter any applicable tax. 22. Click on the Print button to print the DER.23. Click on the Save button to save the DER.
Created by Interactions 55
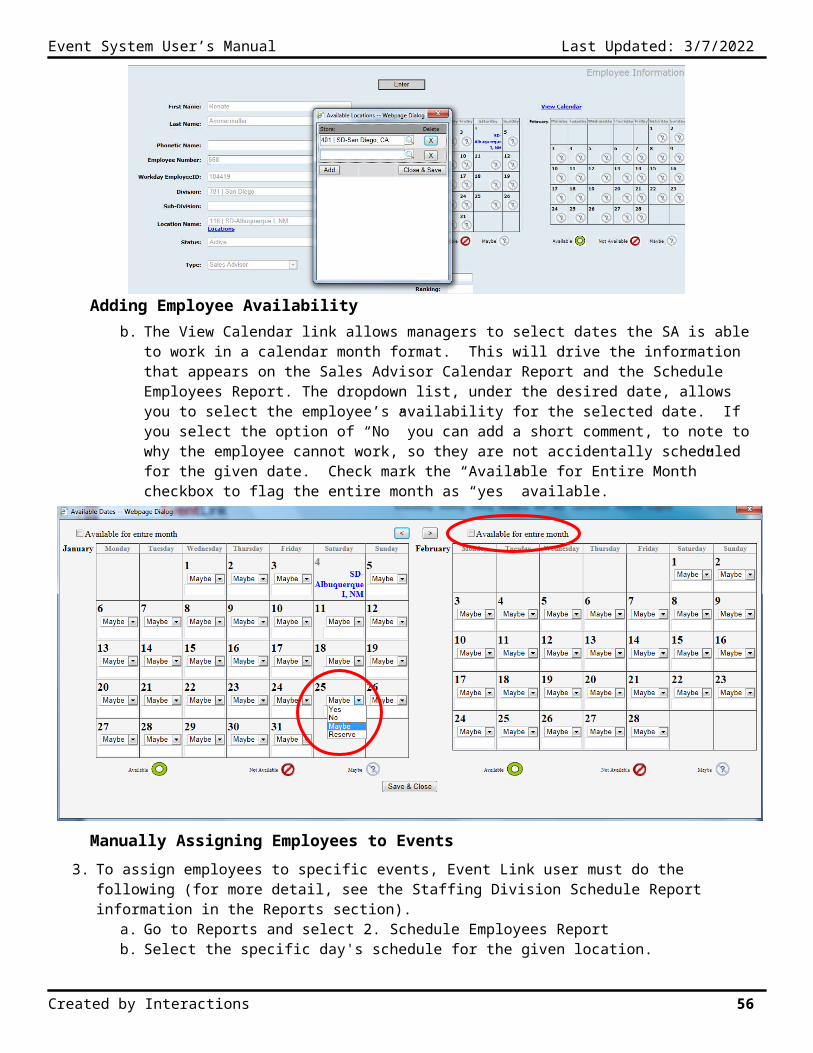
Event System User’s Manual Last Updated: 5/9/2023
24. If the columns do not balance, an error message will appear, telling which column is out of balance. Click Ok on the error message and make your corrections. Click Save when you are finished.
25. If the audit event count and the billing event count do not match, you will receive an error message, ““Audit Event Count does not match Billed Event Count.” Click on the Ok button.
26. If the audit total and the billing total do not match, you will receive an error message, “Audit Total does not match Billed total.” Click on the Yes button to close the DER or click on the No button to fix the totals.
If you need more lines, for several items for one receipt (as in the case of a large purchase, over $1,000.00), click on the Add Receipt button.
To enter a negative number, use the minus sign on the ten key or keyboard. An error message will appear, “Gelco Total is less than zero.” If the number is a negative number, click on the Ok button.
Additional Information
All calculated and pre-filled fields are not editable. The DER is a summary of expenses for ALL events for 1 store for 1 date. The dollar amount cannot be changed for records that have been POSTED (you can change check #’s, hours,
etc… but not check amounts). The Delete button (X) allows you to delete 1 row at a time on non-posted records. The Delete All button allows you to delete the entire non-posted record. This button is disabled if the DER
record has been posted. When you click the Delete button, you are provided with a warning message stating, “Are you sure that you want to delete ALL of the detail records for this DER?” You must click ‘Yes’ to continue. The system removes ALL of the detail records for the current DER and returns you to the DER Processing page.
Finding and Viewing a DER
1. Click on the Enter DER link under Auditing.2. Enter a store number in the Locations field.3. Enter, or select from the calendar, a date in the Event Date field (the event date must be less than or equal to
tomorrow’s date).4. Click on the Filter button.
Created by Interactions 56
Event System User’s Manual Last Updated: 5/9/2023
Posting Daily Expense ReportsThe DER Posting report posts all Daily Expense Reports that have not been posted in the selected division and store from the requested date backward. This process requires Admin permission to run.
1. Click on the Post DER link under Auditing.2. Select a Division.3. Select a Store.4. Enter a Date.5. Select a posting method (Preliminary or
Final - if you choose Final, you are prompted with a message stating, “Running this report will update data in the database. Ok to Continue?" You must click YES to continue. Otherwise, you are returned to the page & the method is changed to preliminary).
6. Click on the Run button.
Sample Report
Payment ReconThe payment recon process allows you to reconcile payments within the system. All American Express non-matching transactions are shown. You must have Admin permissions in order to perform this function.
Reconciling Payments
1. Click on the Payment Recon link under Auditing.2. Select a Division.3. Select a Store.4. Enter a date.OR5. Enter an Employee number or find the employee
with the search function (magnifying glass).6. Enter a Start Date.7. Enter an End Date.8. Click on the View button.9. When the Payment Reconciliation
View page appears, check mark the row(s) you want to reconcile.
10. The DER and WER dates are links to that DER or WER page for that Date and Store. This will allow you to change the date (and not amounts) to match the Date Paid. Once changed, the reconciliation process can be run again so those items are removed from this view.
11. Click on the Submit button – this will cause the payment to drop off the Payment Reconciliation view.
Created by Interactions 57
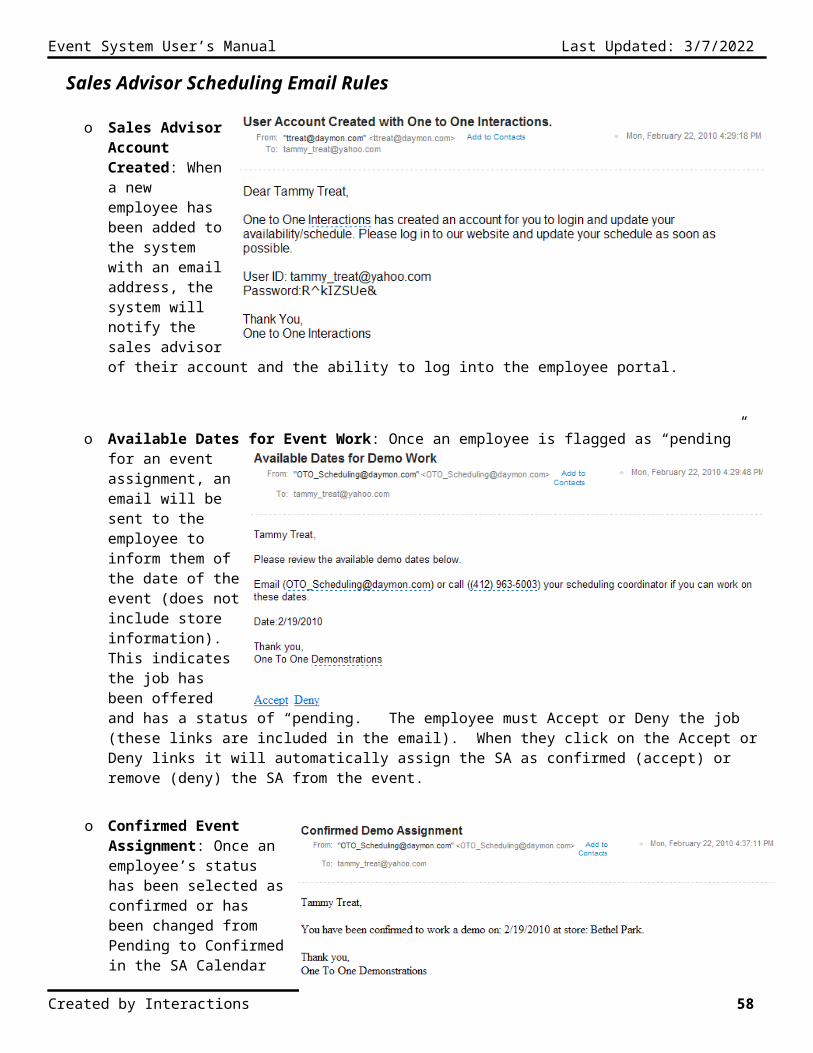
Event System User’s Manual Last Updated: 5/9/2023
Missing DatesThe Missing Dates Report shows the store and date of the missing DER paperwork.
Finding and Viewing Missing Dates
1. Click on the Missing Dates link under Auditing.
2. Enter a Start Date.3. Enter an End Date.4. Click on the View button.
Created by Interactions 58
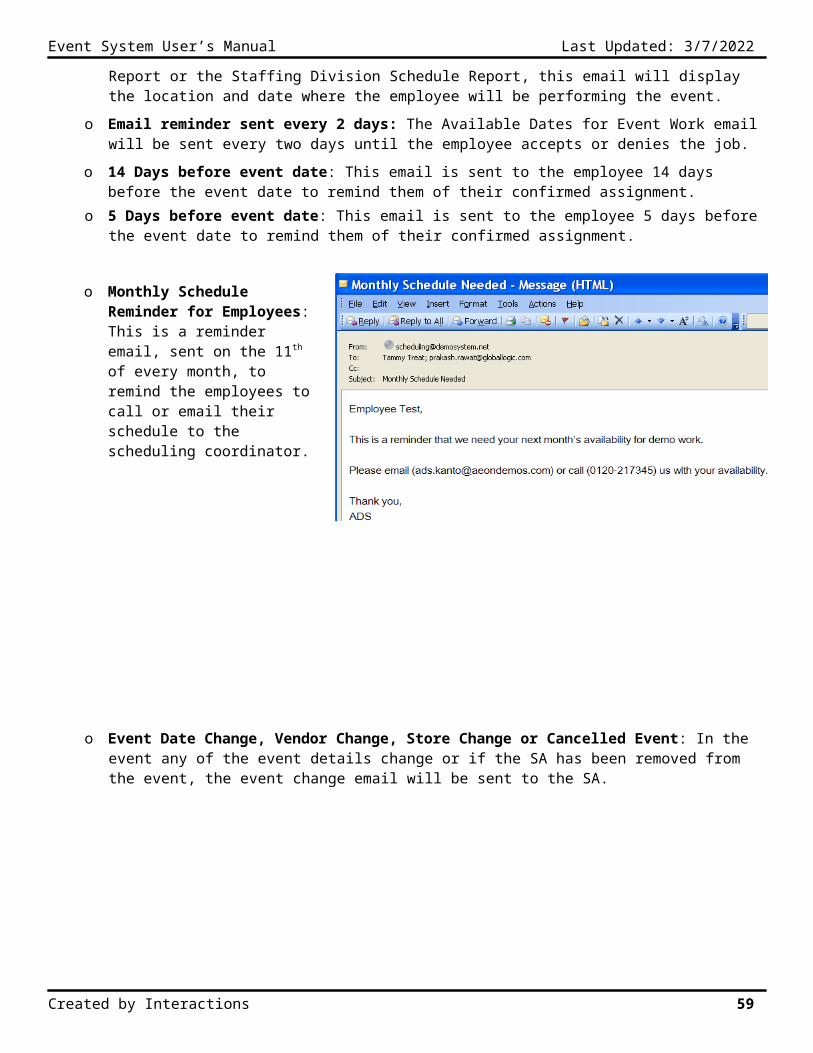
Event System User’s Manual Last Updated: 5/9/2023
Accounts PayableWeekly Expense Report Processing
The Weekly Expense Report processing feature allows you to enter information from the Weekly Expense Report.
Entering a WER
1. Click on the Enter WER link under A/P.2. Enter the employee’s number in the
Employee Number field (if the employee’s # you entered exists in the system, the employee name is displayed to the right of the number. If the employee number does not exist, the number will be removed upon moving off the field).
3. Enter a date in the Expense Ending Date field.4. Click on the View button.5. Enter information in the required fields:
a. GL Account #b. Event Codec. Stored. Payment Typee. Tran #f. Tran Amount (a warning message appears if the check amount is greater than $1000.00).g. Tran Date (any valid date that is not greater than the current date).
Non-Required Fields
h. Miles (click on the Road icon to enter the mileage)i. Journal Entries (red book icon)j. Comment
6. Click on the Submit button.
Created by Interactions 59
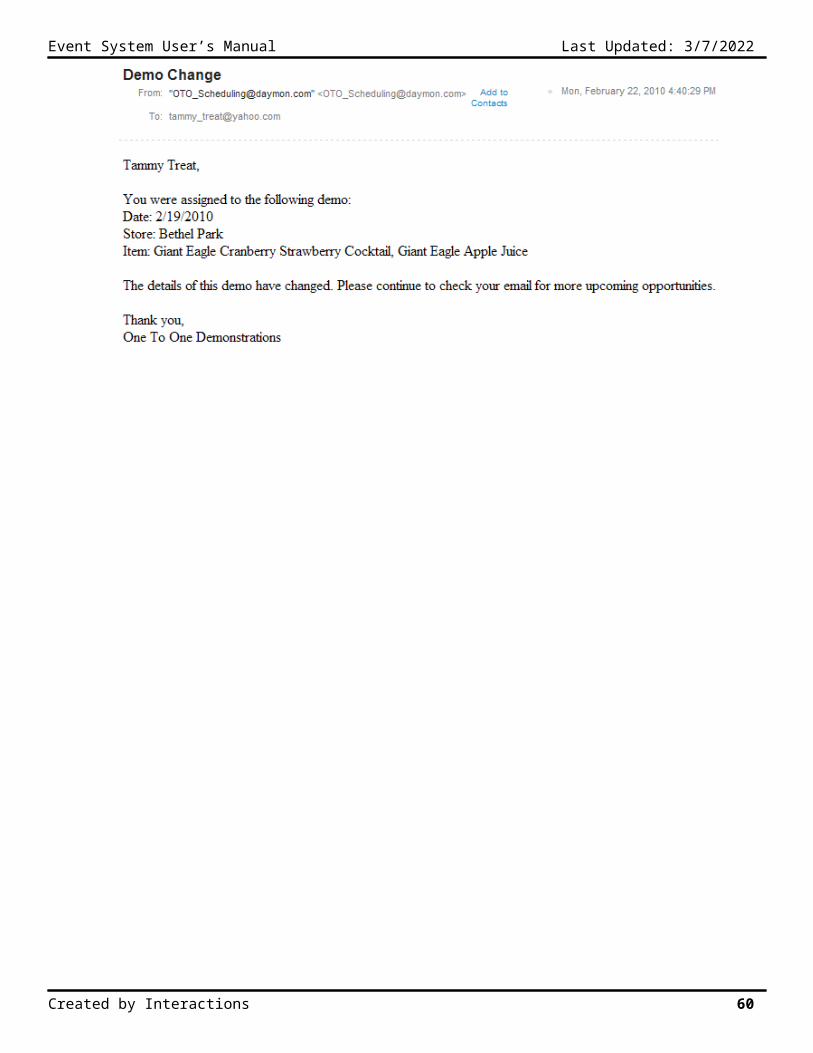
Event System User’s Manual Last Updated: 5/9/2023
Additional Information
All calculated and pre-filled fields are not editable. When you select the AMX pay type and enter the employee number as the Transaction Number, a validation
message appears if the employee number is not valid or if the employee number is different from the employee for which you are entering the WER.
A warning message appears if the Total Amount does not equal the Invoice Amount. The Tran Date column for AMX payments is used to reconcile the AMX charges. This date is a required field of
the AMX payment type is selected. If the AMX payment type is selected, the system verifies that the employee number entered is a valid employee.
Finding and Viewing a WER
1. Enter the employee’s employee number in the Employee Number field.
2. Enter a date in the Expense Ending Date field.
3. Click on the View button.
Editing a WER
1. Enter the employee’s employee number in the Employee Number field.2. Enter a date in the Expense Ending Date field.3. Click on the View button.4. Change the necessary information.Note: You cannot change records that have already been POSTED. This status is noted in the Status field.5. Click on the Submit button.
Posting WER RecordsThe WER posting feature posts all WER records that have not yet been posted previous to the entered date. Posting locks the record, but viewing is still allowed.
1. Click on the Post WER link under A/P.2. Enter a date in the To Date field.3. Select a Posting Method (Preliminary or Final
- If you choose Final, you are prompted with a message box stating, “Running this report will update data in the database. Ok to Continue?" You must click YES to continue. Otherwise, you are returned to this page and the method is changed to preliminary).
4. Click on the Run button OR click on the Export button to export the report to MS Excel.
Sample Report
Created by Interactions 60

Event System User’s Manual Last Updated: 5/9/2023
Direct BillsThe direct bill feature allows you to enter a new bill or change an existing bill for AP Vendors.
Entering a Direct Bill
1. Click on the New Direct Bill link under A/P.2. Select a vendor from the AP Vendor Name dropdown.3. Enter an Invoice Number.4. Enter an Invoice Amount (a warning message appears if the Total Amount does not equal the Invoice Amount).5. Enter an Invoice Date.6. Select a GL Acct # description.7. Enter Journal Entries (red book icon) if necessary8. Select an Event Code.9. Select a Store.10. Enter an Amount11. Click on the Add button to add a detail row.12. Enter a Comment.13. Click on the Save button A warning message appears if the bill is a duplicate. The duplicate check is first based upon the vendor number, date and amount. The second check is based upon the vendor number and the invoice number.All calculated and pre-filled fields are not editable.
Created by Interactions 61

Event System User’s Manual Last Updated: 5/9/2023
Finding and Viewing a Direct Bill
1. Click on the Find Direct Bill link under A/P.2. Select a vendor from the By Vendor Name
dropdown.3. Enter a date in the Start Date field.4. Enter a date in the End Date field.OR5. Enter Invoice #6. Enter Invoice Date7. Enter Invoice Amount8. Click on the View button.9. When the Direct Bills Found page appears, click on the Vendor Name link.
Editing a Direct Bill
1. Click on the Find Direct Bill link under A/P.2. Select a vendor from the By Vendor dropdown.3. Enter a date in the Start Date field.4. Enter a date in the End Date field.5. Click on the View button.6. Click on the Vendor Name link.7. Click on the Edit button.8. Change the necessary information.Note: You cannot change records that have already been POSTED. This status is noted to the right of the Expense Ending Date.9. Click on the Save button.
Created by Interactions 62
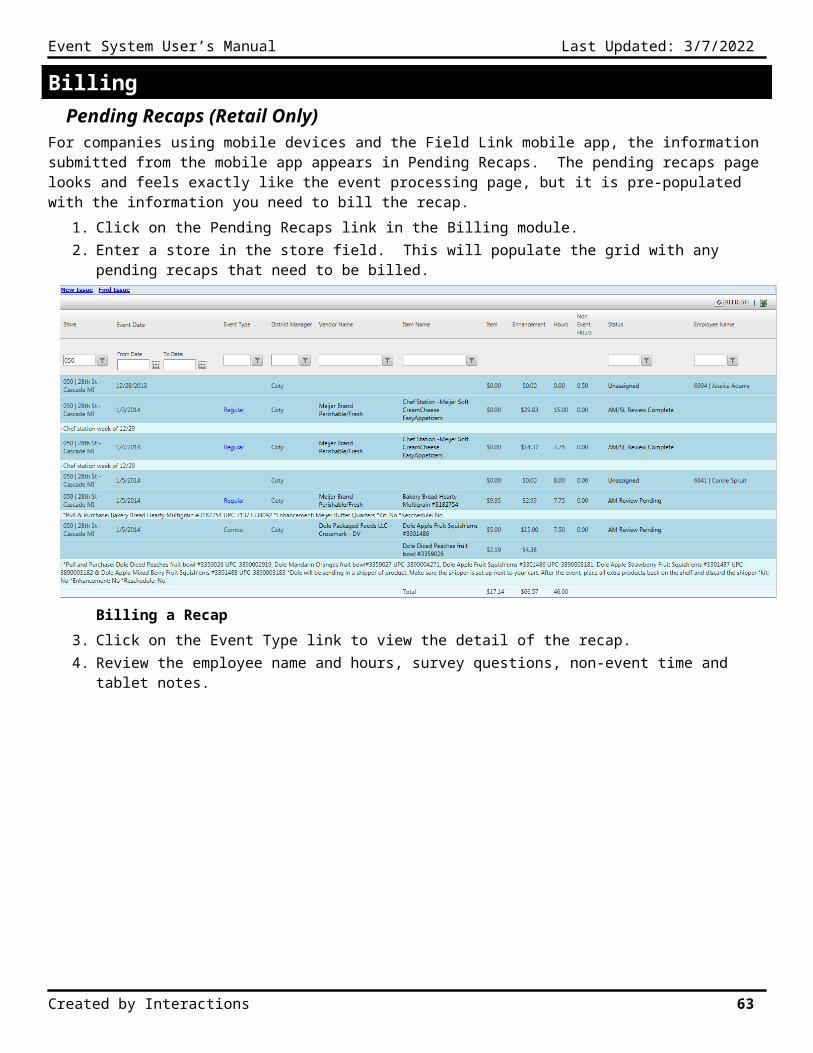
Event System User’s Manual Last Updated: 5/9/2023
AP Vendor PayablesThe new AP vendor feature allows you to enter a new vendor.
Adding a New AP Vendor
1. Click on the New AP Vendor link under A/P.2. Enter information in the required fields:
a. Status (Active checkbox)b. Vendor Name
Non-required fields:c. JDE Vendor #d. Street Address 1 and 2e. Cityf. Stateg. Ziph. Phonei. Phone (Alt)j. Faxk. Emaill. Contact Namem. Comments
3. Click on the Save button.
Created by Interactions 63
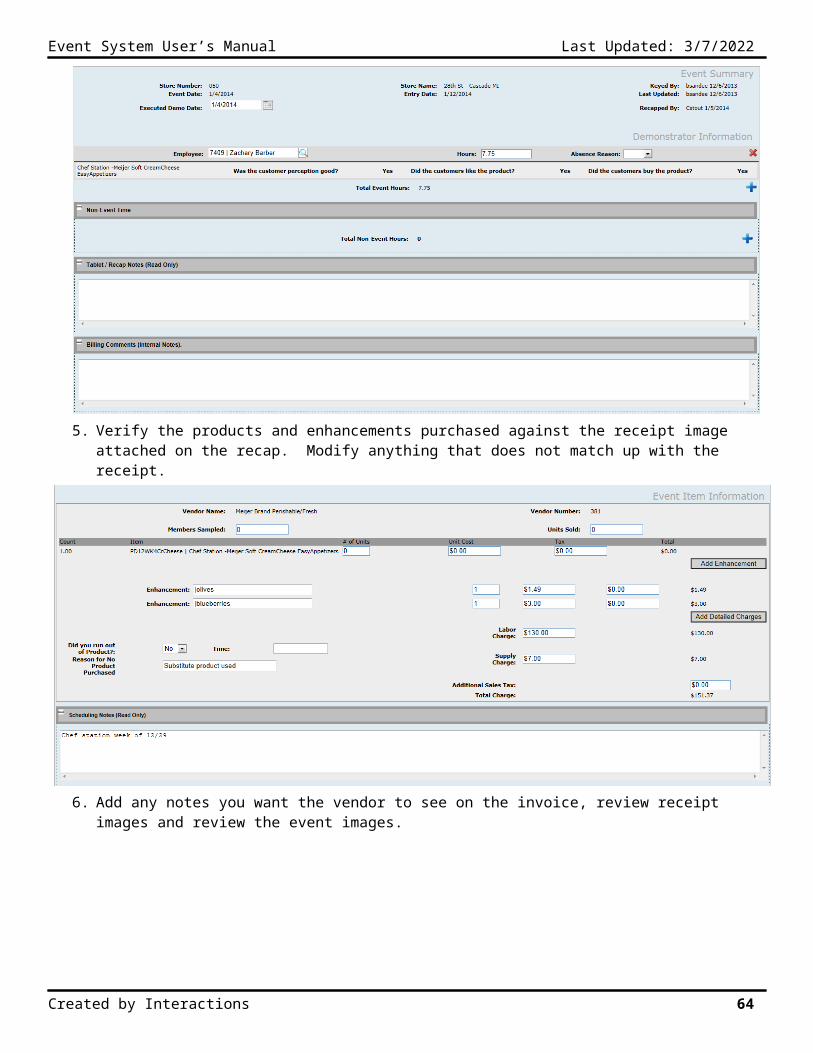
Event System User’s Manual Last Updated: 5/9/2023
Finding and Viewing AP Vendors
The find AP vendor feature allows you to view any AP vendor in the system. The view AP vendor page appears after you click on the View button on the Find AP Vendor page.
1. Click on the Find AP Vendor link under A/P.
2. Select a vendor from the By Vendor dropdown.
3. Click on the View button.
Editing an AP Vendor
The edit AP vendor feature allows you to change existing vendor information.1. Click on the Find AP
Vendor link under A/P.2. Select a vendor from the
By Vendor dropdown.3. Click on the View button.4. Click on the Edit button.5. Change the necessary
information.6. Click on the Save button.
Created by Interactions 64
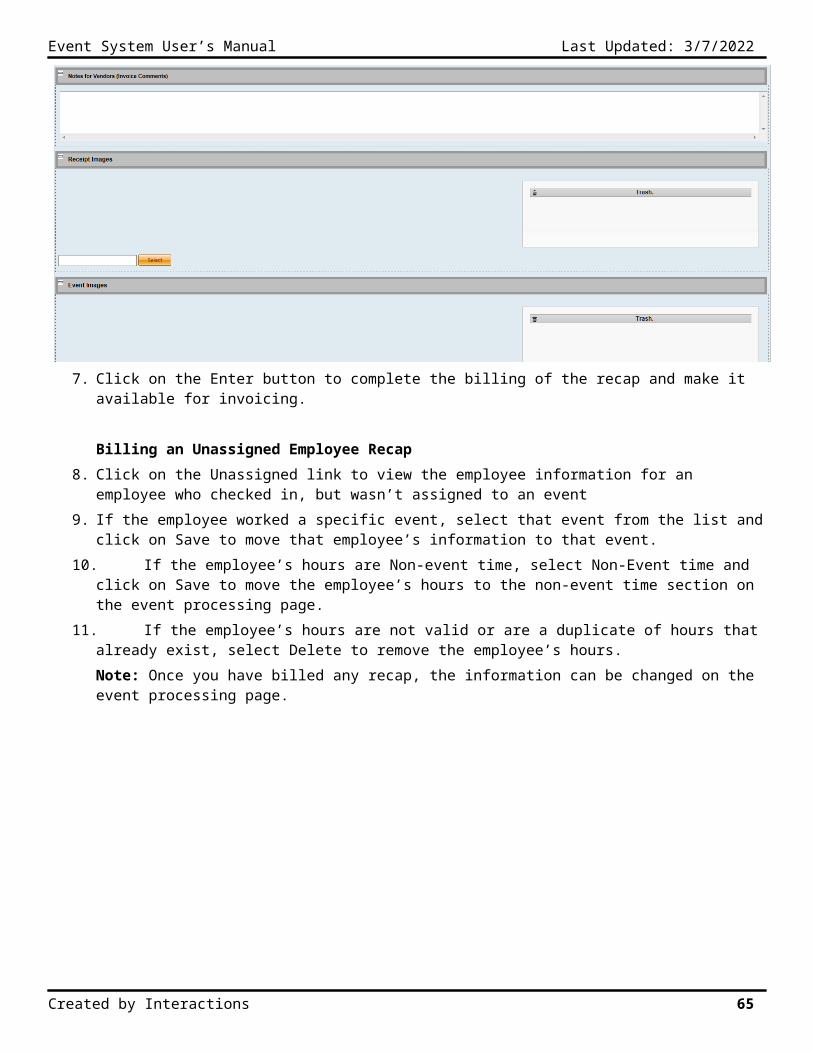
Event System User’s Manual Last Updated: 5/9/2023
Uploading Direct Bill DataThe uploading of direct bill data allows you to directly import any direct bills from an Excel document.
Uploading Data
1. Click on the Upload Direct Bill Data link under A/P.2. Click on the Browse button to search for the desired Excel file.3. Click on the Upload File button to upload the data. A message will appear stating whether the import was
successful.
Direct Bill Upload Sample
The data must remain in the below format in order to upload properly.
Created by Interactions 65

Event System User’s Manual Last Updated: 5/9/2023
Accounts ReceivableApplying Payments
The Apply Payments page displays all unapplied debits and credits and all outstanding invoices for a vendor. The total outstanding balance is displayed (and maintained as balances are applied) on the form. You must have Admin permissions to access this module.
1. Click on the Apply Payments link under A/R.2. Type the vendor’s name in the Filter field and then
click on the Vendor dropdown to view the name.OR3. Type the invoice number in the Invoice # field.4. Click on the View button.5. Check mark the invoice in the Apply column.6. Enter the amount in the Amount field.7. Enter a check number in the Check # field.8. Click on the Post button.
Additional Information
Only 50 invoices will display at one time. You apply the check amount to each of the invoices. As each invoice has a portion of the check applied, the
outstanding balance, the amount applied, and the unapplied balances change. Applied – represents the total amount of outstanding balances that have funds from the check applied.
Created by Interactions 66
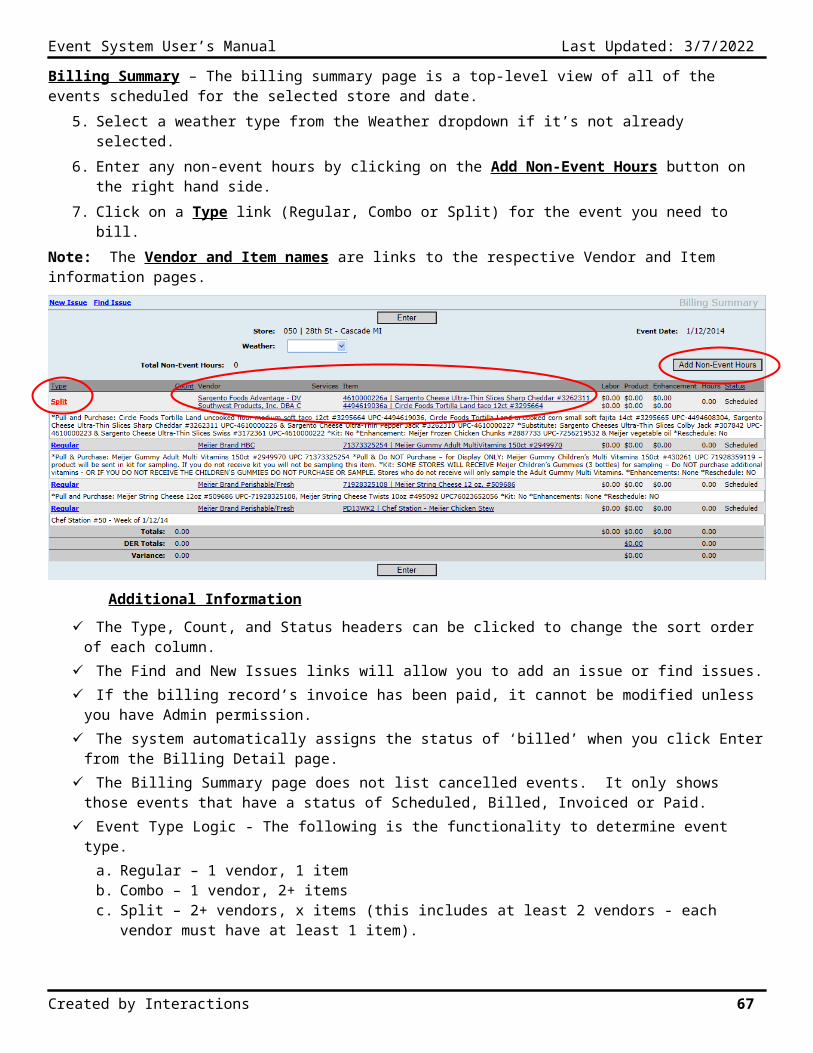
Event System User’s Manual Last Updated: 5/9/2023
Unapplied – represents the amount from the check that has not been applied to any invoices. Payment date – the date the payment is applied (not the date on the check). Once all invoices have had an amount applied, the check may be posted. To be posted, the unapplied balance
must be zero and the amount applied must equal the check amount. Until it is zero, the post command button will be disabled.
You can add an adjustment if the check does not apply to all balances. This takes you to the add Debit/Credit memo page.
If a vendor sends in a check for an amount that cannot be applied to any of the outstanding invoices, the check is applied as a Debit/Credit memo, and the aging report continues to report those invoices.
Adding All Credit/Debit Memo Types from the Apply Payments Page
1. Click on the Apply Payments link under A/R.2. Type the vendor’s name in the Filter field and then click on the Vendor dropdown to view the name.OR3. Enter an invoice number.4. Click on the View button.5. Click on the Add Bad Debt, Add Check Short, Add Fees, Add Refund, Add Credit Add Debit or Add Check
Overpayment buttons.6. Enter the Amount (the system will automatically handle whether the credit/debit is a positive or negative dollar
amount based on the type of credit/debit you have selected).7. Enter notes in the Note field.8. Click on the Ok button (once you hit Ok, you will be navigated back to the Apply Payments page).
Created by Interactions 67
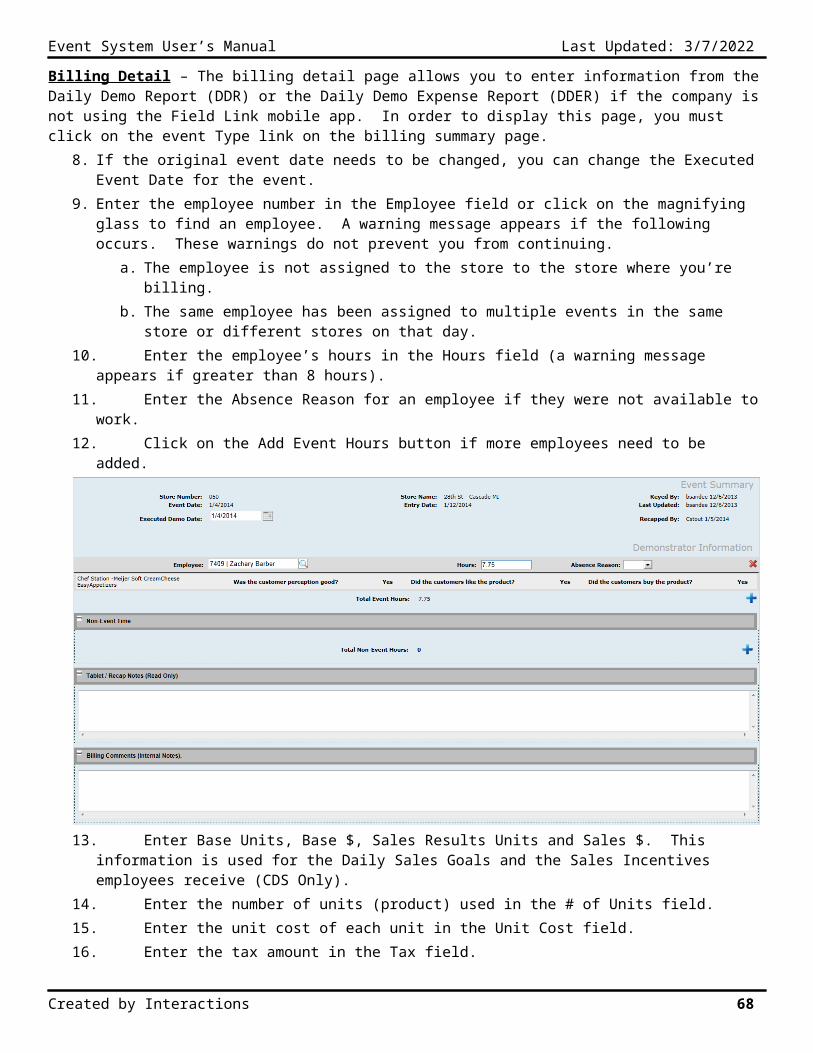
Event System User’s Manual Last Updated: 5/9/2023
Adding Debit/Credit Memos and NSF Checks from the Main Page
The add debit/credit memo and NSF Check features allows you to create a debit/credit memo to adjust the outstanding balance for a vendor (typically a credit).
1. Click on the Credit/Debit Memo link under A/R.2. Type the vendor’s name in the Filter field and
then click on the Vendor dropdown to view the name.
OR3. Enter an invoice number.4. Click on the View button.5. Enter an Amount.6. Enter Notes if necessary.7. Click on the Save button (once you hit
save, you are automatically navigated back to the Choose Vendor for Credit/Debit Memo page).
Note: This record cannot be edited after it has been saved.
Adding a PrePaymentThe add prepayment feature allows you to enter a prepayment independently from the apply payments page. This type of payment does not show on Invoices but it does show on the Payment report.
1. Click on the Apply PrePayment link under A/R.2. Type the vendor’s name in the Filter field and
then click on the Vendor dropdown to view the name.
3. Click on the View button4. Enter the Check Number.5. Enter an Amount.6. Enter Notes if necessary.7. Click on the Save button (once you hit save,
you are automatically navigated back to the Choose Vendor for Applying PrePayments page).
Note: This record cannot be edited after it has been saved.
Created by Interactions 68
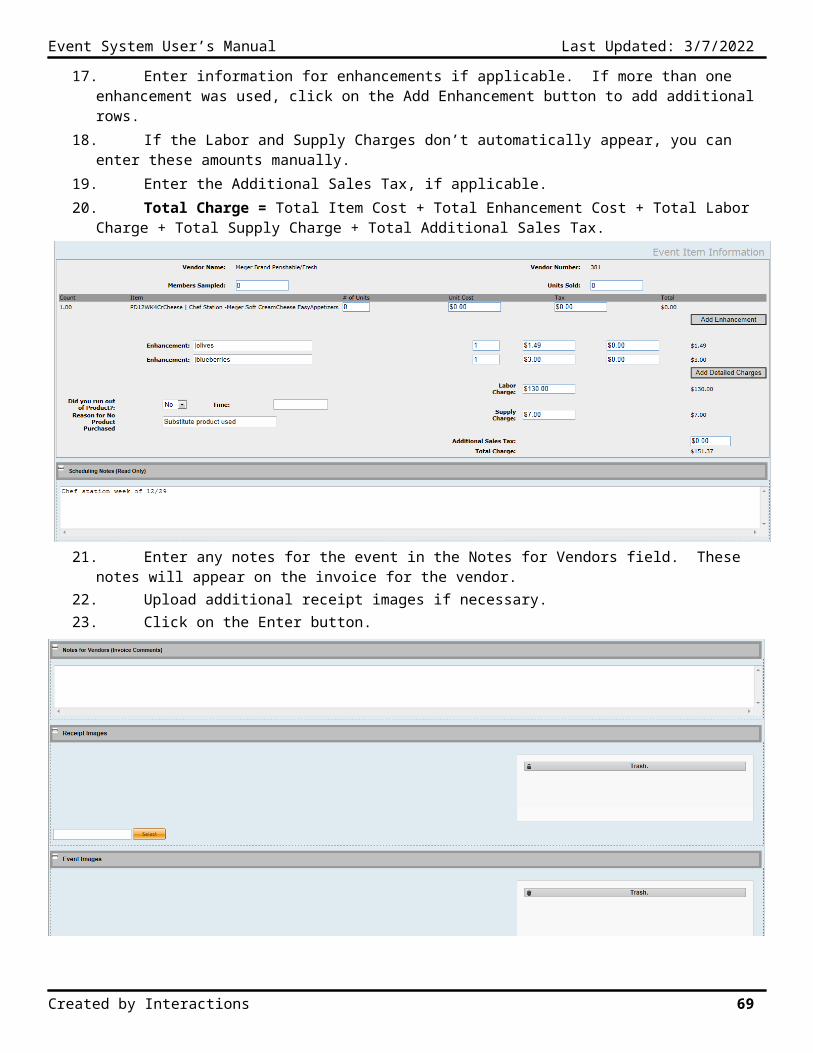
Event System User’s Manual Last Updated: 5/9/2023
OperationsIssues
Issues can be added by the Human Resources, Billing and Auditing if paperwork is missing for a given store. This lets the AMs and Event Managers, in the stores, know what the office is waiting on in order to finish billing. We’ve also added the ability to select the specific event where an issue occurred and a notes field for adding information. We display a history of the notes, from each party, so you can view the detail from each posting. This allows billing and the field to correspond on issues that need to be addressed to complete billing.
Adding a New Issue (Office Staff):
1. In the Event System, under Operations, select New Issue2. Add the store number and event date3. Select the specific event where the issue occurred (this is not required, but helpful if the issue is for a specific
event).
4. Add the issue detail and reason for the issue in the “Issue” field. This will act as the main detail seen when searching for issues. Be specific as possible and what you need from the field.
Finding Issues for my Stores (Area Managers)
Note: AMs should look for issues the day after events have been performed in your stores. This will allow you to address issues in a timely manner so billing can continue to bill events.
1. In the Event System, under Operations, select Find Issue
2. Select your name from the Area Manager list
3. Enter the From and To Dates4. Click on the Find button
Created by Interactions 69
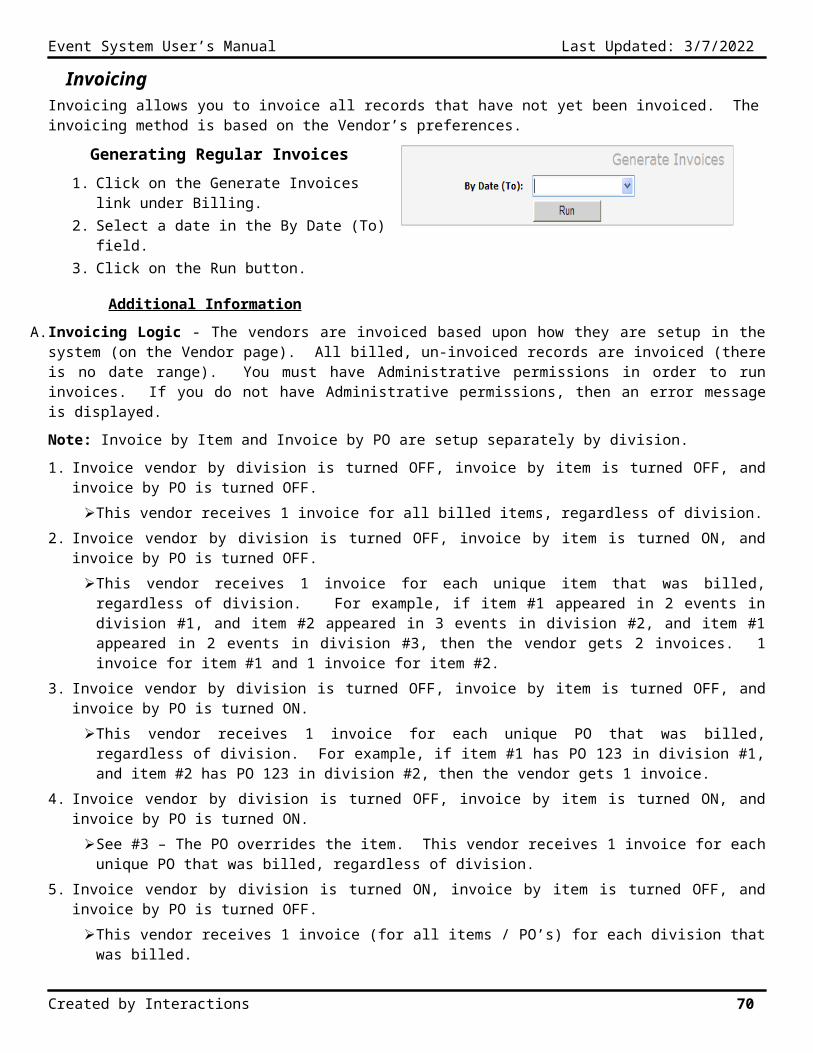
Event System User’s Manual Last Updated: 5/9/2023
5. When the issue list appears, click on the Store number link for the issue
6. Add notes in the Notes field in response to the issue. A history of the conversation will appear at the bottom of the page in Notes History.
Created by Interactions 70
Event System User’s Manual Last Updated: 5/9/2023
Resolving Completed Issues (Office Staff):
1. In the Event System, under Operations, select Find Issue2. Select the necessary search criteria3. When the issue list appears, click on the Store number link for the specific issue4. Add a note in the Notes field describing the final resolution5. Checkmark the “Resolved” checkbox to close the issue (this will enable the issue to fall off the list)6. Click on the Save button.
Created by Interactions 71
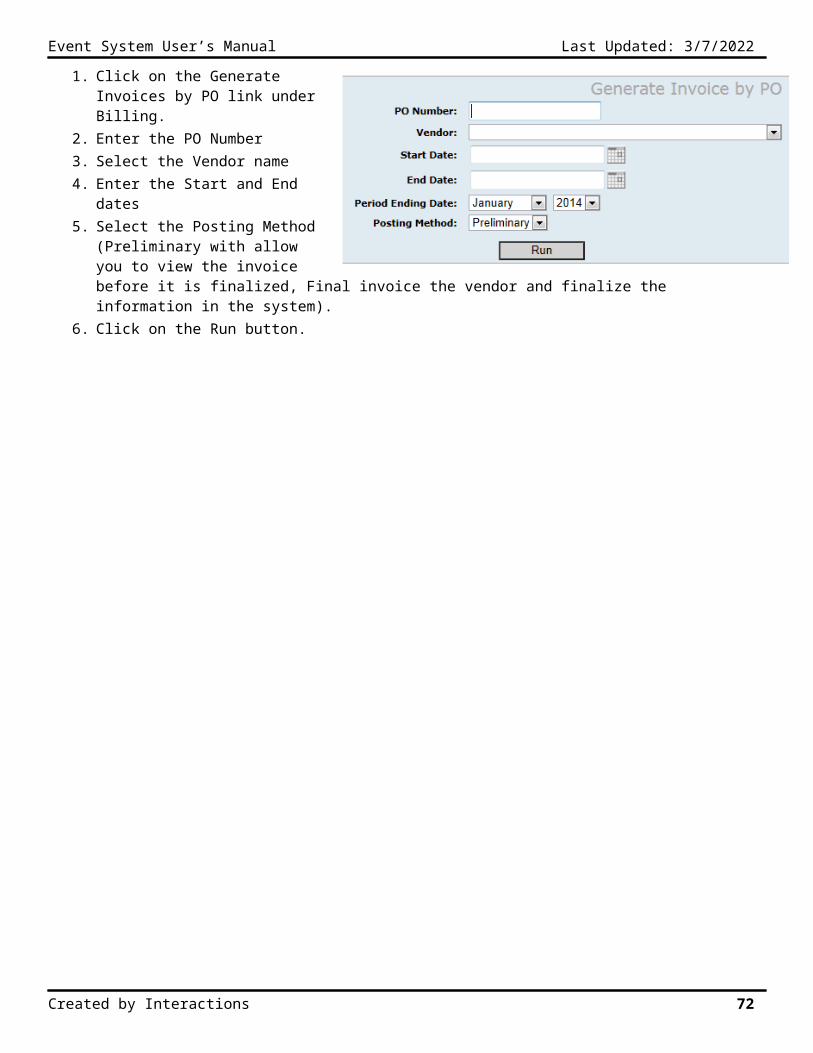
Event System User’s Manual Last Updated: 5/9/2023
Sales GoalsThe Sales Goals feature allows you to track sales information that is used for employee incentive bonuses. Most of the sales data is entered in the billing module, but the sales goals page allows you to modify or add an employee’s sales information.
Entering Daily Sales
1. Click on the Enter Sales Goals link under Operations.2. Enter the store number or click on the magnifying glass to
find your store.3. Enter a Date.4. Click on the Enter button.5. Change the Role for each employee who worked that day.6. Enter the Item, Base Units, Sales Goals Units, Sales Units,
Base $ and Sales $ information.7. Click on the Add button if the employee worked on more than one event/item.8. Click on the Close & Save button when finished.9. Check mark the Sold Out check box if necessary.10. Check mark the Exempt check box if necessary.11. Click on the Save button.
Finding and Editing Daily Sales Goals Records
Sales Goals can only be edited if the records have not been posted by Human Resources (HR). If the records have been posted, and a mistake has been found, the Supervisor must contact the HR department.
1. Click on the Enter Sales Goals link under Operations.2. Enter the store number or click on the magnifying glass to
find your store. OR3. Enter an employee number.OR4. Enter a Role.AND5. Enter a date in the From Date field.6. Enter a date in the To Date field.7. Click on the Find button.8. Click on the Edit button to make changes9. Make the necessary changes and click on the Save button
Created by Interactions 72
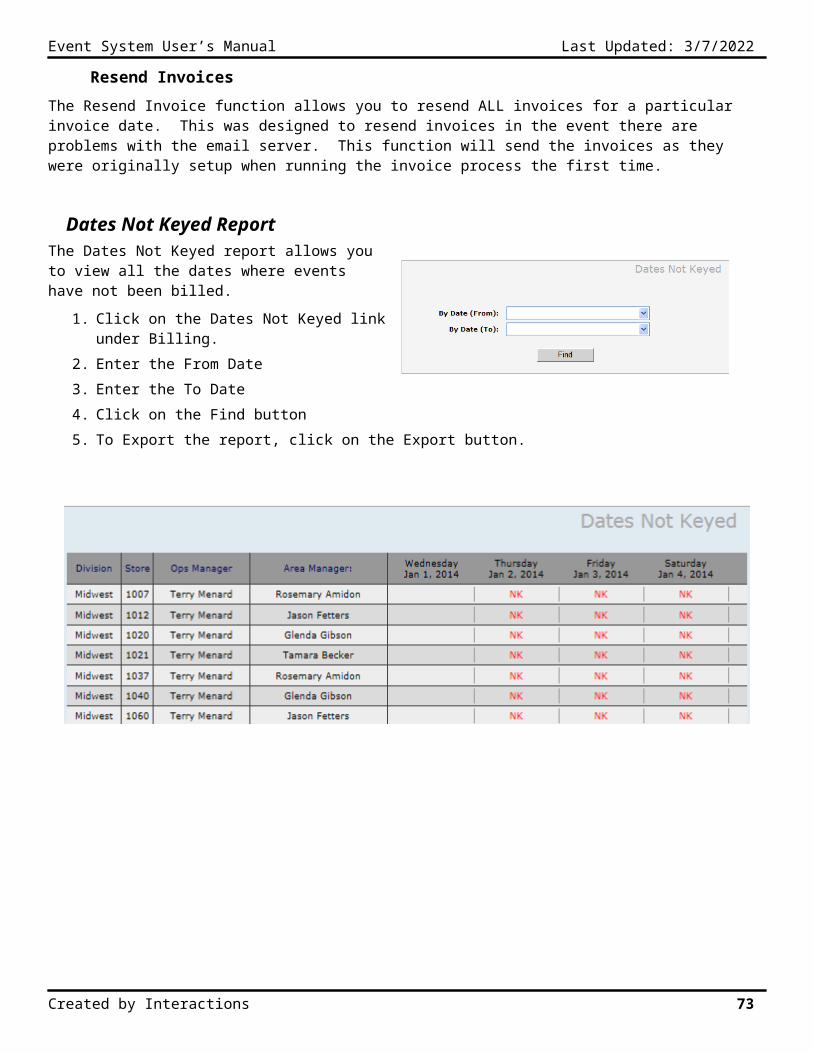
Event System User’s Manual Last Updated: 5/9/2023
Daily Sales Goals Point Rules
1 SA\ 1 item: If sales for item meets or exceeds goals = points 1 SA\multiple items: If sales for one item meets or exceeds goals = points 2 SA\multiple items: If sales for one item meets or exceeds = All SAs get points
(note: Base units and Total sales units split between both SAs on Sales Goals page) 1 SA\2 events: If sales for one item meets or exceeds = points
(note: these items are grouped together for the SA on Sales Goals page) If Breaker, breaker receives a % of goals hit by those who met or exceeded goals. If 40% hit their goals, then
breaker gets 40% of 250. If Lead, lead receives a % of goals
CDS Mobile and eDDR Knowledge Base
http://support.daymoninteractions.com/hc/en-us/categories/200421285-CDS-US-Mobile-EDDR
Created by Interactions 73
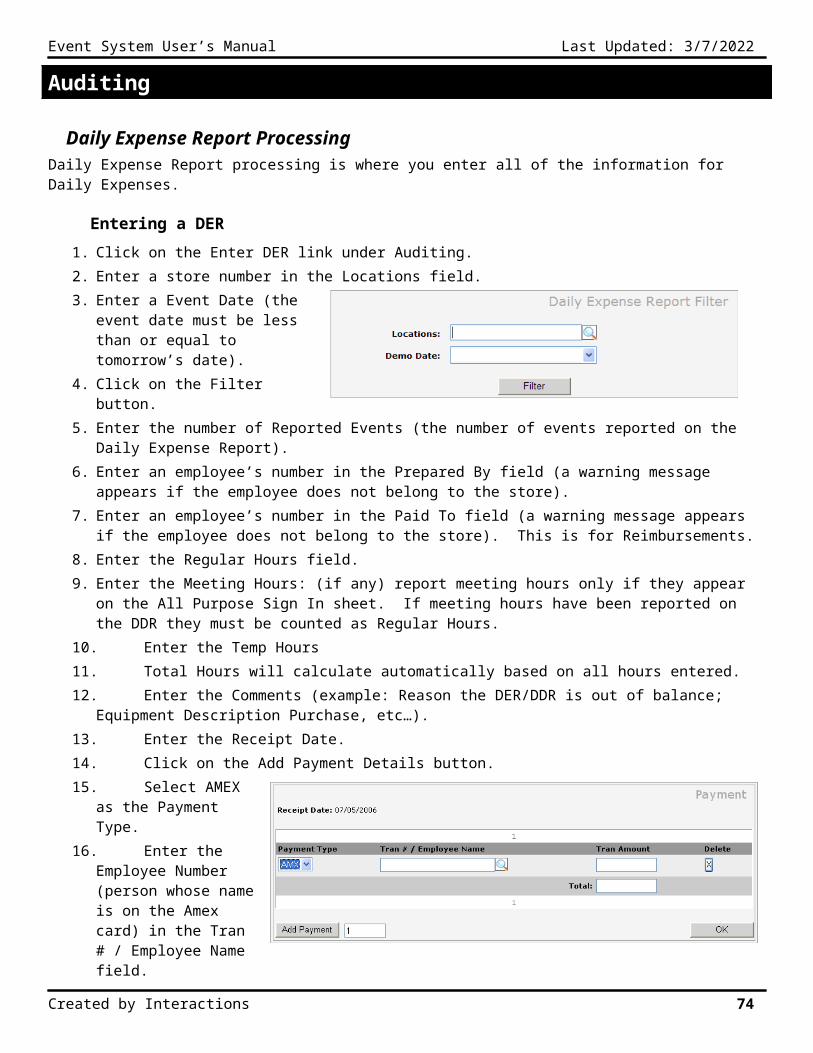
Event System User’s Manual Last Updated: 5/9/2023
Reports
Event Confirmation, Change & Cancellation EmailsThe event confirmation, change and cancellation reports show all events scheduled for a specific vendor. This report is automatically generated and emailed immediately, when you schedule, change or cancel events whose event date is greater than the current date. This report is sent to the vendor, which confirms the events are scheduled, changed, added or cancelled for that vendor and also to the person who scheduled, changed or cancelled the event in Event Link.
Sample Reports
Created by Interactions 74
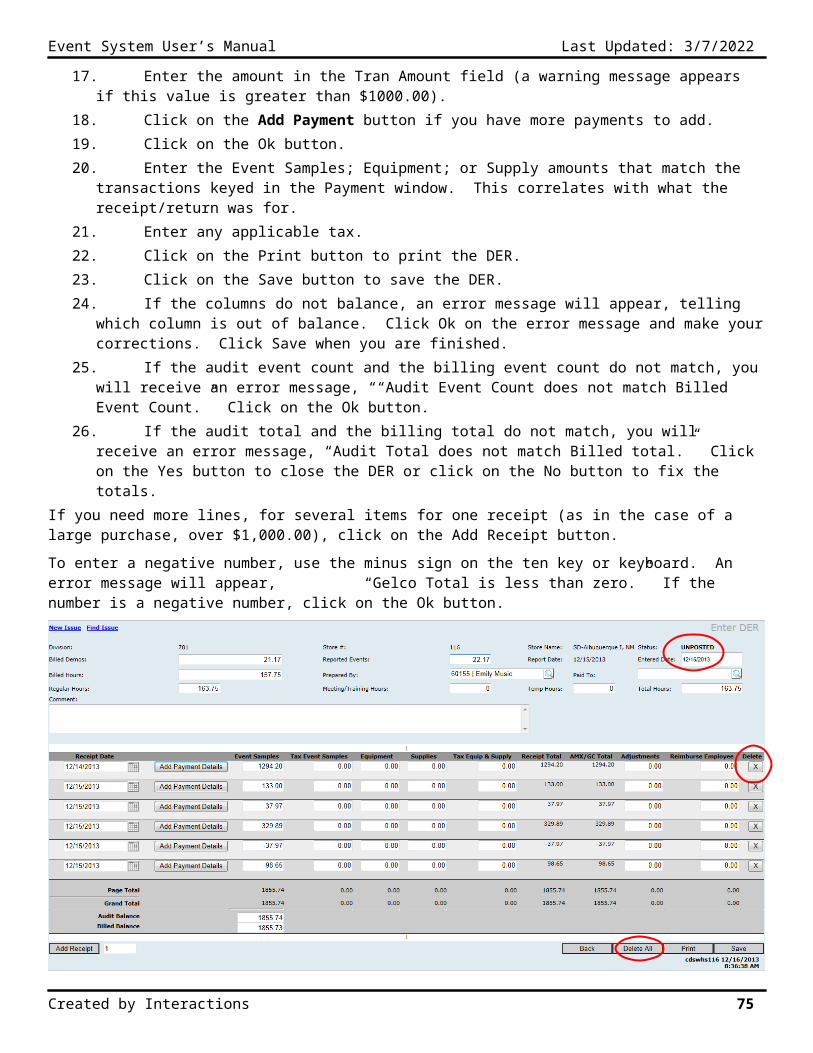
Event System User’s Manual Last Updated: 5/9/2023
Additional Information
This report is sent via email first to the vendor contact for the region and a copy is sent to the user currently logged in.
If the report cannot be emailed to the Scheduling Contact, then the report is emailed to the user currently logged in. It is your responsibility to print this report.
This report is ONLY generated if the Event Date is greater than the current date.
Sort Order: Status, Vendor, Date, Item.
Main Reports Page
Created by Interactions 75
Event System User’s Manual Last Updated: 5/9/2023
Created by Interactions 76
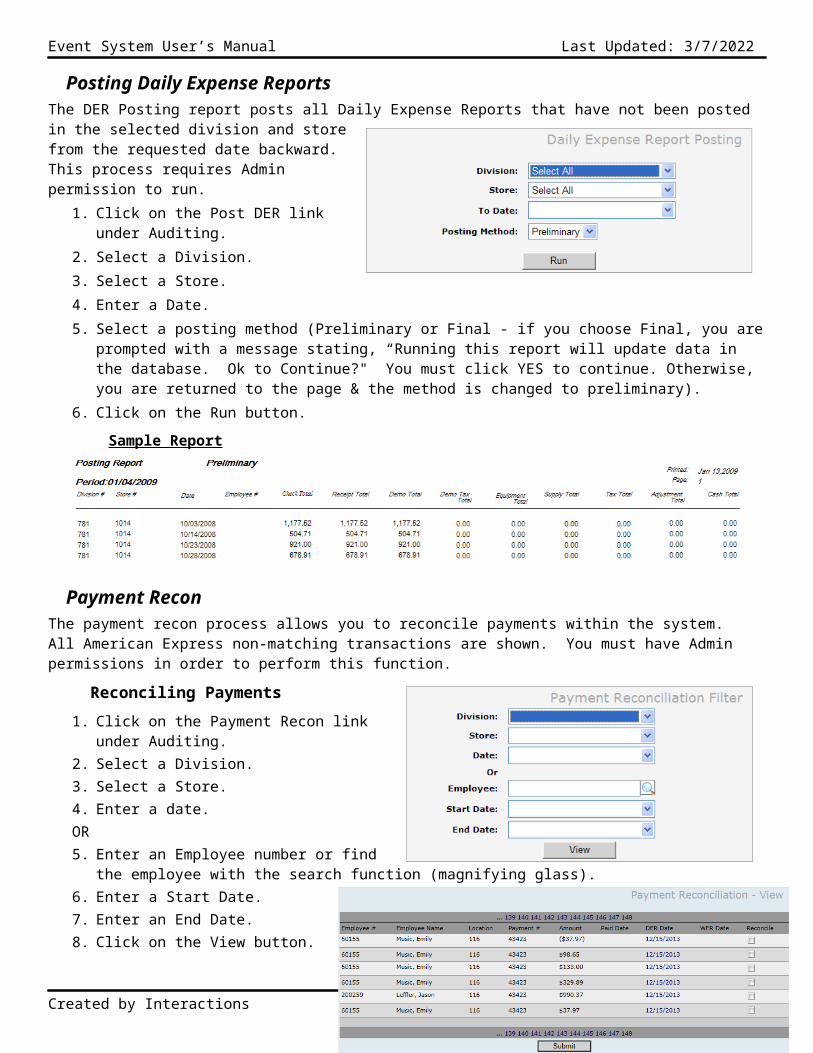
Event System User’s Manual Last Updated: 5/9/2023
Scheduling Reports1. Division Schedule Report
The division schedule report lists scheduling totals by division. This will provide you with a read-only view of the scheduling totals with the ability to drill down to the store to display a list of the events that have been scheduled. The report counts the number of events for each store, within a specific division, across a week period.
Printing the Division Schedule Report
1. Click on the Division Schedule report link.2. Select one or all Divisions.OR3. Select one or all Area Managers.AND4. Enter a date in the By Date (From) field.5. Enter a date in the By Date (To) field (the
maximum date range is 7 days).6. Click on the Find button to view the report or
click on the Export button to export the data to Excel.
7. Click on the desired Store Number link. This will display the Division Schedule Detail page with the events schedule for that store on that day.Report Sort Order: Store # and Day.
8. Click on the item number\name link on the detail page to edit the details of the event in the edit work order page.
Created by Interactions 77
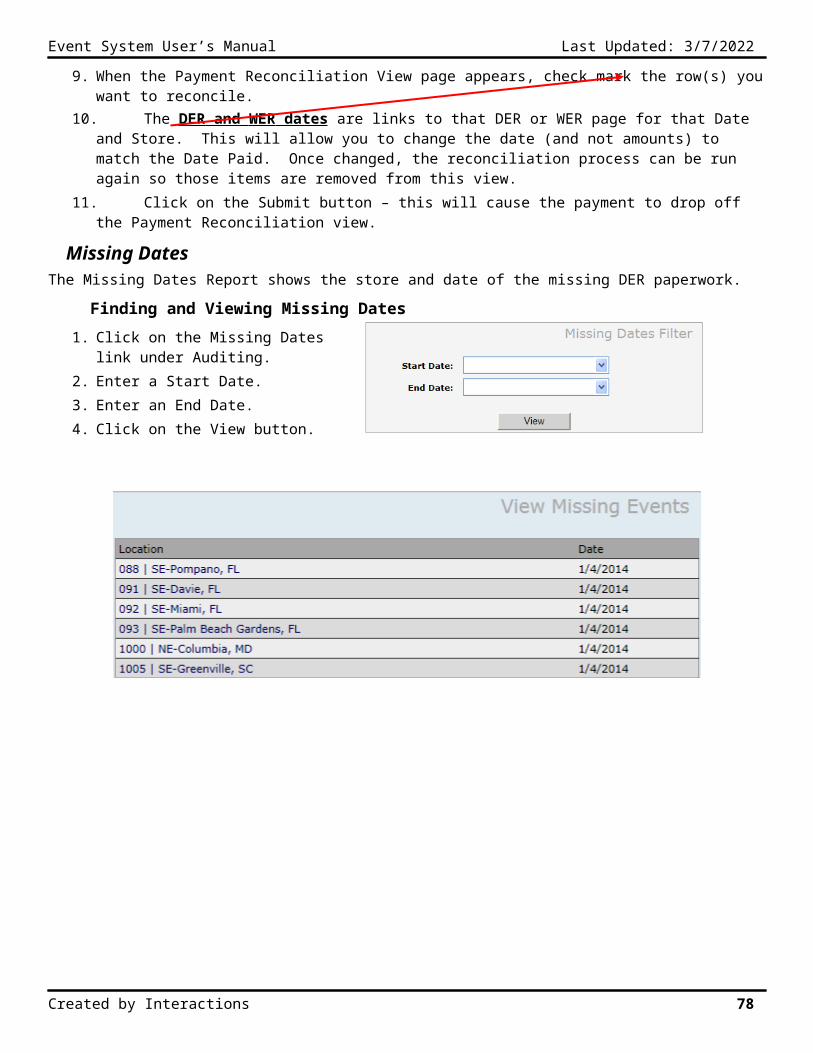
Event System User’s Manual Last Updated: 5/9/2023
2. Event History Report
The event history report gives you an at a glance view of the totals for each type of events the vendor has scheduled or has already performed.
Printing the Event History Report
1. Click on the Event History report link.
2. Select one or all Divisions.
3. Select one or all Vendors.
4. Enter a date in the From field.
5. Enter a date in the To field.
6. Click on the Export button.
Report Sort Order: Region, Vendor, Event Type, Month
Created by Interactions 78
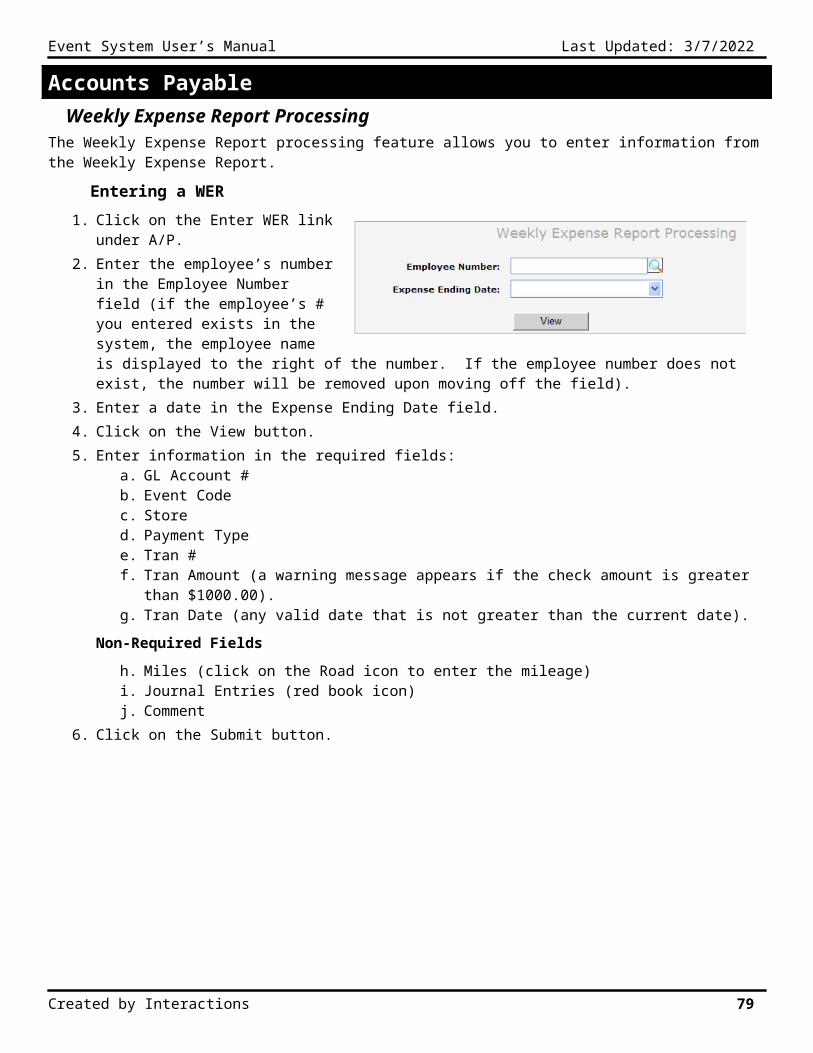
Event System User’s Manual Last Updated: 5/9/2023
Sample Export
Created by Interactions 79
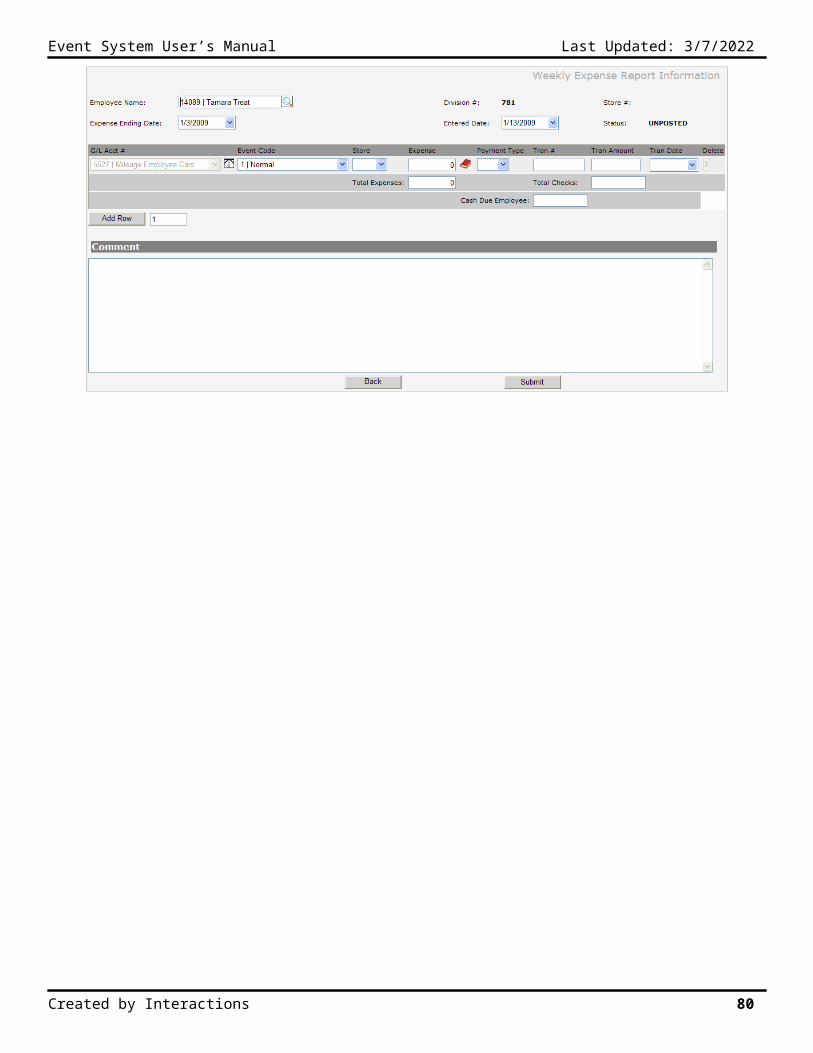
Event System User’s Manual Last Updated: 5/9/2023
3. Daily Demo Report
The daily demo report displays all events scheduled for a specific store for a selected date range. Each page includes three events for the store and prints a Breaker page at the end of the report to log additional employee hours. Each day starts on a new page. Each store writes the event information on the report and is then scanned and emailed to the Billing staff to be entered into Event Link.
Printing the Daily Demo Report
1. Click on the Daily Demo report link.2. Select one or all Divisions.3. Select one or all Stores.4. Enter a date in the Start Date field.5. Enter a date in the End Date field (the
maximum date range is 1 week).6. Click on the View button.
Report Sort Order: Store and Day
Sample Report
Created by Interactions 80
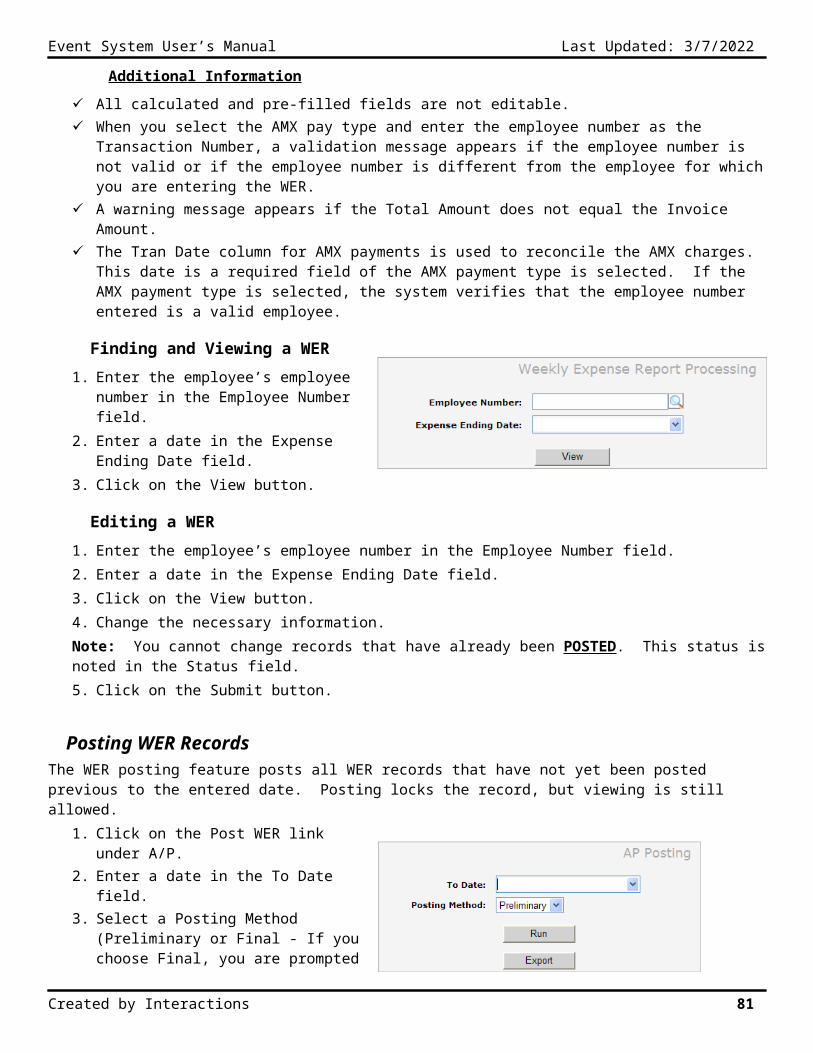
Event System User’s Manual Last Updated: 5/9/2023
4. Daily Demo / Expense ReportThe daily demo / expense report shows all events scheduled within a selected store within a specified date range, followed by the DPIS report for each item. Each store writes the event information on the report and is then scanned and emailed to the Billing staff to be entered into Event Link.
Printing the Daily Demo / Expense Report
1. Click on the Daily Demo / Expense Report link.2. Select one or all Divisions.3. Select one or all Stores.4. Select one or all Vendors.5. Enter a date in the Start Date field.6. Enter a date in the End Date field.7. Click on the View button.
Sample Report
Created by Interactions 81
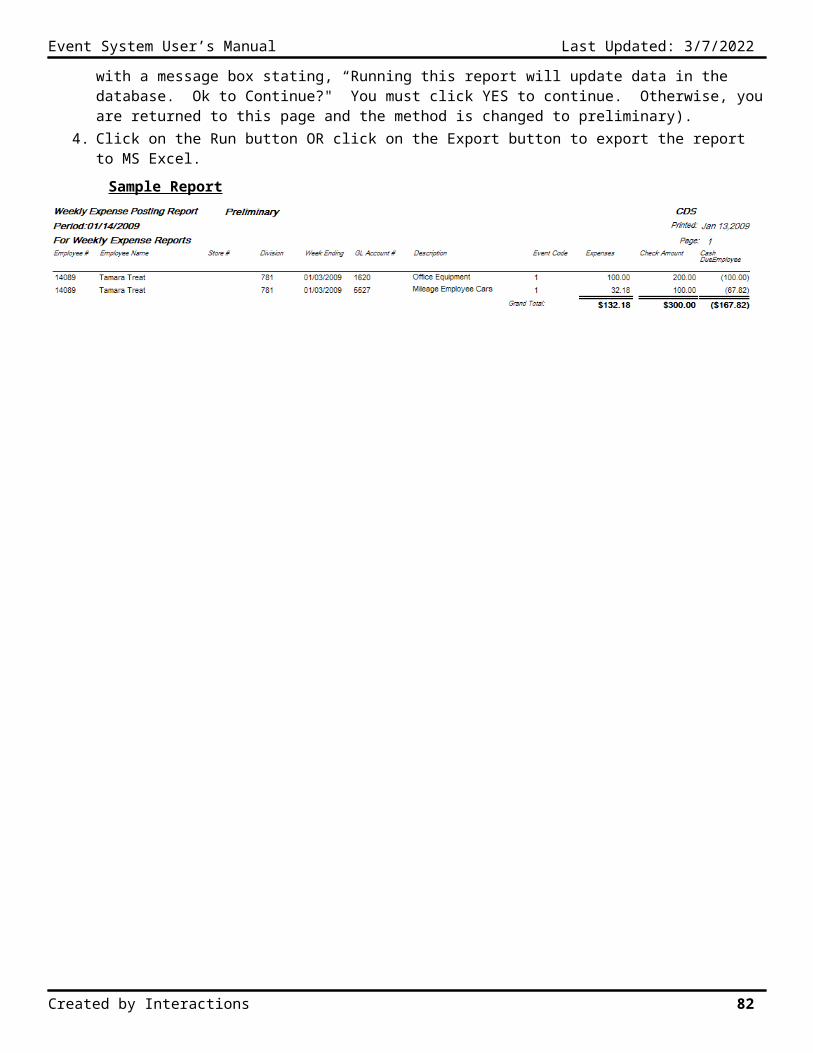
Event System User’s Manual Last Updated: 5/9/2023
Created by Interactions 82
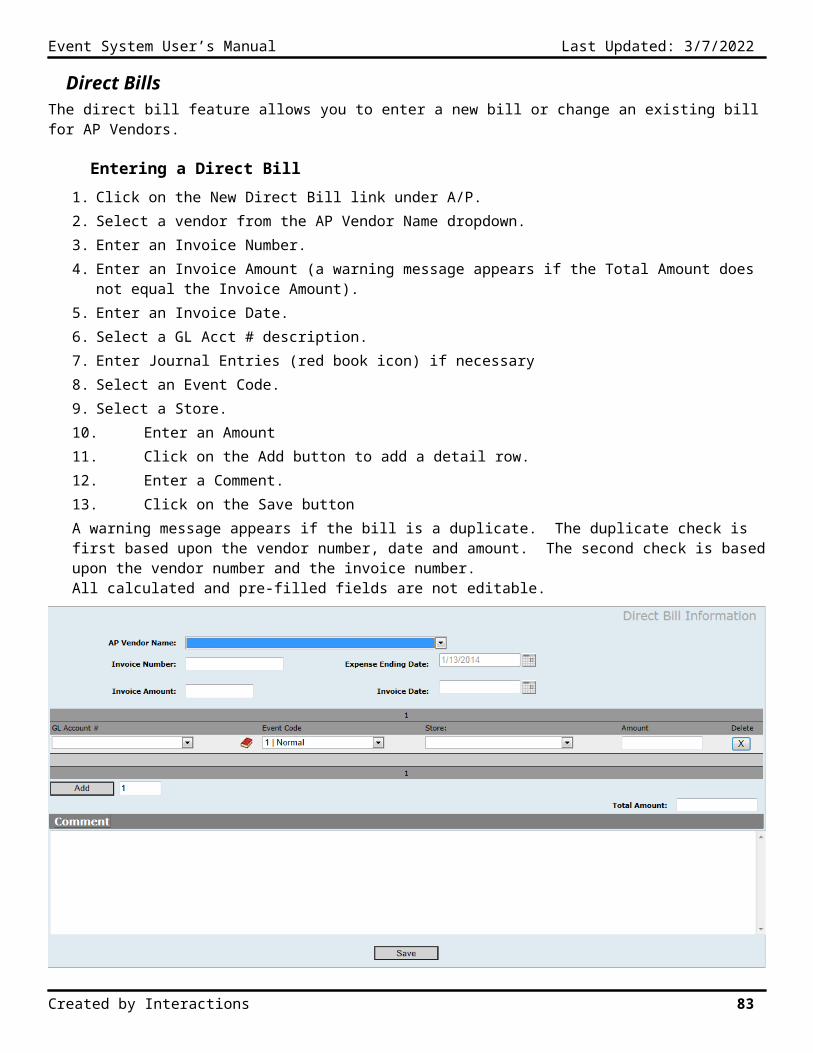
Event System User’s Manual Last Updated: 5/9/2023
5. Store Schedule Report
The store schedule report shows all events scheduled within a date range, by division, and by store.
Printing the Store Schedule Report
1. Click on the Store Schedule report link.
2. Select one or all Divisions.
3. Select one or all Stores.
4. Enter a date in the Start Date field.
5. Enter a date in the End Date field.
6. Click on the View button.
Report Sort Order: Division, Store, Day
Sample Report
Created by Interactions 83
Event System User’s Manual Last Updated: 5/9/2023
6. Vendor Scheduled and Billed Report
The vendor scheduled & billed report shows all events scheduled or billed for vendors with a specific date range.
Printing the Vendor Scheduled and Billed Report
1. Click on the Vendor Scheduled and Billed report link.
2. Select one or all Divisions.3. Select one or all Stores.4. Select one or all Vendors.5. Select one or all Items.6. Check “Group by Items” to group the report by
Items.7. Select one or all Departments8. Enter a date in the Start Date field.9. Enter a date in the End Date field.10. Check Scheduled Only, Billed Only or Scheduled
and Billed.11. Check mark “Display all information” if you want
to view all the billing detail for the events (export only).
12. Click on the View button to view the report or click on the Custom Export button to export the data to Excel.
Report Sort Order: Division #, Item #, Date, Store #
Sample Report
Created by Interactions 84
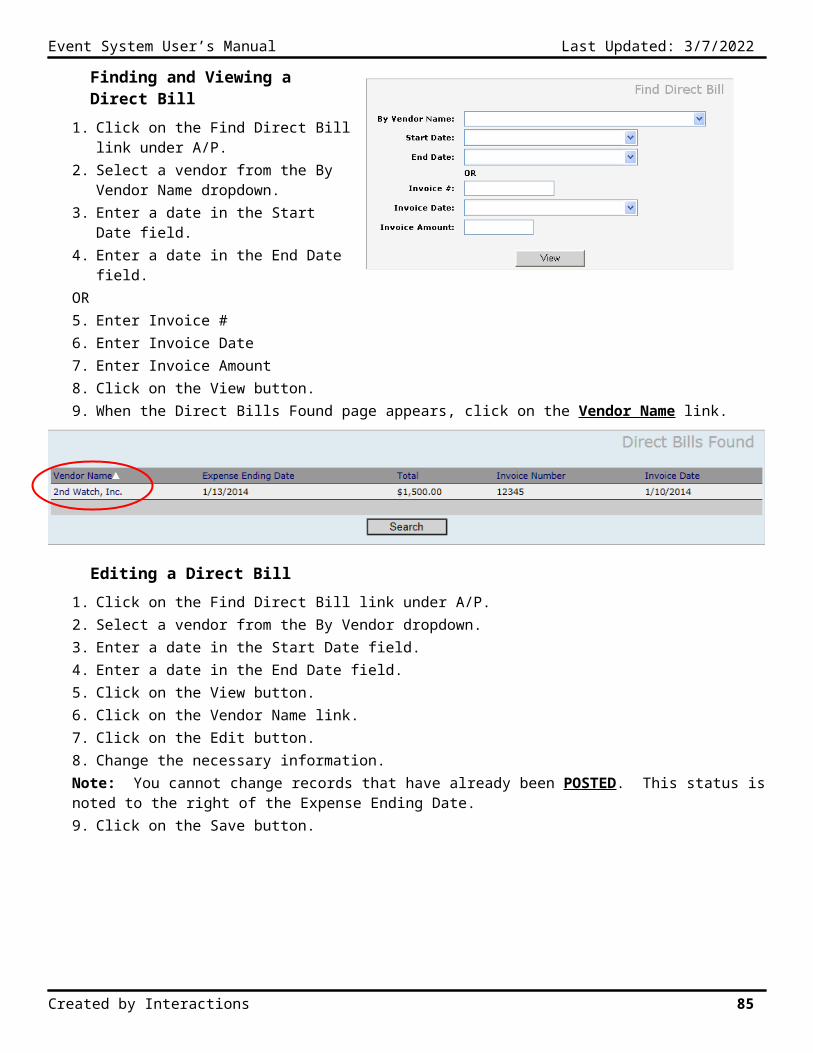
Event System User’s Manual Last Updated: 5/9/2023
7. Vendor Report
The vendor report displays information for Scheduling, Billing, Broker or Vendor Contact information. It also allows you to export a group of contact’s email address to a .txt file.
Printing the Vendor Report
1. Click on the Vendor Report link.2. Select All or Active from the Type dropdown.3. Select the Contact type (Scheduling, Billing, Broker or Vendor
Contact information).4. Click on the View button to view the report in print layout or
click on Export to export a unique list of email address for the selected contact type.
Report Sort Order: By Division, Vendor.
Sample Report
8. Item Report
The item report displays all active items in the system.
Printing the Item Report
1. Click on the Item report link – this will automatically run the report.Report Sort Order: Alphabetically by Vendor Name and Item #.
Sample Report
Created by Interactions 85
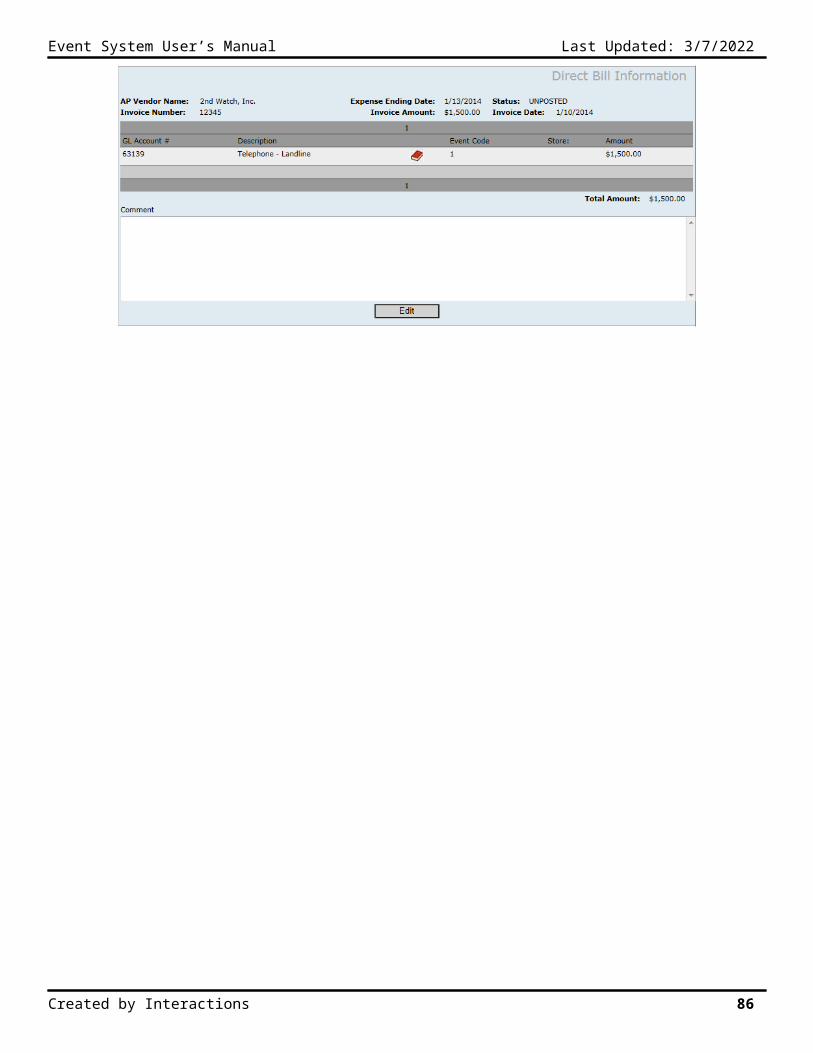
Event System User’s Manual Last Updated: 5/9/2023
9. DPIS – Daily Report
The DPIS - Daily report lists all scheduled item detail for the selected store. Each item starts on a new page.
Printing the DPIS – Daily Report
1. Click on the DPIS – Daily Report link.
2. Select a Division.
3. Select a Store.
4. Enter a date in the Event Date field.
5. Click on the View button.
Report Sort Order: Vendor and Item.
Sample Report
Created by Interactions 86
Event System User’s Manual Last Updated: 5/9/2023
10. Department Schedule Report
The department schedule report shows all events scheduled within a specific division, arranged by department, inside a specific date range. Each new department starts on a new page.
Printing and Exporting the Department Schedule Report
1. Click on the Department Schedule report link.2. Select 1 or All Divisions.3. Select 1 or All Stores.4. Select 1 or All Departments.5. Enter a Start Date.6. Enter an End Date.7. Check the Sort by Vendor check box to sort by Vendor
Name. If this check box is not checked, the sort will be as stated below.
8. Click on the View button to view the report in the viewer. Click on the Export button to export the data to Excel.
Report Sort Order: Division ID, Department ID, Event Date, Vendor Name, Item Number, and Store.
Sample Report
Created by Interactions 87
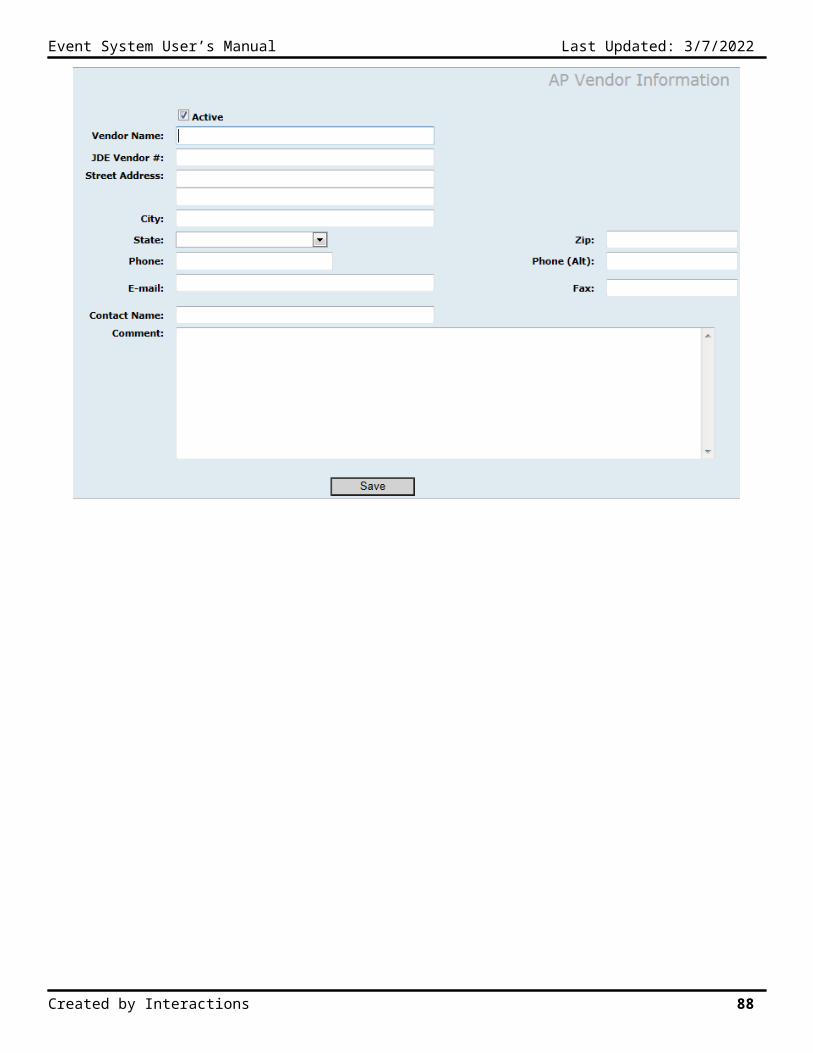
Event System User’s Manual Last Updated: 5/9/2023
11. Vendor Billed Report
The vendor billed report displays the billed information for each vendor with grand total at the end of the report.
Printing the Vendor Billed Report
1. Click on the Vendor Billed Report link.2. Select 1 or All Divisions.3. Select 1 or All Vendors.4. Enter a Start Date.5. Enter an End Date.6. Click on the View button.
Sample Report
Created by Interactions 88
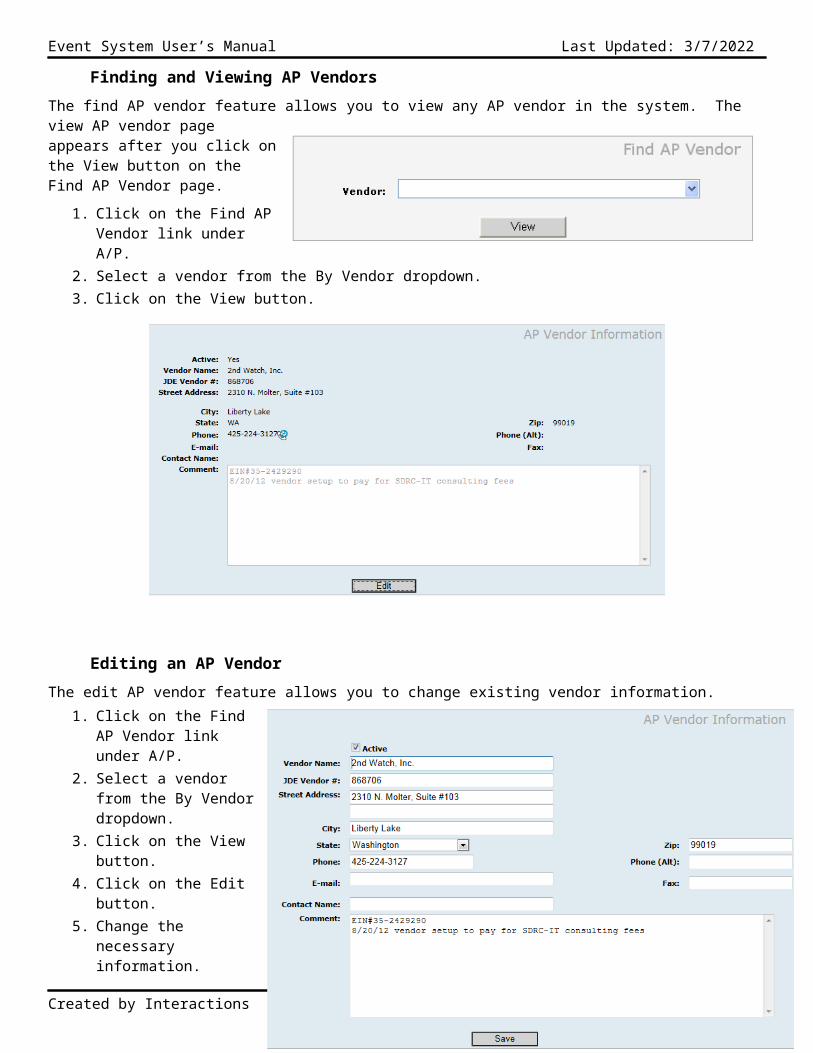
Event System User’s Manual Last Updated: 5/9/2023
12. Forced Distribution Import (OTO Only)
The forced distribution import allows users to upload data for a specific store and product. These numbers appear on the Division Schedule Report.
Uploading the data for Forced Distribution
1. Click on the Forced Distribution Import link.2. Enter a Start Date.3. Enter an End Date.4. Select the file to be uploaded.5. Click on the Upload File button.
Upload Sample
Column A is the Store Number and column B is the Item or UPC number for the Item.
Created by Interactions 89
Event System User’s Manual Last Updated: 5/9/2023
13. Event History Report (Work Order History)
The event history report displays the requested events, notes and any changes made to the event requests since the request was first created. It provides a history of details for each work order.
Printing the Event History Report
1. Click on the Event History Report link.2. Select 1 or All Divisions.3. Select 1 or All Vendors.4. Select 1 or All Items.OR5. Select a StoreAND6. Enter a Start Date.7. Enter an End Date.OR8. Enter a PO NumberOR9. Enter a Request Number10. Click on the Export button.
Sample Report
Created by Interactions 90
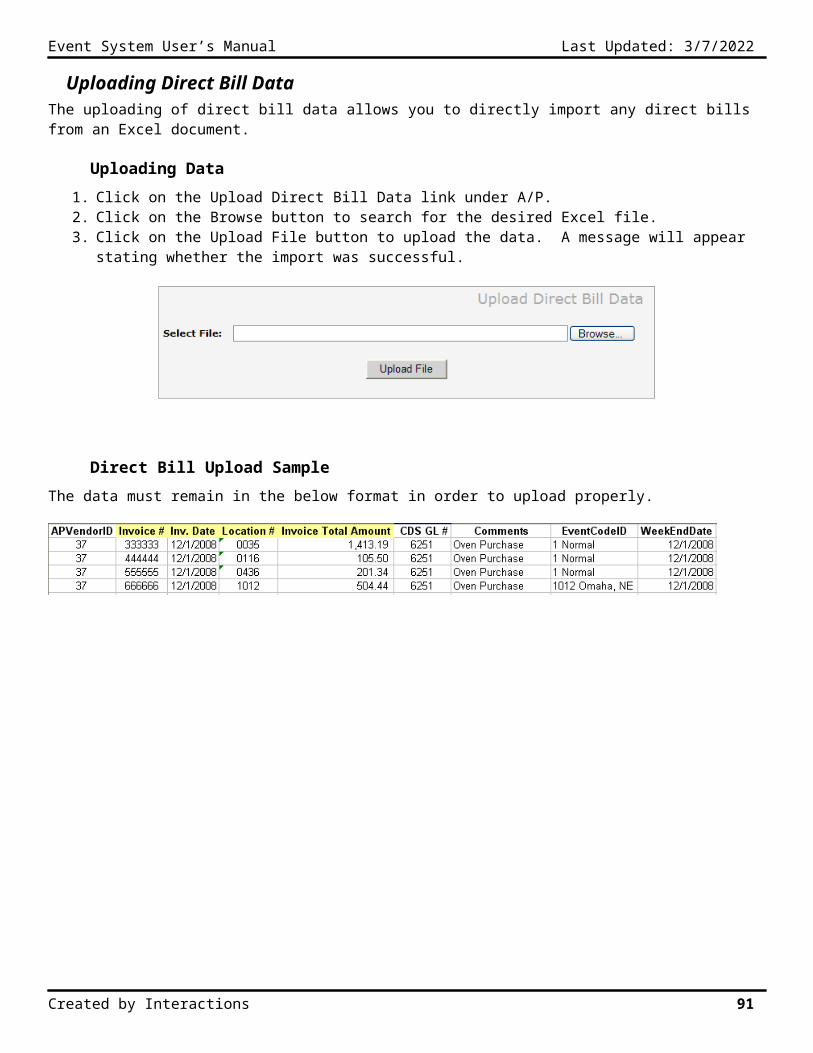
Event System User’s Manual Last Updated: 5/9/2023
14. Event Classification Report
The event classification report displays the scheduled and billed information for each vendor with event classifications and hours worked by employees.
Printing the Event Classification Report
1. Click on the Event Classification Report link.2. Select 1 or All Stores.3. Select 1 or All Event Classifications.4. Enter a Start Date.5. Enter an End Date.6. Check mark, Scheduled Only, Billed Only or
Scheduled and Billed.7. Click on the Custom Export button.
Sample Report
Created by Interactions 91
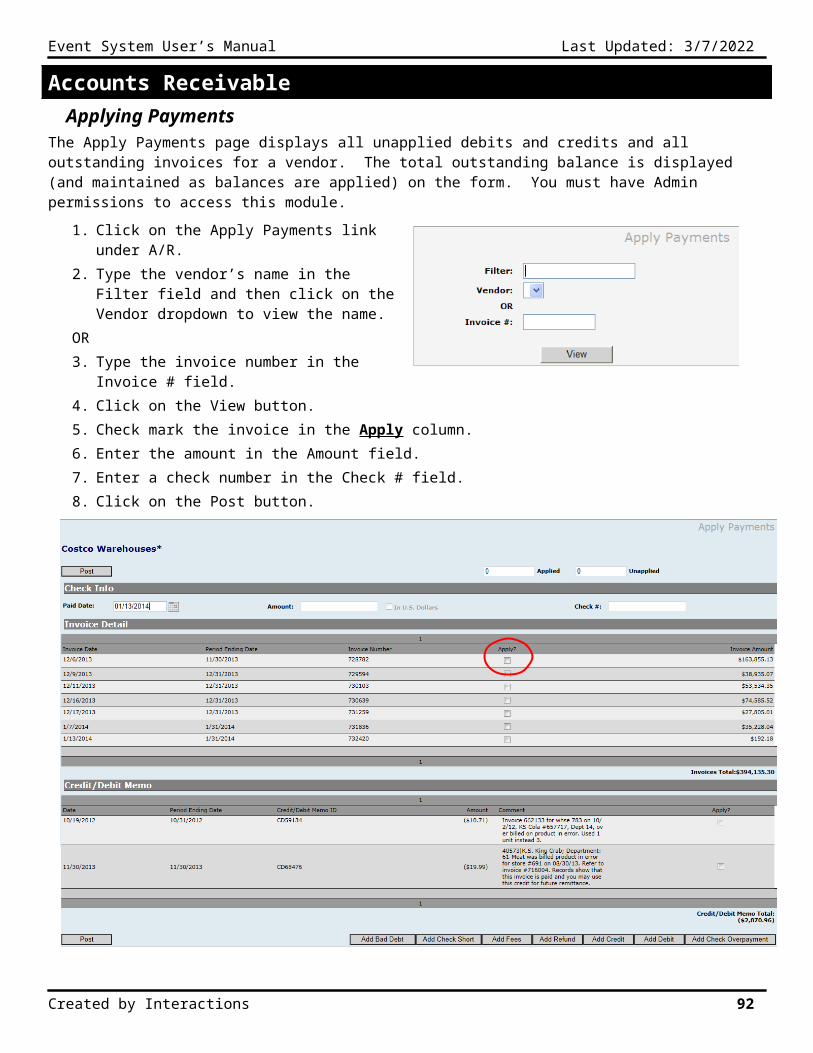
Event System User’s Manual Last Updated: 5/9/2023
Staffing Reports
Event Order Report
The event order report is used by the Scheduling department to view of the upcoming events for a particular vendor and to see how many SAs still need to be scheduled. This report is emailed to the scheduler when entering a work order and is also available under Staffing Reports.
Created by Interactions 92
Event System User’s Manual Last Updated: 5/9/2023
Schedule Employees Report
Search Criteria Division (1 Only) Sub-Division Store Vendor Name Vendor Item Start Date End Date 7 day date range max
The “Total Events” (per day), “Available SA’s”, “Open SA’s” and “Pending SA’s” numbers are links to the Schedule Employees Detail page (see Division Schedule Detail example). Red indicates the number of needed SAs and Blue indicates the number of Pending SAs.
Click on any of the links for the given day and it will open the Staffing Division Schedule Detail page. The Total links will open a pop-up window to allow you to view the Available SAs for the location.
Exporting a Work Schedule
Exporting a work schedule is the easiest way to send work assignments and schedules to your employees.
1. Go to Reports2. Click on the Schedule
Employees link.3. Select a specific store4. Enter up to a 7 day
date range.5. Click on the Custom
Export button.
Created by Interactions 93

Event System User’s Manual Last Updated: 5/9/2023
Staffing Division Schedule Detail Page
The employee name link, in the upper Events grid, will open the SA Calendar report for the selected employee. The Pending or Confirmed links will open the Available Events pop-up to allow you to add, remove or change
an event assignment. The Assign link, in the Available Employees grid, will allow you to add, remove or change an event assignment. The Multiple Date Assignment link will allow you to schedule one employee for a series of events for the same
vendor/item/store. The employee name link, in the Available Employees grid, will open an email for the selected employee. The green house icon indicates the current store is the SA’s primary store. A name in Green indicates the employee is a Lead Sales Advisor. Advanced Search: This advance search function will allow you to look for employee’s, who are not associated
with the specific store, and allow the user to assign any employee to the specified event. This would be used in the event an SA can work in a store they would not normally work in.
Available Events Pop-up
Created by Interactions 94
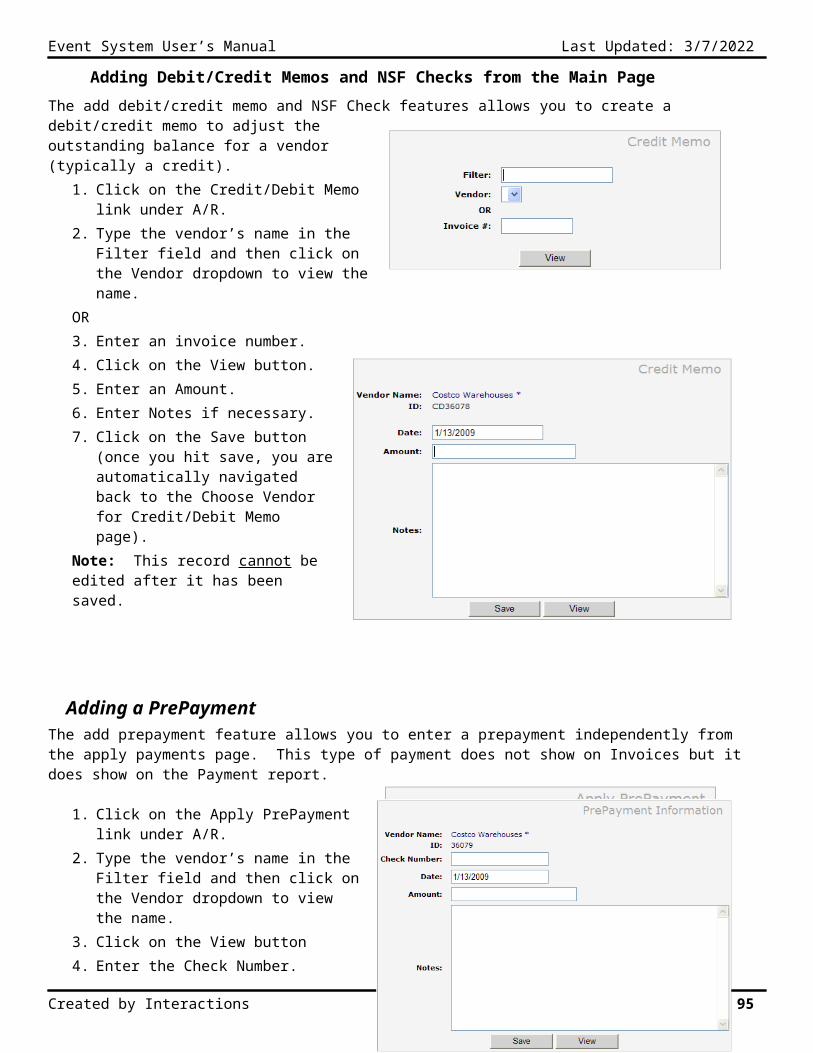
Event System User’s Manual Last Updated: 5/9/2023
Sales Advisor Calendar Report
Search Criteria Employee Number Month/Year
This report allows users to view and change an SA’s availability and assign an SA to a event. After clicking on one of the calendar icons, the Available Events pop-up window will appear with a list of scheduled events.
The Edit Employee’s Information link will open the employee page and allow you to update the employee’s profile.
Available Events pop-up window:o No button: Clicking on the No button will flagged the SA as “Absolutely cannot work – no exceptions.”
This will flag the date with the Red circle with a slash icon.o Reserve button: Clicking on the Reserve button will reserve the SA for the date but will not assign the
SA to an event. This will flag the date in Yellow highlight.o Assigning Events: Clicking on the dropdown list will allow the user to select Confirmed or Pending and
assign the SA to the event. If Pending is selected, an email will be sent to the SA allowing the SA to Accept or Deny the job. If Confirmed is selected, an email will be sent to the SA showing the event details. The will also flag the date in the Green Circle icon.
o Comment: The comment area should be used in the event the SA is flagged as “No” to denote the reason (e.g. death in the family).
Created by Interactions 95
Event System User’s Manual Last Updated: 5/9/2023
Billing Reports1. Commitment Report
The commitment report shows information that compares actual events performed to the commitment between the buyer and the vendor including dollar amounts per month, year to date totals and balances remaining on the commitment. This report can only be run for up to a 1 year period. This report is only exported to Excel.
Exporting the Commitment Report
1. Click on the Commitment Report link.2. Select 1 or All Divisions.3. Select 1 or All Vendors.4. Select 1 or All Departments.5. Enter a Start Date.6. Enter an End Date.7. Click on the Export button to view the report in
Excel.Note: If you click on Email, this will email ALL VENDORS with a commitment report. Do not click this button unless you intend for the vendors to receive this report.
Report Sort Order: Item Department, Vendor Name, and Item #.
Sample Export
Created by Interactions 96
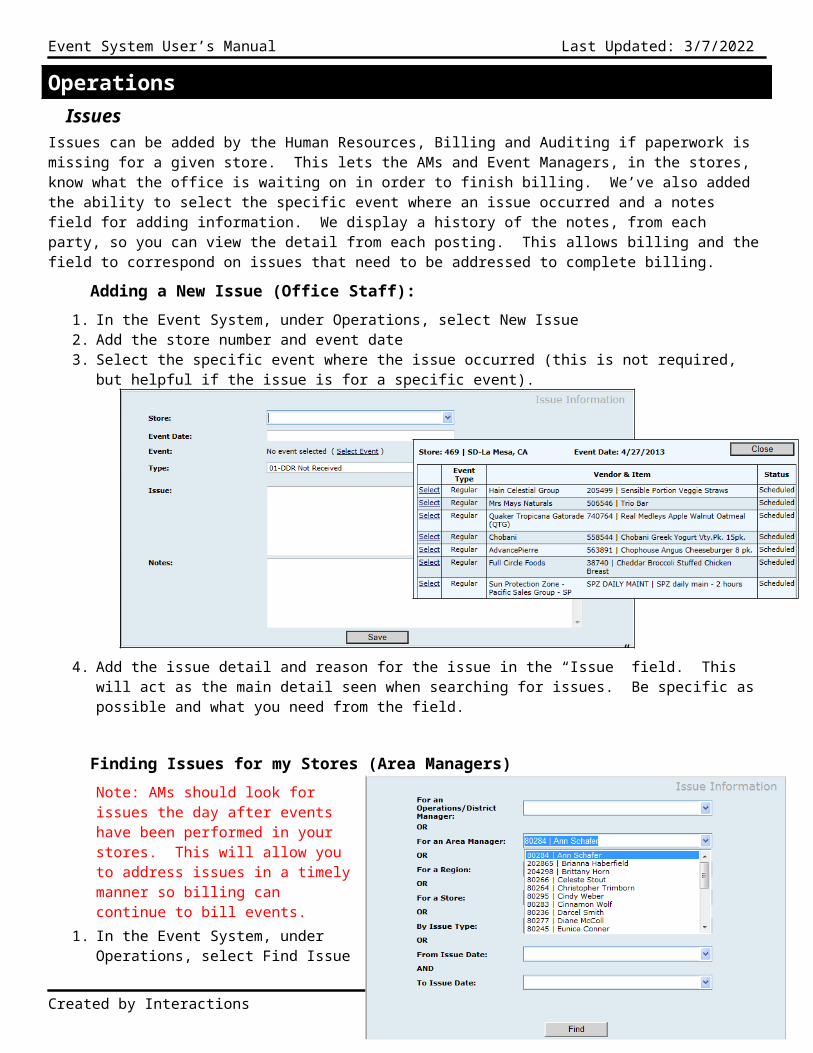
Event System User’s Manual Last Updated: 5/9/2023
2. Event Billing Report
The event billing report displays a summary of charges from billed events for the requested date range.
Printing the Event Billing Report
1. Click on the Event Billing Report link.
2. Select 1 Division.
3. Select 1 or All Stores.
4. Select 1 or All Vendors.
5. Select 1 or All Items.
6. Select 1 or All Departments.
7. Enter a Start Date.
8. Enter an End Date.
9. Click on the View button.
Report Sort Order: Item Department and Division.
Sample Report
Created by Interactions 97
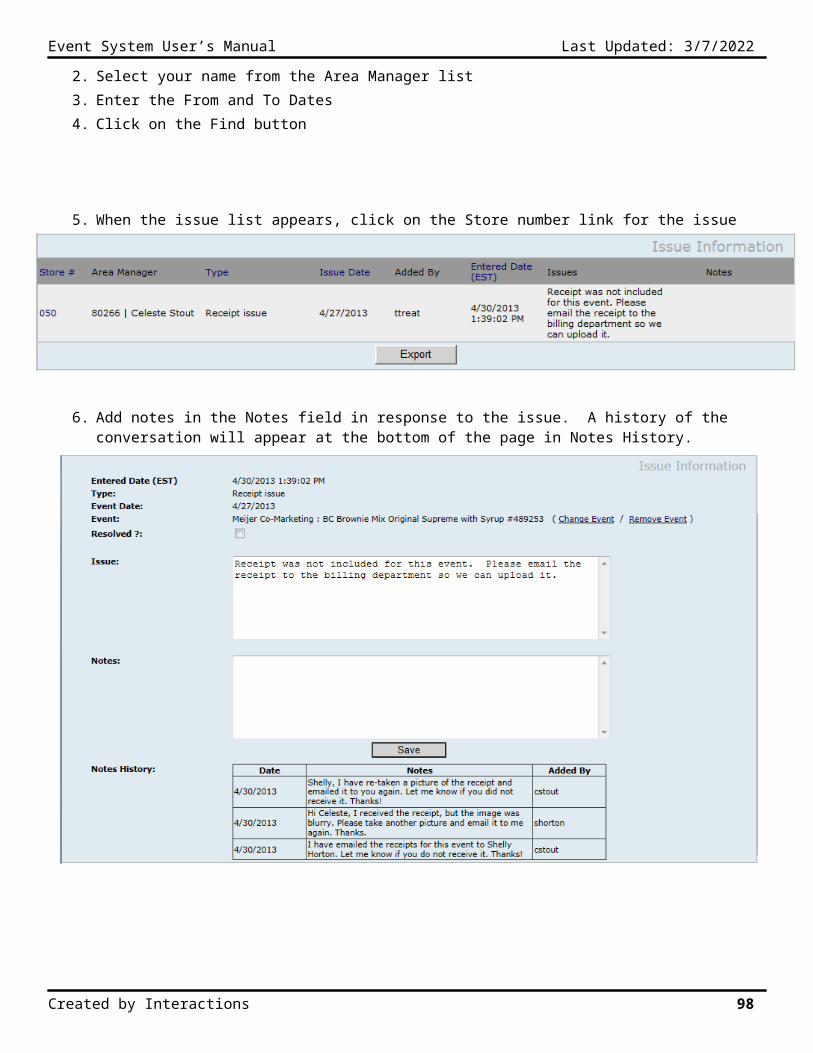
Event System User’s Manual Last Updated: 5/9/2023
3. Employee Report
The employee report lists all employee information. You must have Administrative permissions in order to run this report.
Printing the Employee Report
1. Click on the Employee Report link.
2. Select 1 or All Stores.
3. Select the Type (All or Active) of employees.
4. Click on the View button
Report Sort Order: Store #, Division # and Alphabetically by Employee Name. All unassigned employees are grouped by division.
Sample Report
Created by Interactions 98
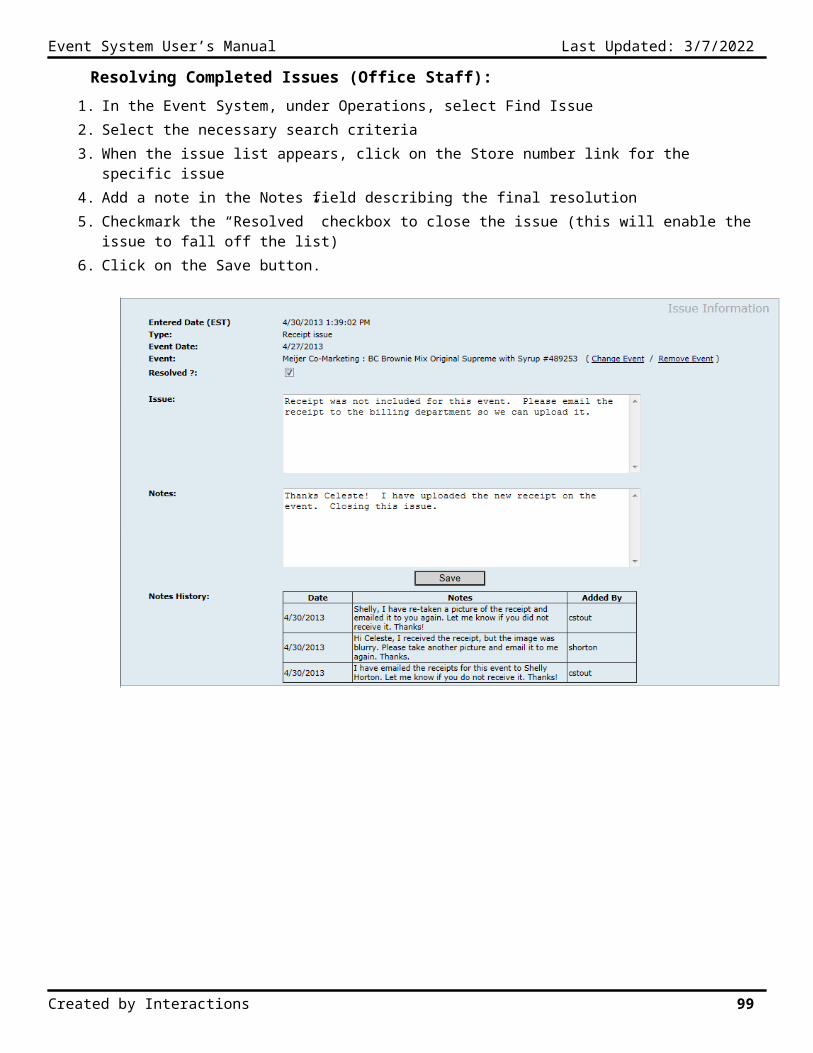
Event System User’s Manual Last Updated: 5/9/2023
4. Employee Hours Report
The employee hours report shows the total hours worked for each employee for the selected date range.
Viewing and Exporting the Employee Hours Report
1. Click on the Employee Hours Report link.2. Select 1 or All Divisions.3. Select 1 or All Stores.
OR4. Enter or select and employee number or
name.5. Select a Status.6. Enter a From date.7. Enter a To date8. Click on the View button to view the data.
Click on the Custom Export button to export the data to Excel.
Sample Report
Sample Export
Created by Interactions 99
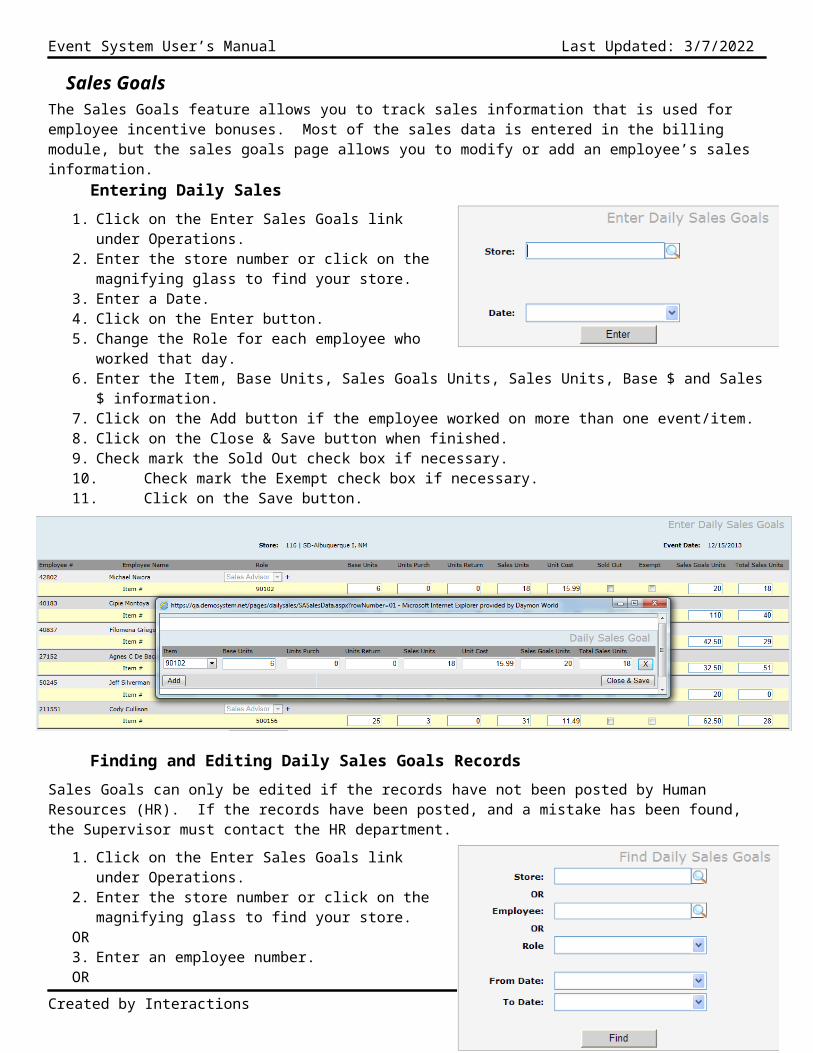
Event System User’s Manual Last Updated: 5/9/2023
5. Payroll Report
The payroll report lists the total hours of all employees in a division, store and in the specified date range. The Total Hours column is the sum of the Day 1 through Day 14 columns. You must have Admin permissions to run this report.
Printing and Exporting the Payroll Report
1. Click on the Payroll Report link.2. Select 1 or All Divisions.3. Select 1 or All Stores.4. Enter a Start Date.5. Enter an End Date (maximum of up to 14 days).6. Click on the View button to see the report in the
viewer. Click on the Custom Export button to export the data to Excel.
Report Sort Order: Division, Store #, and alphabetically by Employee Last Name.
Sample Report
Sample Export
Note:1. Yellow highlight indicates an employee worked at a different location on that particular date2. Green highlight indicates an employee worked at a different location as well as their home location on that
particular date3. Orange highlight indicates an employee worked at a different location for a Special Payment event (Roadshow
or Special Event Campaign) or if the employee worked at a different location as well as home location for an SP event type.
Created by Interactions 100
Event System User’s Manual Last Updated: 5/9/2023
4. Blue highlight indicates an employee worked on SP event (Roadshow or Special Event Campaign).
Created by Interactions 101
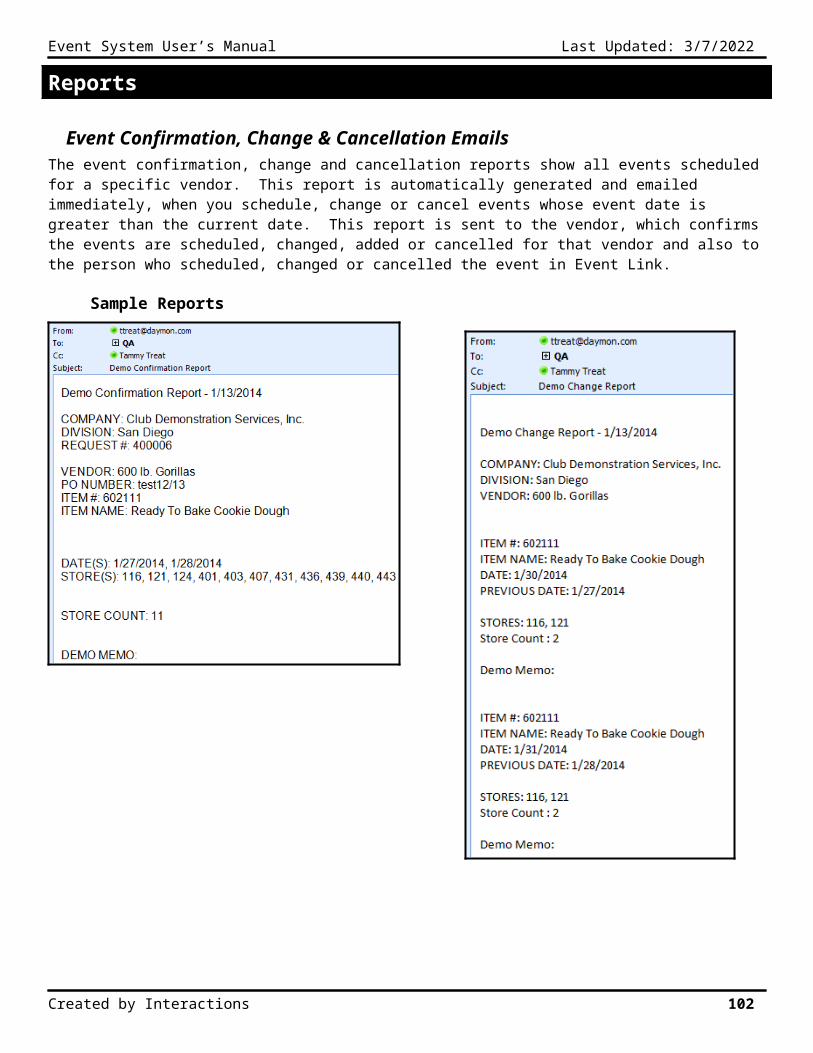
Event System User’s Manual Last Updated: 5/9/2023
6. Payroll Report (Posting)The payroll posting report lists the total hours worked by an employee(s), from the specified date range backward, in the selected division. This report processes ALL employees, regardless of their status. You must have Administrative permissions in order to run this report.
Viewing, Posting and Exporting the Payroll Report (Posting)
1. Click on the Payroll Report (Posting) link.
2. Select 1 or All Divisions.
3. Enter Period Ending Date.
4. Select a Posting Method: Preliminary, Final or Reprint (if you choose Final, you are prompted with a message box stating, “Running this report will update data in the database. Ok to Continue?" You must click YES to continue. Otherwise, you are returned to this page).
5. Select Hours Type (regular or special payment)
6. Click on the View button to see the report in the viewer. Click on the Export button to export the data to Excel to be used as an upload into ADP. Click on the Custom Export button to export the data into Excel.
Report Sort Order: Division, Employee Number, Customer Store Number, and Event Date.
Sample Report
Created by Interactions 102
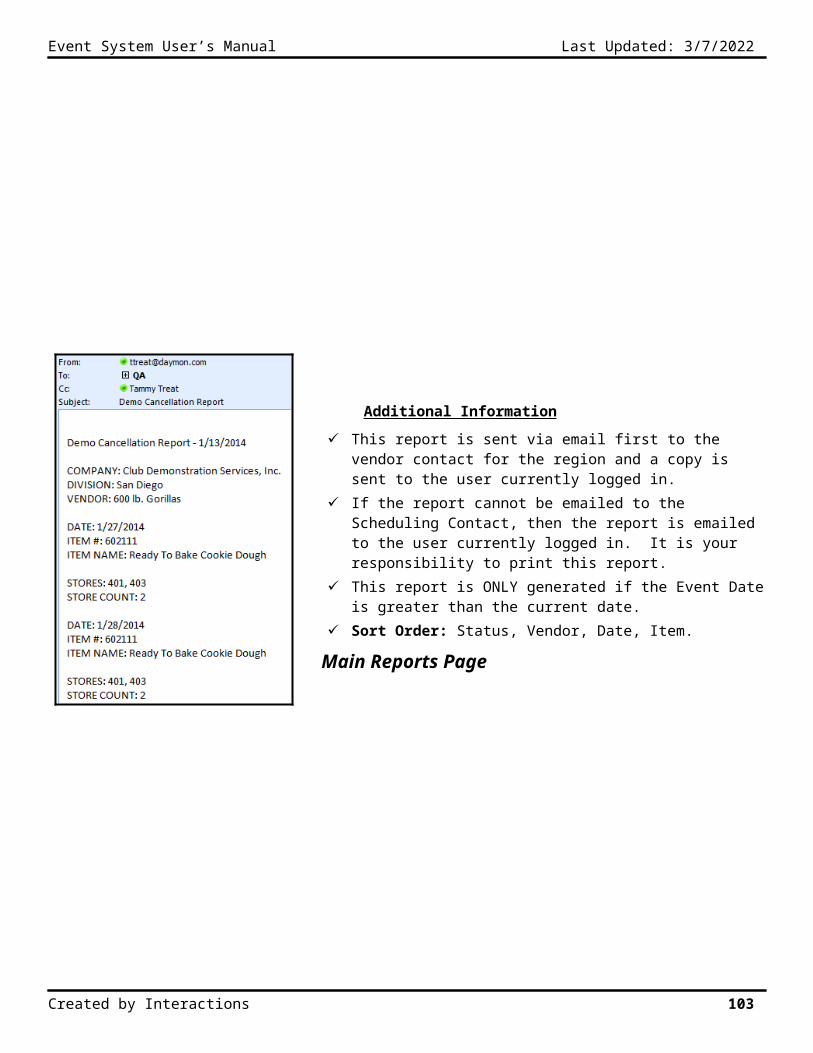
Event System User’s Manual Last Updated: 5/9/2023
Sample Export
Sample Custom Export
Created by Interactions 103
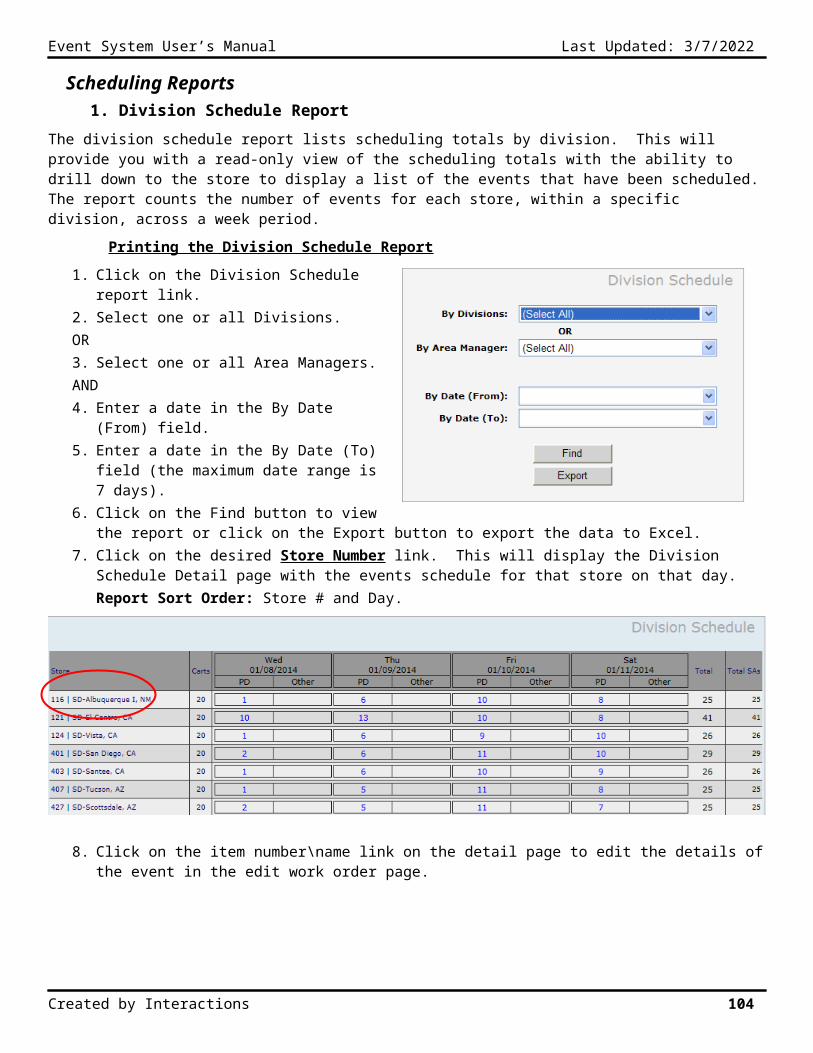
Event System User’s Manual Last Updated: 5/9/2023
7. Sales Tax Due Report
The sales tax due report shows a listing of all paid invoices that have a tax that needs to be paid. The total tax for each individual invoice must be greater than zero and summarizes totals by state. You must have Administrative permissions in order to run this report.
The reprint sales tax due report function allows you to reprint the sales tax due report by Posted Date. The posted date is the date in which the report was originally run.
Printing the Sales Tax Due Report
1. Click on the Sales Tax Due Report link.
2. Enter a Start Date.
3. Enter an End Date.
4. Click on the View button (when you click the view button, a warning message will appear stating that this report will modify data in the database. You must select OK to continue).
Report Sort Order: State, Store, and Day.
Sample Report
8. Reprint Sales Tax Due Report
1. Click on the Reprint Sales Tax Due Report link.2. Enter the original report date in the Date field.3. Click on the View button.
Created by Interactions 104
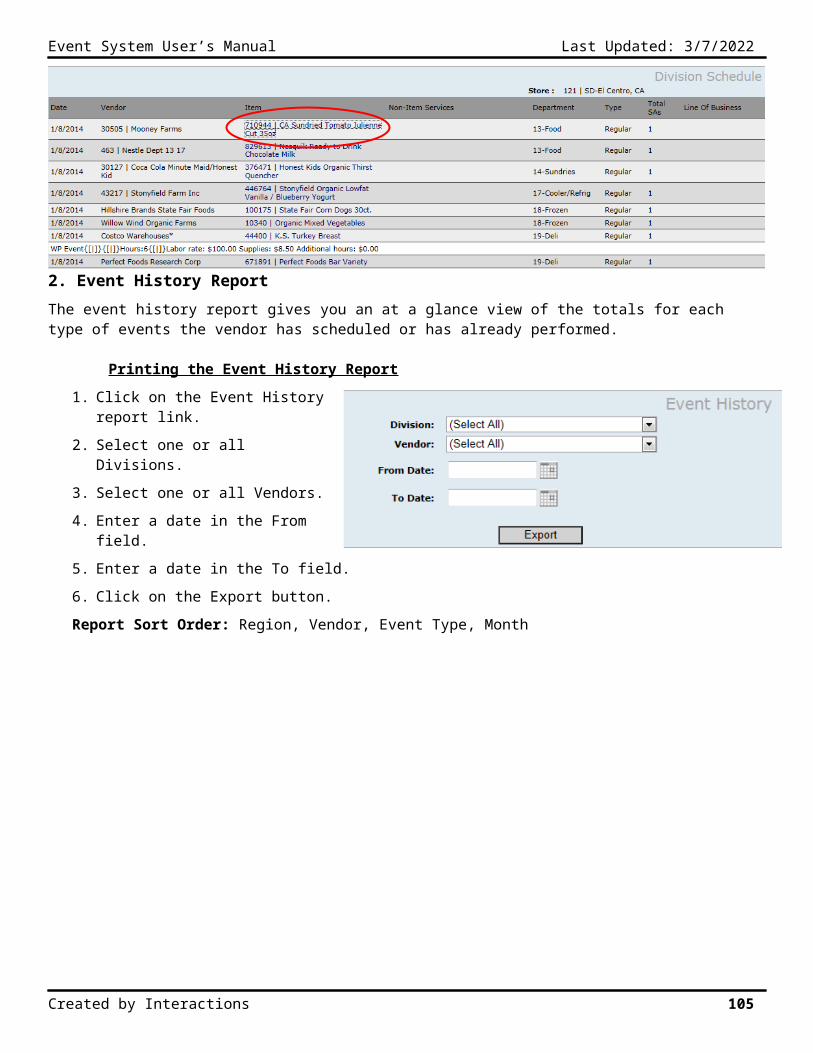
Event System User’s Manual Last Updated: 5/9/2023
9. Unbilled Event Report
The unbilled event report lists all events that have not been billed within the date range selected. Cancel code CBO is NOT included on this report.
Printing the Unbilled Event Report
1. Click on the Unbilled Event Report link.
2. Select 1 or All Divisions.
3. Select 1 or All Stores.
4. Select 1 or All cancellation codes in the Status field.
5. Enter a Start Date.
6. Enter an End Date.
7. Click on the View button.
Report Sort Order: Store # and Date.
Sample Report
Created by Interactions 105
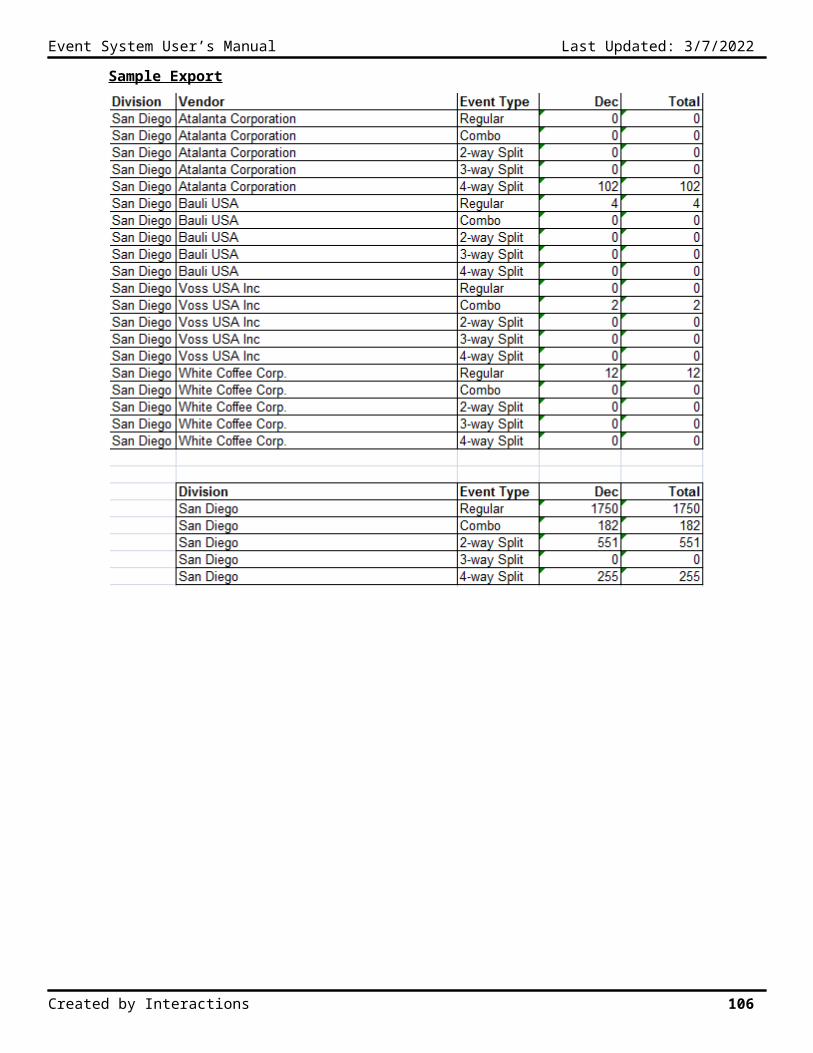
Event System User’s Manual Last Updated: 5/9/2023
10. Demos Not Performed Report
The demos not performed report displays a summary of all events not performed for a date range for the selected division(s) and store(s).
Printing and Emailing the Event Recovery Report
1. Click on the Demos Not Performed Report link.
2. Select 1 or All Divisions.
3. Select 1 or All Stores.
OR
4. Select a Vendor.
AND
5. Enter a Start Date.
6. Enter an End Date.
7. Select the Method you would like to run the report. Select SSRS Report to see the report in the viewer. Select Email to email the report to the scheduling contact for the specified Division/Vendor.
8. Click on the View button.
Report Sort Order: Vendor Name, Division, Item #, Event Date, and Store.
Sample Report
Created by Interactions 106
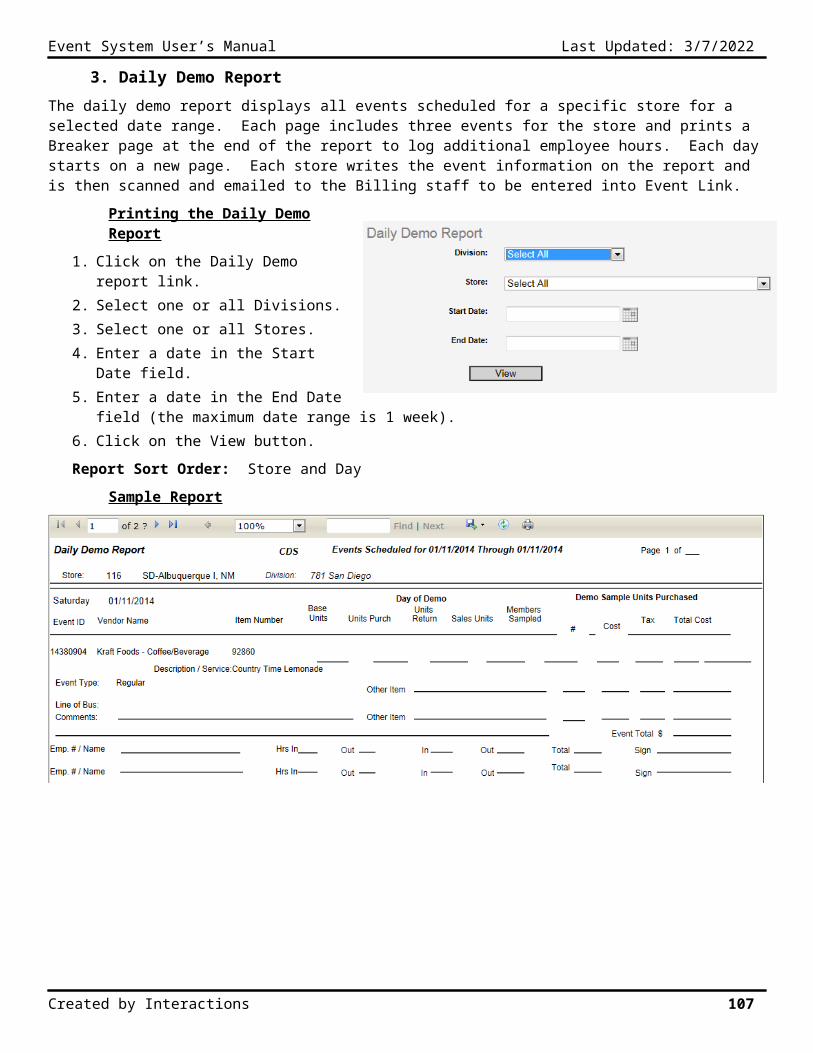
Event System User’s Manual Last Updated: 5/9/2023
11. Invoice Audit Report
The invoice audit report shows the number of invoices sent and the methods by which they were sent.
Printing the Invoice Audit Report
1. Click on the Invoice Audit Report link.
2. Enter an Invoice Date.
3. Click on the View button.
Report Sort Order: InvoiceID.
Sample Report
Created by Interactions 107
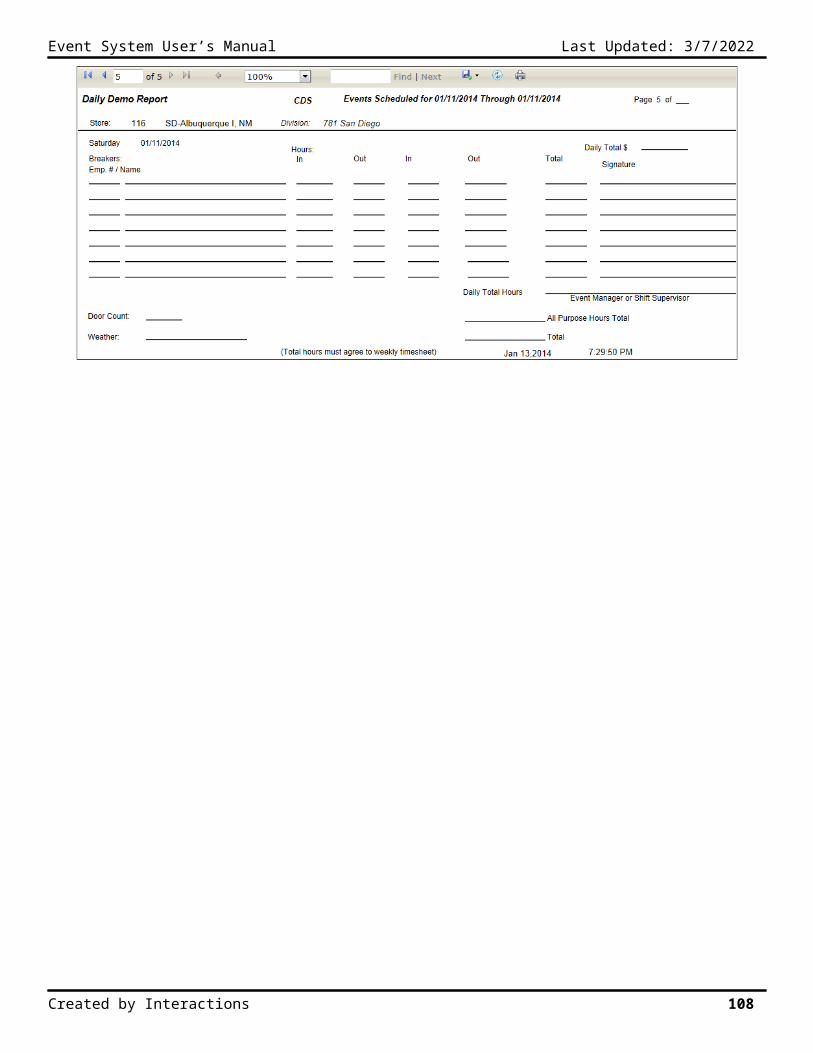
Event System User’s Manual Last Updated: 5/9/2023
12. Reprint Invoice
Invoices are run from the Billing module and emailed to the vendors. The Reprint Invoice function allows you to reprint or resend any invoice to the vendors billing contacts.
Reprinting Invoices
1. Click on the Reprint Invoices link.2. Enter an Invoice Date.3. Select All, Paid or Unpaid invoice types.4. Check mark the, “Only Invoices that were NOT
Emailed” (this allows you to print invoices for any vendors who do not wish to receive them by email).
OR5. Enter an invoice number.6. Check mark the Email checkbox if you want the
system to email the invoice to the Vendor’s Billing contact.
OR7. Select a Vendor name.8. Enter a From Date.9. Enter a To Date.10. Select a Type: Unpaid or Paid.11. Click on the View button.12. On the page where the list of invoices appears,
click on the Invoice # link to display the details of the invoice. You can print a copy of the invoice here.
OR13. Check the Email? checkbox to email the invoice to the vendor’s billing contact. You must click the Resend
Selected Invoices button to email the selected invoices.Note: The total of all invoices appears the end of the Invoice list.
Created by Interactions 108
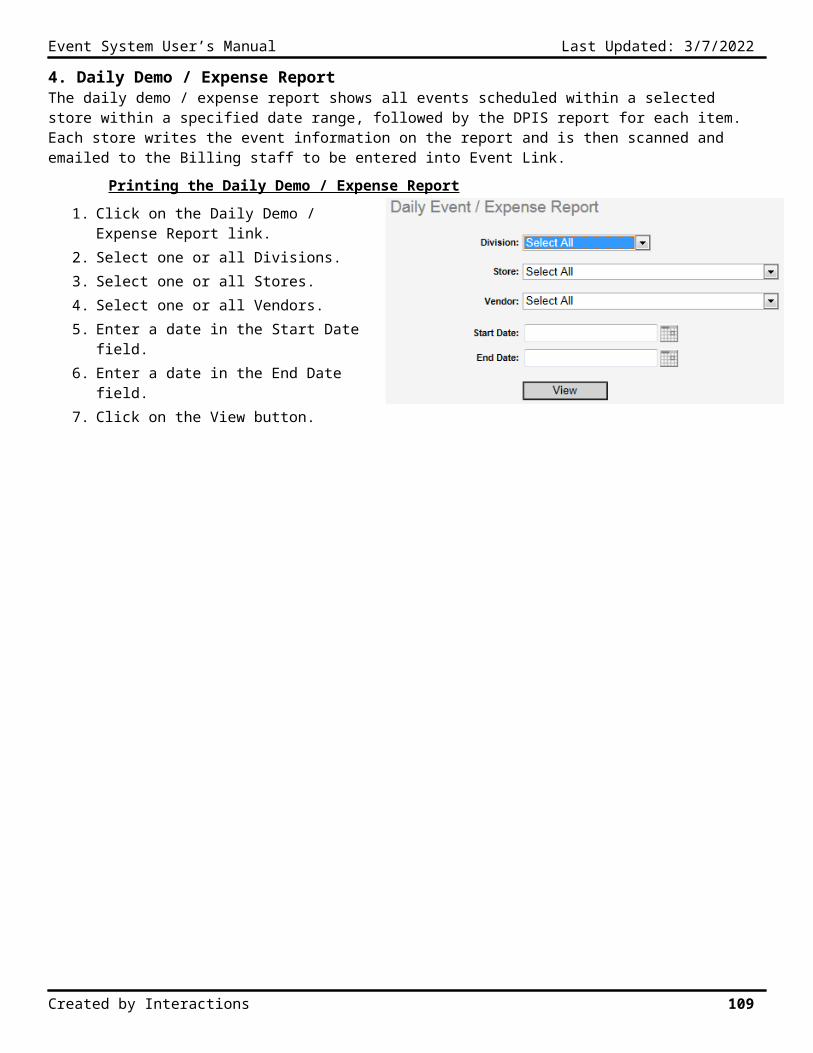
Event System User’s Manual Last Updated: 5/9/2023
13. Special Events to be Invoiced Report
The special event to be invoice report displays all the special events that have not yet been invoiced. It shows the summary data for the vendor and gives you a chance to review the information before invoicing.
Printing the Special Events to be Invoiced Report
1. Click on the Special Events to be Invoice Report link.
2. Select 1 or All Divisions.
3. Select 1 or all Vendors.
4. Enter a Start Date.
5. Enter an End Date.
6. Click on the View button.
Sample Report
Created by Interactions 109
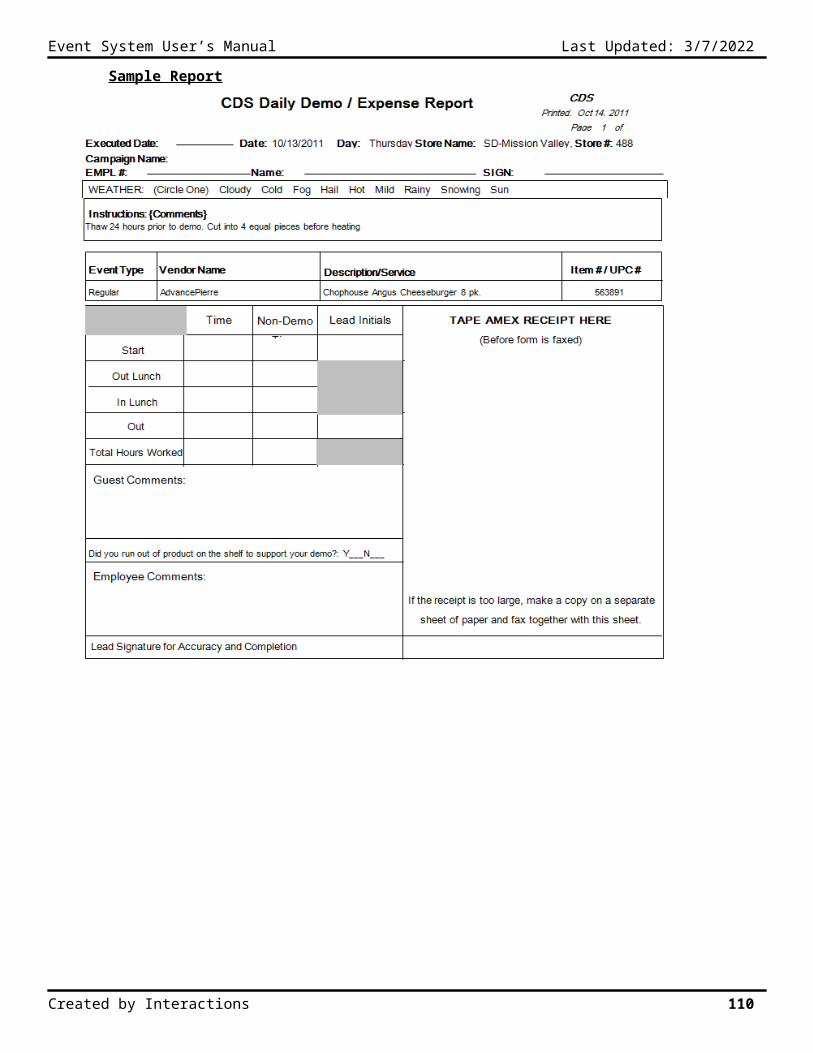
Event System User’s Manual Last Updated: 5/9/2023
14. Recap Status Report
The recap status report displays the status of all events within the billing process. This report primarily gives billing an at a glance view of what is outstanding and what mobile recaps still need to be billed.
Exporting the Recap Status Report
1. Click on the Special Events to be Invoice Report link.
2. Select a Division.
3. Select 1 or all Stores.
4. Select a Billed status (the status of “Unbilled” will display all the events that still need to be billed).
5. Enter a From Date.
6. Enter an To Date.
7. Click on the Export button.
Sample Report
Created by Interactions 110
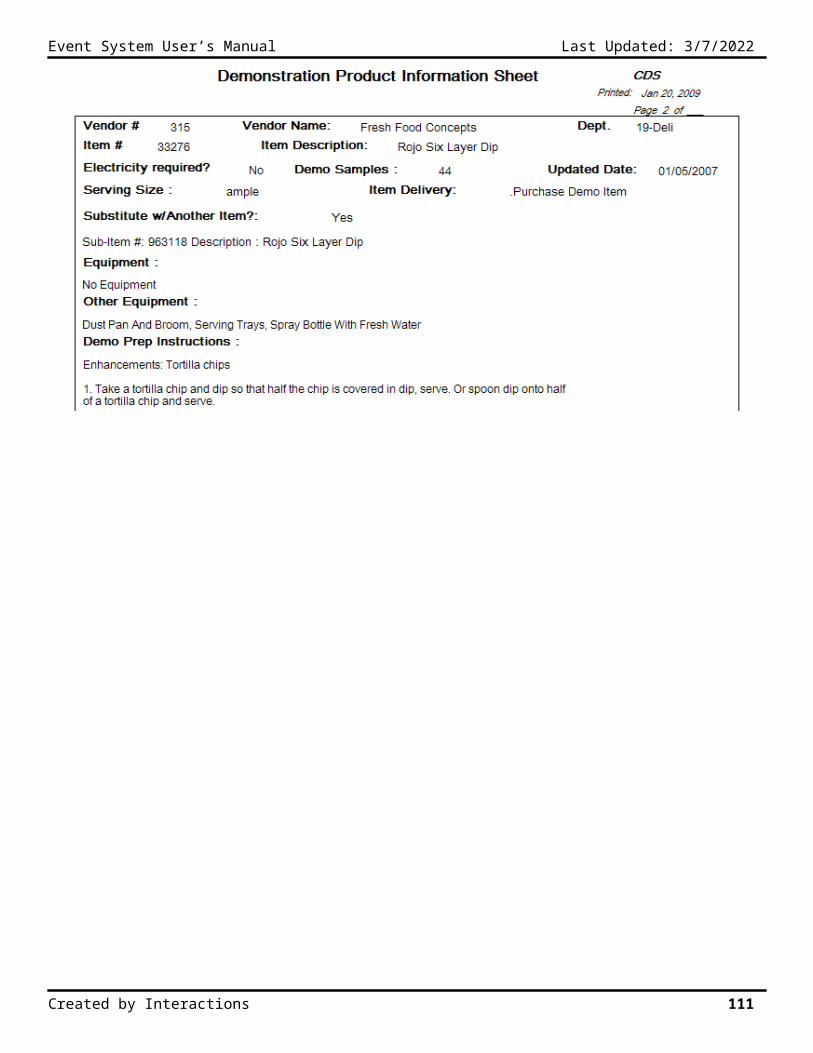
Event System User’s Manual Last Updated: 5/9/2023
Auditing Reports
1. Billed Reconciliation Report
The billed reconciliation report displays a summary of billed events versus audited events. You can run the report for one Division and All stores OR the one Store in the selected Division.
Printing the Billed Reconciliation Report
1. Click on the Billed Reconciliation Report link.
2. Select a Division.
3. Select 1 or All Stores.
4. Enter a Start Date.
5. Enter an End Date.
6. Click on the View button.
Report Sort Order: Division, Store, and Day.
Sample Report
Created by Interactions 111
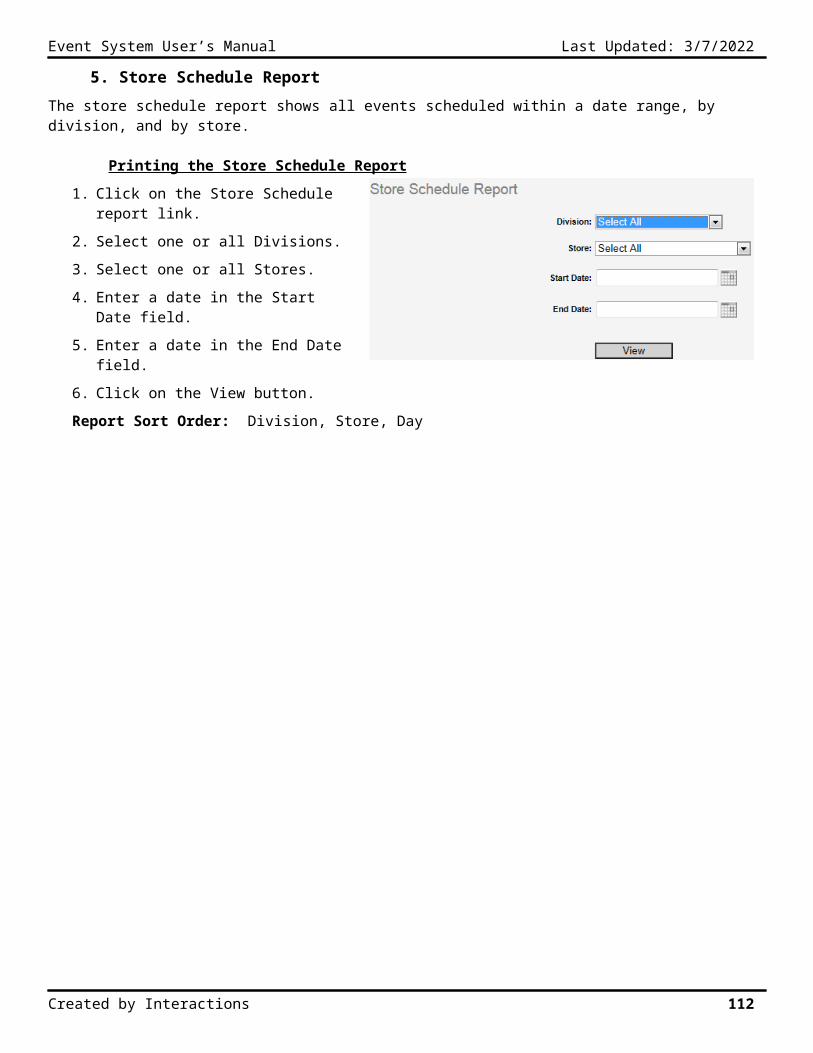
Event System User’s Manual Last Updated: 5/9/2023
2. Billed Reconciliation Report by Variance
The billed reconciliation report by variance displays a summary of billed events versus audited events where the event count variance is greater than 1 or Product Charge variance of $5.00 or more.
Printing the Billed Reconciliation Report By Variance
1. Click on the Billed Reconciliation Report by Variance link.
2. Select a Division.
3. Select 1 or All Stores.
4. Enter a Start Date.
5. Enter an End Date.
6. Click on the View button.
Report Sort Order: Division, Store, and Day.
Sample Report
Created by Interactions 112
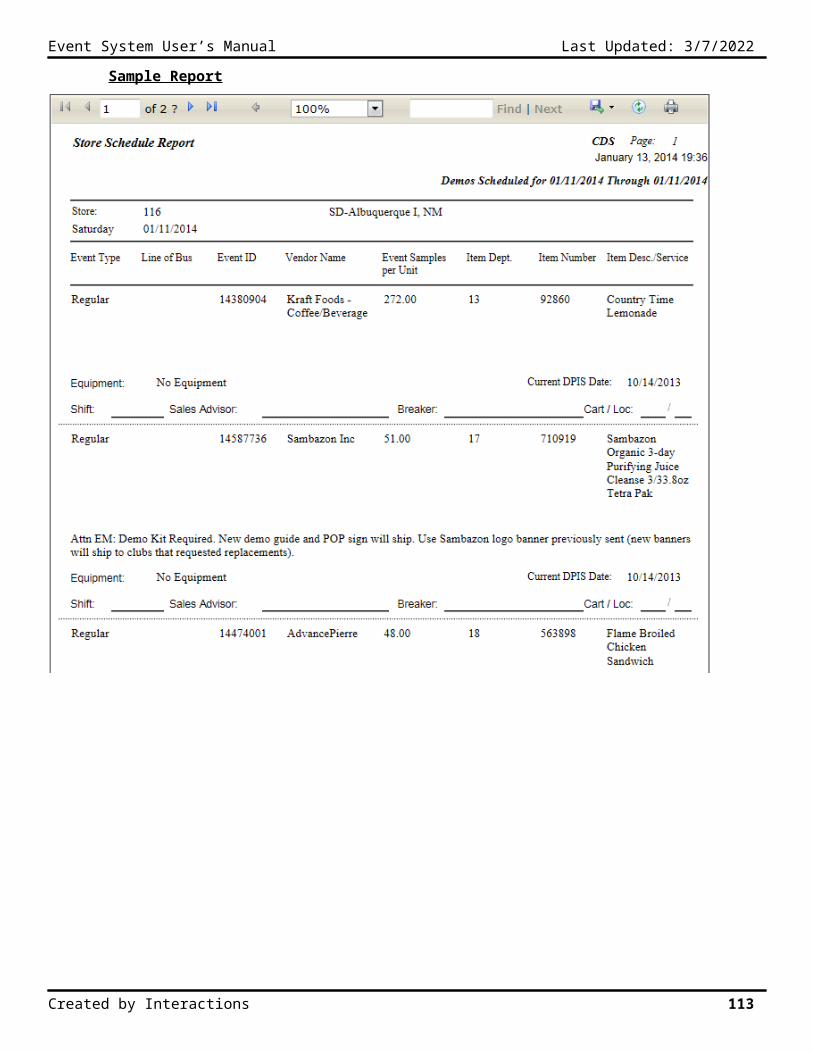
Event System User’s Manual Last Updated: 5/9/2023
3. Reprint DER Posting Report
The Reprint DER Posting report allows you to reprint any DER posting report based on the posted date. It shows the totals of events, Equipment, Supply with their related taxes. This report is printed in three different parts; 1) Posting details for each employee, 2) Posting Summary by month and store, and 3) Employee reimbursements. You must have Administrative permissions in order to run this report.
Reprinting the DER Posting Report
1. Click on the Reprint Posting Report link.
2. Enter, or select from the calendar, a date in the Posted Date field.
3. Click on the View button.
Report Sort Order: Division and Store.
Sample Reports
Created by Interactions 113

Event System User’s Manual Last Updated: 5/9/2023
4. DER Remits to Employees
The DER remits to employees report displays the amount due to the employee for reimbursement. The Excel export file is used to upload into ADP so the reimbursement appears on the employee’s paycheck.
Printing and Exporting the DER Remits to Employees Report
1. Click on the DER Remits to Employee link.
2. Select Detail or Summary report.
3. Enter a To Date.
4. Select a Posting Method: Preliminary, Final or Reprint. Final will post the data in the database.
5. Click on the View button to see the report in the viewer. Click on the Export button to export the data to Excel.
Report Sort Order: Employee Number
Sample Report
Created by Interactions 114
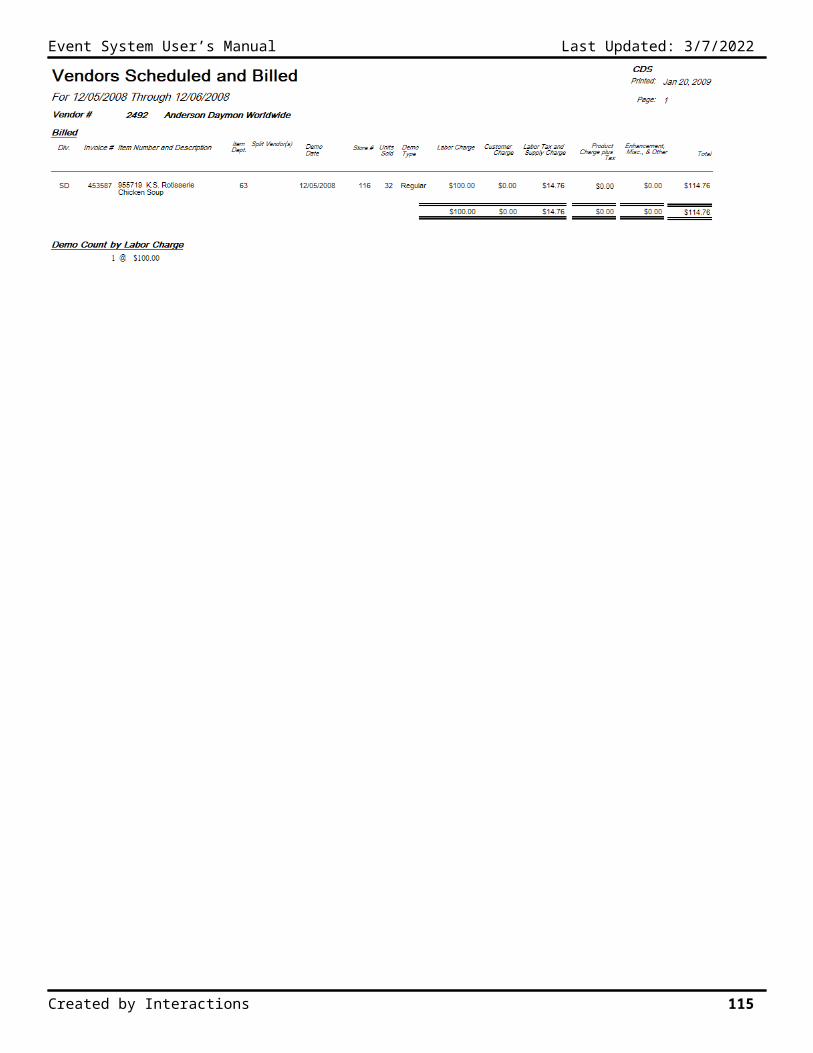
Event System User’s Manual Last Updated: 5/9/2023
5. DER Detail Report
The DER detail report lists all the data from the DER page as entered by the event manager.
Printing the DER Detail Report
1. Click on the DER Detail Report link.2. Select 1 or All Divisions.3. Select 1 or All Stores.4. Enter a Start Date.5. Enter an End Date.6. Select Data Type Report or Receipt.7. Click on the View or Export button.
Sample Report
Sample Export
Created by Interactions 115
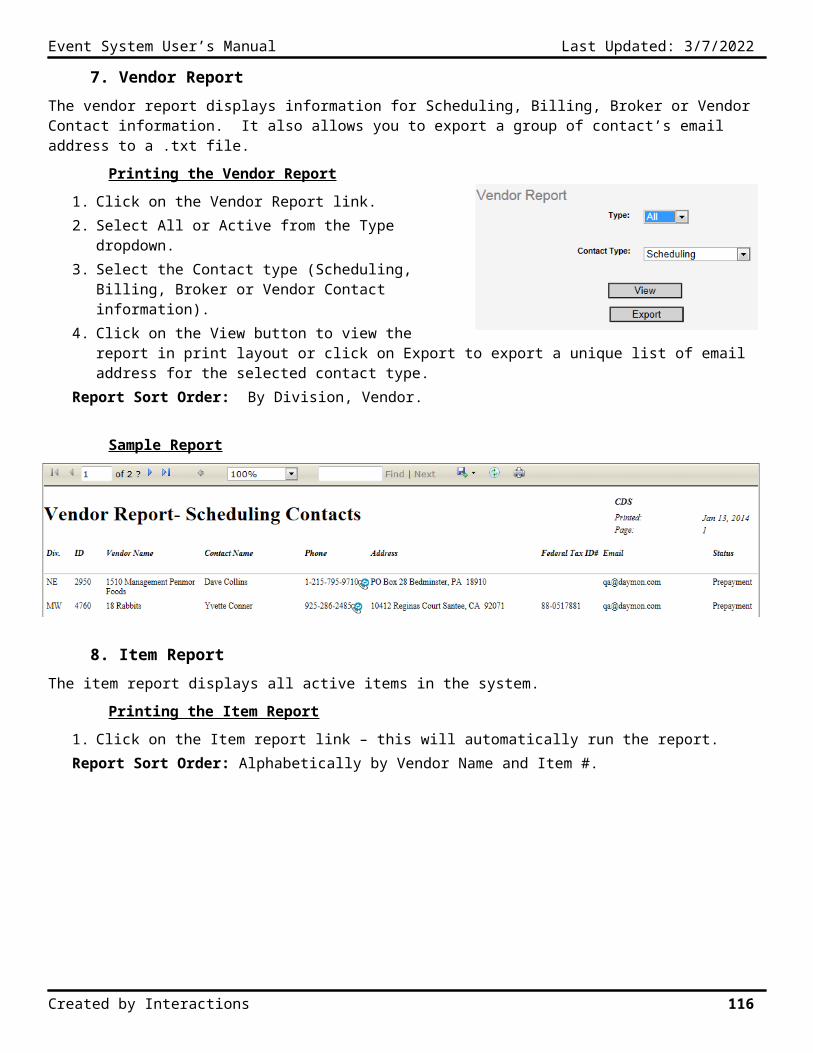
Event System User’s Manual Last Updated: 5/9/2023
A/P Reports1. Invoices Submitted For Payment
The invoices submitted for payment report displays all direct bills that have not been posted in the selected date range. This report excludes Weekly Expense Report (WER) records.
Printing and Exporting the Invoices Submitted For Payment Report
1. Click on the Invoices Submitted for Payment link.
2. Enter a Start Date.
3. Enter an End Date.
4. Select a Posting Method: Preliminary, Final, or Reprint (if Final is selected a warning message will appear. You must click “Yes” to continue. Running this report with the FINAL status will update data in the database).
5. Click on the View button to see the report in the viewer. Click on the Export button to export the data to Excel.
Report Sort Order: Alphabetically by Vendor Name.
Sample Report
Created by Interactions 116
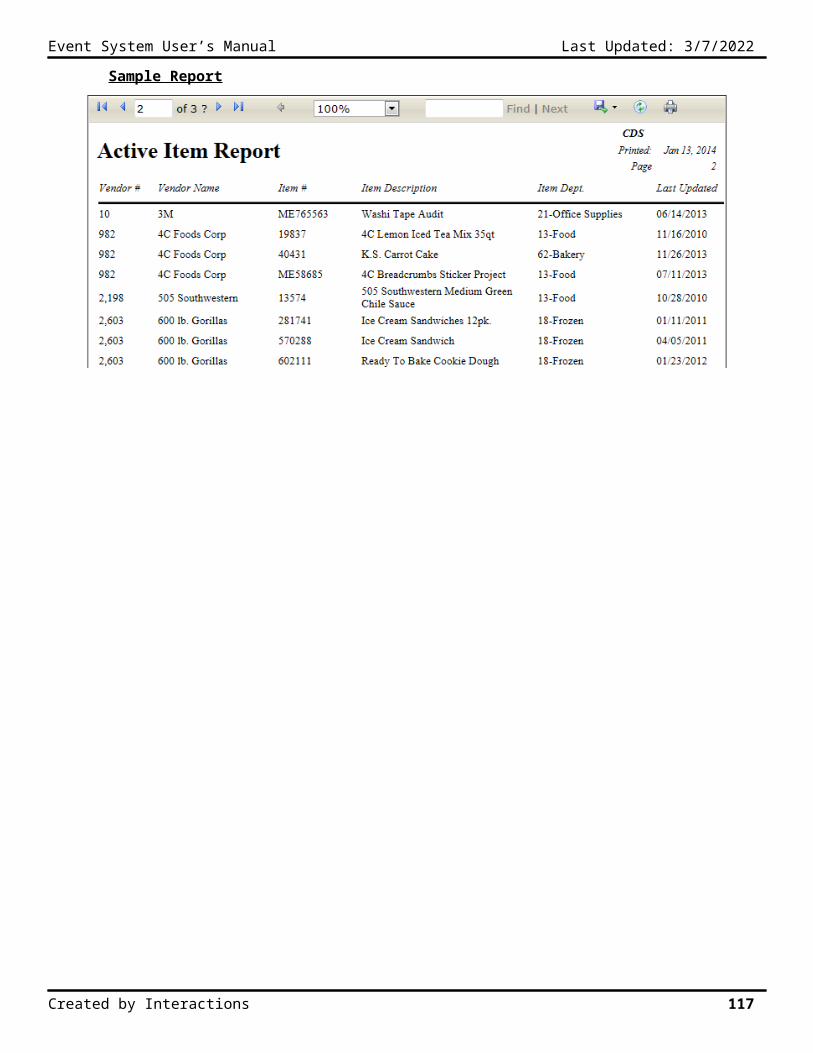
Event System User’s Manual Last Updated: 5/9/2023
2. Matching Payment Reconciliation Report
The matching payment reconciliation report displays all American Express (AMX) transactions that have either been reconciled (matching) or un-reconciled (non-matching) in the selected date range, depending on what Section you select to print. Each Payment Type must be processed separately. This report is separated into two parts; 1) Matching transactions and 2) Non-matching transactions.
Printing and Exporting the Matching Payment Reconciliation Report
1. Click on the Matching Payment Reconciliation link.
2. Select AMX from the Type dropdown list
3. Select Matching Only or Non-matching from the Section dropdown list (if Matching Only is selected, a warning message will appear - you must click “Yes” to continue. Running this report will update data in the database). If Non-matching is selected, enter, or select from the calendar, a date in the To Date field.
4. Click on the View or Excel buttons.
Matching Report Rules
If Location Number = Payment Location (Amex), Expense Amount = Payment Amount (Amex), and Expense Date = Payment Date (Amex), then items are reconciled.
If Location Number = Payment Location (Amex), Expense Amount = Payment Amount (Amex), but the Expense Date and Payment Date (Amex) are off by up to 3 days after the payment date (Amex), then items are reconciled.
If Location Number = Payment Location (Amex), Expense Date = Payment Date (Amex), and the Amounts are off by $0.10, then items are reconciled.
If Location Number = Payment Location (Amex), Expense Date and Payment Date (Amex) are off by 1 day, and the Amounts are off by $0.10, then items are reconciled.
Non-Matching Report Rules
If Location Number = Payment Location, Expense Date = Payment Date, and the Amounts are off by $0.11-$5.00, both transactions are highlighted in “Yellow”.
If Location Number = Payment Location (Amex), Expense Date and Payment Date (Amex) are off by 3 days greater than the Payment Date (Amex), and the Amounts are off by $5 or Less, both transactions are highlighted in “Blue”.
If Location Number = Payment Location (Amex), Expense Amount = Payment Amount (Amex), but the Expense Date and Payment Date (Amex) are off by 4 or more days from the original Payment (Amex) date (Expense date if greater than 4 days off from Payments date), both transactions are highlighted in “Green”.
Created by Interactions 117
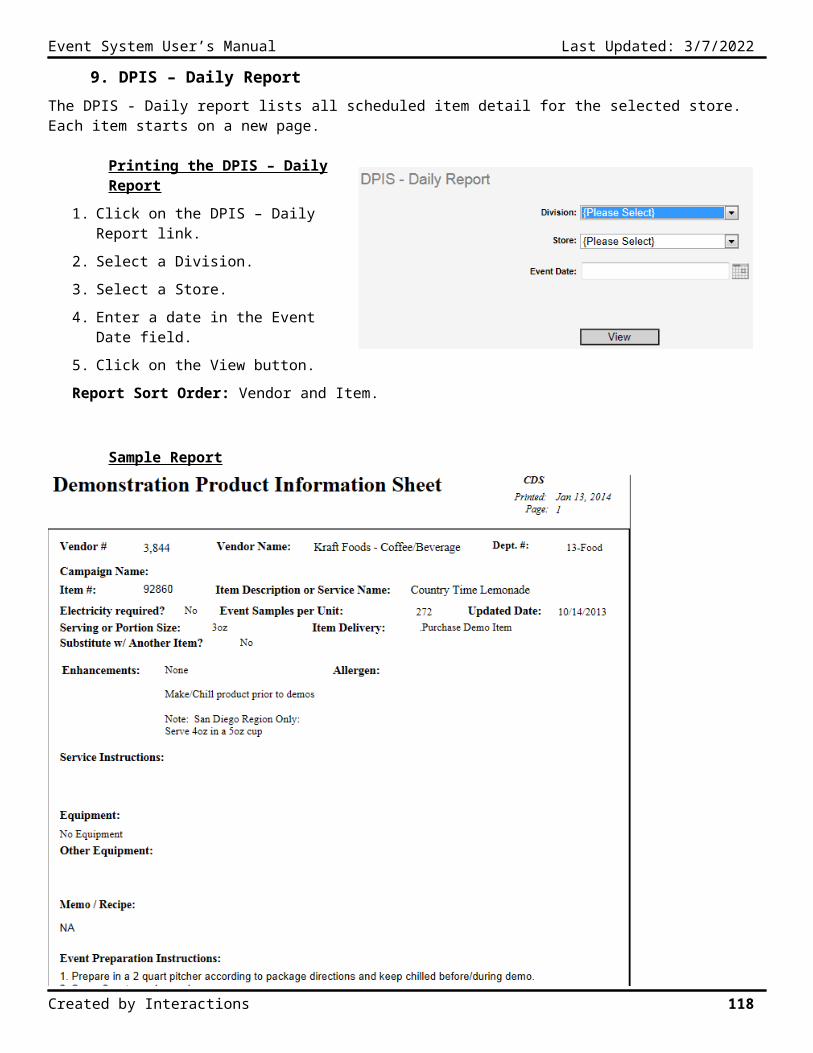
Event System User’s Manual Last Updated: 5/9/2023
Sample Report - Matching Payment Reconciliation Report
Sample Report - Non-Matching Payment Reconciliation Report
3. Reprint Matching Payment Reconciliation Report
The reprint matching payment reconciliation report allows you to reprint the payment reconciliation report for matching AMX or GC amounts.
Reprinting the Matching Payment Reconciliation Report
1. Click on the Reprint Matching Payment Reconciliation link.
2. Select AMX or GC from the Type dropdown list
3. Enter a date in the Reconciled Date field.
4. Click on the View button.
Created by Interactions 118
Event System User’s Manual Last Updated: 5/9/2023
4. Reprint WER Posting Report
The reprint WER posting report reprints all the Weekly Expense Reports already posted based on the posted date.
Reprinting the WER Posting Report
1. Click on the WER Posting Report link.
2. Enter a date in the Posted Date field.
3. Click on the View button to see the report in the viewer. Click on the Export button to export the data to Excel.
Report Sort Order is split into 3 parts:
a. For Weekly Expense Reports – Ordered by Employee #
b. For Employee Cash Reimbursements – Ordered by Date, Employee #
c. For GL Breakdown – Ordered by Division, Month
Sample Report – For Weekly Expense Reports
Sample Report – For Employee Cash Reimbursements
Sample Report – For GL Breakdown
Created by Interactions 119
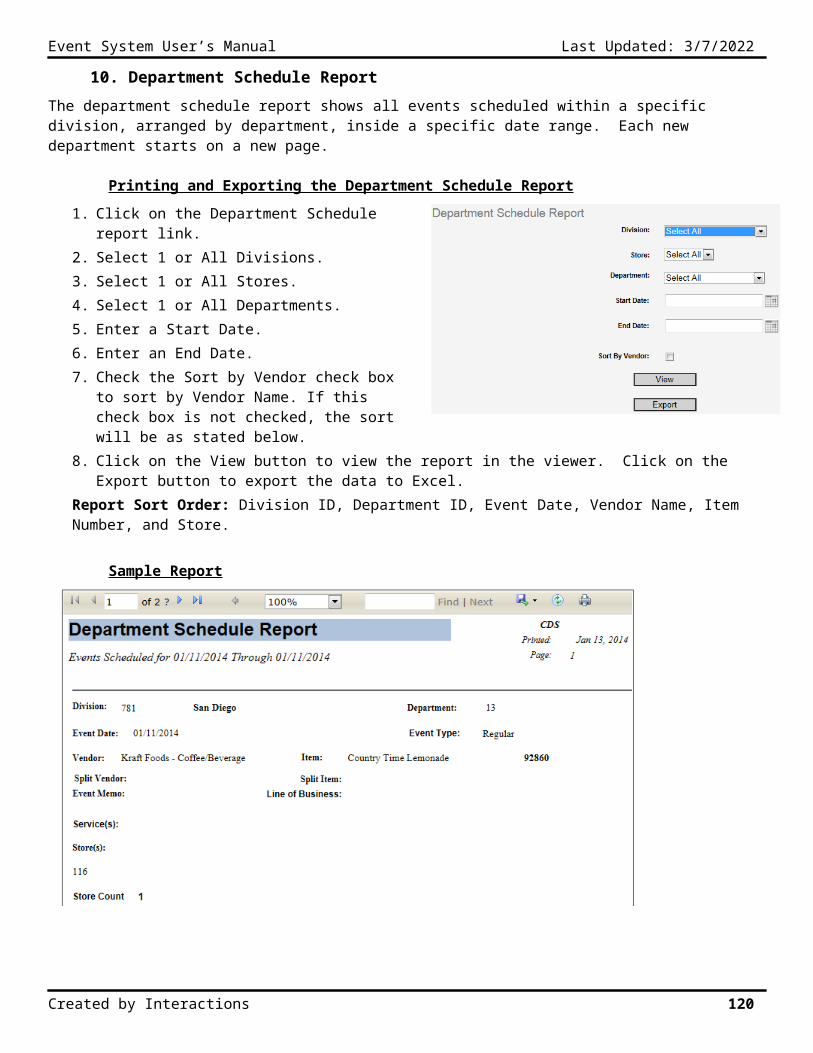
Event System User’s Manual Last Updated: 5/9/2023
5. WER Export – Detail and Summary
The WER export detail and summary export displays the WER entries for the given time period. The detail export displays an itemized list of all entries. The summary export shows the grand total for each GL description.
Exporting the WER Export Detail and Summary Report
1. Click on the WER Export – Detail and Summary link.
2. Enter a Start Date.3. Enter an End Date.
OR4. Select a Period Ending Date5. Check mark, “Detail Report” to see the detail
for all entries.6. Click on the Custom Export button.
Sample Report – Summary Report
Sample Report – Detail Report
Created by Interactions 120
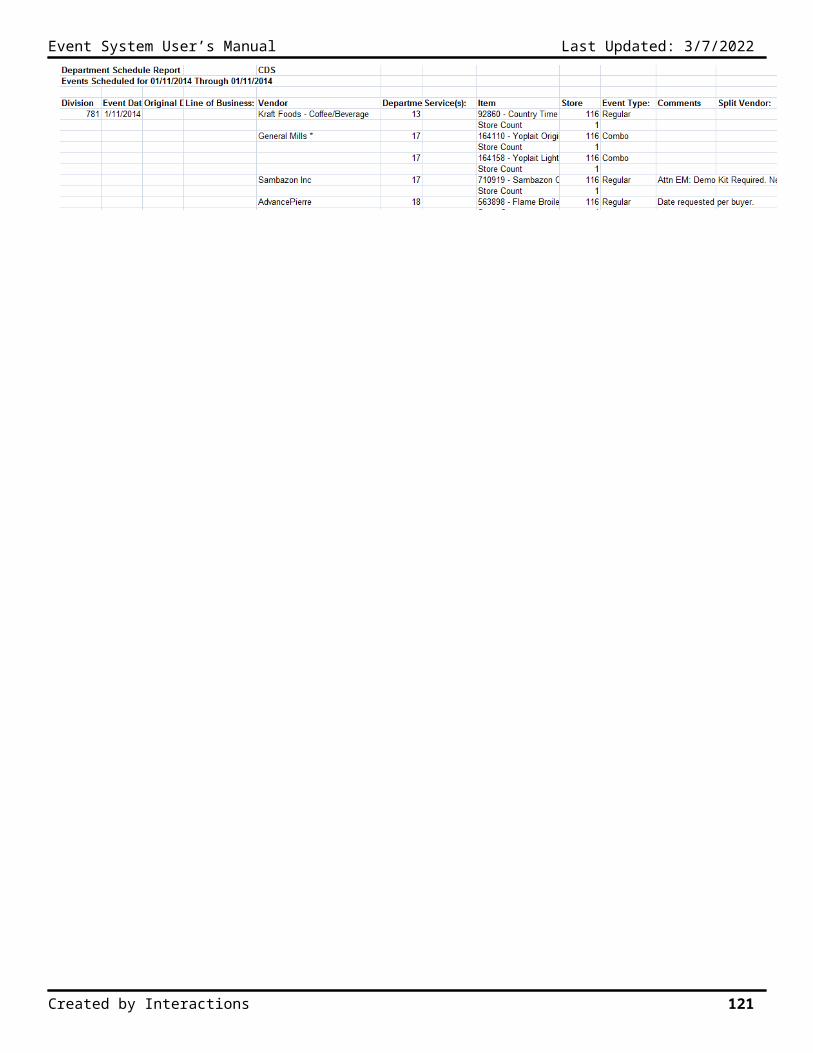
Event System User’s Manual Last Updated: 5/9/2023
6. JE Expensed to Others - Direct Bill
The JE expensed to others – direct bill report displays the detail of direct bill expenses for each business group.
Exporting the JE Expensed to Others - Direct Bill Report
1. Click on the JE Expensed to Others Direct Bill link.2. Enter a Start Date.3. Enter an End Date.4. Select a Posting Method: Preliminary, Final or Reprint.5. Click on the Export button.
Sample Report
Created by Interactions 121
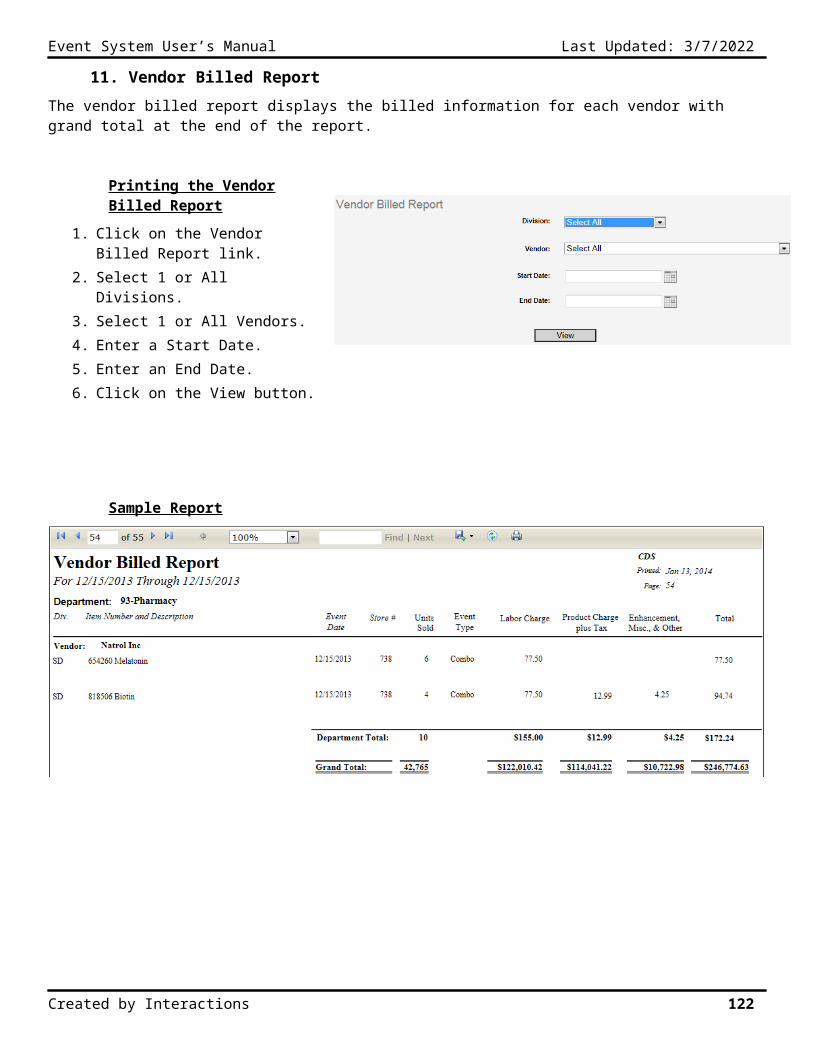
Event System User’s Manual Last Updated: 5/9/2023
7. JE Expensed to Others - WER Report
The JE expensed to others – WER report displays the detail of WER expenses for each business group.
Exporting the JE Expensed to Others WER Report
1. Click on the JE Expensed to Others WER Report link.2. Enter a Start Date.3. Enter an End Date.4. Select a Posting Method: Preliminary, Final or Reprint.5. Click on the Export button
Sample Report
Created by Interactions 122
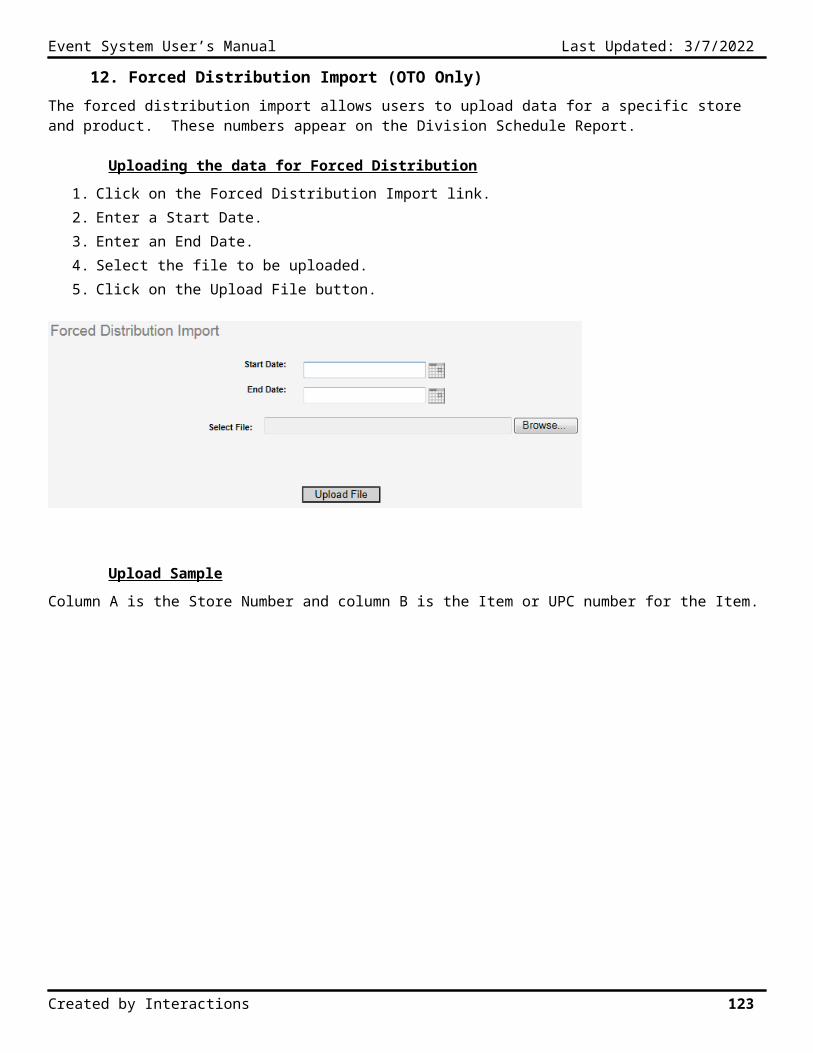
Event System User’s Manual Last Updated: 5/9/2023
8. Direct Bill Export Report
The direct bill export report allows the Accounts Payable department to export all direct bill data into .xls or .txt format. This data is also provided to Daymon to upload into their JDE system.
Exporting the Direct Bill Export Report
1. Click on the Direct Bill Report link.2. Enter a Start Date.3. Enter an End Date.4. Select an Export Option (.txt file format is
sent to Daymon for upload into the JDE system).
5. Select a Posting Method: Preliminary, Final or Reprint.
6. Click on the Export button
Sample Exports
Created by Interactions 123
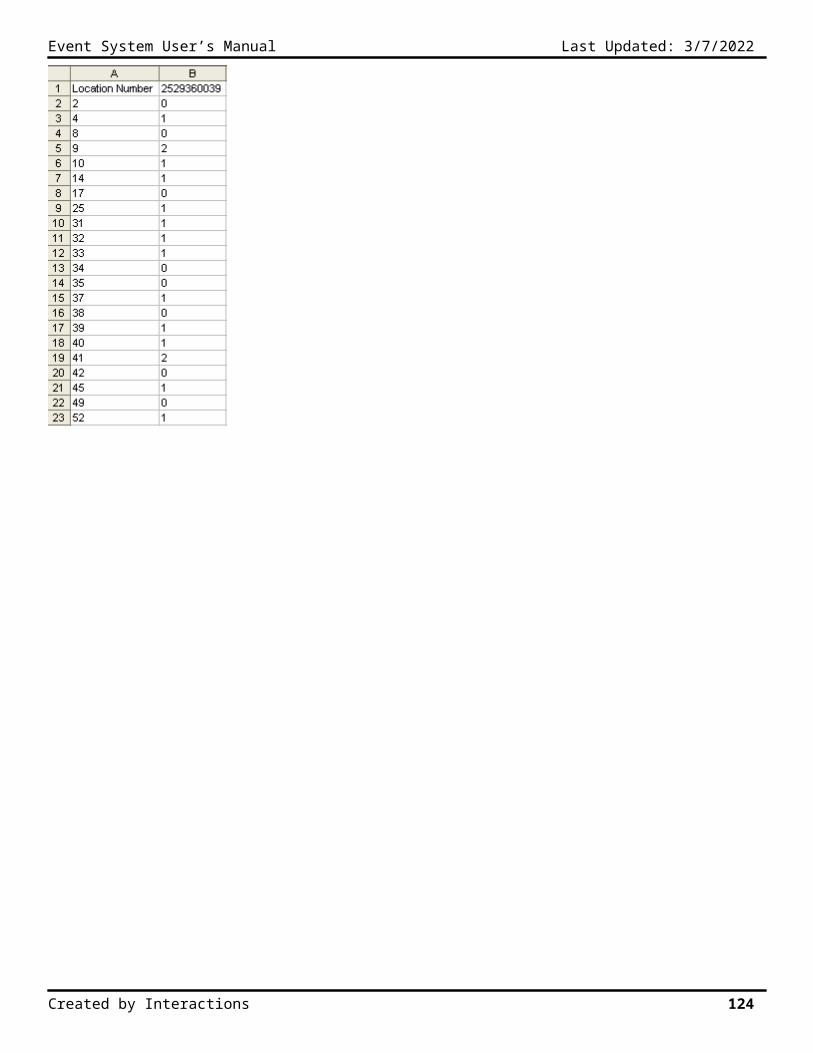
Event System User’s Manual Last Updated: 5/9/2023
Operations Reports1. Hours Analysis Report
The hours analysis report shows the Ops Manager, Area Manager, Store #, employee name and hours and the labor for the event the employee worked.
Printing the Hours Analysis Report
1. Click on the Hours Analysis report link.2. Select a District/Ops Manager or Area Manager or Division and Store.3. Enter a Start Date.4. Enter an End Date.5. Click on the View button.
Sample Report
Created by Interactions 124
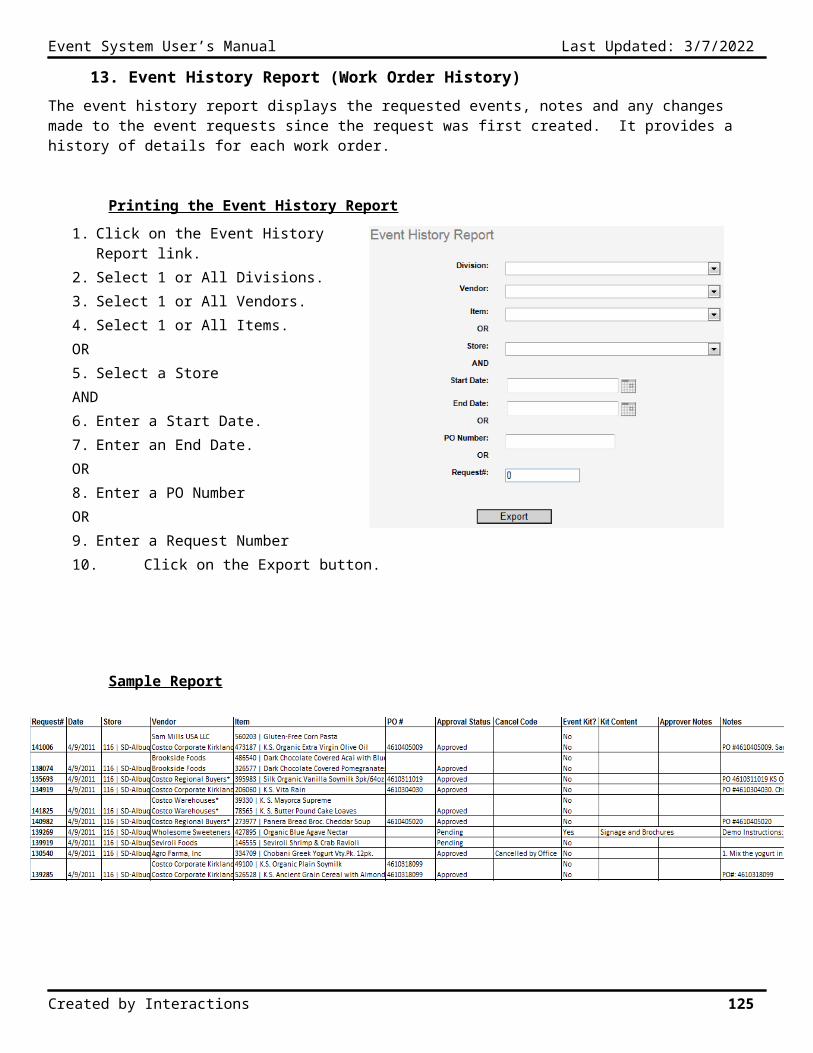
Event System User’s Manual Last Updated: 5/9/2023
2. Issues and Unbilled Report
The issues and unbilled report displays a total count of all issues and unbilled events for each region and warehouse as well as the detail of each issue and unbilled event.
Printing the Issues and Unbilled Report
1. Click on the Issues and Unbilled report link.2. Select a District/Ops Manager or Area
Manager or Division and Store.3. Enter a Start Date.4. Enter an End Date.5. Click on the View button.
Sample Report
Created by Interactions 125
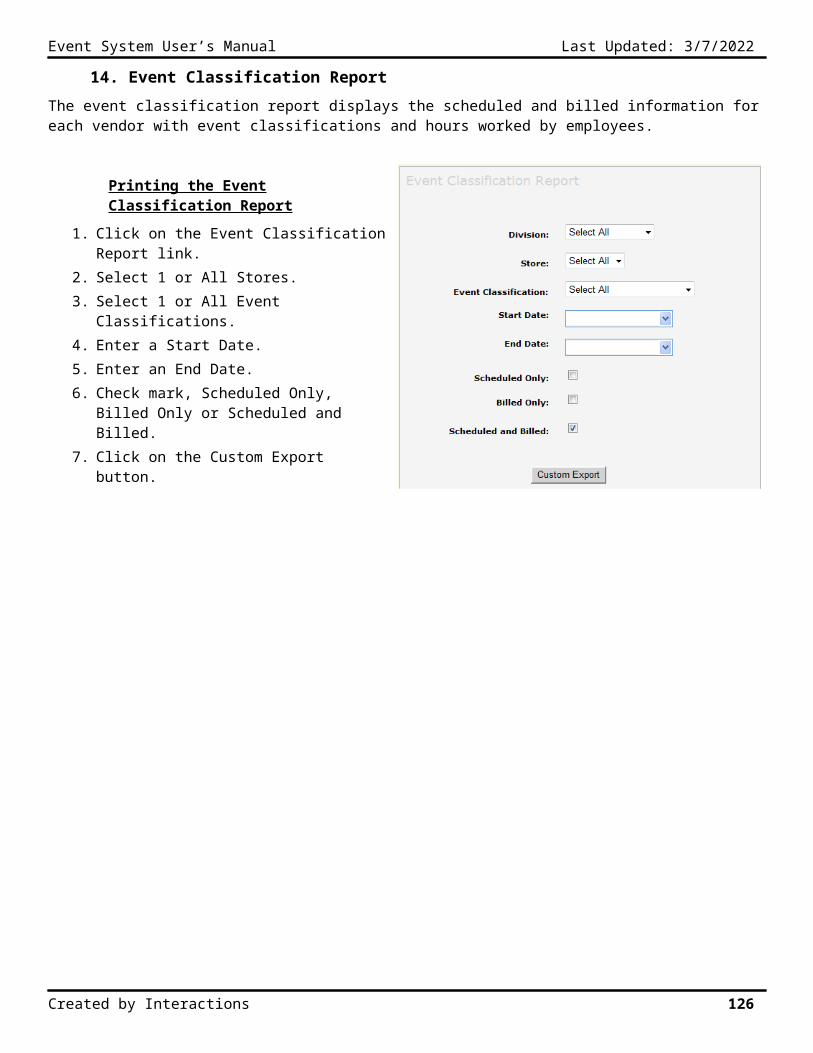
Event System User’s Manual Last Updated: 5/9/2023
3a. Store Analysis Report – Crystal Report
The store analysis report (Crystal) displays a summary of all events billed for a date range for the selected division(s) and store(s). Each store is summarized on 1 row with a division and grand total at the end of the report.
Printing the Store Analysis Report (Crystal)
1. Click on the Store Analysis Report link.
2. Select 1 or All Divisions.
3. Select 1 or All Stores.
4. Enter a Start Date.
5. Enter an End Date.
6. Click on the View button.
Report Sort Order: Division and Store.
Sample Report
Created by Interactions 126
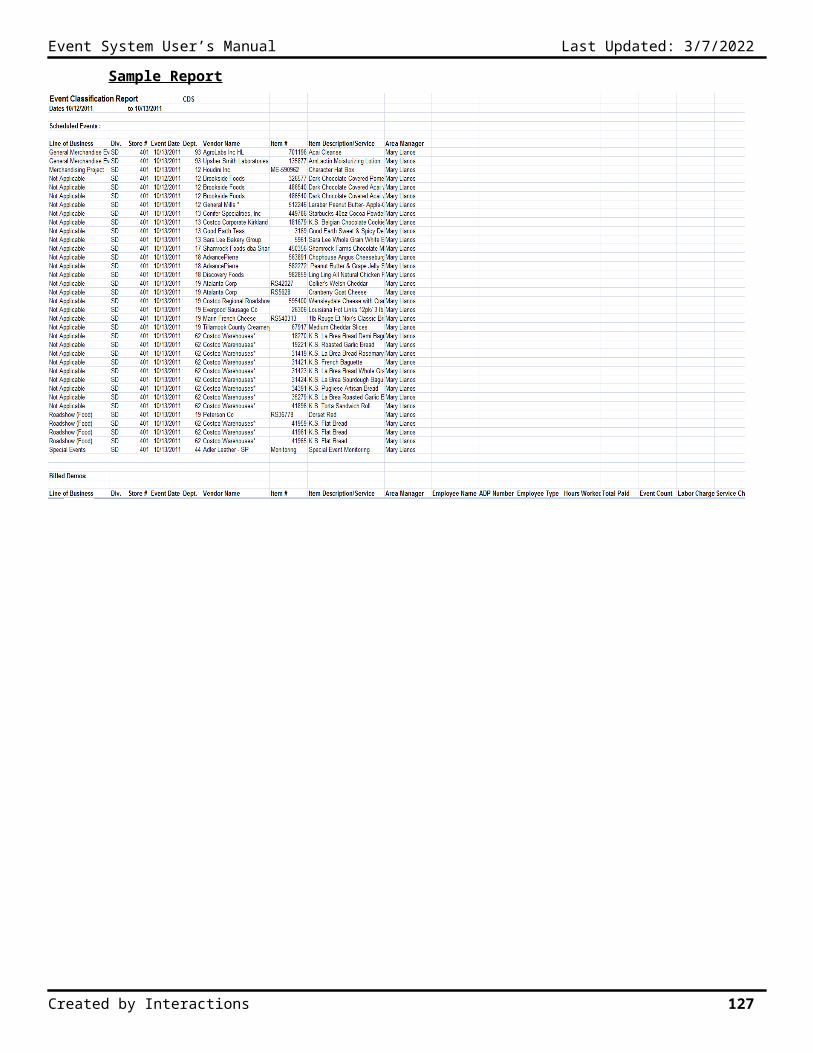
Event System User’s Manual Last Updated: 5/9/2023
3b. Store Analysis Report – Detail and Summary
The store analysis report (detail and summary) displays a summary or detail for billed events with a grand total at the top of the export. Each store is summarized for the date range selected or displays the detail of all the events at each store.
Exporting the Store Analysis Report (Detail and Summary)
1. Click on the Store Analysis Report link.2. Select a District\Regional ManagerOR3. Select an Area ManagerOR4. Select 1 or All Divisions.5. Select 1 or All Stores.6. Enter a Start Date.7. Enter an End Date.8. Check mark “Detail Report” to view the
detail for each store.9. Click on the Custom Export button.
Report Sort Order: Division, Store
Sample Report
Created by Interactions 127
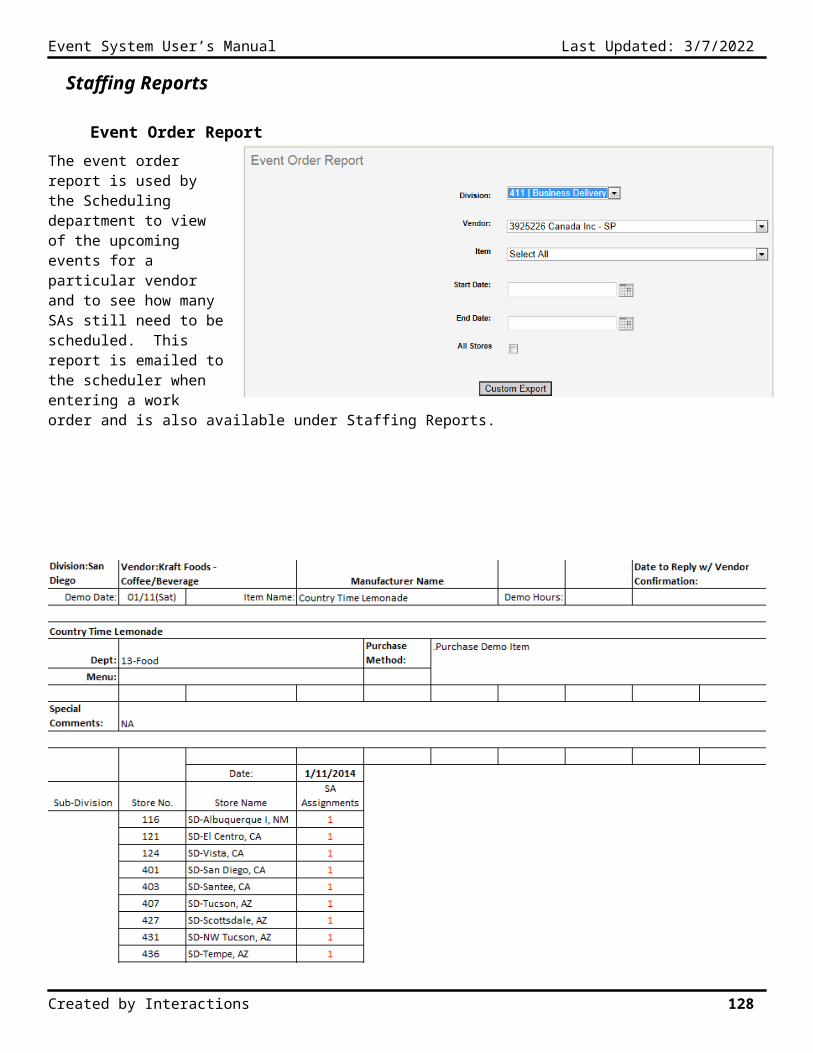
Event System User’s Manual Last Updated: 5/9/2023
4. Completion Analysis Report
The completion analysis report displays a summary of all events performed, cancelled, scheduled, and the completion percent and average hours for a date range for the selected divisions/stores. Each store is summarized on one row.
Printing the Completion Analysis Report
1. Click on the Completion Analysis Report link.
2. Select a District/Ops Manager
OR
3. Select and Area Manager
OR
4. Select 1 or All Divisions and/or Stores.
5. Enter a Start Date.
6. Enter an End Date.
7. Click on the View button.
Report Sort Order: Division and Store.
Sample Report
Sample Export
Created by Interactions 128
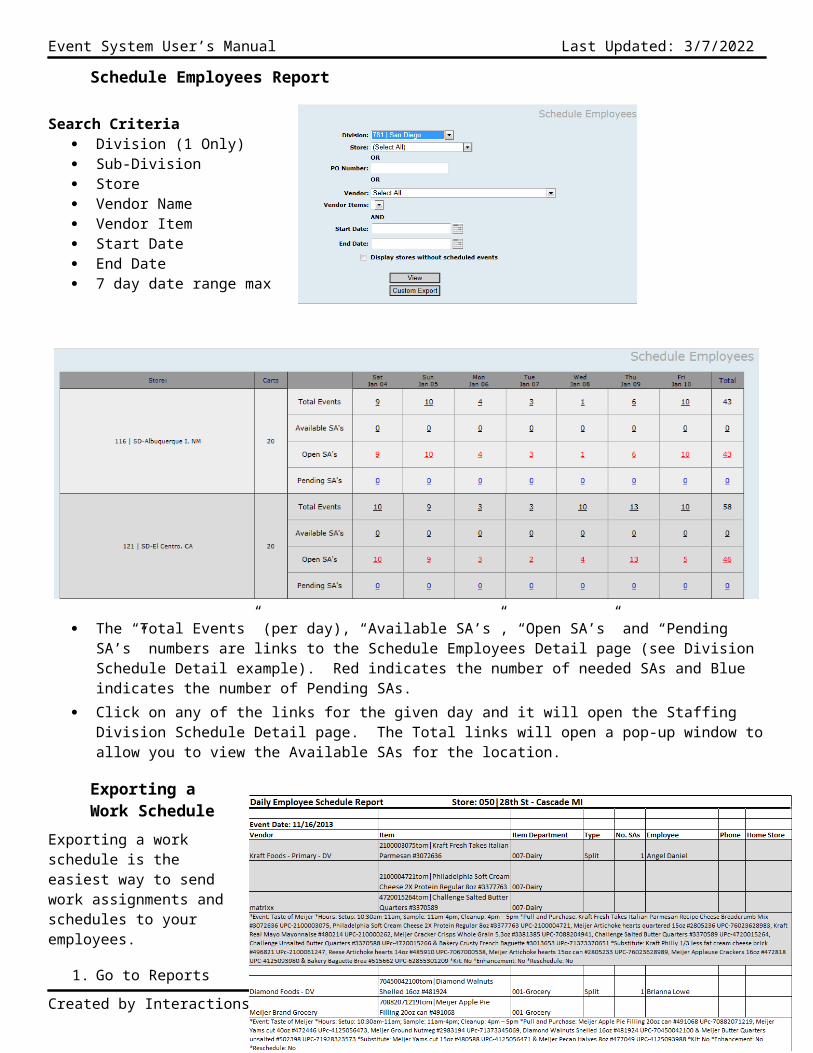
Event System User’s Manual Last Updated: 5/9/2023
5. Completion Analysis Report - Detail and Summary
The completion analysis report – detail and summary displays a summary or detail of all events performed, cancelled, scheduled, and the completion percent and average hours for a date range for the selected divisions/stores.
Printing the Completion Analysis Report – Detail and Summary
1. Click on the Completion Analysis Report – Detail and Summary link.
2. Select a District/Ops ManagerOR3. Select an Area ManagerOR4. Select 1 or All Divisions and/or Stores.5. Enter a Start Date.6. Enter an End Date.7. The Detail Report checkbox will be automatically
checked if you select 1 division.8. Click on the View button.
Sample Report - Summary
Sample Report - Detail
Created by Interactions 129
Event System User’s Manual Last Updated: 5/9/2023
6. Weekly Score Card Report
The weekly score card report automatically runs for the previous week from Sunday to Saturday. The report can be run in several ways, but the detail contains the same fields. The company totals appear at the top of the report and then the detail for criteria selected.
Printing the Weekly Score Card Report
1. Click on the Weekly Score Card Report link.2. Check mark District/Ops ManagerOR3. Check mark Area ManagerOR4. Select 1 or All Divisions and/or Stores.OR5. Check mark Company Total Report.6. Click on the View button.
Sample Report – All Stores
Sample Report – By District/Ops Manager
Created by Interactions 130
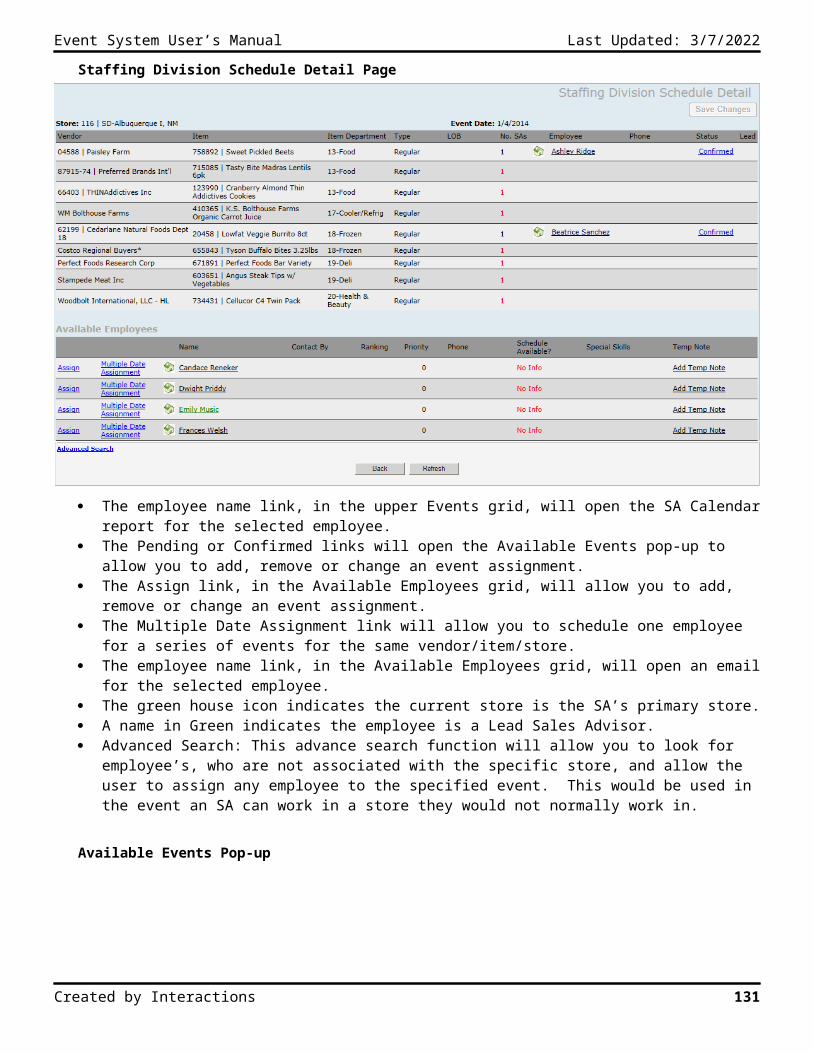
Event System User’s Manual Last Updated: 5/9/2023
7. CDS Warehouse Sales Report
The CDS warehouse sales default detail report displays the percentage of goals achieved, base sales, sales results and sales increase by employee. The default summary report shows this data rolled up by warehouse number.
Printing the CDS Warehouse Sales Report
1. Click on the CDS Warehouse Sales Report link.
2. Select Detail or Summary3. Select a District/Ops ManagerOR4. Select an Area ManagerOR5. Select 1 or All Divisions and/or Stores.OR6. Select an Employee.7. Enter a Start Date.8. Enter an End Date.9. Click on the View button
Sample Report - Detail
Sample Report - Summary
Created by Interactions 131
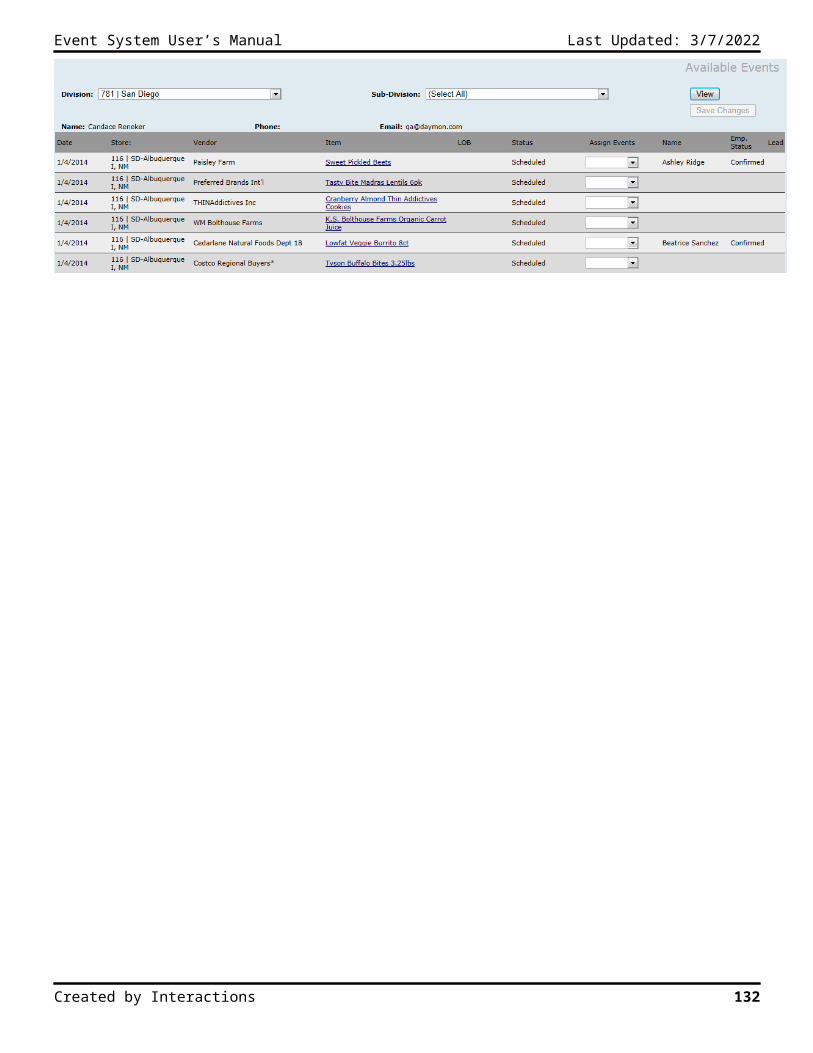
Event System User’s Manual Last Updated: 5/9/2023
8. Costco Warehouse Report
The Costco warehouse report displays the event count, the product purchased and product sold in each warehouse for the selected date range.
Printing the Costco Warehouse Report
1. Click on the Costco Warehouse Report link.2. Select a District/Ops ManagerOR3. Select an Area ManagerOR4. Select 1 or All Divisions and/or Stores.OR5. Enter a Start Date.6. Enter an End Date.7. Click on the View button.
Sample Report
Created by Interactions 132
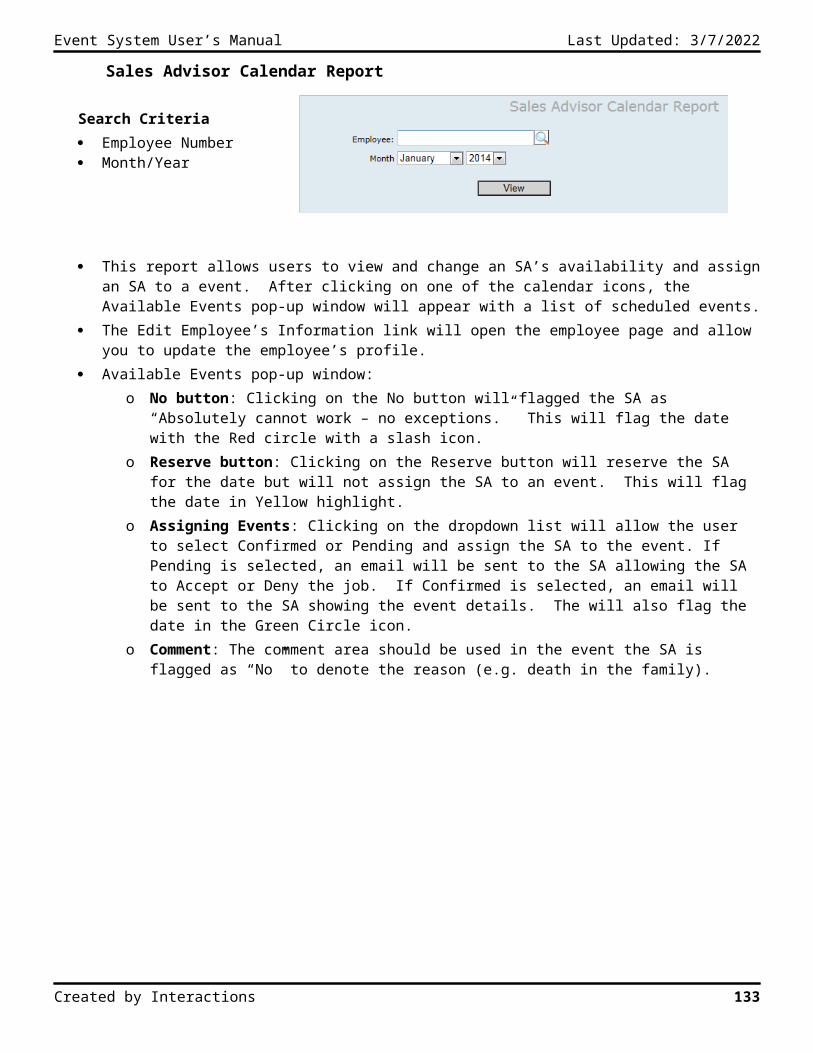
Event System User’s Manual Last Updated: 5/9/2023
9. Sales Goals/Results Not Entered
The sales goals/results not entered report displays the warehouse and date where the sales results have yet to be entered.
Printing the Sales Goals/Results Not Entered Report
1. Click on the Sales Goals/Results Not Entered Report link.
2. Select a District/Ops ManagerOR3. Select an Area ManagerOR4. Select 1 or All Divisions and/or Stores.OR5. Enter a Start Date.6. Enter an End Date.7. Click on the View button.
Sample Report
Created by Interactions 133
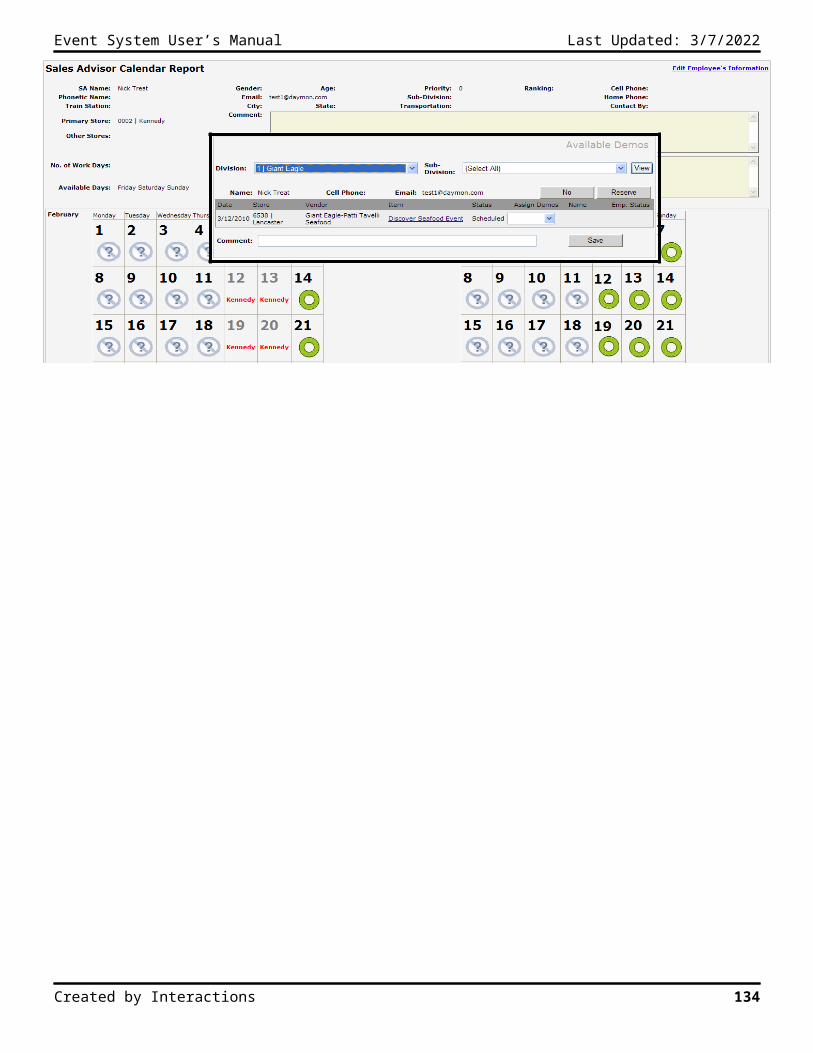
Event System User’s Manual Last Updated: 5/9/2023
10. Item Sales Report
The item sales report displays sales detail for a given vendor and their items for a selected date range.
Printing the Item Sales Report
1. Click on the Item Sales Report link.2. Select Detail or Summary.3. Select a Vendor.4. Select 1 or All Items5. Enter a Start Date.6. Enter an End Date.7. Click on the View button.
Sample Report – Detailed Report
Sample Report – Summary Report
Created by Interactions 134
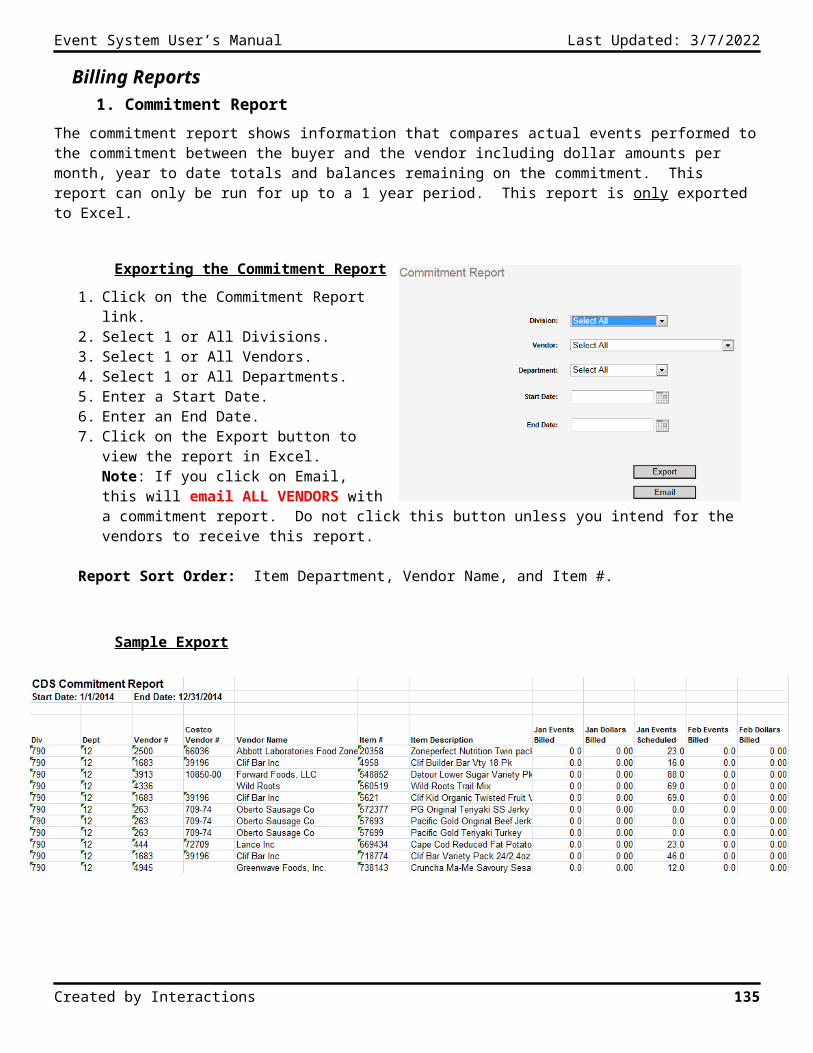
Event System User’s Manual Last Updated: 5/9/2023
11. Department Sales Report
The department sales report displays the item’s sales results for each department. This report allows you to run the report in various ways including a detailed and summary report.
Printing the Department Sales Report
1. Click on the Department Sales Report link.2. Check mark Show Company Results.OR3. Check mark Show Division Results.OR4. Select a StoreAND5. Enter a Start Date.6. Enter an End Date.7. Click on the View button.
Sample Report – Detail Report
Sample Report – Summary Report
Created by Interactions 135
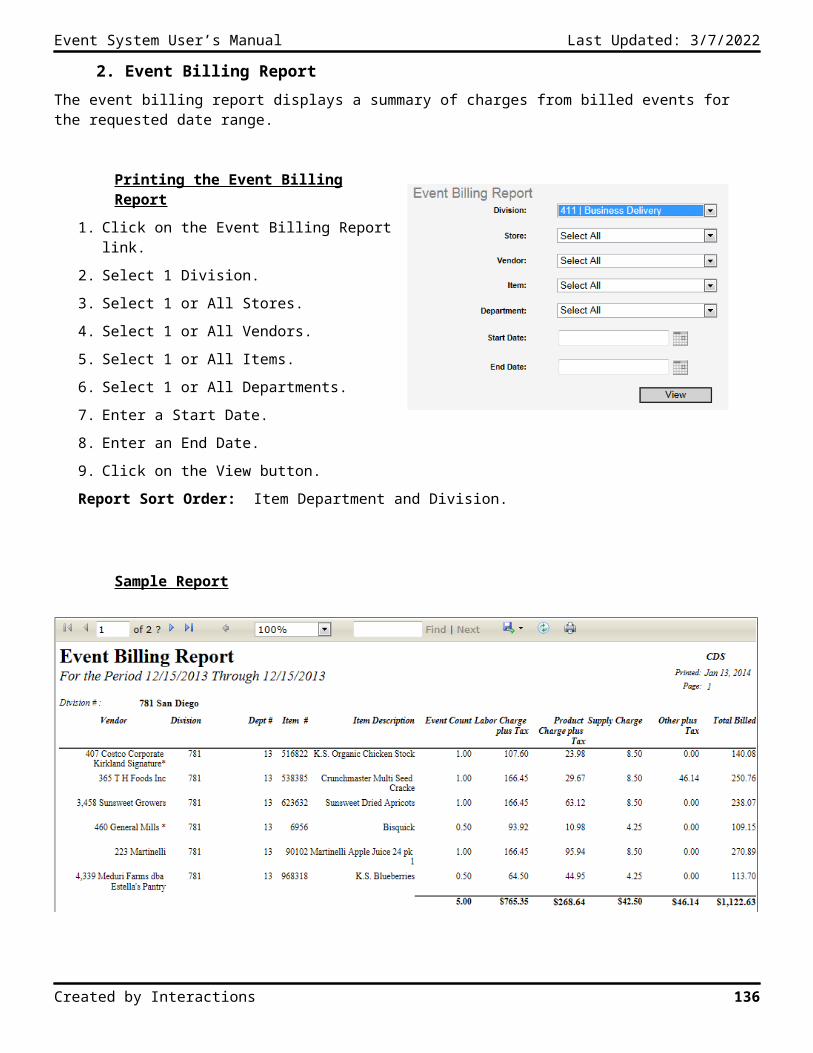
Event System User’s Manual Last Updated: 5/9/2023
A/R Reports1. Applied Payments Report
The applied payments report displays all paid invoices, applied credits, and credit/debit memos for all vendors for the specified date range.
Printing the Applied Payments Report
1. Click on the Applied Payments Report link.2. Type the vendor’s name in the Filter field.3. Click on the Vendor dropdown list (this list populates with any matching vendor records when you click on
the dropdown list) and select the vendor from the Vendor list.
4. Enter a Start Date.5. Enter an End Date (the maximum date range is 1
week).6. Select the Method in which you want to run the
report: Paid Date or Invoice Date. Paid Date lists all paid invoices and debit/credit memos for the date range. Invoice Date lists all invoices and debit/credit memos created for the date range.
OR7. Enter an Invoice number.OR8. Enter a Check numberOR9. Enter a Credit/Debit Memo number.10. Click on the View button.
Report Sort Order: The totals are broken down by Transaction Date, Vendor Name, & Invoice Number with the sub-totals for each section as shown below. The information is displayed in ascending order by date.
Sample Report
Created by Interactions 136
Event System User’s Manual Last Updated: 5/9/2023
2. Delinquent Vendor Report and Delinquency Letters
The emailing of delinquency letters allows you to get the delinquent letter to the past due vendor quicker. Only those vendors whose status is Delinquent appear on this report. The list of invoices includes invoices that are 30 days past due from the date you enter.
There are 2 ways in which you can print or email a delinquency letter. The first way is from the Online Aging page, accessed from the Vendor record (see Accessing the Online Aging Report from the View Vendor Page), and the second is from the A/R reports section in the Reports module.
Printing the Delinquent Vendor Report and Delinquency Letters
1. Click on the Delinquent Vendor Report and Delinquency Letters link.2. Type the vendor’s name in the Filter field.3. Click on the Vendor dropdown list (this list populates with any matching vendor records when you click on
the dropdown list) and select the vendor from the Vendor list.
4. Enter a date in the By Date field.5. Select a Method to view the report: SSRS
Report or Email (when the letters are printed they are first viewable in the viewer and can then be printed. When the letters are emailed, the system will use the first, valid billing contact email address found for that vendor, for that particular division).
6. Select the Contact Information that should be used in the letter.
7. Click on the View button.
Sample Report
Created by Interactions 137
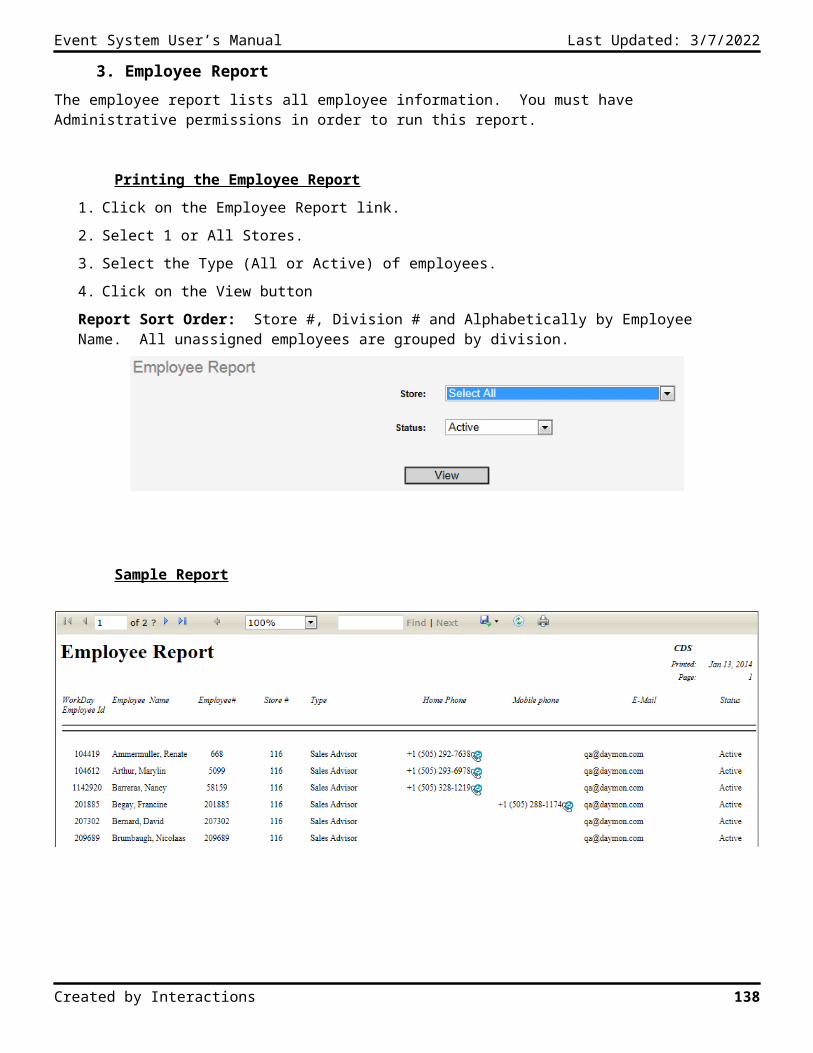
Event System User’s Manual Last Updated: 5/9/2023
3. Detail Aging Report
The detail aging report displays one or all vendors and their outstanding balance as of the day the report is run. The outstanding balance is defined as All unpaid Invoices AND All unapplied Credit/Debit Memos.
Printing the Detail Aging Report
1. Click on the Detail Aging Report link.
2. Type the vendor’s name in the Filter field.
3. Click on the Vendor dropdown list (this list populates with any matching vendor records when you click on the dropdown list) and select the vendor from the Vendor list.
4. Enter a date in the By Date field or select a Period Ending Date.
5. Click on the View button.
Sample Report
Created by Interactions 138
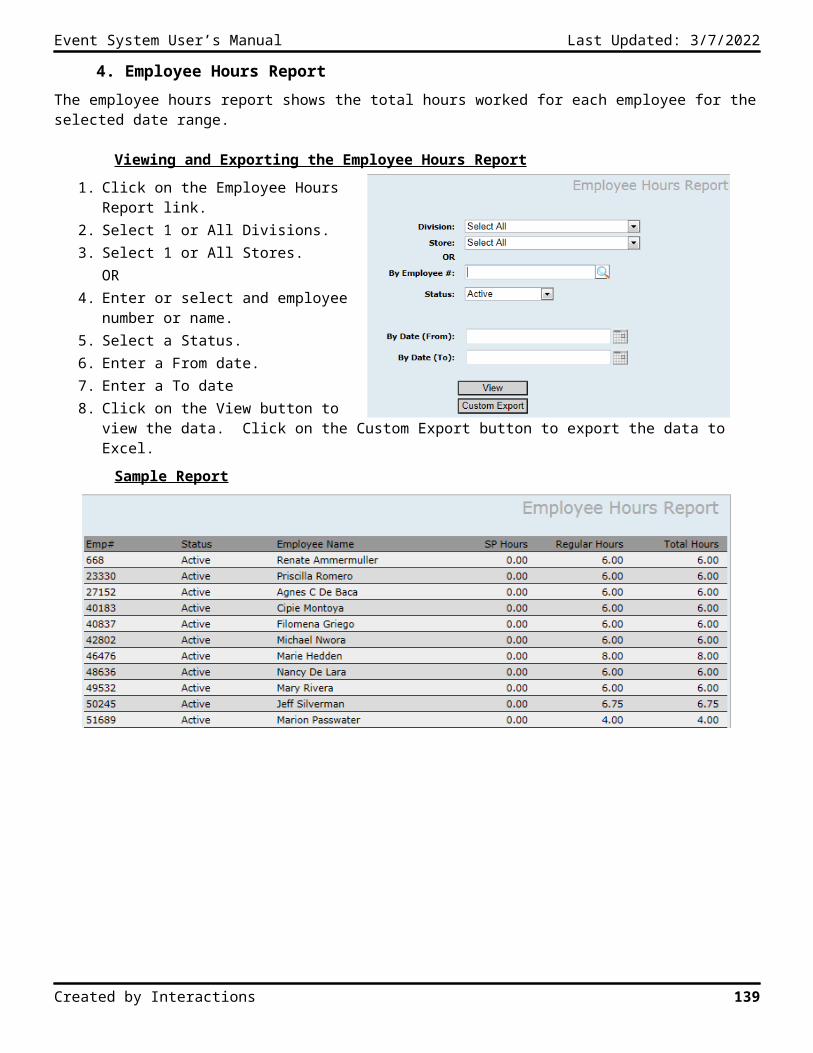
Event System User’s Manual Last Updated: 5/9/2023
4. Past Due Followup Report
The past due followup report lists all vendors with the status of the account and their follow up dates.
Printing the Past Due Followup Report
1. Click on the Past Due Followup Report link.
2. Click on the View button.
Report Sort Order: Alphabetically by Vendor Name.
Sample Report
Created by Interactions 139
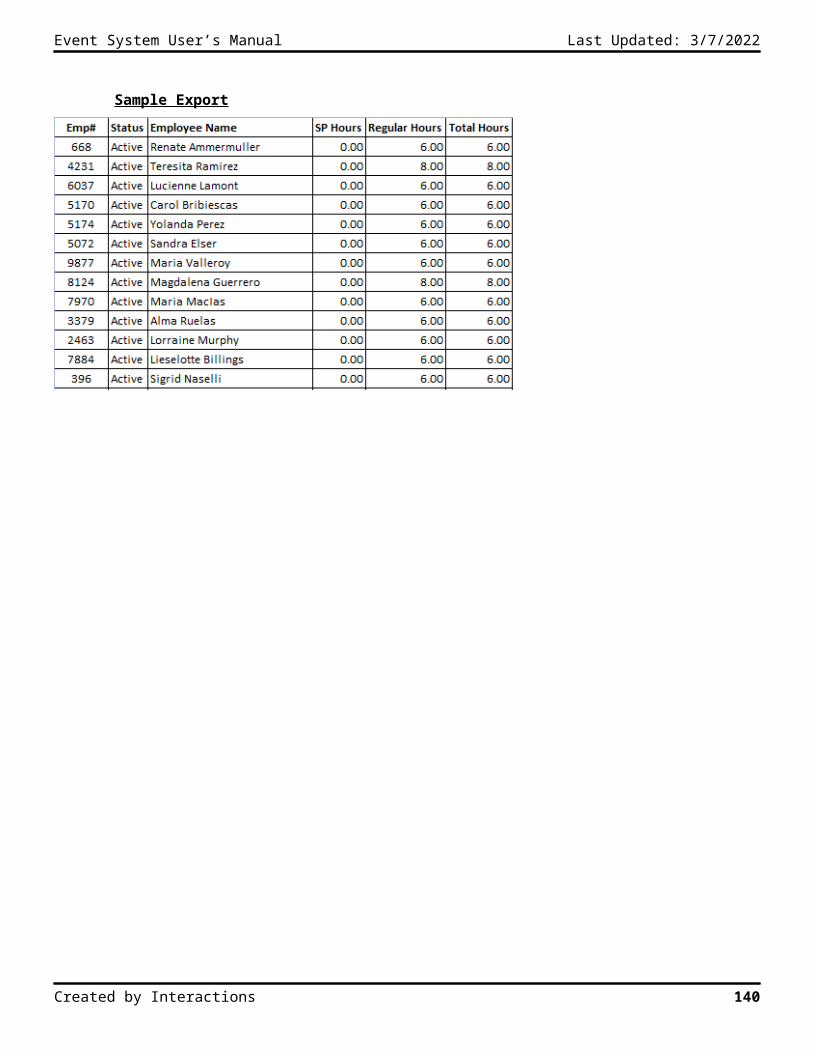
Event System User’s Manual Last Updated: 5/9/2023
5. Summary Aging Report
The summary aging report displays all vendors with an outstanding balance as of the day the report is run. The outstanding balance is defined as All unpaid Invoices AND All unapplied Credit/Debit Memos. The report totals by Total Outstanding, Current Amounts, 31-60days, 61-90 days, 90-180 days and over 180 days.
Printing and Exporting the Summary Aging Report
1. Click on the Summary Aging Report link.
2. Enter a date in the By Date field
3. Click on the View button to see the report in the viewer. Click on the Custom Export button to export the data to Excel.
Sample Report - Crystal Report
Sample Report – Custom Export
Created by Interactions 140
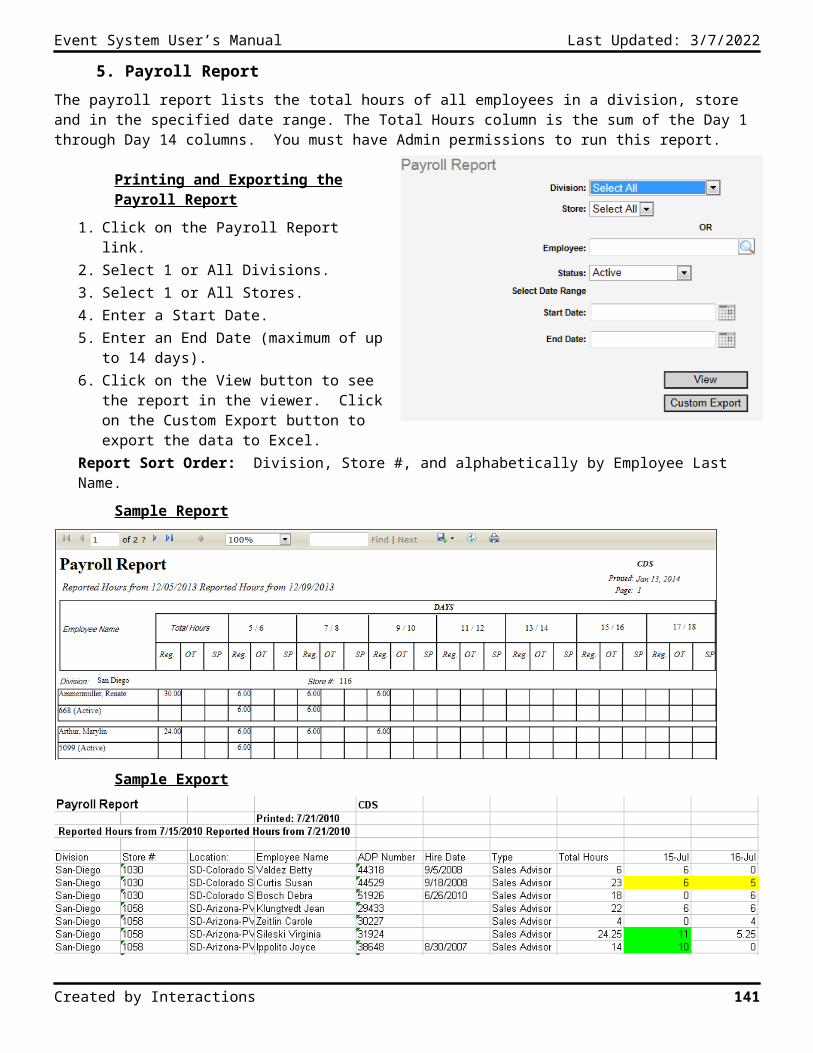
Event System User’s Manual Last Updated: 5/9/2023
6. Vendor Credit Exceptions Report
The vendor credit exceptions report lists all vendors who are currently 125% over their credit limit and displays the credit memos, total amounts and vendors with a delinquent status. The current outstanding credit is based on the 5 days prior to the date specified for scheduled events (credit owed) and all outstanding amounts with a status of billed.
Printing the Vendor Credit Exceptions Report
1. Click on the Vendor Credit Exceptions Report link.
2. Select the PrePay\Regular Vendors if necessary.
3. Click on the View button.
Report Sort Order: Alphabetically by Vendor Name.
Sample Report
Created by Interactions 141
Event System User’s Manual Last Updated: 5/9/2023
7. Invoice Followup Email Report
The invoice followup email report allows you to send a followup email the day proceeding the emailing of invoices. You must have administrative permissions to run this function.
Running the Invoice Followup Email Report
1. Click on the Invoice Followup Email Report link.
2. Enter an Invoice Date.
3. Select whose contact information should be used in the email from the Contact Info dropdown list.
4. Click on the Run button.
Sample Report
Created by Interactions 142
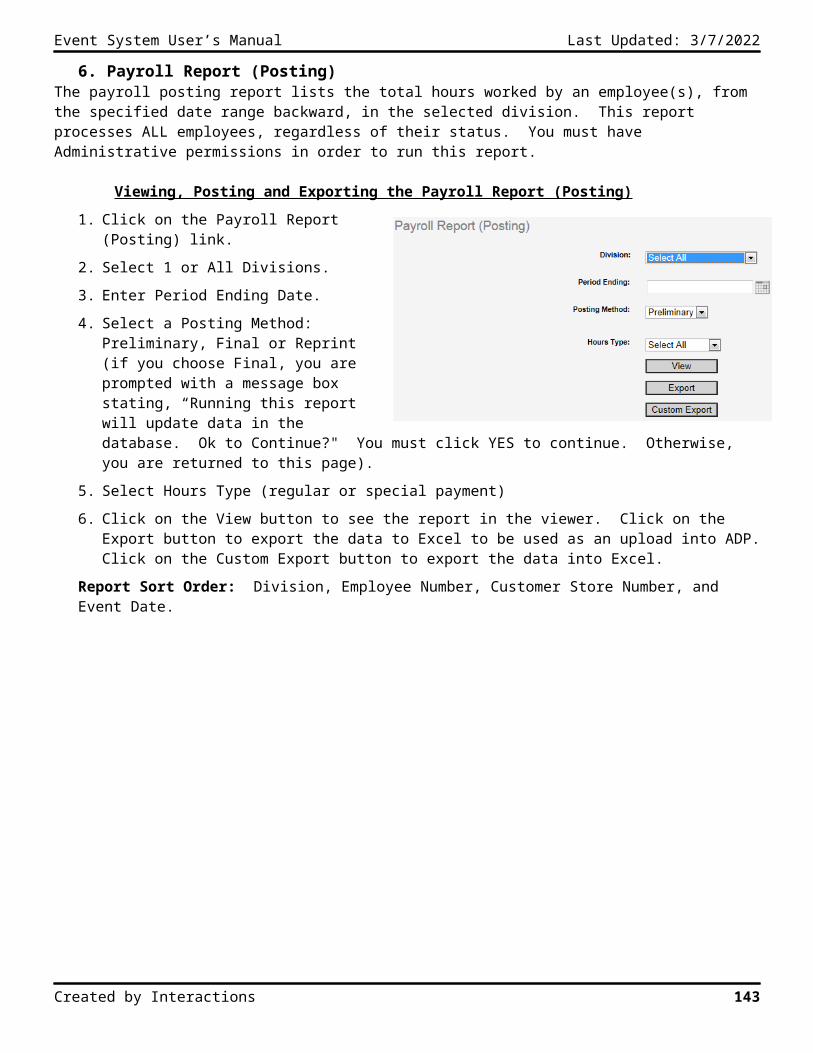
Event System User’s Manual Last Updated: 5/9/2023
8. Credit/Debit Memo Report
The credit/debit memo report displays the credit and debit information for all vendors within the specified date range.
Printing the Credit/Debit Memo Report
1. Click on the Credit/Debit Memo Report link.
2. Enter a Start Date.
3. Enter an End Date.
4. Click on the View button.
Sample Report
Created by Interactions 143
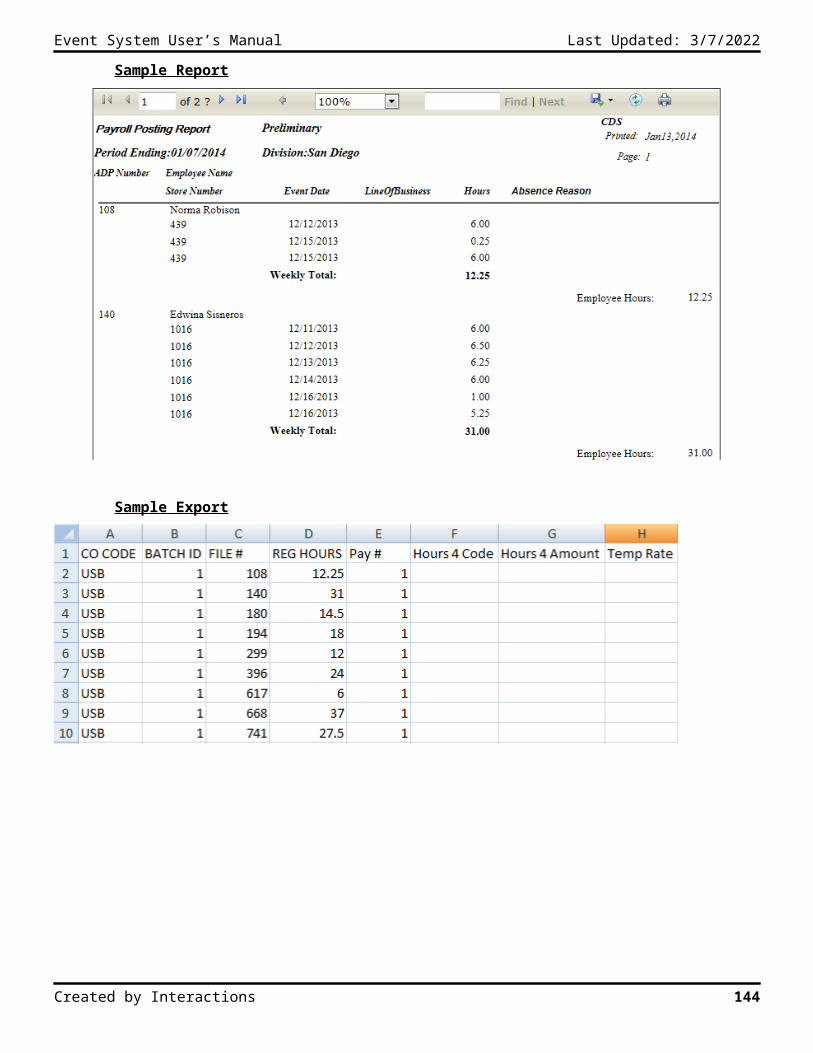
Event System User’s Manual Last Updated: 5/9/2023
9. Revenue Report
The revenue report displays the revenue/total billed per accounting period. This report also allows you to post each period by the invoice period ending date.
Printing the Credit/Debit Memo Report
1. Click on the Revenue Report link.2. Select a Report Type.3. Select Report Method: preliminary or Final
(Final will update the database base and flag the records as posted).
4. Select a Search by Method (you can only post records by Period ending Date).
5. Select a Start Date6. Select an End Date.7. Click on the View or Export button.
Sample Report
Sample Export
Created by Interactions 144

Event System User’s Manual Last Updated: 5/9/2023
Printing ReportsIn order to print reports from Event Link, you must click on the print icon on the viewer’s report header. YOU CANNOT USE THE PRINT ICON ON THE INTERNET EXPLORER TOOLBAR. It will not print your reports properly.
Exporting Reports and Searching for Data in ReportsExporting Reports
You may already be exporting reports from Event Link, but here are some tips and tricks in exporting reports and finding information you need.
If the report itself does not already have an export option when running the report initially, you can use the option in the report viewer and export it from there. After the report appears, click on the Export button.
Exporting a Report
There are five usable formats in which you can export a report; CSV, PDF, Excel, Tiff file (image) and Word.
1. Run the desired report from Event Link.2. Click on the Export button.3. Select the file format you would like to export to.4. Select the Open, Save or Save As option.5. If you select Save As, select the location, where you would like to
save your file (e.g. your C drive).6. Name your export in the File name field.7. Click on the Save button.8. Go to the folder where you saved the Export and open the file.
Created by Interactions 145
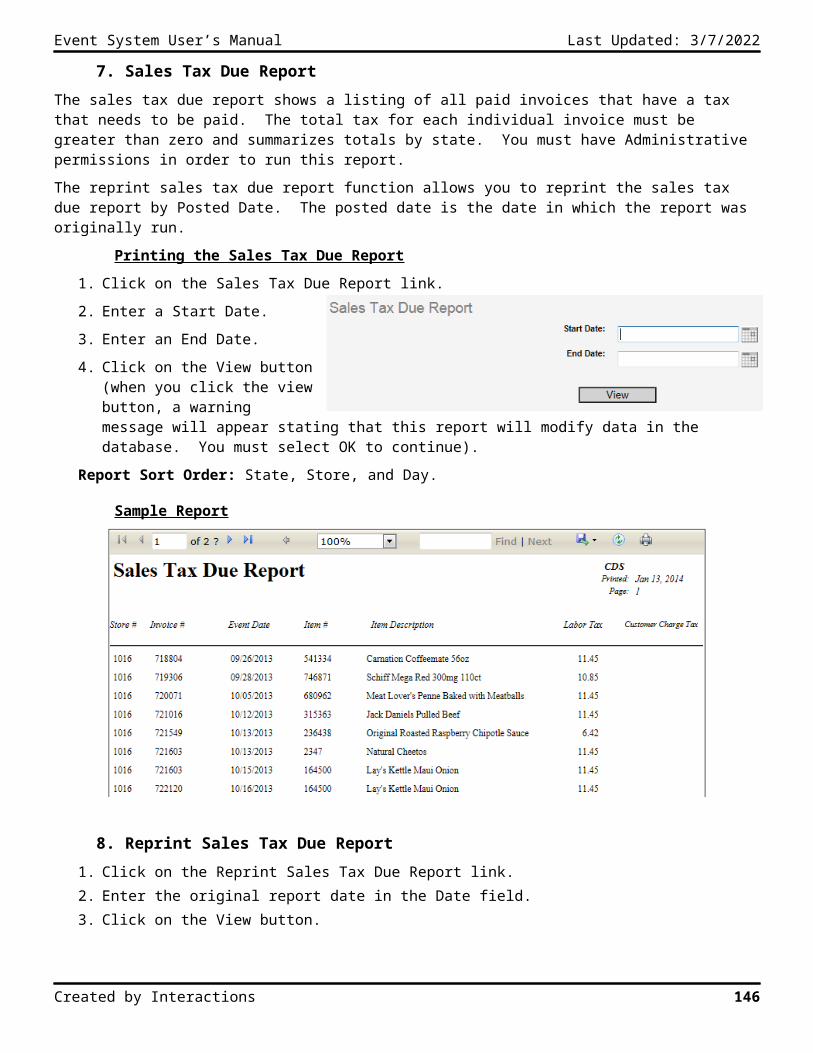
Event System User’s Manual Last Updated: 5/9/2023
Searching For Words and Numbers in the Report ViewerIf you’re looking for information within a report, but you really don’t need to export the report, you can use the Find feature in the reports viewer in Event Link. You can type in a word (or series of words) or number and the click on the Find link to start the search. It will take you to the first item it finds, that meets your search criteria, and if you continue to click on the Find Next button it will find every instance of the word or number you have typed in.
How to Search from the Reports Viewer:
1. Enter the text you want to search for in the Find field.
2. Click on the Find link.
3. If the first word\number the search finds is not what you’re looking for, click on the Find button again until you find the word\number you want.
Created by Interactions 146
Find Link
Search Field - type in word (or series of
words) or numbers you want to search for.
The text the search has
found.
Related Documents