Introduction | 1 INTRODUCTION eCommerce Recipes Online stores vary almost as much as the products they carry. Some stores sell software or other virtual goods and don’t have to worry about shipping while others must ship everything they sell, all around the world. A number of merchants provide special discounts for customers who have registered with them while other sellers give price breaks to shoppers who buy several units of an item. If you're the Web designer responsible for one or more of these online stores, you may be overwhelmed trying to figure out how to implement your client's must-have features. eCommerce Recipes was developed to help you make these online selling needs a reality. The six recipes included represent the most commonly requested functionality: shipping, sales tax, member discounts, quantity discounts, static-based options and database-driven options. • Simple sales tax – An additional charge is calculated as a percentage of the subtotal and added to the total; the percentage charged is derived from the customer's billing location. • Database-driven shipping and tax – Charges pulled from the recordset are added to the subtotal according to the shipping location and the type of shipping (standard, over-night, etc.) requested by the customer. • Member discounts – Per product discounts are drawn from a database table and applied if the current shopper is an authorized member. An optional message in their shopping cart informs the shopper how much they have saved. • Quantity discounts – Calculates and applies a discount based on the amount of single products a customer buys. The potential savings can be included in the product pages to encourage multiple item purchases.

Welcome message from author
This document is posted to help you gain knowledge. Please leave a comment to let me know what you think about it! Share it to your friends and learn new things together.
Transcript
Introduction | 1
INTRODUCTION
eCommerce Recipes
Online stores vary almost as much as the products they carry. Some stores sell software or other virtual goods and don’t have to worry about shipping while others must ship everything they sell, all around the world. A number of merchants provide special discounts for customers who have registered with them while other sellers give price breaks to shoppers who buy several units of an item. If you're the Web designer responsible for one or more of these online stores, you may be overwhelmed trying to figure out how to implement your client's must-have features.
eCommerce Recipes was developed to help you make these online selling needs a reality. The six recipes included represent the most commonly requested functionality: shipping, sales tax, member discounts, quantity discounts, static-based options and database-driven options.
• Simple sales tax – An additional charge is calculated as a percentage of the subtotal and added to the total; the percentage charged is derived from the customer's billing location.
• Database-driven shipping and tax – Charges pulled from the recordset are added to the subtotal according to the shipping location and the type of shipping (standard, over-night, etc.) requested by the customer.
• Member discounts – Per product discounts are drawn from a database table and applied if the current shopper is an authorized member. An optional message in their shopping cart informs the shopper how much they have saved.
• Quantity discounts – Calculates and applies a discount based on the amount of single products a customer buys. The potential savings can be included in the product pages to encourage multiple item purchases.
Introduction | 2
• Static-based product options – A drop-down option list is inserted next to every Add to Cart button as well as on the shopping cart itself for a more flexible customer experience. The option list is populated with static values which is basically the same across the product-line.
• Database-driven product options – Two separate options are incorporated into the Add to Cart buttons as well as the shopping cart page. One option varies according to the category of product while the other is product specific. All option lists are populated dynamically by recordsets.
• Remote Form Checkout - There are two basic ways to handle an eCommerce checkout procedure: local and remote. With a local checkout, the shopper stays in the same website throughout the shopping and checkout procedure. A remote checkout is relatively straight-forward to set up. Although the shopper is transferred to another secure site during the checkout process, the payment gateway page is often branded to minimize the transition. In the remote checkout scenario, the payment gateway is responsible for gathering sensitive information, like the customer's credit card number, and handles the security requirements.
What Do You Need?
To follow along with these recipes, you'll need to have these extensions from WebAssist:
• eCart 3.0.1 or greater
• eCommerce Recipes 3
Both extensions are packaged as Dreamweaver extension in MXP format. You'll need to install these extensions using the Macromedia Extension Manager. Once you've downloaded the files, double-click them to begin the installation process. If Dreamweaver is open when the extensions are installed, you'll need to close and re-start Dreamweaver.
In addition to the extensions, you'll need to download and set-up the appropriate working files and data sources. Separate compressed files in .zip format are available for each recipe in all the supported server models. Each
Introduction | 3
recipe file contains starting points and completed files. To set-up your working files, follow these steps:
1. Download the desired recipe file for your server model and save it in an accessible location.
2. Download the data source files as well. Updated data sources have been provided for the eCommerce Recipes in both Access and MySQL format.
3. Uncompress the files to a new folder on your Web server. You'll find two main folders — Starting Points and Completed Files — within your created folder.
4. Create a Dreamweaver site with the recipe's starting point as the site root.
5. Browse the completed files folder on your web server to view the files in action. If your web server is installed locally, the URL will be something like: http://localhost/WA_Recipes/Simple_Sales_Tax/Completed/
6. Advanced programmers can optionally establish a second Dreamweaver site, with the recipe's completed files as the site root, if you want to examine the completed files in detail.
7. Uncompress the data source file and replace the existing Access or MySQL data source. PHP users will need re-execute the set-up procedure covered in the Getting Started Guide; re-executing the procedure replaces the existing sample database and tables. Access users can just overwrite the existing .mdb file.
These recipes build upon the concepts covered in the eCart tutorial found in the Getting Started Guide and assumes you have completed them and are familiar with eCart basics. If you are working with database-driven product pages, you will have also established a data source connection.
Introduction | 4
For more information on setting up data sources and working with eCart, see the eCart Help pages in Dreamweaver, Help > WebAssist > eCart > Tutorials.
Recipe 1: Simple Sales Tax | 5
RECIPE 1
Simple Sales Tax
Many online stores find it necessary to charge sales tax. Sales tax is collected by the various states and, typically, is due if the customer lives in a state in which the online company has an office. If necessary, an additional charge is applied to the subtotal of the order. The sales tax is listed in the shopping cart and updated whenever the shopping cart contents change.
With eCart, incorporating sales tax involves three basic steps:
• Creating a calculated charge for the sales tax using the eCart Charges Wizard.
• Incorporating a drop-down list of states with their related tax percentage values into a customer information page.
• Building the checkout confirmation page with hidden form elements bound with the gathered customer data and displaying the shopping cart including the added tax.
A session variable is used to convey the sales tax, if any, to the shopping cart object.
The sales tax data used in this recipe is based on selling to customers within the United States. Developers working in other countries can easily replace the data to meet their needs.
Step 1: Creating the Sales Tax Rule
The total cost of the products in your customer's shopping cart is often not the same as the final amount due. The cost may be affected by additional charges — such as tax or shipping — or discounts, applied per item or across the board. The calculations that govern these charges and discounts are referred to as merchandising rules. eCart includes a robust architecture for creating merchandising rules, applying them and then displaying the results.
A merchandising rule is similar to a Dreamweaver behavior: for both, there is a triggering action and a resulting event. With merchandising rules like a sales tax, the triggering action is the placing of any item in the shopping cart. The event is the calculation that derives the sales tax based on the cart subtotal multiplied by the given tax rate. eCart develops merchandising rules that result in an additional cost defined in the eCart Charges Wizard which, in turn, is accessible through the eCart Shopping Cart object.
1. From the Files panel, double-click the shopping_cart page for your server model to open it.
Changes to the shopping cart object may be applied once any previously saved, dynamic page in your eCommerce site is open. Here, the shopping_cart page is chosen because it is used in the next sequence of steps.
2. Select Window > eCart Object Panel.
If there are multiple shopping carts objects defined, as there are in the eCommerce Recipes files, you'll see them listed alphabetically.
The three-tabbed eCart panel is displayed.
3. From the Available list, select shoeCart.
eCart allows multiple carts defined within a site, each with their own discount and charge rules.
4. Select the Charges tab and click Add (+)
Recipe 1: Simple Sales Tax | 6
The eCart Charges Wizard is displayed.
5. In the first page of the Wizard, enter State Sales Tax in the Rule Name text field and select the Make Rule Active option. Click Next to continue.
The name entered here is displayed both in the eCart panel interface and, most importantly, in the shopping cart display. Although the text in the shopping cart display can be altered at design-time, it's a good idea to name your merchandising rules meaningfully.
Recipe 1: Simple Sales Tax | 7
Recipe 1: Simple Sales Tax | 8
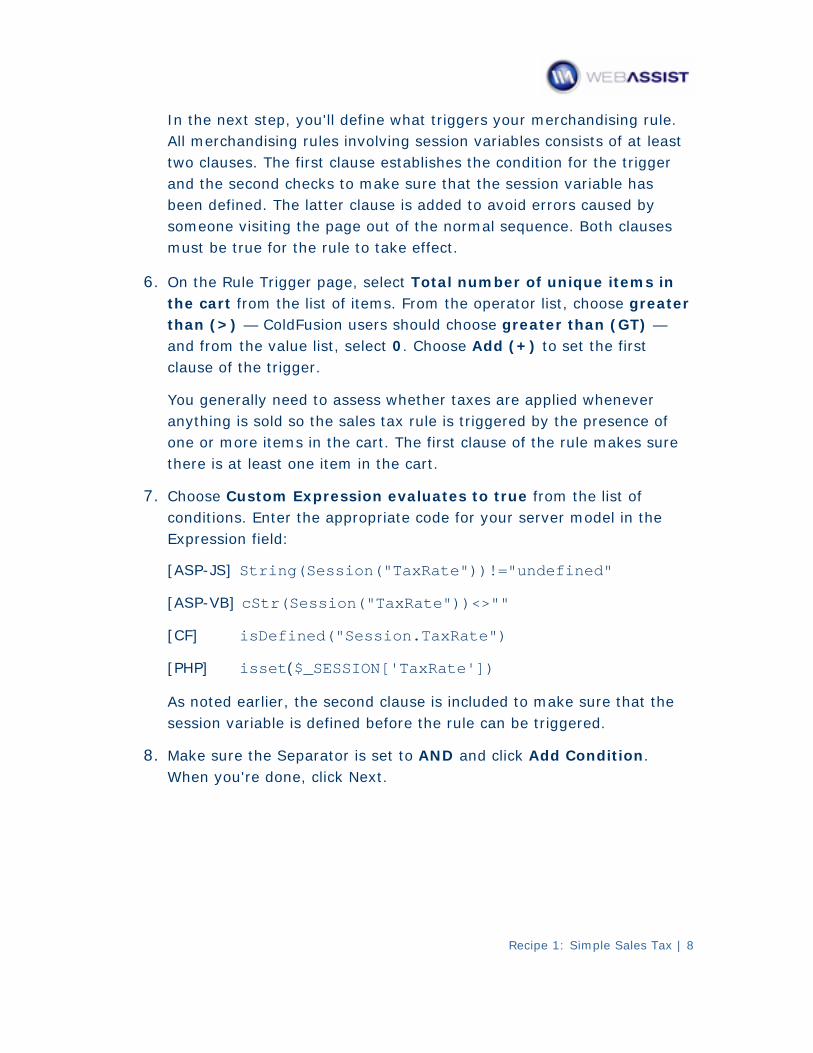
In the next step, you'll define what triggers your merchandising rule. All merchandising rules involving session variables consists of at least two clauses. The first clause establishes the condition for the trigger and the second checks to make sure that the session variable has been defined. The latter clause is added to avoid errors caused by someone visiting the page out of the normal sequence. Both clauses must be true for the rule to take effect.
6. On the Rule Trigger page, select Total number of unique items in the cart from the list of items. From the operator list, choose greater than (>) — ColdFusion users should choose greater than (GT) — and from the value list, select 0. Choose Add (+) to set the first clause of the trigger.
You generally need to assess whether taxes are applied whenever anything is sold so the sales tax rule is triggered by the presence of one or more items in the cart. The first clause of the rule makes sure there is at least one item in the cart.
7. Choose Custom Expression evaluates to true from the list of conditions. Enter the appropriate code for your server model in the Expression field:
[ASP-JS] String(Session("TaxRate"))!="undefined"
[ASP-VB] cStr(Session("TaxRate"))<>""
[CF] isDefined("Session.TaxRate")
[PHP] isset($_SESSION['TaxRate'])
As noted earlier, the second clause is included to make sure that the session variable is defined before the rule can be triggered.
8. Make sure the Separator is set to AND and click Add Condition. When you're done, click Next.
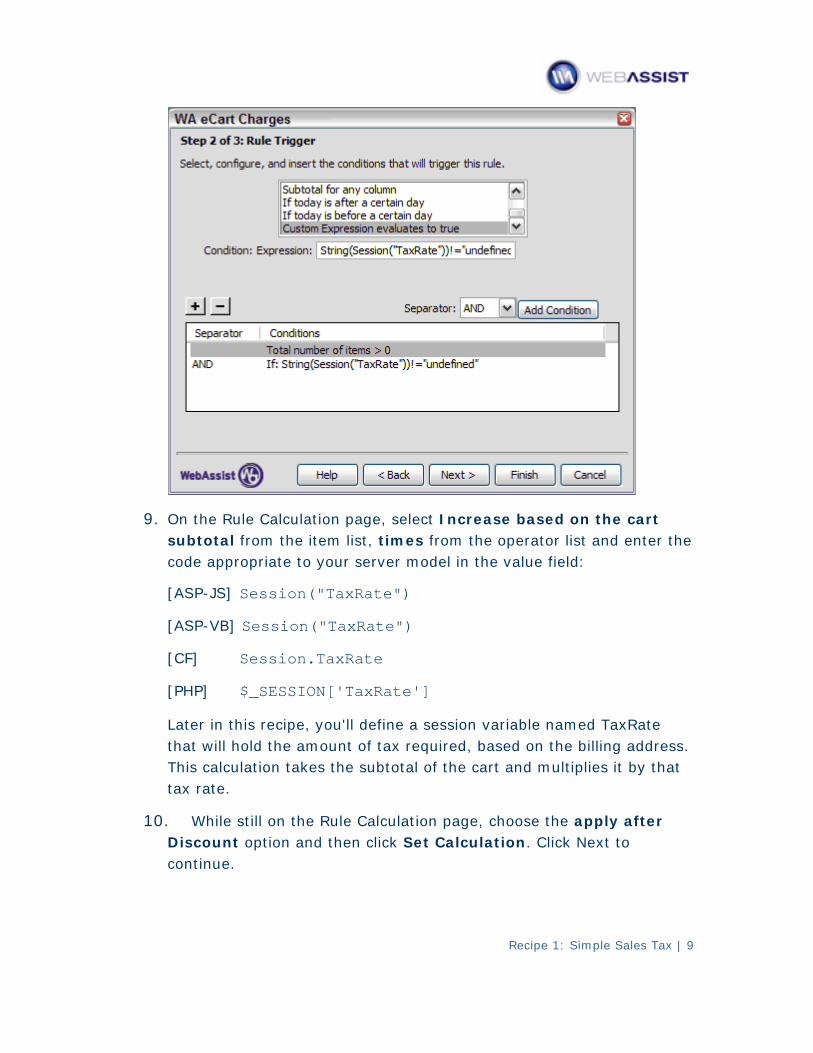
9. On the Rule Calculation page, select Increase based on the cart subtotal from the item list, times from the operator list and enter the code appropriate to your server model in the value field:
[ASP-JS] Session("TaxRate")
[ASP-VB] Session("TaxRate")
[CF] Session.TaxRate
[PHP] $_SESSION['TaxRate']
Later in this recipe, you'll define a session variable named TaxRate that will hold the amount of tax required, based on the billing address. This calculation takes the subtotal of the cart and multiplies it by that tax rate.
10. While still on the Rule Calculation page, choose the apply after Discount option and then click Set Calculation. Click Next to continue.
Recipe 1: Simple Sales Tax | 9

Naturally, it's up to your own store guidelines whether the sales tax is applied before or after discounts; in this scenario, customers would pay a lower tax rate, if any discounts were available.
11. Confirm that your selections are as expected in the final screen of the eCart Charges Wizard. If you need to make a change, click Back; otherwise, click Finish to add the rule to the shoeCart shopping cart object.
Recipe 1: Simple Sales Tax | 10
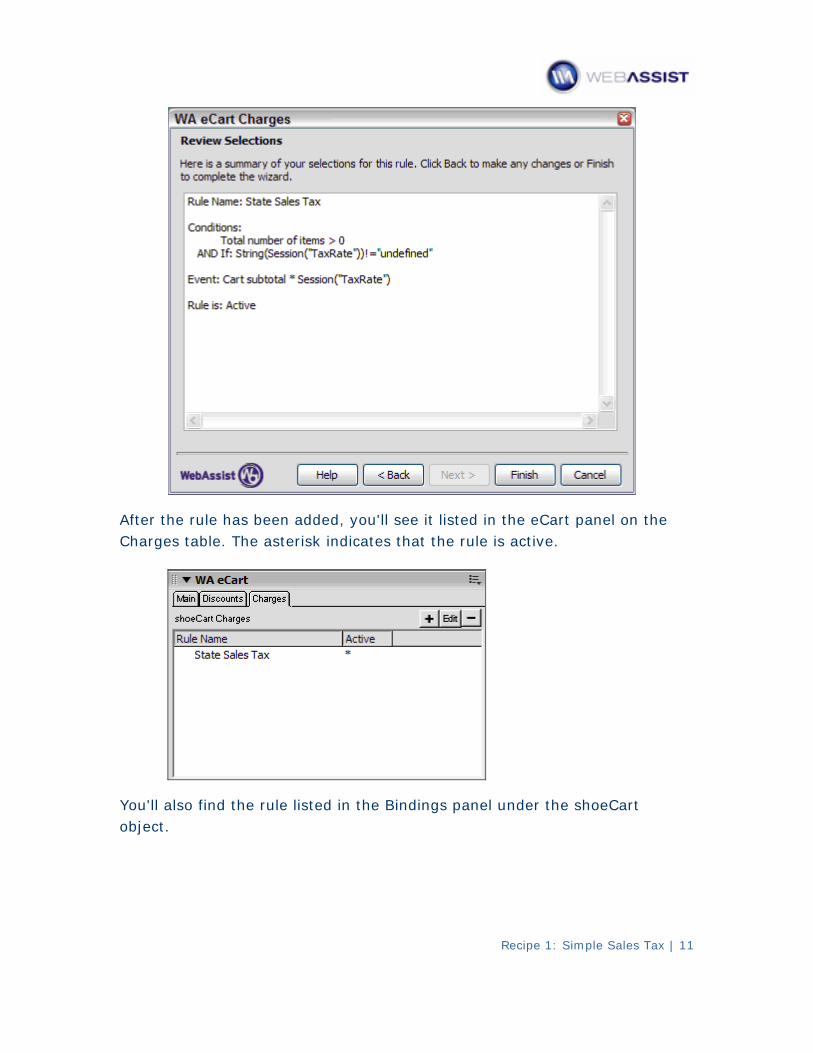
After the rule has been added, you'll see it listed in the eCart panel on the Charges table. The asterisk indicates that the rule is active.
You'll also find the rule listed in the Bindings panel under the shoeCart object.
Recipe 1: Simple Sales Tax | 11

Step 2: Redirect Shopping Cart Page
When the shopping cart display page was originally constructed in the Getting Started Guide tutorial, clicking Checkout took you directly to the final checkout page where the customer information was gathered prior to being posted to the payment gateway. In this recipe, you'll add a page that will be viewed after the shopping cart display and before the final checkout page. This new page will gather the customer information in preparation for applying the tax rate to the shopping cart display. Consequently, you'll need to direct the user to the customer information page when they click Checkout from the shopping cart display.
Why collect the information and display the tax rather than allowing the payment gateway to handle it all? From the developer's perspective, the approach taken in the Getting Started Guide is simplest: the payment gateway is responsible for managing all the transaction details. In this recipe, you're gathering more information from the shopper before calling the payment gateway. Both are valid techniques. Perhaps the key benefit this method brings is informing the customer of the total amount — including
Recipe 1: Simple Sales Tax | 12
taxes — before the transaction is begun. Moreover, the customer information gathered could optionally be stored in a database to retain order history.
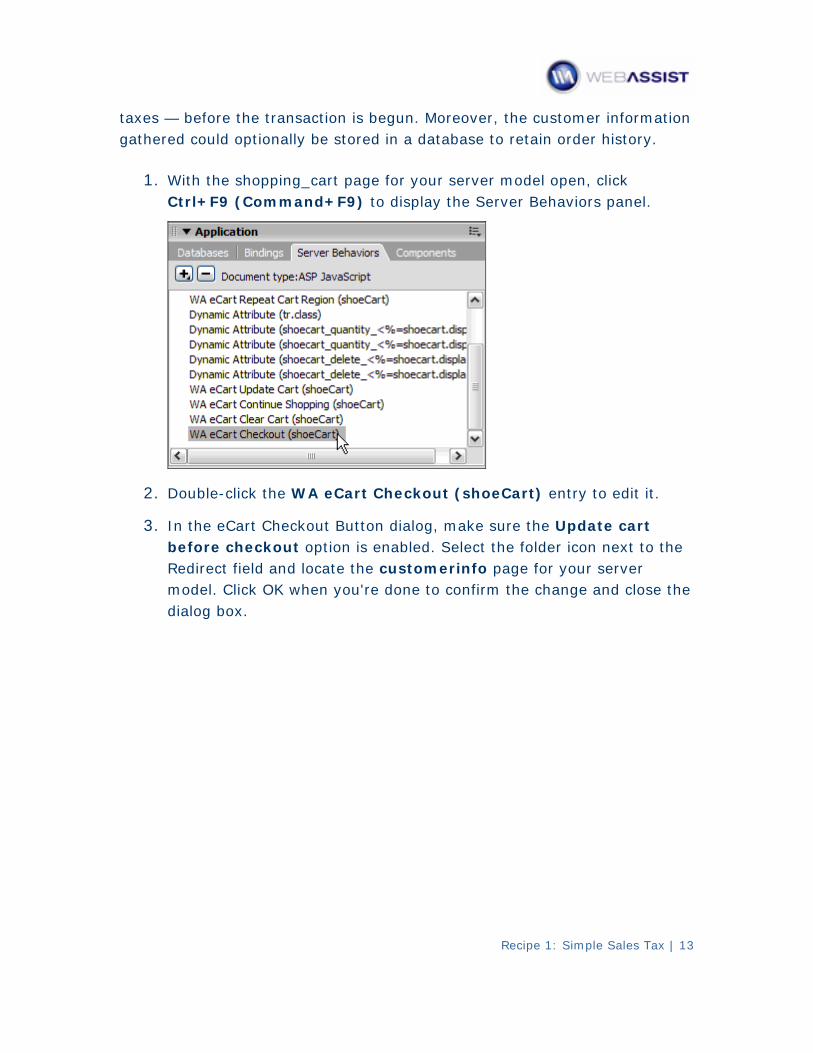
1. With the shopping_cart page for your server model open, click Ctrl+F9 (Command+F9) to display the Server Behaviors panel.
2. Double-click the WA eCart Checkout (shoeCart) entry to edit it.
3. In the eCart Checkout Button dialog, make sure the Update cart before checkout option is enabled. Select the folder icon next to the Redirect field and locate the customerinfo page for your server model. Click OK when you're done to confirm the change and close the dialog box.
Recipe 1: Simple Sales Tax | 13
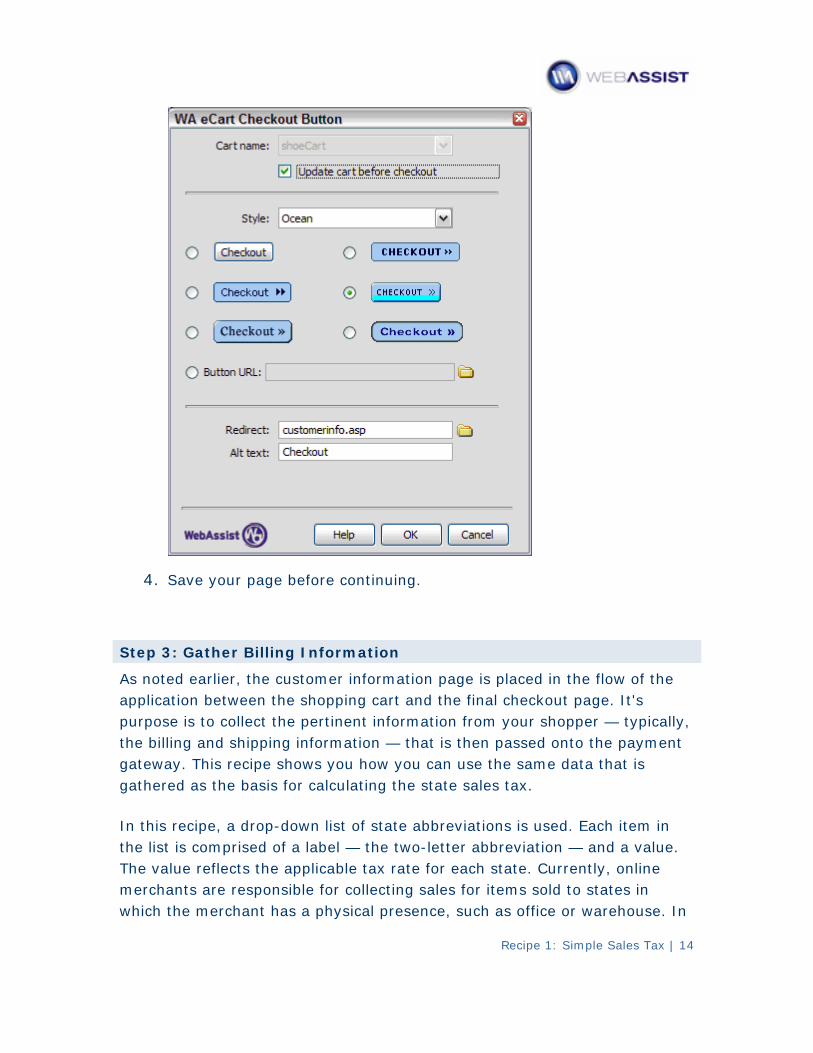
4. Save your page before continuing.
Step 3: Gather Billing Information
As noted earlier, the customer information page is placed in the flow of the application between the shopping cart and the final checkout page. It's purpose is to collect the pertinent information from your shopper — typically, the billing and shipping information — that is then passed onto the payment gateway. This recipe shows you how you can use the same data that is gathered as the basis for calculating the state sales tax.
In this recipe, a drop-down list of state abbreviations is used. Each item in the list is comprised of a label — the two-letter abbreviation — and a value. The value reflects the applicable tax rate for each state. Currently, online merchants are responsible for collecting sales for items sold to states in which the merchant has a physical presence, such as office or warehouse. In
Recipe 1: Simple Sales Tax | 14
Recipe 1: Simple Sales Tax | 15
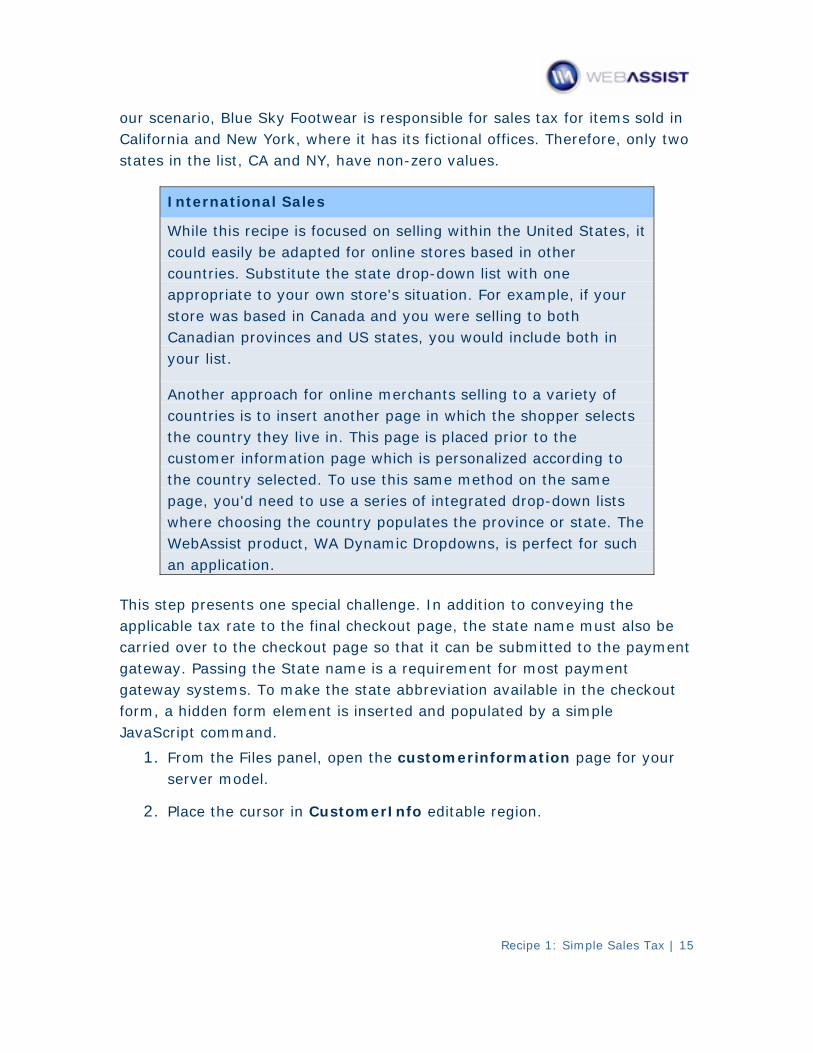
our scenario, Blue Sky Footwear is responsible for sales tax for items sold in California and New York, where it has its fictional offices. Therefore, only two states in the list, CA and NY, have non-zero values.
International Sales
While this recipe is focused on selling within the United States, it could easily be adapted for online stores based in other countries. Substitute the state drop-down list with one appropriate to your own store's situation. For example, if your store was based in Canada and you were selling to both Canadian provinces and US states, you would include both in your list.
Another approach for online merchants selling to a variety of countries is to insert another page in which the shopper selects the country they live in. This page is placed prior to the customer information page which is personalized according to the country selected. To use this same method on the same page, you'd need to use a series of integrated drop-down lists where choosing the country populates the province or state. The WebAssist product, WA Dynamic Dropdowns, is perfect for such an application.
This step presents one special challenge. In addition to conveying the applicable tax rate to the final checkout page, the state name must also be carried over to the checkout page so that it can be submitted to the payment gateway. Passing the State name is a requirement for most payment gateway systems. To make the state abbreviation available in the checkout form, a hidden form element is inserted and populated by a simple JavaScript command.
1. From the Files panel, open the customerinformation page for your server model.
2. Place the cursor in CustomerInfo editable region.
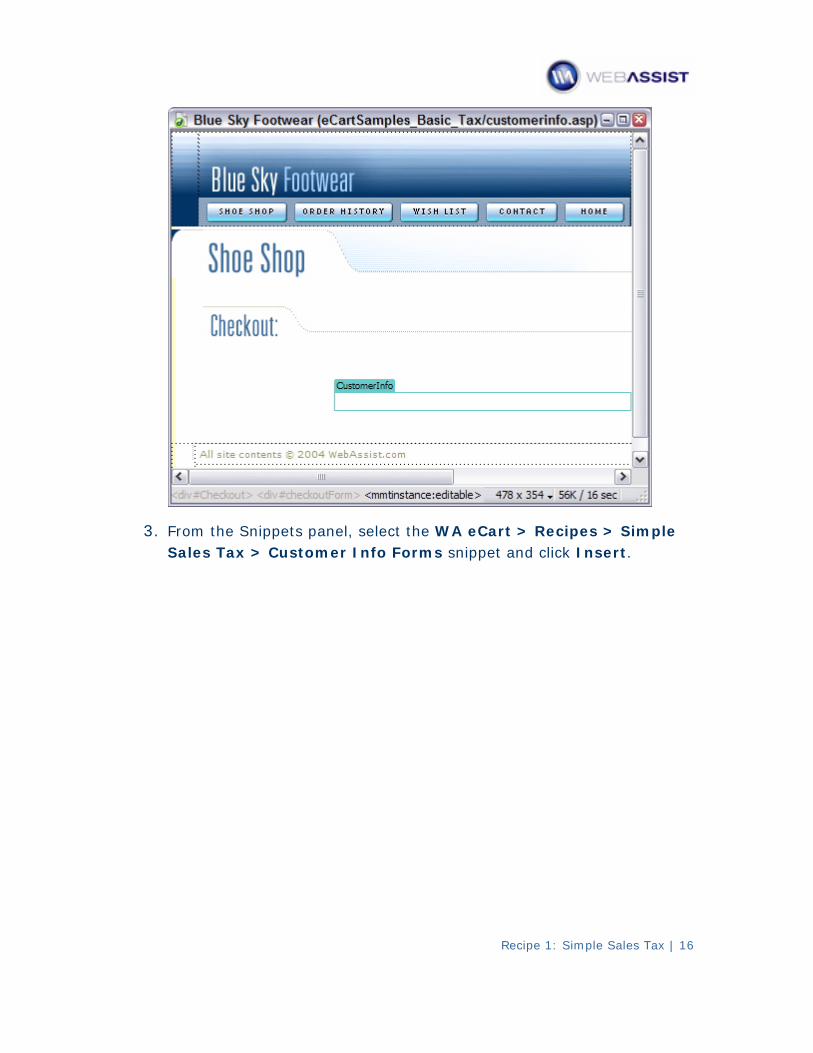
3. From the Snippets panel, select the WA eCart > Recipes > Simple Sales Tax > Customer Info Forms snippet and click Insert.
Recipe 1: Simple Sales Tax | 16
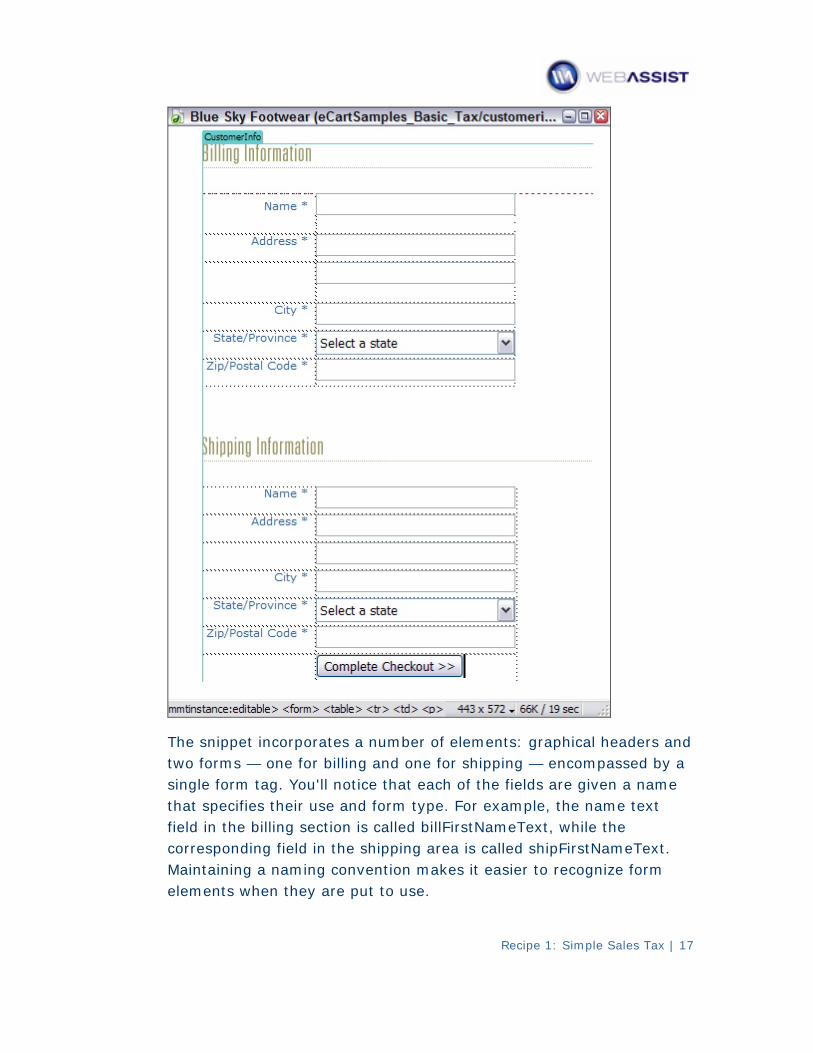
The snippet incorporates a number of elements: graphical headers and two forms — one for billing and one for shipping — encompassed by a single form tag. You'll notice that each of the fields are given a name that specifies their use and form type. For example, the name text field in the billing section is called billFirstNameText, while the corresponding field in the shipping area is called shipFirstNameText. Maintaining a naming convention makes it easier to recognize form elements when they are put to use.
Recipe 1: Simple Sales Tax | 17
The next task is to set the action for the form.
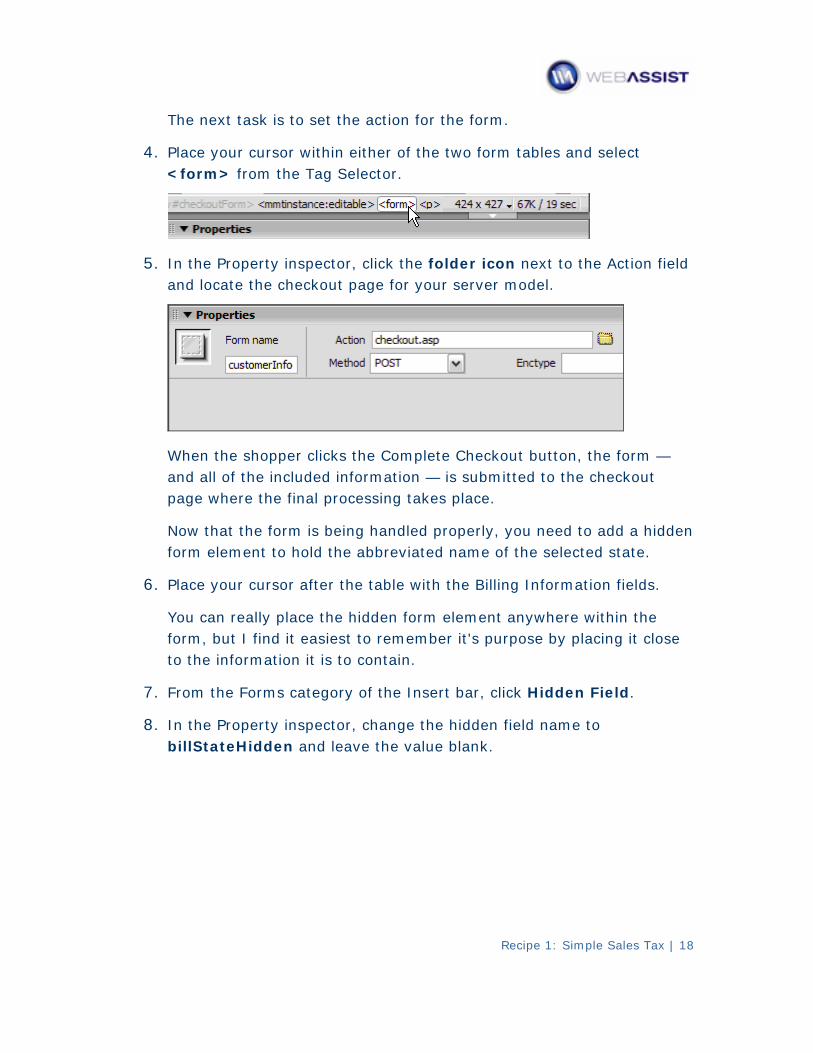
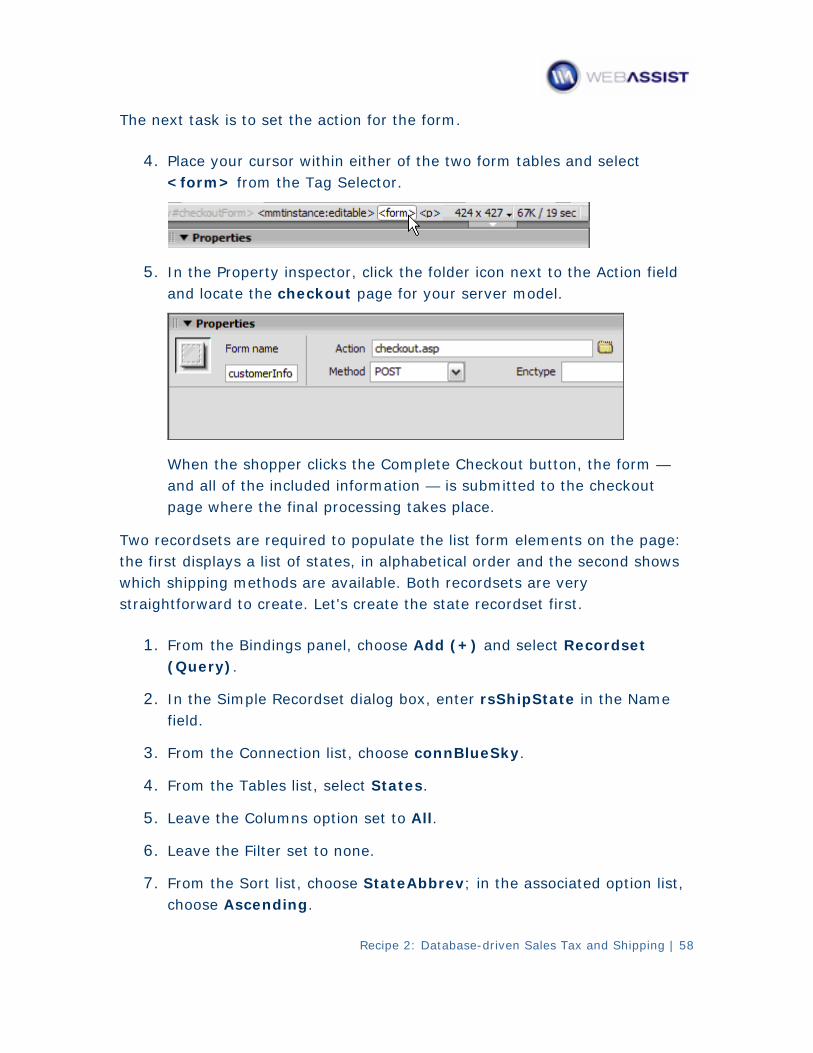
4. Place your cursor within either of the two form tables and select <form> from the Tag Selector.
5. In the Property inspector, click the folder icon next to the Action field and locate the checkout page for your server model.
When the shopper clicks the Complete Checkout button, the form — and all of the included information — is submitted to the checkout page where the final processing takes place.
Now that the form is being handled properly, you need to add a hidden form element to hold the abbreviated name of the selected state.
6. Place your cursor after the table with the Billing Information fields.
You can really place the hidden form element anywhere within the form, but I find it easiest to remember it's purpose by placing it close to the information it is to contain.
7. From the Forms category of the Insert bar, click Hidden Field.
8. In the Property inspector, change the hidden field name to billStateHidden and leave the value blank.
Recipe 1: Simple Sales Tax | 18

The value of the billStateHidden form element is determined by the user's selection of the state list. You'll need to add a bit of JavaScript to add that functionality. To simplify that task, you can use the Copy Snippet command, installed with your recipes, to copy code prior to applying it to a client-side behavior.
9. From the Snippets panel, right-click the WA eCart > Recipes > Simple Sales Tax > Store State Name snippet and choose Copy Snippet. Click OK when the copy is confirmed.
Dreamweaver supplies a handy client-side behavior for applying simple JavaScript known as Call JavaScript. The billing state list is used as the trigger for this behavior.
10. Select the billStateList form element and, from the Behaviors panel (Shift+F4), choose Add (+) and select Call JavaScript. When the Call JavaScript dialog opens, press Ctrl+V (Command+V) to paste the copied code snippet. Click OK when you're done.
Recipe 1: Simple Sales Tax | 19
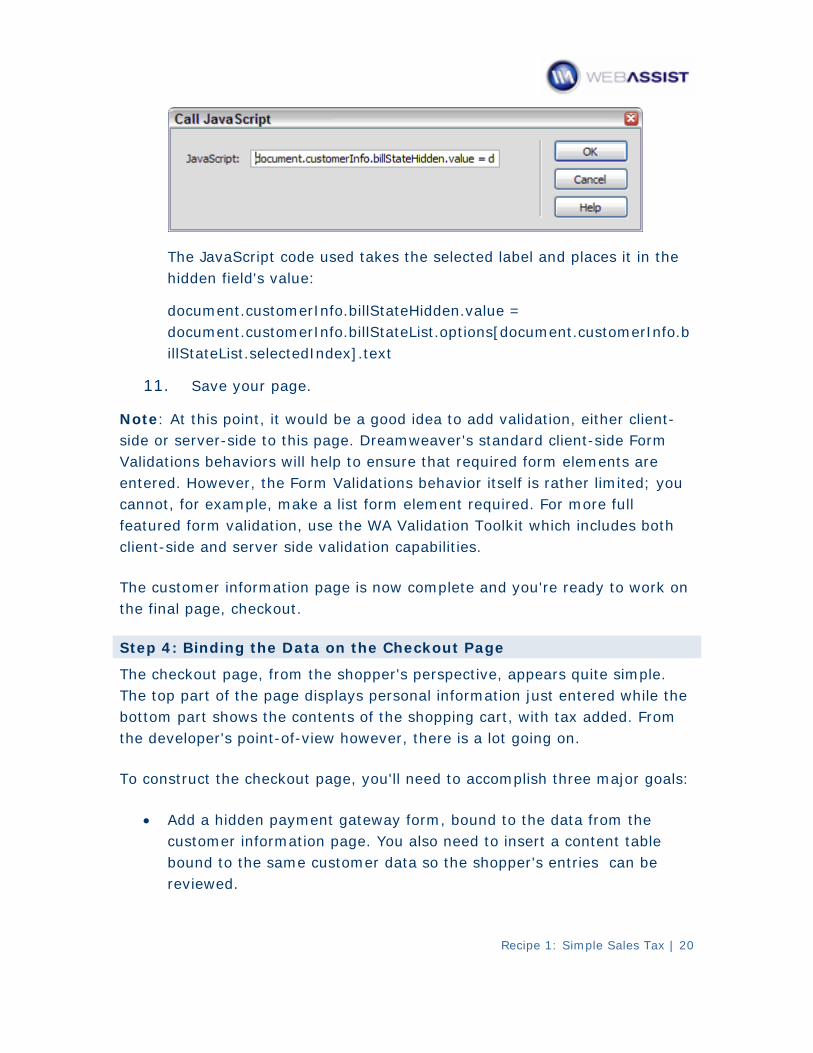
The JavaScript code used takes the selected label and places it in the hidden field's value:
document.customerInfo.billStateHidden.value = document.customerInfo.billStateList.options[document.customerInfo.billStateList.selectedIndex].text
11. Save your page.
Note: At this point, it would be a good idea to add validation, either client-side or server-side to this page. Dreamweaver's standard client-side Form Validations behaviors will help to ensure that required form elements are entered. However, the Form Validations behavior itself is rather limited; you cannot, for example, make a list form element required. For more full featured form validation, use the WA Validation Toolkit which includes both client-side and server side validation capabilities.
The customer information page is now complete and you're ready to work on the final page, checkout.
Step 4: Binding the Data on the Checkout Page
The checkout page, from the shopper's perspective, appears quite simple. The top part of the page displays personal information just entered while the bottom part shows the contents of the shopping cart, with tax added. From the developer's point-of-view however, there is a lot going on.
To construct the checkout page, you'll need to accomplish three major goals:
• Add a hidden payment gateway form, bound to the data from the customer information page. You also need to insert a content table bound to the same customer data so the shopper's entries can be reviewed.
Recipe 1: Simple Sales Tax | 20
• Establish a session variable to hold the selected tax rate.
• Include a read-only shopping cart with the state sales tax charge shown conditionally.
In this first part, you'll bring in the hidden payment gateway form and tie it to the entered data. The hidden form elements are used to convey the information to the payment gateway.
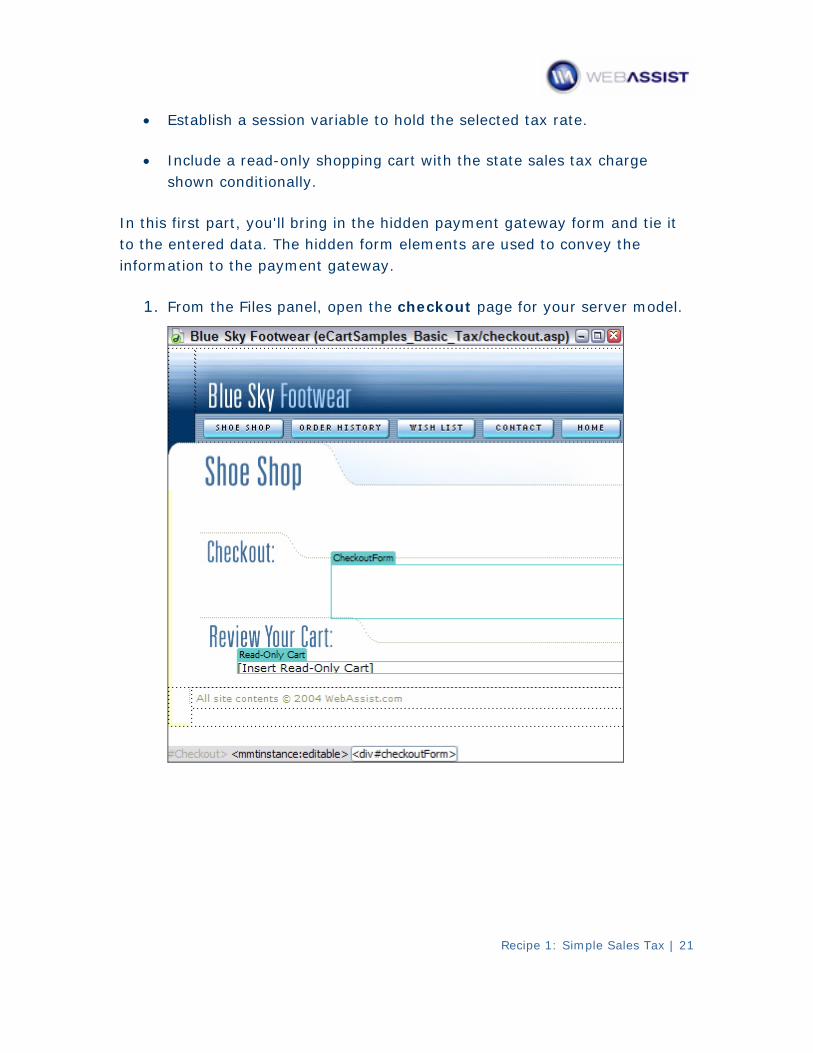
1. From the Files panel, open the checkout page for your server model.
Recipe 1: Simple Sales Tax | 21
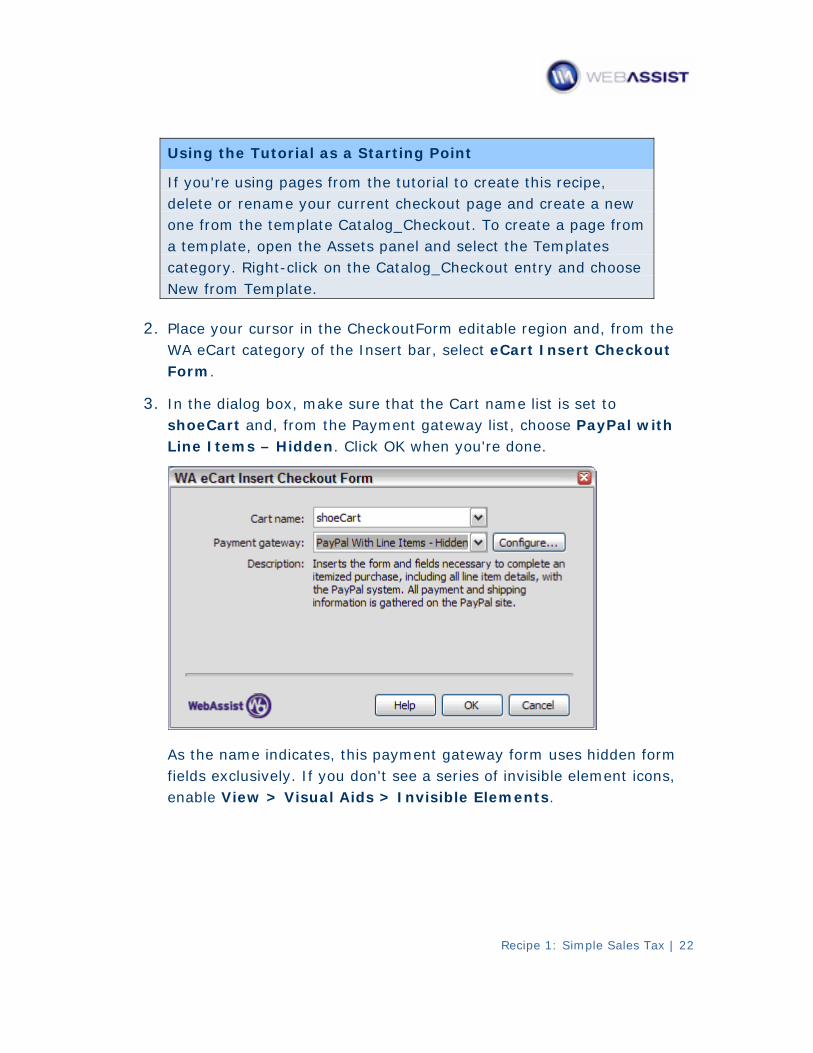
Using the Tutorial as a Starting Point
If you're using pages from the tutorial to create this recipe, delete or rename your current checkout page and create a new one from the template Catalog_Checkout. To create a page from a template, open the Assets panel and select the Templates category. Right-click on the Catalog_Checkout entry and choose New from Template.
2. Place your cursor in the CheckoutForm editable region and, from the WA eCart category of the Insert bar, select eCart Insert Checkout Form.
3. In the dialog box, make sure that the Cart name list is set to shoeCart and, from the Payment gateway list, choose PayPal with Line Items – Hidden. Click OK when you're done.
As the name indicates, this payment gateway form uses hidden form fields exclusively. If you don't see a series of invisible element icons, enable View > Visual Aids > Invisible Elements.
Recipe 1: Simple Sales Tax | 22

In the next step, you'll bind data from the form elements contained in the previously built page to the hidden form elements just inserted. eCart includes a special facility to make drag-and-drop binding possible.
4. From the Bindings panel, choose Add (+) and select WA Form Data from the list. When the Add Form to Bindings dialog box appears, select the folder icon and locate the customerinfo page for your server model; click OK.
The most difficult part of binding data to a hidden form element is finding the right one. Make sure your Property inspector is open for the next step.
5. In the Bindings panel, expand the customerInfo node to reveal the form elements.
Recipe 1: Simple Sales Tax | 23
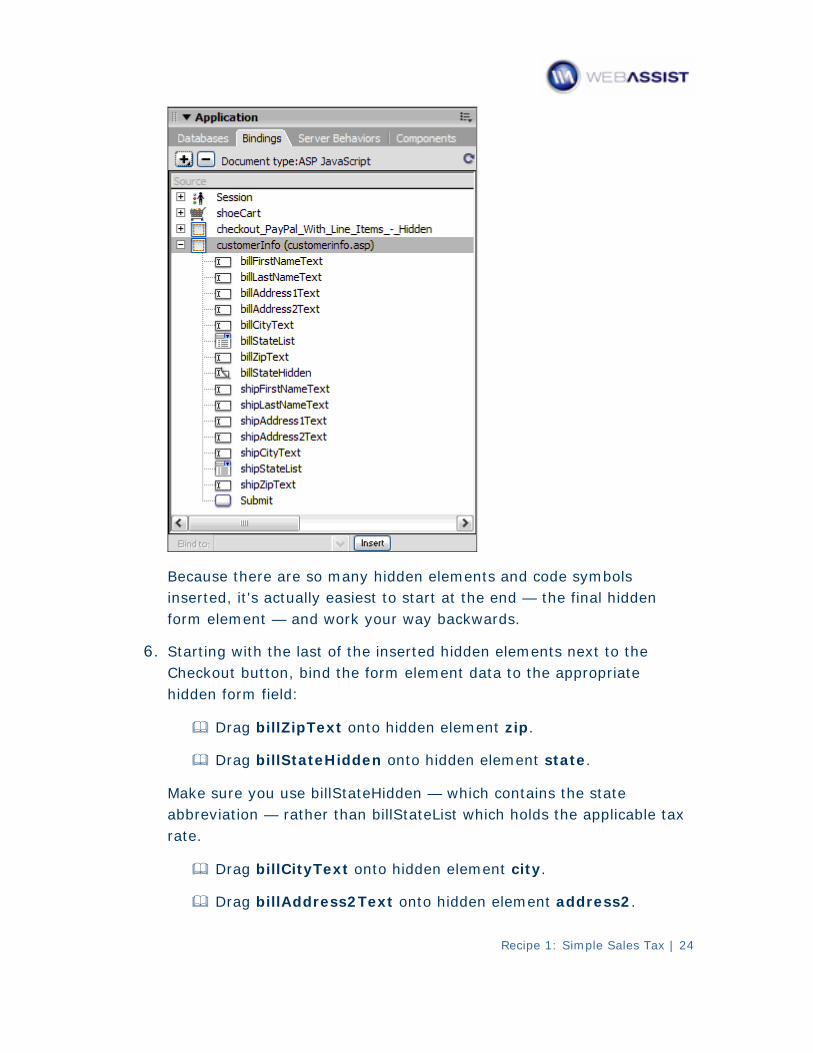
Because there are so many hidden elements and code symbols inserted, it's actually easiest to start at the end — the final hidden form element — and work your way backwards.
6. Starting with the last of the inserted hidden elements next to the Checkout button, bind the form element data to the appropriate hidden form field:
Drag billZipText onto hidden element zip.
Drag billStateHidden onto hidden element state.
Make sure you use billStateHidden — which contains the state abbreviation — rather than billStateList which holds the applicable tax rate.
Drag billCityText onto hidden element city.
Drag billAddress2Text onto hidden element address2.
Recipe 1: Simple Sales Tax | 24

Drag billAddress1Text onto hidden element adddress1.
Drag billLastNameText onto hidden element last_name.
Drag billFirstNameText onto hidden element first_name.
7. Select the first hidden element on the left, named business. Enter your PayPal ID in the Value field; if you don't have a PayPal account, enter [email protected]. Note: If you have the WA PayPal eCommerce Toolkit installed, the business form element will not be visible in Design View. Selecting the Checkout button will make the business attribute editable using the property inspector included in the free PayPal extension.
With the payment gateway taken care of, let's add a content table to show the shopper what values are being passed.
8. Place your cursor just before the Checkout button and, from the Snippets panel, insert the WA eCart > Recipes > Simple Sales Tax > Checkout Content Table snippet.
Recipe 1: Simple Sales Tax | 25
Recipe 1: Simple Sales Tax | 26
The key here is to make sure your that the content table — and the Checkout button — remain within the form tags. By placing your cursor to the left of the button before inserting the snippet, everything remains correctly positioned.
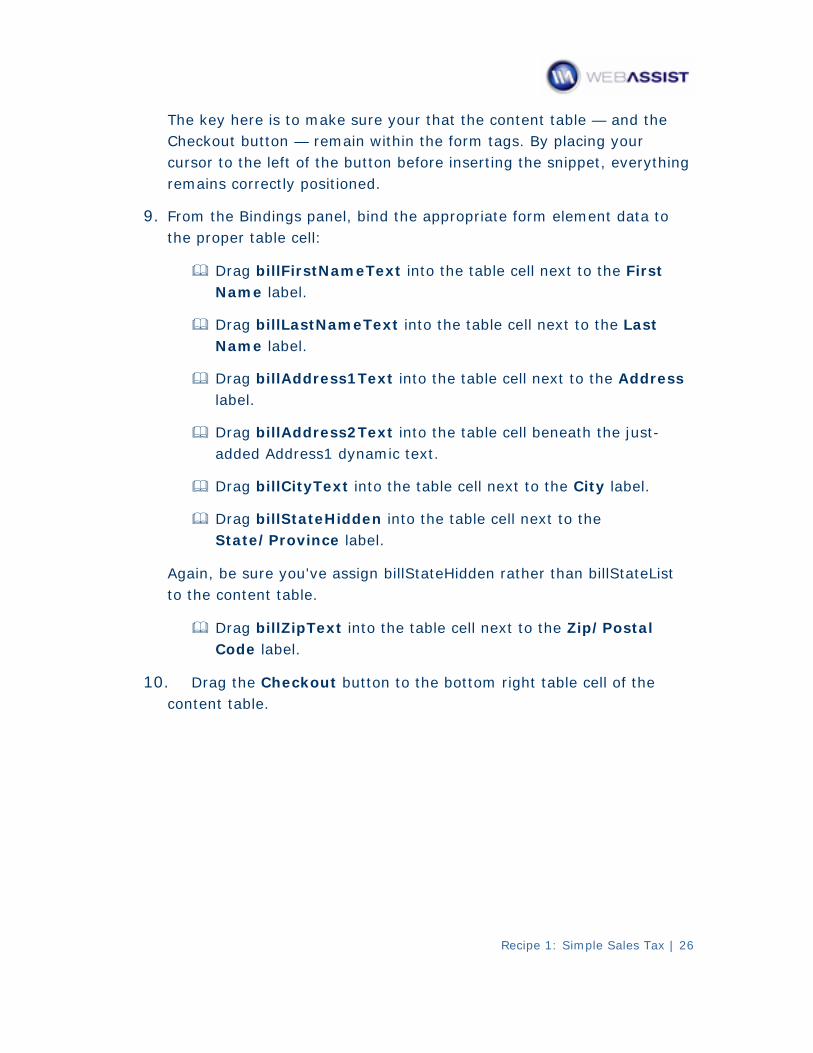
9. From the Bindings panel, bind the appropriate form element data to the proper table cell:
Drag billFirstNameText into the table cell next to the First Name label.
Drag billLastNameText into the table cell next to the Last Name label.
Drag billAddress1Text into the table cell next to the Address label.
Drag billAddress2Text into the table cell beneath the just-added Address1 dynamic text.
Drag billCityText into the table cell next to the City label.
Drag billStateHidden into the table cell next to the State/Province label.
Again, be sure you've assign billStateHidden rather than billStateList to the content table.
Drag billZipText into the table cell next to the Zip/Postal Code label.
10. Drag the Checkout button to the bottom right table cell of the content table.
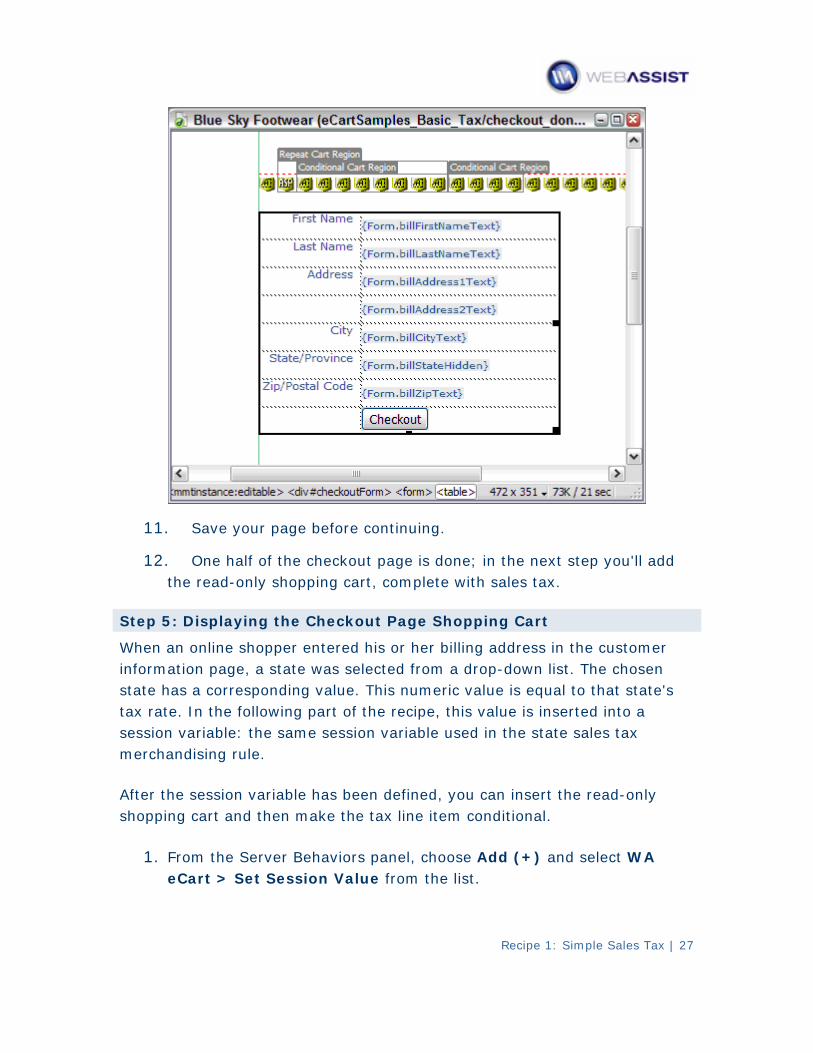
11. Save your page before continuing.
12. One half of the checkout page is done; in the next step you'll add the read-only shopping cart, complete with sales tax.
Step 5: Displaying the Checkout Page Shopping Cart
When an online shopper entered his or her billing address in the customer information page, a state was selected from a drop-down list. The chosen state has a corresponding value. This numeric value is equal to that state's tax rate. In the following part of the recipe, this value is inserted into a session variable: the same session variable used in the state sales tax merchandising rule.
After the session variable has been defined, you can insert the read-only shopping cart and then make the tax line item conditional.
1. From the Server Behaviors panel, choose Add (+) and select WA eCart > Set Session Value from the list.
Recipe 1: Simple Sales Tax | 27
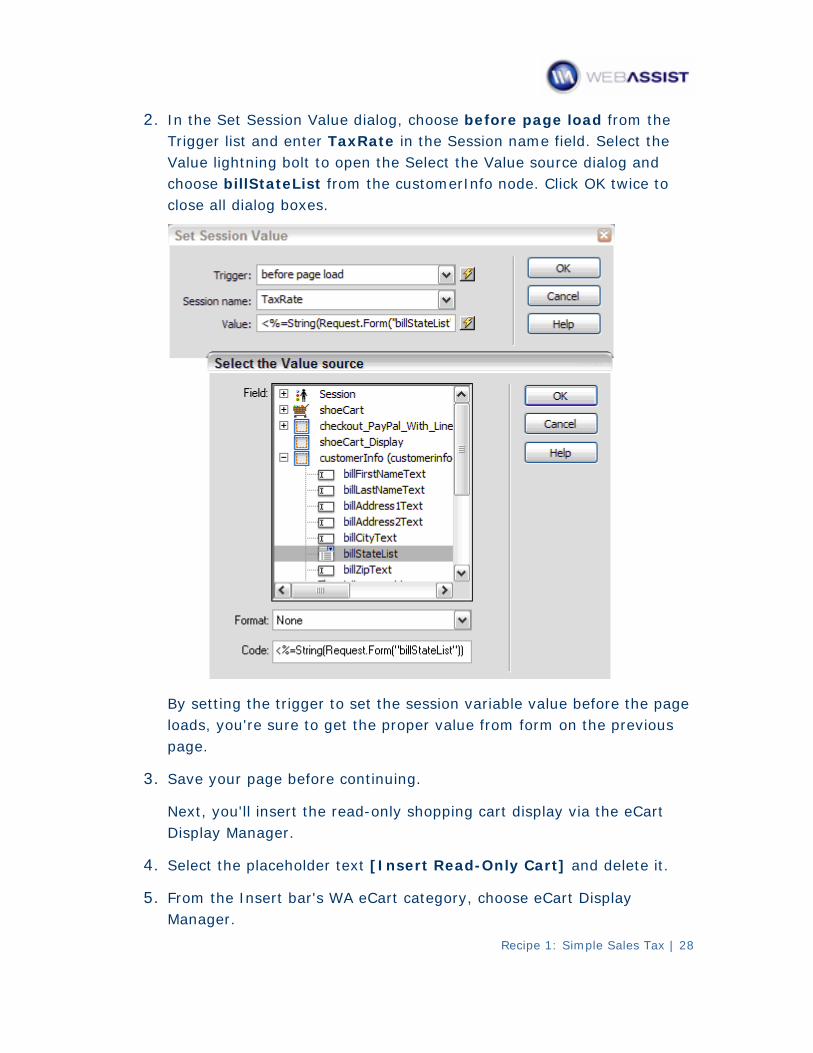
2. In the Set Session Value dialog, choose before page load from the Trigger list and enter TaxRate in the Session name field. Select the Value lightning bolt to open the Select the Value source dialog and choose billStateList from the customerInfo node. Click OK twice to close all dialog boxes.
By setting the trigger to set the session variable value before the page loads, you're sure to get the proper value from form on the previous page.
3. Save your page before continuing.
Next, you'll insert the read-only shopping cart display via the eCart Display Manager.
4. Select the placeholder text [Insert Read-Only Cart] and delete it.
5. From the Insert bar's WA eCart category, choose eCart Display Manager.
Recipe 1: Simple Sales Tax | 28
6. If the Display Manager Wizard shows the last cart used, click Next to create a new cart display.
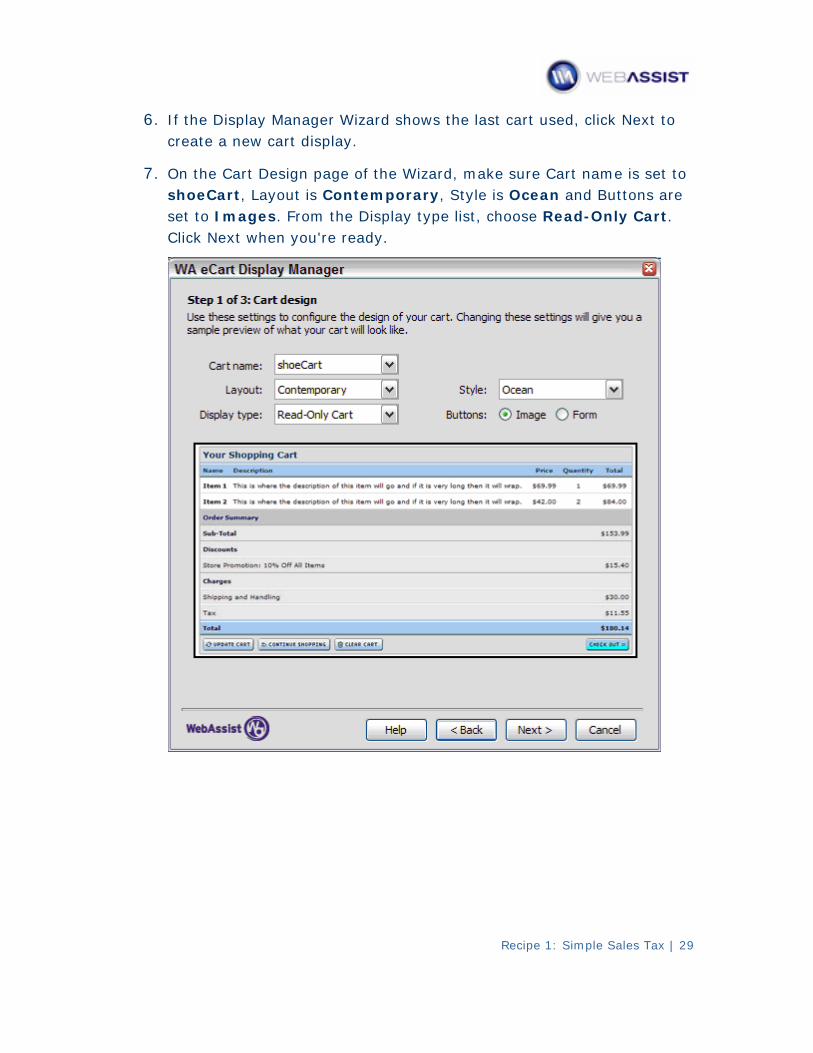
7. On the Cart Design page of the Wizard, make sure Cart name is set to shoeCart, Layout is Contemporary, Style is Ocean and Buttons are set to Images. From the Display type list, choose Read-Only Cart. Click Next when you're ready.
Recipe 1: Simple Sales Tax | 29
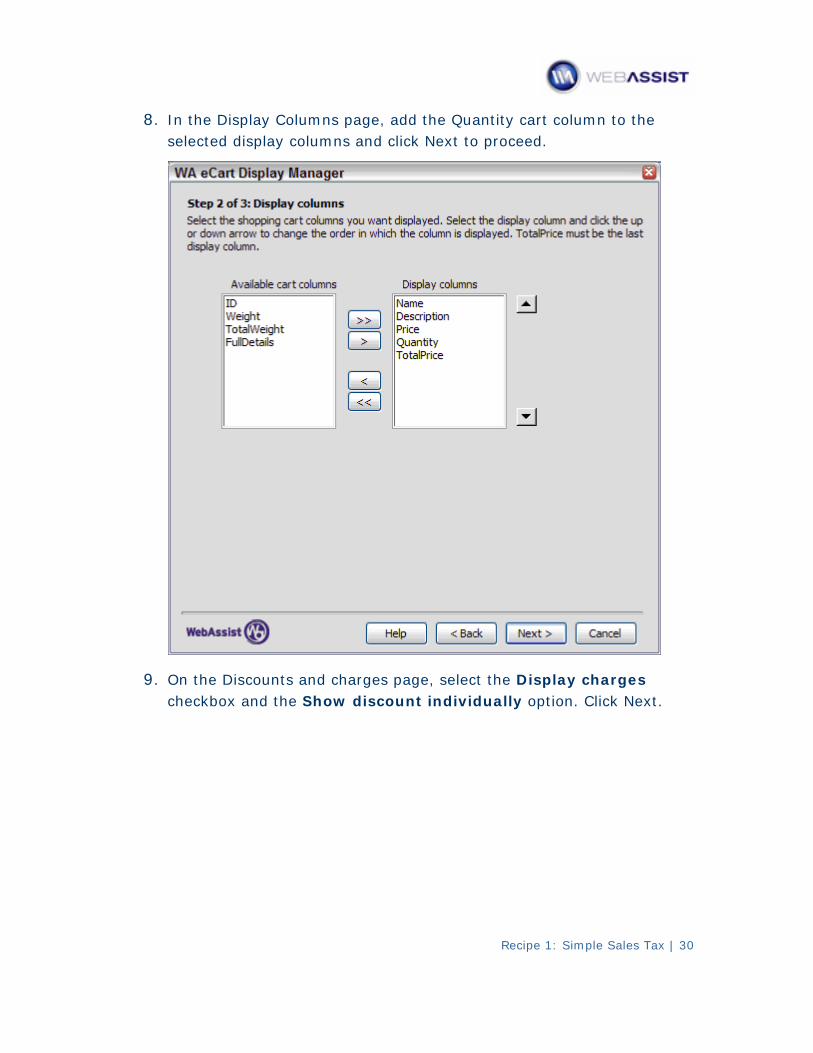
8. In the Display Columns page, add the Quantity cart column to the selected display columns and click Next to proceed.
9. On the Discounts and charges page, select the Display charges checkbox and the Show discount individually option. Click Next.
Recipe 1: Simple Sales Tax | 30
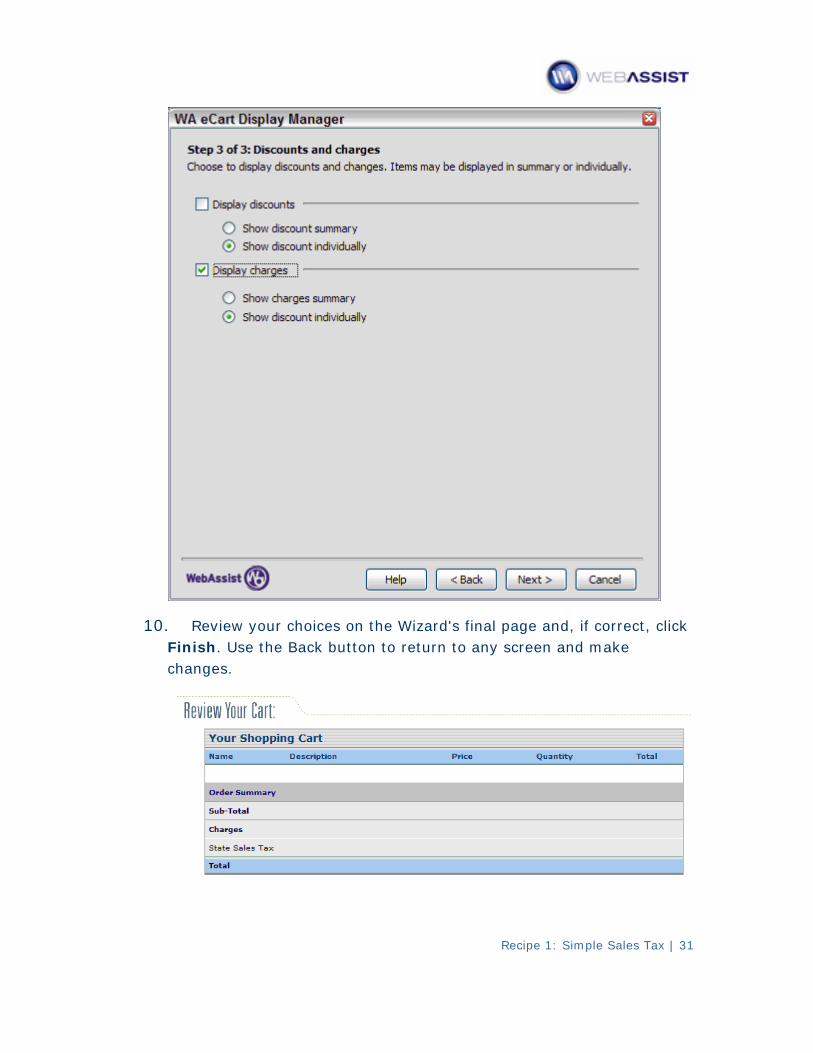
10. Review your choices on the Wizard's final page and, if correct, click Finish. Use the Back button to return to any screen and make changes.
Recipe 1: Simple Sales Tax | 31
Recipe 1: Simple Sales Tax | 32
To see shopping cart as it will be shown in the browser, choose View options > Hide All Visual Aids from the Document toolbar.
11. Save your page.
Not all online customers come from states where tax is due. Shoppers from all but two states will now see a state sales tax line item with a $0 charge in their shopping cart display. The final phase of this recipe will make that line item and it's corresponding header conditional — and only show the sales tax entry when necessary.
The code inserted checks the value in the TaxRate session variable and, if it is not equal to zero, displays the sales tax rows.
1. Place your cursor in the Charges row of the shopping cart display.
2. Switch to Code view and select the current table row and the row beneath it which contains the sales tax item code.
Make sure you select both the opening <tr> and closing </tr> tags for both rows.
3. From the Snippets panel, insert the WA eCart > Recipes > Simple Sales Tax > Conditional Tax Display snippet for your server model. The code inserted wraps around the selection:
[ASP-JS]
Before:
<%
if (String(Session("TaxRate"))!="0") {
%>
After:
<%
}
%>
[ASP-VB]
Before:

Recipe 1: Simple Sales Tax | 33
<%
if (cStr(Session("TaxRate"))<>"0") then
%>
After:
<%
end if
%>
[CF]
Before:
<cfif IsDefined("Session.TaxRate") AND Session.TaxRate NEQ "0">
After:
</cfif>
[PHP]
Before:
<?php if ($_SESSION["TaxRate"]!="0") { ?>
After:
<?php } ?>
4 Save your page. when you're ready.
The re ding items to your cipe is complete and ready for testing! Try adshopping cart and then, on the customer information page, choose either CA or NY to display the tax or any other state to hide the tax charges.
Recipe 2: Database-driven Sales Tax and Shipping | 34
RECIPE 2
Database-driven Sales Tax & Shipping
Applying database-driven charges, like sales tax and shipping, combines back-end preparation and front-end manipulation. On the back-end, you'll need to enter records for all the areas you're selling to in order to present the user with a set list of options. For example, a database table of states and their respective tax rates is needed to display a useable drop-down list of states. To handle shipping charges, you'll also need shipping tables that include data for every method of shipping you offer to every area; for example, if you're shipping to New York from California, you'll need different records for standard, two-day and overnight shipping.
While setting up the database properly is not a trivial task, any required updates are quite simple to implement. Updating either the structure of the database or the content in the database can be accomplished through an administrative web application or directly in the database. For this recipe, all the database initialization has been done for you.
Once your back-end is ready to go, the front-end — the online store web pages themselves — tie everything together. There are four major phases to building this recipe in Dreamweaver:
• Create Merchandising Rules – A total of 3 merchandising rules are defined to calculate the appropriate tax and shipping charges: one for taxes and two for shipping. The eCart Charges Wizard makes developing these calculations a point-and-click operation. eCart will generate optimized server side code for each server model supported.
• Build Customer Information Page with Recordsets — Before the charges can be calculated, you'll need to gather some information from the shopper, specifically the billing and shipping address. Simple recordsets are used to direct key choices, like billing state and shipping method, to standardize responses.
• Create Checkout Page Session Variables and Recordsets — The customer information is passed from a form to the checkout page
Recipe 2: Database-driven Sales Tax and Shipping | 35
where it is stored in session variables. These session variables are then used to filter a recordset. The filtered Recordset data is passed to the shopping cart as data for the charge calculations.
• Bind and Display Checkout Data — The final stage is to bring the data to the page. Two read-only sections are shown on the checkout page; one that replicates the data input by the customer and one for the read-only shopping cart. A minor bit of code manipulation is required to display the shipping charges properly.
If you worked your way through Recipe 1: Including a Simple Sales Tax, you'll find sections of this recipe familiar. There are, however, key differences in adopting a database-driven vs. static approach to including charges in a shopping cart and it's recommended that you follow the process used in Recipe 2 step-by-step.
Step 1: Creating the Sales Tax Rule
A merchandising rule is similar to a Dreamweaver behavior: for both, there is a triggering action and a resulting event. With merchandising rules like a sales tax, the triggering action is the placing of any item in the shopping cart. The event is the calculation that derives the sales tax based on the cart subtotal multiplied by the given tax rate. eCart develops merchandising rules that result in an additional cost defined in the eCart Charges Wizard which, in turn, is accessible through the eCart Shopping Cart object.
1. From the Files panel, double-click the shopping_cart page for your server model to open it.
Changes to the shopping cart object may be applied once any previously saved, dynamic page in your eCommerce site is open. Here, the shopping_cart page is chosen because it is used in the next sequence of steps.
2. Select Window > eCart Object Panel.
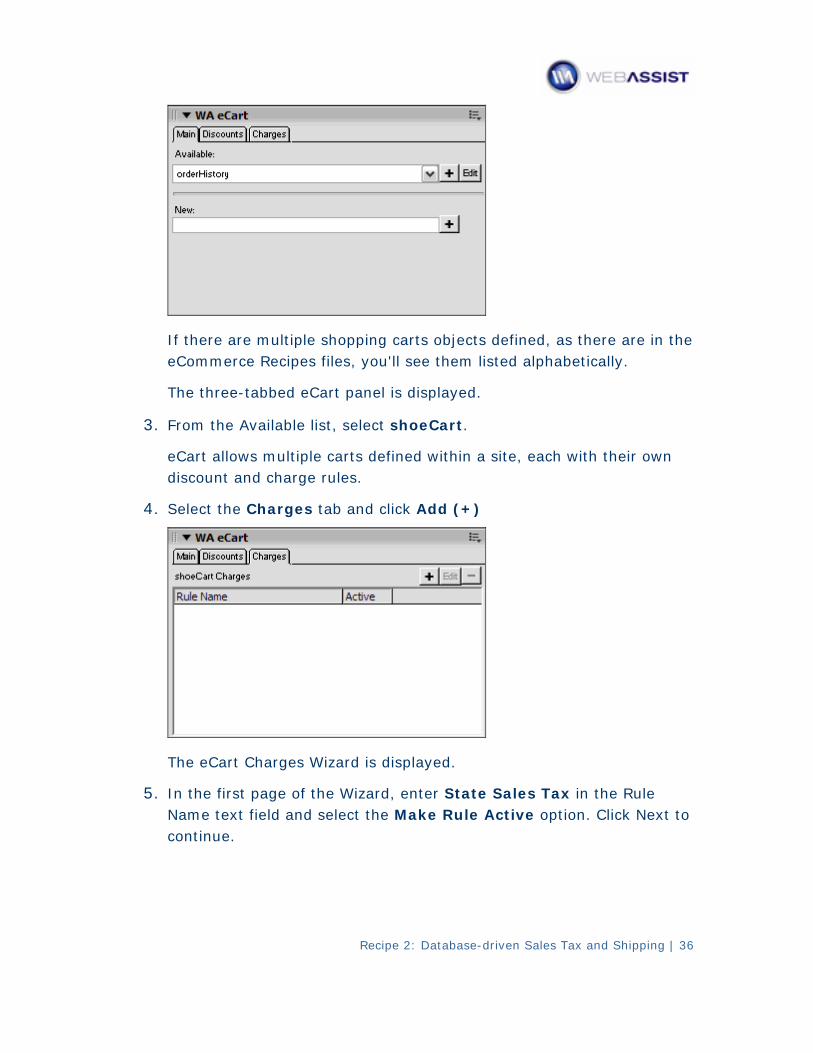
If there are multiple shopping carts objects defined, as there are in the eCommerce Recipes files, you'll see them listed alphabetically.
The three-tabbed eCart panel is displayed.
3. From the Available list, select shoeCart.
eCart allows multiple carts defined within a site, each with their own discount and charge rules.
4. Select the Charges tab and click Add (+)
The eCart Charges Wizard is displayed.
5. In the first page of the Wizard, enter State Sales Tax in the Rule Name text field and select the Make Rule Active option. Click Next to continue.
Recipe 2: Database-driven Sales Tax and Shipping | 36
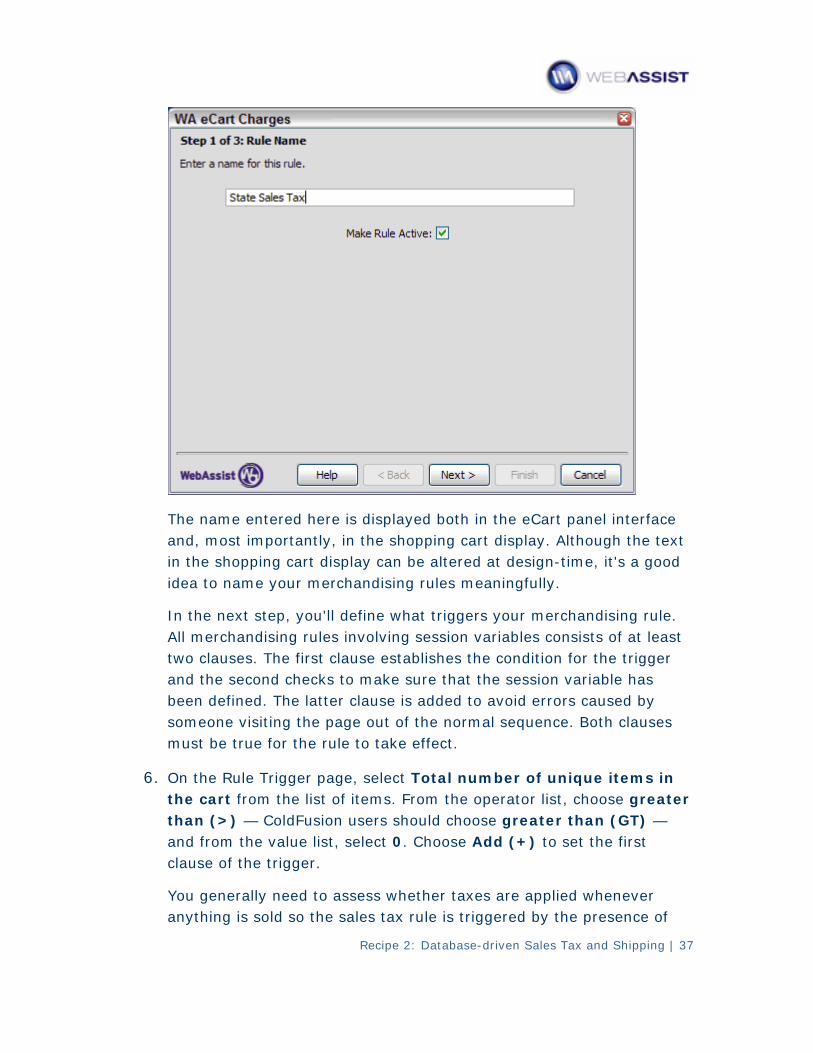
The name entered here is displayed both in the eCart panel interface and, most importantly, in the shopping cart display. Although the text in the shopping cart display can be altered at design-time, it's a good idea to name your merchandising rules meaningfully.
In the next step, you'll define what triggers your merchandising rule. All merchandising rules involving session variables consists of at least two clauses. The first clause establishes the condition for the trigger and the second checks to make sure that the session variable has been defined. The latter clause is added to avoid errors caused by someone visiting the page out of the normal sequence. Both clauses must be true for the rule to take effect.
6. On the Rule Trigger page, select Total number of unique items in the cart from the list of items. From the operator list, choose greater than (>) — ColdFusion users should choose greater than (GT) — and from the value list, select 0. Choose Add (+) to set the first clause of the trigger.
You generally need to assess whether taxes are applied whenever anything is sold so the sales tax rule is triggered by the presence of
Recipe 2: Database-driven Sales Tax and Shipping | 37
one or more items in the cart. The first clause of the rule makes sure there is at least one item in the cart.
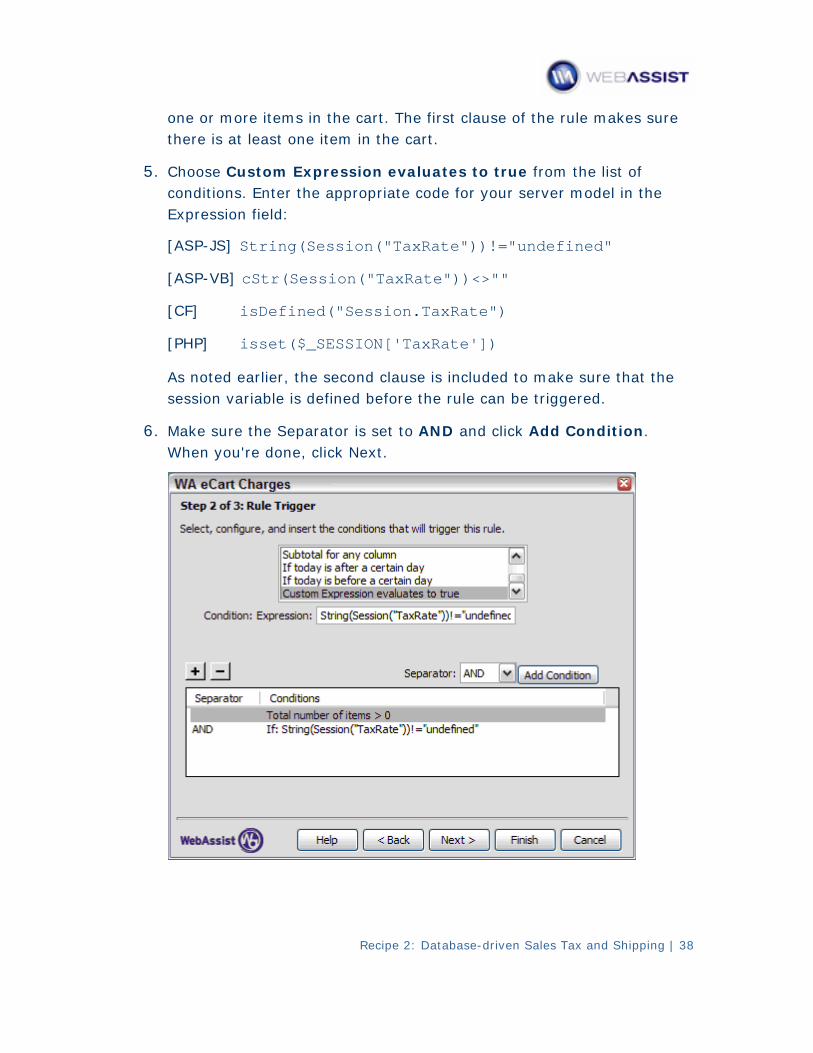
5. Choose Custom Expression evaluates to true from the list of conditions. Enter the appropriate code for your server model in the Expression field:
[ASP-JS] String(Session("TaxRate"))!="undefined"
[ASP-VB] cStr(Session("TaxRate"))<>""
[CF] isDefined("Session.TaxRate")
[PHP] isset($_SESSION['TaxRate'])
As noted earlier, the second clause is included to make sure that the session variable is defined before the rule can be triggered.
6. Make sure the Separator is set to AND and click Add Condition. When you're done, click Next.
Recipe 2: Database-driven Sales Tax and Shipping | 38
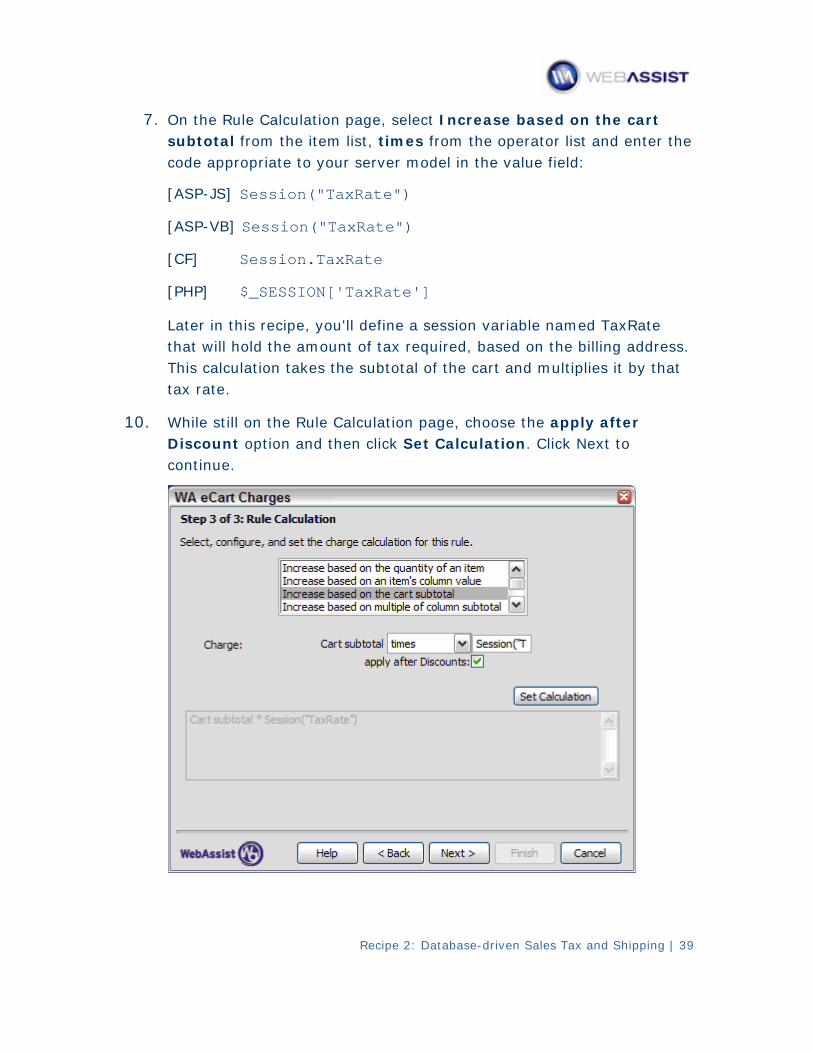
7. On the Rule Calculation page, select Increase based on the cart subtotal from the item list, times from the operator list and enter the code appropriate to your server model in the value field:
[ASP-JS] Session("TaxRate")
[ASP-VB] Session("TaxRate")
[CF] Session.TaxRate
[PHP] $_SESSION['TaxRate']
Later in this recipe, you'll define a session variable named TaxRate that will hold the amount of tax required, based on the billing address. This calculation takes the subtotal of the cart and multiplies it by that tax rate.
10. While still on the Rule Calculation page, choose the apply after Discount option and then click Set Calculation. Click Next to continue.
Recipe 2: Database-driven Sales Tax and Shipping | 39
Naturally, it's up to your own store guidelines whether the sales tax is applied before or after discounts; in this scenario, customers would pay a lower tax rate, if any discounts were available.
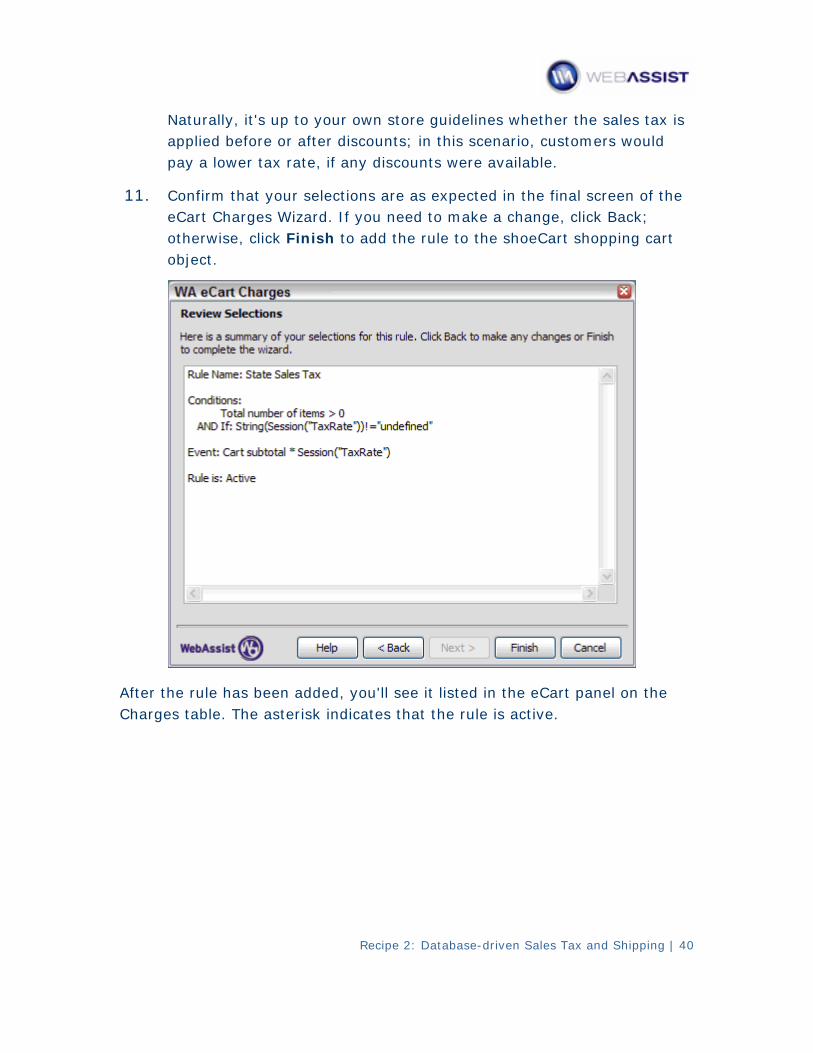
11. Confirm that your selections are as expected in the final screen of the eCart Charges Wizard. If you need to make a change, click Back; otherwise, click Finish to add the rule to the shoeCart shopping cart object.
After the rule has been added, you'll see it listed in the eCart panel on the Charges table. The asterisk indicates that the rule is active.
Recipe 2: Database-driven Sales Tax and Shipping | 40

You'll also find the rule listed in the Bindings panel under the shoeCart object.
Step 2: Define Shipping Charge Rules
Shipping represents a more sophisticated type of charge than sales tax. Most shipping charges are based on three factors: the total weight of the order, the shipping destination and the shipping method. The general formula for
Recipe 2: Database-driven Sales Tax and Shipping | 41

Recipe 2: Database-driven Sales Tax and Shipping | 42
combining these factors employs both a base cost for the first pound and an increment cost for each additional pound:
Shipping Cost = Base Rate + (Increment * Total Weight) – Increment
Translated into English, the formula reads, "The shipping cost is equal to the shipping base rate (for the first pound) plus the shipping incremental rate times the total weight, minus the first pound."
The shipping weight is capable of being calculated by eCart and must be combined with other data pulled from the database. In the database for Blue Sky Footwear, the Ship Rates table consists of six data columns:
• Shipped – The automatically numbered index for the table.
• ShipType – Provides the shipping method: standard, two-day or overnight; options are supplied by the ShipTypes table.
• ShipState – Contains all the states the company ships to; the data comes from the States table.
• ShipZone – Describes the basic shipping regions for area-based shipping. This data column is not used in this recipe.
• ShipRate – A currency field that contains the base rate for shipping one pound of goods to a particular state using a specific shipping method.
• ShipInc – Provides the incremental amount to charge for each pound after the first pound shipped.
As with the sales tax rule, the eCart Charges Wizard is used to set up the necessary shipping calculation. However, because the formula involves both a base rate for the first pound and an incremental rate for every additional pound, two charge rules are defined. The first rule is a minimum flat rate — the base rate — that is applied to every order. The second rule, which incorporates the incremental rate, is only added if the order is over one pound.
Let's start by creating the base rate rule.
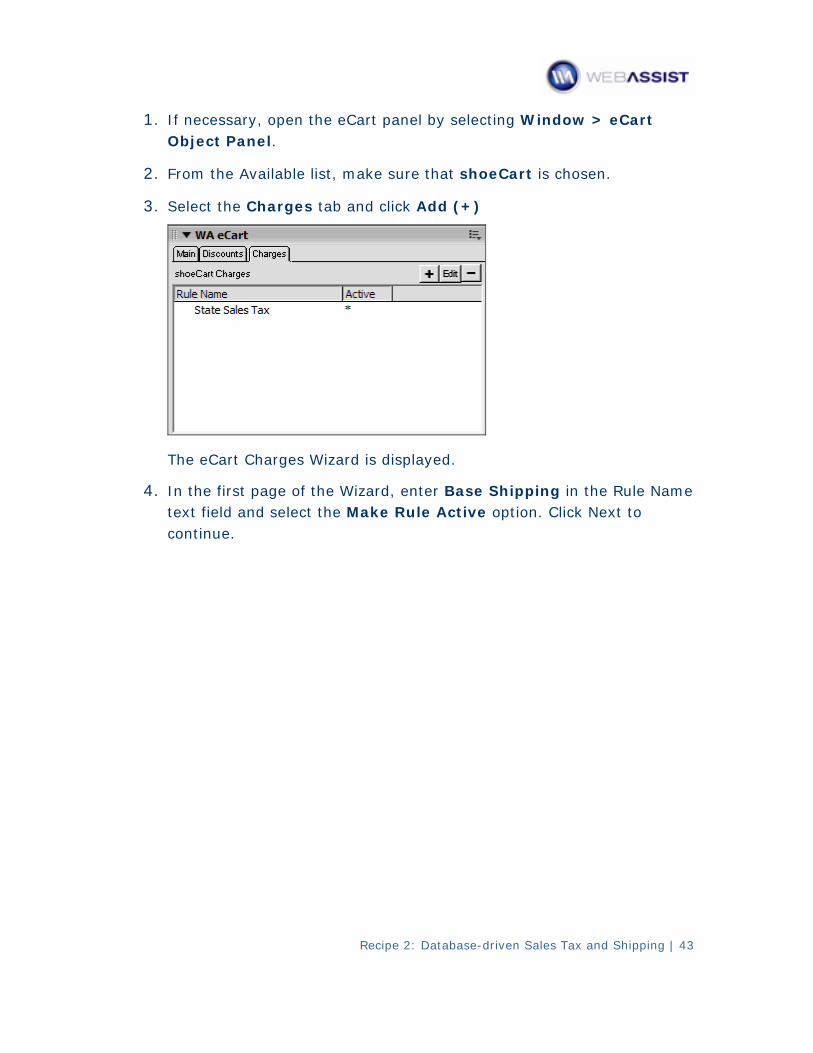
1. If necessary, open the eCart panel by selecting Window > eCart Object Panel.
2. From the Available list, make sure that shoeCart is chosen.
3. Select the Charges tab and click Add (+)
The eCart Charges Wizard is displayed.
4. In the first page of the Wizard, enter Base Shipping in the Rule Name text field and select the Make Rule Active option. Click Next to continue.
Recipe 2: Database-driven Sales Tax and Shipping | 43
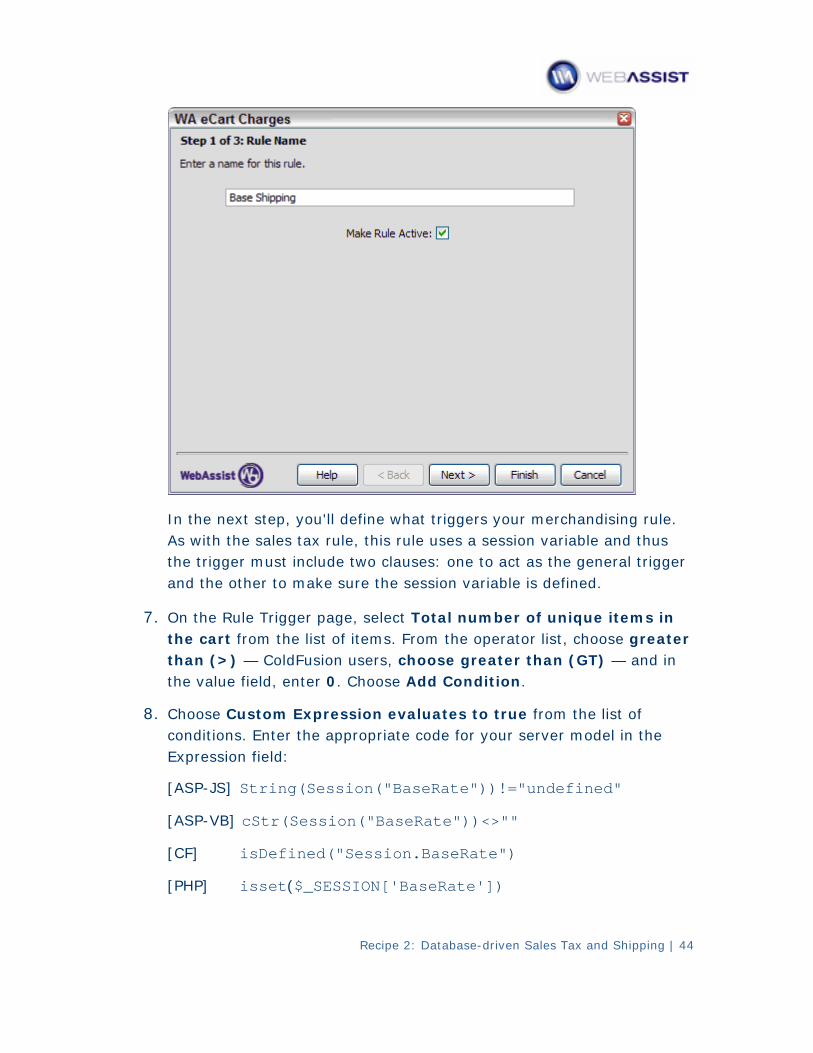
In the next step, you'll define what triggers your merchandising rule. As with the sales tax rule, this rule uses a session variable and thus the trigger must include two clauses: one to act as the general trigger and the other to make sure the session variable is defined.
7. On the Rule Trigger page, select Total number of unique items in the cart from the list of items. From the operator list, choose greater than (>) — ColdFusion users, choose greater than (GT) — and in the value field, enter 0. Choose Add Condition.
8. Choose Custom Expression evaluates to true from the list of conditions. Enter the appropriate code for your server model in the Expression field:
[ASP-JS] String(Session("BaseRate"))!="undefined"
[ASP-VB] cStr(Session("BaseRate"))<>""
[CF] isDefined("Session.BaseRate")
[PHP] isset($_SESSION['BaseRate'])
Recipe 2: Database-driven Sales Tax and Shipping | 44
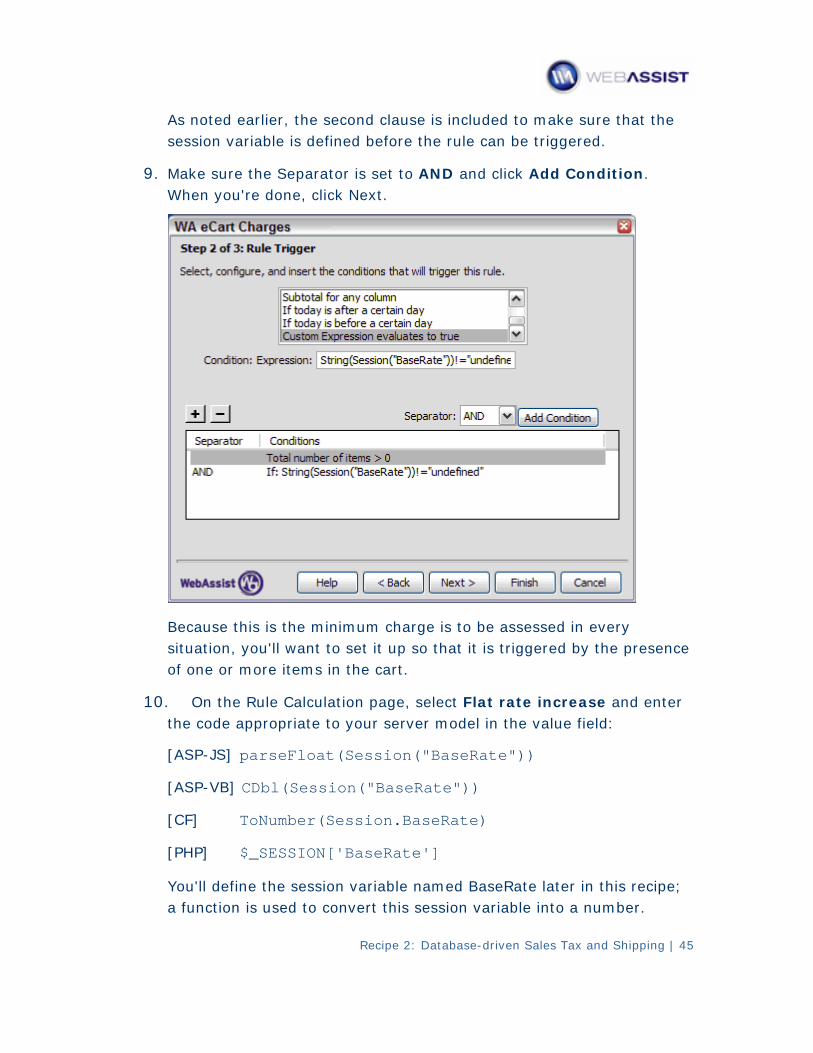
As noted earlier, the second clause is included to make sure that the session variable is defined before the rule can be triggered.
9. Make sure the Separator is set to AND and click Add Condition. When you're done, click Next.
Because this is the minimum charge is to be assessed in every situation, you'll want to set it up so that it is triggered by the presence of one or more items in the cart.
10. On the Rule Calculation page, select Flat rate increase and enter the code appropriate to your server model in the value field:
[ASP-JS] parseFloat(Session("BaseRate"))
[ASP-VB] CDbl(Session("BaseRate"))
[CF] ToNumber(Session.BaseRate)
[PHP] $_SESSION['BaseRate']
You'll define the session variable named BaseRate later in this recipe; a function is used to convert this session variable into a number.
Recipe 2: Database-driven Sales Tax and Shipping | 45
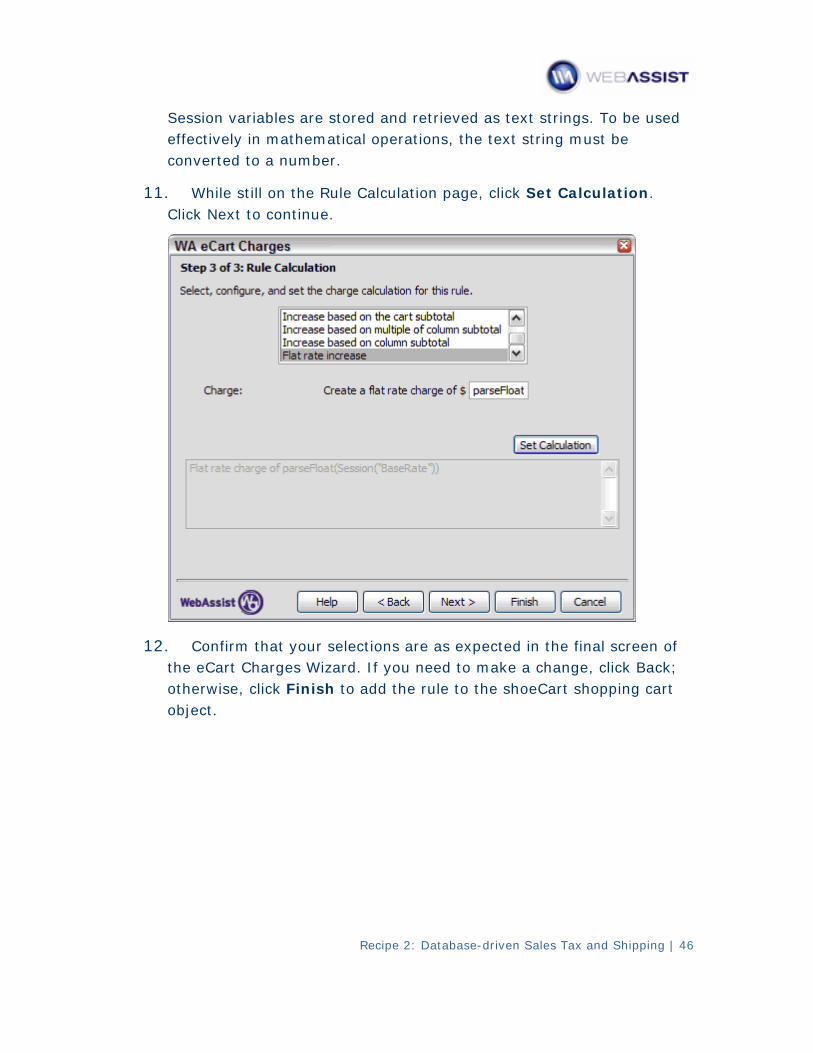
Session variables are stored and retrieved as text strings. To be used effectively in mathematical operations, the text string must be converted to a number.
11. While still on the Rule Calculation page, click Set Calculation. Click Next to continue.
12. Confirm that your selections are as expected in the final screen of the eCart Charges Wizard. If you need to make a change, click Back; otherwise, click Finish to add the rule to the shoeCart shopping cart object.
Recipe 2: Database-driven Sales Tax and Shipping | 46
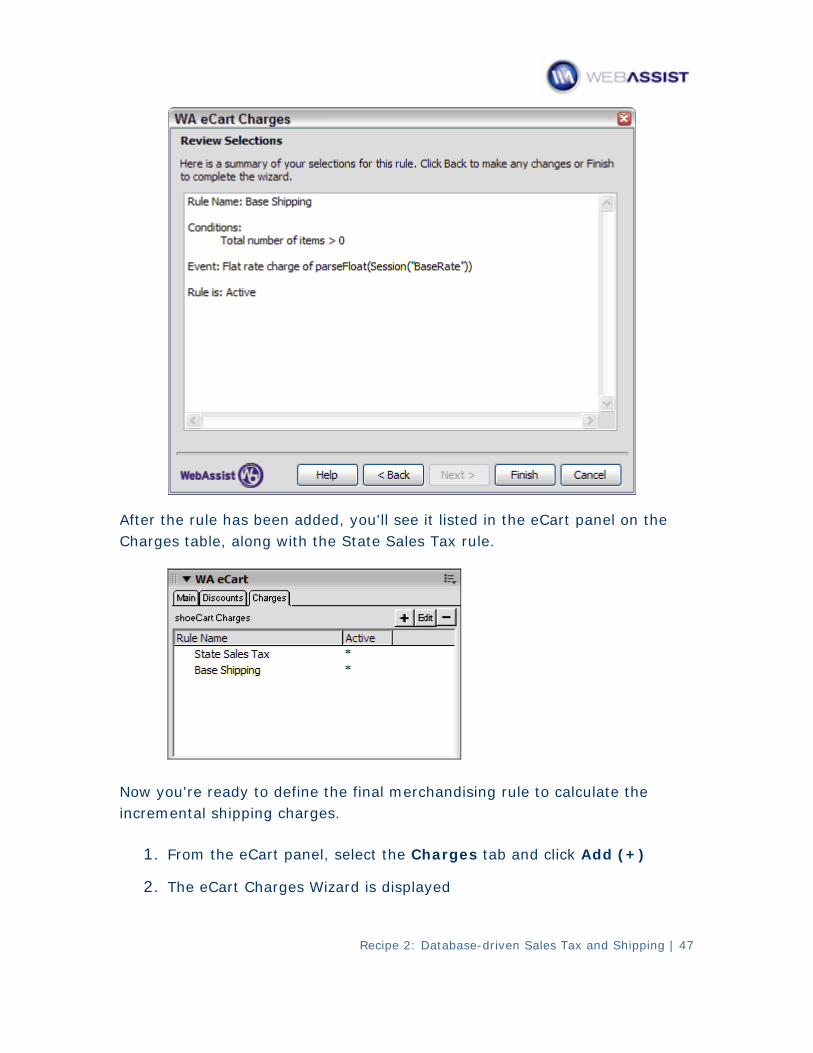
After the rule has been added, you'll see it listed in the eCart panel on the Charges table, along with the State Sales Tax rule.
Now you're ready to define the final merchandising rule to calculate the incremental shipping charges.
1. From the eCart panel, select the Charges tab and click Add (+)
2. The eCart Charges Wizard is displayed
Recipe 2: Database-driven Sales Tax and Shipping | 47
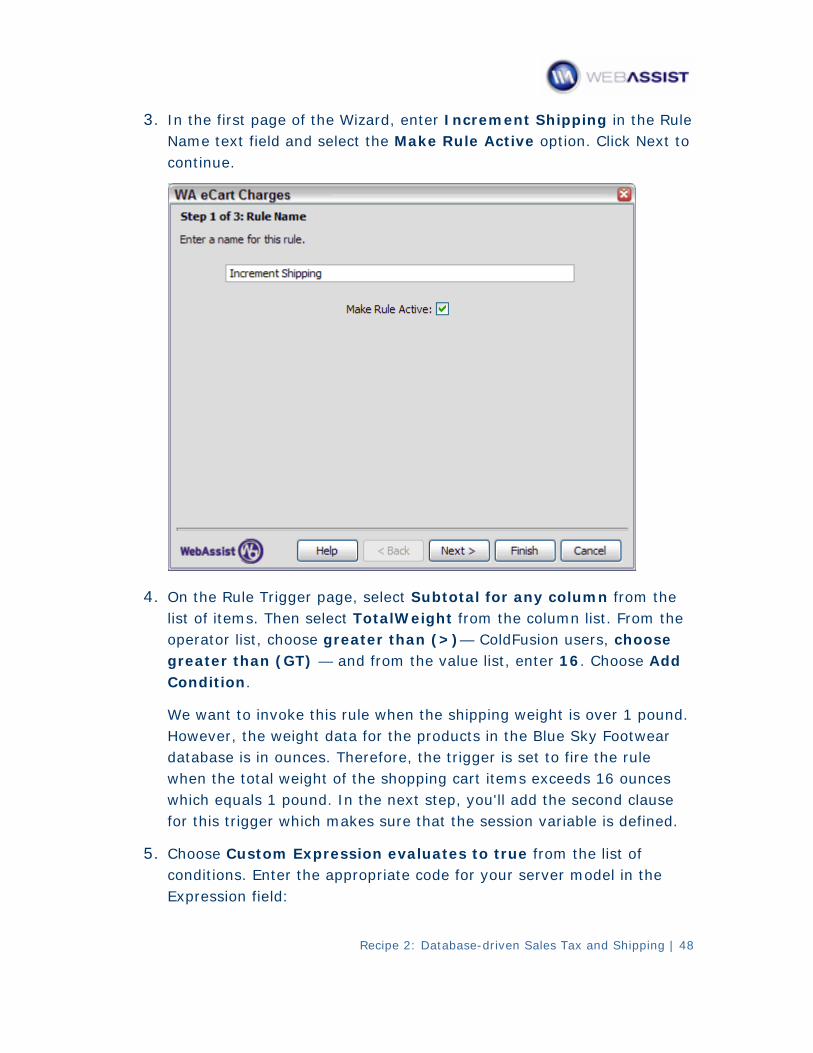
3. In the first page of the Wizard, enter Increment Shipping in the Rule Name text field and select the Make Rule Active option. Click Next to continue.
4. On the Rule Trigger page, select Subtotal for any column from the list of items. Then select TotalWeight from the column list. From the operator list, choose greater than (>)— ColdFusion users, choose greater than (GT) — and from the value list, enter 16. Choose Add Condition.
We want to invoke this rule when the shipping weight is over 1 pound. However, the weight data for the products in the Blue Sky Footwear database is in ounces. Therefore, the trigger is set to fire the rule when the total weight of the shopping cart items exceeds 16 ounces which equals 1 pound. In the next step, you'll add the second clause for this trigger which makes sure that the session variable is defined.
5. Choose Custom Expression evaluates to true from the list of conditions. Enter the appropriate code for your server model in the Expression field:
Recipe 2: Database-driven Sales Tax and Shipping | 48
[ASP-JS] String(Session("Increment"))!="undefined"
[ASP-VB] cStr(Session("Increment"))<>""
[CF] isDefined("Session.Increment")
[PHP] isset($_SESSION['Increment'])
As noted earlier, the second clause is included to make sure that the session variable is defined before the rule can be triggered.
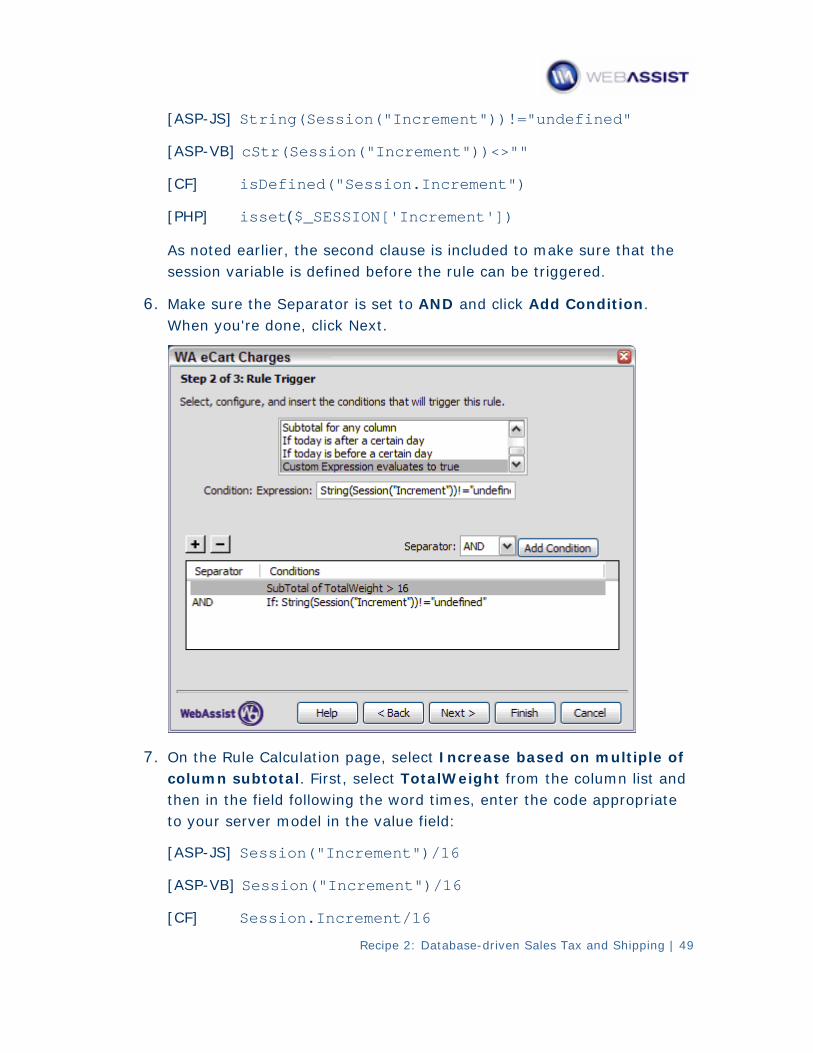
6. Make sure the Separator is set to AND and click Add Condition. When you're done, click Next.
7. On the Rule Calculation page, select Increase based on multiple of column subtotal. First, select TotalWeight from the column list and then in the field following the word times, enter the code appropriate to your server model in the value field:
[ASP-JS] Session("Increment")/16
[ASP-VB] Session("Increment")/16
[CF] Session.Increment/16
Recipe 2: Database-driven Sales Tax and Shipping | 49
[PHP] $_SESSION['Increment']/16
In this section of the formula, you're multiplying the total weight by the increment value and then dividing the result by 16; the division is necessary to convert ounces to pounds.
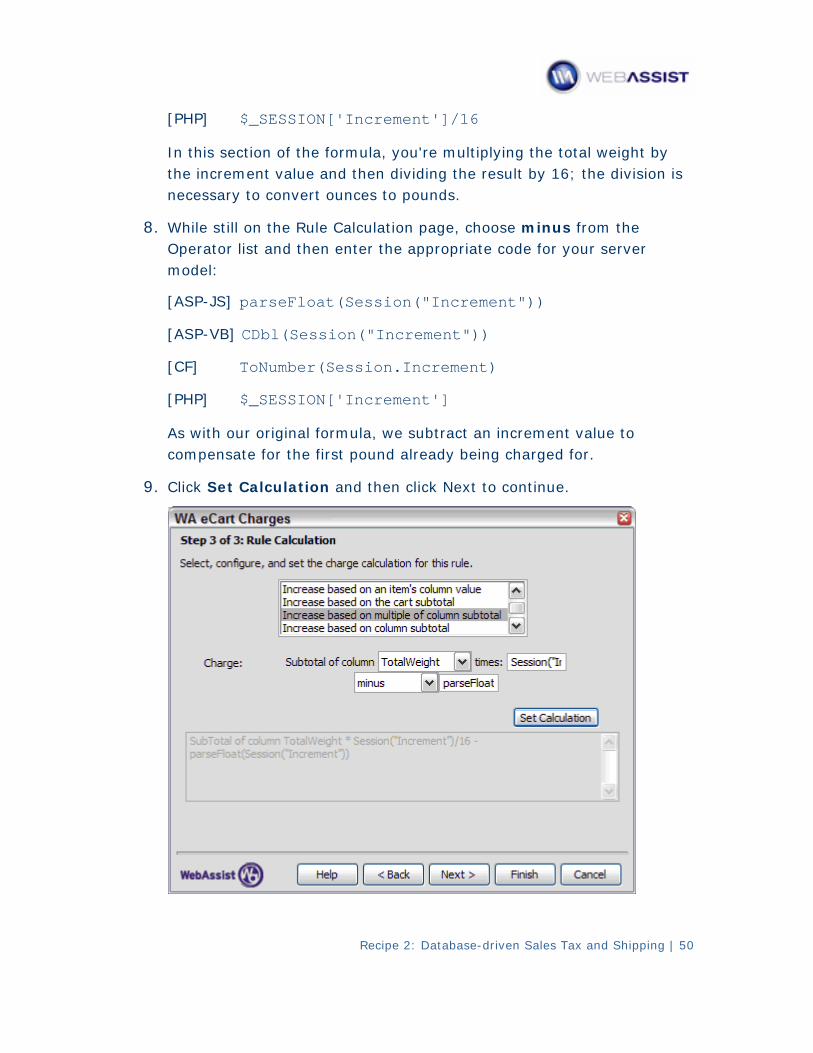
8. While still on the Rule Calculation page, choose minus from the Operator list and then enter the appropriate code for your server model:
[ASP-JS] parseFloat(Session("Increment"))
[ASP-VB] CDbl(Session("Increment"))
[CF] ToNumber(Session.Increment)
[PHP] $_SESSION['Increment']
As with our original formula, we subtract an increment value to compensate for the first pound already being charged for.
9. Click Set Calculation and then click Next to continue.
Recipe 2: Database-driven Sales Tax and Shipping | 50
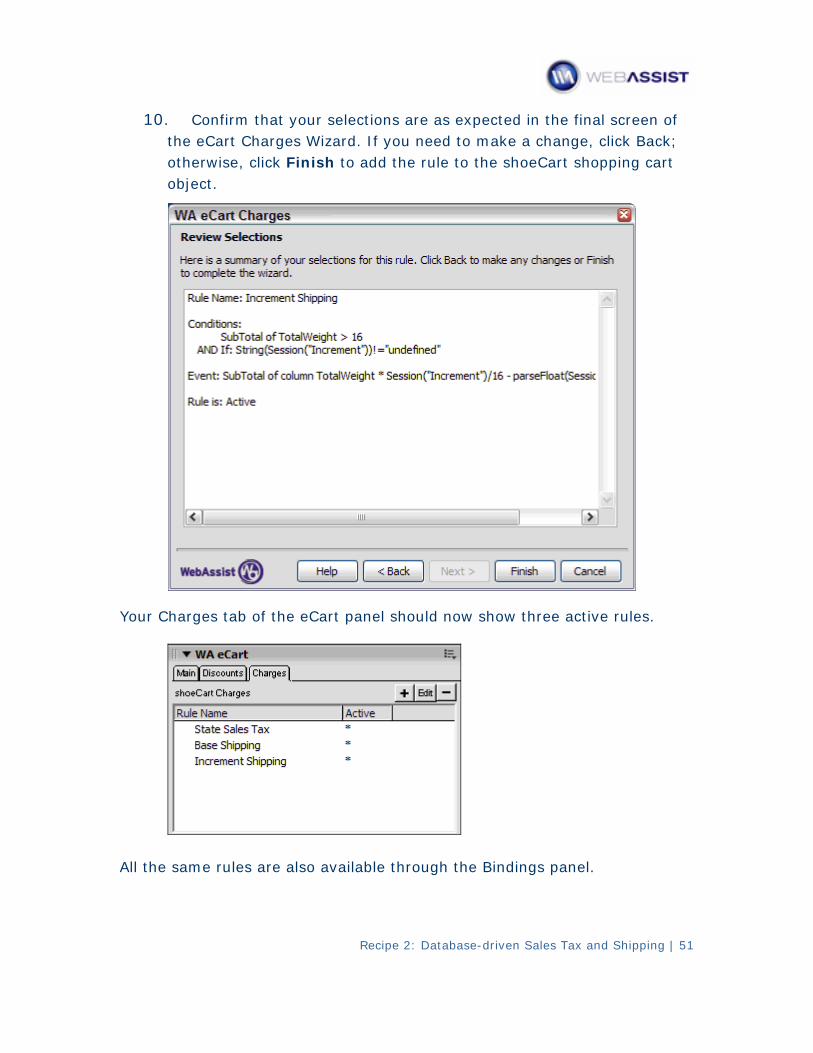
10. Confirm that your selections are as expected in the final screen of the eCart Charges Wizard. If you need to make a change, click Back; otherwise, click Finish to add the rule to the shoeCart shopping cart object.
Your Charges tab of the eCart panel should now show three active rules.
All the same rules are also available through the Bindings panel.
Recipe 2: Database-driven Sales Tax and Shipping | 51
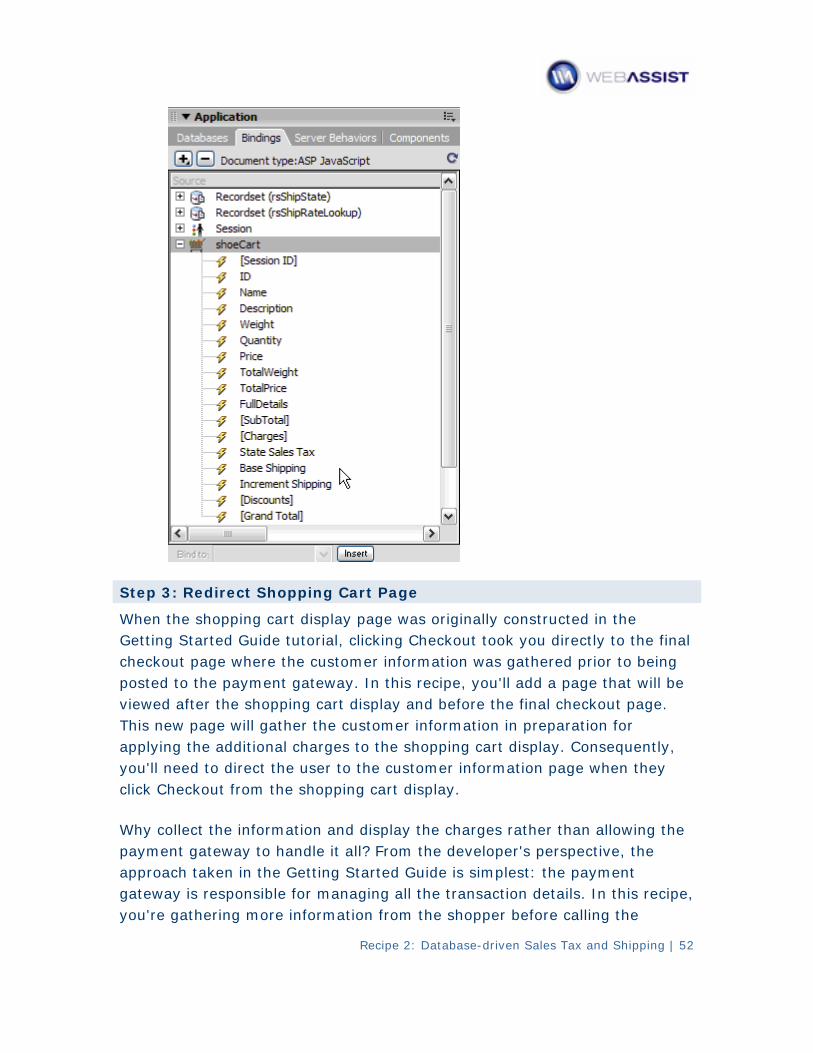
Step 3: Redirect Shopping Cart Page
When the shopping cart display page was originally constructed in the Getting Started Guide tutorial, clicking Checkout took you directly to the final checkout page where the customer information was gathered prior to being posted to the payment gateway. In this recipe, you'll add a page that will be viewed after the shopping cart display and before the final checkout page. This new page will gather the customer information in preparation for applying the additional charges to the shopping cart display. Consequently, you'll need to direct the user to the customer information page when they click Checkout from the shopping cart display.
Why collect the information and display the charges rather than allowing the payment gateway to handle it all? From the developer's perspective, the approach taken in the Getting Started Guide is simplest: the payment gateway is responsible for managing all the transaction details. In this recipe, you're gathering more information from the shopper before calling the
Recipe 2: Database-driven Sales Tax and Shipping | 52

payment gateway. Both are valid techniques. Perhaps the key benefit this method brings is informing the customer of the total amount — including sales taxes and shipping — before the transaction is begun. Moreover, the customer information gathered could optionally be stored in a database to retain order history.
1. With the shopping_cart page for your server model open, click Ctrl+F9 (Command+F9) to display the Server Behaviors panel.
2. Double-click the WA eCart Checkout (shoeCart) entry to edit it.
3. In the eCart Checkout Button dialog, make sure the Update cart before checkout option is enabled. Select the folder icon next to the Redirect field and locate the customerinfo page for your server model. Click OK when you're done to confirm the change and close the dialog box.
Recipe 2: Database-driven Sales Tax and Shipping | 53
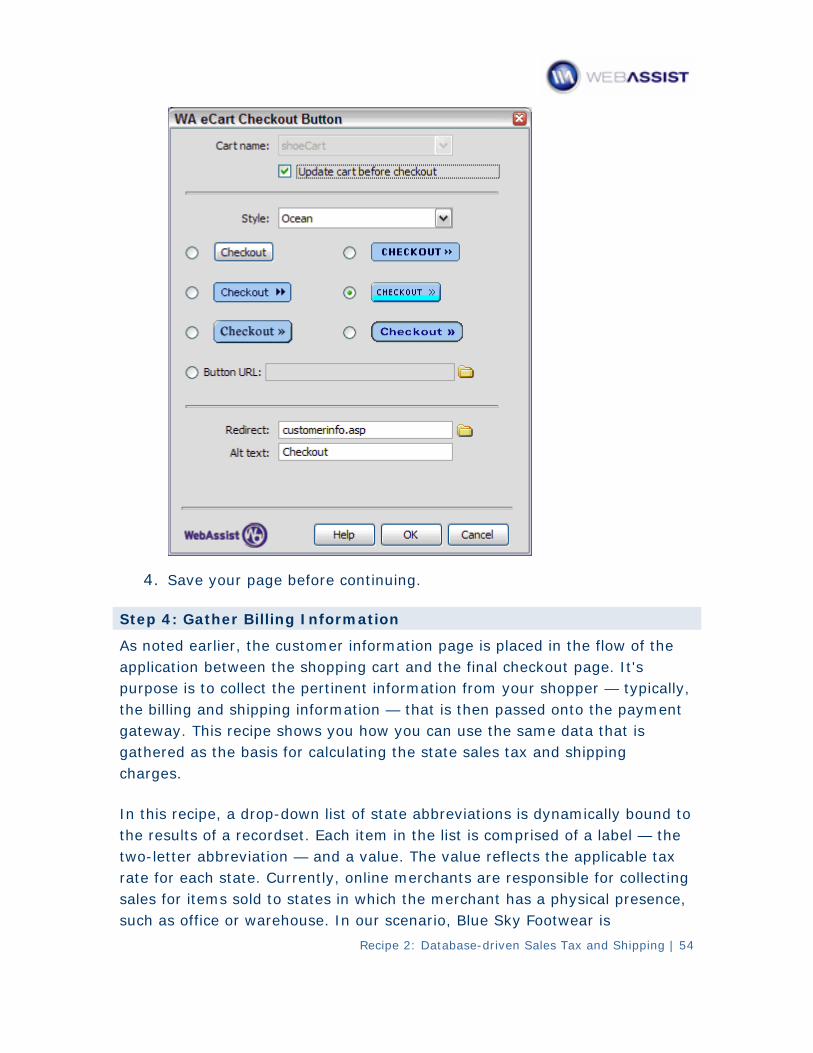
4. Save your page before continuing.
Step 4: Gather Billing Information
As noted earlier, the customer information page is placed in the flow of the application between the shopping cart and the final checkout page. It's purpose is to collect the pertinent information from your shopper — typically, the billing and shipping information — that is then passed onto the payment gateway. This recipe shows you how you can use the same data that is gathered as the basis for calculating the state sales tax and shipping charges.
In this recipe, a drop-down list of state abbreviations is dynamically bound to the results of a recordset. Each item in the list is comprised of a label — the two-letter abbreviation — and a value. The value reflects the applicable tax rate for each state. Currently, online merchants are responsible for collecting sales for items sold to states in which the merchant has a physical presence, such as office or warehouse. In our scenario, Blue Sky Footwear is
Recipe 2: Database-driven Sales Tax and Shipping | 54
Recipe 2: Database-driven Sales Tax and Shipping | 55
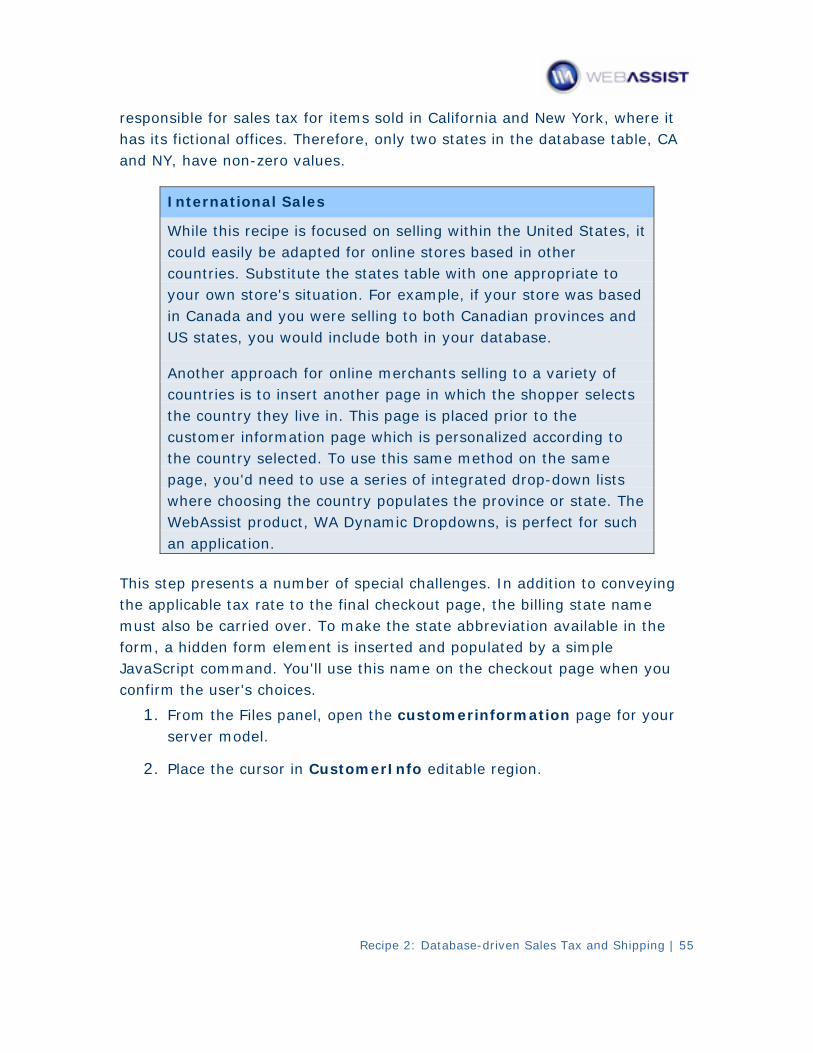
responsible for sales tax for items sold in California and New York, where it has its fictional offices. Therefore, only two states in the database table, CA and NY, have non-zero values.
International Sales
While this recipe is focused on selling within the United States, it could easily be adapted for online stores based in other countries. Substitute the states table with one appropriate to your own store's situation. For example, if your store was based in Canada and you were selling to both Canadian provinces and US states, you would include both in your database.
Another approach for online merchants selling to a variety of countries is to insert another page in which the shopper selects the country they live in. This page is placed prior to the customer information page which is personalized according to the country selected. To use this same method on the same page, you'd need to use a series of integrated drop-down lists where choosing the country populates the province or state. The WebAssist product, WA Dynamic Dropdowns, is perfect for such an application.
This step presents a number of special challenges. In addition to conveying the applicable tax rate to the final checkout page, the billing state name must also be carried over. To make the state abbreviation available in the form, a hidden form element is inserted and populated by a simple JavaScript command. You'll use this name on the checkout page when you confirm the user's choices.
1. From the Files panel, open the customerinformation page for your server model.
2. Place the cursor in CustomerInfo editable region.
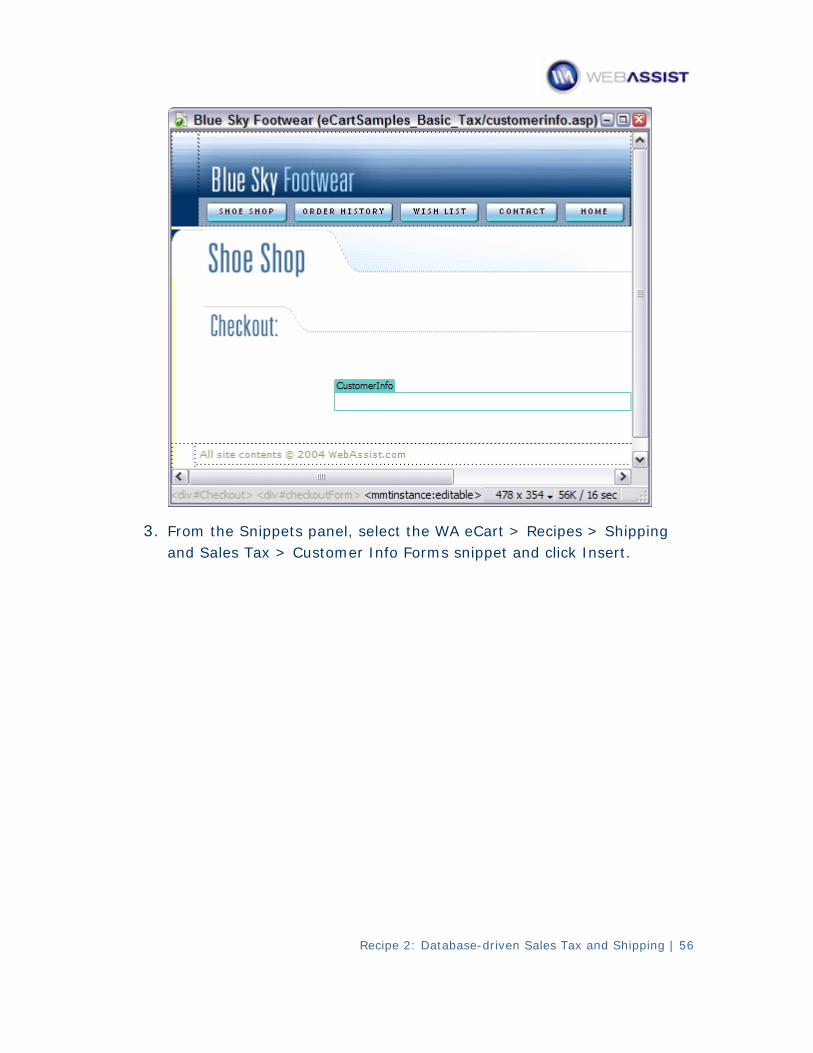
3. From the Snippets panel, select the WA eCart > Recipes > Shipping and Sales Tax > Customer Info Forms snippet and click Insert.
Recipe 2: Database-driven Sales Tax and Shipping | 56
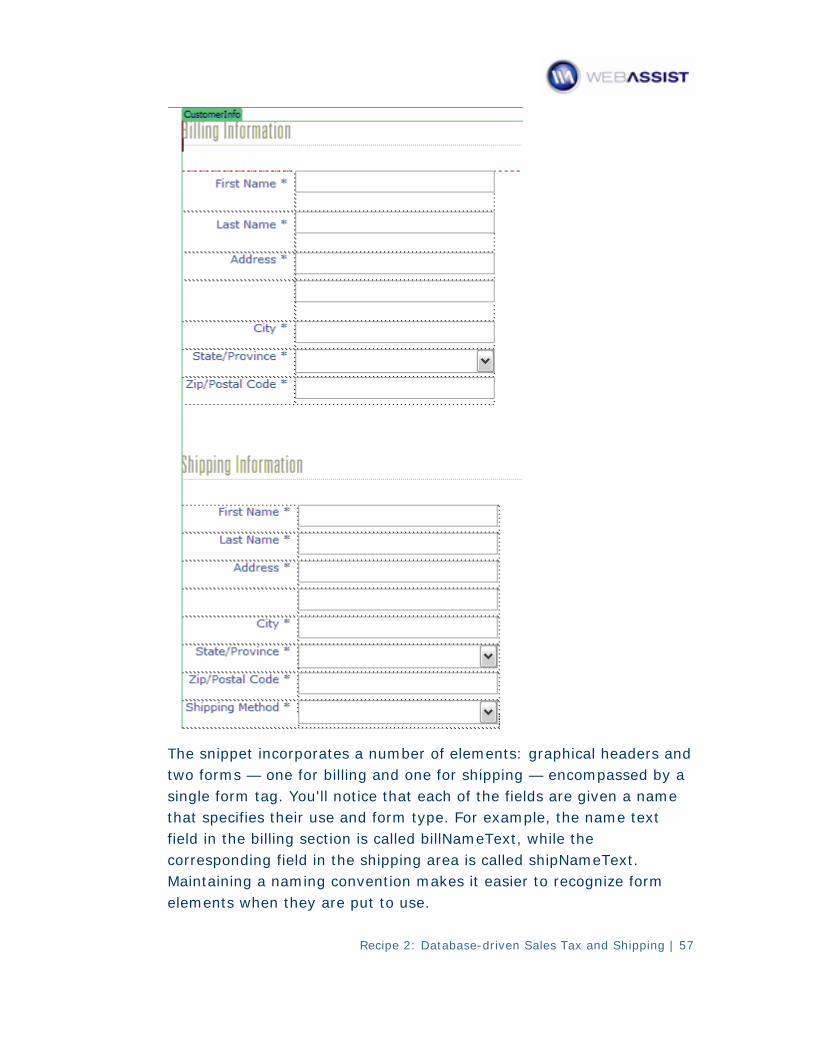
The snippet incorporates a number of elements: graphical headers and two forms — one for billing and one for shipping — encompassed by a single form tag. You'll notice that each of the fields are given a name that specifies their use and form type. For example, the name text field in the billing section is called billNameText, while the corresponding field in the shipping area is called shipNameText. Maintaining a naming convention makes it easier to recognize form elements when they are put to use.
Recipe 2: Database-driven Sales Tax and Shipping | 57
The next task is to set the action for the form.
4. Place your cursor within either of the two form tables and select <form> from the Tag Selector.
5. In the Property inspector, click the folder icon next to the Action field and locate the checkout page for your server model.
When the shopper clicks the Complete Checkout button, the form — and all of the included information — is submitted to the checkout page where the final processing takes place.
Two recordsets are required to populate the list form elements on the page: the first displays a list of states, in alphabetical order and the second shows which shipping methods are available. Both recordsets are very straightforward to create. Let's create the state recordset first.
1. From the Bindings panel, choose Add (+) and select Recordset (Query).
2. In the Simple Recordset dialog box, enter rsShipState in the Name field.
3. From the Connection list, choose connBlueSky.
4. From the Tables list, select States.
5. Leave the Columns option set to All.
6. Leave the Filter set to none.
7. From the Sort list, choose StateAbbrev; in the associated option list, choose Ascending.
Recipe 2: Database-driven Sales Tax and Shipping | 58
8. Click OK to insert the recordset and then save your page.
The second recordset returns what shipping methods have been established in the database.
1. From the Bindings panel, choose Add (+) and select Recordset (Query).
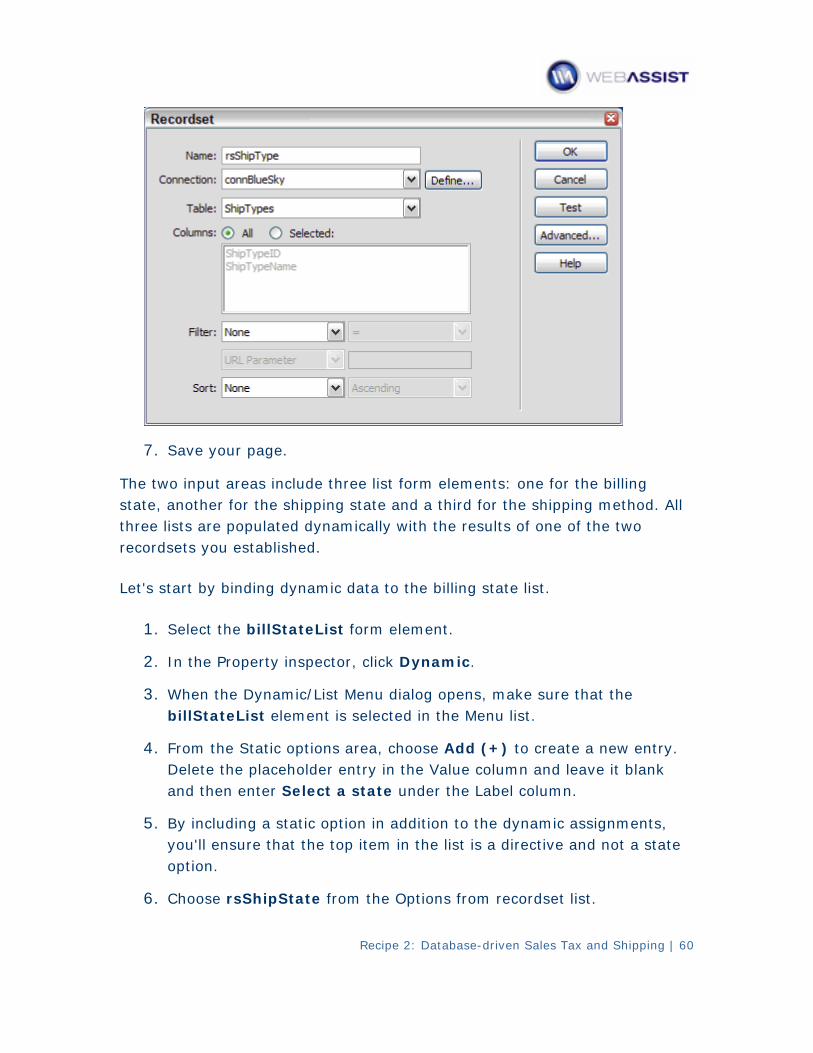
2. In the Simple Recordset dialog box, enter rsShipType in the Name field.
3. From the Connection list, choose connBlueSky.
4. From the Tables list, select ShipTypes.
5. Leave the Columns option set to All.
6. Leave the Filter and Sort options set to None and click OK to insert the recordset.
Recipe 2: Database-driven Sales Tax and Shipping | 59
7. Save your page.
The two input areas include three list form elements: one for the billing state, another for the shipping state and a third for the shipping method. All three lists are populated dynamically with the results of one of the two recordsets you established.
Let's start by binding dynamic data to the billing state list.
1. Select the billStateList form element.
2. In the Property inspector, click Dynamic.
3. When the Dynamic/List Menu dialog opens, make sure that the billStateList element is selected in the Menu list.
4. From the Static options area, choose Add (+) to create a new entry. Delete the placeholder entry in the Value column and leave it blank and then enter Select a state under the Label column.
5. By including a static option in addition to the dynamic assignments, you'll ensure that the top item in the list is a directive and not a state option.
6. Choose rsShipState from the Options from recordset list.
Recipe 2: Database-driven Sales Tax and Shipping | 60
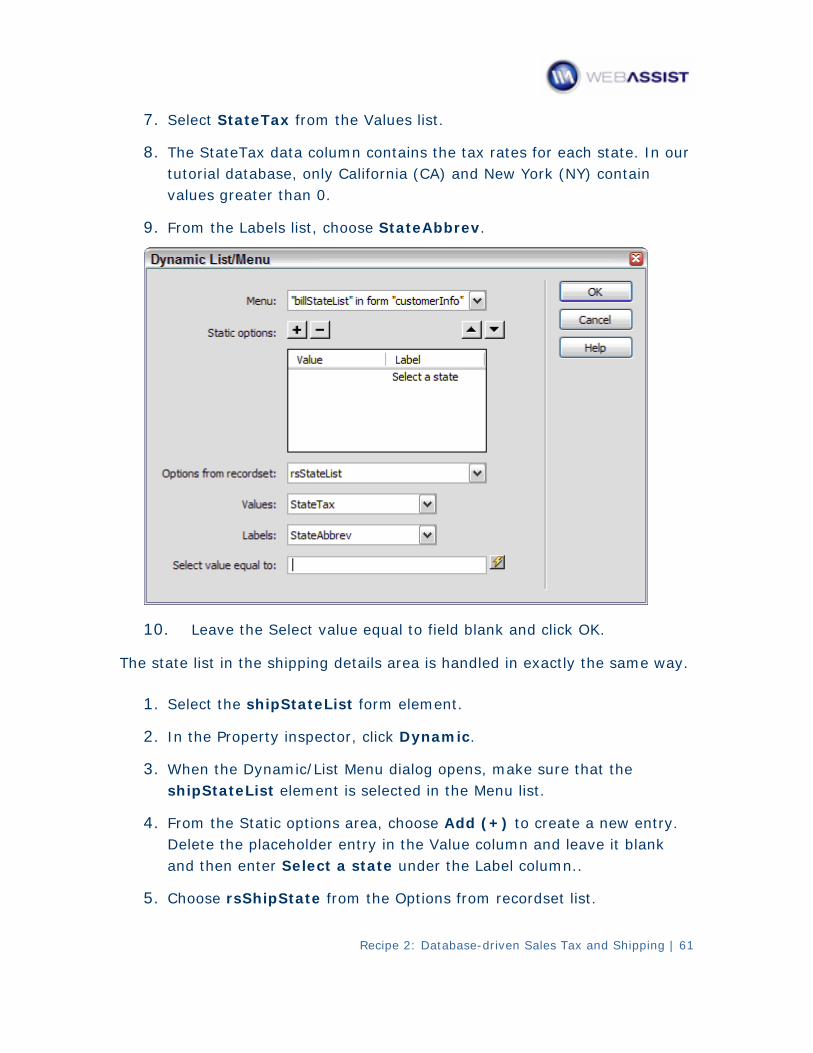
7. Select StateTax from the Values list.
8. The StateTax data column contains the tax rates for each state. In our tutorial database, only California (CA) and New York (NY) contain values greater than 0.
9. From the Labels list, choose StateAbbrev.
10. Leave the Select value equal to field blank and click OK.
The state list in the shipping details area is handled in exactly the same way.
1. Select the shipStateList form element.
2. In the Property inspector, click Dynamic.
3. When the Dynamic/List Menu dialog opens, make sure that the shipStateList element is selected in the Menu list.
4. From the Static options area, choose Add (+) to create a new entry. Delete the placeholder entry in the Value column and leave it blank and then enter Select a state under the Label column..
5. Choose rsShipState from the Options from recordset list.
Recipe 2: Database-driven Sales Tax and Shipping | 61
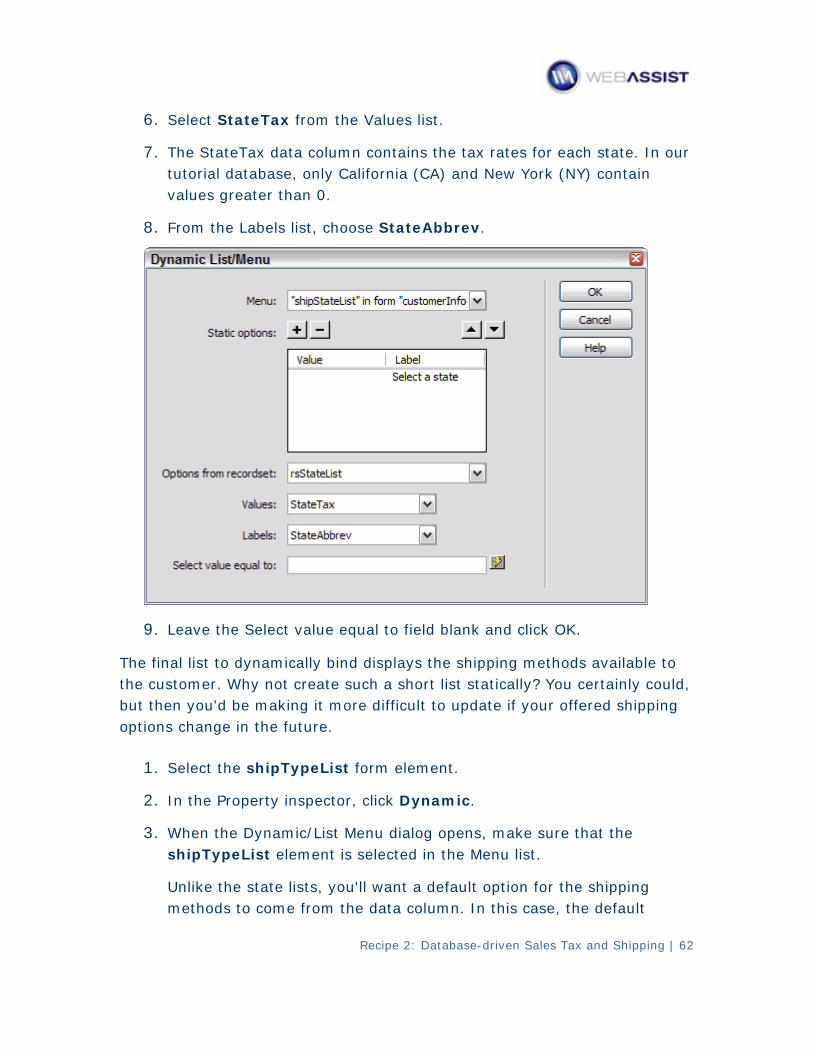
6. Select StateTax from the Values list.
7. The StateTax data column contains the tax rates for each state. In our tutorial database, only California (CA) and New York (NY) contain values greater than 0.
8. From the Labels list, choose StateAbbrev.
9. Leave the Select value equal to field blank and click OK.
The final list to dynamically bind displays the shipping methods available to the customer. Why not create such a short list statically? You certainly could, but then you'd be making it more difficult to update if your offered shipping options change in the future.
1. Select the shipTypeList form element.
2. In the Property inspector, click Dynamic.
3. When the Dynamic/List Menu dialog opens, make sure that the shipTypeList element is selected in the Menu list.
Unlike the state lists, you'll want a default option for the shipping methods to come from the data column. In this case, the default
Recipe 2: Database-driven Sales Tax and Shipping | 62
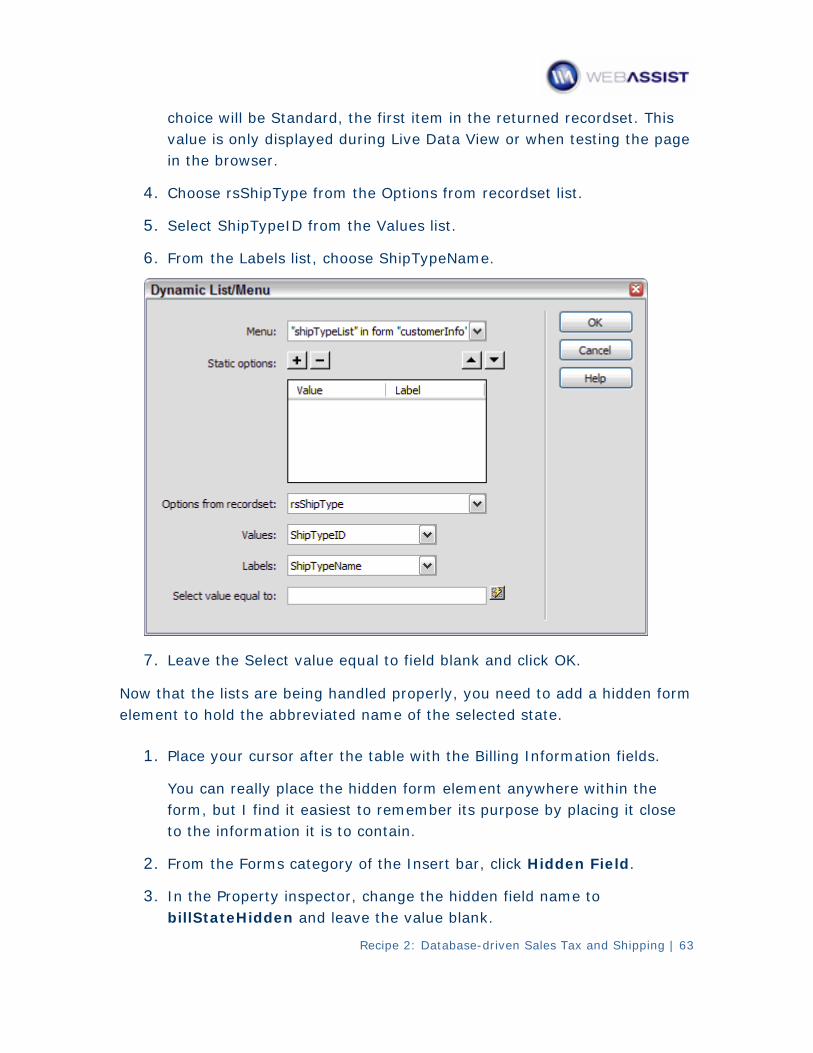
choice will be Standard, the first item in the returned recordset. This value is only displayed during Live Data View or when testing the page in the browser.
4. Choose rsShipType from the Options from recordset list.
5. Select ShipTypeID from the Values list.
6. From the Labels list, choose ShipTypeName.
7. Leave the Select value equal to field blank and click OK.
Now that the lists are being handled properly, you need to add a hidden form element to hold the abbreviated name of the selected state.
1. Place your cursor after the table with the Billing Information fields.
You can really place the hidden form element anywhere within the form, but I find it easiest to remember its purpose by placing it close to the information it is to contain.
2. From the Forms category of the Insert bar, click Hidden Field.
3. In the Property inspector, change the hidden field name to billStateHidden and leave the value blank.
Recipe 2: Database-driven Sales Tax and Shipping | 63

The value of the billStateHidden form element is determined by the user's selection of the state list. You'll need to add a bit of JavaScript to add that functionality. To simplify that task, you can use the Copy Snippet command, installed with your recipes, to copy code prior to applying it to a client-side behavior.
4. From the Snippets panel, right-click the WA eCart > Recipes > Shipping and Sales Tax > Store Bill State Name snippet and choose Copy Snippet. Click OK when the copy is confirmed.
Dreamweaver supplies a handy client-side behavior for applying simple JavaScript known as Call JavaScript. The billing state list is used as the trigger for this behavior.
5. Select the billStateList form element and, from the Behaviors panel, choose Add (+) and select Call JavaScript. When the Call JavaScript dialog opens, press Ctrl+V (Command+V) to paste the copied code snippet. Click OK when you're done.
Recipe 2: Database-driven Sales Tax and Shipping | 64
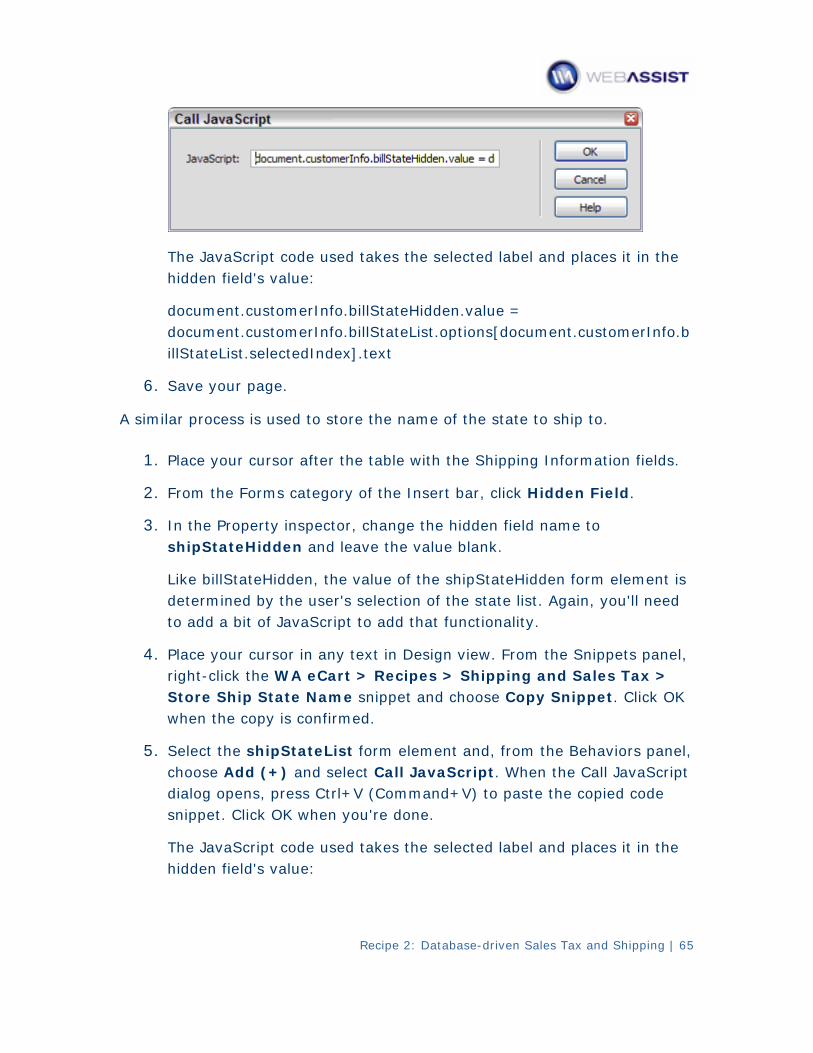
The JavaScript code used takes the selected label and places it in the hidden field's value:
document.customerInfo.billStateHidden.value = document.customerInfo.billStateList.options[document.customerInfo.billStateList.selectedIndex].text
6. Save your page.
A similar process is used to store the name of the state to ship to.
1. Place your cursor after the table with the Shipping Information fields.
2. From the Forms category of the Insert bar, click Hidden Field.
3. In the Property inspector, change the hidden field name to shipStateHidden and leave the value blank.
Like billStateHidden, the value of the shipStateHidden form element is determined by the user's selection of the state list. Again, you'll need to add a bit of JavaScript to add that functionality.
4. Place your cursor in any text in Design view. From the Snippets panel, right-click the WA eCart > Recipes > Shipping and Sales Tax > Store Ship State Name snippet and choose Copy Snippet. Click OK when the copy is confirmed.
5. Select the shipStateList form element and, from the Behaviors panel, choose Add (+) and select Call JavaScript. When the Call JavaScript dialog opens, press Ctrl+V (Command+V) to paste the copied code snippet. Click OK when you're done.
The JavaScript code used takes the selected label and places it in the hidden field's value:
Recipe 2: Database-driven Sales Tax and Shipping | 65
Recipe 2: Database-driven Sales Tax and Shipping | 66
document.customerInfo.shipStateHidden.value = document.customerInfo.shipStateList.options[document.customerInfo.shipStateList.selectedIndex].text
6. Save your page.
Validating Your Form
At this point, it would be a good idea to add validation, either client-side or server-side to this page. Dreamweaver's standard client-side Form Validations behaviors will help to ensure that required form elements are entered. However, the Form Validations behavior itself is rather limited; you cannot, for example, make a list form element required. For more full featured form validation, use the WA Validation Toolkit which includes both client-side and server side validation capabilities.
The customer information page is now complete and you're ready to work on the final page, checkout.
Step 5: Create Recordsets
Two recordsets — one simple and one a bit more complex — are put into service on the checkout page. The simpler recordset, rsShipState, returns the billing state information as filtered by the customer's choice. The second recordset, rsShipRateLookup, provides the needed rate information, both base and increment, for the shopping cart. This recordset is based on a query of a query (also known as a view) and is filtered by a combination of session variables and results from the rsShipState recordset.
The first step is to open the checkout page and make sure that the form elements from the previous page are available.
1. From the Files panel, open the checkout page for your server model.
Using the Tutorial as a Starting Point
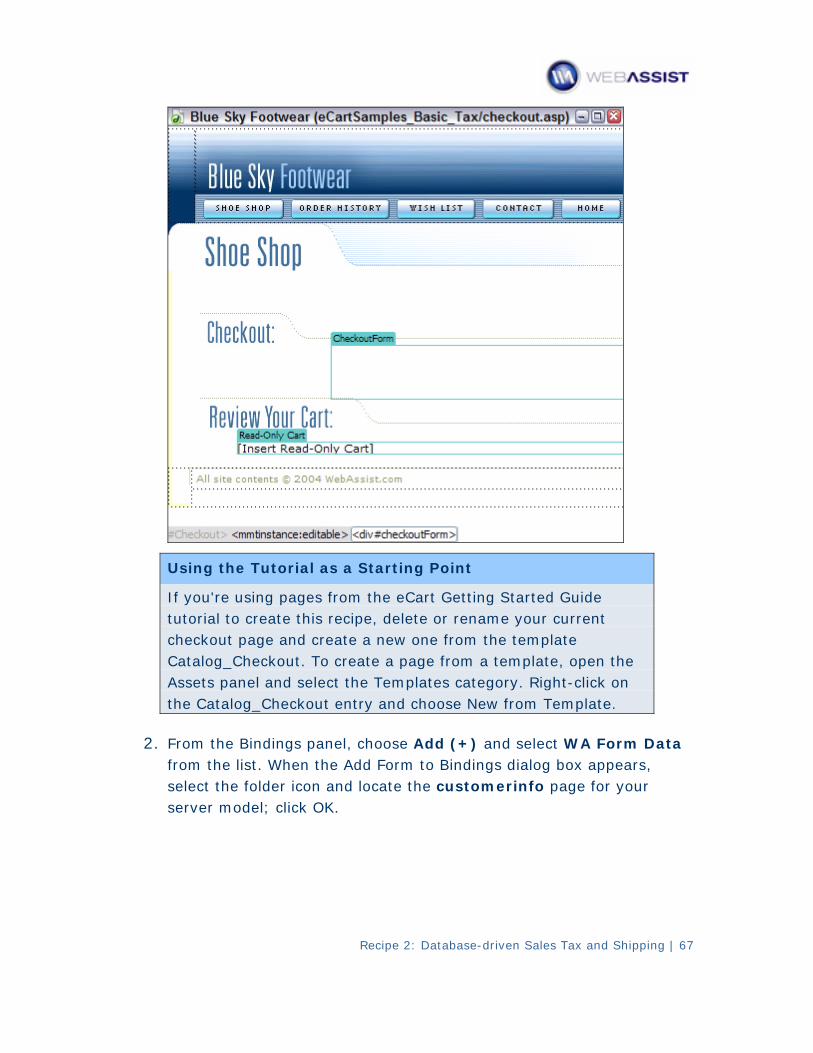
If you're using pages from the eCart Getting Started Guide tutorial to create this recipe, delete or rename your current checkout page and create a new one from the template Catalog_Checkout. To create a page from a template, open the Assets panel and select the Templates category. Right-click on the Catalog_Checkout entry and choose New from Template.
2. From the Bindings panel, choose Add (+) and select WA Form Data from the list. When the Add Form to Bindings dialog box appears, select the folder icon and locate the customerinfo page for your server model; click OK.
Recipe 2: Database-driven Sales Tax and Shipping | 67
Now you're ready to add the first, simplest, recordset.
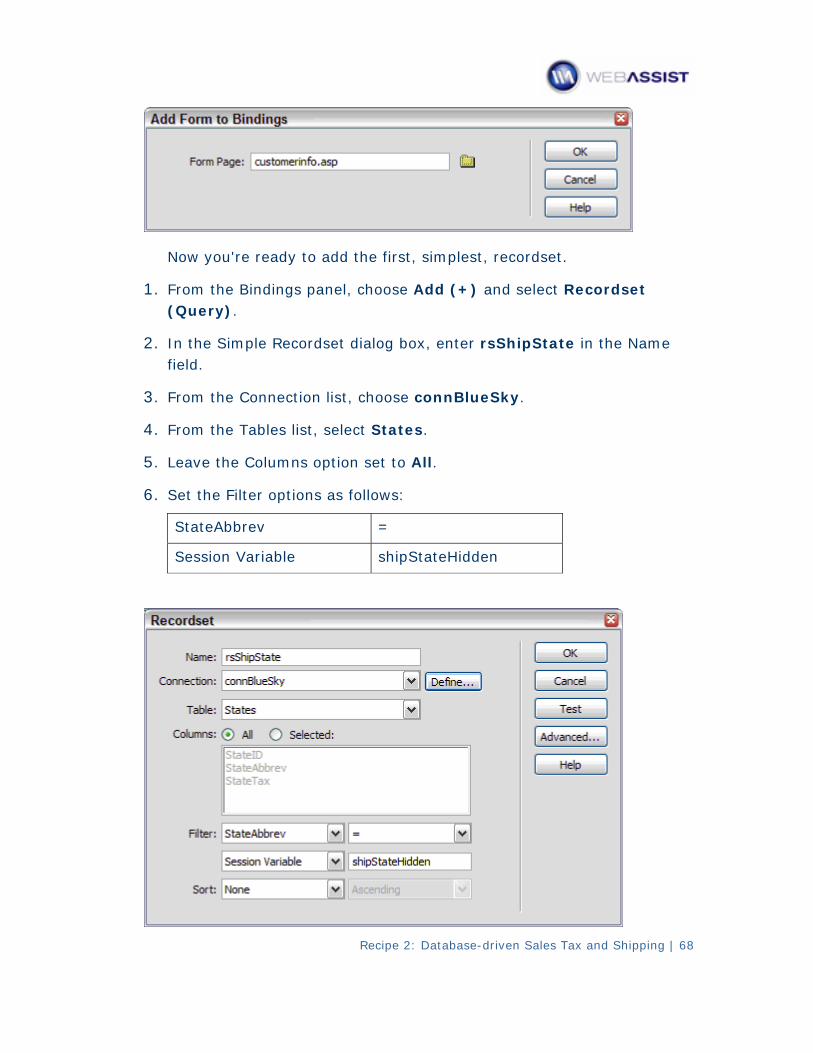
1. From the Bindings panel, choose Add (+) and select Recordset (Query).
2. In the Simple Recordset dialog box, enter rsShipState in the Name field.
3. From the Connection list, choose connBlueSky.
4. From the Tables list, select States.
5. Leave the Columns option set to All.
6. Set the Filter options as follows:
StateAbbrev =
Session Variable shipStateHidden
Recipe 2: Database-driven Sales Tax and Shipping | 68
Recipe 2: Database-driven Sales Tax and Shipping | 69
The filter will bring in the one record that corresponds to the shipping state name chosen on the customerinfo page. This provides access to the state ID which will be used to filter the shipping rate lookup recordset.
7. Leave the Sort options set to None and click OK to insert the recordset.
The second recordset on this page relies on a SQL query or view called StateShipBillingInfo that draws data from three tables, ShipRates, ShipTypes and States. The intent of this query is to display shipping rates and other related information for any given choice of destination and shipping method.
Note: To accommodate the different dialogs for the various server models, the steps are presented separately here and when necessary throughout this recipe.
For ASP
1. From the Snippets panel, right-click on the WA eCart > Recipes > Shipping and State Tax > ShipRateLookup RS SQL – ASP snippet and choose Copy Snippet.
2. From the Bindings panel, choose Add (+) and select Recordset from the list.
3. Switch to the Advanced view of the Recordset dialog.
4. In the Name field, enter rsShipRateLookup.
5. From the Connection list, choose connBlueSky.
6. Place your cursor in the SQL area and press Ctrl+V (Command+V) to paste in the following code:
SELECT *
FROM StateShipBillingInfo
WHERE ShipTypeID = TypeParam AND StateID = StateParam
7. In the Variables area, choose Add (+) and, in the Name column, enter TypeParam; in the Default Value column, enter 0; and in the Run-time Value column, enter Session("shipTypeList").

The first variable is assigned the session variable which contains the ID of the shipping method chosen by the customer.
8. Add a second variable, by choosing Add (+) and, in the Name column, enter StateParam; in the Default Value column, enter 0; and in the Run-time Value column, enter rsShipState.Fields("StateID").value.
The second variable contains the State ID which was filtered in the rsShipState recordset.
9. Click OK when you're done and save your page after the recordset is inserted.
For ColdFusion
1. From the Snippets panel, right-click on the WA eCart > Recipes > Shipping and State Tax > ShipRateLookup RS SQL – CF snippet and choose Copy Snippet.
2. From the Bindings panel, choose Add (+) and select Recordset from the list.
3. Switch to the Advanced view of the Recordset dialog.
Recipe 2: Database-driven Sales Tax and Shipping | 70
Recipe 2: Database-driven Sales Tax and Shipping | 71
4. In the Name field, enter rsShipRateLookup.
5. From the Data Source list, choose connBlueSky.
If necessary, enter the username and password for the data source in the corresponding fields.
6. Place your cursor in the SQL area and press Ctrl+V (Command+V) to paste in the following code:
SELECT *
FROM StateShipBillingInfo
WHERE ShipTypeID = #Session.shipTypeList# AND StateID = #rsShipState.StateID#
7. In the Page Parameter area, choose Add (+) and, in the Add Parameter dialog, choose Session.shipTypeList from the Name list. In the Default Value field, enter 0; click OK when you're done.
8. The first parameter is assigned the session variable which contains the ID of the shipping method chosen by the customer.
9. Add a second page parameter, by choosing Add (+) and, in the Add Parameter dialog, choose rsShipState.StateID from the Name list. In the Default Value field, enter 0; click OK when you're done.
The second parameter contains the State ID which was filtered in the rsShipState recordset.
10. Click OK when you're done and save your page after the recordset is inserted.
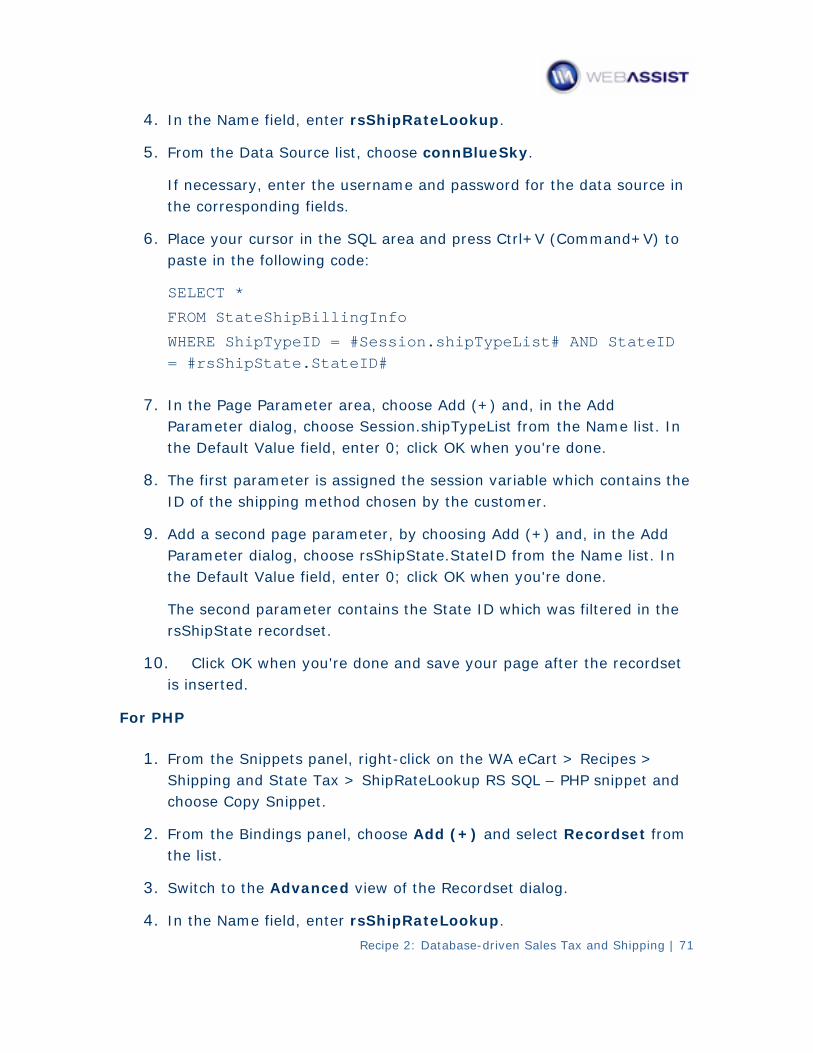
For PHP
1. From the Snippets panel, right-click on the WA eCart > Recipes > Shipping and State Tax > ShipRateLookup RS SQL – PHP snippet and choose Copy Snippet.
2. From the Bindings panel, choose Add (+) and select Recordset from the list.
3. Switch to the Advanced view of the Recordset dialog.
4. In the Name field, enter rsShipRateLookup.
Recipe 2: Database-driven Sales Tax and Shipping | 72
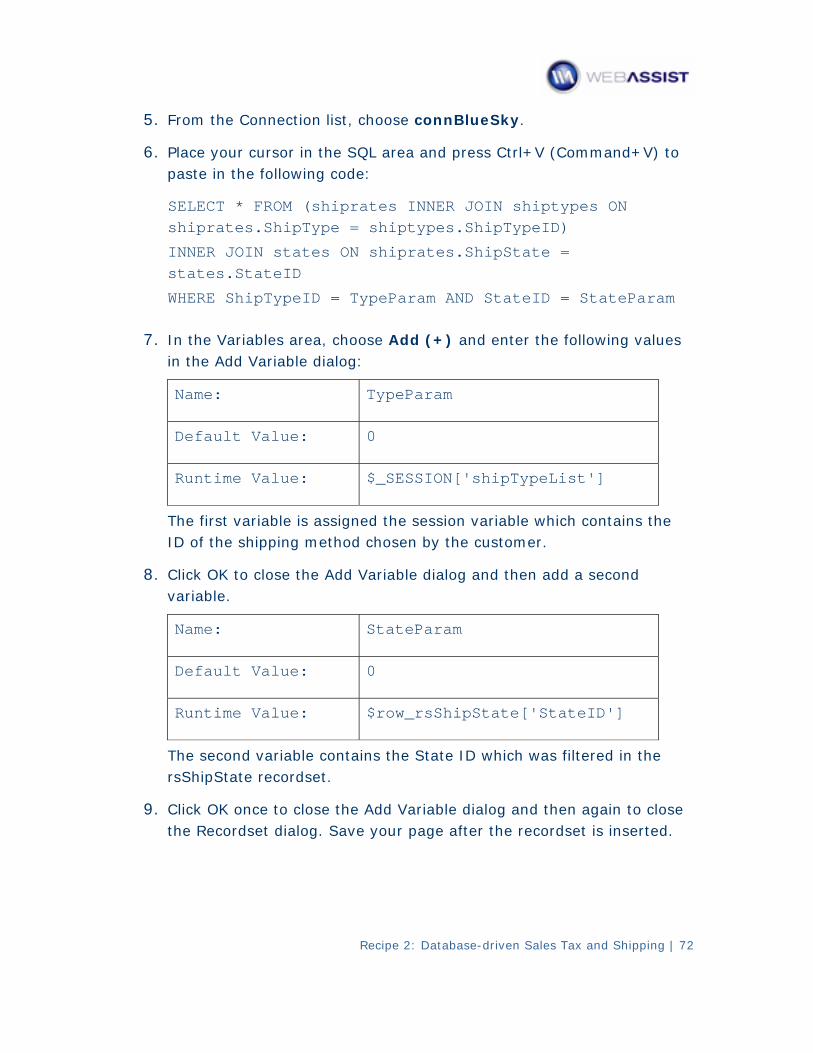
5. From the Connection list, choose connBlueSky.
6. Place your cursor in the SQL area and press Ctrl+V (Command+V) to paste in the following code:
SELECT * FROM (shiprates INNER JOIN shiptypes ON shiprates.ShipType = shiptypes.ShipTypeID)
INNER JOIN states ON shiprates.ShipState = states.StateID
WHERE ShipTypeID = TypeParam AND StateID = StateParam
7. In the Variables area, choose Add (+) and enter the following values in the Add Variable dialog:
Name: TypeParam
Default Value: 0
Runtime Value: $_SESSION['shipTypeList']
The first variable is assigned the session variable which contains the ID of the shipping method chosen by the customer.
8. Click OK to close the Add Variable dialog and then add a second variable.
Name: StateParam
Default Value: 0
Runtime Value: $row_rsShipState['StateID']
The second variable contains the State ID which was filtered in the rsShipState recordset.
9. Click OK once to close the Add Variable dialog and then again to close the Recordset dialog. Save your page after the recordset is inserted.
Recipe 2: Database-driven Sales Tax and Shipping | 73
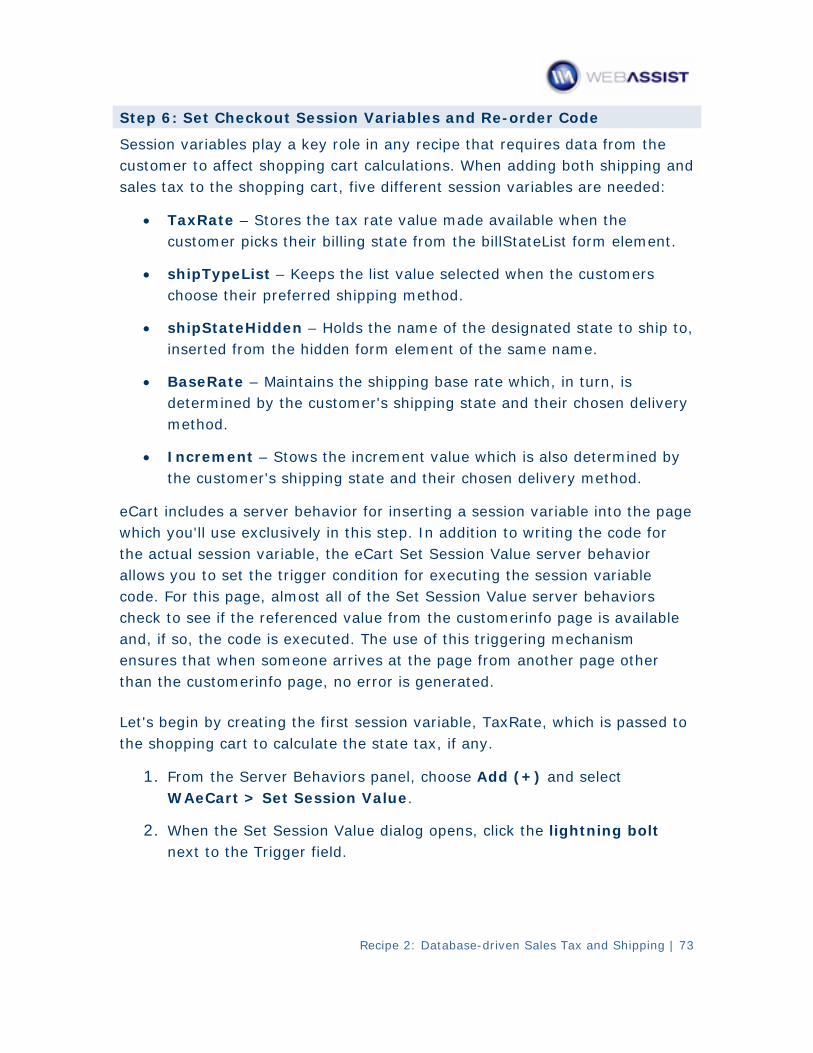
Step 6: Set Checkout Session Variables and Re-order Code
Session variables play a key role in any recipe that requires data from the customer to affect shopping cart calculations. When adding both shipping and sales tax to the shopping cart, five different session variables are needed:
• TaxRate – Stores the tax rate value made available when the customer picks their billing state from the billStateList form element.
• shipTypeList – Keeps the list value selected when the customers choose their preferred shipping method.
• shipStateHidden – Holds the name of the designated state to ship to, inserted from the hidden form element of the same name.
• BaseRate – Maintains the shipping base rate which, in turn, is determined by the customer's shipping state and their chosen delivery method.
• Increment – Stows the increment value which is also determined by the customer's shipping state and their chosen delivery method.
eCart includes a server behavior for inserting a session variable into the page which you'll use exclusively in this step. In addition to writing the code for the actual session variable, the eCart Set Session Value server behavior allows you to set the trigger condition for executing the session variable code. For this page, almost all of the Set Session Value server behaviors check to see if the referenced value from the customerinfo page is available and, if so, the code is executed. The use of this triggering mechanism ensures that when someone arrives at the page from another page other than the customerinfo page, no error is generated.
Let's begin by creating the first session variable, TaxRate, which is passed to the shopping cart to calculate the state tax, if any.
1. From the Server Behaviors panel, choose Add (+) and select WAeCart > Set Session Value.
2. When the Set Session Value dialog opens, click the lightning bolt next to the Trigger field.
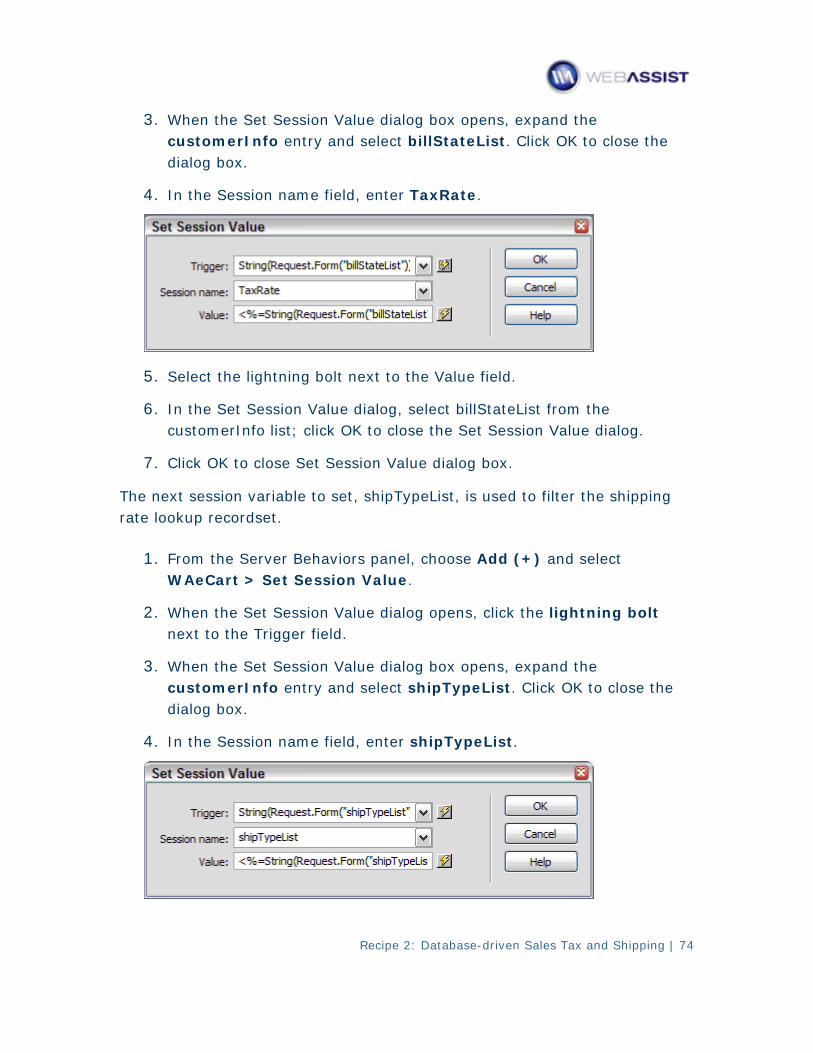
3. When the Set Session Value dialog box opens, expand the customerInfo entry and select billStateList. Click OK to close the dialog box.
4. In the Session name field, enter TaxRate.
5. Select the lightning bolt next to the Value field.
6. In the Set Session Value dialog, select billStateList from the customerInfo list; click OK to close the Set Session Value dialog.
7. Click OK to close Set Session Value dialog box.
The next session variable to set, shipTypeList, is used to filter the shipping rate lookup recordset.
1. From the Server Behaviors panel, choose Add (+) and select WAeCart > Set Session Value.
2. When the Set Session Value dialog opens, click the lightning bolt next to the Trigger field.
3. When the Set Session Value dialog box opens, expand the customerInfo entry and select shipTypeList. Click OK to close the dialog box.
4. In the Session name field, enter shipTypeList.
Recipe 2: Database-driven Sales Tax and Shipping | 74
5. Select the lightning bolt next to the Value field.
6. In the Set Session Value dialog, select shipTypeList from the customerInfo list; click OK to close the Set Session Value dialog.
7. Click OK to close Set Session Value dialog box.
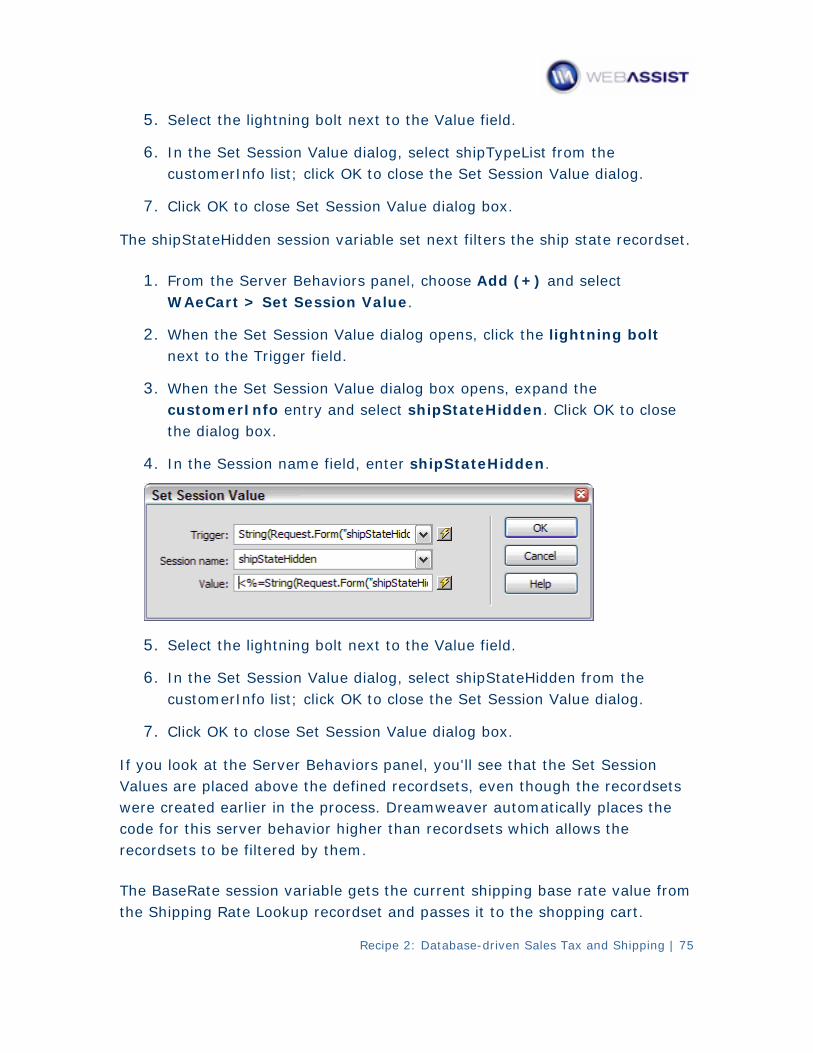
The shipStateHidden session variable set next filters the ship state recordset.
1. From the Server Behaviors panel, choose Add (+) and select WAeCart > Set Session Value.
2. When the Set Session Value dialog opens, click the lightning bolt next to the Trigger field.
3. When the Set Session Value dialog box opens, expand the customerInfo entry and select shipStateHidden. Click OK to close the dialog box.
4. In the Session name field, enter shipStateHidden.
5. Select the lightning bolt next to the Value field.
6. In the Set Session Value dialog, select shipStateHidden from the customerInfo list; click OK to close the Set Session Value dialog.
7. Click OK to close Set Session Value dialog box.
If you look at the Server Behaviors panel, you'll see that the Set Session Values are placed above the defined recordsets, even though the recordsets were created earlier in the process. Dreamweaver automatically places the code for this server behavior higher than recordsets which allows the recordsets to be filtered by them.
The BaseRate session variable gets the current shipping base rate value from the Shipping Rate Lookup recordset and passes it to the shopping cart.
Recipe 2: Database-driven Sales Tax and Shipping | 75
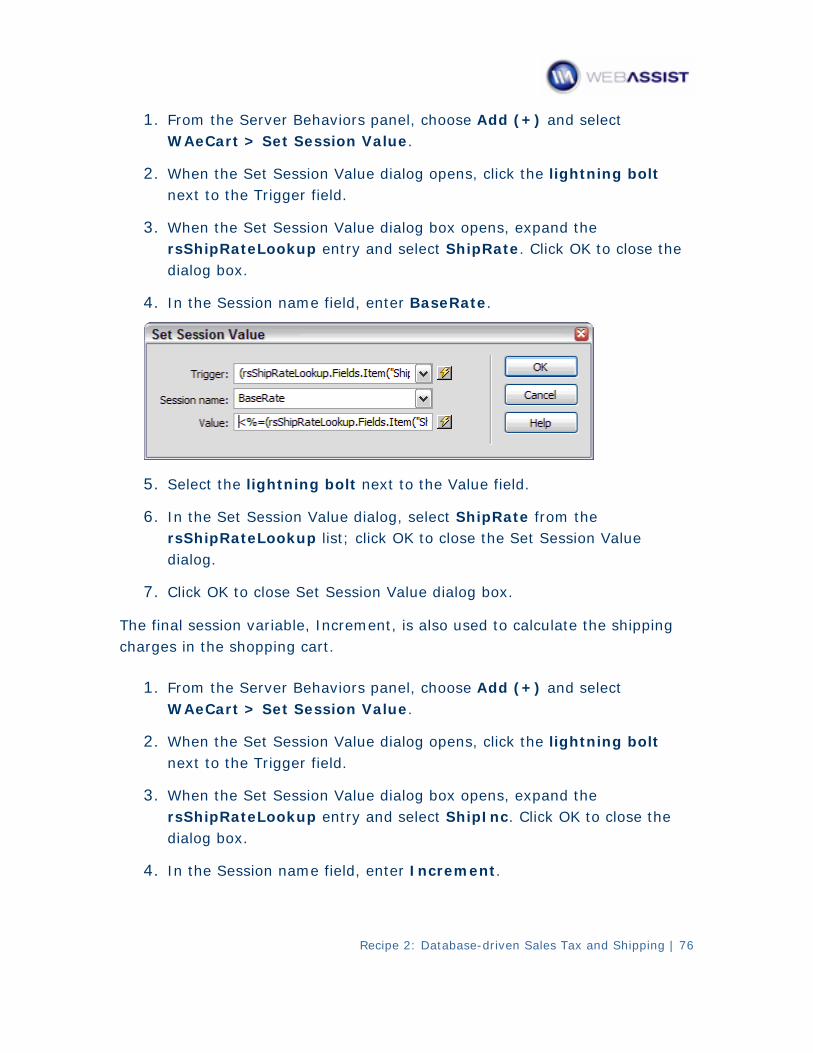
1. From the Server Behaviors panel, choose Add (+) and select WAeCart > Set Session Value.
2. When the Set Session Value dialog opens, click the lightning bolt next to the Trigger field.
3. When the Set Session Value dialog box opens, expand the rsShipRateLookup entry and select ShipRate. Click OK to close the dialog box.
4. In the Session name field, enter BaseRate.
5. Select the lightning bolt next to the Value field.
6. In the Set Session Value dialog, select ShipRate from the rsShipRateLookup list; click OK to close the Set Session Value dialog.
7. Click OK to close Set Session Value dialog box.
The final session variable, Increment, is also used to calculate the shipping charges in the shopping cart.
1. From the Server Behaviors panel, choose Add (+) and select WAeCart > Set Session Value.
2. When the Set Session Value dialog opens, click the lightning bolt next to the Trigger field.
3. When the Set Session Value dialog box opens, expand the rsShipRateLookup entry and select ShipInc. Click OK to close the dialog box.
4. In the Session name field, enter Increment.
Recipe 2: Database-driven Sales Tax and Shipping | 76
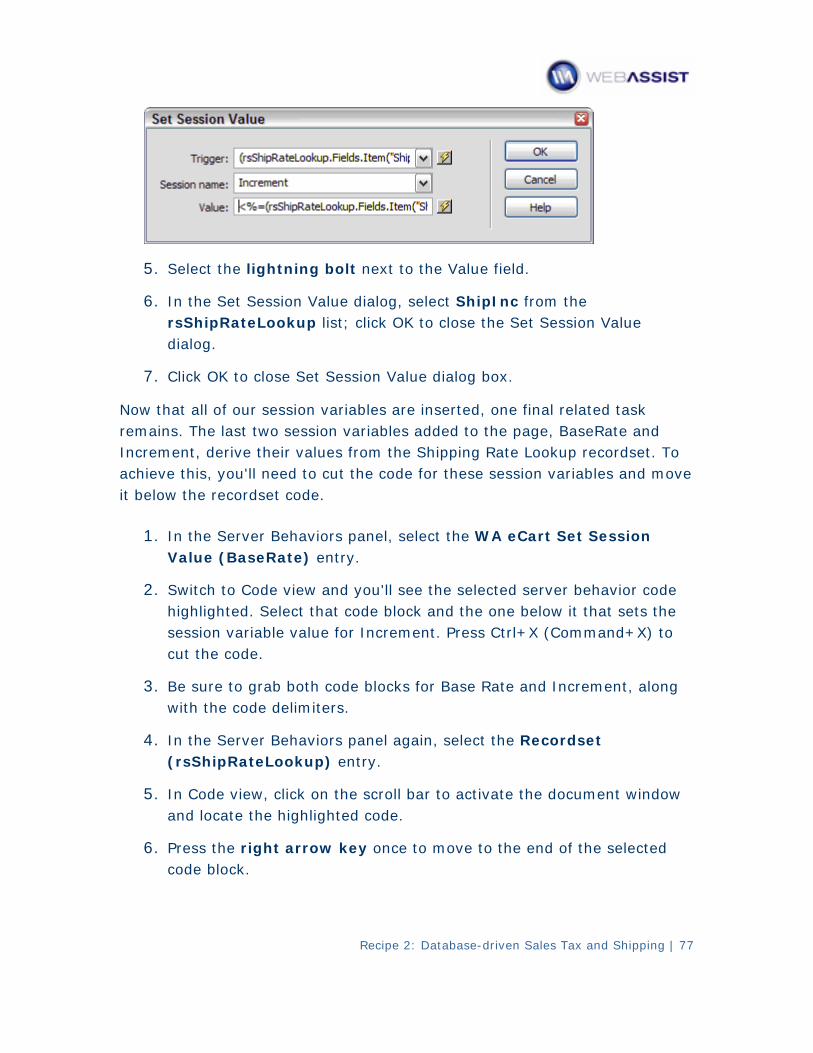
5. Select the lightning bolt next to the Value field.
6. In the Set Session Value dialog, select ShipInc from the rsShipRateLookup list; click OK to close the Set Session Value dialog.
7. Click OK to close Set Session Value dialog box.
Now that all of our session variables are inserted, one final related task remains. The last two session variables added to the page, BaseRate and Increment, derive their values from the Shipping Rate Lookup recordset. To achieve this, you'll need to cut the code for these session variables and move it below the recordset code.
1. In the Server Behaviors panel, select the WA eCart Set Session Value (BaseRate) entry.
2. Switch to Code view and you'll see the selected server behavior code highlighted. Select that code block and the one below it that sets the session variable value for Increment. Press Ctrl+X (Command+X) to cut the code.
3. Be sure to grab both code blocks for Base Rate and Increment, along with the code delimiters.
4. In the Server Behaviors panel again, select the Recordset (rsShipRateLookup) entry.
5. In Code view, click on the scroll bar to activate the document window and locate the highlighted code.
6. Press the right arrow key once to move to the end of the selected code block.
Recipe 2: Database-driven Sales Tax and Shipping | 77
7. Press Enter (Return) to create a new line and then choose Ctrl+V (Command+V) to paste the previously cut code.
8. Save your page.
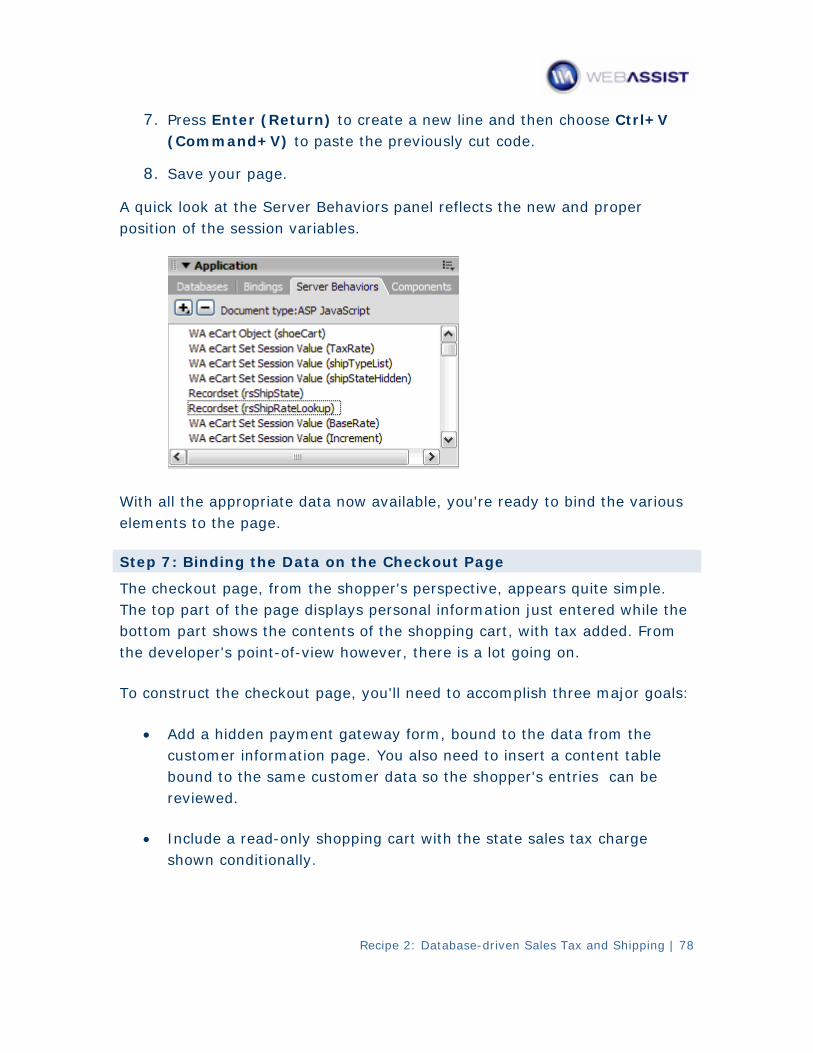
A quick look at the Server Behaviors panel reflects the new and proper position of the session variables.
With all the appropriate data now available, you're ready to bind the various elements to the page.
Step 7: Binding the Data on the Checkout Page
The checkout page, from the shopper's perspective, appears quite simple. The top part of the page displays personal information just entered while the bottom part shows the contents of the shopping cart, with tax added. From the developer's point-of-view however, there is a lot going on.
To construct the checkout page, you'll need to accomplish three major goals:
• Add a hidden payment gateway form, bound to the data from the customer information page. You also need to insert a content table bound to the same customer data so the shopper's entries can be reviewed.
• Include a read-only shopping cart with the state sales tax charge shown conditionally.
Recipe 2: Database-driven Sales Tax and Shipping | 78
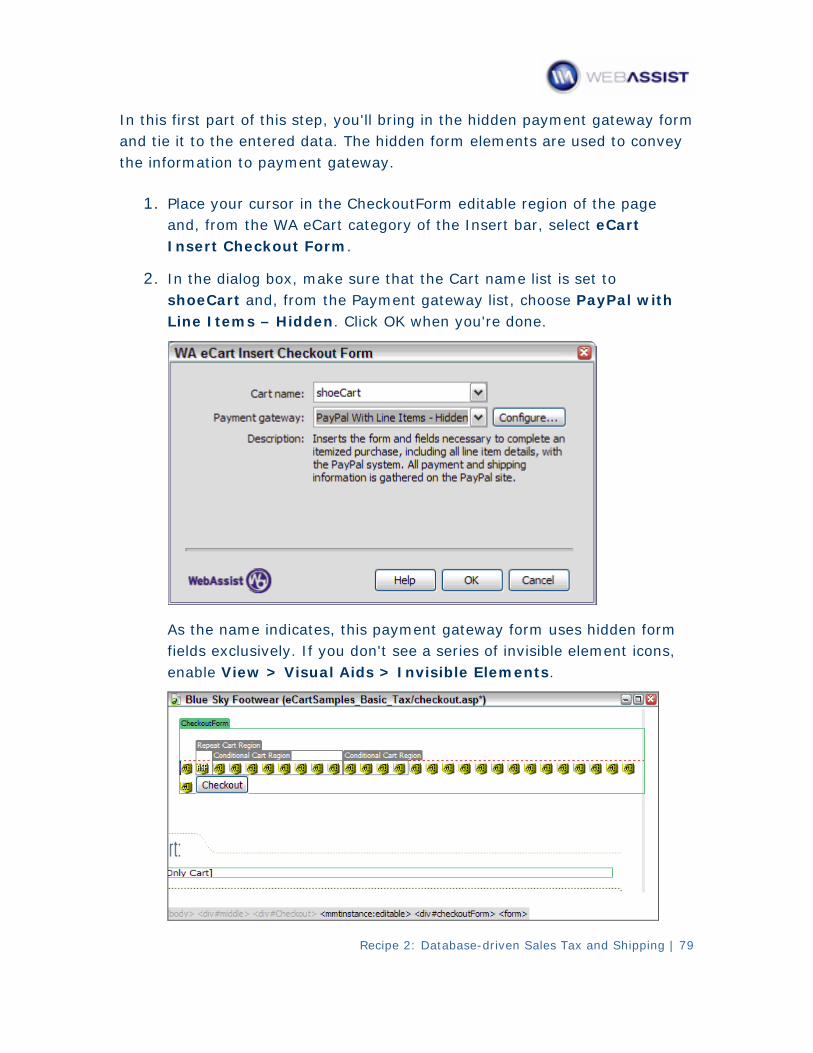
In this first part of this step, you'll bring in the hidden payment gateway form and tie it to the entered data. The hidden form elements are used to convey the information to payment gateway.
1. Place your cursor in the CheckoutForm editable region of the page and, from the WA eCart category of the Insert bar, select eCart Insert Checkout Form.
2. In the dialog box, make sure that the Cart name list is set to shoeCart and, from the Payment gateway list, choose PayPal with Line Items – Hidden. Click OK when you're done.
As the name indicates, this payment gateway form uses hidden form fields exclusively. If you don't see a series of invisible element icons, enable View > Visual Aids > Invisible Elements.
Recipe 2: Database-driven Sales Tax and Shipping | 79
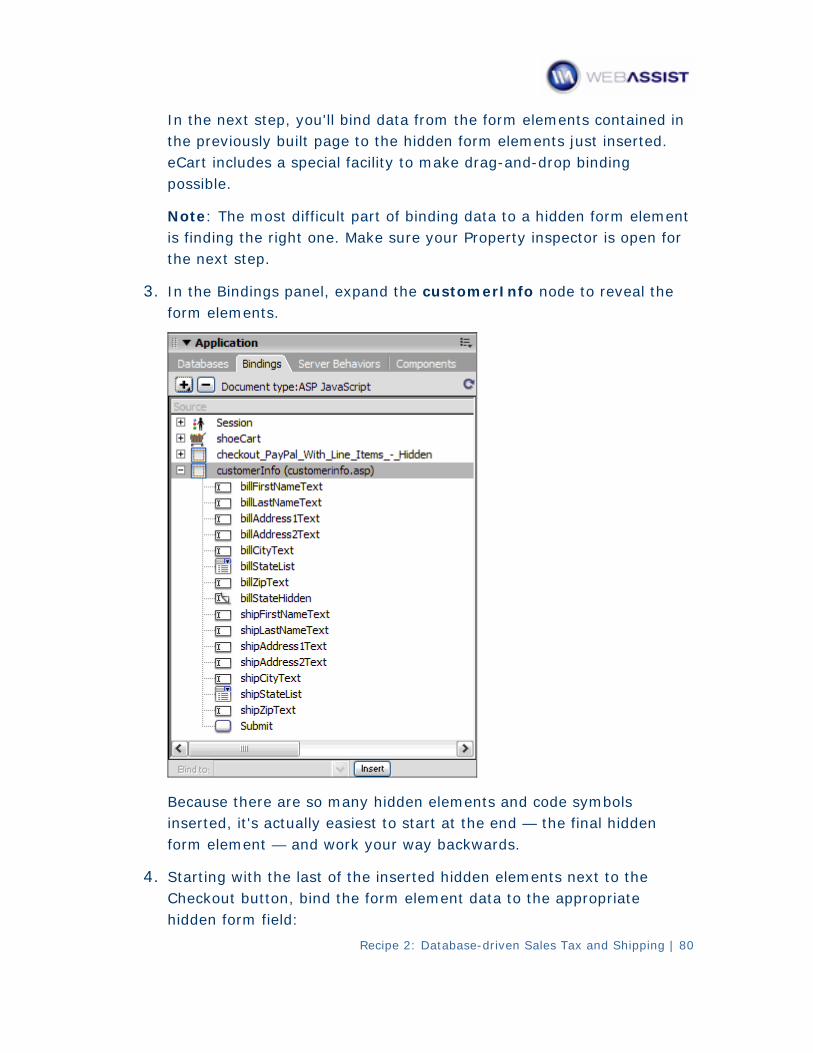
In the next step, you'll bind data from the form elements contained in the previously built page to the hidden form elements just inserted. eCart includes a special facility to make drag-and-drop binding possible.
Note: The most difficult part of binding data to a hidden form element is finding the right one. Make sure your Property inspector is open for the next step.
3. In the Bindings panel, expand the customerInfo node to reveal the form elements.
Because there are so many hidden elements and code symbols inserted, it's actually easiest to start at the end — the final hidden form element — and work your way backwards.
4. Starting with the last of the inserted hidden elements next to the Checkout button, bind the form element data to the appropriate hidden form field:
Recipe 2: Database-driven Sales Tax and Shipping | 80
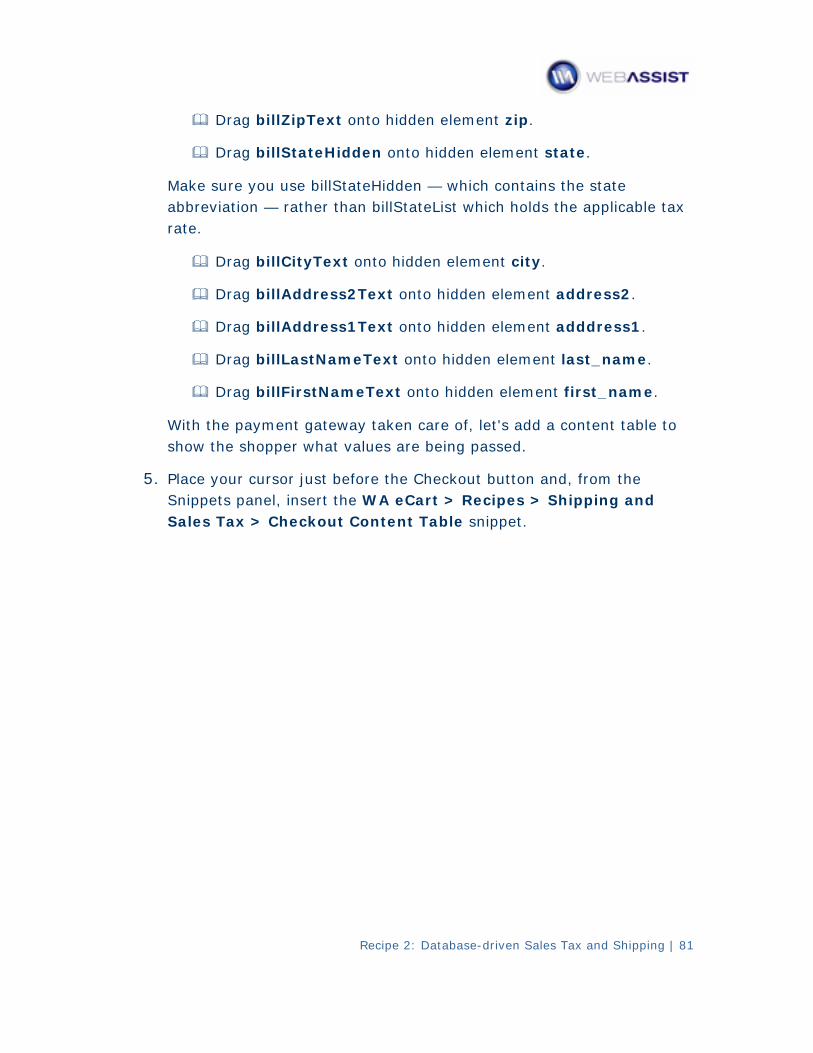
Recipe 2: Database-driven Sales Tax and Shipping | 81
Drag billZipText onto hidden element zip.
Drag billStateHidden onto hidden element state.
Make sure you use billStateHidden — which contains the state abbreviation — rather than billStateList which holds the applicable tax rate.
Drag billCityText onto hidden element city.
Drag billAddress2Text onto hidden element address2.
Drag billAddress1Text onto hidden element adddress1.
Drag billLastNameText onto hidden element last_name.
Drag billFirstNameText onto hidden element first_name.
With the payment gateway taken care of, let's add a content table to show the shopper what values are being passed.
5. Place your cursor just before the Checkout button and, from the Snippets panel, insert the WA eCart > Recipes > Shipping and Sales Tax > Checkout Content Table snippet.
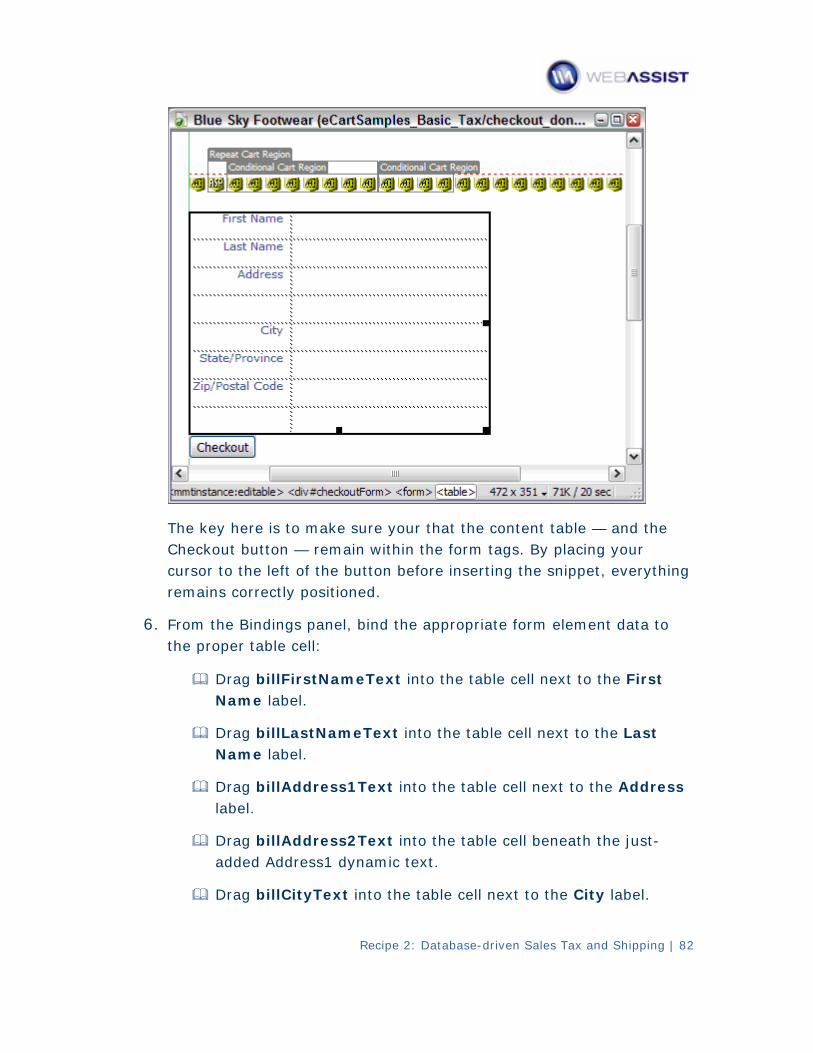
The key here is to make sure your that the content table — and the Checkout button — remain within the form tags. By placing your cursor to the left of the button before inserting the snippet, everything remains correctly positioned.
6. From the Bindings panel, bind the appropriate form element data to the proper table cell:
Drag billFirstNameText into the table cell next to the First Name label.
Drag billLastNameText into the table cell next to the Last Name label.
Drag billAddress1Text into the table cell next to the Address label.
Drag billAddress2Text into the table cell beneath the just-added Address1 dynamic text.
Drag billCityText into the table cell next to the City label.
Recipe 2: Database-driven Sales Tax and Shipping | 82
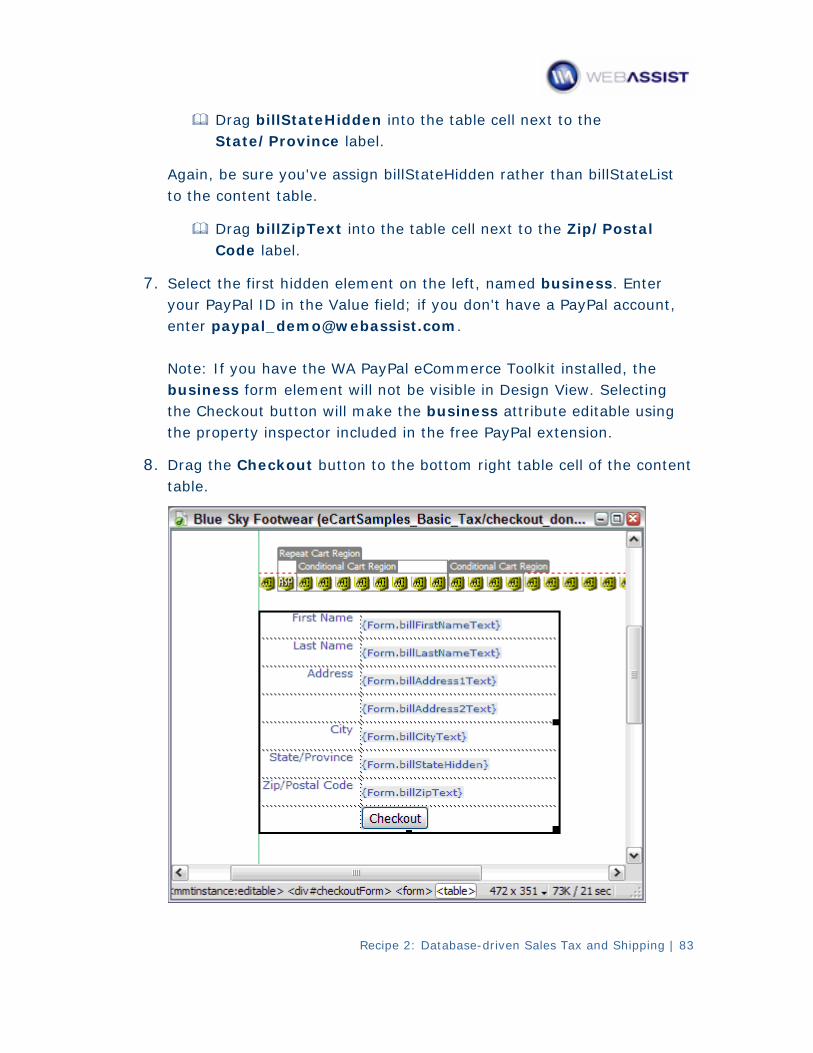
Drag billStateHidden into the table cell next to the State/Province label.
Again, be sure you've assign billStateHidden rather than billStateList to the content table.
Drag billZipText into the table cell next to the Zip/Postal Code label.
7. Select the first hidden element on the left, named business. Enter your PayPal ID in the Value field; if you don't have a PayPal account, enter [email protected]. Note: If you have the WA PayPal eCommerce Toolkit installed, the business form element will not be visible in Design View. Selecting the Checkout button will make the business attribute editable using the property inspector included in the free PayPal extension.
8. Drag the Checkout button to the bottom right table cell of the content table.
Recipe 2: Database-driven Sales Tax and Shipping | 83
Recipe 2: Database-driven Sales Tax and Shipping | 84
9. Save your page before continuing.
One half of the checkout page is done; in the next step you'll add the read-only shopping cart, complete with shipping and sales tax.
Step 8: Displaying the Checkout Page Shopping Cart
The final step in the recipe is to insert the read-only shopping cart display via the eCart Display Manager. Once the cart is added to the page, you'll need to add the two separate shipping related charges — Base Rate and Increment — together to present one cost to the shopper. One final task makes the page more user-friendly: making the sales tax line conditional so that it only shows when tax is due.
1. From the Insert bar's WA eCart category, choose eCart Display Manager.
2. The Display Manager Wizard initially shows the last cart used. Click Next to create a new cart display.
3. On the Cart Design page of the Wizard, make sure Cart name is set to shoeCart, Layout is Contemporary, Style is Ocean and Buttons are set to Images. From the Display type list, choose Read-Only Cart. Click Next when you're ready.
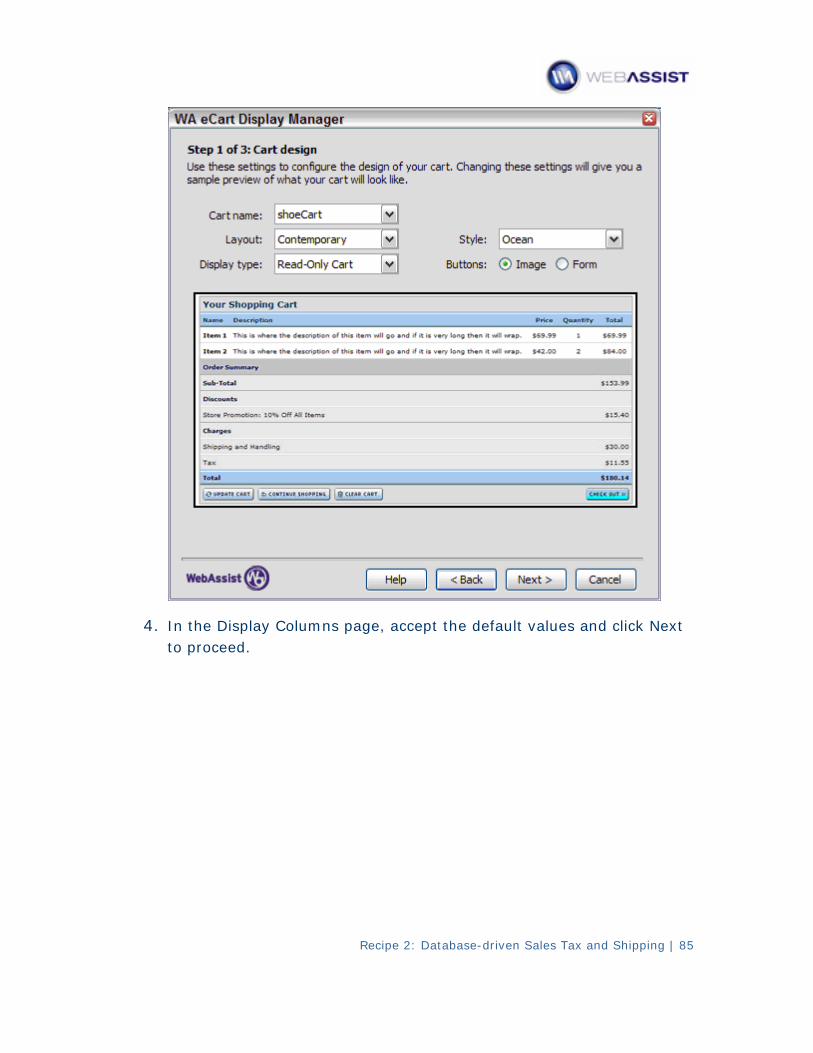
4. In the Display Columns page, accept the default values and click Next to proceed.
Recipe 2: Database-driven Sales Tax and Shipping | 85
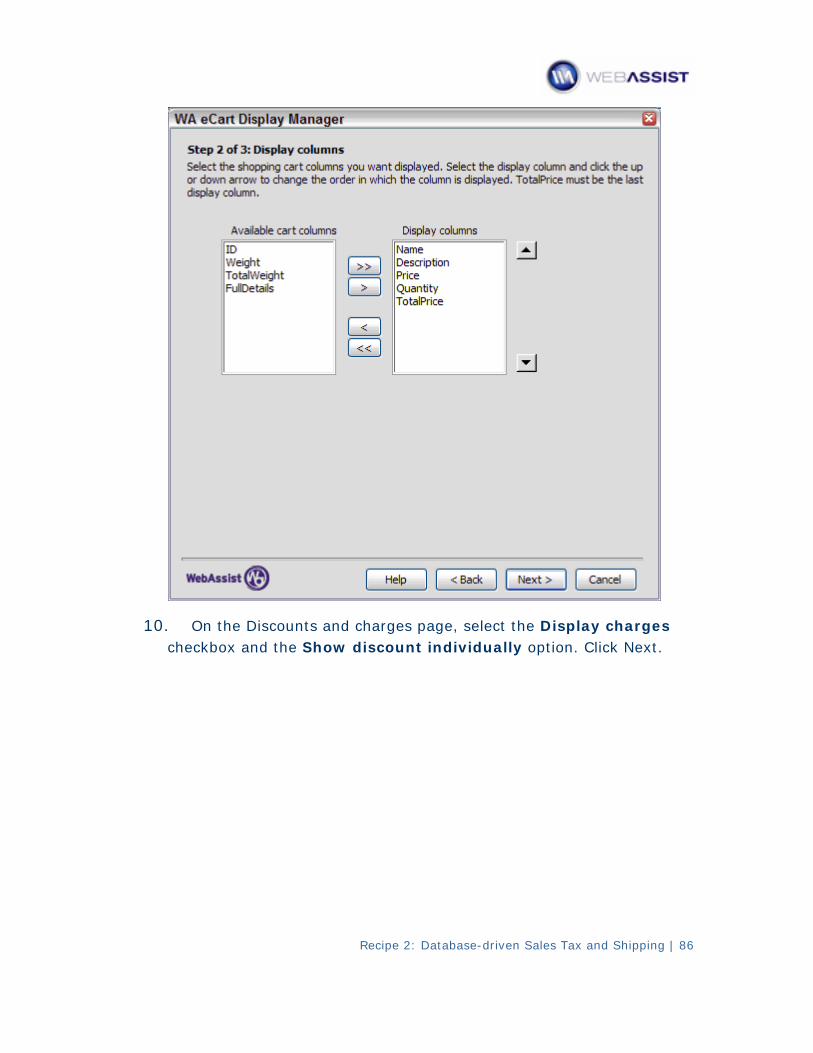
10. On the Discounts and charges page, select the Display charges checkbox and the Show discount individually option. Click Next.
Recipe 2: Database-driven Sales Tax and Shipping | 86

11. Review your choices on the Wizard's final page and, if correct, click Finish. Use the Back button to return to any screen and make changes.
To see shopping cart as it will be shown in the browser, choose View options > Hide All Visual Aids from the Document toolbar.
Recipe 2: Database-driven Sales Tax and Shipping | 87
Recipe 2: Database-driven Sales Tax and Shipping | 88
12. With your cursor in the button row, select the <tr> tag from the Tag Selector and press Delete or Backspace.
13. Save your page.
You'll n are two table rows for otice that in the shopping cart display thereshi and Increment Shipping. The eCart Display Manager pping: Base Shippinginserts a table row for each charge rule defined. You'll need to combine the base and increment shipping values into one total shipping cost. To accomplish that goal, you must move some of the inserted code and also remove the no longer needed table row.
1. In Design view, select the code symbol representing the server side code in the Increment Shipping table row.
2. Switch to Code view and cut the following section of the highlighted line: $shoeCart->WAEC_IncrementShipping().
3. Select the Base Shipping table row and delete it.
4. se Shipping value Locate the server-side code block that inserts the Baand place your cursor in front of the WAEC_BaseShipping() function; press Ctrl+V (Command+V) to paste the copied function into place.
5. Add a plus sign (+) between the two functions.
entire function call in this line should look like this: At this point, the
[ASP-JS] <%= WA_eCart_DisplayMoney(shoeCart, WAEC_IncrementShipping() + WAEC_BaseShipping()) %>
[ASP-VB] <%= WA_eCart_DisplayMoney(shoeCart, WAEC_IncrementShipping() + WAEC_BaseShipping()) %>
[CF] < WA_eCart_DisplayMoney(shoeCart, WAEC_IncrementShipping() + WAEC_BaseShipping()) >
[PHP] <?php WA_eCart_DisplayMoney(shoeCart, WAEC_IncrementShipping() + WAEC_BaseShipping()) ?>
6. Switch to design view and then select the word Base in the term Base Shipping; press Delete to remove the unneeded word.
Recipe 2: Database-driven Sales Tax and Shipping | 89
7. Save your page.
Not all online oppers from customers come from states where tax is due. Shall w see a state sales tax line item with a $0 charge in but two states will notheir shopping cart display. The final phase of this recipe will make that line item and it's corresponding header conditional — and only show the sales tax entry when necessary.
The code inserted checks the value in the TaxRate session variable and, if it is not equal to zero, displays the sales tax rows.
1. Place your cursor in the Charges row of the shopping cart display.
2. Switch to Code view and select the current table row and the row beneath it which contains the sales tax item code.
Make sure you select both the opening <tr> and closing </tr> tags for both rows.
3 From the Snippets panel, insert the WA eCart > Recipes > Shipping . and Sales Tax > Conditional Tax Display snippet for your server model. The code inserted wraps around the selection:
[ASP-JS]
Before:
<%
if (String(Session("TaxRate"))!="0") {
%>
After:
<%
}
%>
[ASP-VB]
Before:
<%
Recipe 2: Database-driven Sales Tax and Shipping | 90
cStr(Session("TaxRate"))<>"0") then if (
%>
After:
<%
end if
%>
[CF]
Before:
<cfif IsDefined("Session.TaxRate") AND Session.TaxRate NEQ "0">
After:
</cfif>
[PHP]
Before:
<?php if ($_Session["TaxRate"]!="0") { ?>
After:
<?php } ?>
1 . Save your p4 age when you're ready.
The ding items to your recipe is complete and ready for testing! Try adshopping cart and then, on the customer information page, choose either CA or NY to display the tax or any other state to hide the tax charges. Feel free to try shipping to a variety of different states with a range of shipping methods.
Recipe 3: Member Discounts | 91
ECIPE 3 R
Member Discounts
One tried-and-true technique for getting shoppers to make the initial purchase — and then later return to your online store for more shopping — is to offer member discounts. These discounts can either be a flat rate –10% off any purchase, for example — or offered on a product-by-product basis. This recipe describes the latter option which provides more control to the merchant and is a bit more difficult to implement. You'll only need to modify key files in the starting point; the rest of the files in the site are already configured.
In our recipe, a member is a site visitor who has registered with the site. The registration information (name, email address, username, password and registration date) is stored in a database table. Standard Dreamweaver server behaviors for authentication are used to create the log in pages. The eCart shopping cart display automatically shows each product's actual price as well as the discounted price to every shopper, but only members who have logged in get the total discount applied to their purchase. Showing customers who are not members what they could be saving is a powerful incentive to sign up.
There are four basic steps to integrating a member discount in eCart:
• Create Shopping Cart Calculations and Column – Two new calculations are defined in the eCart Shopping Cart object: one that sets the current price to either the standard or member price and another that figures the total discount. You'll also need to add a MemberPrice column to your shopping cart.
• Insert Discount Rule – The eCart Discounts Wizard is used to set up the Member Discount entry in the shopping cart.
• Adjust Add to Cart objects – The database column containing the discounted price data is bound to the Member Price shopping cart column for each add to cart object.
Recipe 3: Member Discounts | 92
ld the Shopping Cart page — A link to the log in page is added • Buiand the shopping cart display is modified to display the member discount. Server-side code is inserted to automatically update the shopping cart to reflect the applied discount for logged-in shoppers.
Step 1: Create Shopping Cart Calculations and Column
When a shopping cart is displayed, you'll see the individual items selected by the shopper as well as a variety of subtotals and totals. The results shown in these subtotals and totals are controlled by calculations defined in the eCart object. The eCart includes several default calculations to show, among others values, the total weight and total price of the items in the cart. Custom calculations can also be declared to supplement the default calculations. Likewise, a custom shopping cart column displays the results.
To display a member discount in the shopping cart, two custom calculations are needed. One calculation — CurrentPrice — contains the cost of each item. The CurrentPrice changes depending on whether the shopper is logged in or not. When the shopper is not logged in, the standard price is applied; should the shopper be logged in, a discounted member price is used. This calculation is applied and shown for each item in the cart.
The second calculation is the total discount or the amount saved by the customer per item. The discount is derived by subtracting the CurrentPrice from Price. If the shopper is not logged in as a member, both values are thethe same and the discount is zero. Should the shopper be logged in, the CurrentPrice calculation applies the discounted price; the calculation also takes the quantity into account and multiplies the item savings by the number of items offered.
1. From the Files panel, double-click the catalog page for your server model to open it.
Changes to the shopping cart object may be applied once any previously saved, dynamic page in your eCommerce site is open. Here, the catalog page is chosen because it is used later in this recipe.
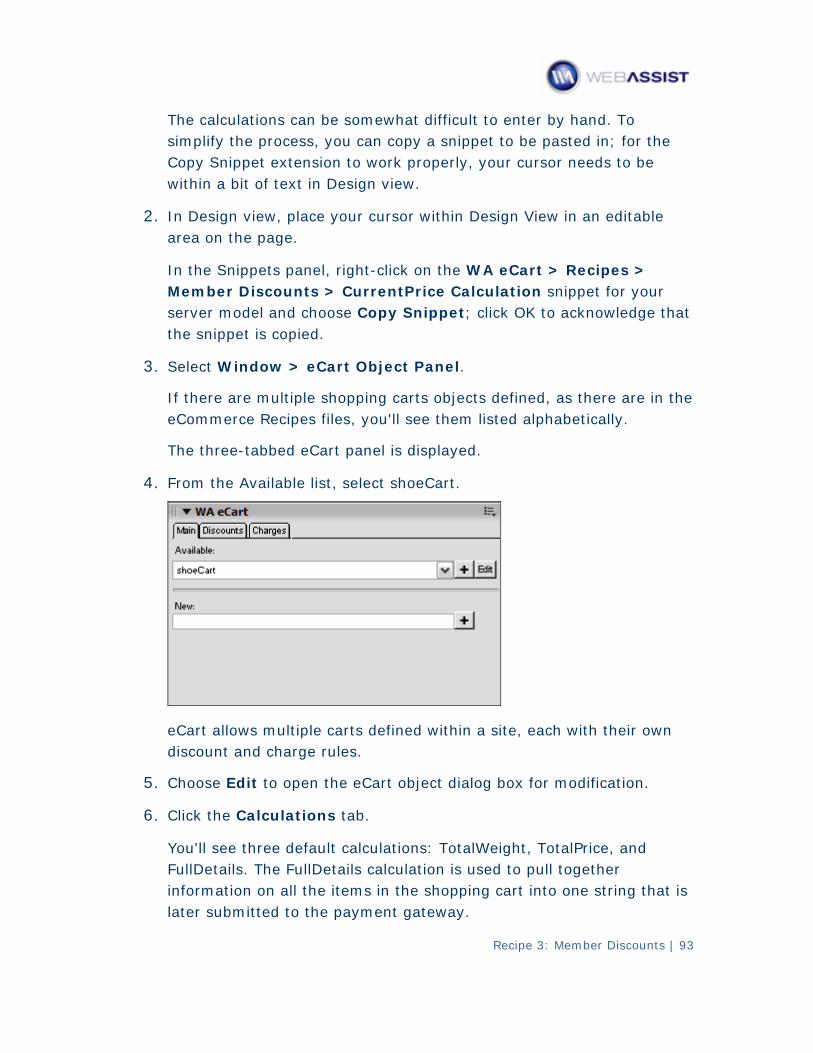
Recipe 3: Member Discounts | 93
The calculations can be somewhat difficult to enter by hand. To simplify the process, you can copy a snippet to be pasted in; for the Copy Snippet extension to work properly, your cursor needs to be within a bit of text in Design view.
2. In Design view, place your cursor within Design View in an editable area on the page.
In the Snippets panel, right-click on the WA eCart > Recipes > Member Discounts > CurrentPrice Calculation snippet for your server model and choose Copy Snippet; click OK to acknowledge that the snippet is copied.
3. Select Window > eCart Object Panel.
If there are multiple shopping carts objects defined, as there are ineCommerce Recipes files, you'll see them listed alphabet
the ically.
The three-tabbed eCart panel is displayed.
4. From the Available list, select shoeCart.
eCart allows multiple carts defined within a site, each with their own discount and charge rules.
5. Choose Edit to open the eCart object dialog box for modification.
6. Click the Calculations tab.
You'll see three default calculations: TotalWeight, TotalPrice, and FullDetails. The FullDetails calculation is used to pull together information on all the items in the shopping cart into one string that is later submitted to the payment gateway.
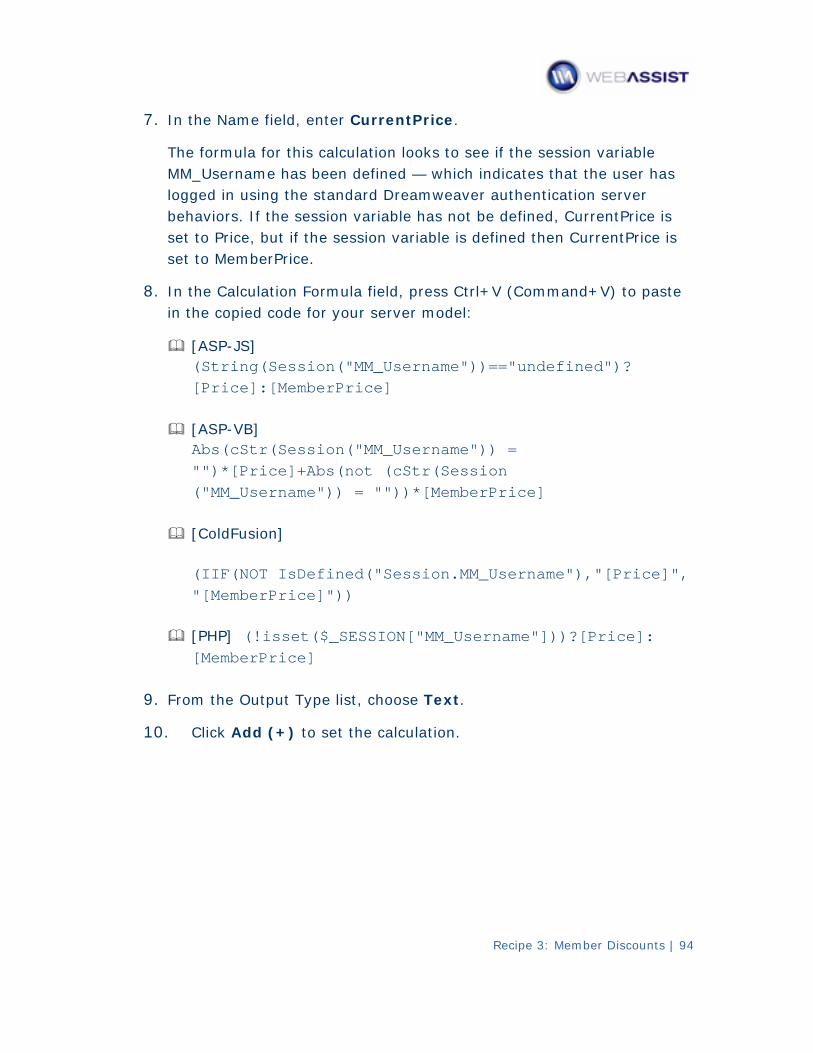
Recipe 3: Member Discounts | 94
. 7 In the Name field, enter CurrentPrice.
The formula for this calculation looks to see if the session variable MM_Username has been defined — which indicates that the user has logged in using the standard Dreamweaver authentication server behaviors. If the session variable has not be defined, CurrentPrice is set to Price, but if the session variable is defined then CurrentPrice is set to MemberPrice.
8. e In the Calculation Formula field, press Ctrl+V (Command+V) to pastin the copied code for your server model:
[ASP-JS](String(Session("MM_Username"))=="undefined")? [Price]:[MemberPrice]
[ASP-VB] Abs(cStr(Session("MM_Username")) = "")*[Price]+Abs(not (cStr(Session ("MM_Username")) = ""))*[MemberPrice]
[ColdFusion]
(IIF(NOT IsDefined("Session.MM_Username"),"[Price]", "[MemberPrice]"))
[PHP] (!isset($_SESSION["MM_Username"]))?[Price]: [MemberPrice]
9. From the Output Type list, choose Text.
10. Click Add (+) to set the calculation.
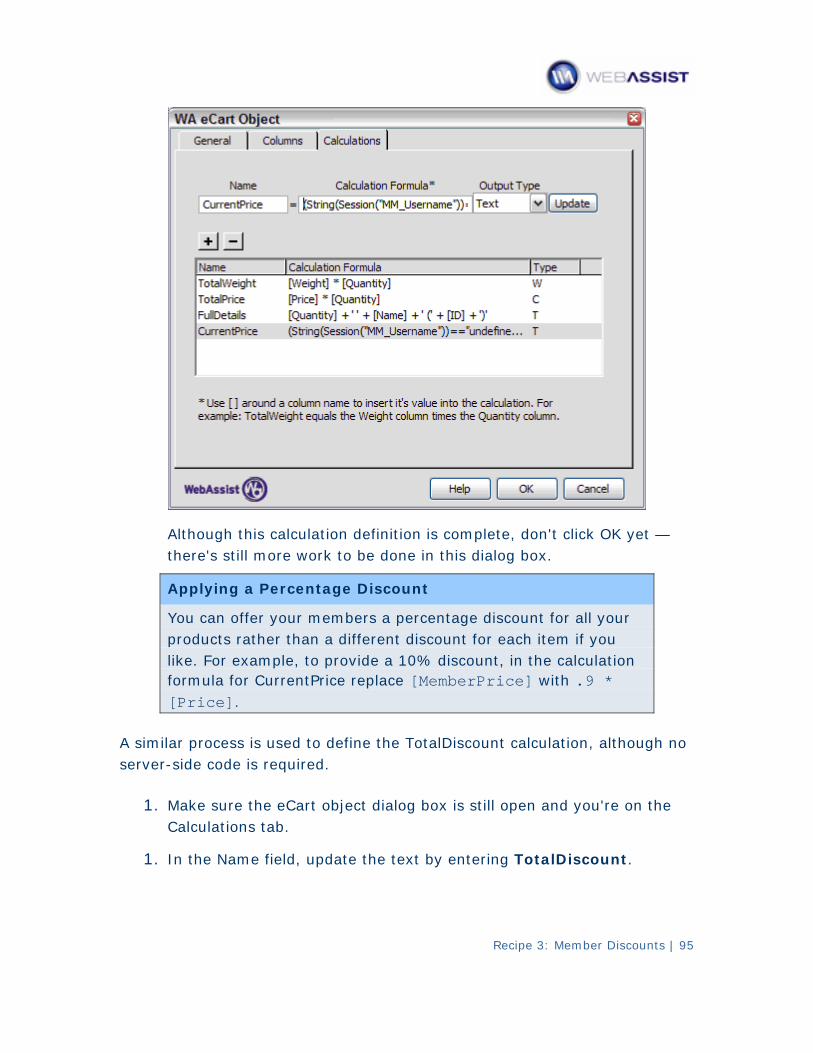
Recipe 3: Member Discounts | 95
definition is complete, don't click OK yet — Although this calculationthere's still more work to be done in this dialog box.
Applying a Percentage Discount
You can offer your members a percentage discount for all your products rather than a different discount for each item if you like vide a 10% discount, in the calculation . For example, to proformula for CurrentPrice replace [MemberPrice] with .9 * [Price].
A similar t calculation, although no process is used to define the TotalDiscounserver-side code is required.
1. Make sure the eCart object dialog box is still open and you're on the Calculations tab.
1. In the Name field, update the text by entering TotalDiscount.
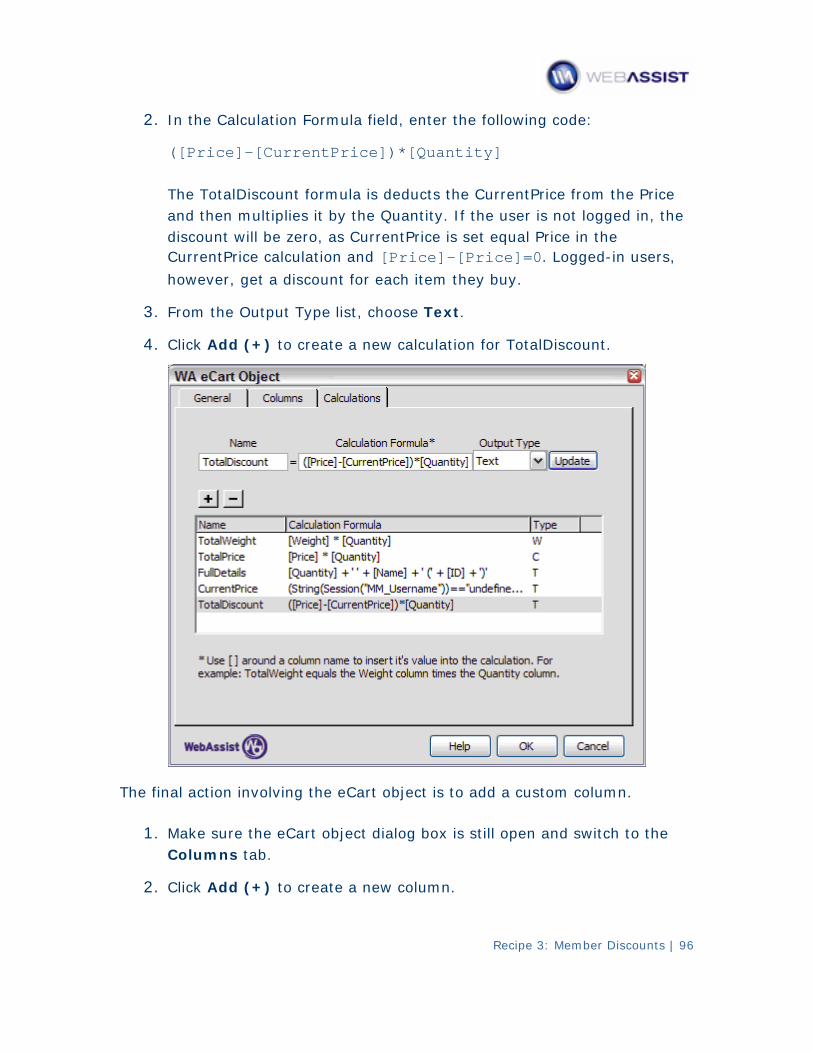
Recipe 3: Member Discounts | 96
2. In the Calculation Formula field, enter the following code:
([Price]-[CurrentPrice])*[Quantity]
The TotalDiscount formula is deducts the CurrentPrice from the Priceand then multiplies it by the Quantity. If the user is not logged in, the discount will be zero, as CurrentPrice is set equal Price in the CurrentPrice calculation and [Price]-[Price]=0. Logged-in users,
however, get a discount for each item they buy.
3. From the Output Type list, choose Text.
4. Click Add (+) to create a new calculation for TotalDiscount.
The final action involving the eCart object is to add a custom column.
1. rt object dialog box is still open and switch to the Make sure the eCaColumns tab.
2. lick Add (+) to create a new column. C
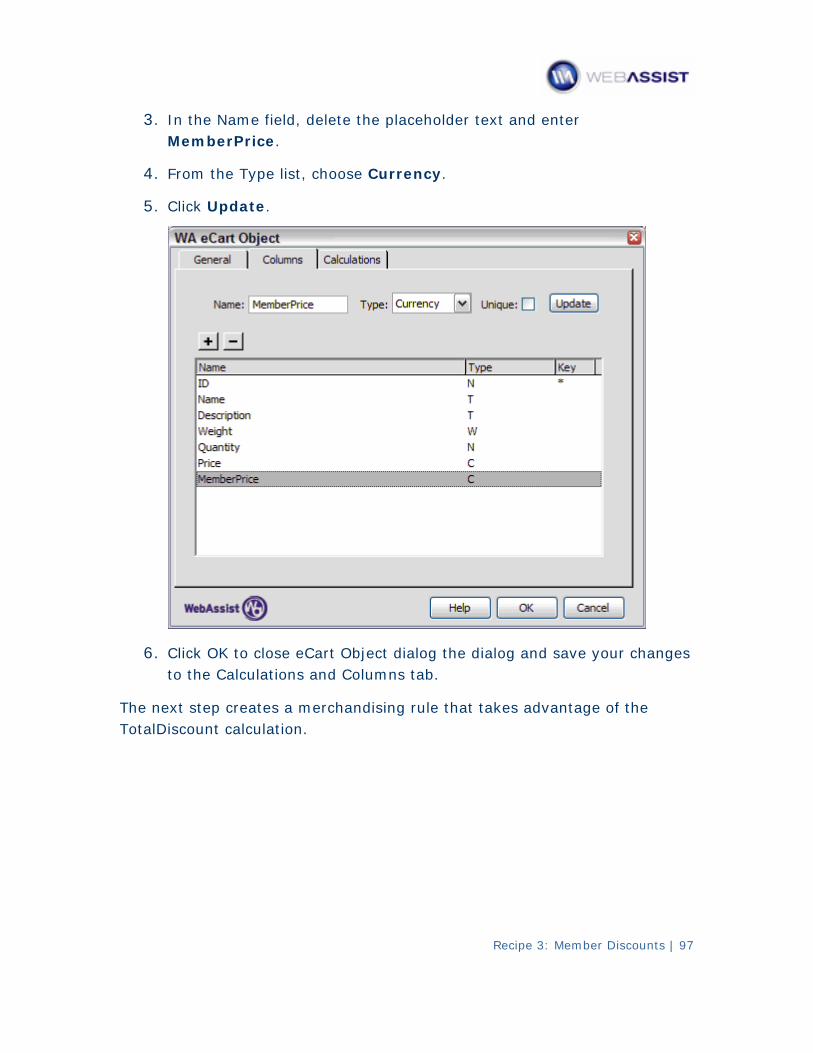
3. In the Name field, delete the placeholder text and enter MemberPrice.
4. From the Type list, choose Currency.
5. Click Update.
6. changes Click OK to close eCart Object dialog the dialog and save your to the Calculations and Columns tab.
The next step creates a merchandising rule that takes advantage of theTotalDiscount calculation.
Recipe 3: Member Discounts | 97
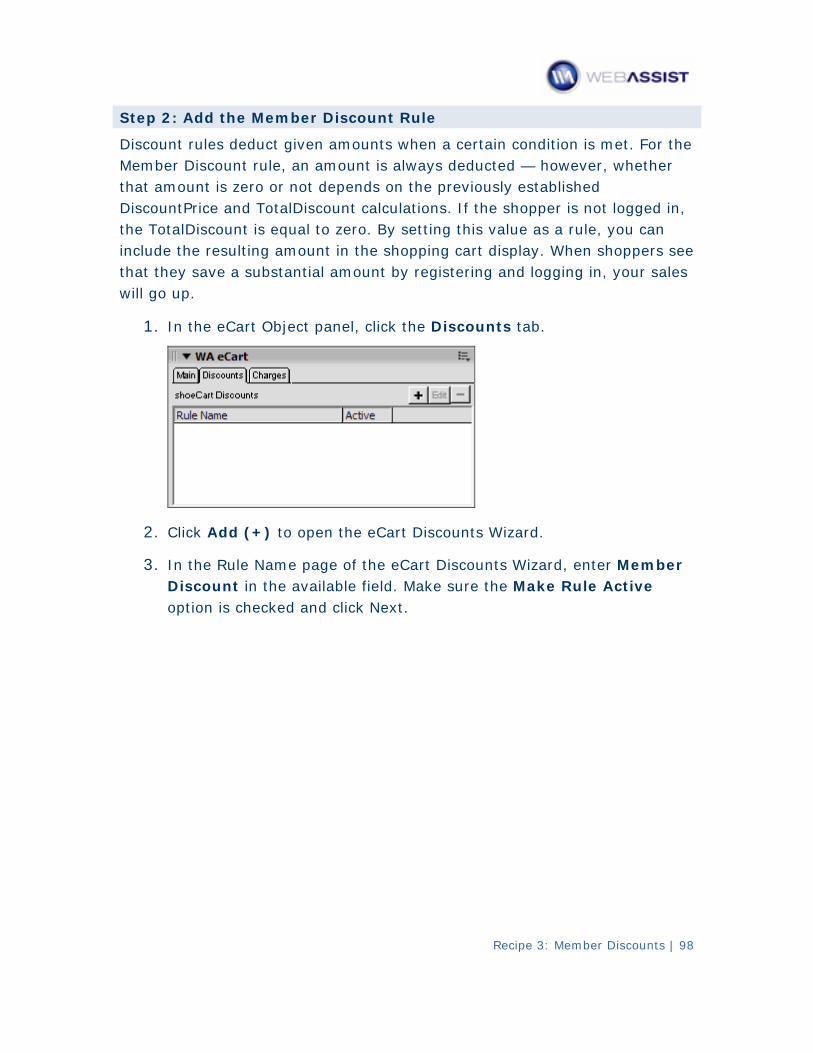
Step 2: Add the Member Discount Rule
Discou iven amounts when a certain condition is met. For the nt rules deduct gMe educted — however, whether mber Discount rule, an amount is always dthat amount is zero or not depends on the previously established Dis t calculations. If the shopper is not logged in, countPrice and TotalDiscounthe Tota an lDiscount is equal to zero. By setting this value as a rule, you cinclud pers see e the resulting amount in the shopping cart display. When shopthat t sales hey save a substantial amount by registering and logging in, your will go up.
1. In the eCart Object panel, click the Discounts tab.
2. Click Add (+) to open the eCart Discounts Wizard.
3. mber In the Rule Name page of the eCart Discounts Wizard, enter MeDiscount in the available field. Make sure the Make Rule Active option is checked and click Next.
Recipe 3: Member Discounts | 98

Recipe 3: Member Discounts | 99
4. On the Rule Trigger page, select Total number of unique items in the cart from the list of items. From the operator list, choose greater than (>) — ColdFusion users should choose greater than (GT) — and from the value list, select 0. Choose Add (+) to set the trigger. When you're done, click Next.
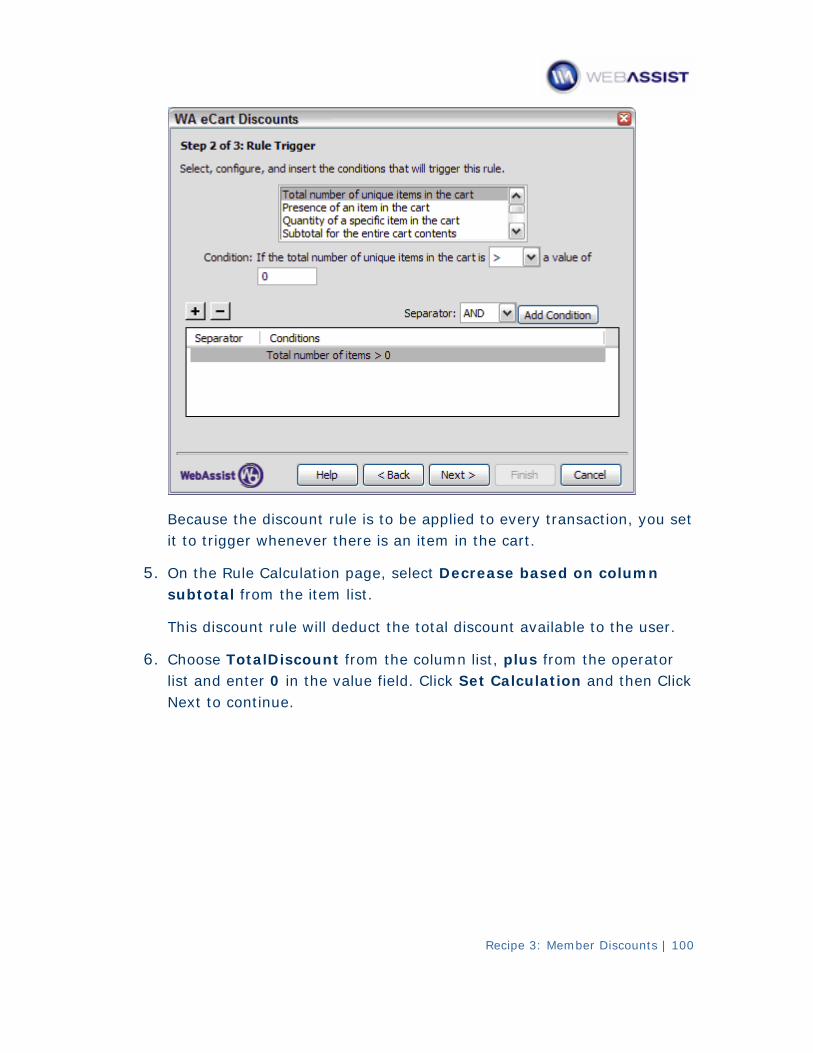
Because the discount rule is to be applied to every transaction, you set it to trigger whenever there is an item in the cart.
5. On the Rule Calculation page, select Decrease based on column subtotal from the item list.
This discount rule will deduct the total discount available to the user.
6. Choose TotalDiscount from the column list, plus from the operator list and enter 0 in the value field. Click Set Calculation and then Click Next to continue.
Recipe 3: Member Discounts | 100
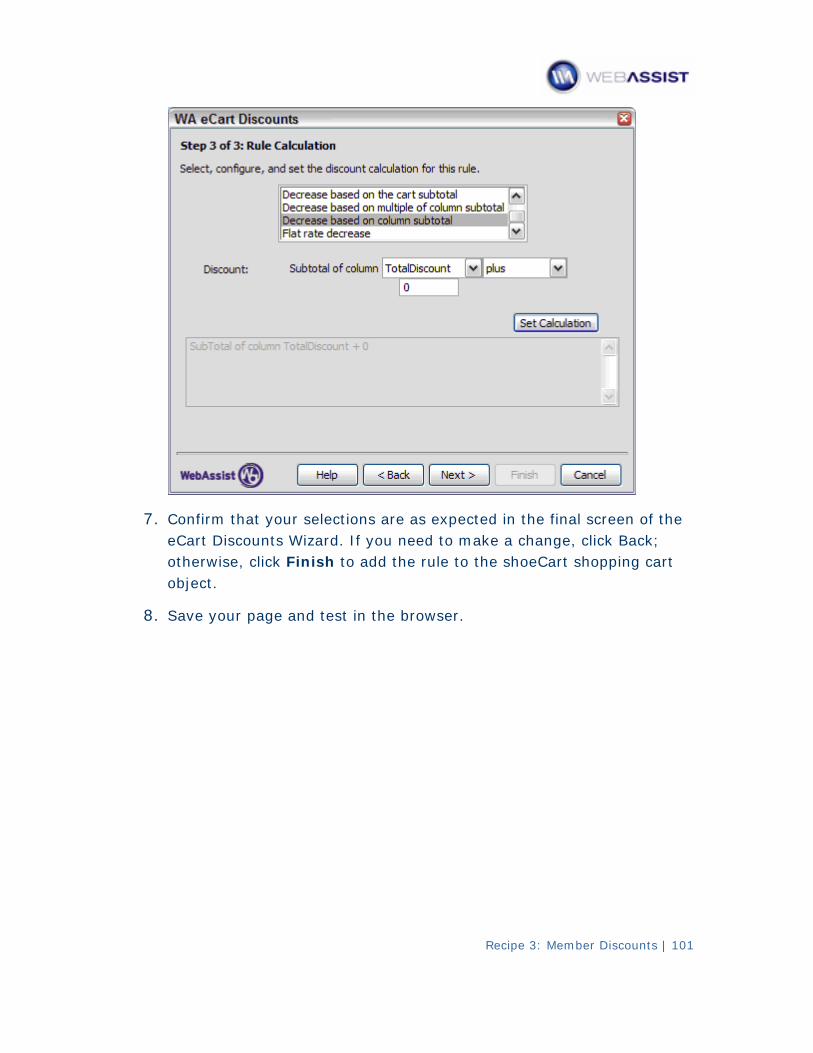
7 Confirm that your selections are as expected in the final screen of the . eCart Discounts Wizard. If you need to make a change, click Back; otherwise, click Finish to add the rule to the shoeCart shopping cart object.
8. Save your page and test in the browser.
Recipe 3: Member Discounts | 101
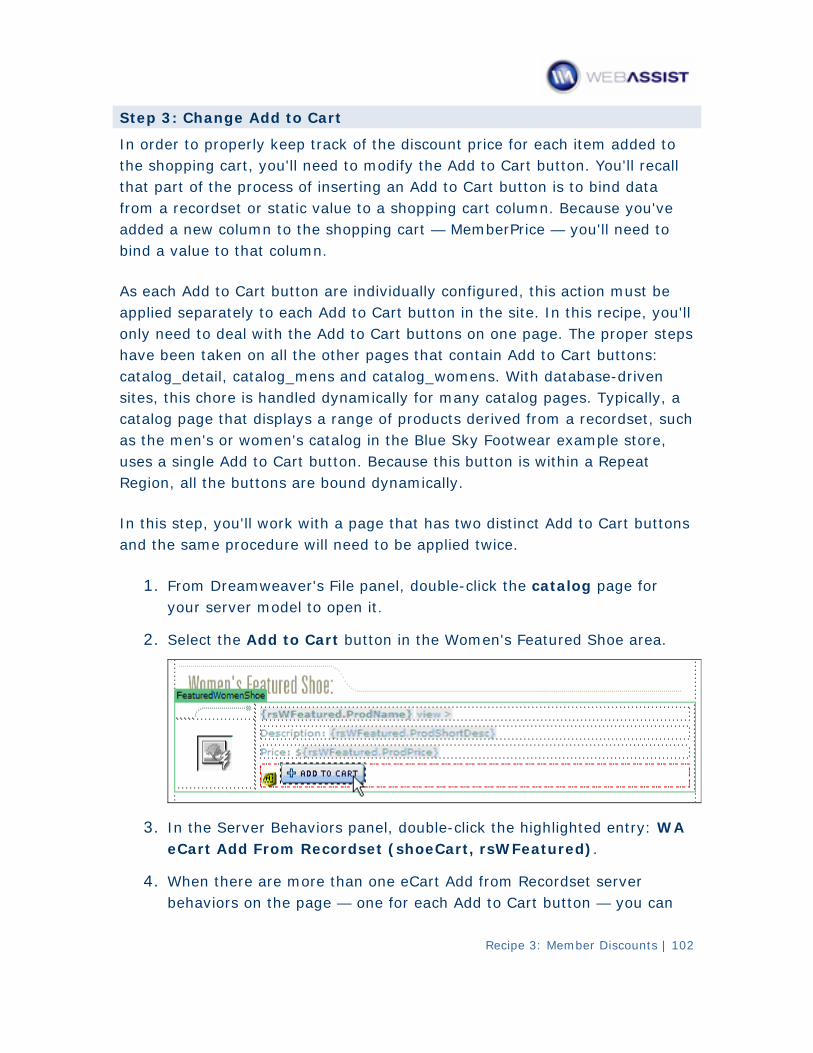
Step 3: Change Add to Cart
In ord ded to er to properly keep track of the discount price for each item adthe sh call opping cart, you'll need to modify the Add to Cart button. You'll rethat pa ta rt of the process of inserting an Add to Cart button is to bind dafrom you've a recordset or static value to a shopping cart column. Because added a eed to new column to the shopping cart — MemberPrice — you'll nbind a value to that column.
As ea st be ch Add to Cart button are individually configured, this action muapplie , you'll d separately to each Add to Cart button in the site. In this recipeonly need steps to deal with the Add to Cart buttons on one page. The proper have been taken on all the other pages that contain Add to Cart buttons: catalog_de riven tail, catalog_mens and catalog_womens. With database-dsite a s, this chore is handled dynamically for many catalog pages. Typically,catalog p such age that displays a range of products derived from a recordset,as th , e men's or women's catalog in the Blue Sky Footwear example storeuses a at single Add to Cart button. Because this button is within a RepeRegion, all the buttons are bound dynamically.
In this step, you'll work with a page that has two distinct Add to Cart buttons and the same procedure will need to be applied twice.
1. eamweaver's File panel, double-click the catalog page for From Dryour server model to open it.
2. Select the Add to Cart button in the Women's Featured Shoe area.
3. In the Server Behaviors panel, double-click the highlighted entry: WA eCart Add From Recordset (shoeCart, rsWFeatured).
4. When there are more than one eCart Add from Recordset server behaviors on the page — one for each Add to Cart button — you can
Recipe 3: Member Discounts | 102
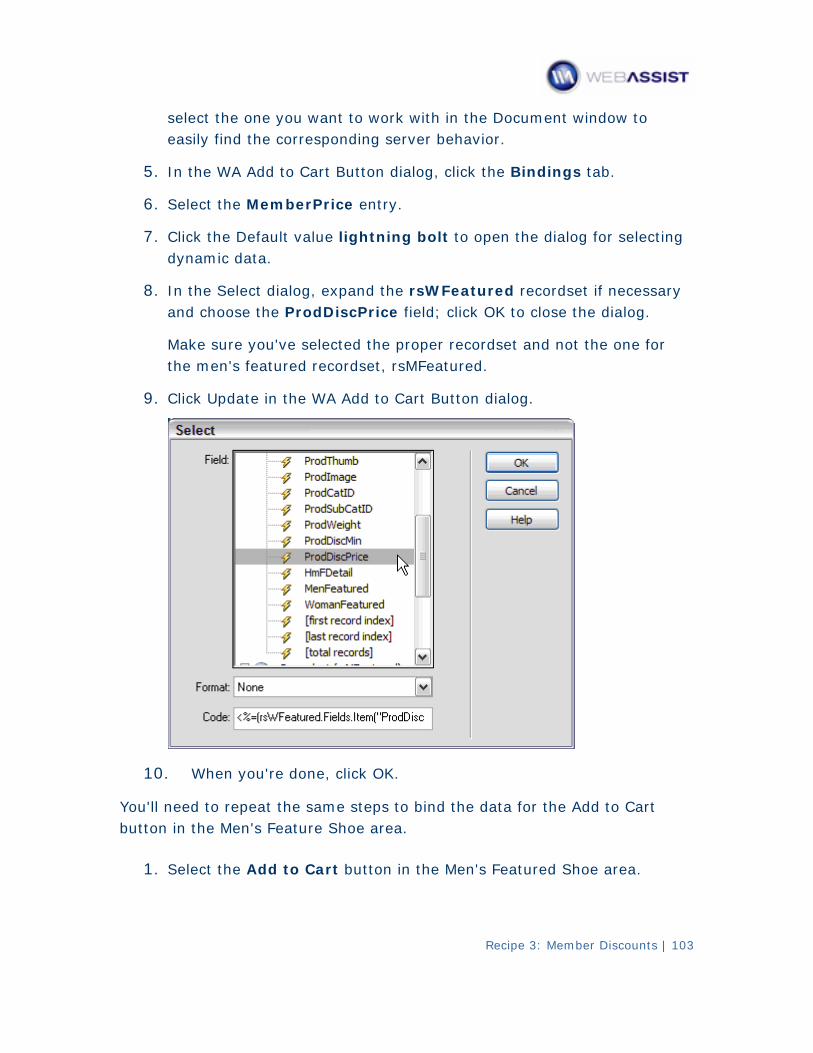
Recipe 3: Member Discounts | 103
to work with in the Document window to select the one you want easily find the corresponding server behavior.
5. In the WA Add to Cart Button dialog, click the Bindings tab.
6. Select the MemberPrice entry.
7. Click the Default value lightning bolt to open the dialog for selecting dynamic data.
8. In the Select dialog, expand the rsWFeatured recordset if necessary and choose the ProdDiscPrice field; click OK to close the dialog.
Make sure you've selected the proper recordset and not the one for the men's featured recordset, rsMFeatured.
9. Click Update in the WA Add to Cart Button dialog.
10. When you're done, click OK.
You'll need to repeat the same steps to bind the data for the Add to Cart button in the Men's Feature Shoe area.
1. Select the Add to Cart button in the Men's Featured Shoe area.
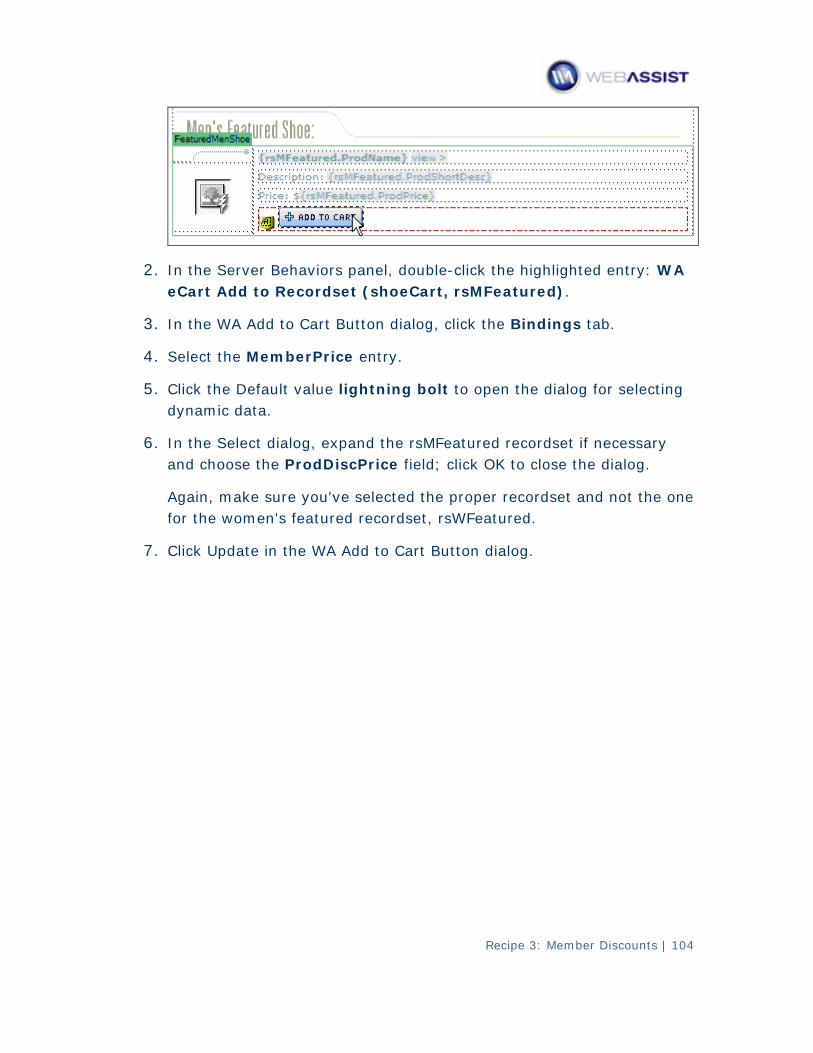
2. viors panel, double-click the highlighted entry: WA In the Server BehaeCart Add to Recordset (shoeCart, rsMFeatured).
3. In the WA Add to Cart Button dialog, click the Bindings tab.
4. Select the MemberPrice entry.
5. Click the Default value lightning bolt to open the dialog for selecting dynamic data.
6. cessary In the Select dialog, expand the rsMFeatured recordset if neand choose the ProdDiscPrice field; click OK to close the dialog.
and not the one Again, make sure you've selected the proper recordset for the women's featured recordset, rsWFeatured.
7. Click Update in the WA Add to Cart Button dialog.
Recipe 3: Member Discounts | 104
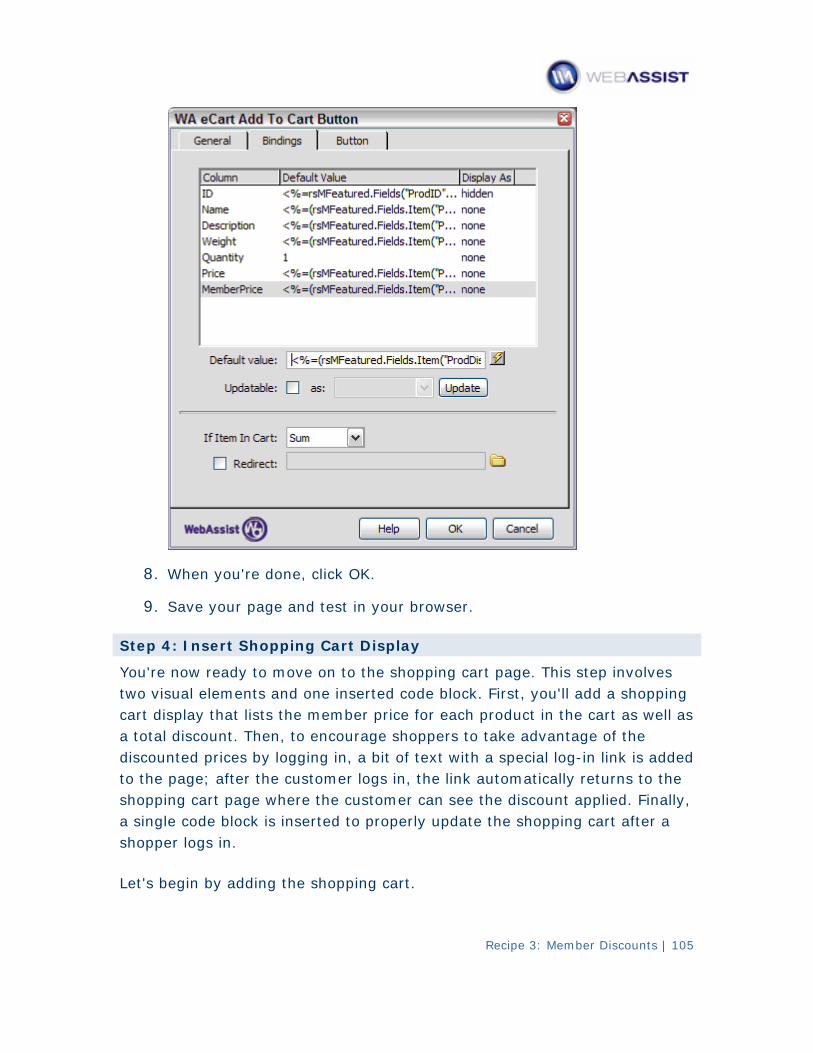
8. When you're done, click OK.
9. Save your page and test in your browser.
Step 4: Insert Shopping Cart Display
You're now ready to move on to the shopping cart page. This step involves two visual elements and one inserted code block. First, you'll add a shopping cart display that lists the member price for each product in the cart as well as a total discount. Then, to encourage shoppers to take advantage of the discounted prices by logging in, a bit of text with a special log-in link is added to the page; after the customer logs in, the link automatically returns to the shopping cart page where the customer can see the discount applied. Finally, a single code block is inserted to properly update the shopping cart after a shopper logs in.
Let's begin by adding the shopping cart.
Recipe 3: Member Discounts | 105
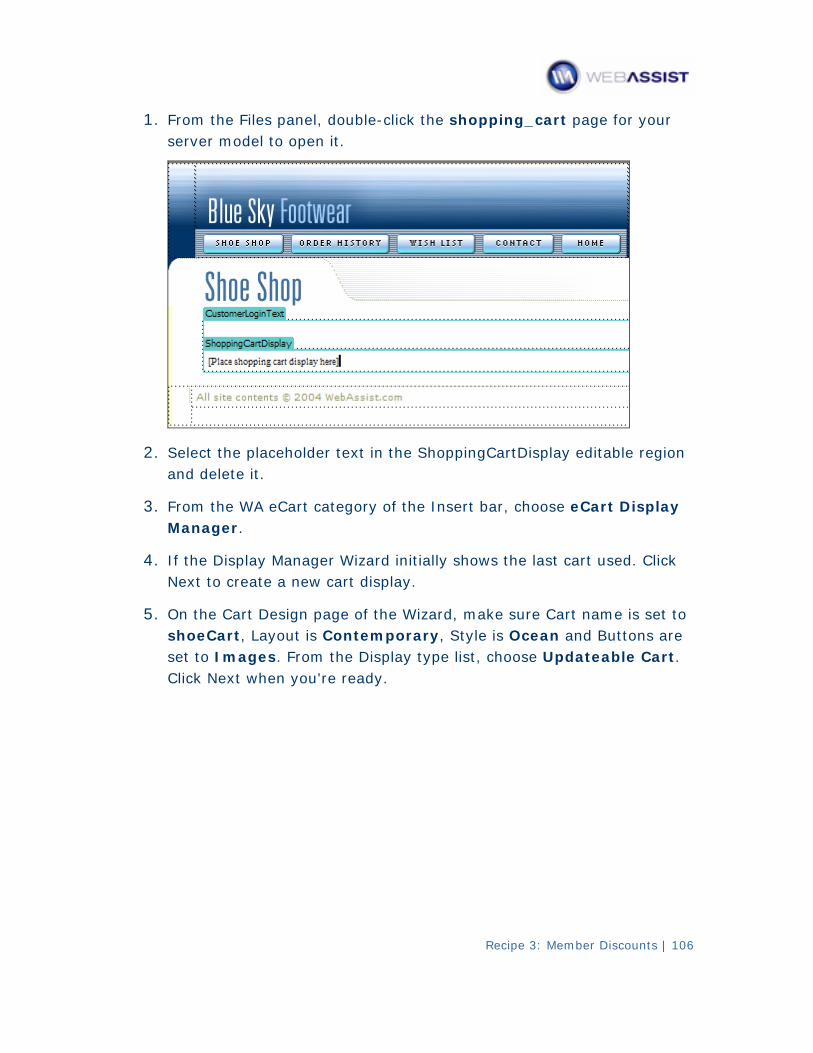
Recipe 3: Member Discounts | 106
1. ge for your From the Files panel, double-click the shopping_cart paserver model to open it.
2. itable region Select the placeholder text in the ShoppingCartDisplay edand delete it.
3. eCart Display From the WA eCart category of the Insert bar, choose Manager.
4. If the Display Manager Wizard initially shows the last cart used. Click Next to create a new cart display.
5. On the Cart Design page of the Wizard, make sure Cart name is set to shoeCart, Layout is Contemporary, Style is Ocean and Buttons are set to Images. From the Display type list, choose Updateable Cart. Click Next when you're ready.
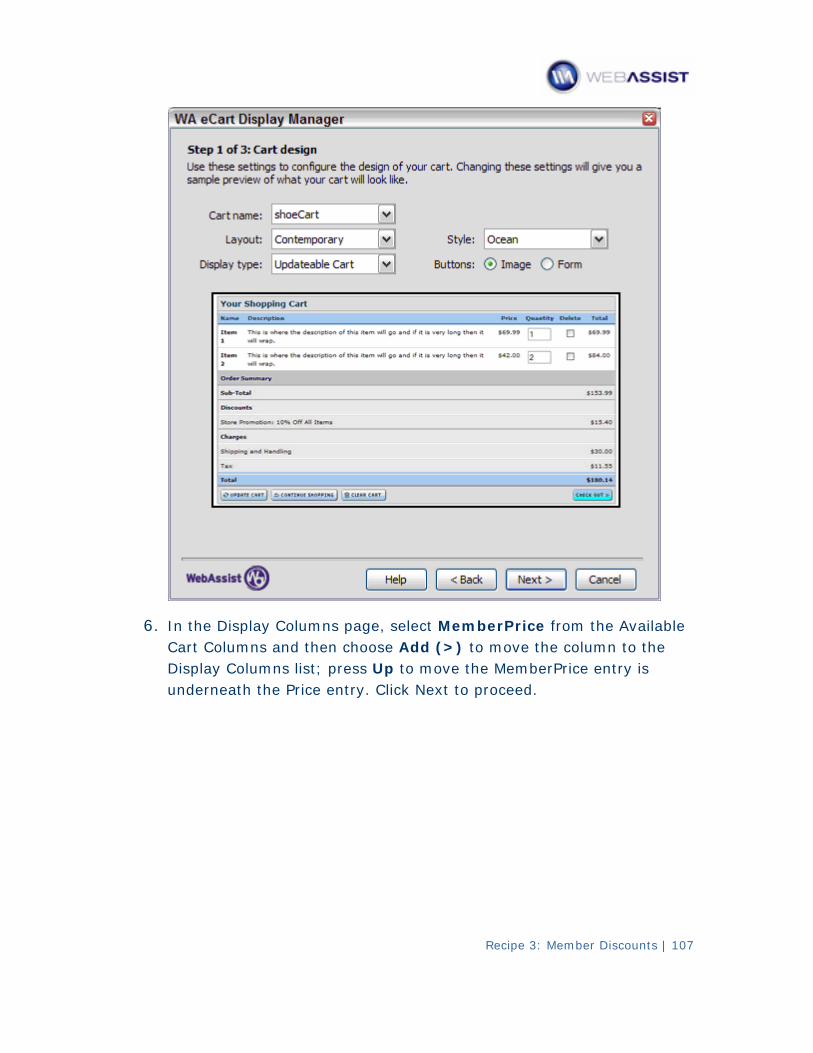
Recipe 3: Member Discounts | 107
6. In the Display Columns page, select MemberPrice from the Available Cart Columns and then choose Add (>) to move the column to the Display Columns list; press Up to move the MemberPrice entry is underneath the Price entry. Click Next to proceed.
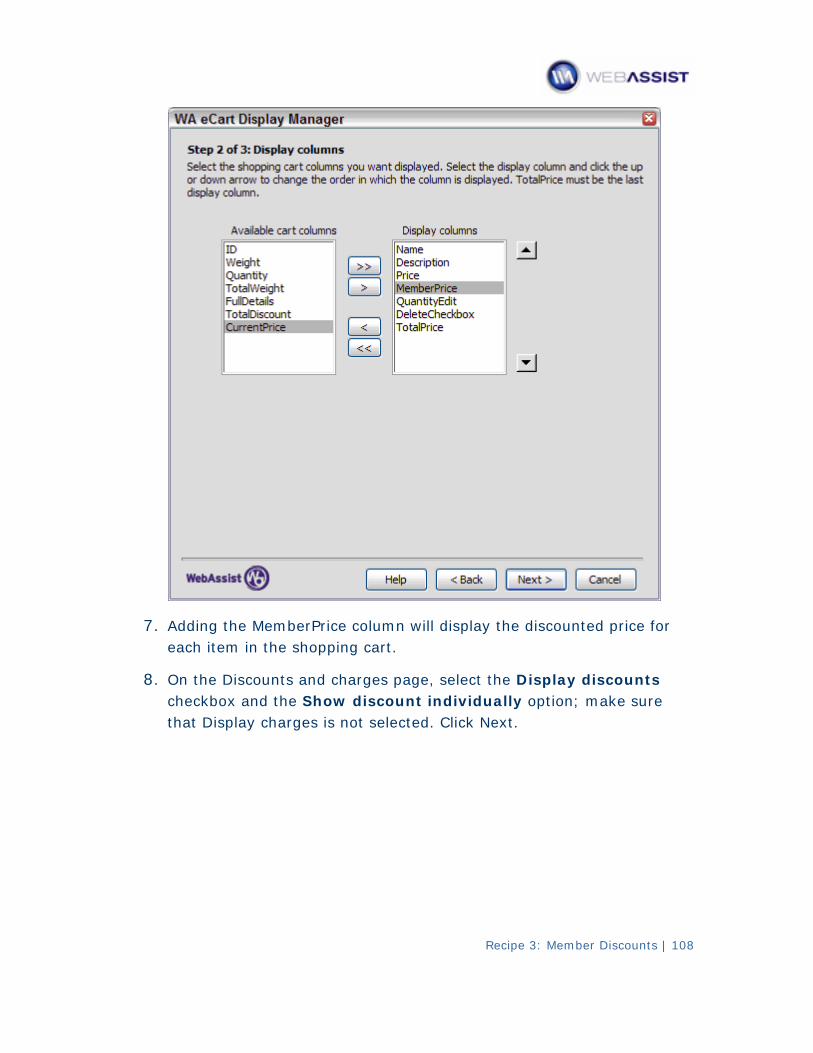
7. Adding the MemberPrice column will display the discounted price for each item in the shopping cart.
8. On the Discounts and charges page, select the Display discounts checkbox and the Show discount individually option; make sure that Display charges is not selected. Click Next.
Recipe 3: Member Discounts | 108
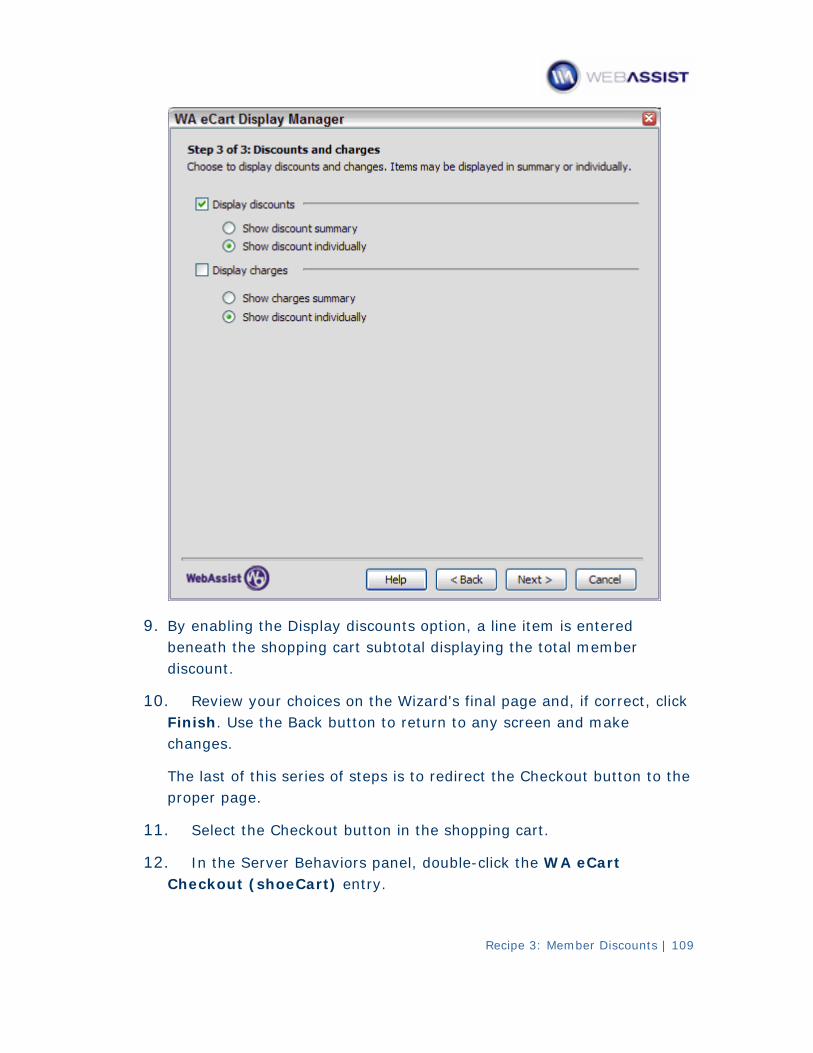
9. By enabling the Display discounts option, a line item is entered beneath the shopping cart subtotal displaying the total member discount.
10. ck Review your choices on the Wizard's final page and, if correct, cliFinish. Use the Back button to return to any screen and make changes.
The last of this series of steps is to redirect the Checkout button to the proper page.
11. Select the Checkout button in the shopping cart.
12. In the Server Behaviors panel, double-click the WA eCart Checkout (shoeCart) entry.
Recipe 3: Member Discounts | 109
Recipe 3: Member Discounts | 110
13. er When the eCart Checkout Button dialog box opens, click the foldicon next to the Redirect field and select the checkout page for your server model. Select the Update cart before checkout option and click OK when you're done.
Save your page. 14.
The other visual element to add to this page besides the shopping cart display is the log in text. The goal of this text is two-fold: first, to inform registere to d members to log in so they will receive their discount and secondprovide a link to login page to make it easier for the customer to complete the ch rs eckout process. The log in page also includes a message for new usewith a link to a registration page.
1. Place your cursor in the CustomerLoginText editable region.
2. From the Snippets panel, insert the WA eCart > Recipes > Member Discount > Log In Text snippet.
3. Select the word Login and in the Property inspector, click the Link folder icon to open the Select File dialog.
4. From the local site root, select the login page for your server model.
PHP users can skip to step 7; PHP users will follow one additional step, detailed after this sequence.
5. While still in the Select File dialog, click Parameters.
6. In the Parameters dialog box, enter accessdenied in the Name column and the filename for the shopping_cart page for your server model; click OK to dismiss the dialog.
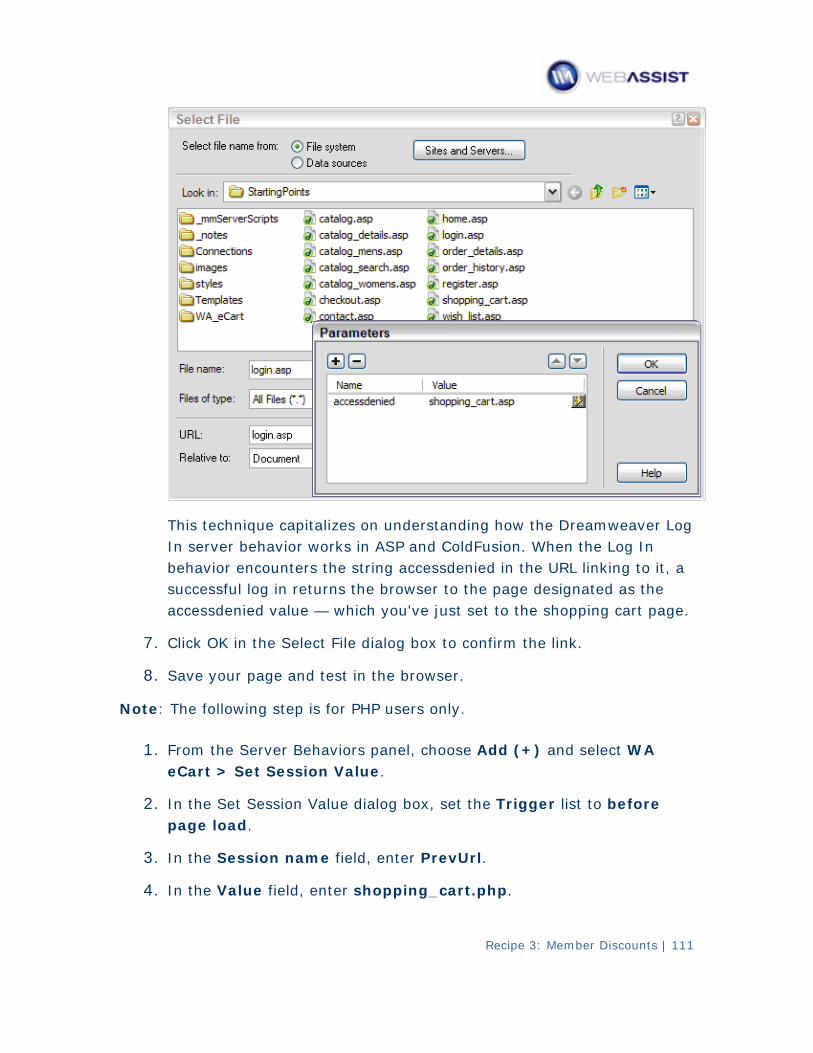
Recipe 3: Member Discounts | 111
This technique capitalizes on understanding how the Dreamweaver Log In server behavior works in ASP and ColdFusion. When the Log In behavior encounters the string accessdenied in the URL linking to it, a successful log in returns the browser to the page designated as the accessdenied value — which you've just set to the shopping cart page.
7. Click OK in the Select File dialog box to confirm the link.
8. Save your page and test in the browser.
Note: . The following step is for PHP users only
1. From the Server Behaviors panel, choose Add (+) and select WA eCart > Set Session Value.
2. In the Set Session Value dialog box, set the Trigger list to before page load.
3. In the Session name field, enter PrevUrl.
4. In the Value field, enter shopping_cart.php.
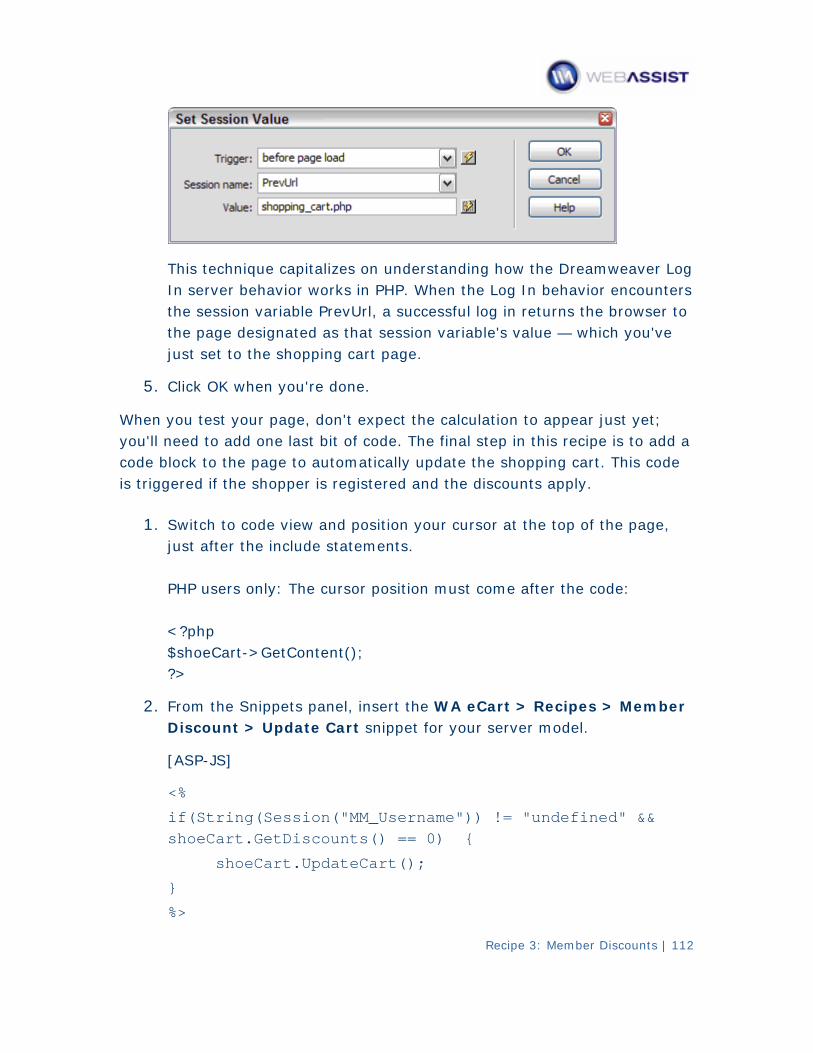
Recipe 3: Member Discounts | 112
This technique capitalizes on understanding how the Dreamweaver Log In server behavior works in PHP. When the Log In behavior encounters the session variable PrevUrl, a successful log in returns the browser to the page designated as that session variable's value — which you've just set to the shopping cart page.
5. Click OK when you're done.
When you test your page, don't expect the calculation to appear just yet; you'll need to add one last bit of code. The final step in this recipe is to add a code block to the page to automatically update the shopping cart. This code is triggered if the shopper is registered and the discounts apply.
1 Switch to code view and position your cursor at the top of the page, . just after the include statements. PHP users only: The cursor position must come after the code: <?php $shoeCart->GetContent(); ?>
2. From the Snippets panel, insert the WA eCart > Recipes > Member Discount > Update Cart snippet for your server model.
[ASP-JS]
<%
if(String(Session("MM_Username")) != "undefined" && shoeCart.GetDiscounts() == 0) {
shoeCart.UpdateCart();
}
%>
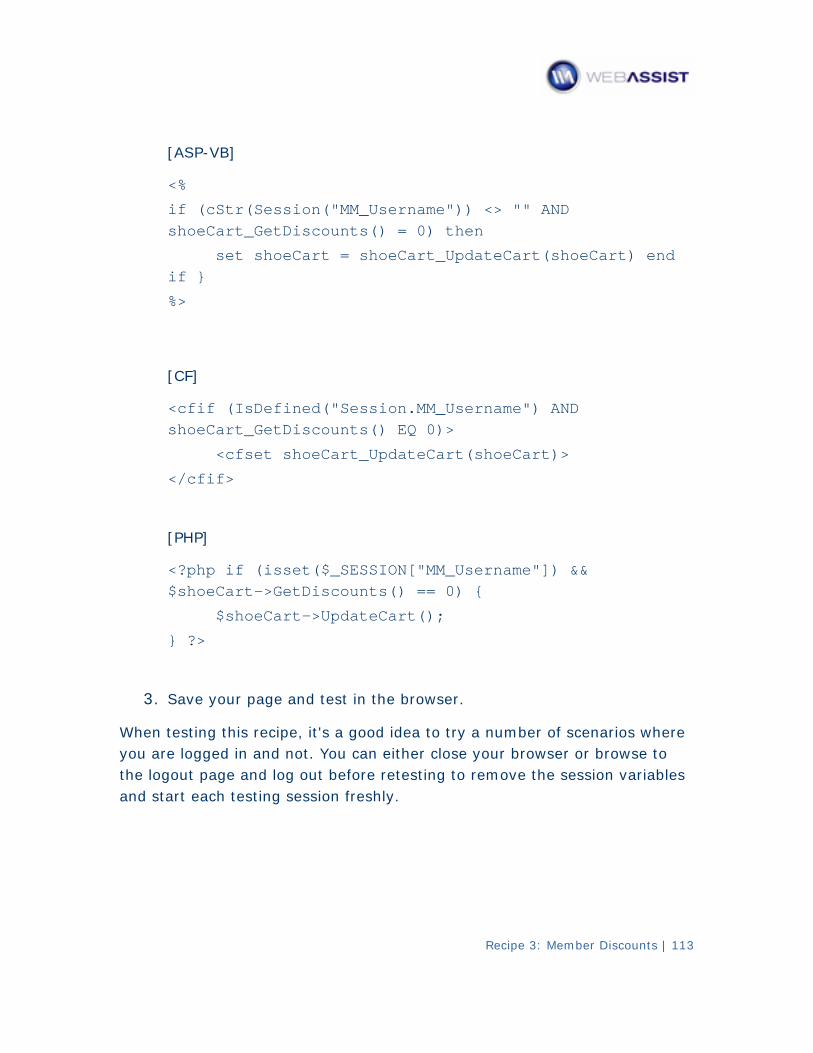
Recipe 3: Member Discounts | 113
[ASP-VB]
<%
if (cStr(Session("MM_Username")) <> "" AND shoeCart_GetDiscounts() = 0) then
set shoeCart = shoeCart_UpdateCart(shoeCart) end if }
%>
[CF]
<cfif (IsDefined("Session.MM_Username") AND shoeCart_GetDiscounts() EQ 0)>
<cfset shoeCart_UpdateCart(shoeCart)>
</cfif>
[PHP]
<?php if (isset($_SESSION["MM_Username"]) && $shoeCart->GetDiscounts() == 0) {
$shoeCart->UpdateCart();
} ?>
3. Save your page and test in the browser.
When arios where testing this recipe, it's a good idea to try a number of scenyou ar and not. You can either close your browser or browse to e logged inthe logout page and log out before retesting to remove the session variables and st ch testing session freshly. art ea
Recipe 4: Quantity Discounts | 114
RECIPE 4
Quantity Discounts
Quant s to ity discounts are one of the best incentives when it comeencour With a quantity discount, aging your customers to buy more products.if a sh opper buys one or two items, the regular price is charged — but if theybuy th re, the items are offered at a discount. For many shoppers, ree or mothe co t of "buy more, save more" is a compelling one. ncep
In this recipe, you'll create a two-tiered discount: if a customer buys 3 or 4 items, ff; if they buy 5 or more, they get 20% off. The they get 10% odiscounte lculated and displayed in the shopping cart d figures are cawhene tions are ver the cart is updated. To achieve this effect, two calculacustom alculation is put into place, ized with the proper formula. Once the cyou on pping ly need to display a new column – Quantity Price - in the shocart to see the results.
The techniques used in this recipe demonstrate how to incorporate a custom col ng cart so customers can compare the standard price umn in the shoppiand the ounts discounted price. Another approach to offering quantity discwould strated in be to create a discount rule, in the same manner as demonWA eCommerce Recipe 3: Member Discounts.
Step 1: Define Custom Calculations
To encourage your shoppers to buy multiple quantities, you want to show them how much they are saving on each item and how much they are saving ove sent these figures. The rall. Three separate calculations are used to prefirst calculation, TruePrice, shows the price of an item at the given quantity; TruePrice is a completely new calculation. The second needed calculation, TotalPrice, is a standard one that is customized to calculate quantity discounts and adjust the total price if needed. The final calculation is TotalDiscount — and, as the name implies, reflects the visitor's total savings. All calculations are modified in the eCart object.
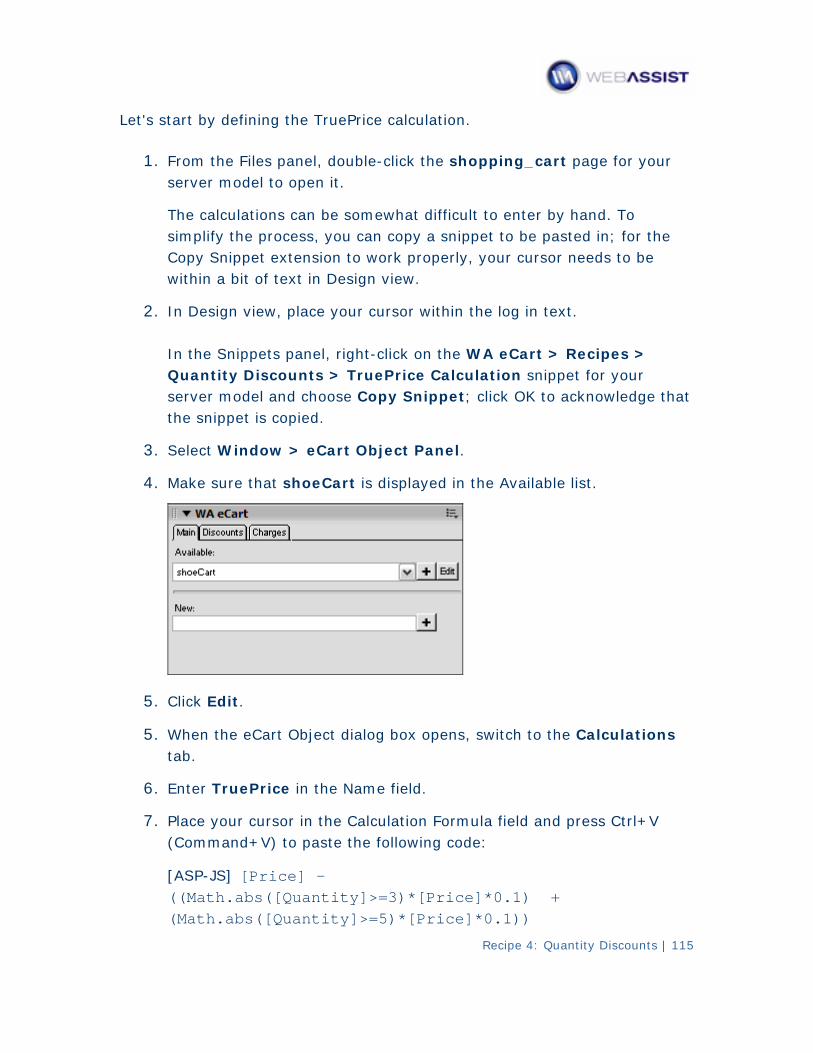
Recipe 4: Quantity Discounts | 115
by defining the TruePrice calculation. Let's start
1. From the Files pane l, double-click the shopping_cart page for your server model to open it.
The calculations can be somewhat difficult to enter by hand. To simplify the process, you can copy a snippet to be pasted in; for the Copy Snippet extension to work properly, your cursor needs to be within a bit of text in Design view.
2. In Design view, place your cursor within the log in text. In the Snippets panel, right-click on the WA eCart > Recipes > Quantity Discounts > TruePrice Calculation snippet for your server model and choose Copy Snippet; click OK to acknowledge that the snippet is copied.
3. Select Window > eCart Object Panel.
4. Make sure that shoeCart is displayed in the Available list.
5. Click Edit.
5. When the eCart Object dialog box opens, switch to the Calculations tab.
6. Enter TruePrice in the Name field.
7. Place your cursor in the Calculation Formula field and press Ctrl+V (Command+V) to paste the following code:
[ASP-JS] [Price] - ((Math.abs([Quantity]>=3)*[Price]*0.1) + (Math.abs([Quantity]>=5)*[Price]*0.1))
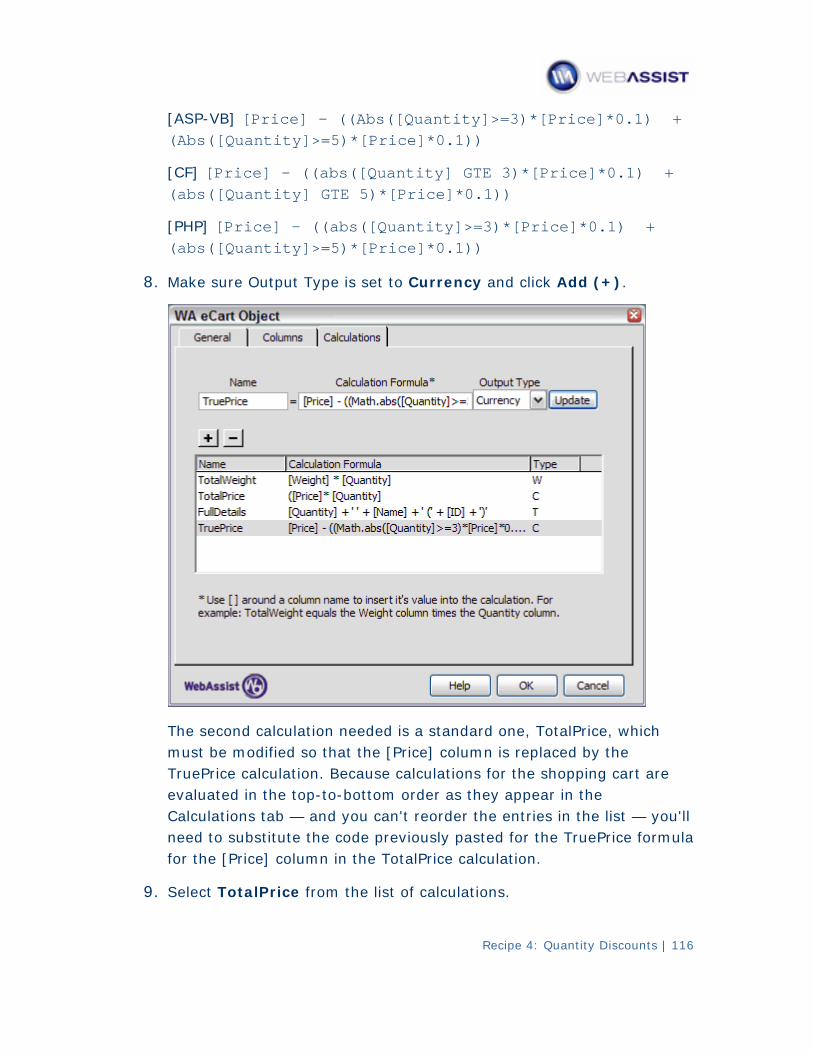
Recipe 4: Quantity Discounts | 116
]>=3)*[Price]*0.1) + [ASP-VB] [Price] - ((Abs([Quantity(Abs([Quantity]>=5)*[Price]*0.1))
[CF] [Price] - ((abs([Quantity] GTE 3)*[Price]*0.1) + (abs([Quantity] GTE 5)*[Price]*0.1))
[PHP] [Price] - ((abs([Quantity]>=3)*[Price]*0.1) + (abs([Quantity]>=5)*[Price]*0.1))
8. rrency and click Add (+). Make sure Output Type is set to Cu
The second calculation needed is a standard one, TotalPrice, which must be modified so that the [Price] column is replaced by the TruePrice calculation. Because calculations for the shopping cart are evaluated in the top-to-bottom order as they appear in the Calculations tab — and you can't reorder the entries in the list — you'll need to substitute the code previously pasted for the TruePrice formula for the [Price] column in the TotalPrice calculation.
9. Select TotalPrice from the list of calculations.
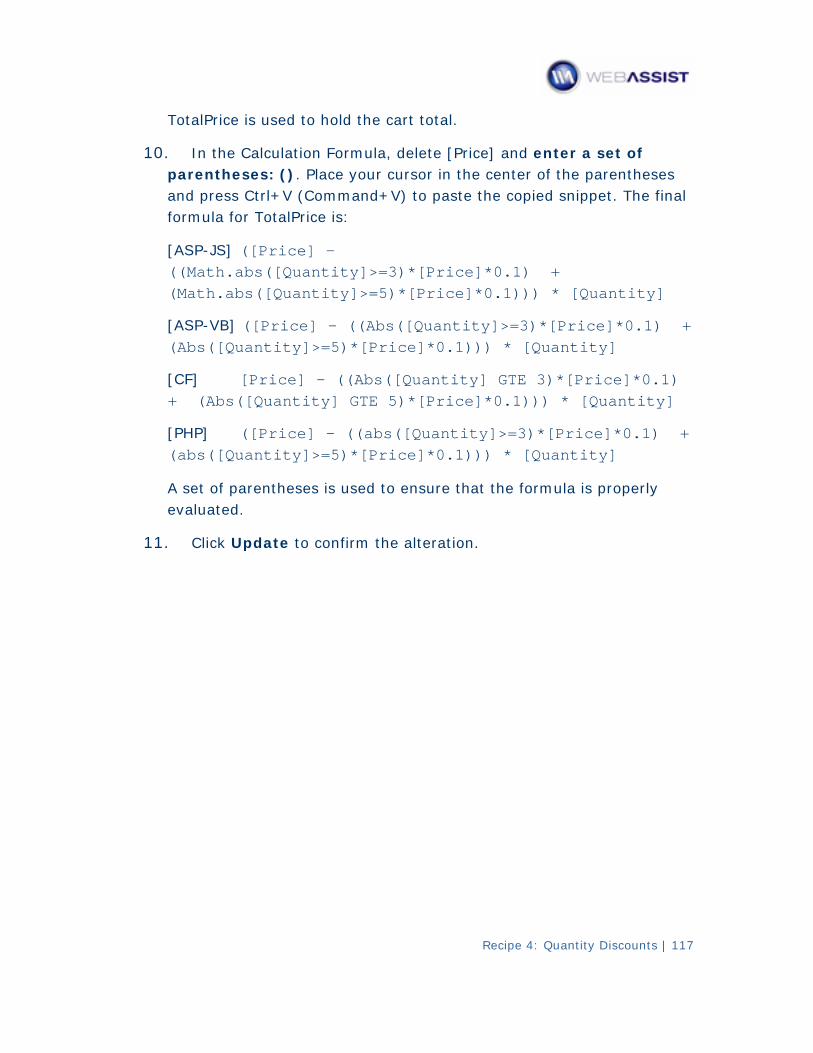
TotalPrice is used to hold the cart total.
10. ] and enter a set of In the Calculation Formula, delete [Priceparentheses: (). Place your cursor in the center of the parentheses and press Ctrl+V (Command+V) to paste the copied snippet. The final formula for TotalPrice is:
[ASP-JS] ([Price] - ((Math.abs([Quantity]>=3)*[Price]*0.1) + (Math.abs([Quantity]>=5)*[Price]*0.1))) * [Quantity]
[ASP-VB] ([Price] - ((Abs([Quantity]>=3)*[Price]*0.1) + (Abs([Quantity]>=5)*[Price]*0.1))) * [Quantity]
[CF] [Price] - ((Abs([Quantity] GTE 3)*[Price]*0.1) + (Abs([Quantity] GTE 5)*[Price]*0.1))) * [Quantity]
[PHP] ([Price] - ((abs([Quantity]>=3)*[Price]*0.1) + (abs([Quantity]>=5)*[Price]*0.1))) * [Quantity]
A set of parentheses is used to ensure that the formula is properly evaluated.
11. Click Update to confirm the alteration.
Recipe 4: Quantity Discounts | 117
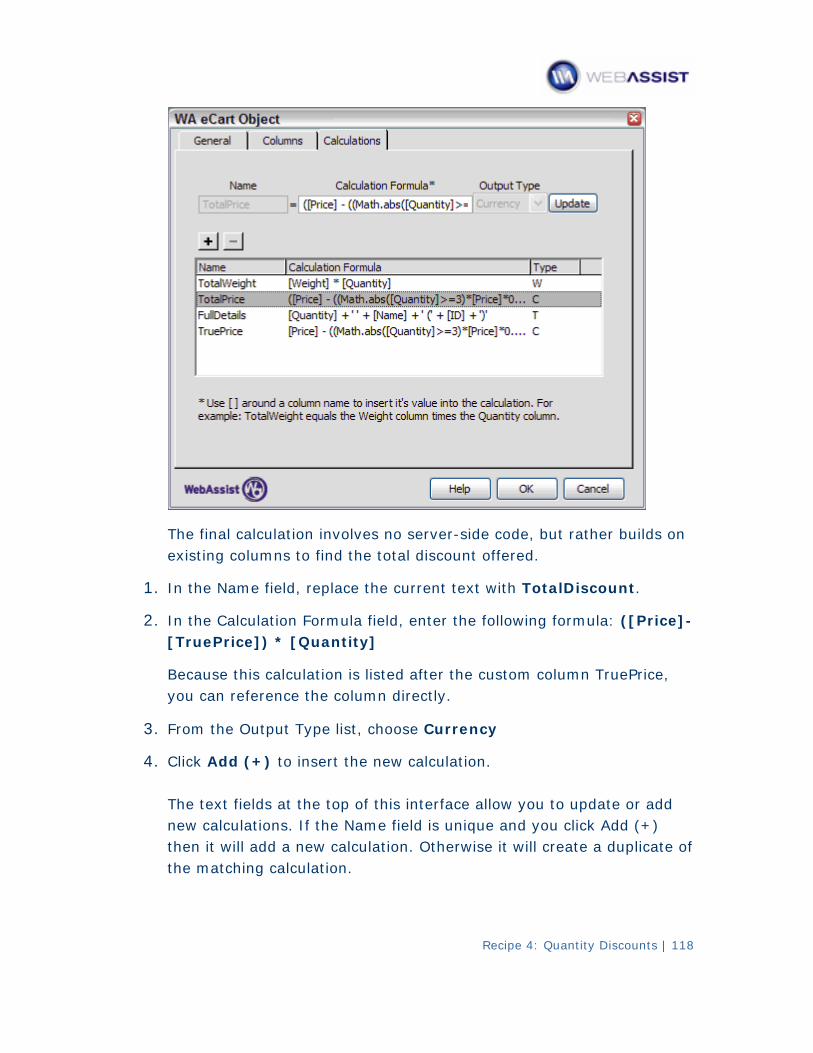
Recipe 4: Quantity Discounts | 118
The final calculation involves no server-side code, but rather builds on existing columns to find the total discount offered.
1. In the Name field, replace the current text with TotalDiscount.
2. In the Calculation Formula field, enter the following formula: ([Price]-[TruePrice]) * [Quantity]
Because this calculation is listed after the custom column TruePrice, you can reference the column directly.
3. From the Output Type list, choose Currency
4. Click Add (+) to insert the new calculation. The text fields at the top of this interface allow you to update or add new calculations. If the Name field is unique and you click Add (+) then it will add a new calculation. Otherwise it will create a duplicate of the matching calculation.
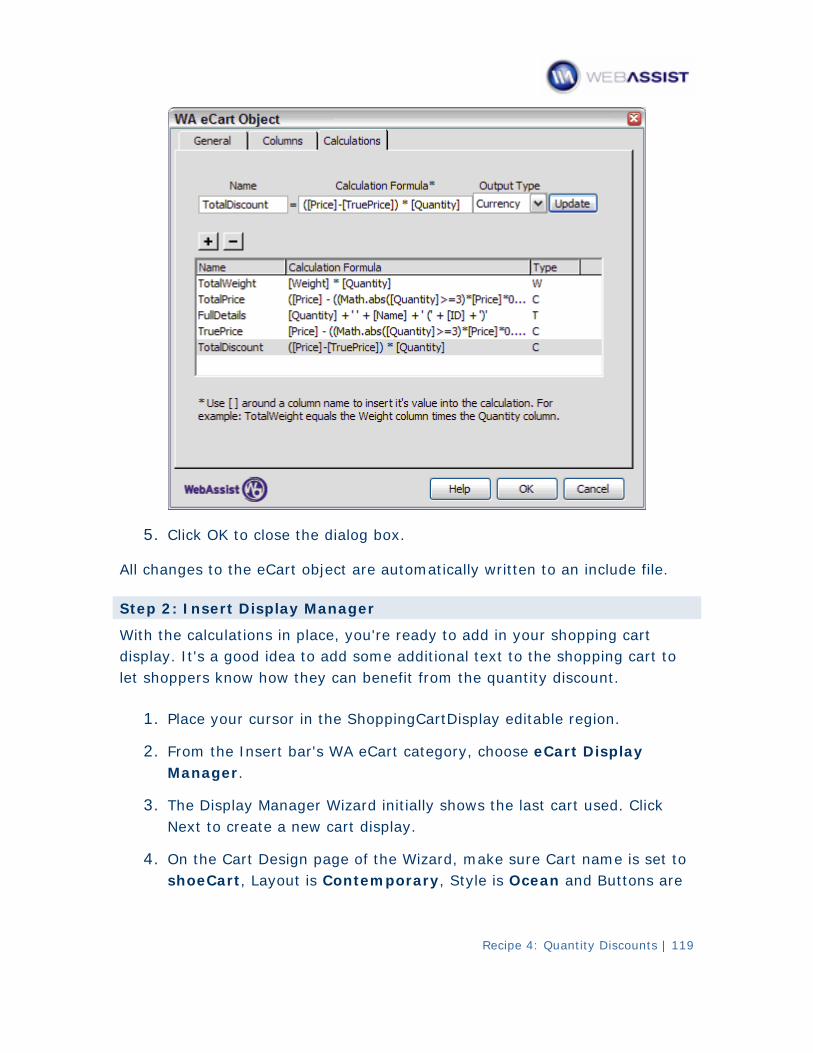
5 Click OK to close the dialog box. .
All changes to the eCart object are automatically written to an include file.
Step 2: Insert Display Manager
With t ready to add in your shopping cart he calculations in place, you'redisplay. It's a good idea to add some additional text to the shopping cart to let shoppers know how they can benefit from the quantity discount.
1. Place your cursor in the ShoppingCartDisplay editable region.
2. From the Insert bar's WA eCart category, choose eCart Display Manager.
3. The Display Manager Wizard initially shows the last cart used. Click Next to create a new cart display.
4. the Wizard, make sure Cart name is set to On the Cart Design page ofshoeCart, Layout is Contemporary, Style is Ocean and Buttons are
Recipe 4: Quantity Discounts | 119
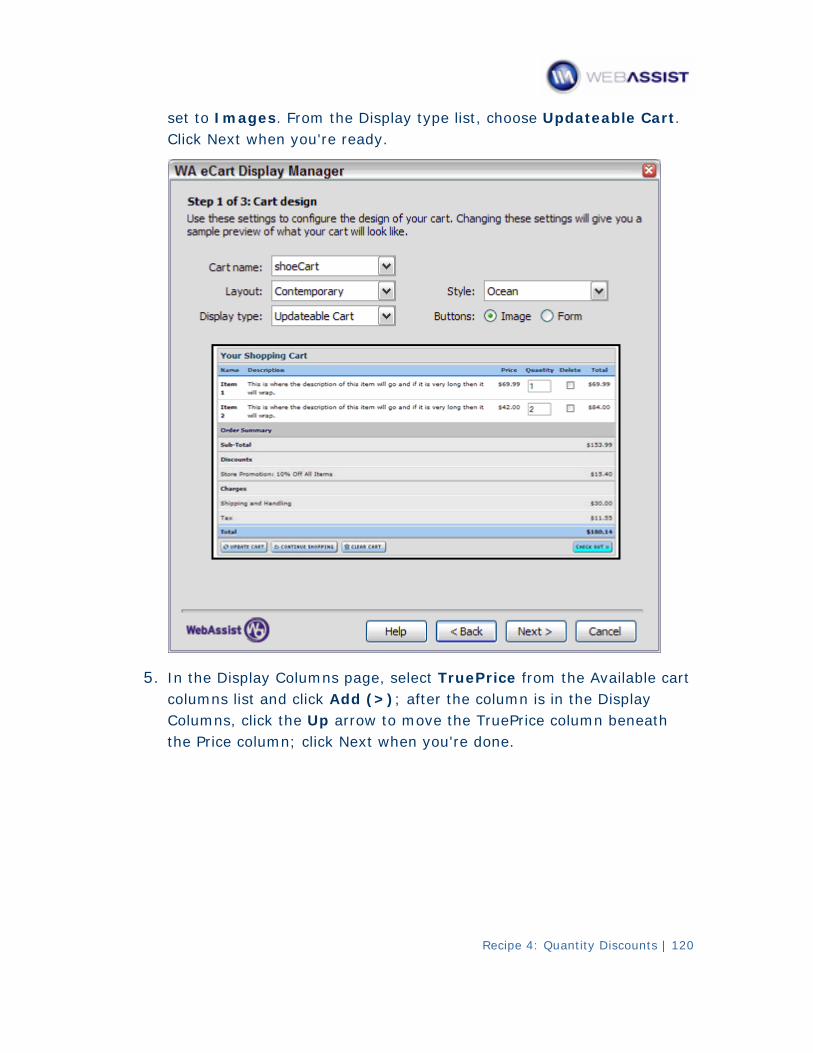
Recipe 4: Quantity Discounts | 120
. set to Images. From the Display type list, choose Updateable CartClick Next when you're ready.
5. In the Display Columns page, select TruePrice from the Available cart columns list and click Add (>); after the column is in the Display Columns, click the Up arrow to move the TruePrice column beneath the Price column; click Next when you're done.
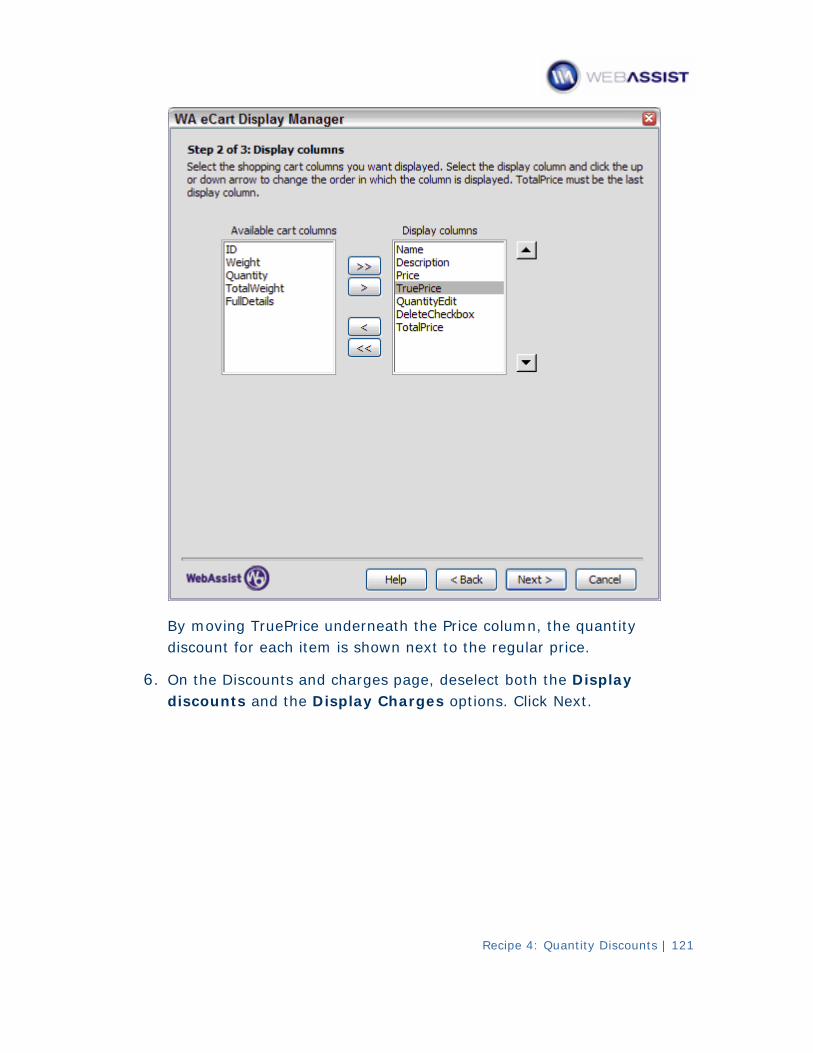
Recipe 4: Quantity Discounts | 121
By moving TruePrice underneath the Price column, the quantity discount for each item is shown next to the regular price.
6. On the Discounts and charges page, deselect both the Display discounts and the Display Charges options. Click Next.
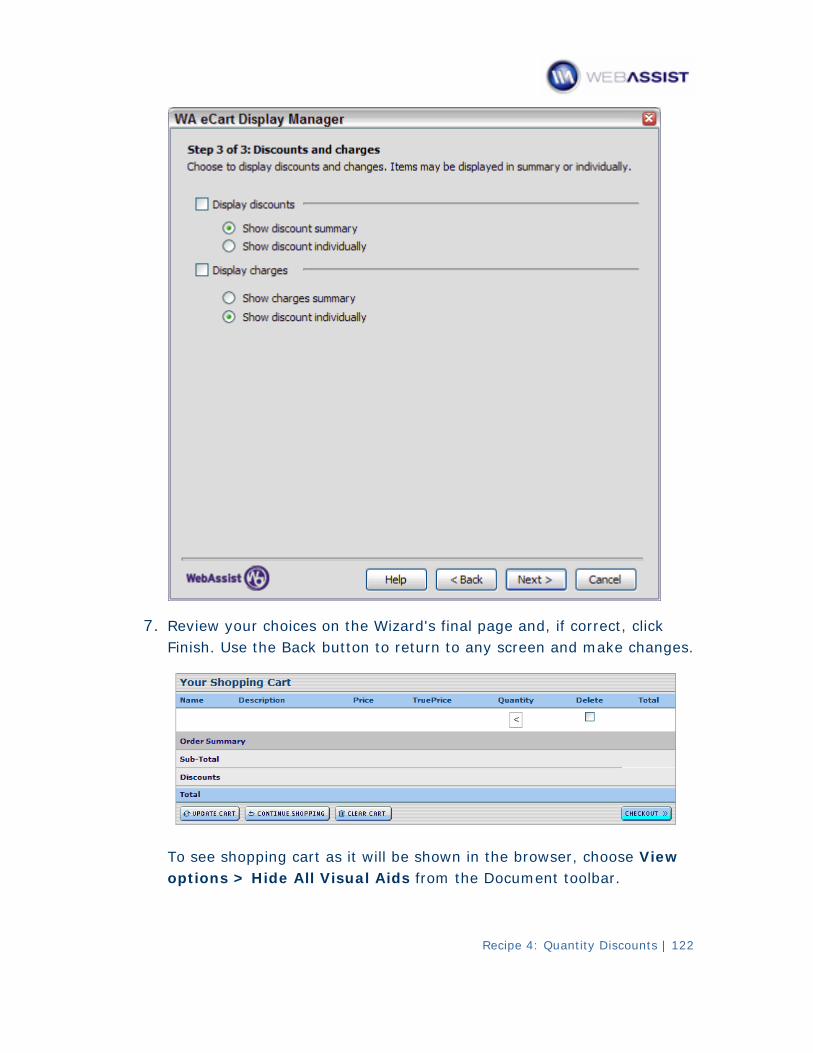
7 Review your choices on the Wizard's final page and, if correct, cl. ick Finish. Use the Back button to return to any screen and make changes.
To see shopping cart as it will be shown in the browser, choose View options > Hide All Visual Aids from the Document toolbar.
Recipe 4: Quantity Discounts | 122
Recipe 4: Quantity Discounts | 123
Although the term TruePrice may make sense to you as a developer, it's not too meaningful to the general public. Luckily, eCart allows you to customize the display as you see fit.
8. e it In the shopping cart display, select the term TruePrice and replacwith the phrase Volume Price.
9. Change the name of the Price column to Regular Price.
It's also helpful to provide a note for users so they can know what toexpect.
10. Following the phrase Your Shopping Cart, add the following text:
Get 10% off any product when you order 3 or 20% off for 5 or more.
11. oose Select the just added text and, from the Property inspector, chActionText from the Style list; with your cursor at the end of the newly added text, press Shift-Enter to insert a line-break.
12. ect As there are no charges or discounts applied for this tutorial, selthe Order Summary and Sub-Total rows in the shopping cart display and delete them by choosing Modify > Table > Delete Table Row; alternatively, you can press Delete or Backspace
If you find it difficult to select these rows, switch to the Layout category of the Insert bar and choose Expanded view; the Expanded view makes it easy to select and manipulate table elements. When you're done, choose Standard view.
The final step is to insert the total discount figure along with a little helper text.
13. Place your cursor below the shopping cart table and add the following text: Total Quantity Discount leave your cursor at the end of the inserted text.
14. From the Bindings panel, expand the shoeCart entry and insert TotalDiscounts. Place your cursor before the dynamic text just inserted and type a dollar-sign character, $.
All that remains is to style the newly added elements.
Recipe 4: Quantity Discounts | 124
15. Select both the text and the added server-side code and, from the Style list in the Property inspector, choose actionText.
16. in the browser. Save your page and test your application
To te g page in the browser and add one or st the application, open any catalomore ite cart page, note that the standard ms to your cart. On the shoppingpric m is less e and the price paid are the same when the quantity for an itethan 3. Enter 3 in the Quantity field for any item and click Update Cart. You'llsee that not only is the individual volume price is changed, but also the cart total and al discounts. the tot
Recipe 5: Static-based Shopping Options | 125
RECIPE 5
Static-based Shopping Options
Many items for sale, both online and off, are available in a range of options. T-shirts, for example, may come in small, medium, large and extra-large while baseball caps may be sold as one-size-fits-all, but are offered with different team logos. Providing options for your shoppers is a great way to broaden the possibility of making a sale.
The options offered can either be explicitly defined in each page as static options or dynamically populated when working with a database-driven options. In this recipe, you'll add a size option to the BlueSky Footwear sample online store using static options. Static-based options are useful when all the products in your store share the same set of options; in this recipe, our fictional shoe store carries both men's and women's shoes in the same sizes. If your store items require different sets of options, you should use Recipe 6, Database-driven Shopping options.
To incorporate a static-based option list, these five steps are necessary:
• Update the eCart object to add a size column.
• Modify each Add to Cart button to include a size column and bind it to a select (i.e., drop-down) list.
• Insert and populate a drop-down list next to each Add to Cart button.
• Ensure that the shopping cart size column is included in the Display Manager; you'll also need to insert an updateable list element and populate it so your shoppers can change their choice without returning to the catalog pages.
• Include the selected size in the read-only shopping cart on the checkout page and make sure that value is transferred to your payment gateway.
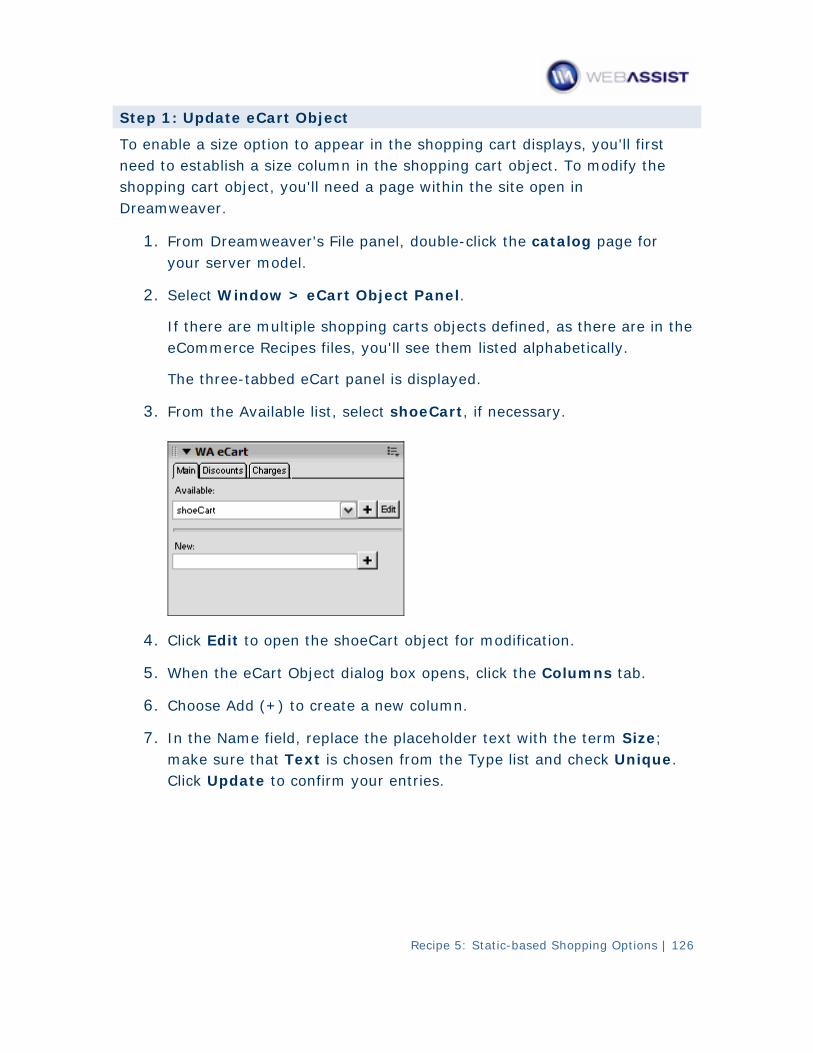
Recipe 5: Static-based Shopping Options | 126
Step 1: Update eCart Object
To enable a size option to appear in the shopping cart displays, you'll first need to establish a size column in the shopping cart object. To modify the shopping cart object, you'll need a page within the site open in Dreamweaver.
1. From Dreamweaver's File panel, double-click the catalog page for your server model.
2. Select Window > eCart Object Panel.
If there are multiple shopping carts objects defined, as there are in the eCommerce Recipes files, you'll see them listed alphabetically.
The three-tabbed eCart panel is displayed.
3. From the Available list, select shoeCart, if necessary.
4. object for modification. Click Edit to open the shoeCart
5. When the eCart Object dialog box opens, click the Columns tab.
6. Choose Add (+) to create a new column.
7. In the Name field, replace the placeholder text with the term Size; make sure that Text is chosen from the Type list and check Unique. Click Update to confirm your entries.
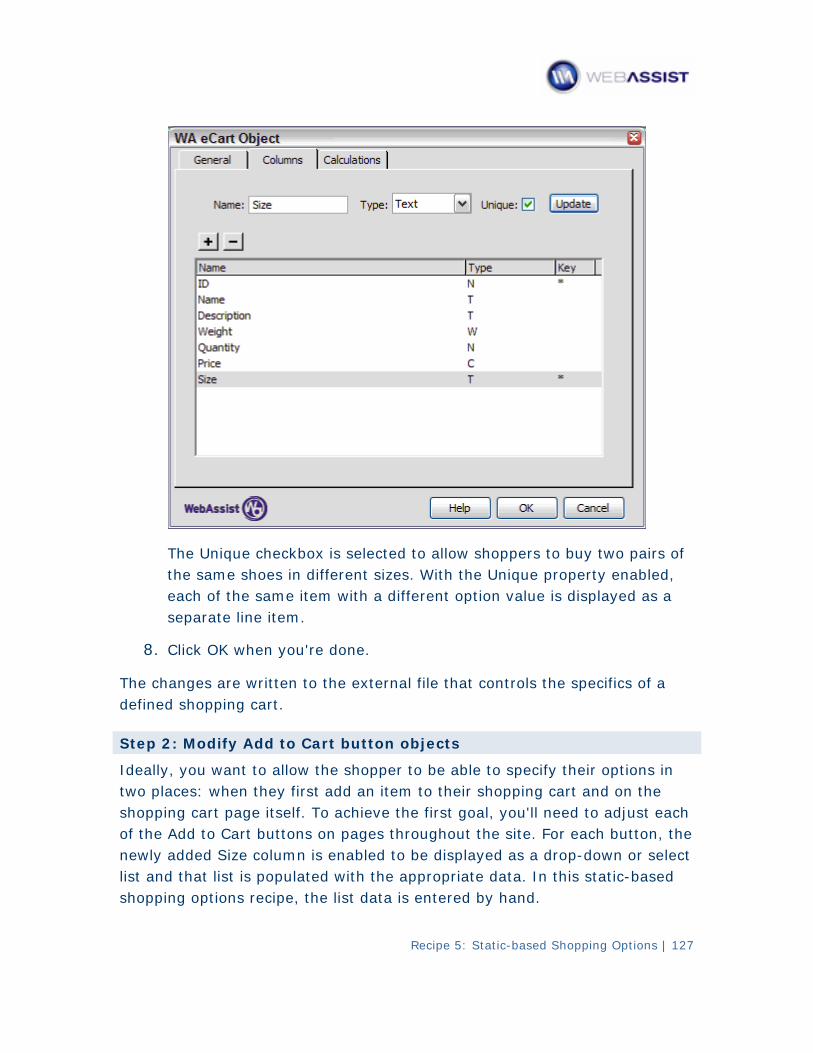
ed to allow shoppers to buy two pairs of The Unique checkbox is selectthe same shoes in different sizes. With the Unique property enabled, each of the same item with a different option value is displayed as a separate line item.
8. Click OK when you're done.
The chang a es are written to the external file that controls the specifics of defined shopping cart.
Step 2: Modify Add to Cart button objects
Ideally, you want to allow the shopper to be able to specify their options in two place shopping cart and on the s: when they first add an item to their shopping cart page itself. To achieve the first goal, you'll need to adjust each of the Add to Cart buttons on pages throughout the site. For each button, the newly added Size column is enabled to be displayed as a drop-down or select list and that list is populated with the appropriate data. In this static-based shopping options recipe, the list data is entered by hand.
Recipe 5: Static-based Shopping Options | 127
Recipe 5: Static-based Shopping Options | 128
As each Add to Cart button are individually configured, these actions must be applie , you'll d separately to each Add to Cart button in the site. In this recipeonly need steps to deal with the Add to Cart buttons on one page. The proper have been taken on all the other pages that contain Add to Cart buttons: catalog_de tail, catalog_mens and catalog_womens. With database-drivensite a s, this chore is handled dynamically for many catalog pages. Typically,catalog p such age that displays a range of products derived from a recordset,as th , e men's or women's catalog in the Blue Sky Footwear example storeuses a ges single Add to Cart button on each catalog page template. On pawhere me you will list multiple products from the same Recordset on the sapage, the ns Add to Cart button is within a Repeat Region, and all the buttoare bound dynamically.
In this step, you'll work with a page that has two distinct Add to Cart buttons and the same procedure will need to be applied twice.
1. ea. Select the Add to Cart button in the Women's Featured Shoe ar
2. WA In the Server Behaviors panel, double-click the highlighted entry: eCart Add to Recordset (shoeCart, rsWFeatured).
When there are more than one eCart Add from Recordset server behaviors on the page — one for each Add to Cart button —select the one you want to work with in the Document window to easily find the corresponding server behavior.
3. In the WA Add to Cart Button dialog, click the Bindings tab.
4. Select the Size entry in the list of columns.
5. In the Default Value field, enter 8.
6. Click Updateable and choose select list from the drop-down list of types.
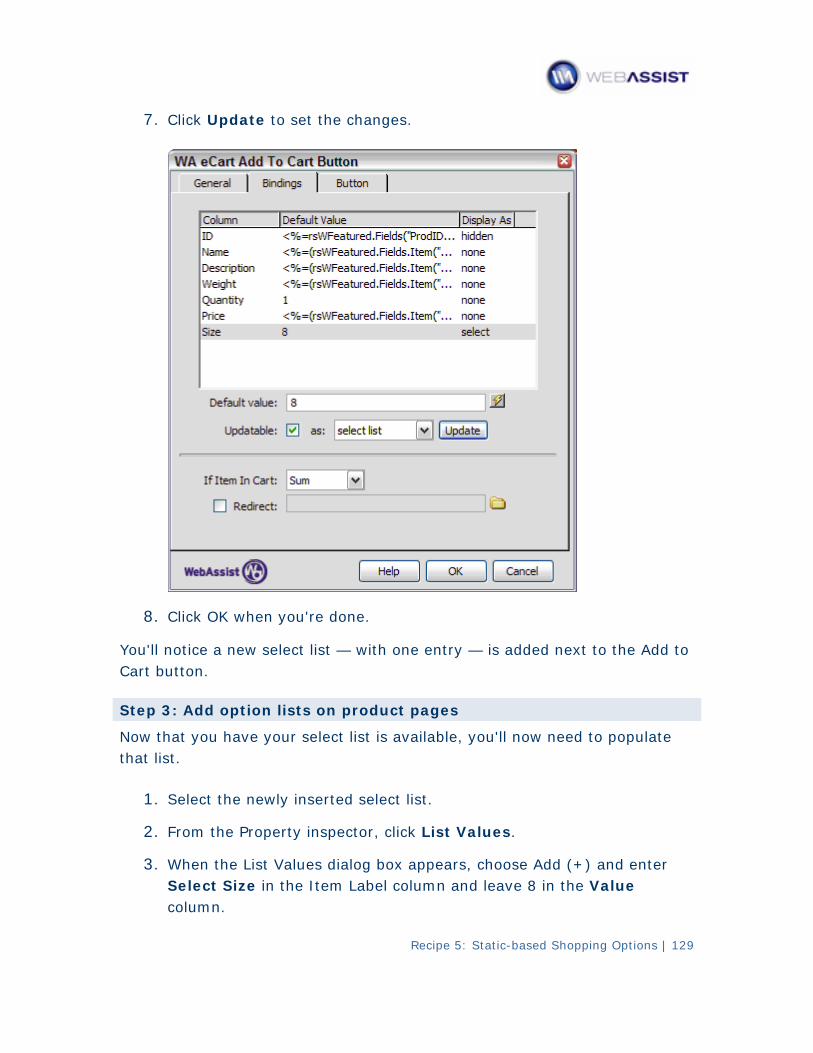
Recipe 5: Static-based Shopping Options | 129
7. Click Update to set the changes.
8. Click OK when you're done.
You'll n Add to otice a new select list — with one entry — is added next to theCart button.
Ste s p 3: Add option lists on product page
Now that you have your select list is available, you'll now need to populate that list.
1. Select the newly inserted select list.
2. From the Property inspector, click List Values.
3. When the List Values dialog box appears, choose Add (+) and enter Select Size in the Item Label column and leave 8 in the Value column.
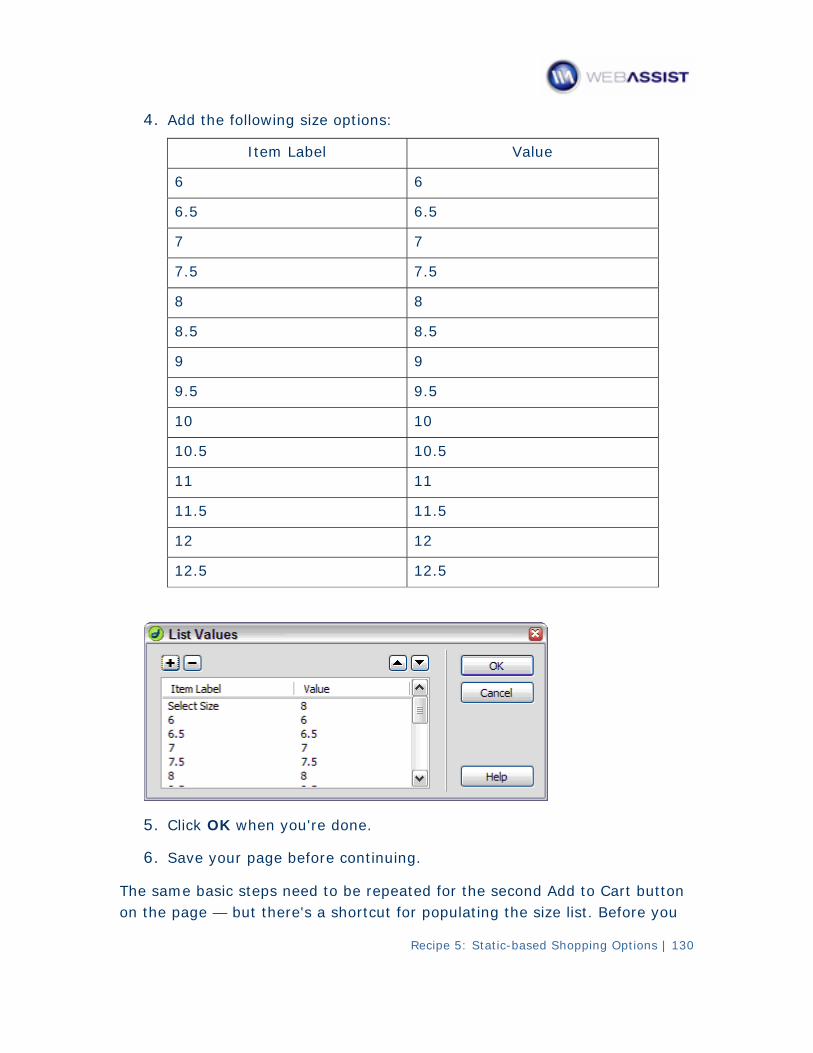
4. Add the following size options:
Item Label Value
6 6
6.5 6.5
7 7
7.5 7.5
8 8
8.5 8.5
9 9
9.5 9.5
10 10
10.5 10.5
11 11
11.5 11.5
12 12
12.5 12.5
5. Click OK when you're done.
6. Save your page before continuing.
The sa utton me basic steps need to be repeated for the second Add to Cart bon the there's a shortcut for populating the size list. Before you page — but
Recipe 5: Static-based Shopping Options | 130
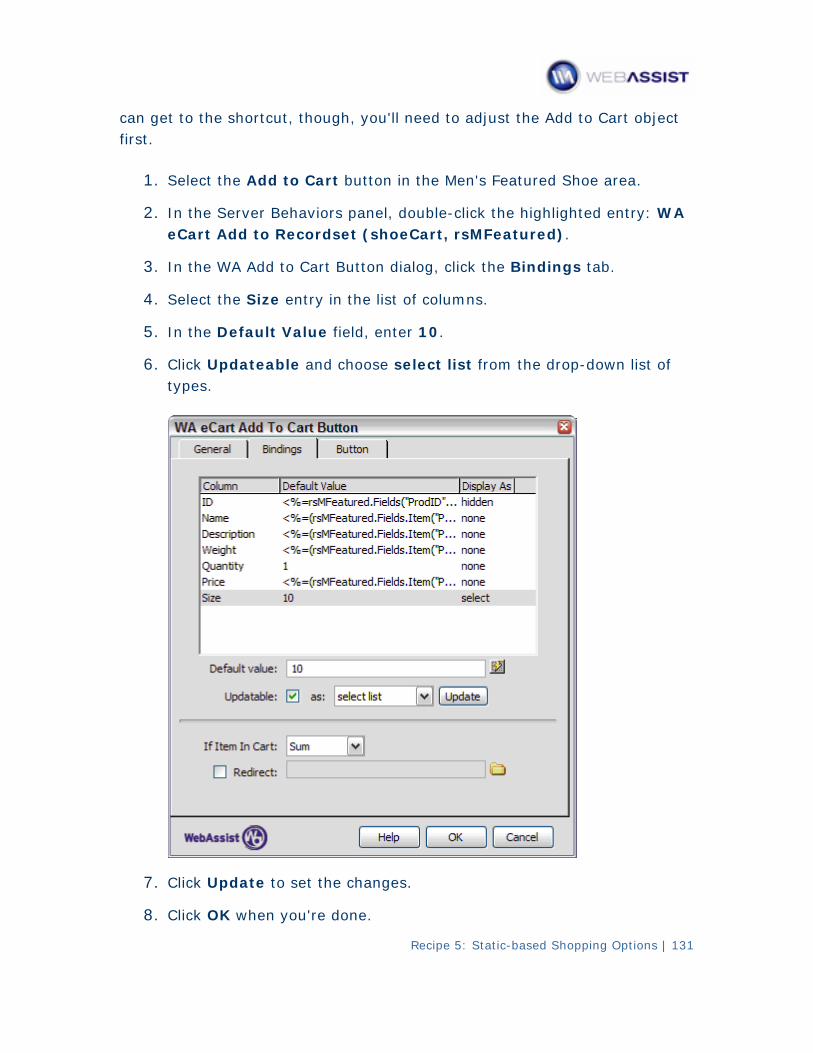
Recipe 5: Static-based Shopping Options | 131
can need to adjust the Add to Cart object get to the shortcut, though, you'll first.
1. Select the Add to Cart button in the Men's Featured Shoe area.
2. In the Server Behaviors panel, double-click the highlighted entry: WA eCart Add to Recordset (shoeCart, rsMFeatured).
3. In the WA Add to Cart Button dia the Bindings tab. log, click
4. Select the Size entry in the list o lumns. f co
5. In the Default Value field, enter 10.
6. Click Updateable and choose select list from the drop-down list of t . ypes
7. Click Update to set the changes.
8. Click OK when you're done.
Again, the newly added list must be populated. While you can manually add the needed labels and values, there's a quicker technique:
1. Select the size list in the Women's Featured section and press Ctrl+C (Command+C) to copy it to the clipboard.
2. tion and press Select the just added size list in the Men's Featured secCtrl+V (Command+V) to replace it. While this gets most of the data in place, there are a few adjustments you'll need to make.
3. With the Men's Featured Size list still selected, choose List Values from the Property inspector.
4. hen the List Values dialog box opens, select the first entry, Select WSize, and change the value from 8 to 10; click OK. One last change is necessary — each option entry must have a unique name.
5. entry from In the Property inspector's Name field, change the shoeCart_1_Size_Add to shoeCart_2_Size_Add.
6. Save your page.
Reme to the other Add mber, we've already applied the same changes for youto Cart buttons found the following pages: catalog_detail, catalog_mens and catalog_womens.
Step 4: Include option list in shopping cart
To enhan it possible for ce the shopping experience, it's a good idea to make people pping cart. to change their minds about options right from the shoAchieving this goal with eCart is a two-step process: first, the eCart Display Manager is adjusted to add a new column for the size option to appear and seco tual options. nd, a eCart Updateable List object is inserted to list the ac
Let's begin by adding the initial shopping cart.
1. From the Files panel, double-click the shopping_cart page for your server model to open it.
Recipe 5: Static-based Shopping Options | 132
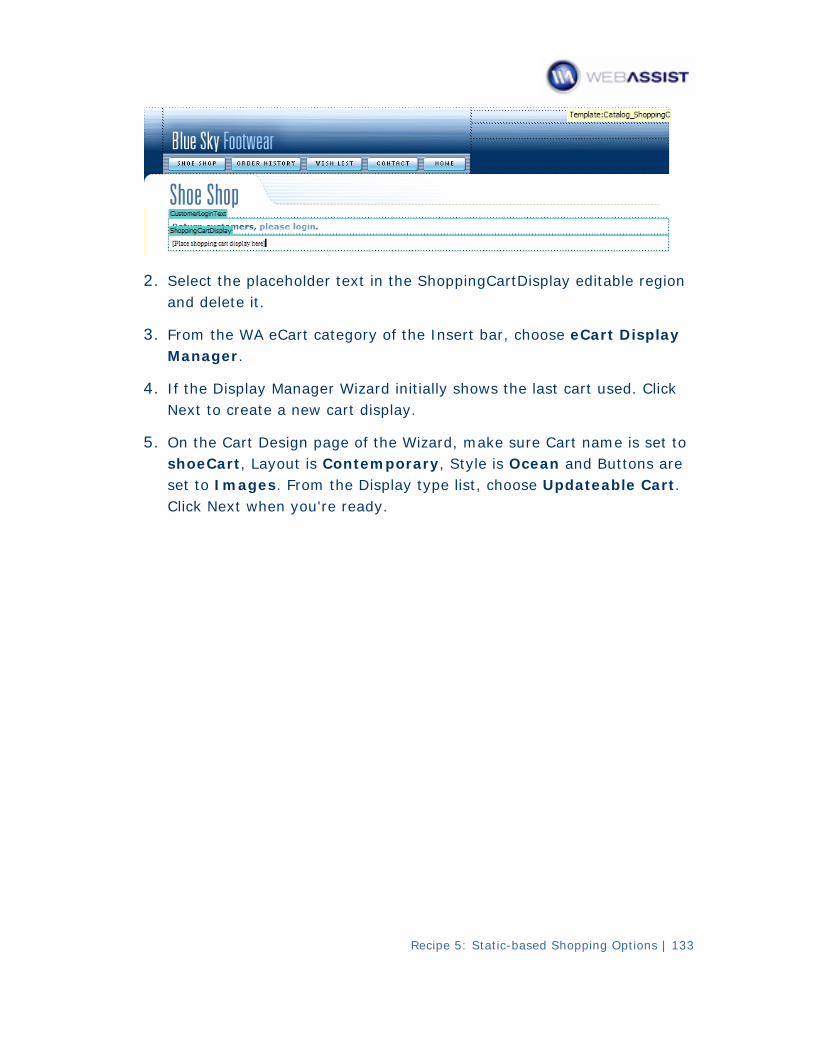
Recipe 5: Static-based Shopping Options | 133
2. elect the placeholder text in the ShoppingCartDisplay editable region Sand delete it.
3. From the WA eCart category of the Insert bar, choose eCart Display Manager.
4. If the Display Manager Wizard initially shows the last cart used. Click Next to create a new cart display.
5. n the Cart Design page of the Wizard, make sure Cart name is set to OshoeCart, Layout is Contemporary, Style is Ocean and Buttons are set to Images. From the Display type list, choose Updateable Cart. Click Next when you're ready.
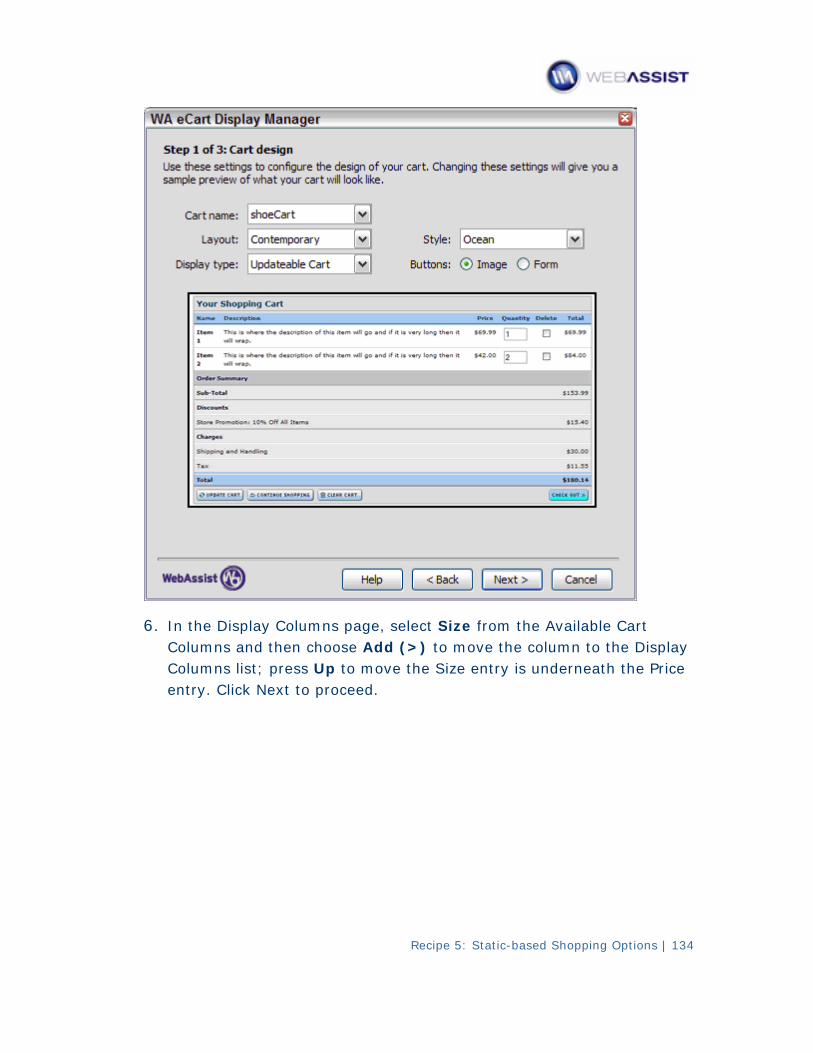
6. In the Display Columns page, select Size from the Available Cart Columns and then choose Add (>) to move the column to the Display Columns list; press Up to move the Size entry is underneath the Price entry. Click Next to proceed.
Recipe 5: Static-based Shopping Options | 134
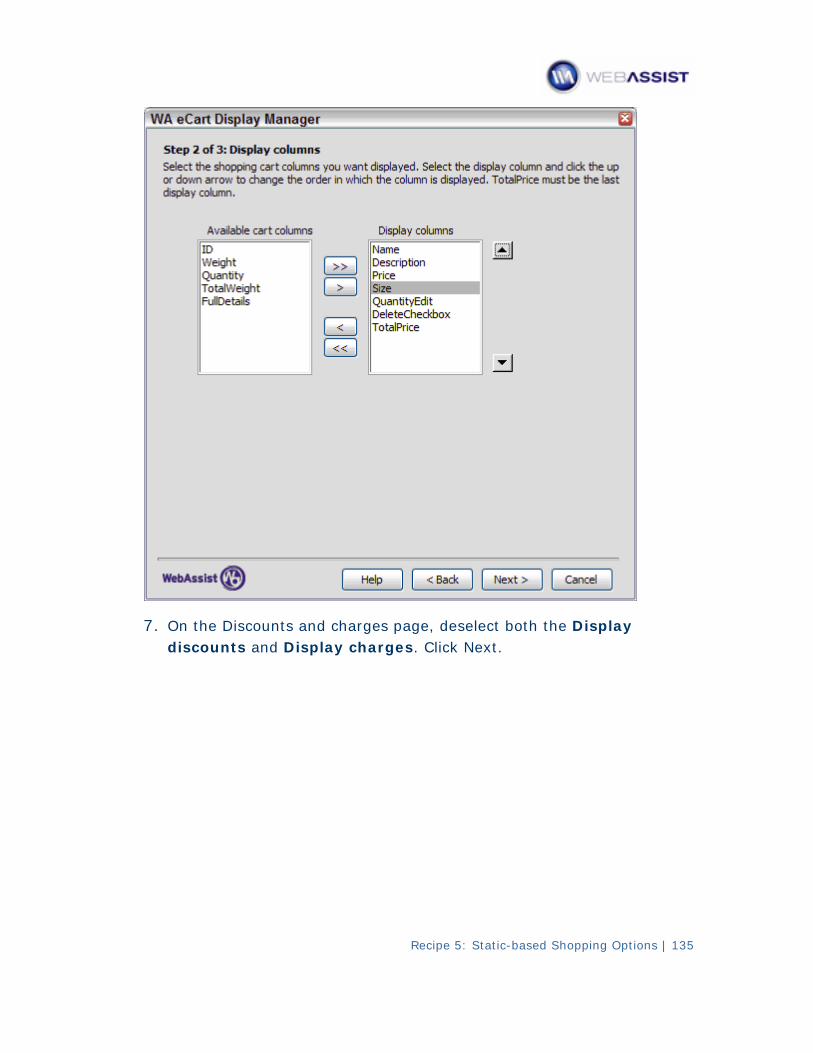
7. On the Discounts and charges page, deselect both the Display discounts and Display charges. Click Next.
Recipe 5: Static-based Shopping Options | 135
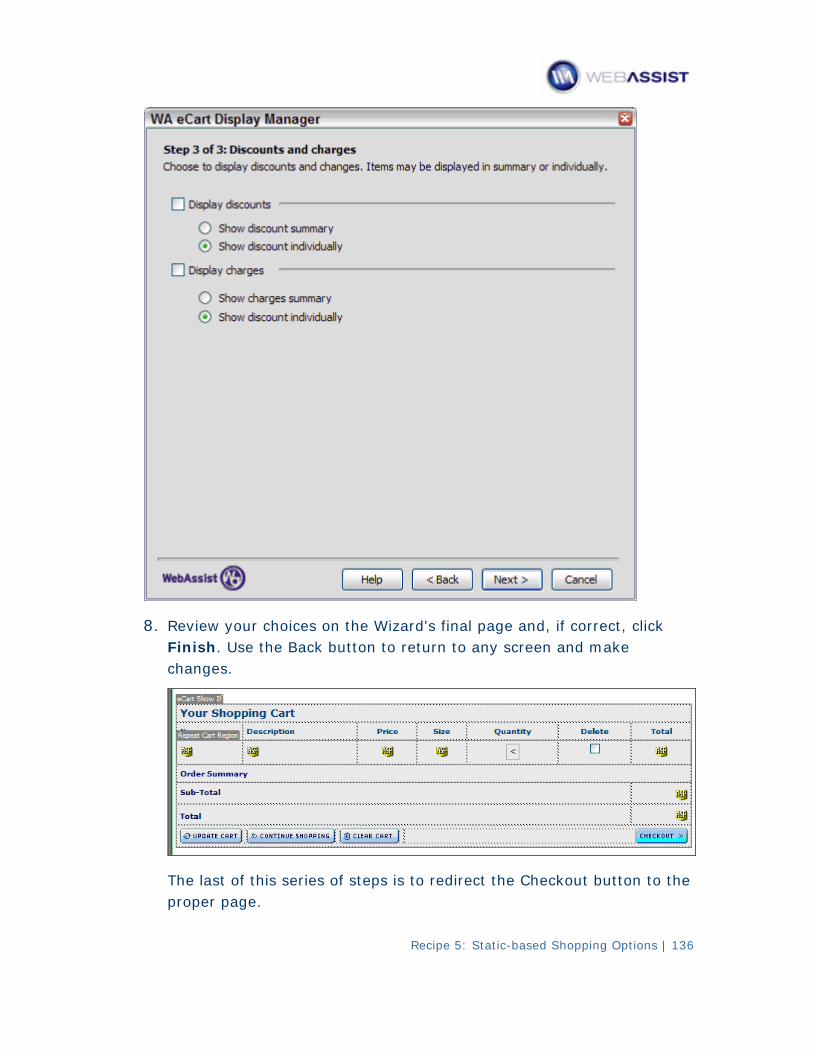
8. Review your choices on the Wizard's final page and, if correct, click Finish. Use the Back button to return to any screen and make changes.
The last of this series of steps is to redirect the Checkout button to the proper page.
Recipe 5: Static-based Shopping Options | 136
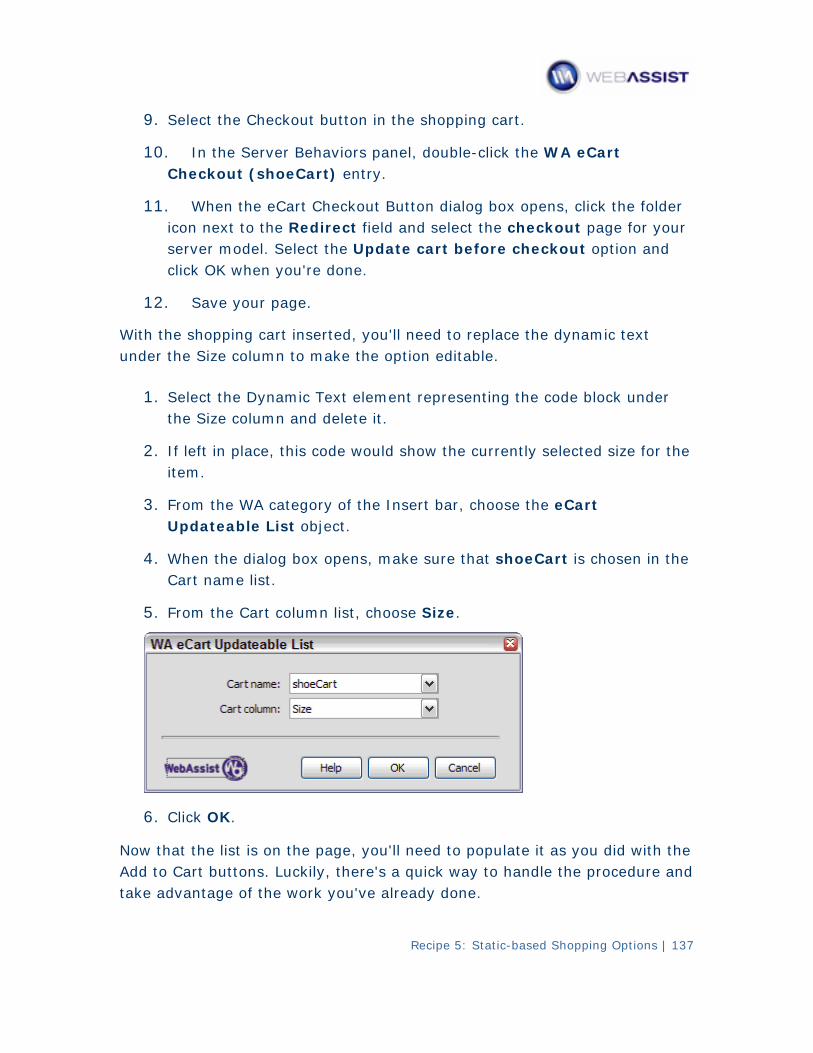
9. Select the Checkout button in the shopping cart.
10. In the Server Behaviors panel, double-click the WA eCart Checkout (shoeCart) entry.
11. When the eCart Checkout Button dialog box opens, click the folder icon next to the Redirect field and select the checkout page for your server model. Select the Update cart before checkout option and click OK when you're done.
12. Save your page.
With xt the shopping cart inserted, you'll need to replace the dynamic teunder the Size column to make the option editable.
1. Select the Dynamic Text element representing the code block under the Size column and delete it.
2. If left in place, this code would show the currently selected size for the item.
3. From the WA category of the Insert bar, choose the eCart Updateable List object.
4. When the dialog box opens, make sure that shoeCart is chosen in the Cart name list.
5. From the Cart column list, choose Size.
6. Click OK.
Now that the list is on the page, you'll need to populate it as you did with the Add to Cart buttons. Luckily, there's a quick way to handle the procedure and take a e work you've already done. dvantage of th
Recipe 5: Static-based Shopping Options | 137
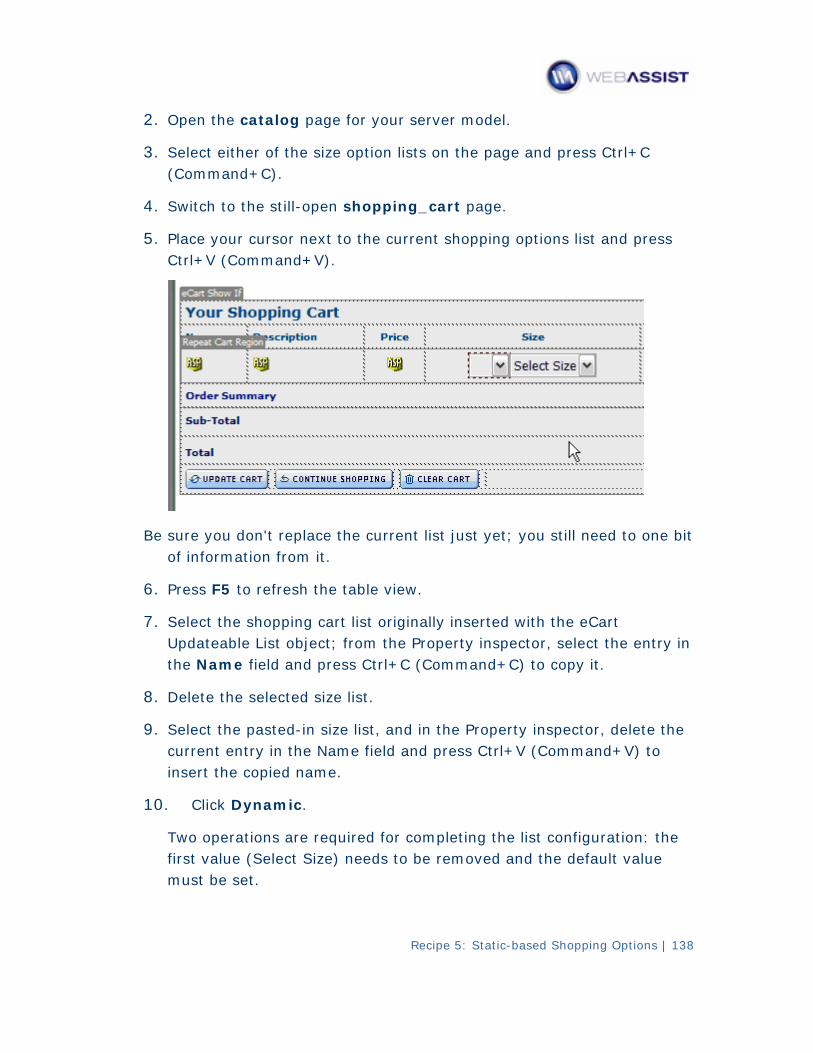
2. Open the catalog page for your server model.
3. Select either of the size option lists on the page and press Ctrl+C (Command+C).
4. Switch to the still-open shopping_cart page.
5. Place your cursor next to the current shopping options list and press Ctrl+V (Command+V).
Be current list just yet; you still need to one bit sure you don't replace the of information from it.
6. sh the table view. Press F5 to refre
7. Select the shopping cart list originally inserted with the eCart Updateable List object; from the Property inspector, select the entry in the Name field and press Ctrl+C (Command+C) to copy it.
8. Delete the selected size list.
9. Select the pasted-in size list, and in the Property inspector, delete the current entry in the Name field and press Ctrl+V (Command+V) to insert the copied name.
10. Click Dynamic.
Two operations are required for completing the list configuration: the first value (Select Size) needs to be removed and the default value must be set.
Recipe 5: Static-based Shopping Options | 138

Recipe 5: Static-based Shopping Options | 139
the first item in the 11. In the Dynamic List/Menu dialog box, select Static options area and click Remove (-).
12. tning bolt symbol next to the Select value equal to Click the lighfield.
13. In the Dynamic Data dialog box, expand the shoeCart entry and select Size; click OK.
14. Click OK to close the Dynamic List/Menu.
the shopping cart display and remove unneeded rows Let's clean upbefore we move on.
15. As there are no charges or discounts applied for this tutorial, select the Order Summary and Sub-Total rows in the shopping cart display and delete them by choosing Modify > Table > Delete Table Row; ; alternatively, you can press Delete or Backspace.
If you find it difficult to select these rows, switch to the Layout category of the Insert bar and choose Expanded view; the Expanded view makes it easy to select and manipulate table elements. When you're done, choose Standard view.
16. Save your page when you're done.
Step 5: Display selected options at checkout
The final step in this recipe is set-up the checkout page to properly convey the options to the payment gateway and to add a non-updateable size column to the read-only cart.
As in the Getting Started tutorial, you'll insert both a checkout form and a read-only cart display. This particular example uses the PayPal payment gateway. You can add up to two options under PayPal. To define an option, you have to enter the name of the option in a hidden field as well as a value for that option in a separate hidden field both located in the checkout form.
1. From the Files panel, double-click the checkout file appropriate to your server model.
2. Place your cursor in the CheckoutForm editable region.
3. From the Insert bar's WA eCart category, choose eCart Insert Checkout Form, the final object on the right.
4. When the Insert Checkout Form dialog box opens, make sure shoeCart is the current Cart name.
5. Expand the PayPal category and select PayPal with Line Items from the payment gateway list. Click Done when you're ready.
Recipe 5: Static-based Shopping Options | 140
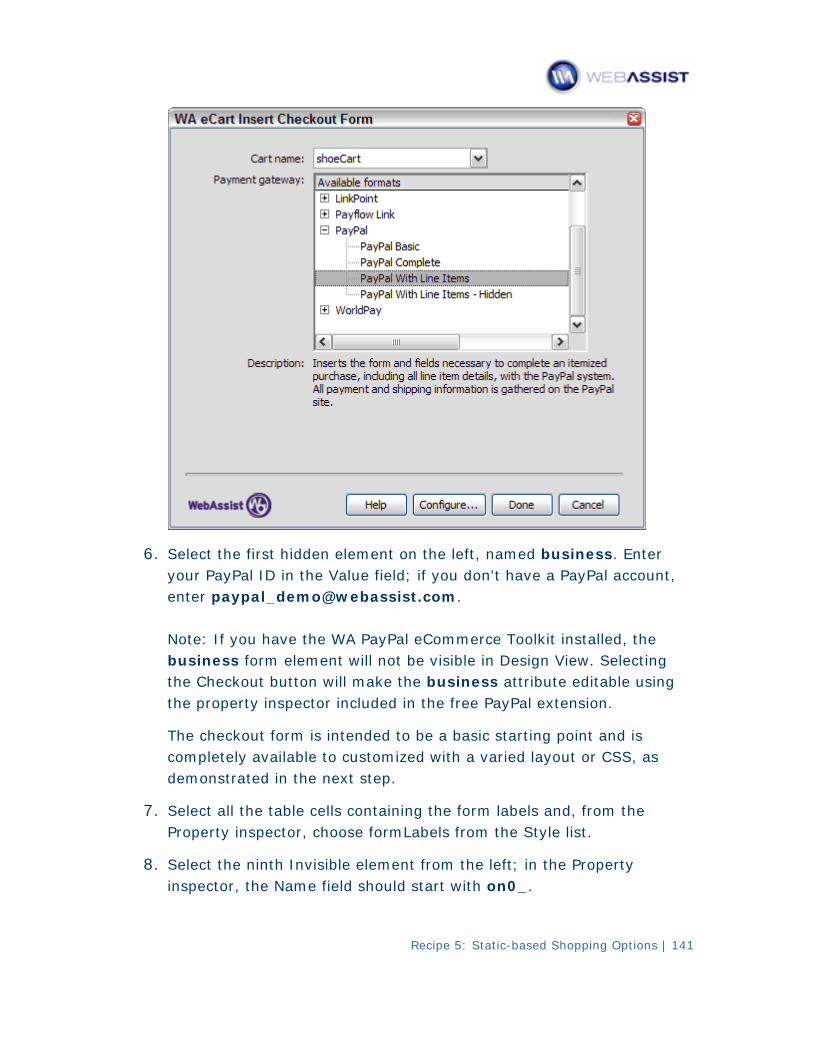
Recipe 5: Static-based Shopping Options | 141
6. Select the first hidden element on the left, named business. Enter your PayPal ID in the Value field; if you don't have a PayPal account, enter [email protected]. Note: If you have the WA PayPal eCommerce Toolkit installed, the business form element will not be visible in Design View. Selecting the Checkout button will make the business attribute editable using the property inspector included in the free PayPal extension.
basic starting point and is The checkout form is intended to be acompletely available to customized with a varied layout or CSS, as demonstrated in the next step.
7. Select all the table cells containing the form labels and, from the Property inspector, choose formLabels from the Style list.
8. Select the ninth Invisible element from the left; in the Property inspector, the Name field should start with on0_.
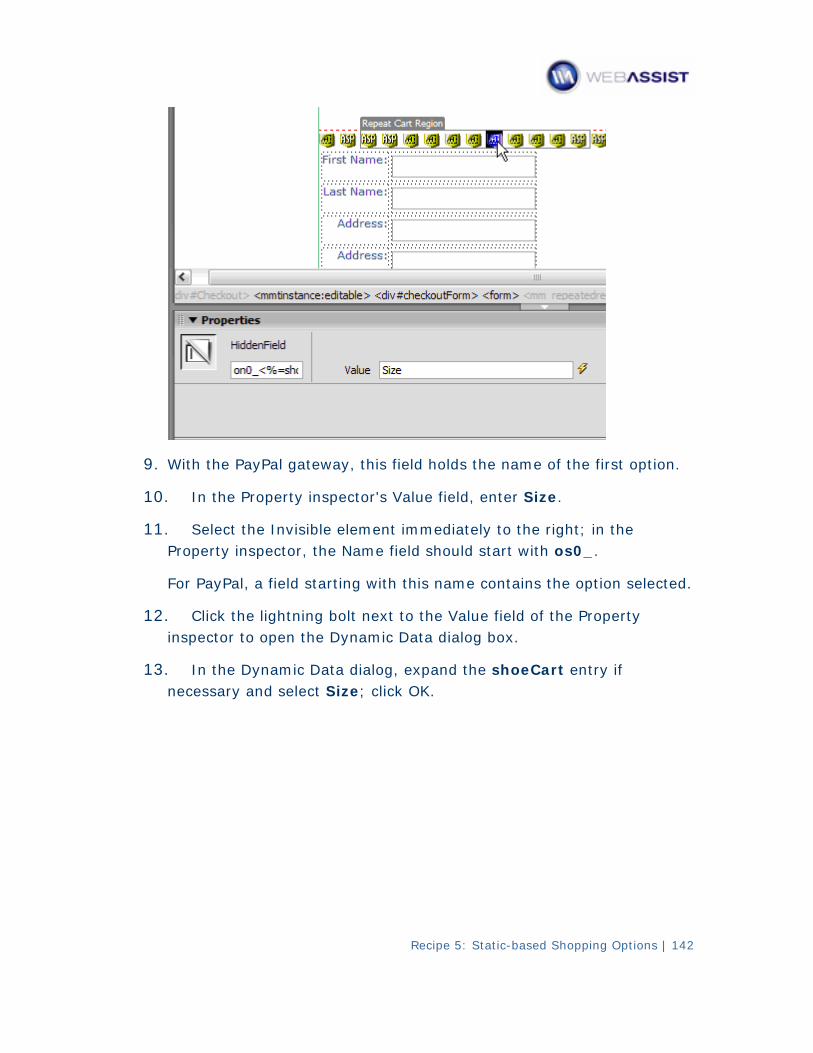
Recipe 5: Static-based Shopping Options | 142
9. option. With the PayPal gateway, this field holds the name of the first
10. In the Property inspector's Value field, enter Size.
11. Select the Invisible element immediately to the right; in the Property inspector, the Name field should start with os0_.
. For PayPal, a field starting with this name contains the option selected
12. Click the lightning bolt next to the Value field of the Property inspector to open the Dynamic Data dialog box.
13. In the Dynamic Data dialog, expand the shoeCart entry if necessary and select Size; click OK.
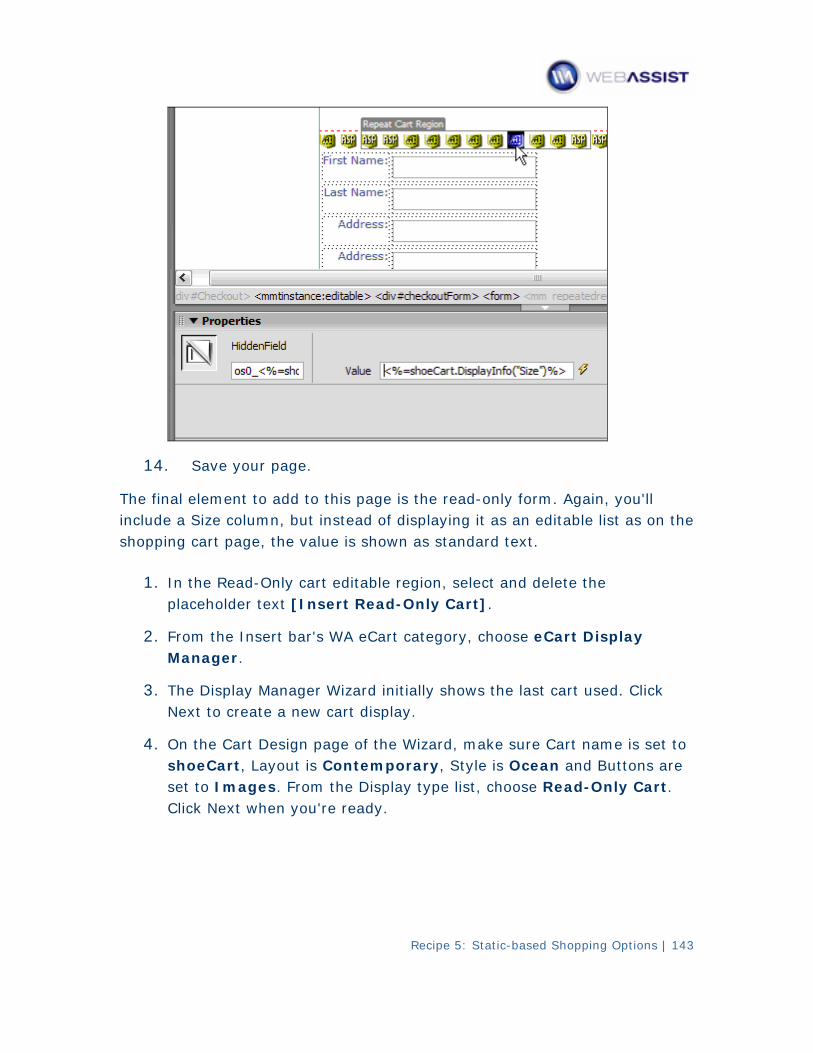
14. Save your page.
The . Again, you'll final element to add to this page is the read-only forminclude a Size column, but instead of displaying it as an editable list as on the shopping cart page, the value is shown as standard text.
1 In the Read-Only cart editable region, select and delete the . placeholder text [Insert Read-Only Cart].
2. choose eCart Display From the Insert bar's WA eCart category, Manager.
3. initially shows the last cart used. Click The Display Manager Wizard Next to create a new cart display.
4. On the Cart Design page of the Wizard, make sure Cart name is set to shoeCart, Layout is Contemporary, Style is Ocean and Buttons are set to Images. From the Display type list, choose Read-Only Cart. Click Next when you're ready.
Recipe 5: Static-based Shopping Options | 143
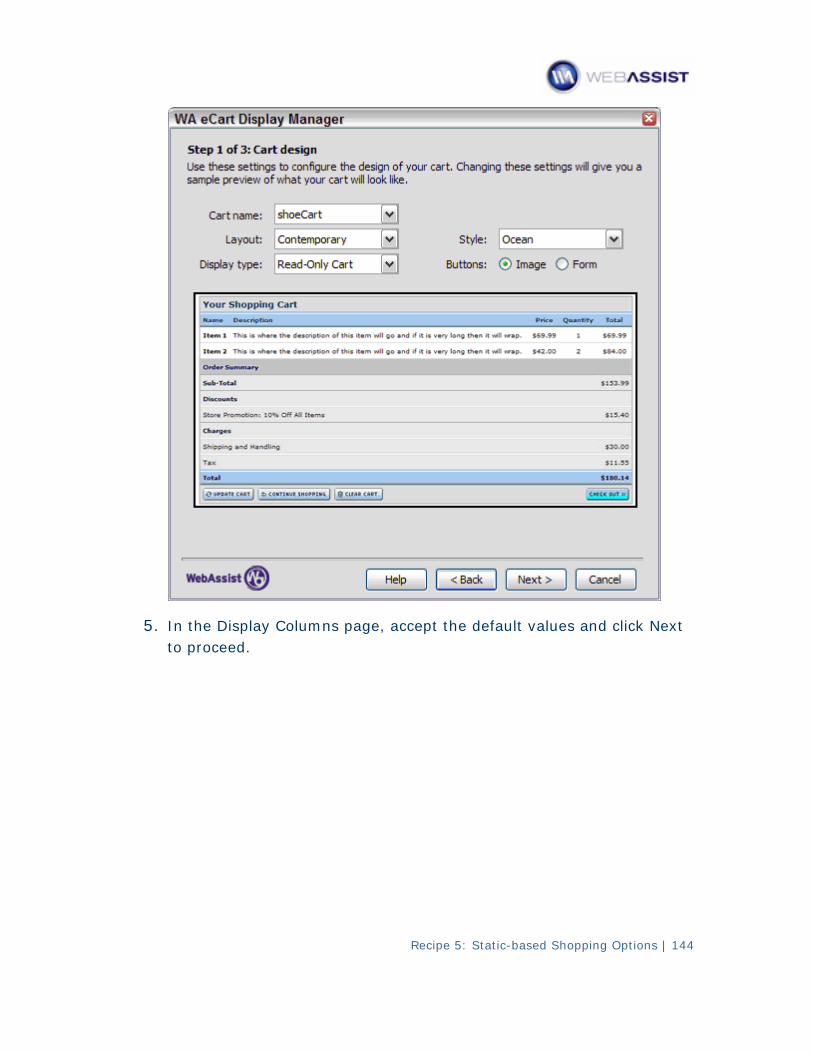
Recipe 5: Static-based Shopping Options | 144
5. In the Display Columns page, accept the default values and click Next to proceed.
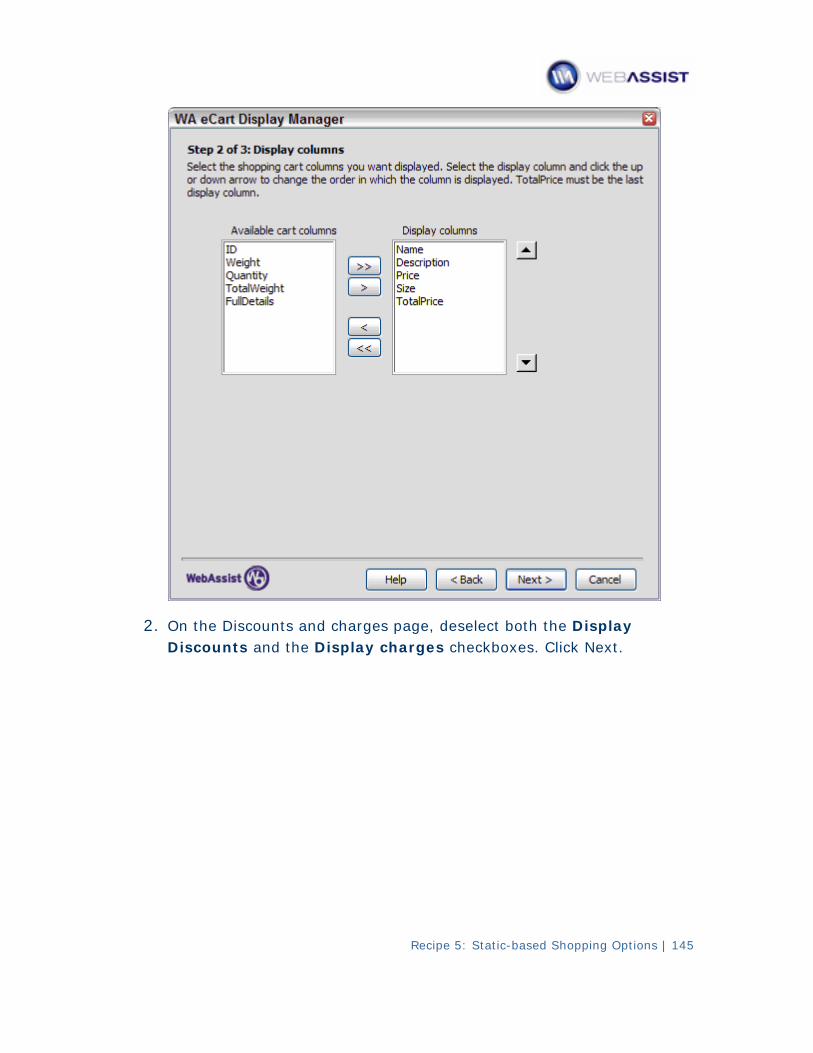
2. On the Discounts and charges page, deselect both the Display Discounts and the Display charges checkboxes. Click Next.
Recipe 5: Static-based Shopping Options | 145
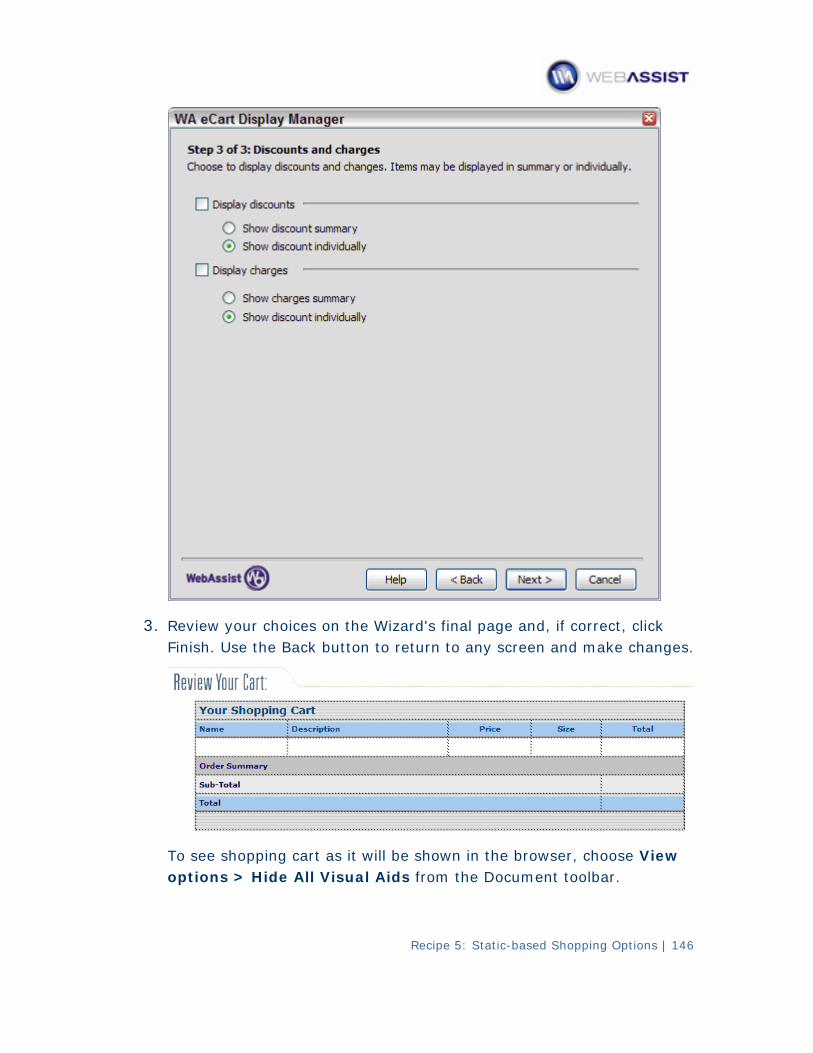
3. Review your choices on the Wizard's final page and, if correct, click Finish. Use the Back button to return to any screen and make changes.
To see shopping cart as it will be shown in the browser, choose View options > Hide All Visual Aids from the Document toolbar.
Recipe 5: Static-based Shopping Options | 146
Recipe 5: Static-based Shopping Options | 147
4. rt Select the Order Summary and Sub-Total rows in the shopping cadisplay and delete them by choosing Modify > Table > Delete Table Row; alternatively, you can press Delete or Backspace.
5. Save your page and test the entire application in the browser.
While testing this recipe, be sure to follow through all the way to the payment gateway to verify that the size option is present throughout.
Recipe 6: Database-driven Shopping Options | 148
RECIPE 6
Data
Often products are offered with a number of different options. Each time
base-driven Shopping Options
you add another set of options, the online store increases in complexity. The only real way to manage a full set of choices is to use a database or other data source. With a relational database, it's possible to keep track of the full spectrum of options a product might have and a shopper might want.
In this recipe, you'll add both size and color options for the products in the BlueSky Footwear online store. As in Recipe 5, Static-based Shopping Options, the sizes offered are by category: all the men's shoes are offered in one set of sizes while all the women's shoes come in another range of sizes. Colors, on the other hand, vary from product to product. Different recordsets will be used to populate the various option lists.
In the course of this recipe, you'll need to accomplish the following goals:
• Update the eCart object to add both a size and color column to the shopping cart
• Modify each Add to Cart button to include size and color column and bind them each to separate select (i.e., drop-down) lists.
• Create recordsets to pull the needed data to populate the option drop-down lists.
• Ensure that the shopping cart size and color columns are included in the Display Manager; you'll also need to insert two updateable lists element and populate them so your shoppers can change their choices without returning to the catalog pages.
• Include the selected size and color in the read-only shopping cart on the checkout page and make sure those values are transferred to your payment gateway.
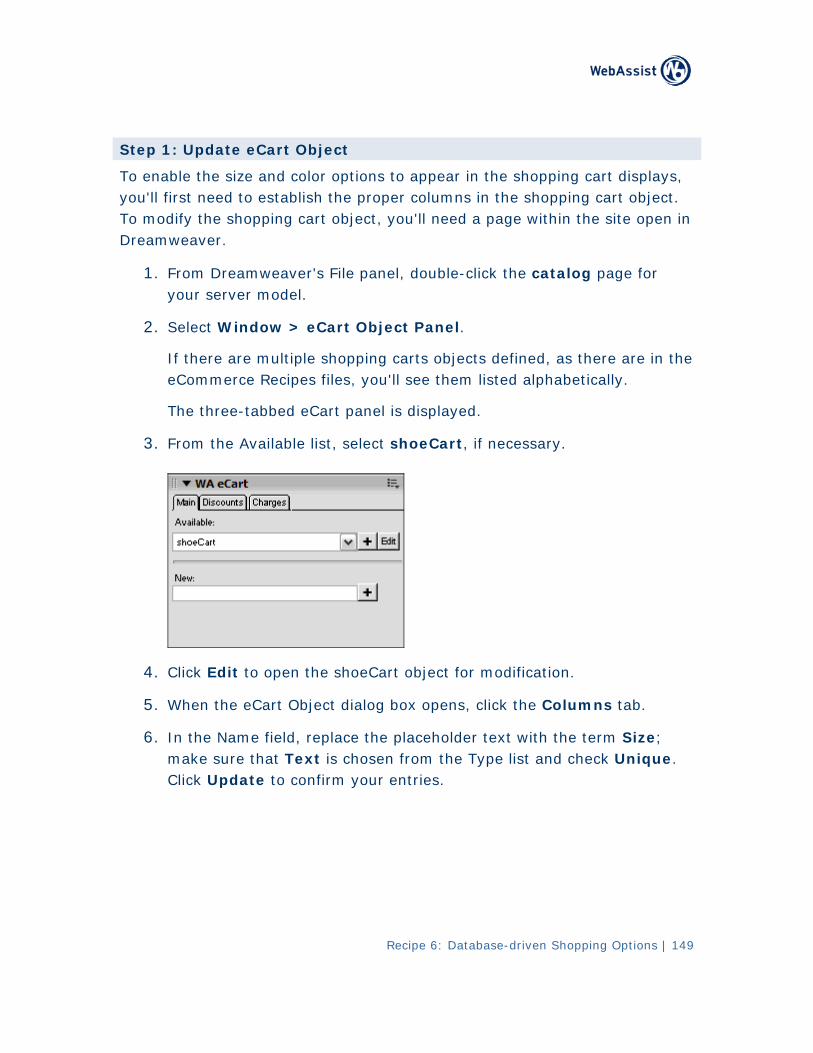
Recipe 6: Database-driven Shopping Options | 149
Step 1: Update eCart Object
To enable the size and color options to appear in the shopping cart displays, you'll first need to establish the proper columns in the shopping cart object. To modify the shopping cart object, you'll need a page within the site open inDreamweaver.
1. From Dreamweaver's File panel, double-click the catalog page for your server model.
2. Select Window > eCart Object Panel.
If there are multiple shopping carts objects defined, as there are in the eCommerce Recipes files, you'll see them listed alphabetically.
The three-tabbed eCart panel is displayed.
3. From the Available list, select shoeCart, if necessary.
4. Click Edit to open the shoeCart object for modification.
5. When the eCart Object dialog box opens, click the Columns tab.
6. In the Name field, replace the placeholder text with the term Size; make sure that Text is chosen from the Type list and check Unique. Click Update to confirm your entries.
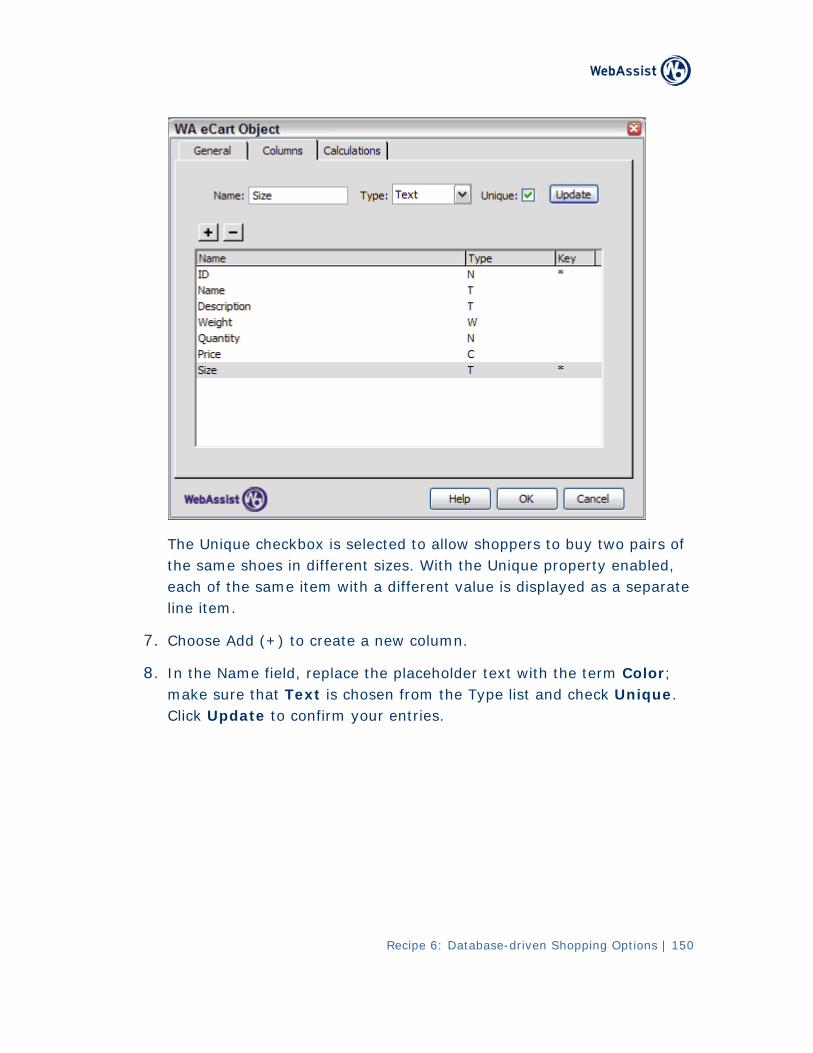
Recipe 6: Database-driven Shopping Options | 150
ed to allow shoppers to buy two pairs of The Unique checkbox is selectthe same shoes in different sizes. With the Unique property enabled, each of the same item with a different value is displayed as a separate line item.
7. olumn. Choose Add (+) to create a new c
8. In the Name field, replace the placeholder text with the term Color; make sure that Text is chosen from the Type list and check Unique. Click Update to confirm your entries.
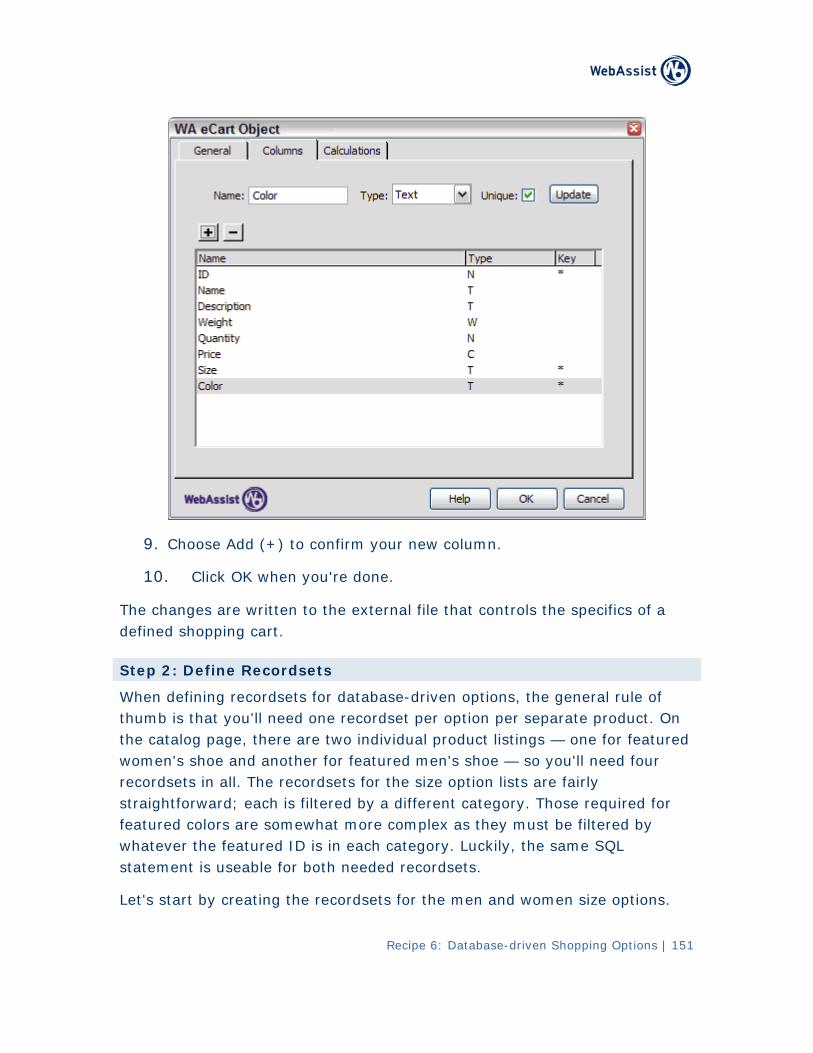
9 Choose Add (+) to confirm your new column. .
Click OK when you're done. 10.
The ch written to the external file that controls the specifics of a anges are defined shopping cart.
Step 2: Define Recordsets
When defining recordsets for database-driven options, the general rule of thumb ption per separate product. On is that you'll need one recordset per othe catalog page, there are two individual product listings — one for featured women's shoe and another for featured men's shoe — so you'll need four recordsets in all. The recordsets for the size option lists are fairly straightforward; each is filtered by a different category. Those required for featured colors are somewhat more complex as they must be filtered by whatever the featured ID is in each category. Luckily, the same SQL statement is useable for both needed recordsets.
Let's start by creating the recordsets for the men and women size options.
Recipe 6: Database-driven Shopping Options | 151
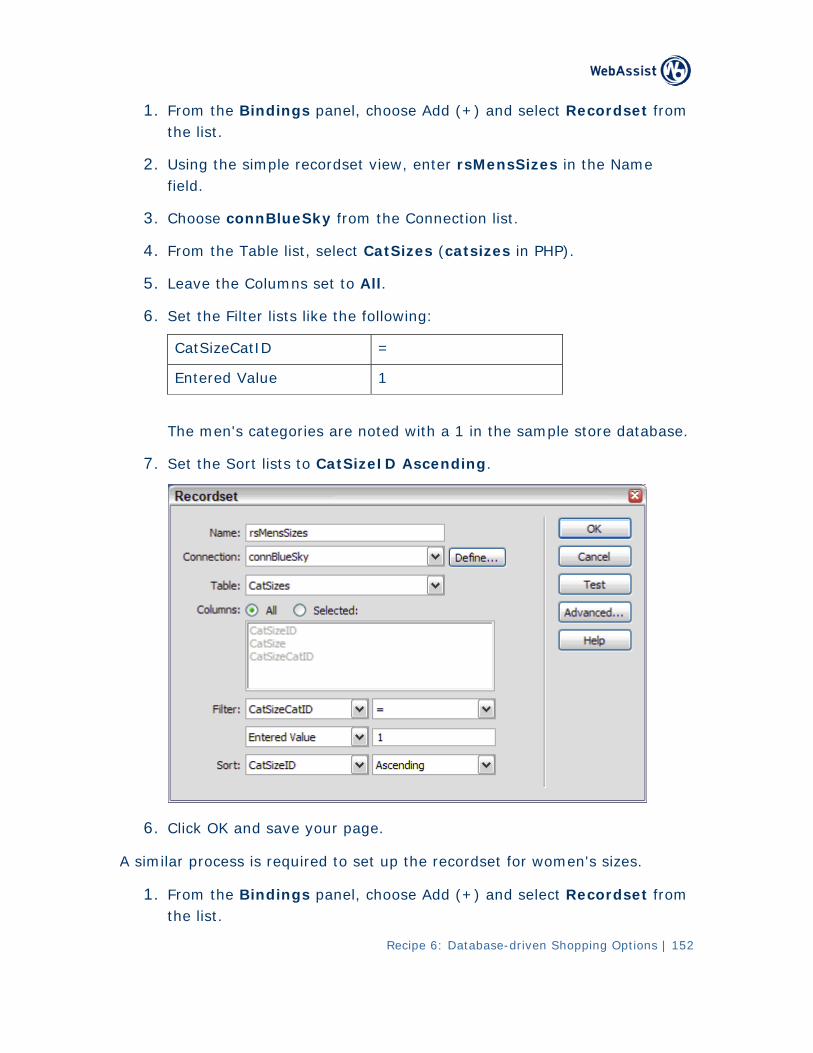
Recipe 6: Database-driven Shopping Options | 152
1. rom the Bindings panel, choose Add (+) and select Recordset from Fthe list.
2. Using the simple recordset view, enter rsMensSizes in the Name field.
3. Choose connBlueSky from the Connection list.
4. From the Table list, select CatSizes (catsizes in PHP).
5. Leave the Columns set to All.
6. Set the Filter lists like the following:
CatSizeCatID =
Entered Value 1
The men's categories are noted with a 1 in the sample store database.
7. Set the Sort lists to CatSizeID Ascending.
6. Click OK and save your page.
A similar process is required to set up the recordset for women's sizes.
1. From the Bindings panel, choose Add (+) and select Recordset from the list.
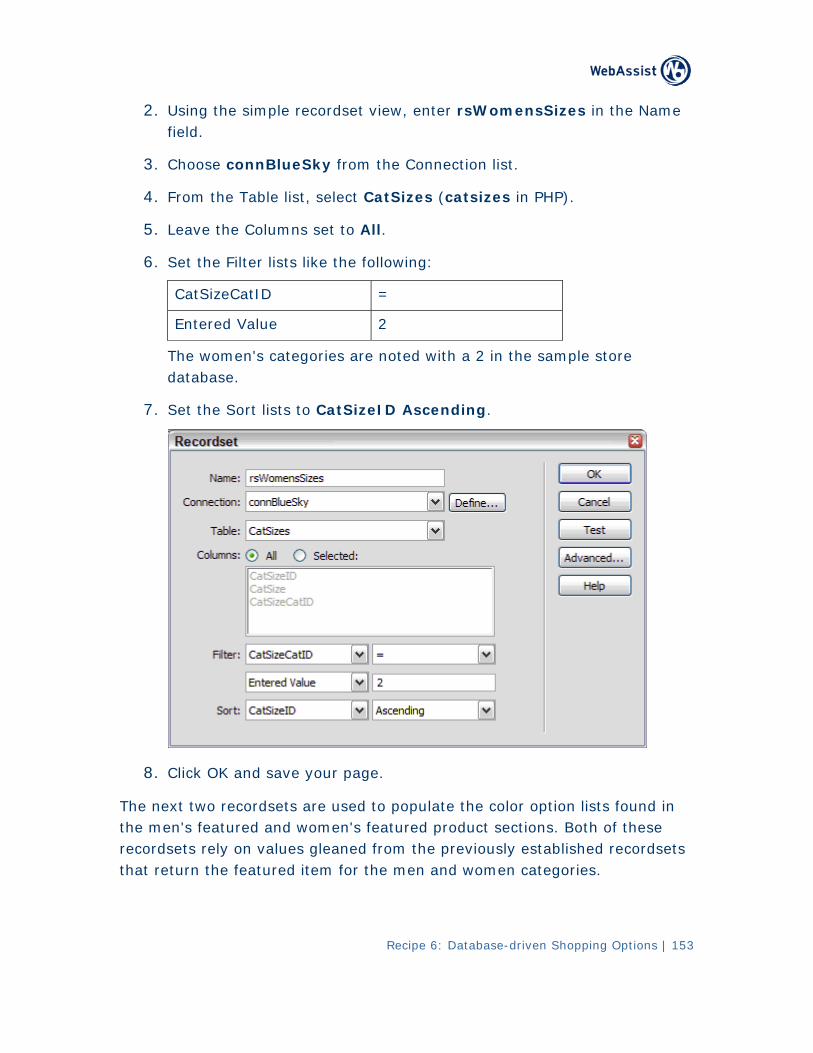
2. Using the simple recordset view, enter rsWomensSizes in the Name field.
3. Choose connBlueSky from the Connection list.
4. Table list, select CatSizes (catsizes in PHP). From the
5. Leave the Columns set to All.
6. Set the Filter lists like the following:
CatSizeCatID =
Entered Value 2
T tegories are ed with a 2 in the sample store he women's ca notdatabase.
7. Set the Sort lists to CatSizeID Ascending.
8. Click OK and save your page.
The next two recordsets are used to populate the color option lists found in the ured product sections. Both of these men's featured and women's featrecordsets rely on values gleaned from the previously established recordsets that return the featured item for the men and women categories.
Recipe 6: Database-driven Shopping Options | 153

Recipe 6: Database-driven Shopping Options | 154
The SQL statement used in these recordsets is fairly complex and is included as a sn to facilitate your work in the recipe. ippet
1. From the Snippets panel, right-click the WA eCart > Recipes > Database-driven Options > SQL > Featured Color SQL snippet for your server model and choose Copy Snippet. Click OK when the copy is confirmed.
2. From the Bindings panel, choose Add (+) and select Recordset from the list.
3. S vanced view and, in the Name field enter witch to the AdrsWFeatureColors.
4. From the C onnection list, choose connBlueSky.
5. Place your cursor in the SQL area and press Ctrl+V (Command+ V) to paste in the copied code.
[ASP-JS]
SELECT *
FROM ProdColors INNER JOIN AvailColors
ON AvailColors.AvailColorID = ProdColors.ProdAvailColor
WHERE ProdProdID = ProdIDParam
[ASP-VB]
SELECT *
FROM ProdColors INNER JOIN AvailColors
ON AvailColors.AvailColorID = ProdColors.ProdAvailColor
WHERE ProdProdID = ProdIDParam
[CF]
SELECT *
FROM ProdColors INNER JOIN AvailColors ON AvailColors.AvailColorID = ProdColors.ProdAvailColor
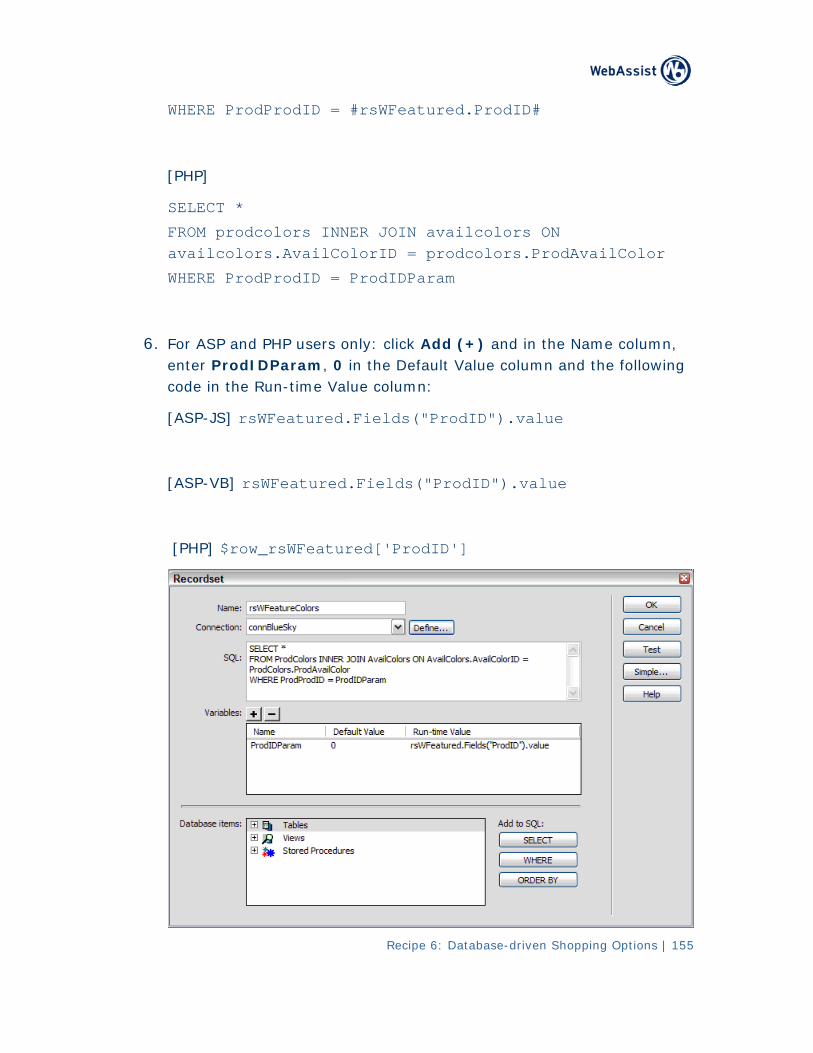
Recipe 6: Database-driven Shopping Options | 155
WHERE ProdProdID = #rsWFeatured.ProdID#
[PHP]
SELECT *
ors INNER JOIN availcolors ON FROM prodcolavailcolors.AvailColorID = prodcolors.ProdAvailColor
rodProdID = ProdIDParam WHERE P
6. s only: click Add (+) and in the Name column, For ASP and PHP userenter ProdIDParam, 0 in the Default Value column and the following code in the Run-time Value column:
ields("ProdID").value [ASP-JS] rsWFeatured.F
[ASP-VB] rsWFeatured.Fields("ProdID").value
[PHP] $row_rsWFeatured['ProdID']
Recipe 6: Database-driven Shopping Options | 156
. 7 Click OK when you're done.
8 S. ave your page.
Simila are equired to define the color options recordset for the men's r steps rfea retu d item.
1 From the Snippets panel, right-click the WA eCart > Recipes > . Database-driven Options > SQL > Featured Color SQL snippet for your server model and choose Copy Snippet. Click OK when the copy is confirmed.
2. From the Bindings panel, choose Add (+) and select Recordset from the list.
3. the Name field enter Switch to the Advanced view and, in rsMFeatureColors.
From the Connection list, choose connBlueSky. 4.
5 Place your cursor in the SQL area and press Ctrl+V (Com. mand+ V) to paste in the copied code.
P-JS] [AS
SELECT *
FROM ProdColors INNER JOIN AvailColors
ON AvailColors.AvailColorID = ProdColors.ProdAvailColor
WHERE ProdProdID = ProdIDParam
[ASP-VB]
SELECT *
FROM ProdColors INNER JOIN AvailColors
ON AvailColors.AvailColorID = ProdColors.ProdAvailColor
WHERE ProdProdID = ProdIDParam
[CF]
Recipe 6: Database-driven Shopping Options | 157
SELECT *
FROM ProdColors INNER JOIN AvailColors ON AvailColors.AvailColorID = ProdColors.ProdAvailColor
WHERE ProdProdID = #rsMFeatured.ProdID#
[PHP]
SELECT *
ors INNER JOIN availcolors ON FROM prodcolavailcolors.AvailColorID = prodcolors.ProdAvailColor
rodProdID = ProdIDParam WHERE P
6. s only: click Add (+) and in the Name column, For ASP and PHP userenter ProdIDParam, 0 in the Default Value column and the following code in the Run-time Value column:
ields("ProdID").value [ASP-JS] rsMFeatured.F
[ASP-VB] rsMFeatured.Fields("ProdID").value
[PHP] $row_rsMFeatured['ProdID']
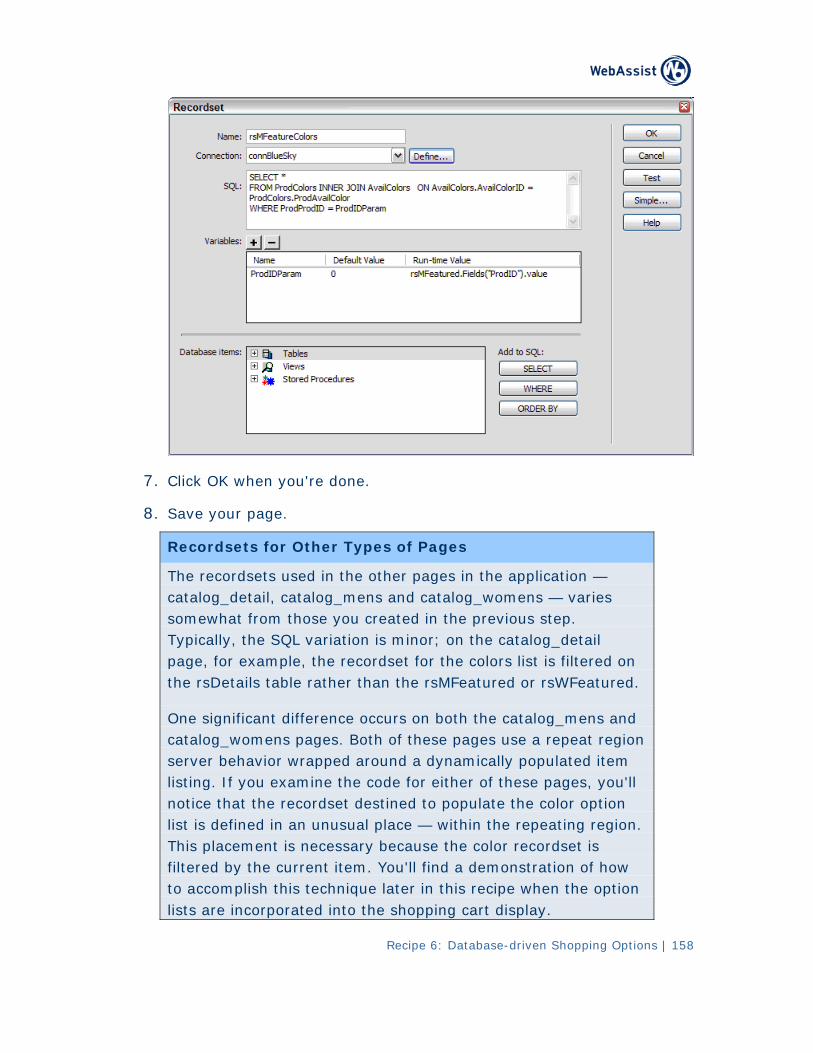
Recipe 6: Database-driven Shopping Options | 158
7 Click OK when you're done. .
8. Save your page.
Recordsets for Other Types of Pages
The recordsets used in the other pages in the application — catalog_detail, catalog_mens and catalog_womens — varies somewhat from those you created in the previous step. Typically, the SQL variation is minor; on the catalog_detail page, for example, the recordset for the colors list is filtered on the rsDetails table rather than the rsMFeatured or rsWFeatured.
One significant difference occurs on both the catalog_mens and catalog_womens pages. Both of these pages use a repeat region server behavior wrapped around a dynamically populated item listing. If you examine the code for either of these pages, you'll notice that the recordset destined to populate the color option list is defined in an unusual place — within the repeating region. This placement is necessary because the color recordset is filtered by the current item. You'll find a demonstration of how to accomplish this technique later in this recipe when the option lists are incorporated into the shopping cart display.
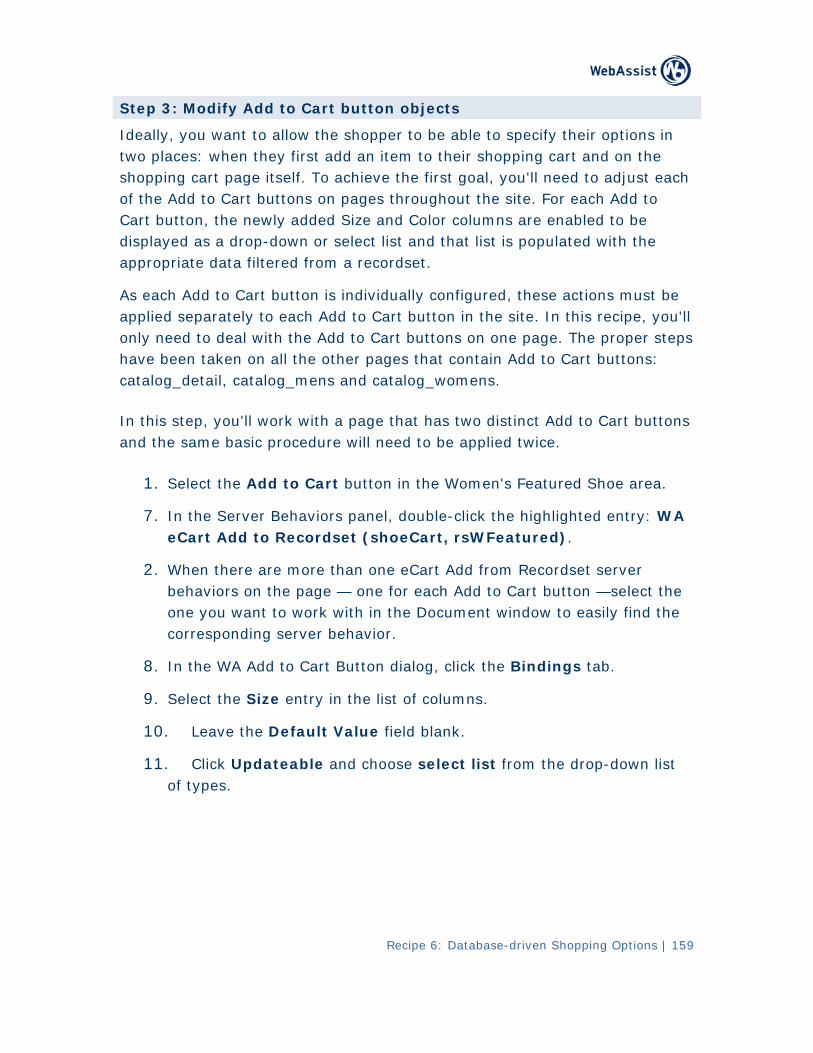
Step 3: Modify Add to Cart button objects
Ideally, you want to allow the shopper to be able to specify their options in two places: when they first add an item to their shopping cart and on the shopping cart page itself. To achieve the first goal, you'll need to adjust each of the Add to Cart buttons on pages throughout the site. For each Add to Cart button, the newly added Size and Color columns are enabled to be displayed as a drop-down or select list and that list is populated with the appropriate data filtered from a recordset.
As each Add to Cart button is individually configured, these actions must be applied separately to each Add to Cart button in the site. In this recipe, you'll only need to deal with the Add to Cart buttons on one page. The proper steps have been taken on all the other pages that contain Add to Cart buttons: catalog_detail, catalog_mens and catalog_womens.
In this step, you'll work with a page that has two distinct Add to Cart buttons and the same basic procedure will need to be applied twice.
1. Select the Add to Cart button in the Women's Featured Shoe area.
7. In the Server Behaviors panel, double-click the highlighted entry: WA eCart Add to Recordset (shoeCart, rsWFeatured).
2. r When there are more than one eCart Add from Recordset servebehaviors on the page — one for each Add to Cart button —select the one you want to work with in the Document window to easily find the corresponding server behavior.
8. In the WA Add to Cart Button dialog, click the Bindings tab.
9. Select the Size entry in the list of columns.
Leave the Default Value field blank. 10.
11. n list Click Updateable and choose select list from the drop-dowof types.
Recipe 6: Database-driven Shopping Options | 159

Recipe 6: Database-driven Shopping Options | 160
12. Click Update to set the changes.
13. Select the Color entry in the list of columns.
14. d blank. Leave the Default Value fiel
15. Click Updateable and choose select list from the drop-down list of types.
16. Click Update to set the changes.

Recipe 6: Database-driven Shopping Options | 161
Click OK when you're done. 17.
You'll notice two new select lists next to the Add to Cart button. Let's label the two with a bit of text.
3. Select the left-most of the newly inserted lists and verify that the Property inspector Name field entry is shoeCart_1_Size_Add; press the left arrow to move the cursor in front of the list and enter the text Size:
To maintain a consistent size with dynamically populated lists, it's best to apply a style setting a specific width.
4. Select the size list and, from the Property inspector's Style list, choose sizeList.
5. Select the other new list and note it's name in the Property inspector is shoeCart_1_Color_Add; press the left arrow to move the cursor in front of the list and enter the text Color:
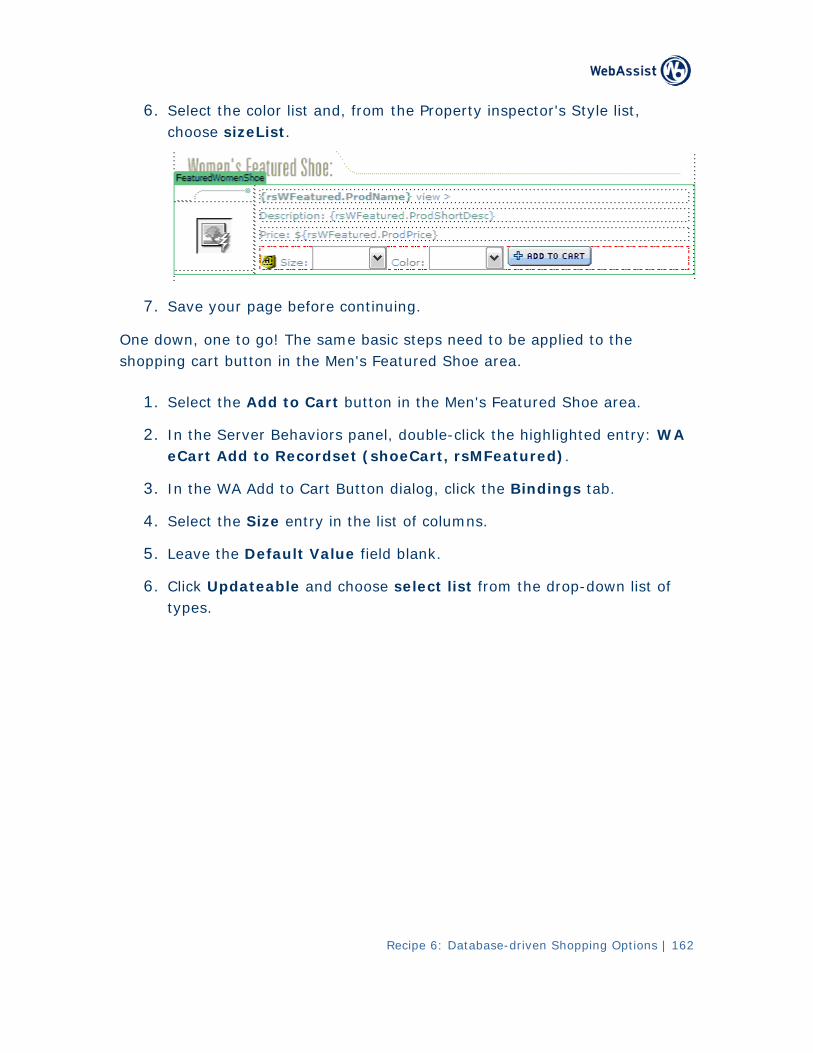
Recipe 6: Database-driven Shopping Options | 162
6. Style list, Select the color list and, from the Property inspector's choose sizeList.
7. Save your page before continuing.
One down, to the one to go! The same basic steps need to be appliedshopping cart button in the Men's Featured Shoe area.
1. area. Select the Add to Cart button in the Men's Featured Shoe
2. entry: WA In the Server Behaviors panel, double-click the highlightedeCart Add to Recordset (shoeCart, rsMFeatured).
3. tab. In the WA Add to Cart Button dialog, click the Bindings
4. Select the Size entry in the list of columns.
5. Leave the Default Value field blank.
6. Click Updateable and choose select list from the drop-down list of types.
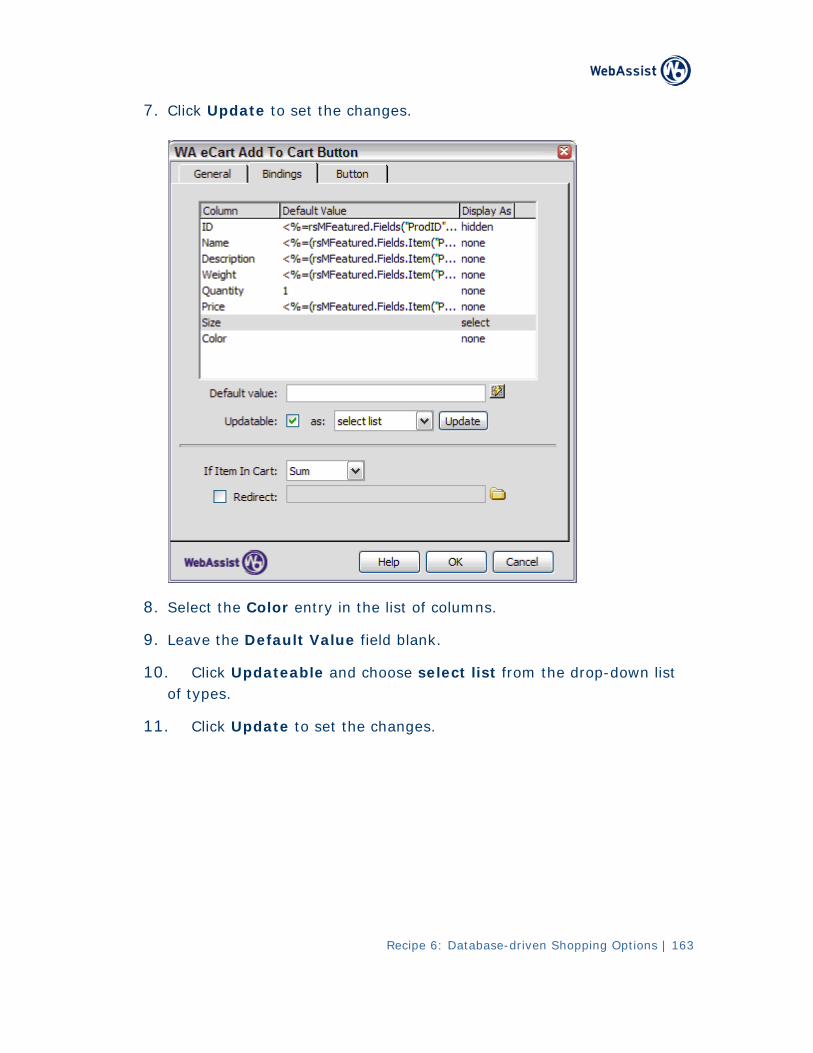
7. Click Update to set the changes.
8. he Color entry in the list of columns. Select t
9. Leave the Default Value field blank.
10. Click Updateable and choose select list from the drop-down list of types.
11. Click Update to set the changes.
Recipe 6: Database-driven Shopping Options | 163
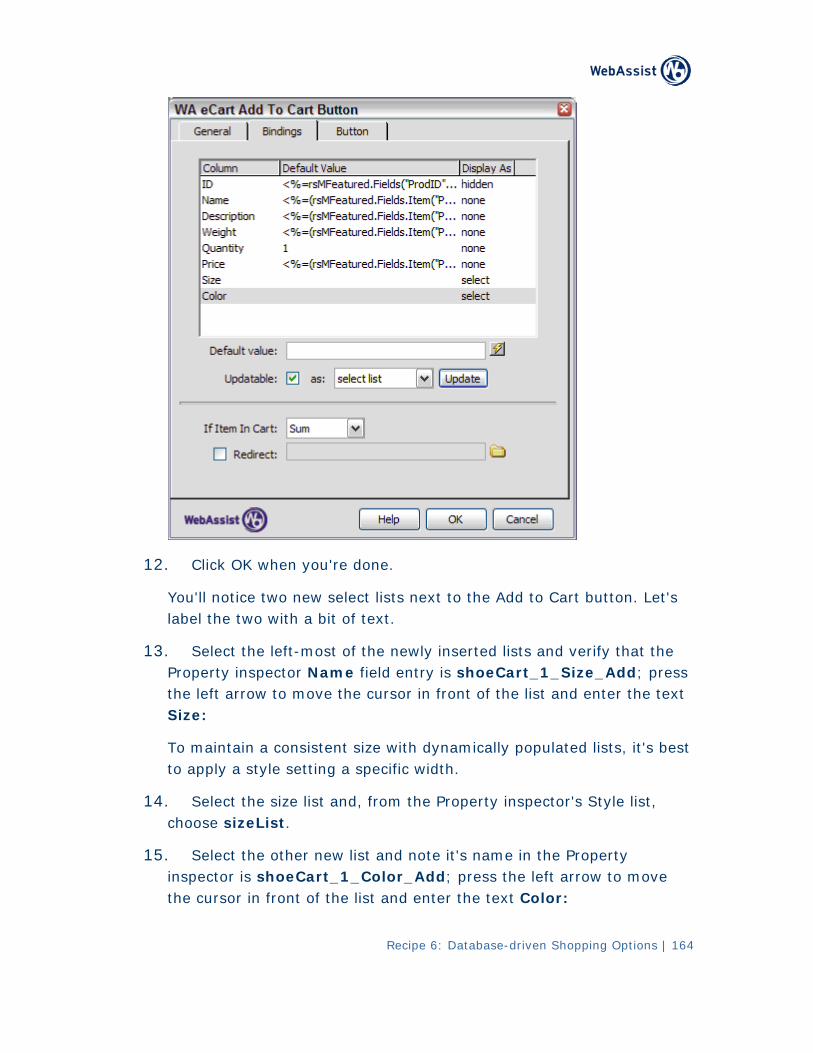
Recipe 6: Database-driven Shopping Options | 164
Click OK when you're done. 12.
You'll notice two new select lists next to the Add to Cart button. Let's label the two with a bit of text.
13. Select the left-most of the newly inserted lists and verify that the Property inspector Name field entry is shoeCart_1_Size_Add; press the left arrow to move the cursor in front of the list and enter the text Size:
To maintain a consistent size with dynamically populated lists, it's best to apply a style setting a specific width.
14. Select the size list and, from the Property inspector's Style list, choose sizeList.
15. Select the other new list and note it's name in the Property inspector is shoeCart_1_Color_Add; press the left arrow to move the cursor in front of the list and enter the text Color:
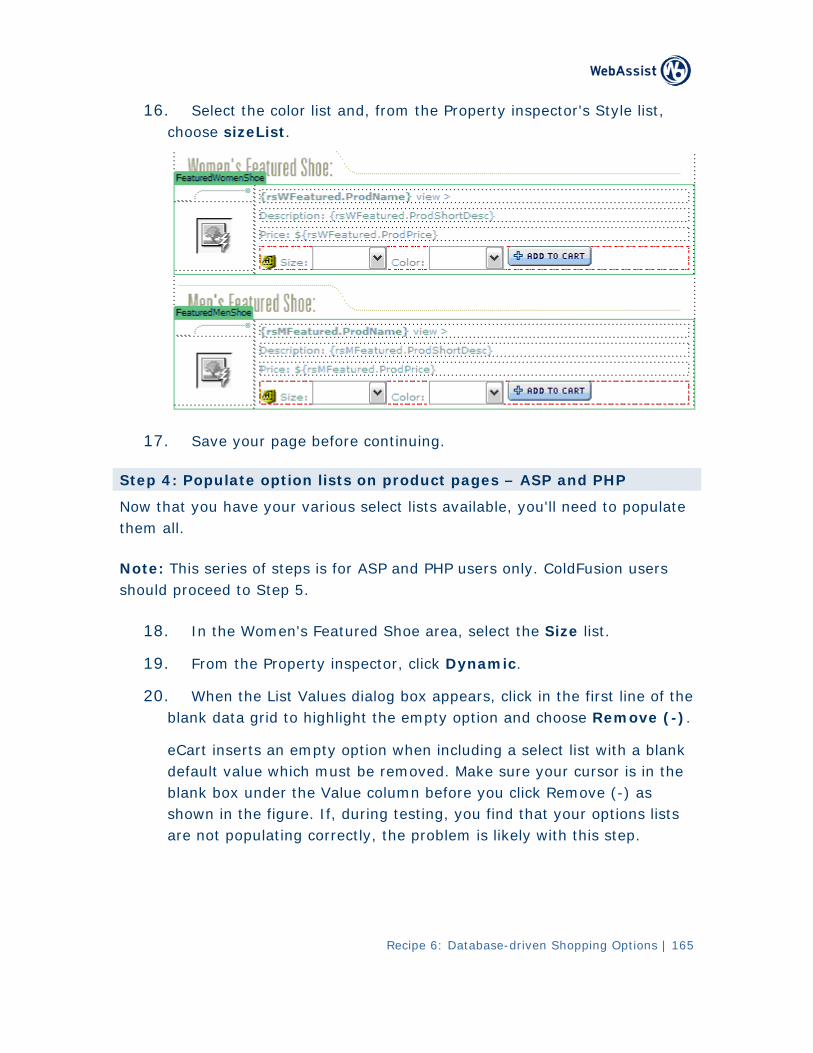
Recipe 6: Database-driven Shopping Options | 165
16. 's Style list, Select the color list and, from the Property inspectorchoose sizeList.
17. Save your page before continuing.
Step 4: Populate option lists on product pages – ASP and PHP
Now that you have your various select lists available, you'll need to populate them all.
No P and PHP users only. ColdFusion users te: This series of steps is for ASshould proceed to Step 5.
18. In the Women's Featured Shoe area, select the Size list.
From the Property inspector, click Dynamic. 19.
20. When the List Values dialog box appears, click in the first line of theblank data grid to highlight the empty option and choose Remove (-).
eCart inserts an empty option when including a select list with a blank default value which must be removed. Make sure your cursor is in the blank box under the Value column before you click Remove (-) as shown in the figure. If, during testing, you find that your options lists are not populating correctly, the problem is likely with this step.
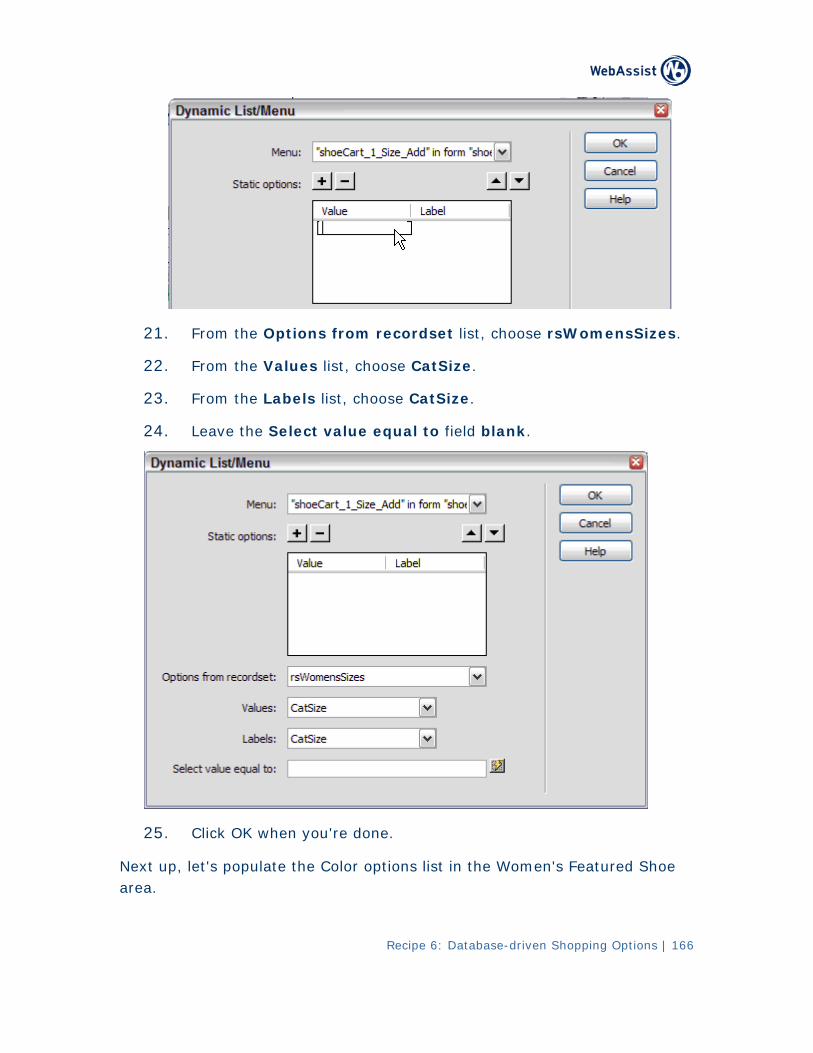
Recipe 6: Database-driven Shopping Options | 166
21. From the Options from recordset list, choose rsWomensSizes.
22. From the Values list, choose CatSize.
23. From the Labels list, choose CatSize.
24. Leave the Select value equal to field blank.
Click OK when you're done. 25.
Next up, let's populate the Color options list in the Women's Featured Shoe area.
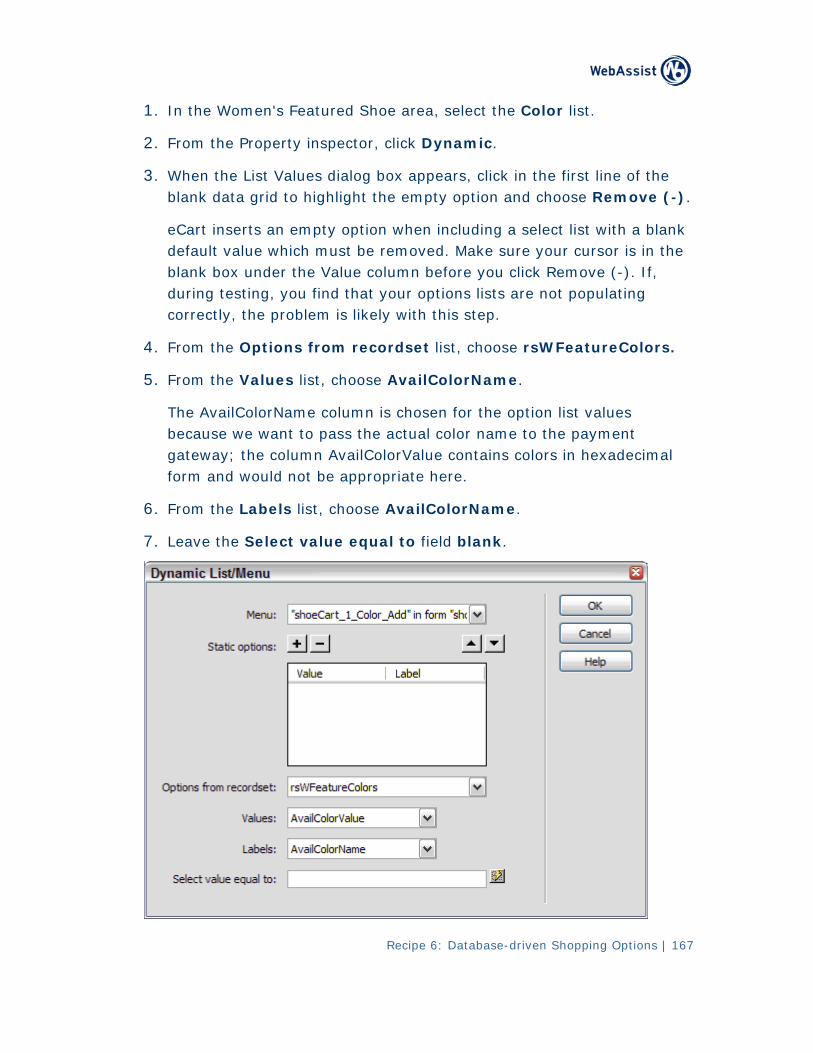
Recipe 6: Database-driven Shopping Options | 167
1. In the Women's Featured Shoe area, select the Color list.
2. From the Property inspector, click Dynamic.
3. When the List Values dialog box appears, click in the first line of the blank data grid to highlight the empty option and choose Remove (-).
k eCart inserts an empty option when including a select list with a blandefault value which must be removed. Make sure your cursor is in the blank box under the Value column before you click Remove (-). If, during testing, you find that your options lists are not populating correctly, the problem is likely with this step.
4. From the Options from recordset list, choose rsWFeatureColors.
5. From the Values list, choose AvailColorName.
The AvailColorName column is chosen for the option list values because we want to pass the actual color name to the payment gateway; the column AvailColorValue contains colors in hexadecimal form and would not be appropriate here.
6. From the Labels list, choose AvailColorName.
7. Leave the Select value equal to field blank.
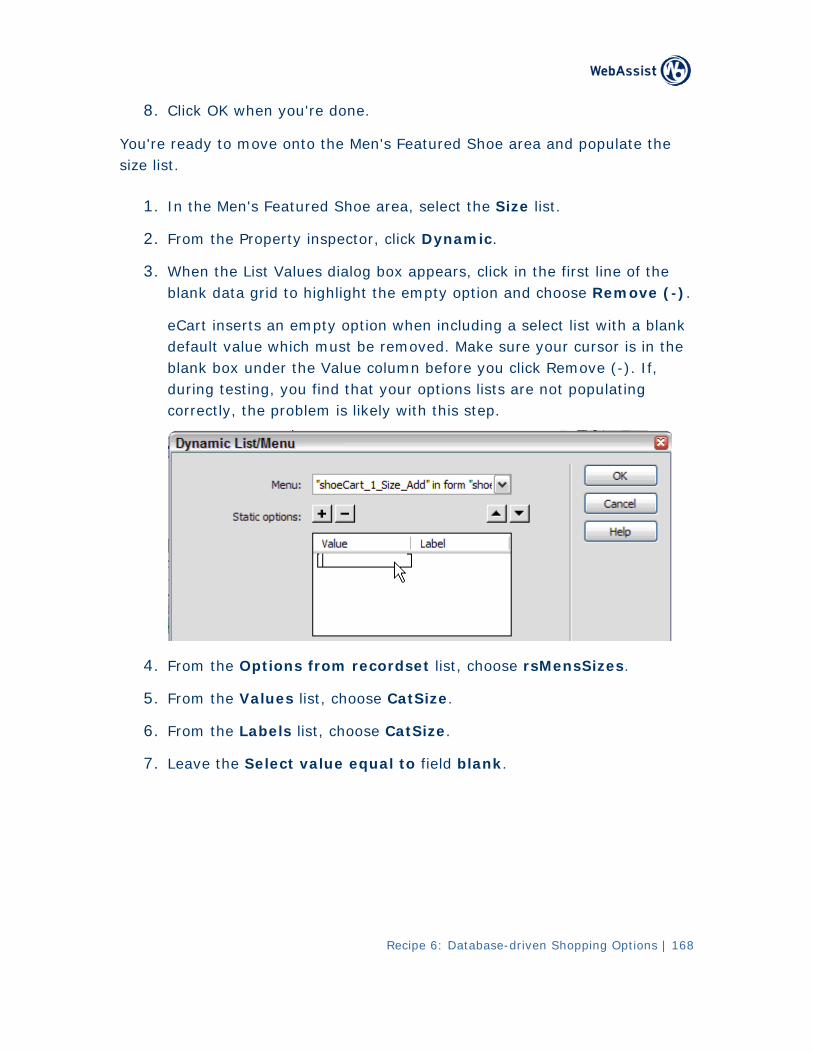
8. Click OK when you're done.
You area and populate the 're ready to move onto the Men's Featured Shoe size list.
1. In the Men's Featured Shoe area, select the Size list.
2 From the Property inspector, click Dynamic. .
3. When the List Values dialog box appears, click in the first line of theblank data grid to highlight the empty option and choose Remove (-).
select list with a blank eCart inserts an empty option when including a default value which must be removed. Make sure your cursor is in the blank box under the Value column before you click Remove (-). If, during testing, you find that your options lists are not populating correctly, the problem is likely with this step.
4. From the Options from recordset list, choose rsMensSizes.
5. From the Values list, choose CatSize.
6. From the Labels list, choose CatSize.
7. Leave the Select value equal to field blank.
Recipe 6: Database-driven Shopping Options | 168
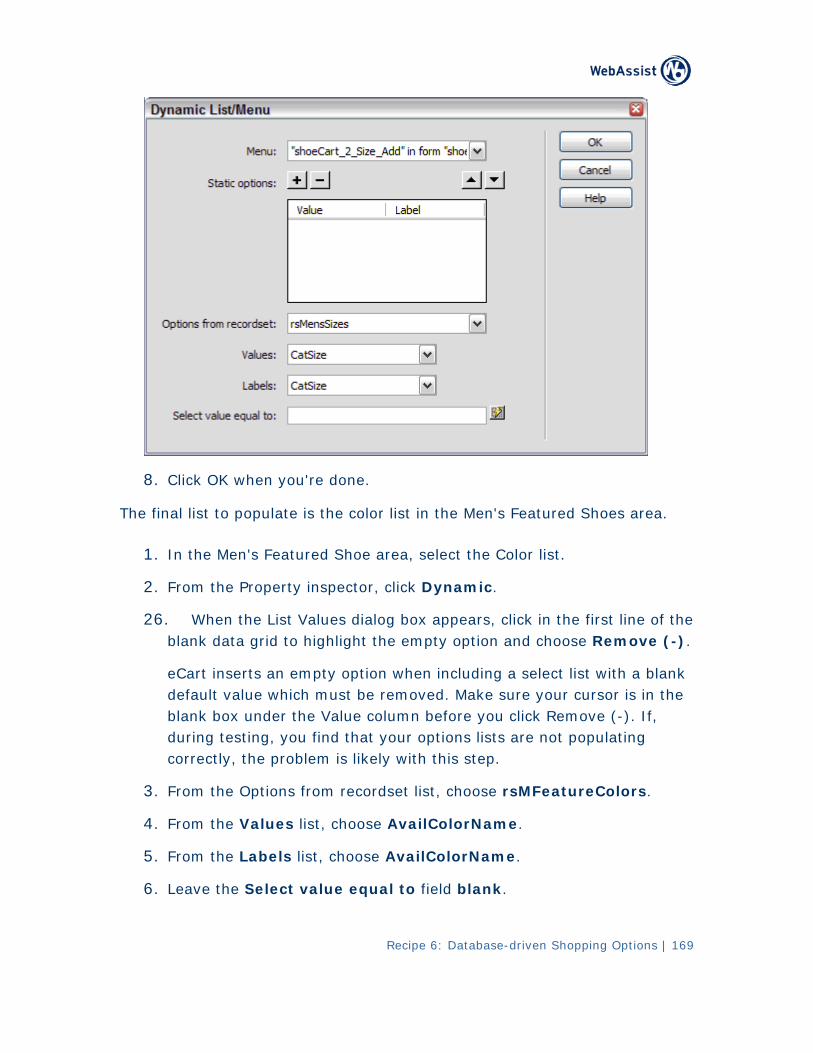
8. Click OK when you're done.
The final list to populate is the color list in the Men's Featured Shoes area.
1. In the Men's Featured Shoe area, select the Color list.
2. From the Property inspector, click Dynamic.
26. the When the List Values dialog box appears, click in the first line of blank data grid to highlight the empty option and choose Remove (-).
eCart inserts an empty option when including a select list with a blank default value which must be removed. Make sure your cursor is in the blank box under the Value column before you click Remove (-). If, during testing, you find that your options lists are not populating correctly, the problem is likely with this step.
3. From the Options from recordset list, choose rsMFeatureColors.
4. From the Values list, choose AvailColorName.
5. From the Labels list, choose AvailColorName.
6. Leave the Select value equal to field blank.
Recipe 6: Database-driven Shopping Options | 169
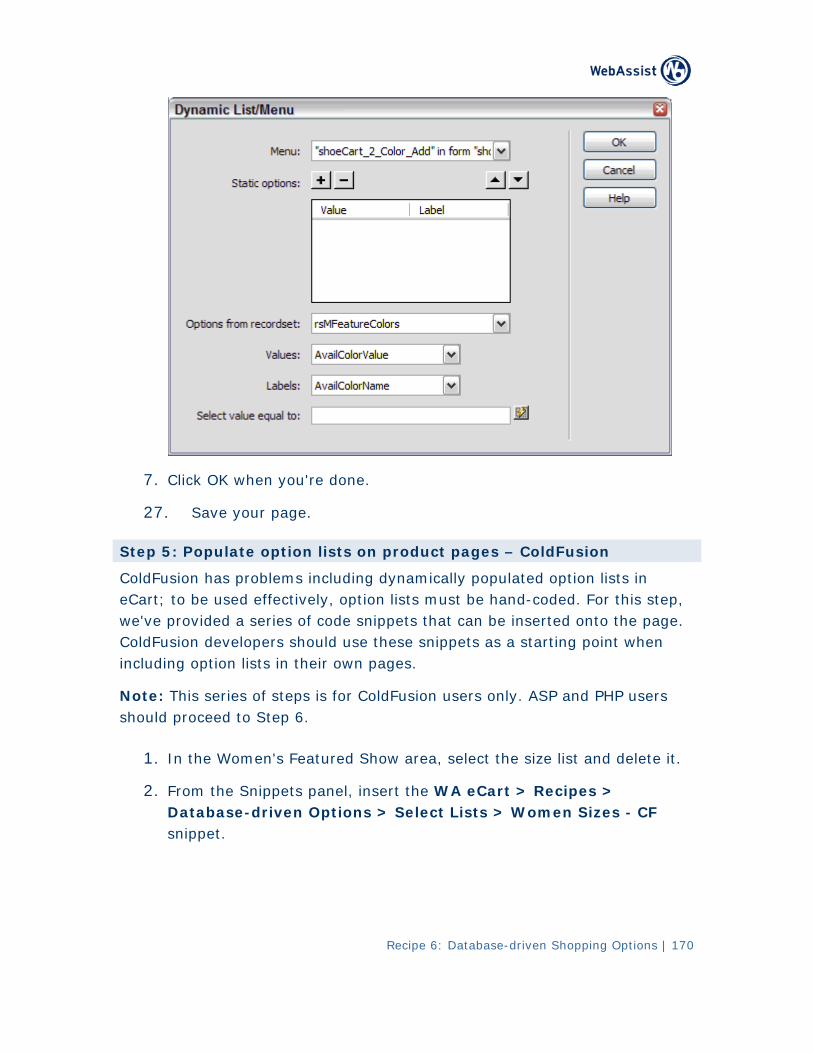
7. Click OK when you're done.
27. Save your page.
Ste sion p 5: Populate option lists on product pages – ColdFu
Col lated option lists in dFusion has problems including dynamically popueCart; to be used effectively, option lists must be hand-coded. For this step, we . 've provided a series of code snippets that can be inserted onto the pageColdFusion developers should use these snippets as a starting point when including option lists in their own pages.
Note: This series of steps is for ColdFusion users only. ASP and PHP users should proceed to Step 6.
1. e size list and delete it. In the Women's Featured Show area, select th
2. From the Snippets panel, insert the WA eCart > Recipes > Database-driven Options > Select Lists > Women Sizes - CF snippet.
Recipe 6: Database-driven Shopping Options | 170
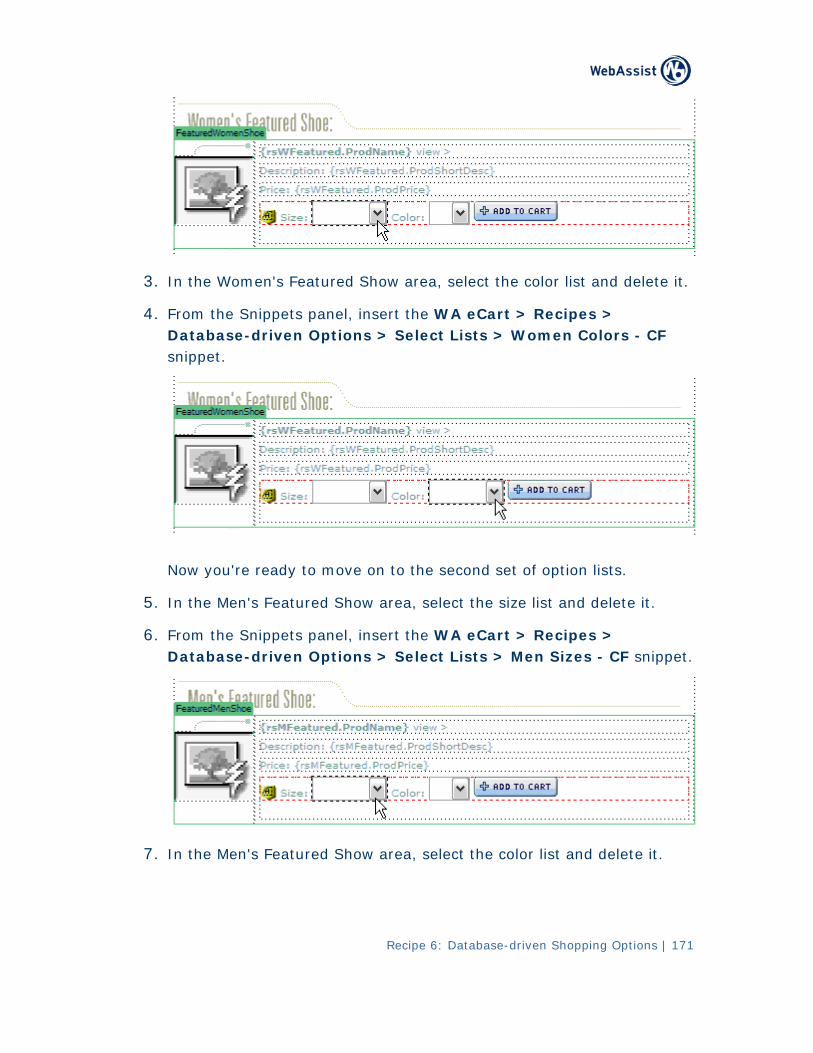
Recipe 6: Database-driven Shopping Options | 171
3. it. In the Women's Featured Show area, select the color list and delete
4. From the Snippets panel, insert the WA eCart > Recipes > Database-driven Options > Select Lists > Women Colors - CF snippet.
Now you're ready to move on to the second set of option lists.
5. In the Men's Featured Show area, select the size list and delete it.
6. From the Snippets panel, insert the WA eCart > Recipes > Database-driven Options > Select Lists > Men Sizes - CF snippet.
7. In the Men's Featured Show area, select the color list and delete it.
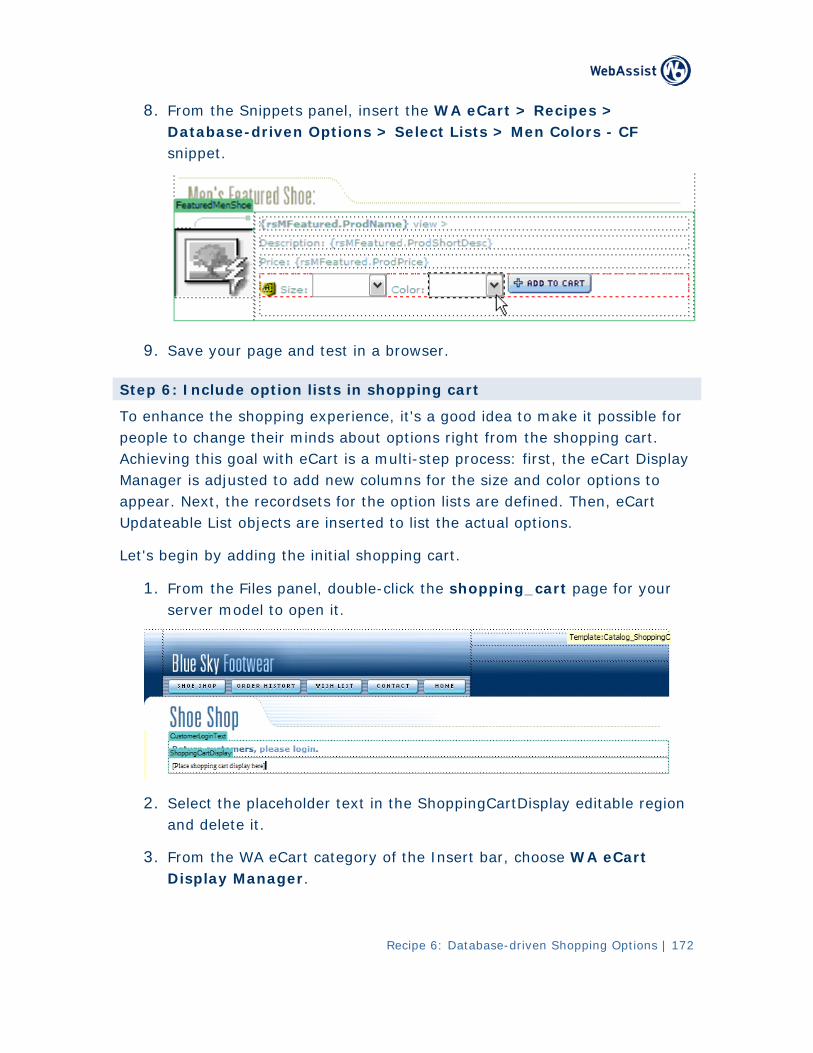
Recipe 6: Database-driven Shopping Options | 172
8. From the Snippets panel, insert the WA eCart > Recipes > Database-driven Options > Select Lists > Men Colors - CF snippet.
9. r page and test in a browser. Save you
Step 6: Include option lists in shopping cart
To enhance the shopping experience, it's a good idea to make it possible for people to change their minds about options right from the shopping cart. Achieving this goal with eCart is a multi-step process: first, the eCart Display Manager is adjusted to add new columns for the size and color options to appear. Next, the recordsets for the option lists are defined. Then, eCart Updateable List objects are inserted to list the actual options.
Let's begin by adding the initial shopping cart.
1. From the Files panel, double-click the shopping_cart page for your server model to open it.
2. Select the placeholder text in the ShoppingCartDisplay editable region and delete it.
3. From the WA eCart category of the Insert bar, choose WA eCart Display Manager.
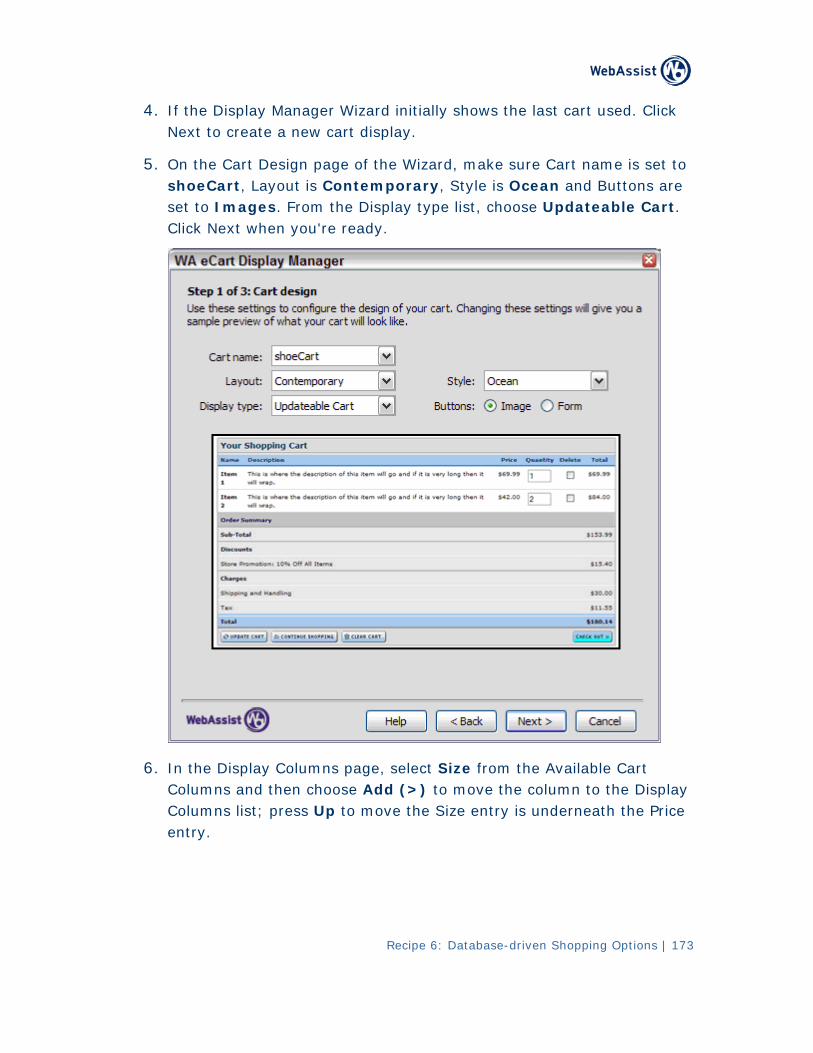
Recipe 6: Database-driven Shopping Options | 173
d. Click 4. If the Display Manager Wizard initially shows the last cart useNext to create a new cart display.
5. t Design page of the Wizard, make sure Cart name is set to On the CarshoeCart, Layout is Contemporary, Style is Ocean and Buttons are set to Images. From the Display type list, choose Updateable Cart. Click Next when you're ready.
6. In the Display Columns page, select Size from the Available Cart Columns and then choose Add (>) to move the column to the Display Columns list; press Up to move the Size entry is underneath the Price entry.
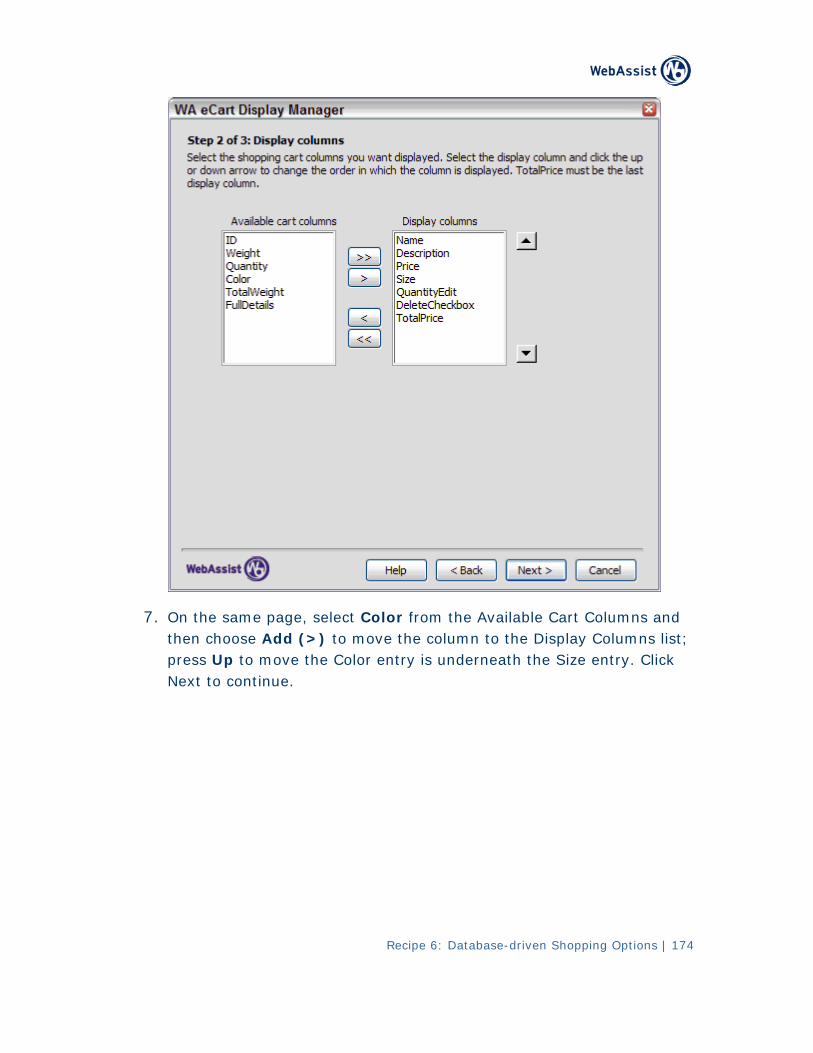
7. d On the same page, select Color from the Available Cart Columns anthen choose Add (>) to move the column to the Display Columns list; press Up to move the Color entry is underneath the Size entry. Click Next to continue.
Recipe 6: Database-driven Shopping Options | 174
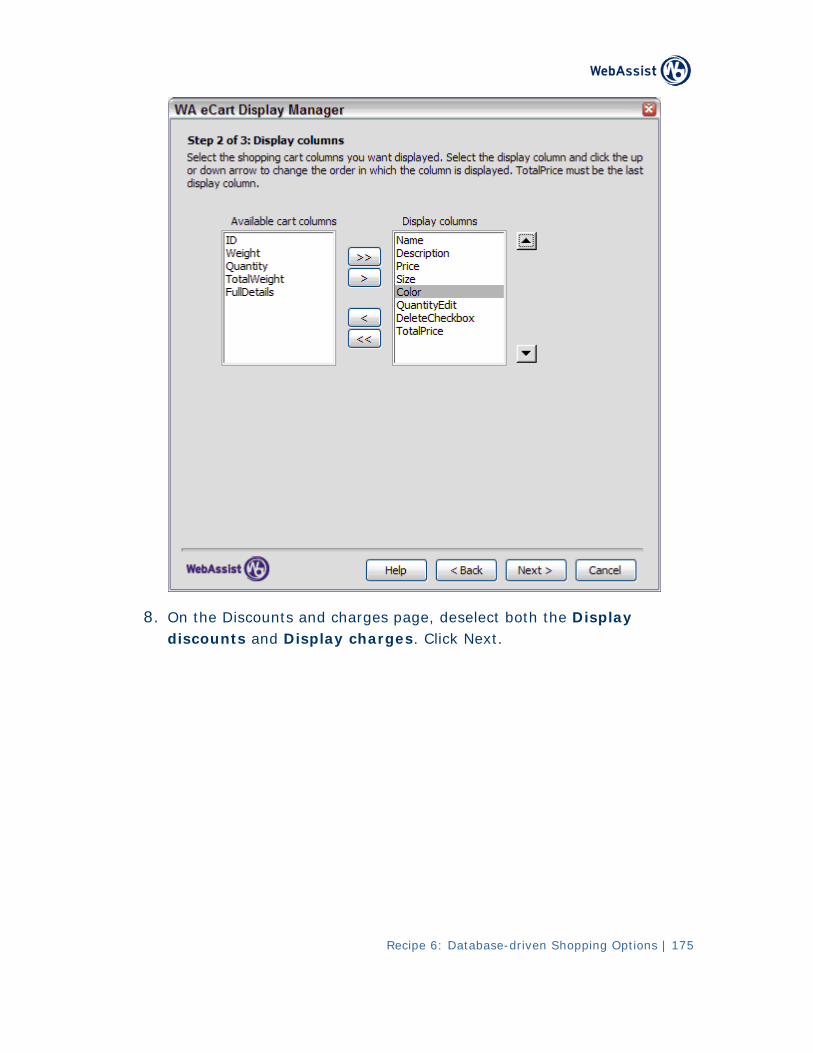
8. On the Discounts and charges page, deselect both the Display discounts and Display charges. Click Next.
Recipe 6: Database-driven Shopping Options | 175
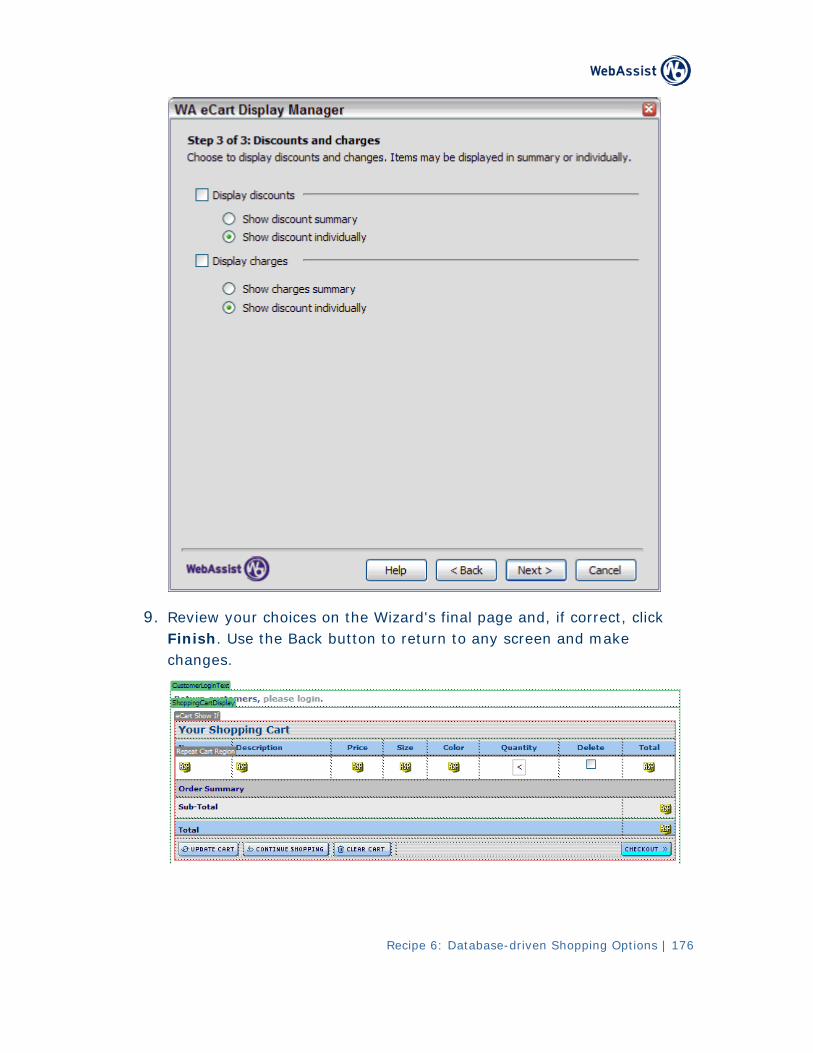
9. Review your choices on the Wizard's final page and, if correct, click Finish. Use the Back button to return to any screen and make changes.
Recipe 6: Database-driven Shopping Options | 176
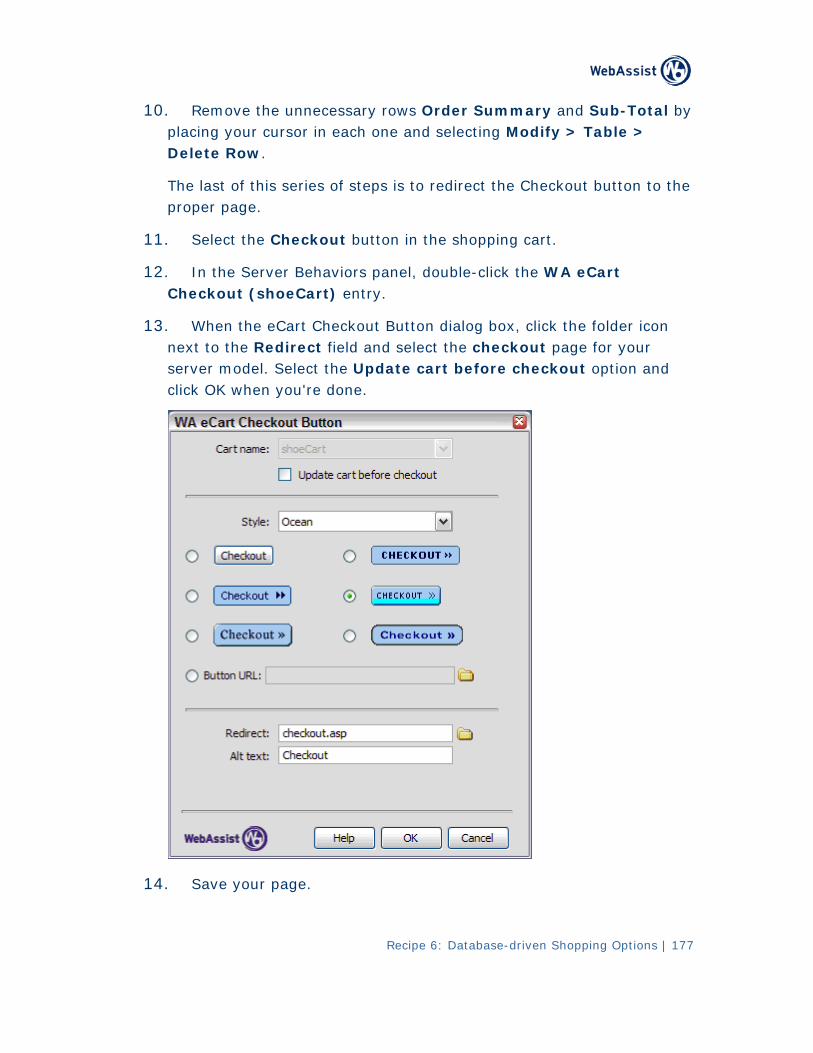
Recipe 6: Database-driven Shopping Options | 177
10. l by Remove the unnecessary rows Order Summary and Sub-Totaplacing your cursor in each one and selecting Modify > Table > Delete Row.
the The last of this series of steps is to redirect the Checkout button to proper page.
Select the Checkout button in the shopping cart. 11.
12. In the Server Behaviors panel, double-click the WA eCart Checkout (shoeCart) entry.
13. When the eCart Checkout Button dialog box, click the folder iconnext to the Redirect field and select the checkout page for your server model. Select the Update cart before checkout option and click OK when you're done.
14. Save your page.

Recipe 6: Database-driven Shopping Options | 178
Next, you'll add the two recordsets needed to populate the option lists that will be inserted under the Size and Color column.
1. From the Snippets panel, right-click the WA eCart > Recipes > Database-driven Options > SQL > Shopping Cart Sizes SQL snippet for your server model and choose Copy Snippet. Click OK when the copy is confirmed.
2. From the Bindings panel, choose Add (+) and select Recordset from the list.
3. Switch to the Advanced view and, in the Name field enter rsSizes.
4. From the Connection list, choose connBlueSky.
5. the SQL area and press Ctrl+V (Command+ V) to Place your cursor inpaste in the copied code.
[ASP-JS]
SELECT *
FROM CatSizes INNER JOIN Products ON Products.ProdCatID = CatSizes.CatSizeCatID
WHERE ProdID = CatParam
ORDER BY CatSizeID
[ASP-VB]
SELECT *
FROM CatSizes INNER JOIN Products ON Products.ProdCatID = CatSizes.CatSizeCatID
WHERE ProdID = CatParam
ORDER BY CatSizeID
[CF]
SELECT * FROM CatSizes
INNER JOIN Products ON Products.ProdCatID = CatSizes.CatSizeCatID
WHERE ProdID = #WA_eCart_DisplayInfo(shoeCart, "ID")#
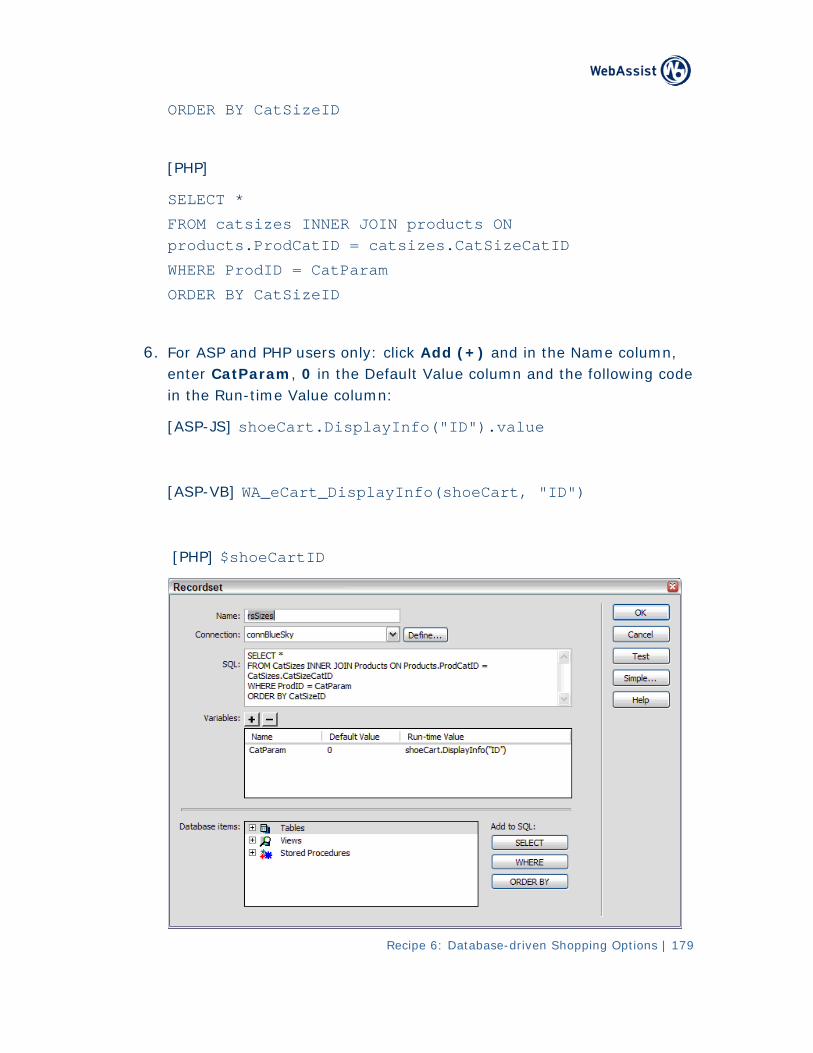
Recipe 6: Database-driven Shopping Options | 179
ORDER BY CatSizeID
[PHP]
SELECT *
products ON FROM catsizes INNER JOINproducts.ProdCatID = catsizes.CatSizeCatID
WHERE ProdID = CatParam
Y CatSizeID ORDER B
6. For ASP and PHP users only: click Add (+) and in the Name column, enter CatParam, 0 in the Default Value column and the following code in the Run-time Value column:
[ASP-JS] shoeCart.DisplayInfo("ID").value
[ASP-VB] WA_eCart_DisplayInfo(shoeCart, "ID")
[PHP] $shoeCartID
Recipe 6: Database-driven Shopping Options | 180
. e. 7 Click OK when you're don
Note: The remaining steps in this series are for PHP users only.
A code block defining the $shoeCartID parameter needs to be added above the recordset just defined.
8 From the Server Behaviors panel, select Record. set (rsSizes) and switch to Code view.
9. In Code view, press the l w key to move in front of the selected eft arrorecordset.
10. From the Snippets panel, insert the WA eCart > Recipes > Database-driven Options > SQL > rsSize Parameter – PHP snippet.
11. Save your page
A similar series o sed to populate f steps is required to create the recordset uthe color option list.
1. From the pes > Snippets panel, right-click the WA eCart > ReciDatabase-driven Options > SQL > Shopping Cart Colors SQL snippet for your server model and choose Copy Snippet. Click OK when the copy is confirmed.
2. From the Bindings panel, choose Add (+) and select Recordset from the list.
3. Switch to the Advanced view and, in the Name field enter rsColors.
4. From the Connection list, choose connBlueSky.
5. Place your cursor in the SQL area and press Ctrl+V (Command+ V) to paste in the copied code.
[ASP-JS]
SELECT *
FROM ProdColors INNER JOIN AvailColors ON AvailColors.AvailColorID = ProdColors.ProdAvailColor
WHERE ProdProdID = ProdIDParam
Recipe 6: Database-driven Shopping Options | 181
[ASP-VB]
SELECT *
FROM ProdColors INNER JOIN AvailColors ON AvailColors.AvailColorID = ProdColors.ProdAvailColor
WHERE ProdProdID = ProdIDParam
[CF]
SELECT * FROM ProdColors
INNER JOIN AvailColors ON AvailColors.AvailColorID = ProdColors.ProdAvailColor
WHERE ProdProdID = #WA_eCart_DisplayInfo(shoeCart, "ID")#
[PHP]
SELECT *
FROM prodcolors INNER JOIN availcolors ON availcolors.AvailColorID = prodcolors.ProdAvailColor
WHERE ProdProdID = ProdIDParam
6. For ASP and PHP users only: click Add (+) and in the Name column, enter ProdIDParam, 0 in the Default Value column and the following code in the Run-time Value column:
shoeCart.DisplayInfo("ID").valu[ASP-JS] e
layInfo(shoeCart, "ID") [ASP-VB] WA_eCart_Disp
[PHP] $shoeCartID
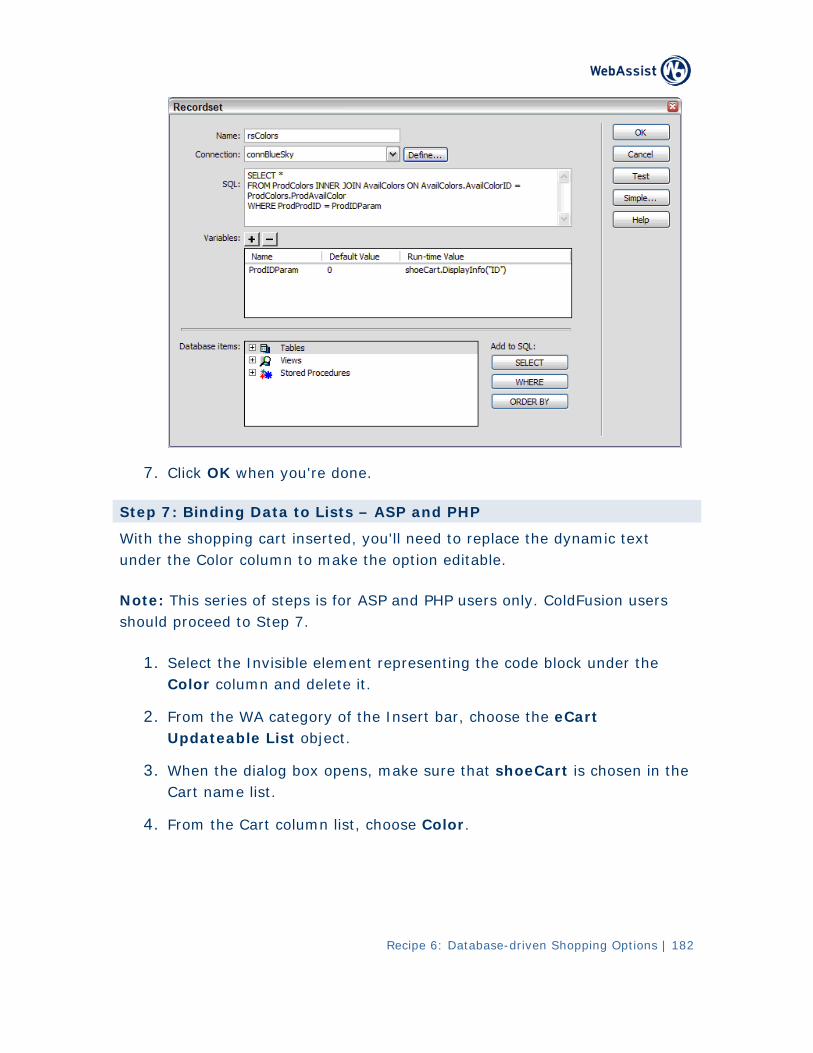
Recipe 6: Database-driven Shopping Options | 182
7 Click OK when . you're done.
Ste 7p : Binding Data to Lists – ASP and PHP
With the shopping cart inserted, you'll need to replace the dynamic text und r able. e the Color column to make the option edit
Note: This series of steps is for ASP and PHP users only. ColdFusion users should proceed to Step 7.
1. Select the Invisible element representing the code block under the Color column and delete it.
2 Fr. om the WA category of the Insert bar, choose the eCart Updateable List object.
3 Wh. en the dialog box opens, make sure that shoeCart is chosen in the Cart name list.
4. From t ist, choose Color. he Cart column l
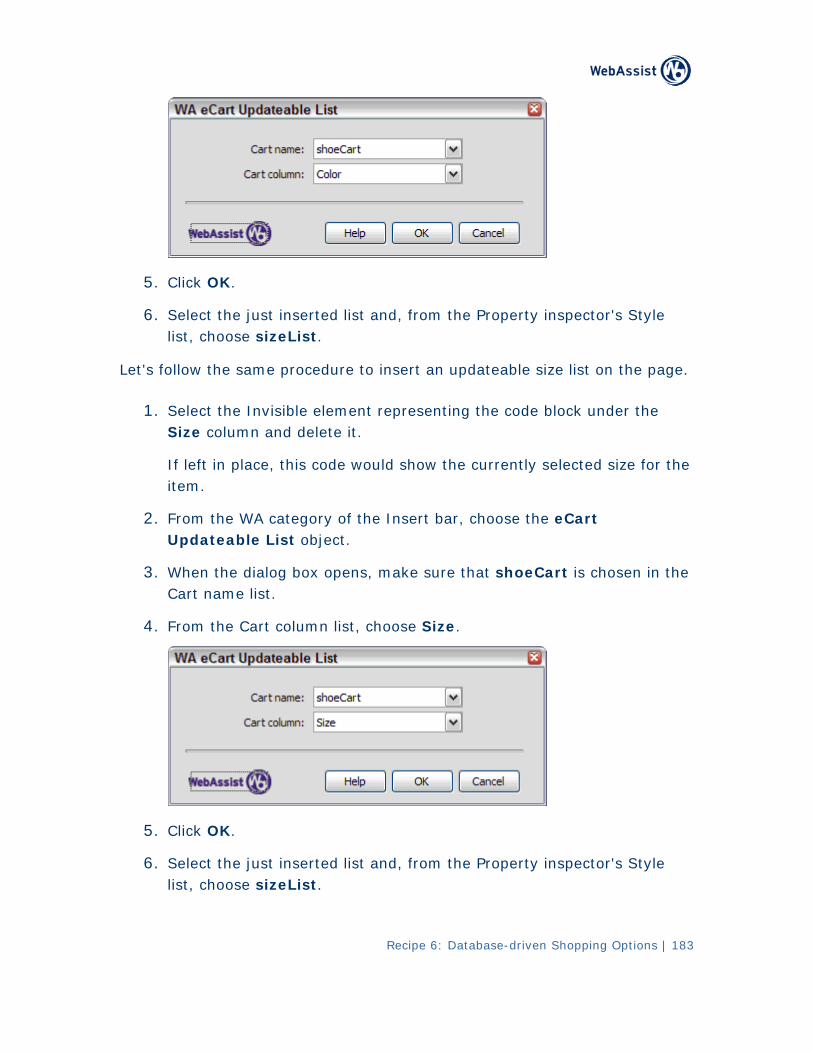
Recipe 6: Database-driven Shopping Options | 183
5. Click OK.
6. Select the just inserted list and, from the Property inspector's Style list, choose sizeList.
Let's follow the same procedure to insert an updateable size list on the page.
1. Select the Invisible element representing the code block under the Size column and delete it.
If left in place, this code would show the currently selected size for the item.
2. From the WA category of the Insert bar, choose the eCart Updateable List object.
3. When the dialog box opens, make sure that shoeCart is chosen in the Cart name list.
4. From the Cart column list, choose Size.
5. Click OK.
6. Select the just inserted list and, from the Property inspector's Style list, choose sizeList.
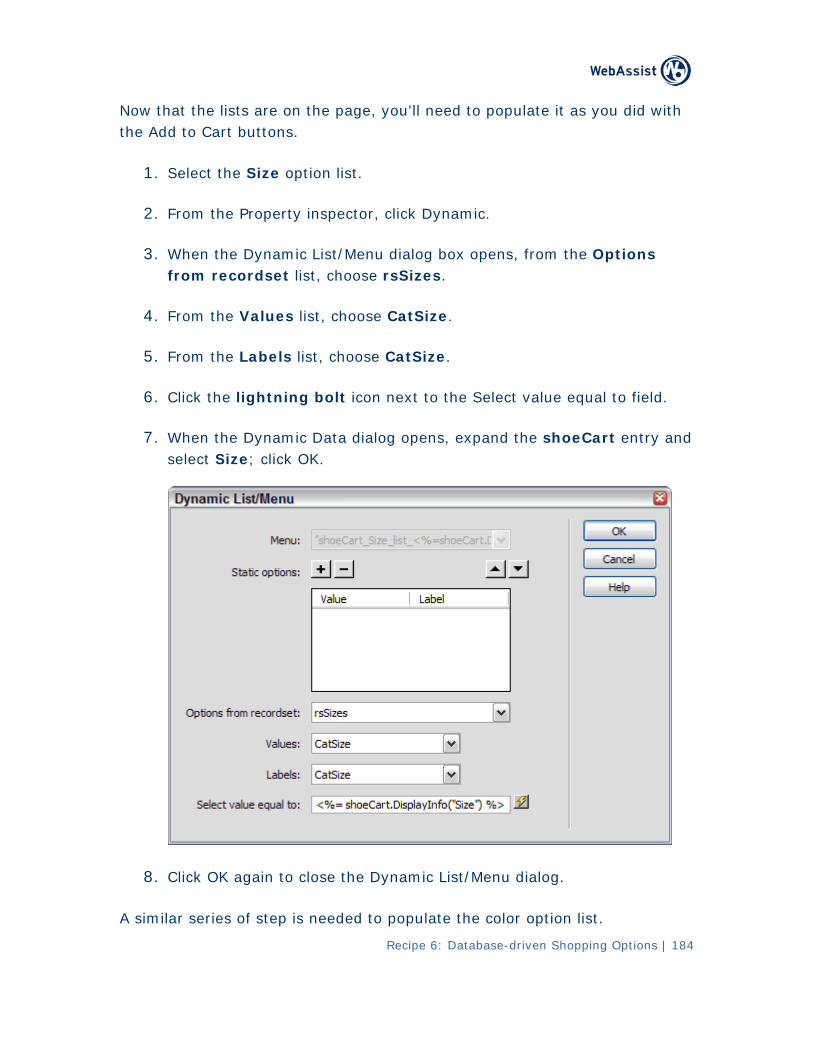
Recipe 6: Database-driven Shopping Options | 184
it as you did with Now that the lists are on the page, you'll need to populate the Add to Cart buttons.
1. Select the Size option list.
2. From the Property inspector, click Dynamic.
3. When the Dynamic List/Menu dialog box opens, from the Options from recordset list, choose rsSizes.
4. From the Values list, choose CatSize.
5. From the Labels list, choose CatSize.
6. Click the lightning bolt icon next to the Select value equal to field.
7. log opens, expand the shoeCart entry and When the Dynamic Data diaselect Size; click OK.
8. e Dynamic List/Menu dialog. Click OK again to close th
A similar series of step is needed to populate the color option list.
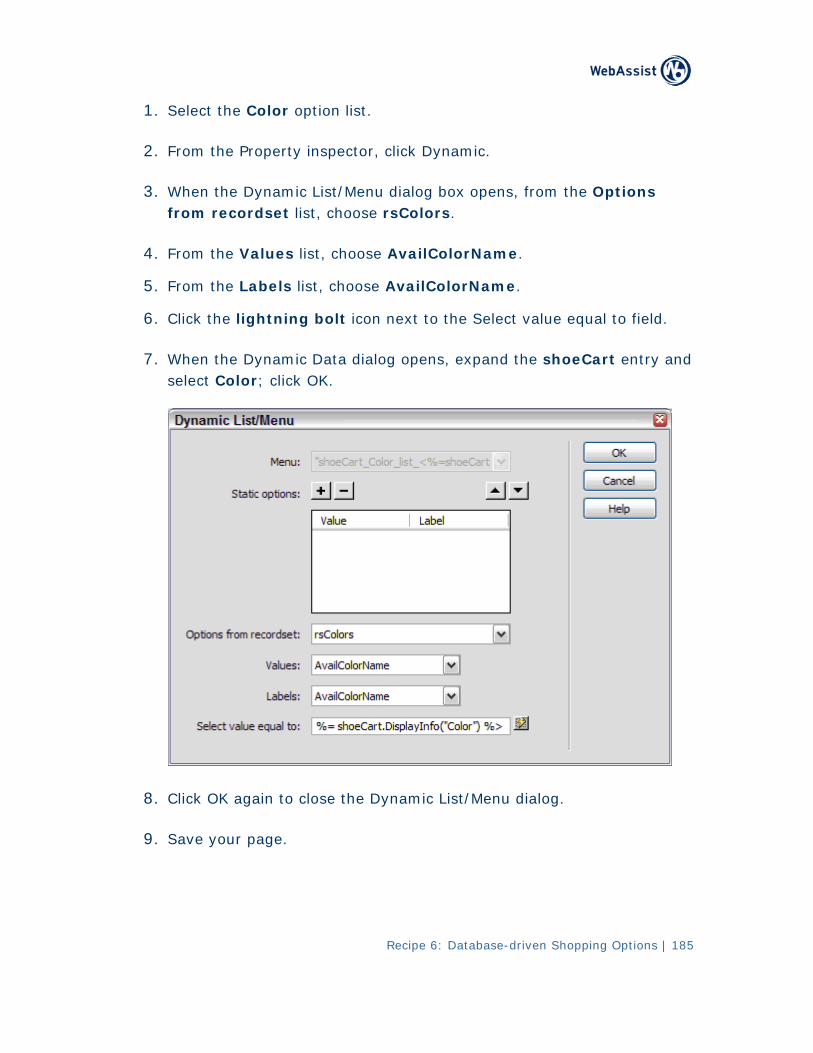
1. Select the Color option list.
2. From the Property inspector, click Dynamic.
3. When the Dynamic List/Menu dialog box opens, from the Options from recordset list, choose rsColors.
4. From the Values list, choose AvailColorName.
5. . From the Labels list, choose AvailColorName
6. Click the lightning bolt icon next to the Select value equal to field.
7. When the Dynamic Data dialog opens, expand the shoeCart entry and select Color; click OK.
8. Click OK again to close the Dynamic List/Menu dialog.
9. Save your page.
Recipe 6: Database-driven Shopping Options | 185
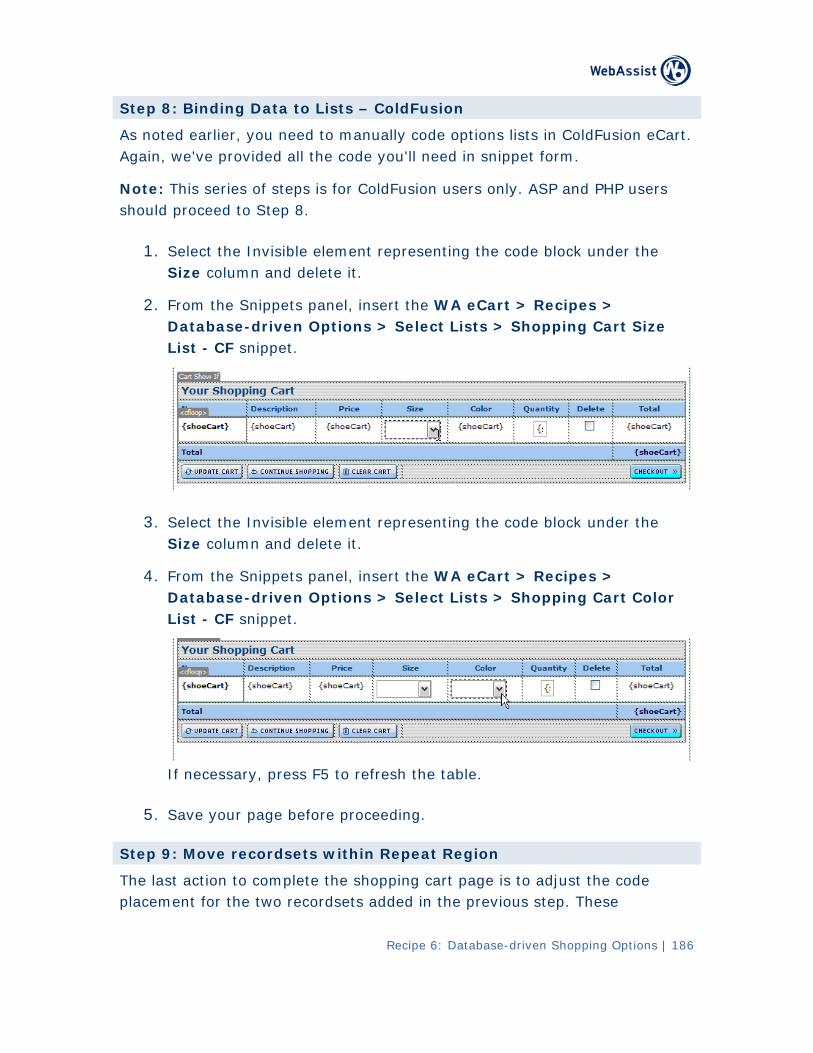
Ste oldFusion p 8: Binding Data to Lists – C
As noted earlier, you need to manually code options lists in ColdFusion eCart. Aga ippet form. in, we've provided all the code you'll need in sn
Note: This series of steps is for ColdFusion users only. ASP and PHP users should proceed to Step 8.
1. Select the Invisible element representing the code block under the Size column and delete it.
2. From the Snippets panel, insert the WA eCart > Recipes > Database-driven Options > Select Lists > Shopping Cart Size List - CF snippet.
3. Select the Invisible element representing the code block under the Size column and delete it.
4. From the Snippets panel, insert the WA eCart > Recipes > Database-driven Options > Select Lists > Shopping Cart Color List - CF snippet.
If necessary, press F5 to refresh the table.
5. Save your page before proceeding.
Step 9: Move recordsets within Repeat Region
The last action to complete the shopping cart page is to adjust the code placement for the two recordsets added in the previous step. These
Recipe 6: Database-driven Shopping Options | 186
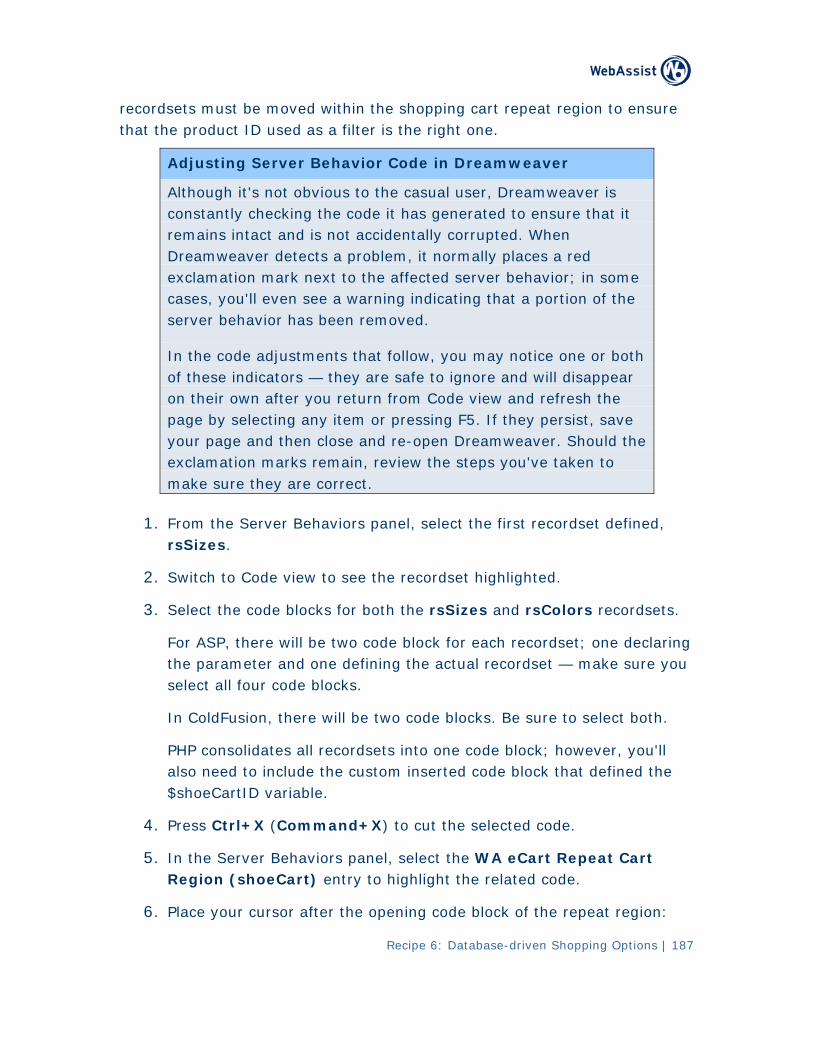
Recipe 6: Database-driven Shopping Options | 187
cart repeat region to ensure recordsets must be moved within the shopping that the product ID used as a filter is the right one.
Adjusting Server Behavior Code in Dreamweaver
Although it's not obvious to the casual user, Dreamweaver is constantly checking the code it has generated to ensure that it remains intact and is not accidentally corrupted. When Dreamweaver detects a problem, it normally places a red exclamation mark next to the affected server behavior; in some cases, you'll even see a warning indicating that a portion of the server behavior has been removed.
In the code adjustments that follow, you may notice one or both of these indicators — they are safe to ignore and will disappear on their own after you return from Code view and refresh the page by selecting any item or pressing F5. If they persist, save your page and then close and re-open Dreamweaver. Should the exclamation marks remain, review the steps you've taken to make sure they are correct.
1. From the Server Behaviors panel, select the first recordset defined, rsSizes.
2. Switch to Code view to see the recordset highlighted.
3. cks for both the rsSizes and rsColors recordsets. Select the code blo
For ASP, there will be two code block for each recordset; one declaring the parameter and one defining the actual recordset — make sure you select all four code blocks.
In ColdFusion, there will be two code blocks. Be sure to select both.
PHP consolidates all recordsets into one code block; however, you'll also need to include the custom inserted code block that defined the $shoeCartID variable.
4. Press Ctrl+X (Command+X) to cut the selected code.
5. In the Server Behaviors panel, select the WA eCart Repeat Cart Region (shoeCart) entry to highlight the related code.
6. Place your cursor after the opening code block of the repeat region:
Recipe 6: Database-driven Shopping Options | 188
[ASP-JS]
<%
while (!shoeCart.EOF()) {
%>
[ASP-VB]
<%
while (NOT WA_eCart_EOF(shoeCart))
%>
[ColdFusion]
<CFIF NOT WA_eCart_EOF(shoeCart)>
<CFLOOP CONDITION="NOT WA_eCart_EOF(shoeCart)">
[PHP]
<?php
while (!$shoeCart->EOF()) {
?>
7 Press Ctrl+V (Command+V) to paste the recordsets into their new . position.
r ASP and PHP only. With these server This final series of steps is fomodels, not only must you move the recordset definitions, you also need to move the code blocks that close the recordsets.
8. In Code view, move to the bottom of the page.
9. wing code: Select and cut the follo
[ASP-JS]
<%
rsSizes.Close();
Recipe 6: Database-driven Shopping Options | 189
%>
<%
rsColors.Close();
%>
[ASP-VB]
<%
rsSizes.Close()
Set rsSizes = Nothing
%>
<%
rsColors.Close()
Set rs lCo ors = Nothing
%>
[PHP]
<?php
ee_result($rsSizes); mysql_fr
mysql_free_result($rsColors);
?>
10. In the Server Behaviors panel, select the WA eCart Repeat Cart Region (shoeCart) entry to highlight the related code.
11. Scro ll to the bottom of the selected code and place your cursor before the following code:
[ASP-JS]
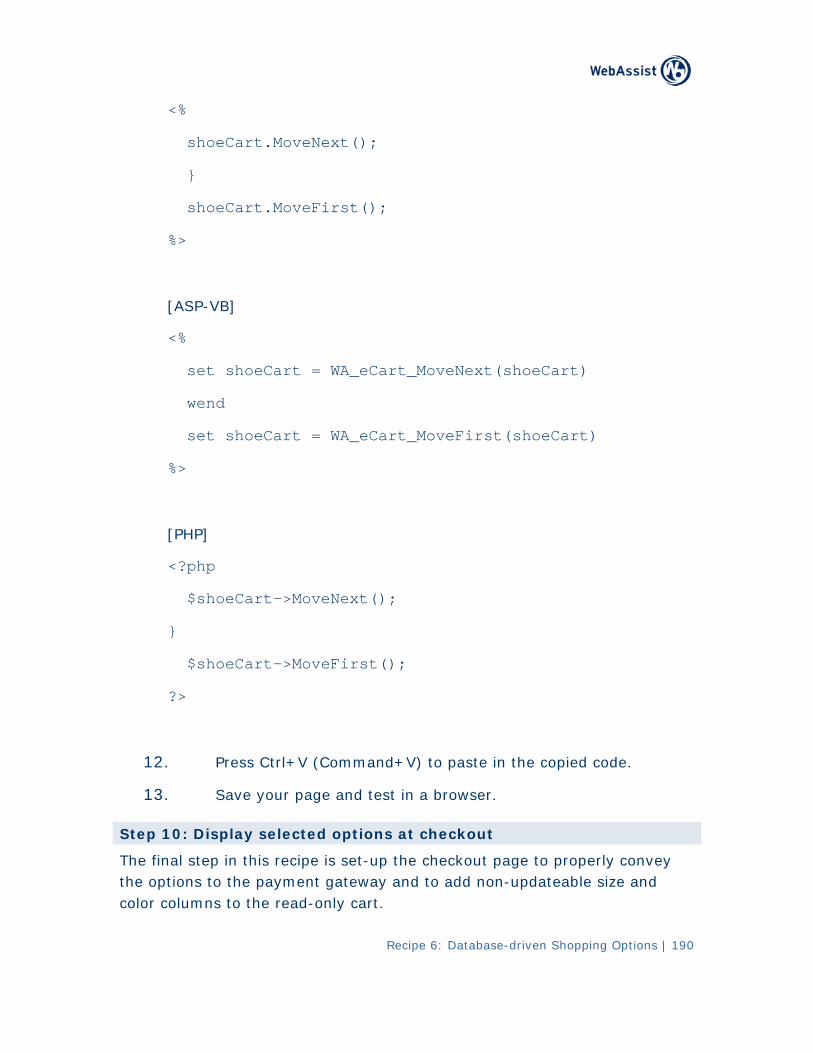
Recipe 6: Database-driven Shopping Options | 190
<%
shoeCart.MoveNext();
}
shoeCart.MoveFirst();
%>
[ASP-VB]
<%
set shoeCart = WA_eCart_MoveNext(shoeCart)
wend
set shoeCart = WA_eCart_MoveFirst(shoeCart)
%>
[PHP]
<?php
$shoeCart->MoveNext();
}
$shoeCart->MoveFirst();
?>
12. Press Ctrl+V (Command+V) to paste in the copied code.
13. Save your page and test in a browser.
Step 10: Display selected options at checkout
The final step in this recipe is set-up the checkout page to properly convey the op d to add non-updateable size and tions to the payment gateway ancol c e read-only cart. or olumns to th
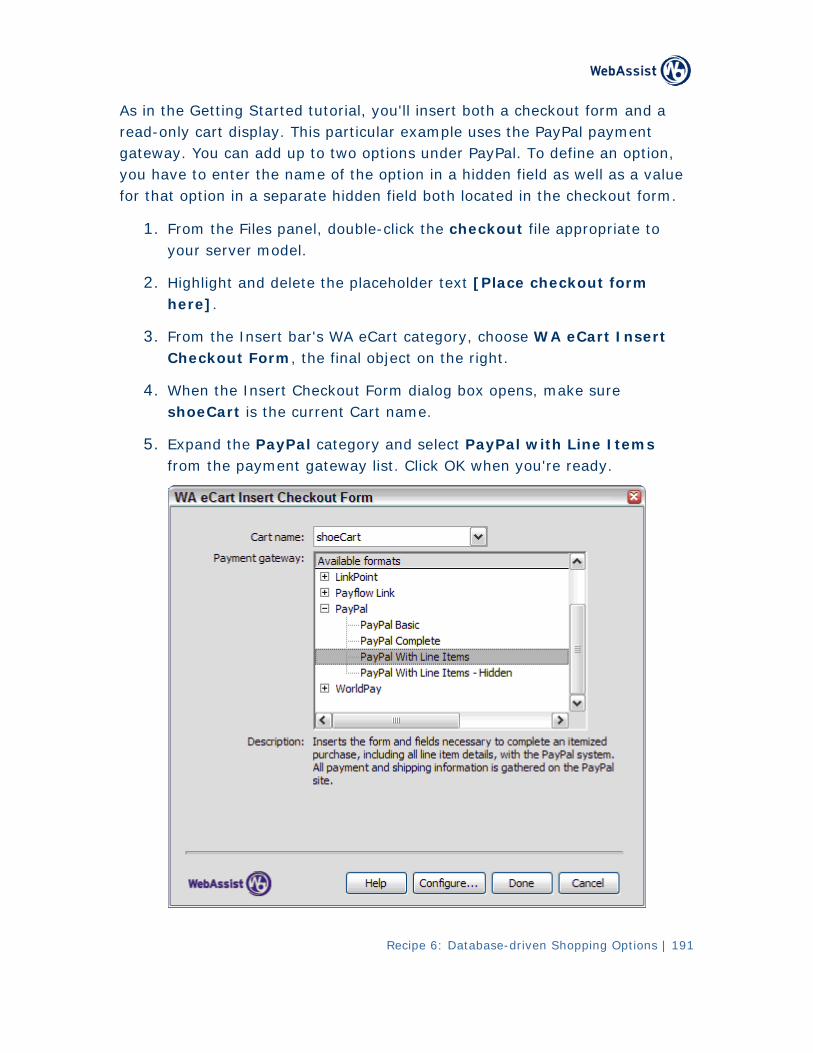
Recipe 6: Database-driven Shopping Options | 191
As etting Started tutorial, you'll insert both a checkout form and a in the Grea -o example uses the PayPal payment d nly cart display. This particulargat w ons under PayPal. To define an option, e ay. You can add up to two optiyou ha enter the name of the option in a hidden field as well as a value ve to for that op d both located in the checkout form. tion in a separate hidden fiel
1. From the Files panel, double-click the checkout file appropriate to your server model.
2 Hi. ghlight and delete the placeholder text [Place checkout form here].
3 From. the Insert bar's WA eCart category, choose WA eCart Insert Checkout Form, the final object on the right.
4. Insert Checkout Form dialog box opens, make sure When theshoeCart is the current Cart name.
5 Expand the PayPal category and select PayPal with Line I. tems from the payment gateway list. Click OK when you're ready.
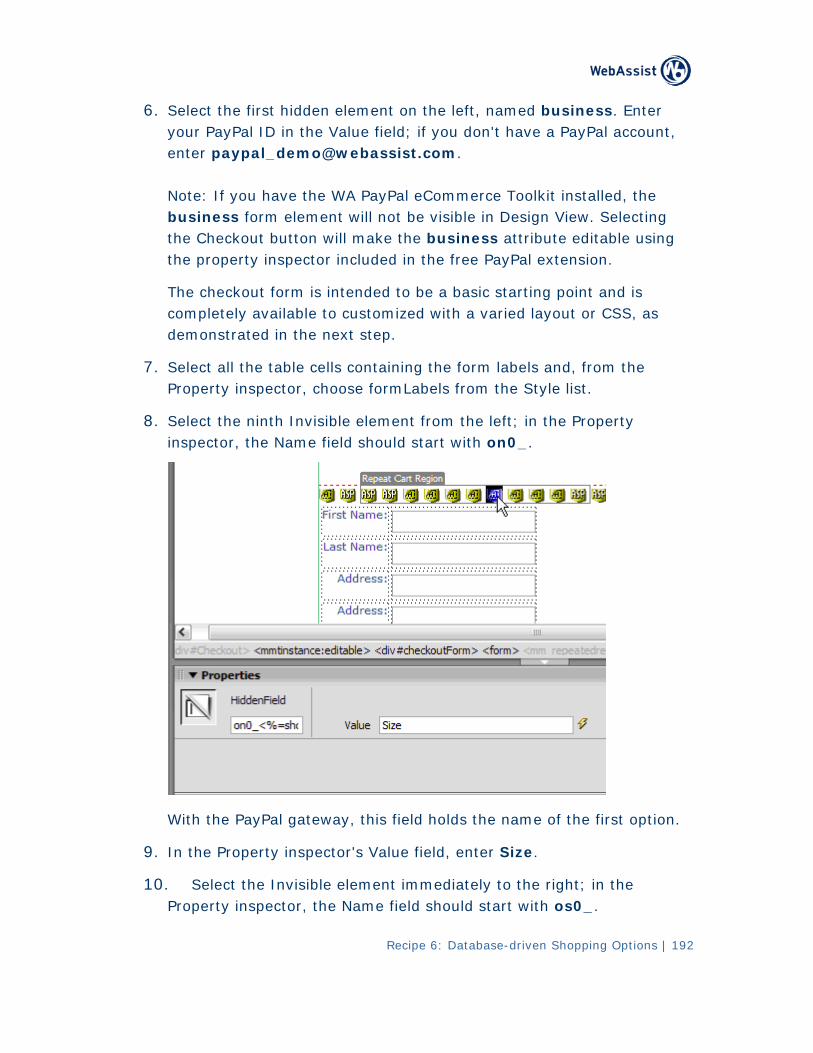
6. Select the first hidden element on the left, named business. Enter your PayPal ID in the Value field; if you don't have a PayPal account, enter [email protected]. Note: If you have the WA PayPal eCommerce Toolkit installed, the business form element will not be visible in Design View. Selecting the Checkout button will make the business attribute editable using the property inspector included in the free PayPal extension.
The checkout form is intended to be a basic starting point and is completely available to customized with a varied layout or CSS, as demonstrated in the next step.
7. ls and, from the Select all the table cells containing the form labeProperty inspector, choose formLabels from the Style list.
8. m the left; in the Property Select the ninth Invisible element froinspector, the Name field should start with on0_.
option. With the PayPal gateway, this field holds the name of the first
9. In the Property inspector's Value field, enter Size.
10. Select the Invisible element immediately to the right; in the Property inspector, the Name field should start with os0_.
Recipe 6: Database-driven Shopping Options | 192
Recipe 6: Database-driven Shopping Options | 193
ed. For PayPal, a field starting with this name contains the option select
11. Click the lightning bolt next to the Value field of the Property inspector to open the Dynamic Data dialog box.
12. In the Dynamic Data dialog, expand the shoeCart entry if necessary and select Size; click OK.
The same process is required to set the color options.
13. Property Select the 11th Invisible element from the left; in theinspector, the Name field should start with on1_.

Recipe 6: Database-driven Shopping Options | 194
option. With the PayPal gateway, this field holds the name of the first
In the Property inspector's Value field, enter Color. 14.
15. the Select the Invisible element immediately to the right; inProperty inspector, the Name field should start with os1_.
For PayPal, a field starting with this name contains the option selected.
16. Click the lightning bolt next to the Value field of the Property inspector to open the Dynamic Data dialog box.
17. In the Dynamic Data dialog, expand the shoeCart entry if necessary and select Color; click OK.
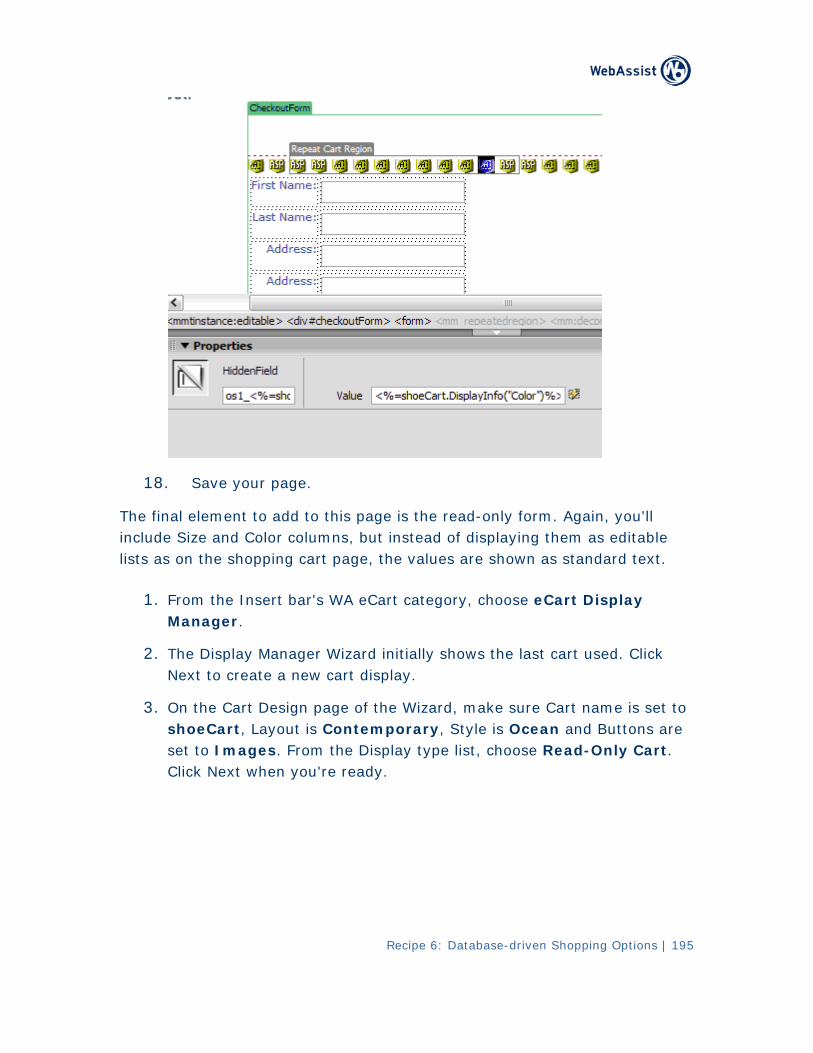
18. Save your page.
The Again, you'll final element to add to this page is the read-only form.include Size and Color columns, but instead of displaying them as editable lists as on the shopping cart page, the values are shown as standard text.
1 From the Insert bar's WA eCart category, choose eCart Display . Manager.
2. ows the last cart used. Click The Display Manager Wizard initially shNext to create a new cart display.
3. he Wizard, make sure Cart name is set to On the Cart Design page of tshoeCart, Layout is Contemporary, Style is Ocean and Buttons are set to Images. From the Display type list, choose Read-Only Cart. Click Next when you're ready.
Recipe 6: Database-driven Shopping Options | 195
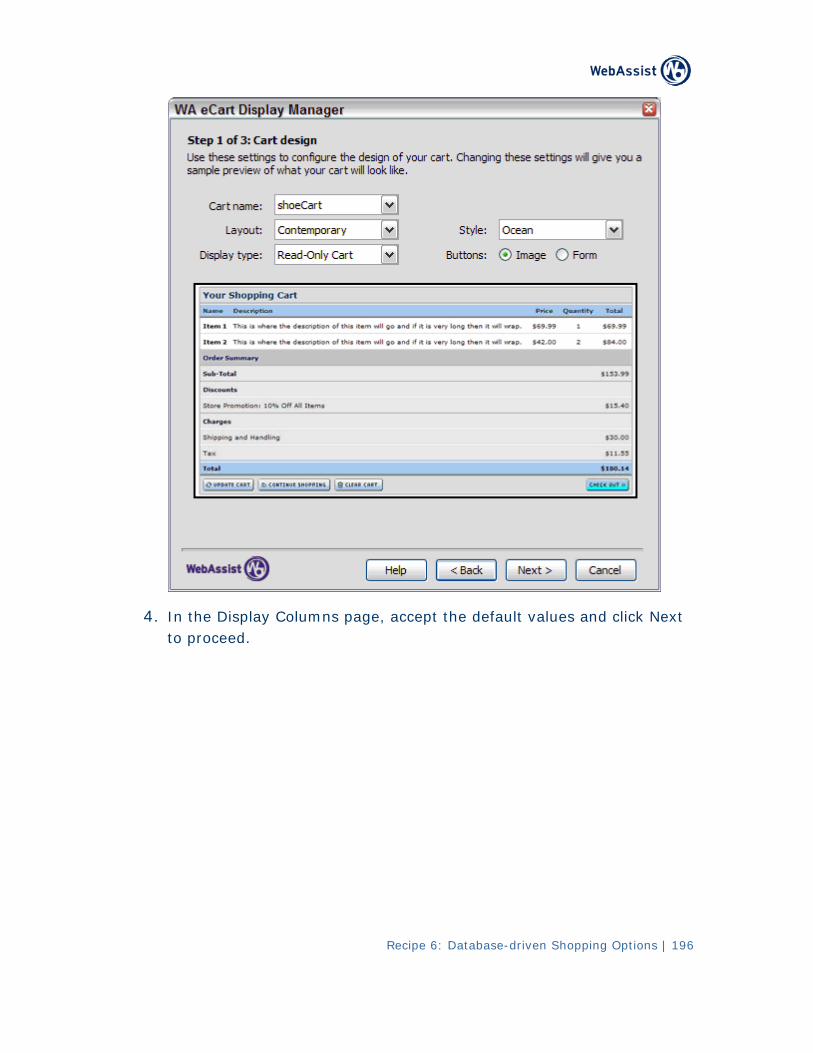
Recipe 6: Database-driven Shopping Options | 196
4. olumns page, accept the default values and click Next In the Display Cto proceed.
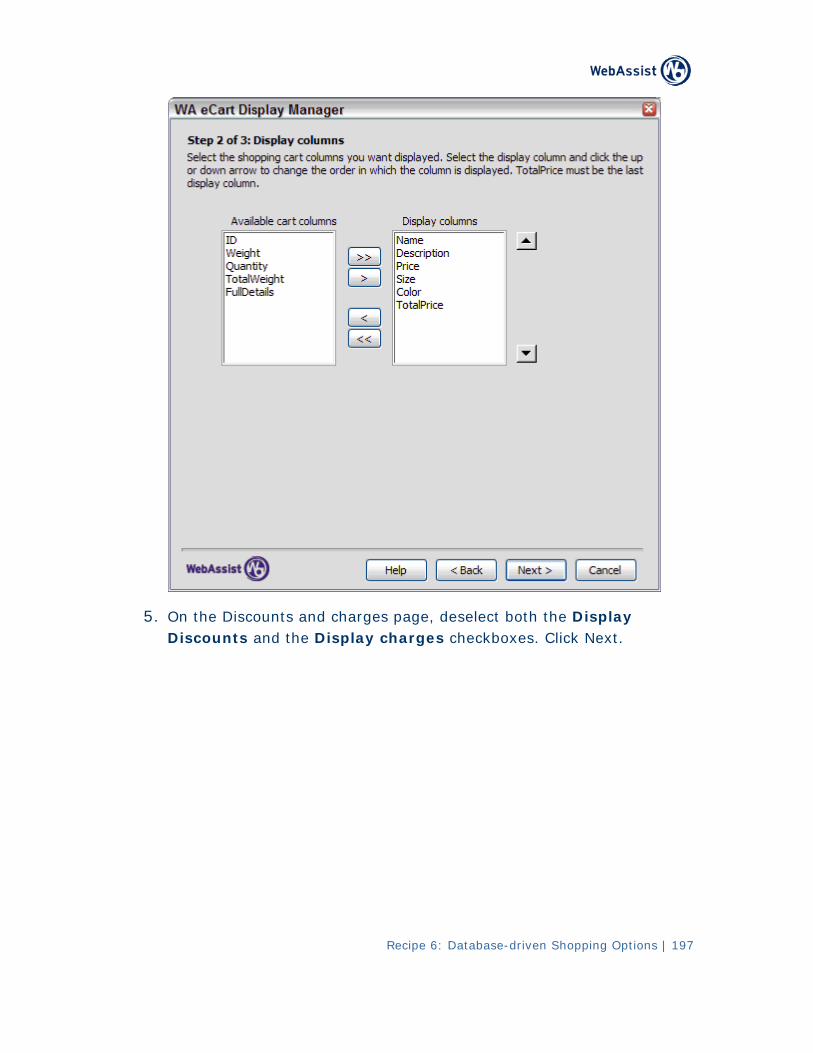
5. On the Discounts and charges page, deselect both the Display Discounts and the Display charges checkboxes. Click Next.
Recipe 6: Database-driven Shopping Options | 197
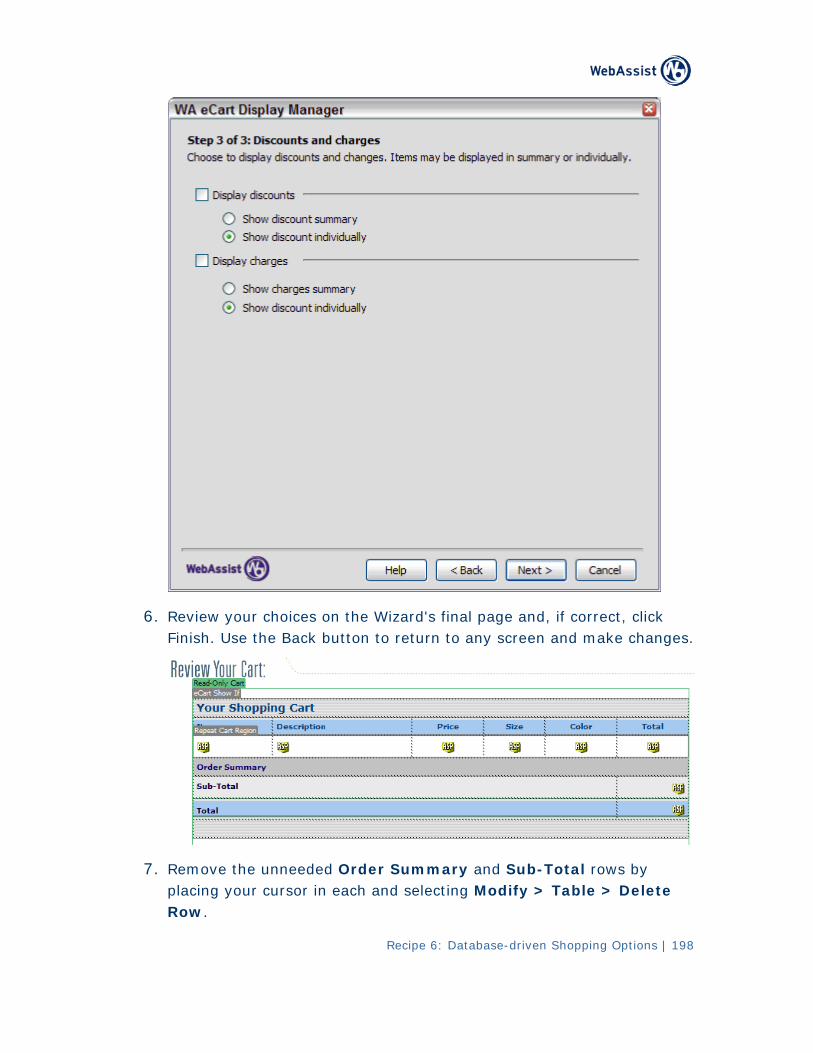
6. Review your choices on the Wizard's final page and, if correct, click Finish. Use the Back button to return to any screen and make changes.
7. Remove the unneeded Order Summary and Sub-Total rows by placing your cursor in each and selecting Modify > Table > Delete Row.
Recipe 6: Database-driven Shopping Options | 198
Recipe 6: Database-driven Shopping Options | 199
To see shopping cart as it will be shown in the browser, choose View options > Hide All Visual Aids from the Document toolbar.
8. Save your page and test your application.
When testing your application, make sure to add multiple items to the cart from different categories to make sure the various options are populated corre ctly. You'll also want to visit the PayPal site by clicking Checkout andverifying that your options are carried through to the payment gateway.
Recipe 7: Implementing Remote Checkout | 200
IMP EL MENTING REMOTE CHECKOUT
Requ
irements for Remote Form Checkout
From the online shopper's perspective, to complete the check out processonly a single click is required. The Web developer, however, has a different point of view. To successfully process the order means preparation of a Web application that runs both before and after the actual authorization takes place. This recipe includes the step-by-step instructions for setting up such an application.
Several enhancements were introduced into eCart 3 to simplify the checkout procedure. Server behaviors for storing data from the shopping cart to a database and subsequently retrieving it were extended for greater functionality. Additionally, new functionality was added to the binding panel to make integrating the responses received from the payment gateway drag-and-drop easy.
What Do You Need?
For this recipe, you'll need to have this extension installed in Dreamweaver:
• eCart 3.0.1 or greater & eCommerce Recipes 3
In addition, you’ll also need to complete the following set-up tasks:
• Create Dreamweaver site
• Copy starting point files to Dreamweaver site
• Copy Access database – or – install MySQL data source
• Create DSN for database/data source.
• Create Database Connection in Dreamweaver
• Obtain a Merchant Account with an eCart supported service
Recipe 7: Implementing Remote Checkout | 201
RECIPE 7
Remote Form Checkout
There are two basic ways to handle an eCommerce checkout procedure: local and remote. With a local checkout, the shopper stays in the same website throughout the shopping and checkout procedure. While this may be advantageous from an experience point of view, it's more difficult and more expensive to implement. The online store site must have purchased an SSL certificate and set up a server-side communication link – often a COM object or other program on the server.
A remote checkout, on the other hand, is relatively straight-forward to set up. Although the shopper is transferred to another secure site during the checkout process, the payment gateway page is often branded to minimize the transition. In the remote checkout scenario, the payment gateway is responsible for gathering sensitive information, like the customer's credit card number, and handles the security requirements.
To implement a local checkout application, two response pages – checkout and success - are used. The checkout page gathers the basic, non-sensitive, cus m the payment to er information, and sets up the data to be passed togateway. In addition, the customer's order – previously maintained in the shopping cart – is stored as a database record. A field within the record notes that the status of the order as being processed. The success page, displayed afte t oved the authorization, thanks the r he payment gateway has apprcustomer and shows their order in a printable receipt format. The order sta be fulfilled. tus is updated to indicate the approval and it's ready to
Bec g the ause the shopper's browser is, in fact, leaving the store site durinauthorization process, all session variables are lost. Therefore, it's necessary to s le based information at tore the shopping cart and other session variabcheckout. The same information is retrieved and updated when the aut rho ization is approved.
The e R mote Checkout recipe starts with the checkout page.
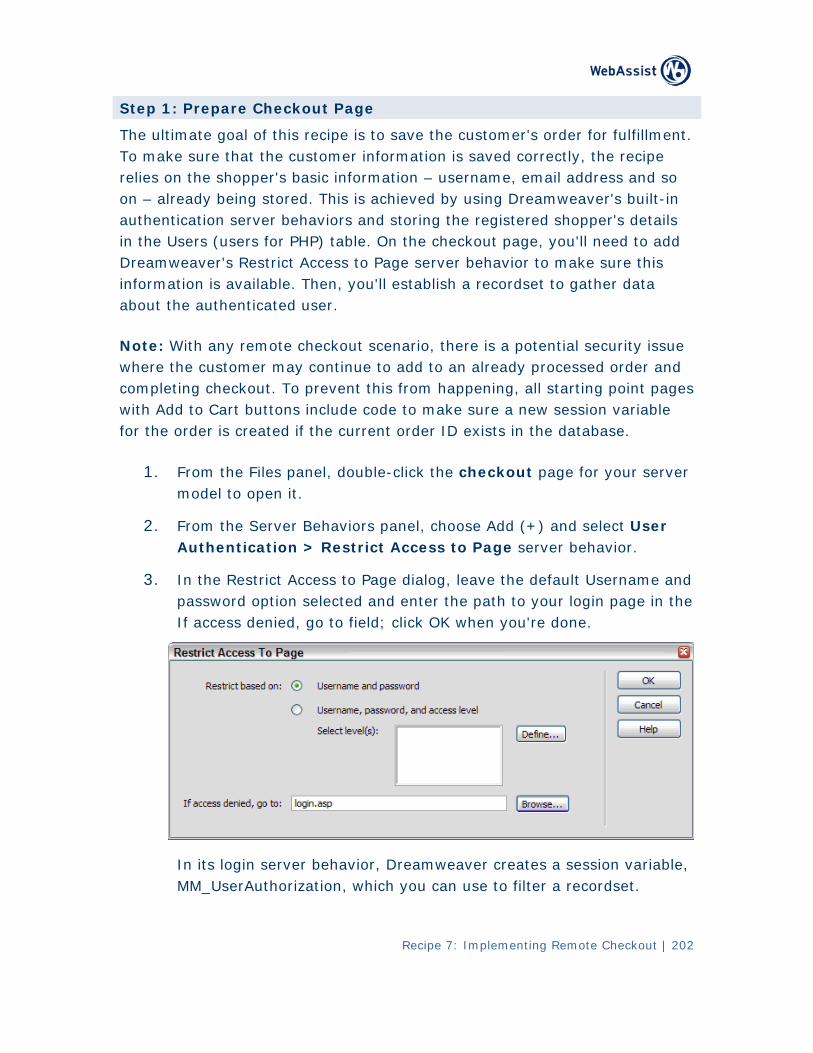
Recipe 7: Implementing Remote Checkout | 202
Step 1: Prepare Checkout Page
The ultimate goal of this recipe is to save the customer's order for fulfillment. To make sure that the customer information is saved correctly, the recipe relies on the shopper's basic information – username, email address and so on – already being stored. This is achieved by using Dreamweaver's built-in authentication server behaviors and storing the registered shopper's details in the Users (users for PHP) table. On the checkout page, you'll need to add Dreamweaver's Restrict Access to Page server behavior to make sure this information is available. Then, you'll establish a recordset to gather data about the authenticated user.
Note: With any remote checkout scenario, there is a potential security issue where the customer may continue to add to an already processed order and completing checkout. To prevent this from happening, all starting point pages with Add to Cart buttons include code to make sure a new session variable for the order is created if the current order ID exists in the database.
1. From the Files panel, double-click the checkout page for your server model to open it.
2. From the Server Behaviors panel, choose Add (+) and select User Authentication > Restrict Access to Page server behavior.
3. In the Restrict Access to Page dialog, leave the default Username and password option selected and enter the path to your login page in the If access denied, go to field; click OK when you're done.
In its login server behavior, Dreamweaver creates a session variable, MM_UserAuthorization, which you can use to filter a recordset.
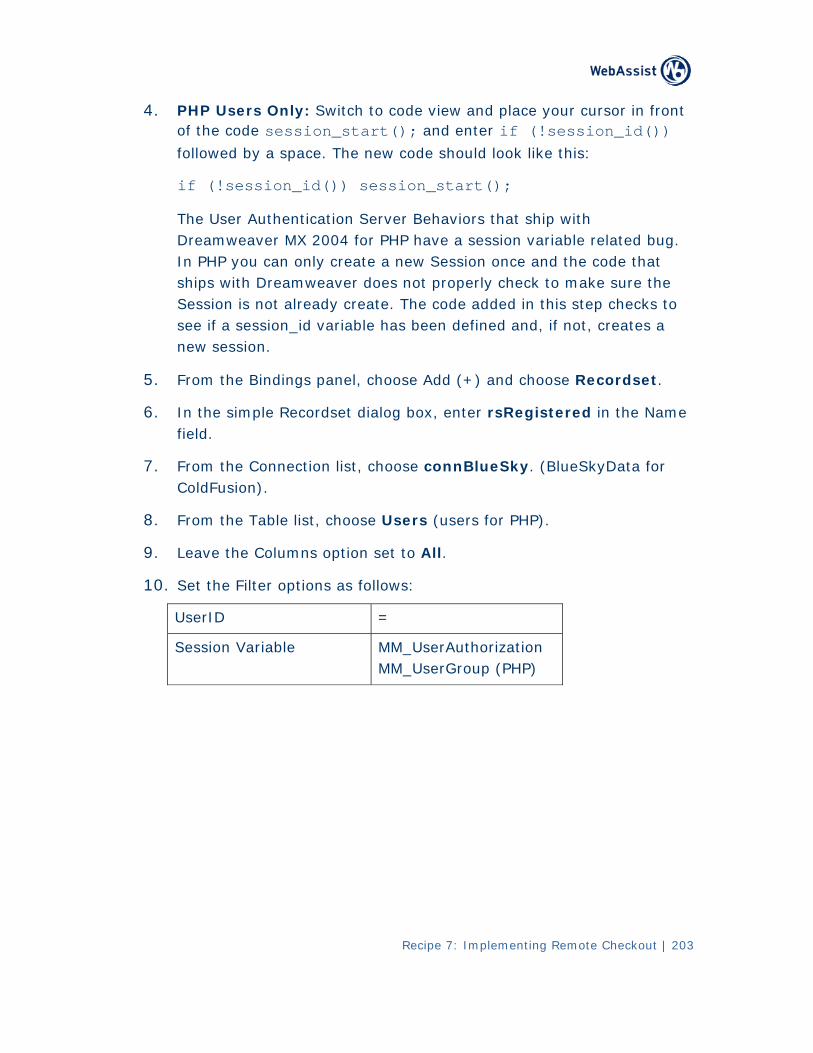
4. PHP Users Only: Switch to
Recipe 7: Implementing Remote Checkout | 203
code view and place your cursor in front of the code session_start(); and enter if (!session_id())
followed by a space. The new code should look like this:
if (!session_id()) session_start();
The User Authentication Server Behaviors that ship with Dreamweaver MX 2004 for PHP have a session variable related bug. In PHP you can only create a new Session once and the code that ships with Dreamweaver does not properly check to make sure the Session is not already create. The code added in this step checks to see if a session_id variable has been defined and, if not, creates a new session.
5. From the Bindings panel, choose Add (+) and choose Recordset.
6. In the simple Recordset dialog box, enter rsRegistered in the Name field.
7. From the Connection list, choose connBlueSky. (BlueSkyData for ColdFusion).
8. From the Table list, choose Users (users for PHP).
9. Leave the Columns option set to All.
10. Set the Filter options as follows:
UserID =
Session Variable
MM_UserAuthorization MM_UserGroup (PHP)
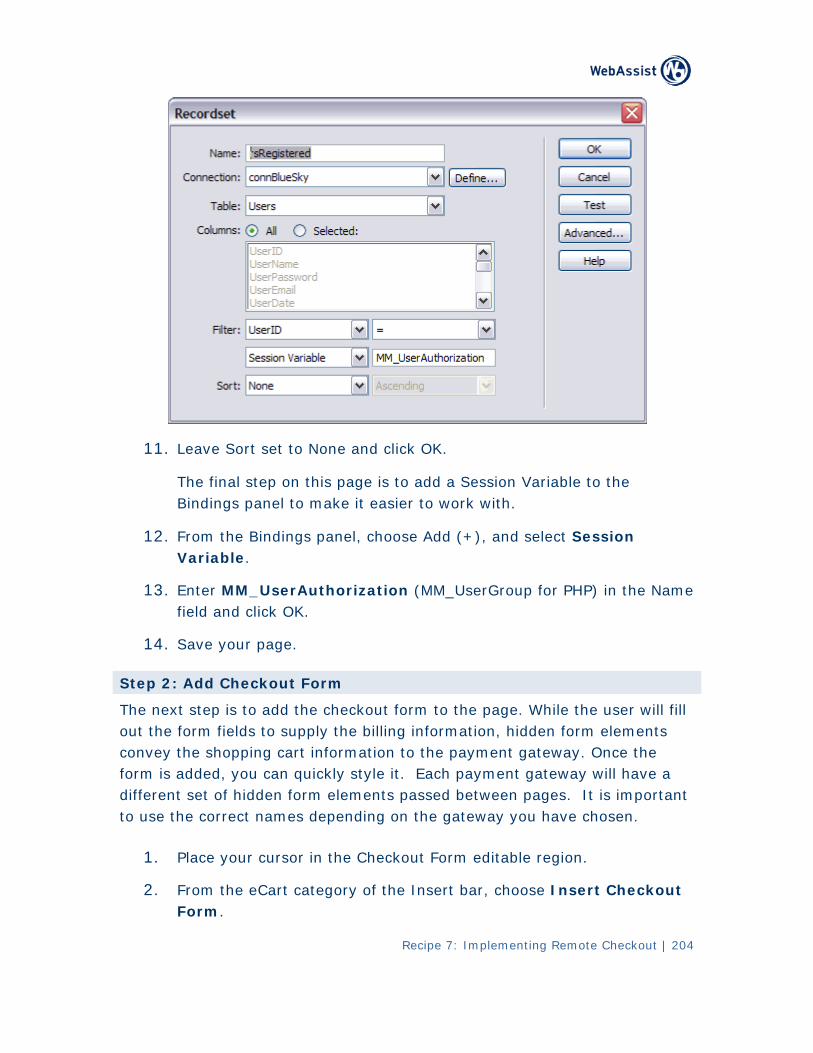
Recipe 7: Implementing Remote Checkout | 204
11. Leave Sort set to None and click OK.
The final step on this page is to add a Session Variable to the Bindings panel to make it easier to work with.
12. From the Bindings panel, choose Add (+), and select Session Variable.
13. Enter MM_UserAuthorization (MM_UserGroup for PHP) in the Name field and click OK.
14. Save your page.
Step 2: Add Checkout Form
The next step is to add the checkout form to the page. While the user will fill out the form fields to supply the billing information, hidden form elements convey the shopping cart information to the payment gateway. Once the form is added, you can quickly style it. Each payment gateway will have a different set of hidden form elements passed between pages. It is important to use the correct names depending on the gateway you have chosen.
1. Place your cursor in the Checkout Form editable region.
2. From the eCart category of the Insert bar, choose Insert Checkout Form.
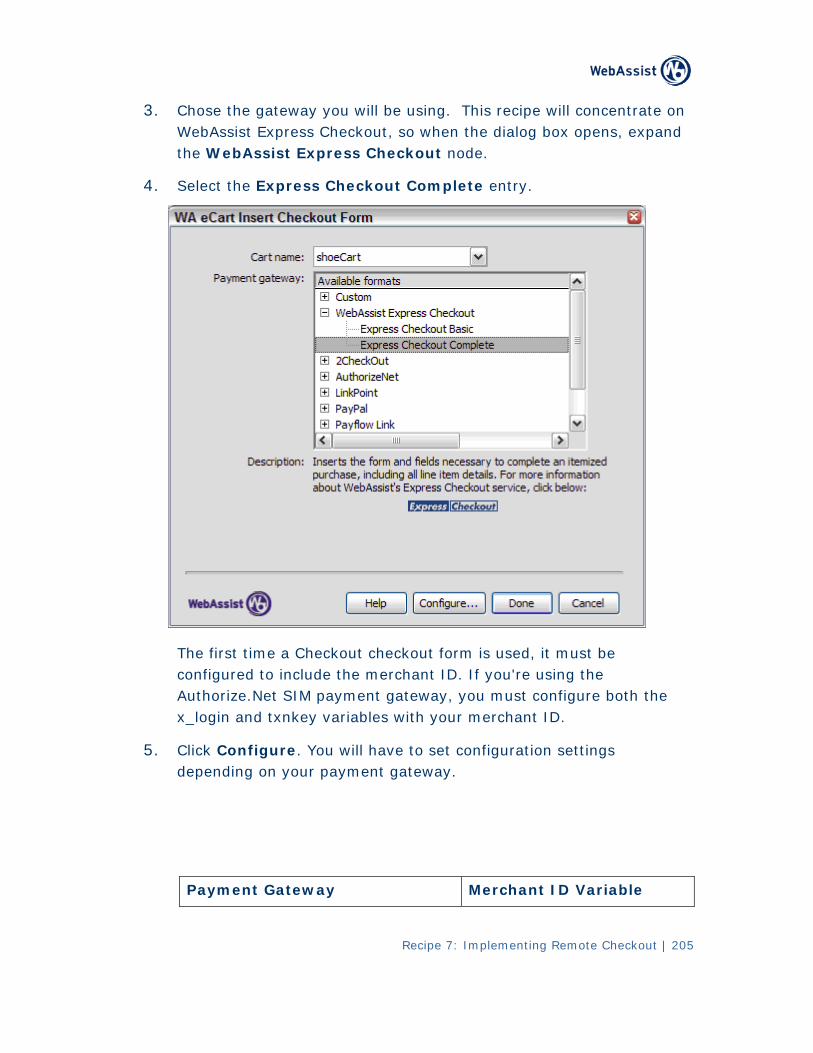
Recipe 7: Implementing Remote Checkout | 205
3. Chose the gateway you will be using. This recipe will concentrate onWebAssist Express Checkout, so when the dialog box opens, expand the WebAssist Express Checkout node.
4. Select the Express Checkout Complete entry.
The first time a Checkout checkout form is used, it must be configured to include the merchant ID. If you're using the Authorize.Net SIM payment gateway, you must configure both the x_login and txnkey variables with your merchant ID.
5. Click Configure. You will have to set configuration settings depending on your payment gateway.
Payment Gateway Merchant ID Variable
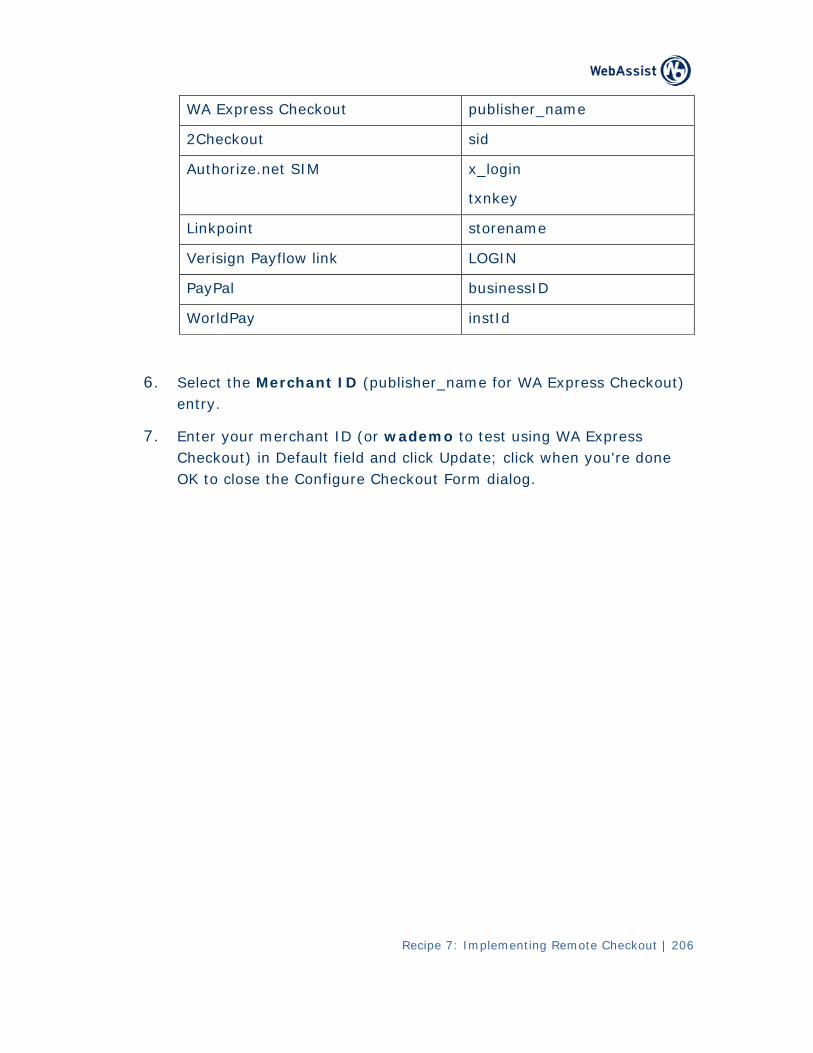
WA Express Checkout publisher_name
2Checkout sid
Authorize.net SIM x_login
txnkey
Linkpoint storename
Verisign Payflow link LOGIN
PayPal businessID
WorldPay instId
6. kout) Select the Merchant ID (publisher_name for WA Express Checentry.
7. Enter your merchant ID (or wademo to test using WA Express Checkout) in Default field and click Update; click when you're done OK to close the Configure Checkout Form dialog.
Recipe 7: Implementing Remote Checkout | 206
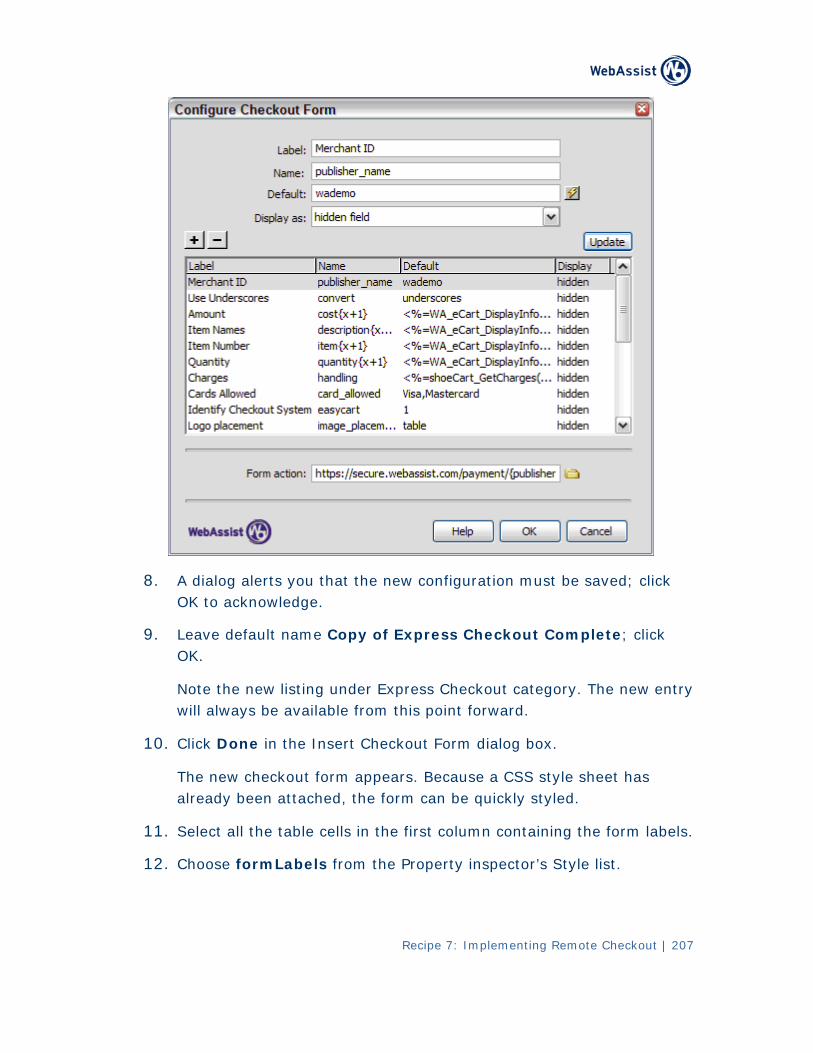
Recipe 7: Implementing Remote Checkout | 207
8. A dialog alerts you that the new configuration must be saved; click OK to acknowledge.
9. Leave default name Copy of Express Checkout Complete; click OK.
Note the new listing under Express Checkout category. The new entry will always be available from this point forward.
10. Click Done in the Insert Checkout Form dialog box.
The new checkout form appears. Because a CSS style sheet has already been attached, the form can be quickly styled.
11. Select all the table cells in the first column containing the form labels.
12. Choose formLabels from the Property inspector’s Style list.
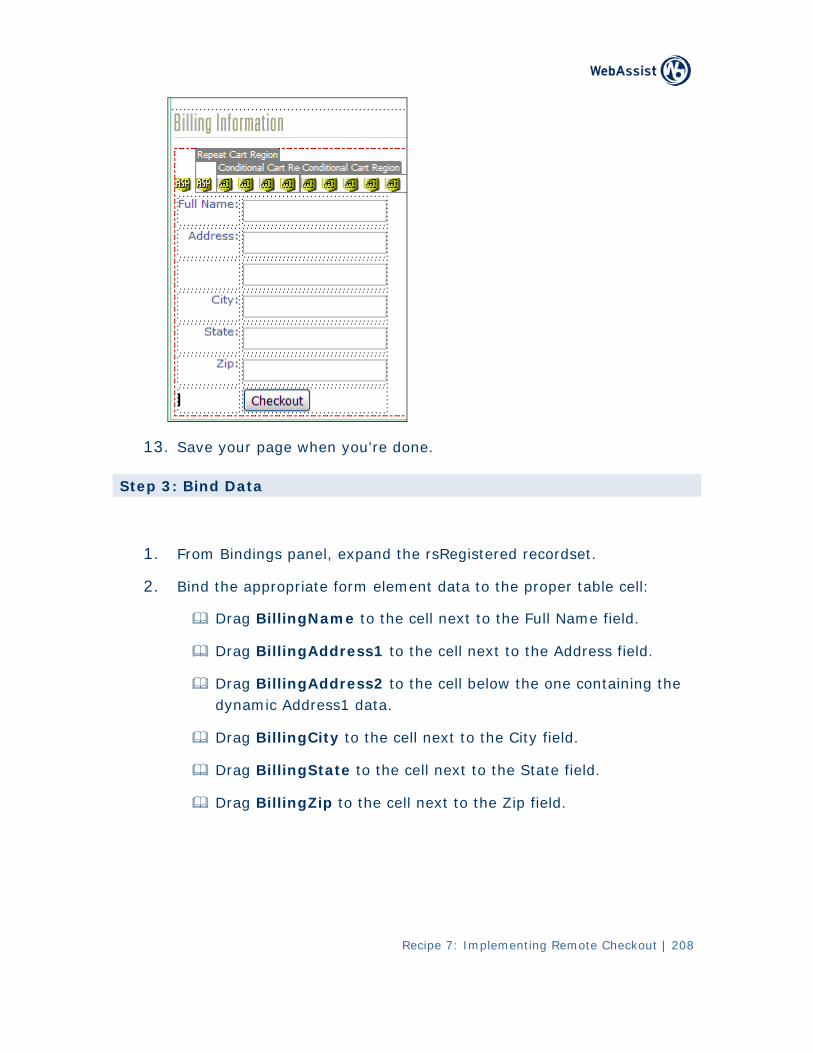
13. Save your page when you're done.
Step 3: Bind Data
1. From Bindings panel, expand the rsRegistered recordset.
2. Bind the appropriate form element data to the proper table cell:
Drag BillingName to the cell next to the Full Name field.
Drag BillingAddress1 to the cell next to the Address field.
Drag BillingAddress2 to the cell below the one containing the dynamic Address1 data.
Drag BillingCity to the cell next to the City field.
Drag BillingState to the cell next to the State field.
Drag BillingZip to the cell next to the Zip field.
Recipe 7: Implementing Remote Checkout | 208
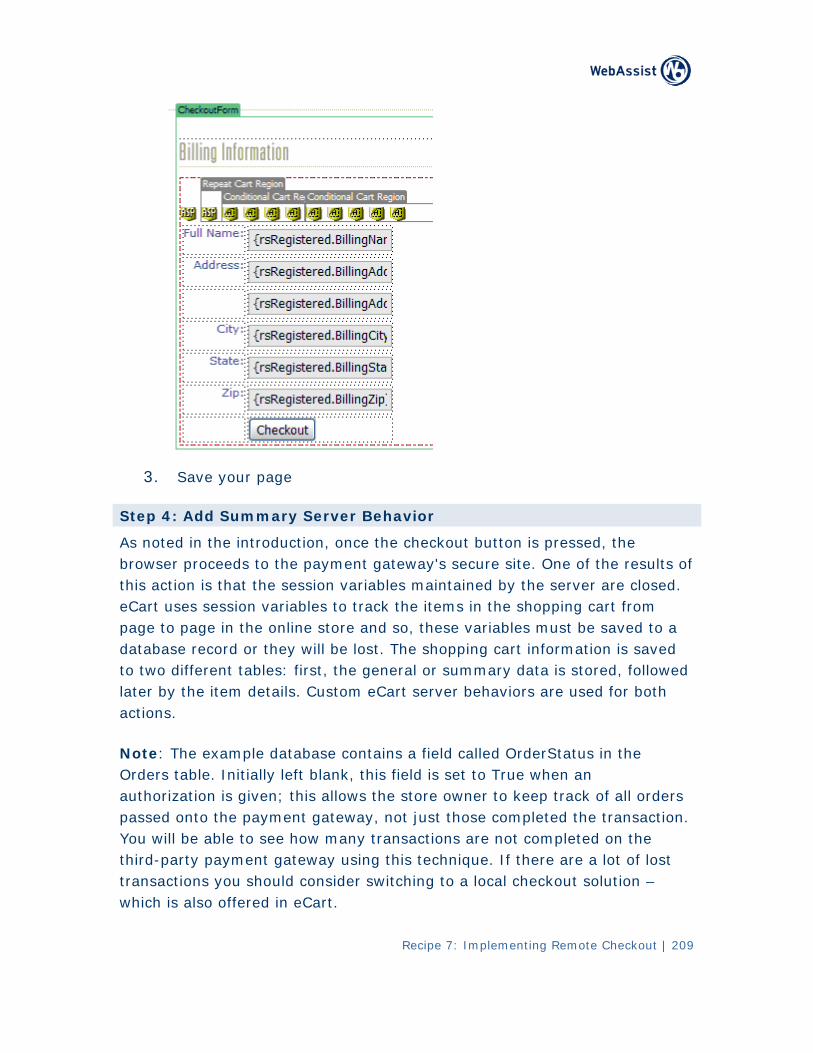
3. Save your page
Step 4: Add Summary Server Behavior
As n e oted in the introduction, once the checkout button is pressed, thbrowser p results of roceeds to the payment gateway's secure site. One of thethis t ed. ac ion is that the session variables maintained by the server are closeCart uses session variables to track the items in the shopping cart from page to p to a age in the online store and so, these variables must be saved database d record or they will be lost. The shopping cart information is saveto two different tables: first, the general or summary data is stored, followed later by the item details. Custom eCart server behaviors are used for both actions.
Note: The example database contains a field called OrderStatus in the Orders table. Initially left blank, this field is set to True when an authoriza k of all orders tion is given; this allows the store owner to keep tracpassed onto the payment gateway, not just those completed the transaction. You will be able to see how many transactions are not completed on the third-party payment gateway using this technique. If there are a lot of lost transactions you should consider switching to a local checkout solution – which is also offered in eCart.
Recipe 7: Implementing Remote Checkout | 209

Recipe 7: Implementing Remote Checkout | 210
4. ick Add (+) and choose WA From the Server Behaviors panel, cleCart > Database Manipulation > Store Cart Summary in Database.
5. choose before page load. In the dialog, from the Trigger list,
6. nnBlueSky (BlueSkyData for From the Connection list, select coColdFusion).
7. . From the Table list, choose Orders
8. s set to OrderID. Make sure that the Unique ID field i
9. D. In the Store As field, enter OrderI
10. e relevant dynamic data element by Set the database columns to thfirst selecting the data column item; then choosing the lightning bolt to open the Dynamic Data dialog; selecting the data item from the indicated node and closing the Dynamic Data dialog; and finally, clicking Update to confirm your choice.
• Set column OrderReferenceID to dynamic data shoeCart > [SessionID]
• Set column OrderUserID to dynamic data Session > MM_UserAuthorization (MM_UserGroup for PHP).
• Set column OrderTotal to dynamic data shoeCart > [GrandTotal].
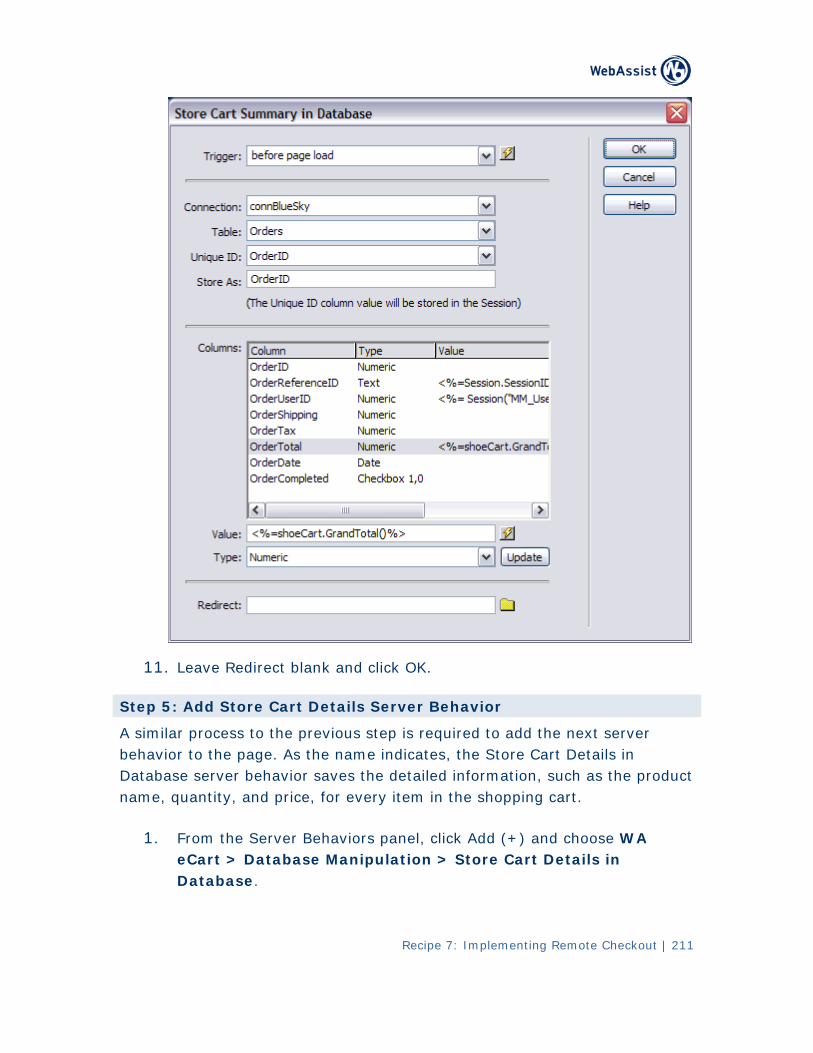
Recipe 7: Implementing Remote Checkout | 211
11. Leave Redirect blank and click OK.
Step 5: Add Store Cart Details Server Behavior
A similar process to the previous step is required to add the next server behavior to the page. As the name indicates, the Store Cart Details in Database server behavior saves the detailed information, such as the product name, quantity, and price, for every item in the shopping cart.
1. From the Server Behaviors panel, click Add (+) and choose WA eCart > Database Manipulation > Store Cart Details in Database.
Recipe 7: Implementing Remote Checkout | 212
2. In the dialog, from the Trigger list, choose before page loads.
3. From the Cart Name list, select shoeCart.
4. From the Connection list, select connBlueSky (BlueSkyData for ColdFusion).
5. From the Table list, choose OrderDetails (orderdetails for PHP).
6. Make sure that the Cart ID field is set to DetailOrderID.
7. Set the database columns to the relevant dynamic data element by first selecting the data column item; then choosing the lightning bolt to open the Dynamic Data dialog; selecting the data item from the indicated node and closing the Dynamic Data dialog; and finally, clicking Update to confirm your choice.
• Set column DetailOrderID to dynamic data Session > OrderID (this is the Session variable that you specified in the previous Server Behavior Store Cart Summary in Database).
• Set column DetailProductID to dynamic data shoeCart > ID.
• Set column DetailProductName to dynamic data shoeCart > Name.
• Set column DetailProductDesc to dynamic data shoeCart > Description.
• Set column DetailQuantity to dynamic data shoeCart > Quantity.
• Set column DetailPrice to dynamic data shoeCart > Price.
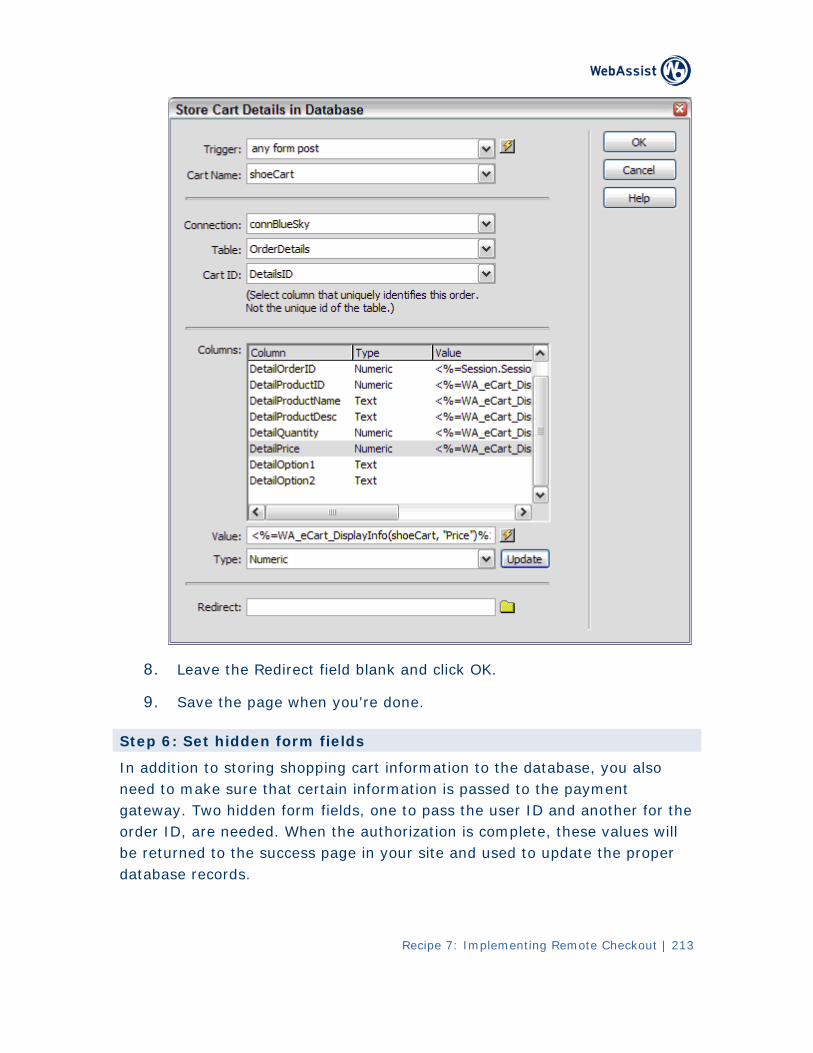
Recipe 7: Implementing Remote Checkout | 213
8. Leave the Redirect field blank and click OK.
9. Save the page when you're done.
Step 6: Set hidden form fields
In addition to storing shopping cart information to the database, you also need to make sure that certain information is passed to the payment gateway. Two hidden form fields, one to pass the user ID and another for the order ID, are needed. When the authorization is complete, these values will be returned to the success page in your site and used to update the proper database records.
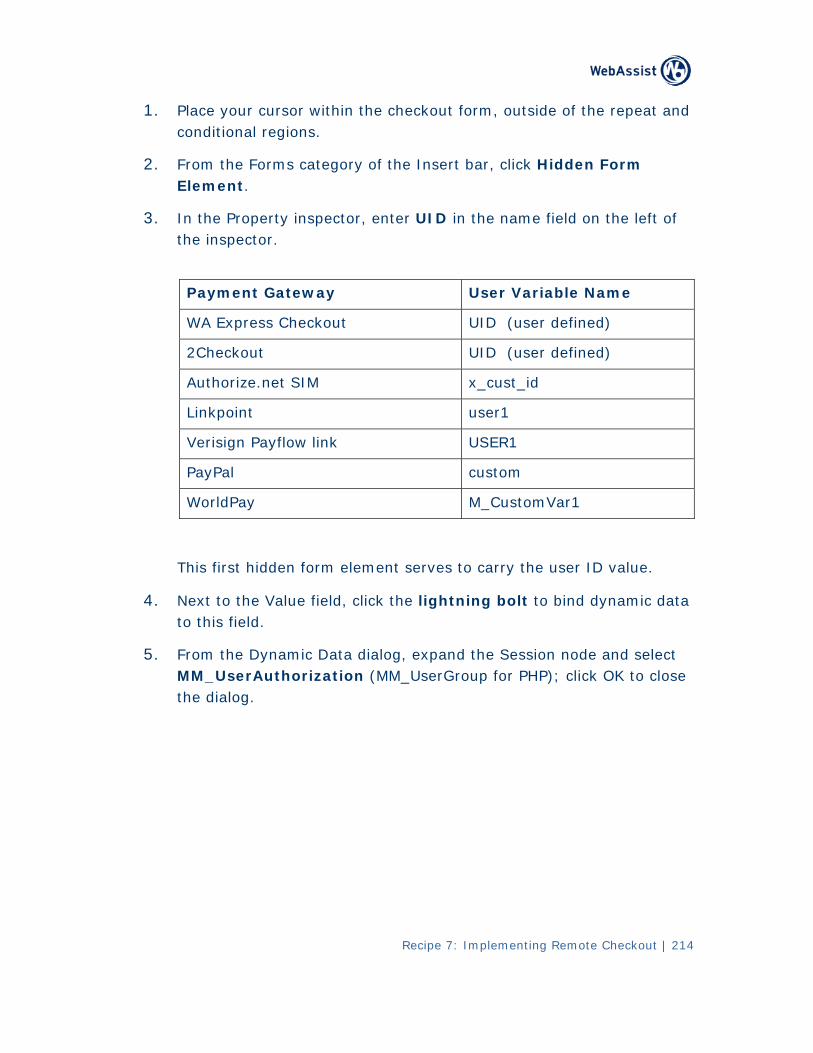
Recipe 7: Implementing Remote Checkout | 214
1. Place your cursor within the checkout form, outside of the repeat and conditional regions.
2. From the Forms category of the Insert bar, click Hidden Form Element.
3. In the Property inspector, enter UID in the name field on the left of the inspector.
Payment Gateway User Variable Name
WA Express Checkout UID (user defined)
2Checkout UID (user defined)
Authorize.net SIM x_cust_id
Linkpoint user1
Verisign Payflow link USER1
PayPal custom
WorldPay M_CustomVar1
This first hidden form element serves to carry the user ID value.
4. Next to the Value field, click the lightning bolt to bind dynamic data to this field.
5. From the Dynamic Data dialog, expand the Session node and select MM_UserAuthorization (MM_UserGroup for PHP); click OK to close the dialog.
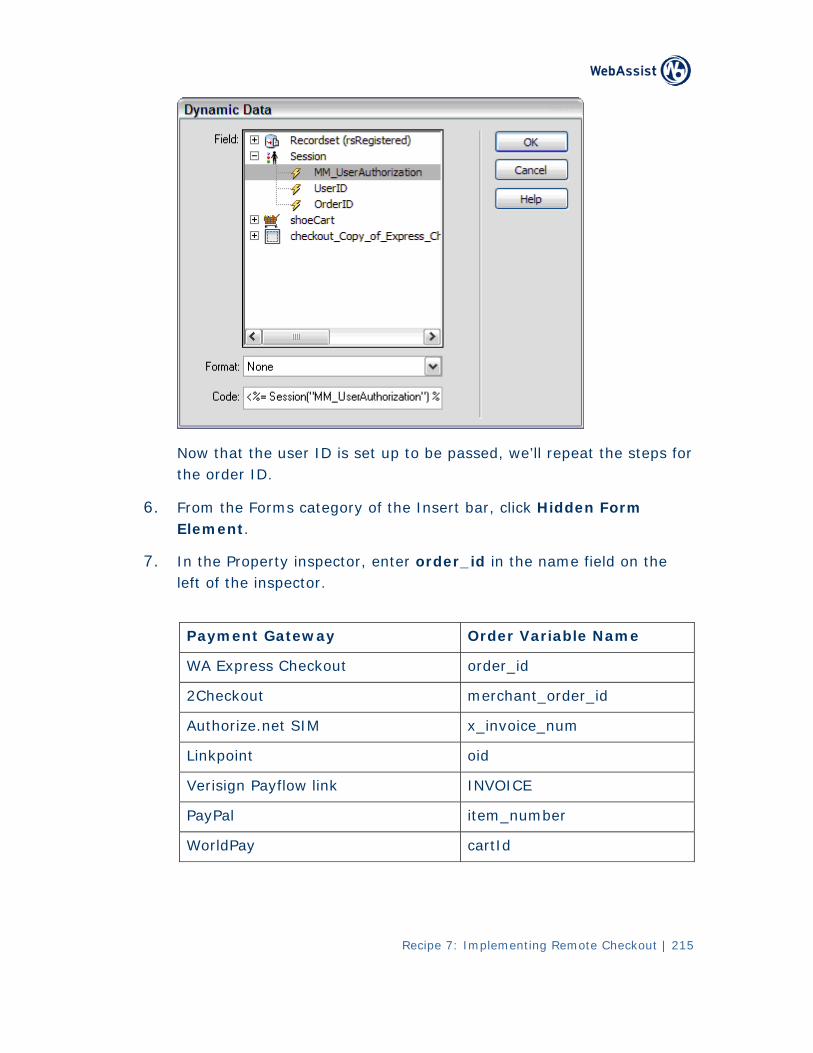
Recipe 7: Implementing Remote Checkout | 215
No set up to be pass ’ll repeat the steps for w that the user ID is ed, wethe order ID.
6. F rms category of the Insert Form rom the Fo bar, click HiddenElement.
7. In the Property inspector, enter order_id in the name field on theleft of the inspector.
Payment Gateway Order Variable Name
WA Express Checkout order_id
2Checkout merchant_order_id
Authorize.net SIM x_invoice_num
Linkpoint oid
Verisign Payflow link INVOICE
PayPal item_number
WorldPay cartId
Recipe 7: Implementing Remote Checkout | 216
field name is When the payment gateway passes back this value, the changed slightly to order-id; this process is automatic, but it’s important to set the name of the field being passed to the gateway with an underscore and not a hyphen. Note: For Express Checkout, the order_id hidden form element will disappear from the Design View after this update has been made. This happens because it is now incorporated with the Express Checkout UI and can be updated by selecting the checkout button of the Form and selecting the Edit button from the Property Inspector.
8. amic data Next to the Value field, click the lightning bolt to bind dynto this field.
9. Session From the Dynamic Data dialog, select OrderID from thenode; click OK to close the dialog.
FOR ColdFusion / Express Checkout only:
10. s category of the Insert bar, click Hidden Form From the FormElement.
11. erty inspector, enter CLIENT in the name field on the left In the Propof the inspector and enter coldfusion in the value field on the right side of the inspector.
Step 7: Complete checkout page
The final t page are to firs ter steps on the checkou t define what happens afthe autho d to then inser ly shopping cart. rization is complete an t a read-onAuthorization is either approved or denied and you can define which page the user sho nding on the outcome of t success uld see depe he process. How theand failu ed depends on the y; some re pages are specifi payment gatewapayment g llow you to declare the page in the actual checkout ateways a s button, wh rs require you use the merchant settings panel. ereas othe
1. S e Checkout button in the formelect th .
2. F operty inspector, click Editrom the Pr .
3. When the Edit Express Checkout Buy Now Button dialog box opens, enter the absolute URL to your success page in the Success field.
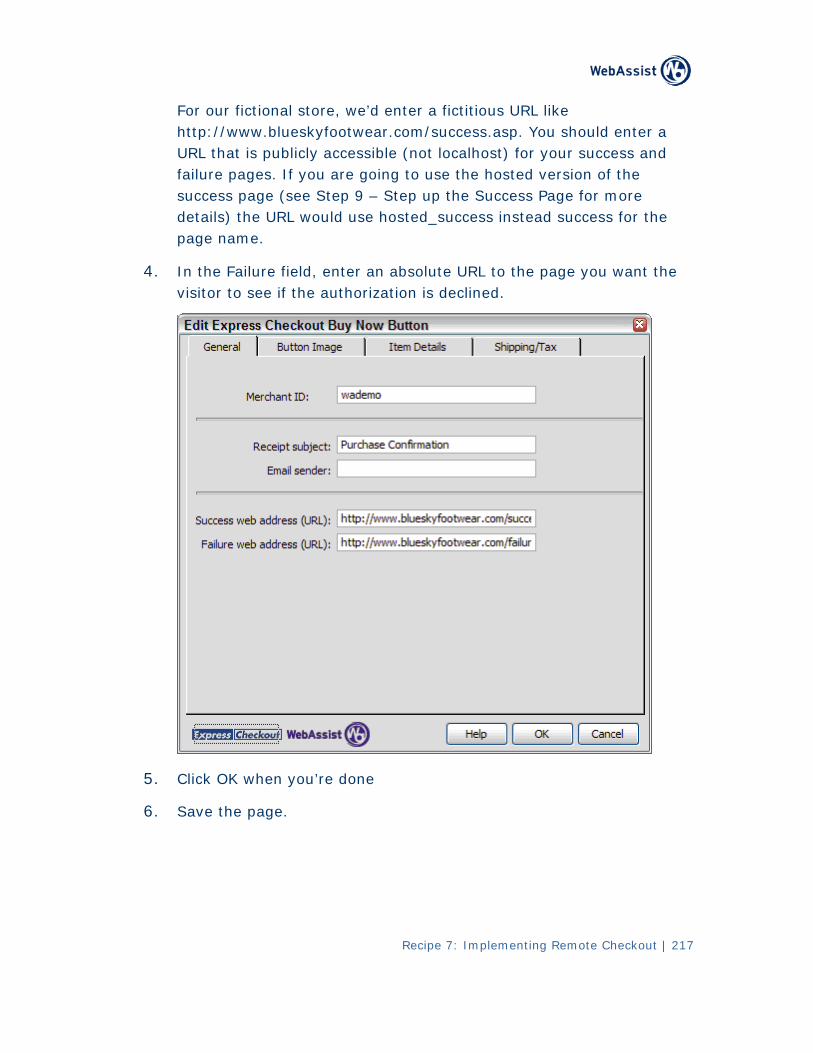
Recipe 7: Implementing Remote Checkout | 217
For our fictional store, we’d enter a fictitious URL like http://www.blueskyfootwear.com/success.asp. You should enter a URL that is publicly accessible (not localhost) for your success and failure pages. If you are going to use the hosted version of the success page (see Step 9 – Step up the Success Page for more details) the URL would use hosted_success instead success for the page name.
4. In the Failure field, enter an absolute URL to the page you want the visitor to see if the authorization is declined.
5. Click OK when you’re done
6. Save the page.
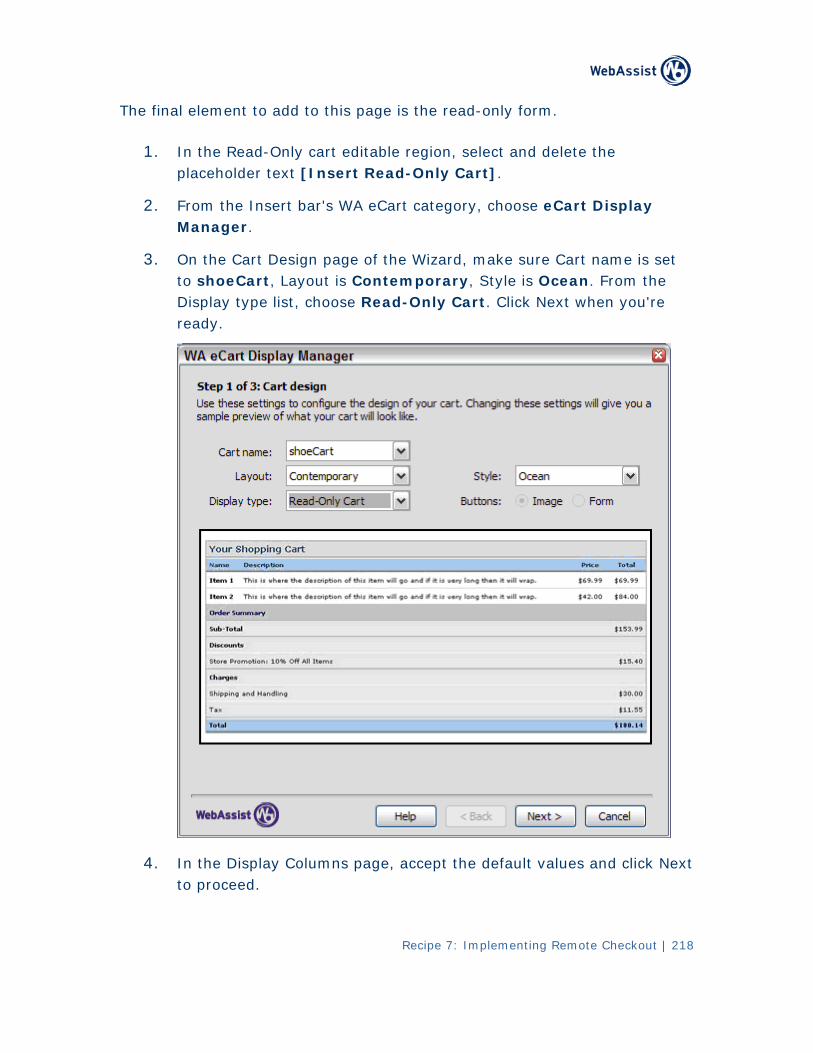
Recipe 7: Implementing Remote Checkout | 218
The final element to add to this page is the read-only form.
1. In the Read-Only cart editable region, select and delete the placeholder text [Insert Read-Only Cart].
2. From the Insert bar's WA eCart category, choose eCart Display Manager.
3. On the Cart Design page of the Wizard, make sure Cart name is set to shoeCart, Layout is Contemporary, Style is Ocean. From the Display type list, choose Read-Only Cart. Click Next when you're ready.
4. In the Display Columns page, accept the default values and click Next to proceed.
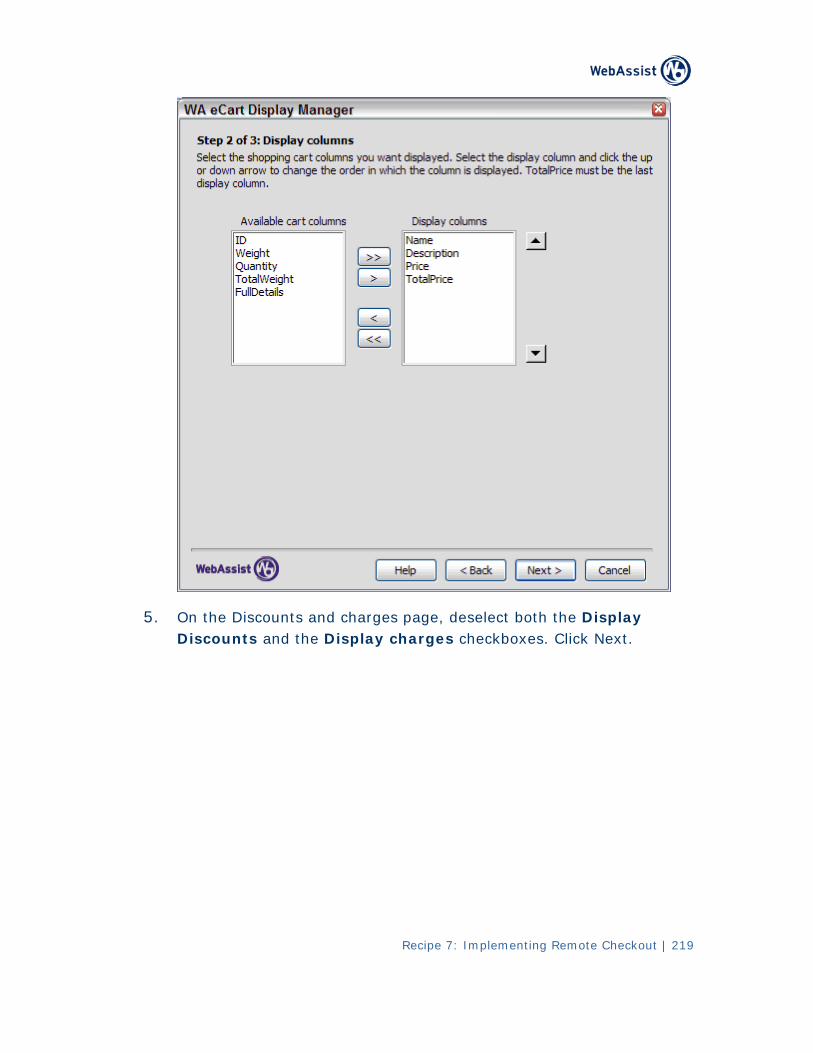
5. On the Discounts and charges page, deselect both the Display Discounts and the Display charges checkboxes. Click Next.
Recipe 7: Implementing Remote Checkout | 219
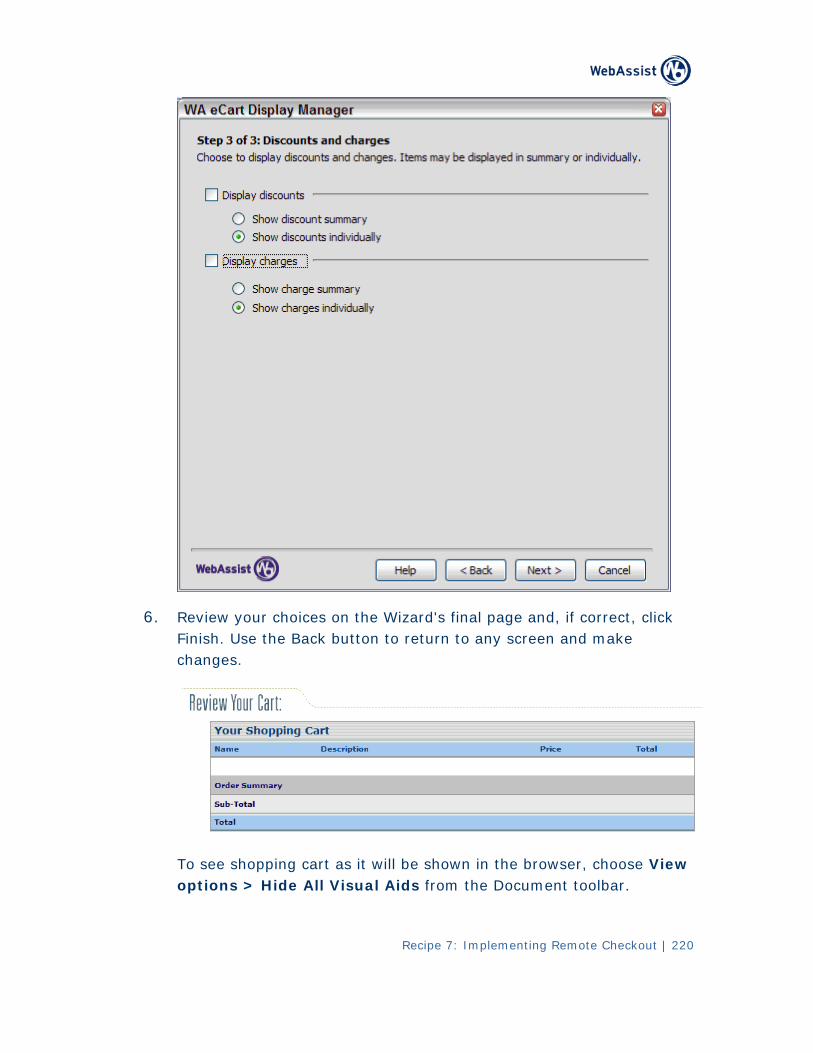
6. Review your choices on the Wizard's final page and, if correct, click Finish. Use the Back button to return to any screen and make changes.
To see shopping cart as it will be shown in the browser, choose View options > Hide All Visual Aids from the Document toolbar.
Recipe 7: Implementing Remote Checkout | 220
Recipe 7: Implementing Remote Checkout | 221
7. Save your page.
You can, if you choose, test this page at this time to verify that the information is being stored to your database properly after the Checkout button is clicked. You should wait until you complete the entire recipe before fully testing your application.
Step 8: Set up the Success Page
For a s smooth success page set-up, you'll need to expose two separate itemin the Bindings panel. The first displays all the response fields possible fromthe chosen remote checkout while the second shows the form elements used in the checkout page. Both Binding panel items include entries that will be applied later in this recipe.
Paym s. ent gateways vary in their requirements for success and failure pageWhile some work fine with standard HTML pages hosted on your own site, others require that these pages be hosted on the payment gateway's server – meaning that HTML code of the page gets transferred by the payment gateway and displayed on their domain. When the payment gateway hosts these pages, your page must be designed without external dependent files to display properly. With Express Checkout and WorldPay, for example, you must embed your CSS in the page and not in an external file; additionally, the src attribute of any images in the page must use an absolute URL. Although pages like these will display fine in the browser, the images will not app ear in Dreamweaver's design view.
Note: E f both types of page – hosted on your own site and hosted xamples oby the gateway – are included in the starting point files for this recipe.
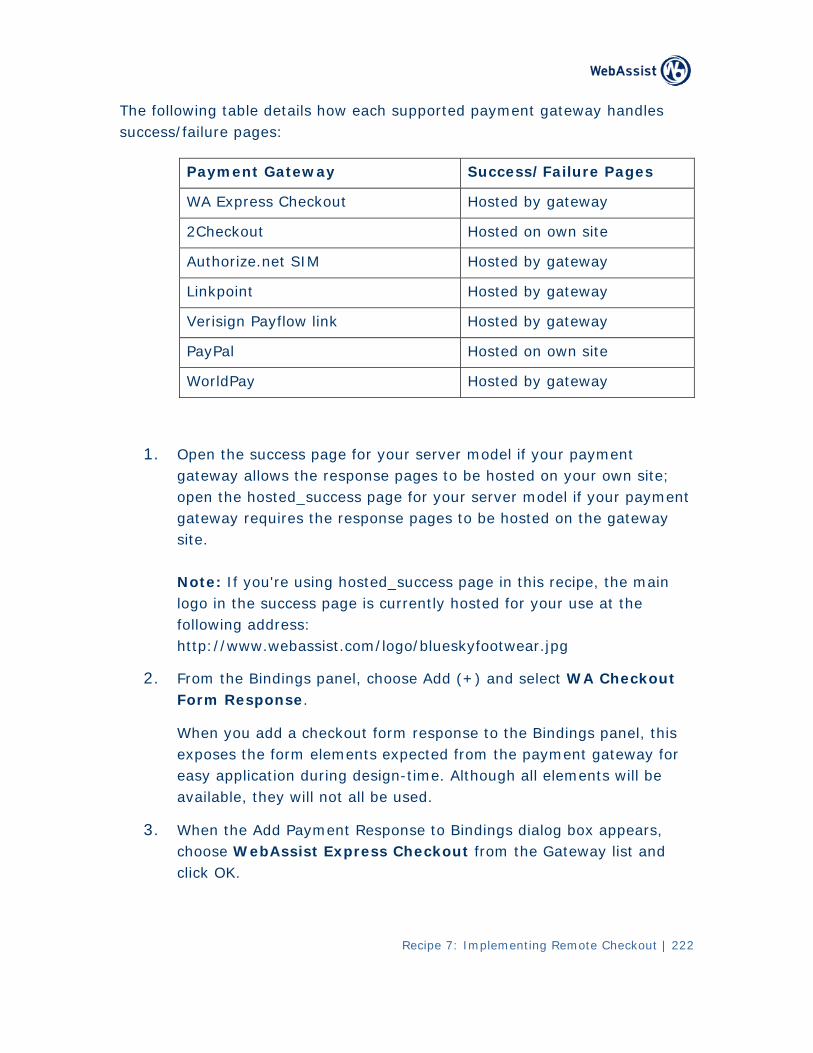
Recipe 7: Implementing Remote Checkout | 222
The ll how each supported payment gateway handles fo owing table detailssuccess/failure pages:
Payment Gateway Success/Failure Pages
WA Express Checkout Hosted by gateway
2Checkout Hosted on own site
Authorize.net SIM Hosted by gateway
Linkpoint Hosted by gateway
Verisign Payflow link Hosted by gateway
PayPal Hosted on own site
WorldPay Hosted by gateway
1. Open the success page for your server model if your payment gateway allows the response pages to be hosted on your own site; open the hosted_success page for your server model if your payment gateway requires the response pages to be hosted on the gateway site. Note: If you're using hosted_success page in this recipe, the main logo in the success page is currently hosted for your use at the following address: http://www.webassist.com/logo/blueskyfootwear.jpg
2. From the Bindings panel, choose Add (+) and select WA Checkout Form Response.
When you add a checkout form response to the Bindings panel, this exposes the form elements expected from the payment gateway for easy application during design-time. Although all elements will be available, they will not all be used.
3. When the Add Payment Response to Bindings dialog box appears, choose WebAssist Express Checkout from the Gateway list and click OK.
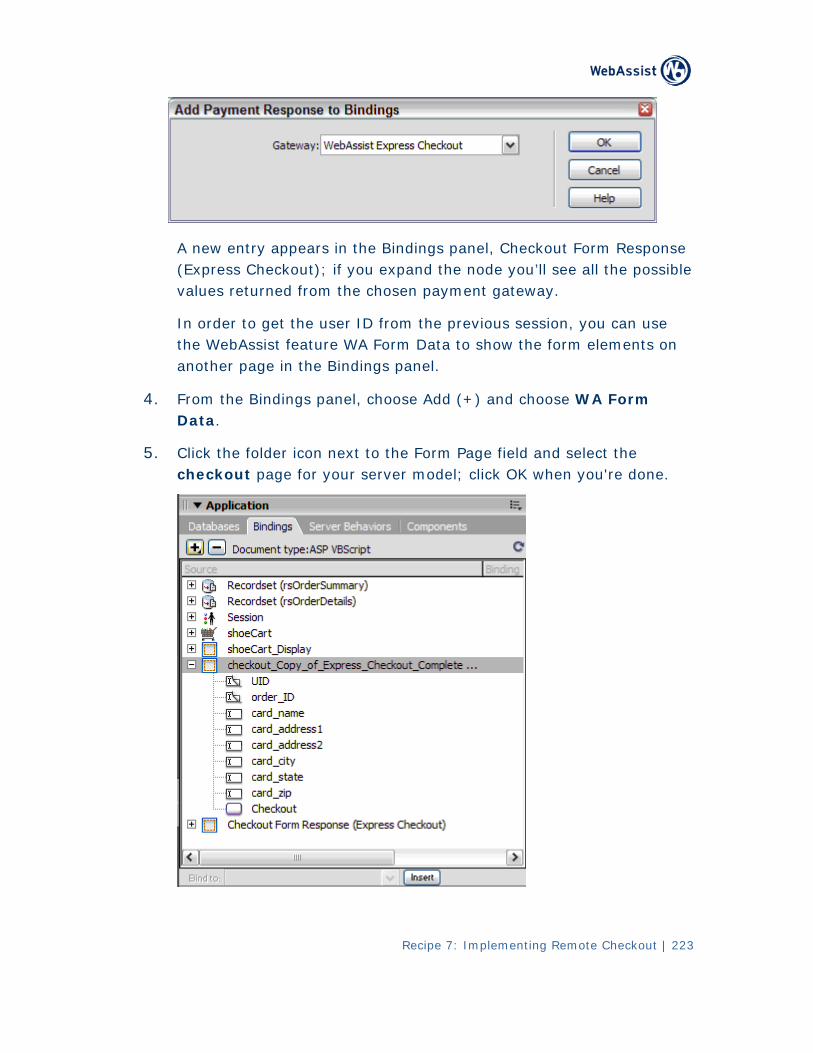
Recipe 7: Implementing Remote Checkout | 223
A new entry appears in the Bindings panel, Checkout Form Response ( if you expand the e possible Express Checkout); node you’ll see all thv ned from the chosen paymalues retur ent gateway.
I ID from the pre an use n order to get the user vious session, you ct ssist feature WA Form Data to ents on he WebA show the form elemanother page in the Bindings panel.
4. From the Bindings panel, choose Add (+) and choose WA Form Data.
5. Click the folder icon next to the Form Page field and select the checkout page for your server model; click OK when you're done.
Recipe 7: Implementing Remote Checkout | 224
The name of the form is listed in the Bindings panel which, in this case is chec now kout_Copy_of_Express_Checkout_Complete. The Bindings panel has been set up properly and you're ready to move on to adding the page's recordsets.
Step 9: Add Database Components to Success page
Now, you’ll need to create two recordsets to retrieve the data stored on the checkout page. The SQL necessary for each of the recordsets is a bit complex d with the , so we’ve included the code as snippets to be appliecustom Copy Snippet command, installed with your recipes.
Note: T o accommodate the different code and dialogs for the various servermodels, Each section contains the steps are presented separately. instructions for defining both required recordsets.
For ASP:
1. Place your cursor anywhere in the text within the Title editable region.
The Copy Snippet command requires that your cursor be placed in a text area on the page before it is invoked.
2. WA eCart > Recipes > From the Snippets panel, right-click the Remote Form Checkout > SQL > OrderSummary SQL - ASP snippet and choose Copy Snippet. Click OK when the copy is confirmed.
3. select Recordset. From the Bindings panel, choose Add (+) and
4. oose Advanced. If the Simple Recordset dialog box appears, ch
5. In the Name field, enter rsOrderSummary.
6. . From the Connection list, choose connBlueSky
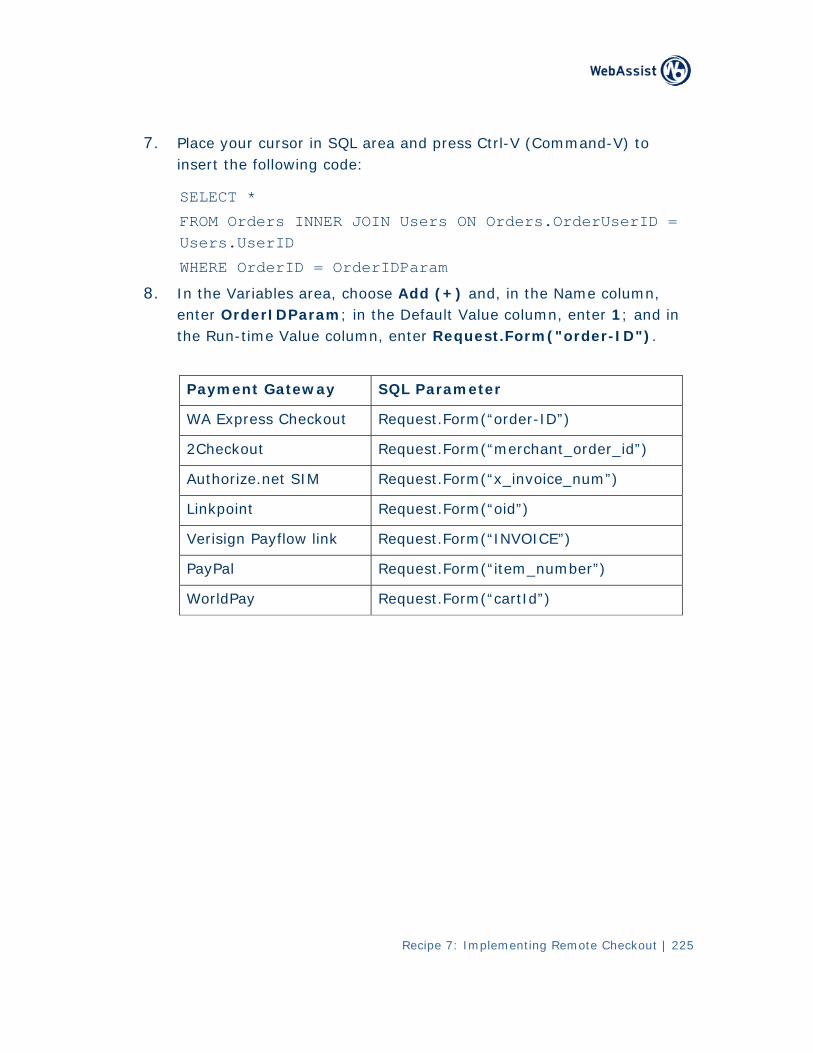
Recipe 7: Implementing Remote Checkout | 225
7. Place your cursor in SQL area and press Ctrl-V (Command-V) to insert the following code:
SELECT *
FROM Orders INNER JOIN Users ON Orders.OrderUserID = Users.UserID
WHERE OrderID = OrderIDParam
8. In the Variables area, choose Add (+) and, in the Name column, enter OrderIDParam; in the Default Value column, enter 1; and in the Run-time Value column, enter Request.Form("order-ID").
Payment Gateway SQL Parameter
WA Express Checkout Request.Form(“order-ID”)
2Checkout Request.Form(“merchant_order_id”)
Authorize.net SIM Request.Form(“x_invoice_num”)
Linkpoint Request.Form(“oid”)
Verisign Payflow link Request.Form(“INVOICE”)
PayPal Request.Form(“item_number”)
WorldPay Request.Form(“cartId”)
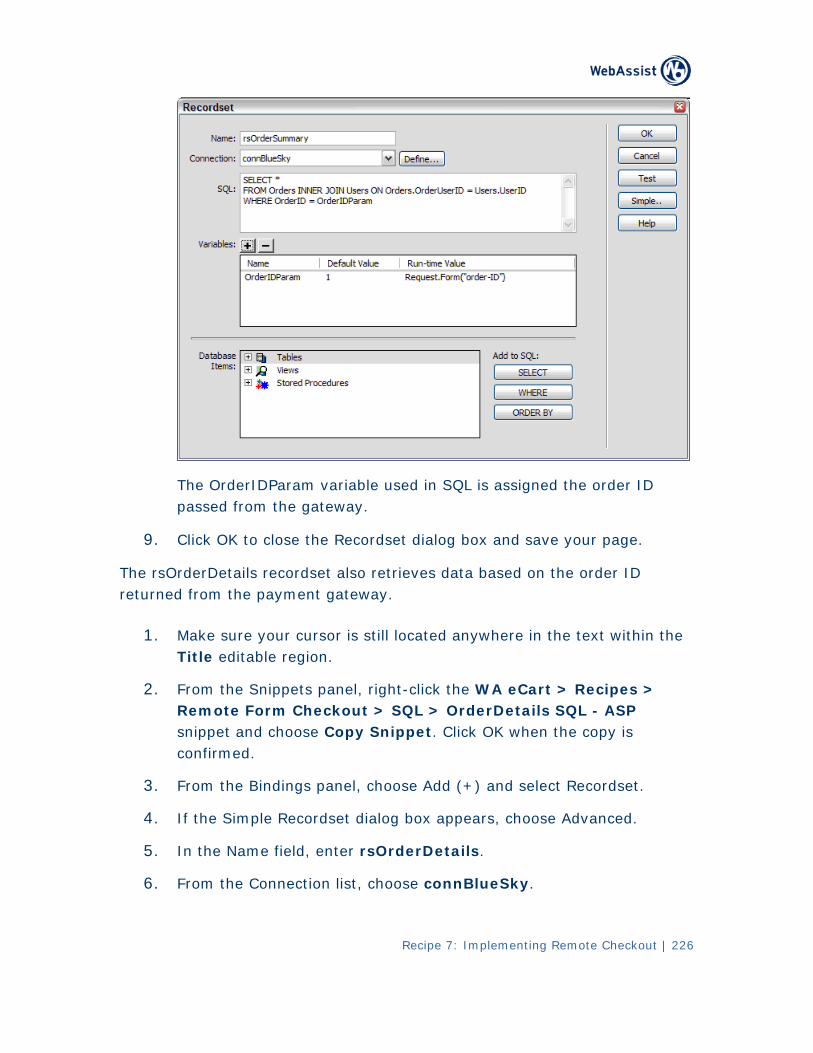
Recipe 7: Implementing Remote Checkout | 226
T ariable r ID he OrderIDParam v used in SQL is assigned the ordep the gateway. assed from
9. C cor ur page. lick OK to close the Re dset dialog box and save yo
The rsOr ls recordset also r ID derDetai etrieves data based on the orderreturned ayment gatewa from the p y.
1. Make sure your cursor is still located anywhere in the text within the Title editable region.
2. From the Snippets panel, right-click the WA eCart > Recipes > Remote Form Checkout > SQL > OrderDetails SQL - ASP snippet and choose Copy Snippet. Click OK when the copy is confirmed.
3. From the Bindings panel, choose Add (+) and select Recordset.
4. If the Simple Recordset dialog box appears, choose Advanced.
5. In the Name field, enter rsOrderDetails.
6. From the Connection list, choose connBlueSky.
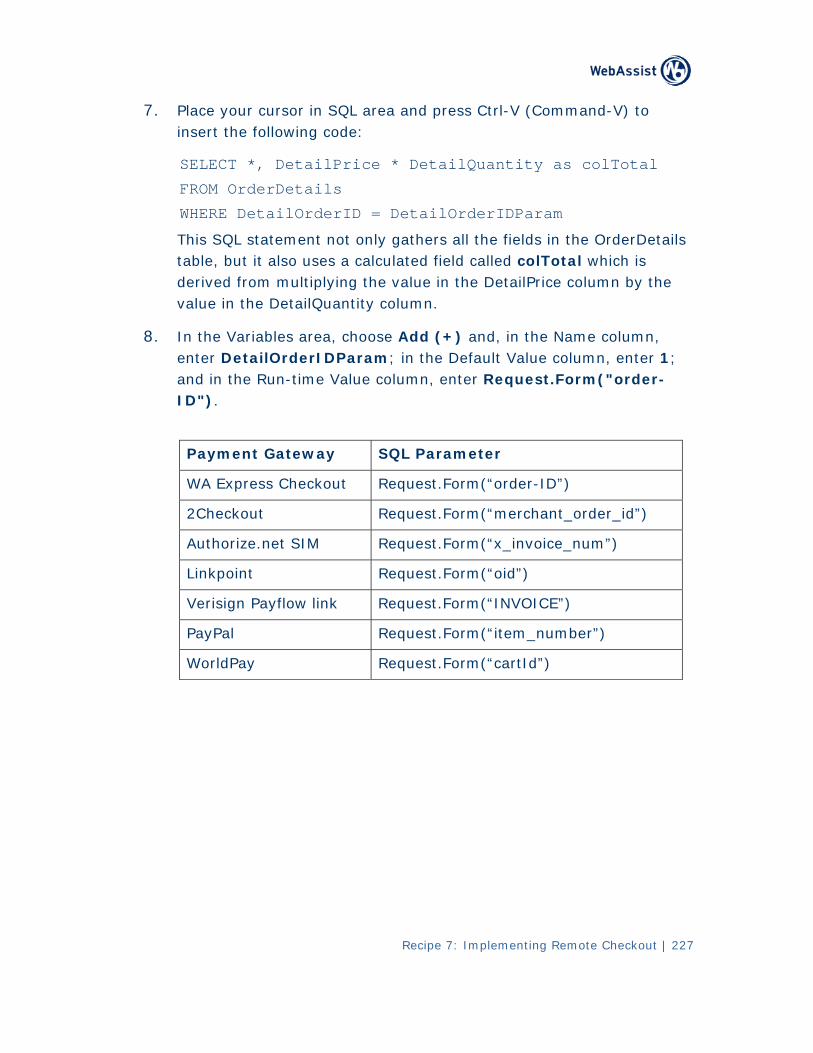
Recipe 7: Implementing Remote Checkout | 227
7. Place your cursor in SQL area and press Ctrl-V (Command-V) to insert the following code:
SELECT *, DetailPrice * DetailQuantity as colTotal
FROM OrderDetails
WHERE DetailOrderID = DetailOrderIDParam
This SQL statement not only gathers all the fields in the OrderDetails table, but it also uses a calculated field called colTotal which is derived from multiplying the value in the DetailPrice column by the value in the DetailQuantity column.
8. In the Variables area, choose Add (+) and, in the Name column, enter DetailOrderIDParam; in the Default Value column, enter 1; and in the Run-time Value column, enter Request.Form("order-ID").
Payment Gateway SQL Parameter
WA Express Checkout Request.Form(“order-ID”)
2Checkout Request.Form(“merchant_order_id”)
Authorize.net SIM Request.Form(“x_invoice_num”)
Linkpoint Request.Form(“oid”)
Verisign Payflow link Request.Form(“INVOICE”)
PayPal Request.Form(“item_number”)
WorldPay Request.Form(“cartId”)
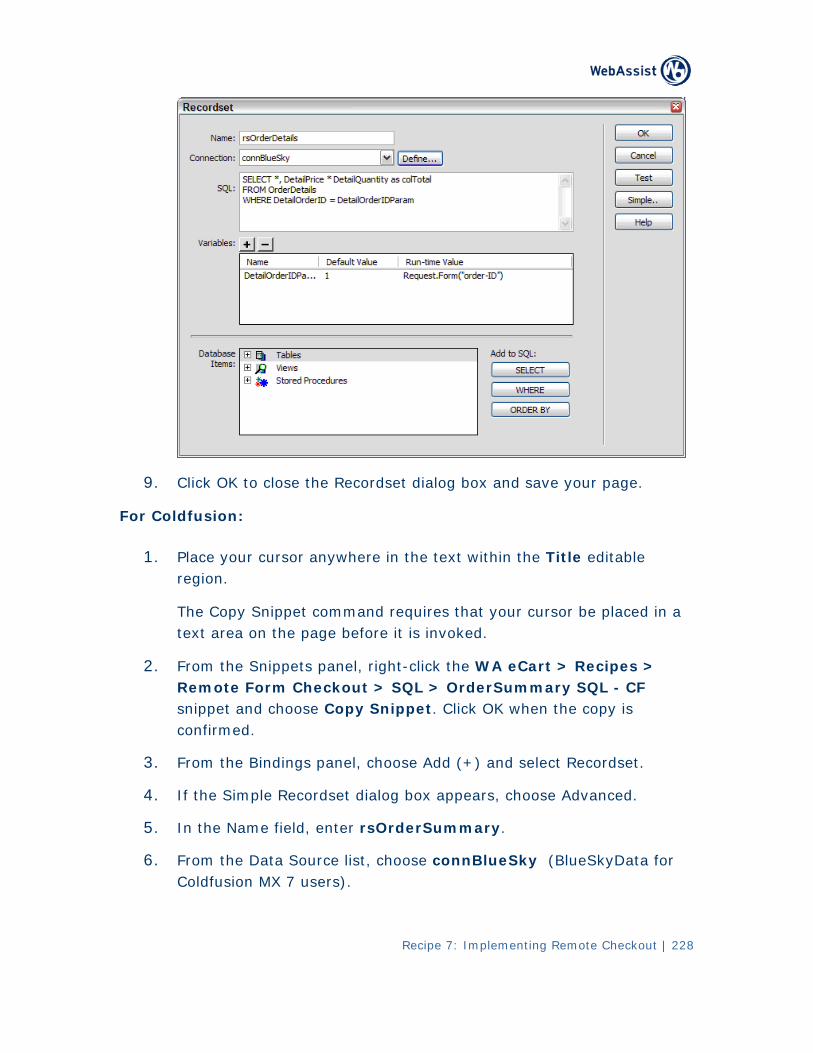
Recipe 7: Implementing Remote Checkout | 228
9. C or r page. lick OK to close the Rec dset dialog box and save you
For Coldfusion:
1. Place your cursor anywhere in the text within the Title editable region.
T an be placed in a he Copy Snippet comm d requires that your cursor text area on the page before it is invoked.
2. F ippets panel, r Recipes > rom the Sn ight-click the WA eCart >Remote Form Checkout > SQL > OrderSummary SQL - CF snippet and choose Copy Snippet. Click OK when the copy is confirmed.
3. From the Bindings panel, choose Add (+) and select Recordset.
4. If the Simple Recordset dialog box appears, choose Advanced.
5. In the Name field, enter rsOrderSummary.
6. From the Data Source list, choose connBlueSky (BlueSkyData for Coldfusion MX 7 users).
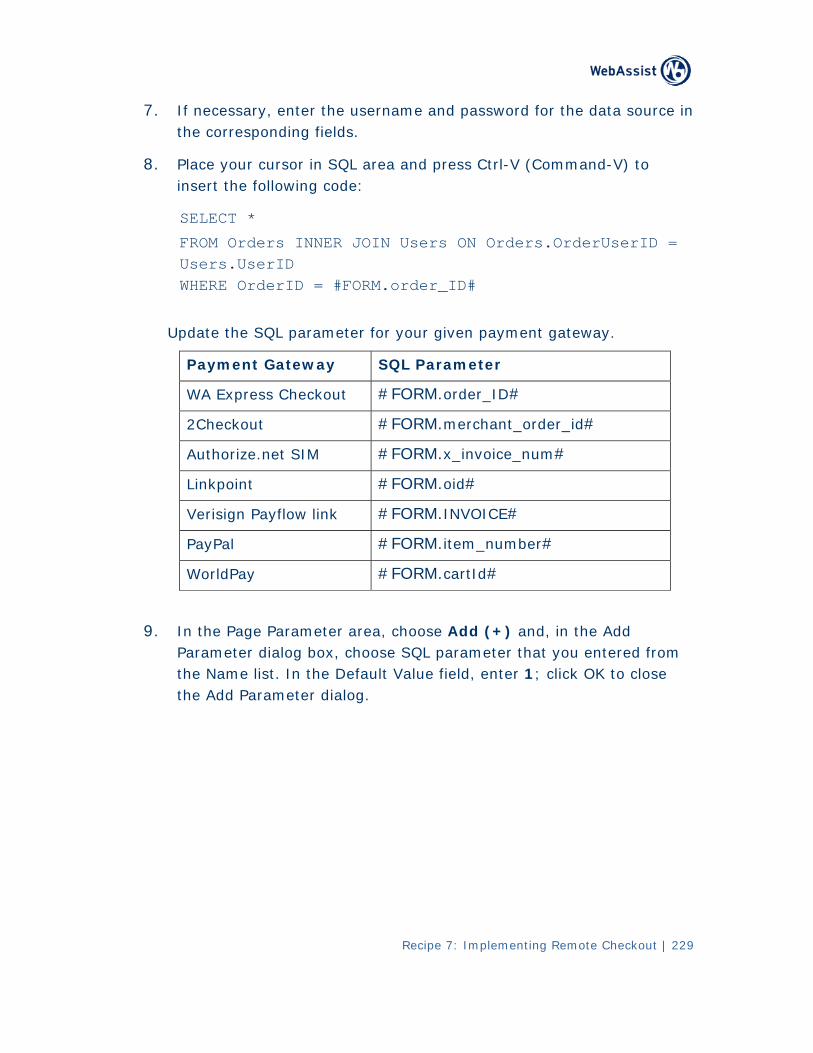
Recipe 7: Implementing Remote Checkout | 229
7. If necessary, enter the username and password for the data source in the corresponding fields.
8. Place your cursor in SQL area and press Ctrl-V (Command-V) to insert the following code:
SELECT *
FROM Orders INNER JOIN Users ON Orders.OrderUserID = Users.UserID WHERE OrderID = #FORM.order_ID#
Update the SQL parameter for your given payment gateway.
Payment Gateway SQL Parameter
WA Express Checkout #FORM.order_ID#
2Checkout #FORM.merchant_order_id#
Authorize.net SIM #FORM.x_invoice_num#
Linkpoint #FORM.oid#
ayflow link #FORM.INVOICE# Verisign P
PayPal #FORM.item_number#
WorldPay #FORM.cartId#
9. ) and, in the Add In the Page Parameter area, choose Add (+Parameter dialog box, choose SQL parameter that you entered from the Name list. In the Default Value field, enter 1; click OK to close the Add Parameter dialog.
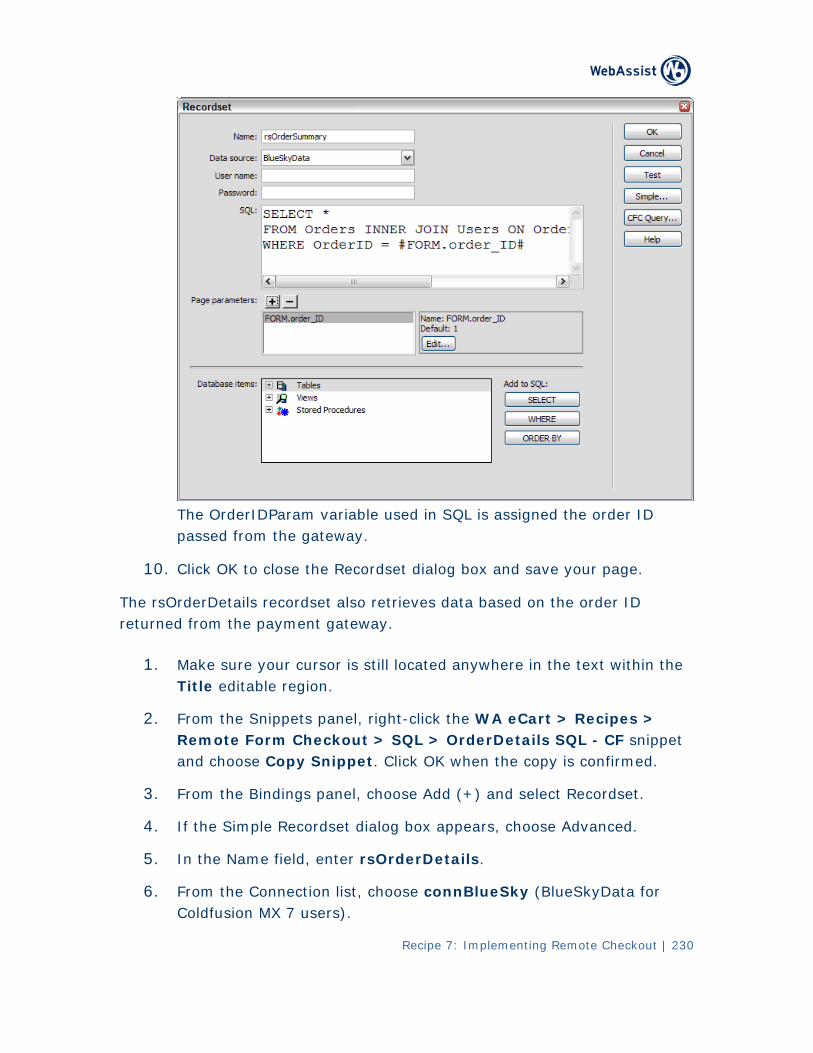
Recipe 7: Implementing Remote Checkout | 230
T able ned the order ID he OrderIDParam vari used in SQL is assigp om the gateway. assed fr
10. C lose the Recor d save your page. lick OK to c dset dialog box an
The rsOrderDetails recordset also retrieves data based on the order ID ret eurn d from the payment gateway.
1. e Make sure your cursor is still located anywhere in the text within thTitle editable region.
2. From the Snippets panel, right-click the WA eCart > Recipes > Remote Form Checkout > SQL > OrderDetails SQL - CF snippet and choose Copy Snippet. Click OK when the copy is confirmed.
3. From the Bindings panel, choose Add (+) and select Recordset.
4. If the Simple Recordset dialog box appears, choose Advanced.
5. In the Name field, enter rsOrderDetails.
6. From the Connection list, choose connBlueSky (BlueSkyData for Coldfusion MX 7 users).
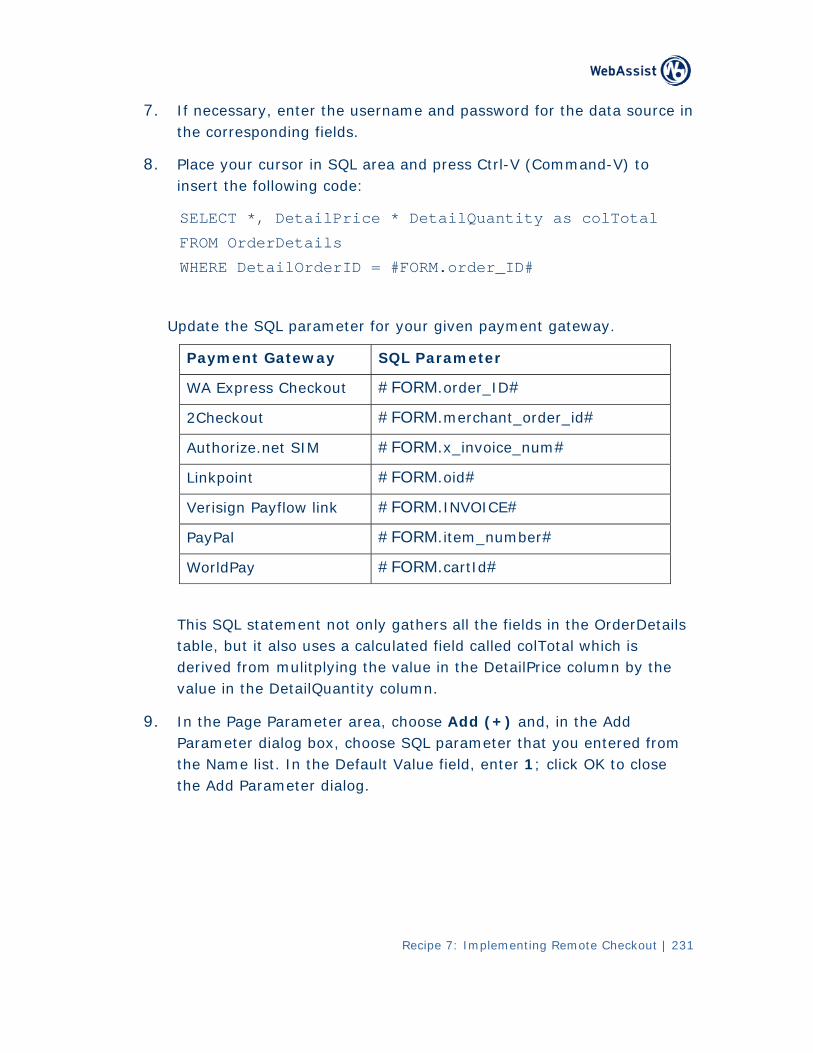
Recipe 7: Implementing Remote Checkout | 231
7. If necessary, enter the username and password for the data source in the corresponding fields.
8. Place your cursor in SQL area and press Ctrl-V (Command-V) to insert the following code:
SELECT *, DetailPrice * DetailQuantity as colTotal
FROM OrderDetails
WHERE DetailOrderID = #FORM.order_ID#
Update the SQL parameter for your given payment gateway.
Payment Gateway SQL Parameter
WA Express Checkout #FORM.order_ID#
2Checkout #FORM.merchant_order_id#
Authorize.net SIM #FORM.x_invoice_num#
Linkpoint #FORM.oid#
Verisign Payflow link #FORM.INVOICE#
PayPal #FORM.item_number#
WorldPay #FORM.cartId#
This SQL statement not only gathers all the fields in the OrderDetails table, but it also uses a calculated field called colTotal which is derived from mulitplying the value in the DetailPrice column by the value in the DetailQuantity column.
9. In the Page Parameter area, choose Add (+) and, in the Add Parameter dialog box, choose SQL parameter that you entered from the Name list. In the Default Value field, enter 1; click OK to close the Add Parameter dialog.
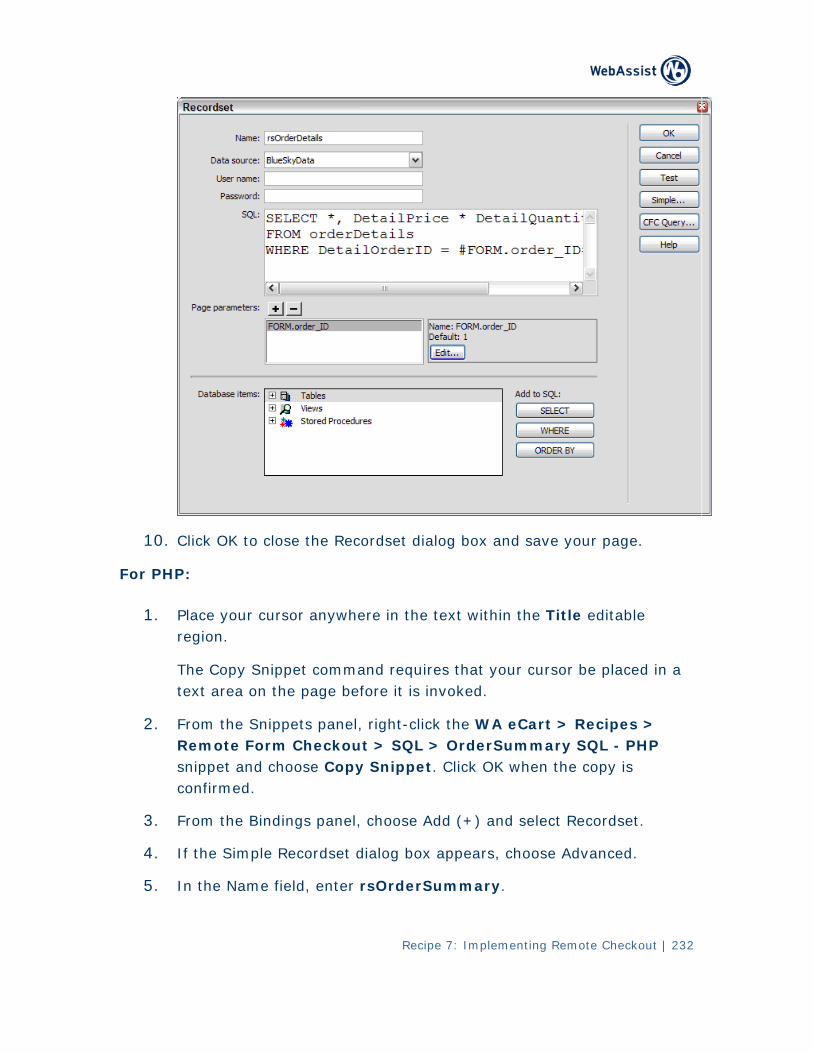
Recipe 7: Implementing Remote Checkout | 232
10. C the Recor and save your page. lick OK to close dset dialog box
For PHP:
1. P ursor anywhere the Title editable lace your c in the text withinregion.
The Copy Snippet command requires that your cursor be placed in a text area on the page before it is invoked.
2. From the Snippets panel, right-click the WA eCart > Recipes > Remote Form Checkout > SQL > OrderSummary SQL - PHP snippet and choose Copy Snippet. Click OK when the copy is confirmed.
3. From the Bindings panel, choose Add (+) and select Recordset.
4. If the Simple Recordset dialog box appears, choose Advanced.
5. In the Name field, enter rsOrderSummary.
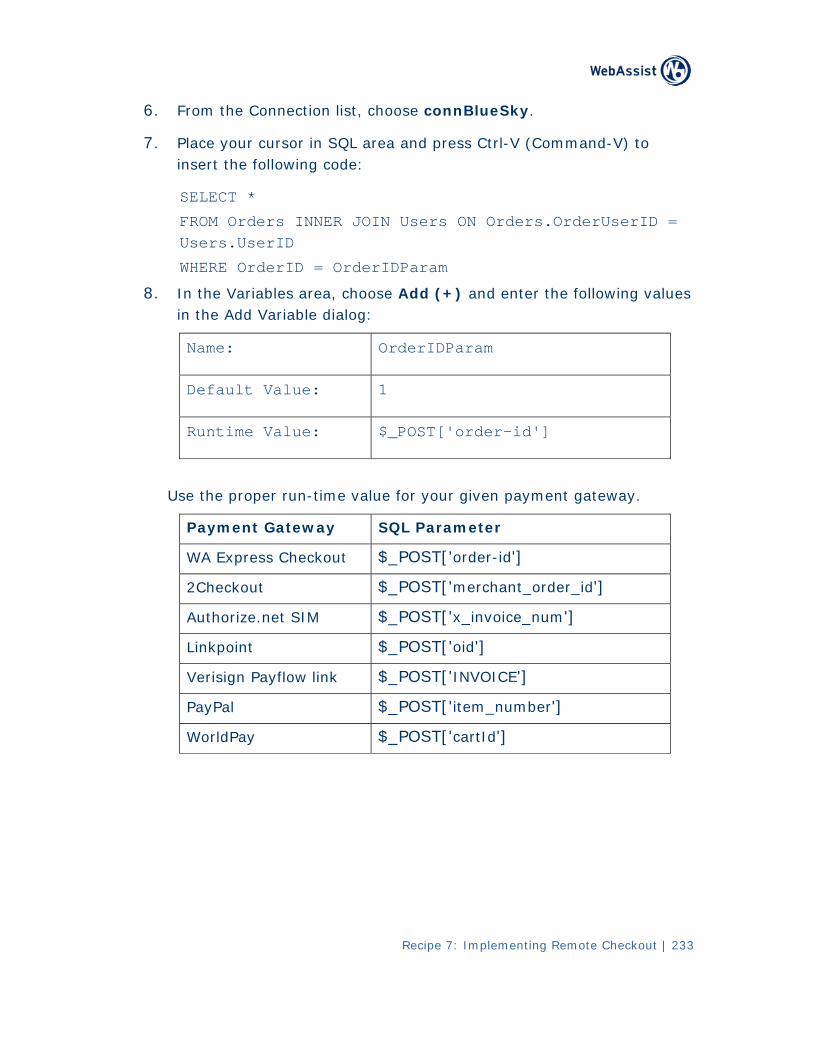
Recipe 7: Implementing Remote Checkout | 233
6. From the Connection list, choose connBlueSky.
7. Place your cursor in SQL area and press Ctrl-V (Command-V) to insert the following code:
SELECT *
FROM Orders INNER JOIN Users ON Orders.OrderUserID = Users.UserID
WHERE OrderID = OrderIDParam
8. In the Variables area, choose Add (+) and enter the following values in the Add Variable dialog:
Name: OrderIDParam
Default Value: 1
Runtime Value: $_POST['order-id']
Use the proper run-time value for your given payment gateway.
Payment Gateway SQL Parameter
WA Express Checkout $_POST['order-id']
2Checkout $_POST['merchant_order_id']
Authorize.net SIM $_POST['x_invoice_num']
Linkpoint $_POST['oid']
Verisign Payflow link $_POST['INVOICE']
PayPal $_POST['item_number']
WorldPay $_POST['cartId']
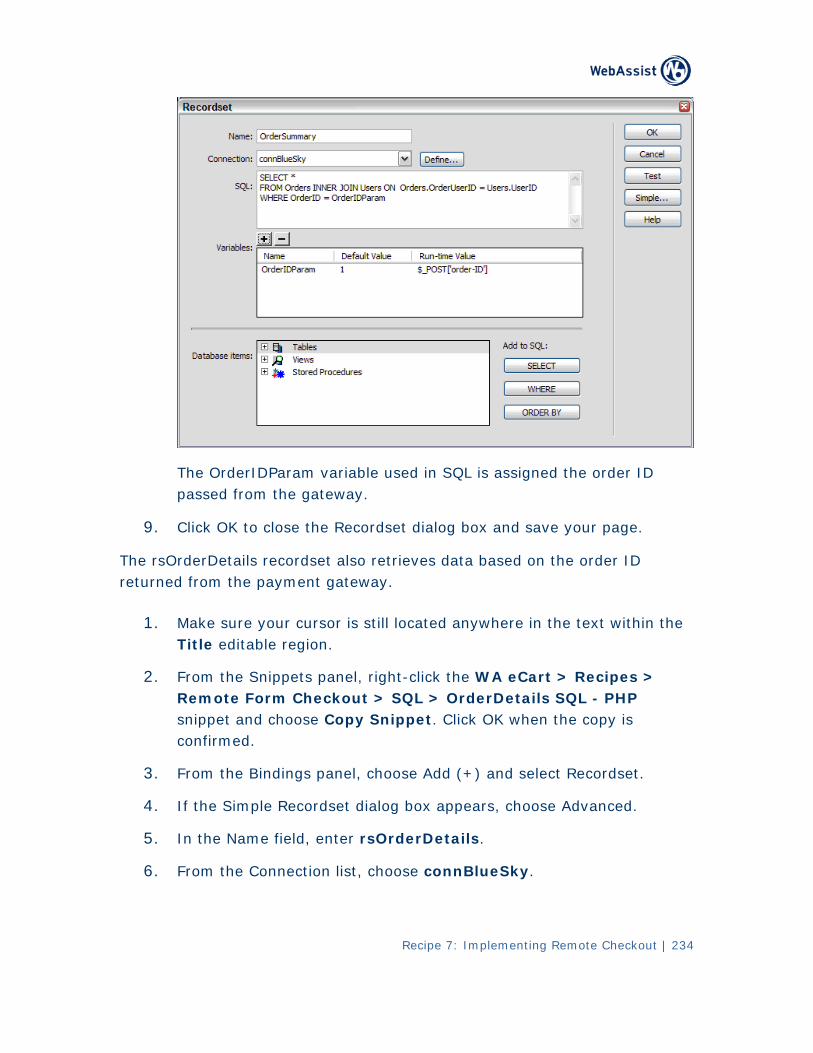
Recipe 7: Implementing Remote Checkout | 234
The OrderIDParam variable used in SQL is assigned the order ID passed from the gateway.
9. C ecor d save your page. lick OK to close the R dset dialog box an
The rsOr o r n the order ID derDetails recordset als etrieves data based oreturned yment gatewa from the pa y.
1. M or is st xt within the ake sure your curs ill located anywhere in the teT le region. itle editab
2. F l, r rt > Recipes > rom the Snippets pane ight-click the WA eCaR Form Checkout L - PHP emote > SQL > OrderDetails SQsnippet and choose Copy Snippet. Click OK when the copy is confirmed.
3. From the Bindings panel, choose Add (+) and select Recordset.
4. If the Simple Recordset dialog box appears, choose Advanced.
5. In the Name field, enter rsOrderDetails.
6. From the Connection list, choose connBlueSky.
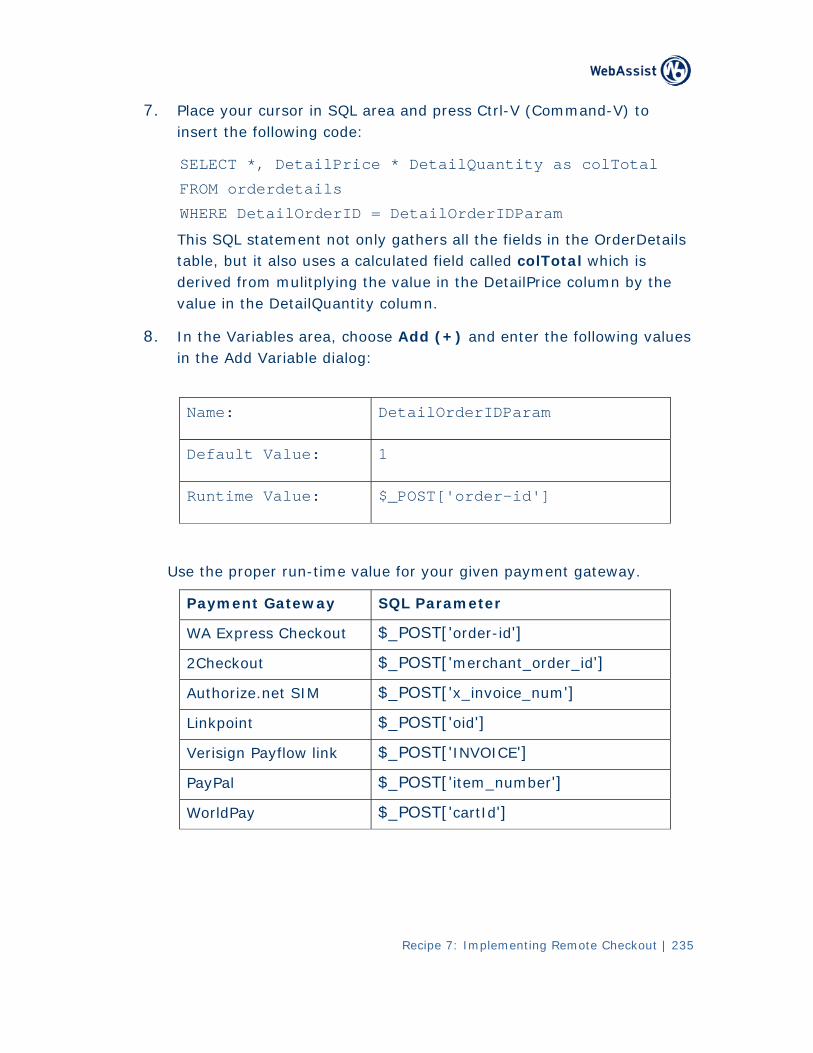
Recipe 7: Implementing Remote Checkout | 235
7. Place your cursor in SQL area and press Ctrl-V (Command-V) to insert the following code:
SELECT *, DetailPrice * DetailQuantity as colTotal
FROM orderdetails
WHERE DetailOrderID = DetailOrderIDParam
This SQL statement not only gathers all the fields in the OrderDetails table, but it also uses a calculated field called colTotal which is derived from mulitplying the value in the DetailPrice column by the value in the DetailQuantity column.
8. In the Variables area, choose Add (+) and enter the following values in the Add Variable dialog:
Name: DetailOrderIDParam
Default Value: 1
Runtime Value: $_POST['order-id']
Use the proper run-time value for your given payment gateway.
Payment Gateway SQL Parameter
WA Express Checkout $_POST['order-id']
2Checkout $_POST['merchant_order_id']
Authorize.net SIM $_POST['x_invoice_num']
Linkpoint $_POST['oid']
Verisign Payflow link $_POST['INVOICE']
PayPal $_POST['item_number']
WorldPay $_POST['cartId']
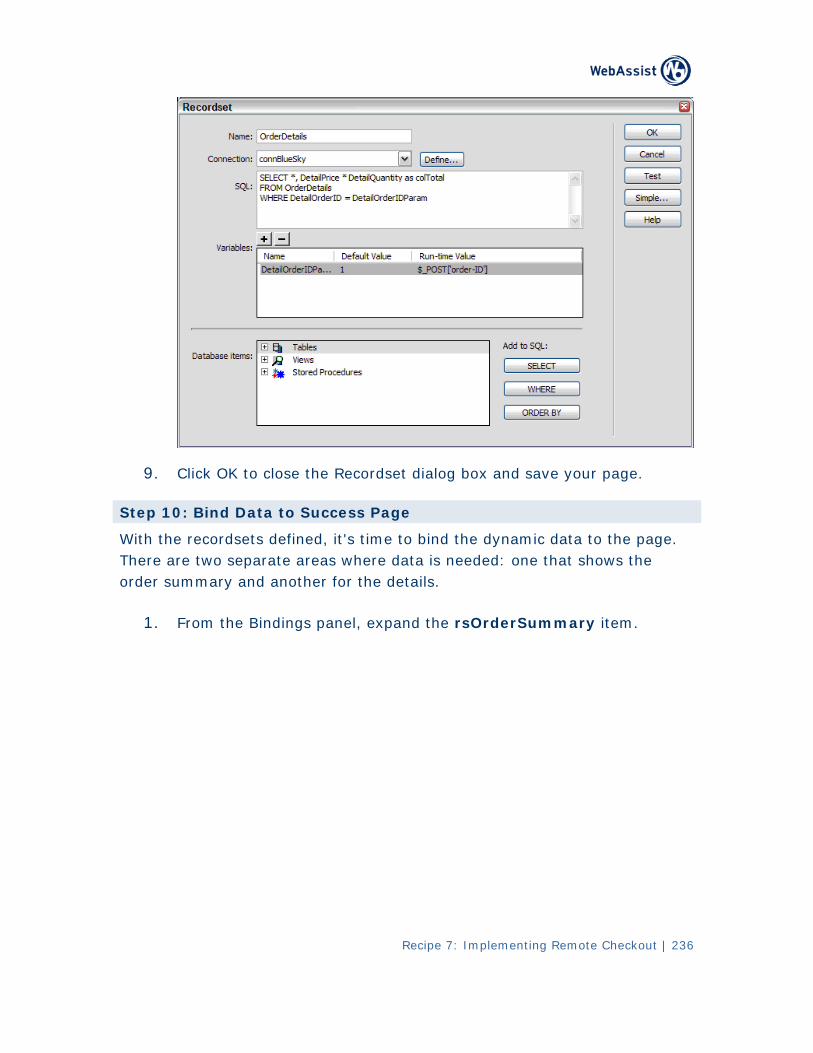
Recipe 7: Implementing Remote Checkout | 236
9. Click OK Recordset dialog box and save your page. to close the
Step 10: Bind Data to Success Page
With the recordsets defined, it's time to bind the dynamic data to the page. There are two separate areas where data is needed: one that shows the order summary and another for the details.
1. From l, e mary item. the Bindings pane xpand the rsOrderSum

2. Bind the appropriate form element data to the proper table cell in the summary table near the top of the page:
• Drag the FirstName element to the cell next to the Name label; place your cursor to the right of the just inserted element and press Ctrl-Shift-Space (Command-Shift-Space) to enter a hard-space character.
• Drag the LastName element right after the hard-space.
• Drag the UserBillingAddress1 element into the cell next to the Address label.
• Drag the UserBillingCity element into the cell below the just inserted element just inserted; enter a comma and space immediately following the newly added element.
• Drag the UserBillingState element into the same cell directly after the comma and space; add two hard-spaces immediately following.
• Drag the UserBillingZip element after the two hard-spaces.
Recipe 7: Implementing Remote Checkout | 237
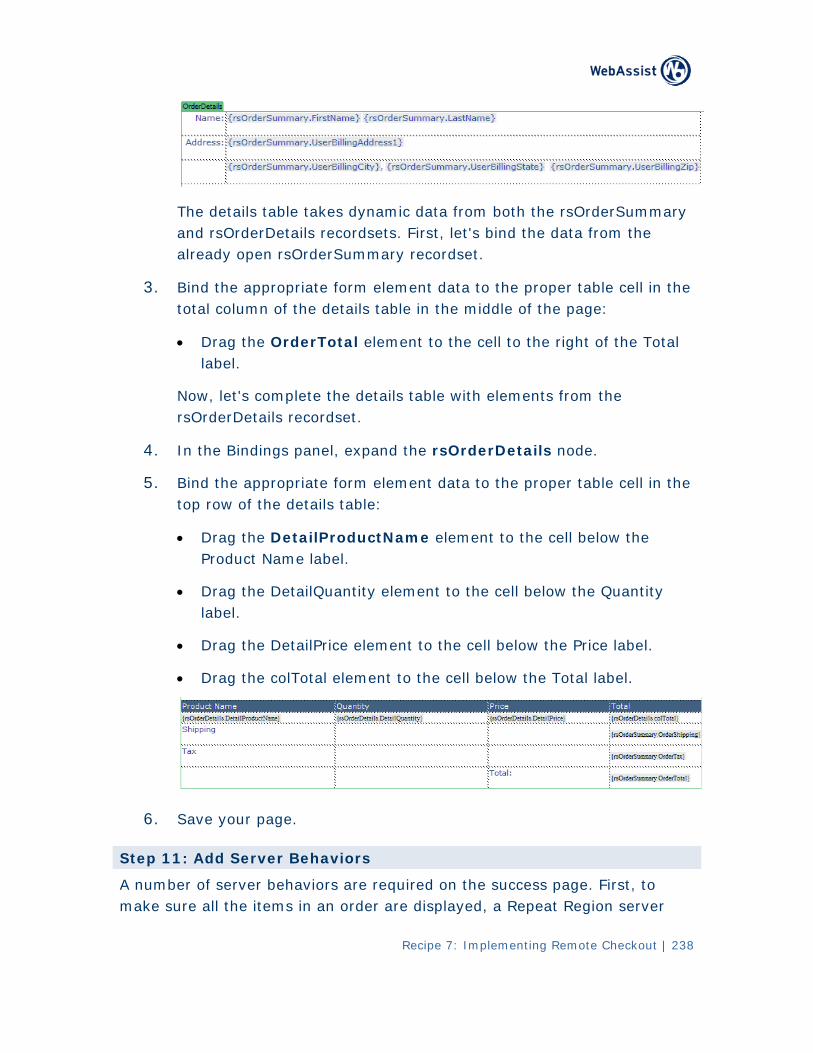
The details table takes dynamic data from both the rsOrderSummary and rsOrderDetails recordsets. First, let's bind the data from the already open rsOrderSummary recordset.
3. ent data to the proper table cell in the Bind the appropriate form elemtotal column of the details table in the middle of the page:
• Drag the OrderTotal element to the cell to the right of the Total label.
Now, let's complete the details table with elements from the rsOrderDetails recordset.
4. rsOrderDetails node. In the Bindings panel, expand the
5. ent data to the proper table cell in the Bind the appropriate form elemtop row of the details table:
• Drag the DetailProductName element to the cell below the Product Name label.
• Drag the DetailQuantity element to the cell below the Quantity label.
• lement to the cell below the Price label. Drag the DetailPrice e
• Drag the colTotal element to the cell below the Total label.
6. Save your page.
Step 11: Add Server Behaviors
A number of server behaviors are required on the success page. First, to
make sure r all the items in an order are displayed, a Repeat Region serve
Recipe 7: Implementing Remote Checkout | 238
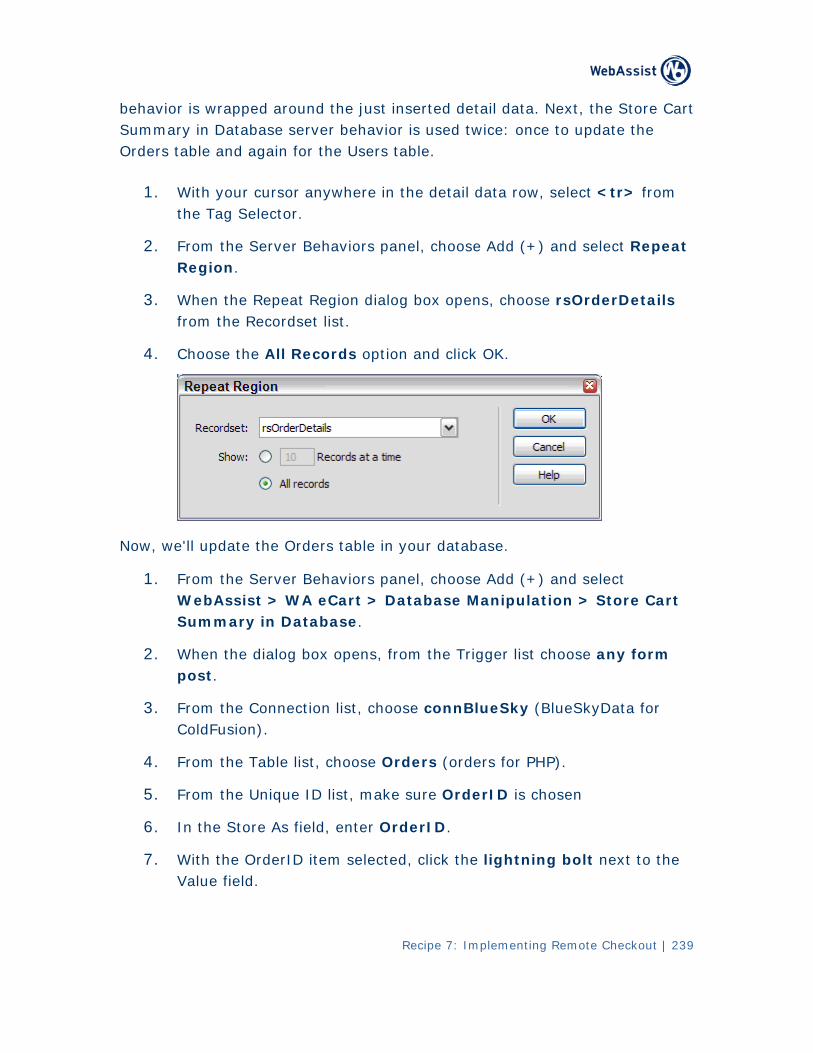
Recipe 7: Implementing Remote Checkout | 239
behavior is wrapped around the just inserted detail data. Next, the Store Cart Summary in Database server behavior is used twice: once to update the Orders table and again for the Users table.
1. With your cursor anywhere in the detail data row, select <tr> from the Tag Selector.
2. dd (+) and select Repeat From the Server Behaviors panel, choose ARegion.
3. When the Repeat Region dialog box opens, choose rsOrderDetails from the Recordset list.
4. Choose the All Records option and click OK.
Now, we'll update the Orders table in your database.
1. From the Server Behaviors panel, choose Add (+) and select W bAssist > WA eCart > Database Manipulation > Store Cart eSummary in Database.
2. When the dialog box opens, from the Trigger list choose any formpost.
3. From the Connection list, choose connBlueSky (BlueSkyData for ColdFusion).
4. From the Table list, choose Orders (orders for PHP).
5. From the Unique ID list, make sure OrderID is chosen
6. In the Store As field, enter OrderID.
7. With the OrderID item selected, click the lightning bolt next to the Value field.
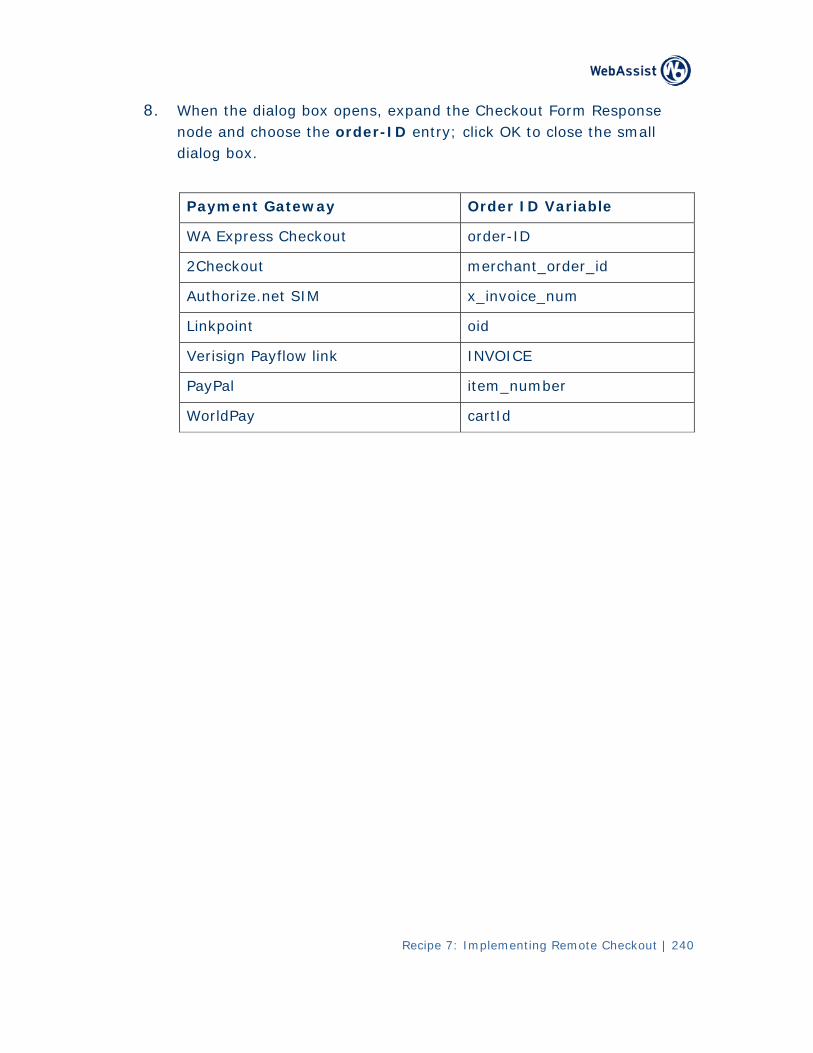
8. When the dialog box opens, expand the Checkout Form Response node and choose the order-ID entry; click OK to close the small dialog box.
Payment Gateway Order ID Variable
WA Express Checkout order-ID
2Checkout merchant_order_id
Authorize.net SIM x_invoice_num
Linkpoint oid
Verisign Payflow link INVOICE
PayPal item_number
WorldPay cartId
Recipe 7: Implementing Remote Checkout | 240
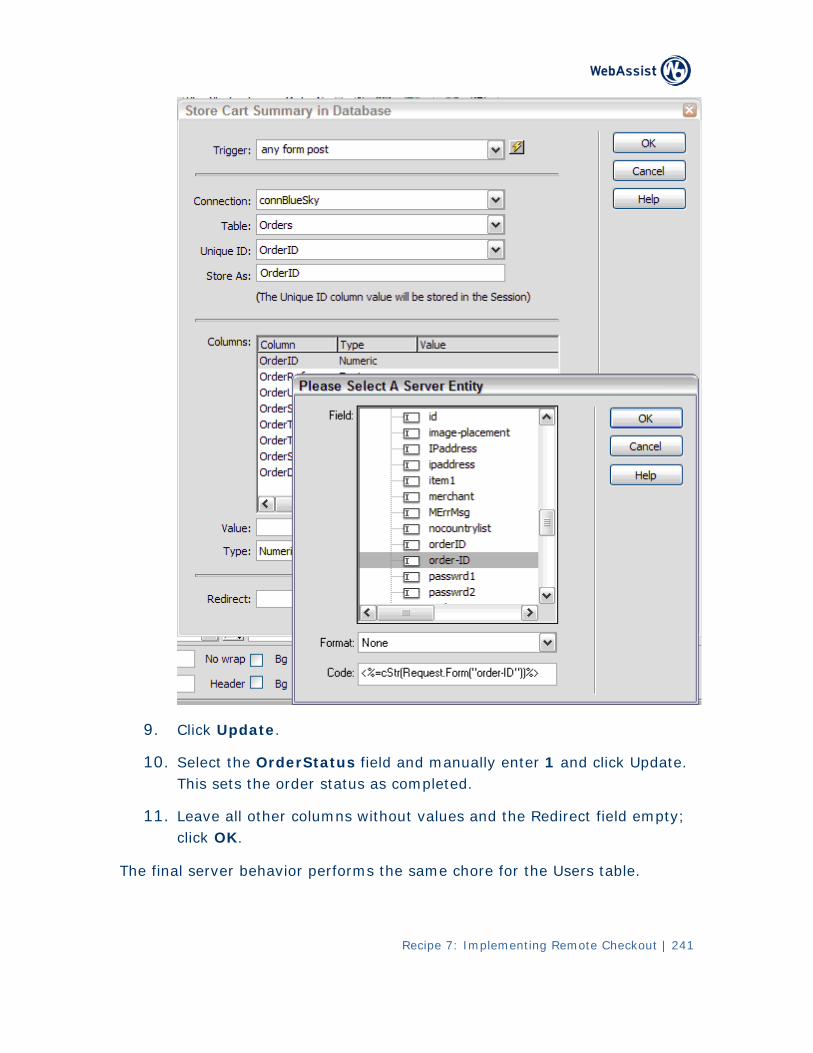
Recipe 7: Implementing Remote Checkout | 241
9. Click Update.
10. Select the OrderStatus field and manually enter 1 and click Update. This sets the order status as completed.
11. Leave all other columns without values and the Redirect field empty; click OK.
The final server behavior performs the same chore for the Users table.
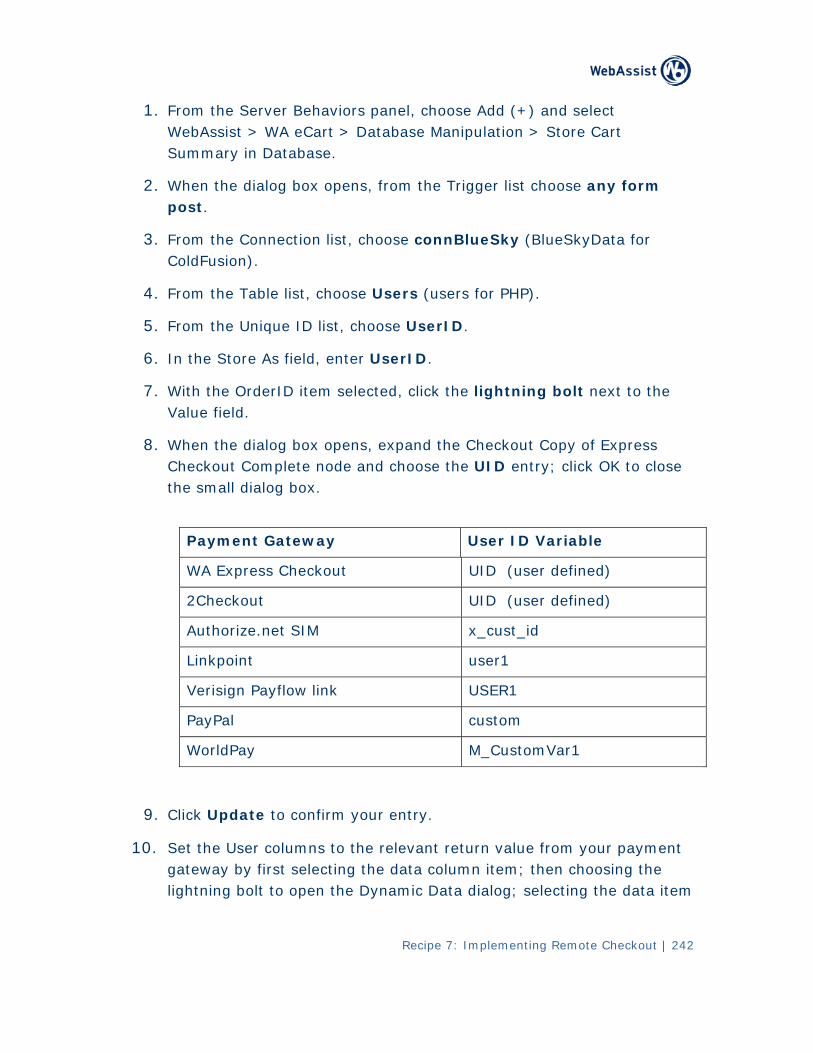
Recipe 7: Implementing Remote Checkout | 242
1. From the Server Behaviors panel, choose Add (+) and select WebAssist > WA eCart > Database Manipulation > Store Cart Summary in Database.
2. When the dialog box opens, from the Trigger list choose any form post.
3. From the Connection list, choose connBlueSky (BlueSkyData for ColdFusion).
4. From the Table list, choose Users (users for PHP).
5. From the Unique ID list, choose UserID.
6. In the Store As field, enter UserID.
7. With the OrderID item selected, click the lightning bolt next to the Value field.
8. When the dialog box opens, expand the Checkout Copy of Express Checkout Complete node and choose the UID entry; click OK to close the small dialog box.
Payment Gateway User ID Variable
WA Express Checkout UID (user defined)
2Checkout UID (user defined)
Authorize.net SIM x_cust_id
Linkpoint user1
Verisign Payflow link USER1
PayPal custom
WorldPay M_CustomVar1
9. Click Update to confirm your entry.
10. Set th s to the relevant return value from your payment e User columngateway by first selecting the data column item; then choosing the lightning bolt to open the Dynamic Data dialog; selecting the data item
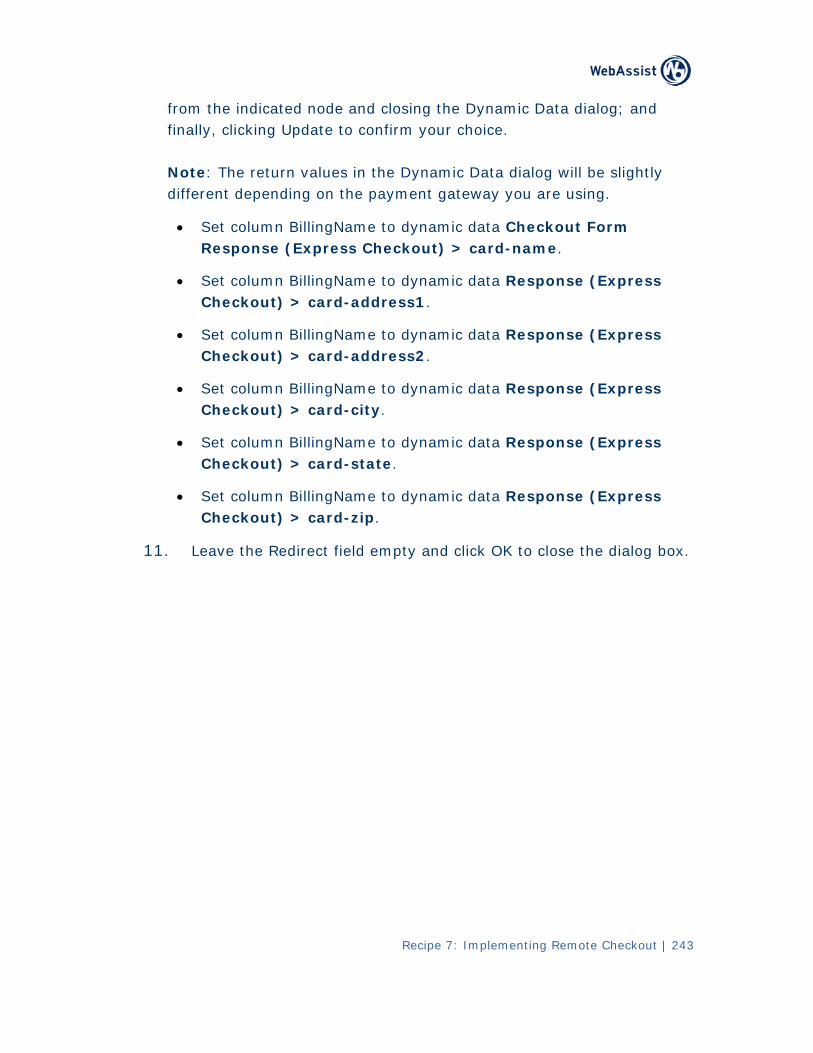
Recipe 7: Implementing Remote Checkout | 243
and from the indicated node and closing the Dynamic Data dialog;finally, clicking Update to confirm your choice. Note: The return values in the Dynamic Data dialog will be slightly different depending on the payment gateway you are using.
• Set column BillingName to dynamic data Checkout Form Response (Express Checkout) > card-name.
• Set column BillingName to dynamic data Response (Express Checkout) > card-address1.
• Set column BillingName to dynamic data Response (Express Checkout) > card-address2.
• Set column BillingName to dynamic data Response (Express Checkout) > card-city.
• Set column BillingName to dynamic data Response (Express Checkout) > card-state.
• Set column BillingName to dynamic data Response (Express Checkout) > card-zip.
11. mpty and click O dialog box. Leave the Redirect field e K to close the
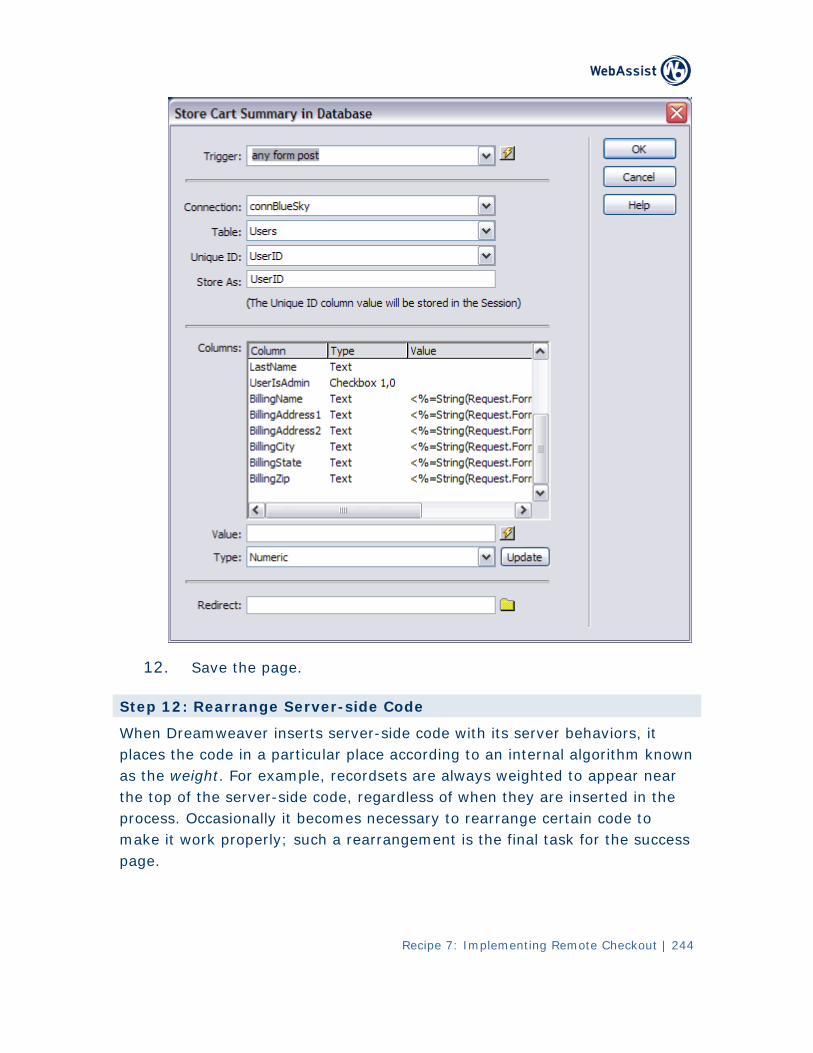
Recipe 7: Implementing Remote Checkout | 244
12. Save the page.
Step 12: Rearrange Server-side Code
When Dreamweaver inserts server-side code with its server behaviors, it places the code in a particular place according to an internal algorithm known as the weight. For example, recordsets are always weighted to appear near the top of the server-side code, regardless of when they are inserted in the process. Occasionally it becomes necessary to rearrange certain code to make it work properly; such a rearrangement is the final task for the success page.
Recipe 7: Implementing Remote Checkout | 245
To make sure that the user values displayed on the page are the correct ones, you'll need to move the second Store Cart Summary in Database server behavior – the one for the Users table – above the declared recordsets. This is handled through a simple copy and paste operation.
1. From the Server Behaviors panel, select the WA eCart Store Summary in Database (Users, UserID) server behavior; for PHP users the entry will read WA eCart Store Summary in Database (users, UserID).
2. Switch to Code view to see the selected code.
3. Cut the code by pressing Ctrl+X (Command+X).
4. Move your cursor to the top of the page, just below the series of <!--#include> tags.
5. Paste the copied code by pressing Ctrl+V (Command+V).
6. Save your page.
Your application is now ready for testing.
The failure page has already been created for you and requires no additional server-side coding.
Related Documents