Introducing DynaStrip This start up document aims to demonstrate how easy it is to impose with DynaStrip, and how feature-rich the application is. For the best first-time experience, we strongly suggest that you print these pages and complete the step by step exercises before testing your own jobs. The installation on your hard disk of optional components such as documents and tutorial files is recommended. You can return to the installation file at any time.* DynaStrip offers a quick-layout interface, called DynaMo, that leads you through the hole imposition process. It’s fast, easy, and conve- nient for most of the “real-world” jobs. Should you need more sophisticated layouts, the standard interface allows you to build a new job from scratch or import your own pre- defined templates. This document will introduce you to both capabilities. Simply follow the guide... Thank you for choosing DynaStrip, THE digital stripping software! *If you use a demo version, remember that it contains all of DynaStrip features and filters but uses encrypted data. The jobs and sheet templates it produces are not compatible with the registered versions. A watermark will be printed on each page and document pages will be skipped randomly during output. First-time experience?

Welcome message from author
This document is posted to help you gain knowledge. Please leave a comment to let me know what you think about it! Share it to your friends and learn new things together.
Transcript
Introducing DynaThis start up document aims t w eas
with DynaStrip, and how feature tion iFor the best first-time experie sugge
print these pages and complete exercbefore testing your own jobs.
The installation on your hard components such as documents is recommended. You can return to file atime.*
rface, called DynaMo, that leads ocess. It’s fast, easy, and conve-s. d layouts, the standard interface ratch or import your own pre-
o both capabilities.
u for
*If you use a demo version, remember tha naStrip oduces are not compatible with the registered versions. A watermark will be and d
Firs e
Stripo demonstrate ho-rich the applicance, we stronglythe step by step
disk of optionaland tutorial files the installation
Thank yo
t it contains all of Dy printed on each page
t-tim
y it is to impose s.st that you
ises
t any
DynaStrip offers a quick-layout inteyou through the hole imposition prnient for most of the “real-world” job
Should you need more sophisticateallows you to build a new job from scdefined templates.
This document will introduce you tSimply follow the guide...
choosing DynaStrip, THE digital stripping software!
features and filters but uses encrypted data. The jobs and sheet templates it procument pages will be skipped randomly during output.
experience?
Y
Lf
Aa
Cc••
Click on OK to go back to the
p-down list.
uickLayout window.
First-time experience? • 2
1
our very first job with DynaMoA “QuickLayout” creation
et’s build a saddle-stitched booklet imposition using a composite pdf ile.
. Double-click on DynaStrip’s icon to start the application nd create a new job (File/New menu or Command + N).
hoose DynaMo QuickLayout to open the QuickLayout window. Since it ontains all object parameters, it allows for fast layout creation.
Enter the name MyJob. In the Color environment menu, select Composite.
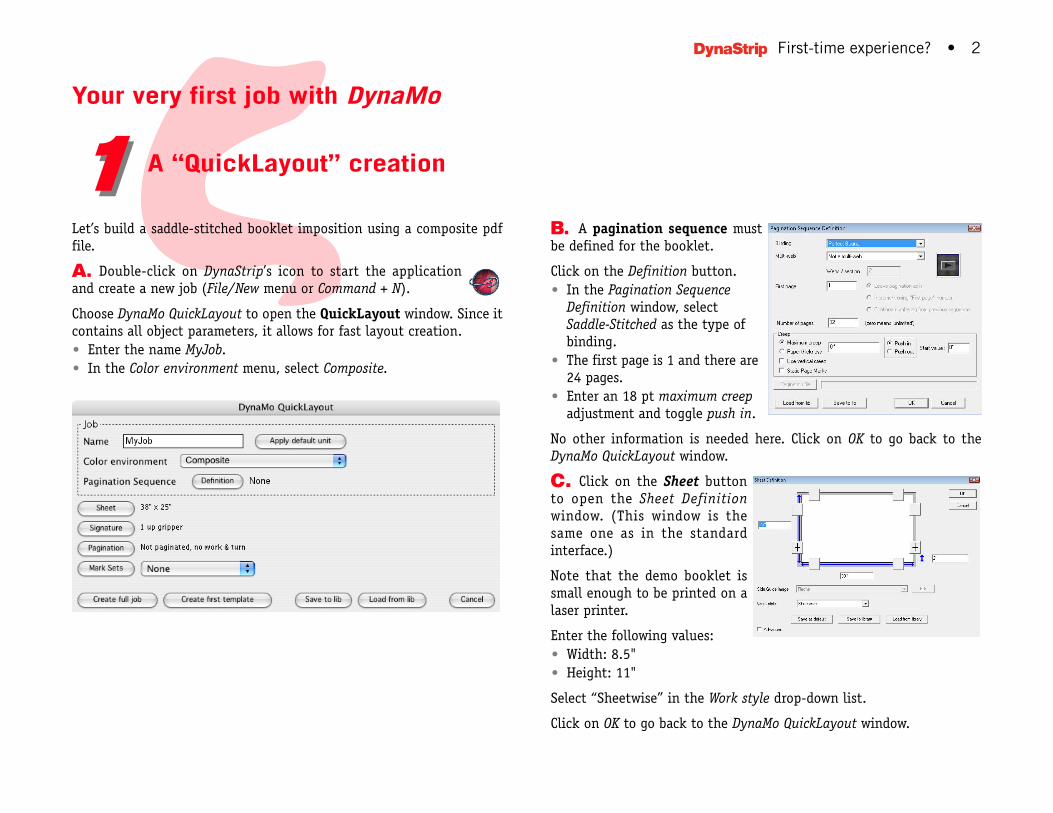
B. A pagination sequence must be defined for the booklet.
Click on the Definition button. • In the Pagination Sequence
Definition window, select Saddle-Stitched as the type of binding.
• The first page is 1 and there are 24 pages.
• Enter an 18 pt maximum creep adjustment and toggle push in.
No other information is needed here. DynaMo QuickLayout window.
C. Click on the Sheet button to open the Sheet Definitionwindow. (This window is the same one as in the standard interface.)
Note that the demo booklet is small enough to be printed on a laser printer.
Enter the following values:• Width: 8.5"• Height: 11"
Select “Sheetwise” in the Work style dro
Click on OK to go back to the DynaMo Q
1
DbDds
Em•••
Cbt
Lm
E
CbfO
Eottmil
r
-
. r
n to the QuickLayout window.
create a folder called MyJob on is folder.
on a warning about paginating esign window.
on the light table, simply select ld down the Command key and
hlighted icon leads you to the he pages of your pdf document
First-time experience? • 3
. Click on the Signatureutton to open the Signature efinition window. (This win-ow is the same as in the tandard interface.)
nter the following Page For-at size:Width: 3.5"Height: 5"No bleed
lick on the Maximum formatutton. Four pages will fit in he sheet (2 columns by 2 rows).
eave the default page marks as is for now (however, you could custo-ize them by clicking on the Details button).
nter 0.25" (or 1/4") in the space between rows box.
lick on OK. A dialog box indicating the width of the lower margin, etween the signature and the bottom of the sheet, will open. This ield is used to adjust the gripper. Keep the default value and click on K to go back to the QuickLayout window.
. Click on the Pagination button to pen the Folding window. The Pagina-ion template button opens an interac-ive window where you can either anually enter the page numbers or
mport a folding template from a ibrary.
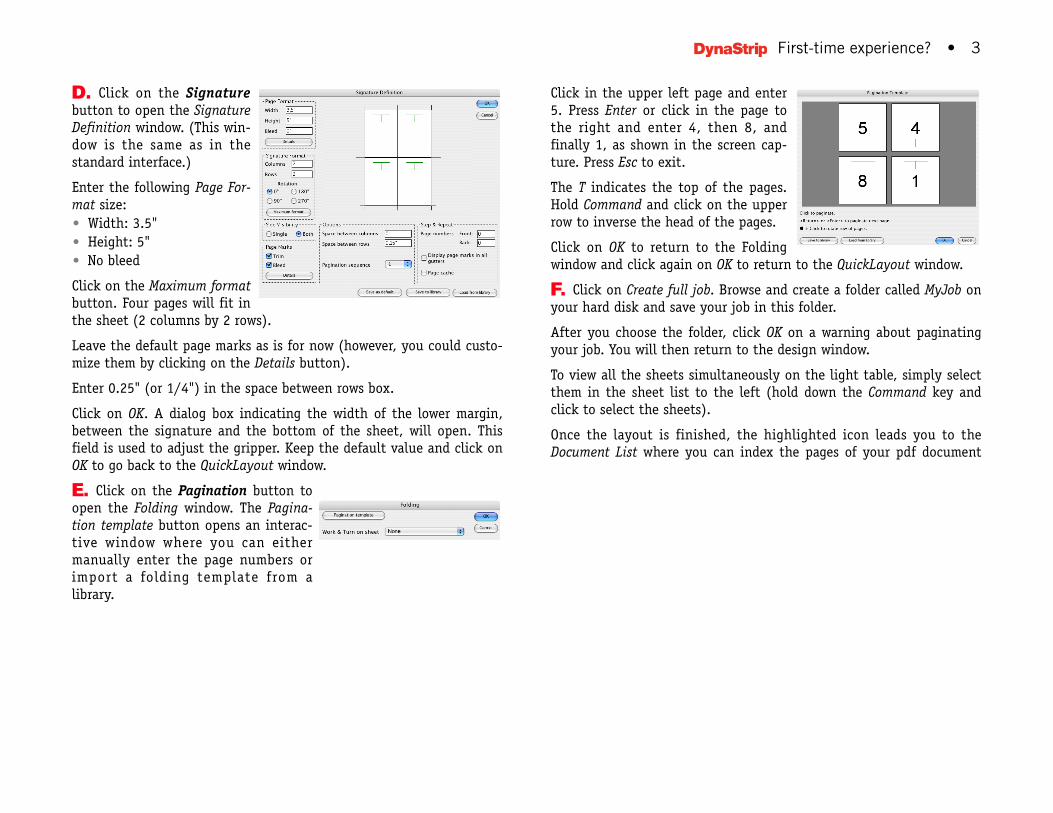
Click in the upper left page and ente5. Press Enter or click in the page tothe right and enter 4, then 8, andfinally 1, as shown in the screen capture. Press Esc to exit.
The T indicates the top of the pagesHold Command and click on the upperow to inverse the head of the pages.
Click on OK to return to the Foldingwindow and click again on OK to retur
F. Click on Create full job. Browse andyour hard disk and save your job in th
After you choose the folder, click OKyour job. You will then return to the d
To view all the sheets simultaneously them in the sheet list to the left (hoclick to select the sheets).
Once the layout is finished, the higDocument List where you can index t
SD
AbI
Bw
rm el-m-to
First-time experience? • 4
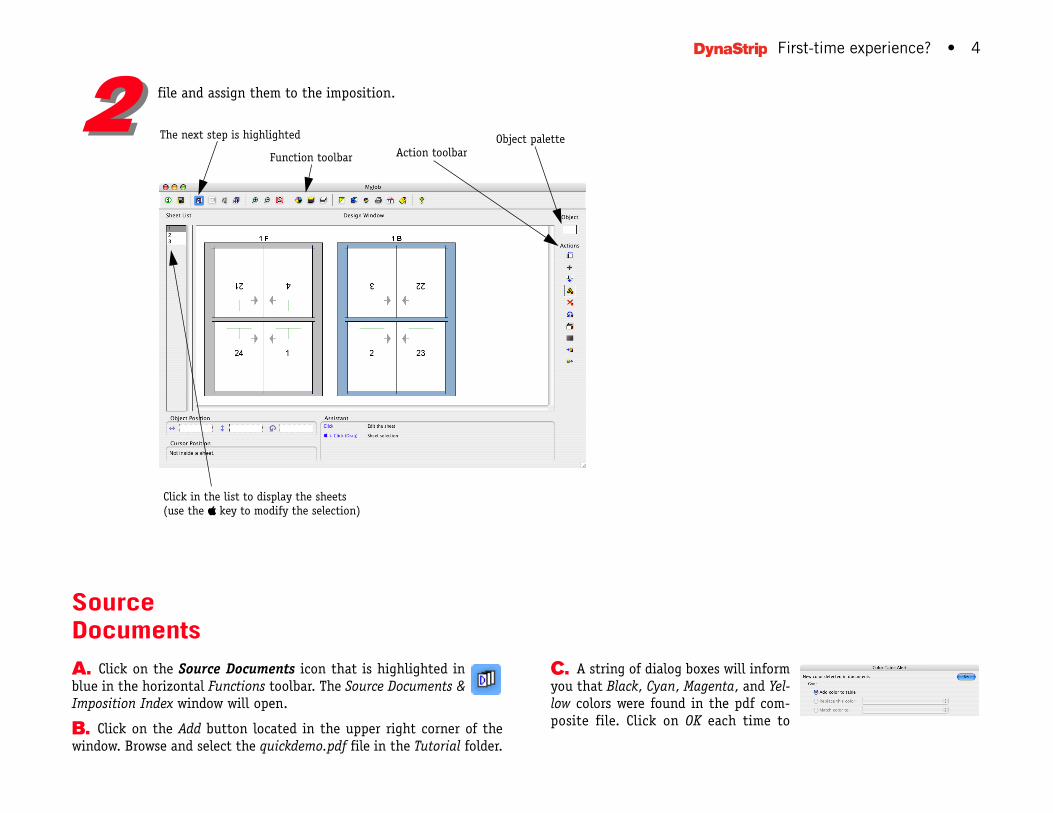
file and assign them to the imposition.
ource ocuments
. Click on the Source Documents icon that is highlighted in lue in the horizontal Functions toolbar. The Source Documents & mposition Index window will open.
. Click on the Add button located in the upper right corner of the indow. Browse and select the quickdemo.pdf file in the Tutorial folder.
C. A string of dialog boxes will infoyou that Black, Cyan, Magenta, and Ylow colors were found in the pdf coposite file. Click on OK each time
The next step is highlighted
Function toolbar Action toolbarObject palette
Click in the list to display the sheets(use the -- key to modify the selection)
22
••
Da
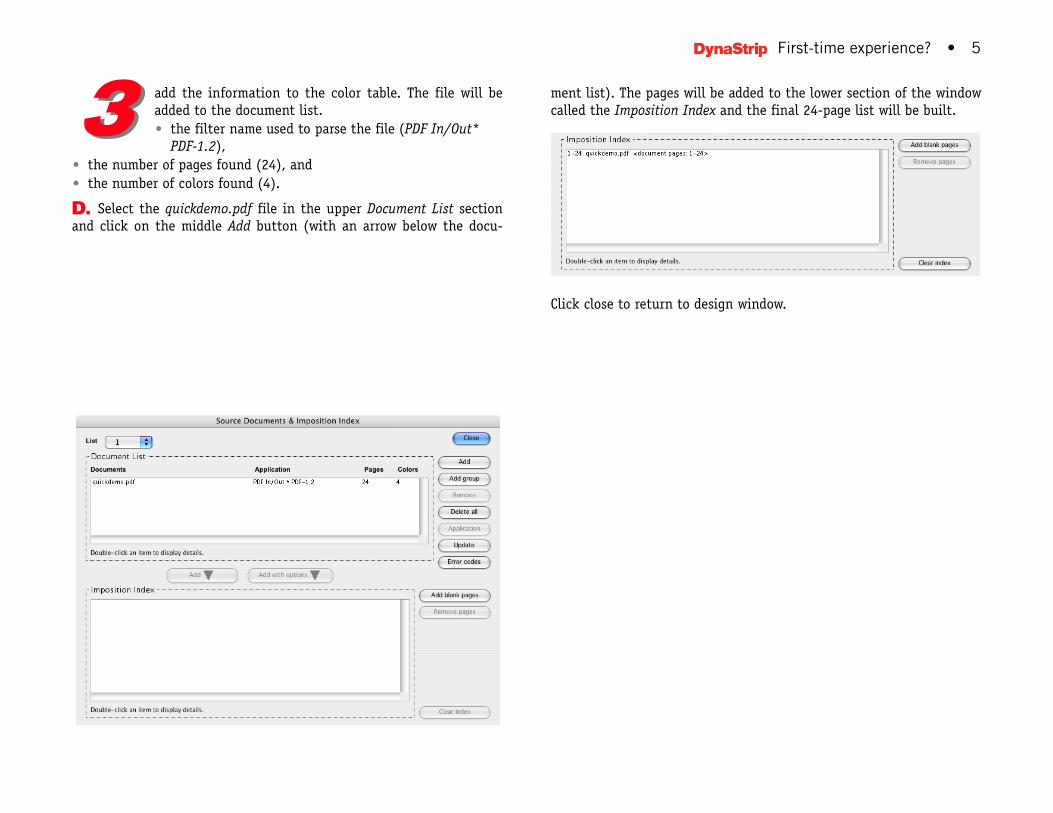
to the lower section of the window final 24-page list will be built.
w.
First-time experience? • 5
add the information to the color table. The file will be added to the document list. • the filter name used to parse the file (PDF In/Out*
PDF-1.2),the number of pages found (24), and the number of colors found (4).
. Select the quickdemo.pdf file in the upper Document List section nd click on the middle Add button (with an arrow below the docu-
ment list). The pages will be added called the Imposition Index and the
Click close to return to design windo
33
First-time experience? • 6
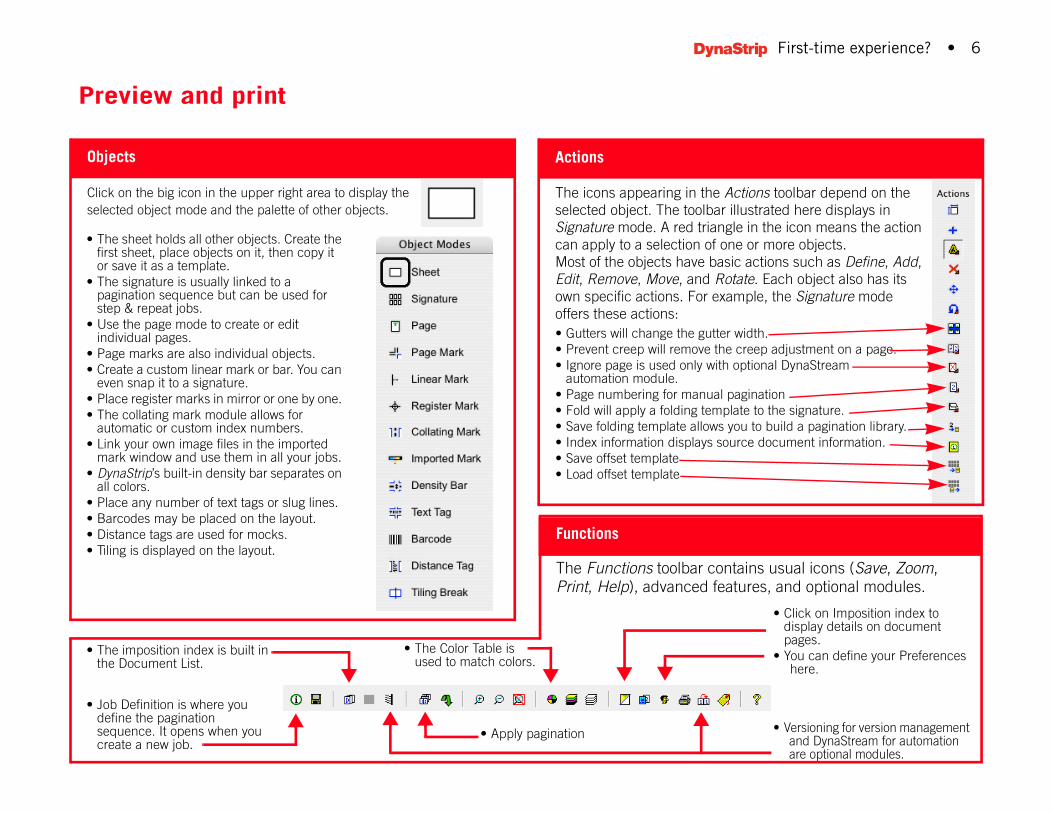
• The sheet holds all other objects. Create the first sheet, place objects on it, then copy it or save it as a template.
• The signature is usually linked to a pagination sequence but can be used for step & repeat jobs.
• Use the page mode to create or edit individual pages.
• Page marks are also individual objects.• Create a custom linear mark or bar. You can
even snap it to a signature. • Place register marks in mirror or one by one. • The collating mark module allows for
automatic or custom index numbers.• Link your own image files in the imported
mark window and use them in all your jobs.• DynaStrip’s built-in density bar separates on
all colors. • Place any number of text tags or slug lines.• Barcodes may be placed on the layout.• Distance tags are used for mocks.• Tiling is displayed on the layout.
Objects
Click on the big icon in the upper right area to display the selected object mode and the palette of other objects.
Actions
The icons appearing in the Actions toolbar depend on the selected object. The toolbar illustrated here displays in Signature mode. A red triangle in the icon means the action can apply to a selection of one or more objects. Most of the objects have basic actions such as Define, Add, Edit, Remove, Move, and Rotate. Each object also has its own specific actions. For example, the Signature mode offers these actions:• Gutters will change the gutter width.• Prevent creep will remove the creep adjustment on a page.• Ignore page is used only with optional DynaStream
automation module.• Page numbering for manual pagination• Fold will apply a folding template to the signature.• Save folding template allows you to build a pagination library.• Index information displays source document information.• Save offset template• Load offset template
Functions
The Functions toolbar contains usual icons (Save, Zoom, Print, Help), advanced features, and optional modules.
position index is built in cument List.
finition is where you the pagination nce. It opens when you a new job.
• The Color Table is used to match colors.
• Apply pagination
• Click on Imposition index to display details on document pages.
• You can define your Preferences here.
• Versioning for version management and DynaStream for automation are optional modules.
Preview and print
• The imthe Do
• Job Dedefinesequecreate
First-time experience? • 7
TTo
Ahw
BIec••
•
•
CweB
TtPl
e e s
-
-
r e s
l a -. g
ts a watermark on each page and skips document
he first time you use DynaStrip, you must define your output device. he output device will be available for all your jobs. For now, you will nly create a basic PDF definition.
. Click on the Output icon (now highlighted in blue in the orizontal Functions toolbar) to open the Output Parametersindow.
. Click on OutPut Device.
n the window, click on New and nter the name PDF Signatures and lick on OK.
Select the PDF format.Choose PDF1.3 as the Configuration.The pdf output files can be sent to a destination folder. Click on Browse and choose a target folder on your hard disk. Finally, click on Default Image Area, and enter 8.5 x 11" (portrait orientation). Click on OK twice to return to the Output Parameters window.
. In the Output Parametersindow and the Sheets section, nter sheets 1 to 3, Front and ack.
o view the resulting imposi-ion on screen, simply click on review and Acrobat® will be aunched.
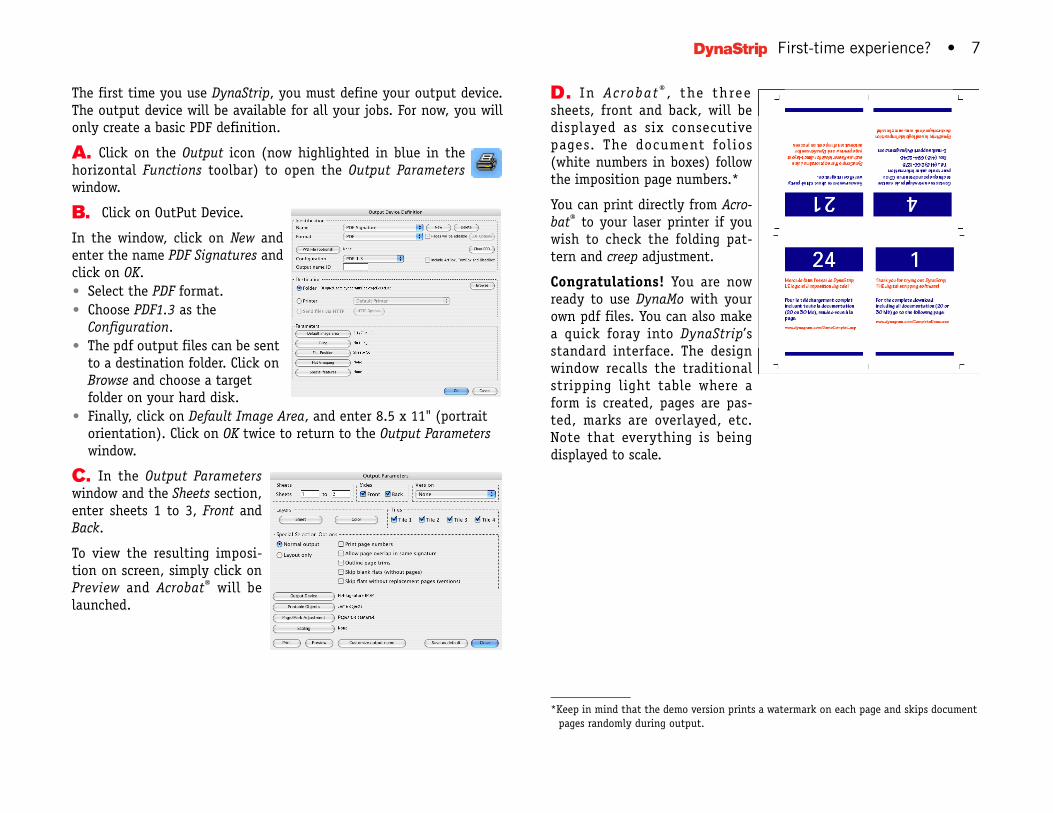
D. In Acrobat® , the threesheets, front and back, will bdisplayed as six consecutivpages. The document folio(white numbers in boxes) followthe imposition page numbers.*
You can print directly from Acrobat® to your laser printer if youwish to check the folding pattern and creep adjustment.
Congratulations! You are nowready to use DynaMo with youown pdf files. You can also maka quick foray into DynaStrip’standard interface. The designwindow recalls the traditionastripping light table where form is created, pages are pasted, marks are overlayed, etcNote that everything is beindisplayed to scale.
*Keep in mind that the demo version prinpages randomly during output.
trademarks or registered trademarks of their respective owners. Printed in Canada.
First-time experience? • 8
S
D
d•
••
W
•••
•
•
•
ilters registered user, you will find all new filters and
he Download/Updates & Filters section of our web site.
portal support issues, please contact:
United States & Canada
Tel.: 418-266-1275Fax: 418-694-2048
E-mail: [email protected]
Other Countries
Contact your distributor or reseller.
*
†
www.dynagram.com
© Copyright 2000-2011 Dynagram. All rights reserved. DynaStr ip is a registered trademark of Dynagram. Other brand or product names are
tandard Interface Exploration
ocumentationFor a more complete training, the Docs folder contains the following
ocuments: A three-lesson Tutorial (pdf format for printing) with step by step exercises. (The installation of the PostScript and working files for this Tutorial is optional.) The complete User’s Guide (pdf format for printing).Other documents and templates.
orkflowsThe current version of DynaStrip supports the following workflows: JDF and PJTF workflows*PDF in & out (without conversion to PS at any time).PS files for main applications such as QuarkXPress, PageMaker, FrameMaker, etc., on both platforms.Filters and modules for pre-RIPing workflow systems such as ArtQuest®, PageFlow®, and RAMpage®. Raster Mode for the preview of fpo’s and link files (the Raster Mode with LZW decompression option is sold separately).Brisque® workflow system†.
Upgrades & FIf you are a
upgrades in t
Technical supFor technic
In the demo version, the template creation for workflow systems can be fully tested. However, for protection reasons, the output of ICF, PJTF and JDF files is prevented. Please contact Dynagram to get an Evaluation version. For information about DynaStrip’s integration into any other proprietary or non-proprie-tary workflow, contact our technical support.
Related Documents