1 2.1 Introduction Visual Basic (VB) has become the most popular programming language for several reasons. VB is easy to learn, which makes it an excellent tool for understanding elementary programming concepts. In addition, it has evolved into such powerful and popular product that skilled Visual Basic programmer are demand in the job market. Visual Basic .NET is the latest version of VB. It is designed to allow the programmer to develop applications that run under Windows and/or in Web browser without the complexity generally associated with programming. 2.2 The Windows Graphical User Interface In this module, you will learn to develop an application that run in the Microsoft Windows environment. Your application will look like standard windows program. Microsoft Windows uses a graphical user interface, or GUI (pronounced “gooey”). The windows GUI defines how the elements such as labels, textboxes, buttons, radio buttons checks boxes, list boxes, menus and scroll bars look and function. As a VB programmer, you have available a toolbox of these elements. Thus, to develop the simple Windows GUI you will: • create new windows, called forms. • use the toolbox to add the various elements, called controls. By the end of this practical section, the students should be able to: Describe the process of visual program and development Identify the element in the Visual Basic project Write, run, save, print and modify the first Visual Basic Project Use text boxes, group boxes, check boxes, radio buttons and picture boxes effectively.

Welcome message from author
This document is posted to help you gain knowledge. Please leave a comment to let me know what you think about it! Share it to your friends and learn new things together.
Transcript

1
2.1 Introduction
Visual Basic (VB) has become the most popular programming language for
several reasons. VB is easy to learn, which makes it an excellent tool for understanding
elementary programming concepts. In addition, it has evolved into such powerful and
popular product that skilled Visual Basic programmer are demand in the job market.
Visual Basic .NET is the latest version of VB. It is designed to allow the
programmer to develop applications that run under Windows and/or in Web browser
without the complexity generally associated with programming.
2.2 The Windows Graphical User Interface
In this module, you will learn to develop an application that run in the Microsoft
Windows environment. Your application will look like standard windows program.
Microsoft Windows uses a graphical user interface, or GUI (pronounced
“gooey”). The windows GUI defines how the elements such as labels, textboxes,
buttons, radio buttons checks boxes, list boxes, menus and scroll bars look and function.
As a VB programmer, you have available a toolbox of these elements. Thus, to develop
the simple Windows GUI you will:
• create new windows, called forms.
• use the toolbox to add the various elements, called controls.
By the end of this practical section, the students should be able to:
Describe the process of visual program and development Identify the element in the Visual Basic project Write, run, save, print and modify the first Visual Basic Project Use text boxes, group boxes, check boxes, radio buttons and picture boxes
effectively.

2
2.3 Visual Basic Application File
A Visual Basic application, called a solution, can consist of one or more
projects. In this module all of the solutions have only one project, therefore you can
think of one solution is for one project. However for each project can contains one or
more form files. For example, to create the HelloWorld application creates these files :
HelloWorld.sln The solution file. A text file that holds
information about solution and the projects
it contains.
HelloWorld.suo Solution user option file. Store
information about the selected option, so
that all customizations can be restored
each time you open the solution.
helloForm.vb
The .vb file. Holds the definitions of a
form, its controls, and code procedures.
This is a text file that you can open in any
editor.
helloForm.resx A resource file for the form. This text file
defines all resources used by form,
including strings of text, numbers and
graphics.
HelloWorld.vbproj A project file. A text file that describes the
project and lists the files that are included
in the project.
HelloWorld.vbproj.user The project user option file. This text file
holds project option settings, so that the
next time you open the project, all selected
options will be restored.
After you run your project, you will find several more file created by the system.
The only file that you will open directly is the .sln, or solution file.
3
2.5 The Visual Studio Environment
Steps by Step: Starting the project
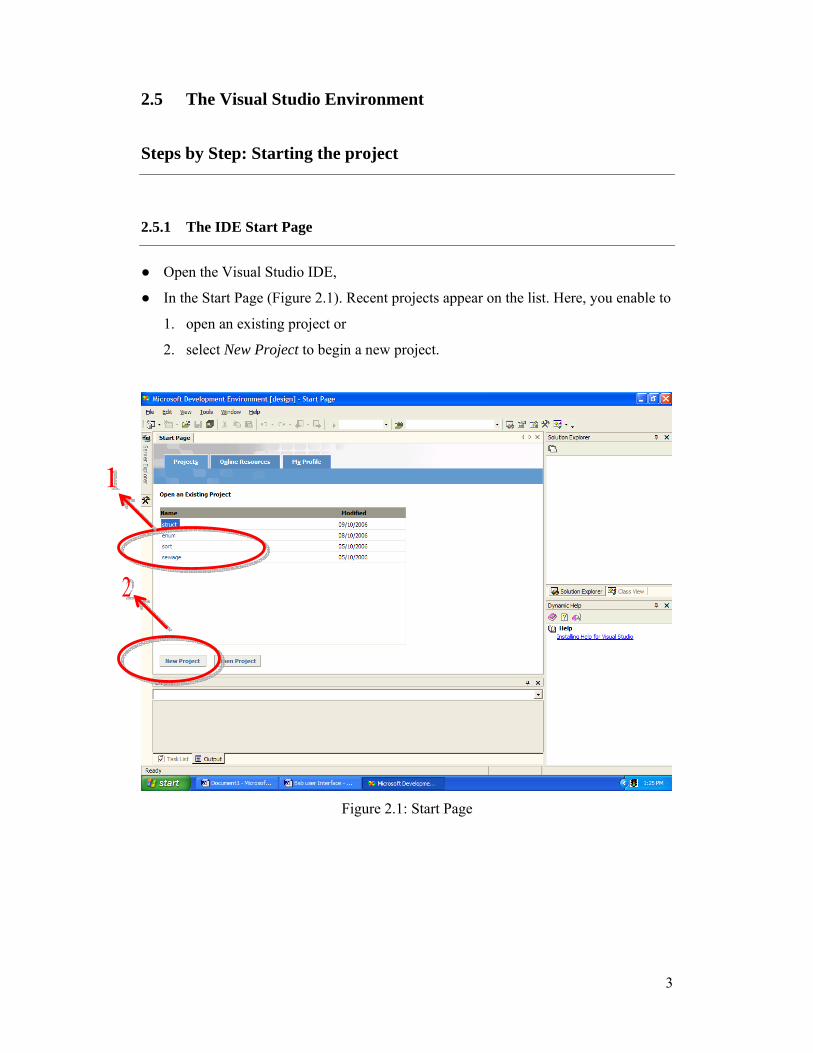
2.5.1 The IDE Start Page
● Open the Visual Studio IDE,
● In the Start Page (Figure 2.1). Recent projects appear on the list. Here, you enable to
1. open an existing project or
2. select New Project to begin a new project.
Figure 2.1: Start Page

4
2.5.2 The New Project Dialog
● In the New Project dialog (Figure 2.2), select Visual Basic Projects in the Project
Type and Windows Application in the Templates box.
● Give the project a name and path on this dialog box
Figure 2.2: Begin a new VB. Net project
● Click OK

5
2.5.3 The IDE Main Windows
● Figure 2.3 shows the Visual Studio environment’s main windows and its various
child windows.
● Some windows have tabs that allow you display different contents
● The IDE main windows hold the Visual Studio menu bar and the toolbars.
Figure 2.3 : The Visual Studio environment

6
2.6 First Visual Basic Project
Steps by Step: Writing your First Visual Basic Project
2.6.1 Start a New Project
● Open the Visual Studio IDE as shown in 2.2.
● Click on the New Project button. The New Project dialog box opens (Figure 2.4).
Make sure that Visual Basic Projects is selected for project Types and Windows
Application is selected for Templates.
● For Location, browse to select the path on your new project.
● Enter “HelloWorld” for the name of the new project.
● Click the OK button.
Figure 2.4: Select the path and enter the name for the new project

7
2.6.2 Set Up Your Environment
● Reset the IDE’ default layout by choosing
Tools/Options/Environment/General/Reset Window Layout.
● Click OK on the both dialog
Figure 2.5:
● Point to the icon for the toolbox at the bottom of the window’s title bar.
● The toolbox window opens. Notice the pushpin icon at the top of the window(Figure
2.6); clicking this icon makes the windows remain on the screen rather than
AutoHide.

8
Figure 2.6: The Toolbox window.

9
2.6.3 Plan the Project
● The first step planning is to design the user interface. Figure 2.7 shows a sketch of
the form that includes a label and two buttons.
Figure 2.7: A sketch of the Hello World form for planning
Push Me
Exit
helloForm
exitButton
MessageLabel
pushButton

10
2.6.4 Set Up The Form
Step 1: Point to the label tool in the toolbox and click. Then Move the pointer over the
form.
Step 2: Point to a spot where you want one corner of the label, press the mouse button,
and drag the pointer to the opposite corner. When you release the mouse button,
the label and its default contents (Label 1) will appear as shown on figure 2.8.
Figure 2.8: Draw the label on the form
The label has eight small square handles as shown in figure 2.9, indicating that the
control is currently selected. While a control is selected, you can delete it, resize it or
move it.

11
Figure 2.9: The label has eight small handles, indicating that it is selected.
Step 3: Draw a button on the form: Click on the Button toll in the toolbox, position the
crosshair pointer for one corner of the button, and drag to the diagonally
opposite corner. The new button should have selection handles.
Step 4: Create another button using this alternative technique. Point to the Button tool in
the toolbox and double click. A new button will appear on top of the last drawn
control.
Step 5: Keep the new button selected, pointed anywhere inside the button, and drag the
button below your first button.
Step 6: Select each control and move and resize the controls as necessary. Make the two
buttons the same size and line them up.
Step 7: Pont to one of the control and click the right mouse button to display a context
menu. On the context menu, select lock control. This lock control will prevent
you from accidentally moving the controls.

12
2.6.5 Set Properties
Set the Name and Text Properties for the Label
Step 1: Click on the label on the form (a shaded outline appears around the control).
Next click on the title bar of the properties windows to make it the active
windows.
Figure 2.10: The selected control is shown in the Properties windows
Notice that the Object box at the top of the properties window is showing
Label1(the name of the object) and System.Windows.Forms.Label as the class of the
object. The actual class is Label: System.Windows.Forms is called the namespace, or
the hierarchy used to locate the class.
Step 2: Find the Name property by using scroll up or down. Click the Alphabetic
button at the top of properties windows to arrange all properties should be in
alphabetic order. Click on Name and notice that the Setting box shows Label1.
The Name property is used to refer to the control in program code.

13
Figure 2.11: The properties Window
Step 3: Change Label1 with “messageLabel” (without the quotation marks) as shown in
figure 2.11. Press Enter or Tab and use can see the new name in the Object box’s
drop-down list.
Figure 2.12: Change Label Name
Step 4: Click on the Text property, the Text property is a control to determine what will
be displayed on the form.

14
Step5: Double click on Label1 in the Settings box. Then press the Delete key to delete
the value on the Text property as shown in figure 2.13. Then press Enter and
Notice that the label on the form+ now appears empty.
Figure 2.13: Delete the value in for Text Property
Setting the Name and Text properties for the First button
Step 1: Select the first button and then look at the Properties windows. The Object box
shows the name is Button1 and class is System.windows.forms.Button.
Step 2: Change the Name property of the button to “pushbutton” (without the quotation
marks)
Step 3: Then find Text property and change to “PushMe” (without the quotation marks)
in the setting box.

15
Setting the Name and text properties for the Second button
Step 1: Select Button2 and change the Name property in the properties windows to
“exitButton”
Step 2: Then change the Text property to “Exit”
Setting Properties of Form
Step 1: Click anywhere on the form (except on a control). Then the properties window
object box should show the form as the selected object.
Step 2: Change the Text property to “My first Hello world” Then your form should
now look like figure 2.14
Step 3: Click on the StartPosition property and select CenterScreen in order to make
your form in the center of the screen when the program runs.
The form’s Text property appears in the title bar
Figure 2.14 : Change the form’s text property
16
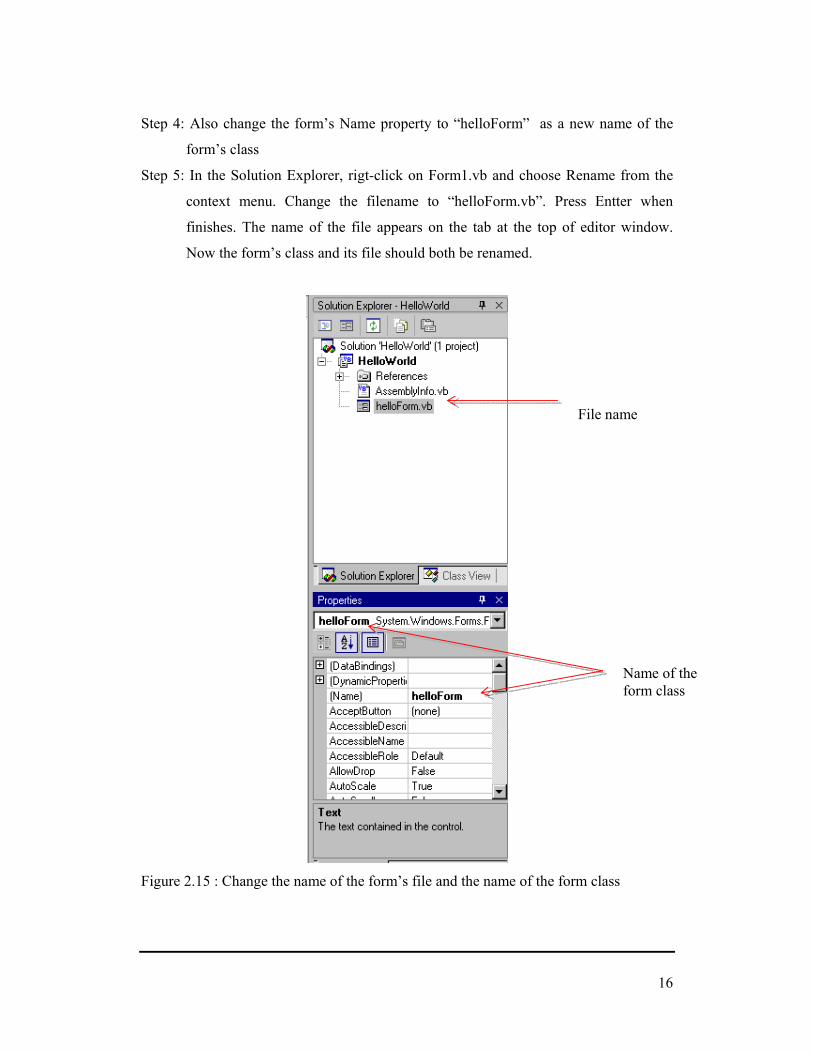
Step 4: Also change the form’s Name property to “helloForm” as a new name of the
form’s class
Step 5: In the Solution Explorer, rigt-click on Form1.vb and choose Rename from the
context menu. Change the filename to “helloForm.vb”. Press Entter when
finishes. The name of the file appears on the tab at the top of editor window.
Now the form’s class and its file should both be renamed.
Figure 2.15 : Change the name of the form’s file and the name of the form class
File name
Name of the form class

17
Set the project’s Startup Object.
Each project has a Startup Object which is the object with which the project begins.
Step 1: In the Solution Explorer, click on HelloWorld to select the project. Then select
Project/Proerties. In the project’s property Pages dialog box, drop down the list
for startp object and select helloForm. Press Apply button and OK.
Figure 2.16 : The Project’s Startup Object
Write Code for Hello World
Code the click Event for the Push Me Button
Step 1: Double click the Push Me Button. The visual Studio opens with the first and last
lines of sub procedure already in place.
Step 2: Type this remark statement ‘Display the hello Message
Step 3: Then type this assignment statement as shown on figure xxx : MessageLabel.Text=”Hello world”
Remark statements, or sometimes called comments is use to make the project more readable and understandable by the people who read it. They a re not consider “executable” and no effect when the project runs.
The Assignment statement assigns a value to a property or variable.

18
Figure 2.17 : The pushbutton_Click event procedure
Step 4: Return to the form by clicking on helloForm.vb in the Solution Explorer.
Code the Click Event for the Exit Button
Step 1: Double click the Exit button to open the editor for exitButton_Click event.
Step 2: Type this remark: ‘Exit the project
Then type this Basic statement Me.Close()
Run the project
After finished writing the code and you ready to run the project. Use one of these three
techniques:
1. Open the Debug menu and choose Start.
2. Press the start button on the toolbar
3. Press F5, the shortcut key for the Start command.
Now click the Push Me button. Your “Hello world” message appears in the label. Click
the Exit button when you are ready to terminate the project.

19
2.7 User Interface Design
User Interface is one of important factor when you design your project User
interface provides a mechanism for end users to interact with the project. Designing
a good interface makes the project easy and simply for the user to use and
understand.
2.7.1 Introducing More Control
Figure 2.18 shows several more control types: type boxes, group boxes, check
boxes, radio batons and picture box . Figure 2.19 shows some these controls on a
form. Each class of controls has its own set properties. You can see a complete list
of the properties for any class of control by placing a control on a form and examine
the properties list.
Figure 2.18: The toolbox showing the more controls.
Text box
Check box
Group boxRadio button
Picture box

20
Figure 2.19: This form uses textboxes, a check box, radio buttons, buttons and a
picture.
Text Box
A text box control is used to accept input from user or used to display text. The
form in figure xxx has two text boxes. You can simply cut and paste to make
another text box. In program code you can use Text property of each text box.
nameLabel = nameTextbox.Text
In this example whatever the user enters into the text box is assigned to the Text
property of nameLabel. If you want to display some textin a text box during
program execution, assigne a literal to the Text property:
positionTextBox.Text = “ Ahmand, Manager.”
You can set the TextAlign property of text boxes to change the alignment of
text within the box. In the Properties window, set the property to Left, Right or
Center. In code, you can set property using these values:

21
HorizontalAlignement.Left
HorizontalAlignement.Right
HorizontalAlignement.Center
positionTextBox.TextAlign = HorizontolAlignment.Left
Group box
A group box is used as container for other control. Usually, groups of text boxes,
radio buttons or check boxes are placed in group boxes. Using group boxes can
make your forms easier to understand
Check Box
A check box allows the user to select an option. In any group of check boxes, any
number can be selected. The Checked property of a check box is set to False if
unchecked and True if checked.
Radio Button
Use a radio button when only one button of group may be selected. Any radio
buttons that you place directly on the form function as a group. A group of radio
buttons inside a group box function together. The best method is to first create a
group box and then create each button inside the group box. The Checked property
of a radio button is set to true is selected or to False if unselected.
Picture Box
A PictureBox control can hold an image. You can set a picture box’s Image
property to a graphic file with extension of .bmp, .gif, .jpg, .jpeng, .png, .ico, .emf,
or .wmf. First place the pictureBox control on a form and then select its image
property in Properties windows. Click on the Properties button (figure 2.20) to
display an Open dialog box where you can select a file name.

22
Figure 2.20: The Image property
You can also use any graphic file (with the proper format) that you have available.
Figure 2.21: The Open dialog box
Properties button

23
2.8 Exercise
1. Create a project to display company contact information. Include buttons and
label for the contact person, department and phone. When the user clicks on one
of the buttons, display the contact information in the corresponding label.
Include a button to exit.
Related Documents