Intel® Storage System Software User Manual Intel® Storage System SSR316MJ2 Intel® Storage System SSR212MA Intel Order Number: D26451-003

Welcome message from author
This document is posted to help you gain knowledge. Please leave a comment to let me know what you think about it! Share it to your friends and learn new things together.
Transcript

Intel® Storage System Software User Manual
Intel® Storage System SSR316MJ2
Intel® Storage System SSR212MA
Intel Order Number: D26451-003

ii Intel® Storage System Software User Manual
Disclaimer
Information in this document is provided in connection with Intel® products. No license, express or implied, by estoppel or otherwise, to any intellectual property rights is granted by this document. Except as provided in Intel's Terms and Conditions of Sale for such products, Intel assumes no liability whatsoever, and Intel disclaims any express or implied warranty, relating to sale and/or use of Intel® products including liability or warranties relating to fitness for a particular purpose, merchantability, or infringement of any patent, copyright or other intellectual property right. Intel products are not designed, intended or authorized for use in any medical, life saving, or life sustaining applications or for any other application in which the failure of the Intel product could create a situation where personal injury or death may occur. Intel may make changes to specifications and product descriptions at any time, without notice.
Intel® server boards contain a number of high-density VLSI and power delivery components that need adequate airflow for cooling. Intel's own chassis are designed and tested to meet the intended thermal requirements of these components when the fully integrated system is used together. It is the responsibility of the system integrator that chooses not to use Intel developed server building blocks to consult vendor datasheets and operating parameters to determine the amount of airflow required for their specific application and environmental conditions. Intel Corporation can not be held responsible if components fail or the server board does not operate correctly when used outside any of their published operating or non-operating limits.
Intel, Intel Pentium, and Intel Xeon are trademarks or registered trademarks of Intel Corporation or its subsidiaries in the United States and other countries.
* Other names and brands may be claimed as the property of others.
Copyright © 2005-2006, Intel Corporation. All Rights Reserved
Contents
Contents
Chapter 1, Getting Started ......................................................................................... 1Installing the Console ............................................................................................................ 1Setting up an Intel® Management Module (IMM) Password for the Intel® Storage System
SSR212MA .................................................................................................................. 14Configuration Tasks ............................................................................................................. 15Wizards ................................................................................................................................ 16
Find SSMs Wizard ....................................................................................................... 16Create Volume Wizard ................................................................................................ 16Access Volume Wizard ................................................................................................ 16
Console Main Window ......................................................................................................... 17Icons Used in the Storage System Console ................................................................ 18
Finding Storage System Modules on the Network ............................................................... 20Finding by Subnet and Mask ....................................................................................... 21Finding by Module IP or Host Name ............................................................................ 24
Using the Network View ....................................................................................................... 27Using the Tab View .............................................................................................................. 29Viewing Storage System Module Details ............................................................................. 31
Details Tab .................................................................................................................. 32Management Group Information Tab .......................................................................... 33Availability Tab ............................................................................................................ 33
Logging In to and Out of the SSM ....................................................................................... 34Logging In to Additional SSMs .................................................................................... 34Logging Out of the SSM .............................................................................................. 35
SSM Configuration Window ................................................................................................. 35Configuring Multiple SSMs .......................................................................................... 36
Chapter 2, Working with Storage System Modules ............................................... 39Configuration Categories ..................................................................................................... 40Logging In to the SSM ......................................................................................................... 40
Logging In to Additional SSMs .................................................................................... 41Closing the SSM Configuration Window .............................................................................. 41
Logging Out of the SSM .............................................................................................. 41Closing the SSM Configuration Window without Logging Out ..................................... 42
Module Configuration Overview ........................................................................................... 42Changing the SSM Host Name ............................................................................................ 43Changing Passwords ........................................................................................................... 43Locating the Module in a Rack (Intel® Storage System SSR212MA only) .......................... 44Upgrading the Storage System Software ........................................................................... 44
Copying the Upgrade Files from CD or FTP Site ........................................................ 45Upgrading the SSM ..................................................................................................... 45
Intel® Storage System Software User Manual iii
Contents
Backup and Restore of SSM Configuration ..........................................................................47Backing Up Multiple SSMs with the Same Configuration .............................................47Backing Up the SSM Configuration File .......................................................................48Restoring the SSM Configuration from a File ...............................................................49
Rebooting the SSM ..............................................................................................................51 Canceling a Reboot ....................................................................................................52
Powering Off the SSM ..........................................................................................................52Registering Features for an SSM .........................................................................................53
Using the Feature Registration Tab .............................................................................53Evaluating Features .....................................................................................................54
Configuring Boot Devices .....................................................................................................54Modules with Two Boot Devices ..................................................................................54Checking Boot Device Status in an SSM .....................................................................55Replacing a Boot Device [Only in Modules with Two Boot Devices] (Intel® Storage Sys-
tem SSR316MJ2 only) .....................................................................................56Replacing a Disk on Module (DOM) (Intel® Storage System SSR212MA only) ..........57
Chapter 3, Storage .................................................................................................... 59Storage Overview .................................................................................................................59
Storage Requirement ...................................................................................................59Getting There ...............................................................................................................59
Configuring and Managing RAID ..........................................................................................60Benefits of RAID ...........................................................................................................60
RAID Configurations Defined ...............................................................................................61Number of Disks and RAID ..........................................................................................61RAID Set Size ..............................................................................................................62RAID 0 ..........................................................................................................................63RAID 1 and RAID 10 ....................................................................................................63RAID 5 and RAID 50 ....................................................................................................64
Understanding RAID Devices in the RAID Setup Report .....................................................67RAID Devices by RAID Type .......................................................................................68
Planning RAID Configuration ...............................................................................................71Data Replication ...........................................................................................................71Using RAID with Replication in a Cluster .....................................................................72Planning RAID for Capacity Growth .............................................................................73
Setting RAID Rebuild Rate for RAID 1/10 or RAID 5/50 ....................................................................................................................73Setting RAID Rebuild Rate ...........................................................................................74
Starting RAID .......................................................................................................................74To Start RAID ...............................................................................................................74
Reconfiguring RAID ..............................................................................................................75Requirements for Reconfiguring RAID .........................................................................75
Monitoring RAID Status ........................................................................................................77Data Transfer and RAID Status ...................................................................................77Data Redundancy and RAID Status .............................................................................77
iv Intel® Storage System Software User Manual
Contents
RAID Quorum .............................................................................................................. 78Replacing Disks and RAID .......................................................................................... 79
Managing Disks ................................................................................................................... 80Getting There ............................................................................................................... 80Reading the Disk Report on the Disk Setup Tab ......................................................... 80Verifying Disk Status ................................................................................................... 81Replacing a Disk .......................................................................................................... 83Replacing Disks in RAID 0 .......................................................................................... 83
Adding Disks to the SSM ..................................................................................................... 84Diagrams of Disk Bays ................................................................................................ 84Adding Disks and SSM Capacity ................................................................................. 85Memory Requirements for Adding Disks ..................................................................... 85Adding Disks ................................................................................................................ 86
Preparing Disks for Replacement ........................................................................................ 86Powering Drives On or Off in SSMs ............................................................................ 87Adding Disks to RAID in SSMs .................................................................................... 87
Chapter 4, Managing the Network ........................................................................... 89Managing the Network Overview ......................................................................................... 89
Getting There ............................................................................................................... 89The TCP/IP Tab ........................................................................................................... 90
Identifying the Network Interfaces ....................................................................................... 90Identifying Ports on the Back of the Storage Module .................................................. 90Adding Interfaces to PCI Slots ..................................................................................... 92
Configuring the IP Address Manually .................................................................................. 94Using DHCP ........................................................................................................................ 95Configuring NIC Bonding ..................................................................................................... 96
Best Practices .............................................................................................................. 96How Active Backup Works .......................................................................................... 97How NIC Aggregation Works ..................................................................................... 101Creating a NIC Bond ................................................................................................. 103Viewing the Status of a NIC Bond ............................................................................. 107Deleting a NIC Bond .................................................................................................. 108
Disabling a Network Interface ............................................................................................ 110Disabling a Network Interface .................................................................................... 110Configuring a Disabled Interface ............................................................................... 110
TCP Status ........................................................................................................................ 111The TCP Status Tab .................................................................................................. 111Editing the TCP Speed and Duplex ........................................................................... 112Editing the NIC Frame Size ....................................................................................... 113Best Practice ............................................................................................................. 114
Using a DNS Server .......................................................................................................... 115DNS and DHCP ......................................................................................................... 115DNS and Static IP Addresses .................................................................................... 115
Intel® Storage System Software User Manual v
Contents
Adding the DNS Domain Name .................................................................................116Adding a DNS Server .................................................................................................116Adding Domain Names to the DNS Suffixes ..............................................................116Editing a DNS Server .................................................................................................116Editing a Domain Name in the DNS Suffixes List ......................................................117Removing a DNS Server ............................................................................................117Removing a Domain Name from the DNS Suffixes List .............................................117
Routing Overview ...............................................................................................................118Adding Routing Information ........................................................................................118Editing Routing Information ........................................................................................119Deleting Routing Information ......................................................................................119
Configuring a Direct Connection Between the SSM and an EBSD Host ...........................120Configuring Storage Module Communication .....................................................................121
Selecting the Interface Used by the Storage System Software .................................122Updating the List of Manager IP Addresses ...............................................................122
Chapter 5, Setting the Date and Time ................................................................... 125Reset Management Group Time ........................................................................................125Getting There .....................................................................................................................125Setting the SSM Time Zone ...............................................................................................126Setting SSM Date and Time ...............................................................................................126
Setting the Date and Time .........................................................................................127Using NTP .........................................................................................................................128
Editing NTP Servers ...................................................................................................129
Chapter 6, Administrative Users and Groups ...................................................... 131Getting There .....................................................................................................................131Managing Administrative Groups .......................................................................................131
Default Administrative Groups ...................................................................................132Adding Administrative Groups ....................................................................................132Adding Administrative Group Permissions .................................................................133Description of Administrative Group Permissions ......................................................134Editing Administrative Groups ....................................................................................135Deleting Administrative Groups ..................................................................................137
Managing Administrative Users ..........................................................................................137Adding Administrative Users ......................................................................................137Editing Administrative Users ......................................................................................139Deleting Administrative Users ....................................................................................140
Chapter 7, Using SNMP .......................................................................................... 141Getting There .....................................................................................................................141Enabling the SNMP Agent ..................................................................................................142Choosing Access Control ...................................................................................................143
By Address .................................................................................................................143By Name ....................................................................................................................143
vi Intel® Storage System Software User Manual

Contents
Editing Access Control Entries .......................................................................................... 144Deleting Access Control Entries ........................................................................................ 145Entering System Information (Optional) ............................................................................. 145Using the SNMP MIB ......................................................................................................... 145Installing the Storage System MIB ..................................................................................... 145Disabling the SNMP Agent ................................................................................................ 146
Disabling SNMP ........................................................................................................ 146Enabling and Disabling SNMP Traps ................................................................................ 146
Enabling SNMP Traps ............................................................................................... 147Disabling SNMP Traps .............................................................................................. 148
Chapter 8, Reporting .............................................................................................. 149Reporting Overview ........................................................................................................... 149Using Passive Reports ...................................................................................................... 150
Saving the Report to a File ........................................................................................ 150Passive Reporting Detail ........................................................................................... 150
Saving Log Files ................................................................................................................ 152Remote Log Files ...................................................................................................... 153
Using Active Monitoring ..................................................................................................... 154Setting Notification Methods for Monitored Variables ................................................ 155Removing a Variable from Active Monitoring ............................................................ 156Adding Variables to Monitor ...................................................................................... 156Downloading a Variable Log File ............................................................................... 158Viewing the Variable Summary ................................................................................. 158List of Monitored Variables ........................................................................................ 159
Setting Email Notification ................................................................................................... 161Running Diagnostics .......................................................................................................... 163
Viewing the Diagnostic Report .................................................................................. 164List of Diagnostic Tests ............................................................................................. 164
Viewing Alerts .................................................................................................................... 165
Chapter 9, Working with Management Groups .................................................... 167Requirements for Creating Management Groups .............................................................. 168Managers Overview ........................................................................................................... 168
Functions of Managers .............................................................................................. 168Managers and Quorum .............................................................................................. 168
Communication Mode ........................................................................................................ 169Unicast Communication ............................................................................................. 169Adding or Removing Managers ................................................................................. 169
Creating a Management Group ......................................................................................... 169Getting There ............................................................................................................. 170Adding the First SSM to Create a New Management Group ..................................... 171Adding Additional SSMs When Creating a Management Group ............................... 173
Adding Managers to the Management Group .................................................................... 173Logging In to a Management Group .................................................................................. 174
Intel® Storage System Software User Manual vii
Contents
Management Group Tab View ...................................................................................176Editing a Management Group ............................................................................................178
Setting or Changing the Local Bandwidth ..................................................................178Logging Out of a Management Group ................................................................................180Adding an SSM to an Existing Management Group ...........................................................180
Adding Manager IP Addresses to Application Servers ..............................................181Resetting the Management Group Time ............................................................................181Starting and Stopping Managers ........................................................................................182
Stopping a A Manager ...............................................................................................183Removing an SSM from a Management Group .................................................................184
Removing an SSM With a License Key .....................................................................184Removing the SSM ....................................................................................................184
Backing Up a Management Group Configuration ...............................................................185Backing Up a Management Group Configuration ......................................................186Saving the Management Group Configuration Description ........................................187
Restoring a Management Group ........................................................................................187Requirements for Restoring a Management Group ...................................................187
Deleting a Management Group ..........................................................................................189Setting the Management Group Version ............................................................................189Selecting a Management Group from the List ....................................................................189
Chapter 10, Disaster Recovery Using A Virtual Manager ................................... 191When to Use a Virtual Manager .........................................................................................191Benefits of a Virtual Manager .............................................................................................192Requirements for Using a Virtual Manager ........................................................................192Configuring a Cluster for Disaster Recovery ......................................................................195
Best Practice ..............................................................................................................195Configuration Steps ....................................................................................................195
Configuring a Virtual Manager ............................................................................................197Adding a Virtual Manager ...........................................................................................197
Starting a Virtual Manager to Regain Quorum ...................................................................198Starting a Virtual Manager .........................................................................................199
Stopping a Virtual Manager ................................................................................................200Removing a Virtual Manager ......................................................................................200
Chapter 11, Working with Clusters ....................................................................... 201Clusters Overview ..............................................................................................................201
Topics Covered in This Chapter .................................................................................201Clusters and Storage Module Capacity ..............................................................................201Using Hot Spares ...............................................................................................................202
Requirements for Hot Spares .....................................................................................202How a Hot Spare Works .............................................................................................202
Clusters and iSCSI .............................................................................................................203iSCSI Load Balancing ................................................................................................204
Creating a Cluster ..............................................................................................................204
viii Intel® Storage System Software User Manual

Contents
Designating a Hot Spare ........................................................................................... 206Configure Virtual IP and iSNS for iSCSI .................................................................... 206Adding an iSNS Server .............................................................................................. 207The Cluster Tab View ................................................................................................ 209
Editing a Cluster ................................................................................................................ 211Getting There ............................................................................................................. 212Adding a Storage Module to an Existing Cluster ....................................................... 212Cluster Capacity ........................................................................................................ 213Changing the Hot Spare Designation ........................................................................ 213Changing the Hot Spare Time Out ............................................................................ 214Removing a Storage Module from a Cluster ............................................................. 214Changing or Removing the Virtual IP ........................................................................ 215Changing or Removing an iSNS Server .................................................................... 215
Swapping in a Hot Spare ................................................................................................... 216Repairing a Storage Module .............................................................................................. 217
Prerequisites for Using Repair SSM ......................................................................... 217How Repair SSM Works ............................................................................................ 217
Deleting a Cluster .............................................................................................................. 220
Chapter 12, Working with Volumes ...................................................................... 221Volume Overview ............................................................................................................... 221Volumes and Client Access ............................................................................................... 221
Topics Covered in This Chapter ................................................................................ 221Planning Volumes .............................................................................................................. 221
Planning Volume Type .............................................................................................. 222Planning Volume Size ............................................................................................... 222Measuring Disk Capacity and Volume Size ............................................................... 222Planning Hard Thresholds ......................................................................................... 223Planning Snapshots ................................................................................................... 224Planning Soft Thresholds .......................................................................................... 224Planning Data Replication ......................................................................................... 224
Requirements for Volumes ................................................................................................ 227Managing Volume Growth Capacity .................................................................................. 228
Creating the Volume and Setting Thresholds ............................................................ 228Using Auto Grow ....................................................................................................... 229How Auto Grow Works .............................................................................................. 229
Creating a Volume ............................................................................................................. 230The Volume Tab View ............................................................................................... 232
Editing a Volume ................................................................................................................ 233Getting There ............................................................................................................. 235Changing the Volume Description ............................................................................. 236Changing the Cluster ................................................................................................. 236Changing the Replication Level ................................................................................. 236Changing the Replication Priority .............................................................................. 236
Intel® Storage System Software User Manual ix

Contents
Changing the Size ......................................................................................................236Changing the Hard Threshold ....................................................................................237Changing the Soft Threshold .....................................................................................237
Fixing a Replica-Challenged Redundant Volume ...............................................................237Deleting a Volume ..............................................................................................................238
Chapter 13, Working with Snapshots ................................................................... 239Snapshots Overview ..........................................................................................................239
Topics Covered in This Chapter .................................................................................239Using Snapshots ................................................................................................................239
Single Snapshots vs. Scheduled Snapshots ..............................................................240Requirements for Snapshots ..............................................................................................240Managing Capacity Using Volume and Snapshot Thresholds ...........................................241
Easiest Method for Planning Capacity .......................................................................241Most Flexible Method for Planning Capacity ..............................................................241
Planning Snapshots ...........................................................................................................242Source Volumes for Data Mining or Tape Backups ...................................................242Data Preservation Before Upgrading Software ..........................................................243Protection Against Data Corruption ............................................................................243
Creating a Snapshot ...........................................................................................................243The Snapshot Tab View .............................................................................................246
Mounting or Accessing a Snapshot ....................................................................................247Snapshot Writable Space ...........................................................................................247Deleting a Snapshot’s Writable Space .......................................................................247
Editing a Snapshot .............................................................................................................248Manually Copying a Volume from a Snapshot ...................................................................249Creating Snapshot Schedules ............................................................................................249
Requirements for Scheduling Snapshots ...................................................................249Creating Snapshot Schedules ....................................................................................250Editing Snapshot Schedules ......................................................................................252Deleting Snapshot Schedules ..................................................................................253
Scripting Snapshots ...........................................................................................................253Rolling Back a Volume to a Snapshot ................................................................................253
Requirements for Rolling Back a Volume ..................................................................253Deleting a Snapshot ...........................................................................................................255
Delete the Snapshot ...................................................................................................256
Chapter 14, Working with Scripting ...................................................................... 257Tools for Scripting ..............................................................................................................257
Java commandline.CommandLine .............................................................................257ebsdvm .......................................................................................................................260
Scripted Commands for Volumes and Snapshots ..............................................................260Creating a Snapshot ..................................................................................................260Deleting a Snapshot ...................................................................................................261Assigning a LUN Number to a Fibre Channel Volume or Snapshot (Intel® Storage Sys-
x Intel® Storage System Software User Manual

Contents
tem SSR316MJ2 only) ................................................................................... 261Mounting a Snapshot ................................................................................................. 262Increasing Volume Hard and Soft Thresholds ........................................................... 262
Scripted Commands for Remote Copy .............................................................................. 263Creating A Remote Snapshot In A Different Management Group ............................. 263Creating A Remote Snapshot In The Same Management Group ............................. 264Converting a Remote Volume to a Primary Volume and Back to a Remote Volume 264Scripting Failover ....................................................................................................... 265Make Remote Volume into Primary Volume .............................................................. 265Mount New Primary Volume ...................................................................................... 265
Chapter 15, Controlling Client Access to Volumes ............................................. 267Client Access Overview ..................................................................................................... 267Creating Access to Volumes .............................................................................................. 267Types of Client Access ...................................................................................................... 267Client Access Using iSCSI ................................................................................................. 268
Configuring Authentication Groups for iSCSI ............................................................ 268Planning iSCSI and Load Balancing .......................................................................... 269Planning iSCSI and CHAP ........................................................................................ 269
Client Access and EBSD ................................................................................................... 273Client Access and Fibre Channel ...................................................................................... 274
Planning Volumes and Fibre Channel ....................................................................... 274Assigning LUN Numbers to Volumes ........................................................................ 274
Creating an Authentication Group ..................................................................................... 276Configuring iSCSI ...................................................................................................... 277Finishing iSCSI Configuration .................................................................................... 279Configuring EBSD ..................................................................................................... 279Finishing EBSD Configuration ................................................................................... 280Configuring Fibre Channel ......................................................................................... 281Finishing Up the New Authentication Group .............................................................. 282
Editing an Authentication Group ........................................................................................ 282Deleting an Authentication Group ...................................................................................... 283Volume Lists Overview ...................................................................................................... 284
Requirements for Volume Lists ................................................................................. 284Planning Volume Lists ....................................................................................................... 284Creating a Volume List ...................................................................................................... 284
Adding Volumes to the Volume List ........................................................................... 285Adding Authentication Groups to the Volume List ..................................................... 286Completing the Volume List ....................................................................................... 287
Editing a Volume List ......................................................................................................... 287Opening the Volume List to Edit ................................................................................ 287Editing Volume Permission Levels ............................................................................ 288Changing Authentication Groups in a Volume List .................................................... 289Removing a Volume from a Volume List ................................................................... 289
Intel® Storage System Software User Manual xi

Contents
Deleting a Volume List .......................................................................................................290
Chapter 16, Feature Registration .......................................................................... 293Add-On Features and Applications Registration Overview ................................................293Evaluating Features ...........................................................................................................293
30-Day Evaluation Period ..........................................................................................293Tracking the Time Remaining in the Evaluation Period .............................................294
Evaluating the Scalability Pak ............................................................................................295Starting the License Evaluation Period ......................................................................295Backing Out of the License Evaluation Period ...........................................................296
Evaluating the Configurable Snapshot Pak ........................................................................296Starting the License Evaluation Period ......................................................................296Backing Out of the License Evaluation Period ...........................................................296
Evaluating the Remote Data Protection Pak ......................................................................297Starting the License Evaluation Period ......................................................................297Backing Out of the License Evaluation Period ...........................................................297
Scripting Evaluation ............................................................................................................298Turn On Scripting Evaluation .....................................................................................298Turn Off Scripting Evaluation .....................................................................................299
Registering Features and Applications ...............................................................................300Using License Keys ....................................................................................................300Registering Available SSMs for License Keys ...........................................................300Registering SSMs in a Management Group ...............................................................301
Appendix A, Using the Configuration Interface ................................................... 305Connecting to the Configuration Interface ..........................................................................305
Connecting to the Configuration Interface with Windows ...........................................305Connecting to the Configuration Interface with Linux/UNIX .......................................306
Logging in to the SSM ........................................................................................................307Configuring Administrative Users .......................................................................................307Configuring a Network Connection .....................................................................................308Deleting a NIC Bond ...........................................................................................................309Setting the TCP Speed, Duplex, and Frame Size ..............................................................310Removing an SSM from a Management Group .................................................................312Resetting the SSM to Factory Defaults ..............................................................................312
Appendix B, SNMP MIB Information ..................................................................... 313SNMP Agent .......................................................................................................................313Supported MIBs ..................................................................................................................313
Exceptions ..................................................................................................................313
Appendix C, Using the EBSD* Driver for Linux ................................................... 317Installing the EBSD Driver for Linux ...................................................................................317
Options Available When Using the Installation Wizard ..............................................317Copying Driver Bundle to a Network Share (Optional) ...............................................317Installing the EBSD Driver Using the CD or the Driver Bundles ................................319
xii Intel® Storage System Software User Manual

Contents
Location of the Installed Driver Files ......................................................................... 319Upgrading the EBSD Driver Using the CD or Driver Bundles ................................... 320
Installing the EBSD Driver with RPM Packages ................................................................ 320RPM Package Naming Convention ........................................................................... 320Installing A Binary RPM Package .............................................................................. 321Querying An Existing RPM Package ......................................................................... 321Uninstalling the RPM ................................................................................................. 322Using the Source RPM Package to Build a Driver for a New Kernel Version ........... 322
Configuring the EBSD Driver for Linux .............................................................................. 323Creating ebsd.conf .................................................................................................... 323Connecting the EBSD Devices to the SSM EBSD Server ......................................... 325Verifying EBSD Devices ............................................................................................ 325Mounting the Block Device EBSD Disk ..................................................................... 326
Adding an EBSD Disk at Runtime ..................................................................................... 326Starting the EBSD Service ................................................................................................. 327Stopping the EBSD Driver ................................................................................................. 327Status of the EBSD Driver and Devices ............................................................................ 328Disconnecting an EBSD Device ........................................................................................ 328Disabling an EBSD Device ................................................................................................ 328Deleting an EBSD Device .................................................................................................. 329Uninstalling the EBSD Driver ............................................................................................. 329Finishing Up ....................................................................................................................... 329Troubleshooting ................................................................................................................. 330
Appendix D, Remote Copy .................................................................................... 331Remote Copy Overview ..................................................................................................... 331Registering Remote Copy .................................................................................................. 331
Number of Remote Copy Licenses Required ............................................................ 331Registering Remote Copy ......................................................................................... 331
Working with Remote Snapshots ....................................................................................... 331 Creating a Remote Snapshot ................................................................................... 332Viewing a List of Remote Snapshots ......................................................................... 337Setting the Remote Bandwidth .................................................................................. 338Canceling a Remote Snapshot .................................................................................. 339Editing a Remote Snapshot ....................................................................................... 340Deleting a Remote Snapshot ..................................................................................... 340
Monitoring Remote Snapshots .......................................................................................... 341Configuring Active Monitoring Alerts for Remote Copy ............................................. 341Monitoring Remote Snapshot Details from the Console Tab View ............................ 341
Scheduling Remote Snapshots ......................................................................................... 345Creating the Schedule ............................................................................................... 345Editing a Remote Snapshot Schedule ....................................................................... 348Deleting a Remote Snapshot Schedule ..................................................................... 349Changing the Roles of Primary and Remote Volumes .............................................. 349
Intel® Storage System Software User Manual xiii

Contents
Configuring Failover ...........................................................................................................353Planning Failover .......................................................................................................353Using Scripting for Failover ........................................................................................353
Resuming Production After Failover ...................................................................................353Synchronizing Data After Failover ..............................................................................353Returning Operations to Original Primary Site ...........................................................354Setting Up a New Production Site ..............................................................................356Making the Backup Site into the New Production Site ...............................................356
Rolling Back Primary and Remote Volumes ......................................................................356Rolling Back a Primary Volume ..................................................................................356Rolling Back a Remote Volume .................................................................................358
Using Remote Snapshots for Data Migration and Data Mining ..........................................358Creating a Split Mirror ................................................................................................358
Disassociate Remote Management Groups .......................................................................359
Appendix E, Sample Remote Copy Configurations ............................................. 361Overview ............................................................................................................................361Using Remote Copy for Business Continuance .................................................................361
Achieving High Availability .........................................................................................361Configuration for High Availability ..............................................................................361How This Configuration Works for High Availability ...................................................362Best Practices ............................................................................................................364Achieving Affordable Disaster Recovery ....................................................................365Configuration for Affordable Disaster Recovery .........................................................365How this Works for Affordable Disaster Recovery .....................................................366Best Practices ............................................................................................................367
Using Remote Copy for Off-site Backup and Recovery .....................................................369Achieving Off-site Tape Backup .................................................................................369Configuration for Off-site Backup and Recovery ........................................................369How This Configuration Works for Off-site Tape Backup ...........................................370Best Practices ............................................................................................................370Achieving Non-Destructive Rollback ..........................................................................371Configuration for Non-Destructive Rollback ...............................................................371How This Configuration Works for Non-Destructive Rollback ....................................372Best Practices ............................................................................................................374
Using Remote Copy for Data Migration ..............................................................................374Achieving Data Migration ...........................................................................................375Configuration for Data Migration ................................................................................375How This Configuration Works for Data Migration .....................................................375
Appendix F, Understanding and Planning Remote Copy ................................... 377Purchase Remote Copy .............................................................................................377Glossary for Remote Copy ........................................................................................377How Remote Copy Works ..........................................................................................378Graphical Representations of Remote Copy ..............................................................379
xiv Intel® Storage System Software User Manual

Contents
Remote Copy and Volume Replication ...................................................................... 380Uses for Remote Copy .............................................................................................. 380Benefits of Remote Copy ........................................................................................... 380
Planning for Remote Copy ................................................................................................. 381Planning the Remote Snapshot ................................................................................. 381
Using Schedules for Remote Copy .................................................................................... 382Planning the Remote Copy Schedule ........................................................................ 382Best Practices ............................................................................................................ 384
Intel® Storage System Software User Manual xv

Contents
xvi Intel® Storage System Software User Manual

List of Figures
List of Figures
Figure 1. Viewing the Wizard Launch Pad ............................................................................... 16Figure 2. Features of the Console Main Window ..................................................................... 17Figure 3. Graphical Legend Items from the Help Menu ........................................................... 18Figure 4. Graphical Legend States Tab from the Help Menu................................................... 19Figure 5. Graphical Legend Hardware Tab from the Help Menu ............................................. 20Figure 6. SSMs Found Message.............................................................................................. 21Figure 7. Using Subnet and Mask to Search............................................................................ 22Figure 8. SSMs in the Network View Pane .............................................................................. 23Figure 9. Using IP or Host Name to Search ............................................................................. 25Figure 10. Network View Features ........................................................................................... 27Figure 11. Tab View in Main Window....................................................................................... 29Figure 12. SSMs Tab with SSMs Listed................................................................................... 29Figure 13. Management Groups Tab from Network Tab View................................................. 30Figure 14. Viewing Messages in the Alert Messages Tab ....................................................... 30Figure 15. EBSD Hosts Tab..................................................................................................... 31Figure 16. Viewing Individual SSM Information........................................................................ 31Figure 17. Icon Showing RAID is Normal................................................................................. 32Figure 18. Icon Showing RAID is Off........................................................................................ 32Figure 19. Icon Showing RAID is Degraded............................................................................. 32Figure 20. Icon Showing RAID is Rebuilding ........................................................................... 33Figure 21. Management Group Information Tab...................................................................... 33Figure 22. Availability Tab........................................................................................................ 33Figure 23. Logging in to an SSM.............................................................................................. 34Figure 24. Automatic Log in Failure ......................................................................................... 34Figure 25. SSM Configuration Window .................................................................................... 35Figure 26. SSM Copy Configuration Window........................................................................... 37Figure 27. SSM Configuration Window for the Intel® Storage System SSR316MJ2............... 39Figure 28. SSM Configuration Window for the Intel® Intel® Storage System SSR212MA...... 39Figure 29. Logging in to an SSM.............................................................................................. 40Figure 30. Automatic Log In Fails because SSM User Name and Password are Different ..... 41Figure 31. Pink Square Indicates Logged In Status ................................................................. 42Figure 32. Viewing the Module Configuration Category........................................................... 42Figure 33. Viewing ID LED Indicator on Front of Module ......................................................... 44Figure 34. ID LED Indicator...................................................................................................... 44Figure 35. Upgrading the SSM Software.................................................................................. 45Figure 36. Browsing for Upgrade or Patch File ........................................................................ 46Figure 37. Upgrade Status Messages...................................................................................... 46Figure 38. Viewing the Backup and Restore Window .............................................................. 47Figure 39. Backing up the SSM Configuration File .................................................................. 48Figure 40. Restoring the SSM Configuration File..................................................................... 49Figure 41. Restoring the SSM Configuration File..................................................................... 50Figure 42. Shutting Down or Rebooting the SSM .................................................................... 51
Intel® Storage System Software User Manual xvii

List of Figures
Figure 43. Canceling the SSM Reboot .................................................................................... 52Figure 44. Viewing the Feature Registration Tab .................................................................... 53Figure 45. Using Remote Copy without a License................................................................... 54Figure 46. Viewing Boot Device Status with Two Devices....................................................... 55Figure 47. Viewing Single Boot Device Status......................................................................... 55Figure 48. Viewing the Storage Configuration Category for an Intel® Storage System
SSR316MJ2....................................................................................................................... 60Figure 49. Capacity of Disk Pairs in RAID 10 .......................................................................... 64Figure 50. Parity Distributed Across a RAID 5 Set Using Four Disks ...................................... 64Figure 51. Capacity of Disk Sets in RAID 50 ........................................................................... 66Figure 52. Capacity of Disk Sets in RAID 50 ........................................................................... 67Figure 53. RAID 0 in an Intel® Storage System SSR316MJ2 ................................................. 67Figure 54. RAID 0 on an Intel® Storage System SSR316MJ2................................................ 68Figure 55. RAID 0 on an Intel® Storage System SSR212MA ................................................. 68Figure 56. RAID 10 on an Intel® Storage System SSR316MJ2.............................................. 69Figure 57. RAID 10 on an Intel® Storage System SSR212MA ............................................... 69Figure 58. Intel® Storage System SSR316MJ2 RAID 50 Using Four-disk Sets...................... 69Figure 59. Intel® Storage System SSR316MJ2 RAID 50 Using 3 Disks Plus a Hot Spare..... 70Figure 60. Intel® Storage System SSR212MA RAID 50 Using 6-disk Sets ............................ 70Figure 61. Intel® Storage System SSR212MA RAID 50 Using 5 Disks Plus a Hot Spare ..... 70Figure 62. Reconfiguring RAID on an Intel® Storage System SSR212MA .......................... 76Figure 63. Monitoring RAID Status on the Main Console Window .......................................... 77Figure 64. Viewing the Disk Setup Tab in the Intel® Storage System SSR316MJ2................ 81Figure 65. Diagram of the Drive Bays in the Intel® Storage System SSR316MJ2.................. 82Figure 66. Viewing the Disk Setup Tab in an Intel® Storage System SSR212MA.................. 82Figure 67. Diagram of the Drive Bays in the Intel® Storage System SSR212MA ................... 82Figure 68. Diagram of the Drive Bays in the Intel® Storage System SSR212MA ................... 84Figure 69. Diagram of the Drive Bays in the Intel® Storage System SSR316MJ2.................. 85Figure 70. Viewing the Network Configuration......................................................................... 89Figure 71. Network Interface Ports and Open PCI Slots on the Back of the Intel® Storage System
SSR316MJ2....................................................................................................................... 91Figure 72. Network Interface Ports and Open PCI Slot on the Back of the Intel® Storage System
SSR212MA ........................................................................................................................ 92Figure 73. Distributing Bandwidth and Ensuring Fault Tolerance of Add-on Ports Across PCI
Slots ................................................................................................................................... 93Figure 74. Viewing the WWN of a Fibre Channel Port............................................................. 94Figure 75. Configuring the IP Address Manually ..................................................................... 95Figure 76. Active Backup in a Two-switch Topology with Server Failover............................. 100Figure 77. Active Backup Failover in a Four-switch Topology ............................................... 101Figure 78. NIC Aggregation in a Single-switch Topology ...................................................... 103Figure 79. Selecting Motherboard:Port0 and Slot1:Port0 for a New Bond ............................ 104Figure 80. Creating a NIC Bond............................................................................................. 105Figure 81. Searching for the Bonded Storage Module on the Network ................................. 105Figure 82. Viewing a New Active Backup Bond..................................................................... 106Figure 83. Verifying Interface Used for Storage System Software Communication .............. 107Figure 84. Viewing the Status of an Active Backup Bond...................................................... 107Figure 85. Viewing the Status of a NIC Aggregation Bond .................................................... 108
xviii Intel® Storage System Software User Manual

List of Figures
Figure 86. Searching for the Unbonded Storage Module on the Network.............................. 109Figure 87. Verifying Interface Used for Storage System Software Communication............... 109Figure 88. Viewing the TCP Status ........................................................................................ 111Figure 89. Editing TCP Speed, Duplex, and Frame Size ....................................................... 112Figure 90. Editing TCP speed, duplex, and frame size .......................................................... 114Figure 91. Adding DNS Servers ............................................................................................. 115Figure 92. Adding Network Routing Information .................................................................... 118Figure 93. Adding Routing Information................................................................................... 118Figure 94. Editing Routing Information................................................................................... 119Figure 95. Selecting the Storage System Software Network Interface and Updating the List of
Managers ......................................................................................................................... 121Figure 96. Setting the Time Zone........................................................................................... 126Figure 97. Setting the SSM Date and Time............................................................................ 127Figure 98. Adding an NTP Server .......................................................................................... 128Figure 99. Viewing the List of NTP Servers ........................................................................... 129Figure 100. Editing an NTP Server ........................................................................................ 129Figure 101. SSM Administration Groups Tab......................................................................... 131Figure 102. Adding an Administrative Group ......................................................................... 132Figure 103. Adding an Administrative User to a Group.......................................................... 133Figure 104. Adding Permissions to Administrative Groups .................................................... 134Figure 105. Sorting Administrative Groups ............................................................................ 135Figure 106. Editing an Administrative Group.......................................................................... 136Figure 107. Adding Administrative Users ............................................................................... 137Figure 108. Adding an Administrative User............................................................................ 138Figure 109. Adding a Group to an Administrative User.......................................................... 138Figure 110. Sorting Administrative Users............................................................................... 139Figure 111. Editing an Administrative User ............................................................................ 140Figure 112. Using SNMP........................................................................................................ 141Figure 113. Enabling the SNMP Agent .................................................................................. 142Figure 114. Adding an SNMP Client ...................................................................................... 143Figure 115. Editing a Host in the Access Control List ............................................................ 144Figure 116. Editing SNMP Client from the Access Control List.............................................. 144Figure 117. Enabling SNMP Traps......................................................................................... 147Figure 118. Adding an SNMP Trap Recipient ........................................................................ 147Figure 119. Viewing the Reporting Window ........................................................................... 149Figure 120. Saving Log Files to a Local Machine .................................................................. 152Figure 121. Adding a Remote Log ......................................................................................... 153Figure 122. Setting Active Monitoring Variables .................................................................... 155Figure 123. Adding a Variable, Step 1 ................................................................................... 156Figure 124. Adding a Variable, Step 2 ................................................................................... 157Figure 125. Setting Alerts for Monitored Variables................................................................. 157Figure 126. Viewing the Monitoring Variable Summary on the Active Window...................... 159Figure 127. Configuring Email Settings for Email Alert Notifications...................................... 162Figure 128. Viewing the List of Diagnostics ........................................................................... 163Figure 129. Alert Messages Tab on Console Main Window .................................................. 165Figure 130. Viewing Alerts ..................................................................................................... 166Figure 131. Viewing SSMs Before Creating a Management Group....................................... 170
Intel® Storage System Software User Manual xix

List of Figures
Figure 132. SSM Tab............................................................................................................. 171Figure 133. Management Group Information Tab.................................................................. 171Figure 134. Creating a New Management Group .................................................................. 172Figure 135. List of Manager IP Addresses for Management Group ...................................... 172Figure 136. New Management Group with One SSM............................................................ 173Figure 137. Starting a Manager ............................................................................................. 174Figure 138. Logging in to a Management Group ................................................................... 174Figure 139. List of SSMs Running Managers ........................................................................ 175Figure 140. Viewing a Management Group in the Console ................................................... 175Figure 141. Editing a Management Group............................................................................. 179Figure 142. Adding an SSM to Existing Management Group ................................................ 180Figure 143. Starting a Manager ............................................................................................. 182Figure 144. Adding Manager IP Addresses to Application Servers ....................................... 183Figure 145. Backing up the Management Group Configuration............................................. 185Figure 146. Save Window for Backing up the Management Group Configuration ................ 186Figure 147. Opening the Configuration Binary File................................................................ 188Figure 148. Verifying the Management Group Configuration ................................................ 188Figure 149. Correct Two-site Failure Scenarios Using Virtual Managers .............................. 193Figure 150. Incorrect Uses of Virtual Manager to Regain Quorum........................................ 194Figure 151. Adding SSMs to Cluster in Alternating Site Order .............................................. 196Figure 152. Cluster with SSMs Added in Alternating Order................................................... 197Figure 153. Management Group with Virtual Manager Added............................................... 198Figure 154. Starting a Virtual Manager .................................................................................. 199Figure 155. Indicator of the Virtual Manager.......................................................................... 199Figure 156. Viewing the Clusters Tab.................................................................................... 205Figure 157. Creating a New Cluster....................................................................................... 205Figure 158. Configuring a Virtual IP Address for iSCSI ......................................................... 207Figure 159. Adding an iSNS Server....................................................................................... 207Figure 160. Viewing the List of iSNS Servers ........................................................................ 208Figure 161. Viewing a Cluster and the Cluster Tab View ...................................................... 208Figure 162. Viewing Usage Statistics for a Cluster................................................................ 209Figure 163. Viewing Disk Space Allocated and Used for the Cluster and its Volumes and Snap-
shots ................................................................................................................................ 210Figure 164. Editing a Cluster ................................................................................................. 212Figure 165. Storage Module with Failed Disk ........................................................................ 217Figure 166. Viewing the Ghost Storage Module .................................................................... 218Figure 167. Returning the Storage Module to the Management Group................................. 218Figure 168. Returning the Repaired Storage Module to the Cluster..................................... 219Figure 169. Write Patterns in 2-way Replication.................................................................... 225Figure 170. Viewing the Volumes Tab ................................................................................... 230Figure 171. Creating a New Primary Volume ........................................................................ 231Figure 172. Setting Replication to None ................................................................................ 231Figure 173. Viewing a Volume in a Cluster............................................................................ 232Figure 174. Editing a Volume................................................................................................. 235Figure 175. Volume Tab View................................................................................................ 244Figure 176. Creating a New Snapshot................................................................................... 244Figure 177. Viewing the New Snapshot................................................................................. 245
xx Intel® Storage System Software User Manual

List of Figures
Figure 178. Snapshot Tab View............................................................................................. 246Figure 179. Viewing the Writable Space Used for a Snapshot .............................................. 247Figure 180. Editing a Snapshot .............................................................................................. 248Figure 181. Creating a Snapshot Schedule ........................................................................... 251Figure 182. List of Scheduled Snapshots............................................................................... 252Figure 183. Editing a Snapshot Schedule .............................................................................. 252Figure 184. Rolling Back a Volume........................................................................................ 254Figure 185. Verifying the Volume Roll Back........................................................................... 255Figure 186. Creating a New Authentication Group for iSCSI Access..................................... 268Figure 187. Click Link for Compliant Initiator Information....................................................... 269Figure 188. Information About Compliant iSCSI Initiators...................................................... 269Figure 189. Opening the MS iSCSI initiator and Copying the Initiator Node Name to the Initiator
Node Name Field ............................................................................................................. 271Figure 190. Configuring iSCSI (shown in the MS iSCSI initiator) for a Single Host with CHAP...
272Figure 191. Adding an Initiator Secret for 2-way CHAP (shown in the Microsoft* iSCSI initiator)
272Figure 192. Creating a New Authentication Group for EBSD Access .................................... 273Figure 193. Creating a New Authentication Group for Fibre Channel Access ....................... 274Figure 194. Example Best Practice Configuration for Assigning LUN Numbers .................... 275Figure 195. LUN Numbering Configuration that is NOT Allowed ........................................... 275Figure 196. LUN Numbering Configuration With One LUN Shared Among Three Hosts ...... 276Figure 197. Creating a New Authentication Group................................................................. 276Figure 198. Creating iSCSI Access in New Authentication Group ......................................... 277Figure 199. Configuring EBSD for New Authentication Group............................................... 279Figure 200. Adding a Subnet and Mask for EBSD Host Authentication................................. 279Figure 201. Configuring Fibre Channel for New Authentication Group .................................. 281Figure 202. Adding a Name and WWPN for Fibre Channel Authentication ........................... 281Figure 203. Viewing the Authentication Groups..................................................................... 282Figure 204. Editing an Authentication Group ......................................................................... 283Figure 205. Creating a New Volume List................................................................................ 285Figure 206. Adding a Volume to a Volume List ...................................................................... 285Figure 207. Connecting Authentication Groups to a Volume List........................................... 286Figure 208. Viewing the New Volume List.............................................................................. 287Figure 209. Opening a Volume List to Edit............................................................................. 288Figure 210. Editing Permissions on a Volume in a Volume List............................................. 288Figure 211. Viewing the Edited Volume List........................................................................... 290Figure 212. Viewing the Volume Lists Tab............................................................................. 290Figure 213. Verifying the Start of the 30-day Evaluation Period ............................................ 293Figure 214. Evaluation Period Countdown on Register Tab .................................................. 294Figure 215. Evaluation Period Countdown Message ............................................................. 294Figure 216. Icons Indicating License Status for Features ...................................................... 295Figure 217. Enabling Scripting Evaluation ............................................................................. 299Figure 218. Registering Features and Applications ............................................................... 301Figure 219. Opening the Feature Registration Window ......................................................... 302Figure 220. Entering License Key .......................................................................................... 303Figure 221. Viewing License Keys ......................................................................................... 303
Intel® Storage System Software User Manual xxi

List of Figures
Figure 222. Opening the Configuration Interface................................................................... 306Figure 223. Enter User Name and Password ........................................................................ 307Figure 224. Configuration Interface Main Menu..................................................................... 307Figure 225. General Settings Window ................................................................................... 307Figure 226. Selecting an Interface to Configure .................................................................... 308Figure 227. Entering the Host Name and Settings for an Interface ....................................... 309Figure 228. Selecting a Bonded Interface in the Available Network Devices Window .......... 310Figure 229. Deleting a NIC Bond ........................................................................................... 310Figure 230. Available Network Devices Window ................................................................... 311Figure 231. Setting the Speed, Duplex, and Frame Size....................................................... 311Figure 232. Removing the SSM from a Management Group................................................. 312Figure 233. Resetting to Factory Defaults ............................................................................. 312Figure 234. Creating a New Remote Snapshot ..................................................................... 332Figure 235. Creating a New Primary Snapshot ..................................................................... 333Figure 236. New Primary Snapshot Created ......................................................................... 334Figure 237. Selecting a Cluster for the Remote Volume........................................................ 335Figure 238. Creating a New Remote Volume ........................................................................ 335Figure 239. Completing the New Remote Snapshot Dialog .................................................. 336Figure 240. Viewing the Remote Snapshot ........................................................................... 337Figure 241. Viewing the List of Remote Snapshots ............................................................... 337Figure 242. Editing a Remote Management Group ............................................................... 339Figure 243. Editing the Remote Bandwidth ........................................................................... 339Figure 244. Editing a Remote Snapshot ................................................................................ 340Figure 245. Viewing Remote Snapshot Details in the Remote Snapshot Tab....................... 342Figure 246. Viewing Remote Snapshot Details for a Completed Remote Copy................... 343Figure 247. Viewing remote Snapshot Details for a Remote Copy in Progress .................... 344Figure 248. Creating a New Remote Snapshot Schedule ..................................................... 346Figure 249. The Remote Setup Tab ...................................................................................... 347Figure 250. Editing a Remote Snapshot Schedule ................................................................ 348Figure 251. Changes to a Volume When Changed from Primary to Remote ........................ 350Figure 252. Creating a Snapshot Before Making a Primary Volume into a Remote Volume. 350Figure 253. Finalizing the New Remote Volume.................................................................... 351Figure 254. Making a Remote Volume into a Primary Volume.............................................. 352Figure 255. Rolling Back a Primary Volume .......................................................................... 357Figure 256. Verifying the Primary Volume Roll Back ............................................................. 358Figure 257. Editing a Management Group............................................................................. 359Figure 258. High Availability Example Configuration ............................................................. 362Figure 259. High Availability Configuration During Failover................................................... 362Figure 260. High Availability Configuration During Failback .................................................. 364Figure 261. High Availability During Failover - Example Configuration ................................. 365Figure 262. Affordable Disaster Recovery Example Configuration........................................ 366Figure 263. Restoring from a Remote Volume ...................................................................... 367Figure 264. Restoring from Tape Backup.............................................................................. 367Figure 265. Off-site Backup and Recovery Example Configuration....................................... 370Figure 266. Non-destructive Rollback Example..................................................................... 372Figure 267. Non-destructive Rollback from the Primary Snapshot ........................................ 373Figure 268. Non-destructive Rollback from the Remote Snapshot........................................ 374
xxii Intel® Storage System Software User Manual

List of Figures
Figure 269. Data Migration Example Configuration ............................................................... 375Figure 270. Configuration after Data Migration ...................................................................... 376Figure 271. Basic Flow of Remote Copy................................................................................ 379Figure 272. Icons Depicting the Primary Snapshot Copying to the Remote Snapshot .......... 379Figure 273. Icons for Remote Copy as Displayed in the Graphical Legends Window........... 380
Intel® Storage System Software User Manual xxiii

List of Figures
xxiv Intel® Storage System Software User Manual

List of Tables
List of Tables
Table 1. SSM Configuration Tasks........................................................................................... 15Table 2. Boot Flash Card Status .............................................................................................. 56Table 3. RAID Levels and Default Configurations for Storage Modules .................................. 59Table 4. Number of Disks Required for Each RAID Level........................................................ 61Table 5. Calculating RAID Set Size for RAID 5/50 in the Intel® Storage System SSR316MJ262Table 6. Calculating RAID Set size for RAID 5/50 in the Intel® Storage System SSR212MA. 63Table 7. Storage Capacity of RAID 5 Sets in SSMs................................................................. 64Table 8. RAID 5 Configurations in Storage Modules................................................................ 65Table 9. Information in the RAID Setup Report........................................................................ 68Table 10. Data Availability and Safety in RAID 1/10 Configuration and in a Clustered RAID 0 or
RAID 5/50 Configuration.................................................................................................... 73Table 11. Disk Requirements for Maintaining RAID Quorum................................................... 79Table 12. Description of Items on the Disk Report................................................................... 80Table 13. Relationship of Software Disk Display Numbering to Hardware Drive Bay Numbering
in the Intel® Storage System SSR316MJ2 ........................................................................ 81Table 14. Memory Requirements for Fully Populated SSM ..................................................... 85Table 15. Network Interfaces Displayed on the TCP/IP Tab.................................................... 90Table 16. Identifying the NICs in the Motherboard................................................................... 90Table 17. Identifying Add-on NICs ........................................................................................... 91Table 18. Comparison of Active Backup and NIC Aggregation Bonding ................................. 97Table 19. Bonded Network Interfaces ...................................................................................... 98Table 20. Description of NIC Status in an Active Backup Configuration .................................. 98Table 21. Example Active Backup Failover Scenario and Corresponding NIC Status............. 99Table 22. NIC Status During Failover with Active Backup ....................................................... 99Table 23. NIC Aggregation Failover Scenario and Corresponding NIC Status...................... 102Table 24. NIC Status During Failover with NIC Aggregation.................................................. 102Table 25. Status Of and Information About Network Interfaces ............................................. 111Table 26. Setting Storage Module Speed and Duplex Settings ............................................. 112Table 27. Setting Corresponding Frame Sizes in Bytes on Storage Modules and Windows* or
Linux Clients..................................................................................................................... 113Table 28. SSM Network Interface Settings ............................................................................ 120Table 29. SSM Route Settings ............................................................................................... 120Table 30. EBSD Host Network Interface Settings .................................................................. 120Table 31. EBSD Host Route Settings..................................................................................... 121Table 32. Using Default Administrative Groups ..................................................................... 132Table 33. Administrative Group Name Requirements............................................................ 133Table 34. Descriptions of Group Permissions ........................................................................ 134Table 35. Selected Details of the Passive Report .................................................................. 150Table 36. Types of Alerts Available for Active Monitoring ...................................................... 157Table 37. List of Variables Available for Active Monitoring .................................................... 159Table 38. Typical Network Types........................................................................................... 178Table 39. Setting a Replication Level for a Volume ............................................................... 225
Intel® Storage System Software User Manual xxv

List of Tables
Table 40. Replication Priority ................................................................................................. 226Table 41. Parameters for Volumes ........................................................................................ 227Table 42. Requirements for Changing Volume Parameters .................................................. 234Table 43. Snapshot Parameters ............................................................................................ 240Table 44. Space Used by Snapshots When Hard Threshold is Set to the Original Volume Size
242Table 45. Space Used by Snapshots When Hard Threshold is Reduced. Note the dramatic sav-
ings in storage space. ...................................................................................................... 242Table 46. Data Requirements for Editing a Snapshot............................................................ 248Table 47. Requirements for Scheduling Snapshots............................................................... 250Table 48. Requirements for Rolling Back a Volume .............................................................. 254Table 49. Setting the Environment for Using Scripting Tools ................................................ 257Table 50. Parameters for commandline.CommandLine ..................................................... 258Table 51. Parameters for ebsdvm......................................................................................... 260Table 52. Configuring iSCSI CHAP ....................................................................................... 270Table 53. Entering CHAP Information in a New Authentication Group.................................. 278Table 54. Choosing the Level of Access for Hosts Using the EBSD Driver........................... 280Table 55. Characteristics of Permission Levels ..................................................................... 286Table 56. Safely Backing out of Scalability Pak Evaluation ................................................... 296Table 57. Safely Backing out of Configurable Snapshot Pak Evaluation............................... 297Table 58. Safely Backing Out of Remote Data Protection Pak Evaluation ............................ 298Table 59. Safely Backing Out of Scripting Evaluation............................................................ 300Table 60. Parameters in ebsd.conf....................................................................................... 323Table 61. Parameters for /proc/ebsd/client ........................................................................... 325Table 62. Guide to Remote Copy Bandwidth Settings........................................................... 338Table 63. Values for Remote Copy Details window............................................................... 343Table 64. Timetable of Failover ............................................................................................. 354Table 65. Creating Snapshots of Data to Synchronize .......................................................... 355Table 66. Requirements for Rolling Back a Primary Volume................................................. 357Table 67. Uses for Remote Copy........................................................................................... 380Table 68. Remote Copy and Management Groups, Clusters, Volumes, Snapshots, and SSMs
381Table 69. Snapshot Retention Policy and Maximum Number of Snapshots Retained in System
384Table 70. Scheduled Remote Copy Planning Checklist ........................................................ 384
xxvi Intel® Storage System Software User Manual

1 Getting Started
Welcome to the Intel® Storage System Console (Console). The Console is used to configure and manage storage volumes spanning clustered Storage System Modules (SSMs).
After you have installed your SSMs and have installed the Console on the system administrator’s PC, you must take certain steps to prepare for creating storage clusters and volumes.
The Console is the storage administrator’s tool for: • Configuring and managing the SSM• Creating and managing clusters and volumes
This user manual provides instructions for installing the Console, configuring individual SSMs, as well as creating volumes that span a cluster of multiple SSMs. Topics in this manual include the following:
• Installing the Console• Configuring individual SSMs by:
— Configuring monitoring and reporting• Creating volumes that span a cluster of SSMs by:
— Creating management groups and clusters— Creating volumes that span multiple SSMs— Controlling client access to volumes— Creating and using snapshots of volume
Installing the Console
1. Before you install the Console software, ensure that you have set up an IP address and password on your storage system. Instructions for setting up an IP address and password are available on the Intel® Storage System Quick Start User’s Guide that shipped with your storage system.
2. Insert the Resource CD that shipped with your storage system into the system from which you will install the Console software.
3. Scroll down and click on the “Agree” to accept the license agreement.4. Select “Microsoft Windows Selection” under “Software Heading”.5. Select “Run” when prompted.6. Click on “Next” at the introduction screen.

Getting Started
7. Read the license agreement and click on “I Accept” to accept the terms of the license agreement. Click on “Next”.
8. Select the “Typical” option and click on “Next”.
9. Enter the path of the folder you wish to use to install the Console software.
2 Intel® Storage System Software User Manual

Getting Started
10. Leave “Desktop” checked if you want the install routine to automatically create a shortcut to the Console on your desktop. Click on “Next” to continue.
11. Select “Yes” and click on “Next” to start the installation process.
Intel® Storage System Software User Manual 3
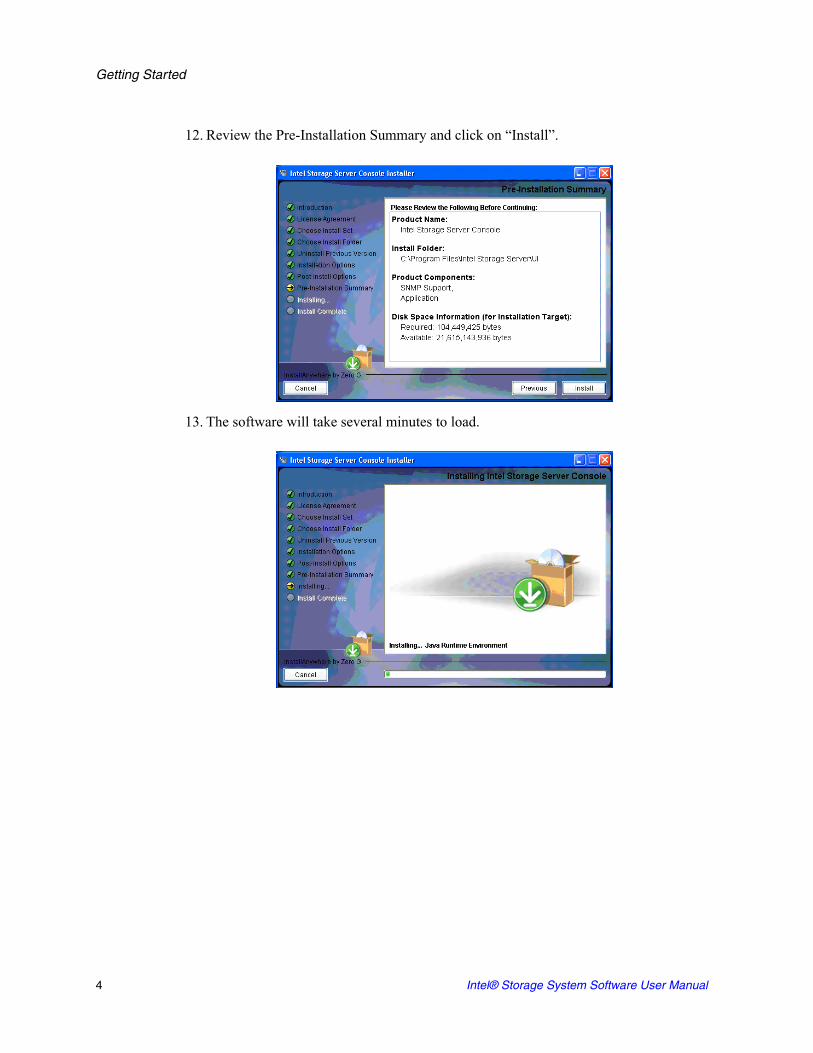
Getting Started
12. Review the Pre-Installation Summary and click on “Install”.
13. The software will take several minutes to load.
4 Intel® Storage System Software User Manual
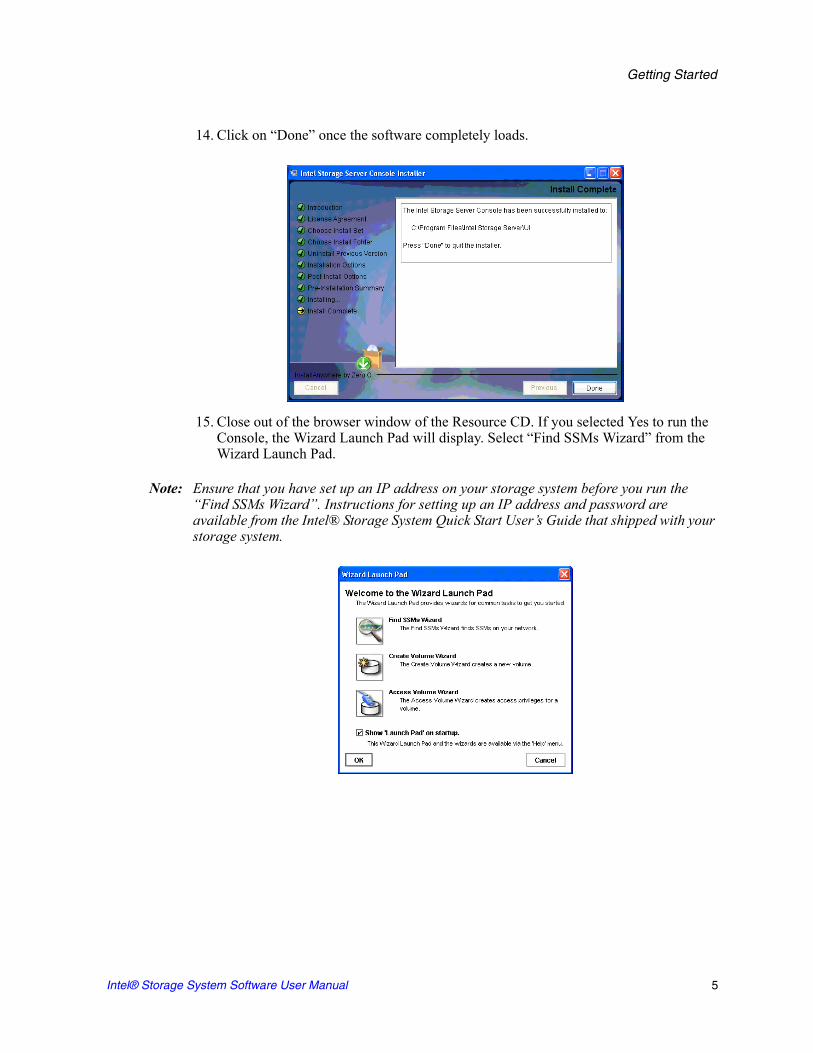
Getting Started
14. Click on “Done” once the software completely loads.
15. Close out of the browser window of the Resource CD. If you selected Yes to run the Console, the Wizard Launch Pad will display. Select “Find SSMs Wizard” from the Wizard Launch Pad.
Note: Ensure that you have set up an IP address on your storage system before you run the “Find SSMs Wizard”. Instructions for setting up an IP address and password are available from the Intel® Storage System Quick Start User’s Guide that shipped with your storage system.
Intel® Storage System Software User Manual 5

Getting Started
16. .Select the “By Subnet and Mask (global broadcast)” or “By Module IP or Host Name (individual search)” option to search for your storage system. If you are using a fixed IP address, select the “By Module IP or Host Name (individual search)” option. Press “Next” to continue.
17. If you selected the “By Module IP or Host Name (individual search)” option, a Search by SSM IP or Hostname list will display. Click on the “Add” button.
6 Intel® Storage System Software User Manual

Getting Started
18. At the Add IP or Host Name screen, enter the static IP address of your storage system. Click on “OK” to continue.
19. Click on “Finish” to search for the specified IP address. The storage system will display a “Found” under “Status” if the unit is correctly detected.
Intel® Storage System Software User Manual 7

Getting Started
20. Click on “Close” to return to the Wizard Launch Pad.
a. You must set up your RAID configuration before using the SSM. Close out of the Wizard Launch Pad by clicking on “OK”.
21. Select the storage system in the main window by double clicking on the icon for the system.
8 Intel® Storage System Software User Manual

Getting Started
22. Enter the user name and password for the storage system. The Edit Configuration window should display.
23. Select the storage link in the left-hand navigation screen
Intel® Storage System Software User Manual 9

Getting Started
24. Enter the RAID level and rebuild rate. See “Storage” on page 59 for more information on RAID levels.
25. Click on “Configure RAID” to set up the RAID level.
Click on “Done”.
26. The RAID Status should indicate normal as illustrated in the following figure.
27. Click on “Done”.28. From the Help menu, select Wizards->Wizard Launch Pad.
10 Intel® Storage System Software User Manual

Getting Started
29. The installed storage system should be listed by host name in the main window area of the Console. The Wizard Launch Pad should also be displayed. Select “Create Volume Wizard” to create a volume.
30. Click on “Next” to continue.
Intel® Storage System Software User Manual 11
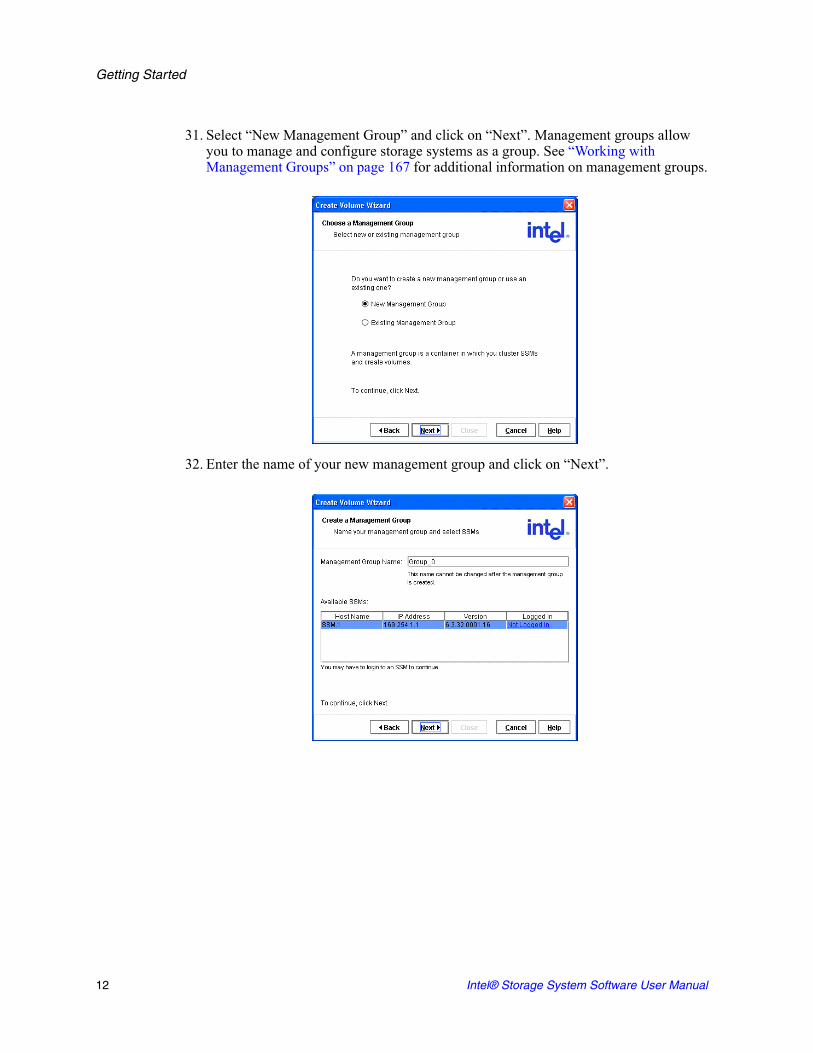
Getting Started
31. Select “New Management Group” and click on “Next”. Management groups allow you to manage and configure storage systems as a group. See “Working with Management Groups” on page 167 for additional information on management groups.
32. Enter the name of your new management group and click on “Next”.
12 Intel® Storage System Software User Manual

Getting Started
33. Enter a cluster name in the “Cluster Name” field. Ensure that the “I do not want to use a virtual IP address for this cluster” checkbox is checked. Click on “Next” to continue. See “Working with Clusters” on page 201 for additional information on clusters.
34. Enter the “Volume Name”, “Description”, “Size” and “Replication Level” for your storage system. Click on “Finish” to continue.
35. Select the IP address for the SSM and click on “OK” if asked for the Manager IP address.
Intel® Storage System Software User Manual 13

Getting Started
36. A summary screen displays showing you that the volume has been successfully created. Click on “Close” to continue.
37. Click on “OK” at the Wizard Launch Pad and you should see the volume listed in the main window. This means that it has been successfully created. Refer to the remainder of this manual for detailed information on managing and configuring your storage system.
Setting up an Intel® Management Module (IMM) Password for the Intel® Storage System SSR212MA
1. Install dpcproxy from the ISM CD that shipped with your Intel® Storage System SSR212MA.For Microsoft* Windows*:dpcproxy -install
net start dpcproxy
2. Bring up an MSDOS window and enter the following commands:c:> telnet localhost 623
ordpccli
Enter the IP address for your system and press <Enter>.For example, Server: 111.112.113.20Press <Enter> for the user name.Press <Enter> for the password.
14 Intel® Storage System Software User Manual
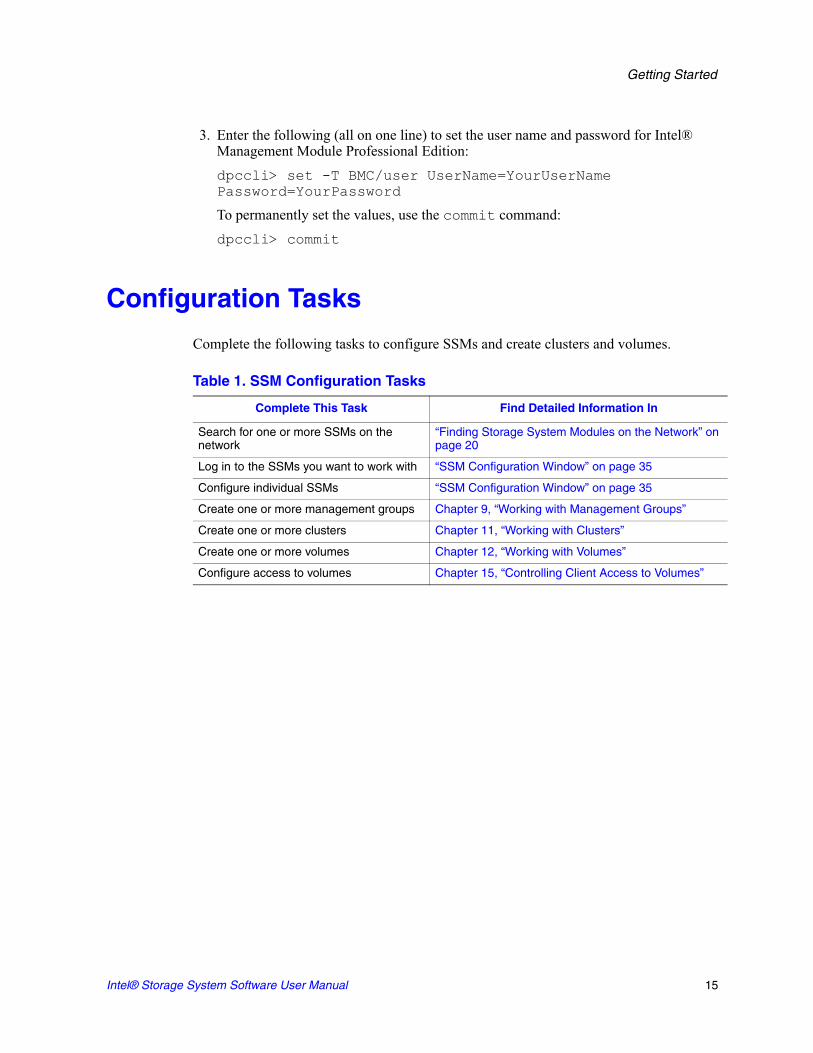
Getting Started
3. Enter the following (all on one line) to set the user name and password for Intel® Management Module Professional Edition:dpccli> set -T BMC/user UserName=YourUserName Password=YourPassword
To permanently set the values, use the commit command:dpccli> commit
Configuration Tasks
Complete the following tasks to configure SSMs and create clusters and volumes.
Table 1. SSM Configuration Tasks
Complete This Task Find Detailed Information In
Search for one or more SSMs on the network
“Finding Storage System Modules on the Network” on page 20
Log in to the SSMs you want to work with “SSM Configuration Window” on page 35
Configure individual SSMs “SSM Configuration Window” on page 35
Create one or more management groups Chapter 9, “Working with Management Groups”
Create one or more clusters Chapter 11, “Working with Clusters”
Create one or more volumes Chapter 12, “Working with Volumes”
Configure access to volumes Chapter 15, “Controlling Client Access to Volumes”
Intel® Storage System Software User Manual 15
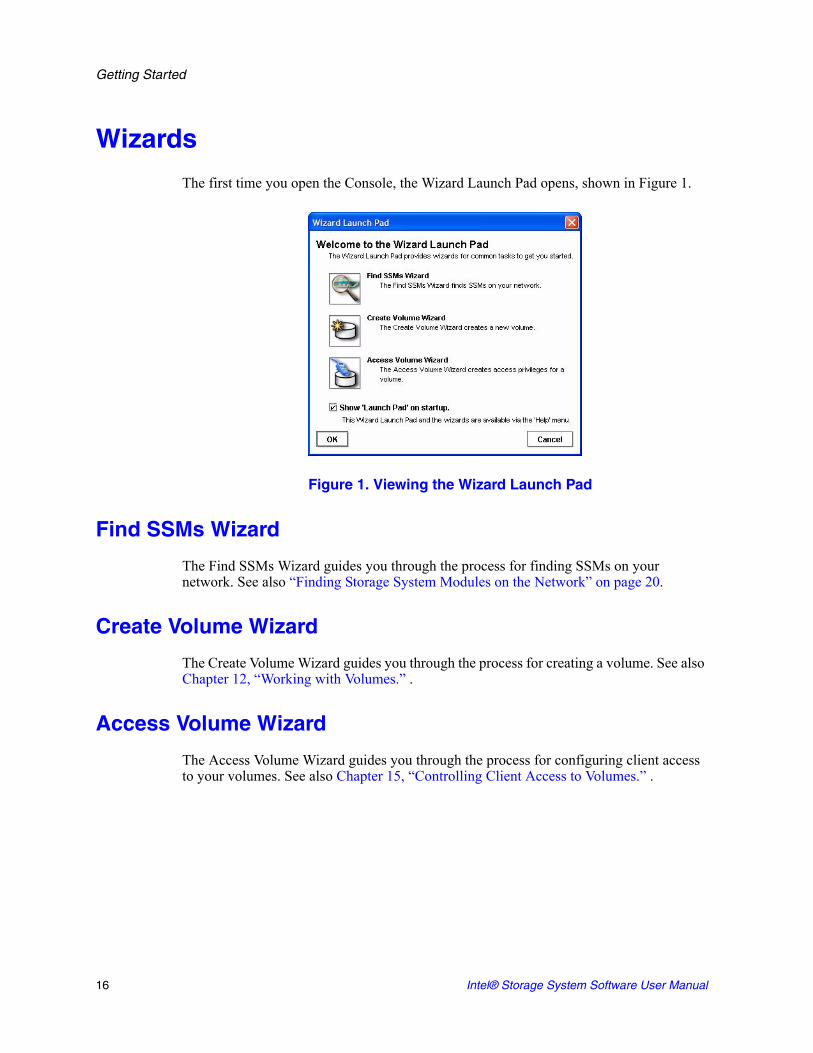
Getting Started
Wizards
The first time you open the Console, the Wizard Launch Pad opens, shown in Figure 1.
Figure 1. Viewing the Wizard Launch Pad
Find SSMs Wizard
The Find SSMs Wizard guides you through the process for finding SSMs on your network. See also “Finding Storage System Modules on the Network” on page 20.
Create Volume Wizard
The Create Volume Wizard guides you through the process for creating a volume. See also Chapter 12, “Working with Volumes.” .
Access Volume Wizard
The Access Volume Wizard guides you through the process for configuring client access to your volumes. See also Chapter 15, “Controlling Client Access to Volumes.” .
16 Intel® Storage System Software User Manual
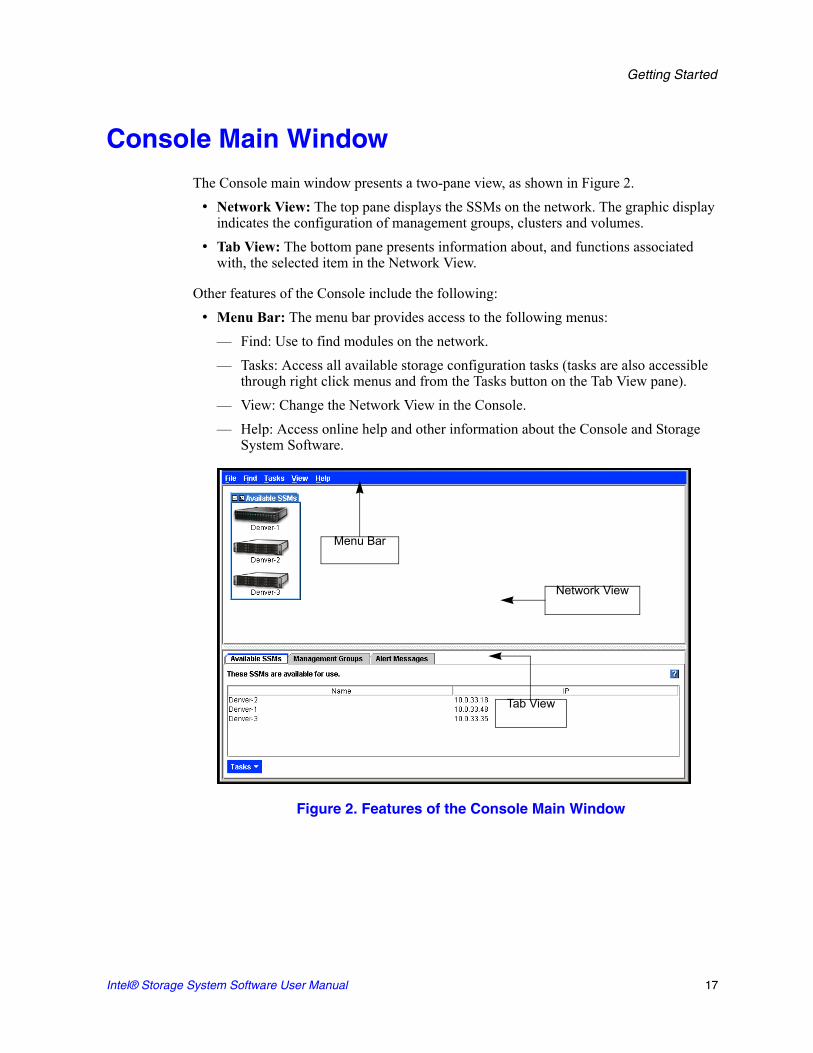
Getting Started
Console Main Window
The Console main window presents a two-pane view, as shown in Figure 2. • Network View: The top pane displays the SSMs on the network. The graphic display
indicates the configuration of management groups, clusters and volumes.• Tab View: The bottom pane presents information about, and functions associated
with, the selected item in the Network View.
Other features of the Console include the following:• Menu Bar: The menu bar provides access to the following menus:
— Find: Use to find modules on the network. — Tasks: Access all available storage configuration tasks (tasks are also accessible
through right click menus and from the Tasks button on the Tab View pane).— View: Change the Network View in the Console.— Help: Access online help and other information about the Console and Storage
System Software.
Figure 2. Features of the Console Main Window
Tab View
Menu Bar
Network View
Intel® Storage System Software User Manual 17
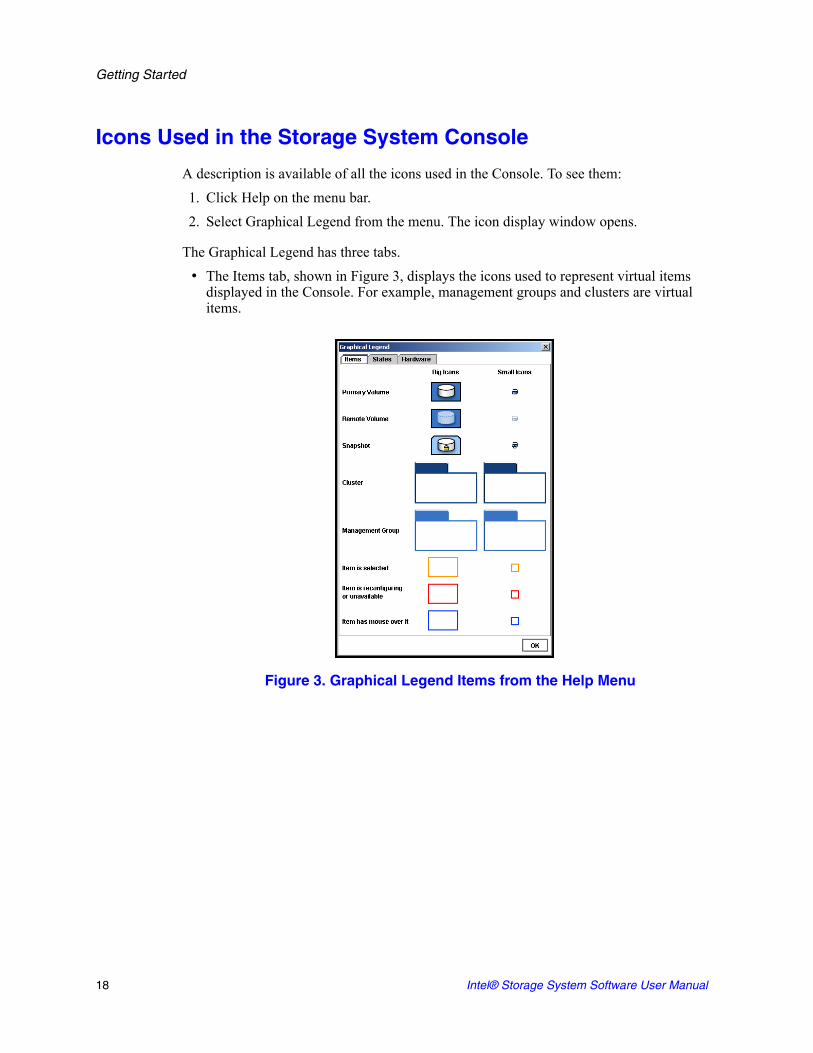
Getting Started
Icons Used in the Storage System Console
A description is available of all the icons used in the Console. To see them:1. Click Help on the menu bar.2. Select Graphical Legend from the menu. The icon display window opens.
The Graphical Legend has three tabs.• The Items tab, shown in Figure 3, displays the icons used to represent virtual items
displayed in the Console. For example, management groups and clusters are virtual items.
Figure 3. Graphical Legend Items from the Help Menu
18 Intel® Storage System Software User Manual

Getting Started
• The States tab, shown in Figure 4, displays the icons used to depict states that the items are in. For example, when you are logged into an SSM, a pink square displays underneath the SSM. When an item such as an SSM or a cluster is selected, it displays a yellow outline.
Figure 4. Graphical Legend States Tab from the Help Menu
Intel® Storage System Software User Manual 19

Getting Started
• The Hardware tab, shown in Figure 5, displays the icons that represent the physical storage units.
Figure 5. Graphical Legend Hardware Tab from the Help Menu
Finding Storage System Modules on the Network
After opening the Console, you must find the SSMs you want to manage. Find these modules by one of two methods:
• Use a mask to search subnets to find all available SSMs on a network. See “Finding by Subnet and Mask” on page 21 for more information about completing the List of Subnets to Search window.
• Enter specific IPs or host names to find individual SSMs. See “Finding by Module IP or Host Name” on page 24 for more information about completing the IP and Host Name List window.
20 Intel® Storage System Software User Manual

Getting Started
Once you have found SSMs the first time, the Find settings are saved. Every time you open the Console, the search takes place and a window opens, as shown in Figure 6, listing which SSMs have been found.
Figure 6. SSMs Found Message
When you click OK, those SSMs appear in the Network View.
Note: You can control which SSMs appear in the Network View by entering only specific IPs or Host Names in the IP and Host Name List window. Then, when you open the Console, only those IPs or Host Names will appear in the Network View.
Modules Not Found
If the network has a lot of traffic, or if a module is busy reading or writing data, it may not be found when a search is performed. If a module is not found, try the following steps to find it.1. Search again using the Find menu. 2. If you have searched by Subnet and Mask, try using the Find by IP or Host Name
search.3. If searching again does not work, try the following:
— Check the physical connection of the module. — Wait a few minutes and try the search again. If activity to the module was high,
the module might not have responded to the search.
Note: Other problems can occur that prevent connection, such as a bad cable connection.
Finding by Subnet and Mask
Find all the SSMs on the network by searching subnets with masks. To do this: Click the Find menu and click By Subnet and Mask. The List of Subnets to Search window opens, shown in Figure 7.
Intel® Storage System Software User Manual 21

Getting Started
Figure 7. Using Subnet and Mask to Search
Adding Subnets and Masks
1. Click Add to enter a subnet and mask. The Add Subnet and Mask window opens.2. Type in the Subnet.3. Select the appropriate mask from the list.4. Click OK to close the Add Subnet and Mask window.5. Click Find all. The Active Search window opens, tracking the search process. When
the search is complete, the Active Search window closes. The Console window opens, listing all the SSMs that were found on the network.
6. Click OK to close the Console window.
22 Intel® Storage System Software User Manual

Getting Started
7. Click Done on the List of Subnets to Search window. The modules appear in the Network View, identified by host name.
Figure 8. SSMs in the Network View Pane
Note: The subnet and mask are saved in the list. Every time you open the Console, the search takes place automatically and all SSMs on the network are listed in the Network View. See “Deleting Subnets and Masks” on page 24 if you want to disable this search.
Editing Subnets and Masks
Change the subnets and masks used to search for modules.1. Click the Find menu.2. Click By Subnet and Mask. The List of Subnets to Search window opens.3. Select the subnet you want to edit.4. Click Edit. The subnet and mask window opens.5. Change information as necessary.6. Click OK.
Available SSMs
Intel® Storage System Software User Manual 23

Getting Started
Deleting Subnets and Masks
You can delete a subnet and mask from the search list if you remove modules from that network, or if you do not want to view those modules in the Network View.1. Click the Find menu.2. Click By Subnet and Mask. The List of Subnets to Search window opens.3. Select the subnet and mask to delete.4. Click Delete. A confirmation message opens.5. Click OK.6. Click Done.
Finding by Module IP or Host Name
Identify SSMs by listing module IP or host names and searching for those SSMs. You can connect to one specific IP or host name, or find all the SSMs in the list.
Network Configuration and Find by IP or Host Name
The way your network is configured may affect the results of finding SSMs by IP address. An example of the effect of network configuration is detailed below.
• You configure both NICs in an SSM (eth0 and eth1).• The NICs are on separate subnets.• You open the Console on a system on the same subnet as the eth0 NIC on the SSM.• The Console Find function is set to Module IP or Host Name using only the IP
address of the eth1 NIC.
The SSM is discovered and appears in the Console. However, the IP address returned to the Console is that of the eth0 NIC. The eth1 IP address is not discovered.
This is normal behavior controlled by the way networking is configured. The SSM receives the broadcast and replies through eth0, regardless of which NIC received the broadcast. The Console picks up the address from the packet that was sent through eth0 and displays it as representative of the SSM.
24 Intel® Storage System Software User Manual

Getting Started
To Find by IP or Host Name
1. If this is the first time you have opened the Console, select By Module IP or Host Name at the dialog box, then click OK.or Click the Find menu and click By Module IP or Host Name.The IP and Host Name List window opens, as shown in Figure 9.
Figure 9. Using IP or Host Name to Search
Adding IPs or Host Names
Use the following steps to add specific IP addresses or host names to the list.1. Click Add. The Add IP or Host Name window opens.2. Type in the IP or Host Name for the module.3. Click OK.4. Repeat steps 1 through 3 for each module you want to find.5. Click Find all.
Intel® Storage System Software User Manual 25

Getting Started
Editing the IP or Host Name in the Search List
Use the following steps to change the IP or Host Name of an SSM in the list used to search for modules.1. Click the Find menu.2. Click By Module IP or Host Name. The IP and Host Name List window opens, shown
in Figure 9.3. Select the IP/Host Name you want to edit.4. Click Edit. The Edit IP or Host Name window opens.5. Change the necessary information.6. Click OK to return to the IP and Host Name List window.
Deleting the IP or Host Name in the Search List
Once you enter an IP or host name in the IP and Host Name List, that entry is saved. Every time you open the Console, a search for all the IPs and host names occurs.
You can delete an IP from the list if you no longer want to search for that SSM.1. Click the Find menu.2. Click By Module IP or Host Name. The IP and Host Name List window opens, shown
in Figure 9.3. Select the IP/Host Name to delete.4. Click Delete. A confirmation message opens.5. Click OK. The IP or host name is removed from the list.6. Click Done.
26 Intel® Storage System Software User Manual

Getting Started
Using the Network View
The Network View displays SSMs according to the criteria you set in the Find function. The graphics displayed in the Network View provide information about the following:
• SSMs• Management groups• Clusters• Volumes• Snapshots • Remote Copy
Figure 10. Network View Features
VolumeSnapshot
Management Group
Cluster
Available SSMs
Intel® Storage System Software User Manual 27
Getting Started
Changing Which SSMs Appear in the Network View
1. Click the Find menu2. Select Clear All Found Items to remove all SSMs and EBSD drivers from the
Network View.3. Perform a Find using either method: “Finding by Subnet and Mask” on page 21, or
“Finding by Module IP or Host Name” on page 24, to find the desired set of SSMs.
Status of SSMs
The Network View graphically depicts the status of each SSM. SSMs on the network are either available or part of a management group.
Other graphical information in the Network View depicts the storage architecture you create on your system. An example setup is shown in Figure 10.
• Management Groups: Management groups are groups of SSMs within which one or more SSMs are designated as managers.
• Clusters: Clusters are sub-groupings of SSMs within a management group.• Volumes: Volumes are data storage areas created on clusters.• Snapshots: Snapshots are read-only copies of volumes created at specific points in
time.
If you are logged into the module, a pink square displays underneath the SSM in the Network View.
28 Intel® Storage System Software User Manual

Getting Started
Using the Tab View
The Tab View displays properties of the item selected in the Network View. For example, Figure 11 shows the tabs that display when the SSMs on the network are found.
Select a tab to perform functions related to the selected item.
Figure 11. Tab View in Main Window
Available SSMs Tab
The Available SSMs tab, shown in Figure 12, lists the SSMs in the Network View pane that are available — that is, are not part of a management group.
Figure 12. SSMs Tab with SSMs Listed
Tab View
Intel® Storage System Software User Manual 29

Getting Started
Management Groups Tab
The Management Groups tab, shown in Figure 13, lists all the management groups currently created with the SSMs that are displayed in the Network View pane.
For information on management groups, see “Working with Management Groups” on page 167.
Figure 13. Management Groups Tab from Network Tab View
Alert Messages Tab
Use the Alert Messages tab to review any alert messages. Figure 14 shows the area in which alert messages display. These messages include alerts from the monitoring parameters you set in Reporting for individual SSMs. See “Using Active Monitoring” on page 154 for detailed information about setting reporting parameters.
Figure 14. Viewing Messages in the Alert Messages Tab
The most recent alert is at the top. The messages are continuous while the Console is open. When you close the Console the messages are cleared.
30 Intel® Storage System Software User Manual

Getting Started
EBSD Hosts Tab
The EBSD Hosts tab, shown in Figure 15, lists all versions of the EBSD drivers that are currently installed on the network. It also lists information about the hosts that are using that driver.
See the EBSD Linux Manual for more information about the EBSD drivers.
Figure 15. EBSD Hosts Tab
Viewing Storage System Module Details
Select an SSM from the Network View and the SSM Details tab opens in the Tab View, shown in Figure 16.
Figure 16. Viewing Individual SSM Information
Details for selected SSM
Intel® Storage System Software User Manual 31

Getting Started
Details Tab
Includes host name, IP address, the model, serial number, RAID status, RAID configuration, storage mode, and software version.
RAID States
RAID states are displayed on the SSM Details tab. • If RAID is normal, a green circle displays in the SSM configuration details tab when
the SSM is selected in the Network View, as shown in Figure 17.
Figure 17. Icon Showing RAID is Normal
• If RAID is off, a red circle displays in the SSM configuration details tab, as shown in Figure 18. For information about turning RAID on, see “Starting RAID” on page 74.
Figure 18. Icon Showing RAID is Off
• If RAID is degraded, a yellow circle displays, as shown in Figure 19. See “Monitoring RAID Status” on page 77 for information about fixing degraded RAID.
Figure 19. Icon Showing RAID is Degraded
32 Intel® Storage System Software User Manual

Getting Started
If RAID is rebuilding for RAID 5 or 50 or for RAID 10, a blue circle displays, as shown in Figure 20.
Figure 20. Icon Showing RAID is Rebuilding
Management Group Information Tab
The Management Group Information tab provides detailed information about the management group to which the SSM belongs.
Figure 21. Management Group Information Tab
Availability Tab
The Availability tab displays which volumes and snapshots availability. This tab depends on this SSM staying online. Details include the replication level and what factors contribute to the availability status. Factors include, but are not limited to, the status of SSMs participating in any replication, and RAID restriping due to auto grow or other factors.
Figure 22. Availability Tab
Intel® Storage System Software User Manual 33

Getting Started
Logging In to and Out of the SSM
After finding all the SSMs on the network you must log in to each SSM individually to configure, modify, or monitor the functions of that SSM. 1. On the Network view, double-click the SSM that you want to log in to. The Log In
window opens, shown in Figure 23.
Figure 23. Logging in to an SSM
2. Type the User Name and Password. 3. Click Log In.
When you are successfully logged in, the SSM configuration window opens to the Module configuration category, shown in Figure 25.
Logging In to Additional SSMs
Once you are logged in to an SSM, you can log in automatically to additional SSMs configured with the same user name and password by double-clicking those SSMs in the Network view.
If you try to log in to an SSM that uses a different user name or password, the Log In window opens, shown in Figure 24.
Figure 24. Automatic Log in Failure
1. Type the correct User Name and Password. 2. Click Log In.
34 Intel® Storage System Software User Manual

Getting Started
Logging Out of the SSM
Log out to prevent access to an SSM without closing the Console. This provides security if you are leaving the management workstation but do not want to close the Console.1. When the SSM Configuration window is open, click Log Out, shown in Figure 25.
The Network view opens and the SSM you logged out of no longer displays the logged in icon — the pink square.
Note: If you are logged in to multiple SSMs, you need to log out of each SSM individually.
SSM Configuration Window
The SSM Configuration window opens when you log into an individual SSM. From the configuration window you have access to all configuration tasks for individual SSMs.
To configure specific settings of an individual module, you use the SSM Configuration window, shown in Figure 25.
Figure 25. SSM Configuration Window
The left pane of the configuration window lists the SSM configuration categories. Within each category is a set of tabs used to configure different functions.
• Module: Upgrade the Storage System Software, change the password or host name, perform backup and restore of the SSM configuration, reboot or shut down the SSM, and manage boot devices. See Chapter 2, “Working with Storage System Modules,” on page 39.
• Storage: Manage RAID and manage individual drives, including powering them on or off, and reviewing drive information. See Chapter 3, “Storage,” on page 59.
Configuration Categories
Configuration Tabs
Intel® Storage System Software User Manual 35
Getting Started
• Time: Use NTP or manually set the time zone, date, and time for the SSM. See Chapter 5, “Setting the Date and Time,” on page 125.
• TCP/IP Network: Specify the TCP/IP settings of the SSM, manage DNS information, manage the routing table, and update the communication mode information if the SSM is running a manager. See Chapter 4, “Managing the Network,” on page 89.
• SSM Administration: Add, edit, and delete administrative users and groups. See Chapter 6, “Administrative Users and Groups,” on page 131.
• SNMP: Enable SNMP and enable SNMP traps. See Chapter 7, “Using SNMP,” on page 141.
• Reporting: View real-time statistical information about the SSM, run diagnostic tests, and configure selected variables for active monitoring. See Chapter 8, “Reporting,” on page 149.
Configuring Multiple SSMs
Note: When planning the configuration of your SSMs, note that all of the SSMs in a cluster must be configured the same way.
You can copy the reporting and monitoring configuration of one SSM to multiple SSMs. Copying these configurations makes it easy to ensure that those SSMs have exactly the same configuration.1. On the Network View, select the SSM that has the configuration that you want to
copy.
36 Intel® Storage System Software User Manual

Getting Started
2. Right-click and select Copy Configuration. The Copy Configuration window opens, as shown in Figure 26.
Figure 26. SSM Copy Configuration Window
1. In the Configuration Settings section, select which configurations you want to copy. For information about the configuration settings, see the following:— “Enabling the SNMP Agent” on page 142— “Using Active Monitoring” on page 154— “Remote Log Files” on page 153— “Setting Email Notification” on page 161
2. In the Copy Configurations to SSMs section, select the SSMs to which you want to copy the configurations.
3. Click Copy. The configuration settings are copied to the selected SSMs.4. Click OK on the confirmation window. The Copy Configuration window closes.
Intel® Storage System Software User Manual 37

Getting Started
38 Intel® Storage System Software User Manual

2 Working with Storage System Modules
The SSM configuration window opens when you log into an individual SSM. From the configuration window you have access to all the configuration tasks for individual SSMs.
Figure 27. SSM Configuration Window for the Intel® Storage System SSR316MJ2
Figure 28. SSM Configuration Window for the Intel® Intel® Storage System SSR212MA
Configuration categories
Configuration categories
Intel® Storage System
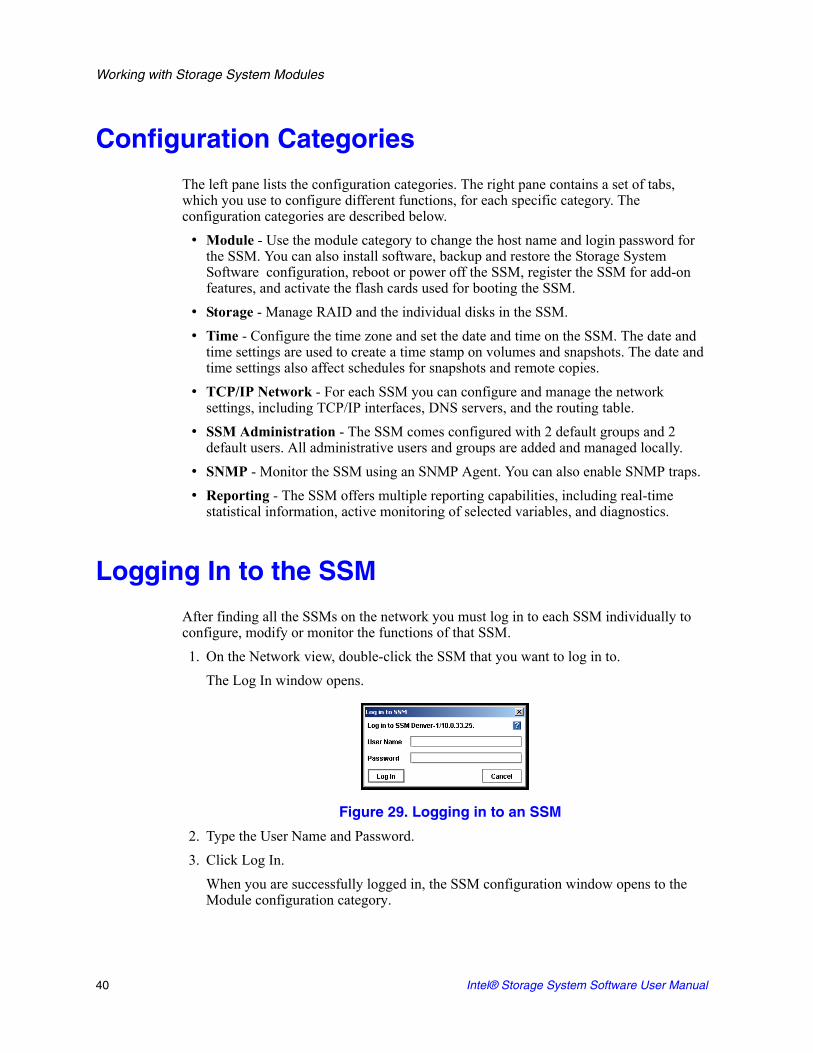
Working with Storage System Modules
Configuration Categories
The left pane lists the configuration categories. The right pane contains a set of tabs, which you use to configure different functions, for each specific category. The configuration categories are described below.
• Module - Use the module category to change the host name and login password for the SSM. You can also install software, backup and restore the Storage System Software configuration, reboot or power off the SSM, register the SSM for add-on features, and activate the flash cards used for booting the SSM.
• Storage - Manage RAID and the individual disks in the SSM.• Time - Configure the time zone and set the date and time on the SSM. The date and
time settings are used to create a time stamp on volumes and snapshots. The date and time settings also affect schedules for snapshots and remote copies.
• TCP/IP Network - For each SSM you can configure and manage the network settings, including TCP/IP interfaces, DNS servers, and the routing table.
• SSM Administration - The SSM comes configured with 2 default groups and 2 default users. All administrative users and groups are added and managed locally.
• SNMP - Monitor the SSM using an SNMP Agent. You can also enable SNMP traps.• Reporting - The SSM offers multiple reporting capabilities, including real-time
statistical information, active monitoring of selected variables, and diagnostics.
Logging In to the SSM
After finding all the SSMs on the network you must log in to each SSM individually to configure, modify or monitor the functions of that SSM. 1. On the Network view, double-click the SSM that you want to log in to.
The Log In window opens.
Figure 29. Logging in to an SSM
2. Type the User Name and Password.3. Click Log In.
When you are successfully logged in, the SSM configuration window opens to the Module configuration category.
40 Intel® Storage System Software User Manual

Working with Storage System Modules
Logging In to Additional SSMs
Once you are logged in to an SSM, you can log in automatically to additional SSMs configured with the same user name and password by double-clicking those SSMs in the Network view.
If you try to log in to an SSM that uses a different user name or password, the Log In window opens
Figure 30. Automatic Log In Fails because SSM User Name and Password are Different
1. Type the correct User Name and Password. 2. Click Log In.
Closing the SSM Configuration Window
Log out of the SSM to close the SSM configuration window or click Done to close without logging out.
Logging Out of the SSM
Log out to prevent access to an SSM without closing the Console. This provides security if you are leaving the management workstation but do not want to close the Console.1. When the SSM Configuration window is open, click Log Out
The Network view opens and the SSM you logged out of no longer displays the logged in icon — the pink square.
Note: If you are logged in to multiple SSMs, you need to log out of each SSM individually.
Intel® Storage System Software User Manual 41

Working with Storage System Modules
Closing the SSM Configuration Window without Logging Out
Clicking Done on the SSM configuration window returns the Console to the Network View and leaves you logged in to the SSM. The Network View window displays the SSM with a pink square underneath, indicating the logged in status.
Figure 31. Pink Square Indicates Logged In Status
Module Configuration Overview
The module configuration category provides access to detailed information about the SSM, backing up and restoring SSM configuration files, the software reboot or power off function, boot devices and feature registration.
Figure 32. Viewing the Module Configuration Category
ID LED only on the Intel® Storage System SSR212MA
42 Intel® Storage System Software User Manual

Working with Storage System Modules
Changing the SSM Host Name
The host name on an SSM is the name that displays below the SSM icon in the Network View. It is also visible when the users browse the network. Change the host name of the SSM on the Module Information tab.
The SSM arrives configured with a default host name.1. Log in to the SSM.2. On the Module Information tab, click the Host Name field and type the new name.
If you are operating in a Windows environment, the host name should be 15 characters or fewer.
3. Click Apply. A confirmation message opens.
4. Click OK.
Note: Add the host name and IP pair to whatever host name resolution methodology is employed in your environment, e.g., DNS or WINS.
Changing Passwords
Change the password for the user who is logged in to an SSM on the Module Information tab.1. Log in to the SSM.2. On the Module Information tab, click Change Password.
The Change Password window opens.3. Type in the User Name and Old Password.4. Type in the New Password.5. Retype the New Password for confirmation.6. Click OK.
Change any other user’s password in the SSM Administration configuration category.
Intel® Storage System Software User Manual 43

Working with Storage System Modules
Locating the Module in a Rack (Intel® Storage System SSR212MA only)
The Set ID LED On turns on lights on the physical module so that you can find that module in a rack.1. Log in to the SSM.2. On the Module Information tab, click Set ID LED On.
The ID LED on the left front of the module illuminates a bright blue. Another ID LED is located on the back of the module on the right side under the empty slot.
Figure 33. Viewing ID LED Indicator on Front of Module
When you click Set ID LED On, the status changes to On and the button changes to Set ID LED Off.
Figure 34. ID LED Indicator
3. Click Set ID LED Off when you are finished. The LED on the module turns off and the button returns to Set ID LED On.
Upgrading the Storage System Software
When you upgrade the Storage System Software, the version number will change. You can view the current software version on the Module Information tab in the SSM configuration window or on the SSM Details tab in the Network View.
Prerequisites• [Intel® Storage System SSR316MJ2] Both flash cards must be present before
upgrading the software.• Stop any applications that are accessing volumes that reside on the SSM you are
upgrading.
Blue ID LED is bottom indicator on left front side
of module
ID LED toggles on and off
44 Intel® Storage System Software User Manual

Working with Storage System Modules
Copying the Upgrade Files from CD or FTP Site
Upgrade the Storage System Software on the SSM when an upgrade or a patch is released. The Storage System Software upgrade/installation takes about 5 to 8 minutes, including the SSM reboot.
Note: The 88M must contain both boot flash cards in order to upgrade the storage system software. See 1. Download the upgrade file from the web site of your approved supplier or from a CD.
Upgrading the SSM
You can install upgrades on SSMs individually, which is recommended. If you are upgrading multiple SSMs that are not in a management group, you can upgrade them simultaneously.1. Log in to the first SSM you want to upgrade.2. On the Module Information tab, click Install Software.
The Install Software window opens.
Figure 35. Upgrading the SSM Software
3. Select the Install check box next to the SSM you want to upgrade. You can select multiple SSMs to upgrade from the list.
4. Select Install file on selected SSMs one at a time (Recommended).
Intel® Storage System Software User Manual 45

Working with Storage System Modules
5. Click Browse to navigate to the folder on the Console computer where you copied the upgrade or patch file.
Figure 36. Browsing for Upgrade or Patch File
6. Select the file and click Open Install File.Focus returns to the Install Software window. When the file name is present, the Install button becomes enabled.
7. Click Install.The install status window opens. Status messages scroll on the window. These messages can be saved to a file.— [Optional] Click Save To File and choose a name and location for the file.
Figure 37. Upgrade Status Messages
After the installation completes, the system reboots. After the system comes back online, it conducts a post-install qualification. After the system passes the post-install qualification, the upgrade process is complete.
8. Click Close when the installation is completed.
46 Intel® Storage System Software User Manual

Working with Storage System Modules
Backup and Restore of SSM Configuration
Backup and restore provides the capability to save the SSM configuration file for use in case of an SSM failure. When you back up an SSM configuration, all of the configuration information about the SSM is stored in a file on the computer where the Console is installed. If an SSM failure occurs, you can restore the configuration file to a new SSM. The new SSM will be configured identically to the SSM when it was backed up.
Backing up the configuration file for an SSM does not save information about the configuration of any management groups, clusters, volume lists or authentication groups that the SSM belongs to. It also does not back up license key entries for registered features. To preserve a record of management group configuration information and license keys, see .
Note: Back up the SSM configuration every time you change SSM settings. This ensures that you can restore an SSM to its most recent configuration.
Backing Up Multiple SSMs with the Same Configuration
If you have multiple SSMs with the same configuration, you can create a single configuration backup file and use it to restore the configuration on any of these SSMs. Any SSM that you restore from the backup file will have exactly the same configuration.
Note: If you back up the configuration of an SSM that has a static IP address, and then restore that configuration to a second SSM, the second SSM will have the same IP address. You must manually change the IP address on the second SSM.
1. Log in to the SSM.2. Click the Backup and Restore tab.
The Backup and Restore window opens.
Figure 38. Viewing the Backup and Restore Window
Intel® Storage System Software User Manual 47

Working with Storage System Modules
Backing Up the SSM Configuration File
Use Backup to save the SSM configuration file to a directory on your local machine.1. Click Backup.
The Save window opens.
Figure 39. Backing up the SSM Configuration File
2. Navigate to a folder on the Console computer to contain the SSM configuration backup file.
3. Accept the default name (SSM_Configuration_Backup) or enter a new name for the backup file.
Note: The configuration files for all SSMs that you back up are stored on the computer running the Console. If you back up multiple SSMs, be sure to give each SSM configuration file a unique and descriptive name. This will make it easier to locate the correct configuration file if you need to restore the configuration of a specific SSM.4. Click Save.
48 Intel® Storage System Software User Manual

Working with Storage System Modules
Restoring the SSM Configuration from a File
Use Restore to restore the configuration of an SSM.1. On the Backup and Restore tab, click Restore.
The Restore SSM window opens.
Figure 40. Restoring the SSM Configuration File
2. Select the Install check box next to the SSM you want to restore. You can select multiple SSMs to restore from the list.
3. Select Install file on selected SSMs one at a time (Recommended).4. Click Browse to navigate to the folder on the Console computer where the
configuration backup file is saved.5. Select the file to restore and click Open Backup File.6. Review the version and description to ensure you are restoring the correct file.
Intel® Storage System Software User Manual 49

Working with Storage System Modules
7. Click Install.The Install Status window opens. When the restoration is complete, the Save to File and Close buttons become enabled.— To save a log file of the restore operation before rebooting, click Save to File.
Figure 41. Restoring the SSM Configuration File
8. Click Close to finish restoring the configuration.The SSM reboots and the configuration is restored to the identical configuration as that in the backup file.
Completing the Restore
After you restore the SSM configuration from a file, up to three manual configuration steps are required:
• You must manually configure RAID on the SSM.• You must manually add network routes after the restoration. Restoring an SSM
configuration file from one SSM to a second SSM does not restore network routes that were configured on the SSM.
• If you restore multiple SSMs from one configuration file, you must manually change the IP address on the additional SSMs. For example, if you back up the configuration of an SSM with a static IP address, and then restore that configuration to a second SSM, the second SSM will have the same IP address.
50 Intel® Storage System Software User Manual

Working with Storage System Modules
Rebooting the SSM
Reboot the SSM from the Console without powering off. Set the amount of time before the reboot begins to ensure that any activity to the module has stopped. 1. Log in to the SSM.2. Select the Power Off tab.
The Power Off window opens.
Figure 42. Shutting Down or Rebooting the SSM
3. Select Reboot.4. In the minutes field, type the number of minutes before the reboot should begin.
You can enter any whole number greater than or equal to 0. If you enter 0 the SSM will reboot as soon as you complete step 6.
5. Click Reboot. A confirmation message appears.
6. Click OK. The SSM will reboot in the specified number of minutes. When reboot actually begins, the SSM disappears from the Network View. The reboot takes 3 to 4 minutes.
7. Search for the SSM to reconnect the Console to the module once it has finished rebooting.
Intel® Storage System Software User Manual 51
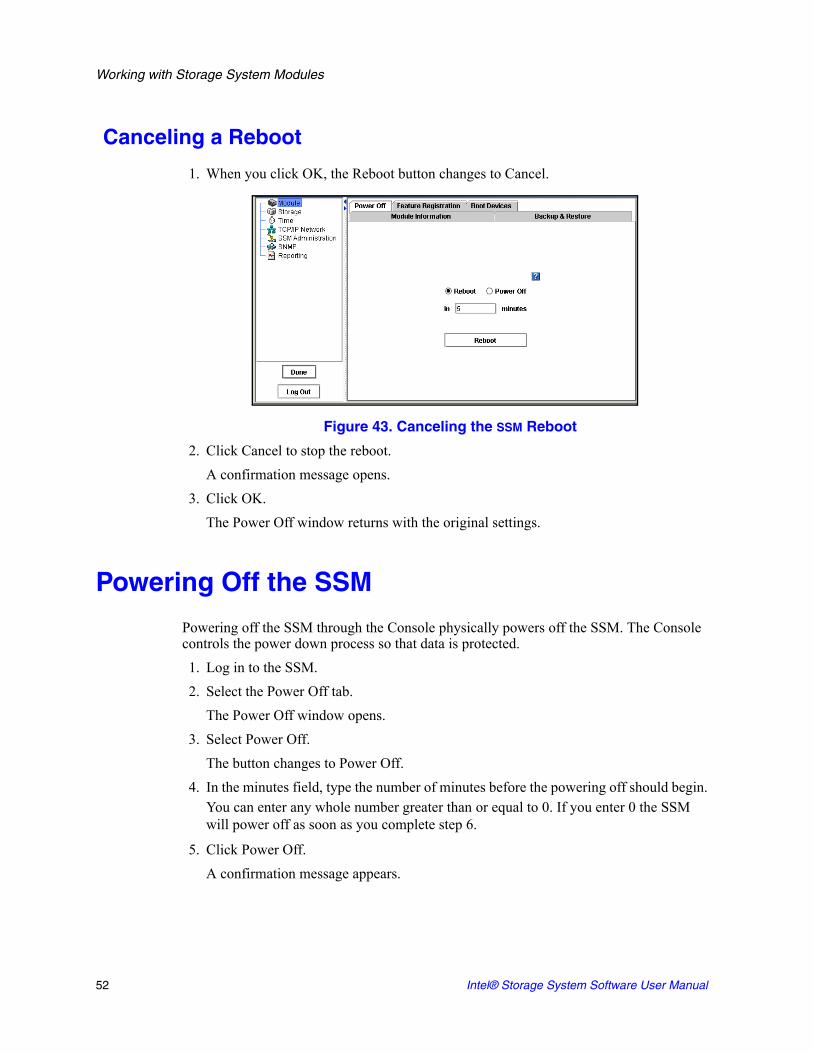
Working with Storage System Modules
Canceling a Reboot
1. When you click OK, the Reboot button changes to Cancel.
Figure 43. Canceling the SSM Reboot
2. Click Cancel to stop the reboot.A confirmation message opens.
3. Click OK.The Power Off window returns with the original settings.
Powering Off the SSM
Powering off the SSM through the Console physically powers off the SSM. The Console controls the power down process so that data is protected.1. Log in to the SSM.2. Select the Power Off tab.
The Power Off window opens.3. Select Power Off.
The button changes to Power Off.4. In the minutes field, type the number of minutes before the powering off should begin.
You can enter any whole number greater than or equal to 0. If you enter 0 the SSM will power off as soon as you complete step 6.
5. Click Power Off.A confirmation message appears.
52 Intel® Storage System Software User Manual
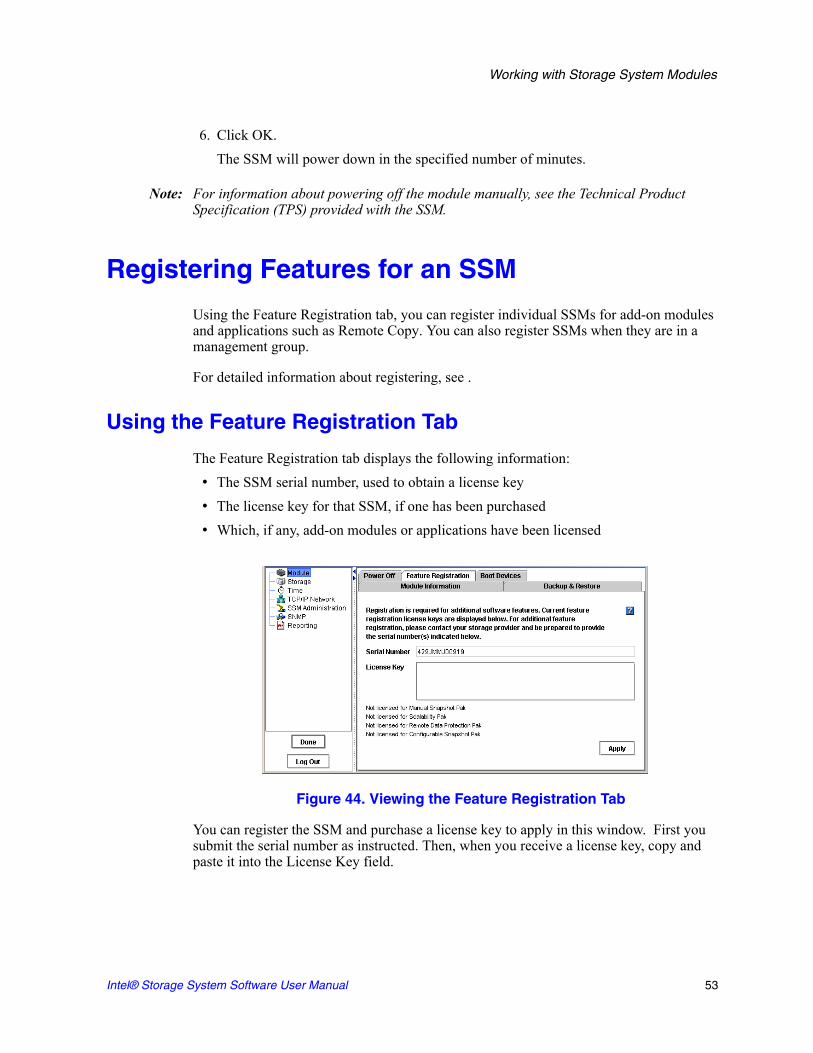
Working with Storage System Modules
6. Click OK.The SSM will power down in the specified number of minutes.
Note: For information about powering off the module manually, see the Technical Product Specification (TPS) provided with the SSM.
Registering Features for an SSM
Using the Feature Registration tab, you can register individual SSMs for add-on modules and applications such as Remote Copy. You can also register SSMs when they are in a management group.
For detailed information about registering, see .
Using the Feature Registration Tab
The Feature Registration tab displays the following information:• The SSM serial number, used to obtain a license key • The license key for that SSM, if one has been purchased• Which, if any, add-on modules or applications have been licensed
Figure 44. Viewing the Feature Registration Tab
You can register the SSM and purchase a license key to apply in this window. First you submit the serial number as instructed. Then, when you receive a license key, copy and paste it into the License Key field.
Intel® Storage System Software User Manual 53
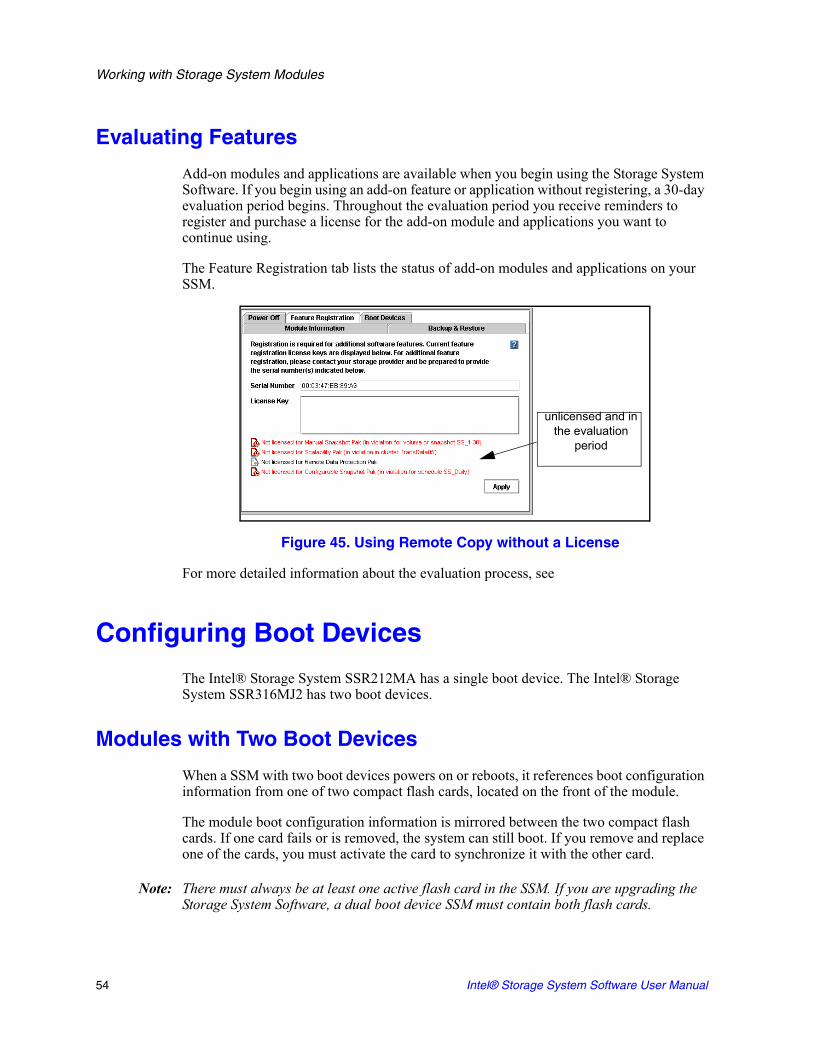
Working with Storage System Modules
Evaluating Features
Add-on modules and applications are available when you begin using the Storage System Software. If you begin using an add-on feature or application without registering, a 30-day evaluation period begins. Throughout the evaluation period you receive reminders to register and purchase a license for the add-on module and applications you want to continue using.
The Feature Registration tab lists the status of add-on modules and applications on your SSM.
Figure 45. Using Remote Copy without a License
For more detailed information about the evaluation process, see
Configuring Boot Devices
The Intel® Storage System SSR212MA has a single boot device. The Intel® Storage System SSR316MJ2 has two boot devices.
Modules with Two Boot Devices
When a SSM with two boot devices powers on or reboots, it references boot configuration information from one of two compact flash cards, located on the front of the module.
The module boot configuration information is mirrored between the two compact flash cards. If one card fails or is removed, the system can still boot. If you remove and replace one of the cards, you must activate the card to synchronize it with the other card.
Note: There must always be at least one active flash card in the SSM. If you are upgrading the Storage System Software, a dual boot device SSM must contain both flash cards.
unlicensed and in the evaluation
period
54 Intel® Storage System Software User Manual

Working with Storage System Modules
Checking Boot Device Status in an SSM
You can view the compact flash card status on the Boot Devices window.1. Log in to the Storage System Module.2. Click the Boot Devices tab.
The Boot Devices window opens
Figure 46. Viewing Boot Device Status with Two Devices
Figure 47. Viewing Single Boot Device Status
Intel® Storage System Software User Manual 55

Working with Storage System Modules
3. The status of each compact flash card is listed in the Status column.
Replacing a Boot Device [Only in Modules with Two Boot Devices] (Intel® Storage System SSR316MJ2 only)
If a compact flash card fails, first try to activate it on the Boot Devices window. If the card fails repeatedly, replace it with a new one.
You can also replace a boot flash card if you have removed the original card to store it as a backup in a remote location.
Note: The replacement boot flash card must be a standard 256-Mb (or larger) compact flash memory card. As of publication, product-approved cards are:- SanDisk 256-Mb Compact Flash- Kingston 256-Mb Compact Flash (P725228X1)Check with your supplier for an updated list of approved flash cards.
Warning: A flash card from one SSM cannot be used in a different SSM. If a card fails, replace it with a fresh flash card.
Table 2. Boot Flash Card Status1
Flash Card Status Description
Active The device is synchronized and ready to be used.
Inactive The device is ready to be removed from the SSM. It will not be used to boot the SSM.
Failed The device encountered an I/O error and is not ready to be used.
[Intel® Storage System SSR316MJ2] If a flash card has a status of Failed, select the card and click Activate. If the card fails repeatedly, it needs to be replaced.
Empty [Intel® Storage System SSR316MJ2] The flash card bay on the front of the SSM does not contain a boot flash card, or the card in the slot is unreadable.
Unformatted The device has not yet been used in an SSM. It is ready to be activated.
Not Recognized The device in the flash card bay is not recognized as a boot flash device.
Unsupported The flash card in the flash card bay cannot be used. (For example, it is the wrong size or card type.)
1. Some statuses listed above only occur in a system with two boot devices.
Note: When the status of a flash card changes, an alert is generated. See .
56 Intel® Storage System Software User Manual

Working with Storage System Modules
Removing a Boot Flash Card
Before you remove one of the boot flash cards from the SSM, deactivate the device in the Storage System Console.1. On the Boot Devices window, select the flash card that you want to remove.2. Click Deactivate.
The flash card status changes to Inactive. It is now safe to remove the card from the SSM.
3. Power off the SSM.4. Remove the flash card from the front of the SSM.
Replacing and Activating a New Boot Flash Card
If you replace a boot flash card in the SSM, you must activate the card before it can be used. Activating the card erases any existing data on the card and then synchronizes it with the other card in the Storage System Module.
1. Insert the new flash card in the front of the SSM.2. Power on the SSM.3. Log in to the SSM.4. On the Boot Devices window, select the new flash card.5. Click Activate.
The flash card begins synchronizing with the other card. When synchronization is complete, ‘Active’ displays in the Status column.
Replacing a Disk on Module (DOM) (Intel® Storage System SSR212MA only)
1. Power down the SSM.2. Remove the DOM from the SSM. Refer to the Intel® Storage System SSR212MA
User Guide for instructions on removing the DOM.3. Install the new DOM in the SSM. Refer to the Intel® Storage System SSR212MA User
Guide for instructions on installing the DOM.4. Attach a serial cable to the storage system and connect to a laptop. Open a terminal
emulation program to run a text interface, such as HyperTerminal* or ProComm Plus*.Use the following settings to configure your session:— Bits per second = 19200— Data bits = 8— Parity = None
Intel® Storage System Software User Manual 57
Working with Storage System Modules
— Stop bits = 1— Flow control = None— Backspace key sends = Del— Emulation = ANSIIf using HyperTerminal, set the properties for the backspace key and emulation after the session is established. If you exit the session and return to the session in order to use the Configuration Interface, the screen will not open correctly.
5. Power up the SSM with the replacement DOM. From the laptop, you should be able to observe two boot cycles. A boot cycle is indicated by a “Welcome to SAN IQ” message displayed on the screen. On the second boot, the cycle should end with a “DOM replacement logic: OS was restored to DOM on previous boot cycle” message. The logon screen will display, indicating a proper restoration process.
Caution: Do not execute any keyboard commands, such as <ESC> to view diagnostic messages, <F2> to enter setup, <F12> for a network boot, <CTRL> <G> for running the RAID BIOS Console or login to the storage system, during reboot.
Note: Disregard any failed statuses and failure messages during reboot. These statuses / messages are normal and are not an indication of a failure.
The entire restoration process, if successful, will take about 30 minutes. Once the two boot cycles have executed, ensure the system has been restored.
6. From the laptop or text interface, log in and verify that the IP address and host name of the storage system have not changed. If the storage system uses DHCP, the IP address may have changed.
7. Login to the Intel® Storage System Console and select Edit Config -> Storage -> RAID Setup and ensure all disks are online and in their original RAID configuration. All volumes should be available with data restored to all volumes, and your host should be able to perform an iSCSI login.
Note: In most cases, DOM replacement should result in no issues. However, the following two conditions may occur if there is another hardware problem present. In both cases, refer to the Intel® Storage System SSR212MA User Guide for instructions on removing the DOM and replacing it with the original. If the new DOM could not access data on the disks because of another system fault (e.g., RAID is seriously degraded or no longer configured, or the RAID controllers, midplane or server board have a failure) then the replacement DOM will boot a single time and appear to be a newly manufactured system. Check the network settings and if they are set to factory defaults, the restoration process has failed because the DOM could not detect a coherent RAID configuration. In this case, the DOM cannot be used again to attempt a system restoration. Replace with the original DOM because the problem is not a bad DOM. If the original RAID array is intact, but the restoration process is unsuccessful because the new DOM can’t be written or verified, then the system will remain in a reboot cycle attempting to recover the configuration. If the DOM has not recovered after several reboot cycles or exceeded an hour without completing the process then the system cannot recover the original configuration. Power down the system if the system is continuously rebooting.
58 Intel® Storage System Software User Manual

3 Storage
Storage Overview
The Storage configuration category is where you configure and manage RAID and individual disks for storage modules.
For each storage module, you can select the RAID configuration, the RAID rebuild options, and monitor the RAID status. You can also manage individual disks, including powering them on or off, and reviewing disk information.
Storage Requirement
RAID must be configured for data storage. Company Name storage modules come with RAID preconfigured.
Getting There
1. On the Network View, double-click the storage module and log in, if necessary.The Edit Configuration window opens.
Table 3. RAID Levels and Default Configurations for Storage Modules
Model Preconfigured for Available RAID Levels
Intel® Storage System SSR316MJ2
RAID 5 0, 10, 5/50
Intel® Storage System SSR212MA
RAID 5 0, 10, 5/50

Storage
2. Select the Storage configuration category.The Storage category opens, shown in Figure 48.
Figure 48. Viewing the Storage Configuration Category for an Intel® Storage System SSR316MJ2
Configuring and Managing RAID
Managing the RAID settings of an SSM includes:• Choosing the right RAID configuration for your storage needs• Setting or changing the RAID configuration• Setting the rate for rebuilding RAID• Monitoring the RAID status for the SSM• Starting or reconfiguring RAID when necessary
Note: The SSM comes configured for RAID 5.
Benefits of RAID
RAID combines several physical disks into a larger virtual disk. This larger virtual disk can be configured to improve both read/write performance and data reliability for the module.
60 Intel® Storage System Software User Manual

Storage
RAID Configurations Defined
The RAID configuration you choose depends upon how you plan to use the storage module. The module can be reconfigured with RAID 0, RAID 1/10 or RAID 5/50, depending on the model. The factory default setting is RAID 5.
Number of Disks and RAID
The number of disks in the SSM affects the RAID configurations available, as illustrated in Table 3 .
RAID 0
RAID 0 is available for any number of disks in an SSM.
RAID 1/10
RAID 1/10 requires pairs of disks. Therefore, an SSM must contain an even number of disks to configure RAID 1/10.
RAID 5/50
RAID 5/50 requires sets of disks to configure. • Intel® Storage System SSR316MJ2 requires sets of 4 or 8 disks up to a total of 16
disks• Intel® Storage System SSR212MA requires sets of 6 disks up to a total of 12 disks.
Table 4. Number of Disks Required for Each RAID Level
Number of disks required
RAID Level
Intel® Storage System
SSR212MA
Intel® Storage System
SSR316MJ2
RAID 0 from 1 to 12 from 1 to 16
RAID 1/10 2, 4, 6, 8, 10, or 12
2, 4, 6, 8, up to 16
RAID 5/50 6 or 12 4, 8, 12 or 16
Intel® Storage System Software User Manual 61

Storage
RAID Set Size
The RAID set size is limited to 2 TB. This means that the combined capacity of the disks participating in the RAID set cannot exceed 2 TB.
RAID 5/50 in the Intel® Storage System SSR316MJ2
Table 5 illustrates RAID 5/50 capacity calculations for three different disk capacities in the Intel® Storage System SSR316MJ2. Since 2 TB equals 2048 GB, the RAID 5/50 configurations available for 400 and 500 GB disks are 3 plus a spare and 4.
Note: In the Intel® Storage System SSR316MJ2, if you plan to use 400 or 500 GB drives, configure RAID 5/50 for 3 plus spare or 4 disks.
RAID 5/50 in the Intel® Storage System SSR212MA
Table 6 illustrates RAID 5/50 capacity calculations for three different disk capacities in the Intel® Storage System SSR212MA. Since 2 TB equals 2048 GB, the RAID 5/50 configuration available for the 400 GB disks is 5 plus a spare. RAID 5/50 is not supported for 500 GB disks.
Table 5. Calculating RAID Set Size for RAID 5/50 in the Intel® Storage System SSR316MJ2
For Intel® Storage System
SSR316MJ2
Using Disk Capacity of
RAID 5/50 Set Size 250 GB 400 GB 500 GB
3 plus spare 750 GB 1200 GB 1500 GB
4 disks 1000 GB 1600 GB 2000 GB
7 plus spare 1750 GB (2800 GB) (3500 GB)
8 disks 2000 GB (3200 GB) (4000 GB)1
1. Parentheses indicate RAID set size greater than 2 TB, therefore, an unsupported configuration.
62 Intel® Storage System Software User Manual

Storage
RAID 0
RAID 0 creates a striped disk set. Data will be stored across all disks in the RAID which increases performance. However, RAID 0 does not provide fault tolerance. If one disk in the set is powered down or fails, all data on the set will be lost.
SSM capacity in RAID 0 is equal to the total capacity of all disks in the module.
RAID 1 and RAID 10
RAID 1
RAID 1 provides data redundancy by mirroring the data from one disk onto a second disk.
RAID 10
RAID 10 combines mirroring data within pairs of disks with striping data across pairs. RAID 10 combines data redundancy with the performance boost of RAID 0.
Configuring RAID 1 or RAID 10
Whether the SSM is configured in RAID 1 or RAID 10 depends on the number of disks in the module.
• If the SSM contains only 2 disks configured for RAID, then the mirrored disk pair is RAID 1.
• If the SSM contains 4 or more disks configured for RAID, then the 2 or more mirrored disk pairs are RAID 10.
Table 6. Calculating RAID Set size for RAID 5/50 in the Intel® Storage System SSR212MA
For Intel® Storage System
SSR212MA
Using Disk Capacity of
RAID 5/50 Set Size 250 GB 400 GB 500 GB
5 plus a spare 1250 GB 2000 GB (2500 GB)
6 disks 1500 GB (2400 GB) (3000 GB) 1
1. Parentheses indicate RAID set size greater than 2 TB, therefore, an unsupported configuration.
Intel® Storage System Software User Manual 63

Storage
Storage Capacity in RAID 10
SSM capacity in RAID 10 is the total capacity of all mirrored disk pairs in the module. The capacity of a single disk pair is equal to the capacity of one of the disks, as shown in Figure 49.
Figure 49. Capacity of Disk Pairs in RAID 10
RAID 5 and RAID 50
RAID 5 provides data redundancy by distributing data blocks across all disks in a RAID set. Redundant information is stored as parity distributed across the disks. Figure 50 shows and example of the distribution of parity across 4 disks in a RAID 5 set.
Figure 50. Parity Distributed Across a RAID 5 Set Using Four Disks
Parity allows the storage module to use more disk capacity for data storage than RAID 10 allows.
Parity and Storage Capacity in RAID 5
Parity in a RAID 5 set equals the capacity of one disk in the set. Therefore, the capacity of any RAID 5 set is n - 1, as illustrated in Table 50 .
250 GB 250 GB 250 GB 250 GB250 GB250 GB
SSM capacity: 750 GB
Pair 1capacity: 250 GB
Pair 2capacity: 250 GB
Pair 3capacity: 250 GB
Table 7. Storage Capacity of RAID 5 Sets in SSMs
Model RAID 5 Configuration Storage Capacity
Intel® Storage System SSR212MA
RAID 5 - 5 disks plus a spare
RAID 5 - 6 disks
4 x single disk capacity
5 x single disk capacity
64 Intel® Storage System Software User Manual

Storage
RAID 5 and Hot Spare Disks
RAID 5 configurations that use a spare designate as a hot spare the remaining disk of the RAID set. With a hot spare disk, if any one of the disks in the RAID 5 set fails, the hot spare disk is automatically added to the set.
Table 8 lists the RAID 5 configurations by model, and indicate which configurations include a hot spare.
Configuring RAID 5 or RAID 50 on the Intel® Storage System SSR316MJ2
RAID 5 and RAID 50 can only be configured on completely populated sets of disks. This means the Intel® Storage System SSR316MJ2 must contain either 4, 8, 12, or 16 disks.
Whether the Intel® Storage System SSR316MJ2 is configured in RAID 5 or RAID 50 depends on the number of disk sets in the module.
• If the Intel® Storage System SSR316MJ2 contains 1 disk set, then that set is RAID 5.• If the Intel® Storage System SSR316MJ2 contains more than one set, then all the sets
are RAID 50.
Intel® Storage System SSR316MJ2
RAID 5 - 4 disks
RAID 5 - 3 disks plus a spare
RAID 5 - 7 disks plus a spare
RAID 5 - 8 disks
3 x single disk capacity
2 x single disk capacity
6 x single disk capacity
7 x single disk capacity
Table 7. Storage Capacity of RAID 5 Sets in SSMs
Model RAID 5 Configuration Storage Capacity
Table 8. RAID 5 Configurations in Storage Modules
SSM Model RAID 5 Configuration
Intel® Storage System SSR316MJ2
RAID 5 - 3 disks plus a spare
RAID 5 - 4 disks
RAID 5 - 7 disks plus a spare
RAID 5 - 8 disks
Intel® Storage System SSR212MA
RAID 5 - 5 disks plus a spare
RAID 5 - 6 disks
Intel® Storage System Software User Manual 65

Storage
Storage Capacity in RAID 50 on the Intel® Storage System SSR316MJ2
The total capacity of the Intel® Storage System SSR316MJ2 in RAID 50 is the combined capacity of each RAID 5 set in the module.
For example, suppose the Intel® Storage System SSR316MJ2 is configured for RAID 50 and contains 2 sets of 4 400 GB disks. The total capacity for that Intel® Storage System SSR316MJ2 equals 2400 GB.
Figure 51. Capacity of Disk Sets in RAID 50
Configuring RAID 5 or RAID 50 on the Intel® Storage System SSR212MA
RAID 5 and RAID 50 can only be configured on completely populated sets of disks. This means the Intel® Storage System SSR212MA must contain either 6 or 12 disks.
Whether the Intel® Storage System SSR212MA is configured in RAID 5 or RAID 50 depends on the number of disk sets in the module.
• If the Intel® Storage System SSR212MA contains 1 disk set, then that set is RAID 5.• If the Intel® Storage System SSR212MA contains 2 disk sets, then both sets are
RAID 50.
Storage Capacity in RAID 50 on the Intel® Storage System SSR212MA
The total capacity of the Intel® Storage System SSR212MA in RAID 50 is the combined capacity of each RAID 5 set in the module.
For example, suppose the Intel® Storage System SSR212MA is configured for RAID 50 and contains 2 sets of 6 250 GB disks. The total capacity for that Intel® Storage System SSR212MA equals 2500 GB.
Set 1capacity: 1200 GB
400 400 400 400
Set 2capacity: 1200 GB
SSM capacity: 2400 GB
400 400 400 400
66 Intel® Storage System Software User Manual

Storage
Figure 52. Capacity of Disk Sets in RAID 50
Understanding RAID Devices in the RAID Setup Report
In the Storage category, the RAID Setup tab lists the RAID devices in the storage module and provides information about them. An example of the RAID Setup Report is shown in Figure 53. Information listed in the report is described in Table 9 .
Figure 53. RAID 0 in an Intel® Storage System SSR316MJ2
Set 1capacity: 1250 GB
250 250 250 250
Set 2capacity: 1250 GB
SSM capacity: 2500 GB
250 250 250 250 250250 250 250
RAID Setup Report
Intel® Storage System Software User Manual 67

Storage
RAID Devices by RAID Type
Each RAID type creates different sets of RAID devices. What follows is a description of the variety of RAID devices created by the different RAID types as implemented on various platform models.
Devices Configured in RAID 0
If RAID 0 is configured, each physical disk operates as a separate RAID 0 disk, as shown in Figure 54 and Figure 55.
Figure 54. RAID 0 on an Intel® Storage System SSR316MJ2
Figure 55. RAID 0 on an Intel® Storage System SSR212MA
Table 9. Information in the RAID Setup Report
This Item Describes This
Device Name The disk sets used in RAID. The number and names of devices varies by platform and RAID level.
Device Type The RAID level of the device.
If the device is not functioning properly, the RAID Level reads “failed” and the level. For example “failed 5.”
Subdevices The number of disks included in the device. For example, in an Intel® Storage System SSR212MA with 12 drives configured for RAID 5 (5 disks plus a spare) displays a Device Type of “RAID 5” and subdevices as “6.”
1 2 3 16RAID 0 disks 4 ....
1 2 3 12RAID 0 disks 4 ....
68 Intel® Storage System Software User Manual

Storage
Devices Configured in RAID 1/10
If RAID 1 or 10 is configured, the physical disks are combined into mirrored pairs of disks, as shown in Figure 56 and Figure 57. RAID 1 uses only one pair of disks. RAID 10 uses up to 8 pairs of disks, depending on the platform.
Figure 56. RAID 10 on an Intel® Storage System SSR316MJ2
Figure 57. RAID 10 on an Intel® Storage System SSR212MA
Devices Configured in RAID 5/50
If RAID 5 is configured, all the physical disks are grouped into one array of disks. If RAID 5 or 50 is configured, the physical disks are grouped into sets. RAID 5 uses one set of disks. RAID 50 uses multiple sets of disks in each SSM.
RAID 50 in the Intel® Storage System SSR316MJ2
RAID 50 in the Intel® Storage System SSR316MJ2 consists of multiple RAID 5 sets using either all the disks, as in 4-disk or 8-disk sets, as shown in Figure 58, or n-1 disks so that the single disk acts as a hot spare for the RAID set, as shown in Figure 59. The RAID 50 n-1 configurations are 3 disks plus a spare and 7 disks plus a spare.
Figure 58. Intel® Storage System SSR316MJ2 RAID 50 Using Four-disk Sets
SSM disks
Mirrored RAID disk pairs
1 2 3 164 ....
SSM disks
Mirrored RAID disk pairs
1 2 3 124 ....
SSM disks
RAID 5 sets
81 2 3 4 5 6 7 10 11 12 13 14 15 169
Intel® Storage System Software User Manual 69

Storage
Figure 59. Intel® Storage System SSR316MJ2 RAID 50 Using 3 Disks Plus a Hot Spare
RAID 50 in the Intel® Storage System SSR212MA
RAID 50 in the Intel® Storage System SSR212MA consists of sets using either all 12 disks in 6-disk sets, shown in Figure 60., or n-1 disks so that the single disk acts as a hot spare for the RAID set, shown in Figure 61. The RAID 50 n-1 configuration is 5 disks plus a spare.
Figure 60. Intel® Storage System SSR212MA RAID 50 Using 6-disk Sets
Figure 61. Intel® Storage System SSR212MA RAID 50 Using 5 Disks Plus a Hot Spare
SSM disks
RAID 5 sets
hs1 2 3 hs 5 6 7 10 11 hs 13 14 15 hs9
SSM disks
RAID 5 sets
81 2 3 4 5 6 7 10 11 129
SSM disks
RAID 5 sets
81 2 3 4 5 hs 7 10 11 hs9
70 Intel® Storage System Software User Manual

Storage
Planning RAID Configuration
The RAID configuration you choose for the storage module depends on your plans for data safety, data availability, and capacity growth. If you plan to expand your network of storage modules and create clusters, choose your RAID configuration carefully.
Warning: Once RAID is configured, you cannot change the RAID configuration without deleting all data on the storage module.
Data Replication
Keeping multiple copies of your data can ensure that data will be safe and will remain available in the case of disk failure. There are two ways to achieve data replication:
• Configure RAID 1, 10, 5, or 50 within each storage module.• Replicate data volumes across clusters of storage modules.
Using RAID for Data Replication
Within each storage module, RAID 1 or RAID 10 can ensure that 2 copies of all data exist. If one of the disks in a RAID pair goes down, data reads and writes can continue on the other disk. Similarly, RAID 5 or RAID 50 provides redundancy by spreading parity evenly across the disks in the set. If one disk in the set goes down, data reads and writes continue on the remaining disks in the set.
RAID protects against failure of disks within a module, but not against failure of an entire SSM. For example, if network connectivity to the SSM is lost, then data reads and writes to the SSM cannot continue.
Note: If you plan to create all data volumes on a single storage module, use RAID 1/10 or 5/50 to replicate data within that module.
Using Volume Replication in a Cluster
A cluster is a group of storage modules across which data can be replicated. Volume replication across a cluster of storage modules protects against disk failures within a storage module and failure of an entire storage module. For example, if a single disk or an entire module in a cluster goes down, data reads and writes can continue because an identical copy of the volume exists on other storage modules in the cluster.
Clustering is part of the Scalability Pak feature upgrade. See ”Working with Clusters” for more information.
Note: If you plan to create data volumes that span 2 or more storage modules, use replication in a cluster to ensure data safety and availability.
Intel® Storage System Software User Manual 71

Storage
Using RAID with Replication in a Cluster
If you use replication in a cluster to replicate volumes across storage modules, then the redundancy provided by RAID 10 uses excess capacity and may not be necessary. For example,
• Using replication, up to 3 copies of a volume can be created on a cluster of 3 storage modules. The replicated configuration ensures that 2 of the 3 storage modules can go down and the volume will still be accessible.
• Configuring RAID 10 on these storage modules means that each of these 3 copies of the volume is stored on 2 disks within the storage module, for a total of 6 copies of each volume. For a 50 GB volume, 300 GB of disk capacity is used.
• In this case, data safety and availability are ensured more efficiently by configuring RAID 0 on the storage module and then achieving 2-way volume replication on clustered storage modules. For a 50 GB volume, 100 GB of disk capacity is used.
RAID 5/50 uses less disk capacity than RAID 1/10, so it can be combined with replication and still use capacity efficiently. One benefit of configuring RAID 5/50 in storage modules that use replication in a cluster is that if a single disk goes down, the data on that module can be rebuilt using RAID instead of requiring a complete copy from another module in the cluster. Rebuilding the disks within a single set is faster and creates less of a performance hit to applications accessing data than copying data from another module in the cluster.
Note: If you are replicating volumes across a cluster:- Configuring the SSM for RAID 0 allows you to use all of the disk capacity on the module while protecting against failure of individual disks or failure of an entire SSM.- Configuring the SSM for RAID 5/50 provides redundancy within each SSM while allowing most of the disk capacity to be used for data storage.
Table 10 summarizes the differences between running RAID 1 or 10 on a stand-alone SSM and running RAID 0 or RAID 5 on SSMs in a cluster.
72 Intel® Storage System Software User Manual
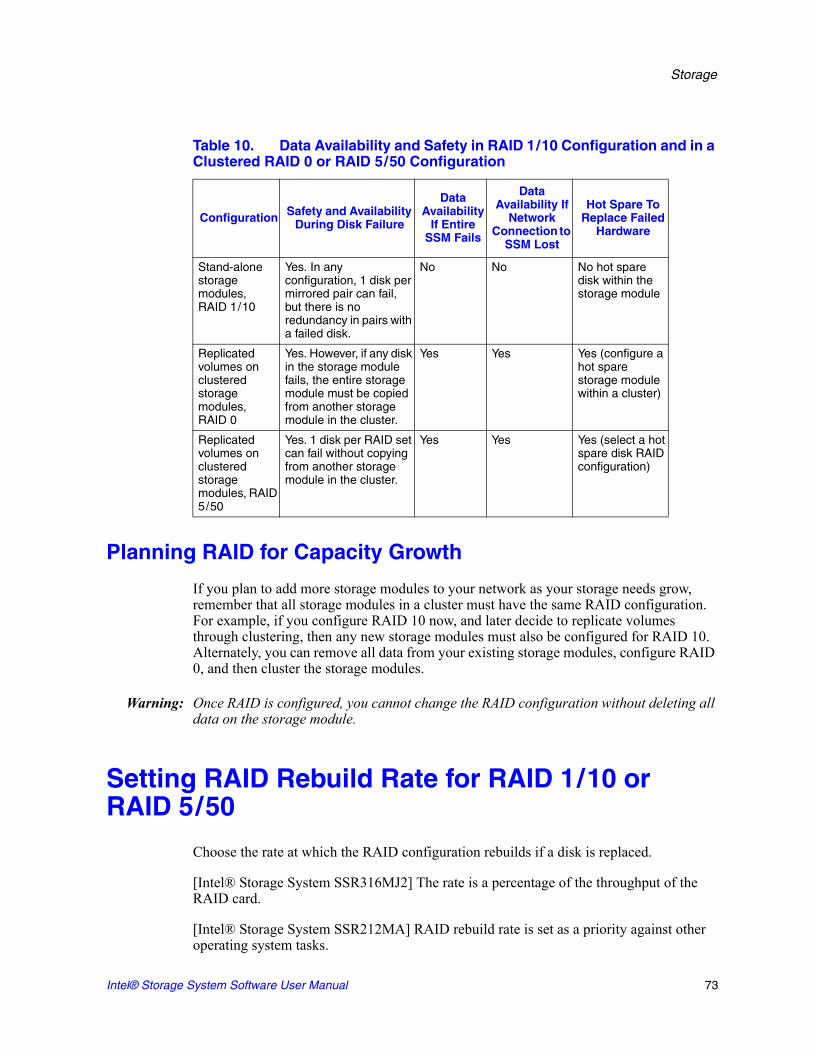
Storage
Planning RAID for Capacity Growth
If you plan to add more storage modules to your network as your storage needs grow, remember that all storage modules in a cluster must have the same RAID configuration. For example, if you configure RAID 10 now, and later decide to replicate volumes through clustering, then any new storage modules must also be configured for RAID 10. Alternately, you can remove all data from your existing storage modules, configure RAID 0, and then cluster the storage modules.
Warning: Once RAID is configured, you cannot change the RAID configuration without deleting all data on the storage module.
Setting RAID Rebuild Rate for RAID 1/10 or RAID 5/50
Choose the rate at which the RAID configuration rebuilds if a disk is replaced.
[Intel® Storage System SSR316MJ2] The rate is a percentage of the throughput of the RAID card.
[Intel® Storage System SSR212MA] RAID rebuild rate is set as a priority against other operating system tasks.
Table 10. Data Availability and Safety in RAID 1/10 Configuration and in a Clustered RAID 0 or RAID 5/50 Configuration
Configuration Safety and Availability During Disk Failure
Data Availability
If Entire SSM Fails
Data Availability If
Network Connection to
SSM Lost
Hot Spare To Replace Failed
Hardware
Stand-alone storage modules,RAID 1/10
Yes. In any configuration, 1 disk per mirrored pair can fail, but there is no redundancy in pairs with a failed disk.
No No No hot spare disk within the storage module
Replicated volumes on clustered storage modules,RAID 0
Yes. However, if any disk in the storage module fails, the entire storage module must be copied from another storage module in the cluster.
Yes Yes Yes (configure a hot spare storage module within a cluster)
Replicated volumes on clustered storage modules, RAID 5/50
Yes. 1 disk per RAID set can fail without copying from another storage module in the cluster.
Yes Yes Yes (select a hot spare disk RAID configuration)
Intel® Storage System Software User Manual 73

Storage
General guidelines• Setting the rate high is good for rebuilding RAID quickly and protecting data;
however it will slow down user access.• Setting the rate low allows users quicker access to data during the rebuild, but slows
the rebuild rate.
Setting RAID Rebuild Rate
1. Select the Storage configuration category. 2. Click the RAID Setup tab.3. Set the slider for the desired rebuild rate.4. Click Apply.
The settings are then ready when and if RAID rebuild takes place.
Starting RAID
If RAID has been configured on the storage module, and RAID is off, it must be started before other RAID tasks can be started.
Normally, once you start RAID, you will not have to restart it. However, in some cases, replacing disks requires that you start RAID after the disk is replaced.
Example
In a storage module, two disks were removed and replaced with two new disks. However, the disks that were removed caused the RAID quorum to break. (See “RAID Quorum” on page 78.) To prevent losing quorum, you replace one of the original disks and start RAID. Finally, you add the replacement disk to RAID.
To Start RAID
1. Select the Storage configuration category. 2. Click the RAID Setup tab. 3. Click Start RAID.
A confirmation message opens.4. Click OK.
RAID starts.
74 Intel® Storage System Software User Manual

Storage
Reconfiguring RAID
Reconfiguring RAID on a storage module destroys any data stored on that storage module. Requirements for reconfiguring RAID are listed below.
Requirements for Reconfiguring RAID
Changing preconfigured RAID on a new storage module
RAID must be reconfigured on individual storage modules before they are added to a management group. If you want to change the preconfigured RAID level of a storage module, you must make the change before you add the module to a management group.
Placement of disks in the storage module
All disks must be in contiguous drive bays, from left to right and, for the Intel® Storage System SSR212MA, from top to bottom as shown in Figure 69, for RAID to be configured. If there are empty drive bays, only the disks to the left of the empty drive bay will be included in RAID. The remaining disks will be inactive.
Because RAID 1 and RAID 10 create mirrored disk pairs, there must be an even number of disks in the SSM. If you configure RAID 1 or RAID 10 on an SSM that contains an odd number of disks, RAID will be configured, but the odd disk will not be included in RAID. For example, if the SSM contains 9 disks, then disks 1-8 will be included in 4 disk pairs. Disk 9 will be inactive. If you add a 10th disk later, you can add disks 9 and 10 to RAID.
RAID 5 and RAID 50 can only be configured on completely populated sets of disks. • The Intel® Storage System SSR316MJ2 must contain 4, 8, 12, or 16 disks. • The Intel® Storage System SSR212MA must contain either 6 or 12 disks.
Management Groups and RAID
You cannot reconfigure RAID on an storage module that is already in a management group. If you want to change the RAID configuration for an storage module that is in a management group, you must first remove it from the management group.
Clusters and RAID
All storage modules in a cluster must have the same RAID configuration. However, you can have mixed versions of RAID 5/50 within a cluster.
In the Intel® Storage System SSR316MJ2, for example, you have 1 SSM with four RAID 50 4-disk sets configured as 3 plus a spare and 1 SSM with two RAID 50 8-disk sets configured as 8 disks per set.
Before you configure RAID, make sure that the disks in the SSM are inserted in contiguous disk bays, from left to right and, for the Intel® Storage System SSR212MA, from top to bottom, as shown in Figure 68 and Figure 69.
Intel® Storage System Software User Manual 75

Storage
• If you are configuring RAID 1 or RAID 10, the SSM must contain an even number of disks.
• If you are configuring RAID 5 or RAID 50, • the Intel® Storage System SSR316MJ2 must contain 4, 8, 12, or 16 disks• the Intel® Storage System SSR212MA must contain 6 or 12 disks
Warning: Changing the RAID configuration will erase all the data on the drives.
Reconfigure RAID
1. Click the RAID Setup tab to bring it to the front.
Figure 62. Reconfiguring RAID on an Intel® Storage System SSR212MA
2. Select the RAID configuration from the list. 3. Click Reconfigure RAID.
A confirmation message opens. 4. Click OK.
A warning message opens.5. Click OK.
RAID starts configuring.
Note: If the SSM contains a large number of disks, it may take several hours for the disks to synchronize in a RAID 10 configuration. When the RAID status on the RAID Setup tab shows Normal, the disks provide fully operational data redundancy with the mirror in place. The storage module is ready for data transfer at this point.
76 Intel® Storage System Software User Manual

Storage
Monitoring RAID Status
RAID is critical to the operation of the storage module. If RAID has not been configured, the storage module cannot be used. Monitor the RAID status of a storage module to ensure that it remains normal. If the RAID status changes, a Console alert is generated. You can configure additional alerts to go to an email address or to an SNMP trap. See “Using Active Monitoring” on page 154 for instructions to set these additional alerts.
Data Transfer and RAID Status
RAID status of Normal, Rebuild, or Degraded all allow data transfer. The only time data cannot be transferred to the storage module is if the RAID status shows Off.
Data Redundancy and RAID Status
In a RAID 1/10 or RAID 5/50 configuration, when RAID is degraded there is not full data redundancy. Therefore, data is at risk if there is a disk failure when RAID is degraded.
Warning: In a degraded RAID 1/10 configuration, loss of a second disk within a pair will result in data loss. In a degraded RAID 5/50 configuration, loss of a second disk will result in data loss.
The RAID Status is located at the top of the RAID Setup tab in Storage. RAID status also displays in the Details Tab on the main Console window when an SSM is selected in the Network view.
Figure 63. Monitoring RAID Status on the Main Console Window
RAID Status
Intel® Storage System Software User Manual 77

Storage
The status displays one of four RAID states. • Normal - RAID is synchronized and running. No action is required. • Rebuild - A new disk has been inserted in a drive bay and RAID is currently
rebuilding. No action is required. • Degraded - RAID is degraded. Either a disk needs to be replaced or a replacement
disk has been inserted in a drive. You must add a disk to RAID on Disk Setup if you are inserting a replacement disk.
• Off - Data cannot be stored on the storage module. The storage module is down and flashes red in the Network view.
RAID Quorum
RAID quorum must be maintained for RAID 1/10 or RAID 5/50 to operate and for data to be preserved.
Quorum for RAID 1 or RAID 10
For RAID 1/10, quorum requires that at least one disk pair in the storage module and one disk in each remaining pair be intact. This means that a storage module configured for RAID 10 can tolerate the loss of up to 7 disks in the Intel® Storage System SSR316MJ2 and up to 5 disks in the Intel® Storage System SSR212MA. An SSM configured in RAID 1 contains only one pair of disks, so if one of the disks in the pair fails, quorum is broken and RAID cannot be rebuilt.
Data is safe as long as both disks in one of the mirrored pairs are operating normally. In order for RAID to rebuild when disks are replaced, at least one complete pair of disks must be in the storage module to ensure that data is rebuilt correctly. See “Managing Disks” for detailed information about the ordering of disks in the storage module.
Disk Pairs
Disks are usually paired from left to right, and for the Intel® Storage System SSR212MA, from top to bottom starting with the first disk in the SSM.
• Disks 1 and 2 • Disks 3 and 4 • Disks 5 and 6
and so on.
78 Intel® Storage System Software User Manual
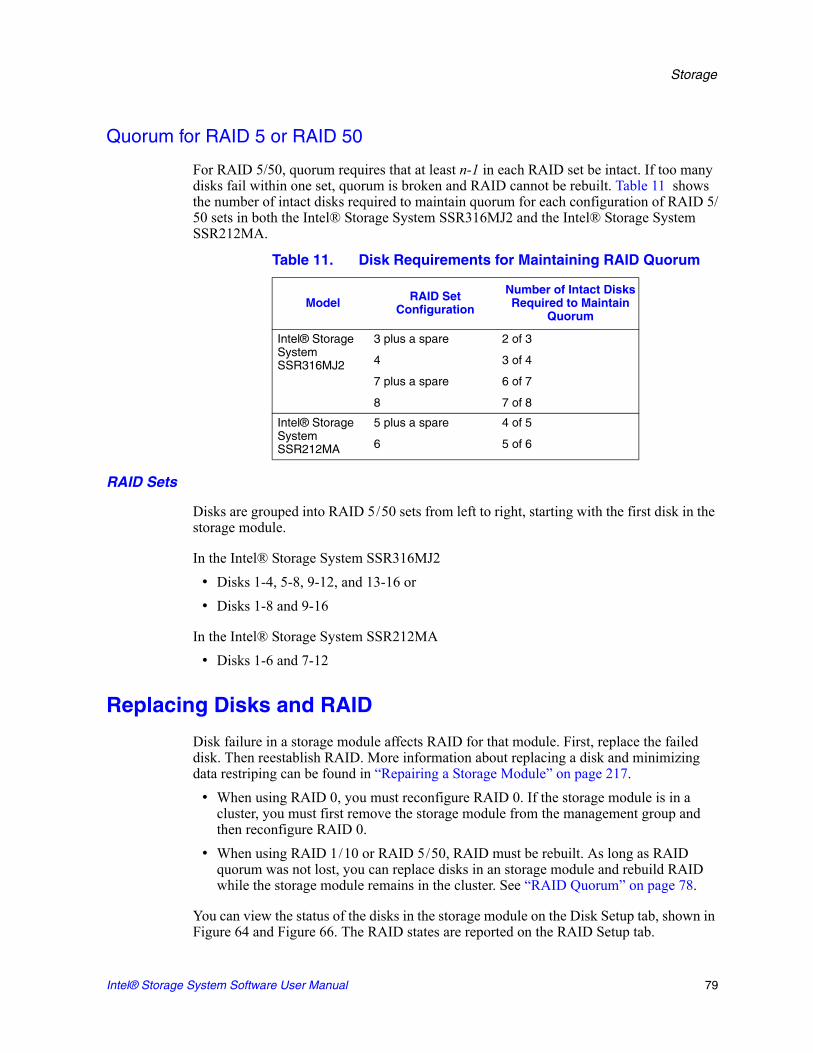
Storage
Quorum for RAID 5 or RAID 50
For RAID 5/50, quorum requires that at least n-1 in each RAID set be intact. If too many disks fail within one set, quorum is broken and RAID cannot be rebuilt. Table 11 shows the number of intact disks required to maintain quorum for each configuration of RAID 5/50 sets in both the Intel® Storage System SSR316MJ2 and the Intel® Storage System SSR212MA.
RAID Sets
Disks are grouped into RAID 5/50 sets from left to right, starting with the first disk in the storage module.
In the Intel® Storage System SSR316MJ2• Disks 1-4, 5-8, 9-12, and 13-16 or • Disks 1-8 and 9-16
In the Intel® Storage System SSR212MA• Disks 1-6 and 7-12
Replacing Disks and RAID
Disk failure in a storage module affects RAID for that module. First, replace the failed disk. Then reestablish RAID. More information about replacing a disk and minimizing data restriping can be found in “Repairing a Storage Module” on page 217.
• When using RAID 0, you must reconfigure RAID 0. If the storage module is in a cluster, you must first remove the storage module from the management group and then reconfigure RAID 0.
• When using RAID 1/10 or RAID 5/50, RAID must be rebuilt. As long as RAID quorum was not lost, you can replace disks in an storage module and rebuild RAID while the storage module remains in the cluster. See “RAID Quorum” on page 78.
You can view the status of the disks in the storage module on the Disk Setup tab, shown in Figure 64 and Figure 66. The RAID states are reported on the RAID Setup tab.
Table 11. Disk Requirements for Maintaining RAID Quorum
Model RAID Set Configuration
Number of Intact Disks Required to Maintain
Quorum
Intel® Storage System SSR316MJ2
3 plus a spare
4
7 plus a spare
8
2 of 3
3 of 4
6 of 7
7 of 8
Intel® Storage System SSR212MA
5 plus a spare
6
4 of 5
5 of 6
Intel® Storage System Software User Manual 79

Storage
For detailed information about replacing disks, see “Managing Disks” on page 80.
Managing Disks
Note: SSMs do not support hot-swap disk drives.
Use the Disk Setup tab to• monitor information about the disks in the selected storage module, • power on a disk that you have replaced or added to the storage module, and• add disks to RAID. You can also power off disks on this tab.
Getting There
1. Open the Edit Configuration window.2. Select the Storage category. 3. Select the Disk Setup tab.
Reading the Disk Report on the Disk Setup Tab
The Disk Setup tab provides a report of the individual disks in the module and provides information about them.
Table 12. Description of Items on the Disk Report
This Item Describes This
Disk Corresponds to the physical slot in the storage module.
Model The model of the disk.
Serial Number The serial number of the disk.
Class The class (type) of disk. The SSM uses SATA disks.
Capacity The data storage capacity of the disk.
Status Whether the disk is
• Active (on and participating in RAID).
• Uninitialized or Inactive (On but not participating in RAID).
• Off or Missing (Not on).
• DMA Off (disk unavailable due to faulty hardware or improperly seated)
80 Intel® Storage System Software User Manual

Storage
Verifying Disk Status
Check the Disk Setup window to verify that all the disks in the storage module are active and participating in RAID.
Any drive bays that do not contain disks are labeled “Off or Missing” in the Status column. Disks that have been inserted in the SSM but not yet added to RAID are labeled “Uninitialized” in the Status column.
Disk Setup Tab for the Intel® Storage System SSR316MJ2
For the Intel® Storage System SSR316MJ2, the drives are labeled 1 through 16 in the Disk Setup window and correspond with the disk drives from left to right when you are looking at the front of the Intel® Storage System SSR316MJ2, as shown in Figure 65. The physical drive bays are numbered from 0 through 15.
Figure 64. Viewing the Disk Setup Tab in the Intel® Storage System SSR316MJ2
Table 13. Relationship of Software Disk Display Numbering to Hardware Drive Bay Numbering in the Intel® Storage System SSR316MJ2
Disk Numbering in Disk Setup Tab
Drive Numbering on Physical System
Disk 1 Drive 0
Disk 2 Drive 1
Disk 3 Drive 2
Disk 4 Drive 3
through through
Disk 16 Drive 15
Intel® Storage System Software User Manual 81

Storage
Figure 65. Diagram of the Drive Bays in the Intel® Storage System SSR316MJ2
Disk Setup Tab for the Intel® Storage System SSR212MA
For the Intel® Storage System SSR212MA, the drives are labeled 1 through 12 in the Disk Setup window and correspond with the disk drives from left to right and top to bottom when you are looking at the front of the Intel® Storage System SSR212MA.
Figure 66. Viewing the Disk Setup Tab in an Intel® Storage System SSR212MA
Figure 67. Diagram of the Drive Bays in the Intel® Storage System SSR212MA
82 Intel® Storage System Software User Manual
Storage
Replacing a Disk
Prerequisites
Always power the drive off before removing and replacing a disk. See “Powering Drives Off” on page 87.
Replacing with New Or Used Disks
If you replace a failed disk with a new, or clean used, disk, the SSM automatically starts rebuilding RAID after you power the disk on. See “Powering Drives On” on page 87.
If you replace the failed disk with a used disk, a message prompts you to confirm that using the disk will remove any existing data from the disk. This safety feature ensures that data on a disk is not accidentally lost due to a RAID rebuild or configuration. After confirming that it is ok to use the used disk, you then must either power the disk on or add it to RAID.
Removing and Reinserting the Same Disk in an SSM
If you pull a disk from its drive bay, and then push it back into that same drive bay, • For RAID 1/10 or 5/50, you must first power on the disk on the Disk Setup tab, and
then select the disk and click Add to RAID.
Warning: Reconfiguring RAID destroys all the data on the disks.• For RAID 0 you must first power on the disk on the Disk Setup tab, and then select
the disk and click Add to RAID.
For information about the rate at which RAID rebuilds on disks added to RAID, see “Setting RAID Rebuild Rate” on page 74.
Replacing Disks in RAID 0
If you lose a disk in RAID 0, you will lose all of the data on the storage module. If RAID 0 is configured and you have achieved data redundancy by using volume replication within the cluster of storage modules, you must rebuild the storage module to recover those replicated volumes. See “Repairing a Storage Module” on page 217.
To make the storage module functional again, you must replace the disk and reconfigure RAID 0.1. Remove the storage module from the management group.
See “Removing an SSM from a Management Group” on page 184.2. Power off the drive.
See “Preparing Disks for Replacement” on page 86. 3. Replace the disk in the storage module.
Intel® Storage System Software User Manual 83

Storage
4. Power on the drive.5. Reconfigure RAID 0.
Replacing Disks in RAID 1/10 or RAID 5/50
To replace a disk in a SSM running RAID 1/10 or RAID 5/50:1. On the Disk Setup tab, select the old disk and click Power Off Disk.2. Replace the disk in the SSM. 3. On the Disk Setup tab, select the new disk and click Power On Disk. 4. When disk is powered on, select the disk and click Add to RAID.
Adding Disks to the SSM
If the SSM is configured for RAID 1 or RAID 10, you must add an even number of disks to include all the disks in the RAID configuration. See “Requirements for Reconfiguring RAID” on page 75.
If the SSM is configured for RAID 5 or RAID 50, you must add disks in complete sets, as follows
• Intel® Storage System SSR316MJ2 - 4 or 8 disks at a time• Intel® Storage System SSR212MA - 6 disks at a time
Diagrams of Disk Bays
Figure 68 and Figure 69 illustrate the placement of the drive bays in the Intel® Storage System SSR212MA and in the Intel® Storage System SSR316MJ2.
Figure 68. Diagram of the Drive Bays in the Intel® Storage System SSR212MA
84 Intel® Storage System Software User Manual

Storage
Figure 69. Diagram of the Drive Bays in the Intel® Storage System SSR316MJ2
Adding Disks and SSM Capacity
If you are using clustering, all SSMs in a cluster will operate at a capacity equal to that of the smallest capacity SSM. Adding capacity to all SSMs in the cluster will prevent stranded storage.
You cannot reduce the capacity of an SSM that is part of a management group. If you want to reduce the capacity of an SSM, first remove it from the management group. Then remove disks from the SSM and reconfigure RAID.
Note: You must add disk in contiguous disk bays, from left to right, and for the Intel® Storage System SSR212MA, from top to bottom, as shown in Figure 68 and Figure 69.
Memory Requirements for Adding Disks
Before you add disks to the SSM, confirm that the SSM has enough memory to use the additional disks. Table 14 summarizes the memory requirements by disk capacity of fully populated SSMs with RAID 0, RAID 1/10, and RAID 5/50 configurations. Contact your SSM supplier for additional memory.
Table 14. Memory Requirements for Fully Populated SSM
Intel® Storage System
SSR316MJ2 and Intel® Storage
System SSR212MA
Memory Requirement for 12 or 16 Disks (Fully Populated)
RAID Level For 250 GB Disks For 400 GB Disks
RAID 0 1 GB 2 GB
RAID 1 / 10 1 GB 1 GB
RAID 5 / 50 1 GB 2 GB
Intel® Storage System Software User Manual 85

Storage
Adding Disks
Prerequisite
Before you add disks to the SSM, be sure that the SSM has enough memory to use the additional disks. See “Memory Requirements for Adding Disks” on page 85.
Warning: Adding a disk to RAID deletes any existing data on that disk.1. Add the new disks to the SSM.
You must add disks in contiguous disk bays, from left to right and, for the Intel® Storage System SSR212MA, from top to bottom, as shown in Figure 68 and Figure 69.
2. Using the Console, log in to the SSM.3. Select the Storage configuration category. 4. Click the Disk Setup tab to bring it to the front.
The new disks will show a red X and be listed as Off.5. Select the new disks and click Power On Disk.
The disk status of the new disks becomes Uninitialized.6. Select the new disks and click Add Disk to RAID.
Shift-click to select multiple disks to add to RAID• pairs of disks to RAID 1/10 or • sets of 4 or 8 disks to RAID 5/50 [Intel® Storage System SSR316MJ2] or • sets of 6 disks [Intel® Storage System SSR212MA].
RAID begins to rebuild on the new disks according to the RAID Rebuild rate configured on the RAID Setup tab.As soon as the RAID Status shows Normal, the disks provide fully operational data redundancy with the mirror in place. The SSM is ready for data transfer at this point. The newly added disks display on the RAID Setup tab.
Preparing Disks for Replacement
When replacing disks in a storage module that is powered on, you must first prepare the disk using the Console before you physically remove the disk. Then you need to properly add the replacement disk into the storage module.
86 Intel® Storage System Software User Manual

Storage
Powering Drives On or Off in SSMs
Powering drives off is the first step of replacing disks in the Intel® Storage System SSR212MA and Intel® Storage System SSR316MJ2. A bad drive should be powered off from the Console before you remove it from the module.
Warning: Any time you must remove a disk, you must power it off from the Console before you physically remove it from the SSM, unless the SSM itself is powered off.
Powering Drives Off
1. Select the Storage configuration category. 2. Click the Disk Setup tab.3. Select the disk in the list to power off.
If the disk is on, all the columns are filled in. 4. Click Power Off Disk.
A confirmation message opens.5. Click OK.
Powering Drives On
When a new disk is inserted into an SSM that is on, the disk must be powered on. If the disk is not powered on, it is listed as Off or Missing in the Status column and the other columns display dotted lines, like this ---------.1. Select the disk in the list to power on. 2. Click Power On Disk.
A confirmation message opens.3. Click OK.
Adding Disks to RAID in SSMs
When a new disk is inserted into an SSM and powered on, it then needs to be added to RAID.1. Select the disk in the list to add to RAID.2. Click Add Disk to RAID.
RAID rebuilds on the system with the newly added drive.
Intel® Storage System Software User Manual 87

Storage
88 Intel® Storage System Software User Manual

4 Managing the Network
Managing the Network Overview
The storage module has two integrated TCP/IP network interfaces.In addition, the Intel® Storage System SSR316MJ2 can include three add-on cards, each with 2 or 4 interfaces. The Intel® Storage System SSR212MA can include one add-on card, with 2 or 4 interfaces. For each storage module you can
• Configure the TCP/IP interfaces• Set up and manage a DNS server• Manage the routing table• View and configure the TCP interface speed, duplex, and frame size• Update the list of managers running in the management group to which a storage
module belongs• Bond NICs to ensure continuous network access or to improve bandwidth
Note: Anytime you make a change to the network configuration, you must manually reconnect iSCSI sessions.
Getting There
1. On the Network View, double-click the storage module and log in.The Edit Configuration window opens.
2. Select TCP/IP Network from the configuration categories.The window opens with the TCP/IP tab on top, shown in Figure 70.
Figure 70. Viewing the Network Configuration
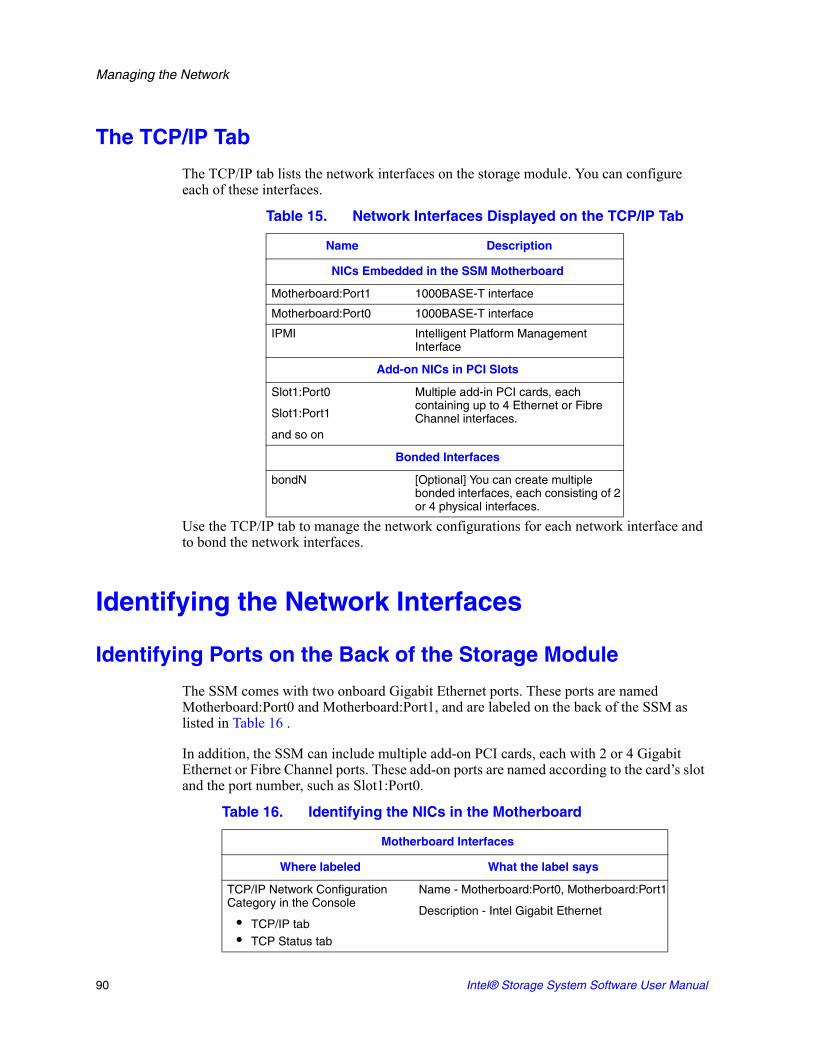
Managing the Network
The TCP/IP Tab
The TCP/IP tab lists the network interfaces on the storage module. You can configure each of these interfaces.
Use the TCP/IP tab to manage the network configurations for each network interface and to bond the network interfaces.
Identifying the Network Interfaces
Identifying Ports on the Back of the Storage Module
The SSM comes with two onboard Gigabit Ethernet ports. These ports are named Motherboard:Port0 and Motherboard:Port1, and are labeled on the back of the SSM as listed in Table 16 .
In addition, the SSM can include multiple add-on PCI cards, each with 2 or 4 Gigabit Ethernet or Fibre Channel ports. These add-on ports are named according to the card’s slot and the port number, such as Slot1:Port0.
Table 15. Network Interfaces Displayed on the TCP/IP Tab
Name Description
NICs Embedded in the SSM Motherboard
Motherboard:Port1 1000BASE-T interface
Motherboard:Port0 1000BASE-T interface
IPMI Intelligent Platform Management Interface
Add-on NICs in PCI Slots
Slot1:Port0
Slot1:Port1
and so on
Multiple add-in PCI cards, each containing up to 4 Ethernet or Fibre Channel interfaces.
Bonded Interfaces
bondN [Optional] You can create multiple bonded interfaces, each consisting of 2 or 4 physical interfaces.
Table 16. Identifying the NICs in the Motherboard
Motherboard Interfaces
Where labeled What the label says
TCP/IP Network Configuration Category in the Console
• TCP/IP tab• TCP Status tab
Name - Motherboard:Port0, Motherboard:Port1
Description - Intel Gigabit Ethernet
90 Intel® Storage System Software User Manual

Managing the Network
The motherboard interfaces are labeled NICs 1 and 2 on the back of the SSM. Figure 71 illustrates the SSR316MJ2. Figure 72 illustrates the Intel® Storage System SSR212MA. The PCI slots for add-on interfaces are located to the right of the motherboard ports.
Figure 71. Network Interface Ports and Open PCI Slots on the Back of the Intel® Storage System SSR316MJ2
Configuration Interface Name Motherboard:Port1
Motherboard:Port0
Label on the back of the SSM NICs 1 & 2
Table 17. Identifying Add-on NICs
Add-on Interfaces
Where labeled What the label says
TCP/IP Network Configuration Category in the Console
• TCP/IP tab
• TCP Status tab
Name - Slot1:Port0, Slot1:Port1, and so on
Description - Intel Gigabit Ethernet
Configuration Interface Name Slot1:Port0
Slot1:Port1
and so on
Label on the back of the SSM Port A
Port B
Port C
Port D
Table 16. Identifying the NICs in the Motherboard
Motherboard Interfaces
Motherboard Port 0 32-bit PCI Slots
Motherboard Port 1 64-bit PCI Slot
Intel® Storage System Software User Manual 91

Managing the Network
Figure 72. Network Interface Ports and Open PCI Slot on the Back of the Intel® Storage System SSR212MA
Adding Interfaces to PCI Slots
You can add interface cards to the PCI slots located to the right of the motherboard NIC ports on the back of the SSM. These interface cards can contain Ethernet or Fibre Channel ports. The Intel® Storage System SSR212MA does not have support for Fibre Channel.
The Intel® Storage System SSR316MJ2 contains one open 64-bit / 66 MHz PCI slot and two open 32-bit / 33 MHz PCI slots. The other three covered slots are occupied by Serial ATA cards.
• The 64-bit PCI slot can hold a quad (4-port) card.• The 32-bit slots can hold dual (2-port) cards.
To distribute bandwidth and to ensure fault tolerance, connect to ports across more than one PCI slot. For example, connect to the first port in the first (64-bit) PCI slot. Then connect to the next port in the second (32-bit) slot, and connect to the third port in the third (32-bit) slot. Connect to the fourth port in the first slot, and so on. The figure below shows the optimal configuration of add-on ports.
32-bit PCI Slot Motherboard Port 1 Motherboard Port 2
92 Intel® Storage System Software User Manual

Managing the Network
Figure 73. Distributing Bandwidth and Ensuring Fault Tolerance of Add-on Ports Across PCI Slots
Note: When adding more than one port to the SSM, you can distribute bandwidth and to ensure fault tolerance by distributing the ports across more than one PCI slot. Start with the first (64-bit) slot.
The Intel® Storage System SSR212MA contains one open 32-bit / 66 MHz PCI slot. This open 32-bit slot can hold a dual (2-port) or a quad (4-port) NIC card. The other two covered slots are occupied by SATA RAID controller cards.
Adding Fibre Channel Ports [SSR316MJ2]
When you add a card containing Fibre Channel ports to a PCI slot, the Fibre Channel ports do not display on the TCP/IP tab of the Network configuration window.
You can view the status of the Fibre Channel ports and the unique World Wide Name (WWN) of each port in the Passive Report.1. Select Reporting from the configuration categories.
The Reporting window opens.2. Click Refresh to display statistics on the Passive tab.
1 2 3
4 5 6
Add port to64-bit slot first
64-bit66MHz
32-bit33 MHz
32-bit33 MHz
Intel® Storage System Software User Manual 93

Managing the Network
3. Scroll down to the Fibre Channel statistics.— The Node WWN is the same for all ports in a management group.— The Port WWN is unique for each port.
Figure 74. Viewing the WWN of a Fibre Channel Port
Configuring the IP Address Manually
Use the TCP/IP Network category in the edit configuration window to configure the IP address for an interface.
Note: Any time you change an IP address of a storage module that is running a manager, the volumes on the storage module may become inaccessible to hosts configured to access the volume. You must reconfigure all hosts that are using that IP address.1. Select TCP/IP Network from the edit configuration categories.
The window opens with the TCP/IP tab on top.2. On the TCP/IP tab, select the interface from the list for which you want to configure
or change the IP address.
Port WWN is unique foreach Fibre Channel port.
Node WWN is the same for
all ports in the management
group.
94 Intel® Storage System Software User Manual

Managing the Network
3. Click Edit.The Edit TCP/IP Configuration window opens, shown in Figure 75.
Figure 75. Configuring the IP Address Manually
4. Select IP Address and complete the fields for IP Address, Subnet mask, and Default gateway.
5. Click OK. A confirmation message opens.
6. Click OK. A message notifying you of an automatic log out opens.
7. Click OK.
The automatic log out occurs.
Note: Wait a few moments for the IP address change to take effect.8. Log in to the newly addressed storage module.
If you are changing the IP address of a storage module which is a manager in a management group, a window opens which displays all the IP addresses of the managers in the management group and a reminder to reconfigure the application servers that are affected by the change.
Using DHCP
A DHCP server becomes a single point of failure in your system configuration. If the DHCP server goes down, then IP addresses may be lost.
Warning: If you use DHCP, be sure to reserve statically assigned IP addresses for all storage modules on the DHCP server. This is required because management groups use unicast communication.1. Select from the list the interface you want to configure for use with DHCP.2. Click Edit.
Intel® Storage System Software User Manual 95

Managing the Network
The Edit TCP/IP Configuration window opens, shown in Figure 75.3. Select Obtain an address automatically using the DHCP/BOOTP protocol.4. Click OK.
Configuring NIC Bonding
Network interface bonding provides high availability, fault tolerance, and/or bandwidth aggregation for the network interface cards in the storage module. Bonds are created by “bonding” NICs into a single logical interface. This logical interface acts as the “master” interface, controlling and monitoring the physical “slave” interfaces.
Bonding two interfaces for failover provides fault tolerance at the local hardware level for network communication. Failures of NICs, Ethernet cables, individual switch ports, and/or entire switches can be tolerated while maintaining data availability. Bonding two interfaces for aggregation provides bandwidth aggregation and localized fault tolerance.
Depending on your storage module hardware, network infrastructure design and Ethernet switch capabilities, you can bond NICs in one of three ways:
• Active Backup. You specify a preferred NIC for the bonded logical interface to use. If the preferred NIC fails, then the logical interface begins using another NIC in the bond until the preferred NIC resumes operation. When the preferred NIC resumes operation, data transfer resumes on the preferred NIC.
• NIC Aggregation. The logical interface uses both NICs simultaneously for data transfer. This configuration increases network bandwidth, and if one NIC fails, the other continues operating normally. NIC aggregation cannot be used on the 100.
• Adaptive Load Balancing. Adaptive Load Balancing (ALB), also known as asymmetric port aggregation, is a method of ensuring more throughput and transparent backup connections by using multiple network connections and balancing the data transmissions across them. ALB dynamically manages the NIC bond and evenly distributes the load among the network connections. It also delivers fault tolerance benefits; if one link fails, the other link continues to ensure network connectivity.
Warning: NIC aggregation requires plugging both NICs into the same switch. This bonding method does not protect against switch failure.
You can create bonds of 2 or 4 NICs. A NIC can only be in one bond.
Best Practices
NIC aggregation provides bandwidth gains because data is transferred over both NICs simultaneously. For NIC aggregation, both NICs must be plugged into the same switch, and that switch must be LACP-capable and support 802.3ad aggregation. Because both NICs are plugged into the same switch, NIC aggregation does not protect against switch failure.
96 Intel® Storage System Software User Manual

Managing the Network
For active backup, plug the two NICs on the storage module into separate switches. While NIC aggregation will only survive a port failure, active backup will survive a switch failure.
NIC Bonding and Speed, Duplex, and Frame Size Settings
These settings are controlled on the TCP Status tab of the TCP/IP Network configuration category. If you change these settings, you must ensure that BOTH sides of the NIC cable are configured in the same manner. For example, if the storage module is set for Auto/Auto, the switch must be set the same. See “The TCP Status Tab” on page 111 for more information.
Allocate a static IP address for the logical bond interface. You cannot use DAHCP for the bond IP.
How Active Backup Works
Bonding NICs for active backup allows you to specify a preferred interface that will be used for data transfer. This is the active interface. The other interface acts as a backup, and its status is “Passive (Ready).”
Physical and Logical Interfaces
The NICs in the SSM are labeled Motherboard:PortN and SlotN:PortN (where N is a number), depending on whether the NIC is located in the motherboard or in a PCI slot.
If 2 or 4 physical interfaces are bonded, the logical interface is labeled bondN and acts as the master interface. As the master interface, bondN controls and monitors the two physical slave interfaces.
Table 18. Comparison of Active Backup and NIC Aggregation Bonding
Feature Active Backup NIC Aggregation
Bandwidth Use of 1 NIC at a time provides normal bandwidth.
Simultaneous use of both NICs increases bandwidth.
Protection during port failure
Yes Yes
Protection during switch failure
Yes (NICs are plugged into separate switches)
No (Both NICs are plugged into the same switch)
Requires support for 802.3ad link aggregation
No Yes
Intel® Storage System Software User Manual 97

Managing the Network
The logical master bond interface monitors each physical slave interface to determine if its link to the device to which it is connected, such as a router, switch, or repeater, is up. As long as the interface link remains up, the interface status is preserved.
If the active NIC fails, or if its link is broken due to a cable failure or a failure in a local device to which the NIC cable is connected, then the status of the NIC becomes Passive (Failed) and the other NIC in the bond, if it has a status of Passive (Ready), becomes active.
This configuration remains until the failed preferred interface is brought back online. When the failed interface is brought back online, it becomes Active. The other NIC returns to the Passive (Ready) state.
Requirements for Active Backup
To configure active backup:• Both NICs should be enabled.• NICs should be connected to separate switches.
Which Physical Interface is Preferred
A preferred interface is an interface within an active backup bond that is used for data transfer during normal operation. When you create an active backup bond, one of the interfaces becomes the preferred interface in the bond. You can change the preferred setting after creating the bond. See “Creating a NIC Bond” on page 103.
Table 19. Bonded Network Interfaces
Interface Name Description
bond0 Logical Interface acting as master.
Motherboard:Port0 Physical interface in the motherboard. This interface acts as a slave.
Slot1:Port0 Physical interface in a PCI slot. This interface acts as a slave.
Table 20. Description of NIC Status in an Active Backup Configuration
If the NIC Status is The NIC is
Active Currently enabled and in use
Passive (Ready) Slave to a bond and available for failover
Passive (Failed) Slave to a bond and no longer has a link
98 Intel® Storage System Software User Manual

Managing the Network
Which Physical Interface is Active
When the active backup bond is created, if both NICs are plugged in, the preferred interface becomes the active interface. The other interface is Passive (Ready).
For example, suppose you create an active backup bond consisting of 2 NICs: Motherboard:Port0 and Slot1:Port0. If Motherboard:Port0 is the preferred interface, it will be active and Slot1:Port0 will be Passive (Ready). Then, if Motherboard:Port0 fails, Slot1:Port0 changes from Passive (Ready) to active. Motherboard:Port0 changes to Passive (Failed).
Once the link is fixed and Motherboard:Port0 is operational, there is a 30 second delay and then Motherboard:Port0 becomes the active interface. Slot1:Port0 returns to the Passive (Ready) state.
Note: When the preferred interface comes back up, there is a 30 second delay before it becomes active.
Summary of NIC Status During Failover
Table 22 shows the states of Motherboard:Port0and Slot1:Port0when configured for Active Backup.
Table 21. Example Active Backup Failover Scenario and Corresponding NIC Status
Example Failover Scenario NIC Status
1. Active backup bond0 is created. The active (preferred) interface isMotherboard:Port0.
• Bond0 is the master logical interface.
• Motherboard:Port0is Active.
• Slot1:Port0is connected and is Passive (Ready).
2. Active interface fails. Bond0 detects the failure and Slot1:Port0takes over.
• Motherboard:Port0status becomes Passive (Failed).
• Slot1:Port0status changes to Active.
3. The Motherboard:Port0link is restored. • Motherboard:Port0status changes to Active after a 30 second delay.
• Slot1:Port0 status changes to Passive Ready).
Table 22. NIC Status During Failover with Active Backup
Failover Status Status of Motherboard: Port0 Status of Slot1: Port0
Normal Operation Preferred: Yes
Status: Active
Data Transfer: Yes
Preferred: No
Status: Passive (Ready)
Data Transfer: No
Intel® Storage System Software User Manual 99
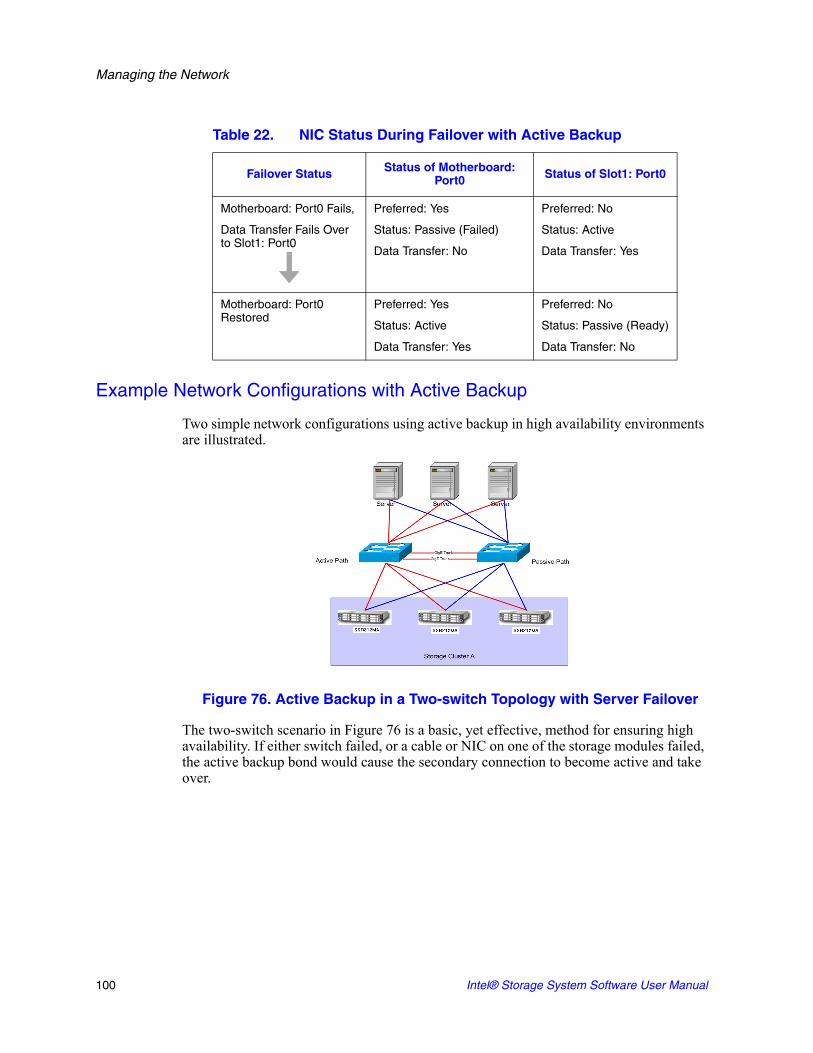
Managing the Network
Example Network Configurations with Active Backup
Two simple network configurations using active backup in high availability environments are illustrated.
Figure 76. Active Backup in a Two-switch Topology with Server Failover
The two-switch scenario in Figure 76 is a basic, yet effective, method for ensuring high availability. If either switch failed, or a cable or NIC on one of the storage modules failed, the active backup bond would cause the secondary connection to become active and take over.
Motherboard: Port0 Fails,
Data Transfer Fails Over to Slot1: Port0
Preferred: Yes
Status: Passive (Failed)
Data Transfer: No
Preferred: No
Status: Active
Data Transfer: Yes
Motherboard: Port0 Restored
Preferred: Yes
Status: Active
Data Transfer: Yes
Preferred: No
Status: Passive (Ready)
Data Transfer: No
Table 22. NIC Status During Failover with Active Backup
Failover Status Status of Motherboard: Port0 Status of Slot1: Port0
100 Intel® Storage System Software User Manual

Managing the Network
Figure 77. Active Backup Failover in a Four-switch Topology
Figure 77 illustrates the active backup configuration in a four-switch topology.
How NIC Aggregation Works
NIC aggregation allows the storage module to use both interfaces simultaneously for data transfer. Both interfaces have an active status. If the interface link to one NIC goes down, the other interface continues operating. Using both NICs also increases network bandwidth.
Requirements for NIC Aggregation
To configure NIC aggregation:• Both NICs should be enabled.• NICs must be configured to the same subnet.• NICs must be connected to a single switch that is LACP-capable and supports
802.3ad link aggregation. If the storage module is directly connected to a server, then the server must support 802.3ad link aggregation.
Which Physical Interface is Preferred
Because the logical interface uses both NICs simultaneously for data transfer, neither of the NICs in an aggregation bond are designated as preferred.
PassiveActive
Intel® Storage System Software User Manual 101

Managing the Network
Which Physical Interface is Active
When the NIC aggregation bond is created, if both NICs are plugged in, both interfaces are active. If one interface fails, the other interface continues operating. For example, suppose Motherboard:Port0 and Slot1:Port0 are bonded in a NIC Aggregation bond. If Motherboard:Port0fails, then Slot1:Port0 remains active.
Once the link is fixed and Motherboard:Port0is operational, it becomes active again. Slot1:Port0 remains active.
Summary of NIC States During Failover
Table 24 shows the states of Motherboard:Port0 and Slot1:Port0 when configured for NIC aggregation.
Table 23. NIC Aggregation Failover Scenario and Corresponding NIC Status
Example Failover Scenario NIC Status
1. NIC aggregation bond0 is created. Motherboard:Port0 and Slot1:Port0 are both active.
• Bond0 is the master logical interface.
• Motherboard:Port0 is Active.
• Slot1:Port0 is Active.
2. Motherboard:Port0 interface fails. Because NIC aggregation is configured, Slot1:Port0 continues operating.
• Motherboard:Port0 status becomes Passive (Failed).
• Slot1:Port0 status remains Active.
3. Motherboard:Port0 link failure is repaired.
• Motherboard:Port0 resumes Active status.
• Slot1:Port0 remains Active.
Table 24. NIC Status During Failover with NIC Aggregation
Failover Status Status of Motherboard: Port0 Status of Slot1: Port0
Normal Operation Preferred: No
Status: Active
Data Transfer: Yes
Preferred: No
Status: Active
Data Transfer: Yes
Motherboard: Port0 Fails,
Data Transfer Continues on Slot1: Port0
Preferred: No
Status: Passive (Failed)
Data Transfer: No
Preferred: No
Status: Active
Data Transfer: Yes
Motherboard: Port0 Restored
Preferred: No
Status: Active
Data Transfer: Yes
Preferred: No
Status: Active
Data Transfer: Yes
102 Intel® Storage System Software User Manual

Managing the Network
Example Network Configurations with NIC Aggregation
A simple network configuration using NIC aggregation in a high availability environment is illustrated.
Figure 78. NIC Aggregation in a Single-switch Topology
Creating a NIC Bond
Follow these guidelines when creating NIC bonds:• Create bonds of 2 or 4 interfaces. • You can create more than one bond on an SSM.• An interface can only be in one bond.• To provide failover capability in the event of a PCI card failure, you should bond
interfaces that are located in the motherboard with interfaces that are in PCI slots. This ensures that if an entire PCI card fails, then the bonded interface will use an interface in the motherboard to continue operating.
• Record the configuration information of each interface before you create the bond. Then, if you delete the bond, you can return to the original configuration if desired. — When you delete an active backup bond, the preferred interface assumes the IP
address and configuration of the deleted logical interface.— When you delete a NIC aggregation bond, one of the interfaces retains the IP
address of the deleted logical interface. The IP address of the other interface is set to 0.0.0.0.
• Create a bond on an storage module before you add the storage module to a management group.
Intel® Storage System Software User Manual 103

Managing the Network
• Ensure that the bond has a static IP address for the logical bond interface. The default values for the IP address, subnet/mask and default gateway are those of one of the physical interfaces.
• Verify on the Communication tab that the Storage System Software interface is communicating with the bonded interface.
Warning: To ensure that the bond works correctly, you should configure it as follows:- Create the bond on the storage module before you add it to a management group.- Verify that the bond is created.If you create the bond on the storage module after it is in a management group, and if it does not work correctly, you might- lose the storage module from the network.- lose quorum in the management group for a while.See the chapter “Using the Configuration Interface” for information about deleting NIC bonds through the Configuration Interface.
Creating the Bond
1. Ensure that the storage module is not in a management group.2. Log in to the storage module.3. On the TCP/IP tab, shown in Figure 79, select 2 or 4 NICs to bond.
The NICs that you select do not have to be consecutive NICs in the list.
Figure 79. Selecting Motherboard:Port0 and Slot1:Port0 for a New Bond
104 Intel® Storage System Software User Manual

Managing the Network
4. Click New Bond.The Create Bond Configuration window opens, shown in Figure 80.
Figure 80. Creating a NIC Bond
5. Select a bond type from the list.6. Enter an IP address for the bond.7. Enter the Subnet mask. 8. [Optional] Enter the default gateway.9. Click OK.
A confirmation message opens.
10. Click OK to confirm the TCP/IP changes.A message opens, shown in Figure 81, prompting you to search for the bonded storage module on the network.
Figure 81. Searching for the Bonded Storage Module on the Network
Intel® Storage System Software User Manual 105

Managing the Network
11. Search for the storage module by Host Name or IP address, or by Subnet/mask.
Note: Because it can take a few minutes for the storage module to reinitialize, the search may fail the first time. If the search fails, wait a minute or two and choose Try Again on the Network Search Failed message.
12. Verify the new bond interface.The TCP/IP tab displays the new list of interfaces, as shown in Figure 82.
Figure 82. Viewing a New Active Backup Bond
The bond interface shows as “bond0” and has a static IP address. The two physical NICs now show up as slaves in the Mode column.
13. [Optional, for active backup bonds only] To change which interface is the preferred interface in an active backup bond, on the TCP Status tab select one of the NICs in the bond and click Set Preferred.
Bonded logical network interface.
Physical interfaces shown as slaves.
106 Intel® Storage System Software User Manual

Managing the Network
Verify Communication Setting for New Bond
1. Select the Communication tab, shown in Figure 83.
Figure 83. Verifying Interface Used for Storage System Software Communication
2. Verify that the Storage System Software communication port is correct.
Viewing the Status of a NIC Bond
You can view the status of the interfaces on the TCP Status tab. Notice that in the active backup bond, one of the NICs is the preferred NIC. In both the NIC aggregation bond, neither physical interface is preferred.
Figure 84 shows the status of interfaces in an active backup bond. Figure 85 shows the status of interfaces in a NIC aggregation bond.
Figure 84. Viewing the Status of an Active Backup Bond
Preferred interface.
Intel® Storage System Software User Manual 107

Managing the Network
Figure 85. Viewing the Status of a NIC Aggregation Bond
Note: If the bonded NIC experiences rapid, sequential Ethernet failures, the Console may display the storage module as failed (flashing red) and access to data on that storage module fails. However, as soon as the Ethernet connection is reestablished, the storage module and the Console display the correct information.
Deleting a NIC Bond
When you delete an active backup bond, the preferred interface assumes the IP address and configuration of the deleted logical interface. All other interfaces are disabled and the IP addresses are set to 0.0.0.0.
When you delete either a NIC aggregation bond, one of the active interfaces in the bond retains the IP address of the deleted logical interface. All other interfaces are disabled and the IP addresses are set to 0.0.0.0.1. On the TCP/IP tab, select the bond that you want to delete.
Neither interface is preferred.
108 Intel® Storage System Software User Manual

Managing the Network
2. Click Delete Bond.Because the IP addresses change, the Search Network window opens.
Figure 86. Searching for the Unbonded Storage Module on the Network
3. Search for the storage module by Host Name or IP Address or Subnet/Mask.
Note: Because it can take a few minutes for the storage module to reinitialize, the search may fail the first time. If the search fails, wait a minute or two and choose Try Again on the Network Search Failed message.
Verify Communication Setting After Deleting a Bond
1. Select the Communication tab, shown in Figure 83.
Figure 87. Verifying Interface Used for Storage System Software Communication
2. Verify that the Storage System Software communication port is correct.
Intel® Storage System Software User Manual 109

Managing the Network
Disabling a Network Interface
You can disable the network interfaces on the storage module.• You can only disable top-level interfaces. This includes bonded interfaces and NICs
that are not part of bonded interfaces.• To ensure that you always have access to the storage module, do not disable the last
interface. If you want to disable the last interface, first enable another interface.
Warning: If you disable an interface, be sure you enable another interface first. That way you always have access to the storage module. If you disable all the interfaces, you must reconfigure at least one interface using the Configuration Interface to access the storage module. See “Configuring a Network Connection” on page 308.
Disabling a Network Interface
1. Select from the list on the TCP/IP window the interface to disable.2. Click Edit.
The Edit TCP/IP Configuration window opens, shown in Figure 75.3. Click Disable Interface.4. Click OK.
A confirmation message opens. If you are disabling the only interface, the message warns that the storage module may be inaccessible if you continue.
5. Click OK.
If the Storage Module is in a Management Group
If the storage module for which you are disabling the interface is a manager in a management group, a window opens which displays all the IP addresses of the managers in the management group and a reminder to reconfigure the application servers that are affected by the update.
Configuring a Disabled Interface
If one interface is still connected to the storage module but another interface is disconnected, you can reconnect to the second interface using the Console. See “Configuring the IP Address Manually” on page 94.
If both interfaces to the storage module are disconnected, you must attach a terminal, or PC or laptop to the storage module with a null modem cable and configure at least one interface using the Configuration Interface. See ‘Using the Configuration Interface,” on page 305.
110 Intel® Storage System Software User Manual

Managing the Network
TCP Status
Review the status of the TCP interfaces. Change the speed and duplex method of an interface.
The TCP Status Tab
Review the status of the network interfaces on the TCP Status tab, shown in Figure 88.
Figure 88. Viewing the TCP Status
Table 25. Status Of and Information About Network Interfaces
Column Description
Name Name of the interface. Entries are
• Motherboard:Port0• Motherboard:Port1
• Slot1:Port0bond0 - the bonded interface(s) [displays only if storage module configured for bonding]
Description Describes each interface listed. For example, the bond0 is the Logical Failover Device.
Speed/Method Lists the actual operating speed reported by the device.
Duplex/Method Lists duplex as reported by the device.
Status Describes the state of the interface. See Table 20 for a detailed description of individual NIC status.
Frame Size Lists the frame size setting for the device.
Preferred [For active backup bonds] Indicates whether the device is set as preferred. The preferred interface is the interface within an active backup bond that is used for data transfer during normal operation.
Intel® Storage System Software User Manual 111

Managing the Network
Editing the TCP Speed and Duplex
Change the speed and duplex of the 1000BASE-T TCP interfaces.
Requirements
• If you change these settings, you must ensure that BOTH sides of the NIC cable are configured in the same manner. For example, if the storage module is set for Auto/Auto, the switch must be set the same.
• If you edit the speed or duplex on a disabled or failed NIC, the new setting will not be applied until the NIC is enabled or connectivity is restored.
Best Practice
Change the speed and duplex settings while the storage module is in the Available mode and not in a management group.
1. On the TCP Status tab, select the interface you want to edit.2. Click Edit.
The Edit Speed and Duplex window opens, shown in Figure 89.
Figure 89. Editing TCP Speed, Duplex, and Frame Size
3. Select the combination of speed and duplex that you want.
Table 26. Setting Storage Module Speed and Duplex Settings
Storage Module Setting Speed/Duplex
Switch SettingSpeed/Duplex
Auto/Auto Auto/Auto
1000/Full 1000/Full
100/Full 100/Full
100/Half 100/Half
10/Full 10/Full
10/Half 10/Half
112 Intel® Storage System Software User Manual

Managing the Network
4. Click OK.A series of status messages display. Then the changed setting displays in the TCP status report.
Note: You can also use the Configuration Interface to edit the TCP speed and duplex. See “Setting the TCP Speed, Duplex, and Frame Size” on page 310.
Editing the NIC Frame Size
The frame size specifies the size of data packets that are transferred over the network. The default Ethernet standard frame size is 1500 bytes. The maximum allowed frame size is 9000 bytes.
Increasing the frame size improves data transfer speed by allowing larger packets to be transferred over the network and by decreasing the CPU processing time required to transfer data. However, increasing the frame size requires that routers, switches, and other devices on your network support that frame size.
Note: Increasing the frame size can cause decreased performance and other network problems if routers, switches, or other devices on your network do not support frame sizes greater than 1500 bytes. If you are unsure about whether your routers and other devices support larger frame sizes, keep the frame size at the default setting.
Note: If you edit the frame size on a disabled or failed NIC, the new setting will not be applied until the NIC is enabled or connectivity is restored.
Best Practice
To avoid potential connectivity and performance problems with other devices on your network, keep the frame size at the default setting. If you decide to change the frame size, set the same frame size on all storage modules on the network, and set compatible frame sizes on all clients.
The frame size on the storage module should correspond to the frame size on Windows and Linux application servers. Table 27 shows recommended storage module frame sizes and the corresponding frame sizes in bytes for Windows and Linux clients.
Table 27. Setting Corresponding Frame Sizes in Bytes on Storage Modules and Windows* or Linux Clients
Storage Module Frame Size
Windows Client Frame Size
Linux Client Frame Size
1500 (Default) 1542 (Default) 1500 (Default)
4046 4088 4046
8972 9014 8972
Intel® Storage System Software User Manual 113

Managing the Network
Frame sizes greater than 1500 bytes, called jumbo frames, can co-exist with 1500 byte frames on the same subnet if the following conditions are met:
• Every device downstream of the storage module on the subnet must support jumbo frames.
• If you are using 802.1q virtual LANs, jumbo frames and non-jumbo frames must be segregated into separate VLANs.
Best Practice
Change the speed and duplex settings while the storage module is in the Available mode and not in a management group.
Note: The frame size for a bonded logical interface must be equal to the frame size of the NICs in the bond.
Editing the Frame Size
To edit the frame size:1. On the TCP Status tab, select the interface you want to edit.2. Click Edit.
The Edit Speed, Duplex, and Frame Size window opens, shown in Figure 90.
Figure 90. Editing TCP speed, duplex, and frame size
3. Select Set To in the Frame Size section.4. Enter a value between 1500 and 9000 bytes in the Set To field.5. Click OK.
A series of status messages display. Then the changed setting displays in the TCP status report.
Note: You can also use the Configuration Interface to edit the frame size. See “Setting the TCP Speed, Duplex, and Frame Size” on page 310.
114 Intel® Storage System Software User Manual
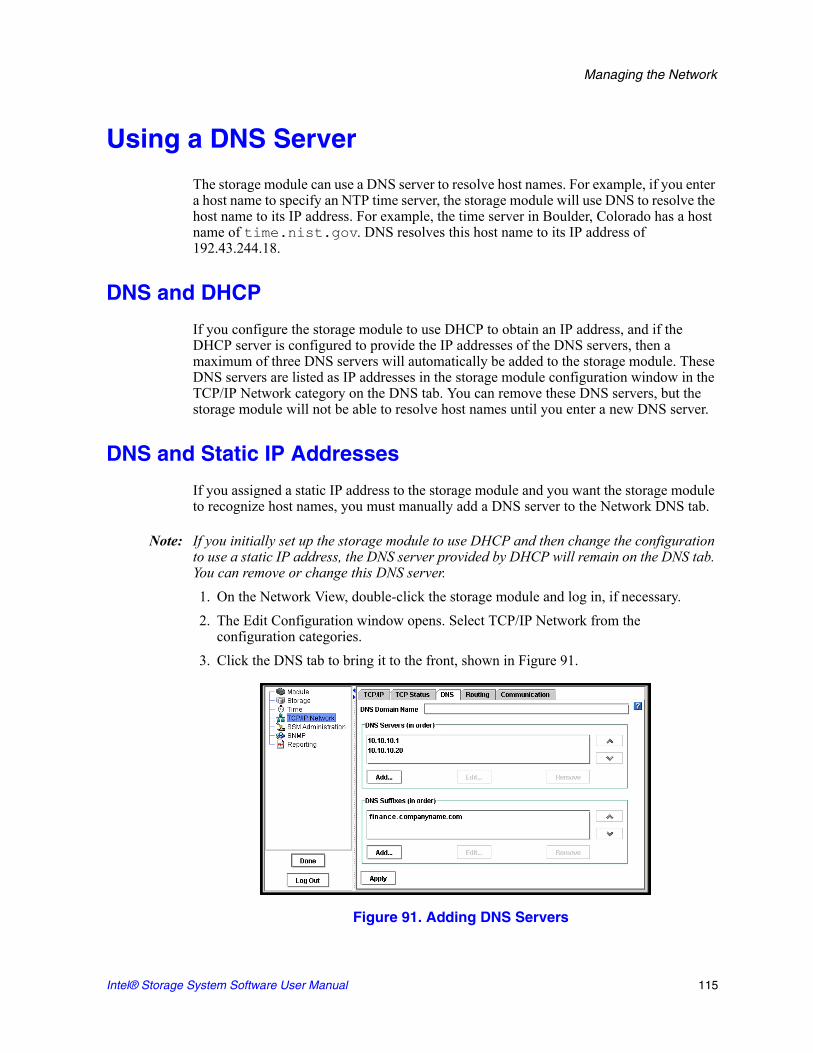
Managing the Network
Using a DNS Server
The storage module can use a DNS server to resolve host names. For example, if you enter a host name to specify an NTP time server, the storage module will use DNS to resolve the host name to its IP address. For example, the time server in Boulder, Colorado has a host name of time.nist.gov. DNS resolves this host name to its IP address of 192.43.244.18.
DNS and DHCP
If you configure the storage module to use DHCP to obtain an IP address, and if the DHCP server is configured to provide the IP addresses of the DNS servers, then a maximum of three DNS servers will automatically be added to the storage module. These DNS servers are listed as IP addresses in the storage module configuration window in the TCP/IP Network category on the DNS tab. You can remove these DNS servers, but the storage module will not be able to resolve host names until you enter a new DNS server.
DNS and Static IP Addresses
If you assigned a static IP address to the storage module and you want the storage module to recognize host names, you must manually add a DNS server to the Network DNS tab.
Note: If you initially set up the storage module to use DHCP and then change the configuration to use a static IP address, the DNS server provided by DHCP will remain on the DNS tab. You can remove or change this DNS server.1. On the Network View, double-click the storage module and log in, if necessary.2. The Edit Configuration window opens. Select TCP/IP Network from the
configuration categories.3. Click the DNS tab to bring it to the front, shown in Figure 91.
Figure 91. Adding DNS Servers
Intel® Storage System Software User Manual 115

Managing the Network
Adding the DNS Domain Name
Add the name of the DNS domain in which the storage module resides.1. On the DNS tab, type the DNS domain name.2. Click Apply when you are finished.
Adding a DNS Server
Add up to three DNS servers for use with the storage module. 1. Click Add in the DNS Server panel.
The Add IP Address dialog opens.2. Type the IP address for the DNS server.3. Click OK.4. Repeat steps 1 through 3 to add up to three servers.
5. Use the arrows on the DNS Server panel to order the servers. The servers will be accessed in the order they appear in the list.
6. Click Apply when you are finished.
Adding Domain Names to the DNS Suffixes
Add up to six domain names to the DNS suffix list (also known as the look up zone). The storage module searches the suffixes first and then uses the DNS server to resolve host names.1. Click Add in the DNS Suffixes panel.
The Add DNS Suffix window opens.2. Type the DNS suffix name. Use the domain name format.3. Click OK.4. Repeat steps 1 through 3 to add up to six domain names.5. Click Apply when you are finished.
Editing a DNS Server
Change the IP address for a DNS Server in the list.1. Select the server to edit.2. Click Edit.
The Edit IP Address window opens.3. Type the new IP address for the DNS server.
116 Intel® Storage System Software User Manual

Managing the Network
4. Click OK.5. Click Apply when you are finished.
Editing a Domain Name in the DNS Suffixes List
Change a domain name in the DNS Suffixes list.1. Select the domain name to edit.2. Click Edit.
The Edit DNS Suffix window opens.3. Enter the change to the domain name.4. Click OK.5. Click Apply when you are finished.
Removing a DNS Server
Remove a DNS server from the list.1. Select the server you want to remove from the DNS Servers list.2. Click Remove.
A confirmation message opens.3. Click OK to remove the DNS server from the list. 4. Click Apply when you are finished.
Removing a Domain Name from the DNS Suffixes List
1. Select the domain name you want to remove from the DNS Suffixes list.2. Click Remove.
A confirmation message opens.3. Click OK to remove the domain name from the list. 4. Click Apply when you are finished.
Intel® Storage System Software User Manual 117

Managing the Network
Routing Overview
The Routing tab displays the routing table. You can specify static routes and/or a default route. If you specify a default route here, it will not survive a reboot or shut down of the storage module. To create a route that will survive a storage module reboot or shut down, you must enter a default gateway on the TCP/IP tab. See “Configuring the IP Address Manually” on page 94.
Information for each route listed includes the device, the network, gateway, and mask, and flags.
Adding Routing Information
1. On the Network View, double-click the storage module and log in, if necessary.2. The Edit Configuration window opens. Select TCP/IP Network from the
configuration categories.
3. Click the Routing tab to bring it to the front, shown in Figure 92.
Figure 92. Adding Network Routing Information
4. Click Add.The Add Routing Information dialog opens, shown in Figure 93.
Figure 93. Adding Routing Information
5. Select the port to use for routing in the Device list.
118 Intel® Storage System Software User Manual

Managing the Network
6. Type the IP address portion of the network address in the Net field.7. Type the IP address of the router in the Gateway field.8. Select the netmask.9. Click OK.
10. Use the arrows on the routing table panel to order devices according to the needs of your network.The storage module will attempt to use the routes in the order in which they are listed.
11. Click Apply when you are finished.
Editing Routing Information
You can only edit optional routes you have added.1. On the routing tab, select the information you want to change.2. Click Edit.
The Edit Routing Information dialog opens, shown in Figure 94.
Figure 94. Editing Routing Information
3. Change the relevant information.4. Click OK.5. Click Apply.
Deleting Routing Information
You can only delete optional routes you have added.1. On the Routing tab, select the information you want to delete.2. Click Delete.
A confirmation message opens.3. Click OK.4. Click Apply when you are finished.
Intel® Storage System Software User Manual 119

Managing the Network
Configuring a Direct Connection Between the SSM and an EBSD Host
If you want to configure a direct (point-to-point) connection between the SSM and the EBSD host computer, you must specify the route to be used for communication between the SSM and the EBSD host. 1. On the TCP/IP tab, edit the Ethernet port to be used for communication as shown
below.
2. On the Routing tab, add a route for communication with the EBSD host.
3. On the EBSD host computer, use the command line to configure the host computer’s Ethernet interface as follows:
Table 28. SSM Network Interface Settings
SSM Network Interface Setting Value
IP Address The IP address of the SSM
Subnet Mask The same subnet as the EBSD host
Default Gateway The IP address of the SSM
Table 29. SSM Route Settings
SSM Route Setting Value
Device The network interface you configured in step 1
Net The IP address of the EBSD host.
Gateway The IP address of the SSM
Netmask 255.255.255.255
Table 30. EBSD Host Network Interface Settings
EBSD Host Network Interface Setting Value
IP Address The IP address of the EBSD host
Subnet Mask The same subnet as the SSM
Default Gateway The IP address of the SSM
120 Intel® Storage System Software User Manual

Managing the Network
4. On the EBSD host computer, use the command line to add a route to communicate with the SSM.
Note: If the network interfaces on the SSM and the EBSD host are both 10/100 NICs, then you must use crossover connection cables.
Configuring Storage Module Communication
Use the Communication tab to configure the network interface used by the storage module to communicate with other storage modules on the network and to update the list of managers that the storage module can communicate with.
Figure 95. Selecting the Storage System Software Network Interface and Updating the List of Managers
Table 31. EBSD Host Route Settings
EBSD Host Route Setting Value
Device The network interface you configured in step
Net The IP address of the SSM
Gateway The IP address of the SSM
Netmask 0.0.0.0
Intel® Storage System Software User Manual 121

Managing the Network
Selecting the Interface Used by the Storage System Software
The Storage System Software uses one network interface for communication with other storage modules on the network. In order for clustering to work correctly, the Storage System Software communication interface must be designated on each storage module. The interface can be
• a single NIC that is not part of a bond• a bonded interface consisting of 2 or 4 bonded NICs
Note: Only NICs that are in the Active or Passive (Ready) state can be designated as the communication interface. You cannot make a disabled NIC the communication interface.
When you initially set up a storage module using the Configuration Interface, the first interface that you configure becomes the interface used for Storage System Software communication.
Warning: To change the communication interface, first remove the storage module from the management group.
To select a different communication interface:1. Make sure that the SSM is not in a management group.1. Select TCP/IP Network from the configuration categories.2. Click the Communication Mode tab to bring it to the front, shown in Figure 95.3. Select an interface from the Storage System Software Interface drop-down list.4. Click Apply.
Updating the List of Manager IP Addresses
Update the list of manager IP addresses to ensure that a manager running on this storage module is communicating correctly with all managers in the management group.
Requirements
• Each time you update the list of managers, you must reconfigure application servers that use the management group to which this storage module belongs. Only update the list mode if you have reason to believe that there is a problem with the communication between the other managers in the group and the manager on this storage module.
1. Select TCP/IP Network from the configuration categories.2. Click the Communication Mode tab to bring it to the front, shown in Figure 95.
122 Intel® Storage System Software User Manual

Managing the Network
3. Click Update. The list is updated with the current storage module in the management group and a list of IPs with every manager’s enabled network interfaces.A window opens which displays the IP addresses in the management group and a reminder to reconfigure the application servers that are affected by the update.
Note: For more information on unicast, see “Communication Mode” on page 169.
Intel® Storage System Software User Manual 123

Managing the Network
124 Intel® Storage System Software User Manual

5 Setting the Date and Time
The Storage System Module (SSM) uses the date and time settings to create a time stamp when data is stored. You must set the date and time on each SSM.
• Setting the Time ZoneSet the time zone where the SSM is located. This time zone controls the time stamp on volumes and snapshots. You must set the SSM time zone whether you set the time of day manually or use NTP.
• Using Network Time Protocol (NTP)Configure the SSM to use an external time service.
• Setting Date and TimeSet the date and time on the SSM if not using an external time service.
Reset Management Group Time
If you change the time on an SSM that is running a manager, you must reset the management group time. If the management group time is different than a manager SSM, you run the risk of inconsistent or unexpected creation time stamps on volumes and snapshots, and also that scheduled snapshots will not start at the intended time. See “Resetting the Management Group Time” on page 181.
Getting There
1. On the Network View, double-click the SSM and log in, if necessary. The SSM Configuration window opens.
2. Select Time from the SSM configuration categories. The Time window opens, shown in Figure 96.

Setting the Date and Time
Figure 96. Setting the Time Zone
Setting the SSM Time Zone
You must set the time zone whether or not you use NTP. Set the time zone for the physical location of the SSM. HTTP files display the time stamp according to this local time zone.1. Choose the time zone for the location of the SSM.2. Click Apply.
Setting SSM Date and Time
If using NTP, the NTP server controls the date and time for the SSM. See “Using NTP” on page 128.
Note: Even if you are using an NTP server, you can set the date and time manually. If the difference between the date and time on the SSM and the date and time on the NTP server is too large, the NTP server will not change the date and time on the SSM. To ensure that the NTP server is able to control the SSM date and time, first set the date and time manually.
126 Intel® Storage System Software User Manual

Setting the Date and Time
Setting the Date and Time
1. If you are not using an NTP server, make sure NTP mode is set to Off. 2. Click the SSM Date and Time tab to bring it to the front, shown in Figure 97.
Figure 97. Setting the SSM Date and Time
3. Change the date and time to the correct date and time for that time zone. — Type the time directly in the field. — Type the date in the field or use the calendar button to select the date.
4. Click Apply.
Intel® Storage System Software User Manual 127

Setting the Date and Time
Using NTP
You can use NTP to manage the time for the SSM. NTP updates are fixed at 5 minute intervals. You still must set the time zone for the SSM. See “Setting the SSM Time Zone” on page 126.1. Select On in the NTP Mode area. The Add NTP Server dialog opens, shown in
Figure 98.
Figure 98. Adding an NTP Server
2. Type the IP address of the NTP server you want to use. 3. Click whether you want the NTP server to be designated preferred or not preferred.
Note: A preferred NTP server is one that is more reliable, such as a server that is on a local network. An NTP server on a local network would have a reliable and fast connection to the SSM.Not preferred designates an NTP server to be used as a back up if a preferred NTP server is not available. An NTP server that is not preferred might be located further away and have a less reliable connection.
128 Intel® Storage System Software User Manual

Setting the Date and Time
4. Click OK. The NTP server is added to the list on the NTP tab, shown in Figure 99.
Figure 99. Viewing the List of NTP Servers
Editing NTP Servers
You can change the properties of NTP servers. To change the IP address of an NTP server, you must remove the one no longer in use and add a new NTP server.1. Make certain that the NTP Mode is On.2. On the NTP tab, select the NTP server you want to edit. 3. Click Edit. The Edit NTP Server window opens, shown in Figure 100.
Figure 100. Editing an NTP Server
4. Change the preference of the NTP server. 5. Click OK. The list of NTP servers displays the changed NTP server in the list.
Note: To change the IP address of an NTP server, you must remove the server no longer in use and add a new NTP server.
Intel® Storage System Software User Manual 129

Setting the Date and Time
130 Intel® Storage System Software User Manual

6 Administrative Users and Groups
The Storage System Software comes configured with two default administrative groups and one default administrative user. You can add, edit, and delete administrative users and groups. All administrative users and groups must be added and managed locally.
Note: The user who is created during SSM configuration using the Configuration Interface becomes a member of the Full Administrator group by default.
Getting There
1. On the Network View, double-click the SSM and log in, if necessary. The Module Configuration window opens.
2. Select SSM Administration from the configuration categories. The Groups tab opens, as shown in Figure 101.
Figure 101. SSM Administration Groups Tab
Managing Administrative Groups
The SSM comes configured with a set of default administrative groups. You can use these groups or create new ones.

Administrative Users and Groups
Default Administrative Groups
If you assign an administrative user to one of the following groups, that user will have the privileges associated with the group.
Adding Administrative Groups
Administrative groups are listed on the SSM Administration window on the Groups tab, shown in Figure 102.
Adding a Group
1. Select SSM Administration from the configuration categories.2. Click Add on the Groups tab. The Create Administrative Group window opens,
shown in Figure 102.
Figure 102. Adding an Administrative Group
Table 32. Using Default Administrative Groups
Name of Group Management Capabilities Assigned to Group
Full_Administrator Manage all functions (read, write access to all functions)
View_Only_Administrator View-only capability to all functions (read only)
132 Intel® Storage System Software User Manual

Administrative Users and Groups
3. Type a Group Name and Description. Both are required.
Adding a User to the Group
1. Click Add in the Users section. The Add Users window opens with a list of administrative users, shown in Figure 103.
Figure 103. Adding an Administrative User to a Group
2. Select one or more users you want to add to the group.3. Click Add.
Adding Administrative Group Permissions
Administrative groups can have • Different levels of access to the SSM, such as read/write• Access to different management capabilities for the SSM, such as creating volumes
When you are creating a group, you also set the management capabilities available to members of a group. The default setting for a new group is Read Only for each category.
Table 33. Administrative Group Name Requirements
Group Name Requirements Example
• 3 to 40 characters
• start with a letter
• Use letters a-z, A-Z, numbers 0-9, or characters _, -
• Software_Admins
• Region11_Managers
Intel® Storage System Software User Manual 133

Administrative Users and Groups
4. From the Create Administrative Group window, click the Group Permission tab to bring it to the front, shown in Figure 104.
Figure 104. Adding Permissions to Administrative Groups
5. Click the permission level for each function for the group you are creating. 6. Click the General tab and complete the rest of the information if you have not already
done so.7. Click OK to finish adding the group. The SSM Administration window opens with the
Groups tab in front. The new group is added to the list.
Description of Administrative Group Permissions
Table 34. Descriptions of Group Permissions
Management Area Activities Controlled by This Area
Network Choose type of network connection, set the time and time zone for the SSMs, identify the Domain Name Server, and use SNMP.
Management Groups, RAID, Drive Hot Swap
Set the RAID configuration for the SSM. Shut down disks, restart RAID, and hot swap disks. Create management groups.
System and Disk Report View reports about the status of the SSM.
Change Password
Change administrative users’ passwords.
SSM Administration and Upgrade
Add administrators and upgrade the Storage System Software.
134 Intel® Storage System Software User Manual

Administrative Users and Groups
What the Permission Levels Mean:• Read Only: User can only view the information about these functions.• Read-Modify: User can view and modify existing settings for these functions.• Full: Users can perform all actions (view, modify, add new, delete) in all functions.
Sorting Columns in the Administrative Group Window
The columns in the Administrative Group window can be sorted in ascending or descending order.
• Click on the column header to sort.• Click again to reverse the sort.
The arrow next to the column title indicates which column is the sorted column, and whether the sorting order is ascending (up arrow) or descending (down arrow).
Figure 105. Sorting Administrative Groups
Editing Administrative Groups
Change information about administrative groups. Administrative groups are listed on the SSM Administration window on the Groups tab.1. Select SSM Administration from the configuration categories.2. Select the group you want to edit.
Sorting indicator
Intel® Storage System Software User Manual 135

Administrative Users and Groups
3. Click Edit. The Edit Administrative Group window opens, shown in Figure 106.
Figure 106. Editing an Administrative Group
4. Change the name and description as necessary.
Adding or Removing Administrative Users in an Existing Group
Adding New Users to the Group1. Click Add in the Users section. The Add Users window opens with a list of
administrative users. 2. Select one or more users to add to the group.3. Click Add. The users are added to the list.4. Click OK when you are finished adding users.
Removing Users from a Group1. Select the user to remove in the Users section.2. Click Remove. The user is removed from the list.
Changing Administrative Group Permissions
Change the management capabilities available to members of a group. The default setting is Read Only for each category.1. Click the Groups tab to bring it to the front.2. Select a group and click Edit. The Edit Administrative Group window opens.3. Click the Group Permission tab to bring it to the front.4. Click the management capabilities you want for the group you are editing.5. Click OK when you are finished.
136 Intel® Storage System Software User Manual

Administrative Users and Groups
Deleting Administrative Groups
1. Select SSM Administration from the configuration categories.2. Click the Groups tab to bring it to the front.3. Select the group to delete.4. Click Delete. A confirmation message opens.5. Click OK.
Note: When you delete a group, the users who are members of that group are NOT deleted.
Managing Administrative Users
Add administrative users as necessary to provide access to the management functions of Storage System Software.
Note: The user who is created during SSM configuration using the Configuration Interface becomes a member of the Full Administrator group by default.
Adding Administrative Users
Administrative users are listed on the SSM Administration window on the Users tab along with their group membership and a description.
Figure 107. Adding Administrative Users
Intel® Storage System Software User Manual 137

Administrative Users and Groups
Adding an Administrative User
1. Select SSM Administration from the configuration categories.2. Click the Users tab to bring it to the front, shown in Figure 107.3. Click Add. The Create Administrative User window opens, shown in Figure 108.
Figure 108. Adding an Administrative User
4. Type a User Name and Description. 5. Type a password and confirm that password.
Adding a Member Group
1. Click Add in the Member Groups section. The Add Administration Groups window opens, shown in Figure 109.
Figure 109. Adding a Group to an Administrative User
138 Intel® Storage System Software User Manual

Administrative Users and Groups
2. Select one or more groups you want to add.3. Click OK. The Create Administrative User window opens.4. Click OK to finish adding the administrative user.
Sorting Columns in the Administrative Users Window
The columns in the Administrative Users window can be sorted in ascending or descending order.
• Click on the column header to sort.• Click again to reverse the sort.• The arrow next to the column title indicates which column is the sorted column, and
whether the sorting order is ascending (up arrow) or descending (down arrow).
Figure 110. Sorting Administrative Users
Editing Administrative Users
1. Select SSM Administration from the configuration categories. 2. Click the Users tab to bring it to the front.3. Select the user to edit from the list of users.4. Click Edit. The Edit Administrative User window opens, shown in Figure 111.
Sorting indicator
Intel® Storage System Software User Manual 139
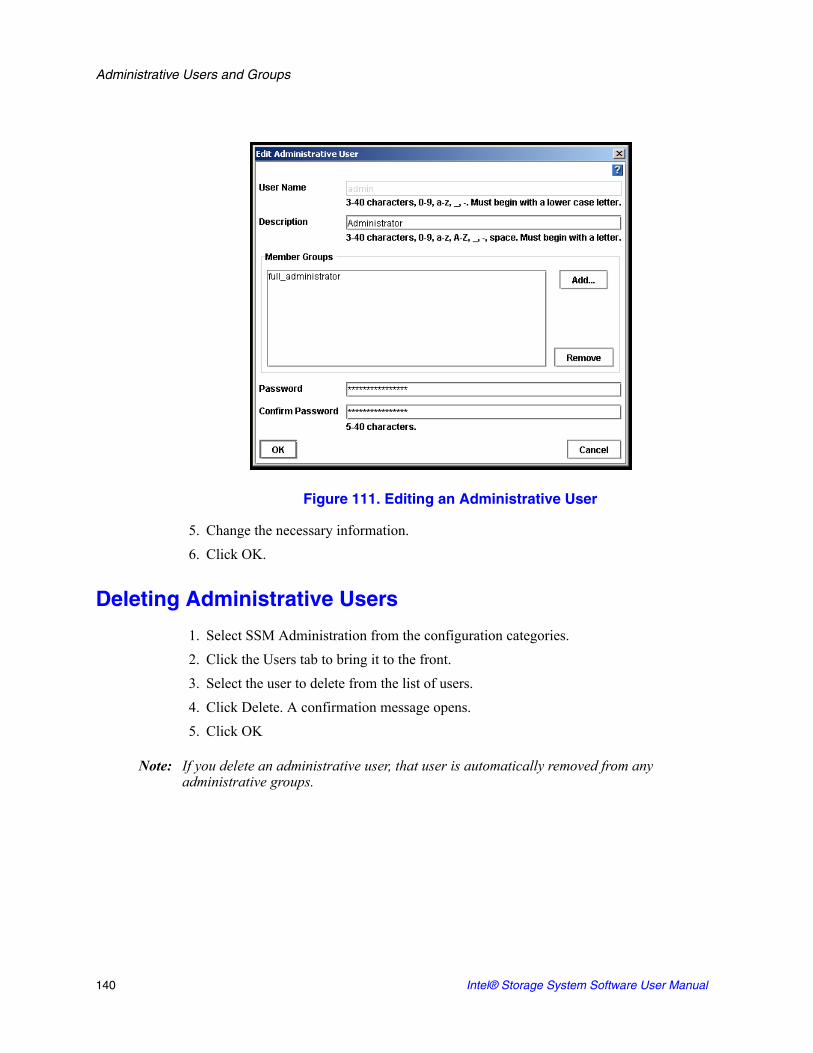
Administrative Users and Groups
Figure 111. Editing an Administrative User
5. Change the necessary information.6. Click OK.
Deleting Administrative Users
1. Select SSM Administration from the configuration categories.2. Click the Users tab to bring it to the front.3. Select the user to delete from the list of users.4. Click Delete. A confirmation message opens.5. Click OK
Note: If you delete an administrative user, that user is automatically removed from any administrative groups.
140 Intel® Storage System Software User Manual

7 Using SNMP
The SSM can be monitored using an SNMP Agent. You can also enable SNMP traps.
The SSM Management Information Base (MIB) is read-only and supports SNMP versions 1 and 2c. See “Installing the Storage System MIB” on page 145 for a list of Storage System MIBs.
Getting There
1. On the Network View, double-click the SSM and log in, if necessary. The SSM Configuration window opens.
2. Select SNMP from the configuration categories. The SNMP General tab opens, shown in Figure 112.
Figure 112. Using SNMP

Using SNMP
Enabling the SNMP Agent
3. Click Enable SNMP Agent. The Enable Agent fields become activated, shown in Figure 113.
Figure 113. Enabling the SNMP Agent
4. Type the Community String.
Note: The community string identifies a group of hosts that are allowed read-only access to the SNMP data. The community "public” is typically used to denote a read access community. This string is entered into the SNMP Management tool (not included) when attempting to access the system.
142 Intel® Storage System Software User Manual

Using SNMP
Choosing Access Control
1. Click Add to add an SNMP client. The Add SNMP Client window opens, shown in Figure 114. You can add SNMP Client either by specifying IP addresses or host names.
Figure 114. Adding an SNMP Client
By Address
1. Click By Address.2. Type the IP Network Address.3. Select an IP Netmask from the list. Select Single Host if the SNMP Client is a single
computer.4. Click OK. The IP address and netmask appear in the Access Control list.
Note: You can either enter a specific IP address and the IP Netmask as None to allow a specific host to access SNMP or you can specify the Network Address with its netmask value so that all hosts that match that IP and netmask combination can access SNMP.
By Name
1. Click By Name.2. Type a host name. That host name must exist in DNS and the SSM must be configured
with DNS for the client to be recognized by the host name. See “Using a DNS Server” on page 115.
3. Click OK. The host name appears in the Access Control list.
Intel® Storage System Software User Manual 143

Using SNMP
Editing Access Control Entries
You can change the information for the hosts granted access.1. Select a host listed in the Access Control list, shown in Figure 115.
Figure 115. Editing a Host in the Access Control List
2. Click Edit. The Edit SNMP Client window opens, shown in Figure 116.
Figure 116. Editing SNMP Client from the Access Control List
3. Change the appropriate information.4. Click OK.
144 Intel® Storage System Software User Manual

Using SNMP
Deleting Access Control Entries
Delete an SNMP client from the list.1. Select a host listed in the Access Control list, shown in Figure 115.2. Click Delete. A confirmation message opens.3. Click OK.
Entering System Information (Optional)
1. Enter System Location information such as address, building name, room number, etc. Normally this will be network administrator information — the person you would contact if you could not connect to SNMP clients.
2. Enter System Contact information such as name, telephone, email, etc.
Using the SNMP MIB
The Storage System MIB provides read-only access to the SSM. The SNMP implementation in the SSM supports MIB-II compliant objects.
In addition, MIB files have been developed for SSM-specific information. These files, when loaded in the Network Management System, allow you to see SSM specific information such as model number, serial number, hard disk capacity, network parameters, RAID configuration, DNS server configuration details, and more. See “Installing the Storage System MIB” on page 145.
Installing the Storage System MIB
The Storage System MIB files are installed when you install the Storage System Console. Load the Storage System MIB in the Network Management System as outlined below.1. Load STORAGE – SYSTEMS – GLOBAL – REG2. Load STORAGE–SYSTEMS–SSM–COMMON – MIB3. The following MIB files can be loaded in any sequence:
— STORAGE–SYSTEMS–SSM–COMMON–DNS–MIB— STORAGE–SYSTEMS–SSM–COMMON-CLUSTERING-MIB— STORAGE–SYSTEMS–SSM–COMMON–INFO–MIB— STORAGE–SYSTEMS–SSM–COMMON– NETWORK–MIB— STORAGE–SYSTEMS–SSM–COMMON–NIS–MIB
Intel® Storage System Software User Manual 145

Using SNMP
— STORAGE-SYSTEMS-SSM-COMMON-NOTIFICATION-MIB— STORAGE–SYSTEMS–SSM–COMMON–NTP–MIB— STORAGE–SYSTEMS–SSM–COMMON–STATUS–MIB— STORAGE–SYSTEMS–SSM–COMMON–STORAGE–MIB
Note: Any variable that is labeled “Counter64” in the MIB requires version 2c or later of the protocol.
Note: Other standard version 2c compliant MIB files are also provided on the resource CD. Load these MIB files in the Network Management System if required.
Disabling the SNMP Agent
Disable the SNMP Agent if you do not plan to use SNMP applications to monitor your network of SSMs.1. On the Network View, double-click the SSM and log in, if necessary. The SSM
Configuration window opens.2. Select SNMP from the configuration categories. The SNMP General window opens,
shown in Figure 112.
Disabling SNMP
1. On the SNMP General window, select Disable SNMP Agent. 2. Click Apply.
Enabling and Disabling SNMP Traps
Enable SNMP Traps if you plan to use an SNMP tool to notify you when a monitoring threshold is reached.1. On the Network View, double-click the SSM and log in, if necessary. The SSM
Configuration window opens.2. Select SNMP from the configuration categories. The SNMP General window opens,
shown in Figure 112 on page 141.
146 Intel® Storage System Software User Manual

Using SNMP
3. Select the SNMP Traps tab. The SNMP Traps window opens, shown in Figure 117.
Figure 117. Enabling SNMP Traps
Enabling SNMP Traps
1. Enter the Trap Community String. This is required if you want to use SNMP traps.
Note: The Trap Community String is used for client-side authentication. 2. Click Add in the Trap Recipients area to add specific trap recipients. The Trap
Recipient window opens.
Figure 118. Adding an SNMP Trap Recipient
3. Enter the host name or IP address for the SNMP client that is receiving the traps.4. Click OK.5. Repeat steps 2 through 4 for each host in the trap community.6. Click Apply when you are finished adding hosts.
Intel® Storage System Software User Manual 147

Using SNMP
Editing the Trap Recipient
1. Select the host you want to change from the list of Trap Recipients.2. Click Edit. The Trap Recipient window opens.3. Change the host name or IP address.4. Click OK.5. Click Apply when you are finished editing trap recipients.
Removing the Trap Recipient
1. Select the host you want to remove from the list of Trap Recipients.2. Click Remove. A confirmation window opens.3. Click OK to remove the trap recipient. The host is removed from the list.4. Click Apply when you are finished removing trap recipients.
Disabling SNMP Traps
To disable SNMP traps, you must delete all of the settings in the SNMP Traps window.1. Remove the Trap Recipient hosts.2. Delete the Trap Community String.3. Click Apply.
148 Intel® Storage System Software User Manual
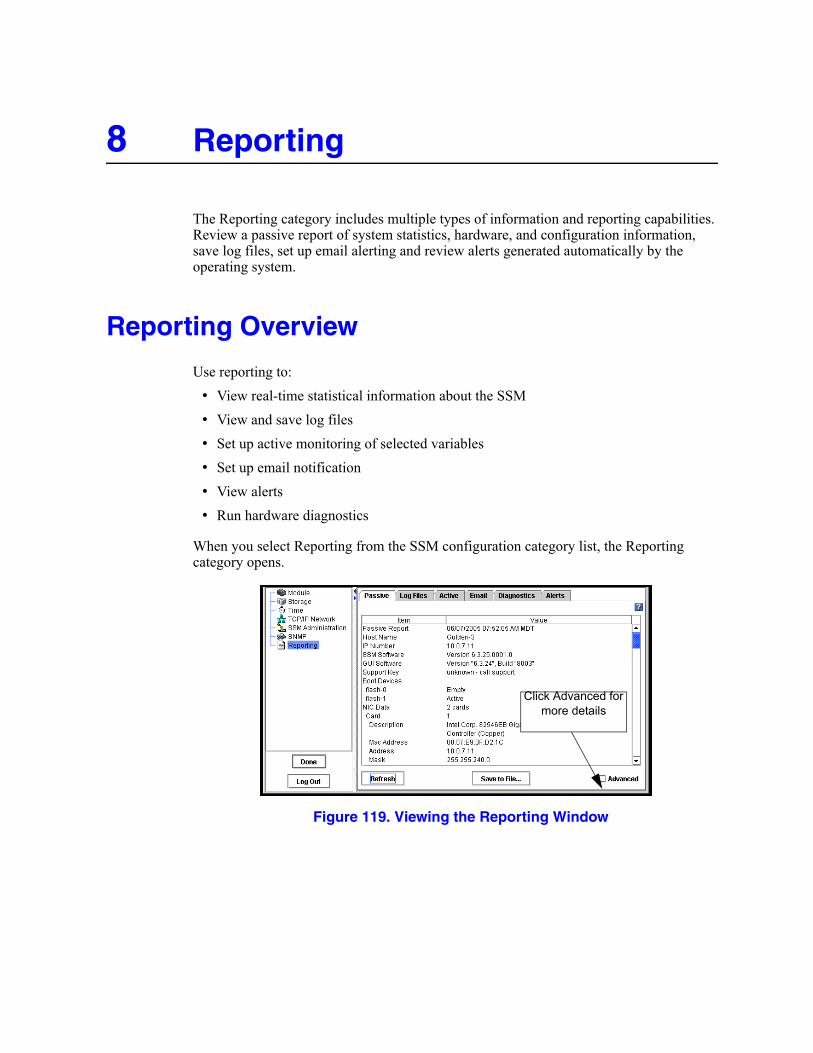
8 Reporting
The Reporting category includes multiple types of information and reporting capabilities. Review a passive report of system statistics, hardware, and configuration information, save log files, set up email alerting and review alerts generated automatically by the operating system.
Reporting Overview
Use reporting to:• View real-time statistical information about the SSM• View and save log files• Set up active monitoring of selected variables• Set up email notification• View alerts• Run hardware diagnostics
When you select Reporting from the SSM configuration category list, the Reporting category opens.
Figure 119. Viewing the Reporting Window
Click Advanced for more details

Reporting
Using Passive Reports
Passive reports display statistics about the performance of the SSM, its drives and configuration. Statistics in the passive reports are point-in-time data, gathered when you click the Refresh button on the Passive tab. Select Advanced to see additional statistics. 1. Select Reporting from the configuration categories.
The Reporting window opens.2. Click Refresh to display statistics on the Passive tab.3. [Optional] To view extended statistics about the SSM, click Advanced at the bottom
of the window.
Saving the Report to a File
1. On the Passive Tab, click Save To File to download a text file of the reported statistics. The Save dialog opens.
2. Choose the location and name for the report.3. Click Save.
The report is saved with a .doc extension. It is a text file and will open with Word in Windows, or any text editor in Linux or UNIX.
Passive Reporting Detail
This list details selected information available on the Passive Reporting window. Not all items are listed here.
Table 35. Selected Details of the Passive Report
This Term Means This
Passive Report Date and time report created.
Host Name Host name of the SSM.
IP Number IP address of the SSM.
SSM Software Full version number for SSM software.
GUI Software Full version number for the Console.
Support Key Support Key is used by a Technical Support representative to log in to the SSM.
Boot Devices
flash-0, flash-1
Status information about the compact flash card(s) used to boot the SSM.
150 Intel® Storage System Software User Manual
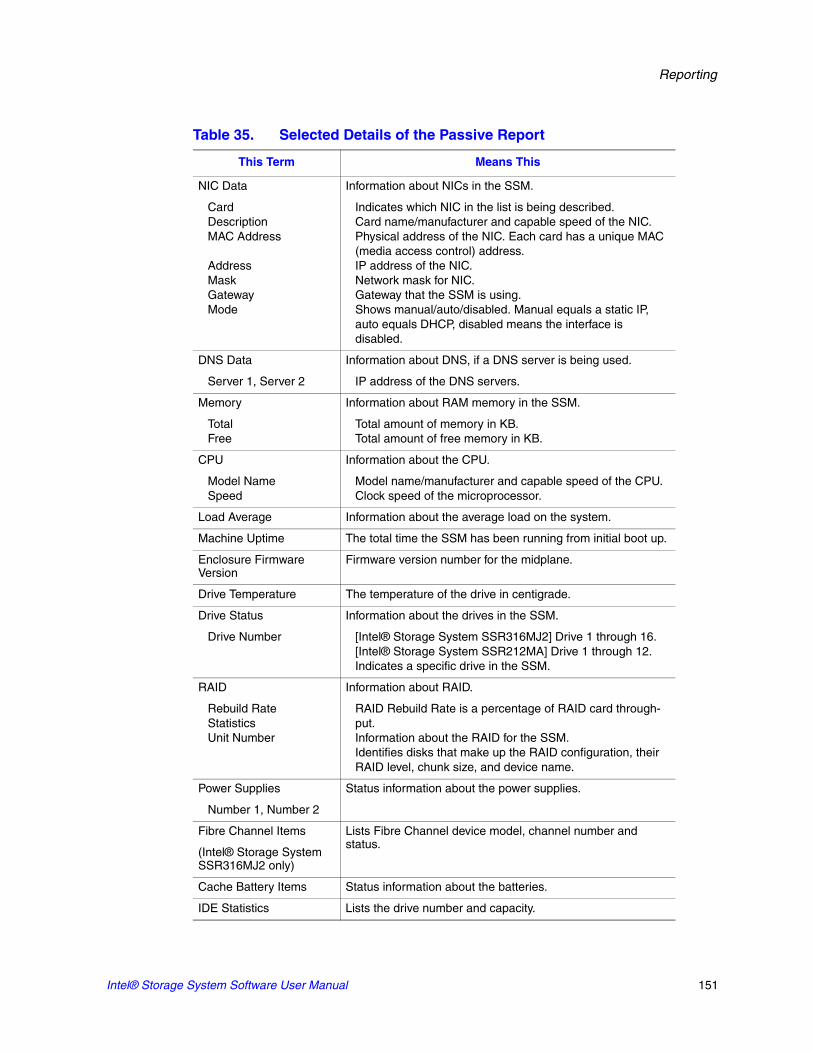
Reporting
NIC Data
CardDescriptionMAC Address
AddressMaskGatewayMode
Information about NICs in the SSM.
Indicates which NIC in the list is being described.Card name/manufacturer and capable speed of the NIC.Physical address of the NIC. Each card has a unique MAC (media access control) address.IP address of the NIC.Network mask for NIC.Gateway that the SSM is using.Shows manual/auto/disabled. Manual equals a static IP, auto equals DHCP, disabled means the interface is disabled.
DNS Data
Server 1, Server 2
Information about DNS, if a DNS server is being used.
IP address of the DNS servers.
Memory
TotalFree
Information about RAM memory in the SSM.
Total amount of memory in KB.Total amount of free memory in KB.
CPU
Model NameSpeed
Information about the CPU.
Model name/manufacturer and capable speed of the CPU.Clock speed of the microprocessor.
Load Average Information about the average load on the system.
Machine Uptime The total time the SSM has been running from initial boot up.
Enclosure Firmware Version
Firmware version number for the midplane.
Drive Temperature The temperature of the drive in centigrade.
Drive Status
Drive Number
Information about the drives in the SSM.
[Intel® Storage System SSR316MJ2] Drive 1 through 16. [Intel® Storage System SSR212MA] Drive 1 through 12. Indicates a specific drive in the SSM.
RAID
Rebuild Rate StatisticsUnit Number
Information about RAID.
RAID Rebuild Rate is a percentage of RAID card through-put.Information about the RAID for the SSM.Identifies disks that make up the RAID configuration, their RAID level, chunk size, and device name.
Power Supplies
Number 1, Number 2
Status information about the power supplies.
Fibre Channel Items
(Intel® Storage System SSR316MJ2 only)
Lists Fibre Channel device model, channel number and status.
Cache Battery Items Status information about the batteries.
IDE Statistics Lists the drive number and capacity.
Table 35. Selected Details of the Passive Report
This Term Means This
Intel® Storage System Software User Manual 151

Reporting
Saving Log Files
If Technical Support requests that you send a copy of a log file, the Log Files tab is where you can save that log file as a text file.
The Log Files tab lists two types of logs:• Log files that are stored locally on the SSM (displayed on the left side of the tab).• Log files that are written to a remote log server (displayed on the right side of the tab).
Note: Save the log files that are stored locally on the SSM. For more information about remote log files, see
1. Select Reporting from the configuration categories.The Reporting Window opens.
2. Select the Log Files tab.
The Log Files window opens.
Figure 120. Saving Log Files to a Local Machine
3. Scroll down the Choose Logs to Save list.4. Select the file or files you want to save.
To select multiple files, use the Ctrl key.5. Click Save Files.
The Save dialog opens.6. Select a location for the file or files.7. Click Save In Directory.
The file or files are saved to the designated location.
152 Intel® Storage System Software User Manual

Reporting
Remote Log Files
Use remote log files to automatically write log files to a computer other than the SSM. For example, you can direct the log files for one or more SSMs to a single log server in a remote location. The computer that receives the log files is called the Remote Log Target.
You must also configure the target computer to receive the log files.
Adding a Remote Log
1. Select Reporting from the configuration categories.The Reporting Window opens.
2. Select the Log Files tab.The Log Files window opens.
3. Click Add below the list of remote logs.The Add Remote Log Target window opens.
Figure 121. Adding a Remote Log
4. In the Log Type list, select the log that you want to direct to a remote computer.The Log Type list only contains logs that support syslog.
5. In the Destination field, type the IP address or host name of the computer that will receive the logs.
6. Click OK.The remote log displays in the Remote logs list on the Log Files tab.
Configuring the Remote Log Target Computer
Configure syslog on the remote log target computer. Refer to the syslog product documentation for information about configuring syslog.
Note: The string in parentheses next to the remote log name on the Log Files tab includes the facility and level information that you will configure in syslog. For example, in the log file name:
Intel® Storage System Software User Manual 153

Reporting
auth error (auth.warning)the facility is “auth” and the level is “warning.”
Editing Remote Log Targets
You can select a different log file or change the target computer for a remote log:1. On the Log Files tab, select the log in the Remote logs list.2. Click Edit.
The Edit Remote Log Target window opens.3. Change the log type or destination.4. Click OK.
Deleting Remote Logs
To delete a remote log:1. On the Log Files tab, select the log in the Remote logs list.2. Click Delete.
A confirmation message opens.3. Click OK.
Note: After deleting a remote log file from the SSM, remove references to this log file from the syslog configuration on the target computer.
Using Active Monitoring
Use active monitoring to track the health of the SSM. Active monitoring allows you to set up notification through emails, alerts in the Console, and SNMP traps. You can choose which variables to monitor and choose the notification methods for alerts related to the monitored variables. For a detailed list of monitored variables, see .
Note: Critical variables, such as the CPU temperature and motherboard temperature, have thresholds that trigger a shutdown of the SSM.1. On the Network View, double-click the SSM and log in, if necessary.
The SSM Configuration window opens.2. Select Reporting from the configuration categories.
The Reporting Window opens.
154 Intel® Storage System Software User Manual

Reporting
3. Select the Active tab.The Active Reporting window opens.
Figure 122. Setting Active Monitoring Variables
Setting Notification Methods for Monitored Variables
Use Edit to configure notification methods and change the frequency that the variable is monitored, if allowed.
Configuring Notification Methods for All Variables
You can configure alert actions for one variable and then apply those settings to all the variables in the list. Use the Apply Threshold Actions button to globally apply the settings. Then you can customize alerting actions for a particular variable by editing that variable.1. Select from the list the variable you want to edit.2. Click Edit.
The Configure Variable wizard opens to Step 2
Note: For some variables, only the notification method can be changed. For example, the frequency for the motherboard temperature variable is set to 15 seconds and cannot be changed.3. [Optional] If allowed, change the frequency for the variable and click Next.4. [Optional] Change the alert notification method.5. [Optional] To apply the alert actions (including the email addresses) that you selected
in step 4 to all variables that are monitored on the SSM, select the Apply Threshold Actions to All Monitored Variables checkbox.
Intel® Storage System Software User Manual 155

Reporting
6. Click Finish.
Note: If you are requesting email notification, be sure to set up the SMTP settings on the Email tab.
Removing a Variable from Active Monitoring
Use Remove to remove variables to stop active monitoring. You can return a variable to active monitoring at any time. Permanent variables, such as motherboard temperature, cannot be removed. .1. Select the variable you want to remove.2. Click Remove.
A confirmation message opens.3. Click OK.
The variable is removed.
Note: Variables are not deleted when they are removed from active monitoring. You can add them back to active monitoring at any time.
Adding Variables to Monitor
You can only add variables that have been previously removed. The variables that the SSM is currently monitoring are listed in the box. All variables in the list are configured and set for Console alerts. 1. Click Add.
The Configure Variable wizard opens to Step 1.
Figure 123. Adding a Variable, Step 1
156 Intel® Storage System Software User Manual
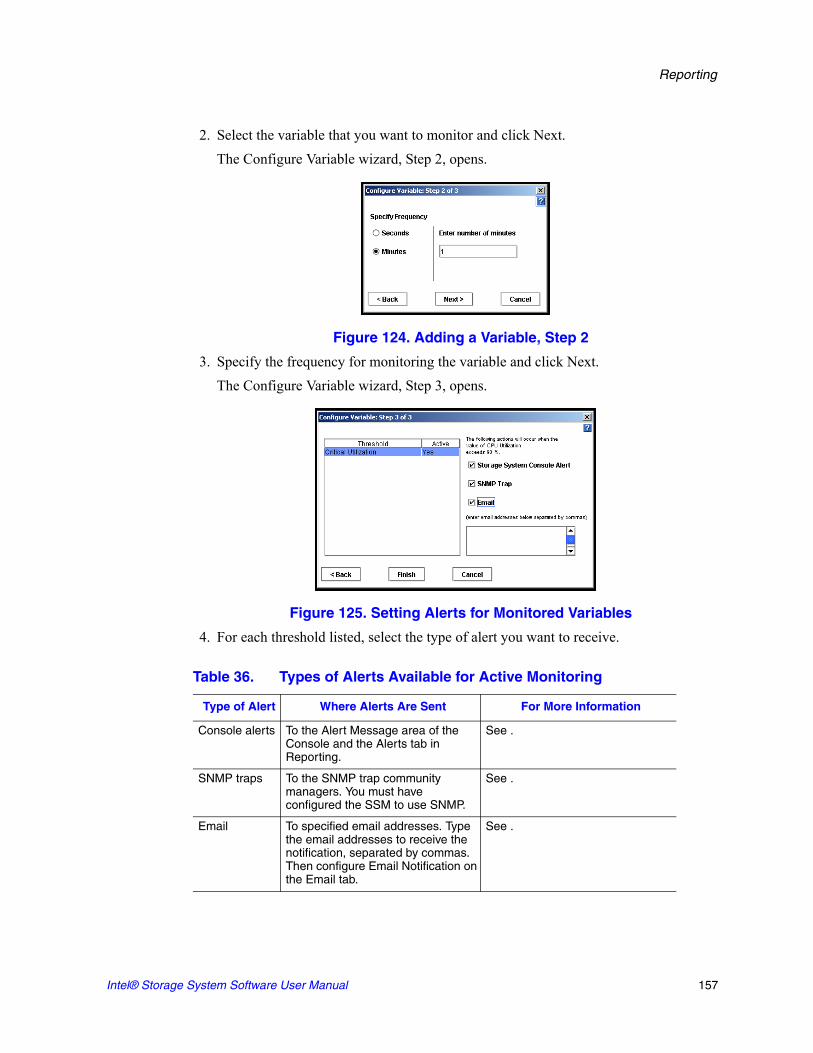
Reporting
2. Select the variable that you want to monitor and click Next.The Configure Variable wizard, Step 2, opens.
Figure 124. Adding a Variable, Step 2
3. Specify the frequency for monitoring the variable and click Next.The Configure Variable wizard, Step 3, opens.
Figure 125. Setting Alerts for Monitored Variables
4. For each threshold listed, select the type of alert you want to receive.
Table 36. Types of Alerts Available for Active Monitoring
Type of Alert Where Alerts Are Sent For More Information
Console alerts To the Alert Message area of the Console and the Alerts tab in Reporting.
See .
SNMP traps To the SNMP trap community managers. You must have configured the SSM to use SNMP.
See .
Email To specified email addresses. Type the email addresses to receive the notification, separated by commas. Then configure Email Notification on the Email tab.
See .
Intel® Storage System Software User Manual 157

Reporting
5. [Optional] To apply the alert actions (including the email addresses) that you selected in step 4 to all variables that are monitored on the SSM, select the Apply Threshold Actions to All Monitored Variables checkbox.
Note: To save time while setting up active monitoring, specify alert actions for one variable and then check the box to apply those actions to all variables on the SSM. This setting applies the same email address and other alert settings to all SSMs. Then, if you need to customize alert actions for a particular variable, you can edit that variable.6. Click Finish when you have configured all the threshold items in the list.
Downloading a Variable Log File
To save the history of a variable, download a copy of the log file. 1. In the list of monitored variables, click the variable for which you want to save the log
file.2. Click Download Log on the Active Reporting window.
The Save Variable Log File window opens.3. Choose a location for the file. 4. [Optional] Change the name of the log file.5. Click Save.
The file is saved to the location you specified.
Viewing the Variable Summary
You can review the frequency settings and the triggers for a variable in the Monitored Variables list without editing the variable.1. In the list of monitored variables, select a variable.
The frequency, thresholds, and notification settings display to the right of the list.
158 Intel® Storage System Software User Manual

Reporting
Figure 126. Viewing the Monitoring Variable Summary on the Active Window
List of Monitored Variables
shows the variables that are monitored for the SSM. For each variable, the table lists the following information:
• The units of measurement.• Whether the variable is permanent. (Permanent variables cannot be removed from
active reporting.)• Whether you can change the frequency with which the measurements are taken.• The default frequency of measurements.• The default action that occurs if the measured value of the variable reaches a
threshold.
Details about the selected variable are displayed here
Table 37. List of Variables Available for Active Monitoring
Variable Name Units Perm. Variable
Specify Freq.
Default Freq.
Default Action/Threshold
Boot Devices Status
Active,
Inactive,
Failed,
Empty,
Unformatted,
Not recognized,
Unsupported
No Yes 30 seconds
Console alert if not normal
Cache Battery Status
Normal, Charging, Missing, Faulty
No Yes 1 minute Console alert if changes
Intel® Storage System Software User Manual 159

Reporting
CPU Utilization Percent No Yes 1 minute Console alert at > 90%
CPUTemperature
Celsius Yes No 15 seconds
Warning at 65º, Console alert[SSR316MJ2] Critical at 70º, Console alert, Shutdown[SSR212MA] Critical at 90º, Console alert, Shutdown
Drive Health Status
Normal,
Marginal,
Faulty
Yes Yes 1 minute Console alert if not normal
Drive Status On and secured, Off and secured, Off or removed
No Yes 1 minute Console alert if changes
Drive Temperature
Celsius Yes No 1 minute Warning at 60º, Console alertCritical at 65º, Console alert, Drive Power Off
Fan Status Normal,
Faulty
No Yes 1 minute Console alert if changes
Fibre Channel Status
Waiting for firmware,
Active,
Enabled,
Not ready,
Initialized
No Yes 1 minute Console alert if changes
Hot Spares Activated
- No Yes 15 minutes
Console alert if an SSM hot spare is activated
MemoryUtilization
Percent No Yes 1 minute Console alert at > 90%
Motherboard Temperature
Celsius Yes No 15 seconds
Warning at 65º, Console alertCritical at 70º, Console alert, Shutdown
Network Interface Status
- No Yes 1 minute Console alert if NIC status changes
NVRAM Status - Yes Yes 1 minute Console alert if not normal
Table 37. List of Variables Available for Active Monitoring
Variable Name Units Perm. Variable
Specify Freq.
Default Freq.
Default Action/Threshold
160 Intel® Storage System Software User Manual

Reporting
Setting Email Notification
If you request email notification on the Active tab, you set the email addresses to receive the notifications there. You then use the Email tab to configure the SMTP settings for email communication. For more information on configuring active monitoring, see .
Power Supply Status
-- No Yes 1 minute Console alert if status changes
RAID Status -- Yes Yes 15 seconds
Console alert if changes
Remote Copy Complete
- No Yes 15 minutes
Console alert if true
Remote Copy Failovers
- No Yes 15 minutes
Console alert if true
Remote Copy Status
- No Yes 15 minutes
Console alert if fails
Remote Management Group Status
- No Yes 1 minute Console alert if changes
Snapshot Status
- No Yes 1 minute Console alert if snapshot status changes
Storage Server Status
- No Yes 1 minute Console alert if not up
Volume Restripe Complete
- No Yes 1 minute Console alert if completed
Volume Status - No Yes 15 minutes
Console alert if volume status changes
Volume Thresholds
-- No Yes 15 minutes
Consolealert if threshold exceeded for any volume or snapshot in the mgt. group
Table 37. List of Variables Available for Active Monitoring
Variable Name Units Perm. Variable
Specify Freq.
Default Freq.
Default Action/Threshold
Intel® Storage System Software User Manual 161

Reporting
To complete the request for email notification that you configured for monitored variables:1. In the Reporting category, select the Email tab.
The Email window opens.
Figure 127. Configuring Email Settings for Email Alert Notifications
2. Enter the IP or host name of the email server.3. Enter the email port.
The standard port is 25.4. (Optional) If your email server is selective about valid sender addresses on incoming
emails, enter a sender address, for example, “[email protected].” If you do not enter a sender address, the From field of email notifications will display “root@hostname,” where hostname is the name of the SSM.
5. Click Apply.
Note: Notification of undeliverable email messages are sent to the sender address.
Note: If you are requesting email notification, be sure to set up the email notification in Active monitoring.
162 Intel® Storage System Software User Manual

Reporting
Running Diagnostics
Use diagnostics to check the health of the SSM hardware.
Note: Running diagnostics can help you to monitor the health of the SSM or to troubleshoot hardware problems.
To run diagnostic tests:1. On the Network View, double-click the SSM and log in, if necessary.
The SSM Configuration window opens.2. Select Reporting from the configuration categories.
The Reporting Window opens.3. Select the Diagnostics tab.
The Diagnostics window opens.
Figure 128. Viewing the List of Diagnostics
4. Select the diagnostic tests that you want to run. The default setting is to run all tests. Clear any tests that you do not want to run. To clear all selections, click Clear All.
Note: Running all of the diagnostic tests will take several minutes. To shorten the time required to run tests, clear the checkboxes for any tests that you do not need.5. Click Run Tests and Apply Changes.
A progress message displays. When the tests complete, the results of each test display in the Result column.
6. [Optional] When the tests complete, if you want to view a report of test results, click Save to File. Then select a location for the diagnostic report file and click Save.The diagnostic report is saved as a “.doc” file in the designated location. It is a text file and will open with Word in Windows, or any text editor in Linux or UNIX.
Intel® Storage System Software User Manual 163

Reporting
7. [Optional] Click Save Configuration to save the list of diagnostics that you selected so that next time you open the Diagnostics window it will be preconfigured with your selections.
Viewing the Diagnostic Report
The results of diagnostic tests are written to a report file. For each diagnostic test, the report lists whether the test was run and whether the test passed, failed, or issued a warning.
Note: If any of the diagnostics show a result of “Failed,” call your Technical Support representative.
To view the report file:1. After the diagnostic tests complete, save the report to a file. 2. Browse to the location where you saved the diagnostics report (.doc) file.3. Open the report file.
List of Diagnostic Tests
shows the diagnostic tests that are available for the SSM. For each test, the table lists the following information:
• A description of the test• Pass / fail criteria
Diagnostic Test Description Pass Criteria
Fail Criteria
Motherboard temperature
Compares the mother board temperature against the accepted temperature range for normal operation.
Within range
Outside range
CPU temperature Compares the processor temperature against the accepted temperature range for normal operation.
Within range
Outside range
Mother board voltages
Compares the power supply voltages against the accepted voltage range for normal operation.
All voltages are within the range
One or more voltages outside range
Enclosure
communication
Sends a passive command to the backplane and verifies that the response from the backplane matches criteria.
Backplane returns expected string
Backplane times out or does not return expected string
164 Intel® Storage System Software User Manual

Reporting
Viewing Alerts
Any time that an actively monitored variable causes an alert, the alert is logged by the SSM. If the Console is open, alerts display in the Alert Messages tab on the Console main window.
Figure 129. Alert Messages Tab on Console Main Window
Hard drive status Checks the status of all installed drives.
All drives are “On and Secured”
One or more drives not “On and Secured”
Hard drive temperature
For each of the drives, compares the temperature against an accepted range for normal operation.
Temp. of all drives are within range
One or more drives out of range
Fan status Checks the fan status. Fan is normal.
Fan is faulty.
Power supply status
Checks the power supply status. Power supply is normal.
Power supply is faulty.
Hard drive SMART health
S.M.A.R.T. (Self-Monitoring, Analysis, and Reporting Technology) is implemented in all modern disks. A program inside the disk constantly tracks a range of the vital parameters, including driver, disk heads, surface state, and electronics. This information may be used to predict hard drive failures.
All drives pass health test
Warning or Failed if one or more drives fails health test
RAID controller BBU Status
Checks the status of the RAID controller Battery Backup Unit (BBU).
BBU is Normal
Failed if Charging, Faulty or Missing
Diagnostic Test Description Pass Criteria
Fail Criteria
Intel® Storage System Software User Manual 165

Reporting
If the Console is not open, these alerts are still logged, and you can view them in the Reporting category of the SSM Configuration window the next time you open the Console.
Note: The Alerts tab in the Reporting category displays the most recent alerts, up until the alert list reaches 1 MB in size. To view alerts older than those displayed on the Alerts tab, save the Alerts log on the Log Files tab.1. On the Network View, double-click the SSM and log in, if necessary.
The SSM Configuration window opens.2. Select Reporting from the configuration categories.
The Reporting window opens.3. Select the Alerts tab.
The Alerts window opens.
Figure 130. Viewing Alerts
4. To refresh the list of alerts, click Refresh.5. [Optional] To save the list of alerts, click Save to File. Then select a location for the
file.
166 Intel® Storage System Software User Manual

9 Working with Management Groups
A management group is a collection of one or more SSMs. It is the container within which you cluster SSMs and create volumes for storage. Creating a management group is the first step towards maximizing the clustering capacity of the SSM.
Management groups serve several purposes: • To organize your SSMs into different groups for different functional areas of
your organization. For example, you might create a management group for your Oracle applications and a separate management group for user file share storage.
• To ensure added administrative security. For example, you could give one storage administrator access to the SSMs in one management group but not in another management group.
• To prevent some storage resources from being used unintentionally. If an SSM is not in a management group, the management group cannot use that SSM as a storage resource. For example, all of the SSMs in management group 1 can be pooled together for use by volumes in that group, if you purchase the Scalability Pak upgrade. To prevent a new SSM from being included in this pool of storage, you would put it in a separate management group.
• To contain clustering managers. Within a management group, one or more of the SSMs will act as the managers that control data transfer and replication.
This chapter discusses:• Managers• Quorum• Setting the management group time• Setting the local bandwidth• Backing up the management group configuration

Working with Management Groups
Requirements for Creating Management Groups
When creating a management group, you must configure the following parameters.
Managers Overview
Managers are SSMs within a management group that you designate to govern the activity of all of the SSMs in the group. All SSMs contain the management software, but you must designate which SSMs in the management group you want to act as managers. These SSMs “run” managers, much like a PC runs various services.
Functions of Managers
Managers control data replication, keep track of system status, coordinate reconfigurations as SSMs are brought up and taken offline, and re-synchronize data when SSMs fail and recover.
Managers and Quorum
Managers use a voting technology to coordinate SSM behavior. In this voting technology, a strict majority of managers (a “quorum”) must be running and communicating with each other in order for the Storage System Software to function. Therefore, for optimal fault tolerance, you should have three or five managers in your management group. Three or five managers provide the best balance between fault tolerance and performance.
Management Group
RequirementWhat it means
Configure SSMs Before you create a management group, you should configure all the SSMs for that management group. When planning your storage, remember that all SSMs in a cluster must be configured alike. See “Configuration Tasks” on page 15.
Log in to SSMs You must be logged in to the SSM to create a management group.
Starting a manager A management group must have at least one manager running. So, when you create a new management group, the first SSM added to the group has the manager started automatically. You can add managers to other SSMs later.
Assigning manager IP addresses
The SSMs that are running managers must have static IP addresses (or reserved IP addresses if using DHCP).
168 Intel® Storage System Software User Manual
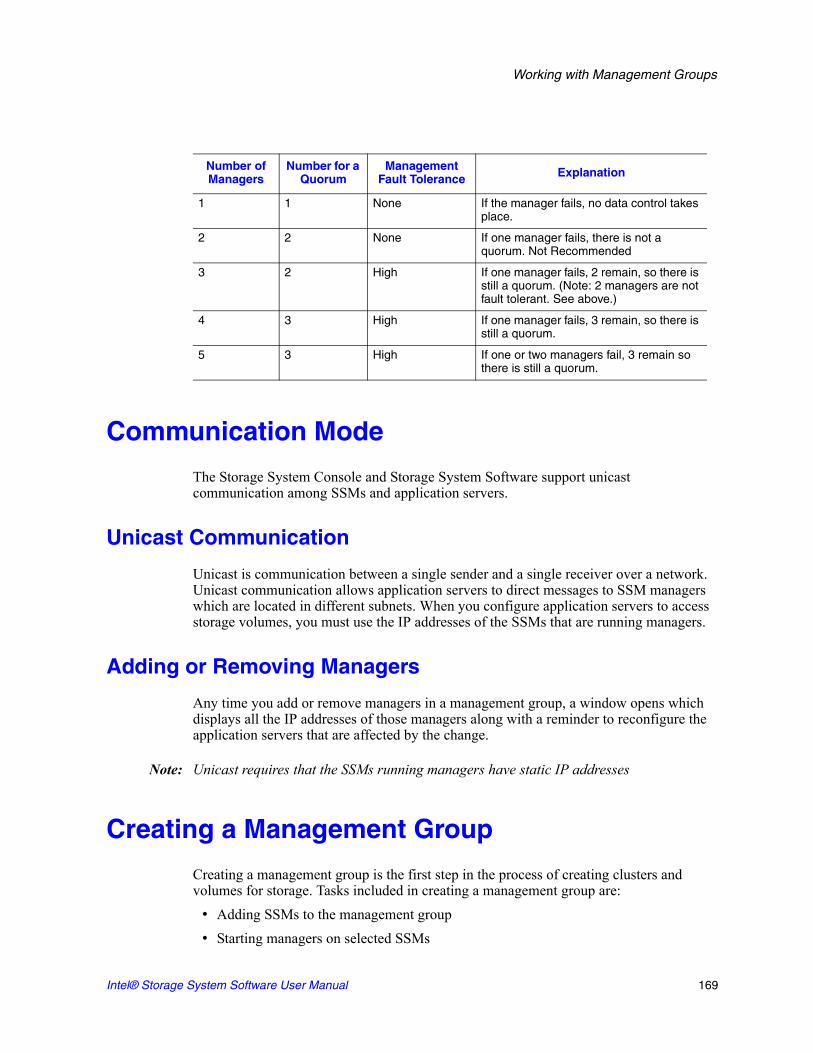
Working with Management Groups
Communication Mode
The Storage System Console and Storage System Software support unicast communication among SSMs and application servers.
Unicast Communication
Unicast is communication between a single sender and a single receiver over a network. Unicast communication allows application servers to direct messages to SSM managers which are located in different subnets. When you configure application servers to access storage volumes, you must use the IP addresses of the SSMs that are running managers.
Adding or Removing Managers
Any time you add or remove managers in a management group, a window opens which displays all the IP addresses of those managers along with a reminder to reconfigure the application servers that are affected by the change.
Note: Unicast requires that the SSMs running managers have static IP addresses
Creating a Management Group
Creating a management group is the first step in the process of creating clusters and volumes for storage. Tasks included in creating a management group are:
• Adding SSMs to the management group• Starting managers on selected SSMs
Number of Managers
Number for a Quorum
Management Fault Tolerance Explanation
1 1 None If the manager fails, no data control takes place.
2 2 None If one manager fails, there is not a quorum. Not Recommended
3 2 High If one manager fails, 2 remain, so there is still a quorum. (Note: 2 managers are not fault tolerant. See above.)
4 3 High If one manager fails, 3 remain, so there is still a quorum.
5 3 High If one or two managers fail, 3 remain so there is still a quorum.
Intel® Storage System Software User Manual 169

Working with Management Groups
Getting There
1. Open the Console. If you have not created a management group, but you have some SSMs on the network, the Console displays those SSMs as available. See Figure 131.
Figure 131. Viewing SSMs Before Creating a Management Group
2. Log in to one or more of the SSMs you want to add to the new management group.
Available SSMs before creating a
management group
170 Intel® Storage System Software User Manual

Working with Management Groups
3. Click Done from the SSM Edit Configuration window to return to the main Console window with the SSM tab view, shown in Figure 132.
Figure 132. SSM Tab
Adding the First SSM to Create a New Management Group
1. Select the first SSM to include in the management group.2. Click the Management Group Information tab in the Tab View, shown in Figure 133.
Figure 133. Management Group Information Tab
SSM Tab View
Intel® Storage System Software User Manual 171

Working with Management Groups
3. Click the Tasks button and select Add to New or Current Management Group. The Add to or create a Management Group window opens, shown in Figure 134.
Figure 134. Creating a New Management Group
4. Select New Management Group and type a name for the management group.
5. Click Add. The Managers IP Addresses window opens, shown in Figure 135.
Figure 135. List of Manager IP Addresses for Management Group
172 Intel® Storage System Software User Manual

Working with Management Groups
6. Click OK. The SSM joins the management group and starts the manager. The Console displays the newly created management group, shown in Figure 136.
Figure 136. New Management Group with One SSM
Adding Additional SSMs When Creating a Management Group
1. Select the next SSM that you want to add.2. Click the Tasks button on the Management Group Information tab and select Add to
New or Current Management Group. The Add to or create a Management Group window opens with the existing management group selected.
3. Click Add. The SSM is added to the specified management group.4. Repeat steps 1 through 3 to add additional SSMs.
Adding Managers to the Management Group
After adding the SSMs to the management group, you can start managers on the additional SSMs in the management group. The number of managers you start depends upon the overall design of your storage system. See “Managers Overview” on page 168 for more information about how many managers to add.1. Select an SSM in the management group on which to start a manager. The SSM Tab
View opens.
Intel® Storage System Software User Manual 173

Working with Management Groups
2. On the Management Group Information tab, select the Tasks menu and click Start Manager, as shown in Figure 137.
Figure 137. Starting a Manager
3. Repeat steps 1 and 2 to start managers on additional SSMs.
Logging In to a Management Group
You must log in to a management group to administer the functions of that group.
Note: Log in to a management group by logging in to an SSM that is designated as a manager for that management group.1. Click Log In on the management group in the Network View, shown in Figure 138.
Figure 138. Logging in to a Management Group
Click Start Manager
Click Log In
174 Intel® Storage System Software User Manual
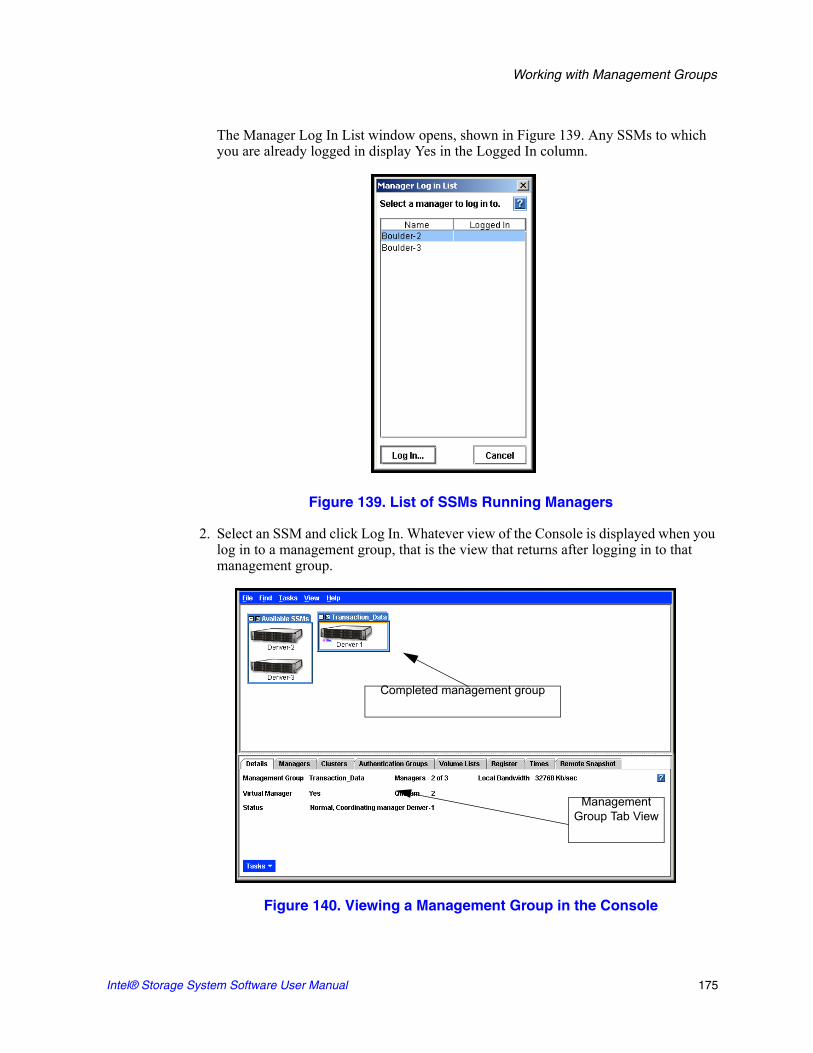
Working with Management Groups
The Manager Log In List window opens, shown in Figure 139. Any SSMs to which you are already logged in display Yes in the Logged In column.
Figure 139. List of SSMs Running Managers
2. Select an SSM and click Log In. Whatever view of the Console is displayed when you log in to a management group, that is the view that returns after logging in to that management group.
Figure 140. Viewing a Management Group in the Console
Completed management group
Management Group Tab View
Intel® Storage System Software User Manual 175

Working with Management Groups
Management Group Tab View
When you have logged in to and selected a management group, the management group Tab View opens. The tabs provide access to management group information and features, such as viewing management group properties, registering features, and creating clusters and authentication groups.
Details Tab
Details about the management group are listed along with the Task menu for taking action on the management group.
Information provided on the Details tab includes:• The name of the management group • The number of managers operating within the group• How many of those managers are required for a quorum and are operational (see
“Managers Overview” on page 168 for information about quorums)• The synchronization bandwidth that is set when you edit the management group• The communication mode of the management group
Managers Tab
All the SSMs included in the management group are listed on the managers tab. SSMs that are running managers display Yes in the Manager column.
Information provided on the Managers tab includes:• Host name of the SSM• Whether that SSM is running a manager • Whether that SSM is running a virtual manager
Clusters Tab
All the clusters created within the management group are listed on the clusters tab. For more information, see Chapter 11, “Working with Clusters.”
Information provided on the Clusters tab includes:• Name of the cluster
176 Intel® Storage System Software User Manual

Working with Management Groups
Authentication Groups Tab
All the authentication groups that are associated with volumes in a management group are created and managed from the management group. See Chapter 15, “Controlling Client Access to Volumes” for more information.
Information provided on the Authentication Groups tab includes:• Name of the authentication group• Authentication mode of the group• The subnet/mask of the authentication group, if the authentication is set up for subnet
and mask• Volume lists associated with the group
Volume Lists Tab
Volume lists are created at the management group level and provide the connection between authentication groups and volumes.
Information provided on the Volume Lists tab includes:• Name of the volume lists• Name of all volumes within the volume lists• Authentication group associated with the volume list
Register Tab
Register to use add-on modules available for specialized storage features. See Chapter 16, “Feature Registration” for more information about registering add-on modules.
Information available on the Register tab includes:• Version information about the software components of the system. The version
information is provided for customer support should you ever have a support issue.• License information for all the SSMs in the management group
Times Tab
Resynchronize the management group time any time you change the time on an SSM in the management group that is running a manager.
Note: Use NTP to ensure closely synchronized times on the SSMs in the management group
Information available on the Times tab includes:• Current time setting of the management group• Current time setting of each SSM in the management group
Intel® Storage System Software User Manual 177

Working with Management Groups
Remote Snapshot Tab
The Remote Snapshot tab lists details for the remote snapshot including:• Primary and remote management groups and snapshots• Copy rate, percent complete, and status information
Editing a Management Group
When editing a management group you can change the local bandwidth. The local bandwidth setting controls the copy rate within the local management group. Therefore it sets the data restripe rate for the management group. If you use Remote Copy between two clusters within one management group, local bandwidth will also control the remote copy rate. For more information about setting the bandwidth for Remote Copy, see the Remote IP Copy User Manual.
Note: When Remote Copy is used to copy a snapshot from one management group to another, the remote bandwidth setting of the management group containing the remote volume determines the rate per second that the manager will devote to copying data.
Setting or Changing the Local Bandwidth
After a management group has been created, you can edit the management group to change the local bandwidth. This is the maximum rate per second that a manager will devote to non-application processing, such as moving data and synchronizing hot spare SSMs. The default rate is 32768 KB (4 MB) per second. You cannot set the range below 2048 KB (256 KB).
Local Bandwidth Settings
The bandwidth setting is in KB (kilobytes) per second. The industry standard for networking bandwidth is in bits per second (bps). Use the following table to convert megabits to kilobytes for setting the local bandwidth.
Table 38. Typical Network Types
Network Type Bits Per Second (bps) Kilobytes Per Second (KB)
Fractional T1 256 Kbps 32
Fractional T1 (1/2) 768 Kbps 96
T1 1.544 Mbps 197
Bonded T1 (2) 3.088 Mbps 395
Bonded T1 (4) 6.176 Mbps 790
Ethernet, 10Base-T 10 Mbps 1280
T3 44.736 Mbps 5726
178 Intel® Storage System Software User Manual

Working with Management Groups
Set or Change Local Bandwidth
1. Log in to the management group.2. Click Edit Management Group. The Edit Management Group window opens, shown
in Figure 141.
Figure 141. Editing a Management Group
3. Change the local bandwidth.4. Click OK. The new rate displays on the Details tab in the management group Tab
View.
Ethernet, 100Base-T 100 Mbps 12,800
OC-3 155 Mbps 19,840
OC-12 622 Mbps 79,616
Ethernet, 1000Base-T 1 Gbps 128,000
OC-192 10 Gbps 1,280,000
Table 38. Typical Network Types
Network Type Bits Per Second (bps) Kilobytes Per Second (KB)
Intel® Storage System Software User Manual 179

Working with Management Groups
Logging Out of a Management Group
Logging out of a management group prevents unauthorized access to that management group and the SSMs in that group.1. Select the management group to log out of.2. Right-click and select Log Out of Management Group.
Adding an SSM to an Existing Management Group
SSMs can be added to management groups at any time. Adding an SSM to a management group increases the storage space available to the group. The newly added SSM can also be used as a hot spare for a cluster within the management group.
Note: All SSMs in a cluster must be configured alike. See “SSM Configuration Window” on page 35.1. Select the SSM that you want to add to a management group.2. Right-click and select Add to New or Current Management Group. The Add to or
Create a Management Group window opens, shown in Figure 142.
Figure 142. Adding an SSM to Existing Management Group
3. Select the correct management group from the list of existing management groups.4. Click Add.5. [Optional] If you want the SSM to run a manager, select the SSM in the management
group, right-click and select Start Manager.
180 Intel® Storage System Software User Manual
Working with Management Groups
Adding Manager IP Addresses to Application Servers
When you add a manager to a management group, a window opens which displays all the IP addresses of the managers in that management group and a reminder to reconfigure the application servers that are affected by the change.
• Click Save Manager IP Addresses to save this list. You can print the list and use it as a reference when reconfiguring application servers.
Resetting the Management Group Time
Any time you change the time setting of an SSM that is running a manager, you must reset the time of the management group as well. If the manager SSM time is different from the management group time, then
• File creation times on volumes and snapshots might be affected
• Scheduled snapshots might not kick off at the intended time
Note: Use NTP to ensure closely synchronized times on the SSMs in the management group.
When resetting the management group time, first verify the time settings of the SSMs running managers. If necessary, change time settings to ensure all the manager SSMs have the same time. For information about setting the time on the SSM, see Chapter 5, “Setting the Date and Time.” Then refresh the management group time.1. Log in to the management group.2. Select the Times tab.3. From the Tasks menu, click Refresh All. Verify the time settings on the SSMs running
managers.4. Click Reset Management Group Time. A confirmation message opens.5. Click OK. All the times listed on the Times tab should be the same.
Intel® Storage System Software User Manual 181

Working with Management Groups
Starting and Stopping Managers
Start or stop managers on SSMs already in a management group.1. Log in to the management group.2. Click the Managers tab in the Tab View. The Managers tab displays, shown in
Figure 143.
Figure 143. Starting a Manager
3. Select from the list the SSM on which you want to start a manager.4. From the Tasks menu, click Start Manager.5. Click OK.
182 Intel® Storage System Software User Manual

Working with Management Groups
Adding Manager IP Addresses to Application Servers
When you add a manager to a management group, a window opens, shown in Figure 144, which displays all the IP addresses of the managers in that management group and a reminder to reconfigure the application servers that are affected by the change.
Figure 144. Adding Manager IP Addresses to Application Servers
Click Save Manager IP Addresses to save this list. You can print the list and use it as a reference when reconfiguring application servers.
Stopping a A Manager
Under normal circumstances, you stop a manager when you are removing an SSM from a management group. You cannot stop the last manager in a management group. Deleting the management group is the only way to stop the last manager.
Implications of Stopping Managers
• Quorum may be decreased• Fewer copies of configuration data are available• Fault tolerance may be lost• Data integrity and security may be compromised
Warning: Stopping a manager can result in the loss of fault tolerance.
1. Select the management group in the Network View.2. Log in to the management group.
Intel® Storage System Software User Manual 183

Working with Management Groups
3. Select the Managers tab in the Tab View. The Managers tab displays.4. Select the SSM on which you want to stop the manager.5. Right-click and select Stop Manager. A confirmation message opens6. Click OK to confirm stopping the manager.
Removing Manager IP Addresses from Application Servers
When you remove a manager from a management group, a window opens that displays all the IP addresses of the managers in that management group and a reminder to reconfigure the application servers that are affected by the change.
Click Save Manager IP Addresses to save this list. You can print the list and use it as a reference when reconfiguring application servers.
Removing an SSM from a Management Group
Remove an SSM from an existing management group.
Prerequisites: Stopping or removing the SSM from data storage activities.• Remove all snapshots and volumes from the cluster containing the SSM. See
“Deleting a Snapshot” on page 255 and “Deleting a Volume” on page 238.• Remove the SSM from any cluster to which it belongs. See “Removing a Storage
Module from a Cluster” on page 214.• Stop the manager on the SSM, if it is running a manager. You may want to start a
manager on a different SSM to maintain quorum and the best fault tolerance. See “Stopping a A Manager” on page 183.
Removing an SSM With a License Key
If you have registered the SSM for add-on features, the license key is saved on the SSM when you remove it from the management group. That key remains valid when you re-add that SSM to a management group.
If you have backed up the configuration as described in “Backing Up a Management Group Configuration” on page 186, the license key is saved in the binary file used to restore the management group.
Removing the SSM
1. Log in to the management group from which you want to remove an SSM.2. Select the SSM to remove.
184 Intel® Storage System Software User Manual

Working with Management Groups
3. Right-click and select Remove from Management Group.A confirmation message opens.
4. Click OK. The SSM is removed from the management group, and moved to Available status.
Backing Up a Management Group Configuration
Use Backup Configuration of Management Group to save one or both of the following on your local machine:
• a binary file of the management group configuration from which you can restore the management group
• a text file listing the configuration parameters of the management group
The binary file enables you to automatically recreate a management group with the same configuration. Use the text file for support information or to manually reconstruct the configuration of a management group.
Note: Backing up the management group configuration does not save the configuration information for the individual SSMs in that management group. To back up SSM configurations, see “Backing Up the SSM Configuration File” on page 48. 1. Log in to the management group.2. From the Tasks menu on the Details tab, select Back up Configuration of
Management Group. The Back up Configuration of Management Group window opens, shown in Figure 145.
Figure 145. Backing up the Management Group Configuration
Intel® Storage System Software User Manual 185
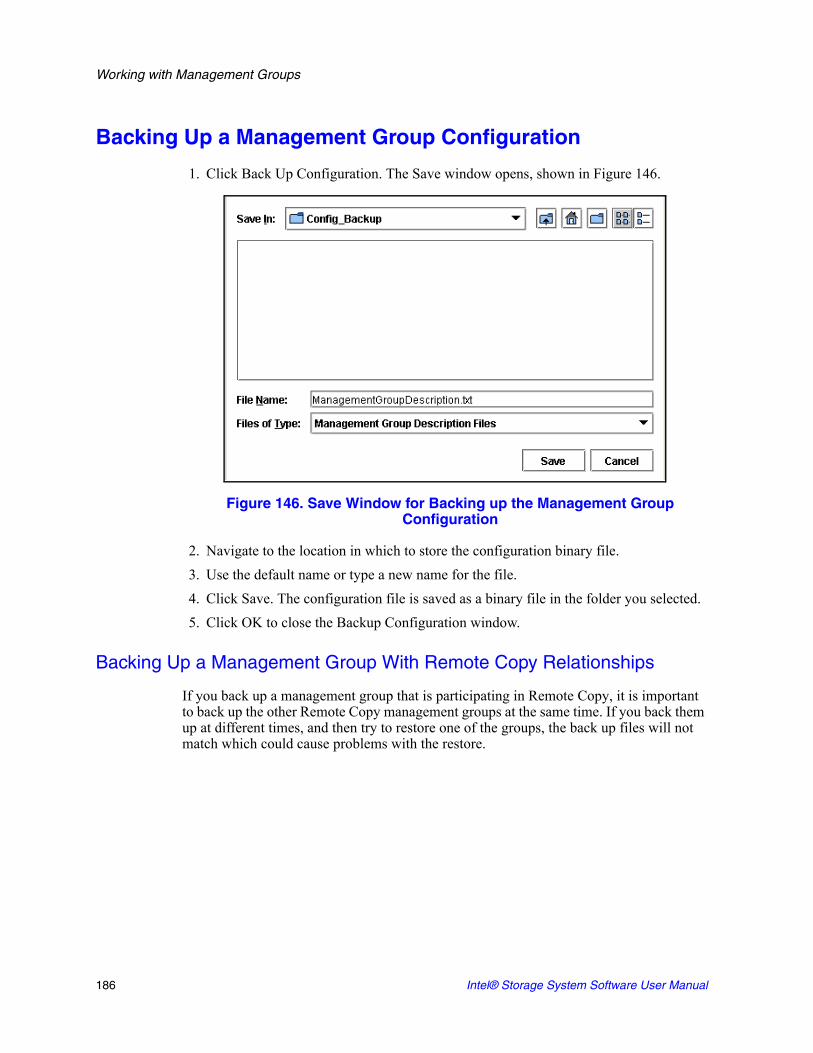
Working with Management Groups
Backing Up a Management Group Configuration
1. Click Back Up Configuration. The Save window opens, shown in Figure 146.
Figure 146. Save Window for Backing up the Management Group Configuration
2. Navigate to the location in which to store the configuration binary file. 3. Use the default name or type a new name for the file.4. Click Save. The configuration file is saved as a binary file in the folder you selected.5. Click OK to close the Backup Configuration window.
Backing Up a Management Group With Remote Copy Relationships
If you back up a management group that is participating in Remote Copy, it is important to back up the other Remote Copy management groups at the same time. If you back them up at different times, and then try to restore one of the groups, the back up files will not match which could cause problems with the restore.
186 Intel® Storage System Software User Manual

Working with Management Groups
Saving the Management Group Configuration Description
1. Click Save Configuration Description. The Save window opens.2. Navigate to the location in which to store the configuration description text file. 3. Use the default name or type a new name for the file.4. Click Save. The configuration description is saved as a text file in the folder you
selected. 5. Click OK to close the Backup Configuration window.
Restoring a Management Group
For disaster recovery, you can use the management group binary file to recreate a management group. The restore procedure restores everything except snapshots, since the data stored in volumes and snapshots is gone.
Requirements for Restoring a Management Group
• Hardware - You must have the same number of SSMs available that are the same capacity or greater.
• IP Addresses - You must use the same IP addresses for the replacement SSMs that were assigned to the original SSMs. If you do not have a record of those IP addresses, you can retrieve them when performing the restore. As part of the restore process, the configuration description is displayed and it lists the IP addresses.
To Restore a Management Group1. Make sure that the SSMs you are using to restore your management group are in the
Available pool in the Console.
Intel® Storage System Software User Manual 187

Working with Management Groups
2. Right-click in the Network view and select Restore Management Group. A standard Open window opens, shown in Figure 147.
Figure 147. Opening the Configuration Binary File
3. Navigate to the location of the configuration binary file.4. Select the file and click Restore Management Group. The Verify Management Group
Configuration window opens, shown in Figure 148.
Figure 148. Verifying the Management Group Configuration
5. After you have reviewed the configuration parameters, click Restore Management Group. The management group is restored.
188 Intel® Storage System Software User Manual

Working with Management Groups
Deleting a Management Group
Delete a management group when you are completely reconfiguring your network storage.
Warning: When a management group is deleted, all data stored on SSMs in that management group are lost.
Prerequisites• Logging in to each SSM in the management group • Stopping the virtual manager and managers on the individual SSMs
1. Log in to the management group in the Network View. The management group Tab View opens.
2. From the Tasks menu on the Details tab, select Delete Management Group.
3. A confirmation message opens.4. Click OK.5. When the management group is deleted, the SSMs return to available status in the
Network View.
Setting the Management Group Version
If instructed by customer support, you can set the management group version back to a previous version of the software. Setting the version back requires using a special command line option before opening the Console. Customer support will instruct you on using the command line option.
Selecting a Management Group from the List
Select a management group from the list and click OK.
Intel® Storage System Software User Manual 189

Working with Management Groups
190 Intel® Storage System Software User Manual

10 Disaster Recovery Using A Virtual Manager
A virtual manager provides disaster recovery for two specific system configurations. A virtual manager is a manager that is added to a management group, but is not started on an SSM until it is needed to regain quorum.
See “Managers and Quorum” on page 168 for detailed information about quorum, fault tolerance, and the number of managers.
Virtual manager is part of the add-on module, Scalability Pak. See Chapter 16, “Feature Registration” for information about add-on modules and registering features.
The following are definitions of the terms used in this chapter.• Virtual Manager: A manager which is added to a management group but is not
started on an SSM until a failure in the system causes a loss of quorum. The virtual manager is designed to be used in specific system configurations which are at risk for a loss of quorum.
• Regular Manager: A manager which is started on an SSM and operates according to the description of managers found in “Managers Overview” on page 168.
• Manager: Either a virtual manager or a regular manager.
When to Use a Virtual Manager
Use a virtual manager in the following configurations:• A management group across two sites: Using a virtual manager allows continuing
operation by one site if the other site fails. The virtual manager provides the ability to regain quorum in the operating site if one site goes down, or in one selected site if communication between the sites is lost. Such capability is necessary if volumes in the management group reside on SSMs in both locations.
• A management group in a single location with two SSMs: If you create a management group with two managers in the same location, that management group is in a non-fault tolerant configuration. One manager provides no fault tolerance. Two managers also provide no fault tolerance, due to loss of quorum if one manager goes down. See “Managers and Quorum” on page 168 for more information.Running two managers and adding a virtual manager to this management group provides the capability of regaining quorum if one manager goes down.

Disaster Recovery Using A Virtual Manager
Benefits of a Virtual Manager
Running a virtual manager supports implementation of disaster recovery configurations to support full site failover. The virtual manager ensures that, in the event of either a failure of an SSM running a manager, or of communication breakdown between managers (as described in the two-site scenario), quorum can be recovered and, hence, data remains accessible.
Requirements for Using a Virtual Manager
It is critical to use a virtual manager correctly. A virtual manager is added to the management group, but not started on an SSM until the management group experiences a failure and a loss of quorum. To regain quorum, you start the virtual manager on an SSM that is operating and in the site that is operational or primary, depending upon your situation.
Illustrations of correct uses of a virtual manager are shown in the first example of two-site failure scenarios.Figure 149. It is important to only start a virtual manager once.
In the second exampleFigure 150, illustrations of incorrect uses of a virtual manager are shown.
Requirement What it Means
Use a Virtual Manager with an Even Number of Regular Managers Running on SSMs
Add a Virtual Manager When Creating Management Group
You cannot add a virtual manager after quorum has been lost. The virtual manager must be added to the management group before any failure occurs.
A Virtual Manager Must Only Be Started Once, and Run Only Until the Site is Restored or Communication is Restored
Only one instance of a virtual manager must run at a time. Once you start a virtual manager, you must not start that virtual manager a second time. The virtual manager should run only until the site is restored and data is resynchronized, or until communication is restored and data is resynchronized.
DisasterRecoveryScenario
# of SSMs Running Regular
Managers
Total # of Managers
Including the Virtual
Manager
Two sites with shared data
4 5
Two SSMs in Management Group
2 3
192 Intel® Storage System Software User Manual

Disaster Recovery Using A Virtual Manager
Figure 149. Correct Two-site Failure Scenarios Using Virtual Managers
Normal Operation
2 regular managers
2 regular managers
Site A Site B
2 managers
2 managers
virtual manager added
Examples of two-site failure scenarios where a virtual manager is started to regain quorum. In all the failure scenarios, only one site becomes primary with a virtual manager started.
2 regular managers, 1 virtual manager started
2 regular managers, 1 virtual manager started
Scenario 3 - Site B fails. Start virtual manager on Site A.
Scenario 2 - Site A fails. Start virtual manager on Site B.
Scenario 1 - Communication link is lost. Start virtual manager on only one site.
2 regular managers
2 regular managers, 1 virtual manager started
Intel® Storage System Software User Manual 193

Disaster Recovery Using A Virtual Manager
Figure 150. Incorrect Uses of Virtual Manager to Regain Quorum
2 managers
Warning: Examples of what NOT to do when using a virtual manager to regain quorum.
Scenario 2 - Site A goes down. Two virtual managers started on Site B.
Site A Site B
Normal Operation
2 regular managers
2 regular managers
virtual manager added
Scenario 1 - Communication link is lost. Virtual manager started on both sites.
2 regular managers, 1 virtual manager started
2 regular managers, 1 virtual manager started
2 regular managers, 2 virtual managers started
194 Intel® Storage System Software User Manual
Disaster Recovery Using A Virtual Manager
Configuring a Cluster for Disaster Recovery
In addition to using a virtual manager, you must configure your cluster and volumes correctly for disaster recovery. This section describes how to configure your system, including the virtual manager.
Best Practice
The following configuration steps ensure that you have all the data replicated at each site and the managers configured correctly to handle disaster recovery.
For the following example, we are configuring two sites with two SSMs at each site, for an even number of SSMs. The management group contains one cluster. The cluster contains four SSMs and one volume with 2-way replication that spans both sites. That volume must contain all the data in each site.
Configuration Steps
Name SSMs with Site-Identifying Host Names
To ensure that you can easily identify in the Console which SSMs reside at each site, use host names that identify where each SSM is located. See “Changing the SSM Host Name” on page 43.
• Management Group Name - Transaction_Data• SSM names
— Denver-1— Boulder-1— Denver-2— Boulder-2
Create Management Group - Plan the Managers and Virtual Manager
When you create the management group in the 2-site scenario, plan to start two managers per site and add a virtual manager to the management group. You then have five managers for fault tolerance. See “Managers Overview” on page 168.
Intel® Storage System Software User Manual 195

Disaster Recovery Using A Virtual Manager
Add SSMs to the Cluster in Alternating Order
Create the cluster. When adding SSMs to the cluster, add them in alternating order, as shown in Figure 151. The order in which the SSMs are added to the cluster determines the order in which copies of data are written to the volume. Alternating the addition of SSMs by site location ensures that data is written to each site as part of the 2-way replication you configure when you create the volume. See “Creating a Cluster” on page 204.
Add SSMs to the cluster in the following order:1. 1st SSM: Denver-12. 2nd SSM: Boulder-13. 3rd SSM: Denver-24. 4th SSM: Boulder-2
Warning: If SSMs are added to the cluster in any order different than alternating order by site, you will not have a complete copy of data on each site.
Figure 151. Adding SSMs to Cluster in Alternating Site Order
196 Intel® Storage System Software User Manual

Disaster Recovery Using A Virtual Manager
Create the Volume with 2-way Replication
Configure the volume with 2-way replication. Two way replication ensures that two copies of the data are written to the volume. The fact that you added the SSMs to the cluster in alternating order ensures that a complete copy of the data exists on each site. See “Planning Data Replication” on page 224.
Figure 152. Cluster with SSMs Added in Alternating Order
Configuring a Virtual Manager
In order to use a virtual manager in a management group beyond the 30-day evaluation period, you must purchase the Scalability Pak. See Chapter 16, “Feature Registration.”
Adding a Virtual Manager
Add a virtual manager to a management group.1. From the Tasks menu on the Details tab, select Add or Delete Virtual Manager. A
confirmation dialog opens.2. Click OK to continue.
The virtual manager is added to the management group. The Details tab lists the virtual manager as added and the virtual manager icon appears in the management group as shown in Figure 153.
Intel® Storage System Software User Manual 197

Disaster Recovery Using A Virtual Manager
Figure 153. Management Group with Virtual Manager Added
The virtual manager remains added to the management group until needed.
Starting a Virtual Manager to Regain Quorum
Only start a virtual manager when it is needed to regain quorum in a management group. Figure 149 illustrates the correct way to start a virtual manager when necessary to regain quorum.
• Two-site Scenario, One Site Goes DownFor example, in the two-site disaster recovery model, one of the sites goes down. On the site that is still up, all managers must be running. Select one of the SSMs at that site and start the virtual manager on it. That site then regains quorum and can continue to operate until the other site is recovered. Once the other site is recovered, the managers in both sites reestablish communication and they ensure that the data in both sites is resynchronized. When the data is resynchronized, stop the virtual manager to return to the disaster recovery configuration.
Note: If the downed site is not recoverable, you can create a new site with new SSMs and reconstruct the cluster. Call your technical support representative.
• Two-site Scenario, Communication Between the Sites is LostIn this scenario, the sites are both operating independently. On the appropriate site, depending upon your configuration, select one of the SSMs and start the virtual manager on it. That site then recovers quorum and operates as the primary site. Once communication between the sites is restored, the managers in both sites reestablish communication and they ensure that the data in both sites is resynchronized. When the data is resynchronized, stop the virtual manager to return to the disaster recovery configuration.
Virtual manager added
198 Intel® Storage System Software User Manual

Disaster Recovery Using A Virtual Manager
Starting a Virtual Manager
A virtual manager must be started on an SSM, ideally one that is not already running a manager. However, if necessary, you can start a virtual manager on an SSM that is already running a manager. Figure 154 shows a management group with a down manager. 1. Click the SSM on which you want to start the virtual manager.2. From the Tasks menu on either the Details tab or the Management Group Information
tab, select Start Virtual Manager, shown in Figure 154.
Figure 154. Starting a Virtual Manager
The virtual manager starts on that SSM, and the black triangle—the graphic indicator of the virtual manager—appears under the SSM, shown in Figure 155. See “Icons Used in the Storage System Console” on page 18 for a key to all the graphic indicators.
Figure 155. Indicator of the Virtual Manager
Note: If you attempt to start a virtual manager on an SSM that appears to be up in the Console, and you receive a message that the SSM is down, start the virtual manager on a different SSM. This situation can occur when quorum is lost because the Console displays the SSM in a normal state, even though the SSM is down.
Virtual manager indicator
Intel® Storage System Software User Manual 199
Disaster Recovery Using A Virtual Manager
Stopping a Virtual Manager
When the situation requiring the virtual manager is resolved—either the down site recovers or the communication link is restored—you must stop the virtual manager. Stopping the virtual manager returns the management group to a fault tolerant configuration.1. Select the SSM that is running the virtual manager.2. From the Tasks menu on either the Details tab or the Management Group Information
tab, select Stop Virtual Manager. A confirmation message appears. 3. Click OK. The virtual manager is stopped. However, it remains part of the
management group and part of the quorum.
Removing a Virtual Manager
You can remove the virtual manager from the management group altogether.1. Select the management group that has the virtual manager.2. From the Tasks menu on the Details tab, select Add or Delete Virtual Manager. A
confirmation message opens.3. Click OK. The virtual manager is removed.
Note: The Console will not allow you to delete a manager or virtual manager if that deletion causes a loss of quorum.
200 Intel® Storage System Software User Manual

11 Working with Clusters
Clusters Overview
Within a management group you create sub-groups of storage modules called clusters. A cluster is a grouping of storage modules from which you create volumes.
Think of a cluster as a pool of storage. You add storage to the pool by adding storage modules. You then carve volumes out of the pool. Volumes seamlessly span the storage modules in the cluster.
Topics Covered in This Chapter
• Mixing storage modules in a cluster• Hot spares • iSCSI and clusters• Creating and managing clusters• Repairing a storage module
Clusters and Storage Module Capacity
Clusters can contain storage modules with different capacities. However, all storage modules in a cluster will operate at a capacity equal to that of the smallest capacity storage module.
Prerequisites
All the storage modules in a cluster must be configured alike. See “SSM Configuration Window” on page 35.
Before you create a cluster, you must have created a management group. See “Creating a Management Group” on page 169.

Working with Clusters
Using Hot Spares
A cluster of storage modules can contain a hot spare storage module. A hot spare is an storage module that is not used for data storage, but stands by in case a storage module in the cluster goes down, at which time the hot spare is activated. When the hot spare is activated in the cluster, replicated volumes restripe onto the hot spare storage module. A hot spare storage module is designated in the Console by the icon show below.
Note: Hot spares do not provide protection for non-replicated volumes. There must be some copy of data to be restriped onto the new storage module, and non-replicated volumes do not have copies.
In order to have more than one SSM in a cluster beyond the 30-day evaluation period, you must purchase the Scalability Pak. See Chapter 16, “Feature Registration.”
Requirements for Hot Spares
To designate a hot spare storage module for a cluster, the following requirements apply.
Best Practice
The hot spare storage module should be equal to or greater in size than the other storage modules in the cluster.
How a Hot Spare Works
If an storage module in a cluster goes down, and a hot spare is designated for that cluster, then the spare is automatically activated and data from replicated volumes start to migrate to the new storage module. At this point the cluster no longer contains a hot spare. When the down storage module comes back up, it becomes the hot spare.
When a hot spare is activated, it is not configured as a manager. If you want to designate the activated hot spare as a manager, you must start the manager. See “Starting and Stopping Managers” on page 182.
Hot Spare Requirements
A cluster must contain at least 3 storage modules to have one storage module designated as a hot spare.
At most, one hot spare storage module can be designated per cluster. However, a cluster does not require a hot spare.
202 Intel® Storage System Software User Manual

Working with Clusters
Setting the Hot Spare Time Out
The hot spare time out designates the amount of time before a hot spare is activated in the cluster. When a hot spare is activated the system will migrate data onto the new storage module. This data migration may take some time. Setting the hot spare time out allows you to control for situations in which you don’t want the hot spare activated, for example, if your network has high latency.
The time out begins counting from the time that the storage module begins blinking in the Console. The default time is set to 0 seconds so that the hot spare takes over as soon as the system detects that the storage module is unavailable.
For example, if you set the time out to 60 seconds, then the hot spare is activated 1 minute after the system detects that the storage module is unavailable.
Swap in Hot Spare
You can manually force a storage module designated as a hot spare to activate in the cluster, if an storage module in that cluster is not available and the cluster is blinking red in the Console. Swapping in a hot spare overrides the hot spare time out setting. However, the setting remains intact in the cluster and continues to apply once the cluster configuration has returned to normal.
Clusters and iSCSI
If you plan to use iSCSI with the Storage System Software, there are iSCSI features you configure at the cluster level, either when you create the cluster or by editing the cluster to configure these items.
• Virtual IP Address - A virtual IP address is a highly available address that ensures that if a storage module in a cluster becomes unavailable, clients can still access the volume through the other storage modules in the cluster. A virtual IP address is required for a fault tolerant SAN.
• iSNS Server - An iSNS server simplifies the discovery of iSCSI targets on multiple clusters on a network. If you use an iSNS server, configure your cluster to register the iSCSI target with the iSNS server. You can use up to 3 iSNS servers.
Requirements for Using a Virtual IP Address
The following table lists the requirements for using a virtual IP address.
Requirements for Using a Virtual IP
Storage modules must be in same subnet address range as the virtual IP.
The virtual IP must be routable regardless of which storage module it is assigned to.
Intel® Storage System Software User Manual 203

Working with Clusters
iSCSI Load Balancing
Use the iSCSI load balancing feature to improve iSCSI performance and scalability by distributing iSCSI sessions for different volumes evenly across storage modules in a cluster.
Requirements• Virtual IP address• Authentication group configured for iSCSI load balancing. See “Client Access Using
iSCSI” on page 268.
Creating a Cluster
Creating a cluster is the first step in designating space for storage in a management group.
Note: If you plan to have a two clusters, each with one storage module, the most reliable configuration is to create two management groups with one storage module in each group.1. Log in to the management group for which you want to create a cluster.
The management group Tab View opens.2. Click the Clusters tab.
The Clusters tab opens, shown in Figure 156.
iSCSI clients must be able to ping the virtual IP when it is enabled in a cluster.
Must be different than storage module IPs on the network.
Must be a specific IP reserved for this purpose. If you use DHCP, you must use a static IP.
All iSCSI initiators must be configured to connect to this IP for failover.
Requirements for Using a Virtual IP
204 Intel® Storage System Software User Manual

Working with Clusters
Figure 156. Viewing the Clusters Tab
3. From the Tasks menu, click New Cluster.The New Cluster window opens with the General tab on top, shown in Figure 157.
Figure 157. Creating a New Cluster
4. Type a meaningful name for the cluster.A cluster name is case sensitive and must be from 1 to 127 characters.
5. [Optional] Type a description of the cluster.
Clusters tab
Intel® Storage System Software User Manual 205

Working with Clusters
6. Select one or more storage modules from the SSMs Available list.
Note: The storage modules in the list are all those included in the management group that are not already in a cluster.7. Click Add.
The selected storage modules move to the storage modules in Cluster list.orClick Add All to move all the storage modules from the Available list to the storage modules in Cluster list.
Designating a Hot Spare
You must purchase the Scalability Pak to use the hot spare feature beyond the 30-day evaluation period.
Detailed information about using hot spares is in “Using Hot Spares” on page 202.1. [Optional] Click the Hot Spare drop down list to designate a hot spare.
Only storage modules in the cluster are displayed in the Hot Spare list. Hot spares cannot be used for storage—that is, you cannot create volumes on them. See “Using Hot Spares” on page 202 for detailed information about hot spares. ”Using Hot Spares”
2. [Optional] If you designate a hot spare you can set the hot spare time out.
Configure Virtual IP and iSNS for iSCSI
A virtual IP address is required for iSCSI load balancing and fault tolerance.1. Click the iSCSI tab to bring it to the front, shown in Figure 158.
The choice to use a virtual IP is enabled by default.
206 Intel® Storage System Software User Manual

Working with Clusters
Figure 158. Configuring a Virtual IP Address for iSCSI
2. Add the IP address, subnet mask and default gateway if required.
Adding an iSNS Server
[Optional] Add an iSNS server.
Note: If you use an iSNS server, you may not need to add Target Portals in the Microsoft iSCSI Initiator.3. Click Add.
The Add iSNS Server window opens, shown in Figure 159.
Figure 159. Adding an iSNS Server
4. Type the IP address of the iSNS server.
Intel® Storage System Software User Manual 207

Working with Clusters
5. Click OK.The server is added to the list, shown in Figure 160.
Figure 160. Viewing the List of iSNS Servers
6. Click OK when you have finished.The cluster is created and displayed inside the management group, shown in Figure 161.
7. Select the cluster to open the clusters Tab View, also shown in Figure 161.
Figure 161. Viewing a Cluster and the Cluster Tab View
List of iSNS servers
Cluster
Cluster Tab View
208 Intel® Storage System Software User Manual

Working with Clusters
The Cluster Tab View
The Cluster Tab View is shown in Figure 161. The tabs provide access to cluster information and features along with a Tasks button for taking actions on features.
Details Tab
Includes name, status, description, hot spare and the storage module to which the Virtual IP is assigned.
Volumes Tab
Includes the name, replication level, size, hard threshold and soft threshold for volumes in the cluster.
SSMs Tab
For each storage module in the cluster, this tab includes the host name, IP address, and whether the module is a hot spare for the cluster.
Disk Usage Tab
Displays usage statistics for the cluster and the modules, volumes, and snapshots contained in the cluster. See “Measuring Disk Capacity and Volume Size” on page 222 for a detailed explanation of disk capacity allocation in a cluster.
Figure 162. Viewing Usage Statistics for a Cluster
Note: Data migration, referred at the bottom of the Disk Usage tab, occurs during a snapshot deletion (when snapshot data returns to top level), or when moving a storage module into or out of an active cluster.
Intel® Storage System Software User Manual 209

Working with Clusters
The usage table provides the following information:
Usage Graphs Tab
The usage graphs, shown in Figure 163, provide a visual display of the cluster usage. The display updates in real time so you can easily see changes in the usage in the space allocated for the cluster, and in the space used for volumes and snapshots.
Figure 163. Viewing Disk Space Allocated and Used for the Cluster and its Volumes and Snapshots
Table 11.1. Details of disk space use reported on Disk Usage tab
Column Heading Information Reported
Space Space is block-level raw space
• Cluster
• SSM
• Volume• Snapshot
• Total raw space in the cluster
• Total raw space on the storage module
• Hard threshold of the volume• Hard threshold of the snapshot and of the writable snapshot
Max Used Maximum block level space ever written to
• Cluster
• SSM• Volume
• Snapshot
• Total raw space ever used in the cluster
• Total raw space ever used on the storage module• Total raw space ever used in the volume
• Total raw space ever used in the snapshot and in the writable snapshot
Max % Full Highest level of block level space ever used
• Cluster
• SSM
• Volume• Snapshot
• Percent of raw space allocated to volumes and snapshots
• Percent of storage module raw space to which data has been written
• Percent of volume hard threshold raw space ever used
• Percent of snapshot hard threshold raw space ever used
Misc. Other information that impacts space usage
• Cluster
• SSM
• Volume • Snapshot
• Percent of raw space in the cluster that has been allocated for volumes and snapshots
• Whether the storage module has been designated as a hot spare
• Replication level for the volume
• Replication level for the snapshot
210 Intel® Storage System Software User Manual

Working with Clusters
iSCSI Tab
Displays the virtual IP address if there is one, and lists any iSNS servers configured for the cluster.
Remote Snapshot Tab
You must purchase the Remote Data Protection Pak to use remote snapshots beyond the 30-day evaluation period. The Remote Snapshot tab lists details about any remote snapshots that have been created. Detailed information about remote snapshots is available in the Remote Copy appendix
iSCSI Sessions Tab
Displays which hosts are connected to which volumes in the cluster. Information includes the initiator name and the SSM that is acting as the gateway for the session.
Identifying iSCSI load balancing - If you are using iSCSI load balancing, and you have more than one volume, you will see one session per host/volume pair, each with a different NSM Gateway entry.
The other way to verify if iSCSI load balancing is enabled is to look on the Authentication Groups tab, from the Management Group tab view.
Editing a Cluster
When editing a cluster, you can change the description, add or remove storage modules, and change the hot spare designation of an storage module. You can also edit or remove the virtual IP and iSNS servers associated with the cluster.
Prerequisite
You must log in to the management group before you can edit any clusters within that group.
Intel® Storage System Software User Manual 211

Working with Clusters
Getting There
1. Select the cluster you want to edit.2. From the Tasks menu on the Details tab, select Edit Cluster.
The Edit Cluster window opens, shown in Figure 164.
Figure 164. Editing a Cluster
Adding a Storage Module to an Existing Cluster
Add a storage module to an exiting cluster to expand the storage for that cluster or to designate the storage module as a hot spare.
Prerequisites
• Configure the storage module to match the storage modules already in the cluster. See “SSM Configuration Window” on page 35 for information about what features must be configured.
• Add the storage module to the management group that contains the cluster.
Warning: [Intel® Storage System SSR212MA, Intel® Storage System SSR316MJ2] You cannot add a storage module to a cluster in which RAID is rebuilding.
212 Intel® Storage System Software User Manual

Working with Clusters
Cluster Capacity
All storage modules in a cluster will operate at a capacity equal to that of the smallest capacity storage module.
Be certain that the capacity of the storage module you add to the cluster matches the capacity of the storage modules already in the cluster. If you add an storage module with a smaller capacity, the capacity of the entire cluster might be reduced.1. Select a storage module from the SSMs Available list.2. Click Add.
The storage module moves to the SSMs in Cluster list.orClick Add All to move all the storage modules from the SSMs Available list to the SSMs in Cluster list.
3. Click OK when you are finished.
Changing the Hot Spare Designation
You can add a hot spare or remove a hot spare from a cluster as long as the volumes in that cluster have a replication priority of availability. See “Planning Data Replication” on page 224 for details about volume replication.
Note: A hot spare cannot reside in a cluster which contains volumes that have a replication priority of redundancy.
Adding a Hot Spare
To add a hot spare, the cluster must contain sufficient storage modules to handle the volumes and snapshots that currently exist in that cluster. See “Adding a Storage Module to an Existing Cluster” on page 212 if you want to add a storage module to become a hot spare. 1. Click the Hot Spare drop down list and select the storage module to designate as the
hot spare.2. Click OK when you are finished.
Note: A cluster must contain at least 3 storage modules to have one storage module designated as a hot spare.
Removing a Hot Spare
To remove a hot spare, simply change the designation in the list to none. The hot spare then becomes a storage module in the cluster, adding more space for storage.1. Click the Hot Spare drop down list and select None from the list.
Intel® Storage System Software User Manual 213

Working with Clusters
2. Click OK when you are finished.The storage module returns to the cluster as available storage.
Changing the Hot Spare Time Out
The hot spare time out designates the amount of time before a hot spare is activated in the cluster. You can change the value at any time. The results of changing the time out value are listed below.
• Cluster operating normally – changing hot spare time out has an effect only if a storage module in the cluster becomes unavailable.
• Cluster with unavailable storage module – reducing the time out value will activate the hot spare earlier. For example, a storage module is not available and the hot spare time out is configured for 6 hours. After 3 hours you reduce the time out to 1 hour, thinking that will activate the hot spare in 60 minutes. However, the hot spare activates immediately. This is because the clock that is tracking the time out started when the storage module became unavailable and it considers the 1 hour interval to have passed already.
• Cluster with unavailable storage module – increasing the time out value will activate the hot spare later.For example, a storage module is not available and the hot spare time out is configured for 6 hours. Four hours have passed. You increase the time out to 8 hours, adding an additional 2 hours to the time out interval, before the hot spare activates
To change the hot spare time out1. Change the value for the hot spare time out.2. Click OK.
Removing a Storage Module from a Cluster
You can remove a storage module from a cluster only if the cluster contains sufficient storage modules to maintain the existing volumes and replication level. See Chapter 12, “Working with Volumes,” on page 221 for details about editing volumes. 1. Select a storage module from the SSMs in Cluster list.2. Click Remove.
The storage module moves to the SSMs Available list.3. Click OK when you are finished.
214 Intel® Storage System Software User Manual

Working with Clusters
Changing or Removing the Virtual IP
Anytime you change or remove the virtual IP address for iSCSI volumes, you are changing the configuration that clients are using. Therefore it is important to disconnect any clients before making this change.
Preparing Clients
• Quiesce any applications that are accessing volumes in the cluster.• Log off the active sessions in the initiator for those volumes.
Changing the Virtual IP Address
1. In the Edit Cluster window, click the iSCSI tab.2. Change the entries in the IP Address, Subnet Mask and Default Gateway fields
Removing the Virtual IP Address
1. In the Edit Cluster window, click the iSCSI tab.2. Clear the checkbox to Use a virtual IP.
Finishing Up
1. Click OK when you are finished changing or removing the virtual IP.2. Reconfigure the iSCSI initiator with the changes.3. Reconnect to the volumes.4. Restart the applications that use the volumes.
Changing or Removing an iSNS Server
If you change the IP address of an iSNS server, or remove the server, you may need to change the configuration that clients are using. Therefore, you may need to disconnect any clients before making this change.
Preparing Clients
• Quiesce any applications that are accessing volumes in the cluster.• Log off the active sessions in the initiator for those volumes.
Intel® Storage System Software User Manual 215

Working with Clusters
Changing an iSNS Server
1. Select the iSNS server to change.2. Click Edit.
The Edit iSNS Server window opens.3. Change the IP address.4. Click OK.
Deleting an iSNS Server
1. Select the iSNS server to delete.2. Click Delete.
A confirmation message opens.3. Click OK.
Finishing Up
1. Click OK when you are finished changing or removing an iSNS server.2. Reconfigure the iSCSI initiator with the changes.3. Reconnect to the volumes.4. Restart the applications that use the volumes.
Swapping in a Hot Spare
You can manually swap in a hot spare if a storage module in the cluster is not available and is blinking red in the Console. Swapping in a hot spare causes the RAID to restripe.1. Right-click on the storage module designated as the hot spare for the cluster.
The hot spare storage module has the hot spare icon next to it. A confirmation message opens.
2. Click OK.The storage module begins restriping.
216 Intel® Storage System Software User Manual

Working with Clusters
Repairing a Storage Module
Repairing a storage module allows you to replace a failed disk in a storage module that is in a cluster configured for 2-way or 3-way replication and only trigger one resync of the data stored on storage modules in that cluster, rather than restriping. Resyncing the data is a shorter operation than a restripe.
Prerequisites for Using Repair SSM
• Volume must have 2-way or 3-way replication.• Storage module must be blinking red in the Console.• If the storage module is running a manager, stopping that manager must not break
quorum.
How Repair SSM Works
Replacing a failed disk requires removing the storage module from the cluster and management group, replacing the disk, and returning the storage module to the cluster. Because of the replication level, removing and returning the storage module to the cluster would normally cause the remaining storage modules in the cluster to restripe the data twice—once when the storage module is removed from the cluster and once when it is returned. Repairing the storage module creates a placeholder in the cluster, in the form of a “ghost” storage module. This ghost storage module keeps the cluster intact while you remove the storage module, replace the disk, configure RAID, and return the storage module to the cluster. The returned storage module only has to resynchronize with the other 2 storage modules in the cluster.
Repairing an SSM
When a storage module in a cluster has a disk failure, the Network View displays the storage module and the cluster as blinking red and needing attention, shown in Figure 165.
Figure 165. Storage Module with Failed Disk
1. If the storage module is running a manager, stop the manager. 2. Select the storage module in the Network View.3. Right-click and select Repair storage module.
A confirmation message opens.
Failed SSM blinks red
Intel® Storage System Software User Manual 217

Working with Clusters
4. Click OK.The storage module leaves the management group and moves to the Available group. A placeholder, or “ghost” storage module remains in the cluster, shown in Figure 166. It is labeled with an IP address instead of a host name.
Figure 166. Viewing the Ghost Storage Module
5. Replace the disk in the storage module.
After you replace the disk you must power the disk on and reconfigure RAID. See “Replacing Disks and RAID” on page 79
6. Add the repaired storage module to the management group.The storage module returns to the management group and the ghost storage module is still in the cluster, shown in Figure 166.
Figure 167. Returning the Storage Module to the Management Group
7. Edit the cluster and add the repaired storage module to the cluster.
Note: The repaired storage module must be returned to the cluster in the same place it originally occupied to have the cluster resync, rather than restripe.
To return the repaired storage module to the cluster in the original order8. In the Edit Cluster window, shown in Figure 168, remove any storage modules in the
list that are below the ghost storage module.The removed storage modules return to the storage modules Available column.
SSM needing repair
ghost SSM
Repaired SSM
218 Intel® Storage System Software User Manual

Working with Clusters
9. Remove the ghost storage module.
Figure 168. Returning the Repaired Storage Module to the Cluster
10. Select the repaired storage module and add it to the cluster.It will be in the place reserved by the ghost storage module.
11. Add any remaining storage modules to the cluster. 12. Click OK.
The storage modules are in the cluster in their original order. The ghost storage module is removed from the cluster.
13. Select the ghost storage module and remove it from the management group.A confirmation message opens, warning that the storage module cannot be found on the network.
14. Click OK to confirm removing storage module from the management group.Another confirmation message opens.
15. Click OK. The ghost storage module disappears from the Console.
Repaired SSMGhost SSM as placeholder
Intel® Storage System Software User Manual 219

Working with Clusters
Deleting a Cluster
Volumes and snapshots must be deleted or moved to a different cluster before you can delete the cluster. For more information, see “Deleting a Volume” on page 238, and “Deleting a Snapshot” on page 255.
Prerequisite
You must log in to the management group before you can delete any clusters within that group.1. Log in to the management group that contains the cluster you want to delete.2. Select the cluster you want to delete.
The Cluster Tab View opens.3. From the Tasks menu on the Details tab, select Delete Cluster.
A confirmation message opens. If the message says that the cluster is in use, you must delete the snapshots and volumes on the cluster first.
4. Click OK. The cluster is deleted and the storage modules return to the management group as available.
220 Intel® Storage System Software User Manual

12 Working with Volumes
Volume Overview
A volume is a logical entity that is made up of storage on one or more storage modules. It can be used as raw data storage or it can be formatted with a file system and used by a host or file server. You create volumes on clusters of one or more storage modules.
Volumes and Client Access
After you create a volume, you must add it to a volume list which is associated with an authentication group. Volume lists and authentication groups control access to volumes by application servers. For detailed information, see Chapter 15, “Controlling Client Access to Volumes.”
Prerequisite
Before you create a volume, you must have created a management group and at least one cluster. See Chapter 9, “Working with Management Groups.” and Chapter 11, “Working with Clusters.”
Topics Covered in This Chapter
• Planning volume size and thresholds• Planning data replication and data priority• Creating and managing volumes
Planning Volumes
Planning volumes takes into account multiple factors.• How many volumes do you need?• What type of volume are you creating - primary or remote?• What size do you want the volume to be?• Do you plan to use snapshots?• Do you plan to use data replication?• Do you plan to grow the volume or to keep it the same size?

Working with Volumes
Note: If you plan to mount file systems, create a volume for each file system you plan to mount. You can then grow each file system independently.
Planning Volume Type
• Primary volumes are volumes used for data storage.• Remote volumes are used with Remote Copy for business continuance, backup and
recovery, and data mining/migration configurations.
Planning Volume Size
Volume size is the size of the virtual device communicated to the operating system and the applications. Volume size falls into one of three categories
• Volumes that are smaller than the storage capacity of the cluster• Volumes that are equal in size to the storage capacity of the cluster• Volumes that are larger than the storage capacity. Creating larger volumes makes it
easy to add additional storage resources to the cluster at a later date.
How you plan to use the volume is one factor in setting the size. Other factors in planning size are calculating the hard threshold and whether you plan to use snapshots.
Measuring Disk Capacity and Volume Size
If you are using Microsoft Windows or Netware with your Storage System Software, you are dealing with two disk space accounting systems-the block system and the native file system (on Windows, this is usually NTFS).
Block Systems and File Systems
Operating systems see hard drives (both physical and virtual) as abstractions known as "block devices": arbitrary arrays of storage space, which can be read from and written to at will.
Files on disks are handled by a different abstraction: the "file system." File systems are placed on block devices. File systems are given authority over reads and writes to block devices.
iSCSI and EBSD do not operate at the file system level of abstraction. Instead, they present the Storage System Software volume to an OS such as Windows as a block device. Typically, then, a file system is created on top of this block device so that it can be used for storage. In contrast, an Oracle database uses a Storage System Software volume as a raw block device.
222 Intel® Storage System Software User Manual

Working with Volumes
Storing File System Data on a Block System
The Windows file system treats this block device as simply another hard drive; that is, it is an array of blocks which the file system can use for storing data. As the iSCSI initiator or the EBSD driver passes writes from the file system, the Storage System Software simply writes those blocks into the volume. So when you look at the Console, the allocation percentage displayed is based on how many physical blocks have been written for this volume.
Now, when you delete a file, typically the file system updates the directory information which removes that file. Then the file system notes that the blocks which that file previously occupied are now freed up. Subsequently, when you query the file system about how much free space is available, the space occupied by the deleted files appears as part of the free space, since the file system knows it can overwrite that space.
However, the file system does not inform the block device underneath (the Storage System Software volume) that there is freed up space. In fact, no mechanism exists to transmit that information. There is no SCSI command which says "block 198646 can be safely forgotten"; at the block device level there are only reads and writes.
So, to ensure that our iSCSI and EBSD network block devices work correctly with file systems, any time a block is written to, that block is forever marked as allocated. Then, when all blocks are allocated up to the full size of the storage volume, the file system takes over. The file system reviews its "available blocks" list and reuses blocks that have been freed up.
Planning Hard Thresholds
The hard threshold is the amount of application data that can actually be written to the volume. This size is the actual physical space reserved for data on the disks in the cluster. Therefore, it is the limit beyond which data can no longer be written to the volume. The hard threshold can be increased up to the volume size, if they are not set as equal.
Best Practice if Not Using Snapshots
For volumes that will not be used with snapshots, hard thresholds should be set equal to the volume size. This setting ensures that the hard threshold cannot be exceeded, which prevents clients from accessing the volume. If you intend to use snapshots, see “Managing Capacity Using Volume and Snapshot Thresholds” on page 241.
Best Practice if Using Snapshots
For volumes that will be used with snapshots, set the hard threshold size less than the volume size. Next, set the soft threshold less than the hard threshold.
Intel® Storage System Software User Manual 223

Working with Volumes
Planning Snapshots
Snapshots take up space on the cluster. Planning how much space, and planning the use and scheduling of snapshots impacts the hard threshold you should set for the volume.
Note: Volume size, volume thresholds, and using snapshots should be planned in conjunction. If you intend to use snapshots, review Chapter 13, “Working with Snapshots.”
Planning Soft Thresholds
Soft thresholds trigger alerts to system administrators to help ensure that hard thresholds are not exceeded. Upon receiving an alert, the system administrator can take steps to increase capacity according to planned capacity management. See “Managing Volume Growth Capacity” on page 228 for strategies to manage volume growth.
Best Practice If Not Using Snapshots
If the hard threshold is equal to the volume size, set the soft threshold equal to the volume size as well. Use application-level monitoring to manage capacity growth.
Best Practice If Using Snapshots
If the hard threshold is less than the volume size, set the soft threshold to a percentage of the hard threshold. When a soft threshold alert is received,
• provision more storage for the cluster (if required), • increase the hard threshold, and • re-adjust the soft threshold to be a percentage of the new hard threshold.
Planning Data Replication
Data replication creates redundant copies of a volume. You can create up to three copies using 3-way replication. Because these copies reside on different storage modules, replication levels are tied to the number of available storage modules in a cluster. (Hot spare storage modules are not available for data storage, and therefore not available when calculating replication levels.)
The Storage System Software and the Storage System Console provide flexibility when planning data replication through two features.
• Replication level allows you to choose how many copies of data you want to keep in the cluster.
• Replication priority allows you to choose whether availability or redundancy is more important in your configuration.
224 Intel® Storage System Software User Manual

Working with Volumes
Replication Level
Three replication levels are available depending upon the number of available (non-hot spare) storage modules in the cluster. The level of replication you choose also affects the Replication Priority you can set.
Note: The system calculates the actual amount of storage resources needed if the replication level is greater than none.
How Replication Levels Work
When you choose 2-way or 3-way replication, data is written to either 2 or 3 consecutive storage modules in the cluster. For example:
2-Way Replication
A cluster with 3 storage modules, configured for 2-way replication. There have been 5 writes to the cluster. Figure 169 illustrates the write patterns on the 3 storage modules.
Figure 169. Write Patterns in 2-way Replication
Table 39. Setting a Replication Level for a Volume
With This Number of Available Storage
Modules in Cluster
Select This Replication Level For This Number of Copies
1 • None • 1 copy of data in the cluster. No replica is created.
2 (not a recommended configuration for high availability)
• None• 2-Way
• 1 copy of data in the cluster, no replication.
• 2 copies of data in the cluster. One replica is created.
3 or more • None• 2-Way
• 3-Way
• 1 copy of data in the cluster (no replication).
• 2 copies of data in the cluster (one replica).
• 3 copies of data in the cluster. Two replicas are created.
Store 1 Store 2 Store 3
1st
4th3rd
1st
4th
2nd
5th
2nd
5th
3rd
Intel® Storage System Software User Manual 225

Working with Volumes
Replication Priority
Set the replication priority according to whether data availability or data redundancy is the goal for the volume.
Availability Priority
If data availability is your priority, you can set any replication level.
Redundancy Priority
If redundancy is the priority, you must select either 2-way or 3-way replication.
Note: When you have volumes with a priority of redundancy, you cannot use a hot spare in the cluster.
Warning: A management group with 3 storage modules is the minimum configuration for fault tolerant operation. Although the system allows you to configure 2-way replication on 2 storage modules, this does not guarantee data availability in the event that 1 storage module becomes unavailable. See “Managers Overview” on page 168.
Best Practice
If your volumes contain critical data, configure them for 2-way replication and a priority of redundancy.
Table 40. Replication Priority
Volume is available to a client with a replication level of
and a priority
setting ofNone 2-way 3-way
AvailabilityAll storage modules must be up
1 of every 2 consecutive storage modules must be up
1 of every 3 consecutive storage modules must be up
RedundancyN/A All storage modules
must be up2 of every 3 consecutive storage modules must be up
226 Intel® Storage System Software User Manual
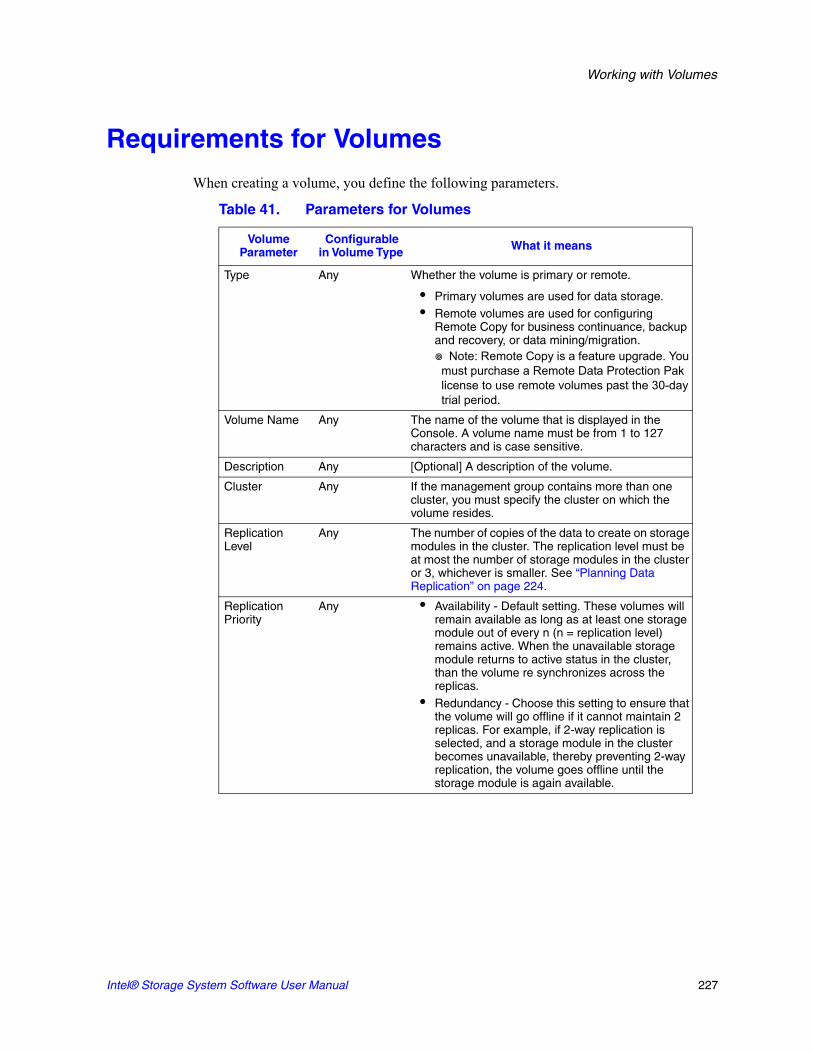
Working with Volumes
Requirements for Volumes
When creating a volume, you define the following parameters.
Table 41. Parameters for Volumes
Volume Parameter
Configurable in Volume Type What it means
Type Any Whether the volume is primary or remote.
• Primary volumes are used for data storage. • Remote volumes are used for configuring
Remote Copy for business continuance, backup and recovery, or data mining/migration.
Note: Remote Copy is a feature upgrade. You must purchase a Remote Data Protection Pak license to use remote volumes past the 30-day trial period.
Volume Name Any The name of the volume that is displayed in the Console. A volume name must be from 1 to 127 characters and is case sensitive.
Description Any [Optional] A description of the volume.
Cluster Any If the management group contains more than one cluster, you must specify the cluster on which the volume resides.
Replication Level
Any The number of copies of the data to create on storage modules in the cluster. The replication level must be at most the number of storage modules in the cluster or 3, whichever is smaller. See “Planning Data Replication” on page 224.
Replication Priority
Any • Availability - Default setting. These volumes will remain available as long as at least one storage module out of every n (n = replication level) remains active. When the unavailable storage module returns to active status in the cluster, than the volume re synchronizes across the replicas.
• Redundancy - Choose this setting to ensure that the volume will go offline if it cannot maintain 2 replicas. For example, if 2-way replication is selected, and a storage module in the cluster becomes unavailable, thereby preventing 2-way replication, the volume goes offline until the storage module is again available.
Intel® Storage System Software User Manual 227

Working with Volumes
Managing Volume Growth Capacity
When creating a volume for which you plan to use snapshots, you can set the soft threshold value to help manage capacity growth. This threshold value triggers an alert, providing you the opportunity to increase the capacity of the volume before it is full.
Note: Volume size, replication level, and snapshots should be planned in conjunction. if you intend to use Snapshots, review Chapter 13, “Working with Snapshots.”
Creating the Volume and Setting Thresholds
• First, create the volume and designate the size. This size is the logical size on the cluster. For example, you have a 750 GB cluster and you create a 500 GB volume.
Size Primary The logical block storage size of the volume. Hosts and file systems will operate as if storage space equal to the volume size is available in the cluster. This volume size may exceed the true allocated disk space on the cluster for data storage, which facilitates adding more storage modules to the cluster later for seamless storage growth. However, if the volume size does exceed true allocated disk space, the ability to make snapshots may be impacted. See Chapter 13, “Working with Snapshots.” Remote volumes contain no data and therefore do not have a size.The default value in the size field is equal to the available space on the cluster.
Hard Threshold Primary The amount of physical space allocated for actual data storage. Reaching the hard threshold triggers an alert and data can no longer be written to the volume. The hard threshold must be less than or equal to the volume size.
Remote volumes contain no data and do not have a size. Therefore, you cannot set a hard threshold for a remote volume.
Soft Threshold Primary The amount of space used on the volume that triggers a warning alert. This alert notifies the storage administrator that the volume is approaching the hard threshold. The soft threshold must be less than or equal to the hard threshold.
Because remote volumes have no size, and cannot have a hard threshold, they also cannot have a soft threshold.
Auto Grow Any Auto grow automatically increases the hard and soft volume thresholds by a specific amount.
Table 41. Parameters for Volumes
Volume Parameter
Configurable in Volume Type What it means
228 Intel® Storage System Software User Manual

Working with Volumes
• Second, set the hard threshold to some size smaller than the actual volume size. For our example 500 GB volume, you set the hard threshold at 300 GB.
• Third, set the soft threshold lower than the hard threshold. The soft threshold triggers an alert to the system administrator, notifying that the soft threshold has been reached. This alert gives you time to increase the volume size and hard threshold. For our example, set the soft threshold at 485 GB.
Warning: If the hard threshold is set lower than the volume size and the hard threshold is reached, then other applications that are accessing the volume will hang until you increase the hard threshold. In this scenario, system resources will be exhausted. Therefore, if there are other volumes in the cluster, accessed by other applications, those volumes will hang as well, even though those volumes’ hard thresholds have NOT been reached.
Managing the Volume Growth Capacity
When you receive the alert that the soft threshold has been reached, you take the following actions.
• Increase the volume size. For our example above, you increase the volume size by 20 percent to 600 GB.
• Increase the hard threshold by about 20 percent, to 590 GB.• Increase the soft threshold to 585 GB.
See “Editing a Volume” on page 233 for information about changing the volume size, and the soft and hard thresholds.
Over time, as you near the capacity of the cluster, you can increase the storage capacity of the cluster by adding more storage modules.
Note: If you have file systems mounted on the host volume, and you reach the soft or hard threshold, deleting files from the volume does not create space on the storage module volume.
Using Auto Grow
You can use auto grow to automatically increase the volume hard and soft thresholds.
Note: Auto grow is also available in the application-based scripting described in Chapter 14, “Working with Scripting.”
How Auto Grow Works
Auto grow is triggered when a soft threshold is reached. Auto grow then raises both the soft and hard thresholds by a calculated increment. The thresholds will only increase
• when there is sufficient room in the cluster to accommodate the increases or
Intel® Storage System Software User Manual 229

Working with Volumes
• to the point where the hard threshold equals the volume length (at which point the soft threshold also is increased to equal the volume length so that alerts are not triggered)
whichever of these conditions occur first.
Auto grow allows volumes to grow smoothly and "just-in-time," growing as little as possible as necessary, and limiting the total number of auto-grow events to a reasonable number. Also, auto grow causes the volume to grow before the client(s) hit the hard threshold, which would cause the client(s) to stall for a few seconds.
Creating a Volume
A volume resides on the storage module(s) contained in a cluster.1. Log in to the management group for which you want to create a volume.
The management group Tab View opens.2. Select the cluster on which you want to create a volume.
The cluster Tab View opens.3. Click the Volumes tab.
The Volumes tab opens, shown in Figure 170.
Figure 170. Viewing the Volumes Tab
Volumes tab
230 Intel® Storage System Software User Manual

Working with Volumes
4. From the Tasks menu, click New Volume.The New Volume window opens, shown in Figure 171. See Table 41 on page 227 for detailed information about setting volume parameters.
Figure 171. Creating a New Primary Volume
5. Select primary as the volume type.The window for a new primary volume is shown in Figure 171. For information about creating a remote volume, see the Remote IP Copy User Manual.
6. Type a name for the volume.7. [Optional] Type a description of the volume.8. Select a replication level.
You must purchase the Scalability Pak to use the N-way replication feature beyond the 30-day evaluation period.
9. Select a replication priority.If you select a replication level of None, the replication priority must be Availability. See Figure 172.
Figure 172. Setting Replication to None
10. Type a size and select the units.11. Type a hard threshold and select the units.12. Type a soft threshold and select the units.
Intel® Storage System Software User Manual 231

Working with Volumes
Note: The system automatically factors replication levels into the settings. For example, if you create a 500 GB volume and the replication level is 2, the system automatically allocates 1000 GB for the volume.
13. Select the cluster you want to contain the volume.14. [Optional] Select the auto grow setting you want.15. Click OK.
The Storage System Software creates the volume and it is attached to the cluster, shown in Figure 173.
16. Select the new volume in the Network View.The volume Tab View opens, also shown in Figure 173.
Figure 173. Viewing a Volume in a Cluster
The Volume Tab View
The tabs provide access to volume information and features, such as creating snapshots, and associating authentication groups with the volume.
Details Tab
Displays information about the selected volume. You can add create snapshots, add volumes to volume lists, and edit and delete volumes from this tab.
Volume Tab View
Volume
232 Intel® Storage System Software User Manual

Working with Volumes
Snapshots Tab
Displays information about the existing snapshots. You can also create, edit, or delete snapshots from this tab. See Chapter 13, “Working with Snapshots” for more information about snapshots.
Snapshot Schedules Tab
Displays the name of the snapshot schedule, the hard and soft thresholds set for the snapshots, the actual schedule and any error that prevented a scheduled snapshot from taking place.
iSCSI Sessions Tab
Displays a list of iSCSI hosts that are accessing this volume. Information listed includes the iSCSI initiator node name and the IP address of the storage module that is acting as the gateway.
Remote Snapshots Tab
Displays the names of the primary and remote snapshots, the management groups they reside in, and the status of the copying from primary to remote. Create a remote snapshot here, or cancel one that is in progress.
Remote Snapshot Schedules Tab
Displays the name of the remote snapshot schedule, the hard and soft thresholds set for the remote snapshots, the actual schedule and any error that prevented a scheduled remote snapshot from taking place.
Target Information Tab
For iSCSI volumes, displays the virtual IP address if configured and lists any iSNS servers. For Fibre Channel volumes, displays the Fibre Channel Port World Wide Name (WWPN) for that volume.
Volume List Memberships Tab
Lists the volume lists and which volumes and authentication groups they are connected to.
Editing a Volume
When editing a volume, you can change the description, replication level, replication priority, size, hard and soft thresholds, the cluster that contains the volume, and whether the volume is configured for auto grow.
Intel® Storage System Software User Manual 233

Working with Volumes
Table 42. Requirements for Changing Volume Parameters
Item Requirements for Changing
Description Must be from 0 to 127 characters.
Cluster The target cluster must
• Reside in the same management group.
• Have sufficient unallocated space for the hard threshold and replication level of the volume being moved.
When moving a volume to a different cluster, that volume will temporarily exist on both clusters.
Replication Level The cluster must have sufficient storage modules and unallocated space to support the new replication level.
Replication Priority To change the replication priority, the replication level must support the change. You can always go from Redundancy to Availability. However, you cannot go from Availability to Redundancy unless a sufficient number of storage modules are in the cluster to make the volume available. For a detailed explanation, see Table 41 on page 227.
For example, if you have 2-way replication with 3 storage modules in the cluster, you can change from Availability to Redundancy if all the storage modules in the cluster are available and have enough space for replicating the data.
Size • To increase the size of the volume,
– there must be sufficient unallocated space in the cluster, or
– you can move the volume to a cluster that has enough unallocated space, or
– you can add a storage module to the cluster.
• To decrease the size of the volume– if the volume has been or is mounted by any operating
system, you must shrink the volume from the client operating system before shrinking the volume in the Console.
– the size entered must be greater than the hard threshold. You cannot decrease the volume size to a value less than the hard threshold.
– you also cannot decrease the size of the volume below the size needed for data currently stored on the volume.
NOTE: Decreasing the volume size or hard threshold is not recommended. If you shrink the volume in the Storage System Console before shrinking it from the client file system, your data will be corrupted or lost.
Hard Threshold • Increase the hard threshold to turn off an alert generated when the threshold is exceeded. The hard threshold must be equal to or less than the size of the volume and there must be sufficient space on the cluster.
• To decrease the hard threshold, first decrease the size of the volume and then decrease the hard threshold to the same value as the size.
WARNING:Decreasing the volume size or hard threshold is not recommended. If you shrink the volume in the Storage System Console before shrinking it from the client file system, your data will be corrupted or lost.
234 Intel® Storage System Software User Manual

Working with Volumes
Warning: Decreasing the volume size or hard threshold is not recommended. If you shrink the volume in the Storage System Console before shrinking it from the client file system, your data will be corrupted or lost.
Getting There
1. Select the volume you want to edit in the Network View.The volume Tab View opens.
2. Click Edit Volume.The Edit Volume window opens, shown in Figure 174. See Table 42 for detailed information about making changes to the volume parameters.
Figure 174. Editing a Volume
Soft Threshold • The soft threshold must be equal to or less than the hard threshold.
• To decrease the soft threshold, first decrease the hard threshold, and decrease the soft threshold to a value less than the hard threshold.
Auto Grow • Change the auto grow setting as desired. You can enable or disable auto grow.
Table 42. Requirements for Changing Volume Parameters
Item Requirements for Changing
Intel® Storage System Software User Manual 235

Working with Volumes
Changing the Volume Description
1. In the Description field, change the description.2. Click OK when you are finished.
Changing the Cluster
1. In the cluster list, select the cluster to which you want to move the volume.2. Click OK when you are finished.
The volume will reside on both clusters until all of the data is moved to the new cluster.
Changing the Replication Level
1. In the Replication Level drop down, select the level of replication you want.2. Click OK when you are finished.
Changing the Replication Priority
1. Select the replication priority you want.2. Click OK when you are finished.
Changing the Size
1. In the size field, change the number and change the units if necessary.2. Click OK when you are finished.
Warning: Decreasing the volume size or hard threshold is not recommended. If you shrink the volume in the Console before shrinking it from the client file system, your data will be corrupted or lost.
236 Intel® Storage System Software User Manual

Working with Volumes
Changing the Hard Threshold
1. In the hard threshold field, change the number and change the units if necessary.2. Click OK when you are finished.
Warning: Decreasing the volume size or hard threshold is not recommended. If you shrink the volume in the Console before shrinking it from the client file system, your data will be corrupted or lost.
Changing the Soft Threshold
1. In the soft threshold field, change the number and change the units if necessary.2. Click OK when you are finished.
Fixing a Replica-Challenged Redundant Volume
If a storage module goes offline and needs to be repaired or replaced, and a replicated volume configured for redundancy becomes unavailable to clients, the following procedure allows you to safely return the volume to fully operational status.1. Stop any clients from accessing the volume.2. Select the volume in the Console.3. Right-click and select Edit Volume.4. Change the data priority from data redundancy to data availability.5. Remove the storage module from the cluster.
Repair or replace the storage module.6. [Optional] Add the new or repaired storage module to the cluster.7. Wait for the restripe of the volume to finish.8. Edit the volume.9. Change the data priority from data availability to data redundancy.
10. Restore the clients’ access to the volume.
Intel® Storage System Software User Manual 237

Working with Volumes
Deleting a Volume
Delete a volume to remove that volume’s data from the storage module and make that space available. When deleting volumes, you must delete all snapshots of that volume before you can delete the volume itself.
Warning: Deleting a volume permanently removes that volume’s data from the storage module.
Prerequisites• Delete all snapshots of the volume that you want to delete. • Stop applications from accessing the volume.• Disable the drives on the host.
To Delete the Volume
1. Select the volume you want to delete.The volume Tab View opens.
2. Click Delete Volume.A confirmation window opens.
3. Click OK.The volume is removed from the cluster.
238 Intel® Storage System Software User Manual

13 Working with Snapshots
Snapshots Overview
Snapshots provide a fixed version of a volume for use with backup and other applications.
Snapshots vs. Backups
Unlike backups, which are typically stored on different physical devices or tapes, snapshots are stored on the same cluster as the volume. Therefore, snapshots protect against data corruption, but not device or storage media failure.
Prerequisites
Before you create a snapshot, you must have created a management group, cluster, and volume.
• a management group• a cluster, and • a volume.
Topics Covered in This Chapter
• Single snapshots and scheduled snapshots• Managing capacity using volume and snapshot thresholds• Creating snapshot schedules
Using Snapshots
You create snapshots from a volume on the cluster. At any time you can roll back to a specific snapshot. When you do roll back, all the snapshots created after that snapshot are deleted. Also, using a third-party utility, you can copy a snapshot to a different server and open the snapshot as a volume on that server.
Snapshots can be used for • source volumes for data mining and other data use• source volumes for creating backups• data or file system preservation before upgrading software• protection against data or file system corruption

Working with Snapshots
• file level restore without tape or backup software
Single Snapshots vs. Scheduled Snapshots
Some snapshot scenarios call for creating a single snapshot and then deleting it when it is no longer needed. Other scenarios call for creating a series of snapshots up to a specified number or for a specified time period, after which the earliest snapshot is deleted when the new one is created (scheduled snapshots).
For example, you plan to keep a series of daily snapshots, up to four. After creating the fifth snapshot, the earliest snapshot is deleted, thereby keeping the number of snapshots on the cluster at four.
Scheduled snapshots are an add-on feature. You must purchase the Configurable Snapshot Pak to use snapshot schedules beyond the 30-day evaluation period.
Requirements for Snapshots
Review in Chapter 12, “Working with Volumes” the section “Planning Volumes” on page 221 to ensure that you configure snapshots correctly. When creating a snapshot, you define the following parameters.
Table 43. Snapshot Parameters
Snapshot Parameter What it means
Snapshot Name The name of the snapshot that is displayed in the Console. A snapshot name must be from 1 to 127 characters and is case sensitive.
Description [Optional] A description of the snapshot.
Hard Threshold This becomes the hard threshold of the writable volume and defines the amount of space allocated for changes to the original volume. When reached, the hard threshold triggers an alert and data can no longer be written to the volume. The hard threshold must be less than, or equal to, the volume size, and cannot exceed available space in the cluster.
Soft Threshold The amount of space actually used on the writable volume that triggers a warning alert. This alert notifies the storage administrator that the writable volume is approaching the hard threshold. The soft threshold must be less than, or equal to, the hard threshold.
240 Intel® Storage System Software User Manual

Working with Snapshots
Managing Capacity Using Volume and Snapshot Thresholds
How Snapshots are Created
When you create a snapshot of a volume, the original volume is actually saved as the snapshot, and a new volume (the “writable” volume) with the original name is created to record any changes made to the volume’s data after the snapshot was created. Subsequent snapshots record only changes made to the volume since the previous snapshot.
Hard Thresholds and Snapshots
One implication of the relationship between volumes and snapshots is that the space used by the writable volume can become very small when it records only the changes that have occurred since the last snapshot was taken. This means that less space—or a smaller hard threshold—may be required for the writable volume. You can save space on your cluster of storage modules by estimating the size required for the changes in data between snapshots and decreasing the hard threshold of each snapshot accordingly. This planning is particularly important if you plan to use a series of snapshots to protect against data corruption. For more information about hard thresholds and volumes, see “Planning Hard Thresholds” on page 223.
Deleting Snapshots
One important factor in planning capacity is the fact that when a snapshot is deleted, the snapshot’s hard and soft thresholds are added to the snapshot or volume directly after it. (Hard and soft thresholds of the volume or snapshot directly after the deleted snapshot will increase by the hard and soft thresholds of the deleted snapshot, up to the size of the volume.) Adding hard and soft thresholds into the next volume or snapshot insures that all changes to data are accounted for and saved. Therefore, if you plan a protocol where you routinely delete snapshots, you must calculate the effect of adding the hard thresholds back into the volume.
For a detailed explanation of disk capacity allocation in a cluster and its relationship to disk or volume size in a file system, see “Measuring Disk Capacity and Volume Size” on page 222.
Easiest Method for Planning Capacity
Make the snapshot hard threshold equal to the volume size, and the soft threshold equal to the hard threshold.
Most Flexible Method for Planning Capacity
Make the hard threshold less than the volume size, and the soft threshold less than the hard threshold. Then, increase the volume size, hard threshold, and soft threshold as necessary to manage capacity growth.
Intel® Storage System Software User Manual 241

Working with Snapshots
Table 44 and Table 45 illustrate how storage can be effectively managed by setting the hard threshold below the original volume size in a series of snapshots.
Note: Deleting files on a file system does not create space on the volume. For file level capacity management, use application or file system-level tools.
Planning Snapshots
When planning to use snapshots, take the purpose and size considerations into account.
Note: When considering the size of snapshots in the cluster, remember that the replication level of the volume is duplicated in the snapshot.
Source Volumes for Data Mining or Tape Backups
Best Practice
Plan to use a single snapshot and delete it when you are finished. Consider the following questions in your planning.
• Is space available on the cluster to create the snapshot?
Table 44. Space Used by Snapshots When Hard Threshold is Set to the Original Volume Size
Day Volume/Snapshot Data Stored or Changed
Snapshot Size w/ No
Threshold Change
Total Space Used on Cluster
Mon. Original Volume = 50 GB
N/A 50 GB 50 GB
Tue. Snapshot 1 < 15 GB 50 GB 100 GB
Wed. Snapshot 2 < 10 GB 50 GB 150 GB
Thur Snapshot 3 < 8 GB 50 GB 200 GB
Table 45. Space Used by Snapshots When Hard Threshold is Reduced. Note the dramatic savings in storage space.
Day Volume/Snapshot Data Stored or Changed
Snapshot Size w/ Hard
Threshold Reduced
Total Space Used on Cluster
Mon. Original Volume = 50 GB
N/A 50 GB 50 GB
Tue. Snapshot 1 < 15 GB 15 GB 65 GB
Wed. Snapshot 2 < 10 GB 15 GB 80 GB
Thur Snapshot 3 < 8 GB 15 GB 95 GB
242 Intel® Storage System Software User Manual

Working with Snapshots
• Is space available in the cluster to accommodate the increase in the volume’s hard threshold when the snapshot is deleted? Remember that the hard threshold will never exceed the volume size.
Data Preservation Before Upgrading Software
Best Practice
Plan to use a single snapshot and delete it when you are finished. Consider the following questions in your planning.
• Is space available on the cluster to create the snapshot?• Is space available in the cluster to accommodate the increase in the volume’s hard
threshold when the snapshot is deleted? Remember that the hard threshold will never exceed the volume size.
Protection Against Data Corruption
Best Practice
Plan to use a series of snapshots, deleting the oldest on a scheduled basis. Consider the following questions in your planning.
• What is the minimum size you can set for the hard threshold that will accommodate the changes likely to occur between snapshots?
• Is space available on the cluster to create the snapshots?• Is space available in the cluster to accommodate the increase in the volume’s hard
threshold when the snapshot is deleted?
Creating a Snapshot
Create a snapshot to preserve a version of a volume at a specific point in time.1. Log into the management group that contains the volume for which you want to create
a new snapshot.The management group Tab View opens.
Intel® Storage System Software User Manual 243

Working with Snapshots
2. Select the volume on which you want to create a snapshot.The volume Tab View opens, shown in Figure 175.
Figure 175. Volume Tab View
3. Click the Snapshots tab to bring it to the front.4. From the Tasks menu, select New Snapshot.
The New Snapshot window opens, shown in Figure 176.
Figure 176. Creating a New Snapshot
5. Type a name for the snapshot.Names are case sensitive. They cannot be changed after the snapshot is created.
6. [Optional] Type in a description of the snapshot.
244 Intel® Storage System Software User Manual

Working with Snapshots
7. [Optional] Change the hard and soft thresholds for the snapshot.
Note: The hard threshold of the snapshot becomes the hard threshold of the writable volume and defines the amount of space allocated for changes to the original volume.
Note: Setting the hard threshold smaller than the size of the original volume allows you to create snapshots that require less space on the cluster. See “Managing Capacity Using Volume and Snapshot Thresholds” on page 241.
8. Click OK when you are finished.The Snapshots tab opens with the new snapshot listed. The new snapshot also displays in the Network view, as shown in Figure 177.
Figure 177. Viewing the New Snapshot
Note: Snapshots are listed below the volume in descending date order - from newest to oldest.
New Snapshot
Intel® Storage System Software User Manual 245

Working with Snapshots
The Snapshot Tab View
Clicking on the snapshot itself opens the snapshot Tab View, shown in Figure 178.
Figure 178. Snapshot Tab View
The tabs provide access to snapshot information and features, such as editing snapshots, rolling back a volume, and associating authentication groups with the snapshot. The Tasks button on each tab provides access to the actions you can take related to that tab.
Details Tab
Displays information about the selected snapshot. Use the Tasks menu to edit and delete snapshots and roll back volumes from this tab.
Hosts Tab
Lists all EBSD hosts that are associated to the snapshot. To retrieve the IP, Mode, Type, and driver version for the snapshot, put the IP address of the host in Find By Module IP or Host Name.
Remote Snapshot Tab
Lists remote snapshots associated with a snapshot. Buttons include creating a remote snapshot and canceling a remote snapshot that is in progress.
Target Information Tab
Displays the Initiator name assigned by the Microsoft iSCSI Initiator and the masked Target Secret.
Volume List Memberships Tab
Displays information about volume list memberships, which are inherited from the parent volume. For information about authentication groups and volume lists, see Chapter 15, “Controlling Client Access to Volumes.”
246 Intel® Storage System Software User Manual
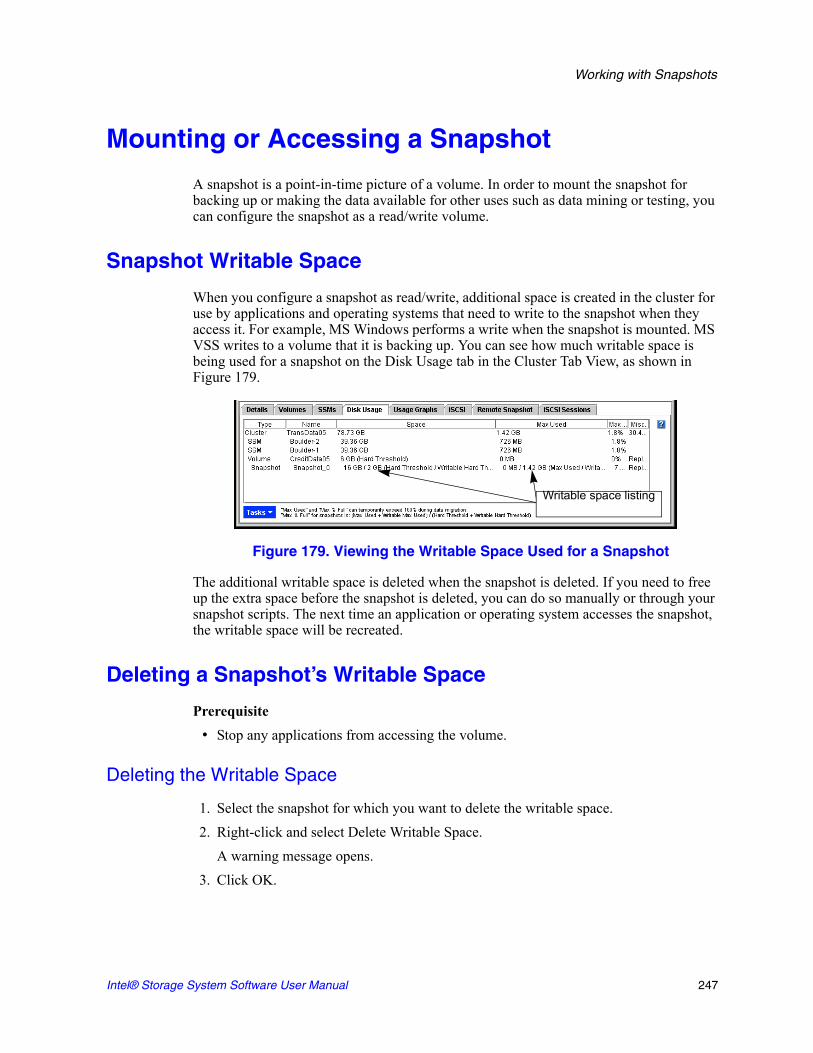
Working with Snapshots
Mounting or Accessing a Snapshot
A snapshot is a point-in-time picture of a volume. In order to mount the snapshot for backing up or making the data available for other uses such as data mining or testing, you can configure the snapshot as a read/write volume.
Snapshot Writable Space
When you configure a snapshot as read/write, additional space is created in the cluster for use by applications and operating systems that need to write to the snapshot when they access it. For example, MS Windows performs a write when the snapshot is mounted. MS VSS writes to a volume that it is backing up. You can see how much writable space is being used for a snapshot on the Disk Usage tab in the Cluster Tab View, as shown in Figure 179.
Figure 179. Viewing the Writable Space Used for a Snapshot
The additional writable space is deleted when the snapshot is deleted. If you need to free up the extra space before the snapshot is deleted, you can do so manually or through your snapshot scripts. The next time an application or operating system accesses the snapshot, the writable space will be recreated.
Deleting a Snapshot’s Writable Space
Prerequisite• Stop any applications from accessing the volume.
Deleting the Writable Space
1. Select the snapshot for which you want to delete the writable space.2. Right-click and select Delete Writable Space.
A warning message opens. 3. Click OK.
Writable space listing
Intel® Storage System Software User Manual 247

Working with Snapshots
Editing a Snapshot
You can edit the description of a snapshot. You can also change the hard and soft thresholds. See “Creating a Snapshot” on page 2431. Log into the management group that contains the snapshot that you want to edit. 2. Select the snapshot you want to edit.
The snapshot Tab View opens.3. From the Tasks menu, select Edit Snapshot.
The Edit Snapshot window opens, shown in Figure 180.
Figure 180. Editing a Snapshot
4. Navigate to the field you want to change and change the information.
5. Click OK when you are finished.The snapshot Tab View opens, shown in Figure 177.
Table 46. Data Requirements for Editing a Snapshot
Item Requirements for Changing
Description Must be from 0 to 127 characters.
Hard Threshold Hard threshold size must be equal to or less than the size of the volume and available storage in the cluster. You cannot decrease the hard threshold.
Soft Threshold Soft threshold size must be equal to or less than the hard threshold size.
248 Intel® Storage System Software User Manual

Working with Snapshots
Manually Copying a Volume from a Snapshot
Once you have mounted the snapshot on a host you can do the following:• Copy the snapshot to a read/write volume• Back up the data
To mount the snapshot on a host1. Create an authentication group for the client that you want to mount the snapshot on.
See “Creating an Authentication Group” on page 276. 2. Create a volume list for the snapshot, and configure the snapshot for read/write
access.See “Creating a Volume List” on page 284.3. Configure client access to the snapshot volume.
Now you can access the snapshot • as a source volume for data mining and other data use• as a source volume for creating backups• for data and file system preservation before upgrading software• for protection against data and file system corruption• for file level restore without tape or backup software
Creating Snapshot Schedules
Using the Console you can schedule recurring snapshots. Recurring snapshots can be scheduled in a variety of frequencies and with a variety of retention policies.
Note: Scripting snapshots can also take place on the client side. Scripted snapshots offer greater flexibility for quiescing hosts while taking snapshots, and for automating tasks associated with volumes and their snapshots.
Scripting of snapshots is an add-on feature. You must purchase the Configurable Snapshot Pak to use snapshot scripting beyond the 30-day evaluation period.
Requirements for Scheduling Snapshots
Scheduled snapshots require particular attention to capacity management. Additionally, you must ensure that the time settings on thestorage modules running managers and the time setting of the management group are synchronized.
Note: Use NTP to ensure that all the storage modules in the management group have synchronized time settings.
Intel® Storage System Software User Manual 249
Working with Snapshots
Creating Snapshot Schedules
You can create one or more snapshot schedules for a volume. For example, one schedule could be for daily snapshots intended for backup and recovery. A second schedule could be for weekly snapshots used for data mining.1. Select the volume for which you want to schedule snapshots.
The volume Tab View opens.2. Click the Snapshot Schedules tab to bring it to the front.
Table 47. Requirements for Scheduling Snapshots
Requirement What it means
Plan for capacity management
Scheduling snapshots should be planned with careful consideration for capacity management as described in “Managing Capacity Using Volume and Snapshot Thresholds” on page 241. Pay attention to how you want to retain snapshots and the capacity in the cluster. If you want to retain <n> snapshots, the cluster should have space for <n+1>. It is possible for the new snapshot and the one to be deleted to coexist in the cluster for some period of time. If there is not sufficient room in the cluster for both snapshots, the scheduled snapshot will not be created, and the schedule will not continue until an existing snapshot is deleted.
Synchronize storage module times with management group time
The time setting on the storage modules running managers and the time setting of the management group must be synchronized. If they are not synchronized, then the snapshot schedule might run incorrectly.
Be sure to configure the correct time on the storage modules and then reset the management group time. See Chapter 5, “Setting the Date and Time” . Also, see “Resetting the Management Group Time” on page 181.
250 Intel® Storage System Software User Manual

Working with Snapshots
3. From the Tasks menu, select New Schedule.The New Snapshot Schedule window opens, shown in Figure 181.
Figure 181. Creating a Snapshot Schedule
4. Type a name for the snapshots. The name will be used with sequential numbering. For example, if the snapshot name is Backup, the list of scheduled snapshots will be named Backup1, Backup2, Backup3.
5. [Optional] Enter a snapshot description.6. [Optional] Change the hard and soft thresholds for the snapshots.
Note: Setting the hard threshold smaller than the size of the original volume allows you to create snapshots that require less space on the cluster. See “Managing Capacity Using Volume and Snapshot Thresholds” on page 241.
7. Enter a start date and time.The date and time must be valid, but they can occur in the past.
8. Select a recurrence schedule.The recurrence schedule can be in minutes, hours, days or weeks.
9. Set a retention schedule.The retention schedule can be for specified number of snapshots, or for a designated period of time.
10. Click OK.
Intel® Storage System Software User Manual 251

Working with Snapshots
The New Snapshot Schedule window closes and the new snapshot schedule appears on the tab, shown in Figure 182.
Figure 182. List of Scheduled Snapshots
Editing Snapshot Schedules
You can edit everything in the snapshot schedule except for the name.1. Select the volume for which you want to edit the snapshot schedule.
The volume Tab View opens.2. Click the Snapshot Schedules tab to bring it to the front.3. Select the schedule you want to edit.4. From the Tasks menu, select Edit Schedule.
The Edit Snapshot Schedule window opens, shown in Figure 183.
Figure 183. Editing a Snapshot Schedule
252 Intel® Storage System Software User Manual

Working with Snapshots
5. Change the desired information.6. Click OK.
Note: If you change the hard threshold, be sure to review the information about snapshot thresholds and their effect on volume thresholds in “Managing Capacity Using Volume and Snapshot Thresholds” on page 241.
Deleting Snapshot Schedules
1. Select the volume for which you want to delete the snapshot schedule.The volume Tab View opens.
2. Click the Snapshot Schedule tab to bring it to the front.3. Select the schedule you want to delete.4. From the Tasks menu, select Delete Schedule.
Scripting Snapshots
Application-based scripting is available for taking snapshots. Using application-based scripts allows automatic snapshots of a volume. For detailed information, see Chapter 14, “Working with Scripting”
Check your vendor’s web site for specific applications for which sample scripts have been developed.
Rolling Back a Volume to a Snapshot
Rolling back a volume to a snapshot replaces the original volume with a read/write copy of the selected snapshot. The new volume has a different name than the original and the original volume is deleted.
Prerequisites• Stop applications from accessing the volume.• Disable the volume if it is mounted by a host.
Requirements for Rolling Back a Volume
Many of the parameters for the new volume must be configured as if you had created this volume for the first time.
Intel® Storage System Software User Manual 253

Working with Snapshots
Warning: After rolling back a volume to a snapshot, you lose all data stored after the rolled back snapshot.
Prerequisites• Stop applications from accessing the volume.• Delete all snapshots that are newer than the snapshot you are rolling back.
Rolling Back the Volume
1. Log in to the management group that contains the volume that you want to roll back.2. Select the snapshot to which you want to roll back.3. Review the snapshot Details tab to ensure you have selected the correct snapshot.4. From the Tasks menu on the Details tab, select Roll Back Volume.
The Roll Back Volume window opens, shown in Figure 184.
Figure 184. Rolling Back a Volume
Table 48. Requirements for Rolling Back a Volume
Parameter Requirements for Changing
New Volume Name You must choose a new name for the volume. The name must be from 1 to 127 characters. Names are case sensitive.
New Hard Threshold Hard threshold size must be equal to or less than the size of the volume See “Managing Capacity Using Volume and Snapshot Thresholds” on page 241.
New Soft Threshold Soft threshold size must be equal to or less than the hard threshold size.
Authentication Groups You must include the new volume in a volume list. See “Volume Lists Overview” on page 284.
Hosts You must reconfigure hosts to connect to the new volume.
254 Intel® Storage System Software User Manual
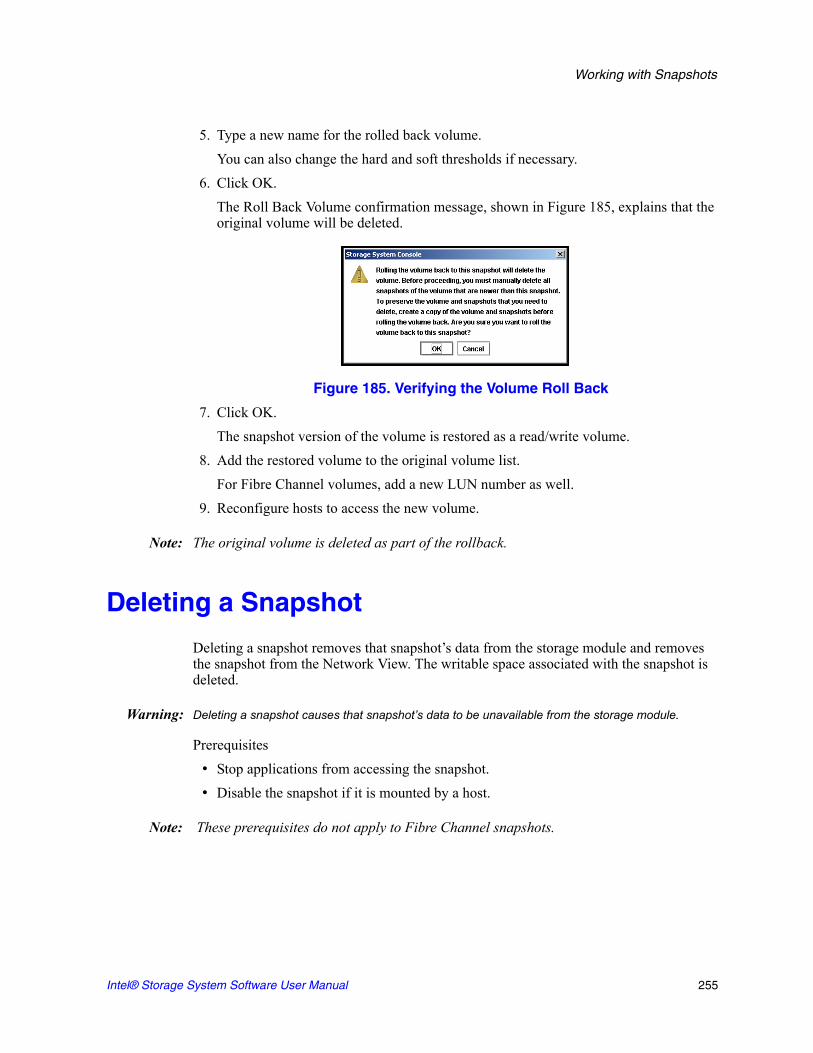
Working with Snapshots
5. Type a new name for the rolled back volume.You can also change the hard and soft thresholds if necessary.
6. Click OK.The Roll Back Volume confirmation message, shown in Figure 185, explains that the original volume will be deleted.
Figure 185. Verifying the Volume Roll Back
7. Click OK.The snapshot version of the volume is restored as a read/write volume.
8. Add the restored volume to the original volume list.For Fibre Channel volumes, add a new LUN number as well.
9. Reconfigure hosts to access the new volume.
Note: The original volume is deleted as part of the rollback.
Deleting a Snapshot
Deleting a snapshot removes that snapshot’s data from the storage module and removes the snapshot from the Network View. The writable space associated with the snapshot is deleted.
Warning: Deleting a snapshot causes that snapshot’s data to be unavailable from the storage module.
Prerequisites• Stop applications from accessing the snapshot.• Disable the snapshot if it is mounted by a host.
Note: These prerequisites do not apply to Fibre Channel snapshots.
Intel® Storage System Software User Manual 255

Working with Snapshots
Delete the Snapshot
1. Log into the management group that contains the snapshot that you want to delete.The management group Tab View opens.
2. Select the snapshot that you want to delete.3. Review the Details tab to ensure you have selected the correct snapshot.4. From the Tasks menu on the Details tab, click Delete Snapshot.
A confirmation message opens.5. Click OK.
256 Intel® Storage System Software User Manual

14 Working with Scripting
The Storage System Software provides application-based scripting for taking snapshots. Using application-based scripts allows automatic snapshots of a volume and automatic increases in the volume thresholds. Scripting also provides access to Remote Copy, the ability to maintain multiple copies of data across multiple facilities. See Chapter 13, “Working with Snapshots” for detailed information about snapshot requirements. Information about Remote Copy can be found in the Remote IP Copy User Manual.
The tasks supported by scripting includes:• Taking a snapshot of the volume• Mounting the snapshot• [Optional] Unmounting or deleting the snapshot• Increasing volume thresholds
Two tools, named commandline.CommandLine and ebsdvm, may be provided by your vendor to access the Console functionality.
Tools for Scripting
Two software tools are available to use in scripts. The first one, java commandline.CommandLine, is used to create and delete snapshots, and to automatically increase volume thresholds. The second one, ebsdvm, is used to mount the snapshot.
Java commandline.CommandLine
Java commandline.CommandLine is the program that actually invokes the snapshot function in the Console for creating and deleting snapshots. In addition, the program can respond when a soft threshold is reached on a volume and automatically increase the hard and soft thresholds on that volume.1. Set the environment
Table 49. Setting the Environment for Using Scripting Tools
Operating System Syntax Example
Windows set CLASSPATH <full path to UI.jar>
set CLASSPATH C:\Program Files\Intel Storage Server\UI\UI.jar

Working with Scripting
2. Run the tool commandline.CommandLine
Note: Run this program twice to take a snapshot of both the journaling data and the application data if you have them stored in separate volumes.
Unix (C Shell type)
setenv CLASSPATH <full path to UI.jar>
setenv CLASSPATH /opt/IntelStorageServer/UI/UI.jar
Unix (Bourne or Kshell or Bash)
export CLASSPATH=<full path to UI.jar>
export CLASSPATH=/opt/IntelStorageServer/UI/UI.jar
Table 49. Setting the Environment for Using Scripting Tools
Operating System Syntax Example
Table 50. Parameters for commandline.CommandLine
Parameter What It Is
admin name Value = text
Name of the administrator with full administrative privileges. Can be either the primary or remote administrator, if they are different.
admin password Value = text
The administrator’s Storage System Console password. Can be either primary or remote password, if they are different.
manager ip Value = IP address
IP address of an SSM running a manager in the management group containing either the source volume or the remote volume.
volume name Value = text
Name of the volume.
For volume_autogrow and FC_LUN commands, this also could be a snapshot.
snapshot name Value = text
Name of the snapshot to create.
primary volume name Value = text
Name of the primary volume to make remote.
remote volume name Value = text
Name of the remote volume created in the Console.
remote snapshot name Value = text
Name of the remote snapshot.
remote snapshot description Value = text
Description of the remote snapshot.
258 Intel® Storage System Software User Manual

Working with Scripting
soft threshold (see note) Value = number
Size of the volume’s new soft threshold in MegaBytes (MB). May be the soft threshold of the new primary volume if using Remote Copy.
hard threshold (see note) Value = number
Size of the source volume’s new hard threshold in MegaBytes (MB). May be the hard threshold of the new primary volume if using Remote Copy.
description (see note) Value = text
[Optional] Description associated with the snapshot.
failure timeout seconds Value = number
The number of seconds to wait until exiting with a failure.
grow size Value = number
The size in MegaBytes by which to increase the volume thresholds.
LUN Value = number
The LUN number assigned to the Fibre Channel volume when associating the volume to an auth group.
volume_snapshot Use this value as written. (This is verbatim.)
Creates a snapshot from a volume.
volume_delete Use this value as written. (This is verbatim.)
Deletes a volume.
volume_remote_snapshot Use this value as written. (This is verbatim.)
Makes a remote snapshot of a volume.
volume_make_primary Use this value as written. (This is verbatim.)
Makes a remote volume into a primary volume.
volume_make_remote Use this value as written. (This is verbatim.)
Makes a primary volume into a remote volume.
volume_autogrow_set Use this value as written. (This is verbatim.)
Sets the value by which to increase a volume threshold.
volume_autogrow_get Use this value as written. (This is verbatim.)
Returns the value currently in the volume_autogrow_set command.
FC_LUN_set Use this value as written. (This is verbatim.)
Sets the LUN number for a volume.
FC_LUN_get Use this value as written. (This is verbatim.)
Returns the LUN number currently set for a volume.
Note: You must provide either all three of the noted items, or none of them. For example, you cannot provide only a soft threshold value.
Table 50. Parameters for commandline.CommandLine
Parameter What It Is
Intel® Storage System Software User Manual 259

Working with Scripting
ebsdvm
ebsdvm is the program that mounts the snapshot or volume. Parameters for ebsdvm are shown below. Table 51 lists the parameters available in ebsdvm.
Getting Help
1. Type ebsdvm help and press Enter.
Scripted Commands for Volumes and Snapshots
Below are examples of the Storage System Software functions that can be accomplished using application-based scripts.
Creating a Snapshot
Create a snapshot using commandline.CommandLine
commandline.CommandLine <admin name> <admin password> <manager ip> volume_snapshot <source volume name> <snapshot name> [<soft threshold (Megabytes)> <hard threshold (Megabytes)> <description>] [<failure
Table 51. Parameters for ebsdvm
Parameter What It Is
mgmt group name Value = text
Name of the management group containing the source volume.
snapshot name Value = text
Name of the snapshot or volume created using commandline.CommandLine.
auth group name Value = text
Name of the authentication group associated with the volume in the Console.
local ip Value = IP address
The IP address of the machine the script is running on.
number of managers Value = number
The number of managers in the management group that contains the source volume.
managers’ ip Value = IP address
Separator = space
The IP addresses of the SSM managers in the management group.
lock_mode Value = ro, rw
The attribute of the volume - read-only or read-write.
260 Intel® Storage System Software User Manual

Working with Scripting
timeout seconds>]
Example
Joe Jones is creating a snapshot for his management group Images, volume named X-Rays, and he wants the snapshot name to be XRayReview. The size of the thresholds for the snapshot is a 100 MB hard threshold and a 98 MB soft threshold. So Joe’s use of java commandline.CommandLine will look as follows:
java commandline.CommandLine jjones trumpet 10.0.111.212 volume_snapshot X-Rays XRayReview 98 100 “review volume for xray storage” 10
Deleting a Snapshot
Delete a snapshot using java commandline.CommandLine
java commandline.CommandLine <admin name> <admin password> <manager ip> volume_delete <snapshot name> [<failure timeout seconds>]
Example
Joe Jones plans to retain the snapshot for a review period, so he writes a script to delete the snapshot after 5 weeks.
java commandline.CommandLine jjones trumpet 10.0.111.212 volume_delete XRayReview 45
Assigning a LUN Number to a Fibre Channel Volume or Snapshot (Intel® Storage System SSR316MJ2 only)
A Fibre Channel volume or snapshot must have a LUN number assigned before it can be mounted. Assign a LUN number as follows:
java commandline.CommandLine
java commandline.CommandLine <admin name> <admin password> <manager ip> FC_LUN_set <volume name><auth group><LUN> [<failure timeout seconds>]
Example
Joe Jones is using Fibre Channel for a volume and snapshots for MRI images and he wants to mount the snapshots for backing up. So first he assigns a LUN number:java commandline.CommandLine jjones trumpet 10.0.111.224 FC_LUN_set MRI604 FC_auth 2 [<failure timeout seconds>]
Intel® Storage System Software User Manual 261

Working with Scripting
Mounting a Snapshot
Below is an example of mounting the snapshot using ebsdvm.
ebsdvm <mgmt group name> <snapshot name> <auth group name> <local ip> <number of managers> <each managers's ip> <lock_mode>
Example
Joe Jones plans to mount his XRayReview snapshot and mount it on another server where the group named adminusers (the administrators of the orthopedic section) can access the images for filing the patient database.
ebsdvm Images XRayReview adminusers 10.0.20.212 3 10.0.13.79 10.0.33.47 10.0.33.87 ro
Increasing Volume Hard and Soft Thresholds
You can create a script that will automatically increase the hard and soft volume thresholds by a specific amount.
The operation is triggered when a soft threshold is reached. It then raises both the soft and hard thresholds by the amount you specify in the script. The thresholds will only increase.
• When there is sufficient room in the cluster to accommodate the increases or
• To the point where the hard threshold equals the volume length
whichever of these conditions occur first.
To increase space in the cluster by adding more SSMs or to increase the volume length, follow instructions as described in Chapter 11, “Working with Clusters” or Chapter 12, “Working with Volumes.”
Scripting Automatic Threshold Increases
Below is an example of scripting automatic threshold increases using java commandline.CommandLine
java commandline.CommandLine <admin name> <admin password> <manager ip> volume_autogrow_set <volume name> <grow size (Megabytes)> [<failure timeout seconds>]
Example
Joe Jones creates a script to automatically increase the hard and soft thresholds for his X-Rays volume The volume length is 10 GB with a hard threshold of 2 GB and a soft threshold of 1 GB. Joe scripts the increases for increments of 512 MB.
java commandline.CommandLine jjones trumpet 10.0.111.212
262 Intel® Storage System Software User Manual

Working with Scripting
volume_autogrow_set X-Rays 512 600
Reviewing the Increment Size for Increasing the Thresholds
You can run an operation to review the setting for automatic threshold increases using java commandline.CommandLine
java commandline.CommandLine <admin name> <admin password> <manager ip> volume_autogrow_get <volume name> [<failure timeout seconds>]
Examplejava commandline.CommandLine jjones trumpet 10.0.111.212 volume_autogrow_get X-Rays 60
Scripted Commands for Remote Copy
Scripting operations for Remote Copy use the same tools that are available for scripting snapshots, with the addition of parameters specific to Remote Copy. Using the command line parameters allows you to create scripts for
• Creating a primary snapshot• Creating a remote snapshot• Making a primary volume into a remote volume• Failing over to a remote snapshot
Creating A Remote Snapshot In A Different Management Group
1. Create the primary snapshotjava commandline.CommandLine <primary admin name> <primary admin password> <primary manager ip> volume_snapshot <primary volume name> <primary snapshot name> [<soft threshold (Megabytes)> <hard threshold (Megabytes)> <description>] [<failure timeout seconds>]
2. Create the remote snapshotjava commandline.CommandLine <remote admin name> <remote admin password> <remote manager ip> volume_remote_snapshot <remote volume name> <remote snapshot name> <remote snapshot description> <primary admin name> <primary admin password> <primary manager ip> <primary snapshot name> [<failure timeout seconds>]
Example
Joe Jones plans to create a remote snapshot of his X-Rays volume in the backup management group in the corporate backup site. He is naming this new remote snapshot RSS2_xrays and the new primary snapshot PSS2_xrays. He created his remote volume RemVolX_Rays using the Console and named his first primary snapshot PSS1_xrays and
Intel® Storage System Software User Manual 263
Working with Scripting
his first remote snapshot RSS1_xrays. The size of the thresholds for the new primary and remote snapshots are the same — 500 MB hard thresholds and 500 MB soft thresholds. The script looks as follows
java commandline.CommandLine jjones trumpet 10.0.111.212 volume_snapshot X-Rays PSS2_xrays 500 500 “first primary snapshot” 15
java commandline.CommandLine jjones saxophone 10.10.45.72 volume_remote_snapshot RemVolX_Rays RSS2_xrays “second remote snapshot” jjones trumpet 10.0.111.212 PSS2_xrays 15
Creating A Remote Snapshot In The Same Management Group
1. Create the primary snapshotjava commandline.CommandLine <primary admin name> <primary admin password> <primary manager ip> volume_snapshot <primary volume name> <primary snapshot name> [<failure timeout seconds>]
2. Create the remote snapshotjava commandline.CommandLine <primary admin name> <primary admin password> <primary manager ip> volume_remote_snapshot <remote volume name> <remote snapshot name> <remote snapshot description> <primary admin name> [<failure timeout seconds>]
Example
If Joe Jones was creating his remote snapshot in the same management group, the script would look like this.java commandline.CommandLine jjones trumpet 10.0.111.212 volume_snapshot X-Rays PSS2_xrays 500 500 “first primary snapshot” 30
java commandline.CommandLine jjones trumpet 10.0.111.212 volume_remote_snapshot RemVolX_Rays RSS2_xrays “second remote snapshot” PSS2_xrays 30
Converting a Remote Volume to a Primary Volume and Back to a Remote Volume
Convert a remote volume into a primary volume to gain read/write access to the most recently completed Remote Copy snapshot. However, if that remote volume is the target for scheduled remote snapshots, those snapshots cannot take place if the remote volume is not present. Therefore, you use the operation for returning the primary volume back to its remote status to allow the scheduled remote snapshots to continue.
Make Remote Volume into Primary Volume
java commandline.CommandLine <remote admin name> <remote admin password> <remote manager ip> volume_make_primary <remote volume name> [<soft quota (Megabytes)> <hard quota (Megabytes)>] [<failure timeout seconds>]
264 Intel® Storage System Software User Manual

Working with Scripting
Make Primary Volume into Remote Volume
java commandline.CommandLine <primary admin name> <primary admin password> <primary manager ip> volume_make_remote <primary volume name> <snapshot name> <snapshot description> [<failure timeout seconds>]
Example
Joe has scripted an operation to make his remote volume into a primary volume once a week so that he can access the data from the most recently completed scheduled snapshot. Since he is running scheduled remote snapshots to that volume, he then needs to convert that primary volume back into a remote volume so that the remote snapshot schedule is maintained.
java commandline.CommandLine jjones saxophone 10.10.45.72 volume_make_primary RemVolX_Rays 512000 512000 30
java commandline.CommandLine jjones trumpet 10.3.11.19 volume_make_remote RemVolX_Rays snapshot_convert “snapshot from making vol remote” 30
Scripting Failover
Scripting failover uses a java commandline.CommandLine script along with the ebsdvm script for mounting a snapshot.
Make Remote Volume into Primary Volume
java commandline.CommandLine <remote admin name> <remote admin password> <remote manager ip> volume_make_primary <remote volume name> [<soft quota (Megabytes)> <hard quota (Megabytes)>] [<failure timeout seconds>]
Mount New Primary Volume
ebsdvm <remote mgmt group name> <remote volume name> <auth group name> <local ip> <number of managers> <each managers's ip> <lock_mode>
Example
Joe’s script for failing over to his remote volume would include the following commands to make the remote volume into a primary volume and mount it in the local network to make it available to the backup application servers.
java commandline.CommandLine jjones saxophone 10.10.45.72 volume_make_primary RemVolX_Rays 512000 512000 30
ebsdvm Remote_Images RemVolX_Rays adminusers 10.3.11.19 3 10.3.11.27 10.3.11.31 10.3.11.12 ro
Intel® Storage System Software User Manual 265

Working with Scripting
266 Intel® Storage System Software User Manual

15 Controlling Client Access to Volumes
Client Access Overview
Access to storage volumes by application servers, also called “clients” or “hosts,” is controlled using a combination of volume lists and authentication groups.
• Volume lists provide the connection between authentication groups and volumes. They are created at the management group level and they link designated volumes with the authentication groups that can access those volumes.
• Authentication groups identify the client or entity accessing the volume.
Creating Access to Volumes
After you have configured storage and created volumes, you then create access to the volumes using authentication groups and volume lists.1. Create an authentication group.2. Create a volume list and associate the authentication group to the specific volume(s) it
can access.
Types of Client Access
The Storage System Software supports three modes by which clients can access volumes - through an iSCSI initiator, the EBSD driver, or a Fibre Channel host. You can configure authentication groups to use one, two or all three modes if desired.
When creating an authentication group, you choose the mode and level of client access you want. Choices are
• iSCSI - authentication based on the initiator node name (single hosts) or CHAP-based authentication (single or multiple hosts).
• EBSD - Hosts with specific subnets and masks, or hosts with all subnets and masks.• Fibre Channel - Hosts with specific World Wide Port Names.

Controlling Client Access to Volumes
Client Access Using iSCSI
Client access using iSCSI can be authenticated via the initiator node name (single host) or via CHAP (Challenge-Handshake Authentication Protocol) which can support single or multiple hosts.
You can also enable load balancing using compliant iSCSI initiators. iSCSI load balancing distributes iSCSI sessions across storage modules in a cluster.
Note: Our iSCSI terminology is based on the MS iSCSI Initiator terminology
Configuring Authentication Groups for iSCSI
When configuring client access using iSCSI, you create an authentication group that allows iSCSI access. The New Authentication Group window with the iSCSI tab is shown in Figure 186.
Figure 186. Creating a New Authentication Group for iSCSI Access
Planning iSCSI access requires planning how you want to configure authentication: • single host with or without using CHAP, or • multiple hosts, with 1-way or 2-way CHAP
and whether you want to enable load balancing.
268 Intel® Storage System Software User Manual

Controlling Client Access to Volumes
Planning iSCSI and Load Balancing
Use the iSCSI load balancing feature to improve iSCSI performance and scalability by distributing iSCSI sessions for different volumes evenly across storage modules in a cluster.
Requirements:• Cluster configured with a Virtual IP address. See “Clusters and iSCSI” on page 203.• A compliant iSCSI initiator.
Find information about which iSCSI initiators are compliant by clicking the link in the New or Edit Authentication Group window, shown in Figure 187.
Figure 187. Click Link for Compliant Initiator Information
The link opens the iSCSI initiator information window, shown Figure 188. Scroll down for a list of compliant initiators.
Figure 188. Information About Compliant iSCSI Initiators
Planning iSCSI and CHAP
CHAP is a standard authentication protocol. The Storage System Software supports no CHAP, 1-way CHAP, or 2-way CHAP.
CHAP Glossary
Target secret
The target secret is required. It is used in both 1-way and 2-way CHAP when the target (volume) challenges the iSCSI initiator.
Intel® Storage System Software User Manual 269

Controlling Client Access to Volumes
Initiator secret
The initiator secret is optional. It is used in 2-way CHAP when the iSCSI initiator challenges the target (volume).
How CHAP Works
• No CHAP - authorized initiators can log in to the volume without proving their identity. The target does not challenge the client.
• 1-way CHAP - initiators must log in with a target secret to access the volume. This secret proves the identity of the initiator to the target.
• 2-way CHAP - initiators must log in with a target secret to access the volume as in 1-way CHAP. In addition, the target must prove its identity to the initiator using the initiator secret. This second step prevents target spoofing.
CHAP is optional. However, if you configure 1-way or 2-way CHAP, you must remember to configure both the authentication group and the iSCSI initiator with the appropriate parameters. Table 52 lists the requirements for configuring CHAP.
Requirements for Configuring CHAP
Initiator Target (volume)
1-way CHAP
1. challenging for the target secret
initiator Target (volume)
2-way CHAP
1. challenging for the target secret2. challenging for the initiator secret
1
1
2
Table 52. Configuring iSCSI CHAP
CHAP Level What to Configure in the Authentication Group
What to Configure in the iSCSI Initiator
CHAP not required • initiator node name only • No configuration requirements
1-way CHAP • CHAP Name*
• Target Secret
• Enter the target secret when logging on to available target.
270 Intel® Storage System Software User Manual

Controlling Client Access to Volumes
Sample iSCSI Configurations
Figure 189 illustrates the configuration for a single host authentication with CHAP not required.
Figure 189. Opening the MS iSCSI initiator and Copying the Initiator Node Name to the Initiator Node Name Field
Figure 190 illustrates the configuration for a single host authentication with 1-way CHAP required.
2-way CHAP • CHAP Name*• Target Secret
• Initiator Secret
• Enter the initiator secret.
• Enter the target secret.
* If using CHAP with a single node only, use the initiator node name as the CHAP name.
Table 52. Configuring iSCSI CHAP
CHAP Level What to Configure in the Authentication Group
What to Configure in the iSCSI Initiator
Intel® Storage System Software User Manual 271

Controlling Client Access to Volumes
Figure 190. Configuring iSCSI (shown in the MS iSCSI initiator) for a Single Host with CHAP
Figure 191 illustrates the configuration for a single host authentication with 2-way CHAP required.
Figure 191. Adding an Initiator Secret for 2-way CHAP (shown in the Microsoft* iSCSI initiator)
Warning: Allowing more than one iSCSI application server to connect to a volume could result in data corruption.
272 Intel® Storage System Software User Manual
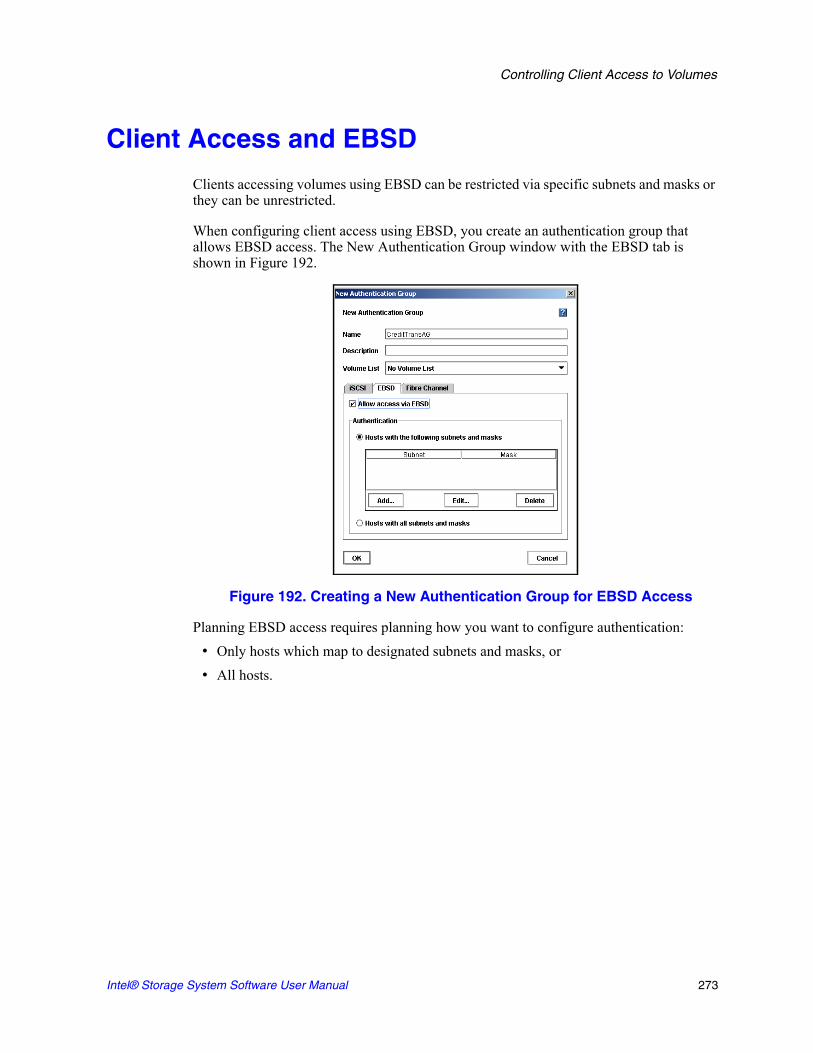
Controlling Client Access to Volumes
Client Access and EBSD
Clients accessing volumes using EBSD can be restricted via specific subnets and masks or they can be unrestricted.
When configuring client access using EBSD, you create an authentication group that allows EBSD access. The New Authentication Group window with the EBSD tab is shown in Figure 192.
Figure 192. Creating a New Authentication Group for EBSD Access
Planning EBSD access requires planning how you want to configure authentication: • Only hosts which map to designated subnets and masks, or • All hosts.
Intel® Storage System Software User Manual 273

Controlling Client Access to Volumes
Client Access and Fibre Channel
Storage volumes can also be configured for Fibre Channel access. Use the Fibre Channel tab in the New Authentication Group window, as shown in Figure 193.
Figure 193. Creating a New Authentication Group for Fibre Channel Access
Planning Volumes and Fibre Channel
First you configure authentication groups for Fibre Channel. Then, when you add the volume to a volume list, you assign a LUN number for that volume.
Assigning LUN Numbers to Volumes
Some requirements for authentication group access and LUN numbers include the following:
• LUN numbers must be assigned to volumes when the volumes are added to a volume list. LUN numbers are required before the hosts can access the volumes.
• LUN numbers must be unique per authentication group. For example, one authentication group can only access one LUN # 0. If you plan to have one host accessing two volumes with the same authentication group, each volume must be assigned a different LUN number.
274 Intel® Storage System Software User Manual

Controlling Client Access to Volumes
Best Practice – Hosts with Separately Numbered LUNs
Figure 194 shows a typical best practice configuration for assigning LUN numbers to volumes and associating LUNs to hosts. Each host is accessing two LUNs. Each of the two LUN associations has a different LUN number.
Figure 194. Example Best Practice Configuration for Assigning LUN Numbers
Prohibited – Host with Duplicate Numbered LUN
Figure 195illustrates a prohibited LUN numbering configuration.
Figure 195. LUN Numbering Configuration that is NOT Allowed
Possible – Hosts with a Shared LUN
It is possible to associate multiple hosts to one LUN, in which case you should make one host association read/write and the other host associations read only, as shown in Figure 196.
Intel® Storage System Software User Manual 275

Controlling Client Access to Volumes
Figure 196. LUN Numbering Configuration With One LUN Shared Among Three Hosts
Creating an Authentication Group
1. Log into the management group and select that management group in the Network View.The management group tab view opens.
2. Click the Authentication Groups tab to bring it to the front.3. From the Tasks menu, select New Authentication Group.
The New Authentication Group window opens, shown in Figure 197.
Figure 197. Creating a New Authentication Group
276 Intel® Storage System Software User Manual

Controlling Client Access to Volumes
4. Type a name and description for the authentication group.The authentication group name is case sensitive.
5. Select the volume list, if appropriate. The volume list can be added later.
6. Select the tab for the appropriate type of host access.
Configuring iSCSI
1. On the Authentication Group iSCSI tab, shown in Figure 198, select the check box to allow access via iSCSI.
2. Select the check box to enable load balancing. 3. Click the link to review the list of compliant iSCSI initiators.4. Select the authentication method.
Warning: Using a non-compliant iSCSI initiator for load balancing can compromise volume availability.
Warning: Allowing more than one iSCSI application server to connect to a volume could result in data corruption.
Figure 198. Creating iSCSI Access in New Authentication Group
Intel® Storage System Software User Manual 277

Controlling Client Access to Volumes
Authenticate with CHAP Not Required
For detailed illustrations of the relationship between the authentication group fields and the MS iSCSI Initiator, see “Planning iSCSI and CHAP” on page 269.1. In the Authentication box, select CHAP not required.2. Copy the Initiator node name into the initiator node name field.
Authenticate with CHAP Required
1. In the Authentication box, select CHAP required.2. Complete the fields necessary for the type of CHAP you intend to configure, as shown
inTable 53 .
Best Practice
In the Microsoft* iSCSI initiator, target and initiator secrets are not displayed. Therefore, it’s a good idea to keep a separate record of the iSCSI initiator CHAP information and the corresponding authentication group information.
Table 53. Entering CHAP Information in a New Authentication Group
For this CHAP Mode Complete these fields
1-way CHAP • CHAP name
• Target Secret - minimum of 12 characters
2-way CHAP • CHAP name• Target Secret - minimum
of 12 characters
• Initiator Secret - minimum of 12 characters; must be alphanumeric
278 Intel® Storage System Software User Manual

Controlling Client Access to Volumes
Finishing iSCSI Configuration
1. Click OK if you are finished configuring the authentication group.
Configuring EBSD
1. On the EBSD tab, shown in Figure 199, select the check box to allow access via EBSD.
Figure 199. Configuring EBSD for New Authentication Group
Authenticate Hosts with Specific Subnets and Masks
1. In the Authentication box, select Hosts with the following subnets and masks.2. Click Add.
The Add Subnet and Mask window opens, shown in Figure 200.
Figure 200. Adding a Subnet and Mask for EBSD Host Authentication
3. Type in the subnet.4. Select the appropriate mask.5. Click OK.
Intel® Storage System Software User Manual 279

Controlling Client Access to Volumes
6. [Optional] Repeat for additional subnets and masks.
Authenticate Hosts with All Subnets and Masks
1. In the Authentication box, select Hosts with all subnets and masks.
Finishing EBSD Configuration
1. Click OK if you are finished configuring the authentication group, orSelect the iSCSI tab if you want to add iSCSI configuration to this authentication group.
Table 54. Choosing the Level of Access for Hosts Using the EBSD Driver
Authentication Method What Happens
No hosts No application server gains access.
Hosts with the following subnets and masks
Only hosts on the designated subnet and mask gain access.
If selecting this method,
1. Click Add.2. Enter a subnet and mask.
3. Click OK.
All hosts on the network
All hosts gain access.
280 Intel® Storage System Software User Manual

Controlling Client Access to Volumes
Configuring Fibre Channel
1. On the Fibre Channel tab, shown in Figure 201, select the check box to allow access via Fibre Channel.
Figure 201. Configuring Fibre Channel for New Authentication Group
2. Click Add.The Add Name and WWPN window opens, shown in Figure 202.
Figure 202. Adding a Name and WWPN for Fibre Channel Authentication
3. Add a name [optional] and a WWPN. 4. Click OK.5. Repeat for additional host WWPNs.
Intel® Storage System Software User Manual 281

Controlling Client Access to Volumes
Finishing Up the New Authentication Group
1. Click OK on the New Authentication Group window when you are finished.The Network View opens. Go to the Authentication Group tab to see the new group displayed in the list, shown in Figure 203.
Figure 203. Viewing the Authentication Groups
Editing an Authentication Group
You can edit the following • change the description • add a volume list • change the types of authentication in either of those modes.• change the state of load balancing
Warning: Editing an authentication group may interrupt client access to volumes. If necessary, stop client access before editing an authentication group.
Warning: If you change an iSCSI authentication group, you must log off and log back on to the target in the iSCSI initiator for the changes to take effect.
See “Client Access Using iSCSI” on page 268 and “Client Access and Fibre Channel” on page 274 before changing iSCSI or Fibre Channel authentication group parameters.1. Log into the management group and select that management group in the Network
View.The management group Tab View opens.
2. Click the Authentication Groups tab to bring it to the front.3. Select from the list the group you want to edit.
282 Intel® Storage System Software User Manual

Controlling Client Access to Volumes
4. From the Tasks menu, select Edit Authentication Group.The Edit Authentication Group window opens, shown in Figure 204.
Figure 204. Editing an Authentication Group
5. Select the appropriate tab for the group you are editing.6. Change the appropriate information.
7. Click OK when you are finished.
Deleting an Authentication Group
Deleting an authentication group will stop access to volumes by clients using that group. Access to the same volume by other authentication groups continues. 1. Log into the management group and select that management group in the Network
View.The management group Tab View opens.
2. Click the Authentication Groups tab to bring it to the front.3. Select from the list the group you want to delete.4. From the Tasks menu, select Delete Authentication Group.
A confirmation window opens.5. Click OK to delete the group.
Intel® Storage System Software User Manual 283

Controlling Client Access to Volumes
Volume Lists Overview
The volume list for an authentication group is the list of volumes accessible to that group.
Prerequisites• At least one management group has been created.• At least one cluster has been created in that management group• At least one volume has been created in that cluster.
Warning: When associating or deleting associations for Fibre Channel LUNs, the host server’s Disk Management (or equivalent) window must be closed.
Requirements for Volume Lists
• An authentication group can contain only one volume list.• Only one authentication group should have read/write access to a volume.• For Fibre Channel volumes or snapshots, you must assign LUN numbers when you
add the volume to the volume list.
Planning Volume Lists
Planning volume lists takes into account multiple factors.• What applications or clients will access the volume? • How will those applications or clients access the volume - through an iSCSI initiator,
the EBSD driver, or through a Fibre Channel host?• What permissions will you assign for those clients?
Creating a Volume List
1. Log into the management group and select that management group in the Network View.The management group Tab View opens.
2. Click the Volume Lists tab to bring it to the front.
284 Intel® Storage System Software User Manual

Controlling Client Access to Volumes
3. From the Tasks menu, select New Volume List.The New Volume List window opens, shown in Figure 205.
Figure 205. Creating a New Volume List
4. Type a name and description for the volume list.The volume list name is case sensitive.
Adding Volumes to the Volume List
1. Select the Volumes tab, shown in Figure 205. 2. Click Add to add a volume to the volume list. 3. The Add Volume to Volume List window opens, shown in Figure 206.
Figure 206. Adding a Volume to a Volume List
4. Select the volume or snapshot to add to the list.
Intel® Storage System Software User Manual 285

Controlling Client Access to Volumes
5. Select the access permission level for the volume. Characteristics of the permission levels are described below inTable 55 .
6. For a Fibre Channel volume, enter the LUN number.
Warning: Before you associate a LUN to an authentication group, the host server’s Disk Management (or equivalent) window must be closed.
7. Click OK when you are finished.8. The volume is listed on the Volumes tab.
Adding Authentication Groups to the Volume List
1. Next, select the Authentication Groups tab, shown in Figure 207.
Figure 207. Connecting Authentication Groups to a Volume List
2. Click Add.A list of existing authentication groups opens.
Table 55. Characteristics of Permission Levels
Type of Access Allows This
No Access Prevents the authentication group from accessing the volume or snapshot.
Read Access Restricts the authentication group to read-only access to the data on the volume or snapshot.
Read/Write Access (not available for snapshots)
Allows the authentication group read and write permissions to the volume.
286 Intel® Storage System Software User Manual

Controlling Client Access to Volumes
3. Select the authentication group that you want to give access to the volume or snapshot.
4. Click OK.The authentication group is listed on the Authentication Groups tab.
Completing the Volume List
1. Click OK on the New Volume List window when you are finished.The Network View opens. Go to the Volume Lists tab to see the new list displayed, shown in Figure 208.
Figure 208. Viewing the New Volume List
Editing a Volume List
Edit the volumes in a volume list to:• Add a volume• Edit the permissions for a volume• Remove a volume
Edit the authentication groups in a volume list to:• Add a group to the list• Remove a group from the list
Warning: Before editing the volume list, stop any applications from accessing volumes for which you are restricting permissions or removing authentication groups.
Opening the Volume List to Edit
1. Log in to the management group that contains the volume list you want to edit.2. Select the Volume Lists tab.3. Select the volume list to edit.
Intel® Storage System Software User Manual 287

Controlling Client Access to Volumes
4. From the Tasks menu, select Edit Volume List.The Edit Volume List window opens, shown in Figure 209.
Figure 209. Opening a Volume List to Edit
Editing Volume Permission Levels
Changing the permission level for a volume changes the access rights for the authentication groups that connect to that volume.
Warning: Before editing the volume list, stop any applications from accessing volumes for which you are restricting permissions.1. In the Edit Volume List window on the volumes tab, select the volume or snapshot for
which you want to edit the permissions.2. Click Edit Permission Level.
The Edit Volume in Volume List window opens, shown in Figure 210.
Figure 210. Editing Permissions on a Volume in a Volume List
3. Change the permission level.
288 Intel® Storage System Software User Manual

Controlling Client Access to Volumes
4. Click OK when you are finished.The Edit Volume List window opens.
5. Click OK when you are finished editing the volume list.The Tab View opens. Select the Volume Lists tab, shown in Figure 211, to review your changes.
Changing Authentication Groups in a Volume List
Removing authentication groups from a volume list
Note: For Fibre Channel associations, you can also change the LUN number, if necessary.• Prevents the associated application servers from accessing the volumes in that list• Is a prerequisite for deleting the volume list
Warning: Before editing the volume list, stop any applications from accessing volumes for which you are restricting permissions or removing authentication groups. 6. In the Edit Volume List window, shown in Figure 209, select the Authentication
Group tab.7. Add or remove authentication groups as required.8. Click OK when you are finished.
The Tab View opens. Select the Volume Lists tab, shown in Figure 211, to review your changes.
Removing a Volume from a Volume List
Remove volumes from a volume list in preparation for deleting the volume list.
Warning: Before deleting volumes from the volume list, stop any applications from accessing those volumes you are removing. 1. In the Edit Volume List window, shown in Figure 209, on the volumes tab, select the
volume or snapshot you want to remove from the volume list.2. Click Remove.
Intel® Storage System Software User Manual 289

Controlling Client Access to Volumes
3. Click OK when you are finished. The Tab View opens. Select the Volume Lists tab, shown in Figure 211, to review your changes.
Figure 211. Viewing the Edited Volume List
Deleting a Volume List
Deleting a volume list removes that list from the management group.
Prerequisites• Remove all volumes from the volume list• Remove all authentication groups from the volume list
Warning: Before you delete access to a volume, the host server’s Disk Management (or equivalent) window must be closed.
Note: To prevent a group from accessing a volume without deleting the volume list, change the volume permissions to “No Access.” See ”Editing Volume Permission Levels”.
1. Log into the appropriate management group.2. Select the Volume Lists tab, shown in Figure 212.
Figure 212. Viewing the Volume Lists Tab
3. Select the volume list you want to remove.
290 Intel® Storage System Software User Manual

Controlling Client Access to Volumes
4. From the Tasks menu, select Delete Volume List.A confirmation window opens.
5. Click OK to confirm the deletion.The Volume Lists tab no longer displays the volume list.
Intel® Storage System Software User Manual 291

Controlling Client Access to Volumes
292 Intel® Storage System Software User Manual
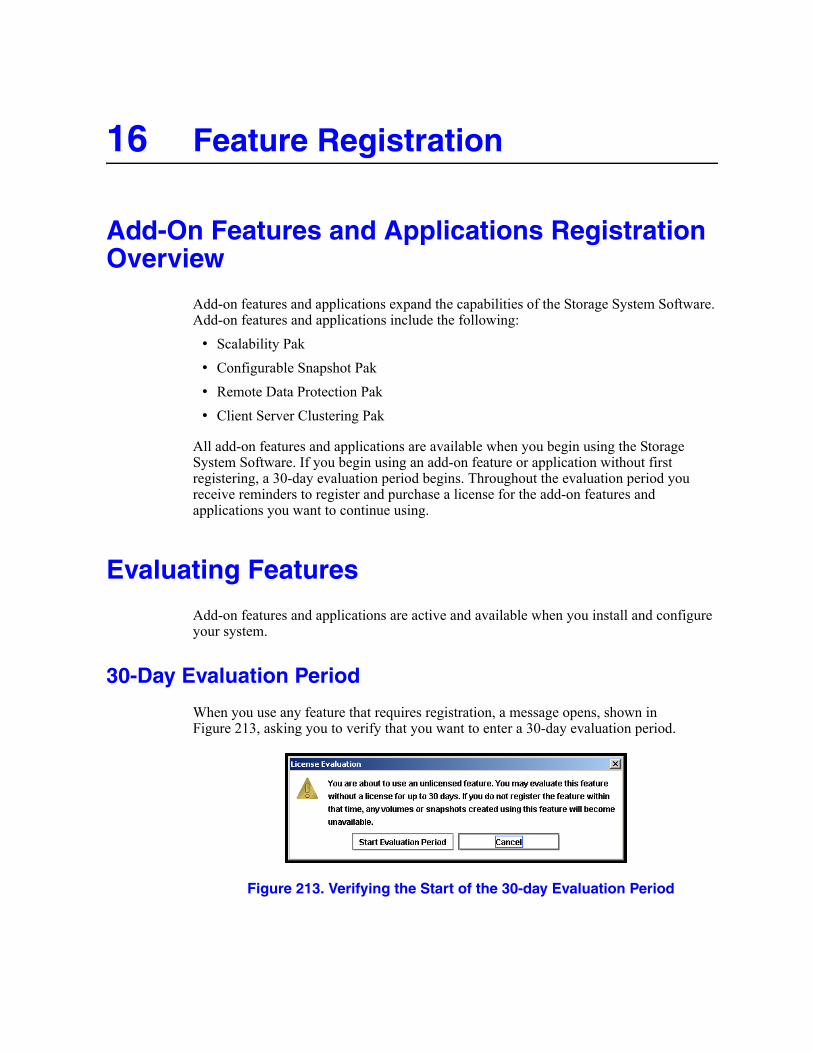
16 Feature Registration
Add-On Features and Applications Registration Overview
Add-on features and applications expand the capabilities of the Storage System Software. Add-on features and applications include the following:
• Scalability Pak• Configurable Snapshot Pak• Remote Data Protection Pak• Client Server Clustering Pak
All add-on features and applications are available when you begin using the Storage System Software. If you begin using an add-on feature or application without first registering, a 30-day evaluation period begins. Throughout the evaluation period you receive reminders to register and purchase a license for the add-on features and applications you want to continue using.
Evaluating Features
Add-on features and applications are active and available when you install and configure your system.
30-Day Evaluation Period
When you use any feature that requires registration, a message opens, shown in Figure 213, asking you to verify that you want to enter a 30-day evaluation period.
Figure 213. Verifying the Start of the 30-day Evaluation Period

Feature Registration
During this evaluation period you may configure, test, and modify any feature. At the end of the 30-day evaluation period, if you do not register and obtain a license key, then all volumes and snapshots associated with the feature or application become unavailable to any clients. The data is safe and you can manage the volumes and snapshots in the Console. Also, the entire configuration can be restored to availability when a license key is obtained and applied to the SSMs in the management group containing the configured features.
Note: If you know you are not going to purchase the feature, plan to remove any volumes and snapshots created by using the feature before the end of the 30-day evaluation period.
Tracking the Time Remaining in the Evaluation Period
Track the time left on your 30-day evaluation period by using either the management group Register tab, shown in Figure 214 or the reminder notices that open periodically, as shown in Figure 215.
Figure 214. Evaluation Period Countdown on Register Tab
Figure 215. Evaluation Period Countdown Message
294 Intel® Storage System Software User Manual

Feature Registration
Viewing Licensing Icons
Icons indicate the status of licensing on individual modules. Figure 216The figure below illustrates the icons for each state.
Figure 216. Icons Indicating License Status for Features
Evaluating the Scalability Pak
The Scalability Pak includes the following features: • Multiple nodes in a cluster• Hot spares • N-way replication • Virtual manager
Starting the License Evaluation Period
If you put more than one SSM into a cluster, the 30-day license evaluation begins. During the 30-day evaluation period you can create volumes with 2- or 3-way replication, add a hot spare to the cluster, or configure a virtual manager. Please read “Using Hot Spares” on page 202, “Planning Data Replication” on page 224 and Chapter 10, “Disaster Recovery Using A Virtual Manager” before working with these features.
License purchased for Scalability Pak
Evaluation period for Configurable Snapshot Pak
No evaluation or license for Remote Data Protection Pak
Intel® Storage System Software User Manual 295

Feature Registration
Backing Out of the License Evaluation Period
If you decide not to purchase the Scalability Pak, you must reduce the cluster to one SSM. The features you are evaluating dictate the steps required to safely back out of the evaluation configuration, particularly if you want to save any volumes or snapshots in the test configuration.1. Back up any volumes you plan to retain. The table below describes additional steps to
safely back out of the Scalability Pak evaluation.
2. Remove the extra SSMs from the cluster.
Evaluating the Configurable Snapshot Pak
The Configurable Snapshot Pak includes programmable snapshots. Features included are• Scheduled snapshots• Scripting for snapshots
Starting the License Evaluation Period
The Configurable Snapshot Pak 30-day evaluation period begins if you create a snapshot schedule.
Backing Out of the License Evaluation Period
If you decide not to purchase the Configurable Snapshot Pak, you must delete any snapshot schedules that you have configured. 1. Back up any volumes you plan to retain. Table 57 describes how to safely back out of
the Configurable Snapshot Pak evaluation.
Table 56. Safely Backing out of Scalability Pak Evaluation
Feature Being Evaluated Steps to Back Out
Multiple SSMs with a large volume If volume is too large to fit on a cluster with one SSM, do one of the following:
• Delete the volume
• Move the volume to another single note cluster with adequate capacity
• Add storage to the SSM
2- or 3-way replication Set volume replication level to none
Virtual manager Stop virtual manager
296 Intel® Storage System Software User Manual

Feature Registration
Evaluating the Remote Data Protection Pak
The Remote Data Protection Pak includes Remote Copy. Features included are• Remote volumes• Remote snapshots• Remote snapshot schedules• Scripting for remote copy
Starting the License Evaluation Period
The Remote Data Protection Pak 30-day evaluation period begins if you create a remote volume by
• Making an existing primary volume into a remote volume• Creating a remote volume in the process of creating a remote snapshot• Creating a new volume and selecting the "Remote" radio button on the New Volume
dialog
When a remote volume is created, the license evaluation period begins on both the primary and remote SSMs. For example, suppose the primary volume is on Cluster 1. You create a remote snapshot of that primary volume to Cluster 2. SSMs in both clusters show the clock ticking for the license evaluation period.
Read the Remote IP Copy User Manual before working with these features.
Backing Out of the License Evaluation Period
If you decide not to purchase the Remote Data Protection Pak, you must delete any remote volumes you have configured. The features you are evaluating dictate the steps required to safely back out of the evaluation configuration, particularly if you want to save any volumes or snapshots in the test configuration.1. Back up any volumes you plan to retain. Table 58 describes additional steps to safely
back out of the Remote Data Protection Pak evaluation.
Table 57. Safely Backing out of Configurable Snapshot Pak Evaluation
Feature Being Evaluated Steps to Back Out
Scheduled snapshots Delete the snapshot schedule
Intel® Storage System Software User Manual 297

Feature Registration
Scripting Evaluation
Application-based scripting is available for volume and snapshot features as part of the Configurable Snapshot Pak and the Remote Data Protection Pak. Features that can be scripted include
• Creating snapshots and setting hard and soft snapshot thresholds• Increasing volume hard and soft thresholds• Scripting automatic threshold increases• Creating remote volumes and snapshots
Because using scripts with add-on features and applications starts the 30-day evaluation period without requiring you to use the Console, you must first verify that you are aware of starting the 30-day evaluation clock when using scripting. If you do not enable the scripting evaluation period, any scripts you have running (licensed or not) will fail.
Turn On Scripting Evaluation
To use scripting while evaluating add-on features or applications, enable the scripting evaluation period.1. Select the management group.2. Select the Register tab.3. From the Tasks menu, select Feature Registration.
Table 58. Safely Backing Out of Remote Data Protection Pak Evaluation
Feature Being Evaluated Steps to Back Out
Remote snapshots - removing data from the remote target
• Delete any remote snapshots
• Delete the remote volume
Remote snapshots - retaining the data on the remote target
• Make the remote volume into a primary volume• Disassociate the primary and remote management
groups, if the remote copy was between management groups.
298 Intel® Storage System Software User Manual

Feature Registration
4. Select the Scripting Evaluation tab, shown in Figure 217.
Figure 217. Enabling Scripting Evaluation
5. Check the box to enable the use of scripts during a license evaluation period.6. Click OK.
For more information about scripting, see Chapter 14, “Working with Scripting.”
Turn Off Scripting Evaluation
The scripting evaluation period is turned off when • You purchase the add-on feature or application you were evaluating, or• You complete the evaluation and decide not to purchase any add-on features or
applications.1. Select the management group.2. Select the Register tab.3. From the Tasks menu, select Feature Registration. 4. Select the Scripting Evaluation tab, shown in Figure 217.5. Clear the check box.6. Click OK. Table 59 The table below describes additional steps to safely back out of
the scripting evaluation.
Intel® Storage System Software User Manual 299

Feature Registration
Note: Turning off the scripting evaluation ensures that no scripts will continue to run the 30-day evaluation clock unintentionally.
Registering Features and Applications
When registering SSMs for add-on features and applications, you first submit the appropriate SSM serial number(s) to purchase the license key(s). You will then receive the license key(s) to apply to the SSM(s).
Using License Keys
License keys are assigned to individual SSMs. License keys can be added to SSMs before or after they are in a management group. One license key is issued per SSM and that key licenses all the features requested for that SSM. Therefore, you register each SSM for which you want to use add-on features and applications.
For example, if you wanted to configure multiple node clusters in two locations to use with, you would license the SSMs in both the primary location and the remote location for both the Scalability Pak and the Remote Data Protection Pak.
Note: If you remove the SSM from the management group, the license key remains with that SSM. See the chapter on “Working with Management Groups” on page 167 for more information about removing SSMs from a management group.
Registering Available SSMs for License Keys
SSMs that are not in a management group are licensed individually in the module configuration category, see “Registering Features for an SSM” on page 53.
Table 59. Safely Backing Out of Scripting Evaluation
Feature Being Evaluated Steps to Back Out
Any of the items below that are created by an application-based script
• Scheduled snapshots• Snapshots with hard and soft
thresholds different than volume size
• Remote copy volumes and snapshots• Automatic threshold increases
1. Back out of any configurable snapshots, scheduled snapshots, or remote copying
2. Delete any scripts3. Delete any primary or remote snapshots created
by the scripts. You can identify these snapshots by viewing the item “Created By Script” on the snapshot Details tab.
300 Intel® Storage System Software User Manual

Feature Registration
Registering SSMs in a Management Group
SSMs that are in a management group are licensed through the management group.
Submitting SSM Serial Numbers
First you must submit the serial numbers of all the SSMs that you want to register. 1. Select the management group for which you want to register features or applications.2. Select the Register tab, shown in Figure 218. The Register tab lists licenses that have
been purchased. If you are evaluating features, the time remaining in the evaluation period is listed on the tab as well.
Figure 218. Registering Features and Applications
Intel® Storage System Software User Manual 301

Feature Registration
3. From the Tasks menu, select Feature Registration. The Feature Registration window opens, shown in Figure 219. Listed are all the SSMs in that management group.
Figure 219. Opening the Feature Registration Window
4. For each SSM listed in the window that you want to register, submit the serial number as instructed in the Feature Registration window.Control + C copies the serial number so that you can paste it into an application such as Notepad or Word.
Note: Record the host name or IP address of the SSM along with the serial number. This record will make it easier to add the license key to the correct SSM when you receive it.
Entering License Keys
When you receive the license keys add them to the SSMs in the Feature Registration window.1. Select the management group.2. Select the Register tab.3. From the Tasks menu, select Feature Registration.
302 Intel® Storage System Software User Manual

Feature Registration
4. Select an SSM and click Edit License Key. The Edit Feature Registration window opens, shown in Figure 220.
Figure 220. Entering License Key
5. Copy and paste the appropriate license key for that SSM into the window.6. Click OK. The license key information is updated in the Feature Registration window,
as shown in Figure 221.
Figure 221. Viewing License Keys
Intel® Storage System Software User Manual 303

Feature Registration
304 Intel® Storage System Software User Manual

A Using the Configuration Interface
The Configuration Interface is the command line interface that uses a direct connection with the SSM.
You may need to access the Configuration Interface if all network connections to the SSM are disabled. Use the Configuration Interface to
• Add SSM administrators and change passwords• Access and configure network interfaces• Delete a NIC bond• Set the TCP speed and duplex• Edit the frame size• Reset the SSM configuration to factory defaults
Connecting to the Configuration Interface
Accessing the Configuration Interface is accomplished by attaching a PC or a laptop to the SSM using a null modem cable and connecting to the Configuration Interface with a terminal emulation program.
Connecting to the Configuration Interface with Windows
On the PC or laptop attached directly to the SSM with a null modem cable, open a session with a terminal emulation program such as HyperTerminal or ProComm Plus.
Use the following settings.• Bits per second = 19200• Data bits = 8 • Parity = None • Stop bits = 1 • Flow control = None • Backspace key sends = Del • Emulation = ANSI

Using the Configuration Interface
When the session is established, the Configuration Interface window opens, shown in Figure 222.
Figure 222. Opening the Configuration Interface
Connecting to the Configuration Interface with Linux/UNIX
If using Linux, create the following configuration file. You must create the file as root, or root must change permissions for /dev/cua0 in order to create the config file in /etc/.1. Create the /etc/minirc.SSM with the following parameters:
— # Begin SSM configuration— # Machine-generated file – use “minicom –s” to— # change parameters
^ pr port = /dev/cua0^ pu baudrate = 19200^ pu bits = 8^ pu parity = N^ pu stopbits = 1^ pu mautobaud = Yes^ pu backspace = DEL^ pu hasdcd = No^ pu rtscts = No^ pu xonxoff = Yes^ pu askdndir = Yes
— # End SSM configuration2. Start xterm as follows: $ xterm3. In the xterm window, start minicom as follows: $ minicom -c on -l Storage System
Module
4. Press Enter when the terminal emulation session is established. A prompt appears asking you to type “start” and hit enter at the login prompt.
5. Type start and press Enter. When the session is connected to the SSM, the Configuration Interface window opens, shown in Figure 222.
306 Intel® Storage System Software User Manual

Using the Configuration Interface
Logging in to the SSM
Once you have established a connection to the SSM using a terminal emulation program, log in to the Configuration Interface.1. From the Configuration Interface entry window, press Enter to start the log in process.
The Configuration Interface Login window opens, shown in Figure 223.
Figure 223. Enter User Name and Password
2. Type the user name and password of the administrative user established when the SSM was first configured.
Note: This user is viewable in the Storage System Console under SSM Administration. Click Users and find the admin user on the list.1. Tab to Login and press Enter. The Configuration Interface main menu opens, shown
in Figure 224.
Figure 224. Configuration Interface Main Menu
Configuring Administrative Users
Use the Configuration Interface to add new administrative users or to change administrative passwords. You can only change the password for the administrative user that you used to log in to the Configuration Interface.1. On the Configuration Interface main menu, tab to General Settings and press Enter.
The General window opens, shown in Figure 225.
Figure 225. General Settings Window
Intel® Storage System Software User Manual 307

Using the Configuration Interface
2. To add an administrative user, tab to Add Administrator and press Enter. Then enter the new user’s name and password. Confirm password, tab to Ok and press Enter.
3. To change the password for the user that you are currently logged in as, tab to Change Password and press Enter. Then enter the new password. Confirm password, tab to Ok and press Enter.
4. On the General window, tab to Done and press Enter.
Configuring a Network Connection
The SSM has two 1000BASE-T (Gigabit Ethernet) NICs in its motherboard. These interfaces are named Motherboard:Port0 and Motherboard:Port1. In addition, the SSM can include multiple add-on PCI cards, each with up to 4 interfaces. These add-on interfaces are named according to the card’s slot and the port number, such as Slot1:Port0. For information about how the interfaces are labeled on the back of the SSM, see “Configuring the IP Address Manually” on page 94.
Once you have established a connection to the SSM using a terminal emulation program, you can configure an interface connection using the Configuration Interface.1. On the Configuration Interface main menu, tab to Network TCP/IP Settings and press
Enter. The Available Network Devices window opens, shown in Figure 226.
Figure 226. Selecting an Interface to Configure
308 Intel® Storage System Software User Manual

Using the Configuration Interface
2. Tab to select the network interface that you want to configure and press Enter. The Network Settings window opens, shown in Figure 227.If the interface you selected is a bond, then the Logical Interface Device window displays first. Click Change Settings to open the Network Settings window for the bond.
Figure 227. Entering the Host Name and Settings for an Interface
3. Enter the host name and tab to the next section to configure the network settings.
Note: If you specify an IP address, the Gateway is a required field. If you do not have a Gateway, enter 0.0.0.0 for the Gateway address.4. Tab to OK and press Enter to complete the network configuration.
A second window opens, asking you to confirm the changes.
5. Press Enter. Return to the Storage System Console and locate the SSM using the Find menu to search by subnet and mask, or search by entering the SSM IP address.
Deleting a NIC Bond
You can delete two types of NIC bonds using the Configuration Interface:
• Active backup bond• NIC aggregation bond
For more information about creating and configuring NIC aggregation and active backup bonds, see “Configuring NIC Bonding” on page 96.
When you delete an active backup bond, the primary interface assumes the IP address and configuration of the deleted logical interface. The other NIC is disabled and its IP address is set to 0.0.0.0.
When you delete a NIC aggregation bond, one of the active interfaces in the bond retains the IP address of the deleted logical interface. The other NIC is disabled and its IP address is set to 0.0.0.0.
Intel® Storage System Software User Manual 309
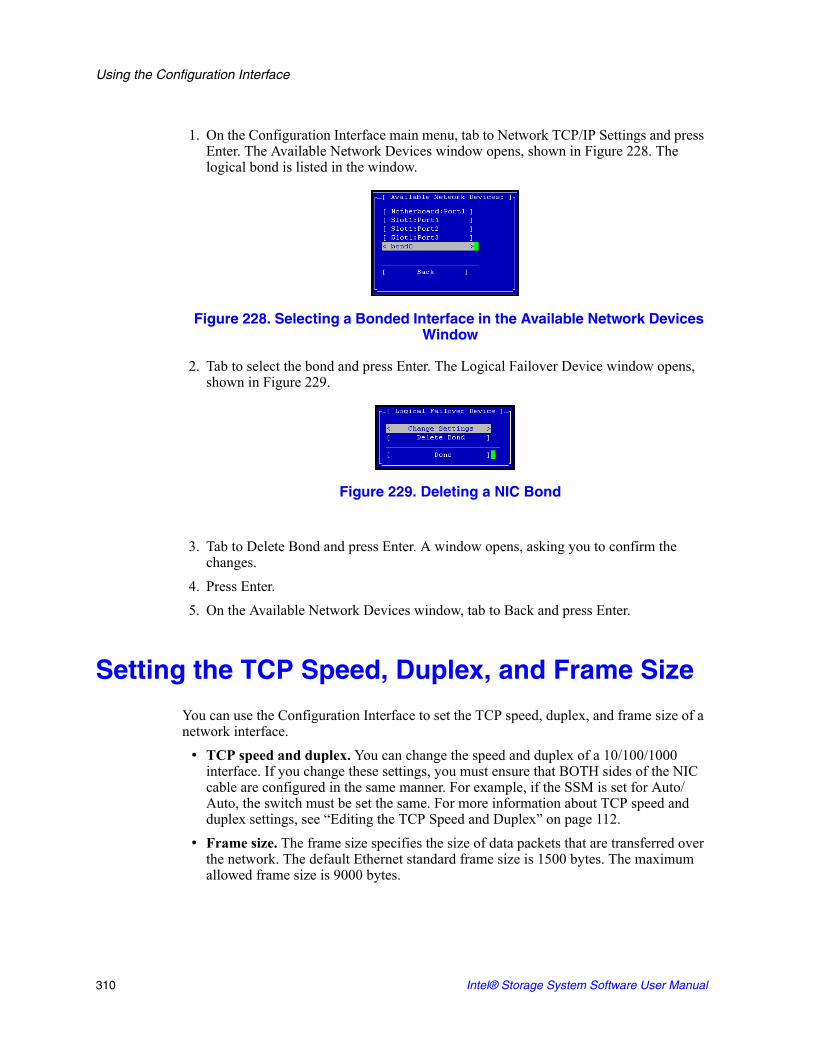
Using the Configuration Interface
1. On the Configuration Interface main menu, tab to Network TCP/IP Settings and press Enter. The Available Network Devices window opens, shown in Figure 228. The logical bond is listed in the window.
Figure 228. Selecting a Bonded Interface in the Available Network Devices Window
2. Tab to select the bond and press Enter. The Logical Failover Device window opens, shown in Figure 229.
Figure 229. Deleting a NIC Bond
3. Tab to Delete Bond and press Enter. A window opens, asking you to confirm the changes.
4. Press Enter.5. On the Available Network Devices window, tab to Back and press Enter.
Setting the TCP Speed, Duplex, and Frame Size
You can use the Configuration Interface to set the TCP speed, duplex, and frame size of a network interface.
• TCP speed and duplex. You can change the speed and duplex of a 10/100/1000 interface. If you change these settings, you must ensure that BOTH sides of the NIC cable are configured in the same manner. For example, if the SSM is set for Auto/Auto, the switch must be set the same. For more information about TCP speed and duplex settings, see “Editing the TCP Speed and Duplex” on page 112.
• Frame size. The frame size specifies the size of data packets that are transferred over the network. The default Ethernet standard frame size is 1500 bytes. The maximum allowed frame size is 9000 bytes.
310 Intel® Storage System Software User Manual

Using the Configuration Interface
Increasing the frame size improves data transfer speed by allowing larger packets to be transferred over the network and by decreasing the CPU processing time required to transfer data. However, increasing the frame size requires that routers, switches, and other devices on your network support that frame size.
For more information about setting a frame size that corresponds to the frame size used by routers, switches, and other devices on your network, see “Editing the NIC Frame Size” on page 113.1. On the Configuration Interface main menu, tab to Network TCP Status and press
Enter. The Available Network Devices window opens, shown in Figure 230.
Figure 230. Available Network Devices Window
2. Tab to select the network interface for which you want to set the TCP speed and duplex and press Enter. The Network TCP Status window opens, shown in Figure 231.
Figure 231. Setting the Speed, Duplex, and Frame Size
3. To change the speed and duplex of an interface, tab to a setting in the Speed / Duplex list.
4. To change the frame size, select Set To in the Frame Size list. Then tab to the field to the right of Set To and type a frame size. The frame size value must be between 1500 bytes and 9000 bytes.
5. On the Network TCP Status window, tab to OK and press Enter.6. On the Available Network Devices window, tab to Back and press Enter.
Intel® Storage System Software User Manual 311

Using the Configuration Interface
Removing an SSM from a Management Group
Removing an SSM from a management group, deletes all data from the SSM, clears all information about the management group from the SSM, and will reboot the SSM.
Warning: Removing an SSM from a management group deletes all data on the SSM.1. On the Configuration Interface main menu, tab to Config Management and press
Enter. The Configuration Management window opens, shown in Figure 232.
Figure 232. Removing the SSM from a Management Group
2. Tab to Remove from management group and press Enter. A window opens, warning you that removing the SSMfrom the management group will delete all data on the SSM and reboot the SSM.
3. Tab to Ok and press Enter4. On the Configuration Management window, tab to Done and press Enter.
Resetting the SSM to Factory Defaults
Resetting the SSM to factory defaults deletes all data and erases the configuration of the SSM, including administrative users and network settings.
Warning: Resetting the SSM to factory defaults deletes all data on the SSM.1. On the Configuration Interface main menu, tab to Config Management and press
Enter. The Configuration Management window opens, shown in Figure 233.
Figure 233. Resetting to Factory Defaults
2. Tab to Reset to factory defaults and press Enter. A window opens, warning you that resetting the SSM configuration will delete all data on the SSM and reboot the SSM.
3. Tab to Ok and press Enter.4. On the Configuration Management window, tab to Done and press Enter.5. Use the default User Name “admin” and Password “storage” to log in to the SSM.
312 Intel® Storage System Software User Manual

B SNMP MIB Information
SNMP Agent
The SNMP Agent resides in the Storage System Module. The agent takes SNMP network requests for reading or writing configuration information and translates them into internal system requests. Management Information Base (MIB) files are provided which can enable the system administrator to use their favorite SNMP tool to view or modify configuration information. The SNMP Agent supports versions 1, 2c, and 3 of the protocol. Security can be configured based on the host making the request and a password.
Note: To ensure that all items display properly in your SNMP tool, use version 2c or later of the protocol.
Supported MIBs
• MIB II• Host Resources MIB • UCD Extensions MIB • SNMPv3 MIB
Exceptions
MIB II
system.sysServices
interfaces.ifTable.ifEntry.ifLastChange
interfaces.ifTable.ifEntry.ifInNUcastPkts
interfaces.ifTable.ifEntry.ifInDiscards
interfaces.ifTable.ifEntry.ifInUnknownProtos
interfaces.ifTable.ifEntry.ifOutNUcastPkts
ip.ipAddrTable.ipAddrEntry.ipAdEntReasmMaxSize
ip.ipRouteTable.ipRouteEntry.ipRouteMetric2
ip.ipRouteTable.ipRouteEntry.ipRouteMetric3
ip.ipRouteTable.ipRouteEntry.ipRouteMetric4
ip.ipRouteTable.ipRouteEntry.ipRouteAge
ip.ipRouteTable.ipRouteEntry.ipRouteMetric5
ip.ipForward (MIB Tree)
tcp.tcpInErrs
tcp.tcpOutRsts
tcp.ipv6TcpConnTable (MIB Tree)
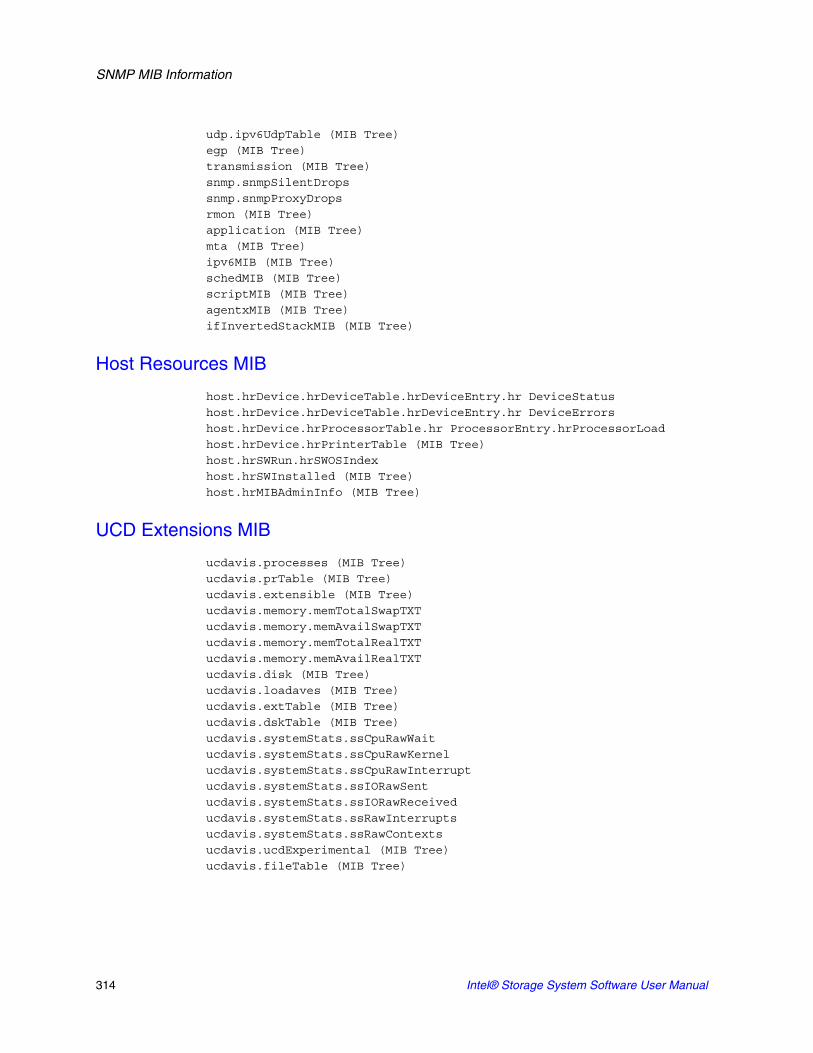
SNMP MIB Information
udp.ipv6UdpTable (MIB Tree)
egp (MIB Tree)
transmission (MIB Tree)
snmp.snmpSilentDrops
snmp.snmpProxyDrops
rmon (MIB Tree)
application (MIB Tree)
mta (MIB Tree)
ipv6MIB (MIB Tree)
schedMIB (MIB Tree)
scriptMIB (MIB Tree)
agentxMIB (MIB Tree)
ifInvertedStackMIB (MIB Tree)
Host Resources MIB
host.hrDevice.hrDeviceTable.hrDeviceEntry.hr DeviceStatus
host.hrDevice.hrDeviceTable.hrDeviceEntry.hr DeviceErrors
host.hrDevice.hrProcessorTable.hr ProcessorEntry.hrProcessorLoad
host.hrDevice.hrPrinterTable (MIB Tree)
host.hrSWRun.hrSWOSIndex
host.hrSWInstalled (MIB Tree)
host.hrMIBAdminInfo (MIB Tree)
UCD Extensions MIB
ucdavis.processes (MIB Tree)
ucdavis.prTable (MIB Tree)
ucdavis.extensible (MIB Tree)
ucdavis.memory.memTotalSwapTXT
ucdavis.memory.memAvailSwapTXT
ucdavis.memory.memTotalRealTXT
ucdavis.memory.memAvailRealTXT
ucdavis.disk (MIB Tree)
ucdavis.loadaves (MIB Tree)
ucdavis.extTable (MIB Tree)
ucdavis.dskTable (MIB Tree)
ucdavis.systemStats.ssCpuRawWait
ucdavis.systemStats.ssCpuRawKernel
ucdavis.systemStats.ssCpuRawInterrupt
ucdavis.systemStats.ssIORawSent
ucdavis.systemStats.ssIORawReceived
ucdavis.systemStats.ssRawInterrupts
ucdavis.systemStats.ssRawContexts
ucdavis.ucdExperimental (MIB Tree)
ucdavis.fileTable (MIB Tree)
314 Intel® Storage System Software User Manual

SNMP MIB Information
SNMPv3 MIB
snmpModules.snmpTargetMIB (MIB Tree)
snmpModules.snmpNotificationMIB (MIB Tree)
snmpModules.snmpProxyMIB (MIB Tree)
snmpModules.snmpUsmMIB.usm MIBObjects.usmUser.usm UserTable (MIB Tree)
snmpModules.snmpVacmMIB.vacm MIBObjects.vacmContextTable (MIB Tree)
snmpModules.snmpCommunityMIB (MIB Tree)
Intel® Storage System Software User Manual 315

SNMP MIB Information
316 Intel® Storage System Software User Manual

C Using the EBSD* Driver for Linux
The EBSD* Driver for Linux provides access to, and management of, Storage System Software volumes from Linux systems. Install and configure the EBSD Driver for Linux on the computer that accesses the SSM.
Note: You will need root privileges during installation and configuration. Use the X11R6 window environment.
Installing the EBSD Driver for Linux
You can install the EBSD Driver for Linux using either the Installation Wizard or the RPM packages available on the Resource CD. See “Installing the EBSD Driver with RPM Packages” on page 320.
Options Available When Using the Installation Wizard
The EBSD Driver for Linux CD has a graphical installation wizard that allows you to install the EBSD Driver directly on your system, or the EBSD Driver Bundles. The EBSD Driver Bundles can be installed locally or on a network share. The appropriate driver version can be installed later from the bundled files.
Copying Driver Bundle to a Network Share (Optional)
Copying the driver bundle results in separate tar.gz files plus an install.sh file copied to the location you specify. The tar.gz files correspond to the versions of Linux that are currently supported by the EBSD driver. Running the install.sh file from the directory containing all the tar.gz files installs the appropriate driver for the Linux version on that system.
Skip this section if you only want to install the EBSD driver from the CD. Go to “Installing the EBSD Driver Using the CD or the Driver Bundles” on page 319.

Using the EBSD* Driver for Linux
With Autorun Enabled
1. Start the Windows Manager of your choice, such as KDE or GNOME.2. Insert the driver CD into the CD drive of the EBSD host server. Autorun should
automatically start, if properly configured. A folder directory window also opens, displaying the contents of the CDROM.
3. The autorun window opens, asking you to verify that you want to run Autorun. The autorun window may be behind the CD folder directory.
4. Click Yes to have the automatic install process run. The automatic installation starts and steps you through the install process.
5. On the Choose Product Component window of the automatic installation, select EBSD Driver Bundles.
6. Click Next. The Choose Install Folder window opens.7. Choose to accept the default directory (/opt/Storage_System/
Storage_System_Software/6.x/Drivers/EBSD) or browse to the directory where you want the EBSD driver bundle installed. This location can be another location on the network, such as a file server.
8. Click Next. Review the Pre-installation Summary window. 9. Click Install. The EBSD driver bundle is copied into the directory you specified. The
driver bundle contains tar.gz files for all the versions of Linux that are currently supported plus an install.sh file to install the driver.
With Autorun Not Enabled
1. Insert the driver CD in to the CD drive of the EBSD host server.2. Open a terminal window.3. Navigate to the VM directory on the cd: # cd /mnt/cdrom/Disk1/InstData/VM. This
directory contains the EBSD6x_setup.bin binary file that will launch the automatic install.
4. Launch the automatic install by issuing the following command: # sh./EBSD6x_setup.bin. The automatic installer launches.
318 Intel® Storage System Software User Manual
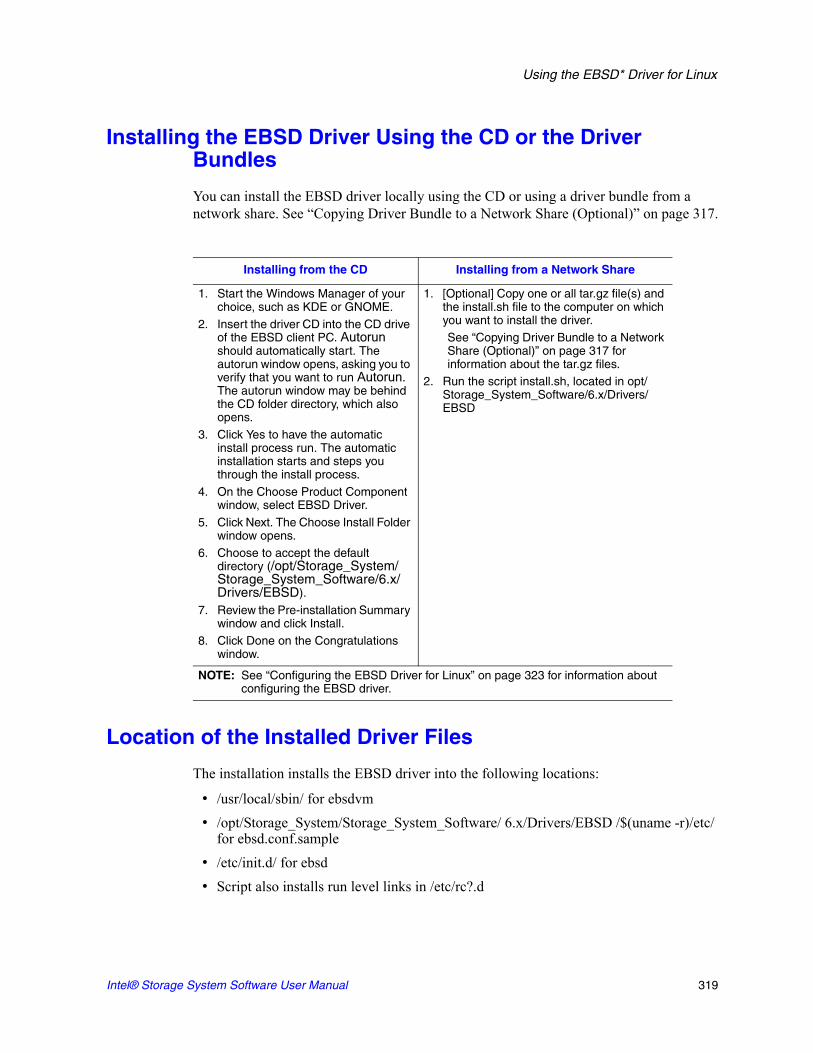
Using the EBSD* Driver for Linux
Installing the EBSD Driver Using the CD or the Driver Bundles
You can install the EBSD driver locally using the CD or using a driver bundle from a network share. See “Copying Driver Bundle to a Network Share (Optional)” on page 317.
Location of the Installed Driver Files
The installation installs the EBSD driver into the following locations:
• /usr/local/sbin/ for ebsdvm• /opt/Storage_System/Storage_System_Software/ 6.x/Drivers/EBSD /$(uname -r)/etc/
for ebsd.conf.sample• /etc/init.d/ for ebsd• Script also installs run level links in /etc/rc?.d
Installing from the CD Installing from a Network Share
1. Start the Windows Manager of your choice, such as KDE or GNOME.
2. Insert the driver CD into the CD drive of the EBSD client PC. Autorun should automatically start. The autorun window opens, asking you to verify that you want to run Autorun. The autorun window may be behind the CD folder directory, which also opens.
3. Click Yes to have the automatic install process run. The automatic installation starts and steps you through the install process.
4. On the Choose Product Component window, select EBSD Driver.
5. Click Next. The Choose Install Folder window opens.
6. Choose to accept the default directory (/opt/Storage_System/ Storage_System_Software/6.x/ Drivers/EBSD).
7. Review the Pre-installation Summary window and click Install.
8. Click Done on the Congratulations window.
1. [Optional] Copy one or all tar.gz file(s) and the install.sh file to the computer on which you want to install the driver.See “Copying Driver Bundle to a Network Share (Optional)” on page 317 for information about the tar.gz files.
2. Run the script install.sh, located in opt/Storage_System_Software/6.x/Drivers/ EBSD
NOTE: See “Configuring the EBSD Driver for Linux” on page 323 for information about configuring the EBSD driver.
Intel® Storage System Software User Manual 319

Using the EBSD* Driver for Linux
Upgrading the EBSD Driver Using the CD or Driver Bundles
1. Stop all operations to ebsd devices (i.e., unmount /ebsddisk).2. Install driver from Installation CD or the driver bundle.3. Run /etc/init.d/ebsd restart, or service ebsd restart4. Cat /proc/ebsd/client to verify driver version and devices online.
Installing the EBSD Driver with RPM Packages
The RPM packages are located in the appropriate RPM directory on the Resource Driver CD. Locate the appropriate RPM for your system.
Prerequisites for using RPM packages:
To use the RPM source kit you need either of the following RPMs:• kernel source • gcc• glibcheader• glibckernelheader• rpmbuild• automake• glibc-devel• libgcc
or include the development and kernel hacking groups when building your system.
RPM Package Naming Convention
RPM packages are named using the following conventionebsd-(Release Version).(Build Number)- (Kernel Version).i386.rpm
For example, RPM nameebsd-6.x.xx.xxxx-2.4.9-e.3enterprise.i386.rpm
• ebsd represents the driver name• 6.x.xx represents the release version• xxxx represents the build number• 2.4.9-e.3enterprise represents the kernel version
320 Intel® Storage System Software User Manual

Using the EBSD* Driver for Linux
Installing A Binary RPM Package
To install a binary RPM package on a system, choose the appropriate RPM for the kernel version.
1. Run uname -r to determine what version of Linux you are running.2. Run rpm -ivh to install the RPM
For example, on Red Hat* Advanced Server 3.0 SMP, the kernel version is 2.4.21-4.ELsmp. The corresponding RPM is ebsd-6.x.xx.xxxx-2.4.21-4.ELsmp.i386.rpm
3. Configure the driver. See “Configuring the EBSD Driver for Linux” on page 323.
Querying An Existing RPM Package
To determine whether an RPM package is installed, run rpm - q ebsd. For example, rpm - q ebsd
would return ebsd-6.x.xx.xxxx-1
To list the files in an RPM package, run rpm - ql ebsd. For example, rpm - ql
would return /opt/Storage_System/Storage_System_Software/6.1/Drivers/EBSD/2.4.21-4.ELsmp
/opt/Storage_System/Storage_System_Software/6.1/Drivers/EBSD/2.4.21-4.ELsmp/etc
/opt/Storage_System/Storage_System_Software/6.1/Drivers/EBSD/2.4.21-4.ELsmp/ etc/ebsd.conf.sample
/opt/Storage_System/Storage_System_Software/6.1/Drivers/EBSD/2.4.21-4.ELsmp/init.d
/opt/Storage_System/Storage_System_Software/6.1/Drivers/EBSD/2.4.21-4.ELsmp/init.d/ebsd
/opt/Storage_System/Storage_System_Software/6.1/Drivers/EBSD/2.4.21-4.ELsmp/license
/opt/Storage_System/Storage_System_Software/6.1/Drivers/EBSD/2.4.21-4.ELsmp/modules
/opt/Storage_System/Storage_System_Software/6.1/Drivers/EBSD/2.4.21-4.ELsmp/modules/ebsd.o
/opt/Storage_System/Storage_System_Software/6.1/Drivers/EBSD/2.4.21-4.ELsmp/readme
/opt/Storage_System/Storage_System_Software/6.1/Drivers/EBSD/2.4.21-4.ELsmp/sbin
/opt/Storage_System/Storage_System_Software/6.1/Drivers/EBSD/2.4.21-4.ELsmp/sbin/ebsdvm
/opt/Storage_System/Storage_System_Software/6.1/Drivers/EBSD/2.4.21-4.ELsmp/sysconfig
/opt/Storage_System/Storage_System_Software/6.1/Drivers/EBSD/2.4.21-
Intel® Storage System Software User Manual 321

Using the EBSD* Driver for Linux
4.ELsmp/sysconfig/ebsd
/opt/Storage_System/Storage_System_Software/6.1/Drivers/EBSD/install.sh
Uninstalling the RPM
To uninstall the ebsd rpm package from the system, run rpm - e ebsd. For example, rpm - e ebsd
To verify that the package has been uninstalled successfully, run rpm - q ebsd.This returns the message“package ebsd-6.x.xx.xxxx is not installed"
Using the Source RPM Package to Build a Driver for a New Kernel Version
If the kernel you have is not currently supported in the binary RPM package, you can create the EBSD driver using a source RPM package.
Prerequisites• Have previously installed the binary RPM package• Have the kernel source installed on the system• Go to /usr/src/ and make a link to the kernel source directory called linux
for example:cd /usr/src/
ln -s linux-#.#.#-#.#/ linux
Determining the Appropriate Source RPM Package
1. Navigate to the SRPM directory on the CD.2. Find the closest lower version to the target kernel. If you have multi-processors, select
the “smp” version. For example: — For kernel version 2.4.20, select source RPM 2.4.19.— For kernel version 2.4.28, select source RPM 2.4.21
Installing the Source RPM Package
3. Run rpm -ivh ebsd-(Release Version).(Build Number)- (Kernel Version).src.rpm to install the appropriate RPM package. This installs the sources in— /usr/src/redhat/SOURCES/ for Redhat Systems— /usr/src/packages/SOURCES/ in SuSE distributions
322 Intel® Storage System Software User Manual
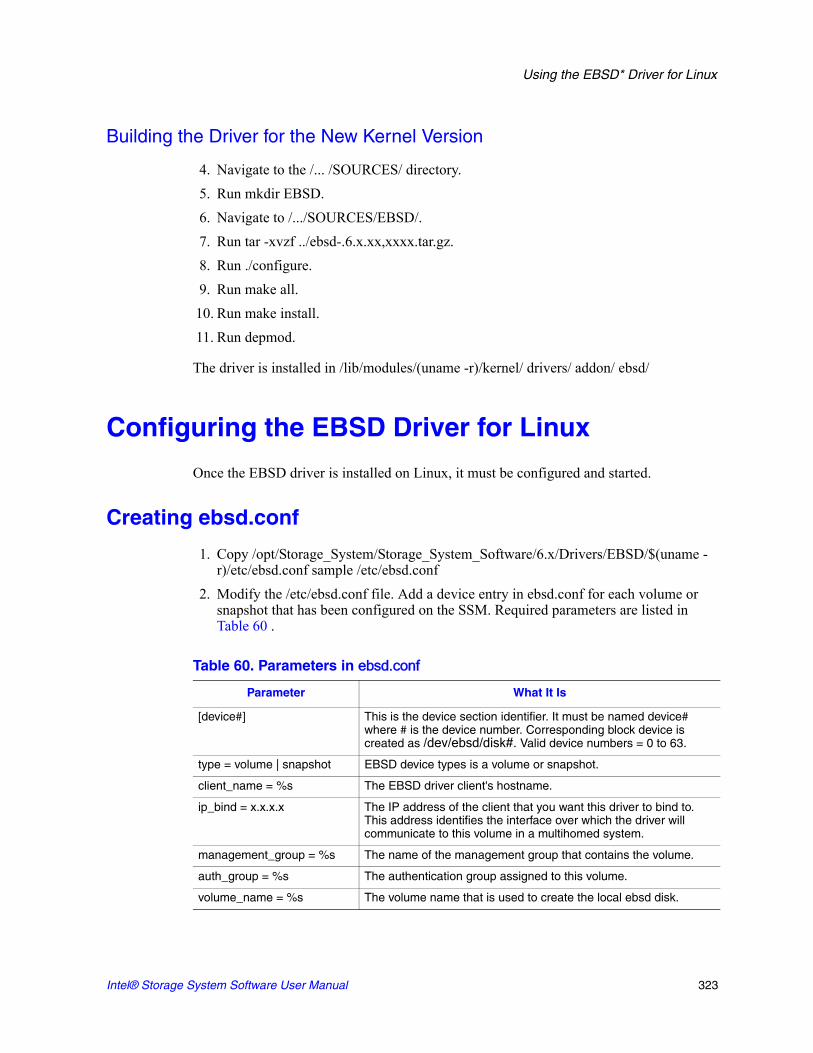
Using the EBSD* Driver for Linux
Building the Driver for the New Kernel Version
4. Navigate to the /... /SOURCES/ directory.5. Run mkdir EBSD.6. Navigate to /.../SOURCES/EBSD/.7. Run tar -xvzf ../ebsd-.6.x.xx,xxxx.tar.gz.8. Run ./configure.9. Run make all.
10. Run make install.11. Run depmod.
The driver is installed in /lib/modules/(uname -r)/kernel/ drivers/ addon/ ebsd/
Configuring the EBSD Driver for Linux
Once the EBSD driver is installed on Linux, it must be configured and started.
Creating ebsd.conf
1. Copy /opt/Storage_System/Storage_System_Software/6.x/Drivers/EBSD/$(uname -r)/etc/ebsd.conf sample /etc/ebsd.conf
2. Modify the /etc/ebsd.conf file. Add a device entry in ebsd.conf for each volume or snapshot that has been configured on the SSM. Required parameters are listed in Table 60 .
Table 60. Parameters in ebsd.conf
Parameter What It Is
[device#] This is the device section identifier. It must be named device# where # is the device number. Corresponding block device is created as /dev/ebsd/disk#. Valid device numbers = 0 to 63.
type = volume | snapshot EBSD device types is a volume or snapshot.
client_name = %s The EBSD driver client's hostname.
ip_bind = x.x.x.x The IP address of the client that you want this driver to bind to. This address identifies the interface over which the driver will communicate to this volume in a multihomed system.
management_group = %s The name of the management group that contains the volume.
auth_group = %s The authentication group assigned to this volume.
volume_name = %s The volume name that is used to create the local ebsd disk.
Intel® Storage System Software User Manual 323

Using the EBSD* Driver for Linux
Sample Device Entry in /etc/ebsd.conf
########################
# Sample device entries:
[device0]
type = volume
client_name = myclient
ip_bind = 10.0.1.63
management_group = my_mgtgroup
auth_group = public
volume_name = my_volume_0
access_mode = rw
use_unicast = true
unicast_list = 10.0.0.12, 10.0.0.13
enabled = true
use_multicast = false
########################
[device1]
type = volume
client_name = myclient
ip_bind = 10.0.1.63
management_group = my_mgtgroup
auth_group = public
volume_name = my_volume_1
access_mode = rw
use_unicast = true
unicast_list = 10.0.0.12, 10.0.0.13
enabled = true
use_multicast = false
access_mode = r | ro | rw r or ro= read only
rw = read+write
The access mode the driver should use to access this volume.
use_unicast = true | false Whether the driver should use unicast discovery.
unicast_list = x.x.x.x, x.x.x.x Used if the use_unicast flag is set to true. Coma separated list of ip addresses to be used for unicast discovery.
enabled = true | false Designates whether the device should come online at boot time. If false then the device is disabled at boot time.
use_multicast = true | false (see note)
Whether the driver should use multicast discovery.
NOTE: Use either unicast or multicast. Do not use both together.
Table 60. Parameters in ebsd.conf
Parameter What It Is
324 Intel® Storage System Software User Manual

Using the EBSD* Driver for Linux
Connecting the EBSD Devices to the SSM EBSD Server
1. Run the startup script which will spawn a child process for the new device: /etc/init.d/ebsd start loads the driver
2. Start and wait until all devices are online. There is a timeout of two minutes.
Verifying EBSD Devices
The EBSD driver creates a block device for each volume.
1. Check the current status of the device entries. Use cat /proc/ebsd/clientIt should say "online." suzy1:~ # cat /proc/ebsd/client
Version:04/04/03,4.1.14.0004
Majors:176:177:178:
Device: 0 ( my_mgtgroup_0:my_volume_0 )
Status: Online ( Active )
Read: 0 B (Requests: 0 )
Write: 0 B (Requests: 0 )
Ops: 0 ( sync = 0 )
Cycles: 147
BSize: 512
Capacity: 52428800 kb
Device: 1 ( my_mgtgroup_0:my_volume_1 )
Status: Online ( Active )
Read: 0 B (Requests: 0 )
Write: 0 B (Requests: 0 )
Ops: 0 ( sync = 0 )
Cycles: 147
BSize: 512
Capacity: 419430400 kb
Table 61. Parameters for /proc/ebsd/client
Parameter What It Is
Status Status of the device
• Starting
• Deleted
• Online - may be either Active or Lost Manager
Read Amount of data read and the number of read requests in bytes (KiB, MiB, or GiB)*
Write Amount of data written and the number of write requests in bytes
Ops Combined total of read requests and write requests
Cycles Internal - the number of times the ebsd task looped
BSize Block size in bytes
Capacity Size of the attached volume in kilobytes
Intel® Storage System Software User Manual 325

Using the EBSD* Driver for Linux
2. To verify that the block devices were created, use ls -la /dev/ebsd/root@lnx-demo /root]# ls -la /dev/ebsd
total 0
crwxr-xr-x 1 root root 176, 0 Apr 4 14:39 ebsdctrl
brwxr-xr-x 1 root root 177, 0 Apr 10 17:53 disk0
brwxr-xr-x 1 root root 177, 1 Apr 10 17:53 disk1
You can format the block devices by using any of the OS filesystem utilities.For example, you can use mkfs -t ext2 /dev/ebsd/disk0
Mounting the Block Device EBSD Disk
Once the ext2 filesystem is created the disk can be mounted. For example:1. Make a mount point for the disk: For example,
mkdir /mnt/ebsd0
2. Mount the EBSD disk. For example, mount /dev/ebsd/disk0 /mnt/ebsd0
At this point you can treat the mounted disk like any other OS file directory. You can copy files, add and delete files, and perform other file functions there.
Adding an EBSD Disk at Runtime
1. Modify ebsd.conf. 2. Run ebsdvm --add-all. The new disk is added to /dev/ebsd/. Use it as a raw or block
device. See “Verifying EBSD Devices” on page 325.
NOTE: KiB, MiB, and GiB are calculated in increments of 1024 bytes. For example, 1 KiB = 1024 bytes; 1 MiB = 1024 KiB; 1 GiB = 1024 MiB
Table 61. Parameters for /proc/ebsd/client
Parameter What It Is
326 Intel® Storage System Software User Manual

Using the EBSD* Driver for Linux
Starting the EBSD Service
If enabled for the current run level, the EBSD service is started when the operating system is booted.
You can also start the EBSD service manually using the following command(s): service ebsd start
or /etc/init.d/ebsd start
The EBSD service reads the file /etc/sysconfig/ebsd to initialize the EBSD volume manager tool (ebsdvm) and the EBSD configuration file (ebsd.conf).
The file contains the following default information: ebsdtool=/usr/local/sbin/ebsdvm
Note: To prevent file system checking of ebsd disks, set the environment variable fsck_check=0 in /etc/sysconfig/ebsd.
You can modify this file for different directories and names.
The EBSD start service first checks for the EBSD configuration file (ebsdconf environment variable), and the EBSD volume manager tool (ebsdtool environment variable). If the configuration file and the EBSD volume manager tool exist, then the EBSD service:
• Loads the EBSD driver if needed. • Starts all the devices listed in the EBSD configuration file ($ebsdconf).• Waits until all the devices become online or exceed the timeout value.• Mount all the EBSD devices listed in /etc/fstab and not marked as noauto.
Stopping the EBSD Driver
The EBSD stop service first checks for the EBSD configuration file (ebsdconf environment variable), and the EBSD volume manager tool (ebsdtool environment variable). If the configuration file and the EBSD volume manager tool exist, then the EBSD service:
• Reports a system hang warning if a mounted device has lost connection.• Stops all processes using mounted EBSD devices.• Unmounts all mounted EBSD devices.• Stops and removes all the EBSD devices. • Unloads the EBSD driver.
Intel® Storage System Software User Manual 327

Using the EBSD* Driver for Linux
Status of the EBSD Driver and Devices
To display the status of the EBSD driver and the associated devices, enter the following: service ebsd status
or/etc/init.d/ebsd status
This status command displays the information in the file /proc/ebsd/client.
Disconnecting an EBSD Device
Disconnecting an EBSD device stops activity on the SSM but preserves the data in the volume.
Prerequisite: Stop all applications using the EBSD device.
Warning: If an application attempts to write to a disconnected or disabled EBSD device (raw or file), the application will hang.
Use these steps to unmount the EBSD disk1. Execute the command, umount. For example: umount /mnt/ebsd0
2. Run ebsdvm --remove # where # = the device you want to disconnect. (Remember, device numbers can be from 0 - 63.) This disconnects the SSM volume from the host device entry.
Disabling an EBSD Device
Disabling the EBSD device keeps the device from being accessed (takes it offline?), saves the data on the device, and maintains the device information in ebsd.conf.
1. Modify the /etc/ebsd.conf file. Set the enabled field for that device to false, as shown in the sample entry below.
Sample Device Entry as Disabled Device########################
# Sample device entries:
[device0]
type = volume
client_name = myclient
ip_bind = 10.0.1.63
management_group = my_mgtgroup
328 Intel® Storage System Software User Manual

Using the EBSD* Driver for Linux
auth_group = public
volume_name = my_volume_0
access_mode = rw
use_unicast = true
unicast_list = 10.0.0.12, 10.0.0.13
enabled = false
use_multicast = false
Deleting an EBSD Device
Deleting the EBSD device erases the volume’s data from the SSM.
Warning: Make sure the EBSD disks you plan to delete are NOT in use. Deleting EBSD disks from the host and deleting volumes from the cluster removes all data stored in those volumes. Once removed, that data cannot be retrieved.
Note: Be sure to disconnect the device before deleting it.1. Modify the /etc/ebsd.conf file. Remove the appropriate device entry in ebsd.conf.
Uninstalling the EBSD Driver
1. Navigate to the following directory /opt/Storage_System/Storage_System_Software/6.x/Drivers/EBSD
2. Copy the file install.sh to your client system.3. Run ./install.sh -u4. Type cd.. and press Enter.5. Run ./Uninstall_EBSD_Driver6. The Install wizard opens.7. Click Uninstall.8. Click Done when the wizard is finished uninstalling the driver.9. Type cd.. and press Enter.
Finishing Up
Remove the EBSD volumes from the Storage System Console.
Intel® Storage System Software User Manual 329

Using the EBSD* Driver for Linux
TroubleshootingError: Could not load the ebsd driver on your system.
1. Run uname -r to determine what version of Linux you are running.2. Determine whether that version is supported by the EBSD driver.
Driver successfully loaded but adding device returns failed (i.e. ebsdvm --add 0 returns “failed”)
1. Check the error message and correct the problem.
Driver successfully loaded, adding a device appears successful, but when you check the config file, the device was not added.
1. Check cat /proc/ebsd/client. 2. If device does not exist, add proper entry into the EBSD config file.
orIf device status stuck in starting mode, check the following:— Verify all entries in the EBSD config file.— Verify the network connection to the SSMs.
3. Re-check cat /proc/ebsd/client after making corrections to any issues found.
During Unmounting
If during unmounting you get "device/filesystem busy" you probably have a process accessing /dev/ebsd/disk0.
Restart EBSD Service Gives Error Message
When the EBSD driver is loaded manually or using the ebsd service the following message appears:
"Warning: loading /lib/modules/2.4.9e.enterprise/kernel/driver/addon/ ebsd/ebsd.o will taint the kernel: non GPL license"
The EBSD Driver for Linux is a custom driver and will always produce this message when installed.
330 Intel® Storage System Software User Manual

D Remote Copy
Remote Copy Overview
This chapter provides instructions for registering, configuring, and using Remote Copy for business continuance, backup and recovery, and failover.
For information about how Remote Copy works and how to plan capacity for Remote Copy, see Appendix F, “Understanding and Planning Remote Copy”.
Registering Remote Copy
Remote Copy is a feature upgrade. You must purchase a Remote Data Protection Pak license to use Remote Copy beyond the 30-day evaluation period. For information about registering Remote Copy licenses, see the chapter “Feature Registration” .
Number of Remote Copy Licenses Required
Register Remote Copy on each management group that contains SSMs that will participate in Remote Copy. If there are SSMs in a management group that will not contain Remote Copy primary or remote volumes, you do not need to purchase licenses for those modules. For example, if your management group contains a cluster of 2 SSMs that will contain a remote volume, and another cluster of 3 SSMs that will not use Remote Copy, you only need 2 Remote Copy licenses.
Registering Remote Copy
For information about starting the 30-day evaluation period and about registering Remote Data Protection Pak, see Chapter 16, “Feature Registration” .
Working with Remote Snapshots
Remote snapshots are the core of Remote Copy. You use the existing volume and snapshot capabilities along with replication across geographic distances to create remote snapshots.

Remote Copy
Creating a Remote Snapshot
Creating a remote snapshot is the main task in Remote Copy. You can create a one-time remote snapshot or set up a schedule for recurring remote snapshots. Many of the parameters for either case are the same. Creating a remote snapshot involves four main steps:
• First, log in to the management groups that will contain primary and remote volumes.• Second, create a primary snapshot on the primary volume.• Third, create a remote volume or select an existing remote volume.• Fourth, specify the settings for the remote snapshot.
Getting There
1. Log in to the management group that contains the primary volume for which you are creating the remote snapshot.
2. Log in to the management group that will contain the remote volume and remote snapshot.You can create remote volumes and snapshots within the same management group. In that case, you only log in to the one management group.
3. Right-click the primary volume and select Remote Copy > New Remote Snapshot.The New Remote Snapshot window opens, shown in Figure 234.
Figure 234. Creating a New Remote Snapshot
332 Intel® Storage System Software User Manual

Remote Copy
Creating the Primary Snapshot
1. In the Primary section of the New Remote Snapshot window, click New Snapshot.The New Snapshot window opens, shown in Figure 235.
Figure 235. Creating a New Primary Snapshot
2. Type a name for the primary snapshot.Names are case sensitive. They cannot be changed after the snapshot is created.
Note: Make the beginning of volume and snapshot names meaningful, for example, “Snap1Exchg_03.” The Console displays volume and snapshot names under the icons. If a name is longer than the width of the icon, the end of the name is cut off (however, the full name does show on the corresponding Details tab and on other relevant tab views).
3. [Optional] Type in a description of the snapshot.4. [Optional] Change the hard and soft thresholds for the snapshot.
Intel® Storage System Software User Manual 333

Remote Copy
5. Click OK to return to the New Remote Snapshot window. The information for the primary snapshot is filled in, as shown in Figure 236. At this point the primary snapshot has been created.
Figure 236. New Primary Snapshot Created
Creating a Remote Volume
If you have already created the remote volume, select the management group and existing remote volume in the Remote section of the New Remote Snapshot window. Then go to “Completing the Remote Snapshot” on page 336.
You can create a remote volume by any of the following methods:• Make an existing volume into a remote volume.• Create a new remote volume during creation of a remote snapshot.• Create a new volume from the cluster Details panel and then select the Remote option
on the New Volume window.
Making an existing volume into a remote volume.
Selecting an existing volume to become a remote volume will cause 1. a snapshot of all existing data to be created for that volume and then2. all the data in that volume will be deleted so that the remote volume will have zero
length and zero hard and soft thresholds.
Creating a new remote volume.
When you create the remote snapshot, use the Remote Snapshot window, shown in Figure 234, to create the volume. Alternately, you can create a new volume from the cluster details panel and select the Remote option in the New Volume Window.
Note: The fastest way to create a remote volume is to create it as part of creating the remote snapshot, using the Remote Snapshot window.
334 Intel® Storage System Software User Manual

Remote Copy
To create the remote volume from the New Remote Snapshot window:1. In the Remote section, select the Management Group to contain the remote snapshot.
You must be logged into the management group to continue.2. To create a new remote volume, click New Volume.
The Cluster List window opens, shown in Figure 237.
Figure 237. Selecting a Cluster for the Remote Volume
3. Select a cluster for the remote volume and click OK.The New Volume window opens, shown in Figure 238. See the chapter on volumes for detailed information about creating volumes.
Figure 238. Creating a New Remote Volume
4. Type a name for the volume.A volume name must be from 1 to 127 characters and is case sensitive.
5. [Optional] Type a description of the volume.
Intel® Storage System Software User Manual 335

Remote Copy
6. Select the replication level.You can set different replication levels for the remote volume and the primary volume.
Note: You cannot set the size or thresholds for the remote volume. Those values are 0, since the remote volume is a placeholder for data.
7. Select a replication priority.If you select a replication level of None, you cannot set a replication priority. See the chapter on volumes for detailed information about creating volumes.
8. Click OK to return to the New Remote Snapshot window.The new remote volume has been created at this point.
Completing the Remote Snapshot
1. Type a name for the remote snapshot.
2. [Optional] Type a description for the snapshot.The completed window is shown in Figure 239.
3. Click OK.
Figure 239. Completing the New Remote Snapshot Dialog
What the System Does
The system creates the remote snapshot in the cluster that contains the remote volume.
The system then copies the primary snapshot onto the remote snapshot. The process of copying the data may take some time.
The remote snapshot appears below the remote volume, as shown in Figure 240.
336 Intel® Storage System Software User Manual

Remote Copy
Note: If you create a remote snapshot of a volume with a remote snapshot still in progress, the second remote snapshot will not begin copying until the first remote snapshot is complete.
Figure 240. Viewing the Remote Snapshot
Viewing a List of Remote Snapshots
You can view a list of remote snapshots associated with management groups, clusters, volumes or snapshots. 1. Click the item for which you want to view the list of remote snapshots.2. Click the Remote Snapshot tab.
The tab view opens, shown in Figure 241. The report on the tab lists both management groups and all the snapshots. The other columns report status information about the remote snapshots, as described in detail in “Monitoring Remote Snapshots” on page 341.
Figure 241. Viewing the List of Remote Snapshots
Remote Volume and Remote Snapshot
Primary Volume and Primary Snapshot
Intel® Storage System Software User Manual 337

Remote Copy
Setting the Remote Bandwidth
The remote bandwidth sets the maximum rate for data transfer between management groups. The remote bandwidth setting is the upper limit of the range of data transfer—that is, the copy rate will be equal to, or less than, the rate set.
The remote bandwidth specifies the speed at which data is received from another management group. This means that to control the maximum rate of data transfer to a remote snapshot, set the remote bandwidth on the management group that contains the remote snapshot. Table 62 lists possible remote bandwidth settings by network type.
Table 62. Guide to Remote Copy Bandwidth Settings
Network Type Bits Per Second (bps)
Remote Bandwidth Setting (Kbps)
Fractional T1 (1/6) 256 Kbps 256
Fractional T1 (1/2) 768 Kbps 768
T1 1.544 Mbps 1 581
Bonded T1 (2) 3.088 Mbps 3 162
Bonded T1 (4) 6.176 Mbps 6 324
Ethernet 10 Mbps 10 240
T3 44.736 Mbps 45 809
Fast-Ethernet, 100Base-T 100 Mbps 102 400
OC-3 155 Mpbs 158 720
OC-12 622 Mbps 636 928
Gigabit-Ethernet, 1000Base-T 1 Gbps 1 048 576
338 Intel® Storage System Software User Manual

Remote Copy
Set the Bandwidth
1. Right-click the remote management group and select Edit Management Group.The Edit Management Group window opens, shown in Figure 242.
Figure 242. Editing a Remote Management Group
2. In the Remote Management Groups section, click Edit Bandwidth.The Edit Remote Bandwidth window opens.
Figure 243. Editing the Remote Bandwidth
3. Change the bandwidth setting as desired.See Table 62 for a list of possible remote copy bandwidth settings by network type.
Canceling a Remote Snapshot
When you cancel a remote snapshot that is in progress, the remote snapshot is deleted and the primary snapshot remains.
To cancel a remote snapshot that is in progress1. Click the primary or remote snapshot.
The snapshot tab view opens.2. Click the Remote Snapshot tab.3. Select from the list the remote snapshot you want to cancel.4. Click Cancel Remote Snapshot.
A confirmation message opens.
Intel® Storage System Software User Manual 339

Remote Copy
5. Click OK.
Editing a Remote Snapshot
You can edit the description of a remote snapshot. You can also change the hard and soft thresholds, but it is not recommended.1. Log in to the management group that contains the remote snapshot.2. Right-click the remote snapshot and select Edit Snapshot from the menu.
The Edit Snapshot window opens, shown in Figure 244.
Figure 244. Editing a Remote Snapshot
3. Change the desired information and click OK.
Deleting a Remote Snapshot
1. Log in to the management group that contains the remote snapshot.2. Right-click the remote snapshot and select Delete Snapshot from the menu.
A confirmation message opens.3. Click OK.
340 Intel® Storage System Software User Manual

Remote Copy
Monitoring Remote Snapshots
Information for monitoring remote snapshots is available from multiple sources. Active monitoring features provide you the capability to configure alerts that you view in the Console as well as receiving alerts as emails and through SNMP traps. The Console tab view also provides monitoring information for remote snapshots.
Configuring Active Monitoring Alerts for Remote Copy
There are four variables for remote snapshots for which you can configure alerts. Notification for these variables automatically come as alert messages in the Console. You can also configure Active Monitoring to receive email notification or for SNMP traps. The Remote Copy variables that are monitored include
• Remote Copy status - an alert is generated if the copy fails• Remote Copy complete - an alert is generated when the remote copy is complete • Remote Copy failovers - an alert is generated when a remote volume is made primary• Remote management group status - an alert is generated if the connection to a remote
management group changes (disconnects and/or reconnects)
For detailed information about configuring Active Monitoring, see .
Monitoring Remote Snapshot Details from the Console Tab View
View information about each remote snapshot in both the Remote Snapshot tab and in the Remote Copy Details panel.
Viewing Information in the Remote Snapshot Tab
The Remote Snapshot tab displays a list of remote snapshots connected with a selected item in the Network view. For example, if you select a management group, the Remote Snapshot tab displays the list of remote snapshots associated with that management group. You can view lists of remote snapshots by management group, cluster, volume and snapshot levels.1. Select the appropriate item in the Network view.
Intel® Storage System Software User Manual 341

Remote Copy
2. Click the Remote Snapshot tab to bring it to the front, shown in Figure 245.
Figure 245. Viewing Remote Snapshot Details in the Remote Snapshot Tab
The remote snapshot details displayed include• Primary Management Group - containing the primary volume from which remote
snapshots are created.• Primary Snapshot - from which the remote snapshot is copied.• Remote Management Group - containing the remote volume to which the remote
snapshot is attached.• Remote Snapshot - target for the copied primary snapshot.• % Complete - the incremental progress of the remote copy operation.• Elapsed Time - incremental time of the copy operation.• Data Copied - incremental quantity of data copied.• Rate - rate at which data is being copied, or, when the remote snapshot is complete,
the average rate for the total operation.• State - status of the operation.
Viewing Status in the Remote Copy Details Window
The Remote Copy Details window displays additional details about a remote snapshot. 1. From the Remote Snapshot tab, select the remote snapshot for which you want to
view details.
342 Intel® Storage System Software User Manual
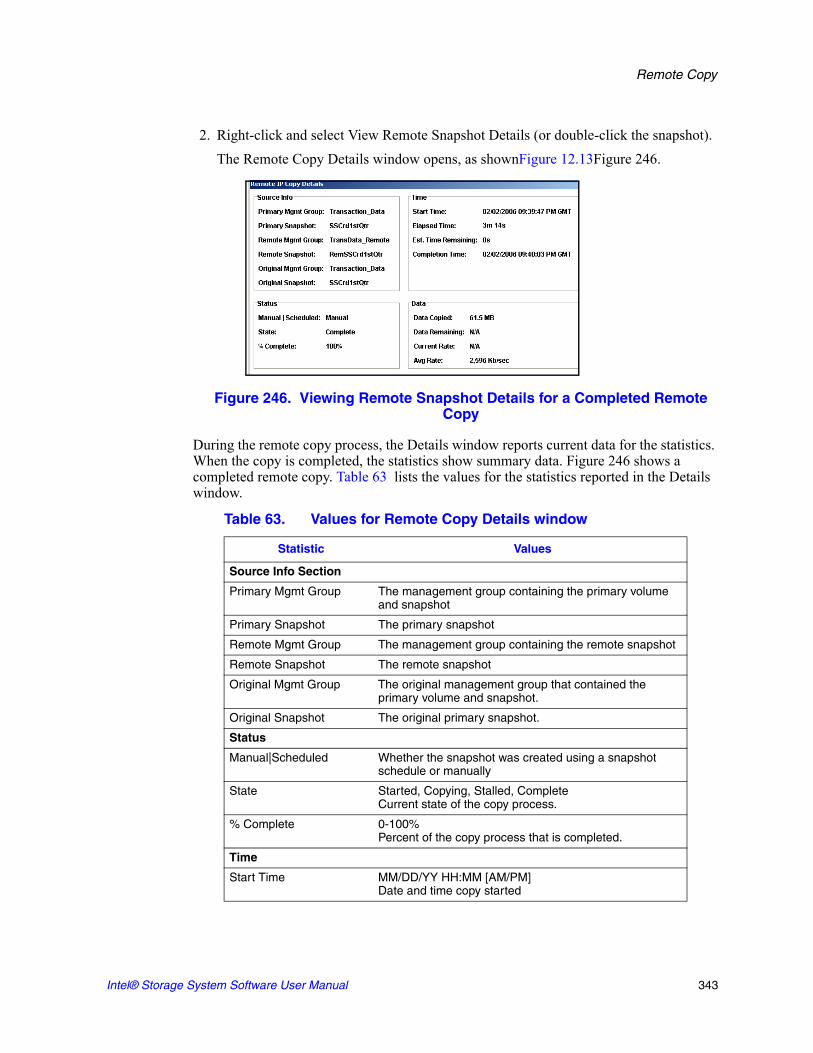
Remote Copy
2. Right-click and select View Remote Snapshot Details (or double-click the snapshot).The Remote Copy Details window opens, as shownFigure 12.13Figure 246.
Figure 246. Viewing Remote Snapshot Details for a Completed Remote Copy
During the remote copy process, the Details window reports current data for the statistics. When the copy is completed, the statistics show summary data. Figure 246 shows a completed remote copy. Table 63 lists the values for the statistics reported in the Details window.
Table 63. Values for Remote Copy Details window
Statistic Values
Source Info Section
Primary Mgmt Group The management group containing the primary volume and snapshot
Primary Snapshot The primary snapshot
Remote Mgmt Group The management group containing the remote snapshot
Remote Snapshot The remote snapshot
Original Mgmt Group The original management group that contained the primary volume and snapshot.
Original Snapshot The original primary snapshot.
Status
Manual|Scheduled Whether the snapshot was created using a snapshot schedule or manually
State Started, Copying, Stalled, CompleteCurrent state of the copy process.
% Complete 0-100%Percent of the copy process that is completed.
Time
Start Time MM/DD/YY HH:MM [AM/PM]Date and time copy started
Intel® Storage System Software User Manual 343

Remote Copy
You can leave the Details window open and monitor the progress of the remote copy. An example of a Details window with a remote copy in progress is shownFigure 12.14Figure 247.
Figure 247. Viewing remote Snapshot Details for a Remote Copy in Progress
Elapsed Time Xd Xh Xm XsX = a number and the days, hours, minutes, and seconds the copy has been processing.N/A if not yet available.
Est. Time Remaining Xd Xh Xm XsX = a number and the days, hours, minutes, and seconds estimated to remain in the copy process. N/A for completed copies or in-progress copies not yet calculated.
Completion Time MM/DD/YY HH:MM [AM/PM]Date and time copy completed.N/A for in-progress copies.
Data
Data Copied MB, GB, or TBAmount of data copied so far in smallest unit size.
Data Remaining MB, GB, or TBAmount of data remaining to be copied in smallest unit size
Current Rate Kb/sec.Current rate of data being copied in Kb/second. This rate is recalculated regularly throughout the remote copy process. N/A If not yet available or completed.
Avg. Rate Kb/sec.Average rate of copy progress.
Table 63. Values for Remote Copy Details window
Statistic Values
344 Intel® Storage System Software User Manual

Remote Copy
Scheduling Remote Snapshots
Scheduled remote snapshots provide high availability for business continuance/disaster recovery and provide a consistent, predictable update of data for remote backup and recovery.
The first step in scheduling remote snapshots is planning for creating and deleting primary and remote snapshots. Issues that require planning include
• Recurrence (frequency)• Snapshot thresholds• Retention policies
For detailed information about these issues, see “Planning for Remote Copy” on page 381.
Once you have defined your plan, you are ready to create the remote snapshot schedule.• First create the schedule• Second, configure the primary volume and snapshot, and• Third, create the remote volume and configure remote snapshots.
Creating the Schedule
1. Right-click the volume for which you want to create the remote snapshot schedule and then select Remote Copy > New Remote Snapshot Schedule.The New Remote Snapshot Schedule window opens, shown in Figure 248.
2. Type a name for the schedule.3. [Optional] Type a description for the schedule.
Intel® Storage System Software User Manual 345

Remote Copy
Figure 248. Creating a New Remote Snapshot Schedule
Remote Snapshot Schedule
The time zone displayed in the Remote Snapshot Schedule area is the time zone set on the storage module through which you are logged in to the management group.
Best Practice
Set all storage modules in the management group to the same time zone. Reset the management group time before creating a remote snapshot schedule. For detailed information, see “Resetting the Management Group Time”.1. Select a start date and time for the schedule.2. [Optional] Select a recurrence interval for the schedule.
Configuring the Primary Volume and Snapshots
1. On the Primary Setup tab, specify the hard threshold and the soft threshold for the primary snapshots.
2. Specify the retention policy for the primary snapshots.
Remote snapshot schedule
Primary setup Remote
setup
346 Intel® Storage System Software User Manual

Remote Copy
Configuring the Remote Volume and Snapshots
1. Click the Remote Setup tab to bring it to the front.
Figure 249. The Remote Setup Tab
2. Select the management group to contain the remote volume and remote snapshots.3. Select an existing volume, or click New Volume to create the remote volume.
See “Making a Primary Volume Into a Remote Volume” on page 349. 4. Specify a retention policy for the remote snapshots.5. Click OK.
What the System Does
If you created a new volume for the remote volume, the system creates a new primary snapshot of the primary volume and a remote snapshot of the remote volume.
If you selected an existing volume to become the remote volume, the system alerts you that all the data on the existing volume will be deleted, but that a snapshot of all the existing data will be created first. The snapshot that is then created retains all the volume’s data.1. Type a name for that snapshot in the alert.2. Click Yes to continue.
The new snapshot is created and the volume becomes a remote volume.
The system creates a new primary snapshot of the primary volume and a remote snapshot of the remote volume. It then copies the data from the primary snapshot to the remote snapshot. This process will recur according to the schedule.
Intel® Storage System Software User Manual 347

Remote Copy
Editing a Remote Snapshot Schedule
When editing a remote snapshot schedule, you can change the following items.• Schedule—description, start date and time, recurrence policy• Primary Setup—primary snapshot thresholds, retention policy• Remote Setup—retention policy
Note: Be certain to plan threshold changes carefully. See the chapter on snapshots for detailed information about threshold requirements.1. Select the primary volume that has the schedule you want to edit.2. Click the Remote Snapshot Schedules tab.3. Select from the list the schedule to edit.4. From the Tasks menu, select Edit Schedule.
The Edit Remote Snapshot Schedule window opens, shown in Figure 250.5. Change the desired information.6. Click OK.
Figure 250. Editing a Remote Snapshot Schedule
348 Intel® Storage System Software User Manual

Remote Copy
Deleting a Remote Snapshot Schedule
1. Select the volume for which you want to delete the remote snapshot schedule.The volume tab view opens.
2. Click the Remote Snapshot Schedule tab to bring it to the front.3. Select the schedule you want to delete. 4. From the Tasks menu, select Delete Schedule.
A confirmation message opens.5. Click OK.
Changing the Roles of Primary and Remote Volumes
Changing the roles of primary and remote volumes comes into play during failover recovery. You use these procedures when you are resynchronizing data between the acting primary volume and the recovered or newly configured production site primary volume.
Making a Primary Volume Into a Remote Volume
You can make any primary volume into a remote volume. First the system takes a snapshot of the volume to preserve the existing data that is on the volume. The data can then be accessed on that snapshot.
Next, the volume is converted to a remote volume. The remote volume is a placeholder for the remote snapshots and does not contain data itself. So the size, hard threshold and soft threshold change to 0 length. 1. Log in to the management group containing the volume that you want to convert.2. Right-click the volume in the network view and select Edit Volume.
The Edit Volume window opens.3. Change the Type from Primary to Remote.
Notice that the window changes to the Edit Remote Volume window, and all the fields are greyed out, as shown in Figure 251. Additionally, the values in the size, hard threshold and soft threshold fields are set to 0.
Intel® Storage System Software User Manual 349

Remote Copy
Figure 251. Changes to a Volume When Changed from Primary to Remote
4. Click OK.The Make Volume Remote window opens, shown in Figure 252.
Figure 252. Creating a Snapshot Before Making a Primary Volume into a Remote Volume
5. Type a name for the snapshot that will be created.This snapshot preserves any existing data on the volume.
6. [Optional] Type a description for the snapshot.
Primary volume with size, hard and soft thresholds defined.
Selecting Remote changes the volume to a remote volume with the size, hard and
soft thresholds set to 0.
350 Intel® Storage System Software User Manual

Remote Copy
7. Click OK.The snapshot is created and the volume becomes a remote volume. The Edit Remote Volume window opens again with the editable fields enabled, as shown in Figure 253.
Figure 253. Finalizing the New Remote Volume
8. [Optional] Make any necessary changes to the new remote volume.
Making a Remote Volume Into a Primary Volume
You can make a remote volume into a primary volume. Changing the remote volume into a primary volume allows the backup application server to read and write to the volume. This is useful in failover recovery if you want to use the failover site as the acting primary site.
Note: You cannot make a remote volume into a primary volume while a remote snapshot is in progress. Wait until the remote snapshot copy is complete before making the remote volume into a primary volume.
Designating Size and Threshold Values for the Converted Volume
If the remote volume was originally created as a remote volume:
• You will need to designate a volume size, and hard and soft thresholds.
If the remote volume was originally created as a primary volume that was then changed to remote:
• Returning that volume to its primary state will automatically return the original size and threshold values. You can change these values before completing the conversion.
Intel® Storage System Software User Manual 351

Remote Copy
1. Log in to the management group containing the remote volume that you want to convert.
2. Right-click the volume in the network view and select Edit Volume.The Edit Remote Volume window opens.
3. Change the Type from Remote to Primary.Notice that the window changes to the Edit Volume window and all the fields are greyed out, as shown in Figure 254.
Figure 254. Making a Remote Volume into a Primary Volume
4. Click OK.The Edit Volume window displays the editable fields enabled. You can edit everything but the name and created date and time.
5. Make any required changes, i.e., to the size and hard and soft thresholds.6. Click OK.
The volume becomes a primary volume.
Remote volume with editable fields enabled.
Selecting Primary changes the volume to a primary volume with all fields greyed out.
352 Intel® Storage System Software User Manual

Remote Copy
Configuring Failover
Configuring Remote Copy for failover provides for business continuance and high availability. When configuring failover you take into consideration both the failover path and the recovery from failover.
Planning Failover
To achieve failover you plan the following parameters:• the location and structure of management groups and clusters • configuration of primary and remote volumes and snapshots and scheduling snapshots • configuration of application servers and backup application servers• task flow for failover recovery [resuming production after failover]
Using Scripting for Failover
Application-based scripting provides the capability for creating, mounting and deleting snapshots using scripts. Remote Copy can be scripted as well. Remote snapshots and snapshot schedules can be created and managed using scripts. Detailed information about snapshot scripting can be found in .
Resuming Production After Failover
After failover occurs, three scenarios exist for resuming production.• Failback Recovery - return operations to the original primary site once it is restored.• Make the backup site into the new primary site.• Set up a new primary site and resume operations at that site.
The task flow for restoring or recovering data and resuming the original Remote Copy configuration are different for each scenario.
Synchronizing Data After Failover
After a failover, there will usually be two snapshots or volumes that have conflicting data. Recovering and synchronizing such data depends on multiple factors, including the application involved. For more detail about synchronizing, see “Glossary for Remote Copy” on page 377.
Intel® Storage System Software User Manual 353

Remote Copy
Example Scenario
The following example illustrates only one process for synchronizing data. Remember that such synchronization is optional.
Timetable of failover
Data that now needs to be synchronized
• Original volume which contains data from 1:00 to 1:30 p.m.• Acting primary volume which contains data from 1:33 to 2:00 p.m.
Returning Operations to Original Primary Site
Once the original primary site is operational again, restore operations to that site. The steps to restore operations depend upon the state of the original primary volume.
• If the primary volume is working Synchronize the data between the acting primary volume and the restored primary volume before returning the acting primary volume to its remote volume state.
• If the primary volume is not availableCreate a new primary volume, synchronize the data with the acting primary volume, and then return the acting primary volume to a remote volume.
Synchronizing the Data Between the Acting Primary Volume and the Original Primary Volume
1. Create Snapshots of Data
First you create snapshots that contain the data that you need to synchronize. The steps to create those snapshots are described Table 12.4Table 65 .
Table 64. Timetable of Failover
Time Event What Happens
1:00 p.m. Regular hourly scheduled remote snapshot
RemoteSS_0 created in Remote Management Group
1:10 p.m. Remote copy finishes Copying is complete
1:30 p.m. Primary volume goes offline OrigPrimaryVol_0 offline
1:33 p.m. Scripted failover causes remote volume to become the acting primary volume.
ActPrimaryVol_0 active in Remote Management Group
2:00 p.m. Original primary volume comes back online
OrigPrimaryVol_0 online
354 Intel® Storage System Software User Manual

Remote Copy
2. Synchronize the Data
”Synchronize” the snapshots OrigPrimarySS_0 and ActPrimarySS_0 that were created in Steps 2 and 3 of Table 12.4Table 65 .
— To synchronize the snapshots, remote copy the remote snapshot back to the original primary volume. For more detail about synchronizing, see “Glossary for Remote Copy” on page 377.
Creating a New Primary Volume at the Original Production Site
If the original primary volume is not available, designate a new primary volume, synchronize the data from the acting primary volume, and configure the remote snapshot schedule on the new primary volume.1. Stop the application that is accessing the acting primary volume.2. Create a remote snapshot of the acting primary volume and make a new primary
volume on the original production site as part of creating that remote snapshot. 3. Convert the remote volume into a primary volume. 4. Make the acting primary volume into the remote volume.
This creates a snapshot of that volume.5. Configure a new snapshot schedule on the new primary volume.
Table 65. Creating Snapshots of Data to Synchronize
Action/Activity
Volumes and Snapshots on
Primary Management
Group
Volumes and Snapshots on
Remote Management
Group
What This Step Accomplishes
1. Stop applications that are accessing the volumes.
1. Make a snapshot of the original volume.
OrigPrimaryVol_0
OrigPrimarySS_0
Creates a snapshot of the original primary volume that includes the data from 1:00 - 1:30 p.m.
1. Make the acting primary volume into the remote volume. This automatically creates a snapshot of the acting primary volume.
RemoteVol_0
ActPrimarySS_0
Returns the remote management group to its original configuration.
Intel® Storage System Software User Manual 355

Remote Copy
6. Reconfigure scripts for failover on the application servers.
Setting Up a New Production Site
Setting up a new production site involves creating a new primary volume and syncing up the acting primary volume before returning it to its original state as a remote volume. The steps are the same as those for creating a new primary volume at the original production site.
Making the Backup Site into the New Production Site
Turn the backup site into the new production site and designate a different backup site. The steps are similar to those for initially configuring Remote Copy.1. Create a remote snapshot or a remote snapshot schedule on the acting primary
volume. 2. Make a new remote volume on the new backup site as part of creating that remote
snapshot or remote snapshot schedule.3. Reconfigure scripts for failover on the application servers.
Rolling Back Primary and Remote Volumes
Rolling back a volume from a snapshot is the method for reverting to an earlier copy of the data on a volume. Rolling back destroys any snapshots that were created after the snapshot that is rolled back to.
Rolling Back a Primary Volume
Rolling back a primary volume to a primary snapshot replaces the original primary volume with a read/write copy of the selected primary snapshot. The new volume has a different name than the original, and the original volume is deleted.
Prerequisites
• Stop applications from accessing the volume. • Delete all snapshots that are newer than the snapshot you are rolling back from.
Warning: After rolling back a volume to a snapshot, you lose all data that was stored since the rolled back snapshot was created.
Warning: Any uncompleted remote copy snapshot that is newer than the snapshot that you are rolling back to will be cancelled.1. Log in to the management group that contains the primary volume that you want to
roll back.
356 Intel® Storage System Software User Manual

Remote Copy
2. Select the snapshot that you want to roll back to.3. Review the snapshot Details tab to ensure you have selected the correct snapshot.4. From the Tasks menu, select Roll Back Volume.
The Roll Back Volume window opens, shown in Figure 255.
Figure 255. Rolling Back a Primary Volume
5. Type a new name for the rolled back primary volume. You can also change the hard threshold and soft threshold if necessary.
Table 66. Requirements for Rolling Back a Primary Volume
Item Requirements for Changing
New Primary Volume Name Must be from 1 to 127 characters. Names are case sensitive.
Hard Threshold Hard threshold size must be equal to or less than the size of the volume.
Soft Threshold Soft threshold size must be equal to or less than the hard threshold size.
Intel® Storage System Software User Manual 357

Remote Copy
6. Click OK.The Roll Back Volume confirmation message opens.
Figure 256. Verifying the Primary Volume Roll Back
7. Click OK.The primary snapshot version of the primary volume is restored as a read/write volume.
8. Reconfigure application servers to access the new volume.
Rolling Back a Remote Volume
A remote volume cannot be rolled back. In order to roll back a remote volume, you must make the remote volume into a primary volume.
Using Remote Snapshots for Data Migration and Data Mining
Use remote snapshots to create split mirrors for data mining and data migration. A split mirror is a one-time remote snapshot created from the volume containing the data you want to use or move. Split mirrors are usually created for one-time use and then discarded.
Creating a Split Mirror
To create a split mirror• create a remote snapshot• create a volume list for that snapshot• create an authentication group for client access• configure client to access the remote snapshot
358 Intel® Storage System Software User Manual

Remote Copy
Disassociate Remote Management Groups
Management groups become associated when linked by remote snapshots or remote snapshot schedules. When you have management groups that no longer share remote snapshots or remote snapshot schedules, you can disassociate those management groups. Disassociating management groups destroys all the shared knowledge between those groups. 1. Log in to both management groups that you want to disassociate.2. Right-click the remote management group and select Edit Management Group.
The Edit Management Groups window opens, shown in Figure 257.
Figure 257. Editing a Management Group
3. Select the management group or groups you want to disassociate.4. Click Disassociate.
A confirmation message opens, describing the results of disassociating the management groups.
Warning: Disassociating the management groups- cancels any in-progress remote snapshots and- deletes all snapshot schedules that are shared between the selected management groups.
5. Click OK. The Edit Management Group window opens and the remote management group you disassociated from is gone from the list.
6. Click OK to return to the Network view.
Intel® Storage System Software User Manual 359

Remote Copy
360 Intel® Storage System Software User Manual

E Sample Remote Copy Configurations
Overview
Because of the flexibility provided by Remote Copy, you can use the functionality in a variety of configurations that are most suitable for your requirements. The sample configurations described in this chapter are only a few possible ways to use Remote Copy for business continuance, backup and recovery, data migration and data mining.
Using Remote Copy for Business Continuance
Business continuance comprises both disaster recovery and high availability of data. Using Remote Copy for business continuance, data is stored off-site and is continuously available in the event of a site or system failure.
Achieving High Availability
Creating remote snapshots in remote locations with application-based scripting can ensure that database applications such as SQL Server, Oracle, and Exchange have continual access to data volumes if production application servers or data volumes fail.
Using off-site remote snapshots of your production volumes, you can configure a backup application server to access those remote snapshots. Off-site remote snapshots, particularly when supplemented with synchronous volume replication within a cluster, ensures high availability of critical data volumes.
Configuration for High Availability
To use remote snapshots for high availability, configure a backup application server to access remote snapshots in the event of a primary system failure. Figure 258 illustrates this simple high availability configuration.
• Configure clustered application servers in both the primary and backup locations.• During normal operation, the production application server read/writes to the primary
volume.• Set up a schedule for copying remote snapshots to the backup location. If your
application server uses multiple volumes that must be in sync, use a script to quiesce the application before creating remote snapshots.

Sample Remote Copy Configurations
Configuration Diagram
Figure 258. High Availability Example Configuration
How This Configuration Works for High Availability
If the production application server or volumes become unavailable, application processing fails over to the backup application server. As shown in Figure 259, the remote volume and remote snapshots become primary and the backup application server becomes the production application server, accessing data from the acting primary volume.
Figure 259. High Availability Configuration During Failover
362 Intel® Storage System Software User Manual

Sample Remote Copy Configurations
Data availability if the primary volume or production application server fails
If either the primary volume or production application server in your production site fails, only that data written to the volume since the last remote snapshot was created will be unavailable until the volume or production application server is restored.
Failover to the backup application server
To maintain availability of the application and the remaining data, the following process occurs:1. A script or other application monitoring the production application server discovers
that primary volume is not available. A script executes to fail over to the backup application server.
2. The backup application server executes a script to convert the remote volume into a primary volume so that the volume can be accessed by the backup application server.
3. Because the backup application server was configured to access the remote (now primary) volume, operation of backup application server begins.
The application continues to operate after the failover to the backup application servers.
Failback to the production configuration
When the production server and volumes become available again, you have two failback options:
• Resume operations using the original production server, and return the backup volumes to their original remote status, as illustrated in Figure 260. This will require migration back onto the production volumes of data that was written to the backup volumes since the failure.
• Continue operating on the backup application server. When the production server and volumes become available, configure the production server to be the backup server (role reversal).
Merging data for failback
In the failover scenarios described above there are probably two snapshots with different data. As part of failback, users must make a decision whether to merge the data from the two snapshots and the most effective method for doing so.
Intel® Storage System Software User Manual 363
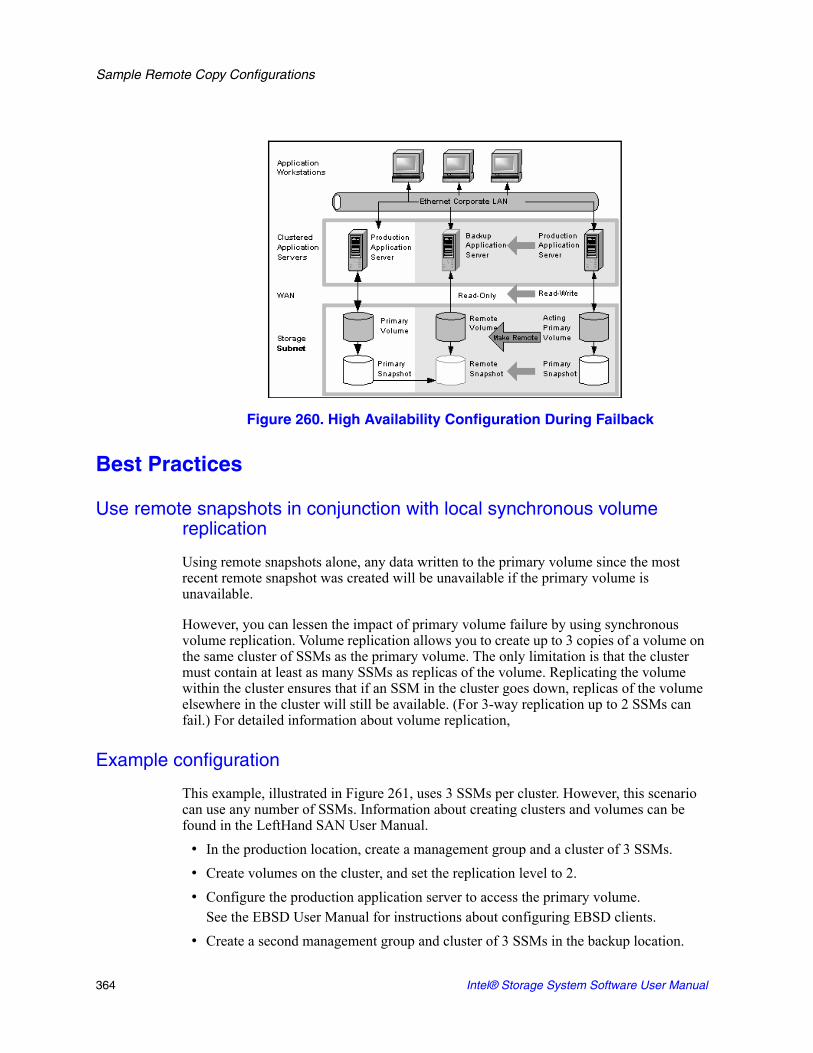
Sample Remote Copy Configurations
Figure 260. High Availability Configuration During Failback
Best Practices
Use remote snapshots in conjunction with local synchronous volume replication
Using remote snapshots alone, any data written to the primary volume since the most recent remote snapshot was created will be unavailable if the primary volume is unavailable.
However, you can lessen the impact of primary volume failure by using synchronous volume replication. Volume replication allows you to create up to 3 copies of a volume on the same cluster of SSMs as the primary volume. The only limitation is that the cluster must contain at least as many SSMs as replicas of the volume. Replicating the volume within the cluster ensures that if an SSM in the cluster goes down, replicas of the volume elsewhere in the cluster will still be available. (For 3-way replication up to 2 SSMs can fail.) For detailed information about volume replication,
Example configuration
This example, illustrated in Figure 261, uses 3 SSMs per cluster. However, this scenario can use any number of SSMs. Information about creating clusters and volumes can be found in the LeftHand SAN User Manual.
• In the production location, create a management group and a cluster of 3 SSMs.• Create volumes on the cluster, and set the replication level to 2.• Configure the production application server to access the primary volume.
See the EBSD User Manual for instructions about configuring EBSD clients.• Create a second management group and cluster of 3 SSMs in the backup location.
364 Intel® Storage System Software User Manual

Sample Remote Copy Configurations
• Create a schedule for making remote snapshots of the primary volume.
Note: Volume replication levels are set independently for primary and remote volumes.
How It Works: If one of the SSMs in the primary location fails, the primary volume will still be available. If all of the SSMs fail, or if the application server fails, then failover to the backup application server occurs, and the remote snapshot becomes available.
Figure 261. High Availability During Failover - Example Configuration
Achieving Affordable Disaster Recovery
Even if you do not have clustered application servers or network bandwidth required for configuring hot backup sites, you can still use Remote Copy to protect your data during an emergency.
Using remote snapshots, you can maintain copies of your volumes in remote sites. Set up a schedule for creating remote copies, and if your primary storage site becomes unavailable, you can easily access the most recent remote copy of your data volumes. You can also use remote snapshots to transfer data to a backup location where tape backups are then created. This eliminates the backup window on your primary volumes, and ensures that you have copies of your data in the remote site on SSMs as well as on tape.
Configuration for Affordable Disaster Recovery
To configure affordable disaster recovery, create remote snapshots of your volumes in an off-site location. In addition, you can create tape backups from the remote snapshots in the off-site location:
• Designate one or more off-site locations to be the destination for remote snapshots.
Intel® Storage System Software User Manual 365

Sample Remote Copy Configurations
• Set up a schedule for creating remote snapshots in the designated off-site locations. If your application server uses multiple volumes that must be in sync, use a script to quiesce the application before creating remote snapshots.
• Create routine tape backups of the remote snapshots in the off-site locations.
Configuration Diagram
Figure 262. Affordable Disaster Recovery Example Configuration
How this Works for Affordable Disaster Recovery
If the SSMs in your primary location fail or volumes become unavailable, the off-site location contains the most recent remote snapshots.
• Use the remote snapshots to resume operations as shown in Figure 263. If you created tape backups, you can recover data from tape backups, as shown in Figure 264.
• Only data written to the primary volumes since the last remote snapshot was created will be unavailable.
• Application servers that were accessing the down volumes will not be available until you reconfigure them to access recovered data.
To resume operations using the most recent set of remote snapshots:1. In the backup location, make the remote volume into a primary volume.2. Configure application servers to access this volume, or if network connections are not
fast enough to facilitate reading and writing to the off-site location, copy this volume to a location where application servers can access it more efficiently.
366 Intel® Storage System Software User Manual

Sample Remote Copy Configurations
Figure 263. Restoring from a Remote Volume
Figure 264. Restoring from Tape Backup
Best Practices
Select a recurrence schedule for remote snapshots that minimizes the potential for data loss.
Any data written to the primary volume since the most recent remote snapshot was created will be unavailable if the primary volume is unavailable. Consider how much data you are willing to lose in the event of an emergency and set the recurrence for creating remote snapshots accordingly.
Intel® Storage System Software User Manual 367

Sample Remote Copy Configurations
If you do not want a large number of remote snapshots to accumulate on your remote volume, you can use more than one remote snapshot schedule, each with different retention policies. For example, suppose you want to create remote snapshots every 4 hours to ensure that no more than 4 hours worth of data is lost in an emergency. In addition, you want to retain 1 week's worth of remote snapshots. Retaining 4-hour snapshots for 1 week can result in the accumulation of over 40 remote snapshots. Another approach would be to create 2 remote snapshot schedules for the volume:
• One schedule to create remote snapshots every 4 hours, but only retain the most recent 3 remote snapshots. This will ensure that you do not lose more than 4 hours worth of data in an emergency.
• A second schedule to create remote snapshots every 24 hours and retain 7 remote snapshots.
Use remote snapshots in conjunction with local synchronous volume replication
To prevent data loss, reinforce Remote Copy with synchronous replication of the volume within the cluster of SSMs at the primary geographic site. With synchronous replication, a single SSM can be off-line, and your primary volume will remain intact.
At the backup location, you can also use synchronous replication to protect your remote volume against SSM failure.
Example configuration
• In the production location, create a cluster of 3 SSMs, all with managers. • Create volumes on the cluster, and set the replication level to 2. • Create a schedule for making remote snapshots of the primary volume. Set the
recurrence to every 4 hours, and retention of remote snapshots to 2 days.
Note: You can use the same volume replication configuration on the remote volume as well. However, this replication is configured independently of the volume replication configured on the primary volume.
If one of the SSMs in the primary location fails, the primary volume will still be available. If all of the SSMs fail, or if the application server fails, then you can recover data from the remote snapshots or tape backups in the off-site location.
368 Intel® Storage System Software User Manual

Sample Remote Copy Configurations
Using Remote Copy for Off-site Backup and Recovery
For backup and recovery systems, Remote Copy can eliminate the backup window on an application server. Using scripting, configure the EBSD driver to mount remote snapshots on a backup server (either local or remote), and then back up the remote snapshot from the backup server. The remote snapshot is available if the primary volume fails.
Achieving Off-site Tape Backup
Rather than creating tape backups and then transporting them to a secure off-site location, you can use Remote Copy to create remote snapshots in an off-site location and then create tape backups at the off-site location.
Configuration for Off-site Backup and Recovery
To use remote snapshots for off-site tape backup, create remote snapshots for access by your tape backup application:
• Create remote volumes in your backup location. • Configure your backup application to access the remote snapshots.• Configure schedules to create remote snapshots in the designated off-site locations. If
your application server uses multiple volumes that must be in sync, use a script to quiesce the application before creating remote snapshots.
• Create routine tape backups of the remote snapshots.
See the example configuration illustrated in Figure 265.
Intel® Storage System Software User Manual 369

Sample Remote Copy Configurations
Configuration Diagram
Figure 265. Off-site Backup and Recovery Example Configuration
How This Configuration Works for Off-site Tape Backup
Depending on how long you retain the copies of the remote snapshots, you can retrieve data directly from recent remote snapshots rather than going to tape backups. Otherwise, retrieve data as you normally would from the tape backup.
Best Practices
Retain the most recent primary snapshots in the primary cluster
By keeping snapshots on your primary volume, you can quickly roll back a volume to a previous snapshot without accessing off-site backups.
• When you create a schedule for Remote Copy, you specify a number of primary and remote snapshots that you want to retain. You can retain primary snapshots to facilitate easy rollback of the primary volume. (Retention of snapshots will affect the amount of space that is used in the cluster of SSMs, so balance the number of snapshots to retain with the amount of space you are willing to use. To roll back to a snapshot that you did not retain, you can still access remote snapshots or tape backups.)
• Retain remote snapshots in the backup location to facilitate fast recovery of backed up data. If you retain a number of remote snapshots after a tape backup is created, you can access this data without going to the backup tape.
370 Intel® Storage System Software User Manual

Sample Remote Copy Configurations
Example configuration
• Retain 3 primary snapshots. This enables you to roll the primary volume back, yet it requires a relatively small amount of space on the primary cluster.
• Retain up to a week's worth of remote snapshots on the backup cluster.• For snapshots older than 1 week, go to the backup tape.
Achieving Non-Destructive Rollback
As discussed in “Rolling Back a Primary Volume” on page 356, rolling a snapshot back to a volume deletes any snapshots that were created since the snapshot that you roll back to. For example, suppose you created snapshots of a volume on Monday, Tuesday, and Wednesday. On Thursday, if you roll the volume back to Monday's snapshot, then the snapshots from Tuesday and Wednesday will be deleted.
You can use Remote Copy to roll a volume back to an old snapshot without losing the interim snapshots. Because Remote Copy creates two sets of snapshots—primary snapshots and remote copies—you can roll a volume back to a snapshot and still retain the other set of snapshots.
Configuration for Non-Destructive Rollback
To use remote snapshots for non-destructive rollback:• Create a remote snapshot schedule. • In the schedule, specify the same retention policy for the primary and remote
snapshots. This ensures that you have copies of the same number of snapshots in your primary and remote locations. Any snapshots destroyed during rollback of one volume will remain intact on the other volume.
See Figure 266 for an illustration of this configuration.
Intel® Storage System Software User Manual 371

Sample Remote Copy Configurations
Configuration Diagram
Figure 266. Non-destructive Rollback Example
How This Configuration Works for Non-Destructive Rollback
You can choose to roll back either the primary snapshot or the remote snapshot. Rolling back one of the snapshots will cause all the more recent snapshots of that volume to be deleted. The other volume retains the full set of snapshots. You can continue to make snapshots even though one side was rolled back and the other side was not.
When deciding whether to roll back the primary or remote volume, consider the following:
• When you roll back the primary snapshot to a primary volume, any applications accessing the primary volume will no longer have access to the most current data (as the primary volume has been rolled back to a previous state). If the primary volume must be synchronized with other volumes accessed by the same application, consider rolling back the remote volume instead. Figure 267 shows rollback of the primary snapshot while leaving the remote snapshots intact.
372 Intel® Storage System Software User Manual
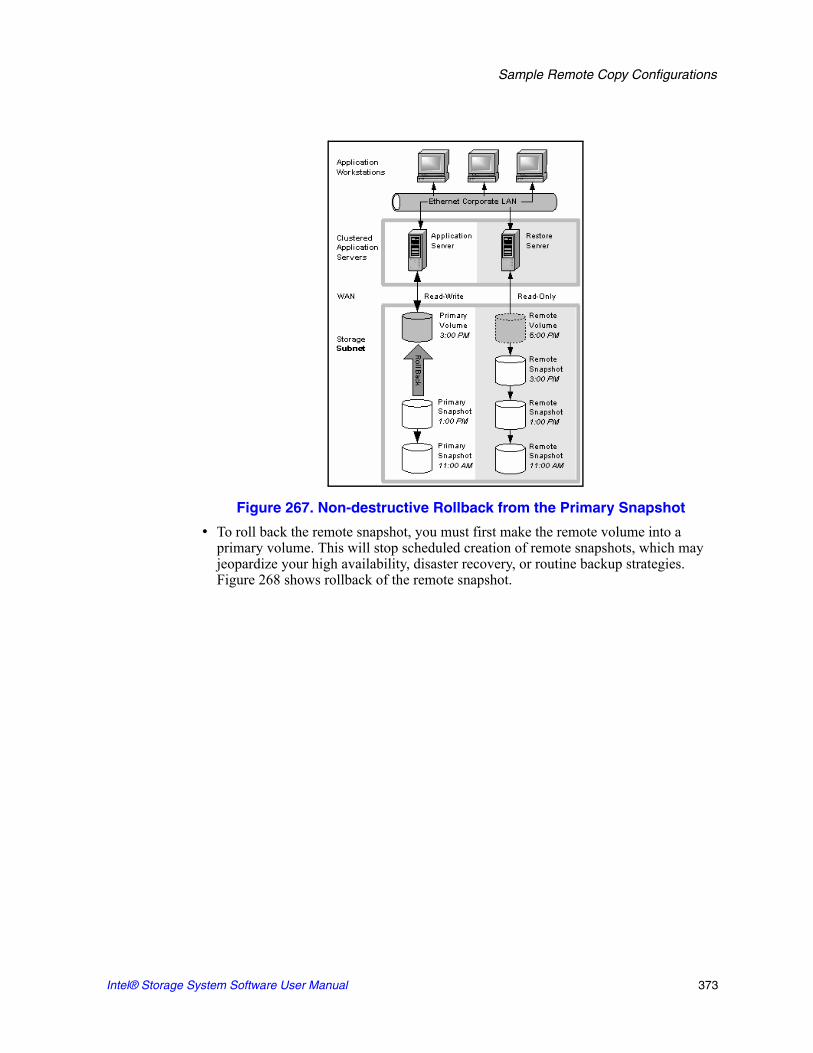
Sample Remote Copy Configurations
Figure 267. Non-destructive Rollback from the Primary Snapshot
• To roll back the remote snapshot, you must first make the remote volume into a primary volume. This will stop scheduled creation of remote snapshots, which may jeopardize your high availability, disaster recovery, or routine backup strategies. Figure 268 shows rollback of the remote snapshot.
Intel® Storage System Software User Manual 373

Sample Remote Copy Configurations
Figure 268. Non-destructive Rollback from the Remote Snapshot
Best Practices
Roll back the primary snapshot and keep the remote snapshots as a backup
To ensure that Remote Copy continues to operate, roll back the primary volume as follows:1. Preserve the current state of the primary volume that you want to roll back by creating
a one-time (manual) remote snapshot of it.2. Roll back the volume.
Remote snapshots remain intact.3. After the primary volume is rolled back, scheduled creation of remote copies will
continue.
Using Remote Copy for Data Migration
Remote Copy allows a one-time migration of data from one application server to another without interrupting the production application server. This capability supports a number of uses such as data mining or content distribution.
374 Intel® Storage System Software User Manual

Sample Remote Copy Configurations
Achieving Data Migration
You can use Remote Copy to make a complete copy of one or more volumes without interrupting access to the original volumes. This type of data migration allows you to copy an entire data set for use by a new application or workgroup.
To copy data from one location to another, simply create a one-time remote snapshot of the volume. To make the remote snapshot a read/write volume, make it into a primary volume.
Configuration for Data Migration
To make a copy of a volume in a remote location, configure a cluster of SSMs in the remote location with enough space to accommodate the volume. See the example illustrated in Figure 269.
Configuration Diagram
Figure 269. Data Migration Example Configuration
How This Configuration Works for Data Migration
Suppose you want to create a complete copy of a volume for an application to use in different location.1. Configure a cluster of SSMs in the new location to contain the copied volume. 2. Create either a one-time remote snapshot of the volume onto the cluster in the new
location.
Intel® Storage System Software User Manual 375

Sample Remote Copy Configurations
If your application server uses multiple volumes that must be in sync, use a script to quiesce the application before creating remote snapshots. [Optional] You can create regular one-time snapshots and use remote copy to move the snapshots to the remote cluster at your convenience.
3. On the cluster in the new location, make the remote volume into a primary volume. 4. Configure the application server in the new location to access the new primary
volume.Figure 270 shows migration of data by making a remote volume into a primary volume.
Figure 270. Configuration after Data Migration
376 Intel® Storage System Software User Manual
F Understanding and Planning Remote Copy
Remote Copy provides a powerful and flexible method for replicating data and keeping that replicated data available for business continuance, backup and recovery, data migration, and data mining.
Remote Copy is a feature upgrade. You must purchase a Remote Data Protection Pak license to use Remote Copy beyond the 30-day evaluation period. You must purchase a license for each Storage System Module in a cluster that will contain a primary volume or a remote volume. For information about registering Remote Copy licenses, see “Registering Features and Applications” on page 300.
Remote Copy uses the existing volume and snapshot features along with replication across geographic distances to create remote snapshots. The geographic distance can be local (in the same data center or on the same campus), metro (in the same city), or long distance.
For example, the accounting department in the corporate headquarters in Chicago runs the corporate accounting application and stores the resulting data. The designated backup site is in Des Moines. Nightly at 11:00 p.m., accounting updates are replicated to the Des Moines backup facility using Remote Copy.
Purchase Remote Copy
Remote Copy is an add-on module. You must purchase a license to use Remote Copy beyond the 30-day evaluation period. You must purchase a license for each SSM in a cluster that will contain a primary volume or a remote volume.
Glossary for Remote Copy
The following terminology is used in describing the components and processes involved in Remote Copy.
Term Definition
Primary Volume The volume which is being accessed by the application server. The primary volume is the volume that is backed up with Remote Copy.
Primary Snapshot A snapshot of the primary volume which is created in the process of creating a remote snapshot. The primary snapshot is located on the same cluster as the primary volume.
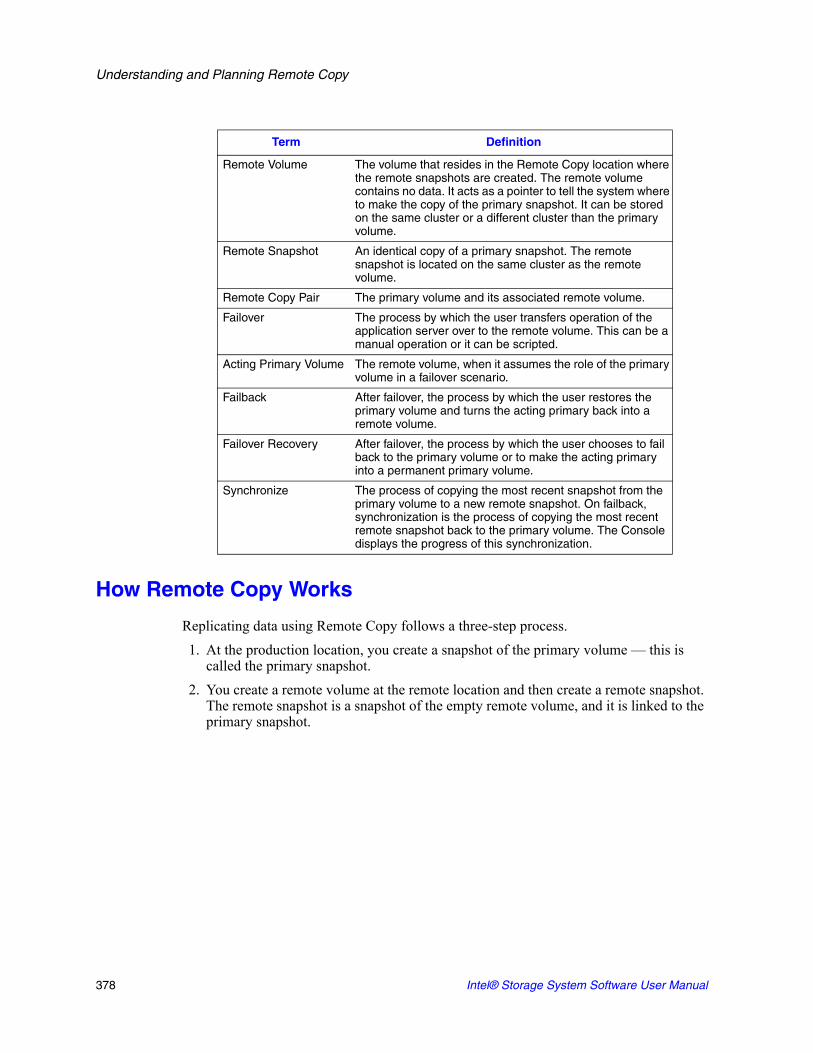
Understanding and Planning Remote Copy
How Remote Copy Works
Replicating data using Remote Copy follows a three-step process.1. At the production location, you create a snapshot of the primary volume — this is
called the primary snapshot.2. You create a remote volume at the remote location and then create a remote snapshot.
The remote snapshot is a snapshot of the empty remote volume, and it is linked to the primary snapshot.
Remote Volume The volume that resides in the Remote Copy location where the remote snapshots are created. The remote volume contains no data. It acts as a pointer to tell the system where to make the copy of the primary snapshot. It can be stored on the same cluster or a different cluster than the primary volume.
Remote Snapshot An identical copy of a primary snapshot. The remote snapshot is located on the same cluster as the remote volume.
Remote Copy Pair The primary volume and its associated remote volume.
Failover The process by which the user transfers operation of the application server over to the remote volume. This can be a manual operation or it can be scripted.
Acting Primary Volume The remote volume, when it assumes the role of the primary volume in a failover scenario.
Failback After failover, the process by which the user restores the primary volume and turns the acting primary back into a remote volume.
Failover Recovery After failover, the process by which the user chooses to fail back to the primary volume or to make the acting primary into a permanent primary volume.
Synchronize The process of copying the most recent snapshot from the primary volume to a new remote snapshot. On failback, synchronization is the process of copying the most recent remote snapshot back to the primary volume. The Console displays the progress of this synchronization.
Term Definition
378 Intel® Storage System Software User Manual

Understanding and Planning Remote Copy
3. The system copies data from the primary snapshot to the remote snapshot.
Figure 271. Basic Flow of Remote Copy
Note: Both primary and completed remote snapshots are the same as regular snapshots.
Note: Remote Copy can be used on the same site, even in the same management group and cluster.
Graphical Representations of Remote Copy
The Storage System Console displays special graphical representations of Remote Copy.
Copying the Primary Snapshot to the Remote Snapshot
When the primary snapshot is copying to the remote snapshot, the Console depicts the process with a moving graphic of pages from the primary to the remote snapshot, as illustrated The pages move in the direction of the data flow from primary to remote snapshot.
Figure 272. Icons Depicting the Primary Snapshot Copying to the Remote Snapshot
Copying from the primary snapshot to
the remote snapshot.Primary snapshot.Remote snapshot.
Intel® Storage System Software User Manual 379
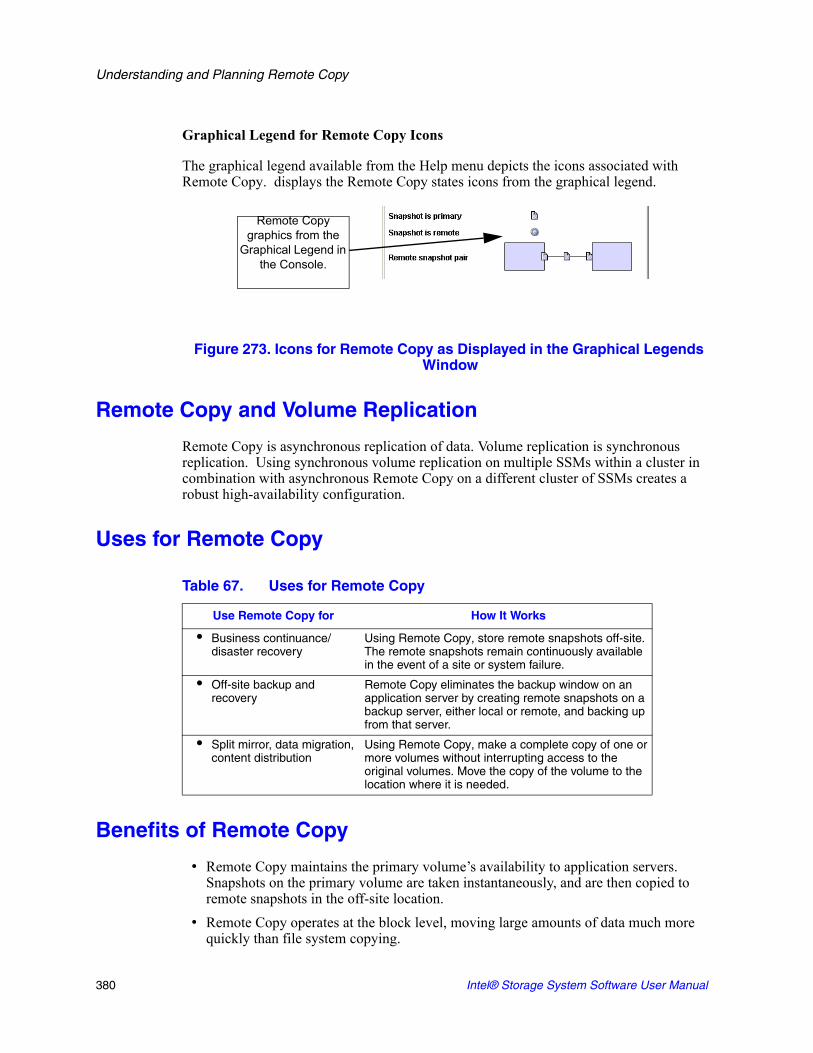
Understanding and Planning Remote Copy
Graphical Legend for Remote Copy Icons
The graphical legend available from the Help menu depicts the icons associated with Remote Copy. displays the Remote Copy states icons from the graphical legend.
Figure 273. Icons for Remote Copy as Displayed in the Graphical Legends Window
Remote Copy and Volume Replication
Remote Copy is asynchronous replication of data. Volume replication is synchronous replication. Using synchronous volume replication on multiple SSMs within a cluster in combination with asynchronous Remote Copy on a different cluster of SSMs creates a robust high-availability configuration.
Uses for Remote Copy
Benefits of Remote Copy
• Remote Copy maintains the primary volume’s availability to application servers. Snapshots on the primary volume are taken instantaneously, and are then copied to remote snapshots in the off-site location.
• Remote Copy operates at the block level, moving large amounts of data much more quickly than file system copying.
Remote Copy graphics from the
Graphical Legend in the Console.
Table 67. Uses for Remote Copy
Use Remote Copy for How It Works
• Business continuance/ disaster recovery
Using Remote Copy, store remote snapshots off-site. The remote snapshots remain continuously available in the event of a site or system failure.
• Off-site backup and recovery
Remote Copy eliminates the backup window on an application server by creating remote snapshots on a backup server, either local or remote, and backing up from that server.
• Split mirror, data migration, content distribution
Using Remote Copy, make a complete copy of one or more volumes without interrupting access to the original volumes. Move the copy of the volume to the location where it is needed.
380 Intel® Storage System Software User Manual

Understanding and Planning Remote Copy
• Snapshots are incremental—that is, snapshots save only those changes in the volume since the last snapshot was created. Hence failover recovery may need to resynchronize only the latest changes rather than the entire volume.
• Remote Copy is robust. If the network link goes down during the process, copying resumes where it left off when the link is restored.
Planning for Remote Copy
Remote Copy works at the management group, cluster, volume, snapshot, and SSM level.
Planning the Remote Snapshot
In order to create a remote snapshot:• you must be logged in to both the management group that contains the primary
volume and the management group containing the target cluster where the remote snapshot will be created.
• you must designate or create a remote volume in that remote management group.
Table 68. Remote Copy and Management Groups, Clusters, Volumes, Snapshots, and SSMs
Storage System Level Remote Copy Configuration
Management Groups • Remote snapshots can be created in the same management group or in a different management group than the primary volume.
• If using different management groups, the remote bandwidth setting of the management group containing the remote volume determines the maximum rate of data transfer to the remote snapshot.
Clusters • Remote snapshots can be created in the same cluster or in a different cluster than the primary volume.
Volumes • Primary volumes contain the data to be copied to the remote snapshot.
• Data is copied to the remote snapshot via the remote volume.
• The remote volume is a pointer to the remote snapshot. The remote volume has a size of 0.
Snapshots • Once data is copied from the primary snapshot to the remote snapshot, the remote snapshot behaves as a regular snapshot.
SSM • Active monitoring of each SSM notifies you when copies complete or fail. Active monitoring also notifies you if a remote volume or snapshot is made primary or if the status of the connection between management groups containing primary and remote volumes changes.
Intel® Storage System Software User Manual 381

Understanding and Planning Remote Copy
• you must have enough space on the target cluster for the remote snapshot.
Logging in to the Management Group
Log in to both management groups before you begin. If you are creating the remote volume and remote snapshot in the same management group as the primary volume, then you only need to log in to that management group.
Designating or Creating the Remote Volume
You can create a remote volume by any of the following methods:• Make an existing volume into a remote volume.• Create a new remote volume during creation of a remote snapshot.• Create a new volume from the cluster Details panel and then select the Remote option
on the New Volume window.
For more information about the three methods of creating remote volumes, see .
Using Schedules for Remote Copy
Scheduled remote snapshots provide high availability for business continuance/disaster recovery and provide a consistent, predictable update of data for remote backup and recovery.
Planning the Remote Copy Schedule
When creating a remote snapshot schedule, a number of considerations are important to plan. All of these issues impact the amount of storage available in the system.
Recurrence
How often do you want the snapshots created? The recurrence frequency must account for the amount of time it takes to complete a remote snapshot. For example, if your recurrence schedule is set for a new snapshot every 4 hours you should ensure that the time to copy that snapshot to the remote location is less than 4 hours.
• Test the Time Required for Copying a SnapshotOne way to check the time required to copy a snapshot is to run a test of the actual process. In the test you take two remote snapshots of the primary volume. Since the first remote snapshot copies the entire volume, it will take longer to copy. The second remote snapshot copies only changes made to the volume since the first remote snapshot. Since you create the second remote snapshot after the time interval you intend to schedule, the copy time for the second remote snapshot is more representative of the actual time required for copying subsequent remote snapshots.
382 Intel® Storage System Software User Manual

Understanding and Planning Remote Copy
1. Create a remote snapshot of the primary volume.2. Wait for the copy to finish. 3. Create another remote snapshot of the primary volume.4. Track the time required to complete the second remote snapshot. This is the minimum
amount of time that you should allow between scheduled copies.Be sure to check the remote bandwidth setting for the management group containing the remote volume, since that setting affects the time required to copy a remote snapshot.
Thresholds
Does the cluster that contains the remote snapshots have sufficient space to accommodate scheduled snapshots?
If the cluster does not have sufficient space available, the remote snapshot will appear in the Console and it will flash red. On the Details tab of the remote snapshot, the status says “Read only, not enough space in cluster to start copy.”
Retention Policies
How long do you want to retain the primary snapshots? The remote snapshots? You can set different retention policies for the primary and remote snapshots. For example, you can choose to retain 2 primary snapshots and 5 remote snapshots. The number of snapshots retained refers to completed snapshots.
Parameters for Remote Snapshot Schedule Retention Policies
The system will never delete the last fully synchronized remote snapshot.
Under some circumstances, such as unpredictable network speeds or varying snapshot size, a remote snapshot schedule may create primary snapshots more frequently than the remote copy process can keep up with. The retention policies for scheduled remote copies ensure that such factors do not cause primary and remote snapshots to become unsynchronized. Regardless of the retention policy defined for scheduled remote copies, up to 2 additional snapshots may be retained by the system at any given time. These two additional snapshots include the snapshot that is in the process of being copied, and the last fully synchronized snapshot. A fully synchronized snapshot is one that has completed copying so that the remote snapshot is a complete mirror of its corresponding primary snapshot.
Up to two additional snapshots may be retained by the system at any given time
Because the system will never delete the last fully synchronized primary snapshot, a remote copy schedule may retain N+2 copies for a retention policy of N (the currently copying remote snapshot plus the last fully synchronized snapshot). Using the example above, if you have a retention policy for your remote copy schedule of 2 primary and 5 remote snapshots, the system may retain up to 4 primary and 7 remote snapshots for a period of time.
Intel® Storage System Software User Manual 383

Understanding and Planning Remote Copy
Remote snapshots will only be deleted after their corresponding primary snapshot is deleted.
Additionally, a remote snapshot will only be deleted after its counterpart primary snapshot. Therefore, you can not retain fewer scheduled remote snapshots than primary snapshots when setting your retention policies.
Note: If you retain more remote snapshots than primary snapshots, the remote snapshots become regular snapshots when their corresponding primary snapshots are deleted. You can identify them as remote snapshots by their names, since the naming convention is established as part of creating the remote snapshot schedule.
Best Practices
• Retain at least two primary snapshots to ensure that only incremental copying is required for primary snapshots.
• Review your remote copy schedule to ensure that the frequency of the remote copies correlates to the amount of time required to complete a copy.
Use the checklist to help plan scheduled remote snapshots.
Scheduled Remote Copy Planning Checklist
Table 69. Snapshot Retention Policy and Maximum Number of Snapshots Retained in System
Remote Schedule Retention Policy
Maximum Number of Snapshots Retained
n of primary snapshots
x of remote snapshots
n + 2 primary snapshots
x + 2 remote snapshots
n of hours for primary snapshots
x of hours for remote snapshots
n + 2 primary snapshots older than n
x + 2 remote snapshots older than xx
n of days for primary snapshots
x of days for remote snapshots
n + 2 primary snapshots older than n
x + 2 remote snapshots older than xx
n of weeks for primary snapshots
x of weeks for remote snapshots
n + 2 primary snapshots older than n
x + 2 remote snapshots older than xx
Table 70. Scheduled Remote Copy Planning Checklist
Configuration Category Parameters
Snapshot Schedule
Start Time • Start date (mm/dd/yyyy) and
• Start time (mm:hh:ss)for the schedule to begin
384 Intel® Storage System Software User Manual

Understanding and Planning Remote Copy
Recurrence • Recurrence ( ). Recurrence is a yes/no choice. You can schedule a remote snapshot to occur one time in the future and not have it recur.
• Frequency (minutes, hours, days or weeks)
Primary Setup
Hard ThresholdSoft Threshold
Set the hard threshold and soft threshold for the primary snapshot.
Retention Retain either
• Maximum number of snapshots (#)
• Set period of time (minutes, hours, days or weeks)
Remote Setup
Management Group The management group to contain the remote snapshot
Volume The remote volume for the remote snapshots
Retention Retain either
• Maximum number of snapshots (#). This number equals completed snapshots only. In-progress snapshots take additional space on the cluster while they are being copied. Also, the system will not delete the last fully synchronized snapshot. For space calculations, figure N+2 with N=maximum number of snapshots.
• Set period of time (minutes, hours, days or weeks)
Table 70. Scheduled Remote Copy Planning Checklist
Configuration Category Parameters
Intel® Storage System Software User Manual 385

Understanding and Planning Remote Copy
386 Intel® Storage System Software User Manual
Related Documents


