Installing SciPy / Linux Table of Contents Contents Table of Contents 1. Introduction : source and binaries 2. Fedora Core 8, openSUSE 10.2, RHEL/Centos 5 Basic install 1. Building Atlas Building Atlas by Hand 1. Building Atlas with atlas-XXX.src.rpm from Ashigabou Repository 2. 2. 3. Mandriva 2007.1 4. Gentoo 5. Debian / Ubuntu - Andrew Straw's unofficial repository Binary packages Ubuntu Dapper (6.06), (i386 and amd64 architectures) 1. Source packages for any Debian-based distribution 2. GPG Verification using Andrew Straw's repository 3. Debian sarge notes 4. Ubuntu notes 5. 6. openSUSE ATLAS 1. Broken BLAS 2. 7. Building everything from source with gfortran on Ubuntu (Nov 2010) 8. Installing SciPy/Linux - http: / / www.scipy .org/Installing SciPy/Linux#head-... 1 of 17 11/ 02/ 11 21:10

Welcome message from author
This document is posted to help you gain knowledge. Please leave a comment to let me know what you think about it! Share it to your friends and learn new things together.
Transcript

8/6/2019 Instructions NUMPY
http://slidepdf.com/reader/full/instructions-numpy 1/17
Installing SciPy / Linux
Table of Contents
Contents
Table of Contents1.
Introduction : source and binaries2.
Fedora Core 8, openSUSE 10.2, RHEL/Centos 5
Basic install1.
Building Atlas
Building Atlas by Hand1.
Building Atlas with atlas-XXX.src.rpm from Ashigabou Repository2.
2.
3.
Mandriva 2007.14.
Gentoo5.
Debian / Ubuntu - Andrew Straw's unofficial repository
Binary packages Ubuntu Dapper (6.06), (i386 and amd64 architectures)1.
Source packages for any Debian-based distribution2.
GPG Verification using Andrew Straw's repository3.
Debian sarge notes4.
Ubuntu notes5.
6.
openSUSE
ATLAS1.
Broken BLAS2.
7.
Building everything from source with gfortran on Ubuntu (Nov 2010)8.
nstalling SciPy/Linux - http://www.scipy.org/Installing_SciPy/Linux#hea
of 17 11/02/11 2

8/6/2019 Instructions NUMPY
http://slidepdf.com/reader/full/instructions-numpy 2/17

8/6/2019 Instructions NUMPY
http://slidepdf.com/reader/full/instructions-numpy 3/17

8/6/2019 Instructions NUMPY
http://slidepdf.com/reader/full/instructions-numpy 4/17
NOOPT = -O0 -fPIC
(Note: Make sure that if you build with gfortran that g77 is not installed on your system
(or at least is not in your PATH when numpy is being built) as you need to link with the
same compiler that you built lapack with when numpy builds. It will try and find g77
first which will lead to linking errors if you have built lapack with gfortran). Then
change to the SRC directory and run make
cd SRC
make
This will create an lapack_<XXXX>.a file in the head lapack directory. You will need
the location of this file to configure atlas.
Now, download the latest release of ATLAS (these instructions worked on 3.7.37). See,
for example, http://sourceforge.net/project/showfiles.php?group_id=23725. Unpackage
the result, change to the directory created, and create a directory to contain the resulting
build. This directory should be named appropriate for the platform (you can build for
multiple platforms from the same SOURCE tree --- perhaps the source is on a network drive and builds are taking place for multiple platforms).
tar jxvf atlas3.7.37.tar.bz2
cd ATLAS
mkdir ATLAS_<my_platform_type>
cd ATLAS_<my_platform_type>
../configure -Fa alg -fPIC --with-netlib-lapack=/path/to/lapack
/lapack_<XXXX>.a
make
Your atlas libraries should now be in the lib subdirectory of the current directory. You
should copy them to some-place that you can tell site.cfg about so that numpy and scipy
can pick them up. If you want to create shared libraries, then you can do that by
cd lib
make shared # for sequential libraries
make ptshared # for threaded libraries
after changing to the lib directory where the .a files are already located.
Building Atlas with atlas-XXX.src.rpm from Ashigabou Repository
ashigabou repository does not provide binary versions, but provides all the tools to make
the building process of ATLAS almost painless: it will build a complete LAPACK,
build it with the right fortran compiler to avoid ABI issues (eg _gfortran_string_write,
etc...), and with the right compiler flags such as it is usable to build numpy and scipy
nstalling SciPy/Linux - http://www.scipy.org/Installing_SciPy/Linux#hea
4 of 17 11/02/11 2

8/6/2019 Instructions NUMPY
http://slidepdf.com/reader/full/instructions-numpy 5/17
(with the -fPIC option).
First, download the source rpm included in the ashigabou repository (the file atlas-
version.src.rpm), and install from the ashigabou repository the package lapack3-pic (the
rpm will refuse to build without it). Then, use the following:
rpm -ivh atlas-version.src.rpm
This will NOT install atlas, just uncompress all the necessary files for building the rpm
in /usr/src/packages. Before building atlas, you must disable dynamic change of CPU
frequency (used to decrease battery consumption):
cpufreq-selector -g performance
If this fails telling you no cpufreq support, this is fine. Now, to build the rpm, go into the
directory /usr/src/packages/SPEC, and execute
rpmbuild -ba atlas.spec
This will build the rpm: this can take a long time, even on a powerful machine. What
matters is whether atlas has arch defaults for your machine: if not, it can take several
hours (it takes 2 hours and a half on a P4 @3.2 Ghz, but takes ~10 minutes on my
macbook under linux). If successfull, you will get an installable rpm in /usr/src/packages
/RPMS/ARCH (where ARCH can be x86_64 or i586 or something else depending on
the distribution and your arch).
The rpm contains two (shared) libraries: libblas.so and liblapack.so, installed in /usr/lib
/atlas/sse2. They are meant to be drop-out for the standard BLAS and LAPACK (the
ones in refblas3 and lapack3). To use the atlas libraries, once you installed numpy and
scipy, you should tell the OS to use atlas instead of default libraries by usingLD_LIBRARY_PATH. That is, normally, you can use numpy by :
python -c "import numpy as N; a=N.random.randn(1000, 1000);
N.dot(a, a)"
To use atlas, you do:
LD_LIBRARY_PATH=/usr/lib/atlas/sse2 python -c "import numpy as N;
a=N.random.randn(1000, 1000); N.dot(a, a)"
If everything is working correctly, you will see that the above script runs much faster
with atlas than without (I see a ten fold speed increase on my machine).
Mandriva 2007.1
Binary packages for NumPy 1.0.3.1 and SciPy 0.5.2.1 are available via the contrib
nstalling SciPy/Linux - http://www.scipy.org/Installing_SciPy/Linux#hea
5 of 17 11/02/11 2

8/6/2019 Instructions NUMPY
http://slidepdf.com/reader/full/instructions-numpy 6/17
urpmi repository:
urpmi python-scipy
Gentoo
Gentoo includes an ebuild. Type:
sudo emerge scipy
Debian / Ubuntu - Andrew Straw's unofficial repository
Andrew Straw has an unofficial repository for NumPy .deb packages. These were built
with stdeb. The binaries are for Ubuntu Dapper (6.06 LTS).
Binary packages Ubuntu Dapper (6.06), (i386 and amd64architectures)
To use the binary package in Ubuntu Dapper, add the following line to your /etc/apt
/sources.list:
deb http://debs.astraw.com/ dapper/
Then type
sudo apt-get install python-numpy
You can verify ATLAS support by running the command ldd /usr/lib/python2.4
/site-packages/numpy/linalg/lapack_lite.so , which should result in output like
the following:
liblapack.so.3 => /usr/lib/atlas/liblapack.so.3
(0x00002aaaaabcf000)
libblas.so.3 => /usr/lib/atlas/libblas.so.3
(0x00002aaaab435000)
libg2c.so.0 => /usr/lib/libg2c.so.0 (0x00002aaaabd15000)
libm.so.6 => /lib/libm.so.6 (0x00002aaaabe44000)
libgcc_s.so.1 => /lib/libgcc_s.so.1 (0x00002aaaabfca000)
libc.so.6 => /lib/libc.so.6 (0x00002aaaac0d7000)
/lib64/ld-linux-x86-64.so.2 (0x0000555555554000)
Source packages for any Debian-based distribution
nstalling SciPy/Linux - http://www.scipy.org/Installing_SciPy/Linux#hea
6 of 17 11/02/11 2

8/6/2019 Instructions NUMPY
http://slidepdf.com/reader/full/instructions-numpy 7/17
The following may (or may not) work on any Debian-based distribution:
Add the following line to your /etc/apt/sources.list:
deb-src http://debs.astraw.com/ dapper/
To download and build, type:
sudo apt-get build-dep python-numpy
sudo apt-get -b source python-numpy
GPG Verification using Andrew Straw's repository
When you start using this repository, you might get warning messages like this:
The following signatures couldn't be verified because
the public key is not available.
Or you will be asked questions like this over and over:
WARNING: The following packages cannot be authenticated!
...
Install these packages without verification [y/N]?
Install the package astraw-keyring to eliminate these messages. This installs Andrew's
archive signing key to your apt through the apt-key add command.
Debian sarge notes
If you install NumPy or SciPy ontop of a debian sarge installation for a CPU with
SSE2, there is a bug in libc6 2.3.2 affecting floating point operations (fixed in version
2.3.3). Due to this bug, the numpy and scipy tests crach with a SIGFPE. Since there is
now patch available, in order to fix this the libc6 sources need to be downloaded, fixed,
and rebuilt. See Andrew Straw's instructions for more information.
Ubuntu notes
If you choose not to use Andrew Straw's repository (which includes numpy built with
ATLAS support), here are some further notes to build numpy and scipy from sources onyour computer.
First, you need to install several libraries/tools (you need to enable universe repository
for some of those packages):
sudo apt-get install gcc g77 python-dev atlas3-base-dev
nstalling SciPy/Linux - http://www.scipy.org/Installing_SciPy/Linux#hea
7 of 17 11/02/11 2

8/6/2019 Instructions NUMPY
http://slidepdf.com/reader/full/instructions-numpy 8/17
To use optimized lapack and blas, you should also install the atlas corresponding to your
achitecture: atlas3-sse2-dev if you have a CPU with SSE2 capabilities, atlas3-sse-dev if
you have a CPU with SSE capabilities only, etc... If you have a recent x86 (eg intel or
AMD cpu), it should support SSE2. To check whether your CPU supports sse, sse2,
etc.. you can check using the following command:
cat /proc/cpuinfo | grep flags
and check whether sse, sse2, etc... appear on it.
Then, you can build numpy with the following, inside the numpy source directory:
python setup.py build
Then, to install it system-wide (requires root privileges):
python setup.py install
To install it in another directory, you need to use the prefix option. For example, I like to
install local softwares in my $HOME/local, so I do the following:
python setup.py install --prefix=$HOME/local
Note that if you do not install numpy system wide, you need to tell python to look for
the directory where you installed numpy. For example, if you use $HOME/local as the
former example, then you should add $HOME/local/lib/python2.4/site-packages in your
PYTHONPATH:
PYTHONPATH=$HOME/local/lib/python2.4/site-packages python
(change python2.4 to python2.5 if you are using python2.5, obviously).
openSUSE
(This section reflects the situation of July 2009. If you have newer of more accurate
information, feel free to modify this section.)
OpenSUSE does not contain Numpy, Scipy or Matplotlib in the standard installation.
Instead those packages are provided by additional repositories, that seem to be run by
volunteers. However Novell provides webspace for some of those repositories.Packages usually exist only for a few current SUSE versions.
The following repositories are currently the best to obtain Numpy, Scipy and
Matplotlib. They can be added to the package manager (YaST) with the Installation
Source dialog. The packages will then appear in the Software Management dialog.
Alternatively the *.rpm files can be downloaded and installed manually (for example
'rpm -U <filename>' or with 'kpackage').
nstalling SciPy/Linux - http://www.scipy.org/Installing_SciPy/Linux#hea
8 of 17 11/02/11 2

8/6/2019 Instructions NUMPY
http://slidepdf.com/reader/full/instructions-numpy 9/17
Science: http://download.opensuse.org/repositories/science/
This repository contains: Numpy, Scipy, Matplotlib, and many more
packages of interest for scientific users.
Installation was tested with openSUSE 11.0 and 11.1, both i586 and
x86-64.
For openSUSE 11.1-x586 additionally the Packman repository was
required as an 'Installation Source'. Select a suitable mirror from thelist.
Education: http://www.opensuse-education.org/download/repo/1.0/ This project
seems to have some backing from Novell. It is primarily oriented towards schools.
The repository was added despite of the broken packages, because it is big and
still active. Also its relatively wide audience (schools) might lead to continuing
development. (The author of this section has also filed bug reports in their
Bugzilla.)
This repository contains: Numpy, Scipy, Matplotlib, and very many other
packages.
Repository has own Bugzilla: http://devzilla.novell.com/education
/enter_bug.cgi and Website: http://en.opensuse.org/Education
Tested with openSUSE 11.0 and 11.1, x86-64:
openSUSE 11.0: broken package Scipy
openSUSE 11.1: one error in scipy.test(), package seems (mostly)
functional though.
Alternatively one can search for packages in repositories hosted by Novell here:
http://software.opensuse.org/search.
One can also search for packages in the very big Packman repository:
http://packman.links2linux.org/.
Lists of Packman mirrors: 1 2
The packman repository should be given a low priority (high value, for example
200, in priority field). It contains very many packages, that are also present in
SUSE's standard repositories. These packages might otherwise override original
packages from SUSE.
Users of older versions of SUSE/openSuse can install Sage, a big collection of
Mathematics related software. It was recently (Jul. 2009) reported that compiling and
installing Sage from sources worked flawlessly, on SUSE Linux 10.2:
Sage http://www.sagemath.org/download-source.html
A more detailed description how to install Sage from sources is on this page too.
ATLAS
nstalling SciPy/Linux - http://www.scipy.org/Installing_SciPy/Linux#hea
9 of 17 11/02/11 2

8/6/2019 Instructions NUMPY
http://slidepdf.com/reader/full/instructions-numpy 10/17
ATLAS is a replacement for BLAS and parts of LAPACK, that is much faster. It must
be built from sources, because it optimizes itself for the computer's processor. The build
process will run for ten minutes to several hours.
There is currently no comfortable way to use ATLAS on openSuse.
The build instructions for ATLAS on this page work, but unfortunately the Numpy and
Scipy packages don't work with ATLAS. One could build Numpy and Scipy from
sources though, and a relatively painless way to do this is the Sage package. (If youknow a comfortable way to make ATLAS work on openSuse, please put it here into the
Wiki.)
David Cournapeau has a repository devoted to ATLAS, but he has not added packages
for recent SUSE versions.
Ashigabou http://software.opensuse.org/download/home:/ashigabou/
This repository contains: ATLAS and additionally other scientific software.
Broken BLAS
SUSE (and Red Hat) regularly shipped versions of the BLAS library where some
functions were missing. This bug has finally been fixed in March 2007. This means
SUSE 10.2 and prior come with a broken BLAS, in later versions SUSE's original
BLAS should work. Unfortunately the repositories mentioned here do no longer contain
corrected/complete packages of BLAS and LAPACK for the affected versions (SUSE
10.2 and older).
The bug's cause was as follows: The BLAS rpm is created from Netlib's LAPACK
package and not from the BLAS package. Until March 2007 however the LAPACK
library did only contain a subset of the functions that were in BLAS. Finally someone
begged the LAPACK developers to include the whole BLAS library in the LAPACK
package, and they did.
For details see: https://bugzilla.novell.com/show_bug.cgi?id=228824 and
http://www.netlib.org/lapack/lapack-3.1.1.changes
Building everything from source with gfortran on Ubuntu
(Nov 2010)
These are instructions for building everything from source on a 64 bit Ubuntu system
(Maverick: 10.10) on a multicore processor using the latest versions as of November
2010. Everything is installed in a user directory structure in $HOME/local (/home /sam/local in my case). Administrator priviliges are required only in the beginning to
disable CPU throttling while building ATLAS.
Install required packages
sudo apt-get install build-essential python-dev swig gfortran
nstalling SciPy/Linux - http://www.scipy.org/Installing_SciPy/Linux#hea
0 of 17 11/02/11 2

8/6/2019 Instructions NUMPY
http://slidepdf.com/reader/full/instructions-numpy 11/17
python-nose
Step 1: Disable CPU Throttling
ATLAS' timing algorithm require CPU throttling to be disabled. This disables it on the
0th core:
sudo cpufreq-selector -g performance
Then disable it on each additional core. For a quad core processor, these commands will
be required:
sudo cp /sys/devices/system/cpu/cpu0/cpufreq/scaling_governor
/sys/devices/system/cpu/cpu1/cpufreq/scaling_governor
sudo cp /sys/devices/system/cpu/cpu0/cpufreq/scaling_governor
/sys/devices/system/cpu/cpu2/cpufreq/scaling_governor
sudo cp /sys/devices/system/cpu/cpu0/cpufreq/scaling_governor
/sys/devices/system/cpu/cpu3/cpufreq/scaling_governor
Step 2: Build ATLAS(3.9.32) with complete Lapack(3.2.2)
Download lapack.tgz from netlib.org and atlas3.9.32.tar.bz2. Extract the atlas archive
into a directory named ATLAS and from within it, issue these commands:
mkdir BUILD
cd BUILD
../configure -b 64 -Fa alg -fPIC --with-netlib-lapack-tarfile=<path
to lapack.tgz> --prefix=/home/sam/local
make
cd lib
make shared
make ptshared
cd ..
make install
Note that make ptshared might not work on a single core machine. Note also that the first
"make" command above will take several hours to run, as ATLAS optimizes various
performance parameters.
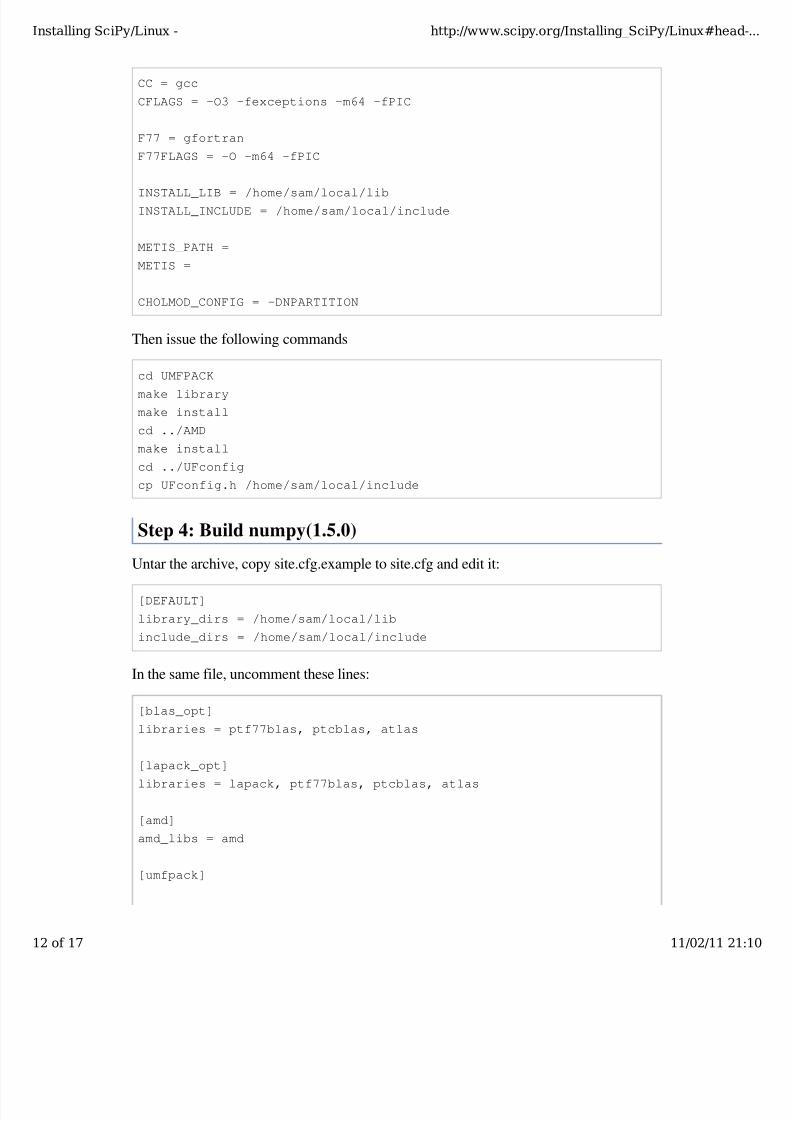
Step 3: Build UMFPACK (5.5.0) with AMD (2.2.1),
UFConfig(3.5.0) and CHOLMOD (1.7.1)
Dowload all four packages and extract them in the same directory. Edit
UFconfig/UFconfig.mk to read:
nstalling SciPy/Linux - http://www.scipy.org/Installing_SciPy/Linux#hea
1 of 17 11/02/11 2
8/6/2019 Instructions NUMPY
http://slidepdf.com/reader/full/instructions-numpy 12/17
CC = gcc
CFLAGS = -O3 -fexceptions -m64 -fPIC
F77 = gfortran
F77FLAGS = -O -m64 -fPIC
INSTALL_LIB = /home/sam/local/libINSTALL_INCLUDE = /home/sam/local/include
METIS_PATH =
METIS =
CHOLMOD_CONFIG = -DNPARTITION
Then issue the following commands
cd UMFPACK
make library
make install
cd ../AMD
make install
cd ../UFconfig
cp UFconfig.h /home/sam/local/include
Step 4: Build numpy(1.5.0)
Untar the archive, copy site.cfg.example to site.cfg and edit it:
[DEFAULT]
library_dirs = /home/sam/local/lib
include_dirs = /home/sam/local/include
In the same file, uncomment these lines:
[blas_opt]
libraries = ptf77blas, ptcblas, atlas
[lapack_opt]
libraries = lapack, ptf77blas, ptcblas, atlas
[amd]
amd_libs = amd
[umfpack]
nstalling SciPy/Linux - http://www.scipy.org/Installing_SciPy/Linux#hea
2 of 17 11/02/11 2

8/6/2019 Instructions NUMPY
http://slidepdf.com/reader/full/instructions-numpy 13/17
umfpack_libs = umfpack
For a single core machine, uncomment these lines:
[blas_opt]
libraries = f77blas, cblas, atlas
[lapack_opt]libraries = lapack, f77blas, cblas, atlas
Then use the standard installation technique
python setup.py build
python setup.py install --prefix=/home/sam/local
Step 5: Build scipy(0.8.0)
Make sure that $HOME/local/bin is in $PATH (for f2py) and $PYTHONPATH
contains $HOME/local/lib/python-2.6/site-packages (for numpy)
Do a standard install
python setup.py build
python setup.py install --prefix=/home/sam/local
Building everything from source with gfortran on Ubuntu
(Feb 2008)
This is how I built everything from source on a 64 bit Ubuntu system with latestversions as of February 2008. It took me some time to work out the issues so I thought
I'd put the details here. I believe it should work the same on 32 bit systems (leaving out
64 bit related options).
Install required packages
sudo apt-get install build-essential python-dev swig gfortran
Install nose (easy_install nose). Do not install python-nose, it is an earlier version that
doesn't work with scipy. Also make sure g77 is not installed. Distutils will not usegfortran if g77 is installed.
sudo apt-get remove python-nose
sudo apt-get remove g77
sudo apt-get install python-setuptools
sudo easy_install nose
nstalling SciPy/Linux - http://www.scipy.org/Installing_SciPy/Linux#hea
3 of 17 11/02/11 2

8/6/2019 Instructions NUMPY
http://slidepdf.com/reader/full/instructions-numpy 14/17
Build lapack (3.1.1)
As described above, copy make.inc.gfortran, add -fPIC flags (and -m64 if building 64
bit) to OPTS and NOOPT. Run make in SRC directory.
Build ATLAS (3.8.0)
As described above untar, create a directory for your build in ATLAS and run configure
(add option '-b 64' for 64 bit).
sudo cpufreq-selector -g performance
../configure -b 64 -Fa alg -fPIC --with-netlib-lapack=/path
/to/lapack/lapack_<XXXX>.a
make
Copy the libraries to a lib directory (/usr/local/lib or ~/scipy_build/lib for example). I
found it's easier to copy all needed libraries and files to a common directory.
Build UMFPACK (5.2.0)
Get the latest versions of AMD, UFconfig and UMFPACK and untar them into a
directory.
UFconfig/UFconfig.mk should contain:
CC = gcc
CFLAGS = -O3 -fexceptions -m64 -fPIC
F77 = gfortran
F77FLAGS = -O -m64 -fPIC
BLAS = -L/usr/lib/gcc/x86_64-linux-gnu/4.2.1 -L/home/robince
/scipy_build/lib -llapack -lf77blas -lcblas -latlas -lgfortran
LAPACK = -L/usr/lib/gcc/x86_64-linux-gnu/4.2.1 -L/home/robince
/scipy_build/lib -llapack -lf77blas -lcblas -latlas -lgfortran
On a 32 bit system, remove the -m64 flags and change the first -L option to -L/usr
/lib/gcc/i486-linux-gnu/4.2.1.
Run 'make' in UMFPACK directory. Copy resulting libraries and include files.
cp AMD/Lib/libamd.a ~/scipy_build/lib
cp UMFPACK/Lib/libumfpack.a ~/scipy_build/lib
cp AMD/Include/amd.h ~/scipy_build/lib/include
cp UFconfig/UFconfig.h ~/scipy_build/lib/include
cp UMFPACK/Include/*.h ~/scipy_build/lib/include
Copy libgfortran into scipy library directory (doesn't seem to work if it doesn't find the
nstalling SciPy/Linux - http://www.scipy.org/Installing_SciPy/Linux#hea
4 of 17 11/02/11 2

8/6/2019 Instructions NUMPY
http://slidepdf.com/reader/full/instructions-numpy 15/17

8/6/2019 Instructions NUMPY
http://slidepdf.com/reader/full/instructions-numpy 16/17
[amd]
amd_libs = amd
[umfpack]
umfpack_libs = umfpack, gfortran
[fftw]
libraries = fftw3
Build Numpy and Scipy.
python setup.py build
sudo python setup.py install
Any distribution with Intel C compiler and MKL
The Intel C compiler and Intel MKL are free for personal non-commercial use.Add some variation of the following lines to site.cfg in your top level numpy directory to
use MKL:
[mkl]
library_dirs = /home/youruser/intel/mkl/8.1/lib/32
mkl_libs = mkl, vml
include_dirs = /home/youruser/intel/mkl/8.1/include
There are also libraries for the IA-64 and EM64T processors.
Modify cc_exe in numpy/numpy/distutils/intelccompiler.py to be something like:
cc_exe = 'icc -O2 -g -fomit-frame-pointer -mcpu=pentium4
-mtune=pentium4 -march=pentium4 -msse2 -axWN -Wall'
Run icc --help for more information on processor-specific options.
Compile and install NumPy with the Intel compiler:
python setup.py config --compiler=intel build_clib --compiler=intel
build_ext --compiler=intel install
Compile and install SciPy with the Intel compilers:
python setup.py config --compiler=intel --fcompiler=intel
build_clib --compiler=intel --fcompiler=intel build_ext
--compiler=intel --fcompiler=intel install
You'll have to set LD_LIBRARY_PATH to ~/intel/mkl/8.1/lib/32/:~/intel
nstalling SciPy/Linux - http://www.scipy.org/Installing_SciPy/Linux#hea
6 of 17 11/02/11 2

8/6/2019 Instructions NUMPY
http://slidepdf.com/reader/full/instructions-numpy 17/17
Installing SciPy/Linux (last edit ed 2010-12-30 00:37:22 by MaxBane)
/cc/9.1.044/lib (exact values will depend on your architecture, compiler and library
versions) for NumPy to work. This can still cause problems. The only solution I've
found that always works is to build Python, NumPy and SciPy inside an environment
where you've set the LD_RUN_PATH variable, e.g:
export LD_RUN_PATH=~/opt/lib:~/intel/cc/9.1.044/lib:~/intel
/fc/9.1.039/lib:~/intel/mkl/8.1/lib/32
Configure Python with --prefix=$HOME/opt, make, make install, add $HOME/opt/bin
to the front of your PATH and then build NumPy and SciPy with the site.cfg as
above in their top level directories (check the config step's output carefully to make sure
it selects MKL). Built like this, you shouldn't have to set any LD_LIBRARY_PATH for
NumPy and SciPy to work. Run the test suites to verify this.
Any Linux distro: self-contained local installation with
Sage.
All you need is some basic tools like gcc (no fortran).
Follow the instructions here to build sage from source:
http://www.sagemath.org/doc/installation/source.html
All you have to do is unpack the tar and type make. This takes about 3 hours.
This will install sage in its own directory. python (and ipython) can be found in
SAGEROOT/local/bin
If you don't want to have to type in absolute paths, you can set the environment variables
to point to your sage executables. To do this, run sage with the -sh option. My .profile
contains the line
~/Sage/sage -sh
CategoryInstallation
nstalling SciPy/Linux - http://www.scipy.org/Installing_SciPy/Linux#hea
7 of 17 11/02/11 2
Related Documents