INSTRUCTIONS FOR DIGITAL RECORDING AND TRANSCRIBING COURT PROCEEDINGS Version I (Windows XP Users) For Customer Support Questions Contact BIS @ 1-800-715-1234 or 1-800-834-7674 Document Revised by: The Administrative Office of the Courts 1-800-448-7980 November 2015

Welcome message from author
This document is posted to help you gain knowledge. Please leave a comment to let me know what you think about it! Share it to your friends and learn new things together.
Transcript
INSTRUCTIONS FOR DIGITAL RECORDING AND
TRANSCRIBING COURT PROCEEDINGS Version I (Windows XP Users)
For Customer Support Questions Contact BIS @ 1-800-715-1234 or
1-800-834-7674
Document Revised by: The Administrative Office
of the Courts 1-800-448-7980
November 2015

Table of Contents
Digital Court Recorder ........................................................................................................................3
GETTING STARTED..................................................................................................................................... 3
System Check .................................................................................... Error! Bookmark not defined.
START RECORDING .................................................................................................................................... 4
DURING RECORDING ................................................................................................................................. 4
Creating a Bookmark or New Docket ............................................................................................... 5
Creating a Predefined Bookmark ..................................................................................................... 6
Using Predefined Bookmarks ........................................................................................................... 8
AFTER RECORDING .................................................................................................................................... 8
Sealing a Recording or a Section of the File After Recording (using Digital Court Recorder) .. Error!
Bookmark not defined.
How to Playback Recording ............................................................................................................. 9
Saving Recording to Disc ................................................................................................................ 10
Saving Partial Recording to Disc ..................................................................................................... 10
Using Windows XP to Burn Additional Copies ............................................................................... 11
Using Windows 7 to Burn Additional Copies ................................................................................. 11
STORING PASSWORDS ............................................................................................................................ 12
Digital Court Player .......................................................................................................................... 13
Transcription without foot pedal ................................................................................................... 13
Using the Foot Pedal ...................................................................................................................... 14
Making Additional Copies of Recording Files ................................................................................. 15
Frequently Asked Questions ............................................................................................................. 16
Instructions for Digital Recording and Transcribing Court Proceedings
Page 3 of 17
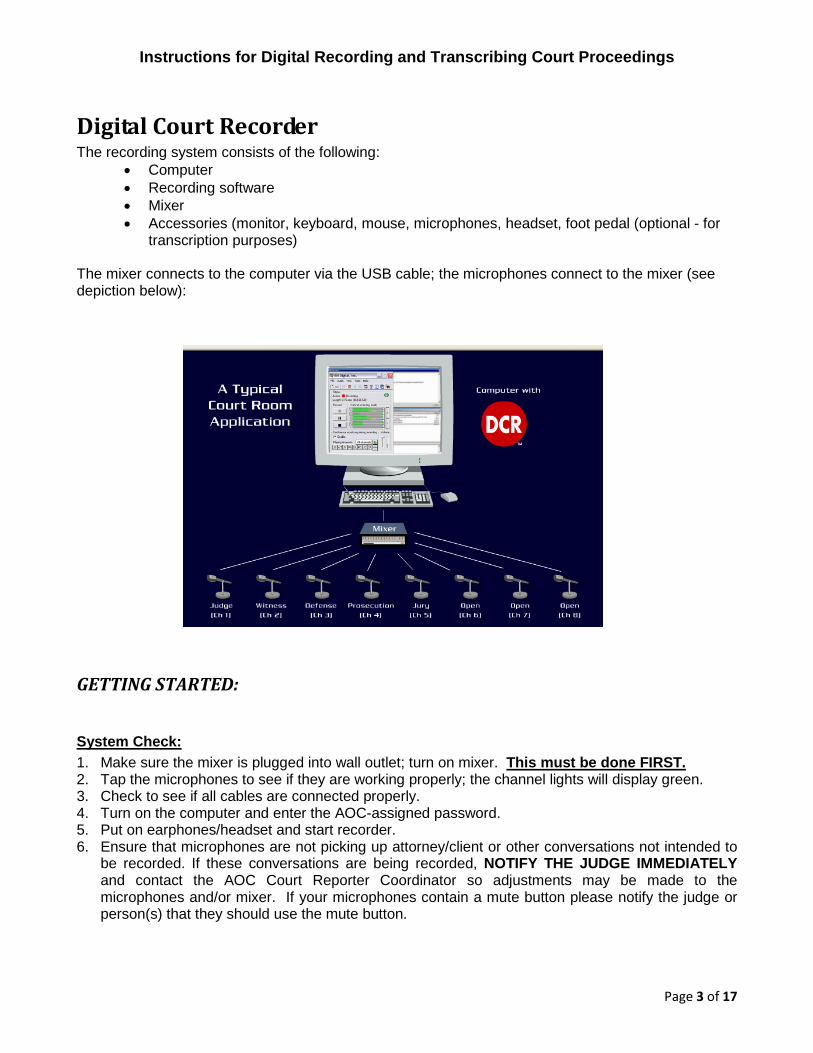
Digital Court Recorder The recording system consists of the following:
• Computer • Recording software • Mixer • Accessories (monitor, keyboard, mouse, microphones, headset, foot pedal (optional - for
transcription purposes) The mixer connects to the computer via the USB cable; the microphones connect to the mixer (see depiction below):
GETTING STARTED:
System Check: 1. Make sure the mixer is plugged into wall outlet; turn on mixer. This must be done FIRST. 2. Tap the microphones to see if they are working properly; the channel lights will display green. 3. Check to see if all cables are connected properly. 4. Turn on the computer and enter the AOC-assigned password. 5. Put on earphones/headset and start recorder. 6. Ensure that microphones are not picking up attorney/client or other conversations not intended to
be recorded. If these conversations are being recorded, NOTIFY THE JUDGE IMMEDIATELY and contact the AOC Court Reporter Coordinator so adjustments may be made to the microphones and/or mixer. If your microphones contain a mute button please notify the judge or person(s) that they should use the mute button.
Instructions for Digital Recording and Transcribing Court Proceedings
Page 4 of 17
START RECORDING: (NOTE: Burning of CD should occur only after recording is complete.)
1. Double-click on the recorder program icon to open. 2. Select File and then New or click on the (new file icon) to start new file.
(File will be in default location on the C: drive in the DCR Recordings folder (C:\DCR Recordings); File name will be: YearMonthDate_Time(HrsMinsSec).dcr: 20110218_18:26:14.dcr; this annotation represents February 18, 2011 at 4:26 PM and 14 seconds.
3. Click View on the Digital Court Recorder menu bar and click Bookmarks (this allows the user to view the progression of the recording as well as view bookmark entries).
4. Start the recorder when court proceedings begin by clicking the red record button (see depiction below).
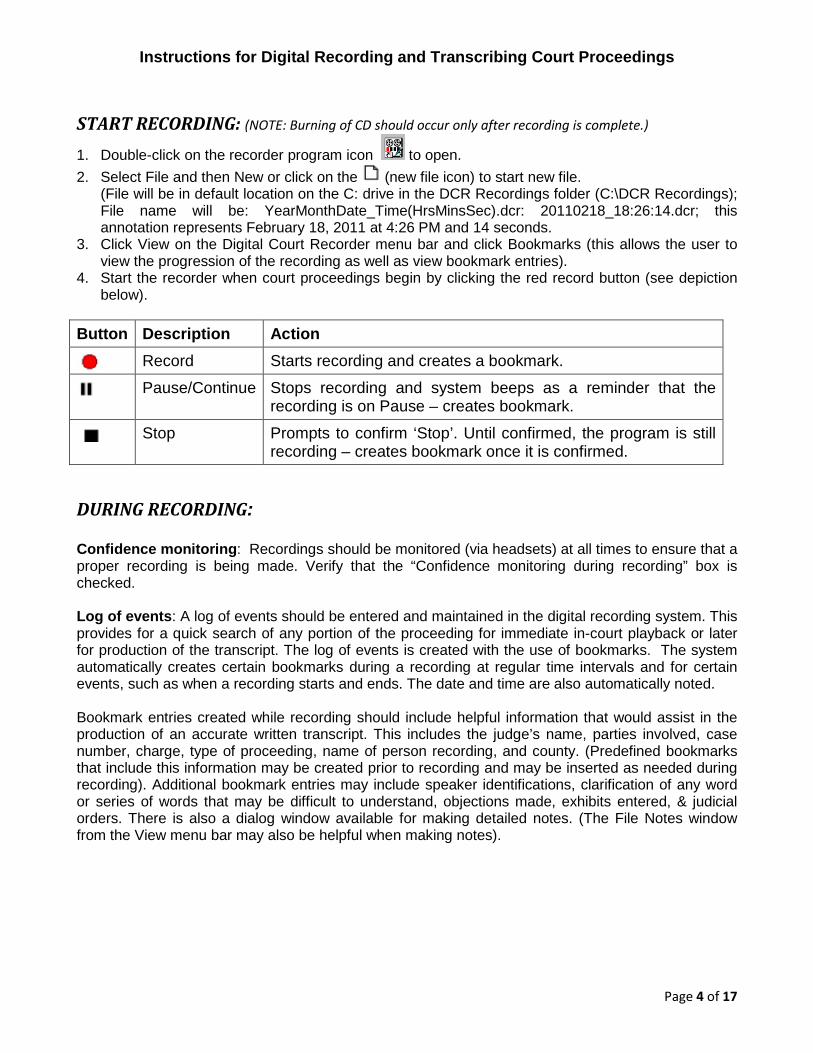
Button Description Action
Record Starts recording and creates a bookmark.
Pause/Continue Stops recording and system beeps as a reminder that the recording is on Pause – creates bookmark.
Stop Prompts to confirm ‘Stop’. Until confirmed, the program is still recording – creates bookmark once it is confirmed.
DURING RECORDING: Confidence monitoring: Recordings should be monitored (via headsets) at all times to ensure that a proper recording is being made. Verify that the “Confidence monitoring during recording” box is checked. Log of events: A log of events should be entered and maintained in the digital recording system. This provides for a quick search of any portion of the proceeding for immediate in-court playback or later for production of the transcript. The log of events is created with the use of bookmarks. The system automatically creates certain bookmarks during a recording at regular time intervals and for certain events, such as when a recording starts and ends. The date and time are also automatically noted. Bookmark entries created while recording should include helpful information that would assist in the production of an accurate written transcript. This includes the judge’s name, parties involved, case number, charge, type of proceeding, name of person recording, and county. (Predefined bookmarks that include this information may be created prior to recording and may be inserted as needed during recording). Additional bookmark entries may include speaker identifications, clarification of any word or series of words that may be difficult to understand, objections made, exhibits entered, & judicial orders. There is also a dialog window available for making detailed notes. (The File Notes window from the View menu bar may also be helpful when making notes).

Instructions for Digital Recording and Transcribing Court Proceedings
Page 5 of 17
Creating a Bookmark or New Docket:
1. To add a bookmark press the F2 key or click on the new bookmark icon .
Bookmark Main Toolbar Icon Description Shortcut
Create new bookmark F2
Create new docket Ctrl + Alt + F2
Begin seal None
End seal None
Delete bookmark or docket information None
2. Clicking on the new docket icon from the Bookmarks window opens the window to the right so that docket information may be added. The Docket No., Judge, Plaintiff Attorney, Defense Attorney, Defendant and Notes may be entered here. With the exception of the Notes information, all other fields are fields that can be used on searches.

Instructions for Digital Recording and Transcribing Court Proceedings
Page 6 of 17
BEFORE & DURING RECORDING Parts of a recording that are not considered public record may be sealed. Once this file or part of a file is sealed, it will require a password to access the file or part of the file that is sealed (see Storing Passwords). Placing a seal on specified recordings or sections of the recording file prevents anyone from listening to the recording or the section without the password or permission. Examples of when to seal a recording or section include but are not limited to:
• Judge orders • Juvenile criminal records
Sealing a Recording or a Section of the File During Recording (using Digital Court Recorder) Therefore, when a hearing is considered “not a public record” it will need to be sealed. Click on the Begin Seal bookmark found on the Bookmarks screen toolbar. This will bookmark the recording where the begin seal starts. Start the recorder; when recording of the sealed case or sealed portion is complete, click on the End Seal bookmark . This will denote the ending point of the sealed recording portion. If there are more cases to be heard, normal recording can continue and will not be included within the sealed section.
Creating a Predefined Bookmark:
The Predefined Bookmarks option or the Definition Editor program enables the user to create bookmarks prior to court. The Definition Editor program may be downloaded to a different computer than what is used for recording purposes. The Predefined Bookmarks option is available on the Digital Court Recorder or Digital Court Player programs and is one of the icons on the toolbar.
1. Click on the Predefined Bookmarks icon or select Tools from the menu bar then
Predefined Bookmarks. 2. Create new or open existing Predefined Bookmark file: click on File from the Predefined
Bookmark menu bar then New or Open. 3. If creating a new file, name the file and save it to the C: drive.
4. Select either the [New Bookmark] or [New Docket] buttons to enter information.
5. Clicking on the [New Bookmark] button enables the user to enter Speaker and Notes.
6. Clicking on the [New Docket] button enables the user to enter docket information.

Instructions for Digital Recording and Transcribing Court Proceedings
Page 7 of 17
7. Information will display under the column headings in the middle of the window. Each row of information will be listed with a blue picture for bookmarks and a red one for docket information.
8. Highlight row to be edited then select the [Edit List] button to modify the entry. Click on row to highlight.
9. Highlight row to be deleted then select the [Delete] button to remove the entry. Click on row to highlight.
10. To resize the Predefined Bookmarks window, grab the sizing handles on the ↕ bold black line below the [Edit list], [New Bookmark] buttons and the blue line around the entire window.
NOTE: If the Definition Editor program was downloaded to a computer other than the one used for recording, the file must be saved onto a flash drive so that it may be transported for use in the courtroom.

Instructions for Digital Recording and Transcribing Court Proceedings
Page 8 of 17
Using Predefined Bookmarks 1. To use a predefined bookmark double-click on the row that contains the information needed in
the bookmark. The information will populate on the Bookmarks window. See example below using docket number 88992211.
AFTER RECORDING:
Sealing a Recording or a Section of the File After Recording (using Digital Court Recorder) Parts of a recording that are not considered public record may be sealed. Once this file or part of a file is sealed, it will require a password to access the file or part of the file that is sealed (see Storing Passwords).
Double-click
Populates
Instructions for Digital Recording and Transcribing Court Proceedings
Page 9 of 17
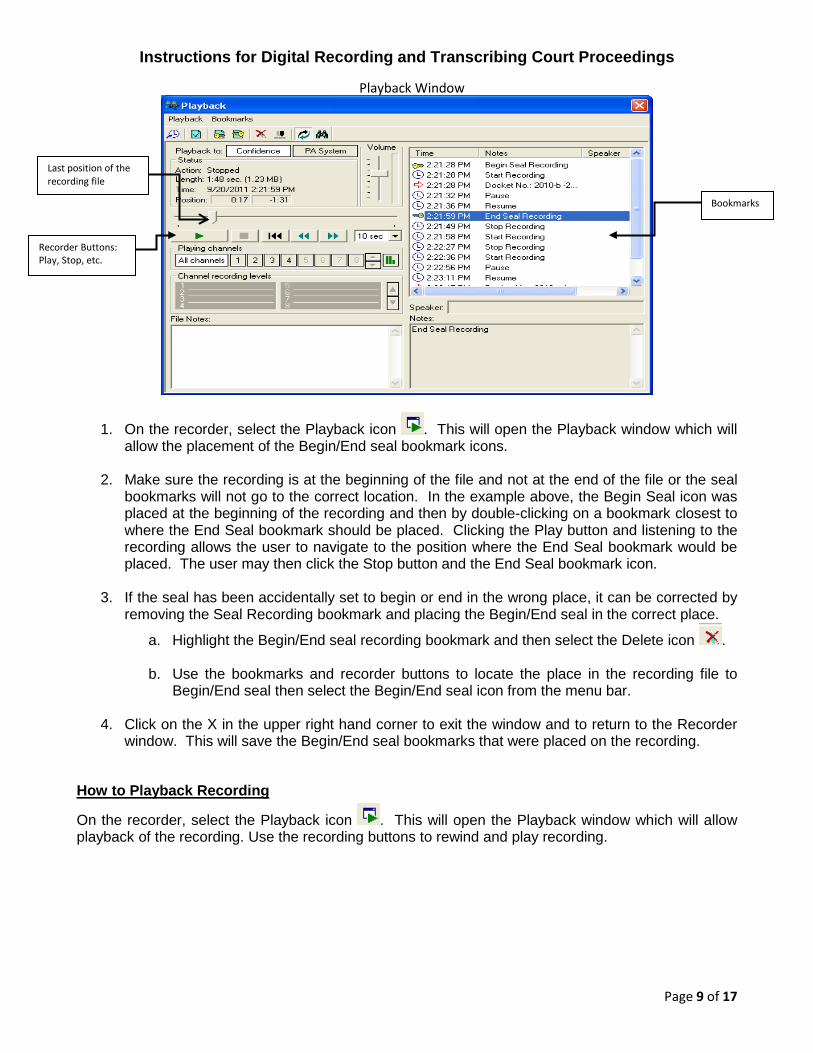
1. On the recorder, select the Playback icon . This will open the Playback window which will allow the placement of the Begin/End seal bookmark icons.
2. Make sure the recording is at the beginning of the file and not at the end of the file or the seal bookmarks will not go to the correct location. In the example above, the Begin Seal icon was placed at the beginning of the recording and then by double-clicking on a bookmark closest to where the End Seal bookmark should be placed. Clicking the Play button and listening to the recording allows the user to navigate to the position where the End Seal bookmark would be placed. The user may then click the Stop button and the End Seal bookmark icon.
3. If the seal has been accidentally set to begin or end in the wrong place, it can be corrected by removing the Seal Recording bookmark and placing the Begin/End seal in the correct place.
a. Highlight the Begin/End seal recording bookmark and then select the Delete icon .
b. Use the bookmarks and recorder buttons to locate the place in the recording file to Begin/End seal then select the Begin/End seal icon from the menu bar.
4. Click on the X in the upper right hand corner to exit the window and to return to the Recorder
window. This will save the Begin/End seal bookmarks that were placed on the recording.
How to Playback Recording
On the recorder, select the Playback icon . This will open the Playback window which will allow playback of the recording. Use the recording buttons to rewind and play recording.
Playback Window
Last position of the recording file
Recorder Buttons: Play, Stop, etc.
Bookmarks
Instructions for Digital Recording and Transcribing Court Proceedings
Page 10 of 17
Saving Recording to Disc All proceedings shall be saved to the recording file on the hard drive of the computer and also to a CD-R/DVD-R (which will be considered the original recording). The user should first verify that the recording file was properly saved onto the hard drive by initiating playback of the audio recording. Once this has been verified, the recording file should also be saved onto CD-R/DVD-R (verification of saving to CD should also occur). A new CD-R/DVD-R should be used each day regardless of whether or not the previous CD-R/DVD-R is completely filled. Additional CD’s or other AOC-approved storage media may be utilized for transcription purposes.
• Close the recorder program. (Select File from the menu bar then Close or click the X in the upper right hand corner of the recorder.)
• Burn recording file onto CD (see instructions below). • Turn off the mixer. • Provide the CD to the Clerk/Deputy Clerk.
1. Insert a blank CD/DVD into your CD/DVD drive.
a. A window may open showing either “blank CD/DVD” or will show contents of CD/DVD. Close that window.
2. Open the Roxio program by clicking on icon or click on the Start button then select Programs Roxio Easy Media Creator 9 DataCreator Classic.
3. The Roxio Creator Classic opens. Locate File by browsing correct drive and folder (Listed
under Select Source). a. Files will be listed in the top right display box. Click once to highlight file to burn. b. Click the [Add] button.
4. The file moves to the bottom display box. a. Highlight another file to [Add] if burning more than one file onto the disc.
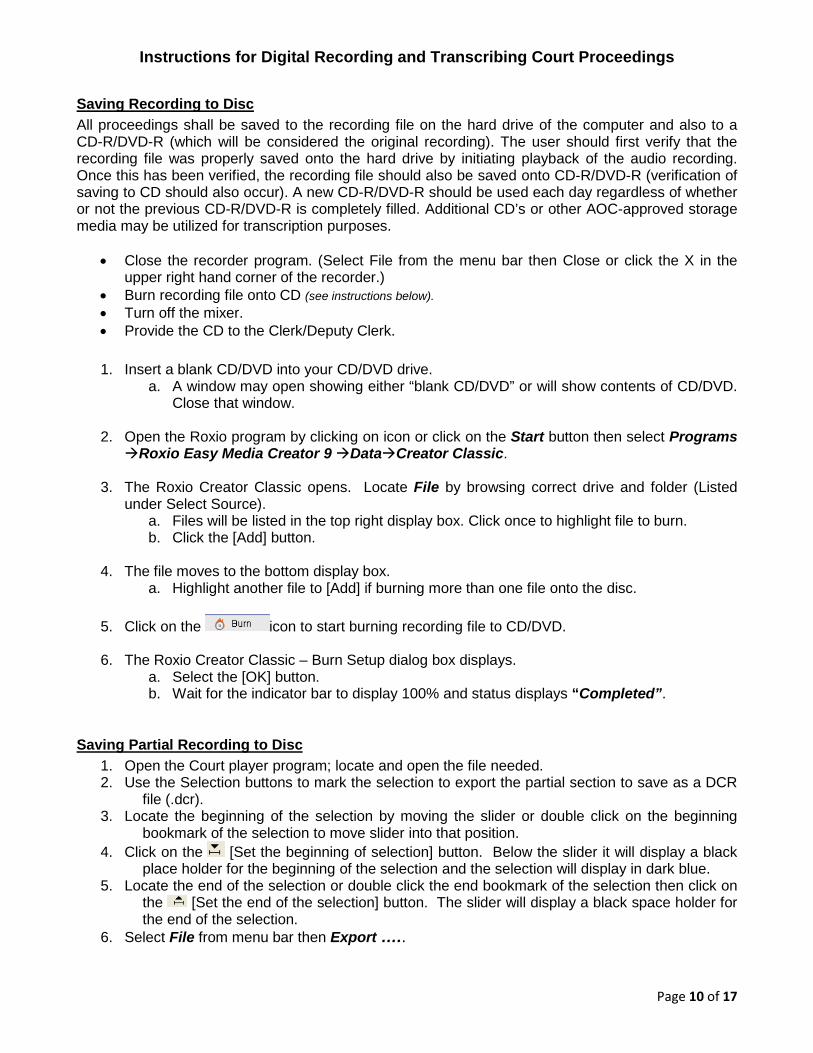
5. Click on the icon to start burning recording file to CD/DVD.
6. The Roxio Creator Classic – Burn Setup dialog box displays.
a. Select the [OK] button. b. Wait for the indicator bar to display 100% and status displays “Completed”.
Saving Partial Recording to Disc 1. Open the Court player program; locate and open the file needed. 2. Use the Selection buttons to mark the selection to export the partial section to save as a DCR
file (.dcr). 3. Locate the beginning of the selection by moving the slider or double click on the beginning
bookmark of the selection to move slider into that position. 4. Click on the [Set the beginning of selection] button. Below the slider it will display a black
place holder for the beginning of the selection and the selection will display in dark blue. 5. Locate the end of the selection or double click the end bookmark of the selection then click on
the [Set the end of the selection] button. The slider will display a black space holder for the end of the selection.
6. Select File from menu bar then Export …..
Instructions for Digital Recording and Transcribing Court Proceedings
Page 11 of 17
7. The File name includes the section begin/end time range: file time stamp_ channels_sel_12-27-47_to_ 12-28-22.dcr. The file name can also be changed for the selection.
8. Make sure the Save as type: DCR files (.dcr) is reflected so burning of the partial recording to a CD may occur.
9. Click on the [Save] button.
Using Windows XP to Burn Additional Copies 1. Refer to the Saving Recording to Disc procedures on page 9.
Using Windows 7 to Burn Additional Copies If using a Windows 7 computer at home, it is no longer required to use Roxio Creator Classic to burn additional copies of the recording. Just follow the instructions below.
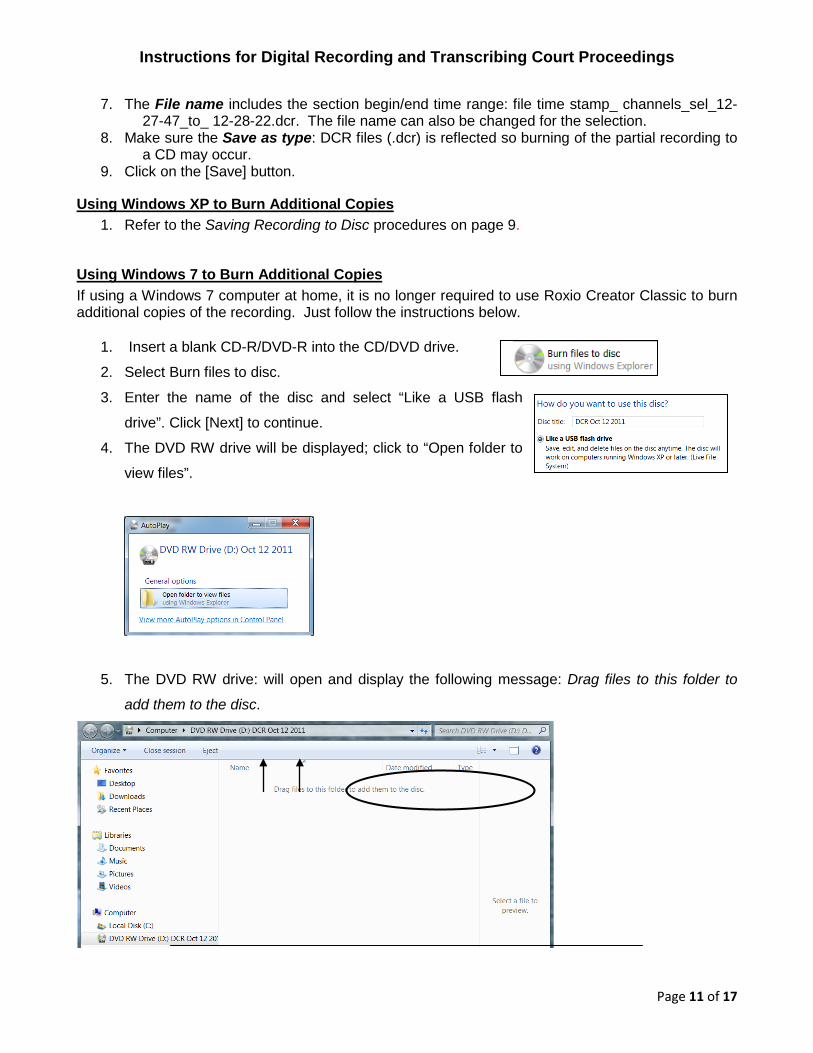
1. Insert a blank CD-R/DVD-R into the CD/DVD drive.
2. Select Burn files to disc.
3. Enter the name of the disc and select “Like a USB flash
drive”. Click [Next] to continue.
4. The DVD RW drive will be displayed; click to “Open folder to
view files”.
5. The DVD RW drive: will open and display the following message: Drag files to this folder to
add them to the disc.
Instructions for Digital Recording and Transcribing Court Proceedings
Page 12 of 17
6. Locate the DCR partial or complete recording file on the C: drive. Copy the file (right click &
copy) then paste into the DVD RW drive.
7. The system will display a processing bar that “copying is in progress”.
8. When system is done copying the file to disc, click on [Close Session]. When it is done
closing the session, click on [Eject].
Storing Passwords Passwords used for sealing full or partial recording files must be kept in a safe and secure place. The passwords should be maintained in a specified folder on a drive on the judge’s assistant’s computer and/or the clerk’s/deputy clerk’s computer. By storing the passwords in this manner, any authorized user will be able to quickly access the recordings whenever necessary. Additionally, passwords should not be changed because the previously sealed recordings will not open since the old passwords will not be recognized any longer.
Instructions for Digital Recording and Transcribing Court Proceedings
Page 13 of 17
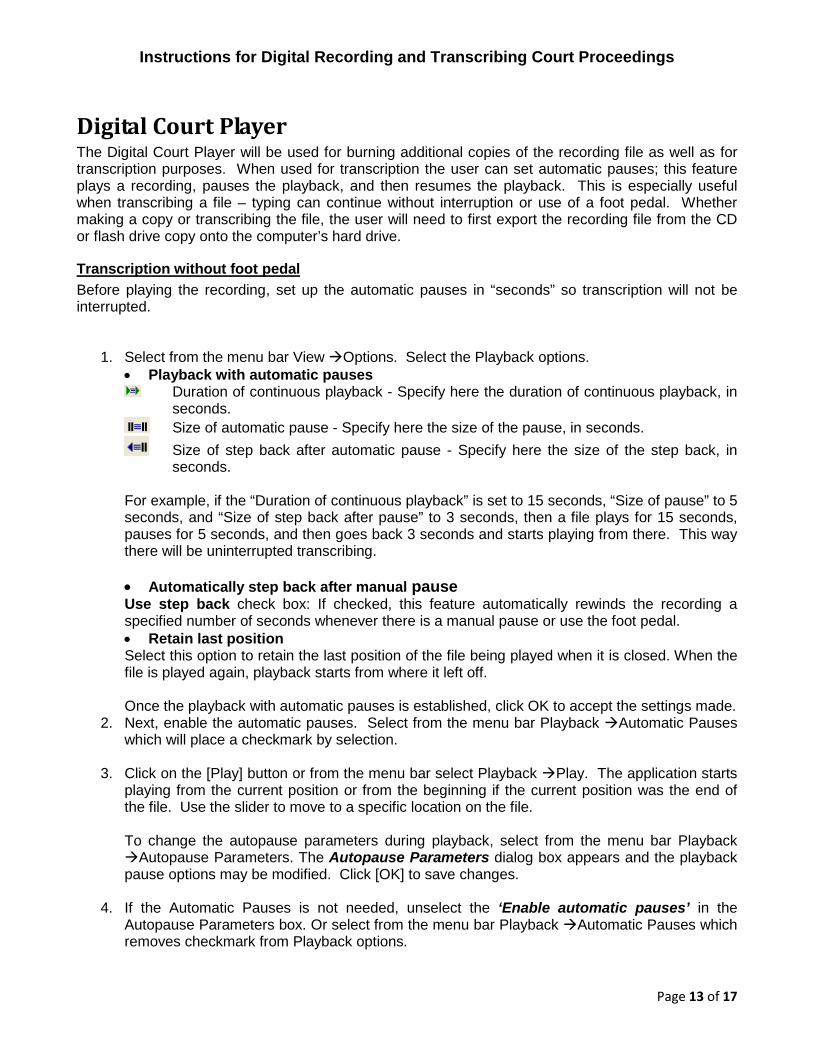
Digital Court Player The Digital Court Player will be used for burning additional copies of the recording file as well as for transcription purposes. When used for transcription the user can set automatic pauses; this feature plays a recording, pauses the playback, and then resumes the playback. This is especially useful when transcribing a file – typing can continue without interruption or use of a foot pedal. Whether making a copy or transcribing the file, the user will need to first export the recording file from the CD or flash drive copy onto the computer’s hard drive.
Transcription without foot pedal Before playing the recording, set up the automatic pauses in “seconds” so transcription will not be interrupted.
1. Select from the menu bar View Options. Select the Playback options.
• Playback with automatic pauses Duration of continuous playback - Specify here the duration of continuous playback, in
seconds. Size of automatic pause - Specify here the size of the pause, in seconds. Size of step back after automatic pause - Specify here the size of the step back, in
seconds. For example, if the “Duration of continuous playback” is set to 15 seconds, “Size of pause” to 5 seconds, and “Size of step back after pause” to 3 seconds, then a file plays for 15 seconds, pauses for 5 seconds, and then goes back 3 seconds and starts playing from there. This way there will be uninterrupted transcribing. • Automatically step back after manual pause Use step back check box: If checked, this feature automatically rewinds the recording a specified number of seconds whenever there is a manual pause or use the foot pedal. • Retain last position Select this option to retain the last position of the file being played when it is closed. When the file is played again, playback starts from where it left off. Once the playback with automatic pauses is established, click OK to accept the settings made.
2. Next, enable the automatic pauses. Select from the menu bar Playback Automatic Pauses which will place a checkmark by selection.
3. Click on the [Play] button or from the menu bar select Playback Play. The application starts playing from the current position or from the beginning if the current position was the end of the file. Use the slider to move to a specific location on the file. To change the autopause parameters during playback, select from the menu bar Playback Autopause Parameters. The Autopause Parameters dialog box appears and the playback pause options may be modified. Click [OK] to save changes.
4. If the Automatic Pauses is not needed, unselect the ‘Enable automatic pauses’ in the Autopause Parameters box. Or select from the menu bar Playback Automatic Pauses which removes checkmark from Playback options.

Instructions for Digital Recording and Transcribing Court Proceedings
Page 14 of 17
Using the Foot Pedal The foot control is used for transcribing a recording file. Connect the foot pedal by using the USB cable to connect to the computer. Then follow the steps below to set up the foot pedal with the correct functions.
1. From the menu bar select View Options. Select the Foot Control option which will display the Foot Control dialog menu options. • Enable Foot Control Check this box if a foot control will be used for transcription. • Device Select the foot pedal device from the drop-down list. • Number of pedals Select the number of foot pedals. A 2- or 3-pedal device may be used. • Set pedal functions Use this button to display the “Pedal Functions” dialog. This dialog allows the assignment of functions for each device pedal and enables control of playback of the recording file. • Foot Control Wizard In order for the foot control to work properly, define a mapping of events. For example, when the left pedal is pressed, it allows an automatic step forward of a specified number of seconds. Use the Foot Control Wizard to map events.
2. Setting Pedal functions. • Step back by x sec. - move backward from current position each time the pedal is
pressed. The size of the step may be adjusted from 1 to 999 seconds. • Rewind with n times normal speed - rewind from the current position while the pedal is
pressed. Adjust the speed from 0.5 times to 3 times the normal speed if necessary. • Play while pressed / Stop when released - play while the pedal is pressed; stop when
the pedal is released. • Play / Step back by x sec. when released - play while the pedal is pressed; stop when
the pedal is released and automatic move backward from current position. Adjust the size of the step from 1 to 999 seconds if necessary.
• Step forward by x sec. - move forward from current position each time the pedal is pressed. Adjust the step from 1 to 999 seconds if necessary.
• Forward with n times normal speed - fast forward from the current position while the pedal is pressed. The speed may be adjusted from 0.5 times to 3 times the normal speed. When using this option it may be useful to automatically step back a specified number of seconds when the foot pedal is released. Specify the number of seconds in the "and step back by x sec. when released" field.
• Switch between the playing channels - tab through the channel selections: All channels, Channel 1, Channel 2, and so on.
3. Mapping the Foot Pedals using the Foot Control Wizard This enables the user to map the pedal movements. Follow the steps below:
a. Before running the Foot Control Wizard the foot control device should already be connected to the computer.
b. Click the “Start” button to start the Foot Control Wizard. c. Press and release the pedals of the device, as follows:

Instructions for Digital Recording and Transcribing Court Proceedings
Page 15 of 17
For a 2-pedal control: press the left pedal and release the left
pedal; press the right pedal and release the right pedal.
For a 3-pedal control: press the left pedal, release the left pedal, press the middle pedal, release the middle pedal, press the right pedal, release the right pedal.
d. Click the “Stop” button to stop the Foot Control Wizard, if it has not stopped automatically
after releasing the last pedal. A message appears indicating whether or not the wizard was able to successfully set the mapping of the pedal movements.
e. If the red indicators do not light up while pressing the pedals, the Foot Control Wizard cannot map the pedal movements. This can be caused by the following: The device is switched off if it is not connected or if it does not work properly.
There is a non-standard device attached and the Foot Control Wizard was not
able to detect the pedal movements.
Making Additional Copies of Recording Files Once the saved copy of the recording file is exported to the computer’s hard drive, additional copies of the file may be made.
1. Insert a new blank CD into the CD drive. 2. Follow the instructions: Saving Recording to Disc on page 9.

Instructions for Digital Recording and Transcribing Court Proceedings
Page 16 of 17
Frequently Asked Questions
1. When I eject my disc, it takes much too long for it to eject?
If the light is flashing on the burner, the disc is still being written to and will not eject until it is completed. The longer the recording session, the longer it will take to write to the disc.
2. When I get my disc home, there is nothing on it? What am I doing wrong?
The disc was either burned as a data disc and as open session or there is no data on the disc. If it is a data disc and an open session, it can only be read by the machine it was recorded on. The disc needs to be returned so it can be closed by the burning software or a new audio disc needs to be created.
3. The lights on my mixer are not lit up, what should I do?
Make sure the mixer is plugged into a live wall outlet.
4. There is static coming from a microphone, how do I get rid of the static? If there is static in a microphone from a particular channel, unplug the microphone and move it on another channel that is not emitting static. If the static moves with the next channel, the microphone may be going bad.
5. I turned on the Recorder then the mixer and I am getting the following error message:
“Low sound levels have been found…” Turn off the recorder and mixer. Then turn the mixer back on first and then turn on the recorder. The mixer must be turned on first.
6. I turned on the recorder and I am getting the following error message: “The Maya 44
USB Audio ASIO Driver device supports no more than 2 channels”.
The USB cable for the mixer was not plugged into the correct USB port. The mixer device is port specific – plug into correct USB port on computer.
7. I can’t hear the recording when using the headset.
On the recorder, make sure that the Enable check box for “Confidence monitoring during recording” is checked.
Instructions for Digital Recording and Transcribing Court Proceedings
Page 17 of 17
Also make sure the computer volume is not set on Mute. Click on the Volume control
icon in task bar (lower right side of computer).
8. The recorder is running slow and locking up.
Make sure the mirroring capability is disabled. Select from the menu bar View Options; Click on the Mirroring option and make sure the “Enable Mirroring” is not checked.
9. Digital Player – I notice there are pauses during the play back of the recording.
If automatic pauses is turned on then the option would have a checkmark by it; to disable the automatic pauses click on menu bar Play back Automatic Pauses.
10. Contact BIS if you have additional questions regarding the equipment and software @ 1-800-715-1234.
Related Documents