Base With Author: Less Date Modified: Page 1 Complete How to do it! # Secure nose cone section to base location (A desired slope is calculated by having a 10" rise over a 20' span from front to back including one attached section of track) Bolt the front and rear legs or nose cone supports to the setting base Product Marine Railway Element Name: Instruction Sheet Installation Of Marine Railway Install "Nose Cone" Section March 10, 2011 Set nose cone down on the ground where you will be securing It to. At this point decide what is required to properly slope the section so the carriage will freely roll. If legs are required, install the front (Lt & Rt) set and the rear leg set of the nose cone and raise as required to achieve the recomonded slope. JBC What to do! Why you do it! This slope is necessary and recommended to allow the carriage to be able to roll freely on the track Place nose cone to desired locaton NOTES AND COMMENTS: To keep the nose cone section secure when rolling the carriage on the track 1 2 1 2 1A 1A 0' 0"

Welcome message from author
This document is posted to help you gain knowledge. Please leave a comment to let me know what you think about it! Share it to your friends and learn new things together.
Transcript
Base
With Author:Less Date Modified:
Page 1
CompleteHow to do it!#
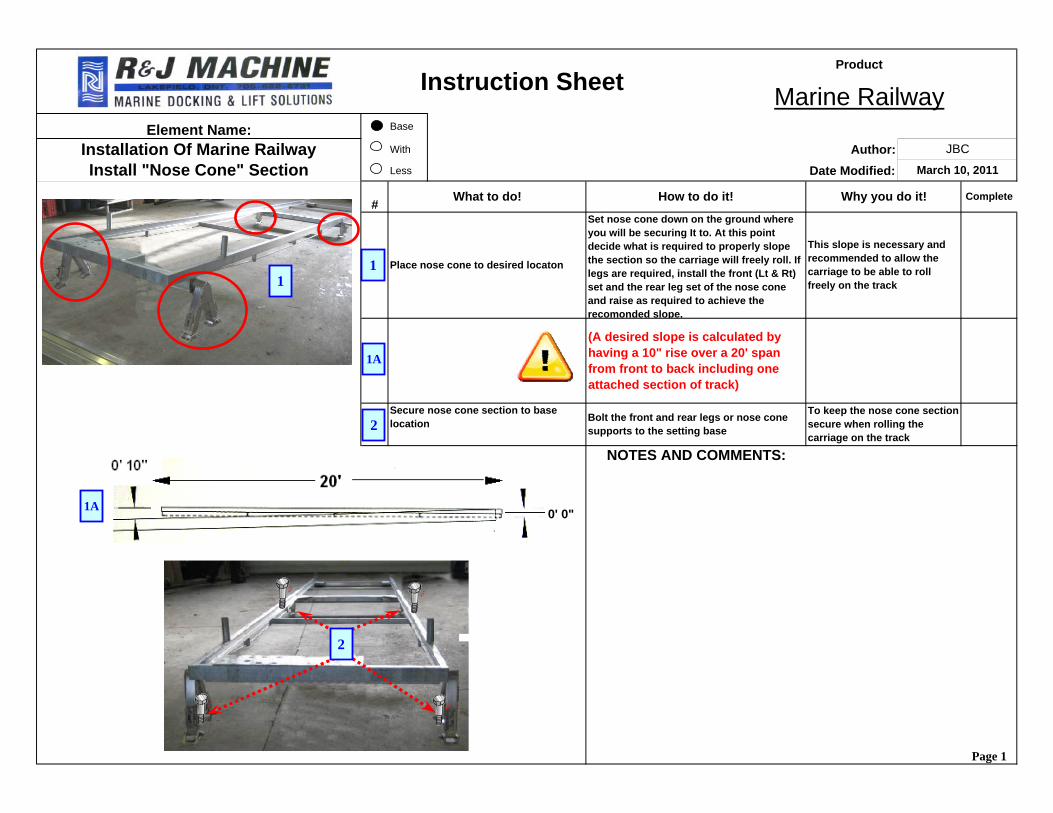
Secure nose cone section to base location
(A desired slope is calculated by having a 10" rise over a 20' span from front to back including one attached section of track)
Bolt the front and rear legs or nose cone supports to the setting base
Product
Marine RailwayElement Name:
Instruction Sheet
Installation Of Marine Railway Install "Nose Cone" Section March 10, 2011
Set nose cone down on the ground where you will be securing It to. At this point decide what is required to properly slope the section so the carriage will freely roll. If legs are required, install the front (Lt & Rt) set and the rear leg set of the nose cone and raise as required to achieve the recomonded slope.
JBC
What to do! Why you do it!
This slope is necessary and recommended to allow the carriage to be able to roll freely on the track
Place nose cone to desired locaton
NOTES AND COMMENTS:
To keep the nose cone section secure when rolling the carriage on the track
1
2
1
2
1A
1A 0' 0"

Base
With Author:Less Date Modified:
Page 2
How to do it!
These bolts are holding the motor to the plate for transporting. They must be re-installed to base
Attach the nuts under base plate to all bolts and tighten.
Set motor assembly on front of nose cone, align holes ( 8 )on motor plate to base (Nose Cone)
Remove and re-install when plate is on nose cone
#
NOTES AND COMMENTS:
It may be necessary to remove the 2 motor mounting bolts before attaching to nose cone ( 5/16" bolts )( 1/2" or 13mm wrench)
JBC
What to do!
To prepare for securing the motor assembly to nose cone
Why you do it!
Place motor assembly onto "Nose Cone" section
Place bolts into the motor base and secure to nose cone. (Use 3/8" bolts) ( 9/16" or 14 mm wrench )
Instruction SheetProduct
Marine Railway
March 10, 2011Installation Of Marine Railway
"Nose Cone" Section - Motor Install
Element Name:
2
1
1
2
2
2A
2A
2A

Base
With Author:Less Date Modified:
Instruction SheetProduct
Marine Railway
JBC
March 10, 2011
Element Name:
Boat Carriage Installation Date Purchased: _________________ Size of Railway: _________________
NOTES AND COMMENTS:
The recommended method to place / install the carriage onto the track is to roll it onto the first "Nose" piece, making sure that the outside shoulderd edge of the wheels are on the outside of the track as shown and the guides are on the inside of the track. This is to ensure that the carriage stays on the railway track when rolling to load or un-load the boat
Page 3

Base
With Author:Less Date Modified:
Page 4
Why you do it!# What to do!
Place to top of cross pieces, attach the 2 "U" clamps to bracket, attach nuts and secure. Place all brackets equal distance from center on both sides of the cradle on all 3 crossers
Recommended bunk placement to properly support the boat on the cradle
Attach 6 bunk secure brackets to carriage
Instruction SheetProduct
Marine Railway
March 10, 2011JBC
Element Name:Installation Of Marine Railway
"Carriage" Section - Install Bunks
Place bunks to the inside of the brackets and measure for correct placement
NOTES AND COMMENTS:NOTE: When you purchase a new railway the bunks will already be installed on the carriage. These instructions are for reference if they need to be removed or replaced
How to do it!
Adjust the bunks equally on both sides and measure 15" from the front bunk supports
2
11
2
2
1
3
4
5 6
2
15"
Base
With Author:Less Date Modified:
Page 5
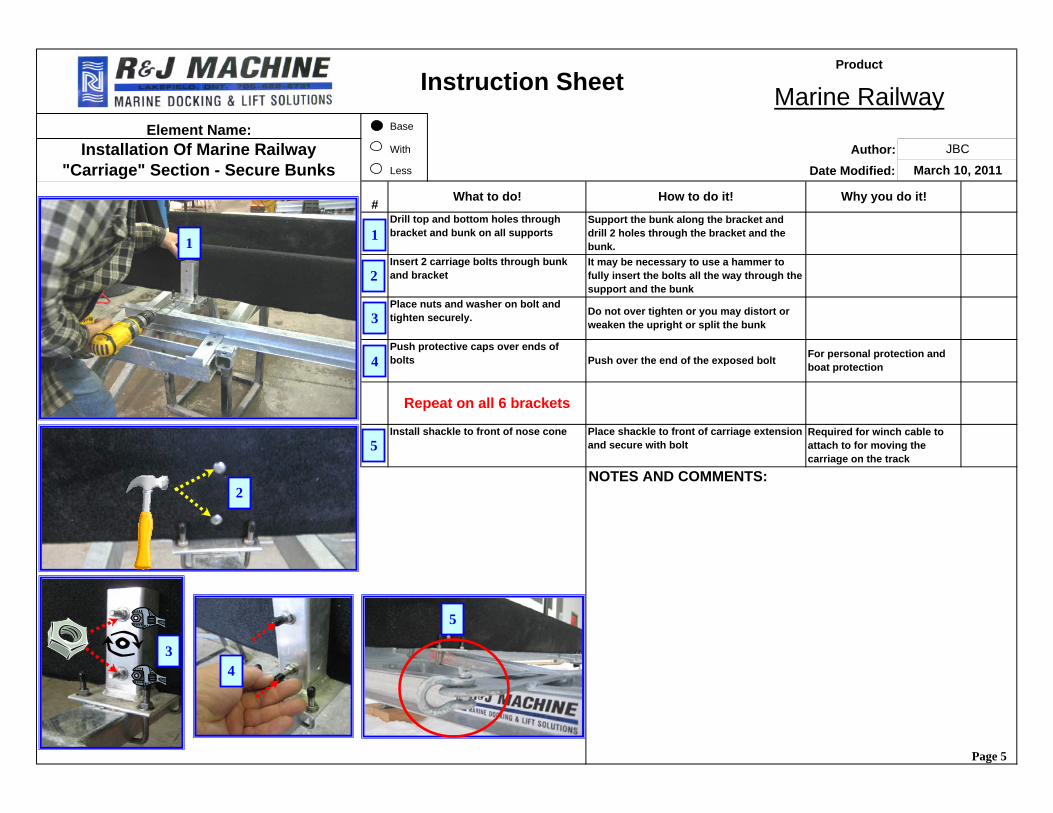
For personal protection and boat protection
Instruction SheetProduct
Marine RailwayElement Name:
Installation Of Marine Railway "Carriage" Section - Secure Bunks March 10, 2011
JBC
Install shackle to front of nose cone
What to do!
Required for winch cable to attach to for moving the carriage on the track
Why you do it!#
Place shackle to front of carriage extension and secure with bolt
Support the bunk along the bracket and drill 2 holes through the bracket and the bunk.
Push protective caps over ends of bolts
Repeat on all 6 brackets
Drill top and bottom holes through bracket and bunk on all supports
Insert 2 carriage bolts through bunk and bracket
Place nuts and washer on bolt and tighten securely. Do not over tighten or you may distort or
weaken the upright or split the bunk
It may be necessary to use a hammer to fully insert the bolts all the way through the support and the bunk
Push over the end of the exposed bolt
How to do it!
NOTES AND COMMENTS:
1
2
1
2
34
3
4
5
5
Base
With Author:Less Date Modified:
Completed
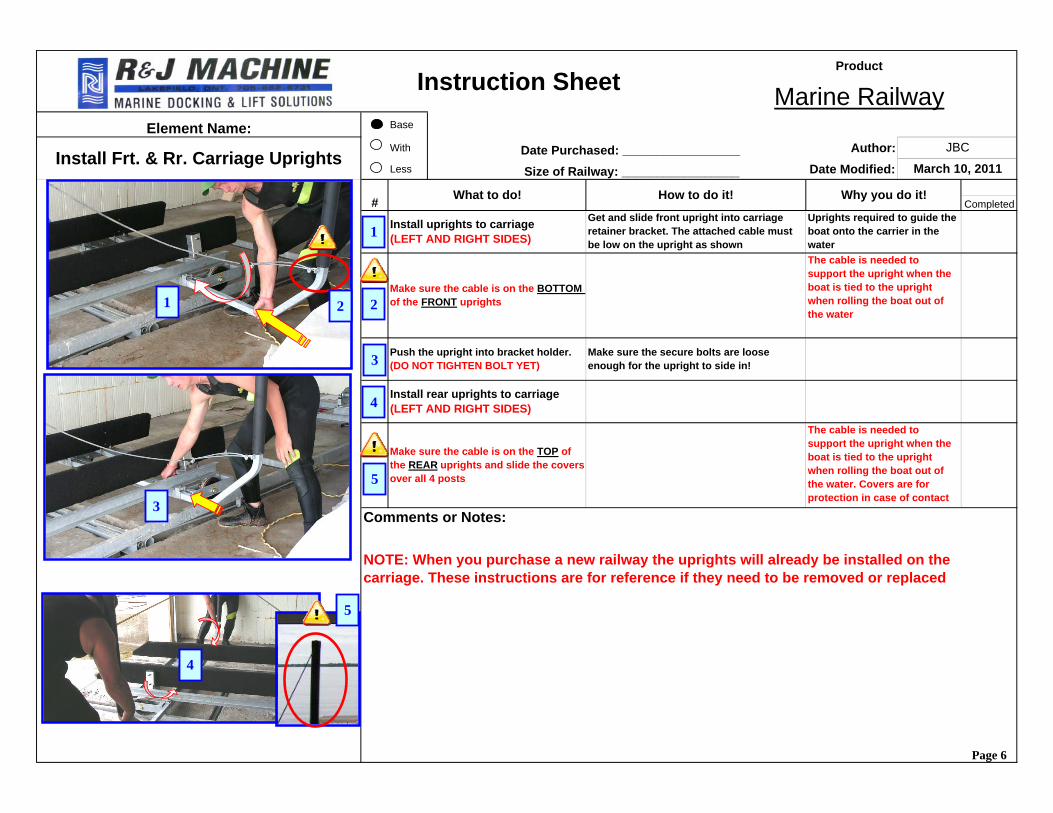
Push the upright into bracket holder. (DO NOT TIGHTEN BOLT YET)
Make sure the secure bolts are loose enough for the upright to side in!
Page 6
Instruction SheetProduct
Marine RailwayElement Name:
Why you do it!
JBC
The cable is needed to support the upright when the boat is tied to the upright when rolling the boat out of the water
March 10, 2011
Uprights required to guide the boat onto the carrier in the water
Install Frt. & Rr. Carriage Uprights
What to do! How to do it!#
Date Purchased: _________________ Size of Railway: _________________
Get and slide front upright into carriage retainer bracket. The attached cable must be low on the upright as shown
The cable is needed to support the upright when the boat is tied to the upright when rolling the boat out of the water. Covers are for protection in case of contact
Install uprights to carriage (LEFT AND RIGHT SIDES)
Install rear uprights to carriage (LEFT AND RIGHT SIDES)
Make sure the cable is on the BOTTOM of the FRONT uprights
Make sure the cable is on the TOP of the REAR uprights and slide the covers over all 4 posts
Comments or Notes:
NOTE: When you purchase a new railway the uprights will already be installed on the carriage. These instructions are for reference if they need to be removed or replaced
2
3
4
1
1
2
3
5
4
5
Base
With Author:Less Date Modified:
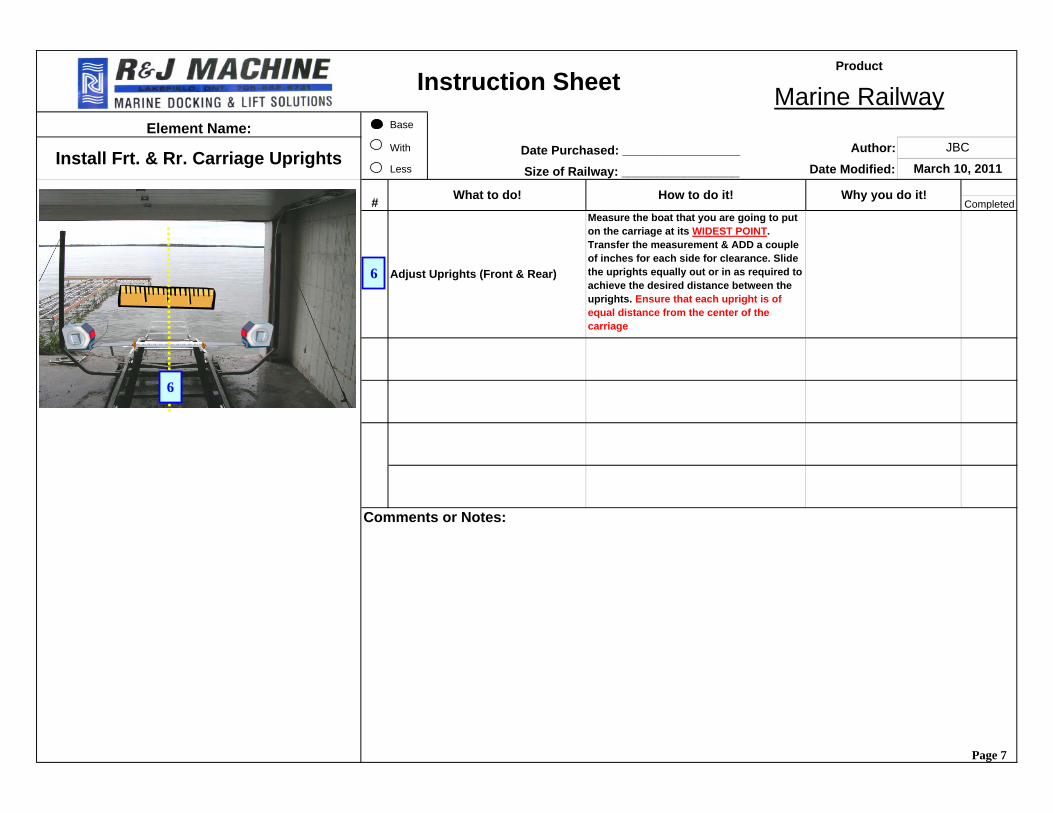
CompletedMeasure the boat that you are going to put on the carriage at its WIDEST POINT. Transfer the measurement & ADD a couple of inches for each side for clearance. Slide the uprights equally out or in as required to achieve the desired distance between the uprights. Ensure that each upright is of equal distance from the center of the carriage
Comments or Notes:
Install Frt. & Rr. Carriage Uprights
What to do! How to do it!#
Date Purchased: _________________ Size of Railway: _________________
Why you do it!
JBC
March 10, 2011
Instruction SheetProduct
Marine RailwayElement Name:
Page 7
Adjust Uprights (Front & Rear)6
6

Base
With Author:Less Date Modified:
Completed
Page 8
Place 1st piece of rail track to the nose cone section. (The nose cone is the term used for the first piece of track that the winching system either electric or manual is affixed to)
Set Support Leg to rail
Repeat same sequence on opposite side of track
Instruction SheetProduct
Marine RailwayElement Name:
March 10, 2011Date Purchased: _________________ Size of Railway: _________________
Why you do it!
JBCInitial Installation Of Marine Railway (1)
What to do! How to do it!#
NOTES AND COMMENTS:
Get 1st section of railway and place to the permanently secured nose cone section. Align the section to the guides and slide the joiner pins to secure the 2 pieces of track
This is the first piece of track!
Necessary to level and adjust the track
Tighten leg assembly to trackUse a 3/4 inch (or 19mm) socket or wrench. Secure tightly
To secure the leg assembly to the track
Place leg support into the leg holder at the end of the track. Slide in and pivot so both legs are on the ground (If required)
1
2
3
1
2
2
3
Base
With Author:Less Date Modified:
Completed
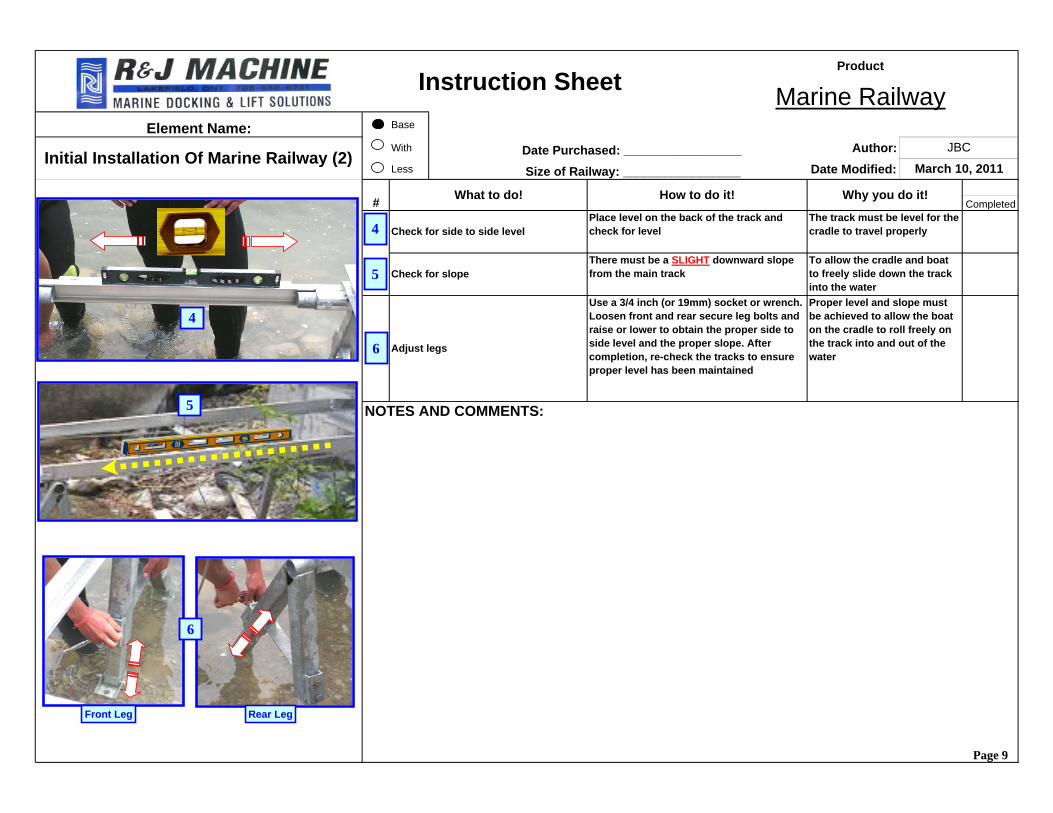
Check for slopeThere must be a SLIGHT downward slope from the main track
To allow the cradle and boat to freely slide down the track into the water
Check for side to side levelPlace level on the back of the track and check for level
The track must be level for the cradle to travel properly
Initial Installation Of Marine Railway (2)
What to do! How to do it!#
March 10, 2011Date Purchased: _________________ Size of Railway: _________________
Why you do it!
JBC
Instruction SheetProduct
Marine RailwayElement Name:
Page 9
Proper level and slope must be achieved to allow the boat on the cradle to roll freely on the track into and out of the water
NOTES AND COMMENTS:
Use a 3/4 inch (or 19mm) socket or wrench. Loosen front and rear secure leg bolts and raise or lower to obtain the proper side to side level and the proper slope. After completion, re-check the tracks to ensure proper level has been maintained
Adjust legs
4
5
4
5
6
6
Front Leg Rear Leg
Base
With Author:Less Date Modified:
Completed
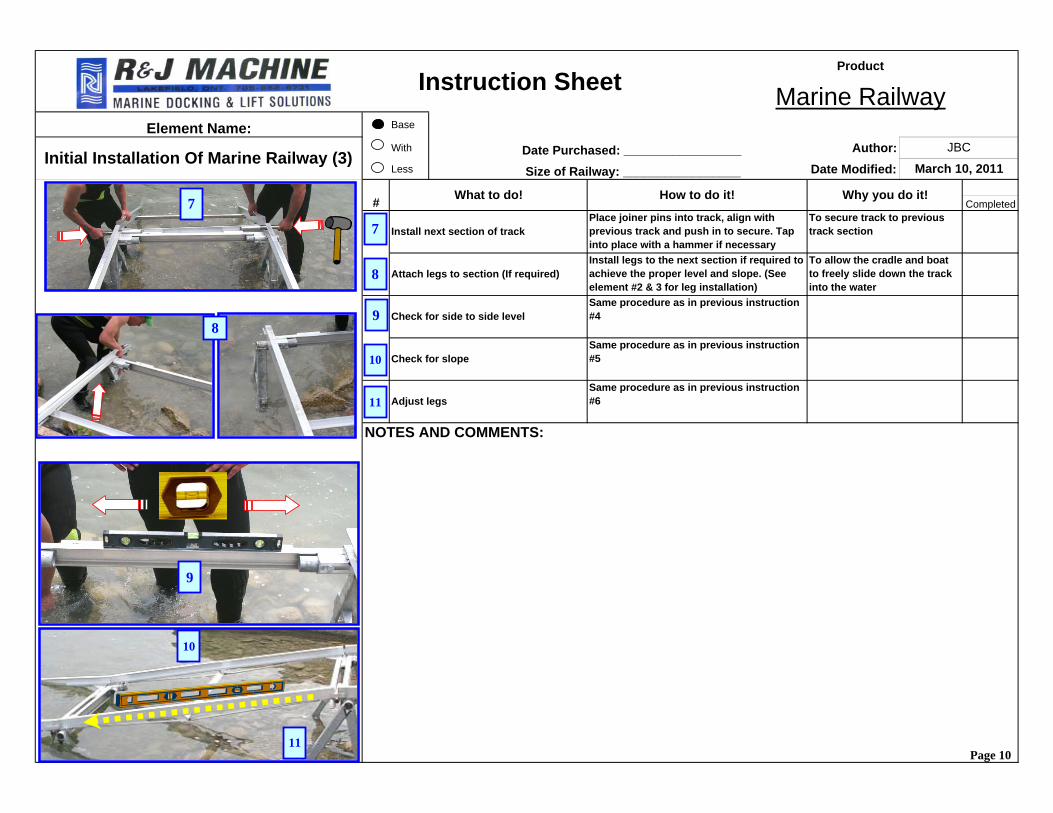
Check for slopeSame procedure as in previous instruction #5
Adjust legsSame procedure as in previous instruction #6
To secure track to previous track section
Page 10
Instruction SheetProduct
Marine RailwayElement Name:
March 10, 2011Date Purchased: _________________ Size of Railway: _________________
Why you do it!
JBCInitial Installation Of Marine Railway (3)
What to do! How to do it!#
NOTES AND COMMENTS:
Check for side to side levelSame procedure as in previous instruction #4
Attach legs to section (If required)Install legs to the next section if required to achieve the proper level and slope. (See element #2 & 3 for leg installation)
To allow the cradle and boat to freely slide down the track into the water
Install next section of trackPlace joiner pins into track, align with previous track and push in to secure. Tap into place with a hammer if necessary
7
8
9
7
10
11
9
10
8
11

Base
With Author:Less Date Modified:
CompletedPlace joiner pins into track, align with previous track and push in to secure. Tap into place with a hammer if necessary. If not using the legs, adjust with cement slabs as required to maintain a slope
Install end section of track
( NOTE: The end piece of track has the upright pieces ON THE END. This final section must be in the proper location as the upright "Stops" are what the prevents the cradle from coming off the track when you are launching your boat off the cradle)
Initial Installation Of Marine Railway (4)
What to do! How to do it!#
NOTES AND COMMENTS:
Instruction SheetProduct
Marine RailwayElement Name:
March 10, 2011Date Purchased: _________________ Size of Railway: _________________
To secure track to previous section and allow the cradle to stop at the end of the track
Why you do it!
JBC
Page 11
12
12

Base
With Author:Less Date Modified:
Instruction SheetProduct
Marine Railway
JBC
March 10, 2011
Element Name:
Marine Railway Final Set-up (1) Date Purchased: _________________ Size of Railway: _________________
NOTES AND COMMENTS:
It is very important when assembling the sections to keep the track joins as close together as possible. Too wide a gap can result in the boat cradle getting stuck in or on any of the joints. It must have a SMOOTH and GENTLE slope entering the water
Page 12

Base
With Author:Less Date Modified:
JBC
March 10, 2011
Element Name:
Marine Railway Final Set-up (2) Date Purchased: _________________ Size of Railway: _________________
Instruction SheetProduct
Marine Railway
NOTES AND COMMENTS:
Depending on the depth of the water when installing the railway, it may be necessary to place the track
sections on cement slabs of varying thickness instead of the leveler legs to continue the appropriate slope & level required for the boat and cradle to glide to
the end of the track in the water unobstructed
Note the smooth flow of the track into the
water
Page 13
2
3
4
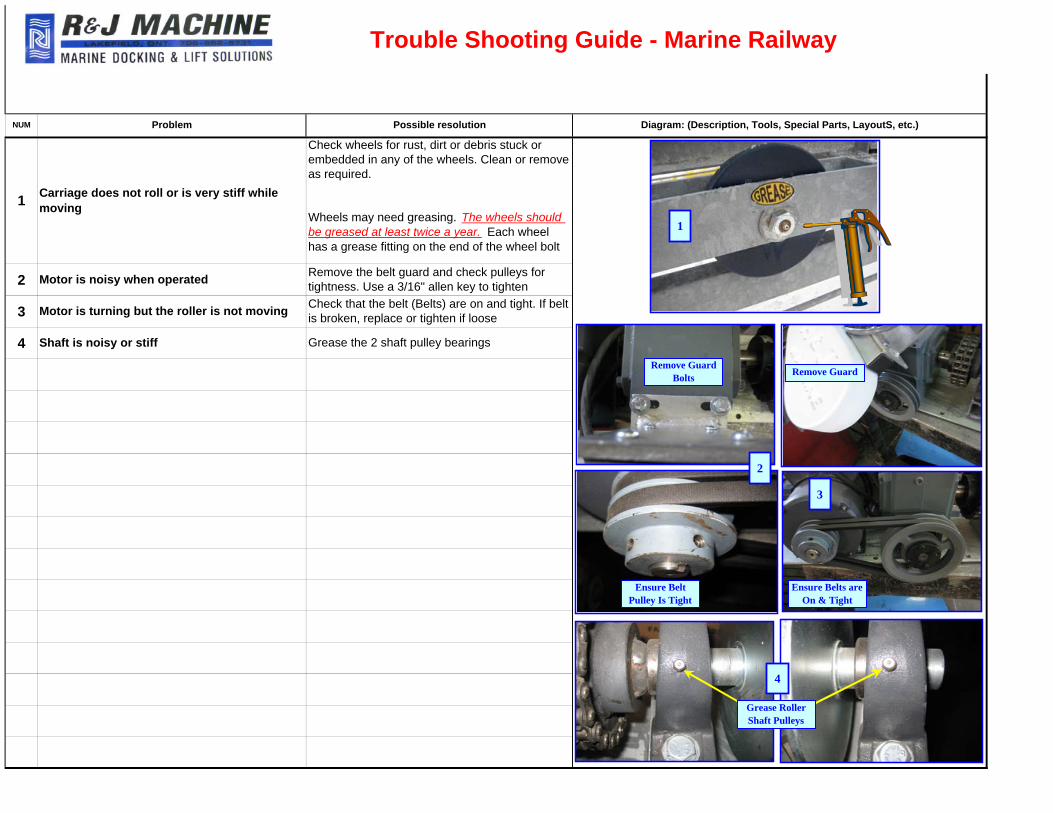
NUM Problem
Motor is noisy when operated
Motor is turning but the roller is not moving
Shaft is noisy or stiff
Carriage does not roll or is very stiff while moving1
Trouble Shooting Guide - Marine Railway
Check that the belt (Belts) are on and tight. If belt is broken, replace or tighten if loose
Grease the 2 shaft pulley bearings
Remove the belt guard and check pulleys for tightness. Use a 3/16" allen key to tighten
Check wheels for rust, dirt or debris stuck or embedded in any of the wheels. Clean or remove as required.
Possible resolution Diagram: (Description, Tools, Special Parts, LayoutS, etc.)
Wheels may need greasing. The wheels should be greased at least twice a year. Each wheel has a grease fitting on the end of the wheel bolt
Remove Guard Bolts Remove Guard
Ensure Belts are On & Tight
Ensure Belt Pulley Is Tight
Grease Roller Shaft Pulleys
1
2
3
4
Related Documents