HGCS Rev. 2/1/2021 The information contained in this manual was current at the time of printing. The most current versions of all Hydro Instruments manuals can be found on our website: www.hydroinstruments.com Hydro Instruments Gas Chlorination Systems Instruction Manual All Hydro Instruments Chlorination systems are carefully designed and tested for years of safe, accurate field service. All Hydro Instruments Chlorination systems are tested, at customer specified conditions, prior to shipment. All Hydro Instruments products are made of the finest materials. To ensure best operation, read these instructions carefully and completely and store them where all maintenance personnel will have access to them. 1

Welcome message from author
This document is posted to help you gain knowledge. Please leave a comment to let me know what you think about it! Share it to your friends and learn new things together.
Transcript

HGCS Rev. 2/1/2021
The information contained in this manual was current at the time of printing. The most current versions of all Hydro Instruments manuals can be found on our website: www.hydroinstruments.com
Hydro InstrumentsGas Chlorination Systems
Instruction ManualAll Hydro Instruments Chlorination systems are carefully designed and tested for years of safe, accurate fi eld service. All Hydro Instruments Chlorination systems are tested, at customer specifi ed conditions, prior to shipment. All Hydro Instruments products are made of the fi nest materials. To ensure best operation, read these instructions carefully and completely and store them where all maintenance personnel will have access to them.
1
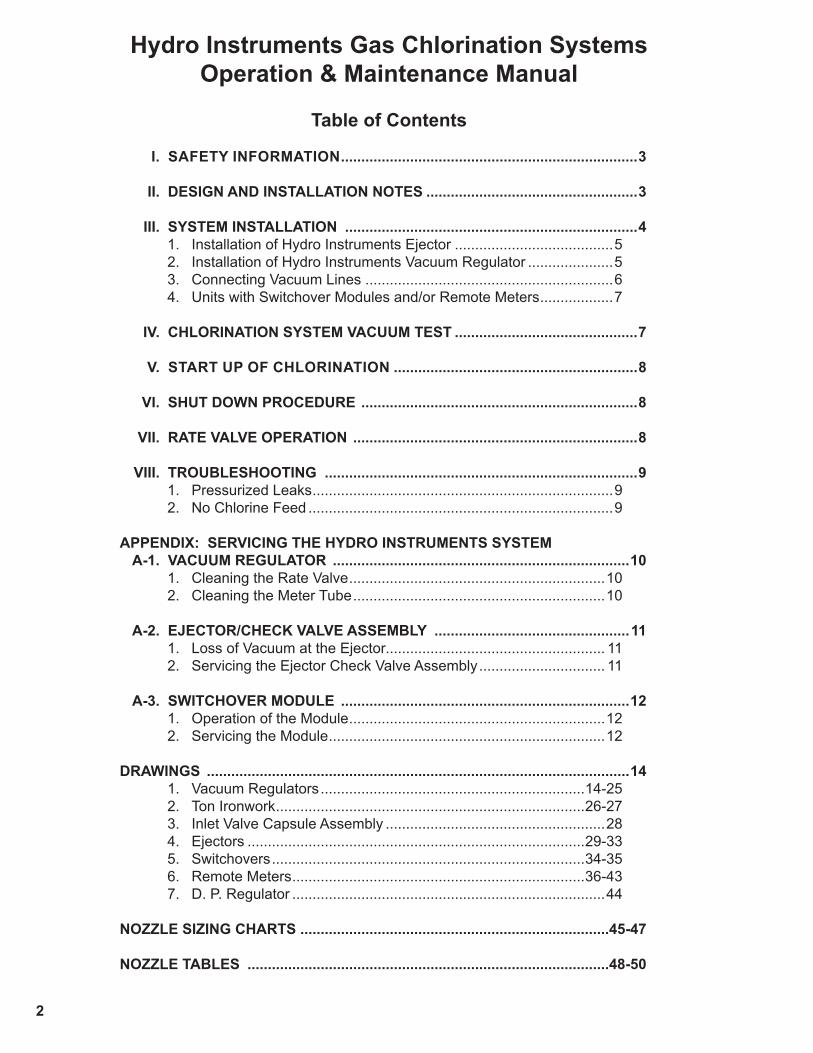
Hydro Instruments Gas Chlorination SystemsOperation & Maintenance Manual
Table of Contents
I. SAFETY INFORMATION .........................................................................3
II. DESIGN AND INSTALLATION NOTES ....................................................3
III. SYSTEM INSTALLATION ........................................................................4 1. Installation of Hydro Instruments Ejector .......................................5 2. Installation of Hydro Instruments Vacuum Regulator .....................5 3. Connecting Vacuum Lines .............................................................6 4. Units with Switchover Modules and/or Remote Meters ..................7
IV. CHLORINATION SYSTEM VACUUM TEST .............................................7
V. START UP OF CHLORINATION ............................................................8
VI. SHUT DOWN PROCEDURE ....................................................................8
VII. RATE VALVE OPERATION ......................................................................8
VIII. TROUBLESHOOTING .............................................................................9 1. Pressurized Leaks ..........................................................................9 2. No Chlorine Feed ...........................................................................9
APPENDIX: SERVICING THE HYDRO INSTRUMENTS SYSTEM A-1. VACUUM REGULATOR .........................................................................10
1. Cleaning the Rate Valve ...............................................................10 2. Cleaning the Meter Tube ..............................................................10
A-2. EJECTOR/CHECK VALVE ASSEMBLY ................................................11 1. Loss of Vacuum at the Ejector...................................................... 11 2. Servicing the Ejector Check Valve Assembly ............................... 11
A-3. SWITCHOVER MODULE .......................................................................12 1. Operation of the Module ...............................................................12 2. Servicing the Module ....................................................................12
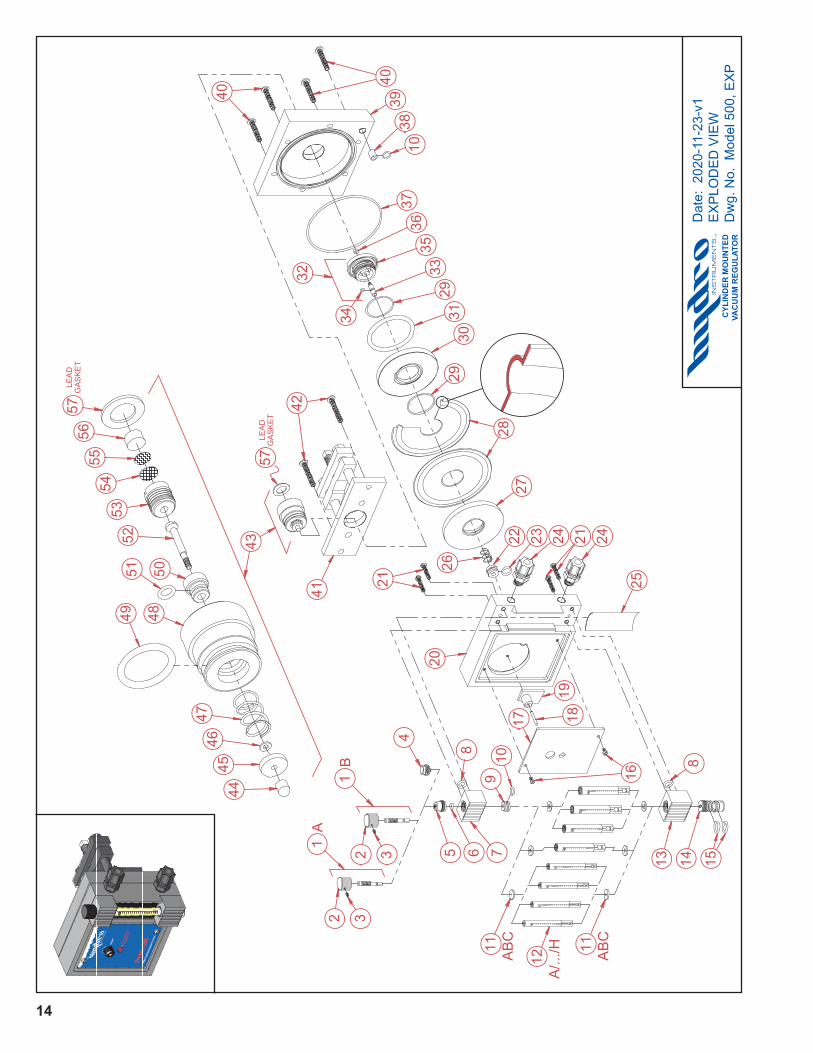
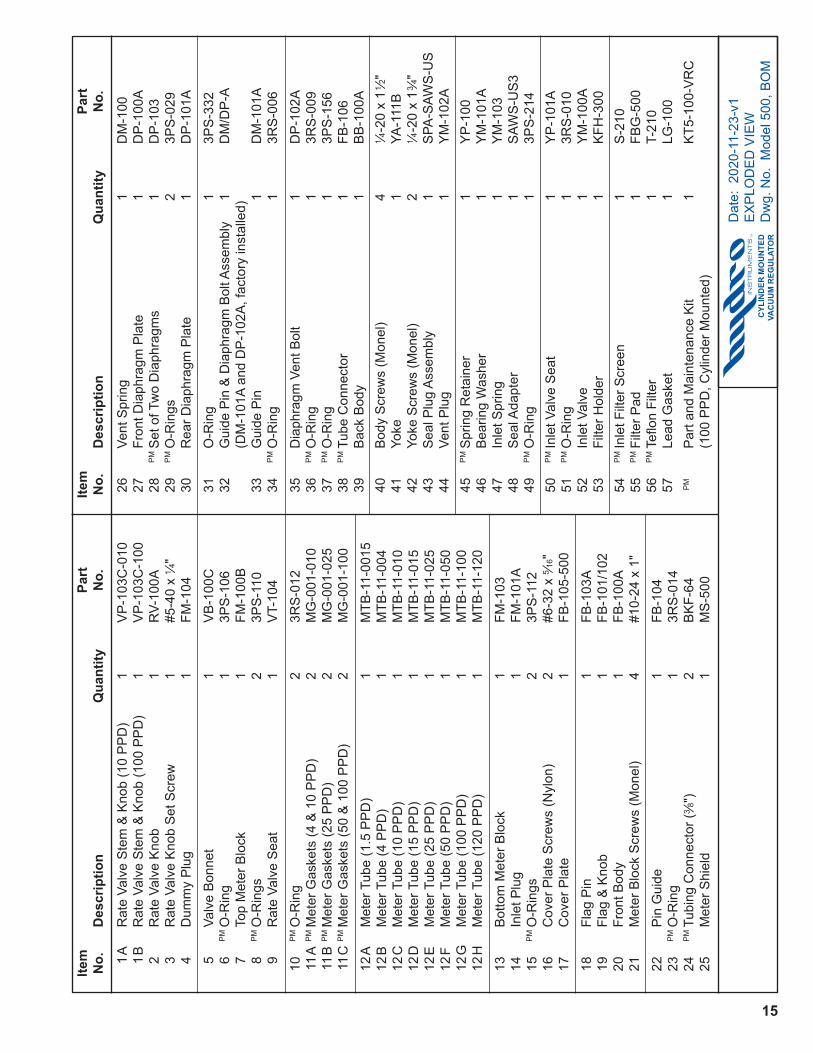
DRAWINGS ........................................................................................................14 1. Vacuum Regulators .................................................................14-25 2. Ton Ironwork ............................................................................26-27 3. Inlet Valve Capsule Assembly ......................................................28 4. Ejectors ...................................................................................29-33 5. Switchovers .............................................................................34-35 6. Remote Meters ........................................................................36-43 7. D. P. Regulator .............................................................................44
NOZZLE SIZING CHARTS ............................................................................45-47
NOZZLE TABLES .........................................................................................48-50
2

SECTION I: SAFETY INFORMATIONTAKE CARE WITH CHLORINE! 1. Always keep chlorine cylinders in an upright position with the valve cap screwed on tight before moving
full or empty cylinders. Cylinders and ton containers must be moved with care.
2. A safety chain must be placed around the cylinder and secured to a wall. Spare full cylinders should also be secured carefully. In earthquake prone areas, ton containers can also be strapped to the fl oor to secure them in place.
3. For best operation and safety, the vacuum regulators and cylinder or ton containers should be protected from the elements including direct sunlight.
4. Never place heaters or heat lamps directly on a cylinder. Use fans to increase air fl ow past chlorine cylinders and ton containers if it is desired to increase the gas withdrawal rate.
5. Ammonia gas should NOT be stored or fed in the same room with chlorine. Contact of the gases may result in an explosive mixture.
6. All chlorine gas installations should include chlorine gas leak detector systems for added safety.
7. Refer to Hydro Instruments Chlorine Handling Manual and other technical guides for more detailed guidance. Refer to the technical literature section of the Hydro Instruments website to obtain all such literature.
IMPORTANT NOTE:Pressurized chlorine gas manifolds should be avoided when possible. These pressurized manifolds increase the risk of a pressurized chlorine gas leak. Hydro Instruments vacuum regulators are designed to mount directly onto the valve of chlorine cylinders and ton containers. Direct cylinder or ton container mounting is the easiest and safest confi guration to operate and maintain. With this confi guration, the chlorine gas fl ows under vacuum everywhere beyond the one pressure point at the chlorine cylinder valve.
SECTION II: DESIGN AND INSTALLATION NOTES 1. The “all vacuum” system means that system will shut off at the vacuum regulator, should the vacuum
line be broken, if water is stopped for any reason, or if the vacuum regulator is physically damaged.
2. Choosing a feed capacity:Vacuum regulator SIZE SHOULD BE ON MAXIMUM POSSIBLE FLOW.Imperial Units: GPM x 0.012 x (PPM) Dosage = PPDGallons Per Minute Parts Per Million Pounds Per Day (Cl2)
Example: 600 GPM x 0.012 x 3 PPM = 21.6 PPDIn this example a Hydro Instruments 50 PPD vacuum regulator would be adequate.
Metric Units: M3/HR x (PPM) Dosage = GR/HRCubic Meters Per Hour Parts Per Million Grams Per Hour (Cl2)
3. TOTAL BACK PRESSURE is the pressure in the pipeline to be chlorinated plus the friction losses in the solution line between the ejector and the point of injection at the pipeline. Ejectors capable of operating with back pressures up to 300 Psig (20 bar) are available.
3

4. It is preferable to locate the ejector at the point of solution injection in order to minimize solution lines. Friction losses in the solution line will increase the ejector back pressure. To reduce the friction losses, increase the solution line internal diameter and limit the number of fl ow restrictions and turns. Also be sure that the solution line material is resistant to the highly concentrated chlorine mixture. Avoid or minimize solution lines wherever possible.
5. The only connection between the ejector and the vacuum regulator is the Hydro Instruments specifi ed black polyethylene tubing which carries the vacuum (originating at the ejector) to the vacuum regulator, allowing the system to operate. Up to 100 feet of polyethylene tubing between vacuum regulator and ejector is standard. For longer distances consult Hydro Instruments and review the Vacuum Tubing and Piping (Gas) guide document.
VacuumRegulator
Vent toOutside
SwitchoverModule
SafetyChain
CylinderWrench
RemoteMeter
Wall PanelOmni-Valve
VacuumLine
BallValve
Water Supplyto Ejector
Y-Strainer
PressureGauge Ejector
CorporationStop
FLOW
Diaphragm ProtectedPressure Gauge
FIGURE 1
SECTION III: SYSTEM INSTALLATION
A typical Hydro Instruments installation injecting chlorine into a pipe line using city water.
Hydro Instruments Gas Chlorination EquipmentTorque Specifi cationsItem Min. Inch/lbs. Max. Inch/lbs.Yoke bolts 20 25Body bolts 20 25Meter block bolts 20 25Meter inlet plug 10 15Meter dummy plug 7 10Vacuum fi ttings 15 20Item Min. Foot/lbs. Max. Foot/lbs.Ton ironworks fl ange bolts 20 25Yoke half-dog bolt 20 25
4

(I) INSTALLATION OF HYDRO INSTRUMENTS EJECTOR (Refer to Figure 1)
1. Installation of HYDRO INSTRUMENTS EJECTOR: a. Remove the diff user from the ejector assembly and place four wraps of Tefl on tape on diff user
threads. b. Do Not install diff user into pipe line when assembled with ejector. c. Turn diff user by hand into NPT threads of pipe line (3⁄4" or 11⁄4" NPT). Place wrench on diff user
and tighten one half turn maximum. d. Reconnect diff user to ejector making sure OH-BUN-214 O-Rings are on each side of nozzle and
diff user.
2. Testing of ejector. (Note: The vacuum regulator should still be in the shipping case.) i. Piping hook up to ejector (Refer to Figure 1 and Servicing Section in this Manual). a. Ejector should be installed down stream at a suffi cient distance so that chlorinated water is
not re-circulated through the booster pump. Pump suction should be 5 feet away from ejec-tor injection point. On larger pipe diameters of 6 inches or greater a distance of 10 times the pipe diameter should be maintained so that chlorinated water is not recirculated through the booster pump.
b. On the water inlet side to the ejector nozzle the following should be installed: a water inlet valve, Y-strainer, and a pressure gauge. On the discharge side of the ejector a diaphragm protect-ed pressure gauge appropriate for use with highly chlorinated water should be installed.
ii. Testing for suffi cient pump pressure to operate ejector. Also checking that booster pump (if ap-plicable) operating in the proper direction. Note 1: Ejector must have some back pressure to prevent jetting. (Jetting causes loss of vacuum) Note 2: When chlorinating into a contact chamber a tee should be installed on the solution line with a vacuum breaker to prevent siphoning.
a. If operating with city water pressure (no booster pump), open the water inlet valve to the ejector and feel for suction (with your fi nger) at the fi tting on the top of the ejector.
b. Each ejector nozzle/diff user combination has corresponding performance charts that indicate the required water fl ow and pressure required to operate at any given back pressure. If suf-fi cient water fl ow and pressure are being supplied, then there should be a strong suction at the fi tting on the top of the ejector. Feel for suction (with your fi nger) at the fi tting on the top of the ejector if no vacuum gauge is available.
c. If the ejector has tested satisfactorily continue on to the next step (Mounting the Vacuum Regulator).
(II) INSTALLATION OF HYDRO INSTRUMENTS VACUUM REGULATOR
NOTE: The chlorine cylinder valve is still closed. Do not turn on until instructed to do so.
1. Make sure that a safety chain is secured around chlorine cylinder or if using ton containers that the ton container is properly supported.
2. Remove the cylinder protection cap from the chlorine cylinder or ton container.IMPORTANT: If using ton containers, make sure that the valves on the ton container are vertically aligned and only connect to the top valve for gas withdrawal.
3. Examine the vacuum regulator for obvious damage.
5

VacuumRegulator
Vent toOutside
SwitchoverModule
SafetyChain
CylinderWrench
RemoteMeter
Wall PanelOmni-Valve
VacuumLine
BallValve
Y-Strainer
PressureGauge Ejector
CorporationStop
FLOW
Diaphragm ProtectedPressure Gauge
BoosterPump
GateValve
A typical Hydro Instruments installation injecting chlorine into a pipe line using a centrifugal pump. Note the location of gate and ball valves for easy Y-strainer cleaning and practical pump maintenance.
NOTE: Pump suction should be 5 feet away from ejector injection point. On larger pipe diameters of 6 inches or greater a distance of 10 times the pipe diameter should be maintained so that chlorinated water is not recirculated through the booster pump.
NOTE: Pump suction and ejector must be from the side of pipeline, not from top of the main.
FIGURE 2
4. Remove all materials used for shipping purposes.IMPORTANT: If it is a direct ton mounted ton container, make sure to evenly tighten the four 3⁄8 -16 x 15⁄16" bolts according to the label with red letters that is on the vacuum regulator. Ton Mounted Vacuum Regulators shipped prior to the year 2016 would have only 2 of these 3⁄8 -16 x 15⁄16" bolts.
5. Place a new lead gasket over vacuum regulator inlet assembly.
6. While placing lead gasket on vacuum regulator make sure that the fi lter material has not fallen out of inlet assembly. (This fi lter is necessary to remove particles that may precipitate out of chlorine.) Filters must be changed as necessary. Inspect the fi lters periodically and keep in mind that if vacu-um level starts to increase or feed rate is restricted, then the fi lter might be clogged and in need of replacement.
7. Mount vacuum regulator on cylinder valve being sure the yoke screw is backed out far enough for suffi cient clearance. While tightening the yoke screw be certain that the lead gasket stays in place. Excessive tightening can damage gasket and/or yoke screw. DO NOT USE EXCESSIVE FORCE.IMPORTANT: Ton mounted vacuum regulators mount on the top valve only. They include a drip leg and heater. The heater must be plugged in and powered on at least 15 minutes prior to opening the ton container valve. The heater must always be powered on while in service.
(III) CONNECTING VACUUM LINES BETWEEN VACUUM REGULATOR AND EJECTOR AND VACUUM REGULATOR VENT TO OUTSIDE (Refer to Figures 1 and 2)
1. The upper connector on right top of vacuum regulator is for vacuum line tubing to ejector.
6

VacuumRegulator
Vent toOutside
SwitchoverModule
CylinderWrench
HeaterPower Cord
RemoteMeter
Wall PanelOmni-Valve
VacuumLine
BallValve
BoosterPump
Y-Strainer
PressureGauge Ejector
CorporationStop
FLOW
GateValve
Diaphragm ProtectedPressure Gauge
A typical Hydro Instruments Switchover System injecting chlorine into a pipeline using a centrifugal pump.
NOTE: Pump suction and ejector must be from the side of the pipeline, not from the top of the line.
FIGURE 3
SECTION IV: CHLORINATION SYSTEM VACUUM TEST 1. Do Not open chlorine cylinder valve until vacuum test is satisfactorily completed. a. Vacuum Test With the chlorine cylinder still closed, start the ejector booster pump and the meter tube ball should
drop to the bottom within 30 seconds. At this time the feed rate adjustment valve should be open. If the ball continues to bounce there is a vacuum leak in the system. Check the lead gasket seal at the cylinder valve and all tubing connections. (The tube fi ttings should be hand tight. It is not necessary to use pliers or a wrench on these fi ttings.)
b. If the ejector is operating properly (pulling suffi cient vacuum) the red indicator on the front of the vacuum regulator should be showing.
c. Turn off water supply to ejector.
2. Connect vent tubing to second connector on the vacuum regulator and vent to safe area outside of building. (Place bug screen outside on end of vent tubing.)NOTE: Vent lines should be lower than the vacuum regulator. Do not connect vent lines from multiple vacuum regulators into a common vent – vent lines must remain separate. If desired, vent lines can be terminated at a scrubber intake duct or a vent arrestor device.
(IV) REMOTE METERS/WALL PANEL OMNI-VALVES & SWITCHOVER MODULES (Refer to Figures 2 & 3)
1. Switchover modules: (Gas fl ow is from bottom/side to top from one side only at a time) Make vacuum tubing connections as shown in Figures 1, 2 and 3.
2. Remote Meters: (Gas fl ow is from bottom to top through the tube) Make vacuum tubing connections as shown in Figures 1, 2 and 3.
7

SECTION V: START UP OF CHLORINATIONMaterial necessary: A small plastic squeeze bottle, 1⁄3 full of ammonia, for detecting chlorine leaks. When
ammonia fumes contact chlorine gas a visible white smoke is produced.
IMPORTANT: If using direct ton container mounted vacuum regulators ensure that the 3⁄8 -16 x 15⁄16" bolts were checked and tightened and that the heater was plugged in and allowed to heat up for at least 15 minutes prior to starting this procedure.
1. Open chlorine cylinder valve 1⁄4 turn and close immediately.
2. Squeeze ammonia bottle at gasket and yoke assembly area and around rate valve bonnet: if no smoke appears the seals are tight and it is OK to proceed to the next step. (Do not intentionally squirt liquid ammonia onto the lead gasket connection or elsewhere. If liquid ammonia does get onto the equipment, wipe it up using a dry towel.)
3. Open chlorine cylinder valve 1⁄4 turn, leave open, and recheck for chlorine leaks. (1⁄4 turn open of the cylinder valve is all that’s required. The reason we specify 1⁄4 turn is that when you turn it off you know it should close with 1⁄4 turn. In an emergency you can shut it off quickly and safely. The wrench stays on the cylinder valve while cylinder is open.)
4. Turn on water supply or booster pump to ejector and set rate valve to desired fl ow rate. Read fl ow rate at center of ball on meter tube scale and at the top edge for machined fl oats.
5. Be aware that the rate valve is not a shut off valve: it is a fl ow rate control only. To shut off chlorine feed close the chlorine cylinder valve/ton container valve.
SECTION VI: SHUT DOWN PROCEDUREIMPORTANT!: This procedure of shut down must be followed before a vacuum regulator is removed from a cylinder or ton container.
1. Close all chlorine cylinder valves or ton container valves while the ejector is still operating.
2. Wait for the ball to rest at the bottom of the meter tube and the indicator fl ag on the vacuum regulator to show red.
3. Shut off the water supply to the ejector.
SECTION VII: RATE VALVE OPERATIONTurn the rate valve counter-clockwise to open it completely. Further turns will completely remove the rate valve from the assembly, which will cause a loss of Cl2 feed. (See Appendix for servicing instructions.)The O-ring seal for the rate valve is locked in place under the valve bonnet and does not come out when the rate valve is pulled out of the bonnet.
d. Wait 5 to 10 minutes with water supply off . The reset knob should turn freely all the way around and the indicator should continue to show red. (If red continues to show, the system is vacuum tight.)
e. If the system is vacuum tight proceed to the next step. f. Disconnect vacuum tubing at top of vacuum regulator to allow air to enter the system. Reconnect
tubing. (1) Turn the reset on the front of the vacuum regulator and it should not show red.
8

PREVENTATIVE MAINTENANCE NOTE: Rate valves which are not exercised frequently may experience a build up of a white powdery substance which precipitates out of the chlorine gas. In order to avoid this build up, which can cause the rate valve to become stuck in place, it is recommended that the rate valve be periodically exercised. See Appendix for rate valve maintenance instructions.
SECTION VIII: TROUBLESHOOTING(I) PRESSURIZED LEAKS
1. Pressurized chlorine leaks are a safety hazard to life and equipment and should be corrected im-mediately. When searching for this type of leak there are basic safety rules to follow.
a. Air breathing pack should be readily available and personnel should know how to use it properly. b. Exhaust fan switch should be located near outside entrance with an additional alternate outside
switch appropriately located. c. Chlorine cylinder wrench should remain on the cylinder whenever cylinder is open. d. Plastic squeeze bottle 1⁄3 full of household ammonia. e. Buddy system used (two people capable of operating system).
2. If a leak is detected the following should be checked fi rst: a. The lead gasket between the chlorine cylinder valve and the vacuum regulator inlet assembly. i. Tighten the half dog screw on the vacuum regulator yoke assembly which is used to secure
the inlet assembly to the chlorine cylinder valve. (Do not use excessive force.) ii. Always use a new lead gasket. It is recommended to obtain gaskets through Hydro
Instruments to be certain of size and quality. b. Chlorine cylinder or ton container valve packing. i. Tighten the cylinder valve with care, not excessively! Close the valve if problem persists and
notify your chlorine supplier. ii. If valve is the problem try to move cylinder with a high degree of safety to an outside
location. (Never attempt to place cylinder in water as this will only increase the leak and the cylinder may fl oat to the surface.) If Emergency Repair Kit A or B is available and personnel are trained to use it, then this can also be used to temporarily stop the leak.
c. Chlorine leaking out the vent due to the inlet safety shut off valve having dirt on the valve seat. i. Close the chlorine cylinder or ton container valve. ii. Wait until the metering ball drops to zero on the fl ow tube. iii. Turn off water supply to ejector. iv. Now remove the vacuum regulator from the cylinder or ton container valve provided that the
red indicator is showing no chlorine pressure. (Red should be showing.) v. See Appendix for inlet safety shut off valve servicing instructions. vi. After servicing and remounting vacuum regulator with a new lead gasket, perform a vacuum
test before you open the cylinder or ton container valve valve. See “Chlorination System Vacuum Test”.
(II) NO CHLORINE FEED
Possible causes: 1. No vacuum being produced by ejector. a. Remove poly tubing from ejector fi tting and place your fi nger on it; you should feel a suction.
9

b. If you feel no suction (vacuum) check in this order: i. Nozzle (See Appendix): Turn off water supply and remove nozzle from ejector. (1) It may be clogged with a stone or other foreign matter. Flush out or run pipe cleaner
through only. (2) If there is a build-up of rust, iron, or manganese, place the nozzle in a Muriatic acid for
fi ve minutes and rinse with water. If you see a black syrup substance you may fi nd it necessary to clean the nozzle on a preventative maintenance schedule.
ii. Inlet Water Supply. iii. Reduced city water pressure. iv. Y strainer needs cleaning. v. Booster pump cavitating (lost its prime). vi. Booster pump insuffi cient boost due to wear or single phasing due to loss of one leg of
power. vii. Booster pump may have fl ooded suction.
2. Chlorine fl ow blocked at vacuum regulator inlet assembly. a. The Inlet fi lter could be clogged.
3. Out of Chlorine. a. The scale would read 150 lbs. lighter than when the cylinder was new or 2,000 lbs. lighter for ton
containers. b. Flow ball would be at zero and RED indicated on front of vacuum regulator.
APPENDIX A – SERVICING THE HYDRO INSTRUMENTS SYSTEM
SECTION A-1: VACUUM REGULATOR(I) CLEANING THE RATE VALVE
1. Unscrew the rate valve knob and stem (by hand) completely out of the top meter block.
2. Replace o-ring under the rate valve bonnet.
3. Lubricate the new o-ring lightly with Flourolube grease before replacing the rate valve and knob into the top meter block.
(II) CLEANING THE METER TUBE
1. While holding the glass meter tube (to prevent it from falling) unscrew the inlet plug at the base of the bottom meter block, until the meter tube can be removed.
2. Remember to be careful not to lose the stops or ball in the following steps.
3. Remove the white stops at either end of the tube (you could use a paper clip).
4. Soak the tube in warm water with a cleaner like lime away or Muriatic Acid. Also, brush the inside of the tube with a pipe cleaner.NOTE: Always follow safety precautions with Muriatic Acid and other chemicals.
10

5. Dry the meter tube and reinstall the ball and stops.
6. It is recommended that new meter tube gaskets be used when reinstalling the meter tube.
7. Remove the inlet plug completely and inspect the o-rings. If it has been more than 12 months since they were changed or if there is any noticeable damage, the o-rings should be replaced.
8. Reinstall the inlet plug, meter gaskets and meter tube, making sure to center the tube on the top and bottom meter gaskets.
9. Tighten the inlet plug with reasonable force to make a seal. Do not use excessive force.NOTE: All other vacuum regulator repairs should be done by the factory or authorized repair personnel.
WARNING: If the vacuum regulator leaks gas out the vent or any other place on the body the problem is most likely caused inside the vacuum regulator inlet capsule assembly SPA-SAWS-US or SPA-SAWS-UN. It is not recommended that the vacuum regulator inlet capsule assembly be disassembled by any untrained personnel because if it is not done properly then dangerous leakage of pressurized chlorine gas could result.
SECTION A-2: EJECTOR/CHECK VALVE ASSEMBLY(I) LOSS OF VACUUM AT THE EJECTOR: If vacuum is lost at the ejector and water supply is
suffi cient, then the nozzle is most likely clogged, broken or loose. Before working on the ejector it must fi rst be isolated so that water will not leak when the ejector is removed.
1. First detach the intake side (nozzle) of the ejector from the pipe line.
2. For 100 PPD or lower ejectors rotate the complete ejector body counter clockwise. This loosens the threaded portion of the nozzle from the diff user. It also eliminates the need for pliers on the nozzle which could damage the plastic.
3. Inspect the nozzle for: Pipe scale, stones, dirt, etc… Build-up of iron, manganese, calcium, etc…
4. The nozzle should be soaked and brushed with warm water mixed with a cleaner like Muriatic Acid. NOTE: TAKE CARE NOT TO SCRATCH OR ATTEMPT TO MODIFY THE ORIFICE IN ANY WAY.
5. Using two new OH-BUN-214 o-rings the ejector can now be reassembled.
When reassembling the ejector the nozzle and diff user should be screwed together hand tight leaving the ejector body 90 degrees to the left of its fi nal position. Once the nozzle and diff user are hand tight, the ejec-tor can then be turned the fi nal 90 degrees.
WARNING: Do not use excessive force in tightening the nozzle, diff user and ejector assembly. The ejector is constructed of PVC and excessive force can break the parts.
(II) SERVICING THE EJECTOR CHECK VALVE ASSEMBLY: If water leaks back into the system, this means that the ejector check valve has failed. This could be caused by incorrect assembly, o-ring or diaphragm, or foreign material lodged in the check valve.
1. Remove the four bolts holding the ejector body together.
2. Inside you will fi nd a diaphragm assembly and a spring.
3. The diaphragm assembly can usually be unscrewed by hand. If it is too tight, carefully try large jaw pliers or a vice. Note that a plastic support diaphragm is on the top side of the rubber diaphragm. The purpose is to protect the softer rubber diaphragm in installations with high pressure.
11

4. Inspect the rubber diaphragm for holes or weak points. a. For o-ring check valves, inspect the 3RS-203 o-ring. Replace if damaged.
5. Reassemble the diaphragm assembly, preferably with a new rubber diaphragm.
6. Install the assembly in the recess between the ejector body halves being careful to install the spring properly below the assembly.
SECTION A-3: SWITCHOVER MODULE(I) OPERATION OF THE MODULE
GENERAL: This device requires no outside setting or adjustment. The switchover module allows gas to fl ow from one of the two intake ports at a time, keeping the other sealed. It will continue to feed from fi rst side until the vacuum level rises suffi ciently (in the event of an empty cylinder or closing of the cylinder valve), at which time an internal spring loaded mechanism automatically switches to open the second intake port and to close the fi rst intake port.
NOTE: In low capacity systems where the feed rate is less than 10 PPD or the time between switching is more than two weeks, it is recommended that the module be “exercised” weekly. If the module is left in one position for long periods of time, it may have a tendency to stick in one position. To exercise the mod-ule it can be disconnected from both vacuum regulators with the ejector still connected and operating. Use a fi nger or thumb to close the open intake port of the module until it switches to feed from the other port. Repeat this process 5 to 10 times.
(II) SERVICING THE MODULE
GENERAL: If the module does not operate correctly fi rst try exercising it as described in the last paragraph. If this does not work the unit must be disassembled.
1. Remove the four screws that secure the top cap onto the main body.
2. Remove the four screws that secure each of the side caps onto the main body.
3. Remove the diaphragm assemblies and the toggle mechanism noting their orientations for reas-sembly.
4. Inspect the guide pin to ensure that it is free of dirt or burrs. If not clean and polish it with alcohol until it is able to slide freely.
5. Inspect the o-ring seats on the diaphragm assemblies. Ensure that they are free of any residue and should be cleaned with alcohol being careful not to scratch them.
6. Replace the o-rings unless they are less than 12 months old and unless they are in perfect condi-tion.
7. Inspect the diaphragms to ensure that they are free of tears or holes. If they are not in good condi-tion, they should be replaced.
8. Reassemble the module in reverse order.
12

13
14
15

16

17

18

19

20

21

22
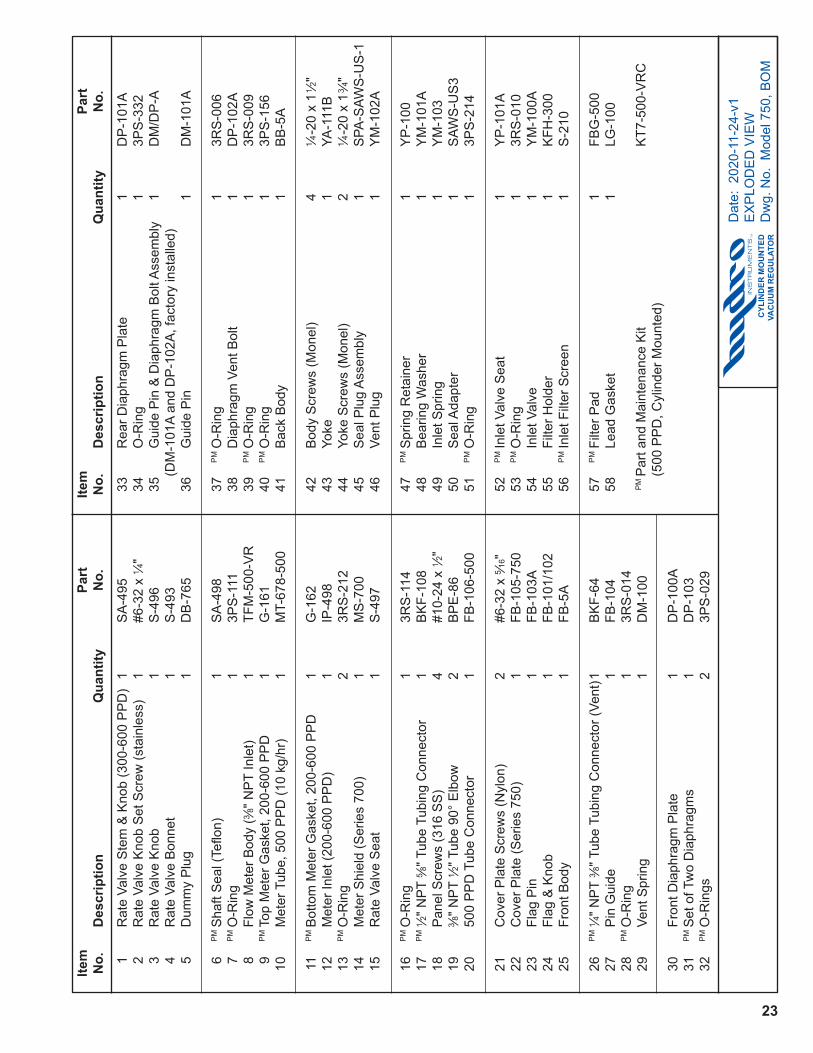
23

24

25

Ton Ironworks
12
4
6
8
9
10
11
1213
14
75
3 LEAD GASKET LEAD GASKET
Actuator MountingTon Ironworks
Date: 2019-05-20-v1 EXPLODED VIEW Dwg. No. IW-1, EXPTON IRONWORKS
ASSEMBLY
Part With Seal Plug Actuator Number Assembly Mounting
IW-1 No No
IW-1SP Yes (Includes item 2) No
IW-1-AW No Yes (Includes item 7)
IW-1SP-AW Yes (Includes item 2) Yes (Includes item 7)
26
Date: 2019-05-20-v1 BILL OF MATERIALS Dwg. No. IW-1, BOMTON IRONWORKS
ASSEMBLY
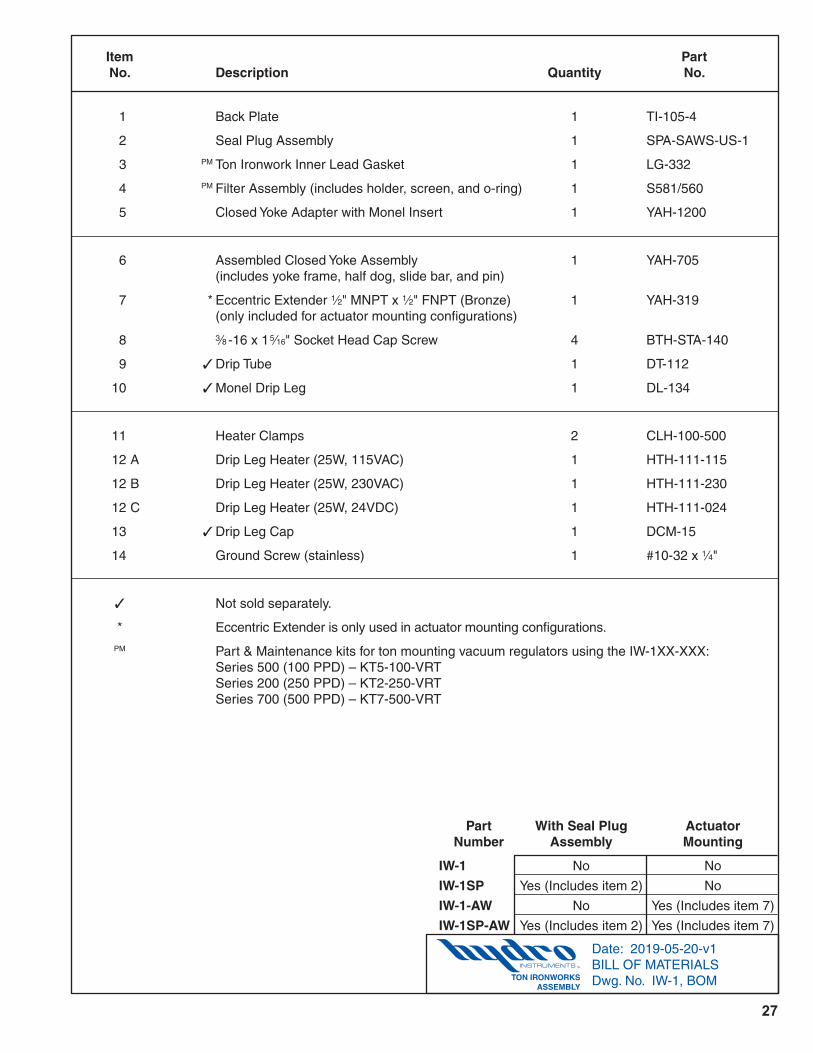
Item Part No. Description Quantity No.
1 Back Plate 1 TI-105-4
2 Seal Plug Assembly 1 SPA-SAWS-US-1
3 PM Ton Ironwork Inner Lead Gasket 1 LG-332
4 PM Filter Assembly (includes holder, screen, and o-ring) 1 S581/560
5 Closed Yoke Adapter with Monel Insert 1 YAH-1200
6 Assembled Closed Yoke Assembly 1 YAH-705 (includes yoke frame, half dog, slide bar, and pin)
7 * Eccentric Extender 1⁄2" MNPT x 1⁄2" FNPT (Bronze) 1 YAH-319 (only included for actuator mounting configurations)
8 3⁄8 -16 x 15⁄16" Socket Head Cap Screw 4 BTH-STA-140
9 ✓ Drip Tube 1 DT-112
10 ✓ Monel Drip Leg 1 DL-134
11 Heater Clamps 2 CLH-100-500
12 A Drip Leg Heater (25W, 115VAC) 1 HTH-111-115
12 B Drip Leg Heater (25W, 230VAC) 1 HTH-111-230
12 C Drip Leg Heater (25W, 24VDC) 1 HTH-111-024
13 ✓ Drip Leg Cap 1 DCM-15
14 Ground Screw (stainless) 1 #10-32 x 1⁄4"
✓ Not sold separately.
* Eccentric Extender is only used in actuator mounting configurations.
PM Part & Maintenance kits for ton mounting vacuum regulators using the IW-1XX-XXX: Series 500 (100 PPD) – KT5-100-VRT Series 200 (250 PPD) – KT2-250-VRT Series 700 (500 PPD) – KT7-500-VRT
Part With Seal Plug Actuator Number Assembly Mounting
IW-1 No No
IW-1SP Yes (Includes item 2) No
IW-1-AW No Yes (Includes item 7)
IW-1SP-AW Yes (Includes item 2) Yes (Includes item 7)
27

28

1
2
5
6
8
9
10
1214
13
11 A
11 C
11 D
11 E
11 F
12
11 B
11 G
3
4
7
TOP VIEWNote arrows indicating
flow direction
29

1
2 5 6 8
14
15
14
9 10
13E
13D
13C
16B
16A
11
12
12
17
13B
13A
3 4 7
TOP
VIE
WN
ote
arro
w in
dic
atin
gflo
w d
irect
ion
30

31

2 5 6 8
14
15
14
9 10
13D
13C
13B
16B
16A
11
12
12
17
13A
1
3 4 7
TOP
VIE
WN
ote
arro
w in
dic
atin
gflo
w d
irect
ion
Dat
e: A
pril
2017
EX
PLO
DE
D V
IEW
E
JEC
TOR
D
wg.
No.
EJ-
5000
, EX
P
32

Dat
e: A
pril
2017
BIL
L O
F M
ATE
RIA
LS
EJE
CTO
R
Dw
g. N
o. E
J-50
00, B
OM
It
em
Par
t
No
. D
escr
ipti
on
Q
uan
tity
N
o.
1
P
M 1 ⁄2
" N
PT
5 ⁄8"
Tube
Tub
ing
Con
nect
or
1 B
KF
-108
2
B
olt 5 ⁄1
6-1
8 x
41 ⁄2
" (s
tain
less
) 4
B-5
7
3
Top
Bod
y (5
00 P
PD
) 1
E-5
50-5
00
4
PM O
-Rin
g 1
3RS
-203
5
P
M C
heck
Ass
embl
y B
olt
1 E
-553
6
P
M S
et o
f Tw
o S
uppo
rt D
iaph
ragm
s 1
KY-
1
7
PM R
ollin
g D
iaph
ragm
1
SM
-112
8
P
M C
heck
Ass
embl
y N
ut
1 E
-552
9
S
prin
g 1
S-1
45
10
Bot
tom
Bod
y 1
E-5
51
11
B
olt 3 ⁄8
-16
x 5"
(st
ainl
ess)
2
B-5
9
12
Noz
zle/
Diff
user
Bra
cket
s 2
EJB
-425
13
A
* N
ozzl
e –
.250
(1
1 ⁄4"
NP
T)
1 E
N-2
50
13 B
*
Noz
zle
– .2
90 (
11 ⁄4
" N
PT
) 1
EN
X-2
90
13 C
*
Noz
zle
– .3
00 (
11 ⁄4
" N
PT
) 1
EN
-296
13
D
* N
ozzl
e –
.375
(1
1 ⁄4"
NP
T)
1 E
N-3
75
14
P
M O
-Rin
g 2
OH
-VIT
-214
15
N
ut 5 ⁄1
6-1
8 (s
tain
less
) 4
N-5
6
16 A
*
Thr
oat –
.380
(1
1 ⁄4"
NP
T)
1 E
DT-
380
16
B
* T
hroa
t – .5
60 (
11 ⁄4
" N
PT
) 1
ED
T-56
0
17
Nut
3 ⁄8-1
6 (s
tain
less
) 2
N-5
8
P
M
Par
t & M
aint
enan
ce K
it (5
00 P
PD
) 1
KT
7-50
0-E
JS
*
R
efer
to n
ozzl
e si
zing
cha
rts
for
corr
ect s
izin
g.
33

1A
1011
13129
8
2 3A
1B
1
C
3B
4 5 6 7
14
15 161 A
1718
1920 A
21
1B
1C
17
1819
211 A
1 B
1 C
20 A
20B
20B
SP
-100
SP
-200
SP
-500
Dat
e: J
uly
2017
EX
PLO
DE
D V
IEW
S
WIT
CH
OV
ER
MO
DU
LE
D
wg.
No.
SP
-XX
X, E
XP
10
0X
XX
= 2
50
500
34

Dat
e: J
uly
2017
BIL
L O
F M
ATE
RIA
LS
SW
ITC
HO
VE
R M
OD
UL
E
Dw
g. N
o. S
P-X
XX
, BO
M
It
em
Par
t
No
. D
escr
ipti
on
Q
uan
tity
N
o.
1
A
PM 3 ⁄8
" Tu
be 1 ⁄4
" N
PT
Tub
ing
Con
ncto
r 3
BK
F-6
4
1
B
PM 1 ⁄2
" Tu
be 1 ⁄4
" N
PT
Tub
ing
Con
nect
or
3 B
KF
-84
1
C
PM 5 ⁄8
" Tu
be 1 ⁄2
" N
PT
Tub
ing
Con
nect
or
3 B
KF
-108
2
#
10-2
4 x
1" T
op C
ap s
crew
(M
onel
) 4
#10-
24 x
1"
3
A
Top
Cap
(fo
r S
P-1
00 a
nd S
P-2
00)
1 S
M-1
06-2
50
3
B
Top
Cap
(fo
r S
P-5
00)
1 S
M-1
06-5
00
4
P
M O
-Rin
g 1
3RS
-023
5
S
prin
g P
in G
uide
1
SM
-104
6
S
prin
g (H
aste
lloy)
1
YM
-103
-HC
7
S
prin
g G
uide
Pin
1
SM
-105
8
T
oggl
e A
ssem
bly
1 S
M-A
ssem
bly
9
*
Spr
ing
Piv
ot
1 S
M-1
03
10
P
M *
O-R
ing
2 3R
S-2
03
11
*
Val
ve P
lug
1 S
M-1
00
12
*
Piv
ot A
rm
1 S
M-1
02
13
*
Hin
ge P
in
2 S
M-1
01
14
C
ente
r B
ody
1 S
M-1
08
15
M
ount
ing
Bra
cket
1
SM
-109
16
M
ount
ing
Bol
t (Z
inc-
plat
ed)
2 1 ⁄4
-20
x 1 ⁄2
"
17
D
iaph
ragm
Bol
t 2
SM
-110
18
P
M R
ollin
g D
iaph
ragm
2
SM
-112
19
D
iaph
ragm
Nut
2
SM
-111
20
A
End
Cap
(fo
r S
P-1
00, S
P-2
00)
2 S
M-1
07-2
50
20
B
End
Cap
(fo
r S
P-5
00)
2 S
M-1
07-5
00
21
1 ⁄4
-20
x 1
1 ⁄2"
End
Cap
scr
ew (
Mon
el)
8 1 ⁄4
-20
x 1
1 ⁄2"
*
Item
s 9,
10,
11,
12,
and
13
are
sold
pre
-ass
embl
ed a
s th
e
Tog
gle
Ass
embl
y (I
tem
8),
“S
M-A
ssem
bly”
It
em
Par
t
No
. D
escr
ipti
on
Q
uan
tity
N
o.
P
M
Par
t & M
aint
enan
ce K
it (1
00 P
PD
) 1
K
T1-
100-
SO
M
PM
Par
t & M
aint
enan
ce K
it (2
50 P
PD
) 1
K
T2-
250-
SO
M
PM
Par
t & M
aint
enan
ce K
it (5
00 P
PD
) 1
K
T7-
500-
SO
M
10
0X
XX
= 2
50
500
35
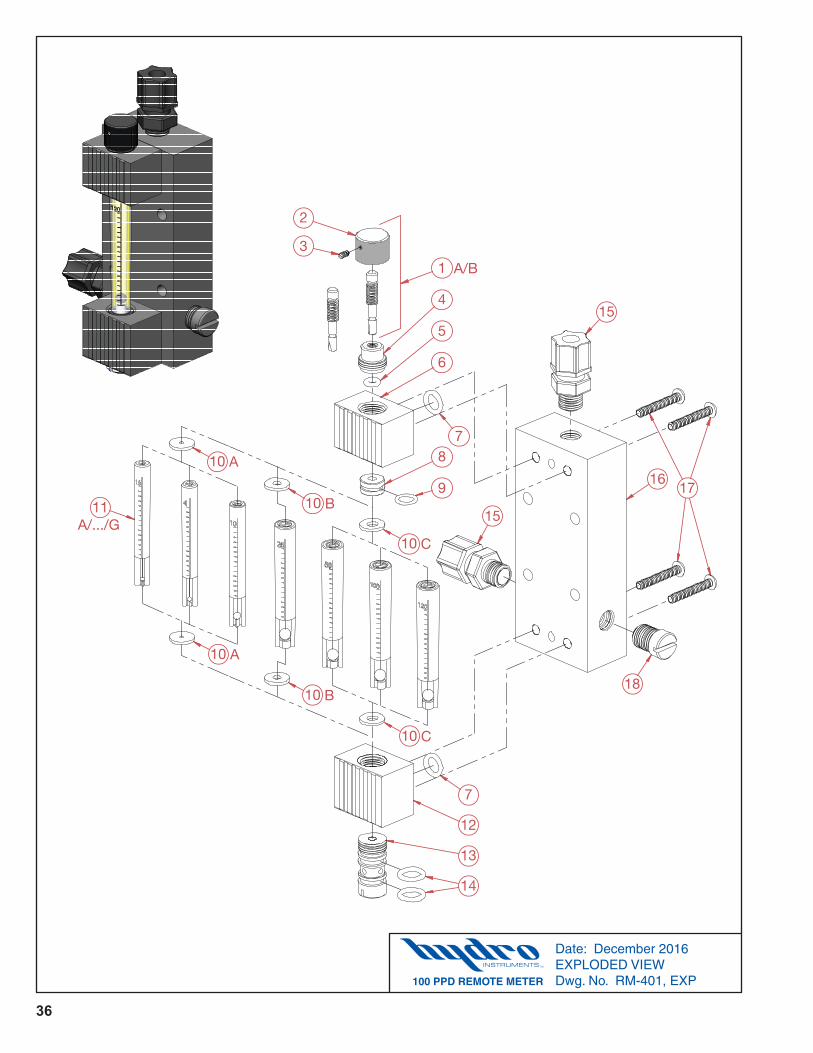
1 A/B
2
3
4
5
6
78
9
10 C
10 B
10 A
11A/.../G
10 A
10 B
10 C
7
12
13
14
16
15
15
18
17
Date: December 2016 EXPLODED VIEW 100 PPD REMOTE METER Dwg. No. RM-401, EXP
36

Date: December 2016 BILL OF MATERIALS 100 PPD REMOTE METER Dwg. No. RM-401, BOM
Item Part No. Description Quantity No.
1 A Rate Valve Stem & Knob (10 PPD) 1 VP-103C-010
1 B Rate Valve Stem & Knob (100 PPD) 1 VP-103C-100
2 Rate Valve Knob 1 RV-100A
3 Rate Valve Knob Set Screw 1 #5-40 x 1⁄4"
4 Valve Bonnet 1 VB-100C
5 PM O-Ring 1 3PS-106
6 Top Meter Block 1 FM-100B
7 PM O-Ring 2 3PS-110
8 Rate Valve Seat 1 VT-104
9 PM O-Ring 1 3RS-012
10 A PM Meter Gasket (1.5-10 PPD) 2 MG-001-010
10 B PM Meter Gasket (25 PPD) 2 MG-001-025
10 C PM Meter Gasket (50-120 PPD) 2 MG-001-100
11 A Meter Tube, 1.5 PPD 1 MTB-11-0015
11 B Meter Tube, 4 PPD (75 gr/hr) 1 MTB-11-004
11 C Meter Tube, 10 PPD (200 gr/hr) 1 MTB-11-010
11 D Meter Tube, 25 PPD (500 gr/hr) 1 MTB-11-025
11 E Meter Tube, 50 PPD (1000 gr/hr) 1 MTB-11-050
11 F Meter Tube, 100 PPD (2000 gr/hr) 1 MTB-11-100
11 G Meter Tube, 120 PPD (2500 gr/hr) 1 MTB-11-120
12 Bottom Meter Block 1 FM-103
13 Inlet Plug 1 FM-101A
14 PM O-Ring 2 3PS-112
15 PM 1⁄4" NPT 3⁄8" Tube Tubing Connector 2 BKF-64
16 Back Body 1 RM-1-250
17 Remote Meter Block Screws (Monel) 4 #10-24 x 11⁄4"
18 1⁄4" NPT Plug (PVC) 1 PLH-108-250
PM Part & Maintenance Kit (100 PPD) 1 KT4-100-RMP
37

1
2
3
4
5
6
78
9
10
11
13
7
14
15
16
16
1718
19
12
Date: 2018-02-23-v1 EXPLODED VIEW 250 PPD REMOTE METER Dwg. No. RM-200, EXP
38

Date: 2018-02-23-v1 BILL OF MATERIALS 250 PPD REMOTE METER Dwg. No. RM-200, BOM
Item Part No. Description Quantity No.
1 Rate Valve Stem & Knob (250 PPD) 1 VP-203C
2 Rate Valve Knob 1 RV-100A
3 Rate Valve Knob Set Screw 1 #5-40 x 1⁄4"
4 Valve Bonnet 1 VB-100C
5 PM O-Ring 1 3PS-106
6 Top Meter Block 1 FM-200B
7 PM O-Ring 2 3PS-110
8 Rate Valve Seat 1 VT-204
9 PM O-Ring 1 3RS-016
10 PM Top Meter Gasket 1 MG-200T
11 Meter Tube, 250 PPD (5 kg/hr) 1 MTB-11-250
12 PM Bottom Meter Gasket 1 MG-001-100
13 Bottom Meter Block 1 FM-103
14 Inlet Plug 1 FM-101A
15 PM O-Ring 2 3PS-112
16 PM 1⁄4" NPT 1⁄2" Tube Tubing Connector 2 BKF-84
17 Back Body 1 RM-2-250
18 Remote Meter Block Screws (Monel) 4 #10-24 x 11⁄4"
19 1⁄4" NPT Plug (PVC) 1 PLH-108-250
PM Part & Maintenance Kit (250 PPD) 1 KT2-250-RMP
39

For
10-1
00 P
PD
,S
ocke
t W
eld
ed t
oM
eter
Bod
y(It
em 1
0)
14 1415
10
1319
20
21A
/.../
D
18A
/.../
D 17
1612
11
9 9
8 A
/B/C
8 A
/B/C
Sta
ndar
d
Op
tiona
l
1 2
3
2
76
A
76
B
5
4A
/.../
K
Dat
e: 2
017-
12-2
0-v1
EX
PLO
DE
D V
IEW
Dw
g. N
o. R
M-7
02, E
XP
UP
TO
600
PP
D /
12 k
g/h
rR
EM
OT
E M
ET
ER
40

Dat
e: 2
017-
12-2
0-v1
BIL
L O
F M
ATE
RIA
LS
D
wg.
No.
RM
-702
, BO
MU
P T
O 6
00 P
PD
/ 12
kg
/hr
RE
MO
TE
ME
TE
R
It
em
Par
t
No
. D
escr
ipti
on
Q
uan
tity
N
o.
1
M
eter
Tub
e A
dapt
er, 1
0-10
0 P
PD
1
MP
H-8
30-1
01
(S
ocke
t Wel
ded
to M
eter
Bod
y, It
em 1
0)
2
P
M M
eter
Gas
ket,
Top
and
Bot
tom
2
MG
-200
B
3
P
M T
op M
eter
Gas
ket,
200-
600
PP
D
1 G
-161
4
A
Met
er T
ube,
4 P
PD
(75
gr/
hr)
1 M
T-67
8-00
4
4
B
Met
er T
ube,
10
PP
D (
200
gr/h
r)
1 M
TH
-129
-010
4
C
Met
er T
ube,
25
PP
D (
500
gr/h
r)
1 M
TH
-129
-025
4
D
Met
er T
ube,
50
PP
D (
1000
gr/
hr)
1 M
TH
-129
-050
4
E
Met
er T
ube,
100
PP
D (
2000
gr/
hr)
1 M
TH
-129
-100
4
F
Met
er T
ube,
200
PP
D (
4 kg
/hr)
1
MT-
678-
200
4
G
Met
er T
ube,
250
PP
D (
5 kg
/hr)
1
MT-
678-
250
4
H
Met
er T
ube,
300
PP
D (
6 kg
/hr)
1
MT-
678-
300
4
I M
eter
Tub
e, 4
00 P
PD
(8
kg/h
r)
1 M
T-67
8-40
0
4
J M
eter
Tub
e, 5
00 P
PD
(10
kg/
hr)
1 M
T-67
8-50
0
4
K
Met
er T
ube,
600
PP
D (
12 k
g/hr
) 1
MT-
678-
600
5
P
M B
otto
m M
eter
Gas
ket,
200-
600
PP
D
1 G
-162
6
A
Met
er In
let (
4-10
0 P
PD
) 1
MIH
-232
-101
6
B
Met
er In
let (
200-
600
PP
D)
1 M
IH-2
32-5
00
7
P
M O
-Rin
g 2
3RS
-212
8
A P
M 1 ⁄4
" N
PT
3 ⁄8"
Tube
Tub
ing
Con
nect
or
2 B
KF
-64
8
B P
M 1 ⁄4
" N
PT
1 ⁄2"
Tube
Tub
ing
Con
nect
or
2 B
KF
-84
8
C P
M 1 ⁄2
" N
PT
5 ⁄8"
Tube
Tub
ing
Con
nect
or
2 B
KF
-108
9
1 ⁄2
" x
1 ⁄4"
PV
C R
educ
ing
Bus
hing
2
839-
072
(Req
uire
d if
usin
g 1 ⁄4
" N
PT
tubi
ng c
onne
ctor
s)
10
A
Met
er B
ody,
10-
100
PP
D
1 T
FM
-501
(Soc
ket W
elde
d to
Met
er T
ube
Ada
pter
, Ite
m 1
)
10
B
Met
er B
ody
1 T
FM
-501
It
em
Par
t
No
. D
escr
ipti
on
Q
uan
tity
N
o.
11
R
emot
e M
eter
Blo
ck S
crew
s (M
onel
) 2
#10-
24 x
11 ⁄4
"
12
T
op M
eter
Blo
ck
1 T
MB
-501
13
R
ate
Val
ve S
eat
1 V
T-50
4
14
P
M O
-Rin
g 3
3RS
-016
15
P
M O
-Rin
g 1
3PS
-111
16
P
M S
haft
Sea
l (Te
flon)
1
SA
-498
17
R
ate
Val
ve B
onne
t 1
S-4
93
18
A
Rat
e V
alve
Ste
m &
Kno
b (4
-10
PP
D)
1 S
A-4
95-0
10
18
B
Rat
e V
alve
Ste
m &
Kno
b (2
5-10
0 P
PD
) 1
SA
-495
-100
18
C
Rat
e V
alve
Ste
m &
Kno
b (2
00-2
50 P
PD
) 1
SA
-495
-250
18
D
Rat
e V
alve
Ste
m &
Kno
b (3
00-6
00 P
PD
) 1
SA
-495
19
R
ate
Val
ve K
nob
1 S
-496
20
R
ate
Val
ve K
nob
Set
Scr
ew (
stai
nles
s)
1 #6
-32
x 1 ⁄4
"
21
A
Rat
e V
alve
Ste
m &
Lar
ge K
nob
(4-1
0 P
PD
) 1
S-4
95-C
AB
-010
21
B
Rat
e V
alve
Ste
m &
Lar
ge K
nob
(25-
100
PP
D)
1 S
-495
-CA
B-1
00
21
C
Rat
e V
alve
Ste
m &
Lar
ge K
nob
(200
-250
PP
D)
1 S
-495
-CA
B-2
50
21
D
Rat
e V
alve
Ste
m &
Lar
ge K
nob
(300
-600
PP
D)
1 S
-495
-CA
B-5
00
P
M
Par
t & M
aint
enan
ce K
it (4
PP
D)
K
T1-
702-
RM
P4
P
M
Par
t & M
aint
enan
ce K
it (1
00 P
PD
)
KT
1-70
2-R
MP
P
M
Par
t & M
aint
enan
ce K
it (2
50 P
PD
)
KT
2-70
2-R
MP
P
M
Par
t & M
aint
enan
ce K
it (6
00 P
PD
)
KT
5-70
2-R
MP
41

For
10-1
00 P
PD
,S
ocke
t W
eld
ed t
oM
eter
Bod
y(It
em 1
1)
4 A
/.../
K
8 A
/B/C
9
11
8 A
/B/C
9
12
13
10
15
15
14
16
17
18
19A
/.../
D
22A
/.../
D
20
21
Sta
ndar
d
Op
tiona
l
1 2
6A
7
6B
7
53
2
Dat
e: 2
017-
12-2
0-v1
EX
PLO
DE
D V
IEW
Dw
g. N
o. R
M-7
03, E
XP
UP
TO
600
PP
D /
12 k
g/h
rR
EM
OT
E M
ET
ER
42

Dat
e: 2
017-
12-2
0-v1
BIL
L O
F M
ATE
RIA
LS
D
wg.
No.
RM
-703
, BO
MU
P T
O 6
00 P
PD
/ 12
kg
/hr
RE
MO
TE
ME
TE
R
It
em
Par
t
No
. D
escr
ipti
on
Q
uan
tity
N
o.
1
M
eter
Tub
e A
dapt
er, 1
0-10
0 P
PD
1
MP
H-8
30-1
01
(S
ocke
t Wel
ded
to M
eter
Bod
y, It
em 1
1)
2
P
M M
eter
Gas
ket,
Top
and
Bot
tom
2
MG
-200
B
3
P
M T
op M
eter
Gas
ket,
200-
600
PP
D
1 G
-161
4
A
Met
er T
ube,
4 P
PD
(75
gr/
hr)
1 M
T-67
8-00
4
4
B
Met
er T
ube,
10
PP
D (
200
gr/h
r)
1 M
TH
-129
-010
4
C
Met
er T
ube,
25
PP
D (
500
gr/h
r)
1 M
TH
-129
-025
4
D
Met
er T
ube,
50
PP
D (
1000
gr/
hr)
1 M
TH
-129
-050
4
E
Met
er T
ube,
100
PP
D (
2000
gr/
hr)
1 M
TH
-129
-100
4
F
Met
er T
ube,
200
PP
D (
4 kg
/hr)
1
MT-
678-
200
4
G
Met
er T
ube,
250
PP
D (
5 kg
/hr)
1
MT-
678-
250
4
H
Met
er T
ube,
300
PP
D (
6 kg
/hr)
1
MT-
678-
300
4
I M
eter
Tub
e, 4
00 P
PD
(8
kg/h
r)
1 M
T-67
8-40
0
4
J M
eter
Tub
e, 5
00 P
PD
(10
kg/
hr)
1 M
T-67
8-50
0
4
K
Met
er T
ube,
600
PP
D (
12 k
g/hr
) 1
MT-
678-
600
5
P
M B
otto
m M
eter
Gas
ket,
200-
600
PP
D
1 G
-162
6
A
Met
er In
let (
4-10
0 P
PD
) 1
MIH
-232
-101
6
B
Met
er In
let (
200-
600
PP
D)
1 M
IH-2
32-5
00
7
P
M O
-Rin
g 2
3RS
-212
8
A P
M 1 ⁄4
" N
PT
3 ⁄8"
Tube
Tub
ing
Con
nect
or
2 B
KF
-64
8
B P
M 1 ⁄4
" N
PT
1 ⁄2"
Tube
Tub
ing
Con
nect
or
2 B
KF
-84
8
C P
M 1 ⁄2
" N
PT
5 ⁄8"
Tube
Tub
ing
Con
nect
or
2 B
KF
-108
9
1 ⁄2
" x
1 ⁄4"
PV
C R
educ
ing
Bus
hing
2
839-
072
(Req
uire
d if
usin
g 1 ⁄4
" N
PT
tubi
ng c
onne
ctor
s)
10
1 ⁄2
" P
VC
Plu
g 1
850-
005
11
A
Met
er B
ody,
10-
100
PP
D
1 T
FM
-501
-T
(S
ocke
t Wel
ded
to M
eter
Tub
e A
dapt
er, I
tem
1)
It
em
Par
t
No
. D
escr
ipti
on
Q
uan
tity
N
o.
11
B
Met
er B
ody
1 T
FM
-501
-T
12
R
emot
e M
eter
Blo
ck S
crew
s (M
onel
) 2
#10-
24 x
11 ⁄4
"
13
T
op M
eter
Blo
ck
1 T
MB
-501
-T
14
R
ate
Val
ve S
eat
1 V
T-50
4
15
P
M O
-Rin
g 3
3RS
-016
16
P
M O
-Rin
g 1
3PS
-111
17
P
M S
haft
Sea
l (Te
flon)
1
SA
-498
18
R
ate
Val
ve B
onne
t 1
S-4
93
19
A
Rat
e V
alve
Ste
m &
Kno
b (4
-10
PP
D)
1 S
A-4
95-0
10
19
B
Rat
e V
alve
Ste
m &
Kno
b (2
5-10
0 P
PD
) 1
SA
-495
-100
19
C
Rat
e V
alve
Ste
m &
Kno
b (2
00-2
50 P
PD
) 1
SA
-495
-250
19
D
Rat
e V
alve
Ste
m &
Kno
b (3
00-6
00 P
PD
) 1
SA
-495
20
R
ate
Val
ve K
nob
1 S
-496
21
R
ate
Val
ve K
nob
Set
Scr
ew (
stai
nles
s)
1 #6
-32
x 1 ⁄4
"
22
A
Rat
e V
alve
Ste
m &
Lar
ge K
nob
(4-1
0 P
PD
) 1
S-4
95-C
AB
-010
22
B
Rat
e V
alve
Ste
m &
Lar
ge K
nob
(25-
100
PP
D)
1 S
-495
-CA
B-1
00
22
C
Rat
e V
alve
Ste
m &
Lar
ge K
nob
(200
-250
PP
D)
1 S
-495
-CA
B-2
50
22
D
Rat
e V
alve
Ste
m &
Lar
ge K
nob
(300
-600
PP
D)
1 S
-495
-CA
B-5
00
P
M
Par
t & M
aint
enan
ce K
it (4
PP
D)
K
T1-
702-
RM
P4
P
M
Par
t & M
aint
enan
ce K
it (1
00 P
PD
)
KT
1-70
2-R
MP
P
M
Par
t & M
aint
enan
ce K
it (2
50 P
PD
)
KT
2-70
2-R
MP
P
M
Par
t & M
aint
enan
ce K
it (6
00 P
PD
)
KT
5-70
2-R
MP
43

4
2
3
2
3
231
6
7
8
9
8
10
11
12
13
14
1516
1718
19
21
22
5
2
2
20
1/4" NPT
3/8" NPT
1/4" NPT
3/8" NPT
Date: August 2017 EXPLODED VIEW AND BOM Dwg. No. DP-500DIFFERENTIAL
PRESSURE REGULATOR
Item Part No. Description Quantity No.
1 Mounting Bracket 1 DPMB-1 2 Hex Nut 8 1⁄4-20 HNUT 3 Flat Washer 4 1⁄4" Flat Washer 4 Monel Screws 4 1⁄4-20 x 21⁄4" 5 Front Body (1⁄4" NPT Port) 1 DP-FB1
6 Diaphragm Vent Plug 1 DPR-B-1 7 Rate Valve (PVDF) 1 DP-SRV 8 PM O-Ring 2 3PS-029 9 Back Diaphragm Plate 1 DP-101A 10 PM Set of Two Diaphragms 1 DP-103
11 Front Diaphragm Plate 1 DP-100A 12 Spring (Hastelloy C-276) 1 YM-103-HC 13 Adjustment Screw 1 DP-AS1 14 PM O-Ring 1 3PS-156 15 Back Body (3⁄8" NPT Port) 1 DP-BB1-500
16 Monel Screws 2 1⁄4-20 x 23⁄4" 17 Seal Disc 1 DP-SD-1 18 Rate Valve Seat 1 DPVS-1 19 PM O-Ring 1 3RS-012 20 PM O-Ring 1 3PS-030
21 Back Body Cap (3⁄8" NPT Port) 1 DP-BBC-500 22 Monel Screws 4 1⁄4-20 x 11⁄4"
PM Part and Maintenance Kit KT5-500-DPR (500 PPD)
44

0 20 40 60 80 100 120 140 160 180 200Ejector Inlet Pressure (psi)
Bac
k P
ress
ure
(psi
)
220 240 260 280 300 320 340 360
240
220
200
180
160
140
120
100
80
60
40
20
0
NOZZLE SIZING CHART (10 PPD / 200 gr/hr)
0 20 40 60 80 100 120 140 160 180 200Ejector Inlet Pressure (psi)
Bac
k P
ress
ure
(psi
)
220 240 260 280 300 320 340 360
240
220
200
180
160
140
120
100
80
60
40
20
0
NOZZLE SIZING CHART (25 PPD / 500 gr/hr)
Note: Pressure combinations that plot below the line for any given nozzle are acceptable for operating that nozzle at the stated chemical feed rate for that chart. Pressure combinations that fall above the line for any given nozzle are not acceptable.
NS-10-25-HGCS Rev. 8/14/13
Ejector Inlet Flow (gpm)
Nozzle UN-102-140 3 3.5 4 4.5 5 5.5 6 6.5 7 8 9 10
Nozzle #3
3.0 4.0 5.0 6.0 7.0 8.0 9.0 10.0 11.0 12.0Nozzle #5 (standard)
Nozzle #3 (standard)
Nozzle #16
Ejector Inlet Flow (gpm)
2.0 3.0 4.0 5.0 6.0 7.0 8.0 9.0
2.0 3.0 4.0 5.0 6.0 7.0Nozzle UN-102-099D
Nozzle UN-102-099D 2.0 3.0 4.0 5.0 6.0 7.0
2.0 3.0 4.0 5.0 6.0 7.0 8.0 9.0 10.0
2.0 3.0 4.0 5.0 6.0 7.0 8.0 9.0 10.0
■ Nozzle #3 and #16■ Nozzle UN-102-099D
■ Nozzle #5■ Nozzle UN-102-140■ Nozzle #3■ Nozzle UN-102-099D
45

0 20 40 60 80 100 120 140 160 180 200Ejector Inlet Pressure (psi)
Bac
k P
ress
ure
(psi
)
220 240 260 280 300 320 340 360
240
220
200
180
160
140
120
100
80
60
40
20
0
NOZZLE SIZING CHART (50 PPD / 1000 gr/hr)
0 20 40 60 80 100 120 140 160 180 200Ejector Inlet Pressure (psi)
Bac
k P
ress
ure
(psi
)
220 240 260 280 300 320 340 360
240
220
200
180
160
140
120
100
80
60
40
20
0
NOZZLE SIZING CHART (100 PPD / 2000 gr/hr)
Note: Pressure combinations that plot below the line for any given nozzle are acceptable for operating that nozzle at the stated chemical feed rate for that chart. Pressure combinations that fall above the line for any given nozzle are not acceptable. NS-50-100-HGCS Rev. 8/14/13
Ejector Inlet Flow (gpm)
Nozzle UN-102-140 3 3.5 4 4.5 5 5.5 6 6.5 7 8 9 10
Ejector Inlet Flow (gpm)
4 5 6 7 8.0 9.0 10.0 11.0 12.0 13.0 14.0 15.0 16.0 17.0Nozzle #2 (standard)
3.0 4.0 5.0 6.0 7.0 8.0 9.0 10.0 11.0 12.0Nozzle #5
Nozzle UN-102-140 3 3.5 4 4.5 5 5.5 6 6.5 7 8 9 10
3.0 4.0 5.0 6.0 7.0 8.0 9.0 10.0 11.0 12.0
Nozzle #2 (standard)
Nozzle #5 4 5 6 7 8.0 9.0 10.0 11.0 12.0 13.0 14.0 15.0 16.0 17.0
Nozzle #3
Nozzle UN-102-099D 2.0 3.0 4.0 5.0 6.0 7.0
3.0 4.0 5.0 6.0 7.0 8.0 9.0 10.0
■ Nozzle #2■ Nozzle #5■ Nozzle UN-102-140■ Nozzle #3■ Nozzle UN-102-099D
■ Nozzle #2■ Nozzle #5■ Nozzle UN-102-140
46

0 20 40 60 80 100 120 140 160 180 200 220 240Ejector Inlet Pressure (psi)
Bac
k P
ress
ure
(psi
)
.275 Nozzle 10 11 14 16 19 25 30
140
120
100
80
60
40
20
0
NOZZLE SIZING CHART (250 PPD / 5 kg/hr)
NOZZLE SIZING CHART (500 PPD / 10 kg/hr)
.296 Nozzle or ENX-290 10 15 20 25
Ejector Inlet Flow (gpm)
Ejector Inlet Flow (gpm)
10 15 20
10 15 20
0 20 40 60 80 100 120 140 160 180 200 220 240Ejector Inlet Pressure (psi)
Bac
k P
ress
ure
(psi
)
15 20 25 30
15 20 25 30 35
.375 Nozzle
.296 Nozzle or ENX-290
.375 Nozzle
15 20 25 30 35
140
120
100
80
60
40
20
0
.250 Nozzle
.250 Nozzle
■ Nozzle – .375 Diffuser – .560■ Nozzle – .296 Diffuser – .380■ Nozzle – .275 Diffuser – .380■ Nozzle – .250 Diffuser – .380■ Nozzle – ENX-290 Diffuser – .380
■ Nozzle – .375 Diffuser – .560■ Nozzle – .296 Diffuser – .560■ Nozzle – .250 Diffuser – .380■ Nozzle – ENX-290 Diffuser – .380■ Nozzle – ENX-290 Diffuser – .560
Note: Pressure combinations that plot below the line for any given nozzle are acceptable for operating that nozzle at the stated chemical feed rate for that chart. Pressure combinations that fall above the line for any given nozzle are not acceptable. NS-250-500-HGCS Rev. 3/13/13
47

Nozzle Tables
10 PPD (200 gr/hr) Nozzle > 3 16 UN-102-099D
Ejector Backpressure PSI @ GPM PSI @ GPM PSI @ GPM 0 20 1.9 18 1.5 12 1.2 10 32 2.2 33 2.0 29 1.5 20 48 2.7 48 2.4 47 1.9 30 60 3.0 60 2.7 65 2.3 40 75 3.5 75 3.1 83 2.6 50 89 3.9 90 3.6 101 3.0 60 102 4.3 103 3.9 120 3.4 70 116 4.7 116 4.3 138 3.8 80 130 5.1 130 4.7 156 4.1 90 143 5.5 145 5.1 174 4.5 100 157 5.9 156 5.4 192 4.9 110 170 6.3 171 5.8 210 5.2 120 185 6.7 185 6.2 228 5.6 130 198 7.0 198 6.6 246 6.0 140 213 7.5 213 7.0 264 6.3 150 227 7.9 227 7.4 282 6.7 160 240 8.3 240 7.7 301 7.1
25 PPD (500 gr/hr) Nozzle > 5 UN-102-140 3 UN-102-099D
Ejector Backpressure PSI @ GPM PSI @ GPM PSI @ GPM PSI @ GPM 0 20 3.7 15 2.5 40 2.5 30 1.5 10 33 4.3 26 3.0 60 3.0 47 1.9 20 47 4.9 45 3.8 80 3.6 65 2.3 30 61 5.3 63 4.5 100 4.2 84 2.6 40 74 5.8 82 5.2 120 4.8 102 3.0 50 88 6.2 101 5.7 140 5.4 120 3.4 60 102 6.7 119 6.3 160 5.9 139 3.8 70 115 7.1 138 6.6 180 6.5 157 4.1 80 130 7.4 156 7.0 200 7.1 175 4.5 90 143 7.7 175 7.4 220 7.7 193 4.9 100 157 8.0 194 7.9 240 8.3 212 5.3 110 170 8.3 212 8.3 260 8.8 230 5.6 120 185 8.7 231 8.7 280 9.4 248 6.0 130 198 8.9 249 9.0 300 10.0 267 6.4 140 212 9.2 268 9.4 - - 285 6.8 150 226 9.5 287 9.6 - - 303 7.1 160 240 9.8 305 9.9 - - 321 7.5
48

Nozzle Tables
50 PPD (1 Kg/hr) Nozzle > 2 5 UN-102-140 3 UN-102-099D
Ejector Backpressure PSI @ GPM PSI @ GPM PSI @ GPM PSI @ GPM PSI @ GPM 0 16 4.0 30 4.3 15 2.8 35 2.3 48 1.9 10 25 5.0 43 4.8 28 3.5 55 2.9 70 2.4 20 40 5.8 55 5.1 48 4.1 75 3.5 92 2.8 30 50 6.3 69 5.4 64 4.5 95 4.1 110 3.2 40 65 7.1 81 6.0 82 5.3 120 4.8 124 3.5 50 80 8.0 95 6.6 100 5.7 141 5.4 137 3.7 60 90 8.6 109 6.8 120 6.3 162 6.0 151 4.0 70 105 9.1 120 7.2 132 6.5 183 6.6 164 4.3 80 115 9.6 134 7.6 150 6.9 205 7.3 178 4.6 90 127 10.0 147 7.8 170 7.4 226 7.9 191 4.8 100 139 10.4 160 8.1 185 7.8 247 8.5 205 5.1 110 152 10.8 173 8.4 202 8.2 268 9.1 218 5.4 120 165 11.3 188 8.7 221 8.5 290 9.8 232 5.7 130 176 11.8 200 9.0 239 8.8 - - 245 5.9 140 189 12.2 213 9.2 255 9.1 - - 259 6.2 150 200 12.7 226 9.5 273 9.4 - - 272 6.5 160 216 13.3 240 9.8 290 9.7 - - 286 6.8
100 PPD (2 Kg/hr) Nozzle > 2 5 UN-102-140
Ejector Backpressure PSI @ GPM PSI @ GPM PSI @ GPM 0 25 5.0 50 5.1 30 3.3 10 50 6.7 65 5.4 59 4.3 20 65 7.3 80 6.1 79 5.0 30 75 8.0 95 6.5 95 5.6 40 89 8.6 110 7.0 110 6.0 50 104 9.0 125 7.2 126 6.4 60 118 9.3 139 7.4 145 6.9 70 131 9.9 155 7.9 160 7.2 80 142 10.5 170 8.3 180 7.5 90 155 11.0 185 8.7 195 7.9 100 170 11.5 200 9.0 210 8.2 110 180 11.9 213 9.3 229 8.5 120 194 12.7 228 9.5 243 8.9 130 208 13.2 244 9.9 260 9.2 140 222 13.7 260 10.2 279 9.5 150 235 14.2 275 10.4 295 9.8 160 250 14.5 291 10.8 310 10.0
49
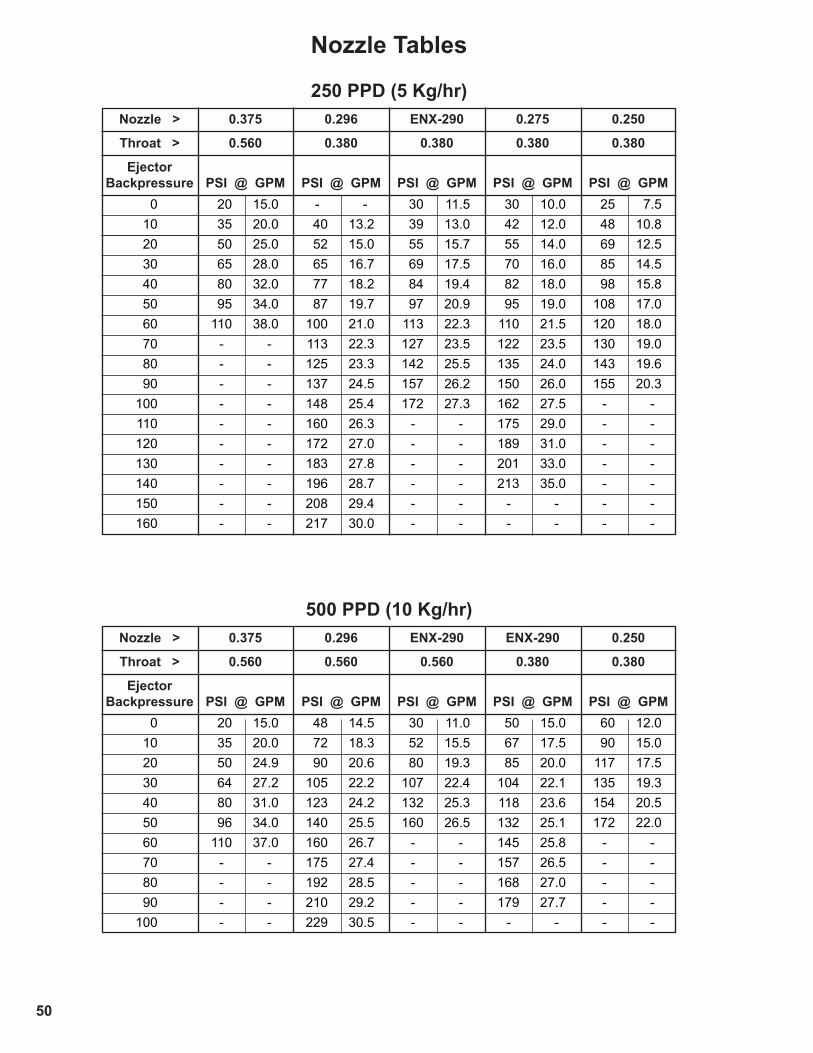
500 PPD (10 Kg/hr) Nozzle > 0.375 0.296 ENX-290 ENX-290 0.250
Throat > 0.560 0.560 0.560 0.380 0.380
Ejector Backpressure PSI @ GPM PSI @ GPM PSI @ GPM PSI @ GPM PSI @ GPM 0 20 15.0 48 14.5 30 11.0 50 15.0 60 12.0 10 35 20.0 72 18.3 52 15.5 67 17.5 90 15.0 20 50 24.9 90 20.6 80 19.3 85 20.0 117 17.5 30 64 27.2 105 22.2 107 22.4 104 22.1 135 19.3 40 80 31.0 123 24.2 132 25.3 118 23.6 154 20.5 50 96 34.0 140 25.5 160 26.5 132 25.1 172 22.0 60 110 37.0 160 26.7 - - 145 25.8 - - 70 - - 175 27.4 - - 157 26.5 - - 80 - - 192 28.5 - - 168 27.0 - - 90 - - 210 29.2 - - 179 27.7 - - 100 - - 229 30.5 - - - - - -
Nozzle Tables
250 PPD (5 Kg/hr) Nozzle > 0.375 0.296 ENX-290 0.275 0.250
Throat > 0.560 0.380 0.380 0.380 0.380
Ejector Backpressure PSI @ GPM PSI @ GPM PSI @ GPM PSI @ GPM PSI @ GPM 0 20 15.0 - - 30 11.5 30 10.0 25 7.5 10 35 20.0 40 13.2 39 13.0 42 12.0 48 10.8 20 50 25.0 52 15.0 55 15.7 55 14.0 69 12.5 30 65 28.0 65 16.7 69 17.5 70 16.0 85 14.5 40 80 32.0 77 18.2 84 19.4 82 18.0 98 15.8 50 95 34.0 87 19.7 97 20.9 95 19.0 108 17.0 60 110 38.0 100 21.0 113 22.3 110 21.5 120 18.0 70 - - 113 22.3 127 23.5 122 23.5 130 19.0 80 - - 125 23.3 142 25.5 135 24.0 143 19.6 90 - - 137 24.5 157 26.2 150 26.0 155 20.3 100 - - 148 25.4 172 27.3 162 27.5 - - 110 - - 160 26.3 - - 175 29.0 - - 120 - - 172 27.0 - - 189 31.0 - - 130 - - 183 27.8 - - 201 33.0 - - 140 - - 196 28.7 - - 213 35.0 - - 150 - - 208 29.4 - - - - - - 160 - - 217 30.0 - - - - - -
50
Related Documents