FHD LED TV Instruction Manual Model :CX22A19DC

Welcome message from author
This document is posted to help you gain knowledge. Please leave a comment to let me know what you think about it! Share it to your friends and learn new things together.
Transcript

FHD LED TV
Instruction Manual
Model:CX22A19DC

. . . . . . . . . . . . . . . . . . . . . . . . . . . . . . . . . . . . . . . . . . . . . . . . . . . . . . . . . . . . . . . . . . . . . . . .
. . . . . . . . . . . . . . . . . . . . . . . . . . . . . . . . . . . . . . . . . . . . . . . . . . . . . . . . . . . . . . . . . . . . . . . . . . . . . . . . . . . . . . . . . . . . . . . . . . . . . . . . . . . . . . . . . . . . . . . . . . . . . . . . . . . . . . . . . . . . . . . . . . . . . . . . . . . . . . . . . . . . . . . . . . . . .
. . . . . . . . . . . . . . . . . . . . . . . . . . . . . . . . . . . . . . . . . . . . . . . . . . . . . . . . . . . . . . . . . . . . . . . . . . . . . . . . . . . . . . . . . . . . . . . . . . . . . . . . . . . . . . . . . . . . . . . . . . . . . . . . . . . . . . . . . . . . . . . . . . . . . . . . . . . .
. . . . . . . . . . . . . . . . . . . . . . . . . . . . . . . . . . . . . . . . . . . . . . . . . . . . . . . . . . . . . . . . . . . . . . . . . . . . . . . . . . . . .
. . . . . . . . . . . . . . . . . . . . . . . . . . . . . . . . . . . . . . . . . . . . . . . . . . . . . . . . . . . . . . . . . . . . . . . . . . . . . . . . . . . . .. . . . . . . . . . . . . . . . . . . . . . . . . . . . . . . . . . . . . . . . . . . . . . . . . . . . . . . . . . . . . . . . . . . . . . . . . . . . . . . . . . . . . . . . . . . . . . . . . . . . . . . . . . . . . . . . . . . . . . . . . . . . . . . . . . . . . . . . . . . . . . . . . . . . . . . . . . . . . . . . . . . . . . . .
. . . . . . . . . . . . . . . . . . . . . . . . . . . . . . . . . . . . . . . . . . . . . . . . . . . . . . . . . . . . . . . . . . . . . . . . . . . . . . . . . . . . .
. . . . . . . . . . . . . . . . . . . . . . . . . . . . . . . . . . . . . . . . . . . . . . . . . . . . . . . . . . . . . . . . . . . . . . . . . . . . . . . . . . . . . . . . . . . . . . . . . . . . . . . . . . . . . . . . . . . . . . . . . . . . . . . . . . . . . . . . . . . . . . . . . . . . . . . . . . . . . . . . . . . . . . . .
. . . . . . . . . . . . . . . . . . . . . . . . . . . . . . . . . . . . . . . . . . . . . . . . . . . . . . . . . . . . . . . . . . . . . . . . . . . . . . . . . . . . .
. . . . . . . . . . . . . . . . . . . . . . . . . . . . . . . . . . . . . . . . . . . . . . . . . . . . . . . . . . . . . . . . . . . . . . . . . . . . . . . . . . . .
1
33
3
3
89101112131415
16
About Your TV
Important Safety Instructions
SpecificationsIncludes
SetupConnecting the Stand
. . . . . . . . . . . . . . . . . . . . . . . . . . . . . . . . . . . . . . . . . . . . . . . . . . . . . . . . . . . . . . . . . . . . . . . . 4Mounting the TV on a wallRemote Batteries
Main Menu OperationSetup Wizard
. . . . . . . . . . . . . . . . . . . . . . . . . . . . . . . . . . . . . . . . . . . . . . . . . . . . . . . . . . . . . . . . . . . . . . . . . . . . . 5Orientation
TV Controls & Inputs
. . . . . . . . . . . . . . . . . . . . . . . . . . . . . . . . . . . . . . . . . . . . . . . . . . . . . . . . . . . . . . . . . . . . . . . . . . . . . . . . . . . . . . . . 17Customer Support
Warranty
. . . . . . . . . . . . . . . . . . . . . . . . . . . . . . . . . . . . . . . . . . . . . . . . . . . . . . . . . . . . . . . . . . . . . . . . . . . . . . . . . . . . . . . . . 7Remote
Setup MenuPicture MenuSound MenuTime MenuLock MenuChannel MenuMedia Menu
Trouble Shooting
Contents

1
Important Safety Instructions

Important Safety Instructions
gently
2

About Your TVSpecifications
• Model: CX22A19DC
• Screen Size: 22”
• Panel Resolution: 1920*1080
• Viewing Angle: 176(H)*176(V)
• Aspect Ratio: 16:9
• USB Port: Supports JPEG image/MP3 audio/ MPEG1,2 & 4 video files
Includes • Remote control and 2 AAA batteries
•
•
Base stand
• I
12V DC harness.
nstruction Manual
Setup
Remote Batteries Requires 2, AAA-size batteries (included)
Connecting the Stand When placing TV on flat surface, be careful not to push, scratch, or otherwise damage the front of the TV and LCD screen. Using a phillips-head screwdriver, tighten the screws by hand. Using a power drill could damage the TV stand.
3
BB4X12(4pcs)

Mounting the TV on a wall
Install Steps
If you mount this TV on the wall, follow the instructions exactly as set out by the manufacturer.
Incomplete or improper installation may cause injury to you, and/or damage to the LED TV.
When you have appropriate wall mount brackets, please install them by using the VESA screws
included in TV PE bag.
1.Assemble the wall mount adapter.
2.Install the wall mount adapter on a wall with screws.
3.Install the wall mount brackets onto rear cabinet with the VESA screws.
4.Buckle the brackets with TV into the wall mount adapter.
Please refer to the table below to ensure the correct size VESA mount is used with the TV.
4
TV size ininches
VESA screw hole specsScrew Size QuantityWidth
mmHeight
mm19-28 100 100 M4 4
3
50-5565
2 200 100 M6 439-43 200 200 M6 4
400 200 M6 4400 400 M6 4
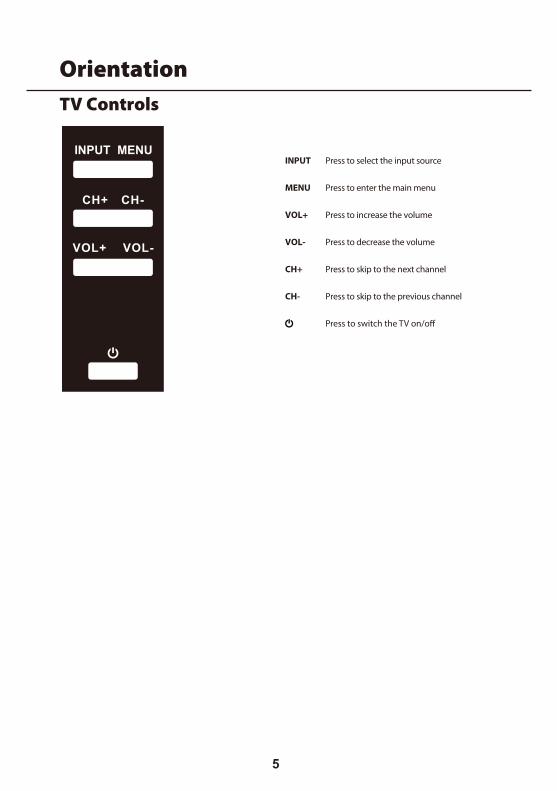
INPUT Press to select the input source
MENU Press to enter the main menu
VOL+ Press to increase the volume
VOL- Press to decrease the volume
CH+ Press to skip to the next channel
CH- Press to skip to the previous channel
TV Controls
Orientation
5

Headphone Jack:
Optical Out:Video Input Jack:
Y/Pb/Pr:
VGA Input Jack:
PC Audio Input Jack:
HDMI Input(ARC) Jack:
RF Input Jack:
USB:
Audio Out:
Headphone output jack.
Connects to the Optical Audio in port of an audio device.
Connects to the COMPOSITE VIDEO OUT ports of an audio device.
Connect to the COMPONENT VIDEO OUT ports of an audio device.
Connects to the VGA output jack on a personal computer.
Connects to the Audio out jack of a computer.
HDMI in.
Connects to the ANTENNA, CABLE, or CABLE BOX.
USB Port for media playback when Media is the TV’s selected source.
DC 12V IN: Power (DC 12V or plugpack) input.
Connects to the AUDIO IN ports of an audio device.
Inputs
Orientation
6

ENTER
LED
During playback, press to select the previous track/chapter.During playback, press to select the next track/chapter.
Switch to the previous display.Move to the next display.
Jump to a specific time on a DVD/ VCD/MP3/WMA or CD.Press to start the A-B repeat function.
Press to select repeat playback modes.
Remote
Orientation
7

8
The Setup Wizardtime you turned on the TV. It will assist you to
IMPORTANT: Make sure the antenna or cable TV system connection is made. 1. Press POWER button on the TV control
panel or button on the remote control to switch on the TV. The power indicator will change to Green. The Setup Wizard window appears on the screen. NOTE: It may take a few seconds before the Setup Wizard window appears on the screen.
2. Use or keys to check Home Mode (Energy Saving) or Retail Mode. Press Enter to enter the next menu.
Setup Wizard
Choose your Picture Mode
Home Mode (Energy Saving)
Move Select ExitMENU
Retail Mode
3. Use or keys to check Yes or No. Press Enter to enter the next menu or press MENU to return to the previous menu.
Setup WizardAre you sure you want Home mode?
In this mode ENERGY STAR saving are realized.Yes
Move Select ReturnMENU
No
4. Use / / / keys to navigate and select your desired settings.
Setup Wizard
Air/Cable Air
Cable System Auto
Auto Scan
Menu Language English
Move Select ExitMENU
Setup Wizard
Menu Language
Use or keys to highlight Menu Language, then press or to select English, French or Spanish.
Air/Cable Use or keys to highlight Air/Cable, then press or to select Air or Cable.
Cable System
Use or keys to highlight Cable System, then press or to select Auto, STD, IRC or HRC.NOTE: Only adjustable after set “Air/Cable” as “Cable” mode.
Auto Scan
Use or keys to highlight Auto Scan, then press Enter or to start memorizing all the channels available in your area.
NOTE: You may press EXIT at any time to exit the menu.
Setup Wizard
Main Menu Operation

9
1. Press MENU button, the setup window will appear on the screen.2. Use or keys to highlight Setup mode.3. Use or to highlight the item you would like to reset, then press or to select the settings.4. Press MENU to return to the previous menu or press EXIT at any time to exit the setting.
Menu Language English
Advanced
Zoom Mode Wide
Closed Caption
Noise Reduction Middle
DLC OnSetup Wizard
Transparency 25%
Source Label
Select Move ExitMENU
Picture Sound Time Setup Lock Channel
Restore Default
Move Next ReturnMENU
Picture Sound Time Setup Lock Channel
HDMI CEC
HDMI3 Default
HDMI1 Default
HDMI2 Default
PC Default
Media Default
AV DefaultComponent Default
Move Select ReturnMENU
Picture Sound Time Setup Lock Channel
TV Default
Move Select ReturnMENU
Picture Sound Time Setup Lock Channel
CC Mode
Basic Selection CC 1
Advanced Service 1
Option
Move Select ReturnMENU
Picture Sound Time Setup Lock Channel
HDMI CEC On
Auto Standby On
Auto TV on On
HDMI ARC
Device control On
Device List
Setup Menu

10
1. Press MENU button, the setup window will appear on the screen.
2. Use or keys to highlight Picture mode.3. Use or to highlight the item you would
like to reset, then press or to select the settings.
4. Press MENU to return to the previous menu or press EXIT at any time to exit the setting.
Picture Mode EnergySaving
Tint
Brightness
Color
Blue Screen On
Color Temperature Cool
Contrast
Sharpness
Select Move ExitMENU
Picture Sound Time Setup Lock Channel
50
50
50
050
Picture Menu
11
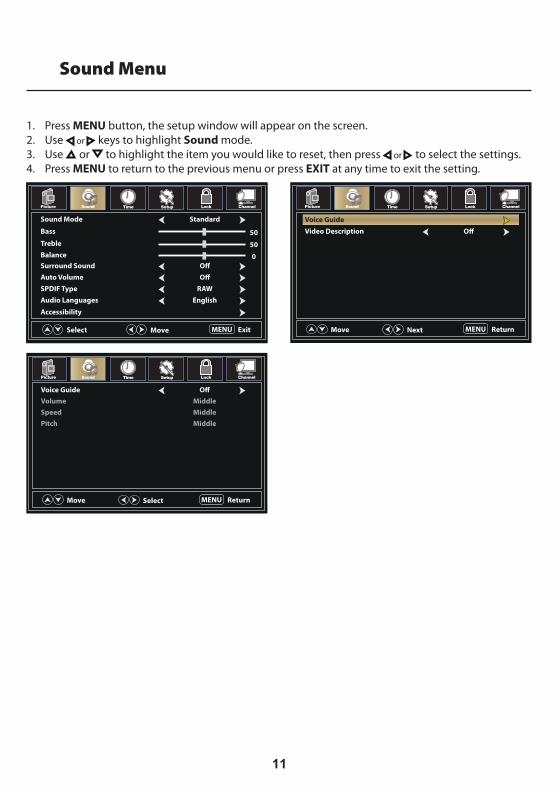
1. Press MENU button, the setup window will appear on the screen.2. Use or keys to highlight Sound mode.3. Use or to highlight the item you would like to reset, then press or to select the settings.4. Press MENU to return to the previous menu or press EXIT at any time to exit the setting.
Voice Guide
Volume Middle
Speed Middle
Pitch Middle
Move Select ReturnMENU
Picture Sound Time Setup Lock Channel
Sound Mode Standard
Treble
Balance
Audio Languages English
SPDIF Type RAW
Auto Volume
Surround Sound
Bass
Select Move ExitMENU
Picture Sound Time Setup Lock Channel
50
50
0
Accessibility
Video Description
Move Next ReturnMENU
Picture Sound Time Setup Lock Channel
Voice Guide
Sound Menu

12
1. Press MENU button, the setup window will appear on the screen.
2. Use or keys to highlight Time mode.3. Use or to highlight the item you would
like to reset, then press or to select the settings.
4. Press MENU to return to the previous menu or press EXIT at any time to exit the setting.
Sleep Timer
Time Zone
Daylight Saving Time
Time Format 12-hour
Auto Clock On
Clock 2005/12/07 07:06 PM
Select Move ExitMENU
Picture Sound Time Setup Lock Channel
Time Menu

13
1. Press MENU button, the setup window will appear on the screen.2. Use or keys to highlight Lock mode.3. Use or keys to highlight “Enter Password” and input “0000” to enter the setup window.4. Use or to highlight the item you would like to reset, then press or to select the settings.5. Press MENU to return to the previous menu or press EXIT at any time to exit the setting.
0-9 ExitMENU
Picture Sound Time Setup Lock Channel
Enter Password _ _ _ _
Move Select ReturnMENU
Picture Sound Time Setup Lock Channel
Canada French ECanada English E
Picture Sound Time Setup Lock Channel
MPAA N/ATV
Move Next ReturnMENU
Move Next ReturnMENU
Picture Sound Time Setup Lock Channel
Set Password
Clear LockClear Lock
System LockInput BlockInput Block
USUSCanadaCanadaRRT SettingRRT SettingReset RRT
Move Select ReturnMENU
Picture Sound Time Setup Lock Channel
ALL FV V S L DTV-YTV-Y7TV-GTV-PGTV-14TV-MA
TV RATING
: Lock Press OK to Lock or Unlock
ExitMENU
Picture Sound Time Setup Lock Channel
Enter New Password _ _ _ _
_ _ _ _
0-9
Lock Menu
14
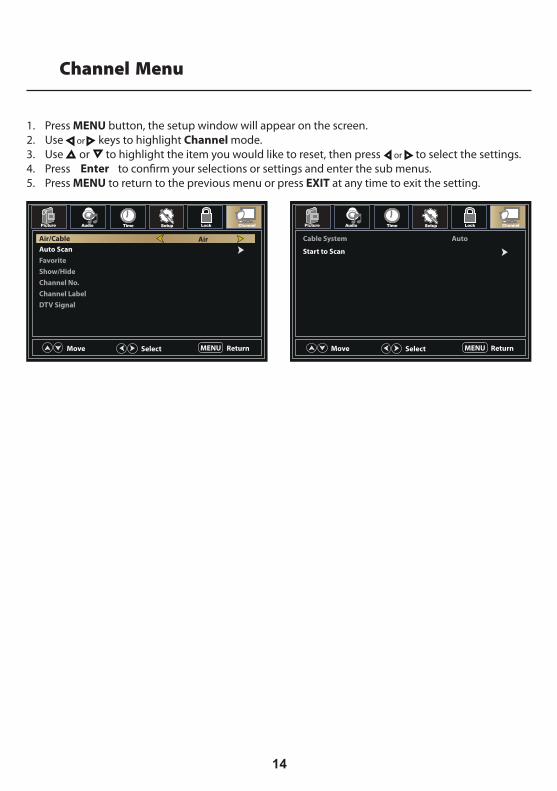
1. Press MENU button, the setup window will appear on the screen.2. Use or keys to highlight Channel mode.3. Use or to highlight the item you would like to reset, then press or to select the settings.4. Press 5. Press MENU to return to the previous menu or press EXIT at any time to exit the setting.
Move Select ReturnMENU
Picture Audio Time Setup Lock Channel
Auto Scan
Favorite
Show/Hide
Channel Label
DTV Signal
Air/Cable Air
Channel No.
Picture Audio Time Setup Lock Channel
Start to Scan
Move Select ReturnMENU
Cable System Auto
Channel
Enter
Menu

15
1. INPUT button and select MEDIA. Press or to enter.2. Use or keys to select to view Photo or Music. Press or to enter.3. Use or 4. Press MENU to return to the previous menu or press EXIT at any time to exit the setting.
EnterEnter
Media Menu

16
Problem Solution/Issue
TV does not operate
Make sure the power cord is plugged in.Try another AC outlet.
Unplug unit for an hour, then plug it back in.
Normal picture, but no sound
Check the volume settings.Sound muted? Press MUTE button.Try another channel.Check audio cable connections.
The remote control does not work
Make the remote control is in range with no obstructions.Check the batteries.Correct operating mode set: TV, VCR etc.
Poor sound or no sound
Station or Cable TV experiencing problems, tune to another station.Check sound adjustments (Volume or Mute).Check for sources of possible interference.
Poor picture or no picture
Station or Cable TV experiencing problems, tune to another station.Make sure channels are set into memory.Check antenna or Cable TV connections, adjust antenna.Check for sources of possible interference.Check picture control adjustments.
Poor TV reception
Adjust the antenna position to a stronger signal receiving angle.Check the Antenna connection is tight to the TV.Check there is power supplied to the Antenna distribution box.
RV.Ensure the internal RV coax jump cable is connected to the correct port.
Poor Cable / Satellite TVReception
Check incoming Cable is connected correctly to RV.Ensure cable splitter box has power.
RV.Ensure the internal RV coax jump cable is connected to the correct port.Check Dish has not obstruction.
Sleep Timer is set.Power interrupted.
TV AV input plays black and white
Check RCA connections on the back of the TV and from the source to ensure they are connected to the correct connections. Ensure the yellow connection is in the correct port.
Trouble Shooting

17
Customer Support
WarrantyLimited 1 Year Warranty The Manufacturer warrants this product to be free from defects in workmanship and materials, under normal use and conditions, for a period of 1 year for parts and 90 days for labor from the original date of purchase. The Manufacturer agrees, at its option during the warranty period, to repair any defect in parts, material or workmanship, or to furnish a repaired or refurbished product of equal value in exchange without charge (except for a fee for shipping, handling, packing, return postage, and insurance which will be incurred by the
not transferable to any person or entity other than the original purchaser, and does not cover the costs incurred from installation, removal, or reinstallation of the product.
The extent of the Manufacturer’s liability under this warranty is limited to the repair or replacement provided above. In no event shall the Manufacturer’s liability exceed the purchase price paid by the purchaser for the product.
Services provided under the terms of this warranty are your exclusive remedy.
Coverage Does NOT Include:• Any product which has been subject to damage due to an act of God, misuse, neglect, accident, abuse,
commercial use.
• Damage due to improper installation, operation or maintenance, or attempted repair by anyone other than the Manufacturer.
• Damage to external media devices such as DVDs, CDs, iPod, iPhone, MP3 players, and/or memory devices.
• Cosmetic damage, accidental damage, set-up adjustments, panel damage by non-moving images for a long
• Re-manufactured units, product sold “As Is”, or closeout product.
• The cost of shipping this product to the Service Center and its return to the owner.
Where is the Warranty Valid?
rights which vary from state to state.
How to Obtain Service
FOR WARRANTY SERVICE AND INSTRUCTIONS ON HOW TO RETURN YOUR PRODUCT CALL:
U.S.(800) 442-7717International(574) 522-7781
Please make sure to place the product in its original packaging, or packaging that provides the same amount of protection as the original packaging.
Our technical support team is available Monday – Friday, 8 am to 5 pm EST

River Park Inc.21953 Protecta Drive | Elkhart, IN 46516
http://www.riverparkinc.comU.S.(800) 442-7717
International(574) 522-7781
Related Documents