Institute of Chess Supplementary Key Notes for Revision to LEVEL 5 The contents were written and arranged by GM Chris Ward. December 2014

Welcome message from author
This document is posted to help you gain knowledge. Please leave a comment to let me know what you think about it! Share it to your friends and learn new things together.
Transcript
Institute of
Chess
Supplementary Key Notes for Revision to
LEVEL 5
The contents were written and arranged by
GM Chris Ward.
December 2014
1
Institute of Chess Level 5 Supplementary Key Notes
by GM Chris Ward
Index of Contents
Page
1. The Importance of Pawn Breaks 2
2. Practical Rook and Pawn Endgames 9
3. Examples of Centre under Tension 15
4. Restriction and Disruption 23
5. The Isolated Queen’s Pawn 26
6. Closed Positions 30
7. Tricky Transpositions 36
8. ‘Anti’ Openings 37
2
PART 1: The Importance of Pawn Breaks
Studying and comparing the d2-d4 and f2-f4 pawn breaks in the following:
Bishop's Opening - Seeking f2-f4
1.e4 e5 2.Bc4
2.Nc3 is the Vienna Game and 2...Nf6 3.Bc4 Nc6 4.d3 transposes.
Instead 2.Nf3 generally sees White ultimately seeking to break with d4 but 2...Nc6 3.Bc4 Bc5
4.d3 Nf6 5.Nc3 d6 would leave no near bright prospects for the rooks.
2...Nf6 3.d3 Nc6 4.Nc3
XABCDEFGHY 8r+lwqkvl-tr( 7zppzpp+pzpp' 6-+n+-sn-+& 5+-+-zp-+-% 4-+L+P+-+$ 3+-sNP+-+-# 2PzPP+-zPPzP" 1tR-vLQmK-sNR! xabcdefghy
White prevents Black's pawn break ...d5 before employing his own f4. Instead 4.f4 exf4 (or
4...d5 5.exd5 Nxd5) 5.Bxf4 d5 6.exd5 Nxd5 is most satisfactory for Black.
4...Bc5
Other candidates include 4...Na5 seeking to eliminate White's light-squared bishop and;
4...Bb4 pinning the c3-knight and thus once again bringing the concept of ...d5 into play.
5.f4!
5 Nf3 would, of course, leave White without either of the d2-d4 or f2-f4 pawn breaks, whilst
5.Nge2? Ng4! 6.0–0 Qh4! would be disastrous.
5...d6 6.Nf3
3
XABCDEFGHY 8r+lwqk+-tr( 7zppzp-+pzpp' 6-+nzp-sn-+& 5+-vl-zp-+-% 4-+L+PzP-+$ 3+-sNP+N+-# 2PzPP+-+PzP" 1tR-vLQmK-+R! xabcdefghy
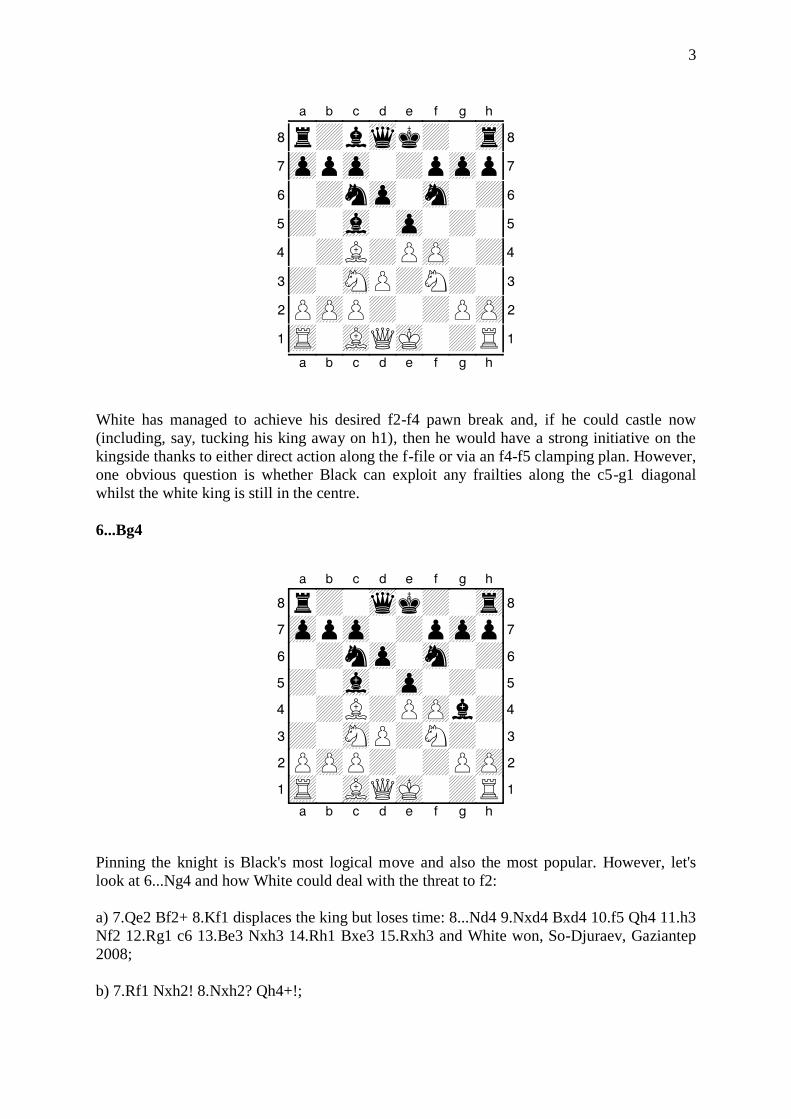
White has managed to achieve his desired f2-f4 pawn break and, if he could castle now
(including, say, tucking his king away on h1), then he would have a strong initiative on the
kingside thanks to either direct action along the f-file or via an f4-f5 clamping plan. However,
one obvious question is whether Black can exploit any frailties along the c5-g1 diagonal
whilst the white king is still in the centre.
6...Bg4
XABCDEFGHY 8r+-wqk+-tr( 7zppzp-+pzpp' 6-+nzp-sn-+& 5+-vl-zp-+-% 4-+L+PzPl+$ 3+-sNP+N+-# 2PzPP+-+PzP" 1tR-vLQmK-+R! xabcdefghy
Pinning the knight is Black's most logical move and also the most popular. However, let's
look at 6...Ng4 and how White could deal with the threat to f2:
a) 7.Qe2 Bf2+ 8.Kf1 displaces the king but loses time: 8...Nd4 9.Nxd4 Bxd4 10.f5 Qh4 11.h3
Nf2 12.Rg1 c6 13.Be3 Nxh3 14.Rh1 Bxe3 15.Rxh3 and White won, So-Djuraev, Gaziantep
2008;
b) 7.Rf1 Nxh2! 8.Nxh2? Qh4+!;
4
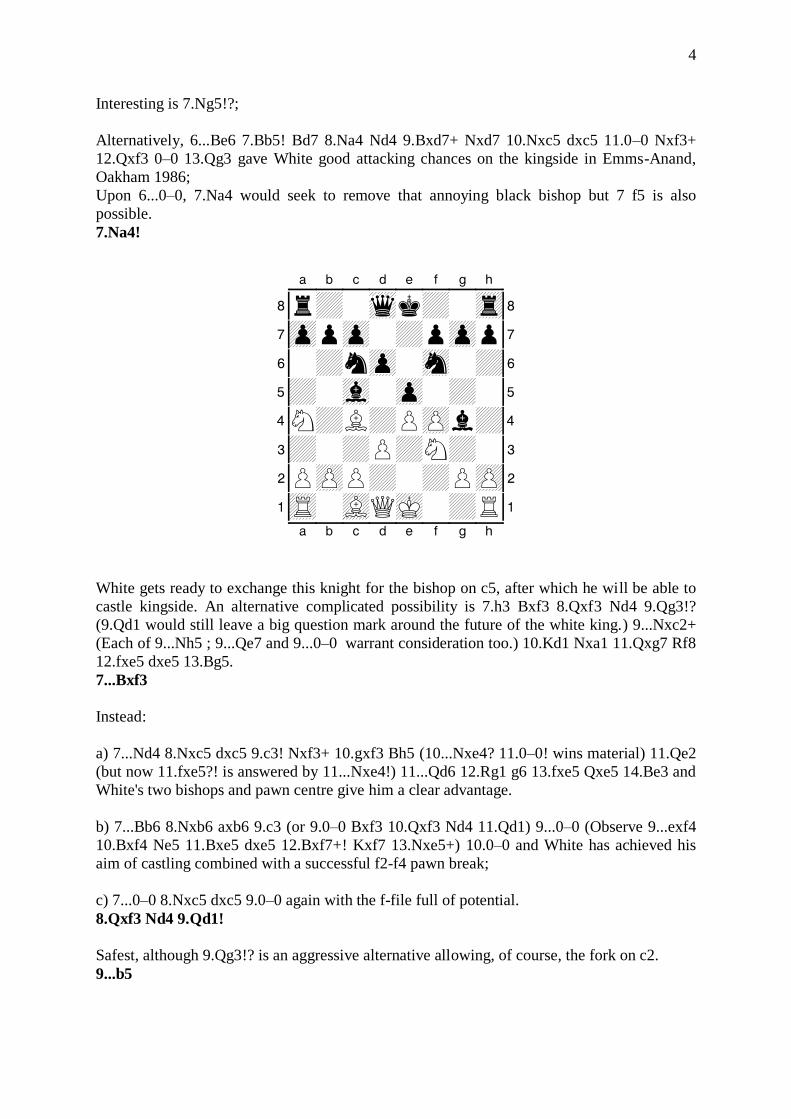
Interesting is 7.Ng5!?;
Alternatively, 6...Be6 7.Bb5! Bd7 8.Na4 Nd4 9.Bxd7+ Nxd7 10.Nxc5 dxc5 11.0–0 Nxf3+
12.Qxf3 0–0 13.Qg3 gave White good attacking chances on the kingside in Emms-Anand,
Oakham 1986;
Upon 6...0–0, 7.Na4 would seek to remove that annoying black bishop but 7 f5 is also
possible.
7.Na4!
XABCDEFGHY 8r+-wqk+-tr( 7zppzp-+pzpp' 6-+nzp-sn-+& 5+-vl-zp-+-% 4N+L+PzPl+$ 3+-+P+N+-# 2PzPP+-+PzP" 1tR-vLQmK-+R! xabcdefghy
White gets ready to exchange this knight for the bishop on c5, after which he will be able to
castle kingside. An alternative complicated possibility is 7.h3 Bxf3 8.Qxf3 Nd4 9.Qg3!?
(9.Qd1 would still leave a big question mark around the future of the white king.) 9...Nxc2+
(Each of 9...Nh5 ; 9...Qe7 and 9...0–0 warrant consideration too.) 10.Kd1 Nxa1 11.Qxg7 Rf8
12.fxe5 dxe5 13.Bg5.
7...Bxf3
Instead:
a) 7...Nd4 8.Nxc5 dxc5 9.c3! Nxf3+ 10.gxf3 Bh5 (10...Nxe4? 11.0–0! wins material) 11.Qe2
(but now 11.fxe5?! is answered by 11...Nxe4!) 11...Qd6 12.Rg1 g6 13.fxe5 Qxe5 14.Be3 and
White's two bishops and pawn centre give him a clear advantage.
b) 7...Bb6 8.Nxb6 axb6 9.c3 (or 9.0–0 Bxf3 10.Qxf3 Nd4 11.Qd1) 9...0–0 (Observe 9...exf4
10.Bxf4 Ne5 11.Bxe5 dxe5 12.Bxf7+! Kxf7 13.Nxe5+) 10.0–0 and White has achieved his
aim of castling combined with a successful f2-f4 pawn break;
c) 7...0–0 8.Nxc5 dxc5 9.0–0 again with the f-file full of potential.
8.Qxf3 Nd4 9.Qd1!
Safest, although 9.Qg3!? is an aggressive alternative allowing, of course, the fork on c2.
9...b5
5
Otherwise, White was simply going to take on c5, when Black would have e5 to worry about
as well.
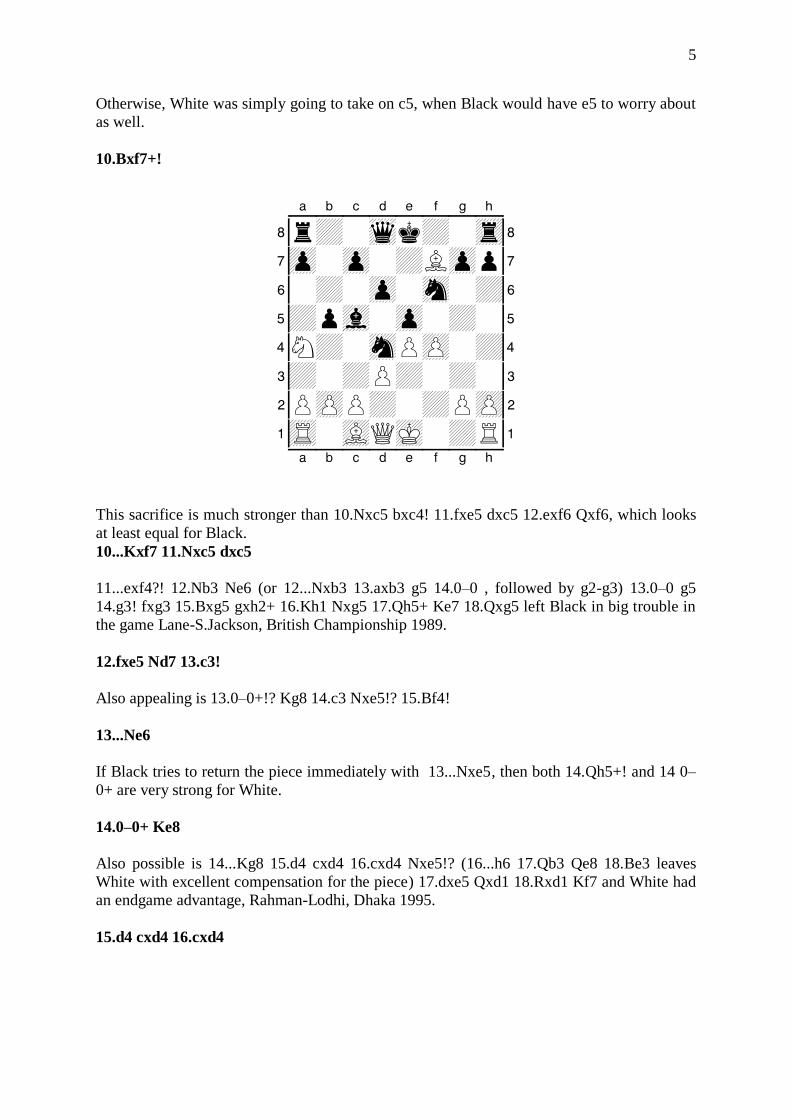
10.Bxf7+!
XABCDEFGHY 8r+-wqk+-tr( 7zp-zp-+Lzpp' 6-+-zp-sn-+& 5+pvl-zp-+-% 4N+-snPzP-+$ 3+-+P+-+-# 2PzPP+-+PzP" 1tR-vLQmK-+R! xabcdefghy
This sacrifice is much stronger than 10.Nxc5 bxc4! 11.fxe5 dxc5 12.exf6 Qxf6, which looks
at least equal for Black.
10...Kxf7 11.Nxc5 dxc5
11...exf4?! 12.Nb3 Ne6 (or 12...Nxb3 13.axb3 g5 14.0–0 , followed by g2-g3) 13.0–0 g5
14.g3! fxg3 15.Bxg5 gxh2+ 16.Kh1 Nxg5 17.Qh5+ Ke7 18.Qxg5 left Black in big trouble in
the game Lane-S.Jackson, British Championship 1989.
12.fxe5 Nd7 13.c3!
Also appealing is 13.0–0+!? Kg8 14.c3 Nxe5!? 15.Bf4!
13...Ne6
If Black tries to return the piece immediately with 13...Nxe5, then both 14.Qh5+! and 14 0–
0+ are very strong for White.
14.0–0+ Ke8
Also possible is 14...Kg8 15.d4 cxd4 16.cxd4 Nxe5!? (16...h6 17.Qb3 Qe8 18.Be3 leaves
White with excellent compensation for the piece) 17.dxe5 Qxd1 18.Rxd1 Kf7 and White had
an endgame advantage, Rahman-Lodhi, Dhaka 1995.
15.d4 cxd4 16.cxd4
6
XABCDEFGHY 8r+-wqk+-tr( 7zp-zpn+-zpp' 6-+-+n+-+& 5+p+-zP-+-% 4-+-zPP+-+$ 3+-+-+-+-# 2PzP-+-+PzP" 1tR-vLQ+RmK-! xabcdefghy
Now the game Balashov-Matanovic, Skopje 1970, concluded 16...Qe7? 17.Be3 Rf8 18.d5
Rxf1+ 19.Qxf1 Nd8 20.e6 Nf6 21.Rc1! Nxe4 22.Qxb5+ c6 23.Rxc6! Kf8 24.Rc1 Kg8
25.Rc7! Qd6 26.Qe8+ Qf8 27.Rxg7+! 1–0.
Instead, Black should try 16...Nxe5!, as 17.dxe5 Qxd1 18.Rxd1 Ke7 is probably only a small
endgame advantage for White.
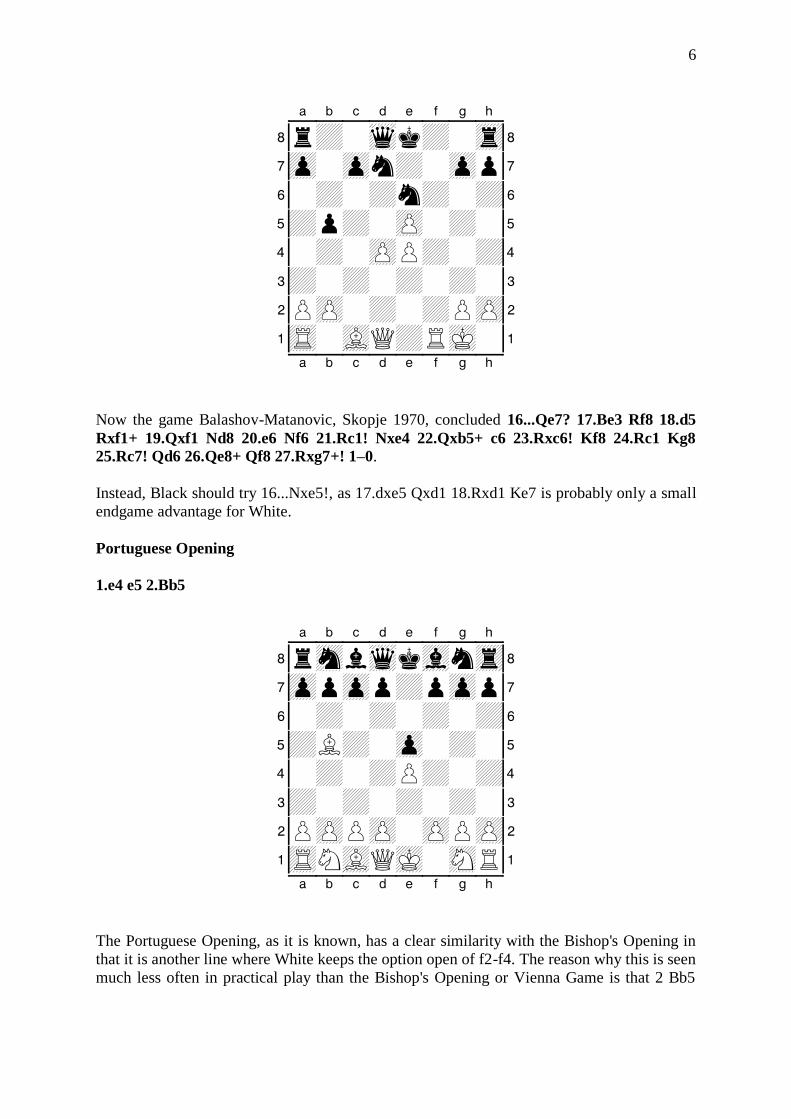
Portuguese Opening
1.e4 e5 2.Bb5
XABCDEFGHY 8rsnlwqkvlntr( 7zppzpp+pzpp' 6-+-+-+-+& 5+L+-zp-+-% 4-+-+P+-+$ 3+-+-+-+-# 2PzPPzP-zPPzP" 1tRNvLQmK-sNR! xabcdefghy
The Portuguese Opening, as it is known, has a clear similarity with the Bishop's Opening in
that it is another line where White keeps the option open of f2-f4. The reason why this is seen
much less often in practical play than the Bishop's Opening or Vienna Game is that 2 Bb5
7
breaks an opening principle and allows Black to gain time attacking the bishop with a useful
move.
2...c6!
Note that this is not possible in the far more popular 'Ruy Lopez' in which the moves 2 Nf3
and 2...Nc6 would have been inserted.
Instead of the text, 2...a6 3.Ba4 b5 4.Bb3 Nf6 hasn't gained that much for Black because:
1. The white bishop is less exposed on b3.
2. ...a6 and ...b5 produces weaknesses as well as activity.
Incidentally, 2...Nc6 3.d3 Nf6 4.f4 is what White is after with, for example, 4...Bc5 5.Nf3 d6
6.Nc3 a6 7.Bxc6+ bxc6 8.fxe5 dxe5 9.Qe2 Qd6 10.Be3 being a clear advantage for White in
Welling,G (2335)-Becker,F (2143) Germany 1998. Black has a shattered queenside pawn
structure and White has a useful half-open f-file.
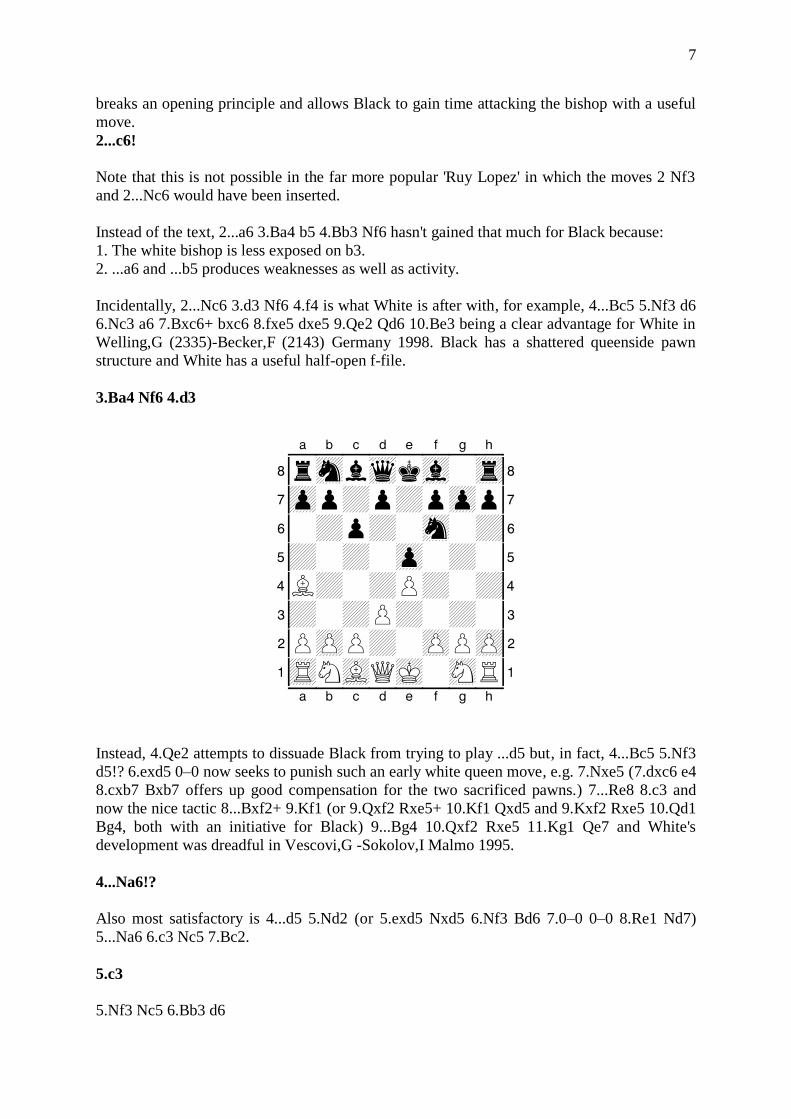
3.Ba4 Nf6 4.d3
XABCDEFGHY 8rsnlwqkvl-tr( 7zpp+p+pzpp' 6-+p+-sn-+& 5+-+-zp-+-% 4L+-+P+-+$ 3+-+P+-+-# 2PzPP+-zPPzP" 1tRNvLQmK-sNR! xabcdefghy
Instead, 4.Qe2 attempts to dissuade Black from trying to play ...d5 but, in fact, 4...Bc5 5.Nf3
d5!? 6.exd5 0–0 now seeks to punish such an early white queen move, e.g. 7.Nxe5 (7.dxc6 e4
8.cxb7 Bxb7 offers up good compensation for the two sacrificed pawns.) 7...Re8 8.c3 and
now the nice tactic 8...Bxf2+ 9.Kf1 (or 9.Qxf2 Rxe5+ 10.Kf1 Qxd5 and 9.Kxf2 Rxe5 10.Qd1
Bg4, both with an initiative for Black) 9...Bg4 10.Qxf2 Rxe5 11.Kg1 Qe7 and White's
development was dreadful in Vescovi,G -Sokolov,I Malmo 1995.
4...Na6!?
Also most satisfactory is 4...d5 5.Nd2 (or 5.exd5 Nxd5 6.Nf3 Bd6 7.0–0 0–0 8.Re1 Nd7)
5...Na6 6.c3 Nc5 7.Bc2.
5.c3
5.Nf3 Nc5 6.Bb3 d6
8
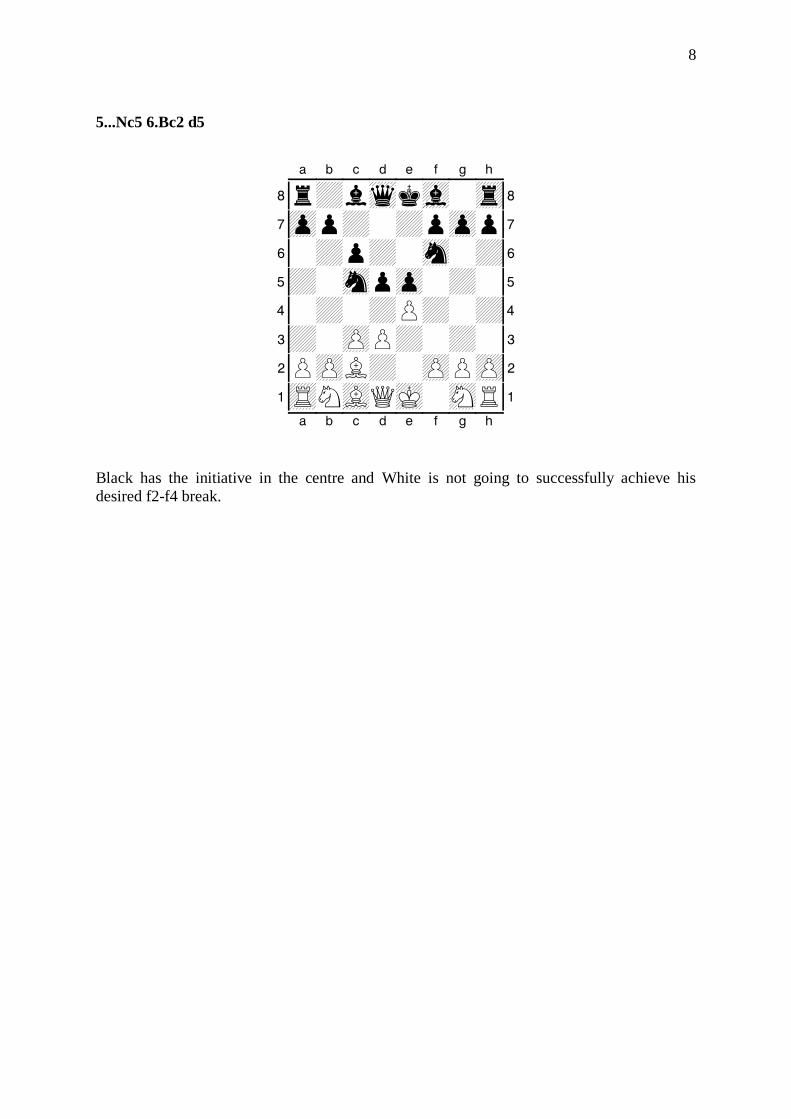
5...Nc5 6.Bc2 d5
XABCDEFGHY 8r+lwqkvl-tr( 7zpp+-+pzpp' 6-+p+-sn-+& 5+-snpzp-+-% 4-+-+P+-+$ 3+-zPP+-+-# 2PzPL+-zPPzP" 1tRNvLQmK-sNR! xabcdefghy
Black has the initiative in the centre and White is not going to successfully achieve his
desired f2-f4 break.
9
PART 2: Practical Rook and Pawn Endgames
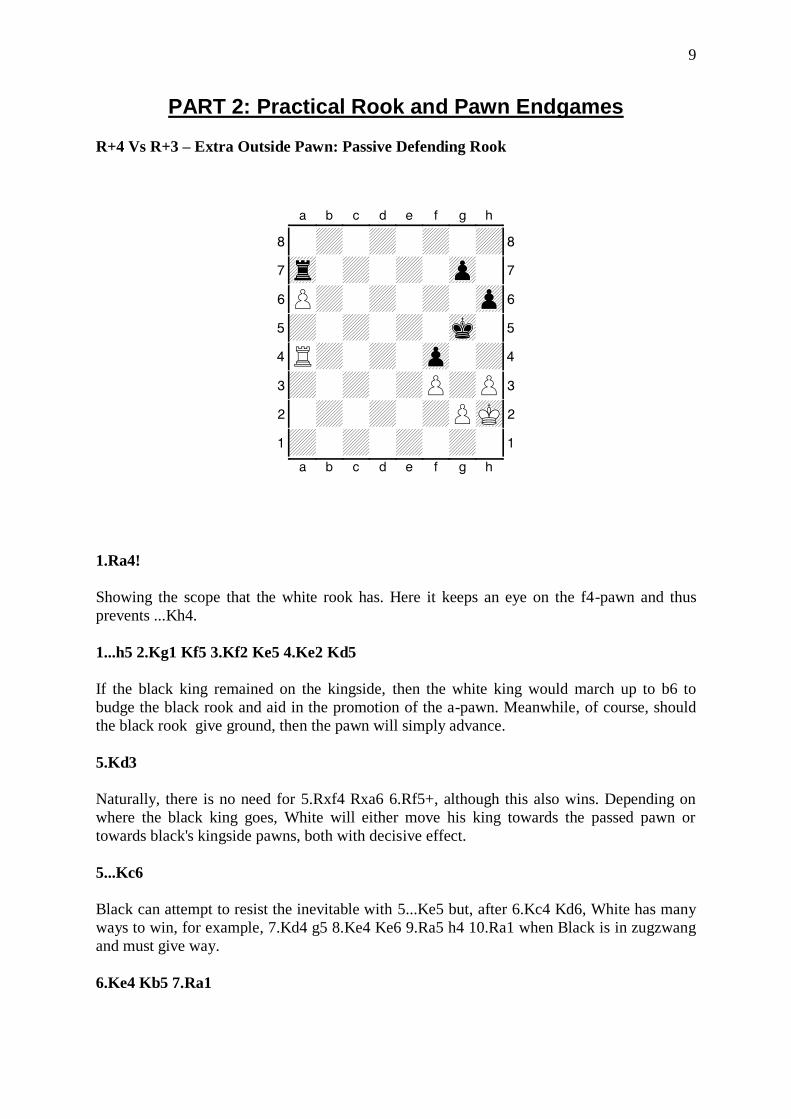
R+4 Vs R+3 – Extra Outside Pawn: Passive Defending Rook
XABCDEFGHY 8-+-+-+-+( 7tr-+-+-zp-' 6P+-+-+-zp& 5+-+-+-mk-% 4R+-+-zp-+$ 3+-+-+P+P# 2-+-+-+PmK" 1+-+-+-+-! xabcdefghy
1.Ra4!
Showing the scope that the white rook has. Here it keeps an eye on the f4-pawn and thus
prevents ...Kh4.
1...h5 2.Kg1 Kf5 3.Kf2 Ke5 4.Ke2 Kd5
If the black king remained on the kingside, then the white king would march up to b6 to
budge the black rook and aid in the promotion of the a-pawn. Meanwhile, of course, should
the black rook give ground, then the pawn will simply advance.
5.Kd3
Naturally, there is no need for 5.Rxf4 Rxa6 6.Rf5+, although this also wins. Depending on
where the black king goes, White will either move his king towards the passed pawn or
towards black's kingside pawns, both with decisive effect.
5...Kc6
Black can attempt to resist the inevitable with 5...Ke5 but, after 6.Kc4 Kd6, White has many
ways to win, for example, 7.Kd4 g5 8.Ke4 Ke6 9.Ra5 h4 10.Ra1 when Black is in zugzwang
and must give way.
6.Ke4 Kb5 7.Ra1
10
XABCDEFGHY 8-+-+-+-+( 7tr-+-+-zp-' 6P+-+-+-+& 5+k+-+-+p% 4-+-+Kzp-+$ 3+-+-+P+P# 2-+-+-+P+" 1tR-+-+-+-! xabcdefghy
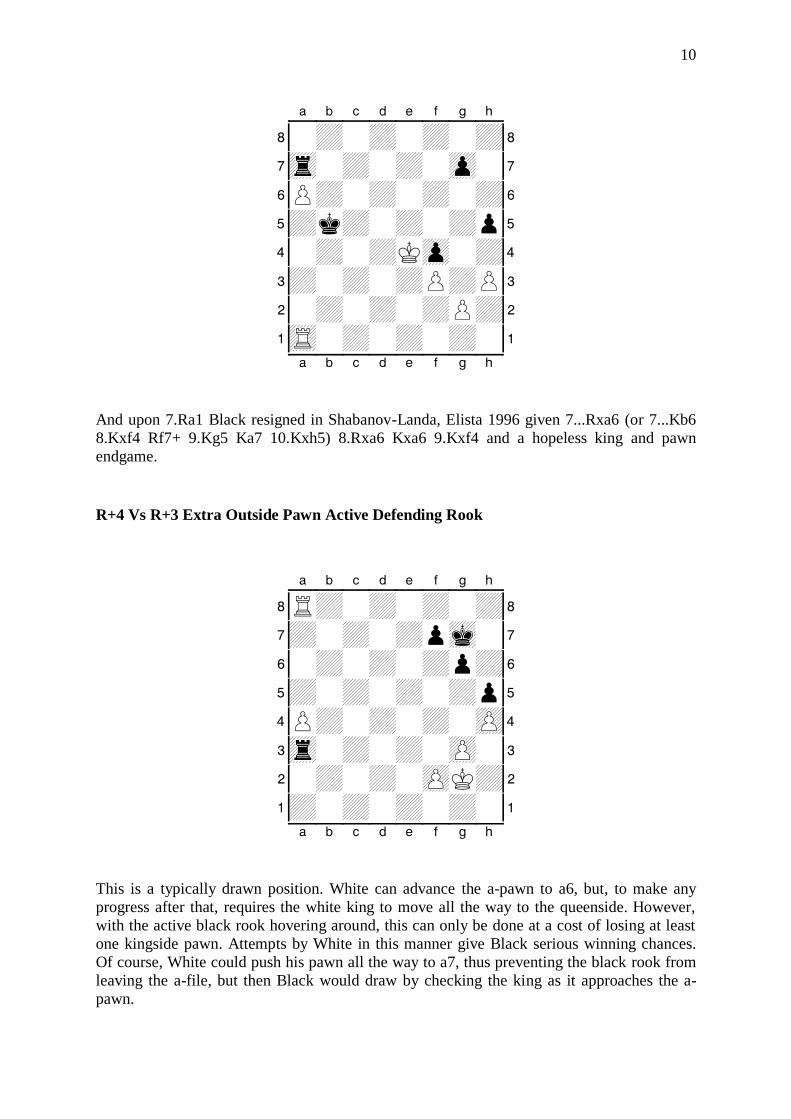
And upon 7.Ra1 Black resigned in Shabanov-Landa, Elista 1996 given 7...Rxa6 (or 7...Kb6
8.Kxf4 Rf7+ 9.Kg5 Ka7 10.Kxh5) 8.Rxa6 Kxa6 9.Kxf4 and a hopeless king and pawn
endgame.
R+4 Vs R+3 Extra Outside Pawn Active Defending Rook
XABCDEFGHY 8R+-+-+-+( 7+-+-+pmk-' 6-+-+-+p+& 5+-+-+-+p% 4P+-+-+-zP$ 3tr-+-+-zP-# 2-+-+-zPK+" 1+-+-+-+-! xabcdefghy
This is a typically drawn position. White can advance the a-pawn to a6, but, to make any
progress after that, requires the white king to move all the way to the queenside. However,
with the active black rook hovering around, this can only be done at a cost of losing at least
one kingside pawn. Attempts by White in this manner give Black serious winning chances.
Of course, White could push his pawn all the way to a7, thus preventing the black rook from
leaving the a-file, but then Black would draw by checking the king as it approaches the a-
pawn.
11
1.a5 Kf6 2.Ra7 Ke6
There's no harm in moving the king here, as long as it keeps protecting the kingside pawns.
3.Kf1 Ra2 4.Kg2 Ra3!
Accurate play by Black. This move prevents Kf3.
5.a6 Kf6
It is important to note that 5...f6? weakens the Black pawn structure on the kingside, and the
following variation would see it punished: 6.Ra8 Kf5 7.a7 Ra2 8.Kf3 Ra3+ 9.Ke2 Ra2+
10.Kd3 Ra1 11.Kd4 Ra2 (11...Ke6 to prevent the ensuing white king march is, of course, now
not possible, as the unsheltered black king is a victim of 12.Re8+ followed by a8Q.) 12.Kd5
(With the pawn on the 7th rank, there is no future in moving the king towards the pawn, say,
with 12.Kc5 Ra1 13.Kb6, as, although there is obviously the threat of moving the white rook
out from in front of the pawn, the simple 13...Rb1+ 14.Kc6 Ra1 stops that plan.) 12...Ra1
13.Kd6 Ra2 14.Ke7 Ra1 15.Kf7 Ra2 16.Kg7 Ra1 17.Kh6 Ra2
XABCDEFGHY 8R+-+-+-+( 7zP-+-+-+-' 6-+-+-zppmK& 5+-+-+k+p% 4-+-+-+-zP$ 3+-+-+-zP-# 2r+-+-zP-+" 1+-+-+-+-! xabcdefghy
when the purpose of this long white king journey is revealed in 18.Rg8! Rxa7 19.Rxg6. The
h5-pawn will drop and White will have a decisive two pawn majority on the kingside.
6.Ra8 Ke7 7.f3 Kf6 8.Kf2 Kg7
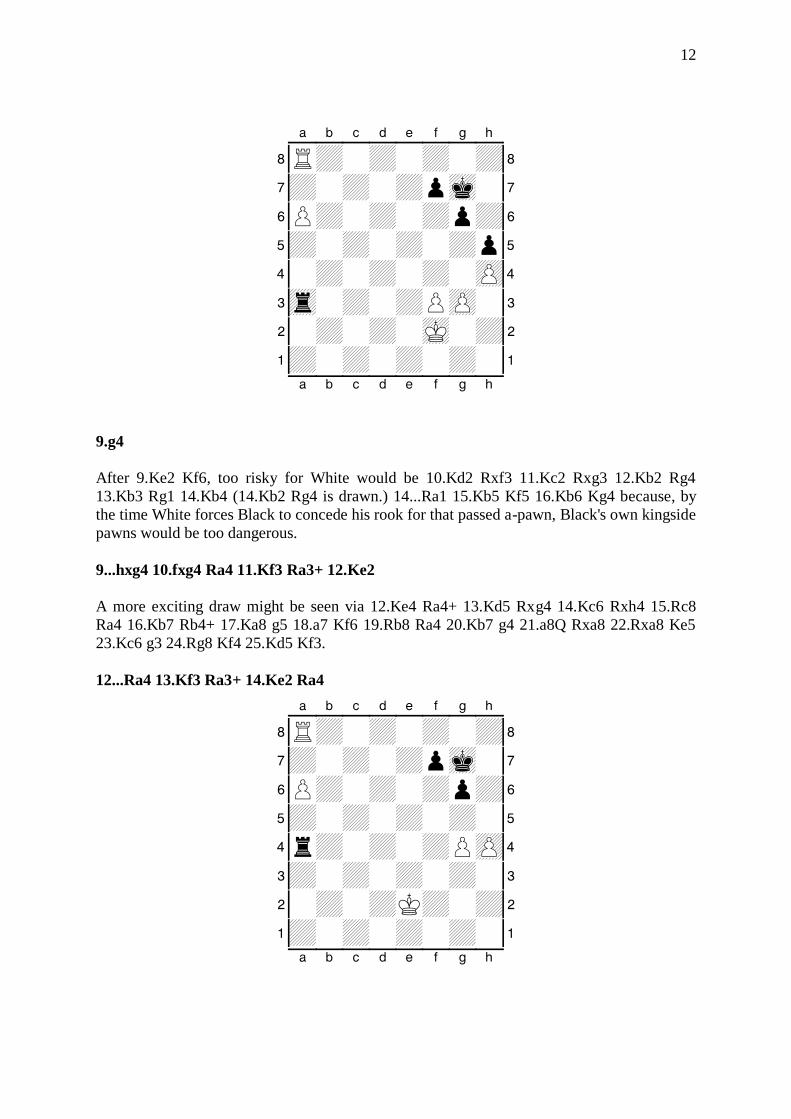
12
XABCDEFGHY 8R+-+-+-+( 7+-+-+pmk-' 6P+-+-+p+& 5+-+-+-+p% 4-+-+-+-zP$ 3tr-+-+PzP-# 2-+-+-mK-+" 1+-+-+-+-! xabcdefghy
9.g4
After 9.Ke2 Kf6, too risky for White would be 10.Kd2 Rxf3 11.Kc2 Rxg3 12.Kb2 Rg4
13.Kb3 Rg1 14.Kb4 (14.Kb2 Rg4 is drawn.) 14...Ra1 15.Kb5 Kf5 16.Kb6 Kg4 because, by
the time White forces Black to concede his rook for that passed a-pawn, Black's own kingside
pawns would be too dangerous.
9...hxg4 10.fxg4 Ra4 11.Kf3 Ra3+ 12.Ke2
A more exciting draw might be seen via 12.Ke4 Ra4+ 13.Kd5 Rxg4 14.Kc6 Rxh4 15.Rc8
Ra4 16.Kb7 Rb4+ 17.Ka8 g5 18.a7 Kf6 19.Rb8 Ra4 20.Kb7 g4 21.a8Q Rxa8 22.Rxa8 Ke5
23.Kc6 g3 24.Rg8 Kf4 25.Kd5 Kf3.
12...Ra4 13.Kf3 Ra3+ 14.Ke2 Ra4
XABCDEFGHY 8R+-+-+-+( 7+-+-+pmk-' 6P+-+-+p+& 5+-+-+-+-% 4r+-+-+PzP$ 3+-+-+-+-# 2-+-+K+-+" 1+-+-+-+-! xabcdefghy
13
And the players merely repeated for a draw in Fedorowicz-Yermolinsky USA 1996 ½–½
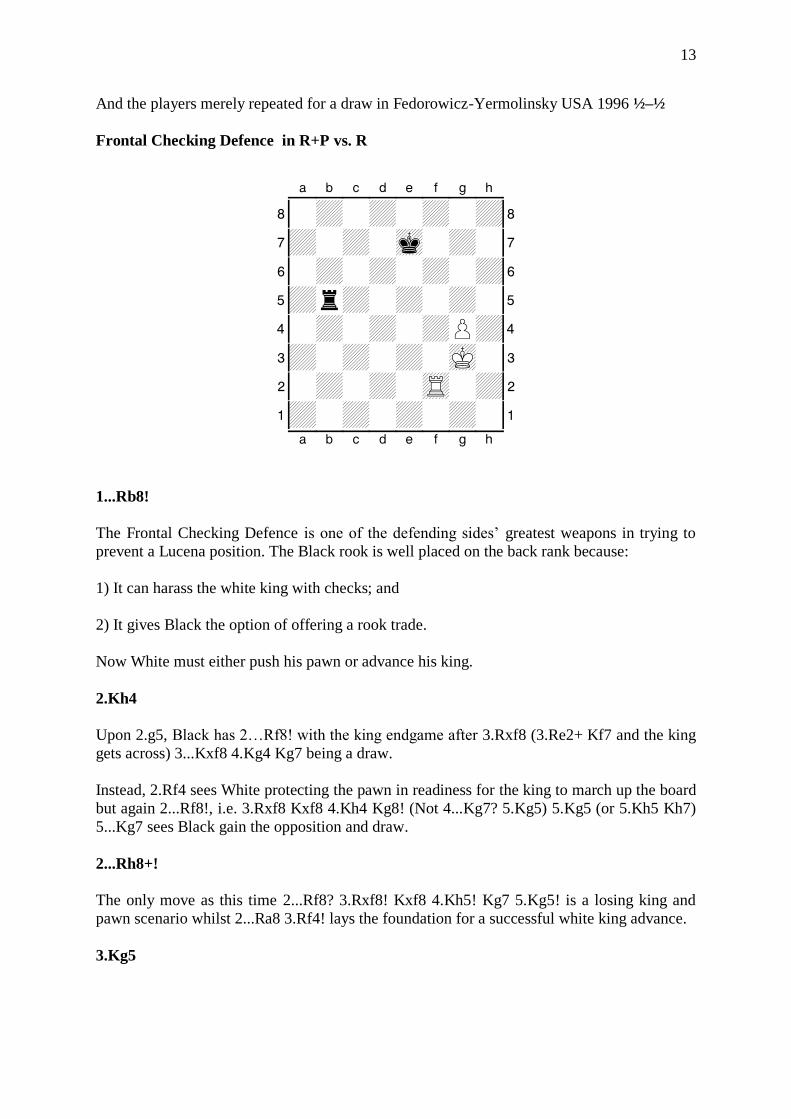
Frontal Checking Defence in R+P vs. R
XABCDEFGHY 8-+-+-+-+( 7+-+-mk-+-' 6-+-+-+-+& 5+r+-+-+-% 4-+-+-+P+$ 3+-+-+-mK-# 2-+-+-tR-+" 1+-+-+-+-! xabcdefghy
1...Rb8!
The Frontal Checking Defence is one of the defending sides’ greatest weapons in trying to
prevent a Lucena position. The Black rook is well placed on the back rank because:
1) It can harass the white king with checks; and
2) It gives Black the option of offering a rook trade.
Now White must either push his pawn or advance his king.
2.Kh4
Upon 2.g5, Black has 2…Rf8! with the king endgame after 3.Rxf8 (3.Re2+ Kf7 and the king
gets across) 3...Kxf8 4.Kg4 Kg7 being a draw.
Instead, 2.Rf4 sees White protecting the pawn in readiness for the king to march up the board
but again 2...Rf8!, i.e. 3.Rxf8 Kxf8 4.Kh4 Kg8! (Not 4...Kg7? 5.Kg5) 5.Kg5 (or 5.Kh5 Kh7)
5...Kg7 sees Black gain the opposition and draw.
2...Rh8+!
The only move as this time 2...Rf8? 3.Rxf8! Kxf8 4.Kh5! Kg7 5.Kg5! is a losing king and
pawn scenario whilst 2...Ra8 3.Rf4! lays the foundation for a successful white king advance.
3.Kg5
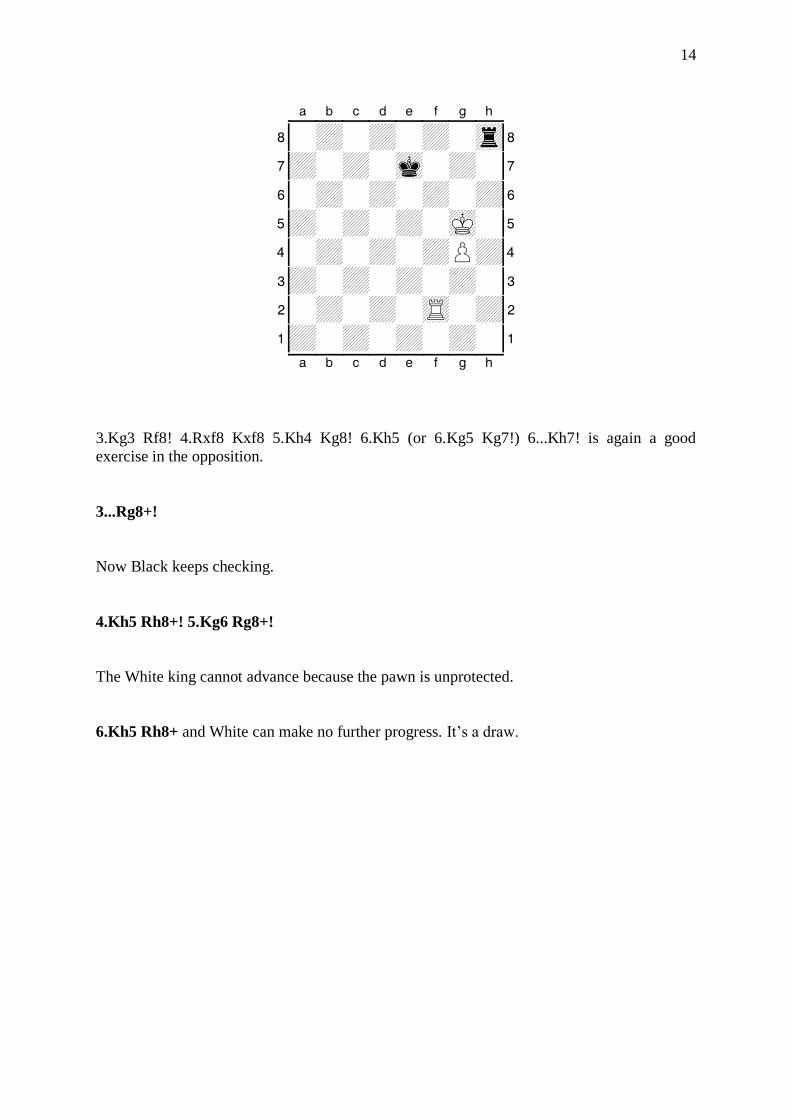
14
XABCDEFGHY 8-+-+-+-tr( 7+-+-mk-+-' 6-+-+-+-+& 5+-+-+-mK-% 4-+-+-+P+$ 3+-+-+-+-# 2-+-+-tR-+" 1+-+-+-+-! xabcdefghy
3.Kg3 Rf8! 4.Rxf8 Kxf8 5.Kh4 Kg8! 6.Kh5 (or 6.Kg5 Kg7!) 6...Kh7! is again a good
exercise in the opposition.
3...Rg8+!
Now Black keeps checking.
4.Kh5 Rh8+! 5.Kg6 Rg8+!
The White king cannot advance because the pawn is unprotected.
6.Kh5 Rh8+ and White can make no further progress. It’s a draw.
15
PART 3: Examples of Centre under Tension
The Queen’s Gambit Declined
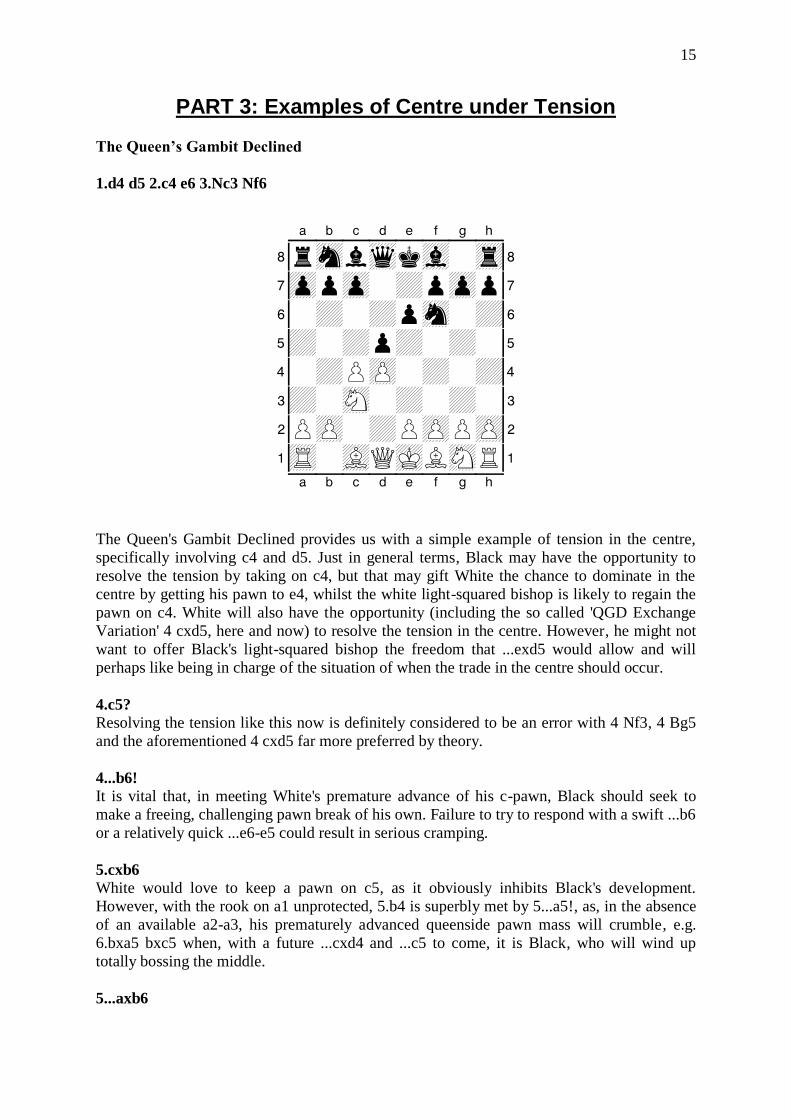
1.d4 d5 2.c4 e6 3.Nc3 Nf6
XABCDEFGHY 8rsnlwqkvl-tr( 7zppzp-+pzpp' 6-+-+psn-+& 5+-+p+-+-% 4-+PzP-+-+$ 3+-sN-+-+-# 2PzP-+PzPPzP" 1tR-vLQmKLsNR! xabcdefghy
The Queen's Gambit Declined provides us with a simple example of tension in the centre,
specifically involving c4 and d5. Just in general terms, Black may have the opportunity to
resolve the tension by taking on c4, but that may gift White the chance to dominate in the
centre by getting his pawn to e4, whilst the white light-squared bishop is likely to regain the
pawn on c4. White will also have the opportunity (including the so called 'QGD Exchange
Variation' 4 cxd5, here and now) to resolve the tension in the centre. However, he might not
want to offer Black's light-squared bishop the freedom that ...exd5 would allow and will
perhaps like being in charge of the situation of when the trade in the centre should occur.
4.c5?
Resolving the tension like this now is definitely considered to be an error with 4 Nf3, 4 Bg5
and the aforementioned 4 cxd5 far more preferred by theory.
4...b6!
It is vital that, in meeting White's premature advance of his c-pawn, Black should seek to
make a freeing, challenging pawn break of his own. Failure to try to respond with a swift ...b6
or a relatively quick ...e6-e5 could result in serious cramping.
5.cxb6 White would love to keep a pawn on c5, as it obviously inhibits Black's development.
However, with the rook on a1 unprotected, 5.b4 is superbly met by 5...a5!, as, in the absence
of an available a2-a3, his prematurely advanced queenside pawn mass will crumble, e.g.
6.bxa5 bxc5 when, with a future ...cxd4 and ...c5 to come, it is Black, who will wind up
totally bossing the middle.
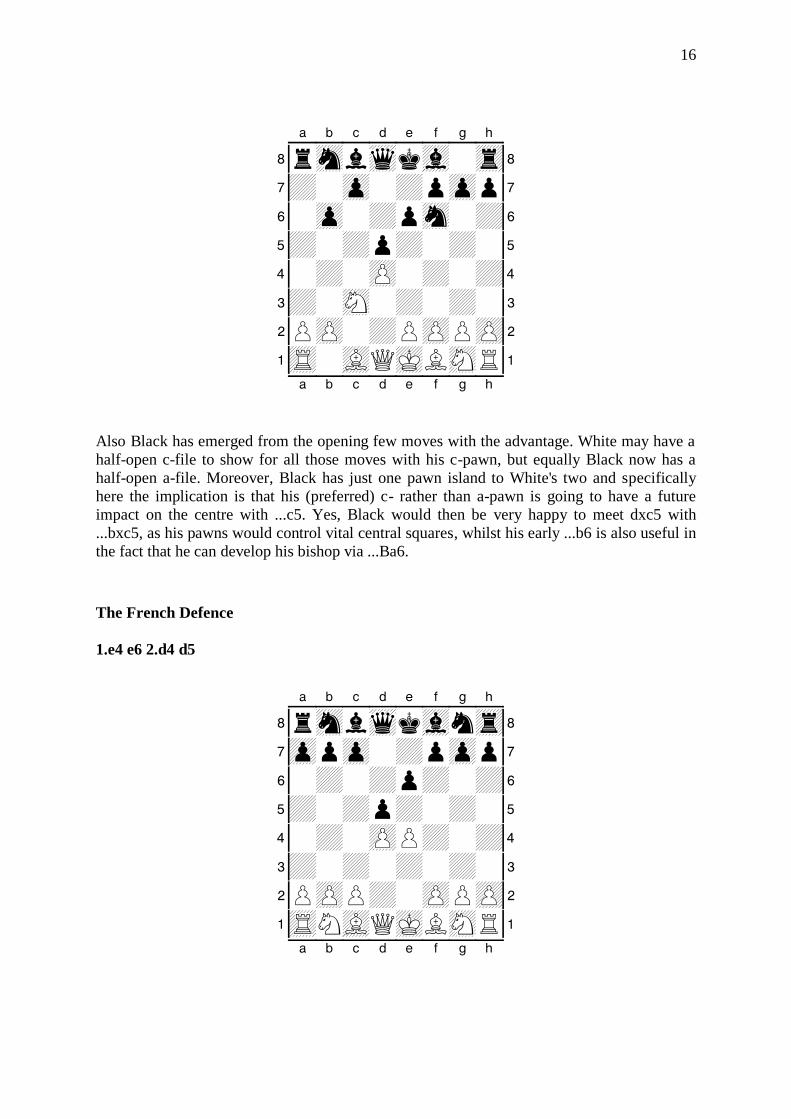
5...axb6
16
XABCDEFGHY 8rsnlwqkvl-tr( 7+-zp-+pzpp' 6-zp-+psn-+& 5+-+p+-+-% 4-+-zP-+-+$ 3+-sN-+-+-# 2PzP-+PzPPzP" 1tR-vLQmKLsNR! xabcdefghy
Also Black has emerged from the opening few moves with the advantage. White may have a
half-open c-file to show for all those moves with his c-pawn, but equally Black now has a
half-open a-file. Moreover, Black has just one pawn island to White's two and specifically
here the implication is that his (preferred) c- rather than a-pawn is going to have a future
impact on the centre with ...c5. Yes, Black would then be very happy to meet dxc5 with
...bxc5, as his pawns would control vital central squares, whilst his early ...b6 is also useful in
the fact that he can develop his bishop via ...Ba6.
The French Defence
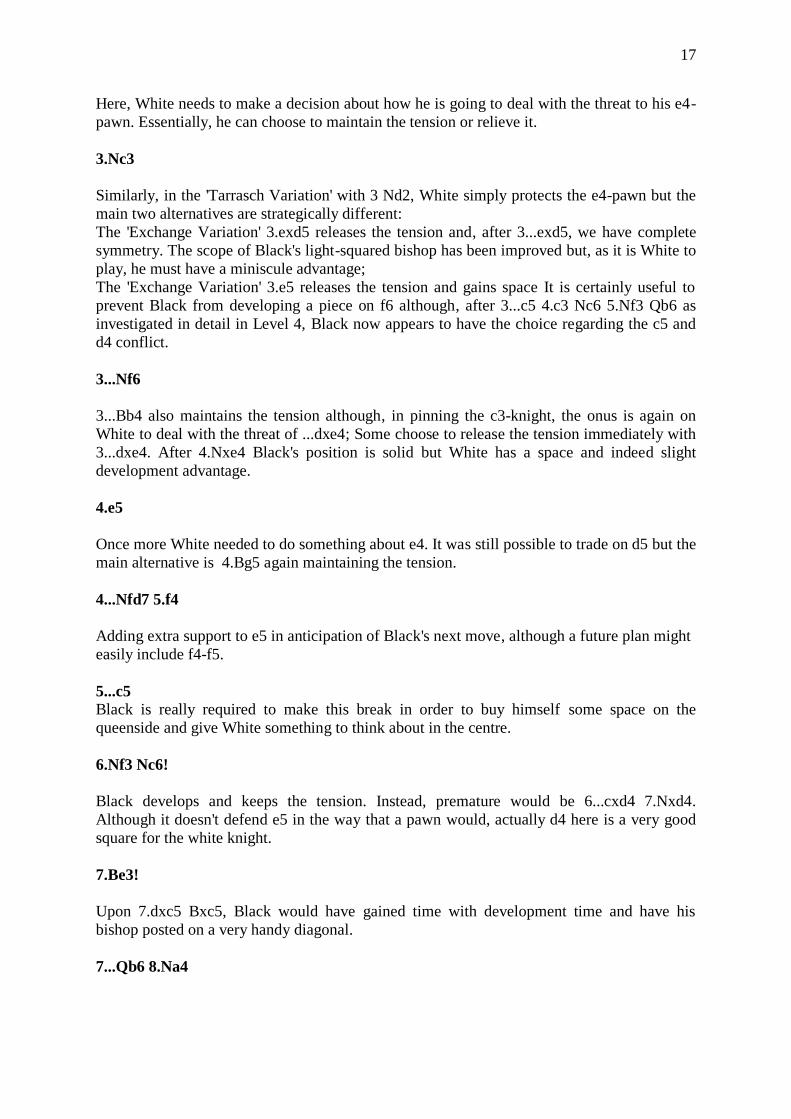
1.e4 e6 2.d4 d5
XABCDEFGHY 8rsnlwqkvlntr( 7zppzp-+pzpp' 6-+-+p+-+& 5+-+p+-+-% 4-+-zPP+-+$ 3+-+-+-+-# 2PzPP+-zPPzP" 1tRNvLQmKLsNR! xabcdefghy
17
Here, White needs to make a decision about how he is going to deal with the threat to his e4-
pawn. Essentially, he can choose to maintain the tension or relieve it.
3.Nc3
Similarly, in the 'Tarrasch Variation' with 3 Nd2, White simply protects the e4-pawn but the
main two alternatives are strategically different:
The 'Exchange Variation' 3.exd5 releases the tension and, after 3...exd5, we have complete
symmetry. The scope of Black's light-squared bishop has been improved but, as it is White to
play, he must have a miniscule advantage;
The 'Exchange Variation' 3.e5 releases the tension and gains space It is certainly useful to
prevent Black from developing a piece on f6 although, after 3...c5 4.c3 Nc6 5.Nf3 Qb6 as
investigated in detail in Level 4, Black now appears to have the choice regarding the c5 and
d4 conflict.
3...Nf6
3...Bb4 also maintains the tension although, in pinning the c3-knight, the onus is again on
White to deal with the threat of ...dxe4; Some choose to release the tension immediately with
3...dxe4. After 4.Nxe4 Black's position is solid but White has a space and indeed slight
development advantage.
4.e5
Once more White needed to do something about e4. It was still possible to trade on d5 but the
main alternative is 4.Bg5 again maintaining the tension.
4...Nfd7 5.f4
Adding extra support to e5 in anticipation of Black's next move, although a future plan might
easily include f4-f5.
5...c5
Black is really required to make this break in order to buy himself some space on the
queenside and give White something to think about in the centre.
6.Nf3 Nc6!
Black develops and keeps the tension. Instead, premature would be 6...cxd4 7.Nxd4.
Although it doesn't defend e5 in the way that a pawn would, actually d4 here is a very good
square for the white knight.
7.Be3!
Upon 7.dxc5 Bxc5, Black would have gained time with development time and have his
bishop posted on a very handy diagonal.
7...Qb6 8.Na4
18
Although the b2-pawn was under threat, an alternative tactical solution would be 8.a3!?, i.e.
8...Qxb2?? 9.Na4, winning the black queen.
8...Qa5+ 9.c3
XABCDEFGHY 8r+l+kvl-tr( 7zpp+n+pzpp' 6-+n+p+-+& 5wq-zppzP-+-% 4N+-zP-zP-+$ 3+-zP-vLN+-# 2PzP-+-+PzP" 1tR-+QmKL+R! xabcdefghy
And we have a balanced middlegame, with tension revolving around c5 and d4.
The King’s Gambit
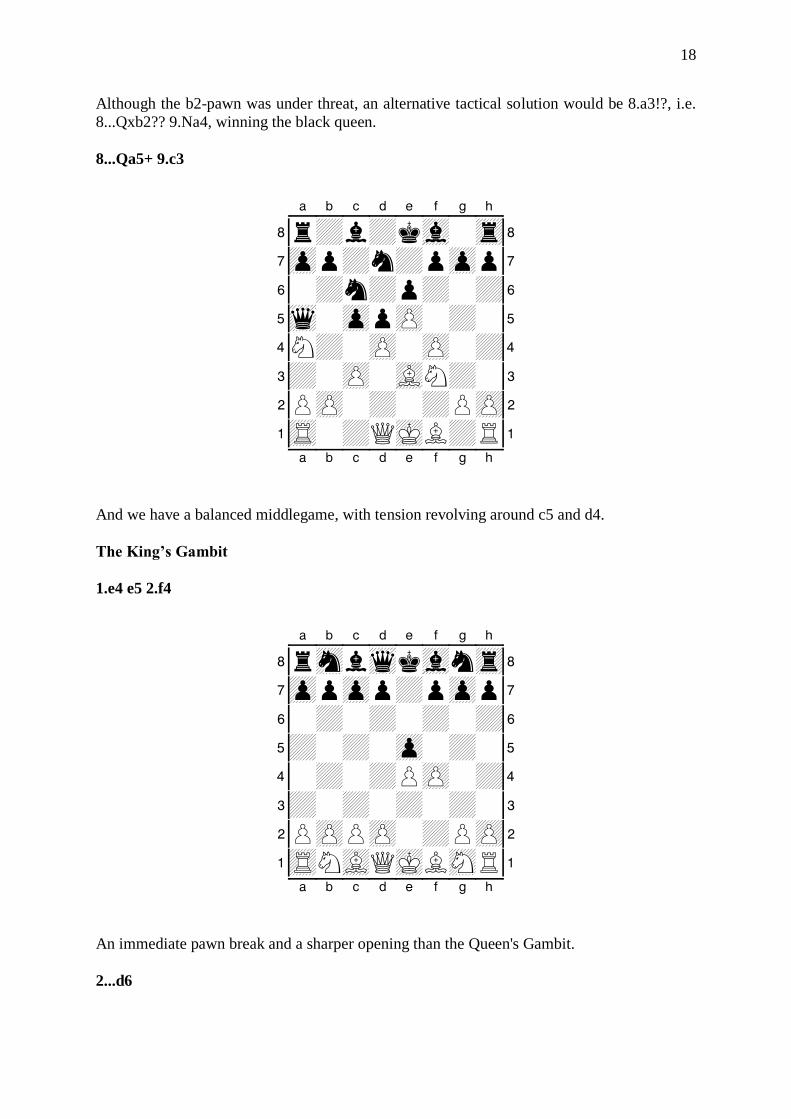
1.e4 e5 2.f4
XABCDEFGHY 8rsnlwqkvlntr( 7zppzpp+pzpp' 6-+-+-+-+& 5+-+-zp-+-% 4-+-+PzP-+$ 3+-+-+-+-# 2PzPPzP-+PzP" 1tRNvLQmKLsNR! xabcdefghy
An immediate pawn break and a sharper opening than the Queen's Gambit.
2...d6
19
If Black is going to decline the offering, then 2...Bc5! is a better way of doing so, as White
isn't yet threatening fxe5 in view of ...Qh4+. Hence, 3.Nf3! d6 4.Nc3 (Again, 4.fxe5 dxe5
5.Nxe5? Qh4+!) 4...Nf6! 5.Bc4 Nc6 is a more dynamic King's Gambit Declined. The King's
Gambit Accepted might see 2...exf4 3.Nf3 g5 (making it a genuine gambit), whilst 2...d5 3
exd5 e4 sees Black making a counter-gambit.
3.Nf3 Nc6
This way of playing is simply too passive.
4.Bb5!
Piling up the pressure on the centre, although 4.Nc3 Be7 5.Bc4 Nf6 6.d3 0–0 7.0–0 would
also be very nice for White. He has effectively achieved a successful pawn break f4 and has
the future option of creating a half-open f-file by trading on e5 or cramping his opponent
further with f4-f5 (and later, maybe, even g4-g5).
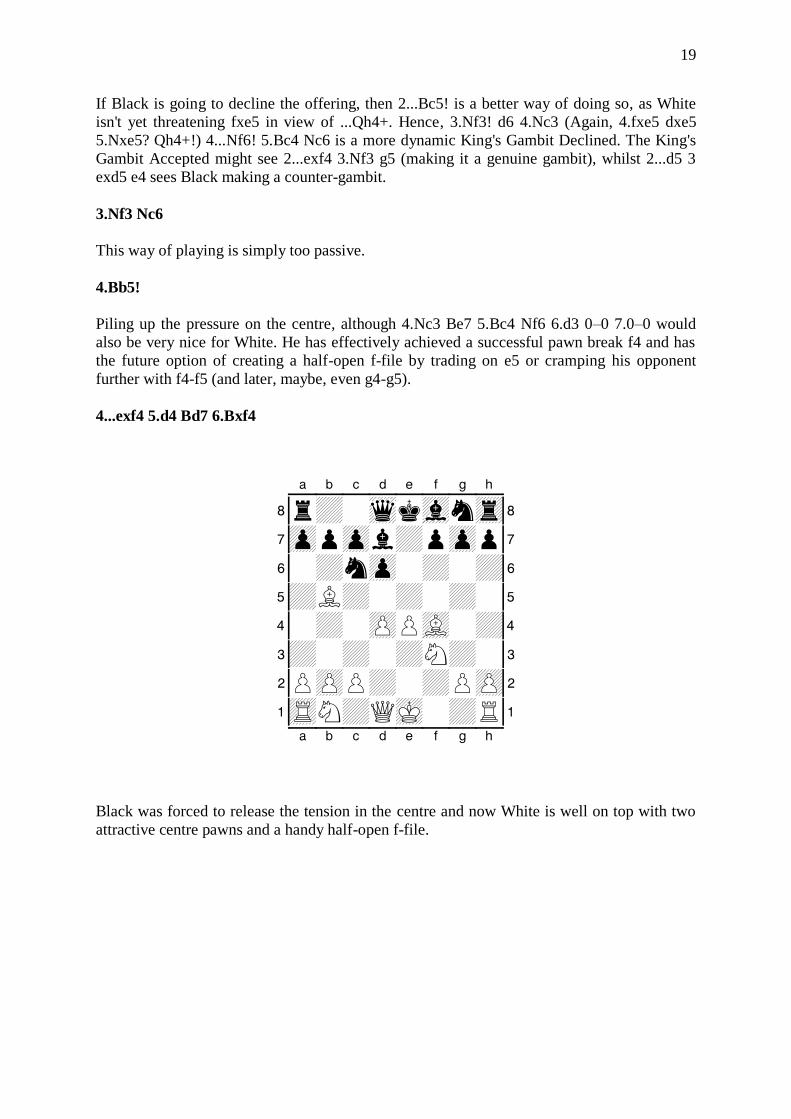
4...exf4 5.d4 Bd7 6.Bxf4
XABCDEFGHY 8r+-wqkvlntr( 7zppzpl+pzpp' 6-+nzp-+-+& 5+L+-+-+-% 4-+-zPPvL-+$ 3+-+-+N+-# 2PzPP+-+PzP" 1tRN+QmK-+R! xabcdefghy
Black was forced to release the tension in the centre and now White is well on top with two
attractive centre pawns and a handy half-open f-file.
20
The Italian Game
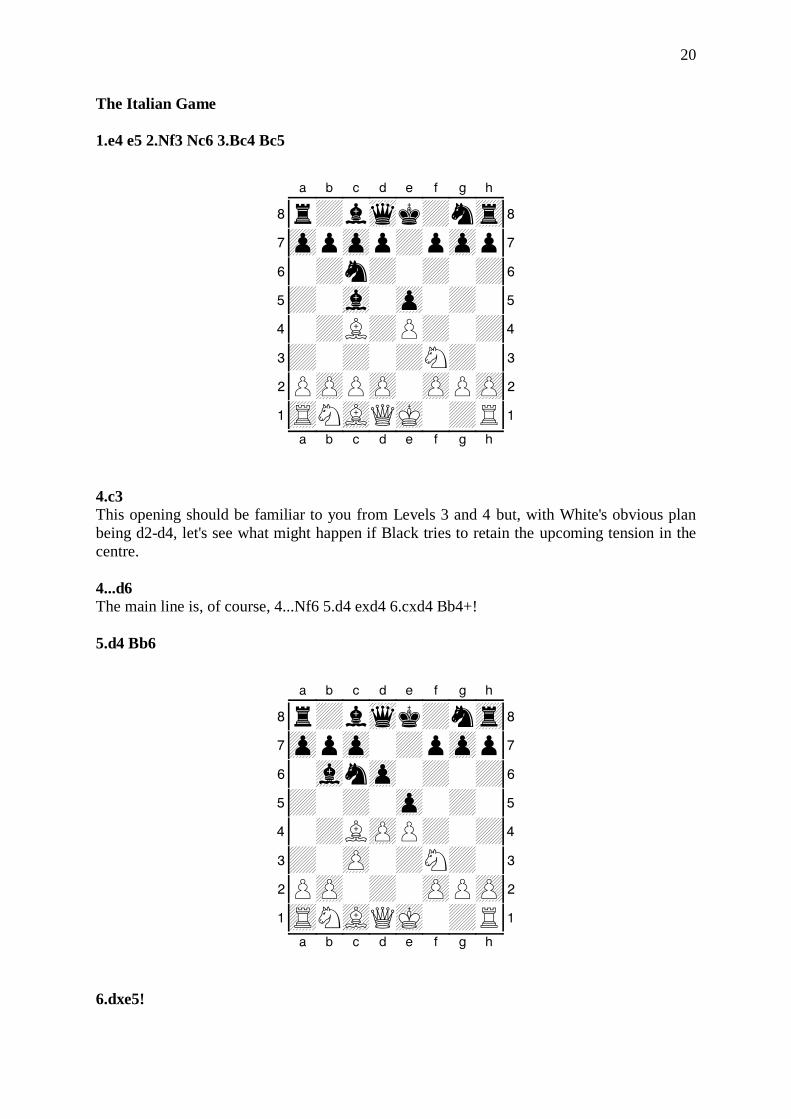
1.e4 e5 2.Nf3 Nc6 3.Bc4 Bc5
XABCDEFGHY 8r+lwqk+ntr( 7zppzpp+pzpp' 6-+n+-+-+& 5+-vl-zp-+-% 4-+L+P+-+$ 3+-+-+N+-# 2PzPPzP-zPPzP" 1tRNvLQmK-+R! xabcdefghy
4.c3
This opening should be familiar to you from Levels 3 and 4 but, with White's obvious plan
being d2-d4, let's see what might happen if Black tries to retain the upcoming tension in the
centre.
4...d6
The main line is, of course, 4...Nf6 5.d4 exd4 6.cxd4 Bb4+!
5.d4 Bb6
XABCDEFGHY 8r+lwqk+ntr( 7zppzp-+pzpp' 6-vlnzp-+-+& 5+-+-zp-+-% 4-+LzPP+-+$ 3+-zP-+N+-# 2PzP-+-zPPzP" 1tRNvLQmK-+R! xabcdefghy
6.dxe5!
21
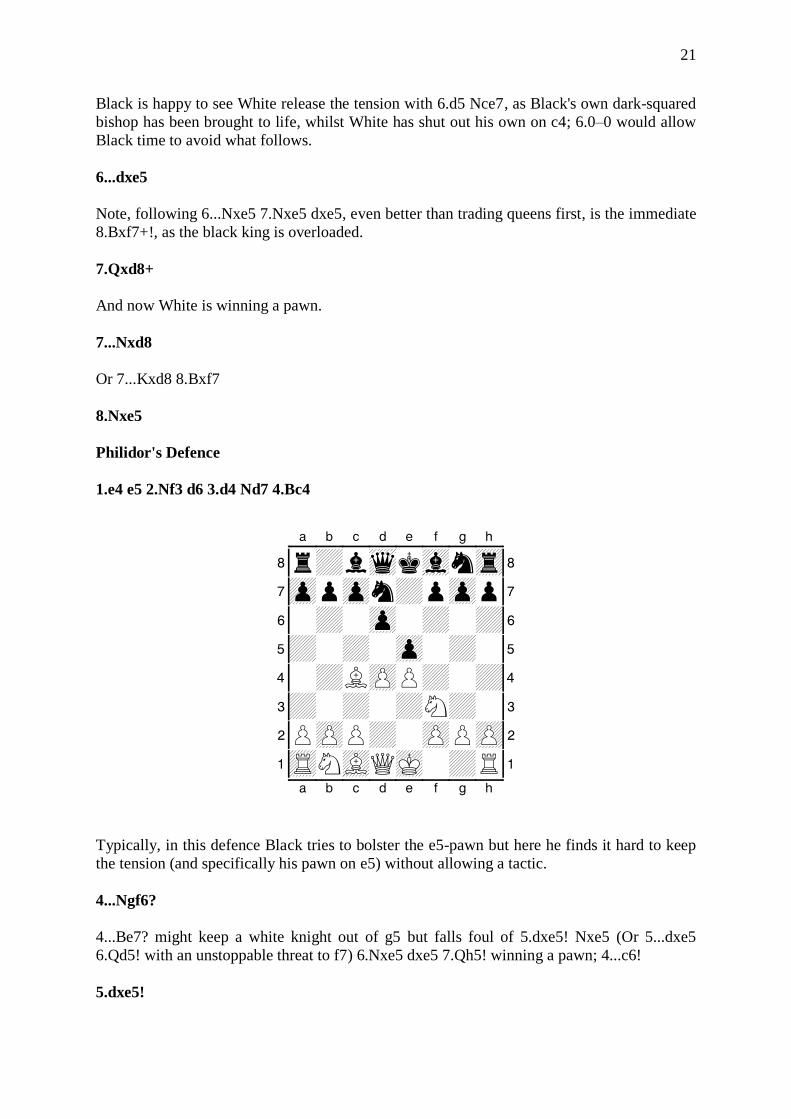
Black is happy to see White release the tension with 6.d5 Nce7, as Black's own dark-squared
bishop has been brought to life, whilst White has shut out his own on c4; 6.0–0 would allow
Black time to avoid what follows.
6...dxe5
Note, following 6...Nxe5 7.Nxe5 dxe5, even better than trading queens first, is the immediate
8.Bxf7+!, as the black king is overloaded.
7.Qxd8+
And now White is winning a pawn.
7...Nxd8
Or 7...Kxd8 8.Bxf7
8.Nxe5
Philidor's Defence
1.e4 e5 2.Nf3 d6 3.d4 Nd7 4.Bc4
XABCDEFGHY 8r+lwqkvlntr( 7zppzpn+pzpp' 6-+-zp-+-+& 5+-+-zp-+-% 4-+LzPP+-+$ 3+-+-+N+-# 2PzPP+-zPPzP" 1tRNvLQmK-+R! xabcdefghy
Typically, in this defence Black tries to bolster the e5-pawn but here he finds it hard to keep
the tension (and specifically his pawn on e5) without allowing a tactic.
4...Ngf6?
4...Be7? might keep a white knight out of g5 but falls foul of 5.dxe5! Nxe5 (Or 5...dxe5
6.Qd5! with an unstoppable threat to f7) 6.Nxe5 dxe5 7.Qh5! winning a pawn; 4...c6!
5.dxe5!
22
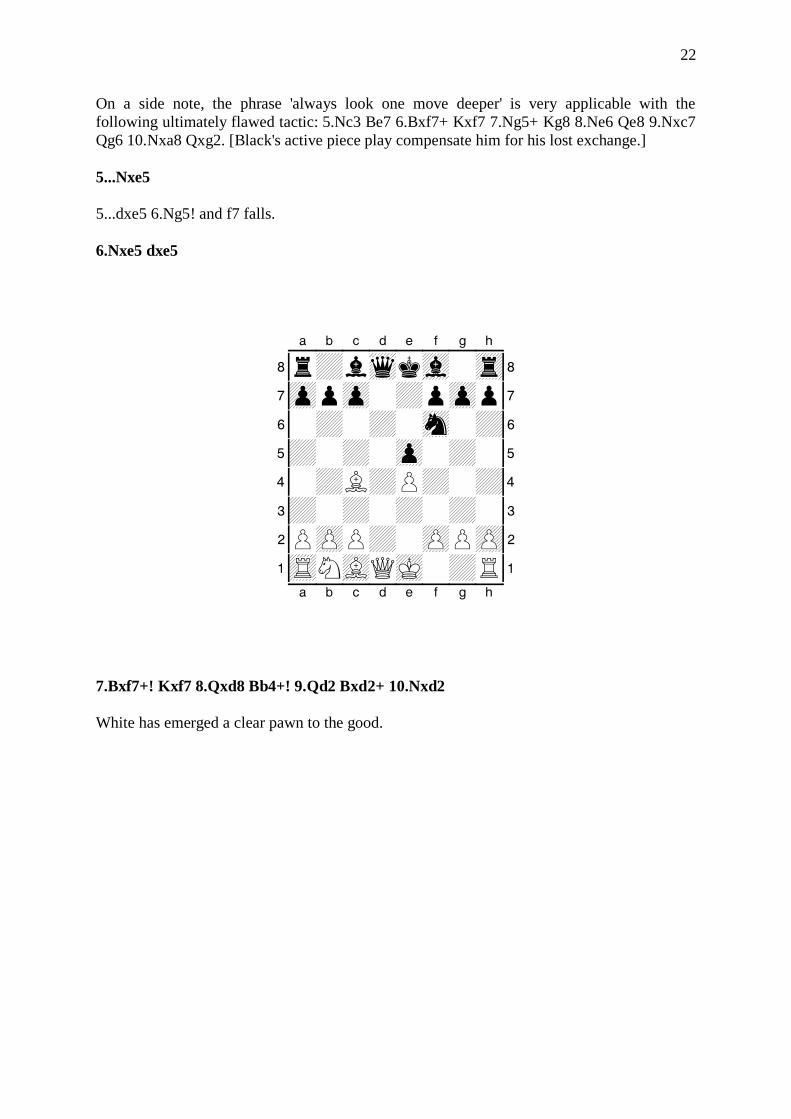
On a side note, the phrase 'always look one move deeper' is very applicable with the
following ultimately flawed tactic: 5.Nc3 Be7 6.Bxf7+ Kxf7 7.Ng5+ Kg8 8.Ne6 Qe8 9.Nxc7
Qg6 10.Nxa8 Qxg2. [Black's active piece play compensate him for his lost exchange.]
5...Nxe5
5...dxe5 6.Ng5! and f7 falls.
6.Nxe5 dxe5
XABCDEFGHY 8r+lwqkvl-tr( 7zppzp-+pzpp' 6-+-+-sn-+& 5+-+-zp-+-% 4-+L+P+-+$ 3+-+-+-+-# 2PzPP+-zPPzP" 1tRNvLQmK-+R! xabcdefghy
7.Bxf7+! Kxf7 8.Qxd8 Bb4+! 9.Qd2 Bxd2+ 10.Nxd2
White has emerged a clear pawn to the good.
23
PART 4: Restriction and Disruption
Cramping and restricting an opponent's development:
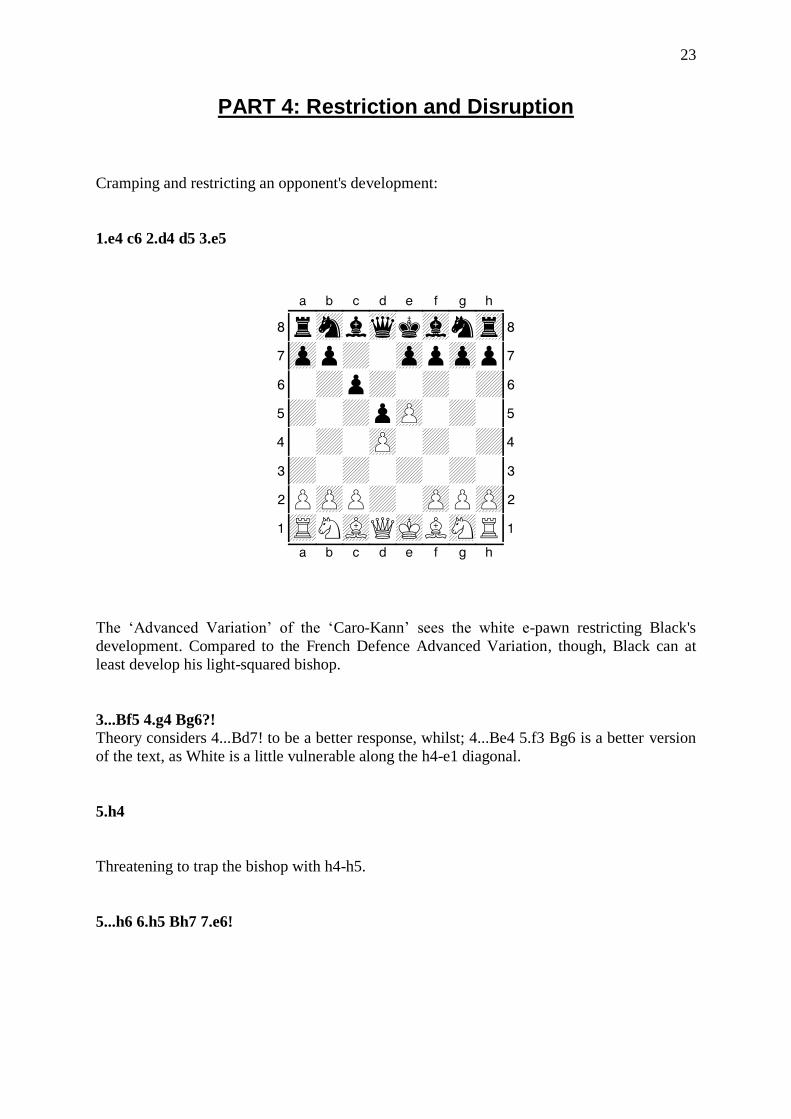
1.e4 c6 2.d4 d5 3.e5
XABCDEFGHY 8rsnlwqkvlntr( 7zpp+-zppzpp' 6-+p+-+-+& 5+-+pzP-+-% 4-+-zP-+-+$ 3+-+-+-+-# 2PzPP+-zPPzP" 1tRNvLQmKLsNR! xabcdefghy
The ‘Advanced Variation’ of the ‘Caro-Kann’ sees the white e-pawn restricting Black's
development. Compared to the French Defence Advanced Variation, though, Black can at
least develop his light-squared bishop.
3...Bf5 4.g4 Bg6?! Theory considers 4...Bd7! to be a better response, whilst; 4...Be4 5.f3 Bg6 is a better version
of the text, as White is a little vulnerable along the h4-e1 diagonal.
5.h4
Threatening to trap the bishop with h4-h5.
5...h6 6.h5 Bh7 7.e6!
24
XABCDEFGHY 8rsn-wqkvlntr( 7zpp+-zppzpl' 6-+p+P+-zp& 5+-+p+-+P% 4-+-zP-+P+$ 3+-+-+-+-# 2PzPP+-zP-+" 1tRNvLQmKLsNR! xabcdefghy
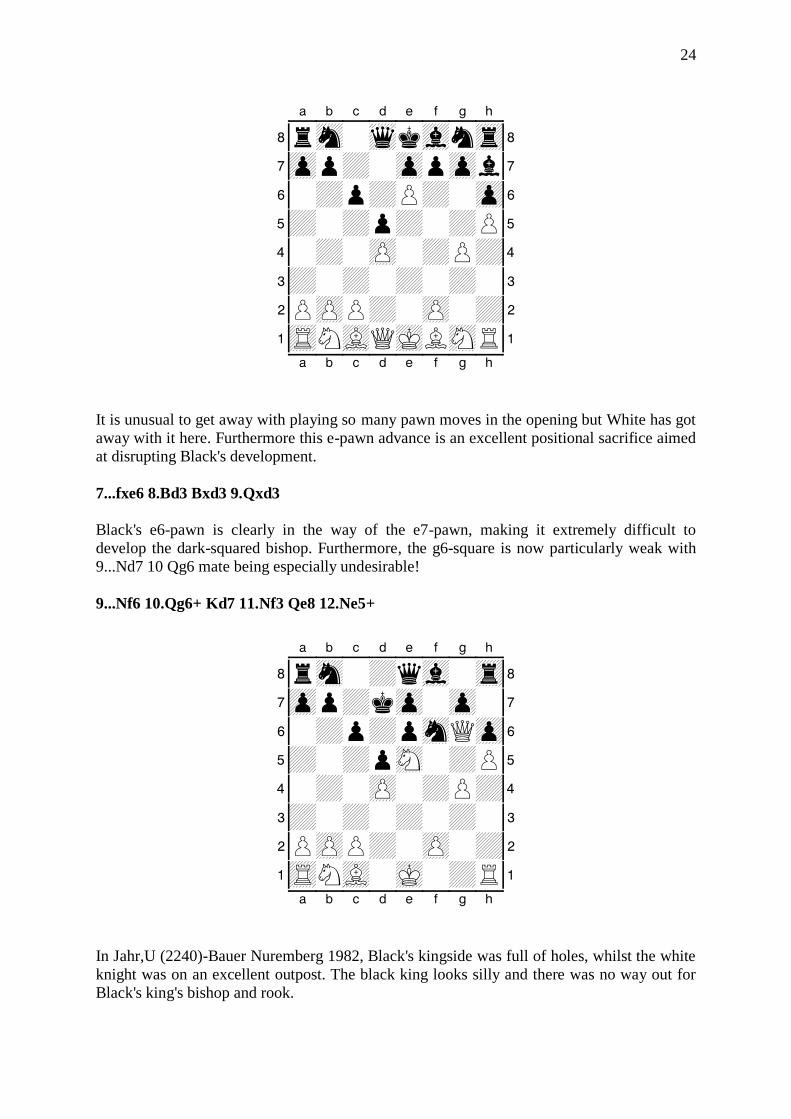
It is unusual to get away with playing so many pawn moves in the opening but White has got
away with it here. Furthermore this e-pawn advance is an excellent positional sacrifice aimed
at disrupting Black's development.
7...fxe6 8.Bd3 Bxd3 9.Qxd3
Black's e6-pawn is clearly in the way of the e7-pawn, making it extremely difficult to
develop the dark-squared bishop. Furthermore, the g6-square is now particularly weak with
9...Nd7 10 Qg6 mate being especially undesirable!
9...Nf6 10.Qg6+ Kd7 11.Nf3 Qe8 12.Ne5+
XABCDEFGHY 8rsn-+qvl-tr( 7zpp+kzp-zp-' 6-+p+psnQzp& 5+-+psN-+P% 4-+-zP-+P+$ 3+-+-+-+-# 2PzPP+-zP-+" 1tRNvL-mK-+R! xabcdefghy
In Jahr,U (2240)-Bauer Nuremberg 1982, Black's kingside was full of holes, whilst the white
knight was on an excellent outpost. The black king looks silly and there was no way out for
Black's king's bishop and rook.
25
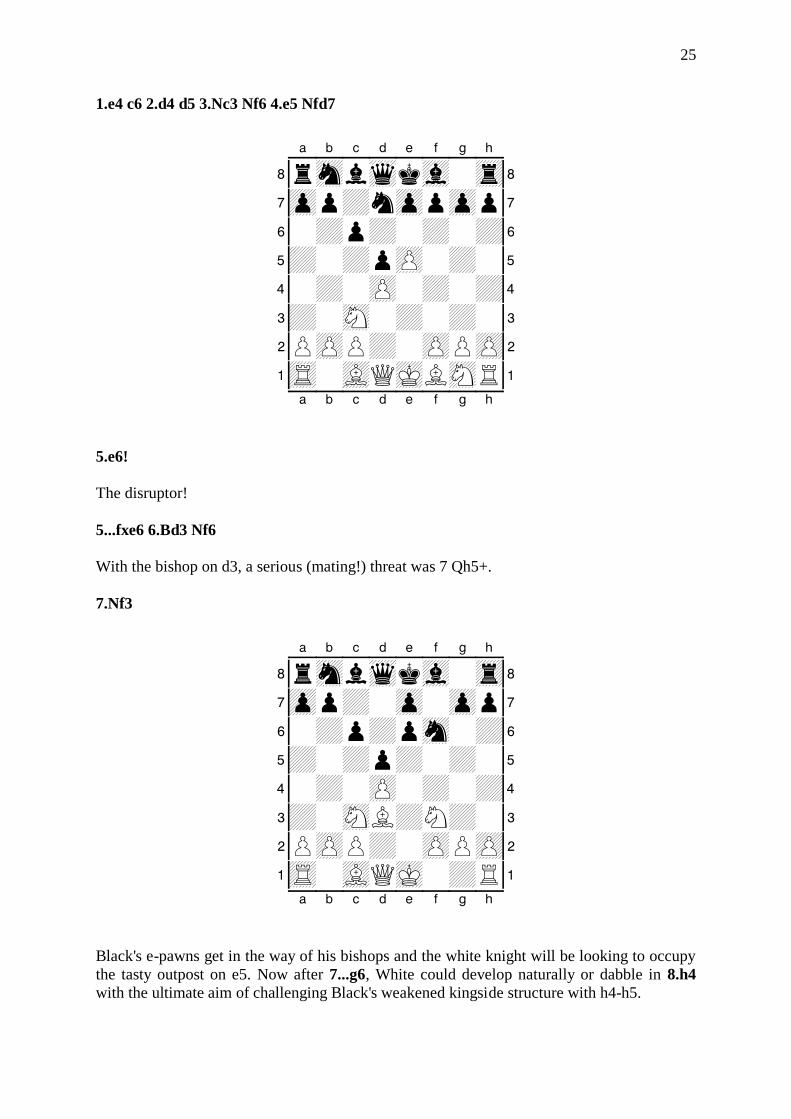
1.e4 c6 2.d4 d5 3.Nc3 Nf6 4.e5 Nfd7
XABCDEFGHY 8rsnlwqkvl-tr( 7zpp+nzppzpp' 6-+p+-+-+& 5+-+pzP-+-% 4-+-zP-+-+$ 3+-sN-+-+-# 2PzPP+-zPPzP" 1tR-vLQmKLsNR! xabcdefghy
5.e6!
The disruptor!
5...fxe6 6.Bd3 Nf6
With the bishop on d3, a serious (mating!) threat was 7 Qh5+.
7.Nf3
XABCDEFGHY 8rsnlwqkvl-tr( 7zpp+-zp-zpp' 6-+p+psn-+& 5+-+p+-+-% 4-+-zP-+-+$ 3+-sNL+N+-# 2PzPP+-zPPzP" 1tR-vLQmK-+R! xabcdefghy
Black's e-pawns get in the way of his bishops and the white knight will be looking to occupy
the tasty outpost on e5. Now after 7...g6, White could develop naturally or dabble in 8.h4
with the ultimate aim of challenging Black's weakened kingside structure with h4-h5.
26
PART 5: The Isolated Queen’s Pawn
Stoica,Valentin - Flis,Jacek Rubinstein mem Polanica Zdroj, 1983
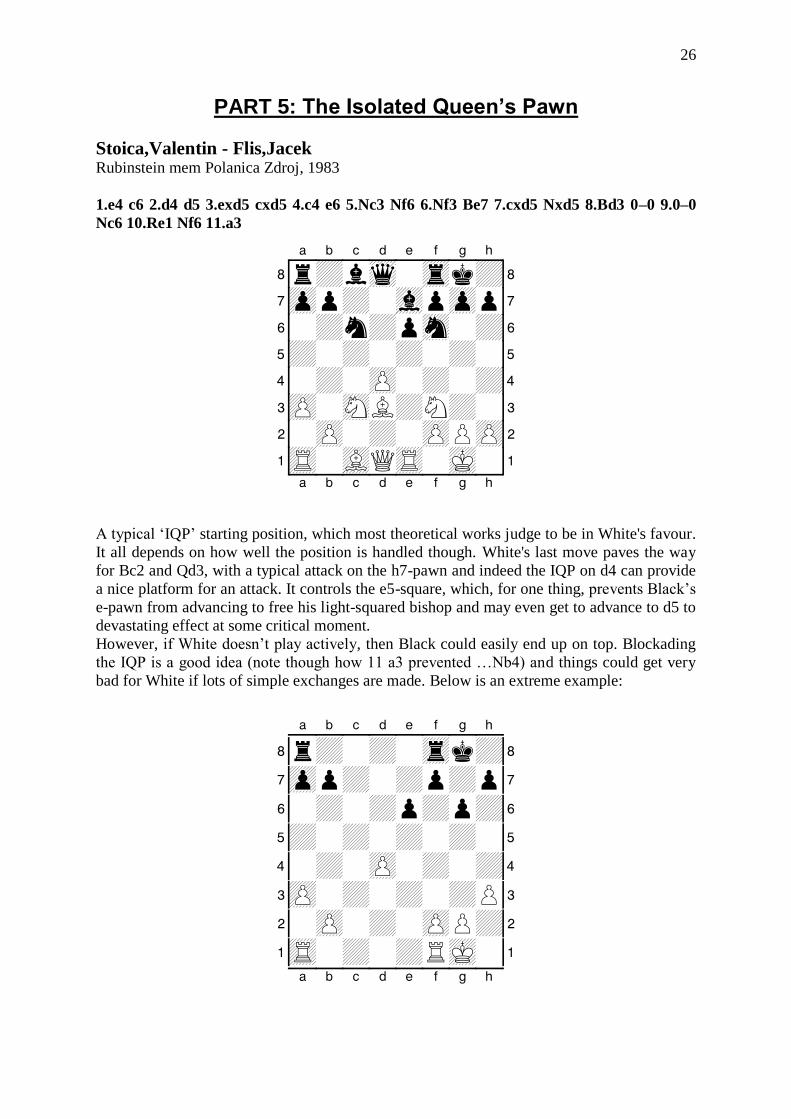
1.e4 c6 2.d4 d5 3.exd5 cxd5 4.c4 e6 5.Nc3 Nf6 6.Nf3 Be7 7.cxd5 Nxd5 8.Bd3 0–0 9.0–0
Nc6 10.Re1 Nf6 11.a3
XABCDEFGHY 8r+lwq-trk+( 7zpp+-vlpzpp' 6-+n+psn-+& 5+-+-+-+-% 4-+-zP-+-+$ 3zP-sNL+N+-# 2-zP-+-zPPzP" 1tR-vLQtR-mK-! xabcdefghy
A typical ‘IQP’ starting position, which most theoretical works judge to be in White's favour.
It all depends on how well the position is handled though. White's last move paves the way
for Bc2 and Qd3, with a typical attack on the h7-pawn and indeed the IQP on d4 can provide
a nice platform for an attack. It controls the e5-square, which, for one thing, prevents Black’s
e-pawn from advancing to free his light-squared bishop and may even get to advance to d5 to
devastating effect at some critical moment.
However, if White doesn’t play actively, then Black could easily end up on top. Blockading
the IQP is a good idea (note though how 11 a3 prevented …Nb4) and things could get very
bad for White if lots of simple exchanges are made. Below is an extreme example:
XABCDEFGHY 8r+-+-trk+( 7zpp+-+p+p' 6-+-+p+p+& 5+-+-+-+-% 4-+-zP-+-+$ 3zP-+-+-+P# 2-zP-+-zPP+" 1tR-+-+RmK-! xabcdefghy
27
Above, the IQP is clearly weak and after 1...Rfd8 2.Rfd1 Rd5 (in fact, 2…Rac8 taking the
open file would be better) 3.Rd3?! (White should seek activity with 3 Rac1) 3…Rad8 4.Rad1
e5, it would, of course, be lost!
White should not get tied down to just defending the IQP and, as he has a space advantage, he
should avoid fair swaps. Back to the game:
11...b6 12.Bc2 A modern refinement is 12.Bg5 Bb7 and only then 13.Bc2.
12...Bb7 Theory now considers 12...Ba6! to be more accurate, as this cuts across White's basic plan.
13.Qd3
This is a very promising position for White. In practice, White has scored 70% from here.
Although it must be admitted that part of the reason for such good results is that this move
conceals a well-hidden idea.
13...Re8?
This innocent looking move is virtually a decisive mistake. Similarly, though the natural
move 13...Rc8? meets the same fate, i.e. 14.d5! exd5 (14...Nb8 is relatively best, after
15.dxe6 Qxd3 16.Bxd3 Bxf3 17.exf7+ Rxf7 18.gxf3, White "only" has a clear advantage.)
15.Bg5 Ne4 (15...g6 16.Rxe7 Qxe7 17.Nxd5 is one of White's ideas) 16.Nxe4 dxe4 17.Qxe4
g6 18.Bh6 Re8 19.Rad1 Qc7 20.Bb3! with a big threat of Bxf7+ 20...Nd8 21.Qd4
W.Schmidt-Imanaliev, Moscow Olympiad 1994.
13...g6 is Black's best move, after which White has to make do with a moderate advantage.
14.Bh6 Re8 15.Rad1 Rc8 16.Bb3 Na5 17.Ba2 Nd5 18.Ne5 Bf8 (18...Nxc3 19.Nxf7!) 19.Bxf8
Rxf8 20.Ne4 Luther-Gheorghiu, Lenk 1999 - Black has succeeded in exchanging a pair of
minor pieces but the dark-squared weaknesses around his king are a cause for concern.
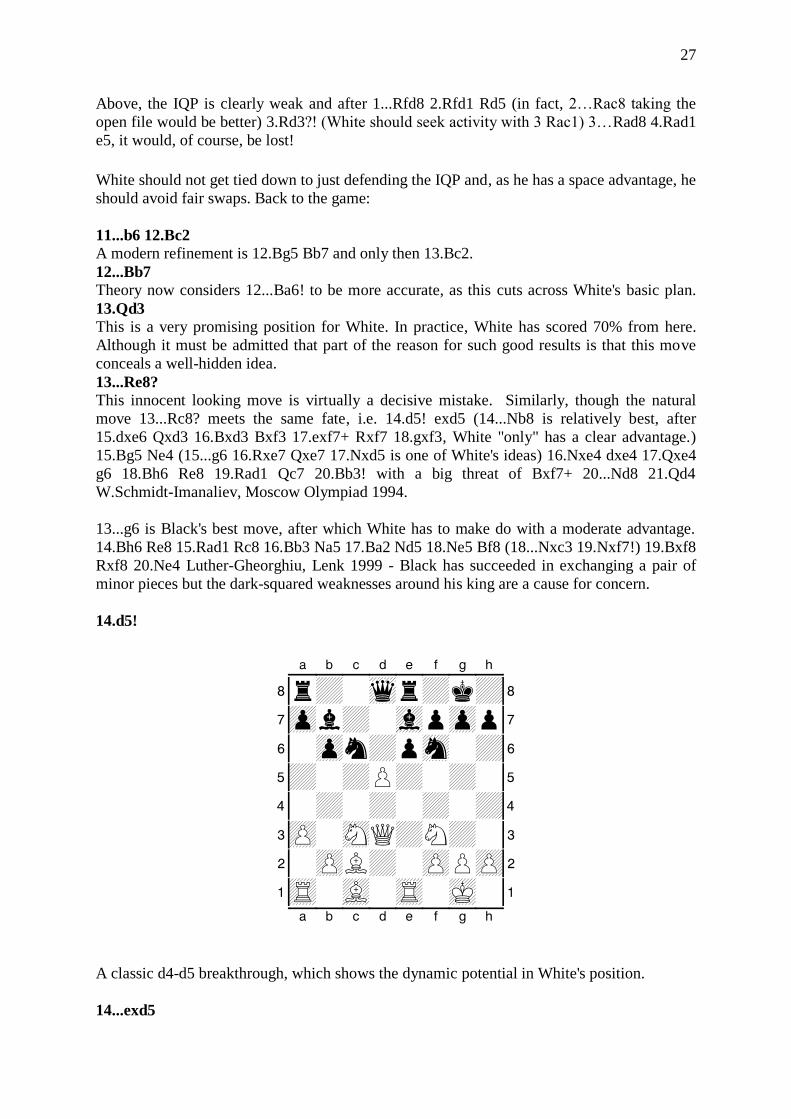
14.d5!
XABCDEFGHY 8r+-wqr+k+( 7zpl+-vlpzpp' 6-zpn+psn-+& 5+-+P+-+-% 4-+-+-+-+$ 3zP-sNQ+N+-# 2-zPL+-zPPzP" 1tR-vL-tR-mK-! xabcdefghy
A classic d4-d5 breakthrough, which shows the dynamic potential in White's position.
14...exd5
28
It's difficult to believe but Black is lost after this move.
14...Na5 15.b4 wins that offside knight;
14…Nxd5, of course, allows the mate on h7 and, so, 14...Nb8 is relatively best, although
15.dxe6 fxe6 16.Nd4 leaves White with a very strong position.
15.Bg5
Simply threatening Bxf6, followed by Qxh7+.
15...Ne4
Upon 15...g6, White has 16.Rxe7! Nxe7 (or 16...Qxe7 17.Nxd5) 17.Bxf6 Qd6 18.Be5 Qe6
19.Nb5 Ba6 20.Qd2 and Black resigned in the game Ong-Olsen, Espoo 2000 on account of
20…Bxb5 21.Qh6 f6 22.Ng5!
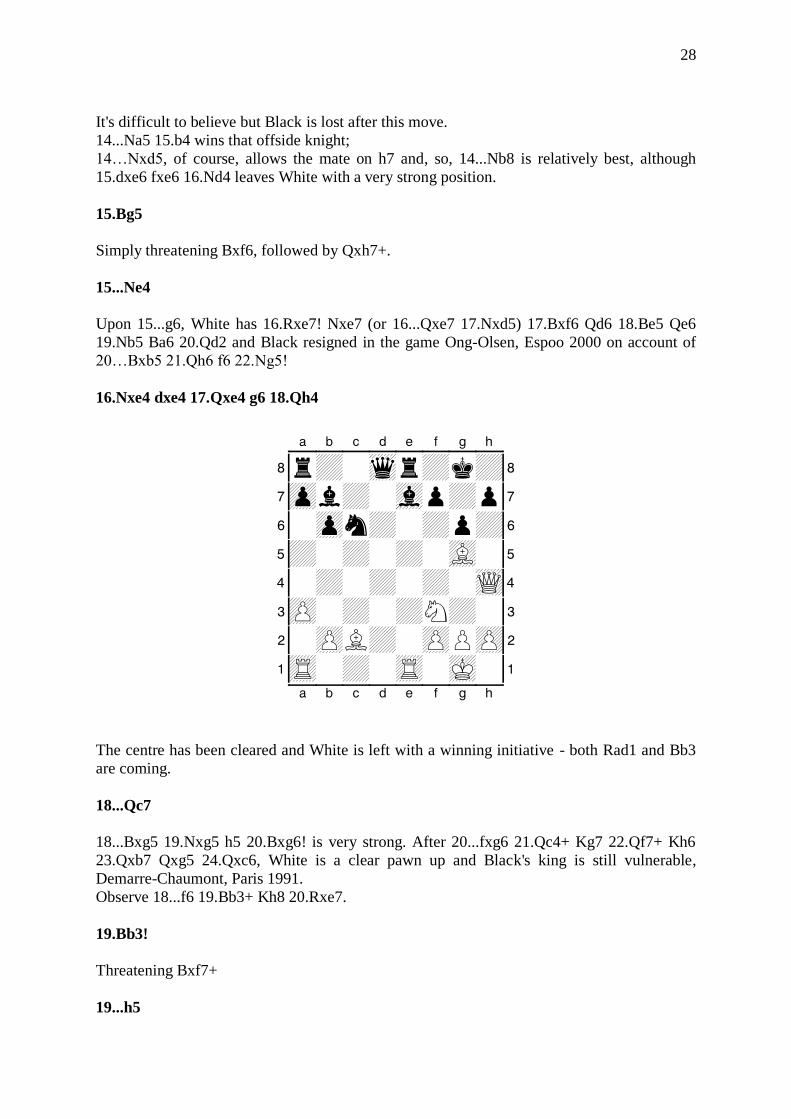
16.Nxe4 dxe4 17.Qxe4 g6 18.Qh4
XABCDEFGHY 8r+-wqr+k+( 7zpl+-vlp+p' 6-zpn+-+p+& 5+-+-+-vL-% 4-+-+-+-wQ$ 3zP-+-+N+-# 2-zPL+-zPPzP" 1tR-+-tR-mK-! xabcdefghy
The centre has been cleared and White is left with a winning initiative - both Rad1 and Bb3
are coming.
18...Qc7
18...Bxg5 19.Nxg5 h5 20.Bxg6! is very strong. After 20...fxg6 21.Qc4+ Kg7 22.Qf7+ Kh6
23.Qxb7 Qxg5 24.Qxc6, White is a clear pawn up and Black's king is still vulnerable,
Demarre-Chaumont, Paris 1991.
Observe 18...f6 19.Bb3+ Kh8 20.Rxe7.
19.Bb3!
Threatening Bxf7+
19...h5
29
19...Bd6 20.Bf6 idea Ng5 20...h5 21.Qg5 Kh7 22.Bc2 was the end of Dizdar-Dizdarevic,
Sarajevo 1988 - Qxh5+ is coming.
20.Qe4
Threatening Qxg6+.
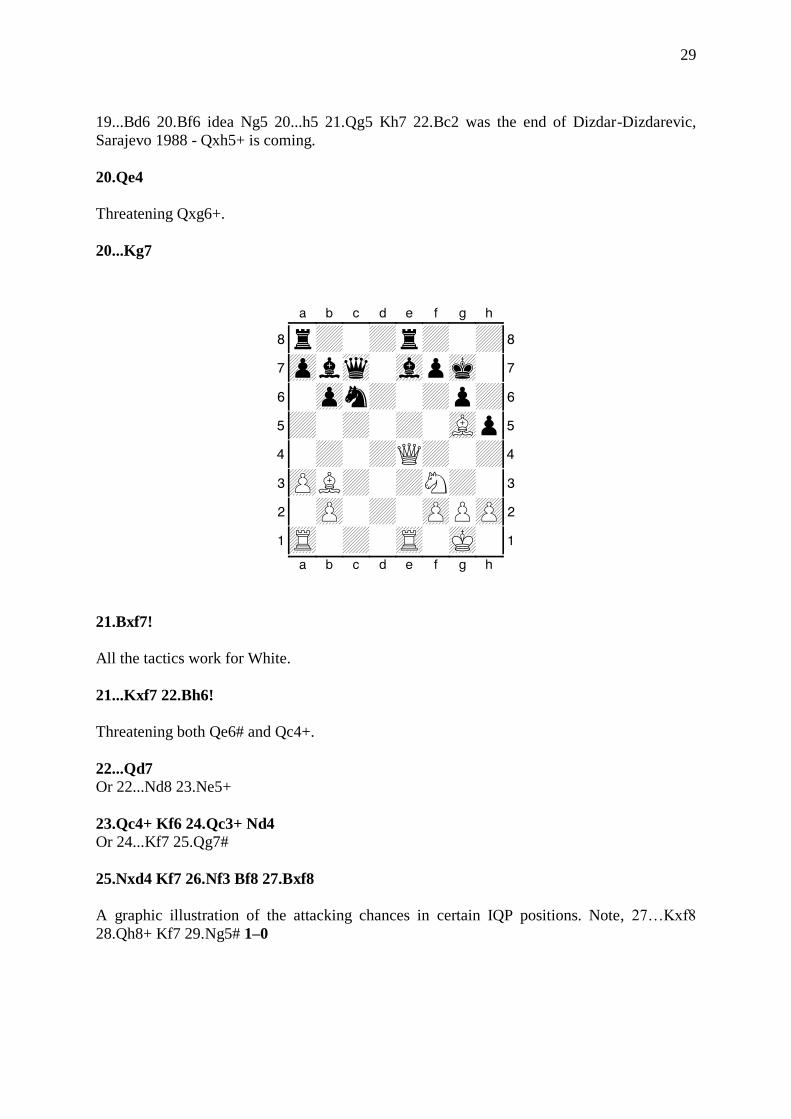
20...Kg7
XABCDEFGHY 8r+-+r+-+( 7zplwq-vlpmk-' 6-zpn+-+p+& 5+-+-+-vLp% 4-+-+Q+-+$ 3zPL+-+N+-# 2-zP-+-zPPzP" 1tR-+-tR-mK-! xabcdefghy
21.Bxf7!
All the tactics work for White.
21...Kxf7 22.Bh6!
Threatening both Qe6# and Qc4+.
22...Qd7 Or 22...Nd8 23.Ne5+
23.Qc4+ Kf6 24.Qc3+ Nd4 Or 24...Kf7 25.Qg7#
25.Nxd4 Kf7 26.Nf3 Bf8 27.Bxf8
A graphic illustration of the attacking chances in certain IQP positions. Note, 27…Kxf8
28.Qh8+ Kf7 29.Ng5# 1–0

30
PART 6: Closed Positions
Kramnik,V - Topalov,V (2690) [D15]
Dortmund, 1999
1.d4 Nf6 2.Nf3 d5 3.c4 c6 4.Nc3 a6
With this, Black is preparing to seek a resolution to the tension revolving around c4 and d5
with the break ...b5.
Making a comparison with the main game, you should note that 4...e6 5.c5? b6! is most
satisfactory for Black, who could meet 6.b4 with 6...a5!
5.c5!?
It's more desirable for White to block now than before, because there is now a hole on b6.
5...Bf5
5...b6 6.cxb6 Qxb6 is still possible but it is nowhere near as good as if Black could have
recaptured on b6 with his a-pawn.
6.Bf4!
An excellent diagonal for the bishop.
6...Nbd7 7.e3
XABCDEFGHY 8r+-wqkvl-tr( 7+p+nzppzpp' 6p+p+-sn-+& 5+-zPp+l+-% 4-+-zP-vL-+$ 3+-sN-zPN+-# 2PzP-+-zPPzP" 1tR-+QmKL+R! xabcdefghy
In closed positions pawn breaks are vitally important. Here, Black should be aiming for ...b6
or ...e5, whilst White should plan to get in either b4-b5 or e3-e4.
7...e6
31
Here, 7...Nh5 to eliminate White's bishop, might come with a cost: 8.Be5!? f6 (8...Nxe5
9.Nxe5 Nf6 10.Bd3 Bxd3 11.Qxd3 e6 12.0–0 leaves White with a comfortable advantage)
9.Bg3 Nxg3 10.hxg3 e5 11.Nh4! Be6 12.Ng6!
8.Be2 Be7 9.Nd2!?
A nice multi-purpose move:
1). It rules out ...Nh5 altogether.
2). White prepares b4 and Nb3-a5.
3). White might attack on the kingside with g4.
PRINCIPLE: In closed positions, speedy development is not necessarily so important but
the quality of development is.
Checking out White alternatives here, we have:
9.0–0 0–0 10.b4 but then Black could play 10...Nh5!?;
9.h3 (to facilitate Bh2) 9...0–0 10.0–0 is sensible too but then it is important to remember
that, if you have a cramped position, exchanges help. Hence, 10...Ne4! 11.Nxe4 Bxe4 12.Nd2
Bg6 13.b4 Re8 14.Nb3 Bf6 15.Rc1 e5! 16.dxe5 Nxe5 and Black was fine in C.Cruz-
A.Mirzoev, Sabadell 2011.
9...Bg6 If 9...0–0, then White might begin an attack with 10.g4!? Bg6 11.h4 threatening h5.
PRINCIPLE: If the centre is closed, then you are often more able to attack on the wing. Here
White's king is perfectly safe on e1.
10.b4 Qc8 11.0–0 Bd8!
Black plans ....Bc7 opposing White's strong bishop on f4 and preparing the key break ...e5.
12.Rc1
This is directed against ...b6.
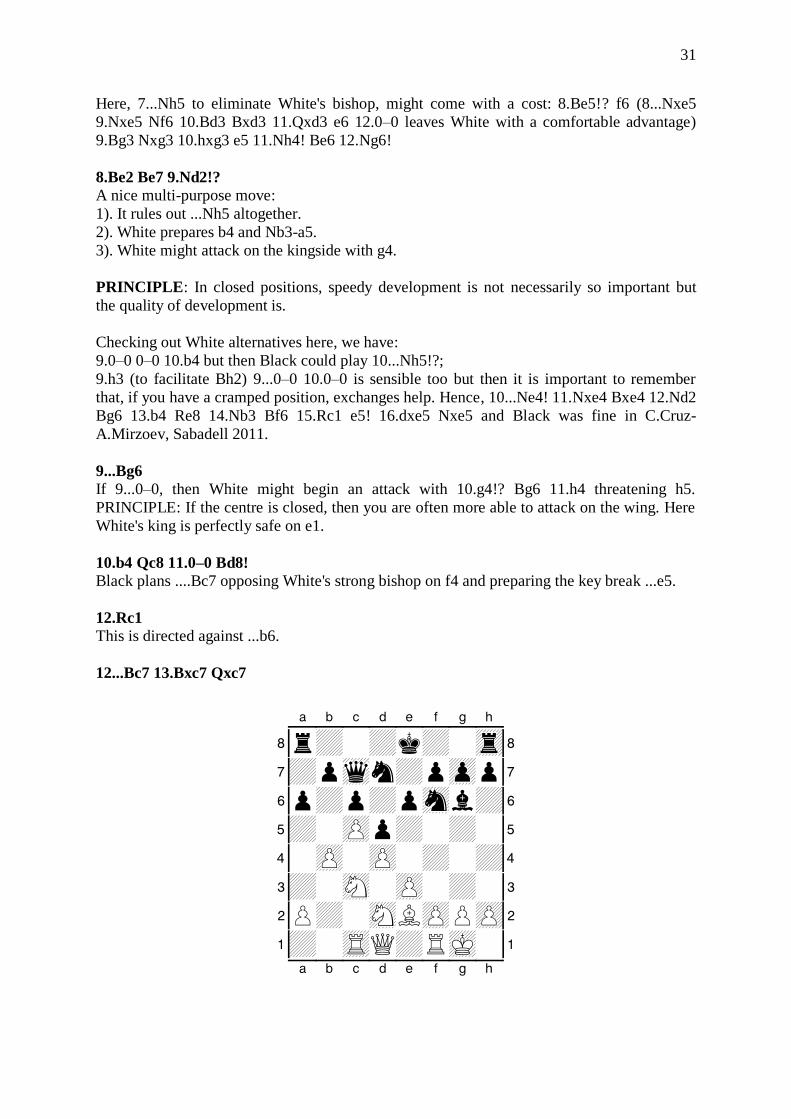
12...Bc7 13.Bxc7 Qxc7
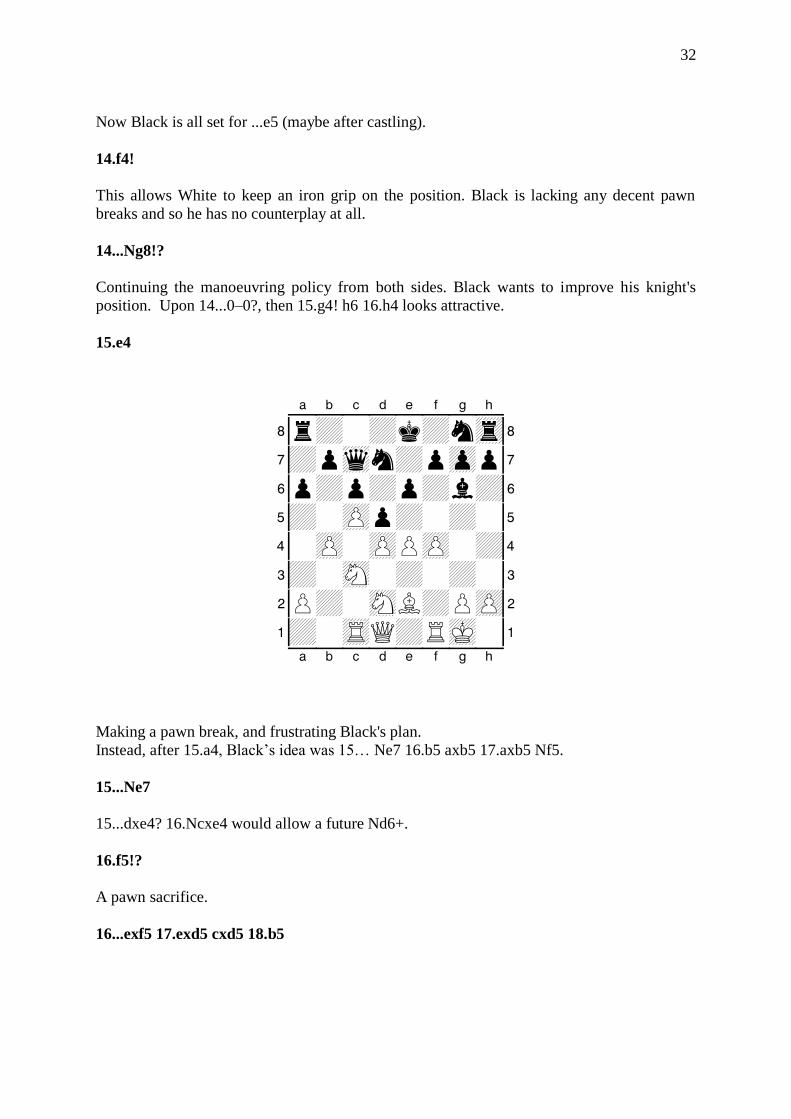
XABCDEFGHY 8r+-+k+-tr( 7+pwqn+pzpp' 6p+p+psnl+& 5+-zPp+-+-% 4-zP-zP-+-+$ 3+-sN-zP-+-# 2P+-sNLzPPzP" 1+-tRQ+RmK-! xabcdefghy
32
Now Black is all set for ...e5 (maybe after castling).
14.f4!
This allows White to keep an iron grip on the position. Black is lacking any decent pawn
breaks and so he has no counterplay at all.
14...Ng8!?
Continuing the manoeuvring policy from both sides. Black wants to improve his knight's
position. Upon 14...0–0?, then 15.g4! h6 16.h4 looks attractive.
15.e4
XABCDEFGHY 8r+-+k+ntr( 7+pwqn+pzpp' 6p+p+p+l+& 5+-zPp+-+-% 4-zP-zPPzP-+$ 3+-sN-+-+-# 2P+-sNL+PzP" 1+-tRQ+RmK-! xabcdefghy
Making a pawn break, and frustrating Black's plan.
Instead, after 15.a4, Black’s idea was 15… Ne7 16.b5 axb5 17.axb5 Nf5.
15...Ne7
15...dxe4? 16.Ncxe4 would allow a future Nd6+.
16.f5!?
A pawn sacrifice.
16...exf5 17.exd5 cxd5 18.b5
33
XABCDEFGHY 8r+-+k+-tr( 7+pwqnsnpzpp' 6p+-+-+l+& 5+PzPp+p+-% 4-+-zP-+-+$ 3+-sN-+-+-# 2P+-sNL+PzP" 1+-tRQ+RmK-! xabcdefghy
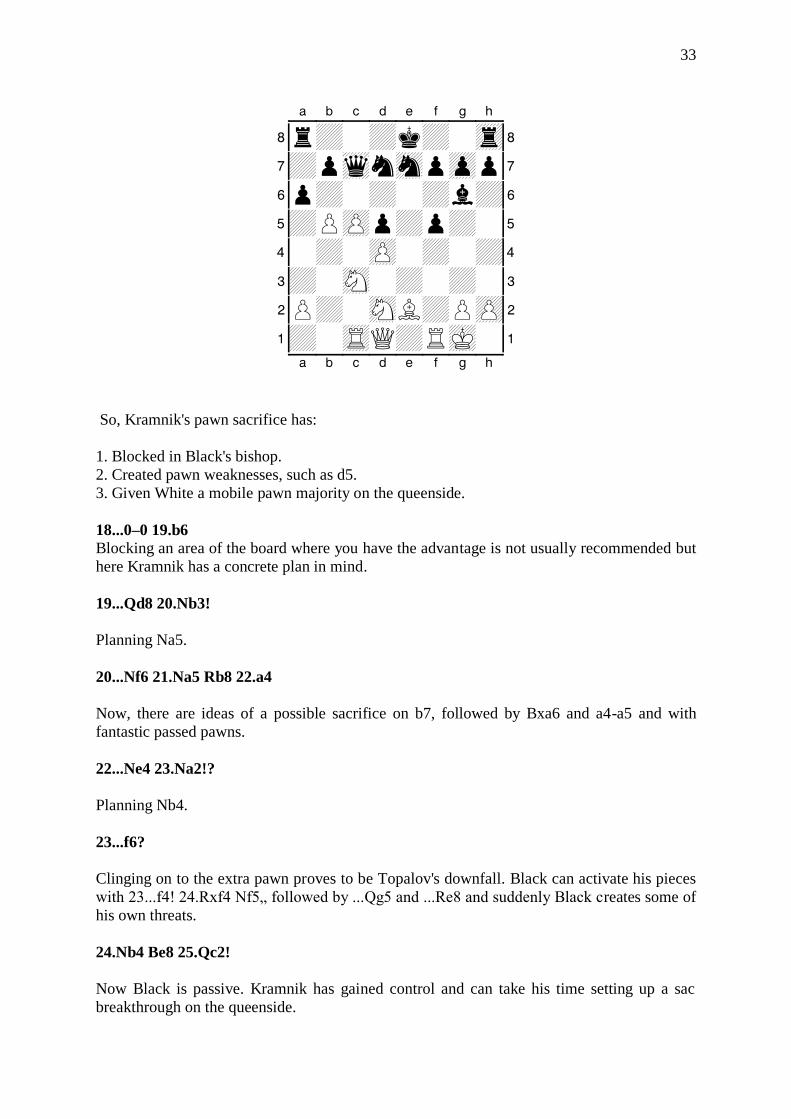
So, Kramnik's pawn sacrifice has:
1. Blocked in Black's bishop.
2. Created pawn weaknesses, such as d5.
3. Given White a mobile pawn majority on the queenside.
18...0–0 19.b6
Blocking an area of the board where you have the advantage is not usually recommended but
here Kramnik has a concrete plan in mind.
19...Qd8 20.Nb3!
Planning Na5.
20...Nf6 21.Na5 Rb8 22.a4
Now, there are ideas of a possible sacrifice on b7, followed by Bxa6 and a4-a5 and with
fantastic passed pawns.
22...Ne4 23.Na2!?
Planning Nb4.
23...f6?
Clinging on to the extra pawn proves to be Topalov's downfall. Black can activate his pieces
with 23...f4! 24.Rxf4 Nf5„ followed by ...Qg5 and ...Re8 and suddenly Black creates some of
his own threats.
24.Nb4 Be8 25.Qc2!
Now Black is passive. Kramnik has gained control and can take his time setting up a sac
breakthrough on the queenside.
34
PRINCIPLE: When your opponent has no counterplay, do not rush!
25...g6?! 26.Rb1 Rf7 27.Nxb7!
Finally, the sacrifice comes.
27...Rxb7 28.a5!
Threatening c6 as well as Bxa6.
28...Nc6 29.Nxc6 Bxc6 30.Bxa6 Rb8 31.Bb5!
Kramnik's bishop move gets out of the way of the a-pawn and eliminates a key blockader.
31...Qc8
Black tries to keep a c6 blockade. 31...Bxb5 32.Rxb5 followed by c6 or a6.
32.Bxc6 Qxc6 33.a6 Kg7 34.Rb4!?
One winning plan is doubling rooks followed by a7 and b7.
34...Nd6!?
Using the pin to get the knight back into play but Kramnik is ready.
35.Qa4!
Without queens on the board, nothing can stop White's pawns.
35...Qxa4 36.Rxa4 Nc8 37.Rb4!
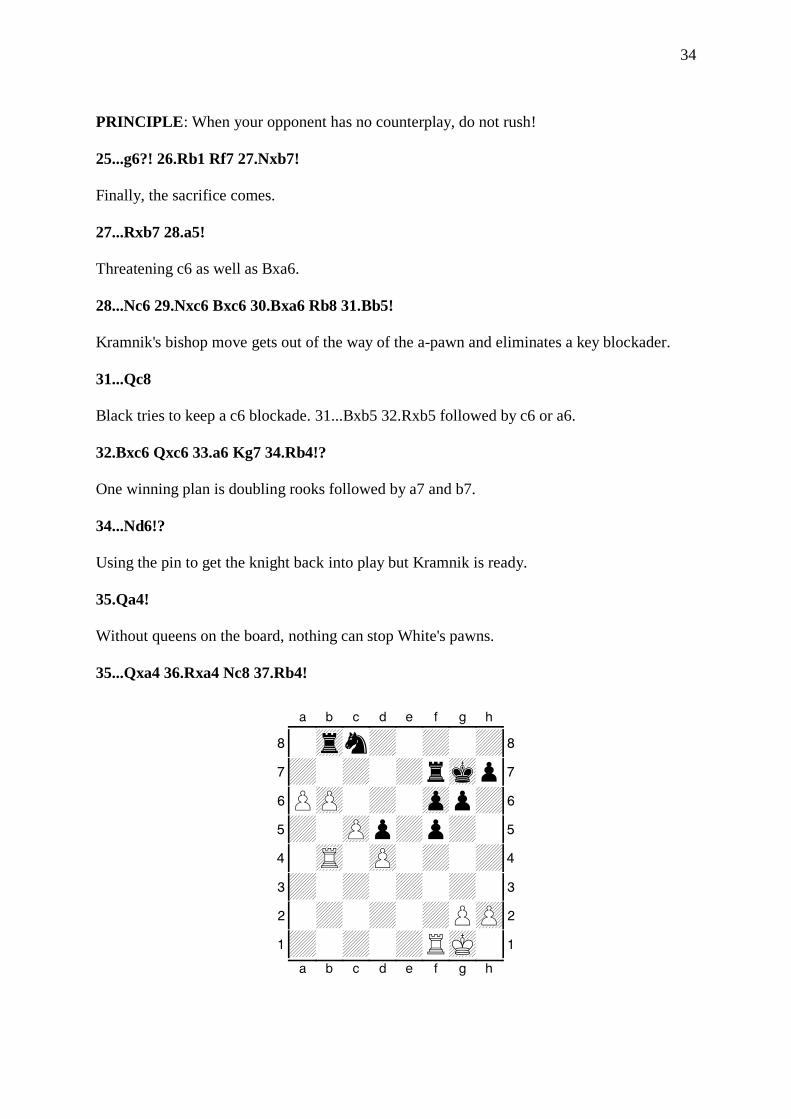
XABCDEFGHY 8-trn+-+-+( 7+-+-+rmkp' 6PzP-+-zpp+& 5+-zPp+p+-% 4-tR-zP-+-+$ 3+-+-+-+-# 2-+-+-+PzP" 1+-+-+RmK-! xabcdefghy

35
37...Na7
White was threatening 38.Ra1 followed by a7. Note the immediate 38.a7? would allow
38...Nxa7 39.bxa7 Ra8.
38.bxa7 Ra8 39.c6! Raxa7 40.Rc1 1-0
SUMMARY:
In closed positions:
1) Pawn breaks are vital.
2) Quality of development is more important that quantity.
3) With a blocked centre, you are more able to attack on the wings.
4) If you have less space, it's a good idea to exchange pieces.
36
PART 7: Tricky Transpositions
Essentially, a transposition occurs when an identical position is reached via a different move
order. For example, everybody knows the French Defence that usually appears via 1 e4 e6 2
d4 d5. Well, although it is far less common, it could equally be reached via 1 d4 e6 2 e4 d5.
Unless you are prepared to play the French Defence as Black, then you should NOT meet 1
d4 with 1…e6.
Similarly, unless you play the Sicilian Defence, then it is unwise to meet the ‘Reti’ opening
of 1 Nf3 with 1…c5, in case White plays 2 e4. Similarly, though you wouldn’t want to play
1…d5 if you normally play the King’s Indian, as, after 2 d4, you are more likely to end up
transposing into a Queen’s Gambit variation when c2-c4 soon appears.
Indeed, I have seen many juniors automatically meet 1 Nf3 with 1…Nc6 just because they
are used to having 1 e4 e5 2 Nf3 Nc6 as Black. However, in this instance, 2 d4 would
completely throw them, particularly as obstructing the c-pawn isn’t generally a good idea in
Queen’s Pawn openings.
There are numerous transpositions but the key is that you don’t allow yourself to be tricked
into deviating from your standard opening repertoire into unfamiliar territory.
37
PART 8: ‘Anti’ Openings
An anti-opening is aimed at forcing your opponent away from their main line. After 1 d4 Nf6,
the Trompowski opening of 2 Bg5 might be aimed at dissuading 2…g6 because of the
debatable threat of 3 Bxf6 (doubling pawns but at the cost of conceding a bishop for a
knight). In that respect, it is arguably an ‘Anti King’s Indian’ or ‘Anti Grunfeld’.
Very common are the group of openings known as ‘Anti-Sicilians’. Rather than entering the
highly theoretical Open Sicilian via 1 e4 c5 2 Nf3 d6 3 d4 cxd4 4 Nxd4, White might for
example employ:
2 Nc3 Nc6 3 f4 (The Grand Prix Attack)
2 Nc3 Nc6 3 g3 (The Closed Sicilian)
2 d4 cxd4 3 c3 (The Morra Gambit)
2 c3 (The c3 Sicilian)
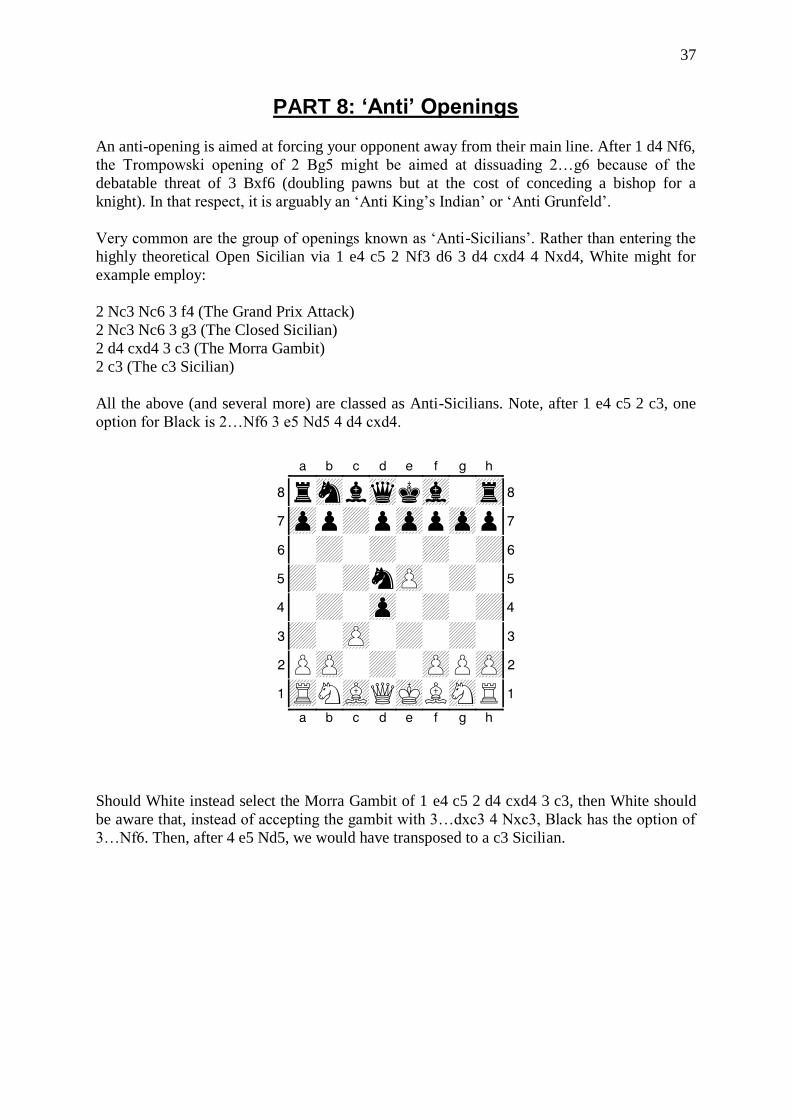
All the above (and several more) are classed as Anti-Sicilians. Note, after 1 e4 c5 2 c3, one
option for Black is 2…Nf6 3 e5 Nd5 4 d4 cxd4.
XABCDEFGHY 8rsnlwqkvl-tr( 7zpp+pzppzpp' 6-+-+-+-+& 5+-+nzP-+-% 4-+-zp-+-+$ 3+-zP-+-+-# 2PzP-+-zPPzP" 1tRNvLQmKLsNR! xabcdefghy
Should White instead select the Morra Gambit of 1 e4 c5 2 d4 cxd4 3 c3, then White should
be aware that, instead of accepting the gambit with 3…dxc3 4 Nxc3, Black has the option of
3…Nf6. Then, after 4 e5 Nd5, we would have transposed to a c3 Sicilian.
Related Documents