Installing Liferay for an Enterprise Eventually, you will want to install Liferay onto a real server, after you've completed your evaluation and you want to begin building your web site. It is easiest to do this by starting with a bundle and then reconfiguring that bundle so that i t is enterprise-ready. Because this is by far the quickest and easiest method to get a production Liferay system running, we will look at this first. Often, however, enterprises will have an established Java EE infrastructure upon which they would like to install Liferay. In this situation, a bundle will not suffice. Most of this section, therefore, will focus on installing Liferay onto an already-established application server. Liferay Home In Liferay 5.2.0 and higher, there is a new folder defined as Liferay Home. This folder for most application servers is one folder higher than the location of the application server itself. In the case of a server which defines different domains for different instances of the server, this folder may be one folder up from the domain in which Liferay is running. If Liferay is unable to create the resources it needs in this folder, or if it finds itself running on certain application servers, it will fall back to defining the home folder in the home folder of the user ID that is running Liferay. As described above in the Bundles section, the home folder is very important to the operation of Liferay. The aforementioned folders (data, deploy, and license) will be created there, and you can also put a special configuration file called portal-ext.properties there. This file will be fully documented in Chapter 5: Advanced Liferay Configuration, but we will use it in this chapter for some basic configuration, including setting up Liferay to talk to our database. Database Setup Default Method: Automatic If you create your database and grant a user ID full access to it, Liferay can use that user ID to create its indexes and tables automatically. This is the recommended way to set up Liferay, as it allows you to take advantage of Liferay's ability to automatically maintain its database through various plugin installs which may create tables of their own and through upgrades of the platform. It is by far the best way to set up your Liferay installation. If you will be setting up Liferay's database with the recommended permissions, you can skip the next section. Manual Method Even though Liferay can create its database automatically, some enterprises prefer not to allow the user ID configured in an application server to have the permissions over the database necessary for Liferay and its plugins to maintain their tables. For these organizations, Select, Insert, Update, and Delete are generally all the permissions that are granted, and so we will go over how to set up the database manually. If your organization is willing to grant the Liferay user ID permissions to create and drop tables in the database —and this is the recommended configuration —you can skip this section. One other caveat is this: Liferay has an automatic database upgrade function which runs when the version of Liferay is upgraded to a new release. If the user ID that accesses the database does not have enough rights to create / modify / drop tables in the database, you will need to grant those rights to the ID before you start your upgraded Liferay for the first time. Once the upgrade is complete, you can remove those rights until the next upgrade. Additionally, many plugins provided by Liferay require that new tables be added to Liferay's database. These plugins cannot be installed if Liferay does not have permission to create these tables automatically. If you wish to install these plugins, you will need to grant rights to create tables in the database before you attempt to install them. Liferay provides an SQL script archive download on the web site. For the SE version, it is in the Additional Files section of the Downloads page. For the EE version, you will be provided a link to this archive. Download this file and unzip it.

Welcome message from author
This document is posted to help you gain knowledge. Please leave a comment to let me know what you think about it! Share it to your friends and learn new things together.
Transcript

Installing Liferay for an Enterprise
Eventually, you will want to install Liferay onto a real server, after you've completed your evaluation and you want to
begin building your web site. It is easiest to do this by starting with a bundle and then reconfiguring that bundle so that i t
is enterprise-ready. Because this is by far the quickest and easiest method to get a production Liferay system running,
we will look at this first. Often, however, enterprises will have an established Java EE infrastructure upon which they
would like to install Liferay. In this situation, a bundle will not suffice. Most of this section, therefore, will focus on installing Liferay onto an already-established application server.
Liferay Home
In Liferay 5.2.0 and higher, there is a new folder defined as Liferay Home. This folder for most application servers is one
folder higher than the location of the application server itself. In the case of a server which defines different domains for different instances of the server, this folder may be one folder up from the domain in which Liferay is running.
If Liferay is unable to create the resources it needs in this folder, or if it finds itself running on certain application servers, it will fall back to defining the home folder in the home folder of the user ID that is running Liferay.
As described above in the Bundles section, the home folder is very important to the operation of Liferay. The
aforementioned folders (data, deploy, and license) will be created there, and you can also put a special configuration file called portal-ext.properties there.
This file will be fully documented in Chapter 5: Advanced Liferay Configuration, but we will use it in this chapter for some basic configuration, including setting up Liferay to talk to our database.
Database Setup
Default Method: Automatic
If you create your database and grant a user ID full access to it, Liferay can use that user ID to create its indexes and
tables automatically. This is the recommended way to set up Liferay, as it allows you to take advantage of Liferay's ability
to automatically maintain its database through various plugin installs which may create tables of their own and through upgrades of the platform. It is by far the best way to set up your Liferay installation.
If you will be setting up Liferay's database with the recommended permissions, you can skip the next sec tion.
Manual Method
Even though Liferay can create its database automatically, some enterprises prefer not to allow the user ID configured in
an application server to have the permissions over the database necessary for Liferay and its plugins to maintain their
tables. For these organizations, Select, Insert, Update, and Delete are generally all the permissions that are granted, and
so we will go over how to set up the database manually. If your organization is willing to grant the Liferay user ID
permissions to create and drop tables in the database—and this is the recommended configuration—you can skip this section.
One other caveat is this: Liferay has an automatic database upgrade function which runs when the version of Liferay is
upgraded to a new release. If the user ID that accesses the database does not have enough rights to create / modify /
drop tables in the database, you will need to grant those rights to the ID before you start your upgraded Liferay for the
first time. Once the upgrade is complete, you can remove those rights until the next upgrade. Additionally, many plugins
provided by Liferay require that new tables be added to Liferay's database. These plugins cannot be installed if Liferay
does not have permission to create these tables automatically. If you wish to install these plugins, you will need to grant rights to create tables in the database before you attempt to install them.
Liferay provides an SQL script archive download on the web site. For the SE version, it is in the Additional Files section
of the Downloads page. For the EE version, you will be provided a link to this archive. Download this file and unzip it.
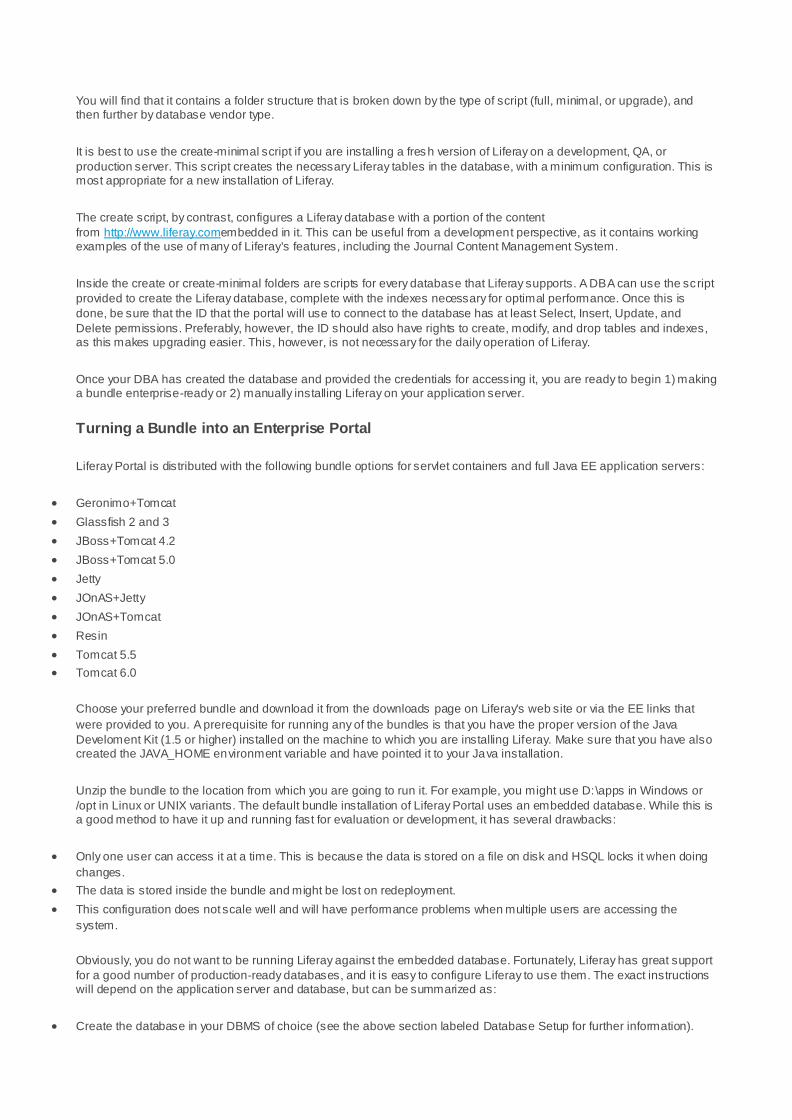
You will find that it contains a folder structure that is broken down by the type of script (full, minimal, or upgrade), and then further by database vendor type.
It is best to use the create-minimal script if you are installing a fresh version of Liferay on a development, QA, or
production server. This script creates the necessary Liferay tables in the database, with a minimum configuration. This is most appropriate for a new installation of Liferay.
The create script, by contrast, configures a Liferay database with a portion of the content
from http://www.liferay.comembedded in it. This can be useful from a development perspective, as it contains working examples of the use of many of Liferay's features, including the Journal Content Management System.
Inside the create or create-minimal folders are scripts for every database that Liferay supports. A DBA can use the script
provided to create the Liferay database, complete with the indexes necessary for optimal performance. Once this is
done, be sure that the ID that the portal will use to connect to the database has at least Select, Insert, Update, and
Delete permissions. Preferably, however, the ID should also have rights to create, modify, and drop tables and indexes, as this makes upgrading easier. This, however, is not necessary for the daily operation of Liferay.
Once your DBA has created the database and provided the credentials for accessing it, you are ready to begin 1) making a bundle enterprise-ready or 2) manually installing Liferay on your application server.
Turning a Bundle into an Enterprise Portal
Liferay Portal is distributed with the following bundle options for servlet containers and full Java EE application servers:
Geronimo+Tomcat
Glassfish 2 and 3
JBoss+Tomcat 4.2
JBoss+Tomcat 5.0
Jetty
JOnAS+Jetty
JOnAS+Tomcat
Resin
Tomcat 5.5
Tomcat 6.0
Choose your preferred bundle and download it from the downloads page on Liferay's web site or via the EE links that
were provided to you. A prerequisite for running any of the bundles is that you have the proper version of the Java
Develoment Kit (1.5 or higher) installed on the machine to which you are installing Liferay. Make sure that you have also created the JAVA_HOME environment variable and have pointed it to your Java installation.
Unzip the bundle to the location from which you are going to run it. For example, you might use D:\apps in Windows or
/opt in Linux or UNIX variants. The default bundle installation of Liferay Portal uses an embedded database. While this is a good method to have it up and running fast for evaluation or development, it has several drawbacks:
Only one user can access it at a time. This is because the data is stored on a file on disk and HSQL locks it when doing
changes.
The data is stored inside the bundle and might be lost on redeployment.
This configuration does not scale well and will have performance problems when multiple users are accessing the
system.
Obviously, you do not want to be running Liferay against the embedded database. Fortunately, Liferay has great support
for a good number of production-ready databases, and it is easy to configure Liferay to use them. The exact instructions will depend on the application server and database, but can be summarized as:
Create the database in your DBMS of choice (see the above section labeled Database Setup for further information).
[Optional] Create a Data Source called jdbc/LiferayPool in your application server which points to your database and has
the proper credentials to access it.
[Optional] Create a mail session called mail/MailSession in your application server which points to your mail server, so
Liferay can send mail.
Create a portal-ext.properties file in the Liferay Home folder which either points directly to the database and mail session
or points to the application server's Data Source and mail session.
Start Liferay. Liferay will create the tables automatically and start. Otherwise, you will have had to prepare the database
first by running the appropriate create script.
Refer to the manual installation instructions below for further details on configuring the various application servers. There
is no difference between the Liferay bundles and the regular distribution archives of the application servers as they are
available from their own sites, with the exception that Liferay is pre-installed in them, and the JVM settings may have been optimized for use with Liferay.
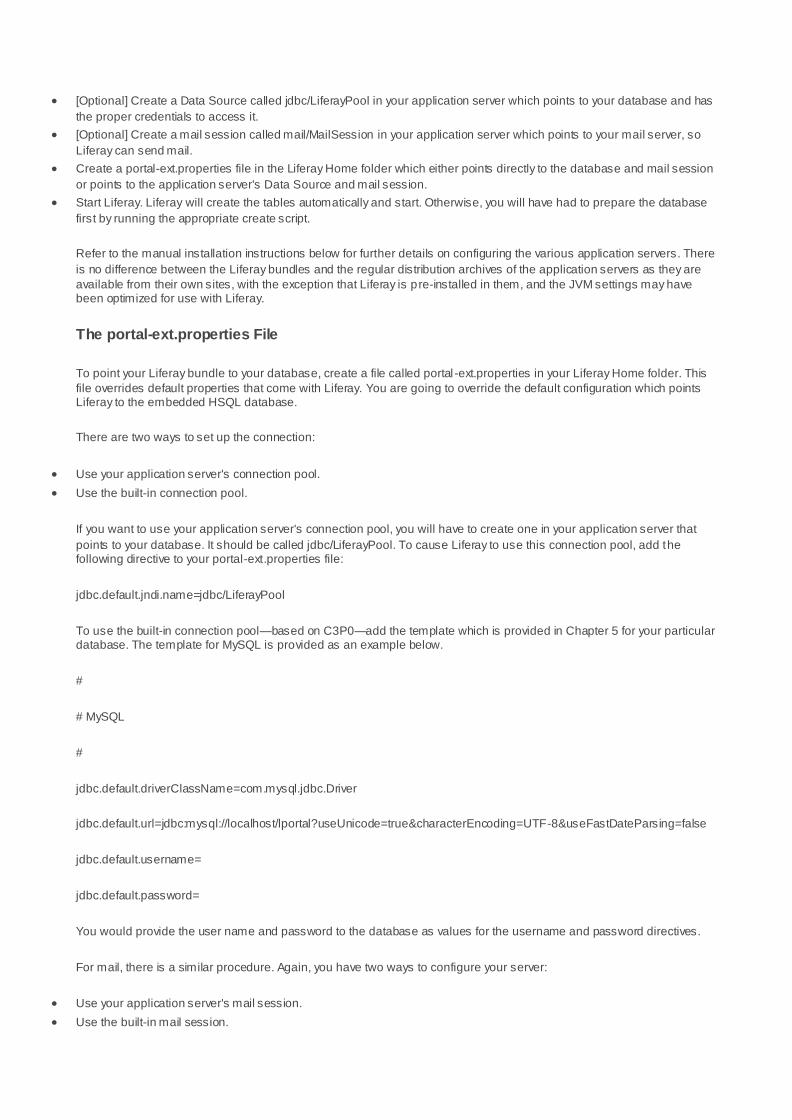
The portal-ext.properties File
To point your Liferay bundle to your database, create a file called portal -ext.properties in your Liferay Home folder. This
file overrides default properties that come with Liferay. You are going to override the default configuration which points Liferay to the embedded HSQL database.
There are two ways to set up the connection:
Use your application server's connection pool.
Use the built-in connection pool.
If you want to use your application server's connection pool, you will have to create one in your application server that
points to your database. It should be called jdbc/LiferayPool. To cause Liferay to use this connection pool, add the following directive to your portal-ext.properties file:
jdbc.default.jndi.name=jdbc/LiferayPool
To use the built-in connection pool—based on C3P0—add the template which is provided in Chapter 5 for your particular database. The template for MySQL is provided as an example below.
#
# MySQL
#
jdbc.default.driverClassName=com.mysql.jdbc.Driver
jdbc.default.url=jdbc:mysql://localhost/lportal?useUnicode=true&characterEncoding=UTF-8&useFastDateParsing=false
jdbc.default.username=
jdbc.default.password=
You would provide the user name and password to the database as values for the username and password directives.
For mail, there is a similar procedure. Again, you have two ways to configure your server:
Use your application server's mail session.
Use the built-in mail session.

To use your application server's mail session, you will have to create one in your application server that points to your mail server. Once you have done that, add the following directive to your portal -ext.properties file:
mail.session.jndi.name=mail/MailSession
To use the built-in mail session, add the following directives to your portal-ext.properties file, substituting your mail server information:
mail.session.mail.pop3.host=localhost
mail.session.mail.pop3.password=
mail.session.mail.pop3.port=110
mail.session.mail.pop3.user=
mail.session.mail.smtp.auth=false
mail.session.mail.smtp.host=localhost
mail.session.mail.smtp.password=
mail.session.mail.smtp.port=25
mail.session.mail.smtp.user=
mail.session.mail.store.protocol=pop3
mail.session.mail.transport.protocol=smtp
Save the file. You can now start your application server.
Installing Liferay on an Existing Application Server
This section contains detailed instructions for installing Liferay Portal using its WAR distribution. This allows system
administrators to deploy Liferay in existing application server installations. It is recommended that you have a good understanding of how to deploy Java EE applications in your application server of choice.
Installing Liferay in 10 Easy Steps
There are 10 generic steps to installing Liferay on an existing application server:
Obtain the Liferay .war file and the dependencies archive.
Make sure you do not have an application listening at the root (/) of your server. If you do, move it to a different context or
undeploy it.
Decide whether you want to use your application server's data sources or if you want to use the one included with
Liferay. If you want to use your application server's data source, create a data source for Liferay called j dbc/LiferayPool.
Decide whether you want to use your application server's mail session or if you want to use the one included with Liferay.
If you want to use your application server's mail session, create one called mail/MailSession.
Shut your application server down.
Extract the dependencies to a location on your server's global class path. This allows both Liferay and plugins to access
these dependencies.

Create a portal-ext.properties file and place it in the Liferay Home folder. Generally, this is one folder up from where your
application server is installed. See the notes on specific application servers below for the location of this folder for your
application server.
Add either the JNDI name of your data source or the JDBC parameters above to connect Liferay to your database.
Add either the JNDI name of your mail session or the mail parameters above to connect Liferay to your mail server.
Start your application server, deploy the Liferay .war file, and start it.
The instructions below are specific for each application server that Liferay supports. Liferay supports a wide combination
of application servers and databases. Because of this, for brevity this section assumes MySQL as the database, that the
database has already been created, and that you are using your application server's mail session and data source. To
use other databases, substitute the JDBC driver and URL construct for your database in place of the MySQL ones shown here.
We also assume your application server is already installed and running successfully. If you still need to install your application server, please follow your vendor's instructions first.
The following instructions assume an installation on a local machine. When installing to a remote server, substitute localhost with the host name or IP of the server.
Remember, for all of these application servers, create your portal-ext.properties file in the Liferay Home folder and make sure it points to your database connection pool and mail session.
Tip: Note that Liferay 5.x requires JDK 1.5 or greater. Do not attempt to install Liferay 5.x on an application server that runs under Java 1.4 or lower; it will not work. If you are running an application server that ships with a JDK and that JDK is 1.4 or lower, you will need to upgrade your application server in order to user Liferay 5.x. Liferay 4.x, however,
will run fine on these application servers. GlassFish 2.x
Liferay Home is one folder above GlassFish's install location.
Download the latest Liferay Portal .war file and dependencies.
Copy the dependencies .jars into $GLASSFISH_HOME/domains/domain1/lib, where $GLASSFISH_HOME is the
directory where Glassfish is installed.
Copy xercesImpl.jar and JDBC driver into the same place.
Start Glassfish if it hasn't already been started. Go to the Glassfish Administration Console at http://localhost:4848.
Default login credentials are user name: admin; password: adminadmin.

Illustration 3: Glassfish JDBC Connection PoolDatabase Configuration
If you want Glassfish to manage your data source, follow the instructions below. If you want Liferay to manage your data source, you can skip this section.
Under Other Tasks, select Create New JDBC Connection Pool.
In the first screen, give it a name of LiferayPool, a Resource Type of javax.sql.ConnectionPoolDataSource, and select
MySQL as the Database Vendor. Click Next.
On the next page, scroll down to the Additional Properties section. Find the property called URL, and set its value to:
jdbc:mysql://localhost/lportal?useUnicode=true&characterEncoding=UTF-8&emulateLocators=true
If your database is not on the same server as Glassfish, substitute your database server's host name for localhost above.
Click Add Property, and add a property called user with a value of the user name to connect to the database.
Click Add Property again, and add a property called password with a value of the password to connect to the database.
Click Finish.
You will now see a list of Connection Pools. To test your connection, click the LiferayPool and click the Ping button. If
you get a Ping Succeeded message, everything has been set up correctly.
Click JDBC Resources. You will see a list of JDBC Resources by JNDI Name.
Click New.
Make the JNDI Name jdbc/LiferayPool and select the LiferayPool you created earlier.
Click OK.
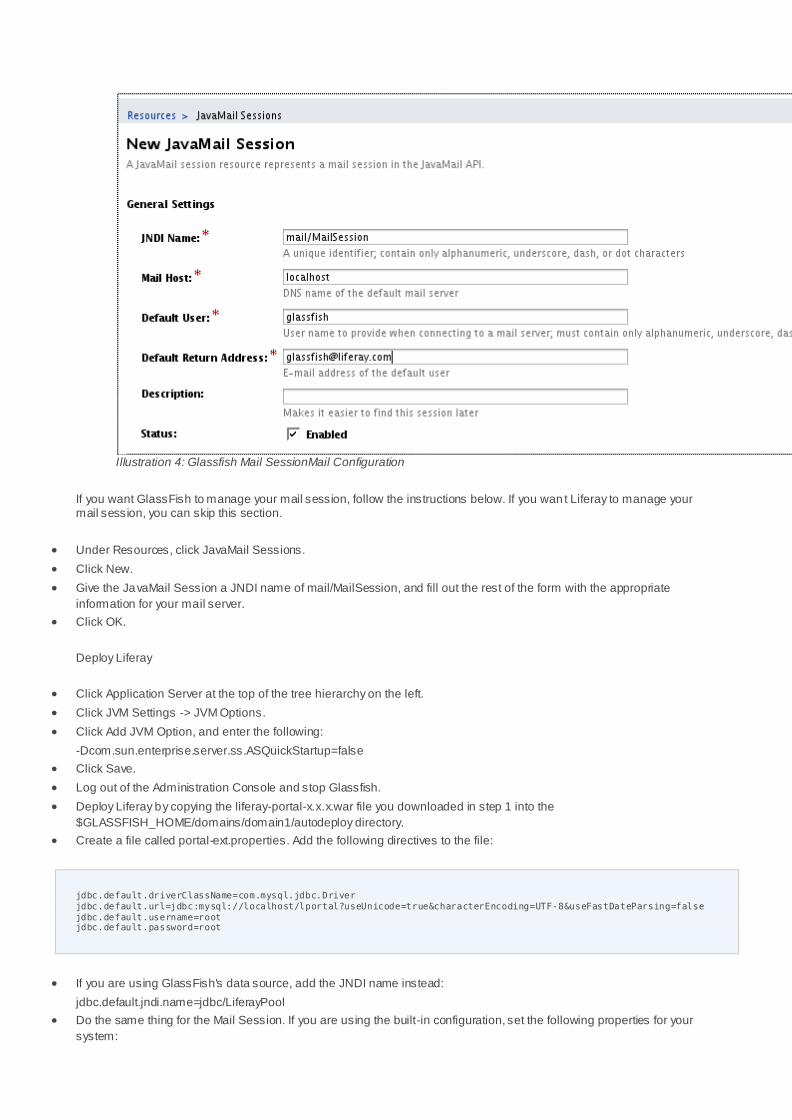
Illustration 4: Glassfish Mail SessionMail Configuration
If you want GlassFish to manage your mail session, follow the instructions below. If you wan t Liferay to manage your mail session, you can skip this section.
Under Resources, click JavaMail Sessions.
Click New.
Give the JavaMail Session a JNDI name of mail/MailSession, and fill out the rest of the form with the appropriate
information for your mail server.
Click OK.
Deploy Liferay
Click Application Server at the top of the tree hierarchy on the left.
Click JVM Settings -> JVM Options.
Click Add JVM Option, and enter the following:
-Dcom.sun.enterprise.server.ss.ASQuickStartup=false
Click Save.
Log out of the Administration Console and stop Glassfish.
Deploy Liferay by copying the liferay-portal-x.x.x.war file you downloaded in step 1 into the
$GLASSFISH_HOME/domains/domain1/autodeploy directory.
Create a file called portal-ext.properties. Add the following directives to the file:
jdbc.default.driverClassName=com.mysql.jdbc.Driver jdbc.default.url=jdbc:mysql://localhost/lportal?useUnicode=true&characterEncoding=UTF-8&useFastDateParsing=false jdbc.default.username=root jdbc.default.password=root
If you are using GlassFish's data source, add the JNDI name instead:
jdbc.default.jndi.name=jdbc/LiferayPool
Do the same thing for the Mail Session. If you are using the built-in configuration, set the following properties for your
system:
mail.session.mail.pop3.host=localhost
mail.session.mail.pop3.password=
mail.session.mail.pop3.port=110
mail.session.mail.pop3.user=
mail.session.mail.smtp.auth=false
mail.session.mail.smtp.host=localhost
mail.session.mail.smtp.password=
mail.session.mail.smtp.port=25
mail.session.mail.smtp.user=
mail.session.mail.store.protocol=pop3
mail.session.mail.transport.protocol=smtp
If you are using Glassfish's mail session, add the JNDI name instead:
mail.session.jndi.name=mail/MailSession
Save and close the file.
Start GlassFish. When Liferay finishes starting, open http://localhost:8080 in your browser. You should see the default
Liferay home page.
GlassFish 3.x
Liferay Home is in the Glassfish root folder. We will assume for these instructions that you are using the default domain stored in [GlassFish Root]/glassfish/domains/domain1.
Before starting GlassFish, you will need to modify some settings in the domain you will be using to increase the default
amount of memory available. In your domain folder is a config folder. Open the file called domain.xml in this folder.
At approximately line 166 of this file, you will find the following JVM option being set:
<jvm-options>-Xmx512m</jvm-options>
Change this to:
<jvm-options>-Xmx1024m</jvm-options>
Add another line after this line with the following JVM option:
<jvm-options>-XX:MaxPermSize=256m</jvm-options>
Save and close the file.
In your domain folder is a folder called docroot. This folder contains a default page for the domain in a file called
index.html. Delete or move this file to another location.
Extract the Liferay dependencies archive into your domain's lib folder. Extract your database's JDBC driver here as well.
Database Configuration
If you want GlassFish to manage the data source, use the following instructions. If you want to use the built -in Liferay data source, you can skip this section.

Illustration 5: Glassfish JDBC Connection PoolGo to the GlassFish console URL: http://localhost:4848.
Under Other Tasks, select Create New JDBC Connection Pool.
In the first screen, give it a name of LiferayPool, a Resource Type of javax.sql.ConnectionPoolDataSource, and select
MySQL as the Database Vendor. Click Next.
On the next page, scroll down to the Additional Properties section. Find the property called URL, and set its value to:
jdbc:mysql://localhost/lportal?useUnicode=true&characterEncoding=UTF-8&emulateLocators=true
If your database is not on the same server as Glassfish, substitute your database server's host name for localhost above.
Click Add Property, and add a property called user with a value of the user name to connect to the database.
Click Add Property again, and add a property called password with a value of the password to connect to the database.
Click Finish.
You will now see a list of Connection Pools. To test your connection, click the LiferayPool and click the Ping button. If
you get a Ping Succeeded message, everything has been set up correctly.
Click JDBC Resources. You will see a list of JDBC Resources by JNDI Name.
Click New.
Make the JNDI Name jdbc/LiferayPool and select the LiferayPool you created earlier.
Click OK.
Mail Configuration
At the time of this writing, JavaMail is not yet implemented in GlassFish 3. For this reason, you will have to use the mail session that is provided by Liferay.
Deploy Liferay
Create a file called portal-ext.properties. Add the following directives to the file:
jdbc.default.driverClassName=com.mysql.jdbc.Driver jdbc.default.url=jdbc:mysql://localhost/lportal?useUnicode=true&characterEncoding=UTF-8&useFastDateParsing=false jdbc.default.username=root jdbc.default.password=root
If you are using GlassFish's data source, add the JNDI name instead:
jdbc.default.jndi.name=jdbc/LiferayPool
Do the same thing for the Mail Session. If you are using the built-in configuration, set the following properties for your
system:
mail.session.mail.pop3.host=localhost
mail.session.mail.pop3.password=

mail.session.mail.pop3.port=110
mail.session.mail.pop3.user=
mail.session.mail.smtp.auth=false
mail.session.mail.smtp.host=localhost
mail.session.mail.smtp.password=
mail.session.mail.smtp.port=25
mail.session.mail.smtp.user=
mail.session.mail.store.protocol=pop3
mail.session.mail.transport.protocol=smtp
GlassFish 3 has not yet implemented JavaMail, so you do not have the option to use one via JNDI.
Save and close the file.
Go to the GlassFish console URL: http://localhost:4848
Click Web Applications in the tree on the left.
Click the Deploy button.
Click Browse and browse to the location of the Liferay .war file.
Leave the rest of the defaults and click OK.
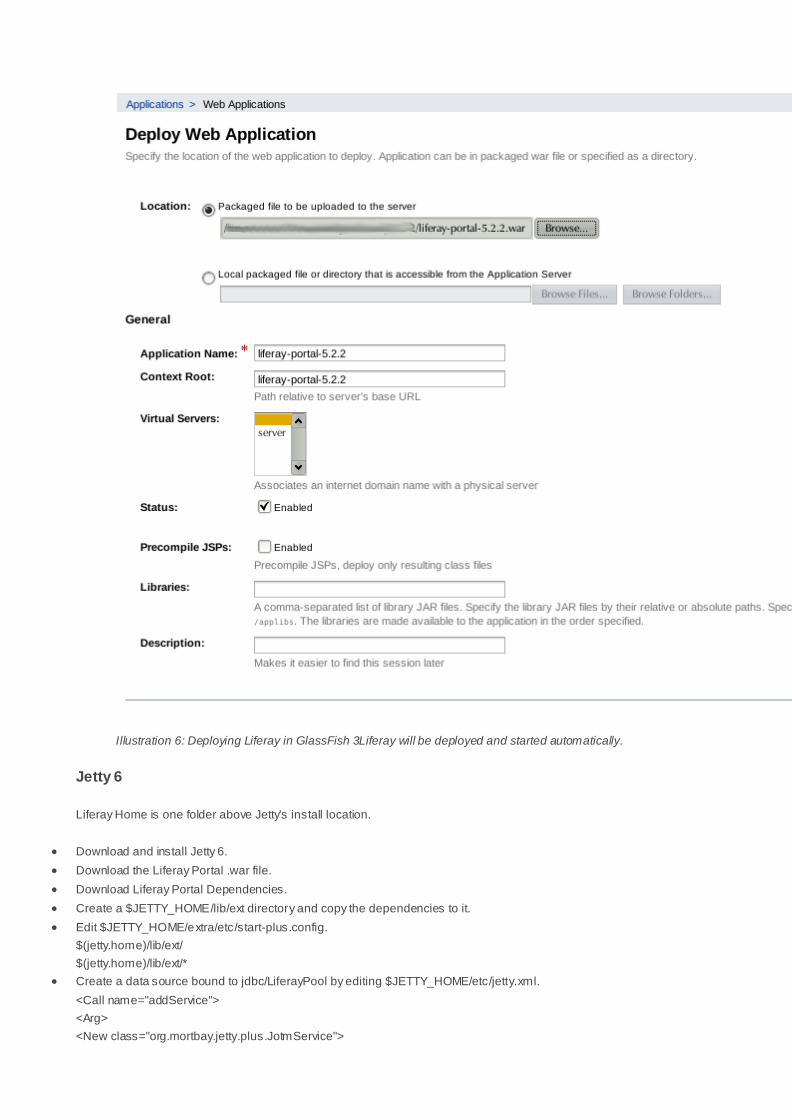
Illustration 6: Deploying Liferay in GlassFish 3Liferay will be deployed and started automatically.
Jetty 6
Liferay Home is one folder above Jetty's install location.
Download and install Jetty 6.
Download the Liferay Portal .war file.
Download Liferay Portal Dependencies.
Create a $JETTY_HOME/lib/ext directory and copy the dependencies to it.
Edit $JETTY_HOME/extra/etc/start-plus.config.
$(jetty.home)/lib/ext/
$(jetty.home)/lib/ext/*
Create a data source bound to jdbc/LiferayPool by editing $JETTY_HOME/etc/jetty.xml.
<Call name="addService">
<Arg>
<New class="org.mortbay.jetty.plus.JotmService">

<Set name="Name">TransactionMgr</Set>
<Call name="addDataSource">
<Arg>jdbc/LiferayPool</Arg>
<Arg>
<New class="org.enhydra.jdbc.standard.StandardXADataSource">
<Set name="DriverName">com.mysql.jdbc.Driver</Set>
<Set name="Url">jdbc:mysql://localhost/lportal?useUnicode=true&characterEncoding=UTF-8</Set>
<Set name="User"></Set>
<Set name="Password"></Set>
</New>
</Arg>
<Arg>
<New class="org.enhydra.jdbc.pool.StandardXAPoolDataSource">
<Arg type="Integer">4</Arg>
<Set name="MinSize">4</Set>
<Set name="MaxSize">15</Set>
</New>
</Arg>
</Call>
</New>
</Arg>
</Call>
Download mysql-connector-java-{$version}-bin.jar and copy to to $JETTY_HOME/lib/ext. This is the JDBC driver for
MySQL. If you are using a different database, copy the appropriate driver.
Create a mail session bound to mail/MailSession by editing $JETTY_HOME/etc/jetty.xml:
<Call name="addService">
<Arg>
<New class="org.mortbay.jetty.plus.MailService">
<Set name="Name">MailService</Set>
<Set name="JNDI">mail/MailSession</Set>
<Put name="mail.smtp.host">localhost</Put>
</New>
</Arg>
</Call>
Create $JETTY_HOME/etc/jaas.config.
PortalRealm {
com.liferay.portal.kernel.security.jaas.PortalLoginModule required;
};
Create directory $JETTY_HOME/webapps/root and unpack the Liferay .war file into it.
Go to $JETTY_HOME/webapps/root/WEB-INF/lib and delete xercesImpl.jar and xml-apis.jar.
Copy $JETTY_HOME/webapps/root/WEB-INF/lib/commons-logging.jar to $JETTY_HOME/ext (overwriting existing one).
Create batch file.
Create a directory $JETTY_HOME/bin.
Create run.bat (Note, this is for Windows platform. For other platforms, configure accordingly).
@echo off if "" == "%JAVA_HOME%" goto errorJavaHome %JAVA_HOME%/bin/java -Xmx512m -Dfile.encoding=UTF8 -Duser.timezone=GMT -Djava.security.auth.login.config=../etc/jaas.config -DSTART=../extra/etc/start-plus.config -jar ../start.jar ../etc/jetty.xml

goto end :errorJavaHome echo JAVA_HOME not defined. goto end :end
Note: If you get a java.lang.OutOfMemoryError exception while starting up Jetty, give your JVM more memory by setting -Xmx512m.
Start Liferay by running run.bat. Open your browser to http://localhost:8080. You should see the default Liferay home page.
JBoss 4.03sp1 / 4.04 / 4.05 / 4.2 / 4.3
Liferay Home is one folder above JBoss's install location.
Download and install JBoss AS into your preferred directory. From now on, the directory where you installed JBoss will
be referred to as $JBOSS_HOME.
Download the Liferay Portal .war file and dependencies.
Edit $JBOSS_HOME/server/default/deploy/jboss -web.deployer/conf/web.xml. Replace the default servlet (lines 79-91) :
<servlet>
<servlet-name>default</servlet-name>
<servlet-class>org.apache.catalina.servlets.DefaultServlet</servlet-class>
<init-param>
<param-name>debug</param-name>
<param-value>0</param-value>
</init-param>
<init-param>
<param-name>listings</param-name>
<param-value>true</param-value>
</init-param>
<load-on-startup>1</load-on-startup>
</servlet>
with:
<servlet>
<servlet-name>default</servlet-name>
<servlet-class>org.apache.catalina.servlets.DefaultServlet</servlet-class>
<init-param>
<param-name>debug</param-name>
<param-value>0</param-value>
</init-param>
<init-param>
<param-name>listings</param-name>
<param-value>false</param-value>
</init-param>
<init-param>
<param-name>input</param-name>
<param-value>4096</param-value>
</init-param>
<init-param>
<param-name>output</param-name>
<param-value>4096</param-value>

</init-param>
<load-on-startup>1</load-on-startup>
</servlet>
Go to $JBOSS_HOME/server/default/lib/, download mysql-connector-java-{$version}-bin.jar and copy to this directory.
This is the JDBC driver for MySQL. If you are using a different database, copy the appropriate driver.
Put the Liferay Portal dependency .jars into $JBOSS_HOME/server/default/lib.
Database Configuration
If you want JBoss to manage the data source, use the following instructions. If you want to use the built-in Liferay data source, you can skip this section.
Create $JBOSS_HOME/server/default/deploy/liferay-ds.xml with following content:
<datasources>
<local-tx-datasource>
<jndi-name>jdbc/LiferayPool</jndi-name>
<connection-url>
jdbc:mysql://localhost/lportal?useUnicode=true&characterEncoding=UTF-8
</connection-url>
<driver-class>com.mysql.jdbc.Driver</driver-class>
<user-name></user-name>
<password></password>
<min-pool-size>0</min-pool-size>
</local-tx-datasource>
</datasources>
Mail Configuration
If you want JBoss to manage the mail configuration, use the following instructions. If you want to use the built-in Liferay mail session, you can skip this section.
Set mail properties by replacing the contents of $JBOSS_HOME/server/default/deploy/mail -service.xml with:
<?xml version="1.0"?>
<server>
<mbean code="org.jboss.mail.MailService" name="jboss:service=MailSession">
<attribute name="JNDIName">mail/MailSession</attribute>
<attribute name="User">nobody</attribute>
<attribute name="Password">password</attribute>
<attribute name="Configuration">
<configuration>
<property name="mail.store.protocol" value="imap" />
<property name="mail.transport.protocol" value="smtp" />
<property name="mail.imap.host" value="localhost" />
<property name="mail.pop3.host" value="localhost" />
<property name="mail.smtp.host" value="localhost" />
</configuration>
</attribute>
</mbean>
</server>
Deploy Liferay
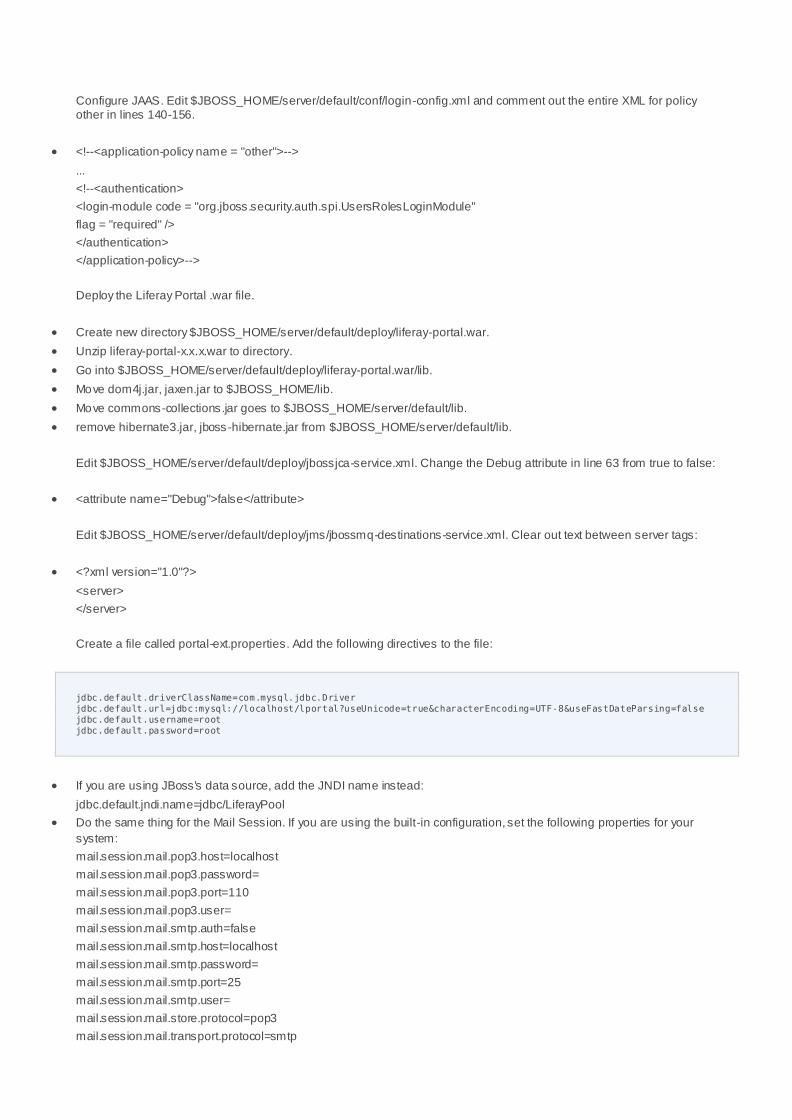
Configure JAAS. Edit $JBOSS_HOME/server/default/conf/login-config.xml and comment out the entire XML for policy other in lines 140-156.
<!--<application-policy name = "other">-->
...
<!--<authentication>
<login-module code = "org.jboss.security.auth.spi.UsersRolesLoginModule"
flag = "required" />
</authentication>
</application-policy>-->
Deploy the Liferay Portal .war file.
Create new directory $JBOSS_HOME/server/default/deploy/liferay-portal.war.
Unzip liferay-portal-x.x.x.war to directory.
Go into $JBOSS_HOME/server/default/deploy/liferay-portal.war/lib.
Move dom4j.jar, jaxen.jar to $JBOSS_HOME/lib.
Move commons-collections.jar goes to $JBOSS_HOME/server/default/lib.
remove hibernate3.jar, jboss-hibernate.jar from $JBOSS_HOME/server/default/lib.
Edit $JBOSS_HOME/server/default/deploy/jbossjca-service.xml. Change the Debug attribute in line 63 from true to false:
<attribute name="Debug">false</attribute>
Edit $JBOSS_HOME/server/default/deploy/jms/jbossmq-destinations-service.xml. Clear out text between server tags:
<?xml version="1.0"?>
<server>
</server>
Create a file called portal-ext.properties. Add the following directives to the file:
jdbc.default.driverClassName=com.mysql.jdbc.Driver jdbc.default.url=jdbc:mysql://localhost/lportal?useUnicode=true&characterEncoding=UTF-8&useFastDateParsing=false jdbc.default.username=root jdbc.default.password=root
If you are using JBoss's data source, add the JNDI name instead:
jdbc.default.jndi.name=jdbc/LiferayPool
Do the same thing for the Mail Session. If you are using the built-in configuration, set the following properties for your
system:
mail.session.mail.pop3.host=localhost
mail.session.mail.pop3.password=
mail.session.mail.pop3.port=110
mail.session.mail.pop3.user=
mail.session.mail.smtp.auth=false
mail.session.mail.smtp.host=localhost
mail.session.mail.smtp.password=
mail.session.mail.smtp.port=25
mail.session.mail.smtp.user=
mail.session.mail.store.protocol=pop3
mail.session.mail.transport.protocol=smtp

If you are using JBoss's mail session, add the JNDI name instead:
mail.session.jndi.name=mail/MailSession
Save and close the file.
Start JBoss. Open your browser to http://localhost:8080. You should see the default Liferay home page.
JBoss 5.x
Liferay Home is one folder above JBoss's install location.
Download and install JBoss AS 5.0.1 GA into your preferred directory. This directory will be referred to below as
$JBOSS_HOME.
Download the latest version of the Liferay Portal .war file.
Go to $JBOSS_HOME/server/default/lib/. Download mysql-connector-java-{$version}-bin.jar and copy to this directory.
(This is the JDBC connector for MySQL. Use the appropriate driver for your database.)
Download Liferay's Portal Dependencies. Unzip to $JBOSS_HOME/server/default/lib.
Configure JAAS. Edit $JBOSS_HOME/server/default/conf/login-config.xml and comment out the entire XML for policy
other in lines 115-131.
<!--<application-policy name = "other">--> ... <!--<authentication> <login-module code = "org.jboss.security. auth.spi.UsersRolesLoginModule" flag = "required" /> </authentication> </application-policy>-->
Database Configuration
If you want JBoss to manage the data source, use the following instructions. If you want to use the built-in Liferay data source, you can skip this section.
Create $JBOSS_HOME/server/default/deploy/liferay-ds.xml with following content:
<datasources> <local-tx-datasource> <jndi-name>jdbc/LiferayPool</jndi-name> <connection-url> jdbc:mysql://localhost/lportal?useUnicode=true&characterEncoding=UTF-8 </connection-url> <driver-class>com.mysql.jdbc.Driver</driver-class> <user-name></user-name> <password></password> <min-pool-size>0</min-pool-size> </local-tx-datasource> </datasources>
Mail Configuration
If you want JBoss to manage the mail configuration, use the following instructions. If you want to use the built -in Liferay mail session, you can skip this section.
Set mail properties by replacing the contents of $JBOSS_HOME/server/default/deploy/mail -service.xml with:

<?xml version="1.0"?> <server> <mbean code="org.jboss.mail.MailService" name="jboss:service=MailSession"> <attribute name="JNDIName">mail/MailSession</attribute> <attribute name="User">nobody</attribute> <attribute name="Password">password</attribute> <attribute name="Configuration"> <configuration> <property name="mail.store.protocol" value="imap" /> <property name="mail.transport.protocol" value="smtp" /> <property name="mail.imap.host" value="localhost" /> <property name="mail.pop3.host" value="localhost" /> <property name="mail.smtp.host" value="localhost" /> </configuration> </attribute> </mbean> </server>
Deploy Liferay
Delete all the files and folders in $JBOSS_HOME/server/default/deploy/ROOT.war
Unzip the Liferay .war file to the ROOT.war directory.
Go to $JBOSS_HOME/server/default/deploy/ROOT.war/lib.
Remove jaxen.jar, jaxrpc.jar, stax.jar, xercesImpl.jar, xml-apis.jar from
$JBOSS_HOME/server/default/deploy/ROOT.war/WEB-INF/lib
Navigate to the Liferay Home folder, which is one folder above JBoss's install location.
Create a file called portal-ext.properties. Add the following directives to the file:
jdbc.default.driverClassName=com.mysql.jdbc.Driver jdbc.default.url=jdbc:mysql://localhost/lportal?useUnicode=true&characterEncoding=UTF-8&useFastDateParsing=false jdbc.default.username=root jdbc.default.password=root
If you are using JBoss's data source, add the JNDI name instead:
jdbc.default.jndi.name=jdbc/LiferayPool
Do the same thing for the Mail Session. If you are using the built-in configuration, set the following properties for your
system:
mail.session.mail.pop3.host=localhost
mail.session.mail.pop3.password=
mail.session.mail.pop3.port=110
mail.session.mail.pop3.user=
mail.session.mail.smtp.auth=false
mail.session.mail.smtp.host=localhost
mail.session.mail.smtp.password=
mail.session.mail.smtp.port=25
mail.session.mail.smtp.user=
mail.session.mail.store.protocol=pop3
mail.session.mail.transport.protocol=smtp
If you are using JBoss's mail session, add the JNDI name instead:
mail.session.jndi.name=mail/MailSession
Save and close the file.
Start JBoss. Open your browser to http://localhost:8080. You should see the default Liferay home page.
Oracle Application Server (OC4J)
Liferay Home is located in the home folder of the user running OC4J.
These instructions assume you have an installed OC4J container 10.1.3.4.0 in a folder that will be referred to as $OC4J_HOME.
Unzip the dependencies archive (which is downloadable from Liferay's web site) into $OC4J_HOME/j2ee/home/applib. Put your JDBC driver here as well.
OC4J contains a startup script in the bin folder of the application server directory. You will need to edit this file and
change some of the arguments. On Windows systems, the filename of the script is oc4j.cmd. On Linux / Unix systems, the filename of the script is oc4j.
Find the line in this file that contains the JVMARGS variable:
JVMARGS=$OC4J_JVM_ARGS
Modify the line so it reads like the following:
JVMARGS=$OC4J_JVM_ARGS -Doc4j.jmx.security.proxy.off=true -Xms512m -Xmx512m -XX:MaxPermSize=256m
Database and Connection Pool
If you are using Liferay's built-in data source, you can skip this section.
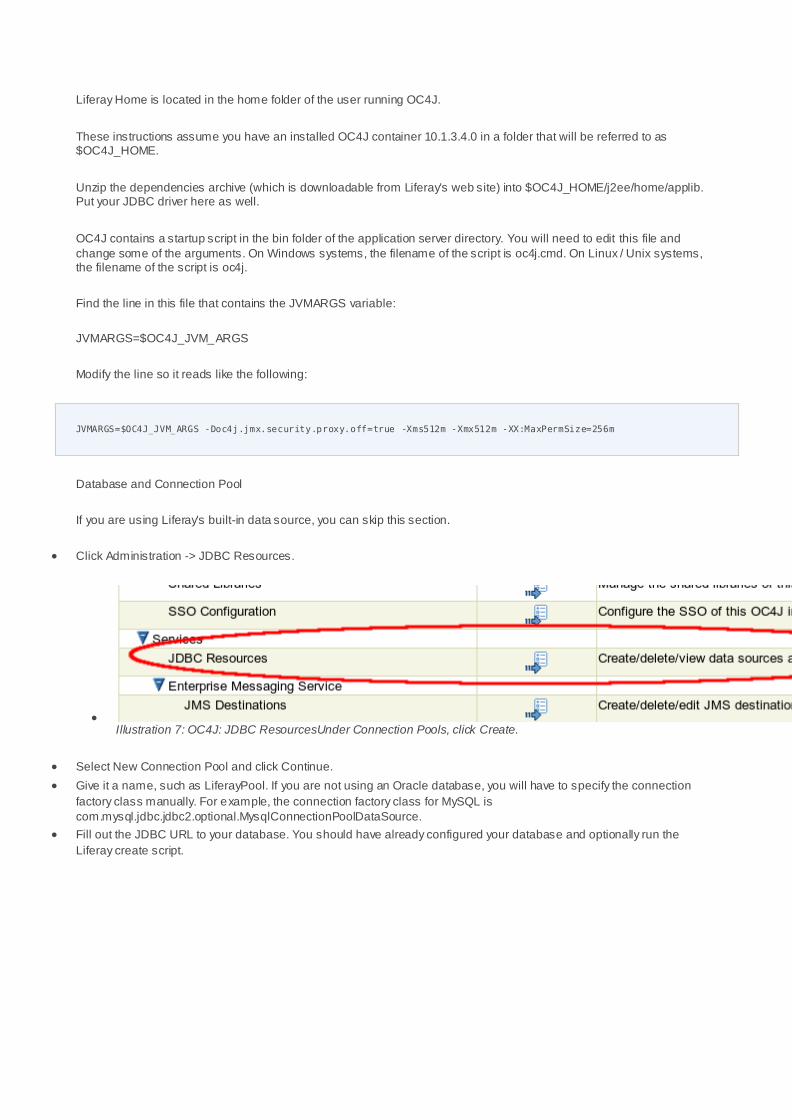
Click Administration -> JDBC Resources.
Illustration 7: OC4J: JDBC ResourcesUnder Connection Pools, click Create.
Select New Connection Pool and click Continue.
Give it a name, such as LiferayPool. If you are not using an Oracle database, you will have to specify the connection
factory class manually. For example, the connection factory class for MySQL is
com.mysql.jdbc.jdbc2.optional.MysqlConnectionPoolDataSource.
Fill out the JDBC URL to your database. You should have already configured your database and optionally run the
Liferay create script.

Illustration 8: OC4J: Connection PoolClick Finish. Under Data Sources, click Create. Select Managed Data Source (default) and click Continue.
Give it a name (LiferayDataSource) and a JNDI location of jdbc/LiferayPool.

Illustration 9: OC4J: Liferay Data SourceSelect the Connection Pool you created in the previous step and then click Finish.
Click the Test Connection icon. If you are not using an Oracle database, change the test SQL to something like SELECT
* from User_, and then click Test. You should get a message saying Connection to "LiferayDataSource" established
successfully. If not, go back and check your settings.
Click the OC4J: home link in the top left of the page.
Installing Liferay
Click Applications.
Click Deploy. Leave the default selected under Archive, and click the Browse button. Browse to where your Liferay .war
file is.

Illustration 10: Deploying the Liferay .war file on OC4JWith the location of the Liferay .war file in the Archive Location field, click Next. Wait a while while OC4J uploads the Liferay .war file.
The next screen allows you to give the application a name and set its context root. Use Liferay for the name and /portal
as the context root. Click Next.
Click the Next link at the bottom right of the page.
Click the OK button at the top of this page. You will be brought back to the previous screen. Click the Deploy button at
the top right of the screen. OC4J will then deploy Liferay.

Illustration 11: Setting the deployment options on OC4JClick the Return button at the top of the page.
Next, navigate to the Liferay Home folder. Create a file called portal -ext.properties in this folder. Add a directive for Portal
Context, then give it a value of /portal.
portal.ctx=/portal
If you are using Liferay's built-in data source, add the database settings:
jdbc.default.driverClassName=com.mysql.jdbc.Driver
jdbc.default.url=jdbc:mysql://localhost/jettyportal?useUnicode=true&characterEncoding=UTF-
8&useFastDateParsing=false
jdbc.default.username=root
jdbc.default.password=root
If you are using OC4J's data source, add the JNDI name instead:
jdbc.default.jndi.name=jdbc/LiferayPool
Do the same thing for the Mail Session. If you are using the built-in configuration, set the following properties for your
system:
mail.session.mail.pop3.host=localhost
mail.session.mail.pop3.password=
mail.session.mail.pop3.port=110
mail.session.mail.pop3.user=
mail.session.mail.smtp.auth=false
mail.session.mail.smtp.host=localhost
mail.session.mail.smtp.password=
mail.session.mail.smtp.port=25
mail.session.mail.smtp.user=
mail.session.mail.store.protocol=pop3
mail.session.mail.transport.protocol=smtp
If you are using OC4J's mail session, add the JNDI name instead:
mail.session.jndi.name=mail/MailSession
Save and close the file.

Shut down and restart the server. In your browser, go to http://localhost:8888/portal. You should see Liferay's default
home page.
09/04/28 15:06:54 Loading code-source:/F:/Liferay/Tools/Application Servers/oc4j_extended_101340/j2ee/home/applications/ Liferay/liferay-portal-5.2.2/WEB-INF/lib/portal-impl.jar!/system.properties 09/04/28 15:06:55 Loading code-source:/F:/Liferay/Tools/Application Servers/oc4j_extended_101340/j2ee/home/applications/ Liferay/liferay-portal-5.2.2/WEB-INF/lib/portal-impl.jar!/portal.properties 09/04/28 15:06:55 Loading file:/F:/Liferay/Tools/Application Servers/oc4j_extended_101340/j2ee/home/applications/Liferay /liferay-portal-5.2.2/WEB-INF/classes/portal-ext.properties 15:07:02,984 INFO [DialectDetector:64] Determining dialect for MySQL 5 15:07:03,125 INFO [DialectDetector:97] Using dialect org.hibernate.dialect.MySQLDialect 09/04/28 15:07:05 Loading code-source:/F:/Liferay/Tools/Application Servers/oc4j_extended_101340/j2ee/home/applications/ Liferay/liferay-portal-5.2.2/WEB-INF/lib/portal-impl.jar!/captcha.properties 15:07:06,359 INFO [PortalImpl:243] Portal lib directory /F:/Liferay/Tools/Application Servers/oc4j_extended_101340/j2ee /home/applications/Liferay/liferay-portal-5.2.2/WEB-INF/lib/ 15:07:20,531 INFO [ServerDetector:104] Detected server oc4j 2009-4-28 15:07:23 com.sun.portal.container.service.ServiceManagerContextListenerImpl contextInitialized INFO: PSC_CSPCS001 : Started initializing ServiceManager 2009-4-28 15:07:23 com.sun.portal.container.service.ServiceManager addService INFO: PSC_CSPCS004 : Service added, Name: com.sun.portal.container.service.CoordinationService, Implementation: com.sun. portal.container.service.coordination.impl.CoordinationServiceImpl 2009-4-28 15:07:23 com.sun.portal.container.service.ServiceManager addService INFO: PSC_CSPCS004 : Service added, Name: com.sun.portal.container.service.CachingService, Implementation: com.sun.porta l.container.service.caching.impl.CachingServiceImpl 2009-4-28 15:07:23 com.sun.portal.container.service.ServiceManager addService INFO: PSC_CSPCS004 : Service added, Name: com.sun.portal.container.service.ClientCachingService, Implementation: com.sun .portal.container.service.caching.impl.ClientCachingServiceImpl 2009-4-28 15:07:23 com.sun.portal.container.service.ServiceManager addService INFO: PSC_CSPCS004 : Service added, Name: com.sun.portal.container.service.DeploymentService_Local, Implementation: com. sun.portal.container.service.deployment.impl.DeploymentServiceLocalImpl 2009-4-28 15:07:23 com.sun.portal.container.service.ServiceManager addService INFO: PSC_CSPCS004 : Service added, Name: com.sun.portal.container.service.ContainerEventService, Implementation: com.su n.portal.container.service.coordination.impl.ContainerEventServiceImpl 2009-4-28 15:07:23 com.sun.portal.container.service.ServiceManager addService INFO: PSC_CSPCS004 : Service added, Name: com.sun.portal.container.service.PolicyService, Implementation: com.liferay.po rtal.portletcontainer.PolicyServiceImpl 2009-4-28 15:07:23 com.sun.portal.container.service.ServiceManager addService 2009-4-28 15:07:24 com.sun.portal.container.service.ServiceManagerContextListenerImpl contextInitialized INFO: PSC_CSPCS002 : Finished initializing ServiceManager 2009-4-28 15:07:24 com.sun.portal.portletcontainer.impl.PortletContainerContextListenerImpl contextInitialized INFO: PSPL_PCCSPCPCI0003 : Starting PortletContainer 2.1 09/04/28 15:07:24 Starting Liferay Portal Standard Edition 5.2.2 (Augustine / Build 5202 / February 20, 2009) 15:07:53,000 INFO [HotDeployUtil:64] Initializing hot deploy manager 10845041 15:07:53,359 INFO [AutoDeployDir:108] Auto deploy scanner started for C:\Documents and Settings\Steven\liferay\deploy 09/04/28 15:07:54 Oracle Containers for J2EE 10g (10.1.3.4.0) initialized 15:10:52,875 INFO [PluginPackageUtil:1148] Reloading repositories
Resin 3.1.x
Liferay Home is one folder above Resin's install location.
Download and install Resin into your preferred directory. From now on, the directory where you installed Resin will be
referred to as $RESIN_HOME.
Edit $RESIN_HOME/conf/resin.conf. Replace lines 60-64 with:
<class-loader>
<tree-loader path="${resin.home}/lib"/>
<tree-loader path="${server.root}/lib"/>
<compiling-loader path="${server.rootDir}/common/classes"/>
<library-loader path="${server.rootDir}/common/lib"/>

</class-loader>
And add the following:
<database>
<jndi-name>jdbc/LiferayPool</jndi-name>
<driver type="com.mysql.jdbc.Driver">
<url>jdbc:mysql://localhost/lportal?useUnicode=true&characterEncoding=UTF-8</url>
<user></user>
<password></password>
</driver>
<prepared-statement-cache-size>8</prepared-statement-cache-size>
<max-connections>20</max-connections>
<max-idle-time>30s</max-idle-time>
</database>
<resource jndi-name="mail/MailSession" type="javax.mail.Session">
<init>
<mail.store.protocol>imap</mail.store.protocol>
<mail.transport.protocol>smtp</mail.transport.protocol>
<mail.imap.host>localhost</mail.imap.host>
<mail.pop3.host>localhost</mail.pop3.host>
<mail.smtp.host>localhost</mail.smtp.host>
</init>
</resource>
<system-property
javax.xml.parsers.DocumentBuilderFactory="org.apache.xerces.jaxp.DocumentBuilderFactoryImpl"
/>
<system-property javax.xml.parsers.SAXParserFactory="org.apache.xerces.jaxp.SAXParserFactoryImpl" />
<system-property javax.xml.transform.TransformerFactory="org.apache.xalan.processor.TransformerFactoryImpl" />
<system-property org.xml.sax.driver="org.apache.xerces.parsers.SAXParser" />
Go to $RESIN_HOME and create new directory called common/lib. Download mysql-connector-java-{$version}-bin .jar
and copy to this directory. This is the JDBC connector for MySQL. If you are using another database, substitute this with
the appropriate driver.
Download the Liferay Portal Dependencies and unzip into $RESIN_HOME/common/lib.
Delete contents of $RESIN_HOME/webapps/ROOT.
Unzip liferay-portal-x.x.x.war to $RESIN_HOME/webapps/ROOT.
If you are using Resin 3.1.9 or higher, remove $RESIN_HOME/lib/portlet-01.jar. This contains the old Portlet 1.0 classes.
The Portlet 2.0 classes are backwards compatible, so this should not affect anything.
Next, you will need several .jar files which are included as part of the Liferay source distribution. Many application
servers ship with these already on the class path, but Resin does not. The best way to get the appropriate versions of
these files is to download the Liferay source code and get them from there. Once you have downloaded the Liferay
source, unzip it to a temporary folder.
o Go to $LIFERAY_SOURCE/lib/development/ and copy activation.jar and mail.jar to $RESIN_HOME/common/lib. Copy
saxpath.jar and xalan.jar to $RESIN_HOME/lib.
o Go to $LIFERAY_SOURCE/lib/portal and copy xercesImpl.jar and xml-apis.jar to $RESIN_HOME/lib.
To start the server, open a command prompt, navigate to the $RESIN_HOME and type:
java -jar lib/resin.jar start
Open your browser to http://localhost:8080. You should see the default Liferay home page.
Resin 3.2.x
Liferay Home is one folder up from Resin's install location.
Download and install Resin 3.2.1 into your preferred directory. From now on, the directory where you installed Resin will
be referred to as $RESIN_HOME.

Edit $RESIN_HOME/conf/resin.conf. Replace lines line 9-13 with:
<tree-loader path="${resin.home}/ext-lib"/>
<tree-loader path="${resin.root}/ext-lib"/>
<tree-loader path="${resin.home}/lib"/>
<tree-loader path="${resin.root}/lib"/>
<compiling-loader path="${server.rootDir}/common/classes"/>
<library-loader path="${server.rootDir}/common/lib"/>
Search <jvm-arg> tag in resin.conf and replace what is there with the following:
<jvm-arg>-Xmx256m</jvm-arg>
<jvm-arg>-Xss1m</jvm-arg>
<jvm-arg>-Dcom.sun.management.jmxremote</jvm-arg>
<jvm-arg>-Xmx1024m</jvm-arg>
<jvm-arg>-XX:MaxPermSize=256m</jvm-arg>
<jvm-arg>-Dfile.encoding=UTF-8</jvm-arg>
<jvm-arg>-Duser.timezone=GMT</jvm-arg>
Go to $RESIN_HOME and create a new directory called common/lib. Download mysqlconnector-java-{$version}-bin .jar
and copy to this directory. This is the JDBC connector for MySQL. If you are using another database, substitute this with
the appropriate driver.
Download the Liferay Portal Dependencies and unzip into $RESIN_HOME/common/lib.
Delete the contents of $RESIN_HOME/webapps/ROOT.
Unzip liferay-portal-x.x.x.war to $RESIN_HOME/webapps/ROOT.
Next, you will need several .jar files which are included as part of the Liferay source distribution. Many application
servers ship with these already on the class path, but Resin does not. The best way to get the appropriate versions of
these files is to download the Liferay source code and get them from there. Once you have downloaded the Liferay
source, unzip it to a temporary folder.
o Go to $LIFERAY_SOURCE/lib/development/ Copy saxpath.jar to $RESIN_HOME/common/lib.
To start the server, open a command prompt, navigate to the $RESIN_HOME and type:
java -jar lib/resin.jar start
Open your browser to http://localhost:8080. You should see the default Liferay home page.
Tomcat 5.5.X
Liferay Home is one folder above Tomcat's install location.
Download and install Tomcat 5.5.X into your preferred directory. From now on, the directory where you installed Tomcat
will be referred to as $TOMCAT_HOME.
Note: For JDK 5 users: move $TOMCAT_HOME/webapps/ROOT/WEB-INF/lib/xercesImpl.jar to
$TOMCAT_HOME/common/endorsed. JDK 1.4 is no longer supported in Liferay 5.x and above.
Create and edit $TOMCAT_HOME/conf/Catalina/localhost/ROOT.xml to set up the portal web application.
<Context path="">
</Context>
Download liferay-portal-x.x.x.war.
Download Liferay's Portal Dependencies. Create a $TOMCAT_HOME/common/lib/ext directory and unzip the
dependencies ZIP in there. If the files do not extract to this directory, make sure they are in the correct directory by
moving them there.
Edit $TOMCAT_HOME/conf/catalina.properties:
common.loader=
${catalina.home}/common/classes,\
...\
${catalina.home}/common/lib/ext/*.jar

Make sure your database server is installed and is working. If it's installed in a different machine, make sure that it's
accessible from the one where Liferay is being installed.
Configure data sources for your database. Make sure the JDBC driver for your database is accessible by Tomcat. Obtain
the JDBC driver for your version of the database server. In the case of MySQL use mysql -connector-java-{$version}-
bin.jar. Next, copy the JAR file to $TOMCAT_HOME/common/lib/ext.
Edit $TOMCAT_HOME/conf/Catalina/localhost/ROOT.xml.
<Context...>
<Resource
name="jdbc/LiferayPool"
auth="Container"
type="javax.sql.DataSource"
driverClassName="com.mysql.jdbc.Driver"
url="jdbc:mysql://localhost/lportal?useUnicode=true&characterEncoding=UTF-8"
username=""
password=""
maxActive="100"
maxIdle="30"
maxWait="10000"
/>
</Context>
Be sure to enter the user name and password to your database in the appropriate fields above.
Create a mail session bound to mail/MailSession. Edit $TOMCAT_HOME/conf/Catalina/localhost/ROOT.xml and
configure a mail session.
<Context...>
<Resource
name="mail/MailSession"
auth="Container"
type="javax.mail.Session"
mail.transport.protocol="smtp"
mail.smtp.host="localhost"
mail.store.protocol="imap"
mail.imap.host="localhost"
/>
</Context>
Configure JAAS. Edit $TOMCAT_HOME/conf/Catalina/localhost/ROOT.xml and configure a security realm.
<Context...>
<Realm
className="org.apache.catalina.realm.JAASRealm"
appName="PortalRealm"
userClassNames="com.liferay.portal.security.jaas.PortalPrincipal"
roleClassNames="com.liferay.portal.security.jaas.PortalRole"
debug="99"
useContextClassLoader="false"
/>
</Context>
Create $TOMCAT_HOME/conf/jaas.config.
PortalRealm {
com.liferay.portal.kernel.security.jaas.PortalLoginModule required;
};
Edit $TOMCAT_HOME/bin/catalina.bat (on Windows) or $TOMCAT_HOME/bin/catalina.sh (on Linux / Mac / Unix) so
that Tomcat can reference the login module.
rem ----- Execute...

set JAVA_OPTS=-Xms128m -Xmx512m -Dfile.encoding=UTF8 -Duser.timezone=GMT -
Djava.security.auth.login.config=%CATALINA_HOME%/conf/jaas.config
Delete contents $TOMCAT_HOME/webapps/ROOT directory. This undeploys the default Tomcat home page.
Unpack liferay-portal-x.x.x.war to $TOMCAT_HOME/webapps/ROOT.
For supporting UTF-8 URI Encoding, edit $TOMCAT_HOME/conf/server.xml:
<!-- Define a non-SSL HTTP/1.1 Connector on port 8080 -->
<Connector port="8080" maxHttpHeaderSize="8192"
maxThreads="150" minSpareThreads="25" maxSpareThreads="75"
enableLookups="false" redirectPort="8443" acceptCount="100"
connectionTimeout="20000" disableUploadTimeout="true"
URIEncoding="UTF-8"
/>
Run Tomcat, point browser to http://localhost:8080. You should see the default Liferay home page .
WebLogic 9 / 10
Liferay Home is one folder above the home folder of the domain in which Liferay is installed.
These instructions assume that you have already configured a domain and server, and that you have access to the WebLogic console.
Dependency Jars
Navigate to the folder which corresponds to the domain to which you will be installing Liferay. Inside this folder is a lib
folder. Unzip the Liferay dependencies archive to this folder.
Copy the JDBC driver for your database to this folder as well.
You will also need the xercesImpl.jar or you will get SAX parsing errors after you deploy Liferay. You may download this
from http://xerces.apache.org. Copy the xercesImpl.jar file into this directory.
Create a folder called endorsed in $WEBLOGIC-HOME/jrockit90_150_04/jre/lib, then copy rhino.jar, serializer.jar, and
xalan.jar to the folder that you just created.
Database Configuration
If you want WebLogic to manage your data source, use the following procedure. If you want to use Liferay's built-in data source, you can skip this section.
Illustration 12: WebLogic: Data SourcesBrowse to your
WebLogic Console. Click the Lock & Edit button above the Domain Structure tree on the left side of the page.
From the Domain Structure tree on the left, select Data Sources. Then click the New button on the right side of the
screen.
Give the Data Source a name, such as LiferayDataSource.
Define the JNDI name as jdbc/LiferayPool.
Select your Database Type and the Driver class, and then click the Next button.
Accept the defaults on the next screen by clicking Next.
On the next screen, put in your Database Name, Host Name, Database User Name, and Password. If you have been
following the defaults we have been using so far, you would use lportal, localhost, root, and no password as the values.
Click Next.
The next screen allows you to test your database configuration. Click the Test Connection button. If the test succeeds,
you have configured your database correctly. Check off the server you want to deploy this Data Source to (AdminServer
is the default). Click Finish.
Click the Activate Changes button on the left, above the Domain Structure tree.
Mail Configuration
If you want WebLogic to manage your mail sessions, use the following procedure. If you want to use Liferay's built -in mail sessions, you can skip this section.
In the Domain Structure tree, select Mail Sessions. Then click the Lock & Edit button again to enable modifying these
settings.
Click the New button which is now enabled on the right side of the screen.
Give the Mail Session a name, such as LiferayMail.
Select your new LiferayMail session from the list by clicking on it.
On the screen that appears, define the JNDI name as mail/MailSession. Click the Save button.
Click the Targets tab. Check off the server you want to deploy this Data Source to (AdminServer is the default).
Click the Activate Changes button on the left side of the screen, above the Domain Structure tree.
Deploy Liferay
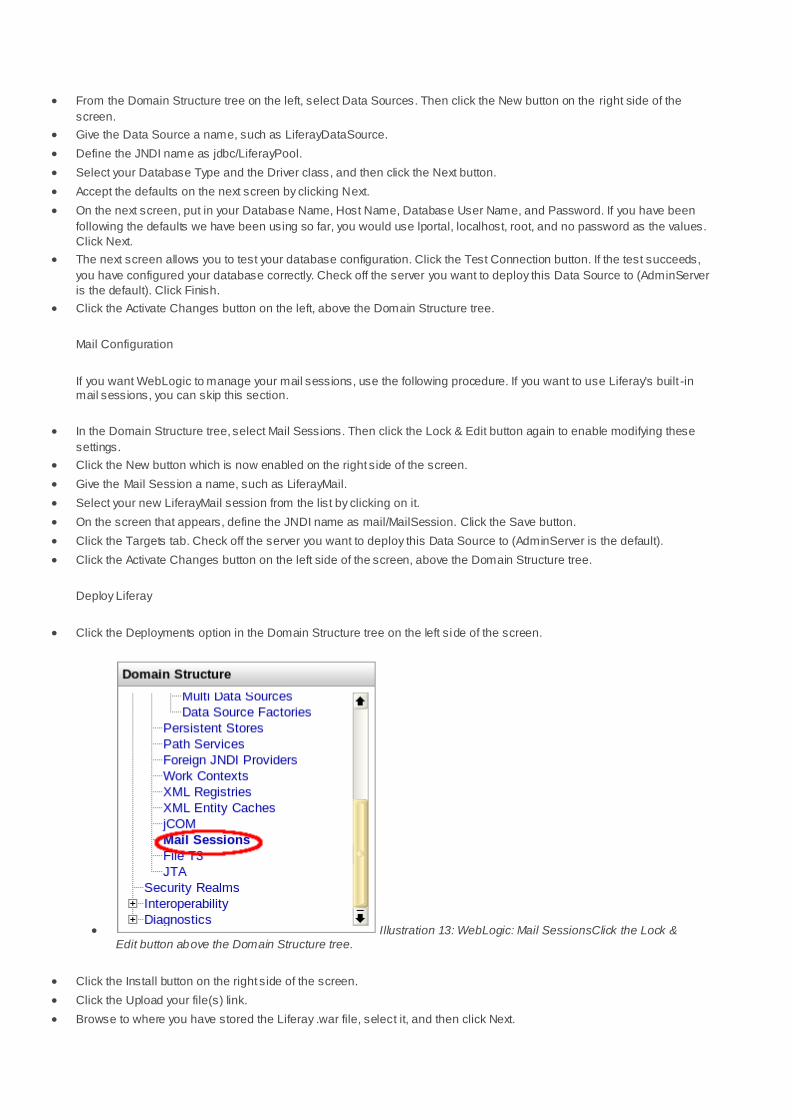
Click the Deployments option in the Domain Structure tree on the left side of the screen.
Illustration 13: WebLogic: Mail SessionsClick the Lock & Edit button above the Domain Structure tree.
Click the Install button on the right side of the screen.
Click the Upload your file(s) link.
Browse to where you have stored the Liferay .war file, select it, and then click Next.

Select the Liferay .war file from the list and click Next.
Leave Install this deployment as an application selected and click Next.
Give the application a name (the default name is fine). Leave the other defaults selected and the n click Finish.
WebLogic will now deploy Liferay. When it is finished, a summary screen is displayed. Click the Activate Changes link on
the left above the Domain Structure tree.
Create a portal-ext.properties file in the Liferay Home folder, which is one folder up from your domain's home folder. If
you are using Liferay's built-in data source, add the database settings:
jdbc.default.driverClassName=com.mysql.jdbc.Driver
jdbc.default.url=jdbc:mysql://localhost/lportal?useUnicode=true&characterEncoding=UTF-8&useFastDateParsing=false
jdbc.default.username=root
jdbc.default.password=root
Illustration 14: Deploying Liferay on WebLogic 9.2If you are using WebLogic's data source, add the JNDI
name instead:
jdbc.default.jndi.name=jdbc/LiferayPool
Do the same thing for the Mail Session. If you are using the built-in configuration, set the following properties for your
system:
mail.session.mail.pop3.host=localhost
mail.session.mail.pop3.password=
mail.session.mail.pop3.port=110
mail.session.mail.pop3.user=
mail.session.mail.smtp.auth=false
mail.session.mail.smtp.host=localhost
mail.session.mail.smtp.password=
mail.session.mail.smtp.port=25
mail.session.mail.smtp.user=
mail.session.mail.store.protocol=pop3

mail.session.mail.transport.protocol=smtp
If you are using WebLogic's mail session, add the JNDI name instead:
mail.session.jndi.name=mail/MailSession
In the Deployments screen, select the Liferay application and click the Start button. Select Servicing All Requests in the
pop up.
Click Yes to continue on the next screen.
Liferay will start. You will be able to get to it by browsing to http://<server name>:7001. If your browser is running on the
same machine upon which you have installed Liferay, the URL is http://localhost:7001.
Oracle WebLogic 10.3
If you still have the mainWebApp module installed, you will need to remove it first.
Copy the dependency .jars and the JDBC driver to the domain/lib directory.
Start WebLogic.
Database Configuration
If you want WebLogic to manage your data source, use the following procedure. If you want to use Liferay's built -in data source, you can skip this section.

Illustration 15: Creating a data source in WebLogic 10.3Select JDBC → Data Sources. Click New.
Give your data source a name, such as Liferay Data Source. The JNDI name should be jdbc/LiferayPool.
Choose the type of database. From the screen shot, you can see that we have chosen MySQL. The database driver
class should be chosen for you automatically.
Click Next twice. You should be on the Connection Properties screen. Enter the database name, the host name, the port,
the database user name, and the password. WebLogic will use this information to construct the appropriate JDBC URL
to connect to your database. Click Next.
WebLogic will now confirm with you the information that it gathered. For MySQL, some additional parameters need to be
added to the URL. Modify the JDBC URL so that it has the proper parameters:
jdbc:mysql://localhost/lportal?useUnicode=true&characterEncoding=UTF-8& \
useFastDateParsing=false
Click Test Configuration to make sure WebLogic can connect to your database successfully. If it does, click Finish.
You will be back to the list of data sources. Notice that your new data source has no value in the Ta rget column. Click on
your data source to edit it.
Click the Targets tab and check off the server instance(s) to which you wish to deploy your data source. Then click Save.
Mail Configuration
Select Mail Sessions and create a new mail session which points to your mail server.
Give it the name Liferay Mail and give it the JNDI name of mail/MailSession and click Next.
Choose your server and then click Finish.
Deploy Liferay
Create a portal-ext.properties file in the Liferay Home folder, which is one folder up from your domain's home folder. If
you are using Liferay's built-in data source, add the database settings:
jdbc.default.driverClassName=com.mysql.jdbc.Driver
jdbc.default.url=jdbc:mysql://localhost/lportal?useUnicode=true&characterEncoding=UTF-8&useFastDateParsing=false
jdbc.default.username=root
jdbc.default.password=root
If you are using WebLogic's data source, add the JNDI name instead:
jdbc.default.jndi.name=jdbc/LiferayPool
Do the same thing for the Mail Session. If you are using the built-in configuration, set the following properties for your
system:
mail.session.mail.pop3.host=localhost
mail.session.mail.pop3.password=
mail.session.mail.pop3.port=110
mail.session.mail.pop3.user=
mail.session.mail.smtp.auth=false
mail.session.mail.smtp.host=localhost
mail.session.mail.smtp.password=
mail.session.mail.smtp.port=25
mail.session.mail.smtp.user=
mail.session.mail.store.protocol=pop3
mail.session.mail.transport.protocol=smtp
If you are using WebLogic's mail session, add the JNDI name instead:
mail.session.jndi.name=mail/MailSession
Save and close the file.
Select Deployments and click the Install button. Select the Liferay .war file from the file system or click the Upload Your
File(s) link to upload it, and then click Next.
Leave Install this deployment as an application selected and click Next.
If the default name is appropriate for your installation, keep it. Otherwise, give it a nam e of your choosing and click Next.
Click Finish. After the deployment finishes, click Save.
Tip: After Liferay completes installing, you may see an error initializing the Web Proxy portlet.
Because the XSL parser configured by default within WebLogic cannot compile a style sheet in this portlet, Liferay
disables it by default. To re-enable this portlet, extract xalan.jar and serializer.jar from the Liferay .war archive and copy
them to your JDK's endorsed folder for libraries. If you are using JRockit, you may find this folder in
[Bea Home]/jrockit_160_05/jre/lib/ext.
WebSphere 6.1
Tip: Throughout this installation and configuration process, WebSphere will prompt you to Click Save
to apply changes to Master Configuration. Do so intermittently to save your changes.
Liferay Home is in a folder called liferay in the home folder of the user ID that is running WebSphere.
Installation
Download the Liferay Portal WAR file.
Download and extract these Liferay jars to websphere/appserver/lib/ext.
o Dependency libraries (Liferay Portal Dependencies)
o Your database JDBC driver .jar
o Currently you also need to copy portlet.jar from the Liferay Dependencies archive into
WebSphere/AppServer/java/jre/lib/ext, as WebSphere already contains older versions of the portlet .jar which must be
overridden at the highest level of the class path. This issue may be fixed in future releases; check the Liferay Wiki for
updates to this issue.
Database Configuration
Start WebSphere.
Open Administrative Console and log in.
Click Resources, click JDBC Providers.
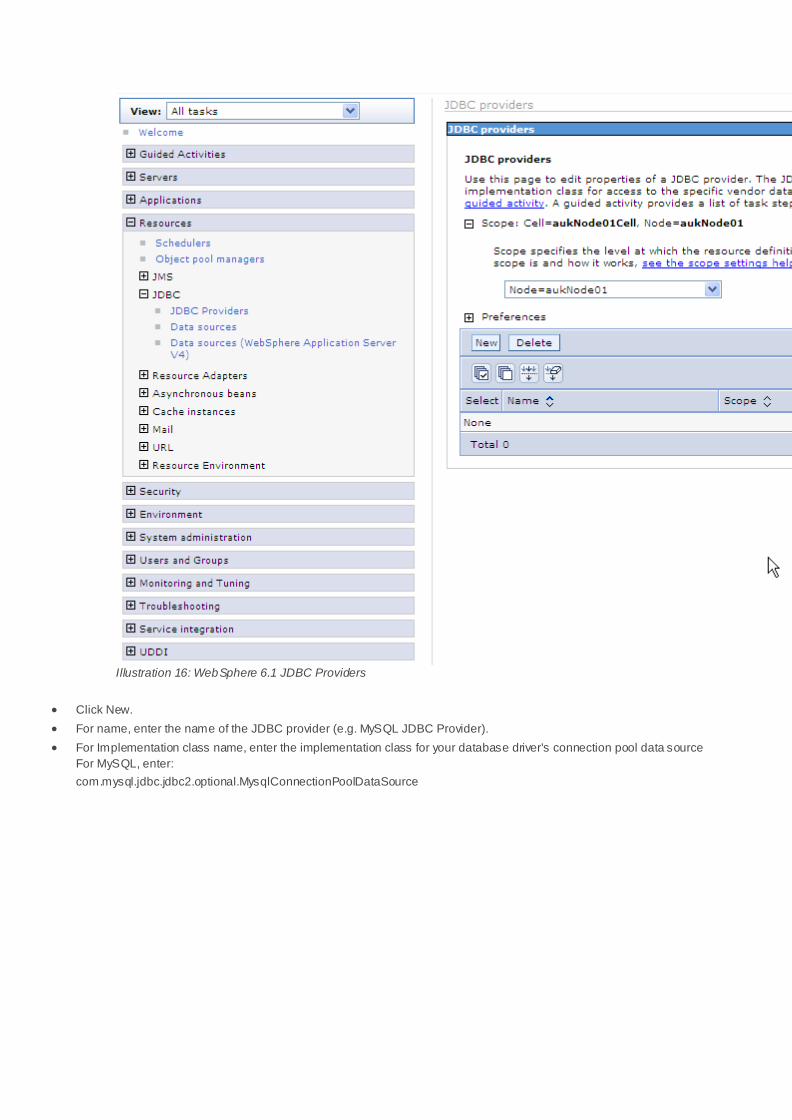
Illustration 16: WebSphere 6.1 JDBC Providers
Click New.
For name, enter the name of the JDBC provider (e.g. MySQL JDBC Provider).
For Implementation class name, enter the implementation class for your database driver's connection pool data source
For MySQL, enter:
com.mysql.jdbc.jdbc2.optional.MysqlConnectionPoolDataSource

Illustration 17: WebSphere 6.1 New JDBC ProviderClick Next.
Illustration 18: Clear out anything in the class path. Clear any text in class path. You already copied the necessary .jars to a location on the server's class path.
Click Next.

Illustration 19: JDBC Provider summary screenClick Finish.
Click Data Sources under Additional Properties.
Click New.
Enter a name: liferaydatabasesource.
Enter JNDI: jdbc/LiferayPool.
Everything else should stay at the default values.

Illustration 20: Liferay data source on WebSphere 6.1Click Next.
Under Additional Properties, click Custom Properties.
Click New.
Create three custom properties by entering Name, Value and clicking OK for each row in the following table.
Name
Value
1. user
root
2. serverName
localhost
3. databaseName
lportal

Illustration 21: WebSphere 6.1 Custom Properties Entry
When done correctly, custom properties should look like this:

Illustration 22: Liferay Custom Properties
Click Data Sources -> Test Connection to test.
Mail Configuration
Click Resources -> Mail Providers.
Click Built-in Mail Provider.
Click Mail Sessions.
Click New.
o Name: liferaymail
o JNDI Name: mail/MailSession

Illustration 23: Creating a Mail Session on WebSphere 6.1
Click OK.
Click Security.
Click Secure administration, applications, and infrastructure.
Select Enable application security.
Deselect Use Java 2 security to restrict application access to local resources.
Install Liferay
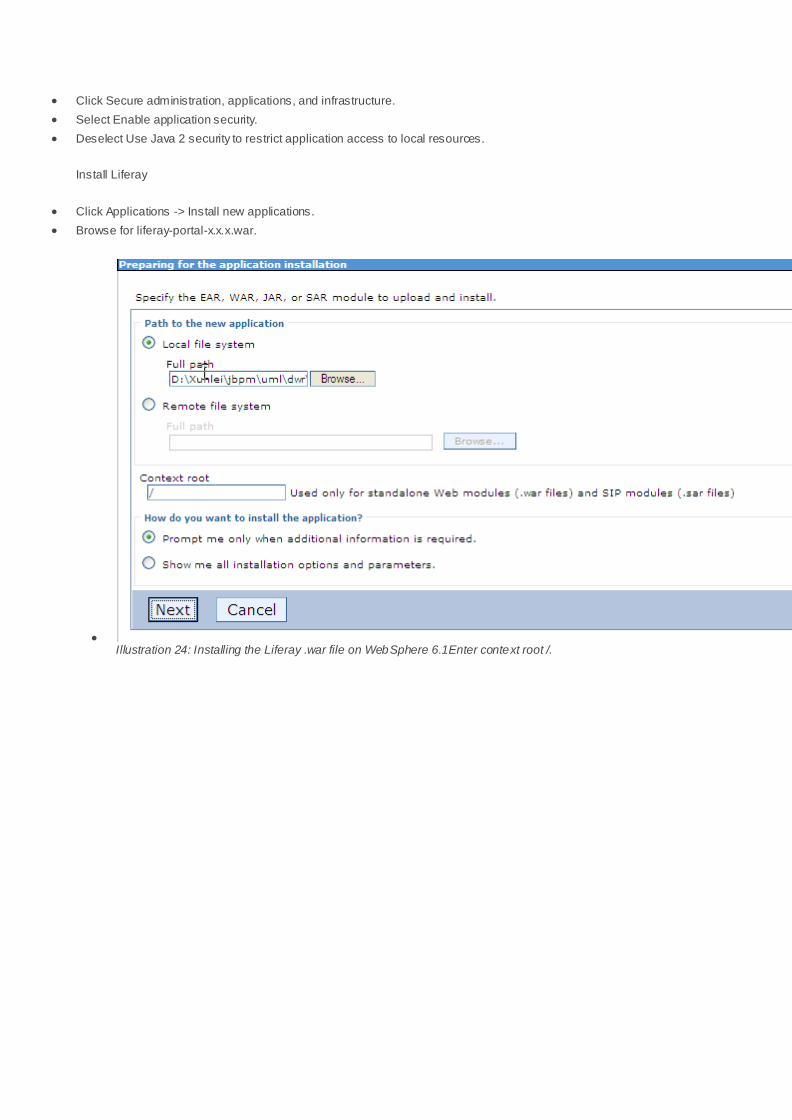
Click Applications -> Install new applications.
Browse for liferay-portal-x.x.x.war.
Illustration 24: Installing the Liferay .war file on WebSphere 6.1Enter context root /.

Illustration 25: Select the installation optionsClick Next. For Steps 1 to 3, click Next to apply defaults.
Choose the Mail Session and Data Source, and then click Next

Illustration 26: Select the virtual hostSpecify the virtual host upon which you want Liferay to run.
At the Summary Screen, click Finish.

Illustration 27: WebSphere 6.1 installation processWait for the installation process to complete.
Save this configuration to master configuration by clicking on System administration and Save Changes to Master
Repository.
Create a portal-ext.properties file in the Liferay Home folder. For WebSphere, this is a folder called liferay in the home
folder of the user that is running WebSphere. If you are using Liferay's built-in data source, add the database settings:
jdbc.default.driverClassName=com.mysql.jdbc.Driver
jdbc.default.url=jdbc:mysql://localhost/lportal?useUnicode=true&characterEncoding=UTF-8&useFastDateParsing=false
jdbc.default.username=root
jdbc.default.password=root
If you are using WebSphere's data source per the instructions above, add the JNDI name instead:
jdbc.default.jndi.name=jdbc/LiferayPool
Do the same thing for the Mail Session. If you are using the built-in configuration, set the following properties for your
system:
mail.session.mail.pop3.host=localhost
mail.session.mail.pop3.password=
mail.session.mail.pop3.port=110
mail.session.mail.pop3.user=
mail.session.mail.smtp.auth=false
mail.session.mail.smtp.host=localhost
mail.session.mail.smtp.password=
mail.session.mail.smtp.port=25
mail.session.mail.smtp.user=
mail.session.mail.store.protocol=pop3
mail.session.mail.transport.protocol=smtp
If you are using WebSphere's mail session, add the JNDI name instead:
mail.session.jndi.name=mail/MailSession
Save and close the file.
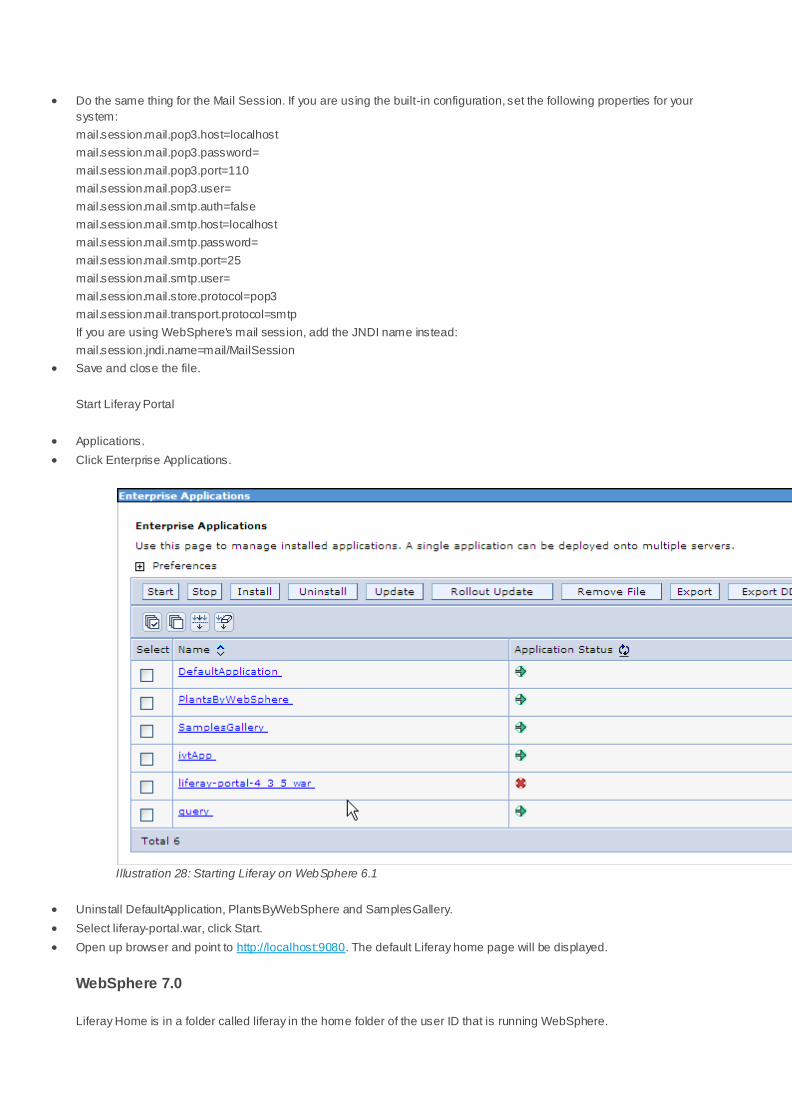
Start Liferay Portal
Applications.
Click Enterprise Applications.
Illustration 28: Starting Liferay on WebSphere 6.1
Uninstall DefaultApplication, PlantsByWebSphere and SamplesGallery.
Select liferay-portal.war, click Start.
Open up browser and point to http://localhost:9080. The default Liferay home page will be displayed.
WebSphere 7.0
Liferay Home is in a folder called liferay in the home folder of the user ID that is running WebSphere.
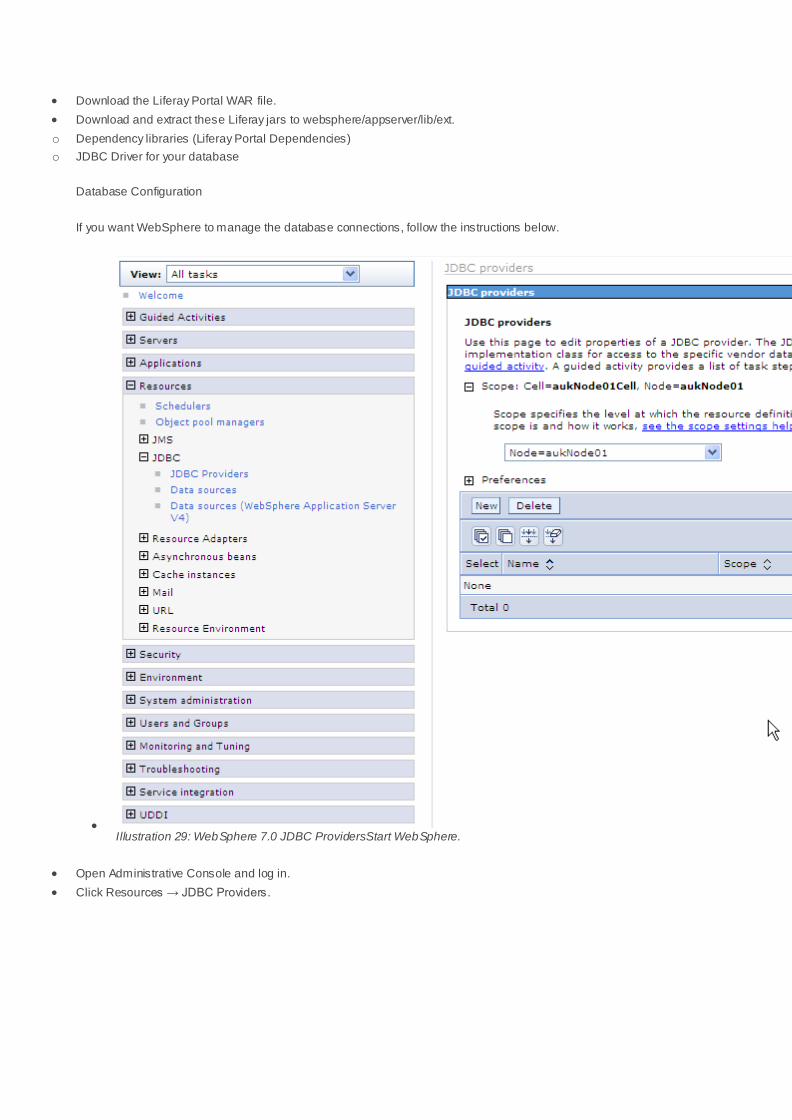
Download the Liferay Portal WAR file.
Download and extract these Liferay jars to websphere/appserver/lib/ext.
o Dependency libraries (Liferay Portal Dependencies)
o JDBC Driver for your database
Database Configuration
If you want WebSphere to manage the database connections, follow the instructions below.
Illustration 29: WebSphere 7.0 JDBC ProvidersStart WebSphere.
Open Administrative Console and log in.
Click Resources → JDBC Providers.

Illustration 30: WebSphere 7.0: Select JDBC ProviderClick New.
For name, enter the name of JDBC provider (e.g. MySQL JDBC Provider).
For Implementation class name, enter:
com.mysql.jdbc.jdbc2.optional.MysqlConnectionPoolDataSource
Click Next.
Clear any text in class path. You already copied the necessary .jars to a location on the server's class path.
Click Next.
Click Finish.
Click Data Sources under Additional Properties.

Illustration 31: WebSphere 7.0: Database PropertiesClick New.
Enter a name: liferaydatabasesource.
Enter JNDI: jdbc/LiferayPool.
Everything else should stay at the default values. Save the data source.
When finished, go back into the data source and click Custom Properties, and then click the Show Filter Function button.
This is the second from last of the small icons under the New and Delete buttons.
Type user into the search terms and click Go.
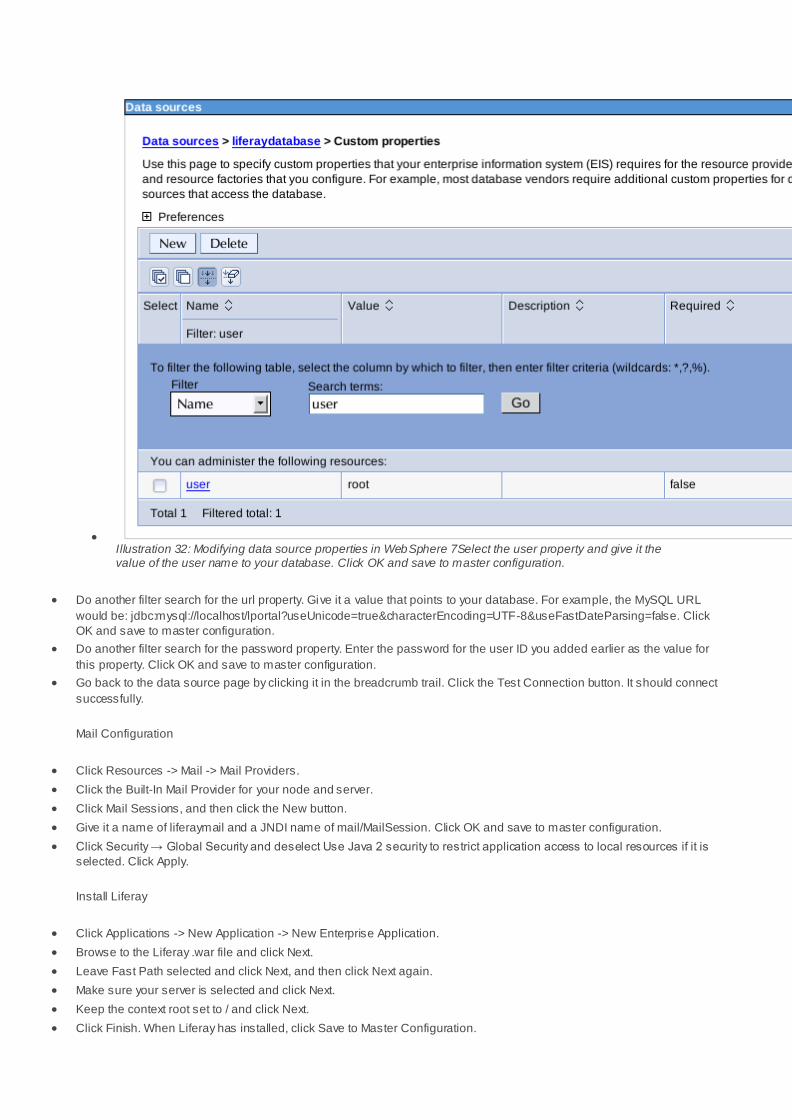
Illustration 32: Modifying data source properties in WebSphere 7Select the user property and give it the value of the user name to your database. Click OK and save to master configuration.
Do another filter search for the url property. Give it a value that points to your database. For example, the MySQL URL
would be: jdbc:mysql://localhost/lportal?useUnicode=true&characterEncoding=UTF-8&useFastDateParsing=false. Click
OK and save to master configuration.
Do another filter search for the password property. Enter the password for the user ID you added earlier as the value for
this property. Click OK and save to master configuration.
Go back to the data source page by clicking it in the breadcrumb trail. Click the Test Connection button. It should connect
successfully.
Mail Configuration
Click Resources -> Mail -> Mail Providers.
Click the Built-In Mail Provider for your node and server.
Click Mail Sessions, and then click the New button.
Give it a name of liferaymail and a JNDI name of mail/MailSession. Click OK and save to master configuration.
Click Security → Global Security and deselect Use Java 2 security to restrict application access to local resources if it is
selected. Click Apply.
Install Liferay
Click Applications -> New Application -> New Enterprise Application.
Browse to the Liferay .war file and click Next.
Leave Fast Path selected and click Next, and then click Next again.
Make sure your server is selected and click Next.
Keep the context root set to / and click Next.
Click Finish. When Liferay has installed, click Save to Master Configuration.

Start Liferay
Create a portal-ext.properties file in the Liferay Home folder. For WebSphere, this is a folder called liferay in the home
folder of the user that is running WebSphere. If you are using Liferay's built-in data source, add the database settings:
jdbc.default.driverClassName=com.mysql.jdbc.Driver
jdbc.default.url=jdbc:mysql://localhost/lportal?useUnicode=true&characterEncoding=UTF-8&useFastDateParsing=false
jdbc.default.username=root
jdbc.default.password=root
If you are using WebSphere's data source per the instructions above, add the JNDI name instead:
jdbc.default.jndi.name=jdbc/LiferayPool
Do the same thing for the Mail Session. If you are using the built-in configuration, set the following properties for your
system:
mail.session.mail.pop3.host=localhost
mail.session.mail.pop3.password=
mail.session.mail.pop3.port=110
mail.session.mail.pop3.user=
mail.session.mail.smtp.auth=false
mail.session.mail.smtp.host=localhost
mail.session.mail.smtp.password=
mail.session.mail.smtp.port=25
mail.session.mail.smtp.user=
mail.session.mail.store.protocol=pop3
mail.session.mail.transport.protocol=smtp
If you are using WebSphere's mail session, add the JNDI name instead:
mail.session.jndi.name=mail/MailSession
Save and close the file.
Click Application Types -> WebSphere Enterprise Application.
Uninstall the default application.
Select the Liferay application and click Start.
Making Liferay Coexist with Other Java EE Applications
Liferay Portal by default is configured to sit at the root (i.e., /) of your application server. Dedicating your application
server to running only Liferay Portal is a good practice, allowing for separation between your portal environment and your
web application environment. This is generally a best practice for portals, which by definition are application development
platforms in and of themselves. For that reason, your instance of Liferay is likely to be hosting many applications, and
even integrating several of them together on a single page. For this reason, you are going to want to make sure your
portal environment has all the resources it needs to do this, and configuring it so that it is the sole consumer of any other .war files that get deployed to the application server helps to make sure that your system performs optimally.
If, however, you want Liferay to share space on an application server with other applications, there is no reason why you cannot do that. In this instance, you may not want to make Liferay the default application in the root context of the server.
There are two steps to modifying this behavior:
Deploy Liferay in a context other than root (for example /portal).
Modify the portal-ext.properties file to tell Liferay the context to which it has been deployed.
To change the file, open it in a text editor. Place the portal.ctx property at the top of the file:
portal.ctx=/

This default setting defines Liferay Portal as the application that sits at the root context. If you change it to something
else, say /portal, for example, you can then deploy Liferay in that context and it will live there instead of a t the root context.
A full discussion of the portal-ext.properties file appears in Chapter 4.
Note for WebLogic Users: WebLogic also requires that you modify the weblogic.xml file which is included with Liferay. In this file are tags for the context root:
<context-root>/</context-root>
Change this so that it matches the path you set in your portal -ext.properties file. You will have to modify the weblogic.xml
file inside the Liferay .war itself. Extract the file from the .war file, modify it, and then put it back in the .war file. Then deploy the modified Liferay .war file to the server in the proper context.
Related Documents