EQUIPMENT FOUNDATION SYSTEMS 130 Commerce Drive • Montgomeryville, PA 18936 • 215-855-8450 • Fax: 215-855-4688 www.chockfastgrout.com Technical Bulletin # 642L Bulletin Introduction The following CHOCKFAST and ESCOWELD Installation Procedures have been written as an aid for contractors and end-users that are applying epoxy grout in the field. Proper pour sizes, the use of expansion joints, and temperatures are emphasized in this bulletin. Application procedures are included for ESCOWELD 7505E/7530, CHOCKFAST Red, CHOCKFAST Red SG, CHOCKFAST Blue, CHOCKFAST Black and CHOCKFAST Orange. The procedures are described in a sequence that follows Bulletin No. 643 entitled "Standardized CHOCKFAST Design For Integral Gas Engine Compressors." If only one product is being used, the section describing the application of that particular product may be used independently. These procedures may be followed, modified or rejected by the Owner, Engineer, Contractor or their Representative since they and not ITW Performance Polymers are responsible for proper grout installation planning and executing. When the planned procedures differ from those discussed herein, the User is urged to contact your local representative of our Worldwide Distributor Network or ITW Performance Polymers to discuss alternate methods. Preparations For Grouting The following applies to all types of grouts. Grout should be stored in a heated, shaded, or air-conditioned area with ambient temperatures between 65°-95°F (18°- 35°C). New concrete foundations must be adequately cured before setting mechanical units. ITW Performance Polymers will not assume the responsibility for the foundation design, concrete formulation, or structural integrity of the machinery foundation. Tensile strength and dimensional stability in particular develop slowly, so allow ample time for proper concrete curing. Consult a CHOCKFAST / ESCOWELD Representative in reference to concrete cure times. Under no circumstances should oil, grease, water, etc soil the surface of the foundation. To achieve good grout bond, chip concrete foundation to a rough finish, exposing 50% aggregate (fractured, course aggregate), using a small chipping hammer or equivalent. Avoid deep holes or grooves that could hinder the flow of grout. Remove loose concrete pieces from the top of the foundation and from within the grout pockets. All surfaces to come in contact with the grout must be blown clean of dust and particles with oil-free air or swept with bristled brush. Surfaces to be grouted should be kept dry. If foundation is left overnight, place a tarp over the surface to prevent dew moisture and surface contamination from other operating machinery. The bedplate should be clean, bright metal and sharp frets left by previous steel chocks or pockmarks left by previously used cement grouts filed down or ground off smooth. It is also a good idea to fill deep voids and pockmarks in the steel with epoxy paste then smoothed. Bedplates should be inspected while the maximum amount of space is available between chipped concrete and the raised equipment. Badly corroded bedplates should be sandblasted to a white metal finish. ITW Repair Compound should be faired into pockmarks left by the corrosive influence of cement grouts. Twelve times the anchor bolt diameter from the bottom of the nut should be wrapped with 1/4" thick neoprene foam rubber. This will prevent epoxy grout from sticking to the bolt and allow the bolt to free- stretch when tensioned and to allow for baseplate thermal growth. The neoprene rubber should be started Installing Grout & Chocks In Industrial Applications

Welcome message from author
This document is posted to help you gain knowledge. Please leave a comment to let me know what you think about it! Share it to your friends and learn new things together.
Transcript
EQUIPMENT FOUNDATION SYSTEMS
130 Commerce Drive • Montgomeryville, PA 18936 • 215-855-8450 • Fax: 215-855-4688 www.chockfastgrout.com
Technical Bulletin # 642L
Bulletin Introduction
The following CHOCKFAST and ESCOWELD Installation Procedures have been written as an aid for contractors and end-users that are applying epoxy grout in the field. Proper pour sizes, the use of expansion joints, and temperatures are emphasized in this bulletin.
Application procedures are included for ESCOWELD 7505E/7530, CHOCKFAST Red, CHOCKFAST Red SG, CHOCKFAST Blue, CHOCKFAST Black and CHOCKFAST Orange. The procedures are described in a sequence that follows Bulletin No. 643 entitled "Standardized CHOCKFAST Design For Integral Gas Engine Compressors." If only one product is being used, the section describing the application of that particular product may be used independently.
These procedures may be followed, modified or rejected by the Owner, Engineer, Contractor or their Representative since they and not ITW Performance Polymers are responsible for proper grout installation planning and executing. When the planned procedures differ from those discussed herein, the User is urged to contact your local representative of our Worldwide Distributor Network or ITW Performance Polymers to discuss alternate methods.
Preparations For Grouting
The following applies to all types of grouts.
Grout should be stored in a heated, shaded, or air-conditioned area with ambient temperatures between 65°-95°F (18°- 35°C).
New concrete foundations must be adequately cured before setting mechanical units. ITW Performance Polymers will not assume the responsibility for the foundation design, concrete formulation, or structural integrity of the machinery foundation. Tensile strength and dimensional stability in particular develop slowly, so allow ample time for proper concrete curing. Consult a CHOCKFAST / ESCOWELD Representative in reference to concrete cure times.
Under no circumstances should oil, grease, water, etc soil the surface of the foundation.
To achieve good grout bond, chip concrete foundation to a rough finish, exposing 50% aggregate (fractured, course aggregate), using a small chipping hammer or equivalent. Avoid deep holes or grooves that could hinder the flow of grout.
Remove loose concrete pieces from the top of the foundation and from within the grout pockets. All surfaces to come in contact with the grout must be blown clean of dust and particles with oil-free air or swept with bristled brush.
Surfaces to be grouted should be kept dry. If foundation is left overnight, place a tarp over the surface to prevent dew moisture and surface contamination from other operating machinery.
The bedplate should be clean, bright metal and sharp frets left by previous steel chocks or pockmarks left by previously used cement grouts filed down or ground off smooth. It is also a good idea to fill deep voids and pockmarks in the steel with epoxy paste then smoothed.
Bedplates should be inspected while the maximum amount of space is available between chipped concrete and the raised equipment. Badly corroded bedplates should be sandblasted to a white metal finish. ITW Repair Compound should be faired into pockmarks left by the corrosive influence of cement grouts.
Twelve times the anchor bolt diameter from the bottom of the nut should be wrapped with 1/4" thick neoprene foam rubber. This will prevent epoxy grout from sticking to the bolt and allow the bolt to free-stretch when tensioned and to allow for baseplate thermal growth. The neoprene rubber should be started
Installing Grout & Chocks
In Industrial Applications
EQUIPMENT FOUNDATION SYSTEMS
Installing Chockfast Grout – Industrial Applications Bulletin No. 642L, Page 2
at the bottom of machinery bedplate. See Bulletin No. 660 entitled "Common Hold Down Bolt Arrangements" for more information on the grouting of hold down bolts. For grouting large anchor bolts (typically 2" or M52) see Bulletin No. 615.
Wooden forms need to be carefully constructed to contain the grout and well-sealed to prevent leakage. Where removal of forms will be required, coat inside of wooden form with sealer (lacquer) and then 2 coats of a good paste wax to prevent adhesion of grout.
For installations of CHOCKFAST Red OR ESCOWELD 7505E/7530, expansion joints should be provided spaced as follows:
Unit Location Expansion Joint Spacing
Indoors in a temperature controlled area or outdoors with mild annual temperatures
7 foot (2.14m) spacing maximum in both directions
Outdoors but in a covered area with annual moderate temperature swings -10oF to 100oF
6 foot (1.8m) spacing maximum
Outdoors with exposure to extremes of weather -40oF to 120oF
5 foot (1.5m) spacing maximum
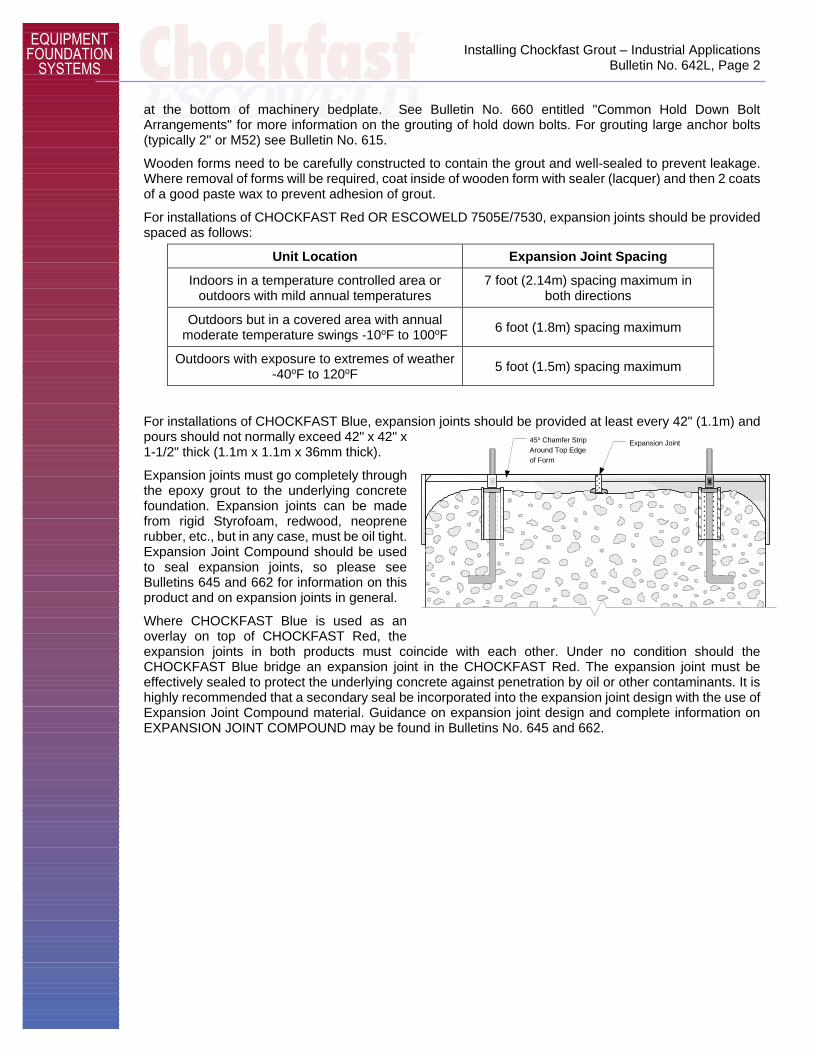
For installations of CHOCKFAST Blue, expansion joints should be provided at least every 42" (1.1m) and pours should not normally exceed 42" x 42" x 1-1/2" thick (1.1m x 1.1m x 36mm thick).
Expansion joints must go completely through the epoxy grout to the underlying concrete foundation. Expansion joints can be made from rigid Styrofoam, redwood, neoprene rubber, etc., but in any case, must be oil tight. Expansion Joint Compound should be used to seal expansion joints, so please see Bulletins 645 and 662 for information on this product and on expansion joints in general.
Where CHOCKFAST Blue is used as an overlay on top of CHOCKFAST Red, the expansion joints in both products must coincide with each other. Under no condition should the CHOCKFAST Blue bridge an expansion joint in the CHOCKFAST Red. The expansion joint must be effectively sealed to protect the underlying concrete against penetration by oil or other contaminants. It is highly recommended that a secondary seal be incorporated into the expansion joint design with the use of Expansion Joint Compound material. Guidance on expansion joint design and complete information on EXPANSION JOINT COMPOUND may be found in Bulletins No. 645 and 662.
Expansion Joint45o Chamfer Strip
Around Top Edge
of Form
EQUIPMENT FOUNDATION SYSTEMS
Installing Chockfast Grout – Industrial Applications Bulletin No. 642L, Page 3
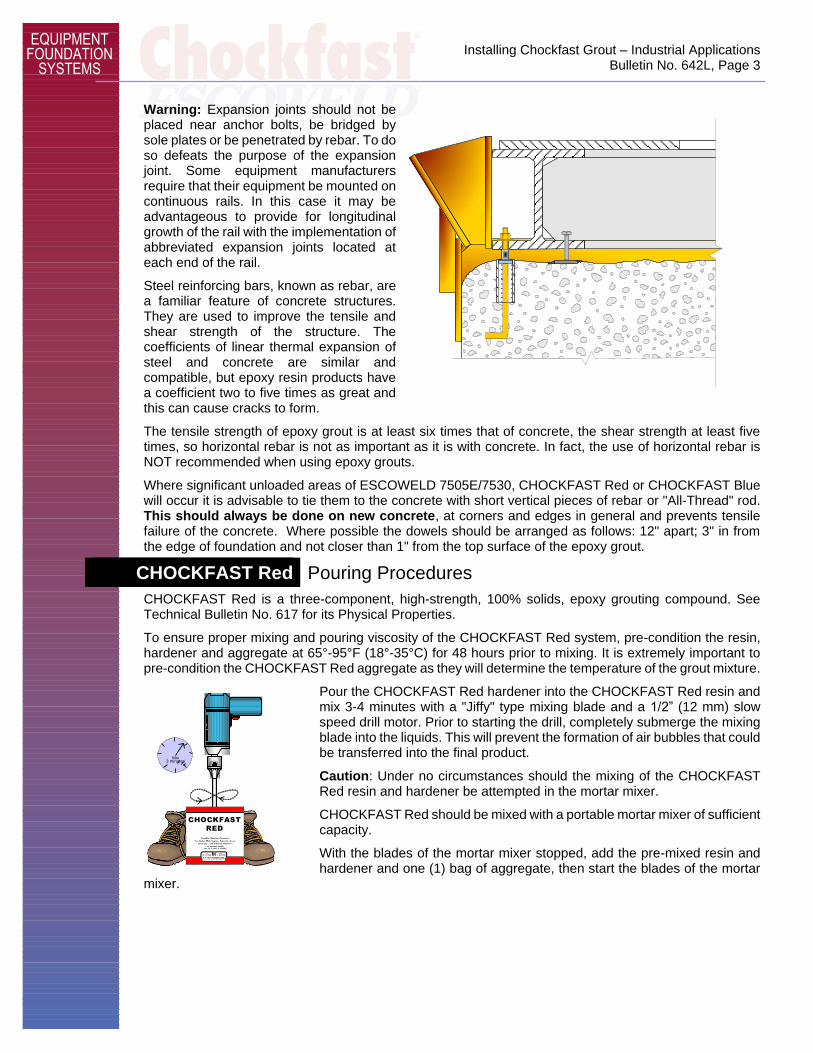
Warning: Expansion joints should not be placed near anchor bolts, be bridged by sole plates or be penetrated by rebar. To do so defeats the purpose of the expansion joint. Some equipment manufacturers require that their equipment be mounted on continuous rails. In this case it may be advantageous to provide for longitudinal growth of the rail with the implementation of abbreviated expansion joints located at each end of the rail.
Steel reinforcing bars, known as rebar, are a familiar feature of concrete structures. They are used to improve the tensile and shear strength of the structure. The coefficients of linear thermal expansion of steel and concrete are similar and compatible, but epoxy resin products have a coefficient two to five times as great and this can cause cracks to form.
The tensile strength of epoxy grout is at least six times that of concrete, the shear strength at least five times, so horizontal rebar is not as important as it is with concrete. In fact, the use of horizontal rebar is NOT recommended when using epoxy grouts.
Where significant unloaded areas of ESCOWELD 7505E/7530, CHOCKFAST Red or CHOCKFAST Blue will occur it is advisable to tie them to the concrete with short vertical pieces of rebar or "All-Thread" rod. This should always be done on new concrete, at corners and edges in general and prevents tensile failure of the concrete. Where possible the dowels should be arranged as follows: 12" apart; 3" in from the edge of foundation and not closer than 1" from the top surface of the epoxy grout.
CHOCKFAST Red Pouring Procedures
CHOCKFAST Red is a three-component, high-strength, 100% solids, epoxy grouting compound. See Technical Bulletin No. 617 for its Physical Properties.
To ensure proper mixing and pouring viscosity of the CHOCKFAST Red system, pre-condition the resin, hardener and aggregate at 65°-95°F (18°-35°C) for 48 hours prior to mixing. It is extremely important to pre-condition the CHOCKFAST Red aggregate as they will determine the temperature of the grout mixture.
Pour the CHOCKFAST Red hardener into the CHOCKFAST Red resin and mix 3-4 minutes with a "Jiffy" type mixing blade and a 1/2” (12 mm) slow speed drill motor. Prior to starting the drill, completely submerge the mixing blade into the liquids. This will prevent the formation of air bubbles that could be transferred into the final product.
Caution: Under no circumstances should the mixing of the CHOCKFAST Red resin and hardener be attempted in the mortar mixer.
CHOCKFAST Red should be mixed with a portable mortar mixer of sufficient capacity.
With the blades of the mortar mixer stopped, add the pre-mixed resin and hardener and one (1) bag of aggregate, then start the blades of the mortar
mixer.
Mix3 minutes
CHOCKFAST
RED

EQUIPMENT FOUNDATION SYSTEMS
Installing Chockfast Grout – Industrial Applications Bulletin No. 642L, Page 4
Progressively add each remaining bag of aggregate, one at a time. When the final bag is added, continue mixing only long enough to wet out the aggregate (“wet-out” is when there are no dry pockets of aggregate still visible in the mixer). Unnecessarily long mixing time can entrap an excessive amount of air, so once the CHOCKFAST Red aggregate is wetted out, the blades of the mortar mixer should be stopped immediately. The mixed batch of CHOCKFAST RED should then be unloaded from the mortar mixer for placement. To facilitate unloading of the mortar mixer bucket, the blades may be rotated slightly after the bucket has been tilted to assist in rapid grout extraction from the mixer.
Note: Small quantities of CHOCKFAST Red (one unit at a time) may be hand mixed in a wheelbarrow with a hoe. Mix the resin and hardener separately as outlined in paragraph 2.
Pour the CHOCKFAST Red as soon as possible after mixing. The pot life of this product is approximately 2-3 hours at 70°F (21°C). Although CHOCKFAST Red is generally self-leveling, at temperatures below 65°F (18°C) rakes or paddles can easily be used to achieve complete filling of prepared areas. CHOCKFAST Red may be used at thicknesses between 2.0" (50mm) and 18" (450mm). Individual pours should generally not exceed 18" thick x 7' long x 7' wide (450mm thick x 2.15m long x 2.15m).
Cure time for CHOCKFAST Red is as follows:
54 hours @ 60°F (16°C) 36 hours @ 70°F (21°C) 24 hours @ 80°F (27°C) 18 hours @ 90°F (32°C)
Protect recently poured grout from any sudden temperature changes and direct sunlight.
Additional layers of CHOCKFAST Red may be poured as soon as the previous pour is firm enough to support the subsequent pour. The surface of the first pour need only be dry and dust free. It does not need to be prepared in any other way. It should be noted, however, that the longer the time between layers, the lower the bond strength between layers due to the build up of an amine blush on the surface of the first pour.
If a cap of CHOCKFAST Blue is to be poured onto the CHOCKFAST Red it may be poured as soon as the CHOCKFAST Red will support firm thumb pressure yet allow a slight denting of the CHOCKFAST Red surface, and still has a tacky feel to it. This will enable the two grouts to both chemically and physically bond.
ESCOWELD Pouring Procedures
The Pouring Procedures for ESCOWELD 7505E/7530 are exactly the same as CHOCKFAST Red.
CHOCKFAST Red SG Pouring Procedures
CHOCKFAST Red SG is a three component, high strength, 100% solids epoxy grouting compound which is used to grout large machinery and to support soleplates in all types of foundation designs with clearances as little as 25mm (1"). CHOCKFAST Red SG has extremely high physical properties and negligible shrinkage, making it ideal for final positioning of critically aligned equipment within close
Epoxy
Grout
Epoxy
Grout

EQUIPMENT FOUNDATION SYSTEMS
Installing Chockfast Grout – Industrial Applications Bulletin No. 642L, Page 5
tolerances. Skid mounted compressors, extruders, turbines, pumps, motors and crane rails are just a few types of equipment supported on CHOCKFAST Red SG.
CHOCKFAST Red SG may be used in any thickness greater than 1" (25mm); however, individual pours should generally not exceed 4" (100mm) in thickness and (5'1.5m) in length. Expansion joints should be provided at least every 5ft. (1.5m). When using CHOCKFAST Red SG for crane rail applications expansion joints may be placed every 10' (3m).
The same mixing and pouring procedures used for CHOCKFAST Red should be used with CHOCKFAST Red SG.
CHOCKFAST Blue Pouring Procedures
CHOCKFAST Blue is a two-component, 100% solids, pourable epoxy-based grouting compound containing aggregate that is most commonly used for severe applications.
When pouring CHOCKFAST Blue on top of CHOCKFAST Red one of the following procedures should be followed: 1) CHOCKFAST Blue may be poured directly on CHOCKFAST Red when the CHOCKFAST Red will support firm thumb pressure, yet allow a slight denting in its surface, and still have a tacky feel. This will allow the two grouts to chemically as well as physically bond. 2) If the CHOCKFAST Red has become hard then the surface must be abraded by chipping or sandblasting to establish a suitable surface profile, prior to pouring the CHOCKFAST Blue.
CHOCKFAST Blue contains aggregate pre-mixed into the resin. To ensure proper mixing and pouring viscosity, rotate the resin container upside-down during the pre-conditioning period to aid in mixing. This will compensate for the aggregate that may have settled during storage and transportation.
Thoroughly mix hardener and resin until homogeneous color and texture is apparent (3-1/2 to 4 minutes) using a KOL mixer or large Jiffy mixer blade in 3/4" (18 mm) drilling machine. It is important that the KOL mixer blade contact the entire surface on the inside and bottom of the CHOCKFAST Blue can to insure a homogeneous mix. Never scrape mixed material from the sides or bottom of the container.
Use grout as soon as possible after mixing. CHOCKFAST Blue pot life is approximately 35 to 50 minutes at 70°F (21°C). Cure time for CHOCKFAST Blue is as follows:
36 hours @ 60°F (16°C) 24 hours @ 72°F (21°C) 16 hours @ 80°F (27°C) 12 hours @ 90°F (32°C)
NOTE: For additional design considerations, please see Technical Bulletin No. 643 entitled “CHOCKFAST Foundation Design for Gas Engine Compressors."
CHOCKFAST Black Pouring Procedures
CHOCKFAST Black is a specially formulated 100% solids, two-component, inert-filled casting compound, developed for use as a chocking or shimming material.
Use CHOCKFAST
Red to build up the
foundation
CHOCKFAST
Black Chocks
CHOCKFAST Blue
cap over Red
EQUIPMENT FOUNDATION SYSTEMS
Installing Chockfast Grout – Industrial Applications Bulletin No. 642L, Page 6
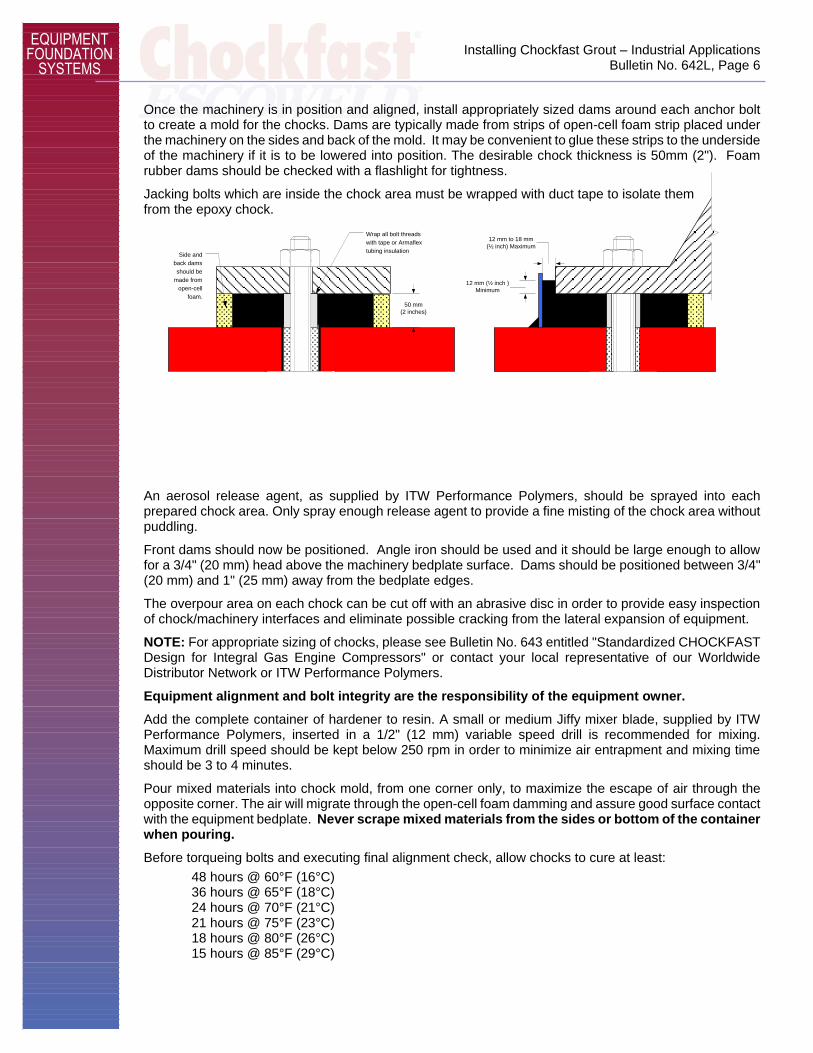
Once the machinery is in position and aligned, install appropriately sized dams around each anchor bolt to create a mold for the chocks. Dams are typically made from strips of open-cell foam strip placed under the machinery on the sides and back of the mold. It may be convenient to glue these strips to the underside of the machinery if it is to be lowered into position. The desirable chock thickness is 50mm (2"). Foam rubber dams should be checked with a flashlight for tightness.
Jacking bolts which are inside the chock area must be wrapped with duct tape to isolate them from the epoxy chock.
An aerosol release agent, as supplied by ITW Performance Polymers, should be sprayed into each prepared chock area. Only spray enough release agent to provide a fine misting of the chock area without puddling.
Front dams should now be positioned. Angle iron should be used and it should be large enough to allow for a 3/4" (20 mm) head above the machinery bedplate surface. Dams should be positioned between 3/4" (20 mm) and 1" (25 mm) away from the bedplate edges.
The overpour area on each chock can be cut off with an abrasive disc in order to provide easy inspection of chock/machinery interfaces and eliminate possible cracking from the lateral expansion of equipment.
NOTE: For appropriate sizing of chocks, please see Bulletin No. 643 entitled "Standardized CHOCKFAST Design for Integral Gas Engine Compressors" or contact your local representative of our Worldwide Distributor Network or ITW Performance Polymers.
Equipment alignment and bolt integrity are the responsibility of the equipment owner.
Add the complete container of hardener to resin. A small or medium Jiffy mixer blade, supplied by ITW Performance Polymers, inserted in a 1/2" (12 mm) variable speed drill is recommended for mixing. Maximum drill speed should be kept below 250 rpm in order to minimize air entrapment and mixing time should be 3 to 4 minutes.
Pour mixed materials into chock mold, from one corner only, to maximize the escape of air through the opposite corner. The air will migrate through the open-cell foam damming and assure good surface contact with the equipment bedplate. Never scrape mixed materials from the sides or bottom of the container when pouring.
Before torqueing bolts and executing final alignment check, allow chocks to cure at least:
48 hours @ 60°F (16°C) 36 hours @ 65°F (18°C) 24 hours @ 70°F (21°C) 21 hours @ 75°F (23°C) 18 hours @ 80°F (26°C) 15 hours @ 85°F (29°C)
Side and
back dams
should be
made from
open-cell
foam.
Wrap all bolt threads
with tape or Armaflex
tubing insulation
12 mm to 18 mm
(½ inch) Maximum
12 mm (½ inch )
Minimum
50 mm
(2 inches)
EQUIPMENT FOUNDATION SYSTEMS
Installing Chockfast Grout – Industrial Applications Bulletin No. 642L, Page 7
12 hours @ 90°F (32°C)
NOTE: A good test for proper cure is to test with a Barcol hardness gauge if there is a question regarding cure. A MINIMUM Barcol reading of 24 on CHOCKFAST Black indicates that sufficient cure has been achieved to allow release of jacking screws and torque of hold down bolts.
CHOCKFAST Orange Pouring Procedures
The standard pour thickness for a CHOCKFAST Orange epoxy chock is 1-1/4" (31mm). Should the designed thickness be greater than 2-3/4" (70mm) please consult the CHOCKFAST Representative or ITW Performance Polymers. The amount of hardener mixed with the CHOCKFAST resin must be measured according to chock thickness and equipment baseplate temperature.
Refer to Bulletin NO. 693 for hardener proportioning. All other procedures for the use of CHOCKFAST Orange are the same as for CHOCKFAST Black, ie, preconditioning, sizing chocks, forming, mixing, curing, etc.
Reference
For design considerations and application details please request Bulletin No. 643 entitled "Standard Chock Design for Integral Gas Engine Compressors." or contact your local representative of our Worldwide Distributor Network or ITW Performance Polymers.
Date June 2018
General: Every reasonable effort is made to insure the technical information and recommendations on these data pages are true and accurate to the best of our knowledge at the date of issuance. However, this information is subject to change without notice. Prior versions of this publication are invalid with the release of this version. Products and information are intended for use by qualified applicators that have the required background, technical knowledge, and equipment to perform said tasks in a satisfactory manner. Consult your local distributor for product availability, additional product information, and technical support. Warranty: ITW Performance Polymers, a division of Illinois Tool Works Inc., warrants that its products meet their printed specifications. This is the sole warranty. This warranty expires one year after product shipment. Warranty Claims: If any product fails to meet the above, ITW Performance Polymers will, at its option, either replace the product or refund the purchase price. ITW Performance Polymers will have no other liability for breach of warranty, negligence, or otherwise. All warranty claims must be made in writing within one year of the date of shipment. No other claims will be considered. Disclaimer: ITW Performance Polymers makes no other warranty, expressed or implied, and specifically
disclaims any warranty of merchantability or fitness for a particular purpose. Suggestions concerning the use of products are not warranties. The purchaser assumes the responsibility for determining suitability of products and appropriate use. ITW Performance Polymers’ sole liability, for breach of warranty, negligence or otherwise, shall be the replacement of product or refund of the purchase price, at ITW Performance Polymers’ election. Under no circumstances shall ITW Performance Polymers be liable for any indirect, incidental or consequential damages. Modification of Warranty: No distributor or sales representative has the authority to change the above provisions. No change in the above provisions will be valid unless in writing and signed by an officer or the Technical Director of ITW Performance Polymers. No term of any purchase order shall serve to modify any provision of this document. Mediation and Arbitration: If any dispute arises relating to products or product warranties, either the purchaser or ITW Performance Polymers may a) initiate mediation under the then current Center for Public Resources (CPR) Model Procedure for Mediation of Business Disputes, or b) initiate a non-binding arbitration under the rules of the American Arbitration Association for the resolution of commercial disputes.
Related Documents