The CURA Outlook Synchronization Tool Page 1 mindSCOPE Staffing and Recruiting Software www.mindscope.com Installing CURA Synchronization for Outlook 1. Go to the Tools Module. 2. Click on CURA – Exchange Server/Outlook Synch from the menu on the left.

Welcome message from author
This document is posted to help you gain knowledge. Please leave a comment to let me know what you think about it! Share it to your friends and learn new things together.
Transcript
The CURA Outlook Synchronization Tool Page 1
mindSCOPE Staffing and Recruiting Software www.mindscope.com
Installing CURA Synchronization for Outlook
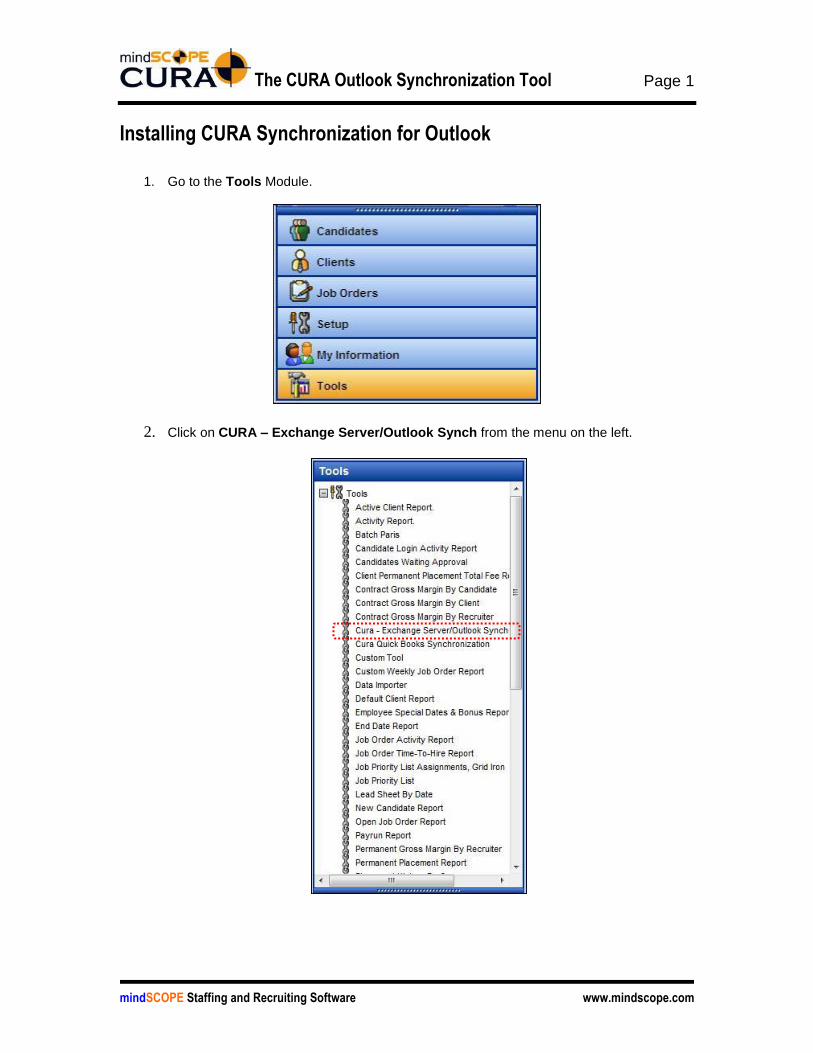
1. Go to the Tools Module.
2. Click on CURA – Exchange Server/Outlook Synch from the menu on the left.
The CURA Outlook Synchronization Tool Page 2
mindSCOPE Staffing and Recruiting Software www.mindscope.com
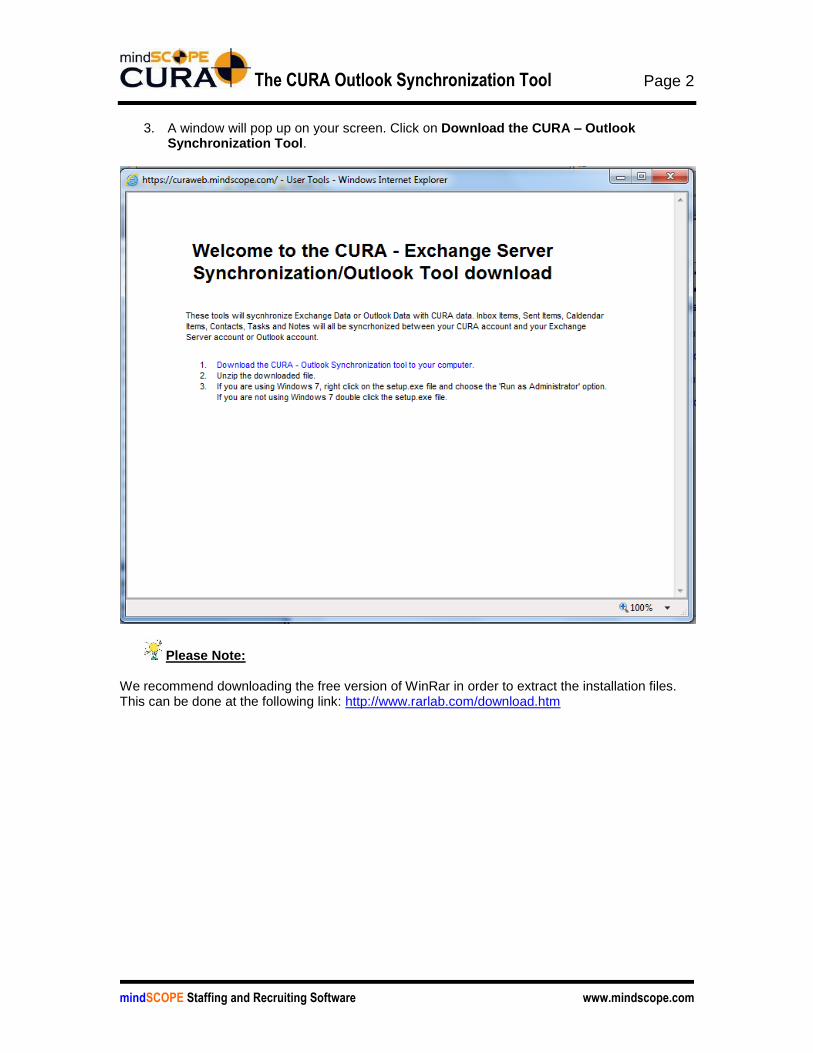
3. A window will pop up on your screen. Click on Download the CURA – Outlook
Synchronization Tool.
Please Note:
We recommend downloading the free version of WinRar in order to extract the installation files. This can be done at the following link: http://www.rarlab.com/download.htm

The CURA Outlook Synchronization Tool Page 3
mindSCOPE Staffing and Recruiting Software www.mindscope.com
4. A dialogue box will appear. Click on Run to begin the installation process.
Please Note:
If you are using an operating system other than Windows 7, the installation process will be slightly different visually; however the steps remain the same.
5. In the following pop-up window, double click on Release to expand the installation files.

The CURA Outlook Synchronization Tool Page 4
mindSCOPE Staffing and Recruiting Software www.mindscope.com
6. If you are on a 32bit computer, double click on CURASyncSetup.msi and then skip to
step #9.
7. If you are on a 64bit computer, select both files with your cursor (hold shift to select both) and drag and drop them to your desktop, or another folder on your computer

The CURA Outlook Synchronization Tool Page 5
mindSCOPE Staffing and Recruiting Software www.mindscope.com
8. Now that you have extracted the files from the Zip folder, right click on setup.exe and
select Run as Administrator.
9. The CURA Sync Setup Wizard will open. Click on Next.

The CURA Outlook Synchronization Tool Page 6
mindSCOPE Staffing and Recruiting Software www.mindscope.com
10. By default, it will install the tool in your C:\Program Files\MindSCOPE\CURAsync\ folder.
You may click on Browse if you wish to have it saved on a different folder within your machine.
It is recommended that you retain the default folder which is C:\Program Files\MindSCOPE\CURAsync\.
Click on Next to continue.

The CURA Outlook Synchronization Tool Page 7
mindSCOPE Staffing and Recruiting Software www.mindscope.com
11. You will be asked to confirm the installation process. Click on Next to confirm.
12. The installation may take a few seconds

The CURA Outlook Synchronization Tool Page 8
mindSCOPE Staffing and Recruiting Software www.mindscope.com
13. A dialogue box will appear informing you that the installation is complete. Click on Close.

The CURA Outlook Synchronization Tool Page 9
mindSCOPE Staffing and Recruiting Software www.mindscope.com
Configuring the CURA Outlook Synchronization Tool
1. Once you have installed the CURA Outlook Synchronization tool, a CURA Synch Icon will be found on your desktop. Locate it and double click on the CURA Synch Icon.
2. The CURA Synch Tool will pop up on your screen. Click on Settings.
The CURA Outlook Synchronization Tool Page 10
mindSCOPE Staffing and Recruiting Software www.mindscope.com
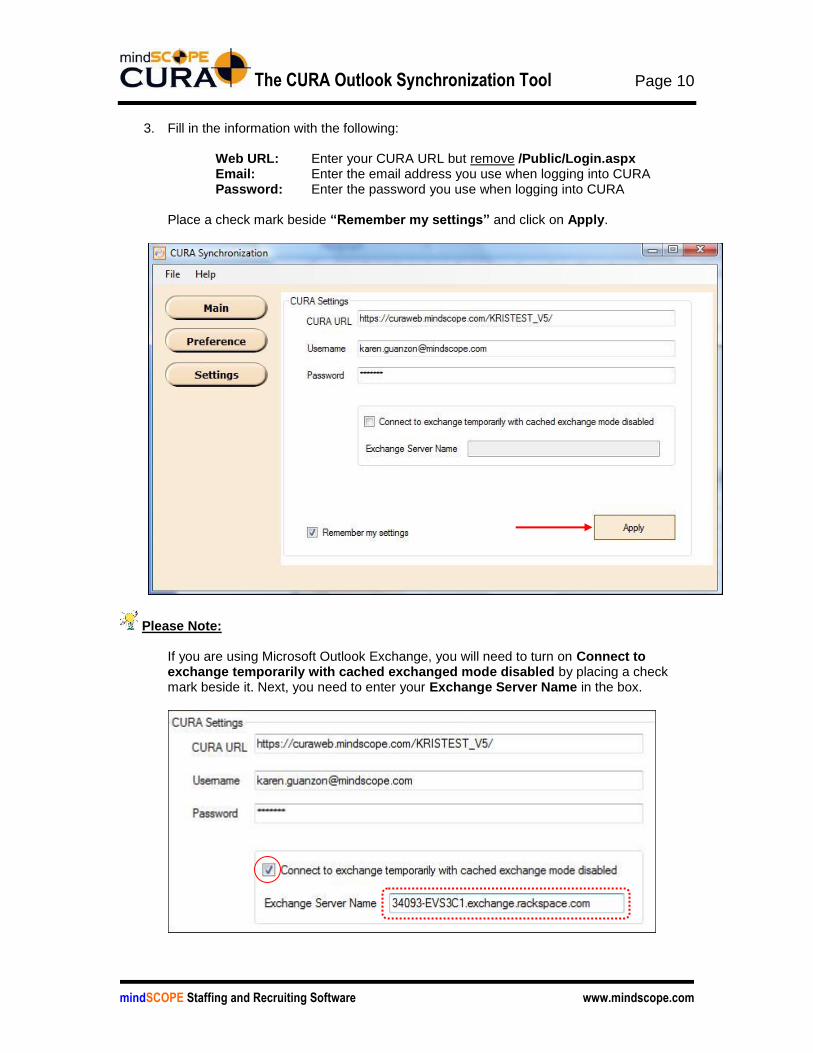
3. Fill in the information with the following:
Web URL: Enter your CURA URL but remove /Public/Login.aspx Email: Enter the email address you use when logging into CURA Password: Enter the password you use when logging into CURA
Place a check mark beside “Remember my settings” and click on Apply.
Please Note:
If you are using Microsoft Outlook Exchange, you will need to turn on Connect to exchange temporarily with cached exchanged mode disabled by placing a check mark beside it. Next, you need to enter your Exchange Server Name in the box.

The CURA Outlook Synchronization Tool Page 11
mindSCOPE Staffing and Recruiting Software www.mindscope.com
4. After successfully saving your settings, next click on Preference.
The CURA Outlook Synchronization Tool Page 12
mindSCOPE Staffing and Recruiting Software www.mindscope.com
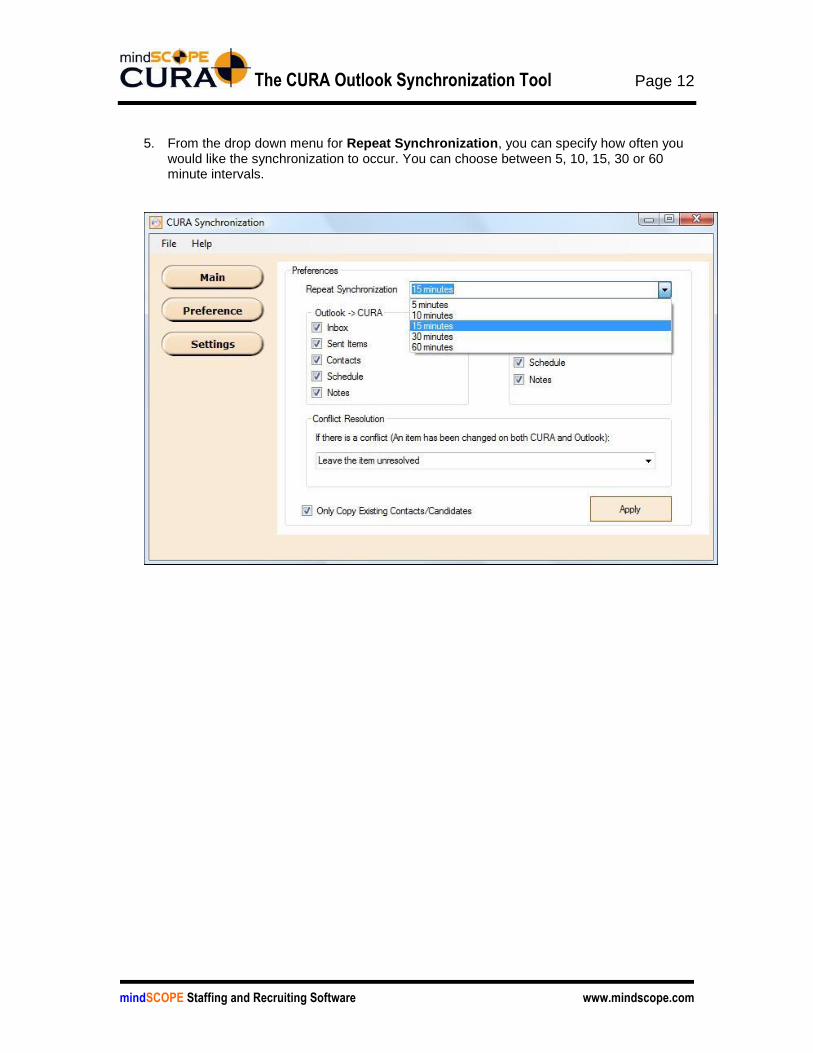
5. From the drop down menu for Repeat Synchronization, you can specify how often you would like the synchronization to occur. You can choose between 5, 10, 15, 30 or 60 minute intervals.
The CURA Outlook Synchronization Tool Page 13
mindSCOPE Staffing and Recruiting Software www.mindscope.com
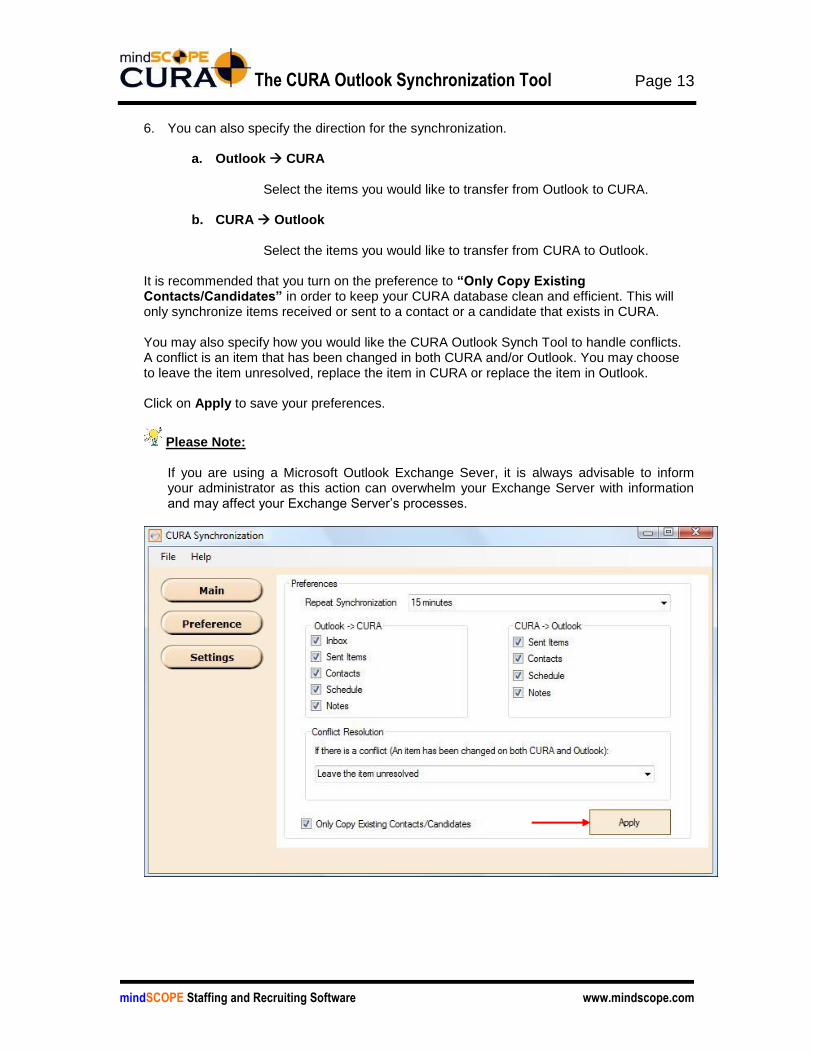
6. You can also specify the direction for the synchronization.
a. Outlook CURA
Select the items you would like to transfer from Outlook to CURA.
b. CURA Outlook
Select the items you would like to transfer from CURA to Outlook.
It is recommended that you turn on the preference to “Only Copy Existing Contacts/Candidates” in order to keep your CURA database clean and efficient. This will only synchronize items received or sent to a contact or a candidate that exists in CURA. You may also specify how you would like the CURA Outlook Synch Tool to handle conflicts. A conflict is an item that has been changed in both CURA and/or Outlook. You may choose to leave the item unresolved, replace the item in CURA or replace the item in Outlook. Click on Apply to save your preferences.
Please Note:
If you are using a Microsoft Outlook Exchange Sever, it is always advisable to inform your administrator as this action can overwhelm your Exchange Server with information and may affect your Exchange Server’s processes.
The CURA Outlook Synchronization Tool Page 14
mindSCOPE Staffing and Recruiting Software www.mindscope.com
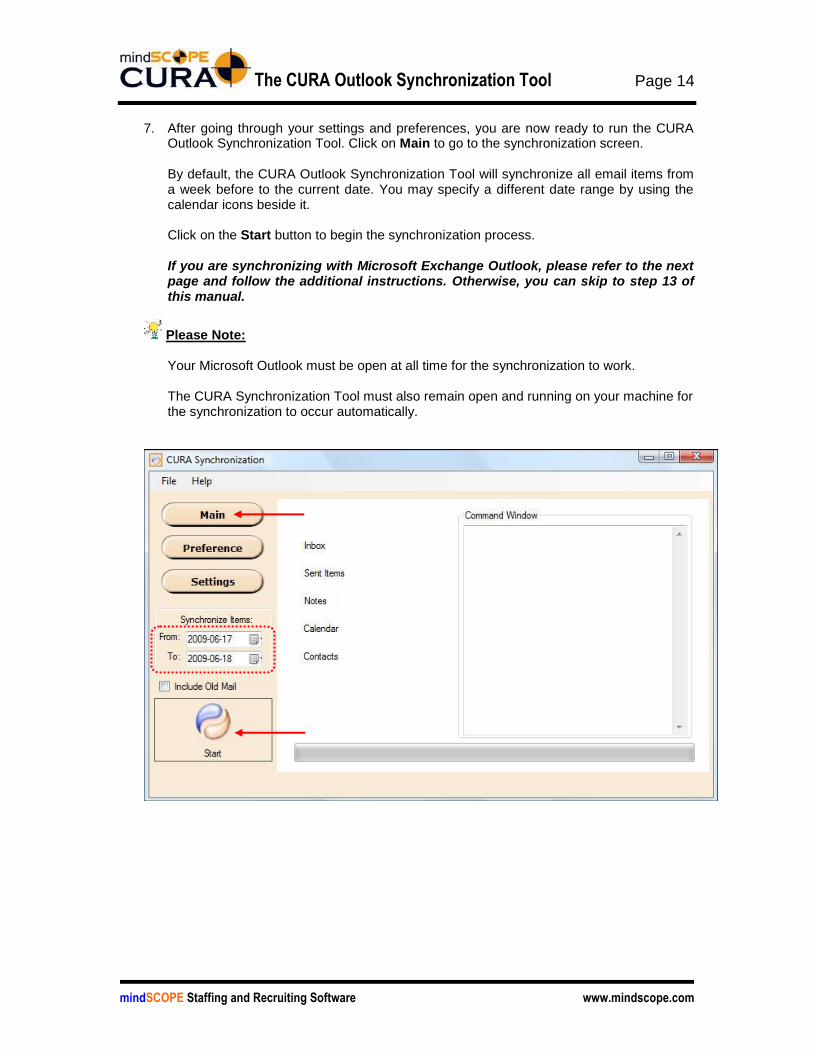
7. After going through your settings and preferences, you are now ready to run the CURA
Outlook Synchronization Tool. Click on Main to go to the synchronization screen. By default, the CURA Outlook Synchronization Tool will synchronize all email items from a week before to the current date. You may specify a different date range by using the calendar icons beside it. Click on the Start button to begin the synchronization process. If you are synchronizing with Microsoft Exchange Outlook, please refer to the next page and follow the additional instructions. Otherwise, you can skip to step 13 of this manual.
Please Note:
Your Microsoft Outlook must be open at all time for the synchronization to work. The CURA Synchronization Tool must also remain open and running on your machine for the synchronization to occur automatically.

The CURA Outlook Synchronization Tool Page 15
mindSCOPE Staffing and Recruiting Software www.mindscope.com
8. If you are synchronizing with Microsoft Exchange Outlook, clicking on the start button will
open a new window where you will need to manually connect to your Exchange Server.
The CURA Outlook Synchronization Tool Page 16
mindSCOPE Staffing and Recruiting Software www.mindscope.com
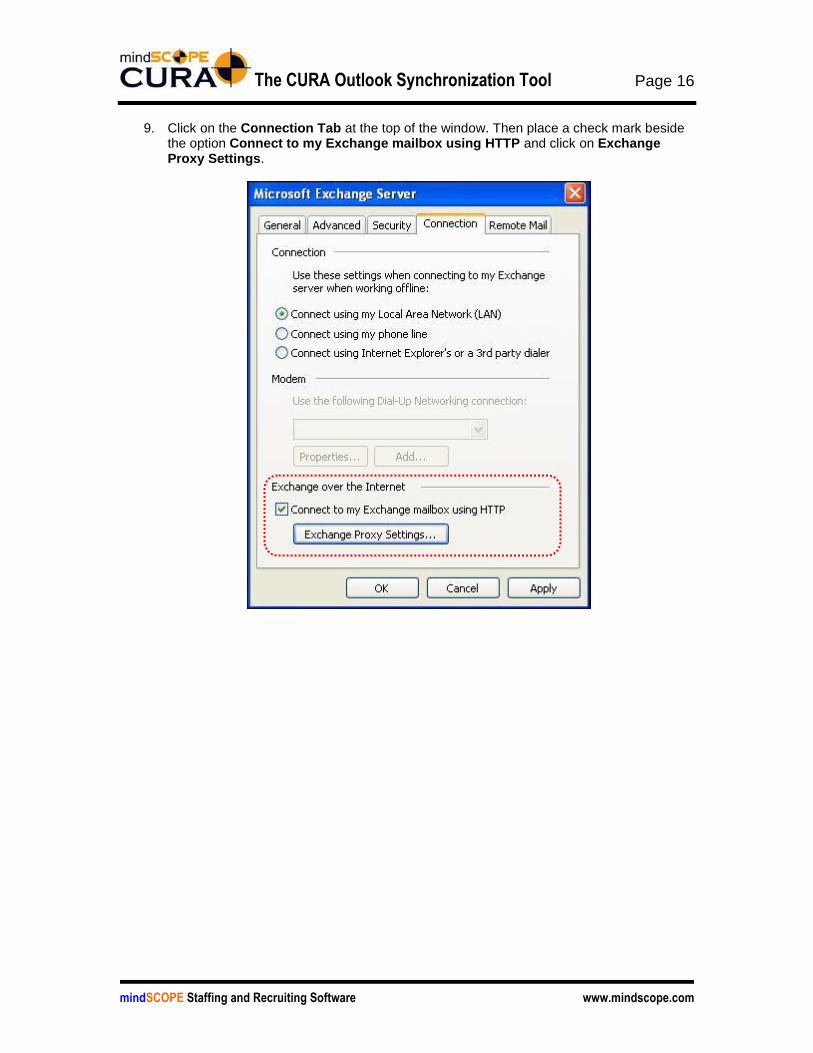
9. Click on the Connection Tab at the top of the window. Then place a check mark beside
the option Connect to my Exchange mailbox using HTTP and click on Exchange Proxy Settings.

The CURA Outlook Synchronization Tool Page 17
mindSCOPE Staffing and Recruiting Software www.mindscope.com
10. Enter your Exchange URL and click on OK.
The CURA Outlook Synchronization Tool Page 18
mindSCOPE Staffing and Recruiting Software www.mindscope.com
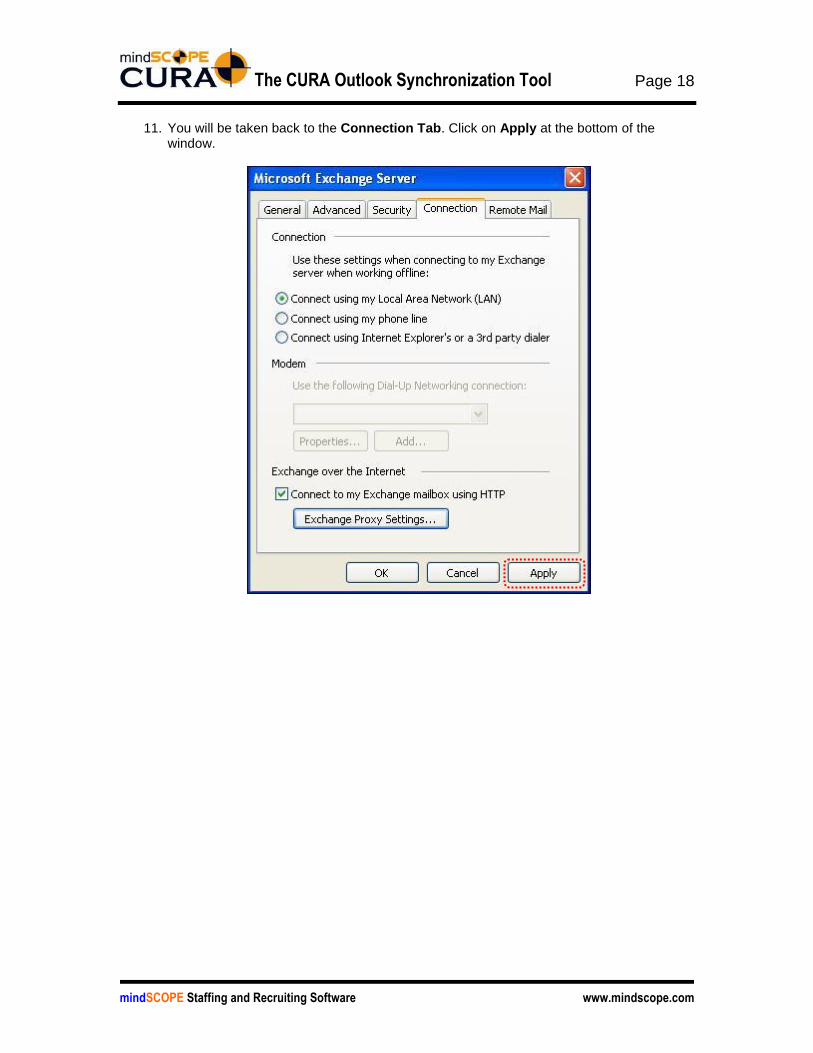
11. You will be taken back to the Connection Tab. Click on Apply at the bottom of the
window.

The CURA Outlook Synchronization Tool Page 19
mindSCOPE Staffing and Recruiting Software www.mindscope.com
12. Next, click on the General Tab. Enter your Mailbox Name and click on Check Name.
An underline will appear under your Mailbox name which indicates that it was able to successfully check and locate the mailbox. Click on OK at the bottom of the window to begin the synchronization process.
Notice the underline under
the mailbox name.

The CURA Outlook Synchronization Tool Page 20
mindSCOPE Staffing and Recruiting Software www.mindscope.com
13. You can minimize the CURA Outlook Synchronization Tool to your Windows Task Bar by
clicking on File from the top menu and then selecting Hide.
Please Note:
This action only hides/minimizes the CURA Outlook Synchronization tool but it does not close it.
You will now notice a small CURA Outlook Synchronization icon on your Windows Task Bar. You can maximize the window again by double clicking on the icon.

The CURA Outlook Synchronization Tool Page 21
mindSCOPE Staffing and Recruiting Software www.mindscope.com
14. A green check mark appears beside an email item every time synchronization has been
completed. The Command Window informs you of the date and time of when the last successful synchronization was completed. It will also inform you of any conflicts that occur during the process. If you would like to stop the synchronization process, click on the Stop button.

The CURA Outlook Synchronization Tool Page 22
mindSCOPE Staffing and Recruiting Software www.mindscope.com
15. It is highly recommended that you close your CURA Outlook Synchronization Tool at the
end of the day or when you are finished using it. To close, simply click on File from the top menu and select Close. You may also close the window. Since you have already set your settings and preferences, the next time you run the CURA Outlook Synchronization Tool, you only need to make sure that that date range is correct and click on the Start button.
Related Documents


