Installing and Upgrading TSM 6.8

Welcome message from author
This document is posted to help you gain knowledge. Please leave a comment to let me know what you think about it! Share it to your friends and learn new things together.
Transcript
Installing and Upgrading TSM 6.8

This guide will take you through the installation of TSM 6.8, the workstation install, and applying incremental updates.
Installing TSM
1) Obtain a copy of the TSM installation file. This is can be found on the TSM Installation CD provided to new customers. If the Installation CD cannot be found, please contact the TSM Support desk for a temporary link where the file can be downloaded. The file is named ‘TSM68DL.EXE’.
Once the file has been found, execute it. You will be greeted with the welcome screen. Click “Next”.
2) The TSM License Agreement will now be displayed. Advise the client to carefully read the License Agreement. When they approve of the Agreement, have them select the “I accept the agreement” option and click “Next”.
3) You will now be asked for the directory to install TSM to. The preferred standard is to create a mapped drive (usually T:\) and to install to a ‘TSM’ directory under this. Do not install to an IP address. Do not install to the root of a mapped drive. Once you have selected the correct location, click “Next”.
4) The next screen will ask you which Start Menu group to add the TSM icons to. You may either click browse and select an existing group, or leave the default and click “Next”

5) The next screen will ask whether you would like to create a desktop icon. Tick or untick the box as appropriate and click “Next”
6) This screen will review the choices you’ve made in the previous steps. Once you have confirmed the details, click “Install”
7) The installer will now begin copying files.
Once this is finished, the final screen will be displayed. Click “Finish” to close the installer.
You may now run TSM, either by double clicking the desktop icon which was created, or by launching the executable from the directory you chose to install to.
When TSM is run for the first time, it will begin a check and reindex. This will take 2-3 minutes to complete.
As this copy of TSM has not yet been registered, the next time TSM is run, the Test Drive screen will appear.
Select Option 3 “Start TSM” and contact the TSM accounts department for registration details.

Installing the Documentation Package
TSM documentation is now inline.
Press F1 from within TSM to view the TSM 6.8 manual.
TSM Backups
Running a TSM Backup copies the TSM data files into a .zip archive. TSM Backups should be run every night to ensure minimum data loss in the event of a server crash or other problem.
TSM Backups should be explained to new clients and they should be aware of the importance of their backups.
To run a TSM Backup, open TSM and log in. Now go to Utilities and Backup/Restore. The options should be set to Dated Backups and Include Reports and Labels and the destination directory should be on another machine, or preferably a removable medium, such as a USB flash drive or removable hard drive.
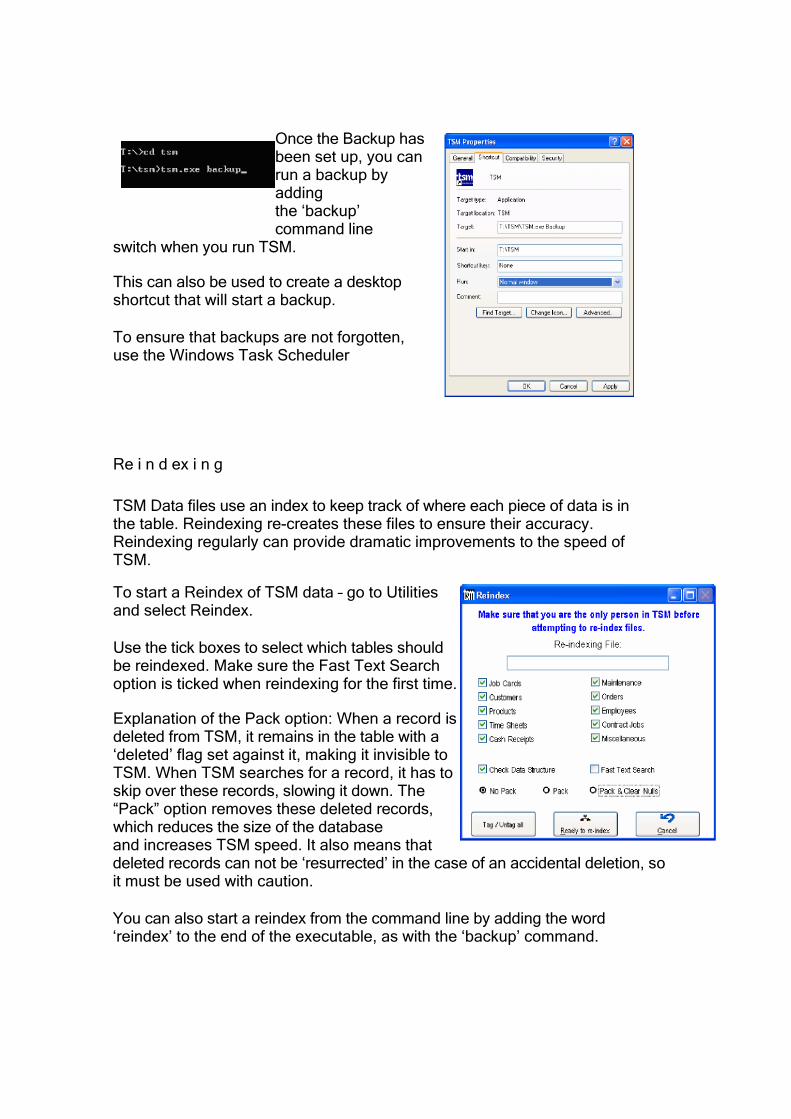
Once the Backup has been set up, you can run a backup by adding the ‘backup’ command line
switch when you run TSM.
This can also be used to create a desktop shortcut that will start a backup.
To ensure that backups are not forgotten, use the Windows Task Scheduler
Re i n d ex i n g
TSM Data files use an index to keep track of where each piece of data is in the table. Reindexing re-creates these files to ensure their accuracy. Reindexing regularly can provide dramatic improvements to the speed of TSM.
To start a Reindex of TSM data – go to Utilities and select Reindex.
Use the tick boxes to select which tables should be reindexed. Make sure the Fast Text Search option is ticked when reindexing for the first time.
Explanation of the Pack option: When a record is deleted from TSM, it remains in the table with a ‘deleted’ flag set against it, making it invisible to TSM. When TSM searches for a record, it has to skip over these records, slowing it down. The “Pack” option removes these deleted records, which reduces the size of the database and increases TSM speed. It also means that deleted records can not be ‘resurrected’ in the case of an accidental deletion, so it must be used with caution.
You can also start a reindex from the command line by adding the word ‘reindex’ to the end of the executable, as with the ‘backup’ command.

Using the Windows Scheduler to automatically run TSM with Command Line parameters
The Windows Scheduler provides a convenient tool for automating the running
of TSM with Command Line parameters.
The following example takes you through the steps to schedule an automatic
backup of TSM each evening at 1:00am however you can use the same
procedure to schedule any of the TSM Command Line Parameters. The
screens might vary slightly for different versions of Windows.
From the Windows Control Panel, select Scheduled Tasks to display the
Scheduled Tasks window.
Click the Add
Scheduled Task
option to start up the
Scheduled Task
Wizard:

Press the Browse button and select TSM.EXE from your live TSM directory.
Enter a descriptive name for the schedule
and choose Daily.
Enter the start time, select Every Day and
enter the date you want the schedule to
commence.
Enter a windows network user name and
password that has rights to run and log in
to
TSM. (This is not necessarily the same as
the TSM login name and password)
Select the “Open advanced properties for
this task when I click Finish” option and
press Finish.
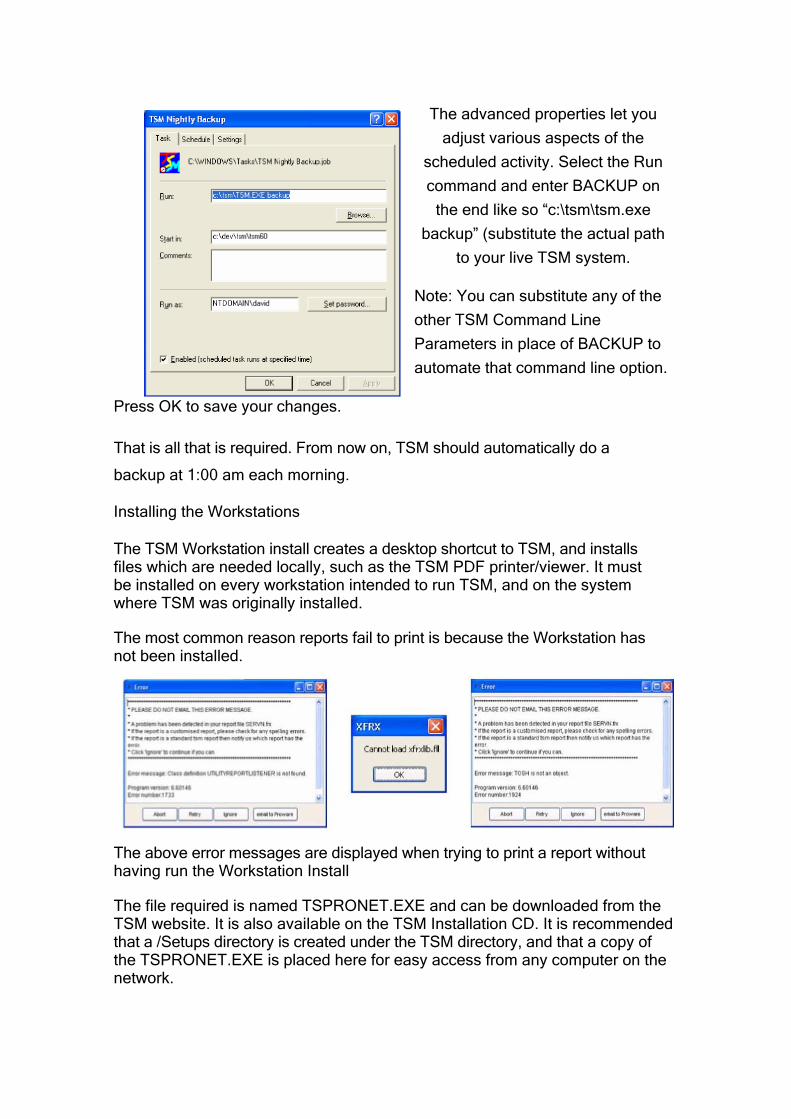
The advanced properties let you
adjust various aspects of the
scheduled activity. Select the Run
command and enter BACKUP on
the end like so “c:\tsm\tsm.exe
backup” (substitute the actual path
to your live TSM system.
Note: You can substitute any of the
other TSM Command Line
Parameters in place of BACKUP to
automate that command line option.
Press OK to save your changes.
That is all that is required. From now on, TSM should automatically do a
backup at 1:00 am each morning.
Installing the Workstations
The TSM Workstation install creates a desktop shortcut to TSM, and installs files which are needed locally, such as the TSM PDF printer/viewer. It must be installed on every workstation intended to run TSM, and on the system where TSM was originally installed.
The most common reason reports fail to print is because the Workstation has not been installed.
The above error messages are displayed when trying to print a report without having run the Workstation Install
The file required is named TSPRONET.EXE and can be downloaded from the TSM website. It is also available on the TSM Installation CD. It is recommended that a /Setups directory is created under the TSM directory, and that a copy of the TSPRONET.EXE is placed here for easy access from any computer on the network.

Before running the file, you must ensure that TSM is not running on the current Windows session. If errors occur during the installation it may be necessary for all users to log out of TSM.
The Installation program is very similar to the Full Install previously covered. As this installer will attempt to register some .DLL files, you may need to log in to the local machine as an administrator.
During the Workstation Install you will be asked for the path where TSM was previously installed. This is to be the same directory specified in the Full Install of TSM. If you are referencing a mapped drive, make sure that the drive has been mapped on the workstation, and that it is pointing to the same directory.
Once this is complete, a TSM icon should be available on the desktop, and the user will be able to start using TSM.
Installing TSM Updates.
Updates to TSM are released as issues are identified and resolved. Once a month TSM clients receive a newsletter advising them of the current version number and the password needed to update to this version. Only clients who have a current maintenance contract will receive the password in their newsletters.
Major updates including new features are released less often, and usually include separate, specific documentation on update procedures. (See the “Upgrading to TSM 6.8” document).
Updates are only available from the Update TSM Utilities menu option from within your TSM program or by contacting TSM Support to obtain an update.
Before running the update, it is recommended the you do a TSM backup. All users must be out of TSM before you run the update.
Any machine running a TSM web application (TSM Remote, TSM Live, TSM Self Service, etc) must have these applications shut down before doing the update.
TSM Accounting links can not be open during the update.

The TSM Update installer is very similar to the other Install programs described so far.
When prompted for the TSM directory, use the directory used when initially installing TSM. If you do not know the name of this directory, you can right click on the existing TSM icon and view the properties or select Help – About TSM from the TSM menu and look at the Program Information tab for the Program File Directoy.
Once the Update has finished, run the TSM.exe. It will begin its self test and reindex. This may take some time, depending on the size of the TSM data files. During this time, no other users will be able to open TSM. When the check and reindex are complete, you may start TSM again. The upgrade is now complete.

Troubleshooting.
If you receive an error similar to the above, this means that the file that is displayed in the error message is in use and cannot be overwritten.
Common causes:
1) Someone has TSM open. 2) Someone has the QuickBooks or MYOB link open. 3) You have not run an IISRESET on the computer that is hosting TSM
Live, TSM Self Service or TSM Remote. 4) Someone had TSM open when they closed their Remote
Desktop/Terminal Service Connection
If you have checked the above, and are still not sure why there is an open TSM file, please do the following.
1) On the TSM Server, right click on the ‘My Computer’ icon and select manage. This will open the Computer Management window.
2) Expand ‘Shared Folders’ and then ‘Open Files’
This will display all the files that are open on the server.

3) Right click on any files that are in the TSM directory and click ‘Close Open File’. You can hold shift to select multiple files at once.
If you continue to get this error when you click Retry, click Abort, reboot the TSM server and then re-run the TSM67UP.exe.

If you clicked Ignore when you got this error message, you will have to rerun the TSM68UP.exe

TSM Reports
TSM 6.8 contains many new features, among which is an updated reporting engine.
Although we have tried to convert existing reports to the new engine, some reports that were customised for TSM 6.5 may eventually need to be adjusted for TSM 6.8. We have included the older TSM report engine for compatibility in the short term, but all TSM users will have to switch to the new TSM 6.8 report engine at some point, as the TSM 6.5 report engine will be phased out and not supported over time, and may not work with many of the new TSM reports.
Until you are ready to go through with the switch to the new report engine, you are able to run TSM 6.8 in backwards compatibility which enables some but not all older report to continue to work. We can not guarantee that all reports using the old report engine will work at all.
The new TSM report function is accessible by going to Utilities -> Setup -> General.
You should try your customised reports with the new engine to determine which will need adjusting. In general, all detailed reports, such as Job Cards and Invoices will need to be re-customised from scratch, while most summary reports will only require minor tweaking.

Field Overflow
If you see stars appearing in a report, as below, it is because the field is too small to accommodate the value that should be displayed. We will need to expand this field so that it displays the value correctly.

Select the report with the error from the list, and click ‘Customise’. If your report is not in this list, you can look through the other categories by using the Report Type dropdown menu.
Identify the field that is having the problem. Click on it once to select it.
In this example, it is the Bill field which we will need to make wider.
It may help for you to have a printed out copy of the report with the error to use as a reference when finding the correct field.

To extend the field, click and hold on one of the black boxes on the left or
right edge of the field (depending on which side you are moving). Now
We now need to check which side of the field the text is aligned to. To do this, make sure you have the field selected and click on Format -> Text Alignment
If the text is aligned to the left, we willneed to extend the field to the right,and vice versa.
drag the cursor to elongate the field.
You may need to adjust this and other fields on this report so that everything fits nicely. You can do this by clicking on the field you want to move and then using the arrow keys on your keyboard to move it.
You can hold the Shift key while you click on fields to select more than one at once.
You may need to print the report to screen a few times and make minor adjustments to each field until the alignment is just right.
Further Assistance
If you are not able to resolve any errors yourself, please contact your TSM distributor or TSM directly and they can quote you for the work required.
As previously mentioned, all reports that were customised in TSM 6.5 using the old report engine will need to be checked for compatibility with TSM 6.8
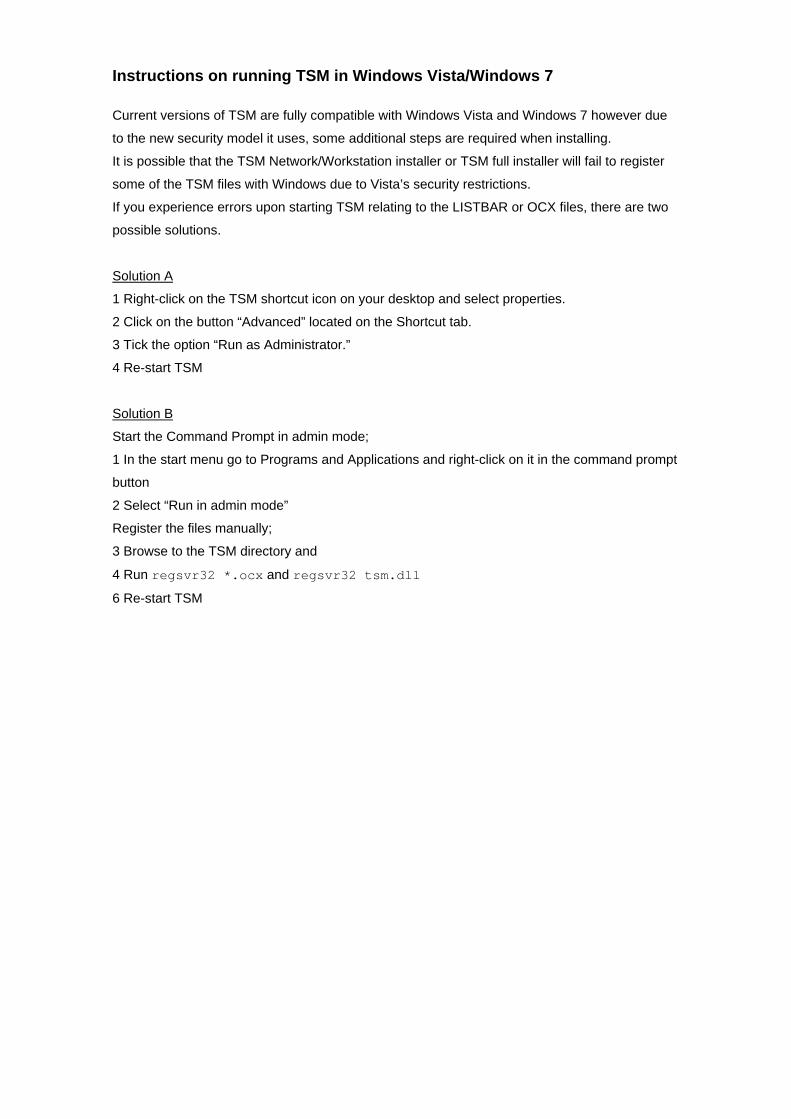
Instructions on running TSM in Windows Vista/Windows 7
Current versions of TSM are fully compatible with Windows Vista and Windows 7 however due
to the new security model it uses, some additional steps are required when installing.
It is possible that the TSM Network/Workstation installer or TSM full installer will fail to register
some of the TSM files with Windows due to Vista’s security restrictions.
If you experience errors upon starting TSM relating to the LISTBAR or OCX files, there are two
possible solutions.
Solution A
1 Right-click on the TSM shortcut icon on your desktop and select properties.
2 Click on the button “Advanced” located on the Shortcut tab.
3 Tick the option “Run as Administrator.”
4 Re-start TSM
Solution B
Start the Command Prompt in admin mode; 1 In the start menu go to Programs and Applications and right-click on it in the command prompt
button
2 Select “Run in admin mode”
Register the files manually;
3 Browse to the TSM directory and
4 Run regsvr32 *.ocx and regsvr32 tsm.dll
6 Re-start TSM
Related Documents