Oracle® Fusion Middleware Installing and Configuring Oracle Internet Directory 12c (12.2.1.4.0) E95116-09 May 2022

Welcome message from author
This document is posted to help you gain knowledge. Please leave a comment to let me know what you think about it! Share it to your friends and learn new things together.
Transcript
Oracle® Fusion MiddlewareInstalling and Configuring Oracle InternetDirectory
12c (12.2.1.4.0)E95116-09May 2022

Oracle Fusion Middleware Installing and Configuring Oracle Internet Directory, 12c (12.2.1.4.0)
E95116-09
Copyright © 2017, 2022, Oracle and/or its affiliates.
Primary Author: Oracle Corporation
This software and related documentation are provided under a license agreement containing restrictions onuse and disclosure and are protected by intellectual property laws. Except as expressly permitted in yourlicense agreement or allowed by law, you may not use, copy, reproduce, translate, broadcast, modify, license,transmit, distribute, exhibit, perform, publish, or display any part, in any form, or by any means. Reverseengineering, disassembly, or decompilation of this software, unless required by law for interoperability, isprohibited.
The information contained herein is subject to change without notice and is not warranted to be error-free. Ifyou find any errors, please report them to us in writing.
If this is software or related documentation that is delivered to the U.S. Government or anyone licensing it onbehalf of the U.S. Government, then the following notice is applicable:
U.S. GOVERNMENT END USERS: Oracle programs (including any operating system, integrated software,any programs embedded, installed or activated on delivered hardware, and modifications of such programs)and Oracle computer documentation or other Oracle data delivered to or accessed by U.S. Government endusers are "commercial computer software" or "commercial computer software documentation" pursuant to theapplicable Federal Acquisition Regulation and agency-specific supplemental regulations. As such, the use,reproduction, duplication, release, display, disclosure, modification, preparation of derivative works, and/oradaptation of i) Oracle programs (including any operating system, integrated software, any programsembedded, installed or activated on delivered hardware, and modifications of such programs), ii) Oraclecomputer documentation and/or iii) other Oracle data, is subject to the rights and limitations specified in thelicense contained in the applicable contract. The terms governing the U.S. Government’s use of Oracle cloudservices are defined by the applicable contract for such services. No other rights are granted to the U.S.Government.
This software or hardware is developed for general use in a variety of information management applications.It is not developed or intended for use in any inherently dangerous applications, including applications thatmay create a risk of personal injury. If you use this software or hardware in dangerous applications, then youshall be responsible to take all appropriate fail-safe, backup, redundancy, and other measures to ensure itssafe use. Oracle Corporation and its affiliates disclaim any liability for any damages caused by use of thissoftware or hardware in dangerous applications.
Oracle, Java, and MySQL are registered trademarks of Oracle and/or its affiliates. Other names may betrademarks of their respective owners.
Intel and Intel Inside are trademarks or registered trademarks of Intel Corporation. All SPARC trademarks areused under license and are trademarks or registered trademarks of SPARC International, Inc. AMD, Epyc,and the AMD logo are trademarks or registered trademarks of Advanced Micro Devices. UNIX is a registeredtrademark of The Open Group.
This software or hardware and documentation may provide access to or information about content, products,and services from third parties. Oracle Corporation and its affiliates are not responsible for and expresslydisclaim all warranties of any kind with respect to third-party content, products, and services unless otherwiseset forth in an applicable agreement between you and Oracle. Oracle Corporation and its affiliates will not beresponsible for any loss, costs, or damages incurred due to your access to or use of third-party content,products, or services, except as set forth in an applicable agreement between you and Oracle.
Contents
Preface
Audience viii
Documentation Accessibility viii
Diversity and Inclusion viii
Related Documents ix
Conventions ix
1 About the Oracle Internet Directory Installation
Using the Standard Installation Topology as a Starting Point 1-1
About the Oracle Internet Directory Standard Installation Topology 1-1
About Elements in the Standard Installation Topology Illustration 1-2
Using This Document to Extend an Existing Domain 1-3
2 Preparing to Install and Configure Oracle Internet Directory
Roadmap for Installing and Configuring a Standard Installation Topology 2-1
Roadmap for Verifying Your System Environment 2-3
Verifying Certification, System, and Interoperability Requirements 2-4
Selecting an Installation User 2-4
About User Permissions 2-5
About Non-Default User Permissions on UNIX Operating Systems 2-7
Verifying that the Installation User has Administrator Privileges on WindowsOperating Systems 2-7
About the Directories for Installation and Configuration 2-8
About the Recommended Directory Structure 2-8
About the Oracle Home Directory 2-9
About the Domain Home Directory 2-10
About the Application Home Directory 2-11
Installing Multiple Products in the Same Domain 2-11
Preparing for Shared Storage 2-12
About JDK Requirements for an Oracle Fusion Middleware Installation 2-12
About Database Requirements for an Oracle Fusion Middleware Installation 2-13
iii
About Product Distributions 2-13
3 Installing the Oracle Internet Directory Software
Verifying the Installation Checklist 3-1
Starting the Installation Program 3-3
Navigating the Installation Screens 3-4
Verifying the Installation 3-5
Reviewing the Installation Log Files 3-5
Checking the Directory Structure 3-5
Viewing the Contents of the Oracle Home 3-5
4 Configuring Oracle Internet Directory Domain
Creating the Database Schemas 4-1
Installing and Configuring a Certified Database 4-2
Starting the Repository Creation Utility 4-2
Navigating the Repository Creation Utility Screens to Create Schemas 4-2
Introducing the RCU 4-3
Selecting a Method of Schema Creation 4-3
Providing Database Connection Details 4-3
Specifying a Custom Prefix and Selecting Schemas 4-5
Specifying Schema Passwords 4-6
Completing Schema Creation 4-6
Configuring the Domain 4-7
Starting the Configuration Wizard 4-7
Navigating the Configuration Wizard Screens to Create and Configure the Domain 4-8
Selecting the Domain Type and Domain Home Location 4-9
Selecting the Configuration Templates for Oracle Internet Directory 4-9
Configuring the Administrator Account 4-10
Specifying the Domain Mode and JDK 4-10
Specifying the Database Configuration Type 4-10
Specifying JDBC Component Schema Information 4-12
Testing the JDBC Connections 4-13
Selecting Advanced Configuration 4-13
Configuring the Administration Server Listen Address 4-14
Configuring Node Manager 4-14
Configuring Managed Servers 4-14
Configuring a Cluster 4-15
Defining Server Templates 4-15
Configuring Coherence Clusters 4-15
iv
Creating a New Oracle Internet Directory Machine 4-15
Assigning Servers to Oracle Internet Directory Machines 4-16
Virtual Targets 4-16
Partitions 4-16
Reviewing Your Configuration Specifications and Configuring the Domain 4-16
Writing Down Your Domain Home and Administration Server URL 4-16
Prerequisites for an Oracle Autonomous Transaction Processing-Shared (ATP-S) database 4-17
Prerequisites for Standalone Oracle Internet Directory Configuration with an OracleAutonomous Transaction Processing-Shared (ATP-S) database 4-17
Prerequisites for Collocated Oracle Internet Directory Configuration with an OracleAutonomous Transaction Processing-Shared (ATP-S) database 4-19
Starting Servers and Processes 4-19
Starting the Servers for Standalone Oracle Internet Directory 4-20
Starting Servers and Processes for Collocated Oracle Internet Directory 4-20
Performing the Initial Oracle Internet Directory Setup 4-23
Verifying the Configuration 4-25
5 Configuring Oracle Directory Integration Platform
Creating the Database Schemas 5-1
Installing and Configuring a Certified Database 5-2
Starting the Repository Creation Utility 5-2
Navigating the Repository Creation Utility Screens to Create Schemas 5-2
Introducing the RCU 5-3
Selecting a Method of Schema Creation 5-3
Providing Database Connection Details 5-3
Specifying a Custom Prefix and Selecting Schemas 5-4
Specifying Schema Passwords 5-5
Completing Schema Creation 5-5
Configuring Oracle Directory Integration Platform with Backend Directories 5-5
Installing ODIP Without a Database 5-6
6 Next Steps After Configuring the Domain
Performing Basic Administrative Tasks 6-1
Performing Additional Domain Configuration Tasks 6-1
Preparing Your Environment for High Availability 6-2
7 Configuring High Availability for Oracle Directory Services Components
About the 12c (12.2.1.4.0) Oracle Directory Services Products 7-1
Prerequisites for Oracle Directory Services High Availability Configuration 7-2
v
Oracle Home Requirement 7-2
Database Prerequisites 7-3
About Installing and Configuring the Database Repository 7-3
Configuring the Database for Oracle Fusion Middleware Metadata 7-3
Database Examples in this Chapter 7-4
Configuring Database Services 7-5
Verifying Transparent Application Failover 7-6
Configuring Virtual Server Names and Ports for the Load Balancer 7-6
Oracle Internet Directory High Availability 7-8
About Oracle Internet Directory Component Architecture 7-9
Oracle Internet Directory Component Characteristics 7-10
Understanding Oracle Internet Directory High Availability Concepts 7-14
Oracle Internet Directory High Availability Architecture 7-14
Protection from Failures and Expected Behavior 7-17
Oracle Internet Directory Prerequisites 7-18
Oracle Internet Directory High Availability Configuration Steps 7-19
Installing Oracle Fusion Middleware Components 7-20
Creating Oracle Internet Directory Schemas in the Repository Using RCU 7-22
Configuring Oracle Internet Directory With a WebLogic Domain 7-23
Validating Oracle Internet Directory High Availability 7-27
Oracle Internet Directory Failover and Expected Behavior 7-28
Performing Oracle Internet Directory Failover 7-28
Performing an Oracle RAC Failover 7-29
Troubleshooting Oracle Internet Directory High Availability 7-29
Additional Oracle Internet Directory High Availability Issues 7-31
Changing the Password of the ODS Schema Used by Oracle Internet Directory 7-31
Oracle Directory Integration Platform High Availability 7-31
Understanding Oracle Directory Integration Platform Component Architecture 7-32
Understanding Oracle Directory Integration Platform High Availability Concepts 7-32
About Oracle Directory Integration Platform High Availability Architecture (OIDBack-End) 7-32
About Oracle Directory Integration Platform High Availability Architecture (OUDBack-End) 7-36
Protection from Failures and Expected Behavior 7-37
Configuring Oracle Directory Integration Platform for High Availability 7-38
Configuring High Availability for an Oracle Internet Directory Back-End Server 7-38
Configuring High Availability for an Oracle Unified Directory Back-End Server 7-44
About Retrieving Changes from Connected Directories 7-50
Understanding Oracle Directory Integration Platform Failover and Expected Behavior 7-51
Troubleshooting Oracle Directory Integration Platform High Availability 7-52
Managed Server Log File Exception May Occur During an Oracle RAC Failover 7-52
Node Manager Fails to Start 7-52
vi
Error Messages May Appear After Starting Node Manager 7-53
Configuration Changes Do Not Automatically Propagate to All Oracle DirectoryIntegration Platform Instances in a Highly Available Topology 7-53
An Operation Cannot Be Completed for Unknown Errors Message Appears 7-54
About Starting and Stopping Oracle Directory Services Components 7-54
8 Uninstalling or Reinstalling Oracle Internet Directory
About Product Uninstallation 8-1
Stopping Oracle Fusion Middleware 8-2
Removing Your Database Schemas 8-2
Uninstalling the Software 8-3
Starting the Uninstall Wizard 8-3
Selecting the Product to Uninstall 8-3
Navigating the Uninstall Wizard Screens 8-3
Removing the Oracle Home Directory Manually 8-4
Removing the Program Shortcuts on Windows Operating Systems 8-4
Removing the Domain and Application Data 8-5
Reinstalling the Software 8-5
A Updating the JDK After Installing and Configuring an Oracle FusionMiddleware Product
About Updating the JDK Location After Installing an Oracle Fusion Middleware Product A-1
Updating the JDK Location in an Existing Oracle Home A-2
Updating the JDK Location in an Existing Domain Home A-3
vii
Preface
This document describes how to install and configure Oracle Internet Directory.
• Audience
• Documentation Accessibility
• Diversity and Inclusion
• Related Documents
• ConventionsLearn about the conventions used in this document.
AudienceThis guide is intended for system administrators or application developers who areinstalling and configuring Oracle Internet Directory. It is assumed that readers arefamiliar with web technologies and have a general understanding of Windows andUNIX platforms.
Documentation AccessibilityFor information about Oracle's commitment to accessibility, visit the OracleAccessibility Program website at http://www.oracle.com/pls/topic/lookup?ctx=acc&id=docacc.
Access to Oracle Support
Oracle customers that have purchased support have access to electronic supportthrough My Oracle Support. For information, visit http://www.oracle.com/pls/topic/lookup?ctx=acc&id=info or visit http://www.oracle.com/pls/topic/lookup?ctx=acc&id=trsif you are hearing impaired.
Diversity and InclusionOracle is fully committed to diversity and inclusion. Oracle respects and values havinga diverse workforce that increases thought leadership and innovation. As part of ourinitiative to build a more inclusive culture that positively impacts our employees,customers, and partners, we are working to remove insensitive terms from ourproducts and documentation. We are also mindful of the necessity to maintaincompatibility with our customers' existing technologies and the need to ensurecontinuity of service as Oracle's offerings and industry standards evolve. Because ofthese technical constraints, our effort to remove insensitive terms is ongoing and willtake time and external cooperation.
Preface
viii
Related DocumentsRefer to the Oracle Fusion Middleware Library for additional information.
• For administering Oracle Internet Directory, see Administering Oracle Internet Directory.
• For installation information, see Fusion Middleware Installation Documentation.
• For upgrade information, see Fusion Middleware Upgrade Documentation.
• For administration-related information, see Fusion Middleware AdministrationDocumentation.
• For release-related information, see Fusion Middleware Release Notes.
ConventionsLearn about the conventions used in this document.
This document uses the following text conventions:
Convention Meaning
boldface Boldface type indicates graphical user interface elements associated with anaction, or terms defined in text or the glossary.
italic Italic type indicates book titles, emphasis, or placeholder variables for whichyou supply particular values.
monospace Monospace type indicates commands within a paragraph, URLs, code inexamples, text that appears on the screen, or text that you enter.
Preface
ix
1About the Oracle Internet DirectoryInstallation
The standard installation for Oracle Internet Directory described in this guide creates thestandard topology, which represents a sample starting topology for this product.
• Using the Standard Installation Topology as a Starting PointThe standard installation topology is a flexible topology that you can use as a startingpoint in production environments.
• Using This Document to Extend an Existing DomainThe procedures in this guide describe how to create a new domain. The assumption isthat no other Oracle Fusion Middleware products are installed on your system.
Using the Standard Installation Topology as a Starting PointThe standard installation topology is a flexible topology that you can use as a starting point inproduction environments.
The information in this guide helps you to create a standard installation topology for OracleInternet Directory. If required, you can later extend the standard installation topology to createa secure and highly available production environment, see Next Steps After Configuring theDomain.
The standard installation topology represents a sample topology for this product. It is not theonly topology that this product supports. See About the Standard Installation Topology inOracle Fusion Middleware Planning an Installation of Oracle Fusion Middleware.
• About the Oracle Internet Directory Standard Installation TopologyThis topology represents a standard WebLogic Server domain that contains anAdministration Server and one or more clusters containing one or more ManagedServers.
• About Elements in the Standard Installation Topology IllustrationThe standard installation topology typically includes common elements.
About the Oracle Internet Directory Standard Installation TopologyThis topology represents a standard WebLogic Server domain that contains an AdministrationServer and one or more clusters containing one or more Managed Servers.
The following figure shows the standard installation topology for Oracle Internet Directory.
See About Elements in the Standard Installation Topology Illustration for information onelements of this topology.
1-1
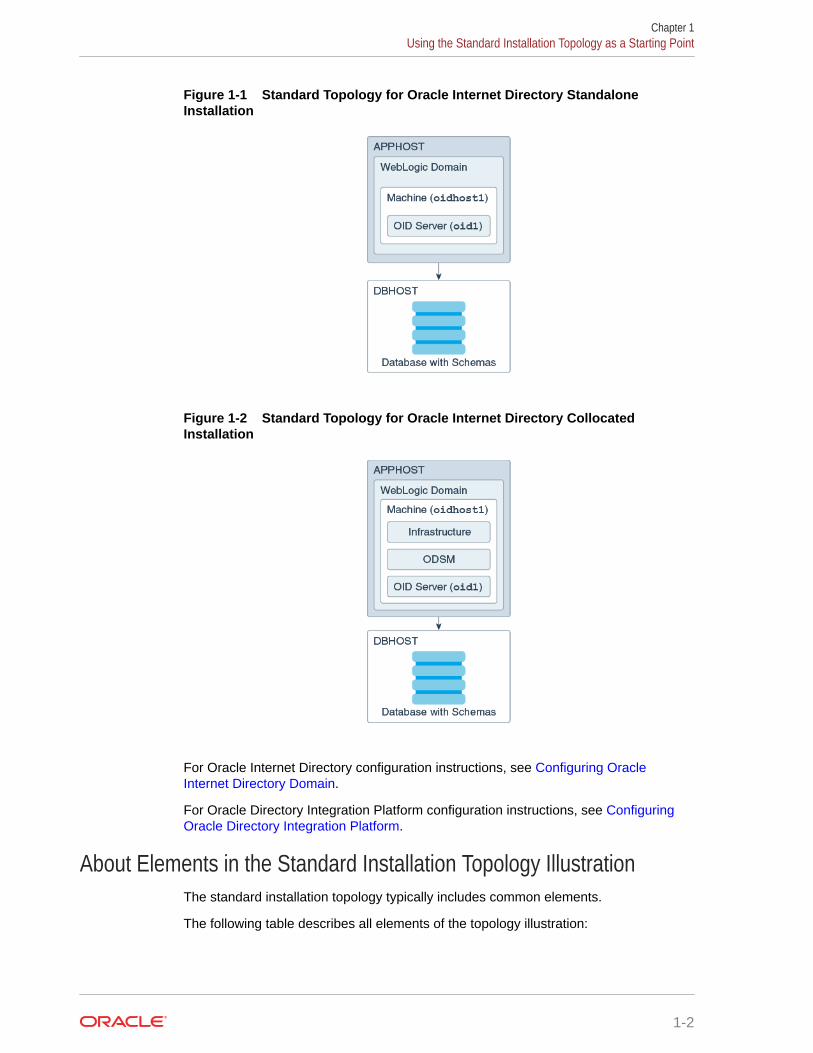
Figure 1-1 Standard Topology for Oracle Internet Directory StandaloneInstallation
Figure 1-2 Standard Topology for Oracle Internet Directory CollocatedInstallation
For Oracle Internet Directory configuration instructions, see Configuring OracleInternet Directory Domain.
For Oracle Directory Integration Platform configuration instructions, see ConfiguringOracle Directory Integration Platform.
About Elements in the Standard Installation Topology IllustrationThe standard installation topology typically includes common elements.
The following table describes all elements of the topology illustration:
Chapter 1Using the Standard Installation Topology as a Starting Point
1-2
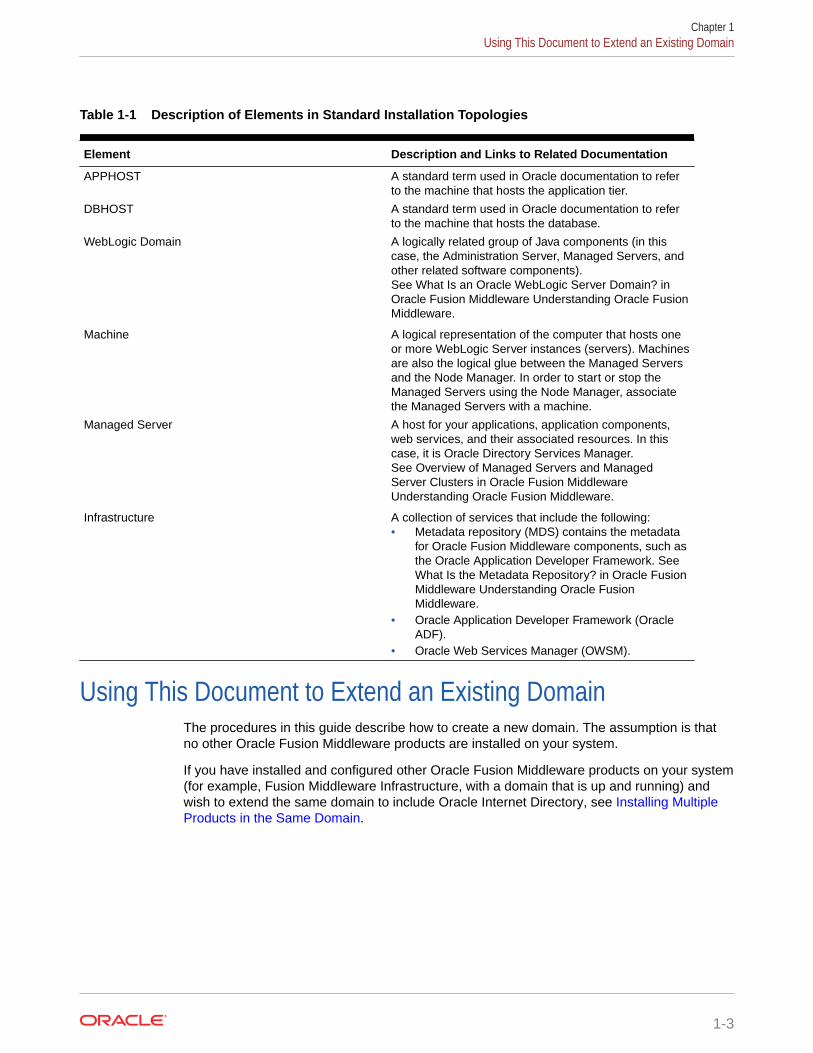
Table 1-1 Description of Elements in Standard Installation Topologies
Element Description and Links to Related Documentation
APPHOST A standard term used in Oracle documentation to referto the machine that hosts the application tier.
DBHOST A standard term used in Oracle documentation to referto the machine that hosts the database.
WebLogic Domain A logically related group of Java components (in thiscase, the Administration Server, Managed Servers, andother related software components).See What Is an Oracle WebLogic Server Domain? inOracle Fusion Middleware Understanding Oracle FusionMiddleware.
Machine A logical representation of the computer that hosts oneor more WebLogic Server instances (servers). Machinesare also the logical glue between the Managed Serversand the Node Manager. In order to start or stop theManaged Servers using the Node Manager, associatethe Managed Servers with a machine.
Managed Server A host for your applications, application components,web services, and their associated resources. In thiscase, it is Oracle Directory Services Manager.See Overview of Managed Servers and ManagedServer Clusters in Oracle Fusion MiddlewareUnderstanding Oracle Fusion Middleware.
Infrastructure A collection of services that include the following:• Metadata repository (MDS) contains the metadata
for Oracle Fusion Middleware components, such asthe Oracle Application Developer Framework. See What Is the Metadata Repository? in Oracle FusionMiddleware Understanding Oracle FusionMiddleware.
• Oracle Application Developer Framework (OracleADF).
• Oracle Web Services Manager (OWSM).
Using This Document to Extend an Existing DomainThe procedures in this guide describe how to create a new domain. The assumption is thatno other Oracle Fusion Middleware products are installed on your system.
If you have installed and configured other Oracle Fusion Middleware products on your system(for example, Fusion Middleware Infrastructure, with a domain that is up and running) andwish to extend the same domain to include Oracle Internet Directory, see Installing MultipleProducts in the Same Domain.
Chapter 1Using This Document to Extend an Existing Domain
1-3
2Preparing to Install and Configure OracleInternet Directory
To prepare for your Oracle Internet Directory installation, verify that your system meets thebasic requirements, then obtain the correct installation software.
• Roadmap for Installing and Configuring a Standard Installation TopologyThis roadmap provides the steps required to install and configure a standard OracleInternet Directory installation topology.
• Roadmap for Verifying Your System EnvironmentBefore you begin the installation and configuration process, you must verify your systemenvironment.
• About Product DistributionsYou create the initial Oracle Internet Directory domain using the Oracle FusionMiddleware Infrastructure distribution, which contains both Oracle WebLogic Serversoftware and Oracle Java Required Files (JRF) software.
Roadmap for Installing and Configuring a Standard InstallationTopology
This roadmap provides the steps required to install and configure a standard Oracle InternetDirectory installation topology.
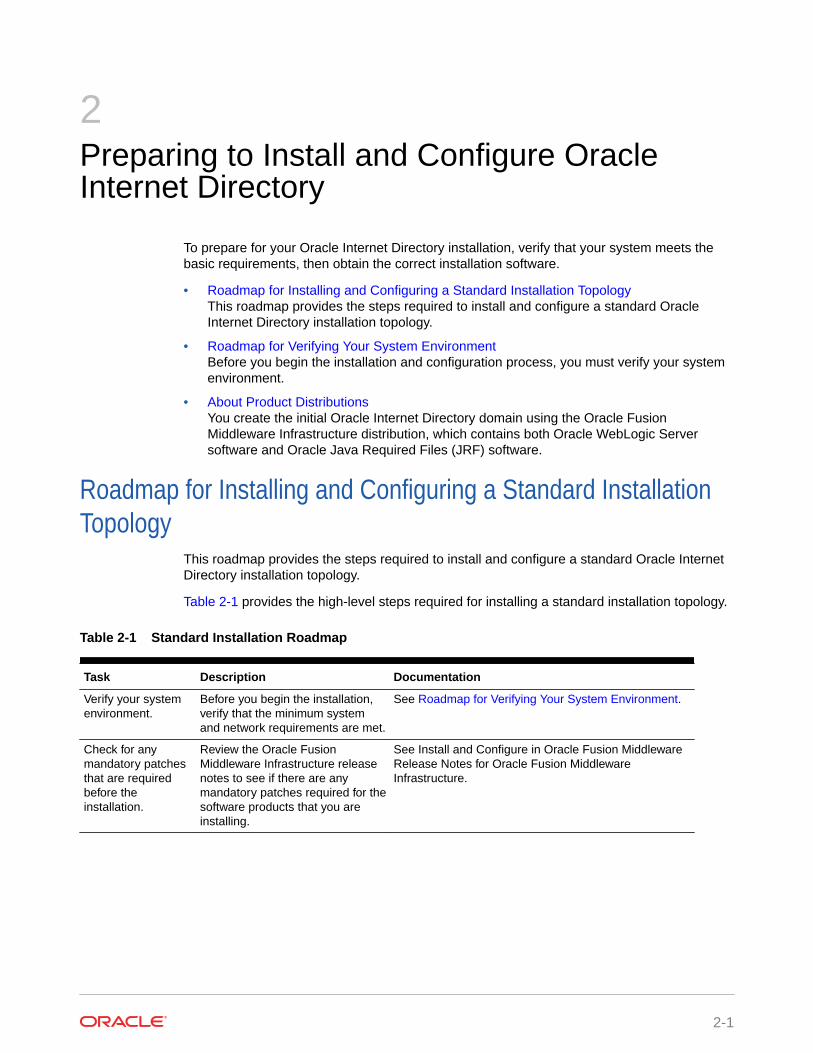
Table 2-1 provides the high-level steps required for installing a standard installation topology.
Table 2-1 Standard Installation Roadmap
Task Description Documentation
Verify your systemenvironment.
Before you begin the installation,verify that the minimum systemand network requirements are met.
See Roadmap for Verifying Your System Environment.
Check for anymandatory patchesthat are requiredbefore theinstallation.
Review the Oracle FusionMiddleware Infrastructure releasenotes to see if there are anymandatory patches required for thesoftware products that you areinstalling.
See Install and Configure in Oracle Fusion MiddlewareRelease Notes for Oracle Fusion MiddlewareInfrastructure.
2-1
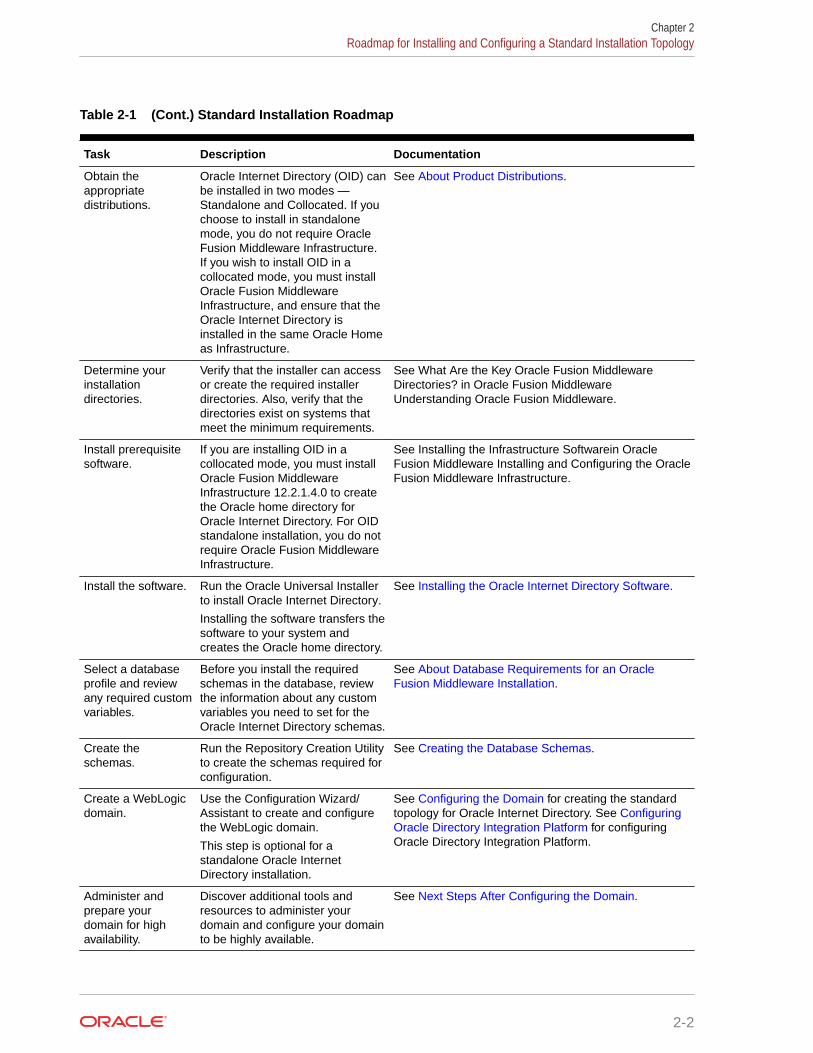
Table 2-1 (Cont.) Standard Installation Roadmap
Task Description Documentation
Obtain theappropriatedistributions.
Oracle Internet Directory (OID) canbe installed in two modes —Standalone and Collocated. If youchoose to install in standalonemode, you do not require OracleFusion Middleware Infrastructure.If you wish to install OID in acollocated mode, you must installOracle Fusion MiddlewareInfrastructure, and ensure that theOracle Internet Directory isinstalled in the same Oracle Homeas Infrastructure.
See About Product Distributions.
Determine yourinstallationdirectories.
Verify that the installer can accessor create the required installerdirectories. Also, verify that thedirectories exist on systems thatmeet the minimum requirements.
See What Are the Key Oracle Fusion MiddlewareDirectories? in Oracle Fusion MiddlewareUnderstanding Oracle Fusion Middleware.
Install prerequisitesoftware.
If you are installing OID in acollocated mode, you must installOracle Fusion MiddlewareInfrastructure 12.2.1.4.0 to createthe Oracle home directory forOracle Internet Directory. For OIDstandalone installation, you do notrequire Oracle Fusion MiddlewareInfrastructure.
See Installing the Infrastructure Softwarein OracleFusion Middleware Installing and Configuring the OracleFusion Middleware Infrastructure.
Install the software. Run the Oracle Universal Installerto install Oracle Internet Directory.
Installing the software transfers thesoftware to your system andcreates the Oracle home directory.
See Installing the Oracle Internet Directory Software.
Select a databaseprofile and reviewany required customvariables.
Before you install the requiredschemas in the database, reviewthe information about any customvariables you need to set for theOracle Internet Directory schemas.
See About Database Requirements for an OracleFusion Middleware Installation.
Create theschemas.
Run the Repository Creation Utilityto create the schemas required forconfiguration.
See Creating the Database Schemas.
Create a WebLogicdomain.
Use the Configuration Wizard/Assistant to create and configurethe WebLogic domain.
This step is optional for astandalone Oracle InternetDirectory installation.
See Configuring the Domain for creating the standardtopology for Oracle Internet Directory. See ConfiguringOracle Directory Integration Platform for configuringOracle Directory Integration Platform.
Administer andprepare yourdomain for highavailability.
Discover additional tools andresources to administer yourdomain and configure your domainto be highly available.
See Next Steps After Configuring the Domain.
Chapter 2Roadmap for Installing and Configuring a Standard Installation Topology
2-2
Roadmap for Verifying Your System EnvironmentBefore you begin the installation and configuration process, you must verify your systemenvironment.
Table 2-2 identifies important tasks and checks to perform to ensure that your environment isprepared to install and configure Oracle Internet Directory.
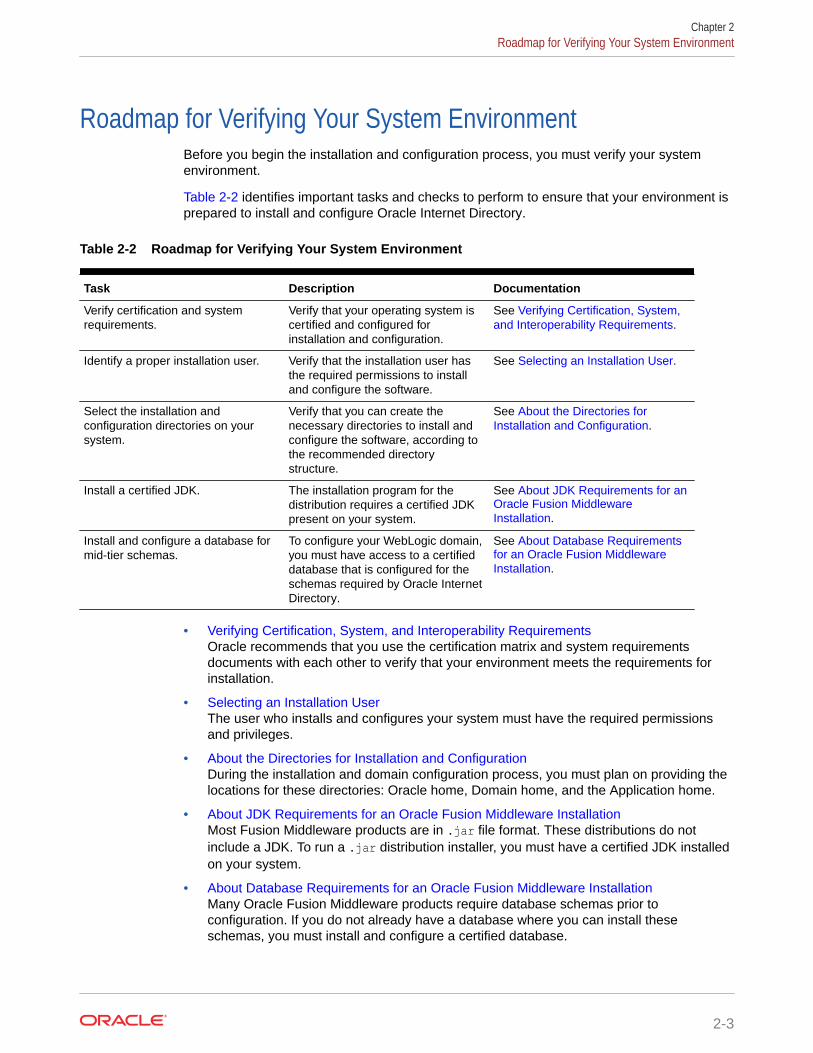
Table 2-2 Roadmap for Verifying Your System Environment
Task Description Documentation
Verify certification and systemrequirements.
Verify that your operating system iscertified and configured forinstallation and configuration.
See Verifying Certification, System,and Interoperability Requirements.
Identify a proper installation user. Verify that the installation user hasthe required permissions to installand configure the software.
See Selecting an Installation User.
Select the installation andconfiguration directories on yoursystem.
Verify that you can create thenecessary directories to install andconfigure the software, according tothe recommended directorystructure.
See About the Directories forInstallation and Configuration.
Install a certified JDK. The installation program for thedistribution requires a certified JDKpresent on your system.
See About JDK Requirements for anOracle Fusion MiddlewareInstallation.
Install and configure a database formid-tier schemas.
To configure your WebLogic domain,you must have access to a certifieddatabase that is configured for theschemas required by Oracle InternetDirectory.
See About Database Requirementsfor an Oracle Fusion MiddlewareInstallation.
• Verifying Certification, System, and Interoperability RequirementsOracle recommends that you use the certification matrix and system requirementsdocuments with each other to verify that your environment meets the requirements forinstallation.
• Selecting an Installation UserThe user who installs and configures your system must have the required permissionsand privileges.
• About the Directories for Installation and ConfigurationDuring the installation and domain configuration process, you must plan on providing thelocations for these directories: Oracle home, Domain home, and the Application home.
• About JDK Requirements for an Oracle Fusion Middleware InstallationMost Fusion Middleware products are in .jar file format. These distributions do notinclude a JDK. To run a .jar distribution installer, you must have a certified JDK installedon your system.
• About Database Requirements for an Oracle Fusion Middleware InstallationMany Oracle Fusion Middleware products require database schemas prior toconfiguration. If you do not already have a database where you can install theseschemas, you must install and configure a certified database.
Chapter 2Roadmap for Verifying Your System Environment
2-3
Verifying Certification, System, and Interoperability RequirementsOracle recommends that you use the certification matrix and system requirementsdocuments with each other to verify that your environment meets the requirements forinstallation.
1. Verifying that your environment meets certification requirements:
Make sure that you install your product on a supported hardware and softwareconfiguration. See the certification document for your release on the Oracle FusionMiddleware Supported System Configurations page.
Oracle has tested and verified the performance of your product on all certifiedsystems and environments. Whenever new certifications are released, they areadded to the certification document right away. New certifications can be releasedat any time. Therefore, the certification documents are kept outside thedocumentation libraries and are available on Oracle Technology Network.
2. Using the system requirements document to verify certification:
Oracle recommends that you use the Oracle Fusion Middleware SystemRequirements and Specifications document to verify that the certificationrequirements are met. For example, if the certification document indicates thatyour product is certified for installation on 64-Bit Oracle Linux 6.5, use thisdocument to verify that your system meets the required minimum specifications.These include disk space, available memory, specific platform packages andpatches, and other operating system-specific requirements. System requirementscan change in the future. Therefore, the system requirement documents are keptoutside of the documentation libraries and are available on Oracle TechnologyNetwork.
3. Verifying interoperability among multiple products:
To learn how to install and run multiple Fusion Middleware products from the samerelease or mixed releases with each other, see Oracle Fusion MiddlewareInteroperability and Compatibility in Oracle Fusion Middleware UnderstandingInteroperability and Compatibility.
Selecting an Installation UserThe user who installs and configures your system must have the required permissionsand privileges.
• About User PermissionsThe user who installs a Fusion Middleware product owns the files and has certainpermissions on the files.
• About Non-Default User Permissions on UNIX Operating SystemsChanging the default permission setting reduces the security of the installation andyour system. Oracle does not recommend that change the default permissionsettings.
• Verifying that the Installation User has Administrator Privileges on WindowsOperating SystemsTo update the Windows Registry, you must have administrator privileges.
Chapter 2Roadmap for Verifying Your System Environment
2-4
About User PermissionsThe user who installs a Fusion Middleware product owns the files and has certainpermissions on the files.
• Read and write permissions on all non-executable files (for example, .jar, .properties,or .xml). All other users in the same group as the file owner have read permissions only.
• Read, write, and execute permissions on all executable files (for example, .exe, .sh,or .cmd). All other users in the same group as the file owner have read and executepermissions only.
This means that someone other than the person who installs the software can use theinstalled binaries in the Oracle home directory to configure a domain or set of FusionMiddleware products.
During configuration, the files generated by the configuration process are owned by the userwho ran the Configuration Wizard. This user has the same permissions as described abovefor the installation user. However, security-sensitive files are not created with grouppermissions. Only the user that created the domain has read and write permissions and canadminister the domain.
Consider the following examples:
• Example 1: A Single User Installs the Software and Configures the Domain
This example explains the file permissions where the same user installs the software andconfigures the domain.
To ensure proper permissions and privileges for all files, Oracle recommends that thesame owner perform both tasks: install the Oracle Fusion Middleware product andconfigure the WebLogic Server domain by using the Configuration Wizard.
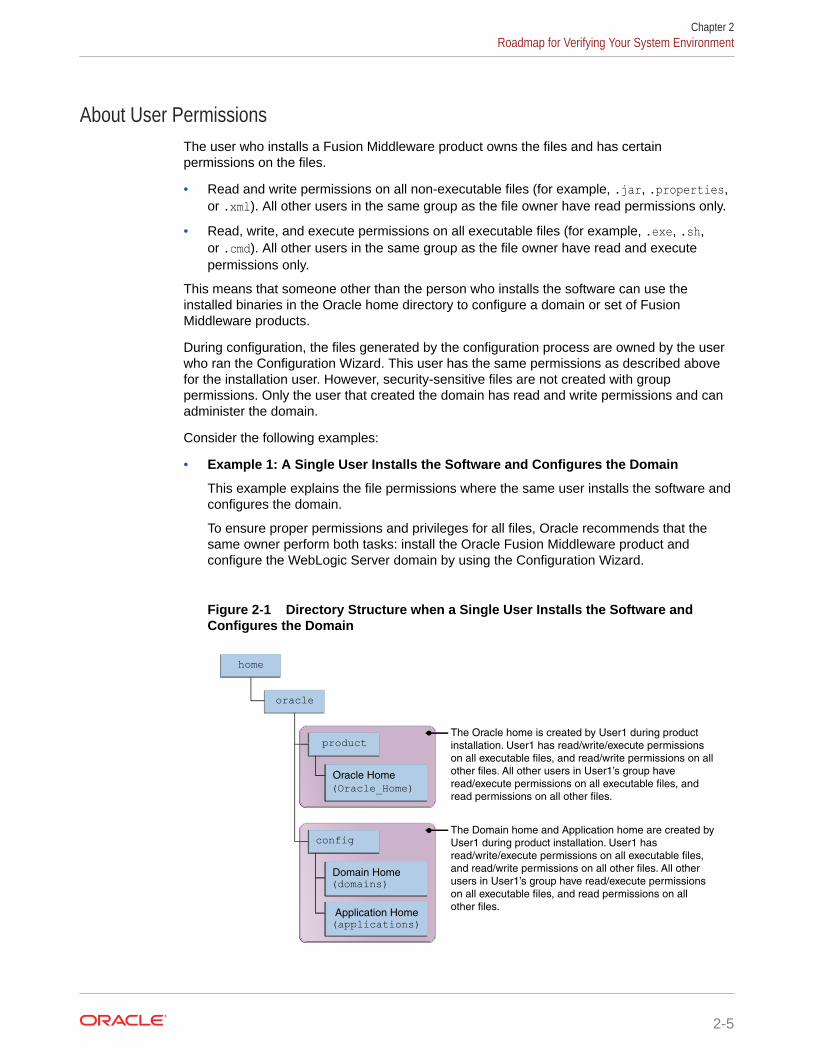
Figure 2-1 Directory Structure when a Single User Installs the Software andConfigures the Domain
The Oracle home is created by User1 during product
installation. User1 has read/write/execute permissions
on all executable files, and read/write permissions on all
other files. All other users in User1’s group have
read/execute permissions on all executable files, and
read permissions on all other files.
product
Oracle Home
(Oracle_Home)
Application Home (applications)
oracle
home
Domain Home(domains)
configThe Domain home and Application home are created by
User1 during product installation. User1 has
read/write/execute permissions on all executable files,
and read/write permissions on all other files. All other
users in User1’s group have read/execute permissions
on all executable files, and read permissions on all
other files.
Chapter 2Roadmap for Verifying Your System Environment
2-5
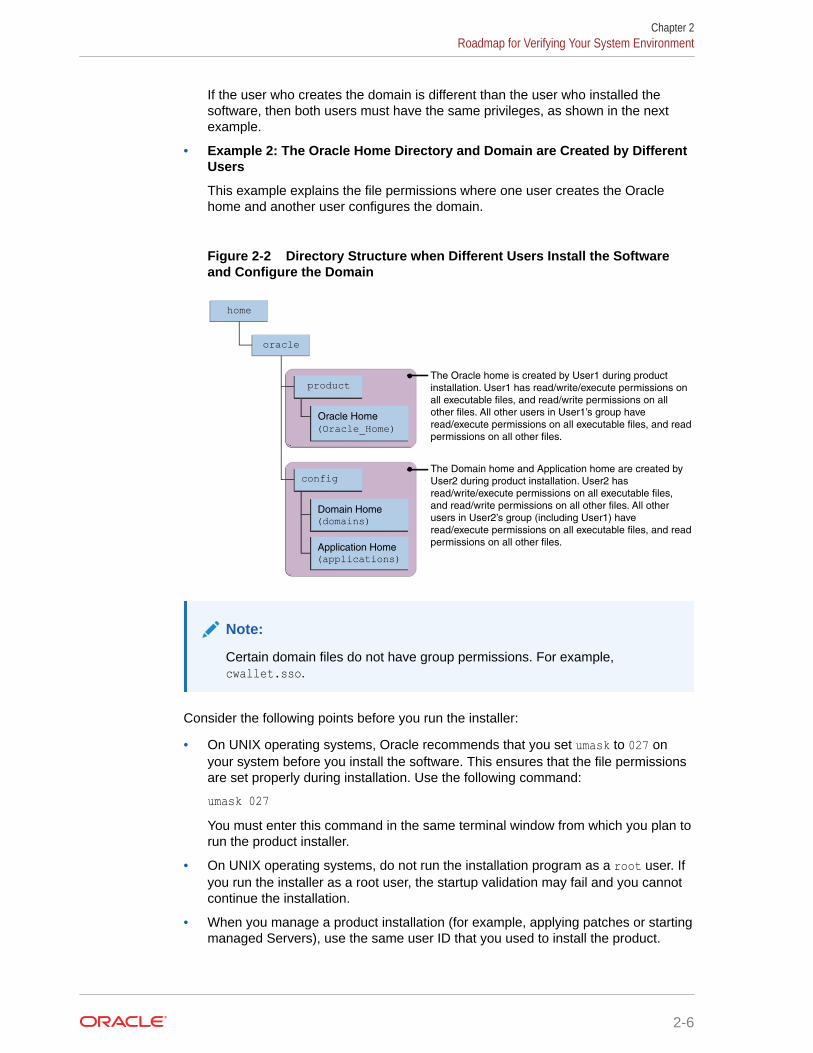
If the user who creates the domain is different than the user who installed thesoftware, then both users must have the same privileges, as shown in the nextexample.
• Example 2: The Oracle Home Directory and Domain are Created by DifferentUsers
This example explains the file permissions where one user creates the Oraclehome and another user configures the domain.
Figure 2-2 Directory Structure when Different Users Install the Softwareand Configure the Domain
The Oracle home is created by User1 during product
installation. User1 has read/write/execute permissions on
all executable files, and read/write permissions on all
other files. All other users in User1’s group have
read/execute permissions on all executable files, and read
permissions on all other files.
product
Oracle Home
(Oracle_Home)
Application Home (applications)
oracle
home
Domain Home(domains)
configThe Domain home and Application home are created by
User2 during product installation. User2 has
read/write/execute permissions on all executable files,
and read/write permissions on all other files. All other
users in User2’s group (including User1) have
read/execute permissions on all executable files, and read
permissions on all other files.
Note:
Certain domain files do not have group permissions. For example,cwallet.sso.
Consider the following points before you run the installer:
• On UNIX operating systems, Oracle recommends that you set umask to 027 onyour system before you install the software. This ensures that the file permissionsare set properly during installation. Use the following command:
umask 027You must enter this command in the same terminal window from which you plan torun the product installer.
• On UNIX operating systems, do not run the installation program as a root user. Ifyou run the installer as a root user, the startup validation may fail and you cannotcontinue the installation.
• When you manage a product installation (for example, applying patches or startingmanaged Servers), use the same user ID that you used to install the product.
Chapter 2Roadmap for Verifying Your System Environment
2-6
• On Windows operating systems, you must have administrative privileges to install theproduct. See Verifying the Installation User has Administrator Privileges on WindowsOperating Systems.
About Non-Default User Permissions on UNIX Operating SystemsChanging the default permission setting reduces the security of the installation and yoursystem. Oracle does not recommend that change the default permission settings.
If other users require access to a particular file or executable, use the UNIX sudo commandor other similar commands to change the file permissions.
Refer to your UNIX operating system Administrator's Guide or contact your operating systemvendor, if you need further assistance.
Verifying that the Installation User has Administrator Privileges on WindowsOperating Systems
To update the Windows Registry, you must have administrator privileges.
By default, users with the administrator privilege sign in to the system with regular privileges,but can request elevated permissions to perform administrative tasks.
To perform a task with elevated privileges:
1. Find the Command Prompt icon, either from the Start menu or the Windows icon in thelower-left corner.
2. Right-click Command Prompt and select Run as administrator.
This opens a new command prompt window, and all actions performed in this window aredone with administrator privileges.
Note:
If you have User Access Control enabled on your system, you may see anadditional window asking you to confirm this action. Confirm and continue withthis procedure.
Note:
For Oracle Internet Directory, ensure that you have enabled User AccountControl (UAC). If you have not done so already, enable UAC by following theinstructions in the Enabling User Account Control (UAC) section from theappropriate version of Oracle Fusion Middleware System Requirements andSpecifications for your installation.
3. Perform the desired task.
For example, to start the product installer:
For a jar file, enter:
java —jar distribution_name.jar
Chapter 2Roadmap for Verifying Your System Environment
2-7
For an executable (.exe, .bin, or .sh file), enter:
distribution_name.exe
About the Directories for Installation and ConfigurationDuring the installation and domain configuration process, you must plan on providingthe locations for these directories: Oracle home, Domain home, and the Applicationhome.
• About the Recommended Directory StructureOracle recommends specific locations for the Oracle Home, Domain Home, andApplication Home.
• About the Oracle Home DirectoryWhen you install any Oracle Fusion Middleware product, you must use an Oraclehome directory.
• About the Domain Home DirectoryThe Domain home is the directory where domains that you configure are created.
• About the Application Home DirectoryThe Application home is the directory where applications for domains youconfigure are created.
• Installing Multiple Products in the Same DomainThere are two methods to install and configure multiple products in one domain.This is also known as extending a domain.
• Preparing for Shared StorageOracle Fusion Middleware allows you to configure multiple WebLogic Serverdomains from a single Oracle home. This allows you to install the Oracle home ina single location on a shared volume and reuse the Oracle home for multiple hostinstallations.
About the Recommended Directory StructureOracle recommends specific locations for the Oracle Home, Domain Home, andApplication Home.
Oracle recommends a directory structure similar to the one shown in Figure 2-3.
Chapter 2Roadmap for Verifying Your System Environment
2-8
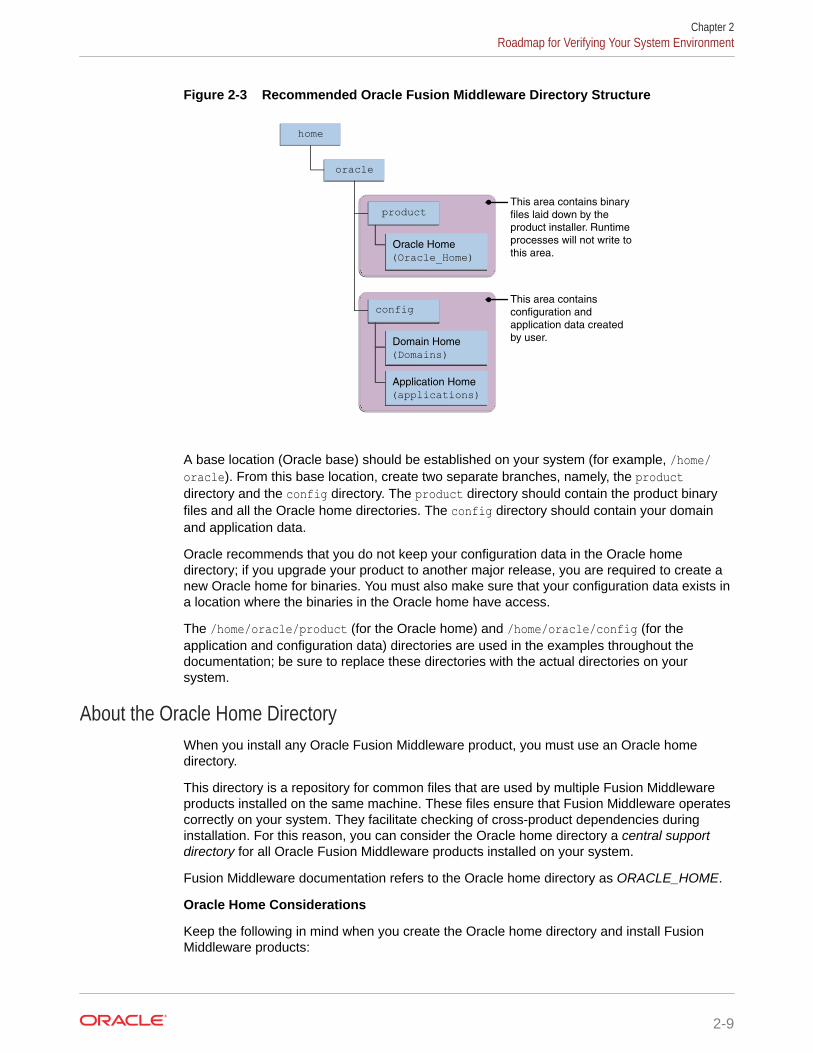
Figure 2-3 Recommended Oracle Fusion Middleware Directory Structure
This area contains binary
files laid down by the
product installer. Runtime
processes will not write to
this area.
product
Oracle Home
(Oracle_Home)
Application Home
(applications)
oracle
home
Domain Home
(Domains)
configThis area contains
configuration and
application data created
by user.
A base location (Oracle base) should be established on your system (for example, /home/oracle). From this base location, create two separate branches, namely, the productdirectory and the config directory. The product directory should contain the product binaryfiles and all the Oracle home directories. The config directory should contain your domainand application data.
Oracle recommends that you do not keep your configuration data in the Oracle homedirectory; if you upgrade your product to another major release, you are required to create anew Oracle home for binaries. You must also make sure that your configuration data exists ina location where the binaries in the Oracle home have access.
The /home/oracle/product (for the Oracle home) and /home/oracle/config (for theapplication and configuration data) directories are used in the examples throughout thedocumentation; be sure to replace these directories with the actual directories on yoursystem.
About the Oracle Home DirectoryWhen you install any Oracle Fusion Middleware product, you must use an Oracle homedirectory.
This directory is a repository for common files that are used by multiple Fusion Middlewareproducts installed on the same machine. These files ensure that Fusion Middleware operatescorrectly on your system. They facilitate checking of cross-product dependencies duringinstallation. For this reason, you can consider the Oracle home directory a central supportdirectory for all Oracle Fusion Middleware products installed on your system.
Fusion Middleware documentation refers to the Oracle home directory as ORACLE_HOME.
Oracle Home Considerations
Keep the following in mind when you create the Oracle home directory and install FusionMiddleware products:
Chapter 2Roadmap for Verifying Your System Environment
2-9
• Do not include spaces in the name of your Oracle home directory; the installerdisplays an error message if your Oracle home directory path contains spaces.
• You can install only one instance of each Oracle Fusion Middleware product in asingle Oracle home directory. If you need to maintain separate versions of aproduct on the same machine, each version must be in its own Oracle homedirectory.
Although you can have several different products in a single Oracle home, onlyone version of each product can be in the Oracle home.
Multiple Home Directories
Although in most situations, a single Oracle home directory is sufficient, it is possible tocreate more than one Oracle home directory. For example, you need to maintainmultiple Oracle home directories in the following situations:
• You prefer to maintain separate development and production environments, with aseparate product stack for each. With two directories, you can update yourdevelopment environment without modifying the production environment until youare ready to do so.
• You want to maintain two different versions of a Fusion Middleware product at thesame time. For example, you want to install a new version of a product whilekeeping your existing version intact. In this case, you must install each productversion in its own Oracle home directory.
• You need to install multiple products that are not compatible with each other. See Oracle Fusion Middleware 12c (12.2.1.4.0) Interoperability and Compatibility inOracle Fusion Middleware Understanding Interoperability and Compatibility .
Note:
If you create more than one Oracle home directory, you must provide non-overlapping port ranges during the configuration phase for each product.
About the Domain Home DirectoryThe Domain home is the directory where domains that you configure are created.
The default Domain home location is ORACLE_HOME/user_projects/domains/domain_name. However, Oracle strongly recommends that you do not use this defaultlocation. Put your Domain home outside of the Oracle home directory, for example,in /home/oracle/config/domains. The config directory should contain domainand application data. Oracle recommends a separate domain directory so that newinstalls, patches, and other operations update the ORACLE_HOME only, not thedomain configuration.
See About the Recommended Directory Structure for more on the recommendeddirectory structure and locating your Domain home.
Fusion Middleware documentation refers to the Domain home directory asDOMAIN_HOME and includes all folders up to and including the domain name. Forexample, if you name your domain exampledomain and locate your domain data inthe /home/oracle/config/domains directory, the documentation would useDOMAIN_HOME to refer to /home/oracle/config/domains/exampledomain.
Chapter 2Roadmap for Verifying Your System Environment
2-10
About the Application Home DirectoryThe Application home is the directory where applications for domains you configure arecreated.
The default Application home location is ORACLE_HOME/user_projects/applications/domain_name. However, Oracle strongly recommends that you locate your Application homeoutside of the Oracle home directory; if you upgrade your product to another major release,you must create a new Oracle home for binaries.
See About the Recommended Directory Structure for more on the recommended directorystructure and locating your Application home..
Fusion Middleware documentation refers to the Application home directory asAPPLICATION_HOME and includes all folders up to and including the domain name. Forexample, if you name your domain exampledomain and you locate your application data inthe /home/oracle/config/applications directory, the documentation usesAPPLICATION_HOME to refer to /home/oracle/config/applications/exampledomain.
Installing Multiple Products in the Same DomainThere are two methods to install and configure multiple products in one domain. This is alsoknown as extending a domain.
• Method 1.
Install and configure Product A, including creating the schemas and starting all servers inthe domain to verify a successful domain configuration.
This is the method used in all installation guides in the Fusion Middleware library. Youcan repeat this process for as many products as necessary. It allows you to validate oneproduct at a time and add more products incrementally.
To install Product B in the same domain as Product A:
1. Stop all servers to prevent any updates to the domain while you add the new product.
See Starting and Stopping Oracle Fusion Middleware in Oracle Fusion MiddlewareAdministering Oracle Fusion Middleware.
2. Follow the instructions in the installation guide for Product B, including creating thenecessary schemas.
3. Run the Configuration Wizard to configure the domain.
During configuration, the Configuration Wizard automatically detects the componentsthat have been installed and offers you the option to extend the existing Product Adomain to include Product B.
• Method 2.
Install all of the required products, then create the schemas for all of the products. Afteryou create the schemas, configure the domain by using the necessary product templates,then start all the servers.
This method of creating a multi-product domain may be slightly faster than Method 1;however, the installation guides in the Fusion Middleware library do not provide specificinstructions for this method of domain creation.
Chapter 2Roadmap for Verifying Your System Environment
2-11
See Also:
• To update WebLogic domains, see Updating WebLogic Domains inOracle Fusion Middleware Creating WebLogic Domains Using theConfiguration Wizard.
• For important information regarding the ability of Oracle FusionMiddleware products to function with previous versions of other OracleFusion Middleware, Oracle, or third-party products, see Oracle FusionMiddleware 12c (12.2.1.4.0) Interoperability and Compatibility in OracleFusion Middleware Understanding Interoperability and Compatibility.
Preparing for Shared StorageOracle Fusion Middleware allows you to configure multiple WebLogic Server domainsfrom a single Oracle home. This allows you to install the Oracle home in a singlelocation on a shared volume and reuse the Oracle home for multiple host installations.
If you plan to use shared storage in your environment, see Using Shared Storage inOracle Fusion Middleware High Availability Guide for more information.
About JDK Requirements for an Oracle Fusion Middleware InstallationMost Fusion Middleware products are in .jar file format. These distributions do notinclude a JDK. To run a .jar distribution installer, you must have a certified JDKinstalled on your system.
Make sure that the JDK is installed outside of the Oracle home. If you install the JDKunder the Oracle home, you may encounter problems when you try to perform tasks inthe future. Oracle Universal Installer validates that the Oracle home directory is empty;the install does not progress until you specify an empty directory. Oracle recommendsthat you locate your JDK installation in the /home/oracle/products/jdk directory.
Platform-specific distributions have a .bin (for UNIX operating systems) or .exe (forWindows operating systems) installer; in these cases, a platform-specific JDK is in thedistribution and you do not need to install a JDK separately. However, you may need toupgrade this JDK to a more recent version, depending on the JDK versions that arecertified.
Always verify the required JDK version by reviewing the certification information on the Oracle Fusion Middleware Supported System Configurations page. For 12c(12.2.1.4.0), the certified JDK is 1.8.0_211 and later.
To download the required JDK, navigate to the following URL and download the JavaSE JDK:
http://www.oracle.com/technetwork/java/javase/downloads/index.html
Chapter 2Roadmap for Verifying Your System Environment
2-12
About Database Requirements for an Oracle Fusion MiddlewareInstallation
Many Oracle Fusion Middleware products require database schemas prior to configuration. Ifyou do not already have a database where you can install these schemas, you must installand configure a certified database.
Note:
Multi-tenancy feature is supported, that is, Pluggable Database (PDB) andContainer Database (CDB) are supported.
To find a certified database for your operating system, see the certification document for yourrelease on the Oracle Fusion Middleware Supported System Configurations page on theOracle Technology Network (OTN).
To make sure that your database is properly configured for schema creation, see RepositoryCreation Utility Requirements in the Oracle Fusion Middleware System Requirements andSpecifications document.
After your database is properly configured, you use the Repository Creation Utility (RCU) tocreate product schemas in your database. This tool is available in the Oracle home for yourOracle Fusion Middleware product. See About the Repository Creation Utility in OracleFusion Middleware Creating Schemas with the Repository Creation Utility.
About Product DistributionsYou create the initial Oracle Internet Directory domain using the Oracle Fusion MiddlewareInfrastructure distribution, which contains both Oracle WebLogic Server software and OracleJava Required Files (JRF) software.
Oracle JRF software consists of:
• Oracle Web Services Manager
• Oracle Application Development Framework (Oracle ADF)
• Oracle Enterprise Manager Fusion Middleware Control
• Repository Creation Utility (RCU)
• Other libraries and technologies required to support Oracle Fusion Middleware products
Prerequisites:
• Install Oracle Fusion Middleware Infrastructure. For more information about installingOracle Fusion Middleware Infrastructure, see Installing the Infrastructure Software in thein Oracle Fusion Middleware Installing and Configuring the Oracle Fusion MiddlewareInfrastructure.
• For SUSE 11 or later:
– The openmotif package is not included by default on SUSE 11 or later. You need theopenmotif package installed to successfully install Oracle Internet Directory onSUSE 11 or later.
Chapter 2About Product Distributions
2-13

Obtain this package from the Novell website and then perform the installationusing the instructions provided by Novell.
– Create a soft-link from /lib64/libnsl.so to /lib64/libnsl.so.1.
Chapter 2About Product Distributions
2-14
3Installing the Oracle Internet DirectorySoftware
Follow the steps in this section to install the Oracle Internet Directory software.Before beginning the installation, ensure that you have verified the prerequisites andcompleted all steps covered in Preparing to Install and Configure Oracle Internet Directory.
If you wish to install Oracle Internet Directory in Standalone mode, you do not require OracleFusion Middleware Infrastructure. You can proceed with the Oracle Internet Directoryinstallation.
If you wish to install Oracle Internet Directory in Collocated mode, ensure that you installOracle Fusion Middleware Infrastructure 12c (12.2.1.4.0) first, followed by the Oracle Internetdirectory 12c (12.2.1.4.0). Infrastructure and Oracle Internet Directory must be installed in thesame Oracle Home.
For more information about installing Oracle Fusion Middleware Infrastructure 12c(12.2.1.4.0), see Installing the Infrastructure Software in the Oracle Fusion MiddlewareInstalling and Configuring the Oracle Fusion Middleware Infrastructure.
• Verifying the Installation ChecklistThe installation process requires specific information.
• Starting the Installation ProgramYou can start the installation program on UNIX or Windows.
• Navigating the Installation ScreensThe installer shows a series of screens where you verify or enter information.
• Verifying the InstallationAfter you complete the installation, verify whether it was successful by completing aseries of tasks.
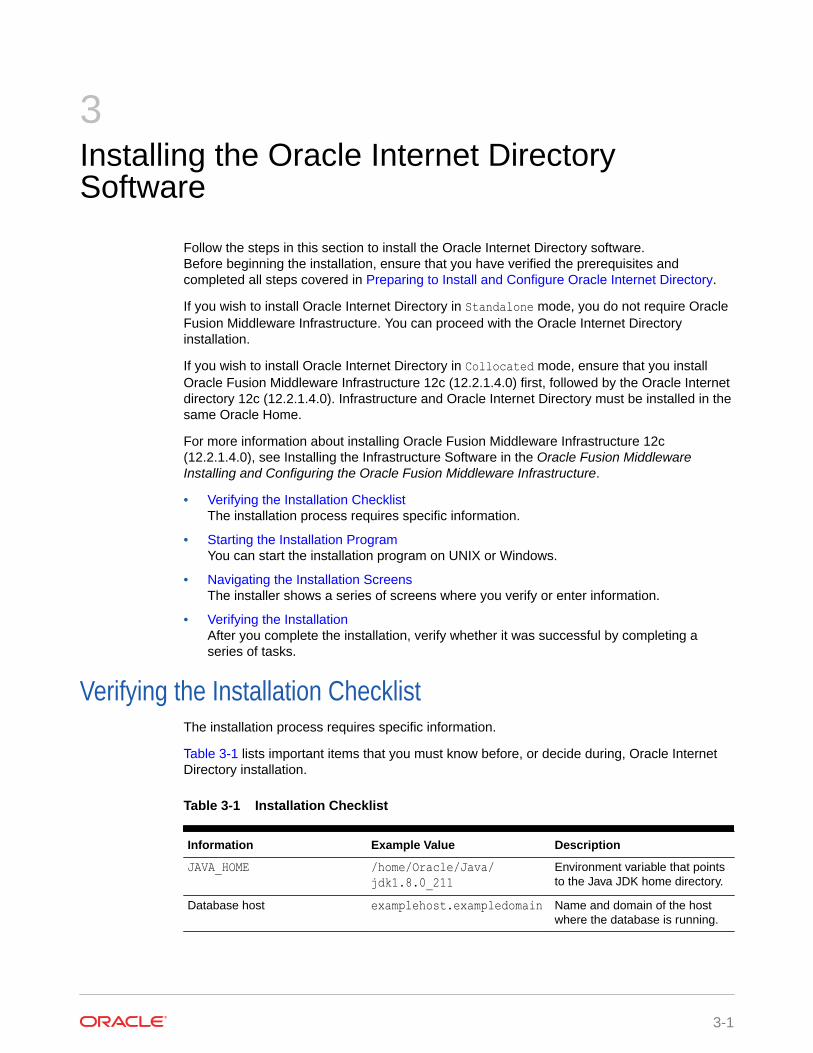
Verifying the Installation ChecklistThe installation process requires specific information.
Table 3-1 lists important items that you must know before, or decide during, Oracle InternetDirectory installation.
Table 3-1 Installation Checklist
Information Example Value Description
JAVA_HOME /home/Oracle/Java/jdk1.8.0_211
Environment variable that pointsto the Java JDK home directory.
Database host examplehost.exampledomain Name and domain of the hostwhere the database is running.
3-1
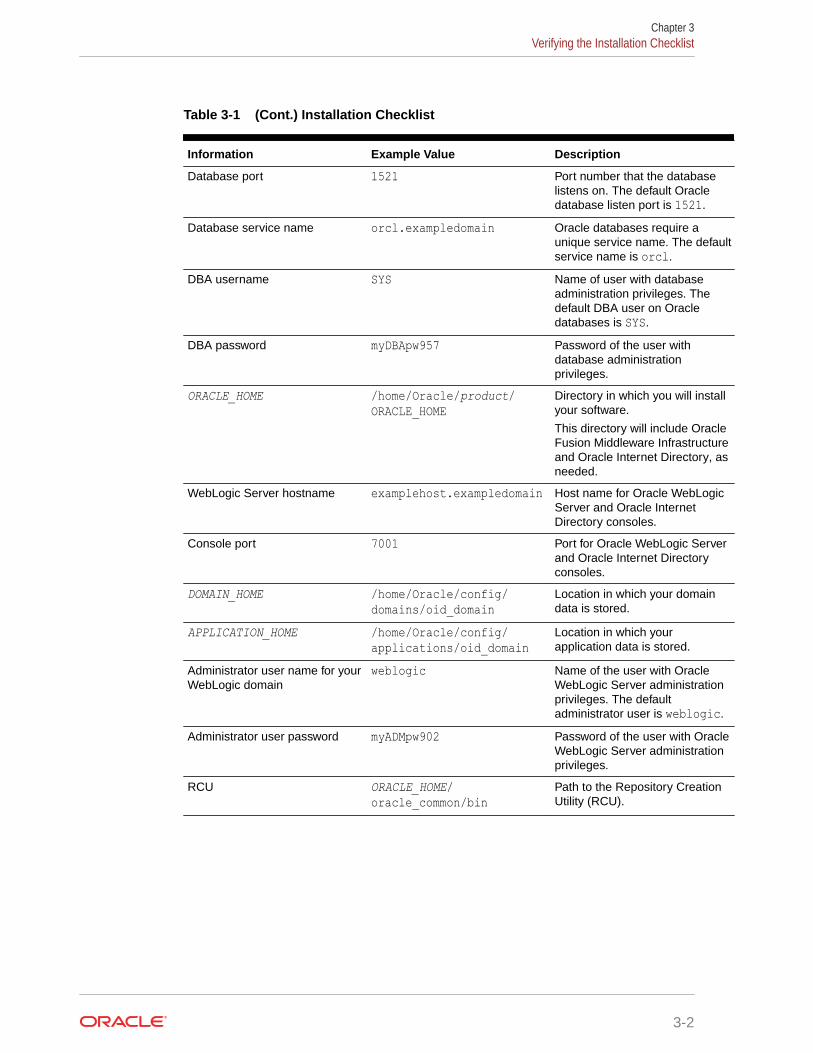
Table 3-1 (Cont.) Installation Checklist
Information Example Value Description
Database port 1521 Port number that the databaselistens on. The default Oracledatabase listen port is 1521.
Database service name orcl.exampledomain Oracle databases require aunique service name. The defaultservice name is orcl.
DBA username SYS Name of user with databaseadministration privileges. Thedefault DBA user on Oracledatabases is SYS.
DBA password myDBApw957 Password of the user withdatabase administrationprivileges.
ORACLE_HOME /home/Oracle/product/ORACLE_HOME
Directory in which you will installyour software.
This directory will include OracleFusion Middleware Infrastructureand Oracle Internet Directory, asneeded.
WebLogic Server hostname examplehost.exampledomain Host name for Oracle WebLogicServer and Oracle InternetDirectory consoles.
Console port 7001 Port for Oracle WebLogic Serverand Oracle Internet Directoryconsoles.
DOMAIN_HOME /home/Oracle/config/domains/oid_domain
Location in which your domaindata is stored.
APPLICATION_HOME /home/Oracle/config/applications/oid_domain
Location in which yourapplication data is stored.
Administrator user name for yourWebLogic domain
weblogic Name of the user with OracleWebLogic Server administrationprivileges. The defaultadministrator user is weblogic.
Administrator user password myADMpw902 Password of the user with OracleWebLogic Server administrationprivileges.
RCU ORACLE_HOME/oracle_common/bin
Path to the Repository CreationUtility (RCU).
Chapter 3Verifying the Installation Checklist
3-2
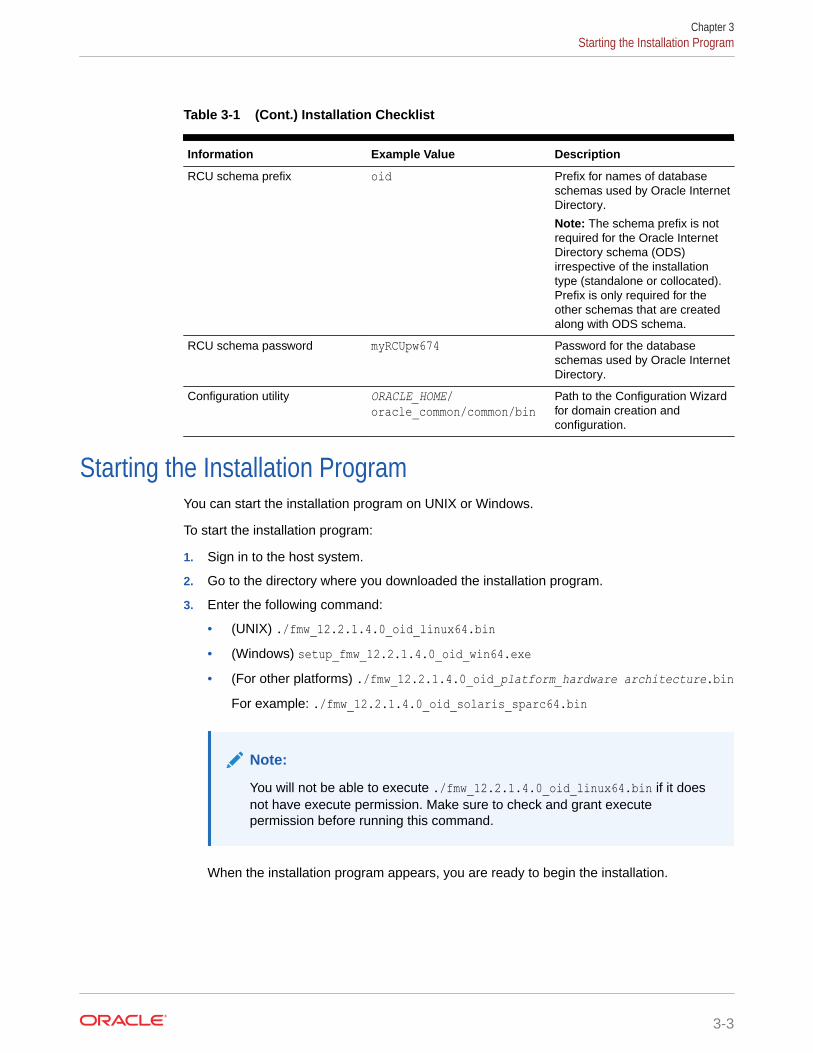
Table 3-1 (Cont.) Installation Checklist
Information Example Value Description
RCU schema prefix oid Prefix for names of databaseschemas used by Oracle InternetDirectory.
Note: The schema prefix is notrequired for the Oracle InternetDirectory schema (ODS)irrespective of the installationtype (standalone or collocated).Prefix is only required for theother schemas that are createdalong with ODS schema.
RCU schema password myRCUpw674 Password for the databaseschemas used by Oracle InternetDirectory.
Configuration utility ORACLE_HOME/oracle_common/common/bin
Path to the Configuration Wizardfor domain creation andconfiguration.
Starting the Installation ProgramYou can start the installation program on UNIX or Windows.
To start the installation program:
1. Sign in to the host system.
2. Go to the directory where you downloaded the installation program.
3. Enter the following command:
• (UNIX) ./fmw_12.2.1.4.0_oid_linux64.bin• (Windows) setup_fmw_12.2.1.4.0_oid_win64.exe• (For other platforms) ./fmw_12.2.1.4.0_oid_platform_hardware architecture.bin
For example: ./fmw_12.2.1.4.0_oid_solaris_sparc64.bin
Note:
You will not be able to execute ./fmw_12.2.1.4.0_oid_linux64.bin if it doesnot have execute permission. Make sure to check and grant executepermission before running this command.
When the installation program appears, you are ready to begin the installation.
Chapter 3Starting the Installation Program
3-3
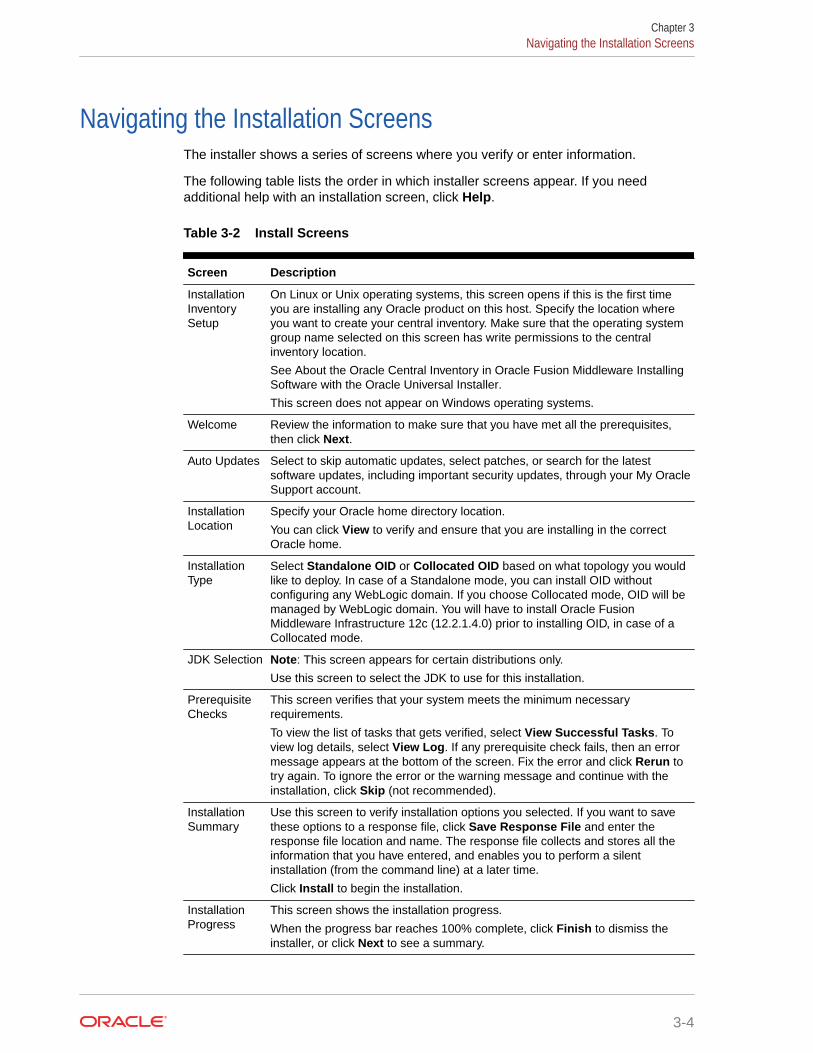
Navigating the Installation ScreensThe installer shows a series of screens where you verify or enter information.
The following table lists the order in which installer screens appear. If you needadditional help with an installation screen, click Help.
Table 3-2 Install Screens
Screen Description
InstallationInventorySetup
On Linux or Unix operating systems, this screen opens if this is the first timeyou are installing any Oracle product on this host. Specify the location whereyou want to create your central inventory. Make sure that the operating systemgroup name selected on this screen has write permissions to the centralinventory location.
See About the Oracle Central Inventory in Oracle Fusion Middleware InstallingSoftware with the Oracle Universal Installer.
This screen does not appear on Windows operating systems.
Welcome Review the information to make sure that you have met all the prerequisites,then click Next.
Auto Updates Select to skip automatic updates, select patches, or search for the latestsoftware updates, including important security updates, through your My OracleSupport account.
InstallationLocation
Specify your Oracle home directory location.
You can click View to verify and ensure that you are installing in the correctOracle home.
InstallationType
Select Standalone OID or Collocated OID based on what topology you wouldlike to deploy. In case of a Standalone mode, you can install OID withoutconfiguring any WebLogic domain. If you choose Collocated mode, OID will bemanaged by WebLogic domain. You will have to install Oracle FusionMiddleware Infrastructure 12c (12.2.1.4.0) prior to installing OID, in case of aCollocated mode.
JDK Selection Note: This screen appears for certain distributions only.
Use this screen to select the JDK to use for this installation.
PrerequisiteChecks
This screen verifies that your system meets the minimum necessaryrequirements.
To view the list of tasks that gets verified, select View Successful Tasks. Toview log details, select View Log. If any prerequisite check fails, then an errormessage appears at the bottom of the screen. Fix the error and click Rerun totry again. To ignore the error or the warning message and continue with theinstallation, click Skip (not recommended).
InstallationSummary
Use this screen to verify installation options you selected. If you want to savethese options to a response file, click Save Response File and enter theresponse file location and name. The response file collects and stores all theinformation that you have entered, and enables you to perform a silentinstallation (from the command line) at a later time.
Click Install to begin the installation.
InstallationProgress
This screen shows the installation progress.
When the progress bar reaches 100% complete, click Finish to dismiss theinstaller, or click Next to see a summary.
Chapter 3Navigating the Installation Screens
3-4
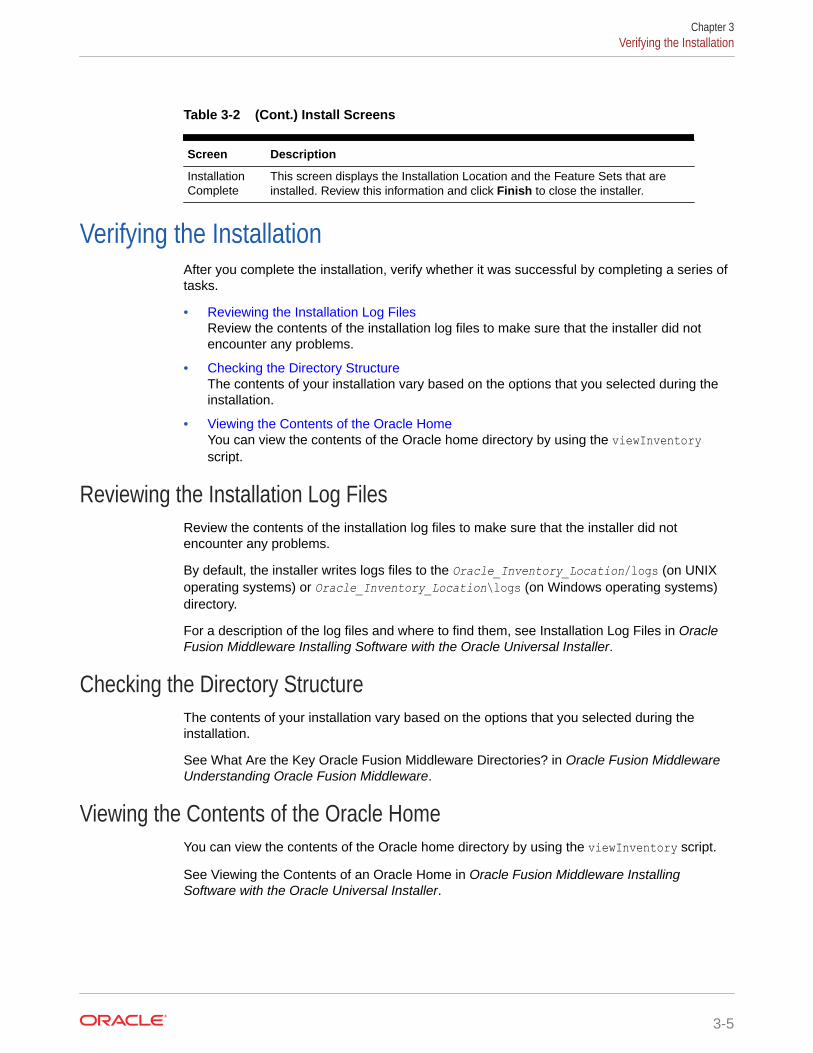
Table 3-2 (Cont.) Install Screens
Screen Description
InstallationComplete
This screen displays the Installation Location and the Feature Sets that areinstalled. Review this information and click Finish to close the installer.
Verifying the InstallationAfter you complete the installation, verify whether it was successful by completing a series oftasks.
• Reviewing the Installation Log FilesReview the contents of the installation log files to make sure that the installer did notencounter any problems.
• Checking the Directory StructureThe contents of your installation vary based on the options that you selected during theinstallation.
• Viewing the Contents of the Oracle HomeYou can view the contents of the Oracle home directory by using the viewInventoryscript.
Reviewing the Installation Log FilesReview the contents of the installation log files to make sure that the installer did notencounter any problems.
By default, the installer writes logs files to the Oracle_Inventory_Location/logs (on UNIXoperating systems) or Oracle_Inventory_Location\logs (on Windows operating systems)directory.
For a description of the log files and where to find them, see Installation Log Files in OracleFusion Middleware Installing Software with the Oracle Universal Installer.
Checking the Directory StructureThe contents of your installation vary based on the options that you selected during theinstallation.
See What Are the Key Oracle Fusion Middleware Directories? in Oracle Fusion MiddlewareUnderstanding Oracle Fusion Middleware.
Viewing the Contents of the Oracle HomeYou can view the contents of the Oracle home directory by using the viewInventory script.
See Viewing the Contents of an Oracle Home in Oracle Fusion Middleware InstallingSoftware with the Oracle Universal Installer.
Chapter 3Verifying the Installation
3-5
4Configuring Oracle Internet Directory Domain
After you have installed Oracle Internet Directory, you can configure the domain, which youcan also extend for high availability.
The configuration steps presented here assume that you have completed the installationsteps covered in:
• Preparing to Install and Configure Oracle Internet Directory
• Installing the Oracle Internet Directory Software
Refer to the following sections to create the database schemas, configure a WebLogicdomain, and verify the configuration:
• Creating the Database SchemasBefore you can configure an Oracle Internet Directory domain, you must install requiredschemas on a certified database for use with this release of Oracle Fusion Middleware.
• Configuring the DomainUse the Configuration Wizard to create and configure a domain.
• Prerequisites for an Oracle Autonomous Transaction Processing-Shared (ATP-S)databaseIn case of a standalone and collocated Oracle Internet Directory (OID) configuration, afterconfiguring the domain, you must modify the wallet settings and update the classpathbefore you start the servers.
• Starting Servers and ProcessesAfter configuration is complete, start the servers and the processes.
• Performing the Initial Oracle Internet Directory SetupUse the wlst command from a different terminal to connect to Administration Server andset up Oracle Internet Directory.
• Verifying the ConfigurationAfter completing all configuration steps, you can perform additional steps to verify thatyour domain is properly configured.
Creating the Database SchemasBefore you can configure an Oracle Internet Directory domain, you must install requiredschemas on a certified database for use with this release of Oracle Fusion Middleware.
• Installing and Configuring a Certified DatabaseBefore you create the database schemas, you must install and configure a certifieddatabase, and verify that the database is up and running.
• Starting the Repository Creation UtilityStart the Repository Creation Utility (RCU) after you verify that a certified JDK is installedon your system.
• Navigating the Repository Creation Utility Screens to Create SchemasEnter required information in the RCU screens to create the database schemas.
4-1
Installing and Configuring a Certified DatabaseBefore you create the database schemas, you must install and configure a certifieddatabase, and verify that the database is up and running.
Note:
For an Autonomous Transaction Processing database (both OracleAutonomous Transaction Processing-Dedicated (ATP-D) and OracleAutonomous Transaction Processing-Shared (ATP-S)), you must modify thewallet settings and set the environment variables, and apply patches onORACLE HOME. For more information, see Settings to connect to AutonomousTransaction Processing Database for Oracle Internet Directory and ApplyingPatches on ORACLE HOME.
See About Database Requirements for an Oracle Fusion Middleware Installation.
Starting the Repository Creation UtilityStart the Repository Creation Utility (RCU) after you verify that a certified JDK isinstalled on your system.
To start the RCU:
1. Verify that a certified JDK already exists on your system by running java -version from the command line. For 12c (12.2.1.4.0), the certified JDK is1.8.0_211 and later.
See About JDK Requirements for an Oracle Fusion Middleware Installation.
2. Ensure that the JAVA_HOME environment variable is set to the location of thecertified JDK. For example:
• (UNIX) setenv JAVA_HOME /home/Oracle/Java/jdk1.8.0_211• (Windows) set JAVA_HOME=C:\home\Oracle\Java\jdk1.8.0_211
3. Change to the following directory:
• (UNIX) ORACLE_HOME/oracle_common/bin• (Windows) ORACLE_HOME\oracle_common\bin
4. Enter the following command:
• (UNIX) ./rcu• (Windows) rcu.bat
Navigating the Repository Creation Utility Screens to Create SchemasEnter required information in the RCU screens to create the database schemas.
• Introducing the RCUThe Welcome screen is the first screen that appears when you start the RCU.
Chapter 4Creating the Database Schemas
4-2

• Selecting a Method of Schema CreationUse the Create Repository screen to select a method to create and load componentschemas into the database.
• Providing Database Connection DetailsOn the Database Connection Details screen, provide the database connection details forthe RCU to connect to your database.
• Specifying a Custom Prefix and Selecting Schemas
• Specifying Schema PasswordsOn the Schema Passwords screen, specify how you want to set the schema passwordson your database, then enter and confirm your passwords.
• Completing Schema CreationNavigate through the remaining RCU screens to complete schema creation.
Introducing the RCUThe Welcome screen is the first screen that appears when you start the RCU.
Click Next.
Selecting a Method of Schema CreationUse the Create Repository screen to select a method to create and load component schemasinto the database.
On the Create Repository screen, select System Load and Product Load. This procedureassumes that you have the necessary permissions and privileges to perform DBA activitieson your database, that is the SYSDBA privileges.
Note:
For an Autonomous Transaction Processing database (both Oracle AutonomousTransaction Processing-Dedicated (ATP-D) and Oracle Autonomous TransactionProcessing-Shared (ATP-S)), you must create schemas as a Normal user, andthough, you do not have full SYS or SYSDBA privileges on the database, you mustselect System Load and Product Load.
Providing Database Connection DetailsOn the Database Connection Details screen, provide the database connection details for theRCU to connect to your database.
If you are unsure of the service name for your database, you can obtain it from theSERVICE_NAMES parameter in the initialization parameter file of the database. If theinitialization parameter file does not contain the SERVICE_NAMES parameter, then the servicename is the same as the global database name, which is specified in the DB_NAME andDB_DOMAIN parameters.
For an Oracle Autonomous Transaction Processing-Shared (ATP-S) database, you must useonly one of the database service names, <databasename>_tpurgent or <databasename>_tp,specified in tnsnames.ora. For database service name details, see Database Service Namesfor Autonomous Transaction Processing and Autonomous JSON Database
Chapter 4Creating the Database Schemas
4-3
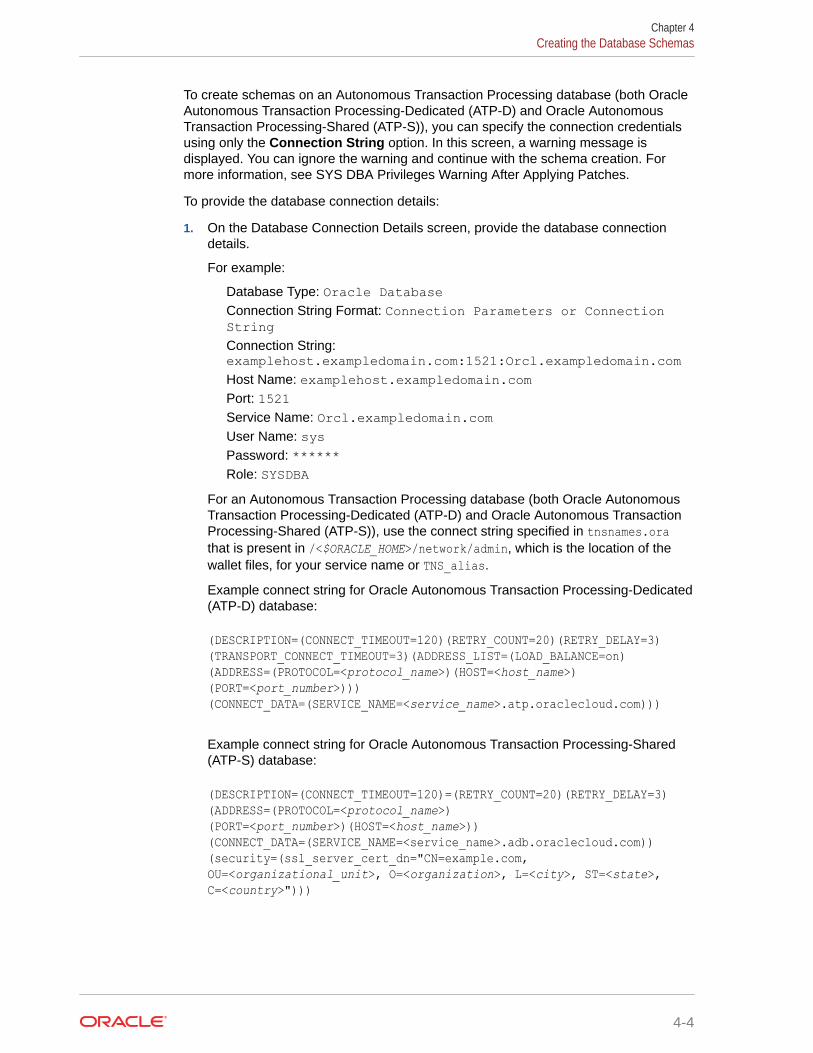
To create schemas on an Autonomous Transaction Processing database (both OracleAutonomous Transaction Processing-Dedicated (ATP-D) and Oracle AutonomousTransaction Processing-Shared (ATP-S)), you can specify the connection credentialsusing only the Connection String option. In this screen, a warning message isdisplayed. You can ignore the warning and continue with the schema creation. Formore information, see SYS DBA Privileges Warning After Applying Patches.
To provide the database connection details:
1. On the Database Connection Details screen, provide the database connectiondetails.
For example:
Database Type: Oracle DatabaseConnection String Format: Connection Parameters or ConnectionStringConnection String:examplehost.exampledomain.com:1521:Orcl.exampledomain.comHost Name: examplehost.exampledomain.comPort: 1521Service Name: Orcl.exampledomain.comUser Name: sysPassword: ******Role: SYSDBA
For an Autonomous Transaction Processing database (both Oracle AutonomousTransaction Processing-Dedicated (ATP-D) and Oracle Autonomous TransactionProcessing-Shared (ATP-S)), use the connect string specified in tnsnames.orathat is present in /<$ORACLE_HOME>/network/admin, which is the location of thewallet files, for your service name or TNS_alias.
Example connect string for Oracle Autonomous Transaction Processing-Dedicated(ATP-D) database:
(DESCRIPTION=(CONNECT_TIMEOUT=120)(RETRY_COUNT=20)(RETRY_DELAY=3)(TRANSPORT_CONNECT_TIMEOUT=3)(ADDRESS_LIST=(LOAD_BALANCE=on)(ADDRESS=(PROTOCOL=<protocol_name>)(HOST=<host_name>)(PORT=<port_number>)))(CONNECT_DATA=(SERVICE_NAME=<service_name>.atp.oraclecloud.com)))
Example connect string for Oracle Autonomous Transaction Processing-Shared(ATP-S) database:
(DESCRIPTION=(CONNECT_TIMEOUT=120)=(RETRY_COUNT=20)(RETRY_DELAY=3)(ADDRESS=(PROTOCOL=<protocol_name>)(PORT=<port_number>)(HOST=<host_name>))(CONNECT_DATA=(SERVICE_NAME=<service_name>.adb.oraclecloud.com))(security=(ssl_server_cert_dn="CN=example.com, OU=<organizational_unit>, O=<organization>, L=<city>, ST=<state>, C=<country>")))
Chapter 4Creating the Database Schemas
4-4
Note:
In this example for Oracle Autonomous Transaction Processing-Shared (ATP-S), you must use only one of the database service names,<databasename>_tpurgent or <databasename>_tp, specified in tnsnames.ora.For database service name details, see Database Service Names forAutonomous Transaction Processing and Autonomous JSON Database.
2. Click Next to proceed, then click OK in the dialog window that confirms a successfuldatabase connection.
Specifying a Custom Prefix and Selecting SchemasSelect Create new prefix, specify a custom prefix, then select the Oracle InternetDirectory schema. This action automatically selects the following schemas as dependencies:
Note:
Oracle Internet Directory (ODS) schema does not need a prefix. The prefix isrequired for the other schemas selected during the schema creation process.
You can load only one Oracle Internet Directory (ODS) schema per Database.
If you are configuring Oracle Internet Directory in a standalone mode, the followingdependant schema is selected:
• Common Infrastructure Service (STB)
If you are configuring Oracle Internet Directory in a collocated mode, the following dependantschemas are selected:
• Oracle Platform Security Services (OPSS)
• Audit Services (IAU)
• Audit Services Append (IAU_Append)
• Audit Services Viewer (IAU_Viewer)
• WebLogic Services (WLS)
• Common Infrastructure Service (STB)
The schema Common Infrastructure Services is automatically created. This schema isdimmed; you cannot select or deselect it. This schema enables you to retrieve informationfrom RCU during domain configuration. For more information, see Understanding the ServiceTable Schema in Oracle Fusion Middleware Creating Schemas with the Repository CreationUtility.
The custom prefix is used to logically group these schemas together for use in this domainonly; you must create a unique set of schemas for each domain. Schema sharing acrossdomains is not supported.
Chapter 4Creating the Database Schemas
4-5
Tip:
For more information about custom prefixes, see Understanding CustomPrefixes in Oracle Fusion Middleware Creating Schemas with the RepositoryCreation Utility.
For more information about how to organize your schemas in a multi-domainenvironment, see Planning Your Schema Creation in Oracle FusionMiddleware Creating Schemas with the Repository Creation Utility.
Tip:
You must make a note of the custom prefix you choose to enter here; you willneed this later on during the domain creation process.
Click Next to proceed, then click OK on the dialog window confirming that prerequisitechecking for schema creation was successful.
Specifying Schema PasswordsOn the Schema Passwords screen, specify how you want to set the schemapasswords on your database, then enter and confirm your passwords.
Note:
For an Autonomous Transaction Processing database (both OracleAutonomous Transaction Processing-Dedicated (ATP-D) and OracleAutonomous Transaction Processing-Shared (ATP-S)), the schemapassword must be minimum 12 characters, and must contain at least oneuppercase, one lower case, and one number.
You must make a note of the passwords you set on this screen; you will need themlater on during the domain creation process.
Click Next.
Completing Schema CreationNavigate through the remaining RCU screens to complete schema creation.
For an Oracle Autonomous Transaction Processing-Shared (ATP-S) database, in theMap Tablespaces screen you must override the default tablespaces and thetemporary tablespaces, and also override the additional tablespaces, if applicable. See Map Tablespaces.
When you reach the Completion Summary screen, click Close to dismiss the RCU.
Chapter 4Creating the Database Schemas
4-6
Note:
If you encounter any issues when you create schemas on an AutonomousTransaction Processing database (both Oracle Autonomous TransactionProcessing-Dedicated (ATP-D) and Oracle Autonomous Transaction Processing-Shared (ATP-S)), see Troubleshooting Tips for Schema Creation on anAutonomous Transaction Processing Database and Product Installation andConfiguration on Autonomous Transaction Processing-Dedicated Database.
Configuring the DomainUse the Configuration Wizard to create and configure a domain.
For information on other methods to create domains, see Additional Tools for Creating,Extending, and Managing WebLogic Domains in Oracle Fusion Middleware CreatingWebLogic Domains Using the Configuration Wizard.
• Starting the Configuration WizardStart the Configuration Wizard to begin configuring a domain.
• Navigating the Configuration Wizard Screens to Create and Configure the DomainEnter required information in the Configuration Wizard screens to create and configurethe domain for the topology.
Starting the Configuration WizardStart the Configuration Wizard to begin configuring a domain.
Note:
For an Oracle Autonomous Transaction Processing-Shared (ATP-S) database,before you start the Configuration Wizard, you must set the TNS_ADMIN propertyusing the following command:
export TNS_ADMIN=/<$ORACLE_HOME>/network/admin.
You must change $ORACLE_HOME to your Oracle Home location. For example:export TNS_ADMIN=/users/test/network/adminWhere, /users/test/ is the Oracle Home location.
To start the Configuration Wizard:
1. Change to the following directory:
(UNIX) ORACLE_HOME/oracle_common/common/bin(Windows) ORACLE_HOME\oracle_common\common\binwhere ORACLE_HOME is your 12c (12.2.1.4.0) Oracle home.
2. Enter the following command:
Chapter 4Configuring the Domain
4-7
(UNIX) ./config.sh(Windows) config.cmd
Navigating the Configuration Wizard Screens to Create and Configurethe Domain
Enter required information in the Configuration Wizard screens to create and configurethe domain for the topology.
Note:
You can use this procedure to extend an existing domain. If your needs donot match the instructions in the procedure, be sure to make your selectionsaccordingly, or see the supporting documentation for more details.
• Selecting the Domain Type and Domain Home LocationUse the Configuration Type screen to select a Domain home directory location,optimally outside the Oracle home directory.
• Selecting the Configuration Templates for Oracle Internet Directory
• Configuring the Administrator AccountUse the Administrator Account screen to specify the user name and password forthe default WebLogic Administrator account for the domain.
• Specifying the Domain Mode and JDKUse the Domain Mode and JDK screen to specify the domain mode and JavaDevelopment Kit (JDK).
• Specifying the Database Configuration TypeUse the Database Configuration type screen to specify details about the databaseand database schema.
• Specifying JDBC Component Schema InformationUse the JDBC Component Schema screen to verify or specify details about thedatabase schemas.
• Testing the JDBC ConnectionsUse the JDBC Component Schema Test screen to test the data sourceconnections.
• Selecting Advanced ConfigurationUse the Advanced Configuration screen to complete the domain configuration.
• Configuring the Administration Server Listen AddressUse the Administration Server screen to select the IP address of the host.
• Configuring Node ManagerUse the Node Manager screen to select the type of Node Manager you want toconfigure, along with the Node Manager credentials.
• Configuring Managed Servers
• Configuring a ClusterYou can skip this screen as it is not applicable to Oracle Internet Directory.
Chapter 4Configuring the Domain
4-8
• Defining Server TemplatesClick Next and proceed, as this is not applicable to Oracle Internet Directory.
• Configuring Coherence ClustersYou can skip this screen as it is not applicable to Oracle Internet Directory.
• Creating a New Oracle Internet Directory MachineUse the Machines screen to update the default machine listed on the screen —oidhost1. A machine is required so that Node Manager can start and stop servers.
• Assigning Servers to Oracle Internet Directory MachinesUse the Assign Servers to Machines screen to assign the Administration Server to thedefault machine oidhost1 that is listed.
• Virtual TargetsYou can skip this screen for Oracle Internet Directory configuration.
• PartitionsClick Next as this is not applicable to Oracle Internet Directory.
• Reviewing Your Configuration Specifications and Configuring the DomainThe Configuration Summary screen shows detailed configuration information for thedomain you are about to create.
• Writing Down Your Domain Home and Administration Server URLThe End of Configuration screen shows information about the domain you justconfigured.
Selecting the Domain Type and Domain Home LocationUse the Configuration Type screen to select a Domain home directory location, optimallyoutside the Oracle home directory.
Oracle recommends that you locate your Domain home in accordance with the directorystructure in What Are the Key Oracle Fusion Middleware Directories? in Oracle FusionMiddleware Understanding Oracle Fusion Middleware, where the Domain home is locatedoutside the Oracle home directory. This directory structure helps avoid issues when you needto upgrade or reinstall software.
To specify the Domain type and Domain home directory:
1. On the Configuration Type screen, select Create a new domain.
2. In the Domain Location field, specify your Domain home directory.
For more details about this screen, see Configuration Type in Oracle Fusion MiddlewareCreating WebLogic Domains Using the Configuration Wizard.
Selecting the Configuration Templates for Oracle Internet DirectoryOn the Templates screen, make sure Create Domain Using Product Templates is selected,then select the following templates:
For standalone mode, select the following template:
• Oracle Internet Directory (Standalone) - [oid]
For collocated mode, select the following templates:
• Oracle Internet Directory (Collocated) - [oid]
Selecting this template automatically selects the following as dependencies:
Chapter 4Configuring the Domain
4-9
– Oracle Directory Services Manager - [oid]
– Oracle JRF - [oracle_common]
– WebLogic Coherence Cluster Extension - [wlserver]
– Oracle Enterprise Manager - [em]
• Oracle Directory Integration Platform - [dip]
Optional. Select this template if you're using OID and ODIP in the same domain.
Tip:
More information about the options on this screen can be found in Templatesin Oracle Fusion Middleware Creating WebLogic Domains Using theConfiguration Wizard.
Configuring the Administrator AccountUse the Administrator Account screen to specify the user name and password for thedefault WebLogic Administrator account for the domain.
Oracle recommends that you make a note of the user name and password that youenter on this screen; you need these credentials later to boot and connect to thedomain's Administration Server.
Specifying the Domain Mode and JDKUse the Domain Mode and JDK screen to specify the domain mode and JavaDevelopment Kit (JDK).
On the Domain Mode and JDK screen:
• Select Production in the Domain Mode field.
• Select the Oracle HotSpot JDK in the JDK field.
For more information about this screen, see Domain Mode and JDK in Oracle FusionMiddleware Creating WebLogic Domains Using the Configuration Wizard.
Specifying the Database Configuration TypeUse the Database Configuration type screen to specify details about the database anddatabase schema.
On the Database Configuration type screen, select RCU Data. This option instructsthe Configuration Wizard to connect to the database and Service Table (STB) schemato automatically retrieve schema information for schemas needed to configure thedomain.
Chapter 4Configuring the Domain
4-10
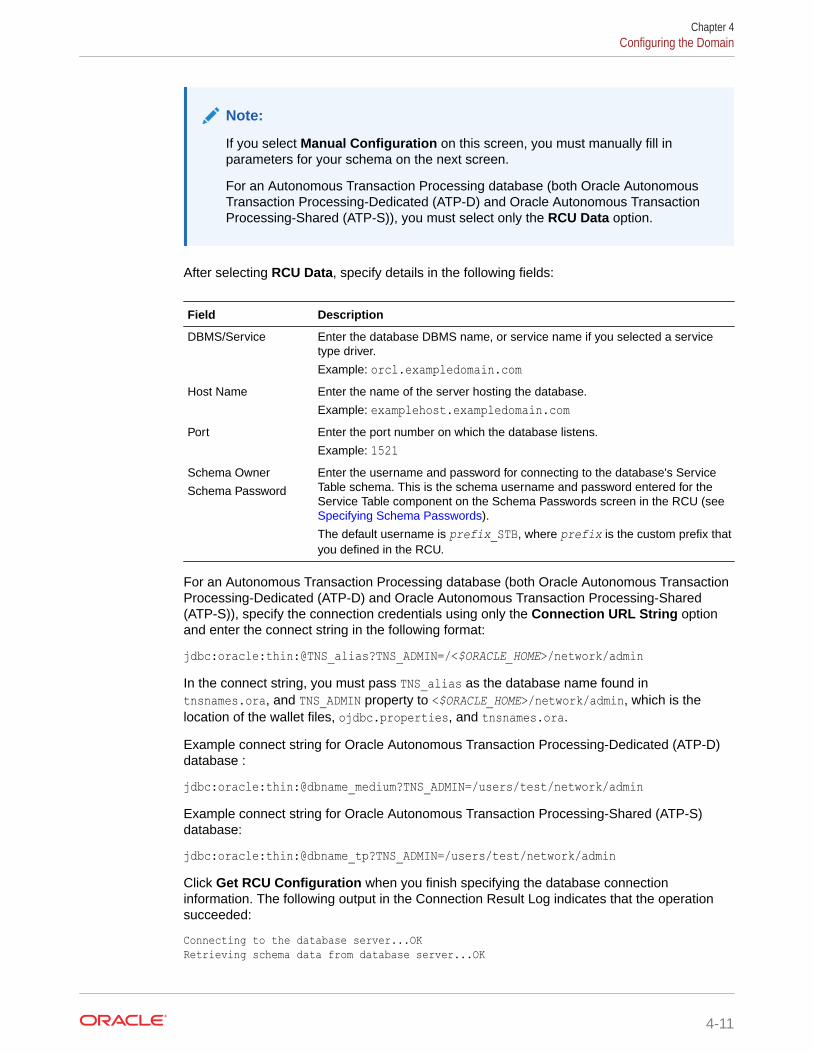
Note:
If you select Manual Configuration on this screen, you must manually fill inparameters for your schema on the next screen.
For an Autonomous Transaction Processing database (both Oracle AutonomousTransaction Processing-Dedicated (ATP-D) and Oracle Autonomous TransactionProcessing-Shared (ATP-S)), you must select only the RCU Data option.
After selecting RCU Data, specify details in the following fields:
Field Description
DBMS/Service Enter the database DBMS name, or service name if you selected a servicetype driver.
Example: orcl.exampledomain.comHost Name Enter the name of the server hosting the database.
Example: examplehost.exampledomain.comPort Enter the port number on which the database listens.
Example: 1521Schema Owner
Schema Password
Enter the username and password for connecting to the database's ServiceTable schema. This is the schema username and password entered for theService Table component on the Schema Passwords screen in the RCU (see Specifying Schema Passwords).
The default username is prefix_STB, where prefix is the custom prefix thatyou defined in the RCU.
For an Autonomous Transaction Processing database (both Oracle Autonomous TransactionProcessing-Dedicated (ATP-D) and Oracle Autonomous Transaction Processing-Shared(ATP-S)), specify the connection credentials using only the Connection URL String optionand enter the connect string in the following format:
jdbc:oracle:thin:@TNS_alias?TNS_ADMIN=/<$ORACLE_HOME>/network/adminIn the connect string, you must pass TNS_alias as the database name found intnsnames.ora, and TNS_ADMIN property to <$ORACLE_HOME>/network/admin, which is thelocation of the wallet files, ojdbc.properties, and tnsnames.ora.
Example connect string for Oracle Autonomous Transaction Processing-Dedicated (ATP-D)database :
jdbc:oracle:thin:@dbname_medium?TNS_ADMIN=/users/test/network/adminExample connect string for Oracle Autonomous Transaction Processing-Shared (ATP-S)database:
jdbc:oracle:thin:@dbname_tp?TNS_ADMIN=/users/test/network/adminClick Get RCU Configuration when you finish specifying the database connectioninformation. The following output in the Connection Result Log indicates that the operationsucceeded:
Connecting to the database server...OKRetrieving schema data from database server...OK
Chapter 4Configuring the Domain
4-11
Binding local schema components with retrieved data...OK
Successfully Done.
For more information about the schema installed when the RCU is run, see About theService Table Schema in Oracle Fusion Middleware Creating Schemas with theRepository Creation Utility.
See Database Configuration Type in Oracle Fusion Middleware Creating WebLogicDomains Using the Configuration Wizard .
Specifying JDBC Component Schema InformationUse the JDBC Component Schema screen to verify or specify details about thedatabase schemas.
Verify that the values populated on the JDBC Component Schema screen are correctfor all schemas. If you selected RCU Data on the previous screen, the schema tableshould already be populated appropriately.
Note:
If you selected standalone mode, you must use the Datasources screen tospecify details about the database schemas.
For an Autonomous Transaction Processing database (both Oracle AutonomousTransaction Processing-Dedicated (ATP-D) and Oracle Autonomous TransactionProcessing-Shared (ATP-S)), specify the connection credentials using the ConnectionURL String option only, and enter the connect string specified in tnsnames.ora that ispresent in /<$ORACLE_HOME>/network/admin, which is the location of the wallet files,for your service name or TNS_alias.
Example connect string for Oracle Autonomous Transaction Processing-Dedicated(ATP-D) database:
jdbc:oracle:thin:@(DESCRIPTION=(CONNECT_TIMEOUT=120)(RETRY_COUNT=20)(RETRY_DELAY=3)(TRANSPORT_CONNECT_TIMEOUT=3)(ADDRESS_LIST=(LOAD_BALANCE=on)(ADDRESS=(PROTOCOL=<protocol_name>)(HOST=<host_name>)(PORT=<port_number>)))(CONNECT_DATA=(SERVICE_NAME=<service_name>.atp.oraclecloud.com)))
Example connect string for Oracle Autonomous Transaction Processing-Shared (ATP-S) database:
jdbc:oracle:thin:@(DESCRIPTION=(CONNECT_TIMEOUT=120)=(RETRY_COUNT=20)(RETRY_DELAY=3)(ADDRESS=(PROTOCOL=<protocol_name>)(PORT=<port_number>)(HOST=<host_name>))(CONNECT_DATA=(SERVICE_NAME=<service_name>.adb.oraclecloud.com))(security=(ssl_server_cert_dn="CN=example.com, OU=<organizational_unit>, O=<organization>, L=<city>, ST=<state>, C=<country>")))
Chapter 4Configuring the Domain
4-12
For high availability environments, see the following sections in Oracle Fusion MiddlewareHigh Availability Guide for additional information on configuring data sources for Oracle RACdatabases:
• Configuring Active GridLink Data Sources with Oracle RAC
• Configuring Multi Data Sources
See JDBC Component Schema in Oracle Fusion Middleware Creating WebLogic DomainsUsing the Configuration Wizard for more details about this screen.
Testing the JDBC ConnectionsUse the JDBC Component Schema Test screen to test the data source connections.
A green check mark in the Status column indicates a successful test. If you encounter anyissues, see the error message in the Connection Result Log section of the screen, fix theproblem, then try to test the connection again.
By default, the schema password for each schema component is the password you specifiedwhile creating your schemas. If you want different passwords for different schemacomponents, manually edit them in the previous screen (JDBC Component Schema) byentering the password you want in the Schema Password column, against each row. Afterspecifying the passwords, select the check box corresponding to the schemas that youchanged the password in and test the connection again.
For more information about this screen, see JDBC Component Schema Test in Oracle FusionMiddleware Creating WebLogic Domains Using the Configuration Wizard.
Selecting Advanced ConfigurationUse the Advanced Configuration screen to complete the domain configuration.
On the Advanced Configuration screen, select:
• Administration Server
Required to properly configure the listen address of the Administration Server.
• Node Manager
Required to configure Node Manager.
• Topology
Select Topology to configure machines and assign the Administration Server to amachine. Note that you cannot configure the oid system component using theConfiguration Wizard. The oid instance is configured after the domain configuration. See Performing the Initial Oracle Internet Directory Setup.
Optionally, select other available options as required for your desired installation environment.The steps in this guide describe a standard installation topology, but you may choose tofollow a different path. If your installation requirements extend to additional options outsidethe scope of this guide, you may be presented with additional screens to configure thoseoptions. For information about all Configuration Wizard screens, see Configuration WizardScreens in Oracle Fusion Middleware Creating WebLogic Domains Using the ConfigurationWizard.
Chapter 4Configuring the Domain
4-13
Configuring the Administration Server Listen AddressUse the Administration Server screen to select the IP address of the host.
Select the drop-down list next to Listen Address and select the IP address of the hostwhere the Administration Server will reside, or use the system name or DNS namethat maps to a single IP address. Do not use All Local Addresses.
Do not specify any server groups for the Administration Server.
Configuring Node ManagerUse the Node Manager screen to select the type of Node Manager you want toconfigure, along with the Node Manager credentials.
Select Per Domain Default Location as the Node Manager type, then specify NodeManager credentials.
For more information about this screen, see Node Manager in Oracle FusionMiddleware Creating WebLogic Domains Using the Configuration Wizard.
For more about Node Manager types, see Node Manager Overview in Oracle FusionMiddleware Administering Node Manager for Oracle WebLogic Server.
Configuring Managed ServersIf you do not plan to create a WebLogic managed server during installation, click Nextand proceed. A WebLogic managed server is not required for OID 12c and OracleDirectory Services Manager (ODSM) gets deployed on the administration server.
Note:
If you are configuring Oracle Internet Directory and Oracle DirectoryIntegration Platform in the same domain then you must configure theManaged Server. By default, wls_ods1 is the Managed Server for OracleDirectory Integration Platform.
If you plan to create a WebLogic managed server during installation, ensure that youassociate the Server Groups to the managed server. This step deploys the ODSM/oiddms on the administration server.
Note:
Server Groups are WebLogic Server constructs that are used to organizeresources such as hostname(s) being part of a 'machine'.
If you do not select any server groups for the managed server and ODSM/oiddms aredeployed on the managed server, then use the Administration Server Console toremove oiddms from the managed sever and deploy them on the administration server.
Chapter 4Configuring the Domain
4-14
Configuring a ClusterYou can skip this screen as it is not applicable to Oracle Internet Directory.
Click Next.
Tip:
For more information about this screen, see Clusters in Oracle Fusion MiddlewareCreating WebLogic Domains Using the Configuration Wizard.
Defining Server TemplatesClick Next and proceed, as this is not applicable to Oracle Internet Directory.
Configuring Coherence ClustersYou can skip this screen as it is not applicable to Oracle Internet Directory.
Click Next.
Creating a New Oracle Internet Directory MachineUse the Machines screen to update the default machine listed on the screen — oidhost1. Amachine is required so that Node Manager can start and stop servers.
If you plan to create a high availability environment and know the list of machines your targettopology requires, you can follow the instructions in this section to create all the machines atthis time. For more about scale out steps, see Optional Scale Out Procedure in Oracle FusionMiddleware High Availability Guide.
Select the default machine oidhost1 that is listed, and update the Listen Port to appropriatevalue based on the Node Manager listen port number.
Note:
Do not change the name of the default machine (oidhost1), as the WLSTcommand oid_setup() run for setting up the OID instance, later during the post-configuration stage (as described in Performing the Initial Oracle Internet DirectorySetup), relies on this name.
For more information about this screen, see Machines in Oracle Fusion Middleware CreatingWebLogic Domains Using the Configuration Wizard.
Chapter 4Configuring the Domain
4-15
Assigning Servers to Oracle Internet Directory MachinesUse the Assign Servers to Machines screen to assign the Administration Server to thedefault machine oidhost1 that is listed.
On the Assign Servers to Machines screen:
1. In the Machines pane, select the default machine oidhost1 that is listed.
2. In the Servers pane, assign AdminServer to oidhost1 by doing one of thefollowing:
• Click once on AdminServer to select it, then click the right arrow to move itbeneath the selected machine (oidhost1) in the Machines pane.
• Double-click on AdminServer to move it beneath the selected machine(oidhost1) in the Machines pane.
Virtual TargetsYou can skip this screen for Oracle Internet Directory configuration.
Click Next and proceed.
PartitionsClick Next as this is not applicable to Oracle Internet Directory.
For details about options on this screen, see Partitions in Oracle Fusion MiddlewareCreating WebLogic Domains Using the Configuration Wizard.
Reviewing Your Configuration Specifications and Configuring the DomainThe Configuration Summary screen shows detailed configuration information for thedomain you are about to create.
Review each item on the screen and verify that the information is correct. To make anychanges, go back to a screen by clicking the Back button or selecting the screen inthe navigation pane. Domain creation does not start until you click Create.
For more details about options on this screen, see Configuration Summary in OracleFusion Middleware Creating WebLogic Domains Using the Configuration Wizard.
Writing Down Your Domain Home and Administration Server URLThe End of Configuration screen shows information about the domain you justconfigured.
Make a note of the following items because you need them later:
• Domain Location
• Administration Server URL
You need the domain location to access scripts that start Node Manager andAdministration Server, and you need the URL to access the Administration Server.
Click Finish to dismiss the Configuration Wizard.
Chapter 4Configuring the Domain
4-16
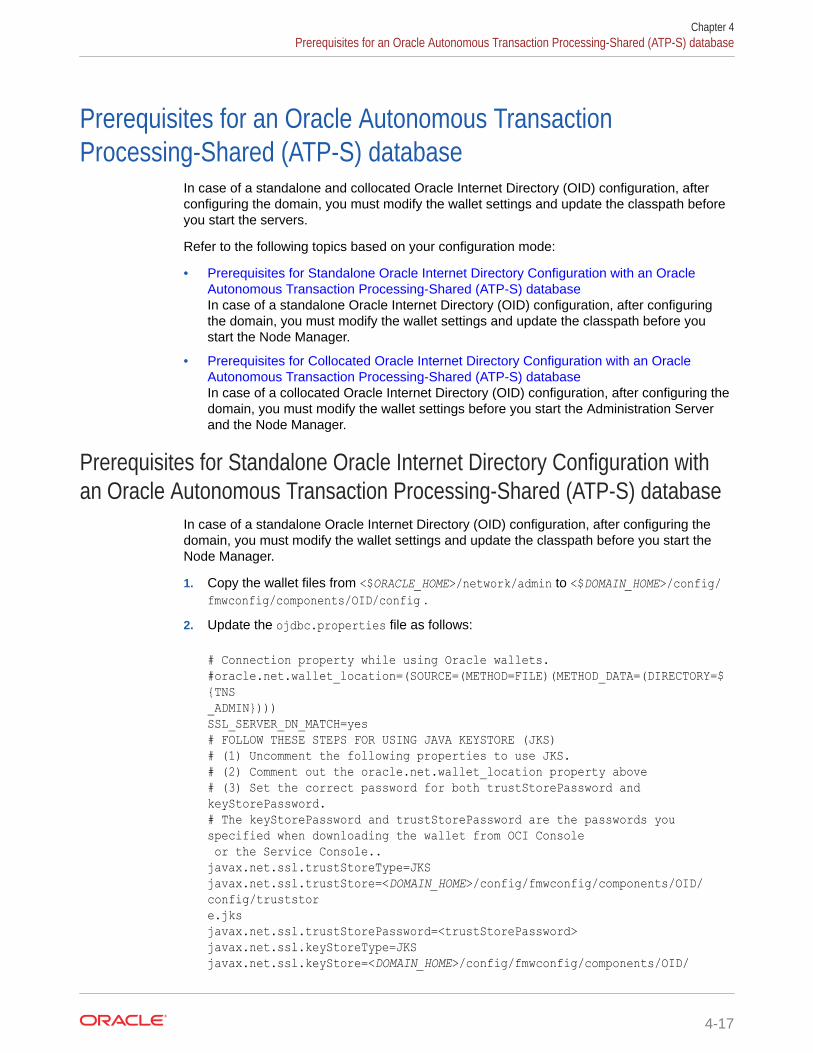
Prerequisites for an Oracle Autonomous TransactionProcessing-Shared (ATP-S) database
In case of a standalone and collocated Oracle Internet Directory (OID) configuration, afterconfiguring the domain, you must modify the wallet settings and update the classpath beforeyou start the servers.
Refer to the following topics based on your configuration mode:
• Prerequisites for Standalone Oracle Internet Directory Configuration with an OracleAutonomous Transaction Processing-Shared (ATP-S) databaseIn case of a standalone Oracle Internet Directory (OID) configuration, after configuringthe domain, you must modify the wallet settings and update the classpath before youstart the Node Manager.
• Prerequisites for Collocated Oracle Internet Directory Configuration with an OracleAutonomous Transaction Processing-Shared (ATP-S) databaseIn case of a collocated Oracle Internet Directory (OID) configuration, after configuring thedomain, you must modify the wallet settings before you start the Administration Serverand the Node Manager.
Prerequisites for Standalone Oracle Internet Directory Configuration withan Oracle Autonomous Transaction Processing-Shared (ATP-S) database
In case of a standalone Oracle Internet Directory (OID) configuration, after configuring thedomain, you must modify the wallet settings and update the classpath before you start theNode Manager.
1. Copy the wallet files from <$ORACLE_HOME>/network/admin to <$DOMAIN_HOME>/config/fmwconfig/components/OID/config .
2. Update the ojdbc.properties file as follows:
# Connection property while using Oracle wallets.#oracle.net.wallet_location=(SOURCE=(METHOD=FILE)(METHOD_DATA=(DIRECTORY=${TNS_ADMIN})))SSL_SERVER_DN_MATCH=yes# FOLLOW THESE STEPS FOR USING JAVA KEYSTORE (JKS)# (1) Uncomment the following properties to use JKS.# (2) Comment out the oracle.net.wallet_location property above# (3) Set the correct password for both trustStorePassword andkeyStorePassword. # The keyStorePassword and trustStorePassword are the passwords you specified when downloading the wallet from OCI Console or the Service Console..javax.net.ssl.trustStoreType=JKSjavax.net.ssl.trustStore=<DOMAIN_HOME>/config/fmwconfig/components/OID/config/truststore.jksjavax.net.ssl.trustStorePassword=<trustStorePassword>javax.net.ssl.keyStoreType=JKSjavax.net.ssl.keyStore=<DOMAIN_HOME>/config/fmwconfig/components/OID/
Chapter 4Prerequisites for an Oracle Autonomous Transaction Processing-Shared (ATP-S) database
4-17
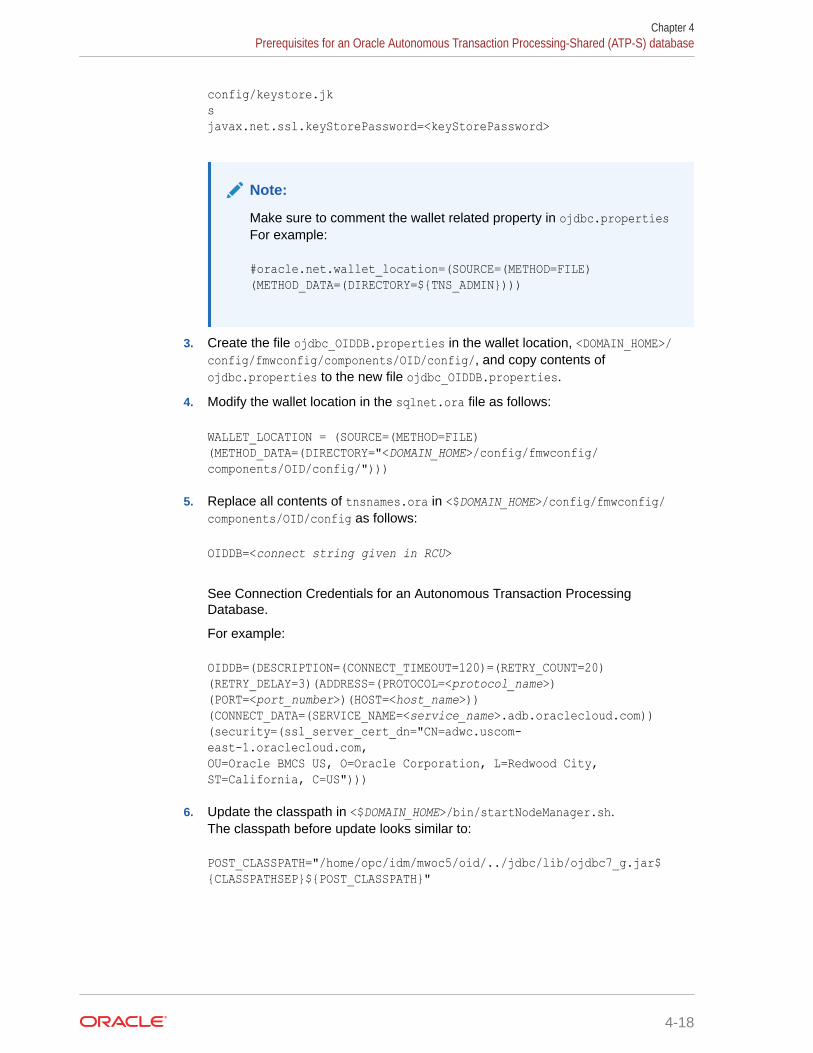
config/keystore.jksjavax.net.ssl.keyStorePassword=<keyStorePassword>
Note:
Make sure to comment the wallet related property in ojdbc.propertiesFor example:
#oracle.net.wallet_location=(SOURCE=(METHOD=FILE)(METHOD_DATA=(DIRECTORY=${TNS_ADMIN})))
3. Create the file ojdbc_OIDDB.properties in the wallet location, <DOMAIN_HOME>/config/fmwconfig/components/OID/config/, and copy contents ofojdbc.properties to the new file ojdbc_OIDDB.properties.
4. Modify the wallet location in the sqlnet.ora file as follows:
WALLET_LOCATION = (SOURCE=(METHOD=FILE)(METHOD_DATA=(DIRECTORY="<DOMAIN_HOME>/config/fmwconfig/components/OID/config/")))
5. Replace all contents of tnsnames.ora in <$DOMAIN_HOME>/config/fmwconfig/components/OID/config as follows:
OIDDB=<connect string given in RCU>
See Connection Credentials for an Autonomous Transaction ProcessingDatabase.
For example:
OIDDB=(DESCRIPTION=(CONNECT_TIMEOUT=120)=(RETRY_COUNT=20)(RETRY_DELAY=3)(ADDRESS=(PROTOCOL=<protocol_name>)(PORT=<port_number>)(HOST=<host_name>))(CONNECT_DATA=(SERVICE_NAME=<service_name>.adb.oraclecloud.com))(security=(ssl_server_cert_dn="CN=adwc.uscom-east-1.oraclecloud.com, OU=Oracle BMCS US, O=Oracle Corporation, L=Redwood City, ST=California, C=US")))
6. Update the classpath in <$DOMAIN_HOME>/bin/startNodeManager.sh.The classpath before update looks similar to:
POST_CLASSPATH="/home/opc/idm/mwoc5/oid/../jdbc/lib/ojdbc7_g.jar${CLASSPATHSEP}${POST_CLASSPATH}"
Chapter 4Prerequisites for an Oracle Autonomous Transaction Processing-Shared (ATP-S) database
4-18
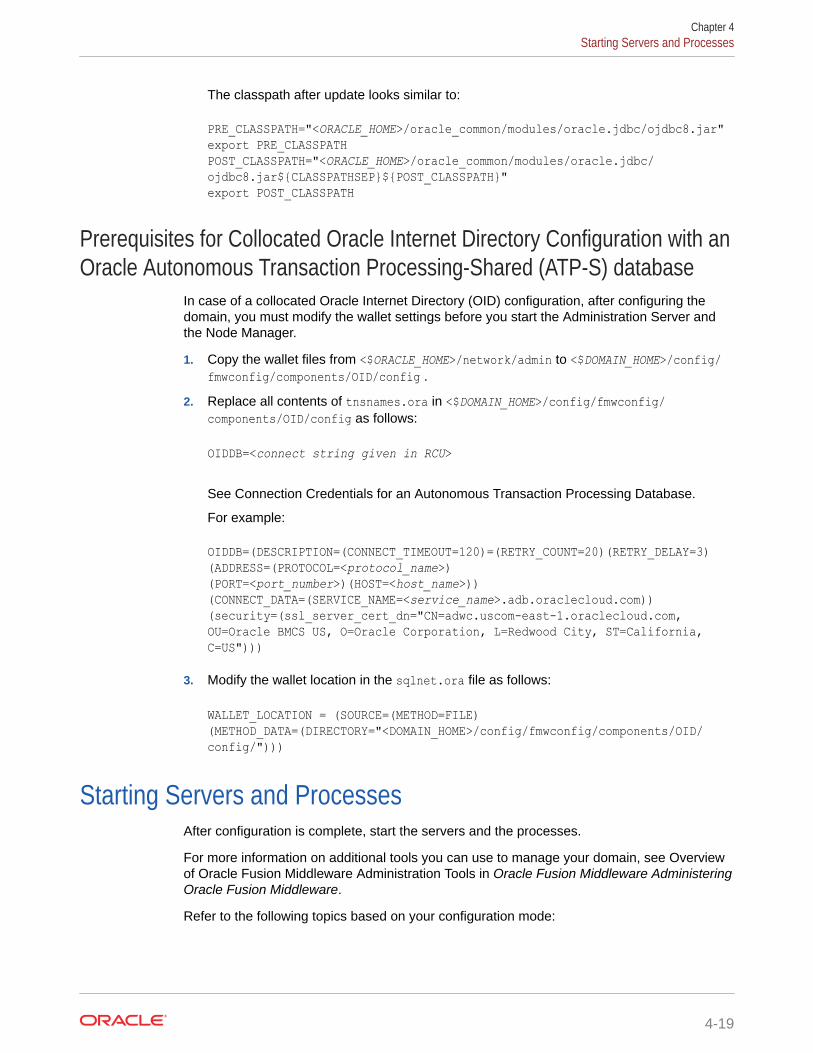
The classpath after update looks similar to:
PRE_CLASSPATH="<ORACLE_HOME>/oracle_common/modules/oracle.jdbc/ojdbc8.jar"export PRE_CLASSPATHPOST_CLASSPATH="<ORACLE_HOME>/oracle_common/modules/oracle.jdbc/ojdbc8.jar${CLASSPATHSEP}${POST_CLASSPATH}"export POST_CLASSPATH
Prerequisites for Collocated Oracle Internet Directory Configuration with anOracle Autonomous Transaction Processing-Shared (ATP-S) database
In case of a collocated Oracle Internet Directory (OID) configuration, after configuring thedomain, you must modify the wallet settings before you start the Administration Server andthe Node Manager.
1. Copy the wallet files from <$ORACLE_HOME>/network/admin to <$DOMAIN_HOME>/config/fmwconfig/components/OID/config .
2. Replace all contents of tnsnames.ora in <$DOMAIN_HOME>/config/fmwconfig/components/OID/config as follows:
OIDDB=<connect string given in RCU>
See Connection Credentials for an Autonomous Transaction Processing Database.
For example:
OIDDB=(DESCRIPTION=(CONNECT_TIMEOUT=120)=(RETRY_COUNT=20)(RETRY_DELAY=3)(ADDRESS=(PROTOCOL=<protocol_name>)(PORT=<port_number>)(HOST=<host_name>))(CONNECT_DATA=(SERVICE_NAME=<service_name>.adb.oraclecloud.com))(security=(ssl_server_cert_dn="CN=adwc.uscom-east-1.oraclecloud.com, OU=Oracle BMCS US, O=Oracle Corporation, L=Redwood City, ST=California, C=US")))
3. Modify the wallet location in the sqlnet.ora file as follows:
WALLET_LOCATION = (SOURCE=(METHOD=FILE)(METHOD_DATA=(DIRECTORY="<DOMAIN_HOME>/config/fmwconfig/components/OID/config/")))
Starting Servers and ProcessesAfter configuration is complete, start the servers and the processes.
For more information on additional tools you can use to manage your domain, see Overviewof Oracle Fusion Middleware Administration Tools in Oracle Fusion Middleware AdministeringOracle Fusion Middleware.
Refer to the following topics based on your configuration mode:
Chapter 4Starting Servers and Processes
4-19
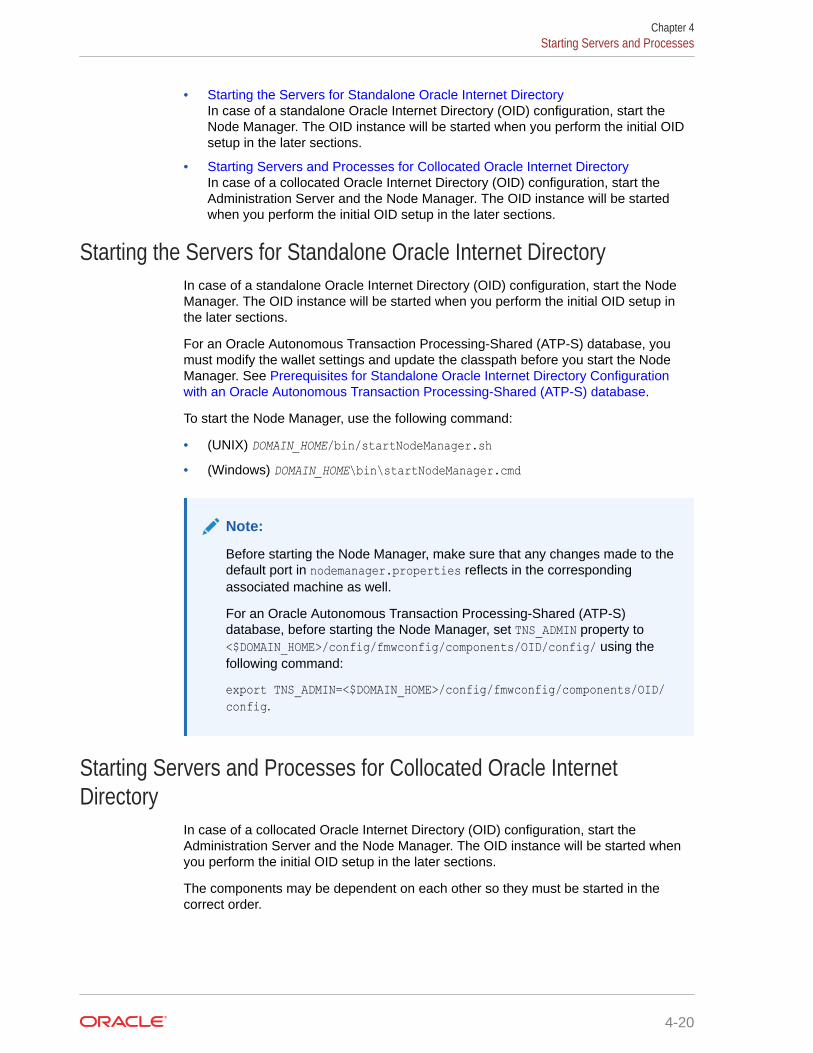
• Starting the Servers for Standalone Oracle Internet DirectoryIn case of a standalone Oracle Internet Directory (OID) configuration, start theNode Manager. The OID instance will be started when you perform the initial OIDsetup in the later sections.
• Starting Servers and Processes for Collocated Oracle Internet DirectoryIn case of a collocated Oracle Internet Directory (OID) configuration, start theAdministration Server and the Node Manager. The OID instance will be startedwhen you perform the initial OID setup in the later sections.
Starting the Servers for Standalone Oracle Internet DirectoryIn case of a standalone Oracle Internet Directory (OID) configuration, start the NodeManager. The OID instance will be started when you perform the initial OID setup inthe later sections.
For an Oracle Autonomous Transaction Processing-Shared (ATP-S) database, youmust modify the wallet settings and update the classpath before you start the NodeManager. See Prerequisites for Standalone Oracle Internet Directory Configurationwith an Oracle Autonomous Transaction Processing-Shared (ATP-S) database.
To start the Node Manager, use the following command:
• (UNIX) DOMAIN_HOME/bin/startNodeManager.sh• (Windows) DOMAIN_HOME\bin\startNodeManager.cmd
Note:
Before starting the Node Manager, make sure that any changes made to thedefault port in nodemanager.properties reflects in the correspondingassociated machine as well.
For an Oracle Autonomous Transaction Processing-Shared (ATP-S)database, before starting the Node Manager, set TNS_ADMIN property to<$DOMAIN_HOME>/config/fmwconfig/components/OID/config/ using thefollowing command:
export TNS_ADMIN=<$DOMAIN_HOME>/config/fmwconfig/components/OID/config.
Starting Servers and Processes for Collocated Oracle InternetDirectory
In case of a collocated Oracle Internet Directory (OID) configuration, start theAdministration Server and the Node Manager. The OID instance will be started whenyou perform the initial OID setup in the later sections.
The components may be dependent on each other so they must be started in thecorrect order.
Chapter 4Starting Servers and Processes
4-20
Note:
The procedures in this section describe how to start servers and process using theWLST command line or a script. You can also use the Oracle Fusion MiddlewareControl and the Oracle WebLogic Server Administration Console. See Starting andStopping Administration and Managed Servers and Node Manager in AdministeringOracle Fusion Middleware.For an Oracle Autonomous Transaction Processing-Shared (ATP-S) database, youmust modify the wallet settings before you start the Administration Server and theNode Manager. See Prerequisites for Collocated Oracle Internet DirectoryConfiguration with an Oracle Autonomous Transaction Processing-Shared (ATP-S)database.
To start your Fusion Middleware environment, follow the steps below:
Step 1: Start the Administration Server
When you start the Administration Server, you also start the processes running in theAdministration Server, including the WebLogic Server Administration Console and FusionMiddleware Control.
Note:
For an Oracle Autonomous Transaction Processing-Shared (ATP-S) database,before starting the Administration Server, set TNS_ADMIN property to<$DOMAIN_HOME>/config/fmwconfig/components/OID/config/ using the followingcommand:export TNS_ADMIN=<$DOMAIN_HOME>/config/fmwconfig/components/OID/config
To start the Administration Server, use the startWebLogic script:
• (UNIX) DOMAIN_HOME/bin/startWebLogic.sh• (Windows) DOMAIN_HOME\bin\startWebLogic.cmdWhen prompted, enter your user name, password, and the URL of the Administration Server.
Chapter 4Starting Servers and Processes
4-21
Note:
For an Oracle Autonomous Transaction Processing-Shared (ATP-S)database, the following error messages are displayed during theAdministration Server startup:
Example messages:
java.io.FileNotFoundException: /<DOMAIN_HOME>/config/fmwconfig/components/OID/ admin/oidpwdlldap1 (No such file or directory)
oracle.simplefan.impl.FanManager configure SEVERE: attempt to configure ONS in FanManager failed with oracle.ons.NoServersAvailable: Subscription time out
These messages do not have any functional impact and can be ignored.
For an Autonomous Transaction Processing database (both OracleAutonomous Transaction Processing-Dedicated (ATP-D) and OracleAutonomous Transaction Processing-Shared (ATP-S)), the following errormessage may be displayed in the Administration Server logs.
<AdminServer> <[ACTIVE] ExecuteThread: '63' for queue: 'weblogic.kernel.Default (self-tuning)'> <weblogic> <> <16023522-e47f-40f4-a66f-7ea3729188d1-00000064> <1628079696204> <[severity-value: 8] [rid: 0] [partition-id: 0] [partition-name: DOMAIN] > <BEA-240003> <Administration Console encountered the following error: java.lang.NoSuchMethodError: org.glassfish.jersey.internal.LocalizationMessages.WARNING_PROPERTIES()Ljava/l ang/String; atorg.glassfish.jersey.internal.config.SystemPropertiesConfigurationModel.getProperties(SystemPropertiesConfigurationModel.java:122) atorg.glassfish.jersey.internal.config.SystemPropertiesConfigurationProvider.getProperties(SystemPropertiesConfigurationProvider.java:29) atorg.glassfish.jersey.internal.config.ExternalPropertiesConfigurationFactory.readExternalPropertiesMap(ExternalPropertiesConfigurationFactory.java:55) atorg.glassfish.jersey.internal.config.ExternalPropertiesConfigurationFactory.configure(ExternalPropertiesConfigurationFactory.java:72) atorg.glassfish.jersey.internal.config.ExternalPropertiesConfigurationFeature.configure(ExternalPropertiesConfigurationFeature.java:26) atorg.glassfish.jersey.model.internal.CommonConfig.configureFeatures(CommonConfig.java:730)
Chapter 4Starting Servers and Processes
4-22
This message does not have any functional impact and can be ignored.
Step 2: Start Node Manager
Note:
For an Oracle Autonomous Transaction Processing-Shared (ATP-S) database,before starting the Node Manager, set TNS_ADMIN property to <$DOMAIN_HOME>/config/fmwconfig/components/OID/config/ using the following command:export TNS_ADMIN=<$DOMAIN_HOME>/config/fmwconfig/components/OID/config.
To start Node Manager, use the startNodeManager script:
• (UNIX) DOMAIN_HOME/bin/startNodeManager.sh• (Windows) DOMAIN_HOME\bin\startNodeManager.cmd
Note:
Before starting the Node Manager, make sure that any changes made to the defaultport in nodemanager.properties reflects in the corresponding associated machineas well.
Performing the Initial Oracle Internet Directory SetupUse the wlst command from a different terminal to connect to Administration Server and setup Oracle Internet Directory.
To perform the initial setup of OID, do the following:
1. Run the following command from the location ORACLE_HOME/oracle_common/common/binto launch the WLST tool:
./wlst.sh2. In case of a standalone Oracle Internet Directory configuration, connect to the Node
Manager using the following command:
nmConnect(username='wls_user',password='password',domainName='base_domain')In case of a collocated Oracle Internet Directory configuration, connect to theAdministration Server using the following command:
connect('Admin_username','Admin_password','t3://Admin_host:Admin_port’)3. Run the following command to perform the initial setup of OID:
From location:
• For standalone mode: /base_domain• For collocated mode: /base_domain/serverConfig
Chapter 4Performing the Initial Oracle Internet Directory Setup
4-23
oid_setup(orcladminPassword='password',odsPassword='password',realmDN='<your realm>' port='nnnn', sslPort='nnnn', host='hostname' )where,
realmDN='<dc=<xxxx>,dc=<company name>, dc=com>'
Note:
For information about the other optional arguments that can be used withoid_setup command, run the following command:
help('oid_setup')You can use the appropriate arguments for running OID on custom SSLand non-SSL ports, setting instanceName, port, hostname,machineName as input parameters etc.
The command oid_setup() performs the following operations:
• Sets the password for cn=orcladmin user.
• Creates the first oid1 instance. The following parameters are set by defaultwhen oid_setup is run:
– instanceName = 'oid1'– host = 'hostname of the current machine'– port = '3060'– machine = 'oidhost1'
This gets created automatically when you run config.sh.
– sslPort = '3131'• Starts the OID instance oid1 .
• Creates the realm.
Note:
If the realm is not provided then 'dc=us,dc=oracle,dc=com' realm iscreated automatically.
Note:
For more information about managing Oracle Internet Directory componentsusing WLST commands, see Managing Oracle Internet DirectoryComponents by Using WLST Commands in the Administering OracleInternet Directory.
Chapter 4Performing the Initial Oracle Internet Directory Setup
4-24
Verifying the ConfigurationAfter completing all configuration steps, you can perform additional steps to verify that yourdomain is properly configured.
To verify the Oracle Internet Directory (OID) is configured successfully, do the following:
1. Set the environment variable ORACLE_HOME to the new 12c ORACLE_HOME location.
2. Run the following command to check on the OID instance:
ORACLE_HOME/bin/ldapbind -h OID_HOST -p OID_PORTFor additional configuration and administration tasks, see Performing Additional DomainConfiguration Tasks.
Chapter 4Verifying the Configuration
4-25
5Configuring Oracle Directory IntegrationPlatform
Configure Oracle Directory Integration Platform (ODIP) after you install Oracle InternetDirectory binaries.
The configuration steps presented here assume that you have completed the installationsteps covered in:
• Preparing to Install and Configure Oracle Internet Directory
• Installing the Oracle Internet Directory Software
Note:
Ensure that you install Oracle Fusion Middleware Infrastructure too. Installation ofODIP requires Infrastructure to be installed.
Refer to the following sections to create the database schemas, configure a WebLogicdomain, and verify the configuration:
• Creating the Database SchemasBefore you can configure an Oracle Directory Integration Platform (ODIP) domain, youmust install required schemas on a certified database for use with this release of OracleFusion Middleware.
• Configuring Oracle Directory Integration Platform with Backend DirectoriesOracle Directory Integration Platform (ODIP) can be configured with the Oracle InternetDirectory (OID), Oracle Unified Directory (OUD), or Oracle Directory Server EnterpriseEdition (ODSEE).
• Installing ODIP Without a DatabaseYou can install and configure ODIP to run without a database.
Creating the Database SchemasBefore you can configure an Oracle Directory Integration Platform (ODIP) domain, you mustinstall required schemas on a certified database for use with this release of Oracle FusionMiddleware.
Note:
You can skip this section if OID is configured as a backend directory and you'vealready created a schema for OID collocated mode as described in Creating theDatabase Schemas.
5-1
• Installing and Configuring a Certified DatabaseBefore you create the database schemas, you must install and configure acertified database, and verify that the database is up and running.
• Starting the Repository Creation UtilityStart the Repository Creation Utility (RCU) after you verify that a certified JDK isinstalled on your system.
• Navigating the Repository Creation Utility Screens to Create SchemasEnter required information in the RCU screens to create the database schemas.
Installing and Configuring a Certified DatabaseBefore you create the database schemas, you must install and configure a certifieddatabase, and verify that the database is up and running.
See About Database Requirements for an Oracle Fusion Middleware Installation.
Starting the Repository Creation UtilityStart the Repository Creation Utility (RCU) after you verify that a certified JDK isinstalled on your system.
To start the RCU:
1. Verify that a certified JDK already exists on your system by running java -version from the command line. For 12c (12.2.1.4.0), the certified JDK is1.8.0_211 and later.
See About JDK Requirements for an Oracle Fusion Middleware Installation.
2. Ensure that the JAVA_HOME environment variable is set to the location of thecertified JDK. For example:
• (UNIX) setenv JAVA_HOME /home/Oracle/Java/jdk1.8.0_211• (Windows) set JAVA_HOME=C:\home\Oracle\Java\jdk1.8.0_211
3. Change to the following directory:
• (UNIX) ORACLE_HOME/oracle_common/bin• (Windows) ORACLE_HOME\oracle_common\bin
4. Enter the following command:
• (UNIX) ./rcu• (Windows) rcu.bat
Navigating the Repository Creation Utility Screens to Create SchemasEnter required information in the RCU screens to create the database schemas.
• Introducing the RCUThe Welcome screen is the first screen that appears when you start the RCU.
• Selecting a Method of Schema CreationUse the Create Repository screen to select a method to create and loadcomponent schemas into the database.
Chapter 5Creating the Database Schemas
5-2
• Providing Database Connection DetailsOn the Database Connection Details screen, provide the database connection details forthe RCU to connect to your database.
• Specifying a Custom Prefix and Selecting Schemas
• Specifying Schema PasswordsOn the Schema Passwords screen, specify how you want to set the schema passwordson your database, then enter and confirm your passwords.
• Completing Schema CreationNavigate through the remaining RCU screens to complete schema creation.
Introducing the RCUThe Welcome screen is the first screen that appears when you start the RCU.
Click Next.
Selecting a Method of Schema CreationUse the Create Repository screen to select a method to create and load component schemasinto the database.
On the Create Repository screen:
• If you have the necessary permissions and privileges to perform DBA activities on yourdatabase, select System Load and Product Load. This procedure assumes that youhave SYSDBA privileges.
• If you do not have the necessary permissions or privileges to perform DBA activities inthe database, you must select Prepare Scripts for System Load on this screen. Thisoption generates a SQL script that you can give to your database administrator. See About System Load and Product Load in Oracle Fusion Middleware Creating Schemaswith the Repository Creation Utility.
• If the DBA has already run the SQL script for System Load, select Perform ProductLoad.
Providing Database Connection DetailsOn the Database Connection Details screen, provide the database connection details for theRCU to connect to your database.
Note:
If you are unsure of the service name for your database, you can obtain it from theSERVICE_NAMES parameter in the initialization parameter file of the database. If theinitialization parameter file does not contain the SERVICE_NAMES parameter, then theservice name is the same as the global database name, which is specified in theDB_NAME and DB_DOMAIN parameters.
For example:
Database Type: Oracle Database
Chapter 5Creating the Database Schemas
5-3
Connection String Format: Connection Parameters or ConnectionStringConnection String:examplehost.exampledomain.com:1521:Orcl.exampledomain.comHost Name: examplehost.exampledomain.comPort: 1521Service Name: Orcl.exampledomain.comUser Name: sysPassword: ******Role: SYSDBA
Click Next to proceed, then click OK in the dialog window that confirms a successfuldatabase connection.
Specifying a Custom Prefix and Selecting SchemasSelect Create new prefix, specify a custom prefix, then select the Oracle InternetDirectory schema. This action automatically selects the following schemas asdependencies:
• ODS — Select this schema only if ODIP needs to be wired against OID backenddirectory installed in same domain.
• Oracle Platform Security Services
• Audit Services
• Audit Services Append
• Audit Services Viewer
• WebLogic Services
The schema Common Infrastructure Services is also automatically created. Thisschema is dimmed; you cannot select or deselect it. This schema enables you toretrieve information from RCU during domain configuration. For more information, see Understanding the Service Table Schema in Oracle Fusion Middleware CreatingSchemas with the Repository Creation Utility.
The custom prefix is used to logically group these schemas together for use in thisdomain only; you must create a unique set of schemas for each domain. Schemasharing across domains is not supported.
Tip:
For more information about custom prefixes, see Understanding CustomPrefixes in Oracle Fusion Middleware Creating Schemas with the RepositoryCreation Utility.
For more information about how to organize your schemas in a multi-domainenvironment, see Planning Your Schema Creation in Oracle FusionMiddleware Creating Schemas with the Repository Creation Utility.
Chapter 5Creating the Database Schemas
5-4
Tip:
You must make a note of the custom prefix you choose to enter here; you will needthis later on during the domain creation process.
Click Next to proceed, then click OK on the dialog window confirming that prerequisitechecking for schema creation was successful.
Specifying Schema PasswordsOn the Schema Passwords screen, specify how you want to set the schema passwords onyour database, then enter and confirm your passwords.
You must make a note of the passwords you set on this screen; you will need them later onduring the domain creation process.
Click Next.
Completing Schema CreationNavigate through the remaining RCU screens to complete schema creation.
On the Map Tablespaces screen, the Encrypt Tablespace check box appears only if youenabled Transparent Data Encryption (TDE) in the database (Oracle or Oracle EBR) whenyou start the RCU. Select the Encrypt Tablespace check box if you want to encrypt all newtablespaces that the RCU creates.
When you reach the Completion Summary screen, click Close to dismiss the RCU.
Configuring Oracle Directory Integration Platform with BackendDirectories
Oracle Directory Integration Platform (ODIP) can be configured with the Oracle InternetDirectory (OID), Oracle Unified Directory (OUD), or Oracle Directory Server Enterprise Edition(ODSEE).
Note:
When configuring ODIP with backend directories, you must set the environmentvariable ORACLE_HOME for ODIP, to the top level Oracle home, wherever required.
For example, for Oracle Internet Directory or Infrastructure installation, if wlserver isinstalled under /home/Oracle/Middleware/Oracle_Home, then ORACLE_HOME must beset to /home/Oracle/Middleware/Oracle_Home.
• To configure Oracle Directory Integration Platform with Oracle Internet Directory, see Configuring Oracle Internet Directory in the Oracle Fusion Middleware Administrator'sGuide for Oracle Directory Integration Platform.
Chapter 5Configuring Oracle Directory Integration Platform with Backend Directories
5-5
• To configure Oracle Directory Integration Platform with Oracle Unified Directory,see Configuring Oracle Directory Integration Platform for Oracle Unified Directoryin the Oracle Fusion Middleware Administrator's Guide for Oracle DirectoryIntegration Platform.
• To configure Oracle Directory Integration Platform with Oracle Directory ServerEnterprise Edition, see Configuring Oracle Directory Integration Platform forOracle Directory Server Enterprise Edition in the Oracle Fusion MiddlewareAdministrator's Guide for Oracle Directory Integration Platform.
Installing ODIP Without a DatabaseYou can install and configure ODIP to run without a database.
To configure ODIP to work without creating and using a database, create the followingPython script, oudscript.py, which creates a domain for ODIP without a database.Note: replace password in the script with your WebLogic password. This sampleassumes /oracle/mw_oud12c as the Oracle Unified Directory home. Be sure to use thedirectory information that matches your installation.
setTopologyProfile('Compact')selectTemplate('Basic WebLogic Server Domain')selectTemplate('Oracle Directory Integration Platform')loadTemplates()setOption('AppDir', '${MW_HOME}/applications/dip1')cd(r'/Security/base_domain/User/weblogic')cmo.setPassword('Oracle123')writeDomain('${MW_HOME}/domains/dip1')closeTemplate()readDomain('${MW_HOME}/domains/dip1')cd('Servers/AdminServer')cmo.setListenPort(7007)cmo.setListenAddress('')create('AdminServer','SSL')cd('SSL/AdminServer')cmo.setEnabled(true)cmo.setListenPort(7008)cd('/Servers/wls_ods1')cmo.setListenPort(7009)create('wls_ods1','SSL')cd('SSL/wls_ods1')cmo.setEnabled(true)cmo.setListenPort(7010)updateDomain()closeDomain()
You can deploy this with wlst.sh by running the command wlst.sh oudscript.py.After running the script, use the dipConfigurator to configure ODIP; see ConfiguringOracle Directory Integration Platform for Oracle Unified Directory.
Chapter 5Installing ODIP Without a Database
5-6
6Next Steps After Configuring the Domain
After you configure a product domain, there are additional tasks that you may want toperform.
• Performing Basic Administrative TasksReview the administrative tasks you will likely want to perform on a new domain.
• Performing Additional Domain Configuration TasksReview additional configuration tasks you will likely want to perform on a new domain.
• Preparing Your Environment for High AvailabilityScaling out for high availability requires additional steps.
Performing Basic Administrative TasksReview the administrative tasks you will likely want to perform on a new domain.
Table 6-1 Basic Administration Tasks for a New Domain
Task Description More Information
Getting familiar with FusionMiddleware administration tools
Get familiar with various tools thatyou can use to manage yourenvironment.
See Overview of Oracle FusionMiddleware Administration Tools inOracle Fusion MiddlewareAdministering Oracle FusionMiddleware.
Starting and stopping products andservers
Learn how to start and stop OracleFusion Middleware, including theAdministration Server, ManagedServers, and components.
See Starting and Stopping OracleFusion Middleware in Oracle FusionMiddleware Administering OracleFusion Middleware.
Configuring Secure Sockets Layer(SSL)
Learn how to set up securecommunications between OracleFusion Middleware componentsusing SSL.
See Configuring SSL in OracleFusion Middleware in Oracle FusionMiddleware Administering OracleFusion Middleware.
Monitoring Oracle Fusion Middleware Learn how to keep track of the statusof Oracle Fusion Middlewarecomponents.
See Monitoring Oracle FusionMiddleware in Oracle FusionMiddleware Administering OracleFusion Middleware.
Understanding Backup and RecoveryProcedures
Learn the recommended backup andrecovery procedures for OracleFusion Middleware.
See Introduction to Backup andRecovery in Oracle FusionMiddleware Administering OracleFusion Middleware.
Performing Additional Domain Configuration TasksReview additional configuration tasks you will likely want to perform on a new domain.
6-1
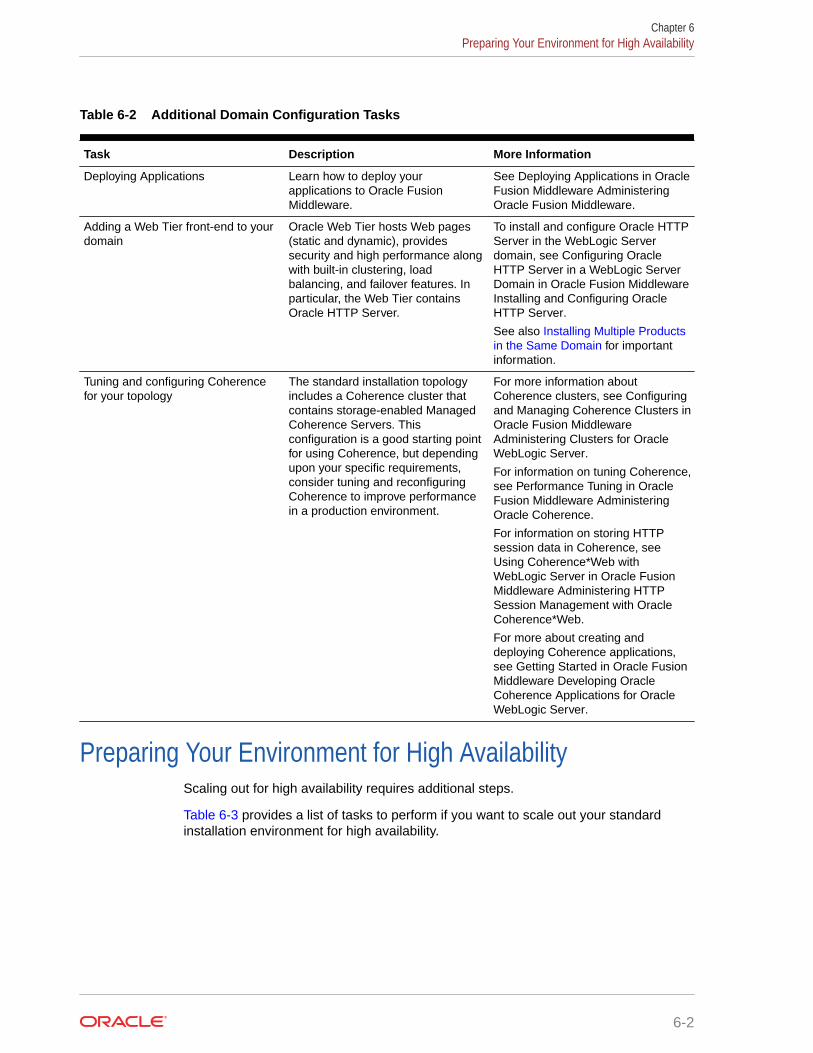
Table 6-2 Additional Domain Configuration Tasks
Task Description More Information
Deploying Applications Learn how to deploy yourapplications to Oracle FusionMiddleware.
See Deploying Applications in OracleFusion Middleware AdministeringOracle Fusion Middleware.
Adding a Web Tier front-end to yourdomain
Oracle Web Tier hosts Web pages(static and dynamic), providessecurity and high performance alongwith built-in clustering, loadbalancing, and failover features. Inparticular, the Web Tier containsOracle HTTP Server.
To install and configure Oracle HTTPServer in the WebLogic Serverdomain, see Configuring OracleHTTP Server in a WebLogic ServerDomain in Oracle Fusion MiddlewareInstalling and Configuring OracleHTTP Server.
See also Installing Multiple Productsin the Same Domain for importantinformation.
Tuning and configuring Coherencefor your topology
The standard installation topologyincludes a Coherence cluster thatcontains storage-enabled ManagedCoherence Servers. Thisconfiguration is a good starting pointfor using Coherence, but dependingupon your specific requirements,consider tuning and reconfiguringCoherence to improve performancein a production environment.
For more information aboutCoherence clusters, see Configuringand Managing Coherence Clusters inOracle Fusion MiddlewareAdministering Clusters for OracleWebLogic Server.
For information on tuning Coherence,see Performance Tuning in OracleFusion Middleware AdministeringOracle Coherence.
For information on storing HTTPsession data in Coherence, see Using Coherence*Web withWebLogic Server in Oracle FusionMiddleware Administering HTTPSession Management with OracleCoherence*Web.
For more about creating anddeploying Coherence applications,see Getting Started in Oracle FusionMiddleware Developing OracleCoherence Applications for OracleWebLogic Server.
Preparing Your Environment for High AvailabilityScaling out for high availability requires additional steps.
Table 6-3 provides a list of tasks to perform if you want to scale out your standardinstallation environment for high availability.
Chapter 6Preparing Your Environment for High Availability
6-2
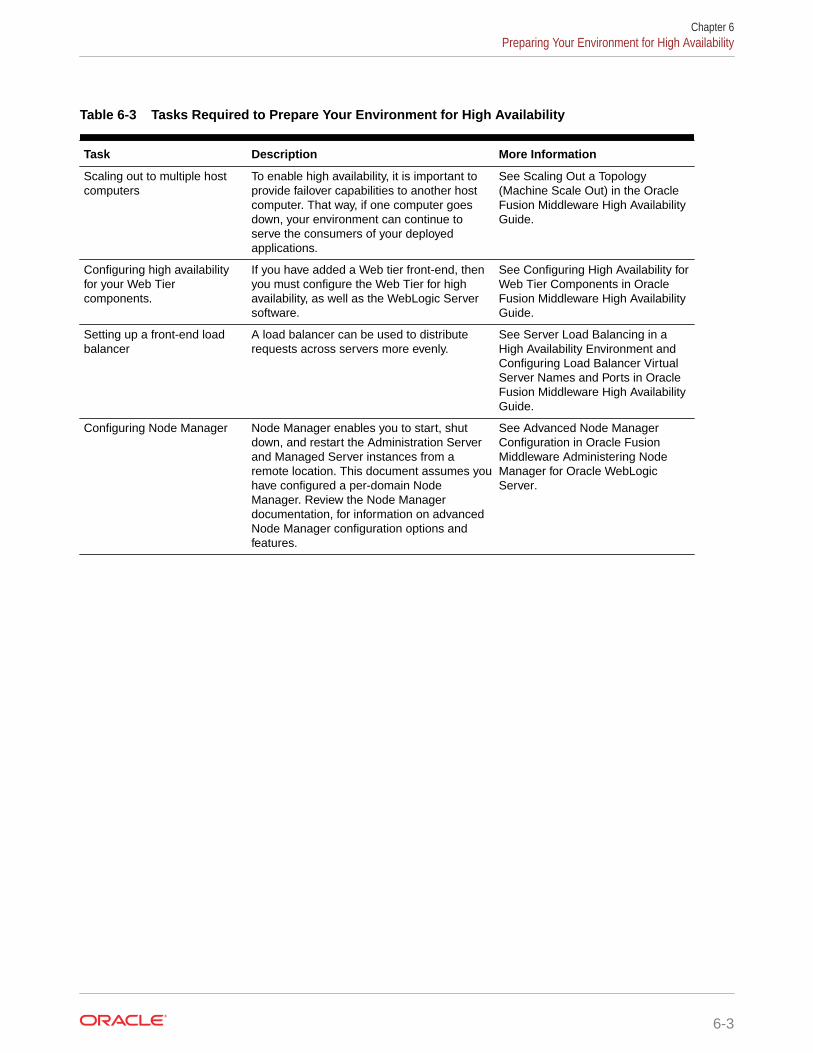
Table 6-3 Tasks Required to Prepare Your Environment for High Availability
Task Description More Information
Scaling out to multiple hostcomputers
To enable high availability, it is important toprovide failover capabilities to another hostcomputer. That way, if one computer goesdown, your environment can continue toserve the consumers of your deployedapplications.
See Scaling Out a Topology(Machine Scale Out) in the OracleFusion Middleware High AvailabilityGuide.
Configuring high availabilityfor your Web Tiercomponents.
If you have added a Web tier front-end, thenyou must configure the Web Tier for highavailability, as well as the WebLogic Serversoftware.
See Configuring High Availability forWeb Tier Components in OracleFusion Middleware High AvailabilityGuide.
Setting up a front-end loadbalancer
A load balancer can be used to distributerequests across servers more evenly.
See Server Load Balancing in aHigh Availability Environment and Configuring Load Balancer VirtualServer Names and Ports in OracleFusion Middleware High AvailabilityGuide.
Configuring Node Manager Node Manager enables you to start, shutdown, and restart the Administration Serverand Managed Server instances from aremote location. This document assumes youhave configured a per-domain NodeManager. Review the Node Managerdocumentation, for information on advancedNode Manager configuration options andfeatures.
See Advanced Node ManagerConfiguration in Oracle FusionMiddleware Administering NodeManager for Oracle WebLogicServer.
Chapter 6Preparing Your Environment for High Availability
6-3
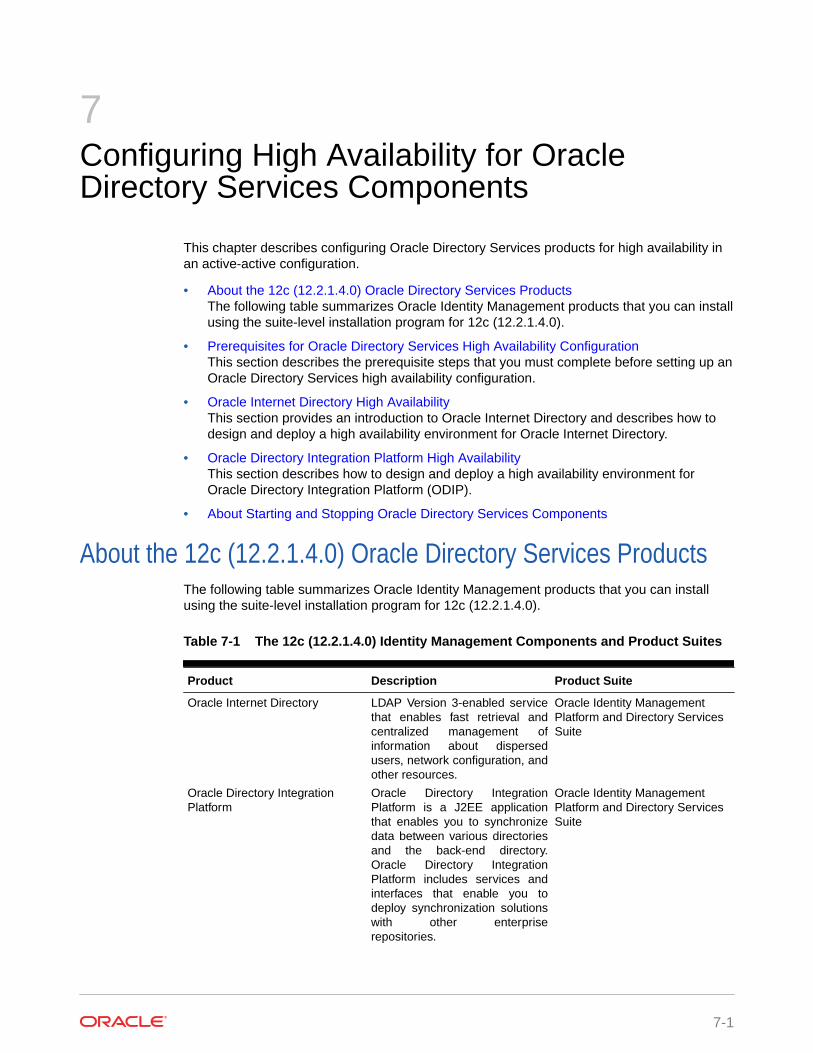
7Configuring High Availability for OracleDirectory Services Components
This chapter describes configuring Oracle Directory Services products for high availability inan active-active configuration.
• About the 12c (12.2.1.4.0) Oracle Directory Services ProductsThe following table summarizes Oracle Identity Management products that you can installusing the suite-level installation program for 12c (12.2.1.4.0).
• Prerequisites for Oracle Directory Services High Availability ConfigurationThis section describes the prerequisite steps that you must complete before setting up anOracle Directory Services high availability configuration.
• Oracle Internet Directory High AvailabilityThis section provides an introduction to Oracle Internet Directory and describes how todesign and deploy a high availability environment for Oracle Internet Directory.
• Oracle Directory Integration Platform High AvailabilityThis section describes how to design and deploy a high availability environment forOracle Directory Integration Platform (ODIP).
• About Starting and Stopping Oracle Directory Services Components
About the 12c (12.2.1.4.0) Oracle Directory Services ProductsThe following table summarizes Oracle Identity Management products that you can installusing the suite-level installation program for 12c (12.2.1.4.0).
Table 7-1 The 12c (12.2.1.4.0) Identity Management Components and Product Suites
Product Description Product Suite
Oracle Internet Directory LDAP Version 3-enabled servicethat enables fast retrieval andcentralized management ofinformation about dispersedusers, network configuration, andother resources.
Oracle Identity ManagementPlatform and Directory ServicesSuite
Oracle Directory IntegrationPlatform
Oracle Directory IntegrationPlatform is a J2EE applicationthat enables you to synchronizedata between various directoriesand the back-end directory.Oracle Directory IntegrationPlatform includes services andinterfaces that enable you todeploy synchronization solutionswith other enterpriserepositories.
Oracle Identity ManagementPlatform and Directory ServicesSuite
7-1
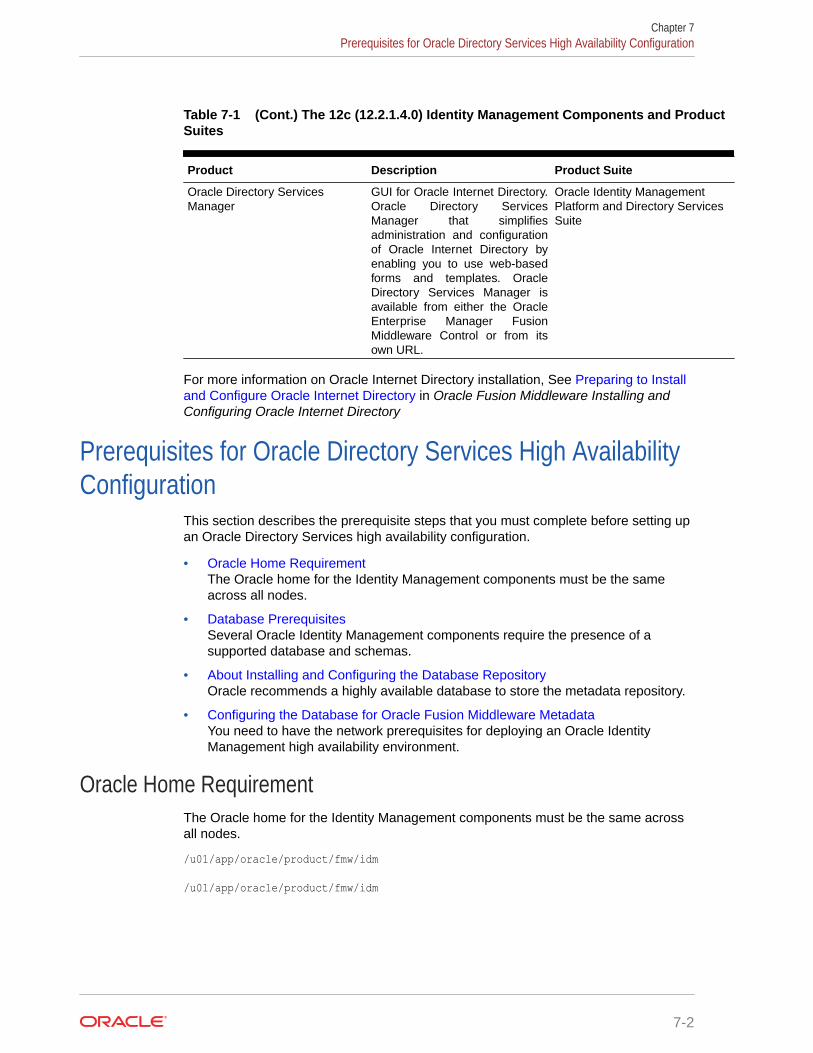
Table 7-1 (Cont.) The 12c (12.2.1.4.0) Identity Management Components and ProductSuites
Product Description Product Suite
Oracle Directory ServicesManager
GUI for Oracle Internet Directory.Oracle Directory ServicesManager that simplifiesadministration and configurationof Oracle Internet Directory byenabling you to use web-basedforms and templates. OracleDirectory Services Manager isavailable from either the OracleEnterprise Manager FusionMiddleware Control or from itsown URL.
Oracle Identity ManagementPlatform and Directory ServicesSuite
For more information on Oracle Internet Directory installation, See Preparing to Installand Configure Oracle Internet Directory in Oracle Fusion Middleware Installing andConfiguring Oracle Internet Directory
Prerequisites for Oracle Directory Services High AvailabilityConfiguration
This section describes the prerequisite steps that you must complete before setting upan Oracle Directory Services high availability configuration.
• Oracle Home RequirementThe Oracle home for the Identity Management components must be the sameacross all nodes.
• Database PrerequisitesSeveral Oracle Identity Management components require the presence of asupported database and schemas.
• About Installing and Configuring the Database RepositoryOracle recommends a highly available database to store the metadata repository.
• Configuring the Database for Oracle Fusion Middleware MetadataYou need to have the network prerequisites for deploying an Oracle IdentityManagement high availability environment.
Oracle Home RequirementThe Oracle home for the Identity Management components must be the same acrossall nodes.
/u01/app/oracle/product/fmw/idm
/u01/app/oracle/product/fmw/idm
Chapter 7Prerequisites for Oracle Directory Services High Availability Configuration
7-2
Database PrerequisitesSeveral Oracle Identity Management components require the presence of a supporteddatabase and schemas.
To check if your database is certified or to see all certified databases, see the "CertifiedDatabases" section in the Certification Document: http://www.oracle.com/technology/software/products/ias/files/fusion_certification.html.
To determine the database version, run this query:
SQL>select version from sys.product_component_version where product like 'Oracle%'
About Installing and Configuring the Database RepositoryOracle recommends a highly available database to store the metadata repository.
For maximum availability, Oracle recommends using an Oracle Real Application Clusters(Oracle RAC) database. Oracle recommends that the database use Oracle AutomaticStorage Management for data storage. If you use Oracle ASM, the best practice is to alsouse Oracle Managed Files.
If you use Oracle ASM, install it in its own Oracle Home and have two disk groups:
• One for the Database files.
• One for the Flash Recovery Area.
Oracle Clusterware
See Oracle Real Application Clusters Installation Guide for Linux and UNIX.
Automatic Storage Management
See Oracle Real Application Clusters Installation Guide for Linux and UNIX.
When you run the installer, select Configure Automatic Storage Management in the SelectConfiguration page to create a separate Automatic Storage Management home.
Oracle Real Application Clusters
See Oracle Real Application Clusters Installation Guide for Linux and UNIX.
Many Oracle Fusion Middleware components require that schemas are in a database prior toinstallation. Use the Repository Creation Utility (RCU) to create the component schemas inan existing database. For high availability environments, you must create the schemas andload them into an Oracle RAC database.
Configuring the Database for Oracle Fusion Middleware MetadataYou need to have the network prerequisites for deploying an Oracle Identity Managementhigh availability environment.
Create the Oracle Real Application Clusters database to store Oracle Fusion Middleware 12c(12.2.1.4.0) metadata with the following characteristics:
• It should be in archive log mode to facilitate backup and recovery.
Chapter 7Prerequisites for Oracle Directory Services High Availability Configuration
7-3

• Optionally, flashback should be enabled.
• It should be created with the ALT32UTF8 character set.
The value of the static PROCESSES initialization parameter must be 500 or greaterfor Oracle Internet Directory. This value is checked by the Repository Creation Utility.
To check the value, you can use the SHOW PARAMETER command in SQL*Plus:
prompt> sqlplus "sys/password as sysdba"SQL> SHOW PARAMETER processes
One common way to change the parameter value is to use a command similar to thefollowing and then stop and restart the database to make the parameter take effect:
prompt> sqlplus "sys/password as sysdba"SQL> ALTER SYSTEM SET PROCESSES=500 SCOPE=SPFILE;
The method that you use to change a parameter's value depends on whether theparameter is static or dynamic, and on whether your database uses a parameter file ora server parameter file.
See:
• Database Examples in this ChapterSee the databases used in Oracle Directory Services Configuration examples inthis chapter.
• Configuring Database ServicesOracle recommends using the Oracle Enterprise Manager Cluster ManagedServices Page to create database services that client applications use to connectto the database.
• Verifying Transparent Application FailoverAfter the Oracle Internet Directory process starts, you can query theFAILOVER_TYPE, FAILOVER_METHOD, and FAILED_OVER columns in theV$SESSION_VIEW to obtain information about connected clients and their TAFstatus.
• Configuring Virtual Server Names and Ports for the Load BalancerThere are network prerequisites for Load Balancer and Virtual Server Names fordeploying an Oracle Identity Management high availability environment.
Database Examples in this ChapterSee the databases used in Oracle Directory Services Configuration examples in thischapter.
Table 7-2 Databases Used in Identity Management Configuration Examples
Component Database Service Name Database Instance Name
Oracle Internet Directory oid.example.com oiddb1, oiddb2
Oracle Directory IntegrationPlatform
oid.example.com oiddb1, oiddb2
Oracle Directory ServicesManager
N/A N/A
Chapter 7Prerequisites for Oracle Directory Services High Availability Configuration
7-4
Configuring Database ServicesOracle recommends using the Oracle Enterprise Manager Cluster Managed Services Page tocreate database services that client applications use to connect to the database.
You can also use SQL*Plus to configure your Oracle RAC database to automate failover forOracle Internet Directory using the following instructions. Note that each of the followingcommands has to be run on only one node in the cluster:
1. Use the CREATE_SERVICE subprogram to both create the database service and enablehigh availability notification and configure server-side Transparent Application Failover(TAF) settings.
prompt> sqlplus "sys/password as sysdba"
SQL> EXECUTE DBMS_SERVICE.CREATE_SERVICE(SERVICE_NAME => 'idm.example.com',NETWORK_NAME => 'idm.example.com',AQ_HA_NOTIFICATIONS => TRUE, FAILOVER_METHOD => DBMS_SERVICE.FAILOVER_METHOD_BASIC, FAILOVER_TYPE => DBMS_SERVICE.FAILOVER_TYPE_SELECT, FAILOVER_RETRIES => 5, FAILOVER_DELAY => 5);
You must enter the EXECUTE DBMS_SERVICE command on a single line.
2. Add the service to the database and assign it to the instances using srvctl.
prompt> srvctl add service -d idmdb -s idm -r idmdb1,idmdb23. Start the service using srvctl.
prompt> srvctl start service -d idmdb -s idmIf you already have a service in the database, ensure that it is enabled for high availabilitynotifications and configured with the proper server-side Transparent Application Failover(TAF) settings. Use the DBMS_SERVICE package to modify the service to enable highavailability notification to go through Advanced Queuing (AQ) by setting theAQ_HA_NOTIFICATIONS attribute to TRUE and configure server-side TAF settings, asshown below:
prompt> sqlplus "sys/password as sysdba"
SQL> EXECUTE DBMS_SERVICE.MODIFY_SERVICE(SERVICE_NAME => 'idm.example.com',AQ_HA_NOTIFICATIONS => TRUE,FAILOVER_METHOD => DBMS_SERVICE.FAILOVER_METHOD_BASIC, FAILOVER_TYPE => DBMS_SERVICE.FAILOVER_TYPE_SELECT, FAILOVER_RETRIES => 5, FAILOVER_DELAY => 5);
You must enter the EXECUTE DBMS_SERVICE command on a single line.
See Also:
• Administering Services with Oracle Enterprise Manager, PL/SQL, and SRVCTLin Oracle Real Application Clusters Administration and Deployment Guide
• DBMS_SERVICE in Oracle Database PL/SQL Packages and Types Reference
Chapter 7Prerequisites for Oracle Directory Services High Availability Configuration
7-5
Verifying Transparent Application FailoverAfter the Oracle Internet Directory process starts, you can query theFAILOVER_TYPE, FAILOVER_METHOD, and FAILED_OVER columns in theV$SESSION_VIEW to obtain information about connected clients and their TAF status.
For example, use the following SQL statement to verify that TAF is correctlyconfigured:
SELECT MACHINE, FAILOVER_TYPE, FAILOVER_METHOD, FAILED_OVER, COUNT(*)FROM V$SESSIONGROUP BY MACHINE, FAILOVER_TYPE, FAILOVER_METHOD, FAILED_OVER;
The output before failover is similar to this:
MACHINE FAILOVER_TYPE FAILOVER_M FAI COUNT(*)-------------------- ------------- ---------- ---- ----------oidhost1 SELECT BASIC NO 11oidhost1 SELECT BASIC NO 1
The output after failover is similar to this:
MACHINE FAILOVER_TYPE FAILOVER_M FAI COUNT(*)-------------------- ------------- ---------- ---- ----------oidhost2 SELECT BASIC NO 11oidhost2 SELECT BASIC NO 1
Configuring Virtual Server Names and Ports for the Load BalancerThere are network prerequisites for Load Balancer and Virtual Server Names fordeploying an Oracle Identity Management high availability environment.
• Load BalancersAll components in the Oracle Identity Management software stack require ahardware load balancer when deployed in a high availability configuration.
• Virtual Server NamesYou should setup virtual server names for the high availability deployments.Ensure that the virtual server names are associated with IP addresses and arepart of your Domain Name System (DNS). The computers on which Oracle FusionMiddleware is running must be able to resolve these virtual server names.
Load BalancersAll components in the Oracle Identity Management software stack require a hardwareload balancer when deployed in a high availability configuration.
The hardware load balancer should have the following features:
• Ability to load-balance traffic to a pool of real servers through a virtual hostname:Clients access services using the virtual hostname (instead of using actual hostnames). The load balancer can then load balance requests to the servers in thepool.
• Port translation configuration: The load balancer should have the ability to performport translation, where it enables incoming requests received on one port to berouted to a server process running on a different port. For example, a requestreceived on port 80 can be routed to port 7777.
Chapter 7Prerequisites for Oracle Directory Services High Availability Configuration
7-6
• Protocol translation: The load balancer should support protocol translation betweensystems running different protocols. It enables users on one network to access hosts onanother network, despite differences in the native protocol stacks associated with theoriginating device and the targeted host. For example, incoming requests can be HTTPS,and outgoing requests can be HTTP.
This feature is recommended but not required.
• SSL acceleration: SSL acceleration is a method of offloading the processor-intensivepublic key encryption algorithms involved in SSL transactions to a hardware accelerator.
This feature is recommended but not required.
• Monitoring of ports (HTTP, HTTPS, LDAP, LDAPS)
• Virtual servers and port configuration. Ability to configure virtual server names and portson your external load balancer, and the virtual server names and ports must meet thefollowing requirements:
The load balancer should enable configuration of multiple virtual servers. For each virtualserver, the load balancer should enable configuration of traffic management on more thanone port. For example, for Oracle Internet Directory clusters, the load balancer needs tobe configured with a virtual server and ports for LDAP and LDAPS traffic.
The virtual server names must be associated with IP addresses and be part of your DNS.Clients must be able to access the load balancer through the virtual server names.
• Ability to detect node failures and immediately stop routing traffic to the failed node.
• Resource monitoring / port monitoring / process failure detection.
The load balancer must be able to detect service and node failures (through notificationor some other means) and to stop directing non-Oracle Net traffic to the failed node. Ifyour load balancer has the ability to automatically detect failures, you should use it.
• Fault-tolerant mode
It is highly recommended that you configure the load balancer to be in fault-tolerantmode.
• Other
Oracle recommends that you configure the load balancer virtual server to returnimmediately to the calling client when the back-end services that it forwards traffic to areunavailable. This is preferred over the client disconnecting on its own after a timeoutbased on the TCP/IP settings on the client machine.
• Sticky routing capability
Ability to maintain sticky connections to components based on cookies or URL.
The following table shows the virtual server names to use for the external load balancer in theOracle Identity Management high availability environment.
Table 7-3 Virtual Server Names for the External Load Balancer
Component Virtual Server Name
Oracle Internet Directory oid.example.com
Oracle Directory Services Manager Console admin.example.com
Chapter 7Prerequisites for Oracle Directory Services High Availability Configuration
7-7
Virtual Server NamesYou should setup virtual server names for the high availability deployments. Ensurethat the virtual server names are associated with IP addresses and are part of yourDomain Name System (DNS). The computers on which Oracle Fusion Middleware isrunning must be able to resolve these virtual server names.
oid.example.com
This virtual server acts as the access point for all LDAP traffic to the Oracle InternetDirectory servers in the directory tier. Traffic to both the SSL and non-SSL ports isconfigured. The clients access this service using the address oid.example.com:636 forSSL and oid.example.com:389 for non-SSL.
Monitor the heartbeat of the Oracle Internet Directory processes on OIDHOST1 andOIDHOST2. If an Oracle Internet Directory process stops on OIDHOST1 orOIDHOST2, or if either host is down, the load balancer must continue to route theLDAP traffic to the surviving computer.
Oracle Internet Directory High AvailabilityThis section provides an introduction to Oracle Internet Directory and describes how todesign and deploy a high availability environment for Oracle Internet Directory.
• About Oracle Internet Directory Component ArchitectureOracle Internet Directory is an LDAP store that can be used by Oraclecomponents such as Directory Integration Platform, Oracle Directory ServicesManager, JPS, and also by non-Oracle components. These components connectto Oracle Internet Directory using the LDAP or LDAPS protocols.
• Understanding Oracle Internet Directory High Availability ConceptsThis section provides conceptual information about using Oracle Internet Directoryin a high availability two-node Cluster Configuration.
• Oracle Internet Directory High Availability Configuration StepsYou can deploy Oracle Internet Directory in a High Availability configuration as partof a WebLogic Server domain.
• Validating Oracle Internet Directory High AvailabilityUse the ldapbind command-line tool to ensure that you can connect to each OIDinstance and the LDAP Virtual Server. The ldapbind tool enables you to determinewhether you can authenticate a client to a server.
• Oracle Internet Directory Failover and Expected BehaviorThis section describes how to perform a failover of Oracle Internet Directory andOracle RAC.
• Troubleshooting Oracle Internet Directory High AvailabilityThis section provides information that can help you troubleshoot OID highavailability issues:
• Additional Oracle Internet Directory High Availability IssuesThis section describes issues for Oracle Internet Directory in a high availabilityenvironment.
Chapter 7Oracle Internet Directory High Availability
7-8
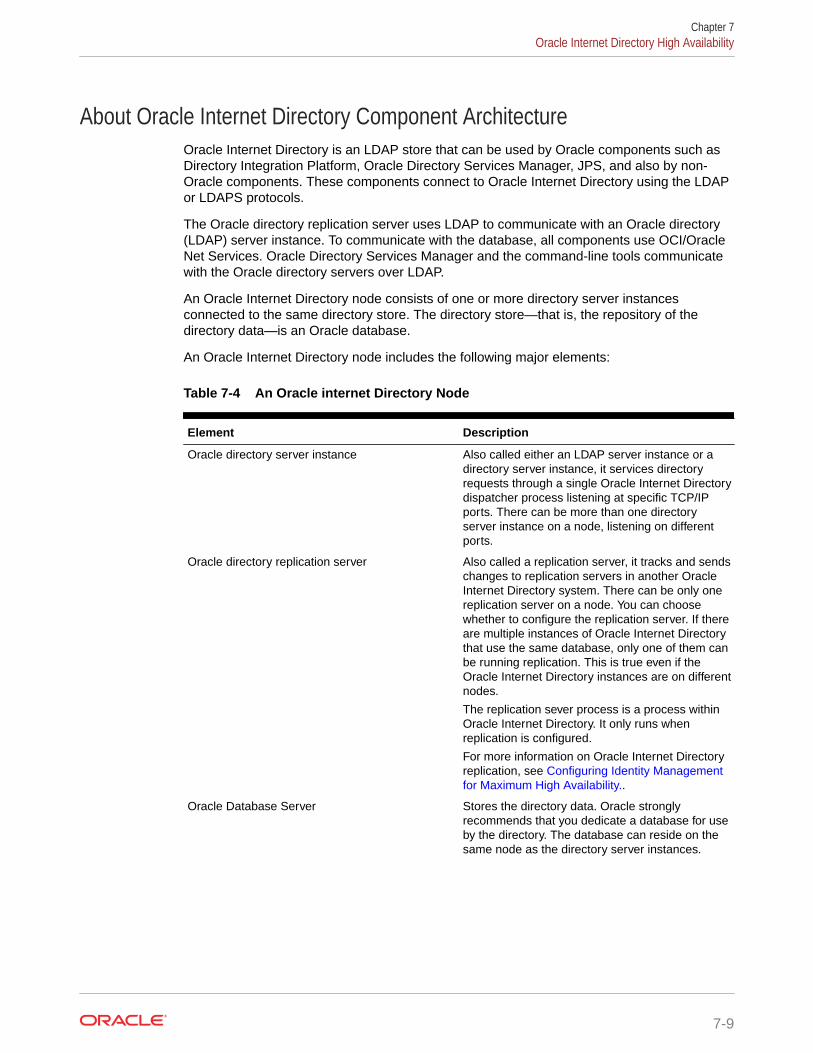
About Oracle Internet Directory Component ArchitectureOracle Internet Directory is an LDAP store that can be used by Oracle components such asDirectory Integration Platform, Oracle Directory Services Manager, JPS, and also by non-Oracle components. These components connect to Oracle Internet Directory using the LDAPor LDAPS protocols.
The Oracle directory replication server uses LDAP to communicate with an Oracle directory(LDAP) server instance. To communicate with the database, all components use OCI/OracleNet Services. Oracle Directory Services Manager and the command-line tools communicatewith the Oracle directory servers over LDAP.
An Oracle Internet Directory node consists of one or more directory server instancesconnected to the same directory store. The directory store—that is, the repository of thedirectory data—is an Oracle database.
An Oracle Internet Directory node includes the following major elements:
Table 7-4 An Oracle internet Directory Node
Element Description
Oracle directory server instance Also called either an LDAP server instance or adirectory server instance, it services directoryrequests through a single Oracle Internet Directorydispatcher process listening at specific TCP/IPports. There can be more than one directoryserver instance on a node, listening on differentports.
Oracle directory replication server Also called a replication server, it tracks and sendschanges to replication servers in another OracleInternet Directory system. There can be only onereplication server on a node. You can choosewhether to configure the replication server. If thereare multiple instances of Oracle Internet Directorythat use the same database, only one of them canbe running replication. This is true even if theOracle Internet Directory instances are on differentnodes.
The replication sever process is a process withinOracle Internet Directory. It only runs whenreplication is configured.
For more information on Oracle Internet Directoryreplication, see Configuring Identity Managementfor Maximum High Availability..
Oracle Database Server Stores the directory data. Oracle stronglyrecommends that you dedicate a database for useby the directory. The database can reside on thesame node as the directory server instances.
Chapter 7Oracle Internet Directory High Availability
7-9
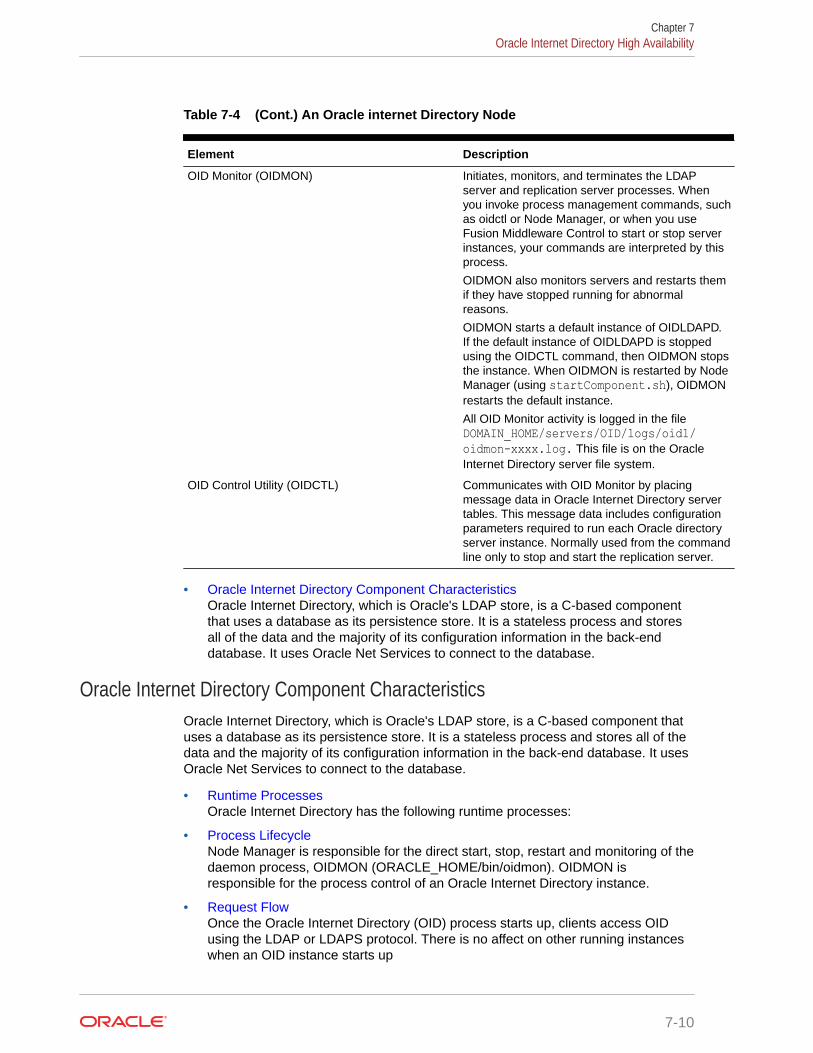
Table 7-4 (Cont.) An Oracle internet Directory Node
Element Description
OID Monitor (OIDMON) Initiates, monitors, and terminates the LDAPserver and replication server processes. Whenyou invoke process management commands, suchas oidctl or Node Manager, or when you useFusion Middleware Control to start or stop serverinstances, your commands are interpreted by thisprocess.
OIDMON also monitors servers and restarts themif they have stopped running for abnormalreasons.
OIDMON starts a default instance of OIDLDAPD.If the default instance of OIDLDAPD is stoppedusing the OIDCTL command, then OIDMON stopsthe instance. When OIDMON is restarted by NodeManager (using startComponent.sh), OIDMONrestarts the default instance.
All OID Monitor activity is logged in the fileDOMAIN_HOME/servers/OID/logs/oid1/oidmon-xxxx.log. This file is on the OracleInternet Directory server file system.
OID Control Utility (OIDCTL) Communicates with OID Monitor by placingmessage data in Oracle Internet Directory servertables. This message data includes configurationparameters required to run each Oracle directoryserver instance. Normally used from the commandline only to stop and start the replication server.
• Oracle Internet Directory Component CharacteristicsOracle Internet Directory, which is Oracle's LDAP store, is a C-based componentthat uses a database as its persistence store. It is a stateless process and storesall of the data and the majority of its configuration information in the back-enddatabase. It uses Oracle Net Services to connect to the database.
Oracle Internet Directory Component CharacteristicsOracle Internet Directory, which is Oracle's LDAP store, is a C-based component thatuses a database as its persistence store. It is a stateless process and stores all of thedata and the majority of its configuration information in the back-end database. It usesOracle Net Services to connect to the database.
• Runtime ProcessesOracle Internet Directory has the following runtime processes:
• Process LifecycleNode Manager is responsible for the direct start, stop, restart and monitoring of thedaemon process, OIDMON (ORACLE_HOME/bin/oidmon). OIDMON isresponsible for the process control of an Oracle Internet Directory instance.
• Request FlowOnce the Oracle Internet Directory (OID) process starts up, clients access OIDusing the LDAP or LDAPS protocol. There is no affect on other running instanceswhen an OID instance starts up
Chapter 7Oracle Internet Directory High Availability
7-10
• About Configuration ArtifactsThe storage location requires a DB connect string. TNSNAMES.ORA is stored inDOMAIN_HOME/config. The wallet is stored in DOMAIN_HOME/config/fmwconfig/components/OID/admin (The DB ODS user password is stored in the wallet).
• External DependenciesOracle Internet Directory uses an Oracle database to store configuration information aswell as data. It uses the ODS schema to store this information.
• Oracle Internet Directory Log FileLog files for Oracle Internet Directory are under the following directory:
Runtime ProcessesOracle Internet Directory has the following runtime processes:
• OIDLDAPD: This is the main process for Oracle Internet Directory. OIDLDAPD consistsof a dispatcher process and a server process. The dispatcher process spawns theOIDLDAPD server processes during startup. Each OIDLDAPD dispatcher process has itsown SSL and non-SSL ports for receiving requests. Every OID instance has onedispatcher and one server process by default. The number of server processes spawnedfor an instance is controlled by the orclserverprocs attribute.
• OIDMON: OIDMON is responsible for the process control of an Oracle Internet Directoryinstance. This process starts, stops, and monitors Oracle Internet Directory. Duringstartup OIDMON spawns the OIDLDAPD dispatcher process and the replication serverprocess, if replication is configured for the instance.
• Replication server process: This is a process within Oracle Internet Directory that runsonly when replication is configured. The replication server process is spawned byOIDMON during startup.
• Node Manager: Node Manager is a daemon process that monitors Oracle FusionMiddleware components, including Oracle Internet Directory.
Node Manager is responsible for the direct start, stop, restart and monitoring of OIDMON.It does not start or stop the server process directly.
Process LifecycleNode Manager is responsible for the direct start, stop, restart and monitoring of the daemonprocess, OIDMON (ORACLE_HOME/bin/oidmon). OIDMON is responsible for the processcontrol of an Oracle Internet Directory instance.
Process Status Table
Oracle Internet Directory process information is maintained in the ODS_PROCESS_STATUStable in the ODS database user schema. OIDMON reads the contents of the table at aspecified interval and acts upon the intent conveyed by the contents of that table. The intervalis controlled by the value of the sleep command line argument used at OIDMON startup, andthe default value is 10 seconds.
Starting and Stopping Oracle Internet Directory
An Oracle Internet Directory instance can be started and stopped using system componentmanagement scripts — startComponent.sh and stopComponent.sh.
Start Process
Chapter 7Oracle Internet Directory High Availability
7-11
The start process for Oracle Internet Directory is:
1. Upon receiving the start command, Node Manager issues an oidmon startcommand with appropriate arguments.
2. OIDMON then starts all Oracle Internet Directory Server instances whoseinformation in the ODS_PROCESS_STATUS table has state value 1 or 4 andCOMPONENT_NAME, INSTANCE_NAME values matching the environmentparameters set by Node Manager.
Stop Process
The stop process for Oracle Internet Directory is:
1. Upon receiving the stop command, Node Manager issues an oidmon stopcommand.
2. For each row in the ODS_PROCESS_STATUS table that matches theenvironment parameters COMPONENT_NAME, and INSTANCE_NAME, theoidmon stop command kills OIDMON, OIDLDAPD, and OIDREPLD processes andupdates the state to 4.
Monitoring
Node Manager does not monitor server processes directly. Node Manager monitorsOIDMON and OIDMON monitors the server processes. The events are:
• When you start OIDMON through Node Manager, Node Manager starts OIDMONand ensures that OIDMON is up and running.
• If OIDMON goes down for some reason, Node Manager brings it back up.
• OIDMON monitors the status of the Oracle Internet Directory dispatcher process,LDAP server processes, and replication server process and makes this statusavailable to Node Manager.
Request FlowOnce the Oracle Internet Directory (OID) process starts up, clients access OID usingthe LDAP or LDAPS protocol. There is no affect on other running instances when anOID instance starts up
Oracle Internet Directory listener/dispatcher starts a configured number of serverprocesses at startup time. The number of server processes is controlled by theorclserverprocs attribute in the instance-specific configuration entry. The default valuefor orclserverprocs is 1. Multiple server processes enable OID to take advantage ofmultiple processor systems.
The OID dispatcher process sends the LDAP connections to the OID server process ina round robin fashion. The maximum number of LDAP connections accepted by eachserver is 1024 by default. This number can be increased by changing the attributeorclmaxldapconns in the instance-specific configuration entry, which has a DN of theform:
cn=componentname,cn=osdldapd,cn=subconfigsubentry
Database connections from each server process are spawned at server startup time,depending on the value set for the instance configuration parameters ORCLMAXCCand ORCLPLUGINWORKERS. The number of database connections spawned byeach server equals ORCLMAXCC + ORCLPLUGINWORKERS + 2. The OID server
Chapter 7Oracle Internet Directory High Availability
7-12
processes communicate with the Oracle database server through Oracle Net Services. AnOracle Net Services listener/dispatcher relays the request to the Oracle database. For moreinformation, see Oracle Fusion Middleware Administrator's Guide for Oracle InternetDirectory.
About Configuration ArtifactsThe storage location requires a DB connect string. TNSNAMES.ORA is stored inDOMAIN_HOME/config. The wallet is stored in DOMAIN_HOME/config/fmwconfig/components/OID/admin (The DB ODS user password is stored in the wallet).
External DependenciesOracle Internet Directory uses an Oracle database to store configuration information as wellas data. It uses the ODS schema to store this information.
The Oracle directory replication server uses LDAP to communicate with an Oracle directory(LDAP) server instance. To communicate with the database, all components use OCI/OracleNet Services. Oracle Directory Services Manager and the command-line tools communicatewith the Oracle directory servers over LDAP.
Oracle Internet Directory Log FileLog files for Oracle Internet Directory are under the following directory:
DOMAIN_HOME/servers/OID/logs/InstanceName/Table shows Oracle Internet Directory processes and the log file name and location for theprocess.
Table 7-5 Locations of Oracle Internet Directory Process Log Files
Process Log File Location
Directory server (oidldapd) DOMAIN_HOME/servers/OID/logs/InstanceName/oidldapd00sPID-XXXX.logwhere:
00 is the instance number (00 by default)
s stands for server
PID is the server process identifier
XXXX is a number from 0000 toorclmaxlogfilesconfigured. Once theorclmaxlogfilesconfigured value is reached, itstarts over again from 0000. When it starts over, ittruncates the file to 0 bytes.
DOMAIN_HOME/servers/OID/logs/InstanceName/oidstackInstNumberPID.log
LDAP dispatcher (oiddispd) DOMAIN_HOME/servers/OID/logs/InstanceName/oiddispd00-XXXX.log where:
00 is the instance number (00 by default)
XXXX is a number from 0000 toorclmaxlogfilesconfigured
Chapter 7Oracle Internet Directory High Availability
7-13
Table 7-5 (Cont.) Locations of Oracle Internet Directory Process Log Files
Process Log File Location
OID Monitor (OIDMON) DOMAIN_HOME/servers/OID/logs/InstanceName/oidmon-XXXX.log where:
XXXX is a number from 0000 toorclmaxlogfilesconfigured
Directory replication server (oidrepld) DOMAIN_HOME/servers/OID/logs/InstanceName/oidrepld-XXXX.log where:
XXXX is a number from 0000 toorclmaxlogfilesconfigured
For more information on using log files to troubleshoot Oracle Internet Directory, see Troubleshooting Oracle Internet Directory High Availability.
Understanding Oracle Internet Directory High Availability ConceptsThis section provides conceptual information about using Oracle Internet Directory in ahigh availability two-node Cluster Configuration.
See Oracle Internet Directory Prerequisites for prerequisites and Oracle InternetDirectory High Availability Configuration Steps to set up the two-node ClusterConfiguration.
• Oracle Internet Directory High Availability ArchitectureLearn about the Oracle Internet Directory Cluster Configuration high availabilityarchitecture in an active-active configuration.
• Protection from Failures and Expected BehaviorThis section discusses protection from different types of failure in an OID ClusterConfiguration.
• Oracle Internet Directory PrerequisitesThis section describes prerequisites for setting up the OID high availabilityarchitecture.
Oracle Internet Directory High Availability ArchitectureLearn about the Oracle Internet Directory Cluster Configuration high availabilityarchitecture in an active-active configuration.
The Figure 7-1 shows the Oracle Internet Directory Cluster Configuration highavailability architecture in an active-active configuration.
Chapter 7Oracle Internet Directory High Availability
7-14
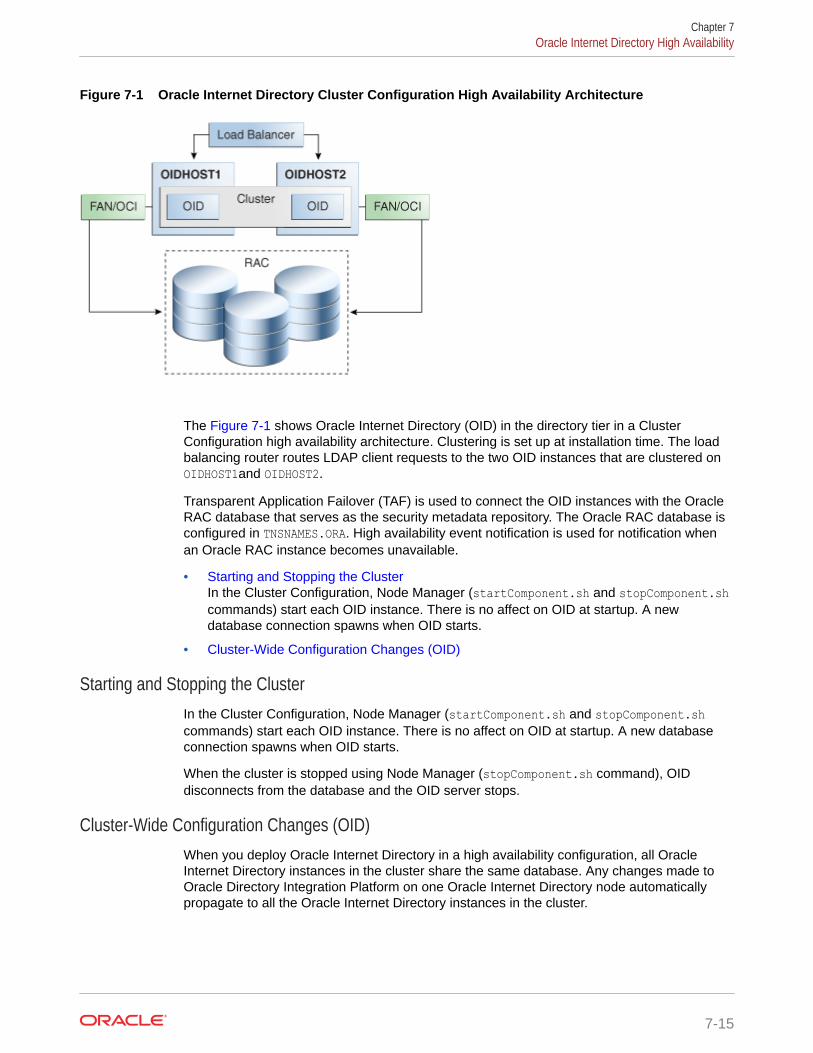
Figure 7-1 Oracle Internet Directory Cluster Configuration High Availability Architecture
The Figure 7-1 shows Oracle Internet Directory (OID) in the directory tier in a ClusterConfiguration high availability architecture. Clustering is set up at installation time. The loadbalancing router routes LDAP client requests to the two OID instances that are clustered onOIDHOST1and OIDHOST2.
Transparent Application Failover (TAF) is used to connect the OID instances with the OracleRAC database that serves as the security metadata repository. The Oracle RAC database isconfigured in TNSNAMES.ORA. High availability event notification is used for notification whenan Oracle RAC instance becomes unavailable.
• Starting and Stopping the ClusterIn the Cluster Configuration, Node Manager (startComponent.sh and stopComponent.shcommands) start each OID instance. There is no affect on OID at startup. A newdatabase connection spawns when OID starts.
• Cluster-Wide Configuration Changes (OID)
Starting and Stopping the ClusterIn the Cluster Configuration, Node Manager (startComponent.sh and stopComponent.shcommands) start each OID instance. There is no affect on OID at startup. A new databaseconnection spawns when OID starts.
When the cluster is stopped using Node Manager (stopComponent.sh command), OIDdisconnects from the database and the OID server stops.
Cluster-Wide Configuration Changes (OID)When you deploy Oracle Internet Directory in a high availability configuration, all OracleInternet Directory instances in the cluster share the same database. Any changes made toOracle Directory Integration Platform on one Oracle Internet Directory node automaticallypropagate to all the Oracle Internet Directory instances in the cluster.
Chapter 7Oracle Internet Directory High Availability
7-15
Directory Synchronization Profiles
Changes that you make to directory integration profiles on one Oracle InternetDirectory node do not replicate automatically to other Oracle Internet Directory nodesin a default multimaster Oracle Internet Directory replication environment. You mustcopy changes from the primary node to the secondary nodes manually and do so on aperiodic basis. By doing this, a directory synchronization profile can run on asecondary node if a problem occurs on the primary node.
Oracle Directory Integration Platform uses the parameterorcllastappliedchangenumber. The value assigned to the lastchangenumber attributein a directory synchronization profile depends on the directory server on which OracleDirectory Integration Platform is running. In an active-active Oracle DirectoryIntegration Platform configuration, you must manually update the lastchangenumberattribute in all instances.
To synchronize directory provisioning profiles between the primary Oracle InternetDirectory node and secondary nodes:
1. On the primary node, use the ldifwrite command to create an LDIF dump of theentries from this container:
cn=subscriber profiles,cn=changelog subscriber,cn=oracle internet directory2. Copy the LDIF dump to the secondary node.
3. Use the ldapadd command to add the profiles on the secondary node.
After you copy an export profile to a target node, you must update thelastchangenumber attribute with the target node value. To update the value:
1. Disable the synchronization profile.
2. Get the value of the lastchangenumber attribute on the target node using theldapsearch command.
3. Use ldapsearch to get the LDIF dump of the profile entry.
4. Use ldapadd to add the profile to the other Managed Server instance.
5. Go to the Oracle Directory Integration Platform Admin console and select theprofile. Select Edit. Select the Advanced tab then select Edit and Persist. Enterthe value of the lastchangenumber attribute. Save the profile.
6. Enable the synchronization profile.
Directory Provisioning Profiles
In a default multimaster Oracle Internet Directory replication environment, OracleDirectory Integration Platform is installed in the same location as the primary OracleInternet Directory. The information and steps in this topic applies only whenmultimaster replication is set up.
If the primary node fails, event propagation stops for all profiles located on the node.Although the events are queued and not lost while the primary node is stopped, theevents do not propagate to any applications that expect them. To ensure that eventscontinue to propagate even when the primary node is down for the Version 1.0 and 2.0profiles, the directory provisioning profiles must be copied to other secondary nodes.
Chapter 7Oracle Internet Directory High Availability
7-16
However, copy directory provisioning profiles from the primary node to any secondary nodesimmediately after an application is installed and before any user changes are made in OracleInternet Directory.
To synchronize directory provisioning profiles between a primary node and any secondarynodes:
1. On the primary node, use the ldifwrite command to create an LDIF dump of the entriesfrom this container:
cn=provisioning profiles,cn=changelog subscriber,cn=oracle internet directory2. Copy the LDIF dump to the secondary node.
3. Use the ldapadd command to add the profiles on the secondary node.
Protection from Failures and Expected BehaviorThis section discusses protection from different types of failure in an OID ClusterConfiguration.
• Oracle Internet Directory Process FailureOIDMON monitors OID processes. If the OID process goes down, OIDMON tries torestart it.
• Expected Client Application Behavior When Failure OccursOracle Internet Directory server failure is usually transparent to OID clients as theycontinue to get routed through the load balancer. External load balancers are typicallyconfigured to perform a health check of OID processes. If a request is received beforethe load balancer detects process unavailability, clients application could receive a error.If the client application performs a retry, the load balancer should route it to a healthy OIDinstance and the request should be successful.
• External Dependency FailureThis section describes the protection available for OID from database failure.
Oracle Internet Directory Process FailureOIDMON monitors OID processes. If the OID process goes down, OIDMON tries to restart it.
Node Manager monitors OIDMON. If OIDMON goes down, Node Manager restarts OIDMON.
If you cannot start an OID process, the front-ending load balancing router detects failure ofOID instances in the Cluster Configuration and routes LDAP traffic to surviving instances. Incase of failure, the LDAP client retries the transaction. If the instance fails in the middle of atransaction, the transaction is not committed to the database. When the failed instancecomes up again, the load balancing router detects this and routes requests to all theinstances.
If an OID instance in the Cluster Configuration gets hung, the load balancing router detectsthis and routes requests to surviving instances.
If one OID instance in the two-node Cluster Configuration fails (or if one of the computershosting an instance fails), the load balancing router routes clients to the surviving OIDinstance.
Chapter 7Oracle Internet Directory High Availability
7-17
Expected Client Application Behavior When Failure OccursOracle Internet Directory server failure is usually transparent to OID clients as theycontinue to get routed through the load balancer. External load balancers are typicallyconfigured to perform a health check of OID processes. If a request is received beforethe load balancer detects process unavailability, clients application could receive aerror. If the client application performs a retry, the load balancer should route it to ahealthy OID instance and the request should be successful.
In OID active-active configurations, if you are doing ldapadd operations through theLDIF file at the time of failover, your operation would fail even if you are doing thisoperation through a load balancer host and port. This is because OID is down for afraction of a second. For most applications, this will not be an issue because mostapplications have the ability to retry the connection a fixed number of times.
External Dependency FailureThis section describes the protection available for OID from database failure.
By default, the tnsnames.ora file configured in OID's ORACLE_INSTANCE ensuresthat OID's connections to the database are load balanced between the Oracle RACdatabase instances. For example, if an OID instance establishes four databaseconnections, two connections are made to each database instance.
Oracle Internet Directory uses database high availability event notification to detectdatabase node failure and to fail over to a surviving node.
If Transparent Application Failover (TAF) is configured, then upon a database instancefailure, OID will fail over its database connections to the surviving database instance,which enables the LDAP search operations that were in progress during the failover tobe continued.
If both TAF and high availability event notification are configured, TAF is used forfailover and high availability event notifications are used only for logging the events.The high availability event notifications are logged in OIDLDAPD log file.
Oracle Internet Directory also has a mechanism to detect stale database connections,which enables OID to reconnect to the database.
If none of the database instances are available for a prolonged period, then the OIDLDAP and REPL processes will automatically be shut down. However, OIDMON andNode Manager will continue to ping for the database instance availability and when thedatabase becomes available, the OID processes (LDAP and REPL) are automaticallyrestarted by OIDMON.
While all database instances are down, OIDMON continues to be up and anoid_instanceStatus(instanceName = 'instance-name') command shows thatOIDLDAPD instances are down. When a database instance becomes available,OIDMON restarts all configured OID instances.
All database failover induced activity for OID is recorded in the OIDMON log file.
Oracle Internet Directory PrerequisitesThis section describes prerequisites for setting up the OID high availabilityarchitecture.
Chapter 7Oracle Internet Directory High Availability
7-18
• Synchronizing the Time on Oracle Internet Directory NodesBefore setting up OID in a high availability environment, you must ensure that the time onthe individual OID nodes is synchronized.
• Load Balancer Virtual Server Names for Oracle Internet DirectoryWhen you deploy OID in a high availability configuration, Oracle recommends using anexternal load balancer to front-end OID instances and load balance requests between theOID instances.
Synchronizing the Time on Oracle Internet Directory NodesBefore setting up OID in a high availability environment, you must ensure that the time on theindividual OID nodes is synchronized.
Synchronize the time on all nodes using Greenwich Mean Time so that there is a discrepancyof no more than 250 seconds between them.
If OID Monitor detects a time discrepancy of more than 250 seconds between the two nodes,the OID Monitor on the node that is behind stops all servers on its node. To correct thisproblem, synchronize the time on the node that is behind in time. The OID Monitorautomatically detects the change in the system time and starts the OID servers on its node.
If there are more than two nodes, the same behavior is followed. For example, assume thatthere are three nodes, where the first node is 150 seconds ahead of the second node, andthe second node is 150 seconds ahead of the third node. In this case, the third node is 300seconds behind the first node, so the OID Monitor will not start the servers on the third nodeuntil the time is synchronized.
Load Balancer Virtual Server Names for Oracle Internet DirectoryWhen you deploy OID in a high availability configuration, Oracle recommends using anexternal load balancer to front-end OID instances and load balance requests between theOID instances.
See Configuring Virtual Server Names and Ports for the Load Balancer.
Oracle Internet Directory High Availability Configuration StepsYou can deploy Oracle Internet Directory in a High Availability configuration as part of aWebLogic Server domain.
Oracle recommends that you set up OID in a clustered deployment in which clustered OIDinstances access the same Oracle RAC database repository.
• Installing Oracle Fusion Middleware ComponentsThis section describes how to install the required binaries for the Oracle WebLogicServer (WL_HOME) and Oracle Home for (ORACLE_HOME) for Oracle IdentityManagement.
• Creating Oracle Internet Directory Schemas in the Repository Using RCUThis section describes the procedure to create schemas in the repository usingRepository Creation Utility (RCU).
• Configuring Oracle Internet Directory With a WebLogic DomainIn this configuration, OID and a WebLogic Server domain is configured on the first hostand the second host. The OID instance on the second host joins the domain created onthe first host.
Chapter 7Oracle Internet Directory High Availability
7-19
Installing Oracle Fusion Middleware ComponentsThis section describes how to install the required binaries for the Oracle WebLogicServer (WL_HOME) and Oracle Home for (ORACLE_HOME) for Oracle IdentityManagement.
Oracle strongly recommends that you read the release notes for any additionalinstallation and deployment considerations prior to starting the setup process.
• Installing Oracle WebLogic ServerThis section describes the procedure to install Oracle WebLogic server.
• Installing Oracle Internet DirectoryThis section describes the procedure to install Oracle Internet Directory.
Installing Oracle WebLogic ServerThis section describes the procedure to install Oracle WebLogic server.
See Understanding Your Installation Starting Point in Oracle Fusion MiddlewareInstallation Planning Guide for the Oracle WebLogic Server version to use with thelatest Oracle Fusion Middleware version.
Ensure that system, patch, kernel and other requirements are met as described in Planning the Oracle WebLogic Server Installation in Oracle Fusion MiddlewareInstallation Guide for Oracle WebLogic Server.
Start the Oracle WebLogic Server installer then follow these steps:
1. On the Welcome screen, click Next.
2. On the Choose Installation Location screen, browse and navigate to the folderwhere you want to install the WebLogic Servre.
Click Next
3. On the Installation Type screen, Select Fusion Middleware Insfrastructure
4. On the Prerequisite Checks screen, Click Next.
5. On the Installation Summary screen, the window contains a list of the componentsyou selected for installation, along with the approximate amount of disk space tobe used by the selected components once installation is complete.
Click Install.
6. On the Installation Progress, Click Next.
7. On the Installation Complete screen, click Finish.
Installing Oracle Internet DirectoryThis section describes the procedure to install Oracle Internet Directory.
Ensure that the system, patch, kernel and other requirements are met. These arelisted in the Preparing to Install in Oracle Fusion Middleware Installation Guide forOracle Identity Management.
Chapter 7Oracle Internet Directory High Availability
7-20
Note:
Ensure that the ORACLE_HOME that are using for installing OID is same asORACLE_HOME used for installing weblogic server.
On Linux platforms, if the /etc/oraInst.loc file exists, verify that its contents are correct.Specifically, check that the inventory directory is correct and that you have write permissionsfor it. If the/etc/oraInst.loc file does not exist, skip this step.
Start the installer for Oracle Fusion Middleware components.
Before starting the install, ensure that the following environment variables are not set:
• LD_ASSUME_KERNEL
On the Specify Inventory Directory screen, do the following:
• Enter HOME/oraInventory, where HOME is the home directory of the user performing theinstallation (this is the recommended location).
• Enter the OS group for the user performing the installation. Click Next.
For a UNIX install, follow the instructions on screen to run createCentralInventory.sh asroot.
Click OK.
Proceed as follows:
1. Start Oracle Internet Directory 12c (12.2.1.4.0) Installer.
2. On the Welcome screen, click Next.
3. On the Auto Updates screen, select Skip Auto Updates and click Next.
4. On the Installation Location screen, browse and select the folder where you want toinstall Oracle Internet Directory. Click Next
Note:
Ensure that the ORACLE_HOME used for installing OID is same asORACLE_HOME used for installing Weblogic server.
5. On the Installation Type screen, Based on your requirement, Select either of the option— Standalone Oracle Internet Directory Server (Managed Independently ofWebLogic server) or Collocated Oracle Internet Directory Server (Managed throughWeblogic server) . ClickNext.
6. On the JDK Selection screen, browse and select jdk8 folder and click Next.
7. On the Prerequisite Checks ensure that all the prerequisites are met, without anywarnings. Click Next.
8. On the Installation Summary screen, click Install.
9. Click Finish.
Chapter 7Oracle Internet Directory High Availability
7-21
Creating Oracle Internet Directory Schemas in the Repository Using RCUThis section describes the procedure to create schemas in the repository usingRepository Creation Utility (RCU).
To run RCU and create Identity Management schemas in a RAC database repository:
1. Run this command:
ORACLE_HOME/oracle_common/bin/rcu &2. On the Welcome screen, click Next.
3. On the Create Repository screen, select the Create Repository and SystemLoad and Product Load to load component schemas into an existing database.
Click Next.
4. On the Database Connection Details screen, enter connection information for theexisting database as follows:
• Database Type: Oracle Database• Connection String Format: select either —
– Connection Parameters: This option provides an interface that accepts allconnection parameters (namely - host, port and service name) separatelyin different UI elements.
– Connection String: This option accepts all parameters in a single string.This string can be of one of the following formats:
<host>:<port>/service or <host>:<port>:<SID> or(DESCRIPTION=(ADDRESS=(host=host_name)(protocol=protocol_name)(port=port_number))(CONNECT_DATA=(SERVICE_NAME=service_name)))
• Host Name:Name of the computer on which the database is running. For anOracle RAC database, specify the VIP name or one node name. Example:INFRADBHOST1-VIP or INFRADBHOST2-VIP
• Port:The port number for the database. Example: 1521• Service Name:The service name of the database. Example: oid.example.com• Username:SYS• Password: The SYS user password
• Role:SYSDBA5. Click Next.
6. On the Select Components screen, create a new prefix and select thecomponents to be associated with this deployment:
Create a New Prefix:idm (Entering a prefix is optional if you select only IdentityManagement(Oracle Internet Directory - ODS) in the Components field)
Components: Select Identity Management(Oracle Internet Directory - ODS). Onselecting Identity Management component, some of the default componentsthat are dependent on Oracle Internet Directory are automatically selected.
Click Next.
Chapter 7Oracle Internet Directory High Availability
7-22
7. On the Schema Passwords screen, enter the passwords to create password for the mainand auxiliary schema users.
Click Next.
8. On the Map Tablespaces screen, select the tablespaces for the components. Thedefault tablespaces for the selected components are displayed. Click Next
9. On the Summary screen, click Create.
10. On the Completion Summary screen, click Close.
Configuring Oracle Internet Directory With a WebLogic DomainIn this configuration, OID and a WebLogic Server domain is configured on the first host andthe second host. The OID instance on the second host joins the domain created on the firsthost.
• Oracle Internet Directory Component Names Assigned by Oracle Identity ManagementInstallerWhen you configure OID using the Config Wizard, the default instance that the installerassigns to the OID instance is oid1. You cannot change this name.
• Configuring Oracle Internet Directory on OIDHOST1Ensure that the schema database is running and that RCU has been used to seed theODS database schema, then follow these steps to configure the OID instance onOIDHOST1:
• Configuring Oracle Internet Directory on OIDHOST2Ensure that the OID repository is running and then follow these steps to configure theOID instance on OIDHOST2:
Oracle Internet Directory Component Names Assigned by Oracle Identity Management InstallerWhen you configure OID using the Config Wizard, the default instance that the installerassigns to the OID instance is oid1. You cannot change this name.
The instance-specific configuration entry for this OID instance is cn=oid1, cn=osdldapd,cn=subconfigsubentry.
If you perform a second OID installation on another computer and that OID instance uses thesame database as the first instance, the installer detects the previously installed OID instanceon the other computer using the same Oracle database, so it gives the second OID instancea component name of oid2.
The instance-specific configuration entry for the second OID instance is cn=oid2,cn=osdldapd, cn=subconfigsubentry. Any change of properties in the entry cn=oid2,cn=osdldapd, cn=subconfigsubentry will not affect the first instance (oid1).
If a third OID installation is performed on another computer and that instance uses the samedatabase as the first two instances, the installer gives the third OID instance a componentname of oid3, and so on for additional instances on different hosts that use the samedatabase.
Note that the shared configuration for all OID instances is cn=dsaconfig,cn=configsets,cn=oracle internet directory. Any change in this entry will affect all theinstances of OID.
Chapter 7Oracle Internet Directory High Availability
7-23
Configuring Oracle Internet Directory on OIDHOST1Ensure that the schema database is running and that RCU has been used to seed theODS database schema, then follow these steps to configure the OID instance onOIDHOST1:
1. Ensure that the system, patch, kernel and other requirements are met. These arelisted in Preparing to Install in Oracle Fusion Middleware Installation Guide forOracle Identity Managementguide.
2. Ensure that Oracle Identity Management software is installed and upgraded onOIDHOST1 Installing Oracle Fusion Middleware Components describes.
3. Ensure that ports 3060 and 3131 are not in use by any service on the computer byissuing these commands for the operating system you are using. If a port is not inuse, no output is returned from the command.
On UNIX:
netstat -an | grep LISTEN | grep ":3060" netstat -an | grep LISTEN | grep ":3131"
On Windows:
netstat -an | findstr "LISTEN" | findstr ":3060"netstat -an | findstr "LISTEN" | findstr ":3131"
4. If the port is in use (if the command returns output identifying the port), you mustfree the port.
a. On Unix:
Remove any entries for ports 3060 and 3131 in the /etc/services file andrestart the services, or restart the computer. You can also check for anyexisting processes that is using these ports, using netstat -anp command.
b. On Windows:
Stop the component that is using these ports.
5. Start the Configuration Wizard from ORACLE_HOME/oracle_common/common/bin/config.sh directory:
On UNIX, issue this command: ./config.shOn Windows, double-click config.exe
6. On Create Domain screen, select Create a New Domain and provide the domainlocation. Click Next.
7. On Templates screen, select Oracle Internet Directory( Collocated ) - 12.2.1.3.0 [oid] template. Retain all the selecteddependent templates. Click Next.
8. On Administrator Account screen, provide weblogic user password and clickNext.
9. On Domain Mode and JDK screen, select Production in Domain Mode field andselect JDK8 Based Install . Click Next.
10. On Database Configuration Type screen, specify the database connectionparameters. Change the schema owner field value from DEV_STB to relevant
Chapter 7Oracle Internet Directory High Availability
7-24
prefix — <PREFIX_STB> — as needed, click Get RCU Configuration and click Next.
11. On Component Datasources screen, click Next.
12. On JDBC Test screen, after successful connection test, click Next.
13. On Advanced Configuration screen, select Administration Server, Node Managerand Topology. Click Next.
14. On Administration Server screen, update Listen Address to a desired hostname andListen Port as needed. Click Next.
15. On Node Manager Type screen, provide Node Manager credentials and Click Next.
16. On Manager Server, Skip the screen and click Next.
17. On Cluster screen, Skip and click Next.
18. On Server Templates screen, Skip and click Next.
19. On Coherence Clusters screen, Skip and click Next.
20. On Machines screen, Do Not change the name of the default machine name asoidhost1. Update the Listen Address to appropriate host name. The Node ManagerListen Port can be changed, if required. This port number should be the same value asthe one in nodemanager.properties file. Add a new machine with name - oidhost2and update the Listen Address to appropriate host name that points to OIDHOST2. Ifrequired, change the Listen Port to a desired port value.
21. On Assign Servers to Machines screen, select oidhost1 and assign AdminServer tooidhost1. Click Next.
22. On Virtual Targets screen, click Next.
23. On Partitions screen, click Next.
24. On Configuration Summary, click Create.
25. Start Administration Server.
26. Start Node Manager.
27. From ORACLE_HOME/oracle_common/common/bin/wlst.sh directory, Runwlst.sh and execute the following commands:
connect('weblogic','<password>', 't3://<admin-host>:<admin-port>')oid_setup(orcladminPassword='<desired-password>', odsPassword='ODS-schema-password")oid_createInstance(instanceName='oid2', machine='oidhost2',port='oid-non-ssl-port',sslPort='oid-ssl-port', host='hostname-of-OIDHOST2')exit()
28. From ORACLE_HOME/oracle_common/common/bin/pack.sh directory, executepack.sh command, as shown below:
pack.sh -domain=<DOMAIN_HOME_LOCATION> -template=./base_domain.jar -template_name=base_domain -managed=true
Configuring Oracle Internet Directory on OIDHOST2Ensure that the OID repository is running and then follow these steps to configure the OIDinstance on OIDHOST2:
Chapter 7Oracle Internet Directory High Availability
7-25
1. Ensure that the system, patch, kernel and other requirements are met. These arelisted in Preparing to Install in Oracle Fusion Middleware Installation Guide forOracle Identity Managementguide.
2. Ensure that Oracle Identity Management software has been installed andupgraded on OIDHOST2 as described in Installing Oracle Fusion MiddlewareComponents
3. On OIDHOST1, ports 3060 and 3131 were used for OID. The same ports shouldbe used for the OID instance on OIDHOST2. Therefore, ensure that ports 3060and 3131 are not in use by any service on OIDHOST2 by issuing these commandsfor the operating system you are using. If a port is not in use, no output is returnedfrom the command.
On Unix:
netstat -an | grep LISTEN | grep ":3060"
netstat -an | grep LISTEN | grep ":3131"
On Windows:
netstat -an | findstr "LISTEN" | findstr ":3060"
netstat -an | findstr "LISTEN" | findstr ":3131"4. If the port is in use (if the command returns output identifying the port), you must
free the port.
On Unix:Remove any entries for ports 3060 and 3131 in the /etc/services file and restartthe services, or restart the computer. You can also check for any existingprocesses that is using these ports, using netstat -anp command.
On Windows:Stop the component that is using these ports.
5. From ORACLE_HOME/oracle_common/common directory, create the domainusing unpack.sh command. Use the packed domain jar file created inOIDHOST1:
unpack.sh -template=./base_domain.jar -domain=<ORACLE_HOME>/user_projects/domains/base_domain
6. From theDOMAIN_HOME/bin directory, start Node Manager.
./startNodeManager.sh
7. From DOMAIN_HOME/bin directory, Start oid2 instance by executingstartComponent.sh script. Execute the script from OIDHOST1 machine, whereAdminServer is setup and not from OIDHOST2.
• ./startComponent.sh oid2• oid2 can also be started either from OIDHOST1 or OIDHOST2 using WLST
command — nmStart()
nmStart(erverName='oid2', serverType='OID')
Chapter 7Oracle Internet Directory High Availability
7-26
Validating Oracle Internet Directory High AvailabilityUse the ldapbind command-line tool to ensure that you can connect to each OID instanceand the LDAP Virtual Server. The ldapbind tool enables you to determine whether you canauthenticate a client to a server.
Note:
See the Configuring Your Environment section of Oracle Fusion MiddlewareReference for Oracle Identity Management for a list of the environment variablesyou must set before using theldapbind command.
For non-SSL:
ldapbind -h oidhost1.example.com -p 3060 -D "cn=orcladmin" -qldapbind -h oidhost2.example.com -p 3060 -D "cn=orcladmin" -qldapbind -h oid.example.com -p 3060 -D "cn=orcladmin" -q
Note:
The -q option prompts the user for a password. LDAP tools are modified to disablethe options -w password and -P password when the environment variableLDAP_PASSWORD_PROMPTONLY is set to TRUE or 1. Use this featurewhenever possible.
For SSL:
ldapbind -h oidhost1.example.com -p 3131 -D "cn=orcladmin" -q -U 1ldapbind -h oidhost2.example.com -p 3131 -D "cn=orcladmin" -q -U 1ldapbind -h oid.example.com -p 3131 -D "cn=orcladmin" -q -U 1
where -U is an optional argument used to specify the SSL authentication mode. These arethe valid values for the SSL authentication mode:
• 1 = No authentication required
• 2 = One way authentication required. With this option, you must also supply a walletlocation (-W "file:/home/my_dir/my_wallet") and wallet password (-P wallet_password).
• 3 = Two way authentication required. With this option, you must also supply a walletlocation (-W "file:/home/my_dir/my_wallet") and wallet password (-P wallet_password).
For more information about the ldapbind command, see the ldapbind section in OracleFusion Middleware Reference for Oracle Identity Management.
For information about setting up SSL for OID, see Configuring Secure Sockets Layer (SSL) inthe Oracle Fusion Middleware Administrator's Guide for Oracle Internet Directory manual.
WebLogic Server Administration Console:
http://oidhost1.example.com:7001/console
Oracle Enterprise Manager Fusion Middleware Console:
Chapter 7Oracle Internet Directory High Availability
7-27
http://oidhost1.example.com:7001/em
Oracle Internet Directory Failover and Expected BehaviorThis section describes how to perform a failover of Oracle Internet Directory andOracle RAC.
This section includes the following topics:
• Performing Oracle Internet Directory FailoverThis procedure describes the steps to be followed to perform Oracle InternetDirectory failover.
• Performing an Oracle RAC FailoverThe orclfailoverenabled attribute is a configuration entry("cn=configset,cn=oidmon,cn=subconfigsubentry") that configures failover forOracle Internet Directory processes. This attribute specifies the failover time inminutes before the OID Monitor will start failed processes on a surviving node. Thedefault failover time is 5 minutes. A value of zero (0) specifies that Oracle InternetDirectory processes will not fail over to another node.
Performing Oracle Internet Directory FailoverThis procedure describes the steps to be followed to perform Oracle Internet Directoryfailover.
The following example describes how to perform a failover to OIDHOST2 and checkthe status of OID service:
1. On OIDHOST1, use the following WLST command to stop the OID instance:
shutdown(name='instance-name')2. On OIDHOST2, check the status of OID using the load balancing router.
Note:
See Configuring Your Environment in Oracle Fusion MiddlewareReference for Oracle Identity Management for a list of environmentvariables you must set before using the ldapbind command.
ldapbind -h oid.example.com -p 3060 -D "cn=orcladmin" -q
Note:
The -q option above prompts you for a password. LDAP tools aremodified to disable the options -w password and -P password when theenvironment variable LDAP_PASSWORD_PROMPTONLY is set toTRUE or 1. Use this feature whenever possible.
Related Topics
• Managing Oracle Internet Directory Components by Using WLST Commands
Chapter 7Oracle Internet Directory High Availability
7-28
Performing an Oracle RAC FailoverThe orclfailoverenabled attribute is a configuration entry("cn=configset,cn=oidmon,cn=subconfigsubentry") that configures failover for OracleInternet Directory processes. This attribute specifies the failover time in minutes before theOID Monitor will start failed processes on a surviving node. The default failover time is 5minutes. A value of zero (0) specifies that Oracle Internet Directory processes will not failover to another node.
To perform an Oracle RAC failover, perform the following steps:
1. Use the srvctl command to stop a database instance:
srvctl stop instance -d db_unique_name -i inst_name_list2. Use the srvctl command to check the status of the database:
srvctl status database -d db_unique_name -v3. Check the status of Oracle Internet Directory:
Note:
See Configuring Your Environment in Oracle Fusion Middleware Reference forOracle Identity Management for a list of environment variables you must setbefore using the ldapbind command.
ldapbind -h oid_host1 -p 3060 -D "cn=orcladmin" -qldapbind -h oid_host2 -p 3060 -D "cn=orcladmin" -qldapbind -h oid.example.com -p 3060 -D "cn=orcladmin" -q
Note:
The -q option above prompts the user for a password. LDAP tools are modifiedto disable the options -w password and -P password when the environmentvariable LDAP_PASSWORD_PROMPTONLY is set to TRUE or 1. Use thisfeature whenever possible.
To know more about RAC failover, See Oracle Internet Directory Replication-Server Controland Failover
Troubleshooting Oracle Internet Directory High AvailabilityThis section provides information that can help you troubleshoot OID high availability issues:
• Log files for OID are in directory:DOMAIN_HOME/servers/OID/logs/InstanceName
• The order in which log files should be examined when troubleshooting is:
1. oidmon-xxx.log2. oiddispd01-xxxx.log
Chapter 7Oracle Internet Directory High Availability
7-29
3. oidldapd01s-xxxx.log• This section shows some of the error messages that may be related to high
availability, and their meaning:
Error: ORA-3112, ORA-3113 errors in the log file
Cause: one of the database node is down, OID connects again to surviving node.
Action: See why database node went down or Oracle process got killed
Error: Failing Over...Please stand by in the log file
Cause: OID server received a notification from the Oracle process that one of thedatabase node is down. OID will connect to the surviving node.
– If the failover is successful you would see this message:
Failover ended...resuming services.
– If the failover was not successful, you would see these errors:
– Tried 10 times, now quitting from failover function...
– Bad Failover Event:
– Forcing Failover abort as setting of DB parameters for the session failed
• If high availability event notification is enabled, you would see a message similarto the following:
HA Callback EventThread Id: 8Event type: 0HA Source: OCI_HA_INSTANCEHost name: dbhost1Database name: orclInstance name: orcl1Timestamp: 14-MAY-09 03.25.24 PM -07:00Service name: orcl.example.comHA status: DOWN - TAF Capable
• If TAF is disabled, HA status will be shown as
DOWN.Action: See why database node went down.
Error: Time Difference of at least 250 sec found between node1 and node2.
Cause: There is time difference between the two nodes
Action: Synchronize the system time.
Error: Node=% did not respond for configured %d times, Failing over...
Cause: One of the OID nodes (oidmon) is not responding.
Action: See if the node is alive or OIDMON process is running.
Related Topics
• Troubleshooting Oracle Internet Directory
Chapter 7Oracle Internet Directory High Availability
7-30
Additional Oracle Internet Directory High Availability IssuesThis section describes issues for Oracle Internet Directory in a high availability environment.
This section describes issues for Oracle Internet Directory in a high availability environment.
See Changing the Password of the ODS Schema Used by Oracle Internet Directory
• Changing the Password of the ODS Schema Used by Oracle Internet DirectoryYou can change the OID database schema password (that is, the password of the ODSuser in the database) using the Oracle Internet Directory Database Password Utility(oidpasswd) from OIDHOST1 (Where AdminServer is installed). However, since the ODSschema password is stored in a password wallet under the DOMAIN_HOME on eachhost. This is propagated from OIDHOST1 to all other hosts automatically by WeblogicDomain Framework.
Changing the Password of the ODS Schema Used by Oracle Internet DirectoryYou can change the OID database schema password (that is, the password of the ODS userin the database) using the Oracle Internet Directory Database Password Utility (oidpasswd)from OIDHOST1 (Where AdminServer is installed). However, since the ODS schemapassword is stored in a password wallet under the DOMAIN_HOME on each host. This ispropagated from OIDHOST1 to all other hosts automatically by Weblogic DomainFramework.
To change the ODS database user password, invoke the following command on one of theOID nodes:oidpasswd connect=database-connection-string change_oiddb_pwd=true
Oracle Directory Integration Platform High AvailabilityThis section describes how to design and deploy a high availability environment for OracleDirectory Integration Platform (ODIP).
• Understanding Oracle Directory Integration Platform Component ArchitectureOracle Directory Integration Platform is a J2EE application that enables you to integrateyour applications and directories, including third-party LDAP directories, with an Oracleback-end directory: Oracle Internet Directory, Oracle Unified Directory, and OracleDirectory Server Enterprise Edition.
• Understanding Oracle Directory Integration Platform High Availability ConceptsThis section describes the Oracle Directory Integration Platform high availabilityconcepts.
• Configuring Oracle Directory Integration Platform for High AvailabilityYou can use Oracle Internet Directory or Oracle Unified Directory as the as the back-enddirectory to configure Oracle Directory Integration Platform high availability.
• About Retrieving Changes from Connected Directories
• Understanding Oracle Directory Integration Platform Failover and Expected BehaviorIn a high availability environment, you deploy the Oracle Directory Integration Platformapplication on a WebLogic Server cluster that comprises at least two WebLogicinstances.
Chapter 7Oracle Directory Integration Platform High Availability
7-31
• Troubleshooting Oracle Directory Integration Platform High AvailabilityThis section describes how to manage issues involving Oracle DirectoryIntegration Platform high availability.
Understanding Oracle Directory Integration Platform ComponentArchitecture
Oracle Directory Integration Platform is a J2EE application that enables you tointegrate your applications and directories, including third-party LDAP directories, withan Oracle back-end directory: Oracle Internet Directory, Oracle Unified Directory, andOracle Directory Server Enterprise Edition.
Note:
Oracle Directory Integration Platform does not support Oracle DirectoryServer Enterprise Edition in high availability mode in this release.
See Introduction to Oracle Directory Integration Platform in Oracle Fusion MiddlewareAdministering Oracle Directory for more on Oracle Directory Integration Platformarchitecture.
Understanding Oracle Directory Integration Platform High AvailabilityConcepts
This section describes the Oracle Directory Integration Platform high availabilityconcepts.
• About Oracle Directory Integration Platform High Availability Architecture (OIDBack-End)Learn about the Oracle Directory Integration Platform high availability architecturewith Oracle Internet Directory as the back-end directory.
• About Oracle Directory Integration Platform High Availability Architecture (OUDBack-End)This section describes the Oracle Directory Integration Platform high availabilityarchitecture with Oracle Unified Directory (OUD ) as the back-end directory.
• Protection from Failures and Expected BehaviorThis section describes protection from different types of failure in an OracleDirectory Integration Platform active-active cluster
About Oracle Directory Integration Platform High Availability Architecture (OIDBack-End)
Learn about the Oracle Directory Integration Platform high availability architecture withOracle Internet Directory as the back-end directory.
Chapter 7Oracle Directory Integration Platform High Availability
7-32
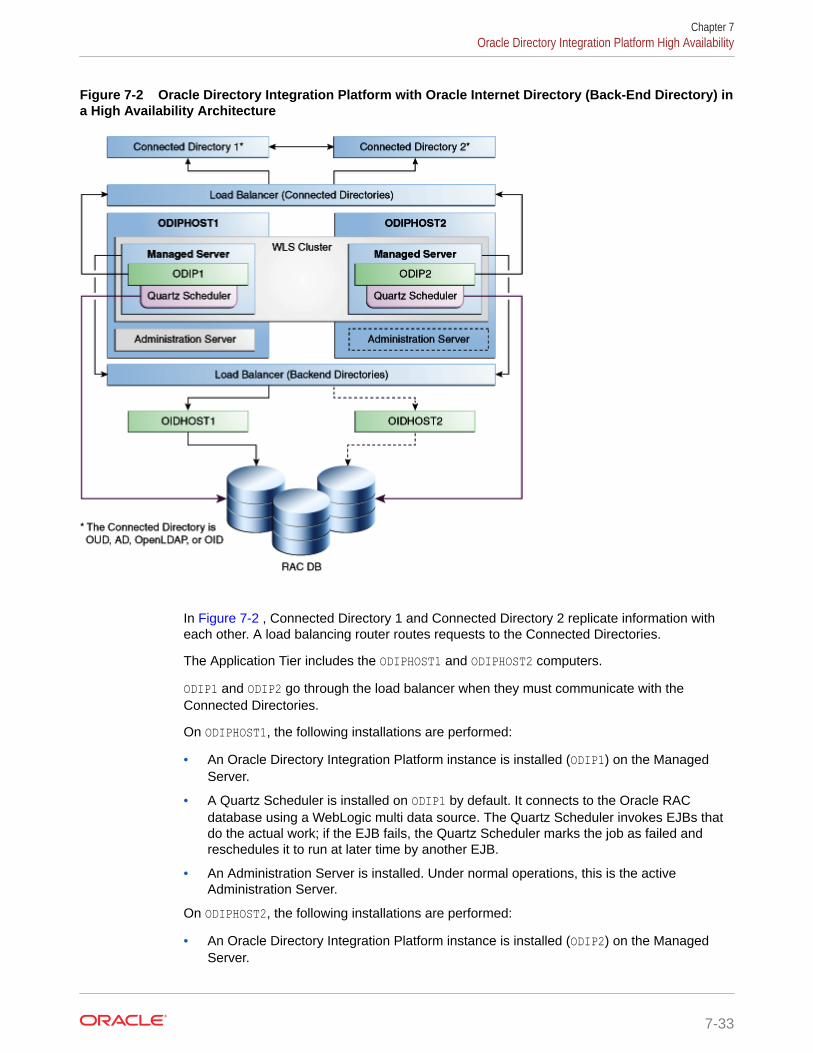
Figure 7-2 Oracle Directory Integration Platform with Oracle Internet Directory (Back-End Directory) ina High Availability Architecture
In Figure 7-2 , Connected Directory 1 and Connected Directory 2 replicate information witheach other. A load balancing router routes requests to the Connected Directories.
The Application Tier includes the ODIPHOST1 and ODIPHOST2 computers.
ODIP1 and ODIP2 go through the load balancer when they must communicate with theConnected Directories.
On ODIPHOST1, the following installations are performed:
• An Oracle Directory Integration Platform instance is installed (ODIP1) on the ManagedServer.
• A Quartz Scheduler is installed on ODIP1 by default. It connects to the Oracle RACdatabase using a WebLogic multi data source. The Quartz Scheduler invokes EJBs thatdo the actual work; if the EJB fails, the Quartz Scheduler marks the job as failed andreschedules it to run at later time by another EJB.
• An Administration Server is installed. Under normal operations, this is the activeAdministration Server.
On ODIPHOST2, the following installations are performed:
• An Oracle Directory Integration Platform instance is installed (ODIP2) on the ManagedServer.
Chapter 7Oracle Directory Integration Platform High Availability
7-33
• A Quartz Scheduler is installed on ODIP2 by default. Quartz Scheduler connects tothe Oracle RAC database using a WebLogic multi data source.
• An Administration Server is installed. Under normal operations, this is the passiveAdministration Server instance. You make this Administration Server active if theAdministration Server on ODIPHOST1 becomes unavailable.
The Oracle Directory Integration Platform instances on the ODIPHOST1 and ODIPHOST2Managed Servers are configured as a cluster.
A load balancer is set up for the back-end directories OIDHOST1 and OIDHOST2. Theload balancer routes requests to either OIDHOST1 or OIDHOST2.
Note:
When you use a RAC database, multi data source is used with OracleDirectory Integration Platform to protect the instances from RAC failure.
• About Starting and Stopping the Cluster
• Cluster-Wide Configuration Changes (OID)
About Starting and Stopping the ClusterBy default, the WebLogic Server starts, stops, and monitors the applications andOracle Directory Integration Platform leverages the high availability features of theunderlying clusters. If there is a hardware or other failure, session state is available toother cluster nodes that can resume the work of the failed node.
Node Manager monitors the WebLogic servers. If failure occurs, Node Managerrestarts the WebLogic Server.
See Configuring Java Node Manager in Oracle Fusion Middleware AdministeringNode Manager for Oracle WebLogic Server.
Cluster-Wide Configuration Changes (OID)When you deploy Oracle Internet Directory in a high availability configuration, allOracle Internet Directory instances in the cluster share the same database. Anychanges made to Oracle Directory Integration Platform on one Oracle InternetDirectory node automatically propagate to all the Oracle Internet Directory instances inthe cluster.
Directory Synchronization Profiles
Changes that you make to directory integration profiles on one Oracle InternetDirectory node do not replicate automatically to other Oracle Internet Directory nodesin a default multimaster Oracle Internet Directory replication environment. You mustcopy changes from the primary node to the secondary nodes manually and do so on aperiodic basis. By doing this, a directory synchronization profile can run on asecondary node if a problem occurs on the primary node.
Oracle Directory Integration Platform uses the parameterorcllastappliedchangenumber. The value assigned to the lastchangenumber attributein a directory synchronization profile depends on the directory server on which OracleDirectory Integration Platform is running. In an active-active Oracle Directory
Chapter 7Oracle Directory Integration Platform High Availability
7-34
Integration Platform configuration, you must manually update the lastchangenumber attributein all instances.
To synchronize directory provisioning profiles between the primary Oracle Internet Directorynode and secondary nodes:
1. On the primary node, use the ldifwrite command to create an LDIF dump of the entriesfrom this container:
cn=subscriber profiles,cn=changelog subscriber,cn=oracle internet directory2. Copy the LDIF dump to the secondary node.
3. Use the ldapadd command to add the profiles on the secondary node.
After you copy an export profile to a target node, you must update the lastchangenumberattribute with the target node value. To update the value:
1. Disable the synchronization profile.
2. Get the value of the lastchangenumber attribute on the target node using the ldapsearchcommand.
3. Use ldapsearch to get the LDIF dump of the profile entry.
4. Use ldapadd to add the profile to the other Managed Server instance.
5. Go to the Oracle Directory Integration Platform Admin console and select the profile.Select Edit. Select the Advanced tab then select Edit and Persist. Enter the value ofthe lastchangenumber attribute. Save the profile.
6. Enable the synchronization profile.
Directory Provisioning Profiles
In a default multimaster Oracle Internet Directory replication environment, Oracle DirectoryIntegration Platform is installed in the same location as the primary Oracle Internet Directory.The information and steps in this topic applies only when multimaster replication is set up.
If the primary node fails, event propagation stops for all profiles located on the node.Although the events are queued and not lost while the primary node is stopped, the events donot propagate to any applications that expect them. To ensure that events continue topropagate even when the primary node is down for the Version 1.0 and 2.0 profiles, thedirectory provisioning profiles must be copied to other secondary nodes.
However, copy directory provisioning profiles from the primary node to any secondary nodesimmediately after an application is installed and before any user changes are made in OracleInternet Directory.
To synchronize directory provisioning profiles between a primary node and any secondarynodes:
1. On the primary node, use the ldifwrite command to create an LDIF dump of the entriesfrom this container:
cn=provisioning profiles,cn=changelog subscriber,cn=oracle internet directory2. Copy the LDIF dump to the secondary node.
3. Use the ldapadd command to add the profiles on the secondary node.
Chapter 7Oracle Directory Integration Platform High Availability
7-35
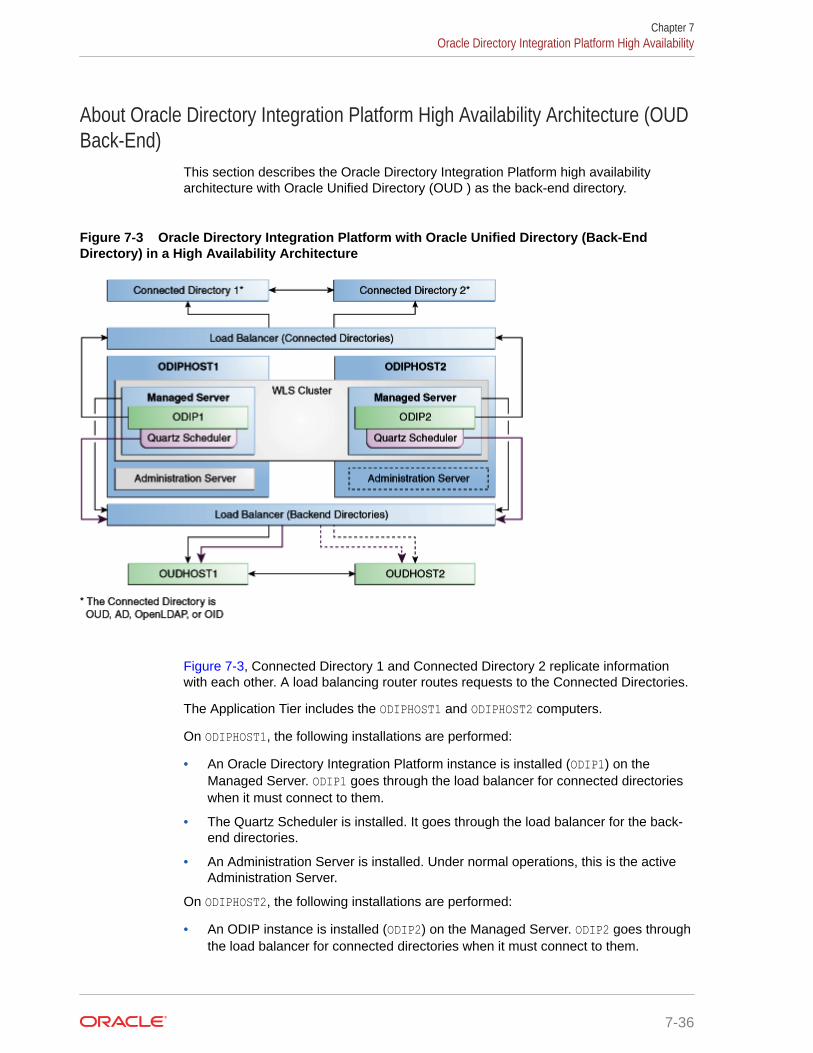
About Oracle Directory Integration Platform High Availability Architecture (OUDBack-End)
This section describes the Oracle Directory Integration Platform high availabilityarchitecture with Oracle Unified Directory (OUD ) as the back-end directory.
Figure 7-3 Oracle Directory Integration Platform with Oracle Unified Directory (Back-EndDirectory) in a High Availability Architecture
Figure 7-3, Connected Directory 1 and Connected Directory 2 replicate informationwith each other. A load balancing router routes requests to the Connected Directories.
The Application Tier includes the ODIPHOST1 and ODIPHOST2 computers.
On ODIPHOST1, the following installations are performed:
• An Oracle Directory Integration Platform instance is installed (ODIP1) on theManaged Server. ODIP1 goes through the load balancer for connected directorieswhen it must connect to them.
• The Quartz Scheduler is installed. It goes through the load balancer for the back-end directories.
• An Administration Server is installed. Under normal operations, this is the activeAdministration Server.
On ODIPHOST2, the following installations are performed:
• An ODIP instance is installed (ODIP2) on the Managed Server. ODIP2 goes throughthe load balancer for connected directories when it must connect to them.
Chapter 7Oracle Directory Integration Platform High Availability
7-36
• The Quartz Scheduler is installed. It goes through the load balancer for backenddirectories.
• An Administration Server is installed. Under normal operations, this is the passiveAdministration Server instance. You make this Administration Server active if theAdministration Server on ODIPHOST1 becomes unavailable.
The Oracle Directory Integration Platform instances on the ODIPHOST1 and ODIPHOST2Managed Servers are configured as a cluster.
A load balancer is set up for the back-end directories OUDHOST1 and OUDHOST2. The loadbalancer routes requests to either OUDHOST1 or OUDHOST2.
• Cluster-Wide Configuration Changes (OUD)
Cluster-Wide Configuration Changes (OUD)Oracle Unified Directory supports cluster-wide configuration changes. All Oracle UnifiedDirectory instances that are part of the same replication topology share the same content.Any changes made to Oracle Directory Integration Platform on one Oracle Unified Directorynode automatically propagate to all Oracle Unified Directory instances in the replicationtopology.
Protection from Failures and Expected BehaviorThis section describes protection from different types of failure in an Oracle DirectoryIntegration Platform active-active cluster
• About Process Failure
• About Updating the Oracle Directory Integration Platform Server Configuration
• About External Dependency Failure
About Process FailureIn a high availability environment, you deploy the Oracle Directory Integration Platformapplication to a cluster that comprises at least two Oracle WebLogic instances.
By default, the Oracle Directory Integration Platform application leverages high availabilityfeatures of the underlying WebLogic clusters. When you deploy Oracle Directory IntegrationPlatform, the Quartz scheduler starts with a clustering option. Depending on the load on thenode, the scheduler then runs the job on any available nodes in the cluster. If hardware orother failures occur on one or more nodes, the Quartz scheduler runs the jobs on availablenodes.
Also, Node Manager monitors WebLogic servers. In case of failure, Node Manager restartsthe WebLogic server.
Within the Oracle Directory Integration Platform application, the Quartz Scheduler invokes theProvisioning or Synchronization EJBs that do the actual work. As soon as the Quartzscheduler invokes an EJB, it tags that EJB as running the job. If the EJB fails, the Quartzscheduler marks the job as failed and reschedules it to run later by another EJB.
About Updating the Oracle Directory Integration Platform Server ConfigurationIf the back-end server is not accessed or cannot be accessed through a load balancer,Oracle Directory Integration Platform failover is not transparent.
Chapter 7Oracle Directory Integration Platform High Availability
7-37
This scenario requires manual intervention because the information to connect to theback-end directory is local to each Oracle Directory Integration Platform instance.
You must run the manageDIPServerConfig utility to update the Oracle back-enddirectory (Oracle Internet Directory and Oracle Unified Directory) host and portparameters for all of the Oracle Directory Integration Platform instances.
See manageDIPServerConfig Utility in Oracle Fusion Middleware AdministeringOracle Directory Integration Platform.
About External Dependency FailureOracle Directory Integration Platform requires the back-end repository, Oracle InternetDirectory, Oracle Unified Directory, Credential Store Framework, and the WebLogicManaged Server to be available during startup.
It fails to start if any one of these elements are unavailable.
Configuring Oracle Directory Integration Platform for High AvailabilityYou can use Oracle Internet Directory or Oracle Unified Directory as the as the back-end directory to configure Oracle Directory Integration Platform high availability.
• Configuring High Availability for an Oracle Internet Directory Back-End ServerUse the steps in the following order to configure Oracle Internet Directory (back-end directory) for Oracle Directory Integration Platform high availablity.
• Configuring High Availability for an Oracle Unified Directory Back-End ServerUse the steps in the following order to configure Oracle Unified Directory (back-end directory) for Oracle Directory Integration Platform high availability.
Configuring High Availability for an Oracle Internet Directory Back-End ServerUse the steps in the following order to configure Oracle Internet Directory (back-enddirectory) for Oracle Directory Integration Platform high availablity.
• Before You Configure Oracle Directory Integration High Availability (OID)
• Configuring Oracle Directory Integration Platform on ODIPHOST1 (OID)
• Configuring Oracle Directory Integration Platform for Oracle Internet Directory(OIDHOST1)
• Configuring Oracle Directory Integration Platform on ODIPHOST2 (OID)
• Before You Configure Oracle Directory Integration High Availability (OID)
• Configuring Oracle Directory Integration Platform on ODIPHOST1 (OID)
• Configuring Oracle Directory Integration Platform for Oracle Internet Directory(OIDHOST1)You must configure Oracle Directory Integration Platform for Oracle InternetDirectory on OIDHOST1 instance.
• Configuring Oracle Directory Integration Platform on ODIPHOST2 (OID)
Before You Configure Oracle Directory Integration High Availability (OID)Complete the following before you configure Oracle Directory Integration Platform highavailability with Oracle Internet Directory as the back-end directory:
Chapter 7Oracle Directory Integration Platform High Availability
7-38
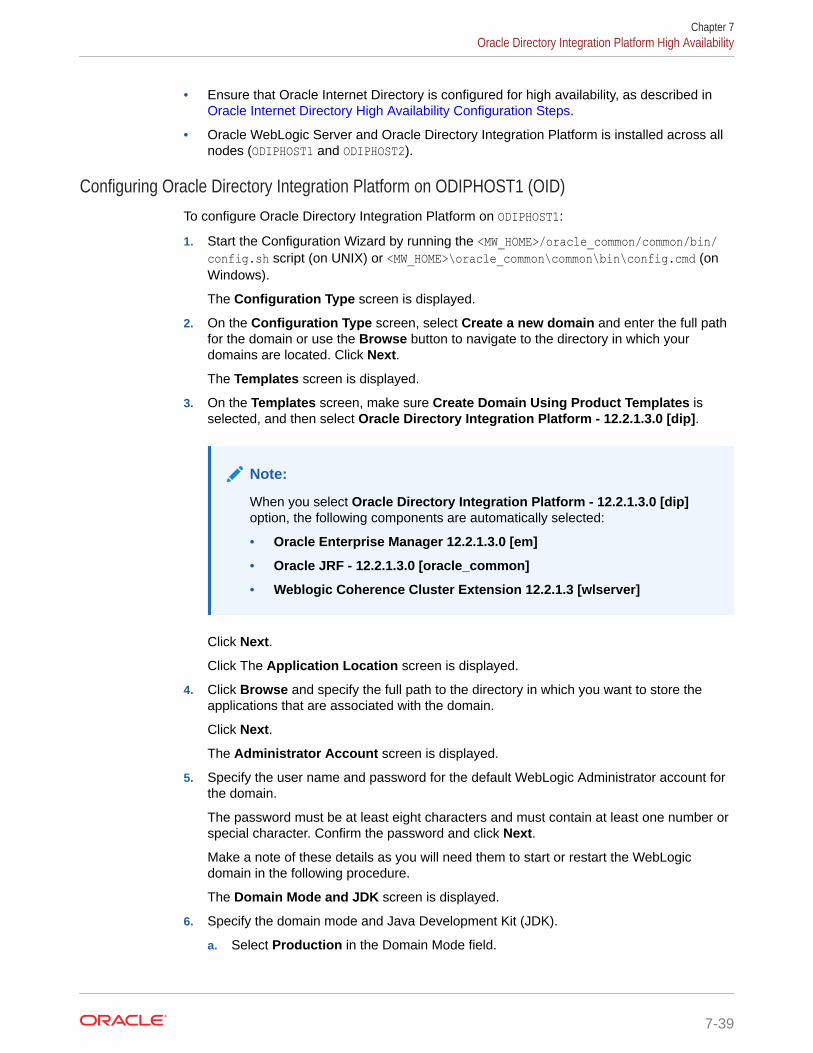
• Ensure that Oracle Internet Directory is configured for high availability, as described in Oracle Internet Directory High Availability Configuration Steps.
• Oracle WebLogic Server and Oracle Directory Integration Platform is installed across allnodes (ODIPHOST1 and ODIPHOST2).
Configuring Oracle Directory Integration Platform on ODIPHOST1 (OID)To configure Oracle Directory Integration Platform on ODIPHOST1:
1. Start the Configuration Wizard by running the <MW_HOME>/oracle_common/common/bin/config.sh script (on UNIX) or <MW_HOME>\oracle_common\common\bin\config.cmd (onWindows).
The Configuration Type screen is displayed.
2. On the Configuration Type screen, select Create a new domain and enter the full pathfor the domain or use the Browse button to navigate to the directory in which yourdomains are located. Click Next.
The Templates screen is displayed.
3. On the Templates screen, make sure Create Domain Using Product Templates isselected, and then select Oracle Directory Integration Platform - 12.2.1.3.0 [dip].
Note:
When you select Oracle Directory Integration Platform - 12.2.1.3.0 [dip]option, the following components are automatically selected:
• Oracle Enterprise Manager 12.2.1.3.0 [em]
• Oracle JRF - 12.2.1.3.0 [oracle_common]
• Weblogic Coherence Cluster Extension 12.2.1.3 [wlserver]
Click Next.
Click The Application Location screen is displayed.
4. Click Browse and specify the full path to the directory in which you want to store theapplications that are associated with the domain.
Click Next.
The Administrator Account screen is displayed.
5. Specify the user name and password for the default WebLogic Administrator account forthe domain.
The password must be at least eight characters and must contain at least one number orspecial character. Confirm the password and click Next.
Make a note of these details as you will need them to start or restart the WebLogicdomain in the following procedure.
The Domain Mode and JDK screen is displayed.
6. Specify the domain mode and Java Development Kit (JDK).
a. Select Production in the Domain Mode field.
Chapter 7Oracle Directory Integration Platform High Availability
7-39
Note:
If you select Production mode as the domain, the node managerhas a random username and password assigned to it. Use theWebLogic Server Administration Console to reset the password.
b. Accept Oracle Hotspot as a default JDK location.
c. Click Next.
The Database Configuration Type screen is displayed.
7. Select RCU Data. This option instructs the Configuration Wizard to connect to thedatabase’s Service Table (STB) schema to automatically retrieve schemainformation for schemas needed to configure the domain.
Note:
Ensure that you have created the database schemas required for OracleInternet Directory. See Creating the Database Schemas in Oracle FusionMiddleware Installing and Configuring Oracle Internet Directory.
After selecting RCU Data:
a. Enter the name of the server hosting the database in the Host Name field.
b. Enter the database DBMS name, or service name if you selected a servicetype driver in the DBMS/Service field.
c. Enter the port number on which the database listens.
d. Enter the username and password for connecting to the database's ServiceTable schema.
e. Click Get RCU Configuration to retrieve the schema information. Aftersuccessfully retrieving the schema information, click Next to continue.
The JDBC Component Schema screen is displayed.
8. Verify that the values populated are correct for all schemas, and Click Next.
Note:
To convert one or more of the schemas to Oracle RAC multi-data sourceschemas, select the check boxes next to the name of those schemas,and select the Convert to RAC multi data source option. Click Nextwhen done. When you click Next, the Oracle RAC Multi Data SourceComponent Schema screen appears.
See Oracle RAC Multi Data Source Component Schema in OracleFusion Middleware Creating WebLogic Domains Using the ConfigurationWizard.
The JDBC Component Schema Test screen is displayed.
Chapter 7Oracle Directory Integration Platform High Availability
7-40
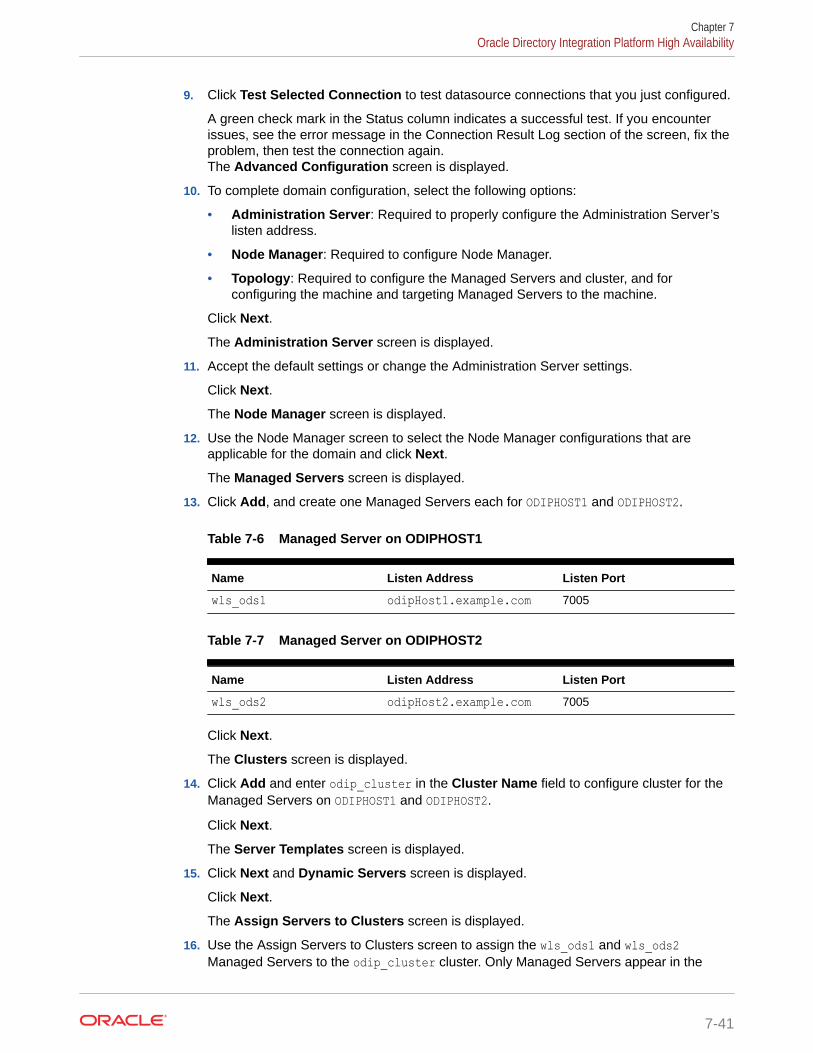
9. Click Test Selected Connection to test datasource connections that you just configured.
A green check mark in the Status column indicates a successful test. If you encounterissues, see the error message in the Connection Result Log section of the screen, fix theproblem, then test the connection again.The Advanced Configuration screen is displayed.
10. To complete domain configuration, select the following options:
• Administration Server: Required to properly configure the Administration Server’slisten address.
• Node Manager: Required to configure Node Manager.
• Topology: Required to configure the Managed Servers and cluster, and forconfiguring the machine and targeting Managed Servers to the machine.
Click Next.
The Administration Server screen is displayed.
11. Accept the default settings or change the Administration Server settings.
Click Next.
The Node Manager screen is displayed.
12. Use the Node Manager screen to select the Node Manager configurations that areapplicable for the domain and click Next.
The Managed Servers screen is displayed.
13. Click Add, and create one Managed Servers each for ODIPHOST1 and ODIPHOST2.
Table 7-6 Managed Server on ODIPHOST1
Name Listen Address Listen Port
wls_ods1 odipHost1.example.com 7005
Table 7-7 Managed Server on ODIPHOST2
Name Listen Address Listen Port
wls_ods2 odipHost2.example.com 7005
Click Next.
The Clusters screen is displayed.
14. Click Add and enter odip_cluster in the Cluster Name field to configure cluster for theManaged Servers on ODIPHOST1 and ODIPHOST2.
Click Next.
The Server Templates screen is displayed.
15. Click Next and Dynamic Servers screen is displayed.
Click Next.
The Assign Servers to Clusters screen is displayed.
16. Use the Assign Servers to Clusters screen to assign the wls_ods1 and wls_ods2Managed Servers to the odip_cluster cluster. Only Managed Servers appear in the
Chapter 7Oracle Directory Integration Platform High Availability
7-41
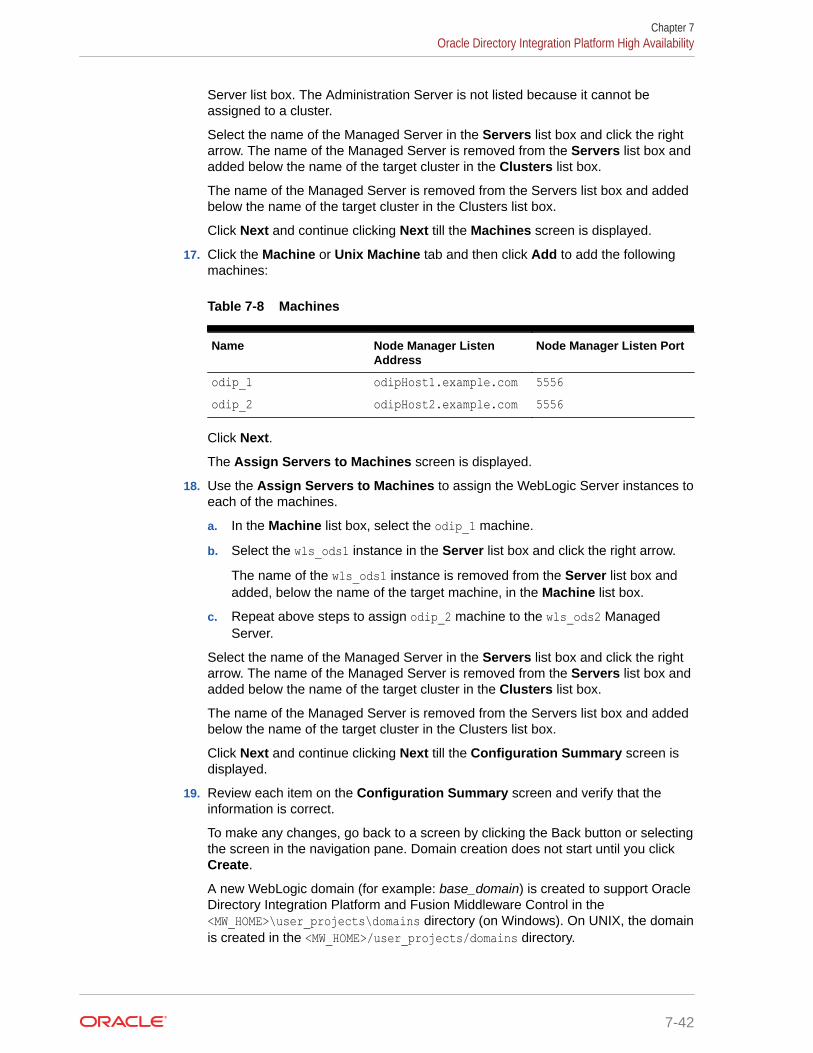
Server list box. The Administration Server is not listed because it cannot beassigned to a cluster.
Select the name of the Managed Server in the Servers list box and click the rightarrow. The name of the Managed Server is removed from the Servers list box andadded below the name of the target cluster in the Clusters list box.
The name of the Managed Server is removed from the Servers list box and addedbelow the name of the target cluster in the Clusters list box.
Click Next and continue clicking Next till the Machines screen is displayed.
17. Click the Machine or Unix Machine tab and then click Add to add the followingmachines:
Table 7-8 Machines
Name Node Manager ListenAddress
Node Manager Listen Port
odip_1 odipHost1.example.com 5556odip_2 odipHost2.example.com 5556
Click Next.
The Assign Servers to Machines screen is displayed.
18. Use the Assign Servers to Machines to assign the WebLogic Server instances toeach of the machines.
a. In the Machine list box, select the odip_1 machine.
b. Select the wls_ods1 instance in the Server list box and click the right arrow.
The name of the wls_ods1 instance is removed from the Server list box andadded, below the name of the target machine, in the Machine list box.
c. Repeat above steps to assign odip_2 machine to the wls_ods2 ManagedServer.
Select the name of the Managed Server in the Servers list box and click the rightarrow. The name of the Managed Server is removed from the Servers list box andadded below the name of the target cluster in the Clusters list box.
The name of the Managed Server is removed from the Servers list box and addedbelow the name of the target cluster in the Clusters list box.
Click Next and continue clicking Next till the Configuration Summary screen isdisplayed.
19. Review each item on the Configuration Summary screen and verify that theinformation is correct.
To make any changes, go back to a screen by clicking the Back button or selectingthe screen in the navigation pane. Domain creation does not start until you clickCreate.
A new WebLogic domain (for example: base_domain) is created to support OracleDirectory Integration Platform and Fusion Middleware Control in the<MW_HOME>\user_projects\domains directory (on Windows). On UNIX, the domainis created in the <MW_HOME>/user_projects/domains directory.
Chapter 7Oracle Directory Integration Platform High Availability
7-42
Configuring Oracle Directory Integration Platform for Oracle Internet Directory (OIDHOST1)You must configure Oracle Directory Integration Platform for Oracle Internet Directory onOIDHOST1 instance.
Complete the following steps:
1. Run the dipConfigurator command to configure Oracle Directory Integration Platform(ODIPHOST1) for OIDHOST1. For more information, see Configuring Oracle DirectoryIntegration Platform for Oracle Internet Directory in Oracle Fusion MiddlewareAdministering Oracle Directory Integration Platform.
Note:
• If you are using a RAC database, then Oracle recommends that you specifythe URL for the RAC database in the dbconfigfile file fordipConfigurator properties.
• If the cipher suites configured for Oracle Internet Directory are not availableor recognized in Oracle Directory Integration Platform then you must addthose suites into Oracle Directory Integration Platform using the OracleFusion Middleware System MBean Browser. See Adding Cipher SuitesConfigured for Oracle Internet Directory into Oracle Directory IntegrationPlatformin Oracle Fusion Middleware Administering Oracle DirectoryIntegration Platform.
2. Run the manageDIPServerConfig command to tune the cluster:
./manageDIPServerConfig set -host ODIPHOST1.example.com -port 7005 -wlsuser weblogic -attribute ClusterCheckInInterval -value 30000
./manageDIPServerConfig set -host ODIPHOST1 -port 7005 -wlsuser weblogic -attribute RefreshInterval -value 120
3. Run the manageDIPServerConfig command for reconfiguring Oracle Directory IntegrationPlatform to use the TCP load balancer.
LB_HOST is the load balancer IP address you must configure to redirect to one of theback-end instances.
./manageDIPServerConfig set -host ODIPHOST1 -port 7005 -wlsuser weblogic -attribute BackendHostPort -value LB_HOST:LB_PORT
Configuring Oracle Directory Integration Platform on ODIPHOST2 (OID)You must configure the Oracle Directory Integration Platform on ODIPHOST2 for the OracleInternet Directory back-end directory:
1. Run the following pack command on ODIPHOST1 to create a template pack:
cd MW_HOME/oracle_common/common/bin./pack.sh -managed=true -domain=MW_HOME/user_projects/domains/domainName -template=dipdomain.jar -managed=true -template_name="dipdomain"
2. Copy the template file created in the previous step from ODIPHOST1 to ODIPHOST2. Forexample, on a UNIX platform:
Chapter 7Oracle Directory Integration Platform High Availability
7-43
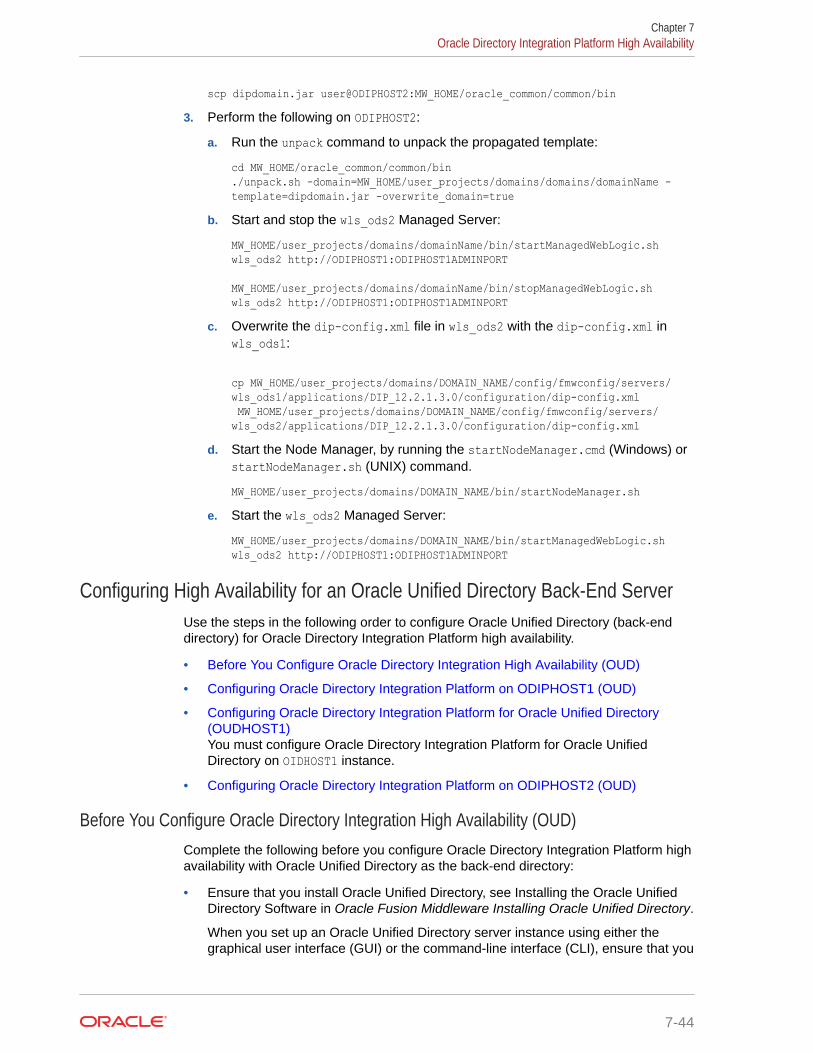
scp dipdomain.jar user@ODIPHOST2:MW_HOME/oracle_common/common/bin3. Perform the following on ODIPHOST2:
a. Run the unpack command to unpack the propagated template:
cd MW_HOME/oracle_common/common/bin./unpack.sh -domain=MW_HOME/user_projects/domains/domains/domainName -template=dipdomain.jar -overwrite_domain=true
b. Start and stop the wls_ods2 Managed Server:
MW_HOME/user_projects/domains/domainName/bin/startManagedWebLogic.sh wls_ods2 http://ODIPHOST1:ODIPHOST1ADMINPORT
MW_HOME/user_projects/domains/domainName/bin/stopManagedWebLogic.sh wls_ods2 http://ODIPHOST1:ODIPHOST1ADMINPORT
c. Overwrite the dip-config.xml file in wls_ods2 with the dip-config.xml inwls_ods1:
cp MW_HOME/user_projects/domains/DOMAIN_NAME/config/fmwconfig/servers/wls_ods1/applications/DIP_12.2.1.3.0/configuration/dip-config.xml MW_HOME/user_projects/domains/DOMAIN_NAME/config/fmwconfig/servers/wls_ods2/applications/DIP_12.2.1.3.0/configuration/dip-config.xml
d. Start the Node Manager, by running the startNodeManager.cmd (Windows) orstartNodeManager.sh (UNIX) command.
MW_HOME/user_projects/domains/DOMAIN_NAME/bin/startNodeManager.she. Start the wls_ods2 Managed Server:
MW_HOME/user_projects/domains/DOMAIN_NAME/bin/startManagedWebLogic.sh wls_ods2 http://ODIPHOST1:ODIPHOST1ADMINPORT
Configuring High Availability for an Oracle Unified Directory Back-End ServerUse the steps in the following order to configure Oracle Unified Directory (back-enddirectory) for Oracle Directory Integration Platform high availability.
• Before You Configure Oracle Directory Integration High Availability (OUD)
• Configuring Oracle Directory Integration Platform on ODIPHOST1 (OUD)
• Configuring Oracle Directory Integration Platform for Oracle Unified Directory(OUDHOST1)You must configure Oracle Directory Integration Platform for Oracle UnifiedDirectory on OIDHOST1 instance.
• Configuring Oracle Directory Integration Platform on ODIPHOST2 (OUD)
Before You Configure Oracle Directory Integration High Availability (OUD)Complete the following before you configure Oracle Directory Integration Platform highavailability with Oracle Unified Directory as the back-end directory:
• Ensure that you install Oracle Unified Directory, see Installing the Oracle UnifiedDirectory Software in Oracle Fusion Middleware Installing Oracle Unified Directory.
When you set up an Oracle Unified Directory server instance using either thegraphical user interface (GUI) or the command-line interface (CLI), ensure that you
Chapter 7Oracle Directory Integration Platform High Availability
7-44

select the Enable for DIP option to enable the server instance for Oracle DirectoryIntegration Platform.
• Ensure that Oracle Unified Directory is configured for high availability. See UnderstandingOracle Unified Directory High Availability Deployments in Oracle Fusion MiddlewareAdministering Oracle Unified Directory.
• Ensure that you have created the Oracle Unified Directory Suffixes for Oracle DirectoryIntegration Platform. See Creating Oracle Unified Directory Suffixes in Oracle FusionMiddleware Administering Oracle Directory Integration Platform.
• Ensure that the change log is enabled. See Enabling External Change Login OracleFusion Middleware Administering Oracle Directory Integration Platform.
• Oracle WebLogic Server and Oracle Directory Integration Platform is installed across allnodes (ODIPHOST1 and ODIPHOST2).
Configuring Oracle Directory Integration Platform on ODIPHOST1 (OUD)To configure Oracle Directory Integration Platform on ODIPHOST1 for Oracle Unified Directoryas the back-end directory:
1. Start the Configuration Wizard by running the <MW_HOME>/oracle_common/common/bin/config.sh script (on UNIX) or <MW_HOME>\oracle_common\common\bin\config.cmd (onWindows).
The Configuration Type screen is displayed.
2. On the Configuration Type screen, select Create a new domain and enter the full pathfor the domain or use the Browse button to navigate to the directory in which yourdomains are located. Click Next.
The Templates screen is displayed.
3. On the Templates screen, make sure Create Domain Using Product Templates isselected, and then select Oracle Directory Integration Platform - 12.2.1.3.0 [dip].
Note:
When you select Oracle Directory Integration Platform - 12.2.1.3.0 [dip]option, the following components are automatically selected:
• Oracle Enterprise Manager 12.2.1.3.0 [em]
• Oracle JRF - 12.2.1.3.0 [oracle_common]
• Weblogic Coherence Cluster Extension 12.2.1.3 [wlserver]
Click Next.
Click The Application Location screen is displayed.
4. Click Browse and specify the full path to the directory in which you want to store theapplications that are associated with the domain.
Click Next.
The Administrator Account screen is displayed.
5. Specify the user name and password for the default WebLogic Administrator account forthe domain.
Chapter 7Oracle Directory Integration Platform High Availability
7-45
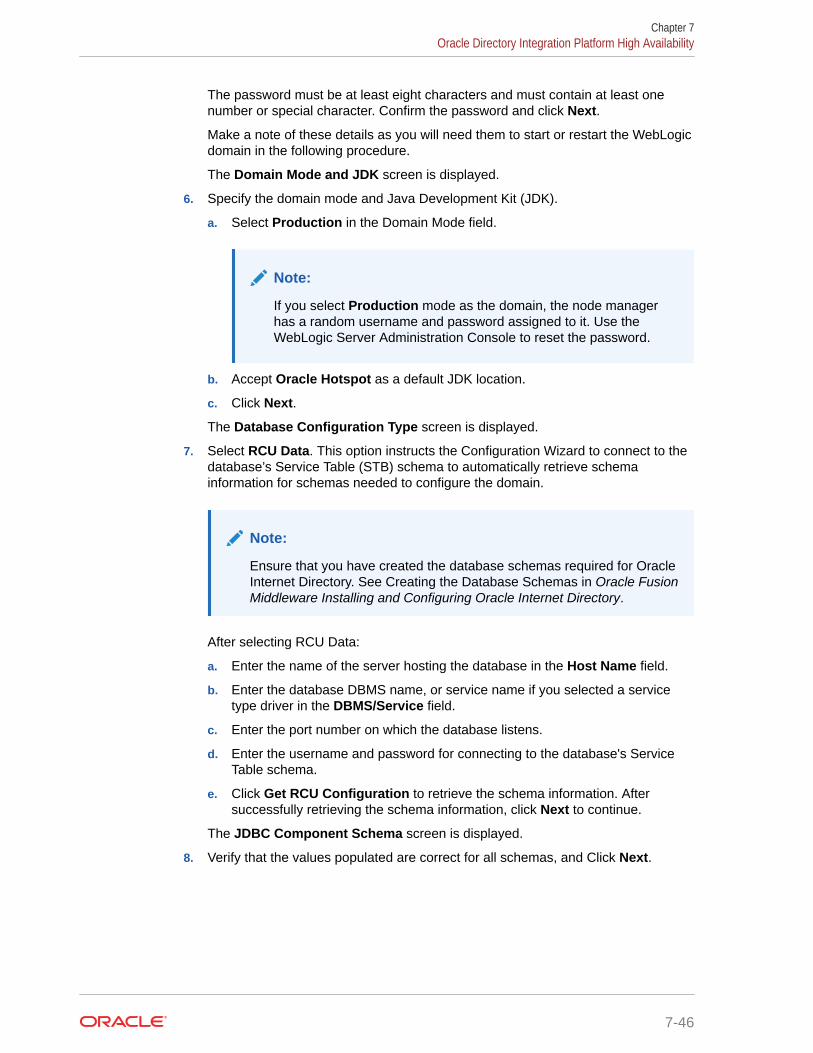
The password must be at least eight characters and must contain at least onenumber or special character. Confirm the password and click Next.
Make a note of these details as you will need them to start or restart the WebLogicdomain in the following procedure.
The Domain Mode and JDK screen is displayed.
6. Specify the domain mode and Java Development Kit (JDK).
a. Select Production in the Domain Mode field.
Note:
If you select Production mode as the domain, the node managerhas a random username and password assigned to it. Use theWebLogic Server Administration Console to reset the password.
b. Accept Oracle Hotspot as a default JDK location.
c. Click Next.
The Database Configuration Type screen is displayed.
7. Select RCU Data. This option instructs the Configuration Wizard to connect to thedatabase’s Service Table (STB) schema to automatically retrieve schemainformation for schemas needed to configure the domain.
Note:
Ensure that you have created the database schemas required for OracleInternet Directory. See Creating the Database Schemas in Oracle FusionMiddleware Installing and Configuring Oracle Internet Directory.
After selecting RCU Data:
a. Enter the name of the server hosting the database in the Host Name field.
b. Enter the database DBMS name, or service name if you selected a servicetype driver in the DBMS/Service field.
c. Enter the port number on which the database listens.
d. Enter the username and password for connecting to the database's ServiceTable schema.
e. Click Get RCU Configuration to retrieve the schema information. Aftersuccessfully retrieving the schema information, click Next to continue.
The JDBC Component Schema screen is displayed.
8. Verify that the values populated are correct for all schemas, and Click Next.
Chapter 7Oracle Directory Integration Platform High Availability
7-46
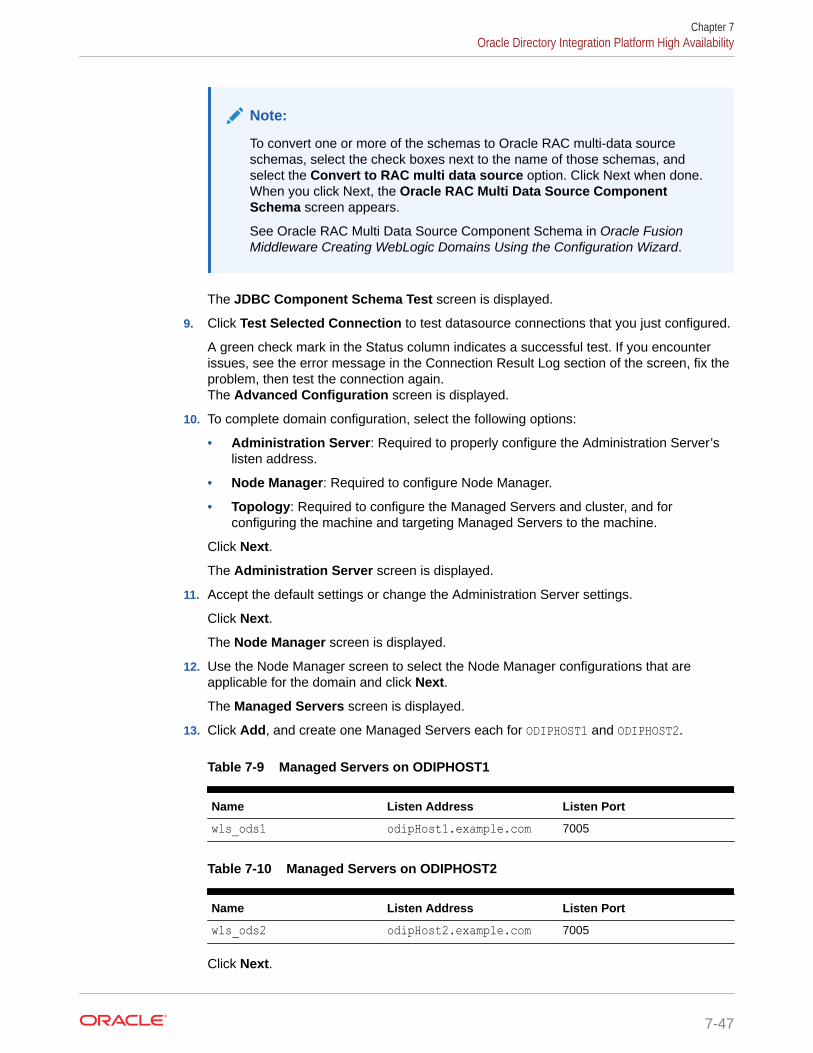
Note:
To convert one or more of the schemas to Oracle RAC multi-data sourceschemas, select the check boxes next to the name of those schemas, andselect the Convert to RAC multi data source option. Click Next when done.When you click Next, the Oracle RAC Multi Data Source ComponentSchema screen appears.
See Oracle RAC Multi Data Source Component Schema in Oracle FusionMiddleware Creating WebLogic Domains Using the Configuration Wizard.
The JDBC Component Schema Test screen is displayed.
9. Click Test Selected Connection to test datasource connections that you just configured.
A green check mark in the Status column indicates a successful test. If you encounterissues, see the error message in the Connection Result Log section of the screen, fix theproblem, then test the connection again.The Advanced Configuration screen is displayed.
10. To complete domain configuration, select the following options:
• Administration Server: Required to properly configure the Administration Server’slisten address.
• Node Manager: Required to configure Node Manager.
• Topology: Required to configure the Managed Servers and cluster, and forconfiguring the machine and targeting Managed Servers to the machine.
Click Next.
The Administration Server screen is displayed.
11. Accept the default settings or change the Administration Server settings.
Click Next.
The Node Manager screen is displayed.
12. Use the Node Manager screen to select the Node Manager configurations that areapplicable for the domain and click Next.
The Managed Servers screen is displayed.
13. Click Add, and create one Managed Servers each for ODIPHOST1 and ODIPHOST2.
Table 7-9 Managed Servers on ODIPHOST1
Name Listen Address Listen Port
wls_ods1 odipHost1.example.com 7005
Table 7-10 Managed Servers on ODIPHOST2
Name Listen Address Listen Port
wls_ods2 odipHost2.example.com 7005
Click Next.
Chapter 7Oracle Directory Integration Platform High Availability
7-47
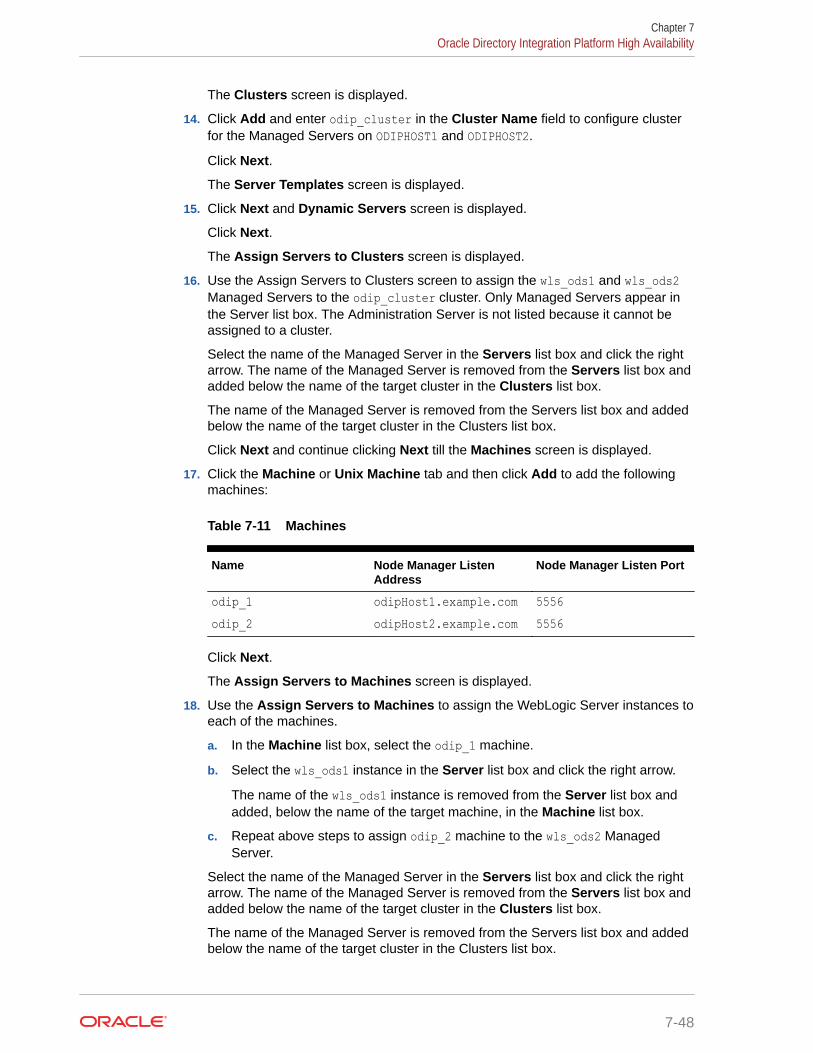
The Clusters screen is displayed.
14. Click Add and enter odip_cluster in the Cluster Name field to configure clusterfor the Managed Servers on ODIPHOST1 and ODIPHOST2.
Click Next.
The Server Templates screen is displayed.
15. Click Next and Dynamic Servers screen is displayed.
Click Next.
The Assign Servers to Clusters screen is displayed.
16. Use the Assign Servers to Clusters screen to assign the wls_ods1 and wls_ods2Managed Servers to the odip_cluster cluster. Only Managed Servers appear inthe Server list box. The Administration Server is not listed because it cannot beassigned to a cluster.
Select the name of the Managed Server in the Servers list box and click the rightarrow. The name of the Managed Server is removed from the Servers list box andadded below the name of the target cluster in the Clusters list box.
The name of the Managed Server is removed from the Servers list box and addedbelow the name of the target cluster in the Clusters list box.
Click Next and continue clicking Next till the Machines screen is displayed.
17. Click the Machine or Unix Machine tab and then click Add to add the followingmachines:
Table 7-11 Machines
Name Node Manager ListenAddress
Node Manager Listen Port
odip_1 odipHost1.example.com 5556odip_2 odipHost2.example.com 5556
Click Next.
The Assign Servers to Machines screen is displayed.
18. Use the Assign Servers to Machines to assign the WebLogic Server instances toeach of the machines.
a. In the Machine list box, select the odip_1 machine.
b. Select the wls_ods1 instance in the Server list box and click the right arrow.
The name of the wls_ods1 instance is removed from the Server list box andadded, below the name of the target machine, in the Machine list box.
c. Repeat above steps to assign odip_2 machine to the wls_ods2 ManagedServer.
Select the name of the Managed Server in the Servers list box and click the rightarrow. The name of the Managed Server is removed from the Servers list box andadded below the name of the target cluster in the Clusters list box.
The name of the Managed Server is removed from the Servers list box and addedbelow the name of the target cluster in the Clusters list box.
Chapter 7Oracle Directory Integration Platform High Availability
7-48
Click Next and continue clicking Next till the Configuration Summary screen isdisplayed.
19. Review each item on the Configuration Summary screen and verify that the informationis correct.
To make any changes, go back to a screen by clicking the Back button or selecting thescreen in the navigation pane. Domain creation does not start until you click Create.
A new WebLogic domain (for example: base_domain) is created to support OracleDirectory Integration Platform and Fusion Middleware Control in the<MW_HOME>\user_projects\domains directory (on Windows). On UNIX, the domain iscreated in the <MW_HOME>/user_projects/domains directory.
Configuring Oracle Directory Integration Platform for Oracle Unified Directory (OUDHOST1)You must configure Oracle Directory Integration Platform for Oracle Unified Directory onOIDHOST1 instance.
Complete the following steps:
1. Run the dipConfigurator command to configure Oracle Directory Integration Platform(ODIPHOST1) for OUDHOST1. For more information, see Configuring Oracle DirectoryIntegration Platform for Oracle Unified Directory in Oracle Fusion MiddlewareAdministering Oracle Directory Integration Platform.
2. Run the manageDIPServerConfig command to tune the cluster:
./manageDIPServerConfig set -host ODIPHOST1.example.com -port 7005 -wlsuser weblogic -attribute ClusterCheckInInterval -value 30000
./manageDIPServerConfig set -host ODIPHOST1 -port 7005 -wlsuser weblogic -attribute RefreshInterval -value 120
3. Run the manageDIPServerConfig command for reconfiguring Oracle Directory IntegrationPlatform to use the TCP load balancer.
LB_HOST is the load balancer IP address you must configure to redirect to one of theback-end instances.
./manageDIPServerConfig set -host ODIPHOST1 -port 7005 -wlsuser weblogic -attribute BackendHostPort -value LB_HOST:LB_PORT
Configuring Oracle Directory Integration Platform on ODIPHOST2 (OUD)You must configure the Oracle Directory Integration Platform on ODIPHOST2 for the OracleUnified Directory back-end directory:
1. Run the following pack command on ODIPHOST1 to create a template pack:
cd MW_HOME/oracle_common/common/bin./pack.sh -managed=true -domain=MW_HOME/user_projects/domains/domainName -template=dipdomain.jar -managed=true -template_name="dipdomain"
2. Copy the template file created in the previous step from ODIPHOST1 to ODIPHOST2. Forexample, on a UNIX platform:
scp dipdomain.jar user@ODIPHOST2:MW_HOME/oracle_common/common/bin3. Perform the following on ODIPHOST2:
a. Run the unpack command to unpack the propagated template:
Chapter 7Oracle Directory Integration Platform High Availability
7-49
cd MW_HOME/oracle_common/common/bin./unpack.sh -domain=MW_HOME/user_projects/domains/domains/domainName -template=dipdomain.jar -overwrite_domain=true
b. Start and stop the wls_ods2 Managed Server:
MW_HOME/user_projects/domains/domainName/bin/startManagedWebLogic.sh wls_ods2 http://ODIPHOST1:ODIPHOST1ADMINPORT
MW_HOME/user_projects/domains/domainName/bin/stopManagedWebLogic.sh wls_ods2 http://ODIPHOST1:ODIPHOST1ADMINPORT
c. Overwrite the dip-config.xml file in wls_ods2 with the dip-config.xml inwls_ods1:
cp MW_HOME/user_projects/domains/DOMAIN_NAME/config/fmwconfig/servers/wls_ods1/applications/DIP_12.2.1.3.0/configuration/dip-config.xml MW_HOME/user_projects/domains/DOMAIN_NAME/config/fmwconfig/servers/wls_ods2/applications/DIP_12.2.1.3.0/configuration/dip-config.xml
d. Start the Node Manager, by running the startNodeManager.cmd (Windows) orstartNodeManager.sh (UNIX) command.
MW_HOME/user_projects/domains/DOMAIN_NAME/bin/startNodeManager.she. Start the wls_ods2 Managed Server:
MW_HOME/user_projects/domains/DOMAIN_NAME/bin/startManagedWebLogic.sh wls_ods2 http://ODIPHOST1:ODIPHOST1ADMINPORT
About Retrieving Changes from Connected DirectoriesOracle Directory Integration Platform uses readers to retrieve changes from connecteddirectories. However, there are some connectors that you cannot use for load-balanced directories. This section describes how Oracle Directory Integration Platformsupports the use of several instances of a connected directory for import profiles.
Failing Over Oracle Directory Server Enterprise Edition Manually
Oracle Directory Integration Platform does not support transparent failover from oneOracle Directory Server Enterprise Edition (ODSEE) Managed Server(WLS_ODSEE1) to another ODSEE server (WLS_ODSEE2). Even if you replicateODSEE Managed Server instances, the change numbers may not be identical on bothODSEE Managed Servers for the same update. If Oracle Directory IntegrationPlatform fails over transparently from WLS_ODSEE1 to WLS_ODSEE2, ODIP mayreplay changes or miss changes each time it switches.
Oracle Unified Directory
When you use Oracle Unified Directory with Iplanet Reader and Iplanet Writer, OracleUnified Directory does not support transparent failover from one Oracle UnifiedDirectory instance to another because, as with ODSEE Server, change numbers maynot be synchronized. However, you can configure your profile to use an Oracle UnifiedDirectory connector that does support it.
To configure your profile, you must set the reader tooracle.ldap.odip.gsi.OudCookieReader. You must configure this attribute at creationtime; you cannot configure it for existing profiles.
Chapter 7Oracle Directory Integration Platform High Availability
7-50
1. Go to the directory ORACLE_HOME/ldap/odi/conf and edit the file iplanetimp.cfg.master2. Replace the line Reader: oracle.ldap.odip.gsi.IPlanetReader with the line
oracle.ldap.odip.gsi.OudCookieReaderTo failover transparently from one Oracle Unified Directory instance to another, the readeruses the External Change Log cookie that Oracle Unified Directory provides. The last appliedchange number contains a cookie but no longer contains a change number.
See Using the External Change Log in Oracle Fusion Middleware Administering OracleUnified Directory for more information on Oracle Unified Directory external change logcookies.
Novell eDirectory
Because the Oracle Directory Integration Platform reader for Novell eDirectory is based ontimestamps, clocks on all instances must be synchronized.
OpenLDAP
Because Oracle Directory Integration Platform reader for OpenLDAP is based ontimestamps, clocks on all instances must be synchronized.
IBM Tivoli Directory Server
Oracle does not support IBM Tivoli by means of the load balancer.
Oracle Internet Directory
If you configure Oracle Internet Directory replication so that change numbers are identical onall Oracle Internet Directory instances that you target, the Oracle Internet Directory instancescan failover transparently. If you do not set up this configuration, transparent failover is notsupported.
Understanding Oracle Directory Integration Platform Failover and ExpectedBehavior
In a high availability environment, you deploy the Oracle Directory Integration Platformapplication on a WebLogic Server cluster that comprises at least two WebLogic instances.
By default, the Oracle Directory Integration Platform application leverages high availabilityfeatures of the underlying WebLogic clusters. In case of hardware or other failures, sessionstate is available to other cluster nodes that can resume the work of the failed node.
In addition, in a high availability environment, Node Manager is configured to monitor theWebLogic servers. In case of failure, Node Manager restarts the WebLogic Server.
If an instance of Oracle Internet Directory fails, the load balancer redirects to the survivinginstance of Oracle Internet Directory and the Oracle RAC database. If Oracle UnifiedDirectory fails, the load balancer redirects to the surviving instance of Oracle UnifiedDirectory.
In case of a database instance failure, the surviving Oracle RAC node takes over anyremaining processes. There may be innocuous errors in the Managed Servers logs during anOracle RAC failover; see Troubleshooting Oracle Directory Integration Platform HighAvailability.
Chapter 7Oracle Directory Integration Platform High Availability
7-51
Troubleshooting Oracle Directory Integration Platform High AvailabilityThis section describes how to manage issues involving Oracle Directory IntegrationPlatform high availability.
• Managed Server Log File Exception May Occur During an Oracle RAC Failover
• Node Manager Fails to Start
• Error Messages May Appear After Starting Node Manager
• Configuration Changes Do Not Automatically Propagate to All Oracle DirectoryIntegration Platform Instances in a Highly Available Topology
• An Operation Cannot Be Completed for Unknown Errors Message Appears
Managed Server Log File Exception May Occur During an Oracle RAC FailoverDuring an Oracle RAC failover, exceptions similar to the ones below are seen in theManaged Server log files running the Oracle Directory Integration Platform application.These errors are thrown when the multi data sources configured on the WebLogicServer platform try to verify the health of the Oracle RAC database instances duringfailover. These are innocuous errors that you can ignore. The Oracle DirectoryIntegration Platform application recovers and begins to operate normally after a lag ofone or two minutes. During an Oracle RAC failover, there will be no Oracle DirectoryIntegration Platform down time if one Oracle RAC instance is running at all times.
RuntimeException:[2008-11-21T00:11:10.915-08:00] [wls_ods] [ERROR] [][org.quartz.impl.jdbcjobstore.JobStoreTX] [tid: 25] [userId: <anonymous>][ecid: 0000Hqy69UiFW7V6u3FCEH199aj0000009,0] [APP: DIP] ClusterManager: Errormanaging cluster: Failed to obtain DB connection from data source'schedulerDS': java.sql.SQLException: Could not retrieve datasource via JNDIurl 'jdbc/schedulerDS' java.sql.SQLException: Cannot obtain connection:driverURL = jdbc:weblogic:pool:schedulerDS, props ={EmulateTwoPhaseCommit=false, connectionPoolID=schedulerDS,jdbcTxDataSource=true, LoggingLastResource=false,dataSourceName=schedulerDS}.[[Nested Exception: java.lang.RuntimeException: Failed to setAutoCommit to truefor pool connection
AuthenticationException while connecting to OID:[2008-11-21T00:12:08.812-08:00] [wls_ods] [ERROR] [DIP-10581] [oracle.dip][tid: 11] [userId: <anonymous>] [ecid: 0000Hqy6m54FW7V6u3FCEH199apO000000,0][APP: DIP] DIP was not able to get the context with the given details {0}[[javax.naming.AuthenticationException: [LDAP: error code 49 - InvalidCredentials]
Most exceptions are related to the scheduler or LDAP, for example:
• Could not retrieve datasource via JNDI url 'jdbc/schedulerDS'java.sql.SQLException
• javax.naming.AuthenticationException: [LDAP: error code 49 - Invalid Credentials]
Node Manager Fails to StartIf the Node Manager fails to start, ensure that you have copied thenodemanager.domains file from ODIPHOST1 to ODIPHOST2:
Chapter 7Oracle Directory Integration Platform High Availability
7-52

WL_HOME/common/nodemanager/nodemanager.domains
Error Messages May Appear After Starting Node ManagerIf you see the following error message after starting Node Manager, follow the proceduredescribed after the error message:
<Dec 15, 2008 8:40:05 PM> <Warning> <Uncaught exception in server handler:javax.net.ssl.SSLKeyException: [Security:090482]BAD_CERTIFICATE alert wasreceived from stbee21.example.com - 152.68.64.2155. Check the peer to determine why it rejected the certificate chain (trusted CA configuration,hostname verification). SSL debug tracing may be required to determine theexact reason the certificate was rejected.> javax.net.ssl.SSLKeyException:[Security:090482]BAD_CERTIFICATE alert was received from stbee21.example.com -152.68.64.215. Check the peer to determine why it rejected the certificate chain (trusted CA configuration, hostname verification). SSL debug tracing may berequired to determine the exact reason the certificate was rejected.
1. If you have not already done so, click Lock & Edit in the Change Center of theAdministration Console.
2. In the left pane of the Console, expand Servers and AdminServer (admin).
3. Select the Configuration > SSL > Advanced Link.
4. Select None for Hostname Verification.
5. Click Save to save the setting.
6. To activate these changes, in the Change Center of the Administration Console, clickActivate Changes.
7. Restart all servers.
(Optional) Enter an example to illustrate your reference here.
1. If you have not already done so, click Lock & Edit in the Change Center of theAdministration Console.
2. In the left pane of the Console, expand Servers and the name of the server that isrunning in ADMIN mode.
3. Select the Control > Start/Stop tab.
4. Select the name of the server.
5. Click Resume.
6. Select Yes to resume servers.
Configuration Changes Do Not Automatically Propagate to All Oracle DirectoryIntegration Platform Instances in a Highly Available Topology
When you change the configuration of one Oracle Directory Integration Platform instance in ahigh availability topology, the configuration change does not propagate automatically to allOracle Directory Integration Platform instances in the topology.
Use the manageDIPServerConfig tool to make configuration change to all Oracle DirectoryIntegration Platform instances in the topology, ensuring the same configuration across allOracle Directory Integration Platform instances.
Chapter 7Oracle Directory Integration Platform High Availability
7-53
See manageDIPServerConfig Utility in Oracle Fusion Middleware AdministeringOracle Directory Integration Platform.
An Operation Cannot Be Completed for Unknown Errors Message AppearsThe following error message may appear intermittently when you use themanageSyncProfiles command:
OPERATION CANNOT BE COMPLETED FOR UNKNOWN ERRORS
If you see this error message, start and stop the Managed Server (wls_ods1 orwls_ods2). If the problem persists, repeat the copy method on the second node.
About Starting and Stopping Oracle Directory ServicesComponents
To start and stop Oracle Directory Services Components components, see Startingand Stopping Components in Oracle Fusion Middleware Administering Oracle FusionMiddleware.
Chapter 7About Starting and Stopping Oracle Directory Services Components
7-54
8Uninstalling or Reinstalling Oracle InternetDirectory
Follow the instructions in this section to uninstall or reinstall Oracle Internet Directory.
Oracle recommends that you always use the instructions in this section to remove thesoftware. If you try to remove the software manually, you may encounter problems when youtry to reinstall the software again at a later time. Following the procedures in this sectionensures that the software is properly removed.
• About Product UninstallationThe Oracle Fusion Middleware uninstaller removes the software from the Oracle homedirectory.
• Stopping Oracle Fusion MiddlewareBefore running the Uninstall Wizard, Oracle recommends that you stop all servers andprocesses associated with the Oracle home you are going to remove.
• Removing Your Database SchemasBefore you remove the Oracle home, Oracle recommends that you run the RepositoryCreation Utility (RCU) to remove database schemas associated with this domain.
• Uninstalling the SoftwareFollow the instructions in this section to start the Uninstall Wizard and remove thesoftware.
• Removing the Oracle Home Directory ManuallyAfter you uninstall the software, you must manually remove your Oracle home directoryand any existing subdirectories that the Uninstall Wizard did not remove.
• Removing the Program Shortcuts on Windows Operating SystemsOn Windows operating systems, you must also manually remove the program shortcuts;the Deinstallation Wizard does not remove them for you.
• Removing the Domain and Application DataAfter you uninstall the software, you must remove the domain and application data.
• Reinstalling the SoftwareYou can reinstall your software into the same Oracle home as a previous installation onlyif you uninstalled the software by following the instructions in this section, includingmanually removing the Oracle home directory.
About Product UninstallationThe Oracle Fusion Middleware uninstaller removes the software from the Oracle homedirectory.
The following table summarizes the tasks to uninstall Fusion Middleware products.
8-1
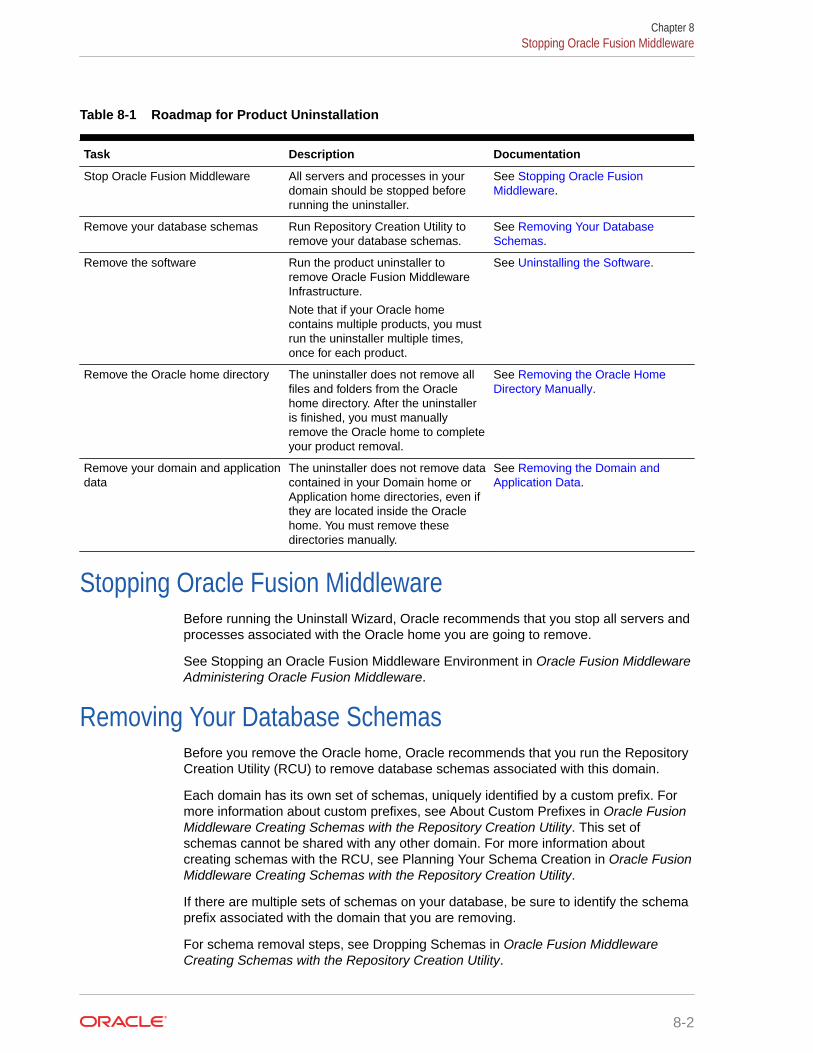
Table 8-1 Roadmap for Product Uninstallation
Task Description Documentation
Stop Oracle Fusion Middleware All servers and processes in yourdomain should be stopped beforerunning the uninstaller.
See Stopping Oracle FusionMiddleware.
Remove your database schemas Run Repository Creation Utility toremove your database schemas.
See Removing Your DatabaseSchemas.
Remove the software Run the product uninstaller toremove Oracle Fusion MiddlewareInfrastructure.
Note that if your Oracle homecontains multiple products, you mustrun the uninstaller multiple times,once for each product.
See Uninstalling the Software.
Remove the Oracle home directory The uninstaller does not remove allfiles and folders from the Oraclehome directory. After the uninstalleris finished, you must manuallyremove the Oracle home to completeyour product removal.
See Removing the Oracle HomeDirectory Manually.
Remove your domain and applicationdata
The uninstaller does not remove datacontained in your Domain home orApplication home directories, even ifthey are located inside the Oraclehome. You must remove thesedirectories manually.
See Removing the Domain andApplication Data.
Stopping Oracle Fusion MiddlewareBefore running the Uninstall Wizard, Oracle recommends that you stop all servers andprocesses associated with the Oracle home you are going to remove.
See Stopping an Oracle Fusion Middleware Environment in Oracle Fusion MiddlewareAdministering Oracle Fusion Middleware.
Removing Your Database SchemasBefore you remove the Oracle home, Oracle recommends that you run the RepositoryCreation Utility (RCU) to remove database schemas associated with this domain.
Each domain has its own set of schemas, uniquely identified by a custom prefix. Formore information about custom prefixes, see About Custom Prefixes in Oracle FusionMiddleware Creating Schemas with the Repository Creation Utility. This set ofschemas cannot be shared with any other domain. For more information aboutcreating schemas with the RCU, see Planning Your Schema Creation in Oracle FusionMiddleware Creating Schemas with the Repository Creation Utility.
If there are multiple sets of schemas on your database, be sure to identify the schemaprefix associated with the domain that you are removing.
For schema removal steps, see Dropping Schemas in Oracle Fusion MiddlewareCreating Schemas with the Repository Creation Utility.
Chapter 8Stopping Oracle Fusion Middleware
8-2
Uninstalling the SoftwareFollow the instructions in this section to start the Uninstall Wizard and remove the software.
If you want to uninstall the product in a silent (command-line) mode, see Running the OracleUniversal Installer for Silent Uninstallation in Oracle Fusion Middleware Installing Softwarewith the Oracle Universal Installer.
• Starting the Uninstall Wizard
• Selecting the Product to Uninstall
• Navigating the Uninstall Wizard Screens
Starting the Uninstall WizardTo start the Uninstall Wizard:
1. Change to the following directory:
(UNIX) ORACLE_HOME/oui/bin(Windows) ORACLE_HOME\oui\bin
2. Enter the following command:
(UNIX) ./deinstall.sh(Windows) deinstall.cmd
Selecting the Product to UninstallBecause multiple products exist in the Oracle home, ensure that you are uninstalling thecorrect product.
After you run the Uninstall Wizard, the Distribution to Uninstall screen opens. From thedropdown menu, select oid and click Uninstall. The uninstallation program shows thescreens listed in Navigating the Uninstall Wizard Screens.
Note:
You can uninstall Oracle Fusion Middleware Infrastructure after you uninstall OracleInternet Directory software by running the Uninstall Wizard again. Before doing so,make sure that there are no other products using the Infrastructure; those productswill no longer function once the Infrastructure is removed. You will not encounter theDistribution to Uninstall screen if no other software depends on Oracle FusionMiddleware Infrastructure. See Uninstalling Oracle Fusion Middleware Infrastructurein Oracle Fusion Middleware Installing and Configuring the Oracle FusionMiddleware Infrastructure.
Navigating the Uninstall Wizard ScreensThe Uninstall Wizard shows a series of screens to confirm the removal of the software.
Chapter 8Uninstalling the Software
8-3
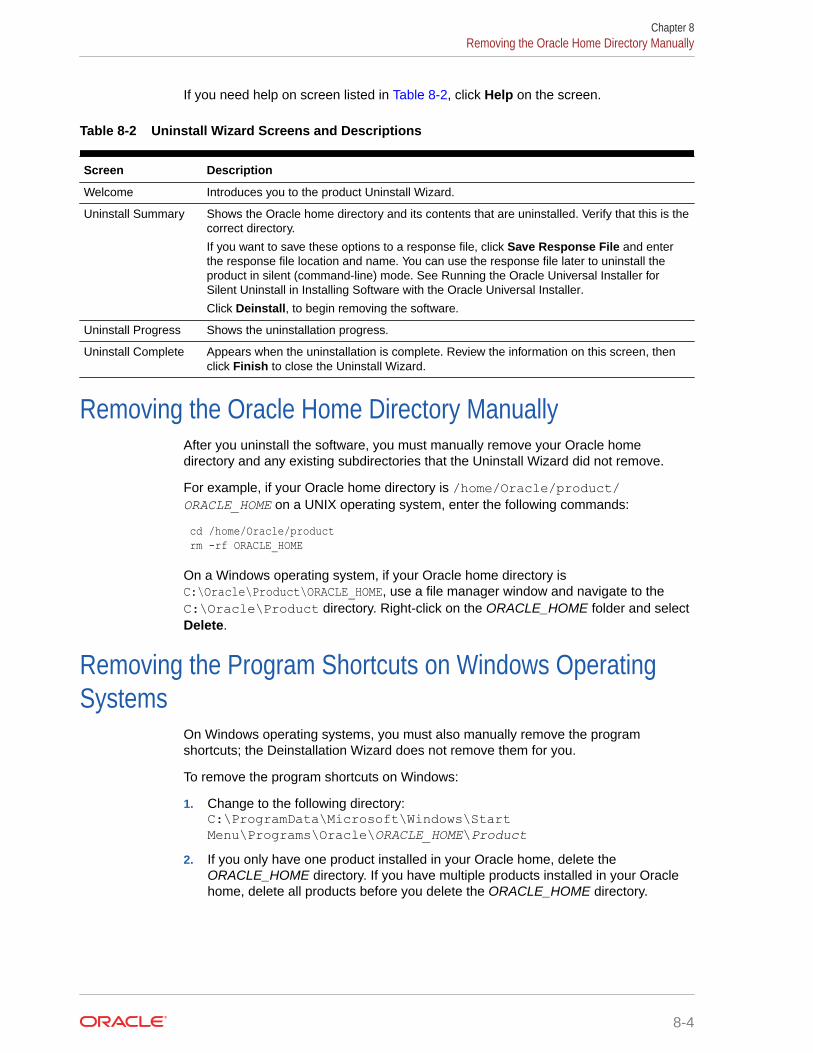
If you need help on screen listed in Table 8-2, click Help on the screen.
Table 8-2 Uninstall Wizard Screens and Descriptions
Screen Description
Welcome Introduces you to the product Uninstall Wizard.
Uninstall Summary Shows the Oracle home directory and its contents that are uninstalled. Verify that this is thecorrect directory.
If you want to save these options to a response file, click Save Response File and enterthe response file location and name. You can use the response file later to uninstall theproduct in silent (command-line) mode. See Running the Oracle Universal Installer forSilent Uninstall in Installing Software with the Oracle Universal Installer.
Click Deinstall, to begin removing the software.
Uninstall Progress Shows the uninstallation progress.
Uninstall Complete Appears when the uninstallation is complete. Review the information on this screen, thenclick Finish to close the Uninstall Wizard.
Removing the Oracle Home Directory ManuallyAfter you uninstall the software, you must manually remove your Oracle homedirectory and any existing subdirectories that the Uninstall Wizard did not remove.
For example, if your Oracle home directory is /home/Oracle/product/ORACLE_HOME on a UNIX operating system, enter the following commands:
cd /home/Oracle/product rm -rf ORACLE_HOME
On a Windows operating system, if your Oracle home directory isC:\Oracle\Product\ORACLE_HOME, use a file manager window and navigate to theC:\Oracle\Product directory. Right-click on the ORACLE_HOME folder and selectDelete.
Removing the Program Shortcuts on Windows OperatingSystems
On Windows operating systems, you must also manually remove the programshortcuts; the Deinstallation Wizard does not remove them for you.
To remove the program shortcuts on Windows:
1. Change to the following directory:C:\ProgramData\Microsoft\Windows\StartMenu\Programs\Oracle\ORACLE_HOME\Product
2. If you only have one product installed in your Oracle home, delete theORACLE_HOME directory. If you have multiple products installed in your Oraclehome, delete all products before you delete the ORACLE_HOME directory.
Chapter 8Removing the Oracle Home Directory Manually
8-4
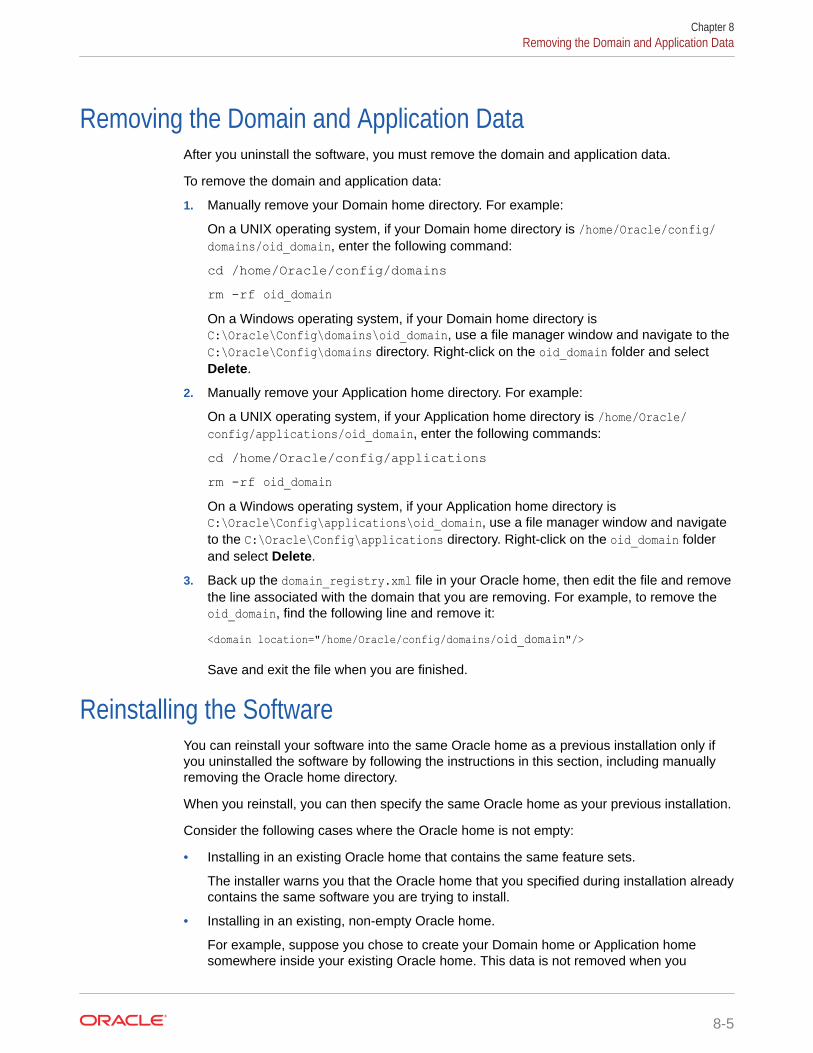
Removing the Domain and Application DataAfter you uninstall the software, you must remove the domain and application data.
To remove the domain and application data:
1. Manually remove your Domain home directory. For example:
On a UNIX operating system, if your Domain home directory is /home/Oracle/config/domains/oid_domain, enter the following command:
cd /home/Oracle/config/domainsrm -rf oid_domainOn a Windows operating system, if your Domain home directory isC:\Oracle\Config\domains\oid_domain, use a file manager window and navigate to theC:\Oracle\Config\domains directory. Right-click on the oid_domain folder and selectDelete.
2. Manually remove your Application home directory. For example:
On a UNIX operating system, if your Application home directory is /home/Oracle/config/applications/oid_domain, enter the following commands:
cd /home/Oracle/config/applicationsrm -rf oid_domainOn a Windows operating system, if your Application home directory isC:\Oracle\Config\applications\oid_domain, use a file manager window and navigateto the C:\Oracle\Config\applications directory. Right-click on the oid_domain folderand select Delete.
3. Back up the domain_registry.xml file in your Oracle home, then edit the file and removethe line associated with the domain that you are removing. For example, to remove theoid_domain, find the following line and remove it:
<domain location="/home/Oracle/config/domains/oid_domain"/>
Save and exit the file when you are finished.
Reinstalling the SoftwareYou can reinstall your software into the same Oracle home as a previous installation only ifyou uninstalled the software by following the instructions in this section, including manuallyremoving the Oracle home directory.
When you reinstall, you can then specify the same Oracle home as your previous installation.
Consider the following cases where the Oracle home is not empty:
• Installing in an existing Oracle home that contains the same feature sets.
The installer warns you that the Oracle home that you specified during installation alreadycontains the same software you are trying to install.
• Installing in an existing, non-empty Oracle home.
For example, suppose you chose to create your Domain home or Application homesomewhere inside your existing Oracle home. This data is not removed when you
Chapter 8Removing the Domain and Application Data
8-5
uninstall a product, so if you try to reinstall into the same Oracle home, the installerdoes not allow it. Your options are:
– Uninstall your software from the Oracle home (as this section describes) andthen remove the Oracle home directory. After you uninstall the software andremove the Oracle home directory, you can reinstall and reuse the sameOracle home location. Any domain or application data that was in the Oraclehome must be re-created.
– Select a different Oracle home directory.
Chapter 8Reinstalling the Software
8-6
AUpdating the JDK After Installing andConfiguring an Oracle Fusion MiddlewareProduct
Consider that you have a JDK version jdk1.8.0_191 installed on your machine. When youinstall and configure an Oracle Fusion Middleware product, the utilities, such as ConfigurationWizard (config.sh|exe), OPatch, or RCU point to a default JDK, for example, jdk1.8.0_191.After some time, Oracle releases a new version of the JDK, say jdk1.8.0_211 that carriessecurity enhancements and bug fixes. From 12c (12.2.1.3.0) onwards, you can upgrade theexisting JDK to a newer version, and can have the complete product stack point to the newerversion of the JDK.
You can maintain multiple versions of JDK and switch to the required version on need basis.
• About Updating the JDK Location After Installing an Oracle Fusion Middleware ProductThe binaries and other metadata and utility scripts in the Oracle home and Domain home,such as RCU or Configuration Wizard, use a JDK version that was used while installingthe software and continue to refer to the same version of the JDK. The JDK path is storedin a variable called JAVA_HOME which is centrally located in .globalEnv.properties fileinside the ORACLE_HOME/oui directory.
About Updating the JDK Location After Installing an OracleFusion Middleware Product
The binaries and other metadata and utility scripts in the Oracle home and Domain home,such as RCU or Configuration Wizard, use a JDK version that was used while installing thesoftware and continue to refer to the same version of the JDK. The JDK path is stored in avariable called JAVA_HOME which is centrally located in .globalEnv.properties file inside theORACLE_HOME/oui directory.
The utility scripts such as config.sh|cmd, launch.sh, or opatch reside in the ORACLE_HOME,and when you invoke them, they refer to the JAVA_HOME variable locatedin .globalEnv.properties file. To point these scripts and utilities to the newer version of JDK,you must update the value of the JAVA_HOME variable in the .globalEnv.properties file byfollowing the directions listed in Updating the JDK Location in an Existing Oracle Home .
To make the scripts and files in your Domain home directory point to the newer version of theJDK, you can follow one of the following approaches:
• Specify the path to the newer JDK on the Domain Mode and JDK screen while runningthe Configuration Wizard.
For example, consider that you installed Oracle Fusion Middleware Infrastructure with theJDK version 8u191. So while configuring the WebLogic domain with the ConfigurationAssistant, you can select the path to the newer JDK on the Domain Mode and JDKscreen of the Configuration Wizard. Example: /scratch/jdk/jdk1.8.0_211.
A-1
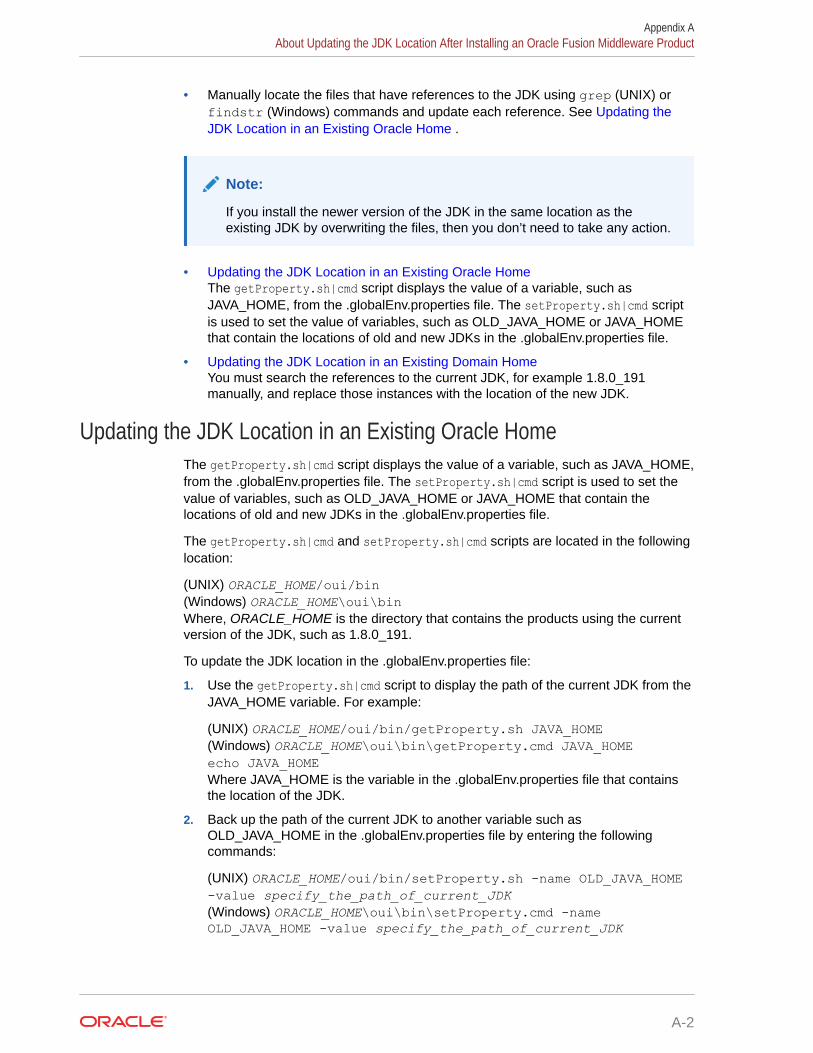
• Manually locate the files that have references to the JDK using grep (UNIX) orfindstr (Windows) commands and update each reference. See Updating theJDK Location in an Existing Oracle Home .
Note:
If you install the newer version of the JDK in the same location as theexisting JDK by overwriting the files, then you don’t need to take any action.
• Updating the JDK Location in an Existing Oracle HomeThe getProperty.sh|cmd script displays the value of a variable, such asJAVA_HOME, from the .globalEnv.properties file. The setProperty.sh|cmd scriptis used to set the value of variables, such as OLD_JAVA_HOME or JAVA_HOMEthat contain the locations of old and new JDKs in the .globalEnv.properties file.
• Updating the JDK Location in an Existing Domain HomeYou must search the references to the current JDK, for example 1.8.0_191manually, and replace those instances with the location of the new JDK.
Updating the JDK Location in an Existing Oracle HomeThe getProperty.sh|cmd script displays the value of a variable, such as JAVA_HOME,from the .globalEnv.properties file. The setProperty.sh|cmd script is used to set thevalue of variables, such as OLD_JAVA_HOME or JAVA_HOME that contain thelocations of old and new JDKs in the .globalEnv.properties file.
The getProperty.sh|cmd and setProperty.sh|cmd scripts are located in the followinglocation:
(UNIX) ORACLE_HOME/oui/bin(Windows) ORACLE_HOME\oui\binWhere, ORACLE_HOME is the directory that contains the products using the currentversion of the JDK, such as 1.8.0_191.
To update the JDK location in the .globalEnv.properties file:
1. Use the getProperty.sh|cmd script to display the path of the current JDK from theJAVA_HOME variable. For example:
(UNIX) ORACLE_HOME/oui/bin/getProperty.sh JAVA_HOME(Windows) ORACLE_HOME\oui\bin\getProperty.cmd JAVA_HOMEecho JAVA_HOMEWhere JAVA_HOME is the variable in the .globalEnv.properties file that containsthe location of the JDK.
2. Back up the path of the current JDK to another variable such asOLD_JAVA_HOME in the .globalEnv.properties file by entering the followingcommands:
(UNIX) ORACLE_HOME/oui/bin/setProperty.sh -name OLD_JAVA_HOME-value specify_the_path_of_current_JDK(Windows) ORACLE_HOME\oui\bin\setProperty.cmd -nameOLD_JAVA_HOME -value specify_the_path_of_current_JDK
Appendix AAbout Updating the JDK Location After Installing an Oracle Fusion Middleware Product
A-2
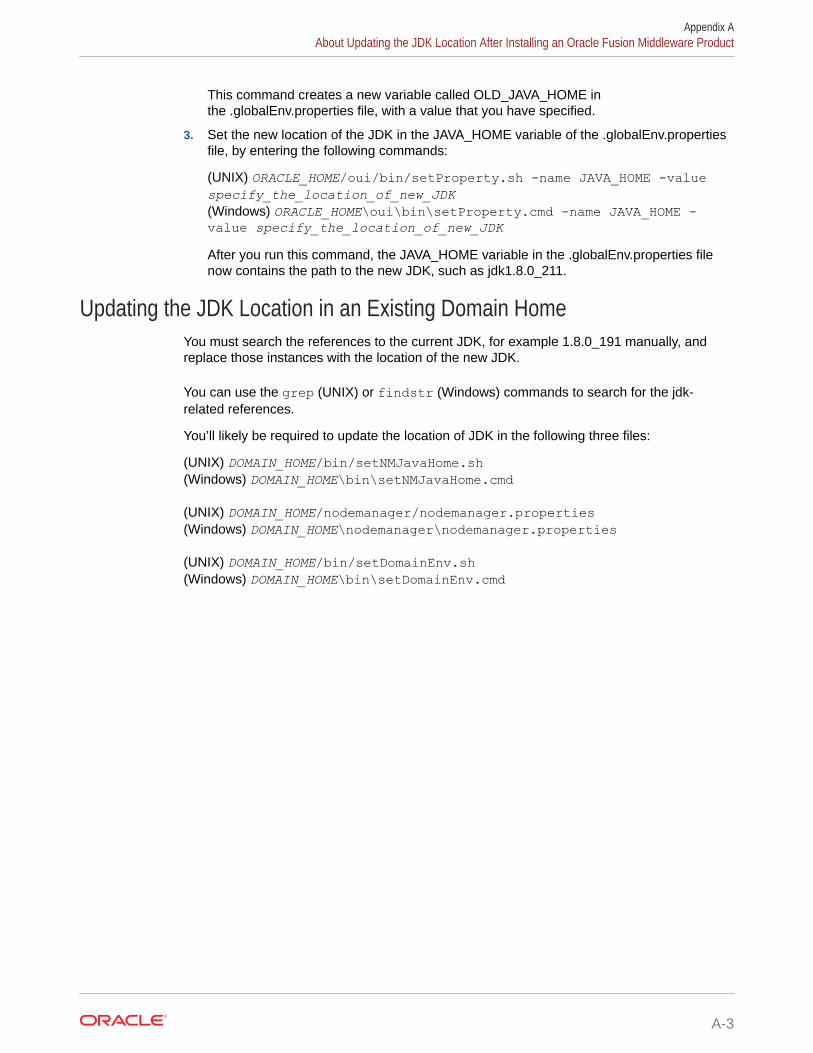
This command creates a new variable called OLD_JAVA_HOME inthe .globalEnv.properties file, with a value that you have specified.
3. Set the new location of the JDK in the JAVA_HOME variable of the .globalEnv.propertiesfile, by entering the following commands:
(UNIX) ORACLE_HOME/oui/bin/setProperty.sh -name JAVA_HOME -valuespecify_the_location_of_new_JDK(Windows) ORACLE_HOME\oui\bin\setProperty.cmd -name JAVA_HOME -value specify_the_location_of_new_JDKAfter you run this command, the JAVA_HOME variable in the .globalEnv.properties filenow contains the path to the new JDK, such as jdk1.8.0_211.
Updating the JDK Location in an Existing Domain HomeYou must search the references to the current JDK, for example 1.8.0_191 manually, andreplace those instances with the location of the new JDK.
You can use the grep (UNIX) or findstr (Windows) commands to search for the jdk-related references.
You’ll likely be required to update the location of JDK in the following three files:
(UNIX) DOMAIN_HOME/bin/setNMJavaHome.sh(Windows) DOMAIN_HOME\bin\setNMJavaHome.cmd
(UNIX) DOMAIN_HOME/nodemanager/nodemanager.properties(Windows) DOMAIN_HOME\nodemanager\nodemanager.properties
(UNIX) DOMAIN_HOME/bin/setDomainEnv.sh(Windows) DOMAIN_HOME\bin\setDomainEnv.cmd
Appendix AAbout Updating the JDK Location After Installing an Oracle Fusion Middleware Product
A-3
Related Documents


![Installing and Configuring Active Directory (v2[1].10.14)](https://static.cupdf.com/doc/110x72/577d2e081a28ab4e1eaea330/installing-and-configuring-active-directory-v211014.jpg)


![[1]Oracle® Fusion Middleware Installing and Configuring ... · Installing and Configuring Oracle Enterprise Data Quality 12c ... Oracle Fusion Middleware Installing and Configuring](https://static.cupdf.com/doc/110x72/5b8396637f8b9a47588d872b/1oracle-fusion-middleware-installing-and-configuring-installing-and.jpg)