Installing and Configuring Avaya one-X® Agent Release 2.5 March 31, 2011

Welcome message from author
This document is posted to help you gain knowledge. Please leave a comment to let me know what you think about it! Share it to your friends and learn new things together.
Transcript

Installing and Configuring Avaya one-XregAgent
Release 25
March 31 2011
copy 2011 Avaya Inc
All Rights Reserved
Notice
While reasonable efforts have been made to ensure that theinformation in this document is complete and accurate at the time ofprinting Avaya assumes no liability for any errors Avaya reserves theright to make changes and corrections to the information in thisdocument without the obligation to notify any person or organization ofsuch changes
Documentation disclaimer
ldquoDocumentationrdquo means information published by Avaya in varyingmediums which may include product information operating instructionsand performance specifications that Avaya generally makes availableto users of its products Documentation does not include marketingmaterials Avaya shall not be responsible for any modificationsadditions or deletions to the original published version ofdocumentation unless such modifications additions or deletions wereperformed by Avaya End User agrees to indemnify and hold harmlessAvaya Avayas agents servants and employees against all claimslawsuits demands and judgments arising out of or in connection withsubsequent modifications additions or deletions to this documentationto the extent made by End User
Link disclaimer
Avaya is not responsible for the contents or reliability of any linked Websites referenced within this site or documentation provided by AvayaAvaya is not responsible for the accuracy of any information statementor content provided on these sites and does not necessarily endorsethe products services or information described or offered within themAvaya does not guarantee that these links will work all the time and hasno control over the availability of the linked pages
Warranty
Avaya provides a limited warranty on its Hardware and Software(ldquoProduct(s)rdquo) Refer to your sales agreement to establish the terms ofthe limited warranty In addition Avayarsquos standard warranty languageas well as information regarding support for this Product while underwarranty is available to Avaya customers and other parties through theAvaya Support Web site httpsupportavayacom Please note that ifyou acquired the Product(s) from an authorized Avaya reseller outsideof the United States and Canada the warranty is provided to you bysaid Avaya reseller and not by Avaya
Licenses
THE SOFTWARE LICENSE TERMS AVAILABLE ON THE AVAYAWEBSITE HTTPSUPPORTAVAYACOMLICENSEINFO AREAPPLICABLE TO ANYONE WHO DOWNLOADS USES ANDORINSTALLS AVAYA SOFTWARE PURCHASED FROM AVAYA INCANY AVAYA AFFILIATE OR AN AUTHORIZED AVAYA RESELLER(AS APPLICABLE) UNDER A COMMERCIAL AGREEMENT WITHAVAYA OR AN AUTHORIZED AVAYA RESELLER UNLESSOTHERWISE AGREED TO BY AVAYA IN WRITING AVAYA DOESNOT EXTEND THIS LICENSE IF THE SOFTWARE WAS OBTAINEDFROM ANYONE OTHER THAN AVAYA AN AVAYA AFFILIATE OR ANAVAYA AUTHORIZED RESELLER AVAYA RESERVES THE RIGHTTO TAKE LEGAL ACTION AGAINST YOU AND ANYONE ELSEUSING OR SELLING THE SOFTWARE WITHOUT A LICENSE BYINSTALLING DOWNLOADING OR USING THE SOFTWARE ORAUTHORIZING OTHERS TO DO SO YOU ON BEHALF OFYOURSELF AND THE ENTITY FOR WHOM YOU ARE INSTALLINGDOWNLOADING OR USING THE SOFTWARE (HEREINAFTERREFERRED TO INTERCHANGEABLY AS ldquoYOUrdquo AND ldquoEND USERrdquo)AGREE TO THESE TERMS AND CONDITIONS AND CREATE ABINDING CONTRACT BETWEEN YOU AND AVAYA INC OR THEAPPLICABLE AVAYA AFFILIATE ( ldquoAVAYArdquo)
Avaya grants End User a license within the scope of the license typesdescribed below The applicable number of licenses and units ofcapacity for which the license is granted will be one (1) unless a
different number of licenses or units of capacity is specified in theDocumentation or other materials available to End User ldquoDesignatedProcessorrdquo means a single stand-alone computing device ldquoServerrdquomeans a Designated Processor that hosts a software application to beaccessed by multiple users ldquoSoftwarerdquo means the computer programsin object code originally licensed by Avaya and ultimately utilized byEnd User whether as stand-alone Products or pre-installed onHardware ldquoHardwarerdquo means the standard hardware originally sold byAvaya and ultimately utilized by End User
License type
Concurrent User License (CU) End User may install and use theSoftware on multiple Designated Processors or one or more Serversso long as only the licensed number of Units are accessing and usingthe Software at any given time A ldquoUnitrdquo means the unit on which Avayaat its sole discretion bases the pricing of its licenses and can bewithout limitation an agent port or user an e-mail or voice mail accountin the name of a person or corporate function (eg webmaster orhelpdesk) or a directory entry in the administrative database utilizedby the Software that permits one user to interface with the SoftwareUnits may be linked to a specific identified Server
Copyright
Except where expressly stated otherwise no use should be made ofmaterials on this site the Documentation Software or Hardwareprovided by Avaya All content on this site the documentation and theProduct provided by Avaya including the selection arrangement anddesign of the content is owned either by Avaya or its licensors and isprotected by copyright and other intellectual property laws including thesui generis rights relating to the protection of databases You may notmodify copy reproduce republish upload post transmit or distributein any way any content in whole or in part including any code andsoftware unless expressly authorized by Avaya Unauthorizedreproduction transmission dissemination storage and or use withoutthe express written consent of Avaya can be a criminal as well as acivil offense under the applicable law
Third-party components
Certain software programs or portions thereof included in the Productmay contain software distributed under third party agreements (ldquoThirdParty Componentsrdquo) which may contain terms that expand or limitrights to use certain portions of the Product (ldquoThird Party Termsrdquo)Information regarding distributed Linux OS source code (for thoseProducts that have distributed the Linux OS source code) andidentifying the copyright holders of the Third Party Components and theThird Party Terms that apply to them is available on the Avaya SupportWeb site httpsupportavayacomCopyright
Preventing Toll Fraud
ldquoToll fraudrdquo is the unauthorized use of your telecommunications systemby an unauthorized party (for example a person who is not a corporateemployee agent subcontractor or is not working on your companysbehalf) Be aware that there can be a risk of Toll Fraud associated withyour system and that if Toll Fraud occurs it can result in substantialadditional charges for your telecommunications services
Avaya Toll Fraud Intervention
If you suspect that you are being victimized by Toll Fraud and you needtechnical assistance or support call Technical Service Center TollFraud Intervention Hotline at +1-800-643-2353 for the United Statesand Canada For additional support telephone numbers see the AvayaSupport Web site httpsupportavayacom Suspected securityvulnerabilities with Avaya products should be reported to Avaya bysending mail to securityalertsavayacom
Trademarks
Avaya the Avaya logo one-X are either registered trademarks ortrademarks of Avaya Inc in the United States of America andor otherjurisdictions
All non-Avaya trademarks are the property of their respective owners
2 Installing and Configuring Avaya one-Xreg Agent March 31 2011
Downloading Documentation
For the most current versions of Documentation see the AvayaSupport Web site httpsupportavayacom
Contact Avaya Support
Avaya provides a telephone number for you to use to report problemsor to ask questions about your Product The support telephone numberis 1-800-242-2121 in the United States For additional supporttelephone numbers see the Avaya Web site httpsupportavayacom
Installing and Configuring Avaya one-Xreg Agent March 31 2011 3
4 Installing and Configuring Avaya one-Xreg Agent March 31 2011
Contents
Chapter 1 Introduction7Installation overview7Architecture overview8
Chapter 2 Requirements9Enterprise requirements9Software requirements9
Feature dependencies on configuration10Computer and other hardware requirements10Video requirements13Network connection requirements14License requirements15
Chapter 3 Avaya one-X Agent installation checklist17
Chapter 4 Installing Avaya one-X Agent19Installing Avaya one-X Agent (GUI installation) 19Installing Avaya one-X Agent (silent installation) 21
Customizing the install24Upgrading Avaya one-X Agent to Release 25 24Installing the Polycom video software25Administration and configuration of Avaya one-X Agent using XML26
Chapter 5 Getting started31Logging on to Avaya one-X Agent 31
Chapter 6 Setting up the initial configuration35Configuring phones for different locations35
Setting up the My Computer configuration36Setting up the Desk Phone configuration37Setting up the Other Phone configuration38
Configuring the agent settings40Configuring IM settings41Choosing User Type41Setting up the dialing rules42Defining Alternate Server addresses45Configuring the Work Handling options46Configuring the incoming call appearance47Configuring incoming Instant Message appearance47Configuring incoming TTY appearance48Setting the audio options50Defining an agent profile52Integrating the voice mail system53Activating a recorded greeting54Defining a reason code54
Defining reason codes for work55Defining reason codes for logging out56Defining reason codes for auxiliary57
Viewing the phone display on the main window58
Installing and Configuring Avaya one-Xreg Agent March 31 2011 5
Setting the toolbar buttons on the main window58
Chapter 7 Repairing Avaya one-X Agent61
Chapter 8 Removing the Avaya one-X Agent application63Removing Avaya one-X Agent in manual mode63
Chapter 9 Removing existing software65
Index67
6 Installing and Configuring Avaya one-Xreg Agent March 31 2011
Chapter 1 Introduction
Avaya one-X Agent is an integrated telephony soft-phone solution that provides seamless connectivity toat-home agents remote agents out-sourced agents contact center agents and agents interacting withclients having vocal and hearing impairment
Avaya one-X Agent 25 has number of enhancements in addition to the features available in Avaya one-X Agent 20
The new release is compatible with Call Center Elite 60 and Avaya one-X Agent 20 and later releasesThe new release also provides the ability to inter-operate with other IM Presence Services namely Avayaone-Xreg Communicator 61 and Microsoft Office Communicator 2007 or later These enhancements arealso supported by Avaya Aurareg Presence Services Avaya Aurareg System Manager Avaya Aurareg
Communication Manager and Central Management Avaya one-X Agent 25 now supports Avaya Aurareg
Presence Services 61 and Avaya Aurareg System Manager 61
The availability of features depend on the Avaya one-X Agent user type used for deployment All theenhancements are achieved in maintaining the same user interface to help users adapt quickly to the newfeatures presented in this release
Installation overviewAvaya one-X Agent supports the Communication Manager H323 telephony protocols Yourenterprise can use any of the following installation methods to install Avaya one-X Agent
bull Desktop installation Desktop installation (Avaya standard installation) allows you todownload and run the installation on the desktop The installer leads the user through asimple wizard to set installation options
bull Silent installation The silent installation (Command Line Installation) allows you to runthe standard install package through a command line interface without the need of agraphical user interface Installs options are controlled through parameters on thecommand line
bull Push installation The push installation (Configurable-Silent Installation) allows you tocustomize the Avaya one-X Agent Installation database The enterprise will require theassistance of Network Administrators to do this usually as part of the users WindowsDomain Login to push the file into the agents desktop computer
Installing and Configuring Avaya one-Xreg Agent March 31 2011 7
Architecture overviewAvaya one-X Agent uses the following system architecture software integrations and softwarecomponents to provide a multi-channel contact center solution
1 Communication Manager
2 H323
3 Avaya IPDCP telephone (Far Endpoint)
4 Desktop running Avaya one-X Agent
5 Video Camera (Optional)
6 Real Time Processing (RTP) to Far Endpoint
Introduction
8 Installing and Configuring Avaya one-Xreg Agent March 31 2011
Chapter 2 Requirements
Enterprise requirementsCommunication ManagerTo use Avaya one-X Agent for H323 voice or video call you must have an extension that isproperly administered for Avaya one-X Agent on a media server running one of the followingversion of Communication Manager
bull Communication Manager Release 2x and higher (voice only)bull Communication Manager Release 4x and higher (voice and video)
Avaya Video Telephony SolutionIf you want to use the video feature you must have any one of the following software packages
bull Avaya Video Telephony Solution 30bull Avaya Video Telephony Solution 40
Software requirementsOperating SystemDesktop computers or laptops must have one of the following 32ndashbit or 64ndashbit operatingsystems
bull Microsoft Windows 7bull Microsoft Windows XP Professional with Service Pack 2 or Service Pack 3bull Microsoft Windows Vista Service with Service Pack 1 for Business Enterprise or Home
Premiumbull Microsoft Windows 2003 Server - Terminal Servicesbull Microsoft Windows 2008 Server - Terminal Services
Software download packageYou must have the following software package
bull Avaya one-X Agent installation programbull Polycom video installer (required only if you are using video)
Installing and Configuring Avaya one-Xreg Agent March 31 2011 9
You can download the software from the Avaya Web site
httpwwwavayacomsupport
Required Microsoft productsAvaya one-X Agent requires the following Microsoft products
bull Microsoft Internet Explorer 70 or later (to use Click-to-Dial from Internet Explorer)bull Microsoft NET Framework 35 Service Pack 1bull Microsoft Re-distributable Primary Interop Assemblies (PIA) required only when
importing Microsoft Office Contacts from Microsoft Office 2003 or 2007bull Windows Media Player R10 or higher required if you are using the H323 protocol
You can download the software from the Microsoft Web site
httpwwwmicrosoftcom
Feature dependencies on configurationThe following table shows the availability of Avaya one-X Agent features supported by 32 bit64 bit and Server OS recommended for Avaya one-X Agent
Feature Name 32 bit operatingsystem
64 bit operatingsystem
Server operatingsystem
ACD Available Available Available
Telephony Available Available Available
Video Available Not Available Not Available
IMPresence Available Available Available
TTY Available Available Not Available
Desktop Sharing Available Available Available
Supervisor Available Available Available
My Computer mode Available Available Not Available
Computer and other hardware requirements
ImportantEnsure that the hardware components are properly configured and functioning as intendedin your personal computer Any improperly configured devices in your personal computercan potentially cause problems with the normal functionality of Avaya one-X Agent The
Requirements
10 Installing and Configuring Avaya one-Xreg Agent March 31 2011
hardware components may include sound card disc drive hard disk drive mouse and videocard
Hardware specifications for clients using only voice operations in Desk Phoneor Other phone modeUsers using extensive Desk Phone or Other Phone connection modes need to have thefollowing minimum client hardware Systems with these specifications do not leverage anyother media type such as VoIP Video Desktop Sharing or IM
Processor 733 MHz Pentium 3 processor or equivalent
RAM 256 MB
Hard disk space Minimum 1 GB and more if records and configuration are stored locally
Monitor display 800 x 600 16 colors
Avaya Switcher II For Agent Greetings in the Other Phone (Dual Connect) and Desk Phone(Shared Control) modes
Hardware specifications for clients using Video My Computer mode IM orDesktop Sharing
Processor 15 GHz Pentium 4 processor or equivalent
RAM 1 GB
Hard disk space Minimum 1 GB and more if records and configuration are stored locally
Larger the disk space better is the media performance especially inVoIP
Monitor display 800 x 600 16 colors
Universal Serial Bus USB 20
Web camera List of supported web cameras and products required for use the videofeatures is available in Video requirements on page 13
Avaya Switcher II For Agent Greetings in the Other Phone (Dual Connect) and DeskPhone (Shared Control) modes
PC headset or headphonesPC Headsets are needed for operation in the My Computer mode
Avaya no longer tests sells or supports headsets however some of the headsets are testedwith Avaya one-X Agent by DevConnect partners Avaya one-X Agent has published an APIsupporting Avaya branded headsets that allows the DevConnect Partners to test headsetinterface through the DevConnect program For more current information on testing see theDevConnect Web site or Application Notes on the Avaya one-X Agent page of the Avaya Website
Computer and other hardware requirements
Installing and Configuring Avaya one-Xreg Agent March 31 2011 11
NoteAvaya does not recommend any specific headset but some of the Avaya branded versionsof the Plantronics headsets are tested through the DevConnect program
For mapping of former Avaya branded headsets to their Plantronics equivalent see theAvaya to Plantronics headset Transition Guide on the Plantronics Web site You candownload the PDF file that has the list of headsets from the following link
httpwwwplantronicscommediaucavaya_transition_guidepdf
The following are the wireless (USBPC) headsets that have been tested with Avaya one-XAgent and perform adequately The list is in no particular order
Model Supported region Headset700438534 Global non EMEA ABT 35 USB Headset NA
700438559 EMEA ABT 35 USB Headset Euro
700373335 EMEA AWH-65 USB WRLsHeadset Euro RHS
NoteTo use these wireless headsets you need Persono Suite software Release 11
The following are the Wired (USBPC) headsets that have been tested with Avaya one-X Agentand perform adequately The list is in no particular order
Model Supported region Headset700414139 Global QD
700343726 Global HDST - SUPRA ELITE MONNC (AH450N)
700470586 Globalnon EMEA
ENCORE ELITE BINAURAL
NoteTo use these wired headsets you need an USB Adapter RHS
IP Telephones (for Desk Phone mode)Avaya one-X Agent supports the Avaya series phone The following are the telephone typesthat are available on Communication Manager and officially supported for use with Avaya one-X Agent
bull Avaya 24xx seriesbull Avaya 46xx seriesbull Avaya 64xx seriesbull Avaya 96xx series (except 9610 The 9610 is not suitable to be an ACD telephone)
Requirements
12 Installing and Configuring Avaya one-Xreg Agent March 31 2011
NoteAvaya 96x1 sets aliased as 96xx sets if operating with Communication Manager before62
bull Clarisys i750 USB Internet Phone
NoteYou can use the 16xx series H323 phones with Avaya one-X Agent as long as they havebeen provisioned as 46xx series phones on Communication Manager
Sound card (For My Computer mode)The computer must have a full-duplex sound system Avaya recommends the following soundcards for use with Avaya one-X Agent as these sound cards have performed adequately Thelist is in no particular order
bull Creative Labs - Livebull Creative Labs - Audigybull Creative Labs - Audigy 2
You can download the latest drivers for these sound cards from the Creative Labs CustomerSupport Web site
NoteUsing splitters with any of these sound devices may result in poor audio quality
NoteMost PCs and laptops have an integrated sound system that meets the Intel High Definitionsound standard These PCs and laptops performs satisfactorily without a need of additionalsound card or system
Video requirementsAvaya Video Telephony Solution provides a point-to-point communication capability for agentsin a contact center
Avaya Video Telephony Solution is an optional Avaya one-X Agent feature and requires theCommunication Manager Remote Feature Activation (RFA) license For information about thislicense requirement see License requirements on page 15
NoteAvaya one-X Agent supports video with H323 in the My Computer and Desk Phonemodes
For more information about the video features see the Avaya Video Telephony Solutiondeployment guide which is available on the Avaya Web site at
Video requirements
Installing and Configuring Avaya one-Xreg Agent March 31 2011 13
httpwwwavayacomsupport
Communication ManagerAvaya Video Telephony Solution features differ depending on the Communication Managerrelease because video is part of Communication Manager Communication Manager 3x orlater is required for video
Web cameraThe following USB cameras have been tested with Avaya one-X Agent and functionadequately The list is in no specific order
bull Camera Logitech QuickCamreg Communicate MP(S5500)bull Logitech QuickCamreg Ultra Visionbull Logitech QuickCamreg Pro 9000bull Microsoft VX-3000bull Microsoft VX-6000bull Creativereg WebCam Livereg Motion
You can find additional information about the video products from the following resourcesbull For the most current list of supported Web cameras go to the Avaya Web site
http wwwavayacomsupportbull For information about the supported Web cameras go to the manufacturers Web sitebull Ensure that your personal computer meets the system requirements for your Web
camera
Network connection requirementsYou can use a Local Access Network (LAN) Digital Subscriber Line (DSL) or a broadbandinternet connection to set up the network The following list provides the network requirementsfor each configuration type
My Computerconfiguration
A single Ethernet connection between the personal computer and theIP network Similarly Communication Manager must be connected tothis network
Desk Phoneconfiguration
An Ethernet connection to the Network from the personal computerand an Avaya Desk Phone connected to Communication Manager bythe IP network or DCP wired protocols
Other Phoneconfiguration
An Ethernet connection from the personal computer to the IP networkand a simple switched connection to any other telephone endpoint asa Communication Manager extension or in the PSTN
Requirements
14 Installing and Configuring Avaya one-Xreg Agent March 31 2011
TipAvaya provides in-depth and informative documents that define and describe all aspects ofnetworking and how those aspects can affect the VoIP communication You can retrievethese documents from the Avaya Web site at
http wwwavayacomsupport
License requirementsAvaya controls the use of Avaya one-X Agent and the optional Avaya Video Telephony Solutionthrough licenses You must purchase licenses for these products in order to use them
Avaya one-X Agent license requirementBefore installing Avaya one-X Agent ensure that the system administrator has registeredCommunication Manager with the required number of Avaya one-X Agent registrationlicenses
You can use different types of users namely agents non-agents and supervisors to accessthe Communication Manager features Based on the user type the system grants a useraccess to a particular User Type then that user will have access to all the features associatedwith that user type unless they are further restricted through Communication Manager If auser does not intend signing on to the ACD as an agent but wants the features of Avaya one-X Agent the user can use a Non-Agent license type
Avaya Video Telephony Solution license requirementsAvaya Video Telephony Solution is an optional Avaya one-X Agent feature that is controlled inthe Communication Manager RFA license You only need this license if you are using the Avayaone-X Agent video feature Avaya one-X Agent supports video only in the H323 mode EachAvaya one-X Agent station administered on Communication Manager requires one RTULicense for the Maximum Video Capable Avaya one-X Agent Endpoints feature Theselicenses are included in all Communication Manager RFA licenses
For more information on license refer to the Licensing section of Avaya one-X Agent Overviewguide
License requirements
Installing and Configuring Avaya one-Xreg Agent March 31 2011 15
Requirements
16 Installing and Configuring Avaya one-Xreg Agent March 31 2011
Chapter 3 Avaya one-X Agent installationchecklist
As Avaya one-X Agent interacts with many different products and services you need to plan for asuccessful installation Use this checklist to plan your activities This check list makes sure that allrequirements are in place for an error-free installation
Task Description
1 Determine how your enterprise willdeploy Avaya one-X Agent
The deployment option may includetelephony protocol feature set usagemode and Communication ManagerAvaya one-X Agent supports video withH323 in the My Computer and DeskPhone modes For details see Enterprise requirements on page 9
2 Ensure that all product licenses are inplace
Avaya controls the use of Avaya one-XAgent and the optional Avaya VideoTelephony Solution through licenses Youmust purchase licenses for theseproducts in order to use them For licenseinformation see Licenserequirements on page 15
3 Download the software package from theAvaya support site
The Avaya one-X Agent softwaredownload package is available on theAvaya Support Web site at httpwwwavayacomsupportFor software requirements see Softwarerequirements on page 9
4 Ensure that the end user and enterpriseenvironments can support Avaya one-XAgent
For the installation option consider thefollowingbull Is the required hardware in place For
hardware requirement see Computerand other hardware requirements onpage 10
bull Have all related Avaya softwareproducts been installed andadministered correctly For Avayasoftware requirements see Softwarerequirements on page 9
bull Have all related third-party softwareproducts been installed and
Installing and Configuring Avaya one-Xreg Agent March 31 2011 17
Task Description
administered correctly For third-partysoftware requirements see Softwarerequirements on page 9
bull Have you verified that yourinfrastructure is ready for videotelephony For more information seethe Avaya Video Telephony Solutiondeployment guide available on theAvaya Web site at httpwwwavayacomsupport
4 Administer Avaya one-X Agent feature onCommunication Manager
Ensure that your system administratorhas configured Communication Managerto support extension assignments IPconnectivity telephone types video andother settings For details seeAdministering Communication Managerfor Avaya one-X Agent
5 Determine how you will distribute theAvaya one-X Agent software to youremployees
You can
bull Use a tool such as the MicrosoftSoftware Management Server (SMS)for silent installations
bull Use a customer installation processthat requires end users to manuallyinstall the Avaya one-X Agent and otherrelated software
6 Begin the installation process Avaya one-X Agent installation isavailable for personal computer andWindows Server environments Forsteps see Installing Avaya one-XAgent on page 19
7 Start Avaya one-X Agent You must register your telephoneextension with the CommunicationManager system to configure yoursystem preferences
8 Complete the initial administration After completing the installation youmust configure your system and agentpreferences The basic administrationsettings are available in Setting up theinitial configuration on page 35
Avaya one-X Agent installation checklist
18 Installing and Configuring Avaya one-Xreg Agent March 31 2011
Chapter 4 Installing Avaya one-X Agent
You or your system administrator can install Avaya one-X Agent using GUI or silent in a networkenvironment that implements a network system management tool such as SMS
The GUI installation allows you to run the installation setting through an installation wizard Theenterprises end users can download and install all required software onto their personal computers
The silent installation allows you to run the standard install settings through a command line interface(CLI) You can do this locally at your desktop or under the control of a tool such as SMS The enterprisessystem administrator tests and installs the Avaya one-X Agent installer software In addition you cancustomize the Avaya one-X Agent configuration file to meet the companys needs and push the customizedinstallation database file in the installation file through a CLI installation
Installing Avaya one-X Agent (GUI installation)Prerequisites
bull If you plan to install Avaya one-X Agent with video and if Avaya IP Softphone with videoor Avaya one-Xreg Communicator with video is installed on your computer you mustremove the Polycom video with either of the products and install the Polycom video withthe installer supplied with Avaya one-X Agent Refer to Removing existing software onpage 65 for more information
bull Ensure that Microsoft NET Framework 35 SP1 is installed on your computer
bull If you plan to use Click-to-Dial using Mozilla Firefox then ensure that Mozilla Firefox isinstalled
1 Using a Windows Explorer navigate to the directory containing the Avaya one-XAgent Installation Software that you have downloaded from the Avaya distributionsite
2 Unzip the contents and double-click the OneXAgentSetupexe fileThe system starts the installation wizard and displays the welcome screen
3 In the welcome screen click NextThe End-User License Agreement screen appears
4 In the End-User License Agreement screen select the I accept the terms in theLicense Agreement check box and click Next
Installing and Configuring Avaya one-Xreg Agent March 31 2011 19
The User Information screen appears
5 Enter your name and organization name in Full Name and Organization fieldsrespectively
6 In the User Information screen click NextThe Destination Folder screen appears
7 In the Destination Folder screen enter the location where you want to install Avayaone-X Agent and click NextThe Central Management Information screen appears
8 If Central Management is installed for Avaya one-X Agent perform the followingsteps
a Select Enable Central storage of profile information check box
b Enter the Central Management server IP address and port number in theCentral Management Host and Central Management Port fieldsrespectively For example enter the https[HOSTANDPORT]oneXAgentCMclient
This is an optional step You can install Avaya one-X Agent without selecting theEnable Central storage of profile information check box An example URL withport number and path appears If you have not changed the default port type theIP Address into this sample preserving the port number The following is an exampleURL with backstroke () at the end https14814718628643oneXAgentCMclient
9 Click NextThe Language Pack Information screen appears
10 Choose Language Packs for future users and click NextThe one-X Agent Options screen appears
11 In the one-X Agent Options screen choose appropriate options
Options DescriptionUse windows credentials to login toCentral Management
Select this option if you are using Singlesign-on which requires additionalMicrosoft Active Directory to be able tolog on to Central Management andorPresence Services using the windowscredentials
Enable Tutorials Select this option to install help withtutorials These are videos clipping withillustrations to perform operationsvisuallyLeave this check box cleared to installhelp without tutorials
Installing Avaya one-X Agent
20 Installing and Configuring Avaya one-Xreg Agent March 31 2011
Options DescriptionIn either case help is presented inHTML and PDF formats
Enable Click to Dial in InternetExplorer
Select this option to enable the Click-to-Dial support in Internet Explorer
Enable Click to Dial in Mozilla Firefox Select this option to enable the Click-to-Dial support in Mozilla Firefox Thisoption appears only if Mozilla Firefox isinstalled on your computer
12 Click NextThe Video Information screen appears
13 To enable the video in Avaya one-X Agent select the Enable Video check box inthe Video Information screenThe Enable Video appears enabled only if the correct version of Polycom Video isinstalled and detected on your computer
14 To change the TTY Baud Rate select the Baud Rate from the available options Bydefault the TTY Baud Rate is 4545 For North American Standard the TTY Baudrate is 4545
15 To complete the Avaya one-X Agent installation click InstallThe system begins the Avaya one-X Agent installation and the wizard displays aprogress bar After completing the installation the Completed the Avaya one-XAgent Setup Wizard screen appears
16 To start Avaya one-X Agent immediately after you exit the wizard in the Completedthe Avaya one-X Agent Setup Wizard screen select Launch one-X Agent whensetup exists
17 In the Completed the Avaya one-X Agent Setup Wizard screen click FinishThis completes the Avaya one-X Agent manual installation
Installing Avaya one-X Agent (silent installation)The silent installer runs the Avaya one-X Agent installation with the following features
bull H323 protocolbull Avaya Video Telephony Solutionbull Microsoft Internet Explorerbull Mozilla Firefoxbull Polycom video
Installing Avaya one-X Agent (silent installation)
Installing and Configuring Avaya one-Xreg Agent March 31 2011 21
You can configure all options available in the GUI install can using the silent installation Youcan use the OneXAgentSetupexe setup to install Avaya one-X Agent 25 with the defaultoptions or with specific options as described in the following procedures
1 Open the command prompt and navigate to the folder where you have copied theAvaya one-X Agent Installation Software that you downloaded from the Avayadistribution site
2 To install Avaya one-X Agent with default options run the following command fromthe command promptOneXAgentSetupexe qn
3 To install Avaya one-X Agent with specific options you must provide appropriateproperty values for each option that you install through the command line or in theinstallproperties file The following table provides description for properties
Property DescriptionINSTALLLOCATION Requires full path to the directory where
you want to install Avaya one-XAgent
USERNAME Sets the agent user name
COMPANY NAME Sets the name of your company
INSTALLTUTORIALS Installs help with or without tutorialsSet its value as 1 to install help withtutorials
ENABLECLICKTODIALIE Enables Click-to-Dial feature in InternetExplorerSet its value as 1 to enable the featurein Internet Explorer
ENABLECLICKTODIALFF Enables Click-to-Dial feature inFirefoxSet its value as 1 to enable the featurein Firefox
ENABLEVIDEO Enables video in Avaya one-X AgentSet its value as 1 to enable video
TTYDEVICEBAUDRATE Sets the standard TTY device baudrateSelect the 4545 if your countrystandard is 4545 or select 50Contact your system administrator formore information
LAUNCHAPPONEXIT Starts Avaya one-X Agent immediatelyafter installation
Installing Avaya one-X Agent
22 Installing and Configuring Avaya one-Xreg Agent March 31 2011
Property DescriptionSet its value as 1 to start Avaya one-XAgent immediately after installation
USESINGLESIGNON Enables single sign-on (SSO) forAvaya one-X AgentSet its value as 1 to allow users toperform a single sign on
ENABLECENTRALSTORAGE Enables central storage of agentprofiles and configuration Agents canmake changes to their profiles andconfigurations through the Avaya one-X Agent user interface Set its value as1 to enable the central storage of theconfiguration
CENTRALMANAGEMENTURI Sets the storage path of the centrallocation where agent profiles andconfiguration will be storedSet its value as httpslthostgtoneXAgentCMclient wherelthostgt is the IP address of CentralManagement
INSTALL_FR Set to 1 to install French languagebinaries
INSTALL_DE Sets the language to German
INSTALL_IT Sets the language to Italian
INSTALL_JA Sets the language to Japanese
INSTALL_KO Sets the language to Korean
INSTALL_ES Sets the language to Spanish
INSTALL_NL Sets the language to Dutch
INSTALL_PT Sets the language to Portuguese
INSTALL_RU Sets the language to Russian
INSTALL_ ZH-CN Sets the language to ChineseTraditional
INSTALL_ ZH-TW Taiwan
4 Run the following command to install Avaya one-X Agent with specific optionsOneXAgentSetupexe qn ltpropertygt=ltproperty valuegt
Installing Avaya one-X Agent (silent installation)
Installing and Configuring Avaya one-Xreg Agent March 31 2011 23
For example you can use the following to enable video and using CentralManagement that as French and German language packsOneXAgentSetupexe qn EnableVideo=1 CENTRALMANAGEMENTURI=https148147173187oneXAgentCMclient INSTALL_FR=1 INSTALL_DE=1
NoteIf you plan to install Avaya one-X Agent using a push mechanism there areseveral options to push the Polycom and Avaya one-X Agent to the agentscomputer Once the file is copied to the agents computer you can use a customscript to install the software on other agent computers Please involve yourtechnical experts in this as Avaya does not support such an installation
Customizing the installSince Avaya provides install property file (installproperties) with Avaya one-X Agentyou can customize the installation
Upgrading Avaya one-X Agent to Release 25
ImportantAvaya recommends that you upgrade the Central Management 25 server before upgradingthe Avaya one-X Agent 25 client if you are deploying the Avaya one-X Agent system withCentral Management
The Avaya one-X Agent installer automatically upgrades any of the following versions alreadyinstalled on your system to Release 25
bull Avaya one-X Agent Release 10
bull Avaya one-X Agent Release 10 SP1
bull Avaya one-X Agent Release 20
bull Avaya one-X Agent Release 20 SP1
bull Avaya one-X Agent Release 20 SP2
bull Avaya one-X Agent Release 20 SP3
ImportantDo not try to upgrade between interim build versions of the Avaya one-X Agent Release 25as the Avaya one-X Agent installer does not support If you attempt to update the applicationbetween the build versions the system displays errors while logging in
Installing Avaya one-X Agent
24 Installing and Configuring Avaya one-Xreg Agent March 31 2011
Use the following steps to upgrade Avaya one-X Agent to Release 25
1 Using a Windows Explorer navigate to the directory containing the Avaya one-XAgent software using Windows Explorer and double-click theOneXAgentSetupexe fileThe system detects the earlier installation and proceeds to remove the installedversion of Avaya one-X Agent After successful removal of previous version thesystem starts the installation wizard and displays the welcome screen
2 To enable or disable any feature before upgrading to Avaya one-X Agent 25 openthe installproperties file and modify the feature optionsThe installproperties file is present in the same folder asOneXAgentSetupexe
3 Follow steps 3 through 16 in Installing Avaya one-X Agent (GUI installation) onpage 19
Installing the Polycom video softwareVideo is an optional feature for Avaya one-X Agent If you intend to make and receive videocalls with Avaya one-X Agent you must install the web camera and its driver on your personalcomputer and install the Polycom video software The video software is available with theAvaya one-X Agent installation package For information on video requirements see Videorequirements
1 Install your Web camera and its driverFor detailed procedure to install the Polycom Video software refer to the installationguide provided with your Web camera
2 Navigate to the directory containing the Polycom Video installer
3 Double-click Polycom Video Setup
4 Follow the on-screen instructions on the installation wizard to complete the setup
Installing the Polycom video software
Installing and Configuring Avaya one-Xreg Agent March 31 2011 25
Administration and configuration of Avaya one-X Agentusing XML
ImportantAvaya strongly recommends that administrators do not attempt to edit or add XMLconfiguration files in the default startup files in the Program folder or in user Application DataHowever administrators who are familiar with XML XML editing and XSD definitions canedit these files
Avaya further recommends Central Management administrators to initialize deploy andmanage configurations for multiple users Central Management requires no special XMLtransform It provides life-cycle management of user configurations support for hot-deskingand the security of Active Directory user authentication
Administrators can use this information to configure Avaya one-X Agent for large number ofagents and in contact centers handling a variety of portfolios This information helps to minimizethe efforts of creating profiles individually and also optimizes the installation and configurationfor Avaya one-X Agent administrators
Profile settingA profile is a collection of pre-configured settings and preferences Agents use profiles to loadthe pre-configured settings such as Home Office Sales Support and so on A profile containsconfiguration files that are stored locally inside a subdirectory of the main configurationTypically the configuration files are located at Program FilesAvayaAvaya one-XAgentltprofile namegt
The Program Files settings can only be loaded into the users current profile or into default inthe users Application Data if the user is starting Avaya one-X Agent for the first time
In the path ltprofile namegt represents the actual name given to the agent profile and sameappears as the directory name If no profile exists Avaya one-X Agent creates a defaultprofile
Preparing agent configurationThe system saves the configuration files as XML files inside the profile subdirectory at thelocation described under Profile setting Avaya provides XSD files that define completely theformats of all of the configuration files You can find these XSD files at the software downloadsite packaged in a separate download package
The following table shows the UI screen settings their related XML configuration files and thecorresponding XSD
System Settings (UIsettings)
Configuration XML Corresponding XSD Remarks
System Settings controls
Installing Avaya one-X Agent
26 Installing and Configuring Avaya one-Xreg Agent March 31 2011
System Settings (UIsettings)
Configuration XML Corresponding XSD Remarks
Login SettingsXML SettingsXSD
Phone Numbers SettingsXML SettingsXSD
Work Handling SettingsXML SettingsXSD
Greeting triggers AudioGreetinsXML PhoneXSD
VuStats Stored internally PhoneXSD
Screen Pop ScreenPopsXML ScreenPopXSD
Launch Application SettingsXML SettingsXSD
Directory SettingsXML SettingsXSD
ContactLog SettingsXML SettingsXSD Controls thesettings forContact LogContactLogXML containsthe data
Voice MailIntegration
SettingsXML SettingsXSD
Reason Codes
WorkReasonCodesXML
ReasonCodeXSDAuxReasonCodesXML
LogoutReasonCodesXML
Event Logging Log4netXML No XSD Apachelog4netconfiguration
Outlook Contacts SettingsXML SettingsXSD
Dialing Rules SettingsXML SettingsXSD
Touch ToneShortcuts
TouchToneShortcutsxml
PhoneXSD
Profiles ProfilesXML ProfilesXSD ProfilesXMLstores theselectedprofile
Agent Preferences settings
Audio Stored Internally PhoneXSD
Video SettingsXML SettingsXSD Some of thesettings are
Administration and configuration of Avaya one-X Agent using XML
Installing and Configuring Avaya one-Xreg Agent March 31 2011 27
System Settings (UIsettings)
Configuration XML Corresponding XSD Remarks
storedinternally
Call Handling SettingsXML SettingsXSD
Agent Greetings AudioGreetingsXML PhoneXSD
Instant Messaging SettingsXML SettingsXSD
Dialpad windowsettings
Selected FeatureButtons
SelectedPhoneFeaturesxml
PhoneXSD
User Interface PreferencesXML PreferencesXSD
Controlling agent permissionsAdministrators can set attributes to control agent permissions Most UI settings have a Read-only attribute If Read-only is set to true agents cannot change the settings for thecorresponding field on the UI ReadOnly attribute works hierarchically which means theattribute value set for parent applies to all its children elements This provides granularity tocontrol agent permissions
For example as an administrator if you want to protect individual applications from LaunchApplication you can set ReadOnly attribute as true This allows agents to add a new launchapplications On the contrary to prevent agents from adding any applications set theReadOnly attribute to true for parent of all Launch Applications This prevents agents fromadding Launch Application configuration
Publishing the configuration to agents computerAdministrator can modify the package to include the configuration files after creating the defaultXML files The administrator must add the files to the application folder The application folderresides into the Installation folder when Avaya one-X Agent is installed (for example CProgram FilesAvayaOneXAgent) At this stage the folder contains the defaultSettingsXML
When an agent logs into a profile and if any configuration file is missing in that profile thesystem copies the required file from the Install directory to the profile If the required file is notfound in the Install directory the system creates a default empty configuration file
Since the Station loginAgent login and passwords in SettingsXML are unique for every agenttheir values must be cleared If Avaya one-X Agent is installed on a system with IP AgentAvaya one-X Agent can import Login ContactsContact Log settings However the systemcannot import Dialing Rules The system imports the setting after the settings files are copiedfrom the Install directory The imported files replace the existing configuration filesAlternatively these configuration files are copied to agentrsquos computer using Windows RoamingProfiles Avaya recommends using Windows Roaming profiles to deliver the configuration Ifyou plan to publish User Name and Passwords in the SettingsXML file contact Avaya Supportfor encryption of passwords
Installing Avaya one-X Agent
28 Installing and Configuring Avaya one-Xreg Agent March 31 2011
ImportantAvaya does recommend the full-function of the Central Management application formanaging user configurations consistently and continually
Administration and configuration of Avaya one-X Agent using XML
Installing and Configuring Avaya one-Xreg Agent March 31 2011 29
Installing Avaya one-X Agent
30 Installing and Configuring Avaya one-Xreg Agent March 31 2011
Chapter 5 Getting started
This section describes how to log on to Avaya one-X Agent The procedure to log on depends on theconfiguration of Avaya one-X Agent deployment in your network and the type of authentication that thedeployment supports The two types of authentications are basic authentication and Single Sign-on
Basic authenticationIn basic authentication your user credentials get authenticated against the servers namelyCommunication Manager Central Management and Presence Services if deployed in your network Youmust to manage all the credentials to each server in your configuration and profile information For CentralManagement you must provide the Active Directory credentials to retrieve your profile information inwhich these secondary server credentials can be stored The system attempts to log on using the last-used profile if the agent is not able to log on to Central Management The previous configuration savedto the local cache will be used to authenticate the agent and logs you on to Avaya one-X Agent If noconfiguration is cached Avaya one-X Agent will create and use a new default configuration
Single Sign-onSingle Sign-on authentication is only available with Central Management This requires administration inboth Central Management and Active Directory so that users do not have to enter any credentials to login to Central Management and retrieve their profiles The system uses the credentials supplied to the userat Windows Domain Network automatically
In this section you will learn how to launch the Avaya one-X Agent application on your personal computerlog in as an extension register as an agent and log into an IM service
ImportantTo enable Single Sign-on you must configure the Central Management administrator for Avaya one-XAgent
Logging on to Avaya one-X AgentYou must register your station with Communication Manager to configure your systempreferences make and receive direct calls or to sign in as an agent The system logs you inautomatically if you or an administrator has enabled automatic registration in the SystemSettings panel
If you are a first time user if the system recognizes Avaya IP Agent in your computer it importsyour logging credentials contacts and contact logs when you log on to Avaya one-X AgentThe Avaya one-X Agent client shows an Import Settings from IP AgentIP Softphone dialogbox when you log in to the system for the first time You can choose Import Login SettingsImport Call History and Import Contacts from the dialog box Avaya one-X Agent detects
Installing and Configuring Avaya one-Xreg Agent March 31 2011 31
the database file and shows the path in the Database File field The selection appears in thecorresponding windows on Avaya one-X Agent However ensure that you have logged out ofAvaya IP Agent while importing the details
Avaya one-X Agent 25 supports migration of older agent profiles (Avaya one-X Agent 10 orAvaya one-X Agent 20) if you are using local profiles When you start the Avaya one-X Agent25 application the system recognizes the application and imports the profile from older releaseand stores it in to the Avaya one-X Agent 25 profiles If there are profiles from Avaya one-XAgent 10 and Avaya one-X Agent 20 then the application imports profiles from Avaya one-X Agent 20 The application applies the default values of the Avaya one-X Agent 25 releasefor new fields in the migrated profiles
PrerequisitesBefore logging on to the application obtain the following user credentials from your systemadministrator
bull For Central Management login mdash user authentication ID and password
bull For telephony login mdash extension password and IP address of Communication Manager
bull For Agent login mdash extension Login ID and password
bull For IM login mdash IM user name password domain name and IP address of PresenceServer
NoteIf Presence Services is not installed the IM user name password and IP address of thePresence Services are not required For installations without Central Management all theabove credentials except User authentication ID and password are required
Use the following steps to log on to Avaya one-X Agent
1 Launch Avaya one-X Agent on your computerThe User Authentication window appears if you are not using Single Sign-on Youruser credentials get authenticated against the servers namely CommunicationManager Central Management if deployed in your network The system attemptsto log on using the last-used profile if the agent is not able to log on to CentralManagement The previous configuration saved to the local cache will be used toauthenticate the agent and logs you on to Avaya one-X Agent If no configurationis cached Avaya one-X Agent will create and use a new default configuration
2 In the User Authentication window enter your ID and password in the appropriatefields
NoteThis step is not required if you are using Single Sign-on or if Central Managementis not installed as a part of server installations The Welcome window appearsafter launching Avaya one-X Agent
Getting started
32 Installing and Configuring Avaya one-Xreg Agent March 31 2011
The Welcome window may display a welcome message or an important instructionconfigured through Central Management provided Central Management is installedas a server componentYou can complete the initial configuration using the Welcome window menu whenyou launch Avaya one-X Agent on your personal computer for the first time Theinitial task may include configuring your agent settings defining your user profileor setting the dialing rules To configure the basic settings see Setting up the initialconfiguration on page 35
3 On the Welcome window click OK
If then
automatic registration is enabledsettings in the System Settings loginpanel
the system logs you on to Avaya one-XAgent automatically
you have not enabled automaticregistration settings in the SystemSettings login panel
the system prompts you to enter theuser credentials You must enter youruser credentials for each of thesubsequent login windows
you have multiple user profiles andhave not enabled the Automaticexecute all logins for the selectedprofile option in the System Settingslogin panel
the system displays the profileselection window with preferred profileon the top of the list You must chooseappropriate profile from the profileselection drop-down list to proceed
Avaya one-X Agent is administeredwith Central Management and theadministrator has set the preferredprofile in Central Management
the system displays the profileselection window with preferred profileon the top of the list You must chooseappropriate profile from the profileselection drop-down list to proceed
Avaya one-X Agent is administeredwith Central Management and theadministrator has disabled the localprofile administration in CentralManagement
the system logs you on to Avaya one-XAgent automatically with the preferredprofile set in Central Management
The Login window appears
4 On the Login window
a In the Extension field enter the telephone extension number
b In the Password field enter the password
c Click Log inThe Agent Sign In to ACD window appears To make and receive ACD callsyou must log on to the ACD server using the agent id
5 On the Agent Sign In to ACD window
Logging on to Avaya one-X Agent
Installing and Configuring Avaya one-Xreg Agent March 31 2011 33
a Select the Automatically sign into the ACD server option if you want Avayaone-X Agent automatically log to the user on to the ACD after successfullyregistering the extension with Communication Manager
b In the Agent field enter the agent login ID
c in the Password field enter the password
d Click Log inThe Connect to IM Server window appears The Connect to IM Server windowwill not appear if Presence Services is not a part of your deployment In suchcase you are directly logged on to Avaya one-X Agent after this step only if youor your administrator has enabled the Activate IM Presence option in the IMtab
6 On the Connect to IM Server window
a In the User Name field enter your IM user name
b In the Password field enter the password
c In the Domain field enter the IM server domain name
d Click Log inThe system logs you on to Avaya one-X Agent
NoteThe respective details appear as you log on to Avaya one-X Agent
If you have logged into Avaya IP Soft Phone a warning message appears Youneed to log out to be able to import contact logs into Avaya one-X Agent
Getting started
34 Installing and Configuring Avaya one-Xreg Agent March 31 2011
Chapter 6 Setting up the initialconfiguration
A user can configure multiple profiles one for each location or type of phone once then when theapplication starts the user can select appropriate profile This section describes how to configure varioussettings after logging in to Avaya one-X Agent
ImportantYou may not have permission to change add delete or configure some of the features in the applicationas these features may be have been restricted at the enterprise level These restricted features arevisible but grayed out
Configuring phones for different locationsYou can perform day-to-day tasks from the contact center at home or while traveling byregistering Avaya one-X Agent with Communication Manager
You can select an appropriate profile that has been created to optimize certain featuresHowever if you are working from multiple locations (from the contact center from your homeor from a different location) you must configure the Communication Manager IP on the Avayaone-X Agent client to connect to Communication Manager each time you change locations
ImportantAvaya one-X Agent has removed the explicit reference to the Communication Managerlicense type from its configuration parameters In this release Avaya one-X Agent selectsUser type and the proper license when registering with Communication Manager In additionthe Basic user type if used in the Desk Phone mode will select an AGENT_SC (the Eliteentitlement) license and allows IM and Presence
Avaya one-X Agent offers several options to register with Communication Manager Dependingon your location telephone set and network you can place and receive calls using
bull My Computer
bull Desk Phone
bull Other Phone
This section provides prerequisites and steps to set up each configuration If you are not sureabout the configuration type contact your system administrator
Installing and Configuring Avaya one-Xreg Agent March 31 2011 35
Setting up the My Computer configurationThe My Computer configuration uses an IP connection to connect to Communication Managerfor data path and VoIP for voice path The configuration does not use an analog or an IPtelephone which obviously is valuable when a physical telephone is not available You canmake or receive voice calls through Avaya one-X Agent using a headset connected to yourpersonal computer
The My Computer setting provides the best IP audio quality that is possible with yourconnection speed personal computer performance and network setup
NoteThe My Computer mode is not available if Avaya one-X Agent is running on Windows Server2003 or 2008
Prerequisites
bull Network connection from a personal computer running the Avaya one-X Agent applicationto Communication Manager
bull Network interface card for connectivity to Communication Manager and a sound card (full-duplex recommended)
bull An USB-compliant headset connected to the personal computer (recommended) or apersonal computer microphone and speakers or a headset with a microphone connectedto the mini connectors
bull Telephone extension number password and Communication Manager address
Use the My Computer configuration when you are traveling and need to accessCommunication Manager through the Internet You can configure the My Computer setting forVoIP either through the Login window or through the System Settings dialog box
1 On the top bar click System Options gt System Settings
2 In the System Settings dialog box Login panel appears by default with theTelephony tab
3 In the Telephony tab
a Select the Enable automatic connection to CM option if you want the systemto connect to Communication Manager automatically using the last successfulregistration
b In the Extension field specify the telephone extension number if you wantCommunication Manager to identify your telephone extension number eachtime you log in to the system
Setting up the initial configuration
36 Installing and Configuring Avaya one-Xreg Agent March 31 2011
c In the Password field specify the password for the associated telephoneextension number
d Select the Save password during sign in option if you want the system tosave the password when you are signing in with the associated extensionnumber
e Select the CM Auto Answer Support Required option if the extension hasbeen administered on Communication Manager to support Auto Answer
f Select the Warn for Another User Logged in at Extension option if you wantthe system to warn you if another agent has logged in using the same extensionThe system removes the warning if you do not enable this option
NoteThis option is available only for Avaya one-X Agent 20 and earlier
g In the Server Address field enter the IP address of CommunicationManager
h In the User Type drop-down list select the appropriate user
i In the Place and receive calls using drop-down field select My Computer
4 Click OKThe system applies the new changes in the next login
Setting up the Desk Phone configurationThe Desk Phone configuration uses an Avaya IPDCP telephone for voice path and an Avayaone-X Agent to share control of the same administered station using the same button layoutand features You access audio components from your office phone and visual componentsfrom your personal computer
Prerequisites
bull Network connection from a personal computer running the Avaya one-X Agent applicationto Communication Manager
bull Avaya DCP or IP telephones capable of receiving calls from Communication Manager
bull Network interface card for connectivity to Communication Manager
bull Desk phone extension number password and Communication Manager server address
Use the Desk Phone configuration when you are at the contact center and want to share thecontrol between the office telephone and your personal computer While registering as a DeskPhone with Communication Manager you must register the desk phone number as theextension number You can configure the Desk Phone setting either through the Login windowor through the System Settings dialog box
Configuring phones for different locations
Installing and Configuring Avaya one-Xreg Agent March 31 2011 37
1 On the top bar click System Options gt System Settings
2 In the System Setting dialog box click Login
3 In the Telephony tab
a Select the Enable automatic connection to Communication Manager optionif you want the system to connect to Communication Manager automaticallyusing the last successful registration
b In the Extension field specify the desktop extension number if you wantCommunication Manager to identify your telephone extension number eachtime you log in to the system
c In the Password field specify the password for the associated desktopextension number
d Select Save password during sign in if you want the system to save thepassword when you are signing in with the associated extension number
e Select the CM Auto Answer Support Required option if the extension hasbeen administered on Communication Manager to support Auto Answer
f Select the Warn for Another User Logged in at Extension option if you wantthe system to warn you if another agent has logged in using the sameextension
g In the Server Address field enter the IP address of CommunicationManager
h From the User Type drop-down list select appropriate user
i In the Place and receive calls using drop-down field choose Desk Phone
4 Click OKThe system applies the new changes in the next login
Setting up the Other Phone configurationThe Other Phone configuration registers with Communication Manager as an off-site agentthrough a telephone and an IP connection The telephone can be a PSTN telephone a cellulartelephone or an extension on a local or remote switch The Other Phone configuration usesan IP connection to connect to Communication Manager and a PSTN connection to make orreceive calls
Setting up the initial configuration
38 Installing and Configuring Avaya one-Xreg Agent March 31 2011
Prerequisites
bull Network connection from a desktop computer running Avaya one-X Agent toCommunication Manager
bull Any telephone capable of receiving calls from Communication Manager
bull Communication Manager connection one user connection for signaling connection andthe other for off-site use one trunk connection or for on-site use an additional userconnection
bull Telephone extension number password and the Communication Manager serveraddress
bull Telephone numbers to be configured as Other Phone must be added on the PhoneNumbers panel Refer Adding a new phone number for information on adding phonenumbers
Use the Other Phone configuration when you are telecommuting and want to use Avaya one-X Agent from a remote location with a PSTN telephone connected to Communication Managerdirectly You can configure the Other Phone setting either through the Login window or throughthe System Settings dialog box
1 On the top bar click System Options gt System Settings
2 In the System Settings dialog box click Login
3 In the Telephony tab
a Select the Enable automatic connection to Communication Manager optionif you want the system to connect to Communication Manager automaticallyusing the last successful registration
b In the Extension field specify the telephone extension number if you wantCommunication Manager to identify your telephone extension number eachtime you log in to the system
c In the Password field specify the password for the associated telephoneextension number
d Select the CM Auto Answer Support Required option if the extension hasbeen administered on Communication Manager to support Auto Answer
e Select the Warn for Another User Logged in at Extension option if you wantthe system to warn you if another agent has logged in using the sameextension
f In the Server Address field enter the IP address of CommunicationManager
g From the User Type drop-down list select the appropriate user
h In the Place and receive calls using drop-down field select Other Phone
Configuring phones for different locations
Installing and Configuring Avaya one-Xreg Agent March 31 2011 39
i In the Telephone at field enter the telephone number you want to use for voicecalls
4 click OK to save the settingsThe system applies the new changes in the next login
Configuring the agent settingsPrerequisites
Obtain the agent extension number and password from your system administrator
NoteThe ACD tab will not appear if you have logged in as a Non-Agent or if appropriate buttonsare administered for this extension
1 On the top bar click System Options gt System Settings
2 In the Login Settings dialog box click the Agent tab
3 In the Agent tab
a Select the Enable ACD Login option if you want to enable the ACD featureBefore selecting the Enable ACD Login option ensure that you provide theuser credentials to log in to the ACD service
b Select the Automatically sign into the ACD server option if you want thesystem to register the agent extension with the ACD server automatically withthe previous successful registration through Communication Manager
c In the Agent field specify the agent extension number if you want the ACDservice to identify your agent extension number each time you log on to thesystem
d In the Password field specify the password for the agent extension number
e Select Save password during sign in if you want the system to save thepassword when you are signing in as an agent with the associated agentextension number
f In the Default Agent state upon ACD connection drop-down field choosethe appropriate option
4 Click OK
Setting up the initial configuration
40 Installing and Configuring Avaya one-Xreg Agent March 31 2011
Configuring IM settingsPrerequisitesObtain your IM user name and password domain name and IM server IP address from yoursupervisor or system administrator
1 On the top bar click System Options gt System settings
2 In the Login Settings dialog box click the IM tab
3 In the IM tab
a Select the Enable IM Login option if you want to enable the IM featureWhen you enable the Enable IM Login option you need to provide the usercredentials required to log on to Avaya Presence Services
b Select the Enable automatic connection to IM server option if you want thesystem to connect to the IM server with the previous successful registration
c In the User Name field specify the IM user ID of the agent
d In the Password field specify the password
e In the Domain field specify the domain name of the IM server
f Select Save password during sign in if you want the system to save thecredentials for subsequent log in
g In the Server Address field enter the IM server IP address
4 Click OK
Choosing User TypeAvaya one-X Agent allows different types of users namely agents non-agents andsupervisors to access the Communication Manager features Based on the user type thesystem grants a user access to a particular User Type then that user will have access to allthe features associated with that user type unless they are further restricted throughCommunication Manager
For example a user authenticated as an Agent user type is provided access to all Avaya one-X Agent features other than the Supervisor feature set (for example Service ObservingRemote Agent Logout) unless they are further restricted through Communication Manager
Configuring IM settings
Installing and Configuring Avaya one-Xreg Agent March 31 2011 41
Each user type has a role-based access to the following features
Feature Agent Non-Agent SupervisorACD Yes No Yes
Telephony Yes Yes Yes
IMPresence Yes Yes Yes
TTY (works only inMy Computer mode)
Yes Yes Yes
Desktop Sharing Yes Yes Yes
Supervisor (Avayaone-X Agentintegrated features)
No No Yes
ImportantAvaya one-X Agent has removed the explicit reference to the Communication Managerlicense type from its configuration parameters In this release Avaya one-X Agent selectsUser type and the proper license when registering with Communication Manager In additionBasic user type if used in the Desk Phone mode will select an AGENT_SC (the Eliteentitlement) license and allow IM and Presence
Use the following steps to choose the user type from the Telephony tab The application usesthe local profile with Agent with Desk Phone mode as default user type
1 On the top bar click System Options gt System Settings
2 In the Login Settings dialog box click the Telephony tab
3 In the Telephony tab choose appropriate user type from the Use Type drop-downlistIf Avaya one-X Agent is configured with Communication Manager you may not beable modify the User Type field as the option may be disabled by administrator Inthis case the relevant controls will be grayed out
Setting up the dialing rulesThe dialing rules depend on the country and location of your Communication Manager Thedialing rules help the system to distinguish extensions from trunk calls based on the length ofthe dialing string It ensures that the system uses the right Automatic Route Selection (ARS)code and if needed modifies the digits in keeping with Communication Manager and the PSTNrequirements
Setting up the initial configuration
42 Installing and Configuring Avaya one-Xreg Agent March 31 2011
Avaya one-X Agent 25 supports authorization and carrier code which is mandatory in somecountries It is an optional feature used to prevent access to expensive telephony resourcesoften international calling by unauthorized users An administrator or an Avaya one-X Agentuser can enter an authorization code in a user profile and the types of telephone calls thatrequire this authorization Avaya one-X Agent then automatically appends the authorizationcode as required so the user does not have to enter it each time a call is made
TipFor traveling agents visiting a different location and needing to register with a differentCommunication Manager Avaya recommends defining a user profile with appropriatedialing rules for that location and using a login with the corresponding profile so that thedialing rules for the system do not change
NoteYou must change the dialing rules each time you register the telephone settings with adifferent Communication Manager
1 On the top bar click System Options gt System Settings
2 In the System Settings dialog box click Dialing RulesThe application displays the Dialing Rules panel with Basic and Advanced tabs
3 In the Basic tab
a In the Number to dial to access outside line field specify the number toaccess an outside line In North America this is set to 9 In Europe it is set to0 For example if you are in North America you must enter the number as 9to access the outside line
b In the Your Country Code field specify the country code of yourCommunication Manager For example type 1 for North America 44 for GreatBritain 61 for Australia
c In the Local Calling Area Code field type the area or city code ofCommunication Manager For example type 785In regions where multiple local calling area codes are supported enter them asa comma-separated list For example 305720 If you can make local calls toboth these area codes
d In the Number to dial for long distance calls field enter the national longdistance prefix for example in North America type 1
e In the Number to dial for international calls field type the international prefixfor example in North America type 011
f In the Extension Length for internal extension calls field type the length ofthe internal extension calls For example if your internal extensions consist of
Setting up the dialing rules
Installing and Configuring Avaya one-Xreg Agent March 31 2011 43
five digits enter 5 If you specify the multiple extension lengths Avaya one-XAgent performs the exact matchesWhen you assign the length of the internal extension number Avaya one-XAgent treats the dialed number consisting of the selected number of digits asan internal extensionCommunication Manager may have multiple length extension numbers forexample if your company supports internal three-digit five-digit and seven-digit extensions type 357 You must use a comma to separate the values
g In the Length of national phone numbers (including CityArea code) fieldtype the length of length of national long distance number for example for NorthAmerica type 10If you are accessing the Communication Manager where the region supportsvariable national phone numbers specify the length of the valid telephonenumbers as a comma separated list For example if the region supports bothtelephone numbers with 10 digit and 11 digit telephone numbers type valuesas 1011
h Select Include areacity code when making a local call if area code mustbe prefix to a number when making a local call For example if you dial atelephone number the system prefixes the area code number defined in theYour AreaCity Code field and dials the telephone number
i Select Add long distance prefix on local calls if you want the system to adda long distance code before local calls For example if you dial a local telephonenumber the system prefixes a long distance code number defined in theNumber to dial for long distance calls field and dials the local telephonenumber
j Select Display confirmation window before dialing a number forconfirmation before dialing
k In the Time Period of Pause (Comma) in dialing (in seconds) field specifythe period for each comma character in the dialing field before dialing the nextdigit By default this field is set to 2 seconds You can specify the any valuebetween 1 to 10 seconds
4 To define authorization code click the Advanced tab and perform the followingsteps
a Select the Enable Authorization code option to enable the authorization codeThese are administered in Communication Manager
b In the Authorization Code field specify an authorization code number
c To make external calls using the authorization code select one or all of thefollowing options as appropriate
bull To make local calls using authorization code select On local calls
bull To make national long distance calls using authorization code select Onnational long distance calls
Setting up the initial configuration
44 Installing and Configuring Avaya one-Xreg Agent March 31 2011
bull To make international calls using authorization code select Oninternational long distance calls
5 Click OK to save the settings
Defining Alternate Server addressesThe Alternate Server address feature allows you to specify alternate registration servers if themain registration server defined on the telephony login screen is not available
NoteThis feature is independent of the Alternate Gatekeeper function available in CommunicationManager The Alternate Gatekeeper List (AGL) is computed by Communication Manager ateach registration and is provided to the endpoint during a successful Registration AccessSecurity (RAS) process The Alternate Server feature on the other hand allows a successfulRAS session to be set up to begin with
PrerequisitesObtain the alternate server addresses from your administrator
1 On the top bar click System Options gt System Settings
2 In the System Settings dialog box click Alternate Server List
3 In the Alternate Server List panel
a Click Add
b In the blank field type the IP address or FQDN of the alternate serverTo add more servers to the list repeat the sub-steps a and b
c In the Maximum attempts of each server field specify the number of attemptsthe system make to connect to each server before switching to the next definedserver
4 Click OK to save the settings
Defining Alternate Server addresses
Installing and Configuring Avaya one-Xreg Agent March 31 2011 45
Configuring the Work Handling optionsThese settings control how to receive calls on the Avaya one-X Agent client
PrerequisitesTo be able to specify Aux Codes during the Transition to Ready state interval Aux Codesmust be defined prior to following this procedure
Use the Work Handling options to configure the incoming work items to use CommunicationManager settings to change the agent status (if administered) to define the agents transitionstate after releasing the call and to set the work completion options
1 On the top bar click System Options gt System Settings
2 In the System Settings dialog box click Work HandlingThe Work Handling panel appears with Basic and Advanced tabs
3 On the Basic tab
a In the Work Completion for ACD calls section define the work completionmode as appropriate
b In the Transitions to Ready State section define the agents transition stateafter releasing the callThe With Aux Code option is only available for Manual-Ready option
4 On the Advanced tab tab
a In the Work Items section select the appropriate option to accept incomingwork itemsAuto-Accept automatically accepts calls however this is not related to CMAuto Answer Support Required option on the Login window but provides thesame functionality on the client side
NoteThe Auto-Accept option automatically answers telephone calls that areringing The Auto-Accept option is not related to support for CommunicationManager Auto answer However it can be used to accomplish a similarfunction
b In the Communication Manager Ready mode section select Auto In if youwant Communication Manager to do the work handling Selecting Auto In
Setting up the initial configuration
46 Installing and Configuring Avaya one-Xreg Agent March 31 2011
disables most of the Work Handling panel settings and it is not recommendedfor normal operation of Avaya one-X Agent
5 Click OK
Configuring the incoming call appearanceUse the following steps to set the incoming call notifications to display the main window or toflash the icon on the task bar when the system recognizes an incoming call
1 On the top bar click System Options gt Agent Preferences
2 In the Agent Preferences dialog box click Call Handling
3 In the Call Handling panel use any of the following options
bull Select Consultative Transfer to consult the caller before transferring thecall
bull Select Consultative Conference to consult the second caller before addingthe first caller to the conference
bull Select Auto-Hold if you want the system to put the call on hold automaticallybefore transferring or conferencing the call or when answering another alertingcall or dialing another outbound call
bull Select Bring main window to front if you want the system to bring the mainwindow to the foreground and activate the window for a ringing call
bull Select Flash icon if you want to view the call flashing in the task bar when thesystem recognizes a ringing call
4 Click OK to save the settings
Configuring incoming Instant Message appearanceUse these settings to define an incoming instant message You can also specify messages tobe sent automatically as greetings when you begin IM interaction or as responses when receiveto an instant message The messages set using the this procedure are available through theAdd Response button on the IM window
1 On the top bar click System Options gt Agent Preferences
Configuring the incoming call appearance
Installing and Configuring Avaya one-Xreg Agent March 31 2011 47
The Agent Preferences dialog box appears
2 In the Agent Preferences dialog box select Instant MessagingThe Instant Messaging panel appears with General Alerts and Responsestabs
3 Click the General tab and perform the following steps
a In the Greeting field enter your automated IM greeting
b Choose a value from the Minutes drop-down list for Avaya one-X Agent userinterface to automatically display the status as Away when the system is in theidle status By default the value is set to 15 minutes
c Select the Allow desktop sharing option to activate desktop sharing
4 Click the Alerts tab and perform the following steps
a Select the Display main window option if you want the system to display mainAvaya one-X Agent window on the foreground for an incoming message
b Select the Display IM window option if you want the system to display theincoming message directly in an IM window
c Select the Flash icon option if you want the system to flash the one-X Agenticon to flash on the task bar for an incoming message
5 Click the Responses tab to set your automated IM response using the followingsteps
a Click the + button
b Double-click the Untitled box and name the text for your automated IMresponse
c Repeat steps a and b to add more IM responses
d To user the IM responses click the Add response button on the IM windowand select the IM response and press EnterYou can record multiple responses and use them anytime during your IMinteraction
6 Click OK on the Instant Messaging panel to save your settings
Configuring incoming TTY appearanceUse this procedure to define the incoming TTY call appearance You can also set an automatedresponse to the incoming TTY message and specify the originating numbers for which the TTYmessage window must appear on the system
Setting up the initial configuration
48 Installing and Configuring Avaya one-Xreg Agent March 31 2011
1 On the top bar click System Options gt Agent Preferences The Agent Preferences dialog box appears
2 On the Agent Preferences dialog box select TTYThe TTY panel appears with General and Abbreviations tabs
3 On the General tab panel perform the following steps
a In the Greeting text box enter your agent greeting By default the systemdisplays Hello GA greetings
b Select the Show TTY window on every voice call option if you want thesystem to display the TTY window on every incoming voice call
c If you want the system to display the TTY window for specific incoming voicecalls perform the following steps
i Select the Show TTY window when a call comes from option
The TTY number field activates
ii Click the + button
An untitled item appears in the TTY number field
iii Double-click the untitled item and specify the number for which youwant the TTY window to appear
d Select the Always show TTY button in Voice interaction option if you wantthe system to display the TTY window for every voice work item on the work listwindowThis option is useful if the agent performs many TTY operations incoming andoutgoing
4 On the Abbreviations tab perform the following steps
a To view the preset TTY abbreviations select any abbreviation in the listAbbreviation corresponding to TTY appears in the Meaning Literal Meaningand Description fields
b To add a new abbreviation perform the following steps
i Click the + button
An untitled abbreviation appears in the TTY list
ii Double-click the untitled abbreviation and enter the TTYabbreviation
iii In the Meaning field enter a short explanation
iv In the Literal Meaning field enter the expansion of abbreviation
Configuring incoming TTY appearance
Installing and Configuring Avaya one-Xreg Agent March 31 2011 49
The Literal Meaning can be a literal text the abbreviation is derivedfor instance a short form for ldquoBe Right Backrdquo can be ldquoBRBrdquo and ldquoGoAheadrdquo can be ldquoGArdquo
v In the Description field enter additional description or informationon the abbreviation
NoteUse of these fields are completely optional
The abbreviations appear in rectangular boxes on the TTY window To view theabbreviation details you must click the abbreviation box on the TTY window Thedetails appear in a pop-up box on the TTY window The recipient can also view thesame details if the same abbreviation and details are configured through therecipients Avaya one-X Agent
5 Click OK to save the settings
Setting the audio optionsUse the following steps to set the auto options to adjust the audio volume for playbackrecording and incoming calls You can also set the system to play ring tone through thepersonal computer speaker and select a ringtone for an incoming call
1 On the top bar click System Options gt Agent Preferences
2 In the Agent Preferences dialog box click AudioThe Audio panel appears with Basic and Advanced tabs The Basic tab is activeby default
3 On the Basic tab perform the following steps in the Volume section to set the basicaudio settings
NoteThe following steps are optional and you can skip to the required step
a Adjust the Playback slider to set the volume for all sound output through yourcomputer speakers or headphones
b Adjust the Record slider to set the recording volume of all sound transmittedthrough a microphone to your personal computer
c Select the Mute check box adjacent to the Record slider to eliminate any soundbeing sent to your personal computer through the microphone
Setting up the initial configuration
50 Installing and Configuring Avaya one-Xreg Agent March 31 2011
These settings will not affect the headset volume if the headset is attached toa telephone rather than the personal computer
NoteThe Playback Record and Mute are only functional for My Computeroperation For Desk Phone or Other Phone modes you cannot control of thevolume of the telephone
d Adjust the Ringing slider to set the volume of the sound played through yourspeakers or headset when you receive an incoming call
e Select the Mute check box adjacent to Ringing slider to eliminate any soundthat indicates an incoming call
f Select the Play ringing through the internal PC speakers option to play thesound associated with an incoming call through the speakers of your personalcomputer and your headset simultaneouslyIf your personal computer does not have an internal speaker this option has noeffect
g Select the Use Custom ringtone option to play the a custom ringtone (a Wavefile) through the speaker or headset when you receive an incoming call Thewave file is played from the specified locationWhen you select Use Custom ringtone a Browse field and Test Ringtonebutton are displayed below Use the browse field to locate the wave file andclick Test Ringtone to test the wave file
4 On the Advanced tab perform the following steps in the Audio Devices section toset the advanced audio settings
a Select the audio play back hardware on your local system from the PlaybackDevice list
b Select the audio recording hardware on your local system from the RecordDevice list
c Use the Transmit Gain slider to set the gain for outgoing sound during a callYou can set the value from 01 to 100 Avaya recommends that you to set thisoption to 035
d Use the Receive Gain slider to set the gain for incoming sound during a callYou can set the from 01 to 1000 Avaya recommends that you to set the valueto 100
e Click Background Noise Test to test the background noiseThe Background Noise Test window appears Click the Test button on that totest the background noise You must perform if the ambient noise level changeor you move to a different location
5 Click OK to save the audio settings
Setting the audio options
Installing and Configuring Avaya one-Xreg Agent March 31 2011 51
Defining an agent profileA profile is a collection of pre-configured settings and preferences Using profiles agents canswitch configurations (For example agents can create profiles for different settings such ashome Office Sales Support and use them as needed) reusing the same Avaya one-X Agentinstallation For example you can create an agent profile for the My Computer configurationand use the profile with the appropriate Voice over Internet Protocol (VoIP) network You canalso create another agent profile for the Desk Phone configuration and use it asappropriate
Avaya one-X Agent 25 supports migration of older agent profiles (Avaya one-X Agent 10 orAvaya one-X Agent 20) if you are using local profiles When you start the Avaya one-X Agent25 application for the first time the application imports the profile from older release and storesit in to the Avaya one-X Agent 25 profiles If there are profiles from Avaya one-X Agent 10and Avaya one-X Agent 20 then the application imports profiles from Avaya one-X Agent 20The application applies the default values of the Avaya one-X Agent 25 release for new fieldsin the migrated profiles
Use the following procedure to create a local agent profile
ImportantThe Profile configuration is available for creating local profile without Central Managementadministration If Avaya one-X Agent is administered with Central Management the systemdisables the profile window
1 Make necessary changes using the System Settings and Agent Preferencesoptions
2 On the top bar click System Options gt System Settings
3 In the System Settings dialog box click Profiles
4 In the Profiles panel
a Click AddThe system displays the Create Profile dialog box
b In the Profile Name field enter the name for the profile and click OKThe new profile appears in the Profile list
5 Click Automatically execute all logins for the selected profile to execute all loginsequences for the selected or current profile without presenting a profile selectiondialog box The sequence depends on how the login option is set (manual orautomatic on other parameters) in the login panelIf you do not choose this option the application provides you with options to choosethe profile from the list if you have multiple profiles You must select the appropriateprofile at the launch of Avaya one-X Agent on your personal computer If you have
Setting up the initial configuration
52 Installing and Configuring Avaya one-Xreg Agent March 31 2011
a single profile the application proceeds silently without the profile selectionwindow
6 Click OKThe system creates a new profile and stores it locally in your personal computerYou can change the settings in the configuration parameters for the new profile inthe next login
Integrating the voice mail systemAvaya one-X Agent provides Communication Manager Message Waiting support for theregistered extension and one step access to access the message retrieval system for Voicemail You can integrate the voice mail system with a telephone system a third-party voice mailapplication or a web-based voice mail server and retrieve your voice mail from one of thevoice mail services
ImportantThe voice mail service is available only for those extensions registered and has a MessageWaiting Light defined If voice mail settings are not available on your extension contact thesystem administrator This is specific to the Message Waiting Light and has nothing to dowith the voice mail system that activates this light
PrerequisitesVoice Mail Integration is only available for those extensions that have a CommunicationManager Message Waiting Lamp translated
The voice mail support is only available for the message waiting light of the registeredextension There is no automatic support for other buttons translated as Message Waiting forother extensions
The voice mail messages can be associated with a telephone an application or a Webbrowser
1 On the top bar click System Options gt System Settings
2 In the left pane of the System Settings dialog box click Voice mail Integration
3 In the Voice Mail Integration panel click Enable Message Access
4 To integrate voice mail service perform one of the following actions as appropriate
bull To integrate voice mail services with a telephone select Dial this number andspecify the voice mail number in the field
Integrating the voice mail system
Installing and Configuring Avaya one-Xreg Agent March 31 2011 53
bull To integrate voice mail services through a third-party voice mail applicationselect Start this application and click Browse to navigate a windowsexecutable file
bull To integrate voice mail with a third-party web server select Open on web andtype a valid web address in the field
5 Click OK
Activating a recorded greetingYou must activate the Record Greetings option for the system to play the greeting You canhave more than one active greeting at the same time
For example you can set multiple greetings to be active if each greeting has a unique VectorDirectory Number (VDN) as the activation criterion This is also true for Agent Greetings thatplay for specific Automatic Number Identification (ANI) telephone numbers or PromptedDigits
If two recorded greetings meet the same criteria that make them eligible for a single call Avayaone-X Agent chooses the first one on the search list
PrerequisitesYou must have at least one greeting recorded to be able to activate a recorded greeting
1 On the top bar click System Options gt System Settings
2 In the System Settings dialog box select Greetings TriggersThe system displays the Greetings Triggers panel
3 In the Greetings Triggers list select a greeting
4 Click OKYou can manually play the selected greeting on the incoming call
Defining a reason codeThere are three classes of Reason Codes namely Agent AUX Work Codes and Call WorkCodes The annotations for these reason codes are made to the call record and Agent LogoutReason Codes These are known in Communication Manager by digit strings This feature
Setting up the initial configuration
54 Installing and Configuring Avaya one-Xreg Agent March 31 2011
allows the user to associate more meaningful text strings to the digit strings for easyreference
Reason code is a way to associate a particular number to a label for an agents reason for notbeing at the workstation or for not accepting an ACD call These reason codes if defined inCommunication Manager appear on the message window when an agent changes the workstatus to auxiliary or logs out from the ACD service By default the system creates a defaultreason code each for auxiliary logout and work reason code types You can change the defaultreason codes but cannot delete them
ImportantThe system administrator must define a common set of reason codes and manage itcentrally The administrator can distribute these reason code files to all agents by pushingthe configuration to agents system Moreover if your deployment is using CentralManagement the administrator must upload a CSV file and universally assign commonreason codes across the account or skill
Defining reason codes for workWork codes are codes that you assign to a work item in the Work List window You must definethe work code to use them in the Work List window
1 On the top bar click System Options gt System Settings
2 In the left pane of the System Settings dialog box click Reason Codes This opensthe Reason Codes panel on the right
3 From the Select menu to edit list select Work Reason Codes A default anduntitled reason code item is displayed under a root node in the container belowSelect menu to edit listYou can add a singular work reason code or create a group and add a set of workreason codes in that group Reason codes having similar or related characteristicsare organized together in one group Make sure that the labels given to the groupare easy to understand the group activity
4 To add a group perform the following steps
a Click the Add Reason Group button at the bottom of the Reason Codes panelThis adds an untitled group node in the container below Select menu to editlist
b Select the untitled node and type the group name The group node gets labeledwith the name you type
c Follow step 5 to add reason codes to the group
5 To add a solitary reason code perform the following steps
Defining a reason code
Installing and Configuring Avaya one-Xreg Agent March 31 2011 55
a Select the node under which you want to add a reason code This node maybe the root node or a group node
b Click the Add Reason Code button This adds an untitled reason code itemunder the selected node
c Select the untitled reason code item and rename it The reason code namereplaces the default name of the reason code item
d Repeat step 5 to add as many singular reason codes you want to
6 Click OK to save your settingsWork codes created using the above procedure are displayed when you click theWork Code icon on an active call on the Work List window You can choose theappropriate code to assign during the active call If you have not created any workcode the Work Code icon remains disabled during an active call
NoteIf Central Management is used reason codes can be defined only from CentralManagement You will not be able to edit from Avaya one-X Agent application
Defining reason codes for logging outThe log out reason code describes the reason for logging out from the ACD service You canuse the log out reason code only if you have defined reason codes in the System Settingsdialog box
1 On the top bar click System Options gt System Settings
2 In the left pane of the System Settings dialog box click Reason Codes This opensthe Reason Codes panel on the right
3 From the Select menu to edit list select Log Out Reason Codes A default anduntitled reason code item is displayed under a root node in the container belowSelect menu to edit listYou can add a singular log out reason code or create a group and add a set of logout reason codes in that group Reason codes having similar or relatedcharacteristics are organized together in one group Make sure that the labels givento the group are easy to understand the group activity
4 To add a group perform the following steps
a Click the Add Reason Group button at the bottom of the Reason Codes panelThis adds an untitled group node in the container below Select menu to editlist
Setting up the initial configuration
56 Installing and Configuring Avaya one-Xreg Agent March 31 2011
b Select the untitled node and type the group name The group node gets labeledwith the name you type
c Follow step 5 to add reason codes to the group
5 To add a solitary reason code perform the following steps
a Select the node under which you want to add a reason code This node maybe the root node or a group node
b Click the Add Reason Code button This adds an untitled reason code itemunder the selected node
c Select the untitled reason code item and rename it The reason code namereplaces the default name of the reason code item
d Repeat step 5 to add as many singular reason codes you want to
6 Click OK to save your settingsThe system displays the newly created log out reason code in the Log Out list ofthe Change Agent State drop-down list
Defining reason codes for auxiliaryThe auxiliary reason code describes the reason for changing your state to the AUX mode Youcan use the auxiliary reason code only if you have defined the reason codes in the SystemSettings window
Use the following steps to define the auxiliary reason codes and to associate them with thenumeric reason codes supported in Avaya Aurareg Communication Manager
1 On the top bar click System Options gt System Settings
2 In the left pane of the System Settings dialog box click Reason Codes This opensthe Reason Codes panel on the right
3 From the Select menu to edit list select Aux Reason Codes A default and untitledreason code item is displayed under a root node in the container below Selectmenu to edit listYou can add a singular auxiliary reason code or create a group and add a set ofauxiliary reason codes in that group Reason codes having similar or relatedcharacteristics are organized together in one group Make sure that the labels givento the group are easy to understand the group activity
4 To add a group perform the following steps
a Click the Add Reason Group button at the bottom of the Reason Codes panelThis adds an untitled group node in the container below Select menu to editlist
Defining a reason code
Installing and Configuring Avaya one-Xreg Agent March 31 2011 57
b Select the untitled node and type the group name The group node gets labeledwith the name you type
c Follow step 5 to add reason codes to the group
5 To add a solitary reason code perform the following steps
a Select the node under which you want to add a reason code This node maybe the root node or a group node
b Click the Add Reason Code button This adds an untitled reason code itemunder the selected node
c Select the untitled reason code item and rename it The reason code namereplaces the default name of the reason code item
d Repeat step 5 to add as many singular reason codes you want to
6 Click OK to save your settingsThe system displays the newly created auxiliary reason code in the Auxiliary listof the Change Agent State drop-down list
Viewing the phone display on the main windowAvaya one-X Agent allows you to view a 40-character display at the bottom of the Work Listwindow from Avaya Aurareg Communication Manager You can view both call-related and non-call-related information including call-prompting digits VuStats data and the local date andtime display from the ACD server
NoteOnly those telephone types that are capable of displaying 80 characters are compatible withthis feature
1 On the top bar click System Options gt Agent Preferences gt User Interface
2 In the User Interface panel enable the Show Phone Display option
3 Click OK
Setting the toolbar buttons on the main windowAvaya one-X Agent allows you to set the toolbar buttons on the main window These buttonsprovide quick-access to options including releasing a call changing the answer settings to
Setting up the initial configuration
58 Installing and Configuring Avaya one-Xreg Agent March 31 2011
manual or auto changing the agent status to ready or auxiliary making a call to the supervisordirectly assigning a work code to the work item and dialing the last called number
These are the same eight Favorite buttons that are defined in the Dialpad Defining them ineither place will have them displayed in both places You need not have to administer themtwice
1 On the top bar click System Options gt Agent Preferences gt User Interface
2 In the User Interface panel
a Enable the Display Button Toolbar option
b Click Select Favorite Buttons
c In the Favorite Buttons dialog box select the appropriate buttonsYou can select up to eight buttons from the list
3 Click OK
Setting the toolbar buttons on the main window
Installing and Configuring Avaya one-Xreg Agent March 31 2011 59
Setting up the initial configuration
60 Installing and Configuring Avaya one-Xreg Agent March 31 2011
Chapter 7 Repairing Avaya one-X Agent
If Avaya one-X Agent is not functioning properly you can use the Repair function to reinstall it If you repairan Avaya one-X Agent application you must also repair any service release that has been installed
NoteIf you are experiencing difficulties at the time of installing Avaya one-X Agent capture the event anderror logs and send them to your system administrator For detailed information on logs and debuggingsee Maintaining and Troubleshooting Avaya one-X Agent
1 In Windows Control Panel select Add or Remove Programs
2 In the list of currently installed programs locate the Avaya one-X Agent application you wantto repair
3 Click the Click here for support information link to display the Support Info dialog box
4 Click RepairThe system reinstalls the program
TipAlternatively you can run the installation again The installer prompts you with Repair andRemove options You can select Repair to repair the installation
Installing and Configuring Avaya one-Xreg Agent March 31 2011 61
Repairing Avaya one-X Agent
62 Installing and Configuring Avaya one-Xreg Agent March 31 2011
Chapter 8 Removing the Avaya one-XAgent application
NoteYou cannot remove the read-only folders that are shared with other applications or remove any filesor directories that you have added to the Avaya one-X Agent installation directory
Removing Avaya one-X Agent in manual modePrerequisitesClose Avaya one-X Agent if it is currently running If Avaya one-X Agent is running duringremoval process some folders may not be removed completely
1 In Windows Control Panel select Add or Remove Programs
2 Select Avaya One-X Agent and choose Change Remove or Uninstall(Windows Vista)During the removal process the Microsoft installer may display a message to shutdown an application that is running You can shut down the specified applicationor ignore the message and continue with the removal
TipAlternatively you can use the OneXAgentSetupexe setup with using x switchto remove the application On command-prompt navigate to the folder whereOneXAgentSetupexe is located and use the following commandOneXAgentSetupexe x
Installing and Configuring Avaya one-Xreg Agent March 31 2011 63
Removing the Avaya one-X Agent application
64 Installing and Configuring Avaya one-Xreg Agent March 31 2011
Chapter 9 Removing existing software
If you are using the Avaya softphones with video and if you plan to use Avaya one-X Agent with videothen you must remove the following Avaya software from your personal computer before installing Avayaone-X Agent
bull Avaya IP Softphone
bull Polycom Via Video
NoteIf you are not using the Avaya softphones with video on your personal computer you can skip thissection
PrerequisitesBefore removing the Avaya IP Softphone software record the following information You will need thisinformation when you install Avaya one-X Agent
bull Your IP Softphone call server address
bull Your IP Softphone login
bull The password for your extension
1 In Windows Control Panel select Add or Remove Programs
2 Follow the standard process for removing programs from Windows
Installing and Configuring Avaya one-Xreg Agent March 31 2011 65
Removing existing software
66 Installing and Configuring Avaya one-Xreg Agent March 31 2011
Index
A
administration using XML 26agent greetings
activating 54steps 54enabling 54
agent profile 52agent settings 40alternate server addresses 45architecture overview 8authorization code 43
C
call handling 47 50carrier code 43checklist 17configuration using XML 26configuring
incoming TTY appearance 48configuring IM settings 41configuring incoming message appearance 47configuring the agent settings 40customizing the installation 24
D
defining agent profile 52defining incoming call appearance 47 50defining reason code
auxiliary reason code 57log out reason code 56
defining TTY display 48defining work codes
work code 55defining work handling options 46desk phone login 37dialing rules 43display button toolbar 59
F
features based on configuration 10
G
getting started 31
I
IM settings 41initial configuration 35installation overview 7installing
polycom video 25installing Avaya one-X Agent
silent mode 21installing manually 19introduction 7
L
launching one-X Agent 32legal notices 2logging from a Desk Phone 37logging from a personal computer 36
M
manual installation 19message appearance settings 47my computer setting 36
N
network connection 14notices legal 2
O
one-X Agent registration 37 39Other phone settings 39overview 7
P
phone display 58phone settings 35
R
reason codes 55
Installing and Configuring Avaya one-Xreg Agent March 31 2011 67
registering with Communication Manager 36 37registration 35removing 63
in interactive mode 63removing existing software 65repairing 61requirements
AVTS 9communication manager 9enterprise 9hardware 10license 15software 9video 13
S
setting 43standard installation 19starting one-X agent application 32
T
telephony setting 35toolbar
configuring 59
settings 59toolbar buttons 59
U
upgrade version 25upgrading Avaya one-X Agent 25user type
selecting 42
V
voice mailintegrating 53
W
wizard-based installation 19work handling 46
X
XML administration 26XML configuration 26
68 Installing and Configuring Avaya one-Xreg Agent March 31 2011
- Contents
- Chapter 1 Introduction
-
- Installation overview
- Architecture overview
-
- Chapter 2 Requirements
-
- Enterprise requirements
- Software requirements
-
- Feature dependencies on configuration
-
- Computer and other hardware requirements
- Video requirements
- Network connection requirements
- License requirements
-
- Chapter 3 Avaya one-X Agent installation checklist
- Chapter 4 Installing Avaya one-X Agent
-
- Installing Avaya one-X Agent (GUI installation)
- Installing Avaya one-X Agent (silent installation)
-
- Customizing the install
-
- Upgrading Avaya one-X Agent to Release 25
- Installing the Polycom video software
- Administration and configuration of Avaya one-X Agent using XML
-
- Chapter 5 Getting started
-
- Logging on to Avaya one-X Agent
-
- Chapter 6 Setting up the initial configuration
-
- Configuring phones for different locations
-
- Setting up the My Computer configuration
- Setting up the Desk Phone configuration
- Setting up the Other Phone configuration
-
- Configuring the agent settings
- Configuring IM settings
- Choosing User Type
- Setting up the dialing rules
- Defining Alternate Server addresses
- Configuring the Work Handling options
- Configuring the incoming call appearance
- Configuring incoming Instant Message appearance
- Configuring incoming TTY appearance
- Setting the audio options
- Defining an agent profile
- Integrating the voice mail system
- Activating a recorded greeting
- Defining a reason code
-
- Defining reason codes for work
- Defining reason codes for logging out
- Defining reason codes for auxiliary
-
- Viewing the phone display on the main window
- Setting the toolbar buttons on the main window
-
- Chapter 7 Repairing Avaya one-X Agent
- Chapter 8 Removing the Avaya one-X Agent application
-
- Removing Avaya one-X Agent in manual mode
-
- Chapter 9 Removing existing software
- Index
-
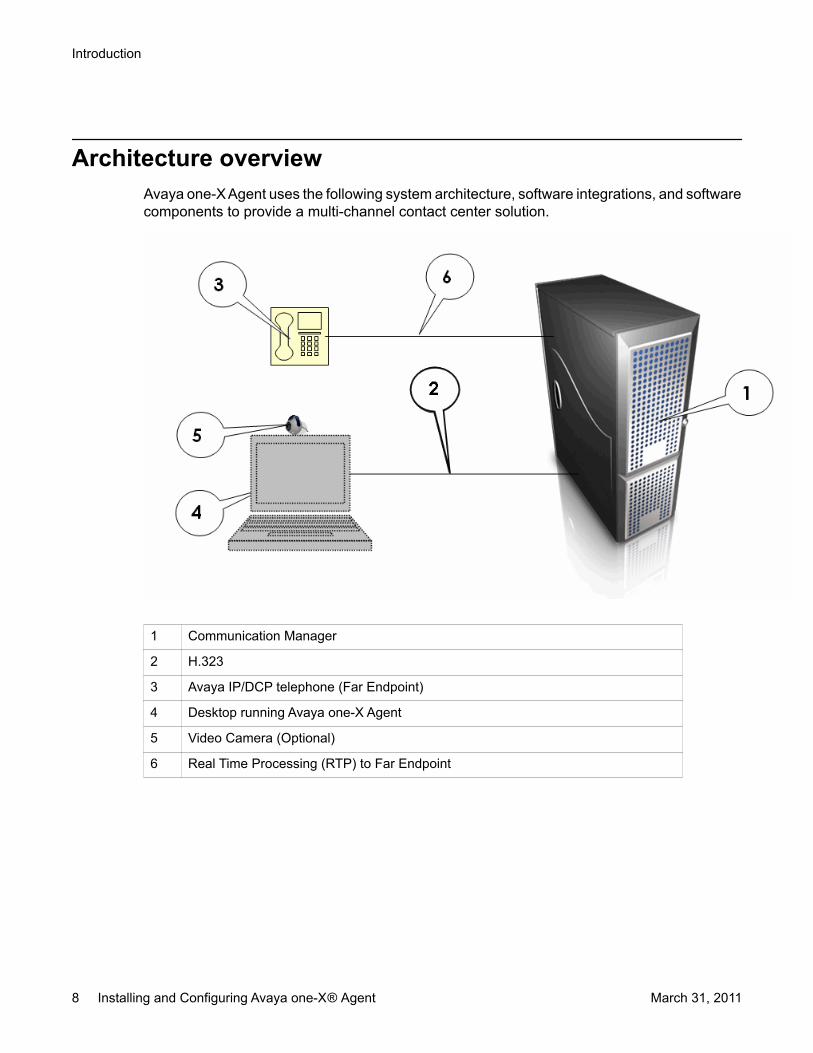
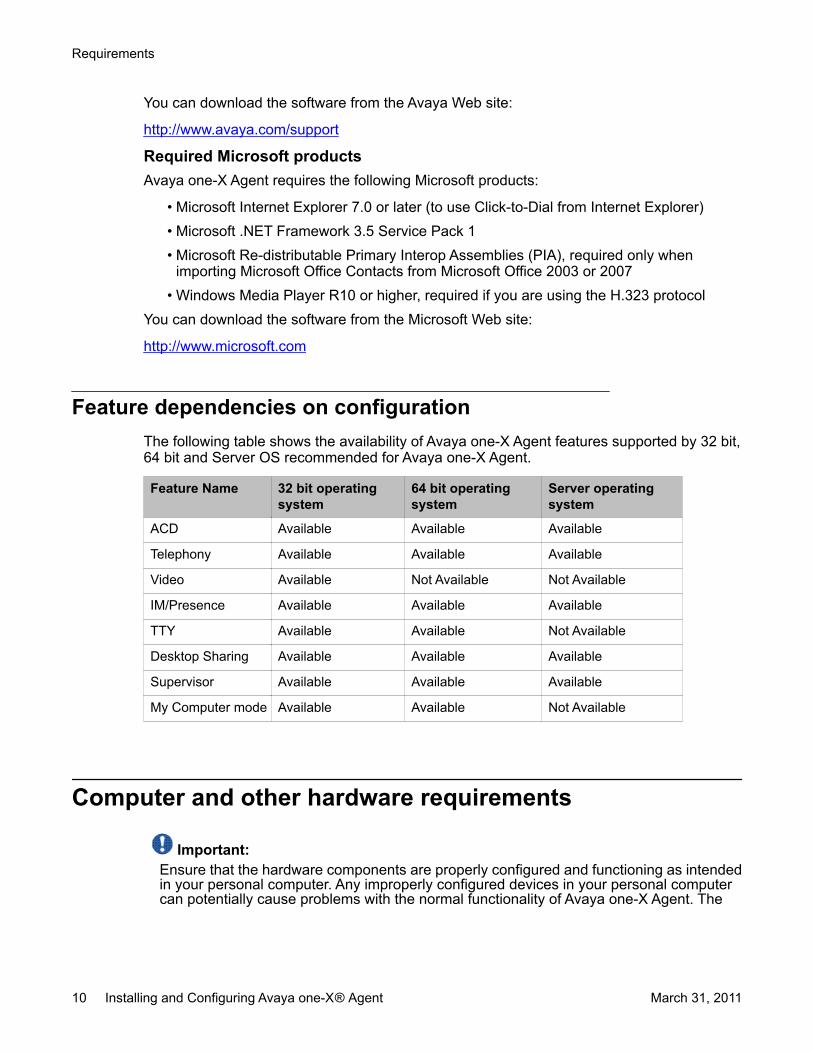
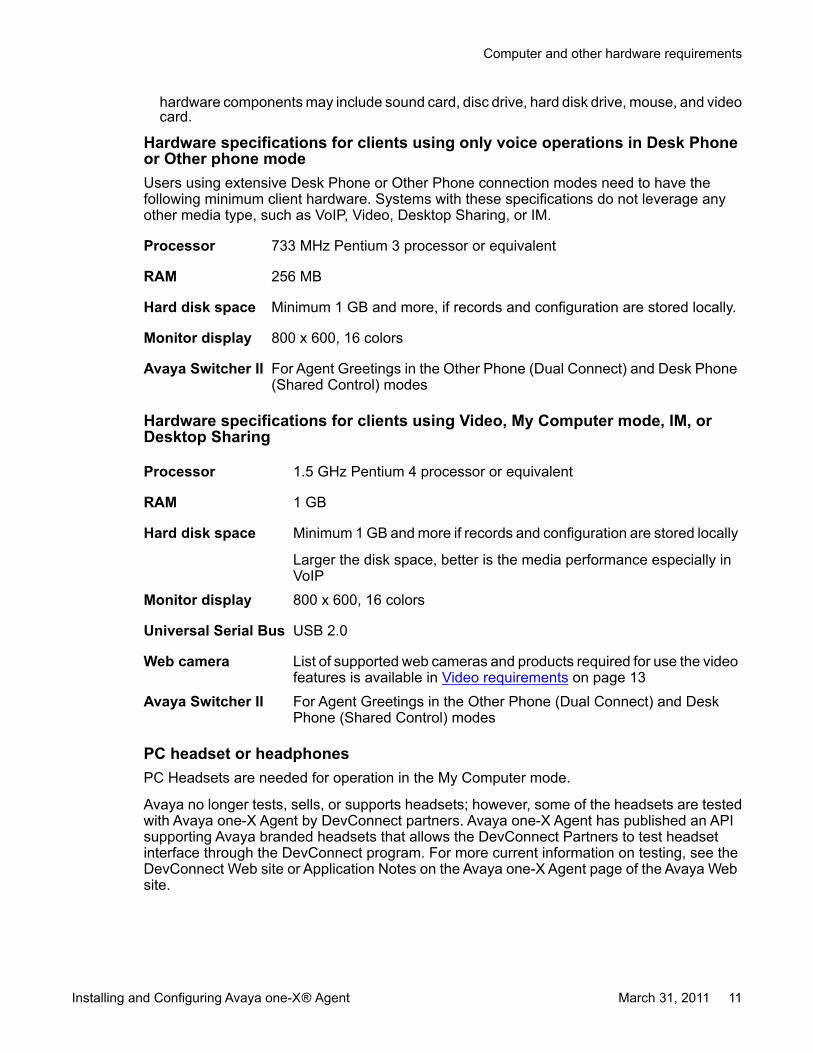
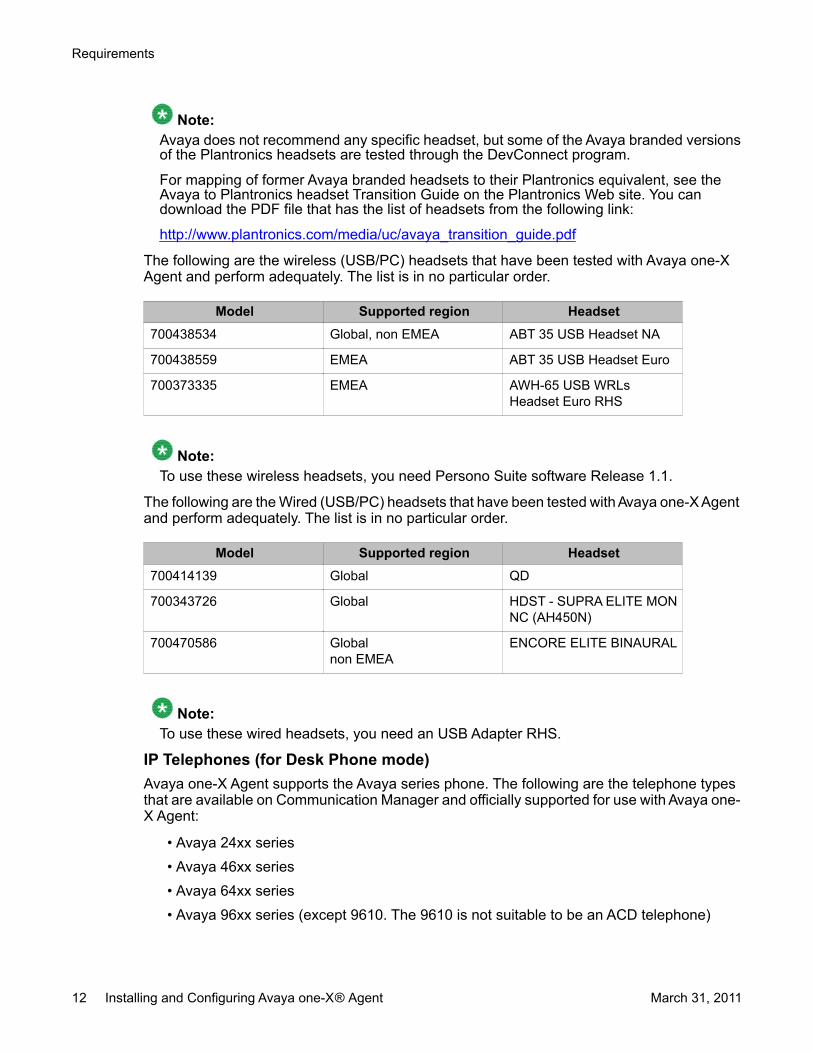
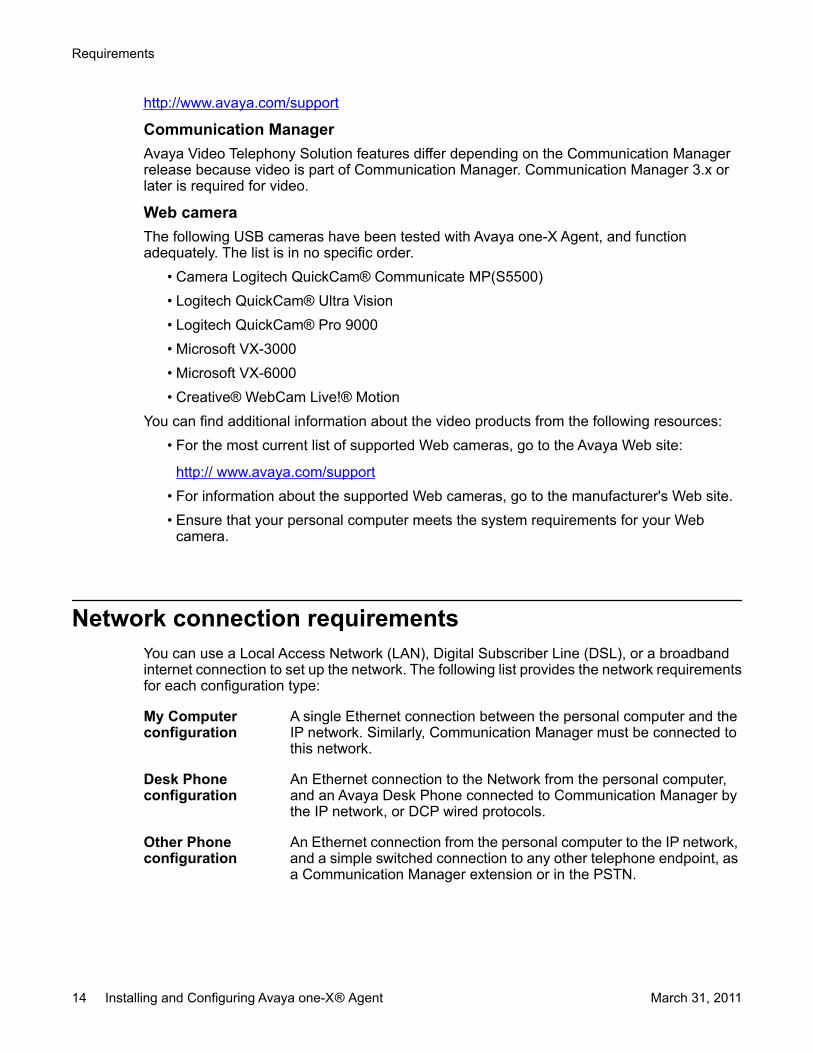
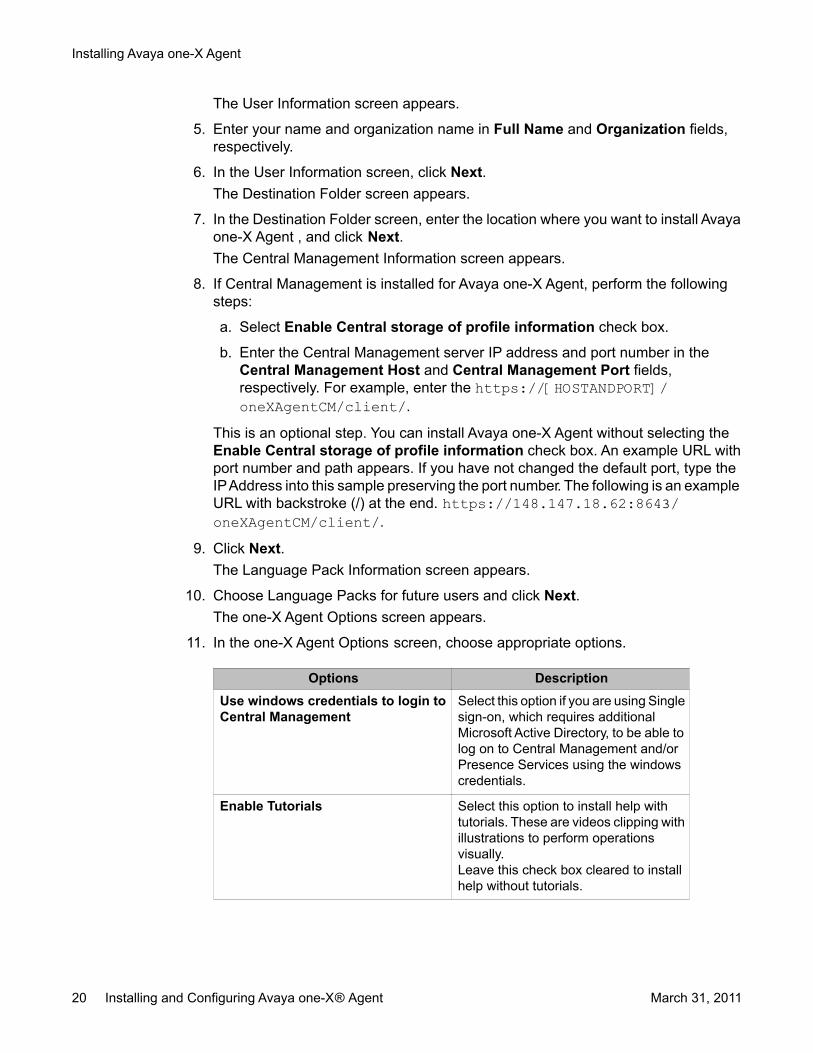
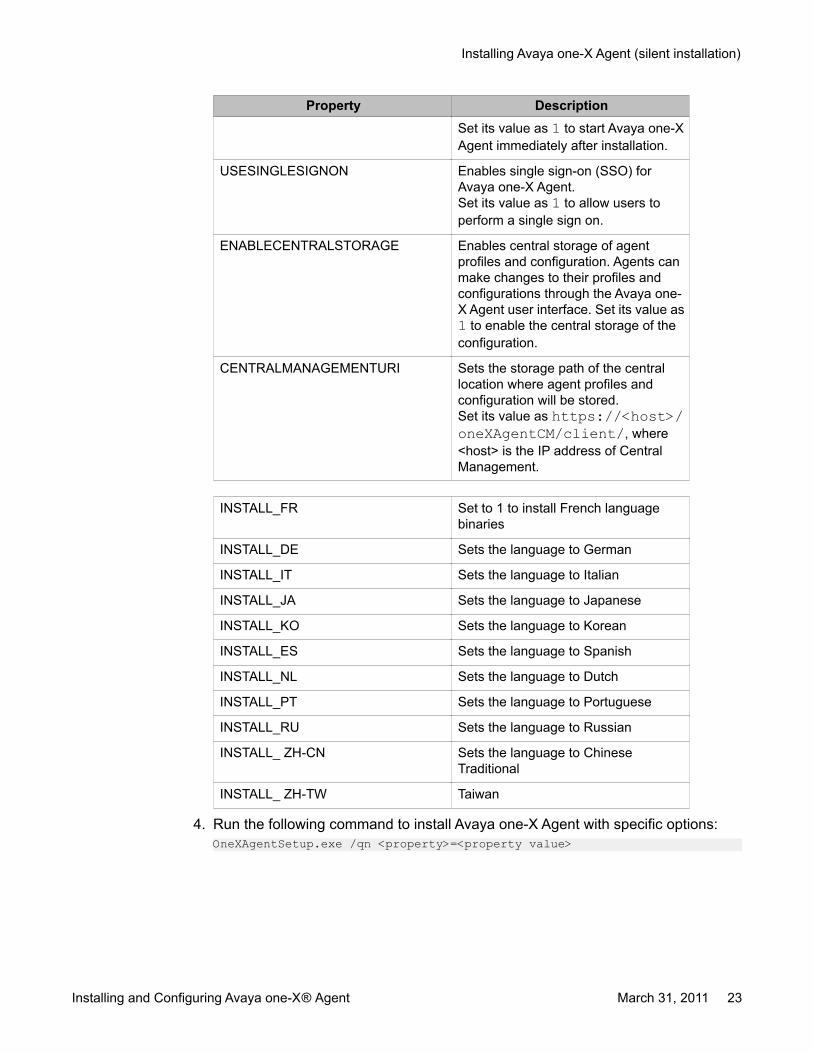
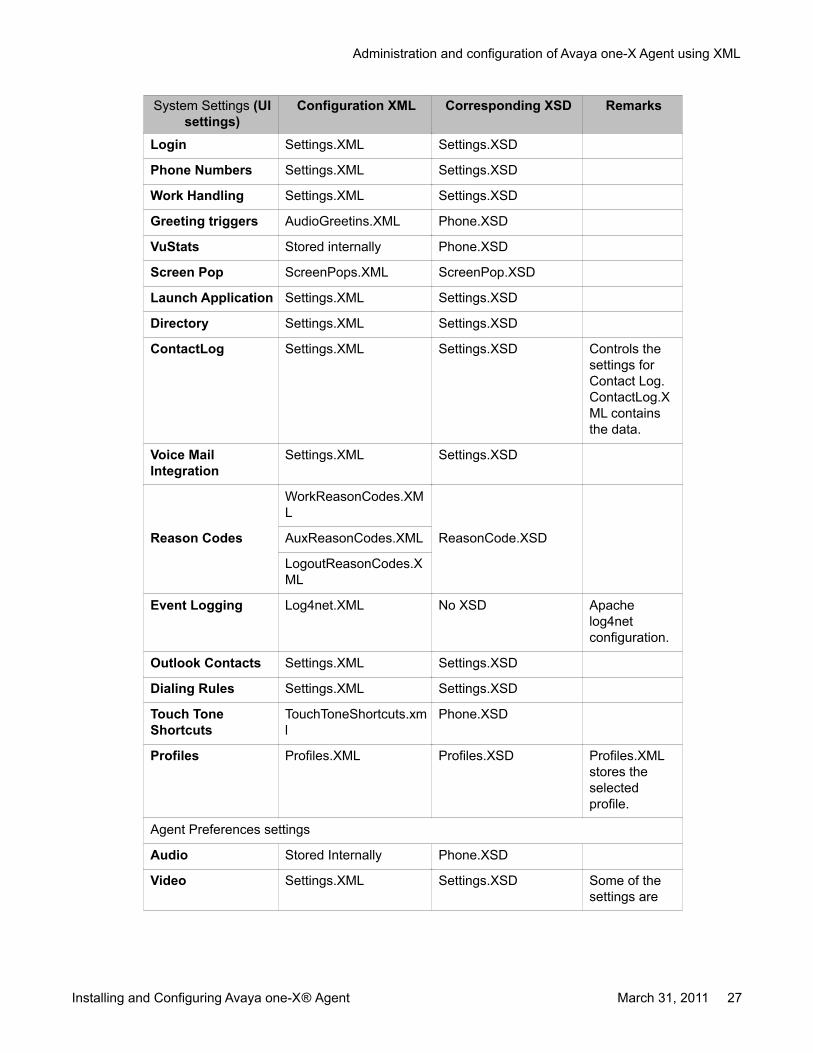
System Settings (UIsettings)
Configuration XML Corresponding XSD Remarks
Login SettingsXML SettingsXSD
Phone Numbers SettingsXML SettingsXSD
Work Handling SettingsXML SettingsXSD
Greeting triggers AudioGreetinsXML PhoneXSD
VuStats Stored internally PhoneXSD
Screen Pop ScreenPopsXML ScreenPopXSD
Launch Application SettingsXML SettingsXSD
Directory SettingsXML SettingsXSD
ContactLog SettingsXML SettingsXSD Controls thesettings forContact LogContactLogXML containsthe data
Voice MailIntegration
SettingsXML SettingsXSD
Reason Codes
WorkReasonCodesXML
ReasonCodeXSDAuxReasonCodesXML
LogoutReasonCodesXML
Event Logging Log4netXML No XSD Apachelog4netconfiguration
Outlook Contacts SettingsXML SettingsXSD
Dialing Rules SettingsXML SettingsXSD
Touch ToneShortcuts
TouchToneShortcutsxml
PhoneXSD
Profiles ProfilesXML ProfilesXSD ProfilesXMLstores theselectedprofile
Agent Preferences settings
Audio Stored Internally PhoneXSD
Video SettingsXML SettingsXSD Some of thesettings are
Administration and configuration of Avaya one-X Agent using XML
Installing and Configuring Avaya one-Xreg Agent March 31 2011 27
System Settings (UIsettings)
Configuration XML Corresponding XSD Remarks
storedinternally
Call Handling SettingsXML SettingsXSD
Agent Greetings AudioGreetingsXML PhoneXSD
Instant Messaging SettingsXML SettingsXSD
Dialpad windowsettings
Selected FeatureButtons
SelectedPhoneFeaturesxml
PhoneXSD
User Interface PreferencesXML PreferencesXSD
Controlling agent permissionsAdministrators can set attributes to control agent permissions Most UI settings have a Read-only attribute If Read-only is set to true agents cannot change the settings for thecorresponding field on the UI ReadOnly attribute works hierarchically which means theattribute value set for parent applies to all its children elements This provides granularity tocontrol agent permissions
For example as an administrator if you want to protect individual applications from LaunchApplication you can set ReadOnly attribute as true This allows agents to add a new launchapplications On the contrary to prevent agents from adding any applications set theReadOnly attribute to true for parent of all Launch Applications This prevents agents fromadding Launch Application configuration
Publishing the configuration to agents computerAdministrator can modify the package to include the configuration files after creating the defaultXML files The administrator must add the files to the application folder The application folderresides into the Installation folder when Avaya one-X Agent is installed (for example CProgram FilesAvayaOneXAgent) At this stage the folder contains the defaultSettingsXML
When an agent logs into a profile and if any configuration file is missing in that profile thesystem copies the required file from the Install directory to the profile If the required file is notfound in the Install directory the system creates a default empty configuration file
Since the Station loginAgent login and passwords in SettingsXML are unique for every agenttheir values must be cleared If Avaya one-X Agent is installed on a system with IP AgentAvaya one-X Agent can import Login ContactsContact Log settings However the systemcannot import Dialing Rules The system imports the setting after the settings files are copiedfrom the Install directory The imported files replace the existing configuration filesAlternatively these configuration files are copied to agentrsquos computer using Windows RoamingProfiles Avaya recommends using Windows Roaming profiles to deliver the configuration Ifyou plan to publish User Name and Passwords in the SettingsXML file contact Avaya Supportfor encryption of passwords
Installing Avaya one-X Agent
28 Installing and Configuring Avaya one-Xreg Agent March 31 2011
ImportantAvaya does recommend the full-function of the Central Management application formanaging user configurations consistently and continually
Administration and configuration of Avaya one-X Agent using XML
Installing and Configuring Avaya one-Xreg Agent March 31 2011 29
Installing Avaya one-X Agent
30 Installing and Configuring Avaya one-Xreg Agent March 31 2011
Chapter 5 Getting started
This section describes how to log on to Avaya one-X Agent The procedure to log on depends on theconfiguration of Avaya one-X Agent deployment in your network and the type of authentication that thedeployment supports The two types of authentications are basic authentication and Single Sign-on
Basic authenticationIn basic authentication your user credentials get authenticated against the servers namelyCommunication Manager Central Management and Presence Services if deployed in your network Youmust to manage all the credentials to each server in your configuration and profile information For CentralManagement you must provide the Active Directory credentials to retrieve your profile information inwhich these secondary server credentials can be stored The system attempts to log on using the last-used profile if the agent is not able to log on to Central Management The previous configuration savedto the local cache will be used to authenticate the agent and logs you on to Avaya one-X Agent If noconfiguration is cached Avaya one-X Agent will create and use a new default configuration
Single Sign-onSingle Sign-on authentication is only available with Central Management This requires administration inboth Central Management and Active Directory so that users do not have to enter any credentials to login to Central Management and retrieve their profiles The system uses the credentials supplied to the userat Windows Domain Network automatically
In this section you will learn how to launch the Avaya one-X Agent application on your personal computerlog in as an extension register as an agent and log into an IM service
ImportantTo enable Single Sign-on you must configure the Central Management administrator for Avaya one-XAgent
Logging on to Avaya one-X AgentYou must register your station with Communication Manager to configure your systempreferences make and receive direct calls or to sign in as an agent The system logs you inautomatically if you or an administrator has enabled automatic registration in the SystemSettings panel
If you are a first time user if the system recognizes Avaya IP Agent in your computer it importsyour logging credentials contacts and contact logs when you log on to Avaya one-X AgentThe Avaya one-X Agent client shows an Import Settings from IP AgentIP Softphone dialogbox when you log in to the system for the first time You can choose Import Login SettingsImport Call History and Import Contacts from the dialog box Avaya one-X Agent detects
Installing and Configuring Avaya one-Xreg Agent March 31 2011 31
the database file and shows the path in the Database File field The selection appears in thecorresponding windows on Avaya one-X Agent However ensure that you have logged out ofAvaya IP Agent while importing the details
Avaya one-X Agent 25 supports migration of older agent profiles (Avaya one-X Agent 10 orAvaya one-X Agent 20) if you are using local profiles When you start the Avaya one-X Agent25 application the system recognizes the application and imports the profile from older releaseand stores it in to the Avaya one-X Agent 25 profiles If there are profiles from Avaya one-XAgent 10 and Avaya one-X Agent 20 then the application imports profiles from Avaya one-X Agent 20 The application applies the default values of the Avaya one-X Agent 25 releasefor new fields in the migrated profiles
PrerequisitesBefore logging on to the application obtain the following user credentials from your systemadministrator
bull For Central Management login mdash user authentication ID and password
bull For telephony login mdash extension password and IP address of Communication Manager
bull For Agent login mdash extension Login ID and password
bull For IM login mdash IM user name password domain name and IP address of PresenceServer
NoteIf Presence Services is not installed the IM user name password and IP address of thePresence Services are not required For installations without Central Management all theabove credentials except User authentication ID and password are required
Use the following steps to log on to Avaya one-X Agent
1 Launch Avaya one-X Agent on your computerThe User Authentication window appears if you are not using Single Sign-on Youruser credentials get authenticated against the servers namely CommunicationManager Central Management if deployed in your network The system attemptsto log on using the last-used profile if the agent is not able to log on to CentralManagement The previous configuration saved to the local cache will be used toauthenticate the agent and logs you on to Avaya one-X Agent If no configurationis cached Avaya one-X Agent will create and use a new default configuration
2 In the User Authentication window enter your ID and password in the appropriatefields
NoteThis step is not required if you are using Single Sign-on or if Central Managementis not installed as a part of server installations The Welcome window appearsafter launching Avaya one-X Agent
Getting started
32 Installing and Configuring Avaya one-Xreg Agent March 31 2011
The Welcome window may display a welcome message or an important instructionconfigured through Central Management provided Central Management is installedas a server componentYou can complete the initial configuration using the Welcome window menu whenyou launch Avaya one-X Agent on your personal computer for the first time Theinitial task may include configuring your agent settings defining your user profileor setting the dialing rules To configure the basic settings see Setting up the initialconfiguration on page 35
3 On the Welcome window click OK
If then
automatic registration is enabledsettings in the System Settings loginpanel
the system logs you on to Avaya one-XAgent automatically
you have not enabled automaticregistration settings in the SystemSettings login panel
the system prompts you to enter theuser credentials You must enter youruser credentials for each of thesubsequent login windows
you have multiple user profiles andhave not enabled the Automaticexecute all logins for the selectedprofile option in the System Settingslogin panel
the system displays the profileselection window with preferred profileon the top of the list You must chooseappropriate profile from the profileselection drop-down list to proceed
Avaya one-X Agent is administeredwith Central Management and theadministrator has set the preferredprofile in Central Management
the system displays the profileselection window with preferred profileon the top of the list You must chooseappropriate profile from the profileselection drop-down list to proceed
Avaya one-X Agent is administeredwith Central Management and theadministrator has disabled the localprofile administration in CentralManagement
the system logs you on to Avaya one-XAgent automatically with the preferredprofile set in Central Management
The Login window appears
4 On the Login window
a In the Extension field enter the telephone extension number
b In the Password field enter the password
c Click Log inThe Agent Sign In to ACD window appears To make and receive ACD callsyou must log on to the ACD server using the agent id
5 On the Agent Sign In to ACD window
Logging on to Avaya one-X Agent
Installing and Configuring Avaya one-Xreg Agent March 31 2011 33
a Select the Automatically sign into the ACD server option if you want Avayaone-X Agent automatically log to the user on to the ACD after successfullyregistering the extension with Communication Manager
b In the Agent field enter the agent login ID
c in the Password field enter the password
d Click Log inThe Connect to IM Server window appears The Connect to IM Server windowwill not appear if Presence Services is not a part of your deployment In suchcase you are directly logged on to Avaya one-X Agent after this step only if youor your administrator has enabled the Activate IM Presence option in the IMtab
6 On the Connect to IM Server window
a In the User Name field enter your IM user name
b In the Password field enter the password
c In the Domain field enter the IM server domain name
d Click Log inThe system logs you on to Avaya one-X Agent
NoteThe respective details appear as you log on to Avaya one-X Agent
If you have logged into Avaya IP Soft Phone a warning message appears Youneed to log out to be able to import contact logs into Avaya one-X Agent
Getting started
34 Installing and Configuring Avaya one-Xreg Agent March 31 2011
Chapter 6 Setting up the initialconfiguration
A user can configure multiple profiles one for each location or type of phone once then when theapplication starts the user can select appropriate profile This section describes how to configure varioussettings after logging in to Avaya one-X Agent
ImportantYou may not have permission to change add delete or configure some of the features in the applicationas these features may be have been restricted at the enterprise level These restricted features arevisible but grayed out
Configuring phones for different locationsYou can perform day-to-day tasks from the contact center at home or while traveling byregistering Avaya one-X Agent with Communication Manager
You can select an appropriate profile that has been created to optimize certain featuresHowever if you are working from multiple locations (from the contact center from your homeor from a different location) you must configure the Communication Manager IP on the Avayaone-X Agent client to connect to Communication Manager each time you change locations
ImportantAvaya one-X Agent has removed the explicit reference to the Communication Managerlicense type from its configuration parameters In this release Avaya one-X Agent selectsUser type and the proper license when registering with Communication Manager In additionthe Basic user type if used in the Desk Phone mode will select an AGENT_SC (the Eliteentitlement) license and allows IM and Presence
Avaya one-X Agent offers several options to register with Communication Manager Dependingon your location telephone set and network you can place and receive calls using
bull My Computer
bull Desk Phone
bull Other Phone
This section provides prerequisites and steps to set up each configuration If you are not sureabout the configuration type contact your system administrator
Installing and Configuring Avaya one-Xreg Agent March 31 2011 35
Setting up the My Computer configurationThe My Computer configuration uses an IP connection to connect to Communication Managerfor data path and VoIP for voice path The configuration does not use an analog or an IPtelephone which obviously is valuable when a physical telephone is not available You canmake or receive voice calls through Avaya one-X Agent using a headset connected to yourpersonal computer
The My Computer setting provides the best IP audio quality that is possible with yourconnection speed personal computer performance and network setup
NoteThe My Computer mode is not available if Avaya one-X Agent is running on Windows Server2003 or 2008
Prerequisites
bull Network connection from a personal computer running the Avaya one-X Agent applicationto Communication Manager
bull Network interface card for connectivity to Communication Manager and a sound card (full-duplex recommended)
bull An USB-compliant headset connected to the personal computer (recommended) or apersonal computer microphone and speakers or a headset with a microphone connectedto the mini connectors
bull Telephone extension number password and Communication Manager address
Use the My Computer configuration when you are traveling and need to accessCommunication Manager through the Internet You can configure the My Computer setting forVoIP either through the Login window or through the System Settings dialog box
1 On the top bar click System Options gt System Settings
2 In the System Settings dialog box Login panel appears by default with theTelephony tab
3 In the Telephony tab
a Select the Enable automatic connection to CM option if you want the systemto connect to Communication Manager automatically using the last successfulregistration
b In the Extension field specify the telephone extension number if you wantCommunication Manager to identify your telephone extension number eachtime you log in to the system
Setting up the initial configuration
36 Installing and Configuring Avaya one-Xreg Agent March 31 2011
c In the Password field specify the password for the associated telephoneextension number
d Select the Save password during sign in option if you want the system tosave the password when you are signing in with the associated extensionnumber
e Select the CM Auto Answer Support Required option if the extension hasbeen administered on Communication Manager to support Auto Answer
f Select the Warn for Another User Logged in at Extension option if you wantthe system to warn you if another agent has logged in using the same extensionThe system removes the warning if you do not enable this option
NoteThis option is available only for Avaya one-X Agent 20 and earlier
g In the Server Address field enter the IP address of CommunicationManager
h In the User Type drop-down list select the appropriate user
i In the Place and receive calls using drop-down field select My Computer
4 Click OKThe system applies the new changes in the next login
Setting up the Desk Phone configurationThe Desk Phone configuration uses an Avaya IPDCP telephone for voice path and an Avayaone-X Agent to share control of the same administered station using the same button layoutand features You access audio components from your office phone and visual componentsfrom your personal computer
Prerequisites
bull Network connection from a personal computer running the Avaya one-X Agent applicationto Communication Manager
bull Avaya DCP or IP telephones capable of receiving calls from Communication Manager
bull Network interface card for connectivity to Communication Manager
bull Desk phone extension number password and Communication Manager server address
Use the Desk Phone configuration when you are at the contact center and want to share thecontrol between the office telephone and your personal computer While registering as a DeskPhone with Communication Manager you must register the desk phone number as theextension number You can configure the Desk Phone setting either through the Login windowor through the System Settings dialog box
Configuring phones for different locations
Installing and Configuring Avaya one-Xreg Agent March 31 2011 37
1 On the top bar click System Options gt System Settings
2 In the System Setting dialog box click Login
3 In the Telephony tab
a Select the Enable automatic connection to Communication Manager optionif you want the system to connect to Communication Manager automaticallyusing the last successful registration
b In the Extension field specify the desktop extension number if you wantCommunication Manager to identify your telephone extension number eachtime you log in to the system
c In the Password field specify the password for the associated desktopextension number
d Select Save password during sign in if you want the system to save thepassword when you are signing in with the associated extension number
e Select the CM Auto Answer Support Required option if the extension hasbeen administered on Communication Manager to support Auto Answer
f Select the Warn for Another User Logged in at Extension option if you wantthe system to warn you if another agent has logged in using the sameextension
g In the Server Address field enter the IP address of CommunicationManager
h From the User Type drop-down list select appropriate user
i In the Place and receive calls using drop-down field choose Desk Phone
4 Click OKThe system applies the new changes in the next login
Setting up the Other Phone configurationThe Other Phone configuration registers with Communication Manager as an off-site agentthrough a telephone and an IP connection The telephone can be a PSTN telephone a cellulartelephone or an extension on a local or remote switch The Other Phone configuration usesan IP connection to connect to Communication Manager and a PSTN connection to make orreceive calls
Setting up the initial configuration
38 Installing and Configuring Avaya one-Xreg Agent March 31 2011
Prerequisites
bull Network connection from a desktop computer running Avaya one-X Agent toCommunication Manager
bull Any telephone capable of receiving calls from Communication Manager
bull Communication Manager connection one user connection for signaling connection andthe other for off-site use one trunk connection or for on-site use an additional userconnection
bull Telephone extension number password and the Communication Manager serveraddress
bull Telephone numbers to be configured as Other Phone must be added on the PhoneNumbers panel Refer Adding a new phone number for information on adding phonenumbers
Use the Other Phone configuration when you are telecommuting and want to use Avaya one-X Agent from a remote location with a PSTN telephone connected to Communication Managerdirectly You can configure the Other Phone setting either through the Login window or throughthe System Settings dialog box
1 On the top bar click System Options gt System Settings
2 In the System Settings dialog box click Login
3 In the Telephony tab
a Select the Enable automatic connection to Communication Manager optionif you want the system to connect to Communication Manager automaticallyusing the last successful registration
b In the Extension field specify the telephone extension number if you wantCommunication Manager to identify your telephone extension number eachtime you log in to the system
c In the Password field specify the password for the associated telephoneextension number
d Select the CM Auto Answer Support Required option if the extension hasbeen administered on Communication Manager to support Auto Answer
e Select the Warn for Another User Logged in at Extension option if you wantthe system to warn you if another agent has logged in using the sameextension
f In the Server Address field enter the IP address of CommunicationManager
g From the User Type drop-down list select the appropriate user
h In the Place and receive calls using drop-down field select Other Phone
Configuring phones for different locations
Installing and Configuring Avaya one-Xreg Agent March 31 2011 39
i In the Telephone at field enter the telephone number you want to use for voicecalls
4 click OK to save the settingsThe system applies the new changes in the next login
Configuring the agent settingsPrerequisites
Obtain the agent extension number and password from your system administrator
NoteThe ACD tab will not appear if you have logged in as a Non-Agent or if appropriate buttonsare administered for this extension
1 On the top bar click System Options gt System Settings
2 In the Login Settings dialog box click the Agent tab
3 In the Agent tab
a Select the Enable ACD Login option if you want to enable the ACD featureBefore selecting the Enable ACD Login option ensure that you provide theuser credentials to log in to the ACD service
b Select the Automatically sign into the ACD server option if you want thesystem to register the agent extension with the ACD server automatically withthe previous successful registration through Communication Manager
c In the Agent field specify the agent extension number if you want the ACDservice to identify your agent extension number each time you log on to thesystem
d In the Password field specify the password for the agent extension number
e Select Save password during sign in if you want the system to save thepassword when you are signing in as an agent with the associated agentextension number
f In the Default Agent state upon ACD connection drop-down field choosethe appropriate option
4 Click OK
Setting up the initial configuration
40 Installing and Configuring Avaya one-Xreg Agent March 31 2011
Configuring IM settingsPrerequisitesObtain your IM user name and password domain name and IM server IP address from yoursupervisor or system administrator
1 On the top bar click System Options gt System settings
2 In the Login Settings dialog box click the IM tab
3 In the IM tab
a Select the Enable IM Login option if you want to enable the IM featureWhen you enable the Enable IM Login option you need to provide the usercredentials required to log on to Avaya Presence Services
b Select the Enable automatic connection to IM server option if you want thesystem to connect to the IM server with the previous successful registration
c In the User Name field specify the IM user ID of the agent
d In the Password field specify the password
e In the Domain field specify the domain name of the IM server
f Select Save password during sign in if you want the system to save thecredentials for subsequent log in
g In the Server Address field enter the IM server IP address
4 Click OK
Choosing User TypeAvaya one-X Agent allows different types of users namely agents non-agents andsupervisors to access the Communication Manager features Based on the user type thesystem grants a user access to a particular User Type then that user will have access to allthe features associated with that user type unless they are further restricted throughCommunication Manager
For example a user authenticated as an Agent user type is provided access to all Avaya one-X Agent features other than the Supervisor feature set (for example Service ObservingRemote Agent Logout) unless they are further restricted through Communication Manager
Configuring IM settings
Installing and Configuring Avaya one-Xreg Agent March 31 2011 41
Each user type has a role-based access to the following features
Feature Agent Non-Agent SupervisorACD Yes No Yes
Telephony Yes Yes Yes
IMPresence Yes Yes Yes
TTY (works only inMy Computer mode)
Yes Yes Yes
Desktop Sharing Yes Yes Yes
Supervisor (Avayaone-X Agentintegrated features)
No No Yes
ImportantAvaya one-X Agent has removed the explicit reference to the Communication Managerlicense type from its configuration parameters In this release Avaya one-X Agent selectsUser type and the proper license when registering with Communication Manager In additionBasic user type if used in the Desk Phone mode will select an AGENT_SC (the Eliteentitlement) license and allow IM and Presence
Use the following steps to choose the user type from the Telephony tab The application usesthe local profile with Agent with Desk Phone mode as default user type
1 On the top bar click System Options gt System Settings
2 In the Login Settings dialog box click the Telephony tab
3 In the Telephony tab choose appropriate user type from the Use Type drop-downlistIf Avaya one-X Agent is configured with Communication Manager you may not beable modify the User Type field as the option may be disabled by administrator Inthis case the relevant controls will be grayed out
Setting up the dialing rulesThe dialing rules depend on the country and location of your Communication Manager Thedialing rules help the system to distinguish extensions from trunk calls based on the length ofthe dialing string It ensures that the system uses the right Automatic Route Selection (ARS)code and if needed modifies the digits in keeping with Communication Manager and the PSTNrequirements
Setting up the initial configuration
42 Installing and Configuring Avaya one-Xreg Agent March 31 2011
Avaya one-X Agent 25 supports authorization and carrier code which is mandatory in somecountries It is an optional feature used to prevent access to expensive telephony resourcesoften international calling by unauthorized users An administrator or an Avaya one-X Agentuser can enter an authorization code in a user profile and the types of telephone calls thatrequire this authorization Avaya one-X Agent then automatically appends the authorizationcode as required so the user does not have to enter it each time a call is made
TipFor traveling agents visiting a different location and needing to register with a differentCommunication Manager Avaya recommends defining a user profile with appropriatedialing rules for that location and using a login with the corresponding profile so that thedialing rules for the system do not change
NoteYou must change the dialing rules each time you register the telephone settings with adifferent Communication Manager
1 On the top bar click System Options gt System Settings
2 In the System Settings dialog box click Dialing RulesThe application displays the Dialing Rules panel with Basic and Advanced tabs
3 In the Basic tab
a In the Number to dial to access outside line field specify the number toaccess an outside line In North America this is set to 9 In Europe it is set to0 For example if you are in North America you must enter the number as 9to access the outside line
b In the Your Country Code field specify the country code of yourCommunication Manager For example type 1 for North America 44 for GreatBritain 61 for Australia
c In the Local Calling Area Code field type the area or city code ofCommunication Manager For example type 785In regions where multiple local calling area codes are supported enter them asa comma-separated list For example 305720 If you can make local calls toboth these area codes
d In the Number to dial for long distance calls field enter the national longdistance prefix for example in North America type 1
e In the Number to dial for international calls field type the international prefixfor example in North America type 011
f In the Extension Length for internal extension calls field type the length ofthe internal extension calls For example if your internal extensions consist of
Setting up the dialing rules
Installing and Configuring Avaya one-Xreg Agent March 31 2011 43
five digits enter 5 If you specify the multiple extension lengths Avaya one-XAgent performs the exact matchesWhen you assign the length of the internal extension number Avaya one-XAgent treats the dialed number consisting of the selected number of digits asan internal extensionCommunication Manager may have multiple length extension numbers forexample if your company supports internal three-digit five-digit and seven-digit extensions type 357 You must use a comma to separate the values
g In the Length of national phone numbers (including CityArea code) fieldtype the length of length of national long distance number for example for NorthAmerica type 10If you are accessing the Communication Manager where the region supportsvariable national phone numbers specify the length of the valid telephonenumbers as a comma separated list For example if the region supports bothtelephone numbers with 10 digit and 11 digit telephone numbers type valuesas 1011
h Select Include areacity code when making a local call if area code mustbe prefix to a number when making a local call For example if you dial atelephone number the system prefixes the area code number defined in theYour AreaCity Code field and dials the telephone number
i Select Add long distance prefix on local calls if you want the system to adda long distance code before local calls For example if you dial a local telephonenumber the system prefixes a long distance code number defined in theNumber to dial for long distance calls field and dials the local telephonenumber
j Select Display confirmation window before dialing a number forconfirmation before dialing
k In the Time Period of Pause (Comma) in dialing (in seconds) field specifythe period for each comma character in the dialing field before dialing the nextdigit By default this field is set to 2 seconds You can specify the any valuebetween 1 to 10 seconds
4 To define authorization code click the Advanced tab and perform the followingsteps
a Select the Enable Authorization code option to enable the authorization codeThese are administered in Communication Manager
b In the Authorization Code field specify an authorization code number
c To make external calls using the authorization code select one or all of thefollowing options as appropriate
bull To make local calls using authorization code select On local calls
bull To make national long distance calls using authorization code select Onnational long distance calls
Setting up the initial configuration
44 Installing and Configuring Avaya one-Xreg Agent March 31 2011
bull To make international calls using authorization code select Oninternational long distance calls
5 Click OK to save the settings
Defining Alternate Server addressesThe Alternate Server address feature allows you to specify alternate registration servers if themain registration server defined on the telephony login screen is not available
NoteThis feature is independent of the Alternate Gatekeeper function available in CommunicationManager The Alternate Gatekeeper List (AGL) is computed by Communication Manager ateach registration and is provided to the endpoint during a successful Registration AccessSecurity (RAS) process The Alternate Server feature on the other hand allows a successfulRAS session to be set up to begin with
PrerequisitesObtain the alternate server addresses from your administrator
1 On the top bar click System Options gt System Settings
2 In the System Settings dialog box click Alternate Server List
3 In the Alternate Server List panel
a Click Add
b In the blank field type the IP address or FQDN of the alternate serverTo add more servers to the list repeat the sub-steps a and b
c In the Maximum attempts of each server field specify the number of attemptsthe system make to connect to each server before switching to the next definedserver
4 Click OK to save the settings
Defining Alternate Server addresses
Installing and Configuring Avaya one-Xreg Agent March 31 2011 45
Configuring the Work Handling optionsThese settings control how to receive calls on the Avaya one-X Agent client
PrerequisitesTo be able to specify Aux Codes during the Transition to Ready state interval Aux Codesmust be defined prior to following this procedure
Use the Work Handling options to configure the incoming work items to use CommunicationManager settings to change the agent status (if administered) to define the agents transitionstate after releasing the call and to set the work completion options
1 On the top bar click System Options gt System Settings
2 In the System Settings dialog box click Work HandlingThe Work Handling panel appears with Basic and Advanced tabs
3 On the Basic tab
a In the Work Completion for ACD calls section define the work completionmode as appropriate
b In the Transitions to Ready State section define the agents transition stateafter releasing the callThe With Aux Code option is only available for Manual-Ready option
4 On the Advanced tab tab
a In the Work Items section select the appropriate option to accept incomingwork itemsAuto-Accept automatically accepts calls however this is not related to CMAuto Answer Support Required option on the Login window but provides thesame functionality on the client side
NoteThe Auto-Accept option automatically answers telephone calls that areringing The Auto-Accept option is not related to support for CommunicationManager Auto answer However it can be used to accomplish a similarfunction
b In the Communication Manager Ready mode section select Auto In if youwant Communication Manager to do the work handling Selecting Auto In
Setting up the initial configuration
46 Installing and Configuring Avaya one-Xreg Agent March 31 2011
disables most of the Work Handling panel settings and it is not recommendedfor normal operation of Avaya one-X Agent
5 Click OK
Configuring the incoming call appearanceUse the following steps to set the incoming call notifications to display the main window or toflash the icon on the task bar when the system recognizes an incoming call
1 On the top bar click System Options gt Agent Preferences
2 In the Agent Preferences dialog box click Call Handling
3 In the Call Handling panel use any of the following options
bull Select Consultative Transfer to consult the caller before transferring thecall
bull Select Consultative Conference to consult the second caller before addingthe first caller to the conference
bull Select Auto-Hold if you want the system to put the call on hold automaticallybefore transferring or conferencing the call or when answering another alertingcall or dialing another outbound call
bull Select Bring main window to front if you want the system to bring the mainwindow to the foreground and activate the window for a ringing call
bull Select Flash icon if you want to view the call flashing in the task bar when thesystem recognizes a ringing call
4 Click OK to save the settings
Configuring incoming Instant Message appearanceUse these settings to define an incoming instant message You can also specify messages tobe sent automatically as greetings when you begin IM interaction or as responses when receiveto an instant message The messages set using the this procedure are available through theAdd Response button on the IM window
1 On the top bar click System Options gt Agent Preferences
Configuring the incoming call appearance
Installing and Configuring Avaya one-Xreg Agent March 31 2011 47
The Agent Preferences dialog box appears
2 In the Agent Preferences dialog box select Instant MessagingThe Instant Messaging panel appears with General Alerts and Responsestabs
3 Click the General tab and perform the following steps
a In the Greeting field enter your automated IM greeting
b Choose a value from the Minutes drop-down list for Avaya one-X Agent userinterface to automatically display the status as Away when the system is in theidle status By default the value is set to 15 minutes
c Select the Allow desktop sharing option to activate desktop sharing
4 Click the Alerts tab and perform the following steps
a Select the Display main window option if you want the system to display mainAvaya one-X Agent window on the foreground for an incoming message
b Select the Display IM window option if you want the system to display theincoming message directly in an IM window
c Select the Flash icon option if you want the system to flash the one-X Agenticon to flash on the task bar for an incoming message
5 Click the Responses tab to set your automated IM response using the followingsteps
a Click the + button
b Double-click the Untitled box and name the text for your automated IMresponse
c Repeat steps a and b to add more IM responses
d To user the IM responses click the Add response button on the IM windowand select the IM response and press EnterYou can record multiple responses and use them anytime during your IMinteraction
6 Click OK on the Instant Messaging panel to save your settings
Configuring incoming TTY appearanceUse this procedure to define the incoming TTY call appearance You can also set an automatedresponse to the incoming TTY message and specify the originating numbers for which the TTYmessage window must appear on the system
Setting up the initial configuration
48 Installing and Configuring Avaya one-Xreg Agent March 31 2011
1 On the top bar click System Options gt Agent Preferences The Agent Preferences dialog box appears
2 On the Agent Preferences dialog box select TTYThe TTY panel appears with General and Abbreviations tabs
3 On the General tab panel perform the following steps
a In the Greeting text box enter your agent greeting By default the systemdisplays Hello GA greetings
b Select the Show TTY window on every voice call option if you want thesystem to display the TTY window on every incoming voice call
c If you want the system to display the TTY window for specific incoming voicecalls perform the following steps
i Select the Show TTY window when a call comes from option
The TTY number field activates
ii Click the + button
An untitled item appears in the TTY number field
iii Double-click the untitled item and specify the number for which youwant the TTY window to appear
d Select the Always show TTY button in Voice interaction option if you wantthe system to display the TTY window for every voice work item on the work listwindowThis option is useful if the agent performs many TTY operations incoming andoutgoing
4 On the Abbreviations tab perform the following steps
a To view the preset TTY abbreviations select any abbreviation in the listAbbreviation corresponding to TTY appears in the Meaning Literal Meaningand Description fields
b To add a new abbreviation perform the following steps
i Click the + button
An untitled abbreviation appears in the TTY list
ii Double-click the untitled abbreviation and enter the TTYabbreviation
iii In the Meaning field enter a short explanation
iv In the Literal Meaning field enter the expansion of abbreviation
Configuring incoming TTY appearance
Installing and Configuring Avaya one-Xreg Agent March 31 2011 49
The Literal Meaning can be a literal text the abbreviation is derivedfor instance a short form for ldquoBe Right Backrdquo can be ldquoBRBrdquo and ldquoGoAheadrdquo can be ldquoGArdquo
v In the Description field enter additional description or informationon the abbreviation
NoteUse of these fields are completely optional
The abbreviations appear in rectangular boxes on the TTY window To view theabbreviation details you must click the abbreviation box on the TTY window Thedetails appear in a pop-up box on the TTY window The recipient can also view thesame details if the same abbreviation and details are configured through therecipients Avaya one-X Agent
5 Click OK to save the settings
Setting the audio optionsUse the following steps to set the auto options to adjust the audio volume for playbackrecording and incoming calls You can also set the system to play ring tone through thepersonal computer speaker and select a ringtone for an incoming call
1 On the top bar click System Options gt Agent Preferences
2 In the Agent Preferences dialog box click AudioThe Audio panel appears with Basic and Advanced tabs The Basic tab is activeby default
3 On the Basic tab perform the following steps in the Volume section to set the basicaudio settings
NoteThe following steps are optional and you can skip to the required step
a Adjust the Playback slider to set the volume for all sound output through yourcomputer speakers or headphones
b Adjust the Record slider to set the recording volume of all sound transmittedthrough a microphone to your personal computer
c Select the Mute check box adjacent to the Record slider to eliminate any soundbeing sent to your personal computer through the microphone
Setting up the initial configuration
50 Installing and Configuring Avaya one-Xreg Agent March 31 2011
These settings will not affect the headset volume if the headset is attached toa telephone rather than the personal computer
NoteThe Playback Record and Mute are only functional for My Computeroperation For Desk Phone or Other Phone modes you cannot control of thevolume of the telephone
d Adjust the Ringing slider to set the volume of the sound played through yourspeakers or headset when you receive an incoming call
e Select the Mute check box adjacent to Ringing slider to eliminate any soundthat indicates an incoming call
f Select the Play ringing through the internal PC speakers option to play thesound associated with an incoming call through the speakers of your personalcomputer and your headset simultaneouslyIf your personal computer does not have an internal speaker this option has noeffect
g Select the Use Custom ringtone option to play the a custom ringtone (a Wavefile) through the speaker or headset when you receive an incoming call Thewave file is played from the specified locationWhen you select Use Custom ringtone a Browse field and Test Ringtonebutton are displayed below Use the browse field to locate the wave file andclick Test Ringtone to test the wave file
4 On the Advanced tab perform the following steps in the Audio Devices section toset the advanced audio settings
a Select the audio play back hardware on your local system from the PlaybackDevice list
b Select the audio recording hardware on your local system from the RecordDevice list
c Use the Transmit Gain slider to set the gain for outgoing sound during a callYou can set the value from 01 to 100 Avaya recommends that you to set thisoption to 035
d Use the Receive Gain slider to set the gain for incoming sound during a callYou can set the from 01 to 1000 Avaya recommends that you to set the valueto 100
e Click Background Noise Test to test the background noiseThe Background Noise Test window appears Click the Test button on that totest the background noise You must perform if the ambient noise level changeor you move to a different location
5 Click OK to save the audio settings
Setting the audio options
Installing and Configuring Avaya one-Xreg Agent March 31 2011 51
Defining an agent profileA profile is a collection of pre-configured settings and preferences Using profiles agents canswitch configurations (For example agents can create profiles for different settings such ashome Office Sales Support and use them as needed) reusing the same Avaya one-X Agentinstallation For example you can create an agent profile for the My Computer configurationand use the profile with the appropriate Voice over Internet Protocol (VoIP) network You canalso create another agent profile for the Desk Phone configuration and use it asappropriate
Avaya one-X Agent 25 supports migration of older agent profiles (Avaya one-X Agent 10 orAvaya one-X Agent 20) if you are using local profiles When you start the Avaya one-X Agent25 application for the first time the application imports the profile from older release and storesit in to the Avaya one-X Agent 25 profiles If there are profiles from Avaya one-X Agent 10and Avaya one-X Agent 20 then the application imports profiles from Avaya one-X Agent 20The application applies the default values of the Avaya one-X Agent 25 release for new fieldsin the migrated profiles
Use the following procedure to create a local agent profile
ImportantThe Profile configuration is available for creating local profile without Central Managementadministration If Avaya one-X Agent is administered with Central Management the systemdisables the profile window
1 Make necessary changes using the System Settings and Agent Preferencesoptions
2 On the top bar click System Options gt System Settings
3 In the System Settings dialog box click Profiles
4 In the Profiles panel
a Click AddThe system displays the Create Profile dialog box
b In the Profile Name field enter the name for the profile and click OKThe new profile appears in the Profile list
5 Click Automatically execute all logins for the selected profile to execute all loginsequences for the selected or current profile without presenting a profile selectiondialog box The sequence depends on how the login option is set (manual orautomatic on other parameters) in the login panelIf you do not choose this option the application provides you with options to choosethe profile from the list if you have multiple profiles You must select the appropriateprofile at the launch of Avaya one-X Agent on your personal computer If you have
Setting up the initial configuration
52 Installing and Configuring Avaya one-Xreg Agent March 31 2011
a single profile the application proceeds silently without the profile selectionwindow
6 Click OKThe system creates a new profile and stores it locally in your personal computerYou can change the settings in the configuration parameters for the new profile inthe next login
Integrating the voice mail systemAvaya one-X Agent provides Communication Manager Message Waiting support for theregistered extension and one step access to access the message retrieval system for Voicemail You can integrate the voice mail system with a telephone system a third-party voice mailapplication or a web-based voice mail server and retrieve your voice mail from one of thevoice mail services
ImportantThe voice mail service is available only for those extensions registered and has a MessageWaiting Light defined If voice mail settings are not available on your extension contact thesystem administrator This is specific to the Message Waiting Light and has nothing to dowith the voice mail system that activates this light
PrerequisitesVoice Mail Integration is only available for those extensions that have a CommunicationManager Message Waiting Lamp translated
The voice mail support is only available for the message waiting light of the registeredextension There is no automatic support for other buttons translated as Message Waiting forother extensions
The voice mail messages can be associated with a telephone an application or a Webbrowser
1 On the top bar click System Options gt System Settings
2 In the left pane of the System Settings dialog box click Voice mail Integration
3 In the Voice Mail Integration panel click Enable Message Access
4 To integrate voice mail service perform one of the following actions as appropriate
bull To integrate voice mail services with a telephone select Dial this number andspecify the voice mail number in the field
Integrating the voice mail system
Installing and Configuring Avaya one-Xreg Agent March 31 2011 53
bull To integrate voice mail services through a third-party voice mail applicationselect Start this application and click Browse to navigate a windowsexecutable file
bull To integrate voice mail with a third-party web server select Open on web andtype a valid web address in the field
5 Click OK
Activating a recorded greetingYou must activate the Record Greetings option for the system to play the greeting You canhave more than one active greeting at the same time
For example you can set multiple greetings to be active if each greeting has a unique VectorDirectory Number (VDN) as the activation criterion This is also true for Agent Greetings thatplay for specific Automatic Number Identification (ANI) telephone numbers or PromptedDigits
If two recorded greetings meet the same criteria that make them eligible for a single call Avayaone-X Agent chooses the first one on the search list
PrerequisitesYou must have at least one greeting recorded to be able to activate a recorded greeting
1 On the top bar click System Options gt System Settings
2 In the System Settings dialog box select Greetings TriggersThe system displays the Greetings Triggers panel
3 In the Greetings Triggers list select a greeting
4 Click OKYou can manually play the selected greeting on the incoming call
Defining a reason codeThere are three classes of Reason Codes namely Agent AUX Work Codes and Call WorkCodes The annotations for these reason codes are made to the call record and Agent LogoutReason Codes These are known in Communication Manager by digit strings This feature
Setting up the initial configuration
54 Installing and Configuring Avaya one-Xreg Agent March 31 2011
allows the user to associate more meaningful text strings to the digit strings for easyreference
Reason code is a way to associate a particular number to a label for an agents reason for notbeing at the workstation or for not accepting an ACD call These reason codes if defined inCommunication Manager appear on the message window when an agent changes the workstatus to auxiliary or logs out from the ACD service By default the system creates a defaultreason code each for auxiliary logout and work reason code types You can change the defaultreason codes but cannot delete them
ImportantThe system administrator must define a common set of reason codes and manage itcentrally The administrator can distribute these reason code files to all agents by pushingthe configuration to agents system Moreover if your deployment is using CentralManagement the administrator must upload a CSV file and universally assign commonreason codes across the account or skill
Defining reason codes for workWork codes are codes that you assign to a work item in the Work List window You must definethe work code to use them in the Work List window
1 On the top bar click System Options gt System Settings
2 In the left pane of the System Settings dialog box click Reason Codes This opensthe Reason Codes panel on the right
3 From the Select menu to edit list select Work Reason Codes A default anduntitled reason code item is displayed under a root node in the container belowSelect menu to edit listYou can add a singular work reason code or create a group and add a set of workreason codes in that group Reason codes having similar or related characteristicsare organized together in one group Make sure that the labels given to the groupare easy to understand the group activity
4 To add a group perform the following steps
a Click the Add Reason Group button at the bottom of the Reason Codes panelThis adds an untitled group node in the container below Select menu to editlist
b Select the untitled node and type the group name The group node gets labeledwith the name you type
c Follow step 5 to add reason codes to the group
5 To add a solitary reason code perform the following steps
Defining a reason code
Installing and Configuring Avaya one-Xreg Agent March 31 2011 55
a Select the node under which you want to add a reason code This node maybe the root node or a group node
b Click the Add Reason Code button This adds an untitled reason code itemunder the selected node
c Select the untitled reason code item and rename it The reason code namereplaces the default name of the reason code item
d Repeat step 5 to add as many singular reason codes you want to
6 Click OK to save your settingsWork codes created using the above procedure are displayed when you click theWork Code icon on an active call on the Work List window You can choose theappropriate code to assign during the active call If you have not created any workcode the Work Code icon remains disabled during an active call
NoteIf Central Management is used reason codes can be defined only from CentralManagement You will not be able to edit from Avaya one-X Agent application
Defining reason codes for logging outThe log out reason code describes the reason for logging out from the ACD service You canuse the log out reason code only if you have defined reason codes in the System Settingsdialog box
1 On the top bar click System Options gt System Settings
2 In the left pane of the System Settings dialog box click Reason Codes This opensthe Reason Codes panel on the right
3 From the Select menu to edit list select Log Out Reason Codes A default anduntitled reason code item is displayed under a root node in the container belowSelect menu to edit listYou can add a singular log out reason code or create a group and add a set of logout reason codes in that group Reason codes having similar or relatedcharacteristics are organized together in one group Make sure that the labels givento the group are easy to understand the group activity
4 To add a group perform the following steps
a Click the Add Reason Group button at the bottom of the Reason Codes panelThis adds an untitled group node in the container below Select menu to editlist
Setting up the initial configuration
56 Installing and Configuring Avaya one-Xreg Agent March 31 2011
b Select the untitled node and type the group name The group node gets labeledwith the name you type
c Follow step 5 to add reason codes to the group
5 To add a solitary reason code perform the following steps
a Select the node under which you want to add a reason code This node maybe the root node or a group node
b Click the Add Reason Code button This adds an untitled reason code itemunder the selected node
c Select the untitled reason code item and rename it The reason code namereplaces the default name of the reason code item
d Repeat step 5 to add as many singular reason codes you want to
6 Click OK to save your settingsThe system displays the newly created log out reason code in the Log Out list ofthe Change Agent State drop-down list
Defining reason codes for auxiliaryThe auxiliary reason code describes the reason for changing your state to the AUX mode Youcan use the auxiliary reason code only if you have defined the reason codes in the SystemSettings window
Use the following steps to define the auxiliary reason codes and to associate them with thenumeric reason codes supported in Avaya Aurareg Communication Manager
1 On the top bar click System Options gt System Settings
2 In the left pane of the System Settings dialog box click Reason Codes This opensthe Reason Codes panel on the right
3 From the Select menu to edit list select Aux Reason Codes A default and untitledreason code item is displayed under a root node in the container below Selectmenu to edit listYou can add a singular auxiliary reason code or create a group and add a set ofauxiliary reason codes in that group Reason codes having similar or relatedcharacteristics are organized together in one group Make sure that the labels givento the group are easy to understand the group activity
4 To add a group perform the following steps
a Click the Add Reason Group button at the bottom of the Reason Codes panelThis adds an untitled group node in the container below Select menu to editlist
Defining a reason code
Installing and Configuring Avaya one-Xreg Agent March 31 2011 57
b Select the untitled node and type the group name The group node gets labeledwith the name you type
c Follow step 5 to add reason codes to the group
5 To add a solitary reason code perform the following steps
a Select the node under which you want to add a reason code This node maybe the root node or a group node
b Click the Add Reason Code button This adds an untitled reason code itemunder the selected node
c Select the untitled reason code item and rename it The reason code namereplaces the default name of the reason code item
d Repeat step 5 to add as many singular reason codes you want to
6 Click OK to save your settingsThe system displays the newly created auxiliary reason code in the Auxiliary listof the Change Agent State drop-down list
Viewing the phone display on the main windowAvaya one-X Agent allows you to view a 40-character display at the bottom of the Work Listwindow from Avaya Aurareg Communication Manager You can view both call-related and non-call-related information including call-prompting digits VuStats data and the local date andtime display from the ACD server
NoteOnly those telephone types that are capable of displaying 80 characters are compatible withthis feature
1 On the top bar click System Options gt Agent Preferences gt User Interface
2 In the User Interface panel enable the Show Phone Display option
3 Click OK
Setting the toolbar buttons on the main windowAvaya one-X Agent allows you to set the toolbar buttons on the main window These buttonsprovide quick-access to options including releasing a call changing the answer settings to
Setting up the initial configuration
58 Installing and Configuring Avaya one-Xreg Agent March 31 2011
manual or auto changing the agent status to ready or auxiliary making a call to the supervisordirectly assigning a work code to the work item and dialing the last called number
These are the same eight Favorite buttons that are defined in the Dialpad Defining them ineither place will have them displayed in both places You need not have to administer themtwice
1 On the top bar click System Options gt Agent Preferences gt User Interface
2 In the User Interface panel
a Enable the Display Button Toolbar option
b Click Select Favorite Buttons
c In the Favorite Buttons dialog box select the appropriate buttonsYou can select up to eight buttons from the list
3 Click OK
Setting the toolbar buttons on the main window
Installing and Configuring Avaya one-Xreg Agent March 31 2011 59
Setting up the initial configuration
60 Installing and Configuring Avaya one-Xreg Agent March 31 2011
Chapter 7 Repairing Avaya one-X Agent
If Avaya one-X Agent is not functioning properly you can use the Repair function to reinstall it If you repairan Avaya one-X Agent application you must also repair any service release that has been installed
NoteIf you are experiencing difficulties at the time of installing Avaya one-X Agent capture the event anderror logs and send them to your system administrator For detailed information on logs and debuggingsee Maintaining and Troubleshooting Avaya one-X Agent
1 In Windows Control Panel select Add or Remove Programs
2 In the list of currently installed programs locate the Avaya one-X Agent application you wantto repair
3 Click the Click here for support information link to display the Support Info dialog box
4 Click RepairThe system reinstalls the program
TipAlternatively you can run the installation again The installer prompts you with Repair andRemove options You can select Repair to repair the installation
Installing and Configuring Avaya one-Xreg Agent March 31 2011 61
Repairing Avaya one-X Agent
62 Installing and Configuring Avaya one-Xreg Agent March 31 2011
Chapter 8 Removing the Avaya one-XAgent application
NoteYou cannot remove the read-only folders that are shared with other applications or remove any filesor directories that you have added to the Avaya one-X Agent installation directory
Removing Avaya one-X Agent in manual modePrerequisitesClose Avaya one-X Agent if it is currently running If Avaya one-X Agent is running duringremoval process some folders may not be removed completely
1 In Windows Control Panel select Add or Remove Programs
2 Select Avaya One-X Agent and choose Change Remove or Uninstall(Windows Vista)During the removal process the Microsoft installer may display a message to shutdown an application that is running You can shut down the specified applicationor ignore the message and continue with the removal
TipAlternatively you can use the OneXAgentSetupexe setup with using x switchto remove the application On command-prompt navigate to the folder whereOneXAgentSetupexe is located and use the following commandOneXAgentSetupexe x
Installing and Configuring Avaya one-Xreg Agent March 31 2011 63
Removing the Avaya one-X Agent application
64 Installing and Configuring Avaya one-Xreg Agent March 31 2011
Chapter 9 Removing existing software
If you are using the Avaya softphones with video and if you plan to use Avaya one-X Agent with videothen you must remove the following Avaya software from your personal computer before installing Avayaone-X Agent
bull Avaya IP Softphone
bull Polycom Via Video
NoteIf you are not using the Avaya softphones with video on your personal computer you can skip thissection
PrerequisitesBefore removing the Avaya IP Softphone software record the following information You will need thisinformation when you install Avaya one-X Agent
bull Your IP Softphone call server address
bull Your IP Softphone login
bull The password for your extension
1 In Windows Control Panel select Add or Remove Programs
2 Follow the standard process for removing programs from Windows
Installing and Configuring Avaya one-Xreg Agent March 31 2011 65
Removing existing software
66 Installing and Configuring Avaya one-Xreg Agent March 31 2011
Index
A
administration using XML 26agent greetings
activating 54steps 54enabling 54
agent profile 52agent settings 40alternate server addresses 45architecture overview 8authorization code 43
C
call handling 47 50carrier code 43checklist 17configuration using XML 26configuring
incoming TTY appearance 48configuring IM settings 41configuring incoming message appearance 47configuring the agent settings 40customizing the installation 24
D
defining agent profile 52defining incoming call appearance 47 50defining reason code
auxiliary reason code 57log out reason code 56
defining TTY display 48defining work codes
work code 55defining work handling options 46desk phone login 37dialing rules 43display button toolbar 59
F
features based on configuration 10
G
getting started 31
I
IM settings 41initial configuration 35installation overview 7installing
polycom video 25installing Avaya one-X Agent
silent mode 21installing manually 19introduction 7
L
launching one-X Agent 32legal notices 2logging from a Desk Phone 37logging from a personal computer 36
M
manual installation 19message appearance settings 47my computer setting 36
N
network connection 14notices legal 2
O
one-X Agent registration 37 39Other phone settings 39overview 7
P
phone display 58phone settings 35
R
reason codes 55
Installing and Configuring Avaya one-Xreg Agent March 31 2011 67
registering with Communication Manager 36 37registration 35removing 63
in interactive mode 63removing existing software 65repairing 61requirements
AVTS 9communication manager 9enterprise 9hardware 10license 15software 9video 13
S
setting 43standard installation 19starting one-X agent application 32
T
telephony setting 35toolbar
configuring 59
settings 59toolbar buttons 59
U
upgrade version 25upgrading Avaya one-X Agent 25user type
selecting 42
V
voice mailintegrating 53
W
wizard-based installation 19work handling 46
X
XML administration 26XML configuration 26
68 Installing and Configuring Avaya one-Xreg Agent March 31 2011
- Contents
- Chapter 1 Introduction
-
- Installation overview
- Architecture overview
-
- Chapter 2 Requirements
-
- Enterprise requirements
- Software requirements
-
- Feature dependencies on configuration
-
- Computer and other hardware requirements
- Video requirements
- Network connection requirements
- License requirements
-
- Chapter 3 Avaya one-X Agent installation checklist
- Chapter 4 Installing Avaya one-X Agent
-
- Installing Avaya one-X Agent (GUI installation)
- Installing Avaya one-X Agent (silent installation)
-
- Customizing the install
-
- Upgrading Avaya one-X Agent to Release 25
- Installing the Polycom video software
- Administration and configuration of Avaya one-X Agent using XML
-
- Chapter 5 Getting started
-
- Logging on to Avaya one-X Agent
-
- Chapter 6 Setting up the initial configuration
-
- Configuring phones for different locations
-
- Setting up the My Computer configuration
- Setting up the Desk Phone configuration
- Setting up the Other Phone configuration
-
- Configuring the agent settings
- Configuring IM settings
- Choosing User Type
- Setting up the dialing rules
- Defining Alternate Server addresses
- Configuring the Work Handling options
- Configuring the incoming call appearance
- Configuring incoming Instant Message appearance
- Configuring incoming TTY appearance
- Setting the audio options
- Defining an agent profile
- Integrating the voice mail system
- Activating a recorded greeting
- Defining a reason code
-
- Defining reason codes for work
- Defining reason codes for logging out
- Defining reason codes for auxiliary
-
- Viewing the phone display on the main window
- Setting the toolbar buttons on the main window
-
- Chapter 7 Repairing Avaya one-X Agent
- Chapter 8 Removing the Avaya one-X Agent application
-
- Removing Avaya one-X Agent in manual mode
-
- Chapter 9 Removing existing software
- Index
-
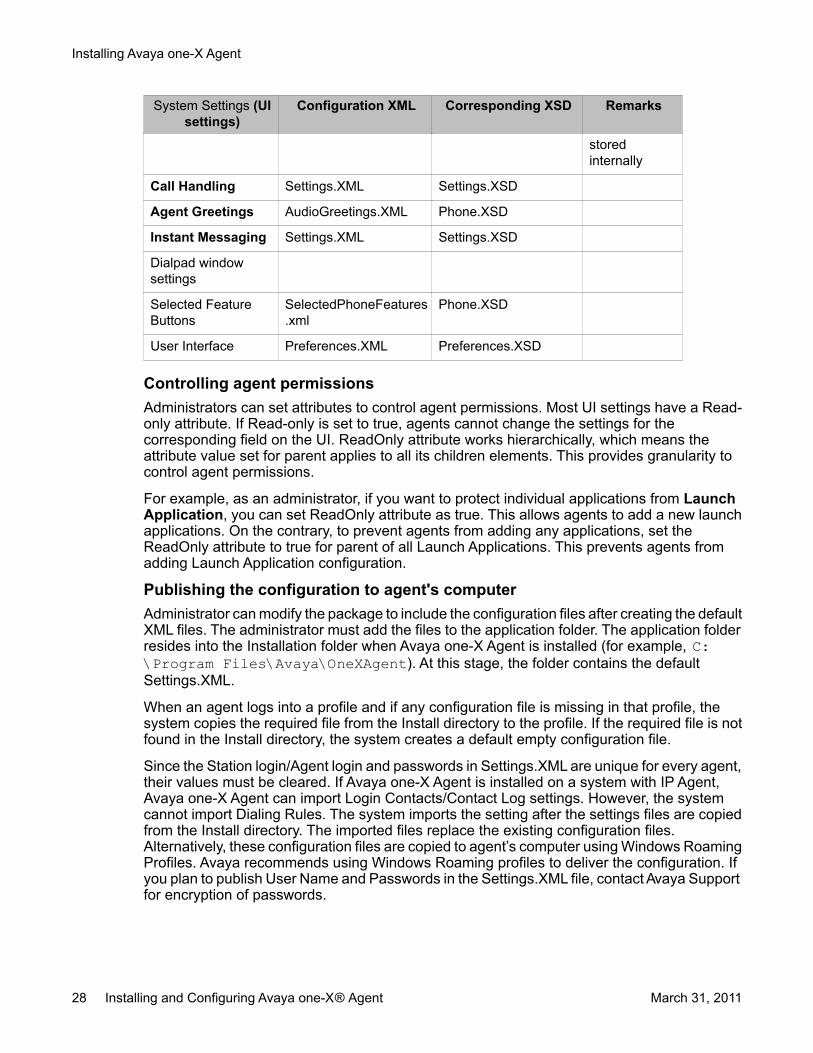
System Settings (UIsettings)
Configuration XML Corresponding XSD Remarks
storedinternally
Call Handling SettingsXML SettingsXSD
Agent Greetings AudioGreetingsXML PhoneXSD
Instant Messaging SettingsXML SettingsXSD
Dialpad windowsettings
Selected FeatureButtons
SelectedPhoneFeaturesxml
PhoneXSD
User Interface PreferencesXML PreferencesXSD
Controlling agent permissionsAdministrators can set attributes to control agent permissions Most UI settings have a Read-only attribute If Read-only is set to true agents cannot change the settings for thecorresponding field on the UI ReadOnly attribute works hierarchically which means theattribute value set for parent applies to all its children elements This provides granularity tocontrol agent permissions
For example as an administrator if you want to protect individual applications from LaunchApplication you can set ReadOnly attribute as true This allows agents to add a new launchapplications On the contrary to prevent agents from adding any applications set theReadOnly attribute to true for parent of all Launch Applications This prevents agents fromadding Launch Application configuration
Publishing the configuration to agents computerAdministrator can modify the package to include the configuration files after creating the defaultXML files The administrator must add the files to the application folder The application folderresides into the Installation folder when Avaya one-X Agent is installed (for example CProgram FilesAvayaOneXAgent) At this stage the folder contains the defaultSettingsXML
When an agent logs into a profile and if any configuration file is missing in that profile thesystem copies the required file from the Install directory to the profile If the required file is notfound in the Install directory the system creates a default empty configuration file
Since the Station loginAgent login and passwords in SettingsXML are unique for every agenttheir values must be cleared If Avaya one-X Agent is installed on a system with IP AgentAvaya one-X Agent can import Login ContactsContact Log settings However the systemcannot import Dialing Rules The system imports the setting after the settings files are copiedfrom the Install directory The imported files replace the existing configuration filesAlternatively these configuration files are copied to agentrsquos computer using Windows RoamingProfiles Avaya recommends using Windows Roaming profiles to deliver the configuration Ifyou plan to publish User Name and Passwords in the SettingsXML file contact Avaya Supportfor encryption of passwords
Installing Avaya one-X Agent
28 Installing and Configuring Avaya one-Xreg Agent March 31 2011
ImportantAvaya does recommend the full-function of the Central Management application formanaging user configurations consistently and continually
Administration and configuration of Avaya one-X Agent using XML
Installing and Configuring Avaya one-Xreg Agent March 31 2011 29
Installing Avaya one-X Agent
30 Installing and Configuring Avaya one-Xreg Agent March 31 2011
Chapter 5 Getting started
This section describes how to log on to Avaya one-X Agent The procedure to log on depends on theconfiguration of Avaya one-X Agent deployment in your network and the type of authentication that thedeployment supports The two types of authentications are basic authentication and Single Sign-on
Basic authenticationIn basic authentication your user credentials get authenticated against the servers namelyCommunication Manager Central Management and Presence Services if deployed in your network Youmust to manage all the credentials to each server in your configuration and profile information For CentralManagement you must provide the Active Directory credentials to retrieve your profile information inwhich these secondary server credentials can be stored The system attempts to log on using the last-used profile if the agent is not able to log on to Central Management The previous configuration savedto the local cache will be used to authenticate the agent and logs you on to Avaya one-X Agent If noconfiguration is cached Avaya one-X Agent will create and use a new default configuration
Single Sign-onSingle Sign-on authentication is only available with Central Management This requires administration inboth Central Management and Active Directory so that users do not have to enter any credentials to login to Central Management and retrieve their profiles The system uses the credentials supplied to the userat Windows Domain Network automatically
In this section you will learn how to launch the Avaya one-X Agent application on your personal computerlog in as an extension register as an agent and log into an IM service
ImportantTo enable Single Sign-on you must configure the Central Management administrator for Avaya one-XAgent
Logging on to Avaya one-X AgentYou must register your station with Communication Manager to configure your systempreferences make and receive direct calls or to sign in as an agent The system logs you inautomatically if you or an administrator has enabled automatic registration in the SystemSettings panel
If you are a first time user if the system recognizes Avaya IP Agent in your computer it importsyour logging credentials contacts and contact logs when you log on to Avaya one-X AgentThe Avaya one-X Agent client shows an Import Settings from IP AgentIP Softphone dialogbox when you log in to the system for the first time You can choose Import Login SettingsImport Call History and Import Contacts from the dialog box Avaya one-X Agent detects
Installing and Configuring Avaya one-Xreg Agent March 31 2011 31
the database file and shows the path in the Database File field The selection appears in thecorresponding windows on Avaya one-X Agent However ensure that you have logged out ofAvaya IP Agent while importing the details
Avaya one-X Agent 25 supports migration of older agent profiles (Avaya one-X Agent 10 orAvaya one-X Agent 20) if you are using local profiles When you start the Avaya one-X Agent25 application the system recognizes the application and imports the profile from older releaseand stores it in to the Avaya one-X Agent 25 profiles If there are profiles from Avaya one-XAgent 10 and Avaya one-X Agent 20 then the application imports profiles from Avaya one-X Agent 20 The application applies the default values of the Avaya one-X Agent 25 releasefor new fields in the migrated profiles
PrerequisitesBefore logging on to the application obtain the following user credentials from your systemadministrator
bull For Central Management login mdash user authentication ID and password
bull For telephony login mdash extension password and IP address of Communication Manager
bull For Agent login mdash extension Login ID and password
bull For IM login mdash IM user name password domain name and IP address of PresenceServer
NoteIf Presence Services is not installed the IM user name password and IP address of thePresence Services are not required For installations without Central Management all theabove credentials except User authentication ID and password are required
Use the following steps to log on to Avaya one-X Agent
1 Launch Avaya one-X Agent on your computerThe User Authentication window appears if you are not using Single Sign-on Youruser credentials get authenticated against the servers namely CommunicationManager Central Management if deployed in your network The system attemptsto log on using the last-used profile if the agent is not able to log on to CentralManagement The previous configuration saved to the local cache will be used toauthenticate the agent and logs you on to Avaya one-X Agent If no configurationis cached Avaya one-X Agent will create and use a new default configuration
2 In the User Authentication window enter your ID and password in the appropriatefields
NoteThis step is not required if you are using Single Sign-on or if Central Managementis not installed as a part of server installations The Welcome window appearsafter launching Avaya one-X Agent
Getting started
32 Installing and Configuring Avaya one-Xreg Agent March 31 2011
The Welcome window may display a welcome message or an important instructionconfigured through Central Management provided Central Management is installedas a server componentYou can complete the initial configuration using the Welcome window menu whenyou launch Avaya one-X Agent on your personal computer for the first time Theinitial task may include configuring your agent settings defining your user profileor setting the dialing rules To configure the basic settings see Setting up the initialconfiguration on page 35
3 On the Welcome window click OK
If then
automatic registration is enabledsettings in the System Settings loginpanel
the system logs you on to Avaya one-XAgent automatically
you have not enabled automaticregistration settings in the SystemSettings login panel
the system prompts you to enter theuser credentials You must enter youruser credentials for each of thesubsequent login windows
you have multiple user profiles andhave not enabled the Automaticexecute all logins for the selectedprofile option in the System Settingslogin panel
the system displays the profileselection window with preferred profileon the top of the list You must chooseappropriate profile from the profileselection drop-down list to proceed
Avaya one-X Agent is administeredwith Central Management and theadministrator has set the preferredprofile in Central Management
the system displays the profileselection window with preferred profileon the top of the list You must chooseappropriate profile from the profileselection drop-down list to proceed
Avaya one-X Agent is administeredwith Central Management and theadministrator has disabled the localprofile administration in CentralManagement
the system logs you on to Avaya one-XAgent automatically with the preferredprofile set in Central Management
The Login window appears
4 On the Login window
a In the Extension field enter the telephone extension number
b In the Password field enter the password
c Click Log inThe Agent Sign In to ACD window appears To make and receive ACD callsyou must log on to the ACD server using the agent id
5 On the Agent Sign In to ACD window
Logging on to Avaya one-X Agent
Installing and Configuring Avaya one-Xreg Agent March 31 2011 33
a Select the Automatically sign into the ACD server option if you want Avayaone-X Agent automatically log to the user on to the ACD after successfullyregistering the extension with Communication Manager
b In the Agent field enter the agent login ID
c in the Password field enter the password
d Click Log inThe Connect to IM Server window appears The Connect to IM Server windowwill not appear if Presence Services is not a part of your deployment In suchcase you are directly logged on to Avaya one-X Agent after this step only if youor your administrator has enabled the Activate IM Presence option in the IMtab
6 On the Connect to IM Server window
a In the User Name field enter your IM user name
b In the Password field enter the password
c In the Domain field enter the IM server domain name
d Click Log inThe system logs you on to Avaya one-X Agent
NoteThe respective details appear as you log on to Avaya one-X Agent
If you have logged into Avaya IP Soft Phone a warning message appears Youneed to log out to be able to import contact logs into Avaya one-X Agent
Getting started
34 Installing and Configuring Avaya one-Xreg Agent March 31 2011
Chapter 6 Setting up the initialconfiguration
A user can configure multiple profiles one for each location or type of phone once then when theapplication starts the user can select appropriate profile This section describes how to configure varioussettings after logging in to Avaya one-X Agent
ImportantYou may not have permission to change add delete or configure some of the features in the applicationas these features may be have been restricted at the enterprise level These restricted features arevisible but grayed out
Configuring phones for different locationsYou can perform day-to-day tasks from the contact center at home or while traveling byregistering Avaya one-X Agent with Communication Manager
You can select an appropriate profile that has been created to optimize certain featuresHowever if you are working from multiple locations (from the contact center from your homeor from a different location) you must configure the Communication Manager IP on the Avayaone-X Agent client to connect to Communication Manager each time you change locations
ImportantAvaya one-X Agent has removed the explicit reference to the Communication Managerlicense type from its configuration parameters In this release Avaya one-X Agent selectsUser type and the proper license when registering with Communication Manager In additionthe Basic user type if used in the Desk Phone mode will select an AGENT_SC (the Eliteentitlement) license and allows IM and Presence
Avaya one-X Agent offers several options to register with Communication Manager Dependingon your location telephone set and network you can place and receive calls using
bull My Computer
bull Desk Phone
bull Other Phone
This section provides prerequisites and steps to set up each configuration If you are not sureabout the configuration type contact your system administrator
Installing and Configuring Avaya one-Xreg Agent March 31 2011 35
Setting up the My Computer configurationThe My Computer configuration uses an IP connection to connect to Communication Managerfor data path and VoIP for voice path The configuration does not use an analog or an IPtelephone which obviously is valuable when a physical telephone is not available You canmake or receive voice calls through Avaya one-X Agent using a headset connected to yourpersonal computer
The My Computer setting provides the best IP audio quality that is possible with yourconnection speed personal computer performance and network setup
NoteThe My Computer mode is not available if Avaya one-X Agent is running on Windows Server2003 or 2008
Prerequisites
bull Network connection from a personal computer running the Avaya one-X Agent applicationto Communication Manager
bull Network interface card for connectivity to Communication Manager and a sound card (full-duplex recommended)
bull An USB-compliant headset connected to the personal computer (recommended) or apersonal computer microphone and speakers or a headset with a microphone connectedto the mini connectors
bull Telephone extension number password and Communication Manager address
Use the My Computer configuration when you are traveling and need to accessCommunication Manager through the Internet You can configure the My Computer setting forVoIP either through the Login window or through the System Settings dialog box
1 On the top bar click System Options gt System Settings
2 In the System Settings dialog box Login panel appears by default with theTelephony tab
3 In the Telephony tab
a Select the Enable automatic connection to CM option if you want the systemto connect to Communication Manager automatically using the last successfulregistration
b In the Extension field specify the telephone extension number if you wantCommunication Manager to identify your telephone extension number eachtime you log in to the system
Setting up the initial configuration
36 Installing and Configuring Avaya one-Xreg Agent March 31 2011
c In the Password field specify the password for the associated telephoneextension number
d Select the Save password during sign in option if you want the system tosave the password when you are signing in with the associated extensionnumber
e Select the CM Auto Answer Support Required option if the extension hasbeen administered on Communication Manager to support Auto Answer
f Select the Warn for Another User Logged in at Extension option if you wantthe system to warn you if another agent has logged in using the same extensionThe system removes the warning if you do not enable this option
NoteThis option is available only for Avaya one-X Agent 20 and earlier
g In the Server Address field enter the IP address of CommunicationManager
h In the User Type drop-down list select the appropriate user
i In the Place and receive calls using drop-down field select My Computer
4 Click OKThe system applies the new changes in the next login
Setting up the Desk Phone configurationThe Desk Phone configuration uses an Avaya IPDCP telephone for voice path and an Avayaone-X Agent to share control of the same administered station using the same button layoutand features You access audio components from your office phone and visual componentsfrom your personal computer
Prerequisites
bull Network connection from a personal computer running the Avaya one-X Agent applicationto Communication Manager
bull Avaya DCP or IP telephones capable of receiving calls from Communication Manager
bull Network interface card for connectivity to Communication Manager
bull Desk phone extension number password and Communication Manager server address
Use the Desk Phone configuration when you are at the contact center and want to share thecontrol between the office telephone and your personal computer While registering as a DeskPhone with Communication Manager you must register the desk phone number as theextension number You can configure the Desk Phone setting either through the Login windowor through the System Settings dialog box
Configuring phones for different locations
Installing and Configuring Avaya one-Xreg Agent March 31 2011 37
1 On the top bar click System Options gt System Settings
2 In the System Setting dialog box click Login
3 In the Telephony tab
a Select the Enable automatic connection to Communication Manager optionif you want the system to connect to Communication Manager automaticallyusing the last successful registration
b In the Extension field specify the desktop extension number if you wantCommunication Manager to identify your telephone extension number eachtime you log in to the system
c In the Password field specify the password for the associated desktopextension number
d Select Save password during sign in if you want the system to save thepassword when you are signing in with the associated extension number
e Select the CM Auto Answer Support Required option if the extension hasbeen administered on Communication Manager to support Auto Answer
f Select the Warn for Another User Logged in at Extension option if you wantthe system to warn you if another agent has logged in using the sameextension
g In the Server Address field enter the IP address of CommunicationManager
h From the User Type drop-down list select appropriate user
i In the Place and receive calls using drop-down field choose Desk Phone
4 Click OKThe system applies the new changes in the next login
Setting up the Other Phone configurationThe Other Phone configuration registers with Communication Manager as an off-site agentthrough a telephone and an IP connection The telephone can be a PSTN telephone a cellulartelephone or an extension on a local or remote switch The Other Phone configuration usesan IP connection to connect to Communication Manager and a PSTN connection to make orreceive calls
Setting up the initial configuration
38 Installing and Configuring Avaya one-Xreg Agent March 31 2011
Prerequisites
bull Network connection from a desktop computer running Avaya one-X Agent toCommunication Manager
bull Any telephone capable of receiving calls from Communication Manager
bull Communication Manager connection one user connection for signaling connection andthe other for off-site use one trunk connection or for on-site use an additional userconnection
bull Telephone extension number password and the Communication Manager serveraddress
bull Telephone numbers to be configured as Other Phone must be added on the PhoneNumbers panel Refer Adding a new phone number for information on adding phonenumbers
Use the Other Phone configuration when you are telecommuting and want to use Avaya one-X Agent from a remote location with a PSTN telephone connected to Communication Managerdirectly You can configure the Other Phone setting either through the Login window or throughthe System Settings dialog box
1 On the top bar click System Options gt System Settings
2 In the System Settings dialog box click Login
3 In the Telephony tab
a Select the Enable automatic connection to Communication Manager optionif you want the system to connect to Communication Manager automaticallyusing the last successful registration
b In the Extension field specify the telephone extension number if you wantCommunication Manager to identify your telephone extension number eachtime you log in to the system
c In the Password field specify the password for the associated telephoneextension number
d Select the CM Auto Answer Support Required option if the extension hasbeen administered on Communication Manager to support Auto Answer
e Select the Warn for Another User Logged in at Extension option if you wantthe system to warn you if another agent has logged in using the sameextension
f In the Server Address field enter the IP address of CommunicationManager
g From the User Type drop-down list select the appropriate user
h In the Place and receive calls using drop-down field select Other Phone
Configuring phones for different locations
Installing and Configuring Avaya one-Xreg Agent March 31 2011 39
i In the Telephone at field enter the telephone number you want to use for voicecalls
4 click OK to save the settingsThe system applies the new changes in the next login
Configuring the agent settingsPrerequisites
Obtain the agent extension number and password from your system administrator
NoteThe ACD tab will not appear if you have logged in as a Non-Agent or if appropriate buttonsare administered for this extension
1 On the top bar click System Options gt System Settings
2 In the Login Settings dialog box click the Agent tab
3 In the Agent tab
a Select the Enable ACD Login option if you want to enable the ACD featureBefore selecting the Enable ACD Login option ensure that you provide theuser credentials to log in to the ACD service
b Select the Automatically sign into the ACD server option if you want thesystem to register the agent extension with the ACD server automatically withthe previous successful registration through Communication Manager
c In the Agent field specify the agent extension number if you want the ACDservice to identify your agent extension number each time you log on to thesystem
d In the Password field specify the password for the agent extension number
e Select Save password during sign in if you want the system to save thepassword when you are signing in as an agent with the associated agentextension number
f In the Default Agent state upon ACD connection drop-down field choosethe appropriate option
4 Click OK
Setting up the initial configuration
40 Installing and Configuring Avaya one-Xreg Agent March 31 2011
Configuring IM settingsPrerequisitesObtain your IM user name and password domain name and IM server IP address from yoursupervisor or system administrator
1 On the top bar click System Options gt System settings
2 In the Login Settings dialog box click the IM tab
3 In the IM tab
a Select the Enable IM Login option if you want to enable the IM featureWhen you enable the Enable IM Login option you need to provide the usercredentials required to log on to Avaya Presence Services
b Select the Enable automatic connection to IM server option if you want thesystem to connect to the IM server with the previous successful registration
c In the User Name field specify the IM user ID of the agent
d In the Password field specify the password
e In the Domain field specify the domain name of the IM server
f Select Save password during sign in if you want the system to save thecredentials for subsequent log in
g In the Server Address field enter the IM server IP address
4 Click OK
Choosing User TypeAvaya one-X Agent allows different types of users namely agents non-agents andsupervisors to access the Communication Manager features Based on the user type thesystem grants a user access to a particular User Type then that user will have access to allthe features associated with that user type unless they are further restricted throughCommunication Manager
For example a user authenticated as an Agent user type is provided access to all Avaya one-X Agent features other than the Supervisor feature set (for example Service ObservingRemote Agent Logout) unless they are further restricted through Communication Manager
Configuring IM settings
Installing and Configuring Avaya one-Xreg Agent March 31 2011 41
Each user type has a role-based access to the following features
Feature Agent Non-Agent SupervisorACD Yes No Yes
Telephony Yes Yes Yes
IMPresence Yes Yes Yes
TTY (works only inMy Computer mode)
Yes Yes Yes
Desktop Sharing Yes Yes Yes
Supervisor (Avayaone-X Agentintegrated features)
No No Yes
ImportantAvaya one-X Agent has removed the explicit reference to the Communication Managerlicense type from its configuration parameters In this release Avaya one-X Agent selectsUser type and the proper license when registering with Communication Manager In additionBasic user type if used in the Desk Phone mode will select an AGENT_SC (the Eliteentitlement) license and allow IM and Presence
Use the following steps to choose the user type from the Telephony tab The application usesthe local profile with Agent with Desk Phone mode as default user type
1 On the top bar click System Options gt System Settings
2 In the Login Settings dialog box click the Telephony tab
3 In the Telephony tab choose appropriate user type from the Use Type drop-downlistIf Avaya one-X Agent is configured with Communication Manager you may not beable modify the User Type field as the option may be disabled by administrator Inthis case the relevant controls will be grayed out
Setting up the dialing rulesThe dialing rules depend on the country and location of your Communication Manager Thedialing rules help the system to distinguish extensions from trunk calls based on the length ofthe dialing string It ensures that the system uses the right Automatic Route Selection (ARS)code and if needed modifies the digits in keeping with Communication Manager and the PSTNrequirements
Setting up the initial configuration
42 Installing and Configuring Avaya one-Xreg Agent March 31 2011
Avaya one-X Agent 25 supports authorization and carrier code which is mandatory in somecountries It is an optional feature used to prevent access to expensive telephony resourcesoften international calling by unauthorized users An administrator or an Avaya one-X Agentuser can enter an authorization code in a user profile and the types of telephone calls thatrequire this authorization Avaya one-X Agent then automatically appends the authorizationcode as required so the user does not have to enter it each time a call is made
TipFor traveling agents visiting a different location and needing to register with a differentCommunication Manager Avaya recommends defining a user profile with appropriatedialing rules for that location and using a login with the corresponding profile so that thedialing rules for the system do not change
NoteYou must change the dialing rules each time you register the telephone settings with adifferent Communication Manager
1 On the top bar click System Options gt System Settings
2 In the System Settings dialog box click Dialing RulesThe application displays the Dialing Rules panel with Basic and Advanced tabs
3 In the Basic tab
a In the Number to dial to access outside line field specify the number toaccess an outside line In North America this is set to 9 In Europe it is set to0 For example if you are in North America you must enter the number as 9to access the outside line
b In the Your Country Code field specify the country code of yourCommunication Manager For example type 1 for North America 44 for GreatBritain 61 for Australia
c In the Local Calling Area Code field type the area or city code ofCommunication Manager For example type 785In regions where multiple local calling area codes are supported enter them asa comma-separated list For example 305720 If you can make local calls toboth these area codes
d In the Number to dial for long distance calls field enter the national longdistance prefix for example in North America type 1
e In the Number to dial for international calls field type the international prefixfor example in North America type 011
f In the Extension Length for internal extension calls field type the length ofthe internal extension calls For example if your internal extensions consist of
Setting up the dialing rules
Installing and Configuring Avaya one-Xreg Agent March 31 2011 43
five digits enter 5 If you specify the multiple extension lengths Avaya one-XAgent performs the exact matchesWhen you assign the length of the internal extension number Avaya one-XAgent treats the dialed number consisting of the selected number of digits asan internal extensionCommunication Manager may have multiple length extension numbers forexample if your company supports internal three-digit five-digit and seven-digit extensions type 357 You must use a comma to separate the values
g In the Length of national phone numbers (including CityArea code) fieldtype the length of length of national long distance number for example for NorthAmerica type 10If you are accessing the Communication Manager where the region supportsvariable national phone numbers specify the length of the valid telephonenumbers as a comma separated list For example if the region supports bothtelephone numbers with 10 digit and 11 digit telephone numbers type valuesas 1011
h Select Include areacity code when making a local call if area code mustbe prefix to a number when making a local call For example if you dial atelephone number the system prefixes the area code number defined in theYour AreaCity Code field and dials the telephone number
i Select Add long distance prefix on local calls if you want the system to adda long distance code before local calls For example if you dial a local telephonenumber the system prefixes a long distance code number defined in theNumber to dial for long distance calls field and dials the local telephonenumber
j Select Display confirmation window before dialing a number forconfirmation before dialing
k In the Time Period of Pause (Comma) in dialing (in seconds) field specifythe period for each comma character in the dialing field before dialing the nextdigit By default this field is set to 2 seconds You can specify the any valuebetween 1 to 10 seconds
4 To define authorization code click the Advanced tab and perform the followingsteps
a Select the Enable Authorization code option to enable the authorization codeThese are administered in Communication Manager
b In the Authorization Code field specify an authorization code number
c To make external calls using the authorization code select one or all of thefollowing options as appropriate
bull To make local calls using authorization code select On local calls
bull To make national long distance calls using authorization code select Onnational long distance calls
Setting up the initial configuration
44 Installing and Configuring Avaya one-Xreg Agent March 31 2011
bull To make international calls using authorization code select Oninternational long distance calls
5 Click OK to save the settings
Defining Alternate Server addressesThe Alternate Server address feature allows you to specify alternate registration servers if themain registration server defined on the telephony login screen is not available
NoteThis feature is independent of the Alternate Gatekeeper function available in CommunicationManager The Alternate Gatekeeper List (AGL) is computed by Communication Manager ateach registration and is provided to the endpoint during a successful Registration AccessSecurity (RAS) process The Alternate Server feature on the other hand allows a successfulRAS session to be set up to begin with
PrerequisitesObtain the alternate server addresses from your administrator
1 On the top bar click System Options gt System Settings
2 In the System Settings dialog box click Alternate Server List
3 In the Alternate Server List panel
a Click Add
b In the blank field type the IP address or FQDN of the alternate serverTo add more servers to the list repeat the sub-steps a and b
c In the Maximum attempts of each server field specify the number of attemptsthe system make to connect to each server before switching to the next definedserver
4 Click OK to save the settings
Defining Alternate Server addresses
Installing and Configuring Avaya one-Xreg Agent March 31 2011 45
Configuring the Work Handling optionsThese settings control how to receive calls on the Avaya one-X Agent client
PrerequisitesTo be able to specify Aux Codes during the Transition to Ready state interval Aux Codesmust be defined prior to following this procedure
Use the Work Handling options to configure the incoming work items to use CommunicationManager settings to change the agent status (if administered) to define the agents transitionstate after releasing the call and to set the work completion options
1 On the top bar click System Options gt System Settings
2 In the System Settings dialog box click Work HandlingThe Work Handling panel appears with Basic and Advanced tabs
3 On the Basic tab
a In the Work Completion for ACD calls section define the work completionmode as appropriate
b In the Transitions to Ready State section define the agents transition stateafter releasing the callThe With Aux Code option is only available for Manual-Ready option
4 On the Advanced tab tab
a In the Work Items section select the appropriate option to accept incomingwork itemsAuto-Accept automatically accepts calls however this is not related to CMAuto Answer Support Required option on the Login window but provides thesame functionality on the client side
NoteThe Auto-Accept option automatically answers telephone calls that areringing The Auto-Accept option is not related to support for CommunicationManager Auto answer However it can be used to accomplish a similarfunction
b In the Communication Manager Ready mode section select Auto In if youwant Communication Manager to do the work handling Selecting Auto In
Setting up the initial configuration
46 Installing and Configuring Avaya one-Xreg Agent March 31 2011
disables most of the Work Handling panel settings and it is not recommendedfor normal operation of Avaya one-X Agent
5 Click OK
Configuring the incoming call appearanceUse the following steps to set the incoming call notifications to display the main window or toflash the icon on the task bar when the system recognizes an incoming call
1 On the top bar click System Options gt Agent Preferences
2 In the Agent Preferences dialog box click Call Handling
3 In the Call Handling panel use any of the following options
bull Select Consultative Transfer to consult the caller before transferring thecall
bull Select Consultative Conference to consult the second caller before addingthe first caller to the conference
bull Select Auto-Hold if you want the system to put the call on hold automaticallybefore transferring or conferencing the call or when answering another alertingcall or dialing another outbound call
bull Select Bring main window to front if you want the system to bring the mainwindow to the foreground and activate the window for a ringing call
bull Select Flash icon if you want to view the call flashing in the task bar when thesystem recognizes a ringing call
4 Click OK to save the settings
Configuring incoming Instant Message appearanceUse these settings to define an incoming instant message You can also specify messages tobe sent automatically as greetings when you begin IM interaction or as responses when receiveto an instant message The messages set using the this procedure are available through theAdd Response button on the IM window
1 On the top bar click System Options gt Agent Preferences
Configuring the incoming call appearance
Installing and Configuring Avaya one-Xreg Agent March 31 2011 47
The Agent Preferences dialog box appears
2 In the Agent Preferences dialog box select Instant MessagingThe Instant Messaging panel appears with General Alerts and Responsestabs
3 Click the General tab and perform the following steps
a In the Greeting field enter your automated IM greeting
b Choose a value from the Minutes drop-down list for Avaya one-X Agent userinterface to automatically display the status as Away when the system is in theidle status By default the value is set to 15 minutes
c Select the Allow desktop sharing option to activate desktop sharing
4 Click the Alerts tab and perform the following steps
a Select the Display main window option if you want the system to display mainAvaya one-X Agent window on the foreground for an incoming message
b Select the Display IM window option if you want the system to display theincoming message directly in an IM window
c Select the Flash icon option if you want the system to flash the one-X Agenticon to flash on the task bar for an incoming message
5 Click the Responses tab to set your automated IM response using the followingsteps
a Click the + button
b Double-click the Untitled box and name the text for your automated IMresponse
c Repeat steps a and b to add more IM responses
d To user the IM responses click the Add response button on the IM windowand select the IM response and press EnterYou can record multiple responses and use them anytime during your IMinteraction
6 Click OK on the Instant Messaging panel to save your settings
Configuring incoming TTY appearanceUse this procedure to define the incoming TTY call appearance You can also set an automatedresponse to the incoming TTY message and specify the originating numbers for which the TTYmessage window must appear on the system
Setting up the initial configuration
48 Installing and Configuring Avaya one-Xreg Agent March 31 2011
1 On the top bar click System Options gt Agent Preferences The Agent Preferences dialog box appears
2 On the Agent Preferences dialog box select TTYThe TTY panel appears with General and Abbreviations tabs
3 On the General tab panel perform the following steps
a In the Greeting text box enter your agent greeting By default the systemdisplays Hello GA greetings
b Select the Show TTY window on every voice call option if you want thesystem to display the TTY window on every incoming voice call
c If you want the system to display the TTY window for specific incoming voicecalls perform the following steps
i Select the Show TTY window when a call comes from option
The TTY number field activates
ii Click the + button
An untitled item appears in the TTY number field
iii Double-click the untitled item and specify the number for which youwant the TTY window to appear
d Select the Always show TTY button in Voice interaction option if you wantthe system to display the TTY window for every voice work item on the work listwindowThis option is useful if the agent performs many TTY operations incoming andoutgoing
4 On the Abbreviations tab perform the following steps
a To view the preset TTY abbreviations select any abbreviation in the listAbbreviation corresponding to TTY appears in the Meaning Literal Meaningand Description fields
b To add a new abbreviation perform the following steps
i Click the + button
An untitled abbreviation appears in the TTY list
ii Double-click the untitled abbreviation and enter the TTYabbreviation
iii In the Meaning field enter a short explanation
iv In the Literal Meaning field enter the expansion of abbreviation
Configuring incoming TTY appearance
Installing and Configuring Avaya one-Xreg Agent March 31 2011 49
The Literal Meaning can be a literal text the abbreviation is derivedfor instance a short form for ldquoBe Right Backrdquo can be ldquoBRBrdquo and ldquoGoAheadrdquo can be ldquoGArdquo
v In the Description field enter additional description or informationon the abbreviation
NoteUse of these fields are completely optional
The abbreviations appear in rectangular boxes on the TTY window To view theabbreviation details you must click the abbreviation box on the TTY window Thedetails appear in a pop-up box on the TTY window The recipient can also view thesame details if the same abbreviation and details are configured through therecipients Avaya one-X Agent
5 Click OK to save the settings
Setting the audio optionsUse the following steps to set the auto options to adjust the audio volume for playbackrecording and incoming calls You can also set the system to play ring tone through thepersonal computer speaker and select a ringtone for an incoming call
1 On the top bar click System Options gt Agent Preferences
2 In the Agent Preferences dialog box click AudioThe Audio panel appears with Basic and Advanced tabs The Basic tab is activeby default
3 On the Basic tab perform the following steps in the Volume section to set the basicaudio settings
NoteThe following steps are optional and you can skip to the required step
a Adjust the Playback slider to set the volume for all sound output through yourcomputer speakers or headphones
b Adjust the Record slider to set the recording volume of all sound transmittedthrough a microphone to your personal computer
c Select the Mute check box adjacent to the Record slider to eliminate any soundbeing sent to your personal computer through the microphone
Setting up the initial configuration
50 Installing and Configuring Avaya one-Xreg Agent March 31 2011
These settings will not affect the headset volume if the headset is attached toa telephone rather than the personal computer
NoteThe Playback Record and Mute are only functional for My Computeroperation For Desk Phone or Other Phone modes you cannot control of thevolume of the telephone
d Adjust the Ringing slider to set the volume of the sound played through yourspeakers or headset when you receive an incoming call
e Select the Mute check box adjacent to Ringing slider to eliminate any soundthat indicates an incoming call
f Select the Play ringing through the internal PC speakers option to play thesound associated with an incoming call through the speakers of your personalcomputer and your headset simultaneouslyIf your personal computer does not have an internal speaker this option has noeffect
g Select the Use Custom ringtone option to play the a custom ringtone (a Wavefile) through the speaker or headset when you receive an incoming call Thewave file is played from the specified locationWhen you select Use Custom ringtone a Browse field and Test Ringtonebutton are displayed below Use the browse field to locate the wave file andclick Test Ringtone to test the wave file
4 On the Advanced tab perform the following steps in the Audio Devices section toset the advanced audio settings
a Select the audio play back hardware on your local system from the PlaybackDevice list
b Select the audio recording hardware on your local system from the RecordDevice list
c Use the Transmit Gain slider to set the gain for outgoing sound during a callYou can set the value from 01 to 100 Avaya recommends that you to set thisoption to 035
d Use the Receive Gain slider to set the gain for incoming sound during a callYou can set the from 01 to 1000 Avaya recommends that you to set the valueto 100
e Click Background Noise Test to test the background noiseThe Background Noise Test window appears Click the Test button on that totest the background noise You must perform if the ambient noise level changeor you move to a different location
5 Click OK to save the audio settings
Setting the audio options
Installing and Configuring Avaya one-Xreg Agent March 31 2011 51
Defining an agent profileA profile is a collection of pre-configured settings and preferences Using profiles agents canswitch configurations (For example agents can create profiles for different settings such ashome Office Sales Support and use them as needed) reusing the same Avaya one-X Agentinstallation For example you can create an agent profile for the My Computer configurationand use the profile with the appropriate Voice over Internet Protocol (VoIP) network You canalso create another agent profile for the Desk Phone configuration and use it asappropriate
Avaya one-X Agent 25 supports migration of older agent profiles (Avaya one-X Agent 10 orAvaya one-X Agent 20) if you are using local profiles When you start the Avaya one-X Agent25 application for the first time the application imports the profile from older release and storesit in to the Avaya one-X Agent 25 profiles If there are profiles from Avaya one-X Agent 10and Avaya one-X Agent 20 then the application imports profiles from Avaya one-X Agent 20The application applies the default values of the Avaya one-X Agent 25 release for new fieldsin the migrated profiles
Use the following procedure to create a local agent profile
ImportantThe Profile configuration is available for creating local profile without Central Managementadministration If Avaya one-X Agent is administered with Central Management the systemdisables the profile window
1 Make necessary changes using the System Settings and Agent Preferencesoptions
2 On the top bar click System Options gt System Settings
3 In the System Settings dialog box click Profiles
4 In the Profiles panel
a Click AddThe system displays the Create Profile dialog box
b In the Profile Name field enter the name for the profile and click OKThe new profile appears in the Profile list
5 Click Automatically execute all logins for the selected profile to execute all loginsequences for the selected or current profile without presenting a profile selectiondialog box The sequence depends on how the login option is set (manual orautomatic on other parameters) in the login panelIf you do not choose this option the application provides you with options to choosethe profile from the list if you have multiple profiles You must select the appropriateprofile at the launch of Avaya one-X Agent on your personal computer If you have
Setting up the initial configuration
52 Installing and Configuring Avaya one-Xreg Agent March 31 2011
a single profile the application proceeds silently without the profile selectionwindow
6 Click OKThe system creates a new profile and stores it locally in your personal computerYou can change the settings in the configuration parameters for the new profile inthe next login
Integrating the voice mail systemAvaya one-X Agent provides Communication Manager Message Waiting support for theregistered extension and one step access to access the message retrieval system for Voicemail You can integrate the voice mail system with a telephone system a third-party voice mailapplication or a web-based voice mail server and retrieve your voice mail from one of thevoice mail services
ImportantThe voice mail service is available only for those extensions registered and has a MessageWaiting Light defined If voice mail settings are not available on your extension contact thesystem administrator This is specific to the Message Waiting Light and has nothing to dowith the voice mail system that activates this light
PrerequisitesVoice Mail Integration is only available for those extensions that have a CommunicationManager Message Waiting Lamp translated
The voice mail support is only available for the message waiting light of the registeredextension There is no automatic support for other buttons translated as Message Waiting forother extensions
The voice mail messages can be associated with a telephone an application or a Webbrowser
1 On the top bar click System Options gt System Settings
2 In the left pane of the System Settings dialog box click Voice mail Integration
3 In the Voice Mail Integration panel click Enable Message Access
4 To integrate voice mail service perform one of the following actions as appropriate
bull To integrate voice mail services with a telephone select Dial this number andspecify the voice mail number in the field
Integrating the voice mail system
Installing and Configuring Avaya one-Xreg Agent March 31 2011 53
bull To integrate voice mail services through a third-party voice mail applicationselect Start this application and click Browse to navigate a windowsexecutable file
bull To integrate voice mail with a third-party web server select Open on web andtype a valid web address in the field
5 Click OK
Activating a recorded greetingYou must activate the Record Greetings option for the system to play the greeting You canhave more than one active greeting at the same time
For example you can set multiple greetings to be active if each greeting has a unique VectorDirectory Number (VDN) as the activation criterion This is also true for Agent Greetings thatplay for specific Automatic Number Identification (ANI) telephone numbers or PromptedDigits
If two recorded greetings meet the same criteria that make them eligible for a single call Avayaone-X Agent chooses the first one on the search list
PrerequisitesYou must have at least one greeting recorded to be able to activate a recorded greeting
1 On the top bar click System Options gt System Settings
2 In the System Settings dialog box select Greetings TriggersThe system displays the Greetings Triggers panel
3 In the Greetings Triggers list select a greeting
4 Click OKYou can manually play the selected greeting on the incoming call
Defining a reason codeThere are three classes of Reason Codes namely Agent AUX Work Codes and Call WorkCodes The annotations for these reason codes are made to the call record and Agent LogoutReason Codes These are known in Communication Manager by digit strings This feature
Setting up the initial configuration
54 Installing and Configuring Avaya one-Xreg Agent March 31 2011
allows the user to associate more meaningful text strings to the digit strings for easyreference
Reason code is a way to associate a particular number to a label for an agents reason for notbeing at the workstation or for not accepting an ACD call These reason codes if defined inCommunication Manager appear on the message window when an agent changes the workstatus to auxiliary or logs out from the ACD service By default the system creates a defaultreason code each for auxiliary logout and work reason code types You can change the defaultreason codes but cannot delete them
ImportantThe system administrator must define a common set of reason codes and manage itcentrally The administrator can distribute these reason code files to all agents by pushingthe configuration to agents system Moreover if your deployment is using CentralManagement the administrator must upload a CSV file and universally assign commonreason codes across the account or skill
Defining reason codes for workWork codes are codes that you assign to a work item in the Work List window You must definethe work code to use them in the Work List window
1 On the top bar click System Options gt System Settings
2 In the left pane of the System Settings dialog box click Reason Codes This opensthe Reason Codes panel on the right
3 From the Select menu to edit list select Work Reason Codes A default anduntitled reason code item is displayed under a root node in the container belowSelect menu to edit listYou can add a singular work reason code or create a group and add a set of workreason codes in that group Reason codes having similar or related characteristicsare organized together in one group Make sure that the labels given to the groupare easy to understand the group activity
4 To add a group perform the following steps
a Click the Add Reason Group button at the bottom of the Reason Codes panelThis adds an untitled group node in the container below Select menu to editlist
b Select the untitled node and type the group name The group node gets labeledwith the name you type
c Follow step 5 to add reason codes to the group
5 To add a solitary reason code perform the following steps
Defining a reason code
Installing and Configuring Avaya one-Xreg Agent March 31 2011 55
a Select the node under which you want to add a reason code This node maybe the root node or a group node
b Click the Add Reason Code button This adds an untitled reason code itemunder the selected node
c Select the untitled reason code item and rename it The reason code namereplaces the default name of the reason code item
d Repeat step 5 to add as many singular reason codes you want to
6 Click OK to save your settingsWork codes created using the above procedure are displayed when you click theWork Code icon on an active call on the Work List window You can choose theappropriate code to assign during the active call If you have not created any workcode the Work Code icon remains disabled during an active call
NoteIf Central Management is used reason codes can be defined only from CentralManagement You will not be able to edit from Avaya one-X Agent application
Defining reason codes for logging outThe log out reason code describes the reason for logging out from the ACD service You canuse the log out reason code only if you have defined reason codes in the System Settingsdialog box
1 On the top bar click System Options gt System Settings
2 In the left pane of the System Settings dialog box click Reason Codes This opensthe Reason Codes panel on the right
3 From the Select menu to edit list select Log Out Reason Codes A default anduntitled reason code item is displayed under a root node in the container belowSelect menu to edit listYou can add a singular log out reason code or create a group and add a set of logout reason codes in that group Reason codes having similar or relatedcharacteristics are organized together in one group Make sure that the labels givento the group are easy to understand the group activity
4 To add a group perform the following steps
a Click the Add Reason Group button at the bottom of the Reason Codes panelThis adds an untitled group node in the container below Select menu to editlist
Setting up the initial configuration
56 Installing and Configuring Avaya one-Xreg Agent March 31 2011
b Select the untitled node and type the group name The group node gets labeledwith the name you type
c Follow step 5 to add reason codes to the group
5 To add a solitary reason code perform the following steps
a Select the node under which you want to add a reason code This node maybe the root node or a group node
b Click the Add Reason Code button This adds an untitled reason code itemunder the selected node
c Select the untitled reason code item and rename it The reason code namereplaces the default name of the reason code item
d Repeat step 5 to add as many singular reason codes you want to
6 Click OK to save your settingsThe system displays the newly created log out reason code in the Log Out list ofthe Change Agent State drop-down list
Defining reason codes for auxiliaryThe auxiliary reason code describes the reason for changing your state to the AUX mode Youcan use the auxiliary reason code only if you have defined the reason codes in the SystemSettings window
Use the following steps to define the auxiliary reason codes and to associate them with thenumeric reason codes supported in Avaya Aurareg Communication Manager
1 On the top bar click System Options gt System Settings
2 In the left pane of the System Settings dialog box click Reason Codes This opensthe Reason Codes panel on the right
3 From the Select menu to edit list select Aux Reason Codes A default and untitledreason code item is displayed under a root node in the container below Selectmenu to edit listYou can add a singular auxiliary reason code or create a group and add a set ofauxiliary reason codes in that group Reason codes having similar or relatedcharacteristics are organized together in one group Make sure that the labels givento the group are easy to understand the group activity
4 To add a group perform the following steps
a Click the Add Reason Group button at the bottom of the Reason Codes panelThis adds an untitled group node in the container below Select menu to editlist
Defining a reason code
Installing and Configuring Avaya one-Xreg Agent March 31 2011 57
b Select the untitled node and type the group name The group node gets labeledwith the name you type
c Follow step 5 to add reason codes to the group
5 To add a solitary reason code perform the following steps
a Select the node under which you want to add a reason code This node maybe the root node or a group node
b Click the Add Reason Code button This adds an untitled reason code itemunder the selected node
c Select the untitled reason code item and rename it The reason code namereplaces the default name of the reason code item
d Repeat step 5 to add as many singular reason codes you want to
6 Click OK to save your settingsThe system displays the newly created auxiliary reason code in the Auxiliary listof the Change Agent State drop-down list
Viewing the phone display on the main windowAvaya one-X Agent allows you to view a 40-character display at the bottom of the Work Listwindow from Avaya Aurareg Communication Manager You can view both call-related and non-call-related information including call-prompting digits VuStats data and the local date andtime display from the ACD server
NoteOnly those telephone types that are capable of displaying 80 characters are compatible withthis feature
1 On the top bar click System Options gt Agent Preferences gt User Interface
2 In the User Interface panel enable the Show Phone Display option
3 Click OK
Setting the toolbar buttons on the main windowAvaya one-X Agent allows you to set the toolbar buttons on the main window These buttonsprovide quick-access to options including releasing a call changing the answer settings to
Setting up the initial configuration
58 Installing and Configuring Avaya one-Xreg Agent March 31 2011
manual or auto changing the agent status to ready or auxiliary making a call to the supervisordirectly assigning a work code to the work item and dialing the last called number
These are the same eight Favorite buttons that are defined in the Dialpad Defining them ineither place will have them displayed in both places You need not have to administer themtwice
1 On the top bar click System Options gt Agent Preferences gt User Interface
2 In the User Interface panel
a Enable the Display Button Toolbar option
b Click Select Favorite Buttons
c In the Favorite Buttons dialog box select the appropriate buttonsYou can select up to eight buttons from the list
3 Click OK
Setting the toolbar buttons on the main window
Installing and Configuring Avaya one-Xreg Agent March 31 2011 59
Setting up the initial configuration
60 Installing and Configuring Avaya one-Xreg Agent March 31 2011
Chapter 7 Repairing Avaya one-X Agent
If Avaya one-X Agent is not functioning properly you can use the Repair function to reinstall it If you repairan Avaya one-X Agent application you must also repair any service release that has been installed
NoteIf you are experiencing difficulties at the time of installing Avaya one-X Agent capture the event anderror logs and send them to your system administrator For detailed information on logs and debuggingsee Maintaining and Troubleshooting Avaya one-X Agent
1 In Windows Control Panel select Add or Remove Programs
2 In the list of currently installed programs locate the Avaya one-X Agent application you wantto repair
3 Click the Click here for support information link to display the Support Info dialog box
4 Click RepairThe system reinstalls the program
TipAlternatively you can run the installation again The installer prompts you with Repair andRemove options You can select Repair to repair the installation
Installing and Configuring Avaya one-Xreg Agent March 31 2011 61
Repairing Avaya one-X Agent
62 Installing and Configuring Avaya one-Xreg Agent March 31 2011
Chapter 8 Removing the Avaya one-XAgent application
NoteYou cannot remove the read-only folders that are shared with other applications or remove any filesor directories that you have added to the Avaya one-X Agent installation directory
Removing Avaya one-X Agent in manual modePrerequisitesClose Avaya one-X Agent if it is currently running If Avaya one-X Agent is running duringremoval process some folders may not be removed completely
1 In Windows Control Panel select Add or Remove Programs
2 Select Avaya One-X Agent and choose Change Remove or Uninstall(Windows Vista)During the removal process the Microsoft installer may display a message to shutdown an application that is running You can shut down the specified applicationor ignore the message and continue with the removal
TipAlternatively you can use the OneXAgentSetupexe setup with using x switchto remove the application On command-prompt navigate to the folder whereOneXAgentSetupexe is located and use the following commandOneXAgentSetupexe x
Installing and Configuring Avaya one-Xreg Agent March 31 2011 63
Removing the Avaya one-X Agent application
64 Installing and Configuring Avaya one-Xreg Agent March 31 2011
Chapter 9 Removing existing software
If you are using the Avaya softphones with video and if you plan to use Avaya one-X Agent with videothen you must remove the following Avaya software from your personal computer before installing Avayaone-X Agent
bull Avaya IP Softphone
bull Polycom Via Video
NoteIf you are not using the Avaya softphones with video on your personal computer you can skip thissection
PrerequisitesBefore removing the Avaya IP Softphone software record the following information You will need thisinformation when you install Avaya one-X Agent
bull Your IP Softphone call server address
bull Your IP Softphone login
bull The password for your extension
1 In Windows Control Panel select Add or Remove Programs
2 Follow the standard process for removing programs from Windows
Installing and Configuring Avaya one-Xreg Agent March 31 2011 65
Removing existing software
66 Installing and Configuring Avaya one-Xreg Agent March 31 2011
Index
A
administration using XML 26agent greetings
activating 54steps 54enabling 54
agent profile 52agent settings 40alternate server addresses 45architecture overview 8authorization code 43
C
call handling 47 50carrier code 43checklist 17configuration using XML 26configuring
incoming TTY appearance 48configuring IM settings 41configuring incoming message appearance 47configuring the agent settings 40customizing the installation 24
D
defining agent profile 52defining incoming call appearance 47 50defining reason code
auxiliary reason code 57log out reason code 56
defining TTY display 48defining work codes
work code 55defining work handling options 46desk phone login 37dialing rules 43display button toolbar 59
F
features based on configuration 10
G
getting started 31
I
IM settings 41initial configuration 35installation overview 7installing
polycom video 25installing Avaya one-X Agent
silent mode 21installing manually 19introduction 7
L
launching one-X Agent 32legal notices 2logging from a Desk Phone 37logging from a personal computer 36
M
manual installation 19message appearance settings 47my computer setting 36
N
network connection 14notices legal 2
O
one-X Agent registration 37 39Other phone settings 39overview 7
P
phone display 58phone settings 35
R
reason codes 55
Installing and Configuring Avaya one-Xreg Agent March 31 2011 67
registering with Communication Manager 36 37registration 35removing 63
in interactive mode 63removing existing software 65repairing 61requirements
AVTS 9communication manager 9enterprise 9hardware 10license 15software 9video 13
S
setting 43standard installation 19starting one-X agent application 32
T
telephony setting 35toolbar
configuring 59
settings 59toolbar buttons 59
U
upgrade version 25upgrading Avaya one-X Agent 25user type
selecting 42
V
voice mailintegrating 53
W
wizard-based installation 19work handling 46
X
XML administration 26XML configuration 26
68 Installing and Configuring Avaya one-Xreg Agent March 31 2011
- Contents
- Chapter 1 Introduction
-
- Installation overview
- Architecture overview
-
- Chapter 2 Requirements
-
- Enterprise requirements
- Software requirements
-
- Feature dependencies on configuration
-
- Computer and other hardware requirements
- Video requirements
- Network connection requirements
- License requirements
-
- Chapter 3 Avaya one-X Agent installation checklist
- Chapter 4 Installing Avaya one-X Agent
-
- Installing Avaya one-X Agent (GUI installation)
- Installing Avaya one-X Agent (silent installation)
-
- Customizing the install
-
- Upgrading Avaya one-X Agent to Release 25
- Installing the Polycom video software
- Administration and configuration of Avaya one-X Agent using XML
-
- Chapter 5 Getting started
-
- Logging on to Avaya one-X Agent
-
- Chapter 6 Setting up the initial configuration
-
- Configuring phones for different locations
-
- Setting up the My Computer configuration
- Setting up the Desk Phone configuration
- Setting up the Other Phone configuration
-
- Configuring the agent settings
- Configuring IM settings
- Choosing User Type
- Setting up the dialing rules
- Defining Alternate Server addresses
- Configuring the Work Handling options
- Configuring the incoming call appearance
- Configuring incoming Instant Message appearance
- Configuring incoming TTY appearance
- Setting the audio options
- Defining an agent profile
- Integrating the voice mail system
- Activating a recorded greeting
- Defining a reason code
-
- Defining reason codes for work
- Defining reason codes for logging out
- Defining reason codes for auxiliary
-
- Viewing the phone display on the main window
- Setting the toolbar buttons on the main window
-
- Chapter 7 Repairing Avaya one-X Agent
- Chapter 8 Removing the Avaya one-X Agent application
-
- Removing Avaya one-X Agent in manual mode
-
- Chapter 9 Removing existing software
- Index
-
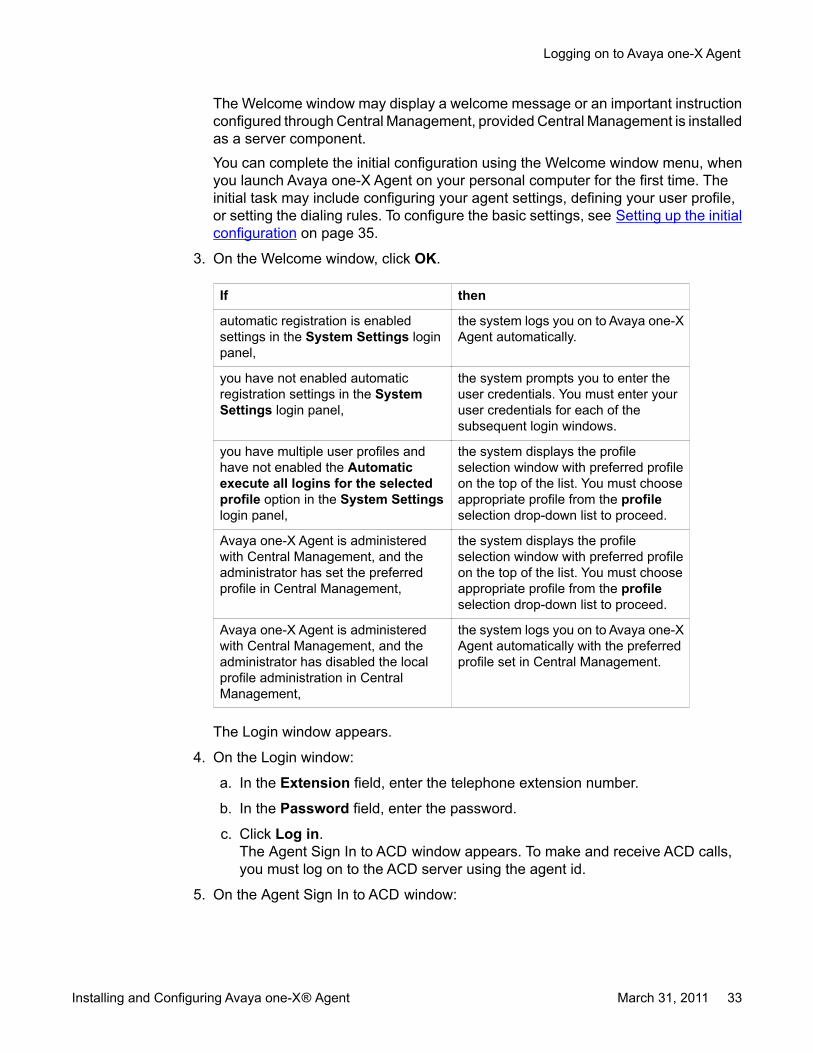

c In the Password field specify the password for the associated telephoneextension number
d Select the Save password during sign in option if you want the system tosave the password when you are signing in with the associated extensionnumber
e Select the CM Auto Answer Support Required option if the extension hasbeen administered on Communication Manager to support Auto Answer
f Select the Warn for Another User Logged in at Extension option if you wantthe system to warn you if another agent has logged in using the same extensionThe system removes the warning if you do not enable this option
NoteThis option is available only for Avaya one-X Agent 20 and earlier
g In the Server Address field enter the IP address of CommunicationManager
h In the User Type drop-down list select the appropriate user
i In the Place and receive calls using drop-down field select My Computer
4 Click OKThe system applies the new changes in the next login
Setting up the Desk Phone configurationThe Desk Phone configuration uses an Avaya IPDCP telephone for voice path and an Avayaone-X Agent to share control of the same administered station using the same button layoutand features You access audio components from your office phone and visual componentsfrom your personal computer
Prerequisites
bull Network connection from a personal computer running the Avaya one-X Agent applicationto Communication Manager
bull Avaya DCP or IP telephones capable of receiving calls from Communication Manager
bull Network interface card for connectivity to Communication Manager
bull Desk phone extension number password and Communication Manager server address
Use the Desk Phone configuration when you are at the contact center and want to share thecontrol between the office telephone and your personal computer While registering as a DeskPhone with Communication Manager you must register the desk phone number as theextension number You can configure the Desk Phone setting either through the Login windowor through the System Settings dialog box
Configuring phones for different locations
Installing and Configuring Avaya one-Xreg Agent March 31 2011 37
1 On the top bar click System Options gt System Settings
2 In the System Setting dialog box click Login
3 In the Telephony tab
a Select the Enable automatic connection to Communication Manager optionif you want the system to connect to Communication Manager automaticallyusing the last successful registration
b In the Extension field specify the desktop extension number if you wantCommunication Manager to identify your telephone extension number eachtime you log in to the system
c In the Password field specify the password for the associated desktopextension number
d Select Save password during sign in if you want the system to save thepassword when you are signing in with the associated extension number
e Select the CM Auto Answer Support Required option if the extension hasbeen administered on Communication Manager to support Auto Answer
f Select the Warn for Another User Logged in at Extension option if you wantthe system to warn you if another agent has logged in using the sameextension
g In the Server Address field enter the IP address of CommunicationManager
h From the User Type drop-down list select appropriate user
i In the Place and receive calls using drop-down field choose Desk Phone
4 Click OKThe system applies the new changes in the next login
Setting up the Other Phone configurationThe Other Phone configuration registers with Communication Manager as an off-site agentthrough a telephone and an IP connection The telephone can be a PSTN telephone a cellulartelephone or an extension on a local or remote switch The Other Phone configuration usesan IP connection to connect to Communication Manager and a PSTN connection to make orreceive calls
Setting up the initial configuration
38 Installing and Configuring Avaya one-Xreg Agent March 31 2011
Prerequisites
bull Network connection from a desktop computer running Avaya one-X Agent toCommunication Manager
bull Any telephone capable of receiving calls from Communication Manager
bull Communication Manager connection one user connection for signaling connection andthe other for off-site use one trunk connection or for on-site use an additional userconnection
bull Telephone extension number password and the Communication Manager serveraddress
bull Telephone numbers to be configured as Other Phone must be added on the PhoneNumbers panel Refer Adding a new phone number for information on adding phonenumbers
Use the Other Phone configuration when you are telecommuting and want to use Avaya one-X Agent from a remote location with a PSTN telephone connected to Communication Managerdirectly You can configure the Other Phone setting either through the Login window or throughthe System Settings dialog box
1 On the top bar click System Options gt System Settings
2 In the System Settings dialog box click Login
3 In the Telephony tab
a Select the Enable automatic connection to Communication Manager optionif you want the system to connect to Communication Manager automaticallyusing the last successful registration
b In the Extension field specify the telephone extension number if you wantCommunication Manager to identify your telephone extension number eachtime you log in to the system
c In the Password field specify the password for the associated telephoneextension number
d Select the CM Auto Answer Support Required option if the extension hasbeen administered on Communication Manager to support Auto Answer
e Select the Warn for Another User Logged in at Extension option if you wantthe system to warn you if another agent has logged in using the sameextension
f In the Server Address field enter the IP address of CommunicationManager
g From the User Type drop-down list select the appropriate user
h In the Place and receive calls using drop-down field select Other Phone
Configuring phones for different locations
Installing and Configuring Avaya one-Xreg Agent March 31 2011 39
i In the Telephone at field enter the telephone number you want to use for voicecalls
4 click OK to save the settingsThe system applies the new changes in the next login
Configuring the agent settingsPrerequisites
Obtain the agent extension number and password from your system administrator
NoteThe ACD tab will not appear if you have logged in as a Non-Agent or if appropriate buttonsare administered for this extension
1 On the top bar click System Options gt System Settings
2 In the Login Settings dialog box click the Agent tab
3 In the Agent tab
a Select the Enable ACD Login option if you want to enable the ACD featureBefore selecting the Enable ACD Login option ensure that you provide theuser credentials to log in to the ACD service
b Select the Automatically sign into the ACD server option if you want thesystem to register the agent extension with the ACD server automatically withthe previous successful registration through Communication Manager
c In the Agent field specify the agent extension number if you want the ACDservice to identify your agent extension number each time you log on to thesystem
d In the Password field specify the password for the agent extension number
e Select Save password during sign in if you want the system to save thepassword when you are signing in as an agent with the associated agentextension number
f In the Default Agent state upon ACD connection drop-down field choosethe appropriate option
4 Click OK
Setting up the initial configuration
40 Installing and Configuring Avaya one-Xreg Agent March 31 2011
Configuring IM settingsPrerequisitesObtain your IM user name and password domain name and IM server IP address from yoursupervisor or system administrator
1 On the top bar click System Options gt System settings
2 In the Login Settings dialog box click the IM tab
3 In the IM tab
a Select the Enable IM Login option if you want to enable the IM featureWhen you enable the Enable IM Login option you need to provide the usercredentials required to log on to Avaya Presence Services
b Select the Enable automatic connection to IM server option if you want thesystem to connect to the IM server with the previous successful registration
c In the User Name field specify the IM user ID of the agent
d In the Password field specify the password
e In the Domain field specify the domain name of the IM server
f Select Save password during sign in if you want the system to save thecredentials for subsequent log in
g In the Server Address field enter the IM server IP address
4 Click OK
Choosing User TypeAvaya one-X Agent allows different types of users namely agents non-agents andsupervisors to access the Communication Manager features Based on the user type thesystem grants a user access to a particular User Type then that user will have access to allthe features associated with that user type unless they are further restricted throughCommunication Manager
For example a user authenticated as an Agent user type is provided access to all Avaya one-X Agent features other than the Supervisor feature set (for example Service ObservingRemote Agent Logout) unless they are further restricted through Communication Manager
Configuring IM settings
Installing and Configuring Avaya one-Xreg Agent March 31 2011 41
Each user type has a role-based access to the following features
Feature Agent Non-Agent SupervisorACD Yes No Yes
Telephony Yes Yes Yes
IMPresence Yes Yes Yes
TTY (works only inMy Computer mode)
Yes Yes Yes
Desktop Sharing Yes Yes Yes
Supervisor (Avayaone-X Agentintegrated features)
No No Yes
ImportantAvaya one-X Agent has removed the explicit reference to the Communication Managerlicense type from its configuration parameters In this release Avaya one-X Agent selectsUser type and the proper license when registering with Communication Manager In additionBasic user type if used in the Desk Phone mode will select an AGENT_SC (the Eliteentitlement) license and allow IM and Presence
Use the following steps to choose the user type from the Telephony tab The application usesthe local profile with Agent with Desk Phone mode as default user type
1 On the top bar click System Options gt System Settings
2 In the Login Settings dialog box click the Telephony tab
3 In the Telephony tab choose appropriate user type from the Use Type drop-downlistIf Avaya one-X Agent is configured with Communication Manager you may not beable modify the User Type field as the option may be disabled by administrator Inthis case the relevant controls will be grayed out
Setting up the dialing rulesThe dialing rules depend on the country and location of your Communication Manager Thedialing rules help the system to distinguish extensions from trunk calls based on the length ofthe dialing string It ensures that the system uses the right Automatic Route Selection (ARS)code and if needed modifies the digits in keeping with Communication Manager and the PSTNrequirements
Setting up the initial configuration
42 Installing and Configuring Avaya one-Xreg Agent March 31 2011
Avaya one-X Agent 25 supports authorization and carrier code which is mandatory in somecountries It is an optional feature used to prevent access to expensive telephony resourcesoften international calling by unauthorized users An administrator or an Avaya one-X Agentuser can enter an authorization code in a user profile and the types of telephone calls thatrequire this authorization Avaya one-X Agent then automatically appends the authorizationcode as required so the user does not have to enter it each time a call is made
TipFor traveling agents visiting a different location and needing to register with a differentCommunication Manager Avaya recommends defining a user profile with appropriatedialing rules for that location and using a login with the corresponding profile so that thedialing rules for the system do not change
NoteYou must change the dialing rules each time you register the telephone settings with adifferent Communication Manager
1 On the top bar click System Options gt System Settings
2 In the System Settings dialog box click Dialing RulesThe application displays the Dialing Rules panel with Basic and Advanced tabs
3 In the Basic tab
a In the Number to dial to access outside line field specify the number toaccess an outside line In North America this is set to 9 In Europe it is set to0 For example if you are in North America you must enter the number as 9to access the outside line
b In the Your Country Code field specify the country code of yourCommunication Manager For example type 1 for North America 44 for GreatBritain 61 for Australia
c In the Local Calling Area Code field type the area or city code ofCommunication Manager For example type 785In regions where multiple local calling area codes are supported enter them asa comma-separated list For example 305720 If you can make local calls toboth these area codes
d In the Number to dial for long distance calls field enter the national longdistance prefix for example in North America type 1
e In the Number to dial for international calls field type the international prefixfor example in North America type 011
f In the Extension Length for internal extension calls field type the length ofthe internal extension calls For example if your internal extensions consist of
Setting up the dialing rules
Installing and Configuring Avaya one-Xreg Agent March 31 2011 43
five digits enter 5 If you specify the multiple extension lengths Avaya one-XAgent performs the exact matchesWhen you assign the length of the internal extension number Avaya one-XAgent treats the dialed number consisting of the selected number of digits asan internal extensionCommunication Manager may have multiple length extension numbers forexample if your company supports internal three-digit five-digit and seven-digit extensions type 357 You must use a comma to separate the values
g In the Length of national phone numbers (including CityArea code) fieldtype the length of length of national long distance number for example for NorthAmerica type 10If you are accessing the Communication Manager where the region supportsvariable national phone numbers specify the length of the valid telephonenumbers as a comma separated list For example if the region supports bothtelephone numbers with 10 digit and 11 digit telephone numbers type valuesas 1011
h Select Include areacity code when making a local call if area code mustbe prefix to a number when making a local call For example if you dial atelephone number the system prefixes the area code number defined in theYour AreaCity Code field and dials the telephone number
i Select Add long distance prefix on local calls if you want the system to adda long distance code before local calls For example if you dial a local telephonenumber the system prefixes a long distance code number defined in theNumber to dial for long distance calls field and dials the local telephonenumber
j Select Display confirmation window before dialing a number forconfirmation before dialing
k In the Time Period of Pause (Comma) in dialing (in seconds) field specifythe period for each comma character in the dialing field before dialing the nextdigit By default this field is set to 2 seconds You can specify the any valuebetween 1 to 10 seconds
4 To define authorization code click the Advanced tab and perform the followingsteps
a Select the Enable Authorization code option to enable the authorization codeThese are administered in Communication Manager
b In the Authorization Code field specify an authorization code number
c To make external calls using the authorization code select one or all of thefollowing options as appropriate
bull To make local calls using authorization code select On local calls
bull To make national long distance calls using authorization code select Onnational long distance calls
Setting up the initial configuration
44 Installing and Configuring Avaya one-Xreg Agent March 31 2011
bull To make international calls using authorization code select Oninternational long distance calls
5 Click OK to save the settings
Defining Alternate Server addressesThe Alternate Server address feature allows you to specify alternate registration servers if themain registration server defined on the telephony login screen is not available
NoteThis feature is independent of the Alternate Gatekeeper function available in CommunicationManager The Alternate Gatekeeper List (AGL) is computed by Communication Manager ateach registration and is provided to the endpoint during a successful Registration AccessSecurity (RAS) process The Alternate Server feature on the other hand allows a successfulRAS session to be set up to begin with
PrerequisitesObtain the alternate server addresses from your administrator
1 On the top bar click System Options gt System Settings
2 In the System Settings dialog box click Alternate Server List
3 In the Alternate Server List panel
a Click Add
b In the blank field type the IP address or FQDN of the alternate serverTo add more servers to the list repeat the sub-steps a and b
c In the Maximum attempts of each server field specify the number of attemptsthe system make to connect to each server before switching to the next definedserver
4 Click OK to save the settings
Defining Alternate Server addresses
Installing and Configuring Avaya one-Xreg Agent March 31 2011 45
Configuring the Work Handling optionsThese settings control how to receive calls on the Avaya one-X Agent client
PrerequisitesTo be able to specify Aux Codes during the Transition to Ready state interval Aux Codesmust be defined prior to following this procedure
Use the Work Handling options to configure the incoming work items to use CommunicationManager settings to change the agent status (if administered) to define the agents transitionstate after releasing the call and to set the work completion options
1 On the top bar click System Options gt System Settings
2 In the System Settings dialog box click Work HandlingThe Work Handling panel appears with Basic and Advanced tabs
3 On the Basic tab
a In the Work Completion for ACD calls section define the work completionmode as appropriate
b In the Transitions to Ready State section define the agents transition stateafter releasing the callThe With Aux Code option is only available for Manual-Ready option
4 On the Advanced tab tab
a In the Work Items section select the appropriate option to accept incomingwork itemsAuto-Accept automatically accepts calls however this is not related to CMAuto Answer Support Required option on the Login window but provides thesame functionality on the client side
NoteThe Auto-Accept option automatically answers telephone calls that areringing The Auto-Accept option is not related to support for CommunicationManager Auto answer However it can be used to accomplish a similarfunction
b In the Communication Manager Ready mode section select Auto In if youwant Communication Manager to do the work handling Selecting Auto In
Setting up the initial configuration
46 Installing and Configuring Avaya one-Xreg Agent March 31 2011
disables most of the Work Handling panel settings and it is not recommendedfor normal operation of Avaya one-X Agent
5 Click OK
Configuring the incoming call appearanceUse the following steps to set the incoming call notifications to display the main window or toflash the icon on the task bar when the system recognizes an incoming call
1 On the top bar click System Options gt Agent Preferences
2 In the Agent Preferences dialog box click Call Handling
3 In the Call Handling panel use any of the following options
bull Select Consultative Transfer to consult the caller before transferring thecall
bull Select Consultative Conference to consult the second caller before addingthe first caller to the conference
bull Select Auto-Hold if you want the system to put the call on hold automaticallybefore transferring or conferencing the call or when answering another alertingcall or dialing another outbound call
bull Select Bring main window to front if you want the system to bring the mainwindow to the foreground and activate the window for a ringing call
bull Select Flash icon if you want to view the call flashing in the task bar when thesystem recognizes a ringing call
4 Click OK to save the settings
Configuring incoming Instant Message appearanceUse these settings to define an incoming instant message You can also specify messages tobe sent automatically as greetings when you begin IM interaction or as responses when receiveto an instant message The messages set using the this procedure are available through theAdd Response button on the IM window
1 On the top bar click System Options gt Agent Preferences
Configuring the incoming call appearance
Installing and Configuring Avaya one-Xreg Agent March 31 2011 47
The Agent Preferences dialog box appears
2 In the Agent Preferences dialog box select Instant MessagingThe Instant Messaging panel appears with General Alerts and Responsestabs
3 Click the General tab and perform the following steps
a In the Greeting field enter your automated IM greeting
b Choose a value from the Minutes drop-down list for Avaya one-X Agent userinterface to automatically display the status as Away when the system is in theidle status By default the value is set to 15 minutes
c Select the Allow desktop sharing option to activate desktop sharing
4 Click the Alerts tab and perform the following steps
a Select the Display main window option if you want the system to display mainAvaya one-X Agent window on the foreground for an incoming message
b Select the Display IM window option if you want the system to display theincoming message directly in an IM window
c Select the Flash icon option if you want the system to flash the one-X Agenticon to flash on the task bar for an incoming message
5 Click the Responses tab to set your automated IM response using the followingsteps
a Click the + button
b Double-click the Untitled box and name the text for your automated IMresponse
c Repeat steps a and b to add more IM responses
d To user the IM responses click the Add response button on the IM windowand select the IM response and press EnterYou can record multiple responses and use them anytime during your IMinteraction
6 Click OK on the Instant Messaging panel to save your settings
Configuring incoming TTY appearanceUse this procedure to define the incoming TTY call appearance You can also set an automatedresponse to the incoming TTY message and specify the originating numbers for which the TTYmessage window must appear on the system
Setting up the initial configuration
48 Installing and Configuring Avaya one-Xreg Agent March 31 2011
1 On the top bar click System Options gt Agent Preferences The Agent Preferences dialog box appears
2 On the Agent Preferences dialog box select TTYThe TTY panel appears with General and Abbreviations tabs
3 On the General tab panel perform the following steps
a In the Greeting text box enter your agent greeting By default the systemdisplays Hello GA greetings
b Select the Show TTY window on every voice call option if you want thesystem to display the TTY window on every incoming voice call
c If you want the system to display the TTY window for specific incoming voicecalls perform the following steps
i Select the Show TTY window when a call comes from option
The TTY number field activates
ii Click the + button
An untitled item appears in the TTY number field
iii Double-click the untitled item and specify the number for which youwant the TTY window to appear
d Select the Always show TTY button in Voice interaction option if you wantthe system to display the TTY window for every voice work item on the work listwindowThis option is useful if the agent performs many TTY operations incoming andoutgoing
4 On the Abbreviations tab perform the following steps
a To view the preset TTY abbreviations select any abbreviation in the listAbbreviation corresponding to TTY appears in the Meaning Literal Meaningand Description fields
b To add a new abbreviation perform the following steps
i Click the + button
An untitled abbreviation appears in the TTY list
ii Double-click the untitled abbreviation and enter the TTYabbreviation
iii In the Meaning field enter a short explanation
iv In the Literal Meaning field enter the expansion of abbreviation
Configuring incoming TTY appearance
Installing and Configuring Avaya one-Xreg Agent March 31 2011 49
The Literal Meaning can be a literal text the abbreviation is derivedfor instance a short form for ldquoBe Right Backrdquo can be ldquoBRBrdquo and ldquoGoAheadrdquo can be ldquoGArdquo
v In the Description field enter additional description or informationon the abbreviation
NoteUse of these fields are completely optional
The abbreviations appear in rectangular boxes on the TTY window To view theabbreviation details you must click the abbreviation box on the TTY window Thedetails appear in a pop-up box on the TTY window The recipient can also view thesame details if the same abbreviation and details are configured through therecipients Avaya one-X Agent
5 Click OK to save the settings
Setting the audio optionsUse the following steps to set the auto options to adjust the audio volume for playbackrecording and incoming calls You can also set the system to play ring tone through thepersonal computer speaker and select a ringtone for an incoming call
1 On the top bar click System Options gt Agent Preferences
2 In the Agent Preferences dialog box click AudioThe Audio panel appears with Basic and Advanced tabs The Basic tab is activeby default
3 On the Basic tab perform the following steps in the Volume section to set the basicaudio settings
NoteThe following steps are optional and you can skip to the required step
a Adjust the Playback slider to set the volume for all sound output through yourcomputer speakers or headphones
b Adjust the Record slider to set the recording volume of all sound transmittedthrough a microphone to your personal computer
c Select the Mute check box adjacent to the Record slider to eliminate any soundbeing sent to your personal computer through the microphone
Setting up the initial configuration
50 Installing and Configuring Avaya one-Xreg Agent March 31 2011
These settings will not affect the headset volume if the headset is attached toa telephone rather than the personal computer
NoteThe Playback Record and Mute are only functional for My Computeroperation For Desk Phone or Other Phone modes you cannot control of thevolume of the telephone
d Adjust the Ringing slider to set the volume of the sound played through yourspeakers or headset when you receive an incoming call
e Select the Mute check box adjacent to Ringing slider to eliminate any soundthat indicates an incoming call
f Select the Play ringing through the internal PC speakers option to play thesound associated with an incoming call through the speakers of your personalcomputer and your headset simultaneouslyIf your personal computer does not have an internal speaker this option has noeffect
g Select the Use Custom ringtone option to play the a custom ringtone (a Wavefile) through the speaker or headset when you receive an incoming call Thewave file is played from the specified locationWhen you select Use Custom ringtone a Browse field and Test Ringtonebutton are displayed below Use the browse field to locate the wave file andclick Test Ringtone to test the wave file
4 On the Advanced tab perform the following steps in the Audio Devices section toset the advanced audio settings
a Select the audio play back hardware on your local system from the PlaybackDevice list
b Select the audio recording hardware on your local system from the RecordDevice list
c Use the Transmit Gain slider to set the gain for outgoing sound during a callYou can set the value from 01 to 100 Avaya recommends that you to set thisoption to 035
d Use the Receive Gain slider to set the gain for incoming sound during a callYou can set the from 01 to 1000 Avaya recommends that you to set the valueto 100
e Click Background Noise Test to test the background noiseThe Background Noise Test window appears Click the Test button on that totest the background noise You must perform if the ambient noise level changeor you move to a different location
5 Click OK to save the audio settings
Setting the audio options
Installing and Configuring Avaya one-Xreg Agent March 31 2011 51
Defining an agent profileA profile is a collection of pre-configured settings and preferences Using profiles agents canswitch configurations (For example agents can create profiles for different settings such ashome Office Sales Support and use them as needed) reusing the same Avaya one-X Agentinstallation For example you can create an agent profile for the My Computer configurationand use the profile with the appropriate Voice over Internet Protocol (VoIP) network You canalso create another agent profile for the Desk Phone configuration and use it asappropriate
Avaya one-X Agent 25 supports migration of older agent profiles (Avaya one-X Agent 10 orAvaya one-X Agent 20) if you are using local profiles When you start the Avaya one-X Agent25 application for the first time the application imports the profile from older release and storesit in to the Avaya one-X Agent 25 profiles If there are profiles from Avaya one-X Agent 10and Avaya one-X Agent 20 then the application imports profiles from Avaya one-X Agent 20The application applies the default values of the Avaya one-X Agent 25 release for new fieldsin the migrated profiles
Use the following procedure to create a local agent profile
ImportantThe Profile configuration is available for creating local profile without Central Managementadministration If Avaya one-X Agent is administered with Central Management the systemdisables the profile window
1 Make necessary changes using the System Settings and Agent Preferencesoptions
2 On the top bar click System Options gt System Settings
3 In the System Settings dialog box click Profiles
4 In the Profiles panel
a Click AddThe system displays the Create Profile dialog box
b In the Profile Name field enter the name for the profile and click OKThe new profile appears in the Profile list
5 Click Automatically execute all logins for the selected profile to execute all loginsequences for the selected or current profile without presenting a profile selectiondialog box The sequence depends on how the login option is set (manual orautomatic on other parameters) in the login panelIf you do not choose this option the application provides you with options to choosethe profile from the list if you have multiple profiles You must select the appropriateprofile at the launch of Avaya one-X Agent on your personal computer If you have
Setting up the initial configuration
52 Installing and Configuring Avaya one-Xreg Agent March 31 2011
a single profile the application proceeds silently without the profile selectionwindow
6 Click OKThe system creates a new profile and stores it locally in your personal computerYou can change the settings in the configuration parameters for the new profile inthe next login
Integrating the voice mail systemAvaya one-X Agent provides Communication Manager Message Waiting support for theregistered extension and one step access to access the message retrieval system for Voicemail You can integrate the voice mail system with a telephone system a third-party voice mailapplication or a web-based voice mail server and retrieve your voice mail from one of thevoice mail services
ImportantThe voice mail service is available only for those extensions registered and has a MessageWaiting Light defined If voice mail settings are not available on your extension contact thesystem administrator This is specific to the Message Waiting Light and has nothing to dowith the voice mail system that activates this light
PrerequisitesVoice Mail Integration is only available for those extensions that have a CommunicationManager Message Waiting Lamp translated
The voice mail support is only available for the message waiting light of the registeredextension There is no automatic support for other buttons translated as Message Waiting forother extensions
The voice mail messages can be associated with a telephone an application or a Webbrowser
1 On the top bar click System Options gt System Settings
2 In the left pane of the System Settings dialog box click Voice mail Integration
3 In the Voice Mail Integration panel click Enable Message Access
4 To integrate voice mail service perform one of the following actions as appropriate
bull To integrate voice mail services with a telephone select Dial this number andspecify the voice mail number in the field
Integrating the voice mail system
Installing and Configuring Avaya one-Xreg Agent March 31 2011 53
bull To integrate voice mail services through a third-party voice mail applicationselect Start this application and click Browse to navigate a windowsexecutable file
bull To integrate voice mail with a third-party web server select Open on web andtype a valid web address in the field
5 Click OK
Activating a recorded greetingYou must activate the Record Greetings option for the system to play the greeting You canhave more than one active greeting at the same time
For example you can set multiple greetings to be active if each greeting has a unique VectorDirectory Number (VDN) as the activation criterion This is also true for Agent Greetings thatplay for specific Automatic Number Identification (ANI) telephone numbers or PromptedDigits
If two recorded greetings meet the same criteria that make them eligible for a single call Avayaone-X Agent chooses the first one on the search list
PrerequisitesYou must have at least one greeting recorded to be able to activate a recorded greeting
1 On the top bar click System Options gt System Settings
2 In the System Settings dialog box select Greetings TriggersThe system displays the Greetings Triggers panel
3 In the Greetings Triggers list select a greeting
4 Click OKYou can manually play the selected greeting on the incoming call
Defining a reason codeThere are three classes of Reason Codes namely Agent AUX Work Codes and Call WorkCodes The annotations for these reason codes are made to the call record and Agent LogoutReason Codes These are known in Communication Manager by digit strings This feature
Setting up the initial configuration
54 Installing and Configuring Avaya one-Xreg Agent March 31 2011
allows the user to associate more meaningful text strings to the digit strings for easyreference
Reason code is a way to associate a particular number to a label for an agents reason for notbeing at the workstation or for not accepting an ACD call These reason codes if defined inCommunication Manager appear on the message window when an agent changes the workstatus to auxiliary or logs out from the ACD service By default the system creates a defaultreason code each for auxiliary logout and work reason code types You can change the defaultreason codes but cannot delete them
ImportantThe system administrator must define a common set of reason codes and manage itcentrally The administrator can distribute these reason code files to all agents by pushingthe configuration to agents system Moreover if your deployment is using CentralManagement the administrator must upload a CSV file and universally assign commonreason codes across the account or skill
Defining reason codes for workWork codes are codes that you assign to a work item in the Work List window You must definethe work code to use them in the Work List window
1 On the top bar click System Options gt System Settings
2 In the left pane of the System Settings dialog box click Reason Codes This opensthe Reason Codes panel on the right
3 From the Select menu to edit list select Work Reason Codes A default anduntitled reason code item is displayed under a root node in the container belowSelect menu to edit listYou can add a singular work reason code or create a group and add a set of workreason codes in that group Reason codes having similar or related characteristicsare organized together in one group Make sure that the labels given to the groupare easy to understand the group activity
4 To add a group perform the following steps
a Click the Add Reason Group button at the bottom of the Reason Codes panelThis adds an untitled group node in the container below Select menu to editlist
b Select the untitled node and type the group name The group node gets labeledwith the name you type
c Follow step 5 to add reason codes to the group
5 To add a solitary reason code perform the following steps
Defining a reason code
Installing and Configuring Avaya one-Xreg Agent March 31 2011 55
a Select the node under which you want to add a reason code This node maybe the root node or a group node
b Click the Add Reason Code button This adds an untitled reason code itemunder the selected node
c Select the untitled reason code item and rename it The reason code namereplaces the default name of the reason code item
d Repeat step 5 to add as many singular reason codes you want to
6 Click OK to save your settingsWork codes created using the above procedure are displayed when you click theWork Code icon on an active call on the Work List window You can choose theappropriate code to assign during the active call If you have not created any workcode the Work Code icon remains disabled during an active call
NoteIf Central Management is used reason codes can be defined only from CentralManagement You will not be able to edit from Avaya one-X Agent application
Defining reason codes for logging outThe log out reason code describes the reason for logging out from the ACD service You canuse the log out reason code only if you have defined reason codes in the System Settingsdialog box
1 On the top bar click System Options gt System Settings
2 In the left pane of the System Settings dialog box click Reason Codes This opensthe Reason Codes panel on the right
3 From the Select menu to edit list select Log Out Reason Codes A default anduntitled reason code item is displayed under a root node in the container belowSelect menu to edit listYou can add a singular log out reason code or create a group and add a set of logout reason codes in that group Reason codes having similar or relatedcharacteristics are organized together in one group Make sure that the labels givento the group are easy to understand the group activity
4 To add a group perform the following steps
a Click the Add Reason Group button at the bottom of the Reason Codes panelThis adds an untitled group node in the container below Select menu to editlist
Setting up the initial configuration
56 Installing and Configuring Avaya one-Xreg Agent March 31 2011
b Select the untitled node and type the group name The group node gets labeledwith the name you type
c Follow step 5 to add reason codes to the group
5 To add a solitary reason code perform the following steps
a Select the node under which you want to add a reason code This node maybe the root node or a group node
b Click the Add Reason Code button This adds an untitled reason code itemunder the selected node
c Select the untitled reason code item and rename it The reason code namereplaces the default name of the reason code item
d Repeat step 5 to add as many singular reason codes you want to
6 Click OK to save your settingsThe system displays the newly created log out reason code in the Log Out list ofthe Change Agent State drop-down list
Defining reason codes for auxiliaryThe auxiliary reason code describes the reason for changing your state to the AUX mode Youcan use the auxiliary reason code only if you have defined the reason codes in the SystemSettings window
Use the following steps to define the auxiliary reason codes and to associate them with thenumeric reason codes supported in Avaya Aurareg Communication Manager
1 On the top bar click System Options gt System Settings
2 In the left pane of the System Settings dialog box click Reason Codes This opensthe Reason Codes panel on the right
3 From the Select menu to edit list select Aux Reason Codes A default and untitledreason code item is displayed under a root node in the container below Selectmenu to edit listYou can add a singular auxiliary reason code or create a group and add a set ofauxiliary reason codes in that group Reason codes having similar or relatedcharacteristics are organized together in one group Make sure that the labels givento the group are easy to understand the group activity
4 To add a group perform the following steps
a Click the Add Reason Group button at the bottom of the Reason Codes panelThis adds an untitled group node in the container below Select menu to editlist
Defining a reason code
Installing and Configuring Avaya one-Xreg Agent March 31 2011 57
b Select the untitled node and type the group name The group node gets labeledwith the name you type
c Follow step 5 to add reason codes to the group
5 To add a solitary reason code perform the following steps
a Select the node under which you want to add a reason code This node maybe the root node or a group node
b Click the Add Reason Code button This adds an untitled reason code itemunder the selected node
c Select the untitled reason code item and rename it The reason code namereplaces the default name of the reason code item
d Repeat step 5 to add as many singular reason codes you want to
6 Click OK to save your settingsThe system displays the newly created auxiliary reason code in the Auxiliary listof the Change Agent State drop-down list
Viewing the phone display on the main windowAvaya one-X Agent allows you to view a 40-character display at the bottom of the Work Listwindow from Avaya Aurareg Communication Manager You can view both call-related and non-call-related information including call-prompting digits VuStats data and the local date andtime display from the ACD server
NoteOnly those telephone types that are capable of displaying 80 characters are compatible withthis feature
1 On the top bar click System Options gt Agent Preferences gt User Interface
2 In the User Interface panel enable the Show Phone Display option
3 Click OK
Setting the toolbar buttons on the main windowAvaya one-X Agent allows you to set the toolbar buttons on the main window These buttonsprovide quick-access to options including releasing a call changing the answer settings to
Setting up the initial configuration
58 Installing and Configuring Avaya one-Xreg Agent March 31 2011
manual or auto changing the agent status to ready or auxiliary making a call to the supervisordirectly assigning a work code to the work item and dialing the last called number
These are the same eight Favorite buttons that are defined in the Dialpad Defining them ineither place will have them displayed in both places You need not have to administer themtwice
1 On the top bar click System Options gt Agent Preferences gt User Interface
2 In the User Interface panel
a Enable the Display Button Toolbar option
b Click Select Favorite Buttons
c In the Favorite Buttons dialog box select the appropriate buttonsYou can select up to eight buttons from the list
3 Click OK
Setting the toolbar buttons on the main window
Installing and Configuring Avaya one-Xreg Agent March 31 2011 59
Setting up the initial configuration
60 Installing and Configuring Avaya one-Xreg Agent March 31 2011
Chapter 7 Repairing Avaya one-X Agent
If Avaya one-X Agent is not functioning properly you can use the Repair function to reinstall it If you repairan Avaya one-X Agent application you must also repair any service release that has been installed
NoteIf you are experiencing difficulties at the time of installing Avaya one-X Agent capture the event anderror logs and send them to your system administrator For detailed information on logs and debuggingsee Maintaining and Troubleshooting Avaya one-X Agent
1 In Windows Control Panel select Add or Remove Programs
2 In the list of currently installed programs locate the Avaya one-X Agent application you wantto repair
3 Click the Click here for support information link to display the Support Info dialog box
4 Click RepairThe system reinstalls the program
TipAlternatively you can run the installation again The installer prompts you with Repair andRemove options You can select Repair to repair the installation
Installing and Configuring Avaya one-Xreg Agent March 31 2011 61
Repairing Avaya one-X Agent
62 Installing and Configuring Avaya one-Xreg Agent March 31 2011
Chapter 8 Removing the Avaya one-XAgent application
NoteYou cannot remove the read-only folders that are shared with other applications or remove any filesor directories that you have added to the Avaya one-X Agent installation directory
Removing Avaya one-X Agent in manual modePrerequisitesClose Avaya one-X Agent if it is currently running If Avaya one-X Agent is running duringremoval process some folders may not be removed completely
1 In Windows Control Panel select Add or Remove Programs
2 Select Avaya One-X Agent and choose Change Remove or Uninstall(Windows Vista)During the removal process the Microsoft installer may display a message to shutdown an application that is running You can shut down the specified applicationor ignore the message and continue with the removal
TipAlternatively you can use the OneXAgentSetupexe setup with using x switchto remove the application On command-prompt navigate to the folder whereOneXAgentSetupexe is located and use the following commandOneXAgentSetupexe x
Installing and Configuring Avaya one-Xreg Agent March 31 2011 63
Removing the Avaya one-X Agent application
64 Installing and Configuring Avaya one-Xreg Agent March 31 2011
Chapter 9 Removing existing software
If you are using the Avaya softphones with video and if you plan to use Avaya one-X Agent with videothen you must remove the following Avaya software from your personal computer before installing Avayaone-X Agent
bull Avaya IP Softphone
bull Polycom Via Video
NoteIf you are not using the Avaya softphones with video on your personal computer you can skip thissection
PrerequisitesBefore removing the Avaya IP Softphone software record the following information You will need thisinformation when you install Avaya one-X Agent
bull Your IP Softphone call server address
bull Your IP Softphone login
bull The password for your extension
1 In Windows Control Panel select Add or Remove Programs
2 Follow the standard process for removing programs from Windows
Installing and Configuring Avaya one-Xreg Agent March 31 2011 65
Removing existing software
66 Installing and Configuring Avaya one-Xreg Agent March 31 2011
Index
A
administration using XML 26agent greetings
activating 54steps 54enabling 54
agent profile 52agent settings 40alternate server addresses 45architecture overview 8authorization code 43
C
call handling 47 50carrier code 43checklist 17configuration using XML 26configuring
incoming TTY appearance 48configuring IM settings 41configuring incoming message appearance 47configuring the agent settings 40customizing the installation 24
D
defining agent profile 52defining incoming call appearance 47 50defining reason code
auxiliary reason code 57log out reason code 56
defining TTY display 48defining work codes
work code 55defining work handling options 46desk phone login 37dialing rules 43display button toolbar 59
F
features based on configuration 10
G
getting started 31
I
IM settings 41initial configuration 35installation overview 7installing
polycom video 25installing Avaya one-X Agent
silent mode 21installing manually 19introduction 7
L
launching one-X Agent 32legal notices 2logging from a Desk Phone 37logging from a personal computer 36
M
manual installation 19message appearance settings 47my computer setting 36
N
network connection 14notices legal 2
O
one-X Agent registration 37 39Other phone settings 39overview 7
P
phone display 58phone settings 35
R
reason codes 55
Installing and Configuring Avaya one-Xreg Agent March 31 2011 67
registering with Communication Manager 36 37registration 35removing 63
in interactive mode 63removing existing software 65repairing 61requirements
AVTS 9communication manager 9enterprise 9hardware 10license 15software 9video 13
S
setting 43standard installation 19starting one-X agent application 32
T
telephony setting 35toolbar
configuring 59
settings 59toolbar buttons 59
U
upgrade version 25upgrading Avaya one-X Agent 25user type
selecting 42
V
voice mailintegrating 53
W
wizard-based installation 19work handling 46
X
XML administration 26XML configuration 26
68 Installing and Configuring Avaya one-Xreg Agent March 31 2011
- Contents
- Chapter 1 Introduction
-
- Installation overview
- Architecture overview
-
- Chapter 2 Requirements
-
- Enterprise requirements
- Software requirements
-
- Feature dependencies on configuration
-
- Computer and other hardware requirements
- Video requirements
- Network connection requirements
- License requirements
-
- Chapter 3 Avaya one-X Agent installation checklist
- Chapter 4 Installing Avaya one-X Agent
-
- Installing Avaya one-X Agent (GUI installation)
- Installing Avaya one-X Agent (silent installation)
-
- Customizing the install
-
- Upgrading Avaya one-X Agent to Release 25
- Installing the Polycom video software
- Administration and configuration of Avaya one-X Agent using XML
-
- Chapter 5 Getting started
-
- Logging on to Avaya one-X Agent
-
- Chapter 6 Setting up the initial configuration
-
- Configuring phones for different locations
-
- Setting up the My Computer configuration
- Setting up the Desk Phone configuration
- Setting up the Other Phone configuration
-
- Configuring the agent settings
- Configuring IM settings
- Choosing User Type
- Setting up the dialing rules
- Defining Alternate Server addresses
- Configuring the Work Handling options
- Configuring the incoming call appearance
- Configuring incoming Instant Message appearance
- Configuring incoming TTY appearance
- Setting the audio options
- Defining an agent profile
- Integrating the voice mail system
- Activating a recorded greeting
- Defining a reason code
-
- Defining reason codes for work
- Defining reason codes for logging out
- Defining reason codes for auxiliary
-
- Viewing the phone display on the main window
- Setting the toolbar buttons on the main window
-
- Chapter 7 Repairing Avaya one-X Agent
- Chapter 8 Removing the Avaya one-X Agent application
-
- Removing Avaya one-X Agent in manual mode
-
- Chapter 9 Removing existing software
- Index
-

1 On the top bar click System Options gt System Settings
2 In the System Setting dialog box click Login
3 In the Telephony tab
a Select the Enable automatic connection to Communication Manager optionif you want the system to connect to Communication Manager automaticallyusing the last successful registration
b In the Extension field specify the desktop extension number if you wantCommunication Manager to identify your telephone extension number eachtime you log in to the system
c In the Password field specify the password for the associated desktopextension number
d Select Save password during sign in if you want the system to save thepassword when you are signing in with the associated extension number
e Select the CM Auto Answer Support Required option if the extension hasbeen administered on Communication Manager to support Auto Answer
f Select the Warn for Another User Logged in at Extension option if you wantthe system to warn you if another agent has logged in using the sameextension
g In the Server Address field enter the IP address of CommunicationManager
h From the User Type drop-down list select appropriate user
i In the Place and receive calls using drop-down field choose Desk Phone
4 Click OKThe system applies the new changes in the next login
Setting up the Other Phone configurationThe Other Phone configuration registers with Communication Manager as an off-site agentthrough a telephone and an IP connection The telephone can be a PSTN telephone a cellulartelephone or an extension on a local or remote switch The Other Phone configuration usesan IP connection to connect to Communication Manager and a PSTN connection to make orreceive calls
Setting up the initial configuration
38 Installing and Configuring Avaya one-Xreg Agent March 31 2011
Prerequisites
bull Network connection from a desktop computer running Avaya one-X Agent toCommunication Manager
bull Any telephone capable of receiving calls from Communication Manager
bull Communication Manager connection one user connection for signaling connection andthe other for off-site use one trunk connection or for on-site use an additional userconnection
bull Telephone extension number password and the Communication Manager serveraddress
bull Telephone numbers to be configured as Other Phone must be added on the PhoneNumbers panel Refer Adding a new phone number for information on adding phonenumbers
Use the Other Phone configuration when you are telecommuting and want to use Avaya one-X Agent from a remote location with a PSTN telephone connected to Communication Managerdirectly You can configure the Other Phone setting either through the Login window or throughthe System Settings dialog box
1 On the top bar click System Options gt System Settings
2 In the System Settings dialog box click Login
3 In the Telephony tab
a Select the Enable automatic connection to Communication Manager optionif you want the system to connect to Communication Manager automaticallyusing the last successful registration
b In the Extension field specify the telephone extension number if you wantCommunication Manager to identify your telephone extension number eachtime you log in to the system
c In the Password field specify the password for the associated telephoneextension number
d Select the CM Auto Answer Support Required option if the extension hasbeen administered on Communication Manager to support Auto Answer
e Select the Warn for Another User Logged in at Extension option if you wantthe system to warn you if another agent has logged in using the sameextension
f In the Server Address field enter the IP address of CommunicationManager
g From the User Type drop-down list select the appropriate user
h In the Place and receive calls using drop-down field select Other Phone
Configuring phones for different locations
Installing and Configuring Avaya one-Xreg Agent March 31 2011 39
i In the Telephone at field enter the telephone number you want to use for voicecalls
4 click OK to save the settingsThe system applies the new changes in the next login
Configuring the agent settingsPrerequisites
Obtain the agent extension number and password from your system administrator
NoteThe ACD tab will not appear if you have logged in as a Non-Agent or if appropriate buttonsare administered for this extension
1 On the top bar click System Options gt System Settings
2 In the Login Settings dialog box click the Agent tab
3 In the Agent tab
a Select the Enable ACD Login option if you want to enable the ACD featureBefore selecting the Enable ACD Login option ensure that you provide theuser credentials to log in to the ACD service
b Select the Automatically sign into the ACD server option if you want thesystem to register the agent extension with the ACD server automatically withthe previous successful registration through Communication Manager
c In the Agent field specify the agent extension number if you want the ACDservice to identify your agent extension number each time you log on to thesystem
d In the Password field specify the password for the agent extension number
e Select Save password during sign in if you want the system to save thepassword when you are signing in as an agent with the associated agentextension number
f In the Default Agent state upon ACD connection drop-down field choosethe appropriate option
4 Click OK
Setting up the initial configuration
40 Installing and Configuring Avaya one-Xreg Agent March 31 2011
Configuring IM settingsPrerequisitesObtain your IM user name and password domain name and IM server IP address from yoursupervisor or system administrator
1 On the top bar click System Options gt System settings
2 In the Login Settings dialog box click the IM tab
3 In the IM tab
a Select the Enable IM Login option if you want to enable the IM featureWhen you enable the Enable IM Login option you need to provide the usercredentials required to log on to Avaya Presence Services
b Select the Enable automatic connection to IM server option if you want thesystem to connect to the IM server with the previous successful registration
c In the User Name field specify the IM user ID of the agent
d In the Password field specify the password
e In the Domain field specify the domain name of the IM server
f Select Save password during sign in if you want the system to save thecredentials for subsequent log in
g In the Server Address field enter the IM server IP address
4 Click OK
Choosing User TypeAvaya one-X Agent allows different types of users namely agents non-agents andsupervisors to access the Communication Manager features Based on the user type thesystem grants a user access to a particular User Type then that user will have access to allthe features associated with that user type unless they are further restricted throughCommunication Manager
For example a user authenticated as an Agent user type is provided access to all Avaya one-X Agent features other than the Supervisor feature set (for example Service ObservingRemote Agent Logout) unless they are further restricted through Communication Manager
Configuring IM settings
Installing and Configuring Avaya one-Xreg Agent March 31 2011 41
Each user type has a role-based access to the following features
Feature Agent Non-Agent SupervisorACD Yes No Yes
Telephony Yes Yes Yes
IMPresence Yes Yes Yes
TTY (works only inMy Computer mode)
Yes Yes Yes
Desktop Sharing Yes Yes Yes
Supervisor (Avayaone-X Agentintegrated features)
No No Yes
ImportantAvaya one-X Agent has removed the explicit reference to the Communication Managerlicense type from its configuration parameters In this release Avaya one-X Agent selectsUser type and the proper license when registering with Communication Manager In additionBasic user type if used in the Desk Phone mode will select an AGENT_SC (the Eliteentitlement) license and allow IM and Presence
Use the following steps to choose the user type from the Telephony tab The application usesthe local profile with Agent with Desk Phone mode as default user type
1 On the top bar click System Options gt System Settings
2 In the Login Settings dialog box click the Telephony tab
3 In the Telephony tab choose appropriate user type from the Use Type drop-downlistIf Avaya one-X Agent is configured with Communication Manager you may not beable modify the User Type field as the option may be disabled by administrator Inthis case the relevant controls will be grayed out
Setting up the dialing rulesThe dialing rules depend on the country and location of your Communication Manager Thedialing rules help the system to distinguish extensions from trunk calls based on the length ofthe dialing string It ensures that the system uses the right Automatic Route Selection (ARS)code and if needed modifies the digits in keeping with Communication Manager and the PSTNrequirements
Setting up the initial configuration
42 Installing and Configuring Avaya one-Xreg Agent March 31 2011
Avaya one-X Agent 25 supports authorization and carrier code which is mandatory in somecountries It is an optional feature used to prevent access to expensive telephony resourcesoften international calling by unauthorized users An administrator or an Avaya one-X Agentuser can enter an authorization code in a user profile and the types of telephone calls thatrequire this authorization Avaya one-X Agent then automatically appends the authorizationcode as required so the user does not have to enter it each time a call is made
TipFor traveling agents visiting a different location and needing to register with a differentCommunication Manager Avaya recommends defining a user profile with appropriatedialing rules for that location and using a login with the corresponding profile so that thedialing rules for the system do not change
NoteYou must change the dialing rules each time you register the telephone settings with adifferent Communication Manager
1 On the top bar click System Options gt System Settings
2 In the System Settings dialog box click Dialing RulesThe application displays the Dialing Rules panel with Basic and Advanced tabs
3 In the Basic tab
a In the Number to dial to access outside line field specify the number toaccess an outside line In North America this is set to 9 In Europe it is set to0 For example if you are in North America you must enter the number as 9to access the outside line
b In the Your Country Code field specify the country code of yourCommunication Manager For example type 1 for North America 44 for GreatBritain 61 for Australia
c In the Local Calling Area Code field type the area or city code ofCommunication Manager For example type 785In regions where multiple local calling area codes are supported enter them asa comma-separated list For example 305720 If you can make local calls toboth these area codes
d In the Number to dial for long distance calls field enter the national longdistance prefix for example in North America type 1
e In the Number to dial for international calls field type the international prefixfor example in North America type 011
f In the Extension Length for internal extension calls field type the length ofthe internal extension calls For example if your internal extensions consist of
Setting up the dialing rules
Installing and Configuring Avaya one-Xreg Agent March 31 2011 43
five digits enter 5 If you specify the multiple extension lengths Avaya one-XAgent performs the exact matchesWhen you assign the length of the internal extension number Avaya one-XAgent treats the dialed number consisting of the selected number of digits asan internal extensionCommunication Manager may have multiple length extension numbers forexample if your company supports internal three-digit five-digit and seven-digit extensions type 357 You must use a comma to separate the values
g In the Length of national phone numbers (including CityArea code) fieldtype the length of length of national long distance number for example for NorthAmerica type 10If you are accessing the Communication Manager where the region supportsvariable national phone numbers specify the length of the valid telephonenumbers as a comma separated list For example if the region supports bothtelephone numbers with 10 digit and 11 digit telephone numbers type valuesas 1011
h Select Include areacity code when making a local call if area code mustbe prefix to a number when making a local call For example if you dial atelephone number the system prefixes the area code number defined in theYour AreaCity Code field and dials the telephone number
i Select Add long distance prefix on local calls if you want the system to adda long distance code before local calls For example if you dial a local telephonenumber the system prefixes a long distance code number defined in theNumber to dial for long distance calls field and dials the local telephonenumber
j Select Display confirmation window before dialing a number forconfirmation before dialing
k In the Time Period of Pause (Comma) in dialing (in seconds) field specifythe period for each comma character in the dialing field before dialing the nextdigit By default this field is set to 2 seconds You can specify the any valuebetween 1 to 10 seconds
4 To define authorization code click the Advanced tab and perform the followingsteps
a Select the Enable Authorization code option to enable the authorization codeThese are administered in Communication Manager
b In the Authorization Code field specify an authorization code number
c To make external calls using the authorization code select one or all of thefollowing options as appropriate
bull To make local calls using authorization code select On local calls
bull To make national long distance calls using authorization code select Onnational long distance calls
Setting up the initial configuration
44 Installing and Configuring Avaya one-Xreg Agent March 31 2011
bull To make international calls using authorization code select Oninternational long distance calls
5 Click OK to save the settings
Defining Alternate Server addressesThe Alternate Server address feature allows you to specify alternate registration servers if themain registration server defined on the telephony login screen is not available
NoteThis feature is independent of the Alternate Gatekeeper function available in CommunicationManager The Alternate Gatekeeper List (AGL) is computed by Communication Manager ateach registration and is provided to the endpoint during a successful Registration AccessSecurity (RAS) process The Alternate Server feature on the other hand allows a successfulRAS session to be set up to begin with
PrerequisitesObtain the alternate server addresses from your administrator
1 On the top bar click System Options gt System Settings
2 In the System Settings dialog box click Alternate Server List
3 In the Alternate Server List panel
a Click Add
b In the blank field type the IP address or FQDN of the alternate serverTo add more servers to the list repeat the sub-steps a and b
c In the Maximum attempts of each server field specify the number of attemptsthe system make to connect to each server before switching to the next definedserver
4 Click OK to save the settings
Defining Alternate Server addresses
Installing and Configuring Avaya one-Xreg Agent March 31 2011 45
Configuring the Work Handling optionsThese settings control how to receive calls on the Avaya one-X Agent client
PrerequisitesTo be able to specify Aux Codes during the Transition to Ready state interval Aux Codesmust be defined prior to following this procedure
Use the Work Handling options to configure the incoming work items to use CommunicationManager settings to change the agent status (if administered) to define the agents transitionstate after releasing the call and to set the work completion options
1 On the top bar click System Options gt System Settings
2 In the System Settings dialog box click Work HandlingThe Work Handling panel appears with Basic and Advanced tabs
3 On the Basic tab
a In the Work Completion for ACD calls section define the work completionmode as appropriate
b In the Transitions to Ready State section define the agents transition stateafter releasing the callThe With Aux Code option is only available for Manual-Ready option
4 On the Advanced tab tab
a In the Work Items section select the appropriate option to accept incomingwork itemsAuto-Accept automatically accepts calls however this is not related to CMAuto Answer Support Required option on the Login window but provides thesame functionality on the client side
NoteThe Auto-Accept option automatically answers telephone calls that areringing The Auto-Accept option is not related to support for CommunicationManager Auto answer However it can be used to accomplish a similarfunction
b In the Communication Manager Ready mode section select Auto In if youwant Communication Manager to do the work handling Selecting Auto In
Setting up the initial configuration
46 Installing and Configuring Avaya one-Xreg Agent March 31 2011
disables most of the Work Handling panel settings and it is not recommendedfor normal operation of Avaya one-X Agent
5 Click OK
Configuring the incoming call appearanceUse the following steps to set the incoming call notifications to display the main window or toflash the icon on the task bar when the system recognizes an incoming call
1 On the top bar click System Options gt Agent Preferences
2 In the Agent Preferences dialog box click Call Handling
3 In the Call Handling panel use any of the following options
bull Select Consultative Transfer to consult the caller before transferring thecall
bull Select Consultative Conference to consult the second caller before addingthe first caller to the conference
bull Select Auto-Hold if you want the system to put the call on hold automaticallybefore transferring or conferencing the call or when answering another alertingcall or dialing another outbound call
bull Select Bring main window to front if you want the system to bring the mainwindow to the foreground and activate the window for a ringing call
bull Select Flash icon if you want to view the call flashing in the task bar when thesystem recognizes a ringing call
4 Click OK to save the settings
Configuring incoming Instant Message appearanceUse these settings to define an incoming instant message You can also specify messages tobe sent automatically as greetings when you begin IM interaction or as responses when receiveto an instant message The messages set using the this procedure are available through theAdd Response button on the IM window
1 On the top bar click System Options gt Agent Preferences
Configuring the incoming call appearance
Installing and Configuring Avaya one-Xreg Agent March 31 2011 47
The Agent Preferences dialog box appears
2 In the Agent Preferences dialog box select Instant MessagingThe Instant Messaging panel appears with General Alerts and Responsestabs
3 Click the General tab and perform the following steps
a In the Greeting field enter your automated IM greeting
b Choose a value from the Minutes drop-down list for Avaya one-X Agent userinterface to automatically display the status as Away when the system is in theidle status By default the value is set to 15 minutes
c Select the Allow desktop sharing option to activate desktop sharing
4 Click the Alerts tab and perform the following steps
a Select the Display main window option if you want the system to display mainAvaya one-X Agent window on the foreground for an incoming message
b Select the Display IM window option if you want the system to display theincoming message directly in an IM window
c Select the Flash icon option if you want the system to flash the one-X Agenticon to flash on the task bar for an incoming message
5 Click the Responses tab to set your automated IM response using the followingsteps
a Click the + button
b Double-click the Untitled box and name the text for your automated IMresponse
c Repeat steps a and b to add more IM responses
d To user the IM responses click the Add response button on the IM windowand select the IM response and press EnterYou can record multiple responses and use them anytime during your IMinteraction
6 Click OK on the Instant Messaging panel to save your settings
Configuring incoming TTY appearanceUse this procedure to define the incoming TTY call appearance You can also set an automatedresponse to the incoming TTY message and specify the originating numbers for which the TTYmessage window must appear on the system
Setting up the initial configuration
48 Installing and Configuring Avaya one-Xreg Agent March 31 2011
1 On the top bar click System Options gt Agent Preferences The Agent Preferences dialog box appears
2 On the Agent Preferences dialog box select TTYThe TTY panel appears with General and Abbreviations tabs
3 On the General tab panel perform the following steps
a In the Greeting text box enter your agent greeting By default the systemdisplays Hello GA greetings
b Select the Show TTY window on every voice call option if you want thesystem to display the TTY window on every incoming voice call
c If you want the system to display the TTY window for specific incoming voicecalls perform the following steps
i Select the Show TTY window when a call comes from option
The TTY number field activates
ii Click the + button
An untitled item appears in the TTY number field
iii Double-click the untitled item and specify the number for which youwant the TTY window to appear
d Select the Always show TTY button in Voice interaction option if you wantthe system to display the TTY window for every voice work item on the work listwindowThis option is useful if the agent performs many TTY operations incoming andoutgoing
4 On the Abbreviations tab perform the following steps
a To view the preset TTY abbreviations select any abbreviation in the listAbbreviation corresponding to TTY appears in the Meaning Literal Meaningand Description fields
b To add a new abbreviation perform the following steps
i Click the + button
An untitled abbreviation appears in the TTY list
ii Double-click the untitled abbreviation and enter the TTYabbreviation
iii In the Meaning field enter a short explanation
iv In the Literal Meaning field enter the expansion of abbreviation
Configuring incoming TTY appearance
Installing and Configuring Avaya one-Xreg Agent March 31 2011 49
The Literal Meaning can be a literal text the abbreviation is derivedfor instance a short form for ldquoBe Right Backrdquo can be ldquoBRBrdquo and ldquoGoAheadrdquo can be ldquoGArdquo
v In the Description field enter additional description or informationon the abbreviation
NoteUse of these fields are completely optional
The abbreviations appear in rectangular boxes on the TTY window To view theabbreviation details you must click the abbreviation box on the TTY window Thedetails appear in a pop-up box on the TTY window The recipient can also view thesame details if the same abbreviation and details are configured through therecipients Avaya one-X Agent
5 Click OK to save the settings
Setting the audio optionsUse the following steps to set the auto options to adjust the audio volume for playbackrecording and incoming calls You can also set the system to play ring tone through thepersonal computer speaker and select a ringtone for an incoming call
1 On the top bar click System Options gt Agent Preferences
2 In the Agent Preferences dialog box click AudioThe Audio panel appears with Basic and Advanced tabs The Basic tab is activeby default
3 On the Basic tab perform the following steps in the Volume section to set the basicaudio settings
NoteThe following steps are optional and you can skip to the required step
a Adjust the Playback slider to set the volume for all sound output through yourcomputer speakers or headphones
b Adjust the Record slider to set the recording volume of all sound transmittedthrough a microphone to your personal computer
c Select the Mute check box adjacent to the Record slider to eliminate any soundbeing sent to your personal computer through the microphone
Setting up the initial configuration
50 Installing and Configuring Avaya one-Xreg Agent March 31 2011
These settings will not affect the headset volume if the headset is attached toa telephone rather than the personal computer
NoteThe Playback Record and Mute are only functional for My Computeroperation For Desk Phone or Other Phone modes you cannot control of thevolume of the telephone
d Adjust the Ringing slider to set the volume of the sound played through yourspeakers or headset when you receive an incoming call
e Select the Mute check box adjacent to Ringing slider to eliminate any soundthat indicates an incoming call
f Select the Play ringing through the internal PC speakers option to play thesound associated with an incoming call through the speakers of your personalcomputer and your headset simultaneouslyIf your personal computer does not have an internal speaker this option has noeffect
g Select the Use Custom ringtone option to play the a custom ringtone (a Wavefile) through the speaker or headset when you receive an incoming call Thewave file is played from the specified locationWhen you select Use Custom ringtone a Browse field and Test Ringtonebutton are displayed below Use the browse field to locate the wave file andclick Test Ringtone to test the wave file
4 On the Advanced tab perform the following steps in the Audio Devices section toset the advanced audio settings
a Select the audio play back hardware on your local system from the PlaybackDevice list
b Select the audio recording hardware on your local system from the RecordDevice list
c Use the Transmit Gain slider to set the gain for outgoing sound during a callYou can set the value from 01 to 100 Avaya recommends that you to set thisoption to 035
d Use the Receive Gain slider to set the gain for incoming sound during a callYou can set the from 01 to 1000 Avaya recommends that you to set the valueto 100
e Click Background Noise Test to test the background noiseThe Background Noise Test window appears Click the Test button on that totest the background noise You must perform if the ambient noise level changeor you move to a different location
5 Click OK to save the audio settings
Setting the audio options
Installing and Configuring Avaya one-Xreg Agent March 31 2011 51
Defining an agent profileA profile is a collection of pre-configured settings and preferences Using profiles agents canswitch configurations (For example agents can create profiles for different settings such ashome Office Sales Support and use them as needed) reusing the same Avaya one-X Agentinstallation For example you can create an agent profile for the My Computer configurationand use the profile with the appropriate Voice over Internet Protocol (VoIP) network You canalso create another agent profile for the Desk Phone configuration and use it asappropriate
Avaya one-X Agent 25 supports migration of older agent profiles (Avaya one-X Agent 10 orAvaya one-X Agent 20) if you are using local profiles When you start the Avaya one-X Agent25 application for the first time the application imports the profile from older release and storesit in to the Avaya one-X Agent 25 profiles If there are profiles from Avaya one-X Agent 10and Avaya one-X Agent 20 then the application imports profiles from Avaya one-X Agent 20The application applies the default values of the Avaya one-X Agent 25 release for new fieldsin the migrated profiles
Use the following procedure to create a local agent profile
ImportantThe Profile configuration is available for creating local profile without Central Managementadministration If Avaya one-X Agent is administered with Central Management the systemdisables the profile window
1 Make necessary changes using the System Settings and Agent Preferencesoptions
2 On the top bar click System Options gt System Settings
3 In the System Settings dialog box click Profiles
4 In the Profiles panel
a Click AddThe system displays the Create Profile dialog box
b In the Profile Name field enter the name for the profile and click OKThe new profile appears in the Profile list
5 Click Automatically execute all logins for the selected profile to execute all loginsequences for the selected or current profile without presenting a profile selectiondialog box The sequence depends on how the login option is set (manual orautomatic on other parameters) in the login panelIf you do not choose this option the application provides you with options to choosethe profile from the list if you have multiple profiles You must select the appropriateprofile at the launch of Avaya one-X Agent on your personal computer If you have
Setting up the initial configuration
52 Installing and Configuring Avaya one-Xreg Agent March 31 2011
a single profile the application proceeds silently without the profile selectionwindow
6 Click OKThe system creates a new profile and stores it locally in your personal computerYou can change the settings in the configuration parameters for the new profile inthe next login
Integrating the voice mail systemAvaya one-X Agent provides Communication Manager Message Waiting support for theregistered extension and one step access to access the message retrieval system for Voicemail You can integrate the voice mail system with a telephone system a third-party voice mailapplication or a web-based voice mail server and retrieve your voice mail from one of thevoice mail services
ImportantThe voice mail service is available only for those extensions registered and has a MessageWaiting Light defined If voice mail settings are not available on your extension contact thesystem administrator This is specific to the Message Waiting Light and has nothing to dowith the voice mail system that activates this light
PrerequisitesVoice Mail Integration is only available for those extensions that have a CommunicationManager Message Waiting Lamp translated
The voice mail support is only available for the message waiting light of the registeredextension There is no automatic support for other buttons translated as Message Waiting forother extensions
The voice mail messages can be associated with a telephone an application or a Webbrowser
1 On the top bar click System Options gt System Settings
2 In the left pane of the System Settings dialog box click Voice mail Integration
3 In the Voice Mail Integration panel click Enable Message Access
4 To integrate voice mail service perform one of the following actions as appropriate
bull To integrate voice mail services with a telephone select Dial this number andspecify the voice mail number in the field
Integrating the voice mail system
Installing and Configuring Avaya one-Xreg Agent March 31 2011 53
bull To integrate voice mail services through a third-party voice mail applicationselect Start this application and click Browse to navigate a windowsexecutable file
bull To integrate voice mail with a third-party web server select Open on web andtype a valid web address in the field
5 Click OK
Activating a recorded greetingYou must activate the Record Greetings option for the system to play the greeting You canhave more than one active greeting at the same time
For example you can set multiple greetings to be active if each greeting has a unique VectorDirectory Number (VDN) as the activation criterion This is also true for Agent Greetings thatplay for specific Automatic Number Identification (ANI) telephone numbers or PromptedDigits
If two recorded greetings meet the same criteria that make them eligible for a single call Avayaone-X Agent chooses the first one on the search list
PrerequisitesYou must have at least one greeting recorded to be able to activate a recorded greeting
1 On the top bar click System Options gt System Settings
2 In the System Settings dialog box select Greetings TriggersThe system displays the Greetings Triggers panel
3 In the Greetings Triggers list select a greeting
4 Click OKYou can manually play the selected greeting on the incoming call
Defining a reason codeThere are three classes of Reason Codes namely Agent AUX Work Codes and Call WorkCodes The annotations for these reason codes are made to the call record and Agent LogoutReason Codes These are known in Communication Manager by digit strings This feature
Setting up the initial configuration
54 Installing and Configuring Avaya one-Xreg Agent March 31 2011
allows the user to associate more meaningful text strings to the digit strings for easyreference
Reason code is a way to associate a particular number to a label for an agents reason for notbeing at the workstation or for not accepting an ACD call These reason codes if defined inCommunication Manager appear on the message window when an agent changes the workstatus to auxiliary or logs out from the ACD service By default the system creates a defaultreason code each for auxiliary logout and work reason code types You can change the defaultreason codes but cannot delete them
ImportantThe system administrator must define a common set of reason codes and manage itcentrally The administrator can distribute these reason code files to all agents by pushingthe configuration to agents system Moreover if your deployment is using CentralManagement the administrator must upload a CSV file and universally assign commonreason codes across the account or skill
Defining reason codes for workWork codes are codes that you assign to a work item in the Work List window You must definethe work code to use them in the Work List window
1 On the top bar click System Options gt System Settings
2 In the left pane of the System Settings dialog box click Reason Codes This opensthe Reason Codes panel on the right
3 From the Select menu to edit list select Work Reason Codes A default anduntitled reason code item is displayed under a root node in the container belowSelect menu to edit listYou can add a singular work reason code or create a group and add a set of workreason codes in that group Reason codes having similar or related characteristicsare organized together in one group Make sure that the labels given to the groupare easy to understand the group activity
4 To add a group perform the following steps
a Click the Add Reason Group button at the bottom of the Reason Codes panelThis adds an untitled group node in the container below Select menu to editlist
b Select the untitled node and type the group name The group node gets labeledwith the name you type
c Follow step 5 to add reason codes to the group
5 To add a solitary reason code perform the following steps
Defining a reason code
Installing and Configuring Avaya one-Xreg Agent March 31 2011 55
a Select the node under which you want to add a reason code This node maybe the root node or a group node
b Click the Add Reason Code button This adds an untitled reason code itemunder the selected node
c Select the untitled reason code item and rename it The reason code namereplaces the default name of the reason code item
d Repeat step 5 to add as many singular reason codes you want to
6 Click OK to save your settingsWork codes created using the above procedure are displayed when you click theWork Code icon on an active call on the Work List window You can choose theappropriate code to assign during the active call If you have not created any workcode the Work Code icon remains disabled during an active call
NoteIf Central Management is used reason codes can be defined only from CentralManagement You will not be able to edit from Avaya one-X Agent application
Defining reason codes for logging outThe log out reason code describes the reason for logging out from the ACD service You canuse the log out reason code only if you have defined reason codes in the System Settingsdialog box
1 On the top bar click System Options gt System Settings
2 In the left pane of the System Settings dialog box click Reason Codes This opensthe Reason Codes panel on the right
3 From the Select menu to edit list select Log Out Reason Codes A default anduntitled reason code item is displayed under a root node in the container belowSelect menu to edit listYou can add a singular log out reason code or create a group and add a set of logout reason codes in that group Reason codes having similar or relatedcharacteristics are organized together in one group Make sure that the labels givento the group are easy to understand the group activity
4 To add a group perform the following steps
a Click the Add Reason Group button at the bottom of the Reason Codes panelThis adds an untitled group node in the container below Select menu to editlist
Setting up the initial configuration
56 Installing and Configuring Avaya one-Xreg Agent March 31 2011
b Select the untitled node and type the group name The group node gets labeledwith the name you type
c Follow step 5 to add reason codes to the group
5 To add a solitary reason code perform the following steps
a Select the node under which you want to add a reason code This node maybe the root node or a group node
b Click the Add Reason Code button This adds an untitled reason code itemunder the selected node
c Select the untitled reason code item and rename it The reason code namereplaces the default name of the reason code item
d Repeat step 5 to add as many singular reason codes you want to
6 Click OK to save your settingsThe system displays the newly created log out reason code in the Log Out list ofthe Change Agent State drop-down list
Defining reason codes for auxiliaryThe auxiliary reason code describes the reason for changing your state to the AUX mode Youcan use the auxiliary reason code only if you have defined the reason codes in the SystemSettings window
Use the following steps to define the auxiliary reason codes and to associate them with thenumeric reason codes supported in Avaya Aurareg Communication Manager
1 On the top bar click System Options gt System Settings
2 In the left pane of the System Settings dialog box click Reason Codes This opensthe Reason Codes panel on the right
3 From the Select menu to edit list select Aux Reason Codes A default and untitledreason code item is displayed under a root node in the container below Selectmenu to edit listYou can add a singular auxiliary reason code or create a group and add a set ofauxiliary reason codes in that group Reason codes having similar or relatedcharacteristics are organized together in one group Make sure that the labels givento the group are easy to understand the group activity
4 To add a group perform the following steps
a Click the Add Reason Group button at the bottom of the Reason Codes panelThis adds an untitled group node in the container below Select menu to editlist
Defining a reason code
Installing and Configuring Avaya one-Xreg Agent March 31 2011 57
b Select the untitled node and type the group name The group node gets labeledwith the name you type
c Follow step 5 to add reason codes to the group
5 To add a solitary reason code perform the following steps
a Select the node under which you want to add a reason code This node maybe the root node or a group node
b Click the Add Reason Code button This adds an untitled reason code itemunder the selected node
c Select the untitled reason code item and rename it The reason code namereplaces the default name of the reason code item
d Repeat step 5 to add as many singular reason codes you want to
6 Click OK to save your settingsThe system displays the newly created auxiliary reason code in the Auxiliary listof the Change Agent State drop-down list
Viewing the phone display on the main windowAvaya one-X Agent allows you to view a 40-character display at the bottom of the Work Listwindow from Avaya Aurareg Communication Manager You can view both call-related and non-call-related information including call-prompting digits VuStats data and the local date andtime display from the ACD server
NoteOnly those telephone types that are capable of displaying 80 characters are compatible withthis feature
1 On the top bar click System Options gt Agent Preferences gt User Interface
2 In the User Interface panel enable the Show Phone Display option
3 Click OK
Setting the toolbar buttons on the main windowAvaya one-X Agent allows you to set the toolbar buttons on the main window These buttonsprovide quick-access to options including releasing a call changing the answer settings to
Setting up the initial configuration
58 Installing and Configuring Avaya one-Xreg Agent March 31 2011
manual or auto changing the agent status to ready or auxiliary making a call to the supervisordirectly assigning a work code to the work item and dialing the last called number
These are the same eight Favorite buttons that are defined in the Dialpad Defining them ineither place will have them displayed in both places You need not have to administer themtwice
1 On the top bar click System Options gt Agent Preferences gt User Interface
2 In the User Interface panel
a Enable the Display Button Toolbar option
b Click Select Favorite Buttons
c In the Favorite Buttons dialog box select the appropriate buttonsYou can select up to eight buttons from the list
3 Click OK
Setting the toolbar buttons on the main window
Installing and Configuring Avaya one-Xreg Agent March 31 2011 59
Setting up the initial configuration
60 Installing and Configuring Avaya one-Xreg Agent March 31 2011
Chapter 7 Repairing Avaya one-X Agent
If Avaya one-X Agent is not functioning properly you can use the Repair function to reinstall it If you repairan Avaya one-X Agent application you must also repair any service release that has been installed
NoteIf you are experiencing difficulties at the time of installing Avaya one-X Agent capture the event anderror logs and send them to your system administrator For detailed information on logs and debuggingsee Maintaining and Troubleshooting Avaya one-X Agent
1 In Windows Control Panel select Add or Remove Programs
2 In the list of currently installed programs locate the Avaya one-X Agent application you wantto repair
3 Click the Click here for support information link to display the Support Info dialog box
4 Click RepairThe system reinstalls the program
TipAlternatively you can run the installation again The installer prompts you with Repair andRemove options You can select Repair to repair the installation
Installing and Configuring Avaya one-Xreg Agent March 31 2011 61
Repairing Avaya one-X Agent
62 Installing and Configuring Avaya one-Xreg Agent March 31 2011
Chapter 8 Removing the Avaya one-XAgent application
NoteYou cannot remove the read-only folders that are shared with other applications or remove any filesor directories that you have added to the Avaya one-X Agent installation directory
Removing Avaya one-X Agent in manual modePrerequisitesClose Avaya one-X Agent if it is currently running If Avaya one-X Agent is running duringremoval process some folders may not be removed completely
1 In Windows Control Panel select Add or Remove Programs
2 Select Avaya One-X Agent and choose Change Remove or Uninstall(Windows Vista)During the removal process the Microsoft installer may display a message to shutdown an application that is running You can shut down the specified applicationor ignore the message and continue with the removal
TipAlternatively you can use the OneXAgentSetupexe setup with using x switchto remove the application On command-prompt navigate to the folder whereOneXAgentSetupexe is located and use the following commandOneXAgentSetupexe x
Installing and Configuring Avaya one-Xreg Agent March 31 2011 63
Removing the Avaya one-X Agent application
64 Installing and Configuring Avaya one-Xreg Agent March 31 2011
Chapter 9 Removing existing software
If you are using the Avaya softphones with video and if you plan to use Avaya one-X Agent with videothen you must remove the following Avaya software from your personal computer before installing Avayaone-X Agent
bull Avaya IP Softphone
bull Polycom Via Video
NoteIf you are not using the Avaya softphones with video on your personal computer you can skip thissection
PrerequisitesBefore removing the Avaya IP Softphone software record the following information You will need thisinformation when you install Avaya one-X Agent
bull Your IP Softphone call server address
bull Your IP Softphone login
bull The password for your extension
1 In Windows Control Panel select Add or Remove Programs
2 Follow the standard process for removing programs from Windows
Installing and Configuring Avaya one-Xreg Agent March 31 2011 65
Removing existing software
66 Installing and Configuring Avaya one-Xreg Agent March 31 2011
Index
A
administration using XML 26agent greetings
activating 54steps 54enabling 54
agent profile 52agent settings 40alternate server addresses 45architecture overview 8authorization code 43
C
call handling 47 50carrier code 43checklist 17configuration using XML 26configuring
incoming TTY appearance 48configuring IM settings 41configuring incoming message appearance 47configuring the agent settings 40customizing the installation 24
D
defining agent profile 52defining incoming call appearance 47 50defining reason code
auxiliary reason code 57log out reason code 56
defining TTY display 48defining work codes
work code 55defining work handling options 46desk phone login 37dialing rules 43display button toolbar 59
F
features based on configuration 10
G
getting started 31
I
IM settings 41initial configuration 35installation overview 7installing
polycom video 25installing Avaya one-X Agent
silent mode 21installing manually 19introduction 7
L
launching one-X Agent 32legal notices 2logging from a Desk Phone 37logging from a personal computer 36
M
manual installation 19message appearance settings 47my computer setting 36
N
network connection 14notices legal 2
O
one-X Agent registration 37 39Other phone settings 39overview 7
P
phone display 58phone settings 35
R
reason codes 55
Installing and Configuring Avaya one-Xreg Agent March 31 2011 67
registering with Communication Manager 36 37registration 35removing 63
in interactive mode 63removing existing software 65repairing 61requirements
AVTS 9communication manager 9enterprise 9hardware 10license 15software 9video 13
S
setting 43standard installation 19starting one-X agent application 32
T
telephony setting 35toolbar
configuring 59
settings 59toolbar buttons 59
U
upgrade version 25upgrading Avaya one-X Agent 25user type
selecting 42
V
voice mailintegrating 53
W
wizard-based installation 19work handling 46
X
XML administration 26XML configuration 26
68 Installing and Configuring Avaya one-Xreg Agent March 31 2011
- Contents
- Chapter 1 Introduction
-
- Installation overview
- Architecture overview
-
- Chapter 2 Requirements
-
- Enterprise requirements
- Software requirements
-
- Feature dependencies on configuration
-
- Computer and other hardware requirements
- Video requirements
- Network connection requirements
- License requirements
-
- Chapter 3 Avaya one-X Agent installation checklist
- Chapter 4 Installing Avaya one-X Agent
-
- Installing Avaya one-X Agent (GUI installation)
- Installing Avaya one-X Agent (silent installation)
-
- Customizing the install
-
- Upgrading Avaya one-X Agent to Release 25
- Installing the Polycom video software
- Administration and configuration of Avaya one-X Agent using XML
-
- Chapter 5 Getting started
-
- Logging on to Avaya one-X Agent
-
- Chapter 6 Setting up the initial configuration
-
- Configuring phones for different locations
-
- Setting up the My Computer configuration
- Setting up the Desk Phone configuration
- Setting up the Other Phone configuration
-
- Configuring the agent settings
- Configuring IM settings
- Choosing User Type
- Setting up the dialing rules
- Defining Alternate Server addresses
- Configuring the Work Handling options
- Configuring the incoming call appearance
- Configuring incoming Instant Message appearance
- Configuring incoming TTY appearance
- Setting the audio options
- Defining an agent profile
- Integrating the voice mail system
- Activating a recorded greeting
- Defining a reason code
-
- Defining reason codes for work
- Defining reason codes for logging out
- Defining reason codes for auxiliary
-
- Viewing the phone display on the main window
- Setting the toolbar buttons on the main window
-
- Chapter 7 Repairing Avaya one-X Agent
- Chapter 8 Removing the Avaya one-X Agent application
-
- Removing Avaya one-X Agent in manual mode
-
- Chapter 9 Removing existing software
- Index
-
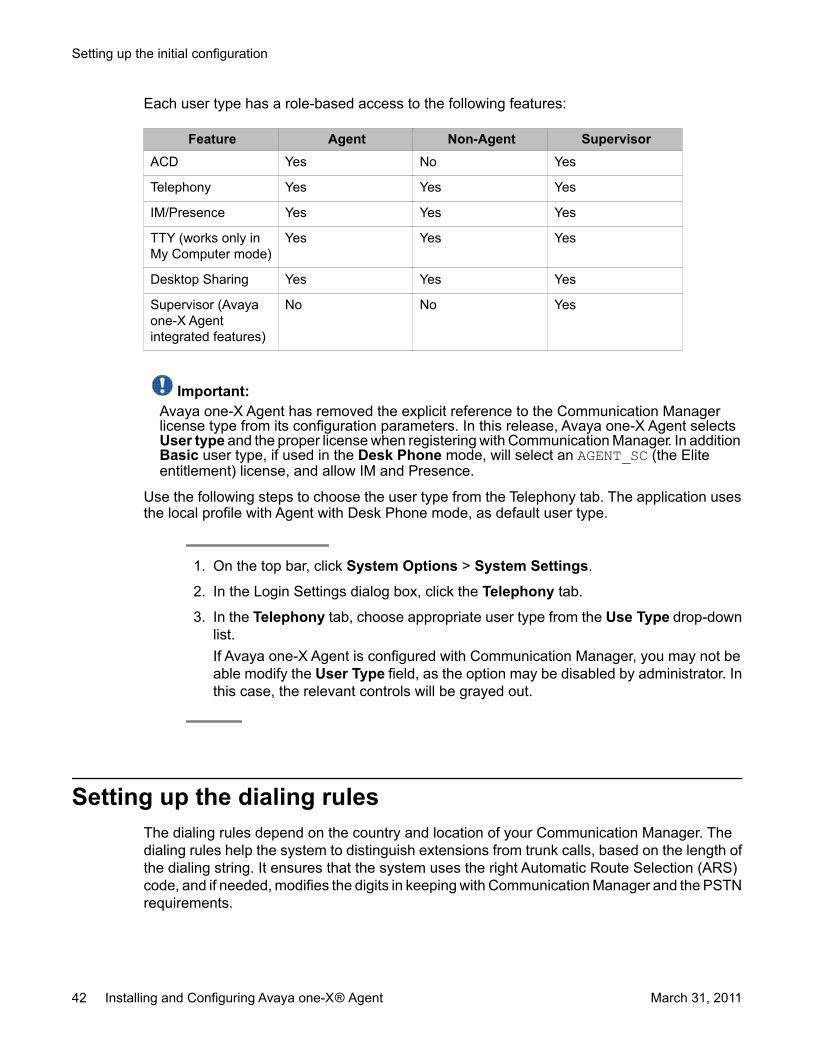
a Select the node under which you want to add a reason code This node maybe the root node or a group node
b Click the Add Reason Code button This adds an untitled reason code itemunder the selected node
c Select the untitled reason code item and rename it The reason code namereplaces the default name of the reason code item
d Repeat step 5 to add as many singular reason codes you want to
6 Click OK to save your settingsWork codes created using the above procedure are displayed when you click theWork Code icon on an active call on the Work List window You can choose theappropriate code to assign during the active call If you have not created any workcode the Work Code icon remains disabled during an active call
NoteIf Central Management is used reason codes can be defined only from CentralManagement You will not be able to edit from Avaya one-X Agent application
Defining reason codes for logging outThe log out reason code describes the reason for logging out from the ACD service You canuse the log out reason code only if you have defined reason codes in the System Settingsdialog box
1 On the top bar click System Options gt System Settings
2 In the left pane of the System Settings dialog box click Reason Codes This opensthe Reason Codes panel on the right
3 From the Select menu to edit list select Log Out Reason Codes A default anduntitled reason code item is displayed under a root node in the container belowSelect menu to edit listYou can add a singular log out reason code or create a group and add a set of logout reason codes in that group Reason codes having similar or relatedcharacteristics are organized together in one group Make sure that the labels givento the group are easy to understand the group activity
4 To add a group perform the following steps
a Click the Add Reason Group button at the bottom of the Reason Codes panelThis adds an untitled group node in the container below Select menu to editlist
Setting up the initial configuration
56 Installing and Configuring Avaya one-Xreg Agent March 31 2011
b Select the untitled node and type the group name The group node gets labeledwith the name you type
c Follow step 5 to add reason codes to the group
5 To add a solitary reason code perform the following steps
a Select the node under which you want to add a reason code This node maybe the root node or a group node
b Click the Add Reason Code button This adds an untitled reason code itemunder the selected node
c Select the untitled reason code item and rename it The reason code namereplaces the default name of the reason code item
d Repeat step 5 to add as many singular reason codes you want to
6 Click OK to save your settingsThe system displays the newly created log out reason code in the Log Out list ofthe Change Agent State drop-down list
Defining reason codes for auxiliaryThe auxiliary reason code describes the reason for changing your state to the AUX mode Youcan use the auxiliary reason code only if you have defined the reason codes in the SystemSettings window
Use the following steps to define the auxiliary reason codes and to associate them with thenumeric reason codes supported in Avaya Aurareg Communication Manager
1 On the top bar click System Options gt System Settings
2 In the left pane of the System Settings dialog box click Reason Codes This opensthe Reason Codes panel on the right
3 From the Select menu to edit list select Aux Reason Codes A default and untitledreason code item is displayed under a root node in the container below Selectmenu to edit listYou can add a singular auxiliary reason code or create a group and add a set ofauxiliary reason codes in that group Reason codes having similar or relatedcharacteristics are organized together in one group Make sure that the labels givento the group are easy to understand the group activity
4 To add a group perform the following steps
a Click the Add Reason Group button at the bottom of the Reason Codes panelThis adds an untitled group node in the container below Select menu to editlist
Defining a reason code
Installing and Configuring Avaya one-Xreg Agent March 31 2011 57
b Select the untitled node and type the group name The group node gets labeledwith the name you type
c Follow step 5 to add reason codes to the group
5 To add a solitary reason code perform the following steps
a Select the node under which you want to add a reason code This node maybe the root node or a group node
b Click the Add Reason Code button This adds an untitled reason code itemunder the selected node
c Select the untitled reason code item and rename it The reason code namereplaces the default name of the reason code item
d Repeat step 5 to add as many singular reason codes you want to
6 Click OK to save your settingsThe system displays the newly created auxiliary reason code in the Auxiliary listof the Change Agent State drop-down list
Viewing the phone display on the main windowAvaya one-X Agent allows you to view a 40-character display at the bottom of the Work Listwindow from Avaya Aurareg Communication Manager You can view both call-related and non-call-related information including call-prompting digits VuStats data and the local date andtime display from the ACD server
NoteOnly those telephone types that are capable of displaying 80 characters are compatible withthis feature
1 On the top bar click System Options gt Agent Preferences gt User Interface
2 In the User Interface panel enable the Show Phone Display option
3 Click OK
Setting the toolbar buttons on the main windowAvaya one-X Agent allows you to set the toolbar buttons on the main window These buttonsprovide quick-access to options including releasing a call changing the answer settings to
Setting up the initial configuration
58 Installing and Configuring Avaya one-Xreg Agent March 31 2011
manual or auto changing the agent status to ready or auxiliary making a call to the supervisordirectly assigning a work code to the work item and dialing the last called number
These are the same eight Favorite buttons that are defined in the Dialpad Defining them ineither place will have them displayed in both places You need not have to administer themtwice
1 On the top bar click System Options gt Agent Preferences gt User Interface
2 In the User Interface panel
a Enable the Display Button Toolbar option
b Click Select Favorite Buttons
c In the Favorite Buttons dialog box select the appropriate buttonsYou can select up to eight buttons from the list
3 Click OK
Setting the toolbar buttons on the main window
Installing and Configuring Avaya one-Xreg Agent March 31 2011 59
Setting up the initial configuration
60 Installing and Configuring Avaya one-Xreg Agent March 31 2011
Chapter 7 Repairing Avaya one-X Agent
If Avaya one-X Agent is not functioning properly you can use the Repair function to reinstall it If you repairan Avaya one-X Agent application you must also repair any service release that has been installed
NoteIf you are experiencing difficulties at the time of installing Avaya one-X Agent capture the event anderror logs and send them to your system administrator For detailed information on logs and debuggingsee Maintaining and Troubleshooting Avaya one-X Agent
1 In Windows Control Panel select Add or Remove Programs
2 In the list of currently installed programs locate the Avaya one-X Agent application you wantto repair
3 Click the Click here for support information link to display the Support Info dialog box
4 Click RepairThe system reinstalls the program
TipAlternatively you can run the installation again The installer prompts you with Repair andRemove options You can select Repair to repair the installation
Installing and Configuring Avaya one-Xreg Agent March 31 2011 61
Repairing Avaya one-X Agent
62 Installing and Configuring Avaya one-Xreg Agent March 31 2011
Chapter 8 Removing the Avaya one-XAgent application
NoteYou cannot remove the read-only folders that are shared with other applications or remove any filesor directories that you have added to the Avaya one-X Agent installation directory
Removing Avaya one-X Agent in manual modePrerequisitesClose Avaya one-X Agent if it is currently running If Avaya one-X Agent is running duringremoval process some folders may not be removed completely
1 In Windows Control Panel select Add or Remove Programs
2 Select Avaya One-X Agent and choose Change Remove or Uninstall(Windows Vista)During the removal process the Microsoft installer may display a message to shutdown an application that is running You can shut down the specified applicationor ignore the message and continue with the removal
TipAlternatively you can use the OneXAgentSetupexe setup with using x switchto remove the application On command-prompt navigate to the folder whereOneXAgentSetupexe is located and use the following commandOneXAgentSetupexe x
Installing and Configuring Avaya one-Xreg Agent March 31 2011 63
Removing the Avaya one-X Agent application
64 Installing and Configuring Avaya one-Xreg Agent March 31 2011
Chapter 9 Removing existing software
If you are using the Avaya softphones with video and if you plan to use Avaya one-X Agent with videothen you must remove the following Avaya software from your personal computer before installing Avayaone-X Agent
bull Avaya IP Softphone
bull Polycom Via Video
NoteIf you are not using the Avaya softphones with video on your personal computer you can skip thissection
PrerequisitesBefore removing the Avaya IP Softphone software record the following information You will need thisinformation when you install Avaya one-X Agent
bull Your IP Softphone call server address
bull Your IP Softphone login
bull The password for your extension
1 In Windows Control Panel select Add or Remove Programs
2 Follow the standard process for removing programs from Windows
Installing and Configuring Avaya one-Xreg Agent March 31 2011 65
Removing existing software
66 Installing and Configuring Avaya one-Xreg Agent March 31 2011
Index
A
administration using XML 26agent greetings
activating 54steps 54enabling 54
agent profile 52agent settings 40alternate server addresses 45architecture overview 8authorization code 43
C
call handling 47 50carrier code 43checklist 17configuration using XML 26configuring
incoming TTY appearance 48configuring IM settings 41configuring incoming message appearance 47configuring the agent settings 40customizing the installation 24
D
defining agent profile 52defining incoming call appearance 47 50defining reason code
auxiliary reason code 57log out reason code 56
defining TTY display 48defining work codes
work code 55defining work handling options 46desk phone login 37dialing rules 43display button toolbar 59
F
features based on configuration 10
G
getting started 31
I
IM settings 41initial configuration 35installation overview 7installing
polycom video 25installing Avaya one-X Agent
silent mode 21installing manually 19introduction 7
L
launching one-X Agent 32legal notices 2logging from a Desk Phone 37logging from a personal computer 36
M
manual installation 19message appearance settings 47my computer setting 36
N
network connection 14notices legal 2
O
one-X Agent registration 37 39Other phone settings 39overview 7
P
phone display 58phone settings 35
R
reason codes 55
Installing and Configuring Avaya one-Xreg Agent March 31 2011 67
registering with Communication Manager 36 37registration 35removing 63
in interactive mode 63removing existing software 65repairing 61requirements
AVTS 9communication manager 9enterprise 9hardware 10license 15software 9video 13
S
setting 43standard installation 19starting one-X agent application 32
T
telephony setting 35toolbar
configuring 59
settings 59toolbar buttons 59
U
upgrade version 25upgrading Avaya one-X Agent 25user type
selecting 42
V
voice mailintegrating 53
W
wizard-based installation 19work handling 46
X
XML administration 26XML configuration 26
68 Installing and Configuring Avaya one-Xreg Agent March 31 2011
- Contents
- Chapter 1 Introduction
-
- Installation overview
- Architecture overview
-
- Chapter 2 Requirements
-
- Enterprise requirements
- Software requirements
-
- Feature dependencies on configuration
-
- Computer and other hardware requirements
- Video requirements
- Network connection requirements
- License requirements
-
- Chapter 3 Avaya one-X Agent installation checklist
- Chapter 4 Installing Avaya one-X Agent
-
- Installing Avaya one-X Agent (GUI installation)
- Installing Avaya one-X Agent (silent installation)
-
- Customizing the install
-
- Upgrading Avaya one-X Agent to Release 25
- Installing the Polycom video software
- Administration and configuration of Avaya one-X Agent using XML
-
- Chapter 5 Getting started
-
- Logging on to Avaya one-X Agent
-
- Chapter 6 Setting up the initial configuration
-
- Configuring phones for different locations
-
- Setting up the My Computer configuration
- Setting up the Desk Phone configuration
- Setting up the Other Phone configuration
-
- Configuring the agent settings
- Configuring IM settings
- Choosing User Type
- Setting up the dialing rules
- Defining Alternate Server addresses
- Configuring the Work Handling options
- Configuring the incoming call appearance
- Configuring incoming Instant Message appearance
- Configuring incoming TTY appearance
- Setting the audio options
- Defining an agent profile
- Integrating the voice mail system
- Activating a recorded greeting
- Defining a reason code
-
- Defining reason codes for work
- Defining reason codes for logging out
- Defining reason codes for auxiliary
-
- Viewing the phone display on the main window
- Setting the toolbar buttons on the main window
-
- Chapter 7 Repairing Avaya one-X Agent
- Chapter 8 Removing the Avaya one-X Agent application
-
- Removing Avaya one-X Agent in manual mode
-
- Chapter 9 Removing existing software
- Index
-
b Select the untitled node and type the group name The group node gets labeledwith the name you type
c Follow step 5 to add reason codes to the group
5 To add a solitary reason code perform the following steps
a Select the node under which you want to add a reason code This node maybe the root node or a group node
b Click the Add Reason Code button This adds an untitled reason code itemunder the selected node
c Select the untitled reason code item and rename it The reason code namereplaces the default name of the reason code item
d Repeat step 5 to add as many singular reason codes you want to
6 Click OK to save your settingsThe system displays the newly created auxiliary reason code in the Auxiliary listof the Change Agent State drop-down list
Viewing the phone display on the main windowAvaya one-X Agent allows you to view a 40-character display at the bottom of the Work Listwindow from Avaya Aurareg Communication Manager You can view both call-related and non-call-related information including call-prompting digits VuStats data and the local date andtime display from the ACD server
NoteOnly those telephone types that are capable of displaying 80 characters are compatible withthis feature
1 On the top bar click System Options gt Agent Preferences gt User Interface
2 In the User Interface panel enable the Show Phone Display option
3 Click OK
Setting the toolbar buttons on the main windowAvaya one-X Agent allows you to set the toolbar buttons on the main window These buttonsprovide quick-access to options including releasing a call changing the answer settings to
Setting up the initial configuration
58 Installing and Configuring Avaya one-Xreg Agent March 31 2011
manual or auto changing the agent status to ready or auxiliary making a call to the supervisordirectly assigning a work code to the work item and dialing the last called number
These are the same eight Favorite buttons that are defined in the Dialpad Defining them ineither place will have them displayed in both places You need not have to administer themtwice
1 On the top bar click System Options gt Agent Preferences gt User Interface
2 In the User Interface panel
a Enable the Display Button Toolbar option
b Click Select Favorite Buttons
c In the Favorite Buttons dialog box select the appropriate buttonsYou can select up to eight buttons from the list
3 Click OK
Setting the toolbar buttons on the main window
Installing and Configuring Avaya one-Xreg Agent March 31 2011 59
Setting up the initial configuration
60 Installing and Configuring Avaya one-Xreg Agent March 31 2011
Chapter 7 Repairing Avaya one-X Agent
If Avaya one-X Agent is not functioning properly you can use the Repair function to reinstall it If you repairan Avaya one-X Agent application you must also repair any service release that has been installed
NoteIf you are experiencing difficulties at the time of installing Avaya one-X Agent capture the event anderror logs and send them to your system administrator For detailed information on logs and debuggingsee Maintaining and Troubleshooting Avaya one-X Agent
1 In Windows Control Panel select Add or Remove Programs
2 In the list of currently installed programs locate the Avaya one-X Agent application you wantto repair
3 Click the Click here for support information link to display the Support Info dialog box
4 Click RepairThe system reinstalls the program
TipAlternatively you can run the installation again The installer prompts you with Repair andRemove options You can select Repair to repair the installation
Installing and Configuring Avaya one-Xreg Agent March 31 2011 61
Repairing Avaya one-X Agent
62 Installing and Configuring Avaya one-Xreg Agent March 31 2011
Chapter 8 Removing the Avaya one-XAgent application
NoteYou cannot remove the read-only folders that are shared with other applications or remove any filesor directories that you have added to the Avaya one-X Agent installation directory
Removing Avaya one-X Agent in manual modePrerequisitesClose Avaya one-X Agent if it is currently running If Avaya one-X Agent is running duringremoval process some folders may not be removed completely
1 In Windows Control Panel select Add or Remove Programs
2 Select Avaya One-X Agent and choose Change Remove or Uninstall(Windows Vista)During the removal process the Microsoft installer may display a message to shutdown an application that is running You can shut down the specified applicationor ignore the message and continue with the removal
TipAlternatively you can use the OneXAgentSetupexe setup with using x switchto remove the application On command-prompt navigate to the folder whereOneXAgentSetupexe is located and use the following commandOneXAgentSetupexe x
Installing and Configuring Avaya one-Xreg Agent March 31 2011 63
Removing the Avaya one-X Agent application
64 Installing and Configuring Avaya one-Xreg Agent March 31 2011
Chapter 9 Removing existing software
If you are using the Avaya softphones with video and if you plan to use Avaya one-X Agent with videothen you must remove the following Avaya software from your personal computer before installing Avayaone-X Agent
bull Avaya IP Softphone
bull Polycom Via Video
NoteIf you are not using the Avaya softphones with video on your personal computer you can skip thissection
PrerequisitesBefore removing the Avaya IP Softphone software record the following information You will need thisinformation when you install Avaya one-X Agent
bull Your IP Softphone call server address
bull Your IP Softphone login
bull The password for your extension
1 In Windows Control Panel select Add or Remove Programs
2 Follow the standard process for removing programs from Windows
Installing and Configuring Avaya one-Xreg Agent March 31 2011 65
Removing existing software
66 Installing and Configuring Avaya one-Xreg Agent March 31 2011
Index
A
administration using XML 26agent greetings
activating 54steps 54enabling 54
agent profile 52agent settings 40alternate server addresses 45architecture overview 8authorization code 43
C
call handling 47 50carrier code 43checklist 17configuration using XML 26configuring
incoming TTY appearance 48configuring IM settings 41configuring incoming message appearance 47configuring the agent settings 40customizing the installation 24
D
defining agent profile 52defining incoming call appearance 47 50defining reason code
auxiliary reason code 57log out reason code 56
defining TTY display 48defining work codes
work code 55defining work handling options 46desk phone login 37dialing rules 43display button toolbar 59
F
features based on configuration 10
G
getting started 31
I
IM settings 41initial configuration 35installation overview 7installing
polycom video 25installing Avaya one-X Agent
silent mode 21installing manually 19introduction 7
L
launching one-X Agent 32legal notices 2logging from a Desk Phone 37logging from a personal computer 36
M
manual installation 19message appearance settings 47my computer setting 36
N
network connection 14notices legal 2
O
one-X Agent registration 37 39Other phone settings 39overview 7
P
phone display 58phone settings 35
R
reason codes 55
Installing and Configuring Avaya one-Xreg Agent March 31 2011 67
registering with Communication Manager 36 37registration 35removing 63
in interactive mode 63removing existing software 65repairing 61requirements
AVTS 9communication manager 9enterprise 9hardware 10license 15software 9video 13
S
setting 43standard installation 19starting one-X agent application 32
T
telephony setting 35toolbar
configuring 59
settings 59toolbar buttons 59
U
upgrade version 25upgrading Avaya one-X Agent 25user type
selecting 42
V
voice mailintegrating 53
W
wizard-based installation 19work handling 46
X
XML administration 26XML configuration 26
68 Installing and Configuring Avaya one-Xreg Agent March 31 2011
- Contents
- Chapter 1 Introduction
-
- Installation overview
- Architecture overview
-
- Chapter 2 Requirements
-
- Enterprise requirements
- Software requirements
-
- Feature dependencies on configuration
-
- Computer and other hardware requirements
- Video requirements
- Network connection requirements
- License requirements
-
- Chapter 3 Avaya one-X Agent installation checklist
- Chapter 4 Installing Avaya one-X Agent
-
- Installing Avaya one-X Agent (GUI installation)
- Installing Avaya one-X Agent (silent installation)
-
- Customizing the install
-
- Upgrading Avaya one-X Agent to Release 25
- Installing the Polycom video software
- Administration and configuration of Avaya one-X Agent using XML
-
- Chapter 5 Getting started
-
- Logging on to Avaya one-X Agent
-
- Chapter 6 Setting up the initial configuration
-
- Configuring phones for different locations
-
- Setting up the My Computer configuration
- Setting up the Desk Phone configuration
- Setting up the Other Phone configuration
-
- Configuring the agent settings
- Configuring IM settings
- Choosing User Type
- Setting up the dialing rules
- Defining Alternate Server addresses
- Configuring the Work Handling options
- Configuring the incoming call appearance
- Configuring incoming Instant Message appearance
- Configuring incoming TTY appearance
- Setting the audio options
- Defining an agent profile
- Integrating the voice mail system
- Activating a recorded greeting
- Defining a reason code
-
- Defining reason codes for work
- Defining reason codes for logging out
- Defining reason codes for auxiliary
-
- Viewing the phone display on the main window
- Setting the toolbar buttons on the main window
-
- Chapter 7 Repairing Avaya one-X Agent
- Chapter 8 Removing the Avaya one-X Agent application
-
- Removing Avaya one-X Agent in manual mode
-
- Chapter 9 Removing existing software
- Index
-
Related Documents