Installation Guide GibbsCAM 2010, v9.5 October 2009

Welcome message from author
This document is posted to help you gain knowledge. Please leave a comment to let me know what you think about it! Share it to your friends and learn new things together.
Transcript

Installation Guide
GibbsCAM 2010, v9.5
October 2009

Gibbs and Associates323 Science Drive
Moorpark, CA 93021
Modified: Wednesday, January 13, 2010 10:48 AM
Proprietary Notice
This document contains proprietary information of Gibbs and Associates and is to be used onlypursuant to and in conjunction with the license granted to the licensee with respect to theaccompanying Gibbs and Associates licensed software. Except as expressly permitted in the license,no part of this document may be reproduced, transmitted, transcribed, stored in a retrieval system,or translated into any language or computer language, in any form or by any means, electronic,magnetic, optical, chemical, manual or otherwise, without the prior expressed written permissionfrom Gibbs and Associates or a duly authorized representative thereof.
It is strongly advised that users carefully review the license in order to understand the rights andobligations related to this licensed software and the accompanying documentation.
Use of the computer software and the user documentation has been provided pursuant to a Gibbsand Associates licensing agreement.
© 2009 Gibbs and Associates, a Cimatron® Company. All rights reserved. The Gibbs logo,GibbsCAM, GibbsCAM logo, Virtual Gibbs, Gibbs SFP, MTM, SolidSurfacer, and “Powerfully Simple.Simply Powerful.” are either trademark(s) or registered trademark(s) of Gibbs and Associates in theUnited States and/or other countries. Windows and the Windows logo are trademarks of theMicrosoft group of companies. All other brand or product names are trademarks or registeredtrademarks of their respective owners. Contains Autodesk® RealDWG by Autodesk, Inc., Copyright ©1998-2008 Autodesk, Inc. All rights reserved. ProAXYZ is a registered trademarks or trademarks ofProductec SA in Switzerland and/or other countries.
INTRODUCTION 1
Welcome 1
What Your Order Should Contain 1
New Security Features 2
Important information About GibbsCAM Security 2
Licensing 2
Hardware Key Lock 2
System Requirements 3
Windows XP and Windows Server 2003 Supported Minimum Requirements 4
Windows 7, Windows Server 2008 and Windows Vista Supported Minimum Requirements 4
Recommended System 5
What Are the Differences Between 32-bit and 64-bit GibbsCAM? 5
64-bit Advantages 5
Plug-Ins 5
Microsoft Excel Interoperability 5
VMM Compatibility 6
Contacting Gibbs and Associates 7
Technical Support 7
www.GibbsCAM.com 7
INSTALLATION 9
The DVD Explorer 9
About the GibbsCAM Installer 13
i
ii
Before Installing 13
Licensing Schemes 13
Installing Across a Network 15
Where are Things Installed? 16
Post Processors 16
File Locations 16
Windows XP and Windows Server 2003 16
Windows 7, Windows Vista and Windows Server 2008 16
User Data 17
Global Data 17
Install Directory Data 17
Existing Communications, CutDATA and Library Files 17
A Note About User Access To Directories 17
Installing the GibbsCAM System 18
Step-By-Step Instructions 18
Running Multiple Versions of GibbsCAM 22
Re-Running the Installer and Uninstalling 22
REGISTRATION 25
Registering GibbsCAM 25
Running the Registration Tool 26
Internet Registration 27
E-Mail Registration 28
Offline Registration 29
Completing E-Mail or Offline Registration 30
iii
Registration Tools 33
Standalone Licensing Utility 33
Verifying Activation Server Connectivity 34
License Updates 36
ABOUT NETWORK LICENSING 37
About Network License Installation Process 37
Phase 1 - Setting Up The Server 37
Phase 2 - Installing The Client Software 38
NLO Installation - Step By Step 39
NLO Step 1 - Setting Up The Server 39
NLO Step 2 - Install the Client Software On Each Node 45
Frequently Asked Questions 46
Installation and Configuration 46

iv

Introduction
• "Welcome"
• "New Security Features"
• "System Requirements"
• "Contacting Gibbs and Associates"
WELCOME
Congratulations on your purchase of GibbsCAM® 2010 v9.5 ("GibbsCAM"), the most productive CAMsystem available. This manual contains all the information you will need to install the system andbegin using the powerful and easy to use features contained in GibbsCAM software. If you have anyproblems with the installation procedure, contact your reseller or Gibbs and Associates’ TechnicalSupport department. They will be happy to assist you in the installation process. GibbsCAM 2010ships with a DVD-ROM that supports both the hardware key licensing system and the NetworkLicense Option. The contents of the DVD are accessed through an interface that should launch whenthe DVD is inserted. See "The DVD Explorer" for information on this tool.
WHAT YOUR ORDER SHOULD CONTAIN
l New customers will receive a USB hardware key.l GibbsCAM 2010 Installation DVD containing the GibbsCAM software for all modules and
options as well as documentation, part files, training videos and extra software.l A packing slip with your Activation Number on it.l A cover letter
1

Introduction
2
NEW SECURITY FEATURES
IMPORTANT INFORMATION ABOUT GIBBSCAM
SECURITY
Please be advised that GibbsCAM security is now activated via the Internet. If you do not haveInternet access available, you may activate security via e-mail or regular mail. Please allowadequate time to have the license file sent to you.
Method Estimated Time
E-mail during Gibbs business hours Same business day if received before 2:00 PST
E-mail after hours Next business day
Regular mail 1-2 business days plus regular mail shipping time
LICENSING
With GibbsCAM 2009 we introduced our next generation licensing technology. GibbsCAM pre-v9used three different licensing technologies from three different vendors. There were two differentsets of installation CDs, Hardware Key Lock and Network License Option. In v9 we unified ourlicensing based on RLM, Reprise License Manager, the newest license manager brought to you bythe people who developed FLEXlm®. We now have the flexibility to support keyed, timed, networkedand software-only licensing all from the same module. The details of your software entitlementswill now be maintained in a license files that can be updated in real time, instantly, as your needschange, through our new Gibbs Activation Service. We have added an on-line activation tool forlicense file creation and deployment with optional electronic or physical mail methods for thoseunable to connect over the internet. Transitions to new releases, duplicates of lost license files andupgrades to new product options will be available quickly and smoothly, facilitated by directcustomer 24/7/365 access to the Gibbs Activation Server.
HARDWARE KEY LOCK
In order to continue to allow you the flexibility to move your licenses between computers withoutcalling GibbsCAM to re-host, our next generation licensing will continue to use hardware locks toidentify authorized GibbsCAM users. The license file is linked to unique information from yourcomputing environment. In most cases this will be the serial number of a hardware key. The licensefile will only authorize use of GibbsCAM product when the hardware key or unique identifier(s) towhich it has been signed is/are present.

Introduction
3
SYSTEM REQUIREMENTS
The requirements to run GibbsCAM do not have specific values. The requirements vary dependingupon the operating system you use and the complexity of your part. We have a list of basicguidelines, seen below, that are common to all users. We also offer minimum supportedrequirements based upon your operating system and we have a recommended requirement.
Operating
System
Windows® 7, Windows Vista (SP1 or SP2), Windows XP (SP2 or SP3), Windows Server
2008 or Windows Server 2003.
Windows
Updates
In addition to the latest video drivers, please ensure that you have the latest patches
through Windows Update. We recommend using the latest available service pack
from Microsoft as we experience greater reliability with the newer software.
Hardware We have different minimum system requirements based on the operating system youwish to use. There are also recommended hardware requirements. Please rememberthat the more complex a part, the higher your system requirements.
• Minimum Supported Requirements: Windows XP & Server 2003
• Minimum Supported Requirements: Windows 7, Windows Vista & Windows Server2008
• Recommended System Requirements
• At least 500MB of drive space for the software.
• A DVD-ROM is required to read the GibbsCAM product disk.
Video
Drivers
Ensuring that you have the latest drivers installed for your video card is very
important. The standard Windows drivers are typically not adequate due to the
software's advanced use of OpenGL® and video RAM. We strongly recommend that
you keep your system up-to-date with fully installed and updated drivers.
Network
Licensing
The Network Licensing Option ("NLO") may be set up on Windows Server 2003 SP2 R2
(32-bit or 64-bit), on Server 2008 (32-bit or 64-bit), on Windows XP SP2 or later, on
Windows Vista SP1 or SP2 (32-bit or 64-bit) or on Windows 7 (32-bit or 64-bit).
For those users who have a 64-bit operating system, you have the choice of installing either the 32-bit version or the 64-bit version of GibbsCAM. Please see the section “What Are the DifferencesBetween 32-bit and 64-bit GibbsCAM?” on page 5
Introduction
4
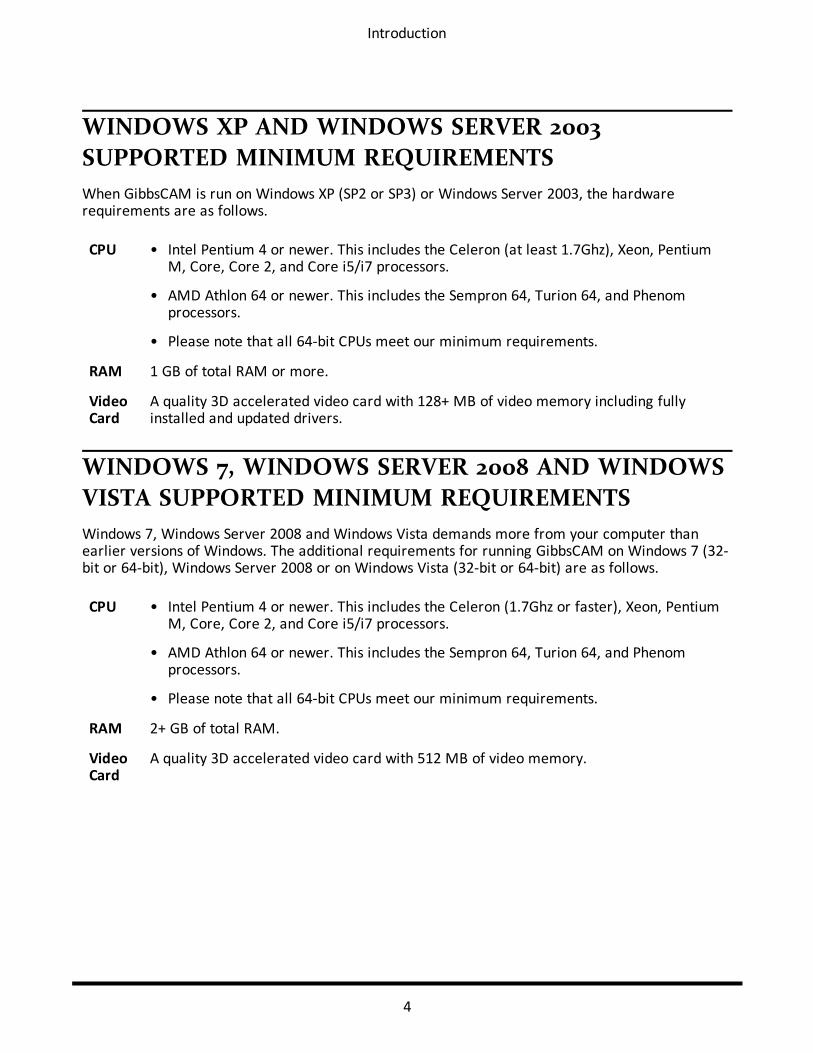
WINDOWS XP AND WINDOWS SERVER 2003
SUPPORTED MINIMUM REQUIREMENTS
When GibbsCAM is run on Windows XP (SP2 or SP3) or Windows Server 2003, the hardwarerequirements are as follows.
CPU • Intel Pentium 4 or newer. This includes the Celeron (at least 1.7Ghz), Xeon, PentiumM, Core, Core 2, and Core i5/i7 processors.
• AMD Athlon 64 or newer. This includes the Sempron 64, Turion 64, and Phenomprocessors.
• Please note that all 64-bit CPUs meet our minimum requirements.
RAM 1 GB of total RAM or more.
VideoCard
A quality 3D accelerated video card with 128+ MB of video memory including fullyinstalled and updated drivers.
WINDOWS 7, WINDOWS SERVER 2008 AND WINDOWS
VISTA SUPPORTED MINIMUM REQUIREMENTS
Windows 7, Windows Server 2008 and Windows Vista demands more from your computer thanearlier versions of Windows. The additional requirements for running GibbsCAM on Windows 7 (32-bit or 64-bit), Windows Server 2008 or on Windows Vista (32-bit or 64-bit) are as follows.
CPU • Intel Pentium 4 or newer. This includes the Celeron (1.7Ghz or faster), Xeon, PentiumM, Core, Core 2, and Core i5/i7 processors.
• AMD Athlon 64 or newer. This includes the Sempron 64, Turion 64, and Phenomprocessors.
• Please note that all 64-bit CPUs meet our minimum requirements.
RAM 2+ GB of total RAM.
VideoCard
A quality 3D accelerated video card with 512 MB of video memory.
Introduction
5
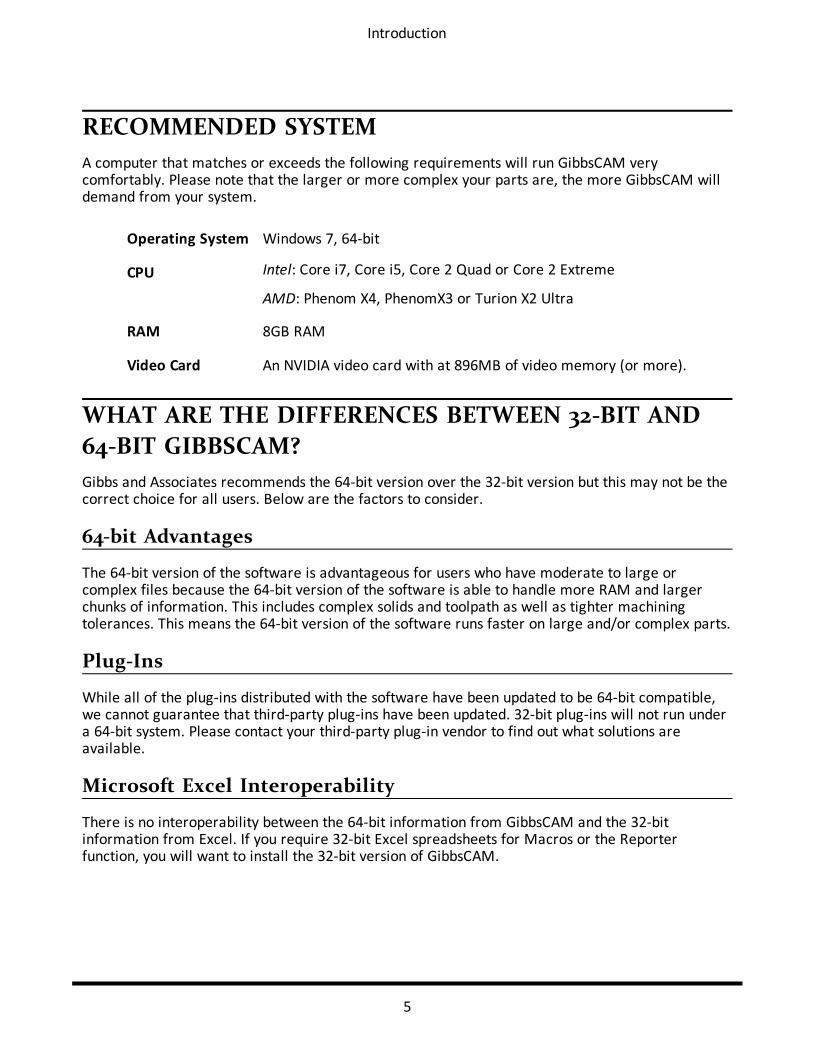
RECOMMENDED SYSTEM
A computer that matches or exceeds the following requirements will run GibbsCAM verycomfortably. Please note that the larger or more complex your parts are, the more GibbsCAM willdemand from your system.
Operating System Windows 7, 64-bit
CPU Intel: Core i7, Core i5, Core 2 Quad or Core 2 Extreme
AMD: Phenom X4, PhenomX3 or Turion X2 Ultra
RAM 8GB RAM
Video Card An NVIDIA video card with at 896MB of video memory (or more).
WHAT ARE THE DIFFERENCES BETWEEN 32-BIT AND
64-BIT GIBBSCAM?
Gibbs and Associates recommends the 64-bit version over the 32-bit version but this may not be thecorrect choice for all users. Below are the factors to consider.
64-bit Advantages
The 64-bit version of the software is advantageous for users who have moderate to large orcomplex files because the 64-bit version of the software is able to handle more RAM and largerchunks of information. This includes complex solids and toolpath as well as tighter machiningtolerances. This means the 64-bit version of the software runs faster on large and/or complex parts.
Plug-Ins
While all of the plug-ins distributed with the software have been updated to be 64-bit compatible,we cannot guarantee that third-party plug-ins have been updated. 32-bit plug-ins will not run undera 64-bit system. Please contact your third-party plug-in vendor to find out what solutions areavailable.
Microsoft Excel Interoperability
There is no interoperability between the 64-bit information from GibbsCAM and the 32-bitinformation from Excel. If you require 32-bit Excel spreadsheets for Macros or the Reporterfunction, you will want to install the 32-bit version of GibbsCAM.

Introduction
6
VMM Compatibility
32-bit VMMs are not usable by 64-bit GibbsCAM. 64-bit VMMs are available on request at nocharge for customers on maintenance. Please contact the Post department ([email protected])to request a 64-bit VMM. Please allow some time for delivery.
Introduction
7
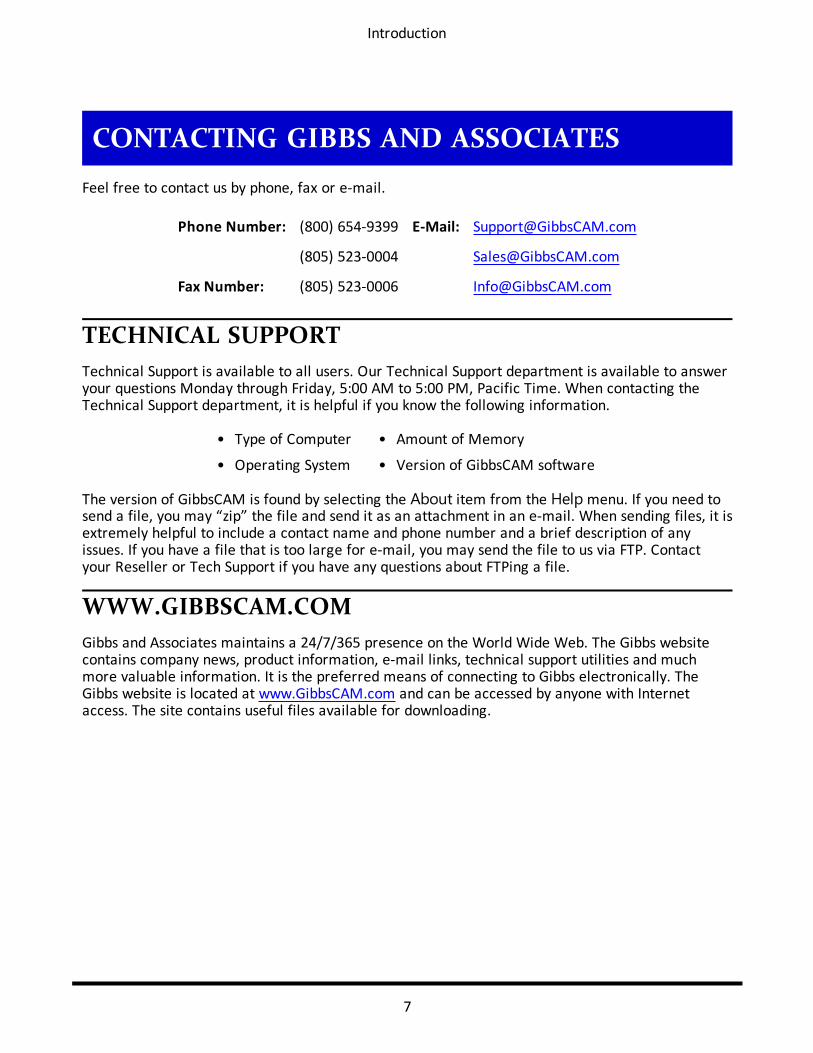
CONTACTING GIBBS AND ASSOCIATES
Feel free to contact us by phone, fax or e-mail.
Phone Number: (800) 654-9399 E-Mail: [email protected]
(805) 523-0004 [email protected]
Fax Number: (805) 523-0006 [email protected]
TECHNICAL SUPPORT
Technical Support is available to all users. Our Technical Support department is available to answeryour questions Monday through Friday, 5:00 AM to 5:00 PM, Pacific Time. When contacting theTechnical Support department, it is helpful if you know the following information.
• Type of Computer • Amount of Memory
• Operating System • Version of GibbsCAM software
The version of GibbsCAM is found by selecting the About item from the Helpmenu. If you need tosend a file, you may “zip” the file and send it as an attachment in an e-mail. When sending files, it isextremely helpful to include a contact name and phone number and a brief description of anyissues. If you have a file that is too large for e-mail, you may send the file to us via FTP. Contactyour Reseller or Tech Support if you have any questions about FTPing a file.
WWW.GIBBSCAM.COM
Gibbs and Associates maintains a 24/7/365 presence on the World Wide Web. The Gibbs websitecontains company news, product information, e-mail links, technical support utilities and muchmore valuable information. It is the preferred means of connecting to Gibbs electronically. TheGibbs website is located at www.GibbsCAM.com and can be accessed by anyone with Internetaccess. The site contains useful files available for downloading.

8

Installation
• "The DVD Explorer"
• "About the GibbsCAM Installer"
• "Where are Things Installed?"
• "Installing the GibbsCAM System"
THE DVD EXPLORER
When the GibbsCAM 2010 DVD is inserted the DVD Explorer opens. The GibbsCAM DVD Explorerprovides access to everything you need to use GibbsCAM. Click on a button or the text to access anitem.
GibbsCAM Installer Clicking this button will begin the process of installing GibbsCAM on your
computer.
Installation Guide Clicking this button will open the GibbsCAM Installation Guide PDF file.
9

Installation
10
Part Files This item will extract the tutorial and sample parts to a location you
specify. The Tutorial Parts folder contains parts used in the documentation,
as well as additional sample parts to experiment with. These files require
a significant amount of hard disk space. The part files are available on the
GibbsCAM website, but not available when using the Web installer.
Machine Sim Models This item opens a variety of sample Machine Sim models. Extract a
machine model to your hard drive if you would like to use it.
Documentation This item opens an Explorer window that contains the PDF files (cross-
platform files that are viewable with Adobe Reader 7.0 and later) for all
GibbsCAM documentation in all supported languages in PDF format.
Please note that the installer will automatically install these on your
system.
Data Sheet for
GibbsCAM 2010
Clicking this button opens the GibbsCAM 2010 data sheet in PDF format.
This document provides an overview of the contents of this release. For
more in-depth coverage of this release's contents, please see the "What's
New in GibbsCAM 2010" PDF.
Activation Check Clicking this button will run a tool that checks your internet connectivity
for on-line activation.
NLO Server
Registration
Click this item to run the NLO Server Registration software. This is the first
step when installing the Network Licensing scheme for the first time. "NLO
Installation - Step By Step" for information on setting up and using the RLM
license manager.
Drivers This item opens an Explorer window containing the hardware drivers for
the Rainbow and HASP Key.
Installation
11
Extras This item opens an Explorer window that contains numerous items
including:
l Training Materials and Tips videos. To view these videos your system
must be equipped with the TechSmith Screen Capture Codec (TSCC).
A codec is a program that encodes/decodes a digital data stream or
signal).l Utility for AVI files folder. There is a utility labelled TSCC.EXE that
will install the codec necessary to view the AVI files that are
provided by Gibbs and Associates. If you are experiencing difficulties
viewing our videos, please run this installer.l Backup copies of the CutDATA™ material database are available in
English, Japanese and Polish. The CutDATA material database
provides over 71,000 machining recommendations for feeds, speeds,
tool material, etc. for integration and access by the Material Library
capability contained in the system. If you are licensed for CutDATA,
it is automatically used. We provide copies here for backup
purposes. The version of CutDATA that is installed with this release is
not an updated version, but if you want to install it and wish to
maintain your old material database, you should copy your
Material.txt file to another directory before installing CutDATA.l The NPT Threading Processes folder contains saved process files
you can import into your parts for threading.l A shortcut for downloading the Adobe® Reader® software.l The File Utilities folder contains links to the websites of two file
archiving utilities, WinZip® (a well known utility) and 7-Zip (a high
quality open-source utility). You may download file
compression/decompression software from either site.l Post Order Forms for ordering custom post processors.l Supplemental materials.
Predator Editor This item will run an installer for Predator CNC Editor™ and PredatorVirtual CNC™ Viewer.
The Predator software that is included on the GibbsCAM 2010 DVD is alight version of the product. When you install the light version, use theserial number “LIGHT” to activate it. The light version is a very functionaleditor with no limitation on the size of the edited file. To understand thedifferences between the light version and the full-function version, youshould view the Predator CNC Editor Feature Grid PDF file in the Extrasfolder. Please visit www.predator-software.com for more information or ifyou are interested in upgrading to the full function version of the product.

Installation
12
www.GibbsCAM.com This item opens a browser window and takes you to the GibbsCAM
website.
Installation
13
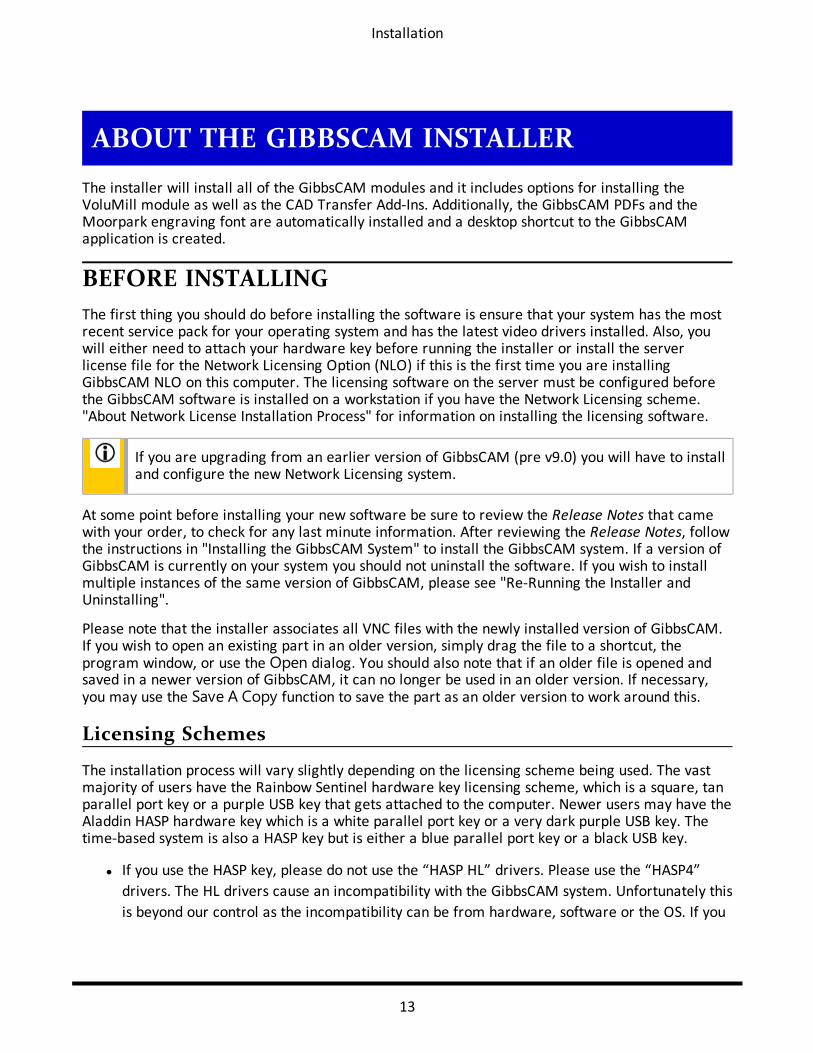
ABOUT THE GIBBSCAM INSTALLER
The installer will install all of the GibbsCAM modules and it includes options for installing theVoluMill module as well as the CAD Transfer Add-Ins. Additionally, the GibbsCAM PDFs and theMoorpark engraving font are automatically installed and a desktop shortcut to the GibbsCAMapplication is created.
BEFORE INSTALLING
The first thing you should do before installing the software is ensure that your system has the mostrecent service pack for your operating system and has the latest video drivers installed. Also, youwill either need to attach your hardware key before running the installer or install the serverlicense file for the Network Licensing Option (NLO) if this is the first time you are installingGibbsCAM NLO on this computer. The licensing software on the server must be configured beforethe GibbsCAM software is installed on a workstation if you have the Network Licensing scheme."About Network License Installation Process" for information on installing the licensing software.
If you are upgrading from an earlier version of GibbsCAM (pre v9.0) you will have to installand configure the new Network Licensing system.
At some point before installing your new software be sure to review the Release Notes that camewith your order, to check for any last minute information. After reviewing the Release Notes, followthe instructions in "Installing the GibbsCAM System" to install the GibbsCAM system. If a version ofGibbsCAM is currently on your system you should not uninstall the software. If you wish to installmultiple instances of the same version of GibbsCAM, please see "Re-Running the Installer andUninstalling".
Please note that the installer associates all VNC files with the newly installed version of GibbsCAM.If you wish to open an existing part in an older version, simply drag the file to a shortcut, theprogram window, or use the Open dialog. You should also note that if an older file is opened andsaved in a newer version of GibbsCAM, it can no longer be used in an older version. If necessary,you may use the Save A Copy function to save the part as an older version to work around this.
Licensing Schemes
The installation process will vary slightly depending on the licensing scheme being used. The vastmajority of users have the Rainbow Sentinel hardware key licensing scheme, which is a square, tanparallel port key or a purple USB key that gets attached to the computer. Newer users may have theAladdin HASP hardware key which is a white parallel port key or a very dark purple USB key. Thetime-based system is also a HASP key but is either a blue parallel port key or a black USB key.
l If you use the HASP key, please do not use the “HASP HL” drivers. Please use the “HASP4”
drivers. The HL drivers cause an incompatibility with the GibbsCAM system. Unfortunately this
is beyond our control as the incompatibility can be from hardware, software or the OS. If you

Installation
14
have installed the HL drivers please download and install the HASP Device Driver GUI
Installation drivers from here: www.aladdin.com/support/hasp/hasp4/enduser.aspx.
USB Key
The USB key may be attached to your system when installing the GibbsCAM software. The USB keymay be hot swapped. Simply place the USB key into a USB port on your computer. USB ports do notallow more than one device to be plugged into a port. If you need additional ports you shouldpurchase a USB hub to provide additional ports.
Rainbow HASP Cimatron Current Shipping
Parallel Port Key
The parallel port key should be attached to your computer before you run GibbsCAM. This willautomatically install the proper drivers for your system. Make sure the computer is turned offbefore attaching the hardware key. The hardware key should be placed in the parallel port (LPT1, orLPT2) in the back of your computer. The parallel port is the same port in which you plug yourprinter. Your printer may be plugged into the hardware key.
Rainbow HASP HASP
Installation
15
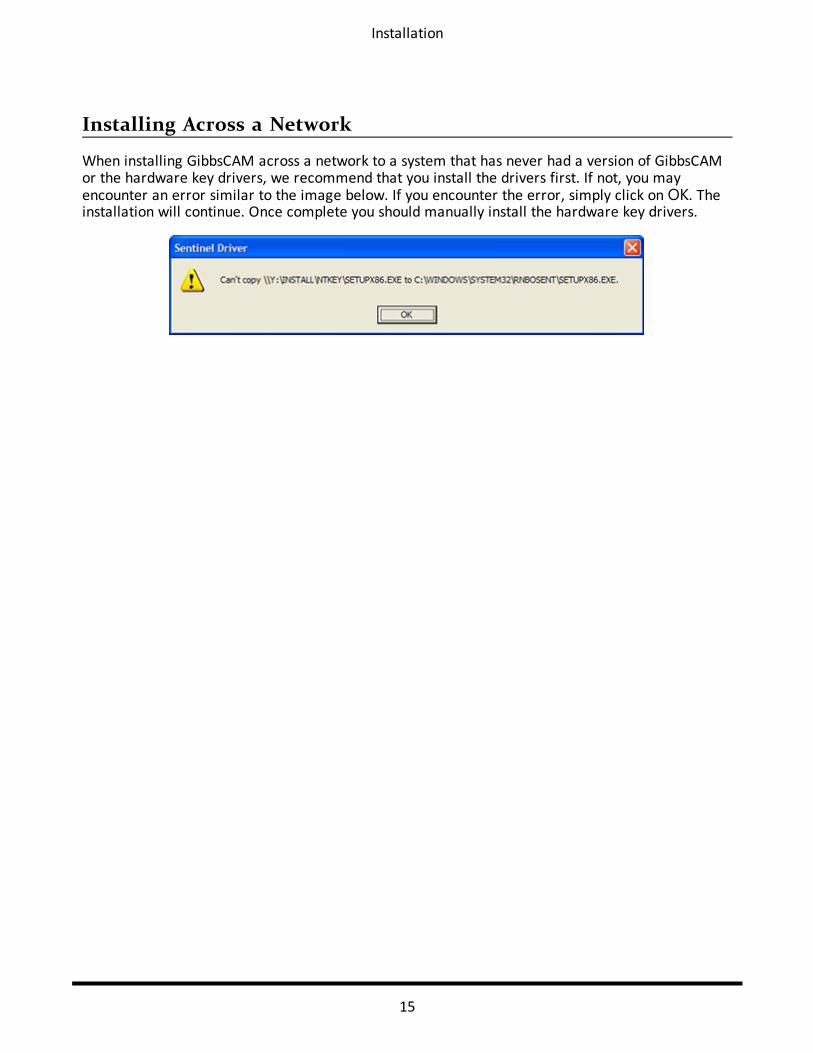
Installing Across a Network
When installing GibbsCAM across a network to a system that has never had a version of GibbsCAMor the hardware key drivers, we recommend that you install the drivers first. If not, you mayencounter an error similar to the image below. If you encounter the error, simply click onOK. Theinstallation will continue. Once complete you should manually install the hardware key drivers.

Installation
16
WHERE ARE THINGS INSTALLED?
POST PROCESSORS
Any post processors you are to receive will be included on a floppy disk which is included with yourorder. Copy the Posts folder from the floppy disk to your hard drive. You may store your postprocessors anywhere. After the first use the software will default to the folder from which you lastopened a post processor.
FILE LOCATIONS
Please be aware that there are three different classifications for data: User data, Global data andInstall Directory data. User data consists of files that change with each user, Global data consists offiles that are applied to all users. Install Directory data includes generic data as well as Reportertemplates. These three types of data are stored in three different locations, as detailed below. Ifyou customize these files or upgrade your version of GibbsCAM frequently, accessing and copyingthese files can become quite important. Please note that the locations and names are differentunder Windows 7, Windows Vista or Windows Server 2008 than under Windows XP or WindowsServer 2003.
Windows XP and Windows Server 2003
The following table shows the folder hierarchy for GibbsCAM files in Windows XP and WindowsServer 2003.
User Data C:\Documents and Settings\<username>\ApplicationData\Gibbs\GibbsCAM\<version>
GlobalData
C:\Documents and Settings\All Users\Application Data\Gibbs\GibbsCAM\<version>
Install Data C:\Program Files \Gibbs\GibbsCAM\<version>
Windows 7, Windows Vista and Windows Server 2008
The following table shows the folder hierarchy for GibbsCAM files in Windows 7, Windows Vista andWindows Server 2008.
User Data C:\Users\<username>\AppData\Roaming\Gibbs\GibbsCAM\<version>
Global Data C:\ProgramData\Gibbs\GibbsCAM\<version>
Install Data C:\Program Files\Gibbs\GibbsCAM\<version>

Installation
17
User Data
This directory holds sysdef.rsc (what was entered in dialogs), UIState.dat (where your windowswere and their size) and a Plugins folder that contains what was entered in the plug-ins. Althoughany of these items can be moved between version folders, it is not recommended because ofunpredictable behavior. If you move the files and experience odd behavior, delete them from thenew directory and relaunch GibbsCAM.
Global Data
This directory holds the bolt and tap tables, the CutDATA file (Material.txt), your communicationset-up data (protocol.txt), a file that stores the Hole Wizard data (prefs.rsc), a folder that containsyour custom MDDs, and the PostHASTE Library folder that contains PostHASTE library files. You willwant to copy these files to a new installation directory if you have customized them and installanother version of GibbsCAM. The location of the CutDATA file can also customized withinGibbsCAM; see the Preferences section of GibbsCAM.
Install Directory Data
Included in this folder are generic versions of Global and User data files as well as ReporterTemplates, which are located in the...PlugIns\Data\Report folder. If you create customreports they should be placed in this folder. Items in the install directory are marked as read-only. Ifyou do not have sufficient privileges you will need to have a user with Administrator access makechanges to this directory.
Existing Communications, CutDATA and Library Files
Installing a new version of GibbsCAM will install the default material database and create a blankcommunications file, default PostHASTE library files and Reporter templates. Once the new versionis installed you may copy protocol.txt, material.txt and the Library folder to the new GibbsCAMfolder.
A Note About User Access To Directories
Please note that Windows marks the Application Data folders as invisible, and Limited Users cannotaccess them. You may need an administrator’s assistance to access and modify these directories.

Installation
18
INSTALLING THE GIBBSCAM SYSTEM
Before installing the software, please review the section "The DVD Explorer". When setting up aNetwork Licensing scheme, the following installation steps must be taken on each client machine.This software must be installed before the license files generated by Gibbs and Associates areinstalled.
STEP-BY-STEP INSTRUCTIONS
1. Insert the product installation DVD-ROM into the DVD drive. The DVD Explorer shouldautomatically start when you put the DVD in the drive.
2. If you are installing on this machine click the GibbsCAM Installer button and the installer begins.If you are setting up a Network License installation, refer to "About Network Licensing".
• If you are running a 64-bit operating system you must decide whether you will install the 32-bit or the 64-bit software. A window opens which lets you choose which version to install.
It is strongly recommended that you click the "Read more about the differences" buttonbefore you make a choice. This will open another window that describes the differencesbetween the 32-bit and 64-bit versions and will help you determine the better choice foryou. For most users, the 64-bit version is recommended but some users, depending upontheir uses, may need the 32-bit version. For more information, please see “What Are theDifferences Between 32-bit and 64-bit GibbsCAM?” on page 5.
Installation
19
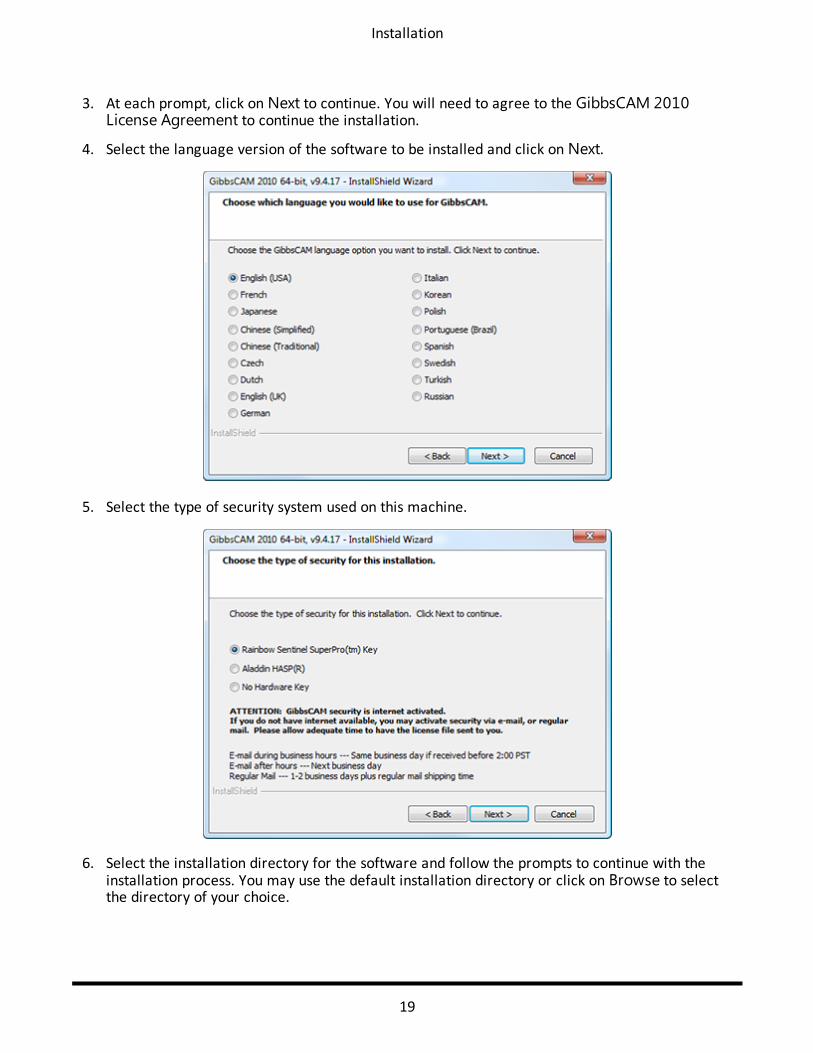
3. At each prompt, click on Next to continue. You will need to agree to the GibbsCAM 2010License Agreement to continue the installation.
4. Select the language version of the software to be installed and click on Next.
5. Select the type of security system used on this machine.
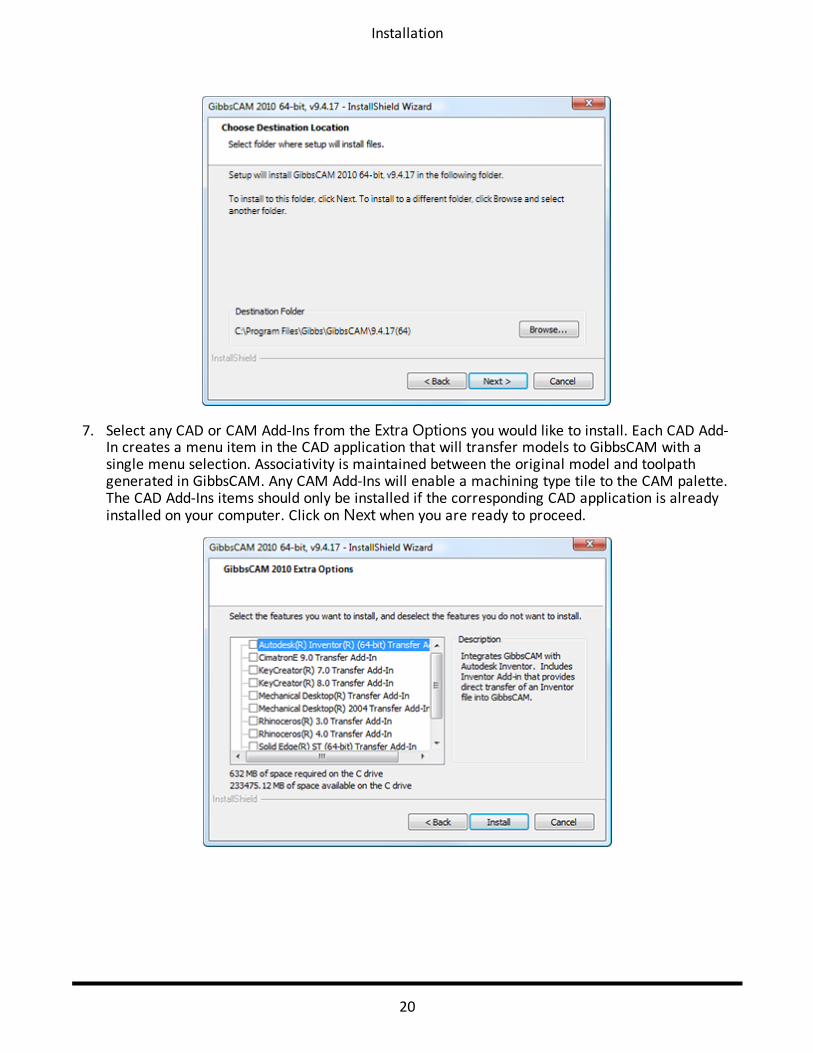
6. Select the installation directory for the software and follow the prompts to continue with theinstallation process. You may use the default installation directory or click on Browse to selectthe directory of your choice.
Installation
20
7. Select any CAD or CAM Add-Ins from the Extra Options you would like to install. Each CAD Add-In creates a menu item in the CAD application that will transfer models to GibbsCAM with asingle menu selection. Associativity is maintained between the original model and toolpathgenerated in GibbsCAM. Any CAM Add-Ins will enable a machining type tile to the CAM palette.The CAD Add-Ins items should only be installed if the corresponding CAD application is alreadyinstalled on your computer. Click on Next when you are ready to proceed.

Installation
21
Please note that on some systems, the SolidWorks Add-In may not automatically show up inthe SolidWorks menu bar. If this occurs while in SolidWorks, select Tools > Add-Ins fromthe menu bar. This opens a dialog that controls which Add-Ins are available. Select theGibbsCAM SolidWorks Add-In item and click OK. The item will now be available in themenu bar.
8. The installer will automatically install the Moorpark engraving font. When the installation iscomplete, click on the Finish button to close out of the setup.
9. To launch the GibbsCAM system, select the GibbsCAM 2010 v9.5 item in the Programs listunder the Startmenu. Additionally, the installer places a shortcut to the GibbsCAM executableon the desktop.
10. Once GibbsCAM is running you will need to register the software. The first time you launchGibbsCAM you will see the following dialog:

Installation
22
For more detailed information on installing and registering your license, see "RegisteringGibbsCAM".
RUNNING MULTIPLE VERSIONS OF GIBBSCAM
GibbsCAM 2010 natively supports simultaneously running multiple instances of the application. Ifyou wish to install multiple versions of GibbsCAM, such as installing several different localizedlanguage versions, make a copy of the existing version in a different directory (such asC:\Program Files\Gibbs\Backup) and then re-run the installer. The original installation willhave to be uninstalled and a new, second installation can be started. The process is described in thefollowing section.
RE-RUNNING THE INSTALLER AND UNINSTALLING
The recommended method foruninstalling GibbsCAM is to use Addand Remove Programs item found inthe Startmenu under Control Panels.
Each time the Installer is run it willattempt to install software but if itfinds that the same release (e.g.v9.5.0 is not the same release as

Installation
23
v9.5.1) of the GibbsCAM 2010 software has already been installed, the Installer will prompt you touninstall that version. Once the uninstall is complete you may install the software again. Please notethat this is not the preferred method of uninstalling GibbsCAM. Additionally, this process will notremove any folders and files you have created in the program folder or any Global or User data.This is to ensure any modifications you have made to these files are not lost.
Related Documents