Installation PM-Ethernet 10/100 in AS/400 Network Installation PM-Ethernet in AS/400 Networks AS/400 Basics The print servers fully support the SCS data stream of the IBM AS/400/iSeries. For IPDS data, only the conversion of fonts is possible. Other IPDS features still have to be converted using special data stream converters that are switched between the print server and the printer. In AS/400 networks there are two ways to operate network using a remote printer queue (RMTPRTQ)) using a device description In both cases the print-out is carried out via the AS/400/iSeries spool output system. We would recommend that you add the attribute SAVE(*YES) to printer files (PRTF) or spool files (SPLF) that are printed on printers with large storage capacity (e.g. PC printers). This avoids the loss of spool files in case of a printer fault. Starting with OS/400 V3R7, network printers can be connected to an enhanced device description via IP. To this purpose, special entries are made in the device description for the keywords DEVCLS(*LAN), LANATTACH (*IP) and RMTLOCNAME. As in the case of locally connected printers, error messages from the printer will accumulate in a message queue so that the printout can easily be controlled. To use this integration method, the Print Service Facility OS/400 (5769TC1 TCP/IP Connectivity Utilities) license program, which is available as standard feature with Release 3.7 and later has to be installed. When the network printer is integrated via a device description, the IBMSNMPDRV driver is supported. This driver allows bidirectionality in the case of external print servers. Starting with OS/400 V4R2, network printers can be addressed directly via a specially defined output queue (*OUTQ) without having to create a device description (*DEVD) for the printer. This can be done using the keywords RMTSYS and RMTPRTQ of the CRTOUTQ command. These keywords define a remote printer with the same name as the output queue. The remote printer can be started using the OS/400 command STRRMTWTR. The disadvantage of this kind of installation under OS/400 V4 is that the AS/400 does not receive the current printer status messages from the network printer and the administration options are considerably restricted. These restrictions are not caused by the print server but by the IP print mechanisms (lpr) used in the AS/400/iSeries. Starting with OS/400 V5R1, the IBM iSeries support IPP (Internet Printing Protocol) that allows the forwarding of detailed messages from the printer to the message queue. In order to configure a network printer, the user must have *IOYSCFG special authority. This may be the AS/400 security officer (QSECOFR) or a specially defined user profile. For further information about the *IOSYSCFG special authority, please consult the relevant AS/400/iSeries documentation. PSi Customer Support 19.04.2007 - 1 -

Welcome message from author
This document is posted to help you gain knowledge. Please leave a comment to let me know what you think about it! Share it to your friends and learn new things together.
Transcript

Installation PM-Ethernet 10/100 in AS/400 Network
Installation PM-Ethernet in AS/400 Networks AS/400 Basics The print servers fully support the SCS data stream of the IBM AS/400/iSeries. For IPDS data, only the conversion of fonts is possible. Other IPDS features still have to be converted using special data stream converters that are switched between the print server and the printer. In AS/400 networks there are two ways to operate network � using a remote printer queue (RMTPRTQ)) � using a device description In both cases the print-out is carried out via the AS/400/iSeries spool output system. We would recommend that you add the attribute SAVE(*YES) to printer files (PRTF) or spool files (SPLF) that are printed on printers with large storage capacity (e.g. PC printers). This avoids the loss of spool files in case of a printer fault. Starting with OS/400 V3R7, network printers can be connected to an enhanced device description via IP. To this purpose, special entries are made in the device description for the keywords DEVCLS(*LAN), LANATTACH (*IP) and RMTLOCNAME. As in the case of locally connected printers, error messages from the printer will accumulate in a message queue so that the printout can easily be controlled. To use this integration method, the Print Service Facility OS/400 (5769TC1 TCP/IP Connectivity Utilities) license program, which is available as standard feature with Release 3.7 and later has to be installed. When the network printer is integrated via a device description, the IBMSNMPDRV driver is supported. This driver allows bidirectionality in the case of external print servers. Starting with OS/400 V4R2, network printers can be addressed directly via a specially defined output queue (*OUTQ) without having to create a device description (*DEVD) for the printer. This can be done using the keywords RMTSYS and RMTPRTQ of the CRTOUTQ command. These keywords define a remote printer with the same name as the output queue. The remote printer can be started using the OS/400 command STRRMTWTR. The disadvantage of this kind of installation under OS/400 V4 is that the AS/400 does not receive the current printer status messages from the network printer and the administration options are considerably restricted. These restrictions are not caused by the print server but by the IP print mechanisms (lpr) used in the AS/400/iSeries. Starting with OS/400 V5R1, the IBM iSeries support IPP (Internet Printing Protocol) that allows the forwarding of detailed messages from the printer to the message queue. In order to configure a network printer, the user must have *IOYSCFG special authority. This may be the AS/400 security officer (QSECOFR) or a specially defined user profile. For further information about the *IOSYSCFG special authority, please consult the relevant AS/400/iSeries documentation.
PSi Customer Support 19.04.2007 - 1 -
Installation PM-Ethernet 10/100 in AS/400 Network
Which procedures can be selected?
• Creating a Remote Output Queue
• Creating a Device Description
Creating a Remote Output Queue The installation involves the following steps:
• Saving the IP Address in the Print Server • Checking the IP Connection • Creating a Remote Output Queue • Starting the Remote Printer Writer
Saving the IP Address in the Print Server In pure AS/400 network environments, the IP address cannot be assigned using arp and ping since the arp command is not available. Use other options to save the IP address such as the PRINTSERVER-NetTool. Checking the IP Connection Make sure that the print server will be recognized in the network by the AS/400/iSeries. Proceed as follows: Enter the following command into the OS/400 command line:
• PING� <IP address or host name of the print server> The result of the connection will be displayed. The IP address or the host name must be put in single quotation marks. If a connection cannot be achieved, check the network cabling and the IP connection of the print server from a PC. Make sure that the required TCP servers are started on the AS/400/iSeries. Creating a Remote Output Queue A remote output queue is created using the CRTOUTQ command. Depending on the release version of the OS/400, the keywords and parameters for the creation of an output queue may differ slightly from the following description. Before creating a remote output queue, make sure that there is no other output queue with the same name.
PSi Customer Support 19.04.2007 - 2 -
Installation PM-Ethernet 10/100 in AS/400 Network
Proceed as follows:
• Log in using a user profile. This user profile has *IOSYSCFG special authority. (alternatively QSECOFR).
• Enter the following command: CRTOUTQ
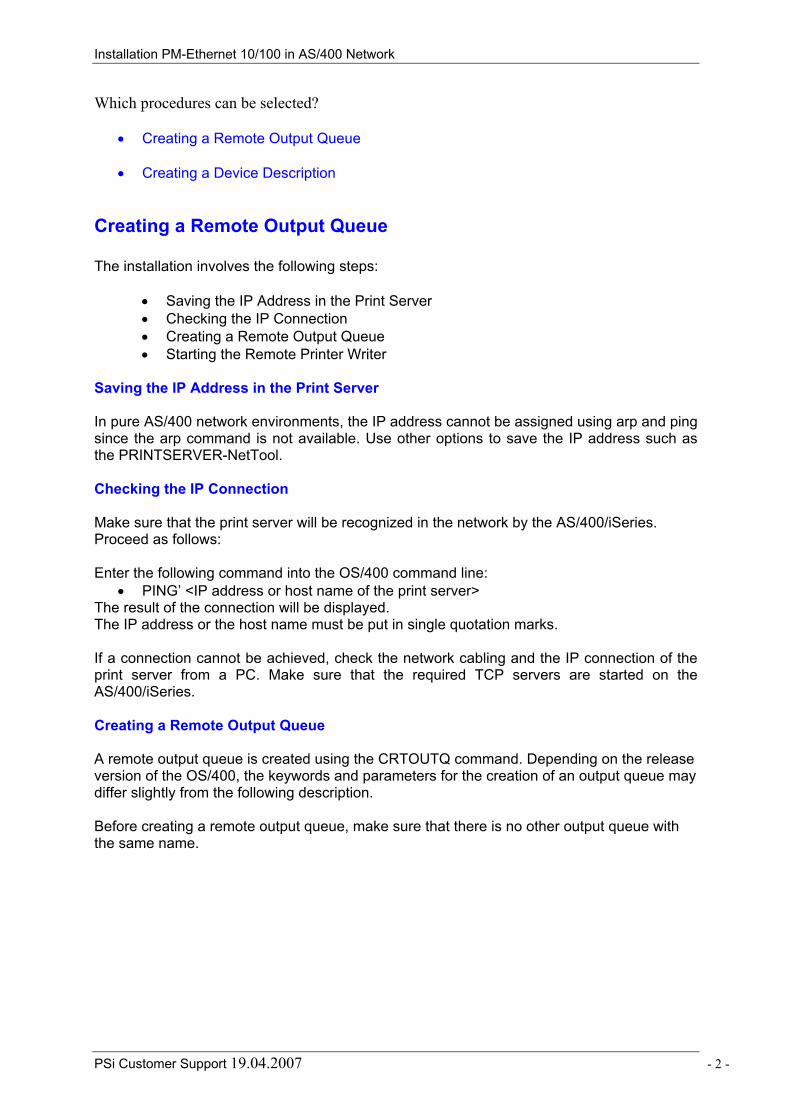
• Press the Enter key. The following window appears:
• Press F11. The command keywords are displayed.
• Geben Sie folgende Parameter in die Maske ein: OUTQ < name of the output queue >
e.g. MY_OUTQ library *QUSRSYS oder *CURLIB RMTSYS *INTNETADR
• Press F11.
• Enter the following parameter into the mask:
RMTPRTQ <logiscal printer> z.B. lp1 (lp1 is the default of Interfaces)
PSi Customer Support 19.04.2007 - 3 -
Installation PM-Ethernet 10/100 in AS/400 Network
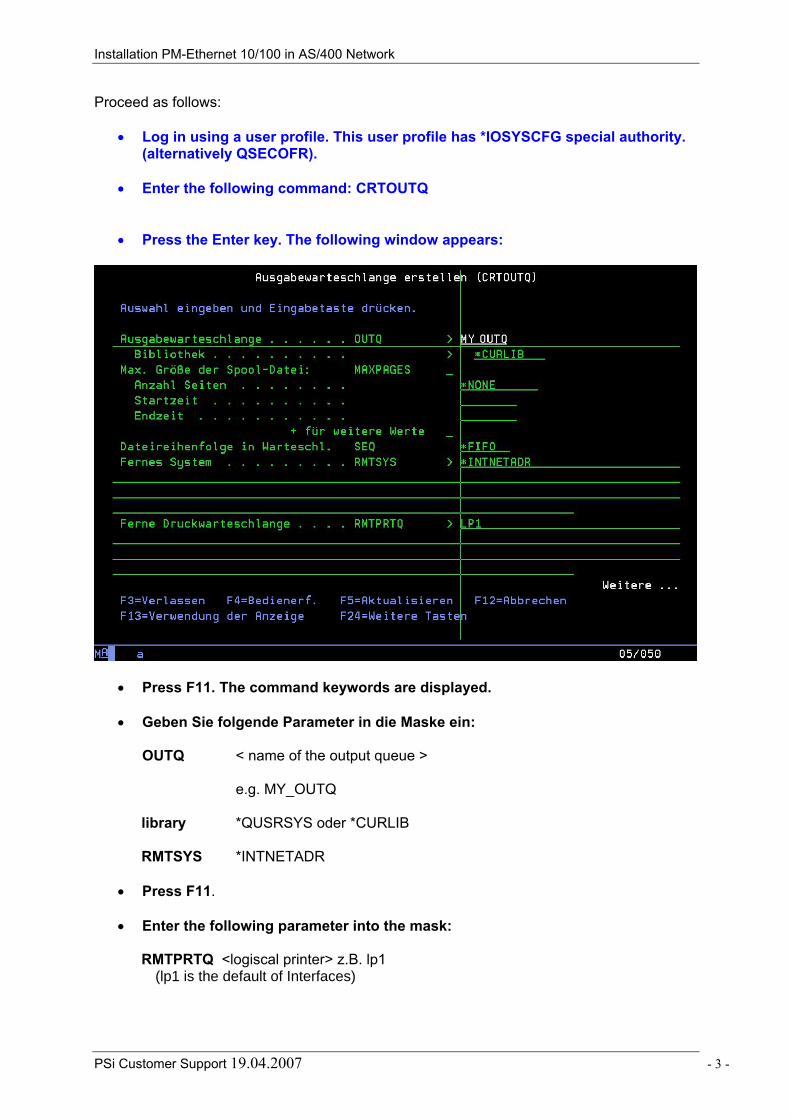
• Press the page down key.
The following window appears:
• Enter the following parameters into the mask:
AUTOSTRWTR < number of WTR jobs to be started > e.g. 2 (from 1-10) CNNMTYPE *IP DESTTYPE *OTHER TRANSFORM *YES MFRTYPMDL < manufacturer printer type and model > e.g. ( *EPLQ2550, *IBM42083......
Recommendation: Model * EPLQ2550 offers the largest use (kinds of fonts, pitches etc..) Depending of model type the appropriate emulation in the printer must be selected.
INTNETADR �<IP- address or host name of the print server >
� z.B.�192.168.0.123�
The IP address or the host name must be put in single quotation marks. Further data of the output queue can be used alternatively. We recommend that you choose a significant description for the keyword TEXT.
PSi Customer Support 19.04.2007 - 4 -
Installation PM-Ethernet 10/100 in AS/400 Network
• Press the Enter key.
The installation of a remote output queue has been completed successfully. Starting the Remote Printer Writer The printer writer for a remote output queue is started using the STRRMTPRT command. Proceed as follows:
• Enter the following command at the system console: STRRMTPRT <name of the output queue> Example: STRRMTPRT MY_DEVICE
If the printer writer has already been started you will receive a message. Alternatively, you can give details about message queues (MSGQ) and restrictions of form types (FORMTYPE).
Troubleshooting
• There may be various reasons that a print job cannot be printed. The remote printer writer is not started. Start the remote printer writer using the writer is not started. STRRMTWTR command <name of the output queue>.:
Note: Printer writers for remote output queues cannot be displayed using the WRKWTR command.
• The output queue is held.
View all output queues using the OS/400 command WRKOUTQ *ALL.The status of the output queue should be RLS (released). If the status is HDL (held), release the output queue by entering 6.
• The spool files are not released
View the contents of the output queue using the WRKOUTQ command <name of the output queue>. If the status of the first spool file to be printed is HDL (held), release the file by chosing 6. The status will change from *RLS to SND (send). Once the file is printed it will be deleted from the list or will change to the status SAV (save). .
PSi Customer Support 19.04.2007 - 5 -
Installation PM-Ethernet 10/100 in AS/400 Network
Creating a Device Description The installation involves the following steps:
• Saving the IP Address in the Print Server • Checking the IP Connection • Creating a Device Description • Attaching the Device Description • Starting the Printer Writer
Saving the IP Address in the Print Server In pure AS/400 network environments, the IP address cannot be assigned using arp and ping since the arp command is not available. Use other options to save the IP address such as the PRINTSERVER-NetTool. Checking the IP Connection Make sure that the print server will be recognized in the network by the AS/400/iSeries. Proceed as follows: Enter the following command into the OS/400 command line:
• PING� <IP address or host name of the print server> The result of the connection will be displayed. The IP address or the host name must be put in single quotation marks. If a connection cannot be achieved, check the network cabling and the IP connection of the print server from a PC. Make sure that the required TCP servers are started on the AS/400/iSeries. Creating a Device Description A remote device printer may be created using the CRTDEVPRT command. Depending on the release version of the OS/400, the keywords and parameters for the creation of a device description may differ slightly from the following description (V5R1). Before creating a device description, make sure that there is no other device with the same name Proceed as follows:
• Log in using a user profile. This user profile has *IOSYSCFG special authority. (alternatively QSECOFR).
• Enter the following command: CRTDEVPRT
• Press F4.
The command prompt is displayed.
PSi Customer Support 19.04.2007 - 6 -
Installation PM-Ethernet 10/100 in AS/400 Network
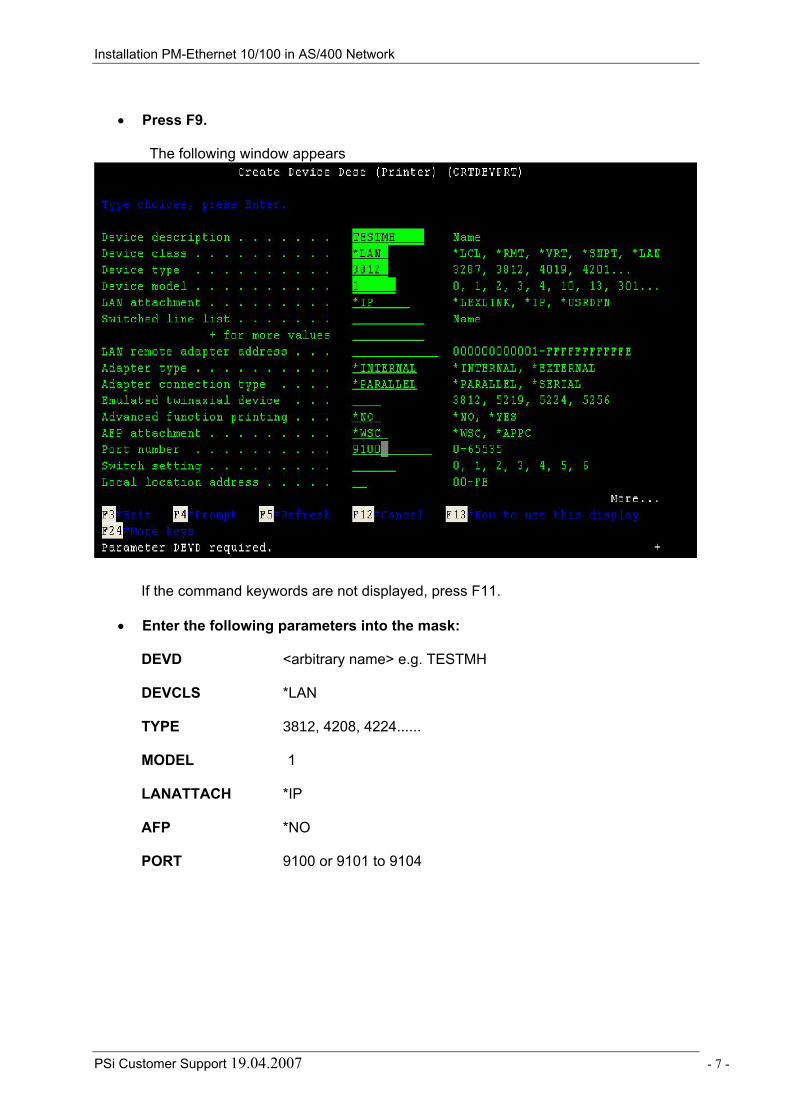
• Press F9.
The following window appears
If the command keywords are not displayed, press F11.
• Enter the following parameters into the mask:
DEVD <arbitrary name> e.g. TESTMH DEVCLS *LAN TYPE 3812, 4208, 4224...... MODEL 1 LANATTACH *IP AFP *NO PORT 9100 or 9101 to 9104
PSi Customer Support 19.04.2007 - 7 -
Installation PM-Ethernet 10/100 in AS/400 Network
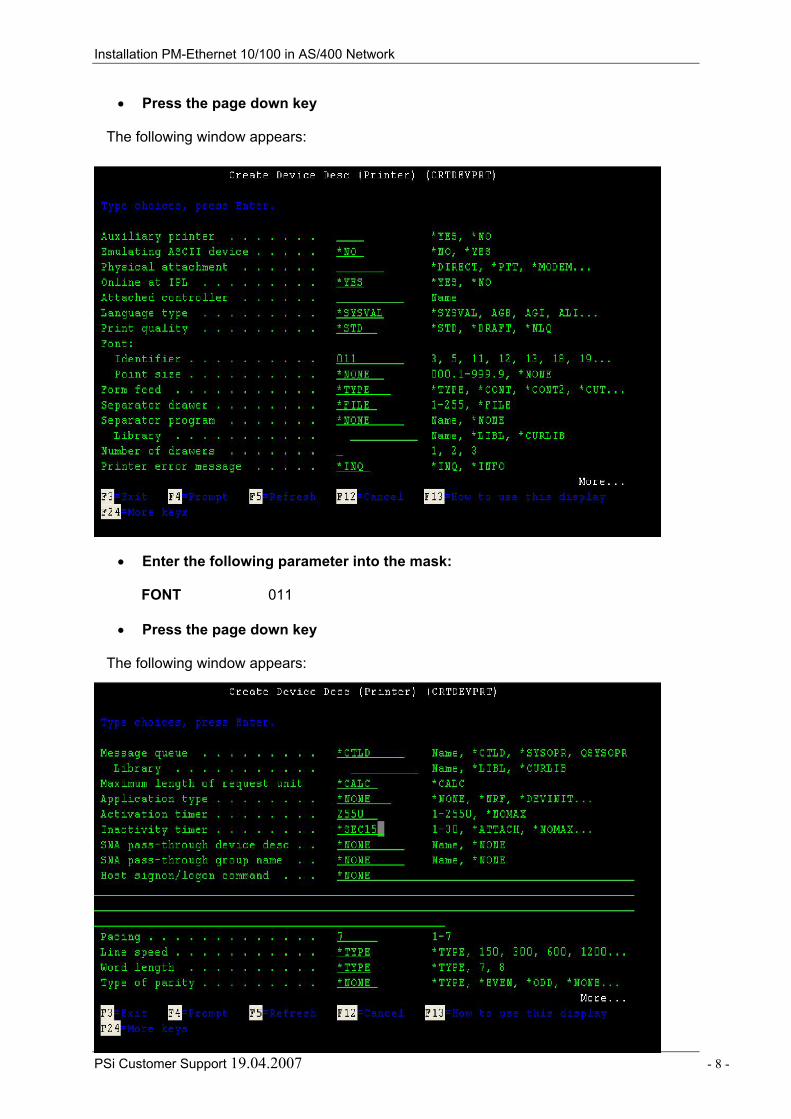
• Press the page down key
The following window appears:
• Enter the following parameter into the mask:
FONT 011
• Press the page down key
The following window appears:
PSi Customer Support 19.04.2007 - 8 -
Installation PM-Ethernet 10/100 in AS/400 Network
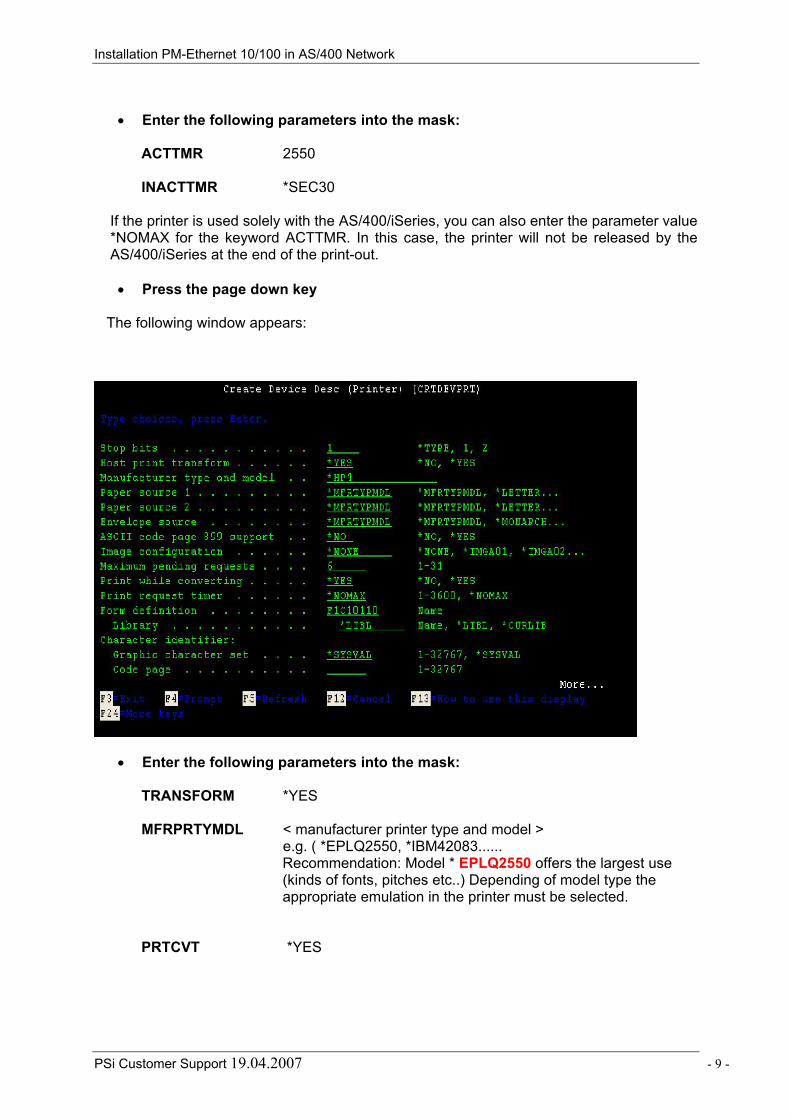
• Enter the following parameters into the mask:
ACTTMR 2550 INACTTMR *SEC30
If the printer is used solely with the AS/400/iSeries, you can also enter the parameter value *NOMAX for the keyword ACTTMR. In this case, the printer will not be released by the AS/400/iSeries at the end of the print-out.
• Press the page down key
The following window appears:
• Enter the following parameters into the mask:
TRANSFORM *YES MFRPRTYMDL < manufacturer printer type and model > e.g. ( *EPLQ2550, *IBM42083......
Recommendation: Model * EPLQ2550 offers the largest use (kinds of fonts, pitches etc..) Depending of model type the appropriate emulation in the printer must be selected.
PRTCVT *YES
PSi Customer Support 19.04.2007 - 9 -
Installation PM-Ethernet 10/100 in AS/400 Network
• Press the page down key
The following window appears:
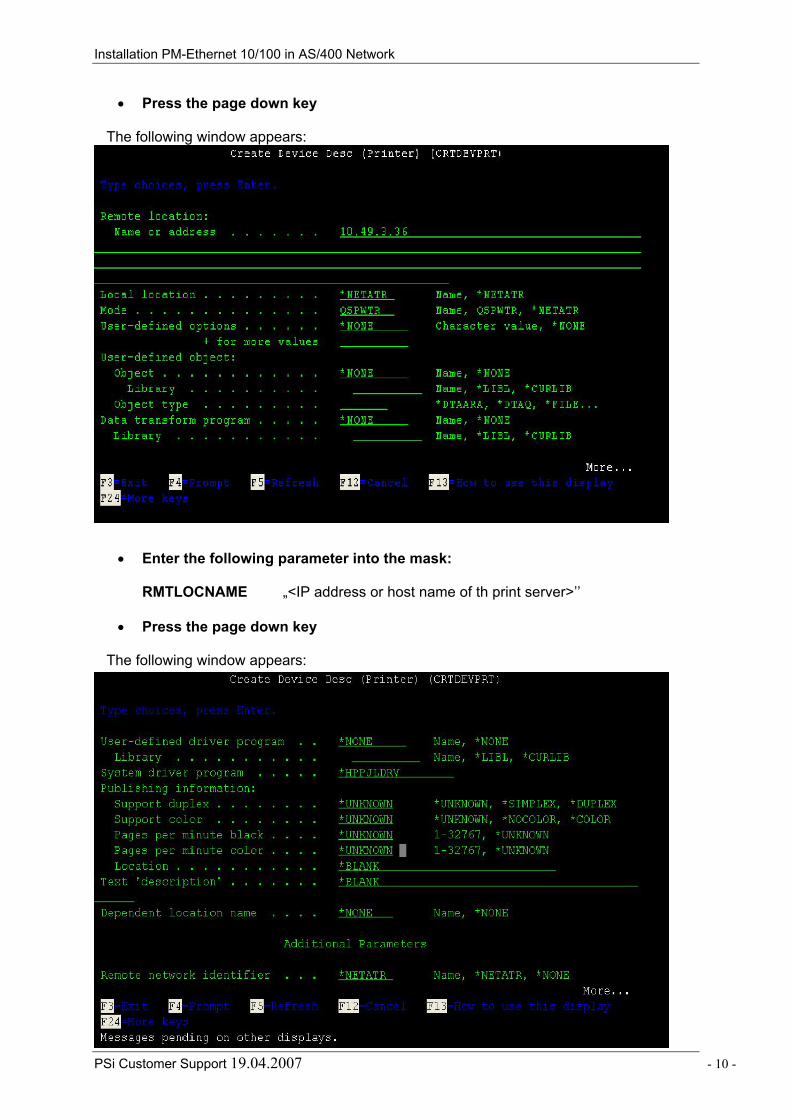
• Enter the following parameter into the mask:
RMTLOCNAME �<IP address or host name of th print server>��
• Press the page down key
The following window appears:
PSi Customer Support 19.04.2007 - 10 -
Installation PM-Ethernet 10/100 in AS/400 Network
• Depending on the printer type, enter the following parameters into the mask under SYSDRVPGM:
for PSi Ethernet Matrixprinter *IBMSNMPDRV
Further details of the device description can be used alternatively. We recommend that you choose a significant description for the keyword TEXT.
• Press the Enter key. The device description is created.
• Attaching the Device Description
Proceed as follows: 1. Check whether the device description is attached: WRKCFGSTS *dev
<arbitrary name>
2. If the status is "detached", attach the device by entering 1.
• Starting the Printer Writer
Proceed as follows:
1. Enter the following command: STRPRTWTR<arbitrary name> The printer writer is started.
2. Make sure that the status of the output queue is RLS. Release the output queue using the RLSWTR command, if necessary. The installation has been completed successfully..
Troubleshooting There may be various reasons that a print job cannot be printed.
• The print device is not attached The print device is not Check the status of the device using the attached WRKCFGSTS command as described in the section "Attaching the Device"
• The printer writer is not startet Start the program using the STRPRTWTR command. The output queue is held. Check the status of the output queue (status HLD). Release the output queue using the RLSOUTQ command.
PSi Customer Support 19.04.2007 - 11 -
Installation PM-Ethernet 10/100 in AS/400 Network
• The output file is held. View the contents of the output queue using the WRKOUTQ command and release the spool file by entering 6.
• A printer message is pending. View the contents of the output queue using the WRKOUTQ command. If the status MSG is shown for an ouput queue to be printed, view the message by entering 7 and answer it.
PSi Customer Support 19.04.2007 - 12 -
Related Documents