©2016 Rekluse Motor Sports, Inc. 208-426-0659 [email protected] REKLUSE MOTOR SPORTS The Rekluse EXP Kit for KTM 1050, 1190, 1290 LC8 INSTALLATION & USER’S GUIDE Doc ID: 191-6383A Doc Rev: 091916 OVERVIEW For Model-Year 2016 bike owners only: Refer to the Slave Cylinder Appendix document before installing the Rekluse-provided slave cylinder on your bike. It may be necessary to change the seals. This kit replaces the OEM clutch pack with a Rekluse-designed clutch pack intended for optimal operation specific to your bike. The entire OEM clutch pack will be replaced with Rekluse friction disks and drive plates, with the judder spring and its spring seat being the only two OEM clutch pack components retained. INSIDE THIS DOCUMENT o PREP & DISASSEMBLY o CLUTCH INSTALLATION o SETTING THE INSTALLED GAP & BREAK-IN o TROUBLESHOOTING o EXP TUNING OPTIONS & ENGAGEMENT SETTINGS o MAINTENANCE INSTALLATION TIPS Watch related videos by following this QR code or visiting rekluse.com/videos. Read this entire document before performing any steps, so you will know what to expect. Be sure to wear proper eye protection. Leaning the bike allows for easy clutch access and eliminates the need to drain oil. Use clean, quality JASO MA certified oil for motorcycle transmissions for best performance. When reinstalling components, use the torque specifications found in your OEM service manual. TOOLS NEEDED Metric socket set 4mm Allen key Torque wrench (in-lb & ft-lb, or N-m) Metric open-end wrench set

Welcome message from author
This document is posted to help you gain knowledge. Please leave a comment to let me know what you think about it! Share it to your friends and learn new things together.
Transcript
©2016 Rekluse Motor Sports, Inc. 208-426-0659
REKLUSE MOTOR SPORTS The Rekluse EXP Kit for KTM 1050, 1190, 1290 LC8
INSTALLATION &
USER’S GUIDE
Doc ID: 191-6383A Doc Rev: 091916
OVERVIEW
For Model-Year 2016 bike owners only: Refer to the Slave Cylinder Appendix document before
installing the Rekluse-provided slave cylinder on your bike. It may be necessary to change the seals.
This kit replaces the OEM clutch pack with a Rekluse-designed clutch pack intended for optimal
operation specific to your bike.
The entire OEM clutch pack will be replaced with Rekluse friction disks and drive plates, with
the judder spring and its spring seat being the only two OEM clutch pack components retained.
INSIDE THIS DOCUMENT
o PREP & DISASSEMBLY
o CLUTCH INSTALLATION
o SETTING THE INSTALLED GAP & BREAK-IN
o TROUBLESHOOTING
o EXP TUNING OPTIONS & ENGAGEMENT SETTINGS
o MAINTENANCE
INSTALLATION TIPS
Watch related videos by following this QR code or visiting rekluse.com/videos.
Read this entire document before performing any steps, so you will know what to expect.
Be sure to wear proper eye protection.
Leaning the bike allows for easy clutch access and eliminates the need to drain oil.
Use clean, quality JASO MA certified oil for motorcycle transmissions for best performance.
When reinstalling components, use the torque specifications found in your OEM service manual.
TOOLS NEEDED
Metric socket set
4mm Allen key
Torque wrench (in-lb & ft-lb, or N-m)
Metric open-end wrench set
Rekluse Adventure-Bike EXP Page 2
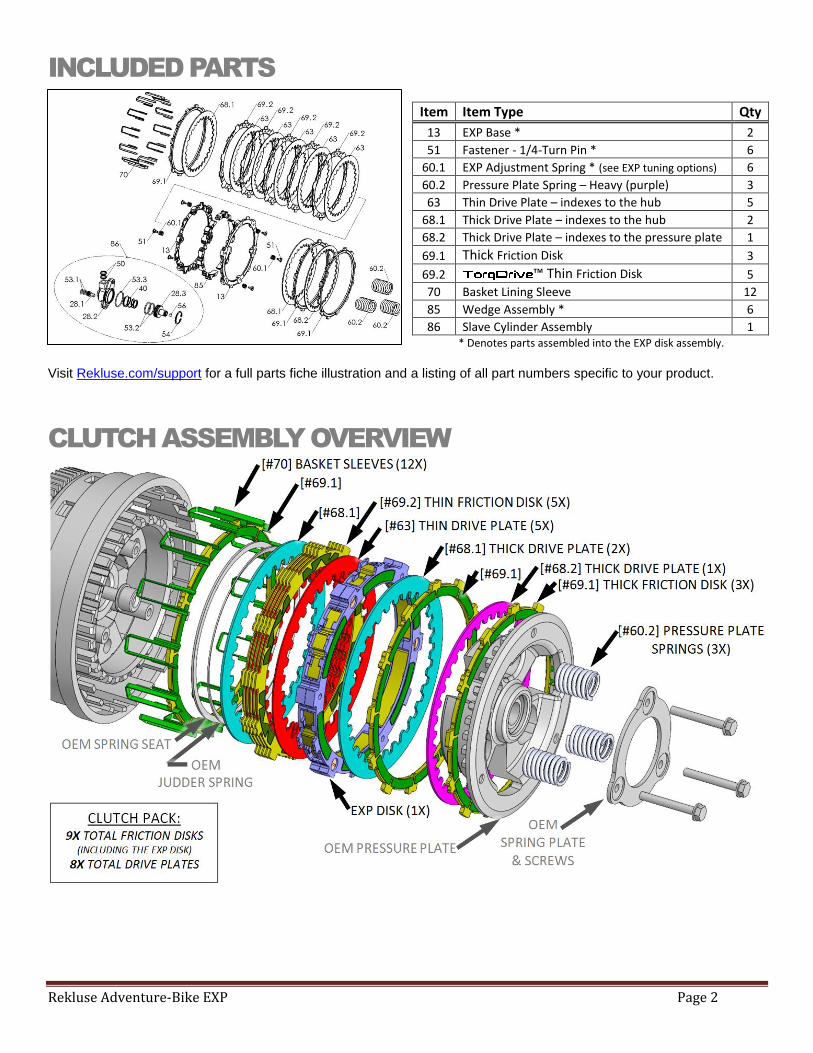
INCLUDED PARTS
Item Item Type Qty
13 EXP Base * 2
51 Fastener - 1/4-Turn Pin * 6
60.1 EXP Adjustment Spring * (see EXP tuning options) 6
60.2 Pressure Plate Spring – Heavy (purple) 3
63 Thin Drive Plate – indexes to the hub 5
68.1 Thick Drive Plate – indexes to the hub 2
68.2 Thick Drive Plate – indexes to the pressure plate 1
69.1 Thick Friction Disk 3
69.2 ™ Thin Friction Disk 5
70 Basket Lining Sleeve 12
85 Wedge Assembly * 6
86 Slave Cylinder Assembly 1 * Denotes parts assembled into the EXP disk assembly.
Visit Rekluse.com/support for a full parts fiche illustration and a listing of all part numbers specific to your product.
CLUTCH ASSEMBLY OVERVIEW

Rekluse Adventure-Bike EXP Page 3
PREP & DISASSEMBLY
1. Soak the EXP disk and Rekluse friction disks in
engine oil for at least 5 minutes.
2. To avoid draining the oil, you can either:
a. Using the regular kickstand, block the rear tire up a few inches to increase the bike’s lean angle.
b. Lean the motorcycle against something sturdy on its left side.
Alternatively, you can stand the bike vertically on its center stand and drain the oil.
3. Remove the clutch cover bolts and clutch cover.
4. Remove the parts named in the following diagram, including the entire OEM clutch pack (all clutch plates and the 2 judder spring components).
NOTE: Is it optional to leave the judder spring and spring seat inside the clutch, as you will be reinstalling them exactly as they were removed. We point them out so that you are aware of their presence and location, and so they are not accidentally left out or misplaced. These parts function to reduce clutch noise.
Rekluse Adventure-Bike EXP Page 4
CLUTCH INSTALLATION
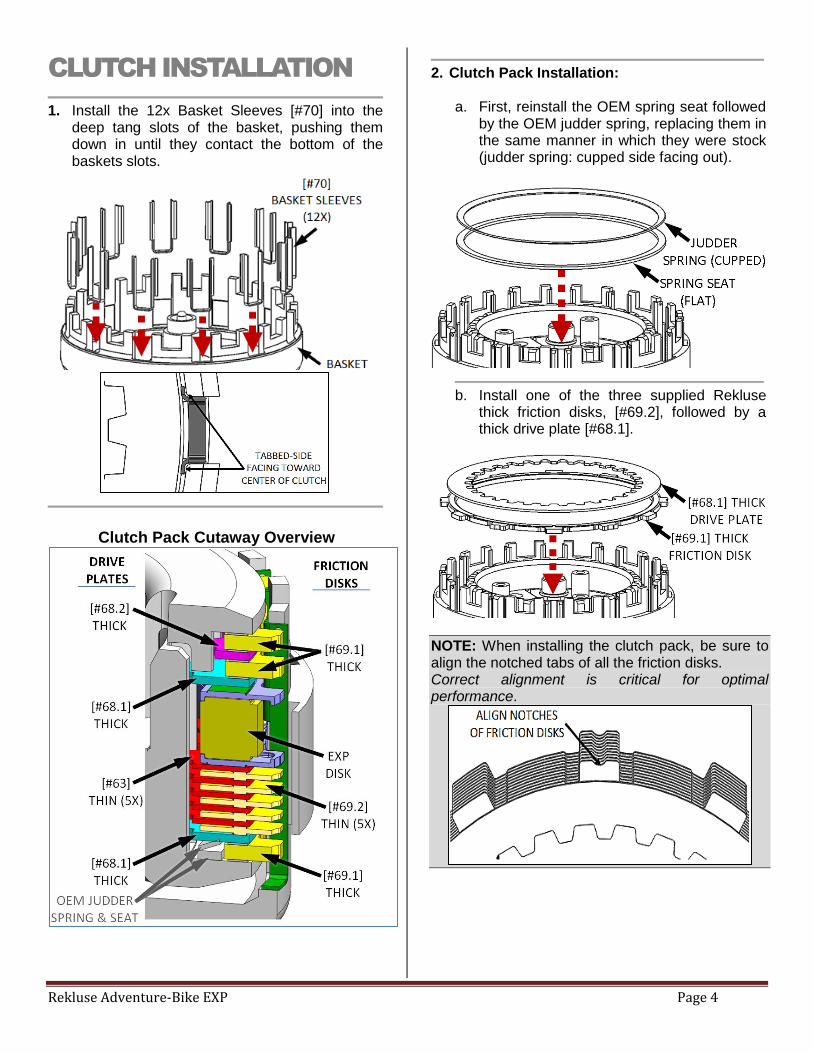
1. Install the 12x Basket Sleeves [#70] into the
deep tang slots of the basket, pushing them down in until they contact the bottom of the baskets slots.
Clutch Pack Cutaway Overview
2. Clutch Pack Installation:
a. First, reinstall the OEM spring seat followed
by the OEM judder spring, replacing them in the same manner in which they were stock (judder spring: cupped side facing out).
b. Install one of the three supplied Rekluse thick friction disks, [#69.2], followed by a thick drive plate [#68.1].
NOTE: When installing the clutch pack, be sure to align the notched tabs of all the friction disks. Correct alignment is critical for optimal performance.

Rekluse Adventure-Bike EXP Page 5
c. Starting with a friction disk, install the 5x
Rekluse thin friction disks [#69.1] and the 5x Rekluse thin drive plates [#63] in an alternating pattern.
d. Next, install the EXP disk on top of the last (5th) thin drive plate. This disk is symmetrical and can be installed with either side facing out. However, the tab notches must align with the tab notches on rest of the friction disks.
e. On top of the EXP disk, install the 2nd thick drive plate [#68.1] followed by the 2nd thick friction disk [#69.2].
f. With the pressure plate flipped upside down
on a workbench, first place the last Rekluse thick friction disk [#69.2] followed by the large-diameter Rekluse thick drive plate [#68.2], indexing its teeth to the teeth of the pressure plate.
g. Install this new pressure plate assembly, taking care to align the tab notches on the top friction disk with tabs on all the rest of the previously installed friction disks.
NOTE: Index the friction disk tabs only into the full basket tang slots. Never install any disks into the half-slots.

Rekluse Adventure-Bike EXP Page 6
3. Install the Rekluse pressure plate springs
[#60.2] with the stock spring plate and screws.
NOTE: The Rekluse pressure plate springs are stiffer than the stock springs, which will offer more clutch torque capacity and better performance. Due to the fact that the EXP clutch pack has one fewer friction disk than the OEM clutch pack, the springs help to compensate by increasing the clamping force.
4. Reinstall the clutch cover and torque the bolts
to OEM spec.
SLAVE CYLINDER
INSTALLATION
Handle with care! During assembly there is a small ball bearing [#56] installed in the slave piston [#28.3] with a small amount of grease. When installing the Rekluse slave cylinder, make sure the ball does not fall out.
NOTE: When compressing the piston, fluid can shoot out from the slave cylinder port. Always be sure to wear eye protection.
1. Stand the bike up and lean it on its kickstand or place it on a suitable bike stand.
2. Using a 13mm wrench, remove the banjo bolt
from the OEM slave cylinder. Be ready to catch the fluid that drains out of the line. Next, remove the OEM slave cylinder from the engine and set it aside.
IMPORTANT CLUTCH FLUID NOTE:
For MY2016 bike owners only:
Refer to the Slave Cylinder Appendix
document before installing the Rekluse-
provided slave cylinder on your bike. It may be
necessary to change the fluid seals in the
cylinder housing and piston.
For all other model-years:
Read the fluid information located on the
reservoir cap of your bike’s clutch master
cylinder. This will inform you of which clutch
fluid to use in the following steps, either mineral
oil or DOT brake fluid.

Rekluse Adventure-Bike EXP Page 7
3. On a workbench (away from the engine), bleed
the Rekluse slave cylinder by this procedure:
a. Using your thumbs, compress the slave cylinder piston until it bottoms out and hold it there.
b. While holding the slave cylinder piston, pour the appropriate clutch fluid into the slave cylinder port until it is full.
c. Release the piston and allow it to pull the fluid into the slave cylinder. Repeat this process until the slave cylinder remains full when the piston is released.
a. There is a ball bearing installed in the slave piston with a small amount of grease. Confirm that this ball bearing [#56] is still inside the piston, and has not fallen out during shipping.
4. Install the Rekluse Slave Cylinder using the
OEM bolts and the provided large O-ring [#53.3] between it and the OEM plastic spacer.
5. Re-install the OEM banjo bolt into the Rekluse Slave Cylinder using the provided crush washers [#50].
6. Remove the cap and bladder from the clutch
master cylinder.
7. Fill the provided syringe with clutch fluid.
8. Attach the syringe hose to the bleed port on top
of the slave cylinder banjo bolt.
9. Using an 8mm wrench, open the bleed port and
back-fill the system using the syringe until the master cylinder reservoir is full. Then, tighten the bleed port.
NOTE: Make sure there are no air bubbles in the clear hose of the bleeder syringe before back-filling the system.
10. Check that the clutch lever functions properly. If
not, repeat the back-bleeding steps after removing any excess clutch fluid from the master cylinder.
11. Finally, remove the bleed tube and clean the
area of spilled fluid. Replace the dust boot over the bleed port.
Rekluse Adventure-Bike EXP Page 8
INSTALLED GAP SETTING
DEFINITION: the “Installed Gap” is the separation in the clutch pack created by the adjustment of the Adjuster Screw in the Slave Cylinder. This gap is what allows the clutch to spin freely until the desired RPM is reached for engagement; it must be set correctly for optimal performance.
NOTICE Failure to check and verify Free Play Gain can cause failure or damage to this product. Setting the correct gap is critical for clutch performance.
1. Using the long end of a 4mm Allen key, turn the
adjuster screw clockwise until it stops under moderate pressure. You are trying to feel for the point at which the screw bottoms on the slave piston and the throwout will start to lift the pressure plate. This is the “starting point”.
NOTE: It may take a few tries to find the point at which the system is bottomed out. You should feel a distinguishable change in turning effort at this point.
2. Once you have found the starting point, turn the adjuster clockwise 1 full turn. This is NOT your final setting, but it is a good reference point for using free play gain to find the final, correct Installed Gap setting.
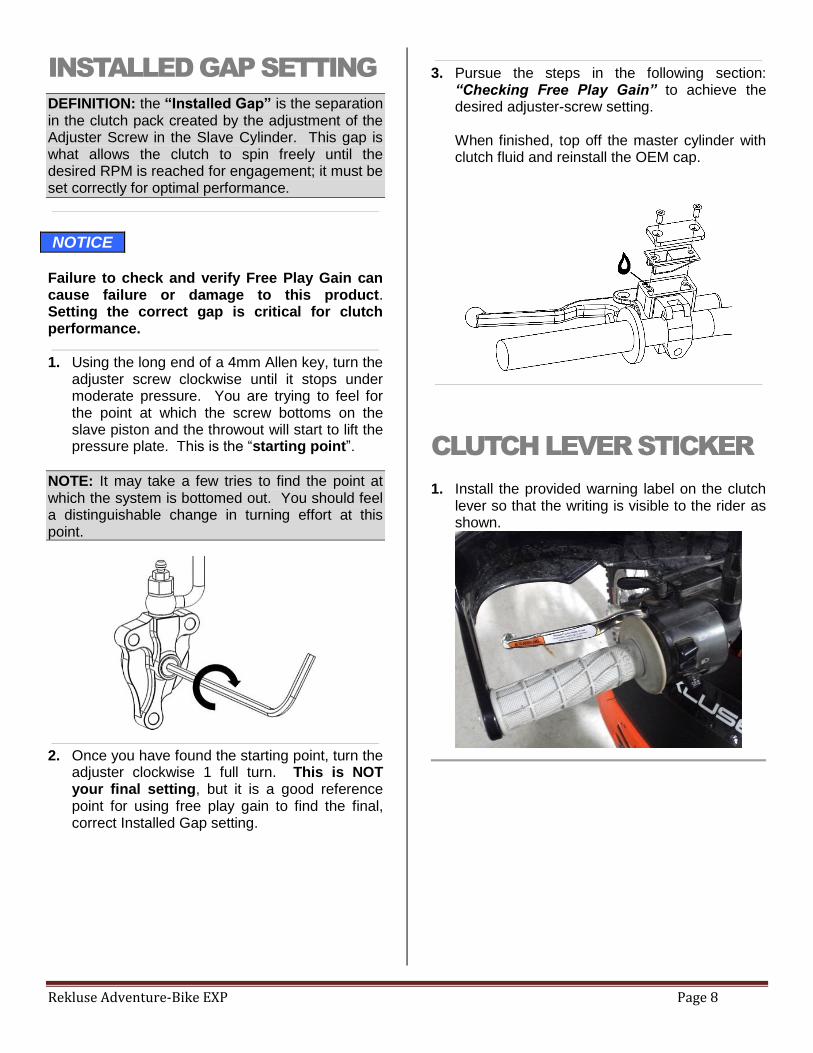
3. Pursue the steps in the following section:
“Checking Free Play Gain” to achieve the desired adjuster-screw setting. When finished, top off the master cylinder with clutch fluid and reinstall the OEM cap.
CLUTCH LEVER STICKER
1. Install the provided warning label on the clutch
lever so that the writing is visible to the rider as shown.

Rekluse Adventure-Bike EXP Page 9
CHECKING
FREE PLAY GAIN
WARNING Always make sure that the bike is in NEUTRAL before checking Free Play Gain. Failure to do so may result in
the bike lurching forward, and loss of control and/or injury may result.
NOTE: Before performing this step, please visit our website at rekluse.com/support to view the TECH VIDEO entitled “How to Check Free Play Gain”.
“Lever Free Play” is essentially the “slack” in the clutch lever before it starts actuating the clutch. Applying a light finger pressure will take up this slack.
“Free Play Gain” is the increase of lever free play as the auto-clutch engages. This happens when the RPM increase from idle through around 5000 RPM. Free Play Gain is caused by the expansion of the EXP disk which lifts the pressure plate away from the throwout assembly.
Optimal Free Play Gain yields ~1/4” (6mm) of clutch lever movement, measured at the end of the lever. This measurement at the lever correlates to achieving the ideal installed gap.
The following steps explain two ways to check Free Play Gain. One will use the rubber band that has been included in the clutch kit and one explains using your hand, which you will perform before every ride. Place the bike in neutral, start the engine and let it warm up for 2-3 minutes.
NOTICE
Failure to check and verify Free Play Gain can cause failure or damage to this product. Setting the correct gap is critical for clutch performance.
Verify that the bike is in NEUTRAL before checking Free Play Gain. Failure to do so may result in the bike lurching forward, and loss of control and/or injury may result. A Rekluse auto-clutch can make your motorcycle appear to be in neutral when in gear, even when the engine is running and clutch lever released. Motorcycles equipped with a Rekluse auto-clutch can move suddenly and unexpectedly and cause riders to lose control. To avoid death, serious injury, and/or property damage, always sit on the motorcycle to start it.

Rekluse Adventure-Bike EXP Page 10
Rubber Band Method: It is recommended that you use this method first to find your Free Play Gain so you can see what it is. Then, check it by hand as well so that you can effectively and comfortably check free play gain every time you ride. Wrap the included rubber band around the outer end of the handlebar grip and attach it to the ball end of the clutch lever.
With the bike at idle in neutral, quickly blip (rev) the engine to at least 5,000 RPM and let it return to idle. The clutch lever should move in about 1/4” (6mm) toward the handlebar as you rev the engine.
Note: If you are not getting the correct lever movement, see the “Free Play Gain Troubleshooting Guide” on the next page.
Hand Method: Free play gain should also be checked using your hand, as you will check it by hand before every ride. With the bike at idle, apply enough pressure to the lever to take up the initial freeplay (slack) shown in the photos on the previous page. While continuing to apply light pressure, rev the engine to at least 5,000 RPM. The clutch lever should move in 1/4” (6mm) under your finger pressure as you rev the engine and the auto-clutch engages.
FREE PLAY GAIN
TROUBLESHOOTING
Each adjustment should be done in small increments - one tick mark at a time. After each adjustment, repeat the rev-cycle until optimal free play gain is achieved.
Symptom:
- Clutch lever moves in too far (too much free play gain)
- Clutch has excessive drag
- It is difficult to fully override the clutch with the lever
Answer: Installed Gap is too small
Solution: Turn the Adjuster Screw inwardly (clockwise) to increase the Installed Gap.
Symptom:
- Clutch lever does not move enough or does not move at all (too little free play gain)
- Clutch is slipping
Answer: Installed Gap is too large
Solution: Turn the Adjuster Screw outwardly (counter-clockwise) to reduce the Installed Gap. It may be helpful to re-find the starting point.

Rekluse Adventure-Bike EXP Page 11
BREAK – IN
Follow these procedures for a new installation and any time new friction disks or EXP bases or wedges are installed.
1. Rev cycles: Warm up the bike for 2-3 minutes.
With the bike in neutral and your hand off of the clutch lever, rev the engine 10 times, being sure to let it return to idle between each rev cycle.
2. With the engine running, pull in the clutch lever and click the bike into gear. Slowly release the clutch lever. The bike should stay in place, perhaps with a slight amount of forward creep.
3. Now that the bike is idling in first gear, slowly apply throttle to begin moving. To break in the clutch components, perform the following roll-on starts in 1st and 2nd gear without using the clutch lever: In 1st gear, accelerate moderately to approximately 5,000 RPMs and come to a stop—repeat this 5 times. Next, starting in 2nd gear, accelerate moderately to approximately 5,000 RPMs then come to a stop—repeat this 5 times.
4. Now that the EXP is broken-in and the clutch is warm, re-check free play gain at your clutch lever and adjust if necessary. Your clutch pack will expand with heat, so final adjustments should be made when the bike is warm. Now you are ready to ride!
WARNING: DO NOT RIDE WITHOUT SUFFICIENT FREE PLAY GAIN!
Checking free play gain is easy and takes less than a minute to perform. For optimum performance and longevity, check free play gain when the bike is warm at the start of every ride.
CLUTCH NOISE & DRAG
Although it is harmless, some bike models may have “squeal” or “chatter” coming from the clutch at low RPM as it engages. Clutch squeal is caused by the clutch components vibrating as the clutch engages and can become more audible as the clutch gets hot. For bike models that tend to have clutch squeal or chatter here are some recommendations to reduce or eliminate it: - Oil:
Rekluse recommends that you have fresh,
clean JASO-MA rated oil for best clutch
performance. Dirty or old oil can make the
clutch more likely to squeal or chatter. Some
heavy-duty oil stabilizers or other additives
have been known to reduce noise and make
shifting smoother. Be sure that any additives
you might use are approved for use in wet-
clutch motorcycles.
- Installed Gap:
Adjusting the Installed Gap will NOT affect
clutch squeal or chatter
- Drag:
Now that your clutch has more friction surfaces,
the clutch may drag more than stock and
possibly may drag more noticeably when cold.
If this occurs, warm the bike up by allowing it to
idle for a few minutes before riding. If drag
persists and your installed gap is correct,
inspect your clutch plates.
- EXP Spring Setting:
If your oil is warm and the clutch plates
configuration is in spec, yet your bike wants to
drag, pulse, or chatter during idle or takeoff, it
may be necessary to tune the EXP springs for a
higher-RPM clutch engagement. See the “EXP
Tuning Options” section on the following pages
for instructions.
Rekluse Adventure-Bike EXP Page 12
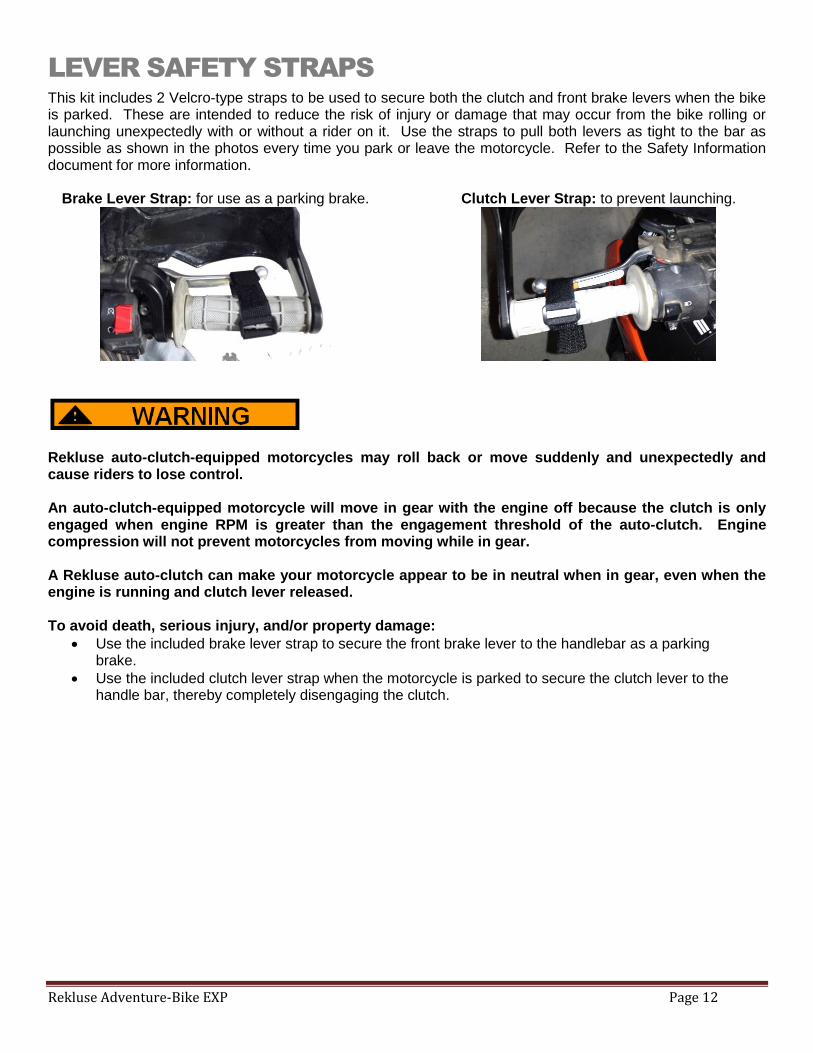
LEVER SAFETY STRAPS
This kit includes 2 Velcro-type straps to be used to secure both the clutch and front brake levers when the bike is parked. These are intended to reduce the risk of injury or damage that may occur from the bike rolling or launching unexpectedly with or without a rider on it. Use the straps to pull both levers as tight to the bar as possible as shown in the photos every time you park or leave the motorcycle. Refer to the Safety Information document for more information.
Brake Lever Strap: for use as a parking brake.
Clutch Lever Strap: to prevent launching.
Rekluse auto-clutch-equipped motorcycles may roll back or move suddenly and unexpectedly and cause riders to lose control. An auto-clutch-equipped motorcycle will move in gear with the engine off because the clutch is only engaged when engine RPM is greater than the engagement threshold of the auto-clutch. Engine compression will not prevent motorcycles from moving while in gear. A Rekluse auto-clutch can make your motorcycle appear to be in neutral when in gear, even when the engine is running and clutch lever released. To avoid death, serious injury, and/or property damage:
Use the included brake lever strap to secure the front brake lever to the handlebar as a parking brake.
Use the included clutch lever strap when the motorcycle is parked to secure the clutch lever to the handle bar, thereby completely disengaging the clutch.

Rekluse Adventure-Bike EXP Page 13
EXP TUNING OPTIONS
Included are spring options to tune the engagement RPM of the EXP friction disk. The EXP friction disk comes set with the recommended “Medium” setting from Rekluse. See the following chart for settings.
NOTE: The engine idle settings and fuel mapping will differ between models. This may necessitate altering the spring setting in the EXP disk to determine the best clutch function.
1050 / 1190 / 1290 Adventure Models
ENGAGEMENT SETTING SPRING CONFIGURATION
Low 3 Gold & 3 Green Springs
Medium (the EXP is pre-assembled with this setting) 6 Green Springs
High 3 Green & 3 White Springs
Very High 6 White Springs (for very high-idling bikes)
1290 Duke Models
ENGAGEMENT SETTING SPRING CONFIGURATION
Low (the EXP is pre-assembled with this setting) 6 Green Springs
Medium (recommended setting) 3 Green & 3 White Springs
High (for use with high idle / tuner) 6 White Springs
Adjusting the engine idle speed to match your engagement setting is important and greatly affects the overall feel of how the EXP disk engages. To prevent freewheeling and maximize engine braking, set the idle so there is a slight amount of drag while the bike is idling in gear and warmed up. The idle should not be so high as to move the bike forward in gear with the throttle closed. However, with a small opening of the throttle the bike should move forward. It is NOT necessary to disassemble the EXP halves to change springs! To change springs, remove 3 of the ¼-turn pins from one side of the EXP, replace springs, and re-install ¼-turn pins. Next, flip the EXP disk over and repeat on the other side if necessary. To maintain even pressure when using two different color spring sets, install one color set of 3 on one side of the EXP and the remaining color set of 3 on the other side.
CAUTION: If you disassemble the EXP, bearing pads may fall out or be stuck to the ramp surfaces of the EXP bases. Take care to ensure all pads are correctly placed into wedge pockets using gentle pressure to avoid damage to the pad surfaces before reassembling the EXP. Properly seated pads will be secured in place once the EXP is reassembled. Operating the clutch without the pads in place will cause part damage or failure.
Rekluse Adventure-Bike EXP Page 14
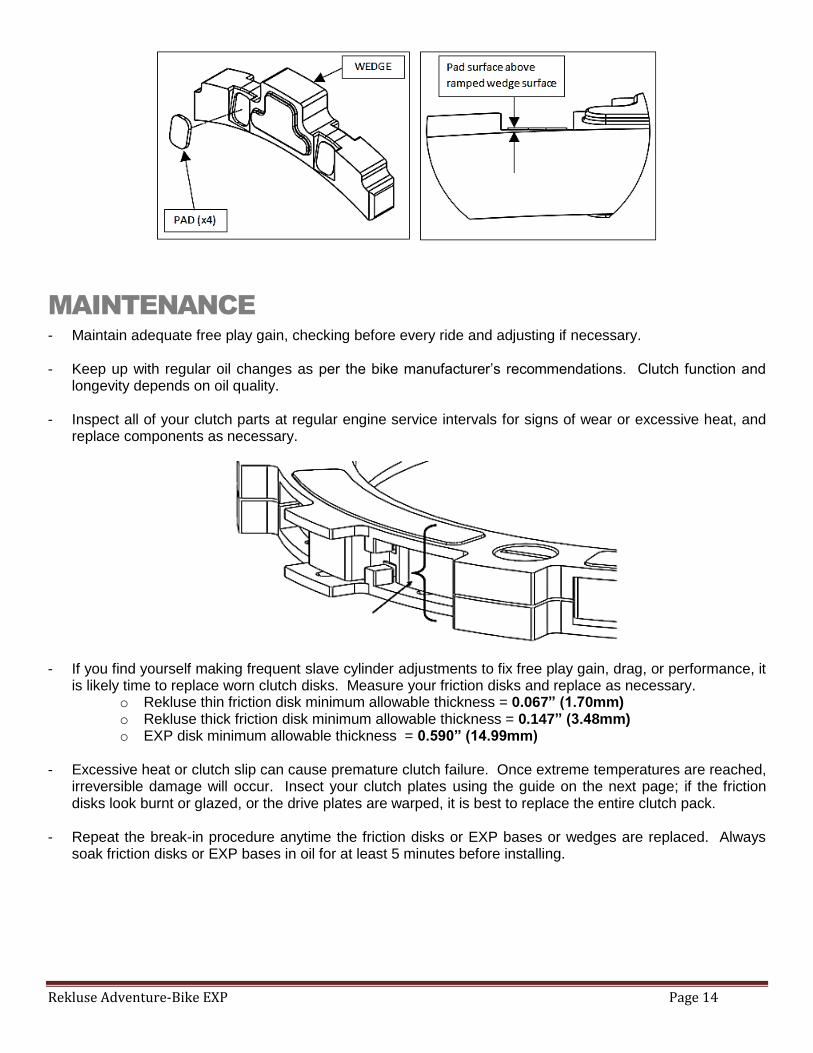
MAINTENANCE
- Maintain adequate free play gain, checking before every ride and adjusting if necessary.
- Keep up with regular oil changes as per the bike manufacturer’s recommendations. Clutch function and longevity depends on oil quality.
- Inspect all of your clutch parts at regular engine service intervals for signs of wear or excessive heat, and replace components as necessary.
- If you find yourself making frequent slave cylinder adjustments to fix free play gain, drag, or performance, it is likely time to replace worn clutch disks. Measure your friction disks and replace as necessary.
o Rekluse thin friction disk minimum allowable thickness = 0.067” (1.70mm) o Rekluse thick friction disk minimum allowable thickness = 0.147” (3.48mm) o EXP disk minimum allowable thickness = 0.590” (14.99mm)
- Excessive heat or clutch slip can cause premature clutch failure. Once extreme temperatures are reached,
irreversible damage will occur. Insect your clutch plates using the guide on the next page; if the friction disks look burnt or glazed, or the drive plates are warped, it is best to replace the entire clutch pack.
- Repeat the break-in procedure anytime the friction disks or EXP bases or wedges are replaced. Always soak friction disks or EXP bases in oil for at least 5 minutes before installing.

Rekluse Adventure-Bike EXP Page 15
DISK INSPECTION
These are best viewed in color by downloading the PDF from rekluse.com/support When inspecting the clutch pack, the following pictures can be used as reference: Drive Plates – If the clutch pack is getting high amounts of heat, purple, blue, or black color can be seen on the drive plate teeth. See Pictures below.
Normal Heat High Heat Excessive Heat (Brownish) (Blue, Purple) (Black) Friction Disks – Due to the dark color of the friction material, the friction disks will appear almost black as soon as they are put in oil. During inspection, look for glazing of the friction material. Glazing will appear shiny and feel like glass, even after oil is cleaned from the friction disk.
Normal Friction Pad Glazed Friction Pad
BUMP-STARTING INSTRUCTIONS
If your bike needs to be bump-started due to a dead battery or any other reason, follow the steps below to quickly bump-start your bike.
1. Use a 4mm Allen key to turn the adjustment screw counter-clockwise, just until it turns freely and no longer is preloading the pressure plate inside the clutch.
2. Bump start the bike. The clutch will function like a manual clutch at this point. 3. Once the bike is started, readjust the free play gain as per the instructions to reset the installed gap.
Visit Rekluse.com for more detailed instructions, videos, parts-fiche documents, and warrantee information.
Related Documents