Installation Guide Home Network System Indoor Camera Model No. KX-HNC200AZ Thank you for purchasing a Panasonic product. This document explains how to install the indoor camera properly. For details about how to use the system, refer to the User’s Guide (page 13). Please read this document before using the unit and save it for future reference. HNC200AZ_(en_en)_0325_ver.031.pdf 1 2015/03/25 14:02:05

Welcome message from author
This document is posted to help you gain knowledge. Please leave a comment to let me know what you think about it! Share it to your friends and learn new things together.
Transcript

Installation GuideHome Network System
Indoor CameraModel No. KX-HNC200AZ
Thank you for purchasing a Panasonic product.
This document explains how to install the indoor camera properly.For details about how to use the system, refer to the User’s Guide (page 13).
Please read this document before using the unit and save it for future reference.
HNC200AZ_(en_en)_0325_ver.031.pdf 1 2015/03/25 14:02:05
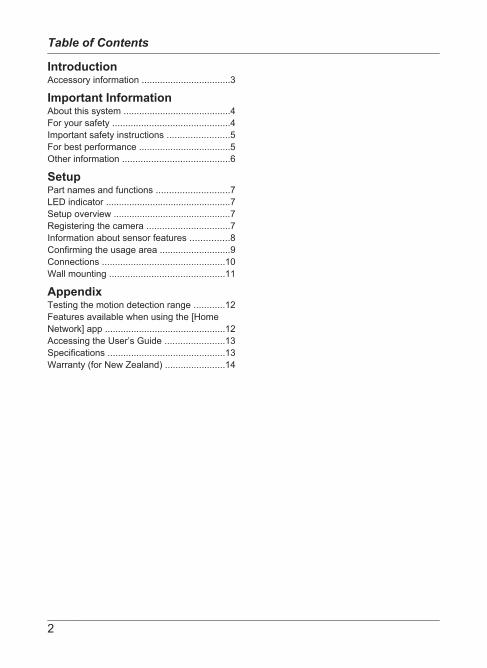
IntroductionAccessory information ..................................3
Important InformationAbout this system .........................................4For your safety .............................................4Important safety instructions ........................5For best performance ...................................5Other information .........................................6
SetupPart names and functions ............................7LED indicator ................................................7Setup overview .............................................7Registering the camera ................................7Information about sensor features ...............8Confirming the usage area ...........................9Connections ...............................................10Wall mounting ............................................11
AppendixTesting the motion detection range ............12Features available when using the [HomeNetwork] app ..............................................12Accessing the User’s Guide .......................13Specifications .............................................13Warranty (for New Zealand) .......................14
2
Table of Contents
HNC200AZ_(en_en)_0325_ver.031.pdf 2 2015/03/25 14:02:05

Accessory information
Supplied accessories
No. Accessory item/Part number QuantityA AC adaptor/PNLV236AL 1
A
Other informationR Design and specifications are subject to change without notice.R The illustrations in these instructions may vary slightly from the actual product.
TrademarksR microSDHC is a trademark of SD-3C, LLC.R iPhone and iPad are trademarks of Apple Inc., registered in the U.S. and other countries.R Android is a trademark of Google Inc.R Microsoft, Windows, and Internet Explorer are either registered trademarks or trademarks of
Microsoft Corporation in the United States and/or other countries.R All other trademarks identified herein are the property of their respective owners.
NoticeR The hub supports microSD and microSDHC memory cards. In this document, the term
“microSD card” is used as a generic term for any of the supported cards.
3
Introduction
HNC200AZ_(en_en)_0325_ver.031.pdf 3 2015/03/25 14:02:05

About this systemR This system is an auxiliary system; it is not
designed to provide complete protectionfrom property loss. Panasonic will not beheld responsible in the event that propertyloss occurs while this system is in operation.
R This product should not be used assubstitute for a medical or caregiver’ssupervision. It is the caregiver’sresponsibility to stay close enough tohandle any eventuality.
R The system’s wireless features are subjectto interference, therefore functionality in allsituations cannot be guaranteed.Panasonic will not be held responsible forinjury or damage to property that occurs inthe event of wireless communication erroror failure.
For your safetyTo prevent severe injury and loss of life/property, read this section carefully beforeusing the product to ensure proper and safeoperation of your product.
WARNING
Power connectionR Use only the power source marked on the
product.R Do not overload power outlets and
extension cords. This can result in the riskof fire or electric shock.
R Completely insert the AC adaptor/powerplug into the power outlet. Failure to do somay cause electric shock and/or excessiveheat resulting in a fire.
R Regularly remove any dust, etc. from theAC adaptor/power plug by pulling it fromthe power outlet, then wiping with a drycloth. Accumulated dust may cause aninsulation defect from moisture, etc.resulting in a fire.
R Unplug the product from power outlets if itemits smoke, an abnormal smell, or makesan unusual noise. These conditions can
cause fire or electric shock. Confirm thatsmoke has stopped emitting and contact anauthorised service centre.
R Unplug from power outlets and never touchthe inside of the product if its casing hasbeen broken open. Danger of electric shockexists.
R Never touch the plug with wet hands.Danger of electric shock exists.
R Do not connect non-specified devices.
InstallationR To prevent the risk of fire or electrical
shock, do not expose the product to rain orany type of moisture.
R Do not place or use this product nearautomatically controlled devices such asautomatic doors and fire alarms. Radiowaves emitted from this product may causesuch devices to malfunction resulting in anaccident.
R Do not allow the AC adaptor to beexcessively pulled, bent or placed underheavy objects.
R Keep small parts, such as microSD cardsand screws, out of the reach of children.There is a risk of swallowing. In the eventthey are swallowed, seek medical adviceimmediately.
R It is advised not to use the equipment at arefuelling point. Users are reminded toobserve restrictions on the use of radioequipment in fuel depots, chemical plantsor where blasting operations are inprogress.
Operating safeguardsR Unplug the product from power outlets
before cleaning. Do not use liquid oraerosol cleaners.
R Do not disassemble the product.R Never put metal objects inside the product.
If metal objects enter the product, turn offthe circuit breaker and contact anauthorised service centre.
MedicalR Consult the manufacturer of any personal
medical devices, such as pacemakers orhearing aids, to determine if they are
4
Important Information
HNC200AZ_(en_en)_0325_ver.031.pdf 4 2015/03/25 14:02:05

adequately shielded from external RF(radio frequency) energy. DECT featuresoperate between 1.88 GHz and 1.90 GHzwith a peak transmission power of 250 mW.
R Do not use the product in health carefacilities if any regulations posted in thearea instruct you not to do so. Hospitals orhealth care facilities may be usingequipment that could be sensitive toexternal RF energy.
CAUTION
Installation and locationR Never install wiring during a lightning storm.R The AC adaptor is used as the main
disconnect device. Ensure that the ACoutlet is installed near the product and iseasily accessible.
R To avoid the risk of strangulation, keep theproduct and the AC adaptor cord at least1 m from a child’s crib and out of the reachof small children.
R Mount the product on the stable locationwhere the camera can be adequatelysupported when installing.
R Do not mount the product on soft material.It may fall down, break or cause injury.
R Do not mount the product on the followingmaterials: gypsum board, ALC (autoclavedlightweight cellular concrete), concreteblock, plywood less than 25 mm thick, andetc.
Preventing accidents and injuriesR Do not put your ear(s) near the speaker, as
loud sounds emitted from the speaker maycause hearing impairment.
General noticesR This equipment will be inoperable when
mains power fails.R When a failure occurs which results in the
internal parts becoming accessible,disconnect the power supply cordimmediately and return this unit to anauthorised service centre.
R To minimise the possibility of lightningdamage, when you know that a
thunderstorm is coming, we recommendthat you unplug the AC adaptor from theAC power outlet.
Important safetyinstructionsWhen using your product, basic safetyprecautions should always be followed toreduce the risk of fire, electric shock, andinjury to persons, including the following:1. Do not use this product near water for
example, near a bathtub, washbowl,kitchen sink, or laundry tub, in a wetbasement or near a swimming pool.
2. Use only the power cord indicated in thisdocument.
SAVE THESE INSTRUCTIONS
For best performanceHub location/avoiding noiseThe hub and other compatible Panasonicdevices use radio waves to communicate witheach other.R For maximum coverage and noise-free
communications, place your hub:– at a convenient, high, and central
location with no obstructions betweenthe product and hub in an indoorenvironment.
– away from electronic appliances such asTVs, radios, personal computers,wireless devices, or other phones.
– facing away from radio frequencytransmitters, such as external antennasof mobile phone cell stations. (Avoidputting the hub on a bay window or neara window.)
R If the reception for a hub location is notsatisfactory, move the hub to anotherlocation for better reception.
5
Important Information
HNC200AZ_(en_en)_0325_ver.031.pdf 5 2015/03/25 14:02:05

EnvironmentR Keep the product away from electrical noise
generating devices, such as fluorescentlamps and motors.
R The product should be kept free fromexcessive smoke, dust, high temperature,and vibration.
R Do not expose this product to directsunlight or other forms of powerful lightsuch as halogen lights for long periods oftime. (This may damage the image sensor.)
R Do not place heavy objects on top of theproduct.
R When you leave the product unused for along period of time, unplug the product fromthe power outlet.
R The product should be kept away from heatsources such as radiators, cookers, etc. Itshould not be placed in rooms where thetemperature is less than 0 °C or greaterthan 40 °C. Damp basements should alsobe avoided.
R Operating the product near electricalappliances may cause interference. Moveaway from the electrical appliances.
Other informationRoutine careR Wipe the outer surface of the product with a
soft moist cloth.R Do not use benzine, thinner, or any
abrasive powder.
Camera image qualityR Camera images may have the following
characteristics.– Colours in images may differ from the
actual colours.– When there is light behind the subject
(i.e., backlighting), faces may appeardark.
– Image quality may be reduced in darklocations.
– Images may appear hazy when thereare outdoor lights in use.
When the subject is lit by sunlight orhalogen lights, black areas of the imagemay appear purplish. This is not amalfunction.
Protecting your recordingsR Do not remove the microSD card or
disconnect the hub’s AC adaptor whilereading or writing data to the microSD card.Data on the card could become corrupted.
R If a microSD card malfunctions or isexposed to electromagnetic waves or staticelectricity, data on the card could becomecorrupted or erased. Therefore werecommend backing up important data to acomputer or other device.
Information on Disposal in otherCountries outside the European Union
These symbols are only valid in the EuropeanUnion. If you wish to discard these items,please contact your local authorities or dealerand ask for the correct method of disposal.
6
Important Information
HNC200AZ_(en_en)_0325_ver.031.pdf 6 2015/03/25 14:02:05
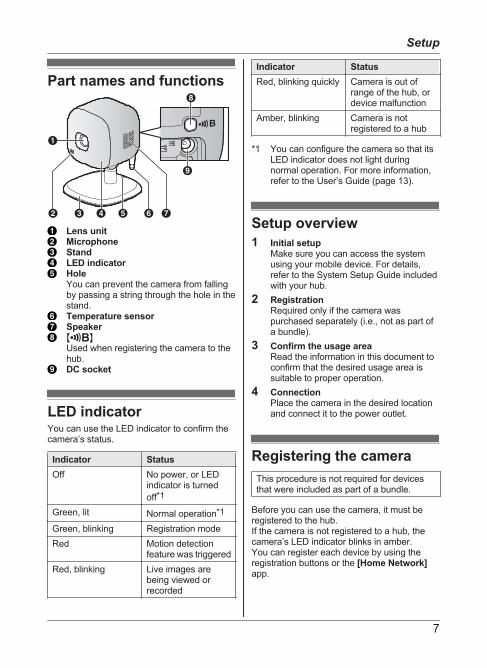
Part names and functions
A
I
H
C ED GFB
Lens unitMicrophoneStandLED indicatorHoleYou can prevent the camera from fallingby passing a string through the hole in thestand.Temperature sensorSpeakerM NUsed when registering the camera to thehub.DC socket
LED indicatorYou can use the LED indicator to confirm thecamera’s status.
Indicator StatusOff No power, or LED
indicator is turnedoff*1
Green, lit Normal operation*1
Green, blinking Registration modeRed Motion detection
feature was triggeredRed, blinking Live images are
being viewed orrecorded
Indicator StatusRed, blinking quickly Camera is out of
range of the hub, ordevice malfunction
Amber, blinking Camera is notregistered to a hub
*1 You can configure the camera so that itsLED indicator does not light duringnormal operation. For more information,refer to the User’s Guide (page 13).
Setup overview1 Initial setup
Make sure you can access the systemusing your mobile device. For details,refer to the System Setup Guide includedwith your hub.
2 RegistrationRequired only if the camera waspurchased separately (i.e., not as part ofa bundle).
3 Confirm the usage areaRead the information in this document toconfirm that the desired usage area issuitable to proper operation.
4 ConnectionPlace the camera in the desired locationand connect it to the power outlet.
Registering the cameraThis procedure is not required for devicesthat were included as part of a bundle.
Before you can use the camera, it must beregistered to the hub.If the camera is not registered to a hub, thecamera’s LED indicator blinks in amber.You can register each device by using theregistration buttons or the [Home Network]app.
7
Setup
HNC200AZ_(en_en)_0325_ver.031.pdf 7 2015/03/25 14:02:05
Note:R Before registering the camera, make sure
the AC adaptors of the hub and camera areconnected and each device is powered.
Using registration buttons1 Hub:
Press and hold M CAMERAN until theLED indicator blinks in green.
2 Camera:Press and hold M N until the LEDindicator blinks in green (page 7).R When registration is complete, the hub
sounds one long beep.Note:R To cancel without registering the camera,
press M N on the hub and on the cameraagain.
R If registration fails, the hub sounds severalshort beeps.
Using the appWhen you register the camera by using the[Home Network] app, you can assign a nameto your devices and group them by location.For more information, refer to the User’sGuide (page 13).
Information about sensorfeaturesThe camera has 3 sensor features: a visualsensor used for motion detection, atemperature sensor, and a sound sensor.Please read the following information abouteach sensor before deciding where to installthe camera.Note:R The camera’s sensor features are not
designed to be used in situations thatrequire high reliability. We do notrecommend use of the sensor features inthese situations.
R Panasonic takes no responsibility for anyinjury or damage caused by the use of thecamera’s sensor features.
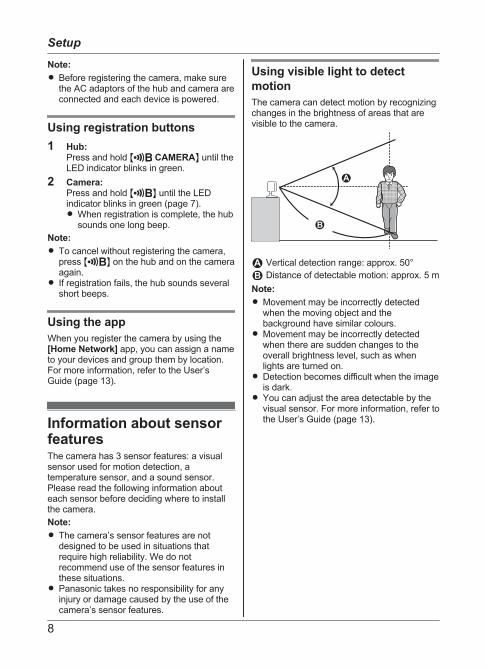
Using visible light to detectmotionThe camera can detect motion by recognizingchanges in the brightness of areas that arevisible to the camera.
1
2
1 Vertical detection range: approx. 50°2 Distance of detectable motion: approx. 5 mNote:R Movement may be incorrectly detected
when the moving object and thebackground have similar colours.
R Movement may be incorrectly detectedwhen there are sudden changes to theoverall brightness level, such as whenlights are turned on.
R Detection becomes difficult when the imageis dark.
R You can adjust the area detectable by thevisual sensor. For more information, refer tothe User’s Guide (page 13).
8
Setup
HNC200AZ_(en_en)_0325_ver.031.pdf 8 2015/03/25 14:02:05
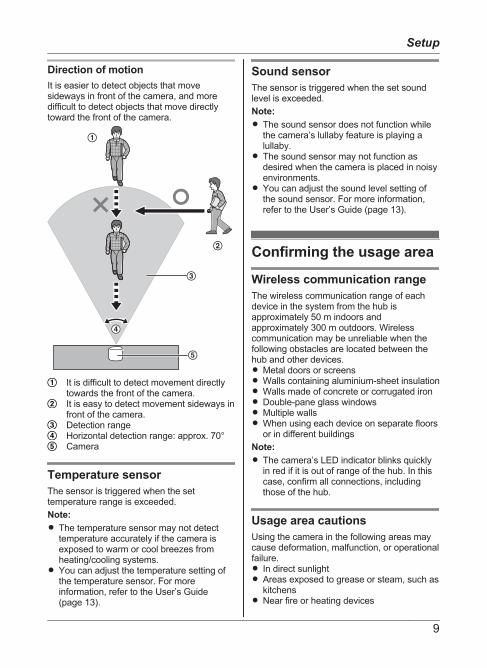
Direction of motionIt is easier to detect objects that movesideways in front of the camera, and moredifficult to detect objects that move directlytoward the front of the camera.
A
B
C
E
D
It is difficult to detect movement directlytowards the front of the camera.It is easy to detect movement sideways infront of the camera.Detection rangeHorizontal detection range: approx. 70°Camera
Temperature sensorThe sensor is triggered when the settemperature range is exceeded.Note:R The temperature sensor may not detect
temperature accurately if the camera isexposed to warm or cool breezes fromheating/cooling systems.
R You can adjust the temperature setting ofthe temperature sensor. For moreinformation, refer to the User’s Guide(page 13).
Sound sensorThe sensor is triggered when the set soundlevel is exceeded.Note:R The sound sensor does not function while
the camera’s lullaby feature is playing alullaby.
R The sound sensor may not function asdesired when the camera is placed in noisyenvironments.
R You can adjust the sound level setting ofthe sound sensor. For more information,refer to the User’s Guide (page 13).
Confirming the usage area
Wireless communication rangeThe wireless communication range of eachdevice in the system from the hub isapproximately 50 m indoors andapproximately 300 m outdoors. Wirelesscommunication may be unreliable when thefollowing obstacles are located between thehub and other devices.R Metal doors or screensR Walls containing aluminium-sheet insulationR Walls made of concrete or corrugated ironR Double-pane glass windowsR Multiple wallsR When using each device on separate floors
or in different buildingsNote:R The camera’s LED indicator blinks quickly
in red if it is out of range of the hub. In thiscase, confirm all connections, includingthose of the hub.
Usage area cautionsUsing the camera in the following areas maycause deformation, malfunction, or operationalfailure.R In direct sunlightR Areas exposed to grease or steam, such as
kitchensR Near fire or heating devices
9
Setup
HNC200AZ_(en_en)_0325_ver.031.pdf 9 2015/03/25 14:02:05
R Near magnetic fields (such as nearmicrowaves and magnets)
R Areas subject to extreme temperaturechanges, such as next to air conditioners
R Areas with reflective objects, such as glass,that can interfere with detection oftemperature variation
R Areas where the temperature is affected bystrong illuminating objects (such asfluorescent lights)
R Near devices that emit strong radio waves,such as mobile phones
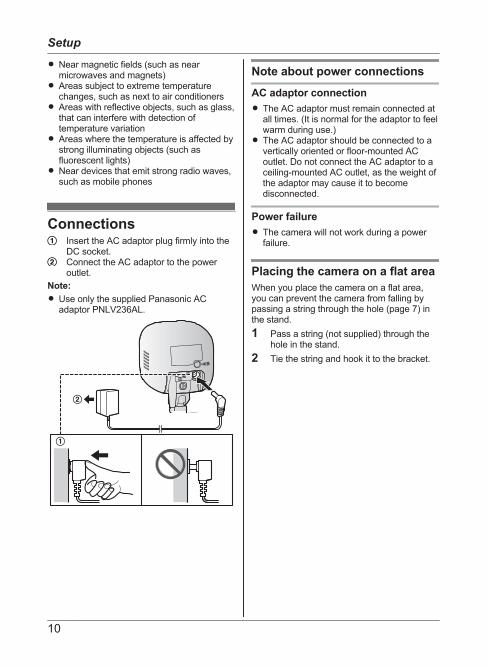
ConnectionsInsert the AC adaptor plug firmly into theDC socket.Connect the AC adaptor to the poweroutlet.
Note:R Use only the supplied Panasonic AC
adaptor PNLV236AL.
2
1
Note about power connections
AC adaptor connectionR The AC adaptor must remain connected at
all times. (It is normal for the adaptor to feelwarm during use.)
R The AC adaptor should be connected to avertically oriented or floor-mounted ACoutlet. Do not connect the AC adaptor to aceiling-mounted AC outlet, as the weight ofthe adaptor may cause it to becomedisconnected.
Power failureR The camera will not work during a power
failure.
Placing the camera on a flat areaWhen you place the camera on a flat area,you can prevent the camera from falling bypassing a string through the hole (page 7) inthe stand.1 Pass a string (not supplied) through the
hole in the stand.2 Tie the string and hook it to the bracket.
10
Setup
HNC200AZ_(en_en)_0325_ver.031.pdf 10 2015/03/25 14:02:05

Wall mountingR Mount the camera on the stable location
where the unit can be adequatelysupported when installing.
R The AC adaptor should be connected to avertically oriented or floor-mounted ACoutlet. Do not connect the AC adaptor to aceiling-mounted AC outlet, as the weight ofthe adaptor may cause it to becomedisconnected.
R Do not mount the camera on a softmaterial. It may fall down, break or causeinjury.
R Do not mount the camera on the followingplaces: plaster board, ALC (autoclavedlightweight cellular concrete), concreteblock, plywood less than 25 mm thick, andetc.
1 Drive the screws (not supplied) into thewall.1 Longer than 20 mm2 Space 1.3 mm
1 2
Note:R Use the following template when
determining the location of the screwholes.
28 mm
2 Mount the camera to the wall.1 Screws2 28 mm
2
1
3 Adjust the angle of the camera.
11
Setup
HNC200AZ_(en_en)_0325_ver.031.pdf 11 2015/03/25 14:02:05
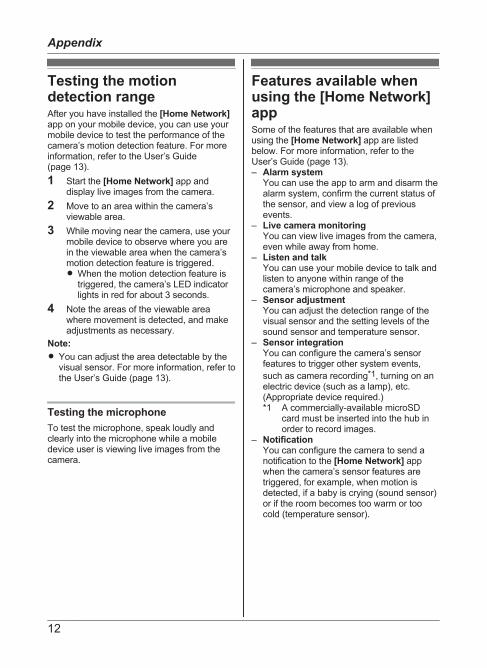
Testing the motiondetection rangeAfter you have installed the [Home Network]app on your mobile device, you can use yourmobile device to test the performance of thecamera’s motion detection feature. For moreinformation, refer to the User’s Guide(page 13).1 Start the [Home Network] app and
display live images from the camera.2 Move to an area within the camera’s
viewable area.3 While moving near the camera, use your
mobile device to observe where you arein the viewable area when the camera’smotion detection feature is triggered.R When the motion detection feature is
triggered, the camera’s LED indicatorlights in red for about 3 seconds.
4 Note the areas of the viewable areawhere movement is detected, and makeadjustments as necessary.
Note:R You can adjust the area detectable by the
visual sensor. For more information, refer tothe User’s Guide (page 13).
Testing the microphoneTo test the microphone, speak loudly andclearly into the microphone while a mobiledevice user is viewing live images from thecamera.
Features available whenusing the [Home Network]appSome of the features that are available whenusing the [Home Network] app are listedbelow. For more information, refer to theUser’s Guide (page 13).– Alarm system
You can use the app to arm and disarm thealarm system, confirm the current status ofthe sensor, and view a log of previousevents.
– Live camera monitoringYou can view live images from the camera,even while away from home.
– Listen and talkYou can use your mobile device to talk andlisten to anyone within range of thecamera’s microphone and speaker.
– Sensor adjustmentYou can adjust the detection range of thevisual sensor and the setting levels of thesound sensor and temperature sensor.
– Sensor integrationYou can configure the camera’s sensorfeatures to trigger other system events,such as camera recording*1, turning on anelectric device (such as a lamp), etc.(Appropriate device required.)*1 A commercially-available microSD
card must be inserted into the hub inorder to record images.
– NotificationYou can configure the camera to send anotification to the [Home Network] appwhen the camera’s sensor features aretriggered, for example, when motion isdetected, if a baby is crying (sound sensor)or if the room becomes too warm or toocold (temperature sensor).
12
Appendix
HNC200AZ_(en_en)_0325_ver.031.pdf 12 2015/03/25 14:02:05
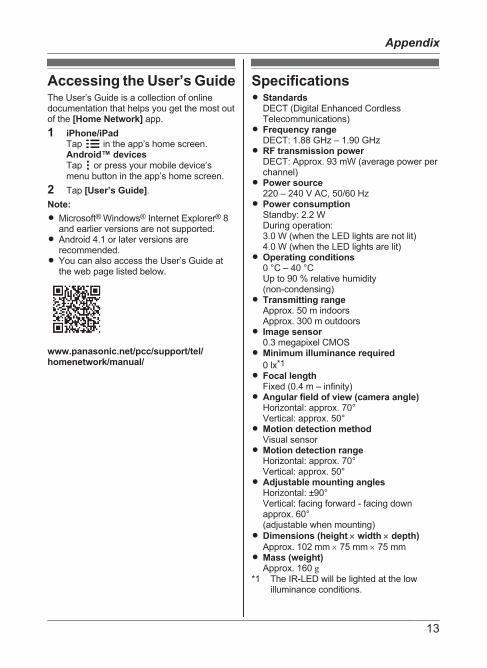
Accessing the User’s GuideThe User’s Guide is a collection of onlinedocumentation that helps you get the most outof the [Home Network] app.1 iPhone/iPad
Tap in the app’s home screen.Android™ devicesTap or press your mobile device’smenu button in the app’s home screen.
2 Tap [User’s Guide].Note:R Microsoft® Windows® Internet Explorer® 8
and earlier versions are not supported.R Android 4.1 or later versions are
recommended.R You can also access the User’s Guide at
the web page listed below.
www.panasonic.net/pcc/support/tel/homenetwork/manual/
SpecificationsR Standards
DECT (Digital Enhanced CordlessTelecommunications)
R Frequency rangeDECT: 1.88 GHz – 1.90 GHz
R RF transmission powerDECT: Approx. 93 mW (average power perchannel)
R Power source220 – 240 V AC, 50/60 Hz
R Power consumptionStandby: 2.2 WDuring operation:3.0 W (when the LED lights are not lit)4.0 W (when the LED lights are lit)
R Operating conditions0 °C – 40 °CUp to 90 % relative humidity(non-condensing)
R Transmitting rangeApprox. 50 m indoorsApprox. 300 m outdoors
R Image sensor0.3 megapixel CMOS
R Minimum illuminance required0 lx*1
R Focal lengthFixed (0.4 m – infinity)
R Angular field of view (camera angle)Horizontal: approx. 70°Vertical: approx. 50°
R Motion detection methodVisual sensor
R Motion detection rangeHorizontal: approx. 70°Vertical: approx. 50°
R Adjustable mounting anglesHorizontal: ±90°Vertical: facing forward - facing downapprox. 60°(adjustable when mounting)
R Dimensions (height ´ width ´ depth)Approx. 102 mm ´ 75 mm ´ 75 mm
R Mass (weight)Approx. 160 g
*1 The IR-LED will be lighted at the lowilluminance conditions.
13
Appendix
HNC200AZ_(en_en)_0325_ver.031.pdf 13 2015/03/25 14:02:05
Warranty (for New Zealand)Panasonic New Zealand undertakes to:
Repair or at its option, replace without cost to the owner, either for material or labour,
part which is found to be defective within two years of the date of purchase.
THIS EXPRESS WARRANTY DOES NOT COVER:
IF YOUR PANASONIC PRODUCT FAILS WITHIN THE
WARRANTY PERIOD:
Take it to the Authorised Panasonic Dealer from whom you purchased the product
will repair it (or arrange to have it repaired) during their normal business
enquiries regarding warranty or otherwise, please call – Customer
e Tel. No.: (09) 272 0178
NOTE: THIS EXPRESS WARRANTY IS OFFERED AS AN
BENEFIT AND DOES NOT AFFECT YOUR LEGAL
1) Pick up and delivery.
2) Batteries.
3) Repairs when the product has not been used in accordance with the Operating
Instructions Manual or has been modified.
4) Normal maintenance and cleaning as required in the product’s Operating
Instructions Manual.
5) Service calls to: a Correct the set up of the product
b Instruct you how to use the product
c Replace fuses or correct your building’s wiring
6) Damage to the product caused by accident, misuse or Act of God.
7) Repairs when the product has been dismantled, repaired, modified or serviced
by other than a Panasonic Authorised Dealer authorised to service that type of
product.
any
Centr
All
who
RIGHTS.
EXTRA
Support
hours.
14
Appendix
HNC200AZ_(en_en)_0325_ver.031.pdf 14 2015/03/25 14:02:05

15
Notes
HNC200AZ_(en_en)_0325_ver.031.pdf 15 2015/03/25 14:02:05
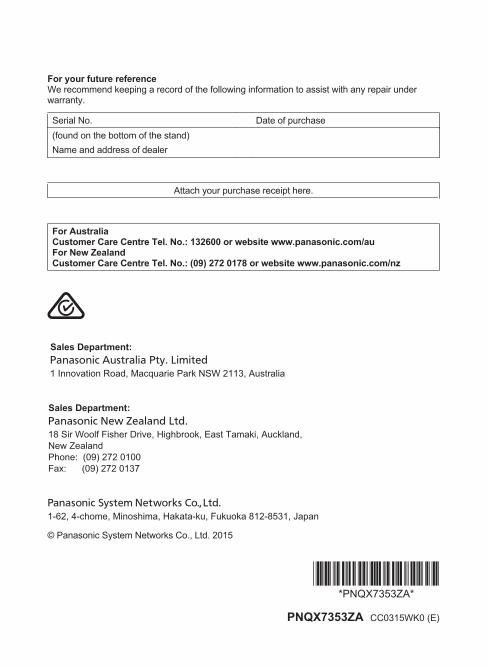
For your future referenceWe recommend keeping a record of the following information to assist with any repair underwarranty.
Serial No. Date of purchase(found on the bottom of the stand)Name and address of dealer
Attach your purchase receipt here.
For AustraliaCustomer Care Centre Tel. No.: 132600 or website www.panasonic.com/auFor New ZealandCustomer Care Centre Tel. No.: (09) 272 0178 or website www.panasonic.com/nz
Sales Department:
1 Innovation Road, Macquarie Park NSW 2113, Australia
Sales Department:
18 Sir Woolf Fisher Drive, Highbrook, East Tamaki, Auckland,
New Zealand
Phone: (09) 272 0100
Fax: (09) 272 0137
1-62, 4-chome, Minoshima, Hakata-ku, Fukuoka 812-8531, Japan
© Panasonic System Networks Co., Ltd. 2015
*PNQX7353ZA**PNQX7353ZA*
PNQX7353ZA CC0315WK0 (E)
HNC200AZ_(en_en)_0325_ver.031.pdf 16 2015/03/25 14:02:05
Related Documents