Installation Instructions for SAS ® 9.3 Electronic Software Delivery for Planning Installations on z/OS ®

Welcome message from author
This document is posted to help you gain knowledge. Please leave a comment to let me know what you think about it! Share it to your friends and learn new things together.
Transcript
Installation Instructions for SAS® 9.3 Electronic Software Delivery for Planning Installations on z/OS®

Copyright Notice
The correct bibliographic citation for this manual is as follows: SAS Institute Inc., Installation
Instructions for SAS® 9.3 Electronic Software Delivery for Planning Installations on z/OS, Cary, NC:
SAS Institute Inc., 2012.
Installation Instructions for SAS® 9.3 Electronic Software Delivery for Planning Installations
on z/OS
Copyright © 2012, SAS Institute Inc., Cary, NC, USA.
All rights reserved. Printed in the United States of America. No part of this publication may be
reproduced, stored in a retrieval system, or transmitted, by any form or by any means, electronic,
mechanical, photocopying, or otherwise, without the prior written permission of the publisher,
SAS Institute Inc. Limited permission is granted to store the copyrighted material in your system
and display it on terminals, print only the number of copies required for use by those persons
responsible for installing and supporting the SAS programming and licensed programs for which
this material has been provided, and to modify the material to meet specific installation
requirements. The SAS Institute copyright notice must appear on all printed versions of this
material or extracts thereof and on the display medium when the material is displayed.
Permission is not granted to reproduce or distribute the material except as stated above.
U.S. Government Restricted Rights Notice. Use, duplication, or disclosure of the software by the
government is subject to restrictions as set forth in FAR 52.227-19 Commercial Computer
Software-Restricted Rights (June 1987).
SAS Institute Inc., SAS Campus Drive, Cary, North Carolina 27513.
SAS and all other SAS Institute Inc. product or service names are registered trademarks or
trademarks of SAS Institute Inc. in the USA and other countries.
® indicates USA registration.
Other brand and product names are trademarks of their respective companies.

i
18 March 2015
Table of Contents
Before You Begin ..................................................................................................... 1
Prerequisites .................................................................................................. 1 System Requirements ................................................................................................... 1 Installation Alert Notes ................................................................................................. 1 Software Order E-mail (SOE) ......................................................................................... 1 SAS Installation Data Files (SID files) ............................................................................. 1 Disk Space .................................................................................................................. 2 User ID Requirements ................................................................................................... 3 Updating the Logon Password ........................................................................................ 3 Deployment Plan .......................................................................................................... 3 Pre-installation Checklists .............................................................................................. 3 Installing Required Third-Party Software ......................................................................... 4 X11 Server Availability .................................................................................................. 4
Terminology ................................................................................................... 4 SAS Deployment Wizard ............................................................................................... 4 SAS Software Depot ..................................................................................................... 4
Location of SAS Software Depot .................................................................................................................5 SAS Home Location ...................................................................................................... 5 SAS Configuration Directory .......................................................................................... 5 Update Mode ............................................................................................................... 5
Creating the SAS Software Depot .......................................................................... 5
SAS Download Manager .................................................................................. 5
Download and Install the SAS Download Manager ......................................... 6
Create Your SAS Software Depot Using the SAS Download Manager .............. 6
Make Your SAS Software Depot accessible to z/OS ........................................ 6
Installing and Maintaining Your Software .............................................................. 7 Installation Action—Action A or Action B .......................................................................... 7 The –nojobsubmit command line option .......................................................................... 8 Planning Metadata Migration from SAS 9.1.3 or SAS 9.2 ................................................... 8 Important Notes .......................................................................................................... 8 Installation Steps ......................................................................................................... 9
After Running setup.rexx with the –nojobsubmit Command-line Option ...... 18
Updating an Existing Installation ......................................................................... 20
Updating the Logon Password ............................................................................. 21
Additional Configuration Steps ............................................................................ 21
Managing Server Sessions ................................................................................... 22
Installing SAS 9.3 Mid-tier and Client Software from the SAS Software Depot ....................................................................................................................... 22
Creating the SAS Software Depot for Your Mid-tier and Client Machines ...... 22
Installing Required Third-Party Software ..................................................... 23
Installing SAS Software from the SAS Software Depot ................................. 24
Archiving Your SAS Software Depot .................................................................... 24
Tips and Additional Information ........................................................................... 25
Technical Support .................................................................................................. 25

ii
Page 1
Before You Begin This document provides all of the information related to downloading and installing a SAS 9.3
Electronic Software planning order on z/OS systems for which you have purchased licenses. Please
review this document before you begin your installation.
Because the SAS 9.3 Electronic Software Delivery download site limits the number of downloads that
may be performed per order, the process of downloading your software from SAS should not be used
as a mechanism for distributing your software across your organization. If you need to distribute the
software image internally, download it to a networked location that is available to all systems where
the software needs to be installed. Alternatively, you can create your own media from your
downloaded image.
Be sure to review each of the topics in the “Prerequisites” and “Overview” sections before beginning
your installation.
Prerequisites
System Requirements
Confirm that your system meets the minimum requirements by referring to the system requirements
from the SAS 9.3 Install Center Documentation Web site
(http://support.sas.com/documentation/installcenter/93/index.html) and
selecting Documentation for SAS 9.3 Installation on z/OS.
Installation Alert Notes
On the http://support.sas.com/notes/index.html web page, click Search Installation
Notes. Select the Results Filter tab, and then select alert as the Priority, 9.4 as the SAS Release and
z/OS as the Operating System. Then press Enter.
Review the Installation Alert Notes that are listed to see if they apply to this installation order.
Software Order E-mail (SOE)
To install SAS 9.3 on z/OS, start with the Software Order E-mail (SOE) you received from SAS
Institute. This e-mail contains details such as the order number, a key, and the type of installation you
have: Basic or Planning. Basic orders are generally straightforward single-machine deployments.
Planning orders are more complex, multi-machine deployments. This document is for a planning
order.
SAS Installation Data Files (SID files)
The SAS Software Depot includes one or more SAS installation data (SID) file or files as part of your
software download. A SID file is valid for a limited time and consists of customized installation
information and product authorization information. The SAS Deployment Wizard uses the
installation information in a SID file to install your licensed software and apply customized product
authorization information to your system. SID files follow a naming convention in which a file called
sas93_xxxxxx_yyyyyyyy_zzz.txt would mean xxxxxx is your order number, yyyyyyyy is
your setnumid (a unique identifier used by SAS Technical Support), and zzz is the operating system
for which the order is licensed.
Installation Instructions for SAS® 9.3 Electronic Software Delivery for Planning Installations on z/OS
2
If you are going to run your metadata server on z/OS, you will be installing a set of 64-bit libraries in
addition to the standard 31-bit libraries, which will have a separate SAS site number and a separate
SID file. The SID file for the 64-bit metadata installation will show “SAS Metadata Server” in the SID
file itself.
The SID files for your software order will be located in the sid_files directory at the root of your
SAS Software Depot.
If your order is more than 90 days old, one or more of the SID files shipped with the order may have
expired. Check your SOE for the expiration date of the SID files in your order. If they have expired,
contact your SAS site representative who may have received a Renewal Software Order E-mail that
will contain more recent SID files. Once you have created your SAS Software Depot, put the updated
SID files in the sid_files directory in your SAS Software Depot. If the site representative does not
have updated SID files, please contact SAS Customer Service at 1-800-727-0025 (press option 3).
Disk Space
Your SAS installation requires the following space defined in UNIX file system directories:
SAS Software Depot
The SAS Software Depot is a collection of SAS installation files that represents one or more
orders. The SAS Software Depot is organized in a specific format that is meaningful to the
SAS Deployment Wizard, which is the tool that is used to install and initially configure SAS.
The SAS Software Depot contains the SAS Deployment Wizard executable, one or more
deployment plans, a SID file, order data, and product data. Please see your Software Order
E-Mail for the space required for the SAS Software Depot for your order.
This directory must be available to z/OS. It can be:
o A UNIX File System directory on the z/OS machine.
o A UNIX File System or Windows remote directory that is accessible to the z/OS
machine via an NFS mount.
You do not need the SAS Software Depot after you have completed installing and
configuring your SAS software. You can archive your SAS Software Depot to tape using the
process documented in SAS Note SN 37119 available at
http://support.sas.com/kb/37/119.html.
SAS home directory
The SAS home directory is an integral part of the SAS 9.3 installation. You may want to have
your SAS Software Depot and SAS home directory in separate UNIX file system spaces so
that you can easily recover the space from your SAS Software Depot after installation. For a
SAS foundation only installation, 3 GB should be allowed for the SASHome directory.
SAS configuration directory
This directory is where your SAS server scripts, configuration files, and metadata server
repositories will reside. The amount of space required varies widely depending on your
usage, but you should have at least 2 GB of space for this directory, 3 GB if you are migrating
metadata from an earlier SAS release. We recommend that the configuration directory not be
a subdirectory under the SAS home directory.
Installation Instructions for SAS® 9.3 Electronic Software Delivery for Planning Installations on z/OS
3
User ID Requirements
The user ID used for downloading your software or for installing SAS 9.3 must meet specific
requirements:
Must have a home directory that is not root.
Must have a default program shell defined.
Must not be a superuser.
Must not share a UID with other user IDs.
The user IDs that will be running either the SAS Download Manager or SAS Deployment Wizard to
install SAS 9.3 Foundation for z/OS require a larger region setting:
If running under OMVS, a TSO region size and ASSIZEMAX setting of at least 800 MB.
If running UNIX-style commands using rlogin, putty, or telnet, an ASSIZEMAX setting of at
least 800 MB.
Note: This note applies only when the SAS Software Depot is downloaded directly to a z/OS UNIX File
System directory.
To increase the amount of CPU time available to the SAS Download Manager download process, set
the CPUTIMEMAX value in the user ID’s OMVS segment to at least 1500. The amount of CPU time
required to download the software varies depending on the size and number of products in the order. If
the SAS Download Manager receives a SIGXCPU error, you may restart the SAS Download Manager
to continue a download that was already in progress.
Updating the Logon Password
Before applying any maintenance or hot fixes, if the administrator of your system has changed their
logon password, you must update the logon password. See “Updating the Logon Password” on page
21 for more information.
Deployment Plan
To install and configure SAS servers that are part of a planning order, you must have a deployment
plan. The deployment plan is an XML-based description of the topology for your SAS system. The
plan file is used in the SAS software deployment process to "instruct" the SAS Deployment Wizard
which software components to install and configure on each machine.
The SAS Deployment Wizard contains a set of standard deployment plans that may be used by many
sites with no customization. These are documented at
http://support.sas.com/demosdownloads/sysdep_t6.jsp?packageID=000803&searchvar=all.
If you are working with a SAS consultant in the deployment of your software, that consultant may
create a customized deployment plan for your installation.
Pre-installation Checklists
You will need to perform some pre-installation tasks such as creating server user IDs, reserving ports,
etc., before installing a planning order. For example, you can record information such as the user IDs
for special SAS users, port numbers, and the installation locations of third-party products used for
this installation. A generic pre-install checklist is available at
http://support.sas.com/documentation/cdl/en/biig/62611/PDF/default/biig.pdf. If
you are using one of the standard deployment plans, you can download the plan with a customized
checklist for that plan by browsing through our library of standard deployment plans available at http://support.sas.com/demosdownloads/sysdep_t6.jsp?packageID=000803&searchvar=all
Installation Instructions for SAS® 9.3 Electronic Software Delivery for Planning Installations on z/OS
4
and selecting the standard plan you will use for your installation. If you received a customized plan,
that plan will include a customized pre-installation checklist.
Installing Required Third-Party Software
The checklist indicates any third-party software that must be installed before you install your SAS
software, as well as which third-party software must be obtained from its vendor. An example is the
X11 Server, described in the next section. Obtain that software and install it according to the vendor’s
instructions.
Some of your third-party software may be provided in your software order. That software is listed in
your ordersummary.html which is available in your SAS Software Depot. Follow the path for each
third-party product listed in the Third Party section of the ordersummary.html to locate the
documentation for its installation.
You must have a supported level of Java installed for a planning installation with SAS 9.3. You can
check SAS’s third party support Web page for information about the latest supported versions of Java
at http://support.sas.com/resources/thirdpartysupport/.
X11 Server Availability
The SAS Download Manager for z/OS and the SAS Deployment Wizard have graphical user
interfaces which require the use of an X11 server, if available. At many sites, this software is already
available and running on a UNIX and/or Windows system. X11 software is available from
commercial and shareware sites.
If you do not have access to an X11 server, you may be able to use the SAS Download Manager and
the SAS Deployment Wizard in console mode, allowing you to use a headless system to configure
your server. If you use console mode, each dialog used in the deployment of your SAS software is
represented in text. Console mode is available in orders with a version number of Rev. 930_12wnn,
where nn is 10 or higher. Refer to your Software Order E-mail to determine your version number.
Console mode cannot be used on your middle tier.
Note: If you are configuring SAS Data Integration Studio and intend to use console mode, you must have a
virtual framebuffer such as Xvfb.
For more information about X11 server minimum version requirements, see the Web page entitled
“SAS 9.3 Support for Additional Software Products” at
http://support.sas.com/resources/thirdpartysupport/v93/othersw.html#tab_x11.
Terminology
SAS Deployment Wizard
The SAS Deployment Wizard is the common interface used to install and deploy all SAS 9.3 software.
Using the SAS Deployment Wizard, you interact with the SAS Software Depot, the repository of files
and data necessary to install your SAS 9.3 software. You will invoke the SAS Deployment Wizard on
each system that is part of your SAS software deployment.
SAS Software Depot
The SAS Software Depot is a collection of SAS installation files that represents one or more orders.
The SAS Software Depot is organized in a specific format that is meaningful to the SAS Deployment
Wizard, which is the tool that is used to install and initially configure SAS. The SAS Software Depot
contains the SAS Deployment Wizard executable, one or more deployment plans, a SID file, order
Installation Instructions for SAS® 9.3 Electronic Software Delivery for Planning Installations on z/OS
5
data, and product data. Please see your Software Order E-Mail for the space required for the SAS
Software Depot for your order.
Location of SAS Software Depot
Before you download the SAS Download Manager, you must first determine a location where you
will store your SAS Software Depot. This may be:
A directory on Windows or UNIX which you can FTP to a UNIX File System directory on
z/OS.
A UNIX File System directory on the z/OS machine.
A UNIX File System remote directory that is accessible to the z/OS machine via an NFS
mount.
SAS Home Location
SASHOME is the UNIX directory location where the UNIX file system components of your SAS
software are installed on your machine. SASHOME is specified when you install software through
the SAS Deployment Wizard for the first time, and that location becomes the default installation
location for any other SAS software you install on the same machine. You will need about 3 GB of
UNIX file system space for your SAS Home directory.
Many sites prefer to have SAS Home in a separate UNIX file system than their SAS Software Depot.
This allows you to easily archive the SAS Software Depot and reuse that disk space. The directory
path for your SAS Home location cannot be a directory within your SAS software depot.
Note: The length of the SASHOME path is limited to 54 characters.
Note: The SAS Home directory is an integral part of the SAS 9.3 installation and MUST exist for you to
apply maintenance or hotfixes to your SAS 9.3 software.
SAS Configuration Directory
The SAS Deployment Wizard will prompt you for a configuration directory. The SAS configuration
directory is the UNIX directory location where your SAS metadata and server configuration files and
scripts will be created. You should have a minimum of 2 GB of space for this data, although total
space requirements will depend on your usage of the metadata server.
Update Mode
If you are adding maintenance or new products to an existing installation, the first invocation of the
SAS Deployment Wizard will compare your installed products to the versions in the SAS Software
Depot. If the SAS Software Depot contains new versions or maintenance to any installed products,
the SAS Deployment Wizard switches to “update mode” and brings those products up to the current
level. If you wanted to add new products to your existing installation, you will need to invoke the
SAS Deployment Wizard a second time.
Creating the SAS Software Depot
SAS Download Manager
The SAS Download Manager is the application you must use to download your software from the
SAS 9.3 Electronic Software Delivery download site to create your SAS Software Depot. It is a Java-
Installation Instructions for SAS® 9.3 Electronic Software Delivery for Planning Installations on z/OS
6
based client that, once installed, can download selected SAS orders to your SAS Software Depot
location. You must download the latest version of the SAS Download Manager for this order, and not
use any previous version you may have installed.
Important:
You should download the SAS Download Manager for the operating system to which you
plan to initially download the SAS Software Depot.
You may download your SAS Software Depot to Windows or UNIX instead of z/OS
ONLY IF
o you can use a UNIX file system directory on the z/OS system (for example, via NFS
mount).
or
o you can FTP your SAS Software Depot to z/OS, using either a third-party utility that can
transfer a complete directory tree, or our provided utility, the SAS Software Copy Utility,
which is provided in your SAS Software Depot. You can find instructions for this utility
in the SAS Deployment Wizard and SAS Deployment Manager 9.3: User’s Guide at http://support.sas.com/documentation/installcenter/93/mvs/index.html.
Download and Install the SAS Download Manager
Download the SAS Download Manager for the target system for the download.
Note: To download directly to z/OS, you must download the z/OS SAS Download Manager.
Based on the location and platform where you plan to store the SAS Software Depot, click SAS
Download Manager from the SUPPORT/DOWNLOADS & HOT FIXES Web site at
http://support.sas.com/demosdownloads/setupcat.jsp?cat=SAS+Download+Manager. Click
Request Download for the appropriate platform to see the license terms and download the SAS
Download Manager. You will be required to register with the SAS support site if you are not
registered already. Then log in to the site to begin the download process.
SAS recommends that you retrieve a copy of the readme file on this page as well, since it contains the
instructions for executing this application on your operating system.
Create Your SAS Software Depot Using the SAS Download Manager
When you are ready to start the download to your SAS Software Depot, follow the instructions in the
readme file to start the SAS Download Manager. When prompted, provide the order number and
SAS installation key which appear on your SAS Software Order E-mail.
When the SAS Download Manager has completed, it will have created a SAS Software Depot in the
location you indicated in the SAS Download Manager dialogs. In addition, the installation process
creates a depotsummary.html document at the root directory of your SAS Software Depot. This
document describes the contents of the SAS Software Depot.
Make Your SAS Software Depot accessible to z/OS
If you did not download directly to z/OS, you must make the SAS Software Depot accessible to z/OS
by either:
NFS mount the directory on z/OS, or
Use the SAS Software Depot Copy Utility, or
Installation Instructions for SAS® 9.3 Electronic Software Delivery for Planning Installations on z/OS
7
Transfer the SAS Software Depot to z/OS using a third-party utility such as Filezilla, WS-FTP,
Blue Zone, etc., that can move a complete directory tree.
1. FTP the entire directory tree, ensuring that all files are transferred in binary to a z/OS
UNIX File System directory, and the case of all file names is preserved.
2. Be sure to set the execute bits after moving from Windows. Execute the following
command: chmod -R a+r+x <SAS Software Depot Location>
Alternatively, if the SAS Depot is stored on UNIX, follow these steps:
1. Create a tar file of your existing SAS Software Depot on your UNIX machine. Execute the
following command: tar -cvf <SAS Software Depot Location> <tar file name>
2. FTP the tar file created in the previous step to z/OS in binary format.
3. Extract the SAS Software Depot on z/OS in the zFS directory where you want the SAS
Software Depot created. Execute the following command from OMVS or rlogin: tar -xvf <tar file name>
Note: The "v" option used in the tar commands is for “verbose.” Information is displayed back to the
terminal about each file as it is processed. It is not required.
Installing and Maintaining Your Software The remainder of this document describes the installation and maintenance (where applicable)
process in detail. At this point you should have reviewed and completed all of the pre-requisites for
this installation previously documented along with the pre-installation steps in the SAS 9.3
Intelligence Platform: Installation and Configuration Guide.
The SAS 9.3 Intelligence Platform: Installation and Configuration Guide is available at
http://support.sas.com/documentation/cdl/en/biig/62611/HTML/default/viewer
.htm#titlepage.htm.
You must have an X11 server available on a Windows PC or UNIX machine at your site, and you
must use the SAS Deployment Wizard to install your software.
Installation Action—Action A or Action B
The installation process will prompt you for an installation action to choose. Determine which one of
these installation actions below apply to this installation.
Action A is for a new installation—if you do not currently have SAS 9.3 installed on your
system at all or you want to create a new SAS 9.3 installation.
Action B installs maintenance and/or new products directly into your existing production
SAS 9.3 libraries and directories.
Installation Instructions for SAS® 9.3 Electronic Software Delivery for Planning Installations on z/OS
8
The –nojobsubmit command line option
Several batch jobs will be used to complete part of the deployment. By default, the SAS Deployment
Wizard submits these jobs and:
Assigns the same job name xxxxxxA to each job it automatically submits, where:
xxxxxxx – is assigned the installer user ID
“A” – suffix assigned to the installer user
Uses the FTP JES interface to track the progress of each job, and in particular determine when
they have completed.
There are several reasons why the use of the FTP JES interface might not be possible or successful at
your site. If you specify the –nojobsubmit command line option when you invoke the SAS
Deployment Wizard, you will submit the batch jobs manually after the SAS Deployment Wizard
completes. Below are some of the reasons for using the –nojobsubmit command line option which
will allow you to edit and submit the batch jobs yourself:
Your site uses JES3 (not JES2), or
Your FTP server is configured for JESINTERFACELEVEL=2, or
The SAS installer ID is not authorized to use FTP, or
You need to make site-specific changes to the JCL or wish to review the JCL before
submission, or
The FTP JES interface’s requirement that the jobname be the user ID performing the install
suffixed with a single letter or digit is incompatible with your site’s jobname requirements
If any of these conditions apply at your site, you must use the –nojobsubmit command line option
when you run the setup.rexx exec, discussed later in this document.
Planning Metadata Migration from SAS 9.1.3 or SAS 9.2
If you are migrating metadata from SAS 9.1.3 or SAS 9.2, you must prepare your software for
migration. To prepare your SAS 9.1.3 or SAS 9.2 deployment for migration to SAS 9.3, follow the
instructions in the SAS 9.3 Intelligence Platform: Migration Guide at http://support.sas.com/documentation/cdl/en/bimig/62613/HTML/default/titlepage.htm.
Important Notes
Do not log in to z/OS as a superuser (sometimes called “root” or “UID(0)”).
The user ID that will be running the SAS Deployment Wizard to install SAS 9.3 Foundation
for z/OS must have the same requirements as noted in “User ID Requirements” on page 3.
If you are applying maintenance or adding software to an existing installation, you must stop
all SAS servers and processes before updating your installation.
Installation Instructions for SAS® 9.3 Electronic Software Delivery for Planning Installations on z/OS
9
Installation Steps
1. In order to use the SAS Deployment Wizard interactively, you will need to have access to a
desktop computer with an X11 server installed and active. You need to determine whether
you have an X11 server.
a. If you will be using an X11 server, set the DISPLAY environment variable to point to
your X11 server. Issue the following case-sensitive command from the z/OS UNIX
shell on your z/OS system before starting the SAS Deployment Wizard:
export DISPLAY=<your X11 server name>:0.0
Note: If you do not issue this command, setup.rexx will prompt you for the server name.
Make sure that the X11 server is started on your workstation before starting the
install.
b. If you don’t have an X11 server, you can use the –console option, and you do not
have to issue the export display command. For example:
./setup.rexx –nojobsubmit –console
Note: -nojobsubmit and –console are optional.
If you intend to run the SAS Deployment Wizard in console mode to perform a
deployment without a graphical display, ensure that the DISPLAY environment
variable is unset, as opposed to it being set to a blank value (that is, DISPLAY= ).
The -console line command option also supports two options to specify the size of
the output of the SAS Deployment Manager. Use -pagesize # to specify the
number of lines to display before pausing the output and -pagewidth # to specify
the number of characters to display on a line before wrapping to another line. Note
that -pagesize and -pagewidth will not work with any other command line
option.
Usage
-console [-pagesize #] [-pagewidth #]
Example
setup.rexx -console -pagesize 20 -pagewidth 50
The ‐console line command option can be used with other options at the same
time, such as recording or playing back a response file.
Note: If you are instructed to enter a sequence that includes angle brackets, such as
“Enter <q> to quit”, you must include those symbols.
Note: If you intend to run the SAS Deployment Wizard in console mode to perform a
deployment without a graphical display, ensure that the DISPLAY environment
variable is unset, as opposed to it being set to a blank value (that is, DISPLAY= ).
Installation Instructions for SAS® 9.3 Electronic Software Delivery for Planning Installations on z/OS
10
2. In SAS 9.3, the metadata server runs only in 64-bit mode and requires a separate installation.
If you plan to run your metadata server on z/OS, you must invoke the SAS Deployment
Wizard multiple times, and this should be your first invocation of the SAS Deployment
Wizard.
Important: If your metadata server will reside on another machine, the metadata server must be
installed, configured, and already running on that other host. Skip to Step 3 to
invoke the SAS Deployment Wizard for the 31-bit install.
a. Invoke the SAS Deployment Wizard with the required option –z64 and optionally
the –nojobsubmit and/or console related options: ./setup.rexx –z64 –nojobsubmit –console
Note: -nojobsubmit and –console are optional.
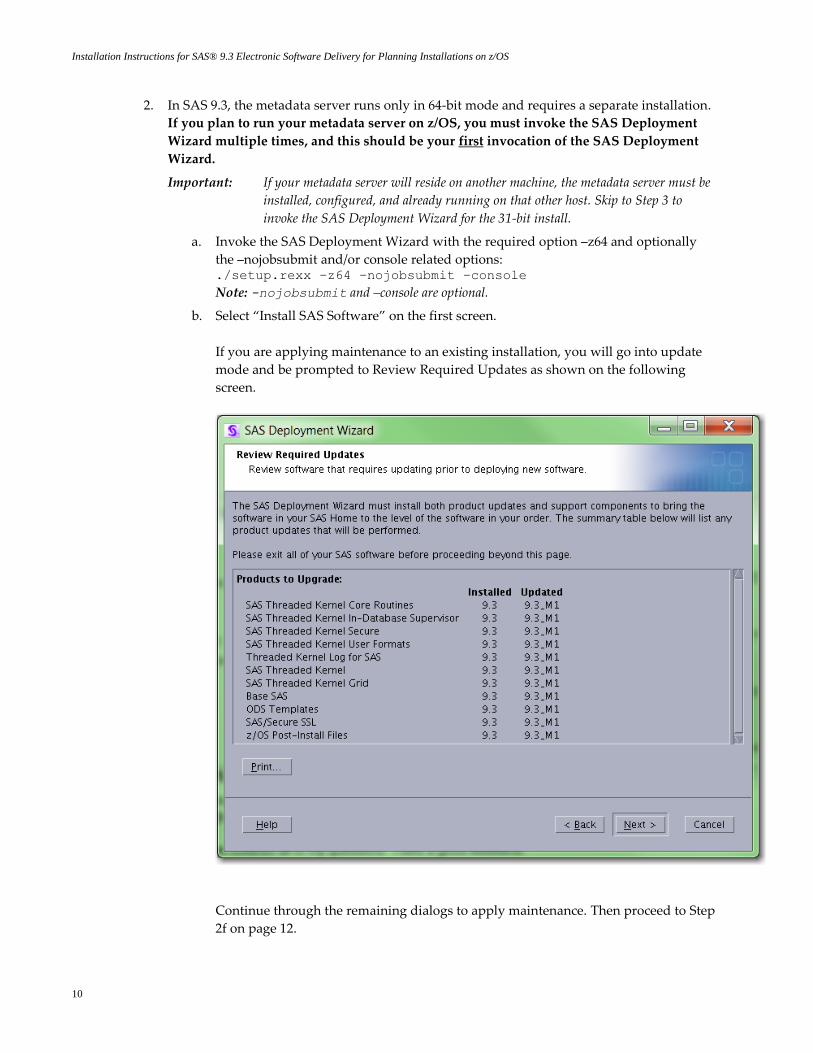
b. Select “Install SAS Software” on the first screen.
If you are applying maintenance to an existing installation, you will go into update
mode and be prompted to Review Required Updates as shown on the following
screen.
Continue through the remaining dialogs to apply maintenance. Then proceed to Step
2f on page 12.
Installation Instructions for SAS® 9.3 Electronic Software Delivery for Planning Installations on z/OS
11
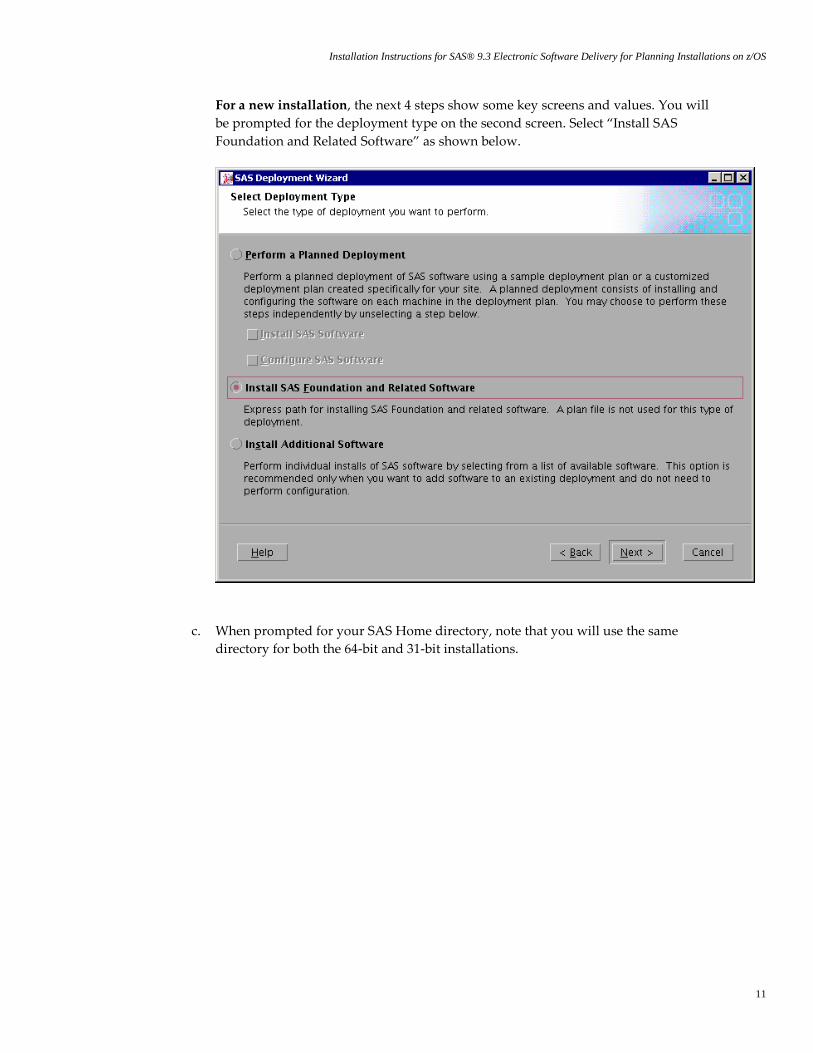
For a new installation, the next 4 steps show some key screens and values. You will
be prompted for the deployment type on the second screen. Select “Install SAS
Foundation and Related Software” as shown below.
c. When prompted for your SAS Home directory, note that you will use the same
directory for both the 64-bit and 31-bit installations.
Installation Instructions for SAS® 9.3 Electronic Software Delivery for Planning Installations on z/OS
12
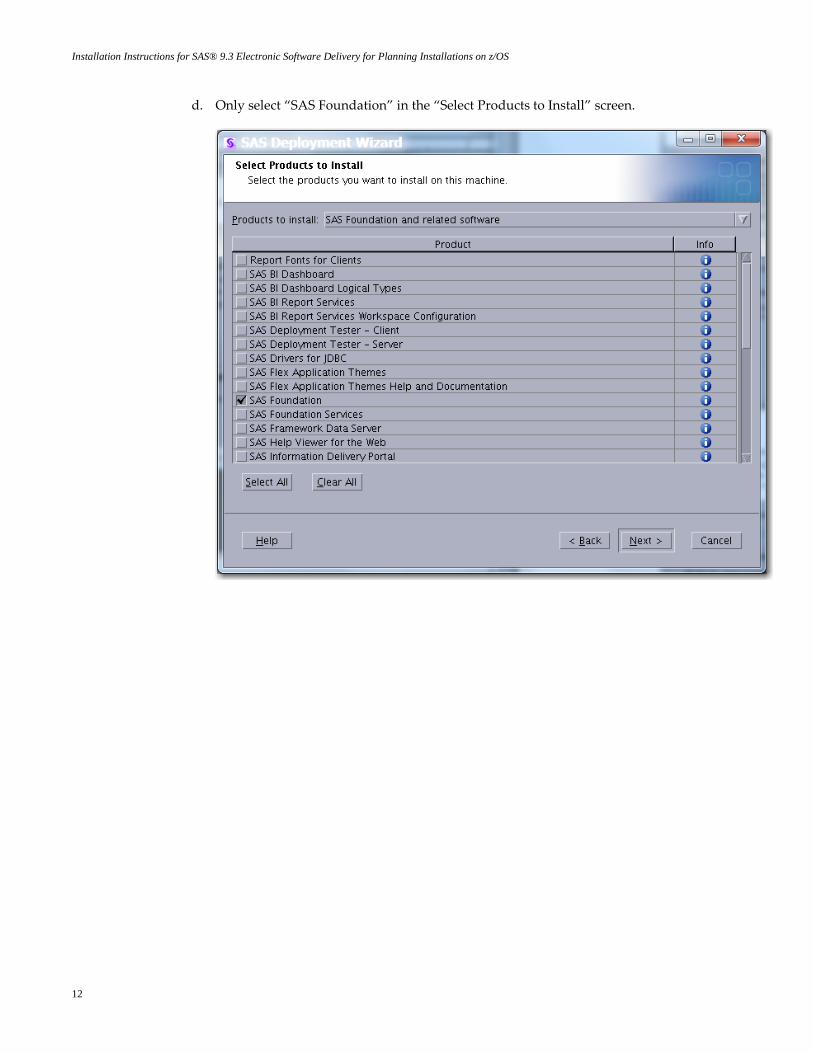
d. Only select “SAS Foundation” in the “Select Products to Install” screen.
Installation Instructions for SAS® 9.3 Electronic Software Delivery for Planning Installations on z/OS
13
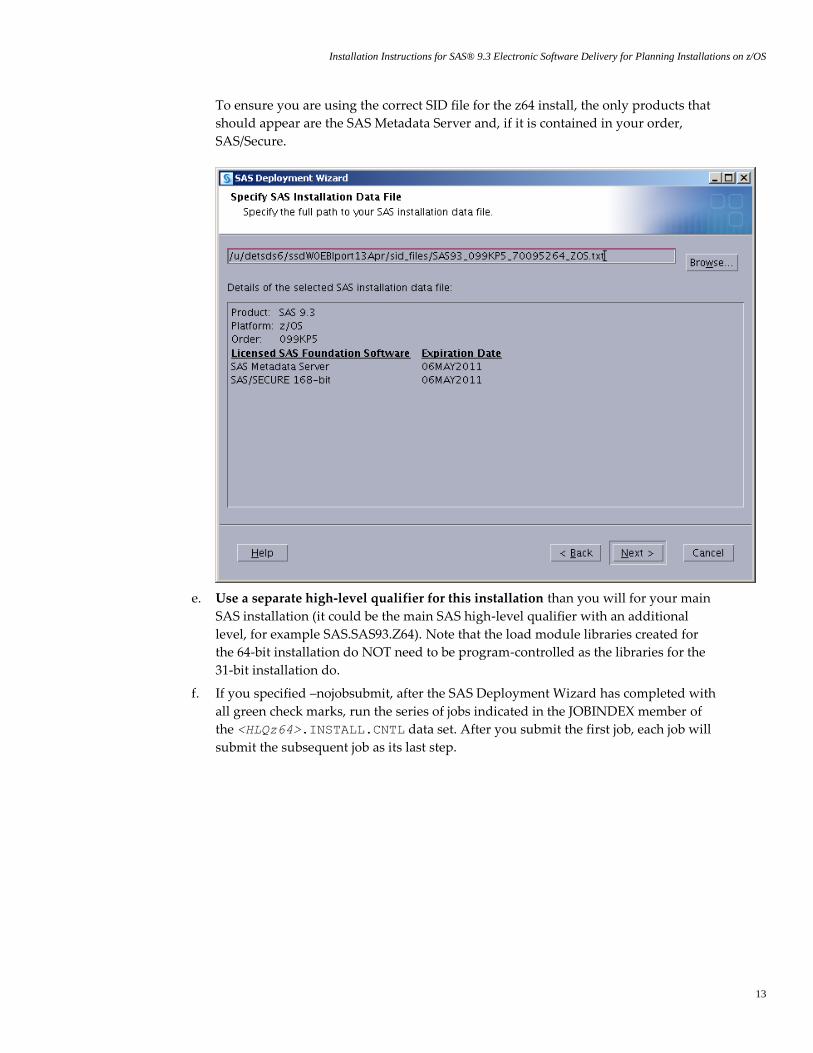
To ensure you are using the correct SID file for the z64 install, the only products that
should appear are the SAS Metadata Server and, if it is contained in your order,
SAS/Secure.
e. Use a separate high-level qualifier for this installation than you will for your main
SAS installation (it could be the main SAS high-level qualifier with an additional
level, for example SAS.SAS93.Z64). Note that the load module libraries created for
the 64-bit installation do NOT need to be program-controlled as the libraries for the
31-bit installation do.
f. If you specified –nojobsubmit, after the SAS Deployment Wizard has completed with
all green check marks, run the series of jobs indicated in the JOBINDEX member of
the <HLQz64>.INSTALL.CNTL data set. After you submit the first job, each job will
submit the subsequent job as its last step.
Installation Instructions for SAS® 9.3 Electronic Software Delivery for Planning Installations on z/OS
14
3. Invoke the SAS Deployment Wizard for the 31-bit install. Note that this will be the second
invocation if you installed your metadata server on z/OS following the instructions in Step 2.
On your z/OS system, from OMVS (not ISHELL), rlogin, or putty, enter the z/OS UNIX shell
command ./setup.rexx at the root of your SAS Software Depot to start the SAS
Deployment Wizard.
The most commonly used options are:
-nojobsubmit as discussed earlier in this document, using this option means that the
SAS Deployment Wizard will not submit the jobs automatically so that
you can inspect and/or modify the JCL before execution. You will
follow the manual steps in the section “After Running setup.rexx with
the –nojobsubmit Command-line Option” on page 18.
-record records the values that you enter for the SAS Deployment Wizard
prompts in the file specified by the –responsefile option. This is
convenient when you have to enter many options such as port
numbers and you may have to rerun the configuration later. Note that
once you have saved a response file, you can use it in a subsequent
invocation of the SAS Deployment Wizard by specifying
–responsefile without the –record option.
-responsefile if –record is also specified, a new file is created with the responses
entered in that invocation of the SAS Deployment Wizard. If –record
is not specified, an existing response file from a previous run will be
used to fill in the responses from that previous run. Your installation
user ID must have write access to the specified file.
-deploy if you specify –record you must also specify –deploy to actually
deploy the software.
-console if you do not have access to an X11 server. Any content that would
have appeared in screens like the screen captures shown in this
document will instead be printed to your command window.
Example
setup.rexx -record -responsefile /u/userid/sdwresponse.properties
Notes:
o By default, no deployment occurs when running in a record mode. In order to force
a deployment while recording, use –deploy. For example:
setup.rexx -record -responsefile
/u/userid/sdwresponse.properties –deploy
o If you specify a file location where a file already exists, the pre‐existing file will be
overwritten by the SAS Deployment Wizard.
o A full listing and description of these command-line options for setup.rexx may be
found in the SAS Deployment Wizard User’s Guide, available from the Install Center
at http://support.sas.com/installcenter.
Installation Instructions for SAS® 9.3 Electronic Software Delivery for Planning Installations on z/OS
15
4. Before you configure your servers, you must have the SASCP64 module installed where it
can be accessed as a TSO or UNIX command. For TSO, the SASCP64 module must be in a
TSO command library or in STEPLIB. If you use rlogin to access your z/OS system, the
SASCP64 module must be in link list.
If you do not have the SAS SVC installed from a previous SAS 9 release, you must also install
that into your system before running the configuration. You can do this by installing (but not
configuring) 31-bit SAS and then obtain the SVC module from the load library, or you can
download it from SAS Note SN 43697 available at
http://support.sas.com/kb/43/697.html.
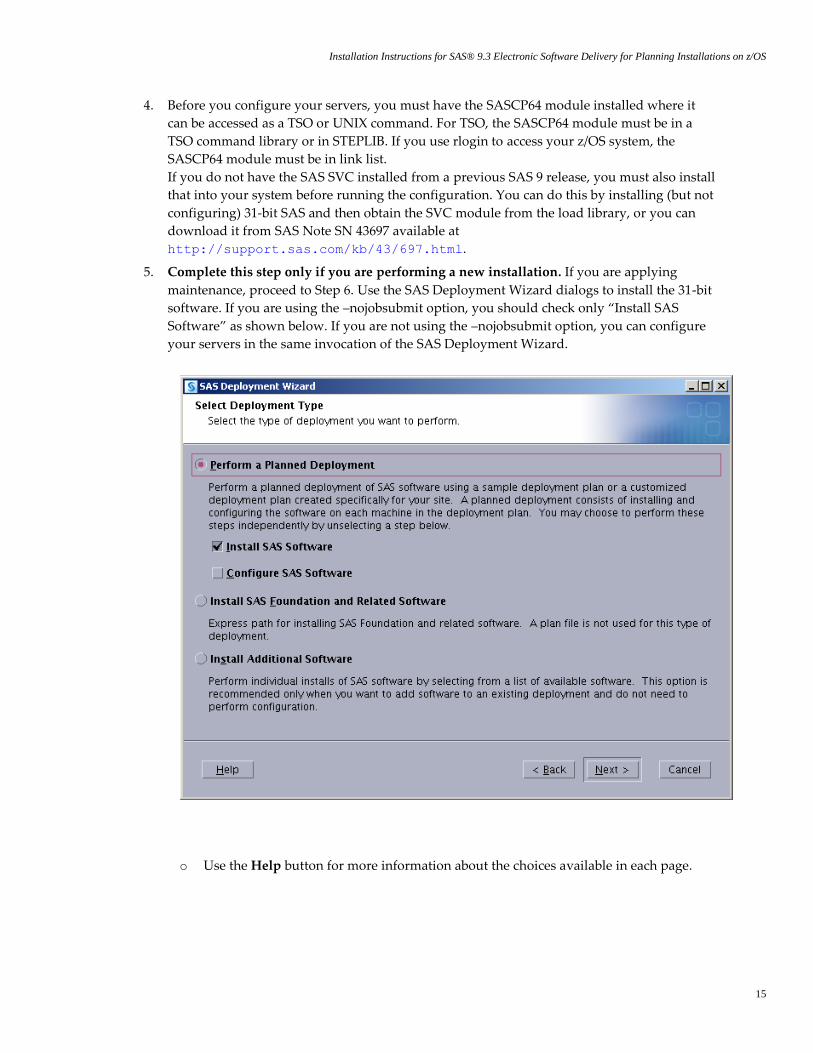
5. Complete this step only if you are performing a new installation. If you are applying
maintenance, proceed to Step 6. Use the SAS Deployment Wizard dialogs to install the 31-bit
software. If you are using the –nojobsubmit option, you should check only “Install SAS
Software” as shown below. If you are not using the –nojobsubmit option, you can configure
your servers in the same invocation of the SAS Deployment Wizard.
o Use the Help button for more information about the choices available in each page.
Installation Instructions for SAS® 9.3 Electronic Software Delivery for Planning Installations on z/OS
16
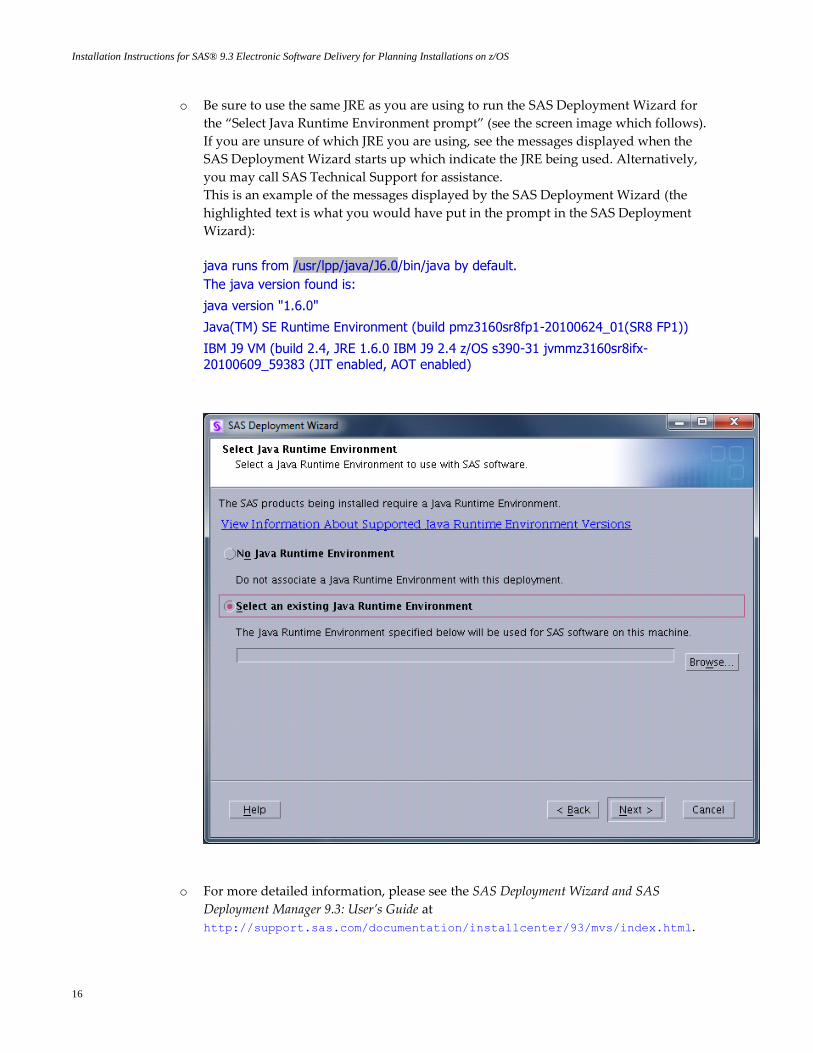
o Be sure to use the same JRE as you are using to run the SAS Deployment Wizard for
the “Select Java Runtime Environment prompt” (see the screen image which follows).
If you are unsure of which JRE you are using, see the messages displayed when the
SAS Deployment Wizard starts up which indicate the JRE being used. Alternatively,
you may call SAS Technical Support for assistance.
This is an example of the messages displayed by the SAS Deployment Wizard (the
highlighted text is what you would have put in the prompt in the SAS Deployment
Wizard):
java runs from /usr/lpp/java/J6.0/bin/java by default.
The java version found is:
java version "1.6.0"
Java(TM) SE Runtime Environment (build pmz3160sr8fp1-20100624_01(SR8 FP1))
IBM J9 VM (build 2.4, JRE 1.6.0 IBM J9 2.4 z/OS s390-31 jvmmz3160sr8ifx-20100609_59383 (JIT enabled, AOT enabled)
o For more detailed information, please see the SAS Deployment Wizard and SAS
Deployment Manager 9.3: User’s Guide at
http://support.sas.com/documentation/installcenter/93/mvs/index.html.
Installation Instructions for SAS® 9.3 Electronic Software Delivery for Planning Installations on z/OS
17
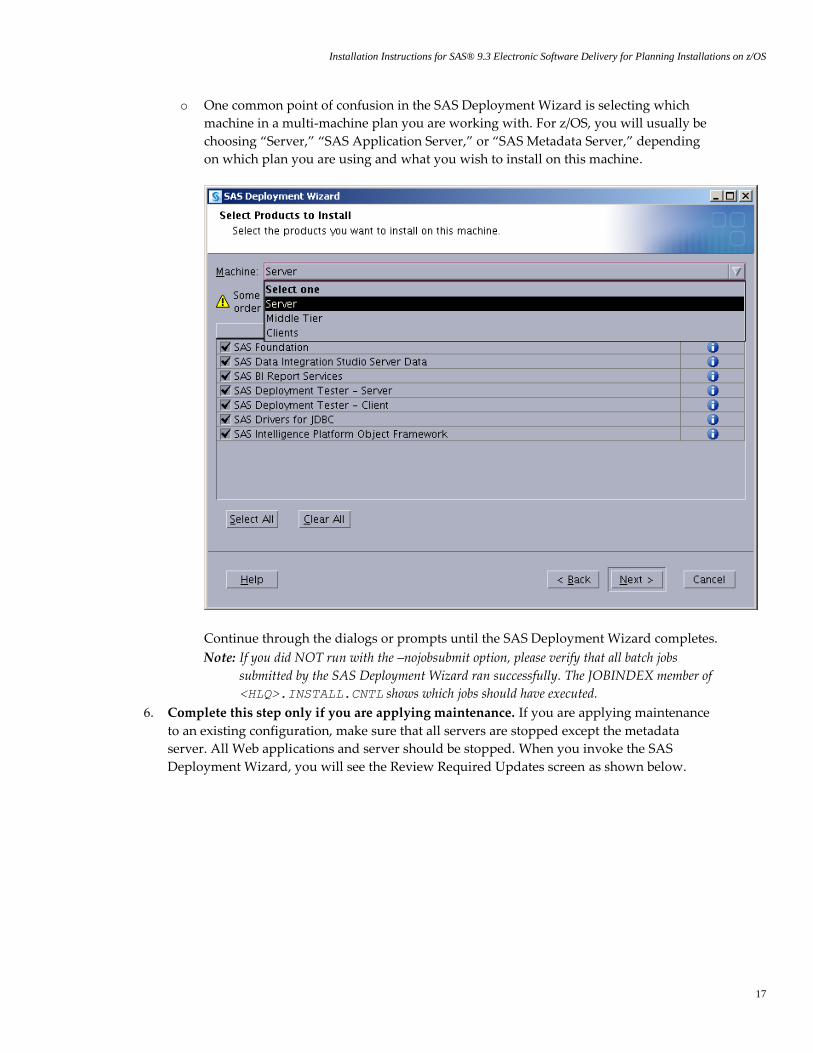
o One common point of confusion in the SAS Deployment Wizard is selecting which
machine in a multi-machine plan you are working with. For z/OS, you will usually be
choosing “Server,” “SAS Application Server,” or “SAS Metadata Server,” depending
on which plan you are using and what you wish to install on this machine.
Continue through the dialogs or prompts until the SAS Deployment Wizard completes.
Note: If you did NOT run with the –nojobsubmit option, please verify that all batch jobs
submitted by the SAS Deployment Wizard ran successfully. The JOBINDEX member of
<HLQ>.INSTALL.CNTL shows which jobs should have executed.
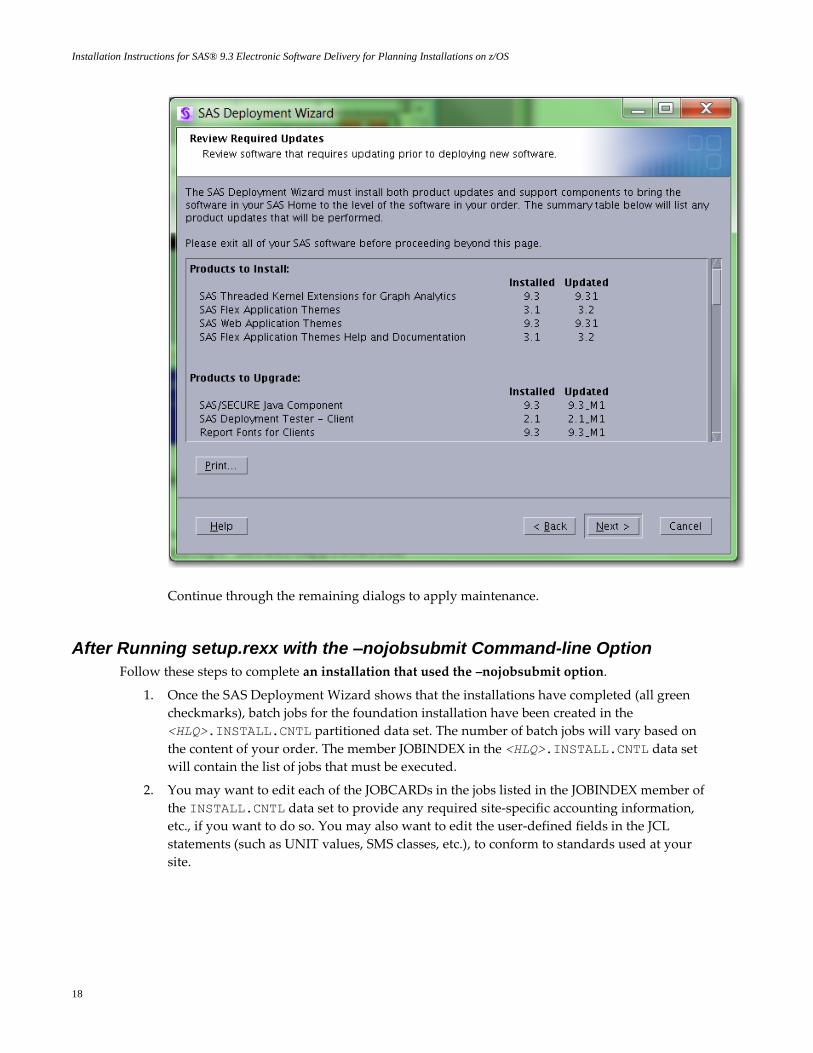
6. Complete this step only if you are applying maintenance. If you are applying maintenance
to an existing configuration, make sure that all servers are stopped except the metadata
server. All Web applications and server should be stopped. When you invoke the SAS
Deployment Wizard, you will see the Review Required Updates screen as shown below.
Installation Instructions for SAS® 9.3 Electronic Software Delivery for Planning Installations on z/OS
18
Continue through the remaining dialogs to apply maintenance.
After Running setup.rexx with the –nojobsubmit Command-line Option
Follow these steps to complete an installation that used the –nojobsubmit option.
1. Once the SAS Deployment Wizard shows that the installations have completed (all green
checkmarks), batch jobs for the foundation installation have been created in the
<HLQ>.INSTALL.CNTL partitioned data set. The number of batch jobs will vary based on
the content of your order. The member JOBINDEX in the <HLQ>.INSTALL.CNTL data set
will contain the list of jobs that must be executed.
2. You may want to edit each of the JOBCARDs in the jobs listed in the JOBINDEX member of
the INSTALL.CNTL data set to provide any required site-specific accounting information,
etc., if you want to do so. You may also want to edit the user-defined fields in the JCL
statements (such as UNIT values, SMS classes, etc.), to conform to standards used at your
site.
Installation Instructions for SAS® 9.3 Electronic Software Delivery for Planning Installations on z/OS
19
3. If you want to submit each job individually, you will need to edit the last step that submits
the next job through the internal reader. Just delete the IEBGENER step at the end.
Otherwise; submit only the first job.
Note: After submitting an install job, the <HLQ>.INSTALL.CNTL library cannot be open in edit
mode. This may cause some of the install jobs to fail when trying to open the CNTL library for
update.
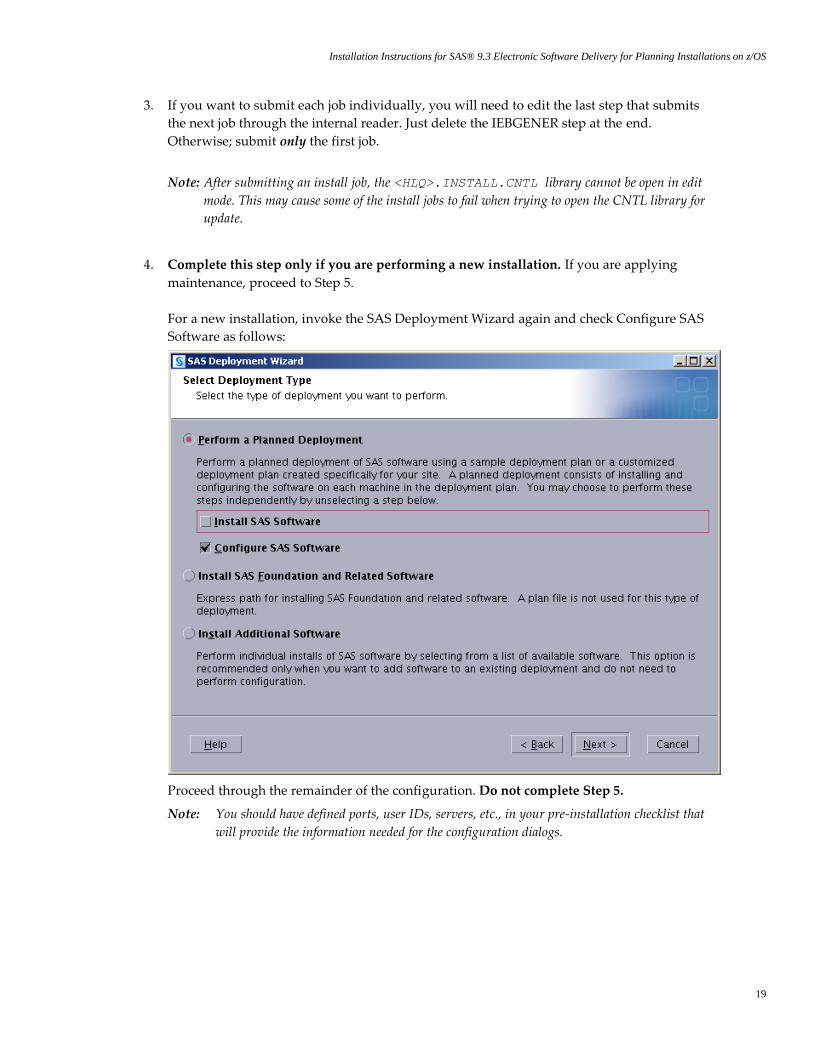
4. Complete this step only if you are performing a new installation. If you are applying
maintenance, proceed to Step 5.
For a new installation, invoke the SAS Deployment Wizard again and check Configure SAS
Software as follows:
Proceed through the remainder of the configuration. Do not complete Step 5.
Note: You should have defined ports, user IDs, servers, etc., in your pre-installation checklist that
will provide the information needed for the configuration dialogs.
Installation Instructions for SAS® 9.3 Electronic Software Delivery for Planning Installations on z/OS
20
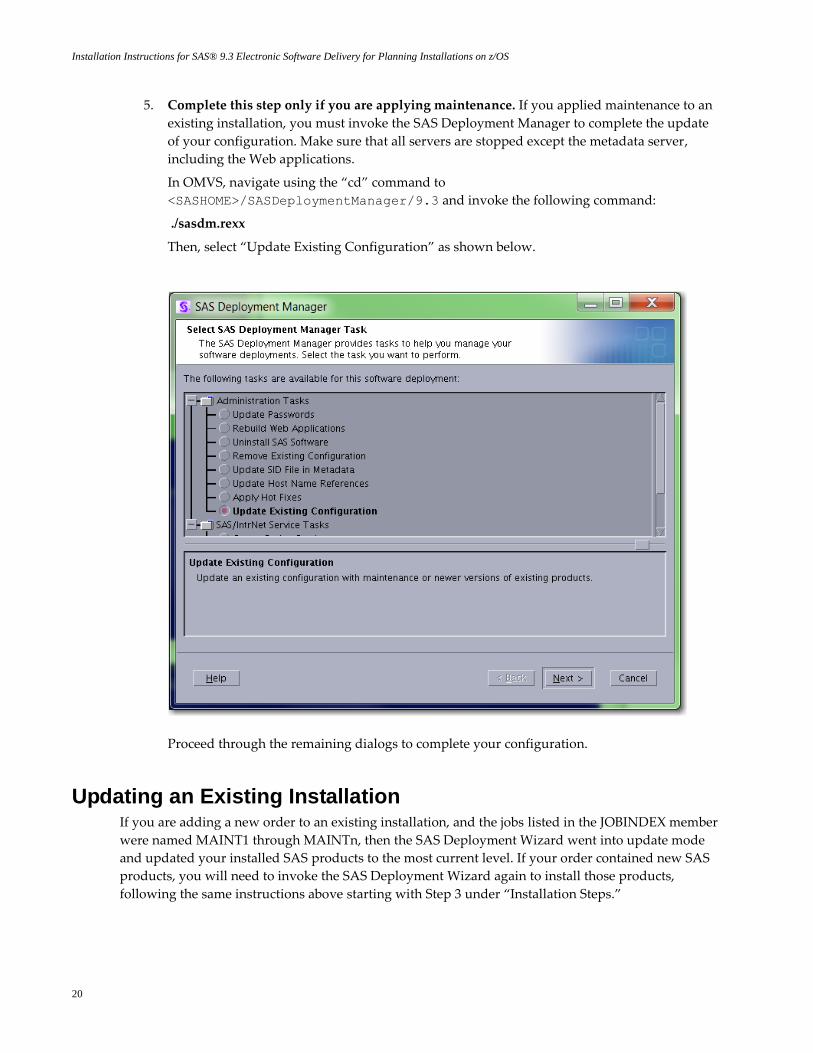
5. Complete this step only if you are applying maintenance. If you applied maintenance to an
existing installation, you must invoke the SAS Deployment Manager to complete the update
of your configuration. Make sure that all servers are stopped except the metadata server,
including the Web applications.
In OMVS, navigate using the “cd” command to
<SASHOME>/SASDeploymentManager/9.3 and invoke the following command:
./sasdm.rexx
Then, select “Update Existing Configuration” as shown below.
Proceed through the remaining dialogs to complete your configuration.
Updating an Existing Installation If you are adding a new order to an existing installation, and the jobs listed in the JOBINDEX member
were named MAINT1 through MAINTn, then the SAS Deployment Wizard went into update mode
and updated your installed SAS products to the most current level. If your order contained new SAS
products, you will need to invoke the SAS Deployment Wizard again to install those products,
following the same instructions above starting with Step 3 under “Installation Steps.”
Installation Instructions for SAS® 9.3 Electronic Software Delivery for Planning Installations on z/OS
21
Updating the Logon Password When the administrator of your system changes their logon password, you must run a rexx program
to update the password that the previous SAS installation process stored. The user ID and password
of the person who initially installed the system is located in the install.properties file. The
password is encrypted and you will not be able to view it if you open the file. Do not attempt to edit
this file on your own.
The CHGPW.REXX program is used to change the password. It can be found in USS under
[SASHOME]/SASDeploymentManager/9.3.
To run this program in USS space, type chgpw.rexx and follow the prompts. Upon invoking the
program, you will see the java version found in the system displayed on the screen along with the
following:
Enter password for YOURID: <enter the current password for your user ID>
The following prompt will appear:
Enter password again: <enter the same password that you provided for the previous prompt>
If the passwords to the prompts are not the same, the following text will be displayed:
Passwords don't match. Try again.
If the passwords match, the following prompt will appear:
Password successfully updated.
Additional Configuration Steps After all installation jobs have finished, submit the VALID job in the CNTL data set from the 31-bit
installation and ensure that all steps complete with a return code of 0.
Consult the configuration instructions available for your operating system for product-specific post-
installation steps. The configuration instructions are available from Install Center.
Installation Instructions for SAS® 9.3 Electronic Software Delivery for Planning Installations on z/OS
22
Managing Server Sessions After the SAS Deployment Wizard has finished configuration of your software, any servers you have
configured (metadata server, object spawner, OLAP server, etc.) will be running as UNIX processes.
To stop these processes cleanly, in OMVS navigate to your configuration directory, then the Lev1
directory below that, and execute the following command:
./sas.servers stop
You can also issue this command
./sas.servers status
to see the status of all servers (and which ones are running)
or
./sas.servers start
to start all servers in the correct order. If you want to run your servers as started tasks, for example,
you would stop all the UNIX processes, and then use the JCL created for the started tasks in the data
set <high-level-qualifier>.Wn.SRVPROC.
Installing SAS 9.3 Mid-tier and Client Software from the SAS Software Depot
Creating the SAS Software Depot for Your Mid-tier and Client Machines
To install software on your mid-tier and client machines, the SAS Software Depot must be accessible
to those machines. If your machines can share directories, a single copy of the SAS Software Depot
can be shared between machines, even on machines with different operating systems. You can use
either of the following methods to create the depot:
Download the SAS Download Manager for either UNIX or Windows and follow the
instructions to create the SAS Software Depot for each of your mid-tier and client machines.
From the following link, identify the appropriate operating system where you will be
downloading your SAS software and click Request Download. http://www.sas.com/downloadmgr
Copy your SAS Software Depot from z/OS to the other machines using a third-party FTP
utility that can transfer entire directory trees in binary mode and preserve the case of all file
names.
Installation Instructions for SAS® 9.3 Electronic Software Delivery for Planning Installations on z/OS
23
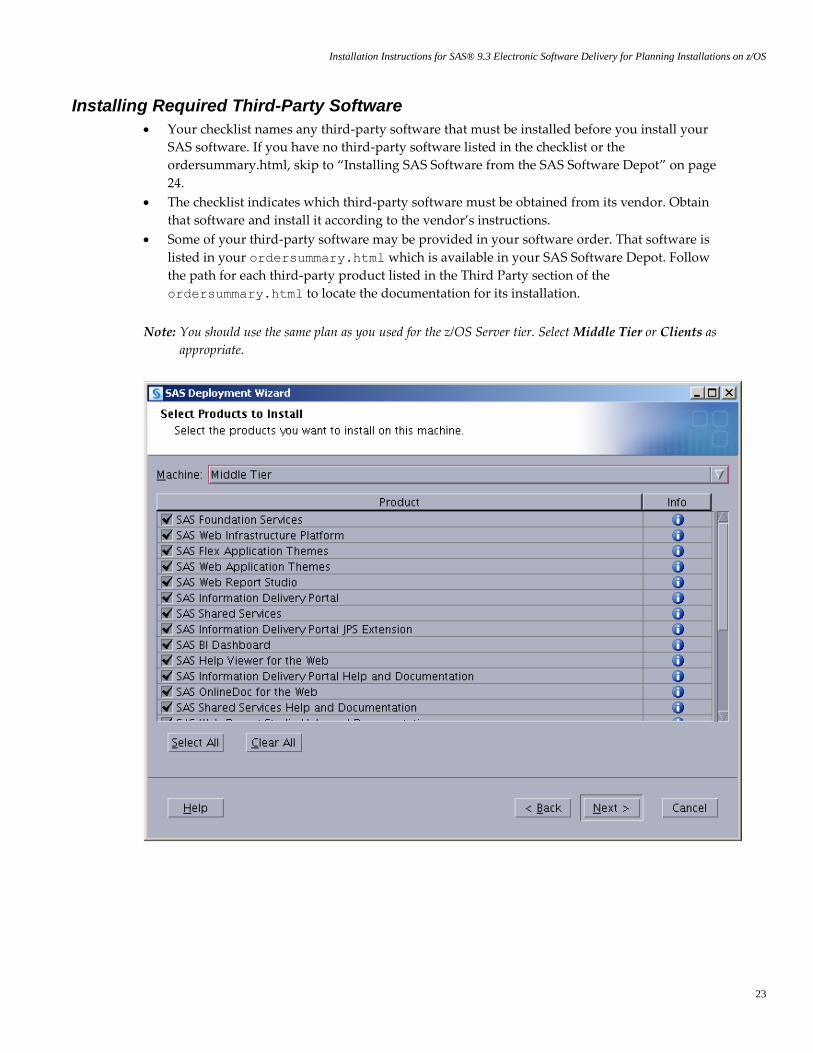
Installing Required Third-Party Software
Your checklist names any third-party software that must be installed before you install your
SAS software. If you have no third-party software listed in the checklist or the
ordersummary.html, skip to “Installing SAS Software from the SAS Software Depot” on page
24.
The checklist indicates which third-party software must be obtained from its vendor. Obtain
that software and install it according to the vendor’s instructions.
Some of your third-party software may be provided in your software order. That software is
listed in your ordersummary.html which is available in your SAS Software Depot. Follow
the path for each third-party product listed in the Third Party section of the
ordersummary.html to locate the documentation for its installation.
Note: You should use the same plan as you used for the z/OS Server tier. Select Middle Tier or Clients as
appropriate.
Installation Instructions for SAS® 9.3 Electronic Software Delivery for Planning Installations on z/OS
24
Installing SAS Software from the SAS Software Depot
Windows users should double-click the setup.exe file at the top level of your SAS Software Depot.
The most commonly used options are:
-record records the values that you enter for the SAS Deployment Wizard prompts in the
file specified by the –responsefile option. This is convenient when you have
to enter many options such as port numbers and you may have to rerun the
configuration later. Note that once you have saved a response file, you can use it
in a subsequent invocation of the SAS Deployment Wizard by specifying –
responsefile without the –record option.
-responsefile if –record is also specified, a new file is created with the responses entered in
that invocation of the SAS Deployment Wizard. If –record is not specified, an
existing response file from a previous run will be used to fill in the responses
from that previous run.
-deploy if you specify –record you must also specify –deploy to actually deploy the
software.
-console only used for UNIX hosts, not needed on Windows.
Example
setup.exe -record -responsefile "C:\Program Files\SAS\sdwresponse.properties"
Notes:
o By default, no deployment occurs when running in a record mode. In order to force a
deployment while recording, use –deploy. For example (enter as one line):
setup.exe -record -responsefile "C:\Program Files\SAS\
sdwresponse.properties " –deploy
o If you specify a file location where a file already exists, the pre‐existing file will be overwritten
by the SAS Deployment Wizard.
o For more information about the choices available in each dialog, click the Help button. A full
listing and description of these command-line options for setup.exe may be found in the SAS
Deployment Wizard and SAS Deployment Manager 9.3: User’s Guide at
http://support.sas.com/documentation/installcenter/93/mvs/index.html.
o UNIX users should execute setup.sh from the root of your SAS Software Depot.
Archiving Your SAS Software Depot For future maintenance or installation of additional SAS software products, you will need your SAS
Software Depot. It can be recreated, but you may find it easier to keep a backup of your SAS Software
Depot so that only updates must be downloaded in the future. SAS Note 37119 (available at
http://support.sas.com/kb/37/119.html) contains sample jobs to back up and restore your
SAS Software Depot.
Installation Instructions for SAS® 9.3 Electronic Software Delivery for Planning Installations on z/OS
25
Tips and Additional Information For the latest installation news, please visit these sites for tips and additional information that may
not be in your documentation:
General support for SAS issues (including a link to Tech Support)
http://support.sas.com
Technical Support SAS 9.3 Hot Fix downloads
http://ftp.sas.com/techsup/download/hotfix/HF2/93p2_home.html
General Information and Troubleshooting for Electronic Software Delivery
http://support.sas.com/kb/30/950.html
Locating the log files for SAS 9.3 installations
http://support.sas.com/kb/43/606.html
Documentation for a SAS 9.3 installation on z/OS
http://support.sas.com/documentation/installcenter/93/mvs/index.html
Technical Support If you need assistance with the software, we ask that only the SAS Installation Representative or
the SAS Support Consultant call our Technical Support Division.
For U.S. and Canadian customers, support is provided from our corporate headquarters in Cary,
North Carolina. You may call (919) 677-8008, Monday through Friday.
Customers outside of the U.S. can obtain local-language technical support through the local office
in their countries. Customers in these locations should contact their local office for specific
support hours. See http://support.sas.com/techsup/contact/index.html for contact
information for local offices.
Before calling, you may want to explore the SAS Institute Technical Support Web site at
http://support.sas.com/techsup/. The Technical Support Web site offers a Knowledge
Base, FAQs, Technical Support Documents and more that may answer your questions. This Web
site also provides a mechanism for reporting problems.

Installation Instructions for SAS® 9.3 Electronic Software Delivery for Planning Installations on z/OS
26

IIOSEP93
SAS is the leader in business analytics software and services, and the largest independent vendor in the business intelligence market. Through innovative solutions delivered within an integrated framework, SAS helps customers at more than 50,000 sites improve performance and deliver value by making better decisions faster. Since 1976, SAS has been giving customers around the world THE POWER TO KNOW®.
Related Documents