FOR YOUR RECORDS DATE PURCHASED: WHERE PURCHASED: SERIAL NUMBER: (Located on switch box) Thank you for purchasing SNOWSPORT TM Electric Plow Winch for your SNOWSPORT ® HD or LT Utility Plow. Agri-Cover, Inc. proudly manufactured this winch using superior quality materials and workmanship. With proper care, your winch will provide years of service and enjoyment. NOTICE TO INSTALLER: Even if familiar with product, read instructions prior to installation as improvements may be made without notice. Always handle components with care. If you have questions or problems, have serial number ready and call customer service. When done, these instructions must be given to the consumer. NOTICE TO CONSUMER: Before using snowplow, read safety and operation sections. Save these instructions for future reference. INSTALLATION INSTRUCTIONS Questions? 800-689-6612 agricover.com

Welcome message from author
This document is posted to help you gain knowledge. Please leave a comment to let me know what you think about it! Share it to your friends and learn new things together.
Transcript

FOR YOUR RECORDSDATE PURCHASED:
WHERE PURCHASED:
SERIAL NUMBER:(Located on switch box)
Thank you for purchasing SNOWSPORTTM Electric Plow Winch for your SNOWSPORT® HD or LT Utility Plow. Agri-Cover, Inc. proudly manufactured this winch using superior quality materials and workmanship. With proper care, your winch will provide years of service and enjoyment.
NOTICE TO INSTALLER: Even if familiar with product, read instructions prior to installation as improvements may be made without notice. Always handle components with care. If you have questions or problems, have serial number ready and call customer service. When done, these instructions must be given to the consumer.
NOTICE TO CONSUMER: Before using snowplow, read safety and operation sections. Save these instructions for future reference.
INSTALLATION INSTRUCTIONS
Questions? 800-689-6612agricover.com

2
PREPARATIONSNOWSPORTTM Electric Plow Winch works on new and prior SNOWSPORT® HD and LT models with a 4 bolt push frame.
Unpack electric plow winch components. For additional installation assistance, go to mysnowsport.com for install and operation videos.
COMPONENTS
• Winch assembly with hardware• Winch cover with bow-tie pins• Tie down cleat with hardware• Main power wire• Cab switch with wire• Dual locking fastener• Primer• Cable tie• Dielectric grease
TOOLS NEEDED
• 3/4" Wrench and socket• Torque wrench (ft-lbs and in-lbs)• 9/16" Socket• Cutting tool• Gloves• Protective eyewear
! CAUTION: Over torquing hardware may damage components.
IMPORTANT: Operating system without a circuit breaker voids warranty.
! CAUTION: Before using, read and understand all directions, warnings and precautions. For more information, visit primer manufacturer's website.
! DANGER: Highly flammable liquid and vapor. Do not use or store primer near fire or flame. Use in well ventilated area. No smoking. Avoid contact with eyes. Do not breathe vapor. Keep out of reach of children. Wear protective gloves and eye/face protection. May be fatal if swallowed and enters airways. May cause an allergic skin reaction. May cause drowsiness or dizziness.
NOTE: Use dielectric grease as needed for electric wire connections. Apply dielectric grease to both electrical plugs when not in use.
SAFETY INFORMATION• Always disconnect power before servicing plow or electrical components.• Always follow vehicle manufacturer recommendations for snowplowing.• Always exercise safety, courtesy and common sense.• Never allow children to operate or play with electric winch.• Never lift electric winch by its cover.• Always look where you are going when backing up, don't rely on mirrors or back up cameras.• Always keep hands free from moving parts and synthetic cable when operating plow.• Always transport blade in retainer grooves secured by quick pins.• Never rely on electric winch's synthetic cable to transport.• Periodically inspect hardware and components, perform maintenance as required.• Always follow safety information in HD or LT Utility Plow's standard instructions.

2 3
SNOWPLOWING TIPS• Check local regulations before plowing snow.• Mark or remove any potential hazards in plowing area as they can be easily covered by snow and forgotten.• If blade is kept in warm storage, cooling outside prior to plowing prevents snow from freezing to blade.• For gravel surfaces, we recommend packing the snow by making several passes with blade up to help prevent movement of loose rock when pushing snow.• Start a pass by accelerating slowly to allow for tire traction and blade to accumulate snow.• Amount of snow to be cleared efficiently per pass is determined by snow depth and water content, adjust the width of each pass and plow more often during continuous snowfalls.• As you come to the end of a pass, reduce speed and apply brakes as needed.• When creating piles with a SNOWSPORT® HD Utility Plow, drive straight with the blade set to center position.• To stack snow on hardened piles, start a new pile then push onto existing snow bank.• Ensure to push snow far enough for future snowfall.• Wet snow can compact and freeze which requires chipping to break loose before attempting to move.

4
PARTS DIAGRAM
Synthetic cable
Control box
Motor
Base
Bow-tie pins
Winch cover
Front plate
Cleat

4 5
1: INSTALLING WINCH TO PUSH FRAMETo install winch, perform one of the following:
NEW PLOW ASSEMBLY
A. Complete provided HD or LT Plow instructions.
Push frame
Winch assembly
RETROFIT PLOW
A. Note placement of bolts with hardware and shims (if applicable) for later reinstallation. Remove (4) 1/2" x 4" hex bolts with hardware connecting push frame to interceptor.
B. Slide winch assembly onto push frame aligning bolt holes.
Push frame
C. Reinsert bolts with washers and shims (if applicable) at previous locations.
D. Secure all bolts with washers and nuts. Torque (4) bolts to 90 ft-lbs.
1/2" x 4" Hex bolts with hardware

6
2: INSTALLING CLEATTo install cleat, perform one of the following, then continue to Step 2A:
NEW PLOW ASSEMBLYCompleted in HD or LT Plow instructions.
Weld nuts
Top channel
RETROFIT PLOWTilt (2) weld nuts into top channel with flat side up at mid-point on blade.
Tip: A hammer and flat head screwdriver can be used to tap nut into top channel if needed.
A. Insert bolts through cleat and into weld nuts. Leave bolts loose.
B. Measure and center cleat on blade then torque bolts to 100 in-lbs.
C. Insert synthetic cable from winch assembly through middle of cleat then around each side.
NOTE: Do not remove synthetic cable from winch assembly.
Cleat centered on blade
Back
Front
Back
Front

6 7
3: ATTACHING WINCH COVERA. Attach winch cover to winch assembly with (2) bow-tie pins.
Bow-tie pins
4: INSTALLING WIRES
! CAUTION: Disconnect power before working with electrical system or components.
A. Run main power wire to battery. Ensure quick connect plug on main power wire will reach plug on winch without interference, adjust as needed.
IMPORTANT: Ensure safe wiring path. Avoid sharp edges, moving parts and hot components.
Quick connect plug
Main power wire
Circuit breaker
B. Connect red battery wire with breaker to positive (+) battery terminal and black battery wire to negative (-) battery terminal.
IMPORTANT: Do not connect quick connect plugs at this time.
IMPORTANT: Operating system without a circuit breaker voids warranty.
Circuit breaker

8
4: INSTALLING WIRES (Continued)C. Starting from winch assembly, run cab wire to a rigid location.
IMPORTANT: Ensure safe wiring path. Avoid sharp edges, moving parts and hot components.
Quick connect
plug
Cab switch wire
Tether wires
PrimerCab switch
NOTE: For best adhesion, ensure air and surface temperatures are above 60° F.
D. Clean cab switch location.
E. Shake primer, squeeze at black dot to start liquid flow, then prime location and allow to dry.
NOTE: Primer typically dries in 5 minutes at room temperature.
Crush at black dot
F. Adhere dual locking fastener to primed area. Apply pressure on fastener for at least 5 seconds for maximum adhesion.
Dual locking fastener
G. Connect tether wires to switch as specified below:
• Green tether wire to power terminal (center post)
• Black tether wire to open terminal (outer terminal)
• White tether wire to close terminal (outer terminal)
Green wire to center post
8 9
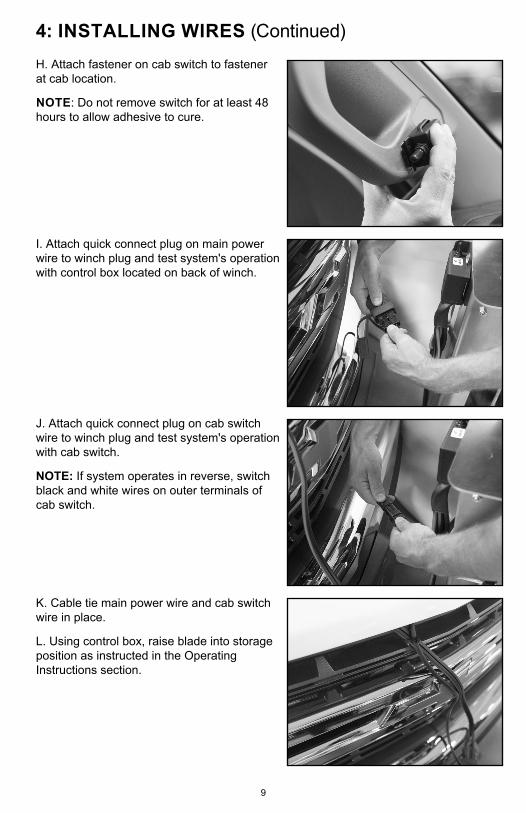
4: INSTALLING WIRES (Continued)H. Attach fastener on cab switch to fastener at cab location.
NOTE: Do not remove switch for at least 48 hours to allow adhesive to cure.
I. Attach quick connect plug on main power wire to winch plug and test system's operation with control box located on back of winch.
J. Attach quick connect plug on cab switch wire to winch plug and test system's operation with cab switch.
NOTE: If system operates in reverse, switch black and white wires on outer terminals of cab switch.
K. Cable tie main power wire and cab switch wire in place.
L. Using control box, raise blade into storage position as instructed in the Operating Instructions section.
10
GENERAL TROUBLESHOOTING
Check all wiring components. A. Check positive (+) and negative (-) wire connections on vehicle battery.
B. Retighten loose connections.
C. Replace any corroded connections.
D. Check all wires for worn or bare spots.
E. Verify 12 volts or more come into the electric winch when operating.
Check power sources. A. Check vehicle battery and charge, replace if required.
Check for physical damage to any equipment.
A. Repair or replace if required.
Check circuit breaker function. A. Circuit breaker may trip. Wait several minutes and try again. If it still does not work, circuit breaker may have detected a continuous short and the short must be repaired.

OPERATING INSTRUCTIONSTO LOWER FOR PUSHING SNOWStep behind blade and remove quick pins. Using switch box, raise blade out of retainer grooves then lower blade to the ground while guiding slide hinges over push frame bars. Reinsert quick pins.
TO PUSH SNOWDrive forward slowly, blade will engage for pushing. When pass is finished, driving in reverse disengages the blade until you are realigned for next pass. Repeat this procedure until job is finished.
TO STORE BLADE FOR TRANSPORTINGStep behind blade and remove quick pins. Use switch box to raise plow and hang slide hinges into retainer grooves on push frame. Secure with quick pins.
TO STORE BLADE DURING OFF SEASON For maximum blade life, periodically retighten bolts and protect blade from sun by storing inside or covering.
NOTE: When pushing snow onto a pile with a SNOWSPORT® HD Utility Plow, always do so with blade set to center position. Piling snow with blade angled may cause damage to plow or vehicle.
Quick pins reinstalled to secure blade during plowing
Quick pins secure blade during transport
IMPORTANT: Operating system without a circuit breaker voids warranty.
11

011421 2000270_B
MANUFACTURER’S LIMITED WARRANTYAgri-Cover, Inc. extends the following Limited Warranty on its SNOWSPORTTM Electric Plow Winch:
Agri-Cover, Inc. warrants its SNOWSPORTTM Electric Plow Winch to be free from defects in material and workmanship under normal use for one (1) year from date of manufacture unless accompanied by proof of purchase. This Limited Warranty does not cover any failure due to abuse, misuse, alteration, neglect, improper assembly or installation, or improper maintenance.
Agri-Cover’s sole obligation under this Limited Warranty or any implied warranty is limited to the repair or replacement at its option, of defective parts only. No labor or service allowance is given or implied. IN NO EVENT SHALL AGRI-COVER, INC. BE LIABLE FOR INCIDENTAL, CONSEQUENTIAL, OR SPECIAL DAMAGES. AGRI-COVER, INC. EXPRESSLY DISCLAIMS ANY AND ALL IMPLIED WARRANTIES OF MERCHANTABILITY, AND THERE ARE NO WARRANTIES WHICH EXTEND BEYOND THE LIMITED WARRANTY DESCRIPTION CONTAINED HEREIN.
For warranty, have serial number ready and fill out the warranty claim form at agricover.com/warrantyclaim or call Customer Service Department at 800-689-6612 to determine if only a replacement part is needed or if the product needs to be returned for inspection and repair. Goods to be returned must have a pre-authorized RA # (Return Authorization Number) – obtained by calling the number above. Mark the number on the package and ship it freight prepaid to address below. Agri-Cover will pay freight to return goods to sender.
This Limited Warranty gives you specific legal rights and you may have other rights, which vary, from state to state.
For replacement parts shop at snowsportparts.com or call Customer Service at 800-689-6612.
Hours: 8:00 am - 5:00 pm CST Monday through Friday, except Holidays
Agri-Cover, Inc.Customer Service Dept
3000 Hwy 281 SEJamestown, ND 58401Phone: 800-689-6612
© 2021 AGRI-COVER, INC. ALL RIGHTS RESERVED.Product subject to change without notice. Patents: agricover.com/patents.
Related Documents