Installation guide Entis Pro version 2.70x for Windows 7

Welcome message from author
This document is posted to help you gain knowledge. Please leave a comment to let me know what you think about it! Share it to your friends and learn new things together.
Transcript

Installation guide Entis Pro version 2.70x for Windows 7
Copyright 2012 Enraf BV All rights reserved.
Reproduction in any form without the prior consent of Enraf BV is not allowed.
This installation guide is for information only. The contents, descriptions and specifications are subject to change without
notice. Enraf BV accepts no responsibility for any errors that may appear in this installation guide.
The warranty terms and conditions applicable in the country of purchase in respect to Enraf BV products are available from
your supplier. Please retain them with your proof of purchase.
Part No.: 4416382 - Revision 1 Installation guide Entis Pro version 2.70x for Windows 7 3
Preface
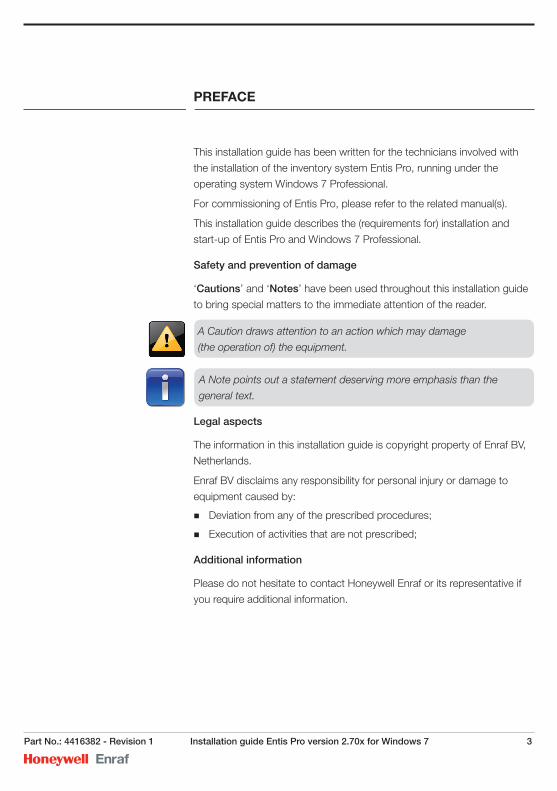
This installation guide has been written for the technicians involved with
the installation of the inventory system Entis Pro, running under the
operating system Windows 7 Professional.
For commissioning of Entis Pro, please refer to the related manual(s).
This installation guide describes the (requirements for) installation and
start-up of Entis Pro and Windows 7 Professional.
Safety and prevention of damage
‘Cautions’ and ‘Notes’ have been used throughout this installation guide
to bring special matters to the immediate attention of the reader.
Legal aspects
The information in this installation guide is copyright property of Enraf BV,
Netherlands.
Enraf BV disclaims any responsibility for personal injury or damage to
equipment caused by:
� Deviation from any of the prescribed procedures;
� Execution of activities that are not prescribed;
Additional information
Please do not hesitate to contact Honeywell Enraf or its representative if
you require additional information.
A Note points out a statement deserving more emphasis than the
general text.
A Caution draws attention to an action which may damage
(the operation of) the equipment.
4 Installation guide Entis Pro version 2.70x for Windows 7 Part No.: 4416382 - Revision 1
Table of contents
Preface . . . . . . . . . . . . . . . . . . . . . . . . . . . . . . . . . . . . . . . . . . . . . . . . . 3
Introduction . . . . . . . . . . . . . . . . . . . . . . . . . . . . . . . . . . . . . . . . . . . . . . 5
System . . . . . . . . . . . . . . . . . . . . . . . . . . . . . . . . . . . . . . . . . . . . . . . . . . 6
Hardware; minimum . . . . . . . . . . . . . . . . . . . . . . . . . . . . . . . . . . . . . 6
Hardware; recommended . . . . . . . . . . . . . . . . . . . . . . . . . . . . . . . . . 6
Hardware; optional . . . . . . . . . . . . . . . . . . . . . . . . . . . . . . . . . . . . . . 6
Software . . . . . . . . . . . . . . . . . . . . . . . . . . . . . . . . . . . . . . . . . . . . . . . . 6
Start Windows 7 Professional . . . . . . . . . . . . . . . . . . . . . . . . . . . . . . . 7
Anti Virus Software . . . . . . . . . . . . . . . . . . . . . . . . . . . . . . . . . . . . . . . . 8
Windows 7 Professional system settings . . . . . . . . . . . . . . . . . . . . . 10
Make Local Entis Pro Group and User(s) . . . . . . . . . . . . . . . . . . . . . 13
Set Security Policy on Change the System Time . . . . . . . . . . . . . . . 15
Installation of Entis Pro . . . . . . . . . . . . . . . . . . . . . . . . . . . . . . . . . . . . 17
Entis Pro configuration . . . . . . . . . . . . . . . . . . . . . . . . . . . . . . . . . . . . 22
CIU Plus Links . . . . . . . . . . . . . . . . . . . . . . . . . . . . . . . . . . . . . . . . . 23
Define New Stations . . . . . . . . . . . . . . . . . . . . . . . . . . . . . . . . . . . . 24
CIU COM Ports . . . . . . . . . . . . . . . . . . . . . . . . . . . . . . . . . . . . . . . . 24
Define CIU Plus host port links . . . . . . . . . . . . . . . . . . . . . . . . . . . . . 25
Tank Access Profile . . . . . . . . . . . . . . . . . . . . . . . . . . . . . . . . . . . . . 26
Define View . . . . . . . . . . . . . . . . . . . . . . . . . . . . . . . . . . . . . . . . . . . 28
Select view . . . . . . . . . . . . . . . . . . . . . . . . . . . . . . . . . . . . . . . . . 28
Import view . . . . . . . . . . . . . . . . . . . . . . . . . . . . . . . . . . . . . . . . 29
Installation of additional Network stations . . . . . . . . . . . . . . . . . . . . 30
Reconfiguration of an Entis Pro network station . . . . . . . . . . . . . . . 31
Backup . . . . . . . . . . . . . . . . . . . . . . . . . . . . . . . . . . . . . . . . . . . . . . . . 32
How to Uninstall . . . . . . . . . . . . . . . . . . . . . . . . . . . . . . . . . . . . . . . . . 33
Appendix A Windows 7 Professional Network installation . . . . . . . 34
Appendix B Network Configuration form . . . . . . . . . . . . . . . . . . . 40
Appendix C Related documents . . . . . . . . . . . . . . . . . . . . . . . . . 41
Part No.: 4416382 - Revision 1 Installation guide Entis Pro version 2.70x for Windows 7 5
InTroducTIon
This installation guide introduces you to installation procedure of Entis Pro as a stand alone system or a network configuration and describes a quick overview of getting started.
It shows you how to do the most common tasks, provides you with tips and points you to Windows 7 Professional features which must be checked before installing Entis Pro.
Before starting with the Entis pro installation procedure we strongly recommend to follow the following instructions:
� Install Windows 7 Professional 32-bit, including the required service
pack (for details see the readme.txt on the CD)
� In case of a network system, install Windows 7 Professional on all
network stations
� Configure the network, if required (hardware, software, TCP/IP
protocol)
� Set the regional settings correct on all stations
� Make sure that no other Entis Pro station is running Entis Pro software
� Install Entis Pro on the station which is going to be used for
configuration
� Use Ensite Pro to configure all CIU Pluses and Primes and create
Ini files
� In case of a network system create stations and make a list of all
Station-names of the Entis Pro network
� Create Com ports and link the CIU Pluses and Host(s) if required.
� Create Groups, Views and the Tank Access Profile on the configuration
station
� Create Entis Pro users and assign privileges
� In case of a network system, install the other Network stations and link
CIU’s and Hosts if required.
See appendix A for the “Network Configuration Form”.
All CIU Primes and Pluses must have unique RTU addresses.
6 Installation guide Entis Pro version 2.70x for Windows 7 Part No.: 4416382 - Revision 1
SySTem
Hardware; minimum
� Intel Xeon W3503 2.4GHz or better
� Windows 7 compatible graphics card
� 4 GB DDR3 memory
� 250GB internal harddisk
� 16x DVD+/-RW drive
� Audio output capability
� 1x Serial RS-232-C I/O port (9 pin D-sub)
� 1x Parallel port for printer (25 pin D-sub)
� 2x PCI Expension slots
� Network Interface Card, Ethernet-Fast Ethernet
� Supply voltage 110 and 230 Volt (50/60 Hz)
� Windows 7 Professional 32-bit (English language)
� Mouse (USB)
� US keyboard, not US international (USB)
� 19” TFT Monitor
� Loudspeaker set.
Hardware; recommended
� UPS with serial interface
Hardware; optional
� 21" TFT monitor
� PCI multi I/O board; (can be supplied by Enraf)
Software
� Windows 7 Professional 32-bit
Per CIU Plus one serial port is required Serial I/O’s are used for: CIU Plus,
Host 45E and UPS
This is displayed in Control Panel - System and Security - System
Part No.: 4416382 - Revision 1 Installation guide Entis Pro version 2.70x for Windows 7 7
STarT WIndoWS 7 ProfeSSIonal
Log on as administrator.
8 Installation guide Entis Pro version 2.70x for Windows 7 Part No.: 4416382 - Revision 1
anTI VIruS SofTWare
Entis Pro is based on Microsoft Windows based platforms. These
platforms are vulnerable to virus and malware attacks. To reduce this
vulnerability, Anti-virus software is required. For Entis Pro 2.70x McAfee
Enterprise 8.8 + Engine 5400 is recommended and verified.
The Anti-virus software must be kept up to date in order to remain
effective. Therefore the DAT files should be updated frequently. Use DAT
files only. SuperDATs are not recommended for use as they contain both
engine and DAT file updates, which could result in loading a not verified
engine on the Entis Pro system.
After installation of McAfee VirusScan Enterprise, some configuration
options must be selected. Please refer to the manufacturer’s instructions
on how to set these options.
Basic required configuration
Full System Scans: Do not automatically schedule full system scans.
Failure to follow this guideline can result in one or more of the following
situations:
� Severe Performance degradation
� Could impact Operators ability to respond to a situation
� Peform system scans only ‘on demand’ when it’s safe to do so.
(It’s recommended to do a full system scan immediatley after installing
the anti-virus software)
(McAfee 8.8 allows you to set the maximum CPU usage.)
On-Access Scans: Enable scanning files on access
� When reading or writing files
� Move infected files to a quarantine directory
� Provide a message to the user that an infected file was found
� Allow user to clean
� Scan boot sectors of all floppy drives
� Exclusion directories on acces scan.
Part No.: 4416382 - Revision 1 Installation guide Entis Pro version 2.70x for Windows 7 9
Anti Virus Software
(Exclusion of the ProgramData\Enraf\Entis Pro diectory and sub
directories might be required to ensure performance)
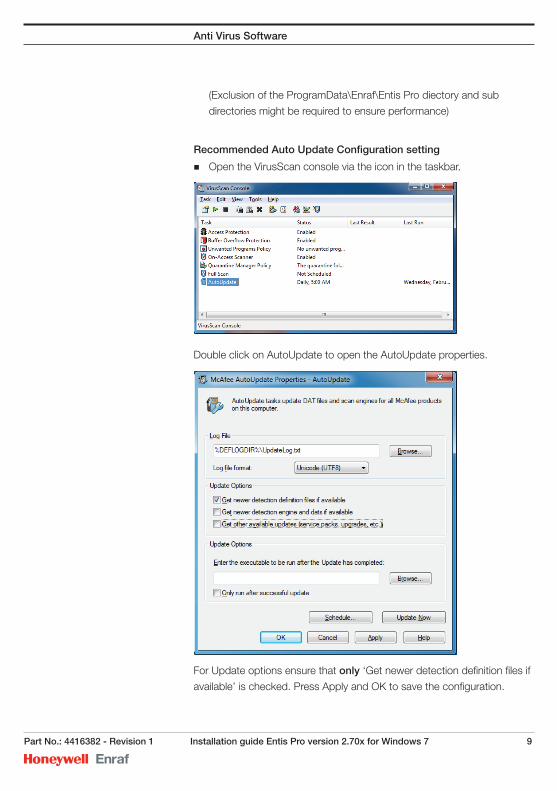
Recommended Auto Update Configuration setting
� Open the VirusScan console via the icon in the taskbar.
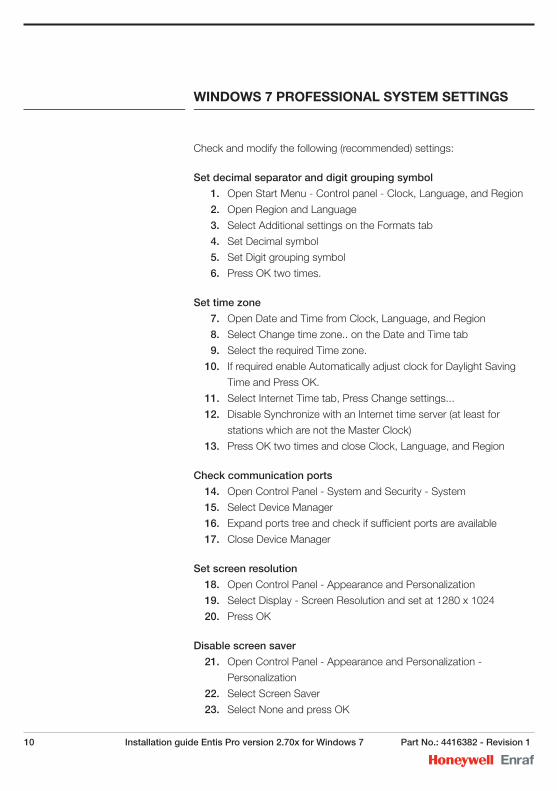
Double click on AutoUpdate to open the AutoUpdate properties.
For Update options ensure that only ‘Get newer detection definition files if
available’ is checked. Press Apply and OK to save the configuration.
10 Installation guide Entis Pro version 2.70x for Windows 7 Part No.: 4416382 - Revision 1
WIndoWS 7 ProfeSSIonal SySTem SeTTIngS
Check and modify the following (recommended) settings:
Set decimal separator and digit grouping symbol
1. Open Start Menu - Control panel - Clock, Language, and Region
2. Open Region and Language
3. Select Additional settings on the Formats tab
4. Set Decimal symbol
5. Set Digit grouping symbol
6. Press OK two times.
Set time zone
7. Open Date and Time from Clock, Language, and Region
8. Select Change time zone.. on the Date and Time tab
9. Select the required Time zone.
10. If required enable Automatically adjust clock for Daylight Saving
Time and Press OK.
11. Select Internet Time tab, Press Change settings...
12. Disable Synchronize with an Internet time server (at least for
stations which are not the Master Clock)
13. Press OK two times and close Clock, Language, and Region
Check communication ports
14. Open Control Panel - System and Security - System
15. Select Device Manager
16. Expand ports tree and check if sufficient ports are available
17. Close Device Manager
Set screen resolution
18. Open Control Panel - Appearance and Personalization
19. Select Display - Screen Resolution and set at 1280 x 1024
20. Press OK
Disable screen saver
21. Open Control Panel - Appearance and Personalization -
Personalization
22. Select Screen Saver
23. Select None and press OK
Part No.: 4416382 - Revision 1 Installation guide Entis Pro version 2.70x for Windows 7 11
Change color for better readability
24. Open Control Panel - Appearance and Personalization -
Personalization
25. Select Window Color and select Advanved appearance
settings...
26. Select Item: 3D objects
27. Select Color 1:
28. Press Other…
29. Enter value 212 for Red, Green and Blue
30. Press OK two times
Set power options
31. Open Control Panel - Hardware and Sound - Power Options
32. Select High performance, select change plan settings
33. Select Never two times and Save changes
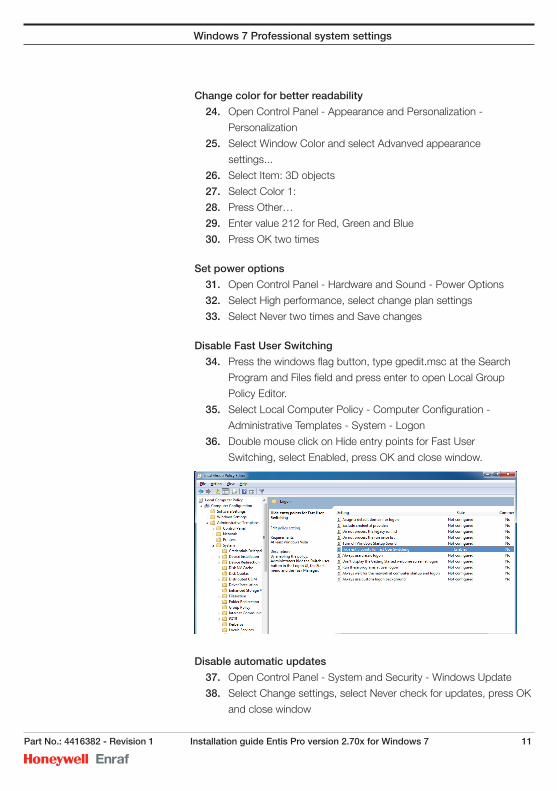
Disable Fast User Switching
34. Press the windows flag button, type gpedit.msc at the Search
Program and Files field and press enter to open Local Group
Policy Editor.
35. Select Local Computer Policy - Computer Configuration -
Administrative Templates - System - Logon
36. Double mouse click on Hide entry points for Fast User
Switching, select Enabled, press OK and close window.
Disable automatic updates
37. Open Control Panel - System and Security - Windows Update
38. Select Change settings, select Never check for updates, press OK
and close window
Windows 7 Professional system settings
12 Installation guide Entis Pro version 2.70x for Windows 7 Part No.: 4416382 - Revision 1
Set User Account Control
39. Open Control Panel - System and Security
40. Select Change User Account Control settings in Action Center
41. Set to Default - Notify me only when programs try to make
changes to my computer, press OK and Yes.
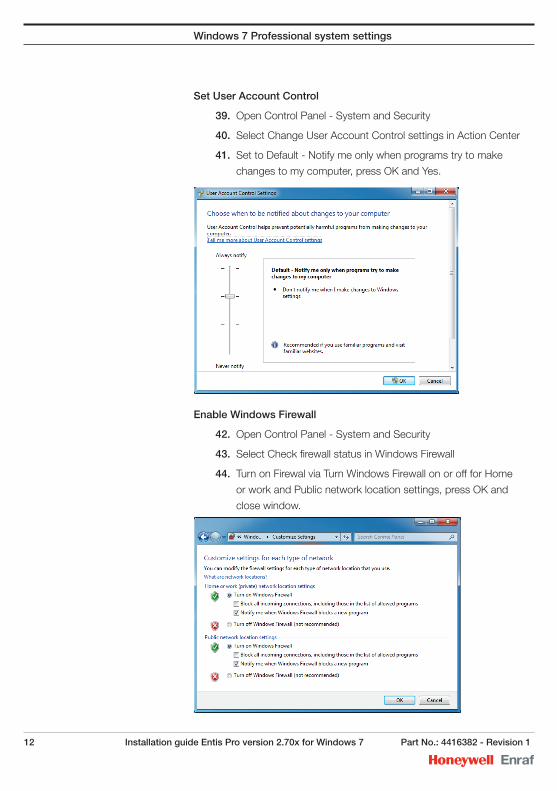
Enable Windows Firewall
42. Open Control Panel - System and Security
43. Select Check firewall status in Windows Firewall
44. Turn on Firewal via Turn Windows Firewall on or off for Home
or work and Public network location settings, press OK and
close window.
Windows 7 Professional system settings
Part No.: 4416382 - Revision 1 Installation guide Entis Pro version 2.70x 13
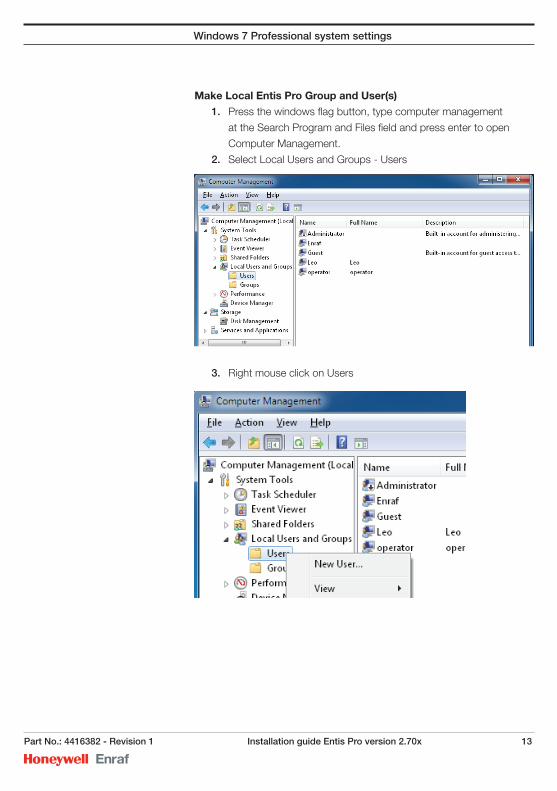
make local entis Pro group and user(s)
1. Press the windows flag button, type computer management
at the Search Program and Files field and press enter to open
Computer Management.
2. Select Local Users and Groups - Users
3. Right mouse click on Users
Windows 7 Professional system settings
Windows 7 Professional system settings
14 Installation guide Entis Pro version 2.70x Part No.: 4416382 - Revision 1
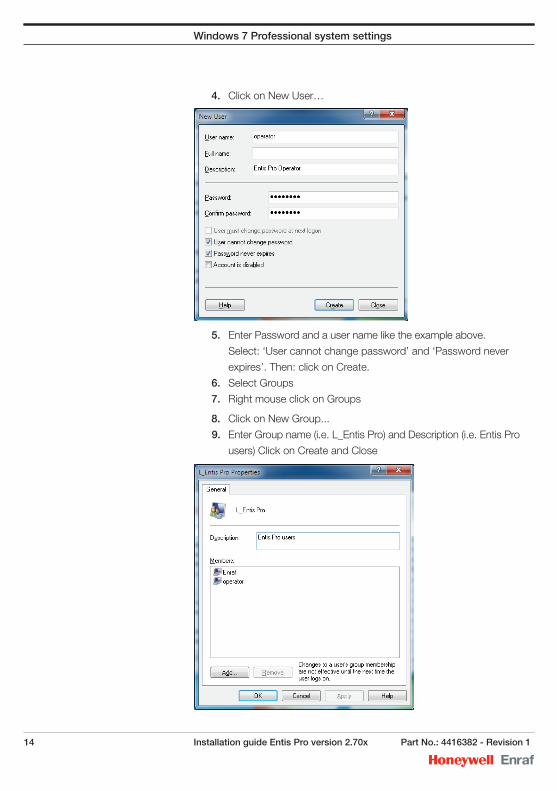
4. Click on New User…
5. Enter Password and a user name like the example above.
Select: ‘User cannot change password’ and ‘Password never
expires’. Then: click on Create.
6. Select Groups
7. Right mouse click on Groups
8. Click on New Group...
9. Enter Group name (i.e. L_Entis Pro) and Description (i.e. Entis Pro
users) Click on Create and Close
Part No.: 4416382 - Revision 1 Installation guide Entis Pro version 2.70x 15
Windows 7 Professional system settings
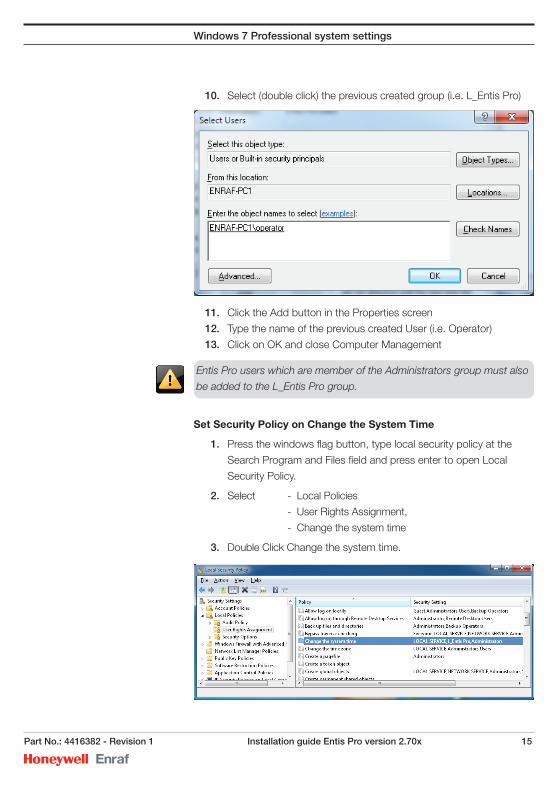
10. Select (double click) the previous created group (i.e. L_Entis Pro)
11. Click the Add button in the Properties screen
12. Type the name of the previous created User (i.e. Operator)
13. Click on OK and close Computer Management
Set Security Policy on change the System Time
1. Press the windows flag button, type local security policy at the
Search Program and Files field and press enter to open Local
Security Policy.
2. Select - Local Policies
- User Rights Assignment,
- Change the system time
3. Double Click Change the system time.
Entis Pro users which are member of the Administrators group must also
be added to the L_Entis Pro group.
Windows 7 Professional system settings
16 Installation guide Entis Pro version 2.70x Part No.: 4416382 - Revision 1
4. Click on Add User or Group
5. Click on Object Types and enable Groups
6. Click on OK
7. Type the name of the group (i.e. L_Entis Pro)
8. Click on OK.
9. Close Local Security Policy.
If a network system will be installed, repeat above procedures on all Entis
Pro network stations. Make sure that users and passwords are identical in
the work group.
Windows 7 Professional will not allow network access without
a password
User name and password are case sensitive.
Part No.: 4416382 - Revision 1 Installation guide Entis Pro version 2.70x 17
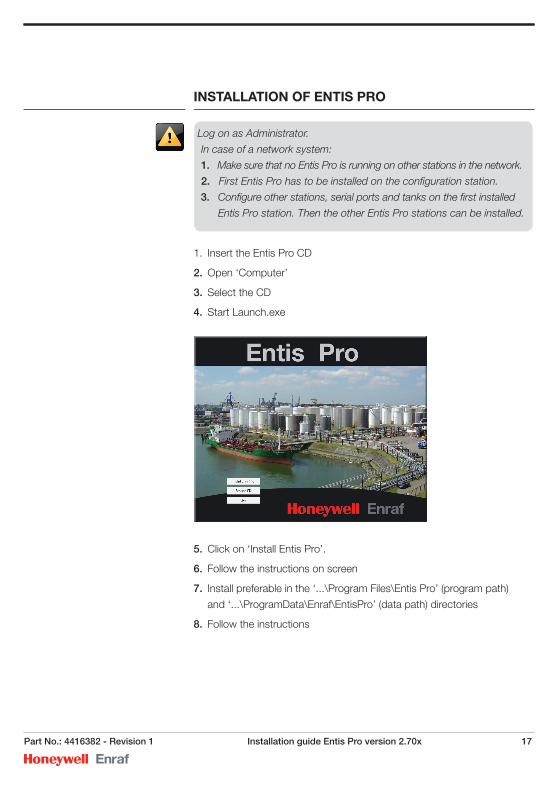
InSTallaTIon of enTIS Pro
1. Insert the Entis Pro CD
2. Open ‘Computer’
3. Select the CD
4. Start Launch.exe
5. Click on ‘Install Entis Pro’.
6. Follow the instructions on screen
7. Install preferable in the ‘...\Program Files\Entis Pro’ (program path)
and ‘...\ProgramData\Enraf\EntisPro’ (data path) directories
8. Follow the instructions
Log on as Administrator.
In case of a network system:
1. Make sure that no Entis Pro is running on other stations in the network.
2. First Entis Pro has to be installed on the configuration station.
3. Configure other stations, serial ports and tanks on the first installed
Entis Pro station. Then the other Entis Pro stations can be installed.
Installation of Entis Pro
18 Installation guide Entis Pro version 2.70x Part No.: 4416382 - Revision 1
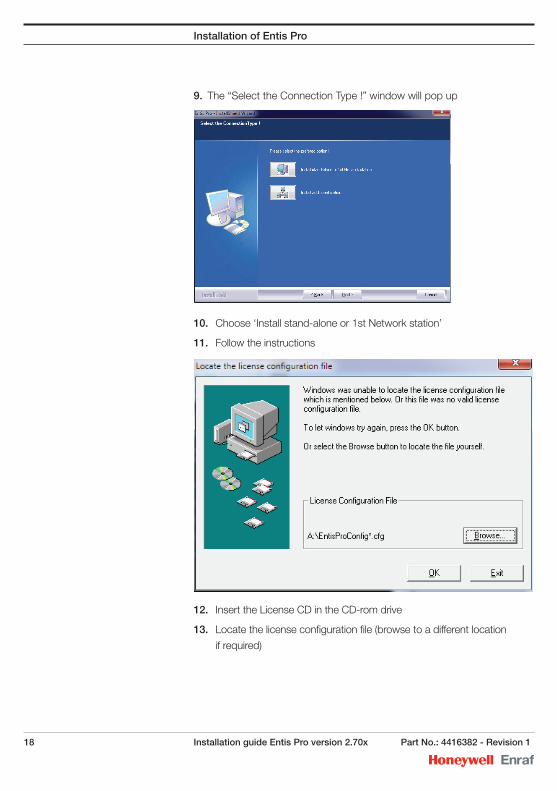
9. The “Select the Connection Type !” window will pop up
10. Choose ‘Install stand-alone or 1st Network station’
11. Follow the instructions
12. Insert the License CD in the CD-rom drive
13. Locate the license configuration file (browse to a different location
if required)
Part No.: 4416382 - Revision 1 Installation guide Entis Pro version 2.70x 19
Installation of Entis Pro
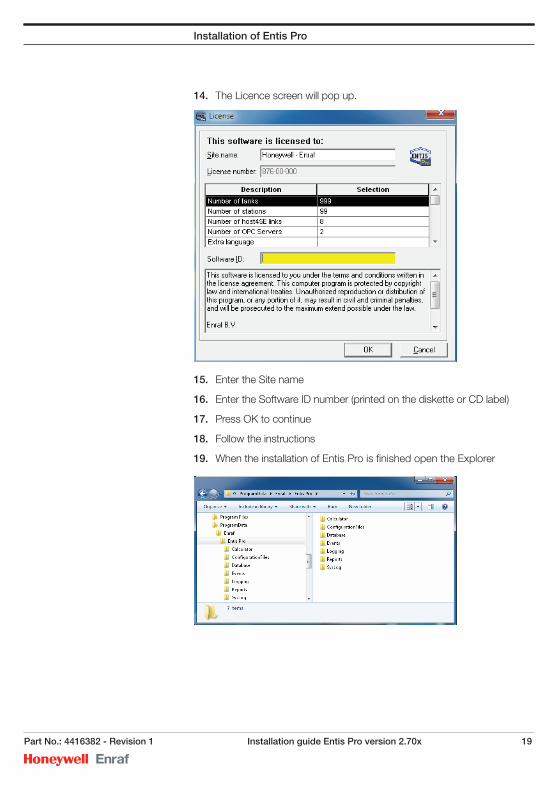
14. The Licence screen will pop up.
15. Enter the Site name
16. Enter the Software ID number (printed on the diskette or CD label)
17. Press OK to continue
18. Follow the instructions
19. When the installation of Entis Pro is finished open the Explorer
Installation of Entis Pro
20 Installation guide Entis Pro version 2.70x Part No.: 4416382 - Revision 1
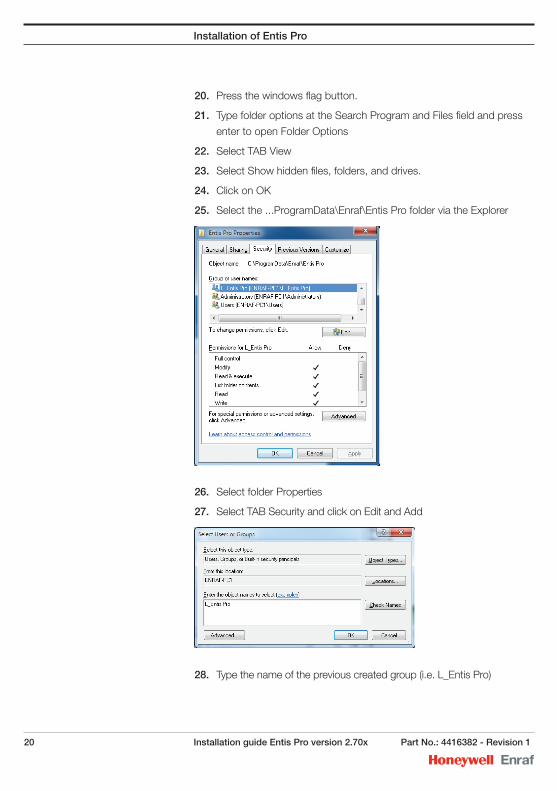
20. Press the windows flag button.
21. Type folder options at the Search Program and Files field and press
enter to open Folder Options
22. Select TAB View
23. Select Show hidden files, folders, and drives.
24. Click on OK
25. Select the ...ProgramData\Enraf\Entis Pro folder via the Explorer
26. Select folder Properties
27. Select TAB Security and click on Edit and Add
28. Type the name of the previous created group (i.e. L_Entis Pro)
Part No.: 4416382 - Revision 1 Installation guide Entis Pro version 2.70x 21
Installation of Entis Pro
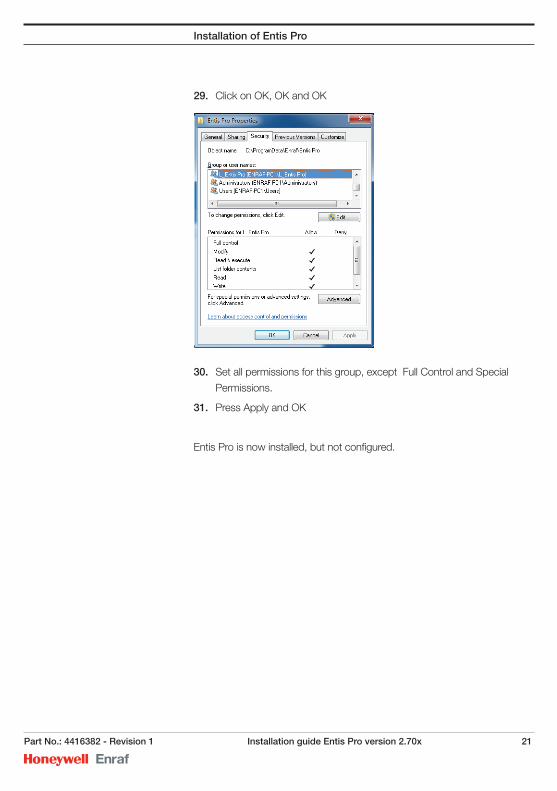
29. Click on OK, OK and OK
30. Set all permissions for this group, except Full Control and Special
Permissions.
31. Press Apply and OK
Entis Pro is now installed, but not configured.
22 Installation guide Entis Pro version 2.70x Part No.: 4416382 - Revision 1
enTIS Pro confIguraTIon
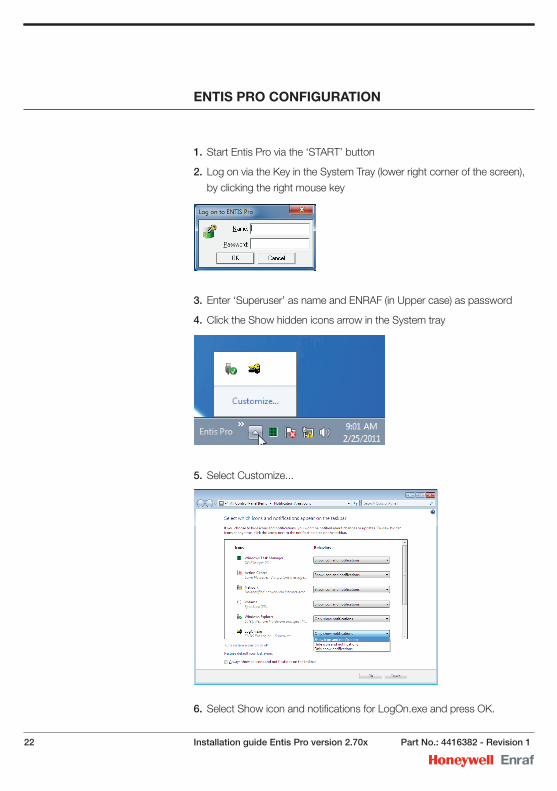
1. Start Entis Pro via the ‘START’ button
2. Log on via the Key in the System Tray (lower right corner of the screen),
by clicking the right mouse key
3. Enter ‘Superuser’ as name and ENRAF (in Upper case) as password
4. Click the Show hidden icons arrow in the System tray
5. Select Customize...
6. Select Show icon and notifications for LogOn.exe and press OK.
Part No.: 4416382 - Revision 1 Installation guide Entis Pro version 2.70x 23
Entis Pro configuration
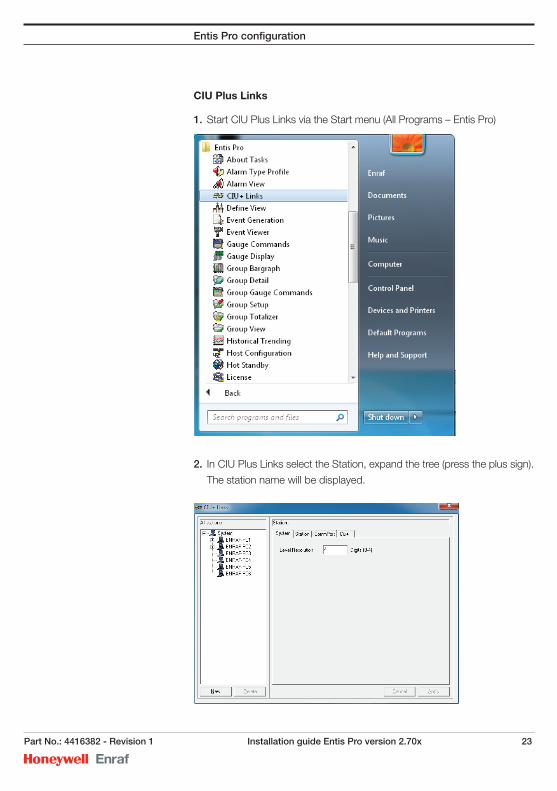
cIu Plus links
1. Start CIU Plus Links via the Start menu (All Programs – Entis Pro)
2. In CIU Plus Links select the Station, expand the tree (press the plus sign).
The station name will be displayed.
Entis Pro configuration
24 Installation guide Entis Pro version 2.70x Part No.: 4416382 - Revision 1
A network alarm will pop up. Press Ack. The alarm and the window will
then disappear.
define new Stations
This procedure is only required for a network installation. The station
names of the other Entis Pro stations have to be created on the
configuration station.
1. Select ‘Stations’
2. Press New
3. Enter the “New Station” name (Windows 7 Professional computer name)
4. Press OK
5. Repeat this procedure for every Entis Pro station in the network
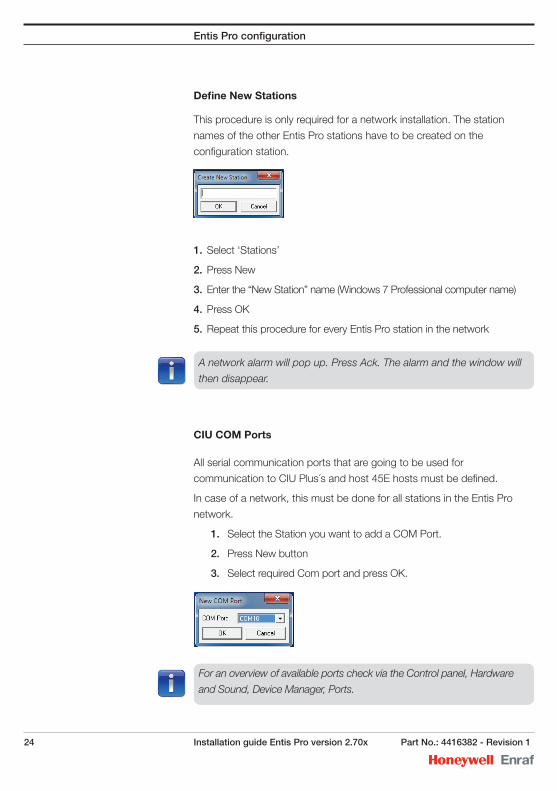
cIu com Ports
All serial communication ports that are going to be used for
communication to CIU Plus´s and host 45E hosts must be defined.
In case of a network, this must be done for all stations in the Entis Pro
network.
1. Select the Station you want to add a COM Port.
2. Press New button
3. Select required Com port and press OK.
For an overview of available ports check via the Control panel, Hardware
and Sound, Device Manager, Ports.
Part No.: 4416382 - Revision 1 Installation guide Entis Pro version 2.70x 25
Entis Pro configuration
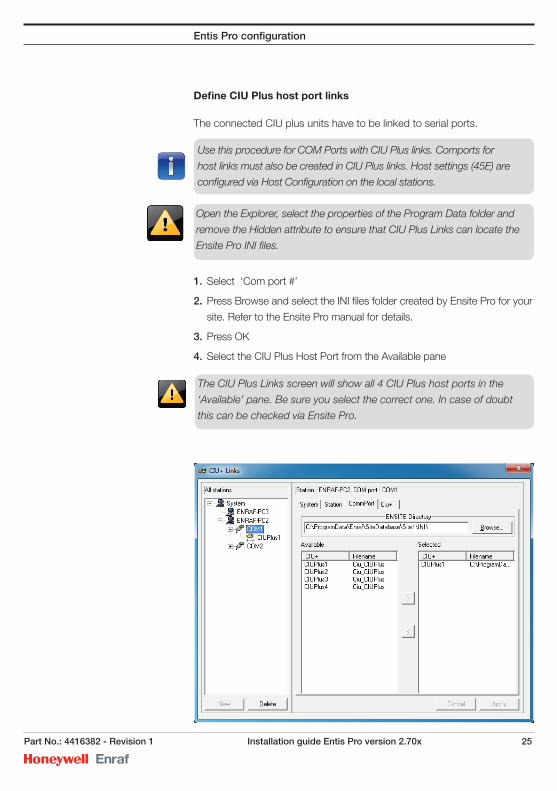
define cIu Plus host port links
The connected CIU plus units have to be linked to serial ports.
1. Select ‘Com port #’
2. Press Browse and select the INI files folder created by Ensite Pro for your
site. Refer to the Ensite Pro manual for details.
3. Press OK
4. Select the CIU Plus Host Port from the Available pane
The CIU Plus Links screen will show all 4 CIU Plus host ports in the
‘Available’ pane. Be sure you select the correct one. In case of doubt
this can be checked via Ensite Pro.
Use this procedure for COM Ports with CIU Plus links. Comports for
host links must also be created in CIU Plus links. Host settings (45E) are
configured via Host Configuration on the local stations.
Open the Explorer, select the properties of the Program Data folder and
remove the Hidden attribute to ensure that CIU Plus Links can locate the
Ensite Pro INI files.
Entis Pro configuration
26 Installation guide Entis Pro version 2.70x Part No.: 4416382 - Revision 1
After installation a CIU communication alarm will pop up. Acknowledge
and proceed.
5. Press right arrow button
6. Press Apply and Confirm
7. Repeat this procedure for all Com Ports and CIU Plus Host ports (also for
CIU Pluses used on other stations in the Entis Pro network).
8. Close CIU Plus Links.
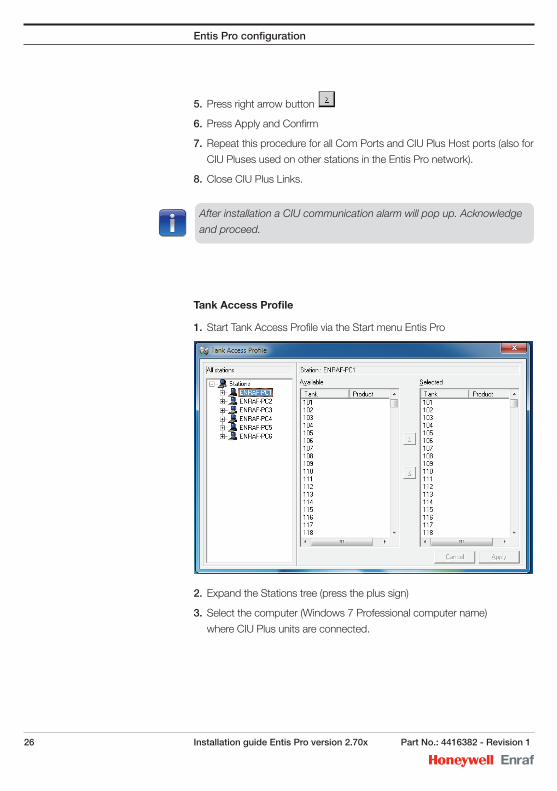
Tank access Profile
1. Start Tank Access Profile via the Start menu Entis Pro
2. Expand the Stations tree (press the plus sign)
3. Select the computer (Windows 7 Professional computer name)
where CIU Plus units are connected.
Part No.: 4416382 - Revision 1 Installation guide Entis Pro version 2.70x 27
Entis Pro configuration
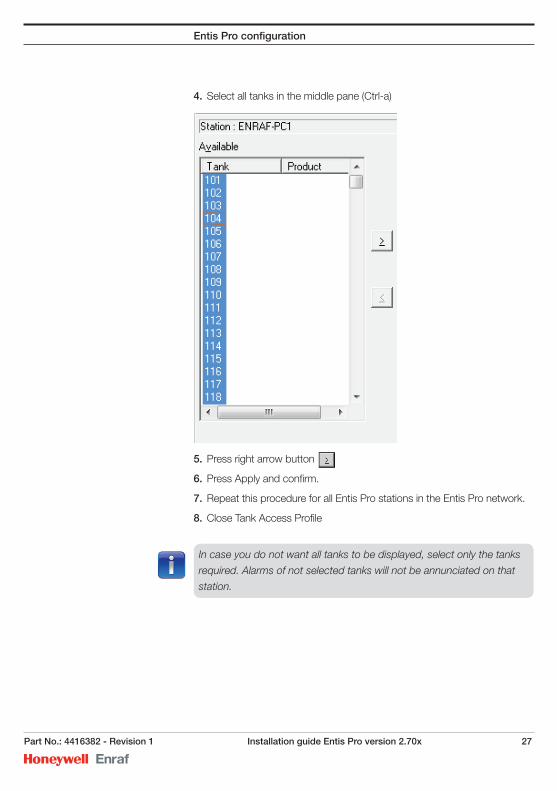
4. Select all tanks in the middle pane (Ctrl-a)
5. Press right arrow button
6. Press Apply and confirm.
7. Repeat this procedure for all Entis Pro stations in the Entis Pro network.
8. Close Tank Access Profile
In case you do not want all tanks to be displayed, select only the tanks
required. Alarms of not selected tanks will not be annunciated on that
station.
Entis Pro configuration
28 Installation guide Entis Pro version 2.70x Part No.: 4416382 - Revision 1
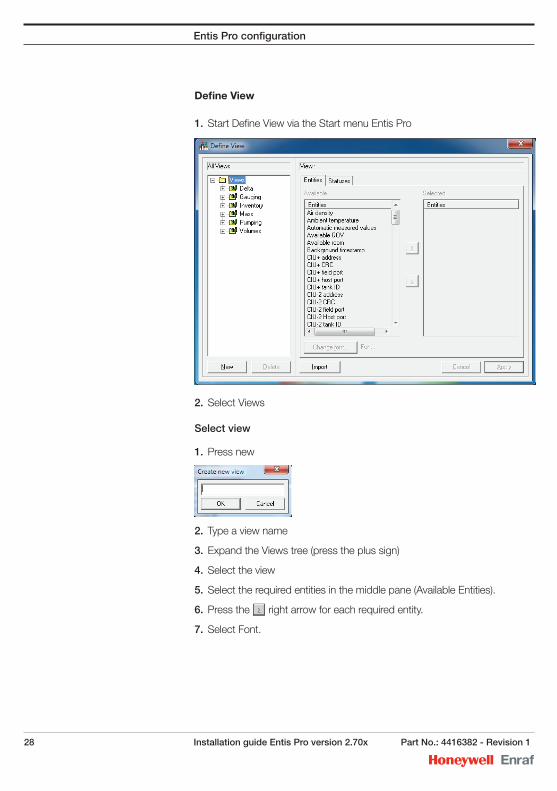
define View
1. Start Define View via the Start menu Entis Pro
2. Select Views
Select view
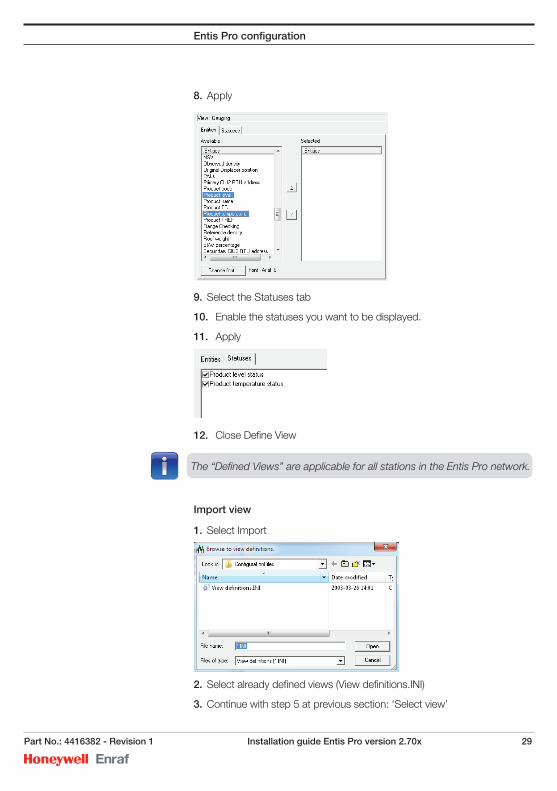
1. Press new
2. Type a view name
3. Expand the Views tree (press the plus sign)
4. Select the view
5. Select the required entities in the middle pane (Available Entities).
6. Press the right arrow for each required entity.
7. Select Font.
Part No.: 4416382 - Revision 1 Installation guide Entis Pro version 2.70x 29
Entis Pro configuration
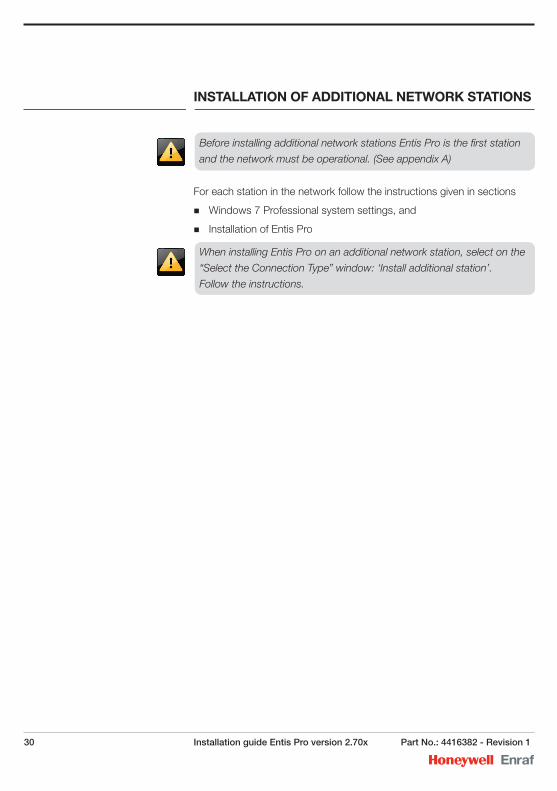
8. Apply
9. Select the Statuses tab
10. Enable the statuses you want to be displayed.
11. Apply
12. Close Define View
The “Defined Views” are applicable for all stations in the Entis Pro network.
Import view
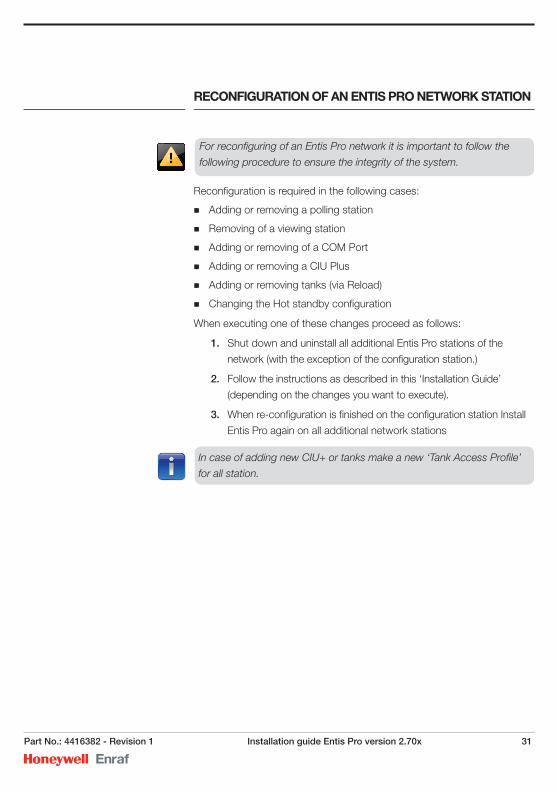
1. Select Import
2. Select already defined views (View definitions.INI)
3. Continue with step 5 at previous section: ‘Select view’
30 Installation guide Entis Pro version 2.70x Part No.: 4416382 - Revision 1
Before installing additional network stations Entis Pro is the first station
and the network must be operational. (See appendix A)
When installing Entis Pro on an additional network station, select on the
“Select the Connection Type” window: ‘Install additional station’.
Follow the instructions.
InSTallaTIon of addITIonal neTWork STaTIonS
For each station in the network follow the instructions given in sections
� Windows 7 Professional system settings, and
� Installation of Entis Pro
Part No.: 4416382 - Revision 1 Installation guide Entis Pro version 2.70x 31
reconfIguraTIon of an enTIS Pro neTWork STaTIon
Reconfiguration is required in the following cases:
� Adding or removing a polling station
� Removing of a viewing station
� Adding or removing of a COM Port
� Adding or removing a CIU Plus
� Adding or removing tanks (via Reload)
� Changing the Hot standby configuration
When executing one of these changes proceed as follows:
1. Shut down and uninstall all additional Entis Pro stations of the
network (with the exception of the configuration station.)
2. Follow the instructions as described in this ‘Installation Guide’
(depending on the changes you want to execute).
3. When re-configuration is finished on the configuration station Install
Entis Pro again on all additional network stations
In case of adding new CIU+ or tanks make a new ‘Tank Access Profile’
for all station.
For reconfiguring of an Entis Pro network it is important to follow the
following procedure to ensure the integrity of the system.
32 Installation guide Entis Pro version 2.70x Part No.: 4416382 - Revision 1
We advise to make a backup copy of the Entis Pro database, once you
are satisfied with the configuration.
BackuP
1. Shut down Entis Pro via the Log on menu.
2. Open ‘..\ProgramData\Enraf\Entis Pro\Database’
3. Make a copy of the file: ‘ENTISPro_Configuration.mdb’.
Suggested name to use is :’
Copy of ‘ENTISPro_Configuration (ddMMMyy).mdb’
Part No.: 4416382 - Revision 1 Installation guide Entis Pro version 2.70x 33
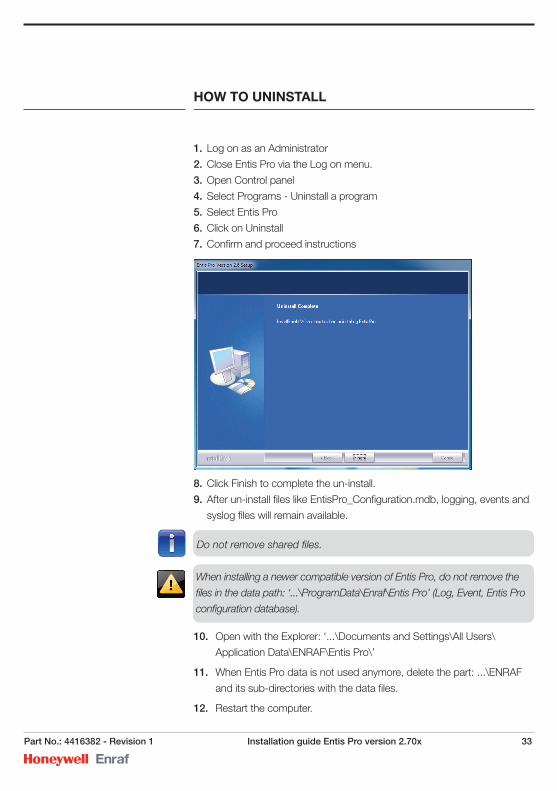
HoW To unInSTall
1. Log on as an Administrator
2. Close Entis Pro via the Log on menu.
3. Open Control panel
4. Select Programs - Uninstall a program
5. Select Entis Pro
6. Click on Uninstall
7. Confirm and proceed instructions
8. Click Finish to complete the un-install.
9. After un-install files like EntisPro_Configuration.mdb, logging, events and
syslog files will remain available.
10. Open with the Explorer: ‘...\Documents and Settings\All Users\
Application Data\ENRAF\Entis Pro\’
11. When Entis Pro data is not used anymore, delete the part: ...\ENRAF
and its sub-directories with the data files.
12. Restart the computer.
Do not remove shared files.
When installing a newer compatible version of Entis Pro, do not remove the
files in the data path: ‘...\ProgramData\Enraf\Entis Pro’ (Log, Event, Entis Pro
configuration database).
34 Installation guide Entis Pro version 2.70x Part No.: 4416382 - Revision 1
This installation procedure refers only to dedicated Entis Pro networks.
When Entis Pro is part of an existing network please consult your
network administrator.
aPPendIx a WIndoWS 7 ProfeSSIonal neTWork InSTallaTIon
Windows 7 Professional Network Setup for a dedicated
Entis Pro network
A dedicated network for a number of Entis Pro stations, which are not
connected to any other computer in a network, can be configured by
selecting the Public network location.
The (default) settings for this Public profile must be set more open for use
in combination with Entis Pro.
A Work network location is not recommended for a dedicated Entis Pro
network because in that case an always reachable device should be
available in the network as default gateway. If the default gateway cannot
be found in a Work network, Windows 7 will force the network location to
Public which is more secure by default, and will be too restricted for an
Entis Pro network.
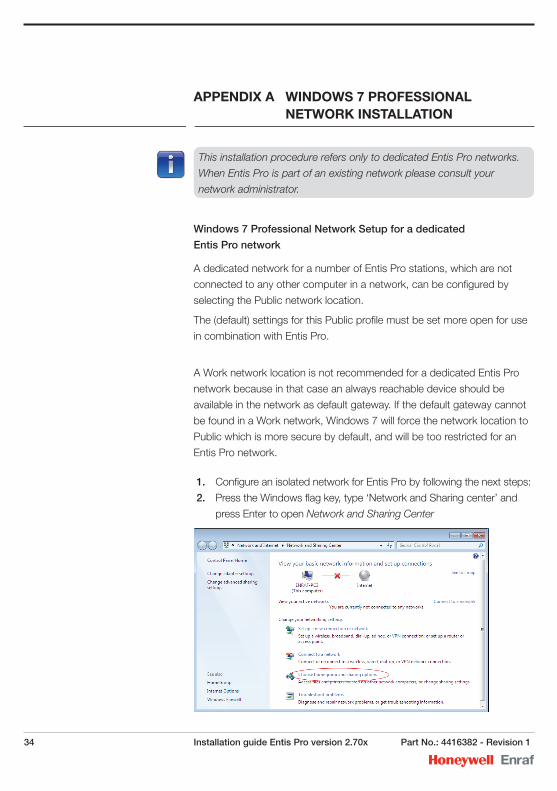
1. Configure an isolated network for Entis Pro by following the next steps:
2. Press the Windows flag key, type ‘Network and Sharing center’ and
press Enter to open Network and Sharing Center
Part No.: 4416382 - Revision 1 Installation guide Entis Pro version 2.70x 35
Appendix A
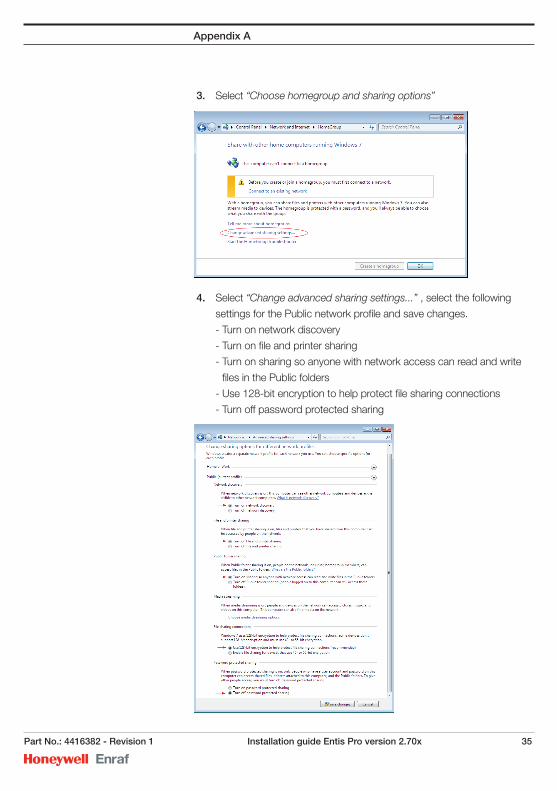
3. Select “Choose homegroup and sharing options”
4. Select “Change advanced sharing settings...” , select the following
settings for the Public network profile and save changes.
- Turn on network discovery
- Turn on file and printer sharing
- Turn on sharing so anyone with network access can read and write
files in the Public folders
- Use 128-bit encryption to help protect file sharing connections
- Turn off password protected sharing
Appendix A
36 Installation guide Entis Pro version 2.70x Part No.: 4416382 - Revision 1
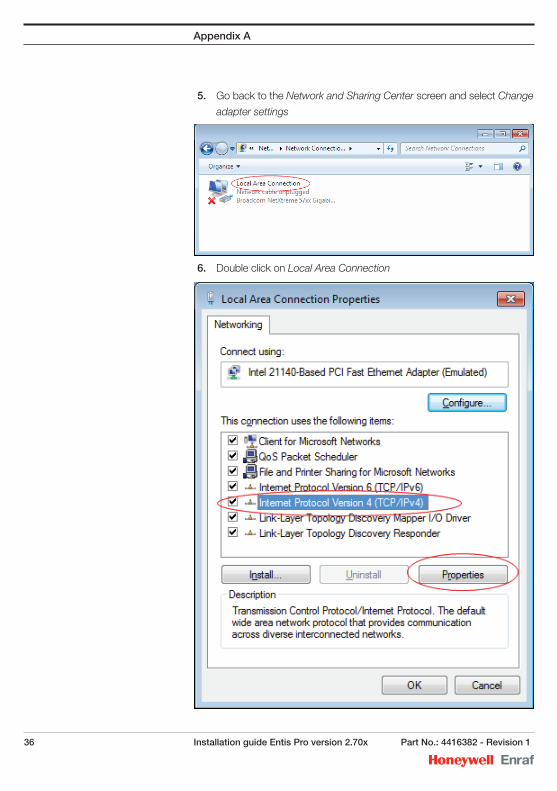
5. Go back to the Network and Sharing Center screen and select Change
adapter settings
6. Double click on Local Area Connection

Part No.: 4416382 - Revision 1 Installation guide Entis Pro version 2.70x 37
Appendix A
7. Double click on Internet Protocol Version 4 (TCP/IPv4)
8. Select Use the following IP address and type the required IP address
and Subnet mask and click OK twice.
Appendix A
38 Installation guide Entis Pro version 2.70x Part No.: 4416382 - Revision 1
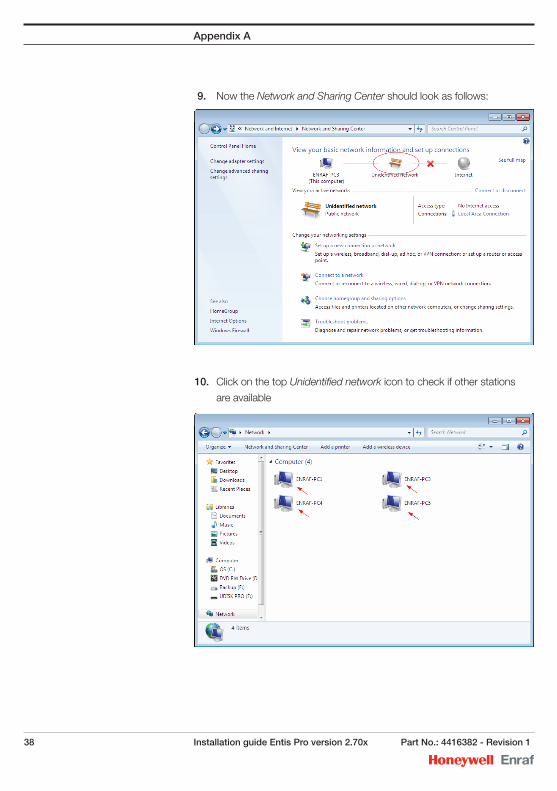
9. Now the Network and Sharing Center should look as follows:
10. Click on the top Unidentified network icon to check if other stations
are available
Part No.: 4416382 - Revision 1 Installation guide Entis Pro version 2.70x 39
Appendix A
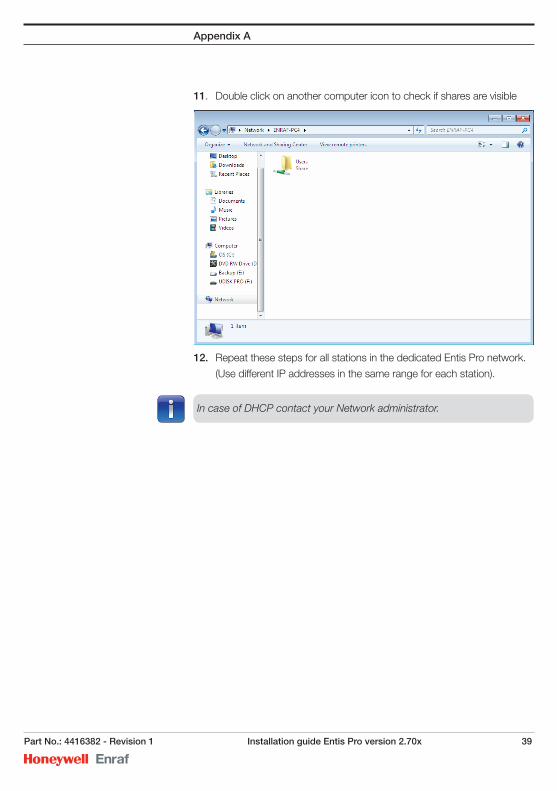
11. Double click on another computer icon to check if shares are visible
12. Repeat these steps for all stations in the dedicated Entis Pro network.
(Use different IP addresses in the same range for each station).
In case of DHCP contact your Network administrator.
40 Installation guide Entis Pro version 2.70x for Windows 7 Part No.: 4416382 - Revision 1
aPPendIx B neTWork confIguraTIon form
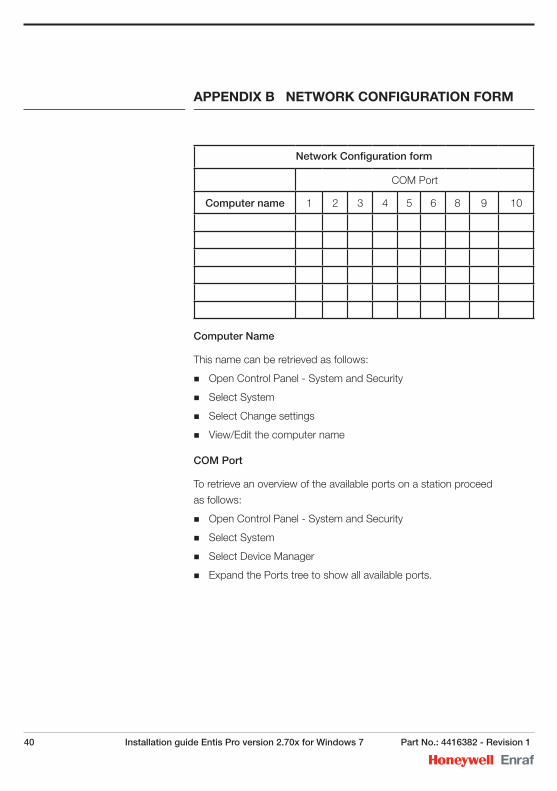
Network Configuration form
COM Port
Computer name 1 2 3 4 5 6 8 9 10
Computer Name
This name can be retrieved as follows:
� Open Control Panel - System and Security
� Select System
� Select Change settings
� View/Edit the computer name
COM Port
To retrieve an overview of the available ports on a station proceed
as follows:
� Open Control Panel - System and Security
� Select System
� Select Device Manager
� Expand the Ports tree to show all available ports.
Part No.: 4416382 - Revision 1 Installation guide Entis Pro version 2.70x 41
aPPendIx c relaTed documenTS
Configuration manual Entis Pro
User Guide Entis Pro
45E Host communication manual
Instruction manual series 880 CIU Prime
Instruction manual series 880 CIU Plus
Instruction manual CIU Prime type 880 (CIU emulation)
Instruction manual ModbusTM protocol
Installation Guide Ensite Pro
Instruction manual Ensite Pro configuration tool


4416382_Rev.1-ENGJune 2012© 2012 Enraf B.V.
for more InformationTo learn more about Honeywell Enraf’s solutions, contact your Honeywell Enraf account manager or visit www.honeywellenraf.com.
americasHoneywell Enraf Americas, Inc.2000 Northfield Ct.Roswell, GA 30076 USAPhone: +1 770 475 1900Email: [email protected]
europe, middle east and africaHoneywell EnrafDelftechpark 392628 XJ DelftThe NetherlandsPhone: +31 (0)15 2701 100Email: [email protected]
asia PacificHoneywell Pte Ltd.17 Changi Business Park Central 1Singapore 486073Phone: +65 6355 2828Email: [email protected]
Related Documents