Installation Guide Installation Guide Concrete Roof Installation Concrete Roof Installation

Welcome message from author
This document is posted to help you gain knowledge. Please leave a comment to let me know what you think about it! Share it to your friends and learn new things together.
Transcript
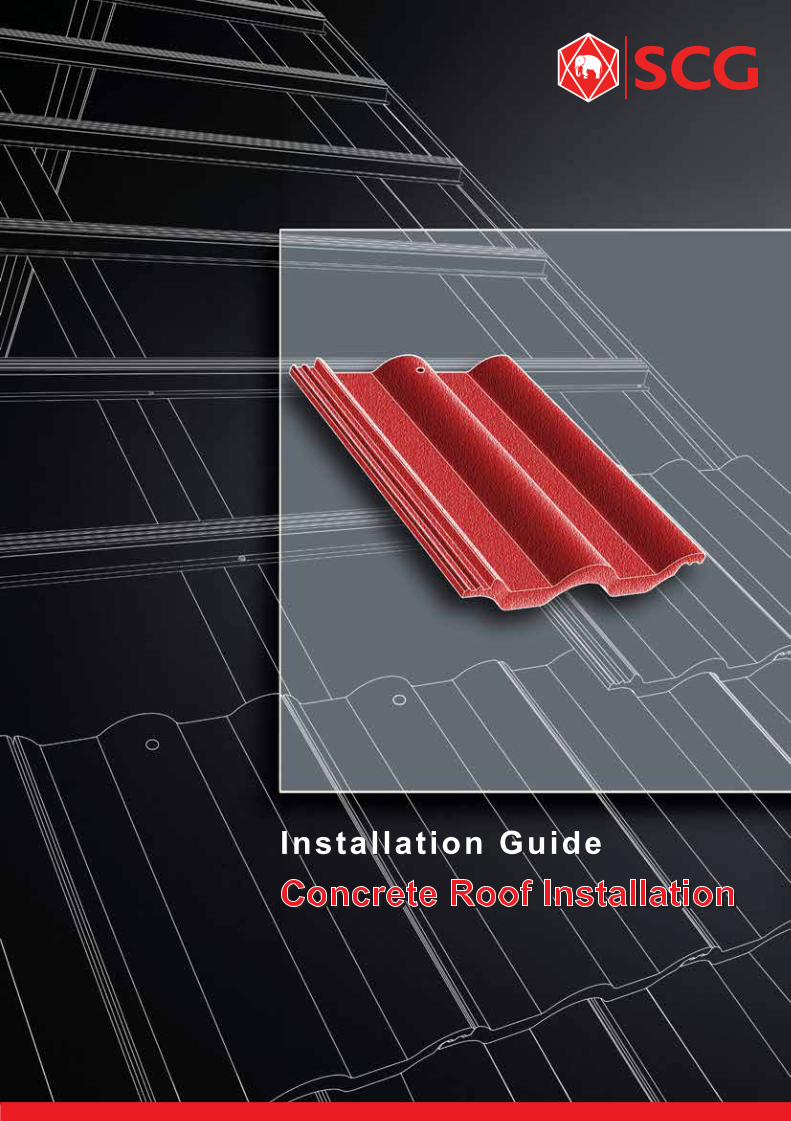
Instal lat ion GuideInstal lat ion GuideConcrete Roof InstallationConcrete Roof Installation

C O N T E N T
SCG Concrete Roof Tiles ...………………………………..........................
SCG Concrete Roof Accessories …………....………….....………….……
SCG Concrete Roof Ridges and Installation Tools ……….....……………
Recommendations for preparing roof frames for tiling with SCG Concrete
Roof ........................................................................................................
Batten Spacing for SCG Concrete Roof ………….......…………………....
Batten Spacing Table for SCG Concrete Roof ………........………………
SCG Insulation Installation for SCG Concrete Roof …………...…...……
Recommendations and Warnings for tiling with SCG Concrete Roof…..
Tiling with SCG Concrete Roof …………………........................………...
SCG Concrete Roof Hip Ridge Installation ...……............................……
Round Ridge Installation for Gable Roofs ……….........................……....
Round Ridge Installation at the Hip Rafter for Hipped Roofs …...........…
SCG Valley Trough Installation and the cutting of the Valley Rafter .……
Dry Tech System Installation at the Roof Ridge ……...............……….....
Dry Tech System Installation at the Hip Ridge ……..........………………..
Installation of SCG Concrete Roof Hip Ridge and Round Ridge at the
Wall Verge ...............................................................................................
Places where SCG Roof Seal is needed for SCG Concrete Roof ……...
2
4-5
6
7
8
9
10
11
12
13
14-15
16-17
18-19
20-21
22-23
24-26
27

INSTALLATION คูมือการติดตั้งกระเบื้องหลังคา ตราช้าง ซีแพคโมเนีย 5 4
2
7
1 4
3
5
6
14
13
12
15
11
10
8
9
11
10
12
1314
151
3 45 6
7
8
8
9
เซ็นจูเรียน
เอลาบานา
1616
SCG Concrete Roof Equipment
SCG Reflective Sheets
Properties: Can reflect up to 95% heat ra-diation from entering the structure; made of pure aluminum foil 7 microns thick on 2 sides with a density of 170 grams/square meter.Directions: Can be installed both under and over SCG battens. Available in two lengths (width x length (meters): o 1.25 X 20 meters Product area = 25 square meters/roll o 1.25 X 60 metersProduct area = 75 square meters/roll
SCG “Ultra Cool” Insulation
Properties: An insulation innovation that combines the properties of heat insulation plus Green-3 fiber glass insulation to further protect homes from heat.
Directions: Install behind battens and at 0.95-1.05 meters between the rafter.
Size: 4 m2 /roll
SCG Eave Filler Unit (to prevent access by small animals)
Properties: High quality and durable PVC plastic eaves with long usage life.Directions: Used to close the eave areas. Can be held together with 1-inch black screws.
Contains: 10 pieces/box.
SCG Batten Screws
Properties: Size 10; 5/8 inches long made of galvanized steel; strong; offers density in attachments without pre-drilling.Directions: Attach SCG battens to the rafter using light gauge steel with a thickness not exceeding 3.2 mm. by an electric drill.Contains: 500 pieces/box.
Product area = 75 square meters/roll
SCG Roof Tile Screws/2.5-inch Self-Drilling
SCG Roof Tile Screws/2.5-inch Self-DrillingProperties: Size 8; 2.5 inches long; self-drilling made of galvanized steel; strong; offers density and stability in roof attach-ments without pre-drilling.Directions: Use to attach SCG Concrete Roof tiles to SCG battens with a thickness of 0.55mm. and 0.70mm.; or Light Gauge Bat-tens such as steel box battens or C-shaped battens with a thickness not exceeding 3.2 mm
Contains: 250 pieces/box
Properties: Size 10; 4 inches long; made of galva-nized steel; strong; offers density and stability in roof attachments without pre-drilling.Directions: Use to attach SCG Concrete Roof tiles to SCG battens with a thickness of 0.55mm. and 0.70mm.; or Light Gauge Battens such as steel box battens or C-shaped battens with a thickness not exceeding 3.2 mm.Contains: 250 pieces/boxProperties: High quality and durable PVC plastic eaves with long usage life.Directions: Used to close the eave areas. Can be held together with 1-inch black screws.Contains: 10 pieces/box.
SCG Roof Tile Screws/4-inch Self-Drilling
SCG Batten
Properties: standard steel designed for use in roofing; rust resistant because the manu-facturer uses hot dip galvanization meeting T.I.S. 50-2538 JIS G 3302 standards; the same method used to protect vehicles from rust.Directions: Install on the rafters by using SCG batten screws to attach both sides on to the rafter without pre-drilling.2 Thickness:1. 0.55 mm. thick; 4 meters long/bar; dis-tance from the rafter is not to exceed 1.00 meters.2. 0.70 mm. thick; 4 meters long/bar; dis-tance from the rafter not to exceed 1.20 meters.
SCG Drytech System
Properties: Effective waterproofing throughout its usage life; used to re-place the typical method of sealing with sand and cement which are prone to cracking. Installed by using Drytech Sealing System to help drain moisture from inside the roof.Directions: Apply along the ridge lines of the roof ridge and rafters be-fore installing SCG Ridge Caps.
Amount Used: 1 set/roof length/3-meter hip rafters/box
1. Included in set: 1. 3-meter Drytech sheet (1 roll) 2. 3- meter steel support (1 rod) 3. Steel mounts (4 pcs.) 4. Batten screws (43 pcs.) 5. 2.5-inch tile screws; drill bits (20 pcs.)
SCG Valley Trough
Properties: Pre-fabricated from the factory meet-ing high standards for shape and size. The valley trough is effective in draining rain water; and the folded wings prevent splashing to eliminate water overflowing from the trough. Directions: Use to protect against water under the roof in the area of the hip valley; used with hip valleys not exceeding 6 meters in length for 12-inch trough edges.Two Types Available to Choose from:1. SCG stainless valley troughs:Size: 12 x 12 x 12; 3 cm. deep; 2 m. longSize: 15 x 15 x 15; 3 cm. deep; 2 m. long2. SCG galvanized valley troughs:Size: 12 x 12 x 12; 3 cm. deep; 2 m. longSize: 15 x 15 x 15; 3 cm. deep; 2 m. long
SCG Roof Seals
Properties: Made of PB synthetic plastic steel-reinforced frames in the center of the sheet; can be shaped like the roof tiles or the joints and fitted tightly; can resist sunlight; leak proof; can also be painted over to match the color of the roof tilesDirections: Use to seal all joints prove to leakage. Size: width x length x thickness = 20 x 40 x 0.2 cm.
SCG Wall Flashing Set
Properties: Completely waterproof and more uniform than protection with reinforced concrete between the roof tiles and the wall results in a neater job with wall flashing de-signed to curve with SCG Concrete Roof wavy roof tiles. Directions: Curved wall flashing: Cover the joints between the end of SCG Concrete Roof roof tiles and walls. Side wall flashing: Cover the joints between the side of SCG Concrete Roof roof tiles and walls (1 set per 4.8 m.).
SCG Mortar Paint
Properties: Use to repaint the underside of the roof cover, rafter ridges, or roof seal to match the roof tiles for a pleasant appearance, organization, convenience; can be used immediately without mixing.Directions: Paint under the roof ridge and rafter ridge over a 4-meter area. Contains: 2 kg./can
SCG Eave Clips
Properties: Strengthens roof tiles on eaves; two selections are available:1. SCG Stainless Eave Clips2. SCG Galvanized Eave ClipsDirections: Use to attach the last row of SCG Concrete Roof tiles to the eavesContains: 50 pieces/ box
SCG Tile Clips.
Properties: Helps strengthen the entire roof; two selections are available:1. SCG Stainless Tile Clips2. SCG Galvanized Tile ClipsDirections: Use screws to attach tiles of all sizes from the end of the upper row to the lower row.Contains: 250 pieces/box
SCG Tile Fragment Clips
Properties: Use to attach tiles at the connecting points be-tween tilesDirections: Use to attach tiles at the connecting points be-tween full tiles and tile fragments along the valley and hip rafter to prevent tile fragments from falling out.Contains: 50 pieces/box
SCG Ridge Mortar
Properties: Convenient and fast; the mortar can be used by add-ing water. With a precisely standardized mix, the approximation of cement and sand is not necessary; therefore reducing cracks. The mortar attaches well to the roof tiles and the ridge covers.Directions: Mix SCG Ridge Mortar with 7.5-9 liters of water for use in plastering the roof ridge and the hip rafter; 1 bag can be used for up to 4 meters.Package Size: 50 kg./bag
คูมือการติดตั้งกระเบื้องหลังคา ตราช้าง ซีแพคโมเนีย6
1. Measuring Tape
12
3
4
5
7
8
1 2
53
6
4
7 8
6
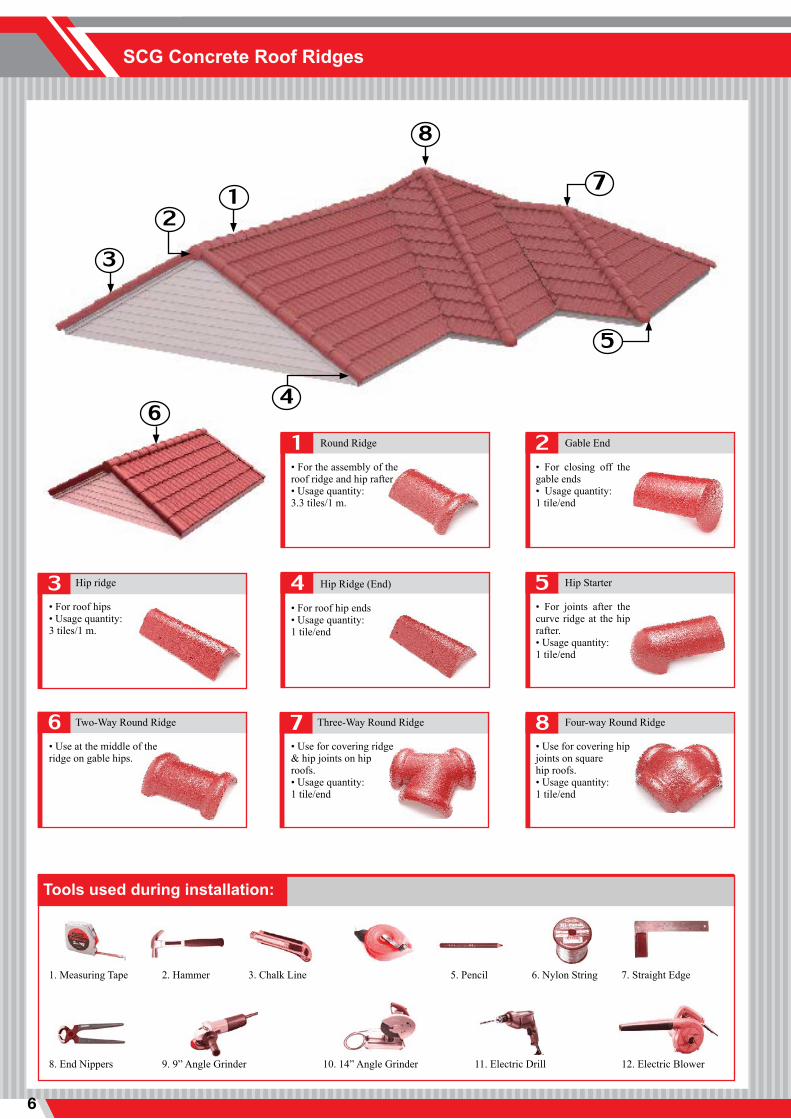
SCG Concrete Roof Ridges
Round Ridge
• For the assembly of the roof ridge and hip rafter• Usage quantity:3.3 tiles/1 m.
Gable End
• For closing off the gable ends• Usage quantity:1 tile/end
Hip ridge
• For roof hips • Usage quantity:3 tiles/1 m.
Hip Ridge (End)
• For roof hip ends• Usage quantity:1 tile/end
Hip Starter
• For joints after the curve ridge at the hip rafter.• Usage quantity:1 tile/end
Two-Way Round Ridge
• Use at the middle of the ridge on gable hips.
Three-Way Round Ridge
• Use for covering ridge& hip joints on hip roofs.• Usage quantity:1 tile/end
Four-way Round Ridge
• Use for covering hipjoints on squarehip roofs.• Usage quantity:1 tile/end
Tools used during installation:
1. Measuring Tape 2. Hammer 3. Chalk Line 5. Pencil 6. Nylon String 7. Straight Edge
8. End Nippers 9. 9” Angle Grinder 10. 14” Angle Grinder 11. Electric Drill 12. Electric Blower
INSTALLATION 7
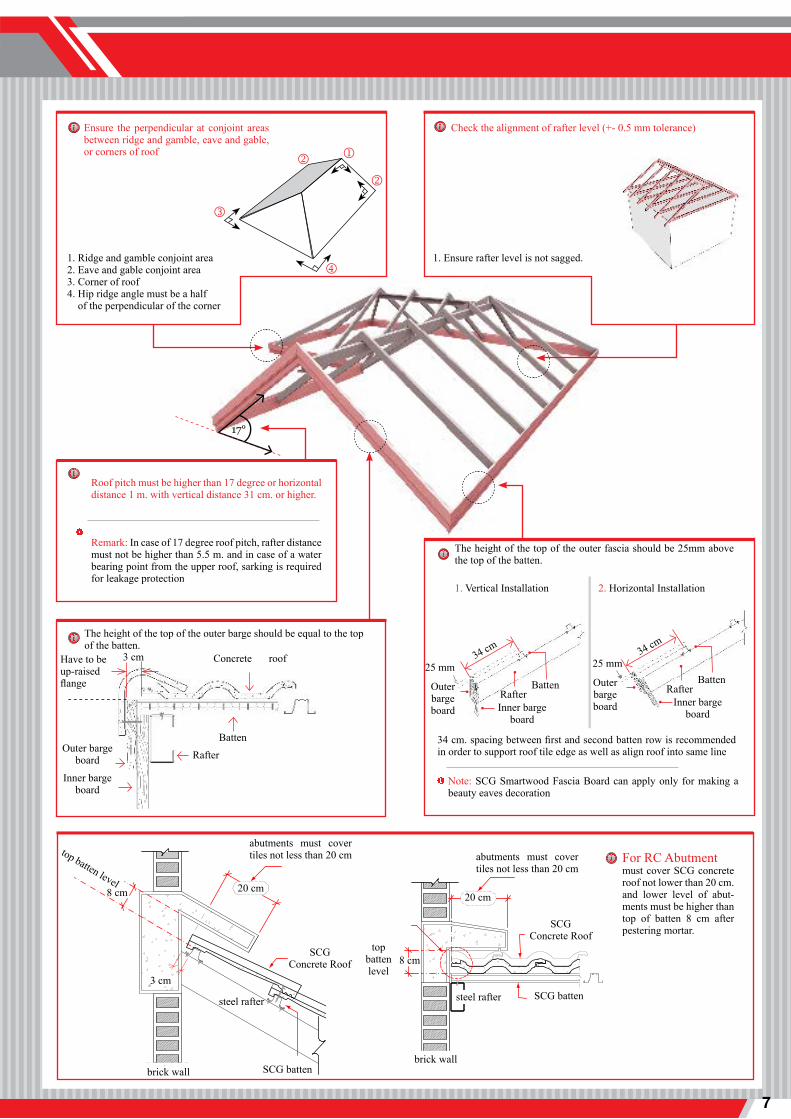
17°
Ensure the perpendicular at conjoint areas between ridge and gamble, eave and gable, or corners of roof
1. Ridge and gamble conjoint area2. Eave and gable conjoint area3. Corner of roof4. Hip ridge angle must be a half of the perpendicular of the corner
Check the alignment of rafter level (+- 0.5 mm tolerance)
1. Ensure rafter level is not sagged.
Roof pitch must be higher than 17 degree or horizontal distance 1 m. with vertical distance 31 cm. or higher.
Remark: In case of 17 degree roof pitch, rafter distance must not be higher than 5.5 m. and in case of a water bearing point from the upper roof, sarking is required for leakage protection
The height of the top of the outer barge should be equal to the top of the batten.
3 cm Concrete roof Have to beup-raisedflange
Batten
RafterOuter bargeboard
Inner bargeboard
The height of the top of the outer fascia should be 25mm above the top of the batten.
25 mm34 cm
Outer bargeboard Inner barge
board
BattenRafter
25 mm34 cm
Outer bargeboard Inner barge
board
BattenRafter
top batten level
abutments must cover tiles not less than 20 cm
20 cm8 cm
3 cm
SCG batten
steel rafter
brick wall
SCGConcrete Roof
20 cm
topbattenlevel
brick wall
abutments must cover tiles not less than 20 cm
SCGConcrete Roof
SCG batten
8 cm
steel rafter
For RC Abutmentmust cover SCG concrete roof not lower than 20 cm. and lower level of abut-ments must be higher than top of batten 8 cm after pestering mortar.
1. Vertical Installation 2. Horizontal Installation
34 cm. spacing between first and second batten row is recommended in order to support roof tile edge as well as align roof into same line
Note: SCG Smartwood Fascia Board can apply only for making a beauty eaves decoration
คูมือการติดตั้งกระเบื้องหลังคา ตราช้าง ซีแพคโมเนีย8
1
3
4
2
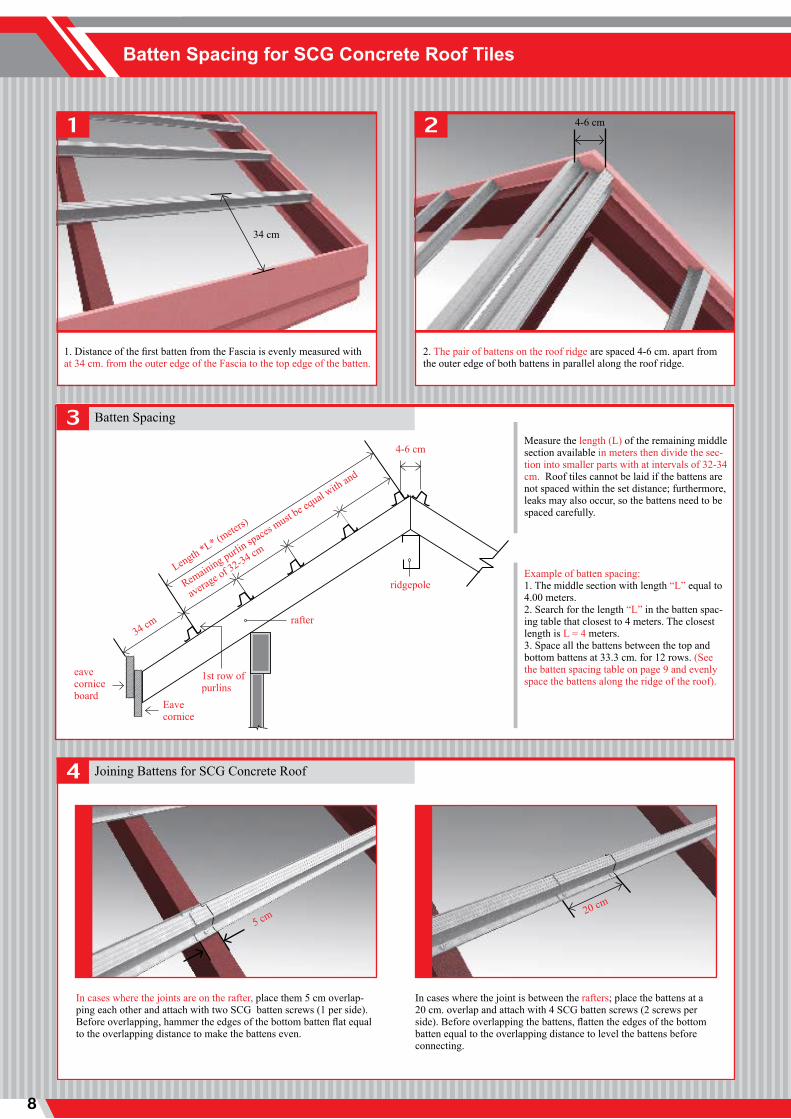
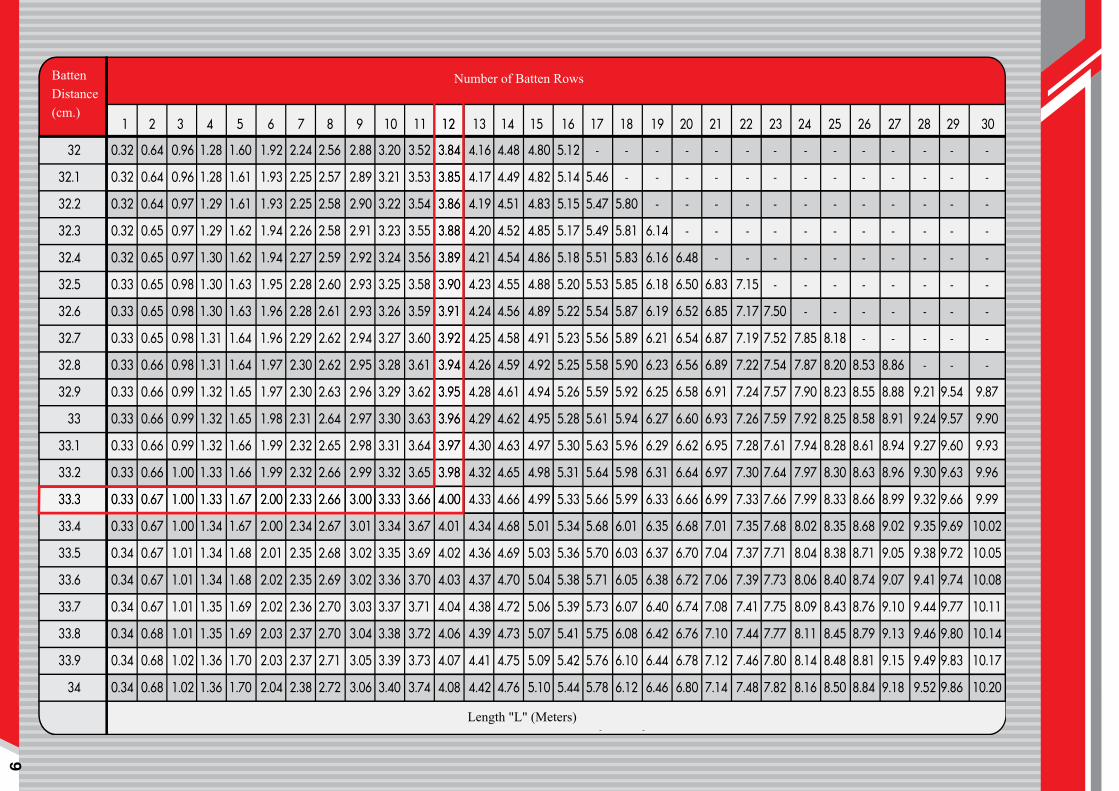
Batten Spacing for SCG Concrete Roof Tiles
1. Distance of the first batten from the Fascia is evenly measured with at 34 cm. from the outer edge of the Fascia to the top edge of the batten.
2. The pair of battens on the roof ridge are spaced 4-6 cm. apart from the outer edge of both battens in parallel along the roof ridge.
Batten Spacing
Length *L* (meter
s)
Remain
ing purlin space
s must b
e equal w
ith and
average of 32-34 cm
4-6 cm
ridgepole
rafter
1st row of purlins
34 cm
eavecorniceboard
Eavecornice
Measure the length (L) of the remaining middle section available in meters then divide the sec-tion into smaller parts with at intervals of 32-34 cm. Roof tiles cannot be laid if the battens are not spaced within the set distance; furthermore, leaks may also occur, so the battens need to be spaced carefully.
Example of batten spacing:1. The middle section with length “L” equal to 4.00 meters.2. Search for the length “L” in the batten spac-ing table that closest to 4 meters. The closest length is L = 4 meters.3. Space all the battens between the top and bottom battens at 33.3 cm. for 12 rows. (See the batten spacing table on page 9 and evenly space the battens along the ridge of the roof).
Joining Battens for SCG Concrete Roof
In cases where the joints are on the rafter, place them 5 cm overlap-ping each other and attach with two SCG batten screws (1 per side). Before overlapping, hammer the edges of the bottom batten flat equal to the overlapping distance to make the battens even.
In cases where the joint is between the rafters; place the battens at a 20 cm. overlap and attach with 4 SCG batten screws (2 screws per side). Before overlapping the battens, flatten the edges of the bottom batten equal to the overlapping distance to level the battens before connecting.
5 cm 20 cm
4-6 cm
34 cm
INS
TA
LL
AT
ION
9
Number of Batten RowsBatten Distance (cm.)
Length "L" (Meters)
คูมือการติดตั้งกระเบื้องหลังคา ตราช้าง ซีแพคโมเนีย10
1
2
SCG Insulation Installation for SCG Concrete Roof Tiles
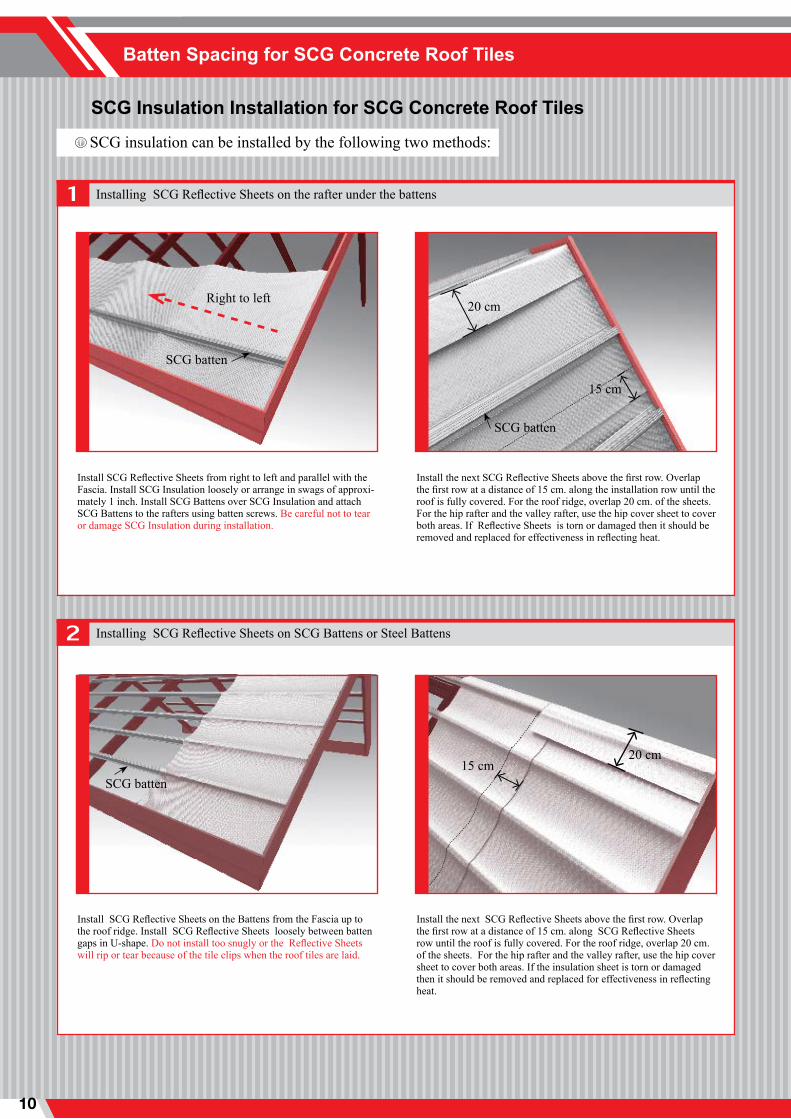
SCG insulation can be installed by the following two methods:
Batten Spacing for SCG Concrete Roof Tiles
Installing SCG Reflective Sheets on the rafter under the battens
Install SCG Reflective Sheets from right to left and parallel with the Fascia. Install SCG Insulation loosely or arrange in swags of approxi-mately 1 inch. Install SCG Battens over SCG Insulation and attach SCG Battens to the rafters using batten screws. Be careful not to tear or damage SCG Insulation during installation.
Install the next SCG Reflective Sheets above the first row. Overlap the first row at a distance of 15 cm. along the installation row until the roof is fully covered. For the roof ridge, overlap 20 cm. of the sheets. For the hip rafter and the valley rafter, use the hip cover sheet to cover both areas. If Reflective Sheets is torn or damaged then it should be removed and replaced for effectiveness in reflecting heat.
SCG batten
Right to left
SCG batten
20 cm
15 cm
Installing SCG Reflective Sheets on SCG Battens or Steel Battens
20 cm15 cm
SCG batten
Install SCG Reflective Sheets on the Battens from the Fascia up to the roof ridge. Install SCG Reflective Sheets loosely between batten gaps in U-shape. Do not install too snugly or the Reflective Sheets will rip or tear because of the tile clips when the roof tiles are laid.
Install the next SCG Reflective Sheets above the first row. Overlap the first row at a distance of 15 cm. along SCG Reflective Sheets row until the roof is fully covered. For the roof ridge, overlap 20 cm. of the sheets. For the hip rafter and the valley rafter, use the hip cover sheet to cover both areas. If the insulation sheet is torn or damaged then it should be removed and replaced for effectiveness in reflecting heat.
INSTALLATION 11
1
2
Recommendations and Warnings for Laying SCG Concrete Roof Tiles
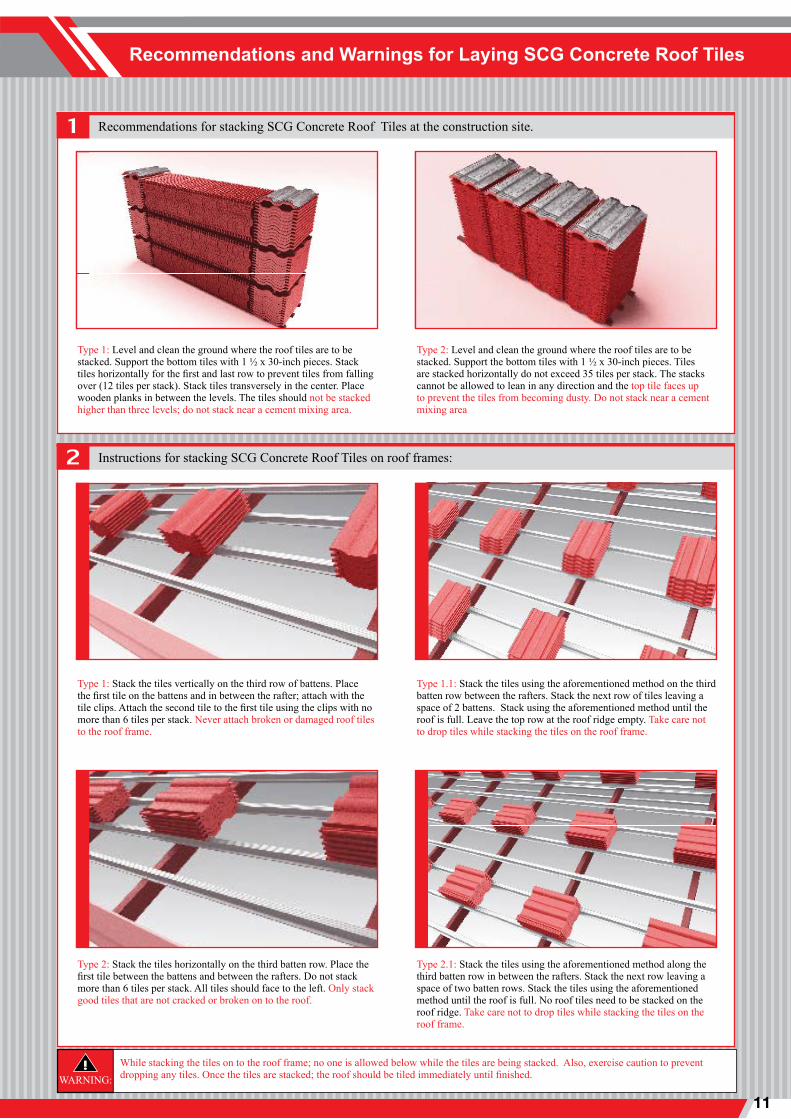
Recommendations for stacking SCG Concrete Roof Tiles at the construction site.
Type 1: Level and clean the ground where the roof tiles are to be stacked. Support the bottom tiles with 1 ½ x 30-inch pieces. Stack tiles horizontally for the first and last row to prevent tiles from falling over (12 tiles per stack). Stack tiles transversely in the center. Place wooden planks in between the levels. The tiles should not be stacked higher than three levels; do not stack near a cement mixing area.
Type 2: Level and clean the ground where the roof tiles are to be stacked. Support the bottom tiles with 1 ½ x 30-inch pieces. Tiles are stacked horizontally do not exceed 35 tiles per stack. The stacks cannot be allowed to lean in any direction and the top tile faces up to prevent the tiles from becoming dusty. Do not stack near a cement mixing area
Instructions for stacking SCG Concrete Roof Tiles on roof frames:
Type 1: Stack the tiles vertically on the third row of battens. Place the first tile on the battens and in between the rafter; attach with the tile clips. Attach the second tile to the first tile using the clips with no more than 6 tiles per stack. Never attach broken or damaged roof tiles to the roof frame.
Type 1.1: Stack the tiles using the aforementioned method on the third batten row between the rafters. Stack the next row of tiles leaving a space of 2 battens. Stack using the aforementioned method until the roof is full. Leave the top row at the roof ridge empty. Take care not to drop tiles while stacking the tiles on the roof frame.
Type 2: Stack the tiles horizontally on the third batten row. Place the first tile between the battens and between the rafters. Do not stack more than 6 tiles per stack. All tiles should face to the left. Only stack good tiles that are not cracked or broken on to the roof.
Type 2.1: Stack the tiles using the aforementioned method along the third batten row in between the rafters. Stack the next row leaving a space of two batten rows. Stack the tiles using the aforementioned method until the roof is full. No roof tiles need to be stacked on the roof ridge. Take care not to drop tiles while stacking the tiles on the roof frame.
While stacking the tiles on to the roof frame; no one is allowed below while the tiles are being stacked. Also, exercise caution to prevent dropping any tiles. Once the tiles are stacked; the roof should be tiled immediately until finished. WARNING:
คูมือการติดตั้งกระเบื้องหลังคา ตราช้าง ซีแพคโมเนีย12
1
3
5
2
4
6
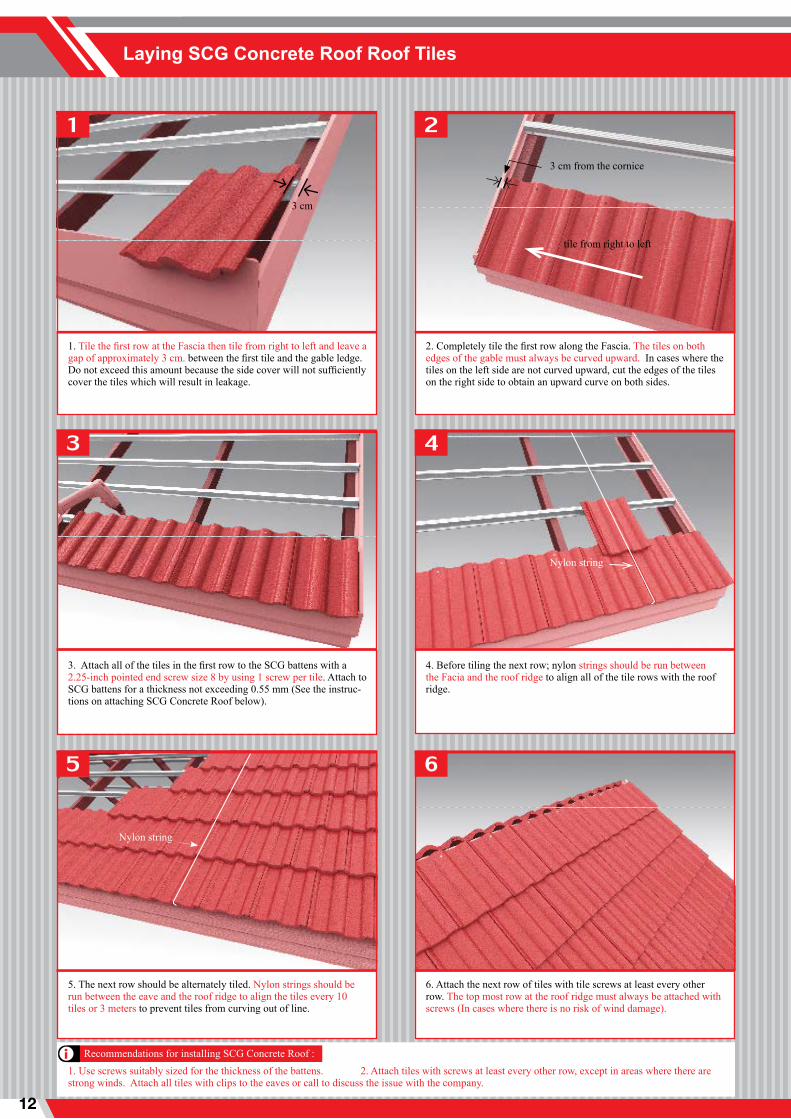
Laying SCG Concrete Roof Roof Tiles
1. Tile the first row at the Fascia then tile from right to left and leave a gap of approximately 3 cm. between the first tile and the gable ledge. Do not exceed this amount because the side cover will not sufficiently cover the tiles which will result in leakage.
2. Completely tile the first row along the Fascia. The tiles on both edges of the gable must always be curved upward. In cases where the tiles on the left side are not curved upward, cut the edges of the tiles on the right side to obtain an upward curve on both sides.
3 cm
3. Attach all of the tiles in the first row to the SCG battens with a 2.25-inch pointed end screw size 8 by using 1 screw per tile. Attach to SCG battens for a thickness not exceeding 0.55 mm (See the instruc-tions on attaching SCG Concrete Roof below).
4. Before tiling the next row; nylon strings should be run between the Facia and the roof ridge to align all of the tile rows with the roof ridge.
3 cm from the cornice
tile from right to left
5. The next row should be alternately tiled. Nylon strings should be run between the eave and the roof ridge to align the tiles every 10 tiles or 3 meters to prevent tiles from curving out of line.
6. Attach the next row of tiles with tile screws at least every other row. The top most row at the roof ridge must always be attached with screws (In cases where there is no risk of wind damage).
Nylon string
Nylon string
Recommendations for installing SCG Concrete Roof :1. Use screws suitably sized for the thickness of the battens. 2. Attach tiles with screws at least every other row, except in areas where there are strong winds. Attach all tiles with clips to the eaves or call to discuss the issue with the company.
INSTALLATION 13
1
3
5
2
4
6
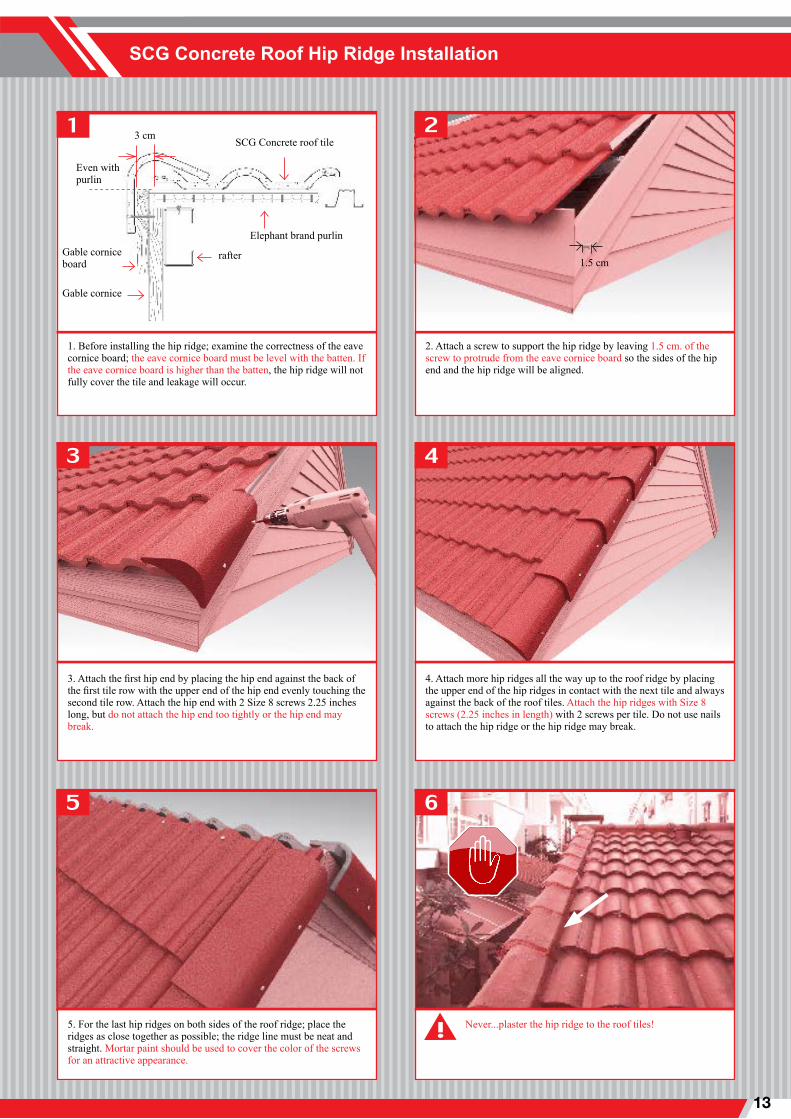
SCG Concrete Roof Hip Ridge Installation
3 cmSCG Concrete roof tile
Elephant brand purlin
rafter
Even withpurlin
Gable cornice
Gable corniceboard
1. Before installing the hip ridge; examine the correctness of the eave cornice board; the eave cornice board must be level with the batten. If the eave cornice board is higher than the batten, the hip ridge will not fully cover the tile and leakage will occur.
2. Attach a screw to support the hip ridge by leaving 1.5 cm. of the screw to protrude from the eave cornice board so the sides of the hip end and the hip ridge will be aligned.
1.5 cm
3. Attach the first hip end by placing the hip end against the back of the first tile row with the upper end of the hip end evenly touching the second tile row. Attach the hip end with 2 Size 8 screws 2.25 inches long, but do not attach the hip end too tightly or the hip end may break.
4. Attach more hip ridges all the way up to the roof ridge by placing the upper end of the hip ridges in contact with the next tile and always against the back of the roof tiles. Attach the hip ridges with Size 8 screws (2.25 inches in length) with 2 screws per tile. Do not use nails to attach the hip ridge or the hip ridge may break.
5. For the last hip ridges on both sides of the roof ridge; place the ridges as close together as possible; the ridge line must be neat and straight. Mortar paint should be used to cover the color of the screws for an attractive appearance.
Never...plaster the hip ridge to the roof tiles!
คูมือการติดตั้งกระเบื้องหลังคา ตราช้าง ซีแพคโมเนีย14
3
1
5 6
4
2
Round Ridge Installation for Gable Roofs
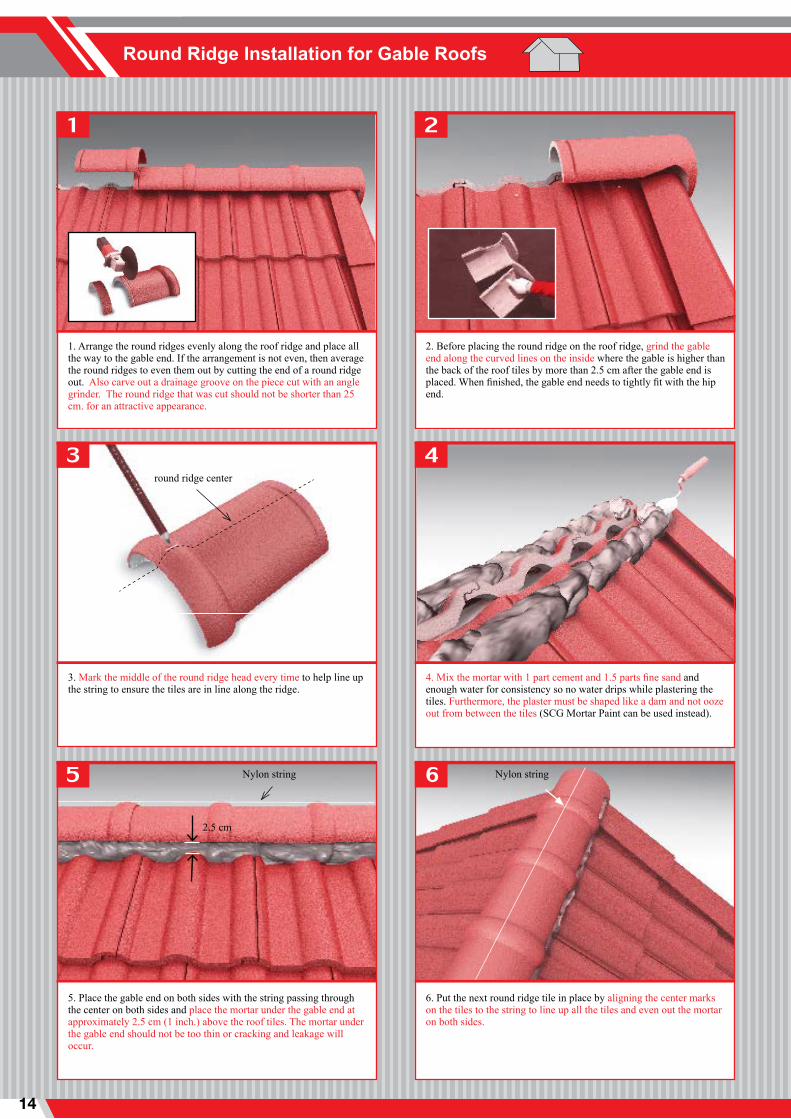
1. Arrange the round ridges evenly along the roof ridge and place all the way to the gable end. If the arrangement is not even, then average the round ridges to even them out by cutting the end of a round ridge out. Also carve out a drainage groove on the piece cut with an angle grinder. The round ridge that was cut should not be shorter than 25 cm. for an attractive appearance.
2. Before placing the round ridge on the roof ridge, grind the gable end along the curved lines on the inside where the gable is higher than the back of the roof tiles by more than 2.5 cm after the gable end is placed. When finished, the gable end needs to tightly fit with the hip end.
round ridge center
3. Mark the middle of the round ridge head every time to help line up the string to ensure the tiles are in line along the ridge.
4. Mix the mortar with 1 part cement and 1.5 parts fine sand and enough water for consistency so no water drips while plastering the tiles. Furthermore, the plaster must be shaped like a dam and not ooze out from between the tiles (SCG Mortar Paint can be used instead).
5. Place the gable end on both sides with the string passing through the center on both sides and place the mortar under the gable end at approximately 2.5 cm (1 inch.) above the roof tiles. The mortar under the gable end should not be too thin or cracking and leakage will occur.
6. Put the next round ridge tile in place by aligning the center marks on the tiles to the string to line up all the tiles and even out the mortar on both sides.
Nylon stringNylon string
2.5 cm

INSTALLATION 15
9
7
10
11 12
8
Round steel rod
7. For the roof ridge, use 2-way round ridge tiles to cover the roof ridge on both sides at the center of the roof ridge. Tiles laid at the overlaps must be tightly placed over every tile. If the tiles do not fit properly, do not remove the tiles or leaks will occur later.
8. While the mortar is still wet, use a trowel to cut out any unwanted mortar; cut perpendicular to the tiles and smooth the mortar. Cut the mortar in curves along the curved ridges.
9. When the mortar is dressed on both sides; use the trowel edge to scrape the mortar on both sides around the round ridge along the roof ridge to prevent the mortar from cracking horizontally.
10. Use a 0.25-inch-diameter round metal rod with a pointed end to punch out a drainage hole through the mortar under the round ridge drainage groove of every tile along the roof ridge on both sides.
11. If the mortar splatters onto the roof tiles and round ridge with white stains appearing, immediately wipe the stains with a dry sponge or rag. When the mortar is completely dry, use SCG mortar paint to paint only the mortar and be careful not to make the surface of the tiles and ridges messy.
12. Do not remove the mortar on the round ridge cover and bent covers should not be installed on the roof!
คูมือการติดตั้งกระเบื้องหลังคา ตราช้าง ซีแพคโมเนีย16
3
1
5 6
4
2
round ridge center
Nylon string
tile clips
Size 18 galvanized wire
Round Ridge Installation at Roof Hips for Hipped Roofs
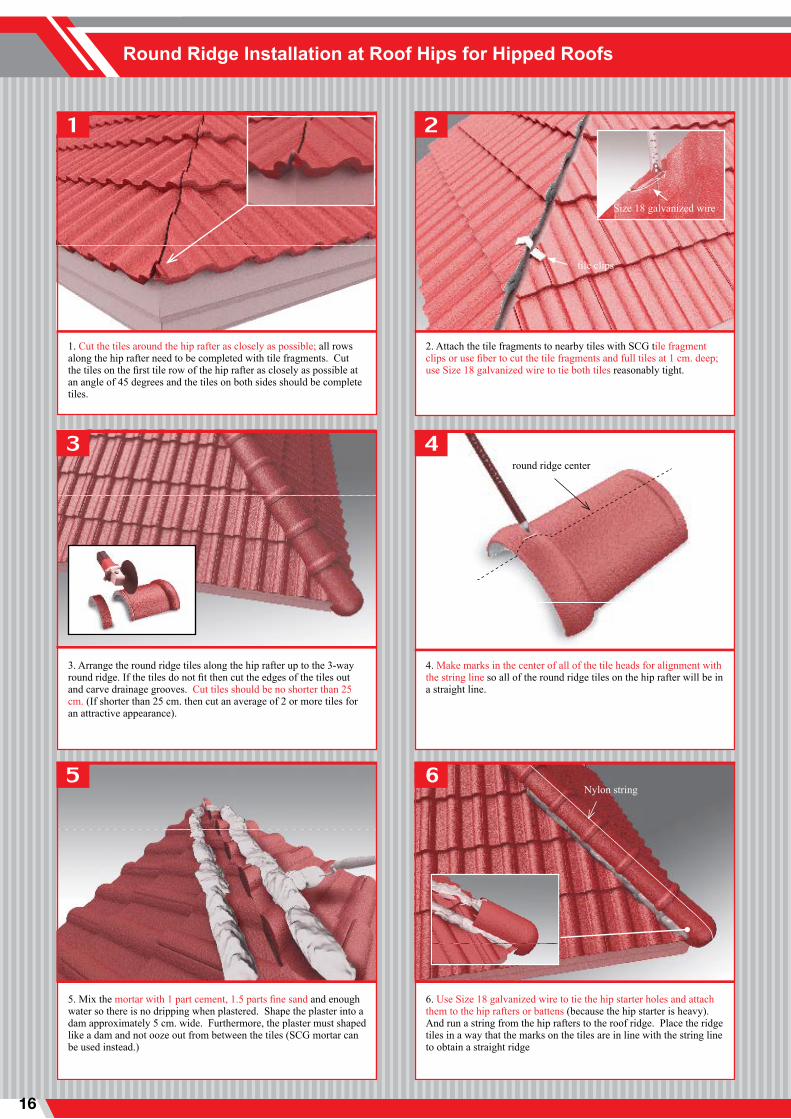
1. Cut the tiles around the hip rafter as closely as possible; all rows along the hip rafter need to be completed with tile fragments. Cut the tiles on the first tile row of the hip rafter as closely as possible at an angle of 45 degrees and the tiles on both sides should be complete tiles.
2. Attach the tile fragments to nearby tiles with SCG tile fragment clips or use fiber to cut the tile fragments and full tiles at 1 cm. deep; use Size 18 galvanized wire to tie both tiles reasonably tight.
3. Arrange the round ridge tiles along the hip rafter up to the 3-way round ridge. If the tiles do not fit then cut the edges of the tiles out and carve drainage grooves. Cut tiles should be no shorter than 25 cm. (If shorter than 25 cm. then cut an average of 2 or more tiles for an attractive appearance).
4. Make marks in the center of all of the tile heads for alignment with the string line so all of the round ridge tiles on the hip rafter will be in a straight line.
5. Mix the mortar with 1 part cement, 1.5 parts fine sand and enough water so there is no dripping when plastered. Shape the plaster into a dam approximately 5 cm. wide. Furthermore, the plaster must shaped like a dam and not ooze out from between the tiles (SCG mortar can be used instead.)
6. Use Size 18 galvanized wire to tie the hip starter holes and attach them to the hip rafters or battens (because the hip starter is heavy). And run a string from the hip rafters to the roof ridge. Place the ridge tiles in a way that the marks on the tiles are in line with the string line to obtain a straight ridge

INSTALLATION 17
9
7
10
11 12
8
4-way round ridge
trimmed round ridges
7. Use the 3-way round ridge to tightly cover the area where both sides of the hip rafter meet the roof ridge.
8. While the mortar is still wet, use a trowel to trim away any un-wanted mortar; cut perpendicular to the tiles and dress the mortar for smoothness. Cut the mortar along the curved ridge.
9. When the mortar is dressed on both sides; use the trowel edge to scrape the mortar on both sides around the round ridge along the roof ridge to prevent the mortar from horizontal cracking.
10. If the mortar splatters onto the roof tiles and round ridge with white stains appearing, use a dry sponge or rag to immediately wipe off the stains. When the mortar is completely dry, paint over the mortar with SCG mortar paint. Paint only over the mortar parts with at least two coats. Exercise caution to avoid splattering on the tiles and ridge.
11. In cases where the roof gable is square, use the square ridge to tightly cover the ridge on all four sides.
12. In cases where there are more than four hip rafters meeting at one point, cut the ridge covers to tightly fit together. Before this part is covered, however, place 1 SCG sealing sheet to cover all sides of the ridge.
คูมือการติดตั้งกระเบื้องหลังคา ตราช้าง ซีแพคโมเนีย18
1
4
3
5
2
SCG Valley Trough Installation and Cutting Valley Rafter Tiles
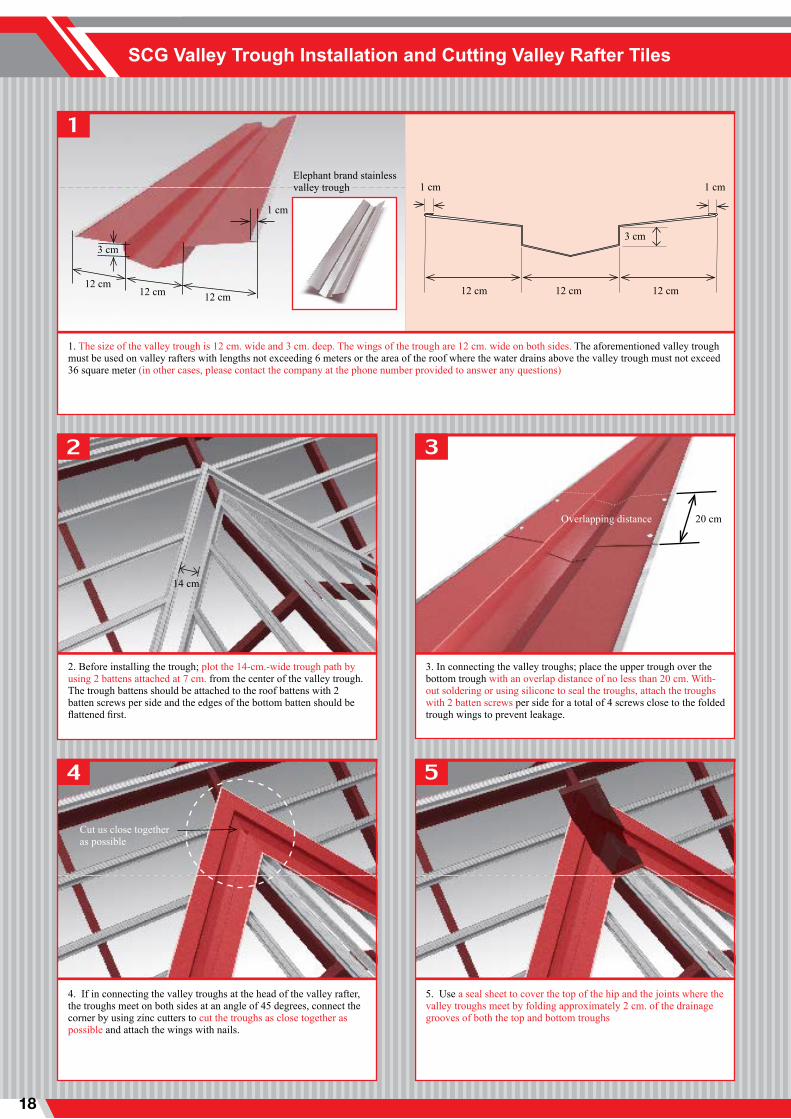
1. The size of the valley trough is 12 cm. wide and 3 cm. deep. The wings of the trough are 12 cm. wide on both sides. The aforementioned valley trough must be used on valley rafters with lengths not exceeding 6 meters or the area of the roof where the water drains above the valley trough must not exceed 36 square meter (in other cases, please contact the company at the phone number provided to answer any questions)
2. Before installing the trough; plot the 14-cm.-wide trough path by using 2 battens attached at 7 cm. from the center of the valley trough. The trough battens should be attached to the roof battens with 2 batten screws per side and the edges of the bottom batten should be flattened first.
3. In connecting the valley troughs; place the upper trough over the bottom trough with an overlap distance of no less than 20 cm. With-out soldering or using silicone to seal the troughs, attach the troughs with 2 batten screws per side for a total of 4 screws close to the folded trough wings to prevent leakage.
4. If in connecting the valley troughs at the head of the valley rafter, the troughs meet on both sides at an angle of 45 degrees, connect the corner by using zinc cutters to cut the troughs as close together as possible and attach the wings with nails.
5. Use a seal sheet to cover the top of the hip and the joints where the valley troughs meet by folding approximately 2 cm. of the drainage grooves of both the top and bottom troughs
1 cm
3 cm
12 cm12 cm12 cm
Elephant brand stainlessvalley trough 1 cm 1 cm
3 cm
12 cm12 cm 12 cm
14 cm
20 cmOverlapping distance
Cut us close together as possible
INSTALLATION 19
8
6
10 11
9
72.5 cm
Bend trough edge against purlin or cut even with purlin
Bend trough edge against purlin or cut even with purlin
Fold the top of the trough upward
3 cm
Use size 18 galvanized wire
Tile fragment clip
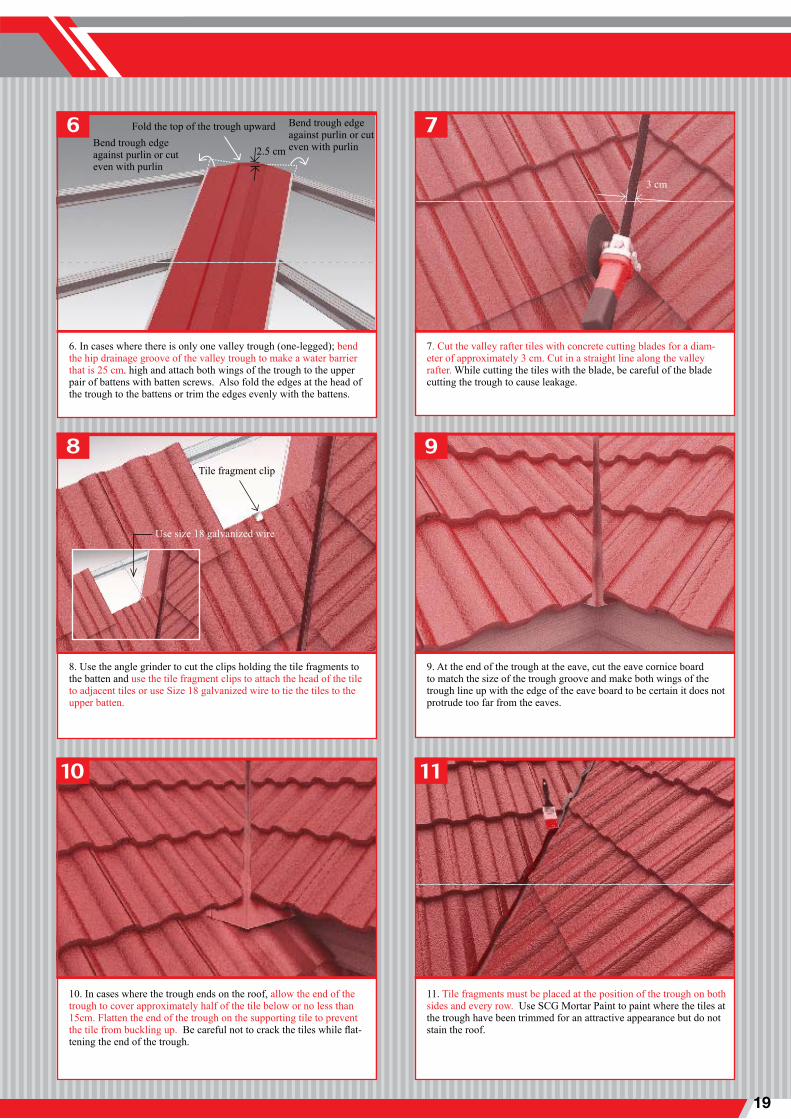
6. In cases where there is only one valley trough (one-legged); bend the hip drainage groove of the valley trough to make a water barrier that is 25 cm. high and attach both wings of the trough to the upper pair of battens with batten screws. Also fold the edges at the head of the trough to the battens or trim the edges evenly with the battens.
7. Cut the valley rafter tiles with concrete cutting blades for a diam-eter of approximately 3 cm. Cut in a straight line along the valley rafter. While cutting the tiles with the blade, be careful of the blade cutting the trough to cause leakage.
8. Use the angle grinder to cut the clips holding the tile fragments to the batten and use the tile fragment clips to attach the head of the tile to adjacent tiles or use Size 18 galvanized wire to tie the tiles to the upper batten.
9. At the end of the trough at the eave, cut the eave cornice board to match the size of the trough groove and make both wings of the trough line up with the edge of the eave board to be certain it does not protrude too far from the eaves.
10. In cases where the trough ends on the roof, allow the end of the trough to cover approximately half of the tile below or no less than 15cm. Flatten the end of the trough on the supporting tile to prevent the tile from buckling up. Be careful not to crack the tiles while flat-tening the end of the trough.
11. Tile fragments must be placed at the position of the trough on both sides and every row. Use SCG Mortar Paint to paint where the tiles at the trough have been trimmed for an attractive appearance but do not stain the roof.
คูมือการติดตั้งกระเบื้องหลังคา ตราช้าง ซีแพคโมเนีย20
3
1
5 6
4
2
Roof Ridge Cover Installation for SCG Dry Tech System
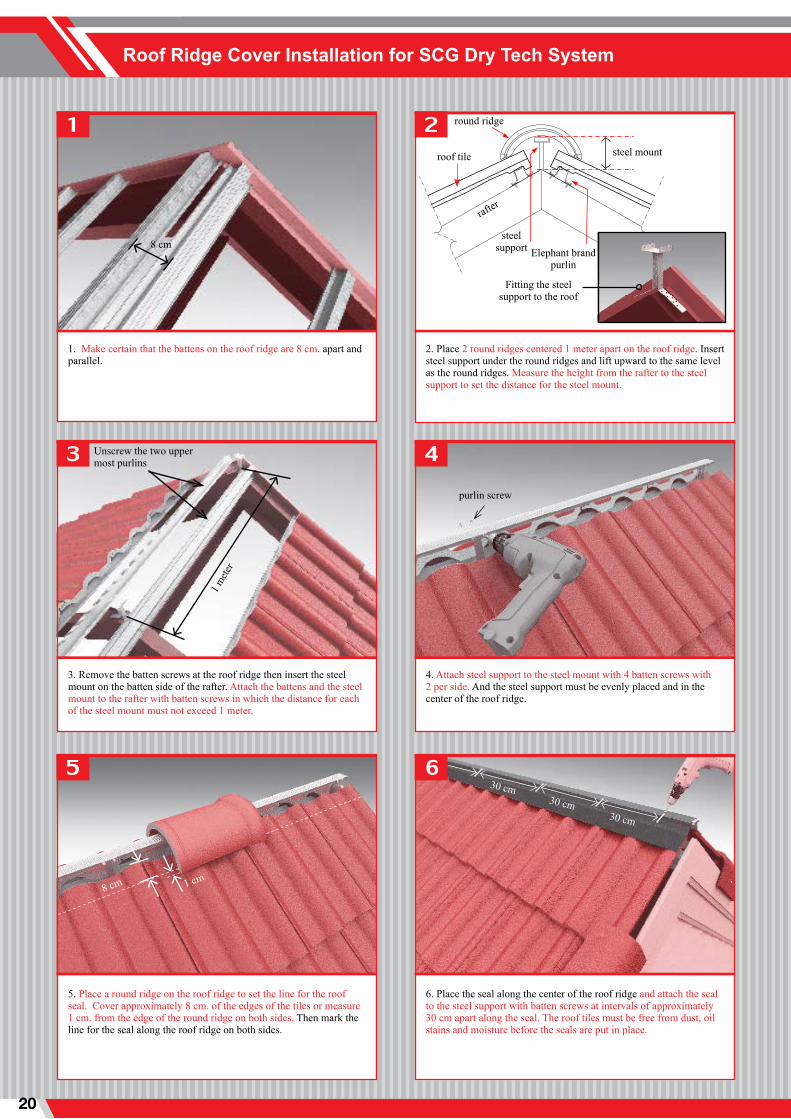
3. Remove the batten screws at the roof ridge then insert the steel mount on the batten side of the rafter. Attach the battens and the steel mount to the rafter with batten screws in which the distance for each of the steel mount must not exceed 1 meter.
4. Attach steel support to the steel mount with 4 batten screws with 2 per side. And the steel support must be evenly placed and in the center of the roof ridge.
5. Place a round ridge on the roof ridge to set the line for the roof seal. Cover approximately 8 cm. of the edges of the tiles or measure 1 cm. from the edge of the round ridge on both sides. Then mark the line for the seal along the roof ridge on both sides.
6. Place the seal along the center of the roof ridge and attach the seal to the steel support with batten screws at intervals of approximately 30 cm apart along the seal. The roof tiles must be free from dust, oil stains and moisture before the seals are put in place.
1. Make certain that the battens on the roof ridge are 8 cm. apart and parallel.
2. Place 2 round ridges centered 1 meter apart on the roof ridge. Insert steel support under the round ridges and lift upward to the same level as the round ridges. Measure the height from the rafter to the steel support to set the distance for the steel mount.
8 cm
roof tile
round ridge
rafter
steel mount
steelsupport Elephant brand
purlin
Fitting the steel support to the roof
Unscrew the two upper most purlins
1 mete
r
purlin screw
8 cm 1 cm
30 cm30 cm
30 cm
INSTALLATION 21
9
7
10
11 12
8
pressure point 1
pressure point 25 cm
gable end
gable end
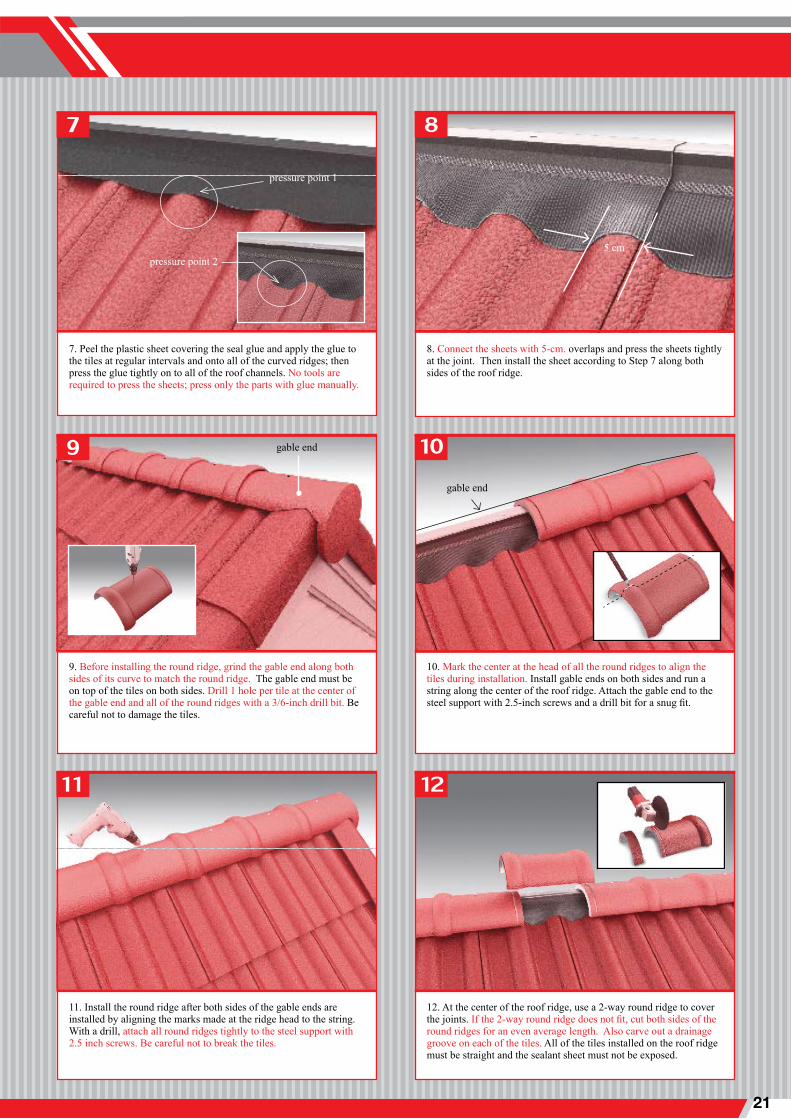
9. Before installing the round ridge, grind the gable end along both sides of its curve to match the round ridge. The gable end must be on top of the tiles on both sides. Drill 1 hole per tile at the center of the gable end and all of the round ridges with a 3/6-inch drill bit. Be careful not to damage the tiles.
10. Mark the center at the head of all the round ridges to align the tiles during installation. Install gable ends on both sides and run a string along the center of the roof ridge. Attach the gable end to the steel support with 2.5-inch screws and a drill bit for a snug fit.
11. Install the round ridge after both sides of the gable ends are installed by aligning the marks made at the ridge head to the string. With a drill, attach all round ridges tightly to the steel support with 2.5 inch screws. Be careful not to break the tiles.
12. At the center of the roof ridge, use a 2-way round ridge to cover the joints. If the 2-way round ridge does not fit, cut both sides of the round ridges for an even average length. Also carve out a drainage groove on each of the tiles. All of the tiles installed on the roof ridge must be straight and the sealant sheet must not be exposed.
7. Peel the plastic sheet covering the seal glue and apply the glue to the tiles at regular intervals and onto all of the curved ridges; then press the glue tightly on to all of the roof channels. No tools are required to press the sheets; press only the parts with glue manually.
8. Connect the sheets with 5-cm. overlaps and press the sheets tightly at the joint. Then install the sheet according to Step 7 along both sides of the roof ridge.
คูมือการติดตั้งกระเบื้องหลังคา ตราช้าง ซีแพคโมเนีย22
3
1
5 6
4
2
SCG Dry Tech System Hip Rafter Installation
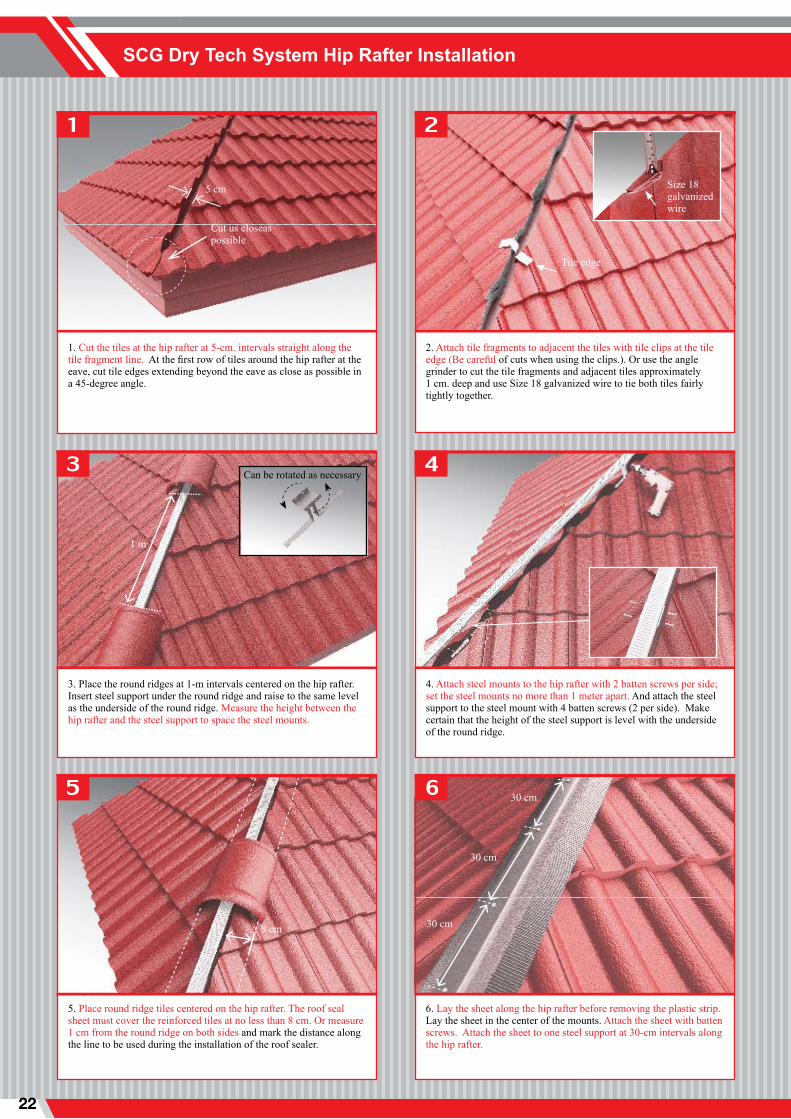
3. Place the round ridges at 1-m intervals centered on the hip rafter. Insert steel support under the round ridge and raise to the same level as the underside of the round ridge. Measure the height between the hip rafter and the steel support to space the steel mounts.
4. Attach steel mounts to the hip rafter with 2 batten screws per side; set the steel mounts no more than 1 meter apart. And attach the steel support to the steel mount with 4 batten screws (2 per side). Make certain that the height of the steel support is level with the underside of the round ridge.
5. Place round ridge tiles centered on the hip rafter. The roof seal sheet must cover the reinforced tiles at no less than 8 cm. Or measure 1 cm from the round ridge on both sides and mark the distance along the line to be used during the installation of the roof sealer.
6. Lay the sheet along the hip rafter before removing the plastic strip. Lay the sheet in the center of the mounts. Attach the sheet with batten screws. Attach the sheet to one steel support at 30-cm intervals along the hip rafter.
1. Cut the tiles at the hip rafter at 5-cm. intervals straight along the tile fragment line. At the first row of tiles around the hip rafter at the eave, cut tile edges extending beyond the eave as close as possible in a 45-degree angle.
2. Attach tile fragments to adjacent the tiles with tile clips at the tile edge (Be careful of cuts when using the clips.). Or use the angle grinder to cut the tile fragments and adjacent tiles approximately 1 cm. deep and use Size 18 galvanized wire to tie both tiles fairly tightly together.
Cut us closeas possible
5 cm
Can be rotated as necessary
1 m
Size 18galvanizedwire
Tile edge
30 cm
30 cm
30 cm8 cm
INSTALLATION 23
9
7
10
11 12
8
pressure point 1 pressure point 2
press tightlyto leave no air pockets
5 cm
Nylonstring
Trim line for poorly fitting ridge
4-way round ridge
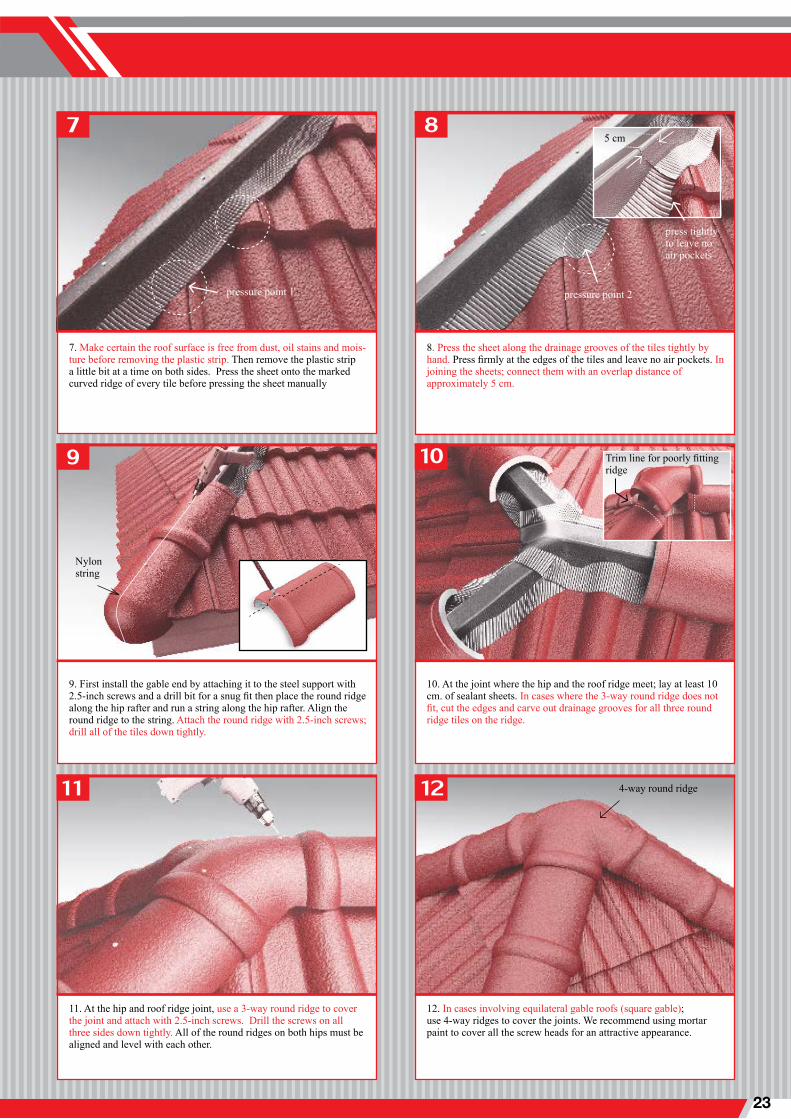
9. First install the gable end by attaching it to the steel support with 2.5-inch screws and a drill bit for a snug fit then place the round ridge along the hip rafter and run a string along the hip rafter. Align the round ridge to the string. Attach the round ridge with 2.5-inch screws; drill all of the tiles down tightly.
10. At the joint where the hip and the roof ridge meet; lay at least 10 cm. of sealant sheets. In cases where the 3-way round ridge does not fit, cut the edges and carve out drainage grooves for all three round ridge tiles on the ridge.
11. At the hip and roof ridge joint, use a 3-way round ridge to cover the joint and attach with 2.5-inch screws. Drill the screws on all three sides down tightly. All of the round ridges on both hips must be aligned and level with each other.
12. In cases involving equilateral gable roofs (square gable);use 4-way ridges to cover the joints. We recommend using mortar paint to cover all the screw heads for an attractive appearance.
7. Make certain the roof surface is free from dust, oil stains and mois-ture before removing the plastic strip. Then remove the plastic strip a little bit at a time on both sides. Press the sheet onto the marked curved ridge of every tile before pressing the sheet manually
8. Press the sheet along the drainage grooves of the tiles tightly by hand. Press firmly at the edges of the tiles and leave no air pockets. In joining the sheets; connect them with an overlap distance ofapproximately 5 cm.
คูมือการติดตั้งกระเบื้องหลังคา ตราช้าง ซีแพคโมเนีย24
3
1
5 6
4
2
SCG Side Cover and Curved Cover Installation
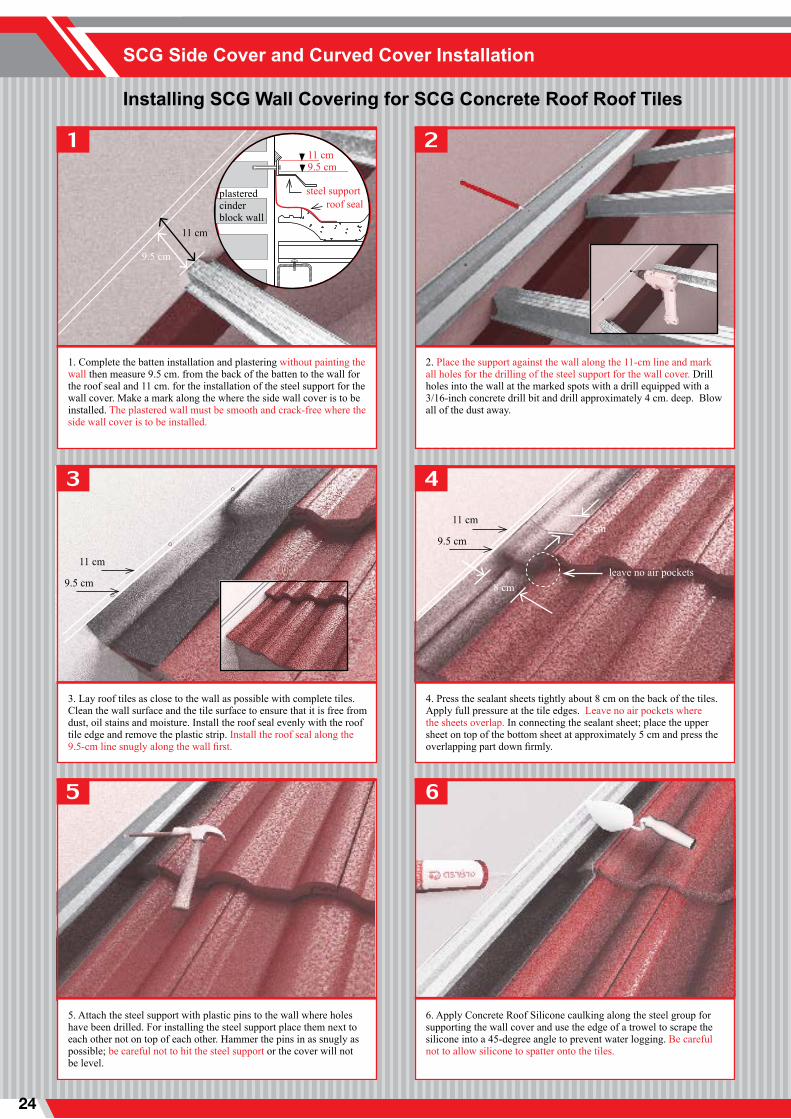
1. Complete the batten installation and plastering without painting the wall then measure 9.5 cm. from the back of the batten to the wall for the roof seal and 11 cm. for the installation of the steel support for the wall cover. Make a mark along the where the side wall cover is to be installed. The plastered wall must be smooth and crack-free where the side wall cover is to be installed.
2. Place the support against the wall along the 11-cm line and mark all holes for the drilling of the steel support for the wall cover. Drill holes into the wall at the marked spots with a drill equipped with a 3/16-inch concrete drill bit and drill approximately 4 cm. deep. Blow all of the dust away.
Installing SCG Wall Covering for SCG Concrete Roof Roof Tiles
9.5 cm
11 cm
11 cm9.5 cm
steel supportroof seal
plastered cinderblock wall
11 cm
9.5 cm
11 cm
9.5 cm
8 cm
5 cm
leave no air pockets
3. Lay roof tiles as close to the wall as possible with complete tiles. Clean the wall surface and the tile surface to ensure that it is free from dust, oil stains and moisture. Install the roof seal evenly with the roof tile edge and remove the plastic strip. Install the roof seal along the 9.5-cm line snugly along the wall first.
4. Press the sealant sheets tightly about 8 cm on the back of the tiles. Apply full pressure at the tile edges. Leave no air pockets where the sheets overlap. In connecting the sealant sheet; place the upper sheet on top of the bottom sheet at approximately 5 cm and press the overlapping part down firmly.
5. Attach the steel support with plastic pins to the wall where holes have been drilled. For installing the steel support place them next to each other not on top of each other. Hammer the pins in as snugly as possible; be careful not to hit the steel support or the cover will not be level.
6. Apply Concrete Roof Silicone caulking along the steel group for supporting the wall cover and use the edge of a trowel to scrape the silicone into a 45-degree angle to prevent water logging. Be careful not to allow silicone to spatter onto the tiles.
INSTALLATION 25
9
7
1
10
2
8
Cut out piece
9.5 cm
11 cm
9.5 cm11 cm
11 cm9.5 cm
steel support seal
plastered cinderblock wall
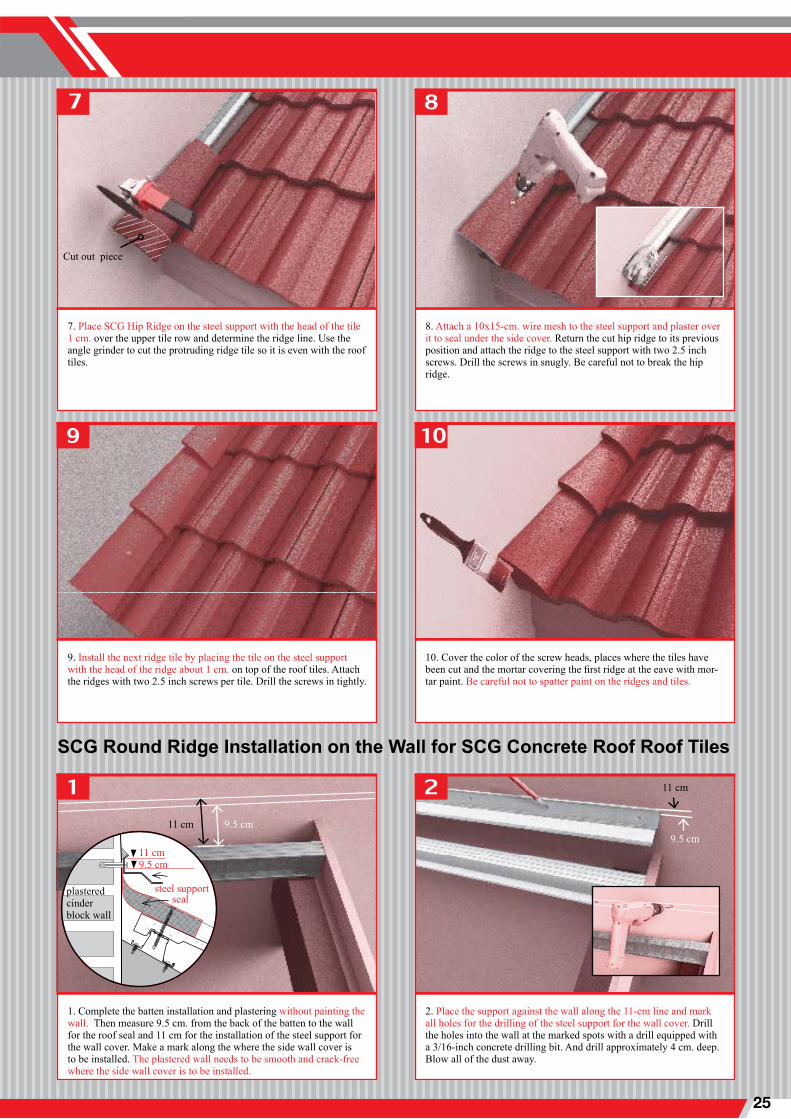
7. Place SCG Hip Ridge on the steel support with the head of the tile 1 cm. over the upper tile row and determine the ridge line. Use the angle grinder to cut the protruding ridge tile so it is even with the roof tiles.
8. Attach a 10x15-cm. wire mesh to the steel support and plaster over it to seal under the side cover. Return the cut hip ridge to its previous position and attach the ridge to the steel support with two 2.5 inch screws. Drill the screws in snugly. Be careful not to break the hip ridge.
SCG Round Ridge Installation on the Wall for SCG Concrete Roof Roof Tiles
9. Install the next ridge tile by placing the tile on the steel support with the head of the ridge about 1 cm. on top of the roof tiles. Attach the ridges with two 2.5 inch screws per tile. Drill the screws in tightly.
10. Cover the color of the screw heads, places where the tiles have been cut and the mortar covering the first ridge at the eave with mor-tar paint. Be careful not to spatter paint on the ridges and tiles.
1. Complete the batten installation and plastering without painting the wall. Then measure 9.5 cm. from the back of the batten to the wall for the roof seal and 11 cm for the installation of the steel support for the wall cover. Make a mark along the where the side wall cover is to be installed. The plastered wall needs to be smooth and crack-free where the side wall cover is to be installed.
2. Place the support against the wall along the 11-cm line and mark all holes for the drilling of the steel support for the wall cover. Drill the holes into the wall at the marked spots with a drill equipped with a 3/16-inch concrete drilling bit. And drill approximately 4 cm. deep. Blow all of the dust away.
คูมือการติดตั้งกระเบื้องหลังคา ตราช้าง ซีแพคโมเนีย26
3
5
7 8
6
411 cm 9.5 cm 11 cm
8 cm
5 cm
leave no air pockets
11 cm
9.5 cm
Wall round ridge
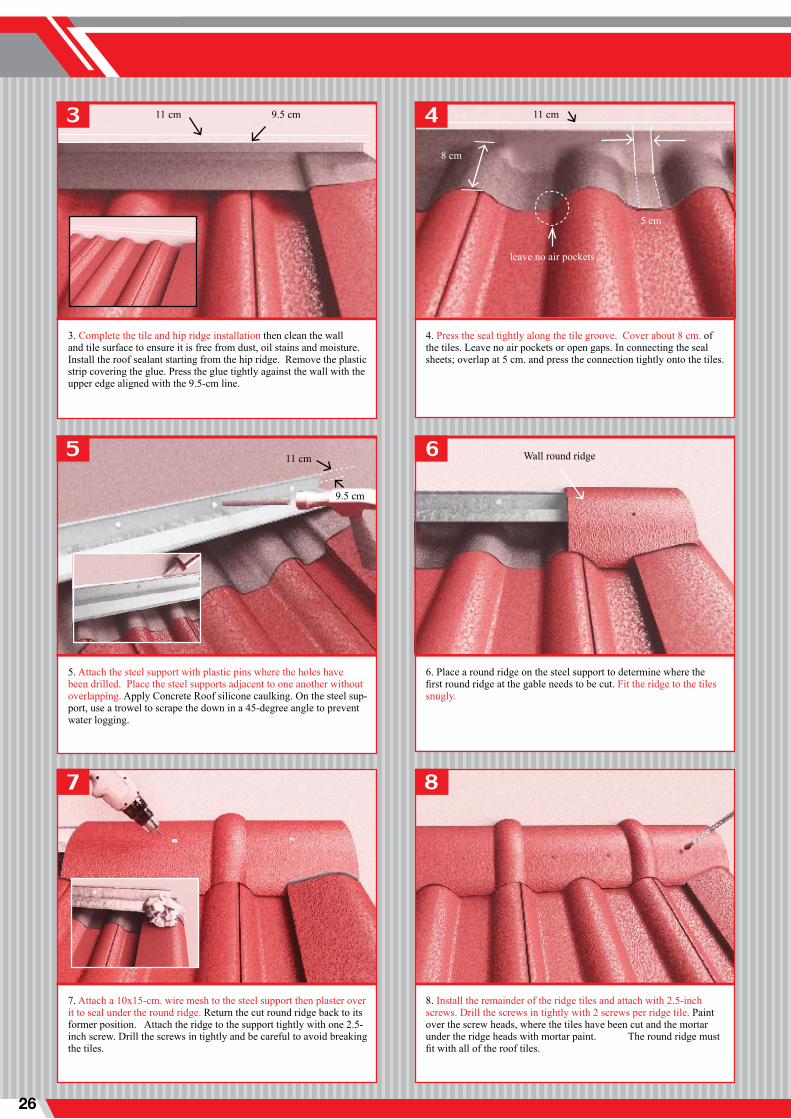
3. Complete the tile and hip ridge installation then clean the wall and tile surface to ensure it is free from dust, oil stains and moisture. Install the roof sealant starting from the hip ridge. Remove the plastic strip covering the glue. Press the glue tightly against the wall with the upper edge aligned with the 9.5-cm line.
4. Press the seal tightly along the tile groove. Cover about 8 cm. of the tiles. Leave no air pockets or open gaps. In connecting the seal sheets; overlap at 5 cm. and press the connection tightly onto the tiles.
5. Attach the steel support with plastic pins where the holes have been drilled. Place the steel supports adjacent to one another without overlapping. Apply Concrete Roof silicone caulking. On the steel sup-port, use a trowel to scrape the down in a 45-degree angle to prevent water logging.
6. Place a round ridge on the steel support to determine where the first round ridge at the gable needs to be cut. Fit the ridge to the tiles snugly.
7. Attach a 10x15-cm. wire mesh to the steel support then plaster over it to seal under the round ridge. Return the cut round ridge back to its former position. Attach the ridge to the support tightly with one 2.5-inch screw. Drill the screws in tightly and be careful to avoid breaking the tiles.
8. Install the remainder of the ridge tiles and attach with 2.5-inch screws. Drill the screws in tightly with 2 screws per ridge tile. Paint over the screw heads, where the tiles have been cut and the mortar under the ridge heads with mortar paint. The round ridge must fit with all of the roof tiles.
INSTALLATION 27
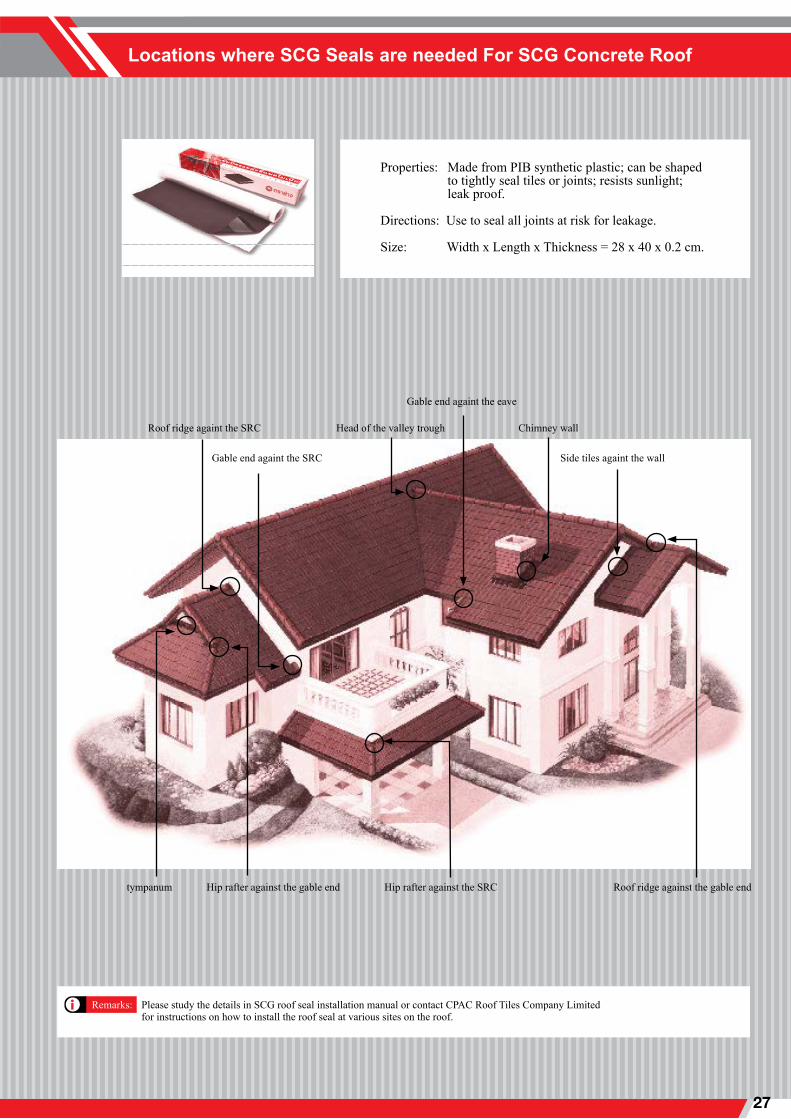
Locations where SCG Seals are needed For SCG Concrete Roof
Please study the details in SCG roof seal installation manual or contact CPAC Roof Tiles Company Limited for instructions on how to install the roof seal at various sites on the roof.
Remarks:
Roof ridge againt the SRC
Gable end againt the SRC
Head of the valley trough
Gable end againt the eave
Chimney wall
Side tiles againt the wall
Hip rafter against the gable end Hip rafter against the SRC Roof ridge against the gable endtympanum
Properties: Made from PIB synthetic plastic; can be shaped to tightly seal tiles or joints; resists sunlight; leak proof.
Directions: Use to seal all joints at risk for leakage.
Size: Width x Length x Thickness = 28 x 40 x 0.2 cm.
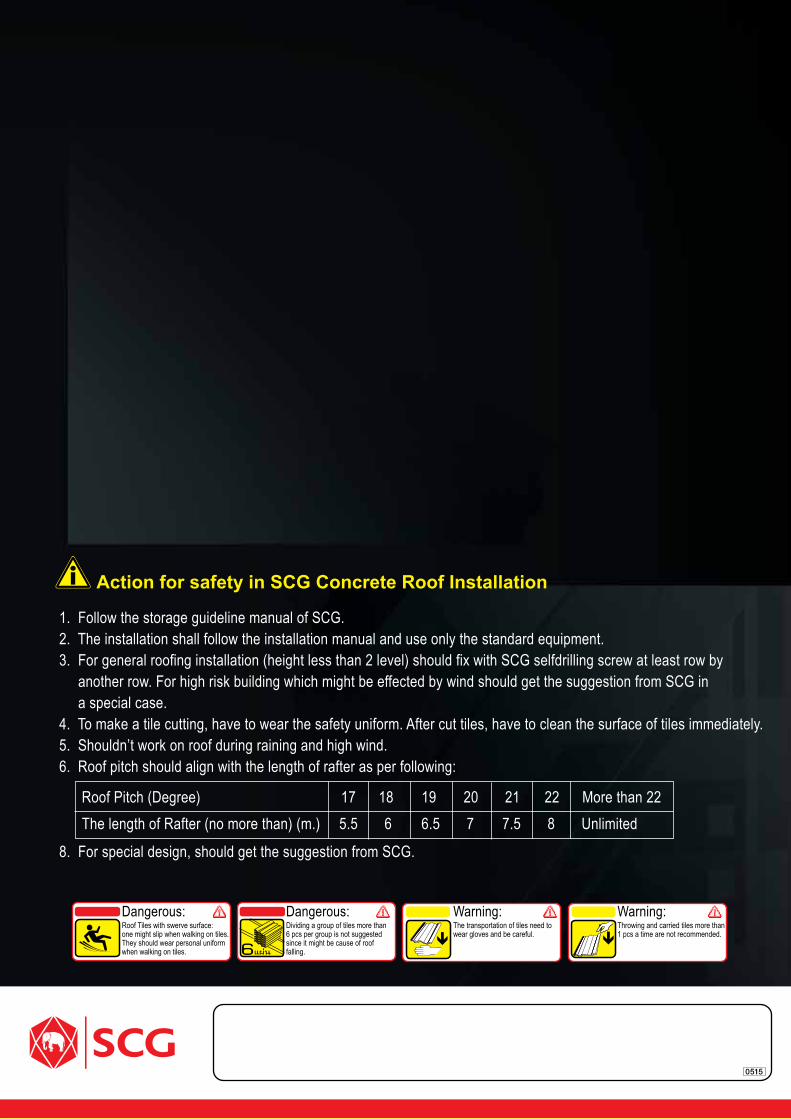
Action for safety in SCG Concrete Roof Installation
1. Follow the storage guideline manual of SCG.2. The installation shall follow the installation manual and use only the standard equipment.3. For general roofing installation (height less than 2 level) should fix with SCG selfdrilling screw at least row by another row. For high risk building which might be effected by wind should get the suggestion from SCG in a special case.4. To make a tile cutting, have to wear the safety uniform. After cut tiles, have to clean the surface of tiles immediately.5. Shouldn’t work on roof during raining and high wind.6. Roof pitch should align with the length of rafter as per following:
8. For special design, should get the suggestion from SCG.
Roof Pitch (Degree) 17 18 19 20 21 22 More than 22The length of Rafter (no more than) (m.) 5.5 6 6.5 7 7.5 8 Unlimited
Dangerous:Roof Tiles with swerve surface:one might slip when walking on tiles.They should wear personal uniformwhen walking on tiles.
Dangerous:Dividing a group of tiles more than6 pcs per group is not suggested since it might be cause of rooffalling.
Warning:The transportation of tiles need towear gloves and be careful.
Warning:Throwing and carried tiles more than1 pcs a time are not recommended.
Related Documents