C120-E443-14ENZ0(A) March 2012 Solaris Install Server Build Guide I/O device driver (SPARC Enterprise) SPARC Enterprise

Welcome message from author
This document is posted to help you gain knowledge. Please leave a comment to let me know what you think about it! Share it to your friends and learn new things together.
Transcript

C120-E443-14ENZ0(A)March 2012
Solaris
Install Server Build GuideI/O device driver(SPARC Enterprise)
SPARC Enterprise
Preface
Purpose
This manual provides procedures to construct the network installation environment required for OS installation in the following conditions:
- Network installation using a LAN card installed in SPARC Enterprise.
- OS installation on an external file unit connected to SPARC Enterprise via a SCSI or SAS card.
Target Reader
This manual is intended for system administrators responsible for installing the Gigabit Ethernet card, 10 Gigabit Ethernet card, SCSI orSAS card.
To understand the concepts and procedures presented in this manual, you need a few years of experience in Oracles Solaris (in this manual,abbreviated to Solaris) system administration and have a basic knowledge of networked systems.
Organization
This section describes how this manual is organized.
Chapter 1 Outline
Chapter 1 provides a description of the circumstances when an installation server is required.
Chapter 2 Hardware/Software Requirements
Chapter 2 explains the hardware and software requirements for the installation server.
Chapter 3 Construction Method
Chapter 3 explains how to construct the installation server.
Symbols
Notations
The notations used in this manual are as follows.
- Actual command input is printed in bold-faced type.
# cd /cdrom/cdrom0/s0/Solaris_10/Tools <RETURN>
Abbreviated Names
The official names of the following products are described in abbreviated form in this manual.
Official name : Oracle SolarisAbbreviated name: Solaris
Official name : Oracle Solaris 10Abbreviated name: Solaris 10
Official name : Oracle Solaris 11Abbreviated name: Solaris 11
Official name : SPARC Enterprise M3000/M4000/M5000/M8000/M9000Abbreviated name: SPARC Enterprise Mxxxx series
Official name : SPARC Enterprise T1000/T2000/T5120/T5220/T5140/T5240/T5440Abbreviated name: SPARC Enterprise Txxxx series
Official name : SPARC T3-1/T3-2Abbreviated name: SPARC T3 series
- i -

Registered Trademarks
- Oracle and Java are registered trademarks of Oracle and/or its affiliates. Other names may be trademarks of their respective owners.
14th edition: March 2012
Attention
- Please do not reprint this book without permission.
- The contents of this manual may be revised without prior notice.
Copyright 2007-2012FUJITSU LIMITED
Revision History
Edition Date Details
1 2007/2/15 First Release
2 2007/3/28 Driver patch application procedure added.
3 2008/2/29 The method to set the FUJITSU PCI GigabitEthernet 4.0 driver added in "3.2 Solaris CustomJumpStart".
4 2008/5/19 The method to set the Serial Attached SCSI card has been added.
5 2008/8/29 The version of the FUJITSU PCI GigabitEthernet driver has been added to Note "2.1 HardwareEnvironment".
The Quad Gigabit Ethernet card (SE0X7GQ2X) has been added to "2.1 Hardware Environment","3.1.2 Install Server Setup", "3.2 Solaris Custom JumpStart Setup" and "3.3 OS Installation".
6 2008/11/13 Because the installation procedure of the package and the patch to the miniroot has been changedfrom Solaris 10 10/08, "3.1.2 Install server Setup", "3.2.2 Solaris Custom JumpStart files Setup"and "3.2.3 Adding to the Install Server" have been updated.
7 2009/2/9 The method to set the 10 Gigabit Ethernet card has been added.
8 2009/12/7 Each explanation of "Preface, "Chapter 1 Outline", "Chapter 2 Hardware/Software Requirement","Chapter 3 Construction Method" is improved.
The procedures of the case of Solaris 10 10/08 or higher in the "3.1.2 Install server Setup" werechanged.
10 2010/5/14 The procedures of installation of FUJITSU 10GigabitEthernet 1.0 or Later in the "3.1.2 Installserver Setup" were changed.
The note of the case of FUJITSU PCI GigabitEthernet 4.0 or Later in the "3.2.1 Making the SolarisCustom JumpStart Directory " was added.
The procedure of the case of FUJITSU 10Gigabit Ethernet 1.0 or Later in the "3.3 OS Installation"was changed.
11 2010/12/17 The name of Solaris was changed to Oracle Solaris.
The version of FUJITSU PCI GigabitEthernet driver was changed in the "2.2 SoftwareEnvironment".
The explanation of FUJITSU PCI GigabitEthernet 3.0 Update1 or later was deleted in "3.1Createing an Install Server", "3.2 Solarsi Custom Jumpstart Setup" and "3.3 Solaris Installation".
12 2011/6/22 Sun Microsystems Documentation was changed to Oracle Documentation.
The SPARC T3 series is added to "Preface", "2.1 Hardware Environment ", "3.2.2 Solaris CustomJumpStart files Setup" and "3.2.3 Adding to the Install Server".
- ii -

Edition Date Details
13 2011/11/17 Solaris 11 setup procedure was added.
In "2.2 Software Environment", The version number and note of Oracle Solaris, FUJITSU PCIGigabitEthernet, FUJITSU ULTRA LVD SCSI Host Bus Adapter Driver were added.
14 2012/3/2 In "2.2 Software Environment", The note and the version of Oracle Solaris and FUJITSU ULTRALVD SCSI Host Bus Adapter Driver were changed.
In " 3.1.1.2 Install Server Setup", " 3.1.2.1 Making the Solaris Custom JumpStart Directory ","3.1.2.2 Solaris Custom JumpStart Files Setups" and " 3.2.1.2 Creating the Finalizer Script", theclerical error was corrected and the note was added.
2012/3/16 The explanation of SPARC Enterprise server was deleted in "Chapter 1 Outline".
- iii -

ContentsChapter 1 Outline.....................................................................................................................................................................1
Chapter 2 Hardware/Software Requirements...........................................................................................................................22.1 Hardware Environment........................................................................................................................................................................22.2 Software Environment.........................................................................................................................................................................2
Chapter 3 Construction Method................................................................................................................................................33.1 Construction Method for Solaris 10.....................................................................................................................................................3
3.1.1 Creating an Install Server.............................................................................................................................................................33.1.1.1 Copying of Solaris.................................................................................................................................................................33.1.1.2 Install Server Setup................................................................................................................................................................3
3.1.2 Solaris Custom JumpStart Setup...................................................................................................................................................93.1.2.1 Making the Solaris Custom JumpStart Directory..................................................................................................................93.1.2.2 Solaris Custom JumpStart Files Setups...............................................................................................................................113.1.2.3 Adding to the Install Server.................................................................................................................................................15
3.1.3 Solaris Installation......................................................................................................................................................................153.2 Construction Method for Solaris 11...................................................................................................................................................16
3.2.1 Creating Solaris Image................................................................................................................................................................163.2.1.1 Distribution Constructor Installation...................................................................................................................................163.2.1.2 Creating the Finalizer Script................................................................................................................................................173.2.1.3 Editing the Manifest File.....................................................................................................................................................263.2.1.4 Creating Solaris Image.........................................................................................................................................................27
3.2.2 Install Server Setup.....................................................................................................................................................................283.2.2.1 Creating AI service..............................................................................................................................................................28
3.2.3 Solaris Installation......................................................................................................................................................................29
- iv -

Chapter 1 OutlineWhen the driver for the optional SCSI or SAS card is not included (bundled) in the Solaris installation media, it is necessary to constructa network install server and install the SCSI/SAS driver in the Solaris image.
It is also necessary to construct a network install server, and install the LAN driver in the Solaris image, when a SPARC Enterprise serveris booted from the network using any of the LAN cards described in "2.1 Hardware Environment".
The following chapters provide information about the optional cards and their drivers that require a network installation server, basicinstallation server setup, and required network installation server customization steps.
- 1 -
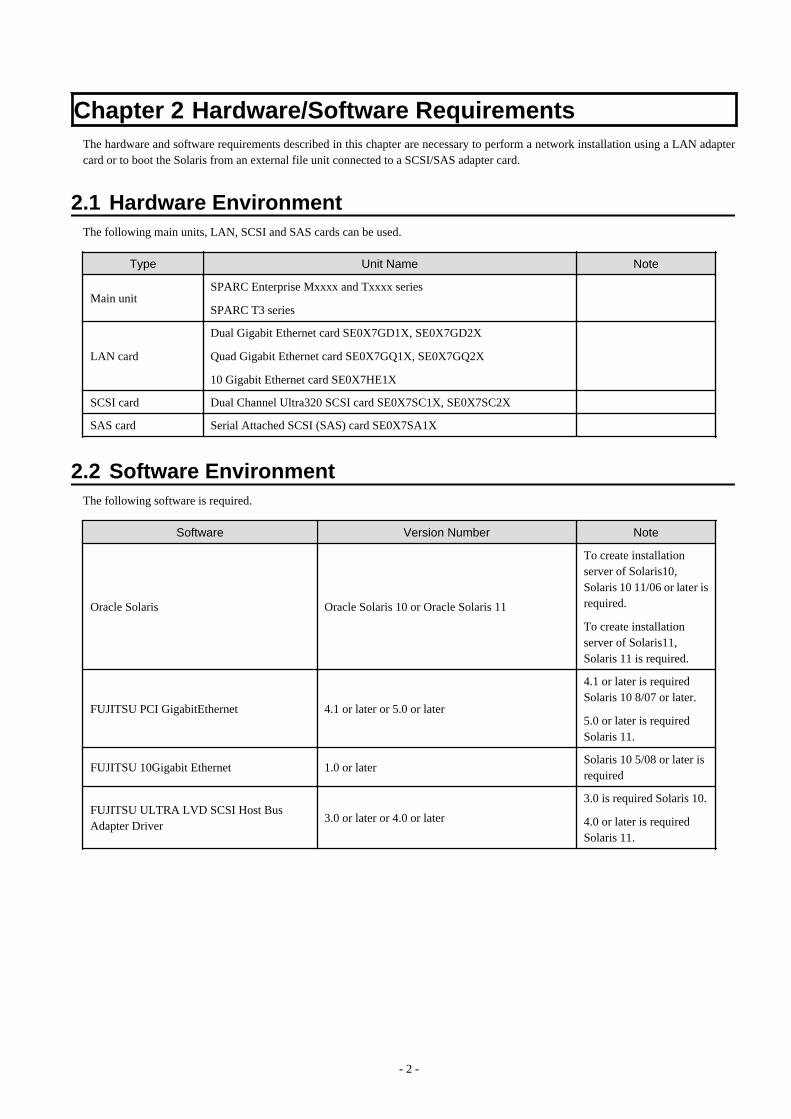
Chapter 2 Hardware/Software RequirementsThe hardware and software requirements described in this chapter are necessary to perform a network installation using a LAN adaptercard or to boot the Solaris from an external file unit connected to a SCSI/SAS adapter card.
2.1 Hardware EnvironmentThe following main units, LAN, SCSI and SAS cards can be used.
Type Unit Name Note
Main unitSPARC Enterprise Mxxxx and Txxxx series
SPARC T3 series
LAN card
Dual Gigabit Ethernet card SE0X7GD1X, SE0X7GD2X
Quad Gigabit Ethernet card SE0X7GQ1X, SE0X7GQ2X
10 Gigabit Ethernet card SE0X7HE1X
SCSI card Dual Channel Ultra320 SCSI card SE0X7SC1X, SE0X7SC2X
SAS card Serial Attached SCSI (SAS) card SE0X7SA1X
2.2 Software EnvironmentThe following software is required.
Software Version Number Note
Oracle Solaris Oracle Solaris 10 or Oracle Solaris 11
To create installationserver of Solaris10,Solaris 10 11/06 or later isrequired.
To create installationserver of Solaris11,Solaris 11 is required.
FUJITSU PCI GigabitEthernet 4.1 or later or 5.0 or later
4.1 or later is requiredSolaris 10 8/07 or later.
5.0 or later is requiredSolaris 11.
FUJITSU 10Gigabit Ethernet 1.0 or laterSolaris 10 5/08 or later isrequired
FUJITSU ULTRA LVD SCSI Host BusAdapter Driver
3.0 or later or 4.0 or later
3.0 is required Solaris 10.
4.0 or later is requiredSolaris 11.
- 2 -
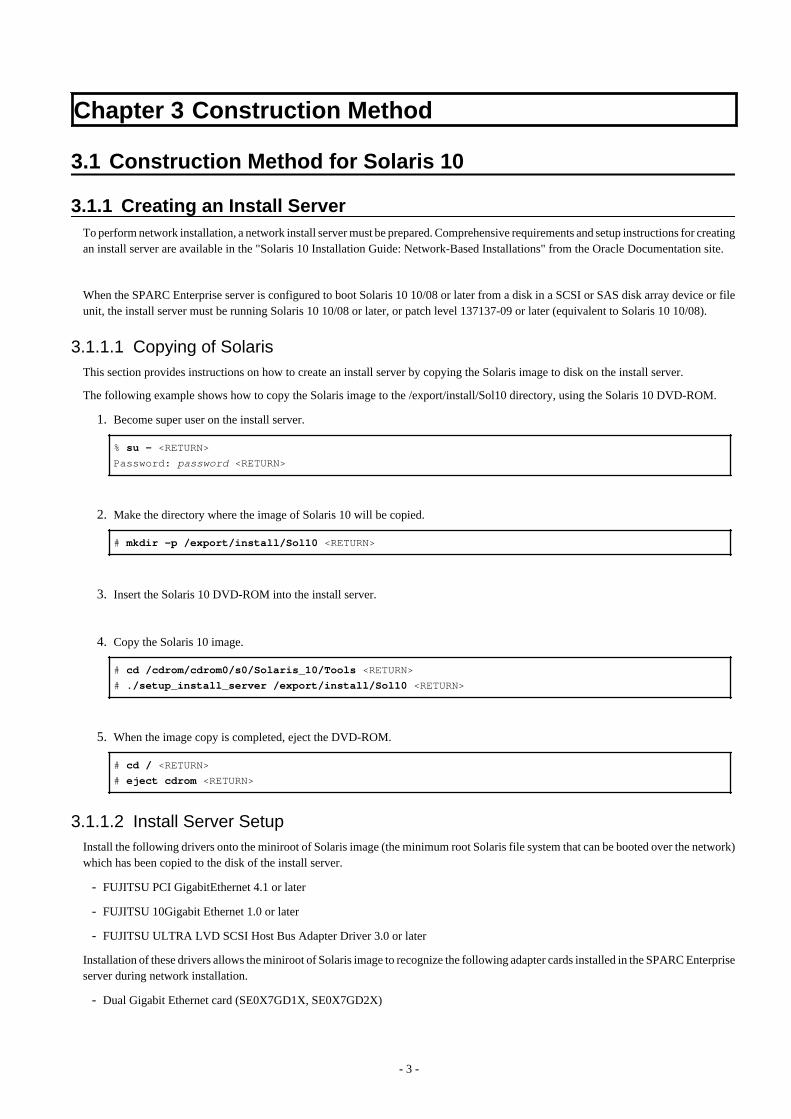
Chapter 3 Construction Method
3.1 Construction Method for Solaris 10
3.1.1 Creating an Install ServerTo perform network installation, a network install server must be prepared. Comprehensive requirements and setup instructions for creatingan install server are available in the "Solaris 10 Installation Guide: Network-Based Installations" from the Oracle Documentation site.
When the SPARC Enterprise server is configured to boot Solaris 10 10/08 or later from a disk in a SCSI or SAS disk array device or fileunit, the install server must be running Solaris 10 10/08 or later, or patch level 137137-09 or later (equivalent to Solaris 10 10/08).
3.1.1.1 Copying of SolarisThis section provides instructions on how to create an install server by copying the Solaris image to disk on the install server.
The following example shows how to copy the Solaris image to the /export/install/Sol10 directory, using the Solaris 10 DVD-ROM.
1. Become super user on the install server.
% su - <RETURN>
Password: password <RETURN>
2. Make the directory where the image of Solaris 10 will be copied.
# mkdir -p /export/install/Sol10 <RETURN>
3. Insert the Solaris 10 DVD-ROM into the install server.
4. Copy the Solaris 10 image.
# cd /cdrom/cdrom0/s0/Solaris_10/Tools <RETURN>
# ./setup_install_server /export/install/Sol10 <RETURN>
5. When the image copy is completed, eject the DVD-ROM.
# cd / <RETURN>
# eject cdrom <RETURN>
3.1.1.2 Install Server SetupInstall the following drivers onto the miniroot of Solaris image (the minimum root Solaris file system that can be booted over the network)which has been copied to the disk of the install server.
- FUJITSU PCI GigabitEthernet 4.1 or later
- FUJITSU 10Gigabit Ethernet 1.0 or later
- FUJITSU ULTRA LVD SCSI Host Bus Adapter Driver 3.0 or later
Installation of these drivers allows the miniroot of Solaris image to recognize the following adapter cards installed in the SPARC Enterpriseserver during network installation.
- Dual Gigabit Ethernet card (SE0X7GD1X, SE0X7GD2X)
- 3 -
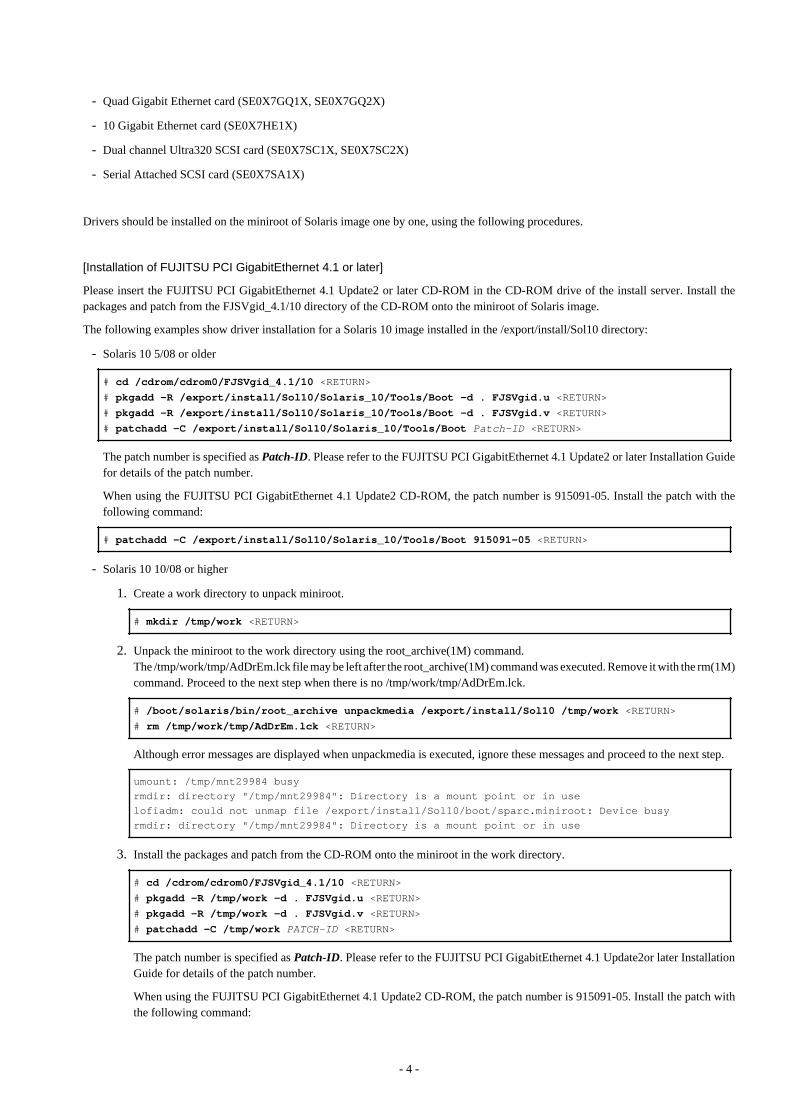
- Quad Gigabit Ethernet card (SE0X7GQ1X, SE0X7GQ2X)
- 10 Gigabit Ethernet card (SE0X7HE1X)
- Dual channel Ultra320 SCSI card (SE0X7SC1X, SE0X7SC2X)
- Serial Attached SCSI card (SE0X7SA1X)
Drivers should be installed on the miniroot of Solaris image one by one, using the following procedures.
[Installation of FUJITSU PCI GigabitEthernet 4.1 or later]
Please insert the FUJITSU PCI GigabitEthernet 4.1 Update2 or later CD-ROM in the CD-ROM drive of the install server. Install thepackages and patch from the FJSVgid_4.1/10 directory of the CD-ROM onto the miniroot of Solaris image.
The following examples show driver installation for a Solaris 10 image installed in the /export/install/Sol10 directory:
- Solaris 10 5/08 or older
# cd /cdrom/cdrom0/FJSVgid_4.1/10 <RETURN>
# pkgadd -R /export/install/Sol10/Solaris_10/Tools/Boot -d . FJSVgid.u <RETURN>
# pkgadd -R /export/install/Sol10/Solaris_10/Tools/Boot -d . FJSVgid.v <RETURN>
# patchadd -C /export/install/Sol10/Solaris_10/Tools/Boot Patch-ID <RETURN>
The patch number is specified as Patch-ID. Please refer to the FUJITSU PCI GigabitEthernet 4.1 Update2 or later Installation Guidefor details of the patch number.
When using the FUJITSU PCI GigabitEthernet 4.1 Update2 CD-ROM, the patch number is 915091-05. Install the patch with thefollowing command:
# patchadd -C /export/install/Sol10/Solaris_10/Tools/Boot 915091-05 <RETURN>
- Solaris 10 10/08 or higher
1. Create a work directory to unpack miniroot.
# mkdir /tmp/work <RETURN>
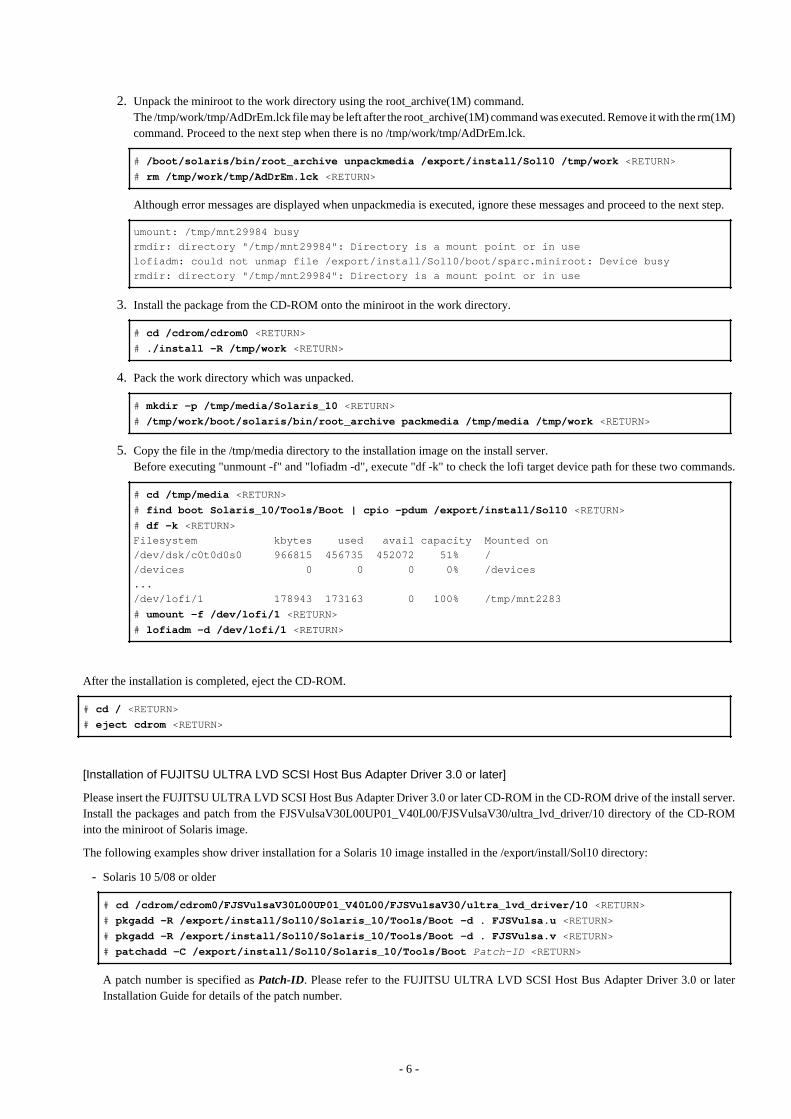
2. Unpack the miniroot to the work directory using the root_archive(1M) command.The /tmp/work/tmp/AdDrEm.lck file may be left after the root_archive(1M) command was executed. Remove it with the rm(1M)command. Proceed to the next step when there is no /tmp/work/tmp/AdDrEm.lck.
# /boot/solaris/bin/root_archive unpackmedia /export/install/Sol10 /tmp/work <RETURN>
# rm /tmp/work/tmp/AdDrEm.lck <RETURN>
Although error messages are displayed when unpackmedia is executed, ignore these messages and proceed to the next step.
umount: /tmp/mnt29984 busy
rmdir: directory "/tmp/mnt29984": Directory is a mount point or in use
lofiadm: could not unmap file /export/install/Sol10/boot/sparc.miniroot: Device busy
rmdir: directory "/tmp/mnt29984": Directory is a mount point or in use
3. Install the packages and patch from the CD-ROM onto the miniroot in the work directory.
# cd /cdrom/cdrom0/FJSVgid_4.1/10 <RETURN>
# pkgadd -R /tmp/work -d . FJSVgid.u <RETURN>
# pkgadd -R /tmp/work -d . FJSVgid.v <RETURN>
# patchadd -C /tmp/work PATCH-ID <RETURN>
The patch number is specified as Patch-ID. Please refer to the FUJITSU PCI GigabitEthernet 4.1 Update2or later InstallationGuide for details of the patch number.
When using the FUJITSU PCI GigabitEthernet 4.1 Update2 CD-ROM, the patch number is 915091-05. Install the patch withthe following command:
- 4 -

# patchadd -C /tmp/work 915091-05 <RETURN>
4. Pack the work directory which was unpacked.
# mkdir -p /tmp/media/Solaris_10 <RETURN>
# /tmp/work/boot/solaris/bin/root_archive packmedia /tmp/media /tmp/work <RETURN>
5. Copy the file in the /tmp/media directory to the installation image on the install server.Before executing "unmount -f" and "lofiadm -d", execute "df -k" to check the lofi target device path for these two commands.
# cd /tmp/media <RETURN>
# find boot Solaris_10/Tools/Boot | cpio -pdum /export/install/Sol10 <RETURN>
# df -k <RETURN>
Filesystem kbytes used avail capacity Mounted on
/dev/dsk/c0t0d0s0 966815 456735 452072 51% /
/devices 0 0 0 0% /devices
...
/dev/lofi/1 178943 173163 0 100% /tmp/mnt2283
# umount -f /dev/lofi/1 <RETURN>
# lofiadm -d /dev/lofi/1 <RETURN>
After the installation is completed, eject the CD-ROM.
# cd / <RETURN>
# eject cdrom <RETURN>
Note
- The package names are displayed as "FJSVgid.2" and "FJSVgid.3" when the drivers are installed. This is not a problem.
- When using the SPARC Enterprise Software DVD 2011.11A or later DVD-ROM, Install the packages and patch from the DRIVER/FJSVgid/FJSVgid_4.1/10 directory of the DVD-ROM onto the miniroot of Solaris image.
# cd /cdrom/cdrom0/DRIVER/FJSVgid/FJSVgid_4.1/10 <RETURN>
[Installation of FUJITSU 10Gigabit Ethernet 1.0 or later]
Please insert the FUJITSU 10Gigabit Ethernet 1.0 or later CD-ROM in the CD-ROM drive of the install server. Install the packages andpatch into the miniroot of Solaris image.
The following examples show driver installation for a Solaris 10 image installed in the /export/install/Sol10 directory:
- Solaris 10 5/08 or older
# cd /cdrom/cdrom0 <RETURN>
# ./install -R /export/install/Sol10/Solaris_10/Tools/Boot <RETURN>
- Solaris 10 10/08 or higher
1. Create a work directory to unpack miniroot.
# mkdir /tmp/work <RETURN>
- 5 -
2. Unpack the miniroot to the work directory using the root_archive(1M) command.The /tmp/work/tmp/AdDrEm.lck file may be left after the root_archive(1M) command was executed. Remove it with the rm(1M)command. Proceed to the next step when there is no /tmp/work/tmp/AdDrEm.lck.
# /boot/solaris/bin/root_archive unpackmedia /export/install/Sol10 /tmp/work <RETURN>
# rm /tmp/work/tmp/AdDrEm.lck <RETURN>
Although error messages are displayed when unpackmedia is executed, ignore these messages and proceed to the next step.
umount: /tmp/mnt29984 busy
rmdir: directory "/tmp/mnt29984": Directory is a mount point or in use
lofiadm: could not unmap file /export/install/Sol10/boot/sparc.miniroot: Device busy
rmdir: directory "/tmp/mnt29984": Directory is a mount point or in use
3. Install the package from the CD-ROM onto the miniroot in the work directory.
# cd /cdrom/cdrom0 <RETURN>
# ./install -R /tmp/work <RETURN>
4. Pack the work directory which was unpacked.
# mkdir -p /tmp/media/Solaris_10 <RETURN>
# /tmp/work/boot/solaris/bin/root_archive packmedia /tmp/media /tmp/work <RETURN>
5. Copy the file in the /tmp/media directory to the installation image on the install server.Before executing "unmount -f" and "lofiadm -d", execute "df -k" to check the lofi target device path for these two commands.
# cd /tmp/media <RETURN>
# find boot Solaris_10/Tools/Boot | cpio -pdum /export/install/Sol10 <RETURN>
# df -k <RETURN>
Filesystem kbytes used avail capacity Mounted on
/dev/dsk/c0t0d0s0 966815 456735 452072 51% /
/devices 0 0 0 0% /devices
...
/dev/lofi/1 178943 173163 0 100% /tmp/mnt2283
# umount -f /dev/lofi/1 <RETURN>
# lofiadm -d /dev/lofi/1 <RETURN>
After the installation is completed, eject the CD-ROM.
# cd / <RETURN>
# eject cdrom <RETURN>
[Installation of FUJITSU ULTRA LVD SCSI Host Bus Adapter Driver 3.0 or later]
Please insert the FUJITSU ULTRA LVD SCSI Host Bus Adapter Driver 3.0 or later CD-ROM in the CD-ROM drive of the install server.Install the packages and patch from the FJSVulsaV30L00UP01_V40L00/FJSVulsaV30/ultra_lvd_driver/10 directory of the CD-ROMinto the miniroot of Solaris image.
The following examples show driver installation for a Solaris 10 image installed in the /export/install/Sol10 directory:
- Solaris 10 5/08 or older
# cd /cdrom/cdrom0/FJSVulsaV30L00UP01_V40L00/FJSVulsaV30/ultra_lvd_driver/10 <RETURN>
# pkgadd -R /export/install/Sol10/Solaris_10/Tools/Boot -d . FJSVulsa.u <RETURN>
# pkgadd -R /export/install/Sol10/Solaris_10/Tools/Boot -d . FJSVulsa.v <RETURN>
# patchadd -C /export/install/Sol10/Solaris_10/Tools/Boot Patch-ID <RETURN>
A patch number is specified as Patch-ID. Please refer to the FUJITSU ULTRA LVD SCSI Host Bus Adapter Driver 3.0 or laterInstallation Guide for details of the patch number.
- 6 -
When using the FUJITSU ULTRA LVD SCSI Host Bus Adapter Driver 3.0 CD-ROM, the patch number is 915098-03. Install thepatch with the following command.
# patchadd -C /export/install/Sol10/Solaris_10/Tools/Boot 915098-03 <RETURN>
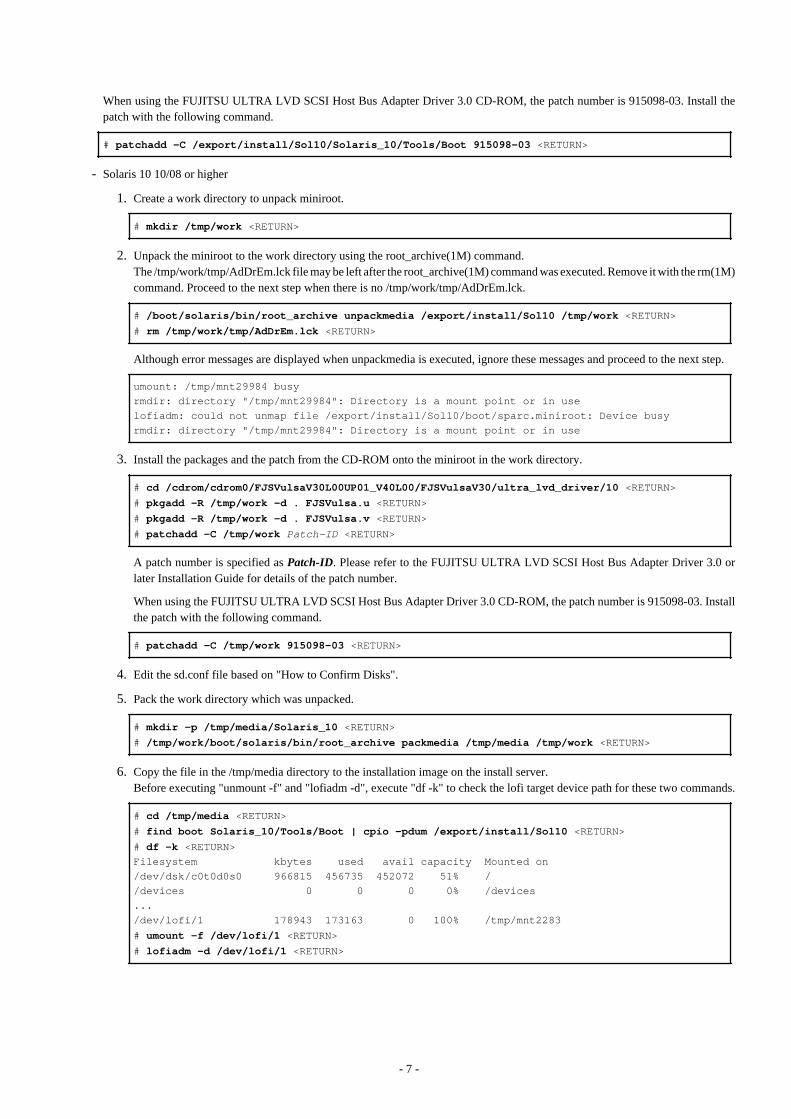
- Solaris 10 10/08 or higher
1. Create a work directory to unpack miniroot.
# mkdir /tmp/work <RETURN>
2. Unpack the miniroot to the work directory using the root_archive(1M) command.The /tmp/work/tmp/AdDrEm.lck file may be left after the root_archive(1M) command was executed. Remove it with the rm(1M)command. Proceed to the next step when there is no /tmp/work/tmp/AdDrEm.lck.
# /boot/solaris/bin/root_archive unpackmedia /export/install/Sol10 /tmp/work <RETURN>
# rm /tmp/work/tmp/AdDrEm.lck <RETURN>
Although error messages are displayed when unpackmedia is executed, ignore these messages and proceed to the next step.
umount: /tmp/mnt29984 busy
rmdir: directory "/tmp/mnt29984": Directory is a mount point or in use
lofiadm: could not unmap file /export/install/Sol10/boot/sparc.miniroot: Device busy
rmdir: directory "/tmp/mnt29984": Directory is a mount point or in use
3. Install the packages and the patch from the CD-ROM onto the miniroot in the work directory.
# cd /cdrom/cdrom0/FJSVulsaV30L00UP01_V40L00/FJSVulsaV30/ultra_lvd_driver/10 <RETURN>
# pkgadd -R /tmp/work -d . FJSVulsa.u <RETURN>
# pkgadd -R /tmp/work -d . FJSVulsa.v <RETURN>
# patchadd -C /tmp/work Patch-ID <RETURN>
A patch number is specified as Patch-ID. Please refer to the FUJITSU ULTRA LVD SCSI Host Bus Adapter Driver 3.0 orlater Installation Guide for details of the patch number.
When using the FUJITSU ULTRA LVD SCSI Host Bus Adapter Driver 3.0 CD-ROM, the patch number is 915098-03. Installthe patch with the following command.
# patchadd -C /tmp/work 915098-03 <RETURN>
4. Edit the sd.conf file based on "How to Confirm Disks".
5. Pack the work directory which was unpacked.
# mkdir -p /tmp/media/Solaris_10 <RETURN>
# /tmp/work/boot/solaris/bin/root_archive packmedia /tmp/media /tmp/work <RETURN>
6. Copy the file in the /tmp/media directory to the installation image on the install server.Before executing "unmount -f" and "lofiadm -d", execute "df -k" to check the lofi target device path for these two commands.
# cd /tmp/media <RETURN>
# find boot Solaris_10/Tools/Boot | cpio -pdum /export/install/Sol10 <RETURN>
# df -k <RETURN>
Filesystem kbytes used avail capacity Mounted on
/dev/dsk/c0t0d0s0 966815 456735 452072 51% /
/devices 0 0 0 0% /devices
...
/dev/lofi/1 178943 173163 0 100% /tmp/mnt2283
# umount -f /dev/lofi/1 <RETURN>
# lofiadm -d /dev/lofi/1 <RETURN>
- 7 -

- How to Confirm Disks
Information about connected devices can be confirmed using the "probe-scsi-all" OBP command, as follows:
{0} ok probe-scsi-all <RETURN>
/pci@7,700000/FJSV,eulsa@0
MPT Version : 01.05 , Firmware Version : 01.24.00.00
SAS World Wide ID(HBA:Port0) is 0x500605b0003cf854
Target 0x1c
Unit 0x0 Disk FUJITSU E2000 0000 2097152 Blocks, 1073 MB
Unit 0x1 Disk FUJITSU E2000 0000 2097152 Blocks, 1073 MB
...
Modify the target driver's configuration file (sd.conf) to add the logical unit (LU) of the disk array device and the device target ID forthe boot disk.
Example: To recognize target ID 28 and logical unit number 0:
- Solaris 10 5/08 or older
# vi /export/install/Sol10/Solaris_10/Tools/Boot/kernel/drv/sd.conf <RETURN>
- Solaris 10 10/08 or higher
Edit the sd.conf file in the directory where the miniroot was unpacked (/tmp/work).
# vi /tmp/work/kernel/drv/sd.conf <RETURN>
#
# Copyright (c) 1992, by Sun Microsystems, Inc.
#ident "@(#)sd.conf 1.8 93/05/03 SMI"
name="sd" class="scsi"
target=0 lun=0;
name="sd" class="scsi"
target=1 lun=0;
...
name="sd" class="scsi"
target=28 lun=0;
...
After the installation is completed, eject the CD-ROM.
# cd / <RETURN>
# eject cdrom <RETURN>
Note
- The package names are displayed as "FJSVulsa.2" and "FJSVulsa.3" when the drivers are installed. This is not a problem.
- When using the SPARC Enterprise Software DVD 2011.11A or later DVD-ROM, Install the packages and patch from the DRIVER/FJSVulsa/FJSVulsaV30/ultra_lvd_driver/10 directory of the DVD-ROM onto the miniroot of Solaris image.
# cd /cdrom/cdrom0/DRIVER/FJSVulsa/FJSVulsaV30/ultra_lvd_driver/10 <RETURN>
- Please confirm whether the NFS service is started if the install server is running the Solaris 10.
Confirm that the nfsd daemon is working.
- 8 -
# svcs -l svc:/network/nfs/server:default <RETURN>
When the nfsd daemon is not running, start the daemon.
# svcadm enable svc:/network/nfs/server <RETURN>
3.1.2 Solaris Custom JumpStart SetupThe previous chapter described the installation of Fujitsu drivers onto the miniroot of Solaris image to allow recognition of Fujitsu adaptercards during network boot. Solaris Custom JumpStart must also be setup to install the Fujitsu drivers during network installation.Comprehensive requirements and setup instructions for Solaris Custom JumpStart, please refer to the "Solaris 10 Installation Guide:Custom JumpStart and Advanced Installations" from the Oracle Documentation site.
Setting up Solaris Custom JumpStart as described below allows for the automatic installation of the following drivers during Solarisinstallation, before the system is rebooted.
- FUJITSU PCI GigabitEthernet 4.1 or later
- FUJITSU 10Gigabit Ethernet 1.0 or later
- FUJITSU ULTRA LVD SCSI Host Bus Adapter Driver 3.0 or later
Installation of these drivers allows the system to recognize the following adapter cards installed in the SPARC Enterprise server afternetwork installation.
- Dual Gigabit Ethernet card (SE0X7GD1X, SE0X7GD2X)
- Quad Gigabit Ethernet card (SE0X7GQ1X, SE0X7GQ2X)
- 10 Gigabit Ethernet card (SE0X7HE1X)
- Dual channel Ultra320 SCSI card (SE0X7SC1X, SE0X7SC2X)
- Serial Attached SCSI card (SE0X7SA1X)
This section provides instructions on how to setup Solaris Custom JumpStart on an install server for automatic driver installation.
The following examples show Solaris Custom JumpStart setup in the "/jumpstart" directory.
3.1.2.1 Making the Solaris Custom JumpStart Directory1. Making the Solaris Custom JumpStart Directory
Make the JumpStart directory on the install server.
# mkdir /jumpstart <RETURN>
Share the Solaris Custom JumpStart directory.
Please add the following line to the /etc/dfs/dfstab file on the install server.
share -F nfs -o ro,anon=0 /jumpstart
Please execute the following command on the install server.
# shareall <RETURN>
- 9 -

2. Copy driver packages, patches, and installation files
Copy the packages, patches, and installation files for each Fujitsu driver to the Solaris Custom JumpStart directory on the installserver.
[FUJITSU PCI GigabitEthernet 4.1 or later]
Make the fjgi directory in the Solaris Custom JumpStart directory.
# mkdir /jumpstart/fjgi <RETURN>
Insert the FUJITSU PCI GigabitEthernet 4.1 Update2 or later CD-ROM in the CD-ROM drive of the install server. Execute thefollowing commands to copy the installation, packages and patch files to the fjgi directory.
# cp -p /cdrom/cdrom0/install /jumpstart/fjgi/. <RETURN>
# cp -p /cdrom/cdrom0/admin /jumpstart/fjgi/. <RETURN>
# cp -pr /cdrom/cdrom0/FJSVgid_4.1/10/* /jumpstart/fjgi/. <RETURN>
After the copy is completed, eject the CD-ROM.
# cd / <RETURN>
# eject cdrom <RETURN>
Note
- When using the SPARC Enterprise Software DVD 2011.11A or later DVD-ROM, Execute the following commands to copythe installation, packages and patch files to the fjgi directory.
# cp -p /cdrom/cdrom0/DRIVER/FJSVgid/install /jumpstart/fjgi/. <RETURN>
# cp -p /cdrom/cdrom0/DRIVER/FJSVgid/admin /jumpstart/fjgi/. <RETURN>
# cp -pr /cdrom/cdrom0/DRIVER/FJSVgid/FJSVgid_4.1/10/* /jumpstart/fjgi/. <RETURN>
[FUJITSU 10Gigabit Ethernet 1.0 or later]
Make the fjxge directory in the Solaris Custom JumpStart directory.
# mkdir /jumpstart/fjxge <RETURN>
Insert the FUJITSU 10Gigabit Ethernet 1.0 or later CD-ROM in the CD-ROM drive of the install server. Execute the followingcommands to copy the installation and packages files to the fjxge directory.
# cp -pr /cdrom/cdrom0/* /jumpstart/fjxge/. <RETURN>
After the copy is completed, eject the CD-ROM.
# cd / <RETURN>
# eject cdrom <RETURN>
[FUJITSU ULTRA LVD SCSI Host Bus Adapter Driver 3.0 or later]
Make the fjulsa directory in the Solaris Custom JumpStart directory.
- 10 -
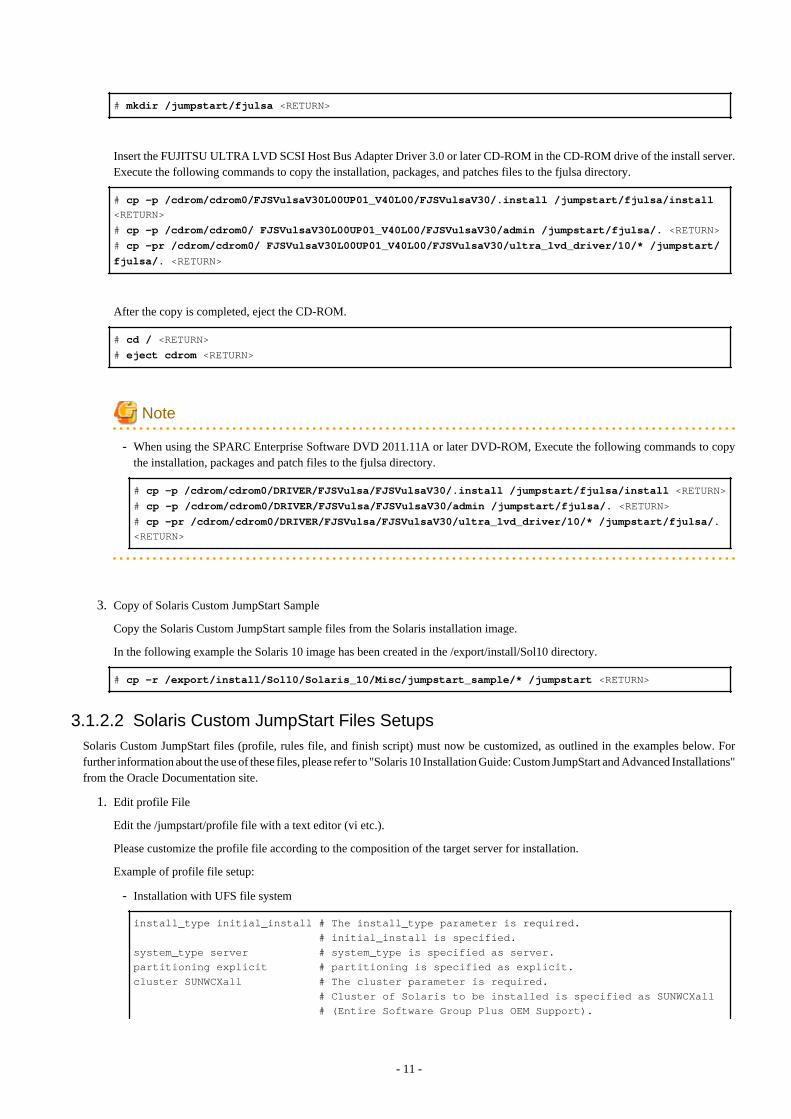
# mkdir /jumpstart/fjulsa <RETURN>
Insert the FUJITSU ULTRA LVD SCSI Host Bus Adapter Driver 3.0 or later CD-ROM in the CD-ROM drive of the install server.Execute the following commands to copy the installation, packages, and patches files to the fjulsa directory.
# cp -p /cdrom/cdrom0/FJSVulsaV30L00UP01_V40L00/FJSVulsaV30/.install /jumpstart/fjulsa/install
<RETURN>
# cp -p /cdrom/cdrom0/ FJSVulsaV30L00UP01_V40L00/FJSVulsaV30/admin /jumpstart/fjulsa/. <RETURN>
# cp -pr /cdrom/cdrom0/ FJSVulsaV30L00UP01_V40L00/FJSVulsaV30/ultra_lvd_driver/10/* /jumpstart/
fjulsa/. <RETURN>
After the copy is completed, eject the CD-ROM.
# cd / <RETURN>
# eject cdrom <RETURN>
Note
- When using the SPARC Enterprise Software DVD 2011.11A or later DVD-ROM, Execute the following commands to copythe installation, packages and patch files to the fjulsa directory.
# cp -p /cdrom/cdrom0/DRIVER/FJSVulsa/FJSVulsaV30/.install /jumpstart/fjulsa/install <RETURN>
# cp -p /cdrom/cdrom0/DRIVER/FJSVulsa/FJSVulsaV30/admin /jumpstart/fjulsa/. <RETURN>
# cp -pr /cdrom/cdrom0/DRIVER/FJSVulsa/FJSVulsaV30/ultra_lvd_driver/10/* /jumpstart/fjulsa/.
<RETURN>
3. Copy of Solaris Custom JumpStart Sample
Copy the Solaris Custom JumpStart sample files from the Solaris installation image.
In the following example the Solaris 10 image has been created in the /export/install/Sol10 directory.
# cp -r /export/install/Sol10/Solaris_10/Misc/jumpstart_sample/* /jumpstart <RETURN>
3.1.2.2 Solaris Custom JumpStart Files SetupsSolaris Custom JumpStart files (profile, rules file, and finish script) must now be customized, as outlined in the examples below. Forfurther information about the use of these files, please refer to "Solaris 10 Installation Guide: Custom JumpStart and Advanced Installations"from the Oracle Documentation site.
1. Edit profile File
Edit the /jumpstart/profile file with a text editor (vi etc.).
Please customize the profile file according to the composition of the target server for installation.
Example of profile file setup:
- Installation with UFS file system
install_type initial_install # The install_type parameter is required.
# initial_install is specified.
system_type server # system_type is specified as server.
partitioning explicit # partitioning is specified as explicit.
cluster SUNWCXall # The cluster parameter is required.
# Cluster of Solaris to be installed is specified as SUNWCXall
# (Entire Software Group Plus OEM Support).
- 11 -

filesys c7t0d0s1 4096 swap # The swap filesystem is allocated to c7t0d0s1 with 4096MB.
filesys c7t0d0s0 free / # The disk area remainder is allocated to c7t0d0s0.
- Installation with ZFS file system
install_type initial_install # The install_type parameter is required.
# initial_install is specified.
system_type server # system_type is specified as server.
partitioning explicit # partitioning is specified as explicit.
cluster SUNWCXall # The cluster parameter is required.
# Cluster of Solaris to be installed is specified as SUNWCXall
# (Entire Software Group Plus OEM Support).
pool newpool auto auto auto c7t0d0s0 # A newpool is created and automatically sized to
c7t0d0s0.
# Swap and dump are automatically assigned and sized in the newpool
bootenv installbe bename sxce_xx # Create a boot file system named
# sxce_xx(newpool/ROOT/sxce_xx)
2. Edit Finish Script File
Create and edit the finish script file with a text editor (vi etc.). Please make the finish script in the /jumpstart directory with anarbitrary file name.
Example 1 - Finish Script Setup for SPARC Enterprise Txxxx or SPARC T3:
When the installation target server is any SPARC Enterprise Txxxx or SPARC T3, specify "sun4v" after the "-p" argument of theinstall command for the fjgi driver and the install commands for the fjulsa driver.
In this example, the finish script name is "sun4v_finish".
#!/bin/sh
BASE=/a
JUMPSTART=/a/mnt
mount -F nfs install-server-IP-address:/jumpstart ${JUMPSTART}
${JUMPSTART}/fjgi/install -R ${BASE} -d ${JUMPSTART}/fjgi -p sun4v
${JUMPSTART}/fjxge/install -R ${BASE}
${JUMPSTART}/fjulsa/install -R ${BASE} -d ${JUMPSTART}/fjulsa -p sun4v
umount ${JUMPSTART}
exit 0
Example 2 - Finish Script Setup for SPARC Enterprise Mxxxx:
When the installation target server is any SPARC Enterprise Mxxxx, specify "sun4u" after the "-p" argument of the install commandfor the fjgi driver and the install commands for the fjulsa driver.
In this example, the finish script name is "sun4u_finish".
#!/bin/sh
BASE=/a
JUMPSTART=/a/mnt
mount -F nfs install-server-IP-address:/jumpstart ${JUMPSTART}
${JUMPSTART}/fjgi/install -R ${BASE} -d ${JUMPSTART}/fjgi -p sun4u
${JUMPSTART}/fjxge/install -R ${BASE}
${JUMPSTART}/fjulsa/install -R ${BASE} -d ${JUMPSTART}/fjulsa -p sun4u
- 12 -

umount ${JUMPSTART}
exit 0
Example 3 - Finish Script Setup for mixed SPARC Enterprise Txxxx, Mxxxx and SPARC T-3:
When one finish script is used for both SPARC Enterprise Txxxx, Mxxxx and SPARC T-3 target servers, make the finish script asfollows.
In this example, the finish script name is "arch_finish".
#!/bin/sh
BASE=/a
JUMPSTART=/a/mnt
ARCH=`uname -m`
mount -F nfs install-server-IP-address:/jumpstart ${JUMPSTART}
${JUMPSTART}/fjgi/install -R ${BASE} -d ${JUMPSTART}/fjgi -p ${ARCH}
${JUMPSTART}/fjxge/install -R ${BASE}
${JUMPSTART}/fjulsa/install -R ${BASE} -d ${JUMPSTART}/fjulsa -p ${ARCH}
umount ${JUMPSTART}
exit 0
Example 4- Finish Script Setup for sd.conf Modification:
When the target driver configuration file (sd.conf) requires modification, as described in "3.1.1.2 Install Server Setup", make thefinish script as follows.
In this example, the finish script name is "conf_finish".
#!/bin/sh
BASE=/a
JUMPSTART=/a/mnt
mount -F nfs install-server-IP-address:/jumpstart ${JUMPSTART}
${JUMPSTART}/fjgi/install -R ${BASE} -d ${JUMPSTART}/fjgi -p sun4u
${JUMPSTART}/fjxge/install -R ${BASE}
${JUMPSTART}/fjulsa/install -R ${BASE} -d ${JUMPSTART}/fjulsa -p sun4u
## Copy sd.conf
if [ -f /kernel/drv/sd.conf ]
then
echo "copying sd.conf "
cp /kernel/drv/sd.conf ${BASE}/kernel/drv/sd.conf
COPY_STATUS="$?"
if [ "$?" != "0" ]
then
echo "ERROR: sd.conf copy failed."
fi
else
echo "NOTICE: /kernel/drv/sd.conf does not exist."
fi
umount ${JUMPSTART}
exit 0
- 13 -

When a Solaris Custom JumpStart environment already exists, please modify the above-mentioned content according to yourenvironment and add it to the existing finish script.
- For example when a SAN Boot environment is constructed based on the "SPARC Enterprise - ETERNUS SAN BootEnvironment Build Guide".
3. Edit Rules File
Edit the /jumpstart/rules file with a text editor (vi etc.). In the rules file, specify the profile and the finish script for the SPARCEnterprise installation target server.
Some examples are included in the original rules file, but they are unnecessary. Please comment out all of the examples.
Example 1 - Rules File Setup for Each SPARC Enterprise:
Add the following to the end of the rules file.
In this example, the "sun4v_finish" script is used for SPARC Enterprise Txxxx or SPARC T3 and the "sun4u_finish" script is usedfor SPARC Enterprise Mxxxx.
# rule keywords and rule values begin script profile finish_script
# ----------------------------- ------------ ------- -------------
karch sun4v - profile sun4v_finish
karch sun4u - profile sun4u_finish
Example 2 - Rules File Setup by Hostname:
Add the following to the end of the rules file.
In this example, the same finish script will be used for all SPARC Enterprise.
hostname <installed-target-server-host-name> - profile finish
4. Checking and Validating Rules File
Execute the check script in the /jumpstart directory to make the rules file effective.
- Solaris 10 5/08 or older
When the Solaris 10 image has been copied to the /export/install/Sol10 directory, the check script is executed as follows.
# cd /jumpstart <RETURN>
# ./check -p /export/install/Sol10 -r rules <RETURN>
- Solaris 10 10/08 or higher
When the unpacked directory has been packed into the /tmp/media, the check script is executed as follows.
# cd /jumpstart <RETURN>
# ./check -p /tmp/media -r rules <RETURN>
If the check script displays the following error message, retry the check script after executing the following procedure.
Error Message:
ERROR: /tmp/media is not a valid Solaris 2.x CD image
Procedure after error message:
# cd /tmp/media/Solaris_10/Tools/Boot <RETURN>
# bzcat lu.cpio.bz2 | cpio -idum <RETURN>
- 14 -

# ls usr/sbin/install.d/chkprobe <RETURN>
usr/sbin/install.d/chkprobe
If no error is detected by the check script, the rules.ok file will be made in the /jumpstart directory.
3.1.2.3 Adding to the Install Server1. Register the install client IP address and MAC address to the install server.
- To register the install client IP address
Edit /etc/hosts with a text editor.
The following example shows an install client IP address "192.168.1.1".
192.168.1.1 hostname
- To register the install client MAC address
Edit /etc/ethers with a text editor.
The following example shows an install client MAC address "0:80:17:28:1:f8".
0:80:17:28:1:f8 hostname
2. Add the install client to the install server.
Specify the Solaris Custom JumpStart directory with the "-c" option of the add_install_client command.
When the Solaris 10 image has been copied to the /export/install/Sol10 directory, execute the command as follows.
The settings differ depending on the installation target server.
Setting example for SPARC Enterprise Txxxx or SPARC T-3:
# /export/install/Sol10/Solaris10/Tools/add_install_client -c install-server-hostname:/
jumpstart install-client-server-hostname sun4v <RETURN>
Setting example for SPARC Enterprise Mxxxx:
# /export/install/Sol10/Solaris10/Tools/add_install_client -c install-server-hostname:/
jumpstart install-client-server-hostname sun4u <RETURN>
All necessary settings for installation over the network must be completed on the install server beforehand. Please confirm the"/etc/inet/hosts", "/etc/ethers" setting. Please refer to the following manuals from the Oracle Documentation site for details.
- Solaris 10 Installation Guide: Network-Based Installations
- Solaris 10 Installation Guide: Custom JumpStart and Advanced Installations
- System Administration Guide: IP Services
3.1.3 Solaris InstallationExecute the following command from OBP of the installation target server.
ok boot net - install <RETURN>
Afterwards, please proceed with the installation according to the instruction on the screen.
- 15 -

Please refer to the FUJITSU PCI GigabitEthernet 4.1 or later, or Fujitsu 10Gigabit Ethernet 1.0 or later manuals when installing over thenetwork using the following cards.
- Dual Gigabit Ethernet card (SE0X7GD1X, SE0X7GD2X)
- Quad Gigabit Ethernet card (SE0X7GQ1X, SE0X7GQ2X)
- 10 Gigabit Ethernet card (SE0X7HE1X)
When the Fujitsu 10Gigabit Ethernet 1.0 or later is used for network installation, determine the 10 Gigabit Ethernet card interface to usefor network boot with the following procedure.
1. From the ok prompt on the client system, search the device path for the 10 Gigabit Ethernet card with the show-nets command.
ok show-nets <RETURN>
example:
ok show-nets <RETURN>
a) /pci@0,600000/FJSV,e1xsa@0
b) /pci@1,700000/FJSV,e1xsa@0
q) NO SELECTION
Enter Selection, q to quit:
2. From the ok prompt, boot the client system using the desired 10 Gigabit Ethernet card.
ok boot /pci@0,600000/FJSV,e1xsa@0 - install <RETURN>
3.2 Construction Method for Solaris 11
3.2.1 Creating Solaris ImageTo perform network installation, Solaris image must be created. Comprehensive requirements and creating Solaris image are available inthe "Creating a Custom Oracle Solaris 11 Installation Image" from the Oracle Documentation site.
Using the distribution constructor as described, the following drivers is added to Solaris image.
- FUJITSU PCI GigabitEthernet 5.0 or later
- FUJITSU ULTRA LVD SCSI Host Bus Adapter Driver 4.0 or later
Adding these drivers allows the miniroot of Solaris image and the system to recognize the following adapter cards installed in the SPARCEnterprise server during and after network installation.
- Dual Gigabit Ethernet card (SE0X7GD1X, SE0X7GD2X)
- Quad Gigabit Ethernet card (SE0X7GQ1X, SE0X7GQ2X)
- Dual channel Ultra320 SCSI card (SE0X7SC1X, SE0X7SC2X)
- Serial Attached SCSI card (SE0X7SA1X)
This section provides instructions on how to create Solaris image on an install server.
3.2.1.1 Distribution Constructor InstallationInstall the distribution constructor package into an install server.
# pkg install distribution-constructor <RETURN>
- 16 -

3.2.1.2 Creating the Finalizer ScriptThis section provides instructions how to create a finalizer script to add driver packages during creating Solaris image on an install server.
The following example shows how to create a finalizer script to the /tmp/work directory.
1. Making a work directory
Make a work directory on the install server.
# mkdir /tmp/work <RETURN>
2. Copying driver packages
Copy driver packages to a work directory.
[FUJITSU PCI GigabitEthernet 5.0 or later]
Make the fjgi directory in a work directory.
# mkdir /tmp/work/fjgi <RETURN>
Insert the FUJITSU PCI GigabitEthernet 5.0 or later CD-ROM in the CD-ROM drive of the install server. Execute the followingcommand to copy packages to the fjgi directory.
# cp -pr /cdrom/cdrom0/FJSVgid_5.0/11/* /tmp/work/fjgi/. <RETURN>
After the copy is completed, eject the CD-ROM.
# cd / <RETURN>
# eject cdrom <RETURN>
Note
- When using the SPARC Enterprise Software DVD 2011.11A or later DVD-ROM, Execute the following commands to copypackages to the fjgi directory.
# cp -pr /cdrom/cdrom0/DRIVER/FJSVgid/FJSVgid_5.0/11/* /tmp/work/fjgi/. <RETURN>
[FUJITSU ULTRA LVD SCSI Host Bus Adapter Driver 4.0 or later]
Make the fjulsa directory in a work directory.
# mkdir /tmp/work/fjulsa <RETURN>
Insert the FUJITSU ULTRA LVD SCSI Host Bus Adapter Driver 4.0 or later CD-ROM in the CD-ROM drive of the install server.Execute the following command to copy packages to the fjulsa directory.
# cp -pr /cdrom/cdrom0/FJSVulsaV30L00UP01_V40L00/FJSVulsaV4.0/ultra_lvd_driver/11/* /tmp/work/
fjulsa/. <RETURN>
After the copy is completed, eject the CD-ROM.
- 17 -
# cd / <RETURN>
# eject cdrom <RETURN>
Note
- When using the SPARC Enterprise Software DVD 2011.11A or later DVD-ROM, Execute the following commands to copypackages to the fjulsa directory.
# cp -pr /cdrom/cdrom0/DRIVER/FJSVulsa/FJSVulsaV4.0/ultra_lvd_driver/11/* /tmp/work/fjulsa/.
<RETURN>
3. Creating a finalizer script
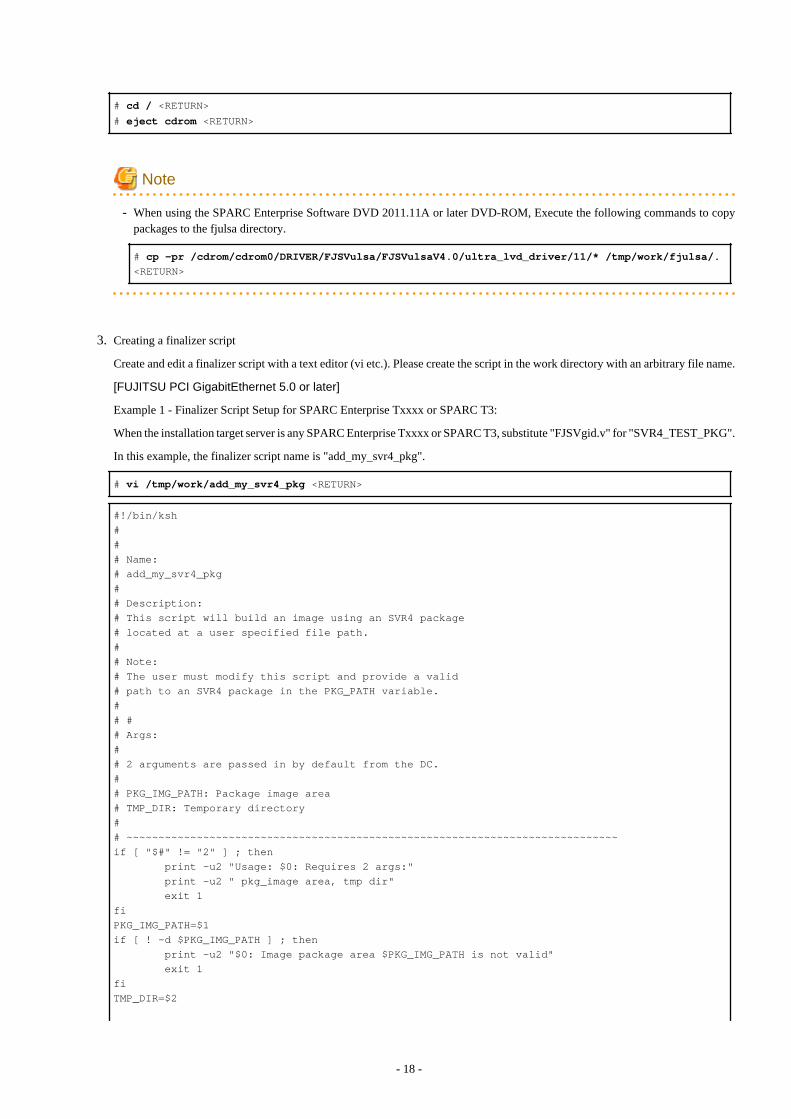
Create and edit a finalizer script with a text editor (vi etc.). Please create the script in the work directory with an arbitrary file name.
[FUJITSU PCI GigabitEthernet 5.0 or later]
Example 1 - Finalizer Script Setup for SPARC Enterprise Txxxx or SPARC T3:
When the installation target server is any SPARC Enterprise Txxxx or SPARC T3, substitute "FJSVgid.v" for "SVR4_TEST_PKG".
In this example, the finalizer script name is "add_my_svr4_pkg".
# vi /tmp/work/add_my_svr4_pkg <RETURN>
#!/bin/ksh
#
#
# Name:
# add_my_svr4_pkg
#
# Description:
# This script will build an image using an SVR4 package
# located at a user specified file path.
#
# Note:
# The user must modify this script and provide a valid
# path to an SVR4 package in the PKG_PATH variable.
#
# #
# Args:
#
# 2 arguments are passed in by default from the DC.
#
# PKG_IMG_PATH: Package image area
# TMP_DIR: Temporary directory
#
# ~~~~~~~~~~~~~~~~~~~~~~~~~~~~~~~~~~~~~~~~~~~~~~~~~~~~~~~~~~~~~~~~~~~~~~~~~~~~~
if [ "$#" != "2" ] ; then
print -u2 "Usage: $0: Requires 2 args:"
print -u2 " pkg_image area, tmp dir"
exit 1
fi
PKG_IMG_PATH=$1
if [ ! -d $PKG_IMG_PATH ] ; then
print -u2 "$0: Image package area $PKG_IMG_PATH is not valid"
exit 1
fi
TMP_DIR=$2
- 18 -

#
# Install an SVR4 packages into the package image area
#
#create an admin file for non-interactive pkgadd!C
ADMIN_FILE=${TMP_DIR}/admin.$$
cat << \ADMIN_EOF > $ADMIN_FILE
mail=
instance=unique
partial=nocheck
runlevel=nocheck
idepend=nocheck
rdepend=nocheck
space=nocheck
setuid=nocheck
conflict=nocheck
action=nocheck
networktimeout=60
networkretries=3
authentication=quit
keystore=/var/sadm/security
proxy=
basedir=default
ADMIN_EOF
#
# Path to your new packages
#
PKG_PATH=/tmp/work/fjgi
#
# Test package name
#
SVR4_TEST_PKG=FJSVgid.v
/usr/sbin/pkgadd -n -a ${ADMIN_FILE} -d $PKG_PATH -R ${PKG_IMG_PATH} ${SVR4_TEST_PKG}
if [ $? != "0" ] ; then
echo "installing package failed"
exit 1
fi
/bin/rm ${ADMIN_FILE}
exit 0
Example 2 - Finalizer Script Setup for SPARC Enterprise Mxxxx:
When the installation target server is any SPARC Enterprise Mxxxx, substitute "FJSVgid.u" for "SVR4_TEST_PKG".
In this example, the finalizer script name is "add_my_svr4_pkg".
# vi /tmp/work/add_my_svr4_pkg <RETURN>
#!/bin/ksh
#
#
# Name:
# add_my_svr4_pkg
#
# Description:
# This script will build an image using an SVR4 package
# located at a user specified file path.
#
# Note:
# The user must modify this script and provide a valid
# path to an SVR4 package in the PKG_PATH variable.
#
# #
- 19 -
# Args:
#
# 2 arguments are passed in by default from the DC.
#
# PKG_IMG_PATH: Package image area
# TMP_DIR: Temporary directory
#
# ~~~~~~~~~~~~~~~~~~~~~~~~~~~~~~~~~~~~~~~~~~~~~~~~~~~~~~~~~~~~~~~~~~~~~~~~~~~~~
if [ "$#" != "2" ] ; then
print -u2 "Usage: $0: Requires 2 args:"
print -u2 " pkg_image area, tmp dir"
exit 1
fi
PKG_IMG_PATH=$1
if [ ! -d $PKG_IMG_PATH ] ; then
print -u2 "$0: Image package area $PKG_IMG_PATH is not valid"
exit 1
fi
TMP_DIR=$2
#
# Install an SVR4 packages into the package image area
#
#create an admin file for non-interactive pkgadd!C
ADMIN_FILE=${TMP_DIR}/admin.$$
cat << \ADMIN_EOF > $ADMIN_FILE
mail=
instance=unique
partial=nocheck
runlevel=nocheck
idepend=nocheck
rdepend=nocheck
space=nocheck
setuid=nocheck
conflict=nocheck
action=nocheck
networktimeout=60
networkretries=3
authentication=quit
keystore=/var/sadm/security
proxy=
basedir=default
ADMIN_EOF
#
# Path to your new packages
#
PKG_PATH=/tmp/work/fjgi
#
# Test package name
#
SVR4_TEST_PKG=FJSVgid.u
/usr/sbin/pkgadd -n -a ${ADMIN_FILE} -d $PKG_PATH -R ${PKG_IMG_PATH} ${SVR4_TEST_PKG}
if [ $? != "0" ] ; then
echo "installing package failed"
exit 1
fi
/bin/rm ${ADMIN_FILE}
exit 0
[FUJITSU ULTRA LVD SCSI Host Bus Adapter Driver 4.0 or later]
Example 1 - Finalizer Script Setup for SPARC Enterprise Txxxx or SPARC T3:
- 20 -
When the installation target server is any SPARC Enterprise Txxxx or SPARC T3, substitute "FJSVulsa.v" for "SVR4_TEST_PKG".
In this example, the finalizer script name is "add_my_svr4_pkg".
# vi /tmp/work/add_my_svr4_pkg <RETURN>
#!/bin/ksh
#
#
# Name:
# add_my_svr4_pkg
#
# Description:
# This script will build an image using an SVR4 package
# located at a user specified file path.
#
# Note:
# The user must modify this script and provide a valid
# path to an SVR4 package in the PKG_PATH variable.
#
# #
# Args:
#
# 2 arguments are passed in by default from the DC.
#
# PKG_IMG_PATH: Package image area
# TMP_DIR: Temporary directory
#
# ~~~~~~~~~~~~~~~~~~~~~~~~~~~~~~~~~~~~~~~~~~~~~~~~~~~~~~~~~~~~~~~~~~~~~~~~~~~~~
if [ "$#" != "2" ] ; then
print -u2 "Usage: $0: Requires 2 args:"
print -u2 " pkg_image area, tmp dir"
exit 1
fi
PKG_IMG_PATH=$1
if [ ! -d $PKG_IMG_PATH ] ; then
print -u2 "$0: Image package area $PKG_IMG_PATH is not valid"
exit 1
fi
TMP_DIR=$2
#
# Install an SVR4 packages into the package image area
#
#create an admin file for non-interactive pkgadd!C
ADMIN_FILE=${TMP_DIR}/admin.$$
cat << \ADMIN_EOF > $ADMIN_FILE
mail=
instance=unique
partial=nocheck
runlevel=nocheck
idepend=nocheck
rdepend=nocheck
space=nocheck
setuid=nocheck
conflict=nocheck
action=nocheck
networktimeout=60
networkretries=3
authentication=quit
keystore=/var/sadm/security
proxy=
basedir=default
- 21 -
ADMIN_EOF
#
# Path to your new packages
#
PKG_PATH=/tmp/work/fjulsa
#
# Test package name
#
SVR4_TEST_PKG=FJSVulsa.v
/usr/sbin/pkgadd -n -a ${ADMIN_FILE} -d $PKG_PATH -R ${PKG_IMG_PATH} ${SVR4_TEST_PKG}
if [ $? != "0" ] ; then
echo "installing package failed"
exit 1
fi
/bin/rm ${ADMIN_FILE}
exit 0
Example 2 - Finalizer Script Setup for SPARC Enterprise Mxxxx:
When the installation target server is any SPARC Enterprise Mxxxx, substitute "FJSVulsa.u" for "SVR4_TEST_PKG".
In this example, the finalizer script name is "add_my_svr4_pkg".
# vi /tmp/work/add_my_svr4_pkg <RETURN>
#!/bin/ksh
#
#
# Name:
# add_my_svr4_pkg
#
# Description:
# This script will build an image using an SVR4 package
# located at a user specified file path.
#
# Note:
# The user must modify this script and provide a valid
# path to an SVR4 package in the PKG_PATH variable.
#
# #
# Args:
#
# 2 arguments are passed in by default from the DC.
#
# PKG_IMG_PATH: Package image area
# TMP_DIR: Temporary directory
#
# ~~~~~~~~~~~~~~~~~~~~~~~~~~~~~~~~~~~~~~~~~~~~~~~~~~~~~~~~~~~~~~~~~~~~~~~~~~~~~
if [ "$#" != "2" ] ; then
print -u2 "Usage: $0: Requires 2 args:"
print -u2 " pkg_image area, tmp dir"
exit 1
fi
PKG_IMG_PATH=$1
if [ ! -d $PKG_IMG_PATH ] ; then
print -u2 "$0: Image package area $PKG_IMG_PATH is not valid"
exit 1
fi
TMP_DIR=$2
#
# Install an SVR4 packages into the package image area
- 22 -

#
#create an admin file for non-interactive pkgadd!C
ADMIN_FILE=${TMP_DIR}/admin.$$
cat << \ADMIN_EOF > $ADMIN_FILE
mail=
instance=unique
partial=nocheck
runlevel=nocheck
idepend=nocheck
rdepend=nocheck
space=nocheck
setuid=nocheck
conflict=nocheck
action=nocheck
networktimeout=60
networkretries=3
authentication=quit
keystore=/var/sadm/security
proxy=
basedir=default
ADMIN_EOF
#
# Path to your new packages
#
PKG_PATH=/tmp/work/fjulsa
#
# Test package name
#
SVR4_TEST_PKG=FJSVulsa.u
/usr/sbin/pkgadd -n -a ${ADMIN_FILE} -d $PKG_PATH -R ${PKG_IMG_PATH} ${SVR4_TEST_PKG}
if [ $? != "0" ] ; then
echo "installing package failed"
exit 1
fi
/bin/rm ${ADMIN_FILE}
exit 0
Example 3 - Finalizer Script Setup when sd.conf file is edited:
The following example shows how to edit the finalizer script when sd.conf file is edited on "How to Confirm Disks",
In this example, the finalizer script name is "add_my_svr4_pkg".
# vi /tmp/work/add_my_svr4_pkg <RETURN>
#!/bin/ksh
#
#
# Name:
# add_my_svr4_pkg
#
# Description:
# This script will build an image using an SVR4 package
# located at a user specified file path.
#
# Note:
# The user must modify this script and provide a valid
# path to an SVR4 package in the PKG_PATH variable.
#
# #
# Args:
#
- 23 -
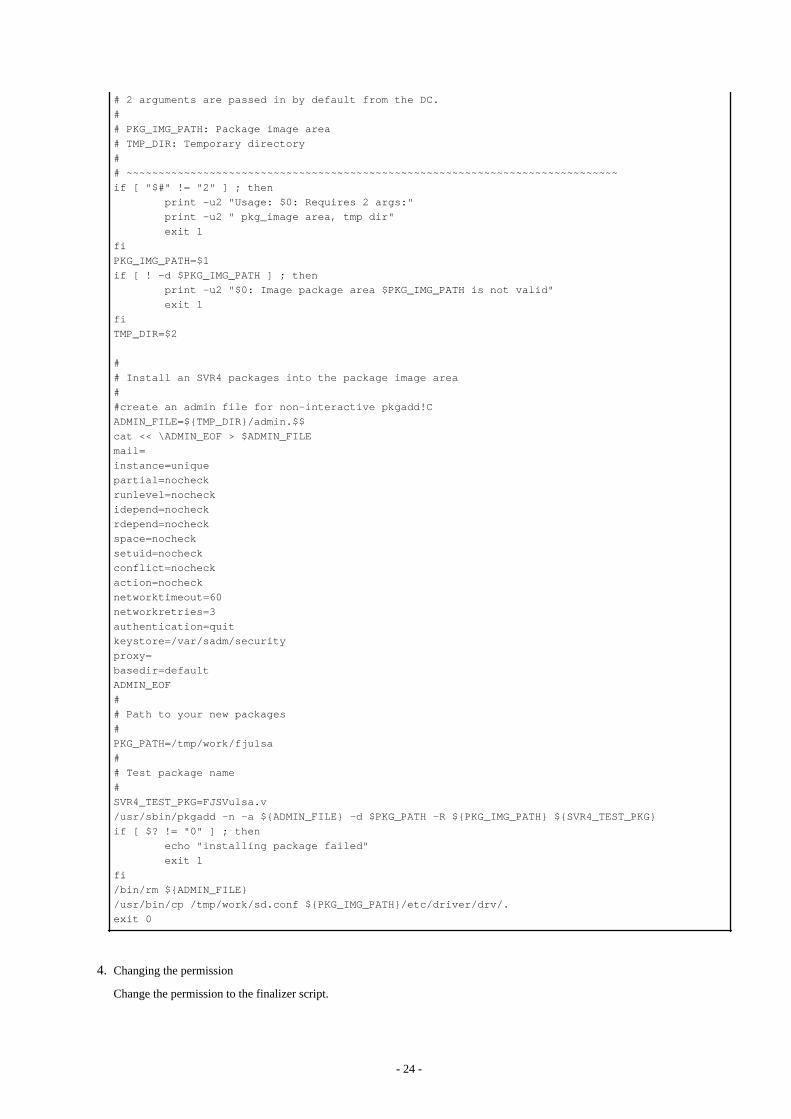
# 2 arguments are passed in by default from the DC.
#
# PKG_IMG_PATH: Package image area
# TMP_DIR: Temporary directory
#
# ~~~~~~~~~~~~~~~~~~~~~~~~~~~~~~~~~~~~~~~~~~~~~~~~~~~~~~~~~~~~~~~~~~~~~~~~~~~~~
if [ "$#" != "2" ] ; then
print -u2 "Usage: $0: Requires 2 args:"
print -u2 " pkg_image area, tmp dir"
exit 1
fi
PKG_IMG_PATH=$1
if [ ! -d $PKG_IMG_PATH ] ; then
print -u2 "$0: Image package area $PKG_IMG_PATH is not valid"
exit 1
fi
TMP_DIR=$2
#
# Install an SVR4 packages into the package image area
#
#create an admin file for non-interactive pkgadd!C
ADMIN_FILE=${TMP_DIR}/admin.$$
cat << \ADMIN_EOF > $ADMIN_FILE
mail=
instance=unique
partial=nocheck
runlevel=nocheck
idepend=nocheck
rdepend=nocheck
space=nocheck
setuid=nocheck
conflict=nocheck
action=nocheck
networktimeout=60
networkretries=3
authentication=quit
keystore=/var/sadm/security
proxy=
basedir=default
ADMIN_EOF
#
# Path to your new packages
#
PKG_PATH=/tmp/work/fjulsa
#
# Test package name
#
SVR4_TEST_PKG=FJSVulsa.v
/usr/sbin/pkgadd -n -a ${ADMIN_FILE} -d $PKG_PATH -R ${PKG_IMG_PATH} ${SVR4_TEST_PKG}
if [ $? != "0" ] ; then
echo "installing package failed"
exit 1
fi
/bin/rm ${ADMIN_FILE}
/usr/bin/cp /tmp/work/sd.conf ${PKG_IMG_PATH}/etc/driver/drv/.
exit 0
4. Changing the permission
Change the permission to the finalizer script.
- 24 -

# chmod u+x /tmp/work/add_my_svr4_pkg <RETURN>
- How to Confirm Disks
Information about connected devices can be confirmed using the "probe-scsi-all" OBP command, as follows:
{0} ok probe-scsi-all <RETURN>
/pci@7,700000/FJSV,eulsa@0
MPT Version : 01.05 , Firmware Version : 01.24.00.00
SAS World Wide ID(HBA:Port0) is 0x500605b0003cf854
Target 0x1c
Unit 0x0 Disk FUJITSU E2000 0000 2097152 Blocks, 1073 MB
Unit 0x1 Disk FUJITSU E2000 0000 2097152 Blocks, 1073 MB
...
Modify the target driver's configuration file (sd.conf) to add the logical unit (LU) of the disk array device and the device target ID forthe boot disk.
Example: To recognize target ID 28 and logical unit number 0:
1. Insert "Oracle Solaris 11 11/11 Automated Install (SPARC)" of Solaris 11 11/11 Media Kit CD-ROM in the CD-ROM driveof the install server.
2. Copy the sd.conf file to the work directory.
- SPARC Enterprise Txxxx: or SPARC T3
# mkdir /tmp/media <RETURN>
# root_archive unpack /cdrom/cdrom0/platform/sun4v/boot_archive /tmp/media <RETURN>
# cp /tmp/media/kernel/drv/sd.conf /tmp/work/. <RETURN>
- SPARC Enterprise Mxxxx
# mkdir /tmp/media <RETURN>
# root_archive unpack /cdrom/cdrom0/platform/sun4u/boot_archive /tmp/media <RETURN>
# cp /tmp/media/kernel/drv/sd.conf /tmp/work/. <RETURN>
3. Edit the sd.conf file.
# vi /tmp/work/sd.conf <RETURN>
#
# Copyright (c) 1992, by Sun Microsystems, Inc.
#ident "@(#)sd.conf 1.8 93/05/03 SMI"
name="sd" class="scsi"
target=0 lun=0;
name="sd" class="scsi"
target=1 lun=0;
...
name= "sd" class="scsi"
target=28 lun=0;
...
4. After editing, eject the CD-ROM.
# cd / <RETURN>
# eject cdrom <RETURN>
- 25 -

3.2.1.3 Editing the Manifest FileThis section provides instructions how to edit a manifest file (dc_ai_sparc.xml) to create Solaris image on an install server.
The following example shows how to create a manifest file to the /tmp/work directory.
1. Copying the manifest file
Copy the manifest file to the work directory,
# cp -p /usr/share/distro_const/dc_ai_sparc.xml /tmp/work/. <RETURN>
2. Changing the permission
Change the permission to the manifest file.
# chmod u+w /tmp/work/dc_ai_sparc.xml <RETURN>
3. Editing the manifest file
Edit the manifest file with a text editor (vi etc.).
1. Add an xml field to set a finalizer script created in "3.2.1.2 Creating the Finalizer Script".
<checkpoint name="custom-script"
desc="Alok's script"
mod_path="solaris_install/distro_const/checkpoints/custom_script"
checkpoint_class="CustomScript">
<args>/tmp/work/add_my_svr4_pkg {PKG_IMAGE_PATH} /tmp</args>
</checkpoint>
The following example shows the xml field must be insert to the <finalizer> section in the manifest file.
# vi /tmp/work/dc_ai_sparc.xml <RETURN>
...
<checkpoint name="custom-script"
desc="Alok's script"
mod_path="solaris_install/distro_const/checkpoints/custom_script"
checkpoint_class="CustomScript">
<args>/tmp/work/add_my_svr4_pkg {PKG_IMAGE_PATH} /tmp</args>
</checkpoint>
<checkpoint name="ba-init"
desc="Boot Archive Initialization"
mod_path="solaris_install/transfer/cpio"
checkpoint_class="TransferCPIO"/>
<checkpoint name="ba-config"
desc="Boot Archive Configuration"
mod_path="solaris_install/distro_const/checkpoints/boot_archive_configure"
checkpoint_class="AIBootArchiveConfigure">
</checkpoint>
...
2. The following example shows an xml field associated IPS repositories is edited when default repository is changed.
In this example, IPS repository URI is changed into "http://192.168.1.10/" from "http://pkg.oracle.com/solaris/release/".
# vi /tmp/work/dc_ai_sparc.xml <RETURN>
...
<software name="transfer-ips-install" type="IPS">
<destination>
<xi:include xmlns:xi="http://www.w3.org/2003/XInclude"
- 26 -
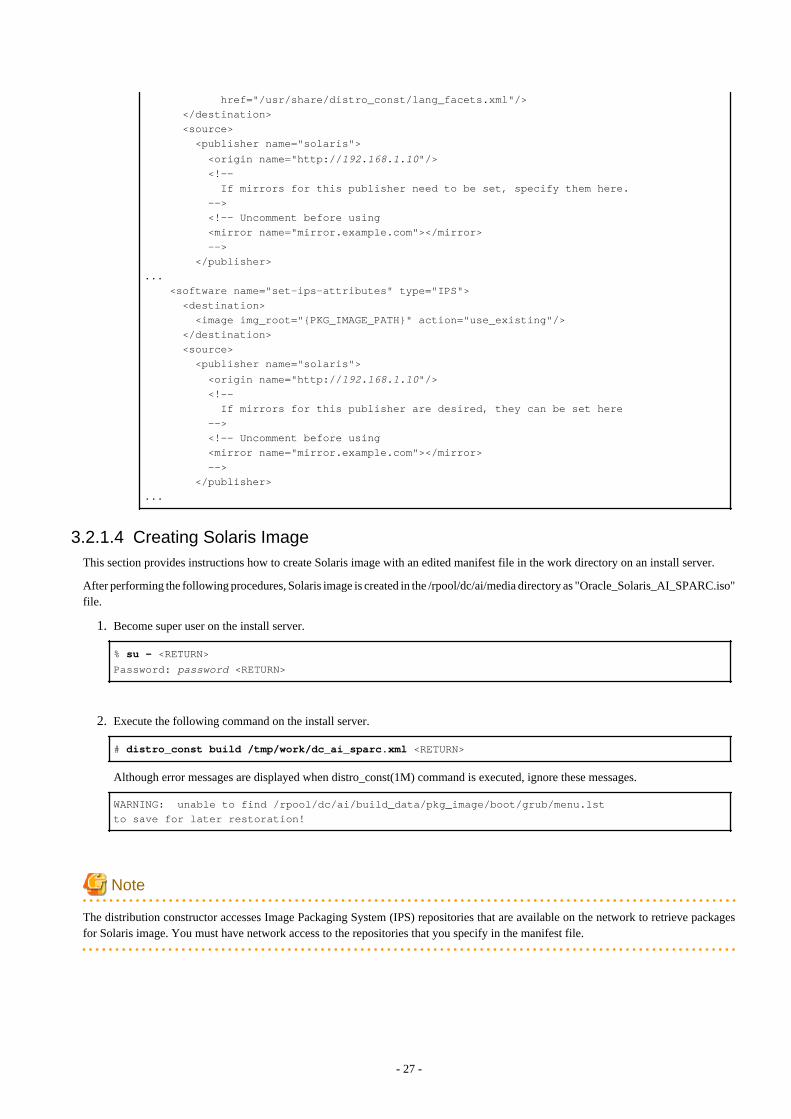
href="/usr/share/distro_const/lang_facets.xml"/>
</destination>
<source>
<publisher name="solaris">
<origin name="http://192.168.1.10"/>
<!--
If mirrors for this publisher need to be set, specify them here.
-->
<!-- Uncomment before using
<mirror name="mirror.example.com"></mirror>
-->
</publisher>
...
<software name="set-ips-attributes" type="IPS">
<destination>
<image img_root="{PKG_IMAGE_PATH}" action="use_existing"/>
</destination>
<source>
<publisher name="solaris">
<origin name="http://192.168.1.10"/>
<!--
If mirrors for this publisher are desired, they can be set here
-->
<!-- Uncomment before using
<mirror name="mirror.example.com"></mirror>
-->
</publisher>
...
3.2.1.4 Creating Solaris ImageThis section provides instructions how to create Solaris image with an edited manifest file in the work directory on an install server.
After performing the following procedures, Solaris image is created in the /rpool/dc/ai/media directory as "Oracle_Solaris_AI_SPARC.iso"file.
1. Become super user on the install server.
% su - <RETURN>
Password: password <RETURN>
2. Execute the following command on the install server.
# distro_const build /tmp/work/dc_ai_sparc.xml <RETURN>
Although error messages are displayed when distro_const(1M) command is executed, ignore these messages.
WARNING: unable to find /rpool/dc/ai/build_data/pkg_image/boot/grub/menu.lst
to save for later restoration!
Note
The distribution constructor accesses Image Packaging System (IPS) repositories that are available on the network to retrieve packagesfor Solaris image. You must have network access to the repositories that you specify in the manifest file.
- 27 -
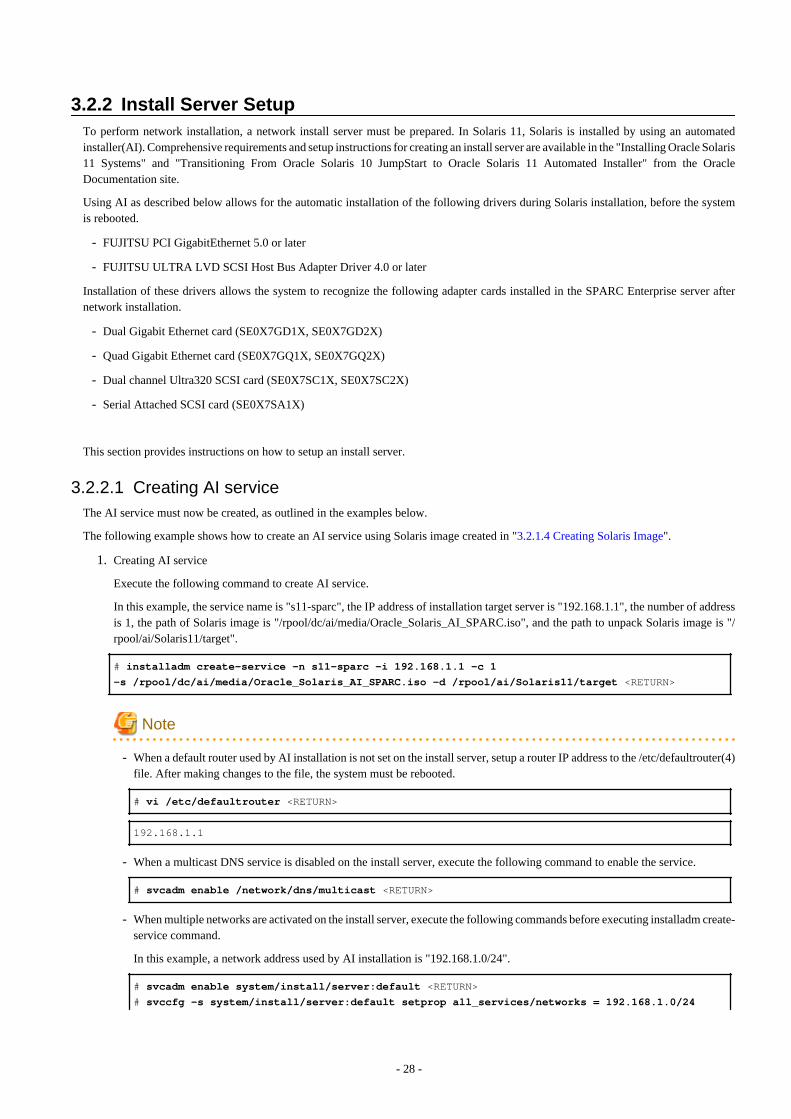
3.2.2 Install Server SetupTo perform network installation, a network install server must be prepared. In Solaris 11, Solaris is installed by using an automatedinstaller(AI). Comprehensive requirements and setup instructions for creating an install server are available in the "Installing Oracle Solaris11 Systems" and "Transitioning From Oracle Solaris 10 JumpStart to Oracle Solaris 11 Automated Installer" from the OracleDocumentation site.
Using AI as described below allows for the automatic installation of the following drivers during Solaris installation, before the systemis rebooted.
- FUJITSU PCI GigabitEthernet 5.0 or later
- FUJITSU ULTRA LVD SCSI Host Bus Adapter Driver 4.0 or later
Installation of these drivers allows the system to recognize the following adapter cards installed in the SPARC Enterprise server afternetwork installation.
- Dual Gigabit Ethernet card (SE0X7GD1X, SE0X7GD2X)
- Quad Gigabit Ethernet card (SE0X7GQ1X, SE0X7GQ2X)
- Dual channel Ultra320 SCSI card (SE0X7SC1X, SE0X7SC2X)
- Serial Attached SCSI card (SE0X7SA1X)
This section provides instructions on how to setup an install server.
3.2.2.1 Creating AI serviceThe AI service must now be created, as outlined in the examples below.
The following example shows how to create an AI service using Solaris image created in "3.2.1.4 Creating Solaris Image".
1. Creating AI service
Execute the following command to create AI service.
In this example, the service name is "s11-sparc", the IP address of installation target server is "192.168.1.1", the number of addressis 1, the path of Solaris image is "/rpool/dc/ai/media/Oracle_Solaris_AI_SPARC.iso", and the path to unpack Solaris image is "/rpool/ai/Solaris11/target".
# installadm create-service -n s11-sparc -i 192.168.1.1 -c 1
-s /rpool/dc/ai/media/Oracle_Solaris_AI_SPARC.iso -d /rpool/ai/Solaris11/target <RETURN>
Note
- When a default router used by AI installation is not set on the install server, setup a router IP address to the /etc/defaultrouter(4)file. After making changes to the file, the system must be rebooted.
# vi /etc/defaultrouter <RETURN>
192.168.1.1
- When a multicast DNS service is disabled on the install server, execute the following command to enable the service.
# svcadm enable /network/dns/multicast <RETURN>
- When multiple networks are activated on the install server, execute the following commands before executing installadm create-service command.
In this example, a network address used by AI installation is "192.168.1.0/24".
# svcadm enable system/install/server:default <RETURN>
# svccfg -s system/install/server:default setprop all_services/networks = 192.168.1.0/24
- 28 -
<RETURN>
# svcadm refresh system/install/server:default <RETURN>
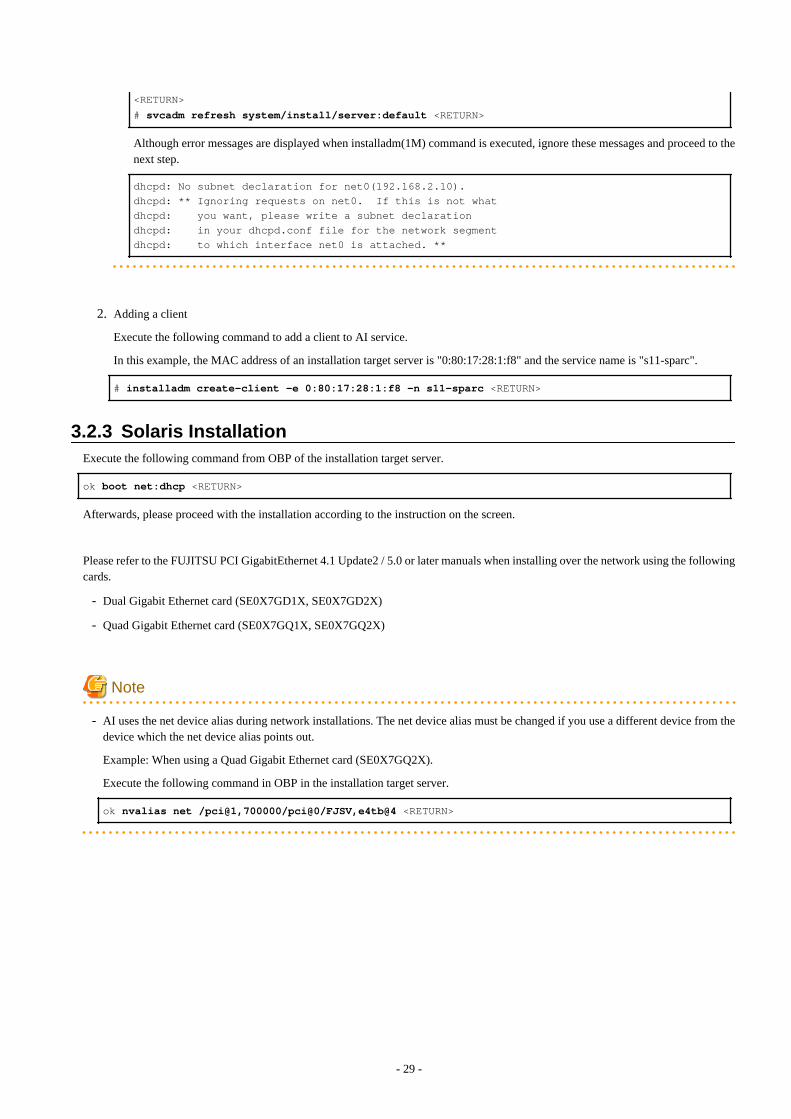
Although error messages are displayed when installadm(1M) command is executed, ignore these messages and proceed to thenext step.
dhcpd: No subnet declaration for net0(192.168.2.10).
dhcpd: ** Ignoring requests on net0. If this is not what
dhcpd: you want, please write a subnet declaration
dhcpd: in your dhcpd.conf file for the network segment
dhcpd: to which interface net0 is attached. **
2. Adding a client
Execute the following command to add a client to AI service.
In this example, the MAC address of an installation target server is "0:80:17:28:1:f8" and the service name is "s11-sparc".
# installadm create-client -e 0:80:17:28:1:f8 -n s11-sparc <RETURN>
3.2.3 Solaris InstallationExecute the following command from OBP of the installation target server.
ok boot net:dhcp <RETURN>
Afterwards, please proceed with the installation according to the instruction on the screen.
Please refer to the FUJITSU PCI GigabitEthernet 4.1 Update2 / 5.0 or later manuals when installing over the network using the followingcards.
- Dual Gigabit Ethernet card (SE0X7GD1X, SE0X7GD2X)
- Quad Gigabit Ethernet card (SE0X7GQ1X, SE0X7GQ2X)
Note
- AI uses the net device alias during network installations. The net device alias must be changed if you use a different device from thedevice which the net device alias points out.
Example: When using a Quad Gigabit Ethernet card (SE0X7GQ2X).
Execute the following command in OBP in the installation target server.
ok nvalias net /pci@1,700000/pci@0/FJSV,e4tb@4 <RETURN>
- 29 -
Related Documents