VINCHIN BACKUP & RECOVERY V4.0 Quick Installation Guide Install on RHV/Ovirt Virtual Server 2018/09

Welcome message from author
This document is posted to help you gain knowledge. Please leave a comment to let me know what you think about it! Share it to your friends and learn new things together.
Transcript

VINCHIN BACKUP & RECOVERY
V4.0
Quick Installation Guide
Install on RHV/Ovirt Virtual Server
2018/09

1
CONTENTS
Create New Virtual Machine ........................................................................................... 2
Install Backup Server ......................................................................................................... 4
Install Backup Plug-in ...................................................................................................... 10
Install Backup Node (Optional) ..................................................................................... 11

2
Create New Virtual Machine
To install the Vinchin backup server on a RedHat RHV/Ovirt host, first you need to connect the
RedHat Virtualization management platform with the host. Then create a new virtual machine via
the management platform. Before creating new virtual machine, you need to upload Vinchin
Backup & Recovery ISO file to ISO library. Steps are as follows:
Click “System”, then click “ New VM” to create a new virtual machine.
In the “General” page, choose “Linux” in the “Operation System” line,choose “Desktop” in the
“Optimized for” line, type a name for the new VM in the “Name” line. Then Click [OK] to the
next page.
3
Click “Boot Options” to enter boot options page, under the “Boot Sequence” options choose”
CD-ROM” in the “First Device” line, enable “Attach CD” and choose VINCHIN Backup & Recovery
ISO file from the ISO library. Then click [OK] to the next page.

4
Set two storage disks for the VM, one as system disk, the other as backup repository. System disk
capacity 100+ GB is recommended, backup repository capacity can be set according to your
actual demands.
Add at least one network interface for the new VM.
Install Backup Server
After new VM created, power on the VM and start installing the VINCHIN Backup & Recovery iSO
file.
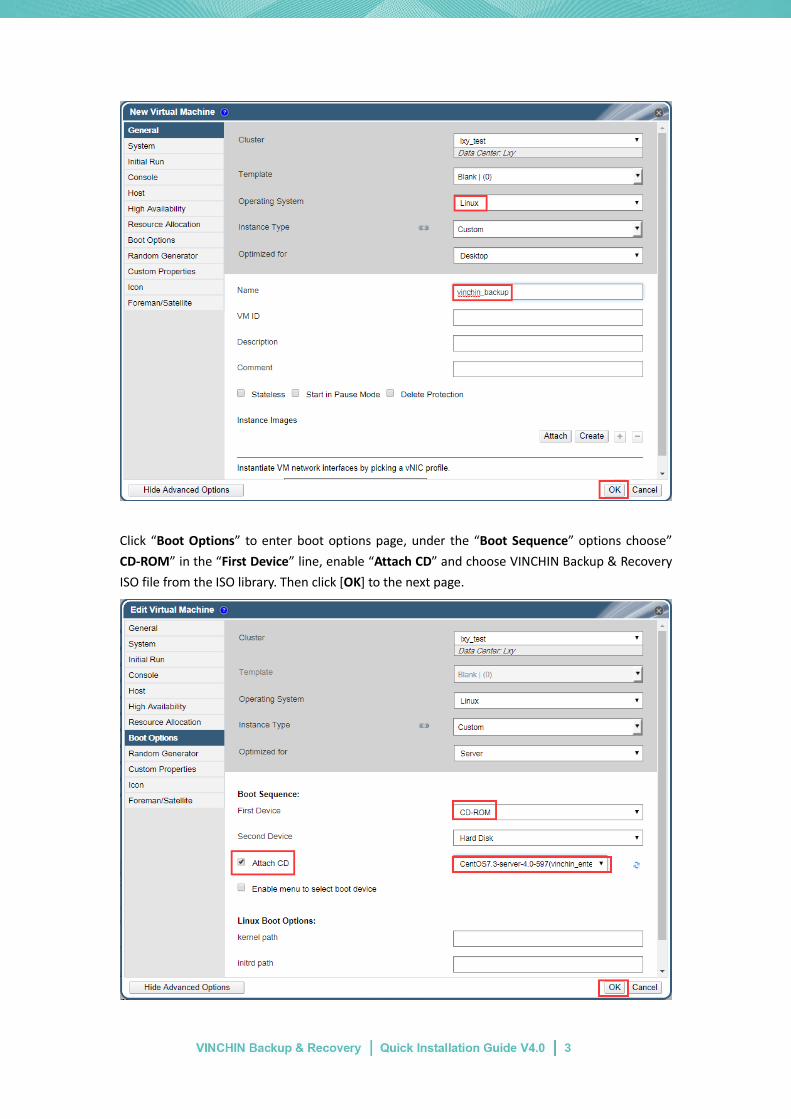
Choose “Install CentOS 7” and press [Enter] button on the keyboard. Then a few seconds later,
you will be entering the “ INSTALLATION SUMMARY” page.

5
Click ”DATE & TIME” to set up time for your Vinchin backup server.
Click the “INSTALLATION DESTINATION” and choose the 100GB hard disk as system disk and click
[Done].
6
Click ”NETWORK&HOST NAME” , then Click 【Configure…】.

7
Click “ IPv4 Settings” → Choose “Manual” in the “Method” selection→ Click [Add] to enter
your network IP address information, example as below. Then click [Save] to save your
configuration data.

8
Click the red marked button in below to enable the Ethernet connection, you will see the
configured network information. Click [Done] on the left top to return back to home page.

9
Other options are defaultly configured, directly click [Begin installation] to install.
After installation completed, click [Reboot] to reboot the VM.

10
After VM rebooted, you can login to the Web UI of VINCHIN Backup & Recovery to start backup
and recovery jobs. Enter the IP address of VINCHIN Backup& Recovery to access the web login
page. (Google Chrome browser is recommended.)
Default login username: admin
Password: 123456
Backup server OS username: root
Password: 12345678
IMPORTANT:
Before backing up VMs under RHV/Ovirt environments, you need to install a “Backup Plug-in”
in each host where runs your business systems.
Install Backup Plug-in
Download the “backup plug-in” from the Vinchin web login page. Click [Download Backup
Plug-in] → select RHV/Ovirt and corresponding version, then click [Download]. Copy the
downloaded plugin to your RHV/Ovirt host root directory for installation.

11
Installation/Uninstallation of RHV/Ovirt backup plugin:
Unzip the plugin file command: tar –zxvf vinchin-kvm-backup-xxxx.tar
Unzip directory enter command: cd vinchin-kvm-backup-xxxx
Install command: ./kvm_backup_patch_install
Uninstall command:./kvm_backup_patch_uninstall
Install Backup Node (Optional)
A backup node is an individual backup server without web console, it is managed by the web
console of vinchin backup server.
In large virtualization environment with large volume of data, computing resources and network

12
resources are limited. How to effectively backup the VMs and occupy the minimal resources,
Vinchin adopts "multiple backup nodes" method.
Deploying multiple backup nodes in large environment can split the overall computing and
storage resources in backup server to realize a horizontal expansion of the resources. Also doing
backup concurrently from multiple backup nodes can increase the network transmission
bandwidth exponentially and make your backup much faster.
Record Vinchin backup node iSO file vinchin-node_enterprise-4.0.xxxx.iso to USB disk or CD,
detailed installation steps please follow chapter “Record iSO File”.
Note: There is no web console on backup node, all backup nodes are managed by the web
console of backup server.
The backup node’s IP address shall be different from the backup server, but make sure they are
connected with each other.
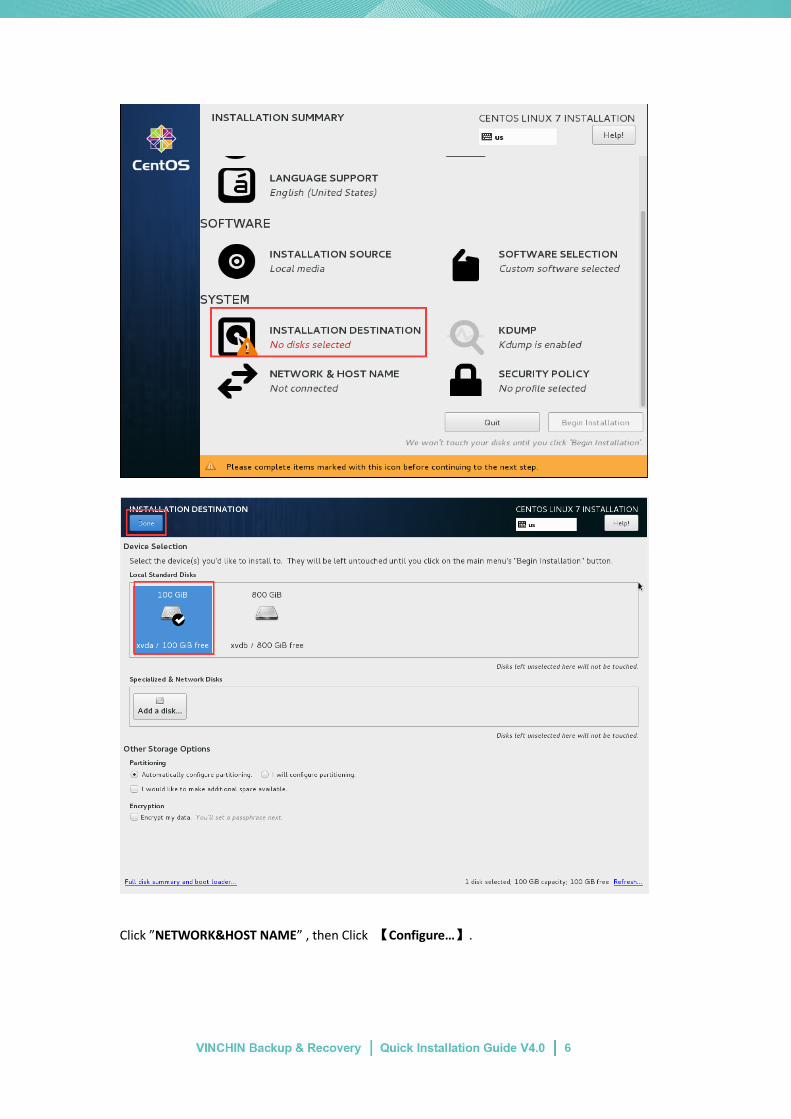
After the backup node is installed successfully, you can login the backup node’s OS to modify
config files.
Backup node OS username: root Password:12345678
Edit config file: vi /etc/common_server.conf.xml
Modify the server_ip and database_ip to Backup Server’s IP address.
13
Enclose:vi editor often-used command
i Insert
esc Exit the editor
:wq Save & exit
Please reboot the backup node OS after you modify its config files: reboot
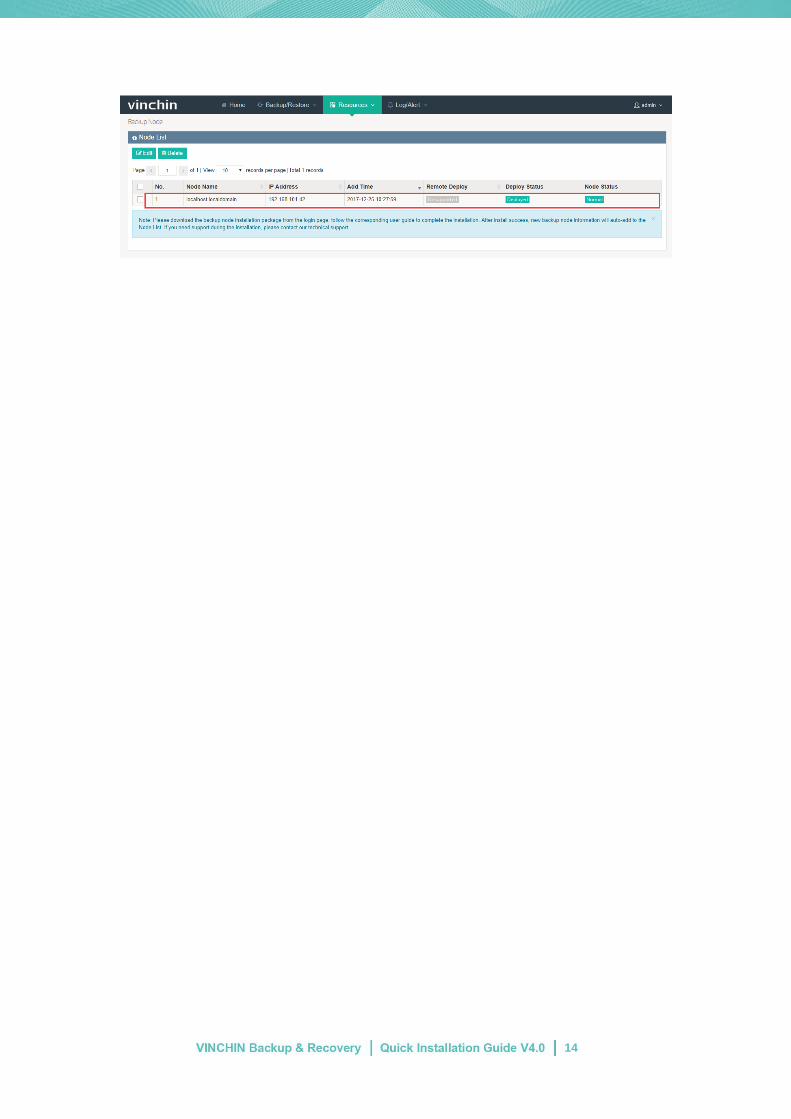
After rebooting the backup node OS, log in the backup server’s web console with default
username : admin , password:123456. You can view the installed backup node information in
the [Resources] → [Backup Node].
14

15
Head Office
F14,No.19,3rd Tianfu Street,
Hi-Tech Zone,Chengdu,China.
P.C.610041
Sales
Tel:+86-28-85530156
Email:[email protected]
Support
Tel:+86-400-9955-698
Email:[email protected]
Website
www.vinchin.com/en
Related Documents