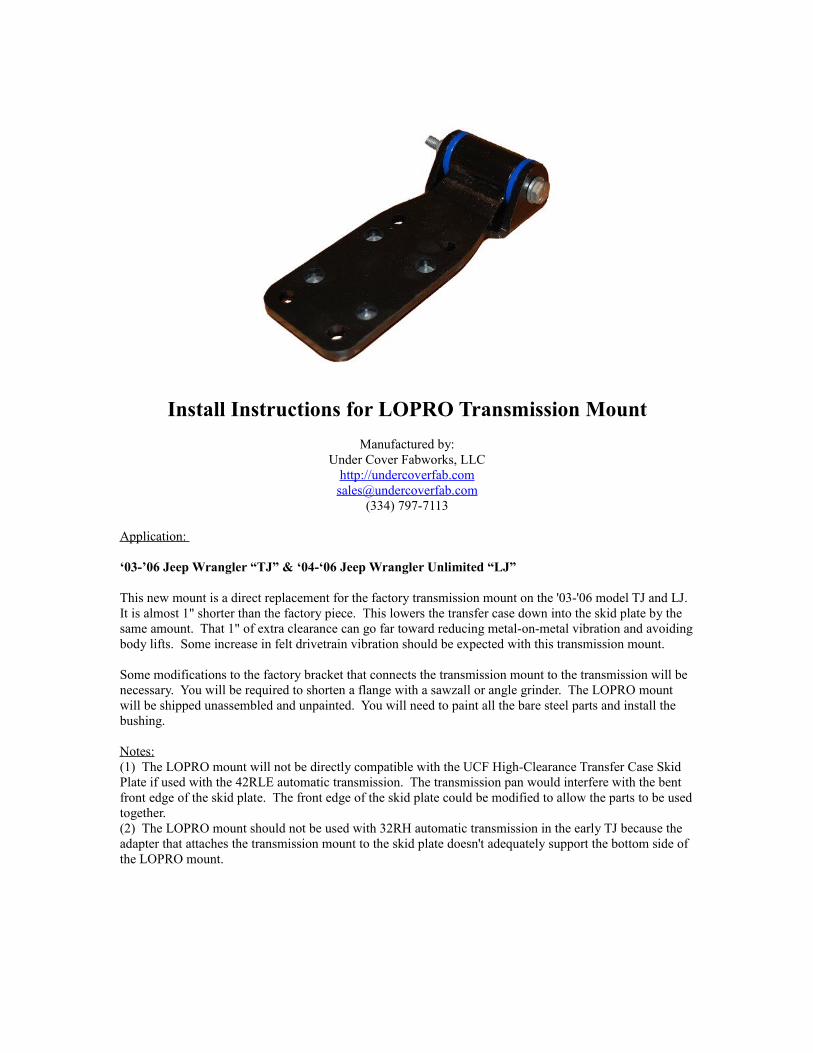
Install Instructions for LOPRO Transmission Mount Manufactured by: Under Cover Fabworks, LLC http://undercoverfab.com [email protected] (334) 797-7113 Application: ‘03-’06 Jeep Wrangler “TJ” & ‘04-‘06 Jeep Wrangler Unlimited “LJ” This new mount is a direct replacement for the factory transmission mount on the '03-'06 model TJ and LJ. It is almost 1" shorter than the factory piece. This lowers the transfer case down into the skid plate by the same amount. That 1" of extra clearance can go far toward reducing metal-on-metal vibration and avoiding body lifts. Some increase in felt drivetrain vibration should be expected with this transmission mount. Some modifications to the factory bracket that connects the transmission mount to the transmission will be necessary. You will be required to shorten a flange with a sawzall or angle grinder. The LOPRO mount will be shipped unassembled and unpainted. You will need to paint all the bare steel parts and install the bushing. Notes: (1) The LOPRO mount will not be directly compatible with the UCF High-Clearance Transfer Case Skid Plate if used with the 42RLE automatic transmission. The transmission pan would interfere with the bent front edge of the skid plate. The front edge of the skid plate could be modified to allow the parts to be used together. (2) The LOPRO mount should not be used with 32RH automatic transmission in the early TJ because the adapter that attaches the transmission mount to the skid plate doesn't adequately support the bottom side of the LOPRO mount.

Welcome message from author
This document is posted to help you gain knowledge. Please leave a comment to let me know what you think about it! Share it to your friends and learn new things together.
Transcript
Install Instructions for LOPRO Transmission Mount
Manufactured by:Under Cover Fabworks, LLC
http://[email protected]
(334) 797-7113
Application:
‘03-’06 Jeep Wrangler “TJ” & ‘04-‘06 Jeep Wrangler Unlimited “LJ”
This new mount is a direct replacement for the factory transmission mount on the '03-'06 model TJ and LJ. It is almost 1" shorter than the factory piece. This lowers the transfer case down into the skid plate by the same amount. That 1" of extra clearance can go far toward reducing metal-on-metal vibration and avoiding body lifts. Some increase in felt drivetrain vibration should be expected with this transmission mount.
Some modifications to the factory bracket that connects the transmission mount to the transmission will be necessary. You will be required to shorten a flange with a sawzall or angle grinder. The LOPRO mount will be shipped unassembled and unpainted. You will need to paint all the bare steel parts and install the bushing.
Notes:(1) The LOPRO mount will not be directly compatible with the UCF High-Clearance Transfer Case Skid Plate if used with the 42RLE automatic transmission. The transmission pan would interfere with the bent front edge of the skid plate. The front edge of the skid plate could be modified to allow the parts to be used together. (2) The LOPRO mount should not be used with 32RH automatic transmission in the early TJ because the adapter that attaches the transmission mount to the skid plate doesn't adequately support the bottom side of the LOPRO mount.
Before you begin the install you should disconnect the battery and properly support the vehicle on jack stands. Create a safe working environment under the vehicle to minimize the risk of an accident. Read through these instructions completely before beginning the installation process. Call us if you have any questions. Under Cover Fabworks assumes no liability for accidents from the use (proper or improper) of these install instructions.
Step (1):Disassemble and paint all bare metal pieces of the LOPRO mount. The polyurethane sheet can be left in place for paint. It is glued to the lower bracket with RTV silicone. Allow adequate drying time before handling. Reassemble the LOPRO mount.
Step (2):Support the weight of the rear part of the power train with a floor jack or bottle hack. This can be supported at the transmission housing about 8” in front of the stock transfer case skid plate. Don’t lift the power train with the jack. Just apply a small amount of pressure.
Step (3):Remove the (4) nuts that attach the factory transmission mount to the stock skid plate. These will not be reused.
Step (4):Carefully remove the (6) bolts that attach the factory transfer case skid plate to the frame rails. Be careful no to drop the skid plate on your arms or legs. Nothing will be supporting the weight of the skid plate after the (6) bolts are removed. A second floor jack could be used under the middle of the factory skid plate to support it while the factory bolts are removed.
Step (5):Remove the (4) nuts that attach the factory transmission mount to the factory transmission mount adapter bracket. Save these nuts as they will be reused to attach the LOPRO mount to the factory adapter bracket. Remove the factory transmission mount. It will not be reused.
Step (6):Remove the (4) bolts that attach the factory transmission mount adapter bracket to the transmission. These bolts will be reused attach factory adapter bracket to transmission after some modifications and installation of the LOPRO mount. The adapter bracket is mounted to the catalytic converter with a rubber bushing. Remove the adapter bracket from the vehicle and onto a secure work surface.
Step (7):Using an angle grinder with a cut-off wheel or some other metal cutting tool remove the flange from the bottom side of the factory transmission mount adapter bracket as shown in Figure 1. You should only remove as much material as is necessary to allow the LOPRO mount to sit squarely on the bracket and allow the bracket to clear the top of the skid plate. This can be tested out of the Jeep by bolting the LOPRO mount to the bracket with the factory hardware and test-fitting it to the skid plate in the “as-installed” orientation. It may take a couple trial fits. Spend some time here getting it right. This will avoid any metal-on-metal vibration between the factory adapter bracket and the skid plate.
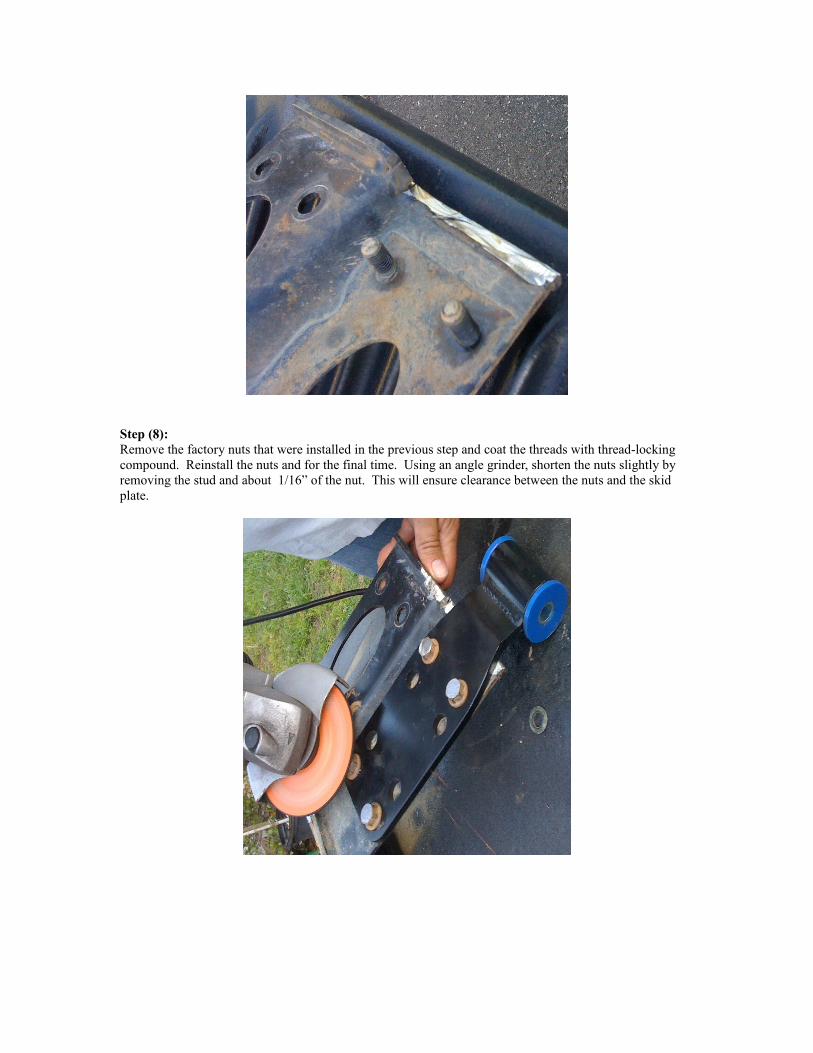
Step (8):Remove the factory nuts that were installed in the previous step and coat the threads with thread-locking compound. Reinstall the nuts and for the final time. Using an angle grinder, shorten the nuts slightly by removing the stud and about 1/16” of the nut. This will ensure clearance between the nuts and the skid plate.
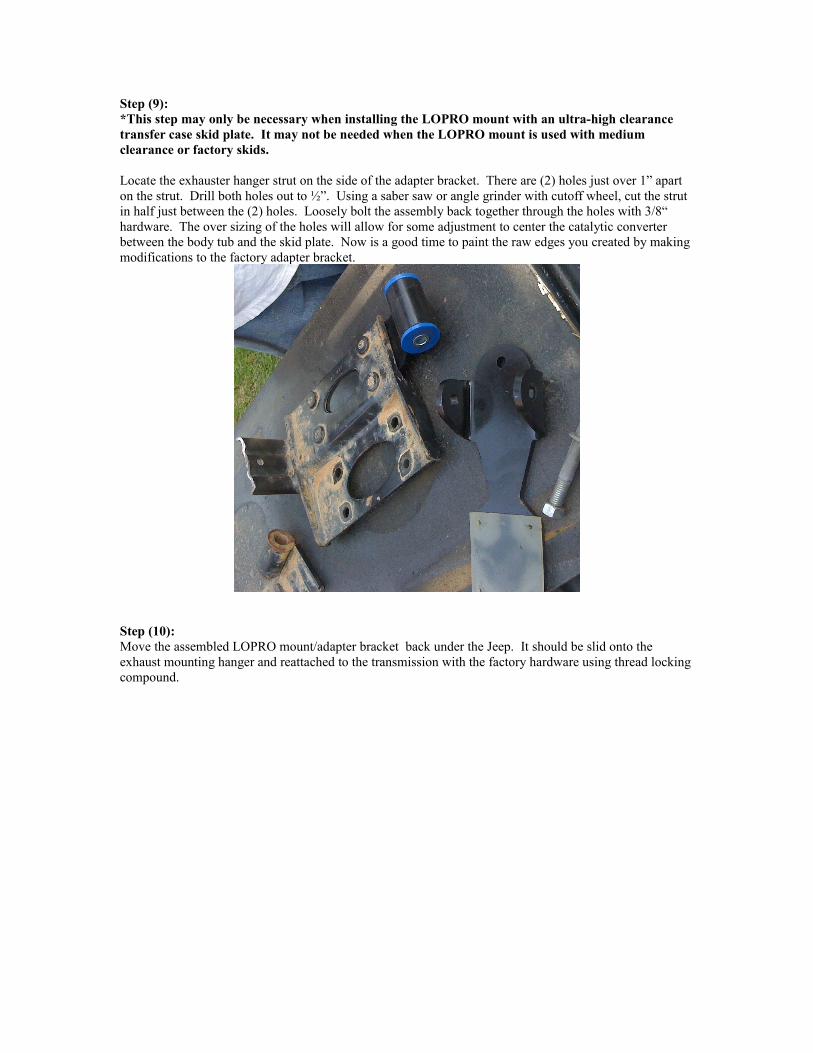
Step (9):*This step may only be necessary when installing the LOPRO mount with an ultra-high clearance transfer case skid plate. It may not be needed when the LOPRO mount is used with medium clearance or factory skids.
Locate the exhauster hanger strut on the side of the adapter bracket. There are (2) holes just over 1” apart on the strut. Drill both holes out to ½”. Using a saber saw or angle grinder with cutoff wheel, cut the strut in half just between the (2) holes. Loosely bolt the assembly back together through the holes with 3/8“ hardware. The over sizing of the holes will allow for some adjustment to center the catalytic converter between the body tub and the skid plate. Now is a good time to paint the raw edges you created by making modifications to the factory adapter bracket.
Step (10):Move the assembled LOPRO mount/adapter bracket back under the Jeep. It should be slid onto the exhaust mounting hanger and reattached to the transmission with the factory hardware using thread locking compound.
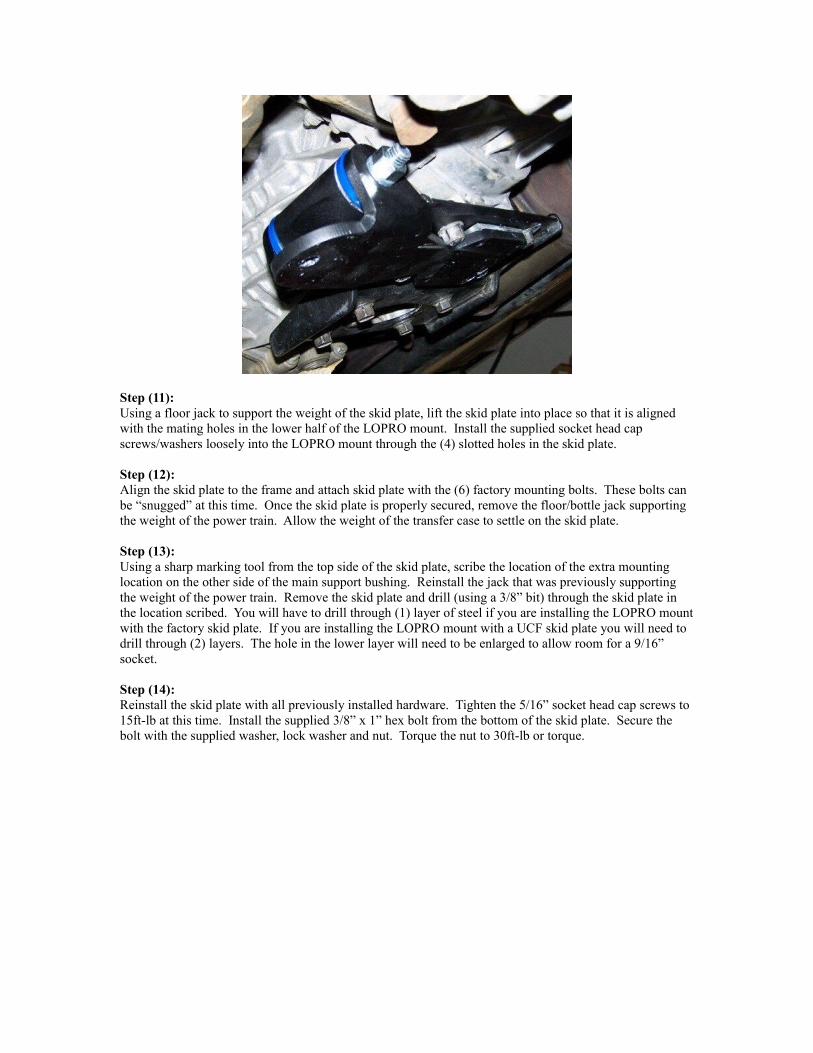
Step (11):Using a floor jack to support the weight of the skid plate, lift the skid plate into place so that it is aligned with the mating holes in the lower half of the LOPRO mount. Install the supplied socket head cap screws/washers loosely into the LOPRO mount through the (4) slotted holes in the skid plate.
Step (12):Align the skid plate to the frame and attach skid plate with the (6) factory mounting bolts. These bolts can be “snugged” at this time. Once the skid plate is properly secured, remove the floor/bottle jack supporting the weight of the power train. Allow the weight of the transfer case to settle on the skid plate.
Step (13):Using a sharp marking tool from the top side of the skid plate, scribe the location of the extra mounting location on the other side of the main support bushing. Reinstall the jack that was previously supporting the weight of the power train. Remove the skid plate and drill (using a 3/8” bit) through the skid plate in the location scribed. You will have to drill through (1) layer of steel if you are installing the LOPRO mount with the factory skid plate. If you are installing the LOPRO mount with a UCF skid plate you will need to drill through (2) layers. The hole in the lower layer will need to be enlarged to allow room for a 9/16” socket.
Step (14):Reinstall the skid plate with all previously installed hardware. Tighten the 5/16” socket head cap screws to 15ft-lb at this time. Install the supplied 3/8” x 1” hex bolt from the bottom of the skid plate. Secure the bolt with the supplied washer, lock washer and nut. Torque the nut to 30ft-lb or torque.
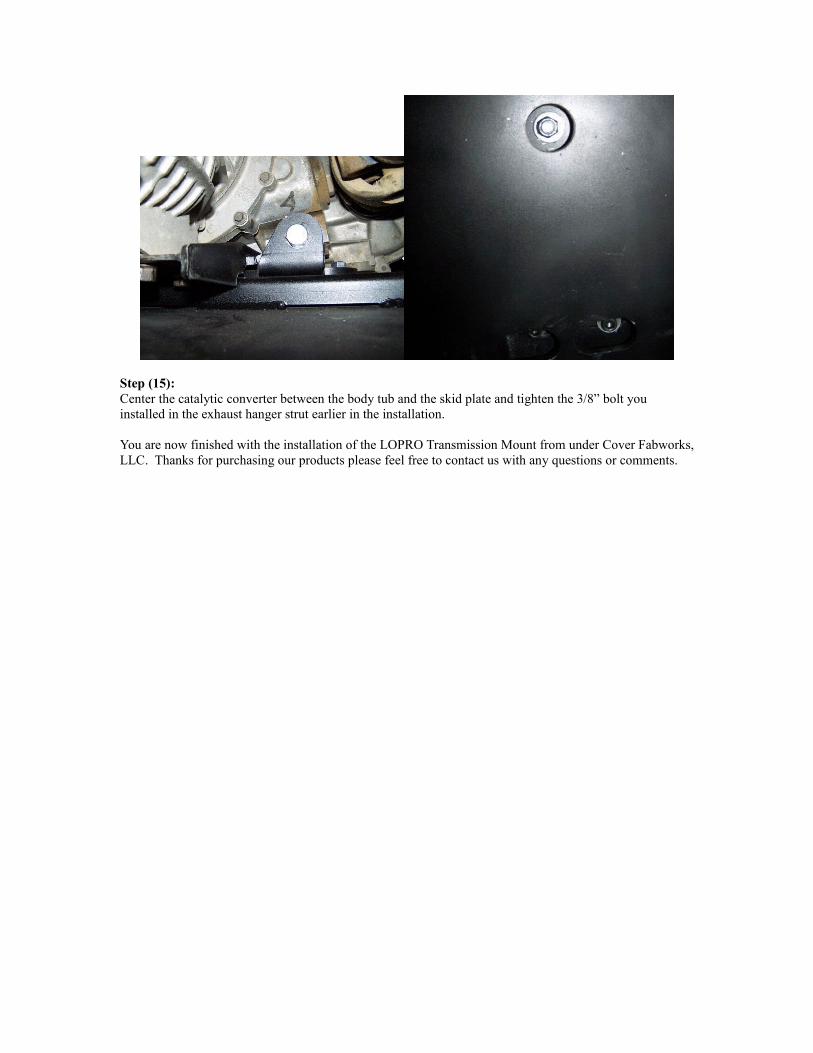
Step (15):Center the catalytic converter between the body tub and the skid plate and tighten the 3/8” bolt you installed in the exhaust hanger strut earlier in the installation.
You are now finished with the installation of the LOPRO Transmission Mount from under Cover Fabworks, LLC. Thanks for purchasing our products please feel free to contact us with any questions or comments.
Related Documents