Install Grid Infrastructure 11gR2 on Oracle VM Created by : Hans Camu Date : 19 February 2011 http://camoraict.wordpress.com This paper is the forth in a series describing how-to install Oracle VM Server and several Oracle VM guests. In this paper I will describe how-to install Grid Infrastructure 11gR2 (GI) on 2 Oracle Virtual Machines. The steps described in this paper will be: Create 2 virtual machines on the command line using a installation directory and a kickstart file Configure the virtual machines to be able to successfully install GI Install Grid Infrastructure 11gR2 Install Oracle 11g RDBMS Software Patch GI and database software with latest GI bundle and PSU Create an Oracle 11g RAC database The installation will take place on virtual machines with 4GB of memory. This guide is for testing purposes only. It is not supported to run a production environment with a setup like described in this paper.

Welcome message from author
This document is posted to help you gain knowledge. Please leave a comment to let me know what you think about it! Share it to your friends and learn new things together.
Transcript

Install Grid Infrastructure 11gR2 on Oracle VM
Created by : Hans Camu Date : 19 February 2011 http://camoraict.wordpress.com This paper is the forth in a series describing how-to install Oracle VM Server and several Oracle VM
guests. In this paper I will describe how-to install Grid Infrastructure 11gR2 (GI) on 2 Oracle Virtual
Machines.
The steps described in this paper will be:
Create 2 virtual machines on the command line using a installation directory and a kickstart file
Configure the virtual machines to be able to successfully install GI
Install Grid Infrastructure 11gR2
Install Oracle 11g RDBMS Software
Patch GI and database software with latest GI bundle and PSU
Create an Oracle 11g RAC database
The installation will take place on virtual machines with 4GB of memory. This guide is for testing
purposes only. It is not supported to run a production environment with a setup like described in this
paper.

Page 2 van 75
Contents 1. Create Virtual Machine ................................................................................................................... 3
2. Create shared ASM disks ............................................................................................................... 17
3. Install some additional OS packages ............................................................................................. 20
4. Configure NTP ................................................................................................................................ 21
5. Install Grid Infrastructure 11gR2 ................................................................................................... 22
6. Install Oracle 11gR2 RDBMS software ........................................................................................... 47
7. Install Oracle 11gR2 RDBMS and GI patches ................................................................................. 57
8. Create ASM diskgroup for database files ...................................................................................... 61
9. Create RAC Database ..................................................................................................................... 64
10. Loading Modified SQL Files into the Database .......................................................................... 75
Page 3 van 75
1. Create Virtual Machine To install GI 11gR2 we first must create 2 virtual machines. On these virtual machines I will install
OEL5.5 64-bit. The DVD ISO can be downloaded from here: http://edelivery.oracle.com/linux.
There are numerous ways of creating an Oracle virtual machines. For example with virt-install, Oracle
VM Manager, using Enterprise Manager Grid Control, and even in a manual way.
In a previous paper I discussed how-to create a virtual machine using the command line tool virt-
install. In this paper I will discuss creating virtual machines by creating the configuration manually
and the starting the installation from the command line. To make sure both virtual machines are
exactly the same I will use a kickstart file.
What will be present after installing using the kickstart file?
- OEL 5.5 64-bit with the selected packages
- a /u01
- an Oracle user
- a generic oracle profile
In this example I have created an installation directory on my Oracle VM Server:
/mount/OEL5u5_x86_64. This directory is a placeholder for the OEL5.5 64-bit installation files. How-
to create this is discussed in paper Install Oracle VM Manager 2.2.
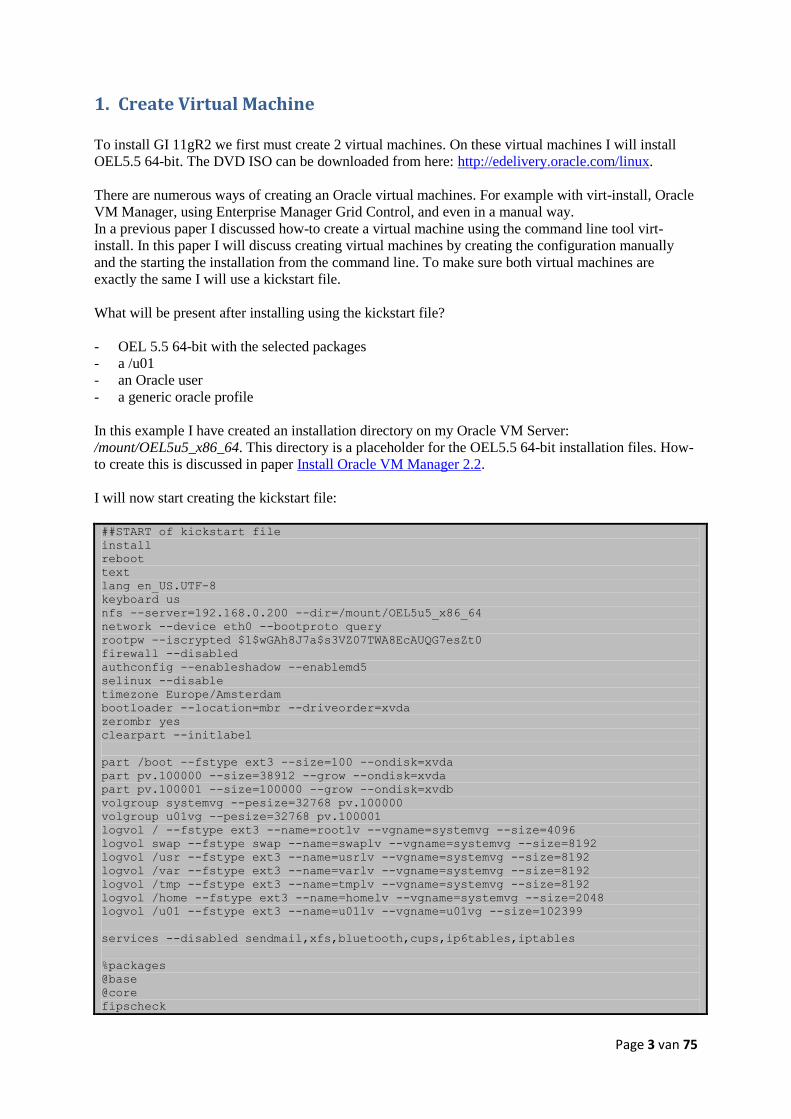
I will now start creating the kickstart file:
##START of kickstart file
install
reboot
text
lang en_US.UTF-8
keyboard us
nfs --server=192.168.0.200 --dir=/mount/OEL5u5_x86_64
network --device eth0 --bootproto query
rootpw --iscrypted $1$wGAh8J7a$s3VZ07TWA8EcAUQG7esZt0
firewall --disabled
authconfig --enableshadow --enablemd5
selinux --disable
timezone Europe/Amsterdam
bootloader --location=mbr --driveorder=xvda
zerombr yes
clearpart --initlabel
part /boot --fstype ext3 --size=100 --ondisk=xvda
part pv.100000 --size=38912 --grow --ondisk=xvda
part pv.100001 --size=100000 --grow --ondisk=xvdb
volgroup systemvg --pesize=32768 pv.100000
volgroup u01vg --pesize=32768 pv.100001
logvol / --fstype ext3 --name=rootlv --vgname=systemvg --size=4096
logvol swap --fstype swap --name=swaplv --vgname=systemvg --size=8192
logvol /usr --fstype ext3 --name=usrlv --vgname=systemvg --size=8192
logvol /var --fstype ext3 --name=varlv --vgname=systemvg --size=8192
logvol /tmp --fstype ext3 --name=tmplv --vgname=systemvg --size=8192
logvol /home --fstype ext3 --name=homelv --vgname=systemvg --size=2048
logvol /u01 --fstype ext3 --name=u01lv --vgname=u01vg --size=102399
services --disabled sendmail,xfs,bluetooth,cups,ip6tables,iptables
%packages
@base
@core
fipscheck

Page 4 van 75
squashfs-tools
#device-mapper-multipath
sgpio
e4fsprogs
oracle-validated
createrepo
audit
sysstat
# For 11g release 2
libaio-devel
unixODBC
unixODBC-devel
compat-libstdc++-296-2.96-138
%post --log=/root/ks-post.log
{
# Delete obsolete groups and users
/usr/sbin/userdel -r oracle
/usr/sbin/groupdel dba
/usr/sbin/groupdel oinstall
#rm -rf /home/oracle
# create group
/usr/sbin/groupadd -g 501 dba
/usr/sbin/groupadd -g 502 asmadmin
#oracle password is oracle
/usr/sbin/useradd -c "npa" -u 500 -p '$1$wGAh8J7a$s3VZ07TWA8EcAUQG7esZt0' -g dba -G
asmadmin oracle
# Setup oracle profile
cat > /etc/profile.d/oracle_profile.sh << EOF
# .bash_profile
#
if [ \$USER = "oracle" ]; then
if [ \$SHELL = "/bin/ksh" ]; then
ulimit -u 16384
ulimit -n 65536
else
ulimit -u 16384 -n 65536
fi
fi
######extend search path
export PATH=\$PATH:\$HOME/bin
export PATH=/usr/java/default/bin:\$PATH
export LD_LIBRARY_PATH=/usr/lib:/lib
####### Set some linux variables
umask 022
trap 2 3
if tty -s
then
set -o vi
export EDITOR=vi
export TERM=vt100
stty erase ^?
[ -s "\$MAIL" ] && echo "\$MAILMSG"
fi
####### Environment variables for Oracle
export ORACLE_BASE=/u01/app/oracle

Page 5 van 75
export ORACLE_TERM=vt100
export NLS_LANG=AMERICAN_AMERICA.UTF8
export NLS_DATE_FORMAT='DD-MM-YYYY:HH24:MI:SS'
export NLS_SORT=Binary
export ORAADMIN=\$ORACLE_BASE/admin
export TNS_ADMIN=\$ORAADMIN/network/admin
###### if interactive session
if tty -s
then
alias l="ls -al"
alias ob="cd \${ORACLE_BASE}"
alias oh="cd "\\\${ORACLE_HOME}""
alias oa="cd \${ORAADMIN}"
alias sid="cat /etc/oratab |grep -v \"#\" |sort"
alias up="ps -ef|grep pm[o]n|awk '{print substr(\\\$NF,10)}'|sort"
alias oracle="sudo su - oracle"
alias root="sudo su -"
alias sqlplus="rlwrap sqlplus"
alias dgmgrl="rlwrap dgmgrl"
alias rman="rlwrap rman"
alias lsnrctl="rlwrap lsnrctl"
alias asmcmd="rlwrap asmcmd"
alias adrci="rlwrap adrci"
alias impdp="rlwrap impdp"
alias expdp="rlwrap expdp"
fi
####### Set unix prompt
USER=\${USER:-\$LOGNAME}
if tty -s
then
export PS1="\${USER}@\`hostname -s\`:\\\${ORACLE_SID}:\\\${PWD}
$ "
fi
if tty -s
then
#create aliases for all ORACLE_SIDs
echo -n aliases:
for LINE in \`cat /etc/oratab| sort | grep -v "^*" | grep -v "^#" | grep -vE "^[
]*$" | cut -f 1 -d :\`
do
sid=\`echo \$LINE|cut -f 1 -d :\`
alias \${sid}="ORAENV_ASK=NO; ORACLE_SID=\${sid}; . oraenv;unset ORAENV_ASK"
echo -n \${sid}" "
done
echo
fi
####### End .profile
EOF
# Setup sudo for oracle
cat > /etc/sudoers << EOF
%rootmembers ALL=NOPASSWD: /bin/su -
%oraclemembers,%rootmembers ALL=NOPASSWD: /bin/su - oracle
oracle ALL=(ALL) NOPASSWD: ALL
root ALL=(ALL) ALL
EOF
# Setup hosts file
cat > /etc/hosts << EOF
# Do not remove the following line, or various programs
# that require network functionality will fail.
127.0.0.1 localhost.localdomain localhost

Page 6 van 75
## Public
192.168.0.210 indy.example.com indy
192.168.0.220 dean.example.com dean
## Private
10.0.0.210 indy-interc.example.com indy-interc
10.0.0.220 dean-interc.example.com dean-interc
# VIP
192.168.0.211 indy-vip.example.com indy-vip
192.168.0.221 dean-vip.example.com dean-vip
## SCAN
192.168.0.212 gridcl01-scan.example.com gridcl01-scan
EOF
mkdir -p /u01/app/oracle/admin/network/admin
chown -R oracle:dba /u01
chmod -R 775 /u01
} 1>/root/ks-post.log 2>&1
##END of kickstart file
In the next few steps I will make some preparations to be able to create the virtual machines. First I will create the directories to store the files for the virtual machines: [root@oraovs01 /]# mkdir /OVS/running_pool/indy
[root@oraovs01 /]# mkdir /OVS/running_pool/dean
As you can see I will name the virtual machines indy and dean. A 2-node cluster also behaves like a twin, so I named the nodes after my sisters twins. Now create the files for the virtual machines. I choose to create spare files which will not immediately occupy all space. In time it will grow until the maximum defined size. For the local file system and /u01 this I not really a problem and will not lead to any performance problems. [root@oraovs01 /]# dd if=/dev/zero of=/OVS/running_pool/indy/system.img bs=1G
count=0 seek=40
[root@oraovs01 /]# dd if=/dev/zero of=/OVS/running_pool/indy/u01disk01.img bs=1G
count=0 seek=100
[root@oraovs01 /]# dd if=/dev/zero of=/OVS/running_pool/dean/system.img bs=1G
count=0 seek=40
[root@oraovs01 /]# dd if=/dev/zero of=/OVS/running_pool/dean/u01disk01.img bs=1G
count=0 seek=100
To create a virtual machine manually you must define the ramdisk and kernel needed for the initial boot. Copy the boot ramdisk and kernel to the /boot direcrory. [root@oraovs01::/root]# cp /mount/OEL5u5_x86_64/images/xen/vmlinuz
/boot/vmlinuz_OEL5_x86_64
[root@oraovs01::/root]# cp /mount/OEL5u5_x86_64/images/xen/initrd.img
/boot/initrd_OEL5_x86_64.img
The last step before we can actual create the virtual machines is to create a configuration files for both virtual machines. This is the vm.cfg for virtual machine indy:

Page 7 van 75
[root@oraovs01::/root]# vi /OVS/running_pool/indy/vm.cfg
kernel = "/boot/vmlinuz_OEL5_x86_64"
ramdisk = "/boot/initrd_OEL5_x86_64.img"
extra = "text ks=nfs:192.168.0.200:/software/kickstart/OEL5u5_x86_64_GI.cfg"
#bootloader = '/usr/bin/pygrub'
disk = ['file:/OVS/running_pool/indy/system.img,xvda,w',
'file:/OVS/running_pool/indy/u01disk01.img,xvdb,w'
]
memory = '4096'
name = 'indy'
on_crash = 'restart'
on_reboot = 'restart'
vcpus = 1
vif = ['bridge=xenbr0,mac=00:16:3E:00:01:01,type=netfront',
'bridge=xenbr1,mac=00:16:3E:00:01:02,type=netfront',
]
vif_other_config = []
And this is the vm.cfg for virtual machine dean: [root@oraovs01::/root]# vi /OVS/running_pool/dean/vm.cfg
kernel = "/boot/vmlinuz_OEL5_x86_64"
ramdisk = "/boot/initrd_OEL5_x86_64.img"
extra = "text ks=nfs:192.168.0.200:/software/kickstart/OEL5u5_x86_64_GI.cfg"
#bootloader = '/usr/bin/pygrub'
disk = ['file:/OVS/running_pool/dean/system.img,xvda,w',
'file:/OVS/running_pool/dean/u01disk01.img,xvdb,w'
]
memory = '4096'
name = 'dean'
on_crash = 'restart'
on_reboot = 'restart'
vcpus = 1
vif = ['bridge=xenbr0,mac=00:16:3E:00:02:01,type=netfront',
'bridge=xenbr1,mac=00:16:3E:00:02:02,type=netfront',
]
vif_other_config = []
Now we are ready to create the first virtual machine: [root@oraovs01::/root]# xm create -c /OVS/running_pool/indy/vm.cfg
Because of the -c option a console will be opened I which can perform the action to create the virtual machine.

Page 8 van 75
Action: Select eth0 as the network device to install through. Click OK.
Action: Enable Manual configuration for the IPv4 support. Disable IPv6 support. Click OK.

Page 9 van 75
Action: Specify the TCP/IP configuration for the virtual machine. Click OK.
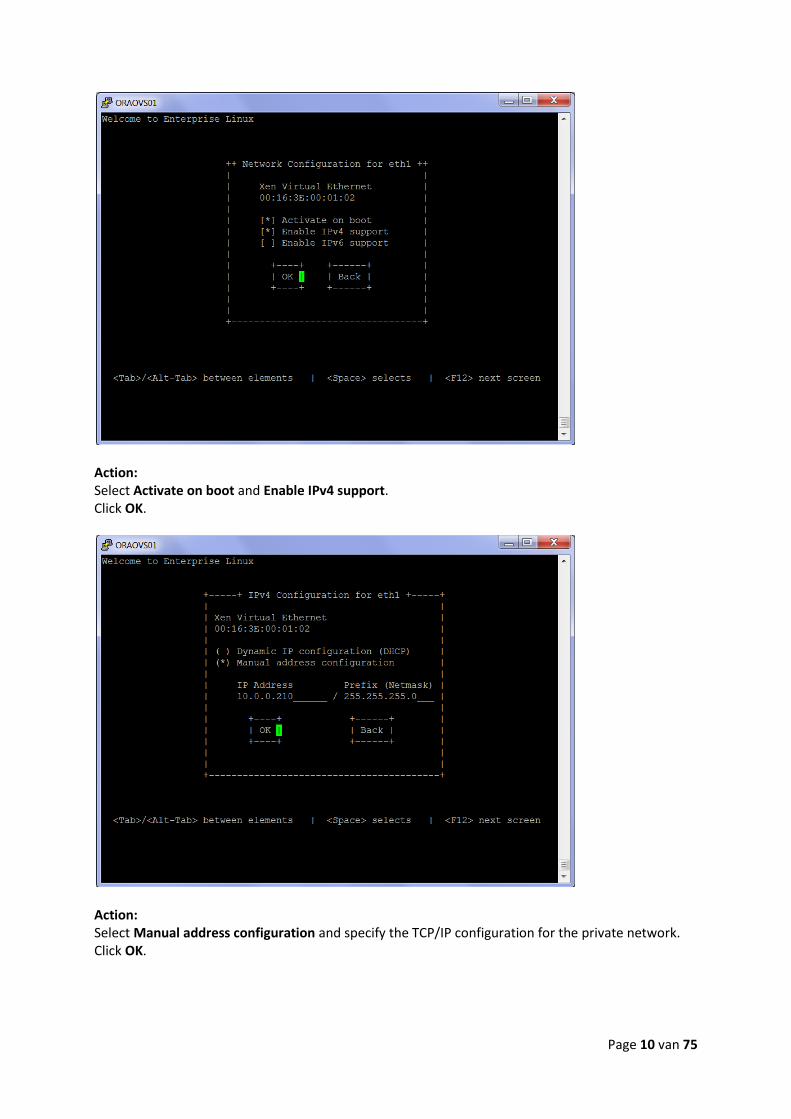
Action: Select eth1 and click Edit. Eth1 will be configured as the private network for the clusterware communication.
Page 10 van 75
Action: Select Activate on boot and Enable IPv4 support. Click OK.
Action: Select Manual address configuration and specify the TCP/IP configuration for the private network. Click OK.

Page 11 van 75
Action: All network devices are now configured. Click OK.
Action: Accept the default values for the Miscellaneous Network Settings. Click OK.

Page 12 van 75
Action: Specify the Hostname Configuration foe the virtual machine. Click OK.
Based on the specifications in the kickstart file all dependencies for the installation will be checked.

Page 13 van 75
OEL 5.5 64-bit is now installed. This only takes a few minutes.
Action: The installation is now finished and the virtual machine is rebooted. Check if virtual machine is running again: [root@oraovs01::/root]# xm list
Name ID Mem VCPUs State Time(s)
Domain-0 0 564 8 r----- 2516.4
indy 1 4096 1 -b---- 1.2

Page 14 van 75
Open the console to check what is happening [root@oraovs01::/root]# xm console indy
Action: This is default behavior. The virtual machines restart and will start the installation procedure again. To stop this stop your console session with ctrl] ( control + ] ) Now stop the virtual machine: [root@oraovs01::/root]# xm destroy indy
OR
[root@oraovs01::/root]# xm shutdown indy
Now modify the virtual machines configuration file. You must deactivate the kernel, ramdisk and extra lines and activate the bootloader line: [root@oraovs01::/root]# vi /OVS/running_pool/indy/vm.cfg
#kernel = "/boot/vmlinuz_OEL5_x86_64"
#ramdisk = "/boot/initrd_OEL5_x86_64.img"
#extra = "text ks=nfs:192.168.0.200:/software/kickstart/OEL5u5_x86_64_GI.cfg"
bootloader = '/usr/bin/pygrub'
disk = ['file:/OVS/running_pool/indy/system.img,xvda,w',
'file:/OVS/running_pool/indy/u01disk01.img,xvdb,w'
]
memory = '4096'
name = 'indy'
on_crash = 'restart'
on_reboot = 'restart'
vcpus = 1
vif = ['bridge=xenbr0,mac=00:16:3E:00:01:01,type=netfront',
'bridge=xenbr1,mac=00:16:3E:00:01:02,type=netfront',
]
vif_other_config = []
Page 15 van 75
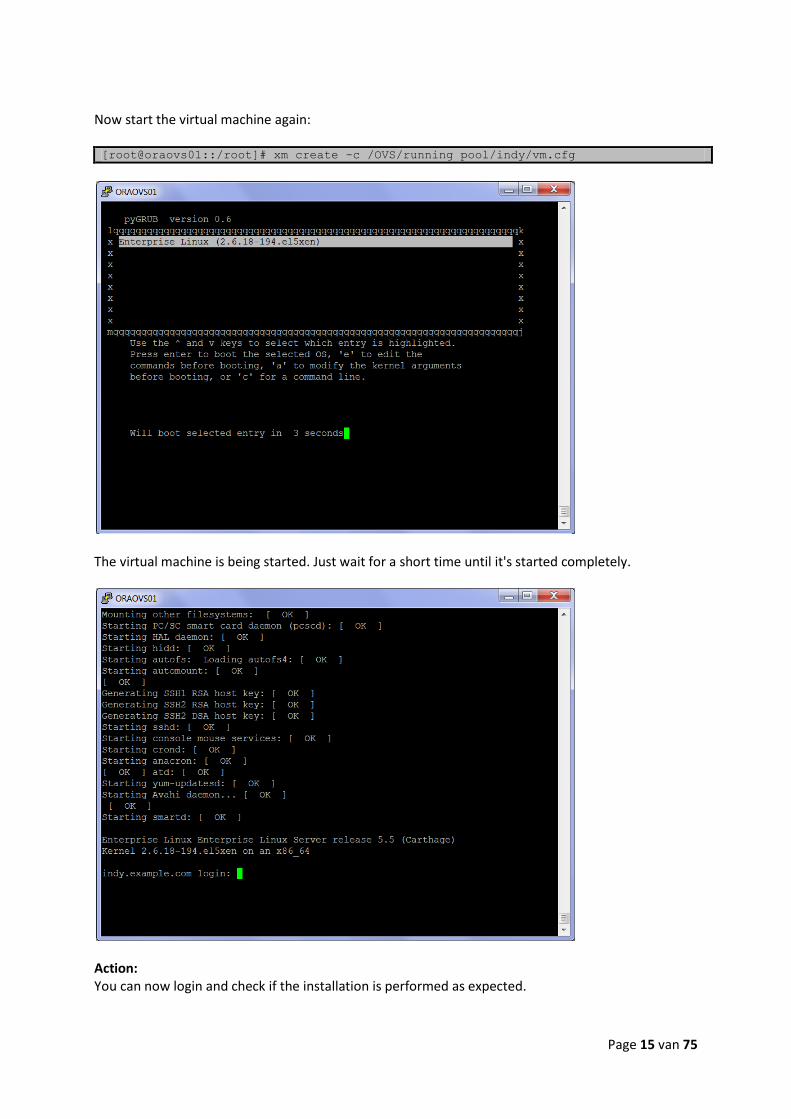
Now start the virtual machine again: [root@oraovs01::/root]# xm create -c /OVS/running_pool/indy/vm.cfg
The virtual machine is being started. Just wait for a short time until it's started completely.
Action: You can now login and check if the installation is performed as expected.

Page 16 van 75
You now have one node for your cluster. Now repeat the steps to create the second virtual machine called dean.

Page 17 van 75
2. Create shared ASM disks To be able to install Grid Infrastructure 11gR2 you must have disks which can be shared between the nodes in the cluster. In this chapter I will create these shared disks. A new feature in GI 11gR2 is that you can now store the OCR and votingdisks in ASM. The files created in the next steps will be used to store the OCR and votingdisk and to create a ASM diskgroup to store database files in. Unlike the previous created files it is recommended not create sparse files but fully allocate the files for ASM usage. This will definitely improve the performance of the virtual machines. [root@oraovs01 /]# dd if=/dev/zero of=/OVS/sharedDisk/asmocrvote.img bs=1M
count=1024
[root@oraovs01 /]# dd if=/dev/zero of=/OVS/sharedDisk/asmdisk1.img bs=1M count=4096
[root@oraovs01 /]# dd if=/dev/zero of=/OVS/sharedDisk/asmdisk2.img bs=1M count=4096
[root@oraovs01 /]# dd if=/dev/zero of=/OVS/sharedDisk/asmdisk3.img bs=1M count=4096
To be able to use these newly created shared disks the configuration file vm.cfg of both virtual machines must be modified: [root@oraovs01::/root]# vi /OVS/running_pool/indy/vm.cfg
disk = ['file:/OVS/running_pool/indy/system.img,xvda,w',
'file:/OVS/running_pool/indy/u01disk01.img,xvdb,w',
'file:/OVS/sharedDisk/asmocrvote.img,xvdc,w!',
'file:/OVS/sharedDisk/asmdisk1.img.img,xvdd,w!',
'file:/OVS/sharedDisk/asmdisk2.img.img,xvde,w!',
'file:/OVS/sharedDisk/asmdisk3.img.img,xvdf,w!',
]
The shared disks can be attached to the virtual machines online. It is not needed to stop the virtual machines first. This can be accomplished with the xm block-attach command: [root@oraovs01::/root]# xm block-attach indy file:/OVS/sharedDisk/asmocrvote.img
/dev/xvdc w!
[root@oraovs01::/root]# xm block-attach indy file:/OVS/sharedDisk/asmdisk1.img
/dev/xvdd w!
[root@oraovs01::/root]# xm block-attach indy file:/OVS/sharedDisk/asmdisk2.img
/dev/xvde w!
[root@oraovs01::/root]# xm block-attach indy file:/OVS/sharedDisk/asmdisk3.img
/dev/xvdf w!
Repeat this step for virtual machine dean! After attaching the shared disks check if the devices are available: root@indy::/root
$ ls -l /dev/xvd*
brw-r----- 1 root disk 202, 0 Feb 19 14:13 /dev/xvda
brw-r----- 1 root disk 202, 1 Feb 19 14:13 /dev/xvda1
brw-r----- 1 root disk 202, 2 Feb 19 14:13 /dev/xvda2
brw-r----- 1 root disk 202, 16 Feb 19 14:13 /dev/xvdb
brw-r----- 1 root disk 202, 17 Feb 19 14:13 /dev/xvdb1
brw-r----- 1 root disk 202, 32 Feb 19 14:49 /dev/xvdc
brw-r----- 1 root disk 202, 48 Feb 19 14:50 /dev/xvdd
brw-r----- 1 root disk 202, 64 Feb 19 14:50 /dev/xvde
brw-r----- 1 root disk 202, 80 Feb 19 14:50 /dev/xvdf

Page 18 van 75
The new disks are now available as devices /dev/xvdc-e. Before you can use the devices they must be partitioned first. Partition the devices on only 1 virtual machine: root@::/root
$ fdisk /dev/xvdc
Device contains neither a valid DOS partition table, nor Sun, SGI or OSF disklabel
Building a new DOS disklabel. Changes will remain in memory only,
until you decide to write them. After that, of course, the previous
content won't be recoverable.
Warning: invalid flag 0x0000 of partition table 4 will be corrected by w(rite)
Command (m for help): n
Command action
e extended
p primary partition (1-4)
p
Partition number (1-4): 1
First cylinder (1-130, default 1):
Using default value 1
Last cylinder or +size or +sizeM or +sizeK (1-130, default 130):
Using default value 130
Command (m for help): w
The partition table has been altered!
Calling ioctl() to re-read partition table.
Syncing disks.
Repeat this for devices /dev/xvdd, /dev/xvde and /dev/xvdf. Perform a quick check to see if the partitions are available: root@indy::/root
$ ls -l /dev/xvd*
brw-r----- 1 root disk 202, 0 Feb 19 14:17 /dev/xvda
brw-r----- 1 root disk 202, 1 Feb 19 14:18 /dev/xvda1
brw-r----- 1 root disk 202, 2 Feb 19 14:17 /dev/xvda2
brw-r----- 1 root disk 202, 16 Feb 19 14:17 /dev/xvdb
brw-r----- 1 root disk 202, 17 Feb 19 14:17 /dev/xvdb1
brw-r----- 1 root disk 202, 32 Feb 19 14:55 /dev/xvdc
brw-r----- 1 root disk 202, 33 Feb 19 14:55 /dev/xvdc1
brw-r----- 1 root disk 202, 48 Feb 19 14:58 /dev/xvdd
brw-r----- 1 root disk 202, 49 Feb 19 14:58 /dev/xvdd1
brw-r----- 1 root disk 202, 64 Feb 19 14:58 /dev/xvde
brw-r----- 1 root disk 202, 65 Feb 19 14:58 /dev/xvde1
brw-r----- 1 root disk 202, 80 Feb 19 14:58 /dev/xvdf
brw-r----- 1 root disk 202, 81 Feb 19 14:58 /dev/xvdf1
Now run the partprobe command to update the kernel with the modified partition table.
root@indy::/root
$ partprobe /dev/xvdc
root@indy::/root
$ partprobe /dev/xvdd
root@indy::/root
$ partprobe /dev/xvde
root@indy::/root
$ partprobe /dev/xvdf
Repeat this step for virtual machine dean!
Page 19 van 75
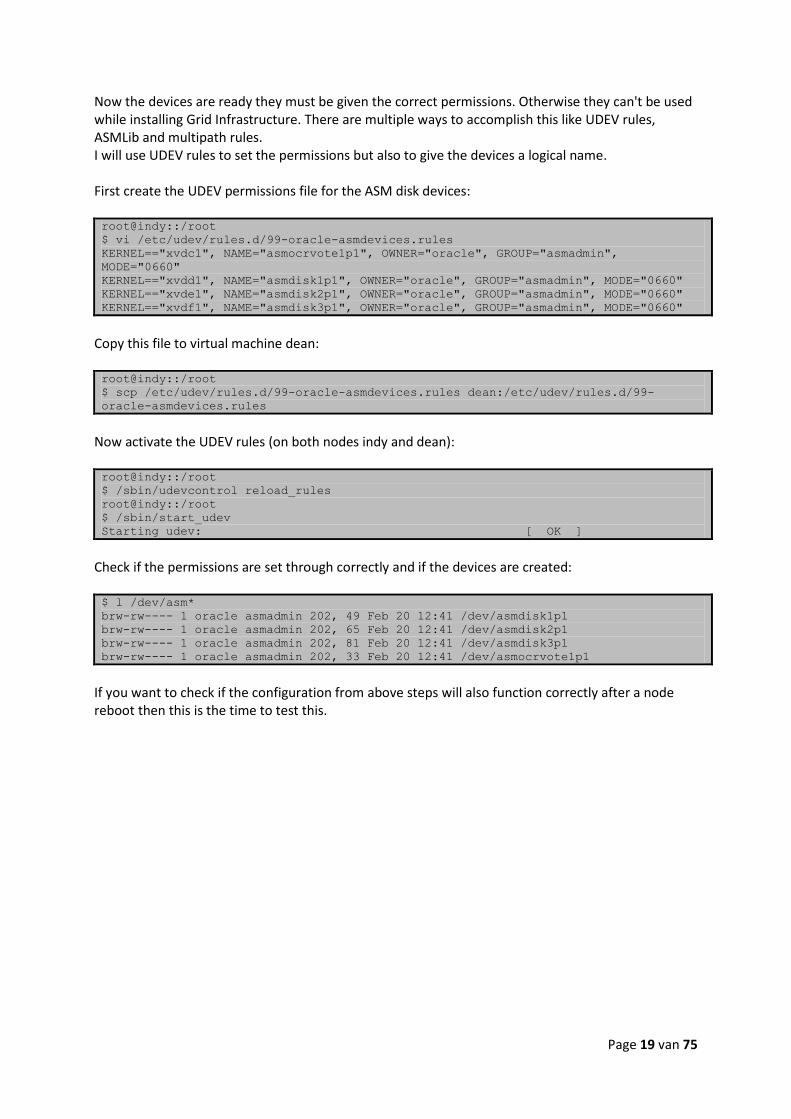
Now the devices are ready they must be given the correct permissions. Otherwise they can't be used while installing Grid Infrastructure. There are multiple ways to accomplish this like UDEV rules, ASMLib and multipath rules. I will use UDEV rules to set the permissions but also to give the devices a logical name. First create the UDEV permissions file for the ASM disk devices: root@indy::/root
$ vi /etc/udev/rules.d/99-oracle-asmdevices.rules
KERNEL=="xvdc1", NAME="asmocrvote1p1", OWNER="oracle", GROUP="asmadmin",
MODE="0660"
KERNEL=="xvdd1", NAME="asmdisk1p1", OWNER="oracle", GROUP="asmadmin", MODE="0660"
KERNEL=="xvde1", NAME="asmdisk2p1", OWNER="oracle", GROUP="asmadmin", MODE="0660"
KERNEL=="xvdf1", NAME="asmdisk3p1", OWNER="oracle", GROUP="asmadmin", MODE="0660"
Copy this file to virtual machine dean: root@indy::/root
$ scp /etc/udev/rules.d/99-oracle-asmdevices.rules dean:/etc/udev/rules.d/99-
oracle-asmdevices.rules
Now activate the UDEV rules (on both nodes indy and dean): root@indy::/root
$ /sbin/udevcontrol reload_rules
root@indy::/root
$ /sbin/start_udev
Starting udev: [ OK ]
Check if the permissions are set through correctly and if the devices are created: $ l /dev/asm*
brw-rw---- 1 oracle asmadmin 202, 49 Feb 20 12:41 /dev/asmdisk1p1
brw-rw---- 1 oracle asmadmin 202, 65 Feb 20 12:41 /dev/asmdisk2p1
brw-rw---- 1 oracle asmadmin 202, 81 Feb 20 12:41 /dev/asmdisk3p1
brw-rw---- 1 oracle asmadmin 202, 33 Feb 20 12:41 /dev/asmocrvote1p1
If you want to check if the configuration from above steps will also function correctly after a node reboot then this is the time to test this.

Page 20 van 75
3. Install some additional OS packages In this chapter I will install some additional OS packages. The first is the command line wrapper rlwrap. With this tool it is possible to track back previous
commands in command line tools like sqlplus, rman and so on. Download rlwrap from here: rlwrap. root@indy::/root
$ rpm -ivh /software/Linux/rpm/rlwrap-0.37-1.el5.x86_64.rpm
warning: /software/Linux/rpm/rlwrap-0.37-1.el5.x86_64.rpm: Header V3 DSA signature:
NOKEY, key ID 217521f6
Preparing... ########################################### [100%]
1:rlwrap ########################################### [100%]

Page 21 van 75
4. Configure NTP For an Oracle cluster to function correctly is is of most importance that some kind of time synchronization is in place. This is possible with the new CTSS (Cluster Time Synchronization Service) daemon. If prefer to configure NTP on the hosts. First make sure the guest will not synchronize with dom0. This is done by adding the xen.independent_wallclock parameter to the /etc/sysctl.conf file: root@indy::/root
$ vi /etc/sysctl.conf
xen.independent_wallclock = 1
To activate the parameter: root@indy::/root
$ sysctl -p
The NTP skewing option must be configured. Also prevent syncing the hardware clock to avoid NTP start errors: root@indy::/root
$ vi /etc/sysconfig/ntpd
OPTIONS="-u ntp:ntp -p /var/run/ntpd.pid -x"
SYNC_HWCLOCK=no
root@indy::/root
$ chmod -x /sbin/hwclock
Now the NTP daemon can be starten: root@indy::/root
$ service ntpd start
ntpd: Synchronizing with time server: [ OK ]
Starting ntpd: [ OK ]
NTP must also be started when the node has te be rebooted. This can be accomplished with the chkconfig utility: root@indy::/root
$ chkconfig ntpd on
And with the same chkconfig you can check the modifications: root@indy::/root
$ chkconfig --list ntpd
ntpd 0:off 1:off 2:on 3:on 4:on 5:on 6:off

Page 22 van 75
5. Install Grid Infrastructure 11gR2 We are now almost ready to start installing Grid Infrastructure. First we hace to download the software. In this paper I use version 11.2.0.2 which can only be download as patch from My Oracle Support (patch 10098816).
For this installation you only need to download: p10098816_112020_Linux-x86-64_1of7.zip Database binaries part 1 p10098816_112020_Linux-x86-64_2of7.zip Database binaries part 2 p10098816_112020_Linux-x86-64_3of7.zip Grid Infrastructure binaries Unzip the files in your staging area after downloading the files. To prepare the OS to install GI without additional steps during the installation the cvudisk package must be installed before installation. This package is available as part of p10098816_112020_Linux-x86-64_3of7.zip.

Page 23 van 75
root@indy::/root
$ export CVUQDISK_GRP=dba
root@indy::/root
$ rpm -ivh /software/Database/11.2.0.2/grid/rpm/cvuqdisk-1.0.9-1.rpm
Preparing... ########################################### [100%]
1:cvuqdisk ########################################### [100%]
Now we can start installing GI 11gR2. Set the DISPLAY parameter and start runInstaller.sh. oracle@indy::/home/oracle
$ export DISPLAY=192.168.0.105:0.0
oracle@indy::/software
$ cd /software/Database/11.2.0.2/grid/
oracle@indy::/software/Database/11.2.0.2/grid
$ ./runInstaller
Action: Select Skip software updates. Click Next.

Page 24 van 75
Action: Select Install and Configure Oracle Grid Infrastructure fo a Cluster. Click Next.
Action: Select Advanced Installation. Click Next.
Page 25 van 75
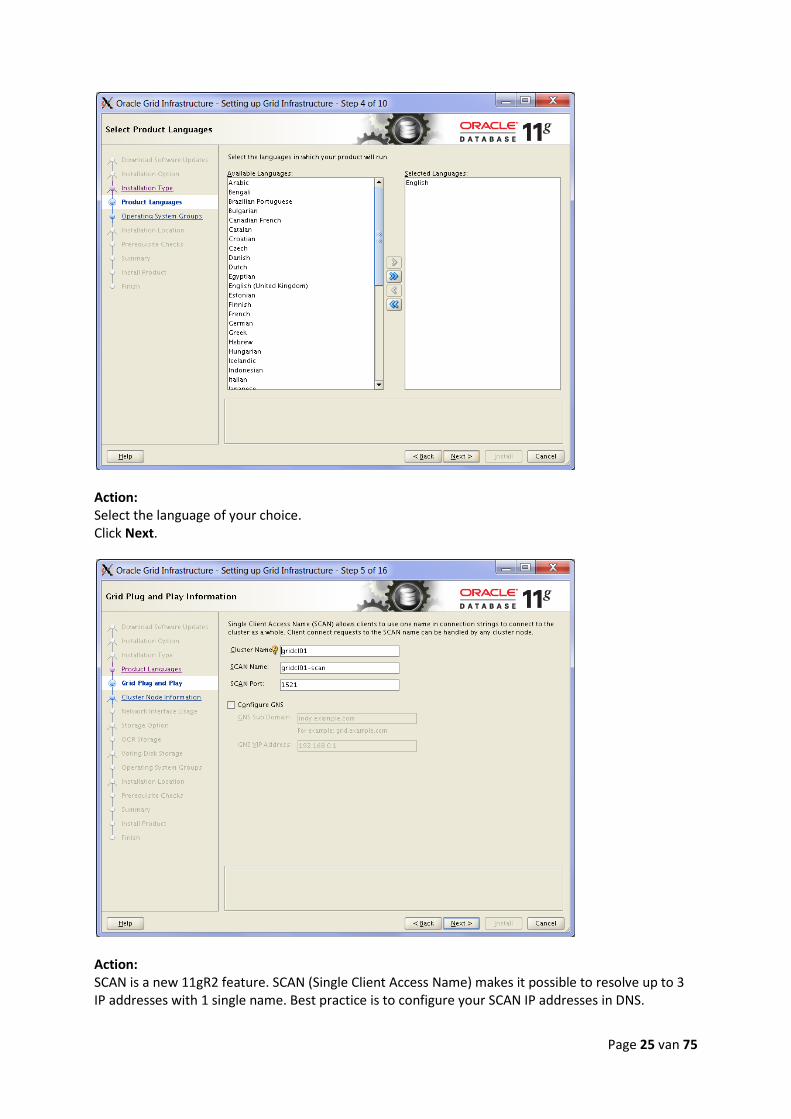
Action: Select the language of your choice. Click Next.
Action: SCAN is a new 11gR2 feature. SCAN (Single Client Access Name) makes it possible to resolve up to 3 IP addresses with 1 single name. Best practice is to configure your SCAN IP addresses in DNS.

Page 26 van 75
For this paper I will use the local /etc/hosts file to resolve the SCAN address. Because of this choice it is only possible to resolve 1 IP address. At this point of the installation you don't have to take additional steps to configure the /etc/hosts file because this was already taken care of while installing the virtual machine. This was one of the steps defined in the kickstart file. We not use the GNS (Global Naming Service) feature in this paper. Action: Specify the Cluster Name, SCAN Name and SCAN Port. Deselect Configure GNS. Click Next.
Action: Click Edit.

Page 27 van 75
Action: Remove domain name from the entries. Click OK.
Action: Click Add to add the 2nd virtual machine to the cluster.

Page 28 van 75
Action: Specify the Hostname and the Virtual IP Name. Click OK.
Action: At this point is it possible to let the installer configure the SSH Connectivity between the nodes. Click SSH Connectivity.

Page 29 van 75
Action: Specify the oracle OS Password. Click Setup.
Action: Wait until the SSH Connectivity is setup.

Page 30 van 75
Action: Click OK.
Action: Click Next.

Page 31 van 75
Action: The network interfaces are configured correctly. Click Next.
Action: Select Oracle Automatic Storage Management (Oracle ASM). Click Next.

Page 32 van 75
Action: At this point no disks are displayed, but they are there! Click Change Discovery Path.
Action: Specify the Disk Discovery Path as /dev/asm*. Click OK.

Page 33 van 75
Action: Specify the Disk Group Name, the Redundancy as External and select the Candidate Disk used for the ASM diskgroup to store the OCR ans votingdisk. Click Next.
Action: Specify the passwords for the SYS and ASMSNMP accounts. Click Next.

Page 34 van 75
Action: Select Do not use Intelligent Platform Management Interface (IPNI). Click Next.
Action: Specify dba as the Oracle ASM Operator (OSOPER for ASM) Group. Click Next.

Page 35 van 75
Action: Click Yes.
Action: Specify the Oracle Base and Software Location for the GI home. Click Next.

Page 36 van 75
Action: Specify the Inventory Directory. Click Next.
Action: Click Yes.

Page 37 van 75
Action: Wait until some checks are performed.
2 checks are returned with errors. The Device Checks for ASM point out to Bug 10357213: ASM DEVICE CHECK FAILS WITH PRVF-5184 DURING GI INSTALL and can be ignored. This will have no impact on the installation.
Page 38 van 75
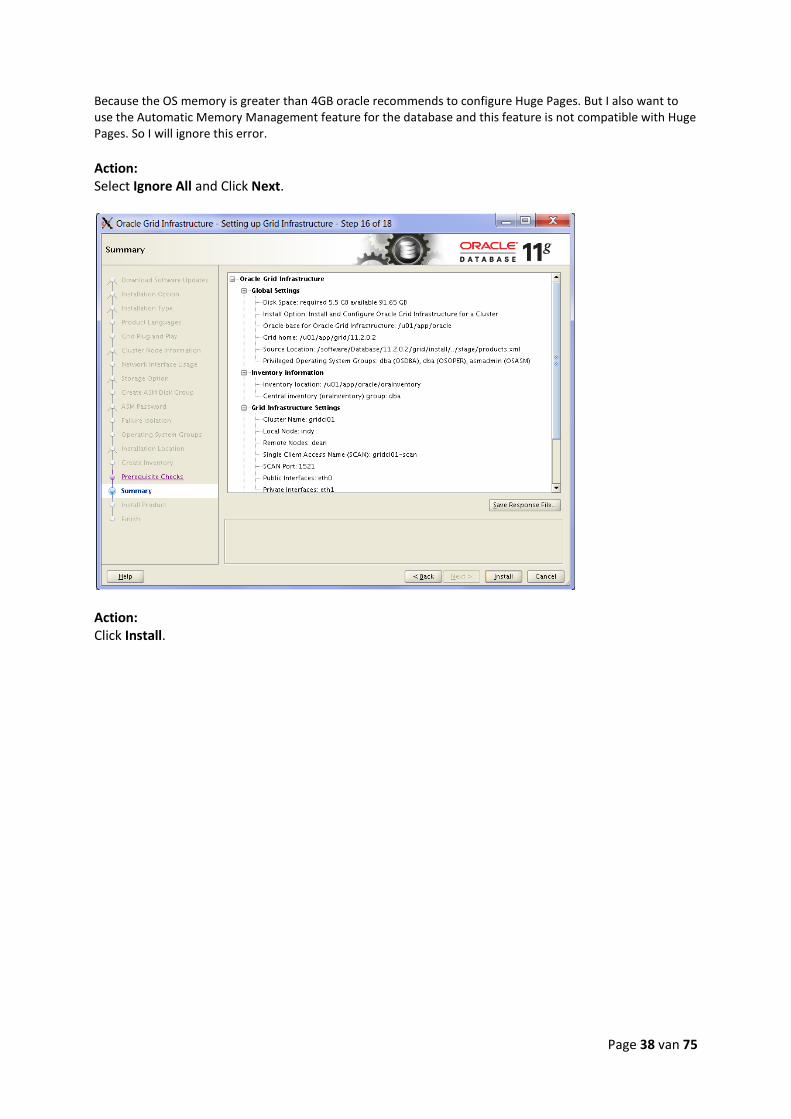
Because the OS memory is greater than 4GB oracle recommends to configure Huge Pages. But I also want to use the Automatic Memory Management feature for the database and this feature is not compatible with Huge Pages. So I will ignore this error. Action: Select Ignore All and Click Next.
Action: Click Install.

Page 39 van 75
Action: Wait while GI gets installed.
Action: Execute the scripts as user root on the local node first and then on the second node.

Page 40 van 75
First node (indy): root@indy::/root
$ /u01/app/oracle/oraInventory/orainstRoot.sh
Changing permissions of /u01/app/oracle/oraInventory.
Adding read,write permissions for group.
Removing read,write,execute permissions for world.
Changing groupname of /u01/app/oracle/oraInventory to dba.
The execution of the script is complete.
root@indy::/root
$ /u01/app/grid/11.2.0.2/root.sh
Running Oracle 11g root script...
The following environment variables are set as:
ORACLE_OWNER= oracle
ORACLE_HOME= /u01/app/grid/11.2.0.2
Enter the full pathname of the local bin directory: [/usr/local/bin]:
Copying dbhome to /usr/local/bin ...
Copying oraenv to /usr/local/bin ...
Copying coraenv to /usr/local/bin ...
Creating /etc/oratab file...
Entries will be added to the /etc/oratab file as needed by
Database Configuration Assistant when a database is created
Finished running generic part of root script.
Now product-specific root actions will be performed.
Using configuration parameter file:
/u01/app/grid/11.2.0.2/crs/install/crsconfig_params
Creating trace directory
LOCAL ADD MODE
Creating OCR keys for user 'root', privgrp 'root'..
Operation successful.
OLR initialization - successful
root wallet
root wallet cert
root cert export
peer wallet
profile reader wallet
pa wallet
peer wallet keys
pa wallet keys
peer cert request
pa cert request
peer cert
pa cert
peer root cert TP
profile reader root cert TP
pa root cert TP
peer pa cert TP
pa peer cert TP
profile reader pa cert TP
profile reader peer cert TP
peer user cert
pa user cert
Adding daemon to inittab
ACFS-9200: Supported
ACFS-9300: ADVM/ACFS distribution files found.
ACFS-9307: Installing requested ADVM/ACFS software.
ACFS-9308: Loading installed ADVM/ACFS drivers.
ACFS-9321: Creating udev for ADVM/ACFS.
ACFS-9323: Creating module dependencies - this may take some time.
ACFS-9327: Verifying ADVM/ACFS devices.
ACFS-9309: ADVM/ACFS installation correctness verified.
CRS-2672: Attempting to start 'ora.mdnsd' on 'indy'

Page 41 van 75
CRS-2676: Start of 'ora.mdnsd' on 'indy' succeeded
CRS-2672: Attempting to start 'ora.gpnpd' on 'indy'
CRS-2676: Start of 'ora.gpnpd' on 'indy' succeeded
CRS-2672: Attempting to start 'ora.cssdmonitor' on 'indy'
CRS-2672: Attempting to start 'ora.gipcd' on 'indy'
CRS-2676: Start of 'ora.cssdmonitor' on 'indy' succeeded
CRS-2676: Start of 'ora.gipcd' on 'indy' succeeded
CRS-2672: Attempting to start 'ora.cssd' on 'indy'
CRS-2672: Attempting to start 'ora.diskmon' on 'indy'
CRS-2676: Start of 'ora.diskmon' on 'indy' succeeded
CRS-2676: Start of 'ora.cssd' on 'indy' succeeded
ASM created and started successfully.
Disk Group DGGRID created successfully.
clscfg: -install mode specified
Successfully accumulated necessary OCR keys.
Creating OCR keys for user 'root', privgrp 'root'..
Operation successful.
CRS-4256: Updating the profile
Successful addition of voting disk aa4ddcf9ff744fd7bfd127b4f208f37a
.
Successfully replaced voting disk group with +DGGRID.
CRS-4256: Updating the profile
CRS-4266: Voting file(s) successfully replaced
## STATE File Universal Id File Name Disk group
-- ----- ----------------- --------- ---------
1. ONLINE aa4ddcf9ff744fd7bfd127b4f208f37a (/dev/asmocrvotedisk1p1) [DGGRID]
Located 1 voting disk(s).
CRS-2672: Attempting to start 'ora.asm' on 'indy'
CRS-2676: Start of 'ora.asm' on 'indy' succeeded
CRS-2672: Attempting to start 'ora.DGGRID.dg' on 'indy'
CRS-2676: Start of 'ora.DGGRID.dg' on 'indy' succeeded
ACFS-9200: Supported
ACFS-9200: Supported
CRS-2672: Attempting to start 'ora.registry.acfs' on 'indy'
CRS-2676: Start of 'ora.registry.acfs' on 'indy' succeeded
Configure Oracle Grid Infrastructure for a Cluster ... succeeded
First node (dean): root@dean::/root
$ /u01/app/oracle/oraInventory/orainstRoot.sh
Creating the Oracle inventory pointer file (/etc/oraInst.loc)
Changing permissions of /u01/app/oracle/oraInventory.
Adding read,write permissions for group.
Removing read,write,execute permissions for world.
Changing groupname of /u01/app/oracle/oraInventory to dba.
The execution of the script is complete.
root@dean::/root
$ /u01/app/grid/11.2.0.2/root.sh
Running Oracle 11g root script...
The following environment variables are set as:
ORACLE_OWNER= oracle
ORACLE_HOME= /u01/app/grid/11.2.0.2
Enter the full pathname of the local bin directory: [/usr/local/bin]:
Copying dbhome to /usr/local/bin ...
Copying oraenv to /usr/local/bin ...
Copying coraenv to /usr/local/bin ...
Creating /etc/oratab file...
Entries will be added to the /etc/oratab file as needed by

Page 42 van 75
Database Configuration Assistant when a database is created
Finished running generic part of root script.
Now product-specific root actions will be performed.
Using configuration parameter file:
/u01/app/grid/11.2.0.2/crs/install/crsconfig_params
Creating trace directory
LOCAL ADD MODE
Creating OCR keys for user 'root', privgrp 'root'..
Operation successful.
OLR initialization - successful
Adding daemon to inittab
ACFS-9200: Supported
ACFS-9300: ADVM/ACFS distribution files found.
ACFS-9307: Installing requested ADVM/ACFS software.
ACFS-9308: Loading installed ADVM/ACFS drivers.
ACFS-9321: Creating udev for ADVM/ACFS.
ACFS-9323: Creating module dependencies - this may take some time.
ACFS-9327: Verifying ADVM/ACFS devices.
ACFS-9309: ADVM/ACFS installation correctness verified.
CRS-4402: The CSS daemon was started in exclusive mode but found an active CSS
daemon on node indy, number 1, and is terminating
An active cluster was found during exclusive startup, restarting to join the
cluster
Configure Oracle Grid Infrastructure for a Cluster ... succeeded
Now click OK.
Action: Wait until some the last configuration steps are being performed.

Page 43 van 75
This error is returned because I didn't setup DNS for the SCAN feature but added it to the host file. For this reason this error can safely be ignored. INFO: Checking Single Client Access Name (SCAN)...
INFO: Checking TCP connectivity to SCAN Listeners...
INFO: TCP connectivity to SCAN Listeners exists on all cluster nodes
INFO: Checking name resolution setup for "gridcl01-scan"...
INFO: ERROR:
INFO: PRVF-4664 : Found inconsistent name resolution entries for SCAN name
"gridcl01-scan"
INFO: ERROR:
INFO: PRVF-4657 : Name resolution setup check for "gridcl01-scan" (IP address:
192.168.0.212) failed
INFO: ERROR:
INFO: PRVF-4664 : Found inconsistent name resolution entries for SCAN name
"gridcl01-scan"
INFO: Verification of SCAN VIP and Listener setup failed
Action: Click OK.

Page 44 van 75
Action: Click Skip.
Action: Click Next.

Page 45 van 75
Action: Click Yes.
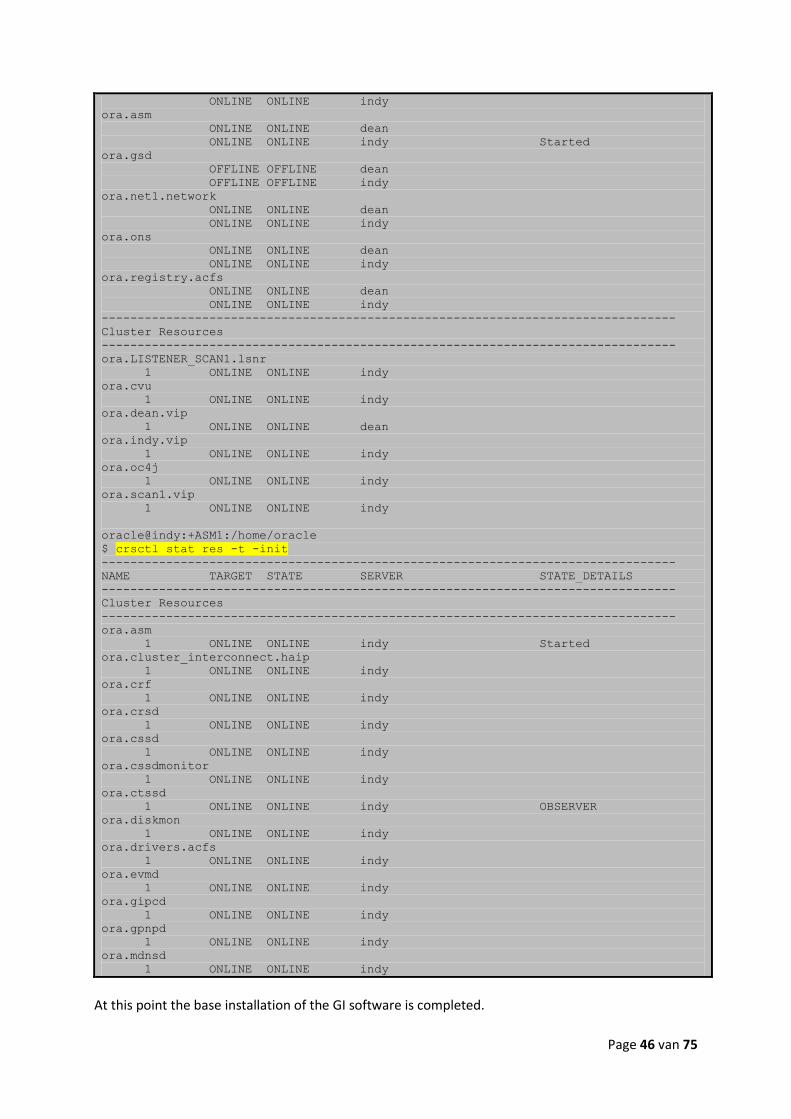
Action: Click Close. Perform a quick check to see if all GI processes are available oracle@indy::/home/oracle
$ . oraenv
ORACLE_SID = [oracle] ? +ASM1
The Oracle base remains unchanged with value /u01/app/oracle
oracle@indy:+ASM1:/home/oracle
$ crsctl stat res -t
--------------------------------------------------------------------------------
NAME TARGET STATE SERVER STATE_DETAILS
--------------------------------------------------------------------------------
Local Resources
--------------------------------------------------------------------------------
ora.DGGRID.dg
ONLINE ONLINE dean
ONLINE ONLINE indy
ora.LISTENER.lsnr
ONLINE ONLINE dean
Page 46 van 75
ONLINE ONLINE indy
ora.asm
ONLINE ONLINE dean
ONLINE ONLINE indy Started
ora.gsd
OFFLINE OFFLINE dean
OFFLINE OFFLINE indy
ora.net1.network
ONLINE ONLINE dean
ONLINE ONLINE indy
ora.ons
ONLINE ONLINE dean
ONLINE ONLINE indy
ora.registry.acfs
ONLINE ONLINE dean
ONLINE ONLINE indy
--------------------------------------------------------------------------------
Cluster Resources
--------------------------------------------------------------------------------
ora.LISTENER_SCAN1.lsnr
1 ONLINE ONLINE indy
ora.cvu
1 ONLINE ONLINE indy
ora.dean.vip
1 ONLINE ONLINE dean
ora.indy.vip
1 ONLINE ONLINE indy
ora.oc4j
1 ONLINE ONLINE indy
ora.scan1.vip
1 ONLINE ONLINE indy
oracle@indy:+ASM1:/home/oracle
$ crsctl stat res -t -init
--------------------------------------------------------------------------------
NAME TARGET STATE SERVER STATE_DETAILS
--------------------------------------------------------------------------------
Cluster Resources
--------------------------------------------------------------------------------
ora.asm
1 ONLINE ONLINE indy Started
ora.cluster_interconnect.haip
1 ONLINE ONLINE indy
ora.crf
1 ONLINE ONLINE indy
ora.crsd
1 ONLINE ONLINE indy
ora.cssd
1 ONLINE ONLINE indy
ora.cssdmonitor
1 ONLINE ONLINE indy
ora.ctssd
1 ONLINE ONLINE indy OBSERVER
ora.diskmon
1 ONLINE ONLINE indy
ora.drivers.acfs
1 ONLINE ONLINE indy
ora.evmd
1 ONLINE ONLINE indy
ora.gipcd
1 ONLINE ONLINE indy
ora.gpnpd
1 ONLINE ONLINE indy
ora.mdnsd
1 ONLINE ONLINE indy
At this point the base installation of the GI software is completed.

Page 47 van 75
6. Install Oracle 11gR2 RDBMS software We are now ready to continue with the installation of the Oracle 11g RDBMS software so we can
create a RAC-database ina next step. Like the GI software I will use Oracle RDBMS version 11.2.0.2.
In a previous step I already downloaded the software needed for this step. Set the DISPLAY parameter and start runInstaller.sh. oracle@indy::/home/oracle
$ export DISPLAY=192.168.0.105:0.0
oracle@indy::/software
$ cd /software/Database/11.2.0.2/database
oracle@indy::/software/Database/11.2.0.2/database
$ ./runInstaller
Action: Deselect I wish to receive security updates via My Oracle Support. Click Next.

Page 48 van 75
Action: Click Yes.
Action: Select Skip software updates. Click Next.

Page 49 van 75
Action: Select Install database software only. Click Next.
Action: Make sure all nodes are selected. Click Next.

Page 50 van 75
Action: Select the language of your choice. Click Next.
Action: Click Select Options.

Page 51 van 75
Action: Because I want to be able to play with all available options I will install all options. Click Select All and then click OK.
Action: Click Next.

Page 52 van 75
Action: Specify the Oracle Base and the database Software Location. Click Next.
Action: Select dba as the Database Operator (OSOPER) Group. Click Next.

Page 53 van 75
Action: Wait until some checks are performed.
Action: Click Install to start the database software installation.

Page 54 van 75
Action: Wait while the database software is being installed.
Action: Execute the script as user root on the local node first and then on the second node.

Page 55 van 75
First node (indy): root@indy::/root
$ /u01/app/oracle/product/11.2.0.2/db_000/root.sh
Running Oracle 11g root script...
The following environment variables are set as:
ORACLE_OWNER= oracle
ORACLE_HOME= /u01/app/oracle/product/11.2.0.2/db_000
Enter the full pathname of the local bin directory: [/usr/local/bin]:
The contents of "dbhome" have not changed. No need to overwrite.
The contents of "oraenv" have not changed. No need to overwrite.
The contents of "coraenv" have not changed. No need to overwrite.
Entries will be added to the /etc/oratab file as needed by
Database Configuration Assistant when a database is created
Finished running generic part of root script.
Now product-specific root actions will be performed.
Finished product-specific root actions.
Second node (dean): root@dean::/root
$ /u01/app/oracle/product/11.2.0.2/db_000/root.sh
Running Oracle 11g root script...
The following environment variables are set as:
ORACLE_OWNER= oracle
ORACLE_HOME= /u01/app/oracle/product/11.2.0.2/db_000
Enter the full pathname of the local bin directory: [/usr/local/bin]:
The contents of "dbhome" have not changed. No need to overwrite.
The contents of "oraenv" have not changed. No need to overwrite.
The contents of "coraenv" have not changed. No need to overwrite.
Entries will be added to the /etc/oratab file as needed by
Database Configuration Assistant when a database is created
Finished running generic part of root script.
Now product-specific root actions will be performed.
Finished product-specific root actions.
Now Click OK.

Page 56 van 75
Action: Click Close. At this point the base installation of the database software is completed.

Page 57 van 75
7. Install Oracle 11gR2 RDBMS and GI patches I recommend downloading and installing at least the following patches:
Grid INfrastructure:
Opatch p6880880_112000_Linux-x86-64.zip
GI Bundle #1 p10157506_112020_Linux-x86-64.zip
Database:
Opatch p6880880_112000_Linux-x86-64.zip
PSU 11.2.0.2.1 p10248523_112020_Linux-x86-64.zip
First refresh OPatch (must be performed on ALL nodes)
oracle@indy::/home/oracle
$ cd /software/OPatch/
oracle@indy::/software/OPatch
$ unzip p6880880_112000_Linux-x86-64.zip -d /u01/app/grid/11.2.0.2
Archive: p6880880_112000_Linux-x86-64.zip
extracting: /u01/app/grid/11.2.0.2/OPatch/ocm/ocm.zip
.....
replace /u01/app/grid/11.2.0.2/OPatch/ocm/ocm_platforms.txt? [y]es, [n]o, [A]ll, [N]one,
[r]ename: A
inflating: /u01/app/grid/11.2.0.2/OPatch/ocm/ocm_platforms.txt
extracting: /u01/app/grid/11.2.0.2/OPatch/crs/log/dummy
.....
inflating: /u01/app/grid/11.2.0.2/OPatch/README.txt
Repeat this for $ORACLE_HOME /u01/app/oracle/product/11.2.0.2/db_000 Now I will Install GI Bundle #1. The next steps must be performed on all nodes: oracle@indy::/home/oracle
$ +ASM1
The Oracle base remains unchanged with value /u01/app/oracle
oracle@indy:+ASM2:/home/oracle
$ cd /u01/app/grid/11.2.0.2/OPatch/ocm/bin
oracle@indy:+ASM2:/u01/app/grid/11.2.0.2/OPatch/ocm/bin
$ /u01/app/grid/11.2.0.2/OPatch/ocm/bin/emocmrsp
OCM Installation Response Generator 10.3.1.2.0 - Production
Copyright (c) 2005, 2009, Oracle and/or its affiliates. All rights reserved.
Provide your email address to be informed of security issues, install and
initiate Oracle Configuration Manager. Easier for you if you use your My
Oracle Support Email address/User Name.
Visit http://www.oracle.com/support/policies.html for details.
Email address/User Name:
You have not provided an email address for notification of security issues.
Do you wish to remain uninformed of security issues ([Y]es, [N]o) [N]: Y
The OCM configuration response file (ocm.rsp) was successfully created.
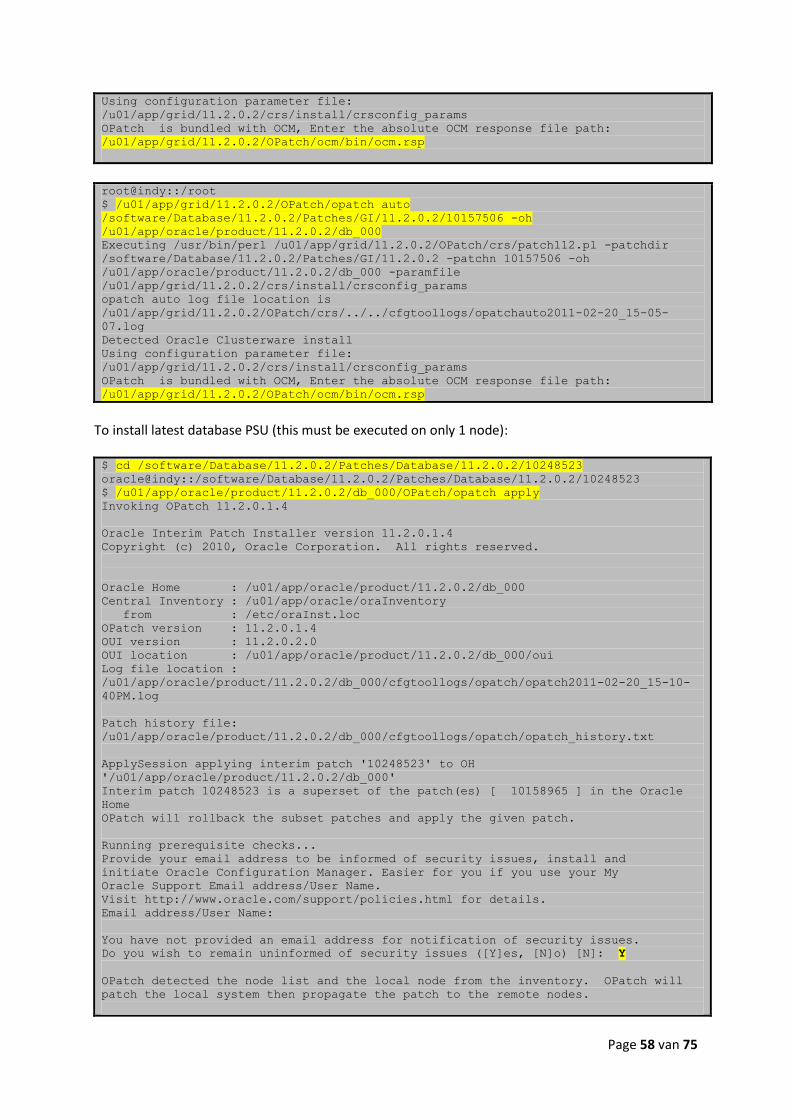
root@indy::/root
$ /u01/app/grid/11.2.0.2/OPatch/opatch auto
/software/Database/11.2.0.2/Patches/GI/11.2.0.2/10157506 -oh /u01/app/grid/11.2.0.2
Executing /usr/bin/perl /u01/app/grid/11.2.0.2/OPatch/crs/patch112.pl -patchdir
/software/Database/11.2.0.2/Patches/GI/11.2.0.2 -patchn 10157506 -oh
/u01/app/oracle/product/11.2.0.2/db_000 -paramfile
/u01/app/grid/11.2.0.2/crs/install/crsconfig_params
opatch auto log file location is
/u01/app/grid/11.2.0.2/OPatch/crs/../../cfgtoollogs/opatchauto2011-02-20_15-05-
07.log
Detected Oracle Clusterware install
Page 58 van 75
Using configuration parameter file:
/u01/app/grid/11.2.0.2/crs/install/crsconfig_params
OPatch is bundled with OCM, Enter the absolute OCM response file path:
/u01/app/grid/11.2.0.2/OPatch/ocm/bin/ocm.rsp
root@indy::/root
$ /u01/app/grid/11.2.0.2/OPatch/opatch auto
/software/Database/11.2.0.2/Patches/GI/11.2.0.2/10157506 -oh
/u01/app/oracle/product/11.2.0.2/db_000
Executing /usr/bin/perl /u01/app/grid/11.2.0.2/OPatch/crs/patch112.pl -patchdir
/software/Database/11.2.0.2/Patches/GI/11.2.0.2 -patchn 10157506 -oh
/u01/app/oracle/product/11.2.0.2/db_000 -paramfile
/u01/app/grid/11.2.0.2/crs/install/crsconfig_params
opatch auto log file location is
/u01/app/grid/11.2.0.2/OPatch/crs/../../cfgtoollogs/opatchauto2011-02-20_15-05-
07.log
Detected Oracle Clusterware install
Using configuration parameter file:
/u01/app/grid/11.2.0.2/crs/install/crsconfig_params
OPatch is bundled with OCM, Enter the absolute OCM response file path:
/u01/app/grid/11.2.0.2/OPatch/ocm/bin/ocm.rsp
To install latest database PSU (this must be executed on only 1 node): $ cd /software/Database/11.2.0.2/Patches/Database/11.2.0.2/10248523
oracle@indy::/software/Database/11.2.0.2/Patches/Database/11.2.0.2/10248523
$ /u01/app/oracle/product/11.2.0.2/db_000/OPatch/opatch apply
Invoking OPatch 11.2.0.1.4
Oracle Interim Patch Installer version 11.2.0.1.4
Copyright (c) 2010, Oracle Corporation. All rights reserved.
Oracle Home : /u01/app/oracle/product/11.2.0.2/db_000
Central Inventory : /u01/app/oracle/oraInventory
from : /etc/oraInst.loc
OPatch version : 11.2.0.1.4
OUI version : 11.2.0.2.0
OUI location : /u01/app/oracle/product/11.2.0.2/db_000/oui
Log file location :
/u01/app/oracle/product/11.2.0.2/db_000/cfgtoollogs/opatch/opatch2011-02-20_15-10-
40PM.log
Patch history file:
/u01/app/oracle/product/11.2.0.2/db_000/cfgtoollogs/opatch/opatch_history.txt
ApplySession applying interim patch '10248523' to OH
'/u01/app/oracle/product/11.2.0.2/db_000'
Interim patch 10248523 is a superset of the patch(es) [ 10158965 ] in the Oracle
Home
OPatch will rollback the subset patches and apply the given patch.
Running prerequisite checks...
Provide your email address to be informed of security issues, install and
initiate Oracle Configuration Manager. Easier for you if you use your My
Oracle Support Email address/User Name.
Visit http://www.oracle.com/support/policies.html for details.
Email address/User Name:
You have not provided an email address for notification of security issues.
Do you wish to remain uninformed of security issues ([Y]es, [N]o) [N]: Y
OPatch detected the node list and the local node from the inventory. OPatch will
patch the local system then propagate the patch to the remote nodes.

Page 59 van 75
This node is part of an Oracle Real Application Cluster.
Remote nodes: 'dean'
Local node: 'indy'
Please shutdown Oracle instances running out of this ORACLE_HOME on the local
system.
(Oracle Home = '/u01/app/oracle/product/11.2.0.2/db_000')
Is the local system ready for patching? [y|n]
y
User Responded with: Y
Backing up files and inventory (not for auto-rollback) for the Oracle Home
Backing up files affected by the patch '10248523' for restore. This might take a
while...
Backing up files affected by the patch '10158965' for restore. This might take a
while...
ApplySession rolling back interim patch '10158965' from OH
'/u01/app/oracle/product/11.2.0.2/db_000'
Patching component oracle.rdbms, 11.2.0.2.0...
Updating archive file "/u01/app/oracle/product/11.2.0.2/db_000/lib/libserver11.a"
with "lib/libserver11.a/kfdp.o"
……
Verifying the update...
Inventory check OK: Patch ID 10248523 is registered in Oracle Home inventory with
proper meta-data.
Files check OK: Files from Patch ID 10248523 are present in Oracle Home.
The local system has been patched. You can restart Oracle instances on it.
Patching in rolling mode.
The node 'dean' will be patched next.
Please shutdown Oracle instances running out of this ORACLE_HOME on 'dean'.
(Oracle Home = '/u01/app/oracle/product/11.2.0.2/db_000')
Is the node ready for patching? [y|n]
y
User Responded with: Y
Updating nodes 'dean'
Apply-related files are:
FP =
"/u01/app/oracle/product/11.2.0.2/db_000/.patch_storage/10248523_Dec_16_2010_23_39_
23/rac/copy_files.txt"
DP =
"/u01/app/oracle/product/11.2.0.2/db_000/.patch_storage/10248523_Dec_16_2010_23_39_
23/rac/copy_dirs.txt"
MP =
"/u01/app/oracle/product/11.2.0.2/db_000/.patch_storage/10248523_Dec_16_2010_23_39_
23/rac/make_cmds.txt"
RC =
"/u01/app/oracle/product/11.2.0.2/db_000/.patch_storage/10248523_Dec_16_2010_23_39_
23/rac/remote_cmds.txt"
Auto-Rollback-related files are:
FR =
"/u01/app/oracle/product/11.2.0.2/db_000/.patch_storage/10248523_Dec_16_2010_23_39_
23/rac/remove_files.txt"
DR =
"/u01/app/oracle/product/11.2.0.2/db_000/.patch_storage/10248523_Dec_16_2010_23_39_
23/rac/remove_dirs.txt"
……

Page 60 van 75
The node 'dean' has been patched. You can restart Oracle instances on it.
……
--------------------------------------------------------------------------------
The following warnings have occurred during OPatch execution:
1) OUI-67620:Interim patch 10248523 is a superset of the patch(es) [ 10158965 ] in
the Oracle Home
--------------------------------------------------------------------------------
OPatch Session completed with warnings.
OPatch completed with warnings.
OK, an error, but this one we can ignore because it only tells us that a subset of the patch is not installed which was already installed while installing the database section of the GI bundle #1.

Page 61 van 75
8. Create ASM diskgroup for database files We are almost ready to create a RAC-database, but first we have to create an ASM diskgroup to store the database files. I will use the utility asmca for this purpose. Set the DISPLAY parameter and environment and start asmca oracle@indy::/home/oracle
$ export DISPLAY=192.168.0.105:0.0
oracle@indy::/home/oracle
$ +ASM1
The Oracle base remains unchanged with value /u01/app/oracle
oracle@indy:+ASM1:/home/oracle
$ asmca
Action: Click Create.

Page 62 van 75
Action: Specify the Disk Group Name, Redundancy as External (None) and select the Candidate Disks to be part of the ASM diskgroup. Click OK.
Action: Wait while the ASM diskgroup is being created.

Page 63 van 75
Action: Click OK.
Action: Click Exit.
Action: Click Yes.

Page 64 van 75
9. Create RAC Database And finally we are now able to create an Oracle RAC-database. I will give an example by creating a database using the dbca utility and some options. Which options you must choose is dependent of your needs. Set the DISPLAY parameter and environment and start asmca oracle@indy::/home/oracle
$ export DISPLAY=192.168.0.105:0.0
oracle@indy::/home/oracle
oracle@indy::/home/oracle
$ /u01/app/oracle/product/11.2.0.2/db_000/bin/dbca
Action: Select Oracle Real Application Clusters (RAC) database. Click Next.

Page 65 van 75
Action: Select Create a Database. Click Next.
Action: Select Custom Database. Next Next.

Page 66 van 75
Action: Specify Admin-Managed as Configuration Type. Specify the Global Database Name and SID Prefix. Click Select All. Click Next.
Action: Deselect Configure Enterprise Manager. Click Next.

Page 67 van 75
Action: Specify the Passwords for the SYS and SYSTEM accounts. Click Next.
Action: Select Use Oracle-Managed Files and +DGDATA as Database Area. Click Next.

Page 68 van 75
Action: Deselect Specify Fast Recovery Area. Select Enable Archiving and click Edit Archive Mode Parameters.
Action: Specify +DGDATA as Archive Log Destination. Click OK.

Page 69 van 75
Action: Click Next.
Action: Select all the options you want to install in your database. Click Next.

Page 70 van 75
Action: Under Typical specify the Memory Size (SGA and PGA). A minimum size of 1024 MB is recommended. This will also avoid that you will get some ORA-04031 errors while creating the database. Select Use Automatic Memory Management. Click tab Character Sets.
Action: Select Use Unicode (AL32UTF8) as Database Character Set and UTF8 as National Character Set. Click Next.

Page 71 van 75
Action: Click Next.
Action: If you are curious about the scripts generated by the dbca utility then select Generate Database Creation Scripts. Click Finish to start creating the RAC database.

Page 72 van 75
Action: Click OK.
Action: Click OK.
Page 73 van 75
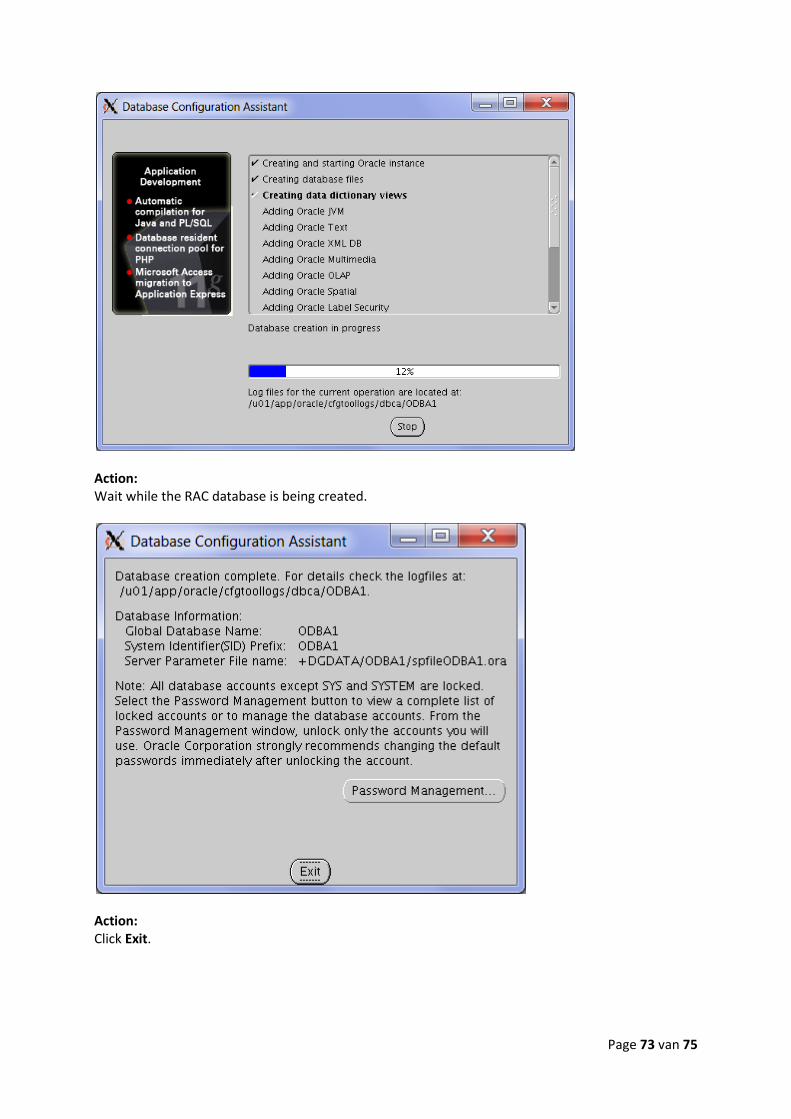
Action: Wait while the RAC database is being created.
Action: Click Exit.
Page 74 van 75
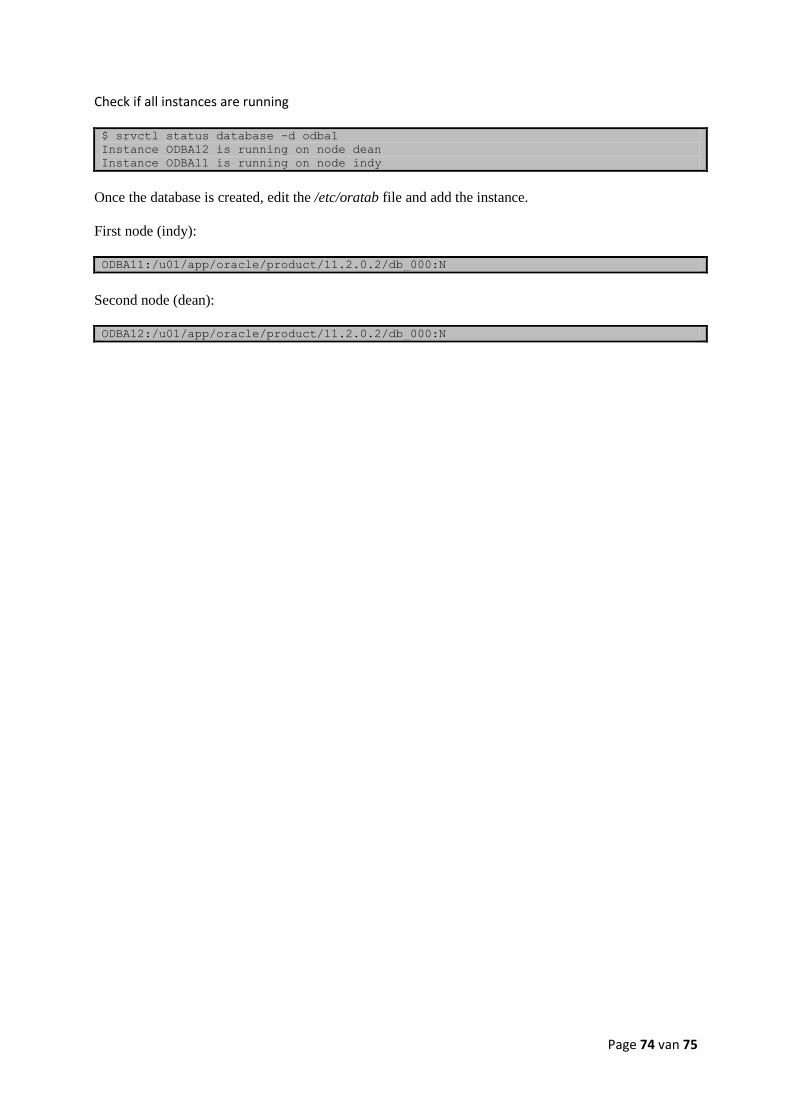
Check if all instances are running $ srvctl status database -d odba1
Instance ODBA12 is running on node dean
Instance ODBA11 is running on node indy
Once the database is created, edit the /etc/oratab file and add the instance.
First node (indy):
ODBA11:/u01/app/oracle/product/11.2.0.2/db_000:N
Second node (dean):
ODBA12:/u01/app/oracle/product/11.2.0.2/db_000:N

Page 75 van 75
10. Loading Modified SQL Files into the Database
In chapter 7 Install Oracle 11gR2 RDBMS and GI patches we installed the latest PSU. To load the
modified SQL files in the database follow the next steps:
oracle@indy::/home/oracle
$ . oraenv
ORACLE_SID = [oracle] ? ODBA11
ORACLE_HOME = [/home/oracle] ? /u01/app/oracle/product/11.2.0.2/db_000
The Oracle base for ORACLE_HOME=/u01/app/oracle/product/11.2.0.2/db_000 is
/u01/app/oracle
oracle@indy::/home/oracle
$ cd $ORACLE_HOME/rdbms/admin/
oracle@indy::/home/oracle
$ sqlplus / as sysdba
SQL*Plus: Release 11.2.0.2.0 Production on Sat Jan 29 20:29:21 2011
Copyright (c) 1982, 2010, Oracle. All rights reserved.
Connected to:
Oracle Database 11g Enterprise Edition Release 11.2.0.2.0 - 64bit Production
With the Partitioning option
SQL> @catbundle psu apply
SQL> exit
Related Documents