BitRock InstallBuilder User Guide 8 i BitRock InstallBuilder User Guide 8

Install Builder Userguide
Oct 23, 2014
Welcome message from author
This document is posted to help you gain knowledge. Please leave a comment to let me know what you think about it! Share it to your friends and learn new things together.
Transcript

BitRock InstallBuilder User Guide 8i
BitRock InstallBuilder User Guide 8
BitRock InstallBuilder User Guide 8ii
Contents
1 Introduction to InstallBuilder 1
1.1 What Sets InstallBuilder Apart . . . . . . . . . . . . . . . . . . . . . . . . . . . . . . . . . . . . . . . . . . . . 1
1.2 What’s New In InstallBuilder 8 . . . . . . . . . . . . . . . . . . . . . . . . . . . . . . . . . . . . . . . . . . . . 1
1.3 Features . . . . . . . . . . . . . . . . . . . . . . . . . . . . . . . . . . . . . . . . . . . . . . . . . . . . . . . . 2
1.4 Supported Platforms . . . . . . . . . . . . . . . . . . . . . . . . . . . . . . . . . . . . . . . . . . . . . . . . . 3
1.5 Requirements . . . . . . . . . . . . . . . . . . . . . . . . . . . . . . . . . . . . . . . . . . . . . . . . . . . . . 3
1.6 Editions . . . . . . . . . . . . . . . . . . . . . . . . . . . . . . . . . . . . . . . . . . . . . . . . . . . . . . . . 4
1.7 The GUI . . . . . . . . . . . . . . . . . . . . . . . . . . . . . . . . . . . . . . . . . . . . . . . . . . . . . . . . 4
1.8 The XML . . . . . . . . . . . . . . . . . . . . . . . . . . . . . . . . . . . . . . . . . . . . . . . . . . . . . . . 9
2 Installation and Getting Started 12
2.1 Installation . . . . . . . . . . . . . . . . . . . . . . . . . . . . . . . . . . . . . . . . . . . . . . . . . . . . . . 12
2.1.1 Installing on Windows . . . . . . . . . . . . . . . . . . . . . . . . . . . . . . . . . . . . . . . . . . . . 12
2.1.2 Installing on Unix . . . . . . . . . . . . . . . . . . . . . . . . . . . . . . . . . . . . . . . . . . . . . . 17
2.1.3 Installing on Mac OS X . . . . . . . . . . . . . . . . . . . . . . . . . . . . . . . . . . . . . . . . . . . 18
2.2 Registering your Copy of InstallBuilder . . . . . . . . . . . . . . . . . . . . . . . . . . . . . . . . . . . . . . . 18
2.2.1 Specifying a License in the Command Line . . . . . . . . . . . . . . . . . . . . . . . . . . . . . . . . . 18
2.2.2 Windows-specific License Registration Details . . . . . . . . . . . . . . . . . . . . . . . . . . . . . . . 18
2.3 Directory Structure . . . . . . . . . . . . . . . . . . . . . . . . . . . . . . . . . . . . . . . . . . . . . . . . . . 19
2.4 Building Your First Installer . . . . . . . . . . . . . . . . . . . . . . . . . . . . . . . . . . . . . . . . . . . . . 19
2.4.1 Startup and Basic Information . . . . . . . . . . . . . . . . . . . . . . . . . . . . . . . . . . . . . . . . 19
2.4.2 Select the Files . . . . . . . . . . . . . . . . . . . . . . . . . . . . . . . . . . . . . . . . . . . . . . . . 21
2.4.3 Add Logic to the Installer . . . . . . . . . . . . . . . . . . . . . . . . . . . . . . . . . . . . . . . . . . 22
2.4.4 Add a license key page . . . . . . . . . . . . . . . . . . . . . . . . . . . . . . . . . . . . . . . . . . . . 23
2.4.5 Customize the Installer . . . . . . . . . . . . . . . . . . . . . . . . . . . . . . . . . . . . . . . . . . . . 25
2.4.6 Packaging the Installer . . . . . . . . . . . . . . . . . . . . . . . . . . . . . . . . . . . . . . . . . . . . 28
2.4.7 CDROM Installers . . . . . . . . . . . . . . . . . . . . . . . . . . . . . . . . . . . . . . . . . . . . . . 29
2.4.7.1 How are disks on multidisk installers detected . . . . . . . . . . . . . . . . . . . . . . . . . . 30
2.5 Sample installers bundled with InstallBuilder . . . . . . . . . . . . . . . . . . . . . . . . . . . . . . . . . . . . 31
2.5.1 Basic demo project . . . . . . . . . . . . . . . . . . . . . . . . . . . . . . . . . . . . . . . . . . . . . . 32
BitRock InstallBuilder User Guide 8iii
2.5.2 Components, component groups and downloadable components . . . . . . . . . . . . . . . . . . . . . . 32
2.5.3 Showcase of available parameters . . . . . . . . . . . . . . . . . . . . . . . . . . . . . . . . . . . . . . 34
2.5.4 Actions and when they are executed . . . . . . . . . . . . . . . . . . . . . . . . . . . . . . . . . . . . . 51
2.5.5 Creating multiple components . . . . . . . . . . . . . . . . . . . . . . . . . . . . . . . . . . . . . . . . 51
2.6 Additional Support Resources . . . . . . . . . . . . . . . . . . . . . . . . . . . . . . . . . . . . . . . . . . . . 52
3 Architecture 533.1 Installer basics . . . . . . . . . . . . . . . . . . . . . . . . . . . . . . . . . . . . . . . . . . . . . . . . . . . . 53
3.1.1 Structure of a Generic Installer . . . . . . . . . . . . . . . . . . . . . . . . . . . . . . . . . . . . . . . . 53
3.1.2 Structure of a BitRock Installer . . . . . . . . . . . . . . . . . . . . . . . . . . . . . . . . . . . . . . . 53
4 Variables 554.1 Basic Syntax . . . . . . . . . . . . . . . . . . . . . . . . . . . . . . . . . . . . . . . . . . . . . . . . . . . . . 55
4.2 Modifier Suffixes . . . . . . . . . . . . . . . . . . . . . . . . . . . . . . . . . . . . . . . . . . . . . . . . . . . 56
4.3 Accessing Environment Variables . . . . . . . . . . . . . . . . . . . . . . . . . . . . . . . . . . . . . . . . . . 57
4.4 Advanced syntax . . . . . . . . . . . . . . . . . . . . . . . . . . . . . . . . . . . . . . . . . . . . . . . . . . . 57
4.4.1 Project properties . . . . . . . . . . . . . . . . . . . . . . . . . . . . . . . . . . . . . . . . . . . . . . . 57
4.4.2 Components . . . . . . . . . . . . . . . . . . . . . . . . . . . . . . . . . . . . . . . . . . . . . . . . . 58
4.4.3 Parameters . . . . . . . . . . . . . . . . . . . . . . . . . . . . . . . . . . . . . . . . . . . . . . . . . . 59
4.5 Accessing Language Strings . . . . . . . . . . . . . . . . . . . . . . . . . . . . . . . . . . . . . . . . . . . . . 62
4.6 Escaping Variables . . . . . . . . . . . . . . . . . . . . . . . . . . . . . . . . . . . . . . . . . . . . . . . . . . 62
4.7 Nested Variables . . . . . . . . . . . . . . . . . . . . . . . . . . . . . . . . . . . . . . . . . . . . . . . . . . . 62
4.8 Built-in variables . . . . . . . . . . . . . . . . . . . . . . . . . . . . . . . . . . . . . . . . . . . . . . . . . . . 63
5 Components 735.1 Enabling and disabling components . . . . . . . . . . . . . . . . . . . . . . . . . . . . . . . . . . . . . . . . . 75
5.2 Component Action Lists . . . . . . . . . . . . . . . . . . . . . . . . . . . . . . . . . . . . . . . . . . . . . . . 81
5.2.1 Component Selection Validation Actions . . . . . . . . . . . . . . . . . . . . . . . . . . . . . . . . . . 81
5.2.2 On Download Error Actions . . . . . . . . . . . . . . . . . . . . . . . . . . . . . . . . . . . . . . . . . 83
5.3 Adding files and directories . . . . . . . . . . . . . . . . . . . . . . . . . . . . . . . . . . . . . . . . . . . . . . 83
5.4 Adding shortcuts to the components . . . . . . . . . . . . . . . . . . . . . . . . . . . . . . . . . . . . . . . . . 84
5.5 Adding components from external files . . . . . . . . . . . . . . . . . . . . . . . . . . . . . . . . . . . . . . . . 86
5.6 Excluding components at build time . . . . . . . . . . . . . . . . . . . . . . . . . . . . . . . . . . . . . . . . . 87
5.7 Component Groups . . . . . . . . . . . . . . . . . . . . . . . . . . . . . . . . . . . . . . . . . . . . . . . . . . 88
5.7.1 Installing in text mode . . . . . . . . . . . . . . . . . . . . . . . . . . . . . . . . . . . . . . . . . . . . 91
5.8 Downloadable components . . . . . . . . . . . . . . . . . . . . . . . . . . . . . . . . . . . . . . . . . . . . . . 92
5.8.1 How to create downloadable components . . . . . . . . . . . . . . . . . . . . . . . . . . . . . . . . . . 92
5.8.2 Running the installers with downloadable components . . . . . . . . . . . . . . . . . . . . . . . . . . . 93
5.8.3 Handling errors . . . . . . . . . . . . . . . . . . . . . . . . . . . . . . . . . . . . . . . . . . . . . . . . 96
5.8.4 Text mode and unattended installers . . . . . . . . . . . . . . . . . . . . . . . . . . . . . . . . . . . . . 97
5.9 Adding or removing components to existing installations . . . . . . . . . . . . . . . . . . . . . . . . . . . . . . 98
5.9.1 Storing installation information . . . . . . . . . . . . . . . . . . . . . . . . . . . . . . . . . . . . . . . 98
5.9.2 Installing additional components . . . . . . . . . . . . . . . . . . . . . . . . . . . . . . . . . . . . . . . 98
5.9.3 Uninstalling components . . . . . . . . . . . . . . . . . . . . . . . . . . . . . . . . . . . . . . . . . . . 98

BitRock InstallBuilder User Guide 8iv
6 Working with Files and Folders 101
6.1 Conditionally Packing a Folder . . . . . . . . . . . . . . . . . . . . . . . . . . . . . . . . . . . . . . . . . . . . 103
6.2 Conditionally Unpacking a Folder . . . . . . . . . . . . . . . . . . . . . . . . . . . . . . . . . . . . . . . . . . 103
6.3 Filters . . . . . . . . . . . . . . . . . . . . . . . . . . . . . . . . . . . . . . . . . . . . . . . . . . . . . . . . . 104
6.3.1 Basic Filters . . . . . . . . . . . . . . . . . . . . . . . . . . . . . . . . . . . . . . . . . . . . . . . . . 104
6.3.2 Advanced Filters . . . . . . . . . . . . . . . . . . . . . . . . . . . . . . . . . . . . . . . . . . . . . . . 106
6.4 Unix Permissions . . . . . . . . . . . . . . . . . . . . . . . . . . . . . . . . . . . . . . . . . . . . . . . . . . . 110
6.5 Symbolic Links . . . . . . . . . . . . . . . . . . . . . . . . . . . . . . . . . . . . . . . . . . . . . . . . . . . . 111
6.6 Unpacking Before Installation Time . . . . . . . . . . . . . . . . . . . . . . . . . . . . . . . . . . . . . . . . . 111
7 User Input 116
7.1 Parameters . . . . . . . . . . . . . . . . . . . . . . . . . . . . . . . . . . . . . . . . . . . . . . . . . . . . . . . 116
7.1.1 Configuring Parameters At Runtime . . . . . . . . . . . . . . . . . . . . . . . . . . . . . . . . . . . . . 118
7.1.2 Validating User Input . . . . . . . . . . . . . . . . . . . . . . . . . . . . . . . . . . . . . . . . . . . . . 119
7.1.3 Available Parameters . . . . . . . . . . . . . . . . . . . . . . . . . . . . . . . . . . . . . . . . . . . . . 121
7.1.4 Populating Choice parameters at Runtime . . . . . . . . . . . . . . . . . . . . . . . . . . . . . . . . . . 130
7.1.5 Parameter Groups . . . . . . . . . . . . . . . . . . . . . . . . . . . . . . . . . . . . . . . . . . . . . . . 136
7.1.6 Dynamic Parameter Groups . . . . . . . . . . . . . . . . . . . . . . . . . . . . . . . . . . . . . . . . . 137
7.1.6.1 Boolean Parameter Group . . . . . . . . . . . . . . . . . . . . . . . . . . . . . . . . . . . . . 137
7.1.6.2 Choice Parameter Group . . . . . . . . . . . . . . . . . . . . . . . . . . . . . . . . . . . . . 140
7.1.6.3 Nesting . . . . . . . . . . . . . . . . . . . . . . . . . . . . . . . . . . . . . . . . . . . . . . . 141
7.1.7 Command Line Parameters . . . . . . . . . . . . . . . . . . . . . . . . . . . . . . . . . . . . . . . . . . 143
7.1.8 Option Files . . . . . . . . . . . . . . . . . . . . . . . . . . . . . . . . . . . . . . . . . . . . . . . . . . 144
8 Actions 146
8.1 What are Actions? . . . . . . . . . . . . . . . . . . . . . . . . . . . . . . . . . . . . . . . . . . . . . . . . . . . 146
8.2 Action Lists . . . . . . . . . . . . . . . . . . . . . . . . . . . . . . . . . . . . . . . . . . . . . . . . . . . . . . 147
8.2.1 Building the Installer . . . . . . . . . . . . . . . . . . . . . . . . . . . . . . . . . . . . . . . . . . . . . 148
8.2.2 Help Menu . . . . . . . . . . . . . . . . . . . . . . . . . . . . . . . . . . . . . . . . . . . . . . . . . . 148
8.2.3 Installation Process . . . . . . . . . . . . . . . . . . . . . . . . . . . . . . . . . . . . . . . . . . . . . . 149
8.2.4 Uninstallation . . . . . . . . . . . . . . . . . . . . . . . . . . . . . . . . . . . . . . . . . . . . . . . . . 151
8.2.5 Special action lists . . . . . . . . . . . . . . . . . . . . . . . . . . . . . . . . . . . . . . . . . . . . . . 151
8.2.6 Unattended mode, RPM and DEB packages . . . . . . . . . . . . . . . . . . . . . . . . . . . . . . . . . 151
8.2.7 Main Project and Components Execution Order . . . . . . . . . . . . . . . . . . . . . . . . . . . . . . . 152
8.3 Running External Programs . . . . . . . . . . . . . . . . . . . . . . . . . . . . . . . . . . . . . . . . . . . . . . 154
8.3.1 Launching in the Background . . . . . . . . . . . . . . . . . . . . . . . . . . . . . . . . . . . . . . . . 158
8.3.2 Opening Programs in OS X . . . . . . . . . . . . . . . . . . . . . . . . . . . . . . . . . . . . . . . . . 158
8.4 Creating Custom Actions . . . . . . . . . . . . . . . . . . . . . . . . . . . . . . . . . . . . . . . . . . . . . . . 159
8.4.1 Returning values from a custom action . . . . . . . . . . . . . . . . . . . . . . . . . . . . . . . . . . . 162
BitRock InstallBuilder User Guide 8v
8.4.2 Current Limitations . . . . . . . . . . . . . . . . . . . . . . . . . . . . . . . . . . . . . . . . . . . . . . 163
8.5 Displaying Progress While Executing Long Running Actions . . . . . . . . . . . . . . . . . . . . . . . . . . . . 164
8.6 Error Handling . . . . . . . . . . . . . . . . . . . . . . . . . . . . . . . . . . . . . . . . . . . . . . . . . . . . 168
8.6.1 Handling Action Errors . . . . . . . . . . . . . . . . . . . . . . . . . . . . . . . . . . . . . . . . . . . . 168
8.6.2 Installation Aborted Action List . . . . . . . . . . . . . . . . . . . . . . . . . . . . . . . . . . . . . . . 169
8.6.3 When Does an Error Not Abort the Installation? . . . . . . . . . . . . . . . . . . . . . . . . . . . . . . . 170
8.6.4 Cleaning and Rollback Directory Restoration . . . . . . . . . . . . . . . . . . . . . . . . . . . . . . . . 170
8.7 List of Available Actions . . . . . . . . . . . . . . . . . . . . . . . . . . . . . . . . . . . . . . . . . . . . . . . 171
9 Rules 241
9.1 What is a Rule? . . . . . . . . . . . . . . . . . . . . . . . . . . . . . . . . . . . . . . . . . . . . . . . . . . . . 241
9.2 Rule List . . . . . . . . . . . . . . . . . . . . . . . . . . . . . . . . . . . . . . . . . . . . . . . . . . . . . . . . 242
9.3 Should Pack Rule List . . . . . . . . . . . . . . . . . . . . . . . . . . . . . . . . . . . . . . . . . . . . . . . . 244
9.4 Rule Groups . . . . . . . . . . . . . . . . . . . . . . . . . . . . . . . . . . . . . . . . . . . . . . . . . . . . . . 245
9.5 Additional Rule Lists . . . . . . . . . . . . . . . . . . . . . . . . . . . . . . . . . . . . . . . . . . . . . . . . . 245
9.6 List of Available Rules . . . . . . . . . . . . . . . . . . . . . . . . . . . . . . . . . . . . . . . . . . . . . . . . 245
10 User Interface 260
10.1 Installation Modes . . . . . . . . . . . . . . . . . . . . . . . . . . . . . . . . . . . . . . . . . . . . . . . . . . 260
10.1.1 Full Graphic Modes . . . . . . . . . . . . . . . . . . . . . . . . . . . . . . . . . . . . . . . . . . . . . 260
10.1.2 Text Mode: . . . . . . . . . . . . . . . . . . . . . . . . . . . . . . . . . . . . . . . . . . . . . . . . . . 260
10.1.3 Unattended mode: . . . . . . . . . . . . . . . . . . . . . . . . . . . . . . . . . . . . . . . . . . . . . . 261
10.1.4 Selecting the Execution Mode . . . . . . . . . . . . . . . . . . . . . . . . . . . . . . . . . . . . . . . . 261
10.1.5 Detecting the Execution Mode . . . . . . . . . . . . . . . . . . . . . . . . . . . . . . . . . . . . . . . . 263
10.2 Pages . . . . . . . . . . . . . . . . . . . . . . . . . . . . . . . . . . . . . . . . . . . . . . . . . . . . . . . . . 263
10.2.1 Custom Pages . . . . . . . . . . . . . . . . . . . . . . . . . . . . . . . . . . . . . . . . . . . . . . . . . 263
10.2.2 Built-in Pages . . . . . . . . . . . . . . . . . . . . . . . . . . . . . . . . . . . . . . . . . . . . . . . . . 267
10.2.2.1 Final Page options . . . . . . . . . . . . . . . . . . . . . . . . . . . . . . . . . . . . . . . . . 267
10.2.3 Controlling the Flow of the Pages . . . . . . . . . . . . . . . . . . . . . . . . . . . . . . . . . . . . . . 269
10.3 Dialogs . . . . . . . . . . . . . . . . . . . . . . . . . . . . . . . . . . . . . . . . . . . . . . . . . . . . . . . . 270
11 Menus and Shortcuts 272
11.1 Defining Shortcuts at Build Time . . . . . . . . . . . . . . . . . . . . . . . . . . . . . . . . . . . . . . . . . . . 272
11.2 Shortcut Folder Structure . . . . . . . . . . . . . . . . . . . . . . . . . . . . . . . . . . . . . . . . . . . . . . . 275
11.3 Creating Shortcuts on Demand at Runtime . . . . . . . . . . . . . . . . . . . . . . . . . . . . . . . . . . . . . . 277
11.4 Shortcuts/Aliases on OS X . . . . . . . . . . . . . . . . . . . . . . . . . . . . . . . . . . . . . . . . . . . . . . 277
11.5 Shortcuts on Linux . . . . . . . . . . . . . . . . . . . . . . . . . . . . . . . . . . . . . . . . . . . . . . . . . . 277
BitRock InstallBuilder User Guide 8vi
12 Installer Customization 279
12.1 Languages . . . . . . . . . . . . . . . . . . . . . . . . . . . . . . . . . . . . . . . . . . . . . . . . . . . . . . . 279
12.1.1 Autodetecting the System Language . . . . . . . . . . . . . . . . . . . . . . . . . . . . . . . . . . . . . 282
12.2 Changing Built-in Installer Text Strings . . . . . . . . . . . . . . . . . . . . . . . . . . . . . . . . . . . . . . . 282
12.2.1 Adding New Localized Strings . . . . . . . . . . . . . . . . . . . . . . . . . . . . . . . . . . . . . . . . 283
12.2.2 Component-Level Translations . . . . . . . . . . . . . . . . . . . . . . . . . . . . . . . . . . . . . . . . 284
12.2.3 Displaying a Localized License and Readme . . . . . . . . . . . . . . . . . . . . . . . . . . . . . . . . 285
12.3 Images . . . . . . . . . . . . . . . . . . . . . . . . . . . . . . . . . . . . . . . . . . . . . . . . . . . . . . . . . 288
12.3.1 Splash Screen . . . . . . . . . . . . . . . . . . . . . . . . . . . . . . . . . . . . . . . . . . . . . . . . . 288
12.3.2 Left and Top Images . . . . . . . . . . . . . . . . . . . . . . . . . . . . . . . . . . . . . . . . . . . . . 288
12.3.3 Windows specific images . . . . . . . . . . . . . . . . . . . . . . . . . . . . . . . . . . . . . . . . . . . 294
12.3.3.1 Windows Icons . . . . . . . . . . . . . . . . . . . . . . . . . . . . . . . . . . . . . . . . . . 294
12.3.3.2 Other Windows images . . . . . . . . . . . . . . . . . . . . . . . . . . . . . . . . . . . . . . 295
12.3.4 OS X Icons . . . . . . . . . . . . . . . . . . . . . . . . . . . . . . . . . . . . . . . . . . . . . . . . . . 296
12.3.5 Other images . . . . . . . . . . . . . . . . . . . . . . . . . . . . . . . . . . . . . . . . . . . . . . . . . 297
12.3.5.1 Window Manager Image . . . . . . . . . . . . . . . . . . . . . . . . . . . . . . . . . . . . . 297
12.3.5.2 Slide Show Images . . . . . . . . . . . . . . . . . . . . . . . . . . . . . . . . . . . . . . . . 297
12.3.5.3 Label Parameter Images . . . . . . . . . . . . . . . . . . . . . . . . . . . . . . . . . . . . . . 298
12.3.5.4 Option Images . . . . . . . . . . . . . . . . . . . . . . . . . . . . . . . . . . . . . . . . . . . 299
12.3.6 Recommended Image Sizes . . . . . . . . . . . . . . . . . . . . . . . . . . . . . . . . . . . . . . . . . 300
13 Running the Installer 301
13.1 Requiring Administrator Privileges . . . . . . . . . . . . . . . . . . . . . . . . . . . . . . . . . . . . . . . . . . 301
13.2 Multiple Instances of the Installer . . . . . . . . . . . . . . . . . . . . . . . . . . . . . . . . . . . . . . . . . . 302
14 Uninstaller 304
14.1 Uninstaller Action Lists . . . . . . . . . . . . . . . . . . . . . . . . . . . . . . . . . . . . . . . . . . . . . . . . 304
14.2 Marking Additional Files for Deletion . . . . . . . . . . . . . . . . . . . . . . . . . . . . . . . . . . . . . . . . 305
14.3 Preventing Files from Being Deleted . . . . . . . . . . . . . . . . . . . . . . . . . . . . . . . . . . . . . . . . . 306
14.4 Interacting with the End User . . . . . . . . . . . . . . . . . . . . . . . . . . . . . . . . . . . . . . . . . . . . . 306
15 Services 307
15.1 Linux Services . . . . . . . . . . . . . . . . . . . . . . . . . . . . . . . . . . . . . . . . . . . . . . . . . . . . 307
15.2 Windows Services . . . . . . . . . . . . . . . . . . . . . . . . . . . . . . . . . . . . . . . . . . . . . . . . . . . 308
15.2.1 Using regular binaries as Windows services . . . . . . . . . . . . . . . . . . . . . . . . . . . . . . . . . 310
15.3 OS X Services . . . . . . . . . . . . . . . . . . . . . . . . . . . . . . . . . . . . . . . . . . . . . . . . . . . . . 311
15.3.1 Adding an Application to the System Startup . . . . . . . . . . . . . . . . . . . . . . . . . . . . . . . . 312
16 File associations 315
16.1 Windows file associations . . . . . . . . . . . . . . . . . . . . . . . . . . . . . . . . . . . . . . . . . . . . . . . 315
16.2 Linux file associations . . . . . . . . . . . . . . . . . . . . . . . . . . . . . . . . . . . . . . . . . . . . . . . . 316
16.3 OS X file associations . . . . . . . . . . . . . . . . . . . . . . . . . . . . . . . . . . . . . . . . . . . . . . . . . 318
BitRock InstallBuilder User Guide 8vii
17 Java 319
17.1 Java Specific Actions . . . . . . . . . . . . . . . . . . . . . . . . . . . . . . . . . . . . . . . . . . . . . . . . . 319
17.2 Bundling a JRE . . . . . . . . . . . . . . . . . . . . . . . . . . . . . . . . . . . . . . . . . . . . . . . . . . . . 322
17.3 Launchers . . . . . . . . . . . . . . . . . . . . . . . . . . . . . . . . . . . . . . . . . . . . . . . . . . . . . . . 323
18 Regular expressions 326
18.1 Basics of regular expressions . . . . . . . . . . . . . . . . . . . . . . . . . . . . . . . . . . . . . . . . . . . . . 326
18.2 Bracket expressions . . . . . . . . . . . . . . . . . . . . . . . . . . . . . . . . . . . . . . . . . . . . . . . . . . 328
18.3 Grouping . . . . . . . . . . . . . . . . . . . . . . . . . . . . . . . . . . . . . . . . . . . . . . . . . . . . . . . 329
18.4 Substituting text in regular expression . . . . . . . . . . . . . . . . . . . . . . . . . . . . . . . . . . . . . . . . 329
19 Rollback 331
20 Troubleshooting 332
20.1 Debugger . . . . . . . . . . . . . . . . . . . . . . . . . . . . . . . . . . . . . . . . . . . . . . . . . . . . . . . 332
20.1.1 Including the debugger in your installer . . . . . . . . . . . . . . . . . . . . . . . . . . . . . . . . . . . 333
20.1.2 Enabling the debugger at runtime . . . . . . . . . . . . . . . . . . . . . . . . . . . . . . . . . . . . . . 333
20.1.3 Debugger usage . . . . . . . . . . . . . . . . . . . . . . . . . . . . . . . . . . . . . . . . . . . . . . . . 334
20.1.3.1 The toolbar . . . . . . . . . . . . . . . . . . . . . . . . . . . . . . . . . . . . . . . . . . . . . 335
20.1.3.2 Project tree editor . . . . . . . . . . . . . . . . . . . . . . . . . . . . . . . . . . . . . . . . . 335
20.1.3.3 Action List Execution Editor . . . . . . . . . . . . . . . . . . . . . . . . . . . . . . . . . . . 336
20.1.3.4 Debugger log . . . . . . . . . . . . . . . . . . . . . . . . . . . . . . . . . . . . . . . . . . . 337
20.1.3.5 Variable Editor . . . . . . . . . . . . . . . . . . . . . . . . . . . . . . . . . . . . . . . . . . . 338
20.1.3.6 XML evaluator . . . . . . . . . . . . . . . . . . . . . . . . . . . . . . . . . . . . . . . . . . . 338
20.2 Logs . . . . . . . . . . . . . . . . . . . . . . . . . . . . . . . . . . . . . . . . . . . . . . . . . . . . . . . . . . 339
20.2.1 Installation Log . . . . . . . . . . . . . . . . . . . . . . . . . . . . . . . . . . . . . . . . . . . . . . . . 339
20.2.1.1 Where the Log is Located . . . . . . . . . . . . . . . . . . . . . . . . . . . . . . . . . . . . . 339
20.2.1.2 Verbosity Level . . . . . . . . . . . . . . . . . . . . . . . . . . . . . . . . . . . . . . . . . . 340
20.2.1.3 Logging custom information . . . . . . . . . . . . . . . . . . . . . . . . . . . . . . . . . . . 340
20.2.2 Debugtrace Log . . . . . . . . . . . . . . . . . . . . . . . . . . . . . . . . . . . . . . . . . . . . . . . . 341
20.3 Other Debugging Methods . . . . . . . . . . . . . . . . . . . . . . . . . . . . . . . . . . . . . . . . . . . . . . 341
21 Updates 343
21.1 What differentiates upgrade installers from normal installers? . . . . . . . . . . . . . . . . . . . . . . . . . . . . 343
21.2 Setting the installer to upgrade installation mode . . . . . . . . . . . . . . . . . . . . . . . . . . . . . . . . . . . 343
21.3 Using normal mode when upgrading . . . . . . . . . . . . . . . . . . . . . . . . . . . . . . . . . . . . . . . . . 347
BitRock InstallBuilder User Guide 8viii
22 AutoUpdate Tool 350
22.1 How to Use AutoUpdate in InstallBuilder . . . . . . . . . . . . . . . . . . . . . . . . . . . . . . . . . . . . . . 350
22.1.1 How Does it Work? . . . . . . . . . . . . . . . . . . . . . . . . . . . . . . . . . . . . . . . . . . . . . . 350
22.1.2 Basic example . . . . . . . . . . . . . . . . . . . . . . . . . . . . . . . . . . . . . . . . . . . . . . . . 354
22.2 Adding the AutoUpdate to an Existing InstallBuilder project . . . . . . . . . . . . . . . . . . . . . . . . . . . . 359
22.3 Using AutoUpdate as a notifier . . . . . . . . . . . . . . . . . . . . . . . . . . . . . . . . . . . . . . . . . . . . 359
22.4 How to execute custom actions after the update installer is downloaded . . . . . . . . . . . . . . . . . . . . . . . 360
22.5 AutoUpdate installers in unattended mode . . . . . . . . . . . . . . . . . . . . . . . . . . . . . . . . . . . . . . 360
22.5.1 Regular unattended mode . . . . . . . . . . . . . . . . . . . . . . . . . . . . . . . . . . . . . . . . . . 361
22.5.2 Download unattended mode . . . . . . . . . . . . . . . . . . . . . . . . . . . . . . . . . . . . . . . . . 361
22.6 Sequential updates . . . . . . . . . . . . . . . . . . . . . . . . . . . . . . . . . . . . . . . . . . . . . . . . . . 362
23 Native Packages 366
23.1 Generation of Native Packages . . . . . . . . . . . . . . . . . . . . . . . . . . . . . . . . . . . . . . . . . . . . 366
23.2 Integration with Native Package Systems . . . . . . . . . . . . . . . . . . . . . . . . . . . . . . . . . . . . . . . 366
24 Builder 367
24.1 Build . . . . . . . . . . . . . . . . . . . . . . . . . . . . . . . . . . . . . . . . . . . . . . . . . . . . . . . . . 367
24.2 Quickbuild . . . . . . . . . . . . . . . . . . . . . . . . . . . . . . . . . . . . . . . . . . . . . . . . . . . . . . 367
24.3 Using the Command Line Interface . . . . . . . . . . . . . . . . . . . . . . . . . . . . . . . . . . . . . . . . . . 368
24.4 Creating Custom Builds . . . . . . . . . . . . . . . . . . . . . . . . . . . . . . . . . . . . . . . . . . . . . . . . 369
25 Windows 371
25.1 Windows Registry . . . . . . . . . . . . . . . . . . . . . . . . . . . . . . . . . . . . . . . . . . . . . . . . . . . 371
25.1.1 Managing the Windows Registry From InstallBuilder . . . . . . . . . . . . . . . . . . . . . . . . . . . . 372
25.1.2 Windows Registry in 64bit Systems . . . . . . . . . . . . . . . . . . . . . . . . . . . . . . . . . . . . . 374
25.1.3 InstallBuilder built-in registry keys . . . . . . . . . . . . . . . . . . . . . . . . . . . . . . . . . . . . . 377
25.2 Windows 64bit . . . . . . . . . . . . . . . . . . . . . . . . . . . . . . . . . . . . . . . . . . . . . . . . . . . . 378
25.2.1 Creating specific Windows 64bit installers . . . . . . . . . . . . . . . . . . . . . . . . . . . . . . . . . . 380
25.2.2 Installing applications in 32bit and 64bit folders . . . . . . . . . . . . . . . . . . . . . . . . . . . . . . . 382
25.3 Managing Access Control Lists . . . . . . . . . . . . . . . . . . . . . . . . . . . . . . . . . . . . . . . . . . . . 384
25.4 Changing file attributes . . . . . . . . . . . . . . . . . . . . . . . . . . . . . . . . . . . . . . . . . . . . . . . . 387
25.5 Digitally signing Microsoft Windows installers . . . . . . . . . . . . . . . . . . . . . . . . . . . . . . . . . . . 387
26 Encryption and password protection 389
26.1 Encrypting payload of the installer . . . . . . . . . . . . . . . . . . . . . . . . . . . . . . . . . . . . . . . . . . 389
26.2 Support for platforms and build types . . . . . . . . . . . . . . . . . . . . . . . . . . . . . . . . . . . . . . . . 390
26.2.1 Supported platforms . . . . . . . . . . . . . . . . . . . . . . . . . . . . . . . . . . . . . . . . . . . . . 390
26.2.2 RPM and DEB packages . . . . . . . . . . . . . . . . . . . . . . . . . . . . . . . . . . . . . . . . . . . 390
26.2.3 Downloadable components . . . . . . . . . . . . . . . . . . . . . . . . . . . . . . . . . . . . . . . . . . 390
26.2.4 Multiplatform CD-ROM mode . . . . . . . . . . . . . . . . . . . . . . . . . . . . . . . . . . . . . . . . 390
26.3 Manually specifying password . . . . . . . . . . . . . . . . . . . . . . . . . . . . . . . . . . . . . . . . . . . . 391
26.3.1 Retrieving password over the Internet . . . . . . . . . . . . . . . . . . . . . . . . . . . . . . . . . . . . 392
BitRock InstallBuilder User Guide 81 / 393
Chapter 1
Introduction to InstallBuilder
InstallBuilder is a modern, fully-featured, cross-platform installation tool. It is designed to simplify the deployment of bothdesktop and server software, helping you reduce support costs related to installation and provide a positive end-user experience.
This document provides an overview of InstallBuilder capabilities and architecture, as well as in-depth coverage of commoninstallation topics. A companion appendix provides detailed information on each one of the XML configuration options.
1.1 What Sets InstallBuilder Apart
To fully understand the architecture and capabilities of InstallBuilder, it is useful to consider the previous generation of cross-platform installers. These were built using the Java programming language. Java is a fine choice for multiple scenarios and indeedover half of your users use InstallBuilder to package Java-based applications. However, it has a set of major drawbacks whenthe goal is to create setup programs. For example, it requires a Java runtime environment to be present in the machine, whichincreases the chances of something going wrong if one is not present or the one present is not a suitable version. Alternatively,if the user decides to bundle a JRE with the installer in order to avoid these potential problems, it will increase significantly thefootprint of the installation. Java-based installers also require a self-extraction step, in which the files are first unpacked to diskbefore installation can begin. For large installers, this can be a time-consuming step and another source of installation-relatedissues if the end-user runs out of disk space during this process. Finally, and although alternative toolkits like SWT finallyemerged, Java GUI development has traditionally suffered from poor performance and lack of a truly native look-and-feel. End-users react much more favorably to setup applications that are responsive and provide a familiar native interface, even if thefunctionality is identical.
The above is not intended as a rant against Java-based installers, rather as an illustration of the challenges that a cross platforminstallation tool faces. So, how does InstallBuilder address these issues? Installers generated with InstallBuilder are nativeapplications that do not require any runtime to be present in the system to run. This means that the overhead the installerintroduces is very small, typically around 2 to 3 Mb, versus the 15 Mb to 20 Mb that a bundled JRE requires. In addition to this,the installers do not perform a self-extraction step, meaning that they start up instantaneously, whereas some Java-based installerscan take up to minutes to initialize for large installers. Installers created with InstallBuilder use the underlying system librariesfor displaying their GUI interfaces, so users get a native look and feel for each platform the installers run on, such as Windowsand Mac OS X. On Linux and other Unix platforms, there is not a single standard look and feel. In those cases, InstallBuilderprovides a choice between the most common toolkits, Qt and GTK, as well as a built-in fallback mode.
1.2 What’s New In InstallBuilder 8
InstallBuilder 8 provides a host of new features, including:
• Built-in debugger: An optional debugger packed within the installers, facilitating troubleshooting or installer development.
• New dynamic parameter pages: Two new parameter groups allow dynamic interaction with the end user.
BitRock InstallBuilder User Guide 82 / 393
• Tree component selection: Components can now be grouped to allow the features to be displayed as a tree in the componentselection
• Downloadable Components: Components can now be marked as downloadable so they will not be packed in the installer butseparated into external data files that will be downloaded at runtime if needed.
• Individual management of component installation/uninstallation: The installers are now capable of adding and removingcomponents from an existing installation.
1.3 Features
InstallBuilder is a fully-featured tool capable of addressing multiple installation scenarios, from desktop games to engineeringsimulation tools to enterprise-level server software.
• Multiplatform Support: BitRock installers are native binaries that can run on Windows, OS X and Linux and most otherflavors of Unix, including FreeBSD, OpenBSD, AIX, OS/400, HP-UX and IRIX.
• Desktop Integration: BitRock installers provide native look and feel and desktop integration for Windows, OS X and Linux(KDE and Gnome).
• Optimized: BitRock installers are optimized in size and speed and do not require a self-extraction step, reducing download,startup and installation time. Built-in LZMA support provides great compression ratios.
• No External Dependencies: BitRock installers are single-file, self-contained native executables with no external dependenciesand minimal overhead. Unlike competing products, all BitRock installers are truly native code and do not require bundling aJava Runtime Environment.
• Ease of Use: BitRock installers provide an intuitive and easy to use interface on all platforms, even for end users withoutprevious Linux experience.
• Ease of Development: InstallBuilder includes an easy to learn, easy to use GUI environment. Design, build and test installerswith the click of a button.
• Time Saving Functionality: For advanced users, a friendly XML project format supports source control integration, collabo-rative development and customizing projects both by hand and using external scripts. A command line interface allows you toautomate and integrate the building process. QuickBuild functionality allows you to update installers in a few seconds, withouthaving to repack the entire application.
• Built-in Actions: InstallBuilder provides convenient built-in actions for commonly required installation functionality such asauto-detecting a Java(tm) Runtime, changing file permissions and ownership, substituting text in a file, adding environmentvariables, adding directories to the path, creating symbolic links, changing the Windows registry, launching external scriptsand so on.
• Crossplatform Build Support: The installer builder tool can run on Windows, Mac OS X, Linux and all other supported Unixplatforms and generate installers for all target platforms from a single project file. Create all your installers from a single buildenvironment!
• Customization: BitRock installers can be customized in a variety of ways, both graphically and in functionality. It is possibleto ask for multiple parameters, like username and passwords, in the same installer screen. This functionality helps to simplifythe installation process for end-users.
• Multiple Installation Modes: BitRock installers provide: several GUI modes with native look-and-feel, for installation in avariety of desktop environments, a text-based installation mode, for console-based and remote installations, and a silent/unat-tended install mode which can be used for integration in shell scripts for automated deployment.
• Support for Qt® GUI Frontend: The InstallBuilder for Qt family of products provides a GUI installation mode using the Qtcrossplatform toolkit, enhancing the end-user experience
• Rollback Functionality: BitRock installers by default perform a backup of all the files overwritten during installation, so ifthere is an error, the system can be recovered to its previous state.
BitRock InstallBuilder User Guide 83 / 393
• Native Package Integration: BitRock installers can register your software with the RPM and DEB package databases, com-bining the ease of use of an installer wizard with the underlying native package management system.
• RPM and DEB generation: In addition to creating native executables that can register with the RPM subsystem, BitRock In-stallBuilder can generate self-contained RPM and Debian packages that can be installed using the native package managementtools.
• Uninstall Functionality: An uninstall program is created as part of every installation, allowing users to easily uninstall thesoftware. Like the installers, it can be run in a variety of modes. On Windows, uninstall functionality can also be accessedfrom the Add/Remove Programs entry in the Control Panel.
• Startup Failure Detection: BitRock installers will automatically and gracefully detect the best installation mode available.Users also have the option to manually select a mode.
• Language and Platform Independent: BitRock installers can install applications written in any language, including: Java,PHP, Perl, Python, Ruby, C/C++ and .NET/Mono.
• Multiple Language Support: BitRock installers support a variety of installation languages, including English, German,Japanese, Spanish, Italian, French, Portuguese, Traditional Chinese, Dutch, Polish, Valencian, Catalan, Estonian, Slovenian,Romanian, Hungarian, Russian and Welsh. Installers in Qt mode support right to left languages such as Arabic. The full listcan be found in the Languages section. You can specify a default language or let the user decide. Please contact us if yourequire additional language support.
1.4 Supported Platforms
InstallBuilder provides support for all common (and not so common!) operating systems out there. If you want to know ifInstallBuilder supports a particular platform, please contact us - chances are that it does. InstallBuilder-generated installers willrun on:
• Windows ME, 2000, XP, 2003, 2008, Vista, Windows 7, Windows 8
• Mac OS X (PPC & Intel) 10.2 and later
• Linux (Intel x86/x64, Itanium, s390 and PPC) All distributions and version including Ubuntu, RHEL, SLES and Meego.
• Solaris (Intel and Sparc) 8, 9, 10
• HP-UX (PA-RISC, Itanium)
• FreeBSD 4.x and later
• OpenBSD 3.x and later
• AIX 4.3 and later
• OS/400
• IRIX 6.5
1.5 Requirements
The command line builder tool will run on any of the supported platforms, allowing you to generate installers for any of the othersupported platforms for the InstallBuilder edition you are using. For example, if you are running InstallBuilder Professional onLinux, you will be able to generate installers for Windows, Linux and OS X. This is particularly useful for situations in whichyou need to build the installers as part of a continuous integration/daily build scenario.
The GUI installer design tool helps you to visually create installation projects. The GUI design tool runs on Linux x86/x64, OSX and Windows with a minimum of 800x600 screen resolution. Note that you can always edit XML projects directly or evenalternate between using the GUI and editing the XML project file as needed.
BitRock InstallBuilder User Guide 84 / 393
1.6 Editions
InstallBuilder is distributed in multiple editions, with the primary differentiation being the supported platforms that you cancreate installers for. The link below provides a detailed comparison of the available editions:
http://installbuilder.bitrock.com/compare-installbuilder-editions.html
1.7 The GUI
InstallBuilder allows projects to be created and edited with an easy to use graphical editor tool. Adding new actions to theinstallation logic or files to pack is as easy as double-clicking the appropriate element and navigating through the organizeddialogs. The GUI is only available on Linux x86/x64, Windows and OS X.
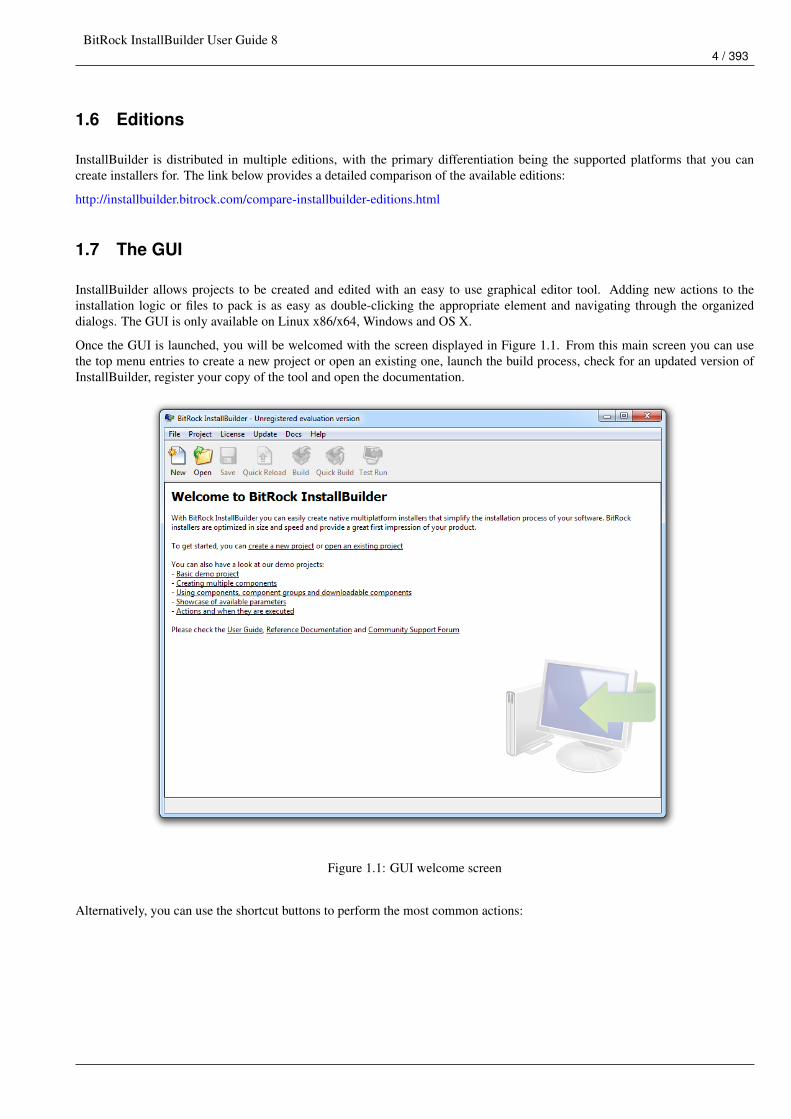
Once the GUI is launched, you will be welcomed with the screen displayed in Figure 1.1. From this main screen you can usethe top menu entries to create a new project or open an existing one, launch the build process, check for an updated version ofInstallBuilder, register your copy of the tool and open the documentation.
Figure 1.1: GUI welcome screen
Alternatively, you can use the shortcut buttons to perform the most common actions:
BitRock InstallBuilder User Guide 85 / 393
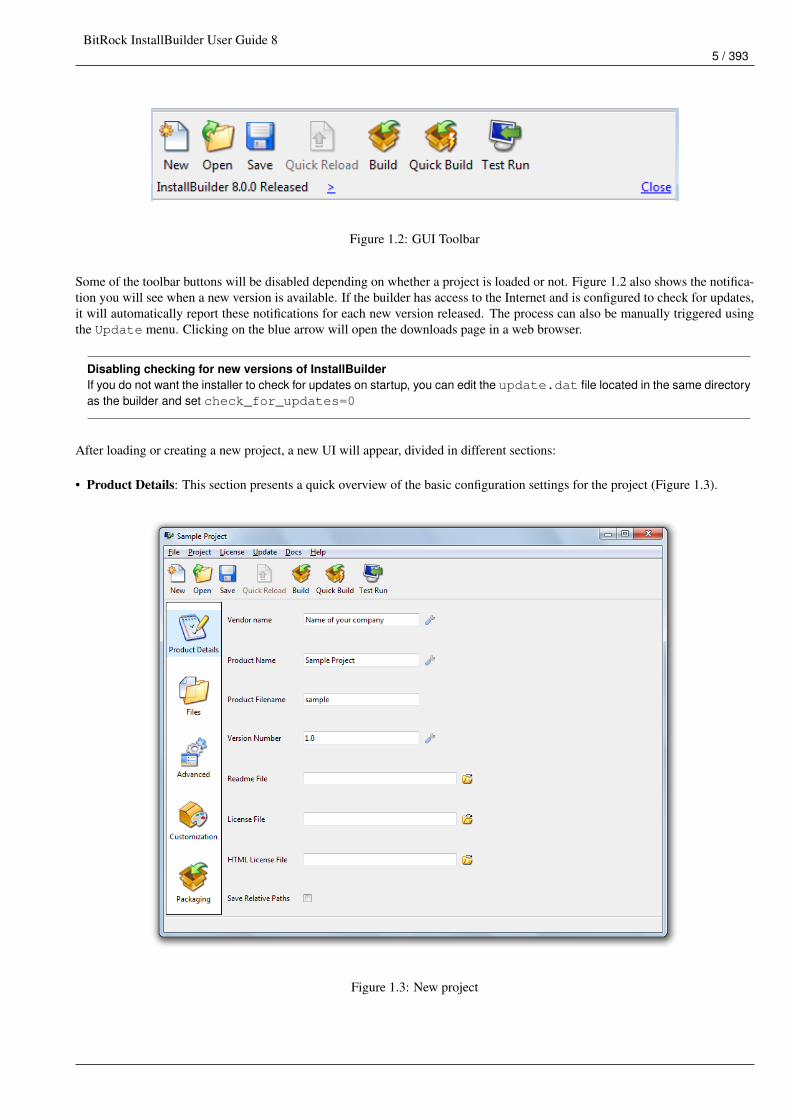
Figure 1.2: GUI Toolbar
Some of the toolbar buttons will be disabled depending on whether a project is loaded or not. Figure 1.2 also shows the notifica-tion you will see when a new version is available. If the builder has access to the Internet and is configured to check for updates,it will automatically report these notifications for each new version released. The process can also be manually triggered usingthe Update menu. Clicking on the blue arrow will open the downloads page in a web browser.
Disabling checking for new versions of InstallBuilderIf you do not want the installer to check for updates on startup, you can edit the update.dat file located in the same directoryas the builder and set check_for_updates=0
After loading or creating a new project, a new UI will appear, divided in different sections:
• Product Details: This section presents a quick overview of the basic configuration settings for the project (Figure 1.3).
Figure 1.3: New project

BitRock InstallBuilder User Guide 86 / 393
The main project settings Vendor name, Product Name, Product Filename and Version Number are definedonce and used multiple times when displaying information during the installation process; in the Add/Remove Program menu,the installer filename and so on. It is always possible to override these default values when necessary.
Enabling Save Relative Paths will convert all of the absolute paths related to the build process (files to pack, images,readme. . . ) to relative paths, using the location of the project file as the reference. This setting will be applied automaticallyand transparently when saving and loading the project so it will not be noticeable while working in the GUI. This particularsetting is especially useful when sharing a project between developers or operating systems, as the location of the resources isnot hardcoded, as explained in theWhen is it necessary to use the Save Relative Paths option? note. If the paths were alreadymanually configured as relative, they will be preserved and resolved when building, also using the location of the project toabsolutize them.
The License File setting specifies a license file that will be displayed during installation. The end user will need to acceptthis license text before continuing with the installation process. If you do not provide a license file, the license acceptance screenwill not be displayed to the end user.
You can also provide an alternate HTML License File. This HTML-formatted license will be used if the front-end supportsit (currently only the case for the Qt front-end). Otherwise the default license text specified in the License File setting willbe displayed.
You can also display multiple licenses in different languages or display them conditionally, as described in the Displaying alocalized license and readme section.
• Files: This section allows managing all of the resources included in the project such as files to pack, and shortcuts to create.These resources are organized in components, designed to group common functionalities, and files, which are divided intofolders (Figure 1.4).
Figure 1.4: Files screen
Shortcuts may also be added in this section.
BitRock InstallBuilder User Guide 87 / 393
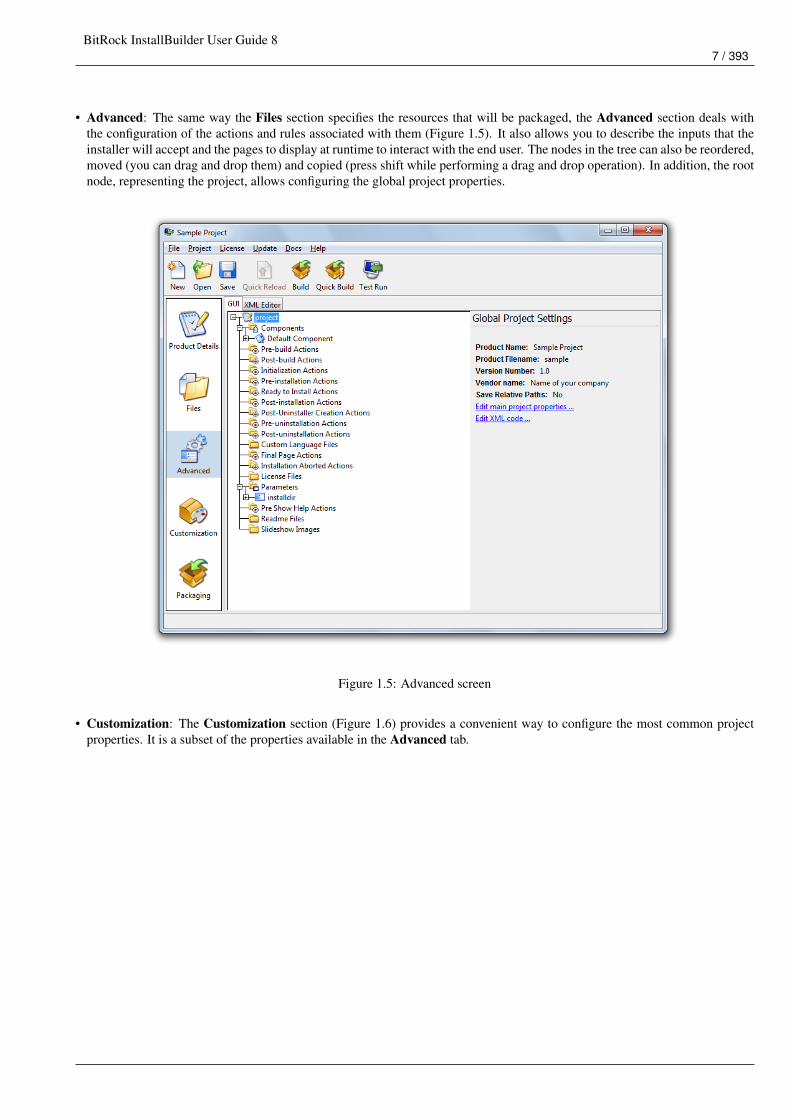
• Advanced: The same way the Files section specifies the resources that will be packaged, the Advanced section deals withthe configuration of the actions and rules associated with them (Figure 1.5). It also allows you to describe the inputs that theinstaller will accept and the pages to display at runtime to interact with the end user. The nodes in the tree can also be reordered,moved (you can drag and drop them) and copied (press shift while performing a drag and drop operation). In addition, the rootnode, representing the project, allows configuring the global project properties.
Figure 1.5: Advanced screen
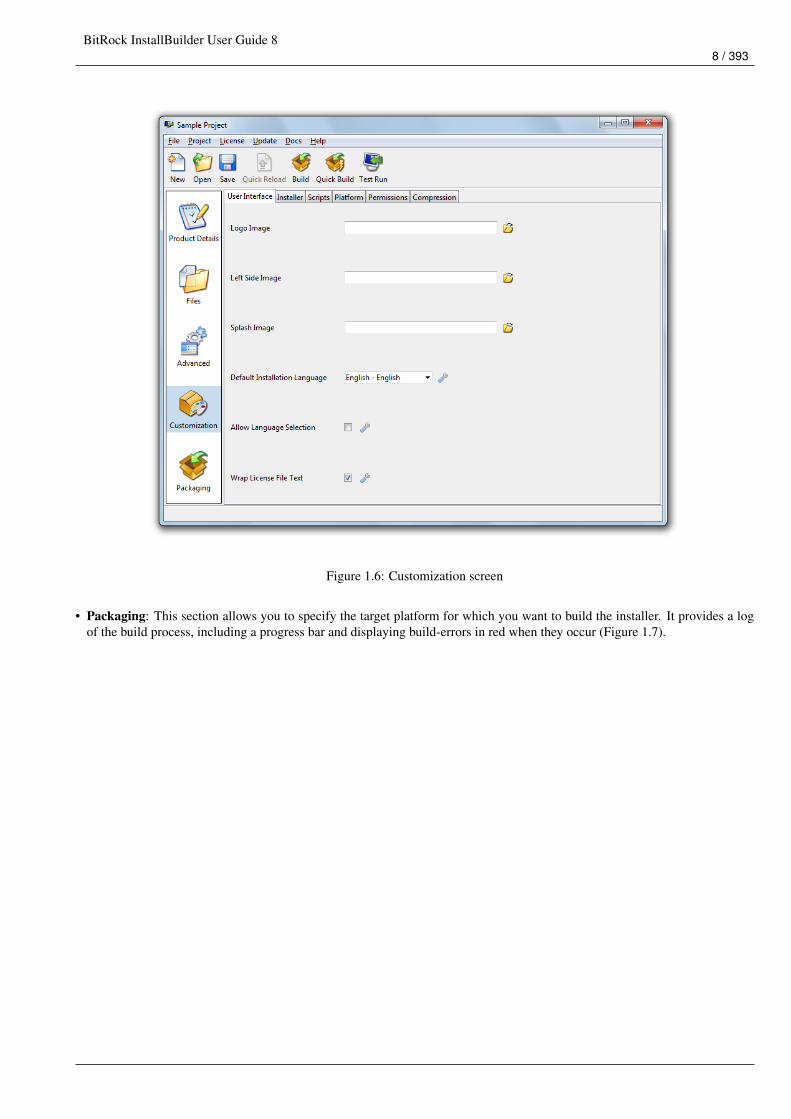
• Customization: The Customization section (Figure 1.6) provides a convenient way to configure the most common projectproperties. It is a subset of the properties available in the Advanced tab.
BitRock InstallBuilder User Guide 88 / 393
Figure 1.6: Customization screen
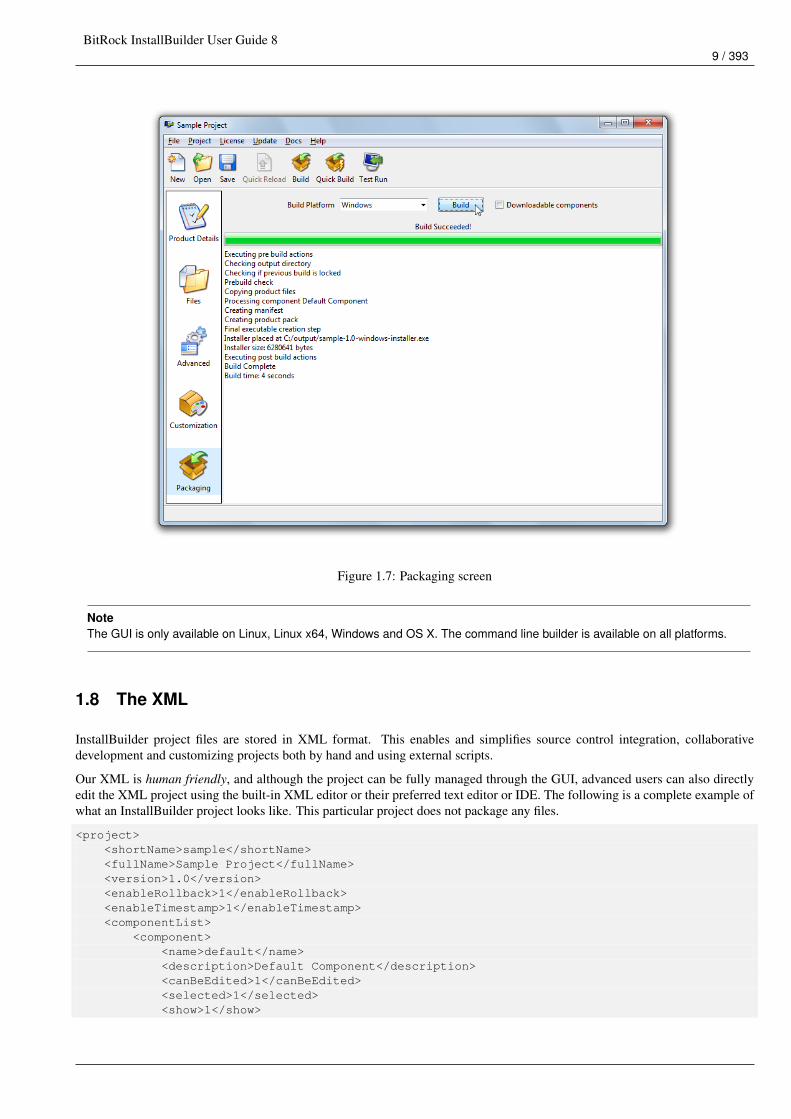
• Packaging: This section allows you to specify the target platform for which you want to build the installer. It provides a logof the build process, including a progress bar and displaying build-errors in red when they occur (Figure 1.7).
BitRock InstallBuilder User Guide 89 / 393
Figure 1.7: Packaging screen
NoteThe GUI is only available on Linux, Linux x64, Windows and OS X. The command line builder is available on all platforms.
1.8 The XML
InstallBuilder project files are stored in XML format. This enables and simplifies source control integration, collaborativedevelopment and customizing projects both by hand and using external scripts.
Our XML is human friendly, and although the project can be fully managed through the GUI, advanced users can also directlyedit the XML project using the built-in XML editor or their preferred text editor or IDE. The following is a complete example ofwhat an InstallBuilder project looks like. This particular project does not package any files.
<project><shortName>sample</shortName><fullName>Sample Project</fullName><version>1.0</version><enableRollback>1</enableRollback><enableTimestamp>1</enableTimestamp><componentList>
<component><name>default</name><description>Default Component</description><canBeEdited>1</canBeEdited><selected>1</selected><show>1</show>
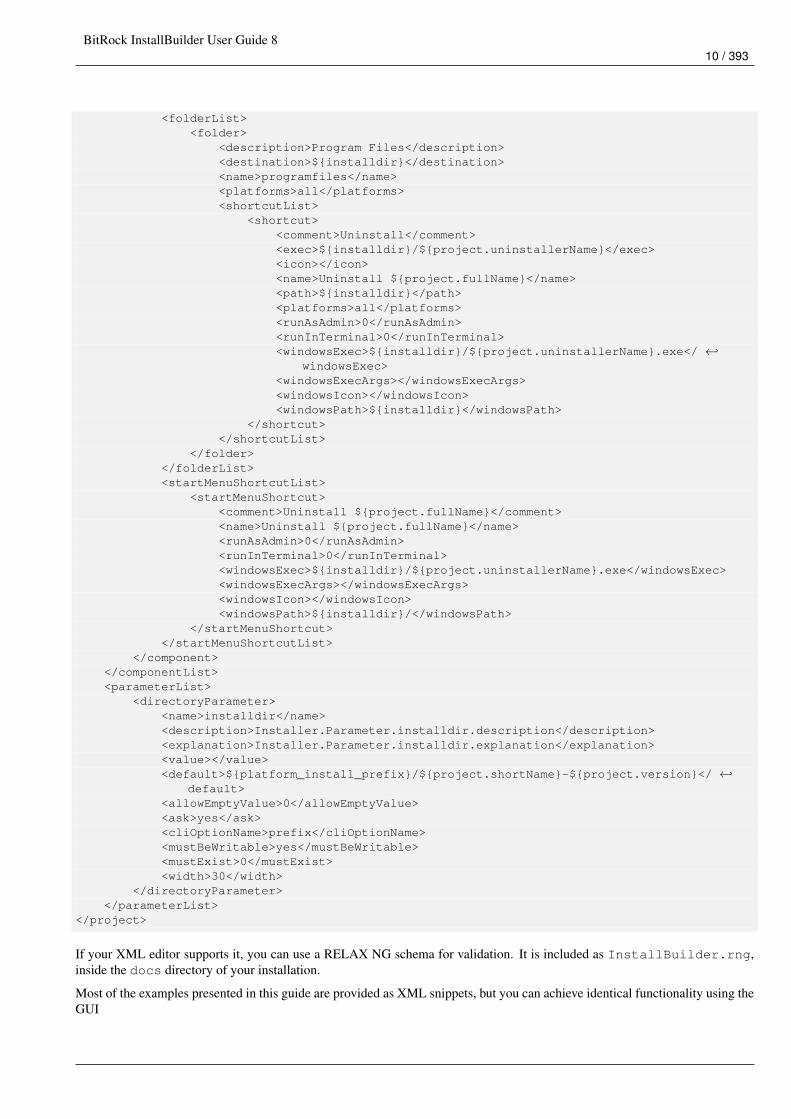
BitRock InstallBuilder User Guide 810 / 393
<folderList><folder>
<description>Program Files</description><destination>${installdir}</destination><name>programfiles</name><platforms>all</platforms><shortcutList>
<shortcut><comment>Uninstall</comment><exec>${installdir}/${project.uninstallerName}</exec><icon></icon><name>Uninstall ${project.fullName}</name><path>${installdir}</path><platforms>all</platforms><runAsAdmin>0</runAsAdmin><runInTerminal>0</runInTerminal><windowsExec>${installdir}/${project.uninstallerName}.exe</ ←↩
windowsExec><windowsExecArgs></windowsExecArgs><windowsIcon></windowsIcon><windowsPath>${installdir}</windowsPath>
</shortcut></shortcutList>
</folder></folderList><startMenuShortcutList>
<startMenuShortcut><comment>Uninstall ${project.fullName}</comment><name>Uninstall ${project.fullName}</name><runAsAdmin>0</runAsAdmin><runInTerminal>0</runInTerminal><windowsExec>${installdir}/${project.uninstallerName}.exe</windowsExec><windowsExecArgs></windowsExecArgs><windowsIcon></windowsIcon><windowsPath>${installdir}/</windowsPath>
</startMenuShortcut></startMenuShortcutList>
</component></componentList><parameterList>
<directoryParameter><name>installdir</name><description>Installer.Parameter.installdir.description</description><explanation>Installer.Parameter.installdir.explanation</explanation><value></value><default>${platform_install_prefix}/${project.shortName}-${project.version}</ ←↩
default><allowEmptyValue>0</allowEmptyValue><ask>yes</ask><cliOptionName>prefix</cliOptionName><mustBeWritable>yes</mustBeWritable><mustExist>0</mustExist><width>30</width>
</directoryParameter></parameterList>
</project>
If your XML editor supports it, you can use a RELAX NG schema for validation. It is included as InstallBuilder.rng,inside the docs directory of your installation.
Most of the examples presented in this guide are provided as XML snippets, but you can achieve identical functionality using theGUI
BitRock InstallBuilder User Guide 811 / 393
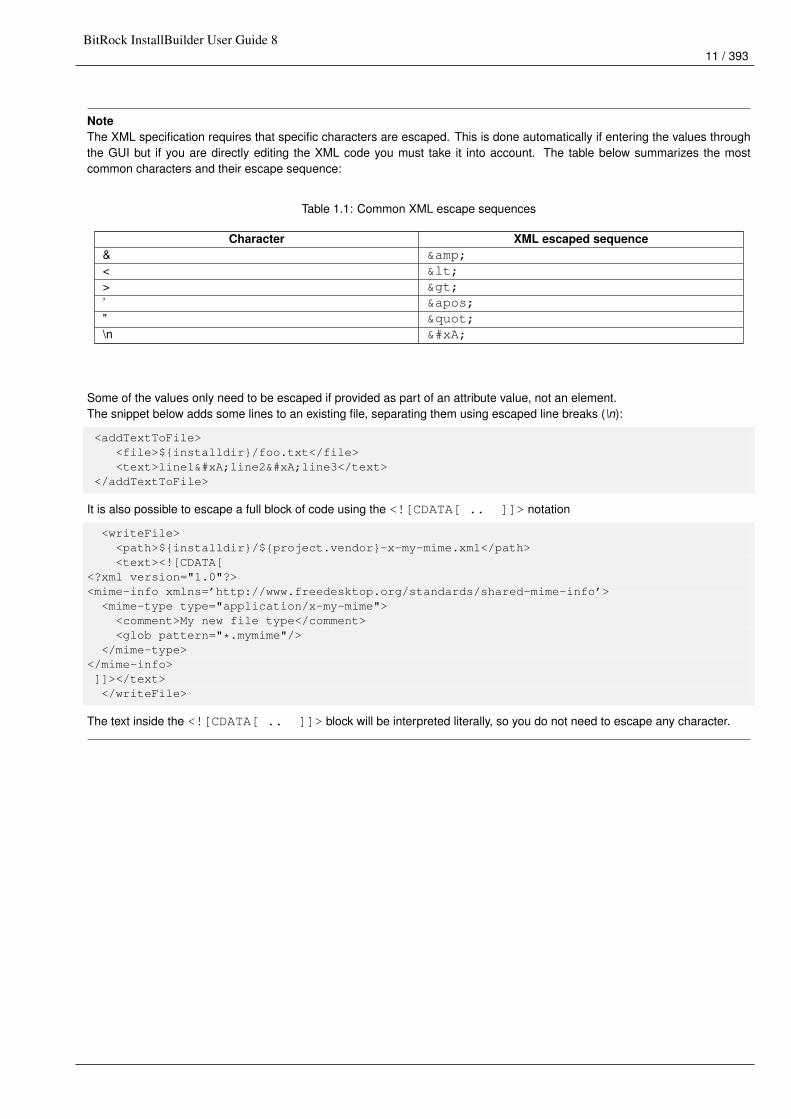
NoteThe XML specification requires that specific characters are escaped. This is done automatically if entering the values throughthe GUI but if you are directly editing the XML code you must take it into account. The table below summarizes the mostcommon characters and their escape sequence:
Table 1.1: Common XML escape sequences
Character XML escaped sequence& &< <> >’ '" "\n 

Some of the values only need to be escaped if provided as part of an attribute value, not an element.The snippet below adds some lines to an existing file, separating them using escaped line breaks (\n):
<addTextToFile><file>${installdir}/foo.txt</file><text>line1
line2
line3</text>
</addTextToFile>
It is also possible to escape a full block of code using the <![CDATA[ .. ]]> notation
<writeFile><path>${installdir}/${project.vendor}-x-my-mime.xml</path><text><![CDATA[
<?xml version="1.0"?><mime-info xmlns=’http://www.freedesktop.org/standards/shared-mime-info’><mime-type type="application/x-my-mime"><comment>My new file type</comment><glob pattern="*.mymime"/>
</mime-type></mime-info>]]></text></writeFile>
The text inside the <![CDATA[ .. ]]> block will be interpreted literally, so you do not need to escape any character.
BitRock InstallBuilder User Guide 812 / 393
Chapter 2
Installation and Getting Started
2.1 Installation
This section describes how to get up and running with InstallBuilder on a variety of platforms
2.1.1 Installing on Windows
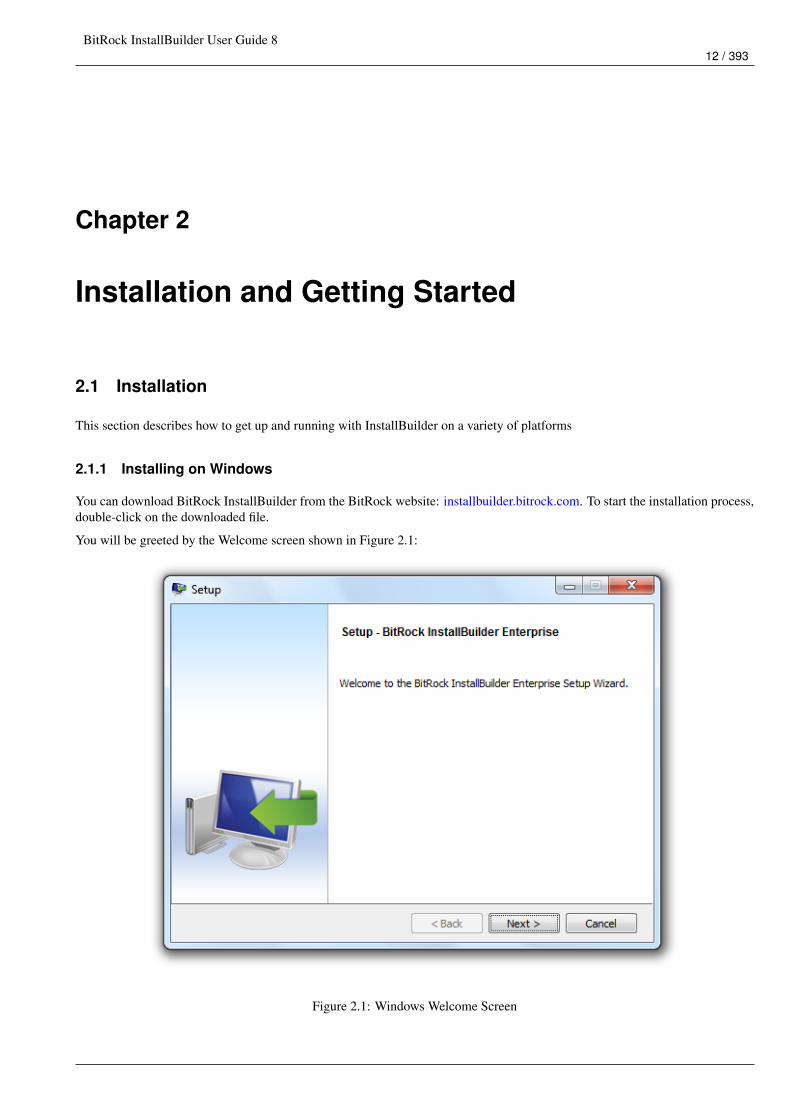
You can download BitRock InstallBuilder from the BitRock website: installbuilder.bitrock.com. To start the installation process,double-click on the downloaded file.
You will be greeted by the Welcome screen shown in Figure 2.1:
Figure 2.1: Windows Welcome Screen
BitRock InstallBuilder User Guide 813 / 393
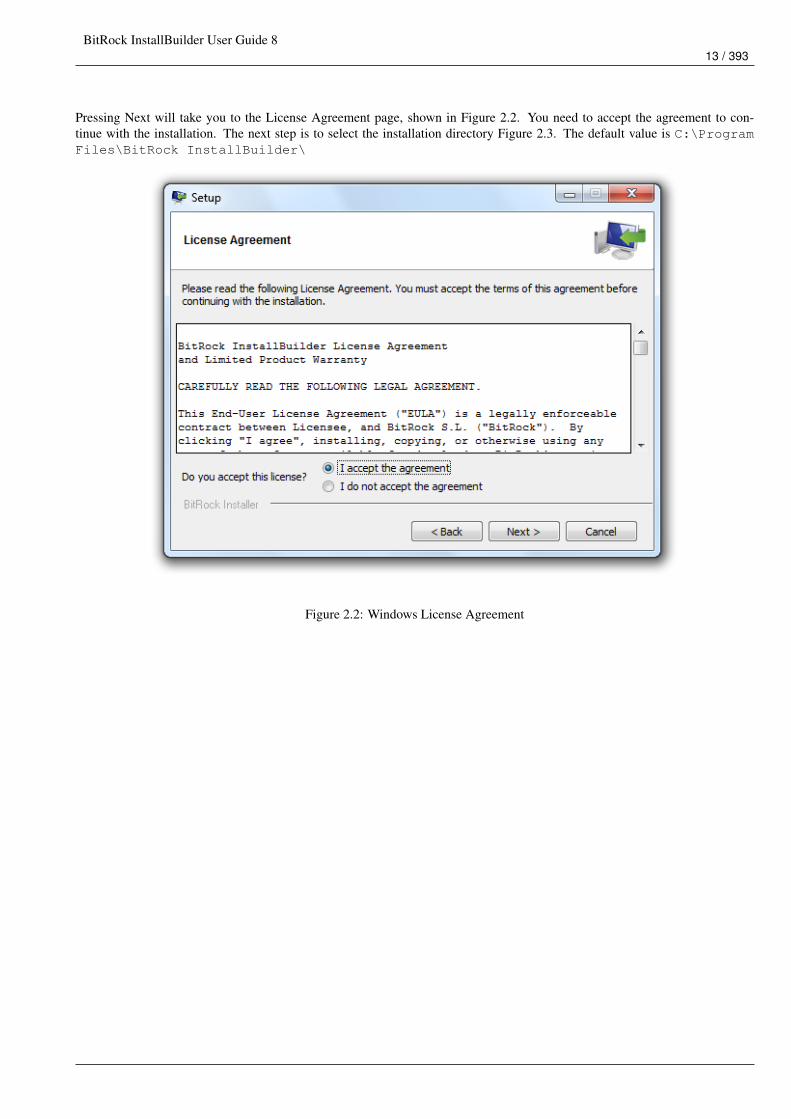
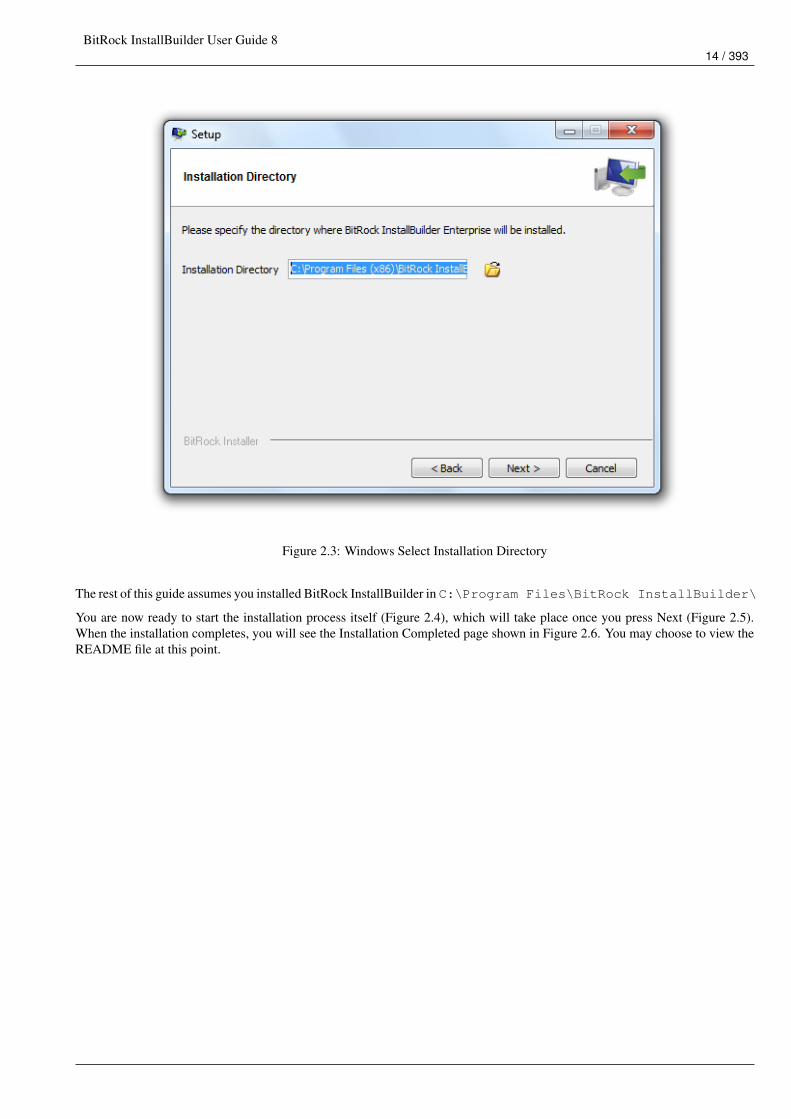
Pressing Next will take you to the License Agreement page, shown in Figure 2.2. You need to accept the agreement to con-tinue with the installation. The next step is to select the installation directory Figure 2.3. The default value is C:\ProgramFiles\BitRock InstallBuilder\
Figure 2.2: Windows License Agreement
BitRock InstallBuilder User Guide 814 / 393
Figure 2.3: Windows Select Installation Directory
The rest of this guide assumes you installed BitRock InstallBuilder in C:\Program Files\BitRock InstallBuilder\
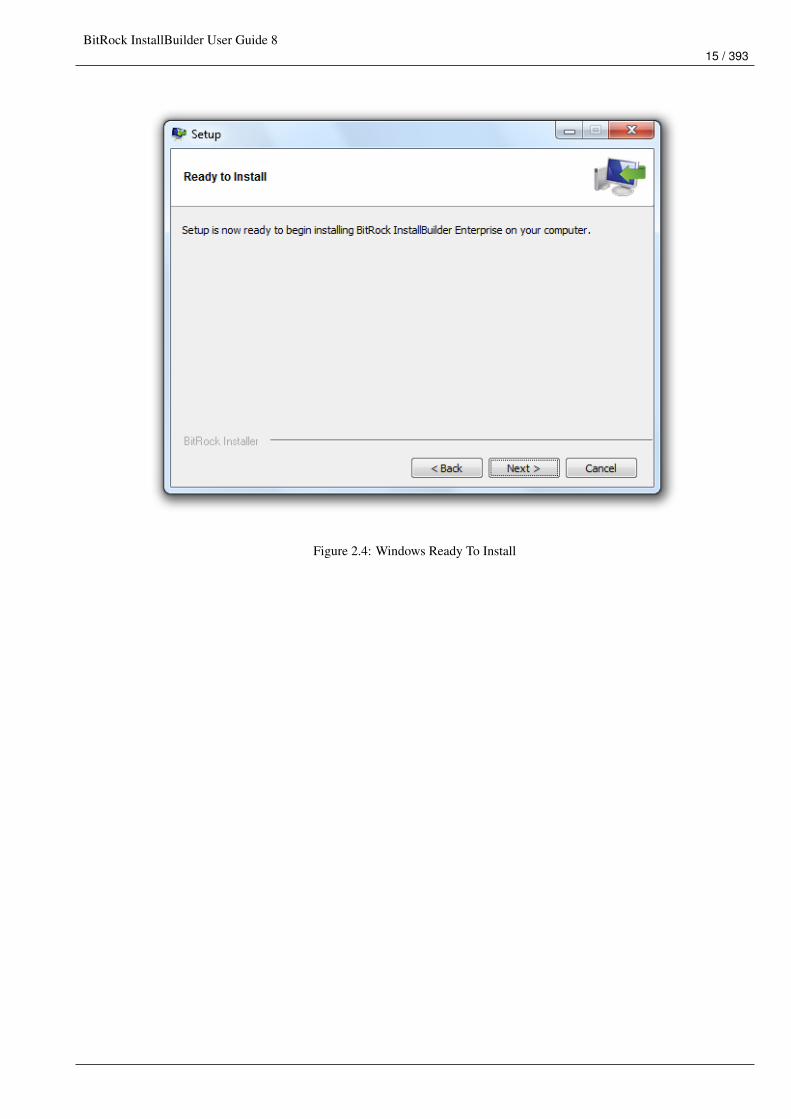
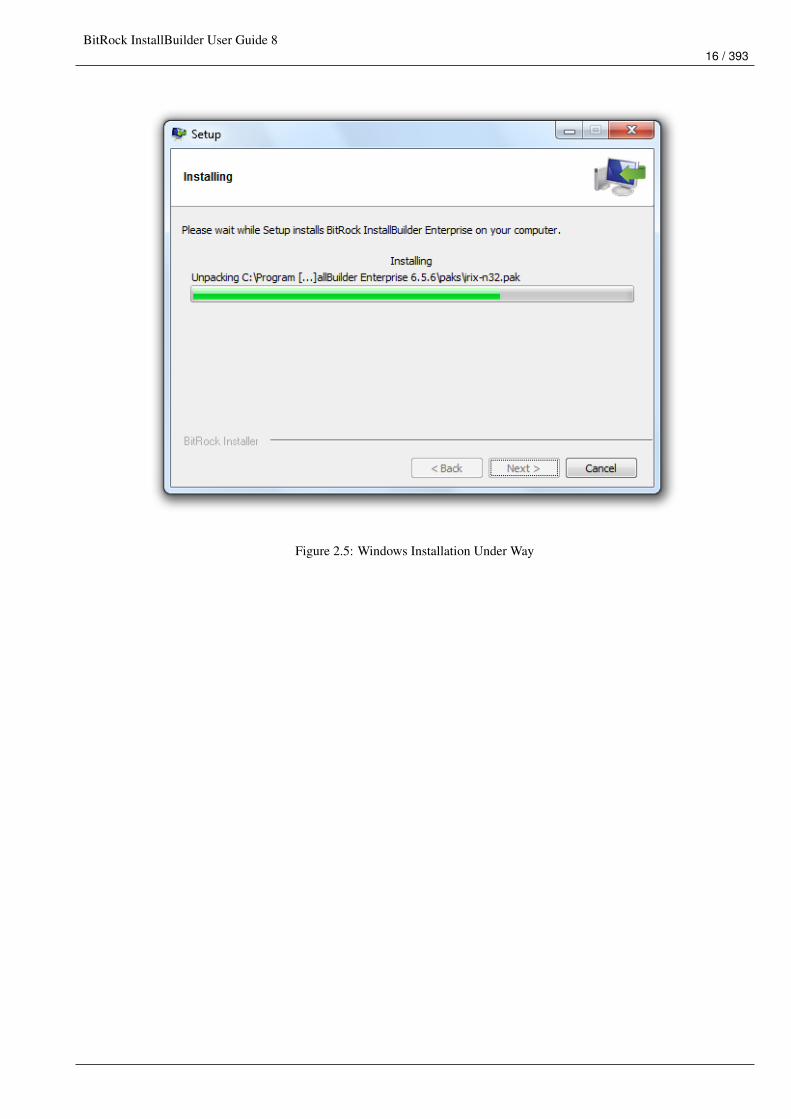
You are now ready to start the installation process itself (Figure 2.4), which will take place once you press Next (Figure 2.5).When the installation completes, you will see the Installation Completed page shown in Figure 2.6. You may choose to view theREADME file at this point.
BitRock InstallBuilder User Guide 815 / 393
Figure 2.4: Windows Ready To Install
BitRock InstallBuilder User Guide 816 / 393
Figure 2.5: Windows Installation Under Way

BitRock InstallBuilder User Guide 817 / 393
Figure 2.6: Windows Installation Completed
NoteIf you found a problem and could not complete the installation, please refer to the Troubleshooting section or contact us [email protected]. Please refer to the Support section for details on which information you should include with your request.
2.1.2 Installing on Unix
The process for installing on Linux and other Unix platforms is similar. The rest of this section assumes you are runningLinux. You can download the BitRock InstallBuilder binary from the BitRock website. It should have a name similar toinstallbuilder-professional-8.2.0-linux-installer.run. Make sure it has read and executable permis-sions by right clicking on the file, selecting "Properties" and then setting the appropriate permissions. Alternatively you can issuethe following shell command:
$> chmod +x installbuilder-professional-8.2.0-linux-installer.run
You can now start the installation by double-clicking on the file from your Desktop environment or by invoking it directly fromthe command line with:
$> ./installbuilder-professional-8.2.0-linux-installer.run
You will be greeted by a Welcome screen if you are running in a Desktop environment or a text message (if no GUI mode isavailable).
The default value for installation will be a folder in your home directory if you are running the installer as a regular user(recommended) or /opt/installbuilder-8.2.0/ if you are running the installation as superuser (root).
BitRock InstallBuilder User Guide 818 / 393
2.1.3 Installing on Mac OS X
The Mac OS X version of InstallBuilder is distributed as a zip file containing a .app that will be uncompressed automatically atdownload time by the browser. Alternatively you can uncompress it with:
$> unzip installbuilder-professional-8.2.0-osx-installer.app.zip
You can launch the application by double-clicking on it in Finder or from the command line with the following instruction
$> open installbuilder-professional-8.2.0-osx-installer.app
2.2 Registering your Copy of InstallBuilder
The InstallBuilder version you can download from installbuilder.bitrock.com is a fully functional evaluation version. It can onlybe used for a period of 30 days, and is intended for evaluation purposes only. It will add a reminder message to each installer("Created with an evaluation version of BitRock InstallBuilder") which will disappear once you purchase and register a license.
There are two ways of registering your license with the product:
• Using the GUI interface: From the main application menu select "License", then "Register License", and a window will appearwhere you can enter the location of your license file.
• Manually: The product can be manually registered by copying the license.xml file to the directory where InstallBuilderwas installed.
2.2.1 Specifying a License in the Command Line
Sometimes you may need to specify a license at build time, instead of registering your copy of InstallBuilder. For example, thisis necessary when you do not have write permissions for the InstallBuilder installation directory.
To do so, you can use the --license flag both with the GUI and command line builder.
$> builder build ~/project.xml --license ~/licenses/license.xml
$> builder --license ~/licenses/license.xml
The code above will launch the command line or GUI builder and all generated installers will be registered with the license~/licenses/license.xml. If the GUI builder is closed and then reopened without specifying the --license flag, thegenerated installers will use a previously registered license. If no license is registered or an incorrect one is provided, the messageBuilt with an evaluation version of InstallBuilder will be displayed while building. A similar messagewill also be displayed in the Welcome page of the generated installers.
2.2.2 Windows-specific License Registration Details
On certain Windows versions, especially those that are UAC-enabled such as Vista and Windows 7, regular users cannot writeto the default installation directory of InstallBuilder under c:\Program Files. When registering a new license, the builderwill try first to write it to the main installation directory. If it is not writable, it will be placed in the user’s personal folder.
When the builder is launched, it will try to load the license from the user’s personal folder and if none is found, it will look for itin the installation directory.
This process allows multiple users to share the same installation of Installbuilder without interference, even if they do not haveadministrative rights. It also allow using different licenses for each user. The output directory follows a similar approach asexplained in the "Directory structure" section.
BitRock InstallBuilder User Guide 819 / 393
2.3 Directory Structure
The installation process will create several directories:
• bin: BitRock InstallBuilder application binaries.
• paks: Support files necessary for creating installers.
• autoupdate: Support and binary files for the bundled automatic update tool.
• projects: Project files for your installers. See note below for Windows Vista.
• docs: Product documentation.
• demo: Files for the sample demo project.
• output: Generated installers. See note below for Windows Vista and Windows 7.
On Windows Vista and Windows 7, in line with the Application Development Requirements for User Account Control (UAC),the projects and output directories are installed under the user Documents folder, so usually they can be found atC:\Users\user\Documents\InstallBuilder\projects and C:\Users\user\Documents\InstallBuilder\output,respectively.
You are ready now to start the application and create your first installer, as described in the next section "Building your FirstInstaller".
2.4 Building Your First Installer
This section explains how to create your first installer in a few simple steps.
2.4.1 Startup and Basic Information
If you are running Gnome or KDE and performed the installation as a regular user, a shortcut was created on your Desktop. Youcan either start BitRock InstallBuilder by double-clicking on it or by invoking the binary from the command line:
$> /home/user/installbuilder-8.2.0/bin/builder
If you are running Windows, the installer created the appropriate Start Menu entries. Additionally, a shortcut was placed on yourDesktop. Please refer to the Using the Command Line Interface section later in the document for more information on buildinginstallers from the command line.
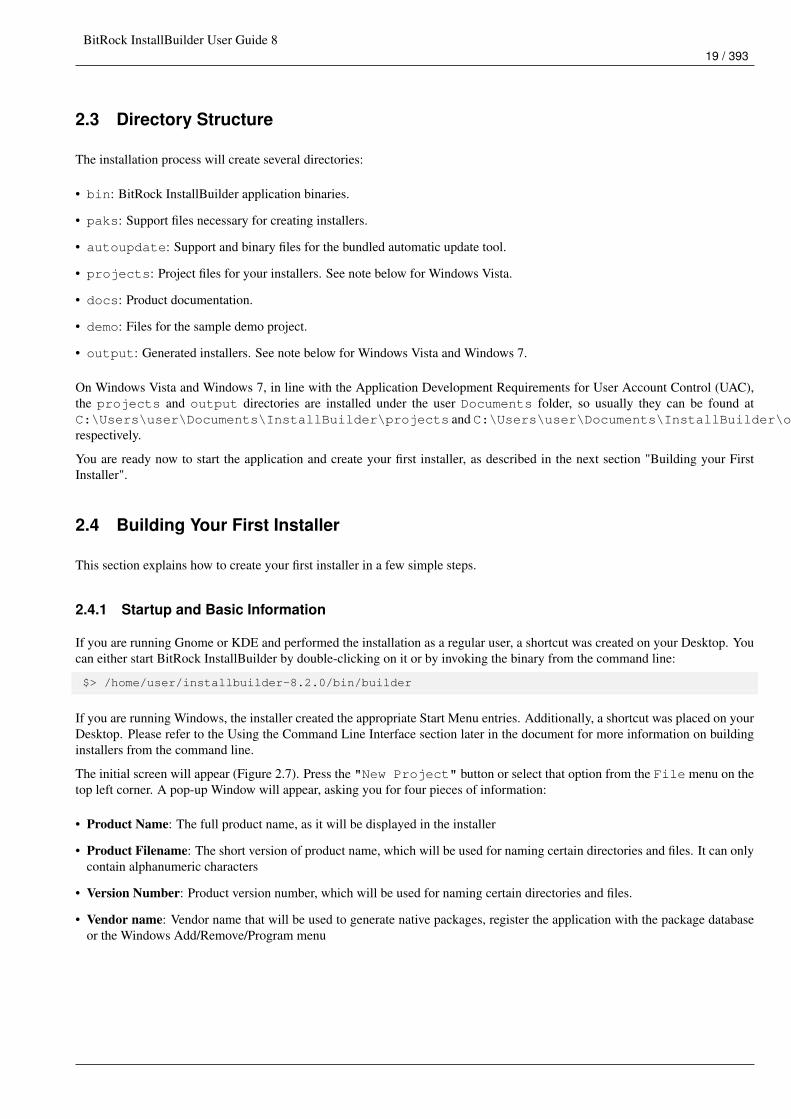
The initial screen will appear (Figure 2.7). Press the "New Project" button or select that option from the File menu on thetop left corner. A pop-up Window will appear, asking you for four pieces of information:
• Product Name: The full product name, as it will be displayed in the installer
• Product Filename: The short version of product name, which will be used for naming certain directories and files. It can onlycontain alphanumeric characters
• Version Number: Product version number, which will be used for naming certain directories and files.
• Vendor name: Vendor name that will be used to generate native packages, register the application with the package databaseor the Windows Add/Remove/Program menu
BitRock InstallBuilder User Guide 820 / 393
The rest of this tutorial assumes you kept the default values: "Sample Project", "sample", "1.0" and "Name ofyour Company".
Figure 2.7: Main Screen
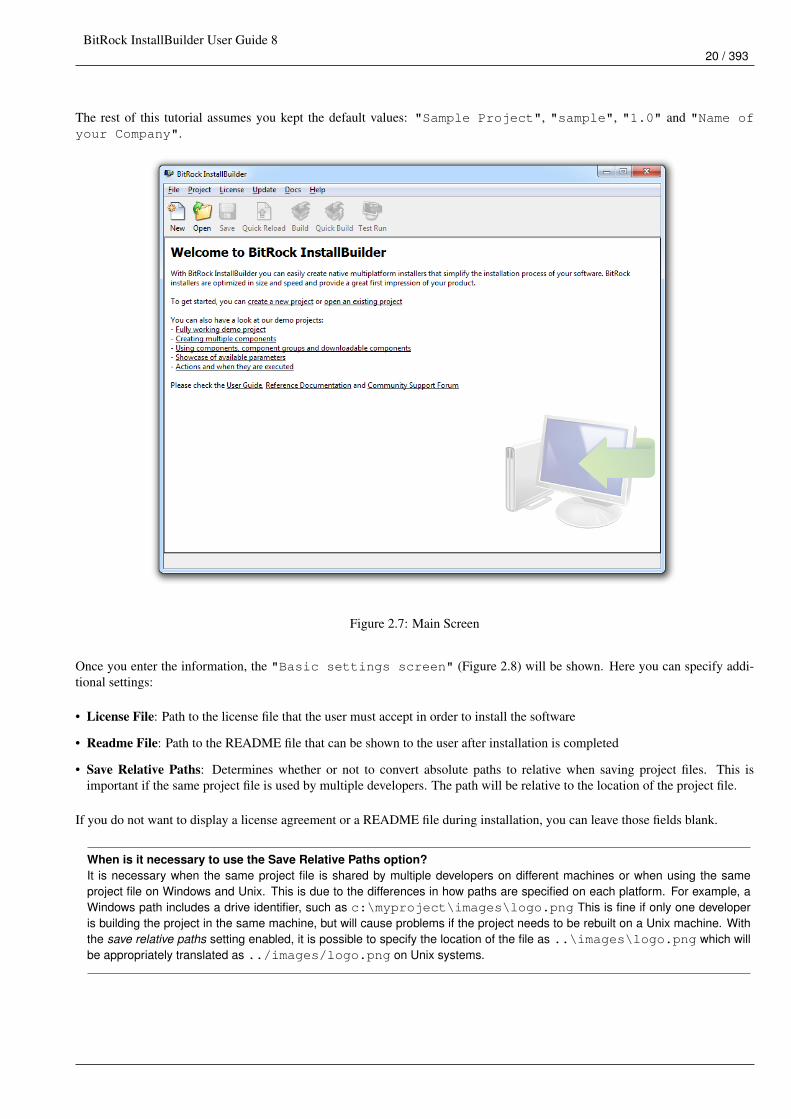
Once you enter the information, the "Basic settings screen" (Figure 2.8) will be shown. Here you can specify addi-tional settings:
• License File: Path to the license file that the user must accept in order to install the software
• Readme File: Path to the README file that can be shown to the user after installation is completed
• Save Relative Paths: Determines whether or not to convert absolute paths to relative when saving project files. This isimportant if the same project file is used by multiple developers. The path will be relative to the location of the project file.
If you do not want to display a license agreement or a README file during installation, you can leave those fields blank.
When is it necessary to use the Save Relative Paths option?It is necessary when the same project file is shared by multiple developers on different machines or when using the sameproject file on Windows and Unix. This is due to the differences in how paths are specified on each platform. For example, aWindows path includes a drive identifier, such as c:\myproject\images\logo.png This is fine if only one developeris building the project in the same machine, but will cause problems if the project needs to be rebuilt on a Unix machine. Withthe save relative paths setting enabled, it is possible to specify the location of the file as ..\images\logo.png which willbe appropriately translated as ../images/logo.png on Unix systems.
BitRock InstallBuilder User Guide 821 / 393
Figure 2.8: Basic Settings
2.4.2 Select the Files
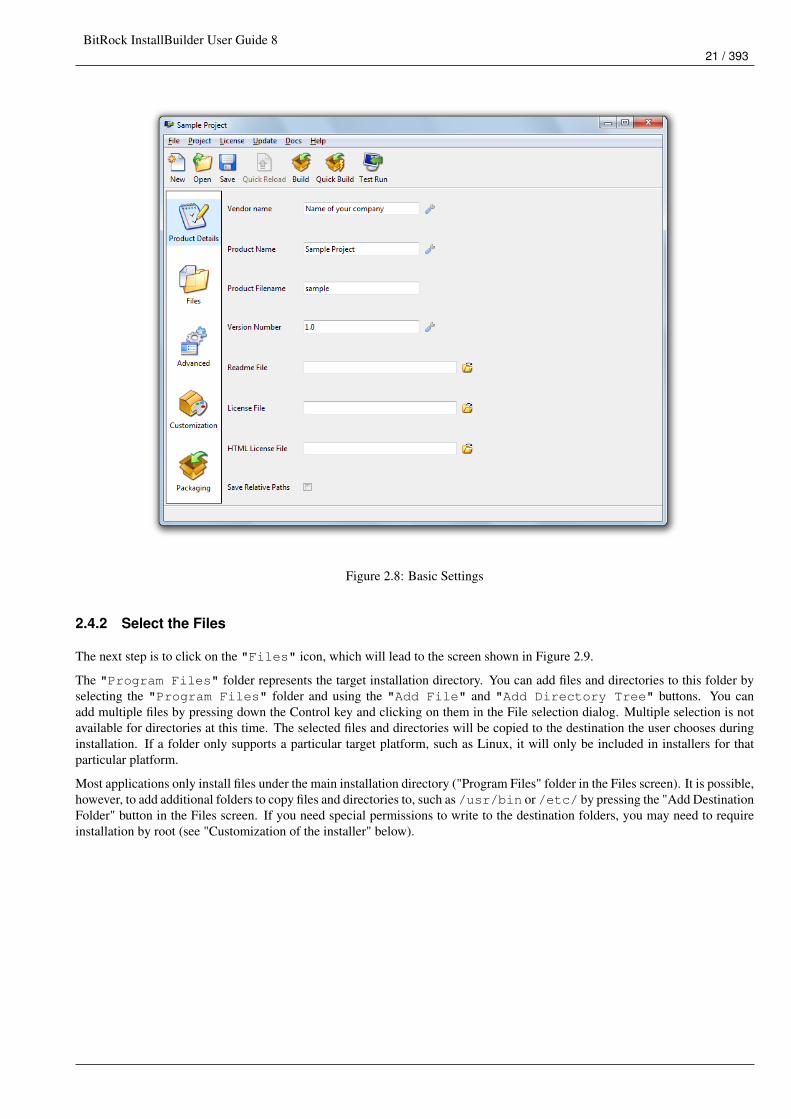
The next step is to click on the "Files" icon, which will lead to the screen shown in Figure 2.9.
The "Program Files" folder represents the target installation directory. You can add files and directories to this folder byselecting the "Program Files" folder and using the "Add File" and "Add Directory Tree" buttons. You canadd multiple files by pressing down the Control key and clicking on them in the File selection dialog. Multiple selection is notavailable for directories at this time. The selected files and directories will be copied to the destination the user chooses duringinstallation. If a folder only supports a particular target platform, such as Linux, it will only be included in installers for thatparticular platform.
Most applications only install files under the main installation directory ("Program Files" folder in the Files screen). It is possible,however, to add additional folders to copy files and directories to, such as /usr/bin or /etc/ by pressing the "Add DestinationFolder" button in the Files screen. If you need special permissions to write to the destination folders, you may need to requireinstallation by root (see "Customization of the installer" below).
BitRock InstallBuilder User Guide 822 / 393
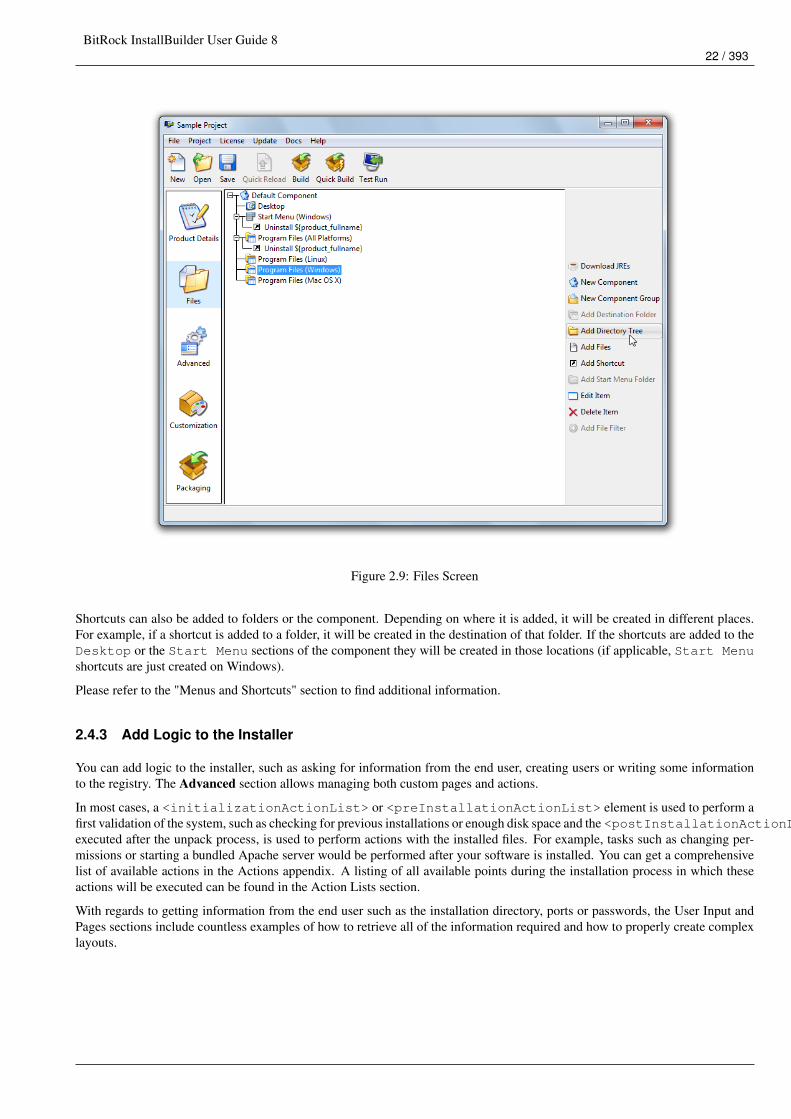
Figure 2.9: Files Screen
Shortcuts can also be added to folders or the component. Depending on where it is added, it will be created in different places.For example, if a shortcut is added to a folder, it will be created in the destination of that folder. If the shortcuts are added to theDesktop or the Start Menu sections of the component they will be created in those locations (if applicable, Start Menushortcuts are just created on Windows).
Please refer to the "Menus and Shortcuts" section to find additional information.
2.4.3 Add Logic to the Installer
You can add logic to the installer, such as asking for information from the end user, creating users or writing some informationto the registry. The Advanced section allows managing both custom pages and actions.
In most cases, a <initializationActionList> or <preInstallationActionList> element is used to perform afirst validation of the system, such as checking for previous installations or enough disk space and the <postInstallationActionList>,executed after the unpack process, is used to perform actions with the installed files. For example, tasks such as changing per-missions or starting a bundled Apache server would be performed after your software is installed. You can get a comprehensivelist of available actions in the Actions appendix. A listing of all available points during the installation process in which theseactions will be executed can be found in the Action Lists section.
With regards to getting information from the end user such as the installation directory, ports or passwords, the User Input andPages sections include countless examples of how to retrieve all of the information required and how to properly create complexlayouts.
BitRock InstallBuilder User Guide 823 / 393
2.4.4 Add a license key page
In some cases it is desirable to prevent your users from installing your software without providing a previously purchased licensekey. The example below explains how to create a custom license key page and how to validate its input:
<project>...<!-- Component bundling the validator --><componentList><component><name>tools</name>
<folderList><folder>
<name>license</name><destination>${installdir}</destination><distributionFileList>
<distributionFile origin="/path/to/validator.exe"/></distributionFileList>
</folder></folderList>
</component></componentList>...<parameterList>...<!-- License key page --><parameterGroup>
<name>licensekey</name><title>License Key</title><explanation>Please enter your registration key</explanation><value></value><default></default><orientation>horizontal</orientation><parameterList>
<!-- A stringParameter for each field. We include a "-" as description to ←↩simulate the license-type format -->
<stringParameter name="field1" description="" allowEmptyValue="0" width="4"/><stringParameter name="field2" description="-" allowEmptyValue="0" width="4"/><stringParameter name="field3" description="-" allowEmptyValue="0" width="4"/><stringParameter name="field4" description="-" allowEmptyValue="0" width="4"/>
</parameterList><validationActionList>
<!-- Check all the fields have the appropriate length --><foreach variables="field">
<values>"${field1}" "${field2}" "${field3}" "${field4}"</values><actionList>
<throwError><text>${field}: Field should be four digits length</text><ruleList>
<compareTextLength text="${field}" logic="equals" length="4" negate ←↩="1"/>
</ruleList></throwError><throwError>
<text>${field}: Should be a pure digit string</text><ruleList>
<stringTest text="${field}" type="digit" negate="1"/></ruleList>
</throwError></actionList>
</foreach><!-- Join all the fields to create the license number -->

BitRock InstallBuilder User Guide 824 / 393
<setInstallerVariable name="${normalizedkey}" value="${field1}${field2}${field3}$ ←↩{field4}"/>
<!-- Unpack a bundled validator program and check if the license is correct --><unpackFile>
<destination>${system_temp_directory}</destination><component>tools</component><folder>license</folder><origin>validator.exe</origin>
</unpackFile><runProgram>
<program>${system_temp_directory}/validator.exe</program><programArguments>${normalizedkey}</programArguments>
</runProgram><throwError text="Wrong license key, please enter a valid one">
<ruleList><compareText text="${program_stdout}" logic="equals" value="1"/>
</ruleList></throwError>
</validationActionList><ruleList>
<compareText text="${installer_ui}" logic="equals" value="gui"/></ruleList>
</parameterGroup>...
</parameterList>...
</project>
Please note that this layout won’t be properly displayed in text mode so the example hides the page if the ${installer_ui}is not gui (see Installation Modes for additional details). If you plan to support it, you should create an additional simplifiedpage to be displayed in text mode:
<stringParameter><name>licensekeytext</name><title>License Key</title><description>Please introduce your registration key:</description><validationActionList>
...</validationActionList><ruleList>
<compareText text="${installer_ui}" logic="equals" value="text"/></ruleList>
</stringParameter>
In the example, the validation code makes use of an external tool to validate the license. If you do not have any tool, you couldimplement an algorithm in your XML code to validate it. A very simple validation would be to check that:
${field1}+${field3}==${field2}+${field4}
<validationActionList><mathExpression>
<text>${field1}+${field3}</text><variable>sum1</variable>
</mathExpression><setInstallerVariableFromRegEx>
<name>trimmedSum1</name><pattern>.*(\d{4})$</pattern><substitution>\1</substitution><text>${sum1}</text>
</setInstallerVariableFromRegEx>
BitRock InstallBuilder User Guide 825 / 393
<mathExpression><text>${field2}+${field4}</text><variable>sum2</variable>
</mathExpression><setInstallerVariableFromRegEx>
<name>trimmedSum2</name><pattern>.*(\d{4})$</pattern><substitution>\1</substitution><text>${sum2}</text>
</setInstallerVariableFromRegEx><throwError>
<text>Invalid License or License Count Exceeded</text><ruleList>
<compareValues><logic>does_not_equal</logic><value1>${trimmedSum2}</value1><value2>${trimmedSum1}</value2>
</compareValues></ruleList>
</throwError></validationActionList>
Please note this is a very simple algorithm. If you plan to use this in your installer you can create more complex checks using<setInstallerVariableFromRegEx> and <md5> actions.
Another option is to send the provided license key to your server to validate:
<validationActionList><httpPost>
<filename>${system_temp_directory}/post_result</filename><url>http://www.example.com/validate.php</url><queryParameterList>
<queryParameter name="key" value="${normalizedkey}"/></queryParameterList>
</httpPost><md5>
<text>${normalizedkey}+secretKey</text><variable>expected</variable>
</md5>
<readFile name="result" path="${system_temp_directory}/post_result"/><throwError text="Invalid License or License Count Exceeded">
<ruleList><compareText>
<logic>does_not_contain</logic><text>${result}</text><value>${expected}</value>
</compareText></ruleList>
</throwError><deleteFile path="${system_temp_directory}/post_result"/>
</validationActionList>
You can also send additional information, such as a required username and password so you can track which user is providingthe license key. The drawback of using this approach is that it requires an Internet connection.
2.4.5 Customize the Installer
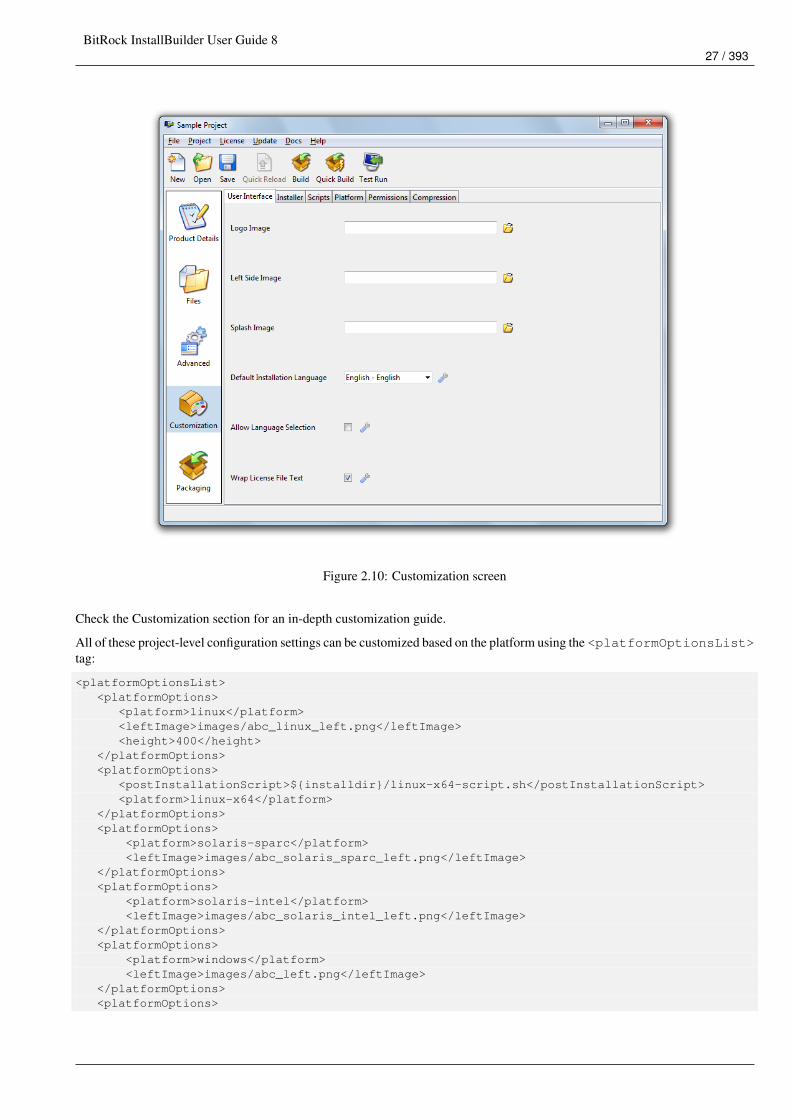
On the Customization (Figure 2.10) and the Packaging screens, you can change the default installation settings to match yourneeds:
User Interface Settings
BitRock InstallBuilder User Guide 826 / 393
• Logo Image: 48x48 GIF or PNG logo image that will be placed at the top right corner of the installer. If no image is specified,the default image will be used
• Left Side Image: 163x314 GIF or PNG image that will be placed at the left side of the installer in the Welcome and InstallationFinished pages. If no image is specified, the default image will be used
• Windows Executable Icon: ICO file with an specific format -see below- to set the icon for the installer executable file onWindows systems.
• Default Installation Language: Default language for the installer
• Allow Language Selection: Allow language selection. If this setting is enabled, the user will be required to specify thelanguage for the installation
• Wrap License File Text: Wrap license file text displayed to the user
• Splash screen delay: Extra display time of the splash screen
Installer Settings
• Require Install by Administrator: Whether or not installation will require super user privileges (root on Linux, Administratoruser on Windows and OS X). This setting will prevent the installer from running if the user is not root or Administrator on alloperating systems except for OS X. In OS X, the regular authentication dialog window will be shown, asking the user for theadministrator password so the installer can be run with root privileges
• Installer Name: Name of the installer created by the build process.
• CDROM Files Directory: Name of the directory that will contain the CDROM files created by the build process
• Uninstaller Directory: Directory where the uninstaller will be created
• Compression Algorithm: Compression algorithm that will be used to pack the files inside the installer. LZMA compressionis available only on Linux, Windows and OS X platforms
• Backup Directory: Path to a directory where existing files will be stored if enableRollback property is enabled
• Installation Scope: Whether or not to install Start Menu and Desktop links for All Users or for the current user. If set to auto,it will be installed for All Users if the current user is an administrator or for the current user otherwise.
It is recommended that instead of using the above settings, you use the equivalent action lists, such as <postInstallationActionList>and <preUninstallationActionList>.
Permissions
Please note that these options only take effect when creating installers for Unix platforms from Windows.
• Default Unix File Permissions: Default Unix file permissions in octal form
• Default Unix Directory Permissions: Default Unix directory permissions in octal form
BitRock InstallBuilder User Guide 827 / 393
Figure 2.10: Customization screen
Check the Customization section for an in-depth customization guide.
All of these project-level configuration settings can be customized based on the platform using the <platformOptionsList>tag:
<platformOptionsList><platformOptions>
<platform>linux</platform><leftImage>images/abc_linux_left.png</leftImage><height>400</height>
</platformOptions><platformOptions>
<postInstallationScript>${installdir}/linux-x64-script.sh</postInstallationScript><platform>linux-x64</platform>
</platformOptions><platformOptions>
<platform>solaris-sparc</platform><leftImage>images/abc_solaris_sparc_left.png</leftImage>
</platformOptions><platformOptions>
<platform>solaris-intel</platform><leftImage>images/abc_solaris_intel_left.png</leftImage>
</platformOptions><platformOptions>
<platform>windows</platform><leftImage>images/abc_left.png</leftImage>
</platformOptions><platformOptions>
BitRock InstallBuilder User Guide 828 / 393
<platform>osx</platform><leftImage>images/abc_osx_left.png</leftImage><height>500</height>
</platformOptions></platformOptionsList>
2.4.6 Packaging the Installer
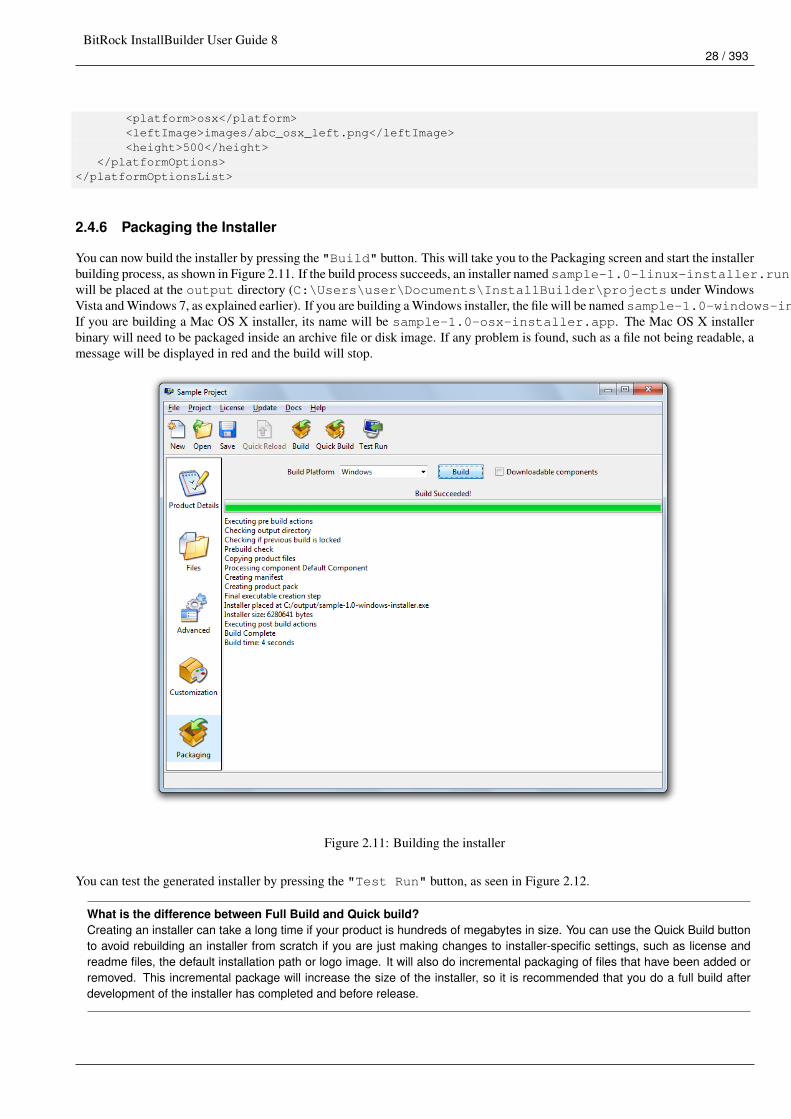
You can now build the installer by pressing the "Build" button. This will take you to the Packaging screen and start the installerbuilding process, as shown in Figure 2.11. If the build process succeeds, an installer named sample-1.0-linux-installer.runwill be placed at the output directory (C:\Users\user\Documents\InstallBuilder\projects under WindowsVista and Windows 7, as explained earlier). If you are building a Windows installer, the file will be named sample-1.0-windows-installer.exe.If you are building a Mac OS X installer, its name will be sample-1.0-osx-installer.app. The Mac OS X installerbinary will need to be packaged inside an archive file or disk image. If any problem is found, such as a file not being readable, amessage will be displayed in red and the build will stop.
Figure 2.11: Building the installer
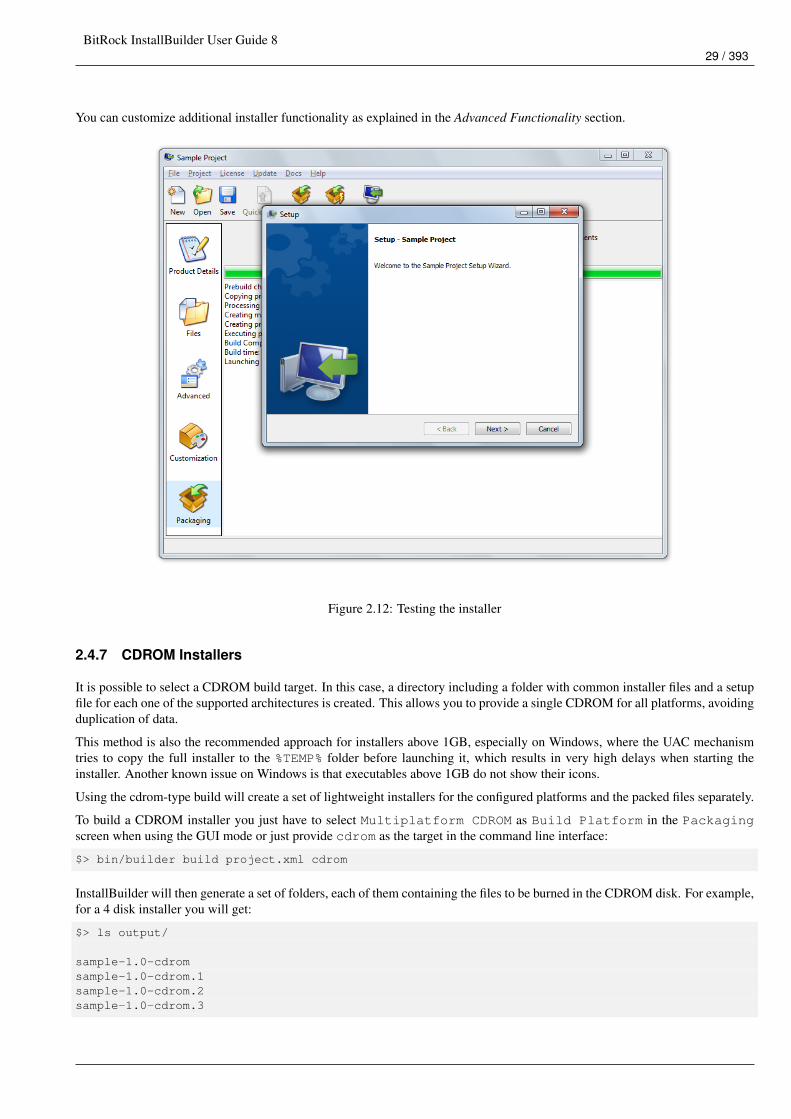
You can test the generated installer by pressing the "Test Run" button, as seen in Figure 2.12.
What is the difference between Full Build and Quick build?Creating an installer can take a long time if your product is hundreds of megabytes in size. You can use the Quick Build buttonto avoid rebuilding an installer from scratch if you are just making changes to installer-specific settings, such as license andreadme files, the default installation path or logo image. It will also do incremental packaging of files that have been added orremoved. This incremental package will increase the size of the installer, so it is recommended that you do a full build afterdevelopment of the installer has completed and before release.
BitRock InstallBuilder User Guide 829 / 393
You can customize additional installer functionality as explained in the Advanced Functionality section.
Figure 2.12: Testing the installer
2.4.7 CDROM Installers
It is possible to select a CDROM build target. In this case, a directory including a folder with common installer files and a setupfile for each one of the supported architectures is created. This allows you to provide a single CDROM for all platforms, avoidingduplication of data.
This method is also the recommended approach for installers above 1GB, especially on Windows, where the UAC mechanismtries to copy the full installer to the %TEMP% folder before launching it, which results in very high delays when starting theinstaller. Another known issue on Windows is that executables above 1GB do not show their icons.
Using the cdrom-type build will create a set of lightweight installers for the configured platforms and the packed files separately.
To build a CDROM installer you just have to select Multiplatform CDROM as Build Platform in the Packagingscreen when using the GUI mode or just provide cdrom as the target in the command line interface:
$> bin/builder build project.xml cdrom
InstallBuilder will then generate a set of folders, each of them containing the files to be burned in the CDROM disk. For example,for a 4 disk installer you will get:
$> ls output/
sample-1.0-cdromsample-1.0-cdrom.1sample-1.0-cdrom.2sample-1.0-cdrom.3
BitRock InstallBuilder User Guide 830 / 393
Where the name of the folders is defined through the <cdromDirectory> project property. The first disk is contained in thefolder named sample-1.0-cdrom and, apart from the packed files, it will contain the installers for the different platforms.The other folders will just contain the rest of the files to install. When installing the generated multidisk installer, InstallBuilderwill automatically ask for the next disk when needed.
A CDROM build is configured through the below project properties:
• <cdromFirstDiskSize>: The size (in bytes) of the first CDROM (default value: 650000000). This tag will allow you toreserve some space in the first disk to include presentations, images or video tutorials without affecting the size of the rest ofthe disks. If you don’t need this extra space in the first disk you can just set it to the same value as the <cdromDiskSize>property.
• <cdromDiskSize>: The size (in bytes) of the remaining CDROMS (default value: 700000000)
• <cdromPlatforms>: Space-separated list of platforms that the CDROM installer will support. A launcher binary will beadded in the first disk for each of these platforms.
• <cdromDirectory>: Name of the directory that will contain the CDROM files created by the build process (defaults to${project.shortName}-${project.version}-cdrom)
• <compressPackedFiles>: Compress files as if they were being packed into the installer file (defaults to 0). Setting thisoption to true results in the creation of a dist file that has packed all the files inside it. It usually achieves better compressionrates.
Creating DVD disksIn case of DVD disks, the appropriate values for the <cdromFirstDiskSize> and <cdromDiskSize> tags are:
<project>...<cdromFirstDiskSize>4650000000</cdromFirstDiskSize><cdromDiskSize>4700000000</cdromDiskSize>...
</project>
Distributing big installers in other media formatsIf your product is distributed in other media formats such as a USB drive or SD card you can still use the CDROM-type build.You just need to set a <cdromFirstDiskSize> above your required disk space so InstallBuilder does not split the datainto multiple disks. As internally calculating the required disk space for each disk does not currently take into account thecompression gain, a safe value to set would be twice the size of your files.In the case of a USB bundling your 10GB of files:
<project>...<cdromFirstDiskSize>20000000000</cdromFirstDiskSize>...
</project>
2.4.7.1 How are disks on multidisk installers detected
A common error while testing the multidisk installers is not being able to detect the next disk when the installer requests it. Tounderstand why this happens, it is important to understand how InstallBuilder detects that the inserted disk is valid:
1) When the unpack process starts, InstallBuilder looks for the dist file (or folder depending on the value of the <compressPackedFiles>property) in its parent directory and starts unpacking the files
2) When InstallBuilder finds a file that requires a new disk during the unpack process, a dialog prompts for it.
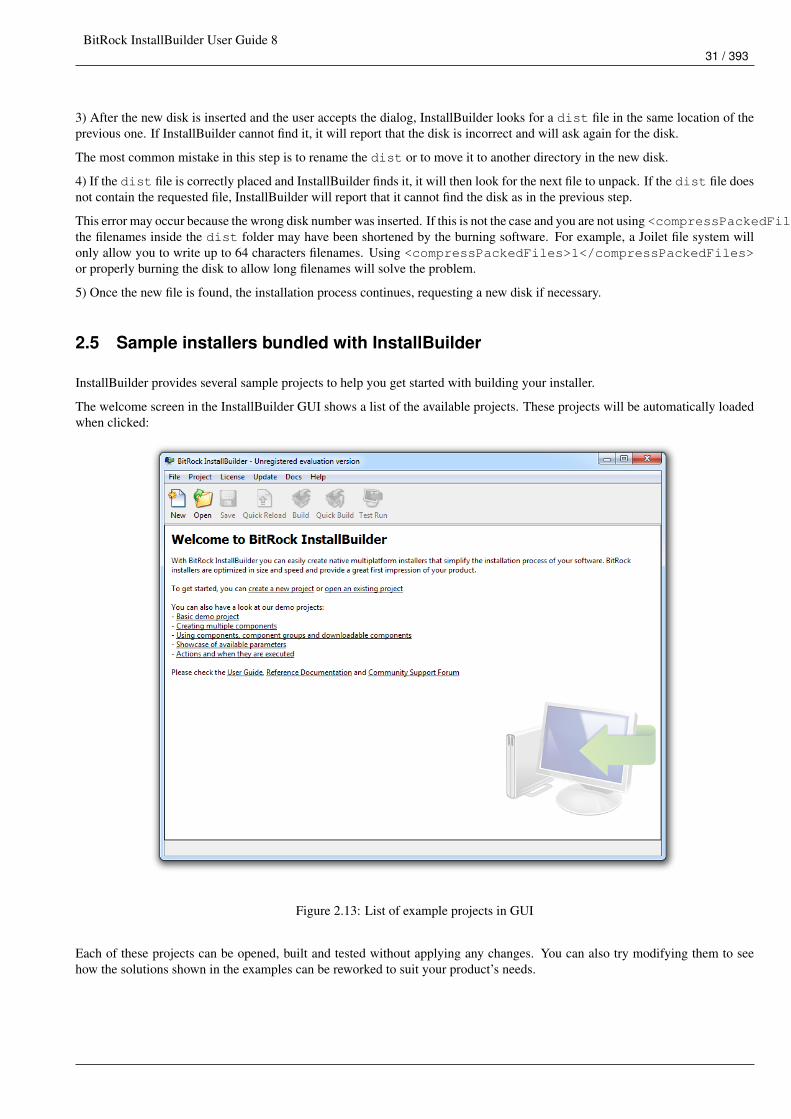
BitRock InstallBuilder User Guide 831 / 393
3) After the new disk is inserted and the user accepts the dialog, InstallBuilder looks for a dist file in the same location of theprevious one. If InstallBuilder cannot find it, it will report that the disk is incorrect and will ask again for the disk.
The most common mistake in this step is to rename the dist or to move it to another directory in the new disk.
4) If the dist file is correctly placed and InstallBuilder finds it, it will then look for the next file to unpack. If the dist file doesnot contain the requested file, InstallBuilder will report that it cannot find the disk as in the previous step.
This error may occur because the wrong disk number was inserted. If this is not the case and you are not using <compressPackedFiles>1</compressPackedFiles>,the filenames inside the dist folder may have been shortened by the burning software. For example, a Joilet file system willonly allow you to write up to 64 characters filenames. Using <compressPackedFiles>1</compressPackedFiles>or properly burning the disk to allow long filenames will solve the problem.
5) Once the new file is found, the installation process continues, requesting a new disk if necessary.
2.5 Sample installers bundled with InstallBuilder
InstallBuilder provides several sample projects to help you get started with building your installer.
The welcome screen in the InstallBuilder GUI shows a list of the available projects. These projects will be automatically loadedwhen clicked:
Figure 2.13: List of example projects in GUI
Each of these projects can be opened, built and tested without applying any changes. You can also try modifying them to seehow the solutions shown in the examples can be reworked to suit your product’s needs.

BitRock InstallBuilder User Guide 832 / 393
2.5.1 Basic demo project
This project provides a simple, ready to use installer that will:
• Prompt the user to accept a license agreement.
• Display a page to select the installation directory.
• Install the packed files.
• Show an optional README file with information about the installation, selectable through a checkbox in the final page.
Figure 2.14: Demo project’s sample license
The demo project includes files for multiple platforms. Depending on the platform built, it will pack different sets of files.
2.5.2 Components, component groups and downloadable components
This project demonstrates how components and component groups can be used to package a complex application. It demonstrateshow component groups can be used to organize common files and functionality. Deselecting or selecting the parent parametergroup will also affect the installation of its child components.
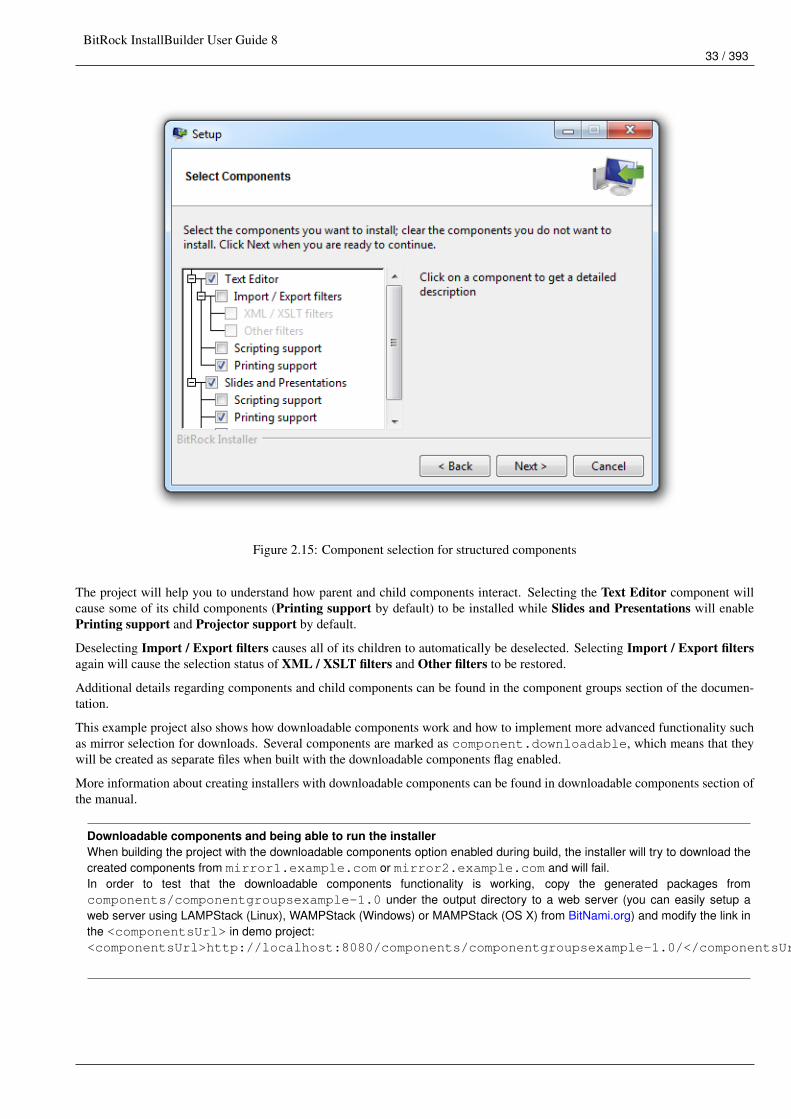
BitRock InstallBuilder User Guide 833 / 393
Figure 2.15: Component selection for structured components
The project will help you to understand how parent and child components interact. Selecting the Text Editor component willcause some of its child components (Printing support by default) to be installed while Slides and Presentations will enablePrinting support and Projector support by default.
Deselecting Import / Export filters causes all of its children to automatically be deselected. Selecting Import / Export filtersagain will cause the selection status of XML / XSLT filters and Other filters to be restored.
Additional details regarding components and child components can be found in the component groups section of the documen-tation.
This example project also shows how downloadable components work and how to implement more advanced functionality suchas mirror selection for downloads. Several components are marked as component.downloadable, which means that theywill be created as separate files when built with the downloadable components flag enabled.
More information about creating installers with downloadable components can be found in downloadable components section ofthe manual.
Downloadable components and being able to run the installerWhen building the project with the downloadable components option enabled during build, the installer will try to download thecreated components from mirror1.example.com or mirror2.example.com and will fail.In order to test that the downloadable components functionality is working, copy the generated packages fromcomponents/componentgroupsexample-1.0 under the output directory to a web server (you can easily setup aweb server using LAMPStack (Linux), WAMPStack (Windows) or MAMPStack (OS X) from BitNami.org) and modify the link inthe <componentsUrl> in demo project:<componentsUrl>http://localhost:8080/components/componentgroupsexample-1.0/</componentsUrl>
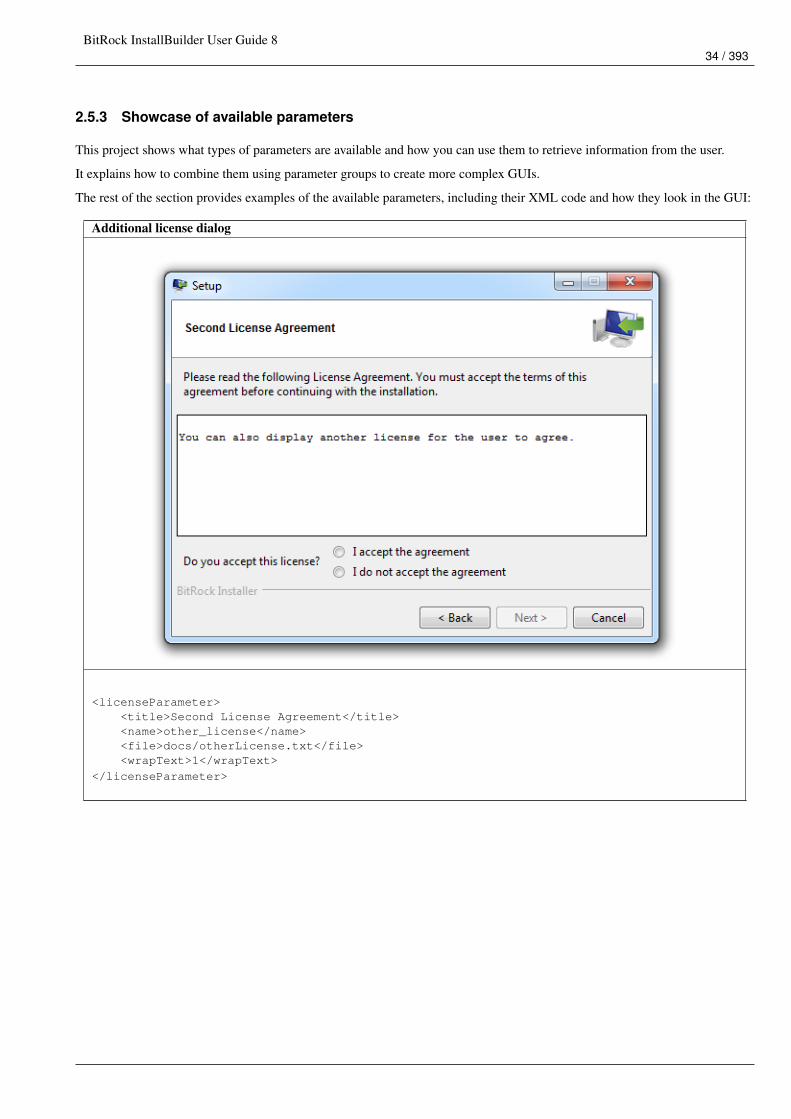
BitRock InstallBuilder User Guide 834 / 393
2.5.3 Showcase of available parameters
This project shows what types of parameters are available and how you can use them to retrieve information from the user.
It explains how to combine them using parameter groups to create more complex GUIs.
The rest of the section provides examples of the available parameters, including their XML code and how they look in the GUI:
Additional license dialog
<licenseParameter><title>Second License Agreement</title><name>other_license</name><file>docs/otherLicense.txt</file><wrapText>1</wrapText>
</licenseParameter>
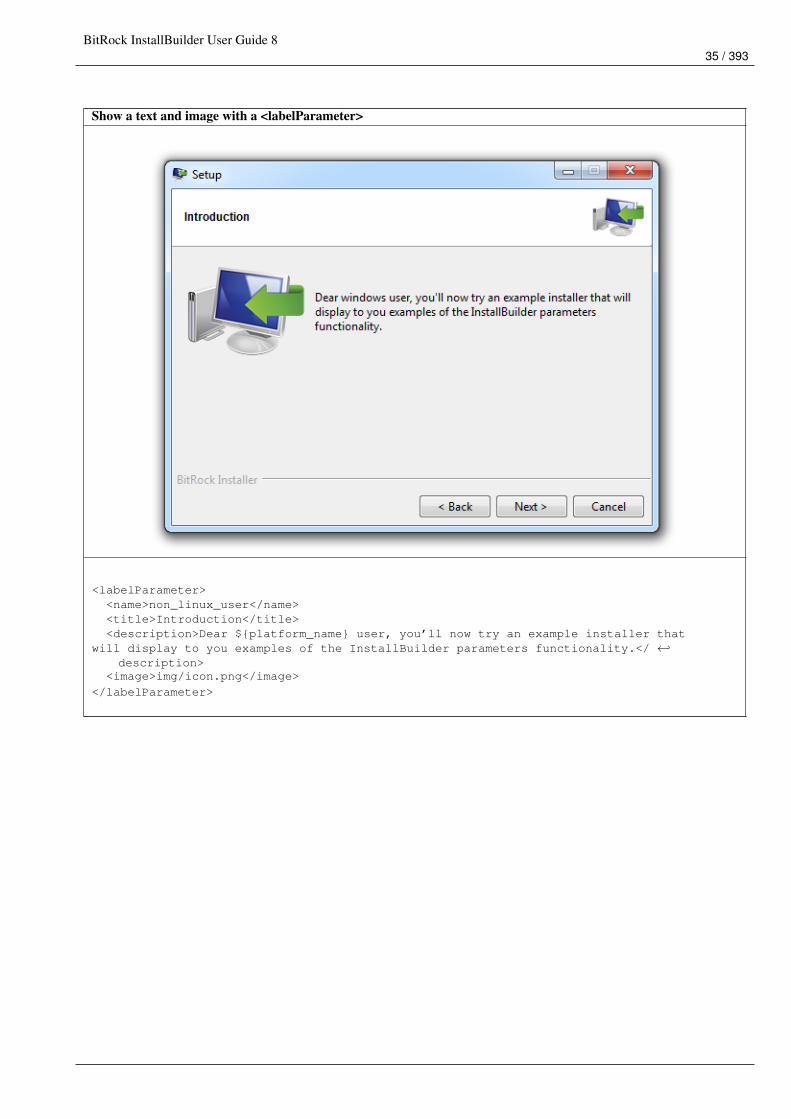
BitRock InstallBuilder User Guide 835 / 393
Show a text and image with a <labelParameter>
<labelParameter><name>non_linux_user</name><title>Introduction</title><description>Dear ${platform_name} user, you’ll now try an example installer that
will display to you examples of the InstallBuilder parameters functionality.</ ←↩description>
<image>img/icon.png</image>
</labelParameter>
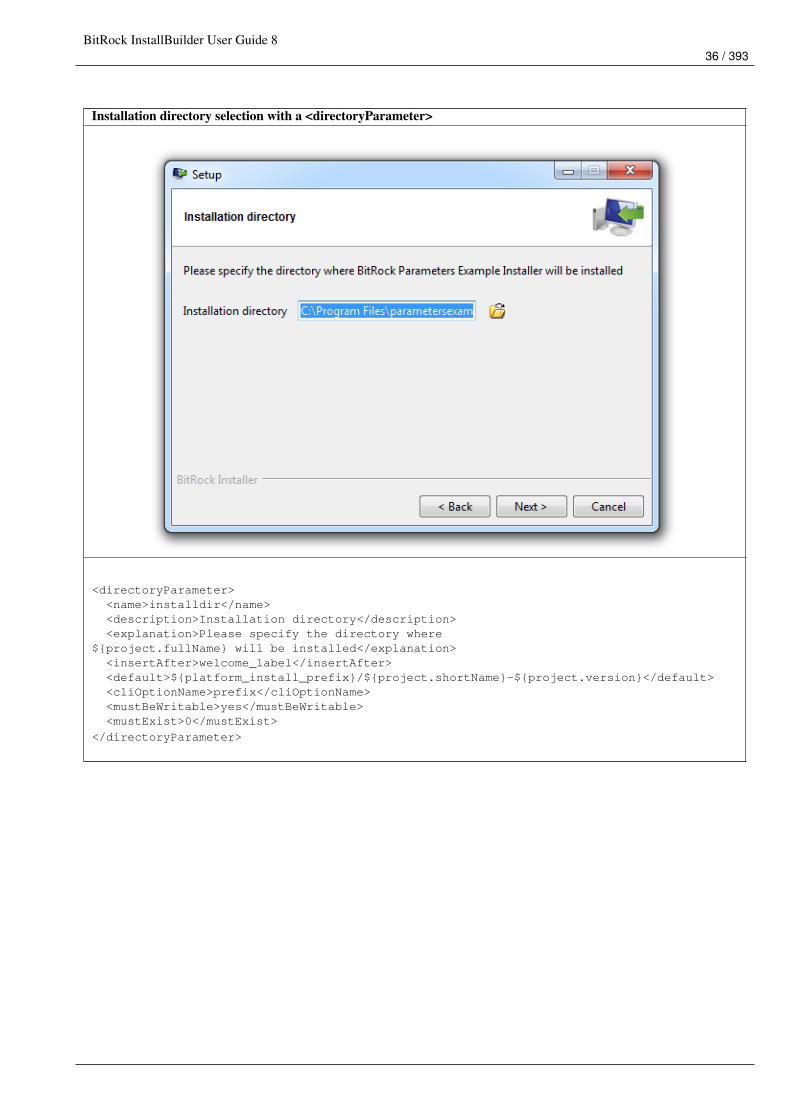
BitRock InstallBuilder User Guide 836 / 393
Installation directory selection with a <directoryParameter>
<directoryParameter><name>installdir</name><description>Installation directory</description><explanation>Please specify the directory where
${project.fullName} will be installed</explanation><insertAfter>welcome_label</insertAfter><default>${platform_install_prefix}/${project.shortName}-${project.version}</default><cliOptionName>prefix</cliOptionName><mustBeWritable>yes</mustBeWritable><mustExist>0</mustExist>
</directoryParameter>
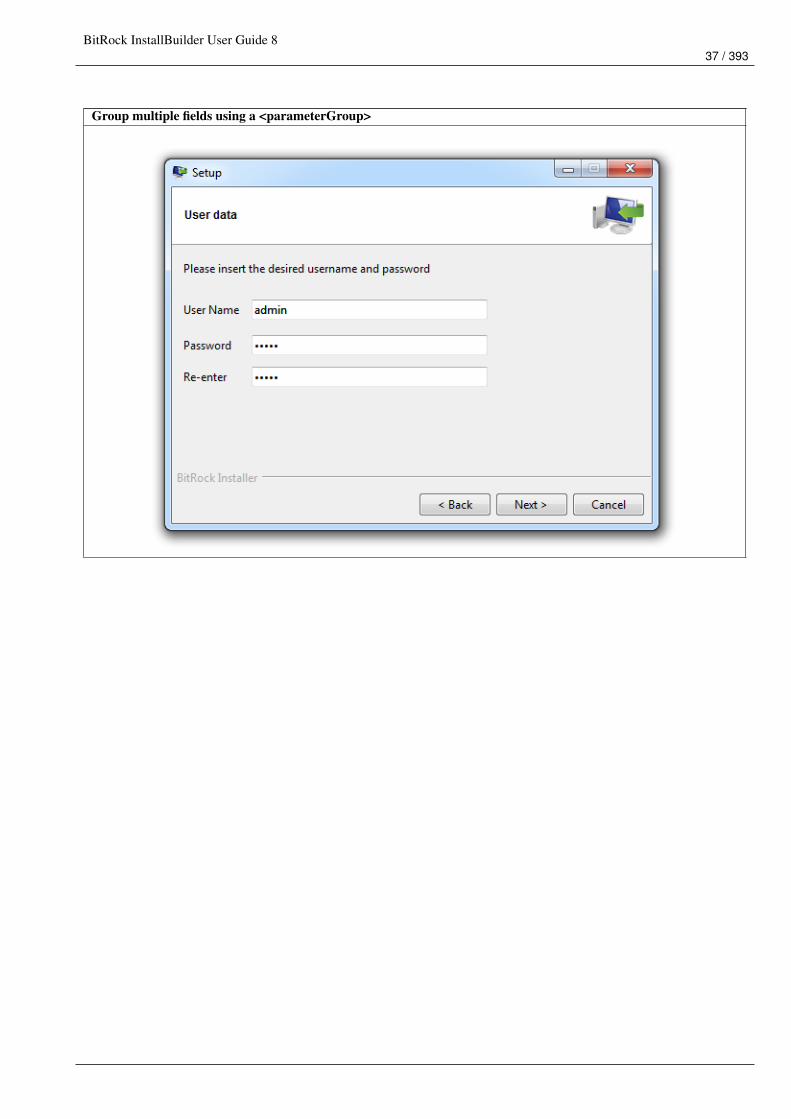
BitRock InstallBuilder User Guide 837 / 393
Group multiple fields using a <parameterGroup>
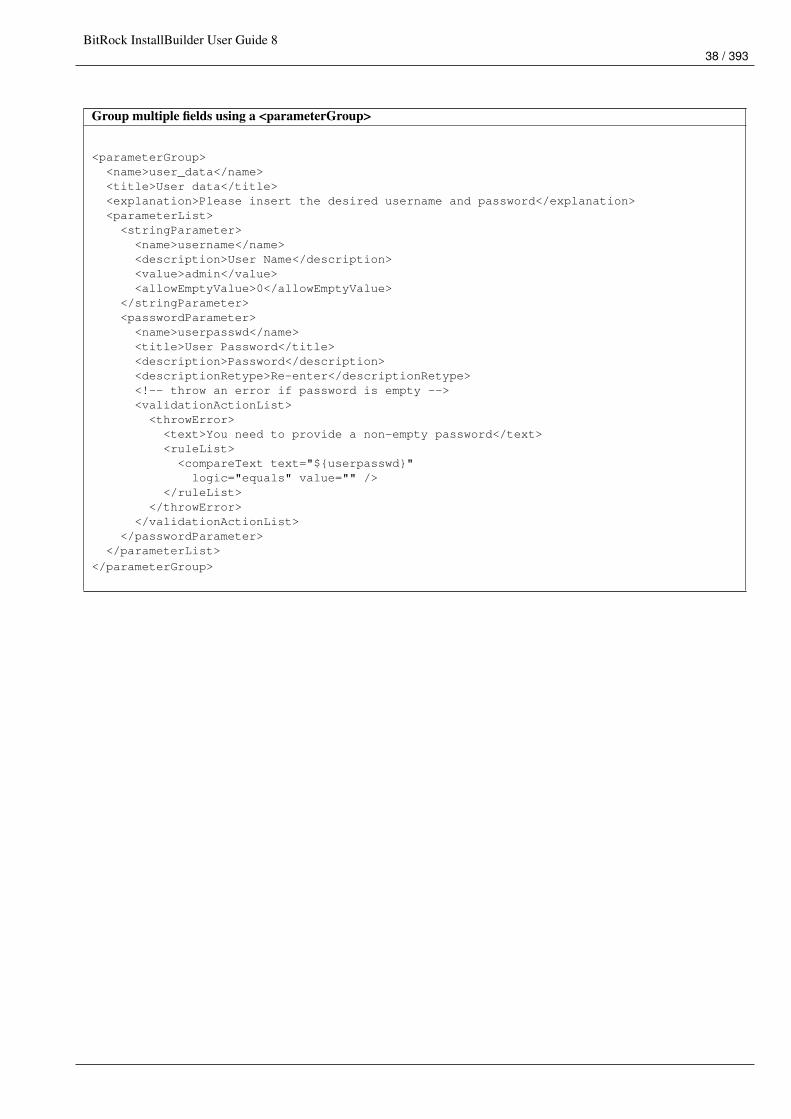
BitRock InstallBuilder User Guide 838 / 393
Group multiple fields using a <parameterGroup>
<parameterGroup><name>user_data</name><title>User data</title><explanation>Please insert the desired username and password</explanation><parameterList>
<stringParameter><name>username</name><description>User Name</description><value>admin</value><allowEmptyValue>0</allowEmptyValue>
</stringParameter><passwordParameter>
<name>userpasswd</name><title>User Password</title><description>Password</description><descriptionRetype>Re-enter</descriptionRetype><!-- throw an error if password is empty --><validationActionList><throwError>
<text>You need to provide a non-empty password</text><ruleList>
<compareText text="${userpasswd}"logic="equals" value="" />
</ruleList></throwError>
</validationActionList></passwordParameter>
</parameterList>
</parameterGroup>
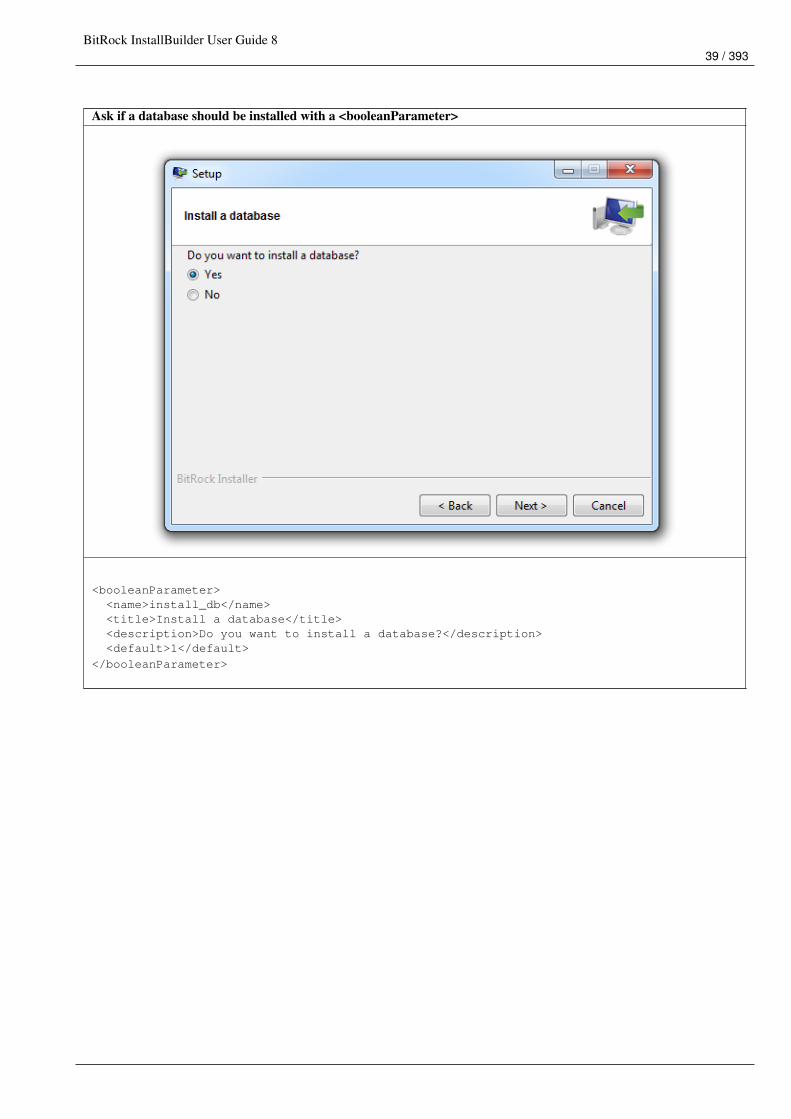
BitRock InstallBuilder User Guide 839 / 393
Ask if a database should be installed with a <booleanParameter>
<booleanParameter><name>install_db</name><title>Install a database</title><description>Do you want to install a database?</description><default>1</default>
</booleanParameter>
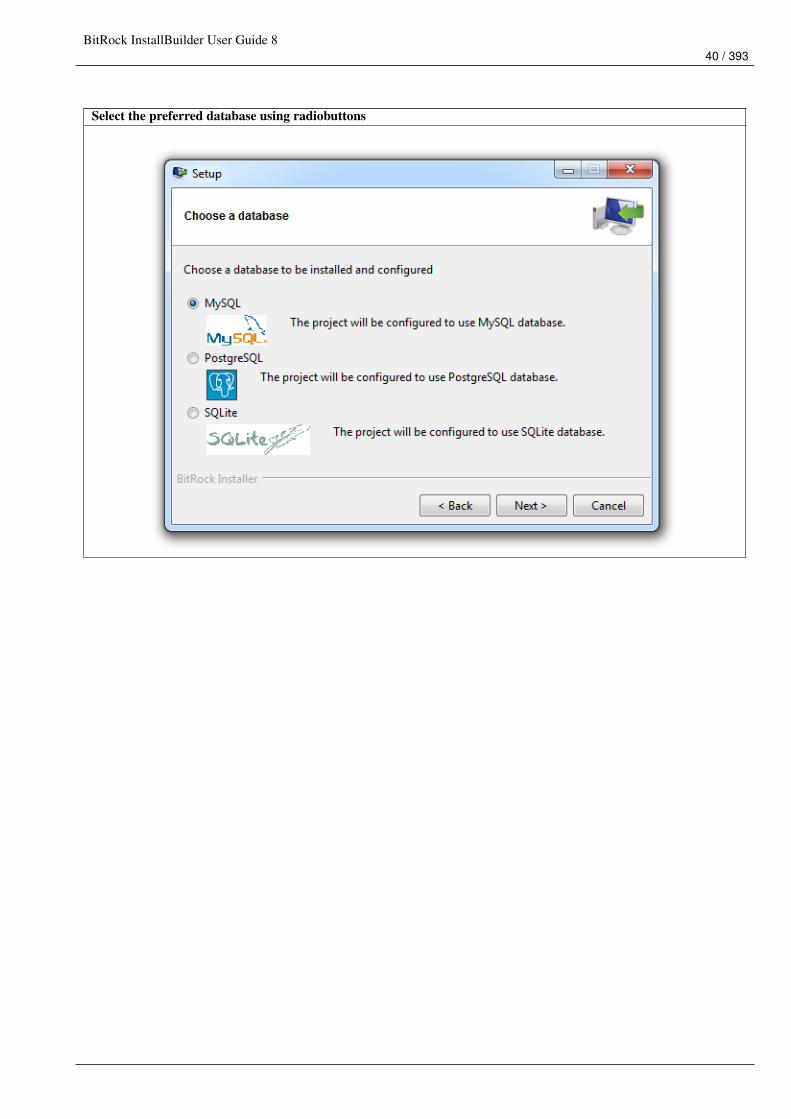
BitRock InstallBuilder User Guide 840 / 393
Select the preferred database using radiobuttons
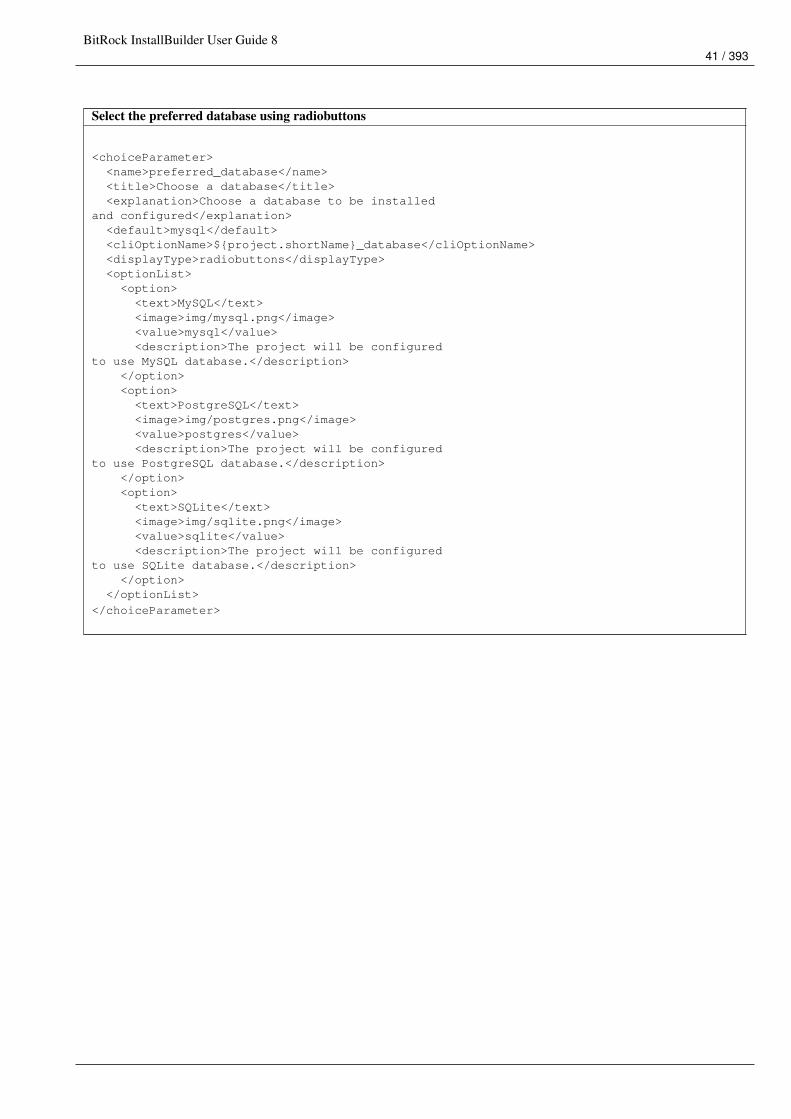
BitRock InstallBuilder User Guide 841 / 393
Select the preferred database using radiobuttons
<choiceParameter><name>preferred_database</name><title>Choose a database</title><explanation>Choose a database to be installed
and configured</explanation><default>mysql</default><cliOptionName>${project.shortName}_database</cliOptionName><displayType>radiobuttons</displayType><optionList>
<option><text>MySQL</text><image>img/mysql.png</image><value>mysql</value><description>The project will be configured
to use MySQL database.</description></option><option>
<text>PostgreSQL</text><image>img/postgres.png</image><value>postgres</value><description>The project will be configured
to use PostgreSQL database.</description></option><option>
<text>SQLite</text><image>img/sqlite.png</image><value>sqlite</value><description>The project will be configured
to use SQLite database.</description></option>
</optionList>
</choiceParameter>
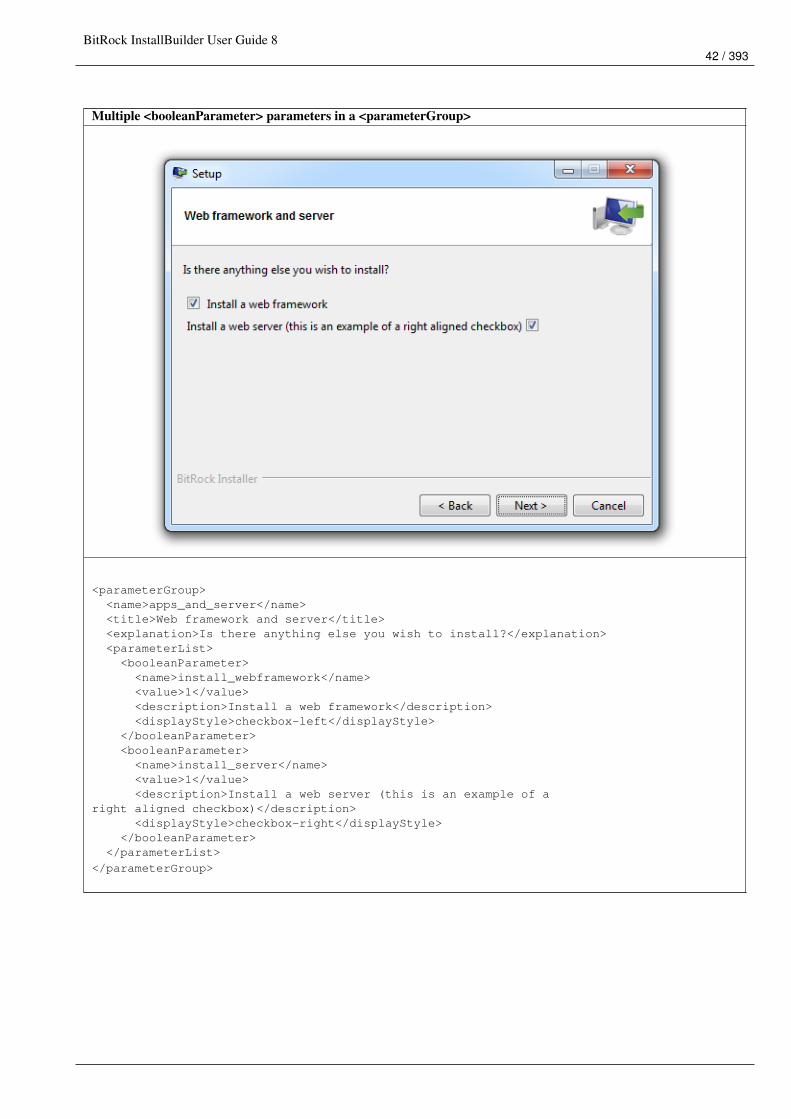
BitRock InstallBuilder User Guide 842 / 393
Multiple <booleanParameter> parameters in a <parameterGroup>
<parameterGroup><name>apps_and_server</name><title>Web framework and server</title><explanation>Is there anything else you wish to install?</explanation><parameterList>
<booleanParameter><name>install_webframework</name><value>1</value><description>Install a web framework</description><displayStyle>checkbox-left</displayStyle>
</booleanParameter><booleanParameter>
<name>install_server</name><value>1</value><description>Install a web server (this is an example of a
right aligned checkbox)</description><displayStyle>checkbox-right</displayStyle>
</booleanParameter></parameterList>
</parameterGroup>

BitRock InstallBuilder User Guide 843 / 393
Choose the preferred framework using radiobuttons

BitRock InstallBuilder User Guide 844 / 393
Choose the preferred framework using radiobuttons
<choiceParameter><name>preferred_apps</name><title>Web Frameworks</title><explanation>Choose the web frameworks you want to install</explanation><default>django</default><cliOptionName>${project.shortName}_apps</cliOptionName><displayType>radiobuttons</displayType><optionList>
<option><text>Django</text><value>django</value><description>A web framework for Python.</description>
</option><option>
<text>Ruby on Rails</text><value>ror</value><description>The famous web framework for Ruby.</description>
</option><option>
<text>Cake</text><value>cake</value><description>A web framework
for PHP.</description></option>
</optionList><ruleList>
<compareValues><value1>${install_webframework}</value1><logic>equals</logic><value2>1</value2>
</compareValues></ruleList>
</choiceParameter>
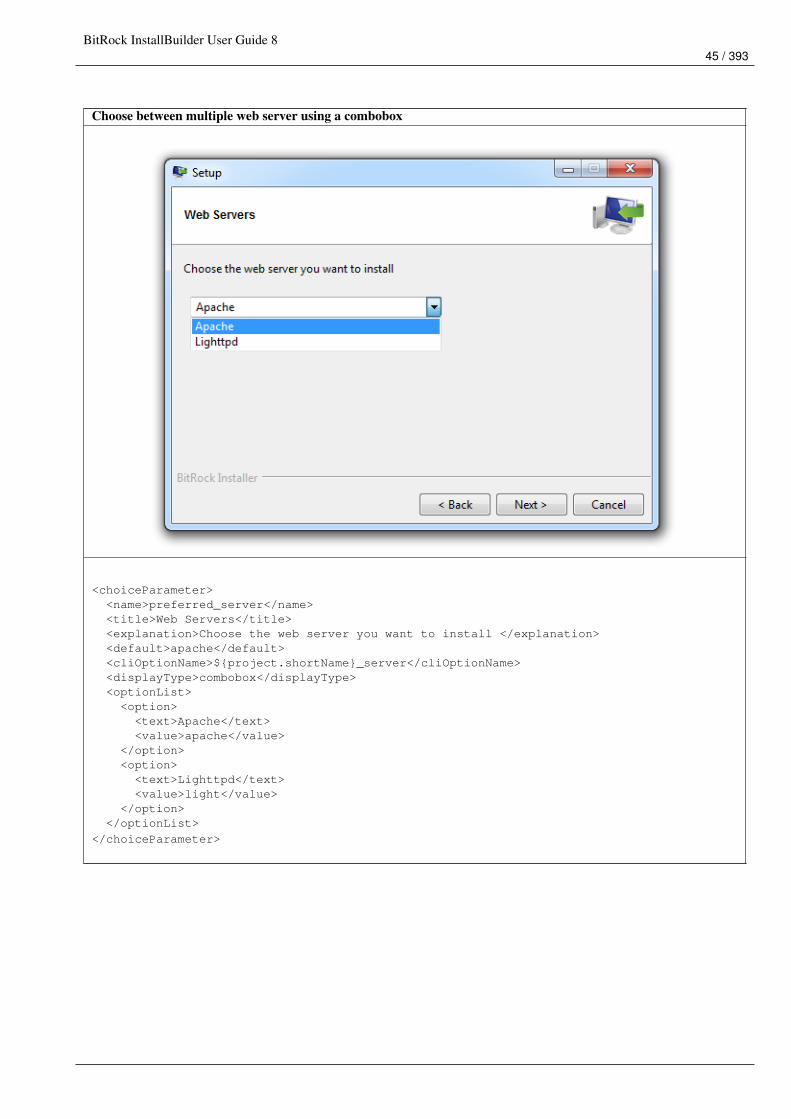
BitRock InstallBuilder User Guide 845 / 393
Choose between multiple web server using a combobox
<choiceParameter><name>preferred_server</name><title>Web Servers</title><explanation>Choose the web server you want to install </explanation><default>apache</default><cliOptionName>${project.shortName}_server</cliOptionName><displayType>combobox</displayType><optionList>
<option><text>Apache</text><value>apache</value>
</option><option>
<text>Lighttpd</text><value>light</value>
</option></optionList>
</choiceParameter>
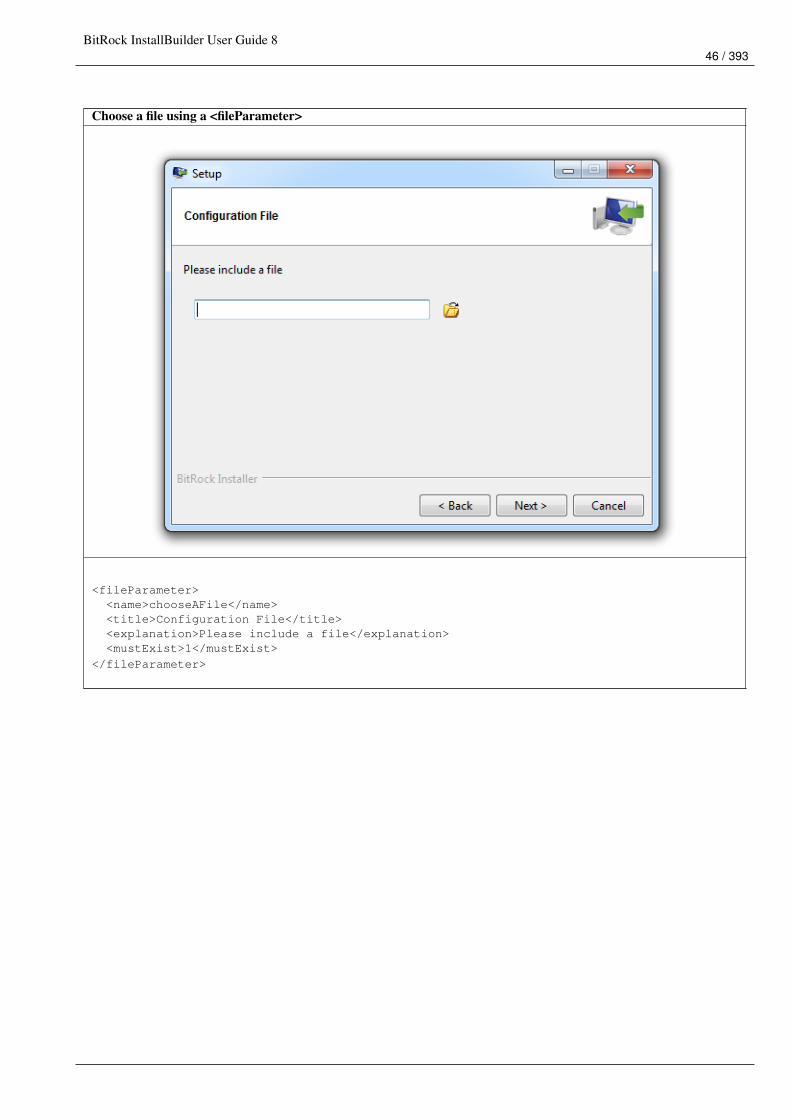
BitRock InstallBuilder User Guide 846 / 393
Choose a file using a <fileParameter>
<fileParameter><name>chooseAFile</name><title>Configuration File</title><explanation>Please include a file</explanation><mustExist>1</mustExist>
</fileParameter>
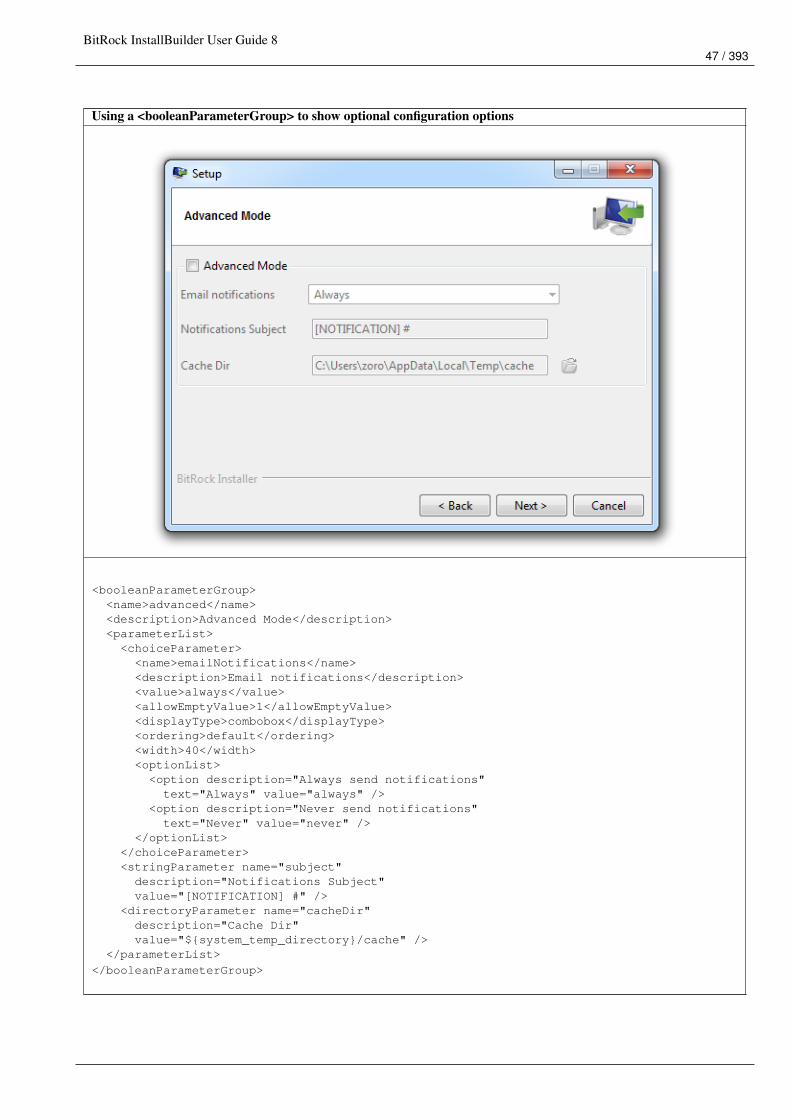
BitRock InstallBuilder User Guide 847 / 393
Using a <booleanParameterGroup> to show optional configuration options
<booleanParameterGroup><name>advanced</name><description>Advanced Mode</description><parameterList>
<choiceParameter><name>emailNotifications</name><description>Email notifications</description><value>always</value><allowEmptyValue>1</allowEmptyValue><displayType>combobox</displayType><ordering>default</ordering><width>40</width><optionList><option description="Always send notifications"
text="Always" value="always" /><option description="Never send notifications"
text="Never" value="never" /></optionList>
</choiceParameter><stringParameter name="subject"
description="Notifications Subject"value="[NOTIFICATION] #" />
<directoryParameter name="cacheDir"description="Cache Dir"value="${system_temp_directory}/cache" />
</parameterList>
</booleanParameterGroup>
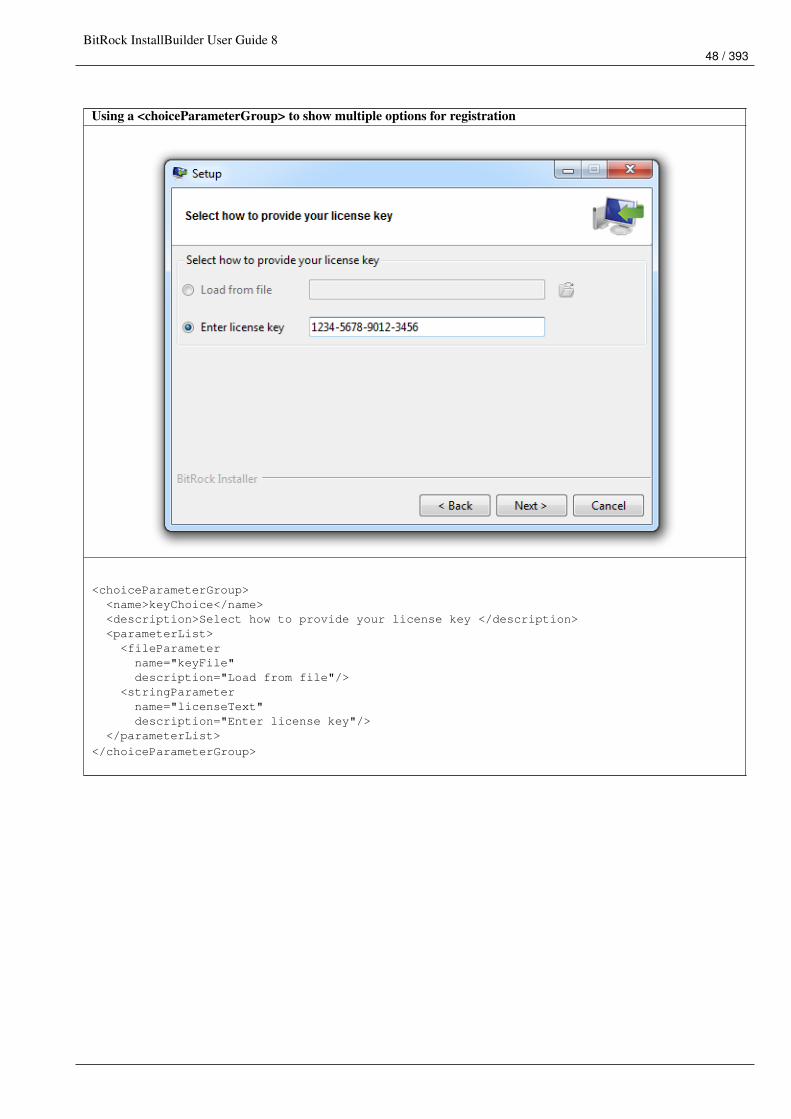
BitRock InstallBuilder User Guide 848 / 393
Using a <choiceParameterGroup> to show multiple options for registration
<choiceParameterGroup><name>keyChoice</name><description>Select how to provide your license key </description><parameterList>
<fileParametername="keyFile"description="Load from file"/>
<stringParametername="licenseText"description="Enter license key"/>
</parameterList>
</choiceParameterGroup>
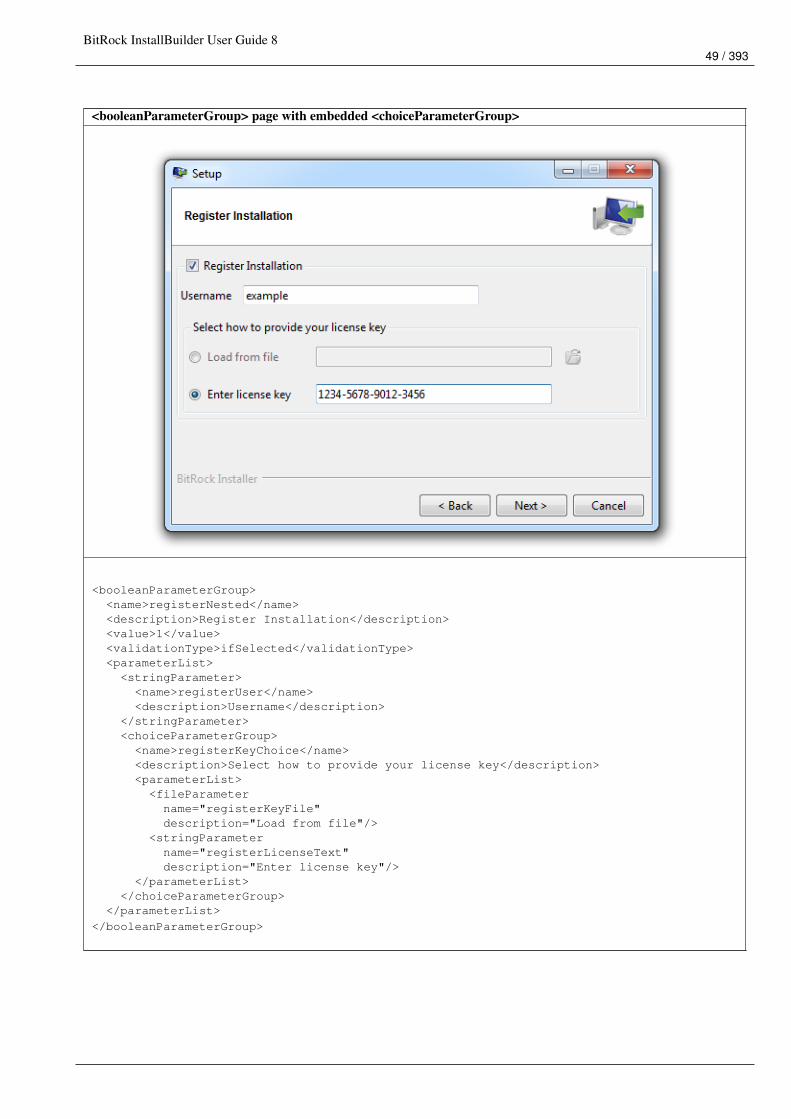
BitRock InstallBuilder User Guide 849 / 393
<booleanParameterGroup> page with embedded <choiceParameterGroup>
<booleanParameterGroup><name>registerNested</name><description>Register Installation</description><value>1</value><validationType>ifSelected</validationType><parameterList>
<stringParameter><name>registerUser</name><description>Username</description>
</stringParameter><choiceParameterGroup>
<name>registerKeyChoice</name><description>Select how to provide your license key</description><parameterList><fileParameter
name="registerKeyFile"description="Load from file"/>
<stringParametername="registerLicenseText"description="Enter license key"/>
</parameterList></choiceParameterGroup>
</parameterList>
</booleanParameterGroup>
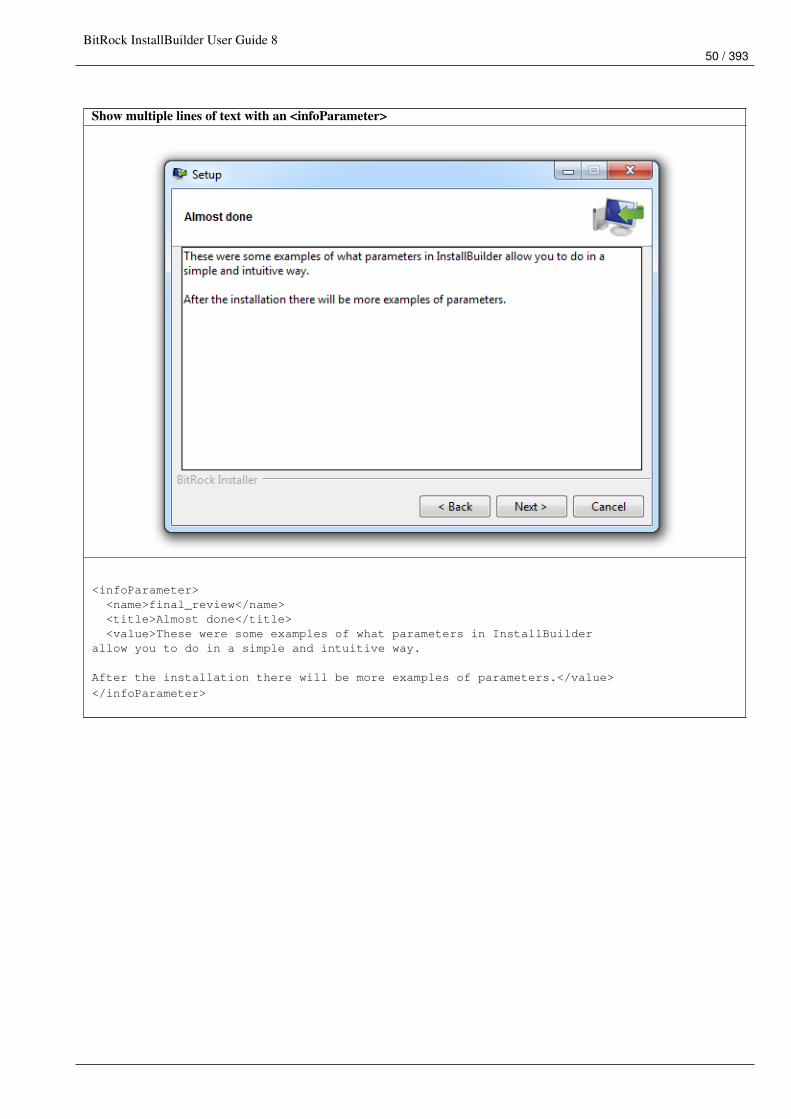
BitRock InstallBuilder User Guide 850 / 393
Show multiple lines of text with an <infoParameter>
<infoParameter><name>final_review</name><title>Almost done</title><value>These were some examples of what parameters in InstallBuilder
allow you to do in a simple and intuitive way.
After the installation there will be more examples of parameters.</value>
</infoParameter>
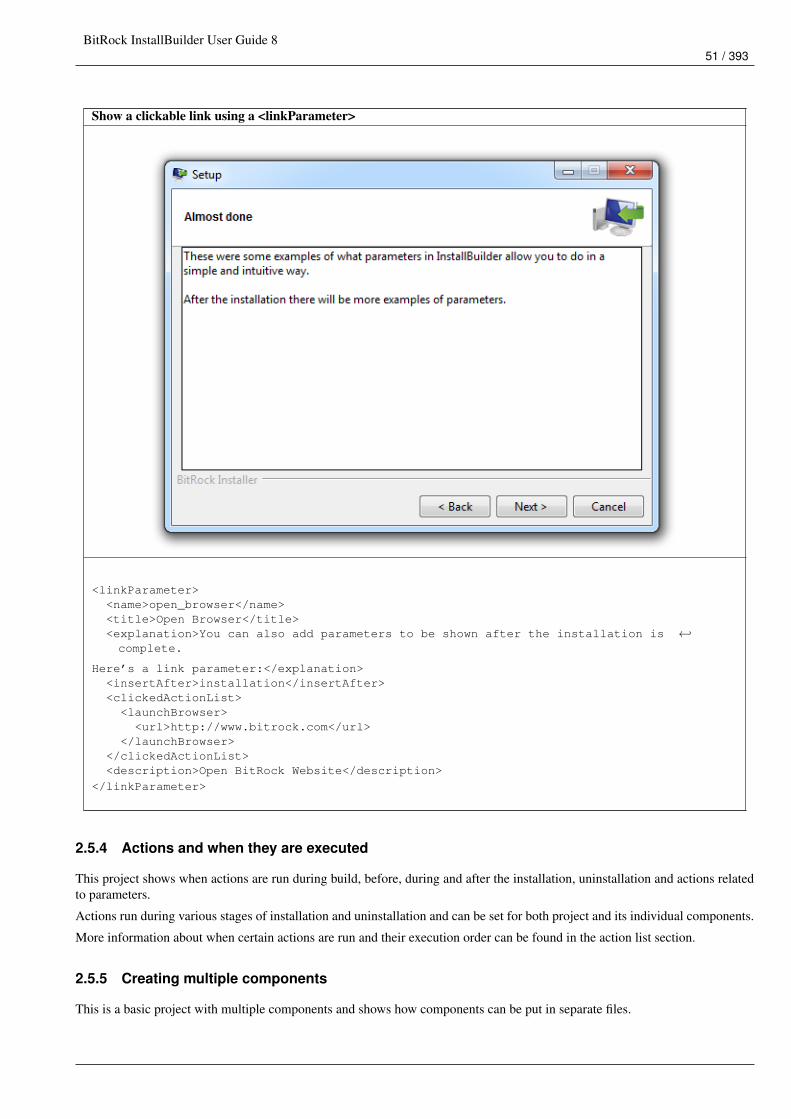
BitRock InstallBuilder User Guide 851 / 393
Show a clickable link using a <linkParameter>
<linkParameter><name>open_browser</name><title>Open Browser</title><explanation>You can also add parameters to be shown after the installation is ←↩complete.
Here’s a link parameter:</explanation><insertAfter>installation</insertAfter><clickedActionList>
<launchBrowser><url>http://www.bitrock.com</url>
</launchBrowser></clickedActionList><description>Open BitRock Website</description>
</linkParameter>
2.5.4 Actions and when they are executed
This project shows when actions are run during build, before, during and after the installation, uninstallation and actions relatedto parameters.
Actions run during various stages of installation and uninstallation and can be set for both project and its individual components.
More information about when certain actions are run and their execution order can be found in the action list section.
2.5.5 Creating multiple components
This is a basic project with multiple components and shows how components can be put in separate files.
BitRock InstallBuilder User Guide 852 / 393
It shows how the <include> tag can be used to extract components into external files, which can be reused in multiple projects.You can use this approach to create reusable features such as Apache, MySQL or Tomcat and use them as construction blocksin your projects.
You can find more information about the <include> directive in the adding components from external files section.
2.6 Additional Support Resources
In addition to the current document, you can find additional information regarding developing with InstallBuilder in the followingresources:
• A Community Support Forum found at answers.bitrock.com
• A Relax-NG schema (InstallBuilder.rng) is bundled in the docs directory. It can be used with code editors to validatethe code being written.
• We aim to provide useful and timely support services. If you have any questions or suggestions, please do not hesitate to contactus online at http://installbuilder.bitrock.com/contact-support.html or email us at [email protected]
BitRock InstallBuilder User Guide 853 / 393
Chapter 3
Architecture
3.1 Installer basics
3.1.1 Structure of a Generic Installer
At a high level, you can think of an installer as three related components (resources, logic and user input) delivered together aspart of an installation package.
• Installation Resources
These are the objects that will be bundled in the installer to be delivered to the end-user machine. They may be executable filesfor your software, SQL scripts or image files.
• Installation Logic
The installation logic specifies a set of actions that will be performed on the resources, such as copying files around and sub-stituting values in them or the system itself, starting or stopping services or creating a new user. The installation logic can beconditional, based on a set of rules that can take into account multiple factors such as the operating system the installer is runningon or which options the end-user selected.
• External Input
Often, you want to make the installation logic depend on input from the end user, such as the installation directory or the TCP/IPport the application should listen to. The user input is usually collected through a GUI frontend, but could also be provided usingcommand line options passed to the installer or written in a response file.
• Installation Package
The installation package contains the installation logic and resources. It can be a self-contained executable or a native package,such as an RPM or Debian package.
The following section explains how the previous concepts are implemented within InstallBuilder.
3.1.2 Structure of a BitRock Installer
• Installation Resources
BitRock InstallBuilder User Guide 854 / 393
InstallBuilder supports multiple types of resources. The most important ones are files and directories that will be bundled whenthe installer is created, but also supports desktop and start menu shortcuts. Files and directories get assigned to folders, whichspecify a location in the target machine. The location does not need to be fixed and can be changed at runtime. Installer resourcescan be further organized in components that specify multiple folders and shortcuts that go together. In addition to the resourcesthat will be installed in the end user’s system, there are resources for customizing the installer itself, such as graphics, languagefiles and descriptions of the installer screens.
• Installation Logic
InstallBuilder allows controlling the flow of the installation using actions and rules. InstallBuilder includes built-in actions forthe most common functionality, such as creating users, starting services or changing file permissions, but it is also possible toinvoke external programs. Actions can be run at multiple points during the installer lifecycle, such as at build time, startup timeor when certain UI screens are displayed. Rules can be attached to these actions to decide which of them should be executed atruntime based on the external input.
• External Input
InstallBuilder presents a set of pages to collect user input in addition to a command line interface. It is also possible to retrieveenvironment variables or information about the OS in which the installer is running.
• Installation Package
By default, InstallBuilder generates single-file, self-contained installers which can easily be distributed over the Internet. Theend user just needs to download the file, and double-click or execute it from a console prompt in order to launch the installer. It isalso possible to generate multiplatform CDROM/DVD installers and native Linux packages, such as Debian and RPM. For nativepackages, the end result of the build process is an .rpm or .deb package that contains the installation files and a small binary thatencapsulates the installation logic and will be run automatically at package install time. Installation values are fixed at build timefor native packages and there is no external input collected at runtime.
BitRock InstallBuilder User Guide 855 / 393
Chapter 4
Variables
4.1 Basic Syntax
Installer variables are an important concept in InstallBuilder. They allow you to store user input, temporary values, establish flagsand use that information at different points during the build and installation processes. There are a number of built-in variablesand you are also able to create them directly. The basic way of creating or changing the value of a variable in InstallBuilder isusing the <setInstallerVariable> action:
<setInstallerVariable name="foo" value="bar"/>
The action above will store the value bar in the variable foo. Once you have defined the variable, its value can be accessed inany other part of the project as ${foo}. If you require a variable that you are creating at install time to be also available in theuninstallation steps, you have to set the optional persist attribute to 1:
<setInstallerVariable name="foo" value="bar" persist="1"/>
Variable names must not contain characters other than digits, letters, dashes and underscores. There is only one exception to thisrule: it is possible to use a variable as part of the name of another variable (as long as it is a valid one).
For example, if you have a variable foo with a value of bar, then:
<setInstallerVariable name="${foo}" value="Hello"/>
will be equivalent to:
<setInstallerVariable name="bar" value="Hello"/>
In addition to regular variables, parameters can also be accessed as variables. One good example is the well-known installdirvariable which is in reality a <directoryParameter>:
<runProgram program="${installdir}/myApplication.run" programArguments="--install"/>
Some additional information to take into account when working with variables is:
• Curly brackets are mandatory: Although the syntax is similar to the notation used in Unix bash-like shells to access variables,it is not the same. If $foo is used instead of ${foo}, it will not be resolved but treated as a literal string.
• Accessing an undefined variable will not throw an error. Instead, if the variable name was bar, the value will be set to***unknown variable bar***
• Variables are not case sensitive. This means that you can use any of the following variants, ${variablename}, ${VariableName}or ${VARIABLENAME} and obtain the same value in all cases.
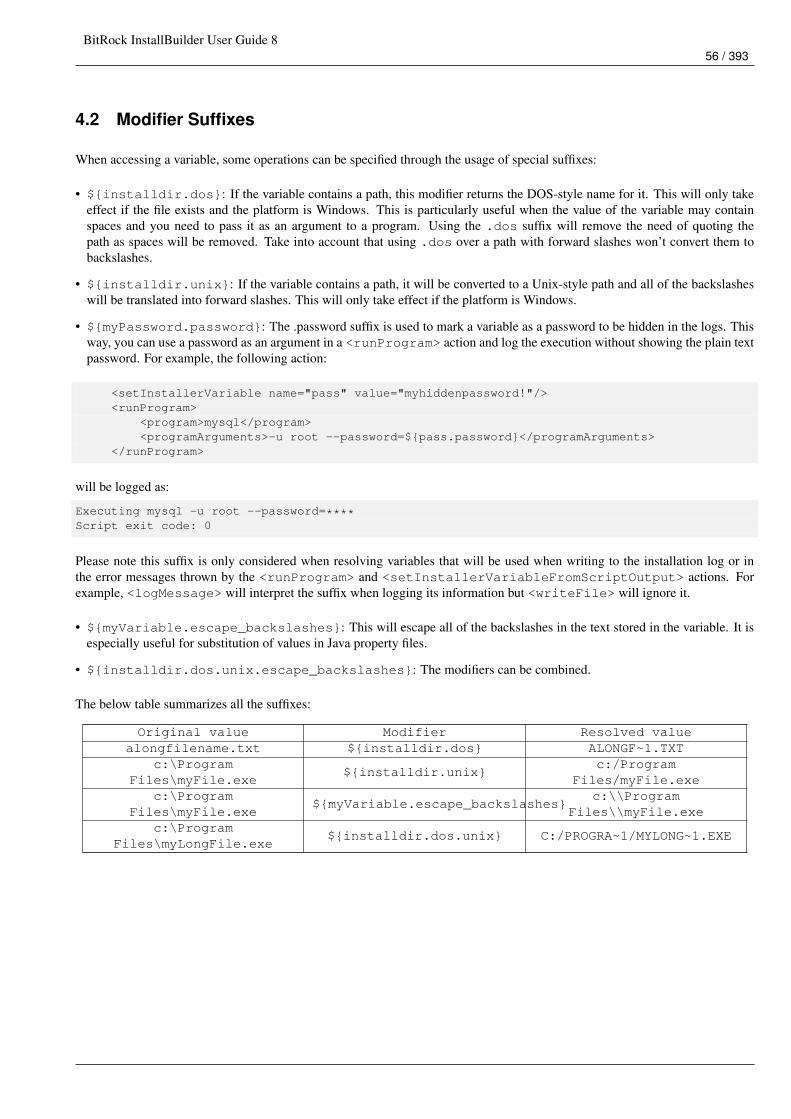
BitRock InstallBuilder User Guide 856 / 393
4.2 Modifier Suffixes
When accessing a variable, some operations can be specified through the usage of special suffixes:
• ${installdir.dos}: If the variable contains a path, this modifier returns the DOS-style name for it. This will only takeeffect if the file exists and the platform is Windows. This is particularly useful when the value of the variable may containspaces and you need to pass it as an argument to a program. Using the .dos suffix will remove the need of quoting thepath as spaces will be removed. Take into account that using .dos over a path with forward slashes won’t convert them tobackslashes.
• ${installdir.unix}: If the variable contains a path, it will be converted to a Unix-style path and all of the backslasheswill be translated into forward slashes. This will only take effect if the platform is Windows.
• ${myPassword.password}: The .password suffix is used to mark a variable as a password to be hidden in the logs. Thisway, you can use a password as an argument in a <runProgram> action and log the execution without showing the plain textpassword. For example, the following action:
<setInstallerVariable name="pass" value="myhiddenpassword!"/><runProgram>
<program>mysql</program><programArguments>-u root --password=${pass.password}</programArguments>
</runProgram>
will be logged as:
Executing mysql -u root --password=****Script exit code: 0
Please note this suffix is only considered when resolving variables that will be used when writing to the installation log or inthe error messages thrown by the <runProgram> and <setInstallerVariableFromScriptOutput> actions. Forexample, <logMessage> will interpret the suffix when logging its information but <writeFile> will ignore it.
• ${myVariable.escape_backslashes}: This will escape all of the backslashes in the text stored in the variable. It isespecially useful for substitution of values in Java property files.
• ${installdir.dos.unix.escape_backslashes}: The modifiers can be combined.
The below table summarizes all the suffixes:
Original value Modifier Resolved valuealongfilename.txt ${installdir.dos} ALONGF~1.TXT
c:\ProgramFiles\myFile.exe
${installdir.unix}c:/Program
Files/myFile.exec:\Program
Files\myFile.exe${myVariable.escape_backslashes}
c:\\ProgramFiles\\myFile.exe
c:\ProgramFiles\myLongFile.exe
${installdir.dos.unix} C:/PROGRA~1/MYLONG~1.EXE
BitRock InstallBuilder User Guide 857 / 393
Convert forward slashes to backslashesInstallBuilder does not have a modifier suffix to convert forward slashes to backslashes the same way as the .unix suffixdoes. To achieve the same result you just have to use a <setInstallerVariableFromRegEx> action:
<setInstallerVariableFromRegEx><name>backslash_path</name><pattern>/</pattern><substitution>\</substitution><text>${forwardslash_path}</text>
</setInstallerVariableFromRegEx>
The above will store the backslash-version of the Unix-like ${forwardslash_path} in the backslash_path variable.
4.3 Accessing Environment Variables
It is possible to access any environment variable using the ${env(varname)} construct, where varname is the name of anenvironment variable. For example, on Windows you can refer to the system drive with ${env(SYSTEMDRIVE)} and, onLinux, Mac OS X and other Unix systems to the user home directory with ${env(HOME)}
To get a list of the environment variables on your system that will be available to the installer you can execute:
• On Windows Systems: Open a command window and execute: set
• On Unix Systems: Open a console and execute: env
Both commands will print a list of the defined environment variables. However, you must take into account that some of thesevariables could vary from one machine to another.
4.4 Advanced syntax
Almost all of the elements of an InstallBuilder project can be accessed and modified as variables. This makes InstallBuildera very versatile tool because it allows installers to customize themselves at runtime, based on the environment or on end userfeedback. The three basic elements which can be accessed are:
4.4.1 Project properties
All of the project properties such as <version>, <shortName>, <installerFilename> and so on, can be referenced us-ing the notation ${project.property}. For example, ${project.shortName} for the <shortName>. Similarly toregular variables, you can use any capitalization when referencing an element. Using ${PrOjEct.InstallerFilename}is equivalent to using ${project.installerFilename}.
The below example changes the <installationType> at runtime to perform an upgrade if the previous installed version,stored in an environment variable, is lower than the current one:
<project>...<shortName>myProduct</shortName><installationType>normal</installationType>...<initializationActionList><setInstallerVariable><name>project.installationType</name><value>upgrade</value><ruleList>
BitRock InstallBuilder User Guide 858 / 393
<!-- Check that the env variable exists --><compareText>
<text>${env(MYPRODUCT_VERSION)}</text><logic>does_not_equal</logic><value></value>
</compareText><!-- Compare the versions --><compareVersions>
<version1>${project.version}</version1><logic>greater</logic><version2>${env(MYPRODUCT_VERSION)}</version2>
</compareVersions></ruleList>
</setInstallerVariable></initializationActionList>...
</project>
You can refer to the Project Properties appendix for the complete list of properties.
4.4.2 Components
Using this notation you can also modify component settings:
• ${project.component(default).selected}
• ${project.component(mysql).show}
This allows, for example, disabling components at runtime when the user does not provide a license key:
<stringParameter><name>licenseKey</name><description>Please provide a license key. If you leave the field emptyyou just will be able to test the basic functionality</description><insertBefore>components</insertBefore><postShowPageActionList><actionGroup>
<actionList><setInstallerVariable><name>project.component(premiumComponent).selected</name><value>0</value>
</setInstallerVariable><setInstallerVariable><name>project.component(premiumComponent).canBeEdited</name><value>0</value>
</setInstallerVariable></actionList><ruleList>
<compareText><text>${licenseKey}</text><logic>equals</logic><value></value>
</compareText></ruleList>
</actionGroup></postShowPageActionList>
</stringParameter>
You can refer to the Components appendix for the complete list of properties.
BitRock InstallBuilder User Guide 859 / 393
4.4.3 Parameters
Using the advanced syntax on parameters will allow you to modify not only their values but their entire set of properties such as<description>, <explanation> and the especially useful <ask>. The basic usage is:
${project.parameter(nameOfTheParameter).propertyName}
For example:
• ${project.parameter(installdir).value}
• ${project.parameter(tomcat).description}
• ${project.parameter(mySQL).default}
If the parameter to access is a child of a <parameterGroup>, the parent must also be specified. For example, the portparameter in the below code:
<project>...<parameterList><parameterGroup>
<name>mysqlConfiguration</name><parameterList>
<stringParameter name="port" description="MySQL port" value="3306"/><passwordParameter name="password" description="MySQL root password" value=""/>...
</parameterList></parameterGroup>
</parameterList>...
</project>
Can be accessed using:
${project.parameter(mysqlConfiguration).parameter(port).value}
If the parameters are also included inside a component, instead of directly under the <project> <parameterList>, it mustbe also specified. For example, reusing the above example:
<project>...<componentList><component>
<name>mySQL</name><parameterList>
<parameterGroup><name>mysqlConfiguration</name><parameterList>
<stringParameter name="port" description="MySQL port" value="3306"/><passwordParameter name="password" description="MySQL root password" value=""/>...
</parameterList></parameterGroup>
</parameterList></component>
</componentList>...
</project>
The parameter should now be accessed using:
BitRock InstallBuilder User Guide 860 / 393
${project.component(mysql).parameter(mysqlConfiguration).parameter(port).value}
You can use this functionality to disable pages or parameters at runtime based on the user input:
<project>...<componentList><component><name>mySQL</name><parameterList><booleanParameter>
<name>enableAdvanced</name><description>Do you want to enable the advanced configuration?</description><postShowPageActionList>
<!-- Enable the page, which is disabled by default --><setInstallerVariable><name>project.component(mySQL).parameter(mysqlAdvanced).ask</name><value>1</value><ruleList>
<isTrue value="${project.component(mySQL).parameter(enableAdvanced).value ←↩}"/>
</ruleList></setInstallerVariable>
</postShowPageActionList></booleanParameter><parameterGroup>
<name>mysqlAdvanced</name><parameterList>
<stringParameter name="mysqlPort" description="MySQL port" value="3306"/><passwordParameter name="mysqlPassword" description="MySQL root password" ←↩
value=""/>...
</parameterList></parameterGroup>
</parameterList></component>
</componentList>...
</project>
Parameters are also handy when you want to preserve variables defined at build time. Accessing a variable defined in the<preBuildActionList> at runtime will result in an ***unknown variable varName*** error. To workaroundthis issue, you could use a hidden parameter (setting ask="0"), that won’t be displayed in the help menu nor the installer pages.For example, to pass a random generated key for each of the built installers you could use the below code:
<project>...<parameterList>...<stringParameter name="build_identifier" value="" ask="0"/>...
</parameterList><preBuildActionList>
<!-- Create random identifier for the build --><generateRandomValue><variable>build_identifier</variable>
</generateRandomValue><!-- Date of the build --><createTimeStamp>
<variable>timestamp</variable></createTimeStamp><!-- Register the build information in a local file -->
BitRock InstallBuilder User Guide 861 / 393
<addTextToFile><file>${build_project_directory}/builds</file><text>${build_identifier} - Product Version: ${project.version} - IB Version: ${ ←↩
installer_builder_version} - Built On: ${timestamp}</text></addTextToFile>
</preBuildActionList>...
</project>
As you are using a hidden parameter, the ${build_identifier} will be available at runtime and you could, for example,send it to your server using an <httpPost> action to register the installations for each release:
<postInstallationActionList>...<httpPost url="http://www.example.com/register.php" filename="${installdir}/ ←↩
activationUrl"><queryParameterList>
<queryParameter name="build_identifier" value="${build_identifier}"/><queryParameter name="version" value="${project.version}"/>
</queryParameterList></httpPost>
</postInstallationActionList>
Accessing a parameter as a regular variableIf you try to access a parameter as if it were a regular variable, it will give you its value. That is, using ${installdir} or${project.parameter(installdir).value} will return the same result.The advantage of using the long notation is that it provides a very descriptive path to the element you are modifying. Forexample, if you are working with a very big project that is maintained by multiple developers and divided into multiple files usingthe <include> directive, locating where the below values are located could be troublesome (they could be parameters orregular variables, located in any of the included files or the main project):
<throwError text="You have selected strict password checking and your password is too ←↩short" >
<ruleList><isTrue value="${enableStrictChecking}"/><compareTextLength>
<text>${password}</text><logic>less</logic><length>${minLength}</length>
</compareTextLength></ruleList>
</throwError>
Where using the long location will point you directly to where they are defined (assuming the included files are named accordingto the component names, for example):
<throwError text="You have selected strict password checking and your password is too ←↩short" >
<ruleList><isTrue value="${project.component(settings).parameter(basicConfiguration). ←↩
parameter(enableStrictChecking).value}"/><compareTextLength>
<text>${password}</text><logic>less</logic><length>${project.component(settings).parameter(defaultPasswordSettings). ←↩
parameter(minLength).value}</length></compareTextLength>
</ruleList></throwError>
BitRock InstallBuilder User Guide 862 / 393
In addition to the above-mentioned elements, any other tag in the XML project with a unique identifier can be referenced. Forexample, is possible to reference a folder in a component to get its destination:
‘<showInfo text="${project.component(mysql).folder(mysqlConfig).destination}"/>‘
But not a file in its <distributionFileList> because files do not have a unique name.
4.5 Accessing Language Strings
You can also access language strings, either built-in or user-defined (check the Languages section for more details), using thespecial notation ${msg(stringKey)}. It will be resolved to the localized string identified by the key stringKey in thecurrent installation language:
<showInfo text="${msg(hello.world)}"/>
If you have defined the hello.world localized string in the <customLanguageFileList>, depending on the installationlanguage you will get results such as Hello world!, Hola Mundo! or Hallo Welt.
4.6 Escaping Variables
In some cases, for example when modifying shell scripts programmatically, you may need a literal ${foo} instead of the con-tents of the foo variable (which may result in an ***unknown variable foo***). For these cases, InstallBuilder imple-ments a special notation to specify that you want the text treated literally, without trying to be resolved: ${’${variableName}’}.
For example, ${’${foo}’} will be resolved to: ${foo}. More complex text can be escaped as shown in the snippet below:
<writeFile><path>~/.bashrc</path><text>${’
PATH=${PATH}:/some/pathFoo=${bar}’}</text>
</writeFile>
It will write:
PATH=${PATH}:/some/pathFoo=${bar}
As shown in the example, it accepts line breaks in the text to escape. The only limitation is that it cannot contain the characters’} in the text to escape or it will be interpreted as the end of the escaped reference.
4.7 Nested Variables
Nested variables are also allowed. They will be evaluated from the most inner reference:
<showInfo><text>${text_${foo-${i}}_${bar}}</text>
</showInfo>
This feature is especially useful when iterating using a <foreach> action. For example, if you have a list of component namesand you want to create a list with those that are selected:
BitRock InstallBuilder User Guide 863 / 393
<setInstallerVariable name="selectedComponents" value=""/><foreach variables="component" values="componentA componentB componentC componentD">
<actionList><setInstallerVariable name="slectedComponents" value="${selectedComponents} ${ ←↩
component}" ><ruleList>
<isTrue value="${project.component(${component}).selected"/></ruleList>
</setInstallerVariable></actionList>
</foreach>
4.8 Built-in variables
InstallBuilder also provides a list of built-in variables containing information about the installer or the environment in which it isexecuted:
JAVA
• java_autodetected: Whether or not a valid Java was autodetected
Possible values:0, 1
• java_bitness: Autodetected Java bitness
Possible values:32, 64
• java_executable: Location of the autodetected Java executable
Example values:/usr/bin/java, c:/Program Files/Java/jre1.6.0_10/bin/java.exe
• java_vendor: Autodetected Java vendor
Possible values:Any, IBM, Sun
• java_version: Autodetected Java version
Example values:1.6.0, 1.5.0
• java_version_full: Autodetected Java full version
Example values:1.6.0_07, 1.5.0_11
• java_version_major: Autodetected Java major version
Example values:1.6, 1.5
• javaw_executable: Autodetected javaw executable path
Example values:/usr/bin/java, c:/Program Files/Java/jre1.6.0_10/bin/java.exe
• javaws_executable: Location of the autodetected Java Web Start executable
BitRock InstallBuilder User Guide 864 / 393
Example values:/usr/bin/javaws, c:/Program Files/Java/jre1.6.0_10/bin/javaws.exe
USER INTERFACE
• installer_interactivity: The level of interactivity of the installation mode
Possible values:none, normal, minimalWithDialogs, minimal
• installer_ui: The mode in which the installer is run
Possible values:unattended, gui, text
• installer_ui_detail: The detailed mode in which the installer is run
Possible values:unattended, xwindow, qt, text, osx, gtk, win32
.NET FRAMEWORK
• dotnet_autodetected: Whether or not a valid .NET framework was autodetected
Possible values:0, 1
• dotnet_framework_type: .NET framework type
Possible values:, full, client
• dotnet_version: .NET framework version
Example values:2.0, 3.5, 4.0
INSTALLER
• installation_aborted_by_user: Whether or not installation was manually aborted by user
Possible values:0, 1
• installation_finished: Whether or not the installation finished successfully
Possible values:0, 1
• installation_guid: Unique installation ID
Example values:754a902f-7270-4b1f-6a07-d8d52e6c5f05
• installation_language_code: Language code of the installation
Possible values:es, sv, ro, et, ko, cy, pt, it, da, tr, sk, va, sl, ru, pt_BR, fr, bg, de, el, zh_CN, hr, es_AR, nl, ja, en, ar, zh_TW, sq, pl, ca, no,hu, he, cs, fi
• installer_builder_timestamp: Timestamp of the InstallBuilder used to build the installer

BitRock InstallBuilder User Guide 865 / 393
Example values:201001220702
• installer_builder_version: Version of InstallBuilder used to build the installer
Example values:6.2.7
• installer_command_line_arguments: Command line arguments as passed to installer
Example values:--mode gtk, --installdir /opt/app-1.0
• installer_exit_code: Installer Exit Code value. It is equal 0 by default and set to 0 if there was an error executing an action.
• installer_installation_log: The location of the installer log
Example values:/tmp/bitrock_install.log, C:\Documents and Settings\user\Local Settings\Temp
• installer_is_root_install: Whether or not the current user has root privileges
Possible values:0, 1
• installer_package_format: Type of installer
Possible values:executable
• program_exit_code: Exit code from program; set by runProgram and setInstallerVariableFromScriptOutput actions
Example values:0, 1
• program_stderr: Program’s error output; set by runProgram and setInstallerVariableFromScriptOutput actions
Example values:
• program_stdout: Program’s output; set by runProgram and setInstallerVariableFromScriptOutput actions
Example values:
• required_diskspace: Required disk space to install the application in Kilobytes
Example values:10000, 25000
WINDOWS FOLDERS
• windows_folder_program_files: Directory for program files
Example values:C:\Program Files
• windows_folder_program_files_common: Directory for components shared across applications
Example values:C:\Program Files\Common Files
• windows_folder_system: Windows system directory
BitRock InstallBuilder User Guide 866 / 393
Example values:C:\Windows\system32
• windows_folder_systemroot: Windows root directory
Example values:C:\Windows
• windows_folder_windows: Windows root directory
Example values:C:\Windows
WINDOWS FOLDERS - SYSTEM SCOPE
• windows_folder_common_admintools: Directory that stores administrator tools for all users
Example values:C:\ProgramData\Microsoft\Windows\Start Menu\Programs\Administrative Tools
• windows_folder_common_appdata: Directory that stores common application-specific data
Example values:C:\ProgramData
• windows_folder_common_desktopdirectory: Directory that stores common desktop files
Example values:C:\Users\Public\Desktop
• windows_folder_common_documents: Directory that stores common document files
Example values:C:\Users\Public\Documents
• windows_folder_common_favorites: Directory that stores common favorite items
Example values:C:\Users\Administrator\Favorites
• windows_folder_common_music: Directory that stores common music files
Example values:C:\Users\Public\Music
• windows_folder_common_pictures: Directory that stores common picture files
Example values:C:\Users\Public\Pictures
• windows_folder_common_programs: Directory that stores common program groups in start menu
Example values:C:\ProgramData\Microsoft\Windows\Start Menu\Programs
• windows_folder_common_startmenu: Directory that stores common start menu items
Example values:C:\ProgramData\Microsoft\Windows\Start Menu
• windows_folder_common_startup: Directory that stores common Startup program group
Example values:C:\ProgramData\Microsoft\Windows\Start Menu\Programs\Startup
BitRock InstallBuilder User Guide 867 / 393
• windows_folder_common_templates: Directory that stores common templates
Example values:C:\ProgramData\Microsoft\Windows\Templates
• windows_folder_common_video: Directory that stores common video files
Example values:C:\Users\Public\Videos
CROSS-PLATFORM FOLDERS
• installdir: The installation directory
Example values:/home/user/programx, C:\Program Files\programx
• installer_directory: The directory location of the installer binary
Example values:/home/user/example, C:\example
• installer_pathname: The full path of the installer binary
Example values:/home/user/example/installer.bin, C:\example\installer.exe
• platform_install_prefix: The platform specific default installation path
Example values:/home/user, C:\Program Files, /Applications
• system_temp_directory: Path to the system’s temporary directory
Example values:/tmp, C:\Documents and Settings\Username\Local Settings\Temp
• user_home_directory: Path to the home directory of the user who is running the installer
Example values:/home/username, C:\Documents and Settings\Username
BUILD-TIME VARIABLES
• build_project_directory: Directory containing the XML project used to generate the installer.
Example values:/home/username/installbuilder-7.0.0/projects, C:\Program Files\Bitrock InstallBuilder for Windows 7.0.0\projects
• installbuilder_install_root: Installation directory of InstallBuilder. This variable is available only at build time, as it does notmake sense to access this information at runtime
Example values:/home/username/installbuilder-7.0.0, C:\Program Files\Bitrock InstallBuilder for Windows 7.0.0
• installbuilder_ui: The mode in which the builder is run
Possible values:gui, text
WINDOWS FOLDERS - USER SCOPE
• windows_folder_admintools: Directory that stores administrator tools for individual user
BitRock InstallBuilder User Guide 868 / 393
Example values:C:\Users\Administrator\AppData\Roaming\Microsoft\Windows\Start Menu\Programs\Administrative Tools
• windows_folder_appdata: Directory that stores user application-specific data
Example values:C:\Users\Administrator\AppData\Roaming
• windows_folder_cookies: Directory that stores user cookies
Example values:C:\Users\Administrator\AppData\Roaming\Microsoft\Windows\Cookies
• windows_folder_desktopdirectory: Directory that stores user desktop files
Example values:C:\Users\Administrator\Desktop
• windows_folder_favorites: Directory that stores user favorite items
Example values:C:\Users\Administrator\Favorites
• windows_folder_history: Directory that stores user Internet history items
Example values:C:\Users\Administrator\AppData\Local\Microsoft\Windows\History
• windows_folder_internet_cache: Directory that stores user temporary internet files
Example values:C:\Users\Administrator\AppData\Local\Microsoft\Windows\Temporary Internet Files
• windows_folder_local_appdata: Directory that stores user local (non-roaming) repository for application-specific data
Example values:C:\Users\Administrator\AppData\Local
• windows_folder_mymusic: Directory that stores user music files
Example values:C:\Users\Administrator\Music
• windows_folder_mypictures: Directory that stores user picture files
Example values:C:\Users\Administrator\Pictures
• windows_folder_myvideo: Directory that stores user video files
Example values:C:\Users\Administrator\Videos
• windows_folder_nethood: Directory that stores user network shortcuts
Example values:C:\Users\Administrator\AppData\Roaming\Microsoft\Windows\Network Shortcuts
• windows_folder_personal: Directory that stores user document files
Example values:C:\Users\Administrator\Documents
• windows_folder_printhood: Directory that stores printer shortcuts
BitRock InstallBuilder User Guide 869 / 393
Example values:C:\Users\Administrator\AppData\Roaming\Microsoft\Windows\Printer Shortcuts
• windows_folder_profile: Directory that stores user profile
Example values:C:\Users\Administrator
• windows_folder_programs: Directory that stores user program groups in start menu
Example values:C:\Users\Administrator\AppData\Roaming\Microsoft\Windows\Start Menu\Programs
• windows_folder_recent: Directory that stores shortcuts to user’s recently used documents
Example values:C:\Users\Administrator\AppData\Roaming\Microsoft\Windows\Recent
• windows_folder_sendto: Directory that stores user Send To menu items
Example values:C:\Users\Administrator\AppData\Roaming\Microsoft\Windows\SendTo
• windows_folder_startmenu: Directory that stores user start menu items
Example values:C:\Users\Administrator\AppData\Roaming\Microsoft\Windows\Start Menu
• windows_folder_startup: Directory that stores user Startup program group
Example values:C:\Users\Administrator\AppData\Roaming\Microsoft\Windows\Start Menu\Programs\Startup
• windows_folder_templates: Directory that stores user templates
Example values:C:\Users\Administrator\AppData\Roaming\Microsoft\Windows\Templates
LINUX SPECIFIC
• linux_distribution: Type of Linux distribution
Possible values:gentoo, suse, redhat, redflag, slackware, fedora, arch, mandrake, debian
• linux_distribution_codename: Linux distribution code name (based on Linux Standard Base tool: lsb_release)
• linux_distribution_description: Linux distribution description (based on Linux Standard Base tool: lsb_release)
Example values:Debian, GNU/Linux
• linux_distribution_fullname: Linux distribution fullname
Possible values:Suse, Scientific Linux, Fedora, Core, Flag, openSUSE, Red, Mandrake, Red Hat Linux, Red Hat Enterprise Linux,Debian, Gentoo, CentOS, SME Server Linux, Slackware, Arch
• linux_distribution_id: Linux distribution distributor’s ID (based on Linux Standard Base tool: lsb_release)
Example values:Debian
• linux_distribution_release: Linux distribution release number(based on Linux Standard Base tool: lsb_release)
BitRock InstallBuilder User Guide 870 / 393
Example values:3.1
• linux_distribution_shortname: Linux distribution shortname
Possible values:gentoo, suse, redflag, slackware, fedora, arch, rh, mandrake, debian, rhel
• linux_distribution_version: Linux distribution mayor version
Example values:5.0
OSX SPECIFIC
• osx_major_version: OSX major version number
Example values:10.3, 10.5
• osx_version: OSX version number
Example values:10.3.9, 10.5.7
WINDOWS SPECIFIC
• windows_os_family: Type of Windows OS
Possible values:Windows NT, Windows 95
• windows_os_family_shortname: Windows OS family shortname
Possible values:winnt, win9x
• windows_os_flavor: Flavor of Windows OS
Possible values:Home Premium, Enterprise, Home, Standard, Home Basic, Ultimate, Server, Web Edition, Data Center, Business, Work-station, Advanced Server, Professional, Starter
• windows_os_name: Windows OS name
Possible values:Windows 2003, Windows 98, Windows 2008 R2, Windows 2008, Windows 2000, Windows 95, Windows Vista, Windows7, Windows XP, Windows 8, Windows 7 WSLK
• windows_os_service_pack: Windows OS Service Pack version number
Example values:1, 2, 3
• windows_os_uac_enabled: Whether or not UAC is enabled
Possible values:0, 1
• windows_os_version_number: Windows OS version number
Possible values:6.0, 5.1, 7.0, 6.1, 5.2, 4.0, 5.0, 4.1
BitRock InstallBuilder User Guide 871 / 393
SYSTEM CONFIGURATION
• machine_cpu_count: Number of CPUs in the machine
Example values:1, 2
• machine_cpu_speed: The machine’s CPU speed in MHZ
Example values:1500
• machine_fqdn: The machine’s fully qualified domain name
Example values:bitrock-desktop.mydomain.com
• machine_hostname: The machine’s hostname
Example values:example.com
• machine_ipaddr: The machine’s IP address
Example values:10.0.0.2
• machine_total_memory: The machine’s total physical memory in MB
Example values:512
• platform_exec_suffix: The platform specific binary suffix
Possible values:app, run, exe
• platform_has_smp: Whether or not the machine has multiple processors
Possible values:0, 1
• platform_name: At build-time, it contains the target build platform. At runtime, the platform in which the installer is running
Possible values:linux, osx, windows
• platform_path_separator: The platform specific path separator
Possible values:\, /
• system_locale: Current system locale
Possible values:es, sv, ro, et, ko, cy, pt, it, da, tr, sk, va, sl, ru, pt_BR, fr, bg, de, el, zh_CN, hr, es_AR, nl, ja, en, ar, zh_TW, sq, pl, ca, no,hu, he, cs, fi
• system_username: Name of the user who is running the installer
Example values:root, Administrator, guest
INSTALLER PAGE ORDER CONTROL

BitRock InstallBuilder User Guide 872 / 393
• back_page: The previous page to show
Example values:installdir, welcome, installation, installationFinished
• next_page: The next page to show
Example values:installdir, welcome, installation, installationFinished
BitRock InstallBuilder User Guide 873 / 393
Chapter 5
Components
Depending on the complexity of your software, you may need to split your project into several components. Components are abundle of folders and associated installation logic.
They are able to execute actions (include Action Lists), copy files and prompt the user for data (display Parameters), as the projectdoes:
<component><name>component</name><description>component</description><detailedDescription>This is a component</detailedDescription><initializationActionList>
<setInstallerVariable name="my_variable" value="1" /></initializationActionList><parameterList>
<booleanParameter><name>boolean_question</name><title>Boolean Question</title><description>Please answer yes or no</description>
</booleanParameter></parameterList><folderList>
<folder><description>Program Files</description><destination>${installdir}</destination><name>programfiles</name><platforms>all</platforms><distributionFileList>
<distributionDirectory origin="program" /></distributionFileList>
</folder></folderList>
</component>
The ability to enable / disable components at build time and runtime allows your installer to provide as many setup combinationsas you need.
The basic properties you should configure when adding a component are:
• <name>: Name of the Component. This name must be unique and just contain alphanumeric characters and underscores.
• <description>: Description of the Component. This description will be included in the list of the visible componentspresented to the user.
• <detailedDescription>: A detailed description of the component. This detailed description will be displayed whenclicking in the component description in the component selection page.

BitRock InstallBuilder User Guide 874 / 393
• <selected>: Whether or not the component is selected. If the component is not selected, its action lists won’t be executedand its folders won’t be unpacked.
• <show>: Whether or not the component is visible in the component selection page.
• <canBeEdited>: Whether or not the component can be edited in the component selection page.
• <requiredSize>: Required disk space in the target system. If 0, then it will automatically be calculated based on the sizeof the packed files. The sum of the sizes of all of the installed components can be later accessed through the built-in variable${required_diskspace}.
Components are defined in the project <componentList> and presented to the end user as in the Figure 5.1:
Figure 5.1: Component Selection Page
As mentioned above, depending on the value of <show>, the component will be visible or not, and if so, the <canBeEdited>property will decide if the user will be able to select and deselect it.
The example below illustrates some of the possible combinations when including components:
<project>...<!-- Shows the component selection page --><allowComponentSelection>1</allowComponentSelection>...<componentList>
<!-- Main base component, it must be alwaysinstalled. We hide it --><component>
...<name>main</name><selected>1</selected>
BitRock InstallBuilder User Guide 875 / 393
<show>0</show>...
</component>...<!-- Important required component. We show itin the component selection but made it mandatoryto install --><component>
...<name>core</name><description>Core product</description><detailedDescription>This is the base of the application.</detailedDescription><selected>1</selected><show>1</show><canBeEdited>0</canBeEdited>...
</component>...<!-- Optional Useful Component. We allow deselecting it but we suggest itby default setting show=1 --><component>
...<name>docs</name><description>Documentation</description><detailedDescription>Documentation of the product</detailedDescription><selected>1</selected><show>1</show><canBeEdited>1</canBeEdited>...
</component>
<!-- Additional Optional Component. It is not very important sowe do not include it by default (show=0) --><component>
...<name>extra</name><description>Extra files</description><detailedDescription>Extra files including imagesand translation files</detailedDescription><selected>0</selected><show>1</show><canBeEdited>1</canBeEdited>...
</component></componentList>...
</project>
Please note that the code also enables <allowComponentSelection>1</allowComponentSelection>. This settingmakes the component selection page (which is hidden by default) visible to the end user.
5.1 Enabling and disabling components
The easiest way of configuring if a component will be selected or not is by modifying its <selected> property:
<componentList><!-- This component is selected --><component>...<name>component1</name>
BitRock InstallBuilder User Guide 876 / 393
...<selected>1</selected>...
</component><!-- This component is not selected --><component>...<name>component2</name>...<selected>0</selected>...
</component></componentList>
However, in most of the cases you will need to decide whether to select or not components at runtime, based on certain condi-tions. For this purpose, InstallBuilder includes a <componentSelection> action. For example, if you detect and existinginstallation of your product, you may want to deselect your core component and select the update component:
<project>...<componentList><component>
<name>core</name>...<selected>1</selected>...
</component><component>
<name>update</name>...<selected>0</selected>...
</component></componentList><readyToInstallActionList>
<componentSelection><deselect>core</deselect><select>update</select><ruleList>
<fileExists path="${installdir}/wellKnown/file"/></ruleList>
</componentSelection></readyToInstallActionList>...
</project>
The <componentSelection> action also accepts multiple components to select or deselect, separated by commas, in its<deselect> and <select> tags. This way you can change the behavior of the installer with a single action.
The code below explains how to prompt the user to select between a minimal (core components), standard (core and usefulcomponents) and full installation (also include documentation and videos):
<project>...<allowComponentSelection>0</allowComponentSelection>...<componentList><component>
<name>core</name>...
</component><component>
BitRock InstallBuilder User Guide 877 / 393
<name>xmlEditor</name>...
</component><component>
<name>debugger</name>...
</component><component>
<name>documentation</name>...
</component><component>
<name>videos</name>...
</component></componentList>...<parameterList>
<choiceParameter><name>installationMode</name><ask>1</ask><default>normal</default><description>Please select the installation mode</description><title>Installation Mode</title><optionList>
<option><value>minimal</value><text>Minimal</text>
</option><option><value>standard</value><text>Standard</text>
</option><option><value>full</value><text>Full</text>
</option></optionList><postShowPageActionList>
<componentSelection><deselect>xmlEditor,debugger,documentation,videos</deselect><select>core</select><ruleList>
<compareText><text>${installationMode}</text><logic>equals</logic><value>minimal</value>
</compareText></ruleList>
</componentSelection><componentSelection>
<deselect>documentation,videos</deselect><select>core,xmlEditor,debugger</select><ruleList>
<compareText><text>${installationMode}</text><logic>equals</logic><value>standard</value>
</compareText></ruleList>
</componentSelection><componentSelection>
BitRock InstallBuilder User Guide 878 / 393
<deselect></deselect><select>core,xmlEditor,debugger,documentation,videos</select><ruleList>
<compareText><text>${installationMode}</text><logic>equals</logic><value>full</value>
</compareText></ruleList>
</componentSelection></postShowPageActionList>
</choiceParameter></parameterList>...
</project>
You can also check the state of a component using the <componentTest> rule:
<throwError><text>You cannot install ’Component A’ and ’Component B’ at the same time!</text><ruleList>
<componentTest name="componentA" logic="selected"/><componentTest name="componentB" logic="selected"/>
</ruleList></throwError>
Another way of selecting or deselecting a component is to directly modify the <selected> property using the <setInstallerVariable>action as explained in the Advanced Syntax section:
<setInstallerVariable name="project.component(core).selected" value="0"/>
The same way, you can check if a component is selected (or any other of its properties):
<directoryParameter><name>installdir</name><validationActionList>
<actionGroup><actionList>
<getFreeDiskSpace path="${installdir}" units="KB" variable="diskSpace"/><throwError><text>You don’t have enough disk space to install${project.component(bigComponent).description}</text><ruleList><compareValues>
<value1>${project.component(bigComponent).requiredSize}</value1><logic>greater</logic><value2>${diskSpace}</value2>
</compareValues></ruleList>
</throwError></actionList><ruleList>
<isTrue value="${project.component(bigComponent).selected}"/></ruleList>
</actionGroup></validationActionList>
</directoryParameter>
Finally, visible and editable components can also be selected and deselected using the command line:
$> /path/to/installer --disable-components windowsdata,unixdata --enable-components osxdata
BitRock InstallBuilder User Guide 879 / 393
Where --disable-components and --enable-components accept a comma-separated list of components. Only visi-ble components (<show>1</show>) will be displayed in the help menu and only those which are also editable (<canBeEdited>1</canBeEdited>)will be configurable using these flags. For example, if your project has the component list below:
<componentList><!-- Main base component, it must be alwaysinstalled. We hide it --><component>
...<name>main</name><selected>1</selected><show>0</show>...
</component>...<!-- Important required component. We show itin the component selection but made it mandatoryto install --><component>
...<name>core</name><description>Core product</description><selected>1</selected><show>1</show><canBeEdited>0</canBeEdited>...
</component>...<!-- Optional Useful Component. We allow deselecting it but we suggest itby default setting show=1 --><component>
...<name>docs</name><selected>1</selected><show>1</show><canBeEdited>1</canBeEdited>...
</component><!-- Additional Optional Component. It is not very important sowe do not include it by default (show=0) --><component>
...<name>extra</name><selected>0</selected><show>1</show><canBeEdited>1</canBeEdited>...
</component></componentList>
The output in the help menu will be:
--enable-components <enable-components> Comma-separated list of componentsDefault: core,docsAllowed: docs extra
--disable-components <disable-components> Comma-separated list of componentsDefault: extraAllowed: docs extra
In this output, main is not mentioned, as it was configured as hidden, and just docs and extra are allowed values, as corewas configured as a non-editable component and always selected.
BitRock InstallBuilder User Guide 880 / 393
These command line options are only available if <allowComponentSelection> is enabled.
Only the hardcoded state of the components is considered when displaying the help menu.As the help menu is completely independent from regular action lists, even if you are changing the components properties inthe <initializationActionList> using a <setInstallerVariable> action, the changes won’t be visible whendisplaying the help. For example:
<componentList><!-- Main base component, it must be alwaysinstalled. We hide it --><component>
...<name>A</name><selected>1</selected><show>0</show>...
</component><component>
...<name>B</name><selected>1</selected><show>0</show>...
</component><component>
...<name>C</name><selected>1</selected><show>0</show>...
</component></componentList><initializationActionList><setInstallerVariable name="component(A).show" value="1"/><setInstallerVariable name="component(B).show" value="1"/><setInstallerVariable name="component(C).show" value="1"/>
</initializationActionList>
Will result in an empty list of components in the help menu:
--enable-components <enable-components> Comma-separated list of componentsDefault:
--disable-components <disable-components> Comma-separated list of componentsDefault:
But all of them will be visible and editable in the graphical component selection.
BitRock InstallBuilder User Guide 881 / 393
The <selected> property cannot contain variablesThe component <selected> tag cannot contain variables. The below component will always be deselected, regardless ofthe value of the variable:
<project>...<componentList><component>
...<name>documentation</name>...<!-- The variable won’t be resolved, so it willbe considered false --><selected>${installDocumentation}</selected>...
</component></componentList>...
</project>
If you need to bind a boolean variable to the <selected> tag, you should modify the property using a<setInstallerVariable> instead:
<booleanParameter><name>installDocumentation</name><title>Documentation</title><description>Would you like to install the documentation files?</description><postShowPageActionList>
<setInstallerVariable><name>project.component(documentation).selected</name><value>${installDocumentation}</value>
</setInstallerVariable></postShowPageActionList>
</booleanParameter>
5.2 Component Action Lists
Components can include all of the Action Lists available for the main projectwith the exception of the <preShowHelpActionList>and the <finalPageActionList.
In addition, components include a few new action lists:
5.2.1 Component Selection Validation Actions
The <componentSelectionValidationActionList> is executed right after clicking Next in the component selectionpage and allows checking if the provided component configuration is valid. It works the same way as the <validationActionList>;if an error is thrown inside it, instead of aborting the installation, the error message is displayed and the page redrawn.
This is really useful when implementing dependencies between components:
<project>...<allowComponentSelection>1</allowComponentSelection>...<componentList>
<component>...<name>A</name>
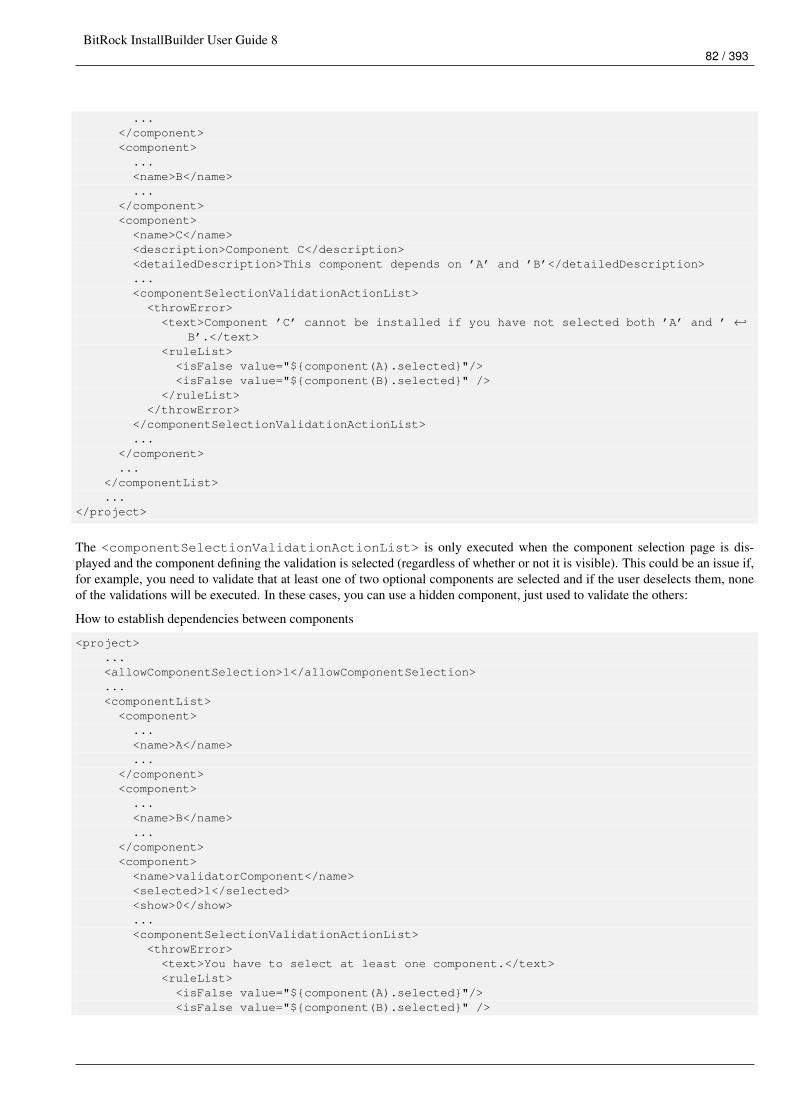
BitRock InstallBuilder User Guide 882 / 393
...</component><component>
...<name>B</name>...
</component><component>
<name>C</name><description>Component C</description><detailedDescription>This component depends on ’A’ and ’B’</detailedDescription>...<componentSelectionValidationActionList><throwError>
<text>Component ’C’ cannot be installed if you have not selected both ’A’ and ’ ←↩B’.</text>
<ruleList><isFalse value="${component(A).selected}"/><isFalse value="${component(B).selected}" />
</ruleList></throwError>
</componentSelectionValidationActionList>...
</component>...
</componentList>...
</project>
The <componentSelectionValidationActionList> is only executed when the component selection page is dis-played and the component defining the validation is selected (regardless of whether or not it is visible). This could be an issue if,for example, you need to validate that at least one of two optional components are selected and if the user deselects them, noneof the validations will be executed. In these cases, you can use a hidden component, just used to validate the others:
How to establish dependencies between components
<project>...<allowComponentSelection>1</allowComponentSelection>...<componentList>
<component>...<name>A</name>...
</component><component>
...<name>B</name>...
</component><component>
<name>validatorComponent</name><selected>1</selected><show>0</show>...<componentSelectionValidationActionList><throwError>
<text>You have to select at least one component.</text><ruleList><isFalse value="${component(A).selected}"/><isFalse value="${component(B).selected}" />
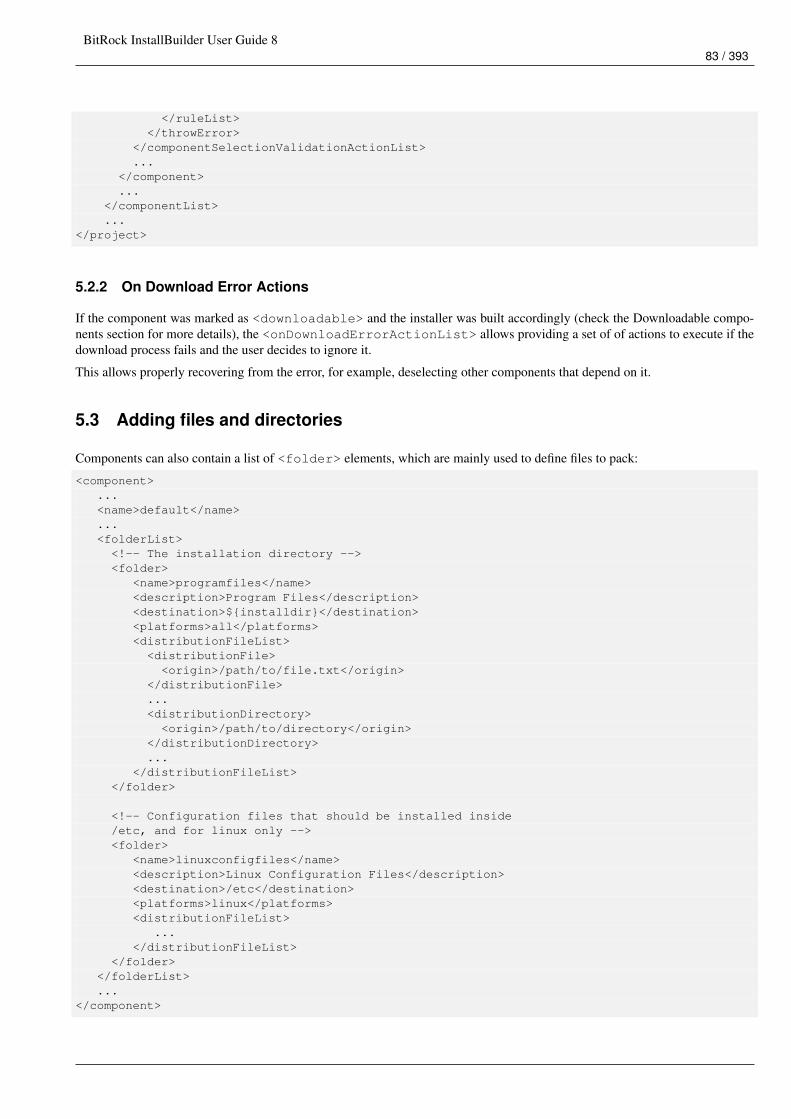
BitRock InstallBuilder User Guide 883 / 393
</ruleList></throwError>
</componentSelectionValidationActionList>...
</component>...
</componentList>...
</project>
5.2.2 On Download Error Actions
If the component was marked as <downloadable> and the installer was built accordingly (check the Downloadable compo-nents section for more details), the <onDownloadErrorActionList> allows providing a set of of actions to execute if thedownload process fails and the user decides to ignore it.
This allows properly recovering from the error, for example, deselecting other components that depend on it.
5.3 Adding files and directories
Components can also contain a list of <folder> elements, which are mainly used to define files to pack:
<component>...<name>default</name>...<folderList><!-- The installation directory --><folder>
<name>programfiles</name><description>Program Files</description><destination>${installdir}</destination><platforms>all</platforms><distributionFileList><distributionFile>
<origin>/path/to/file.txt</origin></distributionFile>...<distributionDirectory>
<origin>/path/to/directory</origin></distributionDirectory>...
</distributionFileList></folder>
<!-- Configuration files that should be installed inside/etc, and for linux only --><folder>
<name>linuxconfigfiles</name><description>Linux Configuration Files</description><destination>/etc</destination><platforms>linux</platforms><distributionFileList>
...</distributionFileList>
</folder></folderList>...
</component>
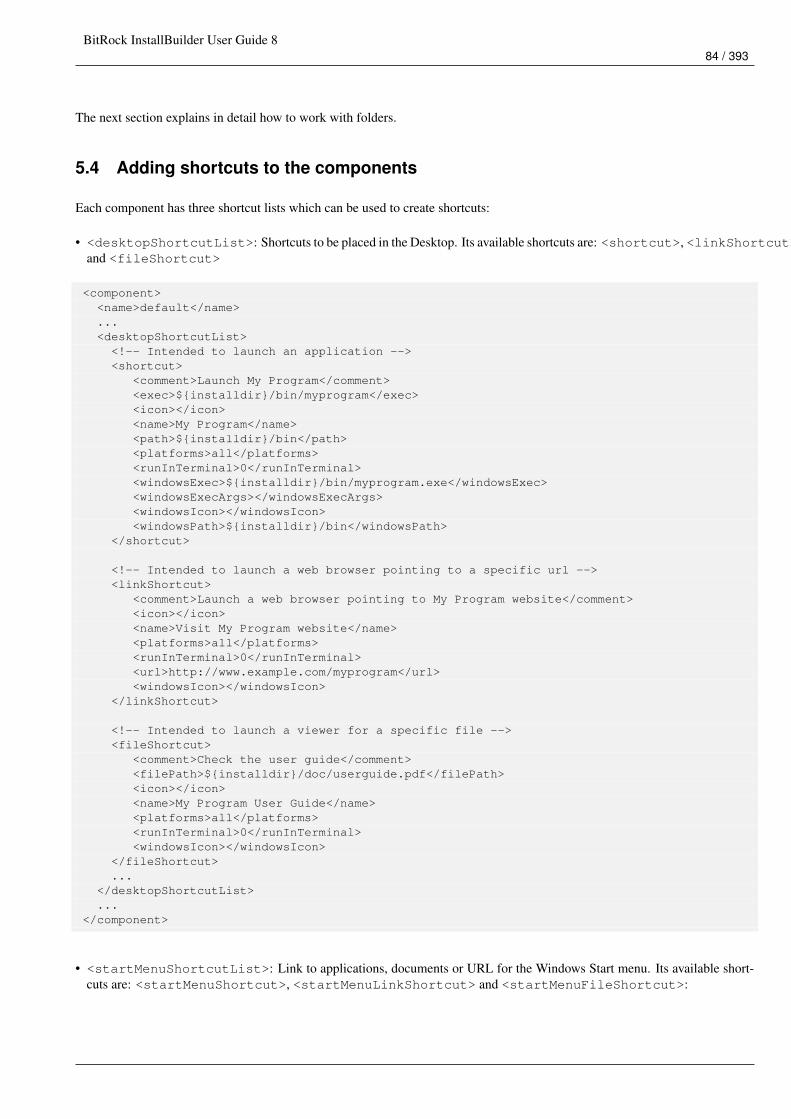
BitRock InstallBuilder User Guide 884 / 393
The next section explains in detail how to work with folders.
5.4 Adding shortcuts to the components
Each component has three shortcut lists which can be used to create shortcuts:
• <desktopShortcutList>: Shortcuts to be placed in the Desktop. Its available shortcuts are: <shortcut>, <linkShortcut>and <fileShortcut>
<component><name>default</name>...<desktopShortcutList><!-- Intended to launch an application --><shortcut>
<comment>Launch My Program</comment><exec>${installdir}/bin/myprogram</exec><icon></icon><name>My Program</name><path>${installdir}/bin</path><platforms>all</platforms><runInTerminal>0</runInTerminal><windowsExec>${installdir}/bin/myprogram.exe</windowsExec><windowsExecArgs></windowsExecArgs><windowsIcon></windowsIcon><windowsPath>${installdir}/bin</windowsPath>
</shortcut>
<!-- Intended to launch a web browser pointing to a specific url --><linkShortcut>
<comment>Launch a web browser pointing to My Program website</comment><icon></icon><name>Visit My Program website</name><platforms>all</platforms><runInTerminal>0</runInTerminal><url>http://www.example.com/myprogram</url><windowsIcon></windowsIcon>
</linkShortcut>
<!-- Intended to launch a viewer for a specific file --><fileShortcut>
<comment>Check the user guide</comment><filePath>${installdir}/doc/userguide.pdf</filePath><icon></icon><name>My Program User Guide</name><platforms>all</platforms><runInTerminal>0</runInTerminal><windowsIcon></windowsIcon>
</fileShortcut>...
</desktopShortcutList>...
</component>
• <startMenuShortcutList>: Link to applications, documents or URL for the Windows Start menu. Its available short-cuts are: <startMenuShortcut>, <startMenuLinkShortcut> and <startMenuFileShortcut>:
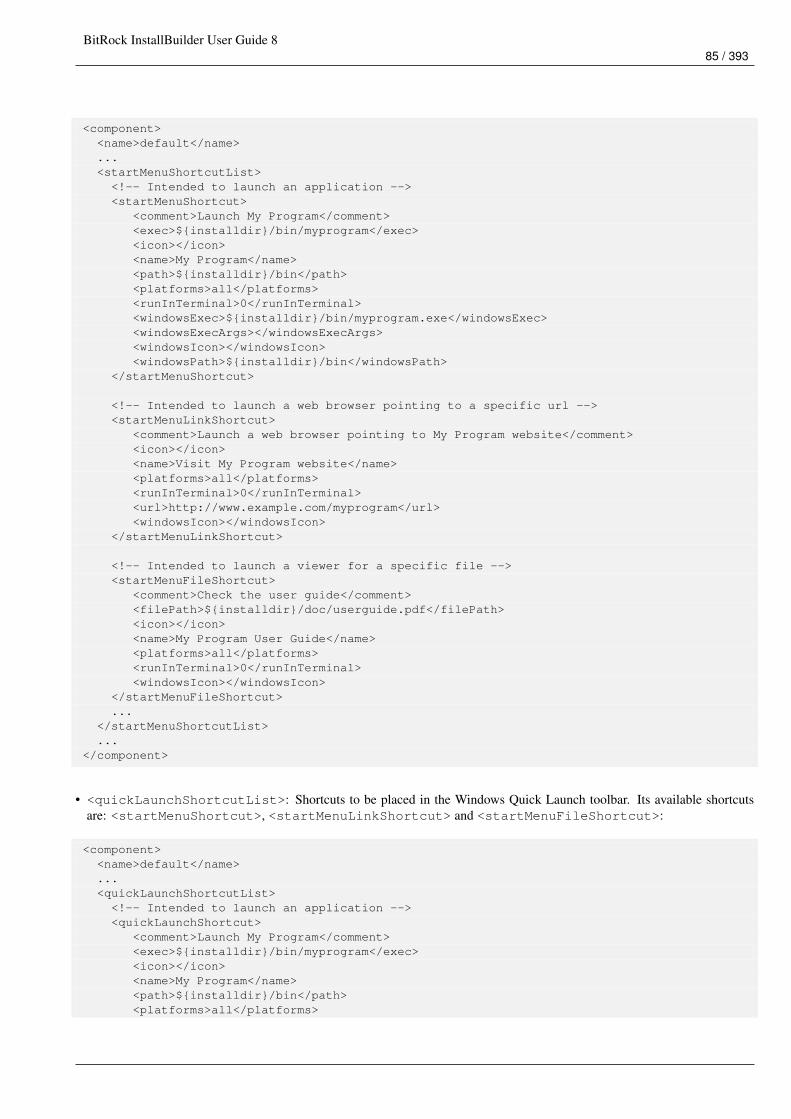
BitRock InstallBuilder User Guide 885 / 393
<component><name>default</name>...<startMenuShortcutList><!-- Intended to launch an application --><startMenuShortcut>
<comment>Launch My Program</comment><exec>${installdir}/bin/myprogram</exec><icon></icon><name>My Program</name><path>${installdir}/bin</path><platforms>all</platforms><runInTerminal>0</runInTerminal><windowsExec>${installdir}/bin/myprogram.exe</windowsExec><windowsExecArgs></windowsExecArgs><windowsIcon></windowsIcon><windowsPath>${installdir}/bin</windowsPath>
</startMenuShortcut>
<!-- Intended to launch a web browser pointing to a specific url --><startMenuLinkShortcut>
<comment>Launch a web browser pointing to My Program website</comment><icon></icon><name>Visit My Program website</name><platforms>all</platforms><runInTerminal>0</runInTerminal><url>http://www.example.com/myprogram</url><windowsIcon></windowsIcon>
</startMenuLinkShortcut>
<!-- Intended to launch a viewer for a specific file --><startMenuFileShortcut>
<comment>Check the user guide</comment><filePath>${installdir}/doc/userguide.pdf</filePath><icon></icon><name>My Program User Guide</name><platforms>all</platforms><runInTerminal>0</runInTerminal><windowsIcon></windowsIcon>
</startMenuFileShortcut>...
</startMenuShortcutList>...
</component>
• <quickLaunchShortcutList>: Shortcuts to be placed in the Windows Quick Launch toolbar. Its available shortcutsare: <startMenuShortcut>, <startMenuLinkShortcut> and <startMenuFileShortcut>:
<component><name>default</name>...<quickLaunchShortcutList><!-- Intended to launch an application --><quickLaunchShortcut>
<comment>Launch My Program</comment><exec>${installdir}/bin/myprogram</exec><icon></icon><name>My Program</name><path>${installdir}/bin</path><platforms>all</platforms>
BitRock InstallBuilder User Guide 886 / 393
<runInTerminal>0</runInTerminal><windowsExec>${installdir}/bin/myprogram.exe</windowsExec><windowsExecArgs></windowsExecArgs><windowsIcon></windowsIcon><windowsPath>${installdir}/bin</windowsPath>
</quickLaunchShortcut>
<!-- Intended to launch a web browser pointing to a specific url --><quickLaunchLinkShortcut>
<comment>Launch a web browser pointing to My Program website</comment><icon></icon><name>Visit My Program website</name><platforms>all</platforms><runInTerminal>0</runInTerminal><url>http://www.example.com/myprogram</url><windowsIcon></windowsIcon>
</quickLaunchLinkShortcut>
<!-- Intended to launch a viewer for a specific file --><quickLaunchFileShortcut>
<comment>Check the user guide</comment><filePath>${installdir}/doc/userguide.pdf</filePath><icon></icon><name>My Program User Guide</name><platforms>all</platforms><runInTerminal>0</runInTerminal><windowsIcon></windowsIcon>
</quickLaunchFileShortcut>...
</quickLaunchShortcutList>...
</component>
5.5 Adding components from external files
Components can also be extracted to a different file, making them usable as modules between different projects. These externalfiles can be later inserted in the <componentList> using the <include> directive as seen in the code below:
<componentList><include file="my_external_component.xml" />
</componentList>
Of course, you can mix external and internal components in the project file
<componentList><component>
<name>internal</name></component><include file="my_external_component.xml" />
</componentList>
In fact, the <include> directive can be used to include any external piece of XML code in any place of the project if someconditions are met:
• The parent XML node is a <*List> tag: <actionList>, <parameterList>, <ruleList>. . .
• The inserted code is valid in the insertion point. For example, trying to include a file containing a <showInfo> action in a<ruleList> will fail.
BitRock InstallBuilder User Guide 887 / 393
• The inserted XML code is grouped in a single element. For example, inserting a code containing two <runProgram> actionswill fail but inserting an <actionGroup> with multiple actions on it will work.
<project><shortName>sample</shortName><fullName>Sample Project</fullName><version>1.0</version><enableRollback>1</enableRollback><enableTimestamp>1</enableTimestamp><componentList>
<!-- component.xml contains a component --><include file="path/to/component.xml"/><component>
<name>default</name><description>Default Component</description><canBeEdited>1</canBeEdited><selected>1</selected><show>1</show><folderList><!-- folder.xml contains a folder --><include file="path/to/folder.xml"/>
</folderList></component>
</componentList><parameterList>
<!-- installdir.xml contains a directory parameter --><include file="path/to/installdir.xml"/><booleanParameter>
<name>boolean_question</name><title>Boolean Question</title><description>Please answer yes or no</description><validationActionList>
<!-- validationActions.xml contains an actionGroup --><include file="path/to/validationActions.xml"/><throwError text="You must click yes!" >
<ruleList><!-- isTrue.xml contains a set of rules in a ruleGroup --><include file="path/to/isTrue.xml"/>
</ruleList></throwError>
</validationActionList></booleanParameter>
...</parameterList>...
</project>
It is not possible to configure whether or not an <include> should be inserted. The <include> directives are evaluatedwhen loading the project so they cannot contain variables or rules.
5.6 Excluding components at build time
Although a component can be disabled and hidden at runtime by modifying its <selected> and <show> properties, some-times it is desirable to do not bundle them at all. In these situations, you can use the <shouldPackRuleList>. This set ofrules is evaluated at build time and will decide whether or not the component containing them will be packed. For example, tojust pack a component when building for OS X:
<component><name>osxComponent</name>
BitRock InstallBuilder User Guide 888 / 393
<description>OS X Component</description><canBeEdited>1</canBeEdited><selected>1</selected><show>1</show>...<shouldPackRuleEvaluationLogic>and</shouldPackRuleEvaluationLogic><shouldPackRuleList>
<compareText><logic>equals</logic><text>${platform_name}</text><value>osx</value>
</compareText></shouldPackRuleList>
</component>
Please note the usage of the built-in variable ${platform_name}, which contains the build target at build time. In this case,using a <platformTest> will not work because it would evaluate the platform in which the builder is running and not theplatform for which the installer is being built.
The same way as a <ruleList>, the <shouldPackRuleList> can contain <ruleGroup> rules to create complex con-ditions. You can also configure its rule evaluation logic using the <shouldPackRuleEvaluationLogic> property.
5.7 Component Groups
A <componentGroup> is a special type of <component> that can contains other components in its <componentList>:
<project>...<componentList>
<!-- componentGroup, a component with sub-components --><componentGroup>
<name>application1</name><description>Application 1</description>...<folderList>
...</folderList><componentList>
<component><name>feature1</name><description>Optional feature 1</description><folderList>
...</folderList>
</component><component>
<name>feature2</name><description>Optional feature 2</description><folderList>
...</folderList>
</component>
<!-- embedding a group inside a group --><componentGroup>
<name>feature3</name><description>Optional feature 3</description><componentList>
<component>
BitRock InstallBuilder User Guide 889 / 393
<name>feature4</name><description>Optional feature 4</description><folderList>
...</folderList>
</component></componentList><folderList>
...</folderList>
</componentGroup></componentList>
</componentGroup>
<component><name>application2</name><description>Application 2</description><folderList>
...</folderList>
</component>
<!-- component group that is always selected and cannot be edited --><componentGroup>
<name>application3</name><description>Application 3</description><selected>1</selected><canBeEdited>0</canBeEdited><folderList>
...</folderList><componentList>
<component><name>feature5</name><description>Optional feature 5</description><folderList>
...</folderList>
</component></componentList>
</componentGroup></componentList>...
</project>
Component groups are displayed as a tree in the component selection page, where the user may choose to install any subset ofits sub-components.
The following image shows the component selection screen for the example above:

BitRock InstallBuilder User Guide 890 / 393
Figure 5.2: Component selection screen
As with a regular component, a component group can include its own files (in its <folderList>) and actions.
Component groups may also be nested, creating multiple levels. This can be done by embedding a <componentGroup> inthe <componentList> of another <componentGroup>. The feature4 component is an example of this - it is inside thefeature3 <componentGroup>, which is a sub-component of application1.
A child component will be installed only if it is selected and all of its parent component groups are selected as well. Forexample, if application1 is not selected, then regardless of whether or not feature1 was previously selected, it will not beinstalled. In the GUI component selection, this behavior is represented by visually deselecting all of the child components whendeselecting a parent. For example, the following shows that when application1 is deselected, all of its child components areautomatically deselected and cannot be edited:

BitRock InstallBuilder User Guide 891 / 393
Figure 5.3: Component selection screen
Selecting a child component for installation requires enabling its parent components. In the example, in order to install feature1,the user first has to select application1 by clicking on the checkbox next to it. This will allow editing of the children ofapplication1. Similarly, to enable feature4, the user needs to select both the application1 and feature3 compo-nent groups.
Specifying which components to enable from the command line differs in behavior. Whenever the user specifies --enable-components,all parents of specified components are also automatically selected. For example, if the user specifies that feature4 should beenabled, feature3 and application1 are automatically selected.
5.7.1 Installing in text mode
When running an installer in text mode, sub-components can only be chosen if a parent has been chosen. For example:
$> /path/to/installer --mode text
...
Select the components you want to install; clear the components you do not wantto install. Click Next when you are ready to continue.
Application 1 [Y/n] :y
Application 1 - Optional feature 1 [Y/n] :y
Application 1 - Optional feature 2 [Y/n] :y
Application 1 - Optional feature 3 [Y/n] :n
BitRock InstallBuilder User Guide 892 / 393
Application 2 [Y/n] :y
Application 3 : Y (Cannot be edited)
Application 3 - Optional feature 5 [Y/n] :n
...
Please note that the user was not asked about feature4 since the feature3 component group was not selected.
As a regular parameter group, a <componentGroup> with its <show> property set to false won’t be visible, hidden itschild as well.
If a <componentGroup> has its <canBeEdited> set to false but is selected by default, its sub-components can be stilledited (if they individually allow it). However, in the case of a deselected component group that cannot be edited, their childwon’t allow any user interaction, regardless of their individual configurations.
5.8 Downloadable components
InstallBuilder provides the ability to configure some or all of the available components to be separate, downloadable contentinstead of being embedded in the installer. This means that elements of the application that are not always used can be madedownloadable to decrease an installer’s size.
Each downloadable component is built as a separate file for each platform. After building a project, its components should becopied to a web server or file hosting service so that users can download it.
5.8.1 How to create downloadable components
Any existing or new project can be configured to have its components downloadable as separate files.
To do so, enable the <downloadable> tag for any <component> in the project that should be made downloadable.
In addition, the <componentsUrl> should be a URL that points to the directory where all files are to be placed.
For example, the following is a complete project, including the URL where the components will be copied:
<project><shortName>downloadabledemo</shortName><version>1.0</version><componentsUrl>http://example.com/installer/components/</componentsUrl>...<componentList><!-- component that should be embedded in the installer --><component>
<name>core</name><description>Core features</description>...
</component>
<!-- another component that should be embedded in the installer, specified explicitly ←↩-->
<component><name>osintegration</name><downloadable>0</downloadable><description>Integration with operating system</description>...
</component>
<!-- another component that should be built as downloadable component --><component>

BitRock InstallBuilder User Guide 893 / 393
<name>optional</name><downloadable>1</downloadable><description>Optional content</description>...
</component>
</componentList>...
</project>
In order to build the project with downloadable components enabled, the --downloadable-components flag should bepassed to the CLI.
$> path/to/bin/builder build project.xml linux --downloadable-components
When using the GUI, the downloadable components checkbox should be enabled in the Build section before buildingthe project.
After building the project for Linux, an additional directory downloadabledemo-1.0-componentswill be created with anoptional-1.0-linux.pak file inside. When a project contains more components or is built for other platforms, additionalfiles will be created in this directory.
After building the project, all contents of this directory should be uploaded to a web server so that they are available at<componentsUrl>. For the example above, the full URL should be http://example.com/installer/components/optional-1.0-linux.pak.
Some components may be available under different URLs. In this case, it is possible to specify the location using the <url>tag. The example below shows how optional content can be placed at a different URL:
<project>...<componentList><!-- another component that should be built as downloadable component --><component>
<name>optional3rdparty</name><downloadable>1</downloadable><description>Optional content, provided by other vendor</description><url>http://example.net/downloads/optional3rdparty-1.0-${platform_name}.pak</url>...
</component></componentList>...
</project>
The component above will be downloaded from a different website using different platform names.
It is also possible to configure the directory for outputting the components using the <componentsDirectory> tag. Thiscan be specified relatively. In this case it is relative to <outputDirectory>.
For example, to copy all component files into the same directory as <outputDirectory>, do the following:
<project><componentsDirectory>.</componentsDirectory>...
</project>
5.8.2 Running the installers with downloadable components
The behavior for installers with one or more downloadable components is the same as it is with regular installers.
The component selection page shows the downloadable file size for each component available for download:
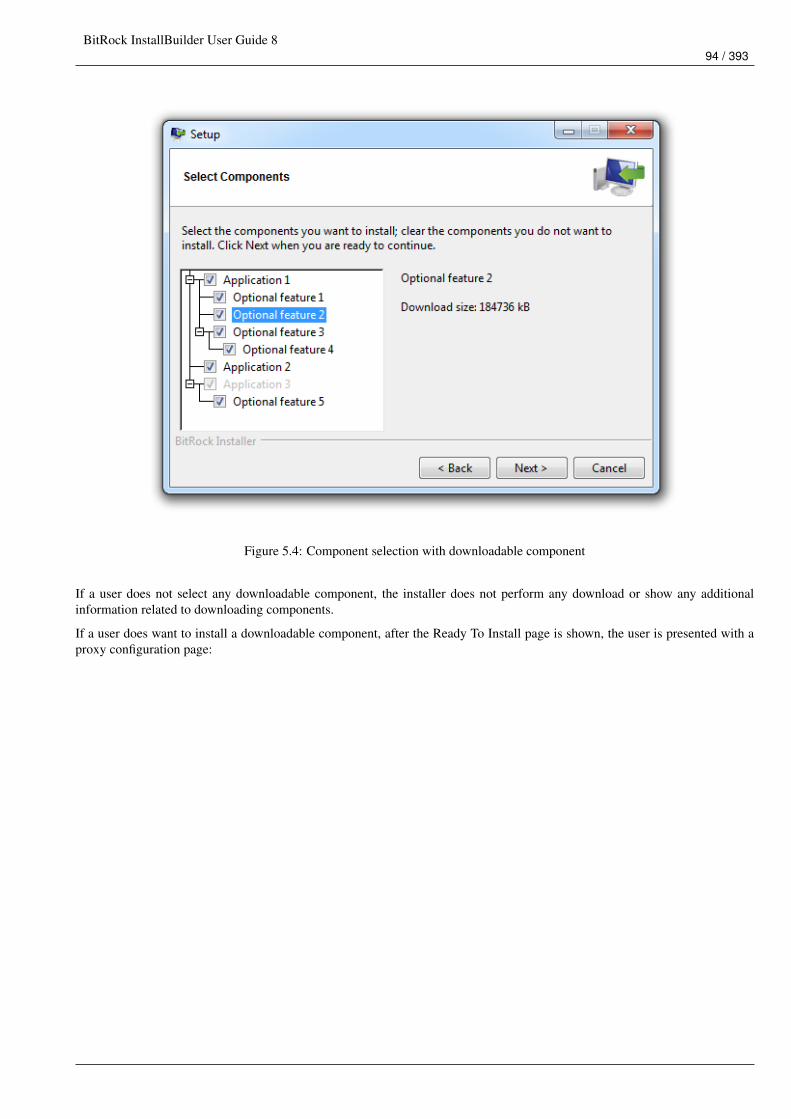
BitRock InstallBuilder User Guide 894 / 393
Figure 5.4: Component selection with downloadable component
If a user does not select any downloadable component, the installer does not perform any download or show any additionalinformation related to downloading components.
If a user does want to install a downloadable component, after the Ready To Install page is shown, the user is presented with aproxy configuration page:
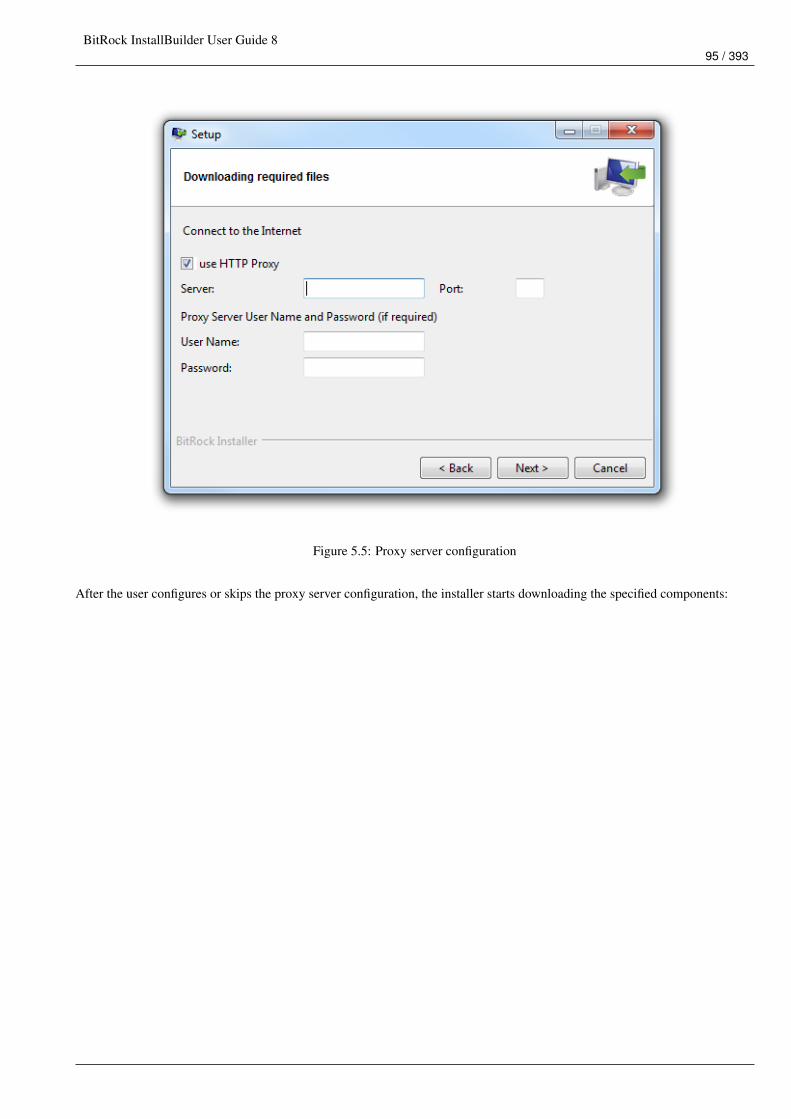
BitRock InstallBuilder User Guide 895 / 393
Figure 5.5: Proxy server configuration
After the user configures or skips the proxy server configuration, the installer starts downloading the specified components:
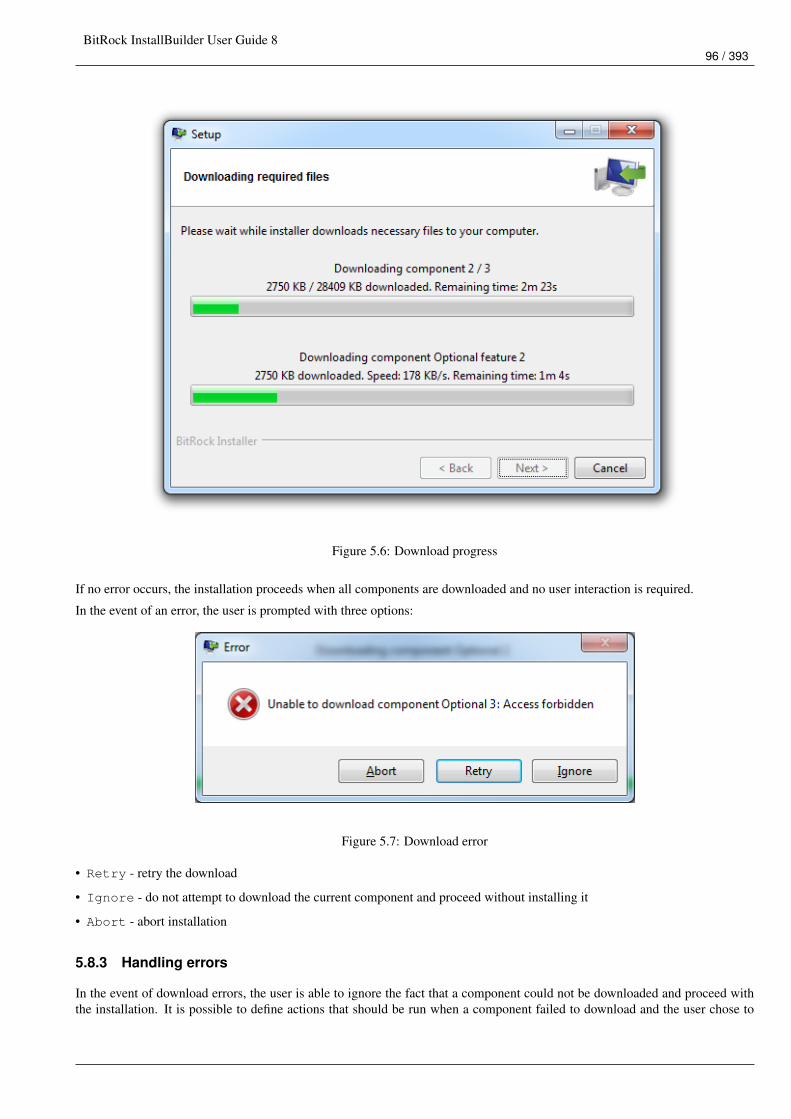
BitRock InstallBuilder User Guide 896 / 393
Figure 5.6: Download progress
If no error occurs, the installation proceeds when all components are downloaded and no user interaction is required.
In the event of an error, the user is prompted with three options:
Figure 5.7: Download error
• Retry - retry the download
• Ignore - do not attempt to download the current component and proceed without installing it
• Abort - abort installation
5.8.3 Handling errors
In the event of download errors, the user is able to ignore the fact that a component could not be downloaded and proceed withthe installation. It is possible to define actions that should be run when a component failed to download and the user chose to
BitRock InstallBuilder User Guide 897 / 393
ignore it. For example:
<project><shortName>downloadabledemo</shortName><version>1.0</version><componentsUrl>http://example.com/installer/components/</componentsUrl>...<componentList><component>
<name>php</name><downloadable>1</downloadable><description>PHP module for Apache</description><onDownloadErrorActionList>
<throwError><text>PHP module is required for phpMyAdmin. Aborting installation</text><ruleList>
<isTrue><value>${project.component(phpmyadmin).selected}</value>
</isTrue></ruleList>
</throwError></onDownloadErrorActionList>
</component>
</componentList>...
</project>
In this case, if the PHP module is not downloaded and another component depends on it, the installation will abort.
5.8.4 Text mode and unattended installers
Text mode installers provide the same support for downloadable components as GUI installers. After all parameters have beenspecified and at least one component needs to be downloaded, the user is prompted with a proxy configuration question. Theuser may choose to skip proxy configuration or specify it.
Next, downloading begins and the overall progress of installation is shown (this is the same feedback provided in the form of aprogress meter for GUI installations).
Unattended installers also provide support for downloadable components. Components are downloaded and installation occursautomatically.
If unattendedmodeui is specified as minimalWithDialogs, progress for downloads is shown only as the overall down-load progress.
Figure 5.8: Download in unattended mode UI
Similar to GUI installers, when all components are downloaded, the installation proceeds.
BitRock InstallBuilder User Guide 898 / 393
5.9 Adding or removing components to existing installations
InstallBuilder 8 offers the ability to install and uninstall individual components without reinstalling or uninstalling the entireapplication.
This functionality is disabled by default. In order to enable it, enable <allowAddRemoveComponents>.
5.9.1 Storing installation information
InstallBuilder stores the location of all applications inside of the application directory. When performing an installation, the userspecifies the directory where the application should be installed. If <allowAddRemoveComponents> is enabled, a check ismade to see if a previous installation exists in specified directory before the component selection page is shown.
If it contains information about a previous installation, it is used by the installer. This information will consist of currentlyinstalled components and optionally for storing previous values for parameters that allow it.
It also contains information about the currently installed version. If the versions do not match, information about the currentlyselected components and values for parameters that allow it is used. However, all components are reinstalled in such a case.
5.9.2 Installing additional components
If <allowAddRemoveComponents> is enabled, the installer will automatically detect whenever a valid installation of theapplication is present in the installation directory.
Components previously installed will always be selected and the user will not be able to uninstall components using the installer.The user may choose to install additional components.
Whenever any change is made, all actions for newly selected components are run. However, actions for components previouslyinstalled are not run. This prevents actions that set up default values from overriding settings that user has already modified.
After a successful installation, the uninstaller and all related information will be updated to reflect that the user has installedadditional components.
5.9.3 Uninstalling components
If <allowAddRemoveComponents> is enabled, running the uninstaller will show an additional choice page with the follow-ing options:
• Entire application - removes the entire application and all files installed by the application
• Individual components - removes individual components while leaving the rest of the application intact.
When a user selects the Entire application option, the behavior is the same as when <allowAddRemoveComponents> isdisabled.
When a user selects Individual components, a component selection page will be shown. All components not currently installedwill not be shown in the component selection tree. Components that have their <canBeEdited> disabled will not be editable.
When a user selects a component group, the component and all of its sub-components will be removed. For example if a userselects application1, this causes feature1, feature2, feature3 and feature4 to be uninstalled:
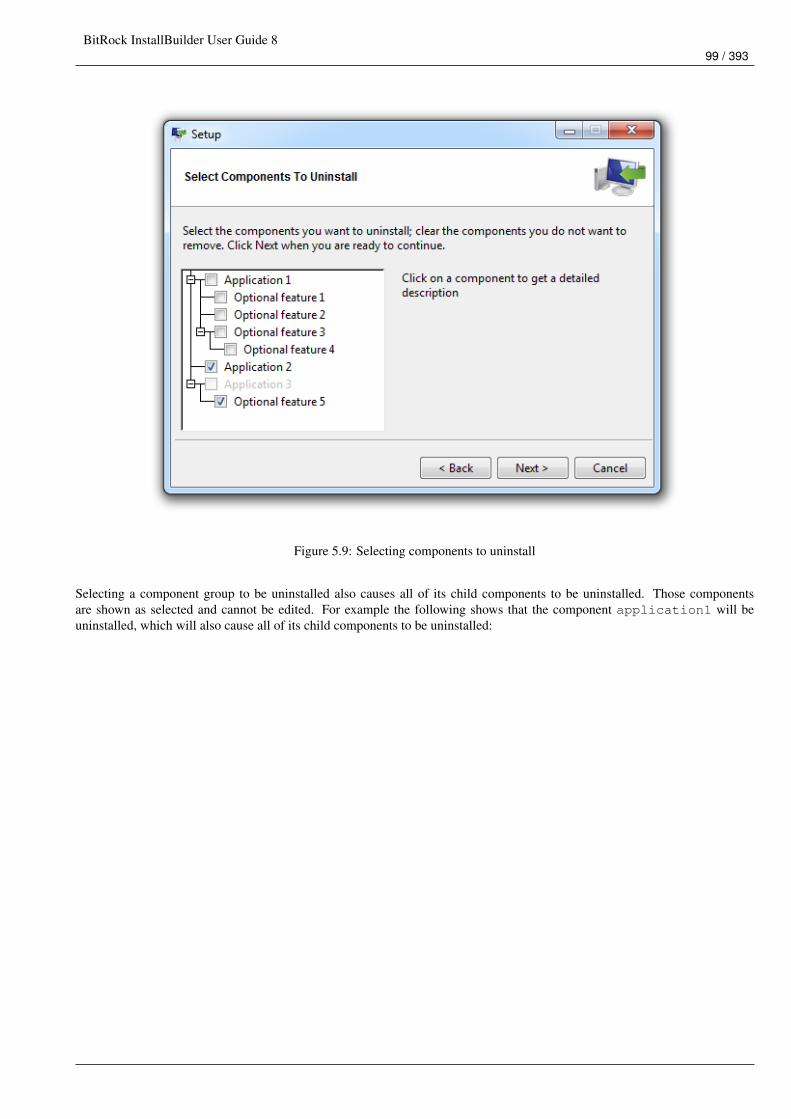
BitRock InstallBuilder User Guide 899 / 393
Figure 5.9: Selecting components to uninstall
Selecting a component group to be uninstalled also causes all of its child components to be uninstalled. Those componentsare shown as selected and cannot be edited. For example the following shows that the component application1 will beuninstalled, which will also cause all of its child components to be uninstalled:
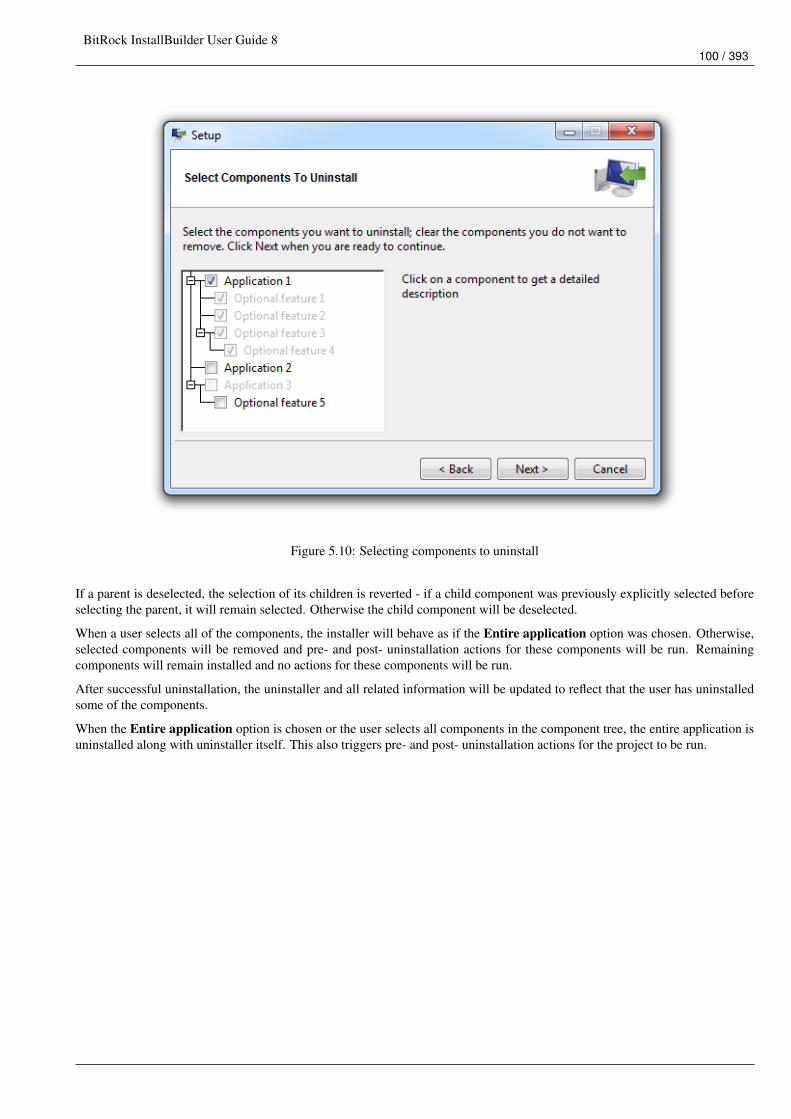
BitRock InstallBuilder User Guide 8100 / 393
Figure 5.10: Selecting components to uninstall
If a parent is deselected, the selection of its children is reverted - if a child component was previously explicitly selected beforeselecting the parent, it will remain selected. Otherwise the child component will be deselected.
When a user selects all of the components, the installer will behave as if the Entire application option was chosen. Otherwise,selected components will be removed and pre- and post- uninstallation actions for these components will be run. Remainingcomponents will remain installed and no actions for these components will be run.
After successful uninstallation, the uninstaller and all related information will be updated to reflect that the user has uninstalledsome of the components.
When the Entire application option is chosen or the user selects all components in the component tree, the entire application isuninstalled along with uninstaller itself. This also triggers pre- and post- uninstallation actions for the project to be run.
BitRock InstallBuilder User Guide 8101 / 393
Chapter 6
Working with Files and Folders
The installation resources (files and directories) are grouped into <folder> elements.
<project>...<componentList>
<component><name>myComponent</name>...<folderList>
<folder><name>documents</name><destination>${installdir}/docs</destination><platforms>linux windows</platforms><distributionFileList>
<distributionDirectory origin="/home/johndoe/docs"/><distributionFile origin="/home/johndoe/README"/>
</distributionFileList><shortcutList>
...<shortcut/>...
</shortcutList><actionList>
<addTextToFile file="${installdir}/docs/README" text="some text"/></actionList>
</folder></folderList>
</component></componentList>
</project>
The most important tags in a folder element are:
• <distributionFileList>: Contains the list of packed files. A directory (and its contents) is defined as a <distributionDirectory>while a file is represented through a <distributionFile>. All of the defined elements will be packed and unpacked atruntime. Both the <distributionDirectory> and <distributionFile> elements support the below tags:
– <origin>: Path to the file or directory to pack in the build machine. If the path is relative, it will be absolutized whenbuilding using the project file parent directory as a reference.
– <allowWildcards>: Configures whether or not the path configured in the <origin> tag must be considered a pattern(thus being resolved using global matching) or a literal location.
– <excludeFiles>: When enabling <allowWildcards>, the list of files matching this pattern will be ignored. If<allowWildcards> is set to false, this pattern is ignored. See the Filters section for more information.
BitRock InstallBuilder User Guide 8102 / 393
– <includeFiles>: When enabling <allowWildcards>, only the list of files matching this pattern will be considered.If <allowWildcards> is set to false, this pattern is ignored. See the Filters section for more information.
<folder>...<distributionFileList>
<distributionFile><origin>${build_project_directory}/license.txt</origin>
</distributionFile><distributionDirectory allowWildcards="1">
<origin>${build_project_directory}/readmeFiles/*.txt</origin><includeFiles>*/README-*.txt</includeFiles><excludeFiles>*/README-template.txt</excludeFiles>
</distributionDirectory></distributionFileList>
</folder>
• <platforms>: This tag defines a space-separated list of platforms for which the files will be packed. This is evaluatedat build time and matched against the specified build target. It allows a single project to define a multiplatform installer.The special platform identifier all can be used and represents all platforms. The full list of supported values in the tag issummarized in the table below:
Supported PlatformsPlatform Identifier Platform Description
all All Platformslinux Linuxlinux-x64 Linux x86 64 bitslinux-ia64 Linux IA64windows Windowsosx Mac OS Xsolaris-sparc Solaris Sparcsolaris-intel Solaris Intellinux-ppc Linux PPClinux-s390 Linux s390freebsd FreeBSD 5freebsd4 FreeBSD 4freebsd6 FreeBSD 6freebsd6-x64 FreeBSD 6 64 bitsfreebsd7 FreeBSD 7/8freebsd7-x64 FreeBSD 7/8 64 bitsopenbsd3 OpenBSD x86hpux HP-UXaix AIX, OS/400irix-n32 IRIX
• <destination>: The destination directory in which all the bundled files in the folder will be unpacked.
• <shortcutList>: Along with the files, a folder can define a list of shortcuts to create. You can find a detailed reference inthe shortcuts section.
• <actionList>: Actions executed right after the files of the folder are unpacked.
BitRock InstallBuilder User Guide 8103 / 393
6.1 Conditionally Packing a Folder
Although the <platforms> tag provides a built-in mechanism to avoid packing folders for different platforms, there are scenar-ios in which you need a more complex condition than just the target platform. This can be achieved using the <shouldPackRuleList>:
<folder><name>documents</name><destination>${installdir}/docs</destination><platforms>linux</platforms><distributionFileList>
<distributionDirectory origin="/home/johndoe/docs"/><distributionFile origin="/home/johndoe/README"/>
</distributionFileList><shouldPackRuleEvaluationLogic>and</shouldPackRuleEvaluationLogic><shouldPackRuleList>
<fileExists path="/home/johndoe/docs"/><fileExists path="/home/johndoe/README"/>
</shouldPackRuleList></folder>
The above folder will only be packed if the target platform is linux and the files exist. The evaluation logic of the rules can bemodified through the <shouldPackRuleEvaluationLogic> property.
This is also helpful when you are developing the installer and do not need all of the files that will be included in the final version(that can greatly increase the build time) to be packed. For example, you could create an environment variable (DEMO_BUILD)to indicate to the builder you do not need an official build:
<folder><name>optionalFiles</name><destination>${installdir}</destination><platforms>linux</platforms><distributionFileList>
<distributionDirectory origin="videos"/><distributionDirectory origin="images"/><distributionDirectory origin="documentation"/>
</distributionFileList><shouldPackRuleList>
<!-- Check if the variable is defined --><compareText text="${env(DEMO_BUILD)}" logic="equals" value=""/>
</shouldPackRuleList></folder>
You can find a more complex example in the "Custom Build Targets" section.
Do not confuse <shouldPackRuleList> with <ruleList>Rules inside a <ruleList> are evaluated at runtime while rules within a <shouldPackRuleList> are evaluated at buildtime.
6.2 Conditionally Unpacking a Folder
By default, folders will be unpacked if they were packed (as described in the previous section) and if the <component> inwhich they are bundled was selected. However, you can add additional logic to discern if it should be unpacked by attachingrules to its <ruleList>:
<folder><name>documents</name><destination>${installdir}/docs</destination>
BitRock InstallBuilder User Guide 8104 / 393
<platforms>windows</platforms><distributionFileList>
<distributionDirectory origin="/home/johndoe/docs"/><distributionFile origin="/home/johndoe/README"/>
</distributionFileList><ruleEvaluationLogic>and</ruleEvaluationLogic><ruleList>
<platformTest type="windows-xp"/></ruleList>
</folder>
The above folder will be packed for any Windows target but will only be unpacked if the platform in which the installer isexecuting is Windows XP.
6.3 Filters
6.3.1 Basic Filters
InstallBuilder implements a basic filtering mechanism for folders. This functionality will allow you to pack the contents of afolder instead of including the folder itself and to apply filters to include or exclude specific files. For example, if you have afolder named "documentation" and you want to pack a subset of its contents and unpack it to ${installdir}/myDocs, youjust need to use the snippet below:
<folder><description>Documentation Files</description><destination>${installdir}/myDocs</destination><name>documentation</name><platforms>all</platforms><distributionFileList>
<distributionDirectory allowWildcards="1"><origin>/some/path/to/documentation/*</origin><includeFiles>*/project-1-*.txt</includeFiles><excludeFiles>*/project-1-secret.txt</excludeFiles>
</distributionDirectory></distributionFileList>
</folder>
In the above example, all of the .txt files related to "project-1" will be packaged, with the exception of "project-1-secret.txt"
The following are the filtering-related tags that you can use:
• <allowWildcards> : This tag determines the behavior of the filtering mechanism. If it is set to "0" (the default),there will not be any global pattern interpretation and patterns will be taken as literal strings. For example, if you define<origin>/some/path/to/documentation/*</origin>, the installer will look for a folder named "*" inside the/some/path/to/documentation/ directory. In addition, the includeFiles and excludeFiles tags will be ignored.
However, if allowWildcards is set to "1", the <origin> will be expanded and the installer will generate a list of matching files.
• <includeFiles> : This tag allows you to select files over the matches produced by the <origin> tag when wildcardsare enabled. The default value of the <includeFiles> tag is "*" so all the files matched by the <origin> tag will bepacked.
• <excludeFiles> : Once the list of files has been filtered with the <includeFiles> pattern, the <excludeFiles>filter will be applied over the result. The default value of this tag is empty so no filter is applied. This tag is ignored if wildcardsare disabled. Only files directly returned by the evaluation of the <origin> pattern can be excluded, the builder won’t try torecursively exclude files at deeper hierarchy levels in the packed directories.
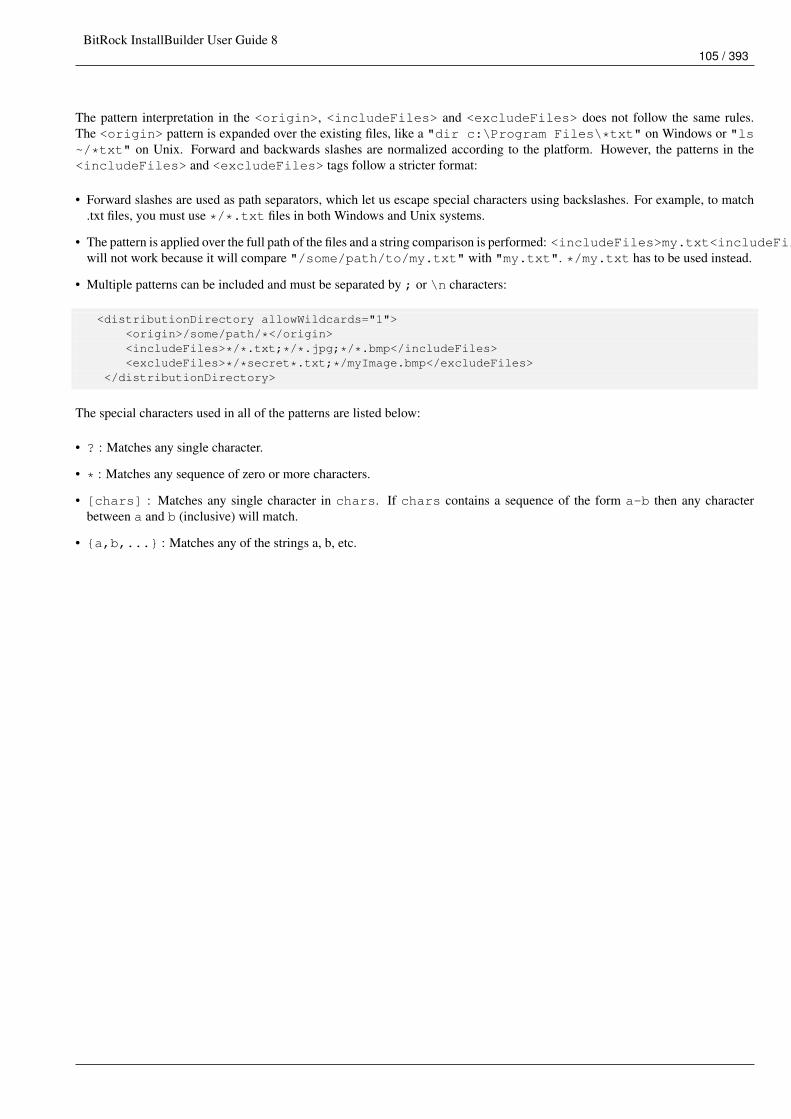
BitRock InstallBuilder User Guide 8105 / 393
The pattern interpretation in the <origin>, <includeFiles> and <excludeFiles> does not follow the same rules.The <origin> pattern is expanded over the existing files, like a "dir c:\Program Files\*txt" on Windows or "ls~/*txt" on Unix. Forward and backwards slashes are normalized according to the platform. However, the patterns in the<includeFiles> and <excludeFiles> tags follow a stricter format:
• Forward slashes are used as path separators, which let us escape special characters using backslashes. For example, to match.txt files, you must use */*.txt files in both Windows and Unix systems.
• The pattern is applied over the full path of the files and a string comparison is performed: <includeFiles>my.txt<includeFiles>will not work because it will compare "/some/path/to/my.txt" with "my.txt". */my.txt has to be used instead.
• Multiple patterns can be included and must be separated by ; or \n characters:
<distributionDirectory allowWildcards="1"><origin>/some/path/*</origin><includeFiles>*/*.txt;*/*.jpg;*/*.bmp</includeFiles><excludeFiles>*/*secret*.txt;*/myImage.bmp</excludeFiles>
</distributionDirectory>
The special characters used in all of the patterns are listed below:
• ? : Matches any single character.
• * : Matches any sequence of zero or more characters.
• [chars] : Matches any single character in chars. If chars contains a sequence of the form a-b then any characterbetween a and b (inclusive) will match.
• {a,b,...} : Matches any of the strings a, b, etc.
BitRock InstallBuilder User Guide 8106 / 393
Basic filters do not operate recursivelyThe basic filters mechanism is not intended to recursively skip packing files in the directory provided in the <origin> tag.Just the results returned by the evaluation of the <origin> pattern can be filtered. For example, if you are packing a directoryimages and want to exclude the file demo.png, the below won’t work:
<folder>...<destination>${installdir}</destination>...<distributionFileList>
<distributionDirectory allowWildcards="1"><origin>images</origin><excludeFiles>*/demo.png</excludeFiles>
</distributionDirectory></distributionFileList>
</folder>
The reason is that the <origin> pattern will only return images as matching file, which does not match the exclusion pattern*/demo.png.If demo.png is packed directly under images you could use:
<folder>...<destination>${installdir}/images</destination>...<distributionFileList>
<distributionDirectory allowWildcards="1"><origin>images/*</origin><excludeFiles>*/demo.png</excludeFiles>
</distributionDirectory></distributionFileList>
</folder>
In this case, evaluating <origin> will return all the contained images (sample-01.png, left-image.jpg,details.gif, demo.png, . . . ), and the exclusion pattern will be able to match demo.png.If you want to filter certain files at any level of the hierarchy in the packed directory, you should use the Advanced Filters instead,which operate recursively.
6.3.2 Advanced Filters
In addition to the basic filters, which allow providing a pattern to the <origin> tag while excluding some of the resultsreturned, InstallBuilder also includes a more complex filtering mechanism that allows excluding files located at any level in thefolder hierarchy of the <distributionDirectory>.
Note that you have to define filters that will decide if the file will be packed or not. Currently, just filters based on the file pathare allowed: <fileNameFilter>. These are the basic tags in the <fileNameFilter>:
• <pattern>: Pattern to match against the path of the file
• <patternType>: Whether to use glob or regular expressions matching
• <logic>: Whether or not the pattern must match to pass the filter.
These filters are grouped into the <onPackingFilterList>. If the file in consideration matches the expressed conditionsin this list, it will be packed, if not, it will be skipped.
For example, if you want to pack a folder dist-files:
dist-files/|-- bin
BitRock InstallBuilder User Guide 8107 / 393
| ‘-- productA| ‘-- data| |-- info.ini| ‘-- info.ini~|-- docs| ‘-- reference| |-- README.tct~| |-- reference.html| |-- reference.html~| |-- reference.pdf| ‘-- reference.pdf~‘-- libraries
|-- lib1.so|-- .#lib2.so‘-- lib2.so
To exclude all of the temporary files (files ending in ~), you could use:
<folder><description>Program Files</description><destination>${installdir}</destination><name>programfiles</name><platforms>all</platforms><distributionFileList><distributionDirectory><origin>dist-files</origin><onPackingFilterList>
<fileNameFilter pattern="*~" logic="does_not_match" patternType="glob"/></onPackingFilterList>
</distributionDirectory></distributionFileList>
</folder>
After the installation, you will find the dist-files directory clean of temporary files:
sample-1.0|-- dist-files| |-- bin| | ‘-- productA| | ‘-- data| | ‘-- info.ini| |-- docs| | ‘-- reference| | |-- reference.html| | ‘-- reference.pdf| ‘-- libraries| |-- lib1.so| |-- .#lib2.so| ‘-- lib2.so|-- uninstall‘-- Uninstall Sample Project.desktop
If you also want to exclude files starting with .#, you just need to add another filter to the <onPackingFilterList>:
<folder><description>Program Files</description><destination>${installdir}</destination><name>programfiles</name><platforms>all</platforms><distributionFileList><distributionDirectory><origin>dist-files</origin>
BitRock InstallBuilder User Guide 8108 / 393
<filterEvaluationLogic>and</filterEvaluationLogic><onPackingFilterList>
<fileNameFilter pattern="*~" logic="does_not_match" patternType="glob"/><fileNameFilter pattern="*/.#*" logic="does_not_match" patternType="glob"/>
</onPackingFilterList></distributionDirectory>
</distributionFileList></folder>
The default <filterEvaluationLogic> is and but you can also set it to or. A file will be packed if its full path in thebuild machine matches all the filters when using and logic or when matching any of them when using or.
For example, if you want to pack just .png and .jpg files, you could rewrite the code with or logic:
<folder><description>Program Files</description><destination>${installdir}</destination><name>programfiles</name><platforms>all</platforms><distributionFileList><distributionDirectory><origin>dist-files</origin><filterEvaluationLogic>or</filterEvaluationLogic><onPackingFilterList>
<fileNameFilter pattern="*.png" logic="matches" patternType="glob"/><fileNameFilter pattern="*.jpg" logic="matches" patternType="glob"/>
</onPackingFilterList></distributionDirectory>
</distributionFileList></folder>
The filters can also include more complex patterns if instead of using the glob <patternType> you set it to regexp. Forexample, you can exclude .txt files that start with a number and contain temp in their paths and .png files that start withthree capital letters using a single filter:
<folder><description>Program Files</description><destination>${installdir}</destination><name>programfiles</name><platforms>all</platforms><distributionFileList><distributionDirectory><origin>dist-files</origin><onPackingFilterList>
<fileNameFilter pattern="/([A-Z]{3}[^/]*\.png|[0-9]+[^/]*temp[^/]*\.txt)$" logic ←↩="does_not_match" patternType="regexp"/>
</onPackingFilterList></distributionDirectory>
</distributionFileList></folder>
Both regexp and glob pattern types allow providing a semicolon-separated list of sub patterns. If any of the sub patterns inthe list evaluates to true, the full pattern will also evaluate to true. For example, to pack all of the .png and .jpg files in adirectory, you could use any of the below snippets:
<folder><destination>${installdir}</destination><name>programfiles</name><distributionFileList><distributionDirectory><origin>dist-files</origin><onPackingFilterList>
BitRock InstallBuilder User Guide 8109 / 393
<fileNameFilter pattern="*.png;*.jpg" logic="matches" patternType="glob"/></onPackingFilterList>
</distributionDirectory></distributionFileList>
</folder>
<folder><description>Program Files</description><destination>${installdir}</destination><name>programfiles</name><platforms>all</platforms><distributionFileList><distributionDirectory><origin>dist-files</origin><filterEvaluationLogic>or</filterEvaluationLogic><onPackingFilterList>
<fileNameFilter pattern="*.jpg" logic="matches" patternType="glob"/><fileNameFilter pattern="*.png" logic="matches" patternType="glob"/>
</onPackingFilterList></distributionDirectory>
</distributionFileList></folder>
<folder><destination>${installdir}</destination><name>programfiles</name><distributionFileList><distributionDirectory><origin>dist-files</origin><filterEvaluationLogic>and</filterEvaluationLogic><onPackingFilterList>
<fileNameFilter pattern=".*\.(png|jpg)$" logic="matches" patternType="regexp"/></onPackingFilterList>
</distributionDirectory></distributionFileList>
</folder>
Even more complex conditions can be expressed using a <filterGroup>. This special type of filter allows grouping a setof filters with a configurable <filterEvaluationLogic>. For example, you can exclude all of the .txt files except forthose in the readme folder and exclude all of the .png and .jpg files that are not under the images folder:
<folder><description>Program Files</description><destination>${installdir}</destination><name>programfiles</name><platforms>all</platforms><distributionFileList><distributionDirectory><origin>dist-files</origin><filterEvaluationLogic>and</filterEvaluationLogic><onPackingFilterList>
<!-- Include files that do not end in .txt or if they are located in the readme ←↩dir -->
<filterGroup><filterEvaluationLogic>or</filterEvaluationLogic><onPackingFilterList>
<fileNameFilter pattern="*.txt" logic="does_not_match" patternType="glob"/><fileNameFilter pattern="*/readme/*" logic="matches" patternType="glob"/>
</onPackingFilterList></filterGroup>
BitRock InstallBuilder User Guide 8110 / 393
<!-- Include files that do not end in .png or .jpg or if they are located in the ←↩images dir -->
<filterGroup><filterEvaluationLogic>or</filterEvaluationLogic><onPackingFilterList>
<fileNameFilter pattern=".*\.png;.*\.jpg" logic="does_not_match" patternType ←↩="regexp"/>
<fileNameFilter pattern="*/images/*" logic="matches" patternType="glob"/></onPackingFilterList>
</filterGroup></onPackingFilterList>
</distributionDirectory></distributionFileList>
</folder>
Filter groups can also be nested as needed.
Take into account that all of the files in the <distributionDirectory> will be matched against the filter, so using a lot ofvery complex files could slightly increase the build time (the performance at runtime will not be affected at all).
The pattern is applied to the full path of the fileBecause of the pattern is applied to the full path of the file to be packed, when trying to match files ending in an specific suffix,you should always prefix it with * (when using glob <patternType>) or .* (when using regexp <patternType>).For example, specifying:
<fileNameFilter pattern="images/*.png" logic="matches" patternType="glob"/>
Wont work because it will be matched against the full path, for example: /home/bitrock/demo/files/images/foo.pngTo make it independent to the location, it should be rewritten to:
<fileNameFilter pattern="*/images/*.png" logic="matches" patternType="glob"/>
Or
<fileNameFilter pattern="${build_project_directory}/files/images/*.png" logic="matches" patternType="glob"/>
6.4 Unix Permissions
InstallBuilder preserves the permissions of bundled files. It also includes two convenient tags: <defaultUnixGroup> and<defaultUnixOwner>. If a value is specified for those tags, the owner and group of the unpacked files will be modified atruntime:
<project>...<defaultUnixGroup>wheel</defaultUnixGroup><defaultUnixOwner>root</defaultUnixOwner>...
</project>
Please take into account that the specified group and owner must exist in the target machine. If not, you can always create thembefore the installation phase:
<project>...<defaultUnixGroup>coolUsers</defaultUnixGroup><defaultUnixOwner>john</defaultUnixOwner>...
BitRock InstallBuilder User Guide 8111 / 393
<readyToInstallActionList><addUser username="john"/><addGroup groupname="coolUsers"/>
</readyToInstallActionList>...
</project>
Despite the permissions being preserved, in some situations they must be fixed. The most convenient way of fixing them is touse the <actionList> of the folder containing the files and set the appropriate rights:
<folder><description>Binary Files</description><destination>${installdir}</destination><name>executables</name><platforms>all</platforms><distributionFileList>
<distributionDirectory><origin>/some/path/executables</origin>
</distributionDirectory></distributionFileList><actionList>
<changePermissions permissions="0755" files="${installdir}/executables/*"/></actionList>
</folder>
A common scenario in which permissions must be fixed is when you are building a Linux installer on Windows. In that case,you could either manually fix the permissions as explained in the latest snippet or define the default permissions:
<project>...<defaultUnixFilePermission>644</defaultUnixFilePermission><defaultUnixDirectoryPermission>755</defaultUnixDirectoryPermission>...
</project>
Please take into account that, contrary to the owner and group tags, the default Unix permissions are only applied when buildingon Windows. This way, if the installer is created on Unix, the configured values will be ignored.
Files packed on Windows lose their executable permissionsWindows does not understand Unix permissions, so Unix installers created on Windows will be unpacked without executablepermissions and must be manually fixed. It is recommended that you use Unix machines to build the installers as they do notpresent any limitation.
6.5 Symbolic Links
When a symbolic link is specified as a <distributionFile>, InstallBuilder does not follow the link to pack its target.Depending on the build type, it will either pack the link (deb, rpm) or it will be registered and recreated at runtime.
6.6 Unpacking Before Installation Time
It is common to have a separate tool or program that must be bundled with and run from the installer but before the file copyingphase of the installation process has completed. A common example would be a license validation program. Typically, all filesbundled within an installer are unpacked and then any tools are run. In the case of a license validation tool, that is less than idealbecause the user may end up waiting for the files to be unpacked only to find that the license is not valid. The user would thenhave to wait for the installation to be rolled back.
InstallBuilder provides you with actions to deal with these situations. The most important are <unpackFile> and <unpackDirectory>:
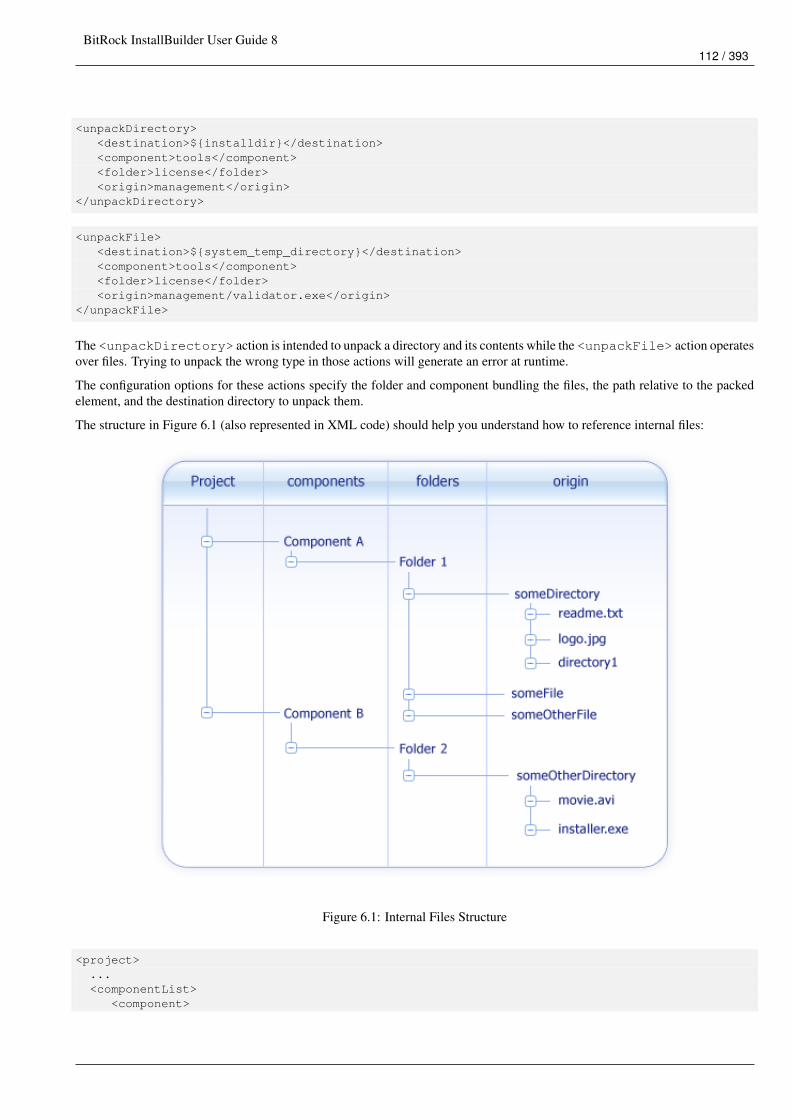
BitRock InstallBuilder User Guide 8112 / 393
<unpackDirectory><destination>${installdir}</destination><component>tools</component><folder>license</folder><origin>management</origin>
</unpackDirectory>
<unpackFile><destination>${system_temp_directory}</destination><component>tools</component><folder>license</folder><origin>management/validator.exe</origin>
</unpackFile>
The <unpackDirectory> action is intended to unpack a directory and its contents while the <unpackFile> action operatesover files. Trying to unpack the wrong type in those actions will generate an error at runtime.
The configuration options for these actions specify the folder and component bundling the files, the path relative to the packedelement, and the destination directory to unpack them.
The structure in Figure 6.1 (also represented in XML code) should help you understand how to reference internal files:
Figure 6.1: Internal Files Structure
<project>...<componentList>
<component>
BitRock InstallBuilder User Guide 8113 / 393
<name>componentA</name><description>Component A</description><folderList>
<folder><name>folder1</name><description>Folder 1</description><distributionFileList>
<distributionDirectory><!-- someDirectory contains: readme.txt,logo.jpg and directory1 --><origin>/path/to/someDirectory</origin>
</distributionDirectory><distributionFile><origin>/path/to/someFile</origin>
</distributionFile><distributionFile><origin>/path/to/someOtherFile</origin>
</distributionFile></distributionFileList>
</folder></folderList>
</component><component><name>componentB</name><description>Component B</description><folderList>
<folder><name>folder2</name><description>Folder 2</description><distributionFileList>
<distributionDirectory><!-- someDirectory contains: movie.avi andinstaller.exe --><origin>/path/to/someOtherDirectory</origin>
</distributionDirectory></distributionFileList>
</folder></folderList>
</component></componentList>...
</project>
To reference logo.jpg:
<unpackFile><component>componentA</component><folder>folder1</folder><origin>someDirectory/logo.jpg</origin><destination>${installdir}</destination>
</unpackFile>
You could also unpack directory1:
<unpackDirectory><component>componentA</component><folder>folder1</folder><origin>someDirectory/directory1</origin><destination>${installdir}</destination>
</unpackDirectory>
BitRock InstallBuilder User Guide 8114 / 393
Please note the <origin> is always provided as the relative path to the file or directory to unpack, relative to the <folder>containing it. It does not matter where the file was originally located in the building machine, just the path inside the installer:
<component name="componentA"><folderList><folder><name>folder1</name><distributionFileList>
<distributionDirectory><origin>/some/long/path/in/the/building/machine/someDirectory</origin>
</distributionDirectory></distributionFileList>
</folder></folderList>
</component>
The example below details a real scenario, in which the installer unpacks a license validator and checks the provided key in the<validationActionList> of the page:
<project>...<componentList><component><name>tools</name>
<folderList><folder>
<name>license</name><destination>${installdir}</destination><distributionFileList>
<!-- The management directory contains a lot oftools, one of the our validator.exe --><distributionDirectory origin="/path/to/dir/to/management"/>
</distributionFileList></folder>
</folderList></component>
</componentList><parameterList><stringParameter>
<name>licenseCheck</name><description>Introduce your license key</description><value></value><validationActionList>
<unpackFile><component>tools</component><folder>license</folder><!-- Relative path from the packed folder ’management’ --><origin>management/validator.exe</origin><destination>${system_temp_directory}</destination>
</unpackFile><runProgram>
<program>${system_temp_directory}/validator.exe</program><programArguments>${project.parameter(licenseCheck).value}</programArguments>
</runProgram><throwError text="Wrong license key, please enter a valid one">
<ruleList><compareText text="${program_stdout}" logic="equals" value="1"/>
</ruleList></throwError>
</validationActionList></stringParameter>
</parameterList>

BitRock InstallBuilder User Guide 8115 / 393
...</project>
BitRock InstallBuilder User Guide 8116 / 393
Chapter 7
User Input
7.1 Parameters
In most cases, you will need to request some information from your end users, such as the installation directory or usernameand password. For this purpose, InstallBuilder allows the creation of custom pages, which make it easy to request and validateuser input. In addition, the provided information will automatically be stored in installer variables so it can be used later in theinstallation process, for example to pass it as arguments to a script in the post-installation. You can define such pages by addingparameters to the <parameterList> section in the XML project file.
There are different types of parameters: strings, booleans, option selection, and so on. Each one of them will be displayed tothe user appropriately through the GUI and text interfaces. For example, a file parameter will be displayed with a graphicalfile selection button next to it and an option selection parameter will be displayed as a combobox. The parameters will also beavailable as command line options and as installer variables.
Parameter example
<fileParameter><name>apacheconfig</name><cliOptionName>apacheconfig</cliOptionName><ask>yes</ask><default>/etc/httpd/conf/httpd.conf</default><title>Configuring Apache</title><explanation>Please specify the location of the Apache configuration file</explanation ←↩
><description>Apache Configuration File</description><mustBeWritable>yes</mustBeWritable><mustExist>1</mustExist><value></value>
</fileParameter>
This will create the appropriate GUI screens for the graphical installers and make the parameter available as the command lineoption --apacheconfig and as the installer variable ${apacheconfig}. It is also possible to have a different name forthe command line flag and the internal variable name using the <cliOptionName> tag. For example, the installdirparameter (accessible using ${installdir}) is usually mapped to the --prefix command line flag:
<directoryParameter><name>installdir</name>...<cliOptionName>prefix</cliOptionName>...
</directoryParameter>
A number of fields are common across all parameters:
BitRock InstallBuilder User Guide 8117 / 393
• <name>: Name of the parameter. This will be used to create the corresponding installer variable and command line option.Because of that, it may only contain alphanumeric characters.
• <value>: Value for the parameter.
• <default>: Default value, in case one is not specified by the user.
• <explanation>: Long description for the parameter.
• <description>: Short description for the parameter.
• <title>: Title that will be displayed for the corresponding installer page. If none is specified, the <description> fieldwill be used instead.
• <cliOptionName>: Command line option associated with the parameter. If none is provided, it will default to the value ofthe <name> field.
• <ask>: Whether or not to show the page to the end user (it can still be set through the command line interface). If it is set to0, the page not only won’t be displayed but also the associated command line option won’t appear in the help menu.
• <leftImage>: When using <style>custom</style> inside the <project> tag in your project file, it displays acustom PNG or GIF image at the left side of the installer page associated with this parameter. Its purpose is the same as the<leftImage> property inside the <project> tag, but allows you set a different image for each parameter page.
Each one of the fields can reference installer variables (${project.fullName}, ${installdir}, and so on) that will besubstituted at runtime.
Difference between the <default> and <value> tagsThe <default> tag of a parameter is used when its <value> is empty, either because it was configured that way or becausethe user set it. For example, for the parameter below:
<directoryParameter><name>installdir</name><value></value><description>Installation Directory</description><explanation>Please specify the directory where ${project.fullName} will be ←↩
installed</explanation><default>${platform_install_prefix}/${project.shortName}-${project.version}</default ←↩
><cliOptionName>prefix</cliOptionName><ask>yes</ask>
<mustBeWritable>yes</mustBeWritable></directoryParameter>
As <value> is empty, the value displayed in the page will be configured in the <default> field:${platform_install_prefix}/${project.shortName}-${project.version}. If the user manuallyset that value to empty, the installer will automatically restore it to its <default> value when clicking next.If you want to allow your users to provide an empty value but still display an initial value in the page, you should set <default>to empty and use <value> instead:
<stringParameter><name>customWelcome</name><value>Welcome!!</value><description>Introduce here the desired welcome message</description><default></default>
</stringParameter>
This way, the user can provide an empty welcome message.
BitRock InstallBuilder User Guide 8118 / 393
7.1.1 Configuring Parameters At Runtime
Parameters can be configured at runtime by modifying their properties using the <setInstallerVariable> action as ex-plained in the Variables section. Although any action list can be used, the recommended approach is to use their <preShowPageActionList>and <posShowPageActionList> action lists, when possible:
• <preShowPageActionList>: This Action List is executed right before displaying the page containing the parameter. Itis really useful to modify the information displayed. For example, if you are working to implement a summary page using a<labelParameter>, you should construct the information in its <preShowPageActionList>:
<labelParameter><name>summary</name><title>Summary</title><explanation></explanation><preShowPageActionList>
<setInstallerVariable><name>text</name><value>You are about to install ${project.fullName}.
Please review the below information:
Installation Directory: ${installdir}
Username: ${username}
License File: ${license_file}
Installed Components:</value>
</setInstallerVariable><foreach>
<variables>component</variables><values>component1 component2 component3</values><actionList>
<!-- Just include selected Components --><continue><ruleList>
<isFalse><value>${component(${component}).selected}</value>
</isFalse></ruleList>
</continue><setInstallerVariable><name>text</name><value>${text}
${component(${component}).description}</value></setInstallerVariable>
</actionList></foreach>
</preShowPageActionList></labelParameter>
• <postShowPageActionList>: This Action List is executed after clicking Next in the page containing the parameter andafter successfully executing the <validationActionList>. One example of how this is useful is configuring installationsettings based on the user input:
<choiceParameter><name>installMode</name>
BitRock InstallBuilder User Guide 8119 / 393
<description>Select the installation mode</description><explanation></explanation><displayType>combobox</displayType><width>30</width><optionList><option>
<description>Upgrade</description><text>Upgrade</text><value>upgrade</value>
</option><option>
<description>Uninstall</description><text>Uninstall</text><value>uninstall</value>
</option></optionList><postShowPageActionList>
<!-- Set upgrade mode in the project --><setInstallerVariable><name>project.installationType</name><value>upgrade</value><ruleList>
<compareText text="${installMode}" logic="equals" value="upgrade"/></ruleList>
</setInstallerVariable></postShowPageActionList>
</choiceParameter>
7.1.2 Validating User Input
Parameters can also include checks to validate the data introduced through their <validationActionList>. The actionsincluded in this <actionList> will be executed right after clicking Next. If an error occurs, it will be displayed and, insteadof aborting the installation, the page will be redrawn. For example, you can use the snippet below to check if a provided passwordis strong enough:
<passwordParameter><name>password</name><description>Password</description><explanation>Administrator account password. It must include at least 2 uppers, 2 lowers ←↩
, 2 digits and 2 special characters and be at least 10 characters long.</explanation><value></value><default></default><allowEmptyValue>1</allowEmptyValue><descriptionRetype></descriptionRetype><width>20</width><validationActionList><throwError text="The password provided is not strong enough"><ruleList>
<regExMatch><logic>does_not_match</logic><pattern>^(?=(?:\D*\d){2})(?=(?:[^a-z]*[a-z]){2})(?=(?:[^A-Z]*[A-Z]){2}) ←↩
(?=(?:[^!@#$%^&*+=]*[!@#$%^&*+=]){2}).{10,}$</pattern><text>${password}</text>
</regExMatch></ruleList>
</throwError></validationActionList>
</passwordParameter>
Or validate if the user has enough free disk space install your application:
BitRock InstallBuilder User Guide 8120 / 393
<directoryParameter><name>installdir</name><value></value><description>Installation Directory</description><explanation>Please specify the directory where ${project.fullName} will be installed ←↩
</explanation><default>${platform_install_prefix}/${project.shortName}-${project.version}</default><cliOptionName>prefix</cliOptionName><ask>yes</ask><mustBeWritable>yes</mustBeWritable><validationActionList>
<throwError><text>You don’t have enough disk space to install the application,please select another installation directory</text><ruleList>
<checkFreeDiskSpace><logic>less</logic><path>${installdir}</path><!-- ${required_diskspace} is automatically calculated byInstallBuilder with all the files packed --><size>${required_diskspace}</size>
</checkFreeDiskSpace></ruleList>
</throwError></validationActionList>
</directoryParameter>
You must to take into account that these validations won’t be executed in unattended mode (as explained here). If you want tovalidate the information provided through command line when running in unattended mode, you can include the validations inthe <preInstallationActionList>, executed after the command line options are processed:
<preInstallationActionList><actionGroup>
<actionList><!-- Validate the password is not empty --><throwError text="You must provide a non-empty password using --masterpassword ←↩
command line flag"><ruleList>
<compareText text="${masterpassword}" logic="equals" value=""/></ruleList>
</throwError>
<!-- Validate the installation directory has enough disk space --><throwError>
<text>You don’t have enough disk space to install the application,please select another installation directory</text><ruleList><checkFreeDiskSpace>
<logic>less</logic><path>${installdir}</path><!-- ${required_diskspace} is automatically calculated byInstallBuilder with all the files packed --><size>${required_diskspace}</size>
</checkFreeDiskSpace></ruleList>
</throwError>...
</actionList><ruleList><compareText>
<text>${installer_interactivity}</text>
BitRock InstallBuilder User Guide 8121 / 393
<logic>does_not_equal</logic><value>normal</value>
</compareText></ruleList>
</actionGroup></preInstallationActionList>...<parameterList>
<passwordParameter><ask>yes</ask><name>masterpassword</name><allowEmptyValue>0</allowEmptyValue><description>Password</description>...
</passwordParameter><directoryParameter>
<name>installdir</name><value></value><default>${platform_install_prefix}/${project.shortName}-${project.version}</default>...
</directoryParameter>...
</parameterList>
7.1.3 Available Parameters
This section provides an exhaustive list of all of the available parameters.
String Parameter The <stringParameter> allows you to request a text string from the user. It accepts all of the commonoptions.
<stringParameter><name>hostname</name><default>localhost</default><value></value><ask>1</ask><description>Hostname</description><explanation>Please enter the hostname for your application server.</explanation>
</stringParameter>
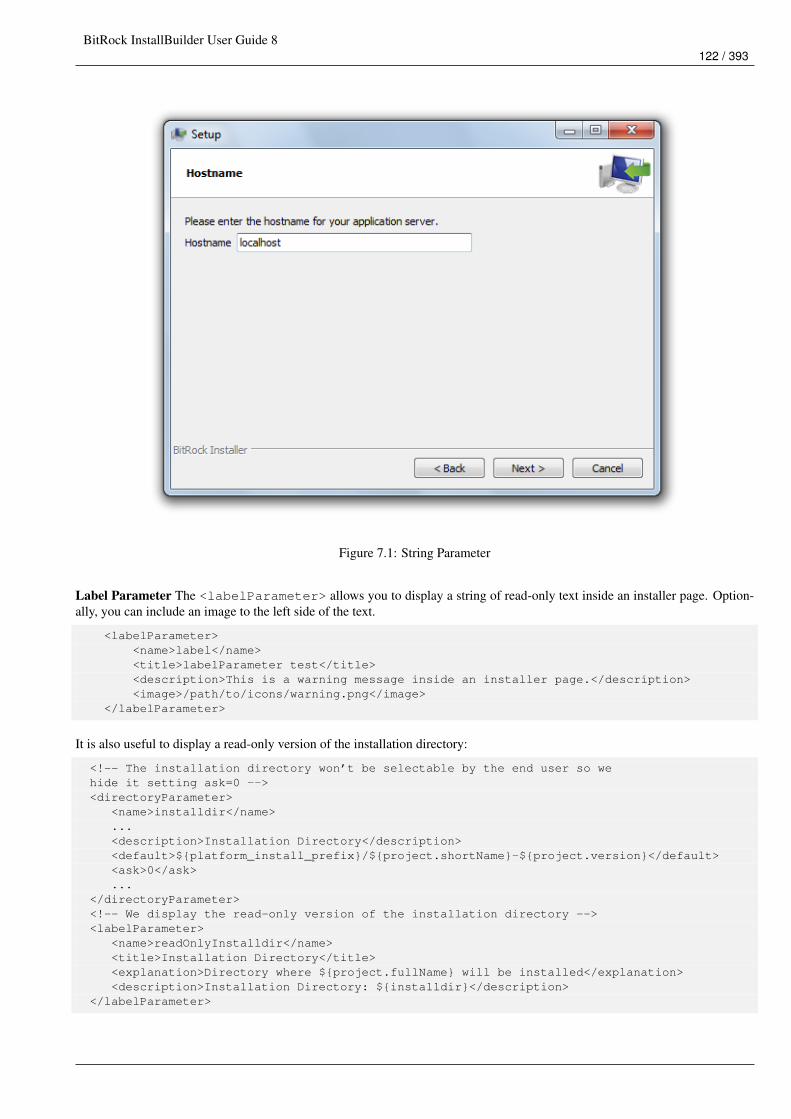
BitRock InstallBuilder User Guide 8122 / 393
Figure 7.1: String Parameter
Label Parameter The <labelParameter> allows you to display a string of read-only text inside an installer page. Option-ally, you can include an image to the left side of the text.
<labelParameter><name>label</name><title>labelParameter test</title><description>This is a warning message inside an installer page.</description><image>/path/to/icons/warning.png</image>
</labelParameter>
It is also useful to display a read-only version of the installation directory:
<!-- The installation directory won’t be selectable by the end user so wehide it setting ask=0 --><directoryParameter>
<name>installdir</name>...<description>Installation Directory</description><default>${platform_install_prefix}/${project.shortName}-${project.version}</default><ask>0</ask>...
</directoryParameter><!-- We display the read-only version of the installation directory --><labelParameter>
<name>readOnlyInstalldir</name><title>Installation Directory</title><explanation>Directory where ${project.fullName} will be installed</explanation><description>Installation Directory: ${installdir}</description>
</labelParameter>
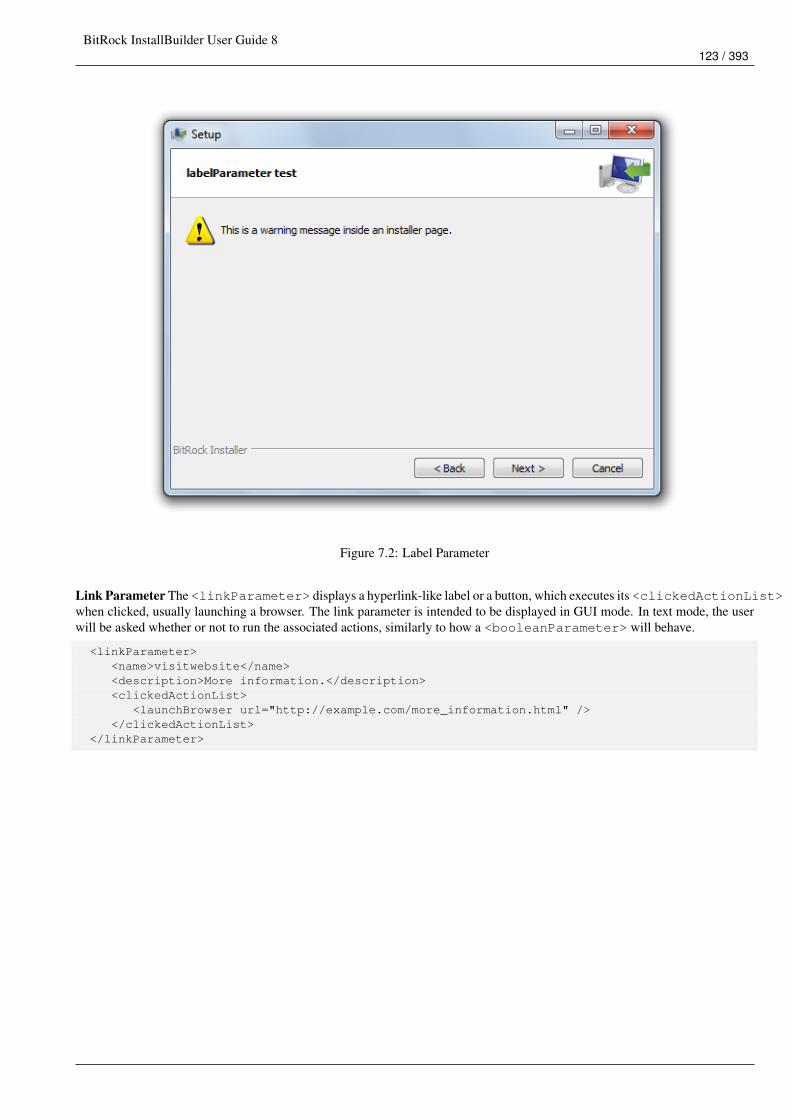
BitRock InstallBuilder User Guide 8123 / 393
Figure 7.2: Label Parameter
Link Parameter The <linkParameter> displays a hyperlink-like label or a button, which executes its <clickedActionList>when clicked, usually launching a browser. The link parameter is intended to be displayed in GUI mode. In text mode, the userwill be asked whether or not to run the associated actions, similarly to how a <booleanParameter> will behave.
<linkParameter><name>visitwebsite</name><description>More information.</description><clickedActionList>
<launchBrowser url="http://example.com/more_information.html" /></clickedActionList>
</linkParameter>

BitRock InstallBuilder User Guide 8124 / 393
Figure 7.3: Link Parameter
File Parameter The <fileParameter> asks the user to enter a file. They also support additional fields:
• <mustExist>: Whether or not to require that the file must already exist.
• <mustBeWritable>: Whether or not to require that the file must be writable.
• <osxBundlesAreFiles>: Whether or not OS X bundles (*.app and *.bundle) will be considered files. The setting willjust have effect on OS X, in other platforms they will be always considered directories.
<fileParameter><name>licenseFile</name><value></value><description>License File</description><explanation>Please specify the downloaded license file</explanation><ask>yes</ask><mustBeWritable>yes</mustBeWritable>
</fileParameter>
Usually, on OS X, some bundles are considered as files although they really are special directories. Using the <osxBundlesAreFiles>tag, you can configure whether you want the parameter to validate them as files or to complain when trying to select them. Notethat *.bundle and *.app bundles will be considered as *.framework bundles and are not treated as files by the OS.
<fileParameter><name>previousProductPath</name><value></value><description>Previous Installation Path</description><explanation>The installer cannot find "${project.shortName}-${oldVersion}.app" bundle ←↩
under /Applications. Please manually select it</explanation>
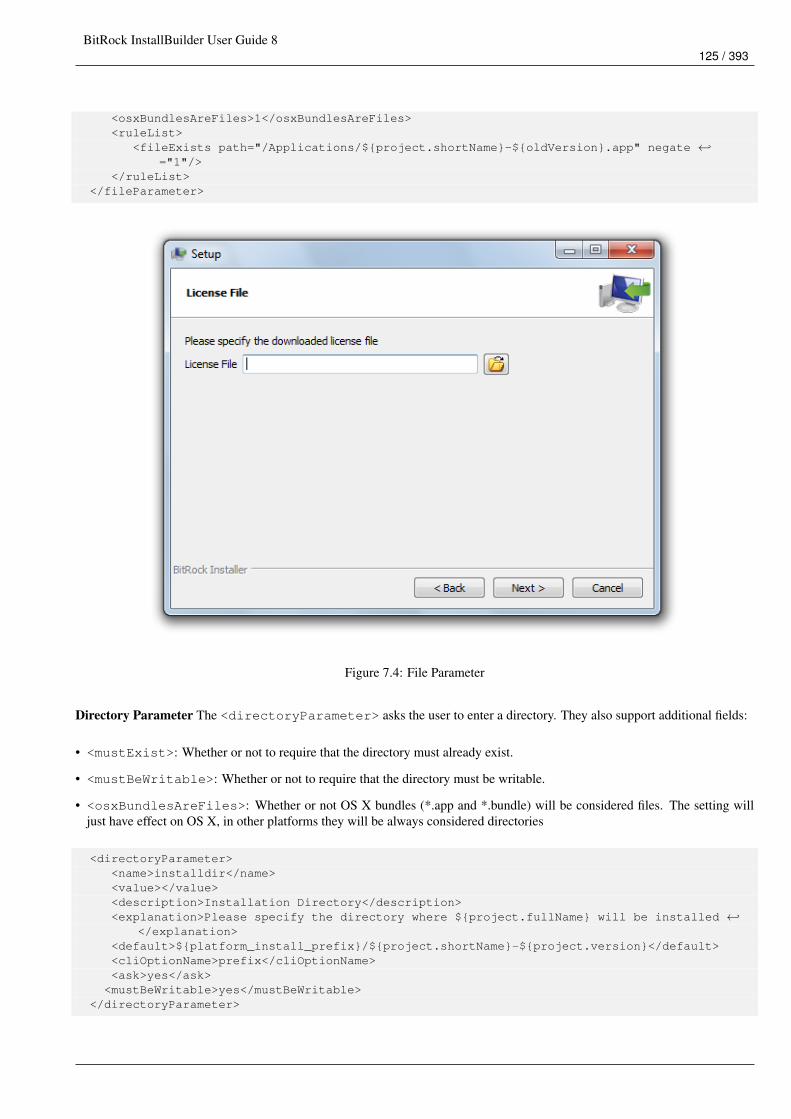
BitRock InstallBuilder User Guide 8125 / 393
<osxBundlesAreFiles>1</osxBundlesAreFiles><ruleList>
<fileExists path="/Applications/${project.shortName}-${oldVersion}.app" negate ←↩="1"/>
</ruleList></fileParameter>
Figure 7.4: File Parameter
Directory Parameter The <directoryParameter> asks the user to enter a directory. They also support additional fields:
• <mustExist>: Whether or not to require that the directory must already exist.
• <mustBeWritable>: Whether or not to require that the directory must be writable.
• <osxBundlesAreFiles>: Whether or not OS X bundles (*.app and *.bundle) will be considered files. The setting willjust have effect on OS X, in other platforms they will be always considered directories
<directoryParameter><name>installdir</name><value></value><description>Installation Directory</description><explanation>Please specify the directory where ${project.fullName} will be installed ←↩
</explanation><default>${platform_install_prefix}/${project.shortName}-${project.version}</default><cliOptionName>prefix</cliOptionName><ask>yes</ask>
<mustBeWritable>yes</mustBeWritable></directoryParameter>
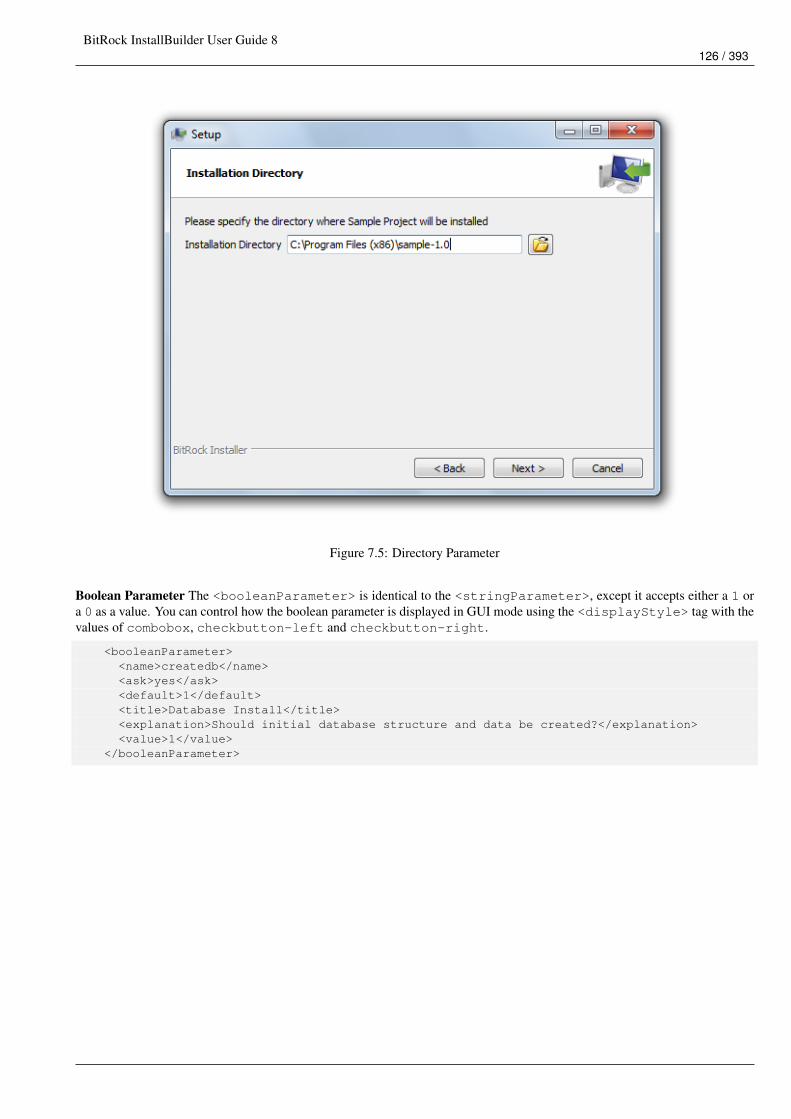
BitRock InstallBuilder User Guide 8126 / 393
Figure 7.5: Directory Parameter
Boolean Parameter The <booleanParameter> is identical to the <stringParameter>, except it accepts either a 1 ora 0 as a value. You can control how the boolean parameter is displayed in GUI mode using the <displayStyle> tag with thevalues of combobox, checkbutton-left and checkbutton-right.
<booleanParameter><name>createdb</name><ask>yes</ask><default>1</default><title>Database Install</title><explanation>Should initial database structure and data be created?</explanation><value>1</value>
</booleanParameter>
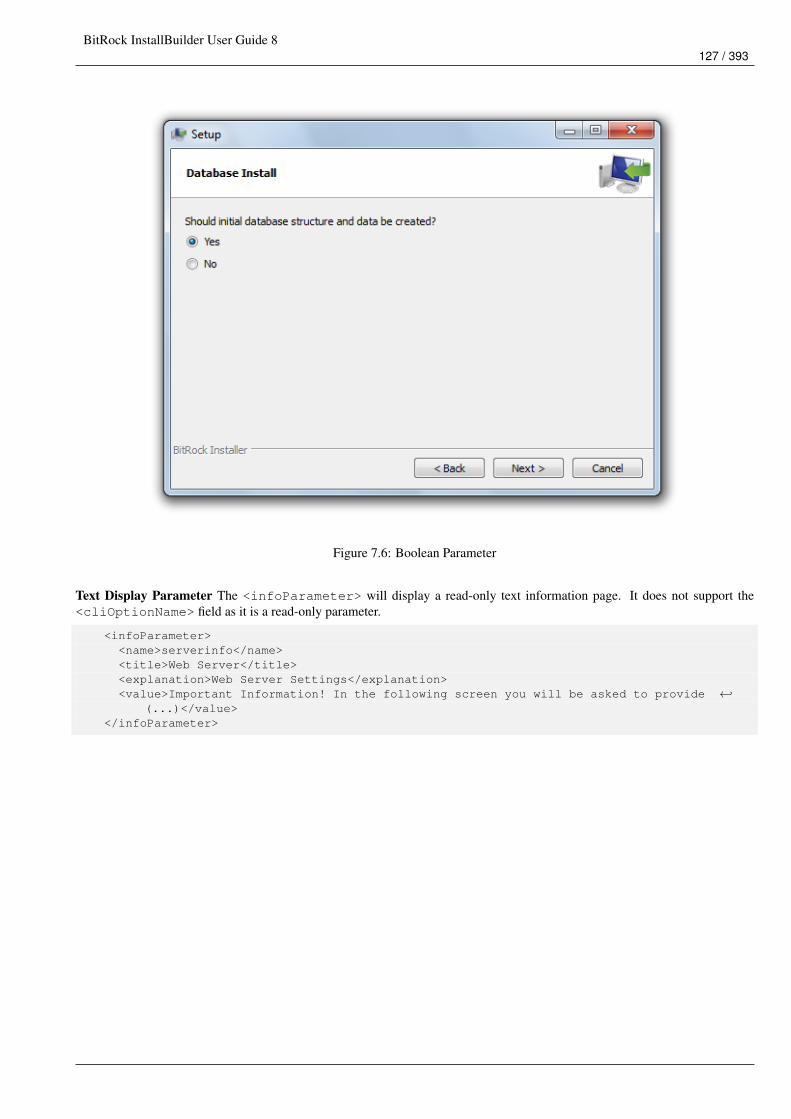
BitRock InstallBuilder User Guide 8127 / 393
Figure 7.6: Boolean Parameter
Text Display Parameter The <infoParameter> will display a read-only text information page. It does not support the<cliOptionName> field as it is a read-only parameter.
<infoParameter><name>serverinfo</name><title>Web Server</title><explanation>Web Server Settings</explanation><value>Important Information! In the following screen you will be asked to provide ←↩
(...)</value></infoParameter>
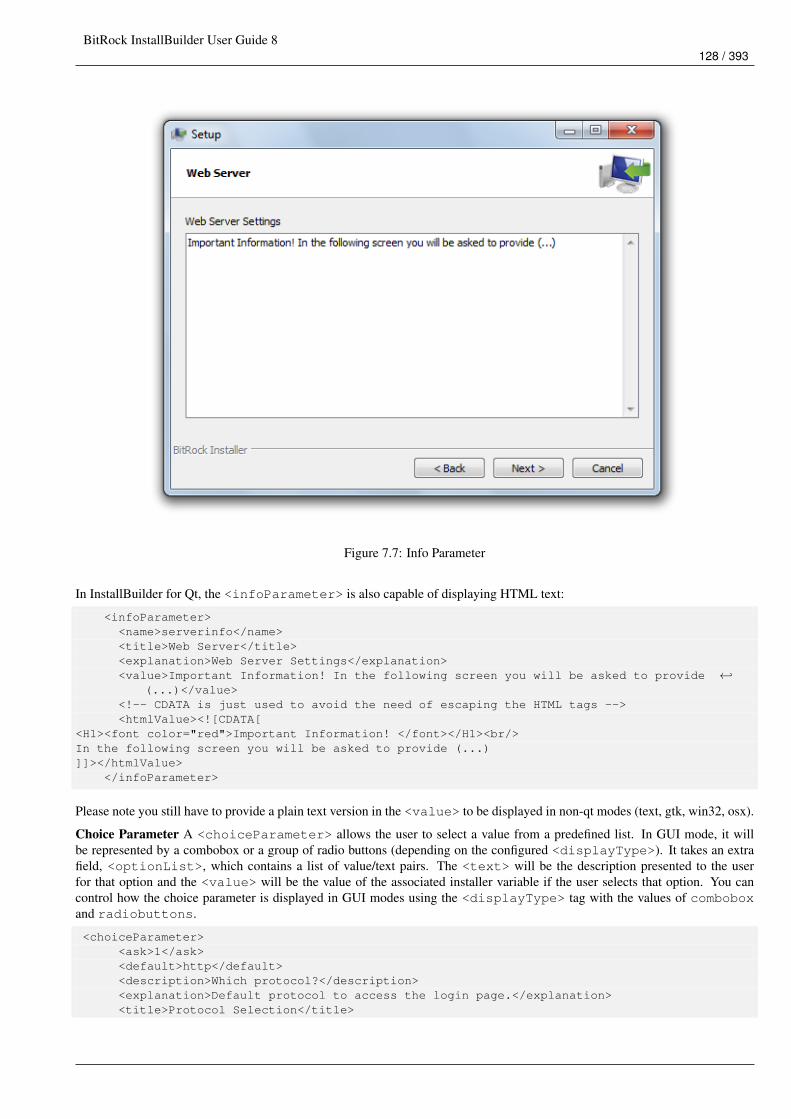
BitRock InstallBuilder User Guide 8128 / 393
Figure 7.7: Info Parameter
In InstallBuilder for Qt, the <infoParameter> is also capable of displaying HTML text:
<infoParameter><name>serverinfo</name><title>Web Server</title><explanation>Web Server Settings</explanation><value>Important Information! In the following screen you will be asked to provide ←↩
(...)</value><!-- CDATA is just used to avoid the need of escaping the HTML tags --><htmlValue><![CDATA[
<H1><font color="red">Important Information! </font></H1><br/>In the following screen you will be asked to provide (...)]]></htmlValue>
</infoParameter>
Please note you still have to provide a plain text version in the <value> to be displayed in non-qt modes (text, gtk, win32, osx).
Choice Parameter A <choiceParameter> allows the user to select a value from a predefined list. In GUI mode, it willbe represented by a combobox or a group of radio buttons (depending on the configured <displayType>). It takes an extrafield, <optionList>, which contains a list of value/text pairs. The <text> will be the description presented to the userfor that option and the <value> will be the value of the associated installer variable if the user selects that option. You cancontrol how the choice parameter is displayed in GUI modes using the <displayType> tag with the values of comboboxand radiobuttons.
<choiceParameter><ask>1</ask><default>http</default><description>Which protocol?</description><explanation>Default protocol to access the login page.</explanation><title>Protocol Selection</title>
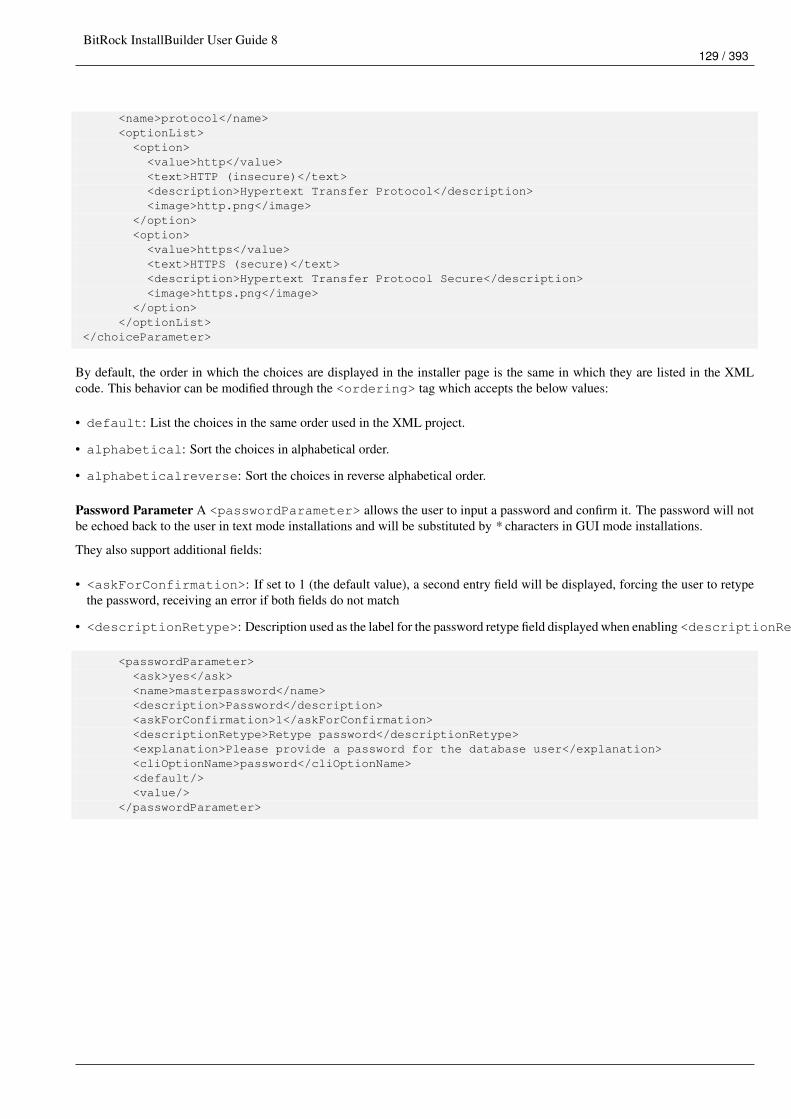
BitRock InstallBuilder User Guide 8129 / 393
<name>protocol</name><optionList>
<option><value>http</value><text>HTTP (insecure)</text><description>Hypertext Transfer Protocol</description><image>http.png</image>
</option><option><value>https</value><text>HTTPS (secure)</text><description>Hypertext Transfer Protocol Secure</description><image>https.png</image>
</option></optionList>
</choiceParameter>
By default, the order in which the choices are displayed in the installer page is the same in which they are listed in the XMLcode. This behavior can be modified through the <ordering> tag which accepts the below values:
• default: List the choices in the same order used in the XML project.
• alphabetical: Sort the choices in alphabetical order.
• alphabeticalreverse: Sort the choices in reverse alphabetical order.
Password Parameter A <passwordParameter> allows the user to input a password and confirm it. The password will notbe echoed back to the user in text mode installations and will be substituted by * characters in GUI mode installations.
They also support additional fields:
• <askForConfirmation>: If set to 1 (the default value), a second entry field will be displayed, forcing the user to retypethe password, receiving an error if both fields do not match
• <descriptionRetype>: Description used as the label for the password retype field displayed when enabling <descriptionRetype>.
<passwordParameter><ask>yes</ask><name>masterpassword</name><description>Password</description><askForConfirmation>1</askForConfirmation><descriptionRetype>Retype password</descriptionRetype><explanation>Please provide a password for the database user</explanation><cliOptionName>password</cliOptionName><default/><value/>
</passwordParameter>
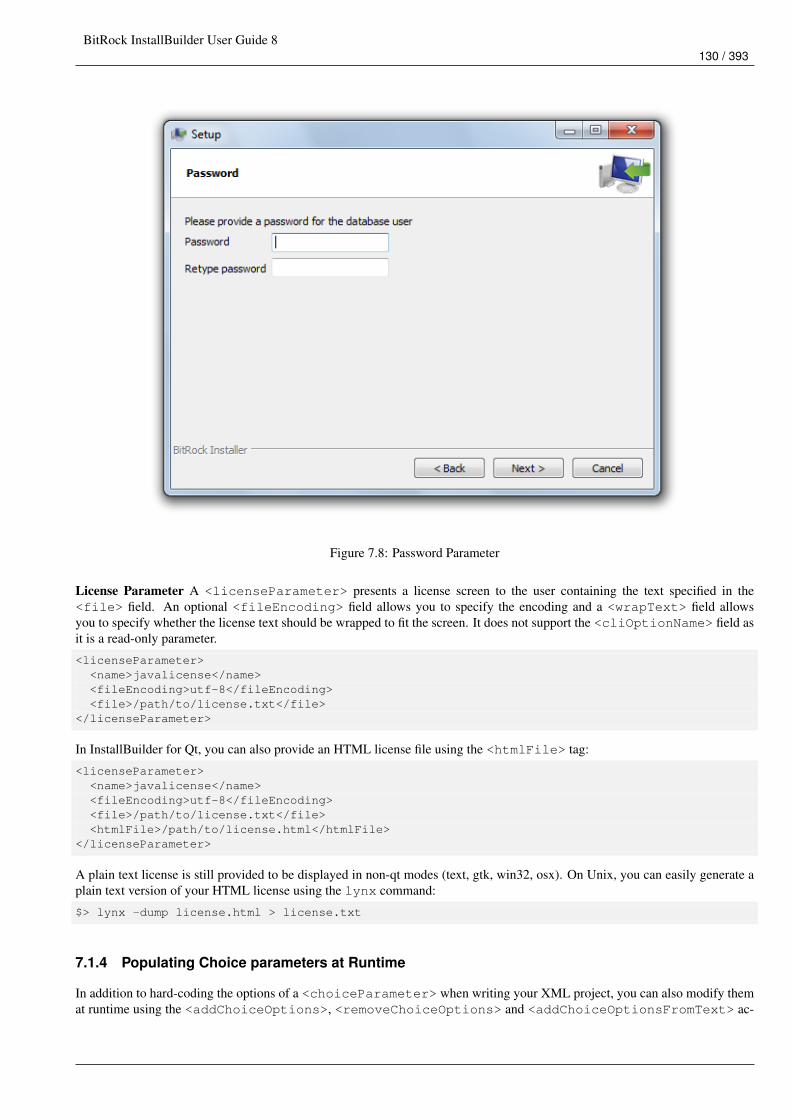
BitRock InstallBuilder User Guide 8130 / 393
Figure 7.8: Password Parameter
License Parameter A <licenseParameter> presents a license screen to the user containing the text specified in the<file> field. An optional <fileEncoding> field allows you to specify the encoding and a <wrapText> field allowsyou to specify whether the license text should be wrapped to fit the screen. It does not support the <cliOptionName> field asit is a read-only parameter.
<licenseParameter><name>javalicense</name><fileEncoding>utf-8</fileEncoding><file>/path/to/license.txt</file>
</licenseParameter>
In InstallBuilder for Qt, you can also provide an HTML license file using the <htmlFile> tag:
<licenseParameter><name>javalicense</name><fileEncoding>utf-8</fileEncoding><file>/path/to/license.txt</file><htmlFile>/path/to/license.html</htmlFile>
</licenseParameter>
A plain text license is still provided to be displayed in non-qt modes (text, gtk, win32, osx). On Unix, you can easily generate aplain text version of your HTML license using the lynx command:
$> lynx -dump license.html > license.txt
7.1.4 Populating Choice parameters at Runtime
In addition to hard-coding the options of a <choiceParameter> when writing your XML project, you can also modify themat runtime using the <addChoiceOptions>, <removeChoiceOptions> and <addChoiceOptionsFromText> ac-
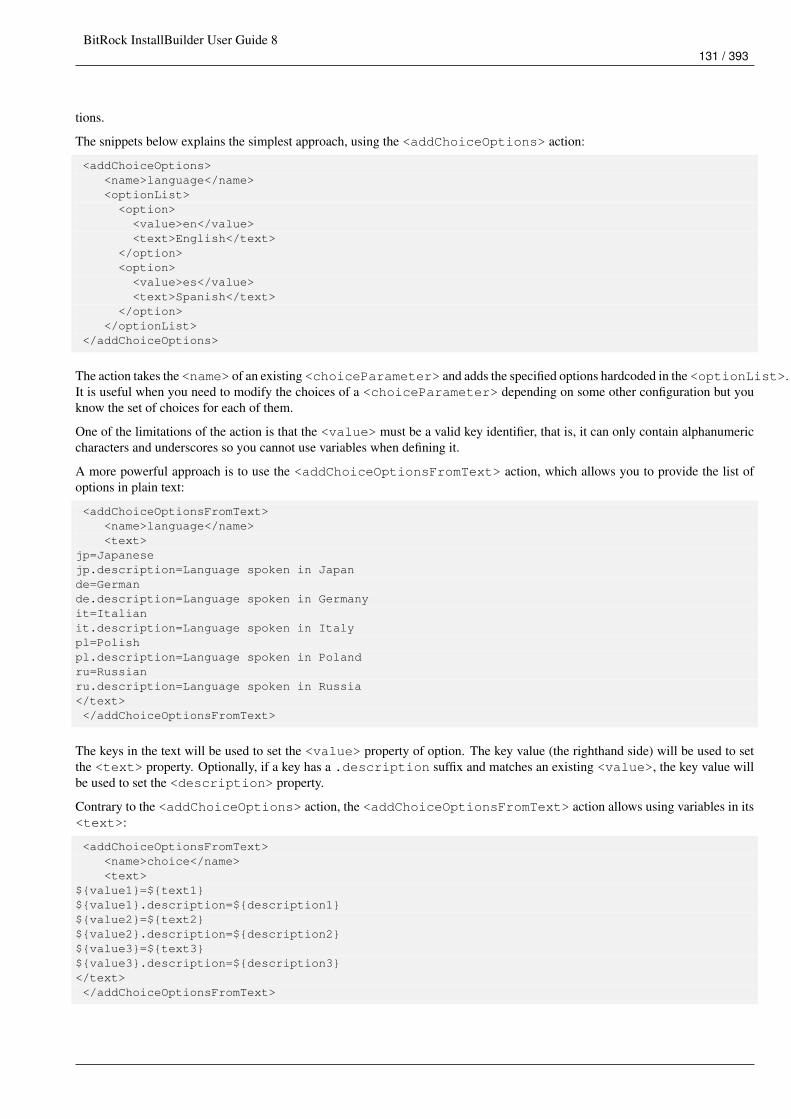
BitRock InstallBuilder User Guide 8131 / 393
tions.
The snippets below explains the simplest approach, using the <addChoiceOptions> action:
<addChoiceOptions><name>language</name><optionList>
<option><value>en</value><text>English</text>
</option><option>
<value>es</value><text>Spanish</text>
</option></optionList>
</addChoiceOptions>
The action takes the <name> of an existing <choiceParameter> and adds the specified options hardcoded in the <optionList>.It is useful when you need to modify the choices of a <choiceParameter> depending on some other configuration but youknow the set of choices for each of them.
One of the limitations of the action is that the <value> must be a valid key identifier, that is, it can only contain alphanumericcharacters and underscores so you cannot use variables when defining it.
A more powerful approach is to use the <addChoiceOptionsFromText> action, which allows you to provide the list ofoptions in plain text:
<addChoiceOptionsFromText><name>language</name><text>
jp=Japanesejp.description=Language spoken in Japande=Germande.description=Language spoken in Germanyit=Italianit.description=Language spoken in Italypl=Polishpl.description=Language spoken in Polandru=Russianru.description=Language spoken in Russia</text></addChoiceOptionsFromText>
The keys in the text will be used to set the <value> property of option. The key value (the righthand side) will be used to setthe <text> property. Optionally, if a key has a .description suffix and matches an existing <value>, the key value willbe used to set the <description> property.
Contrary to the <addChoiceOptions> action, the <addChoiceOptionsFromText> action allows using variables in its<text>:
<addChoiceOptionsFromText><name>choice</name><text>
${value1}=${text1}${value1}.description=${description1}${value2}=${text2}${value2}.description=${description2}${value3}=${text3}${value3}.description=${description3}</text></addChoiceOptionsFromText>
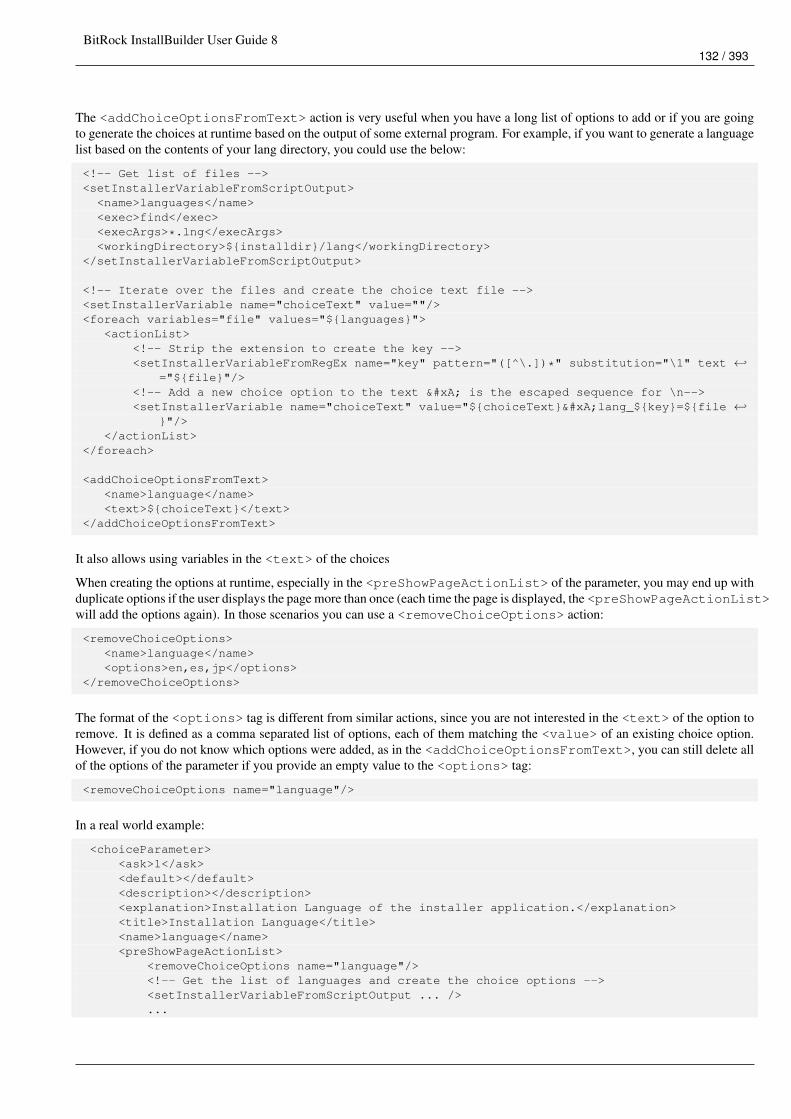
BitRock InstallBuilder User Guide 8132 / 393
The <addChoiceOptionsFromText> action is very useful when you have a long list of options to add or if you are goingto generate the choices at runtime based on the output of some external program. For example, if you want to generate a languagelist based on the contents of your lang directory, you could use the below:
<!-- Get list of files --><setInstallerVariableFromScriptOutput><name>languages</name><exec>find</exec><execArgs>*.lng</execArgs><workingDirectory>${installdir}/lang</workingDirectory>
</setInstallerVariableFromScriptOutput>
<!-- Iterate over the files and create the choice text file --><setInstallerVariable name="choiceText" value=""/><foreach variables="file" values="${languages}">
<actionList><!-- Strip the extension to create the key --><setInstallerVariableFromRegEx name="key" pattern="([^\.])*" substitution="\1" text ←↩
="${file}"/><!-- Add a new choice option to the text 
 is the escaped sequence for \n--><setInstallerVariable name="choiceText" value="${choiceText}
lang_${key}=${file ←↩
}"/></actionList>
</foreach>
<addChoiceOptionsFromText><name>language</name><text>${choiceText}</text>
</addChoiceOptionsFromText>
It also allows using variables in the <text> of the choices
When creating the options at runtime, especially in the <preShowPageActionList> of the parameter, you may end up withduplicate options if the user displays the page more than once (each time the page is displayed, the <preShowPageActionList>will add the options again). In those scenarios you can use a <removeChoiceOptions> action:
<removeChoiceOptions><name>language</name><options>en,es,jp</options>
</removeChoiceOptions>
The format of the <options> tag is different from similar actions, since you are not interested in the <text> of the option toremove. It is defined as a comma separated list of options, each of them matching the <value> of an existing choice option.However, if you do not know which options were added, as in the <addChoiceOptionsFromText>, you can still delete allof the options of the parameter if you provide an empty value to the <options> tag:
<removeChoiceOptions name="language"/>
In a real world example:
<choiceParameter><ask>1</ask><default></default><description></description><explanation>Installation Language of the installer application.</explanation><title>Installation Language</title><name>language</name><preShowPageActionList>
<removeChoiceOptions name="language"/><!-- Get the list of languages and create the choice options --><setInstallerVariableFromScriptOutput ... />...
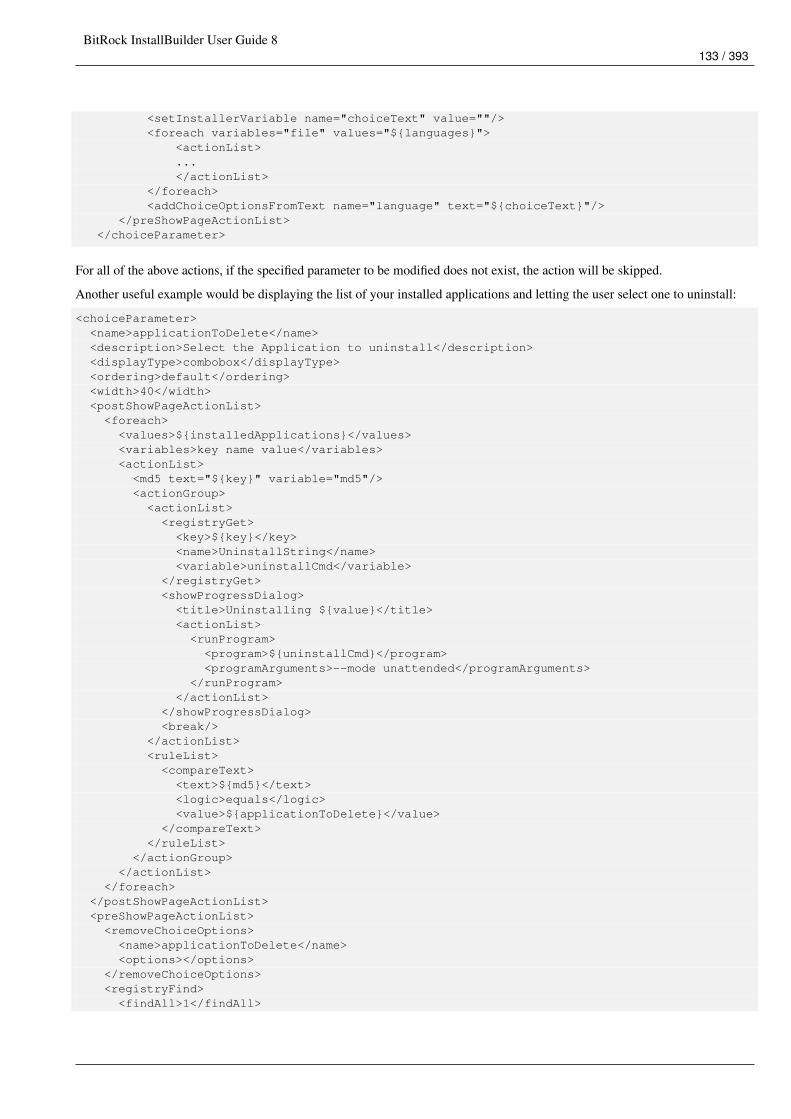
BitRock InstallBuilder User Guide 8133 / 393
<setInstallerVariable name="choiceText" value=""/><foreach variables="file" values="${languages}">
<actionList>...</actionList>
</foreach><addChoiceOptionsFromText name="language" text="${choiceText}"/>
</preShowPageActionList></choiceParameter>
For all of the above actions, if the specified parameter to be modified does not exist, the action will be skipped.
Another useful example would be displaying the list of your installed applications and letting the user select one to uninstall:
<choiceParameter><name>applicationToDelete</name><description>Select the Application to uninstall</description><displayType>combobox</displayType><ordering>default</ordering><width>40</width><postShowPageActionList><foreach>
<values>${installedApplications}</values><variables>key name value</variables><actionList>
<md5 text="${key}" variable="md5"/><actionGroup><actionList>
<registryGet><key>${key}</key><name>UninstallString</name><variable>uninstallCmd</variable>
</registryGet><showProgressDialog><title>Uninstalling ${value}</title><actionList><runProgram>
<program>${uninstallCmd}</program><programArguments>--mode unattended</programArguments>
</runProgram></actionList>
</showProgressDialog><break/>
</actionList><ruleList>
<compareText><text>${md5}</text><logic>equals</logic><value>${applicationToDelete}</value>
</compareText></ruleList>
</actionGroup></actionList>
</foreach></postShowPageActionList><preShowPageActionList><removeChoiceOptions>
<name>applicationToDelete</name><options></options>
</removeChoiceOptions><registryFind>
<findAll>1</findAll>
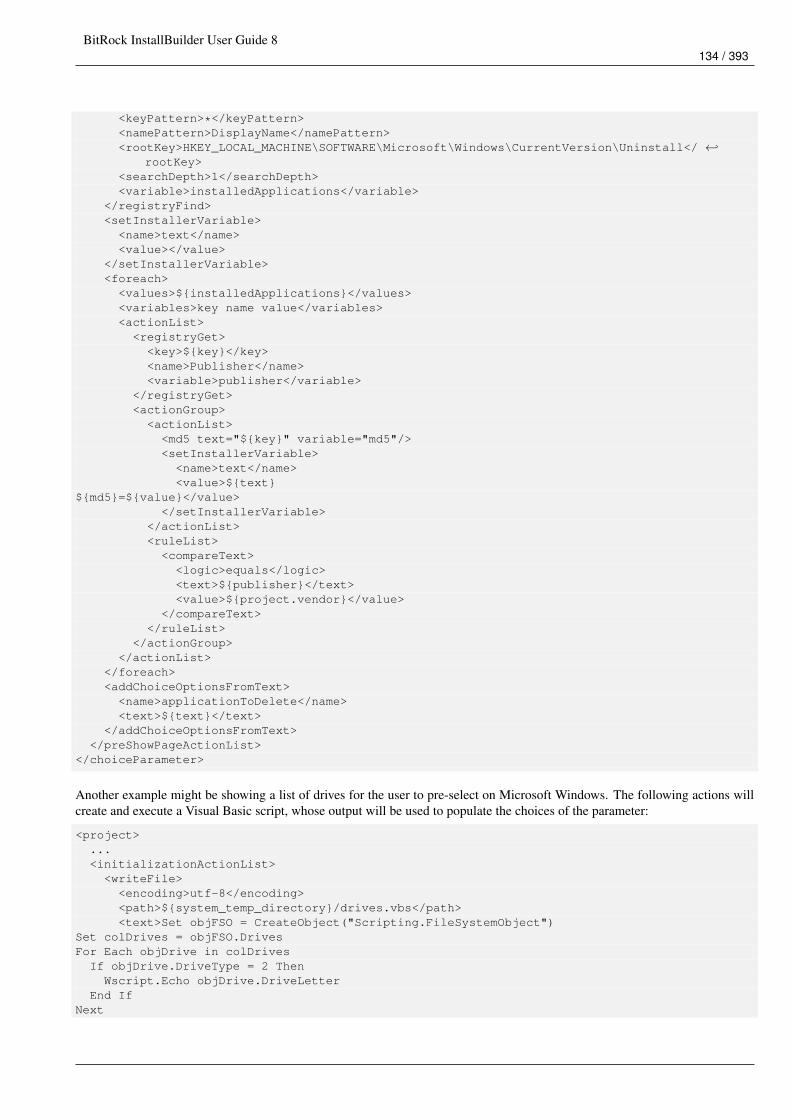
BitRock InstallBuilder User Guide 8134 / 393
<keyPattern>*</keyPattern><namePattern>DisplayName</namePattern><rootKey>HKEY_LOCAL_MACHINE\SOFTWARE\Microsoft\Windows\CurrentVersion\Uninstall</ ←↩
rootKey><searchDepth>1</searchDepth><variable>installedApplications</variable>
</registryFind><setInstallerVariable>
<name>text</name><value></value>
</setInstallerVariable><foreach>
<values>${installedApplications}</values><variables>key name value</variables><actionList>
<registryGet><key>${key}</key><name>Publisher</name><variable>publisher</variable>
</registryGet><actionGroup><actionList>
<md5 text="${key}" variable="md5"/><setInstallerVariable><name>text</name><value>${text}
${md5}=${value}</value></setInstallerVariable>
</actionList><ruleList>
<compareText><logic>equals</logic><text>${publisher}</text><value>${project.vendor}</value>
</compareText></ruleList>
</actionGroup></actionList>
</foreach><addChoiceOptionsFromText>
<name>applicationToDelete</name><text>${text}</text>
</addChoiceOptionsFromText></preShowPageActionList>
</choiceParameter>
Another example might be showing a list of drives for the user to pre-select on Microsoft Windows. The following actions willcreate and execute a Visual Basic script, whose output will be used to populate the choices of the parameter:
<project>...<initializationActionList><writeFile>
<encoding>utf-8</encoding><path>${system_temp_directory}/drives.vbs</path><text>Set objFSO = CreateObject("Scripting.FileSystemObject")
Set colDrives = objFSO.DrivesFor Each objDrive in colDrives
If objDrive.DriveType = 2 ThenWscript.Echo objDrive.DriveLetter
End IfNext
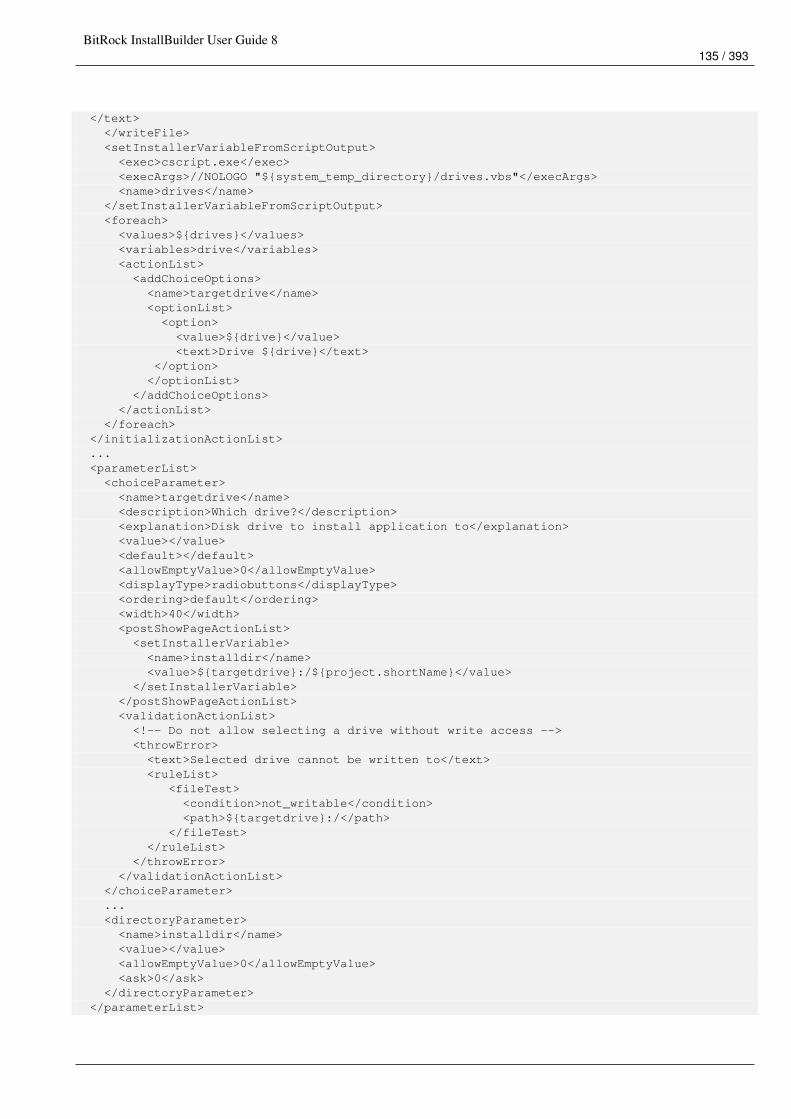
BitRock InstallBuilder User Guide 8135 / 393
</text></writeFile><setInstallerVariableFromScriptOutput>
<exec>cscript.exe</exec><execArgs>//NOLOGO "${system_temp_directory}/drives.vbs"</execArgs><name>drives</name>
</setInstallerVariableFromScriptOutput><foreach>
<values>${drives}</values><variables>drive</variables><actionList>
<addChoiceOptions><name>targetdrive</name><optionList>
<option><value>${drive}</value><text>Drive ${drive}</text>
</option></optionList>
</addChoiceOptions></actionList>
</foreach></initializationActionList>...<parameterList><choiceParameter>
<name>targetdrive</name><description>Which drive?</description><explanation>Disk drive to install application to</explanation><value></value><default></default><allowEmptyValue>0</allowEmptyValue><displayType>radiobuttons</displayType><ordering>default</ordering><width>40</width><postShowPageActionList>
<setInstallerVariable><name>installdir</name><value>${targetdrive}:/${project.shortName}</value>
</setInstallerVariable></postShowPageActionList><validationActionList>
<!-- Do not allow selecting a drive without write access --><throwError><text>Selected drive cannot be written to</text><ruleList>
<fileTest><condition>not_writable</condition><path>${targetdrive}:/</path>
</fileTest></ruleList>
</throwError></validationActionList>
</choiceParameter>...<directoryParameter>
<name>installdir</name><value></value><allowEmptyValue>0</allowEmptyValue><ask>0</ask>
</directoryParameter></parameterList>
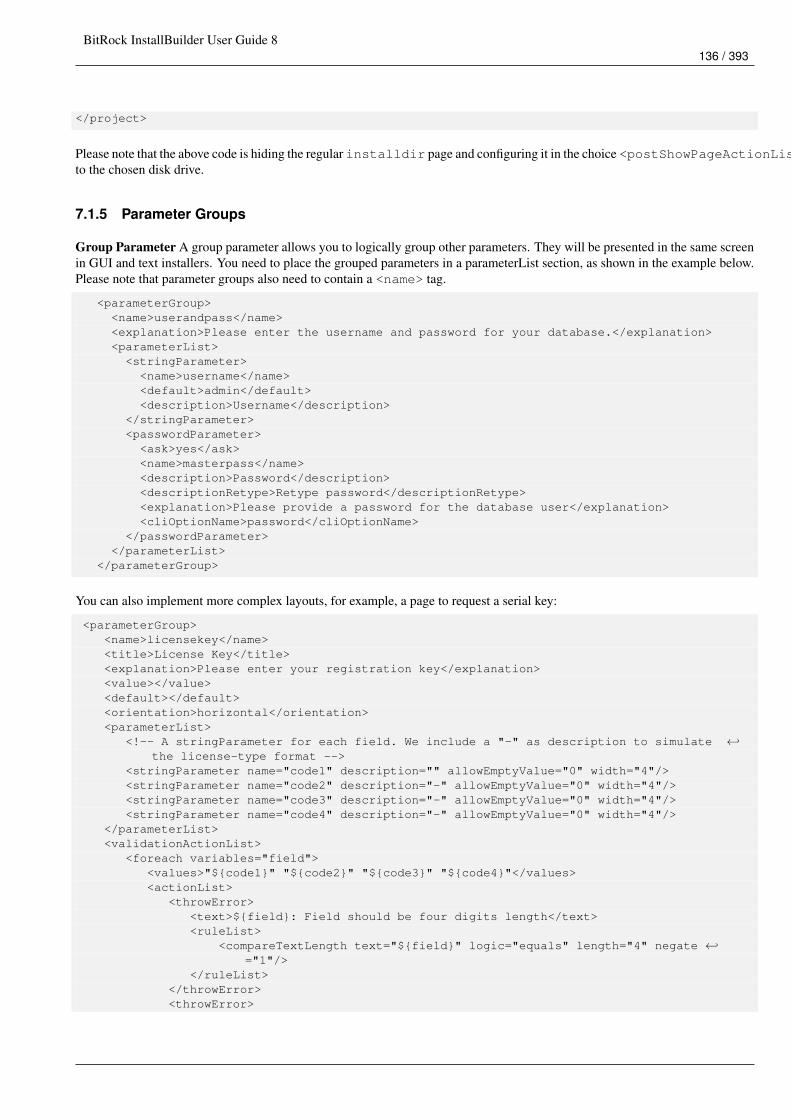
BitRock InstallBuilder User Guide 8136 / 393
</project>
Please note that the above code is hiding the regular installdir page and configuring it in the choice <postShowPageActionList>to the chosen disk drive.
7.1.5 Parameter Groups
Group Parameter A group parameter allows you to logically group other parameters. They will be presented in the same screenin GUI and text installers. You need to place the grouped parameters in a parameterList section, as shown in the example below.Please note that parameter groups also need to contain a <name> tag.
<parameterGroup><name>userandpass</name><explanation>Please enter the username and password for your database.</explanation><parameterList><stringParameter>
<name>username</name><default>admin</default><description>Username</description>
</stringParameter><passwordParameter>
<ask>yes</ask><name>masterpass</name><description>Password</description><descriptionRetype>Retype password</descriptionRetype><explanation>Please provide a password for the database user</explanation><cliOptionName>password</cliOptionName>
</passwordParameter></parameterList>
</parameterGroup>
You can also implement more complex layouts, for example, a page to request a serial key:
<parameterGroup><name>licensekey</name><title>License Key</title><explanation>Please enter your registration key</explanation><value></value><default></default><orientation>horizontal</orientation><parameterList>
<!-- A stringParameter for each field. We include a "-" as description to simulate ←↩the license-type format -->
<stringParameter name="code1" description="" allowEmptyValue="0" width="4"/><stringParameter name="code2" description="-" allowEmptyValue="0" width="4"/><stringParameter name="code3" description="-" allowEmptyValue="0" width="4"/><stringParameter name="code4" description="-" allowEmptyValue="0" width="4"/>
</parameterList><validationActionList>
<foreach variables="field"><values>"${code1}" "${code2}" "${code3}" "${code4}"</values><actionList>
<throwError><text>${field}: Field should be four digits length</text><ruleList>
<compareTextLength text="${field}" logic="equals" length="4" negate ←↩="1"/>
</ruleList></throwError><throwError>
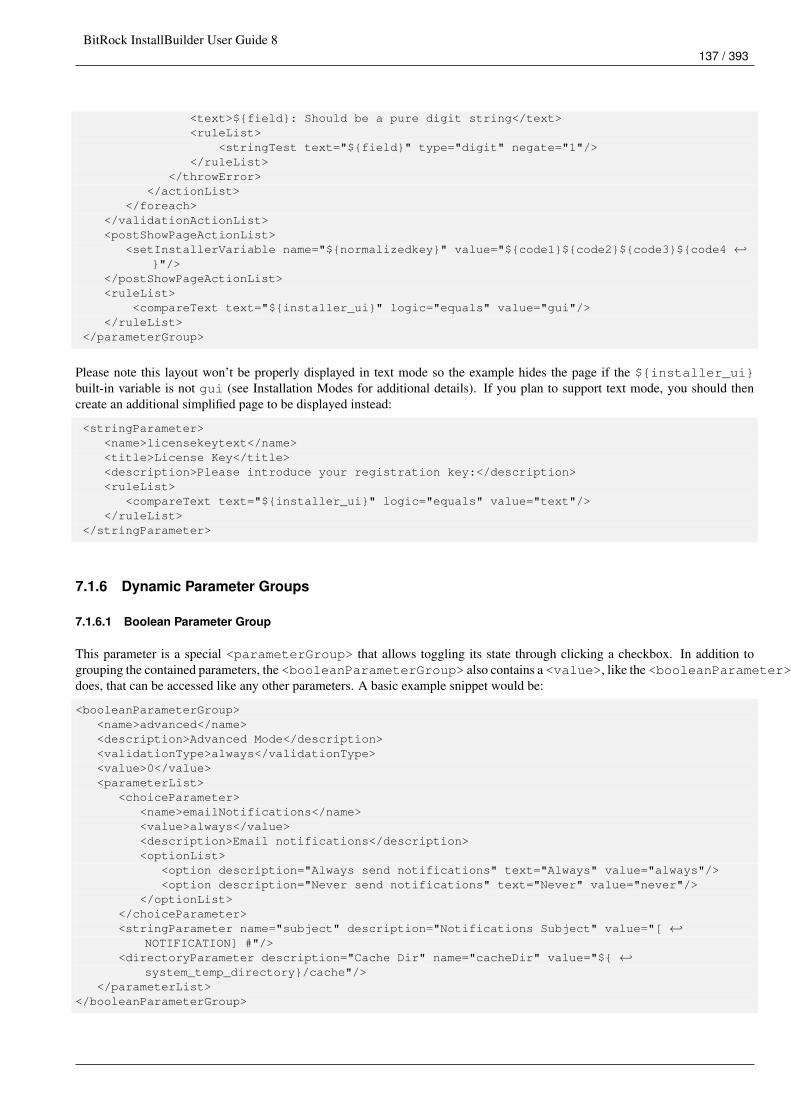
BitRock InstallBuilder User Guide 8137 / 393
<text>${field}: Should be a pure digit string</text><ruleList>
<stringTest text="${field}" type="digit" negate="1"/></ruleList>
</throwError></actionList>
</foreach></validationActionList><postShowPageActionList>
<setInstallerVariable name="${normalizedkey}" value="${code1}${code2}${code3}${code4 ←↩}"/>
</postShowPageActionList><ruleList>
<compareText text="${installer_ui}" logic="equals" value="gui"/></ruleList>
</parameterGroup>
Please note this layout won’t be properly displayed in text mode so the example hides the page if the ${installer_ui}built-in variable is not gui (see Installation Modes for additional details). If you plan to support text mode, you should thencreate an additional simplified page to be displayed instead:
<stringParameter><name>licensekeytext</name><title>License Key</title><description>Please introduce your registration key:</description><ruleList>
<compareText text="${installer_ui}" logic="equals" value="text"/></ruleList>
</stringParameter>
7.1.6 Dynamic Parameter Groups
7.1.6.1 Boolean Parameter Group
This parameter is a special <parameterGroup> that allows toggling its state through clicking a checkbox. In addition togrouping the contained parameters, the <booleanParameterGroup> also contains a <value>, like the <booleanParameter>does, that can be accessed like any other parameters. A basic example snippet would be:
<booleanParameterGroup><name>advanced</name><description>Advanced Mode</description><validationType>always</validationType><value>0</value><parameterList>
<choiceParameter><name>emailNotifications</name><value>always</value><description>Email notifications</description><optionList>
<option description="Always send notifications" text="Always" value="always"/><option description="Never send notifications" text="Never" value="never"/>
</optionList></choiceParameter><stringParameter name="subject" description="Notifications Subject" value="[ ←↩
NOTIFICATION] #"/><directoryParameter description="Cache Dir" name="cacheDir" value="${ ←↩
system_temp_directory}/cache"/></parameterList>
</booleanParameterGroup>
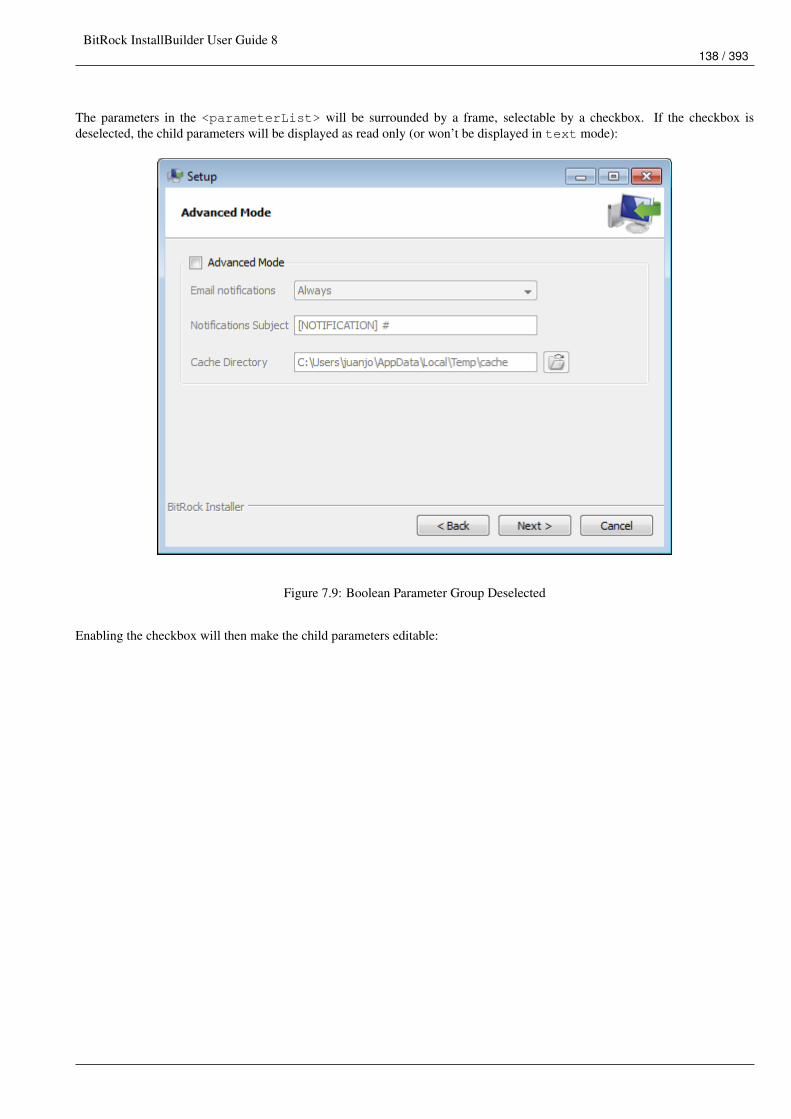
BitRock InstallBuilder User Guide 8138 / 393
The parameters in the <parameterList> will be surrounded by a frame, selectable by a checkbox. If the checkbox isdeselected, the child parameters will be displayed as read only (or won’t be displayed in text mode):
Figure 7.9: Boolean Parameter Group Deselected
Enabling the checkbox will then make the child parameters editable:
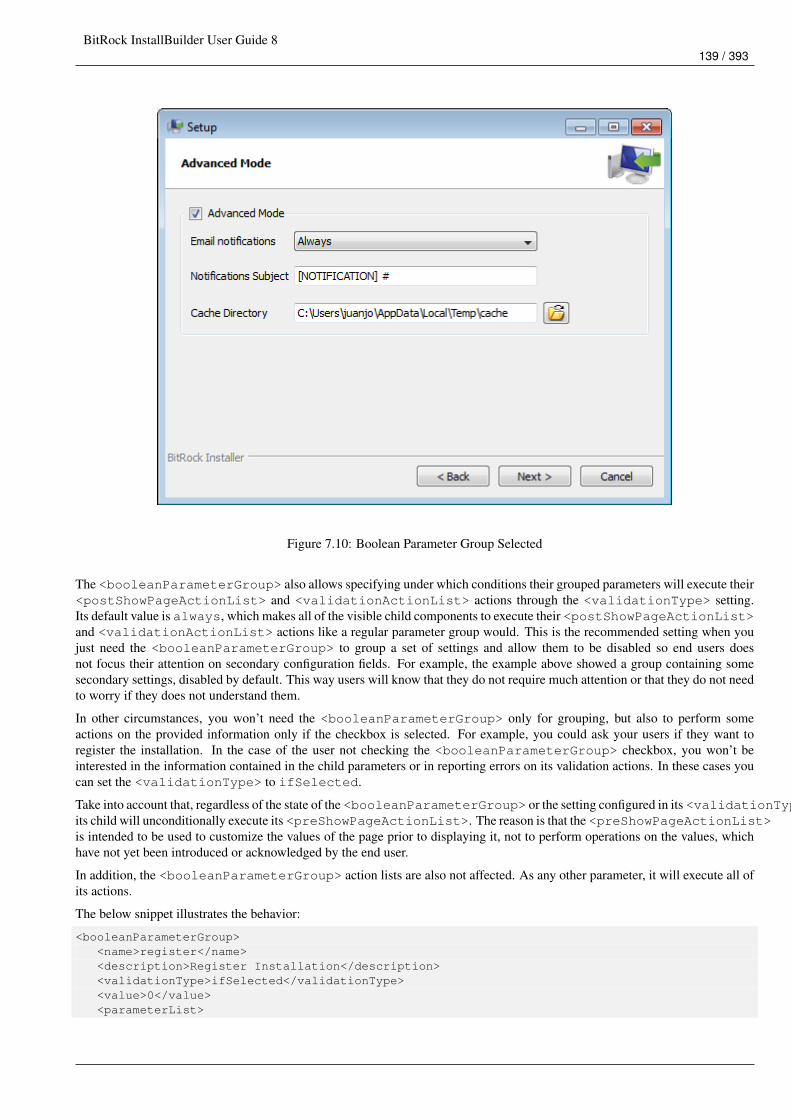
BitRock InstallBuilder User Guide 8139 / 393
Figure 7.10: Boolean Parameter Group Selected
The <booleanParameterGroup> also allows specifying under which conditions their grouped parameters will execute their<postShowPageActionList> and <validationActionList> actions through the <validationType> setting.Its default value is always, which makes all of the visible child components to execute their <postShowPageActionList>and <validationActionList> actions like a regular parameter group would. This is the recommended setting when youjust need the <booleanParameterGroup> to group a set of settings and allow them to be disabled so end users doesnot focus their attention on secondary configuration fields. For example, the example above showed a group containing somesecondary settings, disabled by default. This way users will know that they do not require much attention or that they do not needto worry if they does not understand them.
In other circumstances, you won’t need the <booleanParameterGroup> only for grouping, but also to perform someactions on the provided information only if the checkbox is selected. For example, you could ask your users if they want toregister the installation. In the case of the user not checking the <booleanParameterGroup> checkbox, you won’t beinterested in the information contained in the child parameters or in reporting errors on its validation actions. In these cases youcan set the <validationType> to ifSelected.
Take into account that, regardless of the state of the <booleanParameterGroup> or the setting configured in its <validationType>,its child will unconditionally execute its <preShowPageActionList>. The reason is that the <preShowPageActionList>is intended to be used to customize the values of the page prior to displaying it, not to perform operations on the values, whichhave not yet been introduced or acknowledged by the end user.
In addition, the <booleanParameterGroup> action lists are also not affected. As any other parameter, it will execute all ofits actions.
The below snippet illustrates the behavior:
<booleanParameterGroup><name>register</name><description>Register Installation</description><validationType>ifSelected</validationType><value>0</value><parameterList>
BitRock InstallBuilder User Guide 8140 / 393
<stringParameter name="username" description="User Name" allowEmptyValue="0" value ←↩=""/>
<stringParameter name="email" description="Email" allowEmptyValue="0" value=""><validationActionList>
<throwError text="The provided value does not seem an email address"><ruleList><regExMatch><logic>does_not_match</logic><pattern>[a-zA-Z0-9\._-]+@[a-zA-Z0-9\._-]+</pattern><text>${email}</text>
</regExMatch></ruleList>
</throwError></validationActionList>
</stringParameter><stringParameter description="License Key" name="key" value="" allowEmptyValue="0"/>
</parameterList><validationActionList>
<httpPost><url>http://example.com/register.php</url><filename>${installdir}/result</filename><queryParameterList><queryParameter name="name" value="${username}"/><queryParameter name="email" value="${email}"/><queryParameter name="license" value="${key}"/>
</queryParameterList><ruleList>
<isTrue value="${register}"/></ruleList>
</httpPost>...
</validationActionList></booleanParameterGroup>
If the user checks the checkbox, the parameters will execute their validations. Please note that the code adds the registrationactions to the <validationActionList> of the <booleanParameterGroup>, which are always executed. That iswhy it includes a rule checking its state.
7.1.6.2 Choice Parameter Group
This parameter is a special <parameterGroup> that allows selecting a subset of widgets. In addition to grouping the containedparameters, the <choiceParameterGroup> also contains a <value>, like the <choiceParameter> does, that can beaccessed like any other parameters. The value stored will represent the name of the selected child parameter. A basic examplesnippet would be:
<choiceParameterGroup><name>usbLocation</name><description>Select an USB Drive</description><value>usbDetectedList</value><parameterList>
<choiceParameter><name>usbDetectedList</name><value></value><description>Autodetected List</description><optionList></optionList><preShowPageActionList>
<addChoiceOptionsFromText><name>usbDetectedList</name><text>${driveInfo}</text>
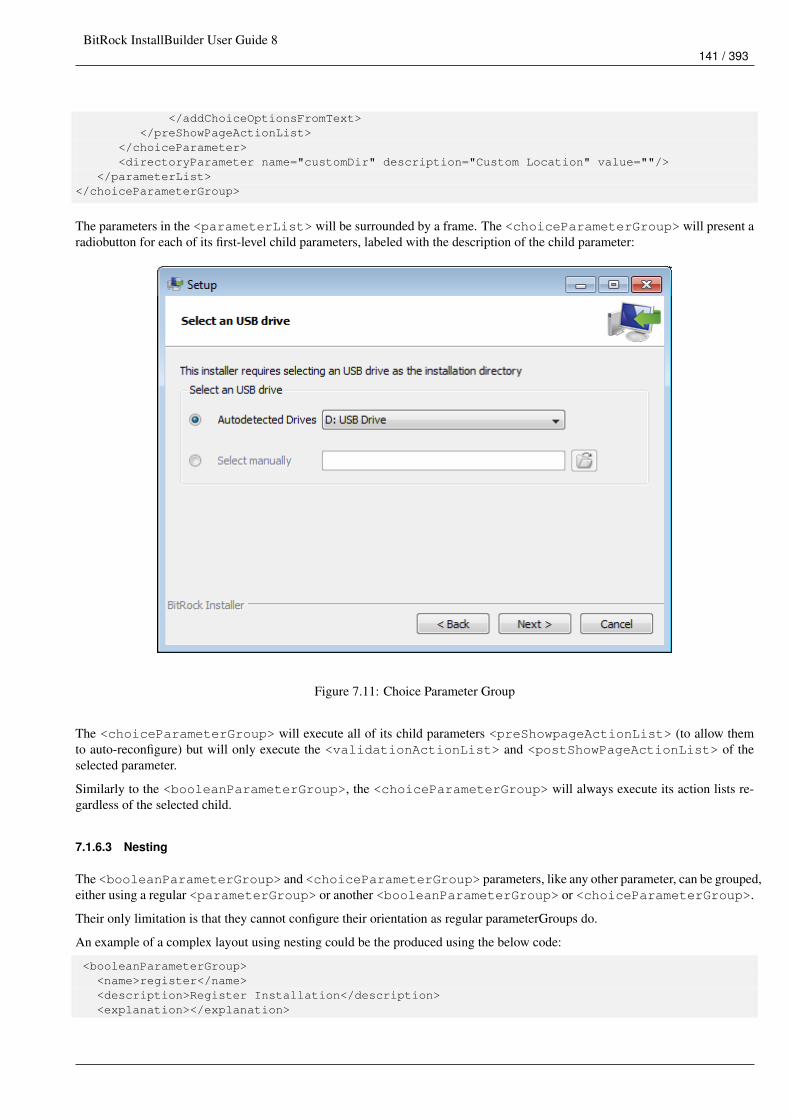
BitRock InstallBuilder User Guide 8141 / 393
</addChoiceOptionsFromText></preShowPageActionList>
</choiceParameter><directoryParameter name="customDir" description="Custom Location" value=""/>
</parameterList></choiceParameterGroup>
The parameters in the <parameterList> will be surrounded by a frame. The <choiceParameterGroup> will present aradiobutton for each of its first-level child parameters, labeled with the description of the child parameter:
Figure 7.11: Choice Parameter Group
The <choiceParameterGroup> will execute all of its child parameters <preShowpageActionList> (to allow themto auto-reconfigure) but will only execute the <validationActionList> and <postShowPageActionList> of theselected parameter.
Similarly to the <booleanParameterGroup>, the <choiceParameterGroup> will always execute its action lists re-gardless of the selected child.
7.1.6.3 Nesting
The <booleanParameterGroup> and <choiceParameterGroup> parameters, like any other parameter, can be grouped,either using a regular <parameterGroup> or another <booleanParameterGroup> or <choiceParameterGroup>.
Their only limitation is that they cannot configure their orientation as regular parameterGroups do.
An example of a complex layout using nesting could be the produced using the below code:
<booleanParameterGroup><name>register</name><description>Register Installation</description><explanation></explanation>
BitRock InstallBuilder User Guide 8142 / 393
<value>1</value><default></default><validationType>ifSelected</validationType><parameterList><stringParameter><name>username</name><description>Username</description><allowEmptyValue>0</allowEmptyValue><width>40</width>
</stringParameter><passwordParameter><name>password</name><description>Enter password</description><allowEmptyValue>0</allowEmptyValue><descriptionRetype></descriptionRetype><width>20</width>
</passwordParameter><stringParameter><name>phone</name><description>Phone</description><allowEmptyValue>1</allowEmptyValue><width>40</width><validationActionList>
<throwError><text>The provided phone ’${phone}’ does not seem a valid one</text><ruleList><regExMatch>
<logic>does_not_match</logic><pattern>^[\d+-]*$</pattern><text>${phone}</text>
</regExMatch></ruleList>
</throwError></validationActionList>
</stringParameter><choiceParameterGroup><name>keyChoice</name><description>Select how to provide your license key</description><explanation></explanation><value></value><default></default><parameterList>
<fileParameter><name>keyFile</name><description>Load from file</description><allowEmptyValue>0</allowEmptyValue><mustBeWritable>0</mustBeWritable><mustExist>0</mustExist><width>40</width>
</fileParameter><stringParameter>
<name>licenseText</name><description>Enter license key</description><allowEmptyValue>1</allowEmptyValue><width>40</width>
</stringParameter></parameterList>
</choiceParameterGroup></parameterList>
</booleanParameterGroup>
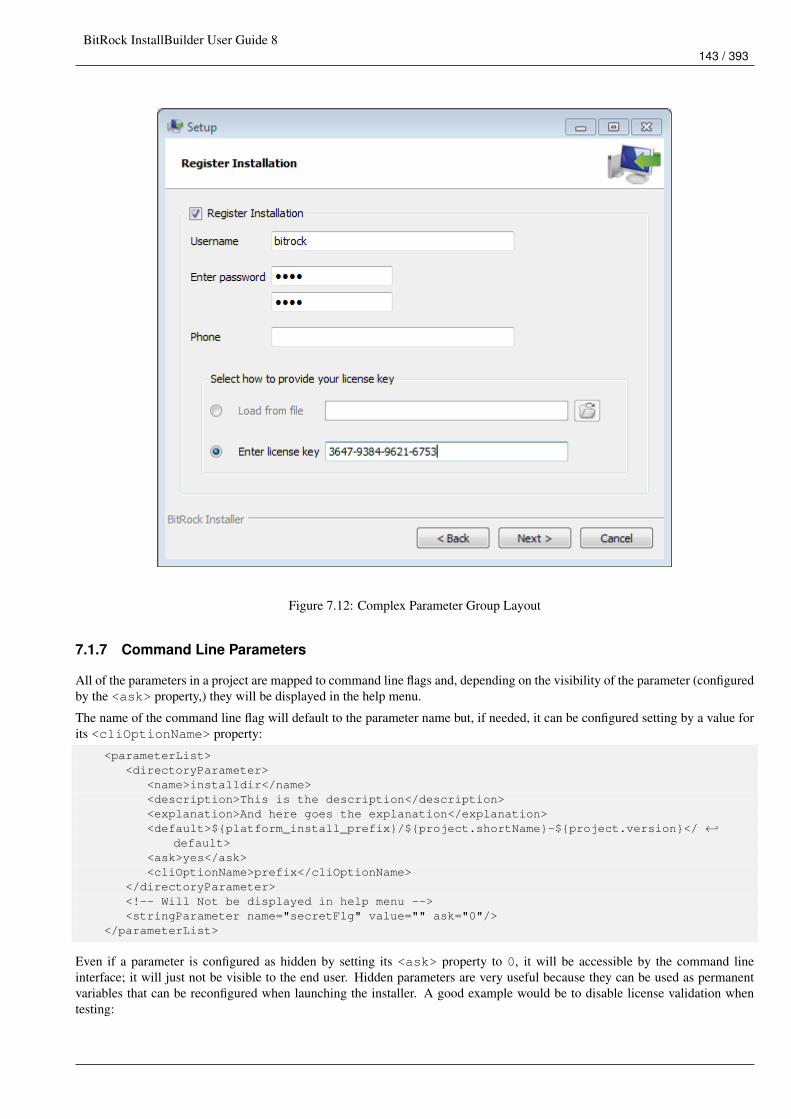
BitRock InstallBuilder User Guide 8143 / 393
Figure 7.12: Complex Parameter Group Layout
7.1.7 Command Line Parameters
All of the parameters in a project are mapped to command line flags and, depending on the visibility of the parameter (configuredby the <ask> property,) they will be displayed in the help menu.
The name of the command line flag will default to the parameter name but, if needed, it can be configured setting by a value forits <cliOptionName> property:
<parameterList><directoryParameter>
<name>installdir</name><description>This is the description</description><explanation>And here goes the explanation</explanation><default>${platform_install_prefix}/${project.shortName}-${project.version}</ ←↩
default><ask>yes</ask><cliOptionName>prefix</cliOptionName>
</directoryParameter><!-- Will Not be displayed in help menu --><stringParameter name="secretFlg" value="" ask="0"/>
</parameterList>
Even if a parameter is configured as hidden by setting its <ask> property to 0, it will be accessible by the command lineinterface; it will just not be visible to the end user. Hidden parameters are very useful because they can be used as permanentvariables that can be reconfigured when launching the installer. A good example would be to disable license validation whentesting:
BitRock InstallBuilder User Guide 8144 / 393
<parameterList><stringParameter>
<name>license</name><description>License Registration Page</description><explanation>Please introduce you license number</explanation><ask>yes</ask><ruleList>
<isTrue value="${validateLicense}"/></ruleList>
</stringParameter><!-- Will Not be displayed in help menu --><booleanParameter name="validateLicense" value="1" ask="0"/>
</parameterList>
To avoid having to introduce the license number each time you launch the installer, you just have to disable the page whenlaunching the installer:
$> myInstaller.run --validateLicense 0
Although the <ask> property allows us to configure whether or not a page is displayed through the installation process and inthe help menu, there are some scenarios in which it is desirable to show the associated command line flag while permanentlyhiding the page at runtime. This can be achieved by attaching a rule to the page:
<parameterList><stringParameter>
<name>create_shortcuts</name><description>Create shortcuts</description><explanation>Whether to create or not shortcuts to the application</explanation><ask>yes</ask><ruleList>
<isTrue value="0"/></ruleList>
</stringParameter></parameterList>
As you have set ask="1", the command line flag is visible through the help menu but at runtime, when the rule attached isevaluated, it will not be displayed.
If a page is not displayed, its associated actions are not executedIndependently of whether the page is hidden through a rule or by setting ask="0", the action lists associated with the pagewill not be executed. The same will happen in unattended mode, as the pages are never displayed.
7.1.8 Option Files
As explained in the previous section, the values of the installer parameters can be configured by passing command line options.However, when a large number of parameters must be configured, there is a more convenient way to do so using an option file.
An option file is just a .properties file containing all of the parameters to configure:
prefix=/tmpvalidateLicense=0installDocumentation=1...
This file can be passed to the installer using the --optionfile command line flag:
$> myInstaller.run --optionfile path/to/configuration.options

BitRock InstallBuilder User Guide 8145 / 393
Another way of providing the option file is to create a file in the same directory as the installer with the same name plus the.options suffix:
$> ls some/output/directory$> myInstaller.run$> myInstaller.run.options
In both cases, the installer will parse the file and will map all the entries to internal parameters. Lines starting with a firstnon-blank # character will be treated as comments.
BitRock InstallBuilder User Guide 8146 / 393
Chapter 8
Actions
8.1 What are Actions?
There are a number of installation tasks that are common to many installers, such as changing file permissions, substituting avalue in a file, and so on. BitRock InstallBuilder includes a large number of useful built-in actions for these purposes.
You can add new actions by manually editing the XML project file directly or in the Advanced section of the GUI building tool.Actions are either attached to a particular folder tag in the project file (<actionList>) that will be executed after the contentsof the folder have been installed, or can be part of specific action lists that are executed at specific points during installation.
Actions usually take one or more arguments. If one of those arguments is a file matching expression (<files>) and the actionwas included in a <folder> action list, the matching will also occur against the contents of the folder:
<folder><name>binaries</name>...<destination>${installdir}</destination><distributionFileList>
<distributionDirectory><origin>/some/path/to/bin</origin>
</distributionDirectory></distributionFileList>
<actionList><changePermissions permissions="0755" files="*"/>
</actionList></folder>
In the example above, although the <changePermissions> action is not recursive, as it was executed inside a <folder>action list, the pattern will be recursively matched against all of the files contained in the bin directory. Alternatively, you coulduse the <postInstallationActionList> to change the permissions, but at that point the <changePermissions>action won’t execute recursively and you will need to provide a more complex pattern:
<folder><name>binaries</name>...<destination>${installdir}</destination><distributionFileList>
<distributionDirectory><origin>/some/path/to/bin</origin>
</distributionDirectory></distributionFileList>
</folder>...<postInstallationActionList>
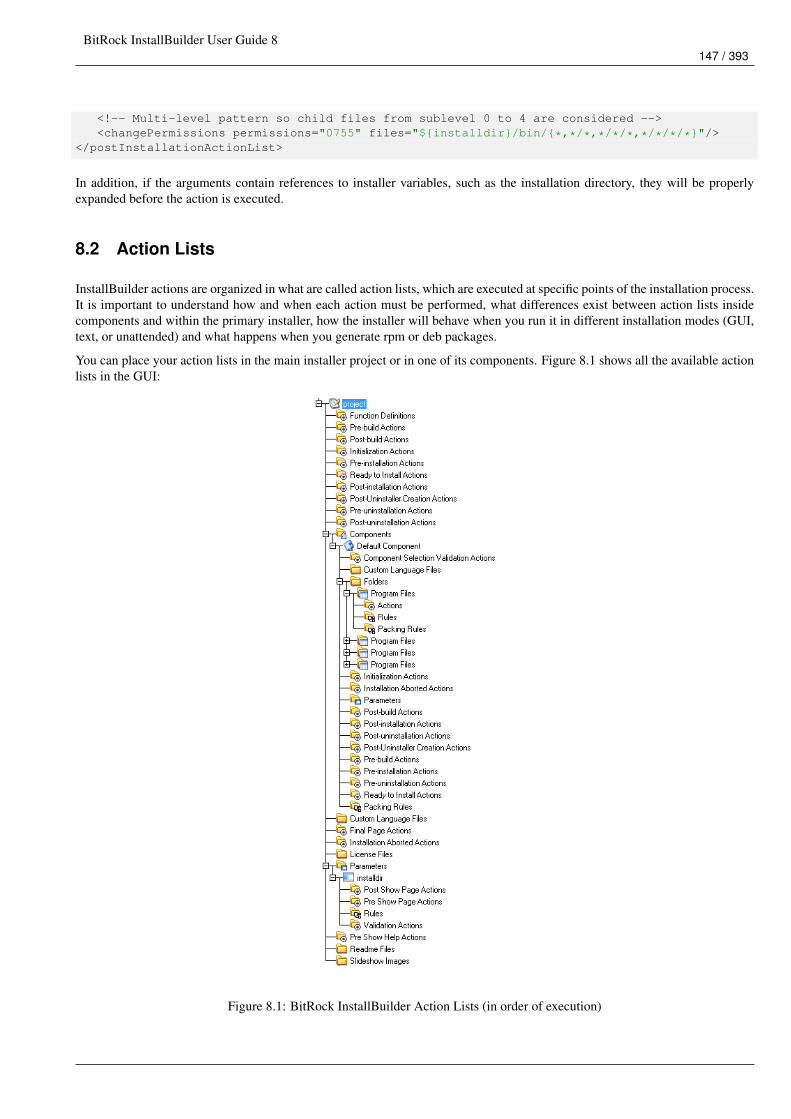
BitRock InstallBuilder User Guide 8147 / 393
<!-- Multi-level pattern so child files from sublevel 0 to 4 are considered --><changePermissions permissions="0755" files="${installdir}/bin/{*,*/*,*/*/*,*/*/*/*}"/>
</postInstallationActionList>
In addition, if the arguments contain references to installer variables, such as the installation directory, they will be properlyexpanded before the action is executed.
8.2 Action Lists
InstallBuilder actions are organized in what are called action lists, which are executed at specific points of the installation process.It is important to understand how and when each action must be performed, what differences exist between action lists insidecomponents and within the primary installer, how the installer will behave when you run it in different installation modes (GUI,text, or unattended) and what happens when you generate rpm or deb packages.
You can place your action lists in the main installer project or in one of its components. Figure 8.1 shows all the available actionlists in the GUI:
Figure 8.1: BitRock InstallBuilder Action Lists (in order of execution)
BitRock InstallBuilder User Guide 8148 / 393
8.2.1 Building the Installer
• Pre-build Actions - <preBuildActionList>: Executes before generating the installer file. These actions usually include settingenvironment variables or performing some type of processing on the files that will go into the installer before they are packedinto it. For multi-platform CDROM installers, the preBuildActionList is executed once at the beginning of the CDROM build,and then again for every one of the specific platform installers.
• Post-build Actions - <postBuildActionList>: Executes after generating the installer file. These actions are usually useful toreverse any changes made to the files during the preBuildActionList or to perform additional actions on the generated installer,such as signing it by invoking an external tool. For multi-platform CDROM installers, the postBuildActionList is executedonce for every one of the specific platform installers and one final time for the whole CDROM build.
8.2.2 Help Menu
• Pre Show Help Actions - <preShowHelpActionList>: Executes before help information is displayed. The help is displayedwhen the --help command line option is passed to an installer. It can be useful for example for modifying the description ofparameters based on the system the installer is running on.
Help menu
Sample Project 1.0Usage:
--help Display the list of valid options
--version Display product information
--unattendedmodeui <unattendedmodeui> Unattended Mode UIDefault: noneAllowed: none minimal minimalWithDialogs
--optionfile <optionfile> Installation option fileDefault:
--debuglevel <debuglevel> Debug information level of verbosityDefault: 2Allowed: 0 1 2 3 4
--mode <mode> Installation modeDefault: gtkAllowed: gtk xwindow text unattended
--debugtrace <debugtrace> Debug filenameDefault:
--enable-components <enable-components> Comma-separated list of componentsDefault: defaultAllowed: default
--disable-components <disable-components> Comma-separated list of componentsDefault:Allowed: default
--installer-language <installer-language> Language selectionDefault: enAllowed: en ar bg ca da nl et fr fi de el es es_AR he hr hu ←↩
it ja ko pl pt_BR pt ro ru no sl sk sq sv tr zh_TW ←↩zh_CN va cy cs
--prefix <prefix> Installation Directory
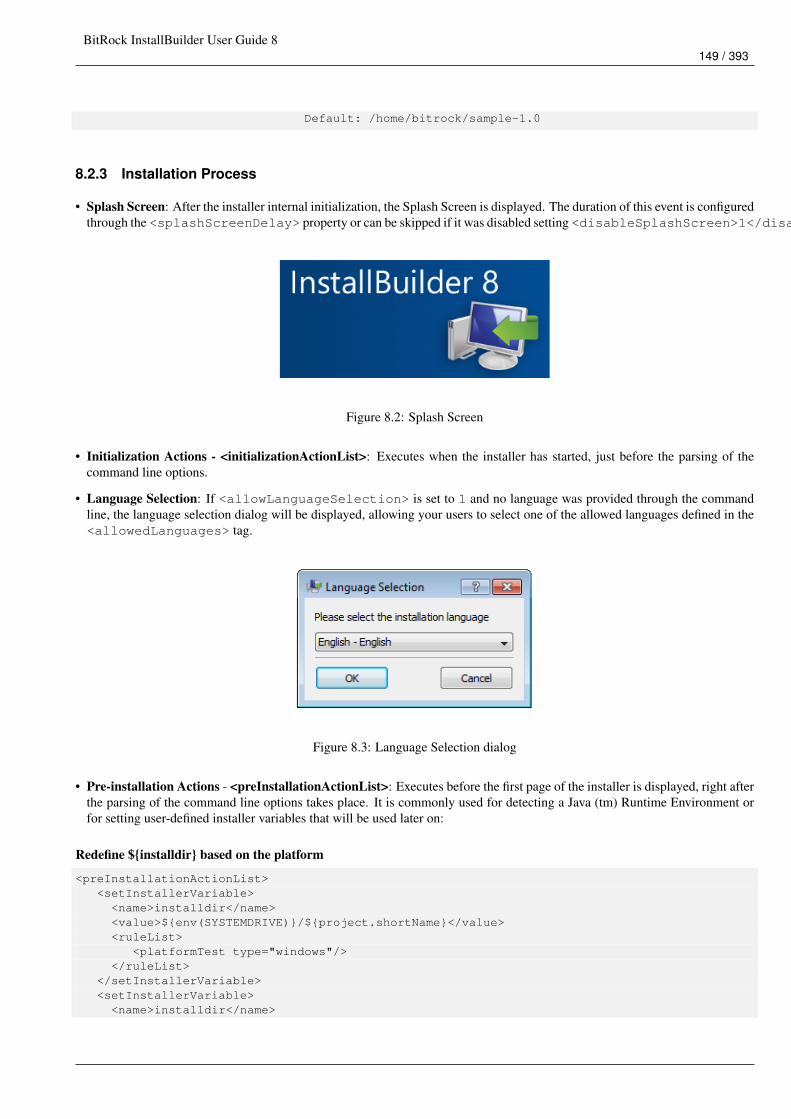
BitRock InstallBuilder User Guide 8149 / 393
Default: /home/bitrock/sample-1.0
8.2.3 Installation Process
• Splash Screen: After the installer internal initialization, the Splash Screen is displayed. The duration of this event is configuredthrough the <splashScreenDelay> property or can be skipped if it was disabled setting <disableSplashScreen>1</disableSplashScreen>
Figure 8.2: Splash Screen
• Initialization Actions - <initializationActionList>: Executes when the installer has started, just before the parsing of thecommand line options.
• Language Selection: If <allowLanguageSelection> is set to 1 and no language was provided through the commandline, the language selection dialog will be displayed, allowing your users to select one of the allowed languages defined in the<allowedLanguages> tag.
Figure 8.3: Language Selection dialog
• Pre-installation Actions - <preInstallationActionList>: Executes before the first page of the installer is displayed, right afterthe parsing of the command line options takes place. It is commonly used for detecting a Java (tm) Runtime Environment orfor setting user-defined installer variables that will be used later on:
Redefine ${installdir} based on the platform
<preInstallationActionList><setInstallerVariable><name>installdir</name><value>${env(SYSTEMDRIVE)}/${project.shortName}</value><ruleList>
<platformTest type="windows"/></ruleList>
</setInstallerVariable><setInstallerVariable><name>installdir</name>
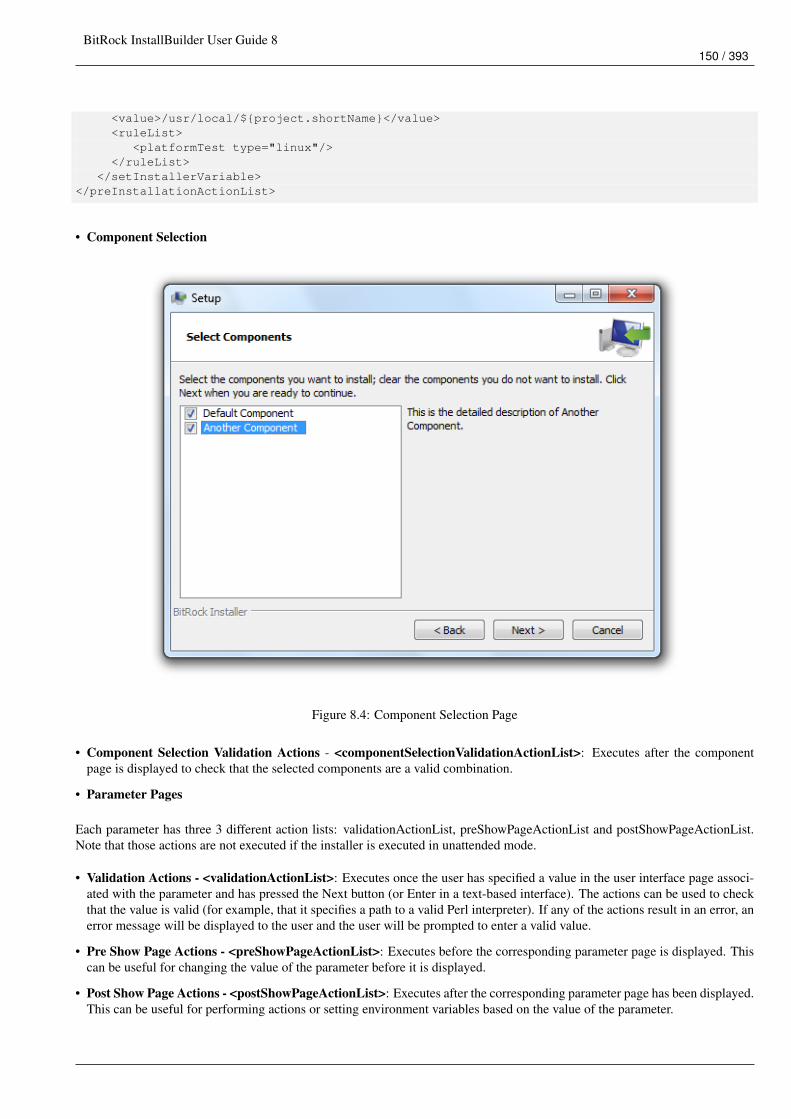
BitRock InstallBuilder User Guide 8150 / 393
<value>/usr/local/${project.shortName}</value><ruleList>
<platformTest type="linux"/></ruleList>
</setInstallerVariable></preInstallationActionList>
• Component Selection
Figure 8.4: Component Selection Page
• Component Selection Validation Actions - <componentSelectionValidationActionList>: Executes after the componentpage is displayed to check that the selected components are a valid combination.
• Parameter Pages
Each parameter has three 3 different action lists: validationActionList, preShowPageActionList and postShowPageActionList.Note that those actions are not executed if the installer is executed in unattended mode.
• Validation Actions - <validationActionList>: Executes once the user has specified a value in the user interface page associ-ated with the parameter and has pressed the Next button (or Enter in a text-based interface). The actions can be used to checkthat the value is valid (for example, that it specifies a path to a valid Perl interpreter). If any of the actions result in an error, anerror message will be displayed to the user and the user will be prompted to enter a valid value.
• Pre Show Page Actions - <preShowPageActionList>: Executes before the corresponding parameter page is displayed. Thiscan be useful for changing the value of the parameter before it is displayed.
• Post Show Page Actions - <postShowPageActionList>: Executes after the corresponding parameter page has been displayed.This can be useful for performing actions or setting environment variables based on the value of the parameter.
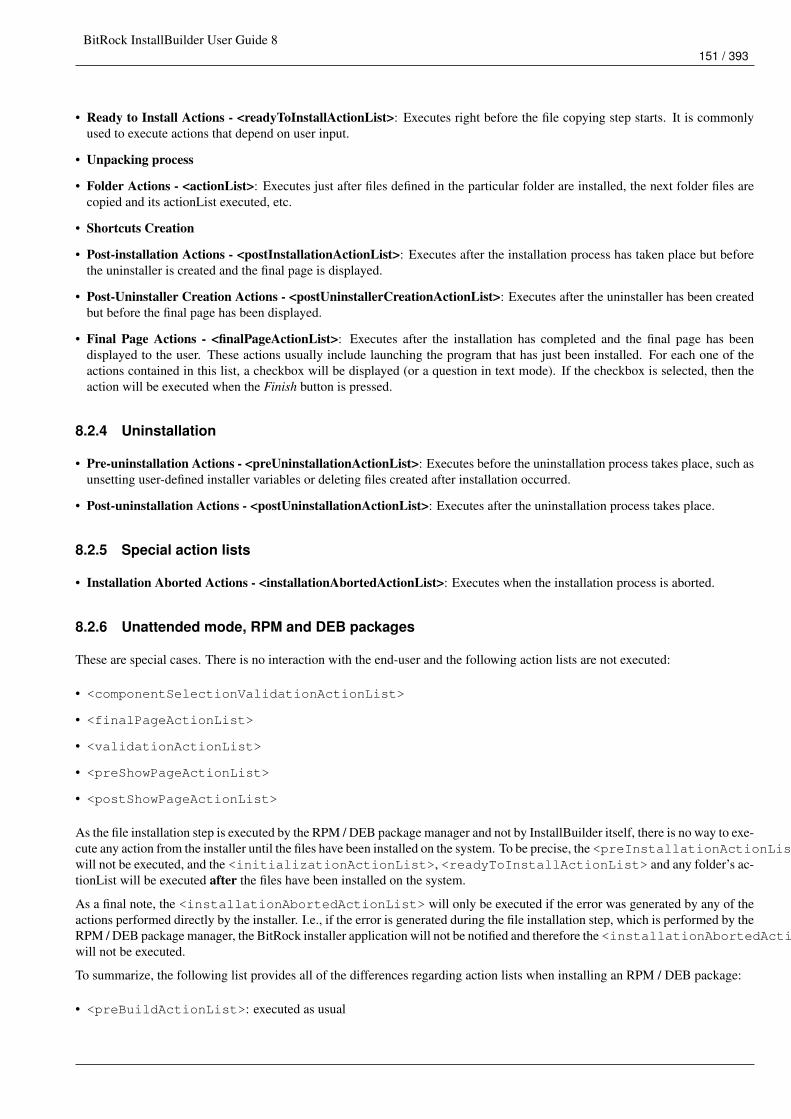
BitRock InstallBuilder User Guide 8151 / 393
• Ready to Install Actions - <readyToInstallActionList>: Executes right before the file copying step starts. It is commonlyused to execute actions that depend on user input.
• Unpacking process
• Folder Actions - <actionList>: Executes just after files defined in the particular folder are installed, the next folder files arecopied and its actionList executed, etc.
• Shortcuts Creation
• Post-installation Actions - <postInstallationActionList>: Executes after the installation process has taken place but beforethe uninstaller is created and the final page is displayed.
• Post-Uninstaller Creation Actions - <postUninstallerCreationActionList>: Executes after the uninstaller has been createdbut before the final page has been displayed.
• Final Page Actions - <finalPageActionList>: Executes after the installation has completed and the final page has beendisplayed to the user. These actions usually include launching the program that has just been installed. For each one of theactions contained in this list, a checkbox will be displayed (or a question in text mode). If the checkbox is selected, then theaction will be executed when the Finish button is pressed.
8.2.4 Uninstallation
• Pre-uninstallation Actions - <preUninstallationActionList>: Executes before the uninstallation process takes place, such asunsetting user-defined installer variables or deleting files created after installation occurred.
• Post-uninstallation Actions - <postUninstallationActionList>: Executes after the uninstallation process takes place.
8.2.5 Special action lists
• Installation Aborted Actions - <installationAbortedActionList>: Executes when the installation process is aborted.
8.2.6 Unattended mode, RPM and DEB packages
These are special cases. There is no interaction with the end-user and the following action lists are not executed:
• <componentSelectionValidationActionList>
• <finalPageActionList>
• <validationActionList>
• <preShowPageActionList>
• <postShowPageActionList>
As the file installation step is executed by the RPM / DEB package manager and not by InstallBuilder itself, there is no way to exe-cute any action from the installer until the files have been installed on the system. To be precise, the <preInstallationActionList>will not be executed, and the <initializationActionList>, <readyToInstallActionList> and any folder’s ac-tionList will be executed after the files have been installed on the system.
As a final note, the <installationAbortedActionList> will only be executed if the error was generated by any of theactions performed directly by the installer. I.e., if the error is generated during the file installation step, which is performed by theRPM / DEB package manager, the BitRock installer application will not be notified and therefore the <installationAbortedActionList>will not be executed.
To summarize, the following list provides all of the differences regarding action lists when installing an RPM / DEB package:
• <preBuildActionList>: executed as usual
BitRock InstallBuilder User Guide 8152 / 393
• <postBuildActionList>: executed as usual
• <initializationActionList>: executed after file installation
• <preInstallationActionList>: not executed
• <componentSelectionValidationActionList>: not executed
• parameter <validationActionList>: not executed
• parameter <preShowPageActionList>: not executed
• parameter <postShowPageActionList>: not executed
• <readyToInstallActionList>: executed after file installation
• folder <actionList>: executed after file installation
• <postInstallationActionList>: executed as usual
• <finalPageActionList>: not executed
• <preUninstallationActionList>: executed as usual
• <postUninstallationActionList>: executed as usual
• <installationAbortedActionList>: executed only if error comes from any of the tasks performed directly by theBitRock installer.
8.2.7 Main Project and Components Execution Order
Each action list may be included in the main project or inside the components. Let’s take an <initializationActionList>as an example. You have one main <initializationActionList> and 4 others in the components A, B, C and D. Thecomponents are declared following the order A, B, C, D (A is the first entry and D is the last one). In this case, the main<initializationActionList> is executed first and then each component’s action lists are executed (A, B, C, D - theorder of component declaration is important).
You can divide all action lists into two groups based on what is executed first: main project or component action lists:
• Main project action lists first and then components:
– <preBuildActionList>
– <initializationActionList>
– <preInstallationActionList>
– <readyToInstallActionList>
– <preUninstallationActionList>
• Component action lists first and then the main project:
– <postBuildActionList>
– <postInstallationActionList>
– <postUninstallationActionList>
The installer executes action lists by group, which means that first, all <initializationActionList> actions take placeand then all <preInstallationActionList> actions are executed:
INITIALIZATION ACTION LIST
• Project Initialization Action List
BitRock InstallBuilder User Guide 8153 / 393
• Component A Initialization Action List
• Component B Initialization Action List
• . . .
PREINSTALLATION ACTION LIST
• Project Preinstallation Action List
• Component A Preinstallation Action List
• Component B Preinstallation Action List . . .
For example, for a project with two components:
<project>...<initializationActionList>
<showInfo><text>I’m the project in the initialization</text>
</showInfo></initializationActionList><preInstallationActionList>
<showInfo><text>I’m the project in the preInstallation</text>
</showInfo></preInstallationActionList><componentList>
<component><name>componentA</name><description>Component A</description>...<initializationActionList>
<showInfo><text>I’m Component A in the initialization</text>
</showInfo></initializationActionList><preInstallationActionList>
<showInfo><text>I’m Component A in the preInstallation</text>
</showInfo></preInstallationActionList>
</component><component>
<name>componentB</name><description>Component B</description><canBeEdited>1</canBeEdited>...<initializationActionList>
<showInfo><text>I’m Component B in the initialization</text>
</showInfo></initializationActionList><preInstallationActionList>
<showInfo><text>I’m Component B in the preInstallation</text>
</showInfo></preInstallationActionList>
</component></componentList>
</project>

BitRock InstallBuilder User Guide 8154 / 393
If you build and execute the installer in, for example, unattended mode, you will see the following in the console:
I’m the project in the initializationI’m Component A in the initializationI’m Component B in the initializationI’m the project in the preinstallationI’m Component A in the preInstallationI’m Component B in the preInstallation
The <installationAbortedActionList> will only be executed if the error was generated by any of the actions per-formed directly by the installer. If the error is generated during the file installation step, which is performed by the RPM / DEBpackage manager, the BitRock installer application will not be notified and therefore the <installationAbortedActionList>will not be executed.
8.3 Running External Programs
In addition to built-in actions, InstallBuilder allows external programs to be executed through the <runProgram> action:
<runProgram><program>kill</program><programArguments>-f myBin</programArguments>
</runProgram>
After the external program ends, its standard streams are registered in the built-in variables ${program_stdout}, ${program_stderr}and ${program_exit_code}:
• ${program_stdout}: Program Standard Output
• ${program_stderr}: Program Standard Error
• ${program_exit_code}: Program Exit Code
For example, to get the path of the gksudo command on Linux you could use the snippet below:
<runProgram><program>which</program><programArguments>gksudo</programArguments><!-- The gksudo program may not beinstalled so it is necessary to mask errors --><abortOnError>0</abortOnError><showMessageOnError>0</showMessageOnError>
</runProgram>
And get the path from the ${program_stdout} variable. If the execution fails, the variable will be defined as empty.
You can also execute more complex commands such as pipes or include redirections. For example, the code below can be usedto count the number of files in a directory:
<runProgram><program>ls</program><programArguments>-l ${installdir}/logs/*.log | wc -l</programArguments>
</runProgram>
Although you can always check the created built-in variables, if you are explicitly calling the external program to use its outputlike in the gksudo example (as opposed to other cases, such us creating a MySQL database in which the important result is thedatabase being created) it may be a better solution to use a <setInstallerVariableFromScriptOutput> action:
BitRock InstallBuilder User Guide 8155 / 393
<setInstallerVariableFromScriptOutput><exec>which</exec><execArgs>gksudo</execArgs><name>gksudoPath</name><!-- The gksudo program may not beinstalled so it is necessary to mask errors --><abortOnError>0</abortOnError><showMessageOnError>0</showMessageOnError>
</setInstallerVariableFromScriptOutput>
The code above will create a new variable gksudoPath containing the ${program_stdout} of the executed program.
On Windows, the <runProgram> action will by default launch programs by their 8.3 names (the same path type obtainedthrough the .dos suffix) to avoid potential errors dealing with spaces and invalid characters in the path. However, as the 8.3 pathmay change depending on other files in the folder, sometimes this is not convenient. For example, when you need to check if theexecutable is running through the <processTest> rule. In these cases, you can prevent the automatic 8.3 conversion usingthe <useMSDOSPath> tag:
<project>...<finalPageActionList>...<runProgram><progressText>Launch Application</progressText><program>${installdir}/My Application with long filename.exe"</program><programArguments>&</programArguments><!-- Use long filename --><useMSDOSPath>0</useMSDOSPath>
</runProgram>...
</finalPageActionList>...<preUninstallationActionList><while><actionList>
<showWarning><text>The application "My Application with long filename.exe" is still running, ←↩
please close it and click ok</text></showWarning>
</actionList><conditionRuleList>
<processTest><logic>is_running</logic><name>My Application with long filename.exe</name>
</processTest></conditionRuleList>
</while>...
</preUninstallationActionList>...
</project>
The <runProgram> action can also be used to call external interpreters, for example, to execute Visual Basic or AppleScripts.The example below explains how to take advantage of this to restart the computer after the installation on OS X, in which the<rebootRequired> tag is not allowed:
<finalPageActionList><actionGroup progressText="Reboot Computer"><actionList>
<runProgram><abortOnError>0</abortOnError>
BitRock InstallBuilder User Guide 8156 / 393
<program>osascript</program><programArguments>-e "tell application \"Finder\" to restart"</programArguments><showMessageOnError>0</showMessageOnError>
</runProgram><!-- If using osascript failed, try using reboot --><runProgram>
<program>reboot</program><programArguments></programArguments><ruleList><compareText>
<logic>does_not_equal</logic><text>${program_stderr}</text><value></value>
</compareText></ruleList>
</runProgram></actionList>
</actionGroup></finalPageActionList>
BitRock InstallBuilder User Guide 8157 / 393
When running shell scripts with subscripts in backgroundOn Unix, when calling shell scripts that also call subscripts in the background, even if the execution of the main shellscript terminates, the installer keeps waiting for the launched child processes in background to close their standardstreams. An example of this situation would be when manually starting a Unix service backup-daemon:backup-daemon script
# chkconfig: 235 30 90# ...start(){
#.../opt/backups/bin/start-backup-daemon.sh &#...
}
# ...exit 0
When calling this script from the installer, for example using the code below:
<runProgram><program>/etc/init.d/backup-daemon</program><programArguments>start</programArguments><workingDirectory>/etc/init.d</workingDirectory>
</runProgram>
The child script /opt/backups/bin/start-backup-daemon.sh is executed in background and the mainservice script quickly reaches to the end and executes exit 0. However, as the child process is still running, theinstaller hangs until it finishes or its standard streams are closed. The solution for this issue would be to redirect theoutput of the child script to /dev/null:backup-daemon script reworked
# chkconfig: 235 30 90# ...start(){
#.../opt/backups/bin/start-backup-daemon.sh > /dev/null 2> /dev/null &#...
}
# ...exit 0
This way the installer won’t hang waiting for output from /opt/backups/bin/start-backup-daemon.sh andthe installation will continue after the script reaches the exit 0.Another solution that does not require modifying the service script would be to redirect the output when calling it fromthe installer:
<runProgram><program>/etc/init.d/backup-daemon</program><programArguments>start > /dev/null 2> /dev/null</programArguments><workingDirectory>/etc/init.d</workingDirectory>
</runProgram>
Or, if you are interested in the output, redirect it to files. The snippets below create a custom action to wrap the<runProgram> and make it return the redirected streams:Custom action wrapping the <runProgram> to redirect its streams to files and return the result
<functionDefinitionList><actionDefinition>
<name>runProgramRedirected</name><actionList>
<!-- Create a timestamp to use unique filenames --><createTimeStamp><format>%Y%m%d%H%M%S</format><variable>timestamp</variable>
</createTimeStamp><!-- Call the problematic script redirecting its output to files --><runProgram><program>${program}</program><programArguments>${programArguments} > ${system_temp_directory}/stdout_$ ←↩
{timestamp}.txt 2> ${system_temp_directory}/stderr_${timestamp}.txt</ ←↩programArguments>
<workingDirectory>${workingDirectory}</workingDirectory></runProgram>
<!-- Read the result into variables --><readFile><name>${stdout}</name><path>${system_temp_directory}/stdout_${timestamp}.txt</path>
</readFile><readFile><name>${stderr}</name><path>${system_temp_directory}/stderr_${timestamp}.txt</path>
</readFile><!-- Remove the files --><deleteFile path="${system_temp_directory}/stdout_${timestamp}.txt"/><deleteFile path="${system_temp_directory}/stderr_${timestamp}.txt"/>
<globalVariables names="${stderr} ${stdout}"/></actionList><parameterList>
<stringParameter name="program" value="" default=""/><stringParameter name="programArguments" value="" default=""/><stringParameter name="workingDirectory" value="" default=""/><stringParameter name="stderr" value="" default="program_stderr"/><stringParameter name="stdout" value="" default="program_stdout"/>
</parameterList></actionDefinition>
</functionDefinitionList>
And call it when needed:
<runProgramRedirected><program>/etc/init.d/backup-daemon</program><programArguments>start</programArguments><workingDirectory>/etc/init.d</workingDirectory>
</runProgramRedirected>
BitRock InstallBuilder User Guide 8158 / 393
8.3.1 Launching in the Background
The standard behavior of the <runProgram> action is to wait for the spawned process to end but it is also possible to launchthe process in the background by appending an ampersand to the arguments. For example, to execute our application at the endof the installation without preventing the installer from finishing you could use the following snippet:
<finalPageActionList><runProgram>
<program>${installdir}/bin/myApplication.exe</program><programArguments>--arg1 value1 --arg2 value 2 &</programArguments>
</runProgram></finalPageActionList>
8.3.2 Opening Programs in OS X
Application bundles are the most common way of distributing software packages on OS X. They are presented as a single filewhich is actually a directory containing all of the necessary resources (images, libraries. . . ).
These bundles can be executed by double-clicking on them, as if they were regular files, so it is a common mistake to try toexecute them using the command line as:
$> /Applications/BitRock\ InstallBuilder\ Professional\ 8.2.0/bin/Builder.app
Or alternatively, using InstallBuilder actions:
<runProgram><program>/Applications/BitRock InstallBuilder Professional 8.2.0/bin/Builder.app</ ←↩
program></runProgram>
Which results in an error similar to: "-bash: /Applications/BitRock InstallBuilder Professional 8.2.0/bin/Builder.app/:is a directory" or a more detailed error suggesting using open (see below) in recent InstallBuilder versions.
There are two ways of executing an application bundle:
• Using the open command: This command is the equivalent of a double-click over the bundle. It can be also used to openregular files, which will launch the associated application:
<runProgram><program>open</program><programArguments>"${installdir}/YourApplication.app"</programArguments>
</runProgram>
The default behavior of the open command is to launch the process in background, so you don’t need to add an "&" at the endof the arguments.
However, if you want to make InstallBuilder wait for the process to finish (launch the bundle in the foreground) you can use the-W command line flag:
<runProgram><program>open</program><programArguments>-W "${installdir}/YourApplication.app"</programArguments>
</runProgram>
A limitation of using open to launch the bundle is that it does not support passing arguments to the launched application in itsearly versions (it started supporting it from OS X 10.6.2). If you just support versions newer than OS X 10.6.2, you can use the--args command line flag:
BitRock InstallBuilder User Guide 8159 / 393
<runProgram><program>open</program><programArguments>-W "${installdir}/YourApplication.app" --args --data-dir ${ ←↩
installdir}/data --check-for-updates</programArguments></runProgram>
All the arguments after --args are directly passed to the application, so you don’t have to surround them by quotes.
• Calling the CFBundleExecutable specified in the Info.plist file: The application bundle contains an XML documentdescribing multiple aspects of the bundle behavior (the binary to execute when double clicked, the icon to use in the dock. . . ).One of the keys specified is CFBundleExecutable, which determines which of the contained files will be executed whenopening the bundle. There are multiple ways of retrieving this key but the easiest way is by executing:
$> defaults read /Applications/BitRock\ InstallBuilder/bin/Builder.app/Contents/Info ←↩CFBundleExecutable
Which will return the file that will be executed relative to the directory Builder.app/Contents/MacOS. In the case of In-stallBuilder application bundles, it will return installbuilder.sh (Builder.app/Contents/MacOS/installbuilder.sh).
Another possibility would be to just open it with a text editor and look for the CFBundleExecutable key and its <string>:
$> emacs Builder.app/Contents/Info.plist
Or from Finder, in the "right-click" menu, clicking "Show Package Contents" and opening Contents/Info.plist.
Using this information, you can execute it using the <runProgram> action:
<runProgram><program>/Applications/BitRock InstallBuilder/bin/Builder.app/Contents/MacOS/ ←↩
installbuilder.sh</program><programArguments>build ~/project.xml linux</programArguments>
</runProgram>
8.4 Creating Custom Actions
In addition to the built-in actions, InstallBuilder allows you to create new custom actions using a mix of base actions and rules.New actions are defined using the <functionDefinitionList>.
For example, let’s suppose you have a lot of long running <runProgram> actions (for example installing sub installers inunattended mode) and you are enclosing all of them in a <showProgressDialog>:
<showProgressDialog><title>Please wait ...</title><actionList>
<runProgram><program>${yourProgram}</program><programArguments>--mode unattended --prefix "${installdir}"</programArguments>
</runProgram></actionList>
</showProgressDialog>
You could then create a new action called <unattendedRunProgamWithProgress> that will just accept the program toexecute and some additional arguments:
<project>...<functionDefinitionList>
<!-- Define the action -->
BitRock InstallBuilder User Guide 8160 / 393
<actionDefinition><name>unattendedRunProgamWithProgress</name><actionList>
<showProgressDialog><title>Please wait ...</title><actionList>
<runProgram progressText="Installing ${program}"><program>${program}</program><programArguments>--mode unattended ${programArguments}</ ←↩
programArguments></runProgram>
</actionList></showProgressDialog>
</actionList><parameterList>
<stringParameter name="program" value="" default=""/><stringParameter name="programArguments" value="" default=""/>
</parameterList></actionDefinition>
</functionDefinitionList><initializationActionList>
<!-- Use the new action --><unattendedRunProgamWithProgress>
<program>${yourProgram}</program><programArguments>--prefix "${installdir}"</programArguments>
</unattendedRunProgamWithProgress></initializationActionList>...
</project>
This new action will take care of displaying the progress dialog and launching the program in unattended mode. The basics ofhow to define a new custom action are as follow:
• <name>: The new custom action will be available in other parts of the XML by its name. No other custom action can bedefined with the same <name>.
• <actionList>: This <actionList> defines the set of actions to wrap. In addition to built-in actions, it also acceptsother custom actions (if they were previously defined).
• <parameterList>: This <parameterList> defines the parameters of the new action. They are used to interfacewith the inner actions in the <actionList>. In addition to the settings defined in the <parameterList>, the newcustom action will also support all the common action properties such as <progressText>, <show>, <abortOnError>,<action.showMessageOnError>. . .
For example, if you want to wrap the built-in <unpackDirectory> action to make it safer and previously backup the desti-nation, you could use:
<functionDefinitionList><actionDefinition><name>unpackDirectoryWithBackup</name><actionList>
<actionGroup><actionList>
<createTimeStamp><format>%s</format><variable>timestamp</variable>
</createTimeStamp><logMessage>
<text>File ${destination} already exists, renaming it to ${destination}.${ ←↩timestamp}</text>
</logMessage>
BitRock InstallBuilder User Guide 8161 / 393
<renameFile><destination>${destination}.${timestamp}</destination><origin>${destination}</origin>
</renameFile></actionList><ruleList>
<fileExists path="${destination}"/></ruleList>
</actionGroup><unpackDirectory>
<component>${component}</component><destination>${destination}</destination><folder>${folder}</folder><origin>${origin}</origin>
</unpackDirectory></actionList><parameterList>
<stringParameter name="component" value="" default=""/><stringParameter name="folder" value="" default=""/><stringParameter name="origin" value="" default=""/><stringParameter name="destination" value="" default=""/>
</parameterList></actionDefinition>
</functionDefinitionList>
The new action will then be available at any point in the installation:
<project>...<initializationActionList>
<unpackDirectoryWithBackup><component>binaries</component><folder>bin</folder><origin>checker/checker.bin</origin><destination>${installdir}/temp</destination>
</unpackDirectoryWithBackup></initializationActionList>...
</project>
In the example above, the <parameterList>was basically a map of the main properties accepted by the <unpackDirectory>action and the <actionList> included a couple of actions to do the backup and log some information before calling <unpackDirectory>.
Another useful example could be to manage your bundled Apache server:
<project>...<functionDefinitionList><actionDefinition><name>apache</name>
<actionList><runProgram program="${apacheCtlPath}" programArguments="${action}"/>
</actionList><parameterList>
<stringParameter name="action" value="" default="start"/><stringParameter name="apacheCtlPath" value="" default="${installdir}/apache2/bin/ ←↩
apachectl"/></parameterList>
</actionDefinition></functionDefinitionList>...<initializationActionList>
BitRock InstallBuilder User Guide 8162 / 393
<apache action="start"/></initializationActionList>...
</project>
8.4.1 Returning values from a custom action
I some cases, you may want to create custom actions that perform some operations and return the result in a variable. The obviousway of achieving this would be to implement something like the following:
<project>...<functionDefinitionList><actionDefinition><name>getPreviousInstallDir</name>
<actionList><setInstallerVariable name="dir" value=""/><setInstallerVariable name="dir" value="${env(OLD_DIR)}" >
<ruleList><platformTest type="unix"/>
</ruleList></setInstallerVariable><registryGet>
<key>HKEY_LOCAL_MACHINE\Software\${project.windowsSoftwareRegistryPrefix}</key><name>Location</name><variable>installdir</variable><ruleList>
<platformTest type="windows"/></ruleList>
</registryGet><!-- Set the return value. ${result} contains the nameof the variable provided by the caller --><setInstallerVariable name="${result}" value="${dir}"/>
</actionList><parameterList>
<stringParameter name="result" value="" default=""/></parameterList>
</actionDefinition></functionDefinitionList>...<initializationActionList><getPreviousInstallDir result="previous_dir"/>
</initializationActionList>...
</project>
However, if you try this, you will realize that the previous_dir variable will still be undefined after the execution of thecustom action. The reason is that all the variables used in the custom action are just a local copy of the project level variables.The same way, variables created inside the custom action are not available in the global scope. This way, you can safely use anyvariable inside the function without affecting other project level variables.
To solve this issue, you just need to mark the desired variables as global using the <globalVariables> action. This actionaccepts a space-separated list of variable names that will then be preserve their values outside the custom action. In our example:
<project>...<functionDefinitionList><actionDefinition><name>getPreviousInstallDir</name>
<actionList>
BitRock InstallBuilder User Guide 8163 / 393
<!-- Define the variable configured as global --><globalVariables names="${result}"/><setInstallerVariable name="dir" value=""/><setInstallerVariable name="dir" value="${env(OLD_DIR)}" >
<ruleList><platformTest type="unix"/>
</ruleList></setInstallerVariable><registryGet>
<key>HKEY_LOCAL_MACHINE\Software\${project.windowsSoftwareRegistryPrefix}</key><name>Location</name><variable>installdir</variable><ruleList>
<platformTest type="windows"/></ruleList>
</registryGet><!-- Set the return value. ${result} contains the nameof the variable provided by the caller --><setInstallerVariable name="${result}" value="${dir}"/>
</actionList><parameterList>
<stringParameter name="result" value="" default=""/></parameterList>
</actionDefinition></functionDefinitionList>...<initializationActionList><getPreviousInstallDir result="previous_dir"/>
</initializationActionList>...
</project>
Take into account that once a variable is defined as global, it will always be accessible from other custom actions, even if theydid not declare it as global.
Custom actions return valuesTo return values from a custom action you must create a parameter in which the result will be returned and mark it as globalusing the <globalVariables> action.
8.4.2 Current Limitations
The Custom Actions are still under development and although the functionality is fully usable, they have some known limitations:
Order matters To make the builder recognize a custom action as a valid XML element, it must be defined in the XML projectbefore it is used. For example, the below will fail with "Unknown tag <myShowInfo>" error:
<project>...<initializationActionList><myShowInfo/>
</initializationActionList>...<functionDefinitionList><actionDefinition>
<name>myShowInfo</name><actionList>
<showInfo text="This is a customized showInfo: ${text}"/></actionList><parameterList>
BitRock InstallBuilder User Guide 8164 / 393
<stringParameter name="text"/></parameterList>
</actionDefinition></functionDefinitionList>...
</project>
However, changing the order will fix the issue:
<project>...<functionDefinitionList><actionDefinition>
<name>myShowInfo</name><actionList>
<showInfo text="This is a customized showInfo: ${text}"/></actionList><parameterList>
<stringParameter name="text"/></parameterList>
</actionDefinition></functionDefinitionList>...<initializationActionList><myShowInfo/>
</initializationActionList>...
</project>
Future versions will fix the issue by implementing a two-pass XML parser.
Custom actions cannot be defined in the GUI tree They cannot be defined in the tree, but actions defined using the integratedXML editor (or externally added) will be available as other regular actions in the action-selector dialog.
Name conventions The <name> must only contain ascii letters. The same applies to its parameters.
Custom actions cannot overwrite built-in ones If you define a new <showInfo>, and a built-in <showInfo> already exists,it will be ignored.
8.5 Displaying Progress While Executing Long Running Actions
When the actions executed require a long time to complete, such as waiting for a service to start or when uncompressing a zipfile, it is advisable to provide some feedback to the end user. The first way of providing feedback is defining a progressText inyour action. If the actions are executed during the <postInstallationActionList>, <postUninstallerCreationActionList>or in a <folder>’s action list, the main progress bar used to display the unpacking process will display the defined message:
<component><name>myComponent</name>...<folderList><folder>
<name>documents</name>...<actionList>
<runProgram progressText="Starting Apache Server..."><program>${installdir}/apache/apachectl</program><programArguments>start &</programArguments>
</runProgram><wait ms="3000" progressText="Waiting apache server to start..."/>
</actionList>
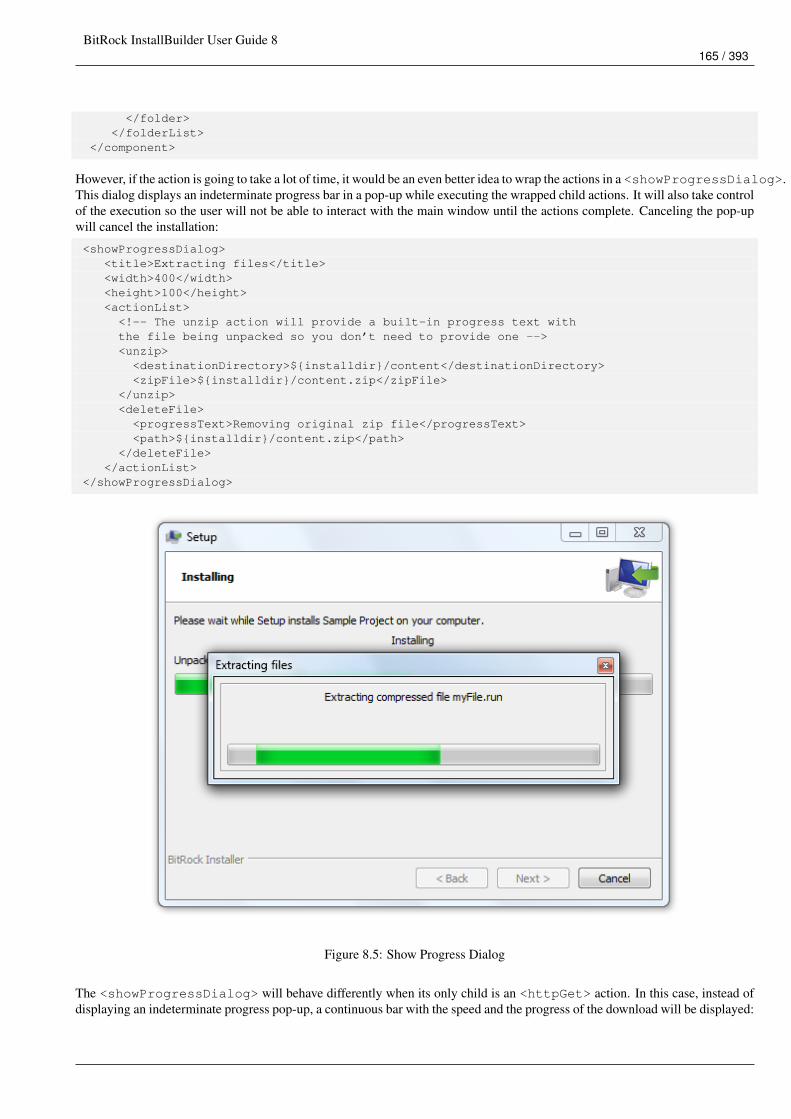
BitRock InstallBuilder User Guide 8165 / 393
</folder></folderList>
</component>
However, if the action is going to take a lot of time, it would be an even better idea to wrap the actions in a <showProgressDialog>.This dialog displays an indeterminate progress bar in a pop-up while executing the wrapped child actions. It will also take controlof the execution so the user will not be able to interact with the main window until the actions complete. Canceling the pop-upwill cancel the installation:
<showProgressDialog><title>Extracting files</title><width>400</width><height>100</height><actionList>
<!-- The unzip action will provide a built-in progress text withthe file being unpacked so you don’t need to provide one --><unzip>
<destinationDirectory>${installdir}/content</destinationDirectory><zipFile>${installdir}/content.zip</zipFile>
</unzip><deleteFile>
<progressText>Removing original zip file</progressText><path>${installdir}/content.zip</path>
</deleteFile></actionList>
</showProgressDialog>
Figure 8.5: Show Progress Dialog
The <showProgressDialog> will behave differently when its only child is an <httpGet> action. In this case, instead ofdisplaying an indeterminate progress pop-up, a continuous bar with the speed and the progress of the download will be displayed:
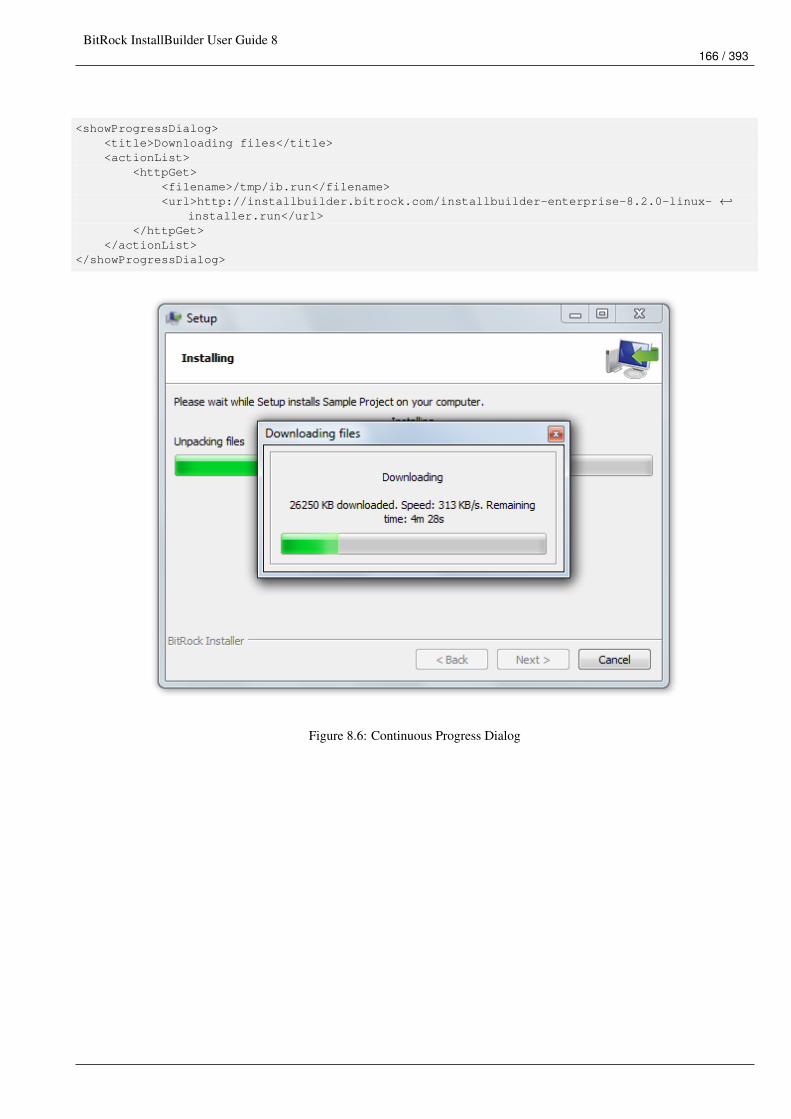
BitRock InstallBuilder User Guide 8166 / 393
<showProgressDialog><title>Downloading files</title><actionList>
<httpGet><filename>/tmp/ib.run</filename><url>http://installbuilder.bitrock.com/installbuilder-enterprise-8.2.0-linux- ←↩
installer.run</url></httpGet>
</actionList></showProgressDialog>
Figure 8.6: Continuous Progress Dialog
BitRock InstallBuilder User Guide 8167 / 393
Progress Dialog HangingIn some cases, when copying big volumes of data using a <copyFile> action inside a <showProgressDialog>, theUI may hang for a while. This is a known limitation. To solve it, you could use OS commands instead. For example, you couldwrap the code in a custom action:
<project>...<functionDefinitionList><!-- Define the action --><actionDefinition><name>copyFileWithProgress</name><actionList>
<actionGroup><actionList>
<createTimeStamp><format>%s</format><variable>timestamp</variable>
</createTimeStamp><setInstallerVariable name="destination" value="${destination}.${timestamp ←↩
}"/></actionList><ruleList>
<compareText text="${destination}" logic="equals" value=""/></ruleList>
</actionGroup><showProgressDialog>
<title>Please wait ...</title><actionList><actionGroup progressText="${text}"><actionList><setInstallerVariableFromRegEx>
<name>origin</name><pattern>/</pattern><substitution>\</substitution><text>${origin.dos}</text>
</setInstallerVariableFromRegEx><setInstallerVariableFromRegEx>
<name>destination</name><pattern>/</pattern><substitution>\</substitution><text>${destination.dos}</text>
</setInstallerVariableFromRegEx><runProgram><program>cmd</program><programArguments>/C copy /y "${origin}" "${destination}"</ ←↩
programArguments></runProgram>
</actionList><ruleList>
<platformTest type="windows"/></ruleList>
</actionGroup><actionGroup progressText="${text}">
<actionList><runProgram><program>cp</program><programArguments>-r "${origin.unix}" "${destination.unix}"</ ←↩
programArguments></runProgram>
</actionList><ruleList>
<platformTest type="windows" negate="1"/></ruleList>
</actionGroup></actionList>
</showProgressDialog></actionList><parameterList><stringParameter name="origin" value="" default=""/><stringParameter name="destination" value="" default=""/><stringParameter name="text" value="" default=""/>
</parameterList></actionDefinition></functionDefinitionList>...<intializationActionList><!-- if destination is empty, it will be timestamped --><copyFileWithProgress origin="${installdir}" destination=""/>
</intializationActionList></project>

BitRock InstallBuilder User Guide 8168 / 393
8.6 Error Handling
During the installation or uninstallation process, there are scenarios in which the installer encounters a non-recoverable error orsimply is manually aborted. This section explains how these scenarios are handled by InstallBuilder and how to manually defineactions in case of failure either to clean the installation or to try to recover.
8.6.1 Handling Action Errors
All actions include some error handling tags that make it very easy to specify the desired behavior when an error is found duringits execution.
• <abortOnError> : This property configures whether or not to abort the execution of the current action list when one of itschild actions fails. Its default value is 1.
For example, in the next snippet, the second action will never be executed:
<initializationActionList><throwError text="This will abort the installation!"/><showInfo text="This will never be executed"/>
</initializationActionList>
But if you set abortOnError="0", even if a message is displayed, the execution will not be aborted:
<initializationActionList><throwError text="This will not abort the installation!" abortOnError="0"/><showInfo text="And this will be executed after the error pop-up"/>
</initializationActionList>
• <showMessageOnError>: This property configures whether or not to display a pop-up notifying the user of the error. Itsdefault value is 1. If you set showMessageOnError="0" and an error occurs, if the action is not configured to ignoreerrors with abortOnError="0", the rest of the actions in the action list will be skipped. However, although the actions willbe skipped, no error will be propagated upward so the installation will not be aborted:
<initializationActionList><throwError text="This will not abort the installation but no other action in the ←↩
initializationActionList will be executed!" showMessageOnError="0"/><showInfo text="This will never be executed"/>
</initializationActionList>
To completely mask an error, you can use a combination of showMessageOnError="0" and abortOnError="0". Areal world example could be to determine if certain Linux command is available and getting its path:
<initializationActionList><!-- The below will fail in some casesbut we do not want to display any error or to abort --><runProgram>
<program>which</program><programArguments>gksudo</programArguments><showMessageOnError>0</showMessageOnError><abortOnError>0</abortOnError>
</runProgram><showInfo text="gksudo is not available" >
<ruleList><compareText text="${program_stdout}" logic="equals" value=""/>
BitRock InstallBuilder User Guide 8169 / 393
</ruleList></showInfo><showInfo text="gksudo is available and its path is ${program_stdout}" >
<ruleList><compareText text="${program_stdout}" logic="does_not_equal" value=""/>
</ruleList></showInfo>
</initializationActionList>
• <customErrorMessage> : When an action fails, InstallBuilder generates a built-in error to be displayed if showMessageOnError="1"This error message can be overwritten using the customErrorMessage property. For example, calling a nonexistent com-mand foo would normally result in an error such as "foo not found" but you can customize it to: "foo must be installed,aborting. . . ":
<runProgram><program>foo</program><customErrorMessage>foo must be installed, aborting...</customErrorMessage>
</runProgram>
• <onErrorActionList>: When an action reports an error during its execution, regardless of the values of showMessageOnErrorand abortOnError, its onErrorActionList will be executed. For example, you can use it to clean the effects of thefailed action before continuing aborting:
<!-- Try to copy some images to the installation directory and then create a pdffile but if the process fail, do not want to preserve the images and the malformedpdf file. The action will take care of the cleaning itself --><actionGroup>
<actionList><!-- ${installer_directory} is resolved to thedirectory of the installer --><copyFile origin="${installer_directory}/images" destination="${installdir}"/><runProgram><program>convert</program><programArguments>${installdir}/images/*.jpg ${installdir}/myImages.pdf</ ←↩
programArguments></runProgram>
</actionList><onErrorActionList>
<deleteFile path="${installdir}/images"/><deleteFile path="${installdir}/myImages.pdf"/>
</onErrorActionList></actionGroup>
8.6.2 Installation Aborted Action List
This action list gets executed when the project is aborted, either by the user or by an internal error. It provides a global way ofdealing with the error in contra-position to the specific approach of the <onErrorActionList>. For example, it could beused to make sure the installation directory is deleted after the installation is being canceled:
<project>...<installationAbortedActionList>
<deleteFile path="${installdir}"/></installationAbortedActionList>...
</project>
You can also differentiate between an installation aborted by the user or an error checking the built-in variable ${installation_aborted_by_user}.
BitRock InstallBuilder User Guide 8170 / 393
8.6.3 When Does an Error Not Abort the Installation?
In most cases, when an error is thrown and it is not caught at any point using abortOnError="0" (the error is completelyignored) or showMessageOnError="0" (the error aborts the current action list but is not propagated upwards), it aborts theinstallation. However, there are some special cases in which the error is treated as a warning or is ignored:
• Parameter’s Validation Actions (<validationActionList>): If an unmasked error occurs inside a parameter action list,the rest of actions in the <validationActionList> are skipped and the error is reported to the user but instead of abortingthe installation, the page is redrawn. For example, if you unconditionally throw an error in a <validationActionList>,the installer will never continue after this page:
<directoryParameter><name>installdir</name><validationActionList>
<throwError text="This page will be displayed again and again !"/></validationActionList>
</directoryParameter>
• Component’s Validation Actions (<componentSelectionValidationActionList>): If an unmasked error occursinside this action list, the same way it happens with the <validationActionList>, the error is reported to the user butinstead of aborting the installation, the component selection page is redrawn:
<component><name>C</name><description>Component C</description><detailedDescription>This component depends on ’A’ and ’B’</detailedDescription>...<componentSelectionValidationActionList>
<throwError><text>Component ’C’ cannot be installed if you have not selected both ’A’ and ’ ←↩
B’.</text><ruleList>
<isFalse value="${component(A).selected}"/><isFalse value="${component(B).selected}" />
</ruleList></throwError>
</componentSelectionValidationActionList>...
</component>
• Post Installation Actions and following (<postInstallationActionList>): At this point of the installation, all of thefiles have already been copied. If an error happens, instead of aborting the installation, it just prevents the execution of theremaining actions in that list and it is reported. This also applies to the <postUninstallerCreationActionList>and <finalPageActionList> lists.
• Pre and Post Uninstallation Actions (<preUninstallationActionList>,<postUninstallationActionList>):If an error occurs in these action lists, it aborts the rest of the actions in the list but it is not reported, just logged in the unin-stallation log.
• Pre Show Help Actions (<preShowHelpActionList>): Any error in this action list will just skip the rest of actions in thelist and will be silently ignored
8.6.4 Cleaning and Rollback Directory Restoration
When an installation is aborted during the installation of files, all of the unpacked files will be automatically deleted, and ifthe rollback functionality was enabled using <enableRollback>1</enableRollback>, the old files overwritten by theprocess will be restored.
Take into account that files manually deleted, copied or moved will not be automatically handled so the <installationAbortedActionList>must be used for this purpose.
BitRock InstallBuilder User Guide 8171 / 393
8.7 List of Available Actions
HTTP Actions
HTTP GET Request
Access a URL and save the result into a file. The allowed properties in the <httpGet> action are:
• <filename>: Filename to which to save the result to
• <password>: Password for URLs that require authentication
• <url>: URL to launch
• <username>: Username for URLs that require authentication
Examples:
Download a readme file
<httpGet><filename>${installdir}/README.txt</filename><url>http://www.example.com/docs/readme.txt</url><username>foo</username><password>bar</password>
</httpGet>
Display a progress bar while downloading a big file
<showProgressDialog><title>Downloading files</title><actionList>
<httpGet><filename>${system_temp_directory}/ib.run</filename><url>http://installbuilder.bitrock.com/installbuilder-enterprise-8.2.0-linux- ←↩
installer.run</url></httpGet>
</actionList></showProgressDialog>
Additional Examples: Example 1, Example 2
HTTP POST Request
Access a URL using HTTP POST and save the result into a file. The allowed properties in the <httpPost> action are:
• <filename>: Filename to which to save the result to
• <password>: Password for URLs that require authentication
• <url>: URL to launch
• <username>: Username for URLs that require authentication
• <queryParameterList>: List of variables that will be included in the POST query.
Examples:
Query your server to validate user provided input

BitRock InstallBuilder User Guide 8172 / 393
<parameterGroup><name>credentials</name><title>Account Credentials</title><explanation>Introduce Your account credentials</explanation><parameterList>
<stringParameter name="username" description="Username:"/><passwordParameter name="password" description="Password:"/><stringParameter name="key" description="License key:"/>
</parameterList><validationActionList>
<httpPost><url>http://www.example.com/register.php</url><filename>${installdir}/result</filename><queryParameterList><queryParameter name="name" value="${username}"/><queryParameter name="pass" value="${password}"/><queryParameter name="license" value="${key}"/>
</queryParameterList></httpPost><readFile path="${installdir}/result" name="result"/><deleteFile path="${installdir}/result"/><throwError>
<text>The provided credentials are not valid</text><ruleList><compareText>
<text>${result}</text><logic>does_not_contain</logic><value>OK</value>
</compareText></ruleList>
</throwError></validationActionList>
</parameterGroup>
Additional Examples: Example 1, Example 2, Example 3
Configure proxy
Configure a proxy to be used by the http actions (<httpGet> and <httpPost>).
The allowed properties in the <httpProxyInit> action are:
• <exclude>: Space separated list of patters for urls that will be excluded from the proxy configuration
• <password>: Proxy server password
• <port>: Proxy server port
• <server>: Proxy server url
• <username>: Proxy server username
If no properties are defined, the action will try to aoutodetect the proxy configured in the system.
Examples:
Ask the user to configure the proxy
<parameterGroup><name>proxyConfiguration</name><title>Configuration</title>
BitRock InstallBuilder User Guide 8173 / 393
<explanation></explanation><parameterList>
<stringParameter name="username" description="Username:"/><passwordParameter name="password" description="Password:"/><parameterGroup>
<name>proxyServer</name><orientation>horizontal</orientation><parameterList><stringParameter name="server" description="Server: "/><stringParameter name="port" description="Port:" width="5"/>
</parameterList></parameterGroup>
</parameterList><postShowPageActionList>
<httpProxyInit><username>${username}</username><password>${password}</password><server>${server}</server><port>${port}</port>
</httpProxyInit></postShowPageActionList>
</parameterGroup>
Use system proxy configuration
<httpProxyInit/>
Encode URL
Encode a given text using URL formatting specifications and place the result in a variable. The allowed properties in the<urlEncode> action are:
• <text>: Text to encode
• <variable>: Variable to store the result in
Examples:
Encode text
<urlEncode><text>Some long text to
send to your server containg a lot offorbiden characters such as ? [ and @</text>
<variable>encodedText</variable></urlEncode>
In the example above, the encoded text would be Some+long+text+to%0d%0asend+to+your+server+containg+a+lot+of%0d%0aforbiden+characters+such+as+%3f+%5b+and+%40,ready to send to our server using an <httpPost> action.
Decode URL
Decode a given text using URL formatting specifications and place the result in a variable. The allowed properties in the<urlDecode> action are:
• <text>: Text to decode
• <variable>: Variable to store the result in
BitRock InstallBuilder User Guide 8174 / 393
Examples:
Decode url
<urlDecode><text>Some+long+text+to%0d%0asend+to+your+server+containg+a+lot+of%0d%0aforbiden+ ←↩
characters+such+as+%3f+%5b+and+%40</text><variable>decodedText</variable>
</urlDecode>
The action will store the below text in the variable ${decodedText}:
Some long text tosend to your server containg a lot offorbiden characters such as ? [ and @
Launch Browser
Launch the default web browser with a given URL. The allowed properties in the <launchBrowser> action are:
• <url>: URL of the page to be shown.
Examples:
Visit your website at the end of the installation
<finalPageActionList><launchBrowser><url>www.downloads.com/optional</url><progressText>Would you like to visit our website to downloadadditional modules?</progressText>
</launchBrowser></finalPageActionList>
Additional Examples: Example 1, Example 2, Example 3
File Manipulation Actions
DOS to Unix File Conversion
Convert plain text files in DOS/Mac format to Unix format. It is specially useful to fix Unix shell scripts modified on Windows.
The allowed properties in the <dos2unix> action are:
• <excludeFiles>: Patterns to exclude files
• <files>: File patterns to apply action to
• <matchHiddenFiles>: Whether or not to attempt to match Windows hidden files
Examples:
Convert all shell scripts to Unix line endings
<dos2unix><files>${installdir}/scripts/*.sh</files>
</dos2unix>
BitRock InstallBuilder User Guide 8175 / 393
Unix to DOS File Conversion
Convert plain text files in Unix format to DOS format. It is specially useful to fix Windows bat files modified on Unix.
The allowed properties in the <unix2dos> action are:
• <excludeFiles>: Patterns to exclude files
• <files>: File patterns to apply action to
• <matchHiddenFiles>: Whether or not to attempt to match Windows hidden files
Examples:
Convert all batch scripts to Unix line endings
<unix2dos><files>${installdir}/scripts/*.bat</files>
</unix2dos>
Read value from XML file
Read value of element or attribute from an XML file The allowed properties in the <xmlFileGet> action are:
• <attribute>: If present, the action will refer to the attribute instead of the element
• <element>: XPath expression pointing to the selected element
• <file>: Path to XML file
• <variable>: Variable where to start the result
Examples:
Extract a property from an Info.plist file If you have an Info.plist file with contents:
<?xml version="1.0" encoding="UTF-8"?><!DOCTYPE plist PUBLIC "-//Apple Computer//DTD PLIST 1.0//EN" "http://www.apple.com/DTDs/ ←↩
PropertyList-1.0.dtd"><plist version="1.0">
<dict><key>CFBundleDevelopmentRegion</key><string>English</string><key>CFBundleExecutable</key><string>installbuilder.sh</string><key>CFBundleIdentifier</key><string>com.bitrock.installbuilder</string><key>CFBundleInfoDictionaryVersion</key><string>6.0</string>...
</dict></plist>
You can access the CFBundleExecutable associated string using:
<xmlFileGet><attribute></attribute><element>/plist/dict[1]/string[preceding-sibling::key[1]/text()="CFBundleExecutable"]</ ←↩
element><file>${installdir}/some.app/Contents/Info.plist</file><variable>CFBundleExecutable</variable>
</xmlFileGet>
BitRock InstallBuilder User Guide 8176 / 393
Extract an attribute from an XML If instead of working with XML elements you need to read an attribute, like the <progressText>in the below InstallBuider action:
<actionList><runProgram progressText="Launch ${project.fullName}" ><program>${installdir}/bin/app.exe</program><programArguments>&</programArguments>
</runProgram></actionList>
You can use:
<xmlFileGet><!-- Specify the XML element containing the attribute --><element>/actionList/runProgram</element><!-- Specify the attribute --><attribute>progressText</attribute><file>${build_project_directory}/actionList.xml</file><variable>progressText</variable>
</xmlFileGet>
Set value in XML file
Set the value of an element or attribute in an XML file The allowed properties in the <xmlFileSet> action are:
• <attribute>: If present, the action will refer to the attribute instead of the element
• <element>: XPath expression pointing to the selected element
• <file>: Path to XML file
• <value>: Value to store in element or attribute
Examples:
Modify an item in a XML list To modify an entry in a XML address book:
<addressBook><addressList>
<address name="Jhon" email="[email protected]"/><address name="joseph" email="[email protected]"/>
</addressList></addressBook>
You can use:
<xmlFileSet><attribute>email</attribute><element>/addressBook/addressList/address[@name="Jhon"]</element><file>${installdir}/config/address.xml</file><value>[email protected]</value>
</xmlFileSet>
Comment subtree of XML file
Comment entire subtree of an XML file The allowed properties in the <xmlFileCommentElement> action are:
• <element>: XPath expression pointing to the selected element
BitRock InstallBuilder User Guide 8177 / 393
• <file>: Path to XML file
Examples:
Comment an entry in an XML list To remove (commenting it) one of the entries in the XML address book from our previousexample:
<xmlFileCommentElement><element>/addressBook/addressList/address[@name="joseph"]</element><file>${installdir}/config/address.xml</file>
</xmlFileCommentElement>
Read File Contents
Read the contents of a file and save it in a variable. The allowed properties in the <readFile> action are:
• <encoding>: Encoding of the text file
• <endOfLineConversion>: End Of Line Conversion
• <name>: Variable to which to save the file contents
• <path>: Path to the file you wish to read the contents from
• <removeBOM>: Whether or not to remove or not Byte Order Mark on Unicode files
Examples:
Read a packed .txt file and display it in the <finalPageActionList>
<finalPageActionList><actionGroup progressText="View readme file">
<actionList><readFile><name>text</name><path>${installdir}/readmes/README-1.txt</path>
</readFile><showText><text>${text}</text><title>README</title>
</showText></actionList>
</actionGroup></finalPageActionList>
Additional Examples: Example 1, Example 2, Example 3
Write Text to File
Create or replace a file with a certain text content. The allowed properties in the <writeFile> action are:
• <encoding>: Encoding of the text file
• <endOfLineConversion>: End Of Line Conversion
• <path>: Path of the file to be created or replaced
• <text>: Text to write
BitRock InstallBuilder User Guide 8178 / 393
Examples:
Write a summary of the installation
<writeFile><path>${installdir}/summary.txt</path><!-- 
 is the XML escape sequence forthe line break --><text>Username: ${username}
Password: *******Installation Type: ${project.installationType}IP: ${ip}Port: ${port}</text></writeFile>
Additional Examples: Example 1, Example 2, Example 3
Append Text to File
Append text to a file. If the file does not exist, it will be created. The allowed properties in the <addTextToFile> action are:
• <encoding>: Encoding of the text file
• <endOfLineConversion>: End Of Line Conversion
• <file>: Path to the file
• <insertAt>: Whether to insert the text at the beginning or at the end of the file
• <text>: Text to append
Examples:
Append information to a file in an upgrade installation:
<addTextToFile><file>${installdir}/ChangeLog</file><text>* Fixed application failing to start from directory with spaces.
* Added new plugins
* Removed unnecessary libraries
* Reworked UI</text>
<ruleList><compareText text="${project.installationType}" logic="equals" value="upgrade"/><fileExists path="${installdir}/ChangeLog"/>
</ruleList></addTextToFile>
Additional Examples: Example 1, Example 2, Example 3
Set INI File Property
Set property values of a INI file. If the file does not exists it will be created.
The allowed properties in the <iniFileSet> action are:
• <file>: Path to INI file
• <key>: Property Key
• <section>: INI section
BitRock InstallBuilder User Guide 8179 / 393
• <value>: Property Value
Examples:
Configure MySQL
<iniFileSet><file>${installdir}/mysql/my.cnf</file><section>mysqld</section><key>port</key><value>${port}</value>
</iniFileSet><iniFileSet>
<file>${installdir}/mysql/my.cnf</file><section>mysqld</section><key>socket</key><value>/tmp/mysql.sock</value>
</iniFileSet><iniFileSet>
<file>${installdir}/mysql/my.cnf</file><section>client</section><key>password</key><value>somePassWord!</value>
</iniFileSet>
Additional Examples: Example 1
Get INI File Property
Extract property values out of a INI file. If the key does not exists, the variable will be set to empty.
The allowed properties in the <iniFileGet> action are:
• <file>: Path to INI file
• <key>: Property Key
• <section>: INI section
• <variable>: Variable name to save property to
Examples:
Read PHP configuration
<iniFileGet><file>${installdir}/php/etc/php.ini</file><key>include_path</key><section>PHP</section><variable>php_include_path</variable>
</iniFileGet>
Additional Examples: Example 1
Write Property File Value
Writes out property values to a properties file, creating a new file if it does not exist. The allowed properties in the <propertiesFileSet>action are:
• <file>: Path to the property file

BitRock InstallBuilder User Guide 8180 / 393
• <key>: Property key
• <value>: Value to set the key to.
Examples:
Update the version of the installed application in an upgrade
<propertiesFileSet><file>${installdir}/installation.properties</file><key>version</key><value>${project.version}</value>
</propertiesFileSet>
Get Property File Value
Extract property values out of a properties file. The allowed properties in the <propertiesFileGet> action are:
• <file>: Path to the property file
• <key>: Property key
• <variable>: Variable name to save property to
Examples:
Check the version of an existing installation to upgrade and abort if greater than the current
<propertiesFileGet><file>${installdir}/installation.properties</file><key>version</key><variable>installedVersion</variable>
</propertiesFileGet><throwError text="The installed application is up to date. Aborting">
<ruleList><compareVersions><version1>${installedVersion}</version1><logic>greater_or_equal</logic><version2>${project.version}</version2>
</compareVersions></ruleList>
</throwError>
Substitute Text in File
Substitute a value in a file. The allowed properties in the <substitute> action are:
• <encoding>: Encoding of the files to substitute
• <excludeFiles>: Patterns to exclude files
• <files>: File patterns to apply action to
• <matchHiddenFiles>: Whether or not to attempt to match Windows hidden files
• <type>: Type of substitution, regular expression or exact
• <substitutionList>: List of patterns/values for a substitution
BitRock InstallBuilder User Guide 8181 / 393
Examples:
Replace well known placeholders
<substitute><files>${installdir}/conf/*</files><type>exact</type><substitutionList>
<substitution pattern="PATH_PLACEHOLDER" value="${installdir.unix}" /><substitution pattern="PORT_PLACEHOLDER" value="${server_port}" />
</substitutionList></substitute>
As the text to match is known, the code uses the exact <type>, which makes the action work faster.
Replace an unknown port in httpd.conf
<substitute><files>${installdir}/apache2/conf/httpd.conf</files><type>regexp</type><substitutionList>
<substitution pattern="\s*Listen\s+[0-9]+" value="${apache_port}"/></substitutionList>
</substitute>
As the port is unknown, we use the regexp <type>.
Add Directories to the Uninstaller
This action allows you to add new directories to the uninstaller, so they will be removed during the uninstallation process. Theuninstaller just takes care of deleting those files unpacked in the installation step. If your installer generates new files at runtime orcopies unpacked files to other locations you can use the <addDirectoriesToUninstaller> (and <addFilesToUninstaller>)to make the uninstaller also delete them in the uninstallation stage. The directories to add must exists at the time the action isexecuted or it will just skip.
The allowed properties in the <addDirectoriesToUninstaller> action are:
• <addContents>: Whether or not to add directory contents to the uninstaller
• <excludeFiles>: Patterns to exclude files
• <files>: File patterns to apply action to
• <matchHiddenFiles>: Whether or not to attempt to match Windows hidden files
Examples:
Add directory without its contents.
<createDirectory><path>${installdir}/config</path>
</createDirectory><addDirectoriesToUninstaller>
<files>${installdir}/config</files></addDirectoriesToUninstaller>
As just the directory and not its contents were added, the uninstaller will just delete the directory if it is empty. This way youruser can preserve the configuration files stored in that directory.
Add directory and its contents to the uninstaller.
BitRock InstallBuilder User Guide 8182 / 393
<copyFile><origin>${installdir}/data</origin><destination>${installdir}/backup</destination>
</copyFile>
<addDirectoriesToUninstaller><files>${installdir}/data</files><addContents>1</addContents><matchHiddenFiles>1</matchHiddenFiles>
</addDirectoriesToUninstaller>
If new files are added to the ${installdir}/data folder, the uninstaller won’t delete them, just those files registered will beremoved. This is how the uninstaller works for the unpacked files. Take into account that adding a directory with a big numberof files and nested directories could take some time to finish as the action must locate all the files to add.
Additional Examples: Example 1, Example 2
Add Files to Uninstaller
This action allows you to add new files to the uninstaller, so they will be removed during the uninstallation process. This actionbehaves the same way the <addDirectoriesToUninstaller> does but is intended to files. If the action is used withdirectories, the uninstaller will delete them regardless of the changes in its contents.
The allowed properties in the <addFilesToUninstaller> action are:
• <excludeFiles>: Patterns to exclude files
• <files>: File patterns to apply action to
• <matchHiddenFiles>: Whether or not to attempt to match Windows hidden files
Examples:
Adds the temporary files created at runtime
<addFilesToUninstaller><files>${installdir}/*~
${installdir}/*/*~${installdir}/*/*/*~${installdir}/*/*/*/*~</files></addFilesToUninstaller>
Delete a directory regardless of its contents
<addFilesToUninstaller><files>${installdir}/someDirectory/</files>
</addFilesToUninstaller>
The action will make the uninstaller delete the ${installdir}/someDirectory/ directory even if new files are added.In addition, as the action does not care about the contents of the directory, it is much more faster.
Additional Examples: Example 1, Example 2, Example 3
Remove Files from Uninstaller
This action allows you to remove files or directories from the uninstaller, so they will not be removed during the uninstallationprocess. This action is used when some files unpacked by the installer (so they are automatically marked to be uninstalled) mustbe preserved after uninstalling.
The allowed properties in the <removeFilesFromUninstaller> action are:
BitRock InstallBuilder User Guide 8183 / 393
• <excludeFiles>: Patterns to exclude files
• <files>: File patterns to apply action to
• <matchHiddenFiles>: Whether or not to attempt to match Windows hidden files
Examples:
<postInstallationActionList><removeFilesFromUninstaller><files>${installdir}/licenses</files>
</removeFilesFromUninstaller></postInstallationActionList>
Additional Examples: Example 1
Flow Control Actions
Foreach
Iterate over a set of values and execute a given set of actions The allowed properties in the <foreach> action are:
• <values>: Space-separated values to iterate over
• <variables>: Space-separated list of variables that will be assigned a value with each iteration
• <actionList>: List of actions
Examples:
Create a summary page with the installed components
<labelParameter><name>summary</name><title>Summary</title><explanation></explanation><preShowPageActionList>
<setInstallerVariable><name>text</name><value>You are about to install ${project.fullName}.
Please review the below information:
Installation Directory: ${installdir}
Username: ${username}
License File: ${license_file}
Installed Componets:</value>
</setInstallerVariable><foreach>
<variables>component</variables><values>component1 component2 component3</values><actionList>
<!-- Just include selected Components --><continue><ruleList>
<isFalse><value>${component(${component}).selected}</value>
BitRock InstallBuilder User Guide 8184 / 393
</isFalse></ruleList>
</continue><setInstallerVariable><name>text</name><value>${text}
${component(${component}).description}</value></setInstallerVariable>
</actionList></foreach>
</preShowPageActionList></labelParameter>
Iterate to define variables from the registry using multiple variables
<foreach><variables>name variable</variables><values>Version oldVersion Location ondInstalldir Language installationLanguage</values><actionList>
<registryGet><key>HKEY_LOCAL_MACHINE\Software\${project.windowsSoftwareRegistryPrefix}</key><name>${name}</name><variable>${variable}</variable>
</registryGet></actionList>
</foreach>
Additional Examples: Example 1, Example 2, Example 3
While
Execute a group of actions as long as conditions are met The allowed properties in the <while> action are:
• <conditionRuleEvaluationLogic>: Condition rule evaluation logic
• <actionList>: List of actions
• <conditionRuleList>: List of conditions
Examples:
Wait for the user to close a running application
<while><actionList><showWarning>
<text>The application "myapp.exe" is still running, please close it and click ok</ ←↩text>
</showWarning></actionList><conditionRuleList><processTest>
<logic>is_running</logic><name>My Application with long filename.exe</name>
</processTest></conditionRuleList>
</while>
Additional Examples: Example 1, Example 2
BitRock InstallBuilder User Guide 8185 / 393
If / Else
Conditionally execute a group of actions The allowed properties in the <if> action are:
• <conditionRuleEvaluationLogic>: Condition rule evaluation logic
• <actionList>: List of actions to execute if condition is true
• <conditionRuleList>: List of conditions
• <elseActionList>: List of actions to execute if condition is false
Examples:
Execute the installed application depending on the platform
<if><conditionRuleEvaluationLogic>or</conditionRuleEvaluationLogic><conditionRuleList>
<platformTest type="linux"/><platformTest type="osx"/>
</conditionRuleList><actionList>
<runProgram><program>${installdir}/scripts/launch.sh</program>
</runProgram></actionList><elseActionList>
<runProgram><program>${installdir}/scripts/launch.bat</program>
</runProgram></elseActionList>
</if>
Continue
Continue current loop. If the <continue> action it is executed outside a loop (a <while> or a <foreach>) it will throw anerror.
Examples:
Backup a list of folders if they are not empty
<foreach><variables>dir</variables><values>${installdir}/data ${installdir}/conf ${installdir}/samples</values><actionList><continue><ruleList>
<fileTest path="${dir}" condition="is_empty"/></ruleList>
</continue><copyFile>
<origin>${dir}</origin><destination>${installdir}/backup</destination>
</copyFile></actionList>
</foreach>
Additional Examples: Example 1

BitRock InstallBuilder User Guide 8186 / 393
Break
Break current loop. If the <continue> action it is executed outside a loop (a <while> or a <foreach>) it will throw anerror.
Examples:
Wait until a service is started or a timeout is reached
<startWindowsService><abortOnError>0</abortOnError><displayName>myservice</displayName><serviceName>My Service</serviceName>
</startWindowsService><setInstallerVariable name="time" value="0"/><while>
<actionList><!-- Break the loop if port is freed --><break>
<ruleList><windowsServiceTest service="myService" condition="is_running"/>
</ruleList></break><!-- Wait a second to avoid using too much cpu --><wait ms="1000"/><mathExpression>
<text>${time}+1000</text><variable>time</variable>
</mathExpression></actionList><conditionRuleList><!-- Iterate until the timeout reach 30 sec (30000msec) --><compareValues>
<value1>${time}</value1><logic>greater_or_equal</logic><value2>30000</value2>
</compareValues></conditionRuleList>
</while>
Additional Examples: Example 1, Example 2
OSX-specific actions
Change OSX file attributes
Change OSX attributes of a file or directory. Trying to set an attribute on a read only file will result in a failure. Make surethe file is writable before attempting to change any attribute other than, of course, readOnly The allowed properties in the<changeOSXAttributes> action are:
• <creator>: Creator to set to file or directory
• <excludeFiles>: Patterns to exclude files
• <files>: File patterns to apply action to
• <hidden>: Whether the file is visible or not
• <readOnly>: Whether the file is read only or writable
• <type>: Type to set to file or directory
BitRock InstallBuilder User Guide 8187 / 393
The <hidden> and <readOnly> tags allow specifying a boolean value (0 or 1) or unchanged, to preserve the current valueof the attribute. You can check the result of the action using the OS X command /Developer/Tools/GetFileInfo:
$> /Developer/Tools/GetFileInfo path/to/someFile
Examples:
Hide a set of files and define their creator and type
<changeOSXAttributes><creator>doug</creator><files>${installdir}/conf/*</files><type>TEXT</type><hidden>1</hidden><readOnly>unchanged</readOnly>
</changeOSXAttributes>
Change attributes of a readOnly file
<!-- The file must be first to be writable --><changeOSXAttributes>
<files>${installdir}/some/file</files><readOnly>0</readOnly>
</changeOSXAttributes>
<!-- Then we change the attributes --><changeOSXAttributes>
<files>${installdir}/some/file</files><creator>jhon</creator><readOnly>unchanged</readOnly>
</changeOSXAttributes>
<!-- Then we revert the readOnly attribute --><changeOSXAttributes>
<files>${installdir}/some/file</files><readOnly>1</readOnly>
</changeOSXAttributes>
Java Actions
Autodetect Java
Autodetects an existing Java (tm) installation in the system and creates corresponding installer variables: java_executablejava_vendor java_version java_version_major java_version_full java_bitness. If a valid java version was found, the variablejava_autodetected will be set to 1 The allowed properties in the <autodetectJava> action are:
• <promptUser>: Prompt user to choose appropriate version
• <selectionOrder>: Order of the Java versions detected
• <validVersionList>: List of supported Java versions
You can find additional information in the Java section.
Examples:
Detect a Java version between 1.4 and 1.5
BitRock InstallBuilder User Guide 8188 / 393
<autodetectJava><promptUser>0</promptUser><validVersionList>
<validVersion><vendor>sun</vendor><minVersion>1.4</minVersion><maxVersion>1.5</maxVersion>
</validVersion></validVersionList>
</autodetectJava>
Additional Examples: Example 1, Example 2, Example 3
Create Launchers
Creates one or more Java launchers in specified location. The allowed properties in the <createJavaLaunchers> actionare:
• <destination>: Path to the location where you want to create the launchers.
• <javaLauncherList>: List of launchers to create.
You can find additional information in the Java Launchers section. Examples:
Create a launcher for a bundled JAR file.
<createJavaLaunchers><destination>${installdir}/launchers</destination><javaLauncherList><javaLauncher>
<binaryName>myLauncher</binaryName><jarFile>testapplication.jar</jarFile>
</javaLauncher></javaLauncherList>
</createJavaLaunchers>
Additional Examples: Example 1, Example 2
Installer Actions
Encode base64
Encode a string using base64. The allowed properties in the <encodeBase64> action are:
• <text>: Text to process
• <variable>: Variable to save the final result to.
Examples:
Encode a message in Base64
<encodeBase64><text>This is some secret text to encode</text><variable>${secretEncodedText}</variable>
</encodeBase64>
BitRock InstallBuilder User Guide 8189 / 393
Decode base64
Decode a string using base64. The allowed properties in the <decodeBase64> action are:
• <text>: Text to process
• <variable>: Variable to save the final result to.
Examples:
Decode a message encided in Base64
<decodeBase64><text>${secretEncodedText}</text><variable>${result}</variable>
</decodeBase64>
MD4
Generate a MD4 from a given text. The allowed properties in the <md4> action are:
• <text>: Text to calculate the MD4 on.
• <useNTLMFormat>: Whether or not to create an NTLM compilant hash
• <variable>: Variable to which to save the MD4 to.
Examples:
Calculate the MD4 has of a password
<md4><text>${password}</text><variable>result</variable>
</md4>
MD5
Generate a MD5 from a given text. The allowed properties in the <md5> action are:
• <text>: Text to calculate the MD5 on.
• <variable>: Variable to which to save the MD5 to.
Examples:
Check the integrity of a file
<readFile><path>${installdir}/keys.txt</path><name>data</name>
</readFile><md5>
<text>${data}</text><variable>result</variable>
</md5><throwError>
<text>The file has been corrupted!</text>
BitRock InstallBuilder User Guide 8190 / 393
<ruleList><compareText><text>${result}</text><logic>does_not_equal</logic><value>3f62e6df4607c4be16f4946dc9fa16ca</value>
</compareText></ruleList>
</throwError>
Additional Examples: Example 1, Example 2, Example 3
SHA-1
Generate a SHA-1 from a given text. The allowed properties in the <sha1> action are:
• <text>: Text to calculate the SHA-1 on.
• <variable>: Variable to which to save the SHA-1 to.
Examples:
Encode some secret data with a secret key to send using <httpPost>
<sha1><text>${user}+thisIsAsecretKey+${password}</text><variable>encodedText</variable>
</sha1><httpPost url="http://www.example.com/checkdata.php">
<filename>${installdir}/activationUrl</filename><queryParameterList><queryParameter name="data" value="${encodedText}"/>
</queryParameterList></httpPost>
Math
Calculate math expression The allowed properties in the <mathExpression> action are:
• <text>:
• <variable>: Variable to save the final result to.
Examples:
Calculate the square root of a number
<mathExpression><text>sqrt(${number})</text><variable>result</variable>
</mathExpression>
Additional Examples: Example 1
BitRock InstallBuilder User Guide 8191 / 393
Add Choice Options
Add options to an existing choice parameter The allowed properties in the <addChoiceOptions> action are:
• <name>: Name of an existing choice parameter.
• <optionList>: List of options to give to a choice parameter
Examples:
Add options for English and Spanish for an existing choice parameter language.<addChoiceOptions>
<name>language</name><optionList>
<option><value>en</value><text>English</text>
</option><option>
<value>es</value><text>Spanish</text>
</option></optionList>
</addChoiceOptions>
Each <option> specifies an additional option to be added to a <choiceParameter>.
Additional Examples: Example 1, Example 2, Example 3
Add Choice Options from Text
Add options to an existing choice parameter from a given text The allowed properties in the <addChoiceOptionsFromText>action are:
• <name>: Name of an existing choice parameter.
• <text>: Text with the options to give to a choice parameter
Examples:
Add options parsing text format existing choice parameter language.<addChoiceOptionsFromText>
<name>language</name><text>
jp=Japanesejp.description=Language spoken in Japande=Germande.description=Language spoken in Germanyit=Italianit.description=Language spoken in Italypl=Polishpl.description=Language spoken in Polandru=Russianru.description=Language spoken in Russia</text></addChoiceOptionsFromText>
The keys in the text will be used to set the <value> property of option. The key value (the righthand side) will be used to setthe <text> property. Optionally, if a key has a .description suffix and matches an existing <value>, the key value willbe used to set the <description> property.
Additional Examples: Example 1, Example 2, Example 3
BitRock InstallBuilder User Guide 8192 / 393
Remove Choice Options
Clear choice values for a parameter The allowed properties in the <removeChoiceOptions> action are:
• <name>: Name of an existing choice parameter.
• <options>: Options to remove
Examples:
Remove options for English and Spanish from existing choice parameter `language.
<removeChoiceOptions><name>language</name><options>es,en</options>
</removeChoiceOptions>
This action can take a single option to remove or multiple options, which are separated using comma.
Additional Examples: Example 1, Example 2, Example 3
Generate Random Value
Generate a random value. The allowed properties in the <generateRandomValue> action are:
• <length>: Character length for the generated value.
• <variable>: Variable to which to save the generated value.
Examples:
Create an unique filename
<generateRandomValue><length>5</length><variable>suffix</variable>
</generateRandomValue><setInstallerVariable name="${installdir}/.tmp${suffix}"/>
Additional Examples: Example 1
Action Group
Group a set of actions. The allowed properties in the <actionGroup> action are:
• <actionList>: List of actions to be grouped
Examples:
Read a file and show its contents
<actionGroup><actionList><readFile>
<path>${installdir}/notes.txt</path><name>text</name>
</readFile><showText>
<title>InstallBuilder Notes</title>
BitRock InstallBuilder User Guide 8193 / 393
<width>500</width><height>600</height><text>${text}</text>
</showText></actionList><ruleList>
<isTrue value="${viewNotes}"/></ruleList>
</actionGroup>
Additional Examples: Example 1, Example 2, Example 3
Log Message
Write a message to the installation log. Useful for debugging purposes. The allowed properties in the <logMessage> actionare:
• <enableTimeStamp>: Whether to enable timestamp in the message or not.
• <text>: Message to include in log
• <timeStampFormat>: Format string for the optional timestamp. The string allows a number of field descriptors.
Examples:
Add additional details to the log
<logMessage><text>Starting MySQL...</text>
</logMessage><runProgram>
<program>${installdir}/ctlscript.sh</program><programArguments>start mysql</programArguments>
</runProgram><logMessage>
<text>MySQL started!</text></logMessage>
Additional Examples: Example 1, Example 2, Example 3
Component Selection
Select or deselect components for installation. The allowed properties in the <componentSelection> action are:
• <deselect>: Comma separated list of components you wish to deselect for installation.
• <select>: Comma separated list of components you wish to select for installation.
Examples:
Configure the selected components based on the installation type
<componentSelection><deselect>minimumDoc</deselect><select>fullDocs,core,images</select><ruleList><compareText text="${installationMode}" logic="equals" value="full"/>
</ruleList></componentSelection>
BitRock InstallBuilder User Guide 8194 / 393
<componentSelection><deselect>fullDocs,images</deselect><select>minimumDoc,core</select><ruleList><compareText text="${installationMode}" logic="equals" value="minimal"/>
</ruleList></componentSelection>
Additional Examples: Example 1, Example 2, Example 3
Mark variables as global
Mark a list of variables as global. Global variables defined or modified inside custom actions preserve their values after theexecution while regular variables are not visible outside. The allowed properties in the <globalVariables> action are:
• <names>: Variable names
Examples:
Create a function that generates an unique name and stores its path in a variable
<project>...<functionDefinitionList><actionDefinition><name>getUniquePath</name>
<actionList><globalVariables names="${variable}"/><if>
<conditionRuleList><fileExists path="${root}" negate="1"/>
</conditionRuleList><actionList>
<setInstallerVariable name="${variable}" value="${root}"/></actionList><elseActionList><setInstallerVariable name="suffix" value="0"/><setInstallerVariable name="candidate" value="${root}.${suffix}"/><while>
<actionList><mathExpression><text>${suffix}+1</text><variable>time</variable>
</mathExpression><setInstallerVariable name="candidate" value="${root}.${suffix}"/>
</actionList><conditionRuleList><fileExists path="${root}"/>
</conditionRuleList></while><setInstallerVariable name="${variable}" value="${candidate}"/>
</elseActionList></if>
</actionList><parameterList>
<stringParameter name="variable" value="" default=""/><stringParameter name="root" value="" default=""/>
</parameterList></actionDefinition>
</functionDefinitionList>
BitRock InstallBuilder User Guide 8195 / 393
...<initializationActionList><getUniquePath root="${installdir}/.conf" variable="uniquepath"/>
</initializationActionList>...
</project>
You can find additional information in the Global Variables section.
Additional Examples: Example 1, Example 2
Set Variable from Program
Set a installer variable to the output of a script. If the name of the variable matches a parameter name, the value of the parameterwill be updated. The allowed properties in the <setInstallerVariableFromScriptOutput> action are:
• <exec>: Path to the script to run
• <execArgs>: Arguments to pass to the script
• <name>: Name of the variable to set
• <workingDirectory>: Working directory. This is important for scripts that expect to be run from a specific location
Examples:Get the list of .txt files in a directory<setInstallerVariableFromScriptOutput>
<exec>find</exec><execArgs>${directory} -name ’*.txt’</execArgs><name>files</name><ruleList>
<platformTest type="linux"/></ruleList>
</setInstallerVariableFromScriptOutput>
Additional Examples: Example 1, Example 2, Example 3
Wait
Pause the installation for given time The allowed properties in the <wait> action are:
• <ms>: Number of milliseconds to wait
Examples:Wait 30 seconds for a service to start<startWindowsService>
<serviceName>myService</serviceName><displayName>My Service</displayName>
</startWindowsService><wait>
<ms>30000</ms></wait><showWarning>
<text>The service ’My Service’ could not be started</text><ruleList><windowsServiceTest service="myService" condition="is_not_running"/>
</ruleList></showWarning>
Additional Examples: Example 1
BitRock InstallBuilder User Guide 8196 / 393
Exit Installer
Exit the installer/uninstaller. The allowed properties in the <exit> action are:
• <exitCode>: exit code returned by the installer/uninstaller
Examples:
Exit the uninstallation if the installed application is still running
<preUninstallationActionList><actionGroup><actionList>
<showWarning><text>You must close the application ${project.fullName}before launching the uninstaller</text>
</showWarning><exit exitCode="1"/>
</actionList><ruleList>
<processTest name="${project.fullName}.exe" logic="is_running" /></ruleList>
</actionGroup></preUninstallationActionList>>
Additional Examples: Example 1, Example 2
Modify a String
This action allows you to transform a given text using one of the allowed string manipulation methods. The allowed propertiesin the <stringModify> action are:
• <logic>: Transformation to perform.
• <text>: Text which will be transformed.
• <variable>: Variable name which will store the result.
Examples:
Normalize a value provided by the user
<stringModify><text>${identifier}</text><logic>tolower</logic><variable>identifier</variable>
</stringModify><stringModify>
<text>${identifier}</text><logic>trim</logic><variable>identifier</variable>
</stringModify>
Set Installer Variable
Set a installer variable. If the name of the variable matches a parameter name, the value of the parameter will be updated. Theallowed properties in the <setInstallerVariable> action are:
BitRock InstallBuilder User Guide 8197 / 393
• <name>: Variable name
• <persist>: Whether the variable will be available in the uninstaller as well.
• <value>: Value to set the variable to
Examples:
<setInstallerVariable><name>dataDir</name><value>${installdir.dos}/data</value>
</setInstallerVariable>
Additional Examples: Example 1, Example 2, Example 3
Set Variable from Regular Expression
Set a installer variable to the result of a regular expression. If the name of the variable matches a parameter name, the value ofthe parameter will be updated. The allowed properties in the <setInstallerVariableFromRegEx> action are:
• <name>: Name of the variable to set
• <pattern>: Pattern to match
• <substitution>: Value to replace matched text with
• <text>: Text to match
Examples:
Get the extension of a file
<setInstallerVariableFromRegEx><name>extension</name><pattern>.*\.([^\.]+)$</pattern><substitution>\1</substitution><text>${filename}</text>
</setInstallerVariableFromRegEx>
Additional Examples: Example 1, Example 2, Example 3
Specify encryption password
Specifies and verifies password to use for copying files from installer The allowed properties in the <setEncryptionPassword>action are:
• <password>: Password to use; action will throw error if password specified does not match password from build time
Examples:
Set MYAPP_HOME environment variable to directory where application is installed.
<setEncryptionPassword><password>...</password>
</setEncryptionPassword>
Additional Examples: Example 1, Example 2
BitRock InstallBuilder User Guide 8198 / 393
Dialog Actions
Show Password Question
This action allows you to ask the user to provide a password in a popup window. The allowed properties in the <showPasswordQuestion>action are:
• <text>: Question message that will be shown.
• <title>: Dialog window title.
• <variable>: Variable name where the password will be stored.
The password will not be echoed back to the user in text mode installations and will be substituted by * characters in GUI modeinstallations.
Examples:
Ask for a password and use it to execute a program
<preUninstallationActionList><showPasswordQuestion>
<title>Password Required</title><text>Please provide you MySQL password</text><variable>pass</variable>
</showPasswordQuestion><runProgram>
<program>mysqldump</program><programArguments>--opt --user=${username} --password=${pass.password} ${ ←↩
databaseName} > ${backupFolder}/dump.sql</programArguments></runProgram>
</preUninstallationActionList>
Show Info Dialog
Prompt an info dialog to the user. The allowed properties in the <showInfo> action are:
• <text>: Information message that will be shown
• <title>: Title of the dialog window
Examples:
Thanks message after installation
<showInfo><text>Thank you for installing ${project.fullName}!</text><title>Installation Finished!</title>
</showInfo>
Additional Examples: Example 1, Example 2, Example 3
Show Text Dialog
Display a read-only text dialog to the user. The allowed properties in the <showText> action are:
• <height>: Text window height

BitRock InstallBuilder User Guide 8199 / 393
• <htmlText>: HTML text that will be shown in Qt mode. Note that regular text still needs to be provided in case the installeris run in another mode
• <text>: Text that will be shown.
• <title>: Dialog title.
• <width>: Text window width
Examples:
Display an introduction text at the end of the installation
<finalPageActionList><showText>
<progressText>View Notes</progressText><title>InstallBuilder Notes</title><width>500</width><height>600</height><text>BitRock InstallBuilder is a development tool for
building crossplatform installers for desktop and server software.With InstallBuilder, you can quickly create professional installers
for Linux, Windows, Mac OS X, Solaris and other platforms from a singleproject file and build environment. In addition to installers,InstallBuilder will generate RPM and Debian packages and multiplatformCDs/DVDs. Its new automatic update functionality makes it easy to deliverupdates directly to your users once they have your software installed.
...</text></showText>
</finalPageActionList>
If you are using InstallBuilder for Qt, the <showText> will be also able to display HTML text when executing in qt mode.Please note you should still provide a plain text to display in other modes:
Display an HTML document
<finalPageActionList><showText>
<progressText>View Notes</progressText><title>InstallBuilder Notes</title><width>500</width><height>600</height><htmlText><h1>This is HTML text</h1>
<p>The supported platforms are:<ul><li><b>Linux</b></li><li><b>Windows</b></li><li><b>OS X</b></li><li><b>...</b></li></ul></p></htmlText>
<text>Some long plain text...</text></showText>
</finalPageActionList>
If the HTML text is read from a file at runtime, you don’t have to escape it:
Display a packed HTML file
<finalPageActionList><actionGroup progressText="View Notes">
BitRock InstallBuilder User Guide 8200 / 393
<actionList><readFile>
<path>${installdir}/notes.html</path><name>htmlText</name>
</readFile><showText>
<title>InstallBuilder Notes</title><width>500</width><height>600</height><htmlText>${htmlText}</htmlText><text>Some long plain text...</text>
</showText></actionList>
</actionGroup></finalPageActionList>
Additional Examples: Example 1, Example 2
Show Question Dialog
Prompt a question to the user. The result is stored as yes or no in the given variable name. The allowed properties in the<showQuestion> action are:
• <default>: Default answer, it can be yes or no.
• <text>: Question message that will be shown.
• <title>: Title of the dialog window
• <variable>: Variable name where the result will be stored
The best way of checking the value is using the <isFalse> and <isTrue> rules.
The text in the <showQuestion> buttons can be localized modifying the language keys:
Installer.Button.Yes=YesInstaller.Button.No=No
Examples:
Ask a Yes/No question
<showQuestion><title>Delete Configuration</title><text>Are you sure you want to delete theconfiguration files?</text><variable>answer</variable><default>yes</default>
</showQuestion>
Additional Examples: Example 1, Example 2, Example 3
Show Progress Dialog
Launch a popup dialog window which displays an indeterminate progress bar to process a list of actions. In text mode frontend,it will display a character-based animation. The allowed properties in the <showProgressDialog> action are:
• <height>: Popup window height
BitRock InstallBuilder User Guide 8201 / 393
• <title>: Title of the progress dialog window
• <width>: Popup window width
• <actionList>: Actions to Execute
Examples:
Show dialog while database silent installation is in progress
<showProgressDialog><title>Please wait while database is installed</title><actionList>
<runProgram><program>${installdir}/db/setup-database</program><programArguments>--silent</programArguments><workingDirectory>${installdir}/db</workingDirectory>
</runProgram></actionList>
</showProgressDialog>
Additional Examples: Example 1, Example 2, Example 3
Show Warning
This action allows you to display a message in a warning dialog. The allowed properties in the <showWarning> action are:
• <text>: Warning message that will be shown.
• <title>: Title of the dialog window
Examples:
Warn if the installation directory is not empty
<showWarning><text>The selected installation directory is not empty!</text><title>Directory not empty</title><ruleList>
<fileTest path="${installdir}" condition="is_not_empty"/></ruleList>
</showWarning>
Additional Examples: Example 1, Example 2
Show Choice Dialog
Prompt a choice question dialog to the user. The allowed properties in the <showChoiceQuestion> action are:
• <defaultValue>: Default value
• <text>: Information message that will be shown
• <title>: Dialog title
• <variable>: Variable to store choice
• <optionList>: Predefined list of options that allows the user to select a value
The text in the <showChoiceQuestion> buttons can be localized modifying the language keys:
BitRock InstallBuilder User Guide 8202 / 393
Installer.Button.OK=OKInstaller.Button.Cancel=Cancel
Examples:
Ask the user to select the uninstallation type
<preUninstallationActionList>...<showChoiceQuestion><defaultValue>keep</defaultValue><text>Do you want to keep your configuration files?</text><variable>answer</variable><optionList>
<option><description>Does not delete the configuration files</description><text>Keep configuration files</text><value>keep</value>
</option><option>
<description>Deletes the configuration files</description><text>Delete configuration files</text><value>delete</value>
</option></optionList>
</showChoiceQuestion><deleteFile path="${installdir}/configuration" >
<ruleList><compareText text="${answer}" logic="equals" value="delete"/>
</ruleList></deleteFile>...
</preUninstallationActionList>
If the user cancels the dialog, either clicking Cancel or closing the popup, the result variable will be set to empty. If the userclicks Ok, the result variable will be set to the selected choice item. This behavior can be used to validate the user input:
Force the user to select a choice
<preUninstallationActionList>...<while>
<actionList><showChoiceQuestion>
<defaultValue>keep</defaultValue><text>Do you want to keep your configuration files?</text><variable>answer</variable><optionList>
<option><description>Does not delete the configuration files</description><image></image><text>Keep configuration files</text><value>keep</value>
</option><option>
<description>Deletes the configuration files</description><image></image><text>Delete configuration files</text><value>delete</value>
</option></optionList>
</showChoiceQuestion>
BitRock InstallBuilder User Guide 8203 / 393
<break><ruleList>
<compareText text="${answer}" logic="does_not_equal" value=""/></ruleList>
</break><showWarning>
<text>You must select an Option!</text></showWarning>
</actionList></while>...
</preUninstallationActionList>
Throw Error
Generate an error inside the installer so the installer will exit. The only exception to this is when abortOnError equals zero or theaction is inside a validationActionList, in which case it will prompt an error dialog to the user, but will not exit the installer. Theallowed properties in the <throwError> action are:
• <text>: Error message
Examples:
Abort if the installer is not launched as Administrator
<initializationActionList><throwError>
<text>The installer requires Admin privileges. Aborting...</text><ruleList>
<isFalse value="${installer_is_root_install}"/></ruleList>
</throwError></initializationActionList>
Additional Examples: Example 1, Example 2, Example 3
Show String Question
This action allows you to ask the user a question in a popup window. The allowed properties in the <showStringQuestion>action are:
• <text>: Question message that will be shown.
• <title>: Dialog window title.
• <variable>: Variable name where the answer will be stored.
Examples:
Ask for an username
<showStringQuestion><title>Username</title><text>Please introduce your username:</text><variable>username</variable>
</showStringQuestion>
BitRock InstallBuilder User Guide 8204 / 393
Write text to console
Write text to console The allowed properties in the <consoleWrite> action are:
• <text>: Text to write
Examples:
Write error message to standard output
<consoleWrite><text>Unable to install database in directory ${installdir}</text>
</consoleWrite>
Registry Actions
Registry Find Key
Retrieve the first registry hive and content matching a certain expression and store it as a list in an installer variable. If no matchis found the variable will be created empty. The allowed properties in the <registryFind> action are:
• <dataPattern>: Pattern to match in the value
• <findAll>: Whether to look for the first occurrence or for all
• <keyPattern>: Pattern to match key name with
• <namePattern>: Pattern to match entry name with
• <rootKey>: Root key from which start the search
• <searchDepth>: Maximum depth of the search. 0 will look just in the Root Key
• <variable>: Variable name to store the results
• <wowMode>: Determines whether we want to access a 32-bit or 64-bit view of the Registry
Examples:
List all applications from same vendor as current installer
<registryFind><findAll>1</findAll><keyPattern>*</keyPattern><namePattern>DisplayName</namePattern><rootKey>HKEY_LOCAL_MACHINE\SOFTWARE\Microsoft\Windows\CurrentVersion\Uninstall</ ←↩
rootKey><searchDepth>1</searchDepth><variable>installedApplications</variable>
</registryFind><setInstallerVariable>
<name>text</name><value></value>
</setInstallerVariable><foreach>
<values>${installedApplications}</values><variables>key name value</variables><actionList>
<registryGet><key>${key}</key><name>Publisher</name>
BitRock InstallBuilder User Guide 8205 / 393
<variable>publisher</variable></registryGet><actionGroup>
<actionList><md5 text="${key}" variable="md5"/><setInstallerVariable>
<name>text</name><value>${text}
${md5}=${value}</value></setInstallerVariable>
</actionList><ruleList>
<compareText><logic>equals</logic><text>${publisher}</text><value>${project.vendor}</value>
</compareText></ruleList>
</actionGroup></actionList>
</foreach>
Action <registryFind> returns all keys from specified subtree matching specified pattern for key.
Additional Examples: Example 1, Example 2
Registry Get Matching Key Value
Store the value of the first match of a registry key matching a certain expression in an installer variable. If the key or name doesnot exist, then the variable will be created empty. The name can contain a wildcard expression (using *) The allowed propertiesin the <registryGetMatch> action are:
• <key>: Registry key
• <name>: Entry name to read value from
• <variable>: Variable name to store registry value to
• <wowMode>: Determines whether we want to access a 32-bit or 64-bit view of the Registry
Examples:
Get the data of the first value in our application key
<registryGetMatch><key>HKEY_LOCAL_MACHINE\SOFTWARE\${project.vendor}\${project.fullName}</key><name>Loc*</name><variable>location</variable>
</registryGetMatch>
Additional Examples: Example 1
Delete Registry Key
Delete a registry entry. If the entry to delete is only a registry key and it does not exist, the action will be ignored. Delet-ing a registry value (key + name combination) that does not exist will trigger a regular error. The allowed properties in the<registryDelete> action are:
• <key>: Registry key
BitRock InstallBuilder User Guide 8206 / 393
• <name>: Entry name to delete
• <wowMode>: Determines whether we want to access a 32-bit or 64-bit view of the Registry
Examples:
Delete application’s build timestamp
<registryDelete><key>HKEY_LOCAL_MACHINE\Software\${project.vendor}\${project.fullName}</key><name>Timestamp</name>
</registryDelete>
Additional Examples: Example 1, Example 2
Set Registry Key Value
Create a new registry key or modify the value of an existing registry key. The allowed properties in the <registrySet> actionare:
• <key>: Registry key
• <name>: Entry name to set or modify value to
• <type>: Type of key to add
• <value>: Value to set to the registry key
• <wowMode>: Determines whether we want to access a 32-bit or 64-bit view of the Registry
Examples:
Store application’s build timestamp
<registrySet><key>HKEY_LOCAL_MACHINE\Software\${project.vendor}\${project.fullName}</key><name>Timestamp</name><value>${installer_builder_timestamp}</value>
</registrySet>
Additional Examples: Example 1
Get Registry Key Name
Store in variable the first registry key that matches the given pattern, or set the variable to empty otherwise. The search iscase-sensitive for the whole key provided. The allowed properties in the <registryGetKey> action are:
• <key>: Registry key
• <variable>: Variable to store result
• <wowMode>: Determines whether we want to access a 32-bit or 64-bit view of the Registry
Examples:
Get the fisrt key referencing one of the applications under ${project.vendor}
<registryGetKey><key>HKEY_LOCAL_MACHINE\SOFTWARE\${project.vendor}\*</key><variable>application</variable>
</registryGetKey>
Additional Examples: Example 1
BitRock InstallBuilder User Guide 8207 / 393
Get Registry Key Value
Store the value of a registry key in an installer variable. If the key or name does not exist, then the variable will be created empty.The allowed properties in the <registryGet> action are:
• <key>: Registry key
• <name>: Entry name to read value from
• <variable>: Variable name to store registry value to
• <wowMode>: Determines whether we want to access a 32-bit or 64-bit view of the Registry
Examples:
Find Google Chrome installation directory
<registryGet><key>HKEY_LOCAL_MACHINE\SOFTWARE\Microsoft\Windows\CurrentVersion\App Paths\chrome.exe ←↩
</key><name>Path</name><variable>chrome_home</variable>
</registryGet>
The <registryGet> actions reads App Paths for chrome.exe from Microsoft Windows registry. If chrome.exe isnot installed or properly registered, chrome_home variable will be set to empty string.
Additional Examples: Example 1, Example 2, Example 3
Windows-specific actions
Change Resource Information
Change resource information of a Windows executable The allowed properties in the <changeExecutableResources>action are:
• <path>: Path to the Windows executable to modify
• <windowsResourceComments>: Comments for resources embedded in Windows executable
• <windowsResourceCompanyName>: Company Name for resources embedded in Windows executable
• <windowsResourceFileDescription>: File Description for resources embedded in Windows executable
• <windowsResourceFileVersion>: File version for resources embedded in Windows executable
• <windowsResourceInternalName>: Internal Name for resources embedded in Windows executable
• <windowsResourceLegalCopyright>: Legal Copyright for resources embedded in Windows executable
• <windowsResourceLegalTrademarks>: Legal Trademarks for resources embedded in Windows executable
• <windowsResourceOriginalFilename>: Original Filename for resources embedded in Windows executable
• <windowsResourceProductName>: Product Name for resources embedded in Windows executable
• <windowsResourceProductVersion>: Product Version for resources embedded in Windows executable
Examples:
Change Java launcher’s product name to evaluation if license not specified

BitRock InstallBuilder User Guide 8208 / 393
<changeExecutableResources><path>${installdir}/mylauncher.exe</path><windowsResourceProductName>My Application (evaluation copy)</ ←↩
windowsResourceProductName><ruleList>
<stringTest><text>${licenseinfo}</text><type>empty</type>
</stringTest></ruleList>
</changeExecutableResources>
Autodetect .NET Framework
Autodetects an existing .NET (tm) installation in the system and creates corresponding installer variables: dotnet_version. Ifa valid .NET framework version was found, the variable dotnet_autodetected, will be set to 1 The allowed properties in the<autodetectDotNetFramework> action are:
• <validDotNetVersionList>: List of supported .NET versions
Examples:
Detect .NET version between 2.0 and 3.5
<autodetectDotNetFramework><validDotNetVersionList>
<validDotNetVersion><maxVersion>3.5</maxVersion><minVersion>2.0</minVersion>
</validDotNetVersion></validDotNetVersionList>
</autodetectDotNetFramework>
Bundle and install .NET Framework if it is not present in the user machine
<project>...<componentList><!-- This component takes care of autodetecting an existinginstallation of .NET and unpack and install the bundled oneif it is not found --><component><name>dotnet</name><description>ServiceEx</description><canBeEdited>0</canBeEdited><selected>1</selected><show>0</show><folderList><folder>
<description>.NET installer</description><destination>${installdir}</destination><name>dotnet</name><platforms>windows</platforms><distributionFileList>
<distributionFile><origin>/path/to/dotnetfx.exe</origin>
</distributionFile></distributionFileList><ruleList>
BitRock InstallBuilder User Guide 8209 / 393
<!-- The .NET installer will be unpacked on demandso we attach a rule that will be never passed toprevent the automatic unpack process --><isTrue value="0"/>
</ruleList></folder>
</folderList>...<readyToInstallActionList><!-- check .NET >= 2.0 is installed --><autodetectDotNetFramework>
<validDotNetVersionList><validDotNetVersion><maxVersion></maxVersion><minVersion>2.0</minVersion>
</validDotNetVersion></validDotNetVersionList>
</autodetectDotNetFramework><!-- install .NET if not found --><actionGroup>
<progressText>Installing .NET framework</progressText><actionList>
<unpackFile><component>dotnet</component><destination>${system_temp_directory}/dotnetfx.exe</destination><folder>dotnet</folder><origin>dotnetfx.exe</origin>
</unpackFile><runProgram><program>${system_temp_directory}/dotnetfx.exe</program><programArguments>/q:a "/c:install.exe /qb"</programArguments>
</runProgram><!-- Delete the .NET installer --><deleteFile><path>${system_temp_directory}/dotnetfx.exe</path>
</deleteFile></actionList><ruleList>
<isFalse><value>${dotnet_autodetected}</value>
</isFalse></ruleList>
</actionGroup></readyToInstallActionList>
</component></componentList>...
</project>
Add Shared DLL
This action allows you to increment the reference count for a shared DLL. The allowed properties in the <addSharedDLL>action are:
• <path>: Path to the shared DLL
Examples:
Add shared.dll that is located in Common Files\MyApp folder.
BitRock InstallBuilder User Guide 8210 / 393
<addSharedDLL><path>${windows_folder_program_files_common}/MyApp/shared.dll</path>
</addSharedDLL>
Remove Shared DLL
This action allows you to decrement the reference count for a shared DLL. If it reaches zero, the file will be removed. Theallowed properties in the <removeSharedDLL> action are:
• <path>: Path to the shared DLL
Examples:
Remove shared.dll that is located in Common Files\MyApp folder.
<removeSharedDLL><path>${windows_folder_program_files_common}/MyApp/shared.dll</path>
</removeSharedDLL>
Change Windows file attributes
Change Windows attributes for a file or directory. The allowed properties in the <changeWindowsAttributes> action are:
• <archive>: Whether the file has or has not changed since the last backup.
• <excludeFiles>: Patterns to exclude files
• <files>: File patterns to apply action to
• <hidden>: Whether the file is visible or not
• <matchHiddenFiles>: Whether or not to attempt to match Windows hidden files
• <readOnly>: Whether the file is read only or writable
• <system>: Whether the file is a System file or a regular one
Examples:
Set *.ini files as read only and hidden
<changeWindowsAttributes><files>${installdir}/*.ini</files><hidden>1</hidden><readOnly>1</readOnly>
</changeWindowsAttributes>
Additional Examples: Example 1
BitRock InstallBuilder User Guide 8211 / 393
Create Windows File Associations
This action allows you to create file associations for Windows, defining commands such as "open" for a given file extension. Theallowed properties in the <associateWindowsFileExtension> action are:
• <extensions>: Space-separated list of extensions for which the given commands will be available.
• <friendlyName>: Friendly Name for the progID.
• <icon>: Path to the icon file that contains the icon to display.
• <mimeType>: MIME type associated to all the file extensions.
• <progID>: Programmatic Identifier to which the extensions are attached, contains the available commands to be invoked oneach file type.
• <scope>: Choose between system or user scope when installing the association
• <commandList>: List of commands that can be invoked on each given file type.
Examples:
<associateWindowsFileExtension><extensions>.myextension</extensions><progID>mycompany.package</progID><icon>${installdir}\images\myicon.ico</icon><mimeType>example/mycompany-package-myextension</mimeType><commandList>
<!-- Defining the ’Open’ command --><command>
<verb>Open</verb><runProgram>${installdir}\yourprogram.exe</runProgram><runProgramArguments>"%1"</runProgramArguments>
</command></commandList>
</associateWindowsFileExtension>
You can get additional information in the Windows File Associations section.
Additional Examples: Example 1
Remove Windows File Associations
This action allows you to remove file associations for Windows, unregistering commands such as "open" for a given file extension.The allowed properties in the <removeWindowsFileAssociation> action are:
• <extensions>: Space-separated list of extensions to remove.
• <mimeType>: MIME type to remove, associated to all the file extensions. It must be specified if you want to delete MIMEassociations added previously with associateWindowsFileExtension action.
• <progID>: Programmatic Identifier to remove, to which the extensions are attached.
• <scope>: Choose between system or user scope when installing the association
Examples:
Removing association of .myextension extension.
BitRock InstallBuilder User Guide 8212 / 393
<removeWindowsFileAssociation><extensions>.myextension</extensions><progID>mycompany.package</progID><mimeType>example/mycompany-package-myextension</mimeType>
</removeWindowsFileAssociation>
You can get additional information in the Windows File Associations section.
Additional Examples: Example 1
Wow64 File System Redirection
Modifies the Windows x64 File System Redirection behavior. It mainly redirects %Windir%System32 to %Windir%SysWOW64for 32-bit processes running on Windows x64 systems. A similar effect is also applied to Program Files The allowed propertiesin the <wow64FsRedirection> action are:
• <action>: Whether to enable or disable the File System Redirection
Examples:
Remove a file in %windir%\system32 disabling redirection temporarily
<wow64FsRedirection><action>disable</action>
</wow64FsRedirection><deleteFile>
<path>${windows_folder_system}/myApp.exe</path></deleteFile><wow64FsRedirection>
<action>enable</action></wow64FsRedirection>
Additional Examples: Example 1
Get Windows file version info
Get file information. The allowed properties in the <getWindowsFileVersionInfo> action are:
• <path>: Path to the file
• <type>: Type of the file info.
• <variable>: Variable to save the file info to
The <type> tag accepts the following values:
• codepage: Returns the code page resource (language and country combination). e.g.: 0409
• flags: Returns a bit mask specifying the boolean attributes of the file. You can get additional information here, in thedwFileFlags table. e.g.: debug, prerelease, patched, privatebuild, infoinferred or specialbuild
• os: The operating system for what the file was built. e.g.: nt_windows32, dos
• productversion: ProductVersion from resources; e.g.: 6.1.7600.16385
• signature: signature for the fixed part of the version resource; e.g.: 0xfeef04bd
• structversion: version of the version resource format; e.g.: 1.0
BitRock InstallBuilder User Guide 8213 / 393
• type:e.g.: file type; e.g.: application, dll, driver.display, font.truetype
• version:e.g.: Returns file version as from resources; e.g. 6.1.7600.16385
Examples:
Retrieve version of Microsoft Word
<registryGet><key>HKEY_LOCAL_MACHINE\SOFTWARE\Microsoft\Windows\CurrentVersion\App Paths\Winword.exe ←↩
</key><name></name><variable>msword_binary</variable>
</registryGet><getWindowsFileVersionInfo>
<path>${msword_binary}</path><type>version</type><variable>msword_version</variable>
</getWindowsFileVersionInfo>
Please note that this example will fail if Microsoft Office is not installed. Proper <stringTest> with <type> not_emptycan be used to check msword_binary.
Clear ACL Permissions
Clear Windows ACL permissions of a file or directory The allowed properties in the <clearWindowsACL> action are:
• <excludeFiles>: Patterns to exclude files
• <files>: File patterns to apply action to
• <matchHiddenFiles>: Whether or not to attempt to match Windows hidden files
You can get additional information in the ACL section.
Examples:
Remove all the ACL from a set of files
<clearWindowsACL><files>${installdir}/doscs/*</files>
</clearWindowsACL>
Additional Examples: Example 1
Change ACL Permissions
Change Windows ACL permissions of a file or directory The allowed properties in the <setWindowsACL> action are:
• <action>: Whether to allow or deny permissions
• <excludeFiles>: Patterns to exclude files
• <files>: File patterns to apply action to
• <matchHiddenFiles>: Whether or not to attempt to match Windows hidden files
• <permissions>: Permissions for matching files or directories
• <recurseContainers>: Whether to apply recursively or not to container descendant
BitRock InstallBuilder User Guide 8214 / 393
• <recurseObjects>: Whether to apply recursively or not to object descendant
• <recurseOneLevelOnly>: Just one level recursion if applicable
• <self>: Whether to apply or not to the specified file
• <users>: Comma separated list of users to modify access permissions for
You can get additional information in the ACL section.
Examples:
Remove write permissions to all users but Administrators
<clearWindowsACL><files>${installdir}/admin;${installdir}/admin/*</files>
</clearWindowsACL><setWindowsACL>
<action>allow</action><files>${installdir}/admin;${installdir}/admin/*</files><permissions>file_all_access</permissions><users>S-1-5-32-544</users>
</setWindowsACL>
Additional Examples: Example 1, Example 2, Example 3
Get ACL Permissions
Get Windows ACL permissions of a file or directory The allowed properties in the <getWindowsACL> action are:
• <deniedPermissions>: Variable name to save denied permissions
• <file>: File to retrieve ACL
• <grantedPermissions>: Variable name to save granted permissions
• <username>: User to retrieve ACL
You can get additional information in the ACL section.
Examples:
<getWindowsACL><deniedPermissions>denied</deniedPermissions><file>${installdir}/admin</file><grantedPermissions>granted</grantedPermissions><username>S-1-1-0</username>
</getWindowsACL>
Additional Examples: Example 1
Add Windows Scheduled Task
Create a new task or modify the value of an existing one. The allowed properties in the <addScheduledTask> action are:
• <dayOfMonth>: This parameter is used only for Task of MONTHLY type. It specifies the day of the month the task will beexecuted.
• <duration>: (minutes) How long the Task is active.
• <endDate>: (year-month-day) Specify the date on which the task becomes inactive.
BitRock InstallBuilder User Guide 8215 / 393
• <interval>: (minutes) How often do you want to execute the given Task in specified duration time.
• <name>: Name of the Task
• <password>: The user password associated with the account specified in runAs parameter.
• <period>: This parameter is used only for Task of DAILY/WEEKLY type. It specifies how often (every PERIOD days fortype DAILY / every PERIOD weeks for type WEEKLY) the task will be executed.
• <program>: Path to program or script to run.
• <programArguments>: Program arguments.
• <runAs>: Run the Task as the specified user.
• <runAsAdmin>: Run with highest privileges.
• <runOnlyIfLoggedOn>: Run task only if the user specified by runAs parameter is logged on.
• <startDate>: (year-month-day) Specify the date on which the task becomes activated.
• <startTime>: (hours:minutes) The time the Task becomes activated.
• <type>: Type of the Task.
• <weekDays>: Specifies days to run the task on (MON, TUE, . . . SUN) or * for all days of week
• <workingDirectory>: Working directory. This is important for scripts that expect to be run from a specific location. Bydefault, it will be the directory where the script or program is located.
Examples:
Schedule monthly task to be run on each 3rd day of month
<addScheduledTask><dayOfMonth>3</dayOfMonth><duration>120</duration><endDate>2037-12-31</endDate><interval></interval><name>myappDailyMaintenance</name><password></password><period></period><program>${installdir}/maintenance.exe</program><programArguments>--monthly</programArguments><runOnlyIfLoggedOn>0</runOnlyIfLoggedOn><startDate>2011-01-01</startDate><startTime>03:00</startTime><type>MONTHLY</type>
</addScheduledTask>
Create a scheduled tasks if it does not already exist
<!-- Check the existence of the task --><setInstallerVariableFromScriptOutput>
<exec>schtasks</exec><execArgs>/query /fo list</execArgs><name>output</name><abortOnError>0</abortOnError><showMessageOnError>0</showMessageOnError>
</setInstallerVariableFromScriptOutput><setInstallerVariable name="taskName" value="Check For Updates"/><setInstallerVariable name="taskExists" value="0"/><setInstallerVariable>
<name>taskExists</name><value>1</value>
BitRock InstallBuilder User Guide 8216 / 393
<ruleList><regExMatch><logic>matches</logic><pattern>TaskName:\s*(${taskName})\n</pattern><text>${output}</text>
</regExMatch></ruleList>
</setInstallerVariable><addScheduledTask>
<program>${installdir}/autoupdate.exe</program><programArguments>--mode unattended --unattendedmodebehavior download</programArguments><startTime>09:00</startTime><type>DAILy</type><ruleList><isFalse value="${taskExists}"/>
</ruleList></addScheduledTask>
Delete Windows Scheduled Task
Delete Windows Scheduled Task The allowed properties in the <deleteScheduledTask> action are:
• <name>: Name of the Task
Examples:
Delete previously scheduled task
<deleteScheduledTask><name>myappDailyMaintenance</name>
</deleteScheduledTask>
Shutdown
Shut down the machine (Windows only) The allowed properties in the <shutdown> action are:
• <delay>: Delay in seconds before shut down.
Examples:
Shutdown the machine at the end of the installation
<finalPageActionList><shutdown progressText="Shutdown the machine" delay="10"/>
</finalPageActionList>
Services Actions
Delete Mac OS X service
This action allows you to delete a Mac OS X service. Requires Mac OS X version 10.4 or later. The allowed properties in the<deleteOSXService> action are:
• <scope>: Scope of service

BitRock InstallBuilder User Guide 8217 / 393
• <serviceName>: Identifier for the service name
Examples:
Delete service com.bitrock.sample
<deleteOSXService><serviceName>com.bitrock.sample</serviceName><scope>system</scope>
</deleteOSXService>
Additional Examples: Example 1
Start Windows Service
This action allows you to start a specified Windows service. The allowed properties in the <startWindowsService> actionare:
• <delay>: Amount of milliseconds to wait for the service to start.
• <displayName>: Name displayed in the Windows service control panel
• <serviceName>: Internal service name
Examples:
Start Sample Service service
<startWindowsService><abortOnError>0</abortOnError><delay>15000</delay><displayName>Sample Service</displayName><serviceName>SampleService</serviceName>
</startWindowsService>
Additional Examples: Example 1
Create Windows Service
This action allows you to create a new Windows service. The allowed properties in the <createWindowsService> actionare:
• <account>: User account under which the service should run. It takes the form domain\username. If the account is alocal account, it may be specified as .\username or username. If this option is not specified, the service will run under theLocalSystem account.
• <dependencies>: Comma separated list of services that the created service depends on
• <description>: Program description
• <displayName>: Name displayed in the Windows service control panel
• <password>: Password for the user account if one is specified.
• <program>: Path to program
• <programArguments>: Arguments to pass to the program
• <serviceName>: Internal service name

BitRock InstallBuilder User Guide 8218 / 393
• <startType>: Specify how the service should be started
Examples:
Create Sample Service
<createWindowsService><abortOnError>0</abortOnError><displayName>Sample Service</displayName><program>${installdir}/sampleservice.exe</program><programArguments>--service</programArguments><serviceName>SampleService</serviceName><startType>auto</startType>
</createWindowsService>
Created service will start automatically and run sampleservice.exe from application directory. After a service is created,it should be started using <startWindowsService> - otherwise it will be started after computer restart.
Additional Examples: Example 1, Example 2, Example 3
Stop Windows Service
This action allows you to stop a specified Windows service. The allowed properties in the <stopWindowsService> actionare:
• <delay>: Amount of milliseconds to wait for the service to stop.
• <displayName>: Name displayed in the Windows service control panel
• <serviceName>: Internal service name
Examples:
Stop Sample Service service
<stopWindowsService><abortOnError>0</abortOnError><delay>15000</delay><displayName>Sample Service</displayName><serviceName>SampleService</serviceName>
</stopWindowsService>
Additional Examples: Example 1
Remove Unix Service
This action allows you to remove a service in a Linux based system. Note that you will need to run the installer as root to be ableto remove services. The allowed properties in the <removeUnixService> action are:
• <name>: Service Name
Examples:
Remove Unix service with name based on project’s shortName
<removeUnixService><name>${project.shortName}</name>
</removeUnixService>
Additional Examples: Example 1
BitRock InstallBuilder User Guide 8219 / 393
Add Unix Service
This action allows you to create a new service in a Linux based system. Note that you will need to run the installer as root to beable to create new services. The allowed properties in the <addUnixService> action are:
• <description>: Product description
• <name>: Service Name
• <program>: Path to the program
Examples:
Create Unix service with name based on project’s shortName
<addUnixService><description>Sample service</description><name>${project.shortName}</name><program>${installdir}/sampleservice</program>
</addUnixService>
Additional Examples: Example 1
Start Mac OS X service
This action allows you to start a Mac OS X service. Requires Mac OS X version 10.4 or later. The allowed properties in the<startOSXService> action are:
• <serviceName>: Identifier for the service name
Examples:
Start service com.bitrock.sample
<startOSXService><serviceName>com.bitrock.sample</serviceName>
</startOSXService>
Additional Examples: Example 1
Get Unique Windows Service Name
This action allows you to get a unique Windows service name. The allowed properties in the <getUniqueWindowsServiceName>action are:
• <displayName>: Initial display name for the service
• <selectedDisplayNameVariable>: Variable to store the service display name
• <selectedServiceNameVariable>: Variable to store the Service name
• <serviceName>: Initial name for the service
Examples:
Create Sample Service with unique service name
BitRock InstallBuilder User Guide 8220 / 393
<getUniqueWindowsServiceName><displayName>Sample Service</displayName><selectedDisplayNameVariable>service_display_name</selectedDisplayNameVariable><selectedServiceNameVariable>service_name</selectedServiceNameVariable><separator>-</separator><serviceName>SampleService</serviceName>
</getUniqueWindowsServiceName><createWindowsService>
<abortOnError>0</abortOnError><displayName>${service_display_name}</displayName><program>${installdir}/sampleservice.exe</program><programArguments>--service</programArguments><serviceName>${service_name}</serviceName><startType>auto</startType>
</createWindowsService>
This will allow multiple services of same base name to be created - for example if multiple applications base on same frameworkthat runs as a service.
Additional Examples: Example 1
Stop Mac OS X service
This action allows you to stop a Mac OS X service. Requires Mac OS X version 10.4 or later. The allowed properties in the<stopOSXService> action are:
• <serviceName>: Identifier for the service name
Examples:
Stop service com.bitrock.sample
<stopOSXService><serviceName>com.bitrock.sample</serviceName>
</stopOSXService>
Additional Examples: Example 1, Example 2
Delete Windows Service
This action allows you to remove a specified Windows service. The allowed properties in the <deleteWindowsService>action are:
• <displayName>: Name displayed in the Windows service control panel
• <serviceName>: Internal service name
Examples:
Delete Sample Service service
<deleteWindowsService><abortOnError>0</abortOnError><displayName>Sample Service</displayName><serviceName>SampleService</serviceName>
</deleteWindowsService>
Before deletion, service is always stopped so <stopWindowsService> does not have to be called prior to <deleteWindowsService>.
Additional Examples: Example 1, Example 2
BitRock InstallBuilder User Guide 8221 / 393
Create Mac OS X service
This action allows you to create a Mac OS X service. Requires Mac OS X version 10.4 or later. System Wide scope requiresrunning the installer as an administrator. The allowed properties in the <createOSXService> action are:
• <groupname>: Groupname
• <keepAlive>: Keep process alive by launchctl
• <program>: Path to program
• <programArguments>: Arguments to pass to the program
• <scope>: Scope of service
• <serviceName>: Identifier for the service name
• <username>: Username
Examples:
Create new service com.bitrock.sample
<createOSXService><keepAlive>1</keepAlive><program>${installdir}/Sample.app/Contents/MacOS/sample</program><programArguments>--service</programArguments><serviceName>com.bitrock.sample</serviceName><scope>system</scope><username>daemon</username><groupname>wheel</groupname>
</createOSXService>
New service will start automatically and run sample from application bundle.
After a service is created, it should be started using <startOSXService> - otherwise it will be started after computer restart.
Additional Examples: Example 1
Restart Windows Service
This action allows you to restart a specified Windows service. The allowed properties in the <restartWindowsService>action are:
• <delay>: Amount of milliseconds to wait for the service to start / stop.
• <displayName>: Name displayed in the Windows service control panel
• <serviceName>: Internal service name
Examples:
Restart Sample Service service
<restartWindowsService><abortOnError>0</abortOnError><delay>15000</delay><displayName>Sample Service</displayName><serviceName>SampleService</serviceName>
</restartWindowsService>
Additional Examples: Example 1
BitRock InstallBuilder User Guide 8222 / 393
File System Actions
Copy File
Create a copy of a file. The destination file will be overwritten if it already exists The allowed properties in the <copyFile>action are:
• <destination>: Path to where the file will be copied.
• <excludeFiles>: Patterns to exclude files
• <matchHiddenFiles>: Whether or not to attempt to match Windows hidden files
• <origin>: Path to the original file.
Examples:
Copy a shortcut to the Desktop
<copyFile><destination>~/Desktop</destination><origin>${installdir}/Launch Application.desktop</origin><ruleList>
<platformTest type="unix"/></ruleList>
</copyFile>
Additional Examples: Example 1, Example 2, Example 3
Unpack Directory
This action allows you to unpack a directory before files are unpacked during the installation phase. This can be helpful toextract a full directory to a temporary folder such as ${env(TEMP)}. If you need to unpack single files, you may want to tryusing <b>unpackFile</b> action instead. The allowed properties in the <unpackDirectory> action are:
• <component>: Project component where the directory you want to extract is located.
• <destination>: Path to the location where you want to extract the directory.
• <folder>: Project folder name where the directory you want to extract is located.
• <origin>: Directory name you want to extract.
Examples:
Unpack initial data if it does not exist (i.e. for initial installation)
<unpackDirectory><component>initialdata</component><destination>${installdir}/data</destination><folder>data</folder><origin>data</origin><ruleList>
<fileTest><condition>not_exists</condition><path>${installdir}/data</path>
</fileTest></ruleList>
</unpackDirectory>
Additional Examples: Example 1, Example 2, Example 3
BitRock InstallBuilder User Guide 8223 / 393
Delete File
Delete a file. The allowed properties in the <deleteFile> action are:
• <excludeFiles>: Patterns to exclude files
• <matchHiddenFiles>: Whether or not to attempt to match Windows hidden files
• <path>: Path to the file or directory to delete. It accepts patterns
Examples:
Delete a directory if it is empty
<deleteFile><path>${installdir}</path><ruleList><fileTest condition="is_empty" path="${installer_directory}"/>
</ruleList></deleteFile>
Additional Examples: Example 1, Example 2, Example 3
Create Backup File
Create a backup of a file or directory. The backup will be named with a .bak extension if no destination is specified. If a backupfile already exists, new backups will be named .bak1, .bak2 and so on. The allowed properties in the <createBackupFile>action are:
• <destination>: Path to the destination backup folder.
• <path>: Path to original file you wish to backup.
Examples:
Backup the backup of a file before making changes
<createBackupFile><destination></destination><path>${installdir}/apache2/conf/httpd.conf</path>
</createBackupFile>
The action does not specifies a <destination> so the destination fileaname will be autogenerated.
Additional Examples: Example 1
Create Directory
This action allows you to create a new directory. The allowed properties in the <createDirectory> action are:
• <path>: Path to the new directory
Examples:
Create a directory
<createDirectory><path>/opt/src</path>
</createDirectory>
If the directory already exists the action won’t have any effect so it is not needed to attach a rule checking the existence.
BitRock InstallBuilder User Guide 8224 / 393
Unzip
This action allows you to uncompress the whole content of a zip file to a given destination folder. The file to unzip must bealready present on the file system, i.e., it doesn’t support unzipping files that are shipped by the installer but which have not beenalready unpacked (you may want to use the <b>unpackFile</b> action in that case). The allowed properties in the <unzip>action are:
• <destinationDirectory>: Path to the folder where you want the file content to be extracted. The folder must exist andmust be writable
• <zipFile>: ZIP file that will be uncompressed
Examples:
Extract a compressed application bundle
<unzip><destinationDirectory>${installdir}/applications</destinationDirectory><zipFile>${installdir}/myApplication.app.zip</zipFile>
</unzip>
Additional Examples: Example 1
Touch File
Update the access and modification times of a file or directory. If the file does not exist, it can be specified whether to create anempty file or not. It is equivalent to the touch Unix command. The allowed properties in the <touchFile> action are:
• <createIfNotExists>: Whether or not to create the file in case it does not exist
• <matchHiddenFiles>: Whether or not to attempt to match Windows hidden files
• <path>: Path to the file/directory to be touched
Examples:
Create a file to mark a component as installed
<touchFile><createIfNotExists>1</createIfNotExists><path>${installdir}/components/documentationComponent</path><ruleList>
<isTrue value="${project.component(documentationComponent).selected}"/></ruleList>
</touchFile>
Additional Examples: Example 1
Get Symbolic Link target
Get the destination path referenced by the given symbolic link. Returns an empty value if the file doesn’t exist or is not a symboliclink. The allowed properties in the <getSymLinkTarget> action are:
• <link>: Symbolic link path
• <variable>: Variable to store result
BitRock InstallBuilder User Guide 8225 / 393
Examples:
Read symbolic link libsample.so in application directory
<getSymLinkTarget><link>${installdir}/libsample.so</link><variable>lib_path</variable>
</getSymLinkTarget>
This will store target path in lib_path variable. Note that if the path is not absolute, it is relative to directory where <link>is located.
Rename File
Change the name of a file or directory The allowed properties in the <renameFile> action are:
• <destination>: New name of the file.
• <excludeFiles>: Patterns to exclude files
• <matchHiddenFiles>: Whether or not to attempt to match Windows hidden files
• <origin>: Original name of the file.
Examples:
Rename file as .bak, deleting previous file if it exists
<deleteFile><path>${installdir}/config.ini.bak</path>
</deleteFile><renameFile>
<destination>${installdir}/config.ini.bak</destination><origin>${installdir}/config.ini</origin>
</renameFile>
Additional Examples: Example 1, Example 2, Example 3
Create Symbolic Link
Create a symbolic link to a file. It is the equivalent to the Unix ln command. The allowed properties in the <createSymLink>action are:
• <linkName>: Symbolic link name.
• <target>: Path to the file to which you want to create a symbolic link.
Examples:
Create symbolic link libsample.so pointing to libsample.so.1 in application directory
<createSymLink><linkName>${installdir}/libsample.so</linkName><target>libsample.so.1</target>
</createSymLink>
This will create a symbolic link in application’s directory. Note that <target> is relative to directory where <linkName>will be created.
Additional Examples: Example 1, Example 2
BitRock InstallBuilder User Guide 8226 / 393
Zip
Pack one or more files to a zip file, relative to base directory. The allowed properties in the <zip> action are:
• <baseDirectory>: Directory that all files will be packed relatively to
• <excludeFiles>: Patterns to exclude files
• <files>: File patterns to apply action to
• <matchHiddenFiles>: Whether or not to attempt to match Windows hidden files
• <zipFile>: ZIP file that will be created
Examples:
Zip all the files in a directory excluding .DS_Store directories
<zip><baseDirectory>${installdir}</baseDirectory><files>${installdir}/backup</files><excludeFiles>*/.DS_Store</excludeFiles><zipFile>${installdir}/backup.zip</zipFile>
</zip>
As the <baseDirectory> is set to ${installdir}, the packed files will be relative to it. For example, the file /home/bitrock/sample-1.0/backup/README.txtwill be stored in the zip file as backup/README.txt.
Additional Examples: Example 1
Create Shortcuts
Creates one or more shortcuts in specified location. The allowed properties in the <createShortcuts> action are:
• <destination>: Path to the location where you want to create the shortcuts.
• <shortcutList>: List of shortcuts to create.
Examples:
Create additional shortcuts that run as administrator if UAC is enabled
<createShortcuts><destination>${windows_folder_common_programs}/${project.startMenuGroupName}</ ←↩
destination><ruleList>
<isTrue value="${windows_os_uac_enabled}"/></ruleList><shortcutList>
<shortcut><comment>Text that will appear on Tooltip</comment><name>Run administrative panel</name><runAsAdmin>1</runAsAdmin><windowsExec>${installdir}/admin.exe</windowsExec><windowsExecArgs></windowsExecArgs><windowsPath>${installdir}</windowsPath>
</shortcut></shortcutList>
</createShortcuts>
Additional Examples: Example 1, Example 2, Example 3
BitRock InstallBuilder User Guide 8227 / 393
Unpack File
This action allows you to unpack a file before files are unpacked during the installation phase. This can be helpful to extract filesto a temporary folder such as ${env(TEMP)} if you need to run a pre-installation check script or program. If you need to unpacka directory, you may want to try using <b>unpackDirectory</b> action instead. The allowed properties in the <unpackFile>action are:
• <component>: Project component where the file you want to extract is located
• <destination>: Path to the location where you want to extract the file
• <folder>: Project folder name where where the file you want to extract is located
• <origin>: File name you want to extract
Examples:
Unpack initial configuration if it does not exist
<unpackFile><component>initialdata</component><destination>${installdir}/config.ini</destination><folder>data</folder><origin>config.ini</origin><ruleList>
<fileTest><condition>not_exists</condition><path>${installdir}/config.ini</path>
</fileTest></ruleList>
</unpackFile>
Additional Examples: Example 1, Example 2, Example 3
Environment Actions
Remove Directory from PATH
This action allows you to remove a directory from the system PATH. For Windows, you can choose to modify the system path orthe user path using the <b>scope</b> property. The allowed properties in the <removeDirectoryFromPath> action are:
• <path>: Path to the directory
• <scope>: Select user path or system path.
Examples:
<removeDirectoryFromPath><path>${installdir}/bin</path>
</removeDirectoryFromPath>
Set Environment Variable
Set the value of a system environment variable. If it does not exist yet, a new one will be created. The variable will not exist oncethe installer has finished. The allowed properties in the <setEnvironmentVariable> action are:
• <name>: Variable name
BitRock InstallBuilder User Guide 8228 / 393
• <value>: Variable value
Examples:
Set MYAPP_HOME environment variable to directory where application is installed.<setEnvironmentVariable>
<name>MYAPP_HOME</name><value>${installdir}</value>
</setEnvironmentVariable>
Action <setEnvironmentVariable> only sets environment variable for this and child processes. Actions <addEnvironmentVariableand <deleteEnvironmentVariable> can be used to set a variable for current user or entire system.
Add Directory to Path
Add a directory to the system path. This will modify the registry on windows and the appropiate shell initialization files on Unixsystems The allowed properties in the <addDirectoryToPath> action are:
• <insertAt>: Where to insert the new directory in the PATH (currently Unix only)
• <path>: Path to the directory
• <scope>: Select user path or system path.
Examples:<addDirectoryToPath>
<insertAt>end</insertAt><path>${installdir}/bin</path>
</addDirectoryToPath>
Add Environment Variable
Add a system environment variable.This will modify the registry on windows and the appropiate shell initialization files on Unixsystems The allowed properties in the <addEnvironmentVariable> action are:
• <name>: Environment variable name.
• <scope>: Scope.
• <username>: User to modify the environment for. If empty, the current user will be used
• <value>: Variable name
Examples:
Set MYAPP_HOME environment variable to directory where application is installed.<addEnvironmentVariable>
<abortOnError>0</abortOnError><name>MYAPP_HOME</name><scope>system</scope><showMessageOnError>0</showMessageOnError><value>${installdir}</value><onErrorActionList>
<addEnvironmentVariable><name>MYAPP_HOME</name><scope>user</scope><value>${installdir}</value>
</addEnvironmentVariable></onErrorActionList>
</addEnvironmentVariable>
BitRock InstallBuilder User Guide 8229 / 393
If setting variable as system <scope> fails, user scope is tried. If both fail, an error is thrown in the <addEnvironmentVariable>action for user <scope>.
Please note that this sets environment variable for operating system. It does not automatically set variable for current installer andits child processes. Action <setEnvironmentVariable> should be used in addition to <addEnvironmentVariable>to set the variable for current process, if it is needed.
Add Fonts
This action allows you to install fonts in Windows systems. The allowed properties in the <addFonts> action are:
• <excludeFiles>: Patterns to exclude files
• <files>: File patterns to apply action to
• <matchHiddenFiles>: Whether or not to attempt to match Windows hidden files
Examples:
Install a set of bundled fonts
<postInstallationActionList><addFonts><files>${installdir}/fonts/*.ttf</files>
</addFonts></postInstallationActionList>
Remove Fonts
This action allows you to remove fonts on Windows. The action accepts only file names or patterns (as opposed to file paths,either relative or absolute), matching them inside the system fonts folder. The allowed properties in the <removeFonts>action are:
• <excludeFiles>: Patterns to exclude files
• <files>: File patterns to apply action to
• <matchHiddenFiles>: Whether or not to attempt to match Windows hidden files
Examples:
Remove the installed fonts on uninstallation
<removeFonts><files>my_old_font.ttf;some_other_font.ttf;${project.shortName}*.ttf</files>
</removeFonts>
Delete Environment Variable
Delete an environment variable from the system. The allowed properties in the <deleteEnvironmentVariable> actionare:
• <name>: Environment variable name.
• <scope>: Scope.
• <username>: User to modify the environment for. If empty, the current user will be used
BitRock InstallBuilder User Guide 8230 / 393
Examples:
Unset MYAPP_HOME from both user and system <scope>.<deleteEnvironmentVariable>
<name>MYAPP_HOME</name><scope>system</scope>
</deleteEnvironmentVariable><deleteEnvironmentVariable>
<name>MYAPP_HOME</name><scope>user</scope>
</deleteEnvironmentVariable>
Add Library to Path
Add a path in which the system will search for shared libraries on Linux The allowed properties in the <addLibraryToPath>action are:
• <path>: Path to add to the system search for dynamic libraries on Linux
Examples:
Add your packed libraries to the system path<addLibraryToPath>
<path>${installdir}/libs</path></addLibraryToPath>
System Actions
Kill Process
This action allows you to kill a running process that matches one or several conditions. Windows support only. The allowedproperties in the <kill> action are:
• <name>: Name of the process, usually the executable filename.
• <path>: Path to the executable of the process.
• <pid>: ID of the process to be killed.
Examples:
Kill a process by its name<kill>
<name>SampleBinary.exe</name></kill>
Kill a process by its path<kill>
<path>${filePath.dos}</path></kill>
Kill that the processes matching any of the provided criteria<kill>
<name>SampleBinary.exe</name><path>${filePath.dos}</path><pid>35025</pid>
</kill>
BitRock InstallBuilder User Guide 8231 / 393
Locate Binary
Based on command given, locates binary and creates command that needs to be run. The allowed properties in the <locate>action are:
• <command>: Command to locate
• <variable>: Variable to store the result in
Examples:
Locate python binary and find Python’s installation directory.
<locate><command>python</command><variable>python_bin</variable>
</locate><!-- get directory name for binary (i.e. /opt/ActivePython-2.5/bin) --><dirName>
<variable>python_parentdir</variable><path>${python_binary}</path>
</dirName><!-- get Python home (i.e. /opt/ActivePython-2.5) --><dirName>
<variable>python_home</variable><path>${python_parentdir}</path>
</dirName>
First python binary is located using PATH environment variable and registry on Windows, next binary name as well as parentdirectory name is stripped - so that /opt/ActivePython-2.5/bin/python is mapped to /opt/ActivePython-2.5.
Directory Name
Returns a name comprised of all of the path components in name excluding the last element. If name is a relative file nameand only contains one path element, then returns ".". If name refers to a root directory, then the root directory is returned. Theallowed properties in the <dirName> action are:
• <path>: The path from which the base directory will be retrieved.
• <variable>: Variable that will store the directory path.
Examples:
Retrieve parent directory for installation - i.e. /opt or C:\Program Files
<dirName><variable>installation_parent</variable><path>${installdir}</path>
</dirName>
Create Timestamp
This action allows you to create a timestamp using a custom format, storing the result in an installer variable. The allowedproperties in the <createTimeStamp> action are:
• <format>: Format string for the generated timestamp. The string allows a number of field descriptors.
• <variable>: Variable that will store the resulting timestamp.

BitRock InstallBuilder User Guide 8232 / 393
The <format> tag should contain one or more following fields, which will be replaced using current date and time:
• %a: short name of the day of the week. e.g.: Thu
• %A: full name of the day of the week. e.g.: Thursday
• %b: short name of the month. e.g.: Apr
• %B: full name of the month. e.g.: April
• %c: localized representation of date and time of day. e.g.: Thu Apr 07 17:23:00 2011
• %d: number of the day of the month, as two decimal digits. e.g.: 07
• %e: number of the day of the month, as one or two decimal digits. e.g.: 7
• %h: same as %b
• %H: number giving the hour of the day in 24-hour clock format, as two decimal digits. e.g.: 17
• %I: number giving the hour of the day in 12-hour clock format, as two decimal digits. e.g.: 05
• %k: number giving the hour of the day in 24-hour clock format, as one or two decimal digits. e.g.: 17
• %l: number giving the hour of the day in 12-hour clock format, as one or two decimal digits. e.g.: 5
• %m: number of the month, as two decimal digits. e.g.: 04
• %M: number of the minute of the hour (00-59), as two decimal digits. e.g.: 23
• %N: number of the month, as one (preceeded with a space) or two decimal digits. e.g.: 4
• %p: AM/PM indicator. e.g.: PM
• %R: same as %H:%M
• %s: count of seconds since the epoch, expressed as decimal integer. e.g.: 1302189780
• %S: number of the seconds in the minute (00-59), as two decimal digits. e.g.: 00
• %T: same as %H:%M:%S
• %u: weekday number (Monday = 1, Sunday = 7). e.g.: 4
• %U: week of the year (00-52), Sunday is the first day of the week. e.g.: 14
• %V: week of the year according to ISO-8601 rules. Week 1 is week containing January 4th. e.g. 14
• %w: weekday number (Sunday = 0, Saturday = 6). e.g.: 4
• %W: week of the year (00-52), Monday is the first day of the week. e.g.: 14
• %y: year without century (00-99). e.g. 11
• %Y: year with century. e.g. 2011
Examples:
Get current timestamp and store it in an INI file<createTimeStamp>
<format>%Y%m%d%H%M%S</format><variable>timestamp</variable>
</createTimeStamp><iniFileSet>
<file>${installdir}/version.ini</file><key>timestamp</key><section>Version</section><value>${timestamp}</value>
</iniFileSet>
Additional Examples: Example 1, Example 2, Example 3
BitRock InstallBuilder User Guide 8233 / 393
Find File
This action allows you to define a file name or pattern (eg. "*.txt") to be searched inside a given directory and all its subdirectories.It will save in the specified installer variable the full path to the first file that matches the provided file name or pattern. Theallowed properties in the <findFile> action are:
• <baseDirectory>: Path to the directory in which to search for the file. It will search inside the directory and all of itssubdirectories.
• <followSymLinks>: Whether or not to follow or not symbolic links
• <pattern>: Pattern for the file that will be searched. The pattern can contain wildcards (*,?).
• <variable>: Variable where the full path to the first matching file will be stored
Examples:
Locate a previous installation by finding a well known file
<findFile><baseDirectory>/Applications</baseDirectory><pattern>myapp-info.ini</pattern><variable>installationInfo</variable><ruleList>
<platformTest type="osx"/></ruleList>
</findFile>
Get Free Disk Space
Calculate the free disk (KiloBytes) space and save the value in the given variable. Returns -1 if free space cannot be determined.The allowed properties in the <getFreeDiskSpace> action are:
• <path>: Path to the folder or disk
• <units>: Size units for the returned value.
• <variable>: Variable to which to save the result of the calculation
Examples:
Validate the disk space in the installation directory
<directoryParameter><name>installdir</name><validationActionList><getFreeDiskSpace path="${installdir}" units="KB" variable="diskSpace"/><throwError><text>You don’t have enough disk space to install${project.component(bigComponent).description}</text><ruleList>
<compareValues><value1>${required_diskspace}</value1><logic>greater</logic><value2>${diskSpace}</value2>
</compareValues></ruleList>
</throwError></validationActionList>
</directoryParameter>
Additional Examples: Example 1
BitRock InstallBuilder User Guide 8234 / 393
Get Available Port
Returns the number of the first available port in a range of port numbers specified by initialPort and finalPort (both inclusive).The allowed properties in the <getFreePort> action are:
• <finalPort>: The final port number on the range (inclusive).
• <initialPort>: The initial port number on the range (inclusive).
• <variable>: Variable that will store the free port number.
Examples:
Find unused port and write it into web server’s configuration file
<getFreePort><finalPort>8999</finalPort><initialPort>8080</initialPort><variable>http_port</variable>
</getFreePort><iniFileSet>
<file>${installdir}/www.ini</file><key>Port</key><section>Listen</section><value>${http_port}</value>
</iniFileSet>
Desktop Session Startup
Adds a program to be executed whenever a window manager session starts (only Linux KDE/Gnome supported). The allowedproperties in the <addUnixDesktopStartUpItem> action are:
• <description>: The description of the program.
• <name>: The name of this startup item.
• <program>: Path to the program to be executed when the session starts.
• <programArguments>: Arguments to be considered when running the program (only available for GNOME).
Examples:
Create a startup item to run a myapp-client application
<addUnixDesktopStartUpItem><description>Client for managing myapp</description><name>myapp-client</name><program>${installdir}/myapp-client</program><programArguments>--dock</programArguments>
</addUnixDesktopStartUpItem>
To get a similar behavior on Windows you just need to write a shortcut to the desired application to launch in the folder${windows_folder_startup}:
<createShortcuts><destination>${windows_folder_startup}/</destination><shortcutList>
<shortcut><comment>Client for managing myapp</comment><name>Launch myapp client</name>
BitRock InstallBuilder User Guide 8235 / 393
<runAsAdmin>1</runAsAdmin><windowsExec>${installdir}/myapp-client.exe</windowsExec><windowsExecArgs>--dock</windowsExecArgs><windowsPath>${installdir}</windowsPath>
</shortcut></shortcutList>
</createShortcuts>
Run Program
Run a program or script The allowed properties in the <runProgram> action are:
• <program>: Path to program or script to run
• <programArguments>: Program arguments
• <runAs>: Run the program or script as a specific user id. It will only take effect on Unix system and when running theinstaller as root
• <useMSDOSPath>: Whether or not to use or not MSDOS program name path on Windows
• <workingDirectory>: Working directory. This is important for scripts that expect to be run from a specific location. Bydefault, it will be the directory where the script or program is located
Examples:
Launch the installed application in background
<runProgram><program>${installdir}/bin/${project.shortName}.run</program><programArguments>--showWelcome 1 &</programArguments><workingDirectory>${installdir}/bin</workingDirectory>
</runProgram>
By default, programs executed are launched by their 8.3 names. InstallBuilder does that to avoid issues handling special charac-ters like spaces. If you need your installer to be launched using the full name, for example to have an exact path to look whenchecking if the process is running, you can disable it setting <useMSDOSPath> to 0. This setting is ignored when executingcommands in platforms other than Windows.
Use the long pathname when launching a program on Windows
<runProgram><program>${installdir}/bin/myApp.exe</program><useMSDOSPath>0</useMSDOSPath>
</runProgram>
In Unix platforms, when running the installer as root, it is also possible to specify the user that will be used to execute thecommand:
Use the long pathname when launching a program on Windows
<runProgram><program>${installdir}/bin/mysql</program><runAs>mysql</runAs>
</runProgram>
If the installer is executed as a regular user in GUI mode, and gksu (Gnome command) or kdesu (KDE command) are in thepath, they will be used to graphically require a password to raise privileges. Please not that this won’t work on OS X.
Additional Examples: Example 1, Example 2, Example 3
BitRock InstallBuilder User Guide 8236 / 393
Wait For Port
Pause the installation for a maximum timeout until a server process is listening in the specified port The allowed properties in the<waitForPort> action are:
• <port>: TCP port to check
• <state>: Wait for port to be free or in use.
• <timeout>: Maximum amount of time to wait (in milliseconds)
Examples:
Wait until a port is free
<runProgram><program>${installdir}/ctlscript.sh</program><programArguments>stop mysql &</programArguments>
</runProgram><waitForPort>
<port>${mysql_port}</port><state>free</state><timeout>30</timeout>
</waitForPort><logMessage text="MySQL Stopped"/>
Path manipulation
Performs change on the path and returns it in variable The allowed properties in the <pathManipulation> action are:
• <action>: Action to perform on the path
• <path>: The path to manipulate
• <variable>: Variable that will store the new path.
Examples:
<pathManipulation><action>absolutize</action><path>${datadir}</path><variable>datadir</variable>
</pathManipulation>
User and Group Actions
Change File Permissions
Change permissions of a file or directory The allowed properties in the <changePermissions> action are:
• <excludeFiles>: Patterns to exclude files
• <files>: File patterns to apply action to
• <permissions>: Permissions to set to file or directory

BitRock InstallBuilder User Guide 8237 / 393
Examples:
Set readonly permissions in a directory
<changePermissions><files>${installdir}/documentation</files><permissions>555</permissions>
</changePermissions>
Additional Examples: Example 1
Get File Permissions
Get permissions of a file or directory The allowed properties in the <getPermissions> action are:
• <file>: File or directory to retrieve permissions
• <variable>: Variable name to save permissions
Examples:
Preserve permisions of a system file when installing as root
<getPermissions><file>~${user}/.MacOSX/environment.plist</file><variable>permissions</variable>
</getPermissions><runProgram>
<program>defaults</program><programArguments>write ~${user}/.MacOSX/environment foo -string bar</programArguments>
</runProgram><changePermissions>
<files>~${user}/.MacOSX/environment.plist</files><permissions>${permissions}</permissions>
</changePermissions>
Add User
Add a user to the system. The allowed properties in the <addUser> action are:
• <homedir>: Path to the users homedir
• <password>: Password for the user account.
• <username>: Username to add to the system
Examples:
Add mysql user
<postInstallationActionList><addUser><abortOnError>0</abortOnError><showMessageOnError>0</showMessageOnError><username>mysql</username>
</addUser></postInstallationActionList>
Additional Examples: Example 1
BitRock InstallBuilder User Guide 8238 / 393
Delete User
Delete a user from the system. Equivalent to the Unix userdel command The allowed properties in the <deleteUser> actionare:
• <username>: Username
Examples:
Delete mysql user
<postUninstallationActionList><deleteUser>
<abortOnError>0</abortOnError><showMessageOnError>0</showMessageOnError><username>mysql</username>
</deleteUser></postUninstallationActionList>
Add Group
Add a group to the system. Equal to the Unix groupadd command The allowed properties in the <addGroup> action are:
• <groupname>: Group to add to the system
Examples:
Add mysql group
<postInstallationActionList><addGroup>
<abortOnError>0</abortOnError><groupname>mysql</groupname><showMessageOnError>0</showMessageOnError>
</addGroup></postInstallationActionList>
Additional Examples: Example 1
Delete Group
This action allows you to remove a group from the system. The allowed properties in the <deleteGroup> action are:
• <groupname>: Group name to delete.
Examples:
Delete mysql group
<postUninstallationActionList><deleteGroup>
<abortOnError>0</abortOnError><groupname>mysql</groupname><showMessageOnError>0</showMessageOnError>
</deleteGroup></postUninstallationActionList>
BitRock InstallBuilder User Guide 8239 / 393
Add Group To User
Add a supplementary group to a user. This way, the user is also member of that group. Make sure that the group already exists.If no username is given, then the current logged on user is selected. The allowed properties in the <addGroupToUser> actionare:
• <groupname>: Groupname
• <username>: Username
Examples:
Add mysql group to mysql user
<postInstallationActionList><addGroupToUser>
<groupname>mysql</groupname><username>mysql</username>
</addGroupToUser></postInstallationActionList>
Delete Group from User
Delete a supplementary group from a user. The allowed properties in the <deleteGroupFromUser> action are:
• <groupname>: Groupname
• <username>: Username
Examples:
Remove user from myappusers group
<postUninstallationActionList><deleteGroupFromUser>
<groupname>myappusers</groupname><username>${system_username}</username>
</deleteGroupFromUser></postUninstallationActionList>
Change Owner And Group
Change the owner and group of a file or directory The allowed properties in the <changeOwnerAndGroup> action are:
• <excludeFiles>: Patterns to exclude files
• <files>: File patterns to apply action to
• <group>: Group to set to file or directory
• <owner>: Owner to set to file or directory
Examples:
Change user and group to PostgreSQL data folder
<changeOwnerAndGroup><files>${installdir}/postgresql/data</files><group>postgres</group><owner>postgres</owner>
</changeOwnerAndGroup>
BitRock InstallBuilder User Guide 8240 / 393
Add Rights to Account
Add rights to user or group on Windows The allowed properties in the <addWindowsAccountRights> action are:
• <account>: User or group name
• <rights>: Account rights, separated by spaces; Example value: SeServiceLogonRight. A complete list can be obtainedfrom http://msdn.microsoft.com/en-us/library/aa375728(v=VS.85).aspx
Examples:
Grant postgres account with SeServiceLogonRight if it does not have it already
<addWindowsAccountRights><abortOnError>0</abortOnError><showMessageOnError>0</showMessageOnError><account>${postgres_account}</account><rights>SeServiceLogonRight</rights><ruleList><windowsAccountTest>
<account>${postgres_account}</account><rights>SeServiceLogonPrivilege</rights><negate>1</negate>
</windowsAccountTest></ruleList>
</addWindowsAccountRights>
Remove Rights from Account
Remove rights from user or group on Windows The allowed properties in the <removeWindowsAccountRights> actionare:
• <account>: User or group name
• <rights>: Account rights, separated by spaces; Example value: SeServiceLogonRight. A complete list can be obtainedfrom http://msdn.microsoft.com/en-us/library/aa375728(v=VS.85).aspx
Examples:
Remove SeBatchLogonRight and SeInteractiveLogonRight rights from an account
<removeWindowsAccountRights><abortOnError>0</abortOnError><showMessageOnError>0</showMessageOnError><account>${account}</account><rights>SeBatchLogonRight SeInteractiveLogonRight</rights>
</removeWindowsAccountRights>
BitRock InstallBuilder User Guide 8241 / 393
Chapter 9
Rules
9.1 What is a Rule?
BitRock InstallBuilder allows you to control whether or not certain actions take place, pages are shown or files are installed.You just have to attach rules to the <ruleList> section of the desired element (an action, parameter, component, folder orshortcut).
Examples of rules include checking if ports are in use, if a file exists, if a process is running or comparing texts.
<ruleList><windowsServiceTest service="myservice" condition="not_exists"/>
</ruleList>
<ruleList><processTest><logic>is_running</logic><name>${project.shortName}.exe</name>
</processTest></ruleList>
A complete list of supported rules can be found in the rules appendix.
All rules can be also negated using the <negate> tag. For example, the following rule will resolve to "true":
<ruleList><isTrue value="1"/>
</ruleList>
While this will resolve to "false":
<ruleList><isTrue value="1" negate="1" />
</ruleList>
This is very convenient when you want to execute an action in all supported platforms but one:
<!-- It will resolve to true in all platforms supported but Windows 7 --><ruleList>
<platformTest type="windows-7" negate="1" /></ruleList>
BitRock InstallBuilder User Guide 8242 / 393
9.2 Rule List
The <ruleList> is the most common way of attaching rules. It is supported by actions, folders, parameters and shortcuts andis evaluated at runtime.
When the set of rules contained in the rule list is evaluated, depending on the result and the element it is attached to, the followingwill occur:
• Action: The action is executed, otherwise it is ignored.
<!-- The error is just thrown if the rule evaluates totrue (it is running in Windows XP) -->
<throwError text="This installer is not supported in Windows XP"><ruleList><platformTest type="windows-xp"/>
</ruleList></throwError>
• Parameter: The associated page is displayed, otherwise it is hidden.
<booleanParameter><name>enableAdvanced</name><description>Do you want to enable the advanced configuration?</description>
</booleanParameter>
<!-- The page will be displayed only if the user selected ’Yes’in the ’enableAdvanced’ page -->
<parameterGroup><name>configuration</name><title>Configuration</title><explanation></explanation><parameterList>
<stringParameter name="username" description="Username"/><passwordParameter name="password" description="Password"/>
</parameterList><ruleList>
<isTrue value="${enableAdvanced}"/></ruleList>
</parameterGroup>
• Folder: If true, files belonging to that folder (files, directories and shortcuts) are installed and the associated <actionList>is executed.
<folder><name>fileswindowsx64</name><platforms>windows</platforms><destination>${installdir}</destination><distributionFileList><distributionDirectory origin="windows-x64/bin"/>
</distributionFileList><shortcutList><shortcut>
<comment>Uninstall</comment><exec>${installdir}/${project.uninstallerName}</exec>...
</shortcut></shortcutList>
BitRock InstallBuilder User Guide 8243 / 393
<actionList><setWindowsACL>
<action>allow</action><files>${installdir}/admin;${installdir}/admin/*</files><permissions>generic_all</permissions><users>S-1-1-0</users>
</setWindowsACL></actionList><ruleList><platformTest type="windows-x64"/>
</ruleList></folder>
The rules will decide if the folder is unpacked at runtime but the installer will always bundle it (they are not considered whenbuilding the installer).
• Shortcut: If true, the shortcut will be created.
<folder><name>files</name>...<shortcutList>...<shortcut>
<comment>Uninstall</comment><exec>${installdir}/${project.uninstallerName}</exec>...<ruleList>
<!-- This can be configured through a booleanparameter page -->
<isTrue value="${createShortcuts}"/></ruleList>
</shortcut>...
</shortcutList>...
</folder>
In addition to the <ruleList> tag, the mentioned elements can also configure the logic used to evaluate the rules through the<ruleEvaluationLogic> setting. Its allowed values are:
• and: The set of rules will evaluate to true only if all of the rules are true. This is the default value if the <ruleEvaluationLogic>is not provided.
<!-- The backup will be just executed if the folder exists andis not empty -->
<createBackupFile><path>${installdir}/data</path><destination>${installdir}/backup</destination><ruleEvaluationLogic>and</ruleEvaluationLogic><ruleList>
<fileTest path="${installdir}/data" condition="exists"/><fileTest path="${installdir}/data" condition="is_not_empty"/>
</ruleList></createBackupFile>
When sequentially executing the rules using and evaluation logic, if any of the rules is not true, the rest are skipped and the fullset evaluates to false.
You can apply this, for example, when checking whether a directory exists. You can first check if the target exists, and if so,check if it is a directory:
BitRock InstallBuilder User Guide 8244 / 393
<deleteFile path="some/directory" ruleEvaluationLogic="and"><ruleList><fileExists path="some/directory"/><!-- If the file does not exists, InstallBuilder will not checkif it is a directory --><fileTest path="some/directory" condition="is_directory"/>
</ruleList></deleteFile>
• or: The set of rules will evaluate to true if any of the rules is true.
<!-- Just create the link if the platform is OS X or Linux --><createSymLink>
<target>${installdir}/bin/checker</target><linkName>/usr/bin</linkName><ruleEvaluationLogic>or</ruleEvaluationLogic><ruleList><platformTest type="osx"/><platformTest type="linux"/>
</ruleList></createSymLink>
When sequentially executing the rules using or evaluation logic, if any of the rules is true, the rest are skipped and the full setevaluates to true.
9.3 Should Pack Rule List
The <shouldPackRuleList> is a special kind of <ruleList> only supported by components and folders.
It supports the same rules but instead of being executed at runtime, the rules are evaluated when building the installer. If they donot match, the element containing them won’t be packed at all in the installer:
• Component: The component, including all the contained folders, shortcuts, pages and actions won’t be included in the installer,as if the project were not defining them.
• Folder: The folder won’t be packed.
<!-- The component will be packed only if the BUILD_TYPE environmentvariable defined at build-time is not set to ’demo’ -->
<component><name>files</name><canBeEdited>1</canBeEdited><selected>1</selected><show>1</show>...<shouldPackRuleEvaluationLogic>and</shouldPackRuleEvaluationLogic><shouldPackRuleList><compareText>
<text>${env(BUILD_TYPE)}</text><logic>does_not_equal</logic><value>demo</value>
</compareText></shouldPackRuleList>
</component>
You can find a more complex example in the Custom Build Targets section.
The evaluation logic of the rules in the <shouldPackRuleList> is configured through the <shouldPackRuleEvaluationLogic>,which behaves as the <ruleEvaluationLogic> setting explained in the previous section.
BitRock InstallBuilder User Guide 8245 / 393
9.4 Rule Groups
A <ruleGroup> is a special type of rule that can contain other rules and therefore perform more complex tests. For example,if you want to execute an action only on Windows 64bit and only if it is neither XP nor Vista:
<runProgram program="myExec.exe" programArguments="--mode unattended"><ruleList>
<platformTest type="windows-x64"/><ruleGroup ruleEvaluationLogic="or" negate="1">
<ruleList><platformTest type="windows-xp"/><platformTest type="windows-vista"/>
</ruleList></ruleGroup>
</ruleList></runProgram>
In the above example, you have created a new rule "Windows 64 bit that is neither XP nor Windows Vista". Please note the<ruleGroup> also accepts the <ruleEvaluationLogic> and <negate> tags.
Using it, you can perform any kind of logic test like if (A and !(B or ((C or !D) and !E)))
<ruleList><isTrue value="${A}"/><ruleGroup negate="1" ruleEvaluationLogic="or"><ruleList>
<isTrue value="${B}"/><ruleGroup>
<ruleList><isTrue value="${E}" negate="1"/><ruleGroup ruleEvaluationLogic="or">
<ruleList><isTrue value="${C}"/><isTrue value="${D}" negate="1"/>
</ruleList></ruleGroup>
</ruleList></ruleGroup>
</ruleList></ruleGroup>
</ruleList>
9.5 Additional Rule Lists
In addition to the previously mentioned <ruleList> and <shouldPackRuleList>, there are flow-control actions, such as<while> and <if> that allow specifying a <conditionRuleList> that controls the condition of the flow-control construct.They will behave like the regular <ruleList> but its evaluation logic is controlled by the <conditionRuleEvaluationLogic>setting.
9.6 List of Available Rules
Component Test
Perform check on a given component. The allowed properties in the <componentTest> rule are:
• <logic>: Comparison type
BitRock InstallBuilder User Guide 8246 / 393
• <name>: Name of the component
Examples:
Deselect a component if it depends on another one that was deselected
<componentSelection><deselect>subComponentA1</deselect><ruleList><componentTest>
<logic>not_selected</logic><name>componentA</name>
</componentTest></ruleList>
</componentSelection>
Additional Examples: Example 1
Windows Firewall Test
Check whether or not a firewall is set up and running. Only available on Windows platform The allowed properties in the<firewallTest> rule are:
• <type>: Type of test
Examples:
Warn your users that a running firewall may interfere in the installation
<showWarning><text>An Antivirus Software is running. You could get errors during the installation ←↩
process. Please disable it before continuing.</text><ruleList><firewallTest type="enabled" />
</ruleList></showWarning>
Compare Text Length
Compare the length of a text. The allowed properties in the <compareTextLength> rule are:
• <length>: Length to compare with
• <logic>: Comparison type
• <text>: Text to compare the length of
Examples:
Check the length of a provided password
<passwordParameter><name>password</name><description>Password</description><validationActionList>
<throwError text="The password provided is too short.A minimum length of 8 characters is required"><ruleList><compareTextLength>
BitRock InstallBuilder User Guide 8247 / 393
<text>${password}</text><logic>less</logic><length>8</length>
</compareTextLength></ruleList>
</throwError></validationActionList>
</passwordParameter>
Additional Examples: Example 1, Example 2, Example 3
String Test
Check the string type The allowed properties in the <stringTest> rule are:
• <text>: Text
• <type>: Type of string
Examples:
Check if a given username is alphanumeric only
<throwError text="The username can only contain alphanumeric characters!"><ruleList><stringTest>
<text>${username}</text><type>not_alphanumeric</type>
</stringTest></ruleList>
</throwError>
Additional Examples: Example 1, Example 2
Windows Account Test
Check whether or not a specified account has proper rights The allowed properties in the <windowsAccountTest> rule are:
• <account>: User or group name to check; if account does not exist, rule always returns false
• <rights>: Account rights to test for, separated by spaces; Example value: SeServiceLogonRight. A complete list can beobtained from http://msdn.microsoft.com/en-us/library/aa375728(v=VS.85).aspx
Examples:
Throw error if user cannot be used for running Windows services
<throwError><text>Account ${service_account} cannot be used as a Windows service</text><ruleList>
<windowsAccountTest><account>${service_account}</account><rights>SeServiceLogonPrivilege</rights><negate>1</negate>
</windowsAccountTest></ruleList>
</throwError>

BitRock InstallBuilder User Guide 8248 / 393
Host Validation
Validates whether or not a given hostname or IP address meets the given condition The allowed properties in the <hostValidation>rule are:
• <condition>: A valid host is one that can be resolved to an IP address and a valid IP is one that is syntactically correct
• <host>: Hostname or IP address to be checked
• <type>: Type of host specification
Examples:
Check if a provided IP is valid
<stringParameter><name>machineIP</name><description>Server IP</description><validationActionList>
<throwError text="The provided IP is malformed" ><ruleList>
<hostValidation><host>${machineIP}</host><type>ip</type><condition>is_not_valid</condition>
</hostValidation></ruleList>
</throwError></validationActionList>
</stringParameter>
Regular Expression Match
Compare a text with a regular expression. The allowed properties in the <regExMatch> rule are:
• <logic>: Whether or not the rule will apply if the regular expression matches.
• <pattern>: Regular expression
• <text>: Text
Examples:
Get installation dir based on other path if it in form of (prefix)/common/. . .
<setInstallerVariableFromRegEx><name>installdir</name><pattern>^(.*)/common/(.*?)$</pattern><substitution>$1</substitution><text>${path_retrieved_from_registry.unix}</text><ruleList>
<regExMatch><logic>matches</logic><pattern>^(.*)/common/(.*?)$</pattern><text>${path_retrieved_from_registry.unix}</text>
</regExMatch></ruleList>
</setInstallerVariableFromRegEx>
Additional Examples: Example 1, Example 2, Example 3
BitRock InstallBuilder User Guide 8249 / 393
Compare Text
Compare a text with a value. The allowed properties in the <compareText> rule are:
• <logic>: Comparison type
• <nocase>: Case insensitive comparison
• <text>: Text
• <value>: Value
Examples:
Check if a given text contains a substring
<compareText><logic>contains</logic><text>${serverResponse}</text><value>OK</value>
</compareText>
Additional Examples: Example 1, Example 2, Example 3
Port Test
Allows you to test whether a port is free in the local machine. The allowed properties in the <portTest> rule are:
• <condition>: Condition to test for
• <port>: A port number
Examples:
Do not allow proceeding if specified port cannot be bound to
<stringParameter><name>portNumber</name><default>8080</default><allowEmptyValue>0</allowEmptyValue><width>40</width><validationActionList>
<throwError><text>Port already taken</text><ruleList>
<portTest><condition>cannot_bind</condition><port>${portNumber}</port>
</portTest></ruleList>
</throwError></validationActionList>
</stringParameter>
BitRock InstallBuilder User Guide 8250 / 393
Single Instance Check
Check if there is another instance of the installer being executed. The allowed properties in the <singleInstanceCheck>rule are:
• <logic>: Condition to check.
Examples:
Check if any other instance of the installer is running
<throwError><text>Another instance is running. This instance will abort</text><ruleList>
<singleInstanceCheck logic="is_running" /></ruleList>
</throwError>
Additional Examples: Example 1, Example 2, Example 3
File Is Locked
Check if file is locked. The allowed properties in the <fileIsLocked> rule are:
• <path>: File or directory path to check
Examples:
Check if your application is running before trying to uninstall
<preUninstallationActionList><actionGroup><actionList>
<showWarning><text>It seems the application is in use, please closeit and relaunch the uninstaller.</text>
</showWarning><exit/>
</actionList><ruleList>
<fileIsLocked><path>${installdir}/bin/yourApp.exe</path>
</fileIsLocked></ruleList>
</actionGroup></preUninstallationActionList>
Program Test
Check whether or not a program is can be found in the system path. The allowed properties in the <programTest> rule are:
• <condition>: Condition to test for
• <name>: Program name
Examples:
Check if package is installed using rpm or dpkg, depending if dpkg command is available
BitRock InstallBuilder User Guide 8251 / 393
<if><actionList>
<runProgram><program>dpkg</program><programArguments>-W ${native_packagename}</programArguments>
</runProgram></actionList><conditionRuleList>
<programTest><condition>is_in_path</condition><name>dpkg</name>
</programTest></conditionRuleList><elseActionList>
<runProgram><program>rpm</program><programArguments>-q ${native_packagename}</programArguments>
</runProgram></elseActionList>
</if><showWarning>
<text>Package ${native_packagename} not found</text><ruleList>
<compareValues><logic>does_not_equal</logic><value1>${program_exit_code}</value1><value2>0</value2>
</compareValues></ruleList>
</showWarning>
Platform Test
Compare the system platform with a given platform name. The allowed properties in the <platformTest> rule are:
• <type>: Type of platform to test for
Examples:
Set executable permissions to your application on Unix
<changePermissions><permissions>0755</permissions><files>${installdir}/executables/*</files><ruleList><platformTest>
<type>unix</type></platformTest>
</ruleList></changePermissions>
Additional Examples: Example 1, Example 2, Example 3
Is True
The rule returns true if value is one of 1, yes or true. Otherwise it evaluates to false. The allowed properties in the <isTrue>rule are:
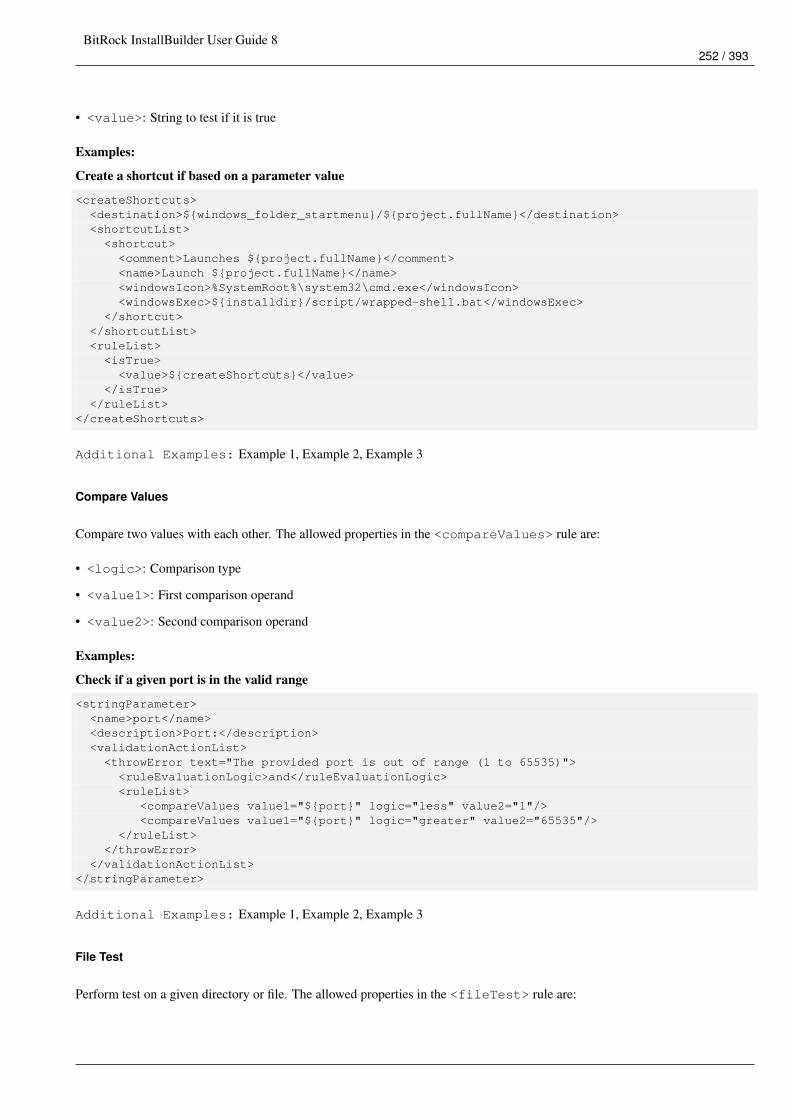
BitRock InstallBuilder User Guide 8252 / 393
• <value>: String to test if it is true
Examples:
Create a shortcut if based on a parameter value
<createShortcuts><destination>${windows_folder_startmenu}/${project.fullName}</destination><shortcutList><shortcut>
<comment>Launches ${project.fullName}</comment><name>Launch ${project.fullName}</name><windowsIcon>%SystemRoot%\system32\cmd.exe</windowsIcon><windowsExec>${installdir}/script/wrapped-shell.bat</windowsExec>
</shortcut></shortcutList><ruleList><isTrue>
<value>${createShortcuts}</value></isTrue>
</ruleList></createShortcuts>
Additional Examples: Example 1, Example 2, Example 3
Compare Values
Compare two values with each other. The allowed properties in the <compareValues> rule are:
• <logic>: Comparison type
• <value1>: First comparison operand
• <value2>: Second comparison operand
Examples:
Check if a given port is in the valid range
<stringParameter><name>port</name><description>Port:</description><validationActionList><throwError text="The provided port is out of range (1 to 65535)">
<ruleEvaluationLogic>and</ruleEvaluationLogic><ruleList>
<compareValues value1="${port}" logic="less" value2="1"/><compareValues value1="${port}" logic="greater" value2="65535"/>
</ruleList></throwError>
</validationActionList></stringParameter>
Additional Examples: Example 1, Example 2, Example 3
File Test
Perform test on a given directory or file. The allowed properties in the <fileTest> rule are:
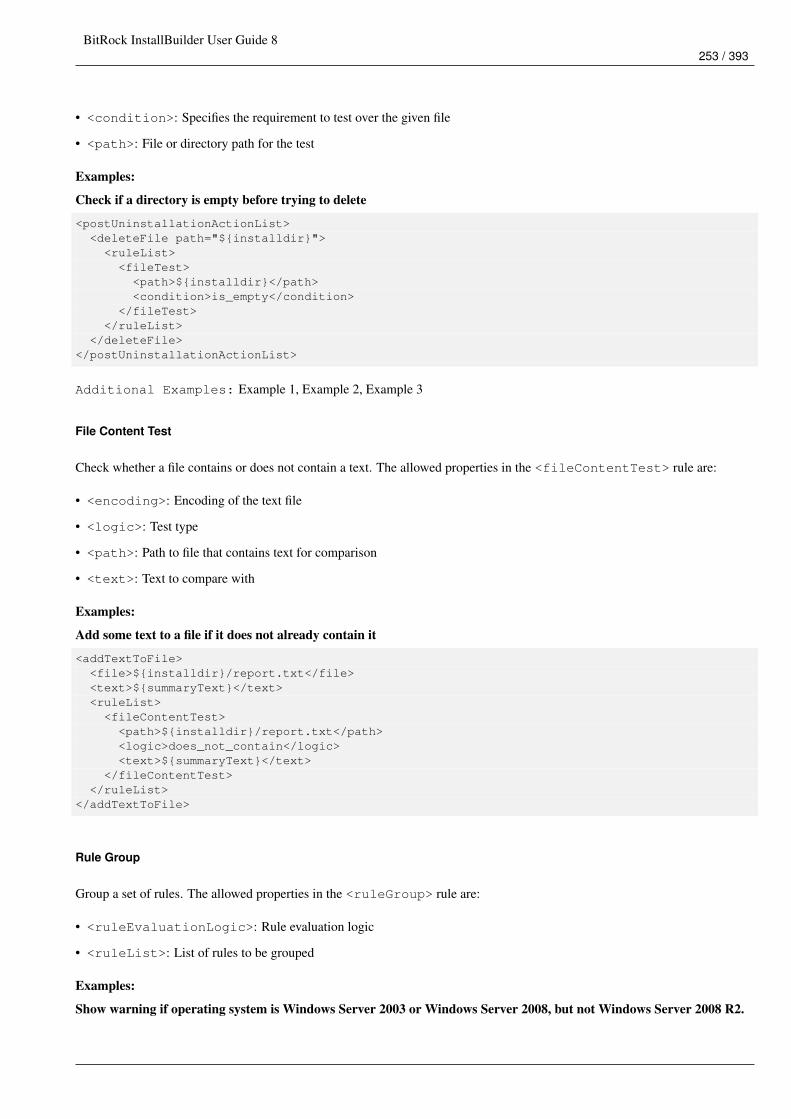
BitRock InstallBuilder User Guide 8253 / 393
• <condition>: Specifies the requirement to test over the given file
• <path>: File or directory path for the test
Examples:
Check if a directory is empty before trying to delete
<postUninstallationActionList><deleteFile path="${installdir}"><ruleList>
<fileTest><path>${installdir}</path><condition>is_empty</condition>
</fileTest></ruleList>
</deleteFile></postUninstallationActionList>
Additional Examples: Example 1, Example 2, Example 3
File Content Test
Check whether a file contains or does not contain a text. The allowed properties in the <fileContentTest> rule are:
• <encoding>: Encoding of the text file
• <logic>: Test type
• <path>: Path to file that contains text for comparison
• <text>: Text to compare with
Examples:
Add some text to a file if it does not already contain it
<addTextToFile><file>${installdir}/report.txt</file><text>${summaryText}</text><ruleList><fileContentTest>
<path>${installdir}/report.txt</path><logic>does_not_contain</logic><text>${summaryText}</text>
</fileContentTest></ruleList>
</addTextToFile>
Rule Group
Group a set of rules. The allowed properties in the <ruleGroup> rule are:
• <ruleEvaluationLogic>: Rule evaluation logic
• <ruleList>: List of rules to be grouped
Examples:
Show warning if operating system is Windows Server 2003 or Windows Server 2008, but not Windows Server 2008 R2.
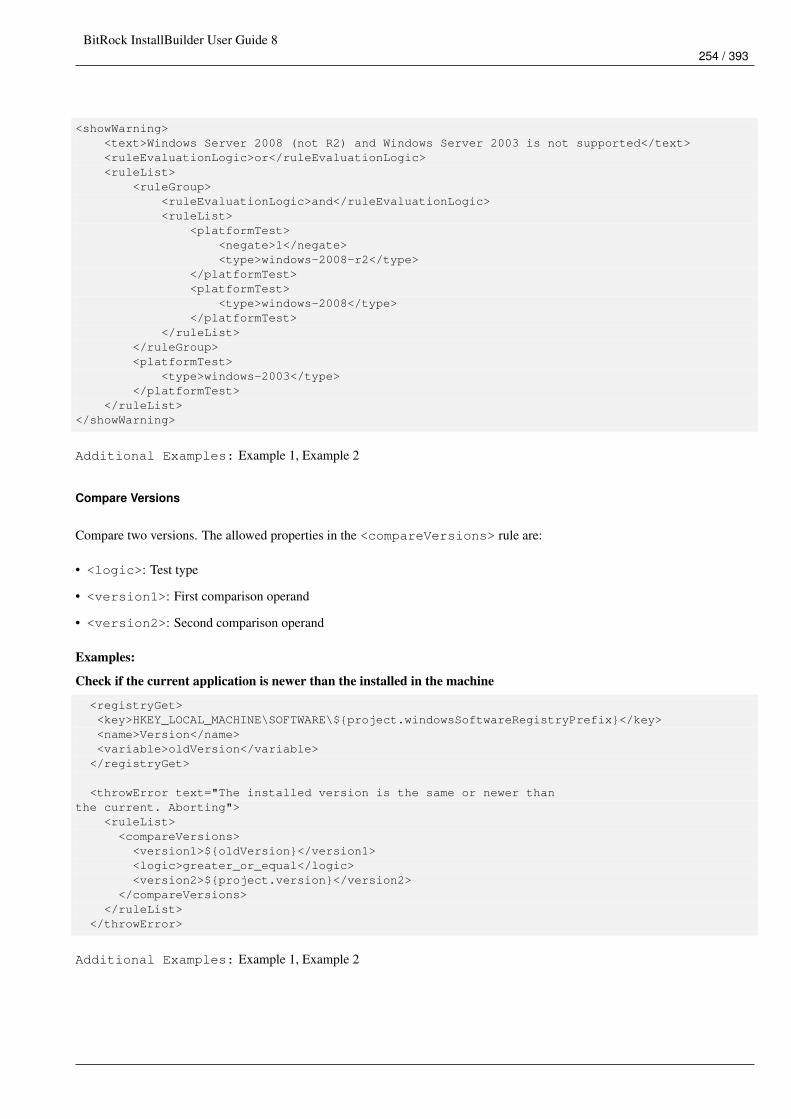
BitRock InstallBuilder User Guide 8254 / 393
<showWarning><text>Windows Server 2008 (not R2) and Windows Server 2003 is not supported</text><ruleEvaluationLogic>or</ruleEvaluationLogic><ruleList>
<ruleGroup><ruleEvaluationLogic>and</ruleEvaluationLogic><ruleList>
<platformTest><negate>1</negate><type>windows-2008-r2</type>
</platformTest><platformTest>
<type>windows-2008</type></platformTest>
</ruleList></ruleGroup><platformTest>
<type>windows-2003</type></platformTest>
</ruleList></showWarning>
Additional Examples: Example 1, Example 2
Compare Versions
Compare two versions. The allowed properties in the <compareVersions> rule are:
• <logic>: Test type
• <version1>: First comparison operand
• <version2>: Second comparison operand
Examples:
Check if the current application is newer than the installed in the machine
<registryGet><key>HKEY_LOCAL_MACHINE\SOFTWARE\${project.windowsSoftwareRegistryPrefix}</key><name>Version</name><variable>oldVersion</variable>
</registryGet>
<throwError text="The installed version is the same or newer thanthe current. Aborting">
<ruleList><compareVersions>
<version1>${oldVersion}</version1><logic>greater_or_equal</logic><version2>${project.version}</version2>
</compareVersions></ruleList>
</throwError>
Additional Examples: Example 1, Example 2
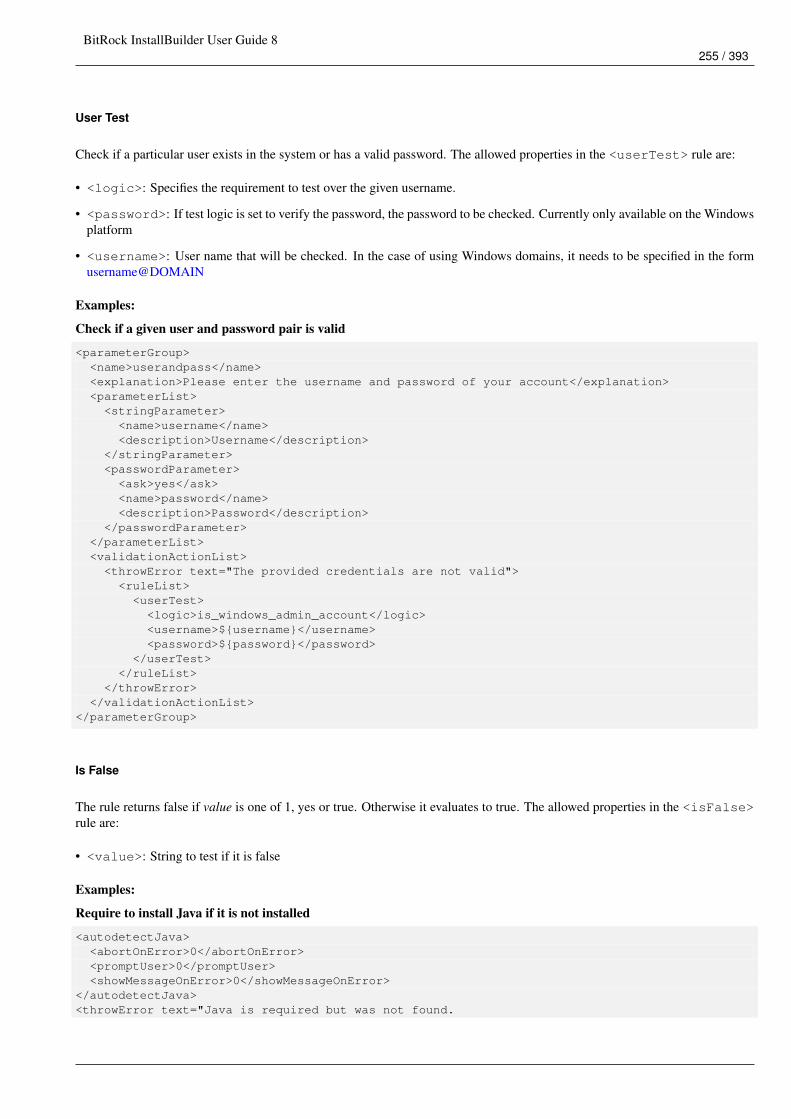
BitRock InstallBuilder User Guide 8255 / 393
User Test
Check if a particular user exists in the system or has a valid password. The allowed properties in the <userTest> rule are:
• <logic>: Specifies the requirement to test over the given username.
• <password>: If test logic is set to verify the password, the password to be checked. Currently only available on the Windowsplatform
• <username>: User name that will be checked. In the case of using Windows domains, it needs to be specified in the formusername@DOMAIN
Examples:
Check if a given user and password pair is valid
<parameterGroup><name>userandpass</name><explanation>Please enter the username and password of your account</explanation><parameterList><stringParameter>
<name>username</name><description>Username</description>
</stringParameter><passwordParameter>
<ask>yes</ask><name>password</name><description>Password</description>
</passwordParameter></parameterList><validationActionList><throwError text="The provided credentials are not valid">
<ruleList><userTest><logic>is_windows_admin_account</logic><username>${username}</username><password>${password}</password>
</userTest></ruleList>
</throwError></validationActionList>
</parameterGroup>
Is False
The rule returns false if value is one of 1, yes or true. Otherwise it evaluates to true. The allowed properties in the <isFalse>rule are:
• <value>: String to test if it is false
Examples:
Require to install Java if it is not installed
<autodetectJava><abortOnError>0</abortOnError><promptUser>0</promptUser><showMessageOnError>0</showMessageOnError>
</autodetectJava><throwError text="Java is required but was not found.
BitRock InstallBuilder User Guide 8256 / 393
Please install it an relaunch this installer"><ruleList><isFalse>
<value>${java_autodetected}</value></isFalse>
</ruleList></throwError>
Additional Examples: Example 1, Example 2, Example 3
Mac OS X Service Test
Check whether or not a service exists and whether or not it is running. Checking if service exists requires Mac OS X version 10.4or later. Checking if service is running requires Mac OS X 10.5 or later. The allowed properties in the <osxServiceTest>rule are:
• <condition>: Condition to test for
• <service>: Name of service
Examples:
Stop OSX service yourservice if it is currently running
<stopOSXService><serviceName>yourservice</serviceName><ruleList>
<osxServiceTest><condition>is_running</condition><service>yourservice</service>
</osxServiceTest></ruleList>
</stopOSXService>
Additional Examples: Example 1
Windows Antivirus Test
Check whether or not antivirus is set up and running. Only available on Windows platform The allowed properties in the<antivirusTest> rule are:
• <type>: Type of test
Examples:
Warn your users that a running antivirus may interfere in the installation
<showWarning><text>An Antivirus Software is running. You could get errors during the installation ←↩
process. Please disable it before continuing.</text><ruleList><antivirusTest type="enabled" />
</ruleList></showWarning>
BitRock InstallBuilder User Guide 8257 / 393
File Exists
Check for the existence of a given directory or file. The allowed properties in the <fileExists> rule are:
• <path>: File or directory path for the test, accepts wildcards.
Examples:
Check if the selected directory already contains an installation
<throwError text="It seems the selected installation directorycontains an old installation. Please, choose another one."><ruleList><fileExists><path>${installdir}/uninstall</path>
</fileExists></ruleList>
</throwError>
Additional Examples: Example 1, Example 2, Example 3
Check Free Disk Space
Check whether or not enough free disk space is available The allowed properties in the <checkFreeDiskSpace> rule are:
• <logic>: Comparison type
• <path>: Path to the folder or disk
• <size>: Size of free disk space to check for
• <units>: Size units for the checked value.
Examples:
Check if the selected installation directory has enough disk space
<directoryParameter><name>installdir</name>...<validationActionList><throwError>
<text>You don’t have enough disk space to install the application,please select another installation directory</text><ruleList>
<checkFreeDiskSpace><logic>less</logic><path>${installdir}</path><size>${required_diskspace}</size>
</checkFreeDiskSpace></ruleList>
</throwError></validationActionList>
</directoryParameter>
Additional Examples: Example 1, Example 2
BitRock InstallBuilder User Guide 8258 / 393
Process Test
Check if a particular process exists in the system. Currently only supported in Windows, Linux, OS X. The allowed propertiesin the <processTest> rule are:
• <logic>: Check whether or not the process is running.
• <name>: Exact process name that will be checked.
Examples:
Wait for myapp.exe program to exit before continuing
<showProgressDialog><title>Waiting for myapp.exe to exit</title><actionList>
<while><actionList>
<wait><ms>1000</ms>
</wait></actionList><conditionRuleList>
<processTest><logic>is_running</logic><name>myapp.exe</name>
</processTest></conditionRuleList>
</while></actionList>
</showProgressDialog>
Additional Examples: Example 1, Example 2, Example 3
Registry Test
Perform tests over a registry entry. You can provide either a key or a key and a name The allowed properties in the <registryTest>rule are:
• <key>: Registry key
• <logic>: Comparison type
• <name>: Entry name to test for existence
• <type>: Type of the key to check with the is_type or is_not_type logic
• <wowMode>: Determines whether we want to access a 32-bit or 64-bit view of the Registry
Examples:
Read previous installation location from registry if it was already installed
<registryGet><key>HKEY_LOCAL_MACHINE\SOFTWARE\${project.windowsSoftwareRegistryPrefix}</key><name>Location</name><variable>installdir</variable><ruleList>
<registryTest><key>HKEY_LOCAL_MACHINE\SOFTWARE\${project.windowsSoftwareRegistryPrefix}</key><logic>exists</logic>
BitRock InstallBuilder User Guide 8259 / 393
<name>Location</name></registryTest>
</ruleList></registryGet>
Additional Examples: Example 1, Example 2, Example 3
Windows Service Test
Check whether a service exists and whether is running The allowed properties in the <windowsServiceTest> rule are:
• <condition>: Condition to test for
• <service>: Name of service
Examples:
Stop your service if it is running
<stopWindowsService><serviceName>yourservice</serviceName><displayName>Your Service</displayName><delay>15000</delay><ruleList>
<windowsServiceTest><condition>is_running</condition><service>yourservice</service>
</windowsServiceTest></ruleList>
</stopWindowsService>
Additional Examples: Example 1, Example 2
BitRock InstallBuilder User Guide 8260 / 393
Chapter 10
User Interface
10.1 Installation Modes
This sections covers the different installation modes that a BitRock Installer can run in and how they can be selected both atruntime and build time.
10.1.1 Full Graphic Modes
These modes allow full interactivity through a point-and-click GUI interface. Depending on the version of InstallBuilder and theplatform of execution, the allowed modes can be:
• Gtk mode (gtk): Regular IB default execution mode on Linux, and Linux x64. The installer presents a Gtk look and feel. Itrequires the Gtk libraries to be present in the system.
• X-Window mode (xwindow): Lightweight graphic execution mode on Linux / Unix systems.
• OS X mode (osx): Regular IB default execution mode on OS X systems. Provides the native OS X application look and feel.
• Windows mode (win32): Regular IB execution mode on Windows. Provides native Windows application look and feel
• Qt mode (qt): InstallBuilder for Qt bundles an additional qt mode which uses a common graphic library for all platforms.The look and feel on Linux is Qt and it has a native look and feel on OS X and Windows. This mode allow extended textformatting among other tweaks in the installers.
All modes are functionally equivalent and which one to use is mostly a matter of personal preference. For example, a Qtapplication developer may want to distribute their application with the InstallBuilder for Qt version.
10.1.2 Text Mode:
This mode provides full interactivity with users in the command line. It is equivalent to any GUI mode but the pages are displayedin text mode in a console. This installation mode is not available on Windows because GUI applications are not attached to aconsole and the text would not be visible.
This mode is especially convenient when no X-Window server is detected. In these cases, this mode is automatically selected bydefault if no other valid mode is forced (such as unattended).

BitRock InstallBuilder User Guide 8261 / 393
10.1.3 Unattended mode:
This execution mode is especially useful for automating the installation processes. It can be configured to present different levelsof user interaction through the --unattendedmodeui command line flag or the <unattendedModeUI> project property.The allowed values are:
• none: No user interaction is required and no output shown. This is the default if no unattended mode UI option is provided.
• minimal: No user interaction is required and a progress pop-up is displayed showing the installation progress.
$> .\installbuilder-professional-8.2.0-windows-installer.exe --mode unattended -- ←↩unattendedmodeui minimal
Figure 10.1: Minimal Unattended Mode
• minimalWithDialogs: In addition to the installation progress shown in the minimal mode, pop-ups are also displayed.This mode may require some user interaction, depending on the specific installer logic.
$> .\sample-1.0-windows-installer.exe --mode unattended --unattendedmodeui ←↩minimalWithDialogs
Figure 10.2: Minimal With Dialogs Unattended Mode
10.1.4 Selecting the Execution Mode
The execution mode can be configured using command line flags or setting it in the XML project. Using the command line is aseasy as typing in a console:
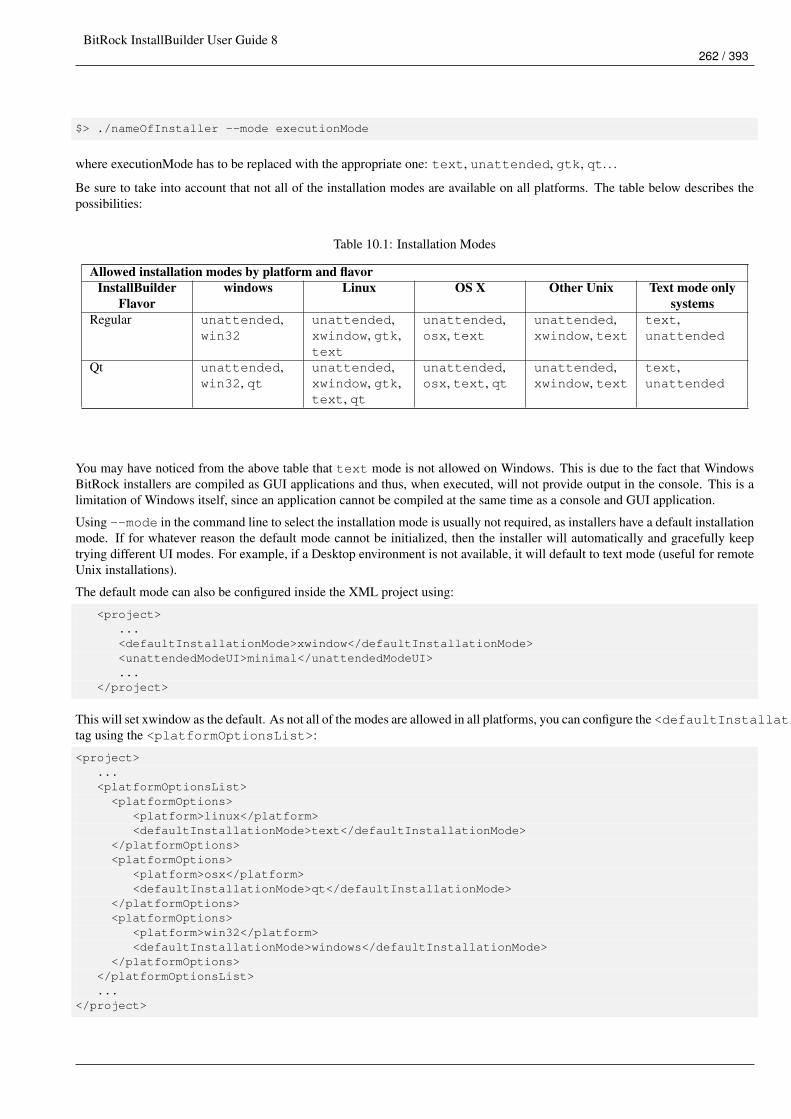
BitRock InstallBuilder User Guide 8262 / 393
$> ./nameOfInstaller --mode executionMode
where executionMode has to be replaced with the appropriate one: text, unattended, gtk, qt. . .
Be sure to take into account that not all of the installation modes are available on all platforms. The table below describes thepossibilities:
Table 10.1: Installation Modes
Allowed installation modes by platform and flavorInstallBuilder
Flavorwindows Linux OS X Other Unix Text mode only
systemsRegular unattended,
win32unattended,xwindow, gtk,text
unattended,osx, text
unattended,xwindow, text
text,unattended
Qt unattended,win32, qt
unattended,xwindow, gtk,text, qt
unattended,osx, text, qt
unattended,xwindow, text
text,unattended
You may have noticed from the above table that text mode is not allowed on Windows. This is due to the fact that WindowsBitRock installers are compiled as GUI applications and thus, when executed, will not provide output in the console. This is alimitation of Windows itself, since an application cannot be compiled at the same time as a console and GUI application.
Using --mode in the command line to select the installation mode is usually not required, as installers have a default installationmode. If for whatever reason the default mode cannot be initialized, then the installer will automatically and gracefully keeptrying different UI modes. For example, if a Desktop environment is not available, it will default to text mode (useful for remoteUnix installations).
The default mode can also be configured inside the XML project using:
<project>...<defaultInstallationMode>xwindow</defaultInstallationMode><unattendedModeUI>minimal</unattendedModeUI>...
</project>
This will set xwindow as the default. As not all of the modes are allowed in all platforms, you can configure the <defaultInstallationMode>tag using the <platformOptionsList>:
<project>...<platformOptionsList><platformOptions>
<platform>linux</platform><defaultInstallationMode>text</defaultInstallationMode>
</platformOptions><platformOptions>
<platform>osx</platform><defaultInstallationMode>qt</defaultInstallationMode>
</platformOptions><platformOptions>
<platform>win32</platform><defaultInstallationMode>windows</defaultInstallationMode>
</platformOptions></platformOptionsList>...
</project>
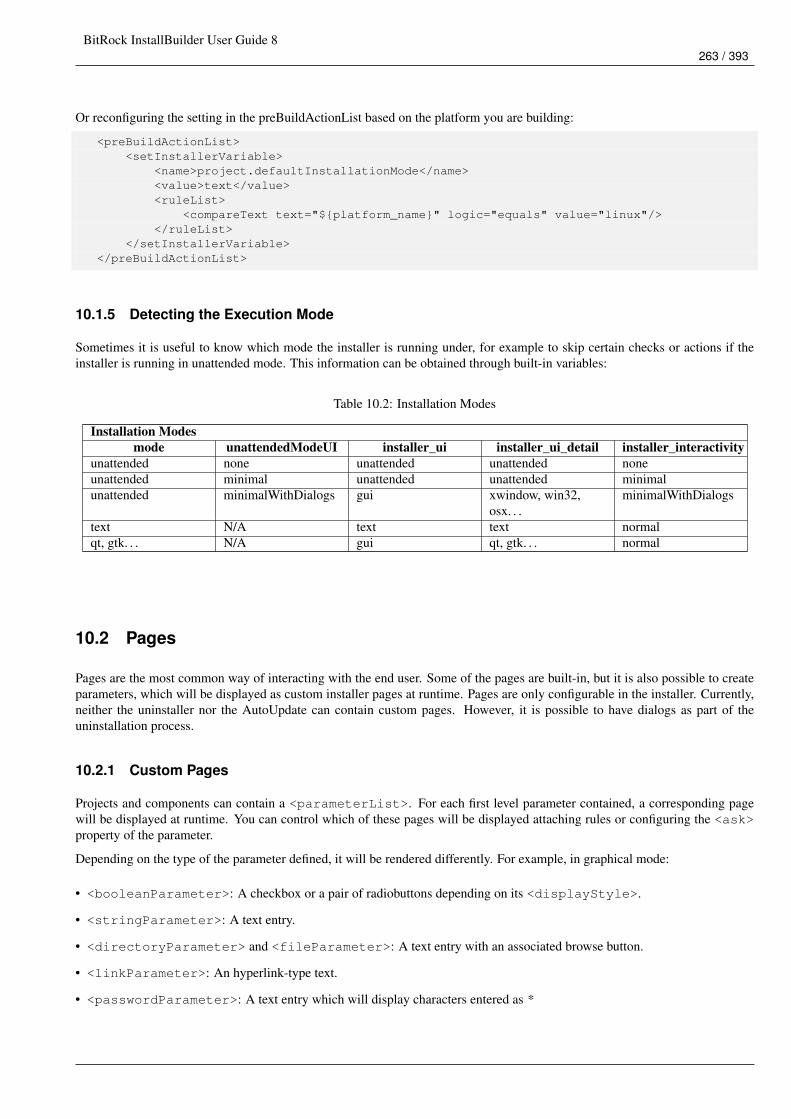
BitRock InstallBuilder User Guide 8263 / 393
Or reconfiguring the setting in the preBuildActionList based on the platform you are building:
<preBuildActionList><setInstallerVariable>
<name>project.defaultInstallationMode</name><value>text</value><ruleList>
<compareText text="${platform_name}" logic="equals" value="linux"/></ruleList>
</setInstallerVariable></preBuildActionList>
10.1.5 Detecting the Execution Mode
Sometimes it is useful to know which mode the installer is running under, for example to skip certain checks or actions if theinstaller is running in unattended mode. This information can be obtained through built-in variables:
Table 10.2: Installation Modes
Installation Modesmode unattendedModeUI installer_ui installer_ui_detail installer_interactivity
unattended none unattended unattended noneunattended minimal unattended unattended minimalunattended minimalWithDialogs gui xwindow, win32,
osx. . .minimalWithDialogs
text N/A text text normalqt, gtk. . . N/A gui qt, gtk. . . normal
10.2 Pages
Pages are the most common way of interacting with the end user. Some of the pages are built-in, but it is also possible to createparameters, which will be displayed as custom installer pages at runtime. Pages are only configurable in the installer. Currently,neither the uninstaller nor the AutoUpdate can contain custom pages. However, it is possible to have dialogs as part of theuninstallation process.
10.2.1 Custom Pages
Projects and components can contain a <parameterList>. For each first level parameter contained, a corresponding pagewill be displayed at runtime. You can control which of these pages will be displayed attaching rules or configuring the <ask>property of the parameter.
Depending on the type of the parameter defined, it will be rendered differently. For example, in graphical mode:
• <booleanParameter>: A checkbox or a pair of radiobuttons depending on its <displayStyle>.
• <stringParameter>: A text entry.
• <directoryParameter> and <fileParameter>: A text entry with an associated browse button.
• <linkParameter>: An hyperlink-type text.
• <passwordParameter>: A text entry which will display characters entered as *
BitRock InstallBuilder User Guide 8264 / 393
• <labelParameter>: A simple text label.
• <choiceParameter>: A combobox or a set of radiobuttons, depending on its <displayStyle>
• <licenseParameter>: A license page with Yes/No buttons
You can find a detailed explanation of all the available parameters as well as how they are represented in the Available Parameterssection.
To create complex page layouts you can use the special parameter <parameterGroup> which allows grouping multipleparameters, including other <parameterGroup> elements:
<parameterGroup><name>configuration</name><title>Configuration</title><explanation></explanation><parameterList>
<stringParameter name="username" description="Username"/><passwordParameter name="password" description="Password"/>
</parameterList></parameterGroup>
The sample code above will group two simple parameters to create a user-password form. By default the alignment is verticalbut it can be modified using the <orientation> tag:
<parameterGroup><name>configuration</name><title>Configuration</title><explanation></explanation><orientation>horizontal</orientation><parameterList>
<stringParameter name="username" description="Username"/><passwordParameter name="password" description="Password"/>
</parameterList></parameterGroup>
The below code will generate a complex page layout using multiple parameter combinations. You can view the result in Figure10.3:
<parameterGroup><name>configuration</name><title>Configuration</title><explanation></explanation><parameterList>
<parameterGroup><name>adminaccount</name><title></title><explanation>Admin Account</explanation><orientation>horizontal</orientation><parameterList>
<stringParameter><name>username</name><description>Username</description><allowEmptyValue>1</allowEmptyValue><width>20</width>
</stringParameter><passwordParameter>
<name>password</name><description>Password</description><allowEmptyValue>1</allowEmptyValue><width>20</width>
</passwordParameter>
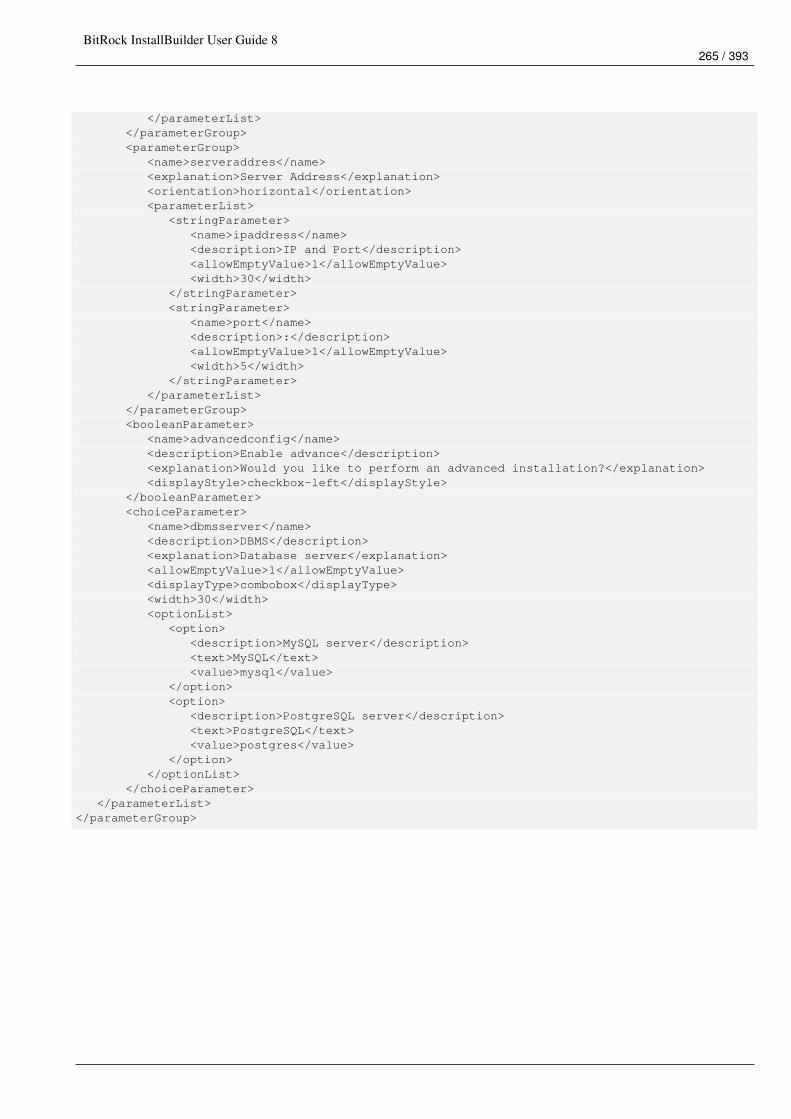
BitRock InstallBuilder User Guide 8265 / 393
</parameterList></parameterGroup><parameterGroup>
<name>serveraddres</name><explanation>Server Address</explanation><orientation>horizontal</orientation><parameterList>
<stringParameter><name>ipaddress</name><description>IP and Port</description><allowEmptyValue>1</allowEmptyValue><width>30</width>
</stringParameter><stringParameter>
<name>port</name><description>:</description><allowEmptyValue>1</allowEmptyValue><width>5</width>
</stringParameter></parameterList>
</parameterGroup><booleanParameter>
<name>advancedconfig</name><description>Enable advance</description><explanation>Would you like to perform an advanced installation?</explanation><displayStyle>checkbox-left</displayStyle>
</booleanParameter><choiceParameter>
<name>dbmsserver</name><description>DBMS</description><explanation>Database server</explanation><allowEmptyValue>1</allowEmptyValue><displayType>combobox</displayType><width>30</width><optionList>
<option><description>MySQL server</description><text>MySQL</text><value>mysql</value>
</option><option>
<description>PostgreSQL server</description><text>PostgreSQL</text><value>postgres</value>
</option></optionList>
</choiceParameter></parameterList>
</parameterGroup>
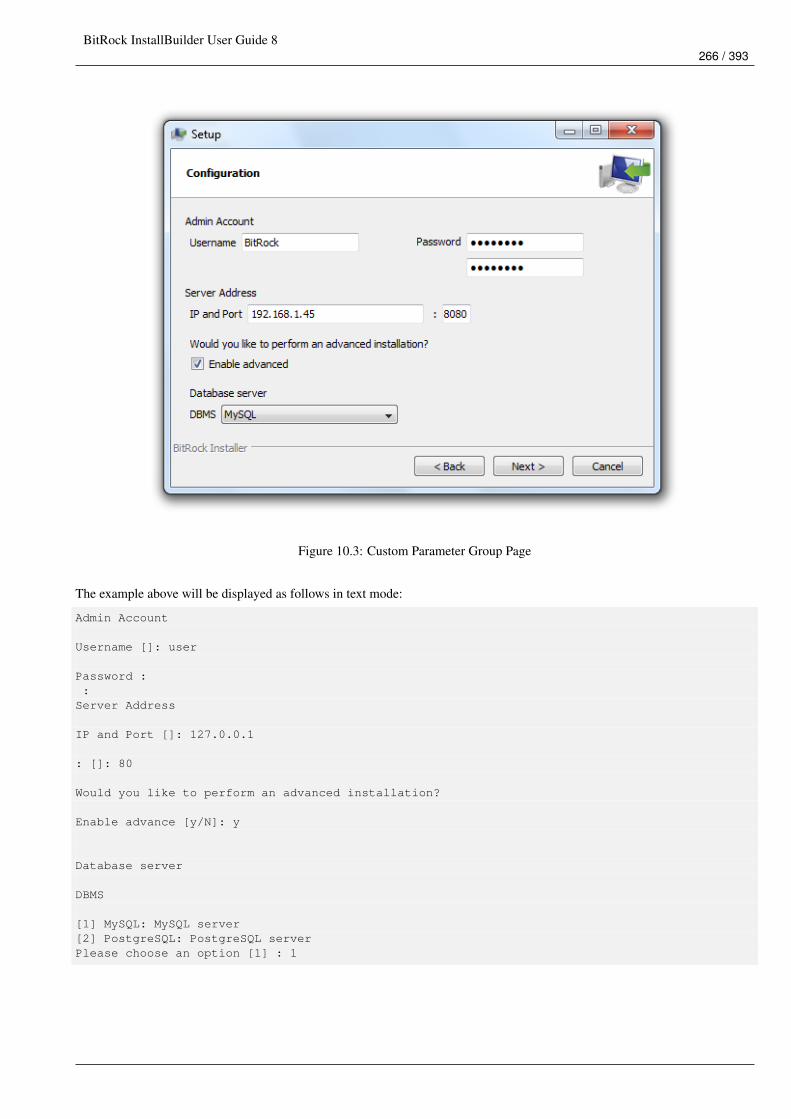
BitRock InstallBuilder User Guide 8266 / 393
Figure 10.3: Custom Parameter Group Page
The example above will be displayed as follows in text mode:
Admin Account
Username []: user
Password ::
Server Address
IP and Port []: 127.0.0.1
: []: 80
Would you like to perform an advanced installation?
Enable advance [y/N]: y
Database server
DBMS
[1] MySQL: MySQL server[2] PostgreSQL: PostgreSQL serverPlease choose an option [1] : 1

BitRock InstallBuilder User Guide 8267 / 393
10.2.2 Built-in Pages
In addition to the user pages registered for each parameter, a set of built-in pages is also added to the installer. These pages, alongwith their appearance order, are detailed below:
• Welcome page (welcome): This is the first page displayed. It displays a welcome message to the installation wizard. Thetext in this page can be configured by modifying the following strings (please refer to the customization section for a detailedexplanation of the process):
– Installer.Welcome.Title=Setup - %1$s
– Installer.Welcome.Text=Welcome to the %1$s Setup Wizard.
The field specifier %1$s will be internally replaced by the project full name.
In addition to the above text, if the installer was created with an unregistered version of InstallBuilder, the text "Createdwith an evaluation version of BitRock InstallBuilder" will be appended.
• Component Selection page (components): This page will be displayed only if the setting <allowComponentSelection>is enabled. By default, it will be displayed right after the installdir page or after the welcome page if the installdirpage is hidden.
• Ready To Install page (readytoinstall): This page is displayed after all of the custom pages and before starting theunpacking stage of the installer. It displays the following configurable messages:
– Installer.Ready.Title=Ready to Install
– Installer.Ready.Text1=Setup is now ready to begin installing %1$s on your computer.
• Installation page (installation): After the readytoinstall page is acknowledged, the unpacking process begins.The process takes place on the installation page while displaying a progress bar. The progress bar also shows a progresstext with the path of the files being unpacked but this can be disabled through the project property <showFileUnpackingProgress>:
<project>...<showFileUnpackingProgress>0</showFileUnpackingProgress>...
</project>
While displaying the installation page, the back and next buttons are disabled although the installation can still be abortedby closing the installer window or pressing cancel.
• Installation Finished page (installationFinished): This is the last page displayed in the installer. The back button isdisabled so the user cannot go back. This page displays the below built-in messages:
– Installer.Installation.Finished.Title=Completing the %1$s Setup Wizard
– Installer.Installation.Finished.Text=Setup has finished installing %1$s on your computer.
10.2.2.1 Final Page options
If a <readmeFile> is defined in the project, a checkbox will be added to the final page with the following text:
‘Installer.ReadmeFile.View=View Readme File‘
If the checkbox is checked, then the contents of the readme file will be displayed.
If a <finalPageActionList> has been defined in the XML project, a checkbox and a description will be displayed forall of the first level actions (an <actionGroup> will display just one checkbox even if it contains multiple actions in its<actionList>). The behavior and appearance of the page depends on the properties of the actions:
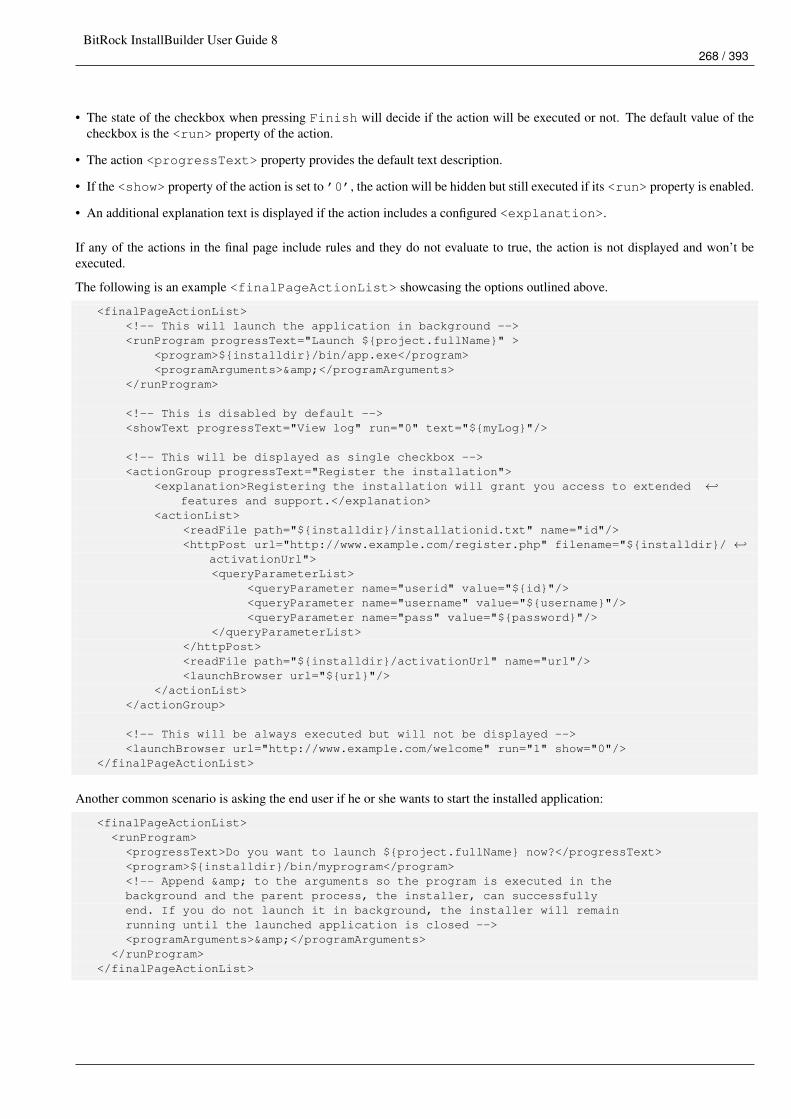
BitRock InstallBuilder User Guide 8268 / 393
• The state of the checkbox when pressing Finish will decide if the action will be executed or not. The default value of thecheckbox is the <run> property of the action.
• The action <progressText> property provides the default text description.
• If the <show> property of the action is set to ’0’, the action will be hidden but still executed if its <run> property is enabled.
• An additional explanation text is displayed if the action includes a configured <explanation>.
If any of the actions in the final page include rules and they do not evaluate to true, the action is not displayed and won’t beexecuted.
The following is an example <finalPageActionList> showcasing the options outlined above.
<finalPageActionList><!-- This will launch the application in background --><runProgram progressText="Launch ${project.fullName}" >
<program>${installdir}/bin/app.exe</program><programArguments>&</programArguments>
</runProgram>
<!-- This is disabled by default --><showText progressText="View log" run="0" text="${myLog}"/>
<!-- This will be displayed as single checkbox --><actionGroup progressText="Register the installation">
<explanation>Registering the installation will grant you access to extended ←↩features and support.</explanation>
<actionList><readFile path="${installdir}/installationid.txt" name="id"/><httpPost url="http://www.example.com/register.php" filename="${installdir}/ ←↩
activationUrl"><queryParameterList>
<queryParameter name="userid" value="${id}"/><queryParameter name="username" value="${username}"/><queryParameter name="pass" value="${password}"/>
</queryParameterList></httpPost><readFile path="${installdir}/activationUrl" name="url"/><launchBrowser url="${url}"/>
</actionList></actionGroup>
<!-- This will be always executed but will not be displayed --><launchBrowser url="http://www.example.com/welcome" run="1" show="0"/>
</finalPageActionList>
Another common scenario is asking the end user if he or she wants to start the installed application:
<finalPageActionList><runProgram><progressText>Do you want to launch ${project.fullName} now?</progressText><program>${installdir}/bin/myprogram</program><!-- Append & to the arguments so the program is executed in thebackground and the parent process, the installer, can successfullyend. If you do not launch it in background, the installer will remainrunning until the launched application is closed --><programArguments>&</programArguments>
</runProgram></finalPageActionList>
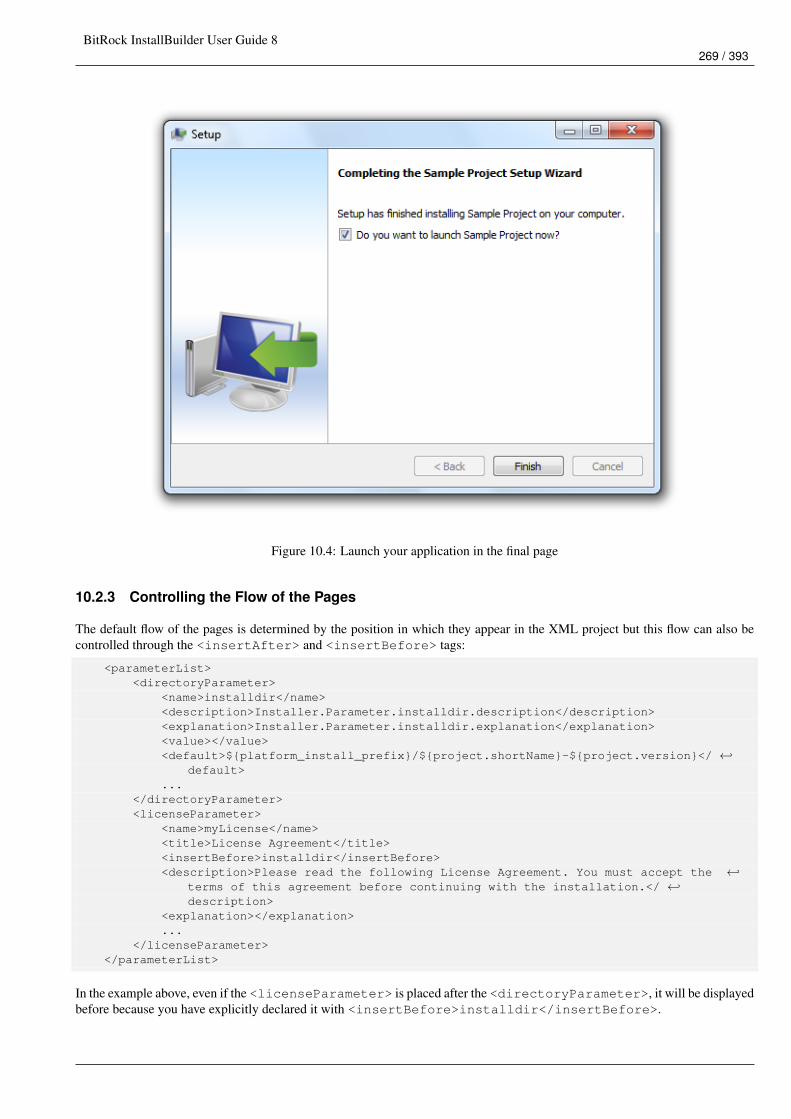
BitRock InstallBuilder User Guide 8269 / 393
Figure 10.4: Launch your application in the final page
10.2.3 Controlling the Flow of the Pages
The default flow of the pages is determined by the position in which they appear in the XML project but this flow can also becontrolled through the <insertAfter> and <insertBefore> tags:
<parameterList><directoryParameter>
<name>installdir</name><description>Installer.Parameter.installdir.description</description><explanation>Installer.Parameter.installdir.explanation</explanation><value></value><default>${platform_install_prefix}/${project.shortName}-${project.version}</ ←↩
default>...
</directoryParameter><licenseParameter>
<name>myLicense</name><title>License Agreement</title><insertBefore>installdir</insertBefore><description>Please read the following License Agreement. You must accept the ←↩
terms of this agreement before continuing with the installation.</ ←↩description>
<explanation></explanation>...
</licenseParameter></parameterList>
In the example above, even if the <licenseParameter> is placed after the <directoryParameter>, it will be displayedbefore because you have explicitly declared it with <insertBefore>installdir</insertBefore>.

BitRock InstallBuilder User Guide 8270 / 393
This can also be used to refer to built-in pages. The list below summarizes the key names for all of the built-in pages:
• welcome : The welcome page
• components : The component selection page
• readytoinstall : The ready to install page
• installation : Main installation page
• installationFinished : The final page
However, sometimes you need to control this flow dynamically at runtime base on certain conditions. For this purpose, Install-Builder defines two built-in variables: next_page and back_page. Modifying their values changes the pages displayedwhen pressing the Next and Back buttons.
For example:
<setInstallerVariable name="next_page" value="installdir" />
Would make the installer show the installdir page after pressing Next regardless of how they were ordered.
Another useful application of this method is to replace the readytoinstall page with your own custom page:
<parameterList>...<!-- Our last parameter --><labelParameter>
<name>summary</name><title>Summary</title><explanation>You are about to install ${project.fullName}.
Please review the below information:
Installation Directory: ${installdir}
Username: ${username}
License File: ${license_file}
Apache Port: ${apache_port}
MySQL Port: ${mysql_port}
Click next if the information is correct</explanation>
<postShowPageActionList><!-- This will skip the readytoinstall page --><setInstallerVariable name="next_page" value="installation" />
</postShowPageActionList></labelParameter>
</parameterList>
In addition to custom page names and built-in pages, a new value is included for convenience: same. When setting next_pageor back_page to same, the installer will remain on the current page, no matter its name.
One typical place to set the next_page variable is in the <postShowPageActionList> and <validationActionList>
10.3 Dialogs
Another useful way of interacting with the end user is using pop-ups. Pop-ups are especially convenient in the <preUninstallationActionList>and <postUninstallationActionList> because the uninstaller does not allow custom pages.
BitRock InstallBuilder User Guide 8271 / 393
• <showInfo>: Prompt an info dialog to the user.
• <showWarning>: Shows a warning dialog with the given text.
• <throwError>: Generate an error inside the installer so the installer will exit. The only exception to this is when abortOn-Error equals zero or the action is inside a validationActionList, in which case it will prompt an error dialog to the user, but willnot exit the installer.
• <showText>: Display a read-only text dialog to the user.
• <showQuestion>: Prompt a question to the user. The result is stored as yes or no in the given variable name.
• <showPasswordQuestion>: Ask the user to enter a password.
• <showChoiceQuestion>: Prompt a choice question dialog to the user.
• <showInfo>: Prompt an info dialog to the user.
• <showProgressDialog>: Display an indeterminate progressmeter in a popup window to execute a list of actions.
• <showStringQuestion>: Ask the user a question.
You can find a detailed explanation and examples of usage of all of these dialogs in the Dialog Actions section.
BitRock InstallBuilder User Guide 8272 / 393
Chapter 11
Menus and Shortcuts
11.1 Defining Shortcuts at Build Time
If you are distributing a GUI program that runs on Windows, KDE or Gnome, you can place a shortcut for your executable onthe Desktop or in a folder and the associated icon will be displayed. When the user clicks on the icon, the associated program,document or URL will be launched. Figure 11.1 shows the prompt you get when adding an Application shortcut to your productinstaller. It has the following fields:
Common
• Shortcut text: Shortcut text
• Tooltip: Tooltip text for the shortcut
• Platforms: Platforms in which the shortcut will be created
Unix settings
• Unix Icon: GIF or PNG Image to use for the shortcut
• Program to execute: Program to execute, including command line arguments
• Working directory: Working directory for the program being executed
Windows settings
• Windows Icon: File containing .ico image
• Program to execute: Program to execute
• Working directory: Working directory for the program being executed
Note that the target program to execute must have been installed with your product, so the value for Program to executeshould include a reference to the installation directory and look similar to: ${installdir}/foo/bar/program wherefoo/bar/program is the path to your program relative to the installation directory. At installation time, ${installdir}will be substituted by the appropriate value. This also applies to Icons referenced by the shortcut.
It is also possible to create shortcuts that point to directories, documents or URLs. Select the "Document" or "URL" option whencreating a shortcut.
On Windows, Start Menu and Desktop shortcuts are by default created for all users, or for the current user in case thereare not sufficient privileges. InstallBuilder allows modifying this behavior via the project property <installationScope>,which can be set to "auto" (default), "user" or "allusers".
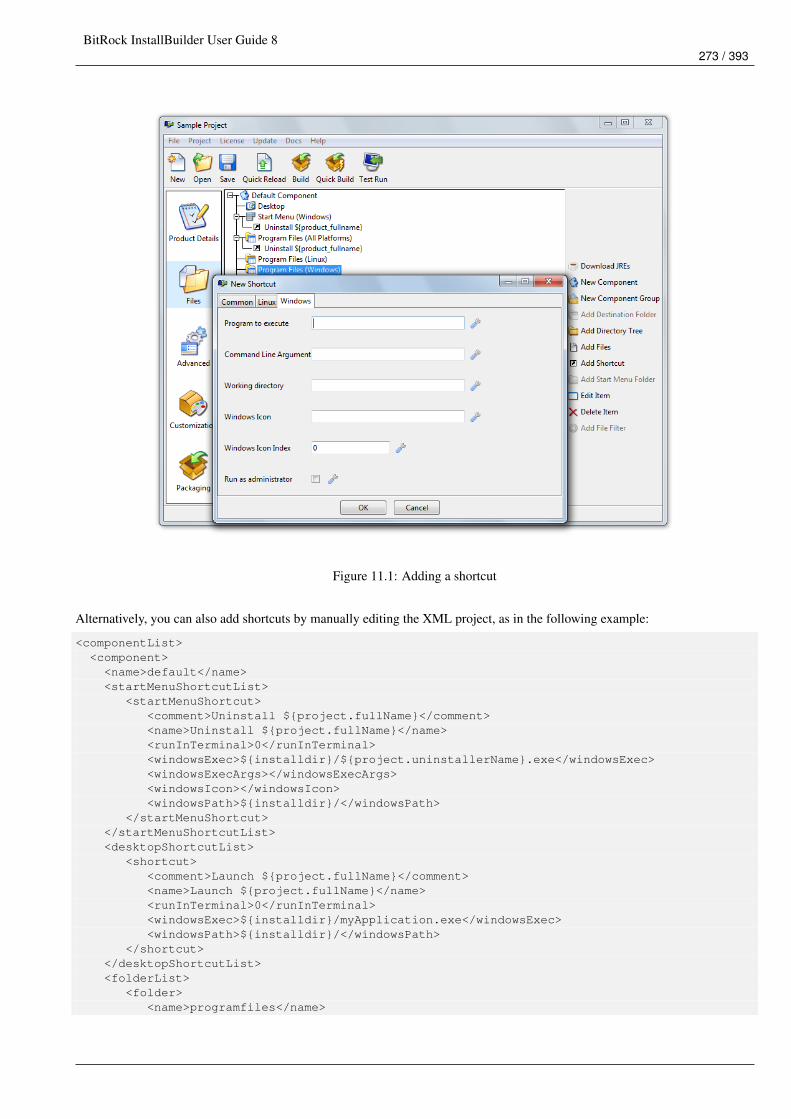
BitRock InstallBuilder User Guide 8273 / 393
Figure 11.1: Adding a shortcut
Alternatively, you can also add shortcuts by manually editing the XML project, as in the following example:
<componentList><component><name>default</name><startMenuShortcutList>
<startMenuShortcut><comment>Uninstall ${project.fullName}</comment><name>Uninstall ${project.fullName}</name><runInTerminal>0</runInTerminal><windowsExec>${installdir}/${project.uninstallerName}.exe</windowsExec><windowsExecArgs></windowsExecArgs><windowsIcon></windowsIcon><windowsPath>${installdir}/</windowsPath>
</startMenuShortcut></startMenuShortcutList><desktopShortcutList>
<shortcut><comment>Launch ${project.fullName}</comment><name>Launch ${project.fullName}</name><runInTerminal>0</runInTerminal><windowsExec>${installdir}/myApplication.exe</windowsExec><windowsPath>${installdir}/</windowsPath>
</shortcut></desktopShortcutList><folderList>
<folder><name>programfiles</name>
BitRock InstallBuilder User Guide 8274 / 393
<platforms>all</platforms><destination>${installdir}</destination><shortcutList>
<shortcut><comment>Uninstall</comment><exec>${installdir}/${project.uninstallerName}</exec><name>Uninstall ${project.fullName}</name><path>${installdir}</path><platforms>all</platforms><runInTerminal>0</runInTerminal><windowsExec>${installdir}/${project.uninstallerName}.exe</windowsExec><windowsExecArgs></windowsExecArgs><windowsIcon></windowsIcon><windowsPath>${installdir}</windowsPath>
</shortcut></shortcutList>
</folder></folderList>
</component></componentList>
You can control where these shortcuts will be created by placing them in one shorcutList or another. For example,shortcuts inside the folders <shortcutList> will be created in the defined <destination>. If instead of the folder<shortcutList>, you use the <startMenuShortcutList> or the <desktopShortcutList>, they will be createdin the Start Menu (Windows only) or the Desktop respectively.
The start menu entry is always created by defaultEven if no shortcuts are created, an entry will be automatically added. To disable this behavior, you just have to set the<startMenuGroupName> to empty:
<project><startMenuGroupName></startMenuGroupName>
</project>
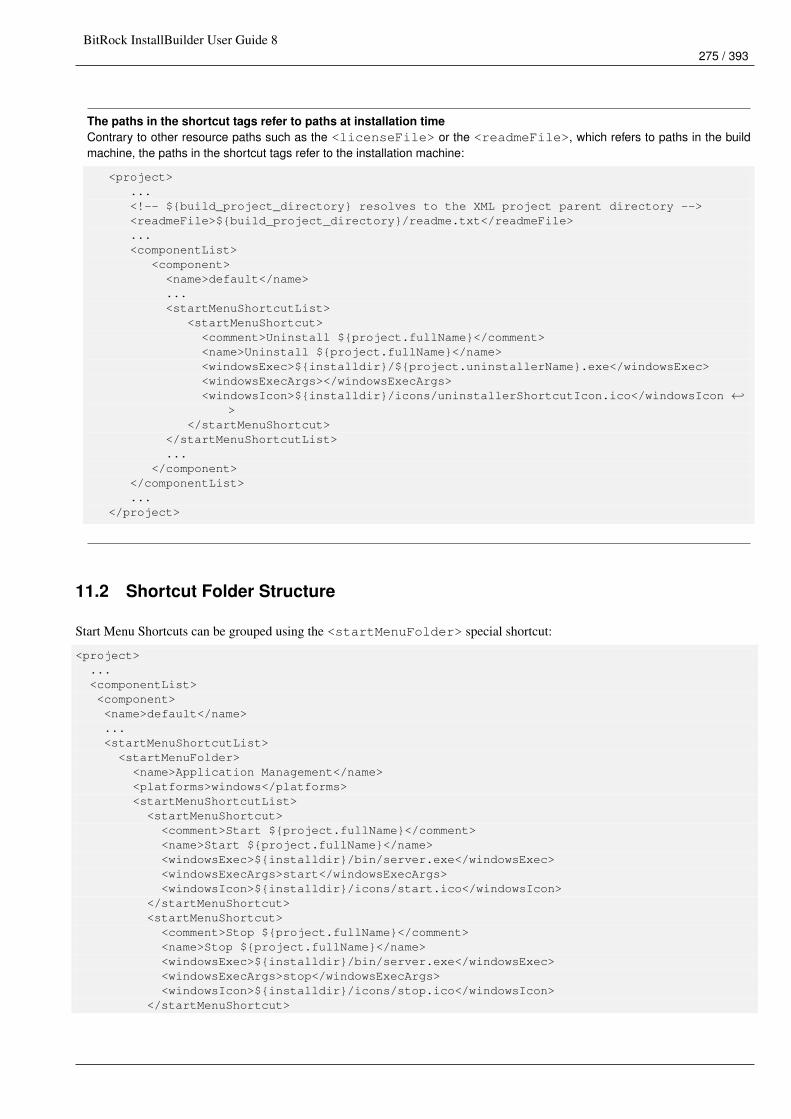
BitRock InstallBuilder User Guide 8275 / 393
The paths in the shortcut tags refer to paths at installation timeContrary to other resource paths such as the <licenseFile> or the <readmeFile>, which refers to paths in the buildmachine, the paths in the shortcut tags refer to the installation machine:
<project>...<!-- ${build_project_directory} resolves to the XML project parent directory --><readmeFile>${build_project_directory}/readme.txt</readmeFile>...<componentList>
<component><name>default</name>...<startMenuShortcutList>
<startMenuShortcut><comment>Uninstall ${project.fullName}</comment><name>Uninstall ${project.fullName}</name><windowsExec>${installdir}/${project.uninstallerName}.exe</windowsExec><windowsExecArgs></windowsExecArgs><windowsIcon>${installdir}/icons/uninstallerShortcutIcon.ico</windowsIcon ←↩
></startMenuShortcut>
</startMenuShortcutList>...
</component></componentList>...
</project>
11.2 Shortcut Folder Structure
Start Menu Shortcuts can be grouped using the <startMenuFolder> special shortcut:
<project>...<componentList><component><name>default</name>...<startMenuShortcutList>
<startMenuFolder><name>Application Management</name><platforms>windows</platforms><startMenuShortcutList><startMenuShortcut>
<comment>Start ${project.fullName}</comment><name>Start ${project.fullName}</name><windowsExec>${installdir}/bin/server.exe</windowsExec><windowsExecArgs>start</windowsExecArgs><windowsIcon>${installdir}/icons/start.ico</windowsIcon>
</startMenuShortcut><startMenuShortcut>
<comment>Stop ${project.fullName}</comment><name>Stop ${project.fullName}</name><windowsExec>${installdir}/bin/server.exe</windowsExec><windowsExecArgs>stop</windowsExecArgs><windowsIcon>${installdir}/icons/stop.ico</windowsIcon>
</startMenuShortcut>
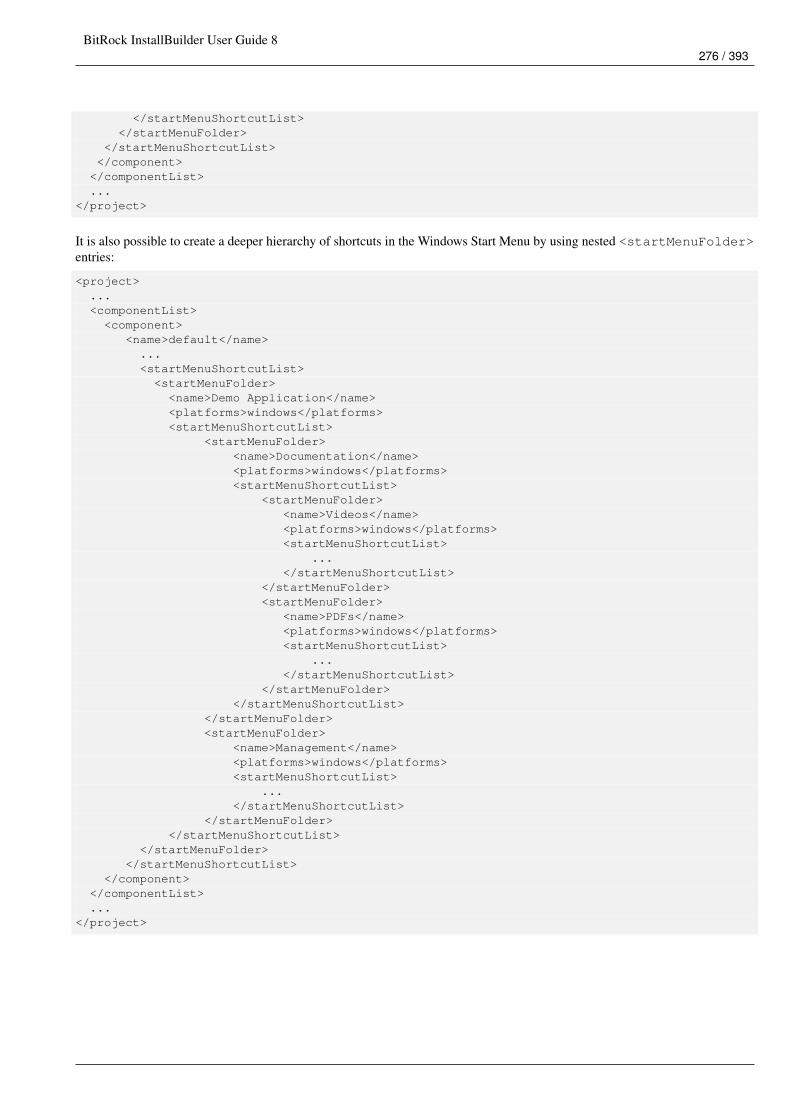
BitRock InstallBuilder User Guide 8276 / 393
</startMenuShortcutList></startMenuFolder>
</startMenuShortcutList></component>
</componentList>...
</project>
It is also possible to create a deeper hierarchy of shortcuts in the Windows Start Menu by using nested <startMenuFolder>entries:
<project>...<componentList><component>
<name>default</name>...<startMenuShortcutList>
<startMenuFolder><name>Demo Application</name><platforms>windows</platforms><startMenuShortcutList>
<startMenuFolder><name>Documentation</name><platforms>windows</platforms><startMenuShortcutList>
<startMenuFolder><name>Videos</name><platforms>windows</platforms><startMenuShortcutList>
...</startMenuShortcutList>
</startMenuFolder><startMenuFolder>
<name>PDFs</name><platforms>windows</platforms><startMenuShortcutList>
...</startMenuShortcutList>
</startMenuFolder></startMenuShortcutList>
</startMenuFolder><startMenuFolder>
<name>Management</name><platforms>windows</platforms><startMenuShortcutList>
...</startMenuShortcutList>
</startMenuFolder></startMenuShortcutList>
</startMenuFolder></startMenuShortcutList>
</component></componentList>...
</project>
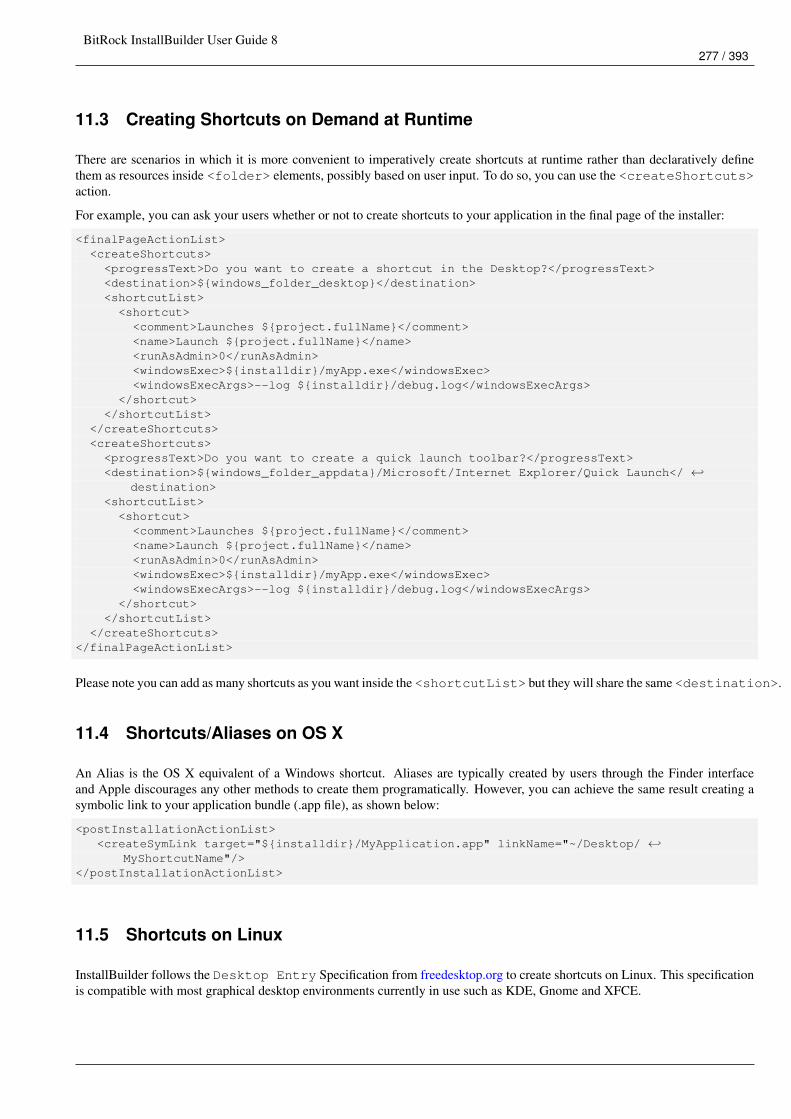
BitRock InstallBuilder User Guide 8277 / 393
11.3 Creating Shortcuts on Demand at Runtime
There are scenarios in which it is more convenient to imperatively create shortcuts at runtime rather than declaratively definethem as resources inside <folder> elements, possibly based on user input. To do so, you can use the <createShortcuts>action.
For example, you can ask your users whether or not to create shortcuts to your application in the final page of the installer:
<finalPageActionList><createShortcuts><progressText>Do you want to create a shortcut in the Desktop?</progressText><destination>${windows_folder_desktop}</destination><shortcutList>
<shortcut><comment>Launches ${project.fullName}</comment><name>Launch ${project.fullName}</name><runAsAdmin>0</runAsAdmin><windowsExec>${installdir}/myApp.exe</windowsExec><windowsExecArgs>--log ${installdir}/debug.log</windowsExecArgs>
</shortcut></shortcutList>
</createShortcuts><createShortcuts><progressText>Do you want to create a quick launch toolbar?</progressText><destination>${windows_folder_appdata}/Microsoft/Internet Explorer/Quick Launch</ ←↩
destination><shortcutList>
<shortcut><comment>Launches ${project.fullName}</comment><name>Launch ${project.fullName}</name><runAsAdmin>0</runAsAdmin><windowsExec>${installdir}/myApp.exe</windowsExec><windowsExecArgs>--log ${installdir}/debug.log</windowsExecArgs>
</shortcut></shortcutList>
</createShortcuts></finalPageActionList>
Please note you can add as many shortcuts as you want inside the <shortcutList> but they will share the same <destination>.
11.4 Shortcuts/Aliases on OS X
An Alias is the OS X equivalent of a Windows shortcut. Aliases are typically created by users through the Finder interfaceand Apple discourages any other methods to create them programatically. However, you can achieve the same result creating asymbolic link to your application bundle (.app file), as shown below:
<postInstallationActionList><createSymLink target="${installdir}/MyApplication.app" linkName="~/Desktop/ ←↩
MyShortcutName"/></postInstallationActionList>
11.5 Shortcuts on Linux
InstallBuilder follows the Desktop Entry Specification from freedesktop.org to create shortcuts on Linux. This specificationis compatible with most graphical desktop environments currently in use such as KDE, Gnome and XFCE.
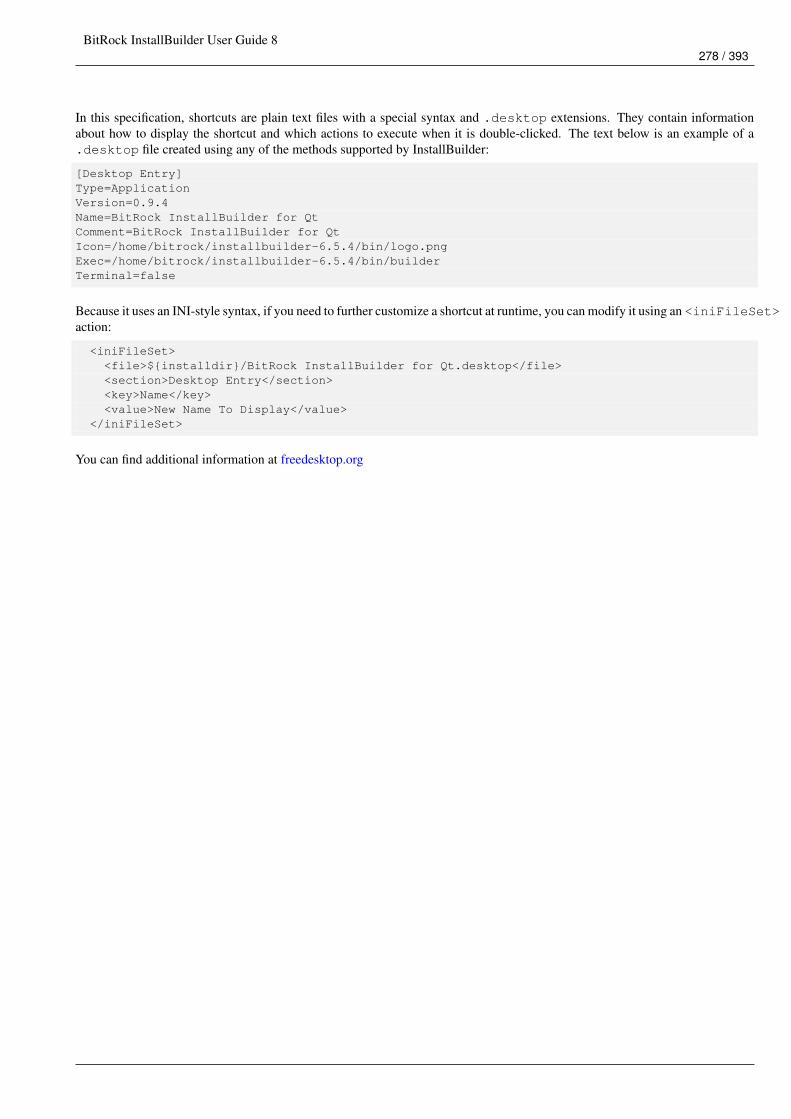
BitRock InstallBuilder User Guide 8278 / 393
In this specification, shortcuts are plain text files with a special syntax and .desktop extensions. They contain informationabout how to display the shortcut and which actions to execute when it is double-clicked. The text below is an example of a.desktop file created using any of the methods supported by InstallBuilder:
[Desktop Entry]Type=ApplicationVersion=0.9.4Name=BitRock InstallBuilder for QtComment=BitRock InstallBuilder for QtIcon=/home/bitrock/installbuilder-6.5.4/bin/logo.pngExec=/home/bitrock/installbuilder-6.5.4/bin/builderTerminal=false
Because it uses an INI-style syntax, if you need to further customize a shortcut at runtime, you can modify it using an <iniFileSet>action:
<iniFileSet><file>${installdir}/BitRock InstallBuilder for Qt.desktop</file><section>Desktop Entry</section><key>Name</key><value>New Name To Display</value>
</iniFileSet>
You can find additional information at freedesktop.org
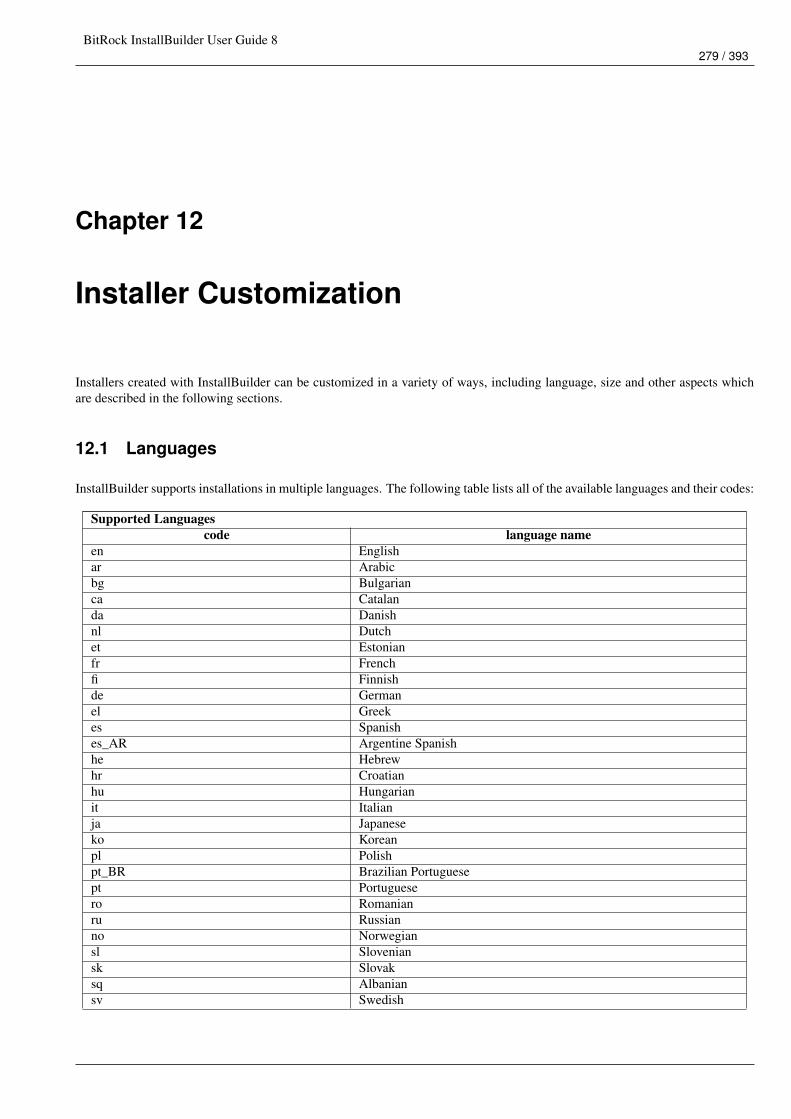
BitRock InstallBuilder User Guide 8279 / 393
Chapter 12
Installer Customization
Installers created with InstallBuilder can be customized in a variety of ways, including language, size and other aspects whichare described in the following sections.
12.1 Languages
InstallBuilder supports installations in multiple languages. The following table lists all of the available languages and their codes:
Supported Languagescode language name
en Englishar Arabicbg Bulgarianca Catalanda Danishnl Dutchet Estonianfr Frenchfi Finnishde Germanel Greekes Spanishes_AR Argentine Spanishhe Hebrewhr Croatianhu Hungarianit Italianja Japaneseko Koreanpl Polishpt_BR Brazilian Portuguesept Portuguesero Romanianru Russianno Norwegiansl Sloveniansk Slovaksq Albaniansv Swedish
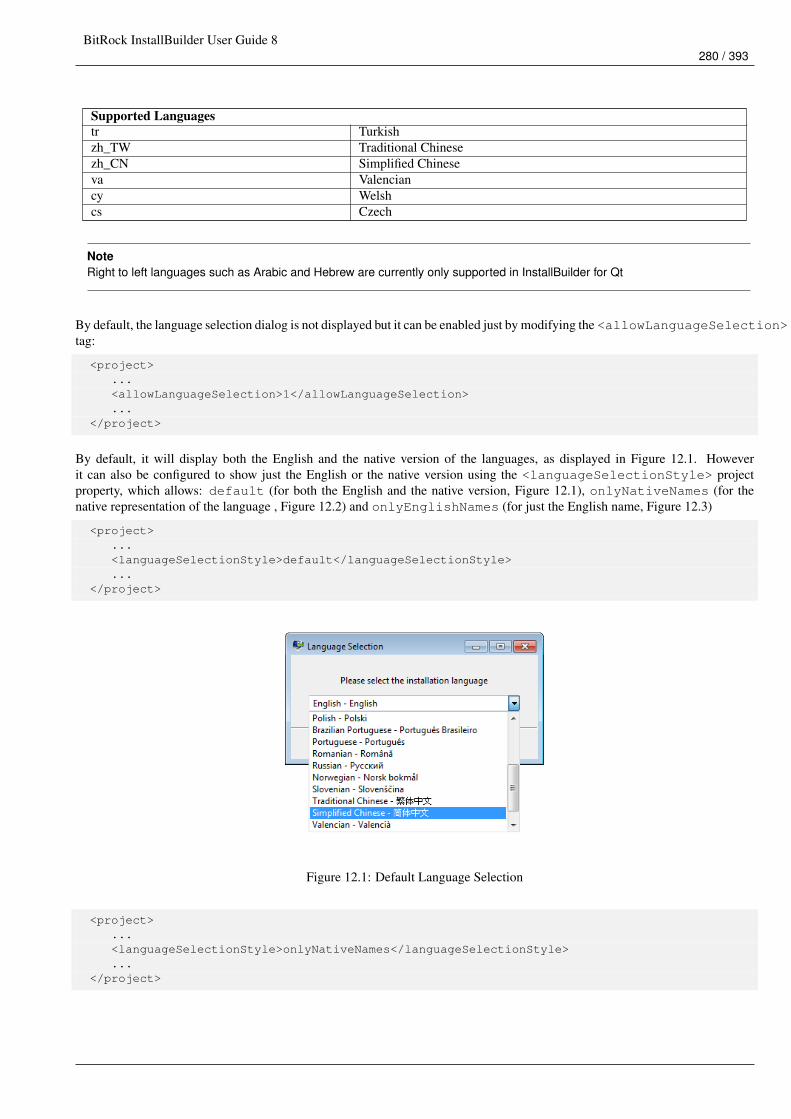
BitRock InstallBuilder User Guide 8280 / 393
Supported Languagestr Turkishzh_TW Traditional Chinesezh_CN Simplified Chineseva Valenciancy Welshcs Czech
NoteRight to left languages such as Arabic and Hebrew are currently only supported in InstallBuilder for Qt
By default, the language selection dialog is not displayed but it can be enabled just by modifying the <allowLanguageSelection>tag:
<project>...<allowLanguageSelection>1</allowLanguageSelection>...
</project>
By default, it will display both the English and the native version of the languages, as displayed in Figure 12.1. Howeverit can also be configured to show just the English or the native version using the <languageSelectionStyle> projectproperty, which allows: default (for both the English and the native version, Figure 12.1), onlyNativeNames (for thenative representation of the language , Figure 12.2) and onlyEnglishNames (for just the English name, Figure 12.3)
<project>...<languageSelectionStyle>default</languageSelectionStyle>...
</project>
Figure 12.1: Default Language Selection
<project>...<languageSelectionStyle>onlyNativeNames</languageSelectionStyle>...
</project>
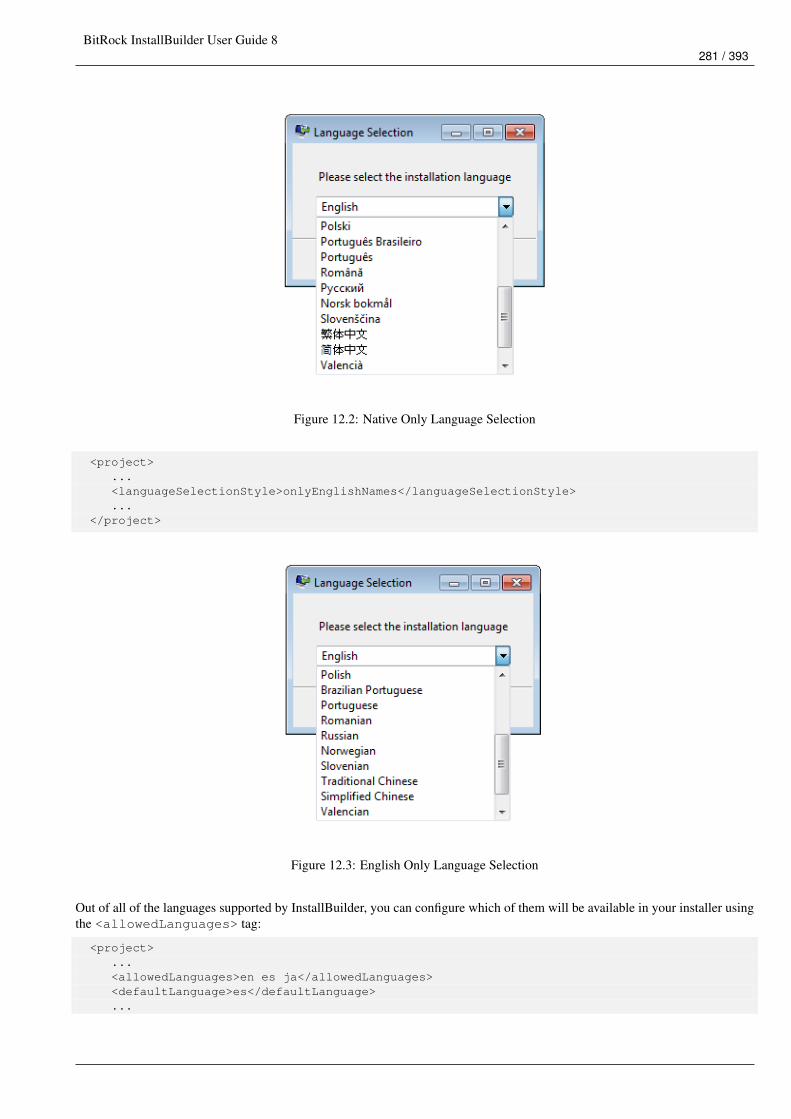
BitRock InstallBuilder User Guide 8281 / 393
Figure 12.2: Native Only Language Selection
<project>...<languageSelectionStyle>onlyEnglishNames</languageSelectionStyle>...
</project>
Figure 12.3: English Only Language Selection
Out of all of the languages supported by InstallBuilder, you can configure which of them will be available in your installer usingthe <allowedLanguages> tag:
<project>...<allowedLanguages>en es ja</allowedLanguages><defaultLanguage>es</defaultLanguage>...
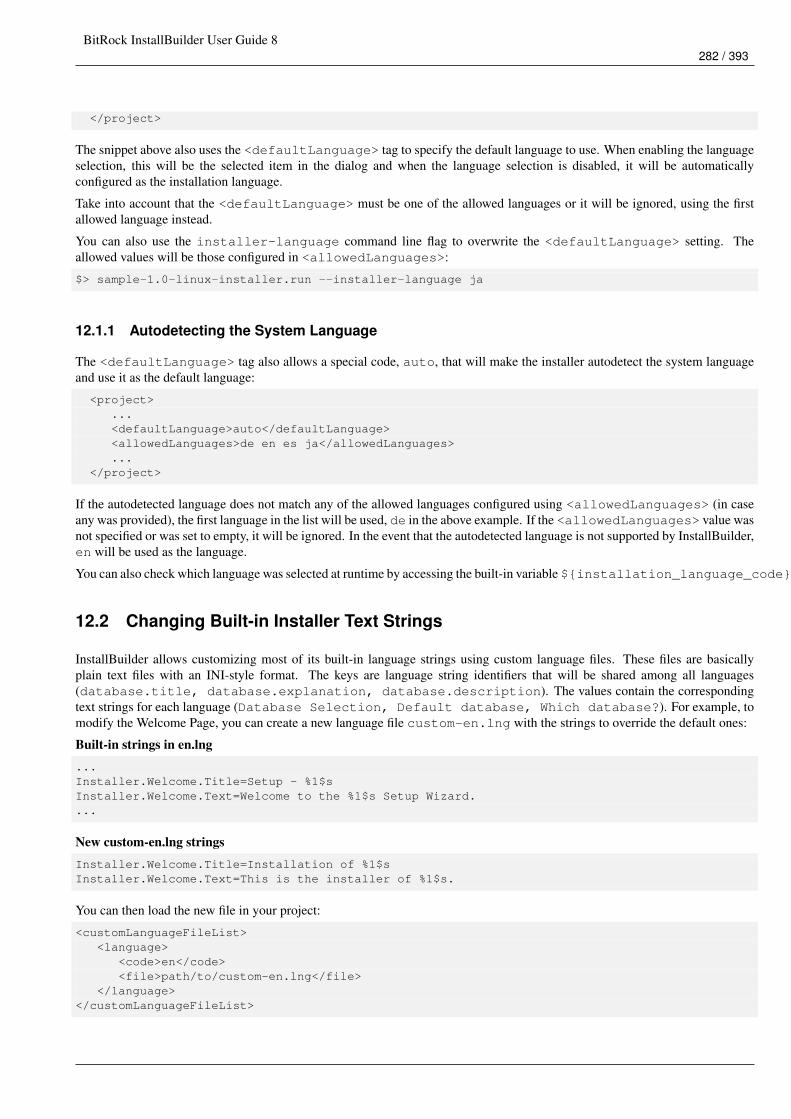
BitRock InstallBuilder User Guide 8282 / 393
</project>
The snippet above also uses the <defaultLanguage> tag to specify the default language to use. When enabling the languageselection, this will be the selected item in the dialog and when the language selection is disabled, it will be automaticallyconfigured as the installation language.
Take into account that the <defaultLanguage> must be one of the allowed languages or it will be ignored, using the firstallowed language instead.
You can also use the installer-language command line flag to overwrite the <defaultLanguage> setting. Theallowed values will be those configured in <allowedLanguages>:
$> sample-1.0-linux-installer.run --installer-language ja
12.1.1 Autodetecting the System Language
The <defaultLanguage> tag also allows a special code, auto, that will make the installer autodetect the system languageand use it as the default language:
<project>...<defaultLanguage>auto</defaultLanguage><allowedLanguages>de en es ja</allowedLanguages>...
</project>
If the autodetected language does not match any of the allowed languages configured using <allowedLanguages> (in caseany was provided), the first language in the list will be used, de in the above example. If the <allowedLanguages> value wasnot specified or was set to empty, it will be ignored. In the event that the autodetected language is not supported by InstallBuilder,en will be used as the language.
You can also check which language was selected at runtime by accessing the built-in variable ${installation_language_code}.
12.2 Changing Built-in Installer Text Strings
InstallBuilder allows customizing most of its built-in language strings using custom language files. These files are basicallyplain text files with an INI-style format. The keys are language string identifiers that will be shared among all languages(database.title, database.explanation, database.description). The values contain the correspondingtext strings for each language (Database Selection, Default database, Which database?). For example, tomodify the Welcome Page, you can create a new language file custom-en.lng with the strings to override the default ones:
Built-in strings in en.lng...Installer.Welcome.Title=Setup - %1$sInstaller.Welcome.Text=Welcome to the %1$s Setup Wizard....
New custom-en.lng stringsInstaller.Welcome.Title=Installation of %1$sInstaller.Welcome.Text=This is the installer of %1$s.
You can then load the new file in your project:
<customLanguageFileList><language>
<code>en</code><file>path/to/custom-en.lng</file>
</language></customLanguageFileList>
BitRock InstallBuilder User Guide 8283 / 393
You can download the complete list of tags or request the latest version by writing to us at [email protected]. A copyof the language file is also included in all InstallBuilder installations inside the docs directory:
$> /home/user/installbuilder-8.2.0/docs/userguide/en.lng
Please note that although the original file contains many other strings, you only need to specify those that need to be modified inyour language file.
Some of the built-in strings contain special identifiers with names like %1$s. This refers to a value that will be automaticallysubstituted at runtime by the installer (in most cases the full product name). Other common fields inserted in messages arefilenames when the string is related to file manipulation actions or error information:
...Installer.Welcome.Text=This is the installer of %1$s....Installer.Error.Installation.CreatingDirectory=Error creating directory %1$s...Installer.Error.PostInstallScript=Error executing post installation script\n%1$s\n\%2$s...
The internally provided values for the identifiers cannot be modified but if you need to display different settings, you can justuse regular InstallBuilder variables. For example, to include the short name and version instead of the full name in the previousstring, you could rewrite your translation as:
...Installer.Welcome.Text=This is the installer of ${project.shortName}-${project.version}....
Or mix both:
...Installer.Welcome.Text=This is the installer of %1$s (${project.shortName}-${project. ←↩
version})....
Where the above string will be resolved as: This is the installer of Sample Installer (sample-1.0).
12.2.1 Adding New Localized Strings
InstallBuilder includes complete language translations for all its built-in messages, but if you customize the installer with newscreens or dialogs, you will need to add the strings to your custom language files. You will need to provide a custom languagefile for each of the languages supported by your installer:
custom-en.lng:
database.title=Database Selectiondatabase.explanation=Default databasedatabase.description=Which database?
custom-es.lng:
database.title=Selección de base de datosdatabase.explanation=Base de datos por defectodatabase.description=Qué base de datos?
Once you have created a language file for each of your supported languages, you will need to load them from your XML project:
<project>...<customLanguageFileList><language>
BitRock InstallBuilder User Guide 8284 / 393
<code>en</code><encoding>iso8859-1</encoding><file>path/to/custom-en.lng</file>
</language><language>
<code>de</code><encoding>iso8859-1</encoding><file>path/to/custom-de.lng</file>
</language><language>
<code>fr</code><encoding>iso8859-1</encoding><file>path/to/custom-fr.lng</file>
</language></customLanguageFileList>...
</project>
Please note that the language files are mapped to the desired language using the <code>. It is also very important to configurethe <encoding> accordingly to your language files or you could end up with an unreadable translation.
Those language files will then be included in the installer at build time and the translated strings will be available at runtime usingthe ${msg()} notation. The following example shows how the strings above can be used to localize a choice parameter:
<choiceParameter><ask>1</ask><default>oracle</default><description>${msg(database.description)}</description><explanation>${msg(database.explanation)}</explanation><title>${msg(database.title)}</title><name>database</name><optionList><option><value>oracle</value><text>Oracle</text>
</option><option><value>mysql</value><text>Mysql</text>
</option></optionList>
</choiceParameter>
12.2.2 Component-Level Translations
Components can also provide their own <customLanguageFileList>. The component-level language files will be pro-cessed after the main one (project level) and the keys there will overwrite the project-level ones. This feature allows you to sharetranslations among multiple projects.
When a specific language is needed for a particular installer, you can add a translation component that will take care of redefiningsome of the language strings:
<project>...<customLanguageFileList><language>
<code>en</code><encoding>iso8859-1</encoding><file>path/to/custom-en.lng</file>
</language></customLanguageFileList>
BitRock InstallBuilder User Guide 8285 / 393
...<componentList><component>
<name>translations</name><show>0</show><customLanguageFileList>
<language><code>en</code><encoding>iso8859-1</encoding>
<file>path/to/alternative-custom-en.lng</file></language>
</customLanguageFileList></component>
</componentList>...
</project>
12.2.3 Displaying a Localized License and Readme
You can specify multiple localized versions for your <licenseFile> using the <licenseFileList> tag. Take intoaccount that you still need to provide a value for the <licenseFile> tag to make the installer show the license page. This<licenseFile> will be also used as the default license file in case there’s no localized license file for the current language.
Inside this tag, you can add as many <licenseFile> elements as localized licenses you provide. For each <licenseFile>element, you’ll need to provide the license file path, its language identifier and the file encoding.
Here’s an example of how it works:
<licenseFileList><licenseFile><code>en</code><file>/home/user/license-english.txt</file><encoding>iso8859-1</encoding>
</licenseFile><licenseFile><code>ja</code><file>/home/user/license-japanese.txt</file><encoding>utf-8</encoding>
</licenseFile></licenseFileList>
The installer will pick the right license file depending on the current selected language for the installer.
If you need to display more than one license page, or simply to make them display conditionally, you can use a <licenseParameter>:
<licenseParameter><name>myLicense</name><title>License Agreement</title><description>Please read the following License Agreement. You must acceptthe terms of this agreement before continuing with the installation.</description><explanation></explanation><file>some/default/license.txt</file><htmlFile>some/default/license.html</htmlFile><licenseFileList>
<licenseFile><code>en</code><file>/home/user/license-english.txt</file><htmlFile>/home/user/license-english.html</htmlFile><encoding>iso8859-1</encoding>
</licenseFile><licenseFile>
BitRock InstallBuilder User Guide 8286 / 393
<code>ja</code><htmlFile>/home/user/license-japanese.html</htmlFile><file>/home/user/license-japanese.txt</file><encoding>utf-8</encoding>
</licenseFile></licenseFileList>
</licenseParameter>
You can do a similar arrangement with readme files and the <readmeFileList> tag:
<readmeFileList><readmeFile><code>en</code><file>/home/user/readme-english.txt</file><encoding>iso8859-1</encoding>
</readmeFile><readmeFile><code>ja</code><file>/home/user/readme-japanese.txt</file><encoding>utf-8</encoding>
</readmeFile></readmeFileList>
Providing a main <readmeFile> at the <project> level is required to enable the readme file. This <readmeFile> willbe used as the default readme file in case there’s no localized readme file for the current language.
NoteEven if the installer provides a project level <licenseFileList>, the license page won’t be displayed if a value is notprovided to the <licenseFile>, the default license file will display if the localized license for the current language was notprovided.The <readmeFile> follows the same rule. If a value is not provided for the default readme file, no readme will be displayed,despite of the value of the <readmeFileList>. The <readmeFile> will also be used if a localized readme was notprovided for the current language.

BitRock InstallBuilder User Guide 8287 / 393
HTML license and readme files in Qt modeBoth the main license file (using the <htmlLicenseFile>) and the <licenseParameter> are capable of displayinghtml files in qt mode. As they are only allowed in qt mode, you still have to provide a regular <file>:
<project><shortName>sample</shortName><fullName>Sample Project</fullName><version>1.0</version><installerFilename></installerFilename><licenseFile>some/default-license.txt</licenseFile><htmlLicenseFile>some/default-license.html</htmlLicenseFile>...<licenseFileList>
<licenseFile code="de" file="main-license_de.txt" htmlFile="main-license_de.html"/><licenseFile code="en" file="main-license_en.txt" htmlFile="main-license_en.html"/><licenseFile code="es" file="main-license_es.txt" htmlFile="main-license_es.html"/>
</licenseFileList>...<parameterList><licenseParameter>
<name>otherLicense</name><title>Other License Agreement</title><file>some/default/other-license.txt</file><htmlFile>some/default/other-license.html</htmlFile><licenseFileList>
<licenseFile code="de" file="other-license_de.txt" htmlFile="other-license_de. ←↩html"/>
<licenseFile code="en" file="other-license_en.txt" htmlFile="other-license_en. ←↩html"/>
<licenseFile code="es" file="other-license_es.txt" htmlFile="other-license_es. ←↩html"/>
</licenseFileList></licenseParameter>
</parameterList>...
</project>
Although the <readmeFile> cannot display HTML text, you could use an <infoParameter> instead:
<infoParameter><name>readme</name><title>Readme</title><explanation>Readme</explanation><value>${textValue}</value><htmlValue>${htmlValue}</htmlValue><preShowPageActionList><readFile>
<path>${installdir}/readme.html</path><name>htmlValue</name>
</readFile><readFile>
<path>${installdir}/readme.txt</path><name>textValue</name>
</readFile></preShowPageActionList>
</infoParameter>
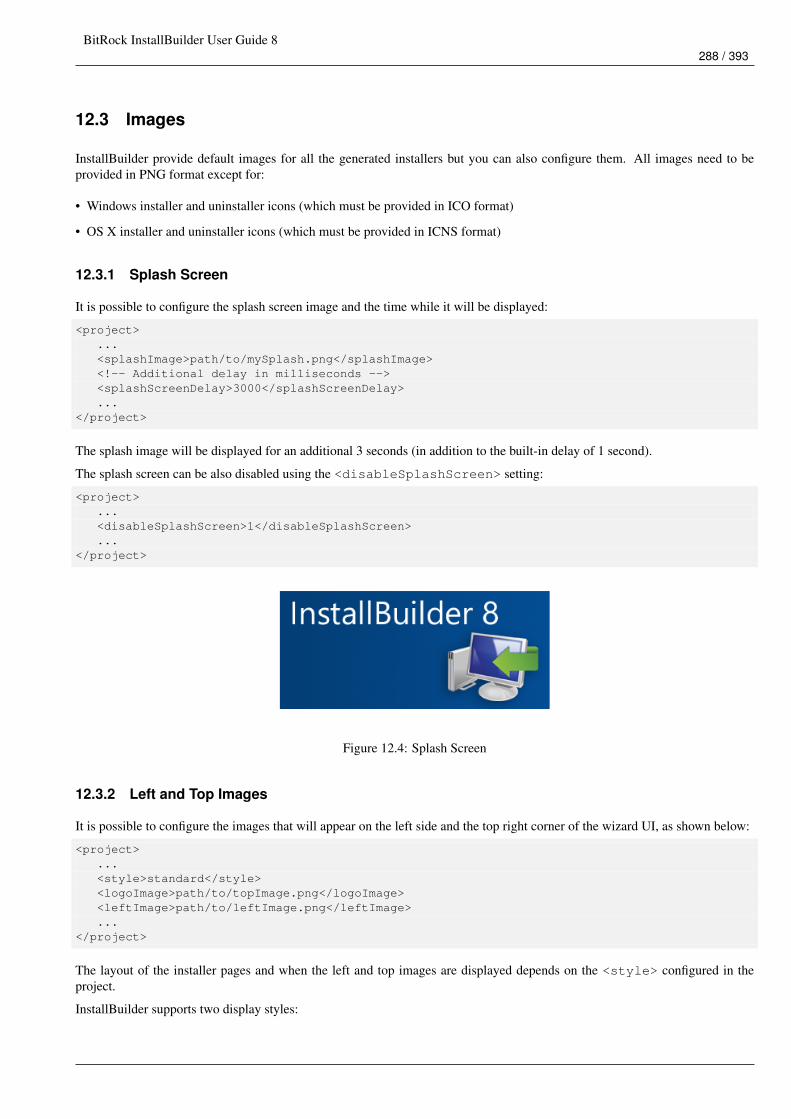
BitRock InstallBuilder User Guide 8288 / 393
12.3 Images
InstallBuilder provide default images for all the generated installers but you can also configure them. All images need to beprovided in PNG format except for:
• Windows installer and uninstaller icons (which must be provided in ICO format)
• OS X installer and uninstaller icons (which must be provided in ICNS format)
12.3.1 Splash Screen
It is possible to configure the splash screen image and the time while it will be displayed:
<project>...<splashImage>path/to/mySplash.png</splashImage><!-- Additional delay in milliseconds --><splashScreenDelay>3000</splashScreenDelay>...
</project>
The splash image will be displayed for an additional 3 seconds (in addition to the built-in delay of 1 second).
The splash screen can be also disabled using the <disableSplashScreen> setting:
<project>...<disableSplashScreen>1</disableSplashScreen>...
</project>
Figure 12.4: Splash Screen
12.3.2 Left and Top Images
It is possible to configure the images that will appear on the left side and the top right corner of the wizard UI, as shown below:
<project>...<style>standard</style><logoImage>path/to/topImage.png</logoImage><leftImage>path/to/leftImage.png</leftImage>...
</project>
The layout of the installer pages and when the left and top images are displayed depends on the <style> configured in theproject.
InstallBuilder supports two display styles:
BitRock InstallBuilder User Guide 8289 / 393
• Standard Style:
In the standard style, the left image is displayed in the welcome and the final page and the top image is displayed in all theparameter pages and the readytoinstall page. The installation page will also display the top image if no slideshow images wereconfigured or the slideshow if they were.
<project>...<style>standard</style>...
</project>
• Custom Style:
When using the custom style, no top right image is displayed and all of the pages will show the left image. Parameter pagescan configure the left image displayed through their <leftImage> property:
<project>...<style>custom</style>...<parameterList>
<directoryParameter><name>installdir</name><description>Installer.Parameter.installdir.description</description>...<leftImage>path/to/installdir_image.png</leftImage>...
</directoryParameter></parameterList>...
</project>
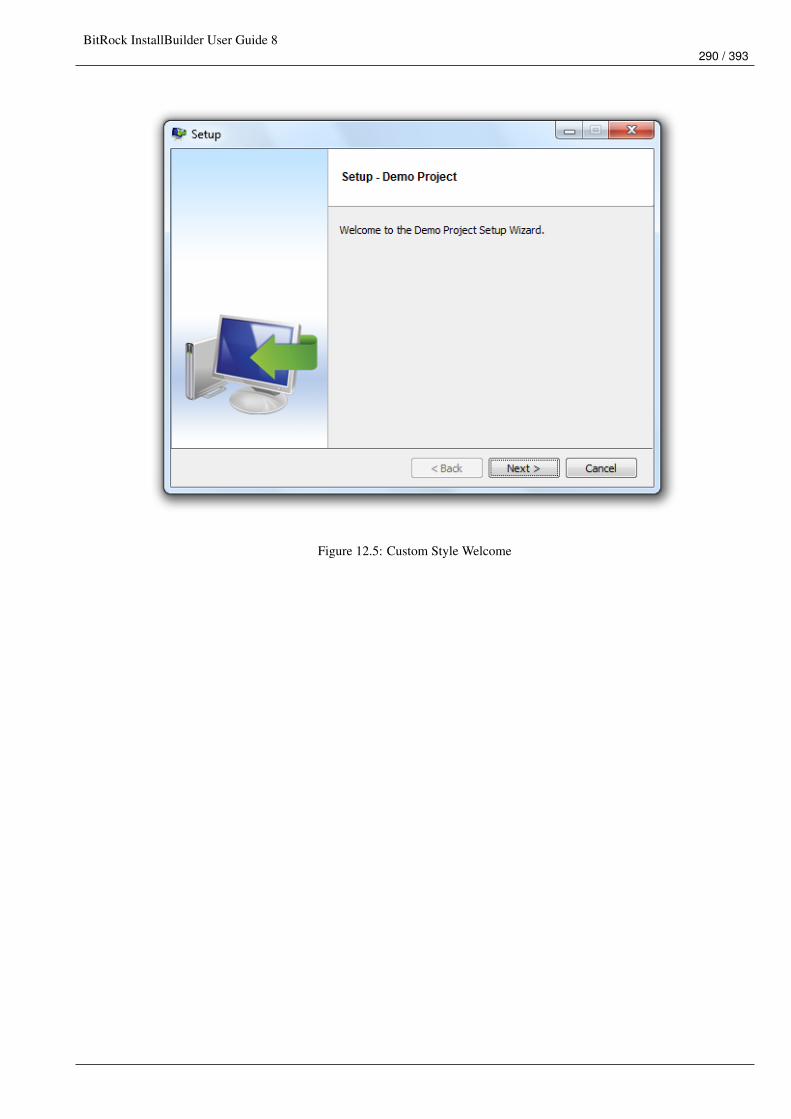
BitRock InstallBuilder User Guide 8290 / 393
Figure 12.5: Custom Style Welcome
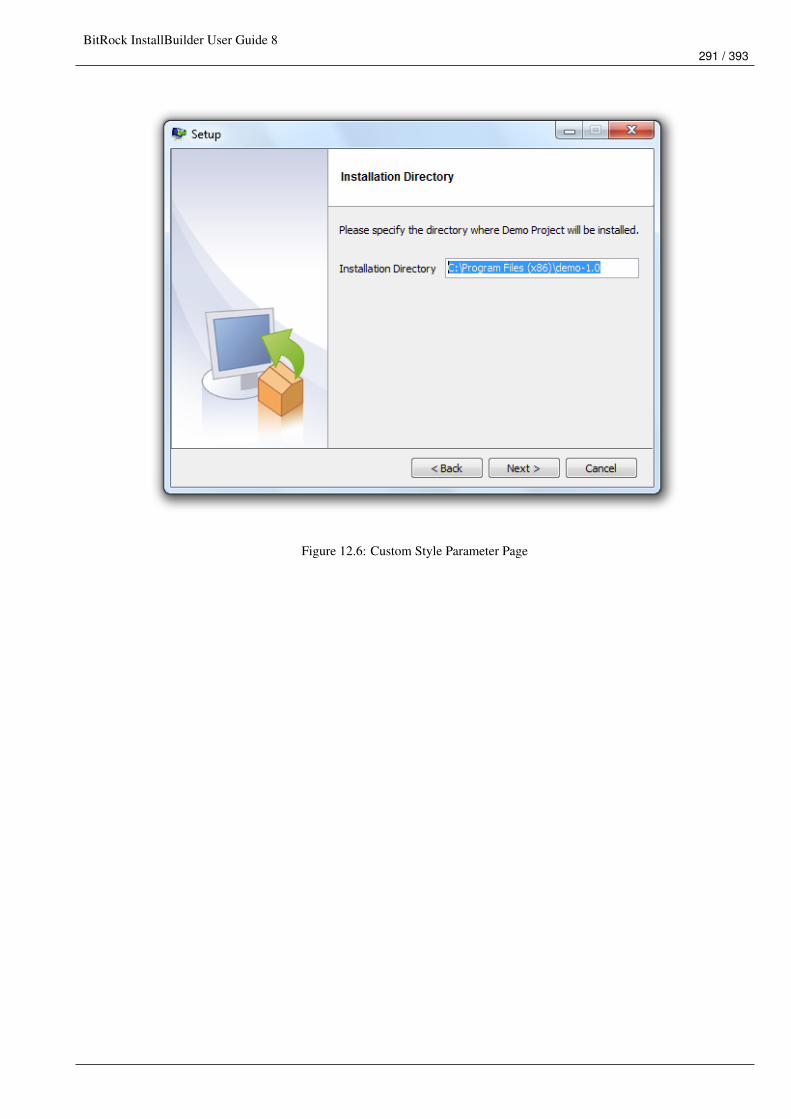
BitRock InstallBuilder User Guide 8291 / 393
Figure 12.6: Custom Style Parameter Page
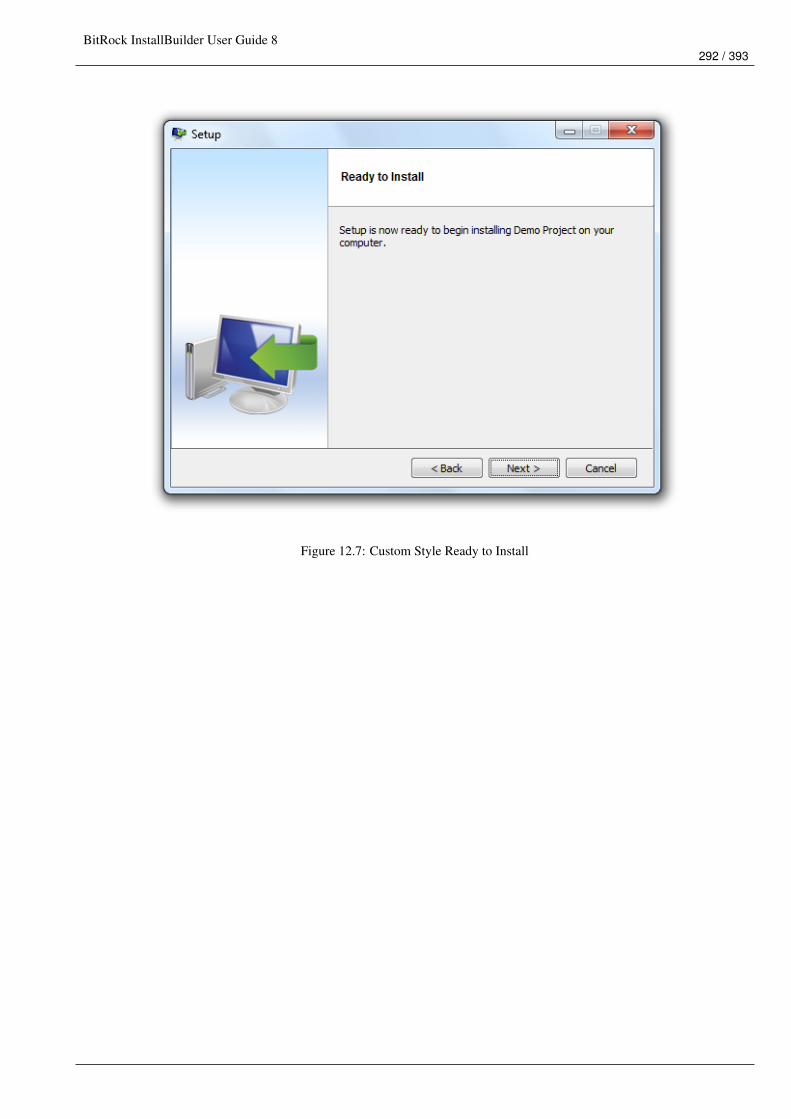
BitRock InstallBuilder User Guide 8292 / 393
Figure 12.7: Custom Style Ready to Install
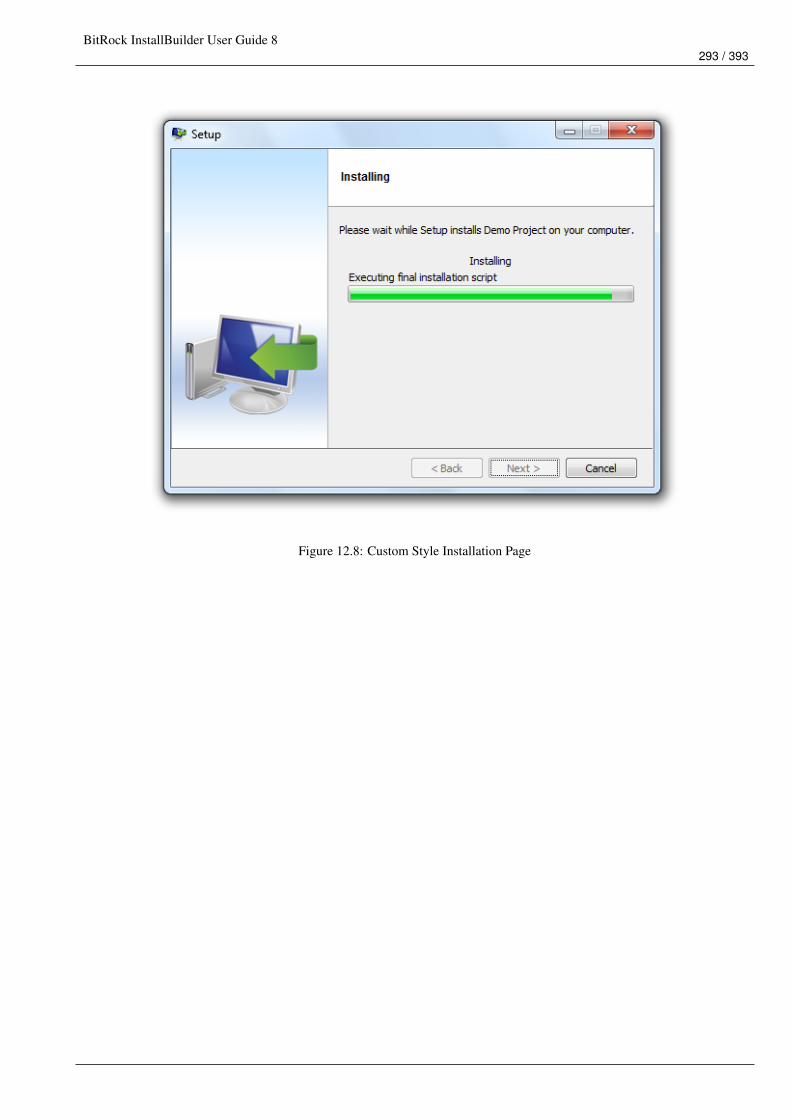
BitRock InstallBuilder User Guide 8293 / 393
Figure 12.8: Custom Style Installation Page
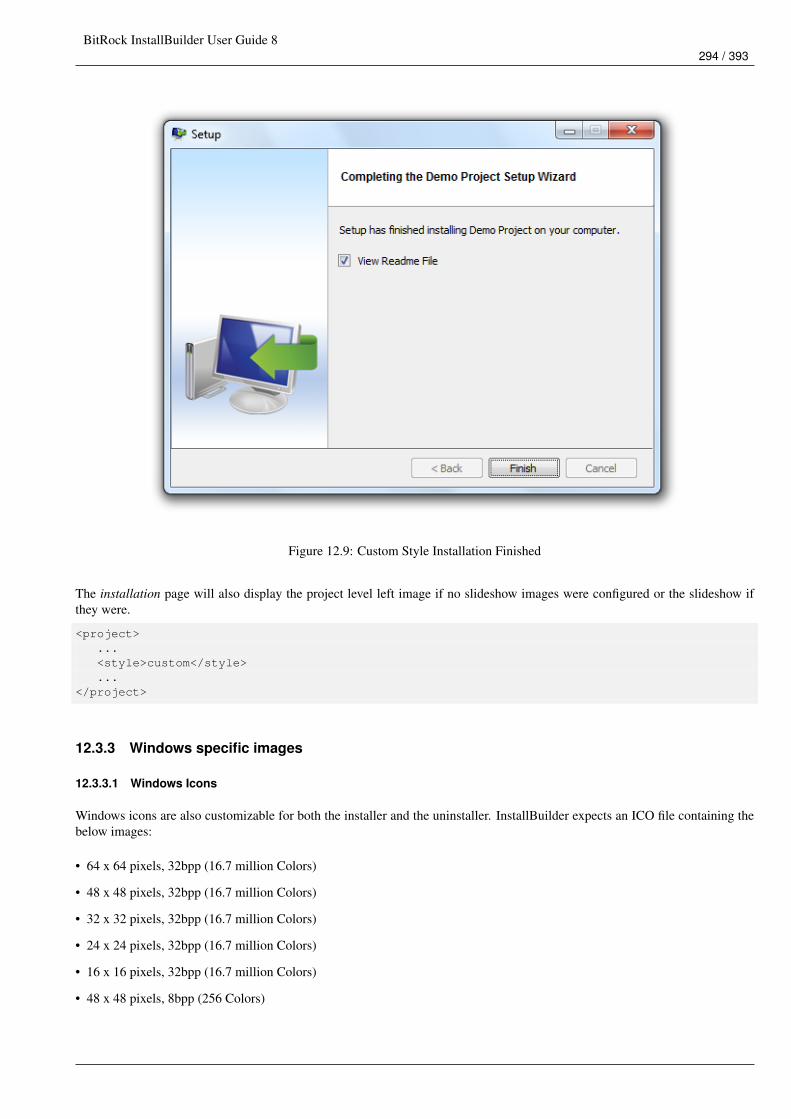
BitRock InstallBuilder User Guide 8294 / 393
Figure 12.9: Custom Style Installation Finished
The installation page will also display the project level left image if no slideshow images were configured or the slideshow ifthey were.
<project>...<style>custom</style>...
</project>
12.3.3 Windows specific images
12.3.3.1 Windows Icons
Windows icons are also customizable for both the installer and the uninstaller. InstallBuilder expects an ICO file containing thebelow images:
• 64 x 64 pixels, 32bpp (16.7 million Colors)
• 48 x 48 pixels, 32bpp (16.7 million Colors)
• 32 x 32 pixels, 32bpp (16.7 million Colors)
• 24 x 24 pixels, 32bpp (16.7 million Colors)
• 16 x 16 pixels, 32bpp (16.7 million Colors)
• 48 x 48 pixels, 8bpp (256 Colors)
BitRock InstallBuilder User Guide 8295 / 393
• 32 x 32 pixels, 8bpp (256 Colors)
• 16 x 16 pixels, 8bpp (256 Colors)
Although some of them can be skipped, you must at least provide the following sizes:
• 48 x 48 pixels, 32bpp (16.7 million Colors) or 8bpp (256 Colors)
• 32 x 32 pixels, 32bpp (16.7 million Colors) or 8bpp (256 Colors)
• 16 x 16 pixels, 32bpp (16.7 million Colors) or 8bpp (256 Colors)
If your icon file contains any additional images (such as a 256x256 image), they will just be ignored.
Those icons must then be configured in your project:
<project>...<windowsExecutableIcon>path/to/installer.ico</windowsExecutableIcon><windowsUninstallerExecutableIcon>path/to/uninstaller.ico</ ←↩
windowsUninstallerExecutableIcon>...
</project>
If the uninstaller icon is not configured explicitly, the installer icon will be used instead. Similarly, if no installer icon is specified,the default InstallBuilder icon will be used.
The locations specified in the <windowsExecutableIcon> and <windowsUninstallerExecutableIcon> refer tofiles in the build machine.
12.3.3.2 Other Windows images
Apart from the installer and uninstaller icons, you can also provide images for other settings:
• Add/Remove Programs Menu Icon: This icon is configured through the <productDisplayIcon> tag and will be displayedin the ARP menu in addition to your application details. The icon is configured at runtime so the provided location must pointto a file in the target machine, in most of the cases, installed by your application:
<project>...<!-- Path in the target machine --><productDisplayIcon>${installdir}/icons/arp.ico</productDisplayIcon>...<componentList><component>
<name>windowsComponent</name><folderList><folder>
<name>icons</name><destination>${installdir}</destination>
<distributionFileList><!-- Directory containing arp.ico icon --><distributionDirectory origin="/path/to/icons"/>
</distributionFileList></folder>
</folderList></component>
</componentList></project>
BitRock InstallBuilder User Guide 8296 / 393
• Shortcuts icons: When creating shortcuts to executables on Windows, the icon of the application will be used. If the shortcutpoints to a different file-type such as a .txt or .bat file, the icon of the associated program will be displayed. Of course,you can also provide your own custom icon:
<createShortcuts><destination>${windows_folder_startmenu}/${project.fullName}</destination><shortcutList>
<shortcut><comment>Launches ${project.fullName}</comment><name>Launch ${project.fullName}</name><windowsIcon>${installdir}/icons/custom.ico</windowsIcon><windowsExec>${installdir}/myApp.exe</windowsExec>
</shortcut></shortcutList>
</createShortcuts>
The <windowsIcon> tag can also point to an executable. In that case, the icon of the referenced binary will be used. Forexample, to configure you .bat files to look like a cmd prompt:
<createShortcuts><destination>${windows_folder_startmenu}/${project.fullName}</destination><shortcutList>
<shortcut><comment>Launches ${project.fullName}</comment><name>Launch ${project.fullName}</name><windowsIcon>%SystemRoot%\system32\cmd.exe</windowsIcon><windowsExec>${installdir}/script/wrapped-shell.bat</windowsExec>
</shortcut></shortcutList>
</createShortcuts>
12.3.4 OS X Icons
Similarly to Windows, OS X installer and uninstaller application bundles can also include custom icons, provided using the<osxApplicationBundleIcon> and <osxUninstallerApplicationBundleIcon> project properties:
<project>...<osxApplicationBundleIcon>path/to/Bundle.icns</osxApplicationBundleIcon><osxUninstallerApplicationBundleIcon>path/to/UninstallerBundle.icns</ ←↩
osxUninstallerApplicationBundleIcon>...
</project>
InstallBuilder will check if the provided icons are valid .icns files and will throw an error if the check fails. In addition, you musttake into account the required icons in your .icns file as described in the Apple guidelines. At a minimum, the icon bundle mustcontain the following sizes:
• 512 x 512 pixels (For finder icons in OS X 10.5 and later)
• 128 x 128 pixels
• 32 x 32 pixels
• 16 x 16 pixels
BitRock InstallBuilder User Guide 8297 / 393
12.3.5 Other images
12.3.5.1 Window Manager Image
The <wmImage> tag expects a 48x48 GIF or PNG logo image that will be shown in the window manager task bar. OnWindows and OS X, when running in Qt mode, it will also be used as the window icon (displayed in the window title bar). OnWindows, in modes other than Qt, the window icon will be obtained from the 16pixel image included in the executable.
If a <wmImage> is not provided, a default image is displayed.
<project>...<wmImage>path/in/the/build/machine/logo.png</wmImage>...
</project>
12.3.5.2 Slide Show Images
InstallBuilder allows displaying a slide show while the files are being copied. This is really useful to show your applicationfeatures or promote other products or services from your company. Each slide is represented by a 500x222 GIF or PNG imageconfigured using a <slideShowImage> element:
<project>...<slideShowImageList>
<slideShowImage><path>path/to/image1.png</path>
</slideShowImage><slideShowImage>
<path>path/to/image2.png</path></slideShowImage><slideShowImage>
<path>path/to/image3.png</path></slideShowImage>
</slideShowImageList>...
</project>
Where the paths to the images correspond to where they are located at build time.
The behavior of the slide show can be configured to continuously loop during the installation (through the <slideShowLoop>tag) or not. The number of seconds that each image will be displayed can be also defined (specified in the <slideShowTiming>tag). For example, if you want to display 5 slides without repeating them with 10 seconds for each of them, you can use:
<project>...<slideShowLoop>0</slideShowLoop><slideShowTiming>10</slideShowTiming><slideShowImageList>
<slideShowImage><path>path/to/feature1.png</path>
</slideShowImage><slideShowImage>
<path>path/to/feature2.png</path></slideShowImage><slideShowImage>
<path>path/to/feature3.png</path></slideShowImage><slideShowImage>
<path>path/to/feature4.png</path>
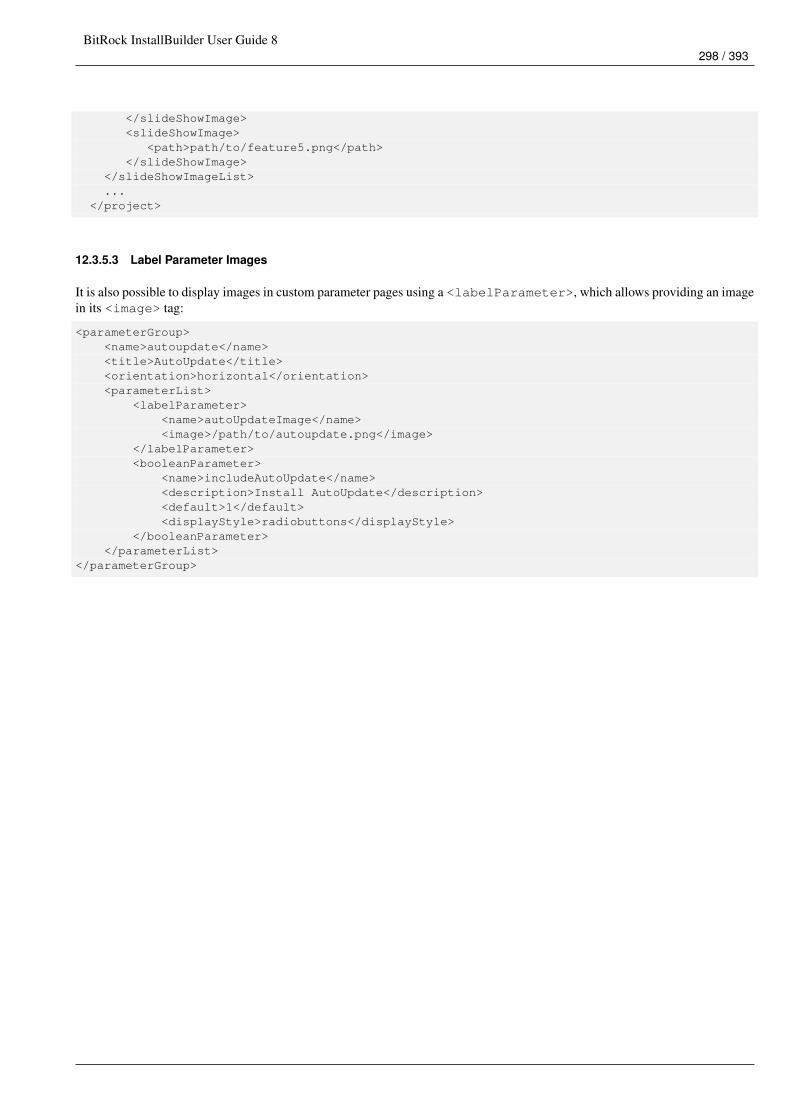
BitRock InstallBuilder User Guide 8298 / 393
</slideShowImage><slideShowImage>
<path>path/to/feature5.png</path></slideShowImage>
</slideShowImageList>...
</project>
12.3.5.3 Label Parameter Images
It is also possible to display images in custom parameter pages using a <labelParameter>, which allows providing an imagein its <image> tag:
<parameterGroup><name>autoupdate</name><title>AutoUpdate</title><orientation>horizontal</orientation><parameterList>
<labelParameter><name>autoUpdateImage</name><image>/path/to/autoupdate.png</image>
</labelParameter><booleanParameter>
<name>includeAutoUpdate</name><description>Install AutoUpdate</description><default>1</default><displayStyle>radiobuttons</displayStyle>
</booleanParameter></parameterList>
</parameterGroup>
BitRock InstallBuilder User Guide 8299 / 393
Figure 12.10: Image in a Label Parameter
12.3.5.4 Option Images
It is also possible to add images to the <option> elements used in a <choiceParameter>:
<choiceParameter><name>dbmsserver</name><description>DBMS</description><explanation>Database server</explanation><allowEmptyValue>1</allowEmptyValue><displayType>combobox</displayType><optionList><option><description>MySQL server</description><text>MySQL</text><value>mysql</value><image>${build_project_directory}/img/mysql-logo.png</image>
</option><option><description>PostgreSQL server</description><text>PostgreSQL</text><value>postgres</value><image>${build_project_directory}/img/postgresql-logo.png</image>
</option></optionList>
</choiceParameter>
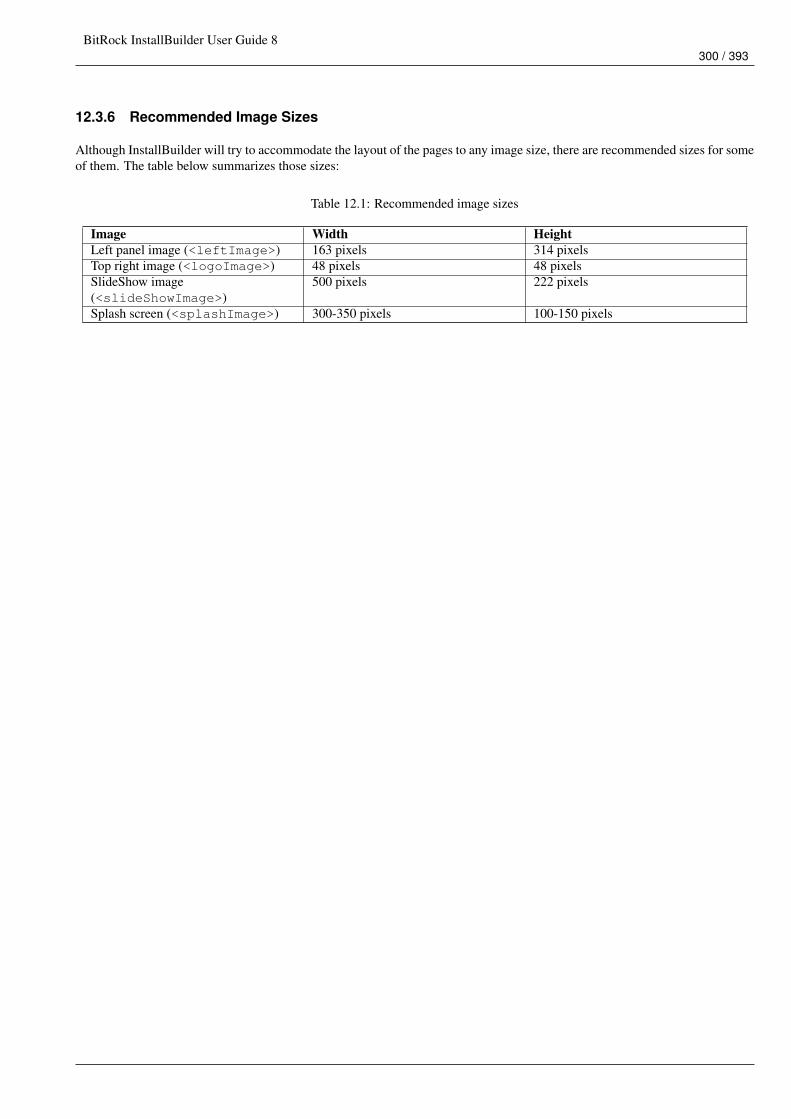
BitRock InstallBuilder User Guide 8300 / 393
12.3.6 Recommended Image Sizes
Although InstallBuilder will try to accommodate the layout of the pages to any image size, there are recommended sizes for someof them. The table below summarizes those sizes:
Table 12.1: Recommended image sizes
Image Width HeightLeft panel image (<leftImage>) 163 pixels 314 pixelsTop right image (<logoImage>) 48 pixels 48 pixelsSlideShow image(<slideShowImage>)
500 pixels 222 pixels
Splash screen (<splashImage>) 300-350 pixels 100-150 pixels
BitRock InstallBuilder User Guide 8301 / 393
Chapter 13
Running the Installer
You can run an installer either by invoking it from the command line or double-clicking it from your desktop environment. OnLinux and other Unix environments, the only requirement is that the file must have executable permissions, which it has bydefault when it is created. Sometimes those permissions can be lost, such as when downloading an installer from a website. Inthat case you can restore the executable permissions with:
chmod u+x installbuilder-professional-8.2.0-linux-installer.run
Because the generated OS X installers are regular .app applications, they contain a directory structure and you will need toadd them to a zip file or disk image for distribution over the web. On OS X, when a user downloads a zip file containing anapplication, it will automatically be unpacked and the user will be prompted to launch it.
On Windows, the installer runs graphically with a native look and feel or it can be invoked in unattended mode (see below). OnMac OS X, the installer runs with the native Aqua look and feel and can also be run in text and unattended modes. On Linux andother supported Unix systems, there are multiple installation modes:
• GTK: This is a native installation mode based on the GTK 2.0 toolkit. The GTK libraries must be present on the system (theyare installed by default in most Linux distributions). This is the default installation mode. If the GTK libraries are not available,the X-Window installation mode will automatically be used instead. The GTK mode is available on Linux and Linux x64 only.
• Qt: This is a native installation mode based on Qt. The Qt libraries are compiled into the installer, so it is not necessary forthem to be present on the end-user system. This mode is only available on Linux, Windows and Mac OS X when using theInstallBuilder for Qt product.
• X-Window: This is a self-contained installation mode that has no external dependencies. It will be started when neither theGTK nor the Qt mode is available. It can also be explicitly requested with the --mode xwindow command line switch.
• Command line: Designed for remote installations or installation on servers without a GUI environment. This installationmode is started by default when a GUI is not available or by passing the --mode text command line option to the installer.
• Unattended Installation: It is possible to perform unattended or silent installations using the --mode unattended com-mand line option. This is useful for automating installations or for inclusion in shell scripts, as part of larger installationprocesses.
13.1 Requiring Administrator Privileges
You can require administrator privileges in your installer by using the <requireInstallationByRootUser> tag:
<project>...<requireInstallationByRootUser>1</requireInstallationByRootUser>...
</project>
BitRock InstallBuilder User Guide 8302 / 393
This will require the end user to have root privileges on Unix platforms (possibly using sudo to invoke the installer) or Adminis-trator privileges on Windows. If the user does not have the appropriate privileges, an error will be displayed and the installer willexit. In the case of OS X, the user will be prompted with an Admin password dialog to raise its privileges.
Once running, you can check whether the installer is running as administrator by checking the ${installer_is_root_install}built-in variable:
<showText text="You are not administrator!"><ruleList><isFalse value="${installer_is_root_install}"/>
</ruleList></showText>
When running on the latest Windows versions (Vista and newer), if the UAC is enabled, the installer will be forced to be executedas Administrator by default, regardless of the value of the <requireInstallationByRootUser> tag. This behavior isforced by the OS but can be also configured in the project using the <requestedExecutionLevel> tag:
<project>...<requestedExecutionLevel>requireAdministrator</requestedExecutionLevel>...
</project>
The allowed values for this setting are:
• requireAdministrator - Require administrator: This is the default value and forces the installer to be executed as an adminis-trator user. All users are forced to introduce valid administrator credentials.
• asInvoker - As invoker: This setting allows the installer to execute with the current privileges level. Any user can run theinstaller without the UAC requesting his credentials.
• highestAvailable - Highest available: This setting makes the application to run with the highest privileges the user execut-ing it can obtain. A regular user won’t be prompted for credentials (as it cannot raise its privileges) but a member of theAdministrators group will be prompted.
Under these circumstances, if want you installer to do not require administrator privileges, you should configure the settingsbelow in your project:
<project>...<requireInstallationByRootUser>0</requireInstallationByRootUser><requestedExecutionLevel>asInvoker</requestedExecutionLevel>...
</project>
13.2 Multiple Instances of the Installer
Sometimes users accidentally launch multiple instances of the installer. In most cases this is not an issue, but if this is an issuefor you, you can prevent users from launching the installer multiple times by enabling the <singleInstanceCheck> projectproperty:
<project>...<singleInstanceCheck>1</singleInstanceCheck>...
</project>
BitRock InstallBuilder User Guide 8303 / 393
If the installer is launched a second time while it is still running, it will display a pop-up dialog asking whether or not to continuewith the installation.
If you want to prevent more than one instance of the installer from running without giving the choice to the user, you could usethe <singleInstanceCheck> rule and throw an error:
<preInstallationActionList><throwError>
<text>Another instance is running. This instance will abort</text><ruleList>
<singleInstanceCheck logic="is_running" /></ruleList>
</throwError></preInstallationActionList>
BitRock InstallBuilder User Guide 8304 / 393
Chapter 14
Uninstaller
As part of the installation process, an uninstaller executable is created. In fact, two files are created, an executable runtime, theone that the user should invoke to uninstall the application and a data file (usually named uninstall.dat), containing informationdata about the installation (installed files, component selected, value of the variables. . . ). Both files must exist to ensure a correctuninstallation.
By default, the uninstaller will remove all files created by the installer, as well as shortcuts and entries in Start Menu and theAdd/Remove Programs menu. The default behavior for the uninstaller is to not remove any files that it did not create. This isintended to prevent accidental removal of user-generated content.
Please also note that actions performed during installation such as <addDirectoryToPath> or <registrySet> won’tbe automatically reverted by the uninstaller. They must be manually included in the <preInstallationActionList> or<postInstallationActionList>. An exception to this rule is the <createShortcuts> action, which will registerthe new shortcuts created in the uninstaller.
It is also possible to allow the uninstallation of individual components as explained in the Adding or removing components toexisting installations section.
The uninstaller name and location can be also configured:
<project>...<uninstallerDirectory>${installdir}/internals/uninstall</uninstallerDirectory><uninstallerName>UninstallApplication</uninstallerName>...
</project>
On Windows and OS X, a prefix will be automatically appended to the uninstaller name (.app on OS X and .exe on Windows).
You can even prevent an uninstaller from being created:
<project>...<createUninstaller>0</createUninstaller>...
</project>
14.1 Uninstaller Action Lists
A number of actions can be run as part of the uninstallation process. They are typically used to revert changes performed atinstallation time: deleting newly created users, removing environment variables, uninstalling services and so on.
• <preUninstallationActionList>: Executed when the uninstaller is started. It can be used for example to prompt theend-user to collect information to be used during the uninstall process, stop any running services and so on.
BitRock InstallBuilder User Guide 8305 / 393
• <postUninstallationActionList>: Executed after the main uninstallation process has taken place. It is typicallyused to delete files and directories not covered by the uninstaller or perform any last-minute cleanups.
If an error is found during uninstallation, it is silently ignored and the uninstallation continues, although the rest of actions arenot executed. This behavior is necessary because there is nothing more frustrating to end users than having an uninstaller fail forsome minor issue and thus, for example, remain in the Add/Remove Program menu.
In case you need to display an error message and abort the uninstaller, one possible workaround is to combine <showWarning>and <exit> actions inside an <actionGroup>, as shown below:
<preUninstallationActionList><actionGroup><actionList>
<showWarning><text>Program ’foo’ is running, aborting uninstallation.</text>
</showWarning><exit/>
</actionList><ruleList>
<processTest name="foo" logic="is_running" /></ruleList>
</actionGroup></preUninstallationActionList>
Uninstallers only allow minimal configuration and no customization with parameters, though it is possible to use actions todisplay dialogs. In any case, it is recommended that you do not include complex logic that could break the uninstallation flowand leave the target machine in an inconsistent state.
14.2 Marking Additional Files for Deletion
The uninstaller automatically removes all of the files unpacked as part of the installation process.
Only files bundled and unpacked directly by InstallBuilder in the installation step will be uninstalled. For example, if dur-ing the installation process your installer uncompresses a zip file, or if the user creates new files by hand, those files willnot be removed. However, it is possible to address this in different ways, such as adding <deleteFile> actions to the<preUninstallationActionList>:
<preUninstallationActionList><deleteFile path="${installdir}/zipContentsDir"/>
</preUninstallationActionList>
In general, you should not use <postUninstallationActionList> to delete files because at this point, the uninstaller hasalready tried to delete the installed files. If it found some unexpected files in one of the directories to delete, it will skip deletingthat directory, so even after specifically deleting the ${installdir}/zipContentsDir an empty ${installdir} willremain.
NoteSometimes it may be tempting to add something like <deleteFile path="${installdir}"/> to the installer logic, toensure that all files are removed. This is not recommended. If the user accidentally enters "/ " or c: as the installation directory,the installer will basically attempt to delete the entire contents of the filesystem.
As an alternative, InstallBuilder includes a couple of actions, <addFilesToUninstaller> and <addDirectoriesToUninstaller>to specifically register external files in the uninstaller so they will be handled as if they were regularly unpacked files:
<addFilesToUninstaller files="/some/path/to/a/file.txt"/>

BitRock InstallBuilder User Guide 8306 / 393
The file will now automatically be removed during the uninstallation process. This action can also be used to register directories,but they will be handled as a single file. For example, if you register a directory foo and after the installation the user storessome information there, as the installer just registered the path to delete and not its contents, it will remove the whole directory,independently of the contents.
In some cases, this functionality makes it easier to clean up a directory, without worrying about its contents changing. In othercases a more conservative approach is required, to make sure files are not accidentally removed. In these scenarios you can usethe <addDirectoriesToUninstaller> action:
<addDirectoriesToUninstaller><addContents>1</addContents><files>${installdir}/zipContentsDir</files><matchHiddenFiles>1</matchHiddenFiles>
</addDirectoriesToUninstaller>
The above will register all of the contents of the ${installdir}/zipContentsDir directory with the uninstaller at thetime the action was run. If a new file is created afterwards, it will not be removed.
NoteFiles need to exist before they can be added to the uninstaller. If you need to add a file to the uninstaller that does not yet exist,you can work around that by first creating an empty placeholder, as shown below.
<touchFile path="/some/path/to/a/file.txt"/><addFilesToUninstaller files="/some/path/to/a/file.txt"/>
14.3 Preventing Files from Being Deleted
Conversely there are times when you want to prevent certain files, such as configuration files, from being uninstalled. You canuse the <removeFilesFromUninstaller> action for this. The following example will prevent any files under the conf/directory that exists at the time the action is run from being removed:
<removeFilesFromUninstaller files="${installdir}/conf/*" />
NoteThe uninstaller is created right after the <postInstallationActionList> so this is the last point in the installationlifecycle at which the files to be uninstalled can be modified.
14.4 Interacting with the End User
An uninstaller cannot contain custom parameters. If you need to request information from the end user, you can use any of thedialogs detailed in the dialogs section. For example, if you need to ask whether certain database data should be deleted as part ofthe uninstallation, you can do the following:
<preUninstallationActionList><showQuestion text="Do you want the uninstallation to also remove the database data?" ←↩
variable="remove_mysql" /><deleteFile>
<path>${installdir}/mysql/data</path><ruleList>
<compareText text="${remove_mysql}" value="yes" logic="equals" /></ruleList>
</deleteFile></preUninstallationActionList>
BitRock InstallBuilder User Guide 8307 / 393
Chapter 15
Services
Services are long-running applications designed to run in the background without user intervention and that are started automat-ically when the OS boots. InstallBuilder includes some actions to manage Windows and Linux services.
15.1 Linux Services
• <addUnixService>: This action allow users to add services to the system:
<addUnixService><program>/path/to/script</program><name>myservice</name>
</addUnixService>
The provided <program> must be a valid init script. As a basic example of code you could use is:
#!/sbin/sh
start () {# Put here the command to start your application
}
stop () {# Put here the command to stop your application
}
case "$1" instart)
start;;
stop)stop;;
restart)stopsleep 1start;;
*)echo "Usage: $0 { start | stop | restart }"exit 1;;
esac
BitRock InstallBuilder User Guide 8308 / 393
exit 0
You can find other examples under /etc/init.d/ in a Linux installation.
• <removeUnixService>: This action allows you remove an existing service:
<removeUnixService><name>myservice</name>
</removeUnixService>
15.2 Windows Services
• <createWindowsService>: This action allows users to add services to the system:
<createWindowsService><program>${installdir}/myapp.exe</program><programArguments></programArguments><serviceName>myservice</serviceName><displayName>My Service</displayName><startType>auto</startType><description>My Sample Service</description><dependencies></dependencies><account></account><password></password>
</createWindowsService>
This will cause a service identified by <serviceName> and with display name <displayName> to be created. Whenstarting, myapp.exe will be run from the application installation directory.
<startType> specifies that the service should be started along with operating system. It takes one of the following values:
• auto - automatically start the service when the operating system is restarted.
• manual - service does not start with the operating system, but can be manually started from the control panel and using theAPI
• disabled - service does not start with the operating system and it cannot be manually started from the control panel or usingthe API.
By default, the service will be run as the system user. In order to run the service under a specific account, the <account>and <password> fields need to contain a valid user and password.
• <deleteWindowsService>: This action removes an existing service.
<deleteWindowsService><serviceName>myservice</serviceName><displayName>My Service</displayName>
</deleteWindowsService>
Deletes the service identified by <serviceName> and with the display name <displayName>. Both fields are used foridentification of services on Microsoft Windows.
A service is stopped before deletion if it is currently running.
• <startWindowsService>: This action allows starting an existing service.
BitRock InstallBuilder User Guide 8309 / 393
<startWindowsService><serviceName>myservice</serviceName><displayName>My Service</displayName><delay>15000</delay>
</startWindowsService>
Starts the service identified by <serviceName> and with the display name <displayName>. Both fields are used foridentification of services on Microsoft Windows.
<delay> specifies the number of milliseconds to wait for the service to start.
• <stopWindowsService>: This action allows stopping an existing service:
<stopWindowsService><serviceName>myservice</serviceName><displayName>My Service</displayName><delay>15000</delay>
</stopWindowsService>
<delay> specifies amount of milliseconds to wait for the service to stop.
• <restartWindowsService>: This action allows restarting an existing service:
<restartWindowsService><serviceName>myservice</serviceName><displayName>My Service</displayName><delay>15000</delay>
</restartWindowsService>
Stops service identified by <serviceName> and with display name <displayName>. Both fields are used for identificationof services on Microsoft Windows.
<delay> specifies amount of milliseconds to wait for the service to stop and start.
InstallBuilder also provides a rule to check the status/existence of Windows services, <windowsServiceTest>. This can beused for example to create a service, but only if it does not already exist:
<createWindowsService><program>${installdir}/myService.exe</program><programArguments></programArguments><serviceName>myservice</serviceName><displayName>My Service</displayName><startType>auto</startType><description>My Service</description><dependencies></dependencies><account>bitrock</account><password>mySecRetPassword!!</password><ruleList><windowsServiceTest service="myservice" condition="not_exists"/>
</ruleList></createWindowsService>
InstallBuilder also provides an automatic way of generating unique Windows service names following a specified pattern. Thisis useful for situations in which you need to install multiple services.
<getUniqueWindowsServiceName><serviceName>foo</serviceName><displayName>My Foo service</displayName><selectedDisplayNameVariable>newDisplayName</selectedDisplayNameVariable><selectedServiceNameVariable>newServiceName</selectedServiceNameVariable>
BitRock InstallBuilder User Guide 8310 / 393
</getUniqueWindowsServiceName>
<createWindowsService><program>${installdir}/myService.exe</program><programArguments></programArguments><serviceName>${newServiceName}</serviceName><displayName>${newDisplayName}</displayName><startType>auto</startType><description>My Service</description><dependencies></dependencies><account>bitrock</account><password>mySecRetPassword!!</password>
</createWindowsService>
If the service foo already exists, InstallBuilder will pick a new service name, foo-1, if that is taken as well, foo-2, foo-3 andso on. . . until a valid unique name is found, storing the new names in the provided <selectedDisplayNameVariable>and <selectedServiceNameVariable>.
15.2.1 Using regular binaries as Windows services
Services in Microsoft Windows require binaries created especially for running as a service and need to properly support beingstopped, started, paused and resumed.
In some cases it is necessary to run binaries that were not created for running as a service. It is possible to use third party tools torun applications as services. This way any application or script can be used as a Windows service. There are multiple solutionsfor running any application as a script. Microsoft provides srvany.exe tool that can be used for creating services from anyapplication. It is described on Microsoft’s website: http://support.microsoft.com/kb/137890. The binary simply runs itself as aservice and starts application as child process. However, srvany cannot be easily redistributed due to licensing issues.
Another tool is ServiceEx.exe. It is a single file application that can be redistributed with your installer. The binary can bedownloaded from http://serviceex.com/.
The first step is to add ServiceEx.exe to the installer’s payload. It can be done as part of existing component or as newcomponent:
<component><name>serviceex</name><description>ServiceEx</description><canBeEdited>0</canBeEdited><selected>1</selected><show>0</show><folderList><folder>
<description>ServiceEx</description><destination>${installdir}</destination><name>serviceex</name><platforms>windows</platforms><distributionFileList>
<distributionFile><origin>/path/to/ServiceEx.exe</origin>
</distributionFile></distributionFileList>
</folder></folderList>
</component>
The next step is to add actions to the post-installation step that creates a service. The service name is set to the service-name variable. The ${servicename}.ini file is written to as well. It defines how a service should be run. Finally, theServiceEx.exe install ${servicename} command creates and runs the service. The ${servicename}.inifile is also added for uninstallation.
BitRock InstallBuilder User Guide 8311 / 393
<postInstallationActionList><setInstallerVariable><name>servicename</name><persist>1</persist><value>IBSampleService</value>
</setInstallerVariable><writeFile><encoding>iso8859-1</encoding><path>${installdir}/${servicename}.ini</path><text>[ServiceEx]
ServiceExeFullPath = "${installdir}\myapp.exe"options = "--silent"desktop = falseStart=AutoStartNow=true</text>
</writeFile><runProgram><program>${installdir}/ServiceEx.exe</program><programArguments>install "${servicename}"</programArguments><workingDirectory>${installdir}</workingDirectory>
</runProgram><addFilesToUninstaller><files>${installdir}/${servicename}.ini</files>
</addFilesToUninstaller></postInstallationActionList>
When the application is uninstalled, <deleteWindowsService> needs to be called to delete the service.
<preUninstallationActionList><deleteWindowsService><abortOnError>0</abortOnError><displayName></displayName><serviceName>${servicename}</serviceName>
</deleteWindowsService></preUninstallationActionList>
15.3 OS X Services
• <createOSXService>: This action allows users to add services to the system:
<createOSXService><groupname>wheel</groupname><username>daemon</username><program>${installdir}/myService.run</program><programArguments></programArguments><scope>user</scope><serviceName>myService</serviceName>
</createOSXService>
• <deleteOSXService>: This action allows removing an existing service:
<deleteOSXService><serviceName>myService</serviceName>
</deleteOSXService>
Deletes a service on Mac OS X identified by <serviceName>, which contains the unique identifier of services for Mac OS X.The service is stopped before deletion if it is currently running.
BitRock InstallBuilder User Guide 8312 / 393
• <stopOSXService>: This action allows stopping an existing service:
<stopOSXService><serviceName>myService</serviceName>
</stopOSXService>
This stops service on Mac OS X identified as serviceName. It is the unique identifier of services for Mac OS X.
• <startOSXService>: This action allows starting an existing service:
<startOSXService><serviceName>myService</serviceName>
</startOSXService>
This starts service on Mac OS X identified as serviceName. It is the unique identifier of services for Mac OS X.
NoteOS X service management actions are only supported from OS X 10.4 and newer
NoteAs a prerequisite, the program to be registered as a service must be compiled to run as a daemon
InstallBuilder also provides a rule to check the status of OS X services, <osxServiceTest>:
<stopOSXService><serviceName>myService</serviceName><ruleList>
<osxServiceTest service="myService" condition="is_running"/></ruleList>
</stopOSXService>
15.3.1 Adding an Application to the System Startup
There are multiple ways of launching an application at startup on OS X, and it can vary from version to version of the operatingsystem. This section describes the most general/compatible ones:
• Changing the user Preferences files: This is the approach followed when manually adding an application to the Startup items.To do this, add a new entry to the ~/Library/Preferences/loginwindow.plist file with the below format:
<plist version="1.0"><dict><key>Label</key><string>nameOfTheEntry</string><key>ProgramArguments</key><array>
<string>/some/path/to/the/program.run</string><string>/Applications/BitRock InstallBuilder for Qt 7.2.5/autoupdate/runtimes/ ←↩
autoupdate-osx.a\pp</string>
</array><key>KeepAlive</key><true/><key>Hide</key><true/>
BitRock InstallBuilder User Guide 8313 / 393
<key>RunAtLoad</key><true/>
</dict></plist>
• Creating a launchd daemon: This approach is the preferred one when you do not have to support OS X versions below 10.4.Using this method you still need to create a .plist file in the same format as the one described in the previous method. Onceyou have it created, you just have to move it to /Library/LaunchDaemons/:
$> sudo cp startup.plist /Library/LaunchDaemons/com.yourCompany.yourProgram.plist
Following the same naming in the target file is important to avoid conflicts in the future.
After restarting the machine, the new process should be running.
The code to automate this method in InstallBuilder would be:
<writeFile><path>${system_temp_directory}/your.plist</path><encoding>utf-8</encoding><text><![CDATA[
<plist version="1.0"><dict><key>Label</key><string>nameOfTheEntry</string><key>ProgramArguments</key><array>
<string>/some/path/to/the/program.run</string><string>/Applications/BitRock InstallBuilder for Qt 7.2.5/autoupdate/runtimes/ ←↩
autoupdate-osx.app</string></array><key>KeepAlive</key><true/><key>Hide</key><true/><key>RunAtLoad</key><true/>
</dict></plist>]]></text>
</writeFile><copyFile><origin>${system_temp_directory}/your.plist</origin><destination>/Library/LaunchDaemons/com.yourCompany.yourProgram.plist</destination>
</copyFile>
• Creating a Startup Item: If your application requires compatibility with OS X 10.3 and earlier, this is the only availableapproach. The steps to follow are:
Create a directory under /Library/StartupItems with the name of the startup item:
$> sudo mkdir /Library/StartupItems/yourItem
Create an executable with the same name of the directory. This executable can be just a bash script wrapping the your binary:
$> sudo touch /Library/StartupItems/yourItem/yourItem
The yourItem script should implement the below functions (you can leave the body blank if they are not applicable to yourstartup item):
BitRock InstallBuilder User Guide 8314 / 393
#!/bin/sh. /etc/rc.common
StartService (){
/Applications/yourApplication-1.0/ctl.sh start}
StopService (){
/Applications/yourApplication-1.0/ctl.sh stop}
RestartService (){
/Applications/yourApplication-1.0/ctl.sh graceful}
RunService "$1"
Create a .plist file named StartupParameters.plist with some information about your item:
<plist version="1.0"><dict>
<key>Description</key><string>My Application v1.0</string><key>OrderPreference</key><string>None</string><key>Provides</key><array>
<string>yourItem</string></array>
</dict></plist>
It can be tested by executing:
$> sudo /sbin/SystemStarter start "yourItem"
BitRock InstallBuilder User Guide 8315 / 393
Chapter 16
File associations
In some scenarios is necessary to register a new file extension to be opened with the installed application or to modify an existingone. This section explains how to achieve this in the most common platforms.
16.1 Windows file associations
On Windows, InstallBuilder includes a built-in action to register new file extensions, <associateWindowsFileExtension>.
The code below creates a new extension named .myextension and associates it to the yourprogram.exe application:
<associateWindowsFileExtension><extensions>.myextension</extensions><progID>mycompany.package.4</progID><icon>${installdir}\images\myicon.ico</icon><mimeType>example/mycompany-package-myextension</mimeType><commandList>
<!-- Defining the ’Open’ command --><command>
<verb>Open</verb><runProgram>${installdir}\yourprogram.exe</runProgram><runProgramArguments>"%1"</runProgramArguments>
</command></commandList>
</associateWindowsFileExtension>
Where its tags are:
• <icon>: Path to the icon file that contains the icon to display.
• <friendlyName>: Friendly Name for the progID.
• <commandList>: List of commands that can be invoked on each given file type.
• <extensions>: Space-separated list of extensions for which the given commands will be available.
• <progID>: Programmatic Identifier to which the extensions are attached, contains the available commands to be invoked oneach file type. The proper format of a <progID> key name is [Vendor or Application].[Component].[Version],separated by periods and with no spaces, as in Word.Document.6. The Version portion is optional but strongly recom-mended.
• <mimeType>: MIME type associated to all the file extensions.
BitRock InstallBuilder User Guide 8316 / 393
For each list of extensions defined, you can add multiple commands to execute. The example creates a new command with verb"Open" (it will be displayed in the right-click contextual menu) that will call the ${installdir}\yourprogram.exepassing the file to open as an argument.
The <runProgramArguments> tag allow some specifiers, like the %1 in the example:
• %1 : is replaced by the short name of the file being executed
• %L : is replaced by the long name
• %* : is replaced by the name of any arguments to the file
InstallBuilder also includes an action to remove the association in the uninstaller:
<removeWindowsFileAssociation><extensions>.myextension</extensions><progID>mycompany.package.4</progID><mimeType>example/mycompany-package-myextension</mimeType>
</removeWindowsFileAssociation>
16.2 Linux file associations
Linux systems use the XDG standard. This way you can abstract from the Desktop environment your customer is running if itsupports the standard.
The process to create a new file association is more verbose than the Windows process but it is still pretty straight forward.
• Create a new mime-type: This is only necessary if you are creating a new extension. If you are assigning an existing extension,you can skip this part. The first step is to create an XML file describing the new mime type:
<!-- bitock-x-my-mime.xml file --><?xml version="1.0"?><mime-info xmlns=’http://www.freedesktop.org/standards/shared-mime-info’>
<mime-type type="application/x-my-mime"><comment>My new file type</comment><glob pattern="*.mymime"/>
</mime-type></mime-info>
The above file describes your new mime type, application/x-my-mime, associated with the extension .mymime.
Once you have the file ready, it must be registered using the XDG tools:
$> xdg-mime install /path/to/bitock-x-my-mime.xml
The filename must start with the vendor, followed by a dash. This information is used to prevent conflicts. It could also beskipped adding the --novendor flag.
The process can be also automated with InstallBuilder:
<actionGroup><actionList>
<writeFile><path>${installdir}/${project.vendor}-x-my-mime.xml</path><!-- The CDATA notation allow escaping ablock of XML characters -->
<text><
BitRock InstallBuilder User Guide 8317 / 393
<mime-type type="application/x-my-mime"><comment>My new file type</comment><glob pattern="*.mymime"/>
</mime-type></mime-info>
]]></text></writeFile><runProgram>
<program>xdg-mime</program><programArguments>install ${installdir}/${project.vendor}-x-my-mime.xml</ ←↩
programArguments></runProgram>
</actionList></actionGroup>
• Create a .desktop file for your application: The file can be created under ~/.local/share/applications/ (for oneuser) or /usr/share/applications (for all users):
<writeFile><path>~/.local/share/applications/yourApplication.desktop</path><encoding>utf-8</encoding><text>
[Desktop Entry]Version=1.0Encoding=UTF-8Name=Your AppGenericName=Your AppComment=Your Registered ApplicationExec=${installdir}/yourApplication.binTerminal=falseType=ApplicationCategories=Application;Utility;TextEditor;MimeType=application/x-my-mime
</text></writeFile>
The new application must specify support for your mime type in the MimeType key.
• Make the new registered application the default for your extension:
<runProgram><program>xdg-mime</program><programArguments>default yourApplication.desktop application/x-my-mime</ ←↩
programArguments></runProgram>
To reverse the new register association in the uninstaller, add the code below to your project:
<preUninstallationActionList><runProgram><program>xdg-mime</program><programArguments>uninstall ${installdir}/${project.vendor}-x-my-mime.xml</ ←↩
programArguments></runProgram><deleteFile path="~/.local/share/applications/yourApplication.desktop"/>
</preUninstallationActionList>
BitRock InstallBuilder User Guide 8318 / 393
16.3 OS X file associations
On OS X, associating an extension with an installed application is as easy as executing:
$> defaults write com.apple.LaunchServices LSHandlers -array-add "<dict><key> ←↩LSHandlerContentTag</key>
<string>myextension</string><key>LSHandlerContentTagClass</key><string>public.filename-extension</string><key>LSHandlerRoleAll</key><string>com.yourVendor.yourApplication</string></dict>"
$> /System/Library/Frameworks/CoreServices.framework/Versions/A/Frameworks/LaunchServices. ←↩framework/Versions/A/Support/lsregister -kill -domain local -domain system -domain user
Where the extension (myextension) must be provided without any leading dot and com.yourVendor.yourApplication is theCFBundleIdentifier key of your application (configured in its Info.plist file).
The below code performs the same process using InstallBuilder:
<actionGroup><actionList>
<runProgram><program>defaults</program>
<!-- The CDATA notation allow escaping ablock of XML characters -->
<programArguments>write com.apple.LaunchServices LSHandlers -array-add <![CDATA ←↩["<dict><key>LSHandlerContentTag</key>
<string>myextension</string><key>LSHandlerContentTagClass</key><string>public.filename-extension</string><key>LSHandlerRoleAll</key><string>com.yourVendor.yourApplication</string></dict>"
]]></programArguments></runProgram><!-- Restart the launch services to reload the configuration --><runProgram>
<program>/System/Library/Frameworks/CoreServices.framework/Versions/A/ ←↩Frameworks/LaunchServices.framework/Versions/A/Support/lsregister</program>
<programArguments>-kill -domain local -domain system -domain user</ ←↩programArguments>
</runProgram></actionList>
</actionGroup>
BitRock InstallBuilder User Guide 8319 / 393
Chapter 17
Java
17.1 Java Specific Actions
Java (tm) Autodetection The <autodetectJava> action attempts to automatically locate an existing Java (tm) installationin the system. If found, it creates a set of installer variables that contain the location and version of the executable.
The action is usually placed in the <preInstallationActionList> and if no valid JRE is found, the installer will abortwith an error listing the supported JREs.
The <autodetectJava> properties are:
• <promptUser>: Prompt user to choose appropriate version
• <selectionOrder>: Order of the Java versions detected
• <validVersionList>: List of supported Java versions
The allowed Java versions are defined using the <validVersion> element, which are included in the <validVersionList>.Each of these versions contain the following fields:
• <vendor>: Java VM vendor to allow. The allowed values are: sun (to allow only Sun Microsystems JREs), ibm (for IBMJREs), kaffe (for Kaffe.org JREs), openjdk (for OpenJDK releases) and empty (for any vendor).
• <minVersion>: Minimum supported version of the JRE. Leave empty to not require a minimum version
• <maxVersion>: Maximum supported version of the JRE. Leave empty to not require a maximum version. If specified onlywith major and minor version numbers then it will match any number in the series. For example, 1.4 will match any 1.4.xversion (1.4.1, 1.4.2, . . . ) but not a 1.5 series JRE.
• <bitness>: Bitness of Java application. Leave empty to not require a specific bitness of Java. If specified, only Javacompiled for specified number of bits will be matched.
• <requireJDK>: Whether the Java version is a JDK.
The following example will select any Sun Microsystems JRE 1.3 32bit or newer (for example, 1.3, 1.4, 1.5) or any IBM JREregardless of bitness with version number equal or greater than 1.4.2 but inside the 1.4 series (1.5 will not work).
<autodetectJava><validVersionList>
<validVersion><vendor>sun</vendor><minVersion>1.4.2</minVersion><maxVersion>1.4</maxVersion><bitness></bitness>
BitRock InstallBuilder User Guide 8320 / 393
</validVersion><validVersion>
<vendor>ibm</vendor><minVersion>1.3</minVersion><maxVersion></maxVersion><bitness>32</bitness>
</validVersion></validVersionList>
</autodetectJava>
Upon successful autodetection, the following installer variables will be created:
• java_executable: Path to the java command line binary (java.exe in Windows). For example /usr/bin/java, C:\ProgramFiles\Java\j2re1.4.2_03\java.exe.
• javaw_executable: Path to javaw.exe binary, if found. Otherwise defaults to the value of java_executable.
• java_version: For example, 1.4.2_03
• java_version_major: For example, 1.4
• java_vendor: sun or ibm.
• java_autodetected: Set to 1
• java_bitness: 32 or 64.
It the autodetection is not successful, the variable ${java_autodetected} will be set to 0 and the action will throw an error,which can be masked by setting abortOnError="0" and showMessageOnError="0" int he action.
The installer will look for valid JREs in the following places and select the first one that meets all of the requirements:
• Standard installation paths.
• Windows Registry, default environment PATH.
• Using JAVA_HOME, JAVAHOME or JDK_HOME environment variables, if present.
The default behavior of the <autodetectJava> action is to automatically pick one of the detected versions. However, it ispossible to display a choice dialog to allow the user select which one he would like to use by setting <promptUser> to 1. Youcan specify the order in which the versions detected will be displayed using the <selectionOrder> tag. It allows first,to display the versions in the same order they were detected, newest, to list newer versions first and oldest, to display olderversions first. The value defined in the <selectionOrder> will also determine which version will be returned by defaultwhen <promptUser> is set to 0.
For example, the below code will pick the newest Java version in the machine automatically and won’t report an error if none isavailable:
<autodetectJava><abortOnError>0</abortOnError><showMessageOnError>0</showMessageOnError><promptUser>0</promptUser><selectionOrder>newest</selectionOrder><validVersionList>
<validVersion><vendor></vendor><minVersion></minVersion><maxVersion></maxVersion>
</validVersion></validVersionList>
</autodetectJava>
BitRock InstallBuilder User Guide 8321 / 393
When you do not have any requirement for the Java version, instead of providing a <validVersion> with all of its fields setto empty, you can just omit the <validVersionList>. The above code is then equivalent to the following:
<autodetectJava selectionOrder="newest" promptUser="0"/>
You can also combine the autodetection with a <httpGet> action and download the runtime if it is not available in the system:
<!-- Set abortOnError="0" and showMessageOnError="0" so the action does not report any ←↩error
if Java is not detected --><autodetectJava selectionOrder="newest" promptUser="0" abortOnError="0" showMessageOnError ←↩
="0"/><actionGroup>
<actionList><actionGroup>
<actionList><showProgressDialog><title>Downloading files</title><actionList><httpGet>
<filename>${installdir}/java.tar.gz</filename><url>http://www.example.com/downloads/java/1.6/jre1.6.0_24-linux.tar.gz</ ←↩
url></httpGet>
</actionList></showProgressDialog><runProgram><program>tar</program><programArguments>xzf ${installdir}/java.tar.gz -C ${installdir}</ ←↩
programArguments></runProgram>
</actionList><ruleList>
<platformTest type="linux"/></ruleList>
</actionGroup><actionGroup>
<actionList><showProgressDialog><title>Downloading files</title><actionList><httpGet>
<filename>${installdir}/java.exe</filename><url>http://www.example.com/downloads/java/1.6/jre1.6.0_24-windows.exe</ ←↩
url></httpGet>
</actionList></showProgressDialog><runProgram><program>${installdir}/java.exe</program><programArguments>/s INSTALLDIR="${installdir.dos}\JRE" REBOOT=Suppress</ ←↩
programArguments></runProgram>
</actionList><ruleList>
<platformTest type="windows"/></ruleList>
</actionGroup></actionList><ruleList>
<isFalse value="${java_autodetected}"/></ruleList>
BitRock InstallBuilder User Guide 8322 / 393
</actionGroup>
17.2 Bundling a JRE
BitRock InstallBuilder can be used to package Java-based applications that provide their own Java Runtime Environment (JRE).You can download ready to use components containing a JRE and InstallBuilder component from the following location:
http://installbuilder.bitrock.com/java/
These components provide the following features:
• Deployment of JRE or JDK
• Creating a Java launcher binary that runs a specified JAR file
• For Microsoft Windows, automatically creating a Start Menu entry for the launcher
Java Runtime Environments are provided as a ZIP archive. Each archive contains JRE binaries as well as a Java component XMLfile that contains the packing and installation logic for the application.
Each archive contains a directory structure similar to:
• jre1.6.0_18-windows - base directory; this name depends on JRE version and platform
• jre1.6.0_18-windows/java.xml - Java component definition
• jre1.6.0_18-windows/java-windows - JRE binaries for Microsoft Windows
You will need to unpack the zip file and use an <include> tag to reference the Java component XML file. By default, thenames of the launcher and the start menu entry are the project <shortName> and <fullName>. You will need to provide apath to your application JAR using the java_launcher_jar variable.
The example below shows a project packaging a Java module for an application Sampleapp.jar.
<project><shortName>samplejavaapp</shortName><fullName>Sample Java Application</fullName><componentList><!-- application’s component(s) - i.e. "default" created by installbuilder GUI --><component>
<name>default</name><description>Default Component</description><canBeEdited>1</canBeEdited><selected>1</selected><show>1</show>...
</component>
<!-- include Java component XML definition --><include file="/path/to/jre_package/java.xml"/>
</componentList>
<!-- set up variables for Java component --><initializationActionList><setInstallerVariable>
<name>java_launcher_jar</name><value>Sampleapp.jar</value>
</setInstallerVariable></initializationActionList>
</project>

BitRock InstallBuilder User Guide 8323 / 393
All of the logic for deploying the JRE, creating the Java launchers and adding shortcuts in start menu is handled by the Javacomponent definition in java.xml.
Each JRE contains Java binaries for a single platform. It is possible to create a single project that ships binaries for multipleplatforms by copying binaries for needed platforms into a single directory. Its structure needs to be as follows:
• jre1.6.0_18 - base directory; can be any name, but it is recommended to name it using versions of the JRE
• jre1.6.0_18/java.xml - Java component definition
• jre1.6.0_18-windows/java-windows - JRE binaries for Microsoft Windows (32bit or 64bit)
• jre1.6.0_18-windows/java-linux - JRE binaries for Linux (32bit)
• jre1.6.0_18-windows/java-linux-x64 - JRE binaries for Linux (64bit)
Java component deployment can be customized to fit an application’s needs. The following variables are used by java.xml:
• java_launcher_destination - defines the destination where Java launcher should be created; defaults to ${installdir}
• java_launcher_binary_name - name of the launcher binary; defaults to ${project.shortName}-launcher.${platform_exec_suffix}
• java_launcher_arguments - command line arguments to pass to the launcher; defaults to empty string
• java_launcher_vm_parameters - additional parameters to pass to the Java VM; defaults to empty string
• java_launcher_jar - JAR file to use; defaults to empty string
• java_launcher_mainClass - JAR file to use; defaults to empty string
• java_launcher_classpath - classpath to pass to Java, comma separated regardless of target platform; defaults to empty string
• java_launcher_startmenu_shortcut_name - name for the start menu shortcut on Microsoft Windows; defaults to Launch${project.fullName}
• java_launcher_add_to_win_startmenu - whether the start menu item should be created on Microsoft Windows; defaults to 1
• java_install_jre - whether the JRE should be installed and used by default by the launcher binary; defaults to 1
The java_launcher_jar, java_launcher_mainClass and java_launcher_classpath variables specify howthe launcher should run the application. If a java_launcher_jar is specified, the java -jar command is used to run theapplication. Otherwise java is run by specifying the class path and main class to run.
These variables map to the <jarFile>, <classpath> and <mainClass> attributes for <createLaunchers> action.This action is described in more detail in the next section.
17.3 Launchers
Java (tm) launchers are binaries that allow running Java-based applications as if they were native. They work by locating aninstalled JRE in the target machine or using one provided to launch a Java application with the right options.
Java Launchers are created using the <createJavaLaunchers> action. It allows creating multiple launchers in the specifieddestination, configurable through the <destination> tag. These launchers are added in its <javaLauncherList>. A launcheris specified using the <javaLauncher> tag.
The target file name for the launched application is specified in <binaryName>. The extension .exe is automatically appendedon the Windows operating systems.
The details of how to run the Java application are provided using the tags <classpath>, <mainClass> and <jarFile>where <jarFile> takes precedence if it is specified. If a <jarFile> is provided, the JRE is called with the -jar optionto execute it and <classpath> and <mainClass> are ignored. If <jarFile> is empty, the <classpath> is configured
BitRock InstallBuilder User Guide 8324 / 393
with the -cp flag and the <mainClass> is passed as name of the class to run. Regardless of the operating system, paths in<classpath> are semi-colon separated.
The <arguments> tag specifies the arguments to pass to the Java application. Additional arguments can be passed to thelauncher (that will in turn pass them to the Java application) through the command line if the <allowCommandLineArguments>tag enables it. These additional arguments will be appended after the predefined <arguments>.
The example below shows how to create two launchers at the end of the installation:
<postInstallationActionList><createJavaLaunchers><destination>${installdir}/javalaunchers</destination><javaLauncherList>
<!-- A launcher to call the com.bitrock.testapplication.MainClassclass, looking for it in the testapplication.jar;additional.jar files --><javaLauncher>
<arguments></arguments><binaryName>launcher1</binaryName><classpath>testapplication.jar;additional.jar</classpath><mainClass>com.bitrock.testapplication.MainClass</mainClass><allowCommandLineArguments>1</allowCommandLineArguments><preferredJavaBinary></preferredJavaBinary><runInConsole>1</runInConsole><workingDirectory>${installdir}/javalaunchers</workingDirectory>
</javaLauncher><!-- A launcher to call the testapplication.jar file --><javaLauncher>
<binaryName>launcher2</binaryName><jarFile>testapplication.jar</jarFile><mainClass></mainClass><allowCommandLineArguments>1</allowCommandLineArguments><preferredJavaBinary></preferredJavaBinary><runInConsole>1</runInConsole><vmParameters></vmParameters>
</javaLauncher></javaLauncherList>
</createJavaLaunchers></postInstallationActionList>
This will create two test launchers. The first one, testlauncher1 (or testlauncher1.exe on Windows) will run Javausing -cp flags and specifying a main class name. The binary testlauncher2 will run Java using the -jar option and Javawill read the main class from the JAR file’s MANIFEST.MF file.
The file names of the generated launchers are also automatically added to the uninstaller. They will be deleted when the uninstalleris run.
By default, Java launchers will use the default Java available on the system. It is also possible to set specific Java versions thatit will accept. The <validVersionList> can be used to specify these accepted versions. It works as explained in the Javaautodetection section.
The following example defines a launcher that will use any Sun Microsystems JRE 1.3 or newer (for example, 1.3, 1.4, 1.5) orany IBM JRE with version number equal or greater than 1.4.2 but inside the 1.4 series (for example, 1.5 will not be accepted asvalid):
<javaLauncher><arguments></arguments><binaryName>launcher2</binaryName><classpath></classpath><jarFile>testapplication.jar</jarFile><validVersionList><validVersion>
<minVersion>1.4.2</minVersion><maxVersion>1.4</maxVersion>
BitRock InstallBuilder User Guide 8325 / 393
</validVersion><validVersion>
<vendor>ibm</vendor><minVersion>1.3</minVersion><maxVersion></maxVersion>
</validVersion></validVersionList>
</javaLauncher>
On Windows systems the launcher executable resource information can be configured:
<createJavaLaunchers><destination>${installdir}/javalaunchers</destination><javaLauncherList>
<javaLauncher><binaryName>launcher1</binaryName><classpath>testapplication.jar;additional.jar</classpath><mainClass>com.bitrock.testapplication.MainClass</mainClass>...<windowsResourceFileVersion>1.0.0.0</windowsResourceFileVersion><windowsResourceLegalCopyright>Test Launcher 1</windowsResourceLegalCopyright><windowsResourceLegalTrademarks>(c) 2010 Bitrock S.L.</ ←↩
windowsResourceLegalTrademarks><windowsResourceOriginalFilename>launcher1.exe</windowsResourceOriginalFilename><windowsResourceProductName>Test launcher 1</windowsResourceProductName><windowsResourceProductVersion>1.0</windowsResourceProductVersion><workingDirectory>${installdir}/javalaunchers</workingDirectory>
</javaLauncher></javaLauncherList>
</createJavaLaunchers>
In addition, it is possible to specify an icon file to use. It must point to an existing file in the target machine at the time the<createJavaLaunchers> action is executed. If not specified, the default icon for the launchers will be the same as the iconfor the installer.
Windows launchers can also request running with administrative privileges using the <requestedExecutionLevel> tag.This is necessary for Windows Vista and Windows 7 operating systems where UAC may prevent some operations if the Javaprocess is not elevated. It accepts the following values:
• requireAdministrator - Require administrator
• asInvoker - As invoker
• highestAvailable - Highest available
The example below covers using the launcher.ico file as the binary icon, which is located in the installation directory, andrequires being administrator on UAC-enabled systems:
<javaLauncher><arguments></arguments><binaryName>launcher2</binaryName><classpath></classpath><jarFile>testapplication.jar</jarFile><windowsExecutableIcon>${installdir}/launcher.ico</windowsExecutableIcon><requestedExecutionLevel>requireAdministrator</requestedExecutionLevel>
</javaLauncher>
NoteRegardless of the operating system, paths in <classpath> are semi-colon separated.
BitRock InstallBuilder User Guide 8326 / 393
Chapter 18
Regular expressions
InstallBuilder supports using regular expressions for processing text. It can be used for a large number of tasks such as checkingif a text matches specified pattern or extracting text from a command output.
InstallBuilder supports extended regular expressions. This is the most commonly used syntax for regular expressions and issimilar to the used in most programming languages.
Regular expressions can be used by the <regExMatch> rule to verify if a text matches a pattern. It can also be used by<setInstallerVariableFromRegEx> to replace or extract a part of a match a part of a given text or in the <substitute>action to replace texts matching regular expression within a file.
18.1 Basics of regular expressions
Regular expressions allow defining a substring in a text through a pattern. This pattern can be as simple as a literal string, forexample to check if some program stdout contains "success":
<regExMatch><logic>matches</logic><pattern>success</pattern><text>${program_stdout}</text>
</regExMatch>
Or complex enough to allow extracting a port number from a configuration file:
<setInstallerVariableFromRegEx><name>port</name><pattern>.*\n\s*Listen\s+(\d+).*</pattern><substitution>\1</substitution><text>${httpdConf}</text>
</setInstallerVariableFromRegEx>
A pattern can be constructed from one or more branches (sub patters), separated by the | character, meaning that if the textmatches any of the branches, it matches the full pattern. For example the pattern success|done|started matches either"success", "done" or "started".
Each character, a group of characters or a potential match is called an atom. For example done consists of 4 atoms - d, o, n ande. The pattern ok|yes consists of two branches, one with o and k atoms and another with y, e and s atoms.
Regular expressions can also use special characters:
• ˆ - Means the start of a line or the text. The pattern ˆyes specifies that the text must start with the yes string to match theregular expression.
BitRock InstallBuilder User Guide 8327 / 393
• $ - Means end of line or text. The pattern yes$ specifies that the text must end with the yes string to match the regularexpression.
• . - Means any character. For example te.t will match both "text" and "test".
If you need to specify one of those characters as a literal, you can escape them using a backslash (\) character. For exampledone. will match any text that has the word "done", followed by any character but the expression done\. will only match theliteral "done.".
Certain characters preceded by a backslash also have a special meaning:
• \e - indicates the ESC character, which has an ascii value of 27
• \r - carriage return character, which has an ascii value of 13
• \n - newline character, which has an ascii value of 10
• \t - horizontal tab character, which has an ascii value of 9
• \v - vertical tab character, which has an ascii value of 11
• \uABCD - where ABCD are exactly four hexadecimal digits, specifies unicode character U+ABCD; for example \u0041 mapsto A character
• \B - synonym for \ that can be used to reduce backslash doubling - for example \\\n and \B\n are synonyms, but the latteris more readable
• \s - Matches any blank character (new lines, tabs or spaces).
Regular expressions also accept quantifiers, which specify how many times a preceeding atom should be matched:
• ? - Specifies that the preceeding atom should match 0 or 1 times - for example colou?r matches both "color" and "colour"
• * - Specifies that the preceeding atom should match 0 or more times - for example \s* matches an empty string or any numberof spaces
• + - Specifies that the preceeding atom should match 1 or more times - for example /+ matches any number of consecutiveslash characters
• {m} - Specifies that the preceeding atom should match exactly m times - for example -{20}matches a series of 20 consecutivehyphen characters
• {m,} - Specifies that the preceeding atom should match at least m times - for example \s{1,} matches a series of at least 1space.
• {m,n} - Specifies that the preceeding atom should match between m and n times
Unlike branches and |, quantifiers only operate on the last atom. A pattern colou?r means that only the u character (the atompreceding the ? quantifier), not the entire colou expression will be affecter by the quantifier.
Grouping and bracket expressions, which are described later, can be used along quantifiers in more complex scenarios.
The * and + quantifiers are greedy by default. This means that they will match the longest substring if the remaining part ofexpression also matches. In the case of the expression ˆ.*-A, it will match the longest substring that ends with -A. For thestring test1-A-test2-A-test3-B, it will match to test1-A-test2-A.
In many cases a shortest match is more useful. In this case, a non-greedy counterparts *? and +? can be used. They workthe same, except that shortest substring matching the pattern will be captured (test1-A in the previous example). This iscommonly used when extracting a part of text.
BitRock InstallBuilder User Guide 8328 / 393
18.2 Bracket expressions
Regular expressions can specify a subset of characters to match, specified within square brackets. For example the following willmatch both "disk drive" and "disc drive":
<regExMatch><logic>matches</logic><pattern>dis[ck] drive</pattern><text>${program_stdout}</text>
</regExMatch>
Please note that in the example just one character will match as it is not including any quantifier (diskc wont match)
It is also possible to specify a range of characters in the format of a-b where a is the first character and b is the last character tomatch. For example [A-Z] specifies any of upper case letters. Multiple ranges can be used such as [A-Za-z0-9] specifyingupper and lower case letters and all digits.
The following will match between 8 and 20 characters, consisting of letters and digits only:
<regExMatch><logic>matches</logic><pattern>^[A-Za-z0-9]{8,20}$</pattern><text>${program_stdout}</text>
</regExMatch>
In the example above, the bracket expression is considered a single atom, therefore the {8,20} quantifier applies to the whole[A-Za-z0-9] expression. The ˆ and $ characters cause the expression to only match if the entire text matches the expression.
If you need to include the literal - in the matching characters, it must be specified as the last character in the bracket expression:[A-Za-z0-9-].
Regular expressions also support specifying a character class, which can be used to as shorthand for commonly used sets ofcharacters:
• [[:alpha:]] - A letter
• [[:upper:]] - An upper-case letter
• [[:lower:]] - A lower-case letter
• [[:digit:]] - A decimal digit
• [[:xdigit:]] - A hexadecimal digit
• [[:alnum:]] - An alphanumeric (letter or digit)
• [[:print:]] - An alphanumeric (same as alnum)
• [[:blank:]] - A space or tab character
• [[:space:]] - A character producing white space in the text
• [[:punct:]] - A punctuation character
• [[:graph:]] - A character with a visible representation
• [[:cntrl:]] - A control character
The following is an equivalent of previous example, using character classes:
<regExMatch><logic>matches</logic><pattern>^[[:alnum:]]{8,20}$</pattern><text>${program_stdout}</text>
</regExMatch>
BitRock InstallBuilder User Guide 8329 / 393
The following are also abbreviations for some of character classes:
• \d is equivalent of [[:digit:]]
• \s is equivalent of [[:space:]]
• \w is equivalent of [[:alnum:]]
18.3 Grouping
Atoms in regular expressions can also be grouped by using round brackets. Grouping can be used along with branches. Thefollowing example will match if a version begins with 9. or 10.:
<regExMatch><logic>matches</logic><pattern>^(9|10)\.</pattern><text>${versionstring}</text>
</regExMatch>
The | character inside a group will only match substrings inside the group.
It is also possible to group one or more characters and use quantifiers for the entire group. A pattern I am (very\s+)*happywill match "I am happy", "I am very happy", "I am very very happy". . .
The very\s+ pattern will match the text "very" followed by at least 1 white space. Then, the * quantifier is applied to the entire(very\s+) group, which means 0 or more occurrences of "very" followed by at least 1 white space.
18.4 Substituting text in regular expression
The <setInstallerVariableFromRegEx> action can be used to do regular expression substitution in a text.
The example below will replace any number of white spaces with a single space in the ${text} variable:
<setInstallerVariableFromRegEx><name>result</name><pattern>[[:space:]]+</pattern><substitution> </substitution><text>${text}</text>
</setInstallerVariableFromRegEx>
Grouping can also be used to match certain values, which can be used for replacing a text as well as extracting a part of text.All items that are grouped can be used in the <substitution> tag by specifying \n, where n is a number between 1 and 9corresponding to the number of the matched group.
For example the following can be used to extract an extension from a filename:
<setInstallerVariableFromRegEx><name>extension</name><pattern>.*\.([^\.]+)$</pattern><substitution>\1</substitution><text>${filename}</text>
</setInstallerVariableFromRegEx>
Since ([ˆ\.]+) is the first grouping used in the expression, the \1 in <substitution> tag will reference characters matchedby it.
In order to extract individual values from a hyphen-separated text such as 1234-5678-ABCD, we can use the following:
BitRock InstallBuilder User Guide 8330 / 393
<setInstallerVariableFromRegEx><name>value1</name><pattern>^(.*?)-(.*?)-(.*?)$</pattern><substitution>\1</substitution><text>${value}</text>
</setInstallerVariableFromRegEx><setInstallerVariableFromRegEx><name>value2</name><pattern>^(.*?)-(.*?)-(.*?)$</pattern><substitution>\2</substitution><text>${value}</text>
</setInstallerVariableFromRegEx><setInstallerVariableFromRegEx><name>value3</name><pattern>^(.*?)-(.*?)-(.*?)$</pattern><substitution>\3</substitution><text>${value}</text>
</setInstallerVariableFromRegEx>
It can be used to get 1234 as value1, 5678 as value2 and ABCD as value3.
This can be used in combination with <regExMatch> to validate the input such as:
<throwError><text>Invalid value for field: ${value}</text><ruleList>
<regExMatch><logic>does_not_match</logic><text>${value}</text><pattern>^(.*?)-(.*?)-(.*?)$</pattern>
</regExMatch></ruleList>
</throwError>
In certain cases, grouping is used for matching more complex patterns, but should not be used for referencing. In this case, thegrouping has to start with ?:.
The following example will match the string separated by either - or a text " hyphen ", whereas the separator will not be matched,even though it is grouped:
<setInstallerVariableFromRegEx><name>value1</name><pattern>^(.*?)(?:-| hyphen )(.*?)(?:-| hyphen )(.*?)$</pattern><substitution>\1</substitution><text>${value}</text>
</setInstallerVariableFromRegEx>

BitRock InstallBuilder User Guide 8331 / 393
Chapter 19
Rollback
InstallBuilder installers include a rollback feature that automatically backs up any files overwritten during the installation andrestores them if an error occurs during the installation process. The rollback functionality only handles files overwritten by theinstaller during the file installation step (i.e., all files specified under any <folder> section), and it does not support rollingback files overwritten as a result of the execution of actions or scripts.
The rollback feature is enabled by default but it can be disabled by setting the project property <enableRollback> to false:
<project>...<enableRollback>0</enableRollback>...
</project>
You can configure the directory where the overwritten files will be stored by setting the project property <rollbackBackupDirectory>(which defaults to an autoincremental ${installdir}/rollbackBackupDirectory) to the desired path:
<project>...<rollbackBackupDirectory>${system_temp_directory}/backup</rollbackBackupDirectory>...
</project>
The files will be automatically restored in the event that the installation aborts. The rollbackBackupDirectory folder will notbe removed after a successful installation, so it can also be manually accessed and restored. It will, however, be automaticallycleaned up after a successful restoration following a failed installation attempt (only those files that could not be restored willremain in the rollback backup directory). If no files were backed up as a result of the rollback process, the empty rollbackBack-upDirectory folder will be automatically deleted after installation.
If you specifically do not want the rollbackBackupDirectory folder to remain on the disk after a successful installation, you candelete it during the <postInstallationActionList> using a <deleteFile> action:
<project>...<rollbackBackupDirectory>${system_temp_directory}/backup</rollbackBackupDirectory>...<postInstallationActionList>
<deleteFile path="${project.rollbackBackupDirectory}"/></postInstallationActionList>...
</project>
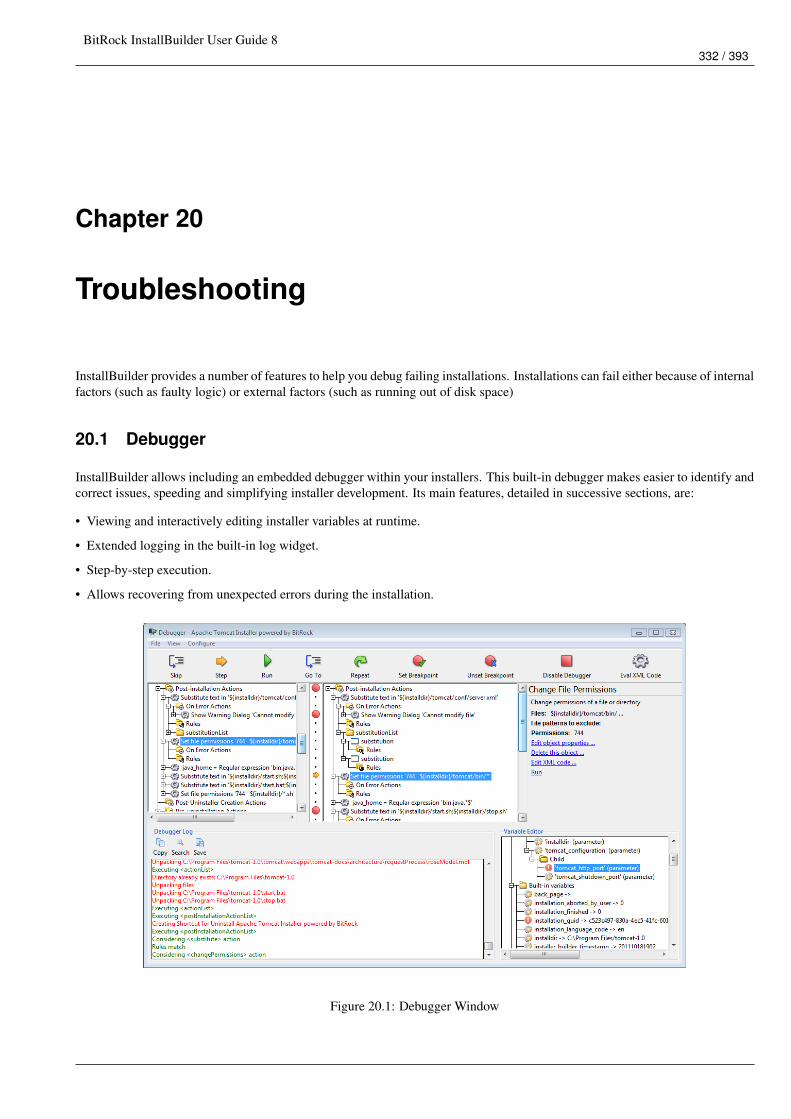
BitRock InstallBuilder User Guide 8332 / 393
Chapter 20
Troubleshooting
InstallBuilder provides a number of features to help you debug failing installations. Installations can fail either because of internalfactors (such as faulty logic) or external factors (such as running out of disk space)
20.1 Debugger
InstallBuilder allows including an embedded debugger within your installers. This built-in debugger makes easier to identify andcorrect issues, speeding and simplifying installer development. Its main features, detailed in successive sections, are:
• Viewing and interactively editing installer variables at runtime.
• Extended logging in the built-in log widget.
• Step-by-step execution.
• Allows recovering from unexpected errors during the installation.
Figure 20.1: Debugger Window
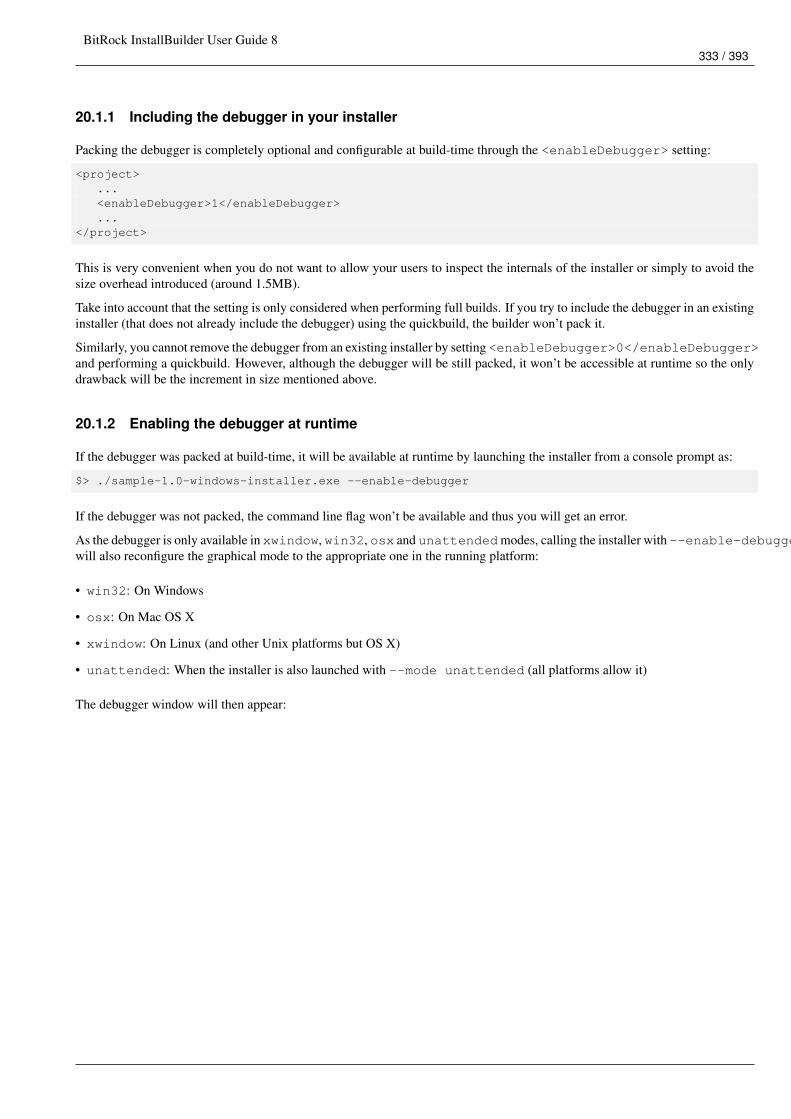
BitRock InstallBuilder User Guide 8333 / 393
20.1.1 Including the debugger in your installer
Packing the debugger is completely optional and configurable at build-time through the <enableDebugger> setting:
<project>...<enableDebugger>1</enableDebugger>...
</project>
This is very convenient when you do not want to allow your users to inspect the internals of the installer or simply to avoid thesize overhead introduced (around 1.5MB).
Take into account that the setting is only considered when performing full builds. If you try to include the debugger in an existinginstaller (that does not already include the debugger) using the quickbuild, the builder won’t pack it.
Similarly, you cannot remove the debugger from an existing installer by setting <enableDebugger>0</enableDebugger>and performing a quickbuild. However, although the debugger will be still packed, it won’t be accessible at runtime so the onlydrawback will be the increment in size mentioned above.
20.1.2 Enabling the debugger at runtime
If the debugger was packed at build-time, it will be available at runtime by launching the installer from a console prompt as:
$> ./sample-1.0-windows-installer.exe --enable-debugger
If the debugger was not packed, the command line flag won’t be available and thus you will get an error.
As the debugger is only available in xwindow, win32, osx and unattendedmodes, calling the installer with --enable-debuggerwill also reconfigure the graphical mode to the appropriate one in the running platform:
• win32: On Windows
• osx: On Mac OS X
• xwindow: On Linux (and other Unix platforms but OS X)
• unattended: When the installer is also launched with --mode unattended (all platforms allow it)
The debugger window will then appear:
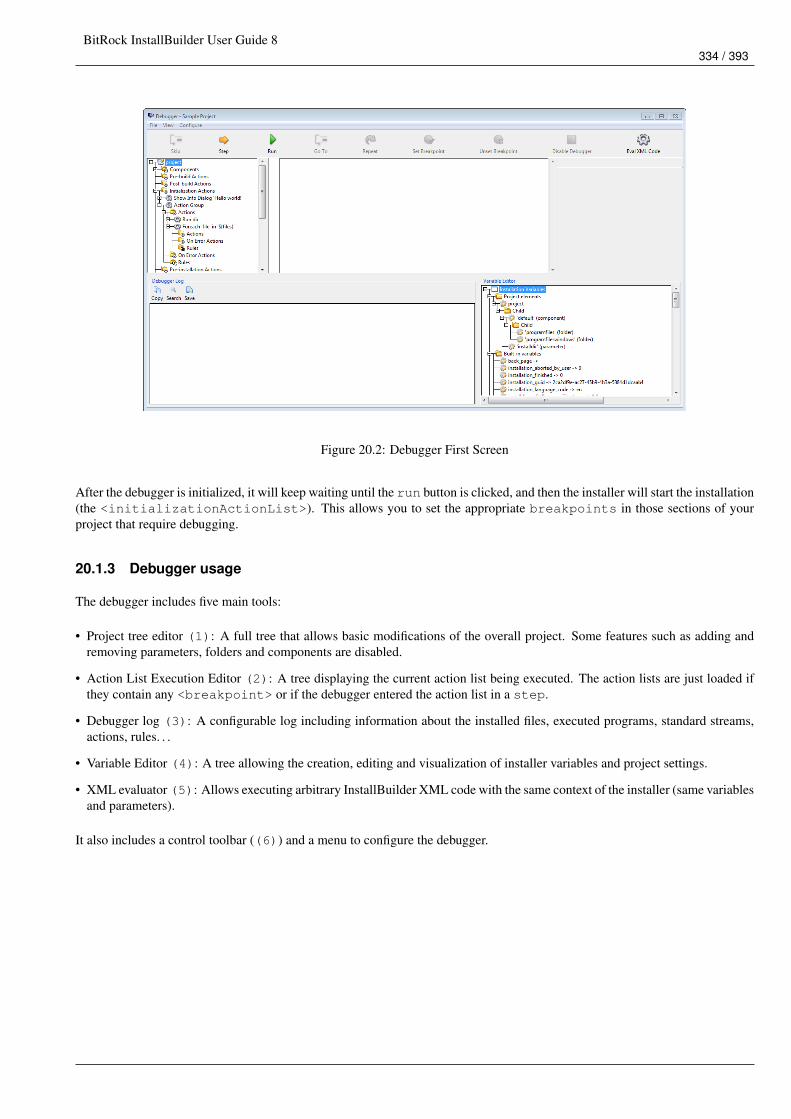
BitRock InstallBuilder User Guide 8334 / 393
Figure 20.2: Debugger First Screen
After the debugger is initialized, it will keep waiting until the run button is clicked, and then the installer will start the installation(the <initializationActionList>). This allows you to set the appropriate breakpoints in those sections of yourproject that require debugging.
20.1.3 Debugger usage
The debugger includes five main tools:
• Project tree editor (1): A full tree that allows basic modifications of the overall project. Some features such as adding andremoving parameters, folders and components are disabled.
• Action List Execution Editor (2): A tree displaying the current action list being executed. The action lists are just loaded ifthey contain any <breakpoint> or if the debugger entered the action list in a step.
• Debugger log (3): A configurable log including information about the installed files, executed programs, standard streams,actions, rules. . .
• Variable Editor (4): A tree allowing the creation, editing and visualization of installer variables and project settings.
• XML evaluator (5): Allows executing arbitrary InstallBuilder XML code with the same context of the installer (same variablesand parameters).
It also includes a control toolbar ((6)) and a menu to configure the debugger.
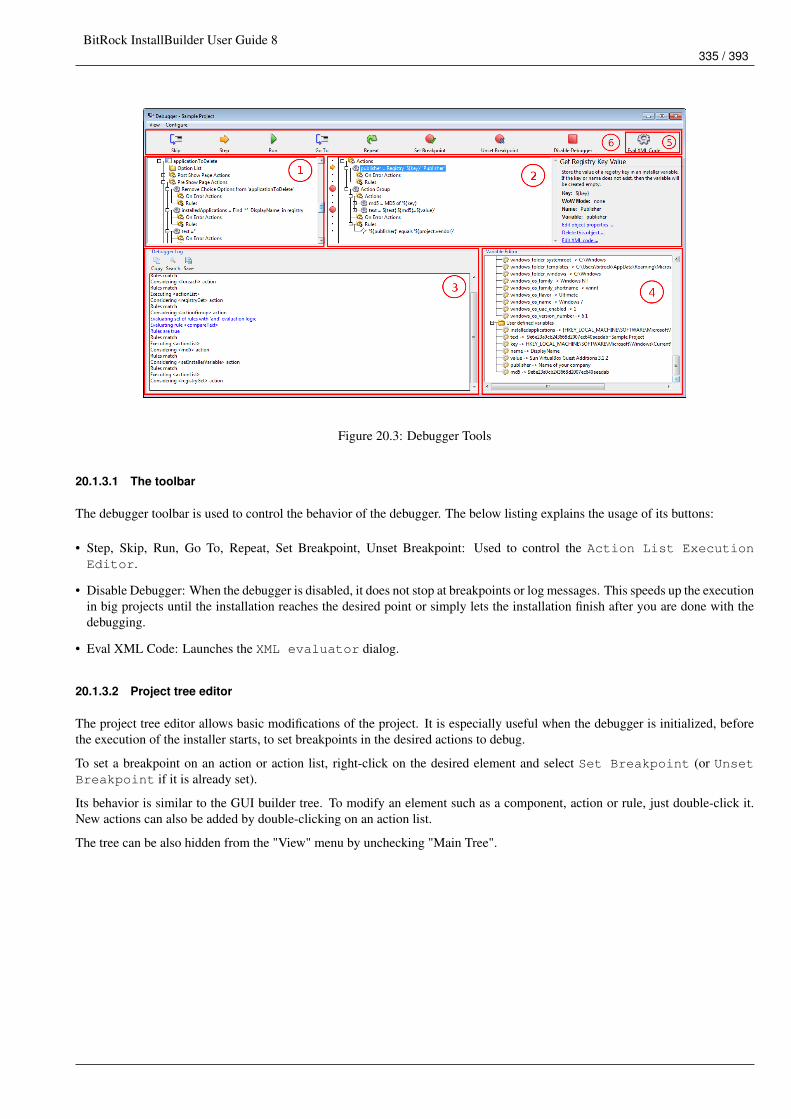
BitRock InstallBuilder User Guide 8335 / 393
Figure 20.3: Debugger Tools
20.1.3.1 The toolbar
The debugger toolbar is used to control the behavior of the debugger. The below listing explains the usage of its buttons:
• Step, Skip, Run, Go To, Repeat, Set Breakpoint, Unset Breakpoint: Used to control the Action List ExecutionEditor.
• Disable Debugger: When the debugger is disabled, it does not stop at breakpoints or log messages. This speeds up the executionin big projects until the installation reaches the desired point or simply lets the installation finish after you are done with thedebugging.
• Eval XML Code: Launches the XML evaluator dialog.
20.1.3.2 Project tree editor
The project tree editor allows basic modifications of the project. It is especially useful when the debugger is initialized, beforethe execution of the installer starts, to set breakpoints in the desired actions to debug.
To set a breakpoint on an action or action list, right-click on the desired element and select Set Breakpoint (or UnsetBreakpoint if it is already set).
Its behavior is similar to the GUI builder tree. To modify an element such as a component, action or rule, just double-click it.New actions can also be added by double-clicking on an action list.
The tree can be also hidden from the "View" menu by unchecking "Main Tree".
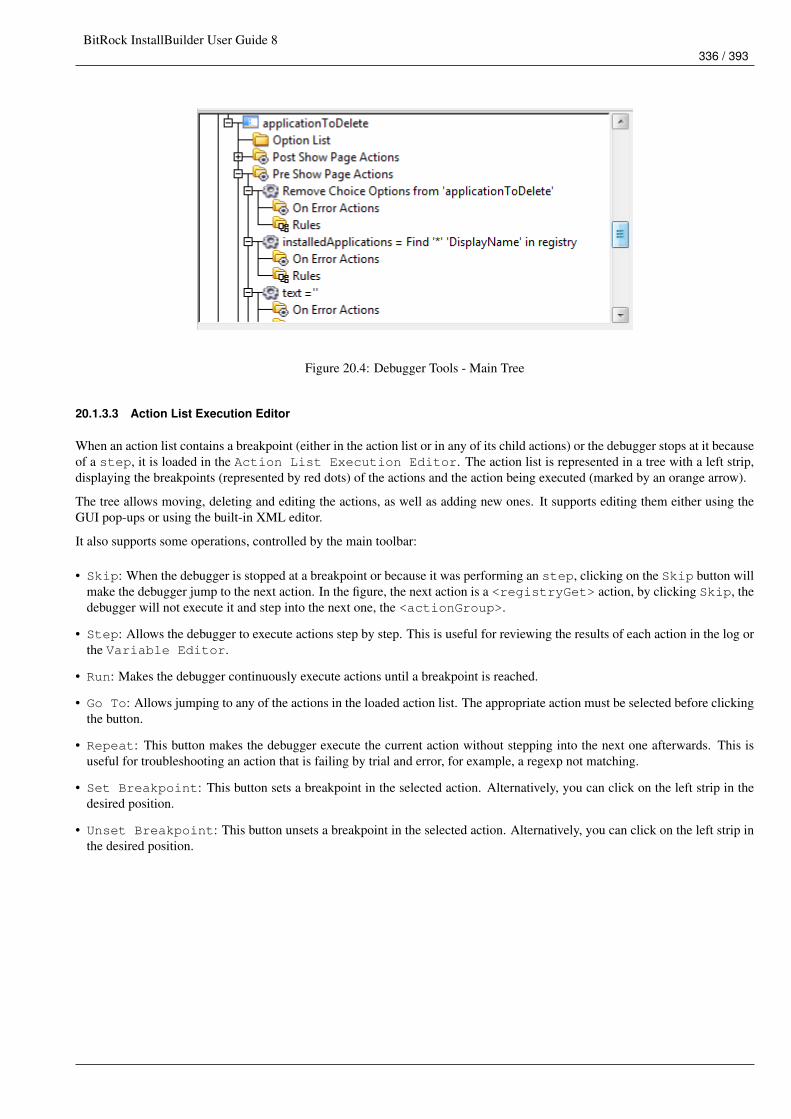
BitRock InstallBuilder User Guide 8336 / 393
Figure 20.4: Debugger Tools - Main Tree
20.1.3.3 Action List Execution Editor
When an action list contains a breakpoint (either in the action list or in any of its child actions) or the debugger stops at it becauseof a step, it is loaded in the Action List Execution Editor. The action list is represented in a tree with a left strip,displaying the breakpoints (represented by red dots) of the actions and the action being executed (marked by an orange arrow).
The tree allows moving, deleting and editing the actions, as well as adding new ones. It supports editing them either using theGUI pop-ups or using the built-in XML editor.
It also supports some operations, controlled by the main toolbar:
• Skip: When the debugger is stopped at a breakpoint or because it was performing an step, clicking on the Skip button willmake the debugger jump to the next action. In the figure, the next action is a <registryGet> action, by clicking Skip, thedebugger will not execute it and step into the next one, the <actionGroup>.
• Step: Allows the debugger to execute actions step by step. This is useful for reviewing the results of each action in the log orthe Variable Editor.
• Run: Makes the debugger continuously execute actions until a breakpoint is reached.
• Go To: Allows jumping to any of the actions in the loaded action list. The appropriate action must be selected before clickingthe button.
• Repeat: This button makes the debugger execute the current action without stepping into the next one afterwards. This isuseful for troubleshooting an action that is failing by trial and error, for example, a regexp not matching.
• Set Breakpoint: This button sets a breakpoint in the selected action. Alternatively, you can click on the left strip in thedesired position.
• Unset Breakpoint: This button unsets a breakpoint in the selected action. Alternatively, you can click on the left strip inthe desired position.
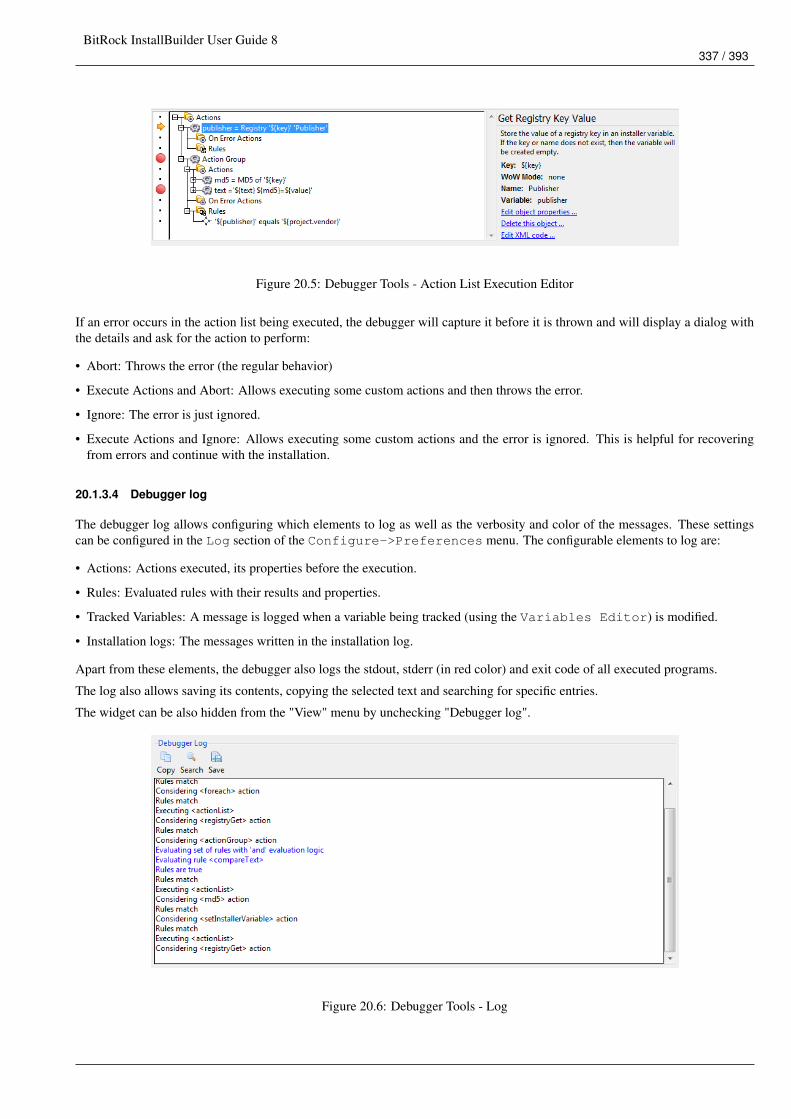
BitRock InstallBuilder User Guide 8337 / 393
Figure 20.5: Debugger Tools - Action List Execution Editor
If an error occurs in the action list being executed, the debugger will capture it before it is thrown and will display a dialog withthe details and ask for the action to perform:
• Abort: Throws the error (the regular behavior)
• Execute Actions and Abort: Allows executing some custom actions and then throws the error.
• Ignore: The error is just ignored.
• Execute Actions and Ignore: Allows executing some custom actions and the error is ignored. This is helpful for recoveringfrom errors and continue with the installation.
20.1.3.4 Debugger log
The debugger log allows configuring which elements to log as well as the verbosity and color of the messages. These settingscan be configured in the Log section of the Configure->Preferences menu. The configurable elements to log are:
• Actions: Actions executed, its properties before the execution.
• Rules: Evaluated rules with their results and properties.
• Tracked Variables: A message is logged when a variable being tracked (using the Variables Editor) is modified.
• Installation logs: The messages written in the installation log.
Apart from these elements, the debugger also logs the stdout, stderr (in red color) and exit code of all executed programs.
The log also allows saving its contents, copying the selected text and searching for specific entries.
The widget can be also hidden from the "View" menu by unchecking "Debugger log".
Figure 20.6: Debugger Tools - Log
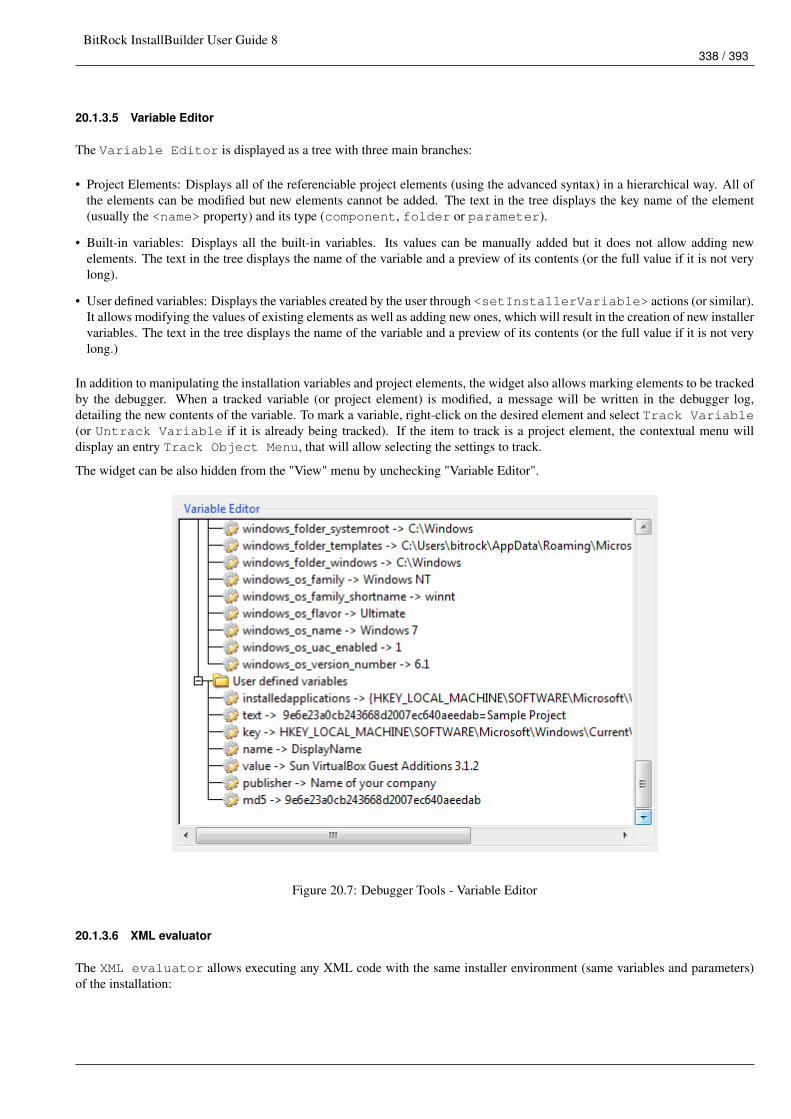
BitRock InstallBuilder User Guide 8338 / 393
20.1.3.5 Variable Editor
The Variable Editor is displayed as a tree with three main branches:
• Project Elements: Displays all of the referenciable project elements (using the advanced syntax) in a hierarchical way. All ofthe elements can be modified but new elements cannot be added. The text in the tree displays the key name of the element(usually the <name> property) and its type (component, folder or parameter).
• Built-in variables: Displays all the built-in variables. Its values can be manually added but it does not allow adding newelements. The text in the tree displays the name of the variable and a preview of its contents (or the full value if it is not verylong).
• User defined variables: Displays the variables created by the user through <setInstallerVariable> actions (or similar).It allows modifying the values of existing elements as well as adding new ones, which will result in the creation of new installervariables. The text in the tree displays the name of the variable and a preview of its contents (or the full value if it is not verylong.)
In addition to manipulating the installation variables and project elements, the widget also allows marking elements to be trackedby the debugger. When a tracked variable (or project element) is modified, a message will be written in the debugger log,detailing the new contents of the variable. To mark a variable, right-click on the desired element and select Track Variable(or Untrack Variable if it is already being tracked). If the item to track is a project element, the contextual menu willdisplay an entry Track Object Menu, that will allow selecting the settings to track.
The widget can be also hidden from the "View" menu by unchecking "Variable Editor".
Figure 20.7: Debugger Tools - Variable Editor
20.1.3.6 XML evaluator
The XML evaluator allows executing any XML code with the same installer environment (same variables and parameters)of the installation:
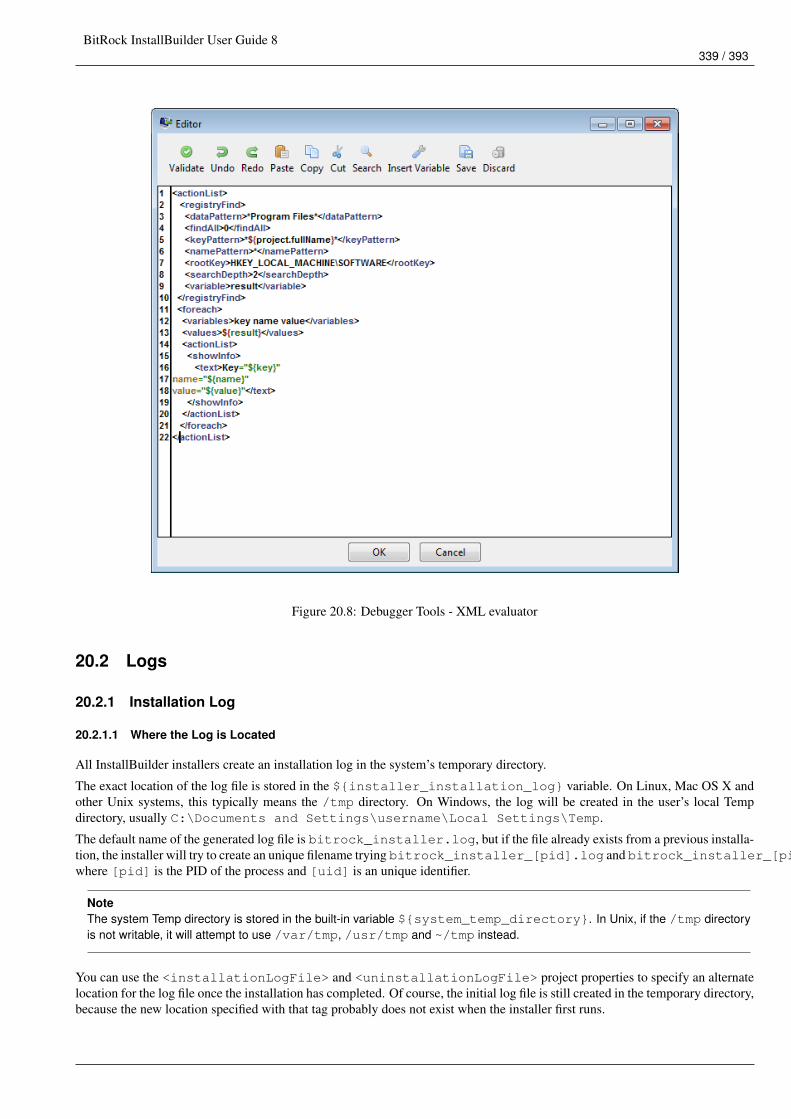
BitRock InstallBuilder User Guide 8339 / 393
Figure 20.8: Debugger Tools - XML evaluator
20.2 Logs
20.2.1 Installation Log
20.2.1.1 Where the Log is Located
All InstallBuilder installers create an installation log in the system’s temporary directory.
The exact location of the log file is stored in the ${installer_installation_log} variable. On Linux, Mac OS X andother Unix systems, this typically means the /tmp directory. On Windows, the log will be created in the user’s local Tempdirectory, usually C:\Documents and Settings\username\Local Settings\Temp.
The default name of the generated log file is bitrock_installer.log, but if the file already exists from a previous installa-tion, the installer will try to create an unique filename trying bitrock_installer_[pid].log and bitrock_installer_[pid]_[uid].logwhere [pid] is the PID of the process and [uid] is an unique identifier.
NoteThe system Temp directory is stored in the built-in variable ${system_temp_directory}. In Unix, if the /tmp directoryis not writable, it will attempt to use /var/tmp, /usr/tmp and ~/tmp instead.
You can use the <installationLogFile> and <uninstallationLogFile> project properties to specify an alternatelocation for the log file once the installation has completed. Of course, the initial log file is still created in the temporary directory,because the new location specified with that tag probably does not exist when the installer first runs.
BitRock InstallBuilder User Guide 8340 / 393
<project>...<!-- Configures the final destination of the installation log --><installationLogFile>${installdir}/${project.shortName}-installLog.log</ ←↩
installationLogFile><!-- Configures the final destination of the uninstallation log --><uninstallationLogFile>${system_temp_directory}/${project.shortName}-uninstallation.log ←↩
</uninstallationLogFile>...
</project>
It is possible to also mark a log file for deletion after the installation has completed.
<project>...<removeLogFile>1</removeLogFile>...
</project>
20.2.1.2 Verbosity Level
Most common errors during installation are related to the execution of third party programs or system commands. The installationlog will include the stdout and stderr output of the program, as well as the exit code:
Executing /home/bitrock/lampstack-1.2-2/php/bin/php -q /home/bitrock/lampstack-1.2-2/php/ ←↩bin/fixreg.php /home/bitrock/lampstack-1.2-2/php
Script exit code: 0
Script output:Patching /home/bitrock/lampstack-1.2-2/php/lib/php/.registry/archive_tar.regPatching /home/bitrock/lampstack-1.2-2/php/lib/php/.registry/console_getopt.regPatching /home/bitrock/lampstack-1.2-2/php/lib/php/.registry/pear.regPatching /home/bitrock/lampstack-1.2-2/php/lib/php/.registry/structures_graph.regPatching /home/bitrock/lampstack-1.2-2/php/lib/php/.registry/xml_util.reg
Script stderr:
By default, standard streams are always logged independently of whether or not the execution succeeds but the debug level canbe decreased to only log them after an error:
<project>...<!-- Levels from 2 to 4 displays the streams --><debugLevel>0</debugLevel>...
</project>
This will log the standard streams only in the event that an error occurs. Reducing the debug level also prevents the argumentsfor the programs being executed from being logged. This can be useful if as part of the installation you are passing sensitiveinformation as command line options and you do not want it stored in the log file. A better approach is to add a .password suffixto the variable reference.
20.2.1.3 Logging custom information
You can add custom information to the log at runtime using the <logMessage> action. It is possible to specify an optional,custom timestamp:
BitRock InstallBuilder User Guide 8341 / 393
<logMessage><text>Uninstalling old installation...</text><timeStampFormat>[%H:%M:%S]</timeStampFormat><enableTimeStamp>1</enableTimeStamp>
</logMessage>
You could also use the <writeFile> and <readFile> actions to include important information from log files from otherprograms.
<preInstallationActionList><readFile name="apacheErrorLog" path="${installdir}/apache2/log/error_log"/><logMessage>
<text>Apache Error Log:</text><timeStampFormat>[%H:%M:%S]</timeStampFormat><enableTimeStamp>1</enableTimeStamp>
</logMessage><writeFile text="${apacheErrorLog}" path="${project.installationLogFile}"/>
</preInstallationActionList>
20.2.2 Debugtrace Log
If you run into issues that are hard to track down, you may be asked to provide a debug trace. This is an internal dump of theinner workings of the installer, serialized as an XML file. It can help BitRock determine the root cause of the problem.
Both the Builder and the generated installers are capable of generating the debug file. You just need to use the --debugtraceflag:
$> sample-1.0-linux-installer.run --debugtrace debug.txtDebug file written.
You can then send the debug.txt file to [email protected]. Please provide as much context information as possible.
NoteTake into account that the log is only serialized when the installer exits normally, either completing the installation or crashingwith an error, but not if the process is killed by external methods.
20.3 Other Debugging Methods
As when debugging any program, the most basic (but useful nonetheless) method of debugging is to provide information of whatis going on at different points in the process. This helps you determine if what is happening is indeed what you were expectingto happen at that particular point in time. You can use a <showInfo> action to display messages during the installation process.
This technique can help, for example, when debugging why an action seems not to be executed:
<showInfo text="About to run the program" /><actionGroup><actionList>
<showInfo><text>Sharing the same rules will check that they are correctly evaluated"</text>
</showInfo><runProgram><program>chown</program><programArguments>-R bitrock ${installdir}</programArguments>
</runProgram></actionList><ruleList>
BitRock InstallBuilder User Guide 8342 / 393
<platformTest type="linu"/></ruleList>
</actionGroup><showInfo text="After executing the program"/>
If you run an installer that includes the above code, you will see the first and the third pop-ups, so something is wrong with therule. A closer look will make you realize that the type field in the platformTest rule has a typo. It reads linu, when it should belinux. This particular case will be automatically reported to you by the builder when loading the project but other issues aretackled the same way.
A similar approach can be used to check that variables have the expected value:
<setInstallerVariable name="docLocation" value="${intalldir}/doc"/>...<renameFile origin="${intalldir}/app/oldDocDirectory" destination="${docLocation}"/>
The above code will not work because of a typo (${intalldir} instead of {installdir}). Adding a <showInfo> helpwill help track the issue:
<setInstallerVariable name="docLocation" value="${intalldir}/doc"/>...<showInfo text="Documents are stored in ${docLocation}"/><renameFile origin="${intalldir}/app/oldDocDirectory" destination="${docLocation}"/>
It will display: Documents are stored in ***unknown variable intalldir***/doc
BitRock InstallBuilder User Guide 8343 / 393
Chapter 21
Updates
It is a common scenario to use installers to upgrade previously installed applications. An upgrade can be divided in two basicparts:
a. Common to all installations: Activities such as copying files, upgrading Add/Remove programs settings or upgrading theuninstaller. InstallBuilder provides support for most of this automatically.
b. Unique to each installation: Activities such as backing up an existing database, populating it with new data, etc.
When most installers refer to upgrade functionality, they refer to a), when in reality the most critical part for a successful upgradetends to be b), which cannot be easily automated.
21.1 What differentiates upgrade installers from normal installers?
Upgrade installers do not create a new uninstaller. Instead, the new installed files will be appended to the existing uninstaller,and persistent variables and parameters from the upgrade installer will also be registered in the existing uninstaller.
Additionally, on Windows an upgrade installer will not create a new entry on the ARP (Add/Remove Programs) Menu. Instead,it will update the "version" field for the existing entry of the application. Also, it will not create a new entry into the StartMenu.
21.2 Setting the installer to upgrade installation mode
It is currently possible to create an upgrade installer by setting the <installationType> project property (which defaults to"normal") to "upgrade" as follows:
<project>...<installationType>upgrade</installationType>...
</project>
Another approach is to switch the installer to upgrade mode at run time, using a <setInstallerVariable> action to setthe "installationType" installer variable to "upgrade". This approach allows you to create a smart installer whichstarts in normal installation mode and is capable of switching to upgrade mode under certain conditions, such as detecting anexisting installation:
<project>...<installationType>normal</installationType>
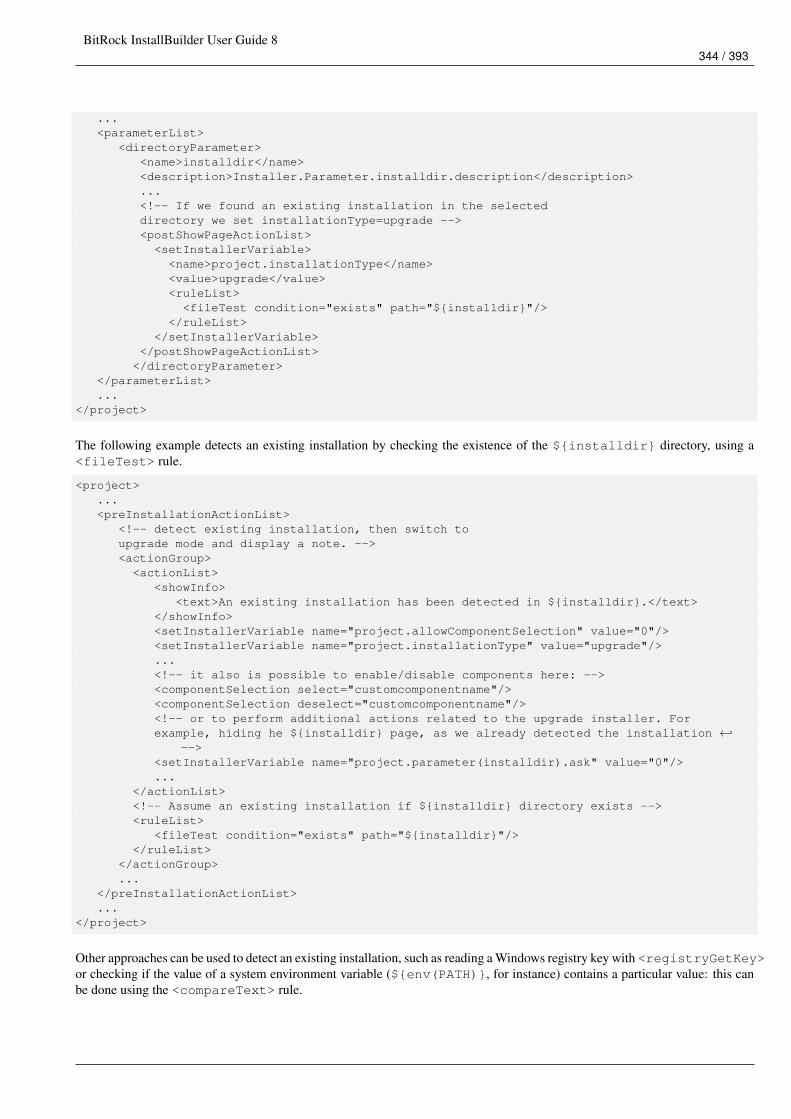
BitRock InstallBuilder User Guide 8344 / 393
...<parameterList>
<directoryParameter><name>installdir</name><description>Installer.Parameter.installdir.description</description>...<!-- If we found an existing installation in the selecteddirectory we set installationType=upgrade --><postShowPageActionList>
<setInstallerVariable><name>project.installationType</name><value>upgrade</value><ruleList>
<fileTest condition="exists" path="${installdir}"/></ruleList>
</setInstallerVariable></postShowPageActionList>
</directoryParameter></parameterList>...
</project>
The following example detects an existing installation by checking the existence of the ${installdir} directory, using a<fileTest> rule.
<project>...<preInstallationActionList>
<!-- detect existing installation, then switch toupgrade mode and display a note. --><actionGroup>
<actionList><showInfo>
<text>An existing installation has been detected in ${installdir}.</text></showInfo><setInstallerVariable name="project.allowComponentSelection" value="0"/><setInstallerVariable name="project.installationType" value="upgrade"/>...<!-- it also is possible to enable/disable components here: --><componentSelection select="customcomponentname"/><componentSelection deselect="customcomponentname"/><!-- or to perform additional actions related to the upgrade installer. Forexample, hiding he ${installdir} page, as we already detected the installation ←↩
--><setInstallerVariable name="project.parameter(installdir).ask" value="0"/>...
</actionList><!-- Assume an existing installation if ${installdir} directory exists --><ruleList>
<fileTest condition="exists" path="${installdir}"/></ruleList>
</actionGroup>...
</preInstallationActionList>...
</project>
Other approaches can be used to detect an existing installation, such as reading a Windows registry key with <registryGetKey>or checking if the value of a system environment variable (${env(PATH)}, for instance) contains a particular value: this canbe done using the <compareText> rule.
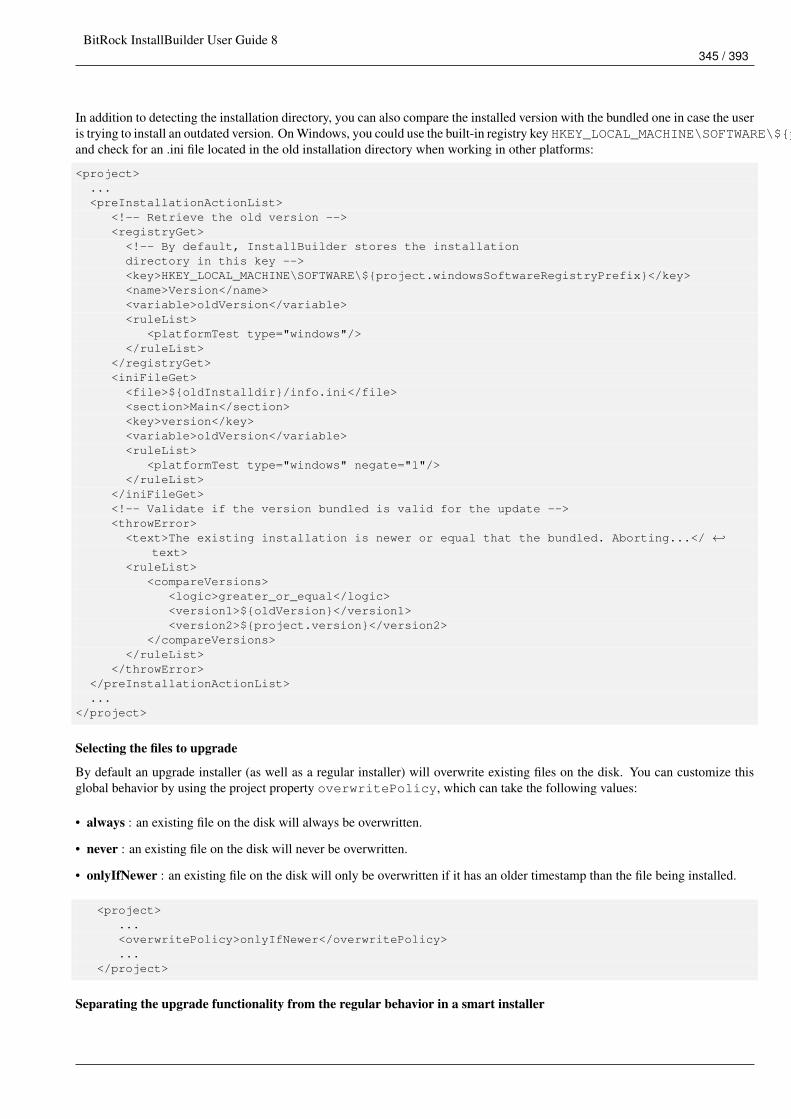
BitRock InstallBuilder User Guide 8345 / 393
In addition to detecting the installation directory, you can also compare the installed version with the bundled one in case the useris trying to install an outdated version. On Windows, you could use the built-in registry key HKEY_LOCAL_MACHINE\SOFTWARE\${project.windowsSoftwareRegistryPrefix}\Version,and check for an .ini file located in the old installation directory when working in other platforms:
<project>...<preInstallationActionList>
<!-- Retrieve the old version --><registryGet><!-- By default, InstallBuilder stores the installationdirectory in this key --><key>HKEY_LOCAL_MACHINE\SOFTWARE\${project.windowsSoftwareRegistryPrefix}</key><name>Version</name><variable>oldVersion</variable><ruleList>
<platformTest type="windows"/></ruleList>
</registryGet><iniFileGet><file>${oldInstalldir}/info.ini</file><section>Main</section><key>version</key><variable>oldVersion</variable><ruleList>
<platformTest type="windows" negate="1"/></ruleList>
</iniFileGet><!-- Validate if the version bundled is valid for the update --><throwError><text>The existing installation is newer or equal that the bundled. Aborting...</ ←↩
text><ruleList>
<compareVersions><logic>greater_or_equal</logic><version1>${oldVersion}</version1><version2>${project.version}</version2>
</compareVersions></ruleList>
</throwError></preInstallationActionList>...
</project>
Selecting the files to upgrade
By default an upgrade installer (as well as a regular installer) will overwrite existing files on the disk. You can customize thisglobal behavior by using the project property overwritePolicy, which can take the following values:
• always : an existing file on the disk will always be overwritten.
• never : an existing file on the disk will never be overwritten.
• onlyIfNewer : an existing file on the disk will only be overwritten if it has an older timestamp than the file being installed.
<project>...<overwritePolicy>onlyIfNewer</overwritePolicy>...
</project>
Separating the upgrade functionality from the regular behavior in a smart installer
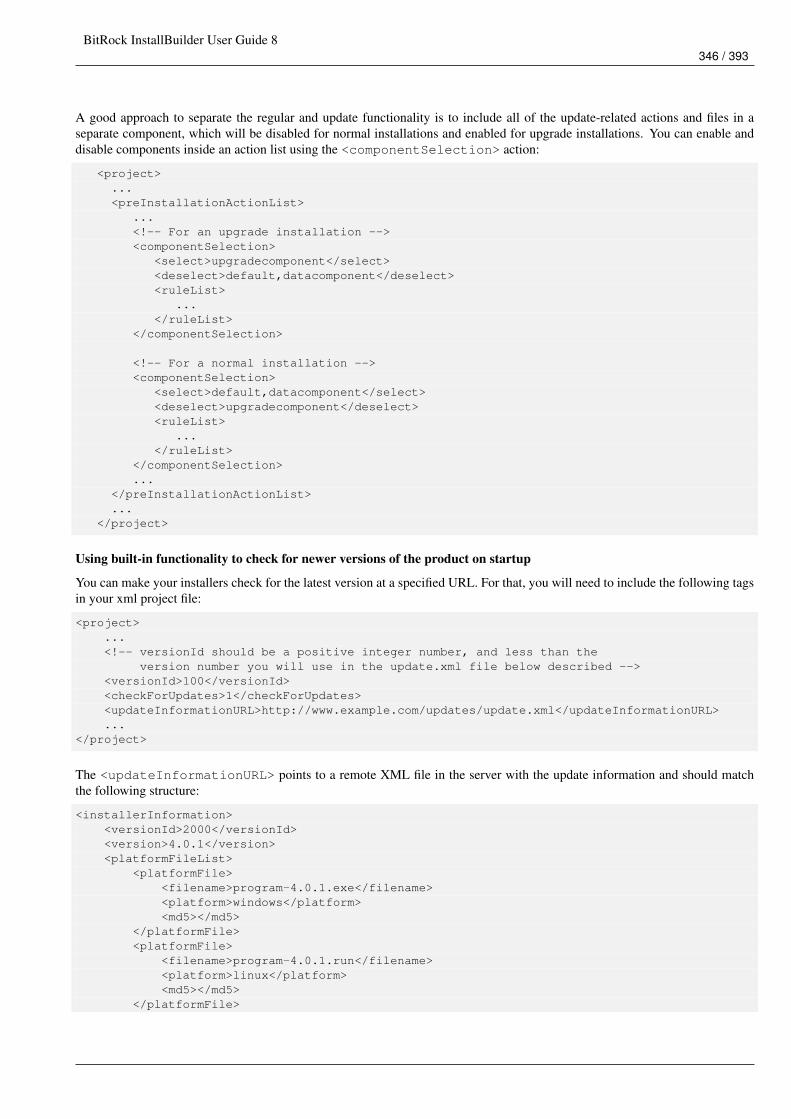
BitRock InstallBuilder User Guide 8346 / 393
A good approach to separate the regular and update functionality is to include all of the update-related actions and files in aseparate component, which will be disabled for normal installations and enabled for upgrade installations. You can enable anddisable components inside an action list using the <componentSelection> action:
<project>...<preInstallationActionList>
...<!-- For an upgrade installation --><componentSelection>
<select>upgradecomponent</select><deselect>default,datacomponent</deselect><ruleList>
...</ruleList>
</componentSelection>
<!-- For a normal installation --><componentSelection>
<select>default,datacomponent</select><deselect>upgradecomponent</deselect><ruleList>
...</ruleList>
</componentSelection>...
</preInstallationActionList>...
</project>
Using built-in functionality to check for newer versions of the product on startup
You can make your installers check for the latest version at a specified URL. For that, you will need to include the following tagsin your xml project file:
<project>...<!-- versionId should be a positive integer number, and less than the
version number you will use in the update.xml file below described --><versionId>100</versionId><checkForUpdates>1</checkForUpdates><updateInformationURL>http://www.example.com/updates/update.xml</updateInformationURL>...
</project>
The <updateInformationURL> points to a remote XML file in the server with the update information and should matchthe following structure:
<installerInformation><versionId>2000</versionId><version>4.0.1</version><platformFileList>
<platformFile><filename>program-4.0.1.exe</filename><platform>windows</platform><md5></md5>
</platformFile><platformFile>
<filename>program-4.0.1.run</filename><platform>linux</platform><md5></md5>
</platformFile>
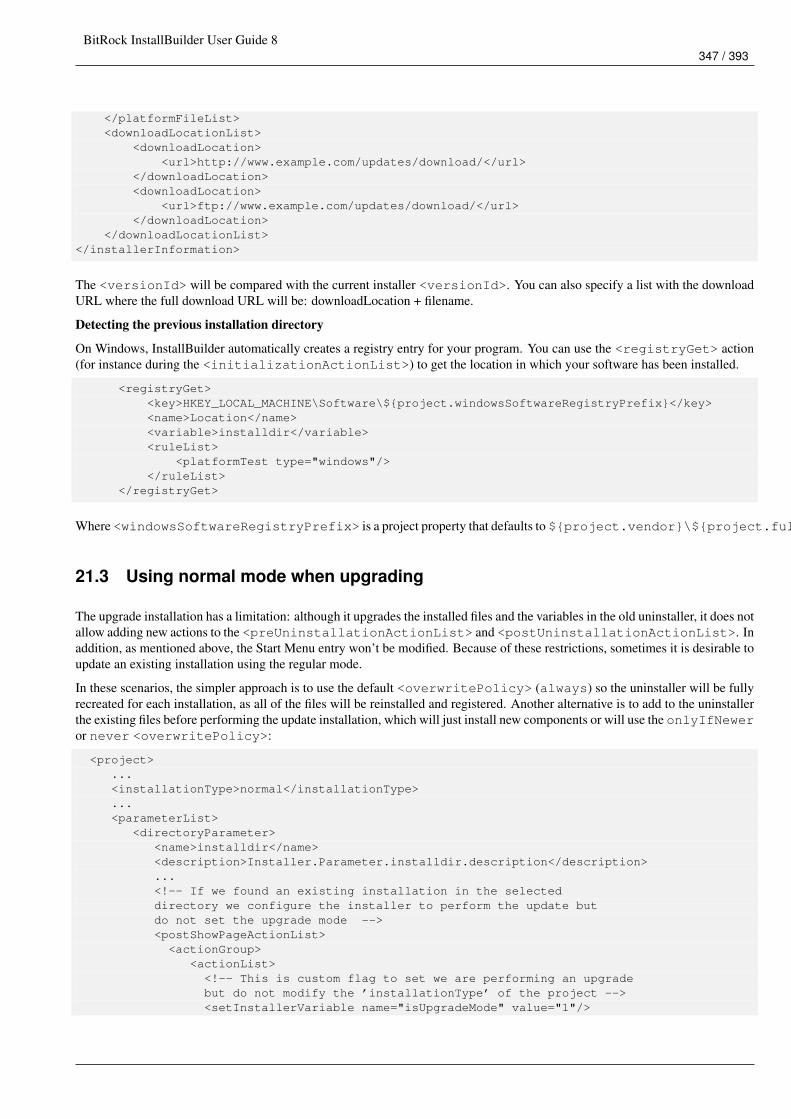
BitRock InstallBuilder User Guide 8347 / 393
</platformFileList><downloadLocationList>
<downloadLocation><url>http://www.example.com/updates/download/</url>
</downloadLocation><downloadLocation>
<url>ftp://www.example.com/updates/download/</url></downloadLocation>
</downloadLocationList></installerInformation>
The <versionId> will be compared with the current installer <versionId>. You can also specify a list with the downloadURL where the full download URL will be: downloadLocation + filename.
Detecting the previous installation directory
On Windows, InstallBuilder automatically creates a registry entry for your program. You can use the <registryGet> action(for instance during the <initializationActionList>) to get the location in which your software has been installed.
<registryGet><key>HKEY_LOCAL_MACHINE\Software\${project.windowsSoftwareRegistryPrefix}</key><name>Location</name><variable>installdir</variable><ruleList>
<platformTest type="windows"/></ruleList>
</registryGet>
Where <windowsSoftwareRegistryPrefix> is a project property that defaults to ${project.vendor}\${project.fullName}
21.3 Using normal mode when upgrading
The upgrade installation has a limitation: although it upgrades the installed files and the variables in the old uninstaller, it does notallow adding new actions to the <preUninstallationActionList> and <postUninstallationActionList>. Inaddition, as mentioned above, the Start Menu entry won’t be modified. Because of these restrictions, sometimes it is desirable toupdate an existing installation using the regular mode.
In these scenarios, the simpler approach is to use the default <overwritePolicy> (always) so the uninstaller will be fullyrecreated for each installation, as all of the files will be reinstalled and registered. Another alternative is to add to the uninstallerthe existing files before performing the update installation, which will just install new components or will use the onlyIfNeweror never <overwritePolicy>:
<project>...<installationType>normal</installationType>...<parameterList>
<directoryParameter><name>installdir</name><description>Installer.Parameter.installdir.description</description>...<!-- If we found an existing installation in the selecteddirectory we configure the installer to perform the update butdo not set the upgrade mode --><postShowPageActionList><actionGroup>
<actionList><!-- This is custom flag to set we are performing an upgradebut do not modify the ’installationType’ of the project --><setInstallerVariable name="isUpgradeMode" value="1"/>
BitRock InstallBuilder User Guide 8348 / 393
<componentSelection><select>upgradecomponent</select><deselect>default,datacomponent</deselect>
</componentSelection><setInstallerVariable name="project.overwritePolicy" value="onlyIfNewer ←↩
"/></actionList><ruleList><fileTest condition="exists" path="${installdir}"/>
</ruleList></actionGroup>
</postShowPageActionList></directoryParameter>
</parameterList><readyToInstallActionList>
...<!-- Add the files installed by the previousinstallation to the uninstaller --><addDirectoriesToUninstaller><addContents>1</addContents><matchHiddenFiles>1</matchHiddenFiles><files>${installdir}/data;${installdir}/core</files><ruleList>
<isTrue value="${isUpgradeMode}"/></ruleList>
</addDirectoriesToUninstaller>...
</readyToInstallActionList>...
</project>
In addition, if you are creating a Windows installer, you need to include some additional actions to clean old registry keys, theStart Menu shortcuts and the ARP (Add/Remove Programs) menu:
<project>...<installationType>normal</installationType>...<readyToInstallActionList>
...<actionGroup><actionList>
<!-- Delete old Start Menu entries if needed --><deleteFile path="${windows_folder_common_startmenu}/${previousStartMenuName ←↩
}"/><deleteFile path="${windows_folder_startmenu}/${previousStartMenuName}"/>
<!-- Remove the old ARP Entry --><!-- Get the old version --><registryGet>
<key>HKEY_LOCAL_MACHINE\Software\${project.windowsSoftwareRegistryPrefix}</ ←↩key>
<name>Version</name><variable>oldVersion</variable>
</registryGet><!-- Delete the old ARP registry keys --><registryDelete>
<key>HKEY_LOCAL_MACHINE\SOFTWARE\Microsoft\Windows\CurrentVersion\Uninstall\ ←↩${project.fullName} ${oldVersion}</key>
</registryDelete><registryDelete>
<key>HKEY_LOCAL_MACHINE\SOFTWARE\Microsoft\Windows\CurrentVersion\App ←↩
BitRock InstallBuilder User Guide 8349 / 393
Management\ARPCache\${project.fullName} ${oldVersion}</key></registryDelete>
</actionList><ruleList>
<platformTest type="windows"/><isTrue value="${isUpgradeMode}"/>
</ruleList></actionGroup>...
</readyToInstallActionList>...
</project>
BitRock InstallBuilder User Guide 8350 / 393
Chapter 22
AutoUpdate Tool
InstallBuilder bundles an automatic update tool that can be used to download and install packages over the Internet, AutoUpdate.It can be found in the autoupdate/ directory under the main installation directory.
22.1 How to Use AutoUpdate in InstallBuilder
The AutoUpdate tool allows you to provide your users with an easy and automatable way to check for, download and applyupdates to your software.
22.1.1 How Does it Work?
When executed, the AutoUpdate wizard will poll your server to get information about the available software versions for theplatform in which it is running. The detailed process is:
• Read the INI file that contains information about where to contact the server and which version is currently installed. This INIfile must be delivered together with the binary and placed in the same directory.
• Get the XML file from the server, which contains available versions for each platform.
• If there’s a newer version available for the target platform (checking that the version ID received is higher than the current onestored in INI file), download and install it or notify the user depending on the execution mode.
The AutoUpdate wizard is defined in an XML project, similar to a regular InstallBuilder project, but much simpler. The projectXML file must have the main tag <autoUpdateProject> containing the list of customizations to apply to the wizard:
<autoUpdateProject><fullName>Example Project</fullName><shortName>example</shortName><vendor>Acme Inc.</vendor><version>1.0</version><windowsExecutableIcon>images/updater.ico</windowsExecutableIcon><leftImage>images/left-image.png</leftImage><logoImage>images/logo-image.png</logoImage>...
</autoUpdateProject>
The currently supported settings are:
• General settings:
– <fullName>: The full product name, as it will be displayed in the autoupdater

BitRock InstallBuilder User Guide 8351 / 393
– <shortName>: The short version of product name. It can only contain alphanumeric characters
– <vendor>: Vendor name
– <version>: Product version number.
– <rebootRequired>: Determines whether or not to ask the user to reboot after the AutoUpdate process is completed(Windows-specific option).
– <requireInstallationByRootUser>: Whether or not running the autoupdater will require super user privileges(root on Linux, Administrator user on Windows and OS X). This setting will prevent the autoupdate from running if the useris not root or Administrator on all operating systems except for OS X. In OS X, the regular authentication dialog windowwill be shown, asking the user for the administrator password so the autoupdate wizard can be run with root privileges
– <singleInstanceCheck>: Check that only one autoupdater instance is running
– <requestedExecutionLevel>: UAC execution level of the AutoUpdate on Windows
• Look And Feel:
– <height>: Autoupdate wizard window height
– <width>: Autoupdate wizard window width
– <leftImage>: 163x314 GIF or PNG image that will be placed at the left side of the autoupdate wizard in the Welcomeand Update Finished pages. If no image is specified, the default image will be used
– <logoImage>: 48x48 GIF or PNG logo image that will be placed at the top right corner of the autoupdate wizard. If noimage is specified, the default image will be used
– <splashImage>: The GIF or PNG image that will appear when launching the autoupdate wizard.
– <splashScreenDelay>: Extra display time of the splash screen in milliseconds
– <disableSplashScreen>: Disable the initial splash screen.
– <overrideGtkButtonText>: Translate buttons to the selected language instead of using system-built values for UnixGTK mode
– <wmImage>: 48x48 GIF or PNG logo image that will be shown in the window manager task bar on Unix systems. If noimage is specified, the default logo image will be used
– <windowsExecutableIcon>: ICO file with an specific format to set the icon for the autoupdate executable file onWindows systems. The allowed ICO formats are detailed in the Windows Icons section.
– <osxApplicationBundleIcon>: ICNS file to include in the AutoUpdate Application Bundle
• Windows Resources:
– <windowsResourceComments>: Comments for resources embedded in Windows executable
– <windowsResourceCompanyName>: Company Name for resources embedded in Windows executable
– <windowsResourceFileDescription>: File Description for resources embedded in Windows executable
– <windowsResourceFileVersion>: File version for resources embedded in Windows executable
– <windowsResourceInternalName>: Internal Name for resources embedded in Windows executable
– <windowsResourceLegalCopyright>: Legal Copyright for resources embedded in Windows executable
– <windowsResourceLegalTrademarks>: Legal Trademarks for resources embedded in Windows executable
– <windowsResourceOriginalFilename>: Original Filename for resources embedded in Windows executable
– <windowsResourceProductName>: Product Name for resources embedded in Windows executable
– <windowsResourceProductVersion>: Product Version for resources embedded in Windows executable
Once your <autoUpdateProject> is configured, you can build it using the customize tool, located in the bin folder,under the AutoUpdate directory. Depending on the OS, you will be able to build AutoUpdate binaries for windows, osx,linux or linux-x64, reusing the same AutoUpdate XML project.
The syntax to use the tool is:
BitRock InstallBuilder User Guide 8352 / 393
$> installbuilder-8.2.0/autoupdate/bin/customize build /path/to/autoUpdateProject.xml ←↩windows
Autoupdater successfully created. You can find it at
installbuilder-8.2.0/autoupdate/output/autoupdate-windows.exe
You can also check it invoking the tool without arguments:
$> installbuilder-8.2.0/autoupdate/bin/customize
Wrong syntax. Correct syntax is
customize build /path/to/project.xml [windows|linux|linux-x64|osx]
As previously mentioned, the AutoUpdate wizard must be distributed along with an INI file. The basic information required,organized in the Update section of the INI file, is:
• url: Points to the remote location of the update data. Currently only HTTP is supported.
• version_id: The local version identifier, which is compared to the remote version identifier to trigger the update process.Its value must be a positive integer.
• update_download_location: The path to the folder where the downloaded files will be saved. Downloading a file thatalready exists in the download location path will result in the new file being renamed in an incremental way, by appending anumber at the end of the file name. If the download folder does not exist, the automatic update process will attempt to createit. If not specified, it defaults to ~/.bitrock/updates.
• check_for_updates: It is possible to enable and disable the AutoUpdate on demand by setting this boolean value.
Basic update.ini file
[Update]
url = http://example.com:8080/update.xmlversion_id = 0100check_for_updates = 1update_download_location = ${installer_directory}/tmp
Apart from these basic keys, it is also possible to configure other AutoUpdate settings such as the proxy configuration (Proxysection):
• enable: Enables (1) or disables (0) the proxy. If the rest of keys are not provided, the proxy configuration from the systemwill be autodetected and used (if any).
• server: The proxy server.
• port: The port in the proxy server.
• username: Username in the proxy server (if required)
• password: The password in the proxy server (if required)
update.ini file with proxy configuration
[Update]
url = http://example.com:8080/update.xmlversion_id = 0100check_for_updates = 1update_download_location = ${installer_directory}/tmp
BitRock InstallBuilder User Guide 8353 / 393
[Proxy]
server=proxy.example.comport=8080username=foopassword=bar
Some of these settings can also be passed to the AutoUpdate through the command line when calling it. The provided values willthen overwrite those configured in the INI file. You can check the available command line settings using the --help flag:
$> installbuilder-8.2.0/autoupdate/runtimes/autoupdate-linux.run --helpYour Program 1.0Usage:
--help Display the list of valid options
--unattendedmodeui <unattendedmodeui> Unattended Mode UIDefault: noneAllowed: none minimal minimalWithDialogs
--debuglevel <debuglevel> Debug information level of verbosityDefault: 2Allowed: 0 1 2 3 4
--settings_file <settings_file> Path to the local settings file, containing the HTTP URL ←↩to update and the current version ID.
Default: installbuilder-8.2.0/autoupdate/runtimes/update. ←↩ini
--url <url> HTTP URL that points to the xml file containing the update ←↩data.
Default:
--version_id <version_id> Version ID of the local installation.Default:
--update_download_location <update_download_location> Path where the downloaded files will ←↩be stored.
Default: ~/.bitrock/updates
--check_for_updates <check_for_updates> Boolean value to specify whether to check for ←↩updates or not.
Default: 1
Apart from the INI file, you also must define an XML file (update.xml) with the available versions and make it available onyour server, in the URL defined in the update.ini file. The server XML must define the below set of properties:
• <version>: Specifies the version of the update. This is the version that will be displayed to the end user. It is not taken intoaccount by the update wizard when determining whether or not there is an update available. Instead, <versionId> is usedfor that.
• <versionId>: This is an integer, whose value is compared with the one located in the local update.ini file. If the value of<versionId> is bigger than the local one, it indicates that there is a new version of the software available.
• <platformFileList>: This section describes the available update installers for each platform. Each update binary isdefined as a <platformFile>, in which you specify the <filename> that will be downloaded only if the user’s operatingsystem matches the one defined as <platform>. At the moment, OS X installers are expected to be compressed in a .tgz filebut future versions will allow users to use other formats.
• <downloadLocationList>: List of download locations (<downloadLocation>), each containing a URL pointing tothe remote folder where the files are located, which is used to generate the list of mirrors selectable in the AutoUpdate user
BitRock InstallBuilder User Guide 8354 / 393
interface. The HTTP URL containing the update will be constructed by appending the file field to the mirror url. In the examplebelow, it means the Linux version will be available from http://www.example.com/updates/download/program-4.0.1.run andftp://www.example.com/mirror/updates/download/program-4.0.1.run
<installerInformation><versionId>2000</versionId><version>4.0.1</version><platformFileList>
<platformFile><filename>program-4.0.1.exe</filename><platform>windows</platform>
</platformFile><platformFile>
<filename>program-4.0.1.run</filename><platform>linux</platform>
</platformFile></platformFileList><downloadLocationList>
<downloadLocation><url>http://www.example.com/updates/download/</url>
</downloadLocation><downloadLocation>
<url>ftp://www.example.com/mirror/updates/download/</url></downloadLocation>
</downloadLocationList></installerInformation>
Note<versionId> must be an integer which takes higher values for the newest versions.
22.1.2 Basic example
Imagine you have an application called My Application and you want to include the AutoUpdate functionality in version1.0.0. You may also want, for example, for the update process to be run by an Administrator and prevent multiple instances ofthe AutoUpdate to run simultaneously. This wizard installer could be created with the simple code below:
<autoUpdateProject><fullName>My Application</fullName><shortName>myapp</shortName><vendor>Acme Inc.</vendor><version>1.0.0</version><singleInstanceCheck>1</singleInstanceCheck><requireInstallationByRootUser>1</requireInstallationByRootUser>
</autoUpdateProject>
You may also want to change the images and icons to have application-specific ones. To do so, you can add the options:<leftImage>, <logoImage>, <splashImage>, <wmImage>. Once all desired options are included in autoUpdateProject.xmlfile, you can build the AutoUpdate wizard using the customize command:
installbuilder-8.2.0/autoupdate/bin/customize.run build autoUpdateProject.xml linuxinstallbuilder-8.2.0/autoupdate/bin/customize.run build autoUpdateProject.xml windowsinstallbuilder-8.2.0/autoupdate/bin/customize.run build autoUpdateProject.xml osx
After that, binary files for Linux, OS X and Windows should be found in the AutoUpdate output directory.
Apart from the AutoUpdate binary, you will need to setup a server with the new installers and update.xml file. This exampleassumes the server is running locally in port 8080. (you can easily setup a web server using LAMPStack (Linux), WAMPStack(Windows) or MAMPStack (OS X) from BitNami.org). Just copy the latest installers and an update.xml file describing thatversion, the filenames and mirrors to the server:
BitRock InstallBuilder User Guide 8355 / 393
<installerInformation><versionId>200</versionId><version>2.0.0</version><platformFileList>
<platformFile><filename>myapplication-installer-2.0.0.exe</filename><platform>windows</platform>
</platformFile><platformFile>
<filename>myapplication-installer-2.0.0.run</filename><platform>linux</platform>
</platformFile>
<platformFile><filename>myapplication-installer-2.0.0.app.tgz</filename><platform>osx</platform>
</platformFile></platformFileList><downloadLocationList>
<downloadLocation><url>http://127.0.0.1:8080/downloads/</url>
</downloadLocation></downloadLocationList>
</installerInformation>
where <versionId> has been set to a higher integer value than previous ones and a single mirror has been configured. Youcan include any number of mirrors by adding multiple <downloadLocation> elements though. In the example, the installerswill be available from:
• http://127.0.0.1:8080/downloads/myapplication-installer-2.0.0.run
• http://127.0.0.1:8080/downloads/myapplication-installer-2.0.0.exe
• http://127.0.0.1:8080/downloads/myapplication-installer-2.0.0.app.tgz
To provide AutoUpdate with the needed information to find the XML file in the server and to check the information on it, youmust write an update.ini file:
[Update]url = http://127.0.0.1:8080/update.xmlversion_id = 100check_for_updates = 1update_download_location = /tmp
In this case, update.xml will be obtained from localhost, saving temporary installers inside the /tmp path. The applica-tion upgrade process will be done if the received <versionId> is greater than 100.
Once you have placed your binary files and update.xml on your server and the update.ini file is in the same directory asthe AutoUpdate binary, it is ready to go. You can launch it by double-clicking on it or from a command line prompt:
$> autoupdater-linux.run
When it is started, according to the settings you configured in the XML project, if the user running the updater is not an Admin-istrator, he will be notified and the AutoUpdate process will end. If there is another instance already running, a notification willlet the user know and he or she will be able to indicate whether or not the process should continue. If both requirements are met,a welcome screen will appear:
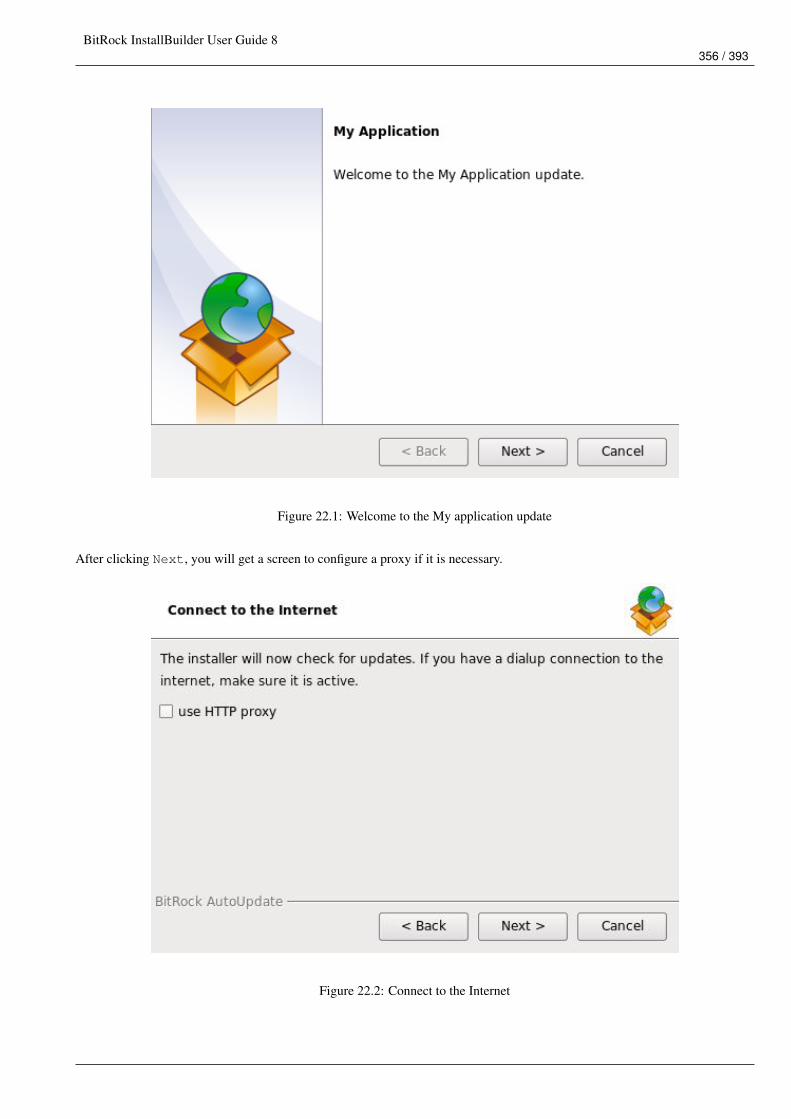
BitRock InstallBuilder User Guide 8356 / 393
Figure 22.1: Welcome to the My application update
After clicking Next, you will get a screen to configure a proxy if it is necessary.
Figure 22.2: Connect to the Internet
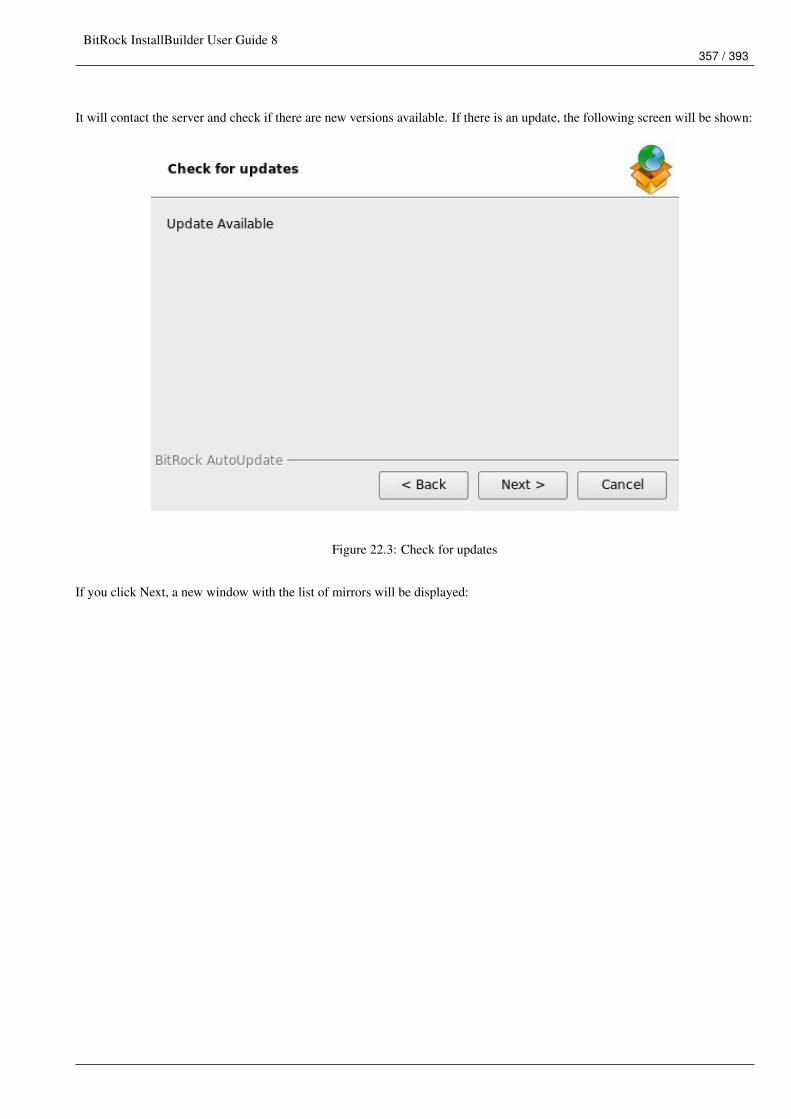
BitRock InstallBuilder User Guide 8357 / 393
It will contact the server and check if there are new versions available. If there is an update, the following screen will be shown:
Figure 22.3: Check for updates
If you click Next, a new window with the list of mirrors will be displayed:
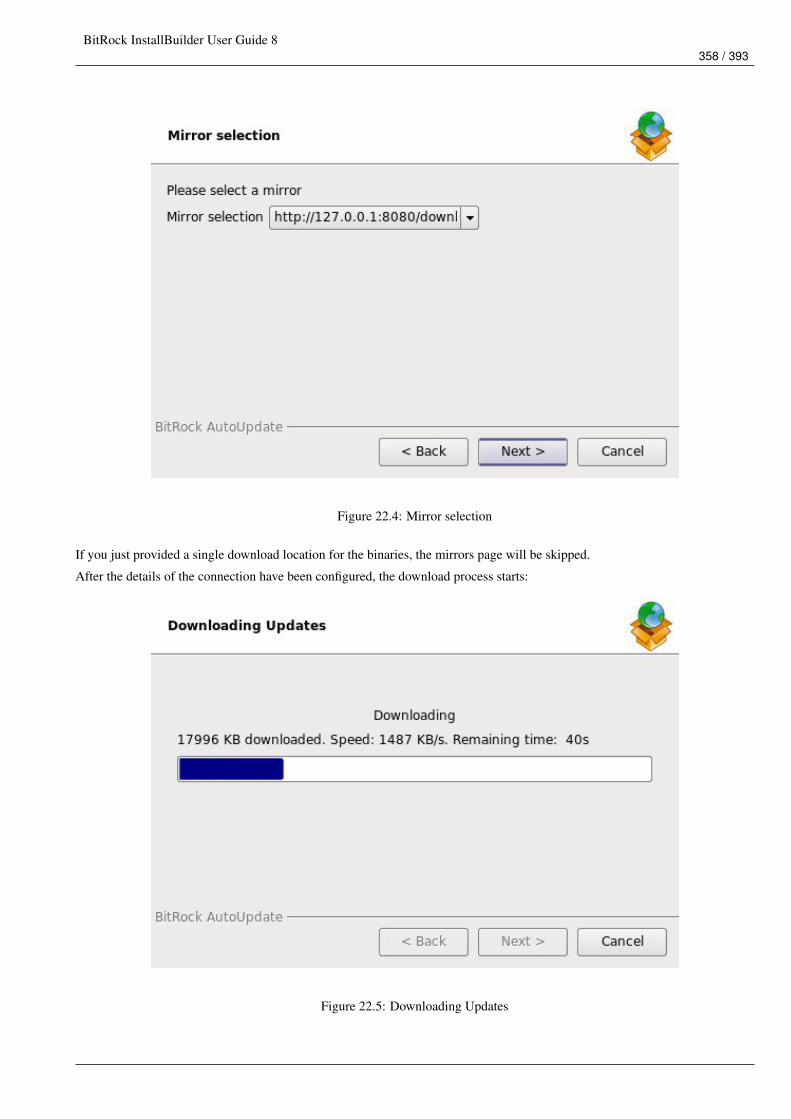
BitRock InstallBuilder User Guide 8358 / 393
Figure 22.4: Mirror selection
If you just provided a single download location for the binaries, the mirrors page will be skipped.
After the details of the connection have been configured, the download process starts:
Figure 22.5: Downloading Updates
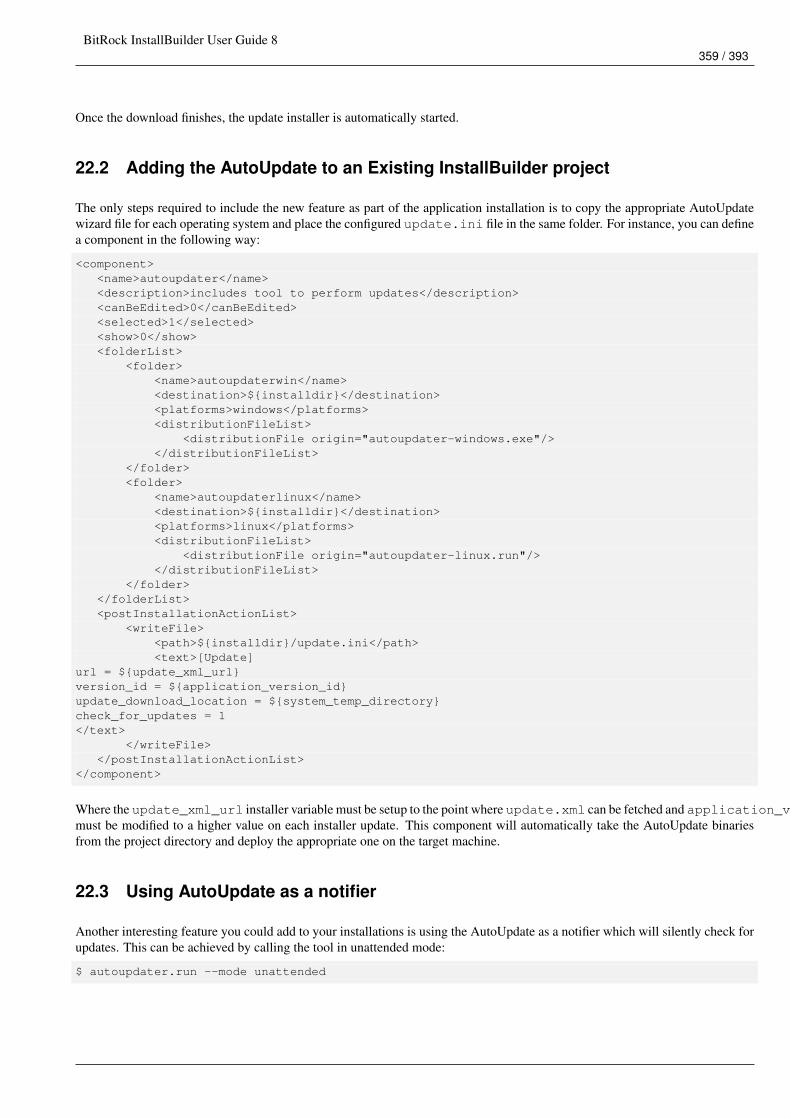
BitRock InstallBuilder User Guide 8359 / 393
Once the download finishes, the update installer is automatically started.
22.2 Adding the AutoUpdate to an Existing InstallBuilder project
The only steps required to include the new feature as part of the application installation is to copy the appropriate AutoUpdatewizard file for each operating system and place the configured update.ini file in the same folder. For instance, you can definea component in the following way:
<component><name>autoupdater</name><description>includes tool to perform updates</description><canBeEdited>0</canBeEdited><selected>1</selected><show>0</show><folderList>
<folder><name>autoupdaterwin</name><destination>${installdir}</destination><platforms>windows</platforms><distributionFileList>
<distributionFile origin="autoupdater-windows.exe"/></distributionFileList>
</folder><folder>
<name>autoupdaterlinux</name><destination>${installdir}</destination><platforms>linux</platforms><distributionFileList>
<distributionFile origin="autoupdater-linux.run"/></distributionFileList>
</folder></folderList><postInstallationActionList>
<writeFile><path>${installdir}/update.ini</path><text>[Update]
url = ${update_xml_url}version_id = ${application_version_id}update_download_location = ${system_temp_directory}check_for_updates = 1</text>
</writeFile></postInstallationActionList>
</component>
Where the update_xml_url installer variable must be setup to the point where update.xml can be fetched and application_version_idmust be modified to a higher value on each installer update. This component will automatically take the AutoUpdate binariesfrom the project directory and deploy the appropriate one on the target machine.
22.3 Using AutoUpdate as a notifier
Another interesting feature you could add to your installations is using the AutoUpdate as a notifier which will silently check forupdates. This can be achieved by calling the tool in unattended mode:
$ autoupdater.run --mode unattended
BitRock InstallBuilder User Guide 8360 / 393
The exit code will be 0 if an update is available and >0 if not. Once a new version is detected, you could then show a popup toyour users with a There’s a new update available message. To do so, you just call the process in background andgenerate the message if the returned code is 0:
if (system("path/to/autoupdater --mode unattended") == 0){printf("Update available. Run autoupdate to apply it.");
}
Something similar may be added when the application starts, or as a cron task if it is a web application, so that the user detectsthat there’s a new update without having to run AutoUpdate manually to check it.
22.4 How to execute custom actions after the update installer is downloaded
The default behavior of AutoUpdate is to launch the downloaded installer but sometimes it is necessary to perform some valida-tion over the downloaded files, for example to check the integrity of the downloaded data. These kind of custom actions can bedefined using the <postUpdateDownloadActionList>:
<postUpdateDownloadActionList><!-- Execute some validations here -->...<!-- The path to the downloaded update will be stored inthe ${downloadedFilePath} built-in variable. We calculate the MD5 --><runProgram><program>md5sum</program><programArguments>${downloadedFilePath}</programArguments>
</runProgram><!-- You can use any action like using httpGet to retrieve a validvalue for the md5sum or directly send the md5 to the server to validate it it --><throwError>
<text>It seems the downloaded installer was corrupted</text><ruleList><compareText>
<text>${program_stdout}</text><logic>does_not_equal</logic><value>${someExpectedValue}</value>
</compareText></ruleList>
</throwError>...<!-- Launch the installer --><runProgram>
<program>${downloadedFilePath}</program><programArguments>--prefix /tmp/someDir --enable_component_a 1 --is_update 1 & ←↩
;</programArguments></runProgram>
</postUpdateDownloadActionList>
Please note the usage of the built-in ${downloadedFilePath} variable to get the path of the update installer. This is neces-sary because although you define the update_download_location key in the update.ini file, if an older file with the samename is found there, a suffix will automatically be appended to the file name: sample-1.0-windows-installer.exe.1,sample-1.0-windows-installer.exe.2 . . .
In addition, you will have to manually launch the downloaded file because the default behavior was overridden.
This is especially useful to launch the updates in unattended mode or to pass some command line argument as in the example.
22.5 AutoUpdate installers in unattended mode
The AutoUpdate installer can be executed in unattended mode just as with regular InstallBuilder installers:
BitRock InstallBuilder User Guide 8361 / 393
autoupdate-linux.run --mode unattended
As mentioned in the previous section, when launched in unattended mode, AutoUpdate will simply check if an update is availableand then will finish its execution. However, this behavior is configurable.
22.5.1 Regular unattended mode
autoupdate-linux.run --mode unattended
In this mode, AutoUpdate is executed as a checker. It will return a 0 exit code if it finds a new update and a positive integerotherwise. The snippet below shows how to use it from an InstallBuilder installer which bundled AutoUpdate:
<project>...<initializationActionList>
<showQuestion default="yes" text="Would you like to check for updates?" variable ←↩="shouldCheckForUpdates" />
<actionGroup><actionList>
<!-- Once you have unpacked the bundled autoupdate and update.ini to some ←↩folder, like /tmp/autoupdate -->
<runProgram><program>/tmp/autoupdate/autoupdate-linux.run</program><programArguments>--mode unattended</programArguments>
</runProgram><showInfo text="An update is available!"><ruleList>
<isFalse value="${program_exit_code}" /></ruleList>
</showInfo><showInfo text="Sorry, no update is available..."><ruleList>
<compareText text="${program_exit_code}" value="0" logic=" ←↩does_not_equal" />
</ruleList></showInfo>
</actionList><ruleList>
<compareText text="${shouldCheckForUpdates}" value="yes" logic="equals" /></ruleList>
</actionGroup></initializationActionList>...
</project>
22.5.2 Download unattended mode
autoupdate-linux.run --mode unattended --unattendedmodebehavior download
The default value for unattendedmodebehavior is check, which causes AutoUpdate tool to only check for updates. Ifinstead of only checking for updates, you want to download and install the update, the unattendedmodebehavior has to be set todownload.
As mentioned, a 0 return code means "An update is available" and a non-zero return code means "No update available" but insome scenarios you need more information. To provide this information, AutoUpdate uses the return codes summarized below:
• 0: Successfully downloaded and executed the installer.
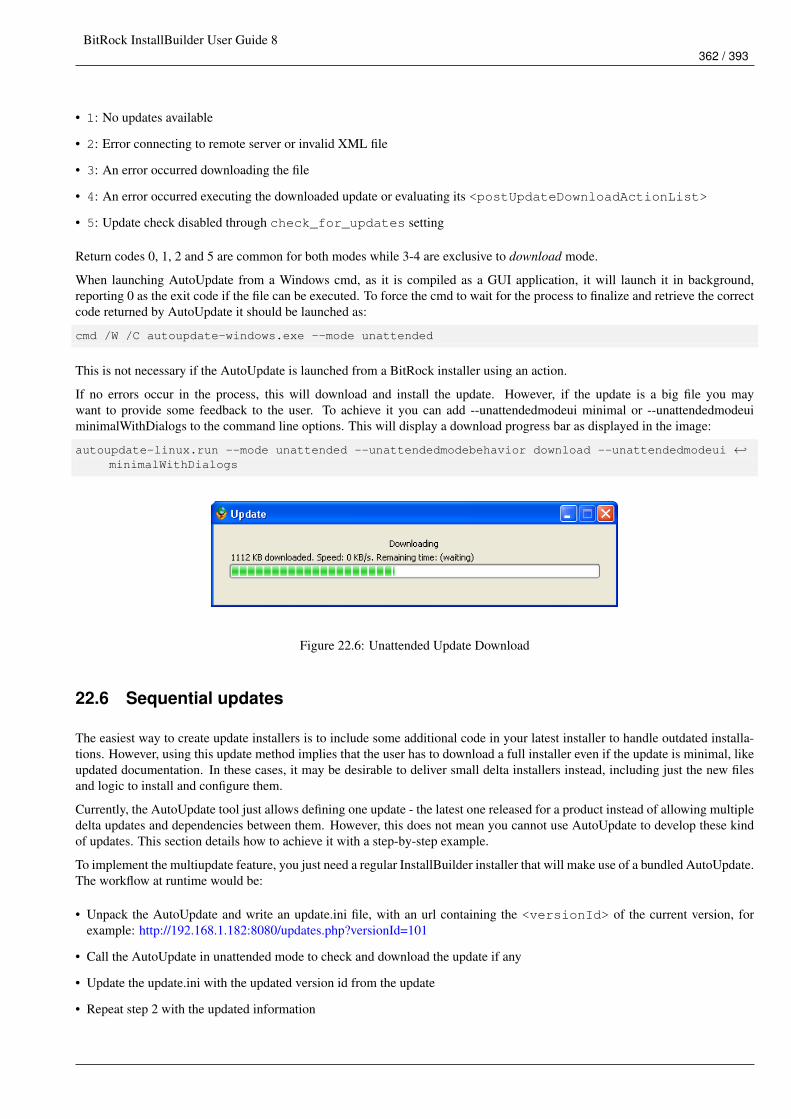
BitRock InstallBuilder User Guide 8362 / 393
• 1: No updates available
• 2: Error connecting to remote server or invalid XML file
• 3: An error occurred downloading the file
• 4: An error occurred executing the downloaded update or evaluating its <postUpdateDownloadActionList>
• 5: Update check disabled through check_for_updates setting
Return codes 0, 1, 2 and 5 are common for both modes while 3-4 are exclusive to download mode.
When launching AutoUpdate from a Windows cmd, as it is compiled as a GUI application, it will launch it in background,reporting 0 as the exit code if the file can be executed. To force the cmd to wait for the process to finalize and retrieve the correctcode returned by AutoUpdate it should be launched as:
cmd /W /C autoupdate-windows.exe --mode unattended
This is not necessary if the AutoUpdate is launched from a BitRock installer using an action.
If no errors occur in the process, this will download and install the update. However, if the update is a big file you maywant to provide some feedback to the user. To achieve it you can add --unattendedmodeui minimal or --unattendedmodeuiminimalWithDialogs to the command line options. This will display a download progress bar as displayed in the image:
autoupdate-linux.run --mode unattended --unattendedmodebehavior download --unattendedmodeui ←↩minimalWithDialogs
Figure 22.6: Unattended Update Download
22.6 Sequential updates
The easiest way to create update installers is to include some additional code in your latest installer to handle outdated installa-tions. However, using this update method implies that the user has to download a full installer even if the update is minimal, likeupdated documentation. In these cases, it may be desirable to deliver small delta installers instead, including just the new filesand logic to install and configure them.
Currently, the AutoUpdate tool just allows defining one update - the latest one released for a product instead of allowing multipledelta updates and dependencies between them. However, this does not mean you cannot use AutoUpdate to develop these kindof updates. This section details how to achieve it with a step-by-step example.
To implement the multiupdate feature, you just need a regular InstallBuilder installer that will make use of a bundled AutoUpdate.The workflow at runtime would be:
• Unpack the AutoUpdate and write an update.ini file, with an url containing the <versionId> of the current version, forexample: http://192.168.1.182:8080/updates.php?versionId=101
• Call the AutoUpdate in unattended mode to check and download the update if any
• Update the update.ini with the updated version id from the update
• Repeat step 2 with the updated information
BitRock InstallBuilder User Guide 8363 / 393
• . . .
Using a PHP script as the update URL, you allow the server to decide which update.xml file to deliver. For example, if you storeyour update.xml files in a directory versions in your server, you could use the below code:
<?php
/* Define the higher version released*/$maxVersion=12;
/* Get the current version sent by the autoupdate */$version=$_GET[’versionId’];
/* Check if the requested version is correct */if (!isset($_GET["versionId"]) || $_GET["versionId"] > $maxVersion) {
echo "Incorrect version";exit();
} else {/* Depending on the current version, we decide which update to deliver */
/* We provide an update pack for versions in the range 1-3 */if ($version < 4 ) {
$file="update-pack-1.xml";
/* We provide an update pack for versions in the range 4-7 */} elseif ($version < 8 ) {
$file="update-pack-2.xml";
/* For versions below the max, we deliver the next one */} elseif ($version < $maxVersion) {
$file="update".($version+1).".xml";
/* For the latest version, we resend it, it will be discarded by the AutoUpdate */} else {
$file="update".$maxVersion.".xml";}
$data=file_get_contents(’./versions/’.$file);echo $data;exit();
}?>
The PHP script will return update packs for the older versions and individual updates for the latest ones. This allows controllingthe granularity of the updates.
The next step is to include the update code in the XML project:
<project><!-- bundled version --><versionId>100</versionId>...<componentList>
<component><name>autoupdate</name><folderList>
<folder><name>autoupdate</name><destination>${installdir}/autoupdate</destination>
<distributionFileList><distributionFile><origin>path/to/autoupdate.run</origin>
BitRock InstallBuilder User Guide 8364 / 393
</distributionFile></distributionFileList>
</folder></folderList>
</component></componentList>...<parameterList>
<!-- This parameter will be used to enable/disable checking for updates --><booleanParameter name="enableUpdates" ask="0" value="1"/>
</parameterList>
<!-- After installing the bundled version, we query our servers for updates --><postInstallationActionList><!-- Write the initial update.ini file --><writeFile><path>${installdir}/autoupdate/update.ini</path><text>[Update]
url = http://www.example.com/versions.php?versionId=${project.versionId}version_id = ${project.versionId}update_download_location = ${installdir}/autoupdate/updateInstallerscheck_for_updates = 1</text>
</writeFile>
<!-- Keep asking for updates while available --><while><actionList>
<showProgressDialog><actionList><runProgram progressText="Checking for updates...">
<abortOnError>0</abortOnError><showMessageOnError>0</showMessageOnError><program>${installdir}/autoupdate/autoupdate.run</program><programArguments>--mode unattended</programArguments>
</runProgram></actionList>
</showProgressDialog><!-- Break the loop if there is no update available (exit code > 0) --><break progressText="No Update Available">
<ruleList><compareValues>
<value1>${program_exit_code}</value1><logic>greater</logic><value2>0</value2>
</compareValues></ruleList>
</break><showProgressDialog>
<actionList><runProgram progressText="Downloading the update...">
<program>${installdir}/autoupdate/autoupdate.run</program><programArguments>--mode unattended --unattendedmodebehavior download</ ←↩
programArguments></runProgram>
</actionList></showProgressDialog>
</actionList><conditionRuleList>
<isTrue value="${parameter(enableUpdates).value}"/></conditionRuleList>
</while>
BitRock InstallBuilder User Guide 8365 / 393
</postInstallationActionList></project>
At this point you have a project that unpacks AutoUpdate and uses it to check for updates while displaying a progress dialog. Ifyour updates follow the same structure, the next installed version will update the update.ini file and, if ${parameter(enableUpdates).value}is enabled, it will check for updates again. As this is not the desired behavior, the AutoUpdate project will be configured to disableit:
<autoUpdateProject>...<postUpdateDownloadActionList><!-- Launch the update specifying the ${installdir} and disabling checking for updates ←↩
--><runProgram>
<program>${downloadedFilePath}</program><programArguments>--prefix "${installer_directory}/../" --enableUpdates 0 --mode ←↩
unattended --unattendedmodeui minimalWithDialogs</programArguments></runProgram>
</postUpdateDownloadActionList></autoUpdateProject>
The above code installs the download update in the same installation directory using the ${installer_directory} built-invariable, containing the AutoUpdate parent directory.
BitRock InstallBuilder User Guide 8366 / 393
Chapter 23
Native Packages
23.1 Generation of Native Packages
The Professional and Enterprise versions of InstallBuilder support generation of native packages. To generate the packages, theappropriate command line tools must be present in the Linux system used at build-time, such as rpm or dpkg. The target platformneeds to be specified as rpm or deb in the command line environment or can be selected in the build screen using the GUI builder.
23.2 Integration with Native Package Systems
BitRock InstallBuilder allows you to register the software being installed with the RPM or DEB package databases.
To enable RPM and DEB registration support add <registerWithPackageDatabase>1</registerWithPackageDatabase>to your installer project file. This will register your installation with the RPM and DEB database. From this point on, users willbe able to query data about your application and its installed files using your distribution’s rpm-based tools as with any otherexisting rpm package. You will also be able to uninstall the application using your distribution’s rpm-based tools.
RPM database integration requires installation as root in an RPM-based distribution. Otherwise, the setting will be ignored. Also,if the RPM generation is performed on a 64bit machine, then 64bit RPM packages will be generated instead of 32bit ones.
To generate the packages, the appropriate command line tools need to be present in the Linux system used at build-time, such asrpm or dpkg. The target platform will be specified as rpm and deb in the command line environment or can be selected in thebuild screen using the GUI builder.
Additionally, to successfully register an RPM, the following tags must be also present in the XML project file:
RPM information tags
<project>...<vendor>Your Company Name</vendor><summary>Detailed description of your software</summary><release>0</release><description>A one-line description of your software</description>...
</project>
The name of the RPM package registered will be ${project.shortName}-${project.version}-${project.release}
BitRock InstallBuilder User Guide 8367 / 393
Chapter 24
Builder
InstallBuilder supports two build modes, "build" and "quickbuild", which are explained in the following sections.
24.1 Build
This is the slower but safer build process. For each build process, if a file already exists with the name of the installer to build, itwill be first deleted. The list of steps performed for a full build are:
• Load and validate the XML project. If the GUI builder is being used, the project has already been loaded and validated.
• Check if the destination filename is locked, for example if it is currently running
• Execute the <preBuildActionList>
• Replace the current file in the output directory
• Modify Windows resources and icons if the target is Windows
• Add language files, licenses, readmes and images to the installer
• Pack all the files defined in the XML project
• Execute the <postBuildActionList>
24.2 Quickbuild
A regular build always creates a new installer and repacks all of the files. On the contrary, using Quick Build makes it possibleto do incremental builds in which only new files or files that have changed will be repackaged. If you are packaging hundredsof megabytes, this should result in significantly quicker builds, but the resulting installers may increase in size with each newincremental build. It is recommended that you use quickbuild during the development process and do a full builds before theofficial release.
bin/builder quickbuild /path/to/project.xml
It is also possible to only update project files like logos, splash screen, readme a license files and project XML without repack-aging any files at all. You can do so with the following option:
bin/builder quickbuild /path/to/project.xml --onlyprojectfiles
This build process is slightly different:
BitRock InstallBuilder User Guide 8368 / 393
• Load and validate the XML project. If the GUI builder is being used, the project has already been loaded and validated.
• If the file does not exist, abort quickbuild and perform a regular full build
• Check if the destination filename is locked, for example if it is currently running
• Execute the <preBuildActionList>
• Modify Windows resources and icons if the target is Windows. The <requestedExecutionLevel> property is ignoredin quickbuilds
• Add language files, licenses, readmes and images to the installer
• Pack just new or modified files
• Execute the <postBuildActionList>
24.3 Using the Command Line Interface
One of the most useful features of InstallBuilder is the ability to automate the build process. Installers can be built from a shellscript or the command line by issuing the following command:
$> bin/builder build /path/to/project.xml
By default, it will build an installer for the current platform. However, you can pass an optional argument to the command lineto indicate the target platform to build for. For example:
$> bin/builder build /path/to/project.xml windows
On Windows, there are separate executables for the Graphical Builder Interface (builder.exe) and the Command LineInterface (builder-cli.exe). This is because Windows imposes a compilation-time switch to distinguish between commandline applications and graphical applications, the latter lacking the ability to write to the console.
You can build an installer from the command line on Windows by issuing the following command:
C:\Program Files\Bitrock InstallBuilder\bin/builder-cli.exe build /path/to/project.xml linux
It is also possible to set different project settings and variables from the command line by passing the option --setvars andits arguments as in the following example:
bin/builder build /path/to/project.xml --setvars project.fullName="New Project Name"project.version=0.1beta some_variable_name=some_value
where some_variable_name is a variable that will be available in the installer <preBuildActionList>.
In addition, the builder application allows some options for both the console and the GUI build process:
--help Display the list of valid options
--version Display product information
--verbose Write files being packed on command line builds
--license <license> Provide an alternative license to the builderDefault:
--debugtrace <debugtrace> Debug filenameDefault:
--setvars <setvars> Modify project variables before the build process: -- ←↩setvars installdir=/tmp project.version=1.5
BitRock InstallBuilder User Guide 8369 / 393
Default:
--downloadable-components Build downloadable components as separate files
--onlyprojectfiles On quickbuild mode, just update project files without ←↩considering new packed files
--project <project> Open specified project for editingDefault:
24.4 Creating Custom Builds
The preceding sections introduced the basic command line build process, specifying the project to build and the target platform.They also presented the --setvars flag, which allows some project elements to be modified. However, the build processallows much more significant customizations.
This example assumes that you plan to build two different installers. A complete project, including documentation and someoptional applications and a lightweight installer, that will only bundle the main project files. The obvious solution would be tohave two projects: one that bundles all of the components and the other with the primary project files. This can be achieved byorganizing the files and logic into components and using the <include> directive, which will allow you to separate them intomultiple .xml files.
The drawback of this approach is that you will be forced to duplicate some logic, such as the project properties. A more efficientapproach would be to have a single XML project file and decide whether or not to pack the components based on the build target.For example, you could use:
$> builder build project.xml --setvars buildFlavor=full
To build the complete installer and
$> builder build project.xml --setvars buildFlavor=minimal
to only pack the main application.
For this approach, you simply have to create a hidden parameter to make the buildFlavor type persistent at runtime and usethe <shouldPackRuleList>:
<project><shortName>myProject</shortName><version>1.4</version>...<parameterList>
...<stringParameter name="buildFlavor" value="minimal" ask="0"/>...
</parameterList><componentList>
<component><name>main</name>...
</component><component>
<name>optionalComponent</name>...<shouldPackRuleList>
<compareText text="${buildFlavor}" logic="equals" value="full"/></shouldPackRuleList>
</component></componentList>
</project>
BitRock InstallBuilder User Guide 8370 / 393
You could also combine it with the <preBuildActionList> and customize the particular aspects of the project as in:
<preBuildActionList><actionGroup>
<actionList><setInstallerVariable name="project.fullName"value="Basic Product Installation"/>
<setInstallerVariable name="project.windowsExecutableIcon"value="/path/to/minimal.ico"/><setInstallerVariable name="project.installerFilename"value="minimal-installation.exe"/>
</actionList><ruleList>
<compareText text="${buildFlavor}" logic="equals" value="minimal"/></ruleList>
</actionGroup><actionGroup>
<actionList><setInstallerVariable name="project.fullName"value="Full Product Installation"/>
<setInstallerVariable name="project.windowsExecutableIcon"value="/path/to/full.ico"/><setInstallerVariable name="project.installerFilename"value="full-installation.exe"/>
</actionList><ruleList>
<compareText text="${buildFlavor}" logic="equals" value="full"/></ruleList>
</actionGroup></preBuildActionList>
All the above functionality would work if you defined buildFlavor as a regular variable instead of creating a hidden param-eter, but you would not be able to access it at runtime in that case.
You can use that functionality, for example, to show a link to a download page at the end of installation if the user wants todownload optional applications:
<finalPageActionList><launchBrowser url="www.downloads.com/optional" progressText="Would youlike to visit our website to download additional modules?">
<ruleList><compareText text="${buildFlavor}" logic="equals" value="minimal"/>
</ruleList></launchBrowser>
</finalPageActionList>
BitRock InstallBuilder User Guide 8371 / 393
Chapter 25
Windows
This section summarizes all of the Windows-specific features that InstallBuilder provides as well as describes solutions forcommonly-found scenarios when creating Windows installers.
25.1 Windows Registry
The Windows Registry is a central hierarchical database in which Windows stores configuration information about the systemand information about the installed applications and devices.
It can be manually edited using the command line through the reg.exe command of executing the graphical registry editor,regedit.exe. It is organized in keys, which can contain other keys (subkeys) and values, which can have different formats.The root keys on Windows, which contain all of the other subkeys and values are:
• HKEY_LOCAL_MACHINE (HKLM): This key contains information about the configuration of the system that is common forall users. One of its subkeys, HKLM\SOFTWARE, contains information about the software in the machine organized by vendor(including Microsoft, for Windows itself). This subkey is especially useful to store per-application information such as theversion installed and the installation directory. This makes the detection of existing installations of your product a trivial taskusing InstallBuilder registry actions.
• HKEY_USERS (HKU): Contains all the user profiles configuration in the system.
• HKEY_CURRENT_USER (HKCU): This key contains information about the current logged-in user. It is not a real key but alink to the appropriate subkey inside HKEY_USERS. The same information is stored in both keys and writing in one of themautomatically updates the other.
• HKEY_CLASSES_ROOT (HKCR): Contains information about registered applications such as file associations. From Win-dows 2000, this key is a mix of the values in HKCU\Software\Classes and HKLM\Software\Classes. If a value isdefined in both, the one in HKCU\Software\Classes is used so per-user configuration always takes precedence.
• HKEY_CURRENT_CONFIG: Contains information about the hardware profile used by the computer at boot time.
These main keys contain many other subkeys, which allow hierarchically organizing the registry. Inside those keys, the data isstored in values, which allow the following types:
• REG_NONE: Data without type defined, treated as binary information.
• REG_SZ: Used for string values, for example paths.
• REG_EXPAND_SZ: This value is also intended to hold string values but in addition allows them to contain environmentvariables, which will be expanded when reading the data. For example if the data stored is %TEMP%\myFolder, it willbe automatically expanded to C:\Users\bitrock\AppData\Local\Temp\myFolder when accessed while a reg-ular REG_SZ value would have been resolved to just %TEMP%\myFolder. The Path environment variable defined inHKEY_LOCAL_MACHINE\SYSTEM\CurrentControlSet\Control\Session Manager\Environment is a goodexample of a REG_EXPAND_SZ value.
BitRock InstallBuilder User Guide 8372 / 393
• REG_BINARY: Binary data.
• REG_DWORD: A 32bit unsigned integer (little-endian)
• REG_DWORD_BIG_ENDIAN: A 32bit unsigned integer (big-endian)
• REG_LINK: This is used to create symbolic links to other keys, specifying the root key and the path to the target key.
• REG_MULTI_SZ: Stores a list of non-empty list of elements, separated by the null character. An example of this key is thevalue PendingFileRenameOperations under the key HKEY_LOCAL_MACHINE\SYSTEM\CurrentControlSet\Control\SessionManager, used to specify files to rename the next time the machine is restarted.
• REG_RESOURCE_LIST: A resource list. Used to store nested arrays by hardware devices
25.1.1 Managing the Windows Registry From InstallBuilder
Although the registry can be managed using the reg.exe command line tool using a <runProgram> action, InstallBuilderincludes a set of built-in actions that allow it to easily read, write and even find data in the registry:
• <registryGet>: Store the value of a registry key in an installer variable. If the key or name does not exist, then the variablewill be created empty.
<registryGet><!-- By default, InstallBuilder stores the installationdirectory in this key --><key>HKEY_LOCAL_MACHINE\SOFTWARE\${project.vendor}\${project.fullName}</key><name>Location</name><variable>previousInstallDir</variable>
</registryGet>
• <registrySet>: Create a new registry key or modify the value of an existing registry key.
<registrySet><!-- Update the installed version --><key>HKEY_LOCAL_MACHINE\SOFTWARE\${project.vendor}\${project.fullName}</key><name>Version</name><type>REG_SZ</type><value>${project.version}</value>
</registrySet>
• <registryDelete>: Delete a registry entry. If the entry to delete is only a registry key and it does not exist, the action willbe ignored. Deleting a registry value (key + name combination) that does not exist will trigger a regular error.
<!-- Clean installed keys --><registryDelete>
<abortOnError>0</abortOnError><key>HKEY_LOCAL_MACHINE\SOFTWARE\${project.vendor}\${project.fullName}</key><name></name>
</registryDelete>
• <registryGetKey>: Store in variable the first registry key that matches the given pattern, or set the variable to emptyotherwise. The search is case-sensitive for the whole key provided.
BitRock InstallBuilder User Guide 8373 / 393
<!-- Gets the first key referencing one of the applicationsunder ${project.vendor} --><registryGetKey>
<key>HKEY_LOCAL_MACHINE\SOFTWARE\${project.vendor}\*</key><variable>application</variable>
</registryGetKey>
• <registryGetMatch>: Store the value of the first match of a registry key matching a certain expression in an installervariable. If the key or name does not exist, then the variable will be created empty. The name can contain a wildcard expression(using *)
<!-- Gets the data of the first value in ourapplication key --><registryGetMatch>
<key>HKEY_LOCAL_MACHINE\SOFTWARE\${project.vendor}\${project.fullName}</key><name>Loc*</name><variable>location</variable>
</registryGetMatch>
• <registryFind>: Retrieve the first registry hive and content matching a certain expression and store it as a list in an installervariable. If no match is found the variable will be created empty. This is an extension of the <registryGetMatch> and<registryGetKey> actions, and much more powerful. If the <findAll> tag is set to 1, it will return a space-separatedlist of all of the matches. The result of this action is intended to be interpreted using a foreach action:
<registryFind><dataPattern>*Program Files*</dataPattern><findAll>0</findAll><keyPattern>*${project.fullName}*</keyPattern><namePattern>*</namePattern><rootKey>HKEY_LOCAL_MACHINE\SOFTWARE</rootKey><searchDepth>2</searchDepth><variable>result</variable>
</registryFind><foreach>
<variables>key name value</variables><values>${result}</values><actionList>
<showInfo><text>Key="${key}"
name="${name}"value="${value}"</text>
</showInfo></actionList>
</foreach>
A much more complex application of the <registryFind> action is explained here.
InstallBuilder also provides a <registryTest> rule:
<!-- Set update mode if we detect that a well-knownkey exists --><setInstallerVariable>
<name>project.installationType</name><value>upgrade</value><ruleList><registryTest>
<key>HKEY_LOCAL_MACHINE\SOFTWARE\${project.vendor}\${project.fullName}\</key><logic>exists</logic>
BitRock InstallBuilder User Guide 8374 / 393
<name>Location</name></registryTest>
</ruleList></setInstallerVariable>
<!-- Throw an error if a required product is not installed --><initializationActionList>
<throwError><text>You need to install "Some Other Product" to install ${project.fullName}</text><ruleList>
<registryTest><key>HKEY_LOCAL_MACHINE\SOFTWARE\Some Vendor\Some Other Product</key><logic>exists</logic><name></name>
</registryTest></ruleList>
</throwError></initializationActionList>
It is even possible to check the type of key:
<throwError><text>The registry key was corrupted. It exists but it is not a ‘REG_EXPAND_SZ‘ name</ ←↩
text><ruleList><registryTest>
<key>HKEY_LOCAL_MACHINE\SOFTWARE\${project.vendor}\${project.fullName}\</key><logic>exists</logic><name>myPath</name>
</registryTest><registryTest>
<key>HKEY_LOCAL_MACHINE\SOFTWARE\${project.vendor}\${project.fullName}</key><logic>is_not_type</logic><name>myPath</name><type>REG_EXPAND_SZ</type>
</registryTest></ruleList>
</throwError>
Keys representing a "path" in the registry must be separated by backslashesWhen referring to a key of the registry you have to provide a "path" with all of the parent keys as you would do with a realdirectory. Although InstallBuilder accepts using forward slashes instead of backslashes in Windows paths, backlashes aremandatory when working with the registry.An example of a correct reference to the key InstallBuilder:HKEY_LOCAL_MACHINE\SOFTWARE\BitRock\InstallBuilderBut if you use:HKEY_LOCAL_MACHINE\SOFTWARE\BitRock/InstallBuilderWhat the installer is going to look for is a key named BitRock/InstallBuilder, which is a perfectly valid key name butnot the one you expected.
25.1.2 Windows Registry in 64bit Systems
When accessing the registry, 32bit applications running on 64bit Windows are presented with a different view of some of the keys.This process allows the isolation of 32 and 64bit applications. If you take a look to how the registry looks in Windows 64bit withregedit you will see that some keys include a subkey named Wow6432Node. This key contains the registry keys correspond-ing to the 32bit view. For example, if a 32bit application tries to access HKEY_LOCAL_MACHINE\SOFTWARE\BitRock it
BitRock InstallBuilder User Guide 8375 / 393
will be transparently redirected to HKEY_LOCAL_MACHINE\SOFTWARE\Wow6432Node\BitRock. This process is knownas "registry redirection". The special key HKEY_LOCAL_MACHINE\SOFTWARE\Wow6432Node is not visible from the 32bitview, but although it is discouraged by Microsoft guidelines, in some Windows versions it can be accessed from the 64bit view.
As InstallBuilder generates 32bit applications, it will by default follow the same registry redirection when using any of its registryactions. This may be convenient if you are bundling a 32bit application or if you are trying to read keys written by other 32bitapplications but there are scenarios in which it is desirable to access the 64bit view of the registry (for example if you are bundlinga 64bit application).
For these scenarios, InstallBuilder includes two ways of configuring which view of the registry should be used:
• Project-level configuration: The easiest way to make your application access the 64bit view of the registry bydefault is by using the project property <windows64bitMode>. As explained in the next section, this setting enables muchmore than just making the 64bit view of the registry visible. Although the registry redirection is just enabled in 64bit OS, thissetting can be just always enabled, as it will be ignored in 32bit Windows. This way there is no need to maintain two differentprojects for the 32 and 64bit versions of your installer or to configure this setting at build-time. This setting is applied at thevery beginning of the installation process so it cannot be configured at runtime, it must be set at build-time or hardcoded in theXML project.
<project>...<!-- This will be ignored in 32bitsystems without consequences --><windows64bitMode>1</windows64bitMode>...
</project>
Is safe to always enable <windows64bitMode>Even if you are building a 32bit installer, you can keep <windows64bitMode> enabled in you project. On 32bit systems itwill just be ignored.
• Per-action configuration: All of the registry actions explained in the previous section accept an extra tag, <wowMode>,which allows configuring the registry view that will be accessed. Its default value is none, which allows the action use thedefault view. Setting none when using <windows64bitMode> will make the actions use the 64bit view on Windows x64.The tag also accepts 64 (which selects the 64bit view) and 32 as values (selecting the 32bit view) as values. The same waythe <windows64bitMode> tag is ignored in 32bit systems, setting 64 will also be ignored on them.
The <wowMode> tag takes precedence over the <windows64bitMode> so it is easy to configure the installer to use the 64bitview by default and just use the 32bit view when needed.
The example below tries to get the installed version of Microsoft SQL Server in the system, checking in both registryviews if the platform is 64bit:
<initializationActionList><registryGet>
<key>HKEY_LOCAL_MACHINE\SOFTWARE\Microsoft\MSSQLServer\MSSQLServer\CurrentVersion</ ←↩key>
<name>CurrentVersion</name><variable>currentVersion</variable>
</registryGet><!-- The 64bit version takes precedence so we check it in second place --><registryGet>
<key>HKEY_LOCAL_MACHINE\SOFTWARE\Microsoft\MSSQLServer\MSSQLServer\CurrentVersion</ ←↩key>
<name>CurrentVersion</name><variable>currentVersion</variable><wowMode>64</wowMode>
BitRock InstallBuilder User Guide 8376 / 393
<ruleList><platformTest type="windows-x64"/>
</ruleList></registryGet>
</initializationActionList>
Or, if you are using <windows64bitMode>, force checking in the 32bit version:
<project>...<windows64bitMode>1</windows64bitMode>...<initializationActionList>
<registryGet><key>HKEY_LOCAL_MACHINE\SOFTWARE\Microsoft\MSSQLServer\MSSQLServer\CurrentVersion</ ←↩
key><name>CurrentVersion</name><variable>currentVersion</variable>
</registryGet><!-- If we are using <windows64bitMode> and we couldn’t detecta 64bit version , check the 32bit key --><registryGet>
<key>HKEY_LOCAL_MACHINE\SOFTWARE\Microsoft\MSSQLServer\MSSQLServer\CurrentVersion</ ←↩key>
<name>CurrentVersion</name><variable>currentVersion</variable><wowMode>32</wowMode><ruleList>
<platformTest type="windows-x64"/><isTrue value="${project.windows64bitMode}"/><compareText text="${currentVersion}" logic="equals" value=""/>
</ruleList></registryGet>
</initializationActionList>...
</project>
In some versions of Windows, a 32bit key on Windows x64 can be accessed in two ways:
• Using the <wowMode>32</wowMode> setting (selecting the 32bit view):
<project>...<windows64bitMode>1</windows64bitMode>...<initializationActionList><registryGet>
<key>HKEY_LOCAL_MACHINE\SOFTWARE\BitRock\BitRock InstallBuilder Enterprise</key><name>Version</name><variable>ibVersion</variable><wowMode>32</wowMode><ruleList>
<platformTest type="windows-x64"/></ruleList>
</registryGet></initializationActionList>...
</project>
• Accessing the redirected key in the 64bit registry:
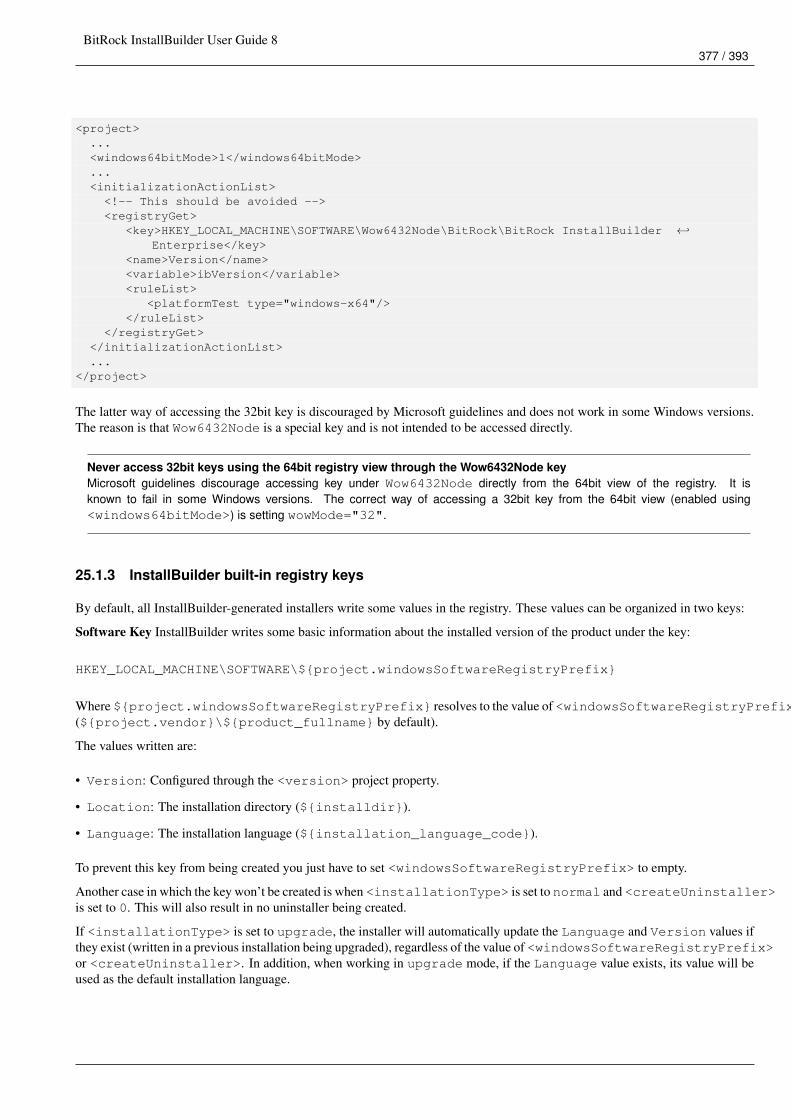
BitRock InstallBuilder User Guide 8377 / 393
<project>...<windows64bitMode>1</windows64bitMode>...<initializationActionList><!-- This should be avoided --><registryGet>
<key>HKEY_LOCAL_MACHINE\SOFTWARE\Wow6432Node\BitRock\BitRock InstallBuilder ←↩Enterprise</key>
<name>Version</name><variable>ibVersion</variable><ruleList>
<platformTest type="windows-x64"/></ruleList>
</registryGet></initializationActionList>...
</project>
The latter way of accessing the 32bit key is discouraged by Microsoft guidelines and does not work in some Windows versions.The reason is that Wow6432Node is a special key and is not intended to be accessed directly.
Never access 32bit keys using the 64bit registry view through the Wow6432Node keyMicrosoft guidelines discourage accessing key under Wow6432Node directly from the 64bit view of the registry. It isknown to fail in some Windows versions. The correct way of accessing a 32bit key from the 64bit view (enabled using<windows64bitMode>) is setting wowMode="32".
25.1.3 InstallBuilder built-in registry keys
By default, all InstallBuilder-generated installers write some values in the registry. These values can be organized in two keys:
Software Key InstallBuilder writes some basic information about the installed version of the product under the key:
HKEY_LOCAL_MACHINE\SOFTWARE\${project.windowsSoftwareRegistryPrefix}
Where ${project.windowsSoftwareRegistryPrefix} resolves to the value of <windowsSoftwareRegistryPrefix>(${project.vendor}\${product_fullname} by default).
The values written are:
• Version: Configured through the <version> project property.
• Location: The installation directory (${installdir}).
• Language: The installation language (${installation_language_code}).
To prevent this key from being created you just have to set <windowsSoftwareRegistryPrefix> to empty.
Another case in which the key won’t be created is when <installationType> is set to normal and <createUninstaller>is set to 0. This will also result in no uninstaller being created.
If <installationType> is set to upgrade, the installer will automatically update the Language and Version values ifthey exist (written in a previous installation being upgraded), regardless of the value of <windowsSoftwareRegistryPrefix>or <createUninstaller>. In addition, when working in upgrade mode, if the Language value exists, its value will beused as the default installation language.
BitRock InstallBuilder User Guide 8378 / 393
How to prevent the creation of the Software keysTo prevent the installer from writing the values under the HKEY_LOCAL_MACHINE\SOFTWARE key, just set the<windowsSoftwareRegistryPrefix> to empty.
Add/Remove Program Menu Key The information stored in this key is used to populate the Add/Remove Program Menu. Theinformation is organized in a set of values under the key:
HKEY_LOCAL_MACHINE\SOFTWARE\Microsoft\Windows\CurrentVersion\Uninstall\${project.windowsARPRegistryPrefix}
Where ${project.windowsARPRegistryPrefix} resolves to the value of <windowsARPRegistryPrefix> (${project.fullName}${project.version} by default). The values written by InstallBuilder are:
• DisplayName: Configured through the <productDisplayName> project property.
• DisplayVersion: Configured through the <version> project property.
• Publisher: Configured through the <vendor> project property.
• DisplayIcon: Configured through the <productDisplayIcon> project property.
• UrlInfoAbout: Configured through the <productUrlInfoAbout> project property.
• Comments: Configured through the <productComments> project property.
• Contact: Configured through the <productContact> project property.
• HelpLink: Configured through the <productUrlHelpLink> project property.
• UninstallString: Contains the path to the uninstaller.
• InstallLocation: The installation directory (${installdir})
• NoModify: If set to 1, disables the Modify button in the ARP Menu.
• NoRepair: If set to 1, disables the Repair button in the ARP Menu.
• EstimatedSize: The size of the installed application. This value is calculated at runtime based on the installed files.
• InstallDate: The installation date.
This key is also just created when <installationType> is set to normal and <createUninstaller> is set to 1.
If <installationType> is set to upgrade, the installer will update the DisplayVersion and DisplayName valuesif they exist (written in a previous installation being upgraded).
Setting <installationType> to normal and <createUninstaller> to 0 will avoid creating or updating any key.
These keys are automatically deleted when uninstalling the product so you don’t have to add any additional logic to the uninstallerfor that.
25.2 Windows 64bit
InstallBuilder allows you to build installers that are 32bit applications, but can be used to properly deploy applications and driversto 64bit operating systems.
Although 32bit installers are fully compatible with 64bit systems, they are treated differently than native 64bit applications. Theymost important differences are:
• When accessing the registry, they are automatically redirected to keys in the 32bit view of the registry. This can be configuredusing the <wowMode> tag in the registry actions or through the <windows64bitMode> project property. The registryredirection process is explained in detail in the Windows 64bit registry section.
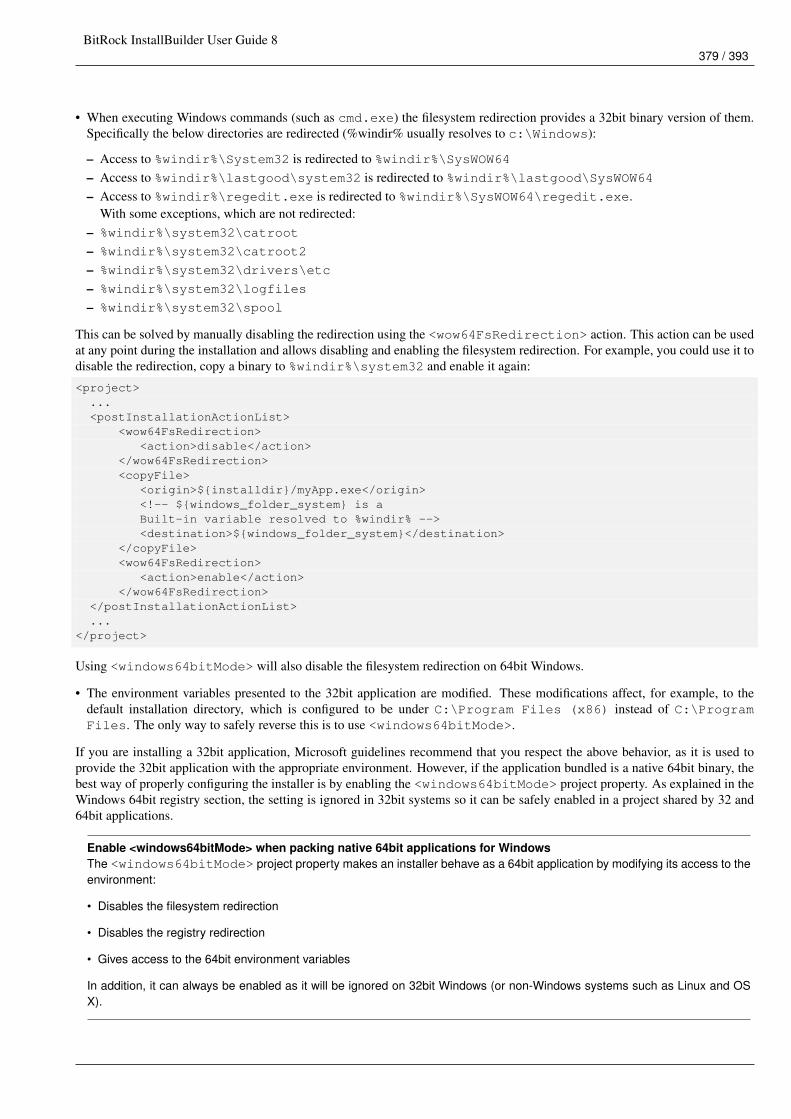
BitRock InstallBuilder User Guide 8379 / 393
• When executing Windows commands (such as cmd.exe) the filesystem redirection provides a 32bit binary version of them.Specifically the below directories are redirected (%windir% usually resolves to c:\Windows):
– Access to %windir%\System32 is redirected to %windir%\SysWOW64– Access to %windir%\lastgood\system32 is redirected to %windir%\lastgood\SysWOW64– Access to %windir%\regedit.exe is redirected to %windir%\SysWOW64\regedit.exe.
With some exceptions, which are not redirected:– %windir%\system32\catroot
– %windir%\system32\catroot2
– %windir%\system32\drivers\etc
– %windir%\system32\logfiles
– %windir%\system32\spool
This can be solved by manually disabling the redirection using the <wow64FsRedirection> action. This action can be usedat any point during the installation and allows disabling and enabling the filesystem redirection. For example, you could use it todisable the redirection, copy a binary to %windir%\system32 and enable it again:
<project>...<postInstallationActionList>
<wow64FsRedirection><action>disable</action>
</wow64FsRedirection><copyFile>
<origin>${installdir}/myApp.exe</origin><!-- ${windows_folder_system} is aBuilt-in variable resolved to %windir% --><destination>${windows_folder_system}</destination>
</copyFile><wow64FsRedirection>
<action>enable</action></wow64FsRedirection>
</postInstallationActionList>...
</project>
Using <windows64bitMode> will also disable the filesystem redirection on 64bit Windows.
• The environment variables presented to the 32bit application are modified. These modifications affect, for example, to thedefault installation directory, which is configured to be under C:\Program Files (x86) instead of C:\ProgramFiles. The only way to safely reverse this is to use <windows64bitMode>.
If you are installing a 32bit application, Microsoft guidelines recommend that you respect the above behavior, as it is used toprovide the 32bit application with the appropriate environment. However, if the application bundled is a native 64bit binary, thebest way of properly configuring the installer is by enabling the <windows64bitMode> project property. As explained in theWindows 64bit registry section, the setting is ignored in 32bit systems so it can be safely enabled in a project shared by 32 and64bit applications.
Enable <windows64bitMode> when packing native 64bit applications for WindowsThe <windows64bitMode> project property makes an installer behave as a 64bit application by modifying its access to theenvironment:
• Disables the filesystem redirection
• Disables the registry redirection
• Gives access to the 64bit environment variables
In addition, it can always be enabled as it will be ignored on 32bit Windows (or non-Windows systems such as Linux and OSX).
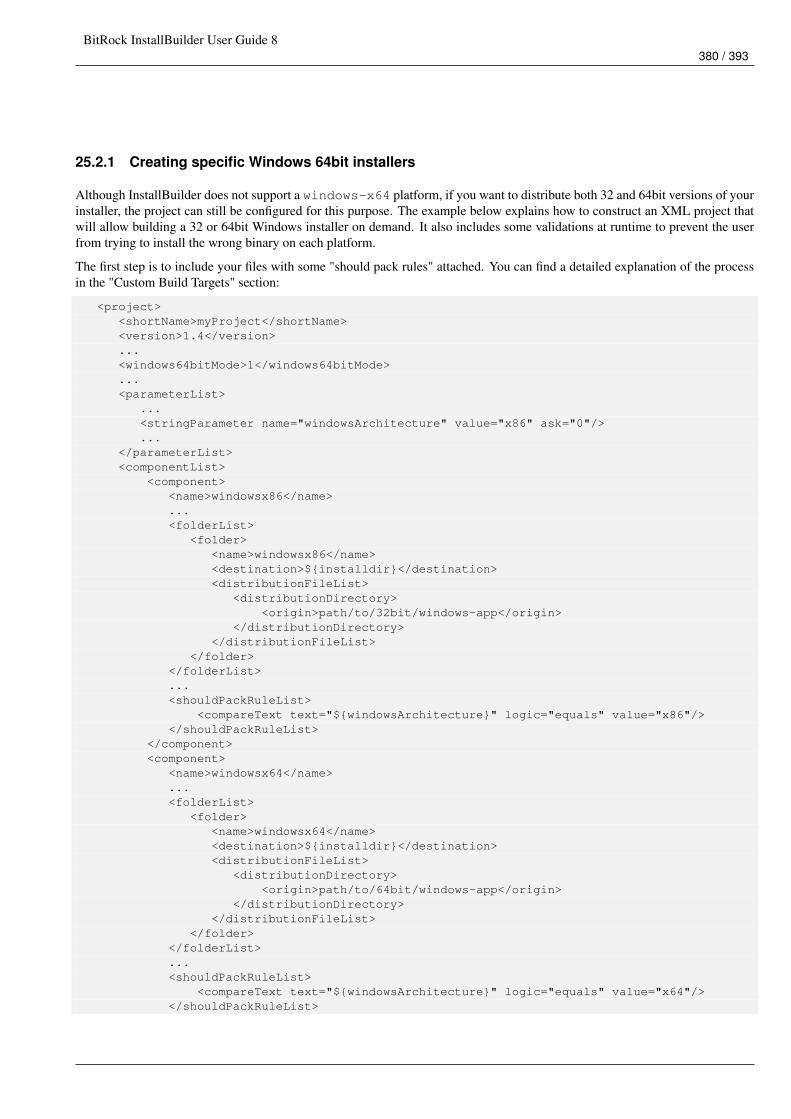
BitRock InstallBuilder User Guide 8380 / 393
25.2.1 Creating specific Windows 64bit installers
Although InstallBuilder does not support a windows-x64 platform, if you want to distribute both 32 and 64bit versions of yourinstaller, the project can still be configured for this purpose. The example below explains how to construct an XML project thatwill allow building a 32 or 64bit Windows installer on demand. It also includes some validations at runtime to prevent the userfrom trying to install the wrong binary on each platform.
The first step is to include your files with some "should pack rules" attached. You can find a detailed explanation of the processin the "Custom Build Targets" section:
<project><shortName>myProject</shortName><version>1.4</version>...<windows64bitMode>1</windows64bitMode>...<parameterList>
...<stringParameter name="windowsArchitecture" value="x86" ask="0"/>...
</parameterList><componentList>
<component><name>windowsx86</name>...<folderList>
<folder><name>windowsx86</name><destination>${installdir}</destination><distributionFileList>
<distributionDirectory><origin>path/to/32bit/windows-app</origin>
</distributionDirectory></distributionFileList>
</folder></folderList>...<shouldPackRuleList>
<compareText text="${windowsArchitecture}" logic="equals" value="x86"/></shouldPackRuleList>
</component><component>
<name>windowsx64</name>...<folderList>
<folder><name>windowsx64</name><destination>${installdir}</destination><distributionFileList>
<distributionDirectory><origin>path/to/64bit/windows-app</origin>
</distributionDirectory></distributionFileList>
</folder></folderList>...<shouldPackRuleList>
<compareText text="${windowsArchitecture}" logic="equals" value="x64"/></shouldPackRuleList>
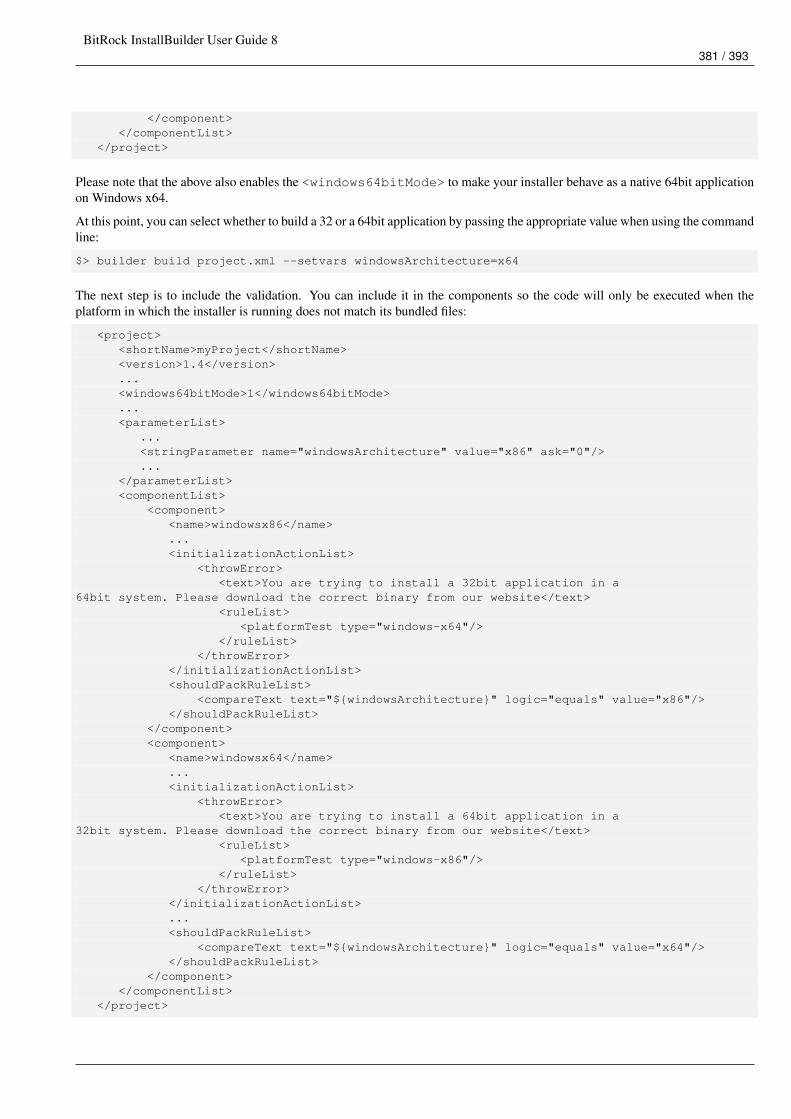
BitRock InstallBuilder User Guide 8381 / 393
</component></componentList>
</project>
Please note that the above also enables the <windows64bitMode> to make your installer behave as a native 64bit applicationon Windows x64.
At this point, you can select whether to build a 32 or a 64bit application by passing the appropriate value when using the commandline:
$> builder build project.xml --setvars windowsArchitecture=x64
The next step is to include the validation. You can include it in the components so the code will only be executed when theplatform in which the installer is running does not match its bundled files:
<project><shortName>myProject</shortName><version>1.4</version>...<windows64bitMode>1</windows64bitMode>...<parameterList>
...<stringParameter name="windowsArchitecture" value="x86" ask="0"/>...
</parameterList><componentList>
<component><name>windowsx86</name>...<initializationActionList>
<throwError><text>You are trying to install a 32bit application in a
64bit system. Please download the correct binary from our website</text><ruleList>
<platformTest type="windows-x64"/></ruleList>
</throwError></initializationActionList><shouldPackRuleList>
<compareText text="${windowsArchitecture}" logic="equals" value="x86"/></shouldPackRuleList>
</component><component>
<name>windowsx64</name>...<initializationActionList>
<throwError><text>You are trying to install a 64bit application in a
32bit system. Please download the correct binary from our website</text><ruleList>
<platformTest type="windows-x86"/></ruleList>
</throwError></initializationActionList>...<shouldPackRuleList>
<compareText text="${windowsArchitecture}" logic="equals" value="x64"/></shouldPackRuleList>
</component></componentList>
</project>
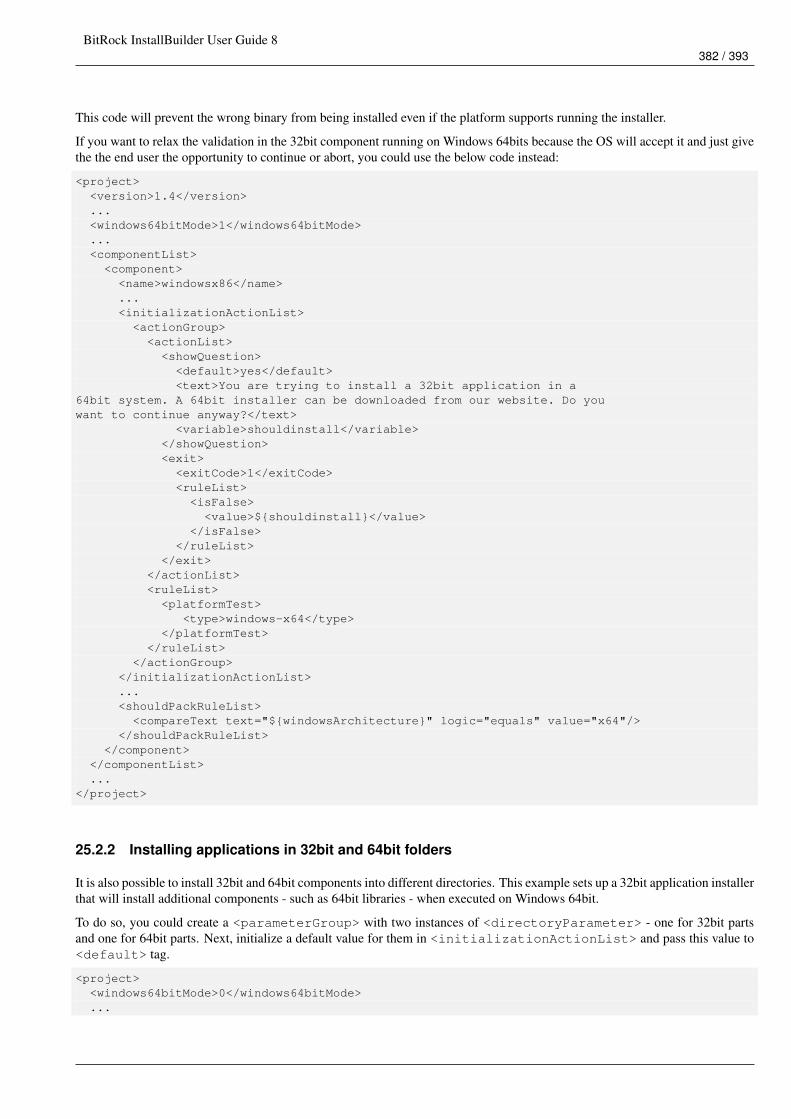
BitRock InstallBuilder User Guide 8382 / 393
This code will prevent the wrong binary from being installed even if the platform supports running the installer.
If you want to relax the validation in the 32bit component running on Windows 64bits because the OS will accept it and just givethe the end user the opportunity to continue or abort, you could use the below code instead:
<project><version>1.4</version>...<windows64bitMode>1</windows64bitMode>...<componentList><component>
<name>windowsx86</name>...<initializationActionList>
<actionGroup><actionList>
<showQuestion><default>yes</default><text>You are trying to install a 32bit application in a
64bit system. A 64bit installer can be downloaded from our website. Do youwant to continue anyway?</text>
<variable>shouldinstall</variable></showQuestion><exit><exitCode>1</exitCode><ruleList><isFalse>
<value>${shouldinstall}</value></isFalse>
</ruleList></exit>
</actionList><ruleList>
<platformTest><type>windows-x64</type>
</platformTest></ruleList>
</actionGroup></initializationActionList>...<shouldPackRuleList>
<compareText text="${windowsArchitecture}" logic="equals" value="x64"/></shouldPackRuleList>
</component></componentList>...
</project>
25.2.2 Installing applications in 32bit and 64bit folders
It is also possible to install 32bit and 64bit components into different directories. This example sets up a 32bit application installerthat will install additional components - such as 64bit libraries - when executed on Windows 64bit.
To do so, you could create a <parameterGroup> with two instances of <directoryParameter> - one for 32bit partsand one for 64bit parts. Next, initialize a default value for them in <initializationActionList> and pass this value to<default> tag.
<project><windows64bitMode>0</windows64bitMode>...
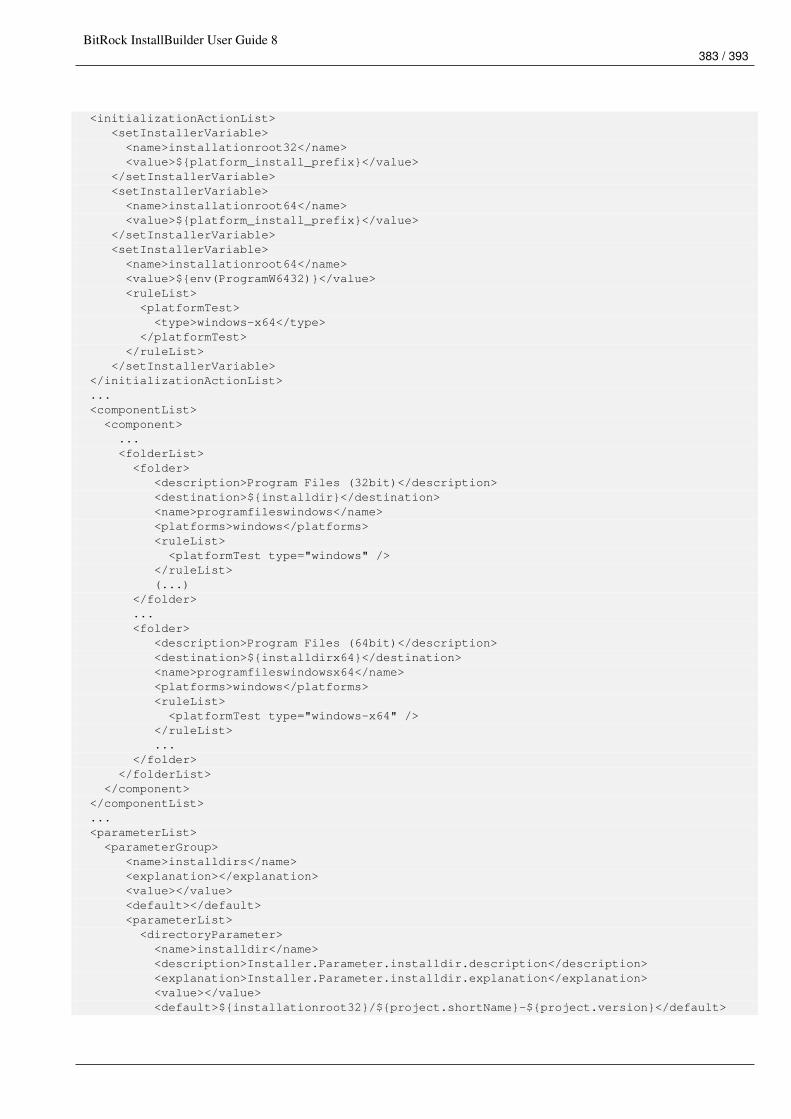
BitRock InstallBuilder User Guide 8383 / 393
<initializationActionList><setInstallerVariable><name>installationroot32</name><value>${platform_install_prefix}</value>
</setInstallerVariable><setInstallerVariable><name>installationroot64</name><value>${platform_install_prefix}</value>
</setInstallerVariable><setInstallerVariable><name>installationroot64</name><value>${env(ProgramW6432)}</value><ruleList>
<platformTest><type>windows-x64</type>
</platformTest></ruleList>
</setInstallerVariable></initializationActionList>...<componentList><component>
...<folderList>
<folder><description>Program Files (32bit)</description><destination>${installdir}</destination><name>programfileswindows</name><platforms>windows</platforms><ruleList><platformTest type="windows" />
</ruleList>(...)
</folder>...<folder>
<description>Program Files (64bit)</description><destination>${installdirx64}</destination><name>programfileswindowsx64</name><platforms>windows</platforms><ruleList><platformTest type="windows-x64" />
</ruleList>...
</folder></folderList>
</component></componentList>...<parameterList><parameterGroup>
<name>installdirs</name><explanation></explanation><value></value><default></default><parameterList>
<directoryParameter><name>installdir</name><description>Installer.Parameter.installdir.description</description><explanation>Installer.Parameter.installdir.explanation</explanation><value></value><default>${installationroot32}/${project.shortName}-${project.version}</default>
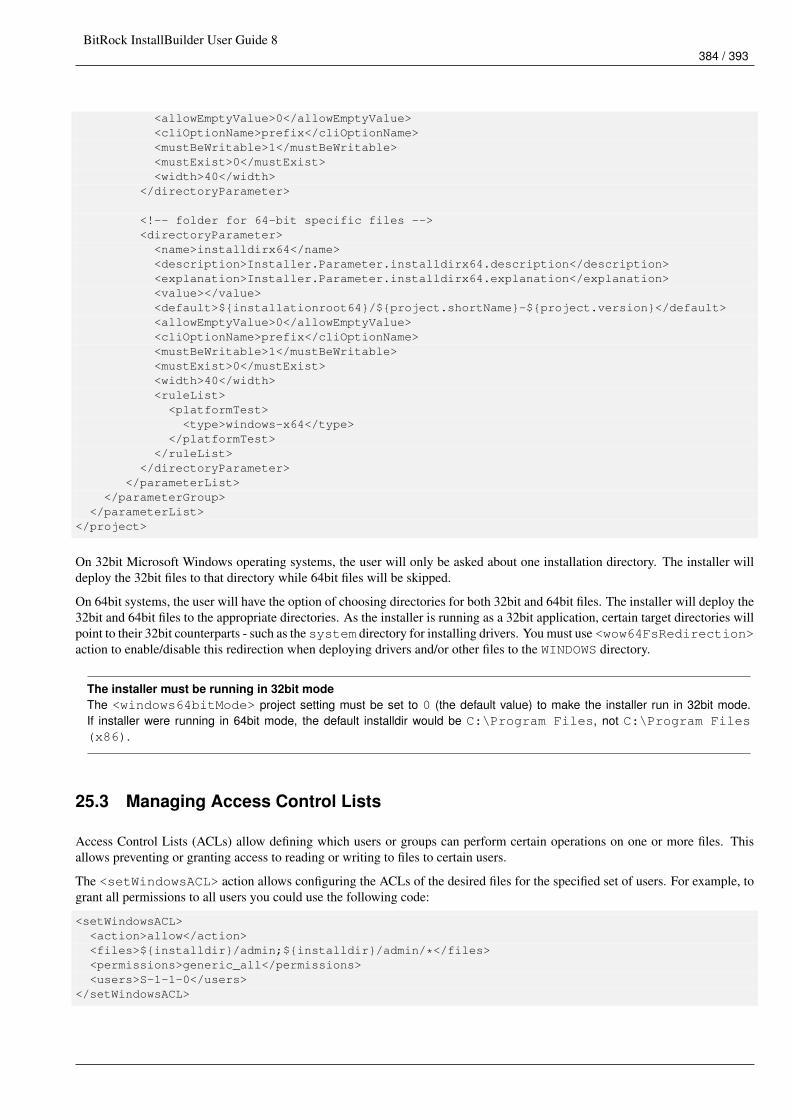
BitRock InstallBuilder User Guide 8384 / 393
<allowEmptyValue>0</allowEmptyValue><cliOptionName>prefix</cliOptionName><mustBeWritable>1</mustBeWritable><mustExist>0</mustExist><width>40</width>
</directoryParameter>
<!-- folder for 64-bit specific files --><directoryParameter>
<name>installdirx64</name><description>Installer.Parameter.installdirx64.description</description><explanation>Installer.Parameter.installdirx64.explanation</explanation><value></value><default>${installationroot64}/${project.shortName}-${project.version}</default><allowEmptyValue>0</allowEmptyValue><cliOptionName>prefix</cliOptionName><mustBeWritable>1</mustBeWritable><mustExist>0</mustExist><width>40</width><ruleList><platformTest>
<type>windows-x64</type></platformTest>
</ruleList></directoryParameter>
</parameterList></parameterGroup>
</parameterList></project>
On 32bit Microsoft Windows operating systems, the user will only be asked about one installation directory. The installer willdeploy the 32bit files to that directory while 64bit files will be skipped.
On 64bit systems, the user will have the option of choosing directories for both 32bit and 64bit files. The installer will deploy the32bit and 64bit files to the appropriate directories. As the installer is running as a 32bit application, certain target directories willpoint to their 32bit counterparts - such as the system directory for installing drivers. You must use <wow64FsRedirection>action to enable/disable this redirection when deploying drivers and/or other files to the WINDOWS directory.
The installer must be running in 32bit modeThe <windows64bitMode> project setting must be set to 0 (the default value) to make the installer run in 32bit mode.If installer were running in 64bit mode, the default installdir would be C:\Program Files, not C:\Program Files(x86).
25.3 Managing Access Control Lists
Access Control Lists (ACLs) allow defining which users or groups can perform certain operations on one or more files. Thisallows preventing or granting access to reading or writing to files to certain users.
The <setWindowsACL> action allows configuring the ACLs of the desired files for the specified set of users. For example, togrant all permissions to all users you could use the following code:
<setWindowsACL><action>allow</action><files>${installdir}/admin;${installdir}/admin/*</files><permissions>generic_all</permissions><users>S-1-1-0</users>
</setWindowsACL>
BitRock InstallBuilder User Guide 8385 / 393
The <setWindowsACL> action supports the following tags:
• <users>: Comma separated list of users to set permissions for.
• <action>: Whether to allow (allow action) or deny (deny action).
• <permissions>: Space-separated list of permissions to set
• <files>: List of files or file patterns to match; separated by semi-colon or newlines.
• <excludeFiles>: List of files or file patterns to exclude from the defined <files>.
• <self>: Determines if the objects specified in the <files> tag will be modified or just their children, if the recursion tagsare enabled.
• <recurseOneLevelOnly>: If enabled, the action will only affect the first level of hierarchy if one of the below is enabled.
• <recurseObjects>: The action will affect to child objects (files)
• <recurseContainers>: The action will affect to child to containers (folders)
The <clearWindowsACL> action allows removing all of the ACLs for the specified files or directories.
For example, in order to make sure just the Administrators group can access some files, you should first remove all of the currentACLs (that may be inherited from a parent directory) and then the permissions appropriately:
<clearWindowsACL><files>${installdir}/admin;${installdir}/admin/*</files>
</clearWindowsACL><setWindowsACL>
<action>allow</action><files>${installdir}/admin;${installdir}/admin/*</files><permissions>file_all_access</permissions><users>S-1-5-32-544</users>
</setWindowsACL>
The <clearWindowsACL> action supports the following tags:
• <files>: List of files or file patterns to match; separated by semi-colon or newlines
• <excludeFiles>: List of files or file patterns to exclude from the defined <files>.
It is also possible to retrieve the ACL for a given user over a certain file using the <getWindowsACL> action. For example,the following will set granted and denied variables to the space-separated list of permissions for specified user:
<getWindowsACL><deniedPermissions>denied</deniedPermissions><file>${installdir}/admin</file><grantedPermissions>granted</grantedPermissions><username>S-1-1-0</username>
</getWindowsACL>
The <getWindowsACL> action supports the below tags:
• <file>: File to retrieve the list of permissions for.
• <username>: User or group to retrieve the list of permissions for.
• <grantedPermissions>: Variable used to store the list of granted permissions.
• <deniedPermissions>: Variable used to store the list of denied permissions.
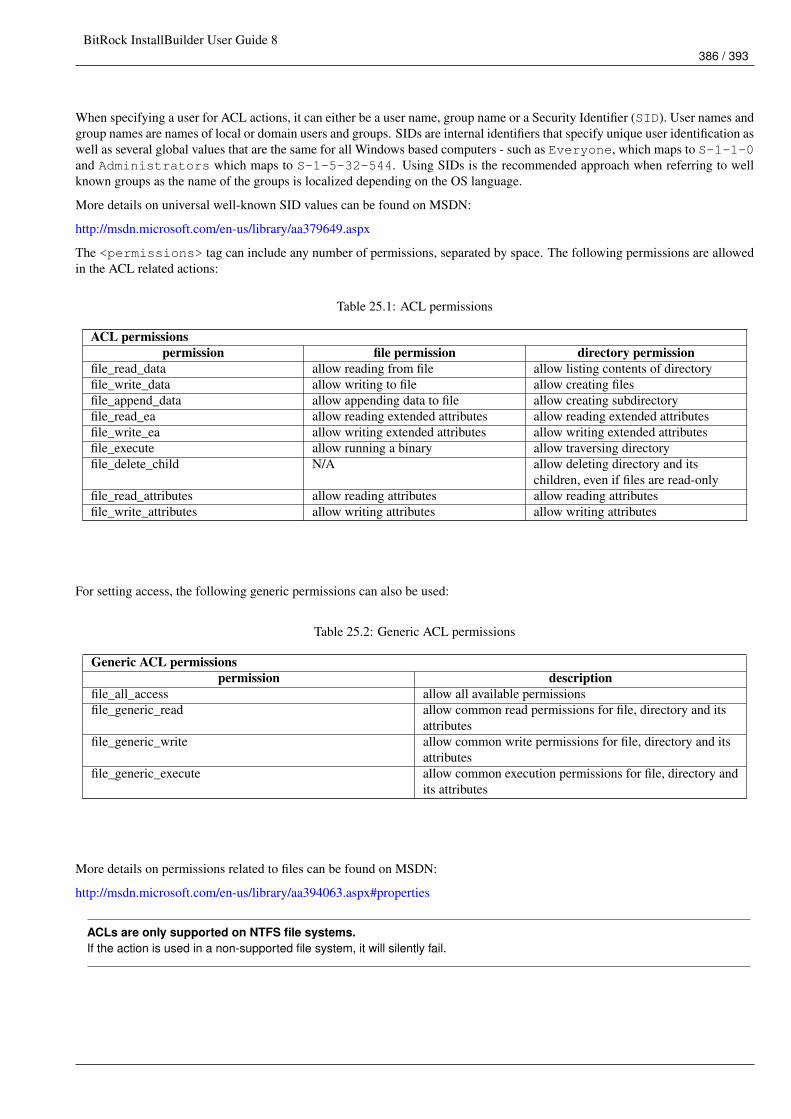
BitRock InstallBuilder User Guide 8386 / 393
When specifying a user for ACL actions, it can either be a user name, group name or a Security Identifier (SID). User names andgroup names are names of local or domain users and groups. SIDs are internal identifiers that specify unique user identification aswell as several global values that are the same for all Windows based computers - such as Everyone, which maps to S-1-1-0and Administrators which maps to S-1-5-32-544. Using SIDs is the recommended approach when referring to wellknown groups as the name of the groups is localized depending on the OS language.
More details on universal well-known SID values can be found on MSDN:
http://msdn.microsoft.com/en-us/library/aa379649.aspx
The <permissions> tag can include any number of permissions, separated by space. The following permissions are allowedin the ACL related actions:
Table 25.1: ACL permissions
ACL permissionspermission file permission directory permission
file_read_data allow reading from file allow listing contents of directoryfile_write_data allow writing to file allow creating filesfile_append_data allow appending data to file allow creating subdirectoryfile_read_ea allow reading extended attributes allow reading extended attributesfile_write_ea allow writing extended attributes allow writing extended attributesfile_execute allow running a binary allow traversing directoryfile_delete_child N/A allow deleting directory and its
children, even if files are read-onlyfile_read_attributes allow reading attributes allow reading attributesfile_write_attributes allow writing attributes allow writing attributes
For setting access, the following generic permissions can also be used:
Table 25.2: Generic ACL permissions
Generic ACL permissionspermission description
file_all_access allow all available permissionsfile_generic_read allow common read permissions for file, directory and its
attributesfile_generic_write allow common write permissions for file, directory and its
attributesfile_generic_execute allow common execution permissions for file, directory and
its attributes
More details on permissions related to files can be found on MSDN:
http://msdn.microsoft.com/en-us/library/aa394063.aspx#properties
ACLs are only supported on NTFS file systems.If the action is used in a non-supported file system, it will silently fail.
BitRock InstallBuilder User Guide 8387 / 393
25.4 Changing file attributes
File and folder attributes are set using the <changeWindowsAttributes> action.
For example, the following action can be used to set read-only and system attributes for admin subdirectory and all itschild files:
<changeWindowsAttributes><files>${installdir}/admin;${installdir}/admin/*</files><readOnly>1</readOnly><system>1</system>
</changeWindowsAttributes>
It accepts the following tags:
• <files>: List of files or file patterns to match; separated by semi-colon or newlines
• <excludeFiles>: List of files or file patterns to exclude from the defined <files>.
• <hidden>: Whether or not the specified files should not be visible in applications such as Windows Explorer.
• <readOnly>: Whether or not the specified files should allow write access.
• <system>: Whether or not the specified files must be marked as system files.
• <archive>: Whether or not the specified files must be marked to be archived. Some applications use this attribute to knowwhich files should be backed up.
Please note that only setting these attributes does not prevent users from modifying the files, as the user can still unset each ofthese attributes manually. In order to prevent users (such as non-administrators) from modifying or accessing certain files, AccessControl Lists should be used instead.
Read-only and system attributes can only be set for files. They are ignored by the operating system if applied to a folder. It isdocumented in more detail by Microsoft:
http://support.microsoft.com/kb/326549
25.5 Digitally signing Microsoft Windows installers
InstallBuilder binaries for Microsoft Windows can be digitally signed using the signtool command-line utility. It is a part ofVisual Studio and Windows SDK packages.
The following example shows how signtool can be used to digitally sign an installer as part of <postBuildActionList>:
<postBuildActionList><runProgram>
<program>/path/to/signtool</program><programArguments>sign /f certfile.pfx "${installbuilder_install_root}/${project. ←↩
installerFilename}"</programArguments></runProgram>
</postBuildActionList>
The detailed syntax of the signtool command can be found on MSDN:
http://msdn.microsoft.com/en-us/library/8s9b9yaz.aspx
A limitation of this tool is that it does not allow re-signing an installer. Therefore, performing multiple quick builds would fail,as the tool would try to sign the same installer multiple times. For testing purposes, it may be convenient to only sign the outputbinary if certain flag is set - such as:
BitRock InstallBuilder User Guide 8388 / 393
<postBuildActionList><runProgram>
<program>/path/to/signtool</program><programArguments>sign /f certfile.pfx "${installbuilder_install_root}/${project. ←↩
installerFilename}"</programArguments><ruleList>
<isTrue value="${runSignTool}" /></ruleList>
</runProgram></postBuildActionList>
This will only sign the binary if runSignTool variable is set. A final build could be then run in the following way:
C:\Program Files\Bitrock InstallBuilder\bin/builder-cli.exe build /path/to/project.xml windows --setvars runSignTool=1
While regular use of the builder GUI and CLI modes will not cause the target binary to be signed.
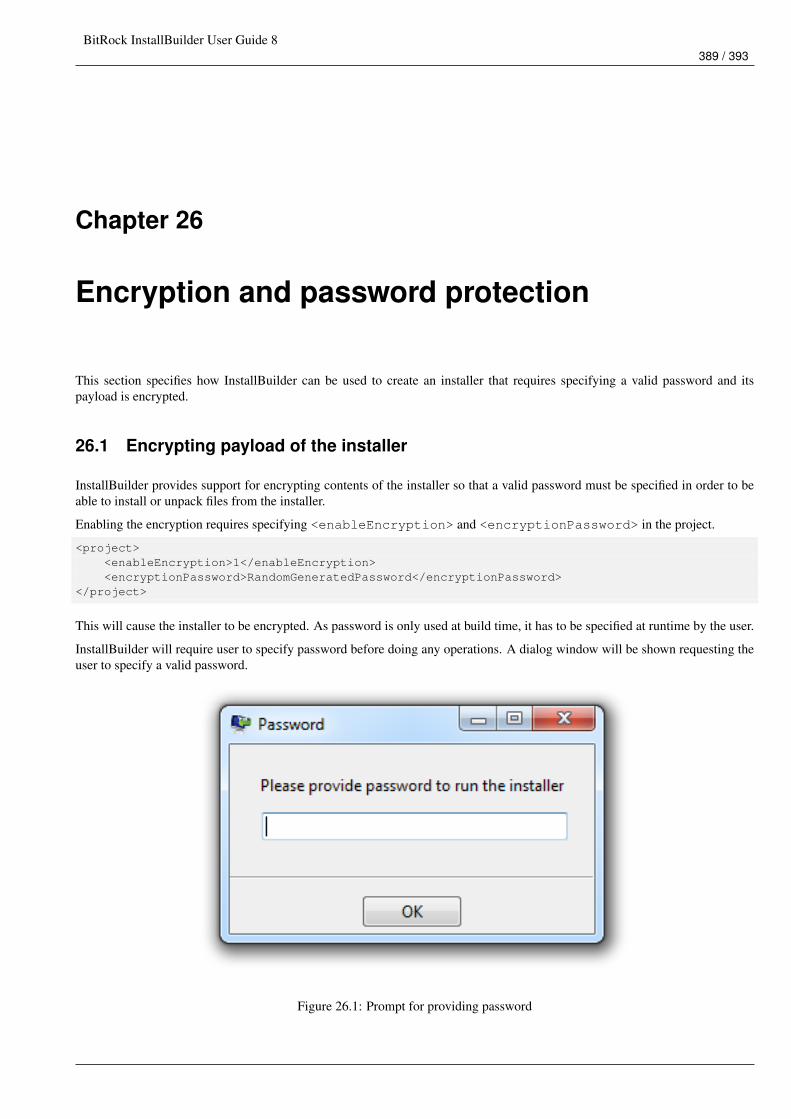
BitRock InstallBuilder User Guide 8389 / 393
Chapter 26
Encryption and password protection
This section specifies how InstallBuilder can be used to create an installer that requires specifying a valid password and itspayload is encrypted.
26.1 Encrypting payload of the installer
InstallBuilder provides support for encrypting contents of the installer so that a valid password must be specified in order to beable to install or unpack files from the installer.
Enabling the encryption requires specifying <enableEncryption> and <encryptionPassword> in the project.
<project><enableEncryption>1</enableEncryption><encryptionPassword>RandomGeneratedPassword</encryptionPassword>
</project>
This will cause the installer to be encrypted. As password is only used at build time, it has to be specified at runtime by the user.
InstallBuilder will require user to specify password before doing any operations. A dialog window will be shown requesting theuser to specify a valid password.
Figure 26.1: Prompt for providing password
BitRock InstallBuilder User Guide 8390 / 393
The user cannot continue until a correct password is entered. Specifying an empty password or closing the window causes theinstaller to exit immediately.
26.2 Support for platforms and build types
26.2.1 Supported platforms
Encryption is supported on the following platforms:
• Linux x86 and x64
• Microsoft Windows
• Mac OS X
When building an installer for other platforms, encryption is not enabled and the <setEncryptionPassword> action mustnot be invoked.
Support for older operating systemsEncryption is not supported on Mac OS X 10.2 and Linux x86 when legacy mode is enabled. On those platforms, if encryptionis enabled, InstallBuilder will not allow be able to decrypt its contents and <setEncryptionPassword> action will reportappropriate error.
26.2.2 RPM and DEB packages
Encryption is not supported for creation of RPM and DEB packages creation. In those modes, files are copied and installed bynative package system and not InstallBuilder.
Enabling encryption in these targets is ignored and built same as when encryption is disabled.
26.2.3 Downloadable components
When encryption is enabled, all downloadable components are also encrypted using the same key as files embedded in theinstaller.
An installer with downloadable components will work the same both when its contents is encrypted and when encryption isdisabled.
26.2.4 Multiplatform CD-ROM mode
Creating a CD-ROM mode installer with encrypted contents requires enabling both <enableEncryption> and <compressPackedFiles>.
<project><enableEncryption>1</enableEncryption><encryptionPassword>RandomGeneratedPassword</encryptionPassword><compressPackedFiles>1</compressPackedFiles>...
</project>
When encryption is enabled and building CD-ROM installer, contents of all files is encrypted and installers only for supportedplatforms will be able to properly perform the installation. Installers for platforms without support for encryption will not be ableto access the data due to it being encrypted.
Therefore it is recommended to specify platforms to build for CD-ROM mode using <cdromPlatforms,project.cdromPlatforms)tag.
BitRock InstallBuilder User Guide 8391 / 393
<project><enableEncryption>1</enableEncryption><encryptionPassword>RandomGeneratedPassword</encryptionPassword><compressPackedFiles>1</compressPackedFiles><cdromPlatforms>osx windows linux linux-x64</cdromPlatforms>...
</project>
This will not create installers for platforms that will be able to access encrypted files.
26.3 Manually specifying password
It is also possible to disable the default dialog that prompts the user for password and use <setEncryptionPassword>action to specify the password. This can be done by specifying 0 for <requirePasswordOnStartup>.
<project><enableEncryption>1</enableEncryption><encryptionPassword>RandomGeneratedPassword</encryptionPassword><requirePasswordOnStartup>0</requirePasswordOnStartup>
</project>
With the password prompt disabled, the installer will show the frontend, however, any file operations will fail until <setEncryptionPassword>action is run with correct password. It can be put in a parameter’s <validationActionList> to disallow continuing untila valid password is specified.
The following parameter will ask the user for payload password and run the <setEncryptionPassword> action to verifyand set the password.
<project><enableEncryption>1</enableEncryption><encryptionPassword>RandomGeneratedPassword</encryptionPassword>...<parameterList>
...<stringParameter>
<name>password</name>...<validationActionList>
<setEncryptionPassword><password>${password}</password>
</setEncryptionPassword></validationActionList>
</stringParameter></parameterList>
</project>
The action <setEncryptionPassword> throws an error whenever password is incorrect and user will not be able to proceeduntil a valid password is specified. The action may take up to 1 second as the number of computations to verify the password isvery large.
After the action is run without errors, the installation may proceed.
Accessing files and folders using actionsSince payload is encrypted, it is not possible to use actions such as <unpackFile> and <unpackDirectory> beforeuser specifies the password and <setEncryptionPassword> action is run if <requirePasswordOnStartup> isset to 0. After the action is invoked, the actions to unpack contents of installer may be invoked freely and will work normally.
BitRock InstallBuilder User Guide 8392 / 393
26.3.1 Retrieving password over the Internet
Often it is more feasible not to provide end users with password to extract the payload but to allow users to specify their individualkey or login and password. This, combined with HTTPS protocol, can be used to request a password based on other information.
<project><enableEncryption>1</enableEncryption><encryptionPassword>RandomGeneratedPassword</encryptionPassword><requirePasswordOnStartup>0</requirePasswordOnStartup>...<parameterList>
<parameterGroup><name>retrievepassword</name><title>Activate application</title><explanation>Please specify example.com username and password</explanation><parameterList>
<stringParameter><name>username</name><description>Username</description><allowEmptyValue>0</allowEmptyValue>
</stringParameter><passwordParameter>
<name>password</name><description>Password</description><allowEmptyValue>0</allowEmptyValue><askForConfirmation>0</askForConfirmation>
</passwordParameter></parameterList><validationActionList>
<httpPost><customErrorMessage>Unable to contact activation server</ ←↩
customErrorMessage><filename>${system_temp_directory}/encryptionpassword</filename><url>https://example.com/api/installer/getpasswordkey</url><queryParameterList>
<queryParameter><name>username</name><value>${username}</value>
</queryParameter><queryParameter>
<name>password</name><value>${password}</value>
</queryParameter></queryParameterList>
</httpPost><readFile>
<name>encryptionpassword</name><path>${system_temp_directory}/encryptionpassword</path>
</readFile><deleteFile>
<path>${system_temp_directory}/encryptionpassword</path></deleteFile><setEncryptionPassword>
<customErrorMessage>Activation failed</customErrorMessage><password>${encryptionpassword}</password>
</setEncryptionPassword></validationActionList>
</parameterGroup></parameterList>
</project>

BitRock InstallBuilder User Guide 8393 / 393
Example above shows how to ask for username and password so that remote server will either accept and provide a passwordvalid for this product version or reject the request and provide an empty result.
Related Documents