Infrastructure as a Service in Microsoft Azure The ability to create a virtual machine on demand, whether a standard image or from one you supply, can be very useful. This approach, commonly known as Infrastructure as a Service (IaaS), is what Azure Virtual Machines provides. To create a VM, you specify which VHD to use and the VM's size. You then pay for the time that the VM is running. You pay by the minute and only while it's running, though there is a minimal storage fee for keeping the VHD available. Azure offers a gallery of stock VHDs (called "images") that contain a bootable operating system to start from. These include Microsoft and partner options, such as Windows Server and Linux, SQL Server, Oracle and many more. You're free to create VHDs and images and then upload them yourself. You can even upload VHDs that contain only data and then access them from your running VMs. This quite general approach to cloud computing can be used to address many different issues: • Dev/Test - You might use them to create an inexpensive development and test platform that you can shut down when you've finished using it. You might also create and run applications that use whatever languages and libraries you like. Those applications can use any of the data management options that Azure provides, and you can also choose to use SQL Server or another DBMS running on one or more virtual machines. • Move Applications to Azure (Lift-and-shift) - "Lift-and-shift" refers to moving your application much like you'd use a forklift to move a large object. You "lift" the VHD from your local datacenter, and "shift" it to Azure and run it there. You will typically have to do some work to remove dependencies on other systems. If there are too many, you may choose option 3 instead. • Extend your Datacenter - Use Azure VMs as an extension of your on-premises datacenter, running SharePoint or other applications. To support this, it's possible to create Windows domains in the cloud by running Active Directory in Azure VMs. You can use Azure Virtual Network to tie together your local And Azure networks. In this lab, you will learn how to create virtual machines using different options provided by Azure. You will also add data disks, access them and install VM extensions. This lab includes the following tasks: • Creating a Virtual Machine using Azure Portal In this task you will create a Windows virtual machine using an existing image from the Azure Management Portal. • Creating a Virtual Machine using the Cross-Platform Command-Line Interface In this task you will use the command line cross-platform tools to: configure the subscription in the command line using a publishsettings file, create a Linux virtual machine using an existing image, attach an empty data disk to it, connect to the virtual machine using PuTTY and configure the attached data disk. • Creating a Virtual Machine using PowerShell: In this task you will use the PowerShell command line to configure the azure subscription using Azure AD, create a Windows virtual machine, attach an empty datadisk to the vm, install a VM Extension, and connect to the vm via a generated rdp file to configure the attached datadisk in the virtual machine. • Creating a Virtual Machine using a Runbook In this task you will ensure some prerequisites are present like creating an organizational account, create an automation account, create an empty runbook, edit the runbook to create a virtual machine and publish it, create the necessary assets for the runbook execution, start the runbook and once it finishes verify that the vm was created in the portal. • Creating a Virtual Machines with IIS and SQL VM using ARM Templates In this task you will use ARM template to create one or two Windows Server 2012R2 VM(s) with IIS configured using DSC. It also installs one SQL Server 2014 standard edition VM, a VNET with two subnets, NSG, loader balancer, NATing and probing rules. Page 1 of 52

Welcome message from author
This document is posted to help you gain knowledge. Please leave a comment to let me know what you think about it! Share it to your friends and learn new things together.
Transcript

Infrastructure as a Service in Microsoft Azure
The ability to create a virtual machine on demand, whether a standard image or from one you supply, can be very useful.
This approach, commonly known as Infrastructure as a Service (IaaS), is what Azure Virtual Machines provides.
To create a VM, you specify which VHD to use and the VM's size. You then pay for the time that the VM is running. You pay
by the minute and only while it's running, though there is a minimal storage fee for keeping the VHD available. Azure offers a
gallery of stock VHDs (called "images") that contain a bootable operating system to start from. These include Microsoft and
partner options, such as Windows Server and Linux, SQL Server, Oracle and many more. You're free to create VHDs and
images and then upload them yourself. You can even upload VHDs that contain only data and then access them from your
running VMs.
This quite general approach to cloud computing can be used to address many different issues:
• Dev/Test - You might use them to create an inexpensive development and test platform that you can shut down when
you've finished using it. You might also create and run applications that use whatever languages and libraries you like.
Those applications can use any of the data management options that Azure provides, and you can also choose to use
SQL Server or another DBMS running on one or more virtual machines.
• Move Applications to Azure (Lift-and-shift) - "Lift-and-shift" refers to moving your application much like you'd use a
forklift to move a large object. You "lift" the VHD from your local datacenter, and "shift" it to Azure and run it there. You
will typically have to do some work to remove dependencies on other systems. If there are too many, you may choose
option 3 instead.
• Extend your Datacenter - Use Azure VMs as an extension of your on-premises datacenter, running SharePoint or other
applications. To support this, it's possible to create Windows domains in the cloud by running Active Directory in Azure
VMs. You can use Azure Virtual Network to tie together your local And Azure networks.
In this lab, you will learn how to create virtual machines using different options provided by Azure. You will also add data
disks, access them and install VM extensions.
This lab includes the following tasks:
• Creating a Virtual Machine using Azure Portal
In this task you will create a Windows virtual machine using an existing image from the Azure Management Portal.
• Creating a Virtual Machine using the Cross-Platform Command-Line Interface
In this task you will use the command line cross-platform tools to: configure the subscription in the command line using a
publishsettings file, create a Linux virtual machine using an existing image, attach an empty data disk to it, connect to the
virtual machine using PuTTY and configure the attached data disk.
• Creating a Virtual Machine using PowerShell:
In this task you will use the PowerShell command line to configure the azure subscription using Azure AD, create a
Windows virtual machine, attach an empty datadisk to the vm, install a VM Extension, and connect to the vm via a
generated rdp file to configure the attached datadisk in the virtual machine.
• Creating a Virtual Machine using a Runbook
In this task you will ensure some prerequisites are present like creating an organizational account, create an automation
account, create an empty runbook, edit the runbook to create a virtual machine and publish it, create the necessary
assets for the runbook execution, start the runbook and once it finishes verify that the vm was created in the portal.
• Creating a Virtual Machines with IIS and SQL VM using ARM Templates
In this task you will use ARM template to create one or two Windows Server 2012R2 VM(s) with IIS configured using
DSC. It also installs one SQL Server 2014 standard edition VM, a VNET with two subnets, NSG, loader balancer,
NATing and probing rules.
Page 1 of 52

• Appendix - Cleanup
This is a long lab which shows how you can perform similar actions using the different tools available, so you can choose
which task you want to execute based on the explanations above. It's recommended that you run Creating a Virtual Machine
using using the Cross-Platform Command-Line Interface and Creating a Virtual Machine using PowerShell, as these provide
a good coverage of many tasks performed on a virtual machine, but you can choose to execute all or the ones that most
interest you.
Creating a Virtual Machine using Azure Portal
In this task you will create a Virtual Machine in Azure Portal.
1. Sign in to the Azure Management Portal.
2. On the Left Side bar, click + NEW and then click on See all.
Creating a VM
3. Click Compute and then click the Windows Server tile.
Creating a VM - Click Virtual Machines then the Windows Server tile
4. A new blade opens with the different images available for Windows Server. Find and click Windows Server 2012 R2
Datacenter.
Page 2 of 52

Creating a VM - Select the image to use
5. In the Windows Server 2012 R2 Datacenter blade, Select 'Resource Manager' from dropdown select a deployment
model, and then click Create.
Creating a VM - Click Create to confirm the use of this image
6. On the Create Virtual Machine blade that opens, enter:
◦ Name: virtual machine name (e.g. testvm)
◦ User Name: administrator user for the virtual machine (e.g. adminUser)
Page 3 of 52

◦ Password: unique password for the administrator account
◦ Subscription: Select if you have multiple subscriptions
◦ Resource: New or Existing (e.g. create-vm)
◦ Location: select the location for the virtual machine. (e.g. West US)
Creating a VM - Basic Configuration
◦ Size: select the size of virtual machine needed. (Select See All for checking all sizes and details)
Page 4 of 52

Creating a VM - Types of Sizes
◦ Disk Type: select the disk size. (e.g. Standard/Premium(SSD))
◦ storage account: storage account details(if existing select the storage account at specified location or create new)
◦ virtual network: virtual network for the virtual machine to create
◦ Subnet: subnets under one Virtual network
◦ Public IP address: public IP address
Creating a VM - Settings
◦ Summary: virtual machine summary details before you click on create.
Page 5 of 52
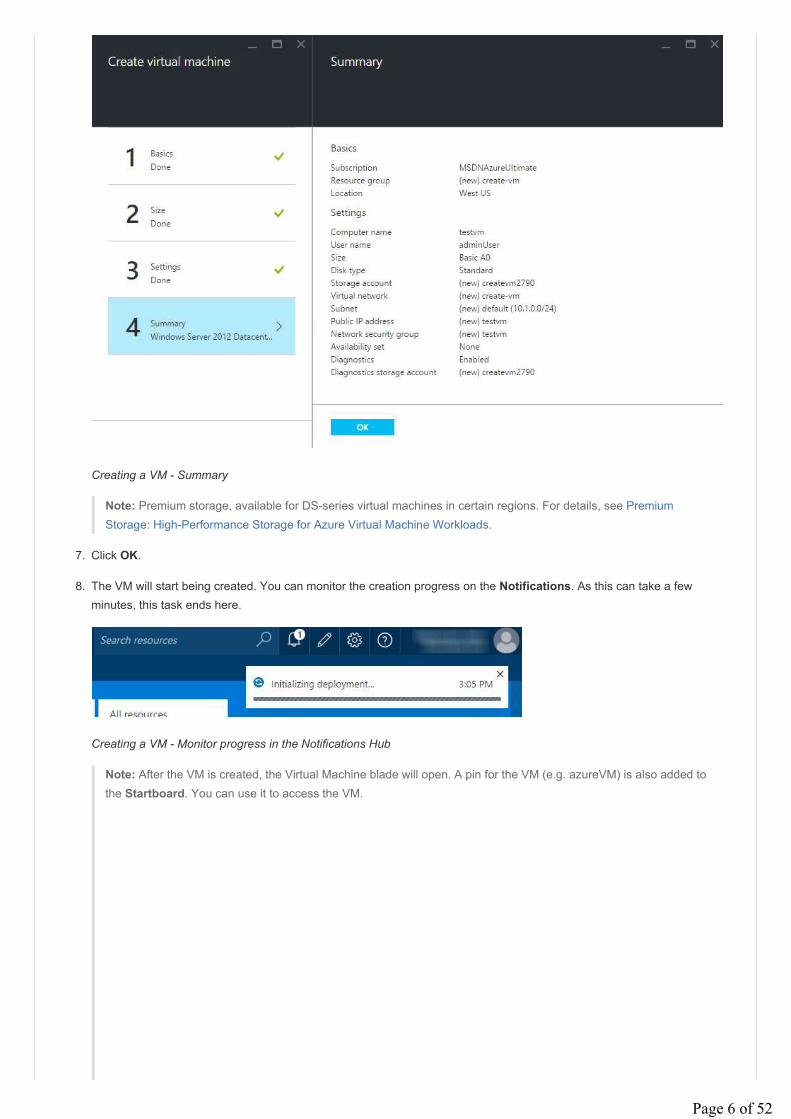
Creating a VM - Summary
Note: Premium storage, available for DS-series virtual machines in certain regions. For details, see Premium
Storage: High-Performance Storage for Azure Virtual Machine Workloads.
7. Click OK.
8. The VM will start being created. You can monitor the creation progress on the Notifications. As this can take a few
minutes, this task ends here.
Creating a VM - Monitor progress in the Notifications Hub
Note: After the VM is created, the Virtual Machine blade will open. A pin for the VM (e.g. azureVM) is also added to
the Startboard. You can use it to access the VM.
Page 6 of 52

Creating a VM - A pin was created in the Startboard
Once the virtual machine has been created you can attach new or existing data disks to the Virtual Machine. See
About Virtual Machine Disks in Azure for more information.
Virtual Machine details after Creation
Page 7 of 52

Creating a Virtual Machine using the Cross-Platform Command-Line Interface
In this task you will use the Azure Cross-Platform Command-Line Interface (xplat-cli) to create a Linux virtual machine and
attach an empty disk to it. After that you will connect to the vm and configure the disk.
You will start by configuring your Azure subscription in the xplat-cli.
While some commands provided by the xplat-cli will work without an Azure subscription, most commands require one. To
configure the xplat-cli to work with your subscription, you can either download and use a publish settings file or log in to Azure
using an organizational account. When you log in, Azure Active Directory is used to authenticate the credentials.
To help you choose the authentication method most appropriate for your needs, consider the following:
• The login method can make it easier to manage access to subscriptions but may disrupt automation, as the credentials
may time out and require you to log in again.
• The publish settings file method installs a certificate that allows you to perform management tasks for as long as the
subscription and the certificate are valid. This method makes it easier to use automation for long-running tasks. After you
download and import the information, you don't need to provide it again. However, this method makes it harder to
manage access to a subscription since anyone with access to the certificate can manage the subscription.
For more information about authentication and subscription management, see "What's the difference between account-based
authentication and certificate-based authentication".
In order to use the publish settings file method, perform the following steps:
1. Open a Command prompt if there is not already one open, and run the following command to download the publish
settings file for your account:
azure account download
This will open your default browser and prompt you to sign in to the Azure Management Portal. After signing in, a
.publishsettings file will be downloaded. Make note of where this file is saved.
2. Next, import the .publishsettings file by running the following command, replacing [path to .publishsettings file]
with the path to your .publishsettings file:
azure account import [path to .publishsettings file]
Note: When you import publish settings, the information to access your Azure subscription is stored in a .azure
directory located in your user directory. Your user directory is protected by your operating system; however, it is
recommended that you take additional steps to encrypt your user directory. You can do so in the following ways:
◦ On Windows, modify the directory properties or use BitLocker.
◦ On Mac, turn on FileVault for the directory.
◦ On Ubuntu, use the Encrypted Home directory feature. Other Linux distributions offer equivalent features.
3. After importing your publish settings, you should delete the .publishsettings file, as it is no longer required by the
Command-Line Tools and presents a security risk as it can be used to gain access to your subscription.
Note: If you prefer using the login method, use the following command:
azure login -u username -p password
Now that you have configured your Azure subscription in the command line you will proceed to create the virtual
machine.
Page 8 of 52
4. From the Command prompt, run the following command to list all the available locations from which you can choose to
create a virtual machine. Take note of one of them (e.g.: West US); as you will use it in the following step.
azure vm location list
5. To create a new virtual machine based on the b39f27a8b8c64d52b05eac6a62ebad85__Ubuntu-14_04-LTS-amd64-
server-20140724-en-us-30GB image run the following command. Replace [LINUX-VM-NAME] and [ADMIN-
USERNAME] with your desired values for the virtual machine name and administrator user. You can also replace West
US by the location you chose in the previous step.
As the command executes it will prompt you to enter the password for the admin user.
azure vm create [LINUX-VM-NAME] b39f27a8b8c64d52b05eac6a62ebad85__Ubuntu-14_04-LTS-amd64-server-20140724-en-us-30GB [ADMIN-USERNAME] --location "West US" --ssh
Note 1: The --ssh parameter enables SSH to manage the deployed Linux virtual machine.
Note 2: To list the available images use the following command.
azure vm image list
Note 3: You can specify the blob storage url by specifying the --blob-url parameter to the vm create command. In
order to create a storage account use the following steps:
i. Replace the [ACCOUNT-NAME] placeholder and execute the following command to create the new storage
account. You will be prompted to provide the location where you want to create the storage account. Make sure
you provide the same location as you plan to use when creating the virtual machine.
azure storage account create [ACCOUNT-NAME]
i. Obtain and take note of the account keys of the new account by executing the following command. Replace the
[ACCOUNT-NAME] placeholder with the one used in the previous step.
azure storage account keys list [ACCOUNT-NAME]
i. Now, create a new container in the blob storage account by executing the following command, replacing all the
placeholders accordingly.
azure storage container create [CONTAINER-NAME] --account-name [ACCOUNT-NAME] --account-key [STORAGE-ACCOUNT-KEY]
i. Finally, execute the azure vm create command using the --blob-url parameter with the blob url, which will
resemble the following: https://<accountname>.blob.core.windows.net/<containerName>/<the-blob-name.vhd> .
azure vm create [LINUX-VM-NAME] b39f27a8b8c64d52b05eac6a62ebad85__Ubuntu-14_04-LTS-amd64-server-20140724-en-us-30GB [ADMIN-USERNAME] --location "West US" --ssh --blob-url https://[ACCOUNT-NAME].blob.core.windows.net/<containerName>/<the-blob-name.vhd>
Once this command finishes creating the virtual machine with no errors, you can proceed to attach an empty data disk to
it.
6. To attach a new 30gb disk to your virtual machine, execute the following command. Replace your-linux-vm with the
name of the virtual machine you created.
azure vm disk attach-new [LINUX-VM-NAME] 30
You should get a message resembling the following:
Page 9 of 52

info: Executing command vm disk attach-new
+Getting virtual machines
+Adding Data-Disk
info: vm disk attach-new command OK
7. To display details about the virtual machine, execute the following command. Replace [LINUX-VM-NAME] with the name
of the virtual machine you created. Take note of the DNSName value and make sure that the SSH endpoint exists.
azure vm show [LINUX-VM-NAME]
The output of this command should be similar to the following:
info: Executing command vm show
+Getting virtual machines
data: DNSName "your-linux-vm.cloudapp.net"
data: Location "West US"
data: VMName "your-linux-vm"
data: IPAddress "100.78.86.88"
data: InstanceStatus "ReadyRole"
data: InstanceSize "Small"
data: Image "b39f27a8b8c64d52b05eac6a62ebad85__Ubuntu-14_04_1-LTS-amd64-server-20141125-en-us-30GB"
data: OSDisk hostCaching "ReadWrite"
data: OSDisk name "your-linux-vm-your-linux-vm-0-201501202057370849"
data: OSDisk mediaLink "https://portalvhdsqmqsgyc6l4zl4.blob.core.windows.net/vhds/your-linux-vm-your-linux-vm-2015-01-20.vhd"
data: OSDisk sourceImageName "b39f27a8b8c64d52b05eac6a62ebad85__Ubuntu-14_04_1-LTS-amd64-server-20141125-en-us-30GB"
data: OSDisk operatingSystem "Linux"
data: OSDisk iOType "Standard"
data: DataDisks 0 hostCaching "None"
data: DataDisks 0 label "your-linux-vm-your-linux-vm-your-linux-vm42-0"
data: DataDisks 0 name "your-linux-vm-your-linux-vm-0-201501202103240353"
data: DataDisks 0 logicalDiskSizeInGB 30
data: DataDisks 0 mediaLink "https://portalvhdsqmqsgyc6l4zl4.blob.core.windows.net/vhds/your-linux-vm-f539b3ed4be4e5ab.vhd"
data: DataDisks 0 iOType "Standard"
data: ReservedIPName ""
data: VirtualIPAddresses 0 address "104.42.11.83"
data: VirtualIPAddresses 0 name "your-linux-vmContractContract"
data: VirtualIPAddresses 0 isDnsProgrammed true
data: Network Endpoints 0 localPort 22
data: Network Endpoints 0 name "SSH"
data: Network Endpoints 0 port 22
data: Network Endpoints 0 protocol "tcp"
data: Network Endpoints 0 virtualIPAddress "104.42.11.83"
data: Network Endpoints 0 enableDirectServerReturn false
info: vm show command OK
To manage the settings of the virtual machine and the applications that run on the machine, you can use an SSH client.
You will use the PuTTY program to access the virtual machine.
Note: To do this, you must install an SSH client on the computer that you want to use to access the virtual machine.
There are many SSH client programs to choose from, including the following:
◦ If you are using a computer that is running a Windows operating system, you might want to use an SSH client
such as PuTTY. For more information, see PuTTY Download.
◦ If you are using a computer that is running a Linux operating system, you might want to use an SSH client such
as OpenSSH. For more information, see OpenSSH.
8. Open the PuTTY program.
Note: If you are using a console SSH client, use the following command to log in: ssh
9. Enter the DNSName that you collected from the execution of the azure vm show command in the Host Name input and
then click Open.
Page 10 of 52

Opening the connection to the virtual machine in PuTTY
10. Click Yes in the PuTTY Security Alert dialog box in order to add the server's key to the cache.
Clicking yes to save the key in the cache
11. Log on to the virtual machine using the administrator user name selected when you created the virtual machine (e.g.:
yourVMUsername).
Page 11 of 52
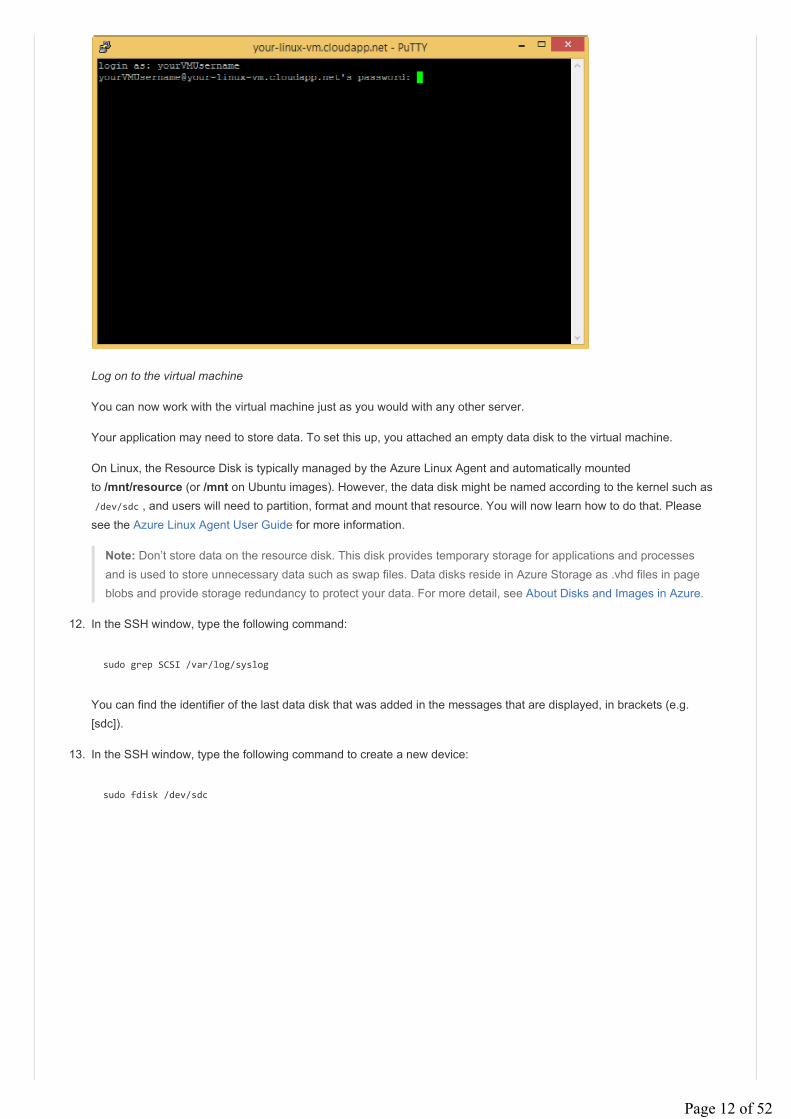
Log on to the virtual machine
You can now work with the virtual machine just as you would with any other server.
Your application may need to store data. To set this up, you attached an empty data disk to the virtual machine.
On Linux, the Resource Disk is typically managed by the Azure Linux Agent and automatically mounted
to /mnt/resource (or /mnt on Ubuntu images). However, the data disk might be named according to the kernel such as
/dev/sdc , and users will need to partition, format and mount that resource. You will now learn how to do that. Please
see the Azure Linux Agent User Guide for more information.
Note: Don’t store data on the resource disk. This disk provides temporary storage for applications and processes
and is used to store unnecessary data such as swap files. Data disks reside in Azure Storage as .vhd files in page
blobs and provide storage redundancy to protect your data. For more detail, see About Disks and Images in Azure.
12. In the SSH window, type the following command:
sudo grep SCSI /var/log/syslog
You can find the identifier of the last data disk that was added in the messages that are displayed, in brackets (e.g.
[sdc]).
13. In the SSH window, type the following command to create a new device:
sudo fdisk /dev/sdc
Page 12 of 52

Executing fdisk in the virtual machine
Note: In this example you may need to use sudo -i on some distributions if /sbin or /usr/sbin are not in your
$PATH .
14. Type n to create a new partition.
15. Type p to make the partition the primary partition, type 1 to make it the first partition, and then type enter to accept the
default values for the first and last sectors.
16. Type p to see the details about the disk that is being partitioned.
Displaying disk details
17. Type w to write the settings for the disk.
18. You must create the file system on the new partition. As an example, type the following command to create the file
system:
sudo mkfs -t ext4 /dev/sdc1
Note: Note that SUSE Linux Enterprise 11 systems provide only read-only access for ext4 file systems. For these
systems, we recommended formatting the new file system as ext3 rather than ext4.
Page 13 of 52
19. Create a directory to mount the new file system. As an example, type the following command:
sudo mkdir /datadrive
20. Type the following command to mount the drive:
sudo mount /dev/sdc1 /datadrive
The data disk is now ready to use as /datadrive.
21. To ensure the drive is re-mounted after a reboot, it must be added to the /etc/fstab file. In addition, it is highly
recommended that the UUID (Universally Unique IDentifier) is used in /etc/fstab to refer to the drive rather than just the
device name (i.e. /dev/sdc1). To find the UUID of the new drive you can use the blkid utility:
sudo -i blkid
The output will resemble the following:
/dev/sda1: UUID="11111111-1b1b-1c1c-1d1d-1e1e1e1e1e1e" TYPE="ext4"
/dev/sdb1: UUID="22222222-2b2b-2c2c-2d2d-2e2e2e2e2e2e" TYPE="ext4"
/dev/sdc1: UUID="33333333-3b3b-3c3c-3d3d-3e3e3e3e3e3e" TYPE="ext4"
Note: blkid may not require sudo access in all cases, however, it may be easier to run with sudo -i on some
distributions if /sbin or /usr/sbin are not in your $PATH .
Caution: Improperly editing the /etc/fstab file could result in an unbootable system. If unsure, please refer to the
distribution's documentation for information on how to properly edit this file. It is also recommended that a backup of
the /etc/fstab file is created before editing.
22. Using a text editor, enter the information about the new file system at the end of the /etc/fstab file. In this example we will
use the UUID value for the new /dev/sdc1 device that was created in the previous steps, and the mountpoint /datadrive.
UUID=33333333-3b3b-3c3c-3d3d-3e3e3e3e3e3e /datadrive ext4 defaults 1 2
Note 1: On systems based on SUSE Linux you may need to use a slightly different format:
/dev/disk/by-uuid/33333333-3b3b-3c3c-3d3d-3e3e3e3e3e3e / ext3 defaults 1 2
Note 2: You can use the vim text editor in order to perform this steps.
i. Execute the following command in order to start the vim editor
sudo vim /etc/fstab
i. Type i to enter to INSERT mode and use the arrows to go to the end of the file.
ii. Type enter and then add the information.
iii. Type Esc to exit the INSERT mode.
iv. Type :wq in order to write the file and quit vim.
Note 3: If additional data drives or partitions are created, you will need to enter them into /etc/fstab separately as
well.
23. You can now test that the file system is mounted properly by simply unmounting and then re-mounting the file system,
i.e. using the example mount point /datadrive created in the earlier steps:
sudo umount /datadrive
sudo mount /datadrive
Page 14 of 52
If the second command produces an error, check the /etc/fstab file and make sure the syntax is correct.
Note: Subsequently removing a data disk without editing fstab could cause the VM to fail to boot. If this is a
common occurrence, then most distributions provide either the nofail and/or nobootwait fstab options that will
allow a system to boot even if the disk is not present. Please consult your distribution's documentation for more
information on these parameters.
Creating a Virtual Machine using Powershell
In this task you will create a virtual machine using PowerShell cmdlets.
In the following steps you will configure your azure subscription in PowerShell, ensure your subscription has a storage
account associated with it and will set one if not. You will then set variables with the parameters of the virtual machine that
will be created, and continue by creating the virtual machine. You will also learn how to attach a new disk to the virtual
machine and how to add a VM Extension to the virtual machine. Finally, you will create a Remote Desktop Protocol file to
access the machine and use it to access the machine and initialize the new disk.
You will start by configuring your Azure subscription in Powershell.
As for the xplat-cli, most cmdlets require an Azure subscription to manage your services. There are two ways to provide your
subscription information to Windows PowerShell: you can use a management certificate that contains the information or you
can sign in to Azure using your Microsoft account or an organizational (work or school) account. When you sign in, Azure
Active Directory (Azure AD) authenticates the credentials and returns an access token that lets Azure PowerShell manage
your account.
Azure AD is the recommended authentication method since it makes it easier to manage access to a subscription. With the
update in version 0.8.6, it enables an automation scenario with Azure AD authentication even when using a work or school
account. It works with Azure Resource Manager API as well.
For more information about authentication and subscription management, see "What's the difference between account-based
authentication and certificate-based authentication".
To log in using an Azure AD account, follow these instructions:
1. Open the Microsoft Azure PowerShell console.
2. Type the following command and hit Enter:
Add-AzureAccount
3. A dialog box to Sign in to Microsoft Azure will appear. Follow the instructions, typing the email address and password
associated with your account when prompted.
Azure authenticates and saves the credential information, and then closes the window. After it does, you will see the
following output appear in the console window.
Page 15 of 52

Running the Add-AzureAccount command
Starting from 0.8.6, if you sign in using an organizational account, you can type the following command to bypass
the pop up window:
$cred = Get-Credential
Add-AzureAccount -Credential $cred
This will prompt the standard Windows PowerShell credential window for you to enter your work or school account
user name and password.
If you are using this in an automation script and want to avoid any popup windows, use the following snippet:
$userName = "<your work or school account user name>"
$securePassword = ConvertTo-SecureString -String "<your work or school account password>" -AsPlainText -Force
$cred = New-Object System.Management.Automation.PSCredential($userName, $securePassword)
Add-AzureAccount -Credential $cred
Note: This non-interactive login method only works with an organizational account. An organizational account is a
user that is managed by your organization and defined in the Azure Active Directory instance for your organization.
If you do not currently have an organizational account you can follow the instructions for Creating a new
organizational account to create one.
Now you will ensure your azure subscription has an associated storage account and configure one, if not.
4. To verify whether your subscription has an associated storage account, run this command.
Get-AzureSubscription
The command will produce an output like this:
Page 16 of 52
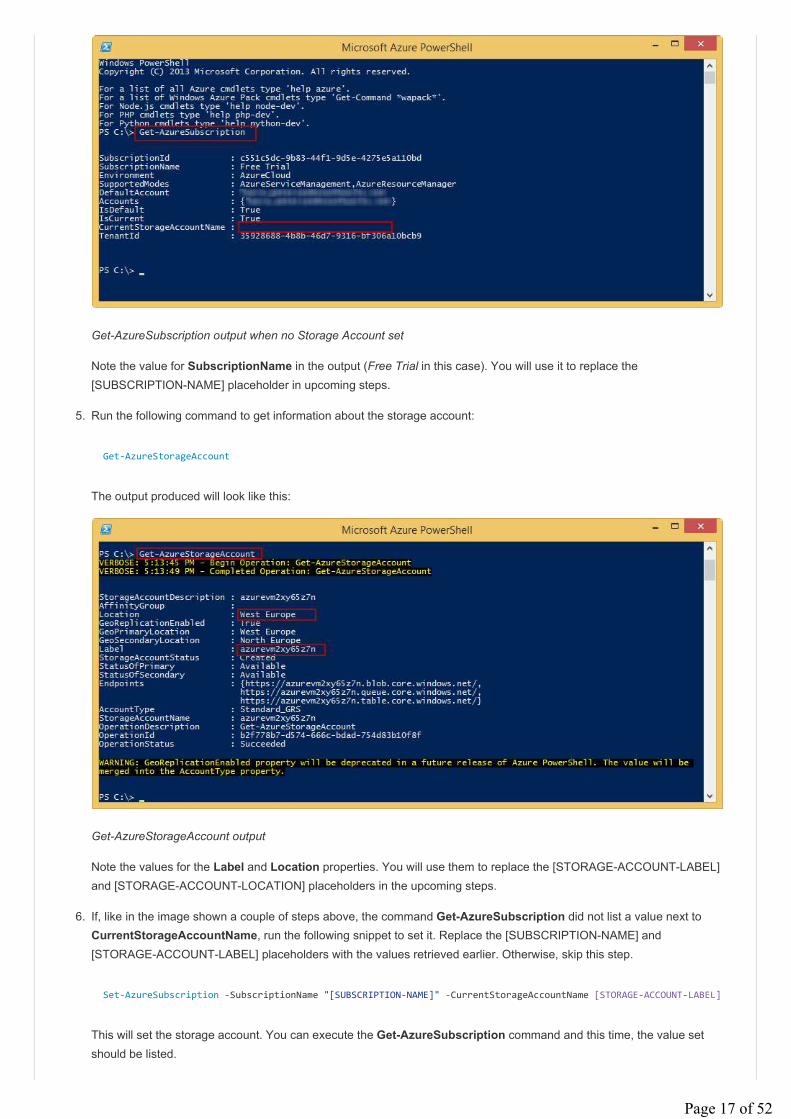
Get-AzureSubscription output when no Storage Account set
Note the value for SubscriptionName in the output (Free Trial in this case). You will use it to replace the
[SUBSCRIPTION-NAME] placeholder in upcoming steps.
5. Run the following command to get information about the storage account:
Get-AzureStorageAccount
The output produced will look like this:
Get-AzureStorageAccount output
Note the values for the Label and Location properties. You will use them to replace the [STORAGE-ACCOUNT-LABEL]
and [STORAGE-ACCOUNT-LOCATION] placeholders in the upcoming steps.
6. If, like in the image shown a couple of steps above, the command Get-AzureSubscription did not list a value next to
CurrentStorageAccountName, run the following snippet to set it. Replace the [SUBSCRIPTION-NAME] and
[STORAGE-ACCOUNT-LABEL] placeholders with the values retrieved earlier. Otherwise, skip this step.
Set-AzureSubscription -SubscriptionName "[SUBSCRIPTION-NAME]" -CurrentStorageAccountName [STORAGE-ACCOUNT-LABEL]
This will set the storage account. You can execute the Get-AzureSubscription command and this time, the value set
should be listed.
Page 17 of 52

Now you will set the variables that will be used to create the virtual machine.
7. Execute the snippet below, replacing the [ADMIN-USER-NAME] and [ADMIN-PASSWORD] placeholders with your
desired values, and the [STORAGE-ACCOUNT-LOCATION] placeholder with the value retrieved earlier. The location
entered should match the storage account location retrieved earlier.
$dclocation = '[STORAGE-ACCOUNT-LOCATION]'
$adminUserName = '[ADMIN-USER-NAME]'
$adminPassword = '[ADMIN-PASSWORD]'
$vmname = 'azureVM'
8. Select a name for the Cloud Service. As it needs to be unique, you can verify first whether the selected Cloud Service
Name exists by running the Test-AzureName command. If this command outputs False, the name is available.
Test-AzureName -Service '[CLOUD-SERVICE-NAME]'
$cloudSvcName = '[CLOUD-SERVICE-NAME]'
9. Set the image name for your virtual machine to a699494373c04fc0bc8f2bb1389d6106__Windows-Server-2012-
Datacenter-201412.01-en.us-127GB.vhd. This corresponds to an image of Windows Server R2 DataCenter.
$image = 'a699494373c04fc0bc8f2bb1389d6106__Windows-Server-2012-Datacenter-201412.01-en.us-127GB.vhd'
Note: You can view the complete list of images available by running the following command:
Get-AzureVMImage | select ImageName
You can choose to create a virtual machine based on a different image. If you choose to create a Linux virtual
machine, the command to create the virtual machine will vary slightly.
10. Now that all variables are set, run the following command to create the virtual machine:
New-AzureQuickVM -AdminUserName $adminUserName -Windows -ServiceName $cloudSvcName -Name $vmname -ImageName $image
Note: If you chose to create a Linux image, the command to use is the following:
New-AzureQuickVM -Linux -ServiceName $cloudSvcName -Name $vmname -ImageName $image -LinuxUser $adminUserName
The differences reside in the -Linux OS switch and the -LinuxUser switch that replaces the -AdminUserName
switch in Windows.
Note 2: Specifying the -Location parameter when calling New-AzureQuickVM or New-AzureVM tells the Cmdlet
to attempt to create a cloud service as a container for the virtual machines. Use this option when creating the first
virtual machine and omit it when adding new virtual machines to the same cloud service.
Note 3: For more information, visit the New-AzureQuickVM reference page.
11. The virtual machine is created.
Page 18 of 52

Virtual Machine creation output
12. You can list all VMs in the Cloud Service by running the following cmdlet:
Get-AzureVM -ServiceName $cloudSvcName
Get-AzureVM output when listing all virtual machines
If you want to enumerate only the details of the virtual machine just created, provide the -Name switch:
Get-AzureVM -ServiceName $cloudSvcName -Name $vmname
Now you will add an empty disk to the virtual machine. Since the virtual machine has already been created, you will need
to modify the existing machine. Modifying an existing virtual machine requires retrieving the current settings by calling
Get-AzureVM, modifying them, and then calling the Update-AzureVM Cmdlet to save the changes.
Note: It's a best practice to use one or more separate disks to store a virtual machine's data. When you create an
Azure virtual machine, it has a disk for the operating system mapped to the C drive and a temporary disk mapped to
the D drive. Do not use the D drive to store data. As the name implies, it provides temporary storage only. It offers
no redundancy or backup because it doesn't reside in Azure storage.
Page 19 of 52

13. Execute the following pipe of cmdlets:
Get-AzureVM -Name $vmname -ServiceName $cloudSvcName |
Add-AzureDataDisk -CreateNew -DiskSizeInGB 50 -DiskLabel 'datadisk1' -LUN 2 |
Update-AzureVM
The Get-AzureVM Cmdlet retrieves the virtual machine object and sends it to the PowerShell Pipeline.
The Add-AzureDataDisk Cmdlet with the -CreateNew parameter allows you to dynamically add storage to the virtual
machine. In this case you are attaching an unformatted blank VHD of 50 gigabytes. The -LUN parameter tells the order
of the device being attached and the optional -MediaLocation parameter can be added to specify the location in storage
to keep the new VHDs.
Add-AzureDataDisk also supports the -Import parameter to attach a disk in the disk library and -ImportFrom to attach
a pre-existing disk in storage.
14. Once the Update-AzureVM call has completed, your virtual machine is ready to be used.
Update-AzureVM output after adding a new datadisk
Now you will learn how to add extensions to the virtual machine just created.
Microsoft Azure provides VM Extensions built by both Microsoft and trusted third-party providers to enable security,
runtime, debugging, management, and other features you can take advantage of to increase your productivity with Azure
Virtual Machines. For more details see Azure VM Extensions and Features.
The Azure Virtual Machine Agent (VM Agent) is used to install, configure, manage and run Azure Virtual Machine
Extensions (VM Extensions). The VM Agent is a secure, light-weight process that installs, configures, and removes VM
extensions on instances of Azure Virtual Machines from the Image Gallery and on custom VM instances if they have the
VM Agent installed.
There are two Azure VM Agents, one for Windows VMs and one for Linux VMs. By default, the VM Agent is
automatically installed when you create a VM from the Image Gallery, but you can also install the VM agent after the
instance is created or install it in a custom VM image that you then upload yourself.
You will now verify that the VM Agent is enabled in the virtual machine created in the previous steps, and after that install
the Symantec Protection extension. Finally, you will verify that the extension was correctly installed on the virtual
machine. All these steps will be carried out using PowerShell and using some of the same variables set previously.
15. To verify whether the VM Agent is enabled on the virtual machine, run these commands:
$vm = Get-AzureVM -ServiceName $cloudSvcName
$vm.VM.ProvisionGuestAgent
The output of the first command should not return any errors, and the second command should be True.
Running these commands will also set the $vm.VM variable, which will be used in upcoming steps to add the extension.
Page 20 of 52

Note: If the value of the $vm.VM.ProvisionGuestAgent property is False, connect to the virtual machine and install
the VM Agent. You can download it here. Then, set the value of the variable to True with the following snippets.
$vm = Get-AzureVM -serviceName $cloudSvcName -Name $vmname
$vm.VM.ProvisionGuestAgent = $TRUE
Update-AzureVM -Name $name -VM $vm.VM -ServiceName $cloudSvcName
Now you will install the Symantec endpoint protection extension.
16. Execute the following command to add the extension:
Set-AzureVMExtension -Publisher Symantec -ExtensionName SymantecEndpointProtection -VM $vm.VM -Version 12.*
Update-AzureVM -ServiceName $cloudSvcName -Name $vmname -VM $vm.VM
Set-AzureVMExtension sets the properties for the extension about to be installed. Update-AzureVM is the cmdlet that
installs the extension.
The output of running all the commands up to now should look like this:
Adding a VM Extension output
17. To verify that the extension was installed on the virtual machine, run the following command:
Get-AzureVMExtension -VM $vm.VM
The output of the command should look like this:
Page 21 of 52

Get-AzureVMExtension output
After you attach a disk to a virtual machine you need to initialize it so it's ready for use. To do so you will need to log in to
the machine to finish the initialization of the new data disk attached.
18. Run the following command to create a remote desktop protocol file (rdp) and launch it. When prompted to log in, use
the credentials for the administrator user you configured when creating the virtual machine.
Note: The location for the rdp file provided must exist, otherwise you will see an error.
Get-AzureRemoteDesktopFile -ServiceName $cloudSvcName -Name $vmname -LocalPath 'C:\myvmconnection.rdp' -Launch
This will launch the rdp, effectively starting the flow of connecting to the remote machine.
Get-AzureRemoteDesktopFile output
19. In the Remote Desktop Connection dialog box, click Connect.
Note:: You might need to wait until the virtual machine has booted for the rdp file to successfully connect and
prompt for credentials. If so, retry by opening the rdp file from the location where it was saved until you are
prompted for credentials.
20. Enter the user name and password for the Administrator user that was entered when creating the virtual machine (step
7) and click OK.
Page 22 of 52

Entering the admin user credentials
21. In the Remote Desktop Connection dialog box, click Yes to verify the identity of the remote computer. You can check
"Don't ask me again for connections to this computer" if you do not want to see this dialog box again.
Verifying the virtual machine identity
22. After a few seconds, the remote desktop window opens and starts setting up the session for the administrator user. Once
it is finished, you will see the Server Manager Dashboard open, which you will use in the following steps to configure
the data disk that you attached previously.
For all other purposes, you could now work with this machine as you would with any other machine in your own
environment.
Page 23 of 52

Using the virtual machine
Now you will configure the data disk that you attached to the Virtual Machine.
23. In the Server Manager Dashboard that is open in the virtual machine, click File and Storage Services.
Clicking File and Storage Services
24. Once you are in the Servers pane of File and Storage Services, click Disks.
Page 24 of 52
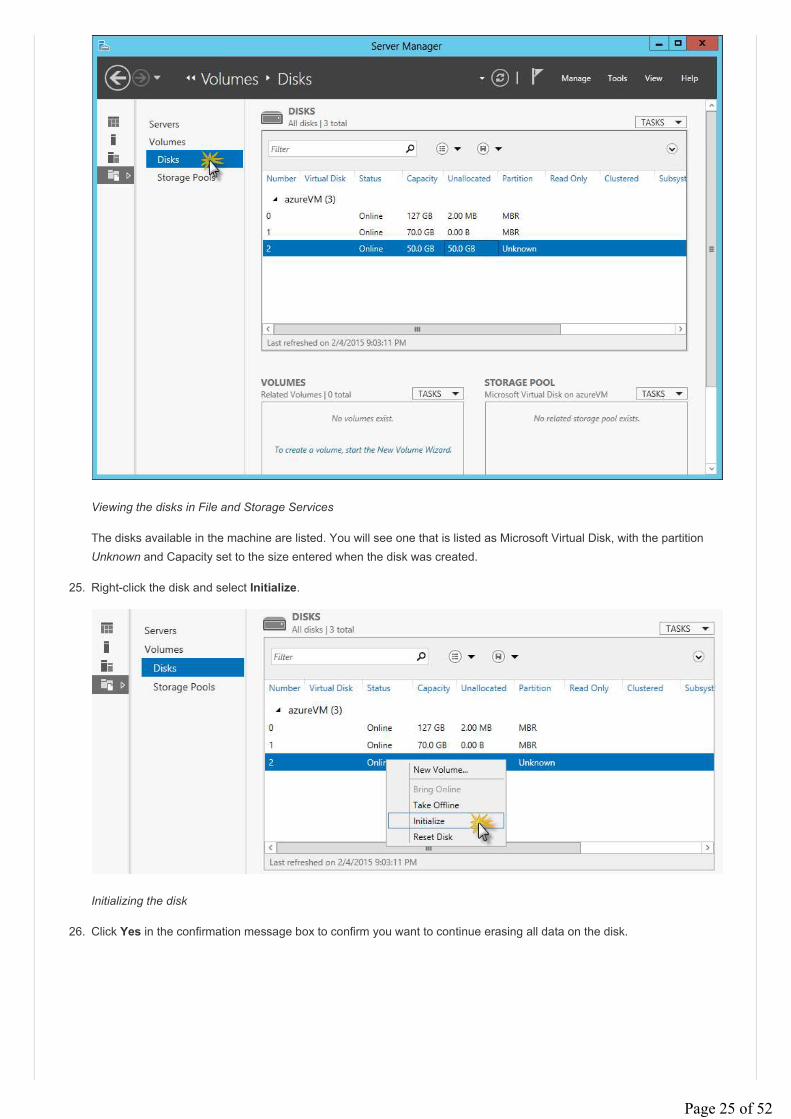
Viewing the disks in File and Storage Services
The disks available in the machine are listed. You will see one that is listed as Microsoft Virtual Disk, with the partition
Unknown and Capacity set to the size entered when the disk was created.
25. Right-click the disk and select Initialize.
Initializing the disk
26. Click Yes in the confirmation message box to confirm you want to continue erasing all data on the disk.
Page 25 of 52

Confirming initialization of the disk
27. After a short wait, the disk now has a Partition set. Right-click the disk and select New Volume.
Clicking New Volume in the context menu
28. Click Next in the New Volume Wizard dialog box that opens.
29. In the Server and Disk step of the New Volume Wizard, click Next.
30. In the Size step of the New Volume Wizard, update the volume size if desired and then click Next.
Page 26 of 52
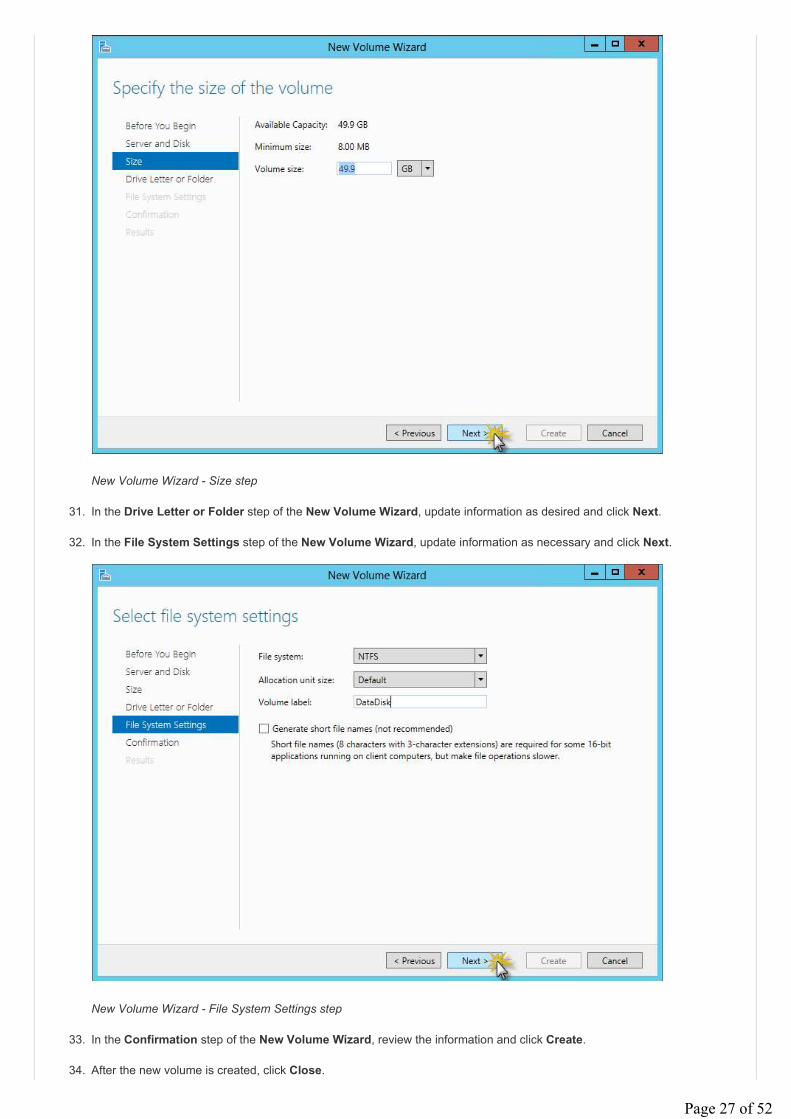
New Volume Wizard - Size step
31. In the Drive Letter or Folder step of the New Volume Wizard, update information as desired and click Next.
32. In the File System Settings step of the New Volume Wizard, update information as necessary and click Next.
New Volume Wizard - File System Settings step
33. In the Confirmation step of the New Volume Wizard, review the information and click Create.
34. After the new volume is created, click Close.
Page 27 of 52

35. You can now open a File Explorer window and confirm the disk is ready to be used.
Viewing attached disk open in File Explorer, ready to be used
Creating a virtual machine using a Runbook
Azure Automation allows you to automate the creation, deployment, monitoring, and maintenance of resources in your Azure
environment using a highly scalable and reliable workflow execution engine.
An Azure Automation account contains:
• Runbooks: a Runbook is a PowerShell workflow that uses Azure Cmdlets to perform unattended actions.
• Assets: an asset is a piece of information that is shared and used by all scripts in the automation account. It can be a
connection, a credential, a variable or a schedule.
• Jobs: a job is the execution of a Runbook.
In this task you will create and start a Runbook from scratch to create a virtual machine. You will also create the necessary
assets for this Runbook, and start it. Before that you will ensure that a couple of prerequisites needed for the task are set up.
For the Runbook to be created and run successfully you will need to ensure that the subscription contains a storage account
and an organizational account that is co-administrator.
To verify whether you already have a storage account, and create a new one if you don't follow these steps:
1. Sign in to the Azure Management Portal.
2. The All Items view will show by default. Find in the table a row with Type = Storage Account. Otherwise, click Storage
in the left sidebar to view only Storage Accounts.
Page 28 of 52
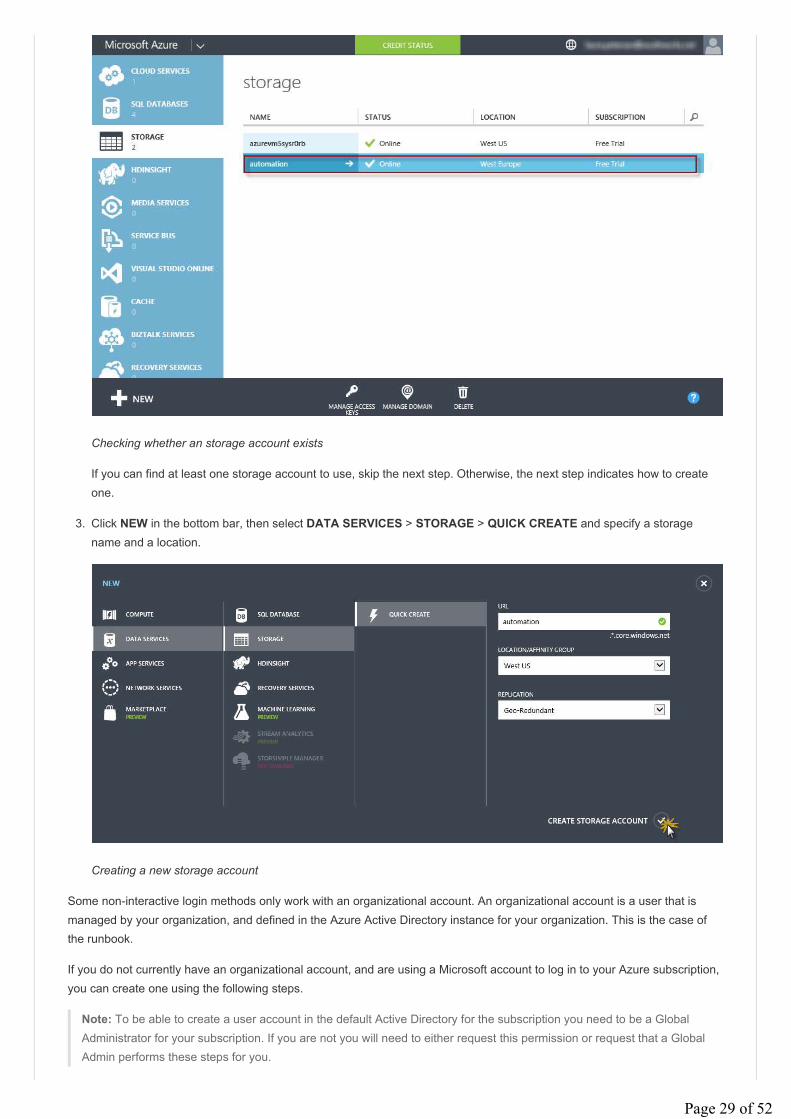
Checking whether an storage account exists
If you can find at least one storage account to use, skip the next step. Otherwise, the next step indicates how to create
one.
3. Click NEW in the bottom bar, then select DATA SERVICES > STORAGE > QUICK CREATE and specify a storage
name and a location.
Creating a new storage account
Some non-interactive login methods only work with an organizational account. An organizational account is a user that is
managed by your organization, and defined in the Azure Active Directory instance for your organization. This is the case of
the runbook.
If you do not currently have an organizational account, and are using a Microsoft account to log in to your Azure subscription,
you can create one using the following steps.
Note: To be able to create a user account in the default Active Directory for the subscription you need to be a Global
Administrator for your subscription. If you are not you will need to either request this permission or request that a Global
Admin performs these steps for you.
Page 29 of 52
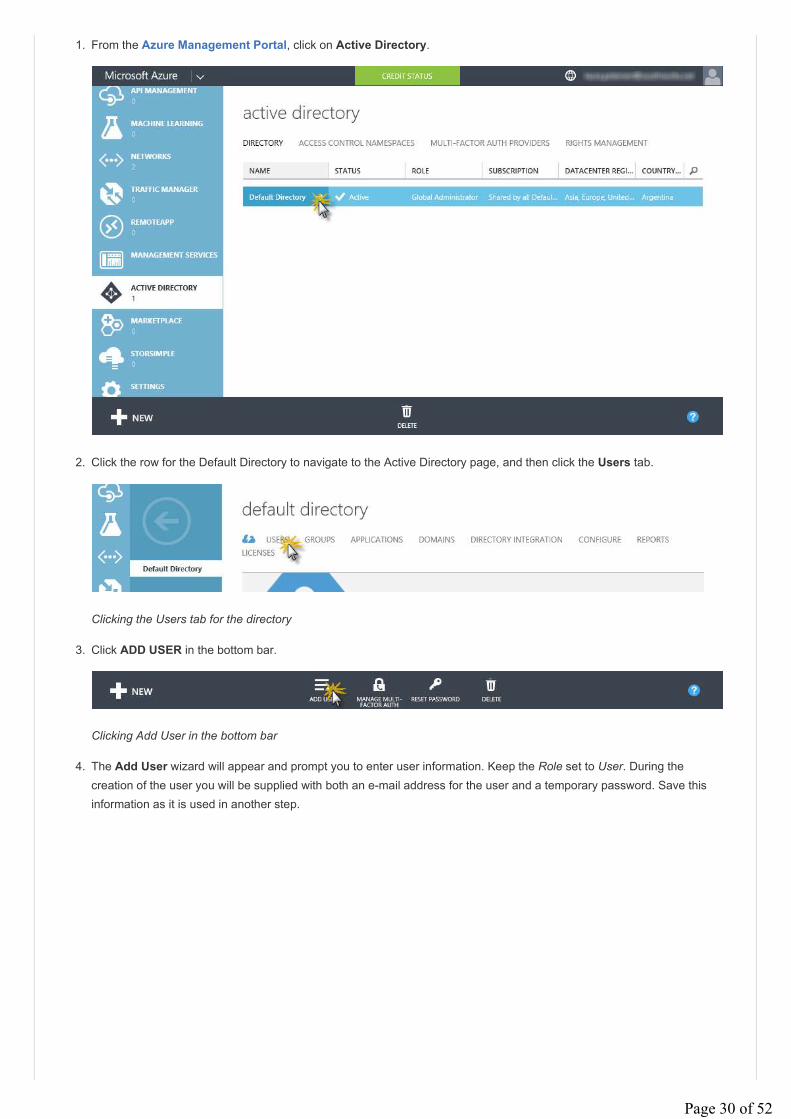
1. From the Azure Management Portal, click on Active Directory.
2. Click the row for the Default Directory to navigate to the Active Directory page, and then click the Users tab.
Clicking the Users tab for the directory
3. Click ADD USER in the bottom bar.
Clicking Add User in the bottom bar
4. The Add User wizard will appear and prompt you to enter user information. Keep the Role set to User. During the
creation of the user you will be supplied with both an e-mail address for the user and a temporary password. Save this
information as it is used in another step.
Page 30 of 52

Organizational account creation
5. From the management portal, click Settings in the sidebar, and then click the Administrators tab.
Clicking Administrators in Settings
6. Click Add in the bottom bar, and add the new user as a co-administrator. This allows the work or school account to
manage your Azure subscription.
Clicking Add User to Administrators
User was added as co-administrator
Page 31 of 52
7. Finally, log out of the Azure portal and then log back in using the work or school account. As this is the first time logging
in with this account, you will be prompted to change the password.
For more information on signing up for Microsoft Azure with a work or school account, see Sign up for Microsoft
Azure as an Organization.
8. Log out of the Azure portal and then log back in using your own account.
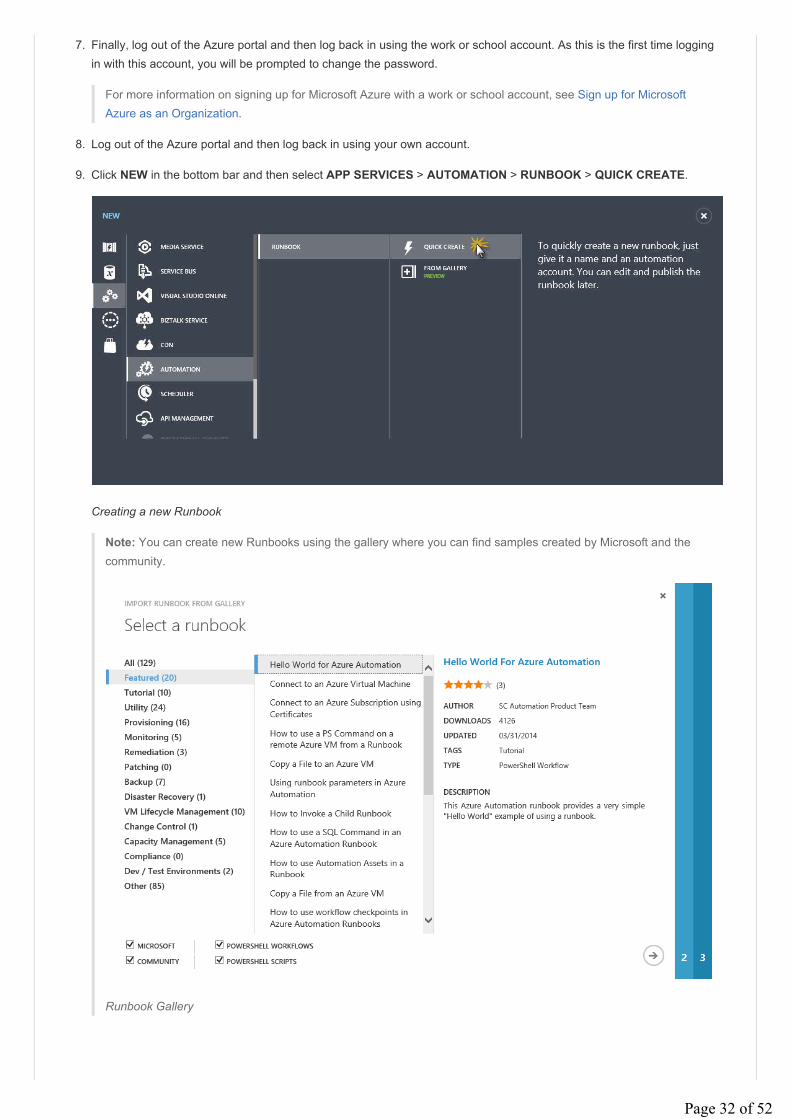
9. Click NEW in the bottom bar and then select APP SERVICES > AUTOMATION > RUNBOOK > QUICK CREATE.
Creating a new Runbook
Note: You can create new Runbooks using the gallery where you can find samples created by Microsoft and the
community.
Runbook Gallery
Page 32 of 52

10. In the QUICK CREATE section enter a name for the Runbook (e.g.: New-AzureVM), select the Create a new
automation account option from the Automation Account selector, and set a valid account name. Finally, click
CREATE.
Creating a new Runbook and Automation account
11. When both the Automation account and the Runbook are ready, click the EDIT RUNBOOK button in the Runbook
notification.
Selecting to edit the new Runbook
This will navigate to the workflow edition page, which will show the following outline. You will build the Runbook script in
the next steps.
workflow New-AzureVM
{
}
Make sure all the code you copy into the workflow is inside the curly braces that define the workflow, and that there are
no lines after that. Also, the workflow name should match the Runbook's name.
12. In the DRAFT view of the Runbook, add the following code to the workflow definition in order to add parameters. These
parameters will later appear in a dialog box when you run the Runbook.
param
(
[Parameter(Mandatory=$true)] [String] $ServiceName,
[Parameter(Mandatory=$true)] [String] $StorageAccountName,
[Parameter(Mandatory=$true)] [PSCredential] $AzureCredential,
[Parameter(Mandatory=$false)] [String] $VMName = "VM-Instance",
[Parameter(Mandatory=$false)] [String] $VMInstanceSize = "ExtraSmall"
)
Page 33 of 52
The parameters defined by the workflow are:
◦ $ServiceName: cloud service name in which the virtual machine will be created. This is created by the script.
◦ $StorageAccountName: name of the storage account that the virtual machine will use.
◦ $AzureCredential: identifier of the Azure Credential asset (to be created later). The PSCredential object will be
created automatically when the Runbook is executed from the Credential asset that matches this identifier.
◦ $VMName: name of the virtual machine to be created. The default value is VM-Instance, but the user will be able to
change it.
◦ $VMInstanceSize: size of the virtual machine. The default value is ExtraSmall, but the user will be able to change it.
13. Now, add the following code below the parameters definition to get and configure the Azure Credentials from the
Automation Asset list.
# Get the Azure credentials and connect to Azure #######################################################
# Get the credential to use for Authentication to Azure and Azure Subscription Name
$AzureSubscriptionName = Get-AutomationVariable -Name 'Subscription name'
if($AzureSubscriptionName -eq $null)
{
throw "No variable asset was found by name 'Subscription name'. Please create it."
}
# Connect to Azure
$AzureAccount = Add-AzureAccount -Credential $AzureCredential
The Get-AutomationVariable CmdLet retrieves the variable with the name Subscription name. You will create this
variable in the Assets tab of the Automation Account for the Runbook later.
14. Add the following code below the code you just added in order to get the credentials that will be used to access the
virtual machine.
# Get the VM credentials ###############################################################################
$VMCred = Get-AutomationPSCredential -Name 'VM credentials'
if($VMCred -eq $null)
{
throw "No Credential asset was found by name 'VM credentials'. Please create it."
}
$VMUserName = $VMCred.UserName
$VMPassword = $VMCred.GetNetworkCredential().Password
The Get-AutomationPSCredential CmdLet retrieves an object of type PSCredential with the name VM Credentials. As
with the $AzureCredentials parameter, you will create an Automation Asset named VM credentials, of type "credentials",
in an upcoming step.
15. Next, add the following code after the code added in the previous step. This code defines an InlineScript block that
contains some variable definitions, including the image to be used to create the virtual machine.
InlineScript
{
$VMUserName = $using:VMUserName
$VMPassword = $using:VMPassword
$VMName = $using:VMName
$VMInstanceSize = $using:VMInstanceSize
$VMImage = 'a699494373c04fc0bc8f2bb1389d6106__Windows-Server-2012-Datacenter-201412.01-en.us-127GB.vhd'
$AzureAccount = $using:AzureAccount
$AzureSubscriptionName = $using:AzureSubscriptionName
$ServiceName = $using:ServiceName
$StorageAccountName = $using:StorageAccountName
Page 34 of 52
}
16. Add the following code inside the InlineScript block, right below the variable definitions, to retrieve the Storage account
that will be used. This code sets the azure subscription to be used as well as the storage account. Additionally, it
validates that the storage account exists.
# Set Azure subscription and storage ################################################################
Set-AzureSubscription -SubscriptionName $AzureSubscriptionName -CurrentStorageAccountName $StorageAccountName
$storageAccount = Get-AzureStorageAccount | Where-Object { ($_.StorageAccountName -eq $StorageAccountName) }
if ($storageAccount -eq $null)
{
throw "Could not retrieve storage account '{0}'. You need to create it first." -f $StorageAccountName
}
$Location = $storageAccount.Location
17. Finally, add the following code inside the InlineScript block, right below the code added in the previous step. This code
will create the virtual machine the same way it was created in the Create virtual machine with PowerShell task.
# Main script ########################################################################################
# Check whether a VM by name $VMName already exists, if it does not exist create VM
Write-Output ("Checking whether VM '{0}' already exists.." -f $VMName)
$AzureVM = Get-AzureVM -ServiceName $ServiceName -Name $VMName
if ($AzureVM -eq $null)
{
Write-Output ("Creating VM with service name {0}, VM name {1}, image name {2}, Location {3}" -f $ServiceName
# Create VM
$CloudServiceInfo = Get-AzureService | Where-Object { ($_.ServiceName -eq $ServiceName) }
if( $CloudServiceInfo -eq $null)
{
$AzureVMConfig = New-AzureQuickVM -Windows -ServiceName $ServiceName -Name $VMName -ImageName $VMImage -Password
}
else
{
if ($CloudServiceInfo.Location -eq $Location)
{
$AzureVMConfig = New-AzureQuickVM -Windows -ServiceName $ServiceName -Name $VMName -ImageName $VMImage
}
else
{
throw "Cloud service location does not match the storage account location."
}
}
$AzureVM = Get-AzureVM -ServiceName $ServiceName -Name $VMName
if ($AzureVM -ne $null)
{
Write-Output ("VM '{0}' was created successfully" -f $VMName)
}
else
{
throw "Could not retrieve info for VM '{0}'. VM was not created" -f $VMName
}
}
else
{
Write-Output ("VM '{0}' already exists." -f $VMName)
}
Page 35 of 52

18. Now that the script is complete, publish the Runbook by clicking the PUBLISH button in the bottom bar.
Publishing the Runbook
19. Click YES in the confirmation prompt that appears after clicking PUBLISH.
Clicking yes to save and publish the Runbook
This publishes the Runbook and leaves it one step closer to execution. Now you will add the Assets that will be
consumed by the Runbook, and later you will start the Runbook.
20. Navigate to the Automation account by clicking the back arrow above the Runbook name.
Navigating to the Automation account
21. Click the ASSETS tab.
Page 36 of 52
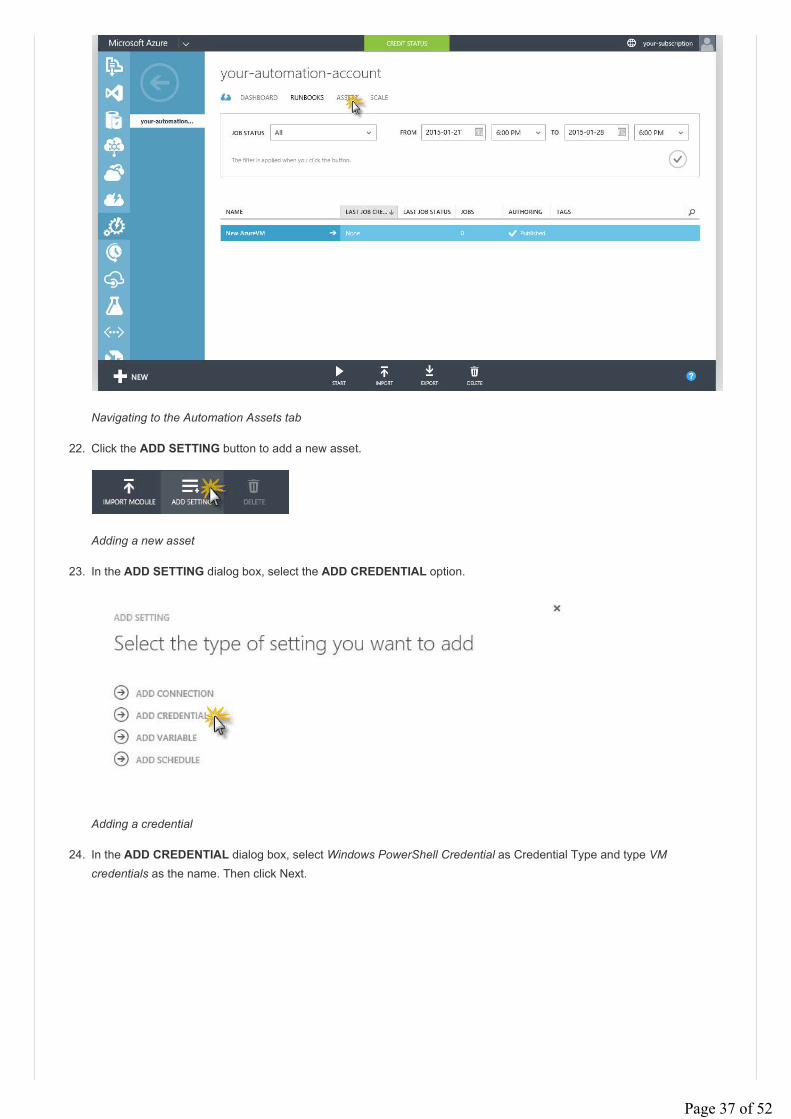
Navigating to the Automation Assets tab
22. Click the ADD SETTING button to add a new asset.
Adding a new asset
23. In the ADD SETTING dialog box, select the ADD CREDENTIAL option.
Adding a credential
24. In the ADD CREDENTIAL dialog box, select Windows PowerShell Credential as Credential Type and type VM
credentials as the name. Then click Next.
Page 37 of 52

Creating the virtual machine credential asset
25. Set the user name and password you want to use for the virtual machine user and click the check button.
Setting the user name and the password for the virtual machine
26. Repeat the previous steps to add a new credential with the name Azure Credentials. This defines an asset for the
credentials that will be used when executing the Runbook. In this case, use the credentials of the organizational account
created at the beginning of this task.
27. Now, create a new variable by clicking the ADD SETTING button one more time. This time click ADD VARIABLE.
Page 38 of 52

Adding a variable
28. Select String as VARIABLE TYPE, type Subscription name in the Name field, and click Next.
Creating a variable asset for the subscription name
29. Enter the name of your subscription (i.e.: Free Trial) and click the check button.
Page 39 of 52

Setting the value of the variable with the subscription name
30. Now that all assets and variables have been created, you will start the Runbook. To do this, navigate to the RUNBOOKS
tab, make sure that the Runbook you just created is selected, and click the START button in the bottom bar.
Starting the Runbook
31. Complete all the values in the START RUNBOOK dialog box and click Next.
Note: Each input in the dialog box matches one of the workflow parameter's and includes a basic type validation.
Additionally, the default values are already in place.
◦ AzureCredential: identifier for the Azure Credential asset created earlier (e.g. Azure Credentials).
◦ ServiceName: cloud service name in which the virtual machine will be created. Type a new name.
◦ StorageAccountName: name of the storage account created at the beginning of this task.
◦ VMInstanceSize: size of the virtual machine. Leave the default value (ExtraSmall).
◦ VMName: name of the virtual machine to be created. Type the desired name or leave the default value (VM-
Instance).
Page 40 of 52

Completing the form in the START RUNBOOK dialog box
This will start running the Runbook.
32. Click the VIEW JOB button in the notification that is shown.
Clicking the VIEW JOB button
33. Wait until the job has finished running. This may take a few minutes. You should see a message informing that the vm
was created successfully and the status of the job will change to Completed.
Note: You can switch to the HISTORY tab to see more detailed output.
Page 41 of 52

Waiting for the job to complete
34. Finally, navigate to the Virtual Machines section of the portal and validate that your new VM is ready.
Note: you may have to refresh the page by pressing Ctrl+F5 for the Virtual Machine to show up.
Validating that the virtual machine was created
Create Virtual Machine using ARM Templates
In this task you will learn how to create a virtual machine using ARM Templates.
Resources and Architecture Diagram:
Page 42 of 52

The following resources are created by this template:
• 1 or 2 Windows 2012R2 IIS Web Servers.
• 1 SQL Server 2014 running on premium or standard storage.
• 1 virtual network with 2 subnets with NSG rules.
• 1 storage account for the VHD files.
• 1 Availability Set for IIS servers.
• 1 Load balancer with NATing rules.
Architecture diagram for ARM Template
The below Deploy to Azure button embeds an Azure ARM template which creates one or two Windows Server 2012R2 VM
(s) with IIS configured using DSC. It also installs one SQL Server 2014 standard edition VM, a VNET with two subnets, NSG,
loader balancer, NATing and probing rules.
In order to create virtual machine using ARM, perform the following steps:
1. Click on the Deploy to Azure button which will navigate you to Azure Portal with Custom Deployment.
Page 43 of 52
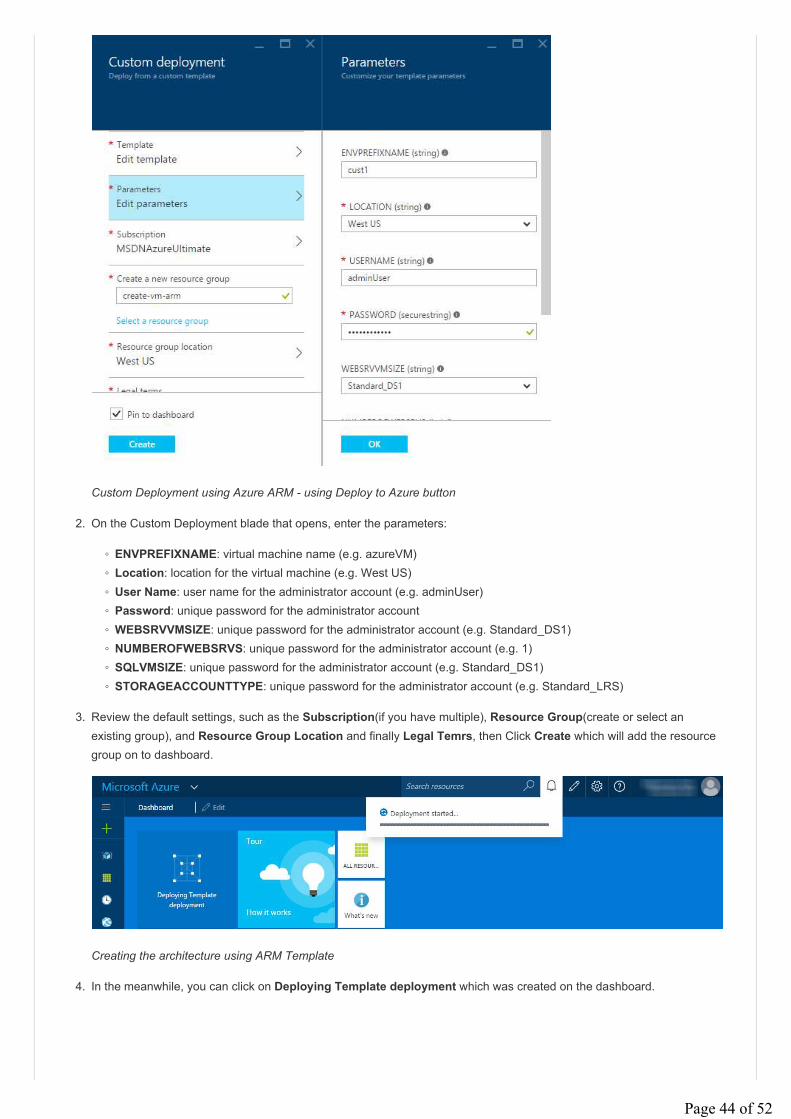
Custom Deployment using Azure ARM - using Deploy to Azure button
2. On the Custom Deployment blade that opens, enter the parameters:
◦ ENVPREFIXNAME: virtual machine name (e.g. azureVM)
◦ Location: location for the virtual machine (e.g. West US)
◦ User Name: user name for the administrator account (e.g. adminUser)
◦ Password: unique password for the administrator account
◦ WEBSRVVMSIZE: unique password for the administrator account (e.g. Standard_DS1)
◦ NUMBEROFWEBSRVS: unique password for the administrator account (e.g. 1)
◦ SQLVMSIZE: unique password for the administrator account (e.g. Standard_DS1)
◦ STORAGEACCOUNTTYPE: unique password for the administrator account (e.g. Standard_LRS)
3. Review the default settings, such as the Subscription(if you have multiple), Resource Group(create or select an
existing group), and Resource Group Location and finally Legal Temrs, then Click Create which will add the resource
group on to dashboard.
Creating the architecture using ARM Template
4. In the meanwhile, you can click on Deploying Template deployment which was created on the dashboard.
Page 44 of 52

Azure ARM Template deployment Status
5. Once the Template Deployment succeeds, you will have WebServer with IIS Installed and SQL Server 2014 Standard
deployed on a Virtual Netowrk with 2 subnets with NSG rules and a Load Balancer with NATing rules. Click on the
Resource Group Tile pinned on the dashboard and then click on each resource for more details.
Azure ARM Template deployment Succeeds
Page 45 of 52

6. Now, the 2-tier architecture is created with all necessary resources, to check whether all the rules are applied we will
deploy an ASP.NET application and a Sample Database(AdventureWorks2012).
◦ Click on dbNsg which is a Netowork security group and delete the outbound Security rules (Prioirity - 200) - We do
this step to download the below AdventureWorks2012 database.
◦ Download RDPs for both Database server and Application server and login with the credentails and download the
ASP.NET application content into appserver and AdventureWorks2012 database into Database server.
◦ A sample ASP.NET Application content can be downloaded here : application content
◦ Sample Database can be downloaded here : AdventureWorks2012
◦ Once you download application content onto app server extract the .zip file and copy the content and past in
C:\inetpub\wwwroot.
Copy content in wwwroot
◦ Open Database Server, and Open SQL Server Management Studio 2014 login with Windows Authentication for
restoring the AdventureWorks2012 database.
◦ Copy the .bak file to the Backup location "C:\Program Files\Microsoft SQL
Server\MSSQL12.MSSQLSERVER\MSSQL\Backup" and click OK.
Page 46 of 52
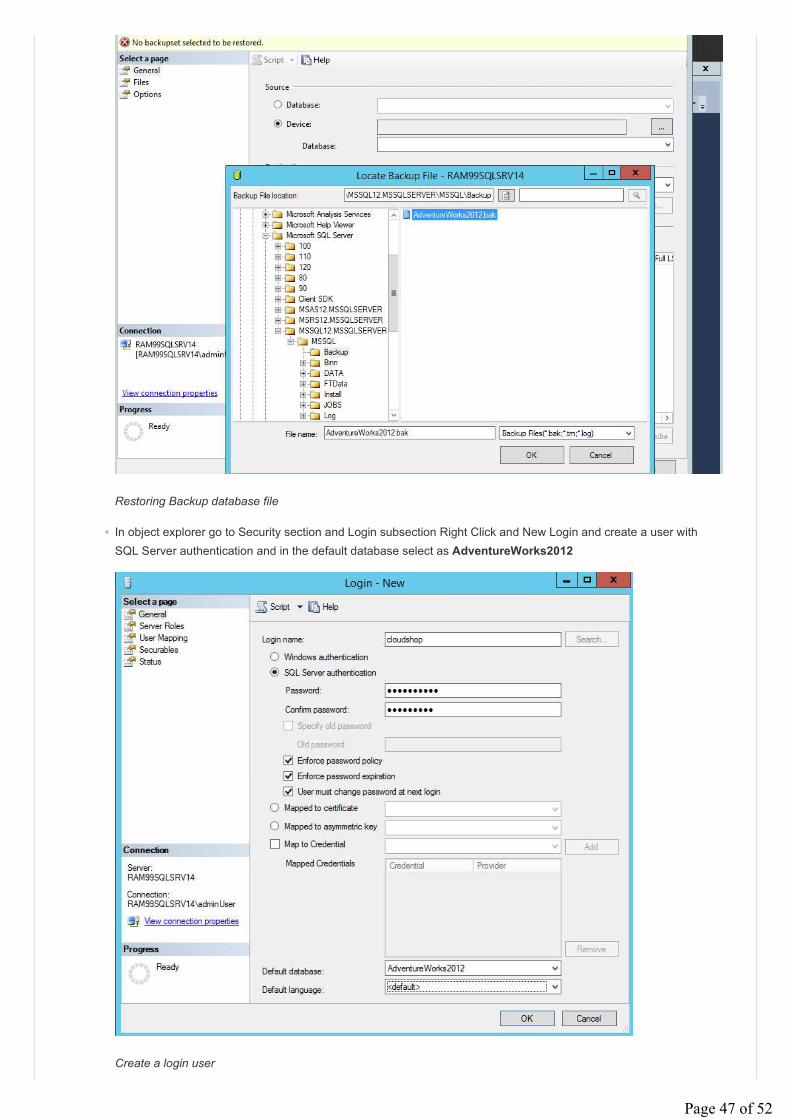
Restoring Backup database file
◦ In object explorer go to Security section and Login subsection Right Click and New Login and create a user with
SQL Server authentication and in the default database select as AdventureWorks2012
Create a login user
Page 47 of 52

◦ On Left side you have Server Roles -> Select public and sysadmin and check in User Mapping whether public is
selected or not and click OK
◦ So till now we have an application content in appserver and database in Database Server. Fianlly we have to setup
the NSG Outbound rule which we have deleted earlier to Database Server through portal.
◦ In Azure Portal Click on the resource group which we just created and in the resources click on dbNsg and click on
All Settings and Outbound security rules and click on add and fill the details as below:
Adding a Outbound NSG rule
◦ And Finally login into AppServer and open inetpub\wwwroot and Open Web.Config in notepad and replace the
ConnectionString with the below code:
<add name="DefaultConnection" connectionString="Data Source=tcp:{Destination-Internal-IP},1433;Initial
Catalog=AdventureWorks2012;User ID={User-created-DbServer};Password=
{password};Encrypt=true;Trusted_Connection=false;TrustServerCertificate=true"
providerName="System.Data.SqlClient"/> < add name="AdventureWorksEntities"
connectionString="metadata=res://*/Models.AdventureWorks.csdl|res://*/Models.AdventureWorks.ssdl|res://*/Models.Ad
ventureWorks.msl;provider=System.Data.SqlClient;provider connection string="data source=tcp:{Destination-
Internal-IP},1433;initial catalog=AdventureWorks2012;Uid={User-created-DbServer};Password=
{password};multipleactiveresultsets=True;App=EntityFramework"" providerName="System.Data.EntityClient" />
NOTE: Before replacing the connection string, do change the following text with respective values
1) Destination IP address : {Destination-Internal-IP} -> Destination IP
2) User ID: {User-created-DbServer} -> User ID for SQL Authentication
3) Password: {password} -> Password for SQL Authentication
◦ Now you can verify by copying the Loadbalancer IP address onto browser and you will see an asp.net application
with data populating from the DB Server.
Page 48 of 52

Output of the application
Appendix - Cleanup
In this task you will learn how to delete the virtual machines created in the previous sections, along with the related data disks
created.
Remove VM using Azure Portal
1. Scroll to the bottom on the left pane and Click Browse >. Then either search in the search box at the top or scroll down
and find Virtual machines (Classic).
Page 49 of 52

Clicking Browse in the left Menu
2. A page listing all Virtual Machines will be displayed.
Viewing all virtual machines created
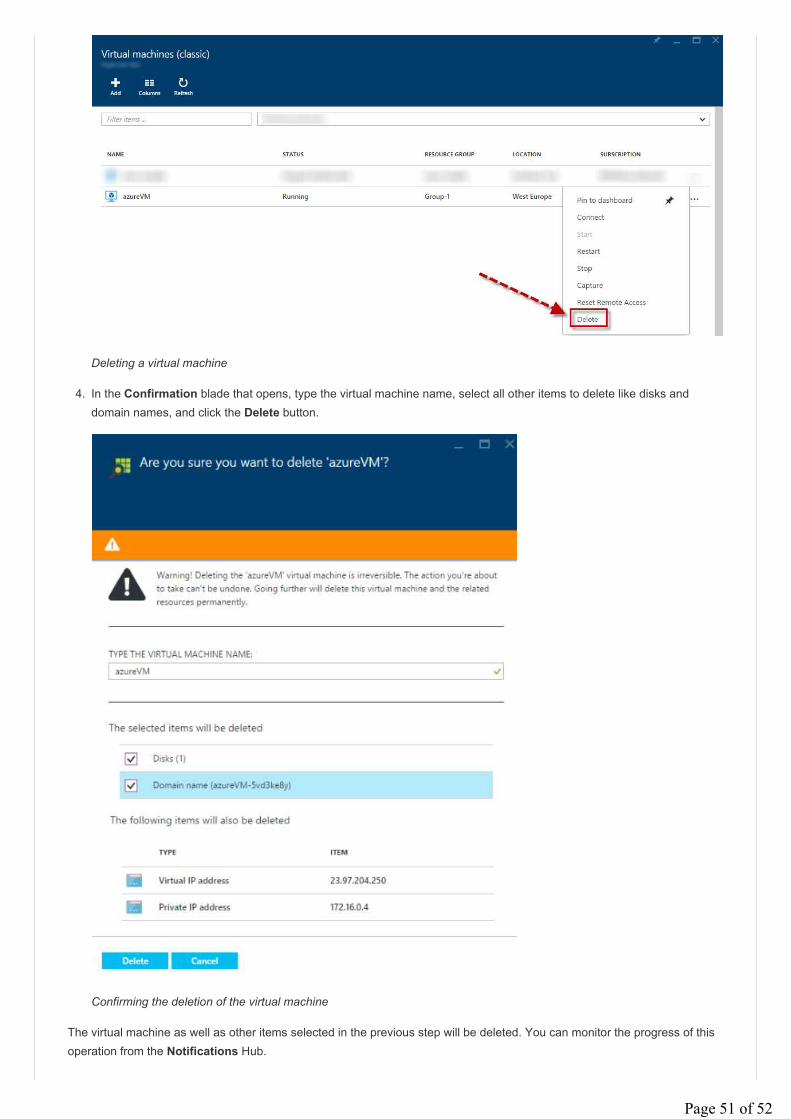
3. Click the ... menu to find the virtual machine to delete and in the context menu that opens, click Delete.
Page 50 of 52
Deleting a virtual machine
4. In the Confirmation blade that opens, type the virtual machine name, select all other items to delete like disks and
domain names, and click the Delete button.
Confirming the deletion of the virtual machine
The virtual machine as well as other items selected in the previous step will be deleted. You can monitor the progress of this
operation from the Notifications Hub.
Page 51 of 52

Once complete, the Virtual Machines list will refresh and the virtual machine recently deleted will no longer appear. Follow
the same instructions to delete all other virtual machines created in this lab.
Summary
By completing this lab you have learned how to create virtual machines using several different methods: the Azure Portal
interface, the Cross-Platform Command Line Tools, PowerShell and Automation Runbook. Additionally, you have seen how
to attach an empty datadisk to the virtual machine, how to generate a Remote Desktop Protocol file to connect to the
machine, and how to install extensions.
Page 52 of 52
Related Documents